> Portal Navigation:
>
> - Append `.md` to any URL under `https://dev.wix.com/docs/` to get its markdown version.
> - Pages are either content pages (article or reference text) or menu pages (a list of links to child pages).
> - To get a menu page, truncate any URL to a parent path and append `.md` (e.g. `https://dev.wix.com/docs/sdk.md`, `https://dev.wix.com/docs/sdk/core-modules.md`).
> - Top-level index of all portals: https://dev.wix.com/docs/llms.txt
> - Full concatenated docs: https://dev.wix.com/docs/llms-full.txt
## Resource: Architecture & Data Flow
## Article: Architecture & Data Flow
## Article Link: https://dev.wix.com/docs/api-reference/business-management/automations/architecture-data-flow.md
## Article Content:
# Architecture and Data Flow
The 2 basic building blocks of automations are [triggers](https://dev.wix.com/docs/rest/business-management/automations/triggers/about-triggers.md) and [actions](https://dev.wix.com/docs/rest/business-management/automations/actions/about-actions.md).
A trigger is an event that an app developer has chosen to expose and report to Wix. This can be any event, such as a visitor landing on a certain site page or an invoice reported overdue.
An action is a single business operation that runs when the automation is triggered. Examples of actions include sending a chat message or updating a database with new customer data.
Both triggers and actions have schemas that determine the structure of the data they carry. In an automation, the trigger's payload data is [mapped](https://dev.wix.com/docs/api-reference/business-management/automations/actions/about-actions.md#understanding-input-mapping) to the input parameters of the action that follows it. Actions can define output schemas that add data to the payload as it moves from one action to another.
The diagram below shows a basic automation flow:
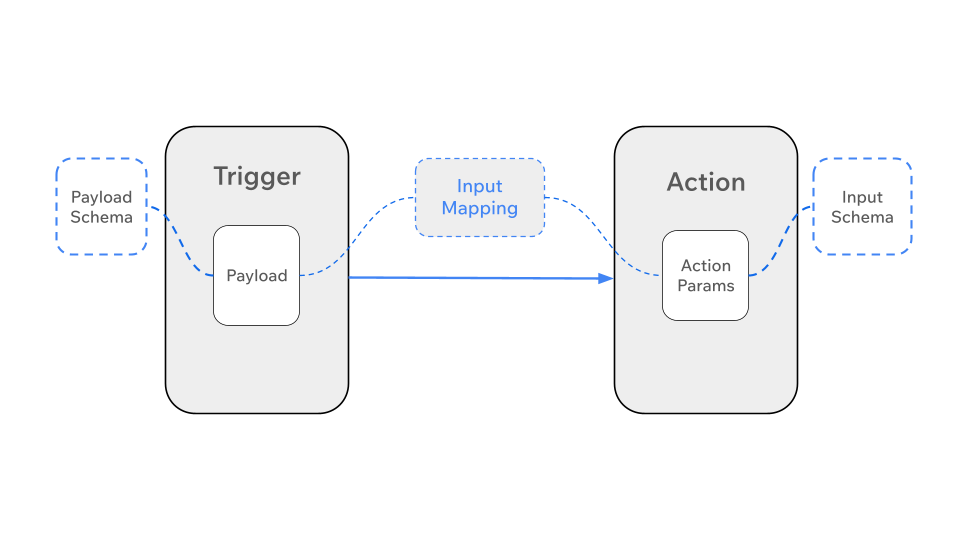
You can also add [conditions](https://dev.wix.com/docs/rest/business-management/automations/terminology.md#condition) and [delays](https://dev.wix.com/docs/rest/business-management/automations/terminology.md#delay) to build more complex automations. These affect the flow of data through an automation by either delaying it for a period of time or directing it down a path based on certain conditions.
Learn more about Automations [terminology](https://dev.wix.com/docs/rest/business-management/automations/terminology.md).
## Basic automation flow
In a simple automation, an app [reports an event](https://dev.wix.com/docs/rest/business-management/automations/triggers/triggered-events/reporting-and-canceling-events.md), and a single action runs immediately.
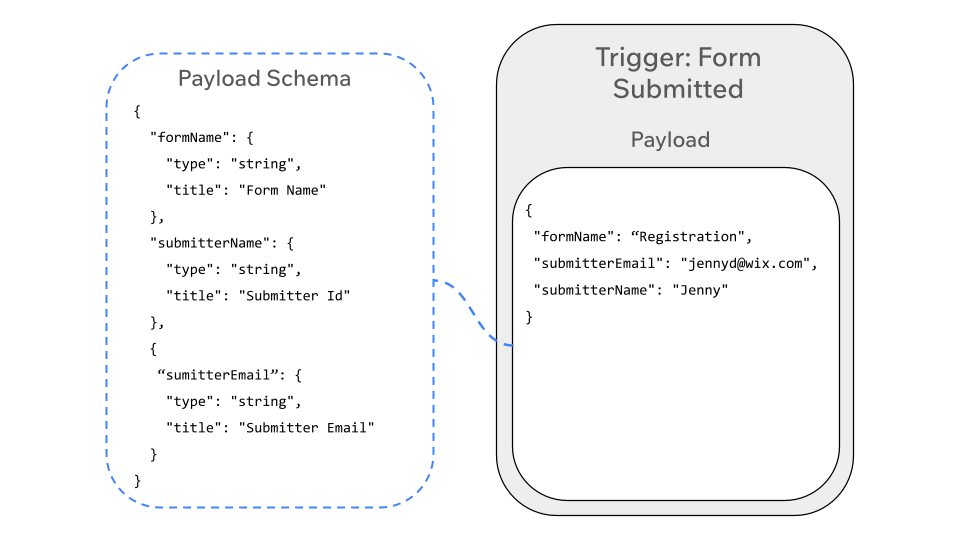
When an app reports the event, it passes the event data to Wix. The [trigger's payload schema](https://dev.wix.com/docs/rest/business-management/automations/triggers/the-trigger-payload-schema.md) defines the type and structure of this data. When the automation runs, Wix makes the event data available to the action.
The diagram below shows the trigger's payload schema, which defines the structure of the data. When the automation runs, Wix populates the trigger payload with actual data that matches the schema.
Each action has an [input schema](https://dev.wix.com/docs/rest/business-management/automations/actions/the-action-input-schema.md) that defines the data it requires to run. This data can be [statically provided](https://dev.wix.com/docs/api-reference/business-management/automations/actions/about-actions.md#static-values), or received during runtime from the trigger payload. When configuring the automation, the trigger's payload is mapped to the action's parameters. When the automation runs, the action's parameters are populated based on this mapping.
The diagram below shows an action's input schema alongside the parameters it receives at runtime:
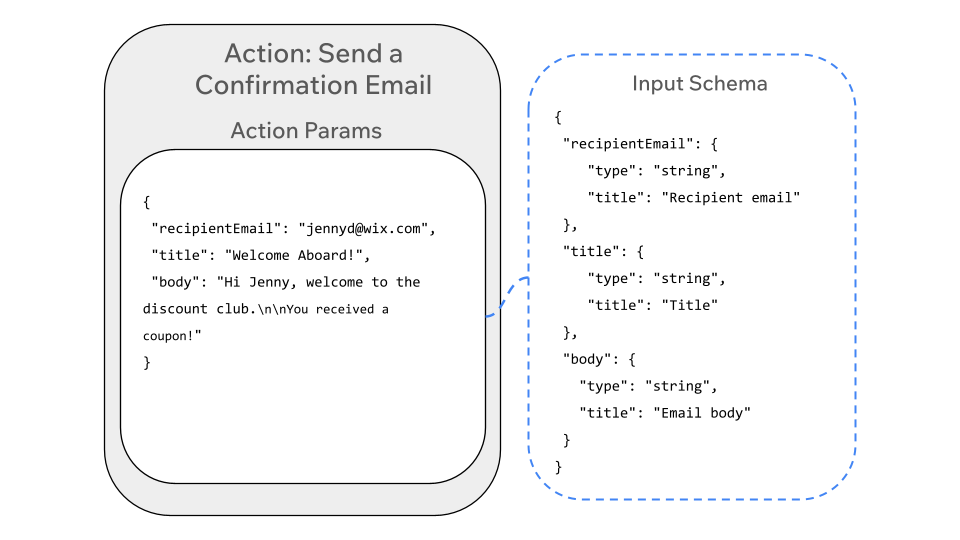
The schema can have [static or dynamic values](https://dev.wix.com/docs/api-reference/business-management/automations/actions/about-actions.md#static-vs-dynamic-values), which might come from the trigger payload, from previous actions, or other site information. When configuring the automation, use the `inputMapping` parameter to [map input values to the action's input schema](https://dev.wix.com/docs/api-reference/business-management/automations/actions/about-actions.md#understanding-input-mapping).
The diagram below illustrates the complete basic automation flow. In the context of an automation, the data from the trigger payload is mapped to the action's parameters:
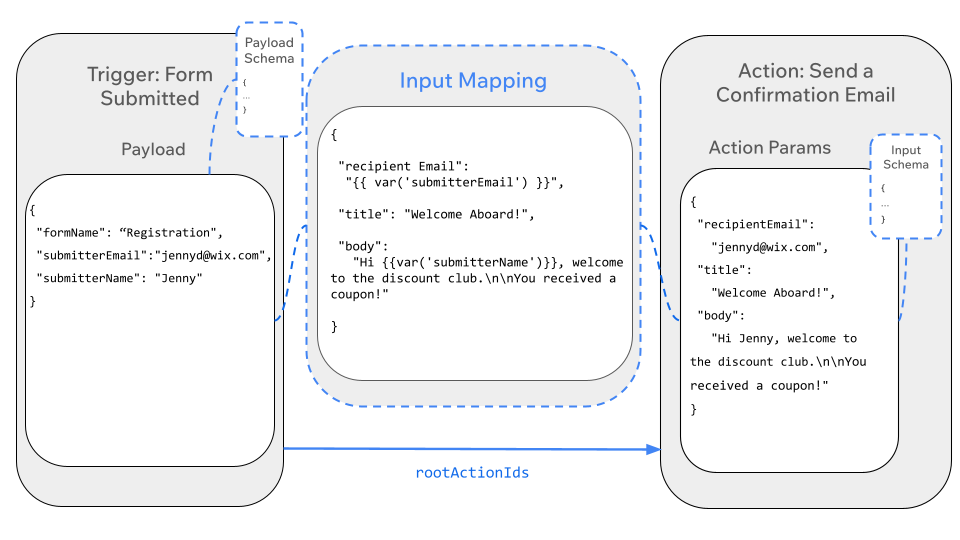
In this flow, the Form Submitted trigger has the following schema:
```json
{
"type": "object",
"properties": {
"formId": {
"type": "string",
"title": "Form ID"
},
"formName": {
"type": "string",
"title": "Form Name"
},
"submitterId": {
"type": "string",
"title": "Submitter ID"
}
},
"required": ["formId", "formName", "submitterId"]
}
```
The trigger payload schema requires 3 properties: `formId`, `formName`, and `submitterId`. When the automation runs, it maps `submitterName` and `submitterEmail` from the trigger payload to the input parameters of the Send Confirmation Email action.
In this example, the trigger payload might look like this:
```json
{
"formName": "Registration",
"submitterName": "Jenny",
"submitterEmail": "jennyd@wix.com"
}
```
The action's input schema might [include the following parameters](https://dev.wix.com/docs/api-reference/business-management/automations/actions/the-action-input-schema.md#the-properties-object):
```json
{
"properties": {
"recipientEmail": {
"type": "string",
"title": "Recipient email"
},
"title": {
"type": "string",
"title": "Title"
},
"body": {
"type": "string",
"title": "Email body"
}
},
"required": ["recipientEmail"]
}
```
This input schema specifies that the action uses the `recipientEmail`, `title`, and `body` parameters. Since `recipientEmail` is in the `required` array, the action must receive a value of the specified type to run.
### Mapping the payload to the action parameters
When [configuring the automation](https://dev.wix.com/docs/api-reference/business-management/automations/automations/automations-v2/configure-your-automation.md#configuring-actions), app-defined actions must include an `inputMapping` object that matches the action's input schema. Wix Automations uses the `inputMapping` object to map runtime parameters to those specified by the action's input schema. The object must include all parameters specified in the schema's `required` array, and can include any other parameters from the schema. At runtime, Wix Automations validates that all parameters have the correct type and format.
In this flow, the trigger payload's `submitterEmail` and `submitterName` parameters are [mapped to the action's `recipientEmail` and `body`](https://dev.wix.com/docs/api-reference/business-management/automations/automations/automations-v2/configure-your-automation.md#app-defined-action) parameters, respectively:
```json
{
"appDefinedInfo": {
"appId": "c7438f41-3e15-41cd-90c5-f17213281cf3",
"actionKey": "send-confirmation-email", // Action A's key
"inputMapping": {
"recipientEmail": "{{ var('submitterEmail') }}",
"title": "Welcome Aboard!",
"body": "Hi {{ var('submitterName') }}, welcome to the discount club.\n\nYou received a coupon!"
},
"skipConditionOrExpressionGroups": [],
"postActionIds": []
}
}
```
The action can now use the values it receives. For the trigger payload mentioned above, the action sends an email to the address `jennyd@wix.com` with the following body:
```console
Hi Jenny, welcome to the discount club.
You received a coupon!
```
> **Note**: The trigger payload can be [mapped](https://dev.wix.com/docs/api-reference/business-management/automations/actions/about-actions.md#understanding-input-mapping) to the input parameters of any action in the same automation, not just the action that immediately follows the trigger.
## Automations with multiple actions
You can create an automation with more than 1 action. Actions are chained together and run in series. The basic data flow remains the same: when the trigger event occurs, the trigger payload becomes available to every action in the automation.
In this example, the automation includes a second action that generates a coupon code and associates it with the user's email.
Every [app-defined action](https://dev.wix.com/docs/api-reference/business-management/automations/automations/automations-v2/configure-your-automation.md#app-defined-action) has its own [input schema](https://dev.wix.com/docs/api-reference/business-management/automations/actions/the-action-input-schema.md) that defines the values it needs to run. For an action to run successfully, you must map values from earlier steps in the automation to its input schema. These can be [static values](https://dev.wix.com/docs/api-reference/business-management/automations/actions/about-actions.md#static-values) that remain the same every time the automation runs, or [dynamic values](https://dev.wix.com/docs/api-reference/business-management/automations/actions/about-actions.md#dynamic-values) using data from the payload passed to the action by earlier steps in the automation flow.
Actions can also have an [output schema](https://dev.wix.com/docs/api-reference/business-management/automations/actions/about-actions.md#the-output-schema) that defines the structure of their output data. The output data is appended to the trigger payload, so a payload reaching an action farther down the chain has aggregated data from the trigger as well as from previous actions.
In this scenario, Action A defines an output schema with a new piece of data: a coupon code. The coupon code is added to the payload made available to Action B, which associates the coupon code with the user's email address for future use.
Like [before](#basic-automation-flow), Action A has the same input schema and is [similarly configured and mapped](https://dev.wix.com/docs/api-reference/business-management/automations/automations/automations-v2/configure-your-automation.md#app-defined-action). This time, however, the `postActionIds` array specifies Action B as the next step in the automation:
```json
{
"appDefinedInfo": {
"appId": "c7438f41-3e15-41cd-90c5-f17213281cf3",
"actionKey": "send-confirmation-email", // Action A's key
"inputMapping": {
"recipientEmail": "{{ var('submitterEmail') }}",
"title": "Welcome Aboard!",
"body": "Hi {{ var('submitterName') }}, welcome to the discount club.\n\nYou received a coupon!"
},
"skipConditionOrExpressionGroups": [],
"postActionIds": ["626d6ab0-43f9-4798-a20d-ef913932e249"] // Action B's ID
}
}
```
Important:
You can currently only specify 1 action in the `postActionIds` array.
Action A also includes an output schema that might look like this:
```json
{
"properties": {
"couponCode": {
"type": "string",
"title": "Coupon code"
}
}
}
```
The `couponCode` value is then added to the aggregated payload, which continues to Action B. Action B receives a payload that contains the data from the trigger payload, as well as additional data defined by Action A's output schema.

Action B's input schema might look like this:
```json
{
"properties": {
"userEmail": {
"type": "string",
"title": "User email"
},
"couponCode": {
"type": "string",
"title": "Coupon code"
},
"expirationDate": {
"type": "string",
"title": "Coupon expiration date"
}
},
"required": ["userEmail", "couponCode"]
}
```
### Mapping the aggregated payload to the action parameters
When [configuring the automation](https://dev.wix.com/docs/api-reference/business-management/automations/automations/automations-v2/configure-your-automation.md#configuring-actions), the trigger payload and any additional data defined by earlier actions are mapped to Action B's parameters using the `inputMapping` object. The diagram below shows how data from both sources is mapped into Action B:
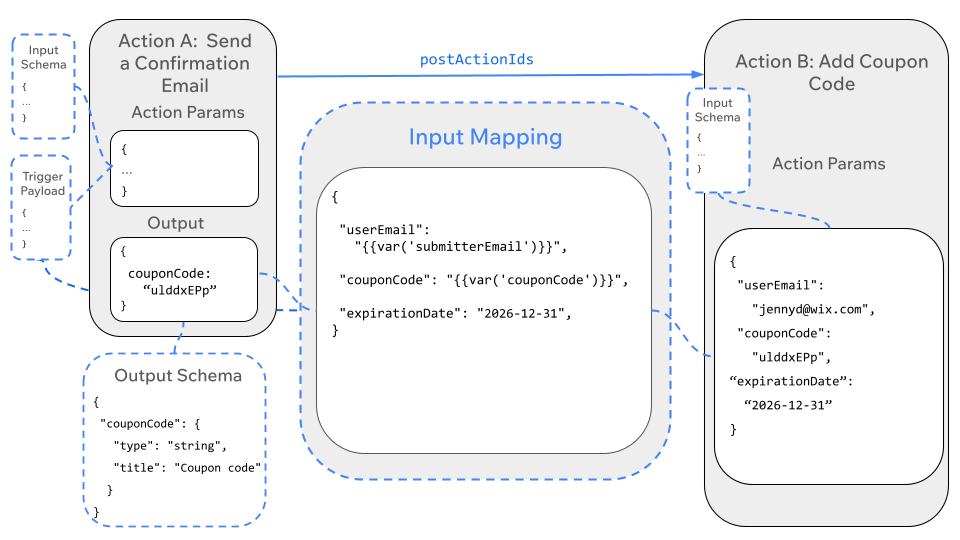
In this automation, the coupon code from the aggregated payload is [mapped](https://dev.wix.com/docs/api-reference/business-management/automations/automations/automations-v2/configure-your-automation.md#app-defined-action) to Action B's `couponCode` parameter. The user's email address is mapped from the original trigger payload, and the expiration date is set as a [static value](https://dev.wix.com/docs/api-reference/business-management/automations/actions/about-actions.md#static-values):
```json
{
"appDefinedInfo": {
"appId": "64a1065c-5c41-4805-896a-738b17891e9f",
"actionKey": "add-coupon-for-user", // Action B's key
"inputMapping": {
"userEmail": "{{ var('submitterEmail') }}", // From the trigger payload
"couponCode": "{{ var('couponCode') }}", // From Action A's payload
"expirationDate": "2026-12-31" // Static value
},
"skipConditionOrExpressionGroups": [],
"postActionIds": []
}
}
```
Action B can now associate the coupon code with the user email for future use.
The diagram below illustrates the complete automation flow, showing how data moves from the trigger through Action A and then to Action B:
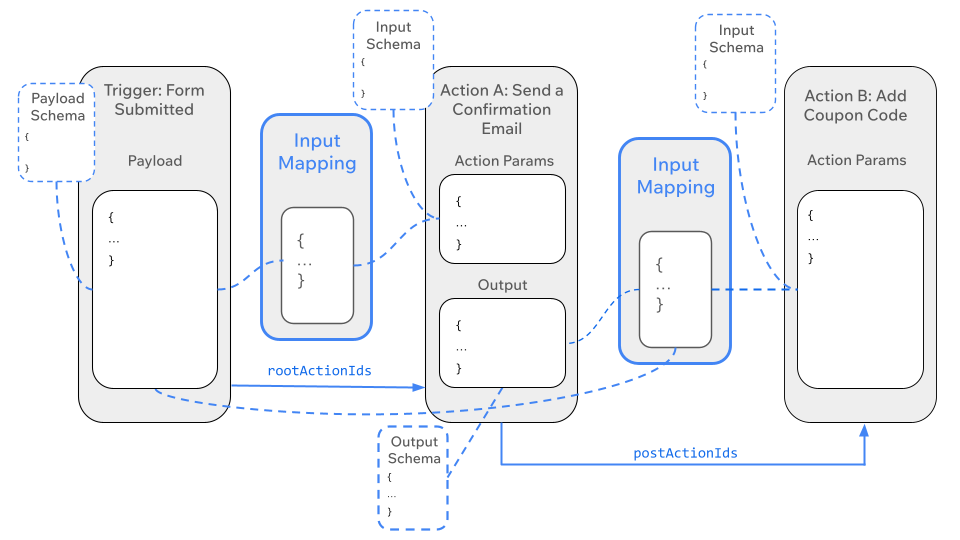
In this flow:
- The trigger payload is available to both actions.
- Action A defines an output that becomes available to Action B.
- Each action's parameters are mapped to data from the trigger or from previous actions.
- The `postActionIds` array defines the sequence of actions in the automation.
## Automations with conditions and delays
The fundamental data flow of payload to input schema remains the same even for more complex automations. However, the introduction of conditions and delays changes when and to which actions the data is sent.
### Delays
By default, an automation runs immediately when the trigger event occurs. However, users can configure an automation to wait before moving to the next step by [adding a delay](https://support.wix.com/en/article/wix-automations-adding-a-delay-in-automations). A delay is a period of time intentionally inserted between 2 steps in the automation flow. The next action in the automation only runs when the specified amount of time passes.
For example, a site might have an automation with the trigger "Customer abandons a cart" and an action "Send an email" that sends the customer a reminder email about their cart. You can add a delay of 5 hours between the trigger and the action. When a customer abandons their cart, the automation is triggered. It waits 5 hours from the time of the trigger, then sends the email.
The diagram below shows an automation with [a delay action](https://dev.wix.com/docs/api-reference/business-management/automations/automations/automations-v2/configure-your-automation.md#delay-action) that waits 24 hours before running the action:
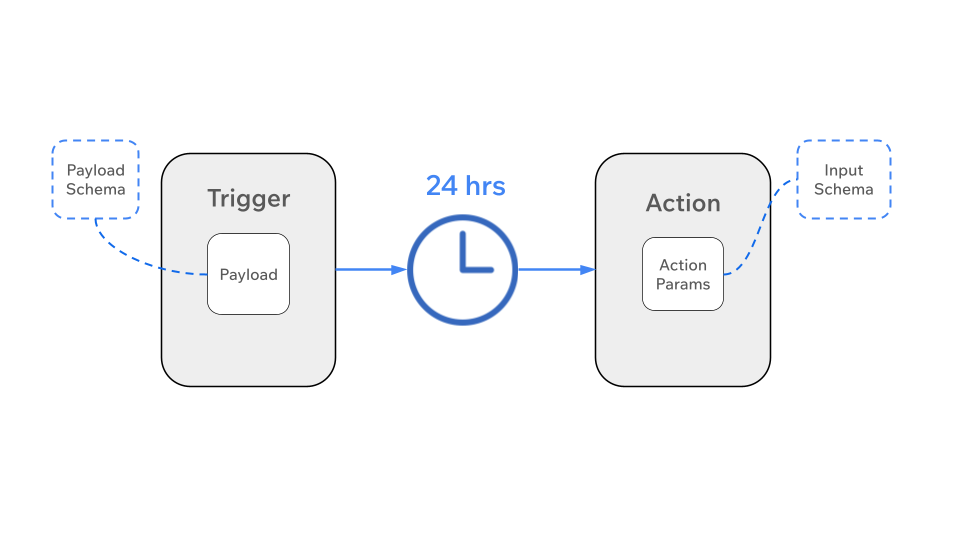
> **Note**: The data flow between the trigger and the action remains the same. Only the execution of the next action is delayed by 24 hours.
When [configuring the automation](https://dev.wix.com/docs/api-reference/business-management/automations/automations/automations-v2/configure-your-automation.md#configuring-actions), the delay action might look like this:
```json
{
"delayInfo": {
"offsetExpression": "{{ 24 }}",
"offsetTimeUnit": "HOURS"
}
}
```
Tip:
Due to the delay, the trigger payload data might become outdated by the time the action runs. To make sure the action runs with the latest data, you can implement the [Refresh Payload method](https://dev.wix.com/docs/rest/business-management/automations/triggers/trigger-provider-service-plugin/refresh-payload.md) to update the trigger payload data.
Learn more about becoming a [trigger provider](https://dev.wix.com/docs/rest/business-management/automations/triggers/trigger-provider-service-plugin/introduction.md).
You can also add a delay to make an action run **before** a specified time. For example, you can add a delay to an automation to run a week before a known date, such as someone's birthday:
```json
{
"delayInfo": {
"offsetExpression": "{{ -1 }}",
"offsetTimeUnit": "WEEKS",
"dueDateExpression": "{{ var('contact.birthday') }}"
}
}
```
### Conditions
You can create complex automation flows by [adding conditions](https://support.wix.com/en/article/the-new-automation-builder-understanding-conditions-operators). Conditions let users define criteria for conditional logic. A condition includes an `if` path that determines which steps in the automation path run next. Conditions can also include an `else` path, which specifies what action or set of actions to perform if the initial conditions aren't met. If an `else` path isn't included, the automation flow stops there.
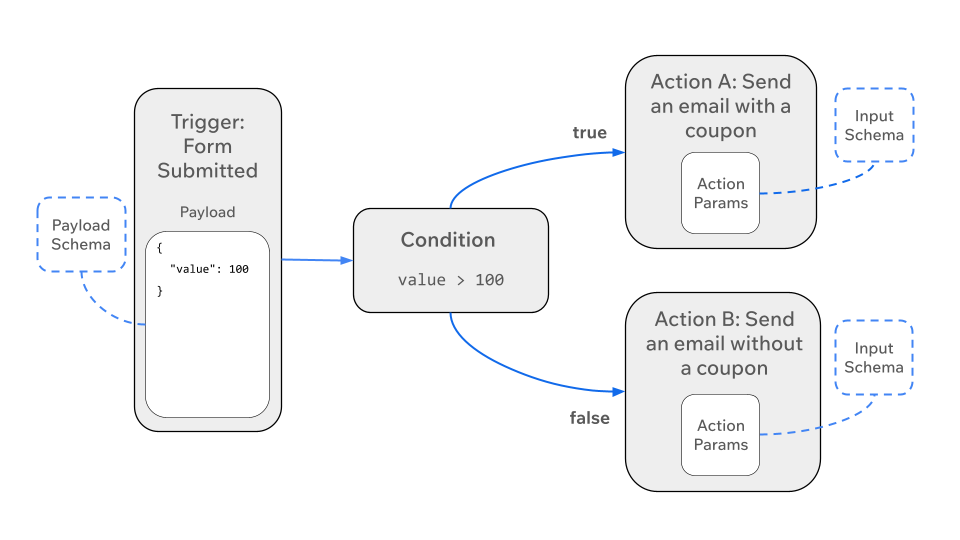
The diagram below illustrates the flow for an automation with [a condition action](https://dev.wix.com/docs/api-reference/business-management/automations/automations/automations-v2/configure-your-automation.md#condition-action). The payload contains the value of an order a customer has submitted. If that value is greater than 100, Action A runs; if the value is equal or lower, Action B runs.
When [configuring the automation](https://dev.wix.com/docs/api-reference/business-management/automations/automations/automations-v2/configure-your-automation.md#configuring-actions), the condition action might look like this:
```json
{
"conditionInfo": {
"orExpressionGroups": [
{
"operator": "OR",
"booleanExpressions": ["{{ gt(var('value') ; 100) }}"]
}
],
"truePostActionIds": ["71213b85-3bf9-4dd8-a210-5c08a37c5e56"],
"falsePostActionIds": ["82bc79c4-f3eb-45af-9773-463d9ebb7bc6"]
}
}
```
Important:
At runtime, the condition is evaluated and the payload data passes to whichever action is selected. Therefore, each [app-defined action](https://dev.wix.com/docs/api-reference/business-management/automations/automations/automations-v2/configure-your-automation.md#app-defined-action) that follows a condition must be properly [configured in the automation](https://dev.wix.com/docs/api-reference/business-management/automations/automations/automations-v2/configure-your-automation.md#configuring-actions), even if it never runs.
## See also
- [Automations terminology](https://dev.wix.com/docs/api-reference/business-management/automations/terminology.md)
- [Configure your automation](https://dev.wix.com/docs/api-reference/business-management/automations/automations/automations-v2/configure-your-automation.md)
- [About triggers](https://dev.wix.com/docs/api-reference/business-management/automations/triggers/about-triggers.md)
- [The trigger payload schema](https://dev.wix.com/docs/api-reference/business-management/automations/triggers/the-trigger-payload-schema.md)
- [About actions](https://dev.wix.com/docs/api-reference/business-management/automations/actions/about-actions.md)
- [The action input schema](https://dev.wix.com/docs/api-reference/business-management/automations/actions/the-action-input-schema.md)