> Portal Navigation:
>
> - Append `.md` to any URL under `https://dev.wix.com/docs/` to get its markdown version.
> - Pages are either content pages (article or reference text) or menu pages (a list of links to child pages).
> - To get a menu page, truncate any URL to a parent path and append `.md` (e.g. `https://dev.wix.com/docs/sdk.md`, `https://dev.wix.com/docs/sdk/core-modules.md`).
> - Top-level index of all portals: https://dev.wix.com/docs/llms.txt
> - Full concatenated docs: https://dev.wix.com/docs/llms-full.txt
## Resource: Add Self-Managed Site Widget Extensions with Custom Elements
## Article: Add Self-hosted Site Widget Extensions with Custom Elements
## Article Link: https://dev.wix.com/docs/build-apps/develop-your-app/develop-a-self-managed-app/supported-extensions/site-extensions/site-widgets-and-plugins/add-self-managed-site-widget-extensions-with-custom-elements.md
## Article Content:
# Add Self-Managed Site Widget Extensions with Custom Elements
**Tip:** The self-managed framework requires you to manage deployment, authentication, and ongoing maintenance. To reduce complexity, [build your widget with the Wix CLI](https://dev.wix.com/docs/wix-cli/guides/extensions/site-extensions/site-widgets/add-a-site-widget-extension.md).
You can create a site widget extension using custom element technology, with your code deployed on your own server. The custom element is essentially a new HTML tag that you define, which is made available in the Wix editors as a widget.
To create this extension, you need to do the following:
* Code and deploy the custom element.
* Code and deploy your widget's settings panel.
* Configure the widget in your app dashboard.
## Step 1 | Code your custom element
Code your custom element and its functionality in a JavaScript file. Use a class to define the element.
> **Note:** For further guidance and examples on using web components, which are the foundation of custom elements, see the [MDN documentation](https://developer.mozilla.org/en-US/docs/Web/Web_Components).
In your code, create a class for the custom element and register the custom element.
Here is a sample code snippet:
```js
class MyCustomElement extends HTMLElement {
constructor() {
super();
console.log(...);
}
connectedCallback() {
...
...
...
}
}
customElements.define('my-custom-element', MyCustomElement);
```
Important:
- Keep track of the name you used when registering the element with `customElements.define()`. You will need it when defining the tag name while configuring the widget extension in your app's dashboard. In our example, the name is `my-custom-element`.
- To call APIs using the [Wix SDK](https://dev.wix.com/docs/sdk.md), you need to [authenticate using the Wix Client](https://dev.wix.com/docs/build-apps/develop-your-app/frameworks/self-hosting/supported-extensions/site-extensions/site-widgets-and-plugins/authenticate-using-the-wix-client-in-custom-elements-for-self-hosted-site-extensions.md).
Custom elements react to DOM-related events. When you create your custom element, use MDN lifecycle callback functions such as [`connectedCallback()`](https://developer.mozilla.org/en-US/docs/Web/API/Web_components/Using_custom_elements#custom_element_lifecycle_callbacks) and [`attributeChangedCallback()`](https://developer.mozilla.org/en-US/docs/Web/API/Web_components/Using_custom_elements#responding_to_attribute_changes).
When your code is ready, deploy your custom element’s JavaScript file on a remote or local server.
## Step 2 | Code your widget’s settings panel
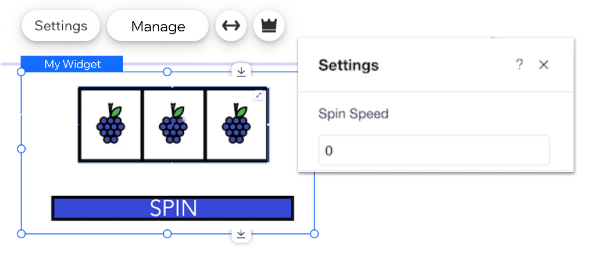
Your widget must have a settings panel in the editor, which is displayed when a user clicks the **Settings** button in the widget’s action bar. The panel is rendered as an iframe, which you can build using any tools you choose.
Learn more about [building a settings panel for a self-managed site widget](https://dev.wix.com/docs/build-apps/develop-your-app/extensions/site-extensions/site-widgets/create-a-settings-panel-for-a-site-widget-or-plugin-wix-cli-and-self-hosting.md).
When your code is ready, deploy your settings panel’s HTML file on a remote or local server.
## Step 3 | Configure the widget in your app dashboard
Configure your widget in your app dashboard so that it can be added to sites.
1. In your Wix Studio workspace, select [Custom Apps](https://manage.wix.com/account/custom-apps), and then create a new app or select an existing app.
2. In the left menu, select **Extensions**.
3. Click **Create Extension** and select **Site Widget (Custom Element)**.
4. Configure your widget’s basic data:
* **Widget name**: The element name displayed in the editor.
* **Tag name**: The custom element’s tag name that is used when registering the element. The tag name should be identical to the name you use in the `customElements.define()` function in your JavaScript file.
* **Script URL**: The URL where your custom element’s JavaScript code is deployed.
5. Define how your widget is sized when added to a site:
* **Widget width**: Whether users can stretch the widget to full width or modify the widget’s width, and how it is sized on installation.
* **Widget height**: Whether the widget’s height is adjusted automatically according to the custom element’s content or can be manually adjusted.
6. Define where your widget is added to a site and how instances of the widget are handled in the editor:
* Define whether your widget is added automatically to the site and on which page. You can add your widget to the site’s homepage or to one of your app’s pages.
* If you're adding your widget to one of your app's pages, define whether your widget is set as [essential](https://dev.wix.com/docs/build-apps/develop-your-app/extensions/site-extensions/site-widgets/about-site-widget-extensions.md#essential-widgets), meaning that it’s crucial to your app’s functionality. If set as essential, deleting the widget will also delete the entire app.
* If your widget isn't set as essential, you can display it in the **Add Elements** panel in the editor and the **Manage Apps** page in the site dashboard. To ensure that your widget appears in both locations, it must include a thumbnail. This allows Wix users to easily find and add it to a site. Learn more about [displaying a site widget in the add panel and site dashboard](https://dev.wix.com/docs/build-apps/develop-your-app/extensions/site-extensions/site-widgets/display-a-custom-element-site-widget-in-the-add-elements-panel.md).
7. Configure your widget’s action bar in the editor:
* **Settings action button**: Provide the URL where your settings panel’s HTML code is deployed.
* **Manage action button** (optional): If your app has a [dashboard page](https://dev.wix.com/docs/build-apps/develop-your-app/extensions/dashboard-extensions/dashboard-pages/about-dashboard-page-extensions.md), select the page you want to open when a user clicks the **Manage** button in the widget’s action bar.
8. Click **Save**.
You can now install your widget on a site.
## Step 4 | Test and preview
To test your widget in the editors:
1. In the top right corner of your [app's dashboard](https://manage.wix.com/account/custom-apps), click **Test App** and select **Test on dev site**.
1. Select an existing development site or click **+ Create Dev Site** to create a new site. Select the editor and the Wix Business Solution you want to use and click **Create Dev Site**.
1. Click **Test App**. Wix installs your app and opens the site in a new tab. You can set which site page opens in your [app settings](https://dev.wix.com/app-selector?title=Select+an+App&primaryButtonText=Select+Site&actionUrl=https%3A%2F%2Fdev.wix.com%2Fapps%2F%7BappId%7D%2Fapp-settings). If you don't set a page, the site editor opens by default.
Once your widget is added to the site, you can preview or publish the site to test the widget’s functionality.
__Important:__
Site widgets are sandboxed when rendered in the editor to enhance security. This means they're treated as if they come from a different domain, which impacts access to browser storage APIs and other same-origin resources. You may encounter various errors when testing.
Learn more about [handling sandboxing in the editor](https://dev.wix.com/docs/build-apps/develop-your-app/extensions/site-extensions/handle-sandboxing-in-the-editor.md).
## See also
- [Tutorial | Create a Self-Managed App](https://dev.wix.com/docs/build-apps/get-started/quick-start/create-a-self-hosted-app.md)