> Portal Navigation:
>
> - Append `.md` to any URL under `https://dev.wix.com/docs/` to get its markdown version.
> - Pages are either content pages (article or reference text) or menu pages (a list of links to child pages).
> - To get a menu page, truncate any URL to a parent path and append `.md` (e.g. `https://dev.wix.com/docs/sdk.md`, `https://dev.wix.com/docs/sdk/core-modules.md`).
> - Top-level index of all portals: https://dev.wix.com/docs/llms.txt
> - Full concatenated docs: https://dev.wix.com/docs/llms-full.txt
## Resource: Add Dashboard Plugin Extensions with the Wix CLI
## Article: Add Dashboard Plugin Extensions with the Wix CLI
## Article Link: https://dev.wix.com/docs/build-apps/develop-your-app/develop-an-app-with-the-cli/supported-extensions/dashboard/dashboard-plugins/add-dashboard-plugin-extensions-with-the-wix-cli.md
## Article Content:
# Add Dashboard Plugin Extensions with the Wix CLI
Dashboard plugins allow you to extend and enhance the functionality of a dashboard page for an app made by Wix.
The Wix CLI makes it easy to create and develop dashboard plugins. You build your plugin using Wix's React/Node.js stack, and then your plugin is deployed and hosted on the Wix cloud.
For more information on dashboard plugin extensions, read [About Dashboard Plugins](https://dev.wix.com/docs/build-apps/develop-your-app/extensions/dashboard-extensions/dashboard-plugins/about-dashboard-plugin-extensions.md).
Follow the instructions below to:
1. Create a dashboard plugin extension for your project.
1. Customize your dashboard plugin.
Once this task is complete, your project will have a dashboard plugin extension that adds a plugin to the dashboard page of an app made by Wix.
**Tip:** Learn how to interact with the Wix dashboard using the [Wix Dashboard SDK](https://dev.wix.com/docs/sdk/host-modules/dashboard/introduction.md).
## Step 1 | Create the plugin extension
In the terminal:
1. Navigate to your project repo.
1. Run the [generate](https://dev.wix.com/docs/wix-cli/command-reference/project-commands/generate.md) command.
1. Follow the prompts for creating a dashboard plugin.
Upon completion, the extension files will be created in your project directory with the following structure:
```tsx
.
└── /
└── src/
└── extensions
└── dashboard/
└── plugins/
└── /
├── .extension.ts
└── .tsx
```
> **Note:** This is the default folder structure created by the CLI. You can move these files to any location within the `src/` folder and update the references in your `extension.ts` file. Learn more about the [flexible file system](https://dev.wix.com/docs/wix-cli/guides/get-started/project-structure.md#your-custom-extension-folder).
For more information about these files, see [Dashboard Plugin Extension Files and Code](https://dev.wix.com/docs/build-apps/develop-your-app/frameworks/wix-cli/supported-extensions/dashboard/dashboard-plugins/dashboard-plugin-extension-files-and-code.md).
## Step 2 | Customize your dashboard plugin
Once you finish generating your dashboard plugin, you can find your plugin's auto-generated React component in your `.tsx` file.
1. Run the [dev](https://dev.wix.com/docs/wix-cli/command-reference/project-commands/dev.md) command to open the dev menu.
2. Follow the prompts, then click the link to open a preview of the dashboard in your browser, then navigate to the dashboard page hosting your plugin.
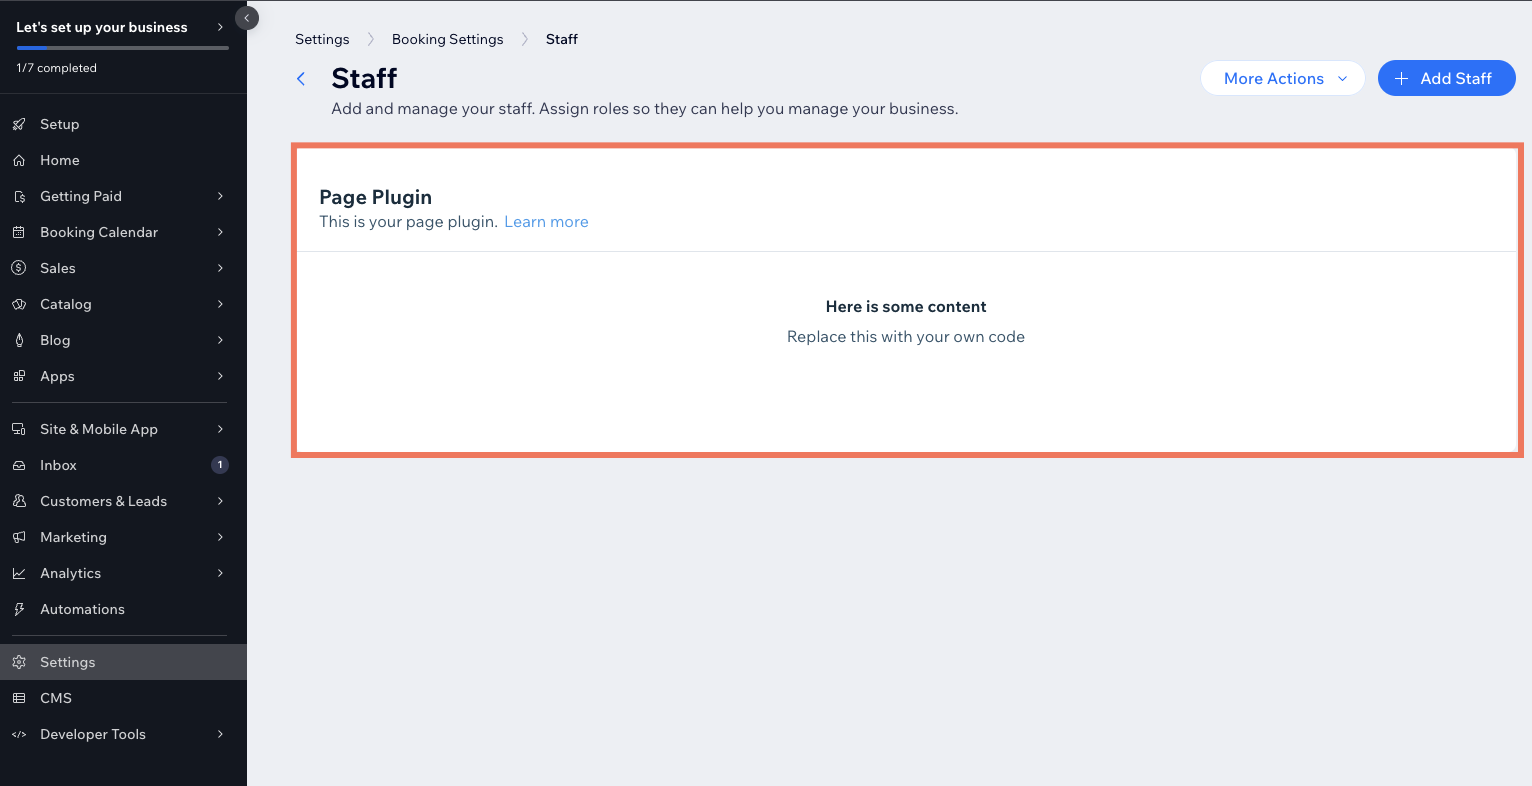
Leave this window open.
3. Go to your `.tsx` file and edit the text inside the `` component to "Hello world!".
```tsx
const Plugin: FC = (props) => {
return (
This dashboard plugin was generated with Wix CLI. Customize it according to your logic. To learn more, read our{' '}
documentation
.
);
};
export default Plugin;
```
>**Note:** When it comes to designing the UI for your plugin, consider using the [Wix Design System](https://www.wixdesignsystem.com/), a collection of reusable React components that you can use to make your project appear and feel like a native Wix experience.
1. Customize your plugin to interact with the dashboard page data passed to the [plugin's slot](https://dev.wix.com/docs/build-apps/develop-your-app/extensions/dashboard-extensions/dashboard-plugins/supported-wix-app-dashboard-pages/about-dashboard-page-slots.md) using the [`observeState()`](https://dev.wix.com/docs/sdk/host-modules/dashboard/observe-state.md) method from the Dashboard SDK:
1. Make sure the [`@wix/dashboard`](https://dev.wix.com/docs/sdk/host-modules/dashboard/introduction.md) package is installed in your project.
1. Add the following import statement to your code:
```js
import { dashboard } from '@wix/dashboard';
```
1. To retrieve the data from the dashboard page, call the `observeState()` method.
```js
dashboard.observeState((componentParams) => {
console.log("componentParams:", componentParams);
});
```
1. Use React to add code and logic to your plugin.
1. Save your file.
1. Navigate back to the dashboard page in your browser and see your changes.
## Build and deploy your project
Once your project is ready for production, you can [build and deploy](https://dev.wix.com/docs/build-apps/develop-your-app/frameworks/wix-cli/project-development/build-and-deploy-a-project-with-the-wix-cli.md) it.
>**Note:**
> When you release an app project, you release a new version of the app allowing you to publish the app to the [Wix App Market](https://www.wix.com/app-market) or install it on a site with a direct install URL. You can view [your app's versions](https://manage.wix.com/app-selector?title=Select+an+App&primaryButtonText=Select+Site&actionUrl=https%3A%2F%2Fdev.wix.com%2Fapps%2F%7BappId%7D%2Fversions-app) in the app dashboard.
## Delete a dashboard plugin
To delete an existing dashboard plugin from your project:
1. Delete the folder that contains your dashboard plugin extension's files.
2. Remove the import and `.use()` statements for the extension from the [`extensions.ts`](https://dev.wix.com/docs/build-apps/develop-your-app/frameworks/wix-cli/supported-extensions/about-the-extensions-ts-file.md) file.
**For app projects:**
If you already have a version of your app project, you must build and deploy the project again after removing the dashboard plugin files.
## See also
- [Dashboard Plugin Extension Files and Code](https://dev.wix.com/docs/build-apps/develop-your-app/frameworks/wix-cli/supported-extensions/dashboard/dashboard-plugins/dashboard-plugin-extension-files-and-code.md)
- [About Dashboard Plugin Extensions](https://dev.wix.com/docs/build-apps/develop-your-app/extensions/dashboard-extensions/dashboard-plugins/about-dashboard-plugin-extensions.md)
- [About Dashboard Page Slots](https://dev.wix.com/docs/build-apps/develop-your-app/extensions/dashboard-extensions/dashboard-plugins/supported-wix-app-dashboard-pages/about-dashboard-page-slots.md)