> Portal Navigation:
>
> - Append `.md` to any URL under `https://dev.wix.com/docs/` to get its markdown version.
> - Pages are either content pages (article or reference text) or menu pages (a list of links to child pages).
> - To get a menu page, truncate any URL to a parent path and append `.md` (e.g. `https://dev.wix.com/docs/sdk.md`, `https://dev.wix.com/docs/sdk/core-modules.md`).
> - Top-level index of all portals: https://dev.wix.com/docs/llms.txt
> - Full concatenated docs: https://dev.wix.com/docs/llms-full.txt
## Resource: Set Up Git Integration with Wix CLI
## Article: Set Up Git Integration with Wix CLI
## Article Link: https://dev.wix.com/docs/develop-websites-sdk/code-your-site/developer-environments/ides/git-integration/set-up-git-integration-with-wix-cli.md
## Article Content:
# Set Up Git Integration with Wix CLI
[Git Integration & Wix CLI](https://dev.wix.com/docs/develop-websites-sdk/code-your-site/developer-environments/ides/git-integration/about-git-integration-with-wix-cli.md) allows you to write, test, preview, and publish code for a Wix site from your preferred IDE. This article explains how to set up Git Integration & Wix CLI by connecting a site to GitHub, cloning the site's GitHub repository to your computer, and installing the CLI.
> **Note:** You can also clone the repo to a cloud IDE workspace, then install and use the CLI there.
## Step 1 | Connect a site to GitHub
To write a site's code locally from your computer, first create a GitHub repo to store the site's code and connect it to the site.
**Important:**
- You can't connect a site to GitHub if you have [Velo packages](https://dev.wix.com/docs/develop-websites-sdk/code-your-site/developer-environments/packages/velo-packages/about-velo-packages.md) set up on the site. This feature isn't supported when using Git Integration & Wix CLI. However, you can connect a site to GitHub if you have [npm packages](https://dev.wix.com/docs/develop-websites-sdk/code-your-site/developer-environments/packages/npm/about-npm-packages.md) installed on the site.
- Once you connect a site to GitHub be careful not to delete the site's repo or revoke the Velo app's access to this repo. These actions may cause the site's GitHub connection to stop working even if you restore the repo or reinstall the app.
1. Go to the GitHub Integration section of your editor:
::::tabs
:::Wix-Studio
In the Code sidebar, click **GitHub** then **Connect to GitHub**.

:::
:::Wix-Editor
Click the **GitHub Integration**  icon in the Code sidebar and then **Connect to GitHub**.
:::
::::
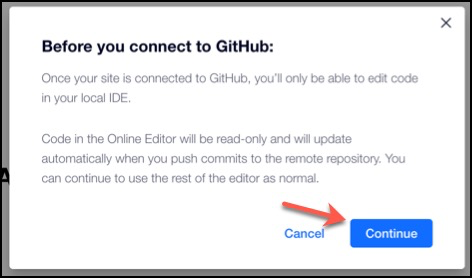
2. Click **Continue**.
3. Click **Sign In**.
Follow the prompts to sign in to your GitHub account and authorize Velo to create a new repo for you.
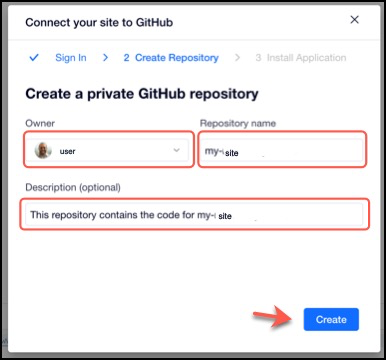
4. Choose an owner and enter a name for the new repo to connect to the site. Optionally, you can add a custom description as well. Click **Create**.
5. Click **Install** to start installing the Velo GitHub app on your new repo.
This app allows the site to communicate with GitHub. You may need to authenticate your identity in GitHub before continuing.
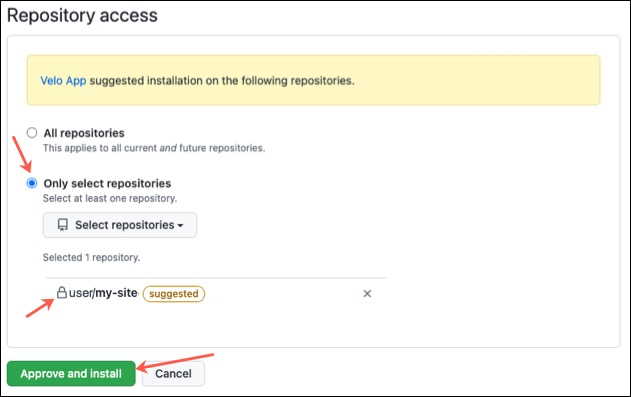
6. Make sure that both **Only select repositories** and your new repo are selected. Click **Approve and Install**.
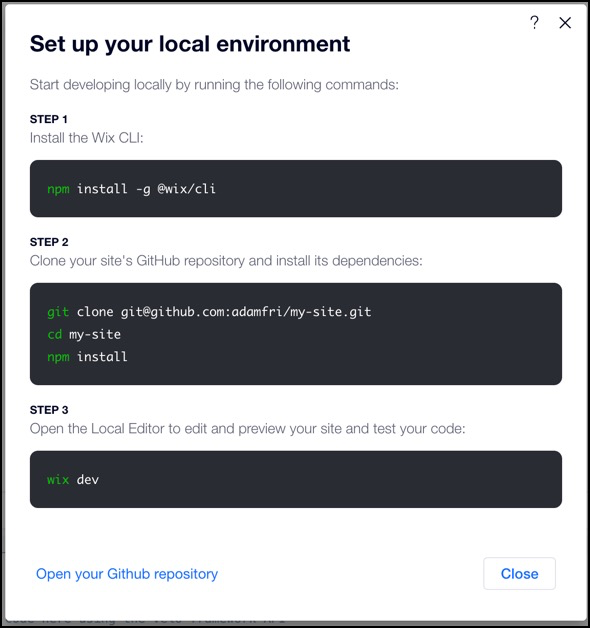
7. Copy the displayed terminal commands. You need them for the next section of the setup.
8. Click **Close**.
Your repo name and default branch are displayed in the **GitHub Integration** panel.

Once you connect a site to GitHub, your editor enters [read-only mode](https://support.wix.com/en/article/velo-working-with-editor-x-and-github-integration#about-read-only-mode).
You can always choose to [disconnect your site from GitHub](https://dev.wix.com/docs/develop-websites-sdk/code-your-site/developer-environments/ides/git-integration/disconnect-a-site-from-git-hub.md).
## Step 2 | Set up your local environment
Once the site's repo it set up, you can clone it to your computer and install the Wix CLI. The commands used in this procedure accomplish the following:
- Clone the site's repo to your computer.
- Install the repo's dependencies.
- Install the [Wix CLI](https://dev.wix.com/docs/develop-websites-sdk/code-your-site/developer-environments/ides/git-integration/wix-cli-commands.md) globally on your computer.
Before getting started, make sure you have the following things installed:
- [Git](https://git-scm.com/download)
- [Node](https://nodejs.org/en/download/), version 20.11 or later.
- [npm](https://docs.npmjs.com/downloading-and-installing-node-js-and-npm) or [yarn](https://yarnpkg.com/getting-started/install)
- An SSH key [added to your GitHub account](https://docs.github.com/en/authentication/connecting-to-github-with-ssh/adding-a-new-ssh-key-to-your-github-account).
To set up your local environment, do the following:
1. Open the terminal on your computer.
2. Navigate to the directory where you want to store your repo's files.
3. Run the commands you copied down in the previous section. Depending on your computer's setup, you may need administrator privileges to run the commands.
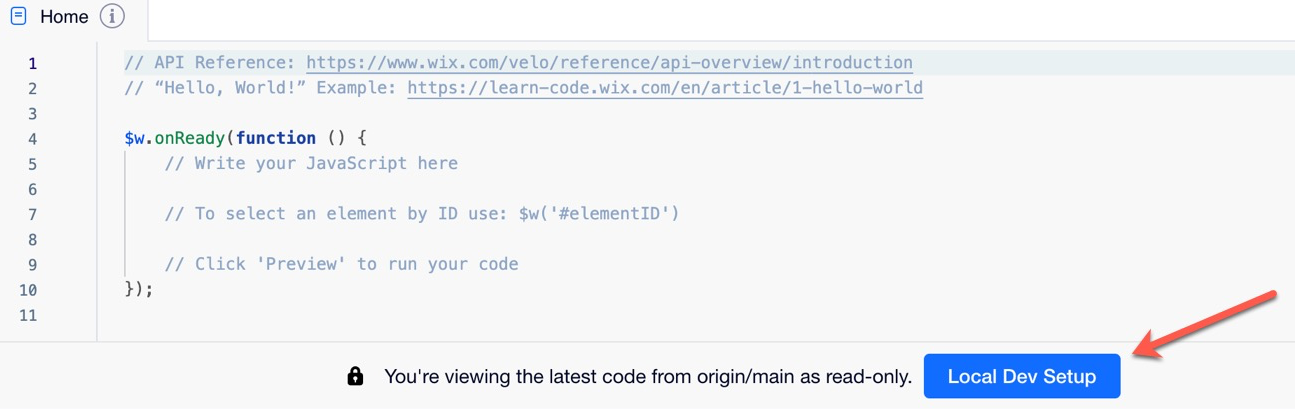
To see the commands again, open the site's editor and click **Local Dev Setup**.
The default commands use npm as the package manager for installations. You can also use yarn to manage packages. To do this, make the following changes:
- Change `npm install` to `yarn install`.
- Change `npm install -g @wix/cli` to `yarn global add @wix/cli`.
After the installation, the [Local Editor](https://dev.wix.com/docs/develop-websites-sdk/code-your-site/developer-environments/ides/git-integration/about-the-local-editor.md) opens in your default web browser.
4. Open the repo in your favorite local IDE to start writing code.
> **Note:** Run [`wix install `](https://dev.wix.com/docs/develop-websites-sdk/code-your-site/developer-environments/ides/git-integration/wix-cli-commands.md) in your project directory to install Wix packages. For example: `wix install @wix/events`.
## Next steps
You're ready to start writing the site's code, and [testing it with the Local Editor](https://dev.wix.com/docs/develop-websites-sdk/code-your-site/developer-environments/ides/git-integration/test-your-code-in-the-local-editor.md)