> Portal Navigation:
>
> - Append `.md` to any URL under `https://dev.wix.com/docs/` to get its markdown version.
> - Pages are either content pages (article or reference text) or menu pages (a list of links to child pages).
> - To get a menu page, truncate any URL to a parent path and append `.md` (e.g. `https://dev.wix.com/docs/sdk.md`, `https://dev.wix.com/docs/sdk/core-modules.md`).
> - Top-level index of all portals: https://dev.wix.com/docs/llms.txt
> - Full concatenated docs: https://dev.wix.com/docs/llms-full.txt
## Resource: Tutorial: Using the Fetch API to Add a Currency Converter
## Article: Getting Started with Velo by Wix
## Article Link: https://dev.wix.com/docs/develop-websites/articles/code-tutorials/wix-editor-elements/tutorial-using-the-fetch-api-to-add-a-currency-converter.md
## Article Content:
# Tutorial: Using the Fetch API to Add a Currency Converter
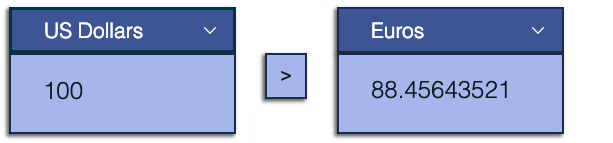
In this tutorial, you'll learn how to create a simple currency converter site that uses the [wix-fetch API](https://www.wix.com/velo/reference/wix-fetch.html) to connect to a 3rd-party service. Site visitors choose source and target currencies from dropdowns and enter an amount to convert. The results are displayed in a text box.
Follow the steps below to create a currency converter with the wix-fetch API.
### Step 1: Create a New Wix Site
1. Sign into your Wix account or [sign up for a Wix account](https://users.wix.com/signin?overrideLocale=en&loginDialogContext=signup) if you don’t already have one.
2. Open a blank template in [Wix Studio](https://wixstudio.new/) or the [Wix Editor](https://editor.wix.com/html/editor/web/renderer/new?siteId=cbf36d3a-49d0-41c2-9482-1bb58d5fdda3&metaSiteId=a573279f-ae6f-46d1-8556-7c93ae9b2c84&editorSessionId=799795e9-07c2-4e7e-8a17-33dab829f776).
### Step 2: Enable Velo Dev Mode
+ **Wix Studio:** In the Code panel, click **Start Coding**.

+ **Wix Editor:** In the top bar of the Wix Editor, click **Dev Mode > Turn on Dev Mode**.

### Step 3: Add Elements to the Page
Add page elements in the editor:
1. On the left side of the editor, click **Add Elements**.
2. Add the page elements illustrated below to your site.
* When you add each element, set its ID in the [Properties & Events panel](https://dev.wix.com/docs/develop-websites/articles/workspace-tools/velo-workspace/properties-events-panel/about-the-properties-events-panel.md). In Wix Studio it appears at the bottom of the code editor, and in Wix Editor, the Properties & Events panel appears on the right side of the code editor.
Use the name shown below for each element, minus the hashtag. See the table below for a full list of the elements and where to find them in the Add menu.
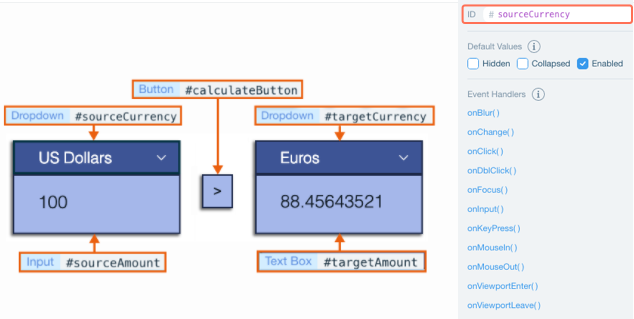
|Element |Location in Add Menu |Description |ID |
|---|---|---|---|
|Dropdown|User Input|For selecting the source currency|sourceCurrency
|Dropdown|User Input|For selecting the target currency|targetCurrency
|Input|User Input|For entering the amount to convert|sourceAmount
|Text Box|User Input|To display the converted amount|targetAmount
|Button|Button|To trigger the currency conversion when clicked|calculateButton
### Step 4: Add Code
>**Notes**
> * All the code for this example is added to a single page on the site. In this section we divided the code into short blocks followed by explanations. To see the complete code for this example without comments, [scroll down](https://dev.wix.com/docs/develop-websites/articles/code-tutorials/wix-editor-elements/tutorial-using-the-fetch-api-to-add-a-currency-converter.md) to the end of the tutorial.
> * See our [API Reference](https://www.wix.com/velo/reference/) to learn more about the Velo-based code in this example.
**To add the code:**
1. + **Wix Studio:** On the left, click  **> Page Code**.
+ **Wix Editor:** In the Code sidebar, click **Page Code**. Under **Main Pages** double-click the page labeled **HOME**.
2. Add the following code to the top of the code in the tab before the [onReady](https://dev.wix.com/docs/develop-websites/articles/workspace-tools/velo-workspace/code-editor-ide/working-in-the-code-editor.md) function:
```javascript
// The getJSON function in wix-fetch lets you retrieve a
// JSON resource from the network using HTTPS.
import {getJSON} from 'wix-fetch';
// Set the URL of the 3rd-party service.
const url = "https://api.exchangerate.host/convert";
// Define the currency option values and text for the dropdowns.
let currencyOptions = [
{ "value": "USD", "label": "US Dollars"},
{ "value": "EUR", "label": "Euros"},
{ "value": "JPY", "label": "Japanese Yen"},
];
```
3. Add the code below to the [onReady](https://dev.wix.com/docs/develop-websites/articles/workspace-tools/velo-workspace/code-editor-ide/working-in-the-code-editor.md) function. Code inside the onReady function runs when the page loads.
```js
$w.onReady(function () {
// Set the currency options for the dropdowns.
populateDropdowns();
// Set the onClick event handler for calculateButton to calculate the target amount.
$w('#calculateButton').onClick((event) => {
calculateCurrency();
})
});
```
The [`$w`](https://www.wix.com/code/reference/$w.html#$w) function can select elements on a page by ID or by type, allowing us to run functions and define the properties of the elements. Use this syntax to select an element by ID, `$w("#myElementId")`, and this syntax to select by type, `$w("ElementType")`.
Here we select the button and define an `onClick` [event handler](https://dev.wix.com/docs/develop-websites/articles/coding-with-velo/frontend-code/about-event-handlers-in-wix.md) to calculate the target amount.
4. Add code to define the functions:
**populateDropdowns( )**
```js
// Populate the dropdowns.
function populateDropdowns(){
//Set the dropdown options.
$w("Dropdown").options = currencyOptions;
// Set the first dropdown option as the initial option.
$w("Dropdown").selectedIndex = 0;
}
```
Here we select all the dropdowns by type. By calling [`$w`](https://www.wix.com/velo/reference/$w.html) with the element type "Dropdown", we select all dropdowns on the page
**calculateCurrency( )**
```js
// Calculate the target amount.
function calculateCurrency() {
// Initial amount
let initialAmount = $w("#sourceAmount").value;
// Original currency
let sourceSymbol = $w("#sourceCurrency").value;
// Target currency
let targetSymbol = $w("#targetCurrency").value;
// Define the full url.
let fullUrl = `${url}?from=${sourceSymbol}&to=${targetSymbol}`;
// Call the wix-fetch API function to retrieve the JSON resource.
getJSON(fullUrl)
.then(json => {
// Set the target amount as the initial amount multiplied by
// the conversion rate.
$w("#targetAmount").value = initialAmount * json.info.rate;
}
)}
```
We use [template literals](https://developer.mozilla.org/en-US/docs/Web/JavaScript/Reference/Template_literals) to define the full URL, which includes the source and target currencies.
The wix-fetch API [`getJSON`](https://www.wix.com/velo/reference/wix-fetch.html#getJSON) function retrieves the JSON resource using the full URL. `getJSON` returns a [promise](https://dev.wix.com/docs/develop-websites/articles/coding-with-velo/java-script-velo/working-with-promises.md), which resolves to a JSON object.
We multiply the retrieved rate by the initial amount and assign it to the `targetAmount` text box.
### Step 5: See It in Action
Now it's time to test your site:
1. In the top right corner of the editor, click  (Wix Studio) or **Preview** (Wix Editor).
2. Enter an amount in the source currency input.
3. Click the calculate button and see the converted currency result in the target amount text box.
4. [Publish](https://support.wix.com/en/article/publishing-your-site-6980885) your site to make it live and production ready.
That's it! In just a few minutes, you created a web application in Velo! No setup, no managing server infrastructure, just integrating Velo APIs with the Wix visual builder.
### Next Steps
Now that you've had a taste of Velo, check out what else you can do:
* Easily call backend code from the frontend using [web modules](https://dev.wix.com/docs/develop-websites/articles/coding-with-velo/backend-code/web-modules/call-backend-code-from-the-frontend.md).
* Work with Wix's [visual builder](https://support.wix.com/en/article/getting-started-with-the-wix-editor).
* Add features and customize your site using [Velo APIs](https://www.wix.com/velo/reference/api-overview/introduction). Here are some examples of what you can do:
* [Collect](https://dev.wix.com/docs/develop-websites/articles/code-tutorials/wix-pay/tutorial-using-the-velo-pay-api-to-collect-payments-for-a-single-product.md) payments
* [Create](https://support.wix.com/en/article/velo-tutorial-expand-text-with-a-read-more-link) a show-more link
* [Use](https://www.wix.com/velo/example/create-a-custom-chart) an HTML component to embed a chart on your page
* Work with the data from [other Wix Apps](https://dev.wix.com/docs/develop-websites/articles/databases/wix-data/collections/working-with-wix-app-collections-and-code.md) like [Stores](https://dev.wix.com/docs/develop-websites/articles/wix-apps/wix-app-collections/wix-e-commerce-stores/wix-stores-collections-collection-fields.md), [Bookings](https://dev.wix.com/docs/develop-websites/articles/wix-apps/wix-app-collections/wix-bookings/wix-bookings-services-collection-fields.md), and [Events](https://dev.wix.com/docs/develop-websites/articles/wix-apps/wix-app-collections/other-apps/wix-events/wix-events-events-collection-fields.md)
* Visit the [Velo by Wix website](https://www.wix.com/velo) to onboard and continue learning. Check out Velo [documentation](https://dev.wix.com/docs/develop-websites/articles/get-started/about-developing-websites.md) and the [API Reference](https://www.wix.com/velo/reference).
### Example Code
Here is the complete code for this example, without comments:
```javascript
import {getJSON} from 'wix-fetch';
const url = "https://api.exchangerate.host/convert";
let currencyOptions = [
{ "value": "USD", "label": "US Dollars"},
{ "value": "EUR", "label": "Euros"},
{ "value": "JPY", "label": "Japanese Yen"},
];
$w.onReady(function () {
populateDropdowns();
$w('#calculateButton').onClick((event) => {
calculateCurrency();
})
});
function populateDropdowns(){
$w('Dropdown').options = currencyOptions;
$w('Dropdown').selectedIndex = 0;
}
function calculateCurrency() {
let initialAmount = $w("#sourceAmount").value;
let sourceSymbol = $w("#sourceCurrency").value;
let targetSymbol = $w("#targetCurrency").value;
let fullUrl = `${url}?from=${sourceSymbol}&to=${targetSymbol}`;
getJSON(fullUrl)
.then(json => {
$w("#targetAmount").value = initialAmount * json.info.rate;
}
)}
```