Add an Embedded Script Extension in Studio Two
An embedded script is an HTML or JavaScript fragment that loads in the site page head or body.
Follow the instructions below to:
- Add an embedded script extension to your site project.
- Customize the script.
- Check the script.
- Publish your site with the script.
Note: You can also ask Aria, Wix's AI assistant, to create and customize the extension.
Step 1 | Add an embedded script
To add an embedded script:
-
In the Studio Two editor, open the Code tab.
-
In the VS Code sidebar, open the Wix Extension Builder.
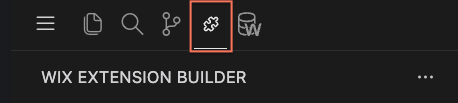
-
Under Create an Extension, choose Site, then Embedded Script.
-
Fill in the form:
- Name: The display name for the script. The Wix Extension Builder also uses it as the folder and file name. For example,
My Scriptbecomes the foldermy-script. - Script type: The consent category. Choose Essential, Functional, Analytics, or Advertising.
- Placement: Where in the page HTML the script is injected. Choose Head, Body Start, or Body End.
- Name: The display name for the script. The Wix Extension Builder also uses it as the folder and file name. For example,
-
Click Generate.
You can find the new files under src/extensions/site/embedded-scripts/<script-folder>/. The extension is registered in your project's extensions.ts and listed under My Extensions. For what each file is for, see Embedded Script Extension Files and Code.
Step 2 | Customize your embedded script
You can edit the generated files to match the script behavior you need. When you're happy with the script, move on to the next step.
For the full workflow, from the configuration file to dynamic parameters and a local script module, see Build an Embedded Script in Studio Two.
For example, to update the script content:
- Open
<script-folder>.html. - Replace
console.log('Hello {{name}}');withconsole.log('Hello world!');. - Save the file.
When the script runs on the site, the browser console logs Hello world!.
Step 3 | Check the script
To check the script on your site:
- Publish your site, then open the live site in a new browser tab. Use a private window, or add a cache-busting query param, to avoid a cached copy.
- Open the browser's developer tools and check the Elements panel for your script's placement, such as the head or the start or end of the body. Alternatively, check the Console panel for any
console.logoutput your script produces.
If your script's content appears in the page HTML at the placement you configured, the extension is working.
Step 4 | Publish your site
When you're ready, click Publish in the Studio Two editor to ship the extension with your site.
See also
Last updated: 2 November 2026