# Wix Developer Portals ## [Develop Websites with Velo](https://dev.wix.com/docs/develop-websites.md) > Extend Wix sites using Velo's JavaScript-based coding environment with access to page elements, backend modules, and Wix APIs > Portal Navigation: > > - Append `.md` to any URL under `https://dev.wix.com/docs/` to get its markdown version. > - Pages are either content pages (article or reference text) or menu pages (a list of links to child pages). > - To get a menu page, truncate any URL to a parent path and append `.md` (e.g. `https://dev.wix.com/docs/sdk.md`, `https://dev.wix.com/docs/sdk/core-modules.md`). > - Top-level index of all portals: https://dev.wix.com/docs/llms.txt > - Full concatenated docs: https://dev.wix.com/docs/llms-full.txt ## Resource: About Developing Websites ## Article: About Velo by Wix ## Article Link: https://dev.wix.com/docs/develop-websites/articles/get-started/about-developing-websites.md ## Article Content: # About Developing Websites Developing websites on Wix using [Velo APIs](https://dev.wix.com/docs/velo.md) offers a unique blend of flexibility, ease of use, and powerful features. Whether you're a seasoned developer or just starting, Wix provides the tools and technologies needed to craft visually appealing and fully functional dynamic web applications: - **Interactive UI:** Use Wix's powerful editors to build sites with custom UI, behaviors, and interactions using the [$w() API](https://www.wix.com/velo/reference/$w). - **Full-stack development:** Leverage a robust suite of developer tools and Wix APIs to build and deploy with efficiency and security. Integrate your code with the editor UI to enhance and extend its capabilities. - **Content management:** Use the Wix CMS and its data APIs to manage, serve, and display content dynamically at scale. - **Wix business solutions:** Connect directly to production-ready solutions like eCommerce and Bookings, and extend them to deliver a tailored experience for site visitors. - **Zero-setup backend:** Implement complex workflows and automations with a fully supported Node.js environment. Wix handles infrastructure, hosting, and scaling so you can focus on your code. - **3rd-party integrations:** Expand a site's capabilities by adding apps, npm packages, and external services such as payment providers and marketing tools. > **Note:** Until now, custom code on Wix sites was implemented using Velo APIs. You can now use the JavaScript SDK for most functionality. Learn more about [Developing Websites with the SDK](https://dev.wix.com/docs/develop-websites/articles/coding-with-velo/develop-with-the-sdk/develop-websites-with-the-sdk.md) and how to [migrate from Velo to the SDK](https://dev.wix.com/docs/develop-websites/articles/coding-with-velo/develop-with-the-sdk/velo-to-sdk-api-mapping.md). ## Technologies Build with trusted, industry-standard tools tailored to Wix's platform. Utilize your existing skills and leverage the following technologies to create and manage dynamic web applications: - **JavaScript**: When developing a site with Wix, you write both frontend and backend code in JavaScript, calling Wix's JavaScript APIs to incorporate interactive and dynamic functionality. - **Node.js**: Wix provides a robust Node.js environment for running your backend code. - **MongoDB**: Wix uses MongoDB as the database for its CMS system, offering a flexible and scalable solution for managing and storing content. ## Development environments Pick the environment that fits how you build. Wix offers several [development environments](https://dev.wix.com/docs/develop-websites/articles/get-started/development-environments.md) to match your workflow: - **Editors:** Use the built-in [code editor](https://dev.wix.com/docs/develop-websites/articles/workspace-tools/velo-workspace/code-editor-ide/working-in-the-code-editor.md) in Wix Studio or the Wix Editor to write and manage code alongside the visual site editor. No setup required. - **Local IDE:** Use a [local IDE](https://dev.wix.com/docs/develop-websites/articles/workspace-tools/developer-tools/git-integration-wix-cli-for-sites/about-git-integration-wix-cli-for-sites.md), such as VS Code, for the flexibility and power of a full-featured development environment on your own machine. Set up via GitHub integration and manage your project using the CLI. Pair with [AI tools](#wix-ai-tools) to provide local AI coding clients the context they need to build and manage your project. - **Wix IDE (Beta):** Use the [Wix IDE](https://dev.wix.com/docs/develop-websites/articles/workspace-tools/velo-workspace/wix-ide/wix-studio-about-the-wix-ide.md), a VS Code-based online IDE for Wix Studio sites. ## Wix AI tools For AI coding clients like Claude Code, Cursor, and VS Code, install the [Wix Plugin](https://dev.wix.com/docs/api-reference/articles/ai-tools/about-the-wix-plugin.md) to give your AI client the context it needs to build and manage your project. The Wix Plugin includes: - [Wix Skills](https://github.com/wix/skills/blob/main/skills): A collection of self-contained instruction sets for Wix development tasks. This includes the Wix Headless skill, which can scaffold and deploy a complete headless project from a single prompt. - [Wix MCP](https://dev.wix.com/docs/api-reference/articles/ai-tools/wix-mcp/about-the-wix-mcp.md): A Model Context Protocol server that lets your AI tool search Wix docs, scaffold code, and call Wix APIs directly from your IDE. To install just Wix Skills, run: ```bash npx skills add wix/skills ``` > **Note:** Add `-g` to install globally and make Wix Skills available across all your projects. ### Programmatic docs access Beyond the Wix Plugin, you can pull Wix docs into any tool or workflow: - **llms.txt index:** Browse a structured index of all documentation at [dev.wix.com/docs/llms.txt](https://dev.wix.com/docs/llms.txt.md). - **Markdown format:** Append `.md` to any documentation page URL to retrieve the Markdown version of that page. - **Page menu:** Use the **Ask Assistant** dropdown on any documentation page to copy the page as Markdown or get a direct link to the Markdown version. ## Developer journey Ready to get started? Here's what to expect at each stage of the development process, from a blank canvas to a fully functioning site: - **Get started:** Explore the [Wix ecosystem](https://dev.wix.com/docs/develop-websites/articles/get-started/the-wix-ecosystem.md) and browse the [API Reference](https://dev.wix.com/docs/api-reference.md) and potential [3rd-party integrations](https://dev.wix.com/docs/develop-websites/articles/get-started/integrate-with-3rd-parties.md) to see what you can build. Take some time to review best practices and any limitations to ensure a smooth development process. > **Note:** Until now, custom code on Wix sites was implemented using Velo APIs. You can now use the JavaScript SDK for most functionality. Learn more about [Developing Websites with the SDK](https://dev.wix.com/docs/develop-websites/articles/coding-with-velo/develop-with-the-sdk/develop-websites-with-the-sdk.md) and how to [migrate from Velo to the SDK](https://dev.wix.com/docs/develop-websites/articles/coding-with-velo/develop-with-the-sdk/velo-to-sdk-api-mapping.md). - **Code:** [Start coding](https://dev.wix.com/docs/develop-websites/articles/coding-with-velo/overview/where-do-i-put-my-code.md) using 1 or more Wix [development environments](https://dev.wix.com/docs/develop-websites/articles/get-started/development-environments.md) to write, manage, and debug your code. Build both frontend and backend to deliver a fully functional and user-friendly site. - **Test:** Preview and thoroughly test your site throughout development. Use the built-in tools to test your code in isolation and as a whole. Create [test sites](https://support.wix.com/en/article/about-test-sites) to experiment without affecting a live site, and use [logs](https://dev.wix.com/docs/develop-websites/articles/workspace-tools/developer-tools/logs/about-logs.md) to monitor and debug issues. - **Publish:** Use the editor or the [CLI](https://dev.wix.com/docs/develop-websites/articles/workspace-tools/developer-tools/git-integration-wix-cli-for-sites/publishing-a-site-with-git-integration-wix-cli-for-sites.md) to publish your site once you've thoroughly tested it. - **Maintain:** Monitor your site using [logs](https://dev.wix.com/docs/develop-websites/articles/workspace-tools/developer-tools/logs/about-logs.md) and the [monitoring dashboard](https://dev.wix.com/docs/develop-websites/articles/workspace-tools/testing-monitoring/monitoring-your-published-site/working-with-the-monitoring-dashboard.md) to track performance and resource usage. Consider [upgrading your premium plan](https://dev.wix.com/docs/develop-websites/articles/coding-with-velo/premium-plans/about-premium-plans.md) to scale your site effectively and avoid hitting plan limitations. - **Grow:** Become a [Certified Wix Partner](https://www.wix.com/partners/partner-program) to offer your development services or sell apps to an audience of 250M+ users. ## Community - Join the [Wix Developers Discord server](https://discord.gg/47gUT9KabP) and [forum](https://forum.wixstudio.com/) to ask questions, discuss complex topics, and collaborate with other Studio creators. - Contact [customer care](https://www.wix.com/contact) for support with platform issues, billing, or account questions. - Follow the Wix [changelog](https://dev.wix.com/docs/changelog.md) for up-to-date information about Wix features and APIs. - [Subscribe](https://www.wixforms.com/f/7394355343209268224) to the Wix newsletter to receive the latest updates and feature announcements. ## Next steps Start building or explore the resources below to go deeper: - Explore [the Wix Ecosystem](https://dev.wix.com/docs/develop-websites/articles/get-started/the-wix-ecosystem.md) and [API Reference](https://dev.wix.com/docs/velo/articles/api-overview/introduction.md) to understand the platform and what you can build. - Browse [tutorials](https://dev.wix.com/docs/develop-websites/articles/code-tutorials/wix-editor-elements/using-re-captcha-to-protect-data-submission.md) and [code examples](https://dev.wix.com/docs/coding-examples.md) for step-by-step guidance on implementing functionality for a site. - Follow the [Quick Start](https://dev.wix.com/docs/develop-websites/articles/get-started/quick-start.md) to start building. Website development on Wix is transitioning to the JavaScript SDK. Learn how to [migrate from Velo to the SDK](https://dev.wix.com/docs/develop-websites/articles/coding-with-velo/develop-with-the-sdk/velo-to-sdk-api-mapping.md). --- > Portal Navigation: > > - Append `.md` to any URL under `https://dev.wix.com/docs/` to get its markdown version. > - Pages are either content pages (article or reference text) or menu pages (a list of links to child pages). > - To get a menu page, truncate any URL to a parent path and append `.md` (e.g. `https://dev.wix.com/docs/sdk.md`, `https://dev.wix.com/docs/sdk/core-modules.md`). > - Top-level index of all portals: https://dev.wix.com/docs/llms.txt > - Full concatenated docs: https://dev.wix.com/docs/llms-full.txt ## Resource: The Wix Ecosystem ## Article: The Wix Ecosystem ## Article Link: https://dev.wix.com/docs/develop-websites/articles/get-started/the-wix-ecosystem.md ## Article Content: # The Wix Ecosystem Before writing code for a site, it's important to have a basic understanding of the greater Wix ecosystem. Once you understand what each part of the ecosystem does and how they work together, you'll be ready to start writing code that interacts with the various parts of the ecosystem. The Wix ecosystem includes a range of tools and services that enable you to build a web presence and manage your business online. The following diagram shows the main parts of the Wix ecosystem: ![Wix ecosystem diagram](https://wixmp-833713b177cebf373f611808.wixmp.com/images/45a8810238260dae1fdc35cebe2d786b.png) ## Site creation Wix offers multiple approaches for creating websites, each designed for different needs and technical preferences. ### Drag-and-drop editors Wix offers the following drag-and-drop editors: - [Wix Studio](https://support.wix.com/en/wix-studio): An advanced web creation platform for agencies, freelancers, and enterprises. - [Wix Editor](https://support.wix.com/en/using-the-wix-editor): Wix's classic site builder. These editors offer a visual, drag-and-drop interface with AI-powered features that lets Wix users: - Add and customize site pages, elements, widgets, and more. - Customize site functionality with code. - Manage site content including text and media. - Add and manage Wix business solutions, such as Wix Stores or Wix Bookings. - Add and manage apps built by 3rd-party developers. Sites built with these editors have a Wix-powered frontend. These are the sites documented in the [Develop Websites](https://dev.wix.com/docs/develop-websites.md) portal. Here's what Wix Studio looks like: ![Wix Studio](https://wixmp-833713b177cebf373f611808.wixmp.com/images/602c65a5abe17eba3931fee886a3cbf8.png) ### Other site creation approaches While the Develop Websites documentation focuses on drag-and-drop editor development, Wix offers additional site creation approaches: - **[Wix Vibe](https://support.wix.com/en/article/wix-vibe-an-overview)**: A conversational website creation tool that builds sites through natural language prompts. While Vibe includes visual editing components, these aren't as fully-featured as the dedicated drag-and-drop editors. Sites built with Vibe take the form of Wix-managed Headless sites, with a React based frontend and use the Astro framework. - **[Wix Headless](https://dev.wix.com/docs/go-headless.md)**: Enables developers to build custom frontends using any technology while leveraging Wix's backend infrastructure. Sites built with Wix Vibe or Wix Headless are documented in the [Go Headless](https://dev.wix.com/docs/go-headless.md) portal. ## Site management Once you create a site, Wix provides tools for ongoing management and operation. ### Site dashboard The dashboard is the site's control center. Whether a site was built using the drag-and-drop editors, created with Vibe, or developed as a headless project, all sites use the same unified dashboard. Only you and your collaborators have access to the dashboard. Most dashboard functionality comes out of the box and enables you to set up, manage, and operate a site and its installed apps. You can also design and code custom dashboard pages. In the dashboard, you can: - Configure site settings. - Manage site content including text and media. - Manage payments, customers, online marketing, automations, and more. - Add and manage business solutions, such as Wix Stores or Wix Bookings. - Add and manage apps built by 3rd-party developers. - Monitor site metrics, such as SEO performance, sales reports, and site traffic. Here's what the dashboard looks like: ![Wix dashboard](https://wixmp-833713b177cebf373f611808.wixmp.com/images/46cca8591e446c4e032473b4c8b65301.jpeg) ## Development and integration Wix's platform offers an extensive array of services and tools for developers to integrate with and extend the Wix ecosystem. ### APIs Wix APIs give you access to Wix's services and resources, providing a gateway that enables you to easily integrate with different areas of the Wix ecosystem. APIs include: - **Business solutions**: Interact with Wix's business solutions, such as Stores, Bookings, Events, and Restaurants. - **Payments**: Manage payments with Pricing Plans, Payments, and Billing modules. - **CRM and Members**: Interact with and manage site contacts and members. - **Data**: Work with data stored in Wix-hosted and external databases. - **Automations**: Streamline work processes and send notifications. - **Web methods**: Create secure backend functions accessible from the frontend. ### CMS Wix's Content Management System (CMS) is where you manage a site's content, such as text, media, videos, products, and booking services. The CMS seamlessly integrates with Wix's site-building tools, providing a user-friendly interface for creating and editing content, as well as mechanisms for easily connecting CMS data to site elements. With Velo APIs, you can programmatically interact with CMS content. ### Wix business solutions At the heart of Wix's backend are its native business solutions, which cater to diverse industries with advanced solutions for bookings, online stores, events, payments, eCommerce, loyalty programs, and more. These apps built by Wix are designed to integrate seamlessly with Wix websites, as well as with external clients that take advantage of Wix's [headless](https://dev.wix.com/docs/go-headless.md) infrastructure. Velo provides dedicated modules for interacting with these business solutions. ### Apps When building a site, you can install apps built by Wix or 3rd-party app developers from the [Wix App Market](https://www.wix.com/app-market/) to add pre-built functionality to your site. #### 3rd-party apps Wix apps are packages of reusable functionality, created by 3rd-party vendors, that you can add to your site. They can contain anything from a simple site widget to a complete business solution, with backend logic, user interfaces, and database collections. Wix apps are listed in the [Wix App Market](https://www.wix.com/app-market/). You can also [build your own apps](https://dev.wix.com/docs/build-apps.md) to share functionality across multiple sites or to offer functionality you've built to other Wix users. ## What's next - [Quick Start](https://dev.wix.com/docs/develop-websites/articles/get-started/quick-start.md) - [Development Environments](https://dev.wix.com/docs/develop-websites/articles/get-started/development-environments.md) --- > Portal Navigation: > > - Append `.md` to any URL under `https://dev.wix.com/docs/` to get its markdown version. > - Pages are either content pages (article or reference text) or menu pages (a list of links to child pages). > - To get a menu page, truncate any URL to a parent path and append `.md` (e.g. `https://dev.wix.com/docs/sdk.md`, `https://dev.wix.com/docs/sdk/core-modules.md`). > - Top-level index of all portals: https://dev.wix.com/docs/llms.txt > - Full concatenated docs: https://dev.wix.com/docs/llms-full.txt ## Resource: Website Development Features ## Article: Website Development Features ## Article Link: https://dev.wix.com/docs/develop-websites/articles/get-started/website-development-features.md ## Article Content: # Website Development Features Wix offers a robust suite of features that support an efficient and productive development workflow. This overview covers the key features that help you develop, test, publish, and maintain custom sites with advanced functionality. ## Developer environment Leverage Wix's suite of tools and IDE options designed for efficient site development. **IDE options**: Choose from the code editor built into Wix Studio and the Wix Editor, the online Wix IDE, or a local IDE like VS Code. **Git integration and Wix CLI for Sites**: When working in a local IDE, use Git and the Wix CLI for Sites to manage version control and local development, allowing easy collaboration, change tracking, and branching. **Secrets Manager**: Store sensitive information securely with the Secrets Manager, which keeps API keys and other sensitive credentials hidden from your code. **Packages and apps**: Add functionality with npm packages, Velo packages, or custom apps tailored to your project’s needs. **AI Assistants**: Use AI-powered tools to speed up development, offering code suggestions, debugging support, and productivity enhancements. ## Build a custom backend Develop backend code, hosted by Wix, to build advanced features and integrations, all managed securely on the platform. **Web modules**: Write backend code that securely handles business logic and can easily be called from the frontend. **Recurring jobs**: Automate tasks, such as data updates and email notifications, to run on a regular schedule. **HTTP functions**: Expose your site functionality as a service by creating endpoints that external applications can call, opening up integration possibilities. **Routers**: Take full control of your site’s URL structure and routing by customizing how requests to specified paths are handled. **Event handlers**: Add backend event handlers to respond to actions that occur on your site, such as a new contact being created or a customer abandoning their cart. ## Build a custom frontend Enhance the pages you've designed in the Wix editor by adding custom code to create interactive and dynamic user interfaces, allowing you to fully tailor the user experience. **$w API**: The $w API lets you interact with UI elements. With support for over 100 element types-—-from simple elements like images, buttons, and input fields to advanced components like repeaters, galleries, and multi-state boxes-—-the $w API enables you to add interactivity, manage user input, and customize element behavior on the page. **CSS**: Use CSS to customize the appearance of your site—from colors and fonts to sizes and positions of elements. Work with the existing Wix CSS classes or create your own custom classes. **Custom elements**: Create custom HTML elements and integrate them seamlessly into your site, enabling unique functionality and design beyond what the built-in components provide. ## Data Manage your site's content and data with Wix's integrated database solutions, allowing for dynamic, data-driven web experiences. **Wix CMS**: Manage structured content with the Wix CMS, allowing you to store, query, and display data programmatically or using no-code features. **External databases**: Connect to external databases, so you can integrate data from other sources using the same APIs and no-code features that you use with native Wix data. **Dynamic pages**: Use dynamic pages to create multiple pages from a single design by connecting page elements to database content. Use the Dataset API to programmatically fine-tune the functionality of dynamic pages. **Data API**: Access and manipulate CMS and external content programmatically with the Data API, enabling you to create, read, update, and delete data directly from your code. ## Wix business solutions Leverage Wix's robust suite of business solutions to incorporate features such as eCommerce and bookings, while having the flexibility to extend and integrate with these solutions to fit your business needs. **Wix business solution APIs**: Integrate directly with Wix’s business solutions, such as Wix Bookings and Wix Stores, using dedicated APIs to access and manage bookings, orders, and more. **Service plugins**: Enhance Wix business solutions by creating custom service plugins that inject your own custom logic or integrate 3rd-party services into Wix flows. For example, you can create a service plugin to customize price calculations for services booked using Wix Bookings or to add an unsupported payment provider as an additional payment option. **Replace business solution pages**: Customize the user experience by replacing default Wix business solution pages with your own, giving you full control over design and functionality. For example, you can replace the default Wix Bookings service page with your own custom version. Your page will appear in the booking flow instead of Wix’s default page. ## Test your site Ensure your site performs optimally and provides a seamless user experience by utilizing Wix's testing features to identify and rectify issues before going live. **Preview**: Use preview mode in the editor to test your code in a controlled environment. You can interact with a preview version of your site and see errors and logs in the developer console, without affecting the live version of your site. **Functional testing**: Run tests on backend methods in isolation to ensure they work as expected, without having to write extraneous testing code. **Test sites**: Create a dedicated test site to experiment with features, test integrations, and refine functionality without impacting your live site. This is especially useful for complex updates or collaborative testing. ## Maintain your site Keep your site updated and running smoothly with Wix's maintenance tools, ensuring long-term performance and security. **Monitoring**: Keep track of your site’s performance, monitor your storage usage, and troubleshoot site issues with the monitoring dashboard. Keeping tabs on monitoring data allows you to proactively address issues and ensure a smooth user experience. **Logs**: Access detailed logs to review site activity, debug issues, and gain insights into user interactions. You can view logs in real time within Wix and connect to Google Cloud Logs to store logs and perform analysis, generate visual depictions of log data, and to extract meaningful insights from your logs. ## What’s next - [Quick Start](https://dev.wix.com/docs/develop-websites/articles/get-started/quick-start.md) - [The Wix Ecosystem](https://dev.wix.com/docs/develop-websites/articles/get-started/the-wix-ecosystem.md) - [Development Environments](https://dev.wix.com/docs/develop-websites/articles/get-started/development-environments.md) --- > Portal Navigation: > > - Append `.md` to any URL under `https://dev.wix.com/docs/` to get its markdown version. > - Pages are either content pages (article or reference text) or menu pages (a list of links to child pages). > - To get a menu page, truncate any URL to a parent path and append `.md` (e.g. `https://dev.wix.com/docs/sdk.md`, `https://dev.wix.com/docs/sdk/core-modules.md`). > - Top-level index of all portals: https://dev.wix.com/docs/llms.txt > - Full concatenated docs: https://dev.wix.com/docs/llms-full.txt ## Resource: Development Environments ## Article: Development Environments ## Article Link: https://dev.wix.com/docs/develop-websites/articles/get-started/development-environments.md ## Article Content: # Development Environments When writing code, having the right development environment can greatly enhance your productivity. Wix provides development options that let you work directly within Wix or work with the tools you already use. The development environments are: - The built-in [code editor](#code-editor) in Wix Studio or the Wix Editor. - The online [Wix IDE](#wix-ide) for Wix Studio sites. - A [local IDE](#local-ide) of your choice, such as VS Code, when using Wix Studio or the Wix Editor. You can use a local IDE, in conjunction with the Wix CLI for Sites, after connecting your site to GitHub. The development environment you should choose depends on your project needs and workflow. Each option offers unique advantages, and you can mix and match environments to some extent as needed. > **Note**: Some Wix website development features are only available in specific development environments. See each feature’s documentation for a list of development environments that support it. ## Code editor The built-in code editor is a browser-based environment available directly within the Wix Studio or Wix Editor. It provides an easy way to write and manage code alongside the visual site editor, enabling you to write code without leaving the Wix platform. ![Code editor](https://wixmp-833713b177cebf373f611808.wixmp.com/images/edd17d777e317076582b7df9b22178ed.png) Learn more about the [code editor](https://dev.wix.com/docs/develop-websites/articles/workspace-tools/velo-workspace/code-editor-ide/working-in-the-code-editor.md). ## Wix IDE The Wix IDE is an advanced, VS Code-based online development environment available for Wix Studio sites. The Wix IDE opens in a separate browser tab or window with hot reloading. This gives you more space for both coding and site editing. Having one window to design and preview and a second window to code is especially useful if you’re working with a multi-monitor setup. The Wix IDE also enables concurrent editing, allowing multiple developers to work in the Wix IDE at the same time. When working in the Wix IDE, you can utilize the [Wix AI Assistant](https://dev.wix.com/docs/develop-websites/articles/workspace-tools/developer-tools/ai-assistants/ai-assistant-in-the-wix-ide/about-the-wix-ai-assistant.md), an intelligent companion that offers real-time coding assistance. ![Wix IDE](https://wixmp-833713b177cebf373f611808.wixmp.com/images/80f327c068d3c46954bf4d585e6b3b1d.png) Learn more about the [Wix IDE](https://dev.wix.com/docs/develop-websites/articles/workspace-tools/velo-workspace/wix-ide/wix-studio-about-the-wix-ide.md). ## Local IDE Use a local IDE, such as VS Code, for the flexibility and power of a full-featured development environment on your own machine. With a local setup, you can customize your environment and use the extensions and shortcuts that you use for all your non-Wix projects. To support local development, use the Wix CLI for Sites, which connects your local code to your site through GitHub. Once you connect a site to GitHub, you can only edit the site’s code in your local IDE. The CLI, along with a local editor, allows you to write, test, sync, and publish your code from your local environment. Because your code is stored in a Git repository, you can manage branches, versions, and team collaboration just like you would for any other Git project. ![Local IDE](https://wixmp-833713b177cebf373f611808.wixmp.com/images/8c45c4e13c906cf619e1d4a0eb69565e.png) Learn more about using a [local IDE](https://dev.wix.com/docs/develop-websites/articles/workspace-tools/developer-tools/git-integration-wix-cli/about-git-integration-wix-cli.md#code-with-velo-in-your-local-ide). ## What’s next - [Quick Start](https://dev.wix.com/docs/develop-websites/articles/get-started/quick-start.md) - [The Wix Ecosystem](https://dev.wix.com/docs/develop-websites/articles/get-started/the-wix-ecosystem.md) - [Website Development Features](https://dev.wix.com/docs/develop-websites/articles/get-started/website-development-features.md) --- > Portal Navigation: > > - Append `.md` to any URL under `https://dev.wix.com/docs/` to get its markdown version. > - Pages are either content pages (article or reference text) or menu pages (a list of links to child pages). > - To get a menu page, truncate any URL to a parent path and append `.md` (e.g. `https://dev.wix.com/docs/sdk.md`, `https://dev.wix.com/docs/sdk/core-modules.md`). > - Top-level index of all portals: https://dev.wix.com/docs/llms.txt > - Full concatenated docs: https://dev.wix.com/docs/llms-full.txt ## Resource: Integrate with Wix's Business Solutions ## Article: Integrate with Wix's Business Solutions ## Article Link: https://dev.wix.com/docs/develop-websites/articles/get-started/integrate-with-wix-s-business-solutions.md ## Article Content: # Integrate with Wix’s Business Solutions Wix offers a range of powerful business solutions, enabling you to sell products and services, run events, write blogs, manage restaurants, and more—all seamlessly integrated with your website. These solutions are built to work out-of-the-box on Wix sites, but with custom code, you can extend their capabilities and tailor them to fit your specific needs. Your site can integrate with Wix’s business solutions in the following ways: - [Wix business solution APIs](#wix-business-solution-apis): Leverage functionality from Wix’s business solutions like Wix Stores and Wix Bookings. - [Service plugins](#service-plugins): Inject custom functionality or 3rd-party integrations into Wix business solutions. - [Replace business solution pages](#replace-business-solution-pages): Customize user experience by replacing Wix’s default business solution pages with your own. ## Wix business solution APIs Wix business solution APIs allow you to programmatically interact with Wix's business solutions, such as Wix Stores and Wix Bookings. This enables you to extend their capabilities, integrate with external systems, and create custom functionality tailored to your site's specific requirements. For example, you can use Wix business solution APIs for: - **Personalized recommendations**: Use customer data to generate personalized Wix stores product recommendations on your site. - **Custom service availability UI**: Retrieve and display the availability status of Wix Bookings services in a custom UI. - **Customer data sync**: Sync Wix Member profiles and purchasing history with data from an external CRM system for a unified customer view. ## Service plugins [Service plugins](https://dev.wix.com/docs/develop-websites/articles/coding-with-velo/integrations/service-plugins-formerly-spis/custom-app-extensions-using-spis.md) allow you to inject additional functionality or integrate 3rd-party services directly into Wix’s business solutions. Plugins consist of functions that are called automatically by Wix apps at defined points in their flows. These functions receive and return data in specific formats, enabling seamless integration with the Wix app’s business logic. For example, you can use service plugins for: - **Custom shipping rate**: Integrate 3rd-party logistics services to provide customized shipping rates in Wix Stores. - **Custom bookings pricing**: Implement dynamic pricing models for services in Wix Bookings, such as surge pricing or member-only discounts. - **Custom payments provider**: Integrate a 3rd-party payment gateway to offer additional payment options for customers in Wix Stores. ## Replace business solution pages Customize the user experience by replacing default Wix business solution pages with your own. Design a page and add functionality to it using the $w API for page elements and the Wix business solution APIs. When the business solution flow reaches the predetermined step, your page is presented to site visitors instead of the usual Wix page. Once visitors finish interacting with your page, you redirect them back to the next Wix page in the flow. For example, you can replace the following pages with your own versions: - **Bookings service page**: Replace the default Wix Bookings service page with a custom-designed page that includes unique features, such as custom booking options and additional information specific to your services. - **Stores product page**: Replace the default Wix Stores product page with a custom version where you can showcase your products with enhanced visuals, custom layout, and unique interactive elements to improve the shopping experience. - **Custom plans & pricing page**: Replace the default Plans & Pricing page from the Wix Pricing Plans app with a custom-designed page that highlights your pricing plans with a unique layout and interactive pricing details to better attract and convert visitors. ## What’s next - [Quick Start](https://dev.wix.com/docs/develop-websites/articles/getting-started/quick-start.md) - [Integrate with 3rd-Parties](https://dev.wix.com/docs/develop-websites/articles/getting-started/integrate-with-3rd-parties.md) - [Website Development Features](https://dev.wix.com/docs/develop-websites/articles/getting-started/website-development-features.md) --- > Portal Navigation: > > - Append `.md` to any URL under `https://dev.wix.com/docs/` to get its markdown version. > - Pages are either content pages (article or reference text) or menu pages (a list of links to child pages). > - To get a menu page, truncate any URL to a parent path and append `.md` (e.g. `https://dev.wix.com/docs/sdk.md`, `https://dev.wix.com/docs/sdk/core-modules.md`). > - Top-level index of all portals: https://dev.wix.com/docs/llms.txt > - Full concatenated docs: https://dev.wix.com/docs/llms-full.txt ## Resource: Integrate with 3rd-Parties ## Article: Integrate with 3rd-Parties ## Article Link: https://dev.wix.com/docs/develop-websites/articles/get-started/integrate-with-3rd-parties.md ## Article Content: # Integrate with 3rd-Parties Integrating 3rd-party services into your site allows you to save time, extend functionality beyond native features, and connect seamlessly with existing systems you have already invested in. Your site can integrate with 3rd-party solutions in the following ways: - [Fetch API](#fetch-api): Connect with 3rd-party APIs securely. - [npm packages](#npm-packages): Leverage 3rd-party functionality within your Wix site. - [HTTP functions](#http-functions): Expose your site's functionality so 3rd-parties can call your site’s APIs. - [Service plugins](#service-plugins): Inject 3rd-party services into Wix business solutions. ## Fetch API The [Fetch API](https://dev.wix.com/docs/velo/api-reference/wix-fetch/introduction.md), an implementation of the standard JavaScript Fetch API you're likely already familiar with, enables you to connect your site to 3rd-party APIs. Store sensitive credentials, such as API keys, in the Secrets Manager to keep your API calls secure. For example, you can use the Fetch API for: - **Weather updates**: Display live weather updates by fetching data from a weather service API. - **Inventory sync**: Keep your store inventory synced with a 3rd-party inventory management system. - **Analytics**: Send custom event data to an analytics service. ## npm Packages With [npm packages](https://dev.wix.com/docs/develop-websites/articles/coding-with-velo/packages/about-npm-packages.md) you can leverage a vast array of prebuilt 3rd-party modules to extend the functionality of your site. By integrating these packages, you can easily add complex features without having to build them from scratch. For example, you can use npm packages for: - **PDF generator**: Use a PDF generator module to dynamically create and customize PDF documents on your site. - **SMS messaging**: Send SMS notifications to visitors for order confirmations, appointment reminders, or promotional messages. - **QR code generation**: Integrate a module to dynamically generate QR codes for promotional offers or mobile app links. ## HTTP Functions With [HTTP functions](https://dev.wix.com/docs/velo/api-reference/wix-http-functions/introduction.md) you can expose your site as a service and allow 3rd-party systems to interact with your site data and functionality. For example, you can use HTTP functions for: - **Webhooks**: Set up an HTTP function to receive and process webhooks from external services, such as payment notifications or delivery updates. - **Alternative frontends**: Use HTTP functions to expose the logic and data of your site to alternative frontends such as mobile apps, smartwatch apps, or other IoT devices. - **Automation services**: Integrate your Wix site with automation services. You can create endpoints that automation platforms can trigger as part of an automation workflow. ## Service plugins [Service plugins](https://dev.wix.com/docs/develop-websites/articles/coding-with-velo/integrations/service-plugins-formerly-spis/custom-app-extensions-using-spis.md) allow you to inject additional functionality or integrate 3rd-party services directly into Wix’s business solutions. For example, you can use service plugins for: - **Custom shipping rate**: Integrate 3rd-party logistics services to provide customized shipping rates in Wix Stores. - **Custom bookings pricing**: Implement dynamic pricing models for services in Wix Bookings, such as surge pricing or member-only discounts. - **Custom payments provider**: Integrate a 3rd-party payment gateway to offer additional payment options for customers in Wix Stores. ## What’s next - [Quick Start](https://dev.wix.com/docs/develop-websites/articles/getting-started/quick-start.md) - [Integrate with Wix Business Solutions](https://dev.wix.com/docs/develop-websites/articles/getting-started/integrate-with-wix-s-business-solutions.md) - [Website Development Features](https://dev.wix.com/docs/develop-websites/articles/getting-started/website-development-features.md) --- > Portal Navigation: > > - Append `.md` to any URL under `https://dev.wix.com/docs/` to get its markdown version. > - Pages are either content pages (article or reference text) or menu pages (a list of links to child pages). > - To get a menu page, truncate any URL to a parent path and append `.md` (e.g. `https://dev.wix.com/docs/sdk.md`, `https://dev.wix.com/docs/sdk/core-modules.md`). > - Top-level index of all portals: https://dev.wix.com/docs/llms.txt > - Full concatenated docs: https://dev.wix.com/docs/llms-full.txt ## Resource: Quick Start ## Article: Getting Started with Code ## Article Link: https://dev.wix.com/docs/develop-websites/articles/get-started/quick-start.md ## Article Content: # Quick Start With Wix you can easily extend your site’s functionality using code. In this tutorial, we walk you through the essential steps to get you quickly up and running with code. **You’ll learn how to:** - Enable coding in the editor - Select a UI element in your code - Add a code interaction - Use a Wix API - Preview your code in action - View console logs We added a text element and button to our site, and then used Wix APIs to change the element’s text when the button is clicked. To get started, watch the video tutorial, or follow the steps below. ## Before you begin Sign up for a [Wix Studio account](https://www.wix.com/studio) and log in. ## Step 1 | Enable coding To start coding in your site, you need to enable Wix developer mode. In the left sidebar, click ![Code icon](https://wixmp-833713b177cebf373f611808.wixmp.com/images/2608ab9f3b2daf53dcf1db19f1b5de11) and then **Start Coding**. Wix Studio start coding This sets up your developer environment which includes a built-in code editor (IDE) at the bottom of your page, and a Code sidebar with advanced developer functionalities such as access to your site’s page code, backend and public code files, databases, code packages, and other tools and features to extend your development experience. ## Step 2 | Add elements to a page In this step, we add elements to the Home page of our site, and change the default text of the elements using the UI. To do this: 1. In the left sidebar, click Add Elements ![Add icon](https://wixmp-833713b177cebf373f611808.wixmp.com/images/89c52700122a42d8b153811db8e5f330). 2. Add the following elements to your site: - Text - Button 3. Use the UI to change the default text of the elements to whatever you like. We changed the text of our button to 'Click Me', and our text element to 'Hello World!'. Later in the tutorial we show how to change the text of our text element using code. ## Step 3 | Select UI elements in your code To select these UI elements in your code, do the following: 1. Click the button element. You can now see the button element’s ID in the Properties & Events panel next to the built-in code editor. 2. Change the button’s ID. We call ours 'btnClick'. It’s best practice to change all of your element IDs to more descriptive text so that you can easily identify them when you start writing code. We also changed our text element ID to 'txtMessage'. 3. To use the elements in our code, we need to look at the [Wix API Reference](https://www.wix.com/velo/reference/api-overview). The reference contains various APIs to interact with site elements, your site’s database content, Wix business solutions, and more. In our example, we use the [$w](https://www.wix.com/code/reference/$w.html#$w) selector function to select elements on a page by ID or by type. We select our elements by ID as follows: - Button: $w('#btnClick') - Text: $w('#txtMessage') > **Note:** To access and modify elements on your site, you must use the $w selector function. You can't use Web APIs or 3rd party libraries such as jQuery to access or manipulate the DOM. ## Step 4 | Add an event handler Now that you know how to select UI elements in your code, let’s add an [`onClick()`](https://www.wix.com/velo/reference/$w/button/onclick) event handler to the button. Events run when they are triggered by a specific action on their element. In our example, every time the button is clicked, the event’s code will run. **To add the event handler:** 1. Go to the code editor at the bottom of your page. Notice the [`onReady()`](https://www.wix.com/velo/reference/$w/onready) function in your page code. We write the code for our event handler inside this function since it runs when all the page elements have finished loading. ![Code icon](https://wixmp-833713b177cebf373f611808.wixmp.com/images/a001d4b08e0124f096962be650bb9ff6) 2. In the `onReady()` function, add the button element using the $w function and the element ID we gave it earlier, $w('#btnClick'). Notice that when you start typing '$w', you can see a list of all the available elements. This is useful to be able to find your target elements, especially as your site grows. 3. Attach the `onClick()` event handler to the selected button element. ```js $w.onReady(function () { $w("#btnClick").onClick(() => {}); }); ``` ## Step 5 | Define the code in the event handler Now that we have a button with an `onClick()` event handler, we need to define the code we want to run when the button is clicked. In our example, we want to change the text of the text element when the button is clicked. To define the code we want to run when the button is clicked, do the following: 1. First add a console log in the `onClick()` event handler function to test that it is working. ```js $w.onReady(function () { $w("#btnClick").onClick(() => { console.log("clicked!"); }); }); ``` 2. Now let’s run the code in Preview mode to test if it is working. Click **Run** on the top right of the code editor. Once in Preview mode, click your button. If everything is working as expected, you’ll see our console log, 'clicked!' printed in the Developer Console at the bottom of the page. 3. Now that our button’s event handler is working, we define our event. In our case, we want the text element’s text to change from the current 'Hello World!' to 'Hello from Wix Studio!' when the button is clicked. To do this, we select our text element, $w('#txtMessage'), and then add the Text API’s `.text` property: ```js $w.onReady(function () { $w('#btnClick').onClick(() => { console.log('clicked!'); $w('#txtMessage').text = 'Hello from Wix Studio!’; }) }); ``` ## Step 6 | Preview your code in action Before publishing our site, let’s see a preview of our code in action. 1. To enter Preview mode, you can either click the **Run** button like we did in the previous step, or click the Preview icon ![Preview icon](https://wixmp-833713b177cebf373f611808.wixmp.com/images/9d867dbfaf7b198120493f1264afa27e) in the top right corner of the editor. 2. In preview mode, click the button. The text element’s text will change to 'Hello from Wix Studio!', and you’ll see our console log, 'clicked!' printed in the Developer Console at the bottom of the page. Your code is up and running, and you’ve now learned the basics of how to code with Wix. ## Next Steps Learn more about coding with Wix: - **Customize your site’s UI:** Interact with site elements and add custom behaviors with the [$w() API](https://www.wix.com/velo/reference/$w). - **Add advanced backend functionality:** Write server-side code on your site's backend, and [call the backend code from your frontend](https://dev.wix.com/docs/develop-websites/articles/coding-with-velo/backend-code/web-modules/call-backend-code-from-the-frontend.md). Then test your backend code in the code editor using [Functional testing](https://dev.wix.com/docs/develop-websites/articles/workspace-tools/testing-monitoring/functional-testing/about-functional-testing.md). - **Integrate with external resources:** Add [npm packages](https://dev.wix.com/docs/develop-websites/articles/coding-with-velo/packages/about-npm-packages.md), and [access 3rd-party services with the fetch API](https://dev.wix.com/docs/develop-websites/articles/coding-with-velo/integrations/fetching-services/accessing-3rd-party-services-with-the-fetch-api.md). - **Manage your site data:** Use the [Data API](https://dev.wix.com/docs/develop-websites/articles/databases/wix-data/data-api/working-with-the-data-api.md) to work with your database collections using code. Use the Wix CMS, or integrate with popular external databases such as MySQL, Google Cloud, and AWS. - **Start with pre-built examples:** Use the [Get Started with an Example](https://dev.wix.com/docs/develop-websites/articles/getting-started/get-started-with-an-example.md) feature in Wix Studio to access a page with pre-built code snippets, helping you begin coding and explore Velo's basic features. --- > Portal Navigation: > > - Append `.md` to any URL under `https://dev.wix.com/docs/` to get its markdown version. > - Pages are either content pages (article or reference text) or menu pages (a list of links to child pages). > - To get a menu page, truncate any URL to a parent path and append `.md` (e.g. `https://dev.wix.com/docs/sdk.md`, `https://dev.wix.com/docs/sdk/core-modules.md`). > - Top-level index of all portals: https://dev.wix.com/docs/llms.txt > - Full concatenated docs: https://dev.wix.com/docs/llms-full.txt ## Resource: Get Started with an Example ## Article: Get Started with an Example ## Article Link: https://dev.wix.com/docs/develop-websites/articles/get-started/get-started-with-an-example.md ## Article Content: # Get Started with an Example > **Note:** This feature is only available in Wix Studio and is not yet available to all Wix Studio users. Wix Studio provides a pre-built example page that demonstrates some of Velo's features: - **Text Manipulation**: Set and change text content dynamically. - **Element Visibility**: Show and hide page elements. - **Expandable Sections**: Create and manage foldable content areas. This article explains how to access and use this example page. ## Access the example page To open the example page with code snippets: 1. Open a Wix Studio site that you haven't added code to yet. 2. In the left sidebar, click the Code icon ![Code icon](https://wixmp-833713b177cebf373f611808.wixmp.com/images/2608ab9f3b2daf53dcf1db19f1b5de11.png) and then **Start with an example**. A new page named "Get Started with Code" is created. > **Tip**: If you've already enabled coding, you can access the example page by clicking ![Code icon](https://wixmp-833713b177cebf373f611808.wixmp.com/images/2608ab9f3b2daf53dcf1db19f1b5de11.png) then **Help > Getting Started** in the left sidebar. Get Started with an Example ## Use the example page The "Get Started with Code" page demonstrates basic Wix Velo functionality. Here's how to get the most out of it: 1. **Review the examples**: The page features several interactive demonstrations. 2. **Test the behavior**: Preview to see how each example works. 3. **Study the code**: Examine the snippets associated with each example. 4. **Modify and experiment**: Change the code and observe the effects. 5. **Preview your changes**: Check the results after modifying the code. ## Try an example To see an example in action: 1. Go to the "Get Started with Code" page. 2. Choose an example from the page, such as the "Change text on button click" example. The following screenshot shows this example: Get Started with an Example 3. In the code editor, review the existing code for the example. 4. Modify the code: - Find the line that sets the text for the button. - Change the text inside the quotation marks. 5. Click the preview icon ![Preview icon](https://wixmp-833713b177cebf373f611808.wixmp.com/images/9d867dbfaf7b198120493f1264afa27e.png) in the top right corner to see your changes. 6. Click the blue "Click to Change Title" button. The existing text changes when you click the button. ## Next steps After exploring the examples: - Use these examples as inspiration for your own Wix Studio site. - Explore the [Wix Velo API Reference](https://dev.wix.com/docs/velo.md) for all API functionality. - Visit the [Wix Coding Examples Site](https://dev.wix.com/docs/coding-examples.md) to see even more examples. --- > Portal Navigation: > > - Append `.md` to any URL under `https://dev.wix.com/docs/` to get its markdown version. > - Pages are either content pages (article or reference text) or menu pages (a list of links to child pages). > - To get a menu page, truncate any URL to a parent path and append `.md` (e.g. `https://dev.wix.com/docs/sdk.md`, `https://dev.wix.com/docs/sdk/core-modules.md`). > - Top-level index of all portals: https://dev.wix.com/docs/llms.txt > - Full concatenated docs: https://dev.wix.com/docs/llms-full.txt ## Resource: About the Wix Site MCP ## Article: About the Wix Site MCP ## Article Link: https://dev.wix.com/docs/develop-websites/articles/get-started/about-the-wix-site-mcp.md ## Article Content: # About Wix Site MCPs Every Wix site has its own [built-in](https://support.wix.com/en/article/ai-tools-connecting-wix-sites-to-ai-platforms) MCP (Model Context Protocol) server. Anyone can connect their compatible AI agent to the MCP server of any Wix site. This allows users and site visitors to interact with Wix sites through AI, using natural language requests. The site MCP server makes it easy for visitors to: - Get business details like contact information and location. - Discover the products and services the business has to offer. - Book services and make reservations. - Start a purchase process and be directed to the site to complete checkout. - Learn about a business by getting relevant answers to questions, instead of having to search the site. ## Connect to the MCP server Every Wix site has a unique endpoint, but they all use the following format: ```shell /_api/mcp ``` In your code, replace `` with the domain of the site you want to connect to. For example, if you want to communicate with the MCP server of `https://andream.wixsite.com/andreas-kitchen`, the endpoint is: ```shell https://andream.wixsite.com/andreas-kitchen/_api/mcp ``` ## Make API calls to Wix site MCPs Make client requests as POST calls that follow MCP [architecture](https://modelcontextprotocol.io/docs/learn/architecture). You don’t need to include authentication for site MCPs. For example: ```shell curl -X POST "https://example.wixsite.com/example-store/_api/mcp" \   -H "Content-Type: application/json" \   -d '{     "jsonrpc": "2.0",     "method": "tools/call",     "id": 1,     "params": {       "name": "SearchInSite",       "arguments": { "searchTerm": "list available products" }     }   }' ``` ## Available tools Wix site MCP servers make the following tools available to MCP clients to interact with a site. ### ReadFullDocsArticle Fetches a complete article from the [Wix developer documentation portal](https://dev.wix.com/docs/develop-websites.md). Parameters: | | | | ------------ | ------------------------------------------------------------------------------------------------------- | | `articleUrl` | A string in `uri` format that contains the URL of an article in the Wix developer documentation portal. | ### ReadFullDocsMethodSchema Fetches the full schema for a Wix API method. The client should call this before calling the actual method. Parameters: | | | | ------------ | ------------------------------------------------------------------------------------------- | | `articleUrl` | A string in `uri` format that contains the URL of a reference article for a Wix API method. | ### CallWixSiteAPI Calls API methods on a site in order to perform actions on a site visitor’s behalf, such as querying site data or booking an appointment. Parameters: | | | | -------------- | ------------------------------------------------------------------------------------------------------------------------------------------------------------------------------------------------------------------------------------------------------------------ | | `visitorToken` | Visitor access token. If you have this in context, always use it and do not create a new one. If you don’t have it in your context, use the [`GenerateVisitorToken`](#generatevisitortoken) tool to get it. | | `url` | A string in format `uri` that contains the URL of the API method to call. Retrieve this URL using the [`SearchSiteApiDocs`](#searchsiteapidocs) tool or from the conversation context. Must be an absolute URL. Typically starts with `https\://www\.wixapis.com…` | | `method` | The HTTP method to use for the API call. | | `body` | A string representing the request body as a valid JSON object. | ### GenerateVisitorToken Creates a new visitor session and obtains a visitor access token for the site. If you don’t have a visitor token yet, use this tool before making a `tools/call` request with [`CallWixSiteAPI`](#callwixsiteapi). ### SearchSiteApiDocs Retrieves the API documentation for the Wix business solutions installed on a site, and informs the client on how to use the APIs. Use this tool for querying products and services on a site (instead of [`SearchInSite`](#searchinsite)). Parameters: | | | | ------------ | --------------------------------------------------- | | `searchTerm` | The term to search for the site API documentation.  | ### GetBusinessDetails Retrieves business and site details such as timezone, email, phone, address, etc. ### SearchInSite Searches the site for information. Parameters: | | | | ------------ | ----------------------------------- | | `searchTerm` | The term to search for in the site. | You can also make a tool discovery request from your client to retrieve the list of tools.  ```shell curl -X POST "https://example.wixsite.com/example-store/_api/mcp" \   -H "Content-Type: application/json" \   -d '{     "jsonrpc": "2.0",     "id": 4,     "method": "tools/list"   }' ``` The `tools/list` call returns the name, description, and input schema of each tool. > **Note**: The MCP server notifies your client when the tools are updated. To receive the latest tool updates, make sure to implement a `tools/list` call upon receipt of a tool update notification. ## See also - [The Wix MCP for developers](https://dev.wix.com/docs/sdk/articles/use-the-wix-mcp/about-the-wix-mcp.md) --- > Portal Navigation: > > - Append `.md` to any URL under `https://dev.wix.com/docs/` to get its markdown version. > - Pages are either content pages (article or reference text) or menu pages (a list of links to child pages). > - To get a menu page, truncate any URL to a parent path and append `.md` (e.g. `https://dev.wix.com/docs/sdk.md`, `https://dev.wix.com/docs/sdk/core-modules.md`). > - Top-level index of all portals: https://dev.wix.com/docs/llms.txt > - Full concatenated docs: https://dev.wix.com/docs/llms-full.txt ## Resource: About Wix Harmony ## Article: About Wix Harmony ## Article Link: https://dev.wix.com/docs/develop-websites/articles/get-started/about-wix-harmony.md ## Article Content: # About Wix Harmony Wix Harmony is a new Wix Editor that offers a flexible, intuitive platform for building sites. It brings together advanced AI tools, including Aria for prompt-based creation, paired with freeform drag-and-drop capabilities. Harmony is designed for self-creators who want an AI-assisted site building experience without code. Wix Harmony doesn't support site code. If your projects require code customization, continue using [Wix Editor](https://www.wix.com) or [Wix Studio](https://www.wix.com/studio). However, you can use [custom code](https://dev.wix.com/docs/develop-websites-sdk/code-your-site/build-a-custom-frontend/custom-code/about-custom-code.md) to add HTML, JavaScript, and CSS snippets to Harmony sites. > **Note:** If you're building apps with Wix Blocks, see [About Wix Harmony and Blocks](https://dev.wix.com/docs/build-apps/develop-your-app/frameworks/wix-blocks/about-wix-harmony-and-blocks.md). ## Existing sites Existing Wix sites with site code will continue to work normally. You can still access and edit your sites and code through the Wix Editor or Wix Studio. Existing sites are not being migrated to Harmony. ## Build with Wix Studio For projects that require site code, Wix Studio is your development platform. Wix Studio supports: - Full coding capabilities with the Wix JavaScript SDK and Velo APIs. - Pixel-perfect layouts with responsive design systems. - Collaboration tools for working with team members. - Professional tooling including IDE integration and Git workflows. Learn more about [Wix Studio](https://www.wix.com/studio). ## Features not available in Wix Harmony Features not available in Wix Harmony include: - [Custom site code](https://dev.wix.com/docs/develop-websites/articles/coding-with-velo/frontend-code/about-event-handlers-in-wix.md), including page code and backend code - [Custom CSS](https://dev.wix.com/docs/develop-websites/articles/coding-with-velo/frontend-code/custom-css/about-css-styling.md) - [HTTP functions](https://dev.wix.com/docs/develop-websites/articles/coding-with-velo/integrations/exposing-services/about-custom-site-apis.md) - [Routers](https://dev.wix.com/docs/develop-websites/articles/coding-with-velo/routers/about-routers.md) - [Data hooks](https://dev.wix.com/docs/develop-websites/articles/databases/wix-data/hooks/about-data-hooks.md) - [Backend event handlers](https://dev.wix.com/docs/develop-websites/articles/coding-with-velo/backend-code/events/about-backend-events.md) - [Web modules](https://dev.wix.com/docs/develop-websites/articles/coding-with-velo/backend-code/web-modules/about-web-modules.md) - [Scheduled jobs](https://dev.wix.com/docs/develop-websites/articles/workspace-tools/developer-tools/recurring-jobs/about-scheduling-recurring-jobs.md) ## What's next We're working on bringing the AI creation experience to Wix Studio. The new features aim to give you the best of both worlds: powerful AI tools combined with full development capabilities. Stay tuned for updates. ## Get support We're here to answer your questions and concerns. [Contact us](https://dev.wix.com/docs/develop-websites/articles/contact-us/contact-us.md). ## See also - [About Developing Websites](https://dev.wix.com/docs/develop-websites/articles/get-started/about-developing-websites.md) - [About Wix Harmony and Apps](https://dev.wix.com/docs/build-apps/get-started/overview/about-wix-harmony-and-apps.md) - [About Wix Harmony and Blocks](https://dev.wix.com/docs/build-apps/develop-your-app/frameworks/wix-blocks/about-wix-harmony-and-blocks.md) - [About Custom Code](https://dev.wix.com/docs/develop-websites-sdk/code-your-site/build-a-custom-frontend/custom-code/about-custom-code.md) --- > Portal Navigation: > > - Append `.md` to any URL under `https://dev.wix.com/docs/` to get its markdown version. > - Pages are either content pages (article or reference text) or menu pages (a list of links to child pages). > - To get a menu page, truncate any URL to a parent path and append `.md` (e.g. `https://dev.wix.com/docs/sdk.md`, `https://dev.wix.com/docs/sdk/core-modules.md`). > - Top-level index of all portals: https://dev.wix.com/docs/llms.txt > - Full concatenated docs: https://dev.wix.com/docs/llms-full.txt ## Resource: Wix Studio: Working with the Code Panel ## Article: Wix Studio: Working with the Code Panel ## Article Link: https://dev.wix.com/docs/develop-websites/articles/workspace-tools/velo-workspace/workspaces/wix-studio-working-with-the-code-panel.md ## Article Content: # Wix Studio: Working with the Code Panel
__Note:__ The features and workflows listed below are only available in Wix Studio.
The Code panel is where you can write code to add custom functionality and interactions to your site. Use the Code panel to add frontend code and CSS styling directly with the built-in code editor, manage your collections, add code packages, and add custom apps or extensions. You can also use the panel to access the platforms, such as the Wix IDE or GitHub integration, for advanced coding features like backend web modules, data hooks, and http functions. To begin coding, select the code icon ![code icon](https://github-production-user-asset-6210df.s3.amazonaws.com/95754543/253806250-18a75e8d-67e5-4b68-958c-ae320e0c972e.png) and click **Start Coding**.
![](https://wixmp-833713b177cebf373f611808.wixmp.com/images/098e4cea05a3ba60a4c0af3847a076dd.png)
## Code Editor The code editor is where you write and edit the code for your site. You can toggle between different code files in the Page Code and Public & Backend sections of the Code sidebar. ### Page Code The Page Code section opens the frontend code editor for every page on your site. ![Page Code](https://wixmp-833713b177cebf373f611808.wixmp.com/images/0d3719214176dd9aa9423c7257ab0331.png) Toggle between your site pages in the Page Code section of the Code sidebar, in the Pages panel, or in the top bar to edit each page's frontend code (shown below). You can see which page you are currently editing at the top left of the code editor.
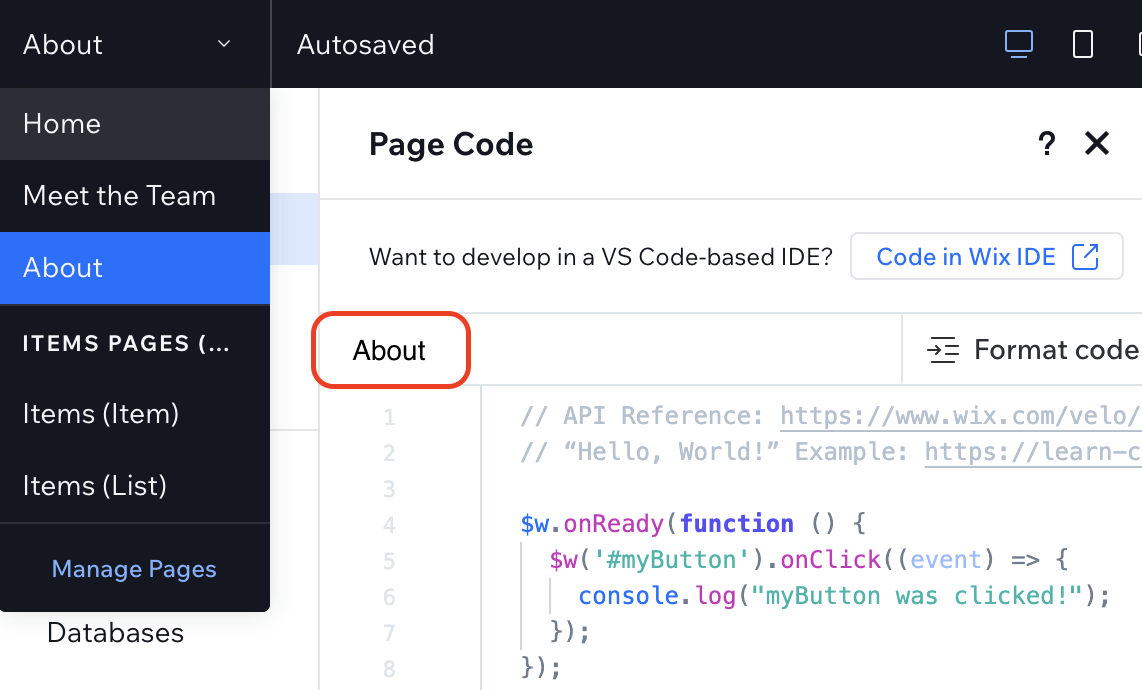
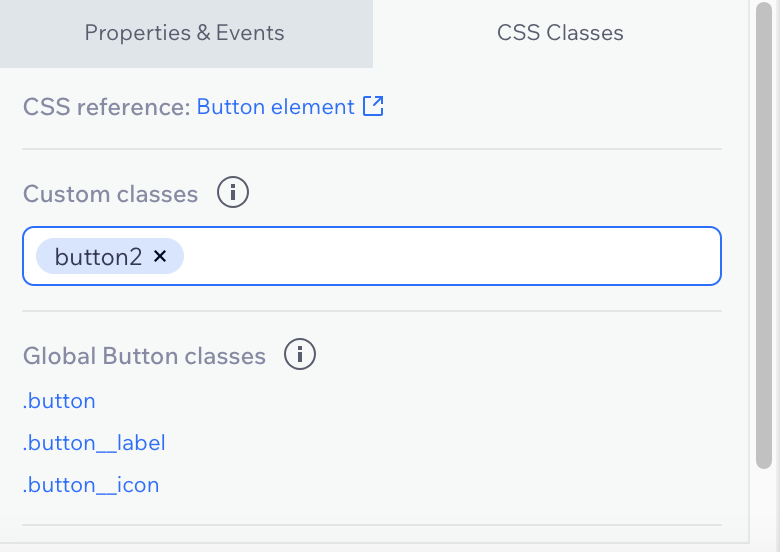
### Public Code The Public section is where you put JavaScript files that contain the code you want to use on any page in your site. For example, you may have a function that you need to use in multiple pages and you don't want to repeat it on each page. You can write that function once in a public file and then call it from any page, or from any backend or public file as needed. You can add public code in the Public & Backend section of the Code sidebar. ### Backend Code The Backend code section of the Code sidebar includes files that are not publicly accessible from your site. Since the backend code isn't visible, you can place sensitive information in your backend code that might otherwise be a [security risk](https://support.wix.com/en/article/velo-security-best-practices#code-visibility). You can add backend code in the Public & Backend section of the Code sidebar, or with one of these options: + [Wix IDE](https://support.wix.com/en/article/about-the-wix-ide): Click **Code in Wix IDE** at the top of the code editor to get started. + [GitHub integration](https://dev.wix.com/docs/develop-websites/articles/workspace-tools/developer-tools/git-integration-wix-cli-for-sites/about-git-integration-wix-cli-for-sites.md): Navigate to the GitHub section to get started. >**Note:** > Currently, you can't write code using both Wix IDE and GitHub integration. ### Global Code Run your global code in the **masterPage.js** file, located in the Page Code section of the Code sidebar. Use this file to add frontend code that runs on every page. If you want to add processing for your header or footer, this is the place to do it. This is also the place to handle elements that you want to put on every page, like a search bar or shopping cart icon for a store. >**Note:** > Don't import functions from **masterPage.js** into the code files of individual pages. Doing this will cause the masterPage onReady function to run twice on that page. If there's a function that you want to use in the code for multiple pages but not every page, store it in a **public.js** file and import it from there. Learn more about the public files section in [About the Wix IDE](https://support.wix.com/en/article/about-the-wix-ide). `youtube:https://www.youtube.com/watch?v=442XHD7-Ah4` ### CSS The **CSS** section, located under the Page Code section of the Code sidebar, allows you to add CSS styling that applies globally to every page of your site. Learn more about [CSS editing](https://dev.wix.com/docs/develop-websites/articles/coding-with-velo/frontend-code/custom-css/about-css-styling.md). ![global.css](https://wixmp-833713b177cebf373f611808.wixmp.com/images/9247162de368bd6c33fb44b2cc6c3c43.png) ### CSS Classes Panel In addition to global CSS styling, you can add CSS styles to specific elements on your site with the CSS Classes panel. Select a specific element on your site and the CSS Classes panel displays the available Global classes for that element. You can also create your own custom class with this panel. See [custom CSS classes](https://www.wix.com/velo/reference/$w/styling-elements-with-css#$w_styling-elements-with-css_available-classes) to learn more.
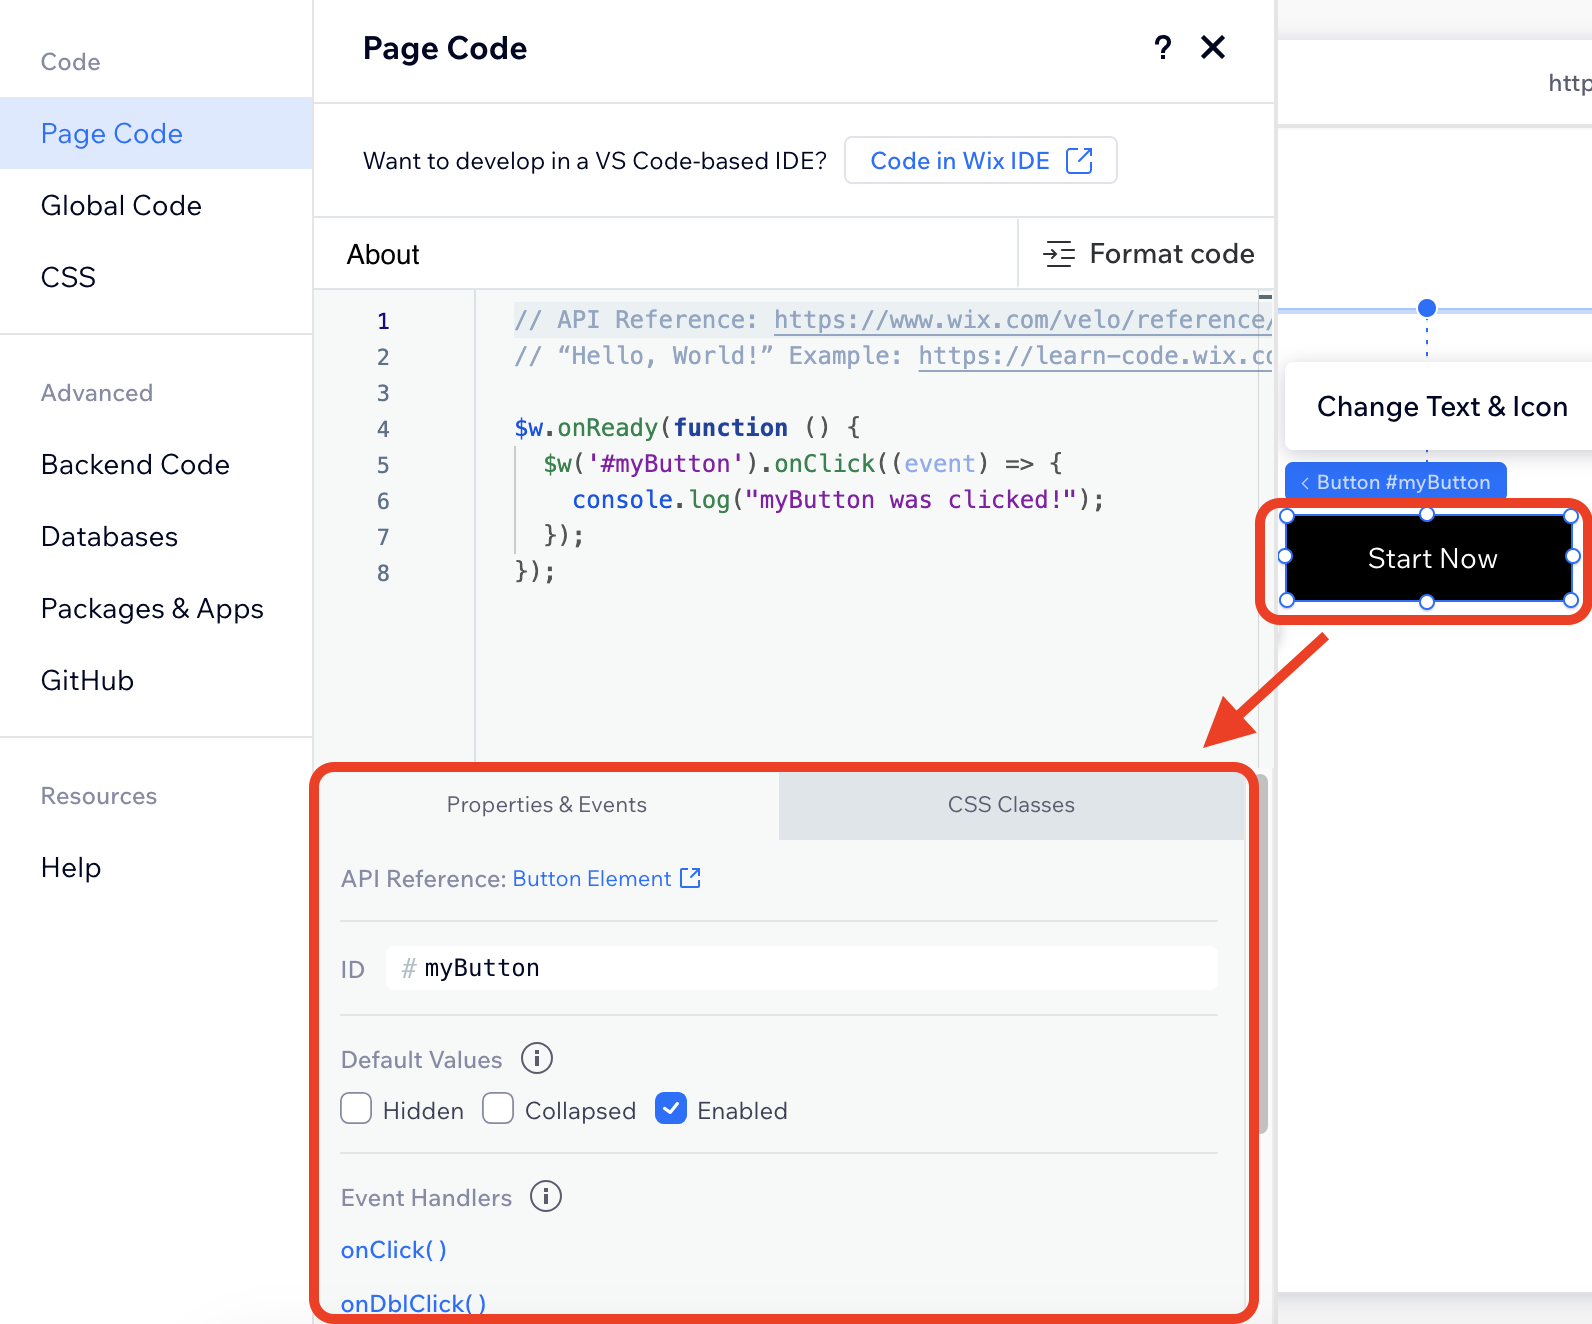
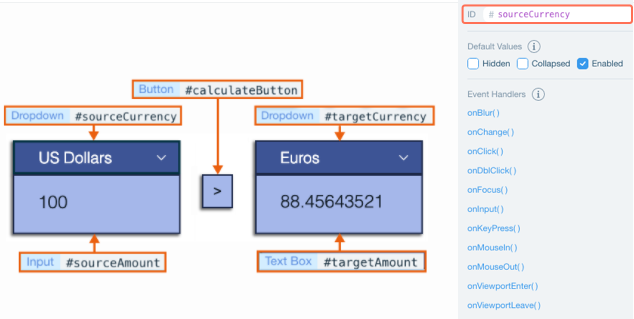
### Properties & Events Panel Use the Properties & Events panel to [work with selected elements](https://dev.wix.com/docs/develop-websites/articles/workspace-tools/velo-workspace/properties-events-panel/about-the-properties-events-panel.md), such as the header and footer, and [datasets](https://support.wix.com/en/article/about-datasets-and-connecting-data). With the Properties & Events panel you can change an element's ID and default values, or [add an event handler that triggers](https://support.wix.com/en/article/velo-reacting-to-user-actions-using-events) when an action is taken on this element. Note that not all actions are available for every element. Select an element on your site and click the Properties & Events tab in the Code panel:
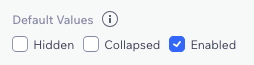
#### Available actions in the properties & events panel: + **Change an element's ID:** The ID field holds the name of the element you selected. Initially a default name is assigned to your element, but you can rename the element to something meaningful. + **Change an element's default values:** By default, an element on your page will have certain initial states. For example, a form might be hidden when your page is loaded, or a button might be disabled. You can change these default values. + **Add an event handler:** Click the event that you want as a trigger and the function for the event handler is added to your page code. Then add the code to run with this event. ### Right-Click Menu You can right-click anywhere in the code editor to open the [right-click menu](https://dev.wix.com/docs/develop-websites/articles/workspace-tools/velo-workspace/code-editor-ide/working-with-the-code-editor-toolbar-and-right-click-menu-with-wix-editor.md) and display more options.
![right click menu](https://d2x3xhvgiqkx42.cloudfront.net/12345678-1234-1234-1234-1234567890ab/11e10e4f-b84d-4136-a5a9-6109fab0b7d7/2020/10/25/3eeeab8e-2074-45f7-ae46-10d01af1b8e4/bf4a8fdb-e2a3-4449-a7c4-ae873728084c.png)
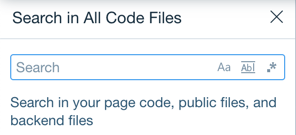
### Format Code You can easily format your code by clicking on the **Format code** button in the code editor toolbar. You can also format your code using the "Format code" keyboard shortcut(Alt + Shift + F) or by clicking **Format** in the right-click-menu. ![format code](https://wixmp-833713b177cebf373f611808.wixmp.com/images/cd5ca3644092c52df4e1ea874e4cbb99.png) >**Notes:** > - See the full list of [keyboard shortcuts](https://dev.wix.com/docs/develop-websites/articles/workspace-tools/velo-workspace/code-editor-ide/keyboard-shortcuts.md) you can use while editing your code. > - The "Search in all files" keyboard shortcut is not yet supported in Wix Studio. ## Velo Syntax and Autocomplete ### Selecting a Specific Element Velo lets you code using standard JavaScript. It also has a specific syntax, or set of rules, for selecting an element on your page, which is: ```javascript $w('#elementID') ``` If you know jQuery, this should look familiar. If you don't, here's what you need to know. **To select an element:** 1. Type $w. 1. Enclose the ID of the element in parentheses and quotes.  1. Add a hashtag before the element ID. >**Note:** > You can use either single quotes or double quotes. To make things even easier, Velo includes code completion. When you type the $, a pop-up window opens listing the elements on your page and the relevant Wix APIs.
![](https://d2x3xhvgiqkx42.cloudfront.net/12345678-1234-1234-1234-1234567890ab/030571df-9516-496b-bc2a-2a8af88f13dd/2022/04/05/c215802a-23ce-41cb-8dc8-25168dcb9afd/5dcf71e1-bc78-4c48-a192-6a371302a21a.png)
Select the element you want. The reference to the element is added to your code with all the necessary syntax. 
**Tips:** * You can press Ctrl+space at any time to view the code completion pop-up. * Element IDs are case sensitive. '#Button1' is not the same as '#button1'. * If you add a new .js file in your page code, code completion lists the elements from the last page you were on.
You can find the ID of any element by hovering over it or selecting it. You can change the ID of any element in the Properties & Events panel. #### Selecting Multiple Elements If you want to select multiple elements by ID, use the same syntax as above to refer to your elements and separate each element with a comma, like this: ```javascript $w('#elementID1, #elementID2, #elementID3') ``` #### Selecting all Elements of a Specific Type To select all the elements of a specific type, use the ID of the element type without the hashtag, like this: ```javascript $w('Button') ``` The ID of the element type is the name of the element as it appears in the [Velo API](https://www.wix.com/velo/reference/$w.html).  #### JavaScript Templates In addition to autocomplete that relates directly to Velo, the Code panel also includes autocomplete for standard JavaScript templates and keywords. For example, if you type the word "for," the autocomplete list includes templates for "for statements" as well as the keyword "for." Each template includes a link to a standard JavaScript API where you can read more information.
![](https://d2x3xhvgiqkx42.cloudfront.net/12345678-1234-1234-1234-1234567890ab/030571df-9516-496b-bc2a-2a8af88f13dd/2022/04/05/cde8b78b-cf82-4233-aa42-754e57c5476d/e0e19da3-f80e-4e66-b36c-20d6e95925d7.png)
When you select a JavaScript template, the full syntax for the template is added to the Code panel. For example, if you select the "for statement," the following template gets added to your code: ```js for (let index = 0; index < array.length; index++) { const element = array[index]; } ``` ## Working with Elements in the Code Editor When a page loads in a browser, it's possible for the code on the page to run before the page finishes loading. This can cause an error if your code tries to reference an element in the page before it's loaded. All the elements on your page should load before you try to access them using code. Make sure to include all code that uses the `$w` selector in the following function: ```javascript $w.onReady(function() { //TODO: write your page related code here... }); ``` This is only required if you add code on your own using the `$w` selector. Any code you add to a function using the Properties & Events panel runs only after the page loads. Learn more about `$w.onReady` [here](https://dev.wix.com/docs/velo/velo-only-apis/$w/on-ready.md). All of the elements in the code editor have **properties**, **methods**, and **event handlers** that you can use to work with your elements and add functionality to your site. Add a period after the `$w` selector to see the full list of these items.
![auto complete](https://wixmp-833713b177cebf373f611808.wixmp.com/images/9895f3e6640213bdcb360c893ad7c3fd.png)
Once you select and item, the necessary syntax is added to the end of your selector. You can move through the options using the up and down arrow keys to see a brief description of the functionality. Click the "Read more" link for more information.  ### Properties Properties contain information about your elements. Some of these are read-only, while others have values you can also set. For example, the text element has an `isVisible` property that returns whether the element is actually visible on-screen. This property is read-only. The text element also has the `text` property that contains the current text in the text element. This is a property you can both read and set. ### Methods Methods perform actions on your elements. For example, the button element has a `hide` method that causes the button not to appear on your site. Some methods have additional options that affect how the action occurs. For example, you can add animation to the `hide` method by specifying it in the parenthesis, like this: ```js $w("#button1").hide("fly"); ``` Learn more about methods in the [Velo API reference](https://www.wix.com/velo/reference/$w.html). ### Event Handlers [Event handlers](https://dev.wix.com/docs/develop-websites/articles/coding-with-velo/frontend-code/about-event-handlers-in-wix.md) let your elements respond to user actions (events). When you add an event handler to an element, you need to specify an action when the event occurs. Do this in the **callback function** for your event. For example, let's say you have a button that says "Take the Tour" on it. You want to add functionality so that when a visitor hovers over the button the text changes to "Let's Go!". You would add code to your site that looks like this: ```javascript $w("#button1").onMouseIn(()=> //onMouseIn is the event handler. // The callback function starts here. { $w("#button1").label = "Let's Go!"; //This is the code that runs when the event occurs. } // The callback function ends here. ); ``` ### Warnings and Errors As you write your code in the Code panel, you may see warning and error indications in the form of a red or yellow wavy line beneath the relevant code. To view a warning or error message, hover over the underlined the code.  - **Warnings:** A warning in your code is an informational message that brings your attention to some code that you might want to change. Warnings do not stop your code from running and can often be safely ignored. Warnings are indicated by a yellow wavy underline. ![code warnings](https://wixmp-833713b177cebf373f611808.wixmp.com/images/9182cb1fe369aaf4e410bc0bfbd445fe.png) A common warning message occurs when you have an unnecessary 'else' after 'return'. This most often occurs when you use the following coding pattern: ```js function myFunction() { if(someCondition) { //do some stuff return 0; } else { //do other stuff return 1; } } ``` If `someCondition` is true, the function will return. That means that we don't need the `else` to stop the code from executing when `someCondition` is `true`. You can safely ignore this warning or change your code to the following pattern: ```js function myFunction() { if(someCondition) { //do some stuff return 0; } //do other stuff return 1; } ``` - **Errors:** An error in your code means that your code will not function properly. Depending on the type of error, your code will either not work as expected or not run at all. Make sure to fix all errors in your code before publishing your site for your site visitors to use. Errors are indicated by a red wavy underline. ![code errors](https://wixmp-833713b177cebf373f611808.wixmp.com/images/06c4afcd3aca9c6aa0ccc1eeb8c6a79a.png) Here are some common situations where you might find errors in your code: * Error message: "#text1" is not a valid selector (see image above) If you change the ID of an element that you are using in some of your page code, the `$w()` selections in your code will cause errors. For example, if you have a text element with the ID **text1** and you change the ID to **statusMessage**, all instances where you selected the element using `$w('#text1')` will now be errors. Note: you can use the Search and Replace functionality to fix this error throughout your code. * Error message: 'import' and 'export' may only appear at the top level When you import an API module, the `import` statement must appear at the top level of your code before the module is used. That means you cannot import the module inside a function as shown below. In general, it is recommended that you place all `import` statements on the first lines of your code, before any variable declarations and function definitions. ![](https://d2x3xhvgiqkx42.cloudfront.net/12345678-1234-1234-1234-1234567890ab/dfff8cbb-ddcb-4376-8cae-3fedb2dd4458/2019/02/04/839f931b-dbf0-41e8-909b-ef22b7825e36.png) * In certain cases, the error indication does not appear at the point of your actual mistake, but occurs on the first line on which your mistake causes an error. For example, if you leave out the closing curly brace (`}`) in one of the functions of your page code, an error will most probably occur on whatever the next line of code happens to be. In the code shown below, a closing curly brace is missing from line 6, but the error does not occur until line 8. ![](https://d2x3xhvgiqkx42.cloudfront.net/12345678-1234-1234-1234-1234567890ab/b0387850-90c2-4f00-a761-a0c5104e1c8c/2018/04/15/d2a89804-69ff-47f2-b9d2-a8e6a4be5435.png) ## Databases The Databases section of the sidebar contains your database collections. These collections store your site's content and are managed in the [Content Management System (CMS)](https://support.wix.com/en/article/cms-formerly-content-manager-about-your-collection-fields). + Add a new collection by clicking the plus ![](https://d2x3xhvgiqkx42.cloudfront.net/12345678-1234-1234-1234-1234567890ab/2017/02/05/99d515cc-eb30-435b-adda-0b105109573f.png) icon that appears when you hover over **My Collections**, and then clicking **Create collection**. + Manage an existing collection by clicking the More Actions ![](https://d2x3xhvgiqkx42.cloudfront.net/12345678-1234-1234-1234-1234567890ab/11e10e4f-b84d-4136-a5a9-6109fab0b7d7/2020/10/25/513de89c-c37e-41e8-8ee2-9b9be5664e96/9f39252c-93d5-4b73-9575-8a49166254f2.png) icon that appears when you hover over a collection name. You can update a [collection's permissions and privacy](https://support.wix.com/en/article/how-do-i-work-with-data-permissions), add a new [dynamic page](https://support.wix.com/en/article/cms-about-dynamic-pages) based on a collection, [remove a collection](https://support.wix.com/en/article/cms-formerly-content-manager-deleting-a-collection), or add and remove [data hooks](https://support.wix.com/en/article/velo-using-data-hooks) to a collection. + Connect external databases in [**External Databases**](https://support.wix.com/en/article/velo-integrating-external-databases-with-your-wix-site). You can manage their content here like any other collection. + When certain Wix Apps are added to your site, database collections are automatically added to your site and appear under [**Wix App Collections**](https://support.wix.com/en/article/cms-formerly-content-manager-working-with-wix-app-collections). Collections for each app are grouped together and are read-only. You can edit the collections in the relevant app manager in your Dashboard. >**Note:** > You may need to save or publish the site and refresh your browser to view the Apps collections in the Database. ## Packages & Apps This section allows you to add complex functionality to your site with packages and apps. ### Packages You can use a code library that suits your needs and incorporate it into your own code. Each reusable library of code is known as a package. There are 2 types of [pre-built packages](https://dev.wix.com/docs/develop-websites/articles/coding-with-velo/packages/about-packages.md) that you can install in the **Packages** section of the sidebar - [npm Packages](https://dev.wix.com/docs/develop-websites/articles/coding-with-velo/packages/about-npm-packages.md) and [Velo Packages](https://dev.wix.com/docs/develop-websites/articles/coding-with-velo/packages/working-with-velo-packages.md). + Install a package by clicking the plus ![](https://d2x3xhvgiqkx42.cloudfront.net/12345678-1234-1234-1234-1234567890ab/0ca9e8ba-16ed-4cd8-a1e1-58d01c4420f7/2021/03/07/30545cd2-342e-4223-9445-e7760e65566d/b2605497-443f-4089-a367-71c037b85423.png) icon that appears when you hover over **npm** or **Velo Packages**, or click **Install packages from npm** and **Install Velo Package**. + Uninstall a package by hovering over the package you want to uninstall, click the **More Actions** ![](https://d2x3xhvgiqkx42.cloudfront.net/12345678-1234-1234-1234-1234567890ab/11e10e4f-b84d-4136-a5a9-6109fab0b7d7/2020/10/25/347cc5c6-bce3-4407-82c3-e211e02cab98/398ced84-9ef5-4f70-87cd-4cb39a66dd65.png) icon, and select **Uninstall**. ### Apps You can create a custom app with Wix Blocks. Click the plus ![](https://d2x3xhvgiqkx42.cloudfront.net/12345678-1234-1234-1234-1234567890ab/0ca9e8ba-16ed-4cd8-a1e1-58d01c4420f7/2021/03/07/30545cd2-342e-4223-9445-e7760e65566d/b2605497-443f-4089-a367-71c037b85423.png) icon, and then **Create New App** to get started. ### Custom Extensions Custom extensions, also known as service plugins, allow you to add your own custom logic to out-of-the-box apps and to integrate services from 3rd party providers. Learn more about [custom app extensions using service plugins](https://support.wix.com/en/article/velo-custom-app-extensions-using-spis). ## GitHub Integration In the GitHub section of the sidebar, you can connect your site to GitHub to write, test, and publish code locally on your computer for your Wix site. To get started, select **Connect to GitHub**. Learn more about [GitHub integration](https://support.wix.com/en/article/velo-about-git-integration-wix-cli). ## Developer Tools Your code will run in your published site or test site, but you may want to [test your code](https://support.wix.com/en/article/testing-and-debugging-code-with-developer-tools#testing) before you publish to make sure it works as expected. The Developer Tools section of the Code sidebar contains tools for: + [Monitoring your code's performance](https://dev.wix.com/docs/develop-websites/articles/workspace-tools/testing-monitoring/monitoring-your-published-site/working-with-the-monitoring-dashboard.md). + [Viewing logs](https://dev.wix.com/docs/develop-websites/articles/workspace-tools/testing-monitoring/testing-troubleshooting/about-debugging-your-code.md#debugging-with-wix-logs). + [Connecting your site to Google Cloud Logs](https://dev.wix.com/docs/develop-websites/articles/workspace-tools/developer-tools/logs/view-logs-using-google-cloud-logs.md). + [Securing your code's secrets](https://dev.wix.com/docs/develop-websites/articles/workspace-tools/developer-tools/secrets-manager/about-the-secrets-manager.md). + [Sending a triggered email](https://dev.wix.com/docs/develop-websites/articles/workspace-tools/developer-tools/triggered-emails/about-triggered-emails.md). You can test your code before you publish by previewing your site or creating a test site. The code runs the same in Preview Mode and Test Site Mode as it does in the published version. You may also want to [debug your code](https://dev.wix.com/docs/develop-websites/articles/workspace-tools/testing-monitoring/testing-troubleshooting/about-debugging-your-code.md) before publishing to identify any potential issues. ## Saving Versions of Your Code When you save your site or your site is [autosaved](https://support.wix.com/en/article/about-autosave), the corresponding code is saved with that [version](https://support.wix.com/en/article/site-versions-with-developer-tools) of your site. If you go to the Site History and revert to a saved version of your site, the code that was saved with that version is restored as well. ## Help The Help section offers links to additional resources: + Check out the [API Reference](https://www.wix.com/velo/reference/api-overview) to explore how to use APIs with your site and to learn basic concepts. + Find examples of the functionality you need with [video tutorials](https://www.wix.com/learn/library/coding) and [code examples](https://dev.wix.com/docs/coding-examples.md). + Connect with Wix developers in [Discord](https://discord.gg/GhdmDN926z) or the [Velo Forum](https://community.wix.com/velo/forum). --- > Portal Navigation: > > - Append `.md` to any URL under `https://dev.wix.com/docs/` to get its markdown version. > - Pages are either content pages (article or reference text) or menu pages (a list of links to child pages). > - To get a menu page, truncate any URL to a parent path and append `.md` (e.g. `https://dev.wix.com/docs/sdk.md`, `https://dev.wix.com/docs/sdk/core-modules.md`). > - Top-level index of all portals: https://dev.wix.com/docs/llms.txt > - Full concatenated docs: https://dev.wix.com/docs/llms-full.txt ## Resource: Wix Editor: Working with the Code Sidebar ## Article: Working with the Code Sidebar ## Article Link: https://dev.wix.com/docs/develop-websites/articles/workspace-tools/velo-workspace/workspaces/wix-editor-working-with-the-code-sidebar.md ## Article Content: # Wix Editor: Working with the Code Sidebar The code sidebar shows all of the files that make up your site, including pages, popups, folders, files, packages, and database collections. Working in this sidebar, you can perform a variety of actions that affect your site as detailed below. To begin coding, select **Dev Mode** at the top of the editor and click **Turn on Dev Mode**. The sidebar displays different content depending on which sidebar button you select.
To hide the sidebar, hover over it and click the arrow ![arrow](https://wixmp-833713b177cebf373f611808.wixmp.com/images/3a756c6adf50fb10462dccf4fd752fea.png) icon on the right side of the sidebar. To show the sidebar after it's hidden, click any of the sidebar buttons. ## Page Code The Page Code section of the sidebar contains the following sections: ### Main Pages Your site's regular pages appear immediately beneath the Main Pages section title. You can change a page's [settings](https://support.wix.com/en/article/page-settings-for-dynamic-pages) by clicking the ![](https://d2x3xhvgiqkx42.cloudfront.net/12345678-1234-1234-1234-1234567890ab/2017/02/05/171af05b-a957-46f2-a72c-2c3d2c30d939.png) Settings icon that appears when you hover over the page's name. You can set any page other than your site's home page as a [dynamic page](https://support.wix.com/en/article/cms-about-dynamic-pages).  ### Dynamic Pages If you've created any dynamic pages, all the pages with the same [prefix are grouped together in the same section](https://support.wix.com/en/article/about-url-prefixes-and-page-grouping). You can add a new dynamic page to a group by clicking the ![](https://d2x3xhvgiqkx42.cloudfront.net/12345678-1234-1234-1234-1234567890ab/2017/02/05/171af05b-a957-46f2-a72c-2c3d2c30d939.png) Settings icon that appears when you hover over a section's name. You can change a page's settings, such as its URL and SEO data, remove its dynamic connections to make it a regular page, or delete it by clicking the ![](https://d2x3xhvgiqkx42.cloudfront.net/12345678-1234-1234-1234-1234567890ab/2017/02/05/171af05b-a957-46f2-a72c-2c3d2c30d939.png) Settings icon  that appears when you hover over the dynamic page's name. ### Router Pages If you've created a [router](https://dev.wix.com/docs/develop-websites/articles/coding-with-velo/routers/about-routers.md), all the pages associated with that router's prefix will be grouped together under the Page Code's Router Pages section of the code sidebar. For example, if you created a router with the prefix **myrouter**, the router pages are grouped together under **Myrouter Pages (Router)**. Each individual router page is given a default name that is used in your router's code. You can change the name, if you want. Your visitors cannot see the page name. You can change a router's prefix (which also changes the names of the associated functions that are implemented in the routers.js file), and/or you can add a new page to a router.  Do this by clicking the   ![](https://d2x3xhvgiqkx42.cloudfront.net/12345678-1234-1234-1234-1234567890ab/76096845-8b12-44f1-91f6-3dc2e838fdd9/2020/12/07/4ca599f4-e5a7-427b-a822-1e1d08db32cc/4161acc3-53b6-4e42-9bcf-001f17e6c5ef.png)   ellipsis icon that appears when you hover over the title of the grouped router pages. Choose either **Change Router** or **Add Page to Router**. You can change a page's settings, rename it, delete it, or remove it from a router to make it a regular page by clicking the ![](https://d2x3xhvgiqkx42.cloudfront.net/12345678-1234-1234-1234-1234567890ab/76096845-8b12-44f1-91f6-3dc2e838fdd9/2020/12/07/4ca599f4-e5a7-427b-a822-1e1d08db32cc/4161acc3-53b6-4e42-9bcf-001f17e6c5ef.png)   ellipsis icon that appears when you hover over the name of the router page. You can add a new router by clicking the ![](https://d2x3xhvgiqkx42.cloudfront.net/12345678-1234-1234-1234-1234567890ab/2017/02/05/58e95893-4a6b-4bec-b4b8-def3e7299bd0.png) plus icon  that appears when you hover over the Main Pages section header in the code sidebar.  ### App-specific Pages Some apps, like those that add Members functionality to your site add special pages to your site. These pages appear in the their own section under Page Code. ### Popups If you've added a popup to a page on your site, it appears in the **Popups** section of the sidebar. This section only appears if you've added at least one popup to your site. You can add a new popup using the **Add** menu in the Editor.  When you select an existing popup in the sidebar, the Editor enters Popup Mode.  ### Global (Site) Elements in the Editor can appear either on a specific page or on all of your site's pages. You put code for specific pages in that page's code file. Code that you want to run on all the pages in your site should be in the **masterPage.js** file. You could have code that you want to run on all the pages of your site for these reasons: * Code for elements set to appear on all pages: When an element appears on all your site pages and you want to add functionality to it that will be consistent across your site, add that code in the Site tab. When you use the Properties panel to add an event to your element that appears on all pages, the code for that event is automatically placed in the **masterPage.js** file.  * Code in your site that isn't related to a particular element: If you have code that relates to all the pages of your site but doesn't relate to an element set to show on all pages, add it to **masterPage.js**. If you have an element that appears on all pages, but you want to add code to it that is specific to one page, add the code to the Page code for that page.
**Tip:** Code that you add to the **masterPage.js** runs on every page in your site. This can impact your site's performance so it's important to consider if you need the code to run on every page. If you have code that needs to run on some, but not all pages you may want to put it in a [Public](https://support.wix.com/en/article/working-with-the-site-structure-sidebar-9621920#public) file and [import](https://dev.wix.com/docs/develop-websites/articles/coding-with-velo/java-script-velo/java-script-support.md) it as needed.
## Code Files The Code Files section contains the following sections: ### Public You may have a function that you need to use in multiple pages and you don't want to repeat it on each page. You can write that function once in a **public** file and then call it from any page, or from any backend or public file as needed. The Public section is where you put JavaScript files that contain the code you want to use on any page in your site.  You need to export functions from public files and then import them in the files where you want to use them, public or backend. When you add a new .js file to the Public section it contains comments that provide instructions and examples for exporting and importing functions. You can refer to those comments for more information.  As your site's functionality grows, it may be easier to keep your code organized in files that you call as you need them in your page code. You can divide your public files into folders to further organize them.  * You add a new file or folder to the Public section by clicking the plus icon ![](https://d2x3xhvgiqkx42.cloudfront.net/12345678-1234-1234-1234-1234567890ab/11e10e4f-b84d-4136-a5a9-6109fab0b7d7/2020/10/25/cfa4c729-c338-432a-b7dc-cd925f225323/e1105ae1-9594-4c69-9b00-e8b3738add35.png)  that appears when you hover over the section name. * You add a new file to a folder or delete a folder by clicking the ellipsis icon ![](https://d2x3xhvgiqkx42.cloudfront.net/12345678-1234-1234-1234-1234567890ab/11e10e4f-b84d-4136-a5a9-6109fab0b7d7/2020/10/25/67cc03b0-219a-4d89-aff8-cee197e647b3/d078bb2b-9a2a-4cba-9b7e-9b01fd2ea345.png)  that appears when you hover over the folder name. * You rename or delete a file by clicking the ellipsis icon ![](https://d2x3xhvgiqkx42.cloudfront.net/12345678-1234-1234-1234-1234567890ab/11e10e4f-b84d-4136-a5a9-6109fab0b7d7/2020/10/25/68b0b468-4988-4509-a8f2-67710a777ca4/0807a3fb-993c-4913-b7cd-1748e71ede91.png)  that appears when you hover over the file name.
**Note:** Your page and site code, which are also publicly accessible, do not appear in the Public section.
### Backend The Backend section of the sidebar lists files that are not publicly accessible from your site. Since the backend code isn't visible, you can place sensitive information in the Backend that might otherwise be a [security risk](https://dev.wix.com/docs/develop-websites/articles/best-practices/security-best-practices.md). You can create JavaScript files, [web modules](https://dev.wix.com/docs/develop-websites/articles/coding-with-velo/backend-code/web-modules/call-backend-code-from-the-frontend.md), and other files for use in the backend, and you can organize these files in folders. There are several special JavaScript files that may be present in your site's Backend section. For example, the **data.js** file contains the code for [data hooks](https://dev.wix.com/docs/develop-websites/articles/databases/wix-data/hooks/about-data-hooks.md), and the **routers.js** file contains the code for [routers](https://dev.wix.com/docs/develop-websites/articles/coding-with-velo/routers/about-routers.md) and [data binding router hooks](https://support.wix.com/en/article/about-data-binding-router-hooks). These files are added automatically when you work with these features.  You can also add a Jobs Scheduler file to [schedule recurring jobs](https://support.wix.com/en/article/velo-scheduling-recurring-jobs) and an **events.js** file to [handle backend events](https://dev.wix.com/docs/develop-websites/articles/coding-with-velo/backend-code/events/about-backend-events.md). * You add a new file or folder to the Backend section by clicking the plus icon ![](https://d2x3xhvgiqkx42.cloudfront.net/12345678-1234-1234-1234-1234567890ab/11e10e4f-b84d-4136-a5a9-6109fab0b7d7/2020/10/25/7510d834-919a-45f7-8e3d-0d895156740c/be3b2743-9022-4ab3-848c-6f0ea1162544.png)  that appears when you hover over the section name. * You add a new file to a folder or delete a folder by clicking the ellipses icon ![](https://d2x3xhvgiqkx42.cloudfront.net/12345678-1234-1234-1234-1234567890ab/11e10e4f-b84d-4136-a5a9-6109fab0b7d7/2020/10/25/215d30e9-c49c-4c4c-a8b0-4fc331b0e957/860b3bd5-089e-49eb-885a-1ef03e54af26.png)  that appears when you hover over the folder name. * You rename or delete a file by clicking the ellipses icon ![](https://d2x3xhvgiqkx42.cloudfront.net/12345678-1234-1234-1234-1234567890ab/11e10e4f-b84d-4136-a5a9-6109fab0b7d7/2020/10/25/1a8f6725-8cf4-4045-9a01-51436fbe3468/c01c827a-8ccd-4636-9ea1-570dee9a5e92.png)  that appears when you hover over the file name. ### Packages Sometimes you need to add complex functionality to your site that has already been implemented by someone else. You can use a code library that suits your needs and incorporate it into your own code. Each reusable library of code is known as a package. There are 2 types of pre-built packages that you can install from the **Packages** section of the sidebar: * [Velo Packages](https://dev.wix.com/docs/develop-websites/articles/coding-with-velo/packages/working-with-velo-packages.md) * [npm Packages](https://dev.wix.com/docs/develop-websites/articles/coding-with-velo/packages/work-with-npm-packages-in-the-editor.md) Velo packages can be divided into 2 categories: * [Built by Wix](https://dev.wix.com/docs/develop-websites/articles/coding-with-velo/packages/working-with-velo-packages.md) * [Built by you](https://dev.wix.com/docs/develop-websites/articles/coding-with-velo/packages/about-custom-apps.md) You can install a package by clicking the plus ![](https://lh6.googleusercontent.com/4jdhs_VfyBiaFRS8MqHTATUcv6TsMjPnvUP2PoehCl8QutDrLGpBiPsCP777h1DsjmN84ivcBRVXIeu2GsIYP0a5j7U1ov9PvcRNRZb2Y1378SG7Tta4bO89qcOS0dwd1Gj0TPJF=s0) icon that appears when you hover over the **Packages** section. Once you've installed a package you can manage the package on your site in the Package Manager by clicking the settings ![](https://lh3.googleusercontent.com/jr9zRRow0hiaf24SRlpKmbMONtao6MrrmvJEIYZ52gXR4Vb4PHEqxhir2bOPpLtMtDQy0XLI9jCJLatfFcoYszHWsAc5L7PJKQu810r-8YN2WA7KOeVn8_df0t7a4O-na2U0hTrw=s0) icon that appears when you hover over the **Packages** section. You can uninstall a package by hovering over the package you want to uninstall, click the Show More ![](https://lh3.googleusercontent.com/Ar0G8s4uEGoOgP_f-_hyAzgcfZMoNgVj-y7YsQmkmMsaPqYSwQoaFThgmcYee_Kddppgye3TeEB2iNDx97mC0zxERQKG-Jcvh7AWfGgLg0rpe7mjMtwuaSi8aBb-zMeiuUpK3uEk=s0) icon, and select **Uninstall**. ## Search Your Code Click the magnifying glass sidebar button to open Search Your Code and search all the code files on your site. You can search with options to match case, match whole word, or use regular expressions.
![](https://d2x3xhvgiqkx42.cloudfront.net/12345678-1234-1234-1234-1234567890ab/11e10e4f-b84d-4136-a5a9-6109fab0b7d7/2019/11/06/e174d8f3-a380-4f95-92f8-9a612f28f954/65c3fad5-78b6-422d-b6ba-2c2a42d3565e.png)
## Databases The Database section of the sidebar contains your [Content Collections](https://support.wix.com/en/article/about-database-collections). Click a collection to open it in the Content Management System (CMS). You can add a new collection or work with [external collections](https://dev.wix.com/docs/develop-websites/articles/databases/external-databases/overview/adding-and-deleting-an-external-database-collection.md) by clicking the plus ![](https://d2x3xhvgiqkx42.cloudfront.net/12345678-1234-1234-1234-1234567890ab/2017/02/05/99d515cc-eb30-435b-adda-0b105109573f.png) icon that appears when you hover over the section name. You can add a new dynamic page based on a collection, update a [collection's permissions](https://support.wix.com/en/article/how-do-i-work-with-data-permissions), [remove a collection](https://support.wix.com/en/article/cms-formerly-content-manager-deleting-a-collection), or add and remove [hooks](https://support.wix.com/en/article/velo-using-data-hooks) to a collection by clicking the ellipsis   ![](https://d2x3xhvgiqkx42.cloudfront.net/12345678-1234-1234-1234-1234567890ab/11e10e4f-b84d-4136-a5a9-6109fab0b7d7/2020/10/25/513de89c-c37e-41e8-8ee2-9b9be5664e96/9f39252c-93d5-4b73-9575-8a49166254f2.png)  icon that appears when you hover over a collection name. When you add certain Wix Apps to your site, database collections are automatically added to your site. These collections appear in your sidebar. [Wix App collections](https://dev.wix.com/docs/develop-websites/articles/databases/wix-data/collections/working-with-wix-app-collections-and-code.md) contain information about the items in your Wix app. Collections for each app are grouped together in the sidebar and are read-only. You can edit the collections in the relevant App manager in your Dashboard. >**Note** > You may need to save or publish the site and refresh your browser to view the Apps collections in the Database. ## Developer Tools The Developer Tools section contain the following sections: ### Logs The [Wix Logs](https://dev.wix.com/docs/develop-websites/articles/workspace-tools/developer-tools/logs/about-logs.md) feature allows you to view information about [logs](https://dev.wix.com/docs/develop-websites/articles/workspace-tools/developer-tools/logs/view-logs-using-wix-logs.md). It records events, such as console logs, HTTP functions, and web module functions as log entries. You can view and track logs in real time or you can connect your Wix Logs to [Google Cloud Logs](https://dev.wix.com/docs/develop-websites/articles/workspace-tools/developer-tools/logs/view-logs-using-google-cloud-logs.md), an external monitoring tool to perform log analysis and generate visual depictions of site data for you to gain meaningful insights. ### Monitoring When using backend code with your site, you will want to monitor the code's performance to ensure the best experience for your site visitors.  The [Monitoring dashboard](https://support.wix.com/en/article/velo-monitoring) assists you with the following: * Track the performance of your backend code over time. * Detect when your site is not functioning as expected. * Troubleshoot and determine the causes of a site not functioning smoothly. * Ask for additional resources when needed. ### Security The Security section of the Developer Tools tab contains your [Secrets Manager](https://dev.wix.com/docs/develop-websites/articles/workspace-tools/developer-tools/secrets-manager/about-the-secrets-manager.md). Sometimes you may need to add private information to your site's code. For example, you may require an API key for some 3rd-party service you choose to integrate with. You never want to expose your secrets to your page, site, or public code. Instead, you can use the Secrets Manager to safely work with secrets in your code.  ### Automation In the Automation section you can find the [Triggered Emails](https://support.wix.com/en/article/velo-creating-a-triggered-email) feature.  Triggered Emails allow you to send personalized messages to site visitors who have triggered a specific event. --- > Portal Navigation: > > - Append `.md` to any URL under `https://dev.wix.com/docs/` to get its markdown version. > - Pages are either content pages (article or reference text) or menu pages (a list of links to child pages). > - To get a menu page, truncate any URL to a parent path and append `.md` (e.g. `https://dev.wix.com/docs/sdk.md`, `https://dev.wix.com/docs/sdk/core-modules.md`). > - Top-level index of all portals: https://dev.wix.com/docs/llms.txt > - Full concatenated docs: https://dev.wix.com/docs/llms-full.txt ## Resource: Working in the Code Editor ## Article: Working in the Code Panel ## Article Link: https://dev.wix.com/docs/develop-websites/articles/workspace-tools/velo-workspace/code-editor-ide/working-in-the-code-editor.md ## Article Content: # Velo: Working in the Code Editor You write the code for your site in the code editor at the bottom of the page in both Wix Studio and Wix Editor.  >**Tips:** > * You can drag the code editor up from the bottom of the page to open it. > * See our list of [keyboard shortcuts](https://dev.wix.com/docs/develop-websites/articles/workspace-tools/velo-workspace/code-editor-ide/keyboard-shortcuts.md). ## Code Editor Tabs The code editor displays your site's code files in tabs. 
![](https://d2x3xhvgiqkx42.cloudfront.net/12345678-1234-1234-1234-1234567890ab/11e10e4f-b84d-4136-a5a9-6109fab0b7d7/2020/08/12/7a270757-486a-45ce-aab5-48face4f701a/695ffe3f-181a-40bd-8953-7c1678e06b7f.png)
How code files open in tabs depends on the type of file you are opening.
What files can I open in a new tab? * **Page Code files**. Because you can't select more than one page at a time to view in the Editor, you also can't have multiple page code tabs open simultaneously. There is one tab that displays the page code for the currently selected page. Selecting a page in the **Page Code** section opens that page's code in this tab. When you select a different page, this same tab will display the newly selected page's code.  * **masterPage.js**. You can open **masterPage.js** alongside page code files. * **Code Files**. All the files in the **Code Files** section can be opened in their own tab.
How do I open a new tab? When you click a file in the **Code sidebar** it opens in a new tab in the code editor. When you first open a file, you'll notice that its name is italicized in the tab. 
![](https://d2x3xhvgiqkx42.cloudfront.net/12345678-1234-1234-1234-1234567890ab/11e10e4f-b84d-4136-a5a9-6109fab0b7d7/2020/08/12/179c455b-0997-4b26-82de-bd26e5b2a3fb/b571be6a-aaa0-4d8e-a5ec-87769553aab5.png)
The italics means that the file has not yet been modified. That also means that if you click another file in the **Code sidebar** it will open in the same tab, replacing the file you first clicked. The file name will change to being un-italicized when you either: * Modify the file * Double click the filename in the tab or the Code sidebar Once the filename isn't italicized, if you click another file in the Sidebar, it will open in a new tab.
## Code Editor Toolbar The [Code Editor toolbar](https://dev.wix.com/docs/develop-websites/articles/workspace-tools/velo-workspace/code-editor-ide/working-with-the-code-editor-toolbar-and-right-click-menu-with-wix-editor.md) is displayed at the top right corner of the code editor. You can click the icons to maximize and minimize the code editor, show or hide the [Properties and Events panel](https://dev.wix.com/docs/develop-websites/articles/workspace-tools/velo-workspace/properties-events-panel/about-the-properties-events-panel.md), test your code in Preview mode, and display more options. The additional options include links to help content and a list of [keyboard shortcuts](https://dev.wix.com/docs/develop-websites/articles/workspace-tools/velo-workspace/code-editor-ide/keyboard-shortcuts.md), plus a button for switching the Velo code editor theme between light (default) and dark. 
![](https://d2x3xhvgiqkx42.cloudfront.net/12345678-1234-1234-1234-1234567890ab/a551efd3-24d0-48fe-8aec-00f810ffc5fc/2022/02/09/7441878a-7bda-4b75-a47b-14e56751ca3e/01a956b0-6c70-4561-934e-24040c1708db.png)
![](https://d2x3xhvgiqkx42.cloudfront.net/12345678-1234-1234-1234-1234567890ab/a551efd3-24d0-48fe-8aec-00f810ffc5fc/2022/02/09/3adc712c-04ce-4dba-9543-3dda477b7ce2/541a1986-9de0-48be-b5a5-2e9851a61a26.png)
## Right-Click Menu In addition to the buttons in the code editor toolbar, you can right-click anywhere in the code editor to bring up the [right-click menu](https://dev.wix.com/docs/develop-websites/articles/workspace-tools/velo-workspace/code-editor-ide/working-with-the-code-editor-toolbar-and-right-click-menu-with-wix-editor.md) and display more options.
![](https://d2x3xhvgiqkx42.cloudfront.net/12345678-1234-1234-1234-1234567890ab/11e10e4f-b84d-4136-a5a9-6109fab0b7d7/2020/10/25/3eeeab8e-2074-45f7-ae46-10d01af1b8e4/bf4a8fdb-e2a3-4449-a7c4-ae873728084c.png)
## Velo Syntax and Autocomplete #### Selecting a specific element Velo lets you code using standard JavaScript. It also has a specific syntax, or set of rules, for selecting an element on your page, which is: ```javascript $w('#elementID') ``` If you know jQuery, this should look familiar. If you don't, here's what you need to know. **To select an element:** 1.  Type $w. 2.  Enclose the ID of the element in parentheses and quotes.  3. Add a hashtag before the element ID. >**Note:** > You can use either single quotes or double quotes. To make things even easier, Velo includes code completion. When you type the $, a pop-up window opens listing the elements on your page and the relevant Wix APIs.
![](https://d2x3xhvgiqkx42.cloudfront.net/12345678-1234-1234-1234-1234567890ab/030571df-9516-496b-bc2a-2a8af88f13dd/2022/04/05/c215802a-23ce-41cb-8dc8-25168dcb9afd/5dcf71e1-bc78-4c48-a192-6a371302a21a.png)
Use the up and down arrow keys to select the element you want, and then press Enter. Alternatively, you can click the element in the list. The reference to the element is added to your code with all the necessary syntax. 
**Tips:** * You can press Ctrl+space at any time to view the code completion pop-up. * Element IDs are case sensitive. '#Button1' is not the same as '#button1'. * If you add a new .js file in Public, code completion lists the elements from the last page you were on.
You can find the ID of any element by hovering over it or selecting it. You can change the ID of any element in the Properties & Events panel. #### Selecting multiple elements If you want to select multiple elements by ID, use the same syntax as above to refer to your elements and separate each element with a comma, like this: ```javascript $w('#elementID1, #elementID2, #elementID3') ``` #### Selecting all elements of a specific type To select all the elements of a specific type, use the ID of the element type without the hashtag, like this: ```javascript $w('Button') ``` The ID of the element type is the name of the element as it appears in the [Velo API](https://www.wix.com/velo/reference/$w.html).  #### JavaScript Templates In addition to autocomplete that relates directly to Velo, the code editor also includes autocomplete for standard JavaScript templates and keywords. For example, if you type the word "for," the autocomplete list includes templates for "for statements" as well as the keyword "for." Each template includes a link to a standard JavaScript API where you can read more information.
![](https://d2x3xhvgiqkx42.cloudfront.net/12345678-1234-1234-1234-1234567890ab/030571df-9516-496b-bc2a-2a8af88f13dd/2022/04/05/cde8b78b-cf82-4233-aa42-754e57c5476d/e0e19da3-f80e-4e66-b36c-20d6e95925d7.png)
When you select a JavaScript template, the full syntax for the template is added to the code editor. For example, if you select the "for statement," the following template gets added to your code: for (let index = 0; index < array.length; index++) { const element = array[index]; } All you need to do is to add the code you want to run in the loop. ## Making Sure the Element Has Loaded Before You Reference It When a page loads in a browser, it's possible for the code on the page to run before the page finishes loading. This can cause an error if your code tries to reference an element in the page before it's loaded. Because of this, you need to make sure that all the elements on your page have loaded before you try to access them using code. You do this is by including all your code that uses the `$w` selector in the following function: ```javascript $w.onReady(function() { //TODO: write your page related code here... }); ``` This is only required if you add code on your own using the `$w` selector. Any code you add to a function using the Properties & Events panel runs only after the page loads. Learn more about `$w.onReady` [here](https://dev.wix.com/docs/velo/velo-only-apis/$w/on-ready.md). ## Working with Your Elements All of the elements in the Editor have **properties**, **methods**, and **event handlers** that you can use to work with your elements and add functionality to your site. After you select an element, type a period to see the full list of these items. 
![](https://d2x3xhvgiqkx42.cloudfront.net/12345678-1234-1234-1234-1234567890ab/b0387850-90c2-4f00-a761-a0c5104e1c8c/2018/04/15/a47ea23b-7b34-44ed-a546-9550dc02783b.png)
Use the up and down arrow keys to select the item you want, and then press Enter. The necessary syntax is added to the end of your element selector. As you move through the options, a brief description of the functionality is displayed. Click the "Read more" link for more information.  The autocomplete pop-up also includes standard Javascript methods that you can call on your element. 
![](https://d2x3xhvgiqkx42.cloudfront.net/12345678-1234-1234-1234-1234567890ab/b0387850-90c2-4f00-a761-a0c5104e1c8c/2018/04/15/dcb32606-79b9-46e9-9d92-d5172d455c86.png)
### Properties Properties contain information about your elements. Some of these are read-only, while others have values you can also set. For example, the text element has an `isVisible` property that returns whether the element is actually visible on-screen. This property is read-only. The text element also has the `text` property that contains the current text in the text element. This is a property you can both read and set. ### Methods Methods perform actions on your elements. For example, the button element has a `hide` method that causes the button not to appear on your site. Some methods have additional options that affect how the action occurs. For example, you can add animation to the `hide` method by specifying it in the parenthesis, like this: $w("#button1").hide("FlyOut"); Here also you'll need to look at the [Velo API](https://www.wix.com/velo/reference/$w.html) to learn all the options. ### Event Handlers [Event handlers](https://dev.wix.com/docs/develop-websites/articles/coding-with-velo/frontend-code/about-event-handlers-in-wix.md) let your elements respond to user actions (events). When you add an event handler to an element, you also need to specify what you want to happen when the event occurs. You do this in the **callback function** for your event. For example, let's say you have a button that says "Take the Tour" on it. You want to add functionality so that when a visitor hovers over the button the text changes to "Let's Go!". You would add code to your site that looks like this (we've added comments to explain each part of the code): ```javascript $w("#button1").onMouseIn(()=> //onMouseIn is the event handler. // The callback function starts here. { $w("#button1").label = "Let's Go!"; //This is the code that runs when the event occurs. } // The callback function ends here. ); ``` Don't forget that you can also add event handlers to your elements using the [Properties & Events panel](https://support.wix.com/en/article/using-the-properties-panel). Unless you have a specific reason for wanting to add event handlers manually, we recommend using the Properties & Events Panel. >**Note:** > Event code that you add to your site using the Properties and Events panel will not work if you copy/paste it to any other page or site, even if you copy the associated element. ## Warnings and Errors As you write your code in the code editor, you may see warning and error indications. Warnings are indicated in yellow, and errors in red. The indications take the form of a colored wavy line underneath the relevant code and an icon to the left of the line number.  To view the warning or error message, hover over the icon.  ### Warnings A warning in your code is an informational message that brings your attention to some code that you might want to change. Warnings do not stop your code from running and can often be safely ignored. Warnings are indicated by a yellow triangle and yellow wavy underline.
![](https://d2x3xhvgiqkx42.cloudfront.net/12345678-1234-1234-1234-1234567890ab/b0387850-90c2-4f00-a761-a0c5104e1c8c/2018/04/15/1bbf5ef0-70b3-484b-9251-db04266b3ac7.png)
A common warning message occurs when you have an unnecessary 'else' after 'return'. This most often occurs when you use the following coding pattern: function myFunction() { if(someCondition) { //do some stuff return 0; } else { //do other stuff return 1; } } If `someCondition` is true, the function will return. That means that we don't need the `else` to stop the code from executing when `someCondition` is `true`. You can safely ignore this warning or change your code to the following pattern: function myFunction() { if(someCondition) { //do some stuff return 0; } //do other stuff return 1; } ### Errors An error in your code means that your code will not function properly. Depending on the type of error, your code either will not work as expected or might not run at all. Make sure to fix all errors in your code before publishing your site for your site visitors to use.
![](https://d2x3xhvgiqkx42.cloudfront.net/12345678-1234-1234-1234-1234567890ab/b0387850-90c2-4f00-a761-a0c5104e1c8c/2018/04/15/dcfaf64d-0e63-4467-90ab-d2163802ab0c.png)
Here are some common situations where you might find errors in your code. * Error message: "#text1" is not a valid selector (see image above) If you change the ID of an element that you are using in some of your page code, the `$w()` selections in your code will cause errors. For example, if you have a text element with the ID **text1** and you change the ID to **statusMessage**, all instances where you selected the element using `$w('#text1')` will now be errors. Note: you can use the Search and Replace functionality to fix this error throughout your code. * Error message: 'import' and 'export' may only appear at the top level When you import an API module, the `import` statement must appear at the top level of your code before the module is used. That means you cannot import the module inside a function as shown below. In general, it is recommended that you place all `import` statements on the first lines of your code, before any variable declarations and function definitions.
![](https://d2x3xhvgiqkx42.cloudfront.net/12345678-1234-1234-1234-1234567890ab/dfff8cbb-ddcb-4376-8cae-3fedb2dd4458/2019/02/04/839f931b-dbf0-41e8-909b-ef22b7825e36.png)
* In certain cases, the error indication does not appear at the point of your actual mistake, but occurs on the first line on which your mistake causes an error. For example, if you leave out the closing curly brace (`}`) in one of the functions of your page code, an error will most probably occur on whatever the next line of code happens to be. In the code shown below, a closing curly brace is missing from line 6, but the error does not occur until line 8.
![](https://d2x3xhvgiqkx42.cloudfront.net/12345678-1234-1234-1234-1234567890ab/b0387850-90c2-4f00-a761-a0c5104e1c8c/2018/04/15/d2a89804-69ff-47f2-b9d2-a8e6a4be5435.png)
## Media Manager Integration Velo allows you to use images that you've stored in the Wix Media Manager in your code. When you work with elements that include an image property, such as `src`, a pop-up window opens, giving you the option to use an image from the Media Manager. This window appears automatically as you type "src".
![](https://d2x3xhvgiqkx42.cloudfront.net/12345678-1234-1234-1234-1234567890ab/b0387850-90c2-4f00-a761-a0c5104e1c8c/2018/04/15/8b4f1347-fb9d-477f-9c31-30de0bca509a.png)
## Testing Your Code Your code will run on your published site or test site. However, you may want to [test your code](https://support.wix.com/en/article/testing-and-debugging-code-with-developer-tools#testing) before publishing it to ensure it works as expected. You can test your code before you publish by previewing your site or creating a test site. The code runs the same in Preview Mode and Test Site Mode as it does in the published version. You may also want to [debug your code](https://dev.wix.com/docs/develop-websites/articles/workspace-tools/testing-monitoring/testing-troubleshooting/about-debugging-your-code.md) before publishing to identify any potential issues. ## Saving Versions of Your Code When you save your site or your site is [autosaved](https://support.wix.com/en/article/about-autosave), the corresponding code is saved with that [version](https://support.wix.com/en/article/site-versions-with-developer-tools) of your site. If you go to the Site History and revert to a saved version of your site, the code that was saved with that version is restored as well. --- > Portal Navigation: > > - Append `.md` to any URL under `https://dev.wix.com/docs/` to get its markdown version. > - Pages are either content pages (article or reference text) or menu pages (a list of links to child pages). > - To get a menu page, truncate any URL to a parent path and append `.md` (e.g. `https://dev.wix.com/docs/sdk.md`, `https://dev.wix.com/docs/sdk/core-modules.md`). > - Top-level index of all portals: https://dev.wix.com/docs/llms.txt > - Full concatenated docs: https://dev.wix.com/docs/llms-full.txt ## Resource: Keyboard Shortcuts ## Article: Keyboard Shortcuts ## Article Link: https://dev.wix.com/docs/develop-websites/articles/workspace-tools/velo-workspace/code-editor-ide/keyboard-shortcuts.md ## Article Content: # Velo: Keyboard Shortcuts |Action |Mac |Windows | |---|---|---| |Format code|⌥⇧F|Alt + Shift + F |Search in file|⌘F|Ctrl + F |Search in all files|⇧⌘F|Ctrl + Shift + F |Undo|⌘Z|Ctrl + Z |Redo|⇧⌘Z|Ctrl+ Shift + Z |Comment in/out|⌘/|Windows + / |Add cursor|⌥ click|Alt + click |Add cursor above|⌥⌘↑|Alt + Ctrl + ↑ |Add cursor below|⌥⌘↓|Alt + Ctrl + ↓ |Move line up|⌥↑|Alt+↑ |Move line down|⌥↓|Alt+↓ |Duplicate line down|⌥⇧↓|Alt + Shift + ↓ |Duplicate line up|⌥⇧↑|Alt + Shift + ↑ |Create/extend a vertical non-contiguous selection|⌥⇧ click|Alt + Shift + click |Toggle fold (Region at cursor)|⌘KL|Ctrl + K + L |Fold all regions|⌘K0|Ctrl + K + 0 |Unfolds all regions|⌘KJ|Ctrl + K + J |Fold level X|⌘K2  (for level 2)|Ctrl + K + 2 * * * ### File Search Shortcuts |**Action** |Mac |Windows | |---|---|---| |Find next|⌘G|F3 |Find previous|⇧⌘G|Shift + F3 |Replace|⇧⌘1|Ctrl + Shift + 1 |Replace all|⌥⌘⏎|Ctrl + Alt + Enter |Match case|⌥⌘C|Alt + C |Match whole word|⌥⌘W|Alt + W |Use regular expression|⌥⌘R|Alt + R --- > Portal Navigation: > > - Append `.md` to any URL under `https://dev.wix.com/docs/` to get its markdown version. > - Pages are either content pages (article or reference text) or menu pages (a list of links to child pages). > - To get a menu page, truncate any URL to a parent path and append `.md` (e.g. `https://dev.wix.com/docs/sdk.md`, `https://dev.wix.com/docs/sdk/core-modules.md`). > - Top-level index of all portals: https://dev.wix.com/docs/llms.txt > - Full concatenated docs: https://dev.wix.com/docs/llms-full.txt ## Resource: Using JSDoc ## Article: Using JSDoc ## Article Link: https://dev.wix.com/docs/develop-websites/articles/workspace-tools/velo-workspace/code-editor-ide/using-jsdoc.md ## Article Content: # About Type Checking and Autocomplete Using JSDoc Tags [JSDoc](https://jsdoc.app/) is a popular markup language used to document JavaScript code, applying type checking and autocomplete as you write your code. You can use JSDoc in a Wix environment in the same way as you would in any JavaScript environment. Adding JSDoc to your custom code allows you to benefit from [type checking and code autocomplete](#type-checking-and-autocomplete). ## Supported IDEs You can add and benefit from JSDoc using: + The [editor](https://dev.wix.com/docs/develop-websites/articles/workspace-tools/velo-workspace/workspaces/wix-studio-working-with-the-code-panel.md) (Wix Studio and Wix Editor). + The [Wix IDE](https://dev.wix.com/docs/develop-websites/articles/workspace-tools/velo-workspace/wix-ide/wix-studio-about-the-wix-ide.md) (Wix Studio). + Your [local IDE](https://dev.wix.com/docs/develop-websites/articles/workspace-tools/developer-tools/git-integration-wix-cli-for-sites/about-git-integration-wix-cli-for-sites.md) (Wix Studio and Wix Editor). You can [import JSDoc](https://dev.wix.com/docs/develop-websites/articles/workspace-tools/velo-workspace/code-editor-ide/import-jsdoc.md) only in the editor. ## JSDoc tags and definitions JSDoc tags are added to JavaScript files as comments. Each line of JSDoc defines an item using the following format: ```js /** * @ {} */ ```
JSDoc tags | Variable | Description | | -------- | ----------- | | `jsdoc-tag` | [JSDoc tag](https://jsdoc.app/) that defines what the item is.
For example, use `@typedef` to define a new type, `@property` to define the property of an object, and `@param` to define a parameter. | | `type` | Data type of the item. For example, `object`. | | `item-name` | How the item is referred to. | | `description` | Description of the item.
Optional. |
### Where to add JSDoc in your code You can add JSDoc to Velo code as you would to any JavaScript code, by including the annotations just above the code you are documenting. However, when defining a parameter type, using the `@param` tag, place the JSDoc definition directly above the function declaration. #### JSDoc example In the following example, we define an `employee` type that is then applied to a function parameter. ```js /** * @typedef {object} employee * @property {string} name Employee's name. * @property {number} seniority The number of years the employee has worked at the company. * @property {number} hours The number of hours the employee works a week. * * @param {employee} employee */ export function salaryCalculator(employee) { return `Salary for ${employee.name}: ${employee.hours * employee.seniority * 100}`; } ``` ## Type checking and autocomplete When you apply JSDoc types to parameters, the editor can perform type checking and provide autocomplete suggestions for function arguments. ![](https://wixmp-833713b177cebf373f611808.wixmp.com/images/using-js-doc-md_velo-articles_velo-workspace_images_typecheck-jsdoc.png) ![](https://wixmp-833713b177cebf373f611808.wixmp.com/images/using-js-doc-md_velo-articles_velo-workspace_images_autocomplete-jsdoc.png) ## File types You can add JSDoc in any JavaScript file, meaning the file's suffix is `.js`. This includes JavaScript files in Velo packages, allowing anyone using your packages to use type checking and autocomplete. You can import types defined by Wix in some specific file types. For example, you can import backend event objects to [`events.js` files](https://dev.wix.com/docs/develop-websites/articles/coding-with-velo/backend-code/events/about-backend-events.md).
Important: Web.md modules (files with the suffix `.jsw`) support autocomplete, but not type checking.
## See also - [Import JSDoc](https://dev.wix.com/docs/develop-websites/articles/workspace-tools/velo-workspace/code-editor-ide/import-jsdoc.md) --- > Portal Navigation: > > - Append `.md` to any URL under `https://dev.wix.com/docs/` to get its markdown version. > - Pages are either content pages (article or reference text) or menu pages (a list of links to child pages). > - To get a menu page, truncate any URL to a parent path and append `.md` (e.g. `https://dev.wix.com/docs/sdk.md`, `https://dev.wix.com/docs/sdk/core-modules.md`). > - Top-level index of all portals: https://dev.wix.com/docs/llms.txt > - Full concatenated docs: https://dev.wix.com/docs/llms-full.txt ## Resource: Import JSDoc ## Article: Import JSDoc ## Article Link: https://dev.wix.com/docs/develop-websites/articles/workspace-tools/velo-workspace/code-editor-ide/import-jsdoc.md ## Article Content: # Set up Type Checking and Autocomplete by Importing JSDoc Types You can import JSDoc types to use in your JavaScript code. Apply a JSDoc type to a parameter to enable [type checking and autocomplete](https://dev.wix.com/docs/develop-websites/articles/workspace-tools/velo-workspace/code-editor-ide/using-jsdoc.md#type-checking-and-autocomplete).
Important: Importing JSDoc is supported only in the code editor, not in the Wix IDE or your local IDE.
## Step 1 | Define and export a type You can skip this step if you want to use a type defined by Wix. To define and export a type using JSDoc: 1. Use [JSDoc tags and definitions](https://dev.wix.com/docs/develop-websites/articles/workspace-tools/velo-workspace/code-editor-ide/using-jsdoc.md#jsdoc-tags-and-definitions) to define a type. For example: ```js /** * @typedef {object} employee * @property {string} name Employee's name. * @property {string} seniority The number of years the employee has worked at the company. * @property {number} hours The number of hours the employee works a week. */ ``` 1. You can expose your type to your site's files as either a global type or a restricted type: - **Global type**: You can use your defined type in any JavaScript file without further changes. - **Restricted type**: You can define different types with the same name in different files. To restrict your type, add `export {};` below your JSDoc declaration. For example: ```js /** * @typedef {object} employee * @property {string} name Employee's name. * @property {string} seniority The number of years the employee has worked at the company. * @property {number} hours The number of hours the employee works a week. */ export {}; ``` ## Step 2 | Access a JSDoc type The way that you import the JSDoc type depends on where and how the type is exposed: - [Self-defined global type](#self-defined-global-type) - [Self-defined restricted type](#self-defined-restricted-type) - [Wix editor elements](#wix-editor-elements) - [Backend event handlers](#backend-event-handlers) - [Router functions](#router-functions) ### Self-defined global type Use the type without importing it. For example: ```js /** * @param {employee} employee */ export function salaryCalculator(employee) { return `Salary for ${employee.name}: ${employee.hours * employee.seniority * 100}`; } ``` ### Self-defined restricted type Import your type using `import('').` directly in the JSDoc's tag type declaration. For example: ```js /** * @param {import('backend/myJSDocFile.js).employee} employee */ export function salaryCalculator(employee) { return `Salary for ${employee.name}: ${employee.hours * employee.seniority * 100}`; } ``` ### Wix editor elements You can use [Wix editor elements](https://dev.wix.com/docs/velo/api-reference/$w/introduction.md) directly in JSDoc types without importing them. Define the JSDoc data type using `$w.Element`. For example: ```js /** @param {$w.Text} parameterName */ ``` ### Backend event handlers By default, the file for [backend event handlers](https://dev.wix.com/docs/develop-websites/articles/coding-with-velo/backend-code/events/about-backend-events.md), `events.js`, doesn't know the type of the parameter you are passing to a function. To tell your `events.js` file the parameter's type: 1. Check your event's `EventObjectName`. You can find it in the method declaration in [API reference](https://dev.wix.com/docs/velo.md). 1. Add the following code above your function declaration: ```js /** @param {import('api-module-name').Events.} parameterName */ ```
Example: onBookingCreated.md To add JSDoc to wix-bookings.v2 event, onBookingCreated():
  1. Open the API reference for onBookingCreated..md Find the EventObjectName.
  2. Add the following JSDoc annotation above the event handler function in the events.js file:
    /** @param {import('api-module-name').Events.BookingCreated} event */

/** @param {import('api-module-name').Events.BookingCreated} event */
export function wixBookings_onBookingCreated(event) {
  // Handle your event
}
### Router functions By default, the [routers.js](https://dev.wix.com/docs/develop-websites/articles/coding-with-velo/routers/about-routers.md) file doesn’t support autocomplete or type checking for [WixRouterRequest](https://dev.wix.com/docs/velo/api-reference/wix-router/wix-router-request/introduction.md) objects passed to router functions. To support autocomplete or type-checking in a `routers.js` file, add the following JSDoc annotation above your router functions: ```js /** @param {import('wix-router').WixRouterRequest} parameterName */ ``` --- > Portal Navigation: > > - Append `.md` to any URL under `https://dev.wix.com/docs/` to get its markdown version. > - Pages are either content pages (article or reference text) or menu pages (a list of links to child pages). > - To get a menu page, truncate any URL to a parent path and append `.md` (e.g. `https://dev.wix.com/docs/sdk.md`, `https://dev.wix.com/docs/sdk/core-modules.md`). > - Top-level index of all portals: https://dev.wix.com/docs/llms.txt > - Full concatenated docs: https://dev.wix.com/docs/llms-full.txt ## Resource: Working with the Code Editor Toolbar and Right-Click Menu (with Wix Editor) ## Article: Working with the Code Panel Toolbar and Right-Click Menu (with Wix Editor) ## Article Link: https://dev.wix.com/docs/develop-websites/articles/workspace-tools/velo-workspace/code-editor-ide/working-with-the-code-editor-toolbar-and-right-click-menu-with-wix-editor.md ## Article Content: # Velo: Working with the Code Editor Toolbar and Right-Click Menu (with Wix Editor) > __Note__: This article is about the code editor in Wix Editor. To learn about the code editor in Wix Studio, see [Wix Studio: Working with the code editor](https://dev.wix.com/docs/develop-websites/articles/workspace-tools/velo-workspace/workspaces/wix-studio-working-with-the-code-panel.md#code-editor). The code editor contains tools to help you work with your code. These are split between the toolbar and the right-click menu. ## Code Editor Toolbar |Item |Description | |---|---| |**Preview**
![](https://d2x3xhvgiqkx42.cloudfront.net/12345678-1234-1234-1234-1234567890ab/a551efd3-24d0-48fe-8aec-00f810ffc5fc/2022/02/09/9f4e8b61-b112-4eb9-bec1-62830f1baa5b/6a923283-4c9c-4699-a09a-3da79306e460.png)|Runs your code in Preview mode. |**Properties & Events**|Shows and hides the [Properties & Events](https://dev.wix.com/docs/develop-websites/articles/workspace-tools/velo-workspace/properties-events-panel/about-the-properties-events-panel.md) editor. |**Maximize**
![](https://d2x3xhvgiqkx42.cloudfront.net/12345678-1234-1234-1234-1234567890ab/2016/07/21/e538c20e-7b2d-4525-bf8c-94ed69cc18be.png)|Maximizes the code editor on the screen. |**Restore**
![](https://d2x3xhvgiqkx42.cloudfront.net/12345678-1234-1234-1234-1234567890ab/11e10e4f-b84d-4136-a5a9-6109fab0b7d7/2017/06/04/4aecd178-0ab1-4573-a425-db7d34482f3a.jpg)|If the code editor has been maximized, restores it to its previous height. |**Minimize**
![](https://d2x3xhvgiqkx42.cloudfront.net/12345678-1234-1234-1234-1234567890ab/2016/07/21/273d9743-1a02-4102-a849-bbec82dd80c2.png)|Minimizes the code editor to its collapsed state. |**More**|Links to help content and a list of keyboard shortcuts. Also contains a radio button for switching the code editor theme between light (default) and dark. ## Code Editor Right-Click Options |Item |Description | |---|---| |**Format**|Makes your code neater and easier to read by fixing its indentation, removing extra lines, and applying other standard formatting styles.| |**Find**
[](https://d2x3xhvgiqkx42.cloudfront.net/12345678-1234-1234-1234-1234567890ab/2016/07/21/3a849248-6e4a-4ff4-8b2b-a50389ccddb9.png)|Opens the Find editor, which contains the following options:| ||**Find** box. Specify the term you are searching for.| ||**Match Case**. Select this button if you want your search to be case sensitive.
![](https://d2x3xhvgiqkx42.cloudfront.net/12345678-1234-1234-1234-1234567890ab/b0387850-90c2-4f00-a761-a0c5104e1c8c/2018/08/06/bf8f2e02-e880-4d4e-ac48-e74a24f31104.png)| ||**Match Whole Word**. Select this button if you want to limit your search to whole words only.
![](https://d2x3xhvgiqkx42.cloudfront.net/12345678-1234-1234-1234-1234567890ab/b0387850-90c2-4f00-a761-a0c5104e1c8c/2018/08/06/73564097-c8d0-4069-b9bc-db993db86fd1.png)| ||**Regular Expression**. Select this button if you want to use a regular expression as your search term.
![](https://d2x3xhvgiqkx42.cloudfront.net/12345678-1234-1234-1234-1234567890ab/b0387850-90c2-4f00-a761-a0c5104e1c8c/2018/08/06/a3fb7bb2-f6cc-444d-b8c8-e06a9ce15dc3.png)| ||**Replace** box. Specify the term you want to use to replace the search term.| ||**Previous.** Jumps to the previous instance of the search term.| ||**Next.** Jumps to the next instance of the search term.| ||**Replace**. Replaces the current instance of the search term with the replace term.| ||**All**. Replaces all instances of the search term with the replace term.| |**Undo**|Undoes your previous action in the code editor. The Undo action in the code editor is independent of the Undo action in the main Editor.| |**Redo**|Re-does the last action you undid in the code editor. The Redo action in the code editor is independent of the Redo action in the main Editor.| --- > Portal Navigation: > > - Append `.md` to any URL under `https://dev.wix.com/docs/` to get its markdown version. > - Pages are either content pages (article or reference text) or menu pages (a list of links to child pages). > - To get a menu page, truncate any URL to a parent path and append `.md` (e.g. `https://dev.wix.com/docs/sdk.md`, `https://dev.wix.com/docs/sdk/core-modules.md`). > - Top-level index of all portals: https://dev.wix.com/docs/llms.txt > - Full concatenated docs: https://dev.wix.com/docs/llms-full.txt ## Resource: About the Colors in the Code Editor ## Article: About the Colors in the Code Panel ## Article Link: https://dev.wix.com/docs/develop-websites/articles/workspace-tools/velo-workspace/code-editor-ide/about-the-colors-in-the-code-editor.md ## Article Content: # Velo: About the Colors in the Code Editor Velo applies syntax highlighting to the code that you write in the code editor. That means certain parts of your code appear in different colors and font weights depending on their purpose. Syntax highlighting makes it easier for you read and write your code. In this article, we describe the highlighting of some of the most common syntactic elements. We use the following form and page code that calculates the area of a circle based on a given radius.
![](https://d2x3xhvgiqkx42.cloudfront.net/12345678-1234-1234-1234-1234567890ab/dfff8cbb-ddcb-4376-8cae-3fedb2dd4458/2018/01/28/90e858be-35e1-4ce9-baf6-273104fbf362.png)
![](https://d2x3xhvgiqkx42.cloudfront.net/12345678-1234-1234-1234-1234567890ab/dfff8cbb-ddcb-4376-8cae-3fedb2dd4458/2018/04/12/eb89d19e-25c2-42d4-ad45-59ab9e5a56a1.png)
### Keywords Keywords are words that have a special meaning in a programming language. For example, in JavaScript, `let`, `function`, and `return` are all keywords.
![](https://d2x3xhvgiqkx42.cloudfront.net/12345678-1234-1234-1234-1234567890ab/dfff8cbb-ddcb-4376-8cae-3fedb2dd4458/2018/04/12/c5115a0e-1e39-4383-a463-1707d74ebbe0.png)
### Function Names in Function Declarations Function declarations include a function name. The function name is used when calling the function in other parts of your code. For example, the `calculateArea` function defined on line 11 in the example below is called on line 5.
![](https://d2x3xhvgiqkx42.cloudfront.net/12345678-1234-1234-1234-1234567890ab/dfff8cbb-ddcb-4376-8cae-3fedb2dd4458/2018/04/12/d2cf79c4-a3b6-450b-a26d-0619158b2cd9.png)
### Parameter Names in Function Declarations Function declarations may include one or more function parameters. The function parameters serve as the names of the arguments passed to the function. For example, the `calculateArea` function defined on line 12 in the example below contains one parameter named `radius`. That parameter name is used on line 13 when calculating the area. When the function is called on line 5, the `value` of the `radiusInput` is the argument passed to the `radius` parameter of the `calculateArea` function.
![](https://d2x3xhvgiqkx42.cloudfront.net/12345678-1234-1234-1234-1234567890ab/dfff8cbb-ddcb-4376-8cae-3fedb2dd4458/2018/04/12/b903d06d-b01a-4a99-a0fe-57a7b3fcdd4d.png)
### String Literals String literals come in three different varieties in JavaScript: * Double quoted strings `"literal value"` * Single quoted strings `'literal value'` * Template strings `` `literal value ${nonliteral}` `` In Velo, you will often use string literals to select elements using the `$w()` function as shown on line 4 in the example below. You might also use literal values to set the value of an element's property as shown on line 6, set the value of a variable, or pass them as arguments to functions.
![](https://d2x3xhvgiqkx42.cloudfront.net/12345678-1234-1234-1234-1234567890ab/dfff8cbb-ddcb-4376-8cae-3fedb2dd4458/2018/04/12/ba476093-ae50-474b-826f-0583b2b6feed.png)
### Number Literals Number literals are used to set the value of an element's property, set the value of a variable as shown on line 1 in the example below, or pass them as arguments to functions as shown on line 13.
![](https://d2x3xhvgiqkx42.cloudfront.net/12345678-1234-1234-1234-1234567890ab/dfff8cbb-ddcb-4376-8cae-3fedb2dd4458/2018/04/12/ccf53bb2-76d7-49e8-8540-e799ec10c94c.png)
### Comments Comments are parts of your code that are not executed when the code is run. Usually, you add comments to explain what a particular part of your code is doing.
![](https://d2x3xhvgiqkx42.cloudfront.net/12345678-1234-1234-1234-1234567890ab/dfff8cbb-ddcb-4376-8cae-3fedb2dd4458/2018/04/12/d42fa595-1168-4f24-8ece-8fdfcac10ff0.png)
--- > Portal Navigation: > > - Append `.md` to any URL under `https://dev.wix.com/docs/` to get its markdown version. > - Pages are either content pages (article or reference text) or menu pages (a list of links to child pages). > - To get a menu page, truncate any URL to a parent path and append `.md` (e.g. `https://dev.wix.com/docs/sdk.md`, `https://dev.wix.com/docs/sdk/core-modules.md`). > - Top-level index of all portals: https://dev.wix.com/docs/llms.txt > - Full concatenated docs: https://dev.wix.com/docs/llms-full.txt ## Resource: About the Properties & Events Panel ## Article: Working with the Properties & Events Panel ## Article Link: https://dev.wix.com/docs/develop-websites/articles/workspace-tools/velo-workspace/properties-events-panel/about-the-properties-events-panel.md ## Article Content: # About the Properties & Events Panel The Properties & Events panel allows you to add properties and functionality to your page elements. With the panel you can: - Access the [Velo API reference](https://dev.wix.com/docs/velo/api-reference/$w/introduction.md) for the selected element. - View and manually update the ID of the selected element. - Set default values for the properties of the selected element. - Add an event handler function declaration to your code to interact with the selected element.
The Properties & Events panel is located to the right of the code editor. **Wix Studio**
## Supported IDEs You can access the Properties & Events panel in the editor (Wix Studio and Wix Editor) **Wix Editor**
The Properties & Events panel changes content when you select an element. The properties and event handlers listed in the panel differ based on the element that you select. You can close and open the panel with the Properties & Events button in the toolbar:
## The ID property All elements come with a default ID value. When you select an element, its ID is displayed in the panel. You can manually change the ID of your element. Assigning meaningful IDs to your elements can make your code easier to maintain.

Important:
If you change the ID of an element, make sure to update any existing code that uses the ID of that element.

## Default state properties Certain boolean properties for your selected element appear under the Default Values section of the panel. They allow you to set an element’s state when the page loads. This limits the need to set an element’s initial state with code, keeping your code cleaner and more concise. Set the element’s initial state by selecting or clearing the checkbox to the left of the property. The available default state properties are: - **Hidden:** Hides the element from your site visitors when your page loads. You can use code to unhide the element upon an action or after a set amount of time. Hidden elements take up space on your page and appear faded in the editor until they are selected. An element's hidden state can also depend on whether its parent element is hidden or collapsed. - **Collapsed:** Collapses the element and hides it from your site visitors when your page loads. You can use code to expand the element upon an action or after a set amount of time. Collapsed elements don’t take up space on your page and appear with diagonal hatching lines in the editor until they are selected. Collapsing and expanding can cause other elements to shift on your page. An element's collapse state can also depend on whether its parent element is hidden or collapsed. - **Enabled:** Enables interactive elements such as [buttons](https://dev.wix.com/docs/velo/api-reference/$w/button/introduction.md) and [text inputs](https://dev.wix.com/docs/velo/api-reference/$w/text-input/introduction.md). Elements with this property are initially in an enabled state. Clear the checkbox to disable the element when the page loads. You can use code to later enable the element when you want visitors to interact with it. Disabled elements appear faded in the editor. >**Notes:** > - The properties displayed in the panel change depending on the selected element. > - To get or set properties with code, see the [Velo API reference](https://dev.wix.com/docs/velo/api-reference/$w/introduction.md) for a full list of an element’s properties. ## Event handlers Event handlers appear under the **Event Handlers** section of the Properties & Events panel. Event handlers allow you to add code that defines what happens when site visitors interact with this element. Clicking on an event handler in the panel adds the event handler’s function declaration to your page code for you. ```js $w('#myButton').onClick((event) => { // Add code here }) ``` Like properties, event handlers are specific to the element. Common event handlers that appear in the panel for many elements include: - `onBlur()` - `onClick()` - `onDblClick()` - `onFocus()` - `onMouseIn()` - `onMouseOut()` - `onViewportEnter()` - `onViewportLeave()` Other event handlers can appear in the panel depending on the element that is selected. For example, when a [Gallery element](https://dev.wix.com/docs/velo/api-reference/$w/gallery/introduction.md) is selected, the panel includes additional event handlers to some of the ones listed above, such as: - `onCurrentItemChanged()` - `onItemClicked()` - `onPlay()` - `onPause()` See the [Velo API reference](https://dev.wix.com/docs/velo/api-reference/$w/introduction.md) for descriptions of all the event handlers for each element. ## Events AI assistant in Wix Studio The Properties & Events panel in Wix Studio also comes with an AI Assistant button.
Use the AI assistant to help create interactive code for your event handlers. The AI assistant allows you to select an event handler and then describe what the code should do. It generates a code example that you can add to your page code.
It’s important to note that AI can make mistakes and that you should double check that any AI generated code is accurate before using it. >**Note:** > The AI Assistant button is only supported in Wix Studio. ## See also - [About Event Handlers in Wix](https://dev.wix.com/docs/develop-websites/articles/coding-with-velo/frontend-code/about-event-handlers-in-wix.md) - [Add an Event Handler](https://dev.wix.com/docs/develop-websites/articles/coding-with-velo/frontend-code/about-event-handlers-in-wix.md) - [Tutorial: Change the Text Label of a Button with Events](https://dev.wix.com/docs/develop-websites/articles/code-tutorials/wix-editor-elements/change-the-text-label-of-a-button-with-events.md) - [Velo API reference](https://dev.wix.com/docs/velo.md) --- > Portal Navigation: > > - Append `.md` to any URL under `https://dev.wix.com/docs/` to get its markdown version. > - Pages are either content pages (article or reference text) or menu pages (a list of links to child pages). > - To get a menu page, truncate any URL to a parent path and append `.md` (e.g. `https://dev.wix.com/docs/sdk.md`, `https://dev.wix.com/docs/sdk/core-modules.md`). > - Top-level index of all portals: https://dev.wix.com/docs/llms.txt > - Full concatenated docs: https://dev.wix.com/docs/llms-full.txt ## Resource: Wix Studio: About the Wix IDE ## Article: Wix Studio: About the Wix IDE ## Article Link: https://dev.wix.com/docs/develop-websites/articles/workspace-tools/velo-workspace/wix-ide/wix-studio-about-the-wix-ide.md ## Article Content: # Wix Studio: About the Wix IDE
**Note**: Some features described in this article aren't yet available to all users.
Wix Studio includes a code editor for adding code directly to your site's pages. For a more advanced option, the Wix IDE provides a browser-based environment built on Visual Studio Code. The Wix IDE also features the [Wix AI Assistant](https://dev.wix.com/docs/develop-websites/articles/workspace-tools/developer-tools/ai-assistants/ai-assistant-in-the-wix-ide/about-the-wix-ai-assistant.md), an intelligent companion that offers real-time coding assistance. > **Note:** > The Wix IDE is currently unavailable for sites using [Git Integration](https://support.wix.com/en/article/velo-about-git-integration-wix-cli). ## Understanding your site's file structure Wix sites have a specific file structure that Wix uses to run your code. When you open the Wix IDE, you see the file structure for your site.
![IDE file tree](https://github.com/wix-incubator/wix-code-docs/assets/89579857/66325e96-7151-4435-8008-ae3b5cb75d33)
Your site's file structure includes these elements: * The **src** folder, that contains the following folders: * [backend](https://support.wix.com/en/article/wix-studio-about-the-wix-ide#backend-folder) * [pages](https://support.wix.com/en/article/wix-studio-about-the-wix-ide#pages-folder) * [public](https://support.wix.com/en/article/wix-studio-about-the-wix-ide#public-folder) * [styles](https://support.wix.com/en/article/wix-studio-about-the-wix-ide#styles-folder) * The `jsconfig.json` file and `.wix` folder found in the repo's root folder. >**Important:** >The `jsconfig.json` file and `.wix` folder are used to support type checking and autocomplete in the IDE. You don't need to edit these files. Changes to these files aren't synced to your site and are lost when you close the IDE. >**Note:** >Wix doesn't support adding files for web crawlers and bots such as `robots.txt`, `ads.txt`, and `security.txt` to your site. If you add these files, they're ignored by Wix. Here is an explanation of the different subfolders in the `src` folder: ### Backend folder This folder contains the backend code files for your site. Some backend code files are automatically added to this folder, for example, when you add a router to your site, a `router.js` file is added to your backend folder. If you don't see the file that you need, you can create it. The backend folder may contain the following files: + **Web Module files:** These are files that allow you to expose functions in your site's backend that you can run in your frontend code. These files require a `.web.js` file extension. A web module contains one or more [web methods](https://support.wix.com/en/article/about-web-methods). + **data.js**. A file for [adding data hooks](https://support.wix.com/en/article/velo-using-data-hooks) to your site's collections. + **routers.js** A file for implementing [routing and sitemap](https://support.wix.com/en/article/velo-about-routers#routing-code) functionality for your site. + **events.js** A file for implementing your site's [backend event handlers](https://support.wix.com/en/article/velo-backend-events). + **http-functions.js** A file for implementing [HTTP endpoints](https://www.wix.com/velo/reference/wix-http-functions/introduction "_blank") that are exposed on your site. + **jobs.config** A file for [scheduling recurring jobs](https://support.wix.com/en/article/velo-scheduling-recurring-jobs). Jobs consist of backend code that's run at regular intervals. + **General backend files** JavaScript code files. You can import code from these files into any other backend file on your site. These files require a `.js` file extension. Use the following syntax to import code from backend files: ```js import { myFunctionName } from 'backend/myFileName'; ``` Trying to import from the relative path in your site's files doesn't work. #### Config folder If you add a [Velo Package built by Wix](https://dev.wix.com/docs/develop-websites/articles/coding-with-velo/packages/working-with-velo-packages.md) to your site, the backend folder contains a folder called `__config__`. This folder contains an editable `config.json` file for defining specific settings for your package. #### Service plugin folder If you add [service plugins](https://support.wix.com/en/article/velo-custom-app-extensions-using-spis) to your site, the backend folder contains a folder called `__spi__`. This folder contains subfolders with the code files for each service plugin. Learn more about [implementing service plugins](https://support.wix.com/en/article/velo-custom-app-extensions-using-spis#implementing-a-custom-extension-with-a-velo-spi).
permissions.json >**Important:** >You only need to use this file if you export backend functions from `.jsw` files. We recommend using web methods and exporting backend functions from `.web.js` files instead. Learn more about [web methods](https://support.wix.com/en/article/about-web-methods). The backend folder also contains the `permissions.json` file. This file defines [permissions](https://dev.wix.com/docs/develop-websites/articles/coding-with-velo/backend-code/web-modules/about-web-modules.md#permissions) for the functions in your web module files. The file contains a key, `"web-methods"` which contains an object. Each key in that object corresponds to a web module file in your backend folder. Name these keys with the following syntax: `"backend/{path to file}/myFile.jsw"`. The value for each file name key is an object that contains keys named after the functions in that file. Those objects contain keys for each permission level. For example: ```json { "web-methods": { "backend/myFileName.jsw": { "myFunction": { "siteOwner" : { "invoke" : // Boolean }, "siteMember" : { "invoke" : // Boolean }, "anonymous" : { "invoke" : // Boolean } } } } } ``` Set the permissions for each function using the following values: * **Owner-only access**: * `siteOwner.invoke`: `true` * `siteMember.invoke`: `false` * `anonymous.invoke` : `false` * **Site member access**: * `siteOwner.invoke`: `true` * `siteMember.invoke`: `true` * `anonymous.invoke` : `false` * **Anyone can access**: * `anonymous.invoke`: `true` * `siteMember.invoke` : `true` * `anonymous.invoke`: `true` The `"web-methods"` object must also contain a `"*"` key. The value for this key defines the default permissions that are applied to any function whose permissions you don't set manually. Here is a sample `permissions.json` file for a site with a backend file called `helperFunctions.jsw`. The file's functions are called `calculate`, `fetchData`, and `syncWithServer`. In this case anyone can call `calculate`, site members can call `syncWithServer`, and only site owners can call `fetchData`. ```json { "web-methods": { "*": { "*": { "siteOwner": { "invoke": true }, "siteMember": { "invoke": true }, "anonymous": { "invoke": true } } }, "backend/helperFunctions.jsw": { "calculate": { "siteOwner": { "invoke": true }, "siteMember": { "invoke": true }, "anonymous": { "invoke": true } }, "fetchData": { "siteOwner": { "invoke": true }, "siteMember": { "invoke": false }, "anonymous": { "invoke": false } }, "syncWithServer": { "siteOwner": { "invoke": true }, "siteMember": { "invoke": true }, "anonymous": { "invoke": false } } } } } ```
### Pages folder This folder contains code files for each of the pages on your site as well as the [masterpage.js](https://support.wix.com/en/article/velo-working-with-the-velo-sidebar#global-site) file. The code you add to these files runs when visitors open pages on your site. When you add a page to your site in the editor, a code file for that page is added to this folder. The name of the file has 2 components: the name of the page that you define when you create it, and an ID string for internal use. The sections are separated by a period.
![image](https://user-images.githubusercontent.com/89579857/188305074-6e2ee718-13b8-435d-9c75-bcb126f35718.png)
When you [add a dynamic page](https://support.wix.com/en/article/content-manager-about-dynamic-pages#adding-dynamic-pages) to your site, 2 code files are added to this folder corresponding to the dynamic list and dynamic item pages. When you open a page's code file, you see the same sample code that appears in the Wix Studio code editor.
![image](https://user-images.githubusercontent.com/89579857/184646571-1e14f166-2b86-4f21-bf57-83468251bca8.png)
When you delete a page in the editor, the page's corresponding code file is deleted as well. > **Warning:** > Do not rename code files for pages. Wix uses these file names to associate the files with the appropriate pages on your site. If you rename a file, your code is ignored and a new code file is created for the page. ### Public folder This folder contains the public code files for your site. You can import code from these files into any other file on your site. Use the following syntax to import code from public files: ```js import { myFunctionName } from 'public/myFileName'; ``` Trying to import from the relative path in your site's files doesn't work. ### Styles folder This folder contains custom CSS files for your site. Add custom CSS to your site in a file called `global.css`. If you don't see this file, you can create it. The styles defined in this file are applied to all the pages on your site. Many [Wix Editor Elements](https://www.wix.com/velo/reference/$w) have specially defined class names that you can use to style them. You can also create custom class names to use in your CSS code. To learn about supported elements and their class names, see the [Velo API Reference](https://www.wix.com/velo/reference/$w/styling-elements-with-css). You can also see an element's predefined classes and add custom class names to an element in the [**CSS Classes panel**](https://support.wix.com/en/article/coding-with-the-wix-studio-sidebar#css-classes-panel). Learn more about [writing CSS code for your site](https://www.wix.com/velo/reference/$w/styling-elements-with-css). ## Using the Wix IDE To use the Wix IDE, do the following: 1. Click **Code in Wix IDE** in the top right corner of the code editor. ![Page Code](https://wixmp-833713b177cebf373f611808.wixmp.com/images/791db58c3a225b5c0df252113cbf1b77.png) 2. The Wix IDE opens in a new browser tab. You can now edit your site's code. Changes saved in the IDE are automatically synced to your site. The IDE's autosave feature is enabled by default. You can [disable autosave](https://code.visualstudio.com/docs/editor/codebasics#_save-auto-save) in the IDE's Settings editor. **Note:** To use backend functions in your public and page code files, export functions from your backend files using [web methods](https://support.wix.com/en/article/about-web-methods). 3. Test your code using a [test site](https://support.wix.com/en/article/creating-a-test-site) or by [previewing your site](https://support.wix.com/en/article/wix-editor-saving-previewing-and-publishing-your-site#previewing-your-site). You can see messages logged from your code in [Wix Logs](https://support.wix.com/en/article/velo-viewing-live-site-monitoring-events#how-it-works) or by [connecting your site](https://support.wix.com/en/article/velo-connecting-site-monitoring-events-to-google-operations-formerly-stackdriver) to Google Cloud Logs (Cloud Logging). 4. When your code is ready, publish your site to make your changes live. ## Editor-only actions You need to do certain parts of the Wix development flow in the editor. These include: + Adding [NPM](https://support.wix.com/en/article/velo-working-with-npm-packages#installing-a-package), [Velo](https://support.wix.com/en/article/velo-working-with-velo-packages-built-by-wix#setting-up-a-package), and [private](https://support.wix.com/en/article/velo-working-with-your-velo-packages) packages. Once you add these packages in the editor, you can import them in your code files in the IDE. + [Adding](https://support.wix.com/en/article/wix-editor-adding-a-page-to-your-site#adding-a-new-page), changing, or deleting pages. + [Changing](https://dev.wix.com/docs/develop-websites/articles/workspace-tools/velo-workspace/properties-events-panel/about-the-properties-events-panel.md) element IDs or properties. + [Previewing](https://support.wix.com/en/article/wix-editor-saving-previewing-and-publishing-your-site#previewing-your-site) your site or [creating a test site](https://support.wix.com/en/article/creating-a-test-site). + [Publishing](https://support.wix.com/en/article/wix-editor-saving-previewing-and-publishing-your-site#publishing-your-site) your site. + Creating a [service plugin](https://support.wix.com/en/article/velo-custom-app-extensions-using-spis#implementing-a-custom-extension-with-a-velo-spi). ## Concurrent editing Two or more site contributors can edit a site's code at the same time in the Wix IDE. Edits made in one instance of the IDE are synced to the other instance in real time. However, you can't edit your site's code in both the Wix IDE and the Wix Studio Code panel at the same time. You also can't edit your code in the Code panel if other site contributors are editing in the Wix IDE. When you open the Wix IDE, the Code panel switches to read-only mode. The Code panel displays this message: ![Go to Wix IDE button](https://github.com/wix-incubator/wix-code-docs/assets/89579857/b0c53a04-962c-4a88-bf0c-18f521961e5e) If you want to edit your site's code in the Code panel, all site contributors must close the Wix IDE. You can then click **Start Coding** in the Code panel. ![Start Coding button](https://github.com/wix-incubator/wix-code-docs/assets/89579857/b5006237-9348-4f84-9597-3cfd82ae952e) --- > Portal Navigation: > > - Append `.md` to any URL under `https://dev.wix.com/docs/` to get its markdown version. > - Pages are either content pages (article or reference text) or menu pages (a list of links to child pages). > - To get a menu page, truncate any URL to a parent path and append `.md` (e.g. `https://dev.wix.com/docs/sdk.md`, `https://dev.wix.com/docs/sdk/core-modules.md`). > - Top-level index of all portals: https://dev.wix.com/docs/llms.txt > - Full concatenated docs: https://dev.wix.com/docs/llms-full.txt ## Resource: About the Wix IDE Beta Release ## Article: About the Wix IDE Beta Release ## Article Link: https://dev.wix.com/docs/develop-websites/articles/workspace-tools/velo-workspace/wix-ide/about-the-wix-ide-beta-release.md ## Article Content: # About the Wix IDE Beta Release The Wix IDE is currently in beta release. While this release is stable and can be safely used for building and modifying production sites, it still lacks important functionality as listed in the [known issues](#known-issues) section. As we continuously improve the Wix IDE, you can stay informed about new updates in the [release notes](#wix-ide-beta-release-notes) below. As a separate environment from the editor, the Wix IDE allows you to focus on code and instantly see your code changes in Preview mode on a separate tab. Although the tutorial upon opening the Wix IDE is not yet fully tailored to the Wix environment, you can enjoy the IDE features such as refactoring capabilities, go to definition, command palette, split view, improved navigation, and more. Learn more about working with the [Wix IDE](https://dev.wix.com/docs/develop-websites/articles/workspace-tools/velo-workspace/wix-ide/wix-studio-about-the-wix-ide.md). You can also check out the README file in your project's root level.

## Known issues Before getting started with the Wix IDE, it's important to note the following known issues that we are working to fix: - **Auto-complete is not fully functional**
[IntelliSense](https://code.visualstudio.com/docs/editor/intellisense), VS Code's language support feature, doesn't currently recognize all NPM packages, Velo packages, Wix Blocks apps, backend modules, and editor elements as expected. You may experience false positive error highlighting for valid code that can run successfully. - **Functional testing is unavailable**
[Functional testing](https://dev.wix.com/docs/develop-websites/articles/workspace-tools/testing-monitoring/functional-testing/about-functional-testing.md) isn't currently available in the wix IDE. For functional testing, use the code editor. - **Terminal is not fully supported**
The Wix IDE doesn't require the terminal console to function. While the terminal is available for use, it only offers limited functionality. - **Built-in Git functionality is not supported**
Currently, you can't initialize a local Git repository or publish to GitHub from the Wix IDE. - **Git Integration and Wix IDE can't connect simultaneously**
You can't use both the [Git Integration](https://dev.wix.com/docs/develop-websites/articles/workspace-tools/developer-tools/git-integration-wix-cli-for-sites/about-git-integration-wix-cli-for-sites.md) and the Wix IDE at the same time. If you connect your site to GitHub with Git Integration, the Wix IDE is unavailable until you disconnect your site from GitHub. The reverse is also true. - **Settings and extensions don't persist between sessions**
In the Wix IDE you can modify settings and install extensions from the [Open VSX Registry](https://open-vsx.org/). However, settings and extensions only apply to the IDE of the site you're currently working in, and aren't retained between Wix IDE sessions for the same site. You will have to reset your settings as well as re-install your extensions at the start of each new session. Note that a session concludes after 30 minutes of inactivity. ## Wix IDE beta release notes Stay up to date on our latest changes and additions as we continue to improve the Wix IDE. Your feedback is important to us. Please help us by reporting any issues that you notice while working with the Wix IDE. | Date | Description | | ------------------- | ------------------------------------------------ | | August 2, 2023 | Wix IDE beta available in Wix Studio. | | March 10, 2024 | Element IDs automatically sync with your IDE when you make changes to your site. ID changes were previously out of sync and required you to sync manually. | | March 26, 2024 | The **Display IDs** toggle is now visible in the **Layers** panel of the editor, while working in the Wix IDE. ![](https://wixmp-833713b177cebf373f611808.wixmp.com/images/wix-ide-limitations-md_velo-articles_coding-with-wix-studio_images_layers-toggle.png) | --- > Portal Navigation: > > - Append `.md` to any URL under `https://dev.wix.com/docs/` to get its markdown version. > - Pages are either content pages (article or reference text) or menu pages (a list of links to child pages). > - To get a menu page, truncate any URL to a parent path and append `.md` (e.g. `https://dev.wix.com/docs/sdk.md`, `https://dev.wix.com/docs/sdk/core-modules.md`). > - Top-level index of all portals: https://dev.wix.com/docs/llms.txt > - Full concatenated docs: https://dev.wix.com/docs/llms-full.txt ## Resource: About Git Integration & Wix CLI for Sites ## Article: About Git Integration & Wix CLI ## Article Link: https://dev.wix.com/docs/develop-websites/articles/workspace-tools/developer-tools/git-integration-wix-cli-for-sites/about-git-integration-wix-cli-for-sites.md ## Article Content: # About Git Integration & Wix CLI for Sites Git Integration & Wix CLI for Sites is a set of tools that allows you to write, test, preview, and publish code for your Wix site using your preferred IDE. Your site code is stored in a GitHub repository, giving you version control and making collaboration easy.
## Code in your preferred IDE Git Integration & Wix CLI for Sites allows you to connect your site to GitHub and develop using your preferred IDE. Wix sets up a repository for your project, which you can clone to your computer or cloud workspace and write code in as you would in any other non-Wix project. Read how to [set up Git integration & Wix CLI for Sites](https://dev.wix.com/docs/develop-websites/articles/workspace-tools/developer-tools/git-integration-wix-cli/setting-up-git-integration-wix-cli.md). ## Test your code with the Local Editor The [Local Editor](https://dev.wix.com/docs/develop-websites/articles/workspace-tools/developer-tools/git-integration-wix-cli-for-sites/about-the-local-editor.md) allows you to test changes made to your site in real time. The code in your IDE is synced with the Local Editor so you can test your changes before committing them to your repo. You can also change your site's design in the Local Editor and sync it with your IDE. ## Preview and publish with the Wix CLI for Sites The [Wix CLI for Sites](https://dev.wix.com/docs/develop-websites/articles/workspace-tools/developer-tools/git-integration-wix-cli-for-sites/wix-cli-for-sites-commands.md) is a tool that allows you to work with your site locally from the terminal. You can use it to build a preview version of your site and publish it. You can also use the CLI to install [npm packages](https://dev.wix.com/docs/develop-websites/articles/coding-with-velo/packages/about-npm-packages.md) to your site. ## Work with multiple collaborators at once Git Integration & Wix CLI for Sites extends Wix Studio's [concurrent editing](https://support.wix.com/en/article/studio-editor-collaborating-on-a-site) capabilities. Invite other developers as collaborators on your [site](https://support.wix.com/en/article/inviting-people-to-contribute-to-your-site) and your [GitHub repo](https://docs.github.com/en/account-and-profile/setting-up-and-managing-your-personal-account-on-github/managing-access-to-your-personal-repositories/inviting-collaborators-to-a-personal-repository). Multiple developers can work on a site's code at once. ## Version control With Git integration, every change to your site's code is tracked in your GitHub repository, giving you a clear history of edits and the ability to revert to previous versions when needed. This makes it easy to manage updates, resolve conflicts, and maintain a stable development workflow—even when working with multiple collaborators. ## Get started - To get started, read how to [Set Up Git Integration & Wix CLI for Sites](https://dev.wix.com/docs/develop-websites/articles/workspace-tools/developer-tools/git-integration-wix-cli/setting-up-git-integration-wix-cli.md). --- > Portal Navigation: > > - Append `.md` to any URL under `https://dev.wix.com/docs/` to get its markdown version. > - Pages are either content pages (article or reference text) or menu pages (a list of links to child pages). > - To get a menu page, truncate any URL to a parent path and append `.md` (e.g. `https://dev.wix.com/docs/sdk.md`, `https://dev.wix.com/docs/sdk/core-modules.md`). > - Top-level index of all portals: https://dev.wix.com/docs/llms.txt > - Full concatenated docs: https://dev.wix.com/docs/llms-full.txt ## Resource: Setting Up Git Integration & Wix CLI for Sites ## Article: Setting Up Git Integration & Wix CLI ## Article Link: https://dev.wix.com/docs/develop-websites/articles/workspace-tools/developer-tools/git-integration-wix-cli-for-sites/setting-up-git-integration-wix-cli-for-sites.md ## Article Content: # Set Up Git Integration & Wix CLI for Sites [Git Integration & Wix CLI for Sites](https://dev.wix.com/docs/develop-websites/articles/workspace-tools/developer-tools/git-integration-wix-cli-for-sites/about-git-integration-wix-cli-for-sites.md) allows you to write, test, preview, and publish code for your Wix site from your preferred IDE. This article explains how to set up Git Integration & Wix CLI for Sites by connecting your site to GitHub, cloning your site's GitHub repository to your computer, and installing the Wix CLI for Sites. > **Note:** You can also clone the repo to a cloud IDE workspace, then install and use the Wix CLI for Sites there. ### Before you begin Make sure you have the following tools installed before you start: * [Git](https://git-scm.com/download) * [Node](https://nodejs.org/en/download/), version 20.11 or later. * [npm](https://docs.npmjs.com/downloading-and-installing-node-js-and-npm) or [yarn](https://yarnpkg.com/getting-started/install) * An SSH key [added to your GitHub account](https://docs.github.com/en/authentication/connecting-to-github-with-ssh/adding-a-new-ssh-key-to-your-github-account). ## Step 1 | Connect your site to GitHub To write your site's code locally from your computer, first create a GitHub repo to store your site's code and connect it to your site.
**Important:** * You can't connect your site to GitHub if you have [Velo Packages](https://dev.wix.com/docs/develop-websites/articles/coding-with-velo/packages/working-with-velo-packages.md) set up on your site. This feature isn't supported when using Git Integration & Wix CLI for Sites. However, you can connect your site to GitHub if you have [npm packages](https://dev.wix.com/docs/develop-websites/articles/coding-with-velo/packages/about-npm-packages.md) installed on your site. * Once you connect your site to GitHub be careful not to delete your site's repo or revoke the Velo app's access to this repo. These actions may cause your site's GitHub connection to stop working even if you restore the repo or reinstall the app.
If you haven't already done so, click ![Code icon](https://github.com/wix-incubator/wix-code-docs/assets/50321691/2c41d3df-930f-4e0f-966f-038742adceed) and then **Start Coding** (Wix Studio), or enable [Velo Dev Mode](https://support.wix.com/en/article/about-velo-by-wix#to-enable-velo-on-your-site) (Wix Editor). 1. Go to the GitHub Integration section of your editor: + **Wix Studio:** In the Code sidebar, click **GitHub** then **Connect to GitHub**. ![Connect to GitHub](https://wixmp-833713b177cebf373f611808.wixmp.com/images/2975acc2f04e09b584d7445e64fb1107.png) + **Wix Editor:** Click the **GitHub Integration** ![](https://user-images.githubusercontent.com/89579857/184818043-6a791df6-9f83-4183-ba2f-63d8c32a6cf7.png) icon in the Code sidebar and then **Connect to GitHub**. 3. Click **Continue**. ![](https://user-images.githubusercontent.com/89579857/188311147-436ecd17-c717-440c-93ae-feb7685eddeb.png) 4. Click **Sign In**. Follow the prompts to sign in to your GitHub account and authorize Velo to create a new repo for you. 5. Choose an owner and enter a name for the new repo to connect to your site. Optionally, you can add a custom description as well. Click **Create**. ![](https://user-images.githubusercontent.com/89579857/188311195-229312f8-3fd5-4c6d-902d-b746f0c9915d.png) 6. Click **Install** to start installing the Velo GitHub app on your new repo. This app allows your site to communicate with GitHub. You may need to authenticate your identity in GitHub before continuing. 7. Make sure that both **Only select repositories** and your new repo are selected. Click **Approve and Install**. ![](https://user-images.githubusercontent.com/89579857/184847450-8f0b382d-4dfd-4918-a23c-983e910a8fc2.png) 8. Copy the displayed terminal commands. You need them for the next section of the setup. 9. Click **Close**. Your repo name and default branch are displayed in the **GitHub Integration** panel. ![](https://user-images.githubusercontent.com/89579857/188308239-bb8c9c44-4844-470a-b1d5-dbd0d48be4ce.png) Once you connect your site to GitHub, your editor enters [read-only mode](https://support.wix.com/en/article/velo-working-with-editor-x-and-github-integration#about-read-only-mode). You can always choose to [disconnect your site from GitHub](https://dev.wix.com/docs/develop-websites/articles/workspace-tools/developer-tools/git-integration-wix-cli-for-sites/disconnect-your-site-from-git-hub.md). ## Step 2 | Set up your local environment Once your site's repo is set up, you can clone it to your computer and install the Wix CLI for Sites. The commands used in this procedure accomplish the following: * Clone your site's repo to your computer. * Install the repo's dependencies. * Install the [Wix CLI for Sites](https://dev.wix.com/docs/develop-websites/articles/workspace-tools/developer-tools/git-integration-wix-cli-for-sites/wix-cli-for-sites-commands.md) globally on your computer. To set up your local environment, do the following: 1. Open the terminal on your computer. 2. Navigate to the directory where you want to store your repo's files. 3. Run the commands you copied down in the previous section. Depending on your computer's setup, you may need administrator privileges to run the commands. To see the commands again, open your site's editor and click **Local Dev Setup**. ![](https://user-images.githubusercontent.com/89579857/188308276-c55c6e03-3bc4-4ca0-9512-14bc1d8040b4.png) The default commands use npm as the package manager for installations. You can also use yarn to manage packages. To do this, make the following changes: * Change `npm install` to `yarn install`. * Change `npm install -g @wix/cli` to `yarn global add @wix/cli`. After the installation, the [Local Editor](https://dev.wix.com/docs/develop-websites/articles/workspace-tools/developer-tools/git-integration-wix-cli-for-sites/about-the-local-editor.md) opens in your default web browser. 4. Open the repo in your favorite local IDE to start writing code. ## Step 3 | Set up the Wix CLI for Sites The CLI is a package that you install on your computer. 1. Open your computer's terminal. 2. Run `npm install -g @wix/cli` or `yarn global add @wix/cli`. Once you've installed the CLI globally, you can use it with any Wix site repos on your computer. ## Next Steps You're ready to start writing your site's code, and [testing it with the Local Editor](https://dev.wix.com/docs/develop-websites/articles/workspace-tools/developer-tools/git-integration-wix-cli-for-sites/test-your-code-in-the-local-editor.md) --- > Portal Navigation: > > - Append `.md` to any URL under `https://dev.wix.com/docs/` to get its markdown version. > - Pages are either content pages (article or reference text) or menu pages (a list of links to child pages). > - To get a menu page, truncate any URL to a parent path and append `.md` (e.g. `https://dev.wix.com/docs/sdk.md`, `https://dev.wix.com/docs/sdk/core-modules.md`). > - Top-level index of all portals: https://dev.wix.com/docs/llms.txt > - Full concatenated docs: https://dev.wix.com/docs/llms-full.txt ## Resource: Publishing a Site with Git Integration & Wix CLI for Sites ## Article: Publishing a Site with Git Integration & Wix CLI ## Article Link: https://dev.wix.com/docs/develop-websites/articles/workspace-tools/developer-tools/git-integration-wix-cli-for-sites/publishing-a-site-with-git-integration-wix-cli-for-sites.md ## Article Content: # Publish a Site with Git Integration & Wix CLI for Sites Once you've used [Git Integration & Wix CLI for Sites](https://dev.wix.com/docs/develop-websites/articles/workspace-tools/developer-tools/git-integration-wix-cli-for-sites/about-git-integration-wix-cli-for-sites.md) to edit your site's code and test it, you're ready to move it to your live site. This process includes 2 stages: 1. Pushing your code to your site's GitHub repository. 2. Publishing your site. ## Step 1 | Push your code to GitHub Your site's editor is synced with the [default branch](https://docs.github.com/en/pull-requests/collaborating-with-pull-requests/proposing-changes-to-your-work-with-pull-requests/about-branches#about-the-default-branch) of your site's GitHub repository. Usually, this is the `main` branch, but you can [change it](https://docs.github.com/en/repositories/configuring-branches-and-merges-in-your-repository/managing-branches-in-your-repository/changing-the-default-branch) to any branch you want. To sync your code with the editor, push a commit to your repo's default branch. You can use other GitHub features like branches, pull requests, and reviews as you normally would.
Once you push a commit to your default branch, your code appears in the editor. The commit details appear in the **GitHub Integration** ![](https://user-images.githubusercontent.com/89579857/184650610-e5aec718-676b-4dc5-b9b4-cad2b6c1fc64.png) panel of the [Code sidebar](https://dev.wix.com/docs/develop-websites/articles/workspace-tools/velo-workspace/workspaces/wix-editor-working-with-the-code-sidebar.md) (Wix Editor), or in the **Github** section of the Code sidebar (Wix Studio).
>**Note:** > There may be a delay between when you push a commit to GitHub and when it appears in the editor. ## Step 2 | Publish your site When working with Git Integration & Wix CLI for Sites, you can publish your site either from the editor or from the [Wix CLI for Sites](https://dev.wix.com/docs/develop-websites/articles/workspace-tools/developer-tools/git-integration-wix-cli-for-sites/wix-cli-for-sites-commands.md). The different publishing options use different copies of your site's code and different [UI versions](https://dev.wix.com/docs/develop-websites/articles/workspace-tools/developer-tools/git-integration-wix-cli-for-sites/about-the-local-editor.md), as follows: |Publishing Method |Code Version |UI Version | |---|---|---| | Editor | The code in the default branch of your site's repo. | The latest UI version, even if this version doesn't align with the code in your site's repo. | | CLI - Latest commit | The code in the default branch of your site's repo. | The UI version indicated in the [wix.config.json](https://dev.wix.com/docs/develop-websites/articles/workspace-tools/developer-tools/git-integration-wix-cli-for-sites/git-hub-repository-file-structure.md) file in your site's repo. | | CLI - Local code | The code saved in your IDE even if you haven't pushed it to GitHub. | The UI version indicated in the [wix.config.json](https://dev.wix.com/docs/develop-websites/articles/workspace-tools/developer-tools/git-integration-wix-cli-for-sites/git-hub-repository-file-structure.md) file in your site's repo. | ### Publish from the Editor To publish your site from the editor do the following: 1. Open the editor. 2. Click **Publish**. ![](https://user-images.githubusercontent.com/89579857/188307221-d43f33ad-36db-4e48-952e-181c619e7891.png) 3. Note that a modal may appear warning you that you are about to publish the latest UI version. Click **Continue**. ### Publish from the Wix CLI for Sites To publish your site from the Wix CLI for Sites, do the following: 1. Open your terminal and navigate to your site's repo. 2. Run this command: `wix publish`. 3. When you publish from the CLI, you can either use the code in your repo's default branch, or the code saved in your IDE. ![](https://user-images.githubusercontent.com/89579857/186160822-6feb52bf-bfb4-42e8-a4c1-5cfe03d16449.png) * To publish from your default branch, select `Latest commit from {your repo's default branch}`. * To publish from the code on your local environment, select `Local code`. **Important:** Publishing your local code leaves your live site and your site's GitHub repo out of sync. If you publish from the repo later without pushing your local code, your local code is overwritten and may be lost. 4. Once you make a selection, the source of the code and UI version that are being used to publish are displayed in the terminal. A link to a preview site is also displayed. If you're sure you want to publish, press `y`. The terminal displays the URL of your published site and links to view logs and backend traffic. ![](https://user-images.githubusercontent.com/89579857/186163253-d5f4a952-9aab-4561-a81e-8f00d4184f1f.png) ## See also * [Wix CLI for Sites commands](https://dev.wix.com/docs/develop-websites/articles/workspace-tools/developer-tools/git-integration-wix-cli-for-sites/wix-cli-for-sites-commands.md) * [About Automated Workflows and the Wix CLI for Sites](https://dev.wix.com/docs/develop-websites/articles/workspace-tools/developer-tools/git-integration-wix-cli-for-sites/about-automated-workflows-and-the-wix-cli-for-sites.md) * [Fix a Broken Git Integration](https://dev.wix.com/docs/develop-websites/articles/workspace-tools/developer-tools/git-integration-wix-cli-for-sites/fixing-a-broken-git-hub-integration.md) --- > Portal Navigation: > > - Append `.md` to any URL under `https://dev.wix.com/docs/` to get its markdown version. > - Pages are either content pages (article or reference text) or menu pages (a list of links to child pages). > - To get a menu page, truncate any URL to a parent path and append `.md` (e.g. `https://dev.wix.com/docs/sdk.md`, `https://dev.wix.com/docs/sdk/core-modules.md`). > - Top-level index of all portals: https://dev.wix.com/docs/llms.txt > - Full concatenated docs: https://dev.wix.com/docs/llms-full.txt ## Resource: Fixing a Broken GitHub Integration ## Article: Fixing a Broken GitHub Integration ## Article Link: https://dev.wix.com/docs/develop-websites/articles/workspace-tools/developer-tools/git-integration-wix-cli-for-sites/fixing-a-broken-git-hub-integration.md ## Article Content: # Fix a Broken Git Integration [Git Integration](https://dev.wix.com/docs/develop-websites/articles/workspace-tools/developer-tools/git-integration-wix-cli/about-git-integration-wix-cli.md) relies on the [Velo GitHub App](https://github.com/apps/velo-app) to maintain the connection between your site and its GitHub repository. If the app is uninstalled or suspended, your site's Git integration stops working. Your Git integration can also stop working if you make changes to the repo's settings or to your GitHub account settings. When the connection between your site and GitHub is lost, a modal indicating the problem appears in the editor. The following sections explain each of the modals you might see in the editor, and the steps you can take to fix your Git integration. ## Repository Not Found The **GitHub repository cannot be found** modal indicates that the Velo GitHub App can't find your site's repo. This happens in the following cases: * You deleted the repo. * You changed the repo's name. * You transferred the repo to another GitHub account or organization. * You changed your GitHub username. * You revoked the Velo App's access to the repo. In the first 4 cases, you need to disconnect your site from GitHub. You can do this by clicking the **Disconnect From GitHub** button in the modal. Once you've done this, [connect your site to GitHub](https://support.wix.com/en/article/velo-setting-up-git-integration-wix-cli-early-access#connect-your-site-to-github) again and create a new repo for your site. Please note that you can't reconnect your site to the original repo. In the last case, you can restore the connection to your site's repo by granting the Velo App access to it: 1. Open [GitHub](https://www.github.com) in a new tab in your browser. 2. In the upper-right corner, click your profile photo and select **Settings**. ![](https://user-images.githubusercontent.com/89579857/211188090-bc05a823-0b0c-462d-bdd2-8099d26dd28a.png) 3. On the left sidebar, under **Integrations**, click **Applications**. ![](https://user-images.githubusercontent.com/89579857/211188102-63a97ac5-5c3e-4fd7-a97c-c91a0f33ab58.png) 4. With the **Installed GitHub Apps** tab selected, find the Velo App and click **Configure**. 5. In the **Repository access** section, click **Select repositories**. Select your site's repository from the dropdown list. Click **Save**. 6. Refresh the Wix editor. ## Velo App Uninstalled The **Velo App on GitHub was uninstalled** modal indicates that you have uninstalled the Velo App from your GitHub account. To reinstall the app, take the following steps: 1. Open the [Velo App](https://github.com/apps/velo-app) page in a new tab in your browser. 2. Click **Configure**. 3. Select where you want to install the app. 4. Select **Only select repositories** and select your site's repository from the dropdown list. 5. Click **Install**. 6. Refresh the Wix editor. ## Velo App Suspended The **Velo App on GitHub was suspended** modal indicates that you have suspended the Velo App's access to your GitHub account. To unsuspend the app, take the following steps: 1. Open [GitHub](https://www.github.com) in a new tab in your browser. 2. In the upper-right corner, click your profile photo and select **Settings**. ![](https://user-images.githubusercontent.com/89579857/211188090-bc05a823-0b0c-462d-bdd2-8099d26dd28a.png) 3. On the left sidebar, under **Integrations**, click **Applications**. 4. With the **Installed GitHub Apps** tab selected, find the Velo App and click **Configure**. 5. In the **Danger Zone** section, click **Unsuspend**. 6. Refresh the Wix editor. ## See also * [Test Your Code in the Local Editor](https://dev.wix.com/docs/develop-websites/articles/workspace-tools/developer-tools/git-integration-wix-cli/test-your-code-in-the-local-editor.md) * [Publish a Site with Git Integration & Wix CLI for Sites](https://dev.wix.com/docs/develop-websites/articles/workspace-tools/developer-tools/git-integration-wix-cli/publishing-a-site-with-git-integration-wix-cli.md) --- > Portal Navigation: > > - Append `.md` to any URL under `https://dev.wix.com/docs/` to get its markdown version. > - Pages are either content pages (article or reference text) or menu pages (a list of links to child pages). > - To get a menu page, truncate any URL to a parent path and append `.md` (e.g. `https://dev.wix.com/docs/sdk.md`, `https://dev.wix.com/docs/sdk/core-modules.md`). > - Top-level index of all portals: https://dev.wix.com/docs/llms.txt > - Full concatenated docs: https://dev.wix.com/docs/llms-full.txt ## Resource: Wix CLI for Sites Commands ## Article: Working with the Wix CLI ## Article Link: https://dev.wix.com/docs/develop-websites/articles/workspace-tools/developer-tools/git-integration-wix-cli-for-sites/wix-cli-for-sites-commands.md ## Article Content: # Wix CLI for Sites Commands This article documents the CLI commands for working with your Wix site. For a detailed explanation of the process and how to initially set up the Wix CLI for Sites, see [Set Up the Wix CLI for Sites](https://dev.wix.com/docs/develop-websites/articles/workspace-tools/developer-tools/git-integration-wix-cli/setting-up-git-integration-wix-cli.md#step-3--set-up-the-wix-cli). ## Command Overview | Command | Description | |--------------------|--------------------------------------------------------------| | [wix dev](#wix-dev) | Opens a local development environment for your Wix site. | | [wix install](#wix-install)| Installs a package to your site. | | [wix update](#wix-update) | Updates a package installed on your site. | | [wix uninstall](#wix-uninstall) | Uninstalls a package from your site. | | [wix publish](#wix-publish)| Publishes your site to production. | | [wix preview](#wix-preview)| Creates a shareable version of your site before going live. | | [wix login](#wix-login) | Logs in to your Wix account. | | [wix whoami](#wix-whoami) | Displays the username of the logged-in Wix user. | | [wix logout](#wix-logout) | Logs out of your Wix account. | ## wix -h ``` bash wix -h ``` Displays a list of supported CLI commands in the terminal. You can also run `wix [command] -h` to get detailed help for a command. ## wix dev ```bash wix dev ``` Opens a site's Local Editor. ### wix dev flags | Flag | Description | |-----------------|--------------------------------------------------------------| | `--tunnel` | Use this flag to allow the editor to connect to the CLI when running it on a cloud IDE. | ## wix install ```bash wix install [options] ``` Installs a code package to a site's repo. If your site's repo has a `yarn.lock` file, the installer uses yarn to install packages by default. Otherwise, the installer uses npm by default. To specify which package manager to use, include an `--npm` or `--yarn` options flag. Example install command: ```bash wix install --yarn marked ``` Once the package is installed, a message is displayed in the terminal. ```bash marked@4.0.16 successfully installed. ``` ### wix install flags | Flag | Description | |-----------------|--------------------------------------------------------------| | `--npm` | Forces the installer to use npm as the package manager. | | `--yarn` | Forces the installer to use yarn as the package manager. | ## wix update ```bash wix update [options] ``` Updates a code package installed on your site's repository. ## wix uninstall ```bash wix uninstall [options] ``` Uninstalls a code package from your site's repository. ## wix publish ```bash wix publish ``` Publishes your site. You can choose to use either the code in the default branch of a site's repo or the local code in your IDE as the publishing source. ```bash ? What would you like to publish? › - Use arrow-keys. Return to submit. ❯ Latest commit from origin/main Local code ```
**Important:** Publishing your local code leaves your live site and your site's GitHub repo out of sync. If you publish from the repo later without pushing your local code, your local code is overwritten and may be lost.
For more information, see [Publish a Site with the Git Integration & Wix CLI for Sites](https://dev.wix.com/docs/develop-websites/articles/workspace-tools/developer-tools/git-integration-wix-cli/publishing-a-site-with-git-integration-wix-cli.md). ## wix preview ```bash wix preview ``` Builds a preview version of a site. You can only use this command if you have previously published your site. You can build the preview from the code in the default branch of a site's repo or from the local code in your IDE. ```bash ? What would you like to preview? › - Use arrow-keys. Return to submit. ❯ Latest commit from origin/main Local code ``` Once the preview site is ready, a URL to the site is displayed in the terminal. ```bash Creating preview deployment... Your preview deployment is now available at http://wix.to/JOaBagO ``` > **Note:** > * This preview isn't a [test site](https://support.wix.com/en/article/about-test-sites) and doesn't appear in the Release Manager. > * The preview uses the live versions of any [HTTP functions](https://www.wix.com/velo/reference/wix-http-functions) exposed on your site. This means you can't use the preview to test changes to HTTP functions. To test HTTP functions, commit and push them to your site's repo and use [functional testing](https://dev.wix.com/docs/develop-websites/articles/workspace-tools/testing-monitoring/functional-testing/test-backend-functions-with-functional-testing.md) in the editor. ## wix login ```bash wix login ``` Logs in to a Wix account. This allows the CLI to perform actions on that account's sites. ## wix whoami ```bash wix whoami ``` Displays the username of the currently logged-in Wix user. ## wix logout ```bash wix logout ``` Logs you out of your Wix account. ## See also * [About Automated Workflows and the Wix CLI for Sites](https://dev.wix.com/docs/develop-websites/articles/workspace-tools/developer-tools/git-integration-wix-cli/about-automated-workflows-and-the-wix-cli.md) * [Testing your code with the Local Editor](https://dev.wix.com/docs/develop-websites/articles/workspace-tools/developer-tools/git-integration-wix-cli/test-your-code-in-the-local-editor.md) --- > Portal Navigation: > > - Append `.md` to any URL under `https://dev.wix.com/docs/` to get its markdown version. > - Pages are either content pages (article or reference text) or menu pages (a list of links to child pages). > - To get a menu page, truncate any URL to a parent path and append `.md` (e.g. `https://dev.wix.com/docs/sdk.md`, `https://dev.wix.com/docs/sdk/core-modules.md`). > - Top-level index of all portals: https://dev.wix.com/docs/llms.txt > - Full concatenated docs: https://dev.wix.com/docs/llms-full.txt ## Resource: About the Local Editor ## Article: Working with the Local Editor ## Article Link: https://dev.wix.com/docs/develop-websites/articles/workspace-tools/developer-tools/git-integration-wix-cli-for-sites/about-the-local-editor.md ## Article Content: # About the Local Editor > **Note** > This article refers to 2 different versions of the editor: > > * **Regular Editor**: The editor that's generally used to build Wix sites. > * **Local Editor**: A specialized version of the Regular Editor that's used when developing your site in your local IDE. The Local Editor is a tool for testing code added to your site in your local IDE using [Git Integration & Wix CLI for Sites](https://dev.wix.com/docs/develop-websites/articles/workspace-tools/developer-tools/git-integration-wix-cli/about-git-integration-wix-cli.md). You can use the Local Editor to test your code in real time and make changes to your site's design that you can sync with your IDE. For detailed instructions on this flow, see [Test Your Code in the Local Editor](https://dev.wix.com/docs/develop-websites/articles/workspace-tools/developer-tools/git-integration-wix-cli/test-your-code-in-the-local-editor.md). ## Differences in the Local Editor Working in the Local Editor is different from working in the Regular Editor. Please note the following changes: * The **Publish** button is replaced with the **Save** button. * Code files are read-only. To make changes to your site's code, use your local IDE. * Packages & Apps are read-only. To add, update, or delete packages and apps, use your local IDE. * The Wix IDE is disabled, use your local IDE instead. * If you duplicate a page on your site, the page's code isn't included in the copy. * Changes to [collection fields](https://support.wix.com/en/article/content-manager-about-your-collection-fields) are immediately reflected on your live site, even before you publish. ## Making changes to site design The Local Editor allows you to make changes to your site's design such as adding or modifying elements and pages. These changes generate a new UI version for your site which you need to sync with your IDE. Once the UI version is synced with your IDE, code files for newly added pages appear in your repo. Autocomplete is also enabled for any newly added page elements. ### About UI versions UI versions are snapshots of a site's design. Saving any design changes to a site including adding a new page or adding or modifying elements generates a new UI version. UI versions are generated in both the Local Editor and the Regular Editor. Wix uses UI versions to match the code in your IDE with your site's design. The current UI version for the code in your site's repo is indicated in the [wix.config.json](https://dev.wix.com/docs/develop-websites/articles/workspace-tools/developer-tools/git-integration-wix-cli-for-sites/git-hub-repository-file-structure.md) file.
## See also * [Test Your Code in the Local Editor](https://dev.wix.com/docs/develop-websites/articles/workspace-tools/developer-tools/git-integration-wix-cli/test-your-code-in-the-local-editor.md) --- > Portal Navigation: > > - Append `.md` to any URL under `https://dev.wix.com/docs/` to get its markdown version. > - Pages are either content pages (article or reference text) or menu pages (a list of links to child pages). > - To get a menu page, truncate any URL to a parent path and append `.md` (e.g. `https://dev.wix.com/docs/sdk.md`, `https://dev.wix.com/docs/sdk/core-modules.md`). > - Top-level index of all portals: https://dev.wix.com/docs/llms.txt > - Full concatenated docs: https://dev.wix.com/docs/llms-full.txt ## Resource: Changes to the Editor When Your Site Is Integrated ## Article: Integrating Your Site With GitHub ## Article Link: https://dev.wix.com/docs/develop-websites/articles/workspace-tools/developer-tools/git-integration-wix-cli-for-sites/changes-to-the-editor-when-your-site-is-integrated.md ## Article Content: # Changes to the Editor When Your Site Is Integrated When you connect your site to GitHub, a GitHub repository is created to store your site's code. Once this happens, the code in the editor is synced with the [default branch](https://docs.github.com/en/pull-requests/collaborating-with-pull-requests/proposing-changes-to-your-work-with-pull-requests/about-branches#about-the-default-branch) of this repo. The name of the connected repo as well as the details of commits to the default branch appear in the **GitHub Integration** ![](https://user-images.githubusercontent.com/89579857/184650610-e5aec718-676b-4dc5-b9b4-cad2b6c1fc64.png) panel of the sidebar.
## About read-only mode While your site is connected to GitHub, the editor is in read-only mode. This involves the following changes: * Code files are read-only. You can't make any changes to your site's code or add new files. Use your local IDE to [add new files and change code](https://dev.wix.com/docs/develop-websites/articles/workspace-tools/developer-tools/git-integration-wix-cli-for-sites/git-hub-repository-file-structure.md). * You can add [dynamic event handlers](https://dev.wix.com/docs/develop-websites/articles/coding-with-velo/frontend-code/about-event-handlers-in-wix.md) to elements using code. To see the event handlers supported for each element, check the [Velo API Reference](https://www.wix.com/velo/reference/$w). * Changes to the [fields](https://support.wix.com/en/article/content-manager-about-your-collection-fields) in a collection are immediately reflected on your live site, even before you publish. * If you duplicate a page on your site, the page's code isn't included in the copy. ## See also * [Testing your code with the Local Editor](https://dev.wix.com/docs/develop-websites/articles/workspace-tools/developer-tools/git-integration-wix-cli/test-your-code-in-the-local-editor.md) * [Publish a Site with Git Integration & Wix CLI for Sites](https://dev.wix.com/docs/develop-websites/articles/workspace-tools/developer-tools/git-integration-wix-cli/publishing-a-site-with-git-integration-wix-cli.md) --- > Portal Navigation: > > - Append `.md` to any URL under `https://dev.wix.com/docs/` to get its markdown version. > - Pages are either content pages (article or reference text) or menu pages (a list of links to child pages). > - To get a menu page, truncate any URL to a parent path and append `.md` (e.g. `https://dev.wix.com/docs/sdk.md`, `https://dev.wix.com/docs/sdk/core-modules.md`). > - Top-level index of all portals: https://dev.wix.com/docs/llms.txt > - Full concatenated docs: https://dev.wix.com/docs/llms-full.txt ## Resource: GitHub Repository File Structure ## Article: Understanding Your Site's GitHub Repository ## Article Link: https://dev.wix.com/docs/develop-websites/articles/workspace-tools/developer-tools/git-integration-wix-cli-for-sites/git-hub-repository-file-structure.md ## Article Content: # GitHub Repository File Structure The repo's file structure matches the [public](https://dev.wix.com/docs/develop-websites/articles/workspace-tools/velo-workspace/workspaces/wix-editor-working-with-the-code-sidebar.md#public), [backend](https://dev.wix.com/docs/develop-websites/articles/workspace-tools/velo-workspace/workspaces/wix-editor-working-with-the-code-sidebar.md#backend), and [page code](https://dev.wix.com/docs/develop-websites/articles/workspace-tools/velo-workspace/workspaces/wix-editor-working-with-the-code-sidebar.md#page-code) sections in the [Code sidebar](https://dev.wix.com/docs/develop-websites/articles/workspace-tools/velo-workspace/workspaces/wix-editor-working-with-the-code-sidebar.md) (Wix Editor). The file structure includes these important elements: * The [wix.config.json](#wixconfigjson) file found in the repo's root folder. * The **src** folder, that contains the following: * The [Backend folder](#backend-folder) * The [Pages folder](#pages-folder) * The [Public folder](#public-folder) * The [velo.dependencies.json](#velodependenciesjson) file (only exists once your first npm package is installed) Add your code in either the **Pages**, **Backend**, or **Public** folders. Files or folders added to the root of the **src** folder are ignored. >**Notes:** > The following Velo features can't be added to a site when using Git Integration & Wix CLI for Sites: > * [Custom Extensions (Beta)](https://dev.wix.com/docs/develop-websites/articles/coding-with-velo/integrations/service-plugins-formerly-spis/about-service-plugins.md) > * [Velo Packages](https://dev.wix.com/docs/develop-websites/articles/coding-with-velo/packages/working-with-velo-packages.md) ## Pages folder This folder contains code files for each of the pages on your site as well as the [masterpage.js](https://dev.wix.com/docs/develop-websites/articles/workspace-tools/velo-workspace/workspaces/wix-editor-working-with-the-code-sidebar.md#global-site) file. The code you add to these files runs when visitors open pages on your site. These files correspond to the ones found in the [**Main Pages**](https://dev.wix.com/docs/develop-websites/articles/workspace-tools/velo-workspace/workspaces/wix-editor-working-with-the-code-sidebar.md#main-pages) section of the **Page Code** ![](https://user-images.githubusercontent.com/89579857/184645988-6d4ee6d3-34ab-45bc-b914-5779a7de0cad.png) tab in the Code sidebar. When you add a page to your site in a Wix editor in your browser, a code file for that page gets added to your repo. The name of the file has 2 components: the name of the page that you define in the editor, and an internal ID string. The sections are separated by a period. ![](https://user-images.githubusercontent.com/89579857/188305074-6e2ee718-13b8-435d-9c75-bcb126f35718.png) When you [add a dynamic page](https://support.wix.com/en/article/content-manager-about-dynamic-pages#adding-dynamic-pages) to your site 2 code files are added to the site's repo corresponding to the dynamic list and dynamic item pages. When you open a page's code file, you see the same sample code that appears in these code files in Wix editors in your browser. ![](https://user-images.githubusercontent.com/89579857/184646571-1e14f166-2b86-4f21-bf57-83468251bca8.png) When you delete a page in a Wix editor in your browser, the page's corresponding code file is deleted from your repo. >**Notes:** > * You can't create new code files for pages from your IDE. To add a file, create a new page for your site in a Wix editor in your browser, and [sync](https://dev.wix.com/docs/develop-websites/articles/workspace-tools/developer-tools/git-integration-wix-cli-for-sites/about-the-local-editor.md) your site with your local IDE. > * Do not rename code files for pages. Wix uses these file names to associate the files with the appropriate pages on your site. If you rename a file, your code is ignored and a new code file is created for the page. ## Backend folder This folder contains the backend code files for your site. These files correspond to the ones found in the [**Backend**](https://dev.wix.com/docs/develop-websites/articles/workspace-tools/velo-workspace/workspaces/wix-editor-working-with-the-code-sidebar.md#backend) section of the **Public & Backend** tab in the Code sidebar. Add the following files to this folder to include them in your site: * [**Web Modules:**](https://dev.wix.com/docs/develop-websites/articles/coding-with-velo/backend-code/web-modules/call-backend-code-from-the-frontend.md) These are files that allow you to expose functions in your site's backend that you can run in your frontend code. These files require a `.web.js` file extension. > **Note:** For web modules with a `.jsw` extension, permissions are managed using the [permissions.json](#permissionsjson) file. Note that `.jsw` web modules are deprecated, although still supported for backward compatibility for both Wix Editor and Wix Studio. * **data.js:** A file for [adding data hooks](https://dev.wix.com/docs/develop-websites/articles/databases/wix-data/hooks/using-data-hooks.md) to your site's collections. * **routers.js:** A file for implementing [routing and sitemap](https://dev.wix.com/docs/develop-websites/articles/coding-with-velo/routers/about-routers.md) functionality for your site. * **events.js:** A file for implementing your site's [backend event handlers](https://dev.wix.com/docs/develop-websites/articles/coding-with-velo/backend-code/events/about-backend-events.md). * **http-functions.js:** A file for implementing [HTTP endpoints](https://www.wix.com/velo/reference/wix-http-functions/introduction) that are exposed on your site. * **jobs.config:** A file for [scheduling recurring jobs](https://dev.wix.com/docs/develop-websites/articles/workspace-tools/developer-tools/recurring-jobs/about-scheduling-recurring-jobs.md). Jobs consist of other backend code that's run at regular intervals. * **General backend files:** JavaScript code files. You can import code from these files into any other backend file on your site. These files require a `.js` file extension. Use the following syntax to import code from backend files: ```javascript import { myFunctionName } from 'backend/myFileName'; ``` Trying to import from the relative path in your site's repo doesn't work. ### permissions.json
When using `.jsw` (deprecated) web modules, you can't change permissions in the editor when using Git Integration & Wix CLI for Sites. Instead, use the permissions.json file to set function permissions.   The backend folder also contains the **permissions.json** file. This file defines [permissions](https://dev.wix.com/docs/develop-websites/articles/coding-with-velo/backend-code/web-modules/about-web-modules.md#permissions) for the functions in your web module files. The file contains a key, `"web-methods"`, whose value is an object that contains keys named after the web module files in your backend folder. Name these keys with the following syntax: `"backend/{path to file}/myFile.jsw"`. The value for each file name key is an object that contains keys named after the functions in that file. Each function key has a value with the following format: ```json "myFunction": { "siteOwner" : { "invoke" : // Boolean }, "siteMember" : { "invoke" : // Boolean }, "anonymous" : { "invoke" : // Boolean } } ``` These values reflect the different levels of web module function permissions. You should set them using the following options: * **Owner-only access**: * `siteOwner.invoke`: `true` * `siteMember.invoke`: `false` * `anonymous.invoke` : `false` * **Site member access**: * `siteOwner.invoke`: `true` * `siteMember.invoke`: `true` * `anonymous.invoke` : `false` * **Anyone can access**: * `anonymous.invoke`: `true` * `siteMember.invoke` : `true` * `anonymous.invoke`: `true` The `"web-methods"` object must also contain a `"*"` key. The value for this key defines the default permissions that are applied to any function whose permissions you don't set manually. Here is an example `permissions.json` file for a site with a backend file called `helperFunctions.jsw`. The file's functions are called `calculate`, `fetchData`, and `syncWithServer`. In this case anyone can call `calculate`, site members can call `syncWithServer`, and only site owners can call `fetchData`. ```json { "web-methods": { "*": { "*": { "siteOwner": { "invoke": true }, "siteMember": { "invoke": true }, "anonymous": { "invoke": true } } }, "backend/helperFunctions.jsw": { "calculate": { "siteOwner": { "invoke": true }, "siteMember": { "invoke": true }, "anonymous": { "invoke": true } }, "fetchData": { "siteOwner": { "invoke": true }, "siteMember": { "invoke": false }, "anonymous": { "invoke": false } }, "syncWithServer": { "siteOwner": { "invoke": true }, "siteMember": { "invoke": true }, "anonymous": { "invoke": false } } } } } ```
## Public folder This folder contains the public code files for your site. These files correspond to the ones found in the [**Public**](https://dev.wix.com/docs/develop-websites/articles/workspace-tools/velo-workspace/workspaces/wix-editor-working-with-the-code-sidebar.md#public) section of the **Public & Backend** tab in the Code sidebar. You can import code from these files into any other file on your site. Use the following syntax to import code from public files: ```javascript import { myFunctionName } from 'public/myFileName'; ``` Trying to import from the relative path in your site's repo doesn't work. ## velo.dependencies.json This file is created automatically when you install your first npm package. Wix uses this file to track the [npm packages](https://dev.wix.com/docs/develop-websites/articles/coding-with-velo/packages/about-npm-packages.md) installed on your site. The file is updated automatically when you [install a package](https://dev.wix.com/docs/develop-websites/articles/workspace-tools/developer-tools/git-integration-wix-cli-for-sites/wix-cli-for-sites-commands.md) with the Wix CLI for Sites. Don't change this file manually. ## wix.config.json Wix uses this file to associate your repo's code with a particular site and [UI version](https://dev.wix.com/docs/develop-websites/articles/workspace-tools/developer-tools/git-integration-wix-cli-for-sites/about-the-local-editor.md). This file is updated automatically when your repo is synced with the Wix editors. Don't change this file manually. ## See also * [Publish a Site with Git Integration & Wix CLI for Sites](https://dev.wix.com/docs/develop-websites/articles/workspace-tools/developer-tools/git-integration-wix-cli/publishing-a-site-with-git-integration-wix-cli.md) * [Test Your Code in the Local Editor](https://dev.wix.com/docs/develop-websites/articles/workspace-tools/developer-tools/git-integration-wix-cli/test-your-code-in-the-local-editor.md) * [Fix a Broken Git Integration](https://dev.wix.com/docs/develop-websites/articles/workspace-tools/developer-tools/git-integration-wix-cli/fixing-a-broken-git-hub-integration.md) --- > Portal Navigation: > > - Append `.md` to any URL under `https://dev.wix.com/docs/` to get its markdown version. > - Pages are either content pages (article or reference text) or menu pages (a list of links to child pages). > - To get a menu page, truncate any URL to a parent path and append `.md` (e.g. `https://dev.wix.com/docs/sdk.md`, `https://dev.wix.com/docs/sdk/core-modules.md`). > - Top-level index of all portals: https://dev.wix.com/docs/llms.txt > - Full concatenated docs: https://dev.wix.com/docs/llms-full.txt ## Resource: About Automated Workflows and the Wix CLI for Sites ## Article: About Automated Workflows and the Wix CLI ## Article Link: https://dev.wix.com/docs/develop-websites/articles/workspace-tools/developer-tools/git-integration-wix-cli-for-sites/about-automated-workflows-and-the-wix-cli-for-sites.md ## Article Content: # About Automated Workflows and the Wix CLI for Sites You can use the Wix CLI for Sites in your preferred automated workflow environment by [authenticating it with an API key](https://support.wix.com/en/article/about-wix-api-keys). For example, you can create [GitHub Actions](https://docs.github.com/en/actions) workflows to streamline and automate site development tasks, such as creating preview deployments and publishing updates to your site. Learn how to [Set Up GitHub Actions to Work with the Wix CLI for Sites](https://dev.wix.com/docs/develop-websites/articles/workspace-tools/developer-tools/git-integration-wix-cli/set-up-git-hub-actions-to-work-with-the-wix-cli.md). ## Suggested workflows Setting up GitHub Actions workflows to work with the Wix CLI for Sites allows you to streamline and automate site development procedures. Some suggested workflows include: 1. Create a preview deployment: Build a live, shareable preview version of your site whenever a new pull request is opened, based the updated code in the pull request's branch. 2. Publish when pushing changes: Automatically publish your site whenever changes are pushed to the default branch of your site's repo. ## See also - [Set Up GitHub Actions to Work with the Wix CLI for Sites](https://dev.wix.com/docs/develop-websites/articles/workspace-tools/developer-tools/git-integration-wix-cli/set-up-git-hub-actions-to-work-with-the-wix-cli.md) - [Learn more about GitHub Actions](https://docs.github.com/en/actions) --- > Portal Navigation: > > - Append `.md` to any URL under `https://dev.wix.com/docs/` to get its markdown version. > - Pages are either content pages (article or reference text) or menu pages (a list of links to child pages). > - To get a menu page, truncate any URL to a parent path and append `.md` (e.g. `https://dev.wix.com/docs/sdk.md`, `https://dev.wix.com/docs/sdk/core-modules.md`). > - Top-level index of all portals: https://dev.wix.com/docs/llms.txt > - Full concatenated docs: https://dev.wix.com/docs/llms-full.txt ## Resource: Set Up GitHub Actions to Work with the Wix CLI for Sites ## Article: Set Up GitHub Actions to Work with the Wix CLI ## Article Link: https://dev.wix.com/docs/develop-websites/articles/workspace-tools/developer-tools/git-integration-wix-cli-for-sites/set-up-git-hub-actions-to-work-with-the-wix-cli-for-sites.md ## Article Content: # Set Up GitHub Actions to Work with the Wix CLI for Sites To enable a GitHub Actions workflow to perform actions on your Wix site, the workflow must set up and authenticate the Wix CLI for Sites using an API key. ## Prerequisites Before creating a GitHub Action workflow to interact with your site, make sure that you [integrate your site with GitHub](https://dev.wix.com/docs/develop-websites/articles/workspace-tools/developer-tools/git-integration-wix-cli-for-sites/changes-to-the-editor-when-your-site-is-integrated.md). > **Note:** You can also [Set up GitHub integration with the Wix CLI for Sites](https://dev.wix.com/docs/develop-websites/articles/workspace-tools/developer-tools/git-integration-wix-cli-for-sites/setting-up-git-integration-wix-cli-for-sites.md) locally. ## Set up GitHub Actions to work with your site To authorize a GitHub Actions workflow to interact with your site, follow these steps: ### Step 1 | Generate an API key An API key allows an authorized external client to access your Wix account and site data. With an API key, you can authorize GitHub Actions to [execute Wix CLI for Sites commands for your site](https://dev.wix.com/docs/develop-websites/articles/workspace-tools/developer-tools/git-integration-wix-cli-for-sites/wix-cli-for-sites-commands.md). You can generate an API key in the [API Keys Manager](https://manage.wix.com/account/api-keys). Select the **Wix CLI for Sites - Git Integration** site permission to allow GitHub Actions to use the Wix CLI for Sites for your sites. ### Step 2 | Store the API key as a GitHub secret Visit your site's GitHub repo and [create a repository secret](https://docs.github.com/en/actions/security-guides/using-secrets-in-github-actions#creating-secrets-for-a-repository) to store the API key. This makes your API key available to use securely in your repo's GitHub Actions workflows. ### Step 3 | Set up the Wix CLI for Sites in your GitHub Actions workflow Configure your GitHub Actions workflow to set up and authenticate the Wix CLI for Sites: 1. In your GitHub Actions workflow, [set up the Wix CLI for Sites](https://dev.wix.com/docs/develop-websites/articles/workspace-tools/developer-tools/git-integration-wix-cli-for-sites/setting-up-git-integration-wix-cli-for-sites.md) by including the following command: ```yaml npm install ``` 2. Next, authenticate it by including the following command: ```yaml npm run wix login -- --api-key ${{ secrets.WIX_CLI_API_KEY }} ``` ### Step 4 | Include Wix CLI for Sites commands Your workflow can now run authenticated Wix CLI for Sites commands to interact with your site. For example: - Include `npm run wix preview` in your workflow to [build a preview version of the site](https://dev.wix.com/docs/develop-websites/articles/workspace-tools/developer-tools/git-integration-wix-cli-for-sites/wix-cli-for-sites-commands.md) based on the current branch. You can set up a workflow to create a preview version whenever a new PR is created. - Include `npm run wix publish` in your workflow to [publish the site](https://dev.wix.com/docs/develop-websites/articles/workspace-tools/developer-tools/git-integration-wix-cli-for-sites/wix-cli-for-sites-commands.md) based on the repo's default branch. You can set up a workflow whenever a PR is merged to the default branch. ## See also - [About Automated Workflows and the Wix CLI for Sites](https://dev.wix.com/docs/develop-websites/articles/workspace-tools/developer-tools/git-integration-wix-cli-for-sites/about-automated-workflows-and-the-wix-cli-for-sites.md) - [Working with the Wix CLI for Sites](https://dev.wix.com/docs/develop-websites/articles/workspace-tools/developer-tools/git-integration-wix-cli-for-sites/wix-cli-for-sites-commands.md) - [Generate an API Key](https://dev.wix.com/docs/go-headless/getting-started/setup/authentication/generate-an-api-key-for-admins.md) - [Using Secrets in GitHub Actions](https://docs.github.com/en/actions/security-guides/using-secrets-in-github-actions) --- > Portal Navigation: > > - Append `.md` to any URL under `https://dev.wix.com/docs/` to get its markdown version. > - Pages are either content pages (article or reference text) or menu pages (a list of links to child pages). > - To get a menu page, truncate any URL to a parent path and append `.md` (e.g. `https://dev.wix.com/docs/sdk.md`, `https://dev.wix.com/docs/sdk/core-modules.md`). > - Top-level index of all portals: https://dev.wix.com/docs/llms.txt > - Full concatenated docs: https://dev.wix.com/docs/llms-full.txt ## Resource: Disconnect Your Site From GitHub ## Article: Disconnect Your Site From GitHub ## Article Link: https://dev.wix.com/docs/develop-websites/articles/workspace-tools/developer-tools/git-integration-wix-cli-for-sites/disconnect-your-site-from-git-hub.md ## Article Content: # Disconnect Your Site From GitHub If you need to, you can disconnect your site from GitHub. When you do this, the site retains the code from the most recent commit to its GitHub repo's default branch. After disconnecting, the repo still exists in GitHub but changes to it aren't reflected on your site. Once your site is disconnected from GitHub, the editor exits read-only mode.
**Important:** Once you disconnect your site from GitHub and from a repo, you can't reconnect the site to that repo again. If you reconnect your site to GitHub later, a new repo is created.
To disconnect from GitHub: 1. Click the **GitHub Integration** icon on the sidebar. ![](https://user-images.githubusercontent.com/89579857/184849141-33a64b0c-ff1a-463b-b0b9-a5051561a38f.png) 2. Hover over your repo's name and click the More Actions icon. ![](https://user-images.githubusercontent.com/89579857/185401800-274af867-f16b-4746-87c1-84c55f60961b.png) 3. Select **Disconnect from GitHub**. ![](https://user-images.githubusercontent.com/89579857/188308466-bc1f1441-9ecb-433a-93b1-6dcebe568c0e.png) 4. In the modal, click **Disconnect from GitHub**. ![](https://user-images.githubusercontent.com/89579857/188308423-38263af6-d191-460e-8166-3abc601a293d.png) --- > Portal Navigation: > > - Append `.md` to any URL under `https://dev.wix.com/docs/` to get its markdown version. > - Pages are either content pages (article or reference text) or menu pages (a list of links to child pages). > - To get a menu page, truncate any URL to a parent path and append `.md` (e.g. `https://dev.wix.com/docs/sdk.md`, `https://dev.wix.com/docs/sdk/core-modules.md`). > - Top-level index of all portals: https://dev.wix.com/docs/llms.txt > - Full concatenated docs: https://dev.wix.com/docs/llms-full.txt ## Resource: Test Your Code in the Local Editor ## Article: Test Your Code in the Local Editor ## Article Link: https://dev.wix.com/docs/develop-websites/articles/workspace-tools/developer-tools/git-integration-wix-cli-for-sites/test-your-code-in-the-local-editor.md ## Article Content: # Test Your Code in the Local Editor > **Note** > This article refers to 2 different versions of the editor: > > * **Regular Editor**: The editor that's generally used to build Wix sites. > * **Local Editor**: A specialized version of the Regular Editor that's used when developing your site in your local IDE. The [Local Editor](https://dev.wix.com/docs/develop-websites/articles/workspace-tools/developer-tools/git-integration-wix-cli-for-sites/about-the-local-editor.md) is a tool for testing code added to your site in your local IDE using [Git Integration & Wix CLI for Sites](https://support.wix.com/en/article/velo-about-velo-pro). You can use the Local Editor to test your code in real time and make changes to your site's design that you can sync with your IDE. This article explains how to test your code in the Local Editor and sync any design changes you make. ## Step 1 | Open the Local Editor Open the Local Editor from your computer using the [Wix CLI for Sites](https://support.wix.com/en/article/velo-working-with-the-wix-cli-beta). 1. Open your computer's terminal and navigate to the clone of your site's GitHub repository. 2. Run this command: `wix dev`. A new tab with the Local Editor opens in your default browser. Notice the **Local Editor** in the top bar on the left. ![Local Editor](https://wixmp-833713b177cebf373f611808.wixmp.com/images/cd9d208a8e66c978cc169e7562f5a520.png) > **Note:** If you're running the CLI on a cloud provider's IDE, such GitHub Code Spaces, add the `--tunnel` flag to the `wix dev` command. This makes the full command `wix dev --tunnel`. ### Reopen a closed Local Editor The Local Editor needs both the terminal and a browser tab open to run. If you close the browser tab, your terminal displays a URL you can use to reopen the editor in your browser. You can also do this by pressing `e` in the terminal.
If you close your terminal, the browser displays this screen:
In this case, you need to [open the Local Editor](https://support.wix.com/en/article/velo-working-with-the-local-editor-beta#open-the-local-editor) again. ## Step 2 | Test your code Once the Local Editor is open, you can use it to test your code in real time. 1. Edit your site's code in your IDE and save it. ```js $w.onReady(function () { console.log("Hello World!"); }); ``` Your code is automatically synced with Local Editor. You can see it in the editor's code panel. ![](https://user-images.githubusercontent.com/89579857/184881543-76c28381-97c3-40f7-bd58-517b15212b11.png) 2. In the Local Editor, click **Preview**. Your site code runs. >**Note:** > Even though you can see your code changes in the Local Editor, they don't appear in the Regular Editor until you [push them to GitHub](https://support.wix.com/en/article/velo-publishing-a-site-with-velo-pro#push-your-code-to-github). Changes don't appear on your live site until you [publish](https://dev.wix.com/docs/develop-websites/articles/workspace-tools/developer-tools/git-integration-wix-cli/publishing-a-site-with-git-integration-wix-cli.md#publish-your-site). ### Sync design changes to your IDE If your testing reveals the need for design changes, you can make the changes directly in the Local Editor. The Local Editor and Regular Editor are synced, so any changes made in one are immediately reflected in the other. However, they aren't reflected in the code in your IDE. To sync the changes with your IDE, do the following: 1. Click **Save**. ![](https://user-images.githubusercontent.com/89579857/188309927-346c82b0-7696-45f5-be51-bb45419f9bd7.png) Clicking this button creates a new [UI version](https://dev.wix.com/docs/develop-websites/articles/workspace-tools/developer-tools/git-integration-wix-cli-for-sites/about-the-local-editor.md). 2. If you see this modal, click **Continue**. ![](https://user-images.githubusercontent.com/89579857/188310497-a2e0d744-5539-4dd2-8cd8-ada8954b788a.png) ## Next steps When you're happy with the way your code runs, [push it to GitHub and publish your site](https://dev.wix.com/docs/develop-websites/articles/workspace-tools/developer-tools/git-integration-wix-cli/publishing-a-site-with-git-integration-wix-cli.md). --- > Portal Navigation: > > - Append `.md` to any URL under `https://dev.wix.com/docs/` to get its markdown version. > - Pages are either content pages (article or reference text) or menu pages (a list of links to child pages). > - To get a menu page, truncate any URL to a parent path and append `.md` (e.g. `https://dev.wix.com/docs/sdk.md`, `https://dev.wix.com/docs/sdk/core-modules.md`). > - Top-level index of all portals: https://dev.wix.com/docs/llms.txt > - Full concatenated docs: https://dev.wix.com/docs/llms-full.txt ## Resource: About the Secrets Manager ## Article: About the Secrets Manager ## Article Link: https://dev.wix.com/docs/develop-websites/articles/workspace-tools/developer-tools/secrets-manager/about-the-secrets-manager.md ## Article Content: # About the Secrets Manager The [Secrets Manager](https://www.wix.com/my-account/site-selector/?buttonText=Select%20Site&title=Select%20a%20Site&autoSelectOnSingleSite=true&actionUrl=https:%2F%2Fwww.wix.com%2Fdashboard%2F%7B%7BmetaSiteId%7D%7D%2Fdeveloper-tools/secrets-manager) allows you to securely store and manage secrets. A secret is any piece of sensitive information used in your site's code, such as API keys, OAuth tokens, and environment configuration settings. [Add secrets](https://dev.wix.com/docs/develop-websites/articles/workspace-tools/developer-tools/secrets-manager/manage-secrets-in-the-secrets-manager.md#add-a-secret) to the Secrets Manager in your dashboard by assigning each secret a [unique name](#secret-fields). You can then use that name to retrieve the secret in code using the [Secrets API](https://dev.wix.com/docs/velo/api-reference/wix-secrets-backend-v2/introduction.md). ![](https://wixmp-833713b177cebf373f611808.wixmp.com/images/about-the-secrets-manager-md_velo-articles_developer-tools_images_secrets-list-2.png) ## Enhanced security Hardcoding secrets into your code can create security risks for your site, which can lead to data breaches and unauthorized access to your site. Here's how the Secrets Manager improves your site's security: * **Code sharing**: You may want to collaborate and share your code with others or manage it in a public repository, increasing the potential for accidentally leaking secrets. * **Code reusability**: Since code is often reused, your hardcoded secrets may be copied, increasing risk of exposure. ## Secret fields It’s important to understand the rules and limitations of a secret within the Secrets Manager. | Field name | Field description | Requirements | Required field | |-------------|-------------------------------------------------------------------------------------------------------------------------------------------------|--------------------------------------------------------------------------------------------------------------------------------------------------------------|----------------| | Name | ID you assign to the secret. Access it in code using the [Secrets API](https://dev.wix.com/docs/velo/api-reference/wix-secrets-backend-v2/introduction.md). |
  • 40 character maximum. Only letters (a-z) and numbers.
  • No spaces or special characters except hyphens (`-`) and underscores (`_`).
  • Cannot begin with `wix`, regardless of case.
| Yes | | Value | Value of the secret. |
  • 3,500 character maximum.
| Yes | | Description | Information about the secret. |
  • 200 characters maximum.
| No | ## Roles and permissions Only site collaborators with the general role of **Admin (Co-Owner)** or **Website Manager** have access to the Secrets Manager. Learn more about [roles and permissions](https://support.wix.com/en/article/roles-permissions-overview). > **Important:** > - [Transferring a site](https://support.wix.com/en/article/transferring-a-free-site-to-another-wix-account) results in secrets being transferred to the new owner. > - [Duplicating a site](https://support.wix.com/en/article/duplicating-your-site-1472847?tabs=Dashboard) **doesn't** result in secrets being transferred to the duplicate site. ## See also - [Manage Secrets in the Secrets Manager](https://dev.wix.com/docs/develop-websites/articles/workspace-tools/developer-tools/secrets-manager/manage-secrets-in-the-secrets-manager.md) in the Secrets Manager. - [About the Wix Secrets API](https://dev.wix.com/docs/velo/api-reference/wix-secrets-backend-v2/introduction.md) --- > Portal Navigation: > > - Append `.md` to any URL under `https://dev.wix.com/docs/` to get its markdown version. > - Pages are either content pages (article or reference text) or menu pages (a list of links to child pages). > - To get a menu page, truncate any URL to a parent path and append `.md` (e.g. `https://dev.wix.com/docs/sdk.md`, `https://dev.wix.com/docs/sdk/core-modules.md`). > - Top-level index of all portals: https://dev.wix.com/docs/llms.txt > - Full concatenated docs: https://dev.wix.com/docs/llms-full.txt ## Resource: Manage Secrets in the Secrets Manager ## Article: Working with the Secrets Manager ## Article Link: https://dev.wix.com/docs/develop-websites/articles/workspace-tools/developer-tools/secrets-manager/manage-secrets-in-the-secrets-manager.md ## Article Content: # Manage Secrets in the Secrets Manager The [Secrets Manager](https://dev.wix.com/docs/develop-websites/articles/workspace-tools/developer-tools/secrets-manager/about-the-secrets-manager.md) allows you to access and manage secrets securely, and use them in your site's code.
## Step 1 | Access the Secrets Manager There are multiple ways to access the [Secrets Manager](https://www.wix.com/my-account/site-selector/?buttonText=Select%20Site&title=Select%20a%20Site&autoSelectOnSingleSite=true&actionUrl=https:%2F%2Fwww.wix.com%2Fdashboard%2F%7B%7BmetaSiteId%7D%7D%2Fdeveloper-tools/secrets-manager), depending on which interface you are using. From **Wix Studio or Wix Editor**: 1. Navigate to **Developer Tools** in the code panel. 2. Click on **Secrets Manager** in the **Security** section. From the **dashboard:** 1. Navigate to **Developer Tools** in the dashboard menu. 2. Click on **Secrets Manager**. ## Step 2 | Manage your secrets Use the Secrets Manager to add, edit, and delete secrets in the Secrets Manager. ![alt text](https://wixmp-833713b177cebf373f611808.wixmp.com/images/working-with-the-secrets-manager-md_velo-articles_developer-tools_images_manage-secrets-ui.png) > **Note:** Changes in the Secrets Manager are applied immediately and don't require publishing the site.
Add a secret To add a secret: 1. At the top right of the Secrets Manager, click **Add Secret**. 2. In the **Add secret** modal, fill in the [fields](https://dev.wix.com/docs/develop-websites/articles/workspace-tools/developer-tools/secrets-manager/about-the-secrets-manager.md#secret-fields). ![](https://wixmp-833713b177cebf373f611808.wixmp.com/images/working-with-the-secrets-manager-md_velo-articles_developer-tools_images_secret_add_panel.jpg) 3. Click **Add Secret**. The secret is added and stored in the Secrets Manager. The name and description are displayed, and the secret value is hidden. ![](https://wixmp-833713b177cebf373f611808.wixmp.com/images/working-with-the-secrets-manager-md_velo-articles_developer-tools_images_secret-added.png)
Edit a secret To edit a secret:
Warning: Changing a secret's name or value breaks all code that implements the secret.
1. For the secret you want to edit, select **Edit** in the secret's **More Actions** home-icon menu. The **Edit secret** modal appears. ![](https://wixmp-833713b177cebf373f611808.wixmp.com/images/working-with-the-secrets-manager-md_velo-articles_developer-tools_images_edit-secrets-modal-2.png) 2. - To change the secret's **Name** or **Description**, click the [fields](https://dev.wix.com/docs/develop-websites/articles/workspace-tools/developer-tools/secrets-manager/about-the-secrets-manager.md#secret-fields) to edit the text. - To change the secret's value, click **Retrieve value**, then click inside the secret's **Value** field that appears. 3. Click **Change Secret**.
Delete a secret To delete a secret:
Warning:
  • Deleting a secret breaks all code that implements the secret.
  • You cannot restore a deleted secret.
1. For the secret you want to delete, select **Delete secret** in the secret's **More Actions** home-icon menu. The **Delete secret?** modal appears. 2. Click **Delete Secret** to confirm. The secret is removed from the Secrets Manager.
## See also - [About the Secrets Manager](https://dev.wix.com/docs/develop-websites/articles/workspace-tools/developer-tools/secrets-manager/about-the-secrets-manager.md) - [About the Wix Secrets API](https://dev.wix.com/docs/velo/api-reference/wix-secrets-backend-v2/introduction.md). --- > Portal Navigation: > > - Append `.md` to any URL under `https://dev.wix.com/docs/` to get its markdown version. > - Pages are either content pages (article or reference text) or menu pages (a list of links to child pages). > - To get a menu page, truncate any URL to a parent path and append `.md` (e.g. `https://dev.wix.com/docs/sdk.md`, `https://dev.wix.com/docs/sdk/core-modules.md`). > - Top-level index of all portals: https://dev.wix.com/docs/llms.txt > - Full concatenated docs: https://dev.wix.com/docs/llms-full.txt ## Resource: About Logs ## Article: About Wix Logs ## Article Link: https://dev.wix.com/docs/develop-websites/articles/workspace-tools/developer-tools/logs/about-logs.md ## Article Content: # About Logs Logs provide information about events and errors that occur on your site. They are generated in both preview mode and for the published site, and can originate from your site's frontend and backend.
Use logs to: - Trace visitor flows. - Gain insights into your site's performance. - View messages generated by methods such as `console.log()` or `console.info()`. - Trace and resolve errors. Error logs include a stack trace to make debugging easier. - Compare logs against your [site history](https://support.wix.com/en/article/viewing-and-managing-your-site-history) and the [Release Manager](https://support.wix.com/en/article/accessing-the-release-manager) to debug and analyze different site revisions. > **Note**: Verbose logging is only supported for [routers](https://dev.wix.com/docs/develop-websites/articles/coding-with-velo/routers/about-routers.md). ## Log viewing options Logs are available directly in your site dashboard, as well as through external monitoring tools you can connect to your site. You can view your site's logs with: - **Wix Logs:** Use [Wix Logs](https://dev.wix.com/docs/develop-websites/articles/workspace-tools/developer-tools/logs/view-logs-using-wix-logs.md) to view basic log information in real-time directly in the site dashboard. - **Google Cloud Logs:** View your [site's logs in Google Cloud Logs](https://dev.wix.com/docs/develop-websites/articles/workspace-tools/developer-tools/logs/view-logs-using-google-cloud-logs.md), a monitoring tool that performs log analysis and generates visual depictions of log data. - **An external monitoring tool:** View your [site's logs using an external monitoring tool](https://dev.wix.com/docs/develop-websites/articles/workspace-tools/developer-tools/logs/view-logs-using-an-external-monitoring-tool.md) of your choice to generate metrics and analyze logs. ## Log structure Each log contains the payload message as well as log metadata, such as the log's timestamp, origin, the site's [view mode](https://support.wix.com/en/article/studio-editor-saving-previewing-and-publishing-your-site#previewing-a-site), and the site's [revision number](https://support.wix.com/en/article/viewing-and-managing-your-site-history). Learn more about the [log object structure](https://dev.wix.com/docs/develop-websites/articles/workspace-tools/developer-tools/logs/log-object-structure.md). ## See also - [View logs using Wix Logs](https://dev.wix.com/docs/develop-websites/articles/workspace-tools/developer-tools/logs/view-logs-using-wix-logs.md) - [View logs using Google Cloud Logs](https://dev.wix.com/docs/develop-websites/articles/workspace-tools/developer-tools/logs/view-logs-using-google-cloud-logs.md) - [View logs using an external monitoring tool](https://dev.wix.com/docs/develop-websites/articles/workspace-tools/developer-tools/logs/view-logs-using-an-external-monitoring-tool.md) - [Tutorial | Generate a log to debug your site](https://dev.wix.com/docs/develop-websites/articles/workspace-tools/developer-tools/logs/generate-logs-to-debug-your-site.md) - [Log object structure](https://dev.wix.com/docs/develop-websites/articles/workspace-tools/developer-tools/logs/log-object-structure.md) --- > Portal Navigation: > > - Append `.md` to any URL under `https://dev.wix.com/docs/` to get its markdown version. > - Pages are either content pages (article or reference text) or menu pages (a list of links to child pages). > - To get a menu page, truncate any URL to a parent path and append `.md` (e.g. `https://dev.wix.com/docs/sdk.md`, `https://dev.wix.com/docs/sdk/core-modules.md`). > - Top-level index of all portals: https://dev.wix.com/docs/llms.txt > - Full concatenated docs: https://dev.wix.com/docs/llms-full.txt ## Resource: View Logs using Wix Logs ## Article: Viewing Live Wix Logs ## Article Link: https://dev.wix.com/docs/develop-websites/articles/workspace-tools/developer-tools/logs/view-logs-using-wix-logs.md ## Article Content: # View Logs using Wix Logs Wix Logs allow you to view [logs](https://dev.wix.com/docs/develop-websites/articles/workspace-tools/developer-tools/logs/about-logs.md) in real-time, and you can pause, resume, or clear the log stream. Logs contain [metadata](https://dev.wix.com/docs/develop-websites/articles/workspace-tools/developer-tools/logs/log-object-structure.md) as well as the log's payload message.
> **Notes**: > > - Logs viewed in Wix Logs can't be saved. To save logs for later use, use [Google Cloud Logs](https://dev.wix.com/docs/develop-websites/articles/workspace-tools/developer-tools/logs/view-logs-using-google-cloud-logs.md) or another [external logging tool](https://dev.wix.com/docs/develop-websites/articles/workspace-tools/developer-tools/logs/view-logs-using-an-external-monitoring-tool.md). > - You can also use the [Site Monitoring service plugin](https://dev.wix.com/docs/velo/api-reference/wix-site-monitoring/service-plugin-spi/site-monitoring/introduction.md) to examine Wix Logs in real time. The [`LogEntry` object](https://dev.wix.com/docs/velo/api-reference/wix-site-monitoring/service-plugin-spi/site-monitoring/log-entry/introduction.md) contains the data for each log. ## View the logs 1. In the site dashboard, click **Developer Tools** > **Logging Tools**. 1. In the **Wix Logs** section, click **Open**. The Wix Logs page opens.
1. To generate a log, preview or publish your site and [trigger an event that generates a log](https://dev.wix.com/docs/develop-websites/articles/workspace-tools/developer-tools/logs/generate-logs-to-debug-your-site.md). For example, if you have a button that, when clicked, logs the result of 2 multiplied numbers, click the button. The logs indicating success appear in the **Wix Logs** page:
Similarly, if not successful, the logs might display as follows:
**Tip:** If the live log stream does not appear, refresh your site while the Wix Logs page is open in another tab.
By default, each log displayed in the Wix Logs page includes the following fields: | Column | Description | [Log object](https://dev.wix.com/docs/develop-websites/articles/workspace-tools/developer-tools/logs/log-object-structure.md) property | | ----------- | ---------------------------------------------------------------------------------- | ---------------------------------------------------------------------------------------------------------------------------------------- | | **Level** | Log's severity level. Possible values are:

`INFO`, `WARNING`, `ERROR`, or `DEBUG`. | `severity` | | **Time** | Timestamp when the log was triggered. | `receiveTimestamp` | | **Message** | Log's payload message in JSON format. | `jsonPayload.message` | | **Source file** | Path to the source file that generated the log message. | `sourceLocation.file` | 1. You can change the view to suit your needs: - To change the order of columns or display additional ones, such as the operation ID and the data stream, click ![customize-icon](https://wixmp-833713b177cebf373f611808.wixmp.com/images/3f5bdbf487735a2fe93e9717218340ac.png). - Filter the log messages by: - **Stream**. Filter by preview, live site, or both. - **Level**. Limit the logs by info, warning, error, or debug. - Find specific logs by providing search criteria. 1. To view additional details for a log, hover over it and click **View**. See the [log object structure](https://dev.wix.com/docs/develop-websites/articles/workspace-tools/developer-tools/logs/log-object-structure.md) for an explanation of each field. 1. To copy the object in JSON format, click ![ellipsis-icon](https://wixmp-833713b177cebf373f611808.wixmp.com/images/0e583769d1305e30a5e8d6ca6ed59453.png) and then **Copy JSON**. ## See also - [About Logs](https://dev.wix.com/docs/develop-websites/articles/workspace-tools/developer-tools/logs/about-logs.md) - [View logs using Google Cloud Logs](https://dev.wix.com/docs/develop-websites/articles/workspace-tools/developer-tools/logs/view-logs-using-google-cloud-logs.md) - [View logs using an external monitoring tool](https://dev.wix.com/docs/develop-websites/articles/workspace-tools/developer-tools/logs/view-logs-using-an-external-monitoring-tool.md) - [Tutorial | Generate logs to debug a site](https://dev.wix.com/docs/develop-websites/articles/workspace-tools/developer-tools/logs/generate-logs-to-debug-your-site.md) - [Log object structure](https://dev.wix.com/docs/develop-websites/articles/workspace-tools/developer-tools/logs/log-object-structure.md) - [Site monitoring service plugin](https://dev.wix.com/docs/velo/api-reference/wix-site-monitoring/service-plugin-spi/site-monitoring/introduction.md) --- > Portal Navigation: > > - Append `.md` to any URL under `https://dev.wix.com/docs/` to get its markdown version. > - Pages are either content pages (article or reference text) or menu pages (a list of links to child pages). > - To get a menu page, truncate any URL to a parent path and append `.md` (e.g. `https://dev.wix.com/docs/sdk.md`, `https://dev.wix.com/docs/sdk/core-modules.md`). > - Top-level index of all portals: https://dev.wix.com/docs/llms.txt > - Full concatenated docs: https://dev.wix.com/docs/llms-full.txt ## Resource: View Logs using Google Cloud Logs ## Article: Connecting Wix Logs to Google Cloud Logs ## Article Link: https://dev.wix.com/docs/develop-websites/articles/workspace-tools/developer-tools/logs/view-logs-using-google-cloud-logs.md ## Article Content: # View Logs using Google Cloud Logs You can view your site's [logs](https://dev.wix.com/docs/develop-websites/articles/workspace-tools/developer-tools/logs/about-logs.md) using [Google Cloud Logs](https://cloud.google.com/products/operations), an external monitoring tool that displays, analyzes, and stores your logs. With Google Cloud Logs, you can: - Stream, search, and analyze log data in real time. - Store log data in the cloud. - Trace, sort, and filter aggregated error data. This article explains how to: - [Connect to Google Cloud Logs](#connect-to-google-cloud-logs) - [View your logs using Google Cloud Logs](#view-your-logs-using-google-cloud-logs) - [Disconnect Google Cloud Logs](#disconnect-google-cloud-logs) ## Connect to Google Cloud Logs To connect your site's logs to Google Cloud Logs: 1. In the site dashboard, click **Developer Tools** > **Logging Tools**. 2. In the Google Cloud Logs section, click **Open**. The Google Cloud Logs page opens.
3. In the Google Cloud Logs page, click **Connect**. The Google Account Login page appears. 4. Sign in to the Google account associated with your site. Your site is now connected to Google Cloud Logs. ## View your logs using Google Cloud Logs Reload your site and [generate logs](https://dev.wix.com/docs/develop-websites/articles/workspace-tools/developer-tools/logs/generate-logs-to-debug-your-site.md) from its frontend or backend. To view logs using Google Cloud Logs: 1. In your site dashboard, click **Developer Tools** > **Logging Tools**. 2. In the Google Cloud Logs section, click **Open**. The Google Cloud Logs page appears.
3. Click **Open** and sign in to a Google account associated with your site. Once logged in, the Google Cloud Logs Explorer page opens. It displays your site's logs and errors.
Click any log to view its data.
To better understand the logs, learn about the [log object structure](https://dev.wix.com/docs/develop-websites/articles/workspace-tools/developer-tools/logs/log-object-structure.md). ## Disconnect Google Cloud Logs To disconnect your site from Google Cloud Logs: 1. In your site dashboard, click **Developer Tools** > **Logging Tools**. 2. In the **Google Cloud Logs** section, click **Open**. The Google Cloud Logs page appears. 3. On the top right of the page, click **Disconnect**.
4. In the **Disconnect from Google cloud Logs?** popup, click **Disconnect**.
Your site is now disconnected from Google Cloud Logs. > **Note:** Disconnecting your site from Google Cloud Logs does not affect the data stored in your Google Cloud Logs account. You can reconnect your site to Google Cloud Logs at any time. ## See also - [About logs](https://dev.wix.com/docs/develop-websites/articles/workspace-tools/developer-tools/logs/about-logs.md) - [View logs using Wix Logs](https://dev.wix.com/docs/develop-websites/articles/workspace-tools/developer-tools/logs/view-logs-using-wix-logs.md) - [View logs using an external monitoring tool](https://dev.wix.com/docs/develop-websites/articles/workspace-tools/developer-tools/logs/view-logs-using-an-external-monitoring-tool.md) - [Tutorial | Generate logs to debug your site](https://dev.wix.com/docs/develop-websites/articles/workspace-tools/developer-tools/logs/generate-logs-to-debug-your-site.md) - [Log object structure](https://dev.wix.com/docs/develop-websites/articles/workspace-tools/developer-tools/logs/log-object-structure.md) --- > Portal Navigation: > > - Append `.md` to any URL under `https://dev.wix.com/docs/` to get its markdown version. > - Pages are either content pages (article or reference text) or menu pages (a list of links to child pages). > - To get a menu page, truncate any URL to a parent path and append `.md` (e.g. `https://dev.wix.com/docs/sdk.md`, `https://dev.wix.com/docs/sdk/core-modules.md`). > - Top-level index of all portals: https://dev.wix.com/docs/llms.txt > - Full concatenated docs: https://dev.wix.com/docs/llms-full.txt ## Resource: View Logs using an External Monitoring Tool ## Article: Connecting Wix Logs to a Monitoring Tool Advanced.md ## Article Link: https://dev.wix.com/docs/develop-websites/articles/workspace-tools/developer-tools/logs/view-logs-using-an-external-monitoring-tool.md ## Article Content: # View Logs using an External Logging Tool You can view [logs](https://dev.wix.com/docs/develop-websites/articles/workspace-tools/developer-tools/logs/about-logs.md) using an external monitoring tool of your choice. This is the general lifecycle of logs when connected to an external monitoring tool:
Wix logs lifecycle
1. Your site generates implicit and explicit logs in JSON format and sends them to the endpoint you provided. 2. The endpoint converts the JSON objects into a format that the external monitoring tool can parse. 3. The converted JSON objects are sent to the monitoring tool for analysis. ## Step 1: Create an endpoint You can create an endpoint by implementing your own or by using one provided by an external monitoring tool.
**Important:** - Your site sends logs in the form of JSON objects. Make sure to configure the endpoint to handle JSON objects so that the external monitoring tool can parse them correctly. - Your endpoint must be configured to accept the POST request method.
### Use an endpoint by an existing monitoring service You can use an endpoint provided by an existing monitoring service, such as [logz.io](https://logz.io/) or [Loggly](https://www.loggly.com/). Refer to the service's documentation to learn how to create an endpoint. ### Implement your own endpoint Alternatively, you can implement your own endpoint and integrate it with a monitoring tool of your choice. > **Note**: You can create an endpoint for logs on a Wix site using the [HTTP functions API](https://dev.wix.com/docs/velo/api-reference/wix-http-functions/introduction.md), but you can't do so on the same site whose logs you want to view. Your endpoint must include code to convert [log objects](https://dev.wix.com/docs/develop-websites/articles/workspace-tools/developer-tools/logs/log-object-structure.md) into a format that can be parsed by the external monitoring tool. For your convenience, Wix offers an open-source example using [Solarwinds Loggly on Google App Engine](https://github.com/wix/corvid-loggly-telemetry-adapter). The code is specific to this tool, but you can adapt it for the monitoring tool of your choice. ## Step 2: Set your endpoint Once you have an endpoint, set it in the site dashboard: 1. In the site dashboard, click **Developer Tools** > **Logging Tools**. 2. In the **Connect an external logging tool** section, click **Next**. The Connect external logging tool page appears.
3. In the **Enter your endpoint URL** field, enter your endpoint URL and click **Connect**. Your site is now connected to the external monitoring tool. ## See also - [About logs](https://dev.wix.com/docs/develop-websites/articles/workspace-tools/developer-tools/logs/about-logs.md) - [View logs using Wix Logs](https://dev.wix.com/docs/develop-websites/articles/workspace-tools/developer-tools/logs/view-logs-using-wix-logs.md) - [View logs using Google Cloud Logs](https://dev.wix.com/docs/develop-websites/articles/workspace-tools/developer-tools/logs/view-logs-using-google-cloud-logs.md) - [Tutorial | Generate logs to debug your site](https://dev.wix.com/docs/develop-websites/articles/workspace-tools/developer-tools/logs/generate-logs-to-debug-your-site.md) - [/log object structure](https://dev.wix.com/docs/develop-websites/articles/workspace-tools/developer-tools/logs/log-object-structure.md) --- > Portal Navigation: > > - Append `.md` to any URL under `https://dev.wix.com/docs/` to get its markdown version. > - Pages are either content pages (article or reference text) or menu pages (a list of links to child pages). > - To get a menu page, truncate any URL to a parent path and append `.md` (e.g. `https://dev.wix.com/docs/sdk.md`, `https://dev.wix.com/docs/sdk/core-modules.md`). > - Top-level index of all portals: https://dev.wix.com/docs/llms.txt > - Full concatenated docs: https://dev.wix.com/docs/llms-full.txt ## Resource: Log Object Structure ## Article: Site Log Object Structure ## Article Link: https://dev.wix.com/docs/develop-websites/articles/workspace-tools/developer-tools/logs/log-object-structure.md ## Article Content: # Log Object Structure The log object contains messages and metadata about events and errors that occur on your site. [Logs](https://dev.wix.com/docs/develop-websites/articles/workspace-tools/developer-tools/logs/about-logs.md) are generated by Wix, and with the exception of the payload message, their structure and data can't be modified. ## Object structure It is important to understand log object structure for effective debugging and monitoring. The log object includes the following fields: | Field | Type | Description | | --------------------- | ------ | ------------------------------------------------------------------------------------------------------------------------------------------------------------------------------------------------------------------------------------------------------------------------------------------------------------------------------------------------------------------------------------------------------------------------------------------------------ | | `id` | string | Each log entry is assigned a unique ID. A log entry that has the same `id` as another log entry indicates a duplicate. | | `insertId` | string | Each log is assigned a unique ID. A log that has the same `insertId` as another log indicates a duplicate. | | `timestamp` | string | Time the log event occurred. Date string in [ISO 8601](https://en.wikipedia.org/wiki/ISO_8601) date format. | | `receiveTimestamp` | string | Time the log was received by [Wix Logs](https://dev.wix.com/docs/develop-websites/articles/workspace-tools/developer-tools/logs/view-logs-using-wix-logs.md) or the [external monitoring tool](https://dev.wix.com/docs/develop-websites/articles/workspace-tools/developer-tools/logs/view-logs-using-an-external-monitoring-tool.md). Date string in [ISO 8601](https://en.wikipedia.org/wiki/ISO_8601) date format. | | `severity` | string | Severity of the log. Possible values:

`INFO`: Status, performance, or other general information.

`WARNING`: An unexpected or undesired development that may cause problems.

`ERROR`: A serious issue likely to cause problems.

`DEBUG`: Logs that are only useful while debugging and generally not relevant for production. | | `labels` | object | Additional information about the log. | | `labels.siteUrl` | string | Base URL of the site associated with the log. | | `labels.namespace` | string | Name of Wix app associated with the log, such as [Wix Stores](https://www.wix.com/app-market/wix-stores) or [Wix Bookings](https://www.wix.com/app-market/bookings).

The generic namespace `Velo` represents site code not associated with any specific Wix app. **Only the `Velo` namespace is supported. You currently can't enter the name of any other Wix app.** | | `labels.tenantId` | GUID | Unique site identifier. Does not change even if the site name or other site parameters change. | | `labels.viewMode` | string | Viewing mode in which the log originated. Possible values:

`Preview`: [Site preview mode](https://support.wix.com/en/article/studio-editor-saving-previewing-and-publishing-your-site#previewing-a-site).

`Site`: [Published site](https://support.wix.com/en/article/studio-editor-saving-previewing-and-publishing-your-site#publishing-a-site). | | `labels.revision` | string | Unique site revision identifier. You can use the `revision` property together with the [Release Manager](https://support.wix.com/en/article/about-site-monitoring#site-revisions) to monitor and debug new site revisions. | | `operation` | object | Additional information about a potentially [long-running operation](#long-running-site-operations) associated with the log. | | `operation.id` | string | Unique operation identifier. | | `operation.producer` | string | Operation context, such as the page or web module where the operation took place. | | `sourceLocation` | object | Source code location information. Applies to backend log entries with the `Velo` namespace. | | `sourceLocation.file` | string | File that generated the log. | | `sourceLocation.line` | number | Number of line that generated the log. | | `sourceLocation.column` | number | Number of the column on the line that generated the log. | | `jsonPayload` | object | Log payload in JSON format. | | `jsonPayload.message` | string | Payload message. | ### Long-running site operations Some operations, such as a method call or a [scheduled job](https://dev.wix.com/docs/develop-websites/articles/workspace-tools/developer-tools/recurring-jobs/about-scheduling-recurring-jobs.md), generate multiple log entries. The `operation` object allows you to find the logs associated with a specific operation. Use the unique `operation.id` field to identify which operation generated the logs, and the `producer` property to view the context in which the operation took place. ## Example Here's an example log object: ```json { "insertId":"6axgiF6X45ftx7A1bjJBCh", "timestamp": "2019-03-31T06:02:12.008Z", "labels": { "siteUrl": "https://my-site.com", "revision": "12", "namespace": "Velo", "tenantId": "fbd4e3c6-8e55-4098-b0ff-5e478b6c957e", "viewMode": "Preview" }, "sourceLocation": { "file": "backend/backend.web.js", "line": 26, "column" : 16 }, "operation": { "id": "1554017373.14484058793726342", "producer": "backend" }, "jsonPayload": { "message": "Backend event triggered." }, "receiveTimestamp": "2025-01-20T06:02:12.925Z", "id": "455b7bef-8ba2-4914-9808-0f9f98084f71", "severity": "INFO" } ``` ## See also - [About Wix logs](https://dev.wix.com/docs/develop-websites/articles/workspace-tools/developer-tools/logs/about-logs.md) - [View logs using Wix Logs](https://dev.wix.com/docs/develop-websites/articles/workspace-tools/developer-tools/logs/view-logs-using-google-cloud-logs.md) - [View logs using Google Cloud Logs](https://dev.wix.com/docs/develop-websites/articles/workspace-tools/developer-tools/logs/view-logs-using-google-cloud-logs.md) - [View logs using an external monitoring tool](https://dev.wix.com/docs/develop-websites/articles/workspace-tools/developer-tools/logs/view-logs-using-an-external-monitoring-tool.md) - [Tutorial | Generate a log to debug your site](https://dev.wix.com/docs/develop-websites/articles/workspace-tools/developer-tools/logs/generate-logs-to-debug-your-site.md) --- > Portal Navigation: > > - Append `.md` to any URL under `https://dev.wix.com/docs/` to get its markdown version. > - Pages are either content pages (article or reference text) or menu pages (a list of links to child pages). > - To get a menu page, truncate any URL to a parent path and append `.md` (e.g. `https://dev.wix.com/docs/sdk.md`, `https://dev.wix.com/docs/sdk/core-modules.md`). > - Top-level index of all portals: https://dev.wix.com/docs/llms.txt > - Full concatenated docs: https://dev.wix.com/docs/llms-full.txt ## Resource: Generate Logs to Debug Your Site ## Article: Generating a Log to Debug Your Site ## Article Link: https://dev.wix.com/docs/develop-websites/articles/workspace-tools/developer-tools/logs/generate-logs-to-debug-your-site.md ## Article Content: # Tutorial | Generate Logs to Debug a Site This tutorial demonstrates how to generate logs from site code. We will then view the generated logs using [Wix Logs](https://dev.wix.com/docs/develop-websites/articles/workspace-tools/developer-tools/logs/about-logs.md). In this tutorial, we will: 1. Add a button to a site's home page. 1. Create an event handler that generates a log whenever the button is clicked. 1. View the generated log using Wix Logs. > **Note**: In this tutorial, logs are generated from page code. However, you can also generate logs from backend code. ## Step 1 | Add a button to your site Add a button to your site and create an event handler: 1. Add a button labeled `button1` to your site's home page, like this:
1. In the site's home page code, add an [event handler](https://dev.wix.com/docs/develop-websites/articles/coding-with-velo/frontend-code/about-event-handlers-in-wix.md) that runs whenever the button is clicked. For the purposes of this tutorial, let's produce an error by defining `factor3` instead of `factor2.` ```js $w("#button1").onClick(() => { const factor1 = 10; const factor3 = 5; try { console.log("Button clicked!"); console.log(factor1 + " * " + factor2 + " = " + (factor1 * factor2)); } catch (error) { console.error("An error occurred during multiplication:", error); console.warn("Make sure to specify 2 factors for multiplication."); } }); ``` 1. Preview or publish your site. > **Note:** You can generate logs when previewing your site, but some log information is available only when your site is published. ## Step 2 | Generate and view a log Generate a log and view it [using Wix Logs](https://dev.wix.com/docs/develop-websites/articles/workspace-tools/developer-tools/logs/view-logs-using-wix-logs.md) as follows: 1. In a separate browser tab or window, [open the Wix Logs page](https://dev.wix.com/docs/develop-websites/articles/workspace-tools/developer-tools/logs/view-logs-using-wix-logs.md).
1. In your live site's home page or in Preview mode, click the button you created. The logs appear in the Wix Logs page:
1. Click **View** for the log with the error to see its full details on the right:
Check out the `jsonPayload` to see an explanation for the error. ## See also - [About logs](https://dev.wix.com/docs/develop-websites/articles/workspace-tools/developer-tools/logs/about-logs.md) - [View logs using Wix Logs](https://dev.wix.com/docs/develop-websites/articles/workspace-tools/developer-tools/logs/view-logs-using-wix-logs.md) - [View logs using Google Cloud Logs](https://dev.wix.com/docs/develop-websites/articles/workspace-tools/developer-tools/logs/view-logs-using-google-cloud-logs.md) - [View logs using an external monitoring tool](https://dev.wix.com/docs/develop-websites/articles/workspace-tools/developer-tools/logs/view-logs-using-an-external-monitoring-tool.md) - [Log object structure](https://dev.wix.com/docs/develop-websites/articles/workspace-tools/developer-tools/logs/log-object-structure.md) --- > Portal Navigation: > > - Append `.md` to any URL under `https://dev.wix.com/docs/` to get its markdown version. > - Pages are either content pages (article or reference text) or menu pages (a list of links to child pages). > - To get a menu page, truncate any URL to a parent path and append `.md` (e.g. `https://dev.wix.com/docs/sdk.md`, `https://dev.wix.com/docs/sdk/core-modules.md`). > - Top-level index of all portals: https://dev.wix.com/docs/llms.txt > - Full concatenated docs: https://dev.wix.com/docs/llms-full.txt ## Resource: About Scheduling Recurring Jobs ## Article: Scheduling Recurring Jobs ## Article Link: https://dev.wix.com/docs/develop-websites/articles/workspace-tools/developer-tools/recurring-jobs/about-scheduling-recurring-jobs.md ## Article Content: # About Scheduling Recurring Jobs Scheduling jobs allows you to schedule code to run at specified intervals. If you have code you need to run on a recurring basis, you can automate the process and prevent the need for human intervention by scheduling a recurring job. You can create jobs to run on any backend function. For example, you might create jobs that: * Import or export data once a day. * Delete collection data that is no longer relevant once a week. * Send a status report to relevant parties once a month.   ## Supported IDEs You can schedule recurring jobs using: + The [editor](https://dev.wix.com/docs/develop-websites/articles/workspace-tools/velo-workspace/workspaces/wix-studio-working-with-the-code-panel.md) (Wix Studio and Wix Editor). + The [Wix IDE](https://dev.wix.com/docs/develop-websites/articles/workspace-tools/velo-workspace/wix-ide/wix-studio-about-the-wix-ide.md) (Wix Studio). + Your [local IDE](https://dev.wix.com/docs/develop-websites/articles/workspace-tools/developer-tools/git-integration-wix-cli-for-sites/about-git-integration-wix-cli-for-sites.md) (Wix Studio and Wix Editor). ## Times You can schedule jobs to run on an hourly, daily, weekly, or monthly basis. All times in jobs are scheduled according to [UTC time](https://en.wikipedia.org/wiki/Coordinated_Universal_Time). To calculate the UTC equivalent of your local time, find your location's UTC time offset. Then either add or subtract to your local time based on the offset. For example, the Eastern Time Zone has an offset of -5, meaning it's 5 hours behind UTC time. To convert Eastern Time to UTC, add 5 hours. The job runs within 5 minutes of the specified time. ## Limits The number and frequency of jobs you can schedule depends on whether you have a [free site](https://dev.wix.com/docs/develop-websites/articles/coding-with-velo/premium-plans/using-velo-with-a-free-wix-site.md) or a [premium plan](https://dev.wix.com/docs/develop-websites/articles/coding-with-velo/premium-plans/about-premium-plans.md): + **Free sites and most premium plans:** You can add up to 20 scheduled jobs that run at a minimum of 1 hour intervals. + **Elite and Business Elite premium plans:** You can add up to 30 jobs that run as frequently as once every 5 minutes. ## Config tool To simplify the process of building your `jobs.config` file, you can use this third-party [Jobs Config tool](https://shoonia.github.io/jobs.config). It allows you to enter the details of your jobs and builds the jobs object for you. The tool also includes a validator that can check your existing `jobs.config` file for errors. ## See also + [Schedule recurring jobs](https://dev.wix.com/docs/develop-websites/articles/workspace-tools/developer-tools/recurring-jobs/schedule-recurring-jobs.md) + [Jobs: JSON object](https://dev.wix.com/docs/develop-websites/articles/workspace-tools/developer-tools/recurring-jobs/jobs-json-object.md) --- > Portal Navigation: > > - Append `.md` to any URL under `https://dev.wix.com/docs/` to get its markdown version. > - Pages are either content pages (article or reference text) or menu pages (a list of links to child pages). > - To get a menu page, truncate any URL to a parent path and append `.md` (e.g. `https://dev.wix.com/docs/sdk.md`, `https://dev.wix.com/docs/sdk/core-modules.md`). > - Top-level index of all portals: https://dev.wix.com/docs/llms.txt > - Full concatenated docs: https://dev.wix.com/docs/llms-full.txt ## Resource: Schedule Recurring Jobs ## Article: Schedule Recurring Jobs ## Article Link: https://dev.wix.com/docs/develop-websites/articles/workspace-tools/developer-tools/recurring-jobs/schedule-recurring-jobs.md ## Article Content: # Schedule Recurring Jobs You can schedule [recurring jobs](https://dev.wix.com/docs/develop-websites/articles/workspace-tools/developer-tools/recurring-jobs/about-scheduling-recurring-jobs.md) to run on any backend function at specified intervals. To schedule recurring jobs on your site: ## Step 1 | Add a backend function Add an exported function to the backend that you want to run with a scheduled job. The function can be in any backend `.js`, `.web.js`, or `.jsw` file. ## Step 2 | Add the jobs.config file in the backend The way that you add the `jobs.config` file depends on which IDE you're using. To add the `jobs.config` file: ### Editor 1. Go to the **Public & Backend** section of the code panel. 2. Hover over **Backend**, click the plus icon ![](https://d2x3xhvgiqkx42.cloudfront.net/12345678-1234-1234-1234-1234567890ab/0ca9e8ba-16ed-4cd8-a1e1-58d01c4420f7/2021/10/13/04083fa4-3262-4606-98d1-cbc359bf8585/1a26226e-c281-42d2-8a60-88e44fe40c61.png), and select **Add scheduled jobs**. A `jobs.config` file opens in the code editor. The file includes a sample JSON object for defining scheduled jobs. ### Wix IDE or your local IDE 1. Add a `jobs.config` file to the `src/backend` folder. 2. Copy the [sample JSON object](https://dev.wix.com/docs/develop-websites/articles/workspace-tools/developer-tools/recurring-jobs/jobs-json-object.md#jobs-json-object) and paste it into the file. ## Step 3 | Edit the JSON object to define the scheduled job The `jobs.config` file contains a JSON object which defines all the scheduled jobs for your site. Each object in the `jobs` array contains the following properties: + `functionLocation` + `functionName` + `description` (optional) + `executionConfig` Use the [jobs JSON object reference](https://dev.wix.com/docs/develop-websites/articles/workspace-tools/developer-tools/recurring-jobs/jobs-json-object.md) for additional details on each property.
Tip: To simplify the process of building your jobs.config file, you can use this third-party Jobs Config tool. It allows you to enter the details of your jobs and builds the jobs object for you. The tool also includes a validator that can check your existing jobs.config file for errors.
Here is an example of a JSON object configured to send a status report every Monday morning at 8:00 AM UTC time: ```json { "jobs": [ { "functionLocation": "/utils.web.js", "functionName": "sendStatusReport", "description": "Send a weekly status report.", "executionConfig": { "time": "08:00", "dayOfWeek": "Monday" } } ] } ``` ### Schedule multiple jobs Schedule multiple jobs in the `jobs.config` file by adding additional objects to the `jobs` array. ```json { "jobs": [ { "functionLocation": "/utils.js", "functionName": "sendStatusReport", "description": "Send a morning status report.", "executionConfig": { "cronExpression": "0 8 * * MON" } }, { "functionLocation": "/utils.js", "functionName": "cleanDb", "description": "Delete stale items from the DB on the first of the month.", "executionConfig": { "time": "01:00", "dateOfMonth": 1 } } ] } ``` ## Step 4 | Publish your site You must [publish your site](https://support.wix.com/en/article/wix-editor-publishing-your-site) to save changes to your scheduled jobs. ## See also + [About scheduling recurring jobs](https://dev.wix.com/docs/develop-websites/articles/workspace-tools/developer-tools/recurring-jobs/about-scheduling-recurring-jobs.md) + [Jobs: JSON object](https://dev.wix.com/docs/develop-websites/articles/workspace-tools/developer-tools/recurring-jobs/jobs-json-object.md) --- > Portal Navigation: > > - Append `.md` to any URL under `https://dev.wix.com/docs/` to get its markdown version. > - Pages are either content pages (article or reference text) or menu pages (a list of links to child pages). > - To get a menu page, truncate any URL to a parent path and append `.md` (e.g. `https://dev.wix.com/docs/sdk.md`, `https://dev.wix.com/docs/sdk/core-modules.md`). > - Top-level index of all portals: https://dev.wix.com/docs/llms.txt > - Full concatenated docs: https://dev.wix.com/docs/llms-full.txt ## Resource: Jobs JSON Object ## Article: Jobs JSON Object ## Article Link: https://dev.wix.com/docs/develop-websites/articles/workspace-tools/developer-tools/recurring-jobs/jobs-json-object.md ## Article Content: # Jobs: JSON Object When scheduling [recurring jobs](https://dev.wix.com/docs/develop-websites/articles/workspace-tools/developer-tools/recurring-jobs/about-scheduling-recurring-jobs.md) on your site, you define the jobs in the `jobs.config` file. The `jobs` object in the file is structured as follows: ```json { "jobs": [ { "functionLocation": "", "functionName": "", "description": "", "executionConfig": { "" } } ] } ``` | Property | Type | Required | | ------------------ | ---- | -------- | | [`functionLocation`](#functionlocation) | String | Yes | | [`functionName`](#functionname) | String | Yes | | [`description`](#description) | String | No | | [`executionConfig`](#executionconfig) | Object | Yes | Here is an example of a JSON object configured to send a status report every Monday morning at 8:00 AM UTC time: ```json { "jobs": [ { "functionLocation": "/utils.web.js", "functionName": "sendStatusReport", "description": "Send a weekly status report.", "executionConfig": { "time": "08:00", "dayOfWeek": "Monday" } } ] } ``` ## `functionLocation` Path to the backend file that contains the function you want to run at the scheduled time. The function location is a relative path within the **Backend** folder. The function can be in any backend `.js`, `.web.js`, or `.jsw` file. ## `functionName` Name of the function to run at the scheduled time. > **Note:** Make sure that you export the function you want the job scheduler to run on. ## `description` Optional description of the job. ## `executionConfig` Object that contains information about when the job should run, using either a cron expression or time configuration properties. > **Notes:** > + All job configuration times are based on [UTC time](https://dev.wix.com/docs/develop-websites/articles/workspace-tools/developer-tools/recurring-jobs/about-scheduling-recurring-jobs.md#times). > + Jobs occurring more than once a day must be defined with a cron expression. > + If both methods below are added to a single `executionConfig` object, only the cron expression is used. ### `cronExpression` Use a [cron expression](https://en.wikipedia.org/wiki/Cron#cRON_expression) as a single property in the `executionConfig` object. For example, to run a job every day at 8:00 in the morning, use: ```json { "executionConfig": { "cronExpression": "0 8 * * *" } } ``` ### `time`, `dayOfWeek`, `dateOfMonth` Use multiple properties, `time`, `dayOfWeek`, `dateOfMonth`, to schedule the job. `time` is the only required property with this method. If a job includes both `dayOfWeek` and `dateOfMonth`, an error occurs and the job will not run. + `time` The time of day the job runs. The time is specified as [UTC time](https://en.wikipedia.org/wiki/Coordinated_Universal_Time) in `HH:MM` format. + `dayOfWeek` One of: `Sunday`, `Monday`, `Tuesday`, `Wednesday`, `Thursday`, `Friday`, or `Saturday` + `dateInMonth` Number between `1` and `31`. For example, to run a job every Sunday at 8:00 in the morning, use: ```json { "executionConfig": { "time": "08:00", "dayOfWeek": "Sunday" } } ``` --- > Portal Navigation: > > - Append `.md` to any URL under `https://dev.wix.com/docs/` to get its markdown version. > - Pages are either content pages (article or reference text) or menu pages (a list of links to child pages). > - To get a menu page, truncate any URL to a parent path and append `.md` (e.g. `https://dev.wix.com/docs/sdk.md`, `https://dev.wix.com/docs/sdk/core-modules.md`). > - Top-level index of all portals: https://dev.wix.com/docs/llms.txt > - Full concatenated docs: https://dev.wix.com/docs/llms-full.txt ## Resource: About Triggered Emails ## Article: Getting Started with Triggered Emails ## Article Link: https://dev.wix.com/docs/develop-websites/articles/workspace-tools/developer-tools/triggered-emails/about-triggered-emails.md ## Article Content: # About Triggered Emails Triggered emails allow you to automatically send customized emails for specific site events. For example, you might trigger emails to send: + A coupon to customers on their birthday. + A satisfaction survey following an issued refund. + A “next steps” email after a form is submitted.
Tip: As an alternative to triggered emails, you can use Wix Automations to reach out to your visitors.
## Supported IDEs You can schedule recurring jobs using: + The [editor](https://dev.wix.com/docs/develop-websites/articles/workspace-tools/velo-workspace/workspaces/wix-studio-working-with-the-code-panel.md) (Wix Studio and Wix Editor). + The [Wix IDE](https://dev.wix.com/docs/develop-websites/articles/workspace-tools/velo-workspace/wix-ide/wix-studio-about-the-wix-ide.md) (Wix Studio). + Your [local IDE](https://dev.wix.com/docs/develop-websites/articles/workspace-tools/developer-tools/git-integration-wix-cli/about-git-integration-wix-cli.md) (Wix Studio and Wix Editor). ## Monthly email marketing balance Every site has a quota of monthly emails available to send. You can check the current balance under **Monthly balance** in your site's [Email Marketing dashboard page](https://www.wix.com/my-account/site-selector/?buttonText=Open%20Email%20Marketing&title=Select%20a%20Site&autoSelectOnSingleSite=true&actionUrl=https://www.wix.com/dashboard/{{metaSiteId}}/shoutout/). Triggered emails count toward the [email marketing balance](https://support.wix.com/en/article/email-marketing-understanding-your-monthly-balance) but continue to send without interruption even once the quota is reached. You can also [upgrade your email marketing plan](https://www.wix.com/my-account/site-selector/?title=Select%20a%20Site&buttonText=Select%20Site&actionUrl=https%3A%2F%2Fwww.wix.com%2Fwix-emails-plans%3FmetaSiteId%3D%7B%7BmetaSiteId%7D%7D%26origin%3Dkb) for a larger sending quota. ## Statistics for triggered emails vs email marketing The [Triggered Emails dashboard page](https://www.wix.com/my-account/site-selector/?buttonText=Select%20Site&title=Select%20a%20Site&autoSelectOnSingleSite=true&actionUrl=https:%2F%2Fwww.wix.com%2Fdashboard%2F%7B%7BmetaSiteId%7D%7D%2Fdeveloper-tools/triggered-emails) maintains [statistics](https://support.wix.com/en/article/viewing-your-email-marketing-statistics) related to the triggered emails you create. Triggered email statistics are based on all emails sent, including test emails you send to yourself. This is different from the statistics for email marketing campaigns in your [Email Marketing dashboard page](https://www.wix.com/my-account/site-selector/?buttonText=Open%20Email%20Marketing&title=Select%20a%20Site&autoSelectOnSingleSite=true&actionUrl=https://www.wix.com/dashboard/{{metaSiteId}}/shoutout/), which are based on emails sent to unique contacts. Therefore, the statistics for triggered emails may seem inflated compared to email marketing statistics. ## Site collaborators [Site collaborators](https://support.wix.com/en/article/inviting-people-to-contribute-to-your-site#inviting-people-to-collaborate-on-your-site) can create and manage triggered emails. To do so, you must [give them](https://www.wix.com/my-account/site-selector/?buttonText=Manage%20this%20Site&title=Select%20a%20Site&autoSelectOnSingleSite=true&actionUrl=https://www.wix.com/dashboard/%7B%7BmetaSiteId%7D%7D/manage-website/authorization) both **Manage Triggered Emails** and **Manage Email Marketing Campaigns** [permissions](https://support.wix.com/en/article/roles-permissions-overview#roles-and-permissions). ## See also + [Set up a triggered email](https://dev.wix.com/docs/develop-websites/articles/workspace-tools/developer-tools/triggered-emails/set-up-a-triggered-email.md) + [Tutorial: Send a triggered email to contacts](https://dev.wix.com/docs/develop-websites/articles/workspace-tools/developer-tools/triggered-emails/sending-a-triggered-email-to-contacts.md) + [Tutorial: Send a triggered email to members](https://dev.wix.com/docs/develop-websites/articles/workspace-tools/developer-tools/triggered-emails/sending-a-triggered-email-to-members.md) + [Tutorial: Send emails using the SendGrid npm package](https://dev.wix.com/docs/develop-websites/articles/code-tutorials/wix-editor-elements/send-emails-using-the-send-grid-npm-package.md) --- > Portal Navigation: > > - Append `.md` to any URL under `https://dev.wix.com/docs/` to get its markdown version. > - Pages are either content pages (article or reference text) or menu pages (a list of links to child pages). > - To get a menu page, truncate any URL to a parent path and append `.md` (e.g. `https://dev.wix.com/docs/sdk.md`, `https://dev.wix.com/docs/sdk/core-modules.md`). > - Top-level index of all portals: https://dev.wix.com/docs/llms.txt > - Full concatenated docs: https://dev.wix.com/docs/llms-full.txt ## Resource: Set Up a Triggered Email ## Article: Creating a Triggered Email ## Article Link: https://dev.wix.com/docs/develop-websites/articles/workspace-tools/developer-tools/triggered-emails/set-up-a-triggered-email.md ## Article Content: # Set Up a Triggered Email Set up a [triggered email](https://dev.wix.com/docs/develop-websites/articles/workspace-tools/developer-tools/triggered-emails/about-triggered-emails.md) to automatically send customized emails for specific events on your site. ## Step 1 | Navigate to the Triggered Emails dashboard page To access the Triggered Emails dashboard page, you can either: + Select **Developer Tools** from the code sidebar and click **Triggered Emails**. + Select **Developer Tools** from [your site’s dashboard](https://www.wix.com/my-account/site-selector/?buttonText=Select%20Site&title=Select%20a%20Site&autoSelectOnSingleSite=true&actionUrl=https:%2F%2Fwww.wix.com%2Fdashboard%2F%7B%7BmetaSiteId%7D%7D%2Fdeveloper-tools/triggered-emails) and select **Triggered Emails**. ## Step 2 | Create an email Use the editor to create and design a new email: 1. On your [Triggered Emails dashboard page](https://www.wix.com/my-account/site-selector/?buttonText=Select%20Site&title=Select%20a%20Site&autoSelectOnSingleSite=true&actionUrl=https:%2F%2Fwww.wix.com%2Fdashboard%2F%7B%7BmetaSiteId%7D%7D%2Fdeveloper-tools/triggered-emails), click **+ New Campaign** to create a new email, or click the **More Actions** ![](https://d2x3xhvgiqkx42.cloudfront.net/12345678-1234-1234-1234-1234567890ab/149e0d5e-6f90-423d-9f3c-7342557186d1/2018/03/26/3b056efa-d2c8-4cc2-b5fc-1cdfe2770936.png) icon and select **Duplicate** to duplicate an existing triggered email. 2. Design your email in the editor. ## Step 3 (Optional) | Add variables to personalize text Add variables to personalize the text of your email. The variable is a placeholder that will be replaced by a value you define in the code. 1. With a text element selected in the editor, click **+ Add Variable**: ![](https://wixmp-833713b177cebf373f611808.wixmp.com/images/fcaec601e7155d7ffa74cdcb27847d63.png) 2. Fill out the fields in the popup: + **Variable name**: Name the variable something meaningful so it’s easy to identify later. For example, `newSubscriberName`. + **Fallback value**: A replacement text that displays here in case you’re missing that specific piece of data. You can apply fallback values in the body of an email, but not in the subject line. For example, with the fallback value `there`, in a case where you don't have the new subscriber's name the email will fallback to "Hey there,". 3. Click **Add**. ## Step 4 | Test, save, or publish the email Once your email is designed you have the option at the top of the editor to preview, save, or publish the triggered email. ![](https://wixmp-833713b177cebf373f611808.wixmp.com/images/de9b62255dd77d87f3eb37ee25727ff0.png) + Click **Preview & Test** to send yourself the email to see how it will appear in an inbox and to test any links you included in the email. + Click **Save as Draft** to save your email as a work-in-progress and returns you to the [Triggered Emails dashboard page](https://www.wix.com/my-account/site-selector/?buttonText=Select%20Site&title=Select%20a%20Site&autoSelectOnSingleSite=true&actionUrl=https:%2F%2Fwww.wix.com%2Fdashboard%2F%7B%7BmetaSiteId%7D%7D%2Fdeveloper-tools/triggered-emails). Draft emails are not sent when the triggering event occurs. + Click **Save & Continue**. If this is the first time ever you're creating a campaign, you'll be asked to fill out [sender details](#step-5-–add-sender-details). That must be completed before publishing. ## Step 5 | Add sender details Sender details are required to send triggered emails. These details contain the information that appears as the sender’s name and email address when an email from your site is received: + **Sender’s name**: This is the name that displays in the recipient's inbox. + **Reply-to email**: This is the email address that will populate as the send-to address in your reader's email when they click Reply.
Important information about the email address included in reply-to email: + Emails sent with a reply-to email with a public domain, such as `@gmail.com` or `@yahoo.com`, tend to land in the spam or promotions category. It's better to use an email address with an authenticated domain, such as `you@yourbusiness.com`. + If you use a public domain address, Wix redirects your email through our own authenticated address `@wixemails.com` or, for free users, `@wixsitemail.com`. When someone replies to your email, their new email will automatically populate the send field with the reply-to email. + You may be asked to confirm your reply-to email. You'll receive an email in your inbox with those instructions.
Click **Save** to continue. ## Step 6 | Get the code snippet Before redirecting back to the [Triggered Emails dashboard page](https://www.wix.com/my-account/site-selector/?buttonText=Select%20Site&title=Select%20a%20Site&autoSelectOnSingleSite=true&actionUrl=https:%2F%2Fwww.wix.com%2Fdashboard%2F%7B%7BmetaSiteId%7D%7D%2Fdeveloper-tools/triggered-emails) you have the opportunity to make changes to the email ID and the audience who will receive the email: ![](https://wixmp-833713b177cebf373f611808.wixmp.com/images/9c5d6d3da3f03171968688308d8cc1be.png) 1. Update the unique **Email ID** to one that’s more friendly to work with. For example, `newsletter_signup`. This email ID is used in the code snippet. 2. Click **Email new contacts** or **Email site members** to display the appropriate snippet. 3. Copy the code snippet now or access it later from the [Triggered Emails dashboard page](https://www.wix.com/my-account/site-selector/?buttonText=Select%20Site&title=Select%20a%20Site&autoSelectOnSingleSite=true&actionUrl=https:%2F%2Fwww.wix.com%2Fdashboard%2F%7B%7BmetaSiteId%7D%7D%2Fdeveloper-tools/triggered-emails). 4. Click **Save**. ## Step 7 | Add the code snippet to an event on your site Take the code snippet you copied from the previous window or hover over a triggered email in the [Triggered Emails dashboard page](https://www.wix.com/my-account/site-selector/?buttonText=Select%20Site&title=Select%20a%20Site&autoSelectOnSingleSite=true&actionUrl=https:%2F%2Fwww.wix.com%2Fdashboard%2F%7B%7BmetaSiteId%7D%7D%2Fdeveloper-tools/triggered-emails) and click the **View code snippet** ![](https://wixmp-833713b177cebf373f611808.wixmp.com/images/fb658cc2897e698b84136109a16fc45c.png) icon and add the snippet to your code. ## See also + [About triggered emails](https://dev.wix.com/docs/develop-websites/articles/workspace-tools/developer-tools/triggered-emails/about-triggered-emails.md) + [Tutorial: Send a triggered email to contacts](https://dev.wix.com/docs/develop-websites/articles/workspace-tools/developer-tools/triggered-emails/sending-a-triggered-email-to-contacts.md) + [Tutorial: Send a triggered email to members](https://dev.wix.com/docs/develop-websites/articles/workspace-tools/developer-tools/triggered-emails/sending-a-triggered-email-to-members.md) + [Tutorial: Send emails using the SendGrid npm package](https://dev.wix.com/docs/develop-websites/articles/code-tutorials/wix-editor-elements/send-emails-using-the-send-grid-npm-package.md) --- > Portal Navigation: > > - Append `.md` to any URL under `https://dev.wix.com/docs/` to get its markdown version. > - Pages are either content pages (article or reference text) or menu pages (a list of links to child pages). > - To get a menu page, truncate any URL to a parent path and append `.md` (e.g. `https://dev.wix.com/docs/sdk.md`, `https://dev.wix.com/docs/sdk/core-modules.md`). > - Top-level index of all portals: https://dev.wix.com/docs/llms.txt > - Full concatenated docs: https://dev.wix.com/docs/llms-full.txt ## Resource: Sending a Triggered Email to Contacts ## Article: Sending a Triggered Email to Contacts ## Article Link: https://dev.wix.com/docs/develop-websites/articles/workspace-tools/developer-tools/triggered-emails/sending-a-triggered-email-to-contacts.md ## Article Content: # Velo Tutorial: Sending a Triggered Email to Contacts [Triggered Emails](https://dev.wix.com/docs/develop-websites/articles/workspace-tools/developer-tools/triggered-emails/about-triggered-emails.md) allow you to create a template for emails that you can send to a newly created contact, using code. Before sending the email, your code can inject information into the template to personalize it with any data that is available in your page code. In this article, we demonstrate how to use the code snippet generated by Triggered Emails to send an email to the newly created contact on the submission of a form. Although this article uses a form submission for demonstration purposes, you can send an email from anywhere in your code. The general idea is to paste the generated snippet into your code where you want the email to be sent. Then edit the snippet so that it uses the ID of the newly created contact and the values you want to insert for the variable placeholders.
**Note:** For a more general-purpose article on sending an email using a 3rd party email service, see [How to Send an Email on Form Submission](https://support.wix.com/en/article/how-to-send-an-email-on-form-submission).
### Prerequisites This article assumes you are familiar with [creating an input form](https://dev.wix.com/docs/develop-websites/articles/databases/wix-data/user-input/processing-user-input-before-it-is-stored-in-a-collection-with-data-hooks.md). In this example we'll assume you've [created and published](https://dev.wix.com/docs/develop-websites/articles/workspace-tools/developer-tools/triggered-emails/set-up-a-triggered-email.md) the following Triggered Email:
Notice that the email template contains the following variables: * name * Interest\_Area It is good practice to give your email template a meaningful name. Doing so makes it easier to work with in code. Click on the Email ID to rename it. In this example, we call our email **newsletter\_signup**.
![](https://d2x3xhvgiqkx42.cloudfront.net/12345678-1234-1234-1234-1234567890ab/11e10e4f-b84d-4136-a5a9-6109fab0b7d7/2018/05/15/d83bfefa-ea9e-4d27-809f-69c7aa559ed3.png)
To create a Triggered Email for Contacts, select the Email New Contacts tab. 
![](https://d2x3xhvgiqkx42.cloudfront.net/12345678-1234-1234-1234-1234567890ab/11e10e4f-b84d-4136-a5a9-6109fab0b7d7/2018/05/15/ea31d34d-dea2-4ced-baf9-5ae2b6dd1835.png)
The code snippet generated by the email looks like this: ```javascript import {triggeredEmails } from 'wix-crm-frontend'; // ... const options = { variables: { name: , interest_area: } } triggeredEmails.emailContact('newsletter_signup', , options); ``` There are a few things to note about the code in this snippet: * At the top of the snippet there is an `import` statement. This line needs to be added to the very top of the code on the page where you will be using the rest of the snippet. It imports the library of functions that lets your code work with the Triggered Email functionality. * The contact ID and the values of the variables (`name` and `interest_area`) are reflected in the code snippet with placeholders. These placeholder values will need to be replaced with real values in your actual code. ### Add a Custom Field to Your Contacts List In our example we save some information about our contact in a custom field. To work with custom fields in our code we first need to add the [custom field](https://support.wix.com/en/article/adding-custom-fields-to-contacts) to the Contact List in the Dashboard. For our example, name the field interest\_area. ### Form Next, we create an input form with a submit button. In this example, we use a simple form with the following input elements:
![](https://d2x3xhvgiqkx42.cloudfront.net/12345678-1234-1234-1234-1234567890ab/11e10e4f-b84d-4136-a5a9-6109fab0b7d7/2018/05/15/97ff0ea4-716e-410c-8485-16e0187af529.png)
|Type |ID |Usage | |---|---|---| |Input - text|nameInput|For entering a name |Input - email|emailInput|For entering an email address |Dropdown|interestArea|For selecting area of interest |Button|signUpButton|For submitting the data |Dataset|newsletterDataset|For connecting the elements ### Code Finally, we write the code to send the Triggered Email described above when the form is successfully submitted. The code will send the values from the form to be used in place of the variables in the email template.  **Here's the outline of what we'll need to do:** 1. Add the import statement to the top of the code where we use the snippet. We will also need to import an additional module to create new site contacts. 2. Add an onClick event handler to the button. The code we add to that handler function will create the new contact and email them. 3. Add code that creates the new contact and gives us the contact's ID. 4. Add the snippet code to the handler function and replace the placeholder values. 5. Add some code to handle success and errors.
**Note:** Triggered Emails may not work properly when previewing your site. Publish your site to test the code found below.
**1\. Add the import statement to the top of the code where we use the snippet.** Paste the import statement that was at the top of your snippet: `import {triggeredEmails} 'wix-crm-frontend';` to the top of the code in the page where you want to use the snippet. Add `contacts` in between the `{ }` to import that module as well. The final import statement should look like this: import { triggeredEmails, contacts } from 'wix-crm-frontend'; **2.** **Add an onClick event handler to the button. The code we add to that handler function will create the new contact and email them.** Use the Properties & Events panel to add an `onClick()` event handler to the signUpButton that runs each time it's clicked. **3\. Add code that creates the new contact and gives us the contact's ID.** Add this code inside the onClick event handler. This uses the [appendOrCreateContact](https://www.wix.com/velo/reference/wix-crm-frontend/contacts/appendorcreatecontact) API to create the new contact using the information the site visitor entered in the form fields. ```javascript contacts.appendOrCreateContact({ name: { first: $w('#nameInput').value }, emails: [{ email: $w('#emailInput').value }], extendedFields: { interest_area: $w('#interestArea').value } }); ``` The `appendOrCreateContact` function returns an object containing the `contactID`, and `identityType` for the newly created contact. We'll grab the ID and use it in our snippet to identify the new contact and email them. **4\. Add the snippet code to the handler function and replace the placeholder values.** The `appendOrCreateContact` function returns a promise, so we'll add our snippet after it. We'll declare a new variable called `contactId` and use it to store the `contactId` value that is stored in the object returned by `appendOrCreateContact()`. We will use this ID in the snippet in place of ``. We'll also use the values that our site visitor entered in the form fields as the actual values for the `name` and `interest_area` variables in the `variables` object. At this point our code should look like this: ```javascript export function signUpButton_click(event) { contacts.appendOrCreateContact({ name: { first: $w('#nameInput').value }, emails: [{ email: $w('#emailInput').value }], extendedFields: { interest_area: $w('#interestArea').value } }) .then((contactInfo) => { const contactId = contactInfo.contactId; triggeredEmails.emailContact("newsletter_signup", contactId, { "variables": { "name": $w('#nameInput').value, "interest_area": $w("#interestArea").value } }) }); } ``` **5\. Add some code to handle success and errors.** Since the `emailContact()` function returns a Promise, we can define what happens when the Promise resolves successfully or rejects with an error. We'll add a `.then` and a `.catch` to handle these. Your code should look like this now: ```javascript import { triggeredEmails, contacts } from 'wix-crm-frontend'; export function signUpButton_click(event) { contacts.appendOrCreateContact({ name: { first: $w('#nameInput').value }, emails: [{ email: $w('#emailInput').value }], extendedFields: { interest_area: $w('#interestArea').value } }) .then((contactInfo) => { const contactId = contactInfo.contactId; triggeredEmails.emailContact("newsletter_signup", contactId, { "variables": { "name": $w('#nameInput').value, "interest_area": $w("#interestArea").value } }) .then(() => { // do something after the email was sent }) .catch((err) => { // handle the error if the email wasn't sent }); }); } ``` Test your form in your published site to see that it creates the contact and sends a Triggered Email. --- > Portal Navigation: > > - Append `.md` to any URL under `https://dev.wix.com/docs/` to get its markdown version. > - Pages are either content pages (article or reference text) or menu pages (a list of links to child pages). > - To get a menu page, truncate any URL to a parent path and append `.md` (e.g. `https://dev.wix.com/docs/sdk.md`, `https://dev.wix.com/docs/sdk/core-modules.md`). > - Top-level index of all portals: https://dev.wix.com/docs/llms.txt > - Full concatenated docs: https://dev.wix.com/docs/llms-full.txt ## Resource: Sending a Triggered Email to Members ## Article: Sending a Triggered Email to Members ## Article Link: https://dev.wix.com/docs/develop-websites/articles/workspace-tools/developer-tools/triggered-emails/sending-a-triggered-email-to-members.md ## Article Content: # Velo Tutorial: Sending a Triggered Email to Members
Visit the Velo by Wix website to onboard and continue learning.
[Triggered Emails](https://support.wix.com/en/article/about-triggered-emails) allow you to create a template for emails that you can send to the currently logged-in site member, using code. Before sending the email, your code can inject information into the template to personalize it with any data that is available in your page code. In this article, we demonstrate how to use the code snippet generated by Triggered Emails to send an email to the currently logged-in site member on the submission of a form. Although this article uses a form submission for demonstration purposes, you can send an email from anywhere in your code. The general idea is to paste the generated snippet into your code where you want the email to be sent. Then edit the snippet so that it uses the ID of the currently logged-in member and the values you want to insert for the variable placeholders.
**Note:** For a more general-purpose article on sending an email using a 3rd party email service, see [How to Send an Email on Form Submission](https://support.wix.com/en/article/how-to-send-an-email-on-form-submission).
### Prerequisites This article assumes you are familiar with [creating an input form](https://dev.wix.com/docs/develop-websites/articles/databases/wix-data/user-input/processing-user-input-before-it-is-stored-in-a-collection-with-data-hooks.md). In this example we'll assume you've [created and published](https://support.wix.com/en/article/creating-a-triggered-email) the following Triggered Email. You will also need a way for members to [log into your site](https://support.wix.com/en/article/adding-a-members-area-to-your-site).
Notice that the email template contains the following variables: * name * sport * comments It is good practice to give your email template a meaningful name. Doing so makes it easier to work with in code. In this example, we call our email **sportMail**.
![](https://d2x3xhvgiqkx42.cloudfront.net/12345678-1234-1234-1234-1234567890ab/dfff8cbb-ddcb-4376-8cae-3fedb2dd4458/2018/04/01/ff4f8c8e-0175-46ef-8532-51a2b4bc7c5c.png)
To create a Triggered Email for Contacts, select the Email Site Members tab. 
![](https://d2x3xhvgiqkx42.cloudfront.net/12345678-1234-1234-1234-1234567890ab/11e10e4f-b84d-4136-a5a9-6109fab0b7d7/2018/05/16/3e038a6f-0a8a-4f51-95e2-7c0ff465a248.png)
The code snippet generated by the email looks like this: ```javascript import {triggeredEmails } from 'wix-crm-frontend'; // ... const options = { variables: { name: , sport: , comments: } } triggeredEmails.emailContact('sportMail', , options); ``` The ID of the Triggered Email (`"sportMail"`) and the names of all the variables it contains (`name`, `sport`, and `comments`) are reflected in the code snippet. ### Form Next, we create an input form with a submit button. You can use an existing form or create a new one. Either way, this is a regular input form without any special setup. Each input element is connected to a field in a dataset and a button is connected to the same dataset with the **Submit** action.  In this example, we use a simple form with the following input elements:
![](https://d2x3xhvgiqkx42.cloudfront.net/12345678-1234-1234-1234-1234567890ab/dfff8cbb-ddcb-4376-8cae-3fedb2dd4458/2018/03/29/281e1980-b261-4afc-ad0f-cb0ea9de4878.png)
|Type |ID |Usage | |---|---|---| |Input|nameInput|For entering a name |Dropdown|sportDropdown|For entering a preferred sport |Text Box|commentsInput|For entering comments |Button|submitButton|For submitting the data |Dataset|sportDataset|For connecting the elements ### Code Finally, we write the code to send the Triggered Email described above when the form is successfully submitted. The code will send the values from the form to be used in place of the variables in the email template. 
**Note:** Triggered Emails may not work properly when previewing your site. Publish your site to test the code found below.
To do so, we register an `onAfterSave()` event handler that runs each time a new item is successfully submitted. Inside the handler function, we paste the code snippet generated when we created our Triggered Email. We also have to import the `triggeredEmails` module, since it contains the `emailMember()` function. At this point, our code looks like this: ```javascript import { triggeredEmails } from 'wix-crm-frontend'; $w.onReady(function () { $w("#sportDataset").onAfterSave( () => { triggeredEmails.emailMember("sportMail", , { variables: { "name": , "sport": , "comments": } } ); } ); } ); ``` However, it still won't work as intended.  We have to edit the snippet so that the code: * checks to see if a site visitor is logged in  * if the site visitor is a logged-in member, uses their ID to send the email * uses the values from the form that was submitted ```javascript import { triggeredEmails } from 'wix-crm-frontend'; import { currentMember } from 'wix-members-frontend'; $w.onReady(function () { $w("#sportDataset").onAfterSave(async () => { const member = await currentMember.getMember() if (member) { const userId = member._id; triggeredEmails.emailMember("sportMail", userId, { variables: { "name": $w("#nameInput").value, "sport": $w("#sportDropdown").value, "comments": $w("#commentsInput").value } }) } }); }); ``` Notice that we import the `currentMember` module from `wix-members-frontend`. This module gives us access to a member's details if they are logged in. import { currentMember } from 'wix-members-frontend'; We call the `getMember()` function which returns a Promise that resolves to a logged-in member's details: await currentMember.getMember() We check if the site visitor is logged in by seeing if `getMember()` returned anything: if (member) { If the site visitor is logged in we get their member ID: const memberId = member._id; And use the `memberId` variable in the `emailMember()` function call: triggeredEmails.emailMember("sportMail", memberId, { We also replaced the values in the `variables` object with the values from our input elements. "name": $w("#nameInput").value, "sport": $w("#sportDropdown").value, "comments": $w("#commentsInput").value We can also add code to verify that the email was sent and handle cases where an error has occurred. Since the `emailMember()` function returns a [Promise](https://support.wix.com/en/article/velo-working-with-promises), we can define what happens when the Promise resolves successfully or rejects with an error. ```javascript import { triggeredEmails } from 'wix-crm-frontend'; import { currentMember } from 'wix-members-frontend'; $w.onReady(function () { $w("#sportDataset").onAfterSave(async () => { const member = await currentMember.getMember() if (member) { const userId = member._id; triggeredEmails.emailMember("sportMail", userId, { variables: { "name": $w("#nameInput").value, "sport": $w("#sportDropdown").value, "comments": $w("#commentsInput").value } }) .then(() => { // do something after the email was sent successfully }) .catch((err) => { // handle error that prevented the email from being sent }); } }); }); ``` --- > Portal Navigation: > > - Append `.md` to any URL under `https://dev.wix.com/docs/` to get its markdown version. > - Pages are either content pages (article or reference text) or menu pages (a list of links to child pages). > - To get a menu page, truncate any URL to a parent path and append `.md` (e.g. `https://dev.wix.com/docs/sdk.md`, `https://dev.wix.com/docs/sdk/core-modules.md`). > - Top-level index of all portals: https://dev.wix.com/docs/llms.txt > - Full concatenated docs: https://dev.wix.com/docs/llms-full.txt ## Resource: About AI Assistants ## Article: About AI Assistants ## Article Link: https://dev.wix.com/docs/develop-websites/articles/workspace-tools/developer-tools/ai-assistants/about-ai-assistants.md ## Article Content: # About AI Assistants AI Assistants are Wix tools that allow you to generate code using prompts and built-in artificial intelligence (AI). Each assistant is designed for specific development environments and use cases. ## Wix AI Assistant in the Wix IDE The [Wix AI Assistant in the Wix IDE](https://dev.wix.com/docs/develop-websites/articles/workspace-tools/developer-tools/ai-assistants/ai-assistant-in-the-wix-ide/about-the-wix-ai-assistant.md) is a comprehensive coding companion for backend development. This assistant helps you: - Generate backend code based on your descriptions. - Debug and fix errors in your existing code. - Look up documentation and learn about Wix APIs. - Have interactive conversations with follow-up questions and clarifications. This assistant is ideal for complex backend logic, API integrations, and when you need detailed explanations of Wix development concepts. ## AI Code Assistant in the Wix Studio Code Panel The [AI Code Assistant in the Wix Studio Code Panel](https://dev.wix.com/docs/develop-websites/articles/workspace-tools/developer-tools/ai-assistants/ai-assistant-in-the-code-panel/about-the-ai-code-assistant.md) specializes in frontend development. This assistant helps you: - Generate custom code that triggers when interacting with elements on a site. - Add the generated code directly to a site's page code. This assistant is perfect for adding interactive features to a site's elements. ## Choosing the right assistant - Use the assistant in the Wix IDE when you want assistance with backend functionality, complex logic, API integrations, or comprehensive debugging help. - Use the assistant in the Code panel when you want assistance with adding custom interactive behaviors to frontend elements. Both assistants are designed to accelerate your development process while helping you learn Wix development best practices. ## See also - [About the Wix AI Assistant in the Wix IDE](https://dev.wix.com/docs/develop-websites/articles/workspace-tools/developer-tools/ai-assistants/ai-assistant-in-the-wix-ide/about-the-wix-ai-assistant.md) - [About the AI Code Assistant in the Wix Studio Code Panel](https://dev.wix.com/docs/develop-websites/articles/workspace-tools/developer-tools/ai-assistants/ai-assistant-in-the-code-panel/about-the-ai-code-assistant.md) - [Generate backend code using the Wix AI Assistant](https://dev.wix.com/docs/develop-websites/articles/workspace-tools/developer-tools/ai-assistants/ai-assistant-in-the-wix-ide/generate-code-using-the-wix-ai-assistant.md) - [Write event handlers with the AI Code Assistant in the Wix Studio Code Panel](https://dev.wix.com/docs/develop-websites/articles/workspace-tools/developer-tools/ai-assistants/ai-assistant-in-the-code-panel/write-event-handlers-with-the-ai-code-assistant-in-the-wix-studio-editor.md) --- > Portal Navigation: > > - Append `.md` to any URL under `https://dev.wix.com/docs/` to get its markdown version. > - Pages are either content pages (article or reference text) or menu pages (a list of links to child pages). > - To get a menu page, truncate any URL to a parent path and append `.md` (e.g. `https://dev.wix.com/docs/sdk.md`, `https://dev.wix.com/docs/sdk/core-modules.md`). > - Top-level index of all portals: https://dev.wix.com/docs/llms.txt > - Full concatenated docs: https://dev.wix.com/docs/llms-full.txt ## Resource: About the Wix AI Assistant ## Article: Wix Studio: Wix AI Assistant ## Article Link: https://dev.wix.com/docs/develop-websites/articles/workspace-tools/developer-tools/ai-assistants/ai-assistant-in-the-wix-ide/about-the-wix-ai-assistant.md ## Article Content: # About the Wix AI Assistant in the Wix IDE The Wix AI Assistant is an intelligent coding companion built into the [Wix IDE](https://support.wix.com/en/article/about-the-wix-ide). It provides real-time assistance to help you write code, fix errors, discover features, and learn how to use Wix APIs to create sites. Use the Wix AI Assistant to: + **Generate code:** Write a code snippet for a site based on your description. + **Fix code:** Debug errors in your code. + **Look up documentation:** Inquire about new features and access detailed information from [Wix's API reference](https://dev.wix.com/docs/velo.md). ## Supported IDEs You can use the Wix AI Assistant in the [Wix IDE](https://support.wix.com/en/article/about-the-wix-ide). ## Code snippets When the Wix AI Assistant provides a code snippet, you can insert it or copy and paste it directly into the Wix IDE.
![Code snippet](https://wixmp-833713b177cebf373f611808.wixmp.com/images/5c1dffe0af4e9ef6641e8095b282c25f.png)
## Interactive chat The Wix AI Assistant provides an interactive chat interface, so you can continue your conversation with the assistant after receiving its initial response. Examples of furthering conversations are: - Ask clarifying questions. - Request corrections. - Make further queries that build on the previous one. You can ask up to 2 follow-up questions after each initial query. After this, the Wix AI Assistant starts over. ## See also - [About AI assistants](https://dev.wix.com/docs/develop-websites/articles/workspace-tools/developer-tools/ai-assistants/about-ai-assistants.md) - [Generate backend code using the Wix AI Assistant](https://dev.wix.com/docs/develop-websites/articles/workspace-tools/developer-tools/ai-assistants/ai-assistant-in-the-wix-ide/generate-code-using-the-wix-ai-assistant.md) - [About the AI Code Assistant in the Wix Studio Code panel](https://dev.wix.com/docs/develop-websites/articles/workspace-tools/developer-tools/ai-assistants/ai-assistant-in-the-code-panel/about-the-ai-code-assistant.md), to generate frontend code for elements using prompts. --- > Portal Navigation: > > - Append `.md` to any URL under `https://dev.wix.com/docs/` to get its markdown version. > - Pages are either content pages (article or reference text) or menu pages (a list of links to child pages). > - To get a menu page, truncate any URL to a parent path and append `.md` (e.g. `https://dev.wix.com/docs/sdk.md`, `https://dev.wix.com/docs/sdk/core-modules.md`). > - Top-level index of all portals: https://dev.wix.com/docs/llms.txt > - Full concatenated docs: https://dev.wix.com/docs/llms-full.txt ## Resource: Generate Code Using the Wix AI Assistant ## Article: Generate Code Using the Wix AI Assistant ## Article Link: https://dev.wix.com/docs/develop-websites/articles/workspace-tools/developer-tools/ai-assistants/ai-assistant-in-the-wix-ide/generate-code-using-the-wix-ai-assistant.md ## Article Content: # Generate Code Using the Wix AI Assistant Use the [Wix AI Assistant](https://dev.wix.com/docs/develop-websites/articles/workspace-tools/developer-tools/ai-assistants/ai-assistant-in-the-wix-ide/about-the-wix-ai-assistant.md) to help you work on a site's code inside the [Wix IDE](https://support.wix.com/en/article/about-the-wix-ide). 1. To access the Wix AI Assistant, click the **Wix AI Assistant** AI Assistant Icon icon in the Wix IDE sidebar or right click in the Wix IDE and select **Open the Wix AI Assistant**. The **Wix AI Assistant** panel opens.
2. Select the type of help you need. 3. In the text input field, describe [what you want the code to do](https://dev.wix.com/docs/develop-websites/articles/workspace-tools/developer-tools/ai-assistants/ai-assistant-in-the-wix-ide/about-the-wix-ai-assistant.md), and then click send ![Send Button](https://github.com/wix-incubator/wix-code-docs/assets/66324550/11994058-d69d-41d3-9e5e-8c0fc74c8156).
Tip: To get immediate code fix suggestions, highlight the code and right click Wix AI Assistant: Fix code.
![code-snippet](https://github.com/wix-incubator/wix-code-docs/assets/66324550/e84b2b08-863f-407d-bea6-28d5ebfe87f0)
The code assistant creates a code snippet that performs the requested task and explains how the code works. 4. You can add the proposed solution to the code by selecting: - **Insert**: Inserts the code directly into the code file you are editing.
Note: If any code is highlighted in the Wix IDE, the inserted code replaces it. Otherwise, the code is inserted at the current cursor position.
- **Copy**: Copies the code snippet to paste it manually into the Wix IDE. 5. You can continue your conversation with the assistant after receiving its initial response. You can ask up to 2 follow-up questions after each initial query. After this, the Wix AI Assistant starts over. 6. After your chat is complete, click home home-icon at the top of the Wix AI Assistant panel to start over. > **Note:** Make sure to test the code in [preview mode](https://dev.wix.com/docs/develop-websites/articles/workspace-tools/testing-monitoring/testing-troubleshooting/about-debugging-your-code.md) before publishing the site. ## See also - [About AI assistants](https://dev.wix.com/docs/develop-websites/articles/workspace-tools/developer-tools/ai-assistants/about-ai-assistants.md) - [About the AI Assistant in the Wix IDE](https://dev.wix.com/docs/develop-websites/articles/workspace-tools/developer-tools/ai-assistants/ai-assistant-in-the-wix-ide/about-the-wix-ai-assistant.md), to generate backend code using prompts. - [Studio Editor: Using the AI Code Assistant to Add Custom Code](https://support.wix.com/en/article/studio-editor-using-the-ai-assistant-to-add-custom-code) - [About the AI Code Assistant in the Wix Studio Code panel](https://dev.wix.com/docs/develop-websites/articles/workspace-tools/developer-tools/ai-assistants/ai-assistant-in-the-code-panel/about-the-ai-code-assistant.md) --- > Portal Navigation: > > - Append `.md` to any URL under `https://dev.wix.com/docs/` to get its markdown version. > - Pages are either content pages (article or reference text) or menu pages (a list of links to child pages). > - To get a menu page, truncate any URL to a parent path and append `.md` (e.g. `https://dev.wix.com/docs/sdk.md`, `https://dev.wix.com/docs/sdk/core-modules.md`). > - Top-level index of all portals: https://dev.wix.com/docs/llms.txt > - Full concatenated docs: https://dev.wix.com/docs/llms-full.txt ## Resource: About the AI Code Assistant ## Article: Writing Event Handlers with the AI Code Assistant ## Article Link: https://dev.wix.com/docs/develop-websites/articles/workspace-tools/developer-tools/ai-assistants/ai-assistant-in-the-code-panel/about-the-ai-code-assistant.md ## Article Content: # About the AI Code Assistant in the Wix Studio Code Panel The [AI Code Assistant in the Code panel](https://support.wix.com/en/article/studio-editor-using-the-ai-assistant-to-add-custom-code) of the Studio editor uses a series of prompts to generate custom [event handler](https://dev.wix.com/docs/develop-websites/articles/workspace-tools/developer-tools/ai-assistants/ai-assistant-in-the-code-panel/write-event-handlers-with-the-ai-code-assistant-in-the-wix-studio-editor.md) code for elements on a site. The assistant also returns an explanation of the code it generates. With the AI Code Assistant, you can : - Disable a button for certain site visitors based on their location using browser locale and IP geolocation detection. - Register a hover event that changes an element's color when the mouse pointer hovers over it. ## Supported IDEs You can use the AI Code Assistant in the [Wix Studio Code panel](https://dev.wix.com/docs/develop-websites/articles/workspace-tools/velo-workspace/workspaces/wix-studio-working-with-the-code-panel.md). ## Before you begin Please note the following before using the AI Code Assistant in the Wix Studio Code panel: - The assistant in the Code panel only supports simple use cases that can be implemented in frontend [page code](https://dev.wix.com/docs/develop-websites/articles/workspace-tools/velo-workspace/workspaces/wix-studio-working-with-the-code-panel.md#page-code) files. It doesn't currently support use cases that require both frontend and backend code. To use an AI assistant for backend code, see [About the AI Assistant in the Wix IDE](https://dev.wix.com/docs/develop-websites/articles/workspace-tools/developer-tools/ai-assistants/ai-assistant-in-the-wix-ide/about-the-wix-ai-assistant.md). - The assistant doesn't support requests that require interactions with 3rd-party services, external APIs, or the use of npm packages. - The assistant currently only supports requests in English. ## See also - [About AI assistants](https://dev.wix.com/docs/develop-websites/articles/workspace-tools/developer-tools/ai-assistants/about-ai-assistants.md) - [Write event handlers with the AI Code Assistant in the Wix Studio Code Panel](https://dev.wix.com/docs/develop-websites/articles/workspace-tools/developer-tools/ai-assistants/ai-assistant-in-the-code-panel/write-event-handlers-with-the-ai-code-assistant-in-the-wix-studio-editor.md) - [Studio Editor: Using the AI Code Assistant to Add Custom Code](https://support.wix.com/en/article/studio-editor-using-the-ai-assistant-to-add-custom-code) - [About the AI Assistant in the Wix IDE](https://dev.wix.com/docs/develop-websites/articles/workspace-tools/developer-tools/ai-assistants/ai-assistant-in-the-wix-ide/about-the-wix-ai-assistant.md), to generate backend code using prompts. --- > Portal Navigation: > > - Append `.md` to any URL under `https://dev.wix.com/docs/` to get its markdown version. > - Pages are either content pages (article or reference text) or menu pages (a list of links to child pages). > - To get a menu page, truncate any URL to a parent path and append `.md` (e.g. `https://dev.wix.com/docs/sdk.md`, `https://dev.wix.com/docs/sdk/core-modules.md`). > - Top-level index of all portals: https://dev.wix.com/docs/llms.txt > - Full concatenated docs: https://dev.wix.com/docs/llms-full.txt ## Resource: Write Event Handlers with the AI Code Assistant in the Wix Studio Editor ## Article: Write Event Handlers with the AI Assistant in the Wix Studio Editor ## Article Link: https://dev.wix.com/docs/develop-websites/articles/workspace-tools/developer-tools/ai-assistants/ai-assistant-in-the-code-panel/write-event-handlers-with-the-ai-code-assistant-in-the-wix-studio-editor.md ## Article Content: # Write Event Handlers with the AI Code Assistant in the Wix Studio Code Panel > **Note:** This feature is only available to Wix Studio users. Use the [AI Code Assistant](https://dev.wix.com/docs/develop-websites/articles/workspace-tools/developer-tools/ai-assistants/ai-assistant-in-the-code-panel/about-the-ai-code-assistant.md) to write custom code behavior for elements on a site. To write an event handler with the **AI Code Assistant**: 1. Start a chat with the AI Code Assistant: + **On the canvas:** Right-click the element you want to customize and select **Add Custom Behavior with AI**. + **Through the Code panel:** Access the Code panel on the left side of the editor and select **AI Code Assistant**. 2. Select one of the assistant's suggestions or describe what you want to customize. The AI Code Assistant generates the code. 3. Select one of the following options: + **Show code** displays the generated code along with an explanation of the code. You can copy and paste this code into a site's [page code](https://dev.wix.com/docs/develop-websites/articles/workspace-tools/velo-workspace/workspaces/wix-studio-working-with-the-code-panel.md#page-code), or ask the assistant to make adjustments. + **Add code** directly adds the code into a site's [page code](https://dev.wix.com/docs/develop-websites/articles/workspace-tools/velo-workspace/workspaces/wix-studio-working-with-the-code-panel.md#page-code). ## See also - [About AI assistants](https://dev.wix.com/docs/develop-websites/articles/workspace-tools/developer-tools/ai-assistants/about-ai-assistants.md) - [About the AI Code Assistant in the Wix Studio Code Panel](https://dev.wix.com/docs/develop-websites/articles/workspace-tools/developer-tools/ai-assistants/ai-assistant-in-the-code-panel/about-the-ai-code-assistant.md) - [Studio Editor: Using the AI Code Assistant to Add Custom Code](https://support.wix.com/en/article/studio-editor-using-the-ai-assistant-to-add-custom-code) - [About the AI Assistant in the Wix IDE](https://dev.wix.com/docs/develop-websites/articles/workspace-tools/developer-tools/ai-assistants/ai-assistant-in-the-wix-ide/about-the-wix-ai-assistant.md), to generate backend code using prompts. --- > Portal Navigation: > > - Append `.md` to any URL under `https://dev.wix.com/docs/` to get its markdown version. > - Pages are either content pages (article or reference text) or menu pages (a list of links to child pages). > - To get a menu page, truncate any URL to a parent path and append `.md` (e.g. `https://dev.wix.com/docs/sdk.md`, `https://dev.wix.com/docs/sdk/core-modules.md`). > - Top-level index of all portals: https://dev.wix.com/docs/llms.txt > - Full concatenated docs: https://dev.wix.com/docs/llms-full.txt ## Resource: About n8n Integration ## Article: About n8n Integration ## Article Link: https://dev.wix.com/docs/develop-websites/articles/workspace-tools/developer-tools/integrations/about-n8n-integration.md ## Article Content: # About n8n Integration [n8n](https://n8n.io/) is a workflow automation platform that lets you connect apps and services to create automated workflows. With the Wix n8n integration, you can automate tasks involving your Wix site without writing code, connecting Wix to hundreds of other services available in the n8n ecosystem. A key capability of n8n is its built-in AI agent. By combining Wix triggers with an AI agent, you can create workflows that analyze incoming data, determine appropriate actions, and execute them automatically. Before getting started, [connect n8n to your Wix site](https://dev.wix.com/docs/develop-websites/articles/workspace-tools/developer-tools/integrations/connect-n8n-to-your-wix-site.md). ## What you can do with the integration The Wix n8n integration provides two types of nodes, both powered by [Wix APIs](https://dev.wix.com/docs/api-reference.md): - Wix trigger node: Starts workflows automatically when an event occurs on your site. [Wix Automations](https://dev.wix.com/docs/api-reference/business-management/automations/triggers/about-triggers?apiView=SDK.md) powers the triggers and provides events across Wix business solutions, such as form submissions, new orders, booking confirmations, contact updates, and membership sign-ups. - Wix node: Performs actions on your Wix site, such as managing products and orders in your Wix Store. You can create, update, delete, and query data as part of your n8n workflows. When configuring a Wix node, you can specify parameter values manually, map them from the trigger output, or use an AI agent to generate them dynamically based on the workflow context. To see the full list of available triggers and actions, browse the options in the Wix nodes' configuration panels in n8n. Learn more about [n8n nodes](https://docs.n8n.io/workflows/components/nodes/).
**Important:** The Wix nodes are currently community nodes. Before you can use them, you must install the `@wix/n8n-nodes-wix` package. See the n8n guide on [installing community nodes](https://docs.n8n.io/integrations/community-nodes/installation/).
## AI-powered workflows The built-in AI agent in n8n is a key advantage of using n8n with Wix. Instead of building complex conditional logic, you can use an AI agent to interpret trigger data and decide what actions to take. The agent can analyze incoming information, determine the appropriate response, and generate the parameters needed for any action in your workflow, whether that's a Wix node, an email service, a CRM, or any other n8n integration. For example, you can create a workflow that recovers abandoned checkouts. When a checkout is abandoned on your site, n8n triggers the workflow and an AI agent analyzes the details and generates the parameters for a discounted recovery order and a personalized email. The workflow then creates the order and sends the email to win back the customer. To expand the capabilities of your AI agent beyond the actions available in the Wix node, you can connect the [Wix MCP server](https://dev.wix.com/docs/api-reference/articles/wix-mcp/about-the-wix-mcp.md) as a tool. Connecting the Wix MCP gives your AI agent access to additional Wix APIs. ## Authentication To connect n8n to your Wix site, you need an [API key](https://dev.wix.com/docs/api-reference/articles/authentication/about-api-keys.md) and the site ID of the site you want to connect. These are added as credentials in n8n. To learn how to set up Wix authentication in n8n, see [Connect n8n to Your Wix Site](https://dev.wix.com/docs/develop-websites/articles/workspace-tools/developer-tools/integrations/connect-n8n-to-your-wix-site.md). ## Use cases Here are some examples of what you can automate with the Wix n8n integration: - Abandoned checkout recovery: When a checkout is abandoned, an AI agent analyzes the details and generates parameters for a discounted recovery order and personalized email. The workflow then creates the order and sends the email. - Smart lead routing: When a form is submitted, an AI agent evaluates the submission and categorizes the lead. The workflow then routes the lead to the appropriate team member or CRM. - Automated content moderation: When a new blog comment or forum post is published, an AI agent analyzes the content and decides whether to approve, flag, or remove it. The workflow then performs the appropriate action. - Dynamic customer support: When a chat message is received, an AI agent analyzes the query, retrieves relevant order or booking information, and generates a response. The workflow then sends the response to the customer. - Cross-platform sync: When product data changes in your Wix Store, automatically update inventory in external systems like spreadsheets or software solutions like Enterprise Resource Planning (ERP). ## n8n marketplace You can search the [n8n workflows](https://n8n.io/workflows/) for workflow templates built by others that use Wix nodes. If you're a developer looking to extend the Wix n8n integration or create your own Wix-related nodes, you can build and publish them to the marketplace for other Wix users to benefit from. ## See also - [n8n Docs](https://docs.n8n.io/) - [Connect n8n to Your Wix Site](https://dev.wix.com/docs/develop-websites/articles/workspace-tools/developer-tools/integrations/connect-n8n-to-your-wix-site.md) --- > Portal Navigation: > > - Append `.md` to any URL under `https://dev.wix.com/docs/` to get its markdown version. > - Pages are either content pages (article or reference text) or menu pages (a list of links to child pages). > - To get a menu page, truncate any URL to a parent path and append `.md` (e.g. `https://dev.wix.com/docs/sdk.md`, `https://dev.wix.com/docs/sdk/core-modules.md`). > - Top-level index of all portals: https://dev.wix.com/docs/llms.txt > - Full concatenated docs: https://dev.wix.com/docs/llms-full.txt ## Resource: Connect n8n to your Wix Site ## Article: Connect n8n to your Wix Site ## Article Link: https://dev.wix.com/docs/develop-websites/articles/workspace-tools/developer-tools/integrations/connect-n8n-to-your-wix-site.md ## Article Content: # Connect n8n to Your Wix Site Connect your Wix site to n8n to automate workflows using Wix triggers and actions. For an overview of the Wix n8n integration and what you can do with it, see [About n8n Integration](https://dev.wix.com/docs/develop-websites/articles/workspace-tools/developer-tools/integrations/about-n8n-integration.md). This guide walks you through creating API credentials and configuring n8n to work with your site. After completing this task, you can create workflows that react to events on your Wix site, perform Wix actions, connect to other n8n integrations, and use AI agents to power your automations.
**Important:** Wix n8n nodes are currently community nodes. Before you can use them, you must install the `@wix/n8n-nodes-wix` package. See the n8n guide on [installing community nodes](https://docs.n8n.io/integrations/community-nodes/installation/).
## Step 1 | Create an API key in Wix Create an [API key](https://dev.wix.com/docs/api-reference/articles/authentication/about-api-keys.md) in your Wix account with the permissions needed for the triggers and actions you want to use. To create an API key: 1. Go to the [API Keys Manager](https://manage.wix.com/account/api-keys) in your Wix account. 2. Click **Create API Key**. 3. Enter a name for your API key, such as "n8n Integration". 4. Select the permissions for the APIs you want to access. The permissions you need depend on which triggers and actions you plan to use. For example: - For product operations, select **Wix Stores** permissions. - For order operations, select **Wix eCommerce** permissions. 5. Click **Create**. 6. Copy and securely store your API key. You can't view it again.
__Important:__ Store your API key securely and never expose it in frontend code.
## Step 2 | Find your site ID Locate the ID of the Wix site you want to connect to n8n. To find your site ID: 1. Go to your [site's dashboard](https://www.wix.com/my-account/site-selector/?buttonText=Select%20Site&title=Select%20a%20Site&autoSelectOnSingleSite=true&actionUrl=https:%2F%2Fwww.wix.com%2Fdashboard%2F%7B%7BmetaSiteId%7D%7D%2Fhome). 2. Check the URL in your browser. The site ID appears after `/dashboard/` in the URL. For example, in `https://manage.wix.com/dashboard/12345678-1234-1234-1234-123456789012/home`, the site ID is `12345678-1234-1234-1234-123456789012`. Alternatively, you can use the [Query Sites](https://dev.wix.com/docs/api-reference/account-level/sites/sites/query-sites?apiView=SDK.md) API to retrieve all site IDs associated with your account. ## Step 3 | Configure Wix credentials in n8n Add your Wix API credentials to n8n to authenticate your workflows. To configure credentials: 1. In n8n, go to **Settings > Credentials**. 2. Click **Add Credential**. 3. Search for and select **Wix API**. 4. Enter your credentials: - **API Key**: Paste the API key you created in Step 1. - **Site ID**: Paste the site ID you found in Step 2. 5. Click **Save**. ## Step 4 | Test the connection Verify that your credentials are working by creating a simple workflow. To test the connection: 1. Create a new workflow in n8n. 2. Add a Wix node to the canvas. 3. When configuring the node, select your saved Wix API credentials. 4. Browse the available resources and operations to see what actions you can perform. 5. Select an operation and click **Test step** to execute it. If the connection is successful, you see results from your Wix site. ## See also - [About n8n Integration](https://dev.wix.com/docs/develop-websites/articles/workspace-tools/developer-tools/integrations/about-n8n-integration.md) - [About API Keys](https://dev.wix.com/docs/rest/articles/authentication/about-api-keys.md) --- > Portal Navigation: > > - Append `.md` to any URL under `https://dev.wix.com/docs/` to get its markdown version. > - Pages are either content pages (article or reference text) or menu pages (a list of links to child pages). > - To get a menu page, truncate any URL to a parent path and append `.md` (e.g. `https://dev.wix.com/docs/sdk.md`, `https://dev.wix.com/docs/sdk/core-modules.md`). > - Top-level index of all portals: https://dev.wix.com/docs/llms.txt > - Full concatenated docs: https://dev.wix.com/docs/llms-full.txt ## Resource: About Debugging Your Code ## Article: Testing and Troubleshooting Your Code ## Article Link: https://dev.wix.com/docs/develop-websites/articles/workspace-tools/testing-monitoring/testing-troubleshooting/about-debugging-your-code.md ## Article Content: # About Debugging Your Code There are several ways you can debug the code in your Wix site: - Debugging with the Developer Console - Debugging with functional testing in the backend - Debugging with your browser's developer tools - Debugging with Wix Logs ## Debugging with the Developer Console The Wix Developer Console is available at the bottom of the page when you are previewing your site. The console displays information that is useful when debugging, such as errors, warnings, and other messages. It also displays debug messages that you added to the code using any [console method](https://developer.mozilla.org/en-US/docs/Web/API/console). If you are new to debugging code, click [here](https://dev.wix.com/docs/develop-websites/articles/workspace-tools/testing-monitoring/testing-troubleshooting/about-debugging-your-code.md) to learn how to log messages to the console. Each message displays the page where the relevant code can be found and a link to the specific line of code (in the editor) that triggered the message. ### Viewing the Developer Console To view the Developer Console, open your site in Preview mode. The Developer Console appears at the bottom of the page. ![Developer Console](https://wixmp-833713b177cebf373f611808.wixmp.com/images/61a21a6485d5f527d42fc5417df978f5.png) If the console is minimized, click the arrow ![developer console arrow](https://wixmp-833713b177cebf373f611808.wixmp.com/images/c27735328334e1589ef91c4f0dfb4aa7.png) to expand it. ### Clearing messages from the console Click ![clear console button](https://wixmp-833713b177cebf373f611808.wixmp.com/images/c79b7d7b6b7b7229338ba32f083e6fdf.png) on the console menu bar. ### Filtering console messages Click **Default View** on the console menu bar, and then choose which kinds of messages you want to see. ![Default View menu](https://wixmp-833713b177cebf373f611808.wixmp.com/images/003d8881d8517049e8b5430f866be849.png) + **Verbose**: System log messages that can help you debug low-level code problems. + **Debug**: Messages you have logged to the console. + **Info**: Informational messages that require no action. + **Warning**: Messages about potential problems in your code. These are highlighted in yellow. + **Error**: Messages about actual errors in your code. These are highlighted in red. ## Debugging with functional testing in the backend Debugging code from the backend is challenging because you need to invest effort to trigger the code and test it. To save you time and effort, Wix Studio and Wix Editor enable [quick testing of backend functions](https://support.wix.com/en/article/velo-testing-your-backend-functions) directly from the code editor. The output you see in the test tab is the same as the output you would see in the Developer Console if you previewed your site and triggered the function. You can debug HTTP functions by adding `console.log()` calls to them. The information you log appears in the function output when using [functional testing](https://dev.wix.com/docs/develop-websites/articles/workspace-tools/testing-monitoring/functional-testing/test-backend-functions-with-functional-testing.md) (Wix Editor) and in your site's [Logs](https://dev.wix.com/docs/develop-websites/articles/workspace-tools/testing-monitoring/testing-troubleshooting/about-debugging-your-code.md). ## Debugging with your browser's developer tools Wix allows you to [debug](https://developer.chrome.com/docs/devtools/javascript/) your site's code as you would any modern JavaScript web-based application, by using [developer tools](https://developer.mozilla.org/en-US/docs/Learn/Common_questions/What_are_browser_developer_tools) to set breakpoints, log to the console, and more. These tools are not part of Wix - they come with your browser. If you are new to debugging, learn how to [log messages to the console](https://dev.wix.com/docs/develop-websites/articles/workspace-tools/testing-monitoring/testing-troubleshooting/about-debugging-your-code.md). You can open a copy of your site's frontend code files in the browser's developer tools. For detailed instructions, read [Locate and Open Frontend Source Files](https://dev.wix.com/docs/develop-websites/articles/workspace-tools/testing-monitoring/testing-troubleshooting/locate-and-open-frontend-source-files.md) You can debug your fully-published site's code directly, or without publishing using Preview mode. Read more about [About Testing Your Code in Preview Mode](https://dev.wix.com/docs/develop-websites/articles/workspace-tools/testing-monitoring/testing-troubleshooting/about-testing-your-code-in-preview-mode.md). ### Expected behaviors when debugging in Preview mode Consider the following expected behaviors when debugging certain features in Preview mode: - **Backend code** Because of security concerns, messages in backend code might not be logged to the browser's console on the published version of your site. - **HTTP functions** Because HTTP functions are not browser-based, there is no console to display your logs. You can use [Wix Logs](#debugging-with-wix-logs) to view console messages in backend code and HTTP functions on your site. ### Source maps When you debug your code in the browser it looks just like your original source code. In reality, the code you write is not the actual code that is run. The usage of source maps means that you don't need to worry about what's going on behind the scenes. But if you're curious to know, this is what's happening.
Read more about source maps Wix supports writing code using the ES2017 standard. But until this standard is fully implemented in all browsers, your code is transpiled from ES2017 code to ES5. Your code is also minified, and source files are combined to make their delivery from the server more efficient. So the code that's actually being run on your site is transpiled, minified, and combined. You don't want to have to debug that generated code. You want to debug the code you wrote originally. That's where source maps come in.  A source map is a file that maps the lines of code that the browser is actually running to the lines in your original source code. When you want to debug some code, the source map lets you find the code in the original version that you wrote, even though the debugger uses the source map to run the corresponding generated code.  All this should happen without you having to do anything. If you’re having trouble, check your browser’s developer tools settings and make sure that source maps are enabled. 
## Debugging with Wix Logs [Wix Logs](https://dev.wix.com/docs/develop-websites/articles/workspace-tools/developer-tools/logs/about-logs.md) allows you to debug your site by generating and tracking logs in real-time by adding [console messages](https://dev.wix.com/docs/develop-websites/articles/workspace-tools/testing-monitoring/testing-troubleshooting/about-debugging-your-code.md) to any code in your site. This includes frontend code, backend code, public code, HTTP functions, or anywhere else in your site. Logs are generated when in Preview mode and when working on a published site. To access Wix Logs while previewing, click **Logging Tools** and then **Wix Logs** in your [Developer Console](https://dev.wix.com/docs/develop-websites/articles/workspace-tools/testing-monitoring/testing-troubleshooting/about-debugging-your-code.md). ![Logging tools button](https://wixmp-833713b177cebf373f611808.wixmp.com/images/5226fd913de0195684564357453b3541.png) Here is sample log: ![Logs](https://wixmp-833713b177cebf373f611808.wixmp.com/images/36338a0bd9887dabd3c1cd24d45d328b.png) Learn more about working with [Wix Logs](https://dev.wix.com/docs/develop-websites/articles/workspace-tools/developer-tools/logs/about-logs.md#about-wix-logs). > **Note**: For more robust log analysis, you can connect to [Google Cloud Logs](https://dev.wix.com/docs/develop-websites/articles/workspace-tools/developer-tools/logs/view-logs-using-google-cloud-logs.md) and other [external monitoring tools](https://dev.wix.com/docs/develop-websites/articles/workspace-tools/developer-tools/logs/view-logs-using-an-external-monitoring-tool.md). Learn more about: - [Viewing logs in your Wix Logs window](https://dev.wix.com/docs/develop-websites/articles/workspace-tools/developer-tools/logs/view-logs-using-wix-logs.md) - [Connecting to Google Cloud Logs](https://dev.wix.com/docs/develop-websites/articles/workspace-tools/developer-tools/logs/view-logs-using-google-cloud-logs.md) - [How to generate a log using Wix Logs](https://dev.wix.com/docs/develop-websites/articles/workspace-tools/developer-tools/logs/generate-logs-to-debug-your-site.md) - [Wix Logs' logging details](https://www.wix.com/velo/reference/spis/site-monitoring/logentry) ## Debugging FORBIDDEN (403) errors Some functions require specific roles and permissions to run. Other functions may limit functionality depending on the site visitor's roles and permissions. If you are receiving a 403 or FORBIDDEN error when you run a function, try using the Wix Auth API's [`elevate()`](https://www.wix.com/velo/reference/wix-auth/elevate) function. This function allows you to bypass permission requirements by elevating the site visitor's permissions to the highest level. Exercise caution when using this function to prevent security vulnerabilities. ## See also - [About Testing Your Code in Preview Mode](https://dev.wix.com/docs/develop-websites/articles/workspace-tools/testing-monitoring/testing-troubleshooting/about-testing-your-code-in-preview-mode.md) - [Locate and Open Frontend Source Files](https://dev.wix.com/docs/develop-websites/articles/workspace-tools/testing-monitoring/testing-troubleshooting/locate-and-open-frontend-source-files.md) - [About Wix Logs](https://dev.wix.com/docs/develop-websites/articles/workspace-tools/developer-tools/logs/about-logs.md) --- > Portal Navigation: > > - Append `.md` to any URL under `https://dev.wix.com/docs/` to get its markdown version. > - Pages are either content pages (article or reference text) or menu pages (a list of links to child pages). > - To get a menu page, truncate any URL to a parent path and append `.md` (e.g. `https://dev.wix.com/docs/sdk.md`, `https://dev.wix.com/docs/sdk/core-modules.md`). > - Top-level index of all portals: https://dev.wix.com/docs/llms.txt > - Full concatenated docs: https://dev.wix.com/docs/llms-full.txt ## Resource: Locate and Open Frontend Source Files ## Article: Locate and Open Frontend Source Files ## Article Link: https://dev.wix.com/docs/develop-websites/articles/workspace-tools/testing-monitoring/testing-troubleshooting/locate-and-open-frontend-source-files.md ## Article Content: # Locate and Open Frontend Source Files When debugging your site's frontend code, you may want to view a copy of the code files in your browser's developer tools. To locate and open the files: 1. Identify the names of the files that contain your site's frontend code. The names of these files appear in the Wix Developer Console when you preview your site They also appear in the browser developer console. ![Developer console filename](https://wixmp-833713b177cebf373f611808.wixmp.com/images/70041265fd4a1dfe29c1bc998fbc7b18.png) 1. Browse to your site (published or in [Preview mode](https://dev.wix.com/docs/develop-websites/articles/workspace-tools/testing-monitoring/testing-troubleshooting/about-testing-your-code-in-preview-mode.md)) and open your browser's developer tools. 1. Open the file search bar. - In Chrome press **command/Ctrl+O**. - In Firefox, open the **Debugger** panel in the developer tools and press **command/Ctrl+P**. 1. Type the name of your code file and select it from the search results to open it. ![Select code file](https://wixmp-833713b177cebf373f611808.wixmp.com/images/8163fd532bdaae8cdaeed150b555535b.png) ## See also - [About Debugging Your Code](https://dev.wix.com/docs/develop-websites/articles/workspace-tools/testing-monitoring/testing-troubleshooting/about-debugging-your-code.md) - [About Testing Your Code in Preview Mode](https://dev.wix.com/docs/develop-websites/articles/workspace-tools/testing-monitoring/testing-troubleshooting/about-testing-your-code-in-preview-mode.md) --- > Portal Navigation: > > - Append `.md` to any URL under `https://dev.wix.com/docs/` to get its markdown version. > - Pages are either content pages (article or reference text) or menu pages (a list of links to child pages). > - To get a menu page, truncate any URL to a parent path and append `.md` (e.g. `https://dev.wix.com/docs/sdk.md`, `https://dev.wix.com/docs/sdk/core-modules.md`). > - Top-level index of all portals: https://dev.wix.com/docs/llms.txt > - Full concatenated docs: https://dev.wix.com/docs/llms-full.txt ## Resource: About Testing Your Code in Preview Mode ## Article: About Testing Your Code in Preview Mode ## Article Link: https://dev.wix.com/docs/develop-websites/articles/workspace-tools/testing-monitoring/testing-troubleshooting/about-testing-your-code-in-preview-mode.md ## Article Content: # About Testing Your Code in Preview Mode You can test the code on your site before publishing using Preview mode. You can perform any actions in Preview mode that you would be able to perform on your live site. When testing your site, you can check if any errors appear in the [Wix Developer Console](https://dev.wix.com/docs/develop-websites/articles/workspace-tools/testing-monitoring/testing-troubleshooting/about-debugging-your-code.md#debugging-with-the-developer-console). ## Supported IDEs Preview mode is available in Wix Studio and Wix Editor. If you're developing in the [Wix IDE](https://dev.wix.com/docs/develop-websites/articles/workspace-tools/velo-workspace/wix-ide/wix-studio-about-the-wix-ide.md) or the [Local IDE](https://dev.wix.com/docs/develop-websites/articles/workspace-tools/developer-tools/git-integration-wix-cli/about-git-integration-wix-cli.md), you can open your site in Wix Studio or Wix Editor to use Preview mode. ## Enter Preview mode To enter Preview mode in **Wix Studio**, either click the **Run** button in the code editor toolbar, or the preview button on the top right. ![Open Preview mode in Studio](https://wixmp-833713b177cebf373f611808.wixmp.com/images/ffbb8a64bf8ec23768ffae14d7c60cc1.png) To enter Preview mode in **Wix Editor**, either click on the **Run** button in the [code editor toolbar](https://support.wix.com/en/article/velo-working-with-the-code-panel-toolbar-and-right-click-menu), or the **Preview** button in the Editor on the top right. ![Open Preview mode in Editor](https://wixmp-833713b177cebf373f611808.wixmp.com/images/07a171db7d78c7d40a3980c98fccd4d5.png) ## Collections in Preview mode When you've finished previewing and return to the Editor, interactions you had with your site aren't maintained. Your site returns to the state it was in before you entered Preview mode. The only exception is your optional [sandbox collection](https://support.wix.com/en/article/cms-about-sandbox-and-live-collections-and-syncing), which is disabled by default. The sandbox collection is useful when you want to test your site without affecting your site's data. When the sandbox collection is enabled and you interact with data from your collections, you'll be using the optional sandbox version of your collections, not the live version. Changes to data that result from interactions with your site in Preview mode persists in your optional sandbox database. ## Differences between Preview mode and published sites Although your can view your pages and interact with your site and data in Preview mode, the site doesn't behave exactly as it does when published: + When previewing your site, you are assigned the Admin [role](https://support.wix.com/en/article/about-database-collection-permissions#roles). That means you are granted all possible [permissions](https://support.wix.com/en/article/database-permissions#permissions). Users of your live site might have different permissions and therefore have more restricted access. + When previewing your site with [sandbox enabled](https://support.wix.com/en/article/about-sandbox-and-live-collections-and-syncing), you're working with the data in your site's optional [sandbox database](https://support.wix.com/en/article/sandbox-data-vs-live-data#sandbox-data). Users of your live site work with your [live database](https://dev.wix.com/docs/develop-websites/articles/databases/wix-data/collections/importing-and-exporting-collection-data-with-code.md#using-the-form-with-the-live-collection-without-publishing-your-site). [Wix app collections](https://dev.wix.com/docs/develop-websites/articles/databases/wix-data/collections/working-with-wix-app-collections-and-code.md), however, only have the live database version. Any changes you make to these collections in Preview mode are reflected in your published site.   + Backend events and several other APIs don't necessarily work when previewing your site. We note when this is the case in the reference. > > You can try out a test version of your published site on a small percentage of visitors using the [Release Manager](https://dev.wix.com/docs/velo/articles/getting-started/testing-and-debugging.md#release-manager). This is helpful for testing functionality that only works on a published site without exposing that functionality to all site visitors. ## Handling errors If you see errors or your site isn't running as expected, there are tools you can use to debug the code in your site. + [Developer console:](https://dev.wix.com/docs/develop-websites/articles/workspace-tools/testing-monitoring/testing-troubleshooting/about-debugging-your-code.md) Debug in Preview mode. + [Functional testing:](https://dev.wix.com/docs/develop-websites/articles/workspace-tools/testing-monitoring/functional-testing/about-functional-testing.md) Trigger and debug backend code in the code editor. + [Browser developer tools:](https://dev.wix.com/docs/develop-websites/articles/workspace-tools/testing-monitoring/testing-troubleshooting/about-debugging-your-code.md) Debug your sites in Preview mode, published sites, and test sites. + [Logs:](https://dev.wix.com/docs/develop-websites/articles/workspace-tools/testing-monitoring/testing-troubleshooting/about-debugging-your-code.md#debugging-with-wix-logs) Debug in Preview or Published mode. ## See also + [About Debugging Your Code](https://dev.wix.com/docs/develop-websites/articles/workspace-tools/testing-monitoring/testing-troubleshooting/about-debugging-your-code.md) --- > Portal Navigation: > > - Append `.md` to any URL under `https://dev.wix.com/docs/` to get its markdown version. > - Pages are either content pages (article or reference text) or menu pages (a list of links to child pages). > - To get a menu page, truncate any URL to a parent path and append `.md` (e.g. `https://dev.wix.com/docs/sdk.md`, `https://dev.wix.com/docs/sdk/core-modules.md`). > - Top-level index of all portals: https://dev.wix.com/docs/llms.txt > - Full concatenated docs: https://dev.wix.com/docs/llms-full.txt ## Resource: About Functional Testing ## Article: About Functional Testing in the Backend ## Article Link: https://dev.wix.com/docs/develop-websites/articles/workspace-tools/testing-monitoring/functional-testing/about-functional-testing.md ## Article Content: # About Functional Testing Functional testing allows you to test your backend functions individually, making it easier to find and resolve bugs. The code editor comes with a quick-test environment for functional testing, which speeds up the development process by reducing the need to manually trigger and test your backend code by [calling functions from the frontend](https://dev.wix.com/docs/develop-websites/articles/coding-with-velo/backend-code/web-modules/call-backend-code-from-the-frontend.md). ## Supported IDEs You can test your backend functions with functional testing using the editor (Wix Studio and Wix Editor). ## Functional testing tab You can access functional testing from the following code files in your site's backend: - .js files - .web.js files - .jsw files (deprecated) >**Note:** Functional testing only works for functions that are exported. The functional testing environment opens as a new tab in the code editor for each function you test. To test your functions, add sample input parameter values as a JSON object on the left. When you run the function, the output is displayed on the right side, where the call statement always appears. If there are no errors, the return statement and console logs generated by the function are displayed. If there is a problem with your code or the input parameter values, an error message will appear instead. This setup helps you easily debug and improve your functions by providing clear feedback in the form of call statements, return values, console logs, or error messages.
## How functional testing compares to preview mode The output you see in the functional testing tab is the same as the output you would see in the [Developer Console](https://dev.wix.com/docs/develop-websites/articles/workspace-tools/testing-monitoring/testing-troubleshooting/testing-and-troubleshooting-your-code.md#debugging-with-the-developer-console) if you previewed your site and triggered the function. Testing backend functions in the code editor has other similarities to testing in Preview mode: - When you test a function that affects a Wix app, the Wix app data gets updated. For example, a new product is displayed in your dashboard after testing a backend function that creates a new product. - When you test code that interacts with a database collection not associated with a Wix app, data is updated in your [sandbox collection](https://dev.wix.com/docs/develop-websites/articles/databases/wix-data/collections/importing-and-exporting-collection-data-with-code.md) and not your [live collection](https://dev.wix.com/docs/develop-websites/articles/databases/wix-data/collections/importing-and-exporting-collection-data-with-code.md). - If there is a problem with your code, you'll see the same errors you would see in Preview mode. - You can use [Logs](https://dev.wix.com/docs/develop-websites/articles/workspace-tools/developer-tools/logs/about-wix-logs.md) to monitor your function output. The [view mode](https://www.wix.com/corvid/reference/spis/site-monitoring/logentry/labels) for Logs is "Preview".  ## See also - [Test Backend Functions with Functional Testing](https://dev.wix.com/docs/develop-websites/articles/workspace-tools/testing-monitoring/functional-testing/test-backend-functions-with-functional-testing.md) - [Functional Testing Examples](https://dev.wix.com/docs/develop-websites/articles/workspace-tools/testing-monitoring/functional-testing/functional-testing-examples.md) --- > Portal Navigation: > > - Append `.md` to any URL under `https://dev.wix.com/docs/` to get its markdown version. > - Pages are either content pages (article or reference text) or menu pages (a list of links to child pages). > - To get a menu page, truncate any URL to a parent path and append `.md` (e.g. `https://dev.wix.com/docs/sdk.md`, `https://dev.wix.com/docs/sdk/core-modules.md`). > - Top-level index of all portals: https://dev.wix.com/docs/llms.txt > - Full concatenated docs: https://dev.wix.com/docs/llms-full.txt ## Resource: Test Backend Functions with Functional Testing ## Article: Functional Testing in the Backend ## Article Link: https://dev.wix.com/docs/develop-websites/articles/workspace-tools/testing-monitoring/functional-testing/test-backend-functions-with-functional-testing.md ## Article Content: # Test Backend Functions with Functional Testing The code editor comes with a functional testing tab where you can test your backend functions individually. This reduces the need to manually trigger and test your backend code by [calling functions from the frontend](https://dev.wix.com/docs/develop-websites/articles/coding-with-velo/backend-code/web-modules/call-backend-code-from-the-frontend.md), speeding up the development and debugging process. ## Test a backend function To test a single backend function with functional testing: 1. In the code panel, open the backend file that contains the function you want to test. 1. In the code editor, click the **play icon** button ![play icon](https://wixmp-833713b177cebf373f611808.wixmp.com/images/1ac7cb9c0770f069c5fb697f77f69cfe.png) located to the left of your function.
This opens the functional testing tab. Your function name appears in the tab header. 1. In the Set Parameters section of the test tab, each parameter appears as a separate property in a JSON. Add [sample arguments](#LINK-TO-ADVANCED-FUNCTIONAL-TESTING-ARTICLE) for each property in the JSON.
>**Note** > If your function doesn't take any parameters, leave the JSON empty. 1. Click **Run** in the Set Parameters section.
The output appears on the right.
>**Note:** > If you close the functional testing tab, the last sample input parameter values and the most recent function output are saved and appear when you reopen the tab unless you refresh the page. ## Additional functional testing tab actions You can also perform the following actions in the functional testing tab: - **Clear sample parameter values:** Hover over your parameter values in the **Set Parameters** section and click the reset button ![](https://d2x3xhvgiqkx42.cloudfront.net/12345678-1234-1234-1234-1234567890ab/0ca9e8ba-16ed-4cd8-a1e1-58d01c4420f7/2020/12/19/14d12f7e-38c4-42e8-92e4-f1f81c2b0e41/8b857a02-2741-4363-af44-d3092e547395.png). - **Clear test output:** Hover over your output in the View Function Output section and click the clear button: ![](https://d2x3xhvgiqkx42.cloudfront.net/12345678-1234-1234-1234-1234567890ab/0ca9e8ba-16ed-4cd8-a1e1-58d01c4420f7/2020/12/19/5f1daab5-e507-4211-b1aa-c7364dbe00c8/8b3e2ccd-a0b9-4bce-8a94-cd4257dad2e9.png). ## See also - [About Functional Testing](https://dev.wix.com/docs/develop-websites/articles/workspace-tools/testing-monitoring/functional-testing/about-functional-testing.md) - [Functional Testing Examples](https://dev.wix.com/docs/develop-websites/articles/workspace-tools/testing-monitoring/functional-testing/functional-testing-examples.md) --- > Portal Navigation: > > - Append `.md` to any URL under `https://dev.wix.com/docs/` to get its markdown version. > - Pages are either content pages (article or reference text) or menu pages (a list of links to child pages). > - To get a menu page, truncate any URL to a parent path and append `.md` (e.g. `https://dev.wix.com/docs/sdk.md`, `https://dev.wix.com/docs/sdk/core-modules.md`). > - Top-level index of all portals: https://dev.wix.com/docs/llms.txt > - Full concatenated docs: https://dev.wix.com/docs/llms-full.txt ## Resource: Functional Testing Examples ## Article: Functional Testing Examples ## Article Link: https://dev.wix.com/docs/develop-websites/articles/workspace-tools/testing-monitoring/functional-testing/functional-testing-examples.md ## Article Content: # Functional Testing Examples With functional testing you can easily test your backend functions individually, reducing the need to build your own system for triggering and testing your backend code. You can use functional testing to test a variety of scenarios, such as functions with: - [HTTP requests](#http-requests) - [Destructured parameters](#destructured-parameters) - [Missing arguments](#missing-arguments) - [JavaScript arguments objects](#javascript-arguments-objects) - [Date objects](#date-objects) ## HTTP requests Here is an example of a function with an HTTP request that performs basic arithmetic operations based on the request path and query parameters:
To test [HTTP functions](https://www.wix.com/velo/reference/wix-http-functions) with functional testing, specify the HTTP request object in the Set Parameters section. A request template is initially created for you with placeholder data, but you need to edit it to fit your specific needs. For example, when testing a `post` function, replace the placeholder JSON object in the `body` property with a JSON object you want to test with. The following properties are included in the request templates: * For `get` and `delete` functions: `path`, `headers`, and `query` * For `put` and `post` functions: `path`, `headers`, and `body` * For `options` functions: `path` and `headers` * For `use` functions: `path`, `headers`, `query`, and `method`
## Destructured parameters Destructuring allows you to extract values from arrays or properties from objects into distinct variables. Here is an example of a function that destructures the parameters `{ factor1, factor2 }` directly from the passed object and returns their product:
To test a function with destructured parameters, place parameter values in a JSON object inside an array:
## Missing arguments When you set default values in your function declarations, you can test those functions without needing to provide all of the arguments. Here is an example of a function that uses default values for `factor2` and `factor3`.
To test a function without providing all of the arguments, place the arguments in an array in the Set Parameters section, and leave out at least one of the arguments that has a default value. For example, the `multiplyWithDefaults()` function above was tested three times with the following arguments: * [1,2,3] * [1,2] * [1] The following results were returned: * 1 * 2 * 3 = 6 * 1 * 2 * 2 = 4 * 1 * -1 * 2 = -2
## JavaScript 'arguments' objects The JavaScript [arguments](https://developer.mozilla.org/en-US/docs/Web/JavaScript/Reference/Functions/arguments) object can accept any number of arguments in a function. Here is an example of a function that uses the arguments object to find the sum of all the arguments provided.
To test a function containing the JavaScript [arguments](https://developer.mozilla.org/en-US/docs/Web/JavaScript/Reference/Functions/arguments) object, place the arguments in an array in the Set Parameters section:
## Date objects Here is an example of a function that takes a Date object as the parameter:
To test a function with a parameter of type **Date**, you need to use a [stringified date](https://developer.mozilla.org/en-US/docs/Web/JavaScript/Reference/Global_Objects/Date/toJSON) in the JSON object. You can use one of the following syntaxes: ```javascript { "date": { "$date": "" } } ``` ```javascript [ { "$date": "" } ] ```
## See also - [About Functional Testing](https://dev.wix.com/docs/develop-websites/articles/workspace-tools/testing-monitoring/functional-testing/about-functional-testing.md) - [Test Backend Functions with Functional Testing](https://dev.wix.com/docs/develop-websites/articles/workspace-tools/testing-monitoring/functional-testing/test-backend-functions-with-functional-testing.md) --- > Portal Navigation: > > - Append `.md` to any URL under `https://dev.wix.com/docs/` to get its markdown version. > - Pages are either content pages (article or reference text) or menu pages (a list of links to child pages). > - To get a menu page, truncate any URL to a parent path and append `.md` (e.g. `https://dev.wix.com/docs/sdk.md`, `https://dev.wix.com/docs/sdk/core-modules.md`). > - Top-level index of all portals: https://dev.wix.com/docs/llms.txt > - Full concatenated docs: https://dev.wix.com/docs/llms-full.txt ## Resource: Test Site Considerations ## Article: Test Sites and Velo ## Article Link: https://dev.wix.com/docs/develop-websites/articles/workspace-tools/testing-monitoring/test-sites/test-site-considerations.md ## Article Content: # Test Site Considerations When using [test sites](https://support.wix.com/en/article/about-test-sites) on a site with code, it is important to understand how the different versions of your site work with the following features. ## Database collections When you have both a published revision and a test site revision of your site, you still only have 1 version of your site's database collections that both revisions access. That means, when you perform a data operation such as updating an item from either your published or test site revision, the change affects both of your site revisions. While your data does not change based on the site revision, your database [schema](https://support.wix.com/en/article/about-database-collection-schemas) may differ from revision to revision. This means that a field that exists in the schema in the test site revision may not exist in the schema in the published revision. Because collection data itself is maintained regardless of whether a field is in the schema, this should not affect the functionality of your site revisions. ## Backend events Currently your site must be published at least once for the version of the event handler in your test site to run when a [backend event](https://dev.wix.com/docs/develop-websites/articles/coding-with-velo/backend-code/events/about-backend-events.md) on your test site is triggered. For example, let's say you have a `onNewOrder` event that handles new events in your store. In your published site your event handler sends an email to `p@supplier.com` for each order received, but in your test site the same event handler sends an email to `rc@supplier.com`. Whenever a site visitor places an order on your test site, an email is sent to `rc@supplier.com`. If you define a backend event handler in your test site revision without ever publishing the site, messages in backend code are not logged to the browser's console and the event handler never runs. Keep in mind that messages in backend code are not logged to the browser's console. ## Scheduled jobs When you [schedule jobs](https://dev.wix.com/docs/velo/articles/getting-started/schedule-jobs.md) in your site's backend, only the jobs scheduled in your published site revision run. The jobs scheduled in your test site revision do not run. ## Service plugins To use [service plugins](https://dev.wix.com/docs/develop-websites/articles/coding-with-velo/integrations/service-plugins-formerly-spis/about-service-plugins.md) in your test site revision, make sure to publish your site once after implementing the plugin. After that first initial publish, the service plugin implementation works on your test site revision. If the site hasn't been published, the published revision's implementation runs. Neither the published revision nor the test site revision runs your latest service plugin code. ## The Realtime API Currently the [Realtime API](https://dev.wix.com/docs/velo/api-reference/wix-realtime-backend/introduction.md) is partially supported for test sites. Keep the following considerations in mind: - [realtime_check_permissions](https://dev.wix.com/docs/velo/api-reference/wix-realtime-backend/realtime-check-permission.md) and [PermissionsRouter](https://dev.wix.com/docs/velo/api-reference/wix-realtime-backend/permissions-router/introduction.md) are not supported on test site revisions. - When publishing/subscribing to messages on a channel in both test site and published revisions, both sites receive messages from both versions. This means that the published site receives the messages from both the published site's backend and the test site's backend. Similarly, the test site receives the messages from the test site's backend and the published site's backend. It isn't possible to add new message types on the same channel with the aim to test it only in the test site revision because the published revision also receives the new message. This might cause unexpected behavior. --- > Portal Navigation: > > - Append `.md` to any URL under `https://dev.wix.com/docs/` to get its markdown version. > - Pages are either content pages (article or reference text) or menu pages (a list of links to child pages). > - To get a menu page, truncate any URL to a parent path and append `.md` (e.g. `https://dev.wix.com/docs/sdk.md`, `https://dev.wix.com/docs/sdk/core-modules.md`). > - Top-level index of all portals: https://dev.wix.com/docs/llms.txt > - Full concatenated docs: https://dev.wix.com/docs/llms-full.txt ## Resource: Working with Site History ## Article: Working with Site History ## Article Link: https://dev.wix.com/docs/develop-websites/articles/workspace-tools/testing-monitoring/site-history/working-with-site-history.md ## Article Content: # About Site History You can [manage the site history](https://support.wix.com/en/article/managing-your-site-history-1079227) of sites that include code in the same way you manage sites without code. You can revert the site to a previous version.
__Tip:__ Name your versions so you can easily find the version to revert to later.
This article explains why it is important to understand the implications of this restore. ## Supported IDEs You can revert the site to a previous version using: + The [editor](https://dev.wix.com/docs/develop-websites/articles/workspace-tools/velo-workspace/workspaces/wix-studio-working-with-the-code-panel.md) (Wix Studio and Wix Editor) + The [Wix IDE](https://dev.wix.com/docs/develop-websites/articles/workspace-tools/velo-workspace/wix-ide/wix-studio-about-the-wix-ide.md) (Wix Studio) + Your [local IDE](https://dev.wix.com/docs/develop-websites/articles/workspace-tools/developer-tools/git-integration-wix-cli/about-git-integration-wix-cli.md) (Wix Studio and Wix Editor) > **Note**: When working in a local IDE, you can connect your site to Github for more advanced version control. ## Restored elements When you revert to an older version of your site, the following elements are reverted to their previous states: - Pages - Code - Hooks - Routers - Schemas - Permissions ## Non-restored elements Keep in mind that data in both the Sandbox and Live databases don't revert to the previous state. This means that the data remain as in the current version and you can't recover deleted data by restoring a previous site. ## Schema changes after reverting When you restore to a previous version, the schema follows the version being restored. This means if you made changes in fields with the newer version, those changes might not exist in the older version's schema. You can add fields to the older version's schema as needed. The data is retained and becomes visible once the fields are added. ## See also - [Manage Site History](https://support.wix.com/en/article/managing-your-site-history-1079227) - [About Database Collections](https://support.wix.com/en/article/about-database-collections) --- > Portal Navigation: > > - Append `.md` to any URL under `https://dev.wix.com/docs/` to get its markdown version. > - Pages are either content pages (article or reference text) or menu pages (a list of links to child pages). > - To get a menu page, truncate any URL to a parent path and append `.md` (e.g. `https://dev.wix.com/docs/sdk.md`, `https://dev.wix.com/docs/sdk/core-modules.md`). > - Top-level index of all portals: https://dev.wix.com/docs/llms.txt > - Full concatenated docs: https://dev.wix.com/docs/llms-full.txt ## Resource: Working with the Monitoring Dashboard ## Article: Working with the Monitoring Dashboard ## Article Link: https://dev.wix.com/docs/develop-websites/articles/workspace-tools/testing-monitoring/monitoring-your-published-site/working-with-the-monitoring-dashboard.md ## Article Content: # Velo: Working with the Monitoring Dashboard The [Monitoring Dashboard](https://www.wix.com/my-account/site-selector/?buttonText=Select%20Site&title=Select%20a%20Site&autoSelectOnSingleSite=true&actionUrl=https:%2F%2Fwww.wix.com%2Fdashboard%2F%7B%7BmetaSiteId%7D%7D%2F/developer-tools/monitoring-dashboard) helps you analyze a site's performance for backend code and data operations, and track its CMS collections. Use it to improve site visitors' experience by monitoring request performance, identifying issues, and optimizing site code. The Monitoring Dashboard has the following tabs: - **Data requests**: Tracks calls to a site's CMS collections. - **Backend requests**: Tracks backend code performance and errors. - **CMS collection storage**: Tracks a site's current storage usage relative to its quotas.
__Tip:__ Check the dashboard regularly to catch issues early. Investigate unusual increases in requests or failures, and methods with high p95 durations.
## Data requests The **Data requests** tab displays information about calls to a site's CMS collections. Every time you access your data, whether to read or write it, you make a data request. The **Data requests** tab includes the following sections: - **Overview**: Displays the number of successful and unsuccessful data requests, along with the error rate. When viewing the default 7-day period, the dashboard compares the error rate to the previous 7 days. - **All data requests**: Displays a graph of all requests made during the selected time period. Successful requests appear in blue and failed requests appear in red. - **Data requests by operation**: Breaks down request information by collection and operation type. Each row represents a unique pairing. The table includes the following columns: | Column | Description | | --- | --- | | Collection | The collection name. If the collection doesn't exist or multiple collections share the same name, the collection ID appears. | | Operation | The type of operation performed, such as **find**, **insert**, or **update**. | | Count | The number of times this operation ran on this collection during the time period. | | Error rate | The percentage of failed requests. | | Cache rate | The percentage of requests served from cache. | | Duration p50 | The median request duration in milliseconds. | | Duration p95 | The 95th percentile request duration in milliseconds, representing slower requests. | Click a row to navigate to a page with more details about requests for that specific collection and operation pairing. To minimize failed data requests: - Simplify complex queries. - [Add proper indexes to collections](https://support.wix.com/en/article/cms-adding-an-index-for-your-collection). - Use [efficient query patterns](https://dev.wix.com/docs/develop-websites/articles/best-practices/best-practices-for-improving-performance-in-wix-sites-with-data.md). - Implement caching for frequently accessed data. - Consider pagination for large result sets. ## Backend requests > **Note:** The **Backend Requests** tab is still under development. To minimize failed backend requests: **For timeout issues:** - Reduce the number of operations in your method. - Use caching to avoid repeated calculations. - Optimize database queries with proper filtering and sorting. **For RPM throttling:** - Implement request batching. - Add delays between rapid requests. - Consider upgrading your [premium plan](https://dev.wix.com/docs/develop-websites/articles/coding-with-velo/premium-plans/about-premium-plans.md) for higher limits. ## CMS collection storage Each Wix site can have a maximum of 1,000 collections and 10 million collection items, which can take up no more than 100 GB of storage space. The **CMS collection storage** tab lets you know how close a site is to these quotas, and lists CMS collections that Wix users created on the site. These don't count toward the storage space quota: - External database collections. - Wix app collections. - Media files stored separately on a site. - Referenced documents and multimedia. ## See also - [About Wix Logs](https://dev.wix.com/docs/develop-websites/articles/workspace-tools/developer-tools/logs/about-logs.md) - [Data features](https://dev.wix.com/docs/develop-websites/articles/coding-with-velo/limits-and-optimization/data-features.md) - [Compute features](https://dev.wix.com/docs/develop-websites/articles/coding-with-velo/limits-and-optimization/compute-features.md) - [About caching](https://dev.wix.com/docs/develop-websites/articles/best-practices/caching/about-caching.md) - [Best practices for building a site](https://dev.wix.com/docs/develop-websites/articles/best-practices/best-practices-for-building-a-site-with-velo.md) - [Best practices for improving site performance](https://dev.wix.com/docs/develop-websites/articles/best-practices/best-practices-for-improving-performance-in-wix-sites-with-data.md) --- > Portal Navigation: > > - Append `.md` to any URL under `https://dev.wix.com/docs/` to get its markdown version. > - Pages are either content pages (article or reference text) or menu pages (a list of links to child pages). > - To get a menu page, truncate any URL to a parent path and append `.md` (e.g. `https://dev.wix.com/docs/sdk.md`, `https://dev.wix.com/docs/sdk/core-modules.md`). > - Top-level index of all portals: https://dev.wix.com/docs/llms.txt > - Full concatenated docs: https://dev.wix.com/docs/llms-full.txt ## Resource: Where Do I Put My Code? ## Article: Where Do I Put My Code? ## Article Link: https://dev.wix.com/docs/develop-websites/articles/coding-with-velo/overview/where-do-i-put-my-code.md ## Article Content: # About Code Placement When developing websites, it’s important to understand where to place your code so it runs in the right context, whether that’s in the browser, on the server, or across all pages. This article gives an overview of the different types of code files available, and explains when and how to use each one. ## Supported IDEs You can store your code using the following IDEs: - The [editor](https://dev.wix.com/docs/develop-websites/articles/workspace-tools/velo-workspace/workspaces/wix-studio-working-with-the-code-panel.md) (Wix Studio and Wix Editor) - The [Wix IDE](https://dev.wix.com/docs/develop-websites/articles/workspace-tools/velo-workspace/wix-ide/wix-studio-about-the-wix-ide.md) - Your [local IDE](https://dev.wix.com/docs/develop-websites/articles/workspace-tools/developer-tools/git-integration-wix-cli-for-sites/about-git-integration-wix-cli-for-sites.md) ## Frontend code Frontend code runs in the site visitor’s browser and here you define the interactive parts of your site. This includes things like: - Responding to user input - Updating the UI - Making calls to backend services Since this code is exposed to the public, avoid including sensitive information, such as API keys or private logic. Use frontend code for: - Customizing how a page looks or behaves - Listening for events like button clicks or form submissions - Calling functions defined in backend web modules (`.web.js`) ### Running code on all pages with Global code Global code is code that runs on every page of your site. This is logic that's shared across all pages, such as managing a universal header or footer, or controlling global UI elements like a site-wide search bar or shopping cart icon. To add global code, edit the `masterPage.js` file. You'll find it in: - Wix Studio: The **Page Code** section of the **Code** panel - Wix Editor: The **Page Code** section of the **Code** sidebar - Local IDE: The `src/pages` folder when using [Git integration](https://dev.wix.com/docs/develop-websites/articles/workspace-tools/developer-tools/git-integration-wix-cli/about-git-integration-wix-cli/.md)
**Important:** `masterPage.js` has its own `onReady` event handler. Be careful not to duplicate logic from individual page `onReady` handlers, as both run in parallel.
#### Retaining an element's state You can also use global code to retain an element’s state across pages. For example, if you change the source of an image element that appears on all pages, that change won’t persist when navigating to another page, or even when returning to the original page. To make changes persistent across pages, use the [`wix-storage-frontend`](https://www.wix.com/velo/reference/wix-storage) API: 1. In the relevant event handler, call [`setItem`](https://www.wix.com/velo/reference/wix-storage/storage/setitem) to store a value that reflects the element’s new state. 1. In the `masterPage.js` `onReady` function, read the stored value and update the element accordingly. > **Note:** Avoid importing functions from `masterPage.js` into individual page files. Doing this causes the `onReady` function in `masterPage.js` to run twice on those pages. For shared logic, create code on a separate public file and import it where needed. ### Running code on a specific page Each page on your site has its own code file. Use these files to add functionality that's specific to that page, for example: - Handling user input - Customizing UI behavior - Calling backend functions. #### Public files If you find yourself repeating the same code across multiple page files, it's better to move shared logic to a separate **public** file. That way, you can write it once and import it wherever it's needed: Whether in a page file, a backend file, or another public file. To share a function across multiple files: 1. Create a public file and export the function from it. 1. Import the function into any page where it’s needed. You can find your public files in: - Wix Studio: The **Backend & Public** section of the **Code** panel - Wix Editor: The **Backend & Public** section of the **Code** sidebar - Local IDE: The `src/public` folder when using [Git integration](https://dev.wix.com/docs/develop-websites/articles/workspace-tools/developer-tools/git-integration-wix-cli/about-git-integration-wix-cli/.md) Use ES module syntax (`import`/`export`) to access functions between files. Always include the function name in curly braces when importing a named export: ```js import { myFunction } from 'backend/bookings.js' ``` Leaving out the curly braces attempts to import a default export: ```js import myFunction from 'backend/bookings.js' ``` Unless `myFunction` was explicitly exported as the default, this will throw a runtime error: ```js (0 , \_bookings.default) is not a function ``` To access all functions from a module, import the entire module without curly braces: ```js import wixData from 'wix-data'; import wixStoresFrontend from 'wix-stores-frontend'; import wixMembers from 'wix-members-backend'; ```
**Tip:** Your page code, which is also publicly accessible, doesn't appear in the list of public files. To see your page code, go to the **Page Code** section and click on the page in the menu.
### Responding to element actions with event handlers Page elements like buttons, text, and input fields can trigger events when site visitors interact with them. The functions that handle these events are called event handlers. There are following types of event handlers: - Dynamic event handlers. Learn how to add an event handler in [Add an Event Handler](https://dev.wix.com/docs/develop-websites/articles/coding-with-velo/frontend-code/add-an-event-handler.md). - Static event handlers (deprecated). Learn more about static event handlers in [About Static Event Handlers](https://dev.wix.com/docs/develop-websites/articles/coding-with-velo/frontend-code/about-static-event-handlers.md). ### HTML Adding raw HTML directly in the code editor isn't supported. That said, there are several ways to include or work with HTML on your site: - Add marketing code using [marketing integrations](https://support.wix.com/en/marketing-tools/marketing-integrations-tracking). - Set the [HTML property](https://www.wix.com/velo/reference/$w/text/html) of a text element to render HTML content. - Display external HTML content by [embedding a site element](https://support.wix.com/en/article/wix-editor-using-iframes-to-display-visible-content-on-your-site). - Insert [custom code snippets](https://support.wix.com/en/article/embedding-custom-code-to-your-site) into the head or body of your site pages. - Use [custom elements](https://support.wix.com/en/article/wix-editor-adding-a-custom-element-to-your-site) to define and embed your own HTML-based components. ## Backend code Backend code runs on Wix’s secure servers and isn’t exposed to site visitors. This is the place for logic that needs to be protected, like: - Interacting with sensitive data - Sending emails - Handling payments - Verifying permissions Use backend code for: - Perform secure database operations - Respond to frontend requests by using web modules - Handle server-side events and scheduled tasks - Expose custom HTTP methods to other services ### Backend files Backend files are where you define server-side logic. They include code that runs securely on the web server rather than in the browser. This is where you define functions from backend libraries such as `wix-pay-backend`, `wix-members.v2`, or `wix-events.v2`. You can find your backend files in: - Wix Studio: The **Backend & Public** section of the **Code** panel - Wix Editor: The **Backend & Public** section of the **Code** sidebar - Local IDE: The `src/backend` folder when using [Git Integration](https://dev.wix.com/docs/develop-websites/articles/workspace-tools/developer-tools/git-integration-wix-cli/about-git-integration-wix-cli/.md) There are 2 main file types used in the backend: - **.web.js:** Web modules that can be called from the frontend. You can configure permissions for each function to control who can access them. Learn more about the .web.js files in [About Web Modules](https://dev.wix.com/docs/develop-websites/articles/coding-with-velo/backend-code/web-modules/about-web-modules.md). - **.js:** Internal backend files that can't be accessed directly from the frontend. Use these for secure server-side logic. > **Note:** You may also see `.jsw` files in older projects. These have been deprecated in favor of `.web.js` files but are still supported. Learn more about the .jsw files in [Call Backend Code from a jsw Web Module](https://dev.wix.com/docs/develop-websites/articles/coding-with-velo/backend-code/web-modules/call-backend-code-from-a-jsw-web-module.md). #### Accessing functions from a .js file To access functions from a `.js` file in the frontend, import the function into a `.web.js` file first, then import that `.web.js` function into your frontend code. Import the `.js` file into the `.web.js` file: ```js import { Permissions, webMethod } from 'wix-web-module'; import { deleteStaffMember } from 'backend/bookings' export const deleteStaff = webMethod( Permissions.Anyone, async (staffMemberid) => { return await deleteStaffMember(staffMemberid); } ); ``` Import the `.web.js` file in your page file: ```js import { deleteStaff } from 'backend/staff.web' ``` If you try to import a `.js` file directly into a frontend file, you'll see this error: ``` Access to backend script 'backend/calculations.js' denied! Client-side scripts can only import web-modules from backend code context. ``` ### Backend events Many Wix modules provide built-in events that trigger when specific actions occur. For example, uploading a file to the Media Manager triggers the `onFileUploaded` event, and successfully paying an invoice triggers the `onInvoicePaid` event. These events let you run custom logic in response to key moments in your site’s workflow. To run an event, you need to add an `events.js` file. Learn more about adding backend events in [About Backend Events](https://dev.wix.com/docs/develop-websites/articles/coding-with-velo/backend-code/events/about-backend-events.md). ### Handling HTTP requests To expose your site’s functionality to the outside world, like enabling `GET`, `PUT`, `POST`, or `DELETE` requests from external services, you can define custom HTTP methods. To create an HTTP function, you need to add an `http-functions.js` file. Learn more about the HTTP functions in [About Custom Site APIs](https://dev.wix.com/docs/develop-websites/articles/coding-with-velo/integrations/exposing-services/about-custom-site-apis.md). ### Using data hooks when data collection changes Data hooks let you run code before or after changes are made to your site’s data collections. They’re useful for validating, modifying, or responding to data operations like insert, update, or remove. To create data hooks, add a `data.js` file to your backend code. You can then define functions that correspond to specific data operations on your collections. Learn more about data hooks in [Using Data Hooks](https://dev.wix.com/docs/develop-websites/articles/databases/wix-data/hooks/using-data-hooks.md). ### Routers By default, Wix uses built-in routers to handle dynamic page URLs and SEO. If you need more control over how incoming requests are handled, you can create your own custom router to define the logic, routing, and data for each request. The code for both routers and data binding router hooks is defined in the `routers.js` file. Learn more about routers in [About Routers](https://dev.wix.com/docs/develop-websites/articles/coding-with-velo/routers/about-routers.md). ## Secrets Manager For sensitive information like API keys, OAuth tokens, or configuration settings, use the [Secrets Manager](https://dev.wix.com/docs/develop-websites/articles/workspace-tools/developer-tools/secrets-manager/about-the-secrets-manager.md) instead of hardcoding values into your code. Secrets are stored securely in your [site's dashboard](https://www.wix.com/my-account/site-selector/?buttonText=Select%20Site&title=Select%20a%20Site&autoSelectOnSingleSite=true&actionUrl=https:%2F%2Fwww.wix.com%2Fdashboard%2F%7B%7BmetaSiteId%7D%7D%2F/developer-tools/secrets-manager) and can be retrieved in code using the [Secrets API](https://dev.wix.com/docs/velo/apis/wix-secrets-backend-v2/introduction.md). Storing secrets in the Secrets Manager improves your site's security, especially when you're collaborating with others or using version control. Each secret has a unique name, and you can access it safely in backend code without exposing it to site visitors. ## See also - [About Event Handlers in Wix](https://dev.wix.com/docs/develop-websites/articles/coding-with-velo/frontend-code/about-event-handlers-in-wix.md) - [About the Site Backend](https://dev.wix.com/docs/develop-websites/articles/coding-with-velo/backend-code/about-the-site-backend.md) - [Secrets Manager](https://dev.wix.com/docs/develop-websites/articles/workspace-tools/developer-tools/secrets-manager/about-the-secrets-manager.md) --- > Portal Navigation: > > - Append `.md` to any URL under `https://dev.wix.com/docs/` to get its markdown version. > - Pages are either content pages (article or reference text) or menu pages (a list of links to child pages). > - To get a menu page, truncate any URL to a parent path and append `.md` (e.g. `https://dev.wix.com/docs/sdk.md`, `https://dev.wix.com/docs/sdk/core-modules.md`). > - Top-level index of all portals: https://dev.wix.com/docs/llms.txt > - Full concatenated docs: https://dev.wix.com/docs/llms-full.txt ## Resource: Velo Glossary ## Article: Velo Glossary ## Article Link: https://dev.wix.com/docs/develop-websites/articles/coding-with-velo/overview/velo-glossary.md ## Article Content: # Velo Glossary [Let us know](mailto:velo.docs@wix.com?subject=Glossary%20feedback) if we missed any terms you would find helpful.
__Tip:__ See the full [Velo API reference](https://www.wix.com/velo/reference/api-overview) to start coding on your Wix site.
## $w $w is the [syntax](https://dev.wix.com/docs/develop-websites/articles/workspace-tools/velo-workspace/workspaces/wix-studio-working-with-the-code-panel.md#velo-syntax-and-autocomplete), or set of rules, that you use in your code to select an element on your page. To select an element, type $w in the [code editor](https://dev.wix.com/docs/develop-websites/articles/workspace-tools/velo-workspace/workspaces/wix-studio-working-with-the-code-panel.md) (Wix Studio), or the [code editor](https://dev.wix.com/docs/develop-websites/articles/workspace-tools/velo-workspace/code-editor-ide/working-in-the-code-editor.md) (Wix Editor), then enclose the name of the element in parentheses and quotes, and add a hashtag before the element name. For example, $w('#myButton'). Once you select an element, you can use the [APIs](https://support.wix.com/en/article/velo-glossary#api) to work with its properties and functions in your code. ## API [Velo APIs](https://dev.wix.com/docs/velo/articles/api-overview/introduction.md) are sets of properties and functions that let you use code to control your site's functionality. There are [APIs](https://www.wix.com/velo/reference/api-overview/introduction) that let you interact with page elements, your site’s database content, and external services. The APIs also give you access to information about your site and its visitors. ## Backend The Backend section is located in the Public & Backend section of the Code sidebar (Wix Studio), or the Code sidebar (Wix Editor). This is where you add code that you want to run server-side. Backend files and code are not publicly accessible from your site. You may want some of your code to run server-side and not in the front-end; for example, your site might be exposed to security risks if the code runs in the front-end. You can call server-side code from your front-end code using [web modules](https://dev.wix.com/docs/develop-websites/articles/coding-with-velo/backend-code/web-modules/about-web-modules.md), and even test your backend code in the editor using [Functional testing](https://dev.wix.com/docs/develop-websites/articles/workspace-tools/testing-monitoring/functional-testing/about-functional-testing.md). ## Blocks [Wix Blocks](https://support.wix.com/en/article/creating-a-velo-package-3964385) allows you to build your own [Velo packages](https://support.wix.com/en/article/velo-about-packages#velo-packages), and reuse your code across multiple Wix sites. ## Calculated fields When you create a dynamic page, Velo calculates what the URL would be for any items that could appear on that page. The [prefix](https://support.wix.com/en/article/url-prefixes-and-page-grouping) and dynamic sections of that URL are added to each item in your collection as a [calculated field](https://support.wix.com/en/article/about-calculated-fields). The dynamic page you create can display any item whose calculated field is the same as the [prefix and dynamic sections](https://support.wix.com/en/article/cms-about-dynamic-pages) you define when you create the page. ## Code packages [Code packages](https://dev.wix.com/docs/develop-websites/articles/coding-with-velo/packages/about-packages.md) are pre-written code, also known as code libraries that you can add to your site(s). Using code packages is a great way to minimize your development time and the amount of code you need to write. There are 2 types of code packages: [Velo Packages](https://dev.wix.com/docs/develop-websites/articles/coding-with-velo/packages/working-with-velo-packages.md) and [npm Packages](https://dev.wix.com/docs/develop-websites/articles/coding-with-velo/packages/about-npm-packages.md). You can add these packages in the Code Packages section of the Code sidebar. You can also create your own Velo Package using Wix [Blocks](https://support.wix.com/en/article/creating-a-velo-package-3964385). ## Code editor You edit the code for your site in the [code editor](https://dev.wix.com/docs/develop-websites/articles/workspace-tools/velo-workspace/workspaces/wix-studio-working-with-the-code-panel.md) (Wix Studio), or in the [code editor](https://dev.wix.com/docs/develop-websites/articles/workspace-tools/velo-workspace/code-editor-ide/working-in-the-code-editor.md) (Wix Editor), located at the bottom of the editor. The code editor displays your site's code files in tabs. When you use the Properties and Events panel to add an event to your element, the code for that event is automatically placed in the tab for that page's code. If you have code that relates to a specific page only, you would add it here. When an element appears on all your site pages and you want to add functionality to it that will be consistent across your site, add that code in the **masterPage.js** file in the Page Code section of the Code sidebar (Wix Studio), or the Code sidebar (Wix Editor). When you use the Properties panel to add an event to your element that appears on all pages, the code for that event is automatically placed there. If you have code that relates to all the pages of your site, add it here. ## Connect to data panel To work with [connecting to data](https://support.wix.com/en/article/connecting-page-elements-to-data), you need to connect elements on your page to a [dataset](https://dev.wix.com/docs/develop-websites/articles/coding-with-velo/overview/velo-glossary.md) using the Connect to Data panel. To open the panel, click the Connect to Data icon ![](https://d2x3xhvgiqkx42.cloudfront.net/12345678-1234-1234-1234-1234567890ab/11e10e4f-b84d-4136-a5a9-6109fab0b7d7/2017/06/27/639025d8-ab7a-4c52-8a3a-519ab5e5ca12.jpg) for your element.  ## Connecting to data [Connecting to Data](https://support.wix.com/en/article/connecting-page-elements-to-data) is the process of connecting your elements to a [collection](#database-collection). You can bind your elements to a collection to display content or to capture user input. To bind your elements to a collection you need to have a [dataset](https://dev.wix.com/docs/develop-websites/articles/coding-with-velo/overview/velo-glossary.md) on your page. ## CMS The Content Management System (CMS) is where you edit the contents of your [database collections](https://support.wix.com/en/article/managing-your-content-collections). There is a CMS in the Editor for your [Sandbox Database](https://dev.wix.com/docs/develop-websites/articles/coding-with-velo/overview/velo-glossary.md) and in the [Wix Database app](https://dev.wix.com/docs/develop-websites/articles/coding-with-velo/overview/velo-glossary.md) for your Live Database. Sandbox and Live [are not always enabled](https://support.wix.com/en/article/about-sandbox-and-live-collections-and-syncing) in the CMS. ## Database A database is made up of one or more [collections](#database-collection). You can add as many collections as you need to your database to manage your site's content. Your site has two databases that are separate but related to each other. One database is your site's [Sandbox database](https://dev.wix.com/docs/develop-websites/articles/coding-with-velo/overview/velo-glossary.md), and the other is your site's [Live database](#live-database). The Sandbox database is where you work while developing your site. The Live database is what your visitors interact with when your site is published. You add a collection to your database in the Editor, and when you publish your site its live version is added to the Live database. You view the Live database in the [Wix Database App](https://dev.wix.com/docs/develop-websites/articles/coding-with-velo/overview/velo-glossary.md). Sandbox and Live are not always enabled for your collections. Learn more [here](https://support.wix.com/en/article/about-sandbox-and-live-collections-and-syncing). ## Database collection A [database collection](https://support.wix.com/en/article/about-database-collections) is a table of data that you can use in a Wix site. Each row in the table represents an [item](https://dev.wix.com/docs/develop-websites/articles/coding-with-velo/overview/velo-glossary.md) in the collection. Each column in the table is a [field](https://dev.wix.com/docs/develop-websites/articles/coding-with-velo/overview/velo-glossary.md) in your collection, which can be of a specific data type. You can connect elements in your site to fields in your collection using [connecting to data](https://support.wix.com/en/article/connecting-page-elements-to-data). ## Dataset A [dataset](https://support.wix.com/en/article/about-datasets-6368396) is a component that you add to your page that enables you to connect the elements on your page to your [collections](https://dev.wix.com/docs/develop-websites/articles/coding-with-velo/overview/velo-glossary.md). A dataset controls which collection is available for your elements to use, whether your elements can display, add to, or modify the items in your collection, as well as how the data is sorted or filtered. You can use a dataset on a regular page as well as a dynamic page. Datasets are not displayed in your published site. ## Dataset mode The [dataset mode](https://support.wix.com/en/article/working-with-dataset-modes-and-collection-permissions) is a setting that controls what the elements that are connected to your collection can do with the collection's data. Options are Read & Write, Read-only, and Write-only.  ## Dynamic item page A [dynamic item page](https://support.wix.com/en/article/cms-setting-up-a-dynamic-item-page) is a [dynamic page](https://dev.wix.com/docs/develop-websites/articles/coding-with-velo/overview/velo-glossary.md) that is used to display one item from your [collection](https://dev.wix.com/docs/develop-websites/articles/coding-with-velo/overview/velo-glossary.md) at a time. When you create the [URL](https://support.wix.com/en/article/cms-creating-unique-dynamic-page-urls) for a dynamic item page, you need to use a field in your collection that uniquely identifies each item in your collection. ## Dynamic list page A [dynamic list page](https://support.wix.com/en/article/cms-setting-up-a-dynamic-list-page) is a [dynamic page](https://dev.wix.com/docs/develop-websites/articles/coding-with-velo/overview/velo-glossary.md) that is used to display a number of items from your [collection](#database-collection) that all match the same criteria. When you create the [URL](https://support.wix.com/en/article/cms-creating-unique-dynamic-page-urls) for a dynamic list page, you need to use fields in your collection that identify a group of items in your collection. ## Dynamic page A [dynamic page](https://support.wix.com/en/article/cms-about-dynamic-pages) is a page you design with one layout that can be used over and over again, each time displaying a different item or items from your database collection. The actual content a dynamic page displays is determined by its [URL](https://support.wix.com/en/article/cms-creating-unique-dynamic-page-urls). There are two types of dynamic pages, [dynamic item pages](https://dev.wix.com/docs/develop-websites/articles/coding-with-velo/overview/velo-glossary.md) and [dynamic list pages](#dynamic-list-page). ## Dynamic page dataset A [dynamic page dataset](https://support.wix.com/en/article/about-data-binding-and-datasets#about-dynamic-page-datasets) is a component that is added to your page automatically when you create a dynamic page. Like a regular [dataset](https://dev.wix.com/docs/develop-websites/articles/coding-with-velo/overview/velo-glossary.md), it enables you to connect the elements on your page to your collections. It also allows you to add more filters and to sort the content on your page.  ## Element ID The element ID is the name assigned to an element in your site. When you hover over or select an element in the Wix Editor, you can see the element’s ID following the hashtag. Velo assigns a default ID to every element you add to your site. You can change the ID in the [Properties panel](https://dev.wix.com/docs/develop-websites/articles/workspace-tools/velo-workspace/properties-events-panel/about-the-properties-events-panel.md).  The ID is used to identify the element in your code. For example, to work with an element named myButton, you would write $w(“#myButton”) in your code. ## Event An [event](https://dev.wix.com/docs/develop-websites/articles/workspace-tools/velo-workspace/properties-events-panel/about-the-properties-events-panel.md) is something that can happen to an element, usually as the result of a user action. For example, onClick is the event that occurs when a user clicks an element. If you want your site to do something, or react, when an event occurs to your element, you add an [event handler](https://dev.wix.com/docs/develop-websites/articles/coding-with-velo/overview/velo-glossary.md) to your element.  ## Event handler An [event handler](https://dev.wix.com/docs/develop-websites/articles/workspace-tools/velo-workspace/properties-events-panel/about-the-properties-events-panel.md) is the function that holds the code you want to run when an [event](https://dev.wix.com/docs/develop-websites/articles/coding-with-velo/overview/velo-glossary.md) occurs to an element. Your site watches elements to see if events happen to them. If an event happens that has an event handler, the code in the event handler function will run. ## Field A [field](https://support.wix.com/en/article/about-database-collections#regular-fields) is the place in your [collection](#database-collection) where you store data, and is represented as a column in the CMS. Every item in your collection is made up of one or more fields that can be of type Text, Image, Boolean, Number, Date and Time, or Rich Text. Collections also have default [system fields](https://dev.wix.com/docs/develop-websites/articles/coding-with-velo/overview/velo-glossary.md) that are hidden by default.  ## Field ID A [field ID](https://support.wix.com/en/article/cms-formerly-content-manager-about-your-collection-fields#field-id-velo-by-wix-only) is the name that you use to refer a field in a collection, in code. When you add a new field in the CMS, you can specify the field ID. If you don't specify your own field ID, one is created based on the Field Name. You cannot change the field ID once the field has been created. ## Field name The [Field Name](https://support.wix.com/en/article/about-database-collections#field-name) is the label you see at the top of the column for that field in the CMS. The Field Name is also used when connecting page elements to a dataset in the Editor. When you add a new field in the CMS, you specify the Field Name. You can change the Field Name after the field has been created, and all connections to that field will be updated.  ## Field type The [Field Type](https://support.wix.com/en/article/about-database-collections#field-type) defines what kinds of data the field contains. The field type can be Text, Image, Boolean, Number, Date and Time, Rich Text, URL, or Document. When you add a new field in the CMS, you specify the field type.  The field type is used when connecting page elements to fields in your collections. ## Functional testing With [functional testing](https://dev.wix.com/docs/develop-websites/articles/workspace-tools/testing-monitoring/functional-testing/test-backend-functions-with-functional-testing.md), you can easily and quickly [test and debug your backend code directly in the Velo code editor](https://dev.wix.com/docs/develop-websites/articles/workspace-tools/testing-monitoring/functional-testing/test-backend-functions-with-functional-testing.md). Functional Testing saves you the time and effort of building your own system for triggering and testing your backend functions.  ## Hook A hook is code that runs before or after certain interactions with your site. [Data hooks](https://dev.wix.com/docs/develop-websites/articles/databases/wix-data/hooks/about-data-hooks.md) run code before or after certain interactions with your site's collections. [Data binding router hooks](https://support.wix.com/en/article/about-data-binding-router-hooks) allow you to intercept the process of a dynamic page's data getting bound to the page. Some data binding router hooks can be used with [router pages](https://support.wix.com/en/article/custom-routers) as well. ## HTTP Endpoint The URL where a web service can be accessed by an application. In Velo, web services built on HTTP endpoints are used to connect [logging tools](https://dev.wix.com/docs/develop-websites/articles/workspace-tools/developer-tools/logs/about-logs.md) and [external database collections](https://dev.wix.com/docs/develop-websites/articles/databases/external-databases/overview/adding-and-deleting-an-external-database-collection.md) to Wix sites.  ## HTTP Functions [HTTP functions](https://support.wix.com/en/article/about-compute-functions) let you create functions to expose the functionality of your site as a service. That means other people can use the functionality of your site by writing code that calls your site's API as defined by Velo Functions you create. ## Interaction An interaction is custom functionality you add that allows your site to respond to [events](https://dev.wix.com/docs/develop-websites/articles/coding-with-velo/overview/velo-glossary.md) that occur in your site.  ## Item An [item](https://support.wix.com/en/article/about-your-database-collection-fields) is one record in a [collection](#database-collection) and is represented as a row in the CMS. Every item in your collection is made up of one or more [fields](https://dev.wix.com/docs/develop-websites/articles/coding-with-velo/overview/velo-glossary.md). ## Live database The [Live database](https://support.wix.com/en/article/managing-your-sandbox-and-live-data#live-data) is the database that is associated with your published site. The data in the Live database is what is visible on your published site when you display data. It is also the database where data you collect in your live site is stored. You can [sync](https://dev.wix.com/docs/develop-websites/articles/coding-with-velo/overview/velo-glossary.md) between databases and copy data from the Sandbox to your Live database, or overwrite your Live data to your Sandbox to work with it in the Editor. Sandbox and Live are not always enabled for your collections. Learn more [here](https://support.wix.com/en/article/about-sandbox-and-live-collections-and-syncing). ## Log Collection of [log entries](https://dev.wix.com/docs/develop-websites/articles/coding-with-velo/overview/velo-glossary.md) associated with the same Wix site and namespace. Each log has a [labels](https://www.wix.com/velo/reference/spis/site-monitoring/logentry/labels) section, which indicates the log’s site URL and namespace. ## Log Entry [Wix Logs](https://dev.wix.com/docs/develop-websites/articles/workspace-tools/developer-tools/logs/about-logs.md) displays logs as a single [log entry](https://www.wix.com/velo/reference/spis/site-monitoring/logentry) in JSON format. You can [view log entries](https://dev.wix.com/docs/develop-websites/articles/workspace-tools/developer-tools/logs/view-logs-using-wix-logs.md) in real time as they’re recorded, or [connect them](https://support.wix.com/en/article/connecting-site-events-to-a-monitoring-tool) to an external monitoring tool for analysis. ## Logs [Wix Logs](https://dev.wix.com/docs/develop-websites/articles/workspace-tools/developer-tools/logs/about-logs.md) lets you gather information about logs, HTTP functions, and web module functions. You can [view](https://dev.wix.com/docs/develop-websites/articles/workspace-tools/developer-tools/logs/view-logs-using-wix-logs.md) logs in real time, or [connect](https://dev.wix.com/docs/develop-websites/articles/workspace-tools/developer-tools/logs/view-logs-using-an-external-monitoring-tool.md) logs to an external monitoring tool to generate event metrics and perform error log analysis. Each log is represented by a [JSON object](https://www.wix.com/velo/reference/spis/site-monitoring/logentry). ## Monitoring Dashboard Velo's built-in [Monitoring Dashboard](https://support.wix.com/en/article/velo-working-with-the-monitoring-dashboard) is a tool for monitoring site performance. You can access the Monitoring Dashboard in the Developer Tools section of the Code sidebar. It’s important to track your code’s performance on sites containing backend code and [Wix Data](https://www.wix.com/velo/reference/wix-data) API requests. You can also use [Wix Logs](https://dev.wix.com/docs/develop-websites/articles/workspace-tools/developer-tools/logs/about-logs.md) to monitor the site’s performance. ## onReady When a page loads in a browser, it's possible for the code on the page to run before the page finishes loading. This can cause an error if your code tries to reference an element in the page before it's loaded. Because of this, you need to make sure that all the elements on your page have loaded before you try to access them using code. You do this is by including all your code that uses the [$w selector](https://dev.wix.com/docs/develop-websites/articles/workspace-tools/velo-workspace/code-editor-ide/working-in-the-code-editor.md) in the function that is added by default to the top of every page's code: ```javascript $w.onReady(function() { // Put all your $w code here }); ``` ## Payload Payload refers to the actual data sent in a message. In [Wix Logs](https://www.wix.com/velo/reference/spis/site-monitoring/logentry), the [JSON payload](https://www.wix.com/velo/reference/spis/site-monitoring/logentry/jsonpayload) is the message included in the site activity’s [log](https://www.wix.com/velo/reference/spis/site-monitoring/logentry), such as an error message or console log. ## Permissions [Permissions](https://support.wix.com/en/article/about-database-collection-permissions) give you control over which visitors are allowed to interact with the data in your collections and what they are allowed to do. The available permissions are create, read, update, and delete. You can assign different permissions to different [roles](https://dev.wix.com/docs/develop-websites/articles/coding-with-velo/overview/velo-glossary.md).  ## Primary field A collection's Primary field is used to enable another collection to connect to it and [reference](https://support.wix.com/en/article/cms-using-reference-fields-to-display-content-from-multiple-collections) its data.  Every database collection has a Primary field. The Primary field is indicated by the lock icon next to its field name. By default, the Title field is the Primary field. However, you can define any text field in the collection as the Primary field.  ## Promise A JavaScript function that returns a promise is returning a contract to eventually produce a return value when an [asynchronous operation](https://developer.mozilla.org/en-US/docs/Learn/JavaScript/Asynchronous) is completed. A Promise is said to be fulfilled or resolved when its value is finally known. There are two main ways to [work with promises](https://dev.wix.com/docs/develop-websites/articles/coding-with-velo/java-script-velo/working-with-promises.md) that are returned from a function: * **then( )** - Allows you more control, but is a bit more complicated. * **async/await** - Allows you to work with asynchronous code as if it were synchronous. ## Properties panel The [Properties panel](https://support.wix.com/en/article/working-with-the-properties-panel-6441151) lets you work with Velo on the elements in your site. You can use the Properties panel to add [event handlers](https://dev.wix.com/docs/develop-websites/articles/coding-with-velo/overview/velo-glossary.md) to your elements and define their default behavior when your page loads. ## Public/front-end The Public section of the [Code sidebar](https://dev.wix.com/docs/develop-websites/articles/coding-with-velo/overview/about-coding-with-wix-studio.md#built-in-code-panel) Code Files section contains files that are publicly accessible from your site. The code you add here runs in the front-end, or client.  ## Query A query is a request for information from a database collection. For example, you might want to retrieve a list of all of the site members in your Members collection who live in a specific country. You can query your collections using the [wix-data query](https://dev.wix.com/docs/develop-websites/articles/databases/wix-data/data-api/working-with-the-data-api.md) function. ## Regular editor The remote Wix Editor you use to edit and preview your site's UI and code. ## Release manager In the [Release Manager](https://support.wix.com/en/article/accessing-the-release-manager) you can see the current published version of your site and the current [test site](https://dev.wix.com/docs/develop-websites/articles/coding-with-velo/overview/velo-glossary.md). You can also create, edit, and delete test site versions. ## Remote repository This is where all your site revisions are stored online. When you perform a save in the Editor, a new site revision is added to your [Site History](https://support.wix.com/en/article/viewing-and-managing-your-site-history) in the remote repository. ## Repeaters Repeaters allow you to create one layout for a group of elements. The repeater then uses that layout for each Repeater Item it displays. Each Repeater Item uses the same layout but displays different content. You can use Repeaters to display static content, meaning you set the elements' content for each Repeater Item in the Editor and it doesn't change. You can also connect Repeaters to the [data in a collection](https://support.wix.com/en/article/displaying-database-content-in-a-repeater). Each Repeater Item then uses the same element layout to display different content in your collection, based on how you connect your elements. ## Revision Every time you manually save or publish your site following a change, a new revision of your site is created. You can view and manage your revisions in your [Site History](https://support.wix.com/en/article/viewing-and-managing-your-site-history). You can also create a [test site](https://support.wix.com/en/article/creating-a-test-site) or [monitor Wix Logs](https://dev.wix.com/docs/develop-websites/articles/workspace-tools/developer-tools/logs/about-logs.md) for a specific revision of your site. ## Roles Together with [permissions](https://dev.wix.com/docs/develop-websites/articles/coding-with-velo/overview/velo-glossary.md), [roles](https://support.wix.com/en/article/about-database-collection-permissions#roles) give you control over which visitors are allowed to interact with the data in your collections and what they are allowed to do. Every person that visits your site falls into one of four roles, and you can assign specific permissions to each role. Possible roles are admin, site member author, site member, and anyone.  ## Router A [router](https://dev.wix.com/docs/develop-websites/articles/coding-with-velo/routers/about-routers.md) lets you customize exactly how your site handles incoming requests. You can customize what happens when your site receives a request to display a page. You can also control the information that search engines use to index the pages in your site. ## Sandbox database The [Sandbox database](https://support.wix.com/en/article/managing-your-sandbox-and-live-data#sandbox-data-1) is the database that is associated with your site in the Wix Editor. Data in the Sandbox is not visible on your published site unless you [sync](https://dev.wix.com/docs/develop-websites/articles/coding-with-velo/overview/velo-glossary.md) your collection with your [Live database](#live-database). Data in the Sandbox is affected by your actions in Preview mode. Sandbox and Live are not always enabled for your collections. Learn more [here](https://support.wix.com/en/article/about-sandbox-and-live-collections-and-syncing). ## Schema/structure A [database schema](https://support.wix.com/en/article/about-database-collection-schemas) is the definition of a database's structure. In Velo, the schema defines which fields are in each of your collections and their [type](https://support.wix.com/en/article/about-database-collections#field-type). However, in some cases, your collections can contain fields that are not part of the schema. When you create a new field in the CMS in the [Sandbox database](https://dev.wix.com/docs/develop-websites/articles/coding-with-velo/overview/velo-glossary.md), the field is added to the schema. The schema is synced from your Sandbox collections to your Live collections when you publish your site. [Syncing](https://dev.wix.com/docs/develop-websites/articles/coding-with-velo/overview/velo-glossary.md) a collection's data will not sync the collection's schema. ## Scope A scope defines which elements you can select with a selector function, such as [$w( )](https://dev.wix.com/docs/develop-websites/articles/coding-with-velo/overview/velo-glossary.md), and how those elements behave when they are selected. Depending on which context you received a selector function from, it will either select from the [global scope](https://dev.wix.com/docs/develop-websites/articles/wix-editor-elements/repeaters/understanding-the-scope-of-selector-functions.md) or the [repeated item scope](https://dev.wix.com/docs/develop-websites/articles/wix-editor-elements/repeaters/understanding-the-scope-of-selector-functions.md). ## Service plugin Velo [service plugins (formerly SPIs)](https://dev.wix.com/docs/develop-websites/articles/coding-with-velo/integrations/service-plugins-formerly-spis/about-service-plugins.md) allow you to extend and customize your site’s functionality. You can use [service plugins](https://www.wix.com/velo/reference/spis/getting-started) to inject your own custom logic into a part of an existing app’s flow. You can also use service plugins to integrate with 3rd-party services so that your Wix site and the external services can communicate seamlessly. ## Sidebar The [Code sidebar](https://dev.wix.com/docs/develop-websites/articles/workspace-tools/velo-workspace/workspaces/wix-editor-working-with-the-code-sidebar.md) in Wix Editor, or [Code sidebar](https://dev.wix.com/docs/develop-websites/articles/coding-with-velo/overview/about-coding-with-wix-studio.md#built-in-code-panel) in Wix Studio, shows all of the files that make up your site, including pages, popups, files, routers, and database collections. Working in the sidebar, you can perform a variety of actions that affect your site. ## Submit button A [Submit button](https://dev.wix.com/docs/develop-websites/articles/databases/wix-data/user-input/processing-user-input-before-it-is-stored-in-a-collection-with-data-hooks.md) is a button that you add to a page with User Input elements that enable visitors to submit data they have entered, to your collection. You create a Submit button by adding a regular button to your page and setting its **Link connects to** action to **Submit** in the [Connect Button](https://support.wix.com/en/article/working-with-the-connect-button-panel) panel. ## Sync (copy/overwrite) [Sync](https://support.wix.com/en/article/cms-accessing-and-syncing-your-sandbox-and-live-collections) allows you to move your data between your [Sandbox](https://dev.wix.com/docs/develop-websites/articles/coding-with-velo/overview/velo-glossary.md) and [Live](https://dev.wix.com/docs/develop-websites/articles/coding-with-velo/overview/velo-glossary.md) databases. You can copy selected or all items in a collection from a Sandbox collection to the live version of that collection. You can also overwrite a Sandbox collection with all the data from the live version, or overwrite all your Sandbox collections with the data from their live versions. You can only initiate sync operations from the Sandbox database.  Sandbox and Live are not always enabled for your collections. Learn more [here](https://support.wix.com/en/article/about-sandbox-and-live-collections-and-syncing). ## System fields [System fields](https://support.wix.com/en/article/about-database-collections#system-fields) are fields that are added automatically to each collection, are hidden by default, and cannot be edited. System fields are ID, Date Created, Last Updated, and Owner.  ## Test site A [test site](https://support.wix.com/en/article/about-test-sites) is a version of your site that you may release to a percentage of your site visitors so that you can test that it's working before publishing. You can manage your test sites from the [Release Manager](https://dev.wix.com/docs/develop-websites/articles/coding-with-velo/overview/velo-glossary.md). ## User input elements [User Input elements](https://support.wix.com/en/article/working-with-user-input-elements-2499809) allow you to capture and store user data in a [database collection](#database-collection). To use User Input elements, you need to connect them to a [dataset](https://dev.wix.com/docs/develop-websites/articles/coding-with-velo/overview/velo-glossary.md) whose [mode](https://dev.wix.com/docs/develop-websites/articles/coding-with-velo/overview/velo-glossary.md) is set to either Write-only or Read & Write. ## Validating Validating is the process of ensuring that data that visitors enter into a [user input element](https://dev.wix.com/docs/develop-websites/articles/coding-with-velo/overview/velo-glossary.md) matches your criteria for that data and what you expect them to enter. You can validate user input with the [Settings panel](https://support.wix.com/en/article/validating-user-input-with-the-settings-panel) or with [code](https://support.wix.com/en/article/validating-user-input-with-code). ## Wix database app The Wix Database app is in the My Account section of your site. This is where you manage your [Live database](#live-database) collections. ## Web modules [Web modules](https://dev.wix.com/docs/develop-websites/articles/coding-with-velo/backend-code/web-modules/call-backend-code-from-the-frontend.md) enable you to write functions that run server-side in the backend, and easily call them in your client-side code. With web modules you can import functions from backend into files or scripts in public, knowing they will run server-side. Velo handles all the client-server communication required to enable this access. --- > Portal Navigation: > > - Append `.md` to any URL under `https://dev.wix.com/docs/` to get its markdown version. > - Pages are either content pages (article or reference text) or menu pages (a list of links to child pages). > - To get a menu page, truncate any URL to a parent path and append `.md` (e.g. `https://dev.wix.com/docs/sdk.md`, `https://dev.wix.com/docs/sdk/core-modules.md`). > - Top-level index of all portals: https://dev.wix.com/docs/llms.txt > - Full concatenated docs: https://dev.wix.com/docs/llms-full.txt ## Resource: About Coding with Wix Studio ## Article: About Coding with Wix Studio ## Article Link: https://dev.wix.com/docs/develop-websites/articles/coding-with-velo/overview/about-coding-with-wix-studio.md ## Article Content: # About Coding with Wix Studio > **Note:** Some of the features listed below are not yet available to all users. When you code with [Wix Studio](https://support.wix.com/en/article/about-wix-studio), you are working in an open development platform that accelerates the way you build web applications. You use [APIs](https://www.wix.com/velo/reference/spis/getting-started) to add custom functionality and interactions. You can code directly in Wix Studio's built-in [Code panel](https://support.wix.com/en/article/wix-studio-working-with-the-code-panel), in the [Wix IDE](https://support.wix.com/en/article/about-the-wix-ide) (Wix's VS Code-based IDE), or with your own IDE and [integrating with GitHub](https://support.wix.com/en/article/velo-about-git-integration-wix-cli). Regardless of how you choose to code, you can enjoy serverless coding, all in an open, extendable platform. ## Coding features and functionality This section highlights key features and functionality for coding with Wix Studio's open platform. * **Coding on our open platform.** First, familiarize yourself with [our platform](https://support.wix.com/en/article/about-velo-by-wix). * **Different environments for coding.** Wix studio offers different [options for coding](https://support.wix.com/en/article/about-coding-with-wix-studio#ways-to-code-with-wix-studio). You decide which option works based on what you need to do. * **CSS styling**. Add and customize styling for the site using [CSS](https://support.wix.com/en/article/studio-editor-about-css-editing) that was developed outside of the Wix Studio ecosystem. * **Concurrent editing**. This feature helps you [collaborate efficiently](https://support.wix.com/en/article/studio-editor-collaborating-on-a-site) by allowing you and your teammates to work simultaneously on the same site. * **AI assistance**. The [Wix AI Assistant](https://dev.wix.com/docs/develop-websites/articles/workspace-tools/developer-tools/ai-assistants/ai-assistant-in-the-wix-ide/about-the-wix-ai-assistant.md) helps you use artificial intelligence to get your code up and running quickly and efficiently. The assistant can help write, and even fix, your code. Receive responses in real time, including code snippets, to help you with your coding tasks. * **Service plugins**. You can integrate with service providers to further expand your site's functionality by replacing and extending existing app flows and/or by integrating external services with your site using [service plugins](https://support.wix.com/en/article/velo-custom-app-extensions-using-spis). * **Headless sites and projects**. Design an independent site or project that takes advantage of Wix Studio's powerful infrastructure, tools, and capabilities in a [headless](https://dev.wix.com/docs/go-headless.md) environment. * **Databases**. Connect your site to [external database collections](https://support.wix.com/en/article/velo-integrating-external-databases-with-your-wix-site) in addition to the built-in [Wix Content Management System (CMS)](https://support.wix.com/en/article/cms-formerly-content-manager-an-overview). * **Functional Testing**. The [Functional Testing](https://dev.wix.com/docs/develop-websites/articles/workspace-tools/testing-monitoring/functional-testing/about-functional-testing.md) tool allows you to test backend code without having to trigger it from the frontend. You can define custom parameters to use in testing backend functions. * **Packages**. This feature lets you choose a [package](https://dev.wix.com/docs/develop-websites/articles/coding-with-velo/packages/about-packages.md) with the functionality you want and add it to your site(s). You can install [npm packages](https://dev.wix.com/docs/develop-websites/articles/coding-with-velo/packages/about-npm-packages.md) and [packages built by Wix](https://dev.wix.com/docs/develop-websites/articles/coding-with-velo/packages/working-with-velo-packages.md). * **Blocks**. You can [add code](https://support.wix.com/en/article/wix-blocks-about-coding-in-blocks) to your Wix Blocks widgets and apps. Because of this integration, [Blocks apps](https://support.wix.com/en/article/blocks-unboxed-a-quick-tour) can be anything from simple widget layouts to full-fledged interactive web components, complete with APIs and code files. * **Custom Apps**. You can create [custom apps](https://dev.wix.com/docs/develop-websites/articles/coding-with-velo/packages/about-custom-apps.md) using Blocks, and add them to your site. This provides you with the ability to write code with specific functionality and use it across multiple sites. * **Developer tools**. A set of [developer tools](https://dev.wix.com/docs/develop-websites/articles/workspace-tools/testing-monitoring/testing-troubleshooting/about-debugging-your-code.md) is available to help you monitor, test, and debug the code on your site(s). * **Test sites**. As you develop your site's functionality, you may want to test a version of your site on a percentage of your visitors. * **And here are some open-platform features for Wix Studio coders**: * [Fetch](https://support.wix.com/en/article/velo-accessing-3rd-party-services-with-the-fetch-api) for calling external APIs. * [HTTP functions](https://support.wix.com/en/article/velo-exposing-a-site-api-with-http-functions) for exposing your site's functionality as an API. * [Routers](https://support.wix.com/en/article/wix-studio-creating-a-router) for handling incoming requests to your site's pages/sitemap and directing the user to a custom page, according to the logic in the code. ## Ways to code with Wix Studio Wix is committed to making sure you, as a developer, have the right environment, tools, and APIs to develop sites and apps for your customers. We know coding is not a 1-size-fits-all experience. With Wix Studio, you choose how and where to code: + With the built-in Code panel + Using the Wix IDE + In your own local IDE and integrate with GitHub While previewing and publishing your site is always done in the Wix Studio Editor, you can use each coding option at different times in the development flow. For example, you can add properties to elements and add pages to your site using the Code panel, but can then switch to the Wix IDE for coding. ![Studio features](https://wixmp-833713b177cebf373f611808.wixmp.com/images/2d4a280cc4f8dc3ac66dcda4928da0c0.png) ### Built-in Code panel To develop small projects that focus mainly on custom interactions and CSS styling on the frontend, craft your code using Wix Studio's built-in Code panel.
To start, click the ![Code icon](https://github.com/wix-incubator/wix-code-docs/assets/50321691/b5b2d7b8-0a53-4239-9e87-0e72bd8189b8) and click **Start Coding**. The resulting [Code panel](https://support.wix.com/en/article/wix-studio-working-with-the-code-panel) contains: + **The Code sidebar**. *What you want to code*—page code, global page code, CSS styling, and more. + **The Code panel**. *How you code*. The Code panel provides you with: + The **Code sidebar** for navigation between Wix Studio coding features. + The **code editor** for writing and editing your code. + The **Properties & Events panel** for naming elements, setting properties, and defining event handlers. + The **CSS Classes panel** for CSS styling on a specific element.

Watch a demo of how to work with the Code panel in Wix Studio: `youtube:https://www.youtube.com/watch?v=p3A2PD-jZ_E` ### Wix IDE For larger, multi-developer projects that involve more complex frontend code and/or backend code, use the online [Wix IDE](https://support.wix.com/en/article/about-the-wix-ide). The Wix IDE is a VS Code-based IDE that allows you to edit your site's code in your browser—no downloading or configuration necessary. Use familiar VS Code features to get up and running quickly.
Click **Code in Wix IDE** from the code editor to start coding.

### Your own local IDE and GitHub integration Use the [Git Integration and Wix CLI for Sites](https://support.wix.com/en/article/velo-about-git-integration-wix-cli) set of power tools to write, test, and publish code for your Wix site locally on your computer.
To [set this up](https://support.wix.com/en/article/velo-setting-up-git-integration-wix-cli), connect your site to GitHub, develop in your favorite IDE, test your code in real time, and publish your site from the command line.

> **Note:** The Wix IDE can't be used together with GitHub Integration. You can, however, connect your site to GitHub to work locally, and then disconnect from GitHub to resume working in the Wix IDE without losing any work. ## What each coding option offers Use this table to decide which Wix Studio coding option is for you based on the features provided. | | Code panel | Wix IDE | Git integration | | :-------: | :---------------------: | :-------: | :---------------------: | | CMS interaction | ![Supported](https://github.com/wix-incubator/wix-code-docs/assets/50321691/1cc99729-151c-4c01-9a4c-09875a7dc355) | ![Supported](https://github.com/wix-incubator/wix-code-docs/assets/50321691/1cc99729-151c-4c01-9a4c-09875a7dc355) | ![Supported](https://github.com/wix-incubator/wix-code-docs/assets/50321691/1cc99729-151c-4c01-9a4c-09875a7dc355) | | Serverless | ![NotSupported](https://github.com/wix-incubator/wix-code-docs/assets/50321691/0b195e9c-ed04-44d1-bb69-5747cf39afd0) | ![Supported](https://github.com/wix-incubator/wix-code-docs/assets/50321691/1cc99729-151c-4c01-9a4c-09875a7dc355) | ![Supported](https://github.com/wix-incubator/wix-code-docs/assets/50321691/1cc99729-151c-4c01-9a4c-09875a7dc355) | | Secure | ![Supported](https://github.com/wix-incubator/wix-code-docs/assets/50321691/1cc99729-151c-4c01-9a4c-09875a7dc355) | ![Supported](https://github.com/wix-incubator/wix-code-docs/assets/50321691/1cc99729-151c-4c01-9a4c-09875a7dc355) | ![Supported](https://github.com/wix-incubator/wix-code-docs/assets/50321691/1cc99729-151c-4c01-9a4c-09875a7dc355) | | Open platform | ![Supported](https://github.com/wix-incubator/wix-code-docs/assets/50321691/1cc99729-151c-4c01-9a4c-09875a7dc355) | ![Supported](https://github.com/wix-incubator/wix-code-docs/assets/50321691/1cc99729-151c-4c01-9a4c-09875a7dc355) | ![Supported](https://github.com/wix-incubator/wix-code-docs/assets/50321691/1cc99729-151c-4c01-9a4c-09875a7dc355) | | NPM Packages | ![Supported](https://github.com/wix-incubator/wix-code-docs/assets/50321691/1cc99729-151c-4c01-9a4c-09875a7dc355) | ![Supported](https://github.com/wix-incubator/wix-code-docs/assets/50321691/1cc99729-151c-4c01-9a4c-09875a7dc355) | ![Supported](https://github.com/wix-incubator/wix-code-docs/assets/50321691/1cc99729-151c-4c01-9a4c-09875a7dc355) | | Velo Packages | ![Supported](https://github.com/wix-incubator/wix-code-docs/assets/50321691/1cc99729-151c-4c01-9a4c-09875a7dc355) | ![Supported](https://github.com/wix-incubator/wix-code-docs/assets/50321691/1cc99729-151c-4c01-9a4c-09875a7dc355) | ![NotSupported](https://github.com/wix-incubator/wix-code-docs/assets/50321691/0b195e9c-ed04-44d1-bb69-5747cf39afd0) | | Frontend code | ![Supported](https://github.com/wix-incubator/wix-code-docs/assets/50321691/1cc99729-151c-4c01-9a4c-09875a7dc355) | ![Supported](https://github.com/wix-incubator/wix-code-docs/assets/50321691/1cc99729-151c-4c01-9a4c-09875a7dc355) | ![Supported](https://github.com/wix-incubator/wix-code-docs/assets/50321691/1cc99729-151c-4c01-9a4c-09875a7dc355) | | CSS styling for all site pages | ![Supported](https://github.com/wix-incubator/wix-code-docs/assets/50321691/1cc99729-151c-4c01-9a4c-09875a7dc355) | ![Supported](https://github.com/wix-incubator/wix-code-docs/assets/50321691/1cc99729-151c-4c01-9a4c-09875a7dc355) | ![Supported](https://github.com/wix-incubator/wix-code-docs/assets/50321691/1cc99729-151c-4c01-9a4c-09875a7dc355) | | CSS styling for specific elements | ![Supported](https://github.com/wix-incubator/wix-code-docs/assets/50321691/1cc99729-151c-4c01-9a4c-09875a7dc355) | ![NotSupported](https://github.com/wix-incubator/wix-code-docs/assets/50321691/0b195e9c-ed04-44d1-bb69-5747cf39afd0) | ![Supported](https://github.com/wix-incubator/wix-code-docs/assets/50321691/1cc99729-151c-4c01-9a4c-09875a7dc355) | | Backend code | ![Supported](https://github.com/wix-incubator/wix-code-docs/assets/50321691/1cc99729-151c-4c01-9a4c-09875a7dc355) | ![Supported](https://github.com/wix-incubator/wix-code-docs/assets/50321691/1cc99729-151c-4c01-9a4c-09875a7dc355) | ![Supported](https://github.com/wix-incubator/wix-code-docs/assets/50321691/1cc99729-151c-4c01-9a4c-09875a7dc355) | | Concurrent editing | ![Supported](https://github.com/wix-incubator/wix-code-docs/assets/50321691/1cc99729-151c-4c01-9a4c-09875a7dc355) | ![Supported](https://github.com/wix-incubator/wix-code-docs/assets/50321691/1cc99729-151c-4c01-9a4c-09875a7dc355) | ![NotSupported](https://github.com/wix-incubator/wix-code-docs/assets/50321691/0b195e9c-ed04-44d1-bb69-5747cf39afd0) | | Collaboration (team work) | ![Supported](https://github.com/wix-incubator/wix-code-docs/assets/50321691/1cc99729-151c-4c01-9a4c-09875a7dc355)


For >1 designers and 1 developer | ![Supported](https://github.com/wix-incubator/wix-code-docs/assets/50321691/1cc99729-151c-4c01-9a4c-09875a7dc355) | ![Supported](https://github.com/wix-incubator/wix-code-docs/assets/50321691/1cc99729-151c-4c01-9a4c-09875a7dc355) | | Public files | ![Supported](https://github.com/wix-incubator/wix-code-docs/assets/50321691/1cc99729-151c-4c01-9a4c-09875a7dc355) | ![Supported](https://github.com/wix-incubator/wix-code-docs/assets/50321691/1cc99729-151c-4c01-9a4c-09875a7dc355) | ![Supported](https://github.com/wix-incubator/wix-code-docs/assets/50321691/1cc99729-151c-4c01-9a4c-09875a7dc355) | | Online access | ![Supported](https://github.com/wix-incubator/wix-code-docs/assets/50321691/1cc99729-151c-4c01-9a4c-09875a7dc355) | ![Supported](https://github.com/wix-incubator/wix-code-docs/assets/50321691/1cc99729-151c-4c01-9a4c-09875a7dc355) | ![NotSupported](https://github.com/wix-incubator/wix-code-docs/assets/50321691/0b195e9c-ed04-44d1-bb69-5747cf39afd0) | | Offline access | ![NotSupported](https://github.com/wix-incubator/wix-code-docs/assets/50321691/0b195e9c-ed04-44d1-bb69-5747cf39afd0) | ![NotSupported](https://github.com/wix-incubator/wix-code-docs/assets/50321691/0b195e9c-ed04-44d1-bb69-5747cf39afd0) | ![Supported](https://github.com/wix-incubator/wix-code-docs/assets/50321691/1cc99729-151c-4c01-9a4c-09875a7dc355) | | Complex projects or projects that require a lot of code | ![NotSupported](https://github.com/wix-incubator/wix-code-docs/assets/50321691/0b195e9c-ed04-44d1-bb69-5747cf39afd0) | ![Supported](https://github.com/wix-incubator/wix-code-docs/assets/50321691/1cc99729-151c-4c01-9a4c-09875a7dc355) | ![Supported](https://github.com/wix-incubator/wix-code-docs/assets/50321691/1cc99729-151c-4c01-9a4c-09875a7dc355) | | Autosave by default | ![Supported](https://github.com/wix-incubator/wix-code-docs/assets/50321691/1cc99729-151c-4c01-9a4c-09875a7dc355) | ![Supported](https://github.com/wix-incubator/wix-code-docs/assets/50321691/1cc99729-151c-4c01-9a4c-09875a7dc355) | User-set | | Wix AI Assistant | ![NotSupported](https://github.com/wix-incubator/wix-code-docs/assets/50321691/0b195e9c-ed04-44d1-bb69-5747cf39afd0) | ![Supported](https://github.com/wix-incubator/wix-code-docs/assets/50321691/1cc99729-151c-4c01-9a4c-09875a7dc355) | ![NotSupported](https://github.com/wix-incubator/wix-code-docs/assets/50321691/0b195e9c-ed04-44d1-bb69-5747cf39afd0) | ## Finding your way The following table lists features you are familiar with in the Wix Editor and directs you to the equivalent features in Wix Studio. | Feature | Wix Editor | Wix Studio | | ------ | ------ | ------ | | Enabling dev mode | From the Dev Mode menu, click

![Turn on Dev Mode](https://github.com/wix-incubator/wix-code-docs/assets/50321691/5ebeb184-e01f-423c-889d-7b8a06a97c66) | Coding is always available, no need to enable. Click ![Code icon](https://github.com/wix-incubator/wix-code-docs/assets/50321691/2c41d3df-930f-4e0f-966f-038742adceed) and ![Start Coding](https://github.com/wix-incubator/wix-code-docs/assets/50321691/37ce59a8-1a3d-44a7-a0cc-05ceff8b98b1). | | Previewing your site | On the site, click **Preview** at the top right. | On the site, click ![Preview icon](https://github.com/wix-incubator/wix-code-docs/assets/50321691/e65d33fd-497b-430a-8719-ff4d10488773) at the top right. | | Page code | In the Code sidebar under Page Code. | **Code panel**: In the Code sidebar under Page Code.


**Wix IDE and GitHub integration**: In the Explorer, navigate to `src/pages`, `src/public`, and `src/styles`. | | Public code | In the Code sidebar under Public Code. | **Code panel**: Under the Public section of Public & Backend in the Code sidebar.


**Wix IDE and GitHub Integration**: In the Explorer, navigate to `src/public`. | | Master page | The `masterpage.js` file is in the Code sidebar under Page Code. | **Code panel**: The `masterpage.js` file is in the Main Pages section under Page Code in the Code sidebar.


**Wix IDE and GitHub integration**: In the Explorer, navigate to `src/pages`. | | CSS for all site pages | Limited release. | **Code panel**: The `global.css` file is in the CSS section under Page Code in the Code sidebar.


**Wix IDE and GitHub integration**: In the Explorer, navigate to `src/styles`. | | CSS Classes panel for specific elements | NA | **Code panel**: The CSS Classes panel is at the bottom right under the code editor. | | Properties & Events panel | Click ![Properties & Events](https://github.com/wix-incubator/wix-code-docs/assets/50321691/507e23d9-1af2-4d91-9cd4-3c8e94531bf3) in the Code panel toolbar. The panel displays on the bottom right. | The Properties & Events panel is at the bottom left of the code editor, next to the Properties & Events panel. | | Backend code | In the Code sidebar under Public & Backend. | **Code panel**: Under the Backend section of Public & Backend in the Code sidebar.


**Wix IDE and GitHub integration**: In the Explorer, navigate to the `src/backend` folder. Here you will see web method files, `data.js`, `routers.js`, `events.js` (for backend event handlers), `http-functions.js`, `jobs.config` (for scheduling recurring jobs), and other general Javascript (`.js`) backend files. | | Web module `.web.js` backend files | In the Code sidebar under Public & Backend | Under the Backend section of Public & Backend in the Code sidebar.


**Wix IDE and GitHub integration**: In the Explorer, add a web module file in the `src/backend` folder. For example, `src/backend.web.js`. | | Web module `.jsw` backend files (deprecated) | In the Code sidebar under Public & Backend. | Under the Backend section of Public & Backend in the Code sidebar.


**Wix IDE and GitHub integration**: In the Explorer, navigate to the `src/backend` folder to see web method files. | | Data hooks | Under the Backend section of Public & Backend in the Code sidebar, add a data hook `data.js` file. | Under the Backend section of Public & Backend in the Code sidebar, add a data hook `data.js` file.


**Wix IDE and GitHub integration**: In the Explorer, you can see a `data.js` file in the `src/backend` folder. | | Packages | In the Code sidebar, click ![Packages & Apps](https://github.com/wix-incubator/wix-code-docs/assets/50321691/468ecdd9-c5db-478f-8cc2-6ff24cdf6068) for [npm packages](https://dev.wix.com/docs/develop-websites/articles/coding-with-velo/packages/about-npm-packages.md) and Velo packages. | **Code panel**: In the Code sidebar, click **Package & Apps** for npm packages and Velo packages. | | Custom apps | Under Custom Apps in the Package & Apps section of the Code sidebar. | **Code panel**: Under Custom Apps in the Package & Apps section of the Code sidebar. | | Service plugins | In the Code sidebar under Public & Backend. | **Code panel**: Under Custom Apps in the Package & Apps section of the Code sidebar. | | Wix AI Assistant | NA | **Wix IDE sidebar**: Click ![AI](https://github.com/wix-incubator/wix-code-docs/assets/50321691/b269b906-908c-48a7-b000-8901dbc75e7c). | | GitHub integration | In the Code sidebar, click ![GitHub](https://github.com/wix-incubator/wix-code-docs/assets/50321691/50635f4a-7600-44eb-9f3a-16fa3ad878fe) and then ![Connect to GitHub](https://github.com/wix-incubator/wix-code-docs/assets/50321691/10c71e4c-2ae0-4187-96fe-1bd6d2fbbca0). | **Code panel**: In the Code sidebar, click **GitHub** and then ![Connect to GitHub](https://github.com/wix-incubator/wix-code-docs/assets/50321691/10c71e4c-2ae0-4187-96fe-1bd6d2fbbca0) | | Routers | In the Code sidebar, under the Page Code's Main Pages section, add a router.

Enter a URL prefix for your router and click **Add & Edit Code**. This action not only adds router pages to your Page Code, but this action also automatically adds a `routers.js` file to your site's Backend. | **Code panel**: In the Code sidebar, under the Page Code's Main Pages section, add a router.

Enter a URL prefix for your router and click **Add & Edit Code**. This action not only adds router pages to your Page Code, but this action also automatically adds a `routers.js` file to your site's Backend.


**Wix IDE and GitHub integration**: In the Explorer, you can see your router pages in the `src/pages` folder, and a `router.js` file in the `src/backend` folder. | | Dashboard Page | In the Add panel under **Page > Dashboard page**. | In the Pages panel on the left, click the plus icon ![](https://d2x3xhvgiqkx42.cloudfront.net/12345678-1234-1234-1234-1234567890ab/0ca9e8ba-16ed-4cd8-a1e1-58d01c4420f7/2021/10/13/04083fa4-3262-4606-98d1-cbc359bf8585/1a26226e-c281-42d2-8a60-88e44fe40c61.png) , and then click **Add** under **Dashboard Page**. | | Dev tools | Accessible from the Code sidebar ![Velo-sidebar](https://github.com/wix-incubator/wix-code-docs/assets/50321691/68231f51-1e67-49ed-bbfd-2005679312e1) or the dashboard. | Accessible from the Developer Tools section of the Code sidebar, or the dashboard. | | Test sites | On the site, click **Site** and then **Deploy Test Site**. | Click ![Main](https://github.com/wix-incubator/wix-code-docs/assets/50321691/6eeb5c1d-d0ad-464b-a225-d5739a3e0271) at the top left, **Site**, and **Create Test Site**. | --- > Portal Navigation: > > - Append `.md` to any URL under `https://dev.wix.com/docs/` to get its markdown version. > - Pages are either content pages (article or reference text) or menu pages (a list of links to child pages). > - To get a menu page, truncate any URL to a parent path and append `.md` (e.g. `https://dev.wix.com/docs/sdk.md`, `https://dev.wix.com/docs/sdk/core-modules.md`). > - Top-level index of all portals: https://dev.wix.com/docs/llms.txt > - Full concatenated docs: https://dev.wix.com/docs/llms-full.txt ## Resource: Copying and Deleting Coded Sites, Pages, and Elements ## Article: Copying and Deleting Coded Sites, Pages, and Elements ## Article Link: https://dev.wix.com/docs/develop-websites/articles/coding-with-velo/overview/copying-and-deleting-coded-sites-pages-and-elements.md ## Article Content: # Managing Coded Sites, Pages, and Elements When working on a Wix site with code, it's important to understand how duplication and deletion affect your site's functionality. Whether you're copying an entire site, a page, or an individual element, or deleting elements with connected code, the outcome depends on how your code is structured and wired. ## Duplicating pages and sites You can duplicate [sites](https://support.wix.com/en/article/duplicating-your-site-1472847) and [pages](https://support.wix.com/en/article/wix-editor-managing-your-sites-pages), as well as [clone](https://support.wix.com/en/article/wix-studio-managing-sites-in-a-workspace) and [transfer](https://support.wix.com/en/article/transferring-a-free-site-to-another-wix-account) your Wix sites. Whether you're duplicating a single page, an entire site, or cloning or transferring a site, the code and events are maintained in the new version. ## Duplicating elements When you copy and paste an element that has associated code, the element itself is duplicated, but any events, wiring, or code linked to it aren't included.
**Important:** If you're building a Wix site that others can edit, make sure they understand the limitations of working with elements. For more information, see [Working with Collaborators](https://dev.wix.com/docs/develop-websites/articles/coding-with-velo/overview/working-with-collaborators.md).
## Deleting elements When you delete elements from your site, the behavior of any associated code depends on the type of event handler used — static or dynamic. In both cases, the code itself isn't automatically removed, but how it's connected to the element changes. >**Note:** In the editor, if a collaborator tries to delete elements referenced by code, a confirmation prompt displays. The prompt helps prevent accidental deletions that can impact your code. The prompt displays for: > >- Elements directly referenced by code. A ![code](https://wixmp-833713b177cebf373f611808.wixmp.com/images/061bba0b7714af979fc4343df936a412.png) icon displays for these elements as an indicator. >- Parent elements whose nested elements are referenced by code. ### Deleting an element with dynamic event handler When you delete an element with a [dynamic event handler](https://dev.wix.com/docs/develop-websites/articles/coding-with-velo/frontend-code/about-event-handlers-in-wix.md), the associated code isn't removed. If you add a new element and give it the same ID as the deleted one, the existing code will continue to work as expected. ### Deleting an element with static event handler When you delete an element with [static event handler](https://dev.wix.com/docs/develop-websites/articles/coding-with-velo/frontend-code/about-static-event-handlers.md), the associated code remains, but the event wiring is removed. For example, you have an element named `button2` with an `onClick` event that toggles the visibility of an element called `image3`: ```javascript export function button2_onClick(event) { if ($w("#image3").visible) { $w("#image3").hide(); } else { $w("#image3").show(); } } ``` If you delete `button2` from your page, the event code is not deleted. However, the event is no longer wired. This means that if you add a new button and name it `button2`, the code above won't run when it's clicked, you would need to rewire the event manually. ## See also - [About Code Placement](https://dev.wix.com/docs/develop-websites/articles/coding-with-velo/overview/where-do-i-put-my-code.md) - [Working with Collaborators](https://dev.wix.com/docs/develop-websites/articles/coding-with-velo/overview/working-with-collaborators.md) --- > Portal Navigation: > > - Append `.md` to any URL under `https://dev.wix.com/docs/` to get its markdown version. > - Pages are either content pages (article or reference text) or menu pages (a list of links to child pages). > - To get a menu page, truncate any URL to a parent path and append `.md` (e.g. `https://dev.wix.com/docs/sdk.md`, `https://dev.wix.com/docs/sdk/core-modules.md`). > - Top-level index of all portals: https://dev.wix.com/docs/llms.txt > - Full concatenated docs: https://dev.wix.com/docs/llms-full.txt ## Resource: Working with Collaborators ## Article: Working with Collaborators ## Article Link: https://dev.wix.com/docs/develop-websites/articles/coding-with-velo/overview/working-with-collaborators.md ## Article Content: # Working with Collaborators When you develop a site, you may want other people to collaborate on the site or you may want to transfer the site to someone else but maintain your ability to collaborate on it. ## Allow other people to collaborate on your site You can let other people collaborate on your site's code and functionality by adding them as [collaborators](https://support.wix.com/en/article/inviting-people-to-contribute-to-your-site) to your site. It isn't necessary to transfer ownership of the site to them. Collaborators need to be assigned a role that has **Edit Site** permissions to be able to edit the site and add or edit code. It is not necessary to give a collaborator **Publish** permissions for them to be able to edit the site code. Note that if the collaborator adds functionality that can only be tested on the live site, they won't be able to test it. ## Transfer ownership and collaborate Some features are available to test only on a live site. You have to have access to the site so you can test and maintain the code you developed, even if it's for other users on their domain.  You also may want to do more development that needs testing after the site has been published and is live. You probably don't want visitors to the site to access the pages that are under development and being tested. To test and maintain a site developed for another user: 1. When a site is ready for live testing, [transfer ownership](https://support.wix.com/en/article/transferring-a-premium-site-to-another-wix-account) of the domain to the other user. 2. Instruct the other user to [invite you as a site collaborator](https://support.wix.com/en/article/inviting-site-contributors). 3. Ensure that you are added as a role that has **Edit Site** permissions from the options for [collaborator roles](https://support.wix.com/en/article/roles-permissions-overview#roles637). This allows you full access to the site, including its backend files and database collections. To continue development on a live site once ownership is transferred: 1. If you are working on a new page, [add a page](https://support.wix.com/en/article/adding-a-page-to-your-site). If you are working on an existing page, [duplicate the page](https://support.wix.com/en/article/duplicating-a-page).  2. Make sure the page is [hidden](https://support.wix.com/en/article/hiding-a-page-from-the-menu) in the menu so site visitors won't be able to access it while it's being developed and tested. (Note that a hidden page on a published site can still be accessed by modifying the URL.) 3. Once you are finished with development and testing, [make the page visible](https://support.wix.com/en/article/hiding-and-unhiding-a-page-from-your-site-menu#unhiding-a-page-in-your-site-menu). If it replaces a page, [delete](https://support.wix.com/en/article/deleting-a-page) the old page.  The following are some considerations for when different users work on a site developed in the editor.  ## Considerations when working on a live site for another user If you develop a site with code for someone else that you can both edit, you need to understand the limitations of what you or the other user can do with the site and its elements. Keep in mind, for example, the other user might be a designer with no coding experience. In this section, we describe: - [Site-related considerations](#site-related-considerations) - [Element-related considerations](#element-related-considerations) ### Site-related considerations If you duplicate an individual page or an entire site, or if you or the other user clones or transfers a site, the code and events in the site are maintained only in the new copy of the page or site. ### Element-related considerations * If you or they copy and paste an element that has event handlers associated with it, the new element will not work as expected since the event wiring and code is not copied.  * If you or they copy and paste an element that is connected to a dataset, the new element maintains the connection settings from the element it was copied from. * If you or they move an element from one page to another, the element will not work as expected since the associated code and wiring is on the original page and is not moved to the new page. * If an element is connected to a dataset, and both are set to show on only one page, if the element is then set to [Show on All Pages](https://support.wix.com/en/article/showing-an-element-on-all-pages-6533570), the connection to the dataset is broken. * In the editor, if a collaborator tries to delete elements referenced by code, a confirmation prompt displays. The prompt helps prevent accidental deletions that can impact your code. The prompt displays for: + Elements directly referenced by code. A ![code](https://wixmp-833713b177cebf373f611808.wixmp.com/images/b2e602834297db1e0836bd83e1de9f8a.png) icon displays for these elements as an indicator. + Parent elements whose nested elements are referenced by code. --- > Portal Navigation: > > - Append `.md` to any URL under `https://dev.wix.com/docs/` to get its markdown version. > - Pages are either content pages (article or reference text) or menu pages (a list of links to child pages). > - To get a menu page, truncate any URL to a parent path and append `.md` (e.g. `https://dev.wix.com/docs/sdk.md`, `https://dev.wix.com/docs/sdk/core-modules.md`). > - Top-level index of all portals: https://dev.wix.com/docs/llms.txt > - Full concatenated docs: https://dev.wix.com/docs/llms-full.txt ## Resource: Error Log When Publishing ## Article: Publishing Your Site ## Article Link: https://dev.wix.com/docs/develop-websites/articles/coding-with-velo/overview/error-log-when-publishing.md ## Article Content: # Error Log When Publishing You can [publish your site](https://support.wix.com/en/article/wix-editor-publishing-your-site) at any time from the top toolbar of the editor. When you click **Publish**, Wix performs an automatic check on the site's code for any errors. If errors are detected, Wix alerts you and provides the option to either return to the editor without publishing your site or to publish your site with the errors. > **Note:** > Wix only reports code errors if there have been changes to the code since the last time the site was published. If no modifications were made to the code, Wix publishes your site without requiring any additional confirmation. ## Viewing the error log
![image of popup with dev mode on](https://wixmp-833713b177cebf373f611808.wixmp.com/images/1ee0549eb4f062ecca3bf3b7e3395af3.png)
If developer mode is enabled when you publish your site, Wix provides details of the errors in your code. You can then access the most recent `build.log` file to analyze where errors have been detected. To do this, click on **View Error Log** in the publishing prompt. Later, open the `build.log` file directly in your Wix editor under **Developer Tools** to review: image of latest build opening build.log file Note that the `build.log` file is only kept for 30 days. After 30 days, the status for Latest Build under **Developer Tools** will be `Awaiting publish`. Publishing your site generates a new `build.log` file.
image of latest build with an Awaiting publish message
## What Wix checks During the automatic check, Wix analyzes your code files and validates the syntax that may prevent the bundling of code files. For example, Wix checks [`no-undef`](https://eslint.org/docs/latest/rules/no-undef) and [`no-const-assign`](https://eslint.org/docs/latest/rules/no-const-assign) rules to flag the use of undeclared variables or if `const` variables were reassigned. The files it checks are: - Page files. - [Web modules.](https://dev.wix.com/docs/develop-websites/articles/coding-with-velo/backend-code/web-modules/about-web-modules.md) - `.js` files, including [events.js](https://support.wix.com/en/article/velo-backend-events), [data.js](https://dev.wix.com/docs/develop-websites/articles/databases/wix-data/hooks/using-data-hooks/.md), [http-functions.js](https://dev.wix.com/docs/velo/velo-only-apis/wix-http-functions/introduction.md), and [routers.js](https://dev.wix.com/docs/develop-websites/articles/coding-with-velo/routers/about-routers.md#routing-code). The files it does not check are: - Certain service plugin files. --- > Portal Navigation: > > - Append `.md` to any URL under `https://dev.wix.com/docs/` to get its markdown version. > - Pages are either content pages (article or reference text) or menu pages (a list of links to child pages). > - To get a menu page, truncate any URL to a parent path and append `.md` (e.g. `https://dev.wix.com/docs/sdk.md`, `https://dev.wix.com/docs/sdk/core-modules.md`). > - Top-level index of all portals: https://dev.wix.com/docs/llms.txt > - Full concatenated docs: https://dev.wix.com/docs/llms-full.txt ## Resource: Develop Websites with the SDK ## Article: Develop Websites with the SDK ## Article Link: https://dev.wix.com/docs/develop-websites/articles/coding-with-velo/develop-with-the-sdk/develop-websites-with-the-sdk.md ## Article Content: # Develop Websites with the SDK You can now use the [Wix JavaScript SDK](https://dev.wix.com/docs/sdk.md) instead of Velo APIs for most functionality when developing sites or building apps with Blocks. This marks the beginning of a gradual transition from using Velo APIs to using the next generation SDK. You are encouraged to start using the SDK in all new and ongoing development projects. You may also want to [migrate existing code](https://dev.wix.com/docs/develop-websites/articles/coding-with-velo/develop-with-the-sdk/migrate-from-velo-to-the-sdk.md) written using Velo APIs to the SDK. ## Benefits to using the SDK Wix has chosen to invest its future efforts in the Wix JavaScript SDK for the following reasons: - **Industry standards**: The SDK follows current industry standards for web development, such as the use of npm modules. This lowers the barrier to entry for professional web developers. - **Stability**: The use of npm modules allows us to provide a better versioning experience. Once you have your code working with a specific version of a module, you can be sure that your code will always continue to work with that version. This also puts you in control of when and where you want to use updated modules. - **Cross-Wix alignment**: The SDK is already used by Wix App and Wix Headless developers when building their projects. It is also used internally by Wix's own developers. Now that site developers will use the SDK as well, Wix can increase the efficiency of the rollout process for new functionality and documentation. This alignment also means that site developers will have an easier time creating apps and headless projects, should they choose to do so. ## Transition Process At the current stage in the process of transitioning from Velo APIs to the SDK: - All Velo APIs will continue to work as usual. - The SDK will receive all new functionality updates. - The Velo API will continue to receive updates to the `$w` and `$widget` APIs. - All other Velo APIs will not receive any more updates. - Some functionality in the Velo API is [not yet supported in the SDK](https://dev.wix.com/docs/develop-websites/articles/coding-with-velo/develop-with-the-sdk/velo-to-sdk-api-mapping.md). - Some documentation in this portal, including tutorials and code examples, still uses Velo APIs for the time being. - The Website Dev Assistant still uses Velo APIs in its responses. - The [Velo API reference](https://dev.wix.com/docs/velo.md) has been restructured to indicate which API modules are currently transitioning to the SDK. In future stages of the transition process: - All Velo functionality will be supported in the SDK. - The documentation in this portal will use the SDK in tutorials and code examples. - The Website Dev Assistant will use the SDK in its responses. - Velo APIs will be deprecated. ## See also - [Velo to SDK API Mapping](https://dev.wix.com/docs/develop-websites/articles/coding-with-velo/develop-with-the-sdk/velo-to-sdk-api-mapping.md) - [Migrate from Velo to the SDK](https://dev.wix.com/docs/develop-websites/articles/coding-with-velo/develop-with-the-sdk/migrate-from-velo-to-the-sdk.md) - [SDK: About Site Development](https://dev.wix.com/docs/sdk/articles/get-started/about-site-development.md) --- > Portal Navigation: > > - Append `.md` to any URL under `https://dev.wix.com/docs/` to get its markdown version. > - Pages are either content pages (article or reference text) or menu pages (a list of links to child pages). > - To get a menu page, truncate any URL to a parent path and append `.md` (e.g. `https://dev.wix.com/docs/sdk.md`, `https://dev.wix.com/docs/sdk/core-modules.md`). > - Top-level index of all portals: https://dev.wix.com/docs/llms.txt > - Full concatenated docs: https://dev.wix.com/docs/llms-full.txt ## Resource: Velo to SDK API Mapping ## Article: Velo to SDK API Mapping ## Article Link: https://dev.wix.com/docs/develop-websites/articles/coding-with-velo/develop-with-the-sdk/velo-to-sdk-api-mapping.md ## Article Content: # Velo to SDK API Mapping You can now use the [Wix JavaScript SDK](https://dev.wix.com/docs/sdk.md) instead of the Velo API for most functionality when developing sites or building apps with Blocks. Learn more about [developing websites with the SDK](https://dev.wix.com/docs/develop-websites/articles/coding-with-velo/develop-with-the-sdk/develop-websites-with-the-sdk.md). Wix's transition to the SDK is a gradual process. At this stage, not all Velo APIs have equivalent SDK modules that can be used for site development or for app creation with Blocks. For functionality that is not yet supported in the SDK, use Velo APIs alongside the SDK. This article outlines which [Velo APIs you should continue to use](#velo-apis-you-should-continue-to-use), and how to [find your Velo APIs' functionality in the SDK](#finding-sdk-replacements-for-velo-apis). ## Velo APIs you should continue to use The Velo APIs that should still be used at this stage fall into 2 categories: - **Velo-Only APIs**: These APIs are imported from Velo modules whose functionality the SDK doesn't support. You can find these APIs in the [Velo-Only APIs](https://dev.wix.com/docs/velo/velo-only-apis/about-velo-only-apis-and-the-sdk.md) section of the Velo API reference. - [`$w`](https://dev.wix.com/docs/velo/velo-only-apis/$w/introduction.md) - [`$widget`](https://dev.wix.com/docs/velo/velo-only-apis/$widget/introduction.md) - [`wix-configs-backend`](https://dev.wix.com/docs/velo/velo-only-apis/wix-configs-backend/introduction.md) - [`wix-http-functions`](https://dev.wix.com/docs/velo/velo-only-apis/wix-http-functions/introduction.md) - [`wix-realtime-backend`](https://dev.wix.com/docs/velo/velo-only-apis/wix-realtime-backend/introduction.md) - [`wix-application`](https://dev.wix.com/docs/velo/velo-only-apis/wix-application/introduction.md): Most `wix-application` functionality isn't yet available in the SDK. The SDK currently supports only identifying the app instance, similar to what [`getDecodedAppInstance()`](https://dev.wix.com/docs/velo/velo-only-apis/wix-application/get-decoded-app-instance.md) provides in Velo. To identify the app instance using the SDK: - In backend code, [call `getTokenInfo()` or `getAppInstance()` in a backend function](https://dev.wix.com/docs/build-apps/develop-your-app/access/app-instances/identify-the-app-instance-in-backend-environments.md#blocks-backend-function). - In frontend code, [simply call your backend function](https://dev.wix.com/docs/build-apps/develop-your-app/access/app-instances/identify-the-app-instance-in-frontend-environments.md#blocks-backend-function). - [`wix-editor`](https://dev.wix.com/docs/velo/velo-only-apis/wix-editor/introduction.md) - **Events and Service Plugins**: These APIs work by file and name conventions. They may have SDK counterparts, but the SDK versions don't work for site development and for app creation with Blocks. You can find them in the [Events & Service Plugins](https://dev.wix.com/docs/velo/events-service-plugins/about-events-service-plugins-and-the-sdk.md) section of the Velo API reference. ## Finding SDK replacements for Velo APIs The functionality of the Velo APIs listed in the [APIs](https://dev.wix.com/docs/velo/apis/about-velo-apis-and-the-sdk.md) section of the Velo API reference are mostly supported by the SDK. These APIs each fall into one of the following categories: - [Universal APIs](#universal-apis) - [Backend APIs](#backend-apis) - [Frontend APIs](#frontend-apis) - [Unique cases](#unique-cases) To learn how to migrate your code from Velo to SDK, see [Migrate from Velo to the SDK](https://dev.wix.com/docs/develop-websites/articles/coding-with-velo/develop-with-the-sdk/migrate-from-velo-to-the-sdk.md). ### Universal APIs Velo APIs that end in `.v2`, such as `wix-bookings.v2`, are universal APIs. [`wix-blog-backend`](https://dev.wix.com/docs/velo/apis/wix-blog-backend/introduction.md), [`wix-ecom-backend`](https://dev.wix.com/docs/velo/apis/wix-ecom-backend/introduction.md), [`wix-pro-gallery-backend`](https://dev.wix.com/docs/velo/apis/wix-pro-gallery-backend/introduction.md), and [`wix-tags.v1`](https://dev.wix.com/docs/velo/apis/wix-tags-v1/introduction.md) are also universal APIs. Universal APIs have direct equivalents in the SDK. These are the backend SDK modules with similar naming to the Velo counterparts. For example, the [`bookings`](https://dev.wix.com/docs/api-reference/business-solutions/bookings/services/introduction.md) SDK module is a direct replacement for the Velo [`wix-bookings.v2`](https://dev.wix.com/docs/velo/apis/wix-bookings-v2/introduction.md) API.
Exceptions: - [`wix-secrets-backend.v2`](https://dev.wix.com/docs/velo/apis/wix-secrets-backend-v2/introduction.md): This is a [backend API](#backend-apis), but it does have an equivalent SDK module.
> **Note:** Because the Wix SDK continues to be updated, an equivalent SDK module may have more functionality than its equivalent Velo API, so they may not look identical. ### Backend APIs Velo APIs that end in `-backend`, such as `wix-bookings-backend`, are backend APIs. Most backend APIs have corresponding [universal APIs](#universal-apis) that contain the same functionality. For example, `wix-bookings.v2` contains `wix-bookings-backend` functionality. To migrate your code that uses backend APIs to the SDK, use the corresponding universal API's equivalent SDK module. For example, use the [`bookings`](https://dev.wix.com/docs/api-reference/business-solutions/bookings/services/introduction.md) SDK module instead of the Velo [`wix-bookings-backend`](https://dev.wix.com/docs/velo/apis/wix-bookings-backend/introduction.md) API. Backend Velo APIs use the `suppressAuth` property to prevent permission checks from running. The equivalent functionality in the SDK is elevation. Learn more about [elevated permissions](https://dev.wix.com/docs/api-reference/articles/authentication/about-elevated-permissions.md).
Exceptions: - [`wix-blog-backend`](https://dev.wix.com/docs/velo/apis/wix-blog-backend/introduction.md): This is a [universal API](#universal-apis). - [`wix-cache-backend`](https://dev.wix.com/docs/velo/apis/wix-cache-backend/cache/introduction.md): The [`cache`](https://dev.wix.com/docs/api-reference/site/viewer/cache/invalidate-cache.md) SDK module contains this API's functionality. - [`wix-chat-backend`](https://dev.wix.com/docs/velo/apis/wix-chat-backend/introduction.md): The [`inbox.messages`](https://dev.wix.com/docs/api-reference/crm/communication/inbox/example-flows.md) SDK submodule contains this API's functionality. - [`wix-ecom-backend`](https://dev.wix.com/docs/velo/apis/wix-ecom-backend/introduction.md): This is a [universal API](#universal-apis). - [`wix-pay-backend`](https://dev.wix.com/docs/velo/apis/wix-pay-backend/introduction.md): This API doesn't currently have an SDK replacement. For now, continue using the Velo API. - [`wix-payment-provider-backend`](https://dev.wix.com/docs/velo/apis/wix-payment-provider-backend/introduction.md): The [`payments.pspCallbacks`](https://dev.wix.com/docs/api-reference/business-management/payments/payment-service-provider-service-plugin/callbacks/submit-event.md) SDK submodule contains this API's functionality. - [`wix-pro-gallery-backend`](https://dev.wix.com/docs/velo/apis/wix-pro-gallery-backend/introduction.md): This is a [universal API](#universal-apis). - [`wix-site-backend`](https://dev.wix.com/docs/velo/apis/wix-site-backend/introduction.md): Migrating this API is a [unique case](#wix-site-backend).
### Frontend APIs Velo APIs that end in `-frontend`, such as `wix-bookings-frontend`, are frontend APIs. [`wix-mobile`](https://dev.wix.com/docs/velo/apis/wix-mobile/introduction.md) and [`wix-navigate-mobile`](https://dev.wix.com/docs/velo/apis/wix-navigate-mobile/introduction.md) are also frontend APIs. Frontend APIs have direct equivalents in the SDK. These are the frontend SDK modules with similar naming to the Velo counterparts. For example, the [`bookings`](https://dev.wix.com/docs/sdk/frontend-modules/bookings/introduction.md) SDK frontend module is a direct replacement for the Velo [`wix-bookings-frontend`](https://dev.wix.com/docs/velo/apis/wix-bookings-frontend/introduction.md) API. Frontend SDK methods are asynchronous, even when the Velo equivalent is synchronous.
Exceptions: - [`wix-pay-frontend`](https://dev.wix.com/docs/velo/apis/wix-pay-frontend/currencies/introduction.md): Migrating this API is a [unique case](#wix-pay-frontend). - [`wix-storage-frontend`](https://dev.wix.com/docs/velo/apis/wix-storage-frontend/introduction.md): This API's equivalent SDK module, [`storage`](https://dev.wix.com/docs/sdk/frontend-modules/storage/introduction.md), has asynchronous methods. The equivalent Velo methods are synchronous.
### Unique cases The following Velo APIs have a unique way to implement their functionality in the SDK. #### `wix-auth` The [`wix-auth`](https://dev.wix.com/docs/velo/apis/wix-auth/introduction.md) Velo API has equivalent functionality in the [`essentials.auth`](https://dev.wix.com/docs/sdk/core-modules/essentials/auth.md) SDK submodule. #### `wix-bookings.v1` The `wix-bookings.v1` Velo API has a corresponding [universal API](#universal-apis), [`wix-bookings.v2`](https://dev.wix.com/docs/velo/apis/wix-bookings-v2/introduction.md). Therefore, use the the [`bookings`](https://dev.wix.com/docs/api-reference/business-solutions/bookings/services/introduction.md) SDK module instead of `wix-bookings.v1`. #### `wix-dashboard` The [`wix-dashboard`](https://dev.wix.com/docs/velo/apis/wix-dashboard/introduction.md) Velo API has an equivalent [`dashboard`](https://dev.wix.com/docs/sdk/host-modules/dashboard/introduction.md) SDK module. This module is a [host module](https://dev.wix.com/docs/sdk/host-modules/about-host-modules.md). #### `wix-data` The [`wix-data`](https://dev.wix.com/docs/velo/apis/wix-data/introduction.md) Velo API has a replacement [`items`](https://dev.wix.com/docs/sdk/business-solutions/data/items/introduction.md) SDK submodule in the `data` SDK module. Note that while this submodule closely mirrors `wix-data`, it's not a direct equivalent. Learn more about [migrating from `wix-data` to the Data Items SDK](https://dev.wix.com/docs/velo/apis/wix-data/migrate-to-the-sdk.md). #### `wix-fetch` Use the native `fetch()` to access the functionality of [`wix-fetch`](https://dev.wix.com/docs/velo/apis/wix-fetch/introduction.md) in the SDK. The `wix-fetch` Velo API has no SDK replacement. This API contains 2 methods: - `fetch()`: You can use the native `fetch()` by calling this method on the frontend or backend without importing it when using the SDK. - `getJSON()`: This method does not exist in the SDK. You can convert your `getJSON()` calls to `fetch()` instead. To get the JSON data from the `fetch()` response, call the `json()` method. #### `wix-pay-frontend` The [`wix-pay-frontend`](https://dev.wix.com/docs/velo/apis/wix-pay-frontend/introduction.md) Velo API has 2 sections and each section is handled differently: - [`startPayment()`](https://dev.wix.com/docs/velo/apis/wix-pay-frontend/start-payment.md): This Velo method doesn't currently have an SDK replacement. For now, continue using the Velo method. - [`currencies`](https://dev.wix.com/docs/velo/apis/wix-pay-frontend/currencies/introduction.md): This Velo API has an equivalent [`pay.currencies`](https://dev.wix.com/docs/sdk/frontend-modules/pay/currencies/introduction.md) SDK frontend submodule. #### `wix-search` The [`wix-search`](https://dev.wix.com/docs/velo/apis/wix-search/introduction.md) Velo API doesn't currently have an SDK replacement. For now, continue using the Velo API. #### `wix-site-backend` The [`wix-site-backend`](https://dev.wix.com/docs/velo/apis/wix-site-backend/introduction.md) Velo API has 2 sections and each section is handled differently: - [`invalidateCache()`](https://dev.wix.com/docs/velo/apis/wix-site-backend/invalidate-cache.md): This Velo method doesn't currently have an SDK replacement. For now, continue using the Velo method. - [`GeneralInfo`](https://dev.wix.com/docs/velo/apis/wix-site-backend/general-info/introduction.md): This functionality can be implemented using [`getSiteProperties()`](https://dev.wix.com/docs/api-reference/business-management/site-properties/properties/get-site-properties.md) from the `business-tools.siteProperties` SDK submodule. #### `wix-site-plugins.v1` The [`wix-site-plugins.v1`](https://dev.wix.com/docs/velo/apis/wix-site-plugins-v1/introduction.md) Velo API has an equivalent [`site-plugins`](https://dev.wix.com/docs/api-reference/app-management/site-plugins/placement-status-v1/introduction.md) SDK module. #### `wix-web-module` The [`wix-web-module`](https://dev.wix.com/docs/velo/apis/wix-dashboard/introduction.md) Velo API has an equivalent [`web-methods`](https://dev.wix.com/docs/sdk/core-modules/web-methods/introduction.md) SDK module. This module is a core module. #### `wix-widget` The [`wix-widget`](https://dev.wix.com/docs/velo/velo-only-apis/wix-widget/introduction.md) Velo API has an equivalent [`widget`](https://dev.wix.com/docs/sdk/host-modules/editor/widget/introduction.md) SDK submodule. #### Velo packages [Velo packages](https://dev.wix.com/docs/develop-websites/articles/coding-with-velo/packages/working-with-velo-packages.md) don't currently have equivalent SDK packages. In the future, equivalent SDK packages will gradually be released. ## See also - [Develop Websites with the SDK](https://dev.wix.com/docs/develop-websites/articles/coding-with-velo/develop-with-the-sdk/develop-websites-with-the-sdk.md) - [Migrate from Velo to the SDK](https://dev.wix.com/docs/develop-websites/articles/coding-with-velo/develop-with-the-sdk/migrate-from-velo-to-the-sdk.md) - [About Site Development](https://dev.wix.com/docs/api-reference/articles/platform-overview/about-wix-site-development.md) --- > Portal Navigation: > > - Append `.md` to any URL under `https://dev.wix.com/docs/` to get its markdown version. > - Pages are either content pages (article or reference text) or menu pages (a list of links to child pages). > - To get a menu page, truncate any URL to a parent path and append `.md` (e.g. `https://dev.wix.com/docs/sdk.md`, `https://dev.wix.com/docs/sdk/core-modules.md`). > - Top-level index of all portals: https://dev.wix.com/docs/llms.txt > - Full concatenated docs: https://dev.wix.com/docs/llms-full.txt ## Resource: Migrate from Velo to the SDK ## Article: Migrate from Velo to the SDK ## Article Link: https://dev.wix.com/docs/develop-websites/articles/coding-with-velo/develop-with-the-sdk/migrate-from-velo-to-the-sdk.md ## Article Content: # Migrate from Velo to the SDK You can now use the [Wix JavaScript SDK](https://dev.wix.com/docs/sdk.md) instead of the Velo API for most functionality when developing sites or building apps with Blocks. You are encouraged to start using the SDK in all new and ongoing development projects. Although your existing code written using the Velo API will continue to work, you may want to migrate that code to use the SDK. This article explains how to migrate your code for Velo APIs that have equivalent SDK modules. ## Step 1 | Identify what to migrate In many cases, the SDK version of a method works exactly the same as the Velo version and no further changes are necessary. However, in some cases the SDK method may work slightly differently. This is especially true if you were using an older version of a Velo API. If there are any differences, you will need to address them in your code. This usually means you need to pass different information when calling a method or handle the method’s response differently. Velo APIs fall into the following categories: **APIs that have equivalent SDK modules**: Migrate your code using the instructions in this article. **APIs that don't have equivalent SDK modules, but the SDK supports their functionality**: Rewrite your code using SDK modules that support the APIs' functionality. **APIs for which the SDK doesn't yet support their functionality**: Continue to use these Velo APIs alongside the SDK. To learn more about finding Velo APIs' functionality in the SDK and which Velo APIs you should continue to use, see [Velo to SDK API Mapping](https://dev.wix.com/docs/develop-websites/articles/coding-with-velo/develop-with-the-sdk/velo-to-sdk-api-mapping.md). ## Step 2 | Install packages The SDK is available through public npm packages. Each module in the SDK has its own package. 1. Determine which packages you need to install. Check the methods you use in the [SDK reference](https://dev.wix.com/docs/sdk.md) to see which packages you need. Each module’s introductory documentation specifies the package you need to install. 2. Install the packages you need using the [editor](https://dev.wix.com/docs/develop-websites/articles/coding-with-velo/packages/work-with-npm-packages-in-the-editor.md#install-an-npm-package) or the [Wix CLI for Sites](https://dev.wix.com/docs/develop-websites/articles/coding-with-velo/packages/work-with-npm-packages-with-the-wix-cli.md#install-an-npm-package). ## Step 3 | Adjust import statements As you need to import from the SDK package instead of from a Velo module, you need to adjust your existing import statements. For example to create a booking using Velo, you import `bookings` from `wix-bookings.v2`: ```javascript import { bookings } from 'wix-bookings.v2'; //... const booking = await bookings.createBooking(bookingInfo); ``` To create a booking using the SDK, you import `bookings` from `@wix/bookings`: ```javascript import { bookings } from '@wix/bookings'; //... const booking = await bookings.createBooking(bookingInfo); ``` In this case, you simply need to change the source of the import from `wix-bookings.v2` to `@wix/bookings`. ## See also - [SDK: About Site Development](https://dev.wix.com/docs/sdk/articles/get-started/about-site-development.md) - [Velo: About Using the SDK](https://dev.wix.com/docs/velo/articles/api-overview/about-using-the-sdk.md) - [Velo to SDK API Mapping](https://dev.wix.com/docs/develop-websites/articles/coding-with-velo/develop-with-the-sdk/velo-to-sdk-api-mapping.md) --- > Portal Navigation: > > - Append `.md` to any URL under `https://dev.wix.com/docs/` to get its markdown version. > - Pages are either content pages (article or reference text) or menu pages (a list of links to child pages). > - To get a menu page, truncate any URL to a parent path and append `.md` (e.g. `https://dev.wix.com/docs/sdk.md`, `https://dev.wix.com/docs/sdk/core-modules.md`). > - Top-level index of all portals: https://dev.wix.com/docs/llms.txt > - Full concatenated docs: https://dev.wix.com/docs/llms-full.txt ## Resource: Identities ## Article: Identities ## Article Link: https://dev.wix.com/docs/develop-websites/articles/coding-with-velo/authorization/identities.md ## Article Content: # About Identities When a method is called on your site or on a [custom dashboard page](https://dev.wix.com/docs/develop-websites/articles/coding-with-velo/frontend-code/dashboard-admin-pages/about-dashboard-pages.md), it is called by a specific identity. This identity represents the current site user who triggers the method call, regardless of whether the code making the call is in the frontend, the backend, or on a custom dashboard page. Some Velo methods are restricted based on which identities are authorized to call them. Authorization notes in the Velo API reference indicate when a method may be restricted by identity. If necessary, you can call such methods even when the current identity lacks permissions by using [elevation](https://dev.wix.com/docs/develop-websites/articles/coding-with-velo/authorization/elevation.md). > Note: Some methods may further restrict access by requiring that the calling identity has specific permissions granted through a role. You can use elevation to bypass these restrictions as well. The Velo API recognizes the following identities: - [Site visitor](#site-visitor) - [Site member](#site-member) - [Wix user](#wix-user) ## Site visitor Site visitors are visitors to a site who have not logged in. Methods that site visitors can call typically involve operations specific to their own experience on the site, such as: - Adding products to the current cart. - Creating a booking. - Copying text to the local clipboard. ## Site member Site members are visitors who have logged in. They can call all the same methods available to site visitors, plus additional methods that only apply to their site membership. Site members who are also [site owners or collaborators](https://support.wix.com/en/article/inviting-people-to-contribute-to-your-site) are also considered admins. Their admin status allows them to call certain administrative methods that other members cannot call, such as methods to work with the files in the site’s Media Manager. ## Wix user When interacting with the site dashboard, site owners or collaborators take on the Wix user identity. Although Wix users are the same people as site owners and collaborators, they assume different identities depending on context. As the dashboard is a secured admin area, Wix users can call methods with stricter authorization requirements in the dashboard. Examples of administrative methods Wix users can call in the dashboard include: - Adding products to a store. - Confirming or canceling bookings. - Approving new members. > Note: Although calls made from a published dashboard page are called with the authorization of a Wix user, those same calls made from a dashboard page being previewed in the editor are only called with the authorization of a site member admin. This means that calls which will work in your published dashboard page may not work when previewing the same dashboard page. ## See more - [About Elevation](https://dev.wix.com/docs/develop-websites/articles/coding-with-velo/authorization/elevation.md) - [Roles & Permissions](https://support.wix.com/en/article/roles-permissions-overview) - [elevate()](https://dev.wix.com/docs/velo/api-reference/wix-auth/elevate.md) --- > Portal Navigation: > > - Append `.md` to any URL under `https://dev.wix.com/docs/` to get its markdown version. > - Pages are either content pages (article or reference text) or menu pages (a list of links to child pages). > - To get a menu page, truncate any URL to a parent path and append `.md` (e.g. `https://dev.wix.com/docs/sdk.md`, `https://dev.wix.com/docs/sdk/core-modules.md`). > - Top-level index of all portals: https://dev.wix.com/docs/llms.txt > - Full concatenated docs: https://dev.wix.com/docs/llms-full.txt ## Resource: Elevation ## Article: Elevation ## Article Link: https://dev.wix.com/docs/develop-websites/articles/coding-with-velo/authorization/elevation.md ## Article Content: # About Elevation > **Note:** This article discusses elevation when developing websites, but the concepts and implementation are the same when [coding in Blocks](https://dev.wix.com/docs/build-apps/develop-your-app/develop-an-app-with-blocks/code-in-blocks/about-coding-in-blocks.md). Some Velo API methods are restricted based on the [identities](https://support.wix.com/en/article/roles-permissions-overview) and [roles](https://support.wix.com/en/article/roles-permissions-overview) authorized to call them. Elevation is a mechanism that allows you to call these restricted methods even when the calling identity lacks the necessary authorization. This process creates a temporary elevated version of a method by calling the elevate() method, enabling you to bypass the usual authentication checks that might otherwise restrict access. For example: ```javascript import { elevate } from "wix-auth"; import { someModule } from "wix-some-module"; //... const elevatedMethod = elevate(someModule.methodName); elevatedMethod(param1, param2); ``` ## Methods that may require elevation Methods can be restricted based on user [identity](https://dev.wix.com/docs/develop-websites/articles/coding-with-velo/authorization/identities.md) or [roles and permissions](https://support.wix.com/en/article/roles-permissions-overview). ### Identity restriction example An example of a method restricted by identity is the [`assignBadge()`](https://dev.wix.com/docs/velo/apis/wix-members-v2/badges/assign-badge.md) method. This method can only be called by [Wix users](https://dev.wix.com/docs/develop-websites/articles/coding-with-velo/authorization/identities.md#wix-user) because site members should not be able to assign badges to themselves. This means that `assignBadge()` can only be called without elevation in a published dashboard page, where the caller will have the Wix user identity. In all other cases, if you need to call `assignBadge()`, you must elevate it first. For example, you might want to automatically assign a badge to users who take some specific action or reach a predetermined milestone. Since the site members who earned the badge don’t have rights to assign it to themselves. In this case, you need to use elevation to assign the badge. ### Roles and permissions restriction example An example of a method restricted based on roles and permissions is the [`confirmBooking()`](https://dev.wix.com/docs/velo/apis/wix-bookings-v2/bookings/confirm-booking.md) method. This method can only be called by admin members with an administrative bookings role because users creating bookings should not be allowed to confirm their own bookings. If you need to call `confirmBooking()` on behalf of a user who does not have an administrative Bookings role, you must elevate it first. For example, you might have a specific service that you want to confirm automatically once a site visitor books it. Since site visitors who book the service don’t have permissions to confirm it themselves, you need to use elevation to confirm the booking. ## Security considerations Due to potential security risks, you can only elevate methods in backend code. While elevation offers flexibility, it’s crucial to consider how and when elevation is triggered. [Web methods](https://dev.wix.com/docs/velo/apis/wix-web-module/web-method.md) and [HTTP functions](https://dev.wix.com/docs/velo/velo-only-apis/wix-http-functions/introduction.md) are particularly vulnerable if not properly managed due to their open nature. Elevation in [backend events](https://dev.wix.com/docs/develop-websites/articles/coding-with-velo/backend-code/events/about-backend-events.md) or code only triggered from [scheduled jobs](https://dev.wix.com/docs/develop-websites/articles/workspace-tools/developer-tools/recurring-jobs/about-scheduling-recurring-jobs.md) presents less risk but should still be handled cautiously. ### Example To demonstrate how to properly handle elevation, consider a site that rewards frequent visitors with a special badge. To do so, the code needs to track recent member visits and call `assignBadge()` using elevation when a member has visited frequently enough. (Note that the code samples below have been simplified, removing error handling and other non-essential code.) Here is an example of an insecure approach to writing this code: ```javascript // Backend code in badges.web.js import { elevate } from "wix-auth"; import { Permissions, webMethod } from "wix-web-module"; import { badges } from "wix-members.v2"; export const assignBadge = webMethod( Permissions.Anyone, (badgeId, memberId) => { const elevatedAssignBadge = elevate(badges.assignBadge); return elevatedAssignBadge(badgeId, [memberId]); } ); export const isFrequentVisitor = webMethod(Permissions.Anyone, (memberId) => { // Query collection that tracks member visits, // determine if the specified member is a frequent visitor, // and return the result }); // Frontend code in masterPage.js import { assignBadge, isFrequentVisitor } from "backend/badges.web"; import { members } from "wix-members.v2"; const frequentVisitorBadgeId = "c705b8dd-aae2-4eea-a4d1-16f52421ec0a"; //... const currentMember = await members.getCurrentMember(); if (isFrequentVisitor(currentMember._id)) { assignBadge(frequentVisitorBadgeId, currentMember._id); } ``` There are several problems with the `assignBadge()` web method used in this approach: - It is open for anyone to call, even though only members can receive badges. - It doesn’t ensure that it will only assign the intended badge. - It doesn’t ensure that it will assign a badge to the currently logged in member. Because of these issues, this method can be called by a malicious user to assign any badge to any member. You can easily remedy these issues by being more careful about where you use elevation and how you expose it to be called. For example: ```javascript // In badges.web.js import { elevate } from 'wix-auth'; import { Permissions, webMethod } from "wix-web-module"; import { badges } from "wix-members.v2"; import { members } from 'wix-members.v2'; const assignFrequentVisitorBadge = webMethod( Permissions.Member, () => { const currentMember = await members.getCurrentMember(); if (isFrequentVisitor(currentMember.\_id)) { const frequentVisitorBadgeId = 'c705b8dd-aae2-4eea-a4d1-16f52421ec0a'; const elevatedAssignBadge = elevate(badges.assignBadge); return elevatedAssignBadge(frequentVisitorBadgeId, [memberId]); } } ) const isFrequentVisitor = (memberId) => { // Query collection that tracks member visits, // determine if the specified member is a frequent visitor, // and return the result } // masterPage.js import { assignFrequentVisitorBadge } from 'backend/badges.web'; //... assignFrequentVisitorBadge(); ``` In this approach, the following makes sure the elevation is not exploited by malicious users: - The ID of the badge to assign is specified in backend code. - The current user ID is retrieved in backend code. - The web method used to trigger the badge assignment has permissions set so it can only be called by site members. ## See more - [About Identities](https://dev.wix.com/docs/develop-websites/articles/coding-with-velo/authorization/identities.md) - [Roles & Permissions](https://support.wix.com/en/article/roles-permissions-overview) - [elevate()](https://dev.wix.com/docs/velo/apis/wix-auth/elevate.md) --- > Portal Navigation: > > - Append `.md` to any URL under `https://dev.wix.com/docs/` to get its markdown version. > - Pages are either content pages (article or reference text) or menu pages (a list of links to child pages). > - To get a menu page, truncate any URL to a parent path and append `.md` (e.g. `https://dev.wix.com/docs/sdk.md`, `https://dev.wix.com/docs/sdk/core-modules.md`). > - Top-level index of all portals: https://dev.wix.com/docs/llms.txt > - Full concatenated docs: https://dev.wix.com/docs/llms-full.txt ## Resource: JavaScript Support ## Article: JavaScript Support ## Article Link: https://dev.wix.com/docs/develop-websites/articles/coding-with-velo/java-script-velo/java-script-support.md ## Article Content: # About JavaScript Support Wix supports working in JavaScript to develop websites, as well as some special features, including: * Support for JavaScript features * Support for modules * Support for the JavaScript Fetch API * Sharing JavaScript code naturally between the backend and frontend using [web modules](https://support.wix.com/en/article/how-to-call-server-side-code-from-the-front-end) ## Supported IDEs You can work in JavaScript in: + The [editor](https://dev.wix.com/docs/develop-websites/articles/workspace-tools/velo-workspace/workspaces/wix-studio-working-with-the-code-panel.md) (Wix Studio and Wix Editor). + The [Wix IDE](https://dev.wix.com/docs/develop-websites/articles/workspace-tools/velo-workspace/wix-ide/wix-studio-about-the-wix-ide.md) (Wix Studio). + Your [local IDE](https://dev.wix.com/docs/develop-websites/articles/workspace-tools/developer-tools/git-integration-wix-cli-for-sites/about-git-integration-wix-cli-for-sites.md) (Wix Studio and Wix Editor). ## JavaScript feature support (ECMAScript 2020) Wix supports modern JavaScript features up through and including the [ES2020](https://tc39.es/ecma262/2020/) standard. You can use promises, async/await, and arrow functions, which were introduced with ES2017. Browsers are gradually adopting the ES2019 standard. Until these standards are fully implemented, we transpile your code into ES5, so it can run in current browsers. Wix supports [source maps](https://developer.mozilla.org/en-US/docs/Web/HTTP/Headers/SourceMap), so that even though the browser runs transpiled ES5 code, you can debug your ES2019 source code in your browser's developer tools.  ## Module support (ECMAScript 2015) Wix supports the native module functionality included in the ES2015 release of JavaScript. To use ES2015 module functionality, you need to follow the [ES2015 Module Syntax](https://developers.google.com/web/shows/ttt/series-2/es2015). Only those items specifically exported in a module are exposed to other files. All other items in your module are internal to the module only. For examples of how to use this functionality, see MDN's [JavaScript modules guide](https://developer.mozilla.org/en-US/docs/Web/JavaScript/Guide/Modules). > **Notes:** > - You can only export functions in files that are located in the Public or Backend sections of your site's code. You can't export functions from page or popup files. > - Certain module export formats are not supported in `events.js`, `data.js`, or `routers.js` files. For more information, see [Module Export Syntax for Backend Events, Data Hooks, and Routers](https://dev.wix.com/docs/develop-websites/articles/coding-with-velo/java-script-velo/module-export-syntax.md). ### Module scope The following is a list of guidelines that define how you can share modules and functions between, and within, the backend and public scopes: * A JavaScript file or script in backend can import a module from any file in backend or public. * A file in public can import a module from any file in public. * You can import functions from backend and use them in public, using a [web module](https://dev.wix.com/docs/develop-websites/articles/coding-with-velo/overview/where-do-i-put-my-code.md). * You can use relative paths to refer to files with the "." prefix. * You can import a module from backend with the _backend/_ prefix. * You can import a module from public with the _public/_ prefix. * Modules can import other modules. ## Wix Fetch [Wix Fetch](http://wix.to/94BuAAs/wix-fetch.html) is an implementation of the standard JavaScript Fetch API, and you work with it the same way, using standard Fetch syntax. You can look at [examples of using Fetch](https://github.com/github/fetch), or check out the [Standard Fetch specification](https://fetch.spec.whatwg.org/). Use Wix Fetch rather than the standard JavaScript Fetch API whenever you need an `http/s` request. You can use Wix Fetch in both backend and frontend code. To use Wix Fetch in your JavaScript code, add `import {fetch} from 'wix-fetch'` to the beginning of your JavaScript file. Among its benefits, Wix Fetch uses promises to handle asynchronous requests, which allows for easier handling of results and errors. ## See also + [Working with promises](https://dev.wix.com/docs/develop-websites/articles/coding-with-velo/java-script-velo/working-with-promises.md) + [About module export syntax](https://dev.wix.com/docs/develop-websites/articles/coding-with-velo/java-script-velo/module-export-syntax.md) --- > Portal Navigation: > > - Append `.md` to any URL under `https://dev.wix.com/docs/` to get its markdown version. > - Pages are either content pages (article or reference text) or menu pages (a list of links to child pages). > - To get a menu page, truncate any URL to a parent path and append `.md` (e.g. `https://dev.wix.com/docs/sdk.md`, `https://dev.wix.com/docs/sdk/core-modules.md`). > - Top-level index of all portals: https://dev.wix.com/docs/llms.txt > - Full concatenated docs: https://dev.wix.com/docs/llms-full.txt ## Resource: Working with Promises ## Article: Working with Promises ## Article Link: https://dev.wix.com/docs/develop-websites/articles/coding-with-velo/java-script-velo/working-with-promises.md ## Article Content: # About Promises > **Note:** This article is intended for coders with limited JavaScript experience, and serves as an introduction to this basic JavaScript content. Some of the code your write when developing your site is asynchronous code. Asynchronous code doesn't execute in the order it's written, unlike synchronous code. Instead, it returns a promise. A [promise](https://developer.mozilla.org/en-US/docs/Web/JavaScript/Guide/Using_promises) is an object that represents the eventual completion (or failure) of an asynchronous operation and its resulting value. While the promise is pending, synchronous code continues to run. When developing your website, there are some cases where you need to work with promises. For example: - [Calling backend functions](https://dev.wix.com/docs/develop-websites/articles/coding-with-velo/backend-code/web-modules/call-backend-code-from-a-jsw-web-module.md) from your page code. - Calling certain [APIs](https://dev.wix.com/docs/velo.md). Promises are a regular JavaScript concept, so it's easy to use AI chatbots or search engines to troubleshoot. ## Supported IDEs You can handle promises using: - The editor (Wix Studio and Wix Editor) - The Wix IDE (Wix Studio) - You local IDE (Wix Studio and Wix Editor) ## Handle a promise Handling a promise means telling your code to read and use the value of the promise only once its resolved value is known. This means the asynchronous code has finished running. At any given time, a promise has one of the following statuses: - **Pending**: The asynchronous code is still running. - **Fulfilled**/**resolved**: The asynchronous code has finished running and has successfully returned a value. - **Rejected**: The asynchronous code has finished running and has thrown an error. You can tell your code to expect a promise and to wait for the asynchronous code to finish running in the following ways: - [`async`/`await`](#asyncawait): Allows you to treat asynchronous code as if it's synchronous, meaning the next line of code won't run until the promise is resolved. - [`then()`](#then): Allows you to run other synchronous code while your asynchronous code is running. You have more control over when your code runs, but it's less readable. ## `async`/`await` The `async`/`await` syntax allows you to handle promises in a way that makes your asynchronous code appear synchronous. This can make your code more readable, as the next line of code won't run until the promise is resolved. ### Define asynchronous functions Asynchronous functions are functions that contain asynchronous code. An asynchronous function's return value is always a promise. To define a function as asynchronous, add `async` before the function declaration. For example: ```js async function myFunction () {} const myFunction = async () => {} ``` > **Note:** This method is not supported at the top level, because top level code is synchronous. Add `await` before the call to an asynchronous function to make your code wait for the function to resolve before moving on to the next line. For example: ```js const myPromiseValue = await myAsyncFunction(); ``` Then you can use the value of the resolved promise on the next line. For example: ```js async function myFunction () { const myPromiseValue = await myAsyncFunction(); console.log(myPromiseValue); } ``` ### Handle errors with `async`/`await` If your promise is rejected, something has gone wrong in the asynchronous code and you need to handle the error. Use the [`try...catch` block](https://developer.mozilla.org/en-US/docs/Web/JavaScript/Reference/Statements/try...catch) to handle errors. For example: ```js async function myFunction () { try { const myPromiseValue = await myAsyncFunction(); console.log(myPromiseValue); } catch (error) { console.log(error); } } ``` ## `then()` With the `then()` syntax, you can instruct your code to handle promises by running a function once the promise is resolved. For example: ```js asyncFunc().then((resolvedPromiseValue) => { // Do something with resolvedPromiseValue. console.log(resolvedPromiseValue); }) ``` ### Handle `then()` return value If you return a value in the function passed to `then()`, that value is always a promise. For example: ```js const returnValue = asyncFunc().then((resolvedPromiseValue) => { return 'The value of the resolved promise is: ' + resolvedPromiseValue; }) // returnValue is a promise. ``` You can handle this promise in the same way as any other promise: - Use `async`/`await` to use the value synchronously in your code. For example: ```js async function myFunction () { const secondPromiseValue = await firstAsyncFunc() .then((firstPromiseValue) => { return secondAsyncFunc(firstPromiseValue); }) console.log(secondPromiseValue); } ``` - Chain `then()` methods. For example: ```js firstAsyncFunc() .then((firstPromiseValue) => { return secondAsyncFunc(firstPromiseValue); }) .then((secondPromiseValue) => { console.log(secondPromiseValue) }) ``` Both of the above examples log the same value to the console. ### Handle errors with `then()` If your promise is rejected, then something has gone wrong in the asynchronous code and you need to handle the error. Use the [`catch()` method](https://developer.mozilla.org/en-US/docs/Web/JavaScript/Reference/Global_Objects/Promise/catch) to handle errors: ```js myAsyncFunction() .then((myPromiseValue) => { console.log(myPromiseValue); }).catch((error) => { console.log(error); }) ``` ## Handle multiple promises simultaneously Waiting for multiple promises to be fulfilled before the execution of some code is supported. You can run multiple asynchronous functions and wait for their promises simultaneously using the [`Promise.all()`](https://developer.mozilla.org/en-US/docs/Web/JavaScript/Reference/Global_Objects/Promise/all) method. It accepts multiple promises in an array, and returns an array of resolved values. If any of the promises are rejected, the method throws an error. For example: ```js Promise.all([promise1, promise2, promise3]).then((values) => { console.log(values); // Expected output: [ // promise1ResolvedValue, // promise2ResolvedValue, // promise3ResolvedValue // ] }); ``` --- > Portal Navigation: > > - Append `.md` to any URL under `https://dev.wix.com/docs/` to get its markdown version. > - Pages are either content pages (article or reference text) or menu pages (a list of links to child pages). > - To get a menu page, truncate any URL to a parent path and append `.md` (e.g. `https://dev.wix.com/docs/sdk.md`, `https://dev.wix.com/docs/sdk/core-modules.md`). > - Top-level index of all portals: https://dev.wix.com/docs/llms.txt > - Full concatenated docs: https://dev.wix.com/docs/llms-full.txt ## Resource: Module Export Syntax ## Article: Module Export Syntax ## Article Link: https://dev.wix.com/docs/develop-websites/articles/coding-with-velo/java-script-velo/module-export-syntax.md ## Article Content: # Module Export Syntax Wix supports working in JavaScript to develop websites, as well as [support for modules](https://dev.wix.com/docs/develop-websites/articles/coding-with-velo/java-script-velo/java-script-support.md#module-support-ecmascript-2015). This allows you to export modules from your code files and import them into your other code files. This article explains the supported syntax for exporting modules. ## Supported IDEs You can export modules in: + The [editor](https://dev.wix.com/docs/develop-websites/articles/workspace-tools/velo-workspace/workspaces/wix-studio-working-with-the-code-panel.md) (Wix Studio and Wix Editor). + The [Wix IDE](https://dev.wix.com/docs/develop-websites/articles/workspace-tools/velo-workspace/wix-ide/wix-studio-about-the-wix-ide.md) (Wix Studio). + Your [local IDE](https://dev.wix.com/docs/develop-websites/articles/workspace-tools/developer-tools/git-integration-wix-cli-for-sites/about-git-integration-wix-cli-for-sites.md) (Wix Studio and Wix Editor). ## Supported syntax When exporting functions in the following files, use the standard export syntax contained in the documentation's code examples: + [`events.js`](https://dev.wix.com/docs/develop-websites/articles/coding-with-velo/backend-code/events/about-backend-events.md) + [`data.js`](https://dev.wix.com/docs/develop-websites/articles/databases/wix-data/hooks/using-data-hooks.md) + [`routers.js`](https://dev.wix.com/docs/develop-websites/articles/coding-with-velo/routers/about-routers.md) + [Service plugin code files](https://dev.wix.com/docs/develop-websites/articles/coding-with-velo/integrations/service-plugins-formerly-spis/about-service-plugins.md) You can also use other export formats that are part of the [ES6 (ES2015) module export syntax](https://developer.mozilla.org/en-US/docs/web/javascript/reference/statements/export). However, the following export formats are **not** supported in `events.js`, `data.js`, `routers.js`, or service plugin code files: + **Re-exporting a function:** Directly re-exporting a function imported from an npm or Velo package. For example, this **doesn't** work: ```javascript import { myFunction } from 'myPackage'; export const wixMediaManager_onFileUploaded = myFunction; ``` The following alternative syntax **is** supported: ```javascript import { myFunction } from 'myPackage'; export const wixMediaManager_onFileUploaded = (paramA, paramB) => myFunction(paramA, paramB); ``` + **Dynamic exports:** Exports including a dynamic operation or expression that requires execution to resolve. For example, this **doesn't** work: ```javascript import myPackage from 'myPackage'; export const myRouter_Router = myPackage.router((paramA, paramB) => { // ... }); ``` The following alternative syntax **is** supported: ```javascript import myPackage from 'myPackage'; const functionForExport = myPackage.router((paramA, paramB) => { // ... }) export const myRouter_Router = (paramA, paramB) => functionForExport(paramA, ParamB); ``` + **Exports wrapped in objects:** Exports where functions are defined as properties of an object. For example, this **doesn't** work: ```javascript const dataHooks = { beforeInsert: (paramA, paramB) => { // ... } }; export const MyCollection_beforeInsert = dataHooks.beforeInsert; ``` The following alternative syntax **is** supported: ```javascript const dataHooks = { beforeInsert: (paramA, paramB) => { // ... } }; export const MyCollection_beforeInsert = (paramA, paramB) => dataHooks.beforeInsert(paramA, paramB); ``` + **CommonJS exports:** Exports in the CommonJS (CJS) format that preceded ES6 (ES2015). For example, this **doesn't** work: ```javascript module.exports = { MyCollection_beforeInsert: () => {} }; ``` ## See also + [About JavaScript support](https://dev.wix.com/docs/develop-websites/articles/coding-with-velo/java-script-velo/java-script-support.md) --- > Portal Navigation: > > - Append `.md` to any URL under `https://dev.wix.com/docs/` to get its markdown version. > - Pages are either content pages (article or reference text) or menu pages (a list of links to child pages). > - To get a menu page, truncate any URL to a parent path and append `.md` (e.g. `https://dev.wix.com/docs/sdk.md`, `https://dev.wix.com/docs/sdk/core-modules.md`). > - Top-level index of all portals: https://dev.wix.com/docs/llms.txt > - Full concatenated docs: https://dev.wix.com/docs/llms-full.txt ## Resource: About Event Handlers in Wix ## Article: Reacting to User Actions Using Events ## Article Link: https://dev.wix.com/docs/develop-websites/articles/coding-with-velo/frontend-code/about-event-handlers-in-wix.md ## Article Content: # About Event Handlers in Wix Event handlers in Wix work differently than in traditional web development. Normally, you would use `addEventListener()` to add event handlers, selecting DOM elements with methods like `getElementById()` or `querySelector()`. For example, you might write: ```js document.getElementById("myButton").addEventListener("click", function() { console.log("Button clicked!"); }); ``` In Wix, however, you don’t access the DOM directly. Instead, you use the [$w API](https://dev.wix.com/docs/velo/api-reference/$w/introduction.md) to interact with elements in the Wix editor and add event handlers, like this: ```js $w('#myButton').onClick(() => { console.log('Button clicked!'); }); ``` ## Supported IDEs You can use event handlers in the following IDEs: + The [editor](https://dev.wix.com/docs/develop-websites/articles/workspace-tools/velo-workspace/workspaces/wix-studio-working-with-the-code-panel.md) (Wix Studio and Wix Editor). + The [Wix IDE](https://dev.wix.com/docs/develop-websites/articles/workspace-tools/velo-workspace/wix-ide/wix-studio-about-the-wix-ide.md) (Wix Studio). + Your [local IDE](https://dev.wix.com/docs/develop-websites/articles/workspace-tools/developer-tools/git-integration-wix-cli/about-git-integration-wix-cli/about-git-integration-wix-cli.md) (Wix Studio and Wix Editor).
Important: Wix event handlers are now dynamic. While [static event handlers](https://dev.wix.com/docs/develop-websites/articles/coding-with-velo/frontend-code/about-static-event-handlers.md) are still supported for existing sites, we recommend using dynamic event handlers for new development and when updating existing code.
## See also + [Add an Event Handler](https://dev.wix.com/docs/develop-websites/articles/coding-with-velo/frontend-code/add-an-event-handler.md). + [Where Do I Put My Code?](https://dev.wix.com/docs/develop-websites/articles/coding-with-velo/overview/where-do-i-put-my-code.md) --- > Portal Navigation: > > - Append `.md` to any URL under `https://dev.wix.com/docs/` to get its markdown version. > - Pages are either content pages (article or reference text) or menu pages (a list of links to child pages). > - To get a menu page, truncate any URL to a parent path and append `.md` (e.g. `https://dev.wix.com/docs/sdk.md`, `https://dev.wix.com/docs/sdk/core-modules.md`). > - Top-level index of all portals: https://dev.wix.com/docs/llms.txt > - Full concatenated docs: https://dev.wix.com/docs/llms-full.txt ## Resource: Add An Event Handler ## Article: Add An Event Handler ## Article Link: https://dev.wix.com/docs/develop-websites/articles/coding-with-velo/frontend-code/add-an-event-handler.md ## Article Content: # Add an Event Handler You can add [dynamic event handlers](https://dev.wix.com/docs/develop-websites/articles/coding-with-velo/frontend-code/about-event-handlers-in-wix.md) to elements on your site. To add an event handler to an element, you can either: + Write the code for the event handler directly in your page code. + Use the Properties & Events panel in the Wix editor to generate the event handler for you. ## Add an event handler directly in your code Write the event handler in your page code, either outside or inside the page’s [`onReady()`](https://dev.wix.com/docs/velo/api-reference/$w/on-ready.md) function. Access your page code files based on your setup: + **Editor:** Select the Page Code tab in the code panel. + **Local IDE when using [Git integration](https://dev.wix.com/docs/develop-websites/articles/workspace-tools/developer-tools/git-integration-wix-cli/about-git-integration-wix-cli/.md):** Locate your site repo's `src` folder. + **[Wix IDE](https://dev.wix.com/docs/develop-websites/articles/workspace-tools/velo-workspace/wix-ide/wix-studio-about-the-wix-ide.md) (Wix Studio):** Use the `src` folder. Sample event handler: ```js $w('#myButton').onClick((event) => { console.log('Button was clicked!'); $w('#myText').text = 'Hello, World!'; }); ``` You can add or modify event handlers dynamically in your code as needed, for example, `$w('#myElement').myHandlerFunction()`. ## Add an event handler using the Property & Events panel To generate an event handler in the editor using the Properties & Events panel: 1. In the editor, select the element you want to add an event handler to. 2. In the Properties & Events panel, click the event you want to handle. For example, **onClick()** or **onMouseIn()**. 3. The page code will display a new event handler in the code editor: ```js $w('#myButton').onClick((event) => { }); ``` 4. Inside the body of the event handler, add the code you want to execute when the event occurs. For example: ```js $w('#myButton').onClick((event) => { console.log('Button was clicked!'); $w('#myText').text = 'Hello, World!'; }); ``` > **Note:** > > When you add an event handler using the Properties & Events panel, the event handler code is placed outside the `onReady()` function. You can then move the generated code snippet to any location. For a complete list of supported event handlers for each element type, see the [Wix API Reference](https://dev.wix.com/docs/velo/api-reference/$w/introduction.md). ## See also + [About Event Handlers in Wix](https://dev.wix.com/docs/develop-websites/articles/coding-with-velo/frontend-code/about-event-handlers-in-wix.md). + [About the Properties & Events Panel](https://dev.wix.com/docs/develop-websites/articles/workspace-tools/velo-workspace/properties-events-panel/about-the-properties-events-panel.md). --- > Portal Navigation: > > - Append `.md` to any URL under `https://dev.wix.com/docs/` to get its markdown version. > - Pages are either content pages (article or reference text) or menu pages (a list of links to child pages). > - To get a menu page, truncate any URL to a parent path and append `.md` (e.g. `https://dev.wix.com/docs/sdk.md`, `https://dev.wix.com/docs/sdk/core-modules.md`). > - Top-level index of all portals: https://dev.wix.com/docs/llms.txt > - Full concatenated docs: https://dev.wix.com/docs/llms-full.txt ## Resource: About Static Event Handlers ## Article: About Static Event Handlers ## Article Link: https://dev.wix.com/docs/develop-websites/articles/coding-with-velo/frontend-code/about-static-event-handlers.md ## Article Content: # About Static Event Handlers
Deprecation Notice: This feature is deprecated but will continue to work as expected. Switch to [dynamic event handlers](https://dev.wix.com/docs/develop-websites/articles/coding-with-velo/frontend-code/add-an-event-handler.md) for your current and future projects. Unlike static event handlers, dynamic event handlers can be added or removed using methods like `$w('#myButton').onClick()`. While static event handlers are still supported for existing sites, we recommend using dynamic event handlers going forward.
A static event handler is predefined and is linked to a specific event. The function can’t be dynamically modified or removed programmatically during execution. **Sample static event handler:** ```js export function myButton_click(event) { console.log('Button clicked'); } ``` ## Migrate from static to dynamic event handlers To migrate a static event handler to a dynamic one: 1. Open the Properties & Events panel for the element with the static event handler. 2. Find the event you want to migrate and click the yellow lightning bolt icon next to the event handler name. 3. Click the **Migrate [eventName] event** link that appears. After migration, your code updates from the old static format to the new dynamic format. For example: **Old format:** ```js export function myButton_click(event) { // Existing code } ``` **New format:** ```js $w('#myButton').onClick((event) => { // Existing code }); ``` ## Delete a static event handler You can no longer use the Properties & Events panel to delete static event handlers. To delete a static event handler, delete the generated code from the page code file. ## See also + [About Event Handlers in Wix](https://dev.wix.com/docs/develop-websites/articles/coding-with-velo/frontend-code/about-event-handlers-in-wix.md). + [Add an Event Handler](https://dev.wix.com/docs/develop-websites/articles/coding-with-velo/frontend-code/add-an-event-handler.md). + [About the Properties & Events Panel](https://dev.wix.com/docs/develop-websites/articles/workspace-tools/velo-workspace/properties-events-panel/working-with-the-properties-events-panel.md). --- > Portal Navigation: > > - Append `.md` to any URL under `https://dev.wix.com/docs/` to get its markdown version. > - Pages are either content pages (article or reference text) or menu pages (a list of links to child pages). > - To get a menu page, truncate any URL to a parent path and append `.md` (e.g. `https://dev.wix.com/docs/sdk.md`, `https://dev.wix.com/docs/sdk/core-modules.md`). > - Top-level index of all portals: https://dev.wix.com/docs/llms.txt > - Full concatenated docs: https://dev.wix.com/docs/llms-full.txt ## Resource: About CSS Styling ## Article: About CSS Styling ## Article Link: https://dev.wix.com/docs/develop-websites/articles/coding-with-velo/frontend-code/custom-css/about-css-styling.md ## Article Content: # About CSS Styling CSS allows you to customize the appearance of your website, from colors and fonts to sizes and positions of different elements. You can even add design elements that aren’t yet available in the editor. For example, you can: - Create a blur filter and apply it to any element in your site. - Use mix-blend-mode properties to combine different elements. - Add a gradient color effect to text. ## Supported IDEs You can customize the CSS using: - The [editor](https://dev.wix.com/docs/develop-websites/articles/workspace-tools/velo-workspace/workspaces/wix-studio-working-with-the-code-panel.md) (Wix Studio). - The [Wix IDE](https://dev.wix.com/docs/develop-websites/articles/workspace-tools/velo-workspace/wix-ide/wix-studio-about-the-wix-ide.md) (Wix Studio). - Your [local IDE](https://dev.wix.com/docs/develop-websites/articles/workspace-tools/developer-tools/git-integration-wix-cli-for-sites/about-git-integration-wix-cli-for-sites.md) (Wix Studio). ## Classes Classes group elements on your site together to easily apply the same styling to all the instances of that group. You can apply custom CSS styling to a global class, semantic class, or custom class. ### Global classes Global classes are built-in and made available to your site. Applying a style to a global class will affect the CSS styling of elements of that class globally, throughout your site. To get started, see the [list of available classes](https://dev.wix.com/docs/velo/api-reference/$w/styling-elements-with-css.md#api-reference_$w_available-classes). ### Semantic classes Most global classes are divided into more specific semantic classes to customize individual aspects. For example, you can apply a custom style to all buttons with `.button` or only apply a style to the label text of a button with `.button__label`. See the [documentation of each element](https://dev.wix.com/docs/velo/api-reference/$w/styling-elements-with-css.md#api-reference_$w_available-classes) for specific information on supported semantic classes. ### Custom classes In addition to the built-in, global classes you can also create your own custom classes and apply CSS styling to just those. For example, you may want to apply a certain animation style to all subscribe buttons throughout your site, but not to all buttons in general. To do so, you can create a custom class called `.button--subscribe` and add custom styling for all elements that you add this class to. ## See also - [Apply custom CSS styling](https://dev.wix.com/docs/develop-websites/articles/coding-with-velo/frontend-code/custom-css/apply-custom-css-styling.md) - For further information on CSS styling options, refer to the [MDN CSS reference docs](https://developer.mozilla.org/en-US/docs/Learn/CSS). - [Wix Studio webinar: Enhance your designs with CSS editing](https://www.youtube.com/watch?v=xynm4m83CqM) --- > Portal Navigation: > > - Append `.md` to any URL under `https://dev.wix.com/docs/` to get its markdown version. > - Pages are either content pages (article or reference text) or menu pages (a list of links to child pages). > - To get a menu page, truncate any URL to a parent path and append `.md` (e.g. `https://dev.wix.com/docs/sdk.md`, `https://dev.wix.com/docs/sdk/core-modules.md`). > - Top-level index of all portals: https://dev.wix.com/docs/llms.txt > - Full concatenated docs: https://dev.wix.com/docs/llms-full.txt ## Resource: Apply Custom CSS Styling ## Article: Apply Custom CSS Styling ## Article Link: https://dev.wix.com/docs/develop-websites/articles/coding-with-velo/frontend-code/custom-css/apply-custom-css-styling.md ## Article Content: # Apply Custom CSS Styling You can apply custom [CSS styling](https://dev.wix.com/docs/develop-websites/articles/coding-with-velo/frontend-code/custom-css/about-css-styling.md) to any supported element in your site. ## Step 1 | Add the global.css file The way that you add the `global.css` file depends on the IDE you’re using. ### Editor (Wix Studio) 1. Go to the **Page Code** section of the code panel. 2. In the **CSS** section, click **+ Add global.css**. ### Wix IDE or your local IDE Add a `global.css` file to the `src/styles` folder. ## Step 2 | (Optional) Add a custom class to your site In addition to the [available classes](https://dev.wix.com/docs/velo/api-reference/$w/styling-elements-with-css.md#api-reference_$w_available-classes) you can add a new class to any supported element. You can add new custom classes with code or with the editor: ### Code Add one or more classes to the element with the `add()` function: ```javascript $w("#myElement").customClassList.add("className1", "className2"); ``` ### Editor (Wix Studio) 1. Select an element. 2. In the CSS Classes panel, type your custom class in the Custom classes field: ![custom classes panel in editor](https://wixmp-833713b177cebf373f611808.wixmp.com/images/d8f840d04075e4169aee11d653dc1dfb.png) ## Step 3 | Apply custom styles to your class In the [`global.css` file](#step-1–add-the-global-css-file) add custom CSS styles to apply. For example: ```css .accordion { text-transform: capitalize; color: yellow; } .button--subscribe { background: linear-gradient(to bottom right, red, yellow); } ``` You can also use [site theme CSS variables](https://dev.wix.com/docs/develop-websites/articles/coding-with-velo/frontend-code/custom-css/site-theme-css-variables.md) to apply your site's theme colors and fonts to your class. For example: ```css .container { background-color: var(--wst-color-fill-background-primary); ``` ## See also - [About CSS styling](https://dev.wix.com/docs/develop-websites/articles/coding-with-velo/frontend-code/custom-css/about-css-styling.md) - [Webinar: Enhance your designs with CSS editing](https://www.wix.com/studio/academy/webinars/enhance-your-designs-with-css-editing) - For specific examples of available classes, refer to the [API documentation](https://dev.wix.com/docs/velo/api-reference/$w/styling-elements-with-css.md#api-reference_$w_available-classes). - For further information on CSS styling options, refer to the [MDN CSS reference docs](https://developer.mozilla.org/en-US/docs/Learn/CSS). --- > Portal Navigation: > > - Append `.md` to any URL under `https://dev.wix.com/docs/` to get its markdown version. > - Pages are either content pages (article or reference text) or menu pages (a list of links to child pages). > - To get a menu page, truncate any URL to a parent path and append `.md` (e.g. `https://dev.wix.com/docs/sdk.md`, `https://dev.wix.com/docs/sdk/core-modules.md`). > - Top-level index of all portals: https://dev.wix.com/docs/llms.txt > - Full concatenated docs: https://dev.wix.com/docs/llms-full.txt ## Resource: Site Theme CSS Variables ## Article: Site Theme CSS Variables ## Article Link: https://dev.wix.com/docs/develop-websites/articles/coding-with-velo/frontend-code/custom-css/site-theme-css-variables.md ## Article Content: # Site Theme CSS Variables ## CSS Variable Reference Wix exposes a comprehensive set of CSS variables for each of your site's theme colors and fonts. You can use these variables when applying custom [CSS styling](https://dev.wix.com/docs/develop-websites/articles/coding-with-velo/frontend-code/custom-css/about-css-styling.md) to supported element in your site. These variables represent the site's color and typography styles, enabling dynamic and consistent design across all components. Use this reference to identify and apply the correct variables for colors and fonts in your code. ## Color theme ### General | Style | CSS Variable | |---------------------|------------------------------------------| | Primary background | `--wst-color-fill-background-primary` | | Secondary background| `--wst-color-fill-background-secondary` | | Lines and dividers | `--wst-color-line` | ### Text | Style | CSS Variable | |---------------------|------------------------------------------| | Title | `--wst-color-title` | | Subtitle | `--wst-color-subtitle` | | Body text | `--wst-color-text-primary` | | Secondary text | `--wst-color-text-secondary` | | Links and actions | `--wst-color-action` | | Disabled actions | `--wst-color-disabled` | ### Buttons #### Primary button | Style | CSS Variable | |------------------------------|-----------------------------------------------| | Fill (Regular) | `--wst-button-color-fill-primary` | | Border (Regular) | `--wst-button-color-border-primary` | | Text (Regular) | `--wst-button-color-text-primary` | | Fill (Hover) | `--wst-button-color-fill-primary-hover` | | Border (Hover) | `--wst-button-color-border-primary-hover` | | Text (Hover) | `--wst-button-color-text-primary-hover` | | Fill (Disabled) | `--wst-button-color-fill-primary-disabled` | | Border (Disabled) | `--wst-button-color-border-primary-disabled` | | Text (Disabled) | `--wst-button-color-text-primary-disabled` | #### Secondary button | Style | CSS Variable | |------------------------------|-----------------------------------------------| | Fill (Regular) | `--wst-button-color-fill-secondary` | | Border (Regular) | `--wst-button-color-border-secondary` | | Text (Regular) | `--wst-button-color-text-secondary` | | Fill (Hover) | `--wst-button-color-fill-secondary-hover` | | Border (Hover) | `--wst-button-color-border-secondary-hover` | | Text (Hover) | `--wst-button-color-text-secondary-hover` | | Fill (Disabled) | `--wst-button-color-fill-secondary-disabled` | | Border (Disabled) | `--wst-button-color-border-secondary-disabled`| | Text (Disabled) | `--wst-button-color-text-secondary-disabled` | #### Theme Colors | Style | CSS Variable | |-----------------------|-----------------------------------| | Base 1 | `--wst-color-fill-base-1` | | Base 2 | `--wst-color-fill-base-2` | | Shade 1 | `--wst-color-fill-base-shade-1` | | Shade 2 | `--wst-color-fill-base-shade-2` | | Shade 3 | `--wst-color-fill-base-shade-3` | | Accent 1 | `--wst-color-fill-accent-1` | | Accent 2 | `--wst-color-fill-accent-2` | | Accent 3 | `--wst-color-fill-accent-3` | | Accent 4 | `--wst-color-fill-accent-4` | ## Font theme | Style | CSS Variable | |-------------------------------------|--------------------------------| | Heading 1 titles (reserved for page titles) | `--wst-font-style-h1` | | Heading 2 titles (recommended) | `--wst-font-style-h2` | | Heading 3 titles | `--wst-font-style-h3` | | Heading 4 titles | `--wst-font-style-h4` | | Heading 5 titles | `--wst-font-style-h5` | | Heading 6 titles | `--wst-font-style-h6` | | Large body text (paragraph 1) | `--wst-font-style-body-large` | | Medium body text (paragraph 2; recommended) | `--wst-font-style-body-medium`| | Small body text (paragraph 3) | `--wst-font-style-body-small` | --- > Portal Navigation: > > - Append `.md` to any URL under `https://dev.wix.com/docs/` to get its markdown version. > - Pages are either content pages (article or reference text) or menu pages (a list of links to child pages). > - To get a menu page, truncate any URL to a parent path and append `.md` (e.g. `https://dev.wix.com/docs/sdk.md`, `https://dev.wix.com/docs/sdk/core-modules.md`). > - Top-level index of all portals: https://dev.wix.com/docs/llms.txt > - Full concatenated docs: https://dev.wix.com/docs/llms-full.txt ## Resource: About Dashboard Pages ## Article: Working with Dashboard Pages ## Article Link: https://dev.wix.com/docs/develop-websites/articles/coding-with-velo/frontend-code/dashboard-admin-pages/about-dashboard-pages.md ## Article Content: # About Dashboard Pages Dashboard pages are pages you create in the editor that only appear on your site’s [dashboard](https://support.wix.com/en/article/wix-dashboard-overview). With dashboard pages, you can create a custom back office allowing you and your [collaborators](https://support.wix.com/en/article/roles-permissions-overview) to efficiently manage your business operations and live database content. Only you and your collaborators can access your dashboard pages. For example, let's say you have a real estate site and have added collaborators to your site. The image below depicts a dashboard page that lists the properties for sale.
You can create several dashboard pages to help you and your collaborators manage your property listings such as: - An upload form for adding new property listings. - A form to simplify making changes to the information about different properties. - A page that lists all of the properties in your live database with search capabilities. - A page that lists all new properties added by form for review before displaying them on your live site. - A page where each collaborator can see the properties they manage. ## Supported IDEs You create dashboard pages in the editor (Wix Studio and Wix Editor). You can view and access any dashboard pages created in the editor when using other IDEs, such as the Local IDE. The IDEs synchronize with the editor to ensure consistency. To add functionality to your dashboard page, add your code to the dashboard's page code file in: - The [Code editor](https://dev.wix.com/docs/develop-websites/articles/workspace-tools/velo-workspace/code-editor-ide/working-in-the-code-editor.md#velo-working-in-the-code-editor) - The [Wix IDE](https://dev.wix.com/docs/develop-websites/articles/workspace-tools/velo-workspace/wix-ide/wix-studio-about-the-wix-ide.md) - Your [local IDE](https://dev.wix.com/docs/develop-websites/articles/workspace-tools/developer-tools/git-integration-wix-cli-for-sites/about-git-integration-wix-cli-for-sites.md) ## Before you begin Before you begin, it's important to note the following: - Dashboard pages appear in your dashboard only after you publish your site. - Site visitors can't access your dashboard pages. However, the underlying page code for a dashboard page is publicly visible. ## Differences between dashboard pages and regular pages Dashboard pages support the same functionality and share most settings with any other page on your site, including the look and feel, with the following exceptions: - They don't have headers or footers. - For sites that include a Members Area, the login bar doesn't appear. - They don't appear in your site menu. - You can't convert a regular page to a dashboard page or a dashboard page to a regular page, but you can convert a dashboard page to a dynamic page. ## Linking to and from dashboard pages When you link to a dashboard page from a regular page or your site's menu, only collaborators are redirected to the dashboard page in your dashboard. All other site visitors are directed to a login page instead. When you link to a regular page from a dashboard page, the regular page opens in your dashboard unless you set the link to open in a new page. ## See also - [Add a Dashboard Page](https://dev.wix.com/docs/develop-websites/articles/coding-with-velo/frontend-code/dashboard-admin-pages/add-a-dashboard-page.md) - [wix-dashboard API](https://dev.wix.com/docs/velo/api-reference/wix-dashboard/introduction.md) --- > Portal Navigation: > > - Append `.md` to any URL under `https://dev.wix.com/docs/` to get its markdown version. > - Pages are either content pages (article or reference text) or menu pages (a list of links to child pages). > - To get a menu page, truncate any URL to a parent path and append `.md` (e.g. `https://dev.wix.com/docs/sdk.md`, `https://dev.wix.com/docs/sdk/core-modules.md`). > - Top-level index of all portals: https://dev.wix.com/docs/llms.txt > - Full concatenated docs: https://dev.wix.com/docs/llms-full.txt ## Resource: Add a Dashboard Page ## Article: Add a Dashboard Page ## Article Link: https://dev.wix.com/docs/develop-websites/articles/coding-with-velo/frontend-code/dashboard-admin-pages/add-a-dashboard-page.md ## Article Content: # Add a Dashboard Page [Dashboard pages](#LINK-PLACEHOLDER) allow you to create a custom back office for you and your [collaborators](https://support.wix.com/en/article/roles-permissions-overview) to efficiently manage your business operations and dynamic content. You can add functionality to your dashboard pages using the [Wix Dashboard API](https://dev.wix.com/docs/velo/api-reference/wix-dashboard/introduction.md), allowing your code to interact with the dashboard environment. > **Note:** In your local IDE, run `wix dev` to open the editor to add a dashboard page to your site. ## Add a dashboard page to your site Dashboard pages can only be added to your site in the editor and can be viewed in your site's dashboard after publishing your site. **Add a dashboard page in Wix Studio** 1. Click the **Pages** ![pages icon](https://wixmp-833713b177cebf373f611808.wixmp.com/images/200b9d74a1d550b51058678b2df28b0b.png) icon on the left sidebar. 1. Click the **Add New Page** ![add page](https://wixmp-833713b177cebf373f611808.wixmp.com/images/2c36935a6e84dbf551dc5f7301ae6bc3.png) icon and then click **Add** under Dashboard Page.
If the **Introducing Dashboard Pages** panel appears, click **Add Dashboard Page**. 1. Find your new dashboard page in the **Dashboard Pages tab**. 1. Click on the **More Actions** ![show more](https://wixmp-833713b177cebf373f611808.wixmp.com/images/506abdf364c2f86a8f34670cbcac015b.png) icon and then select **Rename** to give your new page a name.
1. Use Wix elements, datasets, and code to build your dashboard pages. 1. Publish your site. 1. Navigate to the dashboard to see your page. **Add a dashboard page in Wix Editor** 1. Click **Add** on the left side of the editor. 1. Click **Page** and then click the add ![add page](https://wixmp-833713b177cebf373f611808.wixmp.com/images/9048bd9c78a9635f34d1875af5d678d8.png) icon next to the **Dashboard Page**.
This action opens the **Site Pages and Menu** tab. If the **Introducing Dashboard Pages** panel appears, click **Add Dashboard Page**. 1. In the **Dashboard Pages** panel, give your new page a name.
1. Use Wix elements, datasets, and code to build your dashboard pages. 1. Publish your site. 1. Navigate to the dashboard to see your page. ## Add functionality to your dashboard page Use the [Wix Dashboard API](https://dev.wix.com/docs/velo/api-reference/wix-dashboard/introduction.md) to interact with your dashboard pages, such as displaying toast notifications or navigating users to other pages in the dashboard. To use the Wix Dashboard API, import the relevant functions from `wix-dashboard`: ```js import { } from 'wix-dashboard'; ``` The code example below displays a toast notification at the top of the dashboard page after a product is updated: ```js import { showToast } from "wix-dashboard"; $w.onReady(function () { $w("#updateButton").onClick(() => { const config = { message: "Product updated successfully!", type: "success", }; showToast(config); }); }); ``` ## See also - [About Dashboard Pages](https://dev.wix.com/docs/develop-websites/articles/coding-with-velo/frontend-code/dashboard-admin-pages/about-dashboard-pages.md) - [wix-dashboard API](https://dev.wix.com/docs/velo/api-reference/wix-dashboard/introduction.md) --- > Portal Navigation: > > - Append `.md` to any URL under `https://dev.wix.com/docs/` to get its markdown version. > - Pages are either content pages (article or reference text) or menu pages (a list of links to child pages). > - To get a menu page, truncate any URL to a parent path and append `.md` (e.g. `https://dev.wix.com/docs/sdk.md`, `https://dev.wix.com/docs/sdk/core-modules.md`). > - Top-level index of all portals: https://dev.wix.com/docs/llms.txt > - Full concatenated docs: https://dev.wix.com/docs/llms-full.txt ## Resource: Building a Mobile Site with Code ## Article: Writing Code That Only Runs on Mobile Devices ## Article Link: https://dev.wix.com/docs/develop-websites/articles/coding-with-velo/frontend-code/mobile/building-a-mobile-site-with-code.md ## Article Content: # About Building a Mobile Site with Code When you build a site, Wix automatically creates a mobile version. Wix resizes your site's content to fit mobile screens and hides any elements from the desktop editor that aren't optimized for mobile. You can customize the mobile version of your site by: - Writing code to change the site’s behavior when a site visitor views it on a mobile device or tablet. For example, you can show text on the desktop when hovering over an element. But this functionality is not available on a mobile device. Instead, you can show the text when tapping. - Managing elements in the [Mobile Editor](https://support.wix.com/en/article/wix-editor-getting-started-with-the-mobile-editor) (Wix Editor) or by using [breakpoints](https://support.wix.com/en/article/studio-editor-designing-across-breakpoints) (Wix Studio). For example, you can hide a button when a visitor opens the site on a mobile device or tablet. This doesn't require coding knowledge. This article only discusses how to manage elements with code. ## Supported IDEs You can write code for mobile using: - The [editor](https://dev.wix.com/docs/develop-websites/articles/workspace-tools/velo-workspace/workspaces/wix-studio-working-with-the-code-panel.md) (Wix Studio and Wix Editor). - The [Wix IDE](https://dev.wix.com/docs/develop-websites/articles/workspace-tools/velo-workspace/wix-ide/wix-studio-about-the-wix-ide.md) (Wix Studio). - Your [local IDE](https://dev.wix.com/docs/develop-websites/articles/workspace-tools/developer-tools/git-integration-wix-cli-for-sites/about-git-integration-wix-cli-for-sites.md) (Wix Studio and Wix Editor). ## Managing site behavior on different devices with code To write code that only runs on mobile devices, you first need to check what device the code is running on. You do this by wrapping the mobile-only code in a JavaScript conditional statement with the [wix-window-frontend](https://dev.wix.com/docs/velo/apis/wix-window-frontend/introduction.md) API. Your code will look something like this: ```js import wixWindowFrontend from "wix-window-frontend"; if (wixWindowFrontend.formFactor === "Mobile" || ) { // code that will only run on mobile } ``` ## Considerations Consider the following when coding for mobile sites: - You might expect that code written in the code editor while in mobile view would only run when your site is viewed on a mobile device. However, the code actually runs regardless of the type of device on which your site is being viewed. Be sure this code doesn’t display anything unnecessary in desktop view. - Some event handlers, such as `onMouseIn()` or `onMouseOut()` don't work on mobile. You should replace these handlers with `onClick()`. For example: Code for hovering an image in desktop view: ```js import wixWindowFrontend from "wix-window-frontend"; $w.onReady(function () { $w("#image").onMouseIn(async (event) => { await $w("#hiddenText").show("fade"); }); $w("#image").onMouseOut(async (event) => { await $w("#hiddenText").hide("fade"); }); }); //... ``` Code for tapping the same image in mobile view: ```js //... $w.onReady(function () { $w("#image").onClick(async (event) => { if ( (await window.formFactor()) === "Mobile" || (await window.formFactor()) === "Tablet" ) { if ($w("#hiddenText").hidden) { $w("#hiddenText").show("fade"); } else { $w("#hiddenText").hide("fade"); } } }); }); ``` ## See also - [Build a Mobile Site with Code](https://dev.wix.com/docs/develop-websites/articles/coding-with-velo/frontend-code/mobile/build-a-mobile-site-with-code.md) - [Mobile Editor](https://support.wix.com/en/article/wix-editor-getting-started-with-the-mobile-editor) - [Breakpoints](https://support.wix.com/en/article/studio-editor-designing-across-breakpoints) --- > Portal Navigation: > > - Append `.md` to any URL under `https://dev.wix.com/docs/` to get its markdown version. > - Pages are either content pages (article or reference text) or menu pages (a list of links to child pages). > - To get a menu page, truncate any URL to a parent path and append `.md` (e.g. `https://dev.wix.com/docs/sdk.md`, `https://dev.wix.com/docs/sdk/core-modules.md`). > - Top-level index of all portals: https://dev.wix.com/docs/llms.txt > - Full concatenated docs: https://dev.wix.com/docs/llms-full.txt ## Resource: Working in the Mobile Editor ## Article: Working in the Mobile Editor ## Article Link: https://dev.wix.com/docs/develop-websites/articles/coding-with-velo/frontend-code/mobile/working-in-the-mobile-editor.md ## Article Content: # Velo: Working in the Mobile Editor The primary functionality for the mobile Editor (Wix Editor) or [breakpoints](https://support.wix.com/en/article/studio-editor-designing-across-breakpoints) (Wix Studio) is to design the layout of your site when viewed on a device such as a tablet or mobile device. ### Site behavior on different devices You can use code to control how your site behaves on different devices. To find out which device your site is being displayed on, use the `formFactor` property of the [`wix-window-frontend`](https://www.wix.com/velo/reference/wix-window-frontend/formfactor) API, which returns either "Desktop", "Mobile", or "Tablet". You can then add code to your site that includes a condition to control how your elements behave, based on the device. ### Hiding elements on different devices You can hide certain elements on your site when displayed on different devices using the mobile Editor (Wix Editor) or breakpoints (Wix Studio). Unlike an element's `hidden` property, which controls the visibility of an element when a page first loads, hiding elements allows you to specify which elements should never appear on tablet or mobile views of your site. > **Note:** > Breakpoints (Wix Studio) allow you to hide elements in customized breakpoint views for your site in addition to tablet and mobile views. In the UI of the mobile Editor (Wix Editor) you can hide elements only in the mobile view of your site. **Wix Editor:** - To hide an element from the mobile version of your site, navigate to the mobile Editor. Click on your element, then click the **Hide Element** button ![Hide mobile editor element](https://wixmp-833713b177cebf373f611808.wixmp.com/images/23b5406a0d35445bf7086edb7524ac0a.png). - To unhide the element, navigate to the **Hidden on Mobile** panel on the left and click **Show** on the element you wish to unhide. ![Hidden on Mobile](https://wixmp-833713b177cebf373f611808.wixmp.com/images/51a8ef713be7475b82fdf5b967e5047b.png) **Wix Studio:** - To hide an element from different breakpoints of your site, navigate to the breakpoint of choice and click on your element. Click on the **More Actions** button ![More Actions](https://wixmp-833713b177cebf373f611808.wixmp.com/images/1617580fa1f44c7a618a2ffb45634efc.png), then click **Hide**. ![Hide mobile studio element](https://wixmp-833713b177cebf373f611808.wixmp.com/images/40e0d84e31d9833b1d1a8b6506f8113d.png) - To unhide the element, navigate to the **Layers** panel on the left. Look for the element you want to unhide, click the **Show** button. ![Unhide mobile studio element](https://wixmp-833713b177cebf373f611808.wixmp.com/images/60ecbdfa31e995f6d6720fdd79d57947.png) > **Note:** > - Changes made in larger [breakpoints cascade](https://support.wix.com/en/article/studio-editor-designing-across-breakpoints#cascading-design) down to smaller breakpoint sizes. For example, if you hide the element in the tablet breakpoint, the element will automatically be hidden in the mobile breakpoint. You can override the cascading effect by unhiding the element in the mobile breakpoint.
**Important:** Hiding an element using the mobile Editor (Wix Editor) or breakpoints (Wix studio) removes that element from the page's DOM. Any code that relies on the hidden element's existence will break.
--- > Portal Navigation: > > - Append `.md` to any URL under `https://dev.wix.com/docs/` to get its markdown version. > - Pages are either content pages (article or reference text) or menu pages (a list of links to child pages). > - To get a menu page, truncate any URL to a parent path and append `.md` (e.g. `https://dev.wix.com/docs/sdk.md`, `https://dev.wix.com/docs/sdk/core-modules.md`). > - Top-level index of all portals: https://dev.wix.com/docs/llms.txt > - Full concatenated docs: https://dev.wix.com/docs/llms-full.txt ## Resource: Redirecting Mobile Visitors ## Article: Redirecting Mobile Visitors ## Article Link: https://dev.wix.com/docs/develop-websites/articles/coding-with-velo/frontend-code/mobile/redirecting-mobile-visitors.md ## Article Content: # Velo Tutorial: Redirecting Mobile Visitors
Visit the Velo by Wix website to onboard and continue learning.
You can use Velo to redirect visitors to mobile-friendly pages in your site. The basic steps to redirect to mobile pages are: 1. Use code to check if your site is being viewed on a mobile device or a desktop device 2. If your site is being viewed on a mobile device, use code to redirect to another page This tutorial has 2 parts: * Instructions on how to get set up, including code you can copy and paste onto your page * An explanation of what each line of code does ### Instructions 1. Go to your site's home page. 2. Copy the code below and paste it in your page code. 3. Make sure to substitute your mobile home page URL in line 9 where it says 'http://www.myMobileHome.com.' 4. Publish the page to see the redirect in action. (Previewing isn't enough.) ```javascript import wixLocationFrontend from 'wix-location-frontend'; import wixWindowFrontend from 'wix-window-frontend'; $w.onReady(function () { setTimeout(function () { if(wixWindowFrontend.formFactor === "Mobile"){ wixLocationFrontend.to('http://www.myMobileHome.com'); } }, 7500); }); ``` ### Understanding the Code The code checks the kind of device. If mobile, the code redirects the visitor to a mobile-friendly home page. Import statements on lines 2 and 3 bring in the APIs we need: * [`wixWindowFrontend.formFactor`](https://www.wix.com/velo/reference/wix-window.html#formFactor) checks the device type. * [`wixLocationFrontend.to`](https://www.wix.com/velo/reference/wix-location.html#to) redirects the visitor to the mobile page's URL. ```javascript // Import statements for the Wix Location Frontend and Window APIs import wixLocationFrontend from 'wix-location-frontend'; import wixWindowFrontend from 'wix-window-frontend'; ``` The redirect occurs after a time delay. This gives the visitor time to see notices on the page you are redirecting from. Line 4 contains the setTimeout function that creates this delay. ```javascript $w.onReady(function () { // Adds a time delay so the visitor anticipates the redirect setTimeout(function () { ... ... ... // The timeout value is 7500 nanoseconds }, 7500); }); ``` With an **if** statement on line 10, we check the type of device using `wixWindowFrontend.formFactor`. ```javascript import wixLocationFrontend from 'wix-location-frontend'; import wixWindowFrontend from 'wix-window-frontend'; $w.onReady(function () { // Adds a time delay so the visitor anticipates the redirect setTimeout(function () { // Checks what kind of device if(wixWindowFrontend.formFactor === "Mobile"){ // If mobile, we redirect to a mobile-friendly page wixLocationFrontend.to('http://www.myMobileHome.com'); } // The timeout value is 7500 milliseconds }, 7500); }); ``` On line 13, we use `wixLocationFrontend.to` to perform the redirect. ### API List The following APIs are used in the code in this article. To learn more, see the [API Reference](https://www.wix.com/velo/reference/). * [wix-window-frontend](https://www.wix.com/velo/reference/wix-window.html) * [wix-location-frontend](https://www.wix.com/velo/reference/wix-location.html) --- > Portal Navigation: > > - Append `.md` to any URL under `https://dev.wix.com/docs/` to get its markdown version. > - Pages are either content pages (article or reference text) or menu pages (a list of links to child pages). > - To get a menu page, truncate any URL to a parent path and append `.md` (e.g. `https://dev.wix.com/docs/sdk.md`, `https://dev.wix.com/docs/sdk/core-modules.md`). > - Top-level index of all portals: https://dev.wix.com/docs/llms.txt > - Full concatenated docs: https://dev.wix.com/docs/llms-full.txt ## Resource: Build a Mobile Site with Code ## Article: Displaying Elements in Mobile Only ## Article Link: https://dev.wix.com/docs/develop-websites/articles/coding-with-velo/frontend-code/mobile/build-a-mobile-site-with-code.md ## Article Content: # Velo Tutorial: Displaying Elements in Mobile Only You can use Velo to control elements so they display only in the mobile version of your site. The basic steps to set up an element to display only in mobile are: 1. Set the element to be hidden when the page loads. 2. Use code to check if your site is being viewed on a mobile device or a desktop device. 3. If your site is being viewed on a mobile device, use code to display the hidden element. ### Tutorial #### To set up an element to display only in mobile: 1. Enable coding: + **Wix Studio:** If necessary, click ![Code icon](https://github.com/wix-incubator/wix-code-docs/assets/50321691/2c41d3df-930f-4e0f-966f-038742adceed) and then **Start Coding**. + **Wix Editor:** [Enable Velo Dev Mode](https://support.wix.com/en/article/about-velo-by-wix#to-enable-velo-on-your-site) for your site. 2. Add the element that you want to display only in mobile. 3. With the element selected, select the **Hidden** checkbox in the Properties & Events panel. This sets up the element so that when your page loads this element isn't displayed. Make a note of the **ID** for your element since we'll need to use that a little later.
![](https://d2x3xhvgiqkx42.cloudfront.net/12345678-1234-1234-1234-1234567890ab/0ca9e8ba-16ed-4cd8-a1e1-58d01c4420f7/2020/10/25/70758b0c-cfdb-4fc5-a2d9-a3ca3201ac0b/1e6c89b8-6597-4c08-8e26-3730f70904c2.png)
4. Now we need to check whether your site is being viewed on a mobile device. Open the code editor. You'll see that following is already written. ```javascript $w.onReady(function () { // Write your JavaScript here // To select an element by ID use: $w("#elementID") // Click "Preview" to run your code }); ``` 5. Add a line above the first line and enter the following code. This lets your site work with the `wix-window-frontend` module, which lets you determine the type of device your site is being viewed on. ```javascript import wixWindowFrontend from 'wix-window-frontend'; ``` 6. Replace lines 2-6 with the following code. This checks the type of device your site is being viewed on. It then sets the element that you set to be **Hidden** to be displayed for mobile only.  ```javascript if(wixWindowFrontend.formFactor === "Mobile"){ $w("#button8").show(); } ``` 7. To make this code work with your element, replace **button8** with the ID for your element that you noted in step 3. 8. When you are done, your code should look like this: ```javascript import wixWindowFrontend from 'wix-window-frontend'; $w.onReady(function () { if(wixWindowFrontend.formFactor === "Mobile"){ $w("#your_element's_ID").show(); } }); ``` 9. If you have more than one element that you want to display only in mobile:  1. Complete step 3 for each element. 2. Add a line after line 5 in the example above. 3. Copy line 5 and paste it into the new line. 4. Replace the ID of the first element with the ID of the second element. Now your code should look like this: ```javascript import wixWindowFrontend from 'wix-window-frontend'; $w.onReady(function () { if(wixWindowFrontend.formFactor === "Mobile"){ $w("#your_first_element's_ID").show(); $w("#your_second_element's_ID").show(); } }); ``` ### API List The following API is used in the code in this article. To learn more, see the [API Reference.](https://www.wix.com/velo/reference/) * [wix-window-frontend](https://www.wix.com/velo/reference/wix-window) --- > Portal Navigation: > > - Append `.md` to any URL under `https://dev.wix.com/docs/` to get its markdown version. > - Pages are either content pages (article or reference text) or menu pages (a list of links to child pages). > - To get a menu page, truncate any URL to a parent path and append `.md` (e.g. `https://dev.wix.com/docs/sdk.md`, `https://dev.wix.com/docs/sdk/core-modules.md`). > - Top-level index of all portals: https://dev.wix.com/docs/llms.txt > - Full concatenated docs: https://dev.wix.com/docs/llms-full.txt ## Resource: About Page Rendering ## Article: About the Page Rendering Process ## Article Link: https://dev.wix.com/docs/develop-websites/articles/coding-with-velo/frontend-code/page-rendering/about-page-rendering.md ## Article Content: # About Page Rendering Page rendering is when your site's code is converted to a visual layout that's displayed in the browser. It occurs when visitors first enter your site, and for each subsequent page load, as they access different pages within the same site. To enhance performance, Wix render's your site code on the server and in the browser. You can use the [Rendering API](https://dev.wix.com/docs/velo/api-reference/wix-window-frontend/rendering/introduction.md) to control where your code runs in the rendering process. ## Supported IDEs You can implement the Rendering API using: - The [editor](https://dev.wix.com/docs/develop-websites/articles/workspace-tools/velo-workspace/code-editor-ide/working-in-the-code-editor.md) (Wix Studio and Wix Editor) - The [Wix IDE](https://dev.wix.com/docs/develop-websites/articles/workspace-tools/velo-workspace/wix-ide/wix-studio-about-the-wix-ide.md) (Wix Studio) - Your [local IDE](https://dev.wix.com/docs/develop-websites/articles/workspace-tools/developer-tools/git-integration-wix-cli/about-git-integration-wix-cli.md) (Wix Studio and Wix Editor) ## Rendering process When a page request is made to the server, the server executes server-side rendering and once completed returns the HTML and all the necessary data to render the page. Once the browser gets the server response it displays the HTML immediately so the page is fully visible, though not yet responsive. Then, the browser runs the same page code again, adding the interactive actions. This double rendering occurs on initial site load, first on the server and then in the browser. Navigating to different pages on the same site, however, typically renders only once in the browser for each page load. As a result of the double rendering, any code in your `onReady()` function may often execute twice, to provide faster initial loading time to access a site. ## Side effects Because your `onReady()` runs twice during double rendering, it may produce side effects. For example, if your code inserts an item into a collection, that insertion occurs twice, unless you explicitly add code to prevent that from happening. To avoid such unwanted side effects, use the [Rendering API](https://dev.wix.com/docs/velo/api-reference/wix-window-frontend/rendering/introduction.md) to conditionally control what code runs on the server or browser. You can also use [warmup data](https://dev.wix.com/docs/develop-websites/articles/coding-with-velo/frontend-code/page-rendering/about-warmup-data.md) to further optimize page loading. ## Test your code Keep the following in mind when testing code that uses Rendering API. - Rendering never occurs in the server when [previewing](https://support.wix.com/en/article/studio-editor-saving-previewing-and-publishing-your-site#previewing-a-site) your site. - You can't see logs produced by `console.log()` calls in the [Developer Console](https://dev.wix.com/docs/develop-websites/articles/workspace-tools/testing-monitoring/testing-troubleshooting/about-debugging-your-code.md) or in your browser's [Developer Tools](https://dev.wix.com/docs/develop-websites/articles/workspace-tools/testing-monitoring/testing-troubleshooting/about-debugging-your-code.md) when they are performed on the server. ## See also - [About warmup data](https://dev.wix.com/docs/develop-websites/articles/coding-with-velo/frontend-code/page-rendering/about-warmup-data.md) - [Optimize page rendering with warmup data](https://dev.wix.com/docs/develop-websites/articles/coding-with-velo/frontend-code/page-rendering/optimize-page-rendering-with-warmup-data.md) - [Webinar: Planning for scale: large data design considerations](https://youtu.be/BGnpQ_LTHPg?feature=shared&t=1464) --- > Portal Navigation: > > - Append `.md` to any URL under `https://dev.wix.com/docs/` to get its markdown version. > - Pages are either content pages (article or reference text) or menu pages (a list of links to child pages). > - To get a menu page, truncate any URL to a parent path and append `.md` (e.g. `https://dev.wix.com/docs/sdk.md`, `https://dev.wix.com/docs/sdk/core-modules.md`). > - Top-level index of all portals: https://dev.wix.com/docs/llms.txt > - Full concatenated docs: https://dev.wix.com/docs/llms-full.txt ## Resource: About Warmup Data ## Article: About Warmup Data ## Article Link: https://dev.wix.com/docs/develop-websites/articles/coding-with-velo/frontend-code/page-rendering/about-warmup-data.md ## Article Content: # About Warmup Data Warmup data is used to optimize [page rendering](https://dev.wix.com/docs/develop-websites/articles/coding-with-velo/frontend-code/page-rendering/about-page-rendering.md) when your site's pages are rendered on both the server and the client, ensuring that costly data operations are done only once. Generally, the server executes data operations faster than the browser. With warmup data, you can pass the results of your server operations to your client-side code. During client-side rendering, you can write code to check if those operations were already done and set to warmup data, and if the warmup data exists, use it in your code. This prevents the client from performing the same expensive operations again. Use the [Rendering API](https://dev.wix.com/docs/velo/api-reference/wix-window-frontend/rendering/introduction.md) to check whether your code is being run on the client or the server, and the [Warmup Data API](https://dev.wix.com/docs/velo/api-reference/wix-window-frontend/warmup-data/introduction.md) to set and get the warmup data. ## Supported IDEs You can optimize page rendering with `warmupData` using: - The [editor](https://dev.wix.com/docs/develop-websites/articles/workspace-tools/velo-workspace/code-editor-ide/working-in-the-code-editor.md) (Wix Studio and Wix Editor) - The [Wix IDE](https://dev.wix.com/docs/develop-websites/articles/workspace-tools/velo-workspace/wix-ide/wix-studio-about-the-wix-ide.md) (Wix Studio) - Your [local IDE](https://dev.wix.com/docs/develop-websites/articles/workspace-tools/developer-tools/git-integration-wix-cli-for-sites/about-git-integration-wix-cli-for-sites.md) (Wix Studio and Wix Editor) ## Client-side rendering When working with warmup data it's important to keep in mind that there may be cases where client-side rendering happens before server-side rendering. In such cases, you can't rely on the warmup data being set on the server, and need to execute those operations directly on the client-side. Note that you can only perform the following operations on the client-side: + Accessing the browser's storage  + Using 3rd-party analytics + Creating dynamic event handlers  + Retrieving information about the client's browser + Navigating to another page ## See also - [About page rendering](https://dev.wix.com/docs/develop-websites/articles/coding-with-velo/frontend-code/page-rendering/about-page-rendering.md) - [Optimize page rendering with warmup data](https://dev.wix.com/docs/develop-websites/articles/coding-with-velo/frontend-code/page-rendering/optimize-page-rendering-with-warmup-data.md) --- > Portal Navigation: > > - Append `.md` to any URL under `https://dev.wix.com/docs/` to get its markdown version. > - Pages are either content pages (article or reference text) or menu pages (a list of links to child pages). > - To get a menu page, truncate any URL to a parent path and append `.md` (e.g. `https://dev.wix.com/docs/sdk.md`, `https://dev.wix.com/docs/sdk/core-modules.md`). > - Top-level index of all portals: https://dev.wix.com/docs/llms.txt > - Full concatenated docs: https://dev.wix.com/docs/llms-full.txt ## Resource: Optimize Page Rendering with Warmup Data ## Article: Optimize Page Rendering with Warmup Data ## Article Link: https://dev.wix.com/docs/develop-websites/articles/coding-with-velo/frontend-code/page-rendering/optimize-page-rendering-with-warmup-data.md ## Article Content: # Optimize Page Rendering with Warmup Data Use [warmup data](https://dev.wix.com/docs/develop-websites/articles/coding-with-velo/frontend-code/page-rendering/about-warmup-data.md) to speed up your site's [page rendering](https://dev.wix.com/docs/develop-websites/articles/coding-with-velo/frontend-code/page-rendering/about-page-rendering.md) by reducing the number of data operations that occur during client-side rendering. Follow this procedure to make a data query that is called only once during server-side rendering. The query results are sent as warmup data for display during client-side rendering. If the data query was not made during server-side rendering, it is called for the first time during client-side rendering. 1. Add your import statements. ```javascript import wixData from 'wix-data'; import wixWindowFrontend from 'wix-window-frontend'; ``` 2. Define a `getData()` function that makes a `wixData` query. Use [`warmupData.set`](https://dev.wix.com/docs/velo/api-reference/wix-window-frontend/warmup-data/set.md) to conditionally set the query results as warmup data if the query is being made during server-side rendering. ```javascript async function getData() { const results = await wixData.query("myCollection") .find(); if (wixWindowFrontend.rendering.env == "backend") { wixWindowFrontend.warmupData.set("myWarmupData", results.items); } return results; } ``` 3. In your `onReady()` code, store your data in a variable called `dataResults`. Retrieve the warmup data by calling `warmupData.get`. If server-side rendering does not occur, `dataResults` should default to the return value of `getData()`. ```javascript $w.onReady(async function () { const dataResults = wixWindowFrontend.warmupData.get("myWarmupData") || await getData(); // Use your data as needed. }); ``` In this example, the `dataResults` variable is populated with the results of the query in all cases. When possible, we have optimized performance by using the warmup data initially fetched on the server, instead of running the query a second time during client-side rendering. The full page code looks like this: ```javascript async function getData() { const results = await wixData.query("myCollection") .find(); if (wixWindowFrontend.rendering.env == "backend") { wixWindowFrontend.warmupData.set("myWarmupData", results.items); } return results; } $w.onReady(async function () { const dataResults = wixWindowFrontend.warmupData.get("myWarmupData") || await getData(); // Use your data as needed. }); ``` ## See also - [About page rendering](https://dev.wix.com/docs/develop-websites/articles/coding-with-velo/frontend-code/page-rendering/about-page-rendering.md) - [About warmup data](https://dev.wix.com/docs/develop-websites/articles/coding-with-velo/frontend-code/page-rendering/about-warmup-data.md) - [Warmup Data API](https://dev.wix.com/docs/velo/api-reference/wix-window-frontend/warmup-data/introduction.md) --- > Portal Navigation: > > - Append `.md` to any URL under `https://dev.wix.com/docs/` to get its markdown version. > - Pages are either content pages (article or reference text) or menu pages (a list of links to child pages). > - To get a menu page, truncate any URL to a parent path and append `.md` (e.g. `https://dev.wix.com/docs/sdk.md`, `https://dev.wix.com/docs/sdk/core-modules.md`). > - Top-level index of all portals: https://dev.wix.com/docs/llms.txt > - Full concatenated docs: https://dev.wix.com/docs/llms-full.txt ## Resource: About the URL Structure of Premium and Free Sites ## Article: About the URL Structure of Premium and Free Sites ## Article Link: https://dev.wix.com/docs/develop-websites/articles/coding-with-velo/frontend-code/urls/about-the-url-structure-of-premium-and-free-sites.md ## Article Content: # About the URL Structure of Site Pages Understanding the URL structure of Wix site pages is crucial for tasks such as routing, linking, SEO, and query parameter manipulation. ## Sample URLs The structure of the URLs differ between Wix premium sites and Wix free sites: - **Premium sites**: Use a custom domain, such as `domain.com`: `https://domain.com/animals/mammals/elephant?species=african-elephant`. - **Free sites**: Reflect the Wix editor as the domain followed by the site name, such as `user.wixstudio.io/zoo` for Wix Studio sites and `user.wixsite.com/zoo` for Wix Editor sites. - **Wix Studio**: `https://user.wixstudio.io/zoo/animals/mammals/elephant?species=african-elephant` - **Wix Editor**: `https://user.wixsite.com/zoo/animals/mammals/elephant?species=african-elephant` You can get the full site URL, as well as its parts, using the [Wix Location Frontend API](https://dev.wix.com/docs/velo/api-reference/wix-location-frontend/url.md). ## Key parts of a URL | Term | Description | Example | |-------------|-----------------------------------------------------------------------------------------------------------------------------------------------------|--------------------------------------| | **Protocol**| Standard part of the URL that indicates the protocol used to access the resource. | `https://` | | **Base URL**| Represents the root domain of your site. Premium sites use a custom domain, while free Wix sites include the editor followed by the site name. | Premium: `domain.com`
Free (Wix Studio): `user.wixstudio.io`
Free (Wix Editor): `user.wixsite.com` | | **Prefix** | Component used for dynamic paths and router pages. Prefixes are useful for [making Dynamic Page URLs](https://dev.wix.com/docs/develop-websites/articles/databases/wix-data/dynamic-pages/making-dynamic-page-urls-meaningful-with-prefixes.md), or for determining which incoming requests the [router](https://dev.wix.com/docs/develop-websites/articles/coding-with-velo/routers/about-routers.md) handles. | `/animals` | | **Path** | The path typically follows the base URL or the prefix, if a prefix exists. For dynamic pages and router cases, paths are used for structure or to encode information to indicate what dynamic content to show. | `/mammals/elephant` | | **Query** | Query parameters are key-value pairs appended to the URL to pass additional data. | `?species=african-elephant` | ## See also - [Wix Location Frontend API](https://dev.wix.com/docs/velo/api-reference/wix-location-frontend/url.md) - [Making Dynamic Page URLs](https://dev.wix.com/docs/develop-websites/articles/databases/wix-data/dynamic-pages/making-dynamic-page-urls-meaningful-with-prefixes.md) - [Routers](https://dev.wix.com/docs/develop-websites/articles/coding-with-velo/routers/about-routers.md) --- > Portal Navigation: > > - Append `.md` to any URL under `https://dev.wix.com/docs/` to get its markdown version. > - Pages are either content pages (article or reference text) or menu pages (a list of links to child pages). > - To get a menu page, truncate any URL to a parent path and append `.md` (e.g. `https://dev.wix.com/docs/sdk.md`, `https://dev.wix.com/docs/sdk/core-modules.md`). > - Top-level index of all portals: https://dev.wix.com/docs/llms.txt > - Full concatenated docs: https://dev.wix.com/docs/llms-full.txt ## Resource: About the Site Backend ## Article: About the Site Backend ## Article Link: https://dev.wix.com/docs/develop-websites/articles/coding-with-velo/backend-code/about-the-site-backend.md ## Article Content: # About the Site Backend When you build a site on the Wix Dev Platform, you get access to a zero-setup, serverless backend environment. Experience lightning-fast performance with our powerful Node.js server-side runtime, designed for seamless initialization and code execution. Scale and mobilize your backend operations securely, reliably, and consistently. Here is some of the functionality you can implement in your site's backend: + Interface with [Wix APIs](https://dev.wix.com/docs/velo.md) to execute workflows and [handle backend events](https://dev.wix.com/docs/develop-websites/articles/coding-with-velo/backend-code/events/about-backend-events.md). + Store and manage your data with Wix's out of the box [database](https://dev.wix.com/docs/develop-websites/articles/databases/wix-data/data-api/working-with-the-data-api.md), and the [`wix-data`](https://dev.wix.com/docs/velo/api-reference/wix-data/introduction.md) API, or [integrate with an external database](https://dev.wix.com/docs/develop-websites/articles/databases/external-databases/overview/integrating-external-databases-with-your-wix-site.md). + Seamlessly export backend functions to your site's frontend using [web modules](https://dev.wix.com/docs/develop-websites/articles/coding-with-velo/backend-code/web-modules/about-web-modules.md). + Expose REST endpoints from your site's backend using [HTTP functions](https://dev.wix.com/docs/velo/api-reference/wix-http-functions/introduction.md). --- > Portal Navigation: > > - Append `.md` to any URL under `https://dev.wix.com/docs/` to get its markdown version. > - Pages are either content pages (article or reference text) or menu pages (a list of links to child pages). > - To get a menu page, truncate any URL to a parent path and append `.md` (e.g. `https://dev.wix.com/docs/sdk.md`, `https://dev.wix.com/docs/sdk/core-modules.md`). > - Top-level index of all portals: https://dev.wix.com/docs/llms.txt > - Full concatenated docs: https://dev.wix.com/docs/llms-full.txt ## Resource: About Web Modules ## Article: About Web Modules ## Article Link: https://dev.wix.com/docs/develop-websites/articles/coding-with-velo/backend-code/web-modules/about-web-modules.md ## Article Content: # About Web Modules Web modules are backend files with a `.web.js` extension. They allow you to write backend functions that you can easily [call from the frontend](https://dev.wix.com/docs/develop-websites/articles/coding-with-velo/backend-code/web-modules/call-backend-code-from-the-frontend.md). Use web modules for calling backend code from the frontend: + To protect code that may expose sensitive data, or business logic, if it runs in the frontend. + To centralize and contain business logic such as 3rd-party API calls and database querying. + To avoid [cross-origin resource sharing (CORS)](http://en.wikipedia.org/wiki/Cross-origin_resource_sharing) restrictions that can occur when calling 3rd-party APIs from the frontend. Web modules cannot be used to export primitive values or objects that you want to import on the frontend. You can create web modules using: - The Code panel in the editor (Wix Studio and Wix Editor) - Wix IDE (Wix Studio) - Your local IDE (Wix Studio and Wix Editor). ## Web methods To expose a function within a web module so that it can be called from the frontend, you need to wrap it in a [web method](https://dev.wix.com/docs/velo/apis/wix-web-module/introduction.md). Web methods provide the mechanism that allows your function to be called asynchronously from the frontend and adds a [permissions](#permissions) check on the caller of your function. Here is what a web method looks like when defined in the backend and called from the frontend: ```js // In a file with the .web.js extension import { Permissions, webMethod } from "wix-web-module"; export const myFunction = webMethod( Permissions.Anyone, () => { // Function logic }); ``` ```js // In frontend code import { myFunction } from "backend/someFile.web"; // ... const fromBackend = await myFunction(); ```
Advanced: How web methods work When you import a web method on the frontend, you get a proxy function to the web method. This proxy uses an XMLHttpRequest to invoke the function in the backend. The runtime listens to those invocations and calls the appropriate function. The arguments and return value are serialized and deserialized using JSON.
View a demo: `youtube:https://www.youtube.com/watch?v=qRw0atYFY4I&list=PLi3fKZF2b29g5BQJoYV1sK0nrvM1mu3vm&index=4` ## Permissions Because web modules expose your site's backend functionality, it's important to restrict who can call web methods from the frontend. Do this by setting the permissions for each web method to be as restrictive as possible. It is especially important to set restrictive permissions when: - Passing sensitive data from the backend to the frontend. - Exporting functions that require [`elevation`](https://dev.wix.com/docs/velo/apis/wix-auth/elevate.md). The permissions options are: - **Anyone:** The function can be called from the frontend on behalf of any site visitor. - **Site Member:** The function can be called from the frontend on behalf of logged-in site members. - **Admin:** The function can be called from the frontend on behalf of logged-in site owners and collaborators. ## Debugging web modules You can debug the code in web modules as you would [debug any backend code](https://dev.wix.com/docs/develop-websites/articles/workspace-tools/testing-monitoring/testing-troubleshooting/about-debugging-your-code.md). Additionally, you can use `console.log()` in your web methods and the logs will appear in the Developer Console when previewing your site. For security reasons, the logs will not appear in your browser's console when previewing or on your published site. ## Deprecated `.jsw` web modules Web modules were originally created using `.jsw` files. This method for creating web modules is now deprecated. However, existing [`.jsw` web modules](https://dev.wix.com/docs/develop-websites/articles/coding-with-velo/backend-code/web-modules/call-backend-code-from-a-jsw-web-module.md) will continue to work as expected. ## See also [Call backend code from the frontend](https://dev.wix.com/docs/develop-websites/articles/coding-with-velo/backend-code/web-modules/call-backend-code-from-the-frontend.md) --- > Portal Navigation: > > - Append `.md` to any URL under `https://dev.wix.com/docs/` to get its markdown version. > - Pages are either content pages (article or reference text) or menu pages (a list of links to child pages). > - To get a menu page, truncate any URL to a parent path and append `.md` (e.g. `https://dev.wix.com/docs/sdk.md`, `https://dev.wix.com/docs/sdk/core-modules.md`). > - Top-level index of all portals: https://dev.wix.com/docs/llms.txt > - Full concatenated docs: https://dev.wix.com/docs/llms-full.txt ## Resource: Call Backend Code from the Frontend ## Article: Calling Backend Code from the Frontend ## Article Link: https://dev.wix.com/docs/develop-websites/articles/coding-with-velo/backend-code/web-modules/call-backend-code-from-the-frontend.md ## Article Content: # Call Backend Code from the Frontend [Web modules](https://dev.wix.com/docs/develop-websites/articles/coding-with-velo/backend-code/web-modules/about-web-modules.md) allow you to write backend functions that you can easily call from the frontend. The following describes how to create, export, and call web module functions, also known as web methods. ## Step 1 | Add a web module The way you add a web module file depends on which IDE you're using. ### Editor 1. Navigate to **Public & Backend** in the code panel. 2. Hover over the **Backend** heading, click the plus icon ![plus icon](https://wixmp-833713b177cebf373f611808.wixmp.com/images/e45800424595befdc6fe5931a1b7c0b4), and then select **Add web module**. This action creates a web module file with a `.web.js` extension. ![Add web module](https://wixmp-833713b177cebf373f611808.wixmp.com/images/721daee653bbb56634e4ca349f8597c0) ### Wix IDE or your local IDE Create a new file in the `backend-modules` directory and name it with the `.web.js` extension. ![alt text](https://wixmp-833713b177cebf373f611808.wixmp.com/images/1675cc7cb365bbea2f3d57bd5bf93b2b) ## Step 2 | Define a web method in the backend Add an exported [web method](https://www.wix.com/velo/reference/wix-web-module/webmethod) in the file you created above. The web method wraps an inner function that contains the logic you want to call from the frontend. To create a web method, call the `webMethod()` function and define the web method's permissions and its inner function: 1. Add the necessary imports: ```js import { Permissions, webMethod } from 'wix-web-module'; ``` 2. Call the `webMethod()` function and store its returned value in an exported variable. ```js export const myFunction = webMethod(); ``` 3. Pass the `webMethod()` function a [permissions](https://dev.wix.com/docs/develop-websites/articles/coding-with-velo/backend-code/web-modules/about-web-modules.md#permissions) value as the first argument: ```js export const myFunction = webMethod(Permissions.SiteMember); ``` 4. Pass the `webMethod()` function an inner function as the second argument: ```javascript export const myFunction = webMethod( Permissions.SiteMember, (someParam) => { // Some functionality for site members to call from the frontend return `You passed me ${someParam}`; } ); ``` ## Step 3 | Call the function from the frontend To call a web method from the frontend: 1. Import the exported web method from the web module you created above: ```javascript import { myFunction } from 'backend/weather.web'; ``` 2. Call the imported function: ```js const fromBackend = await myFunction(someValue); ``` Remember, web module functions are always asynchronous. --- > Portal Navigation: > > - Append `.md` to any URL under `https://dev.wix.com/docs/` to get its markdown version. > - Pages are either content pages (article or reference text) or menu pages (a list of links to child pages). > - To get a menu page, truncate any URL to a parent path and append `.md` (e.g. `https://dev.wix.com/docs/sdk.md`, `https://dev.wix.com/docs/sdk/core-modules.md`). > - Top-level index of all portals: https://dev.wix.com/docs/llms.txt > - Full concatenated docs: https://dev.wix.com/docs/llms-full.txt ## Resource: Call Backend Code from a jsw Web Module ## Article: Call Backend Code from a jsw Web Module ## Article Link: https://dev.wix.com/docs/develop-websites/articles/coding-with-velo/backend-code/web-modules/call-backend-code-from-a-jsw-web-module.md ## Article Content: # Deprecated: Call Backend Code from the Frontend Using a jsw Web Module [Web modules](https://dev.wix.com/docs/develop-websites/articles/coding-with-velo/backend-code/web-modules/about-web-modules.md) allow you to write backend functions that you can easily call from the frontend.
**Warning:** Web modules defined using `.jsw` files are deprecated and you will soon be unable to create new `.jsw` files. However, existing `.jsw` web modules will continue work as expected. Switch to [web module defined using `.web.js` files](https://dev.wix.com/docs/develop-websites/articles/coding-with-velo/backend-code/web-modules/call-backend-code-from-the-frontend.md) for your current and future projects.
The following describes how to create, export, and call web module functions. ## Step 1 | Define a function in the backend Add an exported function to an existing `.jsw` file. ```js export myFunction(someParam) { // Some functionality to call from the frontend return `You passed me ${someParam}`; } ``` ## Step 2 | Set permissions Set [permissions](https://dev.wix.com/docs/develop-websites/articles/coding-with-velo/backend-code/web-modules/about-web-modules.md#permissions) for each function in the web module if necessary. The default permission is **Anyone**. You can set permissions in the Wix Editor or by editing the permissions.json file, depending on your development environment: ::::tabs :::Wix-Editor To set permissions for a web module function: 1. Hover over your web module, click the more actions menu, and select **Edit Web Module Permissions**. \ The web module permissions panel opens and displays each exported function in your web module. 1. Click the dropdown next to a function name to define its permissions. ::: :::Wix-and-Local-IDE When using the Wix IDE or a local IDE with GitHub integration, you can add and edit permissions using the `permissions.json` file. The `permissions.json` file is located in the `src/backend` folder. The file contains a `"web-methods"` object where each key represents a web module file using the syntax `backend/{path-to-file}/.jsw`. Under each file key, you define permission objects for each exported function. The `"web-methods"` object must also contain a `"*"` key that defines default permissions for any functions not explicitly configured. Set permissions using the following values: * **Owner-only access**: * `siteOwner.invoke`: `true` * `siteMember.invoke`: `false` * `anonymous.invoke` : `false` * **Site member access**: * `siteOwner.invoke`: `true` * `siteMember.invoke`: `true` * `anonymous.invoke` : `false` * **Anyone can access**: * `siteOwner.invoke`: `true` * `siteMember.invoke` : `true` * `anonymous.invoke`: `true` Here is an example with 3 functions from `helperFunctions.jsw`, each having different permission levels: ```json // permissions.json file { "web-methods": { // Default web method. "*": { "*": { "siteOwner": { "invoke": true }, "siteMember": { "invoke": true }, "anonymous": { "invoke": true } } }, // Web method for the web module. "backend/helperFunctions.jsw": { "calculate": { "siteOwner": { "invoke": true }, "siteMember": { "invoke": true }, "anonymous": { "invoke": true } }, "fetchData": { "siteOwner": { "invoke": true }, "siteMember": { "invoke": false }, "anonymous": { "invoke": false } }, "syncWithServer": { "siteOwner": { "invoke": true }, "siteMember": { "invoke": true }, "anonymous": { "invoke": false } } } } } ``` ::: :::: ## Step 3 | Call the function in the frontend To call a web method from the frontend: 1. Import the exported web method from the web module you created above: ```javascript import { myFunction } from 'backend/weather.web'; ``` 2. Call the imported function: ```js const fromBackend = await myFunction(someValue); ``` Remember, web module functions are always asynchronous. --- > Portal Navigation: > > - Append `.md` to any URL under `https://dev.wix.com/docs/` to get its markdown version. > - Pages are either content pages (article or reference text) or menu pages (a list of links to child pages). > - To get a menu page, truncate any URL to a parent path and append `.md` (e.g. `https://dev.wix.com/docs/sdk.md`, `https://dev.wix.com/docs/sdk/core-modules.md`). > - Top-level index of all portals: https://dev.wix.com/docs/llms.txt > - Full concatenated docs: https://dev.wix.com/docs/llms-full.txt ## Resource: About Backend Events ## Article: Velo Backend Events ## Article Link: https://dev.wix.com/docs/develop-websites/articles/coding-with-velo/backend-code/events/about-backend-events.md ## Article Content: # About Backend Events Many [Velo APIs](https://dev.wix.com/docs/velo.md) include events that trigger when the required conditions are met. Unlike in the frontend, where event handlers are defined in the page code, for backend events, handlers are defined in the `events.js` backend file. > **Note**: When developing websites, you can only handle events using Velo. Handling site events using the JavaScript SDK [isn't currently supported](https://dev.wix.com/docs/develop-websites/articles/coding-with-velo/develop-with-the-sdk/velo-to-sdk-api-mapping.md#velo-apis-you-should-continue-to-use). For example, you might have backend event handlers that trigger when: + An invoice is paid. + A file has been uploaded to the Media Manager. + A form is submitted by a site visitor. Backend events are only triggered for published sites and don't work in preview mode. ## Supported IDEs You can define backend event handlers using: - The [editor](https://dev.wix.com/docs/develop-websites/articles/workspace-tools/velo-workspace/workspaces/wix-studio-working-with-the-code-panel.md) (Wix Studio and Wix Editor) - The [Wix IDE](https://dev.wix.com/docs/develop-websites/articles/workspace-tools/velo-workspace/wix-ide/wix-studio-about-the-wix-ide.md) (Wix Studio) - Your [local IDE](https://dev.wix.com/docs/develop-websites/articles/workspace-tools/developer-tools/git-integration-wix-cli/about-git-integration-wix-cli.md) (Wix Studio and Wix Editor) ## Velo Package Backend Events [Velo packages](https://dev.wix.com/docs/develop-websites/articles/coding-with-velo/packages/working-with-velo-packages.md) are code libraries built with Velo that allow you to add specific functionality to your site, saving you the time you would have spent coding the functionality on your own. Some Velo packages include backend events, which are contained in their own `events.js` files. So if you add a Velo package that includes backend events, you might end up with multiple `events.js` files in several locations. ## Testing and Debugging To test an event handler in preview mode, use [functional testing](https://dev.wix.com/docs/develop-websites/articles/workspace-tools/testing-monitoring/functional-testing/about-functional-testing.md). Functional testing saves you time and effort when building your own system for triggering and testing your backend functions, by allowing you to quickly test backend functions directly in the code editor. See step-by-step instructions on [how to test your backend code](https://dev.wix.com/docs/develop-websites/articles/workspace-tools/testing-monitoring/functional-testing/test-backend-functions-with-functional-testing.md). ## See Also + [Define backend event handlers](https://dev.wix.com/docs/develop-websites/articles/coding-with-velo/backend-code/events/define-backend-event-handlers.md) --- > Portal Navigation: > > - Append `.md` to any URL under `https://dev.wix.com/docs/` to get its markdown version. > - Pages are either content pages (article or reference text) or menu pages (a list of links to child pages). > - To get a menu page, truncate any URL to a parent path and append `.md` (e.g. `https://dev.wix.com/docs/sdk.md`, `https://dev.wix.com/docs/sdk/core-modules.md`). > - Top-level index of all portals: https://dev.wix.com/docs/llms.txt > - Full concatenated docs: https://dev.wix.com/docs/llms-full.txt ## Resource: Define Backend Event Handlers ## Article: Define Backend Event Handlers ## Article Link: https://dev.wix.com/docs/develop-websites/articles/coding-with-velo/backend-code/events/define-backend-event-handlers.md ## Article Content: # Define Backend Event Handlers You can define [backend event](https://dev.wix.com/docs/develop-websites/articles/coding-with-velo/backend-code/events/about-backend-events.md) handlers in the `events.js` backend file. > **Note**: When developing websites, you can only handle events using Velo. Handling site events using the JavaScript SDK [isn't currently supported](https://dev.wix.com/docs/develop-websites/articles/coding-with-velo/develop-with-the-sdk/velo-to-sdk-api-mapping.md#velo-apis-you-should-continue-to-use). ## Step 1 | Add an `events.js` backend file The way that you add an `events.js` file to the backend depends on which IDE you're using. ### Editor 1. Hover over **Backend** in the **Public & Backend** section of the code sidebar. 2. Click the **More Actions** icon ![plus icon](https://wixmp-833713b177cebf373f611808.wixmp.com/images/e45800424595befdc6fe5931a1b7c0b4.png) and then click **Handle backend events**. ![Add events.js](https://wixmp-833713b177cebf373f611808.wixmp.com/images/a1fac75ac6a2e949a10e8098f84d04ea.png) ### Wix IDE or your local IDE Add an `events.js` file to the `src/backend` folder. ## Step 2 | Define a backend event handler To define an event handler in the `events.js` file, export a function using a [supported export syntax](https://dev.wix.com/docs/develop-websites/articles/coding-with-velo/java-script-velo/module-export-syntax.md). The function name should consist of the Wix module and the name of the event, separated by an underscore. Check the **Events** subcategory in most APIs in the [API documentation](https://dev.wix.com/docs/velo.md) to confirm the exact function naming and to see what information is passed to the event handler when it is called. Here is an example of an event handler that [triggers when an invoice is paid](https://dev.wix.com/docs/velo/apis/wix-billing-backend/events/on-invoice-paid.md): ```javascript export function wixBilling_onInvoicePaid(event) { const invoiceId = event.id.id; const email = event.customer.email; // Add your own logic here. } ``` ## Step 3 | Test and debug your function There are two ways to [test your backend event handlers](https://dev.wix.com/docs/develop-websites/articles/coding-with-velo/backend-code/events/about-backend-events.md#testing-and-debugging): + In preview mode, use [functional testing](https://dev.wix.com/docs/develop-websites/articles/workspace-tools/testing-monitoring/functional-testing/test-backend-functions-with-functional-testing.md) to call your event handler function manually. + Publish your site, then trigger the event that activates your event handler. Watch a demo of how to set up backend event handlers: `youtube:https://youtu.be/-LAtdo0mbiY?t=162` --- > Portal Navigation: > > - Append `.md` to any URL under `https://dev.wix.com/docs/` to get its markdown version. > - Pages are either content pages (article or reference text) or menu pages (a list of links to child pages). > - To get a menu page, truncate any URL to a parent path and append `.md` (e.g. `https://dev.wix.com/docs/sdk.md`, `https://dev.wix.com/docs/sdk/core-modules.md`). > - Top-level index of all portals: https://dev.wix.com/docs/llms.txt > - Full concatenated docs: https://dev.wix.com/docs/llms-full.txt ## Resource: About Service Plugins ## Article: Custom App Extensions Using SPIs ## Article Link: https://dev.wix.com/docs/develop-websites/articles/coding-with-velo/integrations/service-plugins-formerly-spis/about-service-plugins.md ## Article Content: # About Service Plugins
**Important:** Some service plugins are in Beta. This means that some aren't yet available to all users, and are subject to change. They also aren't available yet in the SDK.
Service plugins provide a powerful way to expand what your Wix site can do. You can extend and customize using plugins by: - Injecting your own custom logic into an existing, out-of-the-box app flow. Depending on the plugin, you can address certain aspects of a flow or add a new stage in a flow. - Integrating 3rd-party services into app flows on a site. Service plugins let you customize specific parts of flows in apps created by Wix without rebuilding entire features. For example, instead of creating a custom checkout page using the [Checkout API](https://www.wix.com/velo/reference/wix-ecom-backend/checkout), you can use service plugins to inject custom logic at specific points in the existing flow. ## Examples of service plugins **Custom shipping providers:** When you set up a Wix Store, there are a limited number of payment and shipping rates service providers to choose from. If you want to use a provider not currently on the list, you can create a service plugin that allows you to add more shipping rate providers to your store's checkout flow. This type of service plugin involves integrating with a 3rd-party service provider. **Additional checkout fees:** The default eCommerce checkout process doesn't allow you to add additional fees that aren't related to specific line items. You can use a service plugin to add extra fees, like charges for gift wrap or fragile items, to your checkout flow. This type of service plugin involves injecting your own logic into an existing flow in an app created by Wix. ## How service plugins work Service plugins fulfill a kind of contract between your code and existing app flows. You, or a 3rd-party service provider, commit to providing data in a certain format, and the app that manages the flow commits to using this data in its flows at specific points. Each service plugin consists of a set of backend code files that utilize API methods for implementation. Apps created by Wix call the methods automatically at specific points in their flows. The methods receive and return data in a specific format. The returned data is then integrated by the app created by Wix into its flow. The [reference documentation](https://www.wix.com/velo/reference/spis/getting-started) for each method indicates at what point in a flow an app triggers the method. The documentation also outlines the data that must be provided as arguments to the method when it's triggered, and the format of the data that the method must return. Here's how it works: 1. At certain points, an app's activity on your Wix site triggers a call to a service. 2. When triggered, the Wix platform passes the information in the request to the provider. The provider needs this information to provide the service to the Wix platform. 3. Wix processes the request for the service according to the implementation defined in the service plugin files in the backend. 4. The service provider returns the needed information and the Wix platform consumes and/or displays the information. For example: 1. Whenever a customer checks out a cart, the Wix eCommerce app calls the `calculateAdditionalFees()` method. 2. The service provider receives the parameters that it needs from Wix eCommerce, such as the cart and line items. 3. The service provider then returns data about additional fees in a specific structure. The app uses the data received from the method response to display additional fees in a customer's checkout flow. You can add any custom logic to calculate the additional fees as long as the method returns your data in the proper structure. ## Legal notices If you connect to a 3rd-party provider using service plugins, you agree to the [Wix.com Terms of Use](https://www.wix.com/about/terms-of-use). Wix is not responsible for your use of such a 3rd-party provider, and any liability resulting from such use will be your responsibility. ## When to use service plugins vs APIs Without service plugins, if you want to change your out-of-the-box app flow just a little, you might have to rewrite large parts of the flow, such as creating a custom checkout page using the [Wix eCommerce Checkout API](https://www.wix.com/velo/reference/wix-ecom-backend/checkout). This could involve writing many lines of code and creating custom collections. Because service plugins only affect a small part of an app's flow, service plugin methods require fewer lines of code and less maintenance than when working with APIs. So wherever possible, you want to use service plugin methods. For more information, read [Understanding the difference between service plugins and APIs](https://medium.com/wix-engineering/let-others-solve-your-problems-change-your-mindset-from-apis-to-spis-781afa48574f). ## Terminology | Term | Description | | ---- | ----------- | | Service plugins (formerly SPIs and custom extensions) | A feature that lets you extend the services provided on a site using code. You can make these plugins by adding your own custom logic into a flow for an app created by Wix, or by adding data received from a 3rd-party service provider into a flow for an app created by Wix. You implement service plugins by adding files to backend code files to a site. These files contain code for your custom logic method calls that trigger at specific points in the flow for the app created by Wix. These custom logic method calls use a type of API that defines a service, but leaves the implementation of that service to service providers. | | Service provider | The entity providing a service, for example, a shipping company. The service is either a custom service or a 3rd-party service. | | Wix user | You, the Wix user or collaborator responsible for developing the code needed for the service plugin. Your code uses your own custom logic or accesses a service provided by a 3rd-party service provider. | | Service | Any additional functionality you add to the site that's not part of the original flow in an app created by Wix. The Wix user codes the interface to the service with the service plugin feature. The Wix user or a 3rd-party can write the service. If a 3rd-party provides the service, the Wix user writes the code for the interface by [accessing 3rd-party APIs](https://support.wix.com/en/article/velo-accessing-3rd-party-services-with-the-fetch-api) with [wix-fetch](https://www.wix.com/velo/reference/wix-fetch), and/or using [npm packages](https://dev.wix.com/docs/develop-websites/articles/coding-with-velo/packages/about-npm-packages.md). | | App created by Wix | The app created by Wix whose functionality you extend. For example, Wix eCommerce has several Service Plugins available for customizing its flows. | ## See also - [Implement service plugins](https://dev.wix.com/docs/develop-websites/articles/coding-with-velo/integrations/service-plugins-formerly-spis/implement-service-plugins.md) - [Understanding the difference between service plugins and APIs](https://medium.com/wix-engineering/let-others-solve-your-problems-change-your-mindset-from-apis-to-spis-781afa48574f) - [Available service plugins](https://dev.wix.com/docs/develop-websites/articles/coding-with-velo/integrations/service-plugins-formerly-spis/available-service-plugins.md) - [Service plugins reference documentation](https://www.wix.com/velo/reference/spis/getting-started) --- > Portal Navigation: > > - Append `.md` to any URL under `https://dev.wix.com/docs/` to get its markdown version. > - Pages are either content pages (article or reference text) or menu pages (a list of links to child pages). > - To get a menu page, truncate any URL to a parent path and append `.md` (e.g. `https://dev.wix.com/docs/sdk.md`, `https://dev.wix.com/docs/sdk/core-modules.md`). > - Top-level index of all portals: https://dev.wix.com/docs/llms.txt > - Full concatenated docs: https://dev.wix.com/docs/llms-full.txt ## Resource: Implement Service Plugins ## Article: Implementing Service Plugins ## Article Link: https://dev.wix.com/docs/develop-websites/articles/coding-with-velo/integrations/service-plugins-formerly-spis/implement-service-plugins.md ## Article Content: # Implement Service Plugins Implement [service plugins](https://dev.wix.com/docs/develop-websites/articles/coding-with-velo/integrations/service-plugins-formerly-spis/about-service-plugins.md) to extend the functionality of apps created by Wix on a site. > **Note:** You currently can't add the service plugin feature to a site when using Git Integration & CLI, or using the SDK. The process of implementing a service plugin has 5 steps: 1. [Creating a service plugin on a site](#step-1--create-a-service-plugin-on-a-site) 2. [Implementing and testing your custom code](#step-2--implement-your-service-plugin-with-custom-code) 3. [Testing the service plugin](#step-3--test-the-service-plugin) 4. [Deploying the service plugin](#step-4--deploy-the-extension) 5. [Removing an extension](#step-5--optional-remove-an-extension) The end result is a functional service plugin that extends a site's capabilities at specific points in app flows. For detailed instructions, see the tutorial for each [available service plugin](https://dev.wix.com/docs/develop-websites/articles/coding-with-velo/integrations/service-plugins-formerly-spis/available-service-plugins.md). ## Step 1 | Create a service plugin on a site This step adds a service plugin to a site and creates the necessary folder structure. At the end of this step, you'll have a service plugin folder with template files ready for customization. To create a service plugin on a site: 1. If necessary, add the relevant app to a site, such as Wix Stores. 2. Go to the **Public & Backend** section of the **Code** sidebar. 3. Hover over **Service Plugins**, and click the **Add** icon to add the integration that you want. 4. Follow the prompts to add the plugin, and accept any terms and conditions that display. 5. Enter a name for your integration, and click **Add & Edit Code**. The name can't contain spaces or special characters. > **Note:** If you're using the Wix IDE, your plugin appears in the `/src/backend/service-plugin/` folder. If your service plugin doesn't appear, try refreshing both the editor and the Wix IDE. ## Step 2 | Implement your service plugin with custom code This step involves writing the custom logic for your service plugin in the generated template files. At the end of this step, you'll have functional code that implements your service plugin's logic. To implement your service plugin with custom code: 1. Locate the folder created in the previous step under **Service Plugins** in the **Public & Backend** section of the **Code** sidebar. The folder name is based on the plugin you chose and contains 2 files: `-config.js` and `.js`. 2. Find the default extension files and implement your custom code: - `-config.js`: The code in this file generally defines a method, `getConfig()`, that returns an object containing values used to configure your extension. Wix calls this method when you publish a site, and changes to the configuration don't take effect until you publish the site. - `.js`: The code in this file generally defines a method named after the purpose of the service plugin, such as `getShippingRates()` or `getFees()`. Wix calls this method to retrieve the data provided by the service plugin. For guidelines for writing your code, see the tutorial for each [available service plugin](https://dev.wix.com/docs/develop-websites/articles/coding-with-velo/integrations/service-plugins-formerly-spis/about-service-plugins.md). > **Note:** We recommend you use the standard export syntax contained in the code files when they're created. If you wish to use a different export syntax, for information about supported formats, see [Module Export Syntax](https://dev.wix.com/docs/develop-websites/articles/coding-with-velo/java-script-velo/module-export-syntax.md). ## Step 3 | Test the service plugin Before deploying your service plugin, test it thoroughly to ensure it works correctly and handles various scenarios. Testing prevents production issues and validates your implementation. At the end of this step, you'll have verified that your service plugin functions as expected and handles edge cases properly. To test your service plugin: 1. **Start with functional testing**: Test your service plugin methods directly in the code editor using [functional testing](https://dev.wix.com/docs/develop-websites/articles/workspace-tools/testing-monitoring/functional-testing/test-backend-functions-with-functional-testing.md). This lets you verify your logic without publishing your site. 2. **Add logging for debugging**: Include `console.log()` statements in your service plugin code to track execution flow and identify issues. After publishing, view these logs in [Wix Logs](https://dev.wix.com/docs/develop-websites/articles/workspace-tools/developer-tools/logs/about-logs.md). 3. **Validate method responses**: Verify that your service plugin methods return properly formatted responses matching the expected schema for your specific service plugin type. 4. **Test edge cases and error handling**: Ensure your code properly handles: - Invalid or missing input parameters - Network timeouts or failures (for external API calls) - Empty or null data scenarios - Large data sets or high-volume requests 5. **Verify configuration (if applicable)**: If your service plugin uses a config file, test that the `getConfig()` method returns valid configuration data. 6. **Test on a test site before production**: After publishing your site once, test service plugin changes on a [test site](https://support.wix.com/en/article/about-test-sites) before deploying to production. Note: You must publish your production site at least once after implementing the service plugin for it to work on test sites. ## Step 4 | Deploy the extension This step publishes your service plugin to make it active on a site. At the end of this step, your service plugin is live and functional. After your code files are ready, publish the site to deploy the service plugin extension. ## Step 5 | (Optional) Remove an extension This optional step removes a service plugin from a site if you no longer need it. At the end of this step, the service plugin is completely removed from a site. To remove an extension: 1. In the **Public & Backend** section of the **Code** sidebar, under **Service Plugins**, hover over the extension's folder and click the **More Actions** icon. 2. Click **Delete**. ## See also - [About Service Plugins](https://dev.wix.com/docs/develop-websites/articles/coding-with-velo/integrations/service-plugins-formerly-spis/about-service-plugins.md) - [Available Service Plugins](https://dev.wix.com/docs/develop-websites/articles/coding-with-velo/integrations/service-plugins-formerly-spis/available-service-plugins.md) - [Understanding the difference between service plugins and APIs](https://medium.com/wix-engineering/let-others-solve-your-problems-change-your-mindset-from-apis-to-spis-781afa48574f) - [Service plugins reference documentation](https://www.wix.com/velo/reference/spis/getting-started) --- > Portal Navigation: > > - Append `.md` to any URL under `https://dev.wix.com/docs/` to get its markdown version. > - Pages are either content pages (article or reference text) or menu pages (a list of links to child pages). > - To get a menu page, truncate any URL to a parent path and append `.md` (e.g. `https://dev.wix.com/docs/sdk.md`, `https://dev.wix.com/docs/sdk/core-modules.md`). > - Top-level index of all portals: https://dev.wix.com/docs/llms.txt > - Full concatenated docs: https://dev.wix.com/docs/llms-full.txt ## Resource: Available Service Plugins ## Article: Available Service Plugins ## Article Link: https://dev.wix.com/docs/develop-websites/articles/coding-with-velo/integrations/service-plugins-formerly-spis/available-service-plugins.md ## Article Content: # Available service plugins The following service plugins are available: | Service Plugin | Description | Resources | | -------------- | ----------- | --------- | | Bookings Custom Pricing | Customize pricing for bookings to offer varied pricing to the bookings purchase flow. | [Tutorial](https://dev.wix.com/docs/develop-websites/articles/code-tutorials/wix-bookings/tutorial-bookings-pricing-service-plugin.md), [Reference](https://www.wix.com/velo/reference/spis/wix-bookings/bookings-custom-pricing) | | External Database Collection | Use external databases. | [Reference](https://dev.wix.com/docs/velo/events-service-plugins/data/service-plugins/external-database-collection-legacy/introduction.md) | | Billing Tax Calculation | Customize your tax calculations. | [Reference](https://dev.wix.com/docs/velo/events-service-plugins/billing/service-plugins/billing-tax-calculation/introduction.md) | | Automations Action | Write a custom action instead of selecting a pre-made action. | [Reference](https://dev.wix.com/docs/velo/events-service-plugins/automations/service-plugins/automations-actions/introduction.md) | | eCommerce Additional Fees | Add additional fees for things like location and special handling to your store's checkout flow. | [Tutorial](https://dev.wix.com/docs/develop-websites/articles/code-tutorials/wix-e-commerce-stores/e-commerce-additional-fees-service-plugin.md), [Reference](https://www.wix.com/velo/reference/spis/wix-ecom/ecom-additional-fees) | | eCommerce Catalog (Beta) | Define your own custom catalog and how it interacts with the eCommerce purchase flow. | [Tutorial](https://dev.wix.com/docs/develop-websites/articles/code-tutorials/wix-e-commerce-stores/e-commerce-catalog-service-plugin.md), [Reference](https://www.wix.com/velo/reference/spis/wix-ecom/ecom-catalog) | | eCommerce Discount Triggers | Apply discount rules to a site visitor's cart and checkout. | [Tutorial](https://dev.wix.com/docs/develop-websites/articles/code-tutorials/wix-e-commerce-stores/tutorial-custom-discount-trigger-service-plugin.md), [Reference](https://dev.wix.com/docs/velo/events-service-plugins/e-commerce/service-plugins/ecom-custom-discount-triggers/introduction.md) | | eCommerce Payment Settings | Apply custom payment settings during the payment process of an order. | [Tutorial](https://dev.wix.com/docs/develop-websites/articles/code-tutorials/wix-e-commerce-stores/tutorial-payment-settings-service-plugin.md), [Reference](https://www.wix.com/velo/reference/spis/wix-ecom/ecom-payment-settings) | | eCommerce Shipping Rates | Provide custom shipping rates fees to your store's checkout flow. | [Tutorial](https://dev.wix.com/docs/develop-websites/articles/code-tutorials/wix-e-commerce-stores/e-commerce-shipping-rates-service-plugin.md), [Reference](https://www.wix.com/velo/reference/spis/wix-ecom/ecom-shipping-rates) | | eCommerce Validations | Validate a site visitor's cart and checkout. | [Tutorial](https://dev.wix.com/docs/develop-websites/articles/code-tutorials/wix-e-commerce-stores/tutorial-validations-service-plugin.md), [Reference](https://www.wix.com/velo/reference/spis/wix-ecom/ecom-validations) | | Payments Payment Provider | Provides functionality for integrating a site with payment providers not currently supported by Wix. | [Tutorial](https://dev.wix.com/docs/develop-websites/articles/code-tutorials/wix-pay/tutorial-payment-provider-service-plugin.md), [Reference](https://www.wix.com/velo/reference/spis/wix-payments/payment-provider) | | Form Submission | Provides additional form submission validation. | [Tutorial](https://dev.wix.com/docs/develop-websites/articles/code-tutorials/wix-forms/tutorial-form-submission-service-plugin.md), [Reference](https://dev.wix.com/docs/velo/events-service-plugins/forms/service-plugins/form-submission/introduction.md) | --- > Portal Navigation: > > - Append `.md` to any URL under `https://dev.wix.com/docs/` to get its markdown version. > - Pages are either content pages (article or reference text) or menu pages (a list of links to child pages). > - To get a menu page, truncate any URL to a parent path and append `.md` (e.g. `https://dev.wix.com/docs/sdk.md`, `https://dev.wix.com/docs/sdk/core-modules.md`). > - Top-level index of all portals: https://dev.wix.com/docs/llms.txt > - Full concatenated docs: https://dev.wix.com/docs/llms-full.txt ## Resource: About Custom Site APIs ## Article: Exposing a Site API with HTTP Functions ## Article Link: https://dev.wix.com/docs/develop-websites/articles/coding-with-velo/integrations/exposing-services/about-custom-site-apis.md ## Article Content: # About Custom Site APIs Custom site APIs allow you to expose your site's functionality externally. This means that you, or other people, can access your site's functionality by calling your custom site APIs. Write and export [HTTP functions](#http-functions) to define custom site APIs. When you and others call the custom site APIs you defined, the corresponding HTTP function runs and the API responds with the HTTP function's return value.
Important: Custom site APIs are only intended for use in server-to-server communications. For example, don't use custom site APIs to set a cookie on a site visitor's browser as you may no longer be in compliance with applicable data privacy regulations.
For example, you might use custom site APIs to: - Integrate your site with an automation tool, such as [Zapier](https://zapier.com/) or [IFTTT](https://ifttt.com/). - Receive notifications or information from external webhooks or services. - Share a backend between your site and another application. ## Supported IDEs You can write http functions using: + The [editor](https://dev.wix.com/docs/develop-websites/articles/workspace-tools/velo-workspace/workspaces/wix-studio-working-with-the-code-panel.md) (Wix Studio and Wix Editor). + The [Wix IDE](https://dev.wix.com/docs/develop-websites/articles/workspace-tools/velo-workspace/wix-ide/wix-studio-about-the-wix-ide.md) (Wix Studio). + Your [local IDE](https://dev.wix.com/docs/develop-websites/articles/workspace-tools/developer-tools/git-integration-wix-cli/about-git-integration-wix-cli.md) (Wix Studio and Wix Editor). ## HTTP functions The main components of an HTTP function are: - [HTTP method](#http-method) - [Function name](#function-name) - [Request parameter](#request-parameter) - [Functionality](#functionality) - [Response object](#response-object) ```js export function _ (request) { // functionality return response; } ``` ### HTTP method HTTP functions support the following HTTP methods: - `GET` - `POST` - `PUT` - `DELETE` To learn more, see [Methods for HTTP Functions](https://dev.wix.com/docs/develop-websites/articles/coding-with-velo/integrations/exposing-services/methods-for-http-functions.md). ### Function name The function name is the unique identifier for your HTTP function in your site. It is also used to identify the function in the custom site API call. ### Request parameter The [request parameter](https://dev.wix.com/docs/velo/velo-only-apis/wix-http-functions/wix-http-function-request/introduction.md) is an object that is passed to the HTTP function. Use the request parameter for defining the details needed to process the HTTP function when it is called. The details generally include the request body, headers, URL, and other information. For all supported properties, see [`WixHttpFunctionRequest`](https://dev.wix.com/docs/velo/velo-only-apis/wix-http-functions/wix-http-function-request/introduction.md). ### Functionality Add code inside your HTTP function to run when your custom site API is called. Inside your HTTP function, you have full access to the full range of [Velo](https://dev.wix.com/docs/velo.md) and [SDK](https://dev.wix.com/docs/sdk/articles/get-started/about-the-wix-java-script-sdk.md) APIs and you can import and call functions defined elsewhere on your site. ### Response object Your HTTP function should return a [response object](https://dev.wix.com/docs/velo/velo-only-apis/wix-http-functions/wix-http-function-response/introduction.md). This is the response provided by the custom site API when it's called. There are several functions you can use to create a response object. Find them in the Velo [`wix-http-functions` module](https://dev.wix.com/docs/velo/velo-only-apis/wix-http-functions/introduction.md). ## Authentication context Authentication context is information about who is calling an API. Calling Wix APIs with authentication context allows you to use functions that return different responses based on who calls them, such as [`getCurrentMember()`](https://dev.wix.com/docs/sdk/backend-modules/members/members/get-current-member.md). Depending on whether you need to include [authentication context](#authentication-context) in your request, there are different ways to call your custom site API: - [With authentication context](#with-authentication-context) - [Without authentication context](#without-authentication-context) ### With authentication context Call your API using the HTTP functions [REST API](https://dev.wix.com/docs/rest/assets/http-functions/rest/introduction.md) or [SDK module](https://dev.wix.com/docs/sdk/backend-modules/http-functions/functions/introduction.md). Provide these APIs with your HTTP function's details through the API's parameters and authorization. You must publish your site for your custom site APIs to be available through these APIs. ### Without authentication context Access your custom site APIs with different endpoints depending on the context in which you want to use them: - Test sites - Sites being built with [git integration](https://dev.wix.com/docs/develop-websites/articles/workspace-tools/developer-tools/git-integration-wix-cli/about-git-integration-wix-cli.md) - Latest code in the editor - Production Learn more about [custom site API Calls](https://dev.wix.com/docs/develop-websites/articles/coding-with-velo/integrations/exposing-services/site-api-calls.md). ## HTTP Functions APIs There are different Wix APIs for exposing and calling custom site APIs: - [Velo HTTP Functions API](https://dev.wix.com/docs/velo/velo-only-apis/wix-http-functions/introduction.md): Use this API to write and expose your custom site APIs. - [SDK](https://dev.wix.com/docs/sdk/backend-modules/http-functions/functions/introduction.md) and [REST](https://dev.wix.com/docs/rest/assets/http-functions/rest/introduction.md) HTTP Functions API: Use these APIs to call your custom site APIs with [authentication context](#authentication-context). ## See also - [Write an HTTP function](https://dev.wix.com/docs/develop-websites/articles/coding-with-velo/integrations/exposing-services/write-an-http-function.md) - [Methods for HTTP functions](https://dev.wix.com/docs/develop-websites/articles/coding-with-velo/integrations/exposing-services/methods-for-http-functions.md) - [Custom site API calls](https://dev.wix.com/docs/develop-websites/articles/coding-with-velo/integrations/exposing-services/site-api-calls.md) --- > Portal Navigation: > > - Append `.md` to any URL under `https://dev.wix.com/docs/` to get its markdown version. > - Pages are either content pages (article or reference text) or menu pages (a list of links to child pages). > - To get a menu page, truncate any URL to a parent path and append `.md` (e.g. `https://dev.wix.com/docs/sdk.md`, `https://dev.wix.com/docs/sdk/core-modules.md`). > - Top-level index of all portals: https://dev.wix.com/docs/llms.txt > - Full concatenated docs: https://dev.wix.com/docs/llms-full.txt ## Resource: Write an HTTP Function ## Article: Write an HTTP Function ## Article Link: https://dev.wix.com/docs/develop-websites/articles/coding-with-velo/integrations/exposing-services/write-an-http-function.md ## Article Content: # Write an HTTP Function HTTP functions define [custom site APIs](https://dev.wix.com/docs/develop-websites/articles/coding-with-velo/integrations/exposing-services/about-custom-site-apis.md), which allow you to expose your site's functionality externally. This means that you, or other people, can access your site's functionality by calling your custom site APIs. HTTP functions determine the custom site API's HTTP method, endpoint, parameters, functionality, and response. [Calling a custom site API](https://dev.wix.com/docs/develop-websites/articles/coding-with-velo/integrations/exposing-services/site-api-calls.md) triggers your HTTP function to run. ## Step 1 | Create the file to host your HTTP functions Create a file called `http-functions.js` in your site's backend folder: 1. Start coding: - **Wix Studio**: Click on the **Code** icon in the left sidebar to open the code panel. - **Wix Editor**: Turn on Dev Mode. 1. Navigate to **Backend & Public** > **Backend**, and then create a file called `http-functions.js`.
Tip: You can also create the file with the following shortcut: 1. Click on the + next to **Backend**. 1. Click **Expose site API**.
## Step 2 | Create and export your HTTP function Your function's name must include the following parts joined by an underscore: - The [method](https://dev.wix.com/docs/develop-websites/articles/coding-with-velo/integrations/exposing-services/methods-for-http-functions.md) that should be used when calling your custom site API. - The [`functionName`](https://dev.wix.com/docs/develop-websites/articles/coding-with-velo/integrations/exposing-services/site-api-calls.md#variables) that should be used in your custom site API's URL. ```js export function _ () {} ``` ## Step 3 | Code your HTTP function In your HTTP function, add the code you want to run when your custom site API is called. You can access the full range of functionality that you normally can when coding on a Wix site, including Wix's [Velo](https://dev.wix.com/docs/velo.md) and [SDK](https://dev.wix.com/docs/sdk/.md) APIs. As with all API calls, you can interact with a custom site API call in the following ways: - [Request](#request) - [Response](#response) ### Request Use the `request` parameter to provide your HTTP function with information from your custom site API call, including the `body`, `headers`, and `url`. For all supported properties, see [`WixHttpFunctionRequest`](https://dev.wix.com/docs/velo/velo-only-apis/wix-http-functions/wix-http-function-request/introduction.md). ```js export function _ (request) {} ``` You can then access the `request` object in the function in the same way as you'd access a parameter in any JavaScript function. ### Response Your HTTP Function should return a [response object](https://dev.wix.com/docs/velo/velo-only-apis/wix-http-functions/wix-http-function-response/introduction.md). This is the response sent when the custom site API is called. There are several functions you can use to create a response object. Find them in the Velo [`wix-http-functions` module](https://dev.wix.com/docs/velo/velo-only-apis/wix-http-functions/introduction.md). The response object supports the following properties: - `body`: Defined by you in the response function. - `headers`: Defined by you in the response function. - `status`: Defined by the response function. ## Step 4 | Keep your site secure (optional) HTTP functions expose your site's data and functionality to anyone who calls your custom site API, so it's recommended to authenticate who is calling your custom site API. One way to do so is by retrieving a secret key from the authentication header in the API request. This uses the [Secrets Manager](https://dev.wix.com/docs/develop-websites/articles/workspace-tools/developer-tools/secrets-manager/about-the-secrets-manager.md) and [`wix-secrets-backend`](https://dev.wix.com/docs/velo/apis/wix-secrets-backend/introduction.md). For example: ```js import { badRequest } from "wix-http-functions"; import { getSecret } from "wix-secrets-backend"; // This function compares the authorization key provided in the // request headers with the secret key stored in the Secrets Manager. async function isPermitted(headers) { try { const authHeader = headers.auth; const sharedAuthKey = await getSecret("secretEmail"); if (authHeader === sharedAuthKey) { return true; } return false; } catch (err) { console.error(err); return false; } } export async function get_functionName(request) { const headers = request.headers; if (!(await isPermitted(headers))) { const options = { body: { error: "Not authorized", }, headers: { "Content-Type": "application/json", }, }; return badRequest(options); } // Now add your code for authorized requests. } ``` > **Note:** If another Wix site is sending requests to your endpoints, you can use the [HMAC Authentication](https://dev.wix.com/docs/velo/articles/velo-package-readmes/wix-http-functions-hmac-authentication.md) Velo package for even more security. ## Step 5 | Debug your code Debug HTTP functions by adding `console.log()` calls to your function's code. The information you log appears in the function output when using [Functional Testing](https://dev.wix.com/docs/develop-websites/articles/workspace-tools/testing-monitoring/functional-testing/about-functional-testing.md) and in your site's [Logs](https://dev.wix.com/docs/develop-websites/articles/workspace-tools/testing-monitoring/testing-troubleshooting/about-debugging-your-code.md#debugging-with-wix-logs). The information logged by code that runs on the backend can also be viewed as [Wix Logs](https://dev.wix.com/docs/develop-websites/articles/workspace-tools/developer-tools/logs/about-logs.md). Wix Logs are accessible via [**Developer Tools > Logging Tools**](https://www.wix.com/my-account/site-selector/?buttonText=Select%20Site&title=Select%20a%20Site&autoSelectOnSingleSite=true&actionUrl=https:%2F%2Fwww.wix.com%2Fdashboard%2F%7B%7BmetaSiteId%7D%7D%2Fdeveloper-tools/site-events?referralInfo=sidebar) on your site's dashboard. ## See also - [About custom site APIs](https://dev.wix.com/docs/develop-websites/articles/coding-with-velo/integrations/exposing-services/about-custom-site-apis.md) - [Methods for HTTP functions](https://dev.wix.com/docs/develop-websites/articles/coding-with-velo/integrations/exposing-services/methods-for-http-functions.md) - [Custom site API calls](https://dev.wix.com/docs/develop-websites/articles/coding-with-velo/integrations/exposing-services/site-api-calls.md) --- > Portal Navigation: > > - Append `.md` to any URL under `https://dev.wix.com/docs/` to get its markdown version. > - Pages are either content pages (article or reference text) or menu pages (a list of links to child pages). > - To get a menu page, truncate any URL to a parent path and append `.md` (e.g. `https://dev.wix.com/docs/sdk.md`, `https://dev.wix.com/docs/sdk/core-modules.md`). > - Top-level index of all portals: https://dev.wix.com/docs/llms.txt > - Full concatenated docs: https://dev.wix.com/docs/llms-full.txt ## Resource: Methods for HTTP Functions ## Article: Methods for HTTP Functions ## Article Link: https://dev.wix.com/docs/develop-websites/articles/coding-with-velo/integrations/exposing-services/methods-for-http-functions.md ## Article Content: # Methods for HTTP Functions Each HTTP function contains a method definition that is used to call the corresponding [custom site API](https://dev.wix.com/docs/develop-websites/articles/coding-with-velo/integrations/exposing-services/expose-a-site-api-with-http-functions.md). The method is defined in the function declaration: ```js export function _(request) { } ``` HTTP functions support the following method declarations: - [`get`](#get) - [`post`](#post) - [`put`](#put) - [`delete`](#delete) - [`use`](#use) ## Methods ### `get` Calls your custom site API using the HTTP `GET` method. Usually, `GET` methods are used only to retrieve a resource. If the resource is found, your function should respond with a [200 (OK) status code](https://dev.wix.com/docs/velo/api-reference/wix-http-functions/ok.md) and the requested resource. Learn more about [`get` HTTP functions](https://dev.wix.com/docs/velo/api-reference/wix-http-functions/get.md). #### Example: Create a GET HTTP function that queries a collection to find items based on the path of the request ```js import { ok, notFound, serverError } from "wix-http-functions"; import wixData from "wix-data"; export function get_myFunction(request) { let options = { headers: { "Content-Type": "application/json", }, }; // Query a collection to find matching items. return ( wixData .query("myUserCollection") .eq("firstName", request.path[0]) .eq("lastName", request.path[1]) .find() .then((results) => { // Matching items are found. if (results.items.length > 0) { options.body = { items: results.items, }; return ok(options); } // No matching items are found. options.body = { error: `'${request.path[0]} ${request.path[1]}' was not found`, }; return notFound(options); }) // Something went wrong. .catch((error) => { options.body = { error: error, }; return serverError(options); }) ); } ``` ### `post` Calls your custom site API using the HTTP `POST` method. Usually, `POST` methods are used to create a new resource. If the resource is successfully created, your function should respond with a [201 (Created) status code](https://dev.wix.com/docs/velo/api-reference/wix-http-functions/created.md) and a reference to the created resource. Learn more about [`post` HTTP functions](https://dev.wix.com/docs/velo/api-reference/wix-http-functions/post.md). #### Example: Create a POST HTTP function that inserts an item from the request's body into a collection ```js import { created, serverError } from "wix-http-functions"; import wixData from "wix-data"; export function post_myFunction(request) { let options = { headers: { "Content-Type": "application/json", }, }; // Get the new item from the request body. return ( request.body .text() .then((body) => { // Insert the item in a collection. return wixData.insert("myUserCollection", JSON.parse(body)); }) .then((results) => { options.body = { inserted: results, }; return created(options); }) // Something went wrong. .catch((error) => { options.body = { error: error, }; return serverError(options); }) ); } ``` ### `put` Calls your custom site API using the HTTP `PUT` method. Usually, `PUT` methods are used to update a resource. If the resource is successfully updated, your function should respond with a [200 (OK) status code](https://dev.wix.com/docs/velo/api-reference/wix-http-functions/ok.md). If the resource didn't exist so it was created, your function should respond with a [201 (Created) status code](https://dev.wix.com/docs/velo/api-reference/wix-http-functions/created.md). Learn more about [`put` HTTP functions](https://dev.wix.com/docs/velo/api-reference/wix-http-functions/put.md). #### Example: Create a PUT HTTP function that updates an item from the request's body in a collection ```js import { ok, serverError } from "wix-http-functions"; import wixData from "wix-data"; export function put_myFunction(request) { let options = { headers: { "Content-Type": "application/json", }, }; // Get the item from the request body. return ( request.body .text() .then((body) => { // Update the item in a collection. return wixData.update("myUserCollection", JSON.parse(body)); }) .then((results) => { options.body = { inserted: results, }; return ok(options); }) // Something went wrong. .catch((error) => { options.body = { error: error, }; return serverError(options); }) ); } ``` ### `delete` Calls your custom site API using the HTTP `DELETE` method. Usually, `DELETE` methods are used to delete a resource. If the resource is successfully deleted, your function should respond with a [200 (OK) status code](https://dev.wix.com/docs/velo/api-reference/wix-http-functions/ok.md). Learn more about [`delete` HTTP functions](https://dev.wix.com/docs/velo/api-reference/wix-http-functions/delete.md). #### Example: Create a DELETE HTTP function that deletes an item from a collection based on the path of the request ```js import { ok, serverError } from "wix-http-functions"; import wixData from "wix-data"; export function delete_myFunction(request) { let options = { headers: { "Content-Type": "application/json", }, }; // delete the item from a collection return ( wixData .remove("myUserCollection", request.path[1]) .then((results) => { options.body = { deleted: results, }; return ok(options); }) // something went wrong .catch((error) => { options.body = { error: error, }; return serverError(options); }) ); } ``` ### `use` Calls your custom site API using any HTTP method, unless there is another function with the same name defined for that specific HTTP method. For example, if you create 2 HTTP functions, called `get_myFunction` and `use_myFunction`, `GET` calls to `myFunction` will be handled by `get_myFunction`, but `POST`, `PUT`, and `DELETE` calls to `myFunction` will be handled by `use_myFunction`. Learn more about [`use` HTTP functions](https://dev.wix.com/docs/velo/api-reference/wix-http-functions/use.md). ## See also - [About custom site API](https://dev.wix.com/docs/develop-websites/articles/coding-with-velo/integrations/exposing-services/expose-a-site-api-with-http-functions.md) - [Write an HTTP function](https://dev.wix.com/docs/develop-websites/articles/coding-with-velo/integrations/exposing-services/write-an-http-function.md) - [Custom site API calls](https://dev.wix.com/docs/develop-websites/articles/coding-with-velo/integrations/exposing-services/site-api-calls.md) --- > Portal Navigation: > > - Append `.md` to any URL under `https://dev.wix.com/docs/` to get its markdown version. > - Pages are either content pages (article or reference text) or menu pages (a list of links to child pages). > - To get a menu page, truncate any URL to a parent path and append `.md` (e.g. `https://dev.wix.com/docs/sdk.md`, `https://dev.wix.com/docs/sdk/core-modules.md`). > - Top-level index of all portals: https://dev.wix.com/docs/llms.txt > - Full concatenated docs: https://dev.wix.com/docs/llms-full.txt ## Resource: Site API Calls ## Article: Site API Calls ## Article Link: https://dev.wix.com/docs/develop-websites/articles/coding-with-velo/integrations/exposing-services/site-api-calls.md ## Article Content: # Custom Site API Calls Use the [endpoints](#endpoints) below to call your HTTP functions through custom site APIs. Call these endpoints with the [method](https://dev.wix.com/docs/develop-websites/articles/coding-with-velo/integrations/exposing-services/methods-for-http-functions.md) defined in your HTTP function. Make sure to define your [variables](#variables) correctly for the function.
Important: The endpoints in this article call custom site APIs without [authentication context](https://dev.wix.com/docs/develop-websites/articles/coding-with-velo/integrations/exposing-services/about-custom-site-apis.md). You can [call your custom site APIs with authentication context](https://dev.wix.com/docs/develop-websites/articles/coding-with-velo/integrations/exposing-services/about-custom-site-apis.md) using the HTTP Functions [REST API](https://dev.wix.com/docs/rest/assets/http-functions/rest/introduction.md) or [SDK module](https://dev.wix.com/docs/sdk/backend-modules/http-functions/functions/introduction.md).
## Variables You need to define the following variables to construct your API calls. ### `baseUrl` The base URL of the site hosting the HTTP functions: - **Premium sites**: `https://www.` - **Free sites**: `https://.wixsite.com/` > **Note:** The top level domain for free sites may not be `.com`. For example, for UK based sites, it may be `.co.uk`. ### `functionName` The name of the HTTP function your custom site API calls without its method prefix. For example, for an HTTP function defined by `export function get_myFunction(request) { }`, the `functionName` is `myFunction`. ## Endpoints Use the following endpoints to call your custom site APIs. ### Production Accesses the latest code published to the production site: `/_functions/` ### Test sites Accesses the latest code published to a [test site](https://support.wix.com/en/article/about-test-sites): `/_functions/?rc=test-site` ### Sites using [Git Integration](https://dev.wix.com/docs/develop-websites/articles/workspace-tools/developer-tools/git-integration-wix-cli/about-git-integration-wix-cli.md) Accesses the code pushed in the specified branch (`branchId`) in the specified commit hash (`revisionNumber`): `/_functions/?siteRevision=&branchId=` ### Editor preview Accesses the latest code in the site editor: `/_functions-dev/` > **Note:** You must [create a test site](https://support.wix.com/en/article/test-sites-creating-a-test-site) to use this endpoint. ## See also - [About custom site APIs](https://dev.wix.com/docs/develop-websites/articles/coding-with-velo/integrations/exposing-services/about-custom-site-apis.md) - [Write an HTTP function](https://dev.wix.com/docs/develop-websites/articles/coding-with-velo/integrations/exposing-services/write-an-http-function.md) - [Methods for HTTP functions](https://dev.wix.com/docs/develop-websites/articles/coding-with-velo/integrations/exposing-services/methods-for-http-functions.md) --- > Portal Navigation: > > - Append `.md` to any URL under `https://dev.wix.com/docs/` to get its markdown version. > - Pages are either content pages (article or reference text) or menu pages (a list of links to child pages). > - To get a menu page, truncate any URL to a parent path and append `.md` (e.g. `https://dev.wix.com/docs/sdk.md`, `https://dev.wix.com/docs/sdk/core-modules.md`). > - Top-level index of all portals: https://dev.wix.com/docs/llms.txt > - Full concatenated docs: https://dev.wix.com/docs/llms-full.txt ## Resource: About Packages ## Article: About Packages ## Article Link: https://dev.wix.com/docs/develop-websites/articles/coding-with-velo/packages/about-packages.md ## Article Content: # Velo: About Packages When writing code, you often need to build some complex feature or functionality. Sometimes you discover that someone else already wrote and implemented the functionality that you need. Instead of reinventing the wheel and writing the same code over again, you can find a pre-built package or app written by others and incorporate it into your own code. Using pre-built packages, also known as code libraries, is a great way to minimize your development time and the amount of code you need to write. There are 2 types of pre-built packages available to add to your Velo site: * [Velo Packages](https://dev.wix.com/docs/develop-websites/articles/coding-with-velo/packages/working-with-velo-packages.md) * [npm Packages](https://dev.wix.com/docs/develop-websites/articles/coding-with-velo/packages/about-npm-packages.md) You can add packages to your site in the Package Manager, which you can access from the **Packages & Apps** section of the Code sidebar (Wix Editor) or the Code sidebar (Wix Studio). To add a package, click **Install Velo Package** or **Install packages from npm**. Then select the package you want and click **Install**. For more information, see the articles for each package type. If there isn't already a package that meets your needs, you can also create your own [custom app](#custom-apps) to reuse code and other functionality across multiple sites. ### Velo Packages Built using the Velo APIs, Velo packages are created specifically for Wix websites and work seamlessly with Wix elements and apps. Unlike npm packages, Velo package use cases are very specific to your Wix site. A Velo package can include backend code files, public code files, and npm packages. A Velo package's functionality is available for use through its exported functions. An editable **config.json** file may also be included for defining specific settings for a package. You can import the functions and use them in your site code just like you import and use exported functions that you write in .js and .web.js files. > **Note:** If a Velo package includes an npm package, you won't see the npm package in the npm section of the Code sidebar (Wix Editor) or Code sidebar (Wix Studio). Velo packages built by Wix allow you to add popular complex functionality to your site without spending hours writing code. Choose the Velo package you want, and import it on each site where you want to add the specific functionality. You can view all the code used to implement a package. Each Velo package contains a detailed README file explaining the package's functionality and the steps required for implementation. Some package functions are internal and can't be used directly in your site. See the package's README for the list of exposed functions available for use. To help you understand how to use specific Velo packages on your site, we added some examples to the [Coding Examples page](https://dev.wix.com/docs/coding-examples.md) that integrate Velo packages. Look for the **Velo package** tag ![](https://d2x3xhvgiqkx42.cloudfront.net/12345678-1234-1234-1234-1234567890ab/b4ae9703-4364-4550-a797-1cc95ed8046e/2021/11/24/fcdc7965-604e-4777-b2e0-782fe556303e/4f1a6077-5246-4368-bb9a-223d042d533a.png)  in the example. To learn more, see [Working with Velo Packages](https://dev.wix.com/docs/develop-websites/articles/coding-with-velo/packages/working-with-velo-packages.md).   ### npm Packages npm is the most popular registry of pre-built packages. The packages are built and maintained by npm developers. Velo allows you to install public npm packages in your site directly from the npm registry. It is your responsibility to follow the npm package's developer guidelines to understand the package's functionality, in what situations it can be used, and in what situations it should not be used. Once installed, you can import the package and use it in your code. To learn more, see [Working with npm Packages](https://dev.wix.com/docs/develop-websites/articles/coding-with-velo/packages/about-npm-packages.md). ### Custom Apps You can build custom apps using [Wix Blocks](https://dev.wix.com/docs/build-apps/develop-your-app/develop-an-app-with-blocks/about-wix-blocks.md) to share custom functionality across your sites. Once a custom app is installed on your site, the site can import custom app code, use the custom app's widgets, and the custom app's [dashboard extensions](https://dev.wix.com/docs/build-apps/develop-your-app/extensions/dashboard-extensions/about-dashboard-extensions.md) and [collections](https://dev.wix.com/docs/build-apps/develop-your-app/develop-an-app-with-blocks/cms-collections-in-blocks/about-cms-collections-in-blocks.md) are automatically added to the site. Learn more about [custom apps](https://dev.wix.com/docs/develop-websites/articles/coding-with-velo/packages/working-with-custom-apps.md) and how to [install custom apps on a site](https://dev.wix.com/docs/build-apps/develop-your-app/develop-an-app-with-blocks/deploy-and-manage-blocks-apps/install-a-blocks-app-on-a-site.md). --- > Portal Navigation: > > - Append `.md` to any URL under `https://dev.wix.com/docs/` to get its markdown version. > - Pages are either content pages (article or reference text) or menu pages (a list of links to child pages). > - To get a menu page, truncate any URL to a parent path and append `.md` (e.g. `https://dev.wix.com/docs/sdk.md`, `https://dev.wix.com/docs/sdk/core-modules.md`). > - Top-level index of all portals: https://dev.wix.com/docs/llms.txt > - Full concatenated docs: https://dev.wix.com/docs/llms-full.txt ## Resource: About npm Packages ## Article: About npm Packages ## Article Link: https://dev.wix.com/docs/develop-websites/articles/coding-with-velo/packages/about-npm-packages.md ## Article Content: # About npm Packages [Node Package Manager (npm)](https://www.npmjs.com/) is a popular registry of reusable JavaScript code. In npm, each reusable library of code is referred to as a package. When developing Wix sites, you can utilize the following types of packages from npm: - **Wix packages**: Packages from the [Wix JavaScript SDK](https://dev.wix.com/docs/sdk.md). Use these packages to create an interactive UI, work with data-driven content, and integrate with Wix business solutions and 3rd-party services. - **Non-Wix packages**: Packages written by 3rd-party developers. Use these packages to save time instead of redeveloping functionality that already exists. Once an npm package is installed, you can import it in your site's code and use it. Here are some examples of npm packages you could use: - `@wix/data`: Manage data in your Wix CMS. - `@wix/stores`: Manage product and inventory for Wix Stores. - `@wix/site-stores`: Manage the current cart and retrieve information about product variants and availability. - `lodash`: Manipulate strings, arrays, and optimize common operations. - `@sendgrid/mail`: Easily send emails using the SendGrid service. - `axios`: Make HTTP requests from a browser or Node.js environment. ## Supported IDEs You can use npm packages with: - The [editor](https://dev.wix.com/docs/develop-websites/articles/workspace-tools/velo-workspace/workspaces/wix-studio-working-with-the-code-panel.md) (Wix Studio and Wix Editor) - The [Wix IDE](https://dev.wix.com/docs/develop-websites/articles/workspace-tools/velo-workspace/wix-ide/wix-studio-about-the-wix-ide.md) (Wix Studio) - Your [local IDE](https://dev.wix.com/docs/develop-websites/articles/workspace-tools/developer-tools/git-integration-wix-cli/about-git-integration-wix-cli.md) (Wix Studio and Wix Editor) >**Note:** You can't install or update npm packages directly from the Wix IDE, but you can use packages that were installed or updated using the editor. Follow [instructions](https://dev.wix.com/docs/develop-websites/articles/coding-with-velo/packages/work-with-npm-packages-in-the-editor.md) for installing and updating packages in the editor, then import and use the package in the Wix IDE. ## Package examples Check out the following example sites and templates that integrate npm packages: - QR Code Generator ([example site](https://www.wix.com/velo-examples/qr-generator) | [template](https://manage.wix.com/edit-template/from?originTemplateId=f603d9ce-4a52-467d-8907-22f183b3048f&templateId=a288d304-aecb-477d-821a-1cad43966ab1&autoDevMode=true)) - Send SMS on Booking Confirmation ([example site](https://www.wix.com/velo-examples/send-sms-on-booking) | [template](https://manage.wix.com/edit-template/from?originTemplateId=5012203a-d11f-47bf-a8e9-bc41670e7d29&templateId=72a3c87b-938c-4a84-a080-6a7a83930f2f&autoDevMode=true)) - Sendgrid NPM integration ([example site](https://www.wix.com/velo-examples/sendgrid-integration) | [template](https://manage.wix.com/edit-template/from?originTemplateId=8dd1771f-921f-4aee-8a99-9f0f3209dacc&templateId=$c515c94c-3568-45c2-bbcc-f46fe9124d77&autoDevMode=true)) - Mega Search ([example site](https://www.wix.com/velo-examples/mega-search)| [template](https://manage.wix.com/edit-template/from?originTemplateId=0b0cd7d9-4d16-428c-b143-dfbe6f7b3e6c&templateId=048131c8-3cb8-48b6-b1b8-3b453d5182f7&autoDevMode=true)) ## Package support When you install a non-Wix npm package on your site, it's important that you understand the package's functionality, appropriate use cases, and limitations. Note that certain types of packages are not supported, including [private packages](https://docs.npmjs.com/about-private-packages), packages requiring specific hardware, and packages that may pose a security risk. Here are some important considerations for using non-Wix npm packages in your code: - **Package security:** Packages are 3rd-party code and are not verified by Wix. Therefore, installing them can put your site and users at risk. It is your responsibility to make sure that packages are safe before installing them on your site. - **Frontend vs backend code:** Make sure you use packages in the context they were designed to be used. Some packages are intended exclusively for frontend code, while others are meant for backend code. - **DOM interactions:** With Wix, you use [\$w APIs](https://dev.wix.com/docs/velo/velo-only-apis/$w/$w.md) to interact with page elements instead of directly manipulating the DOM. Therefore, some packages that include interaction with the DOM may have limited use in your site. - **React compatibility:** Some packages are designed to work with [React](https://reactjs.org/). Currently, you can only use these packages in conjunction with [custom elements](https://dev.wix.com/docs/velo/velo-only-apis/$w/custom-element/introduction.md). - **Error handling:** Errors that originate from a package's functionality are reflected in the browser console. These errors are generated by the implementation of the package itself, and not from Wix. Refer to the package's documentation for more information on resolving these errors. ## Performance considerations - Importing npm packages in frontend code increases the page's payload and may adversely affect your site's performance. ## Package limitations The non-Wix packages you install and use on your site must be compatible with Wix's runtime environment or they may not run properly. - ES modules and packages containing native modules are incompatible with Wix. - A package won't execute during runtime unless it aligns with Wix's [current Node.js version](https://dev.wix.com/docs/develop-websites/articles/coding-with-velo/java-script-velo/java-script-support.md). - Wix has runtime limitations: terminal commands are not supported. - For a package to be compatible with Wix, all its dependent packages must also be compatible. Otherwise, the package may not run. ## See also - [About packages](https://dev.wix.com/docs/develop-websites/articles/coding-with-velo/packages/about-packages.md) - [Work with npm packages in the editor](https://dev.wix.com/docs/develop-websites/articles/coding-with-velo/packages/work-with-npm-packages-in-the-editor.md) - [Work with npm packages with the Wix CLI for Sites](https://dev.wix.com/docs/develop-websites/articles/coding-with-velo/packages/work-with-npm-packages-with-the-wix-cli.md) - [Wix JavaScript SDK](https://dev.wix.com/docs/sdk.md) --- > Portal Navigation: > > - Append `.md` to any URL under `https://dev.wix.com/docs/` to get its markdown version. > - Pages are either content pages (article or reference text) or menu pages (a list of links to child pages). > - To get a menu page, truncate any URL to a parent path and append `.md` (e.g. `https://dev.wix.com/docs/sdk.md`, `https://dev.wix.com/docs/sdk/core-modules.md`). > - Top-level index of all portals: https://dev.wix.com/docs/llms.txt > - Full concatenated docs: https://dev.wix.com/docs/llms-full.txt ## Resource: Work with npm Packages in the Editor ## Article: Work with npm Packages in the Editor ## Article Link: https://dev.wix.com/docs/develop-websites/articles/coding-with-velo/packages/work-with-npm-packages-in-the-editor.md ## Article Content: # Work with npm Packages in the Editor Wix allows you to install [npm packages](https://dev.wix.com/docs/develop-websites/articles/coding-with-velo/packages/about-npm-packages.md) on your site. This article explains how to install, update, and uninstall npm packages when working in the editor (Wix Studio and Wix Editor) or Wix IDE. You can also use npm packages in your local IDE with the [Wix CLI for Sites](https://dev.wix.com/docs/develop-websites/articles/coding-with-velo/packages/work-with-npm-packages-with-the-wix-cli.md). >**Wix IDE users:** You can't install or update npm packages directly from the Wix IDE, but you can use packages that were installed or updated using the editor. Follow the instructions below for installing and updating packages in the editor, then import and use the package in the Wix IDE.
## Install an npm package Before using an npm package, you need to install it on your site.
__Important:__ By installing an npm package, you agree to that npm module's license agreement.
To install an npm package in the editor: 1. Navigate to **Packages & Apps** in the code panel. 1. Hover over **npm** in Packages & Apps, click the plus icon ![](https://d2x3xhvgiqkx42.cloudfront.net/12345678-1234-1234-1234-1234567890ab/0ca9e8ba-16ed-4cd8-a1e1-58d01c4420f7/2021/03/07/30545cd2-342e-4223-9445-e7760e65566d/b2605497-443f-4089-a367-71c037b85423.png), and select **Install npm package**. The Package Manager opens. Note that the 10 most popular npm packages used on Wix sites are displayed in the Package Manager.
1. In the npm section of the Package Manager, search for the package you want to add to your site. Instructions for how to use the package are displayed on the right side of the Package Manager. 1. Click **Install** next to the package of your choice. Once installed, you can find the package under npm in the Packages & Apps section of the Code sidebar. 1. Learn how to use the installed package from its README file. There are several ways to view the README file: + In the **Packages & Apps** section of the Code sidebar, click the npm package to view the README file in the code editor. + Hover over the package, click the **Show More** ![](https://d2x3xhvgiqkx42.cloudfront.net/12345678-1234-1234-1234-1234567890ab/11e10e4f-b84d-4136-a5a9-6109fab0b7d7/2020/10/25/347cc5c6-bce3-4407-82c3-e211e02cab98/398ced84-9ef5-4f70-87cd-4cb39a66dd65.png) icon, and then select **View Documentation** to view the npm package documentation in a new browser. + Search for your package's README file at [npmjs.com](http://npmjs.com/). ## Change a package's version In the editor, you can update an npm package to its latest version, or you can change it to a previous version.
**Important:** After changing a package's version, make sure that the code on your site is compatible with the updated version of the package.
To change a package version in the editor: 1. Navigate to **Packages & Apps** in the code panel. 1. Hover over **npm** in Packages & Apps, click the plus icon ![](https://d2x3xhvgiqkx42.cloudfront.net/12345678-1234-1234-1234-1234567890ab/0ca9e8ba-16ed-4cd8-a1e1-58d01c4420f7/2021/03/07/30545cd2-342e-4223-9445-e7760e65566d/b2605497-443f-4089-a367-71c037b85423.png), and select **Install npm package**. 1. In the Package Manager, select **Installed Packages**. 1. Hover over the package you want to update, click the **More Actions** ![](https://d2x3xhvgiqkx42.cloudfront.net/12345678-1234-1234-1234-1234567890ab/11e10e4f-b84d-4136-a5a9-6109fab0b7d7/2020/10/25/347cc5c6-bce3-4407-82c3-e211e02cab98/398ced84-9ef5-4f70-87cd-4cb39a66dd65.png) icon, and select **Choose a version**. ![Change version](https://wixmp-833713b177cebf373f611808.wixmp.com/images/3efd4b23b92dda69d0bf42d8ae95b491.png) 2. Find the version you want and click **Install**. ![npm versions](https://wixmp-833713b177cebf373f611808.wixmp.com/images/6122f99e11216c28784295483494b29e.png) ## Uninstall a package You can uninstall npm packages that you no longer need.
**Warning:** When you uninstall a package, make sure to update any code that relies on that package.
To uninstall a package in the editor: 1. Navigate to **Packages & Apps** in the code panel. 2. In the npm section, hover over the package you want to uninstall, click the **More Actions** ![](https://d2x3xhvgiqkx42.cloudfront.net/12345678-1234-1234-1234-1234567890ab/11e10e4f-b84d-4136-a5a9-6109fab0b7d7/2020/10/25/347cc5c6-bce3-4407-82c3-e211e02cab98/398ced84-9ef5-4f70-87cd-4cb39a66dd65.png) icon, and select **Uninstall**. ## See also - [About packages](https://dev.wix.com/docs/develop-websites/articles/coding-with-velo/packages/about-packages.md) - [About npm packages](https://dev.wix.com/docs/develop-websites/articles/coding-with-velo/packages/about-npm-packages.md) - [Work with npm packages with the Wix CLI for Sites](https://dev.wix.com/docs/develop-websites/articles/coding-with-velo/packages/work-with-npm-packages-with-the-wix-cli.md) --- > Portal Navigation: > > - Append `.md` to any URL under `https://dev.wix.com/docs/` to get its markdown version. > - Pages are either content pages (article or reference text) or menu pages (a list of links to child pages). > - To get a menu page, truncate any URL to a parent path and append `.md` (e.g. `https://dev.wix.com/docs/sdk.md`, `https://dev.wix.com/docs/sdk/core-modules.md`). > - Top-level index of all portals: https://dev.wix.com/docs/llms.txt > - Full concatenated docs: https://dev.wix.com/docs/llms-full.txt ## Resource: Work with npm Packages with the Wix CLI ## Article: Work with npm Packages with the Wix CLI ## Article Link: https://dev.wix.com/docs/develop-websites/articles/coding-with-velo/packages/work-with-npm-packages-with-the-wix-cli.md ## Article Content: # Work with npm Packages with the Wix CLI for Sites Wix allows you to install [npm packages](https://dev.wix.com/docs/develop-websites/articles/coding-with-velo/packages/about-npm-packages.md) on your site. This article explains how to install, update, and uninstall npm packages in your local IDE with the Wix CLI for Sites. You can also [use npm packages in the editor or the Wix IDE](https://dev.wix.com/docs/develop-websites/articles/coding-with-velo/packages/work-with-npm-packages-in-the-editor.md). ## Install an npm package Before using an npm package, you need to install it on your site.
__Important:__ By installing an npm package, you agree to that npm module's license agreement.
To install a package in your local IDE with the Wix CLI for Sites: 1. Open a terminal to your project's root directory. 2. Install the package of your choice by running the following command: ```bash wix install ``` 3. Open the `package.json` file in your project to see the installed package. 4. Learn how to use the installed package from its README file. You can find your package's README file at [npmjs.com](http://npmjs.com/). ## Change a package's version Using the Wix CLI for Sites, you can update an npm package to its latest version. Currently, you can't switch to previous versions of your package using the Wix CLI for Sites.
**Important:** After changing a package's version, make sure that the code on your site is compatible with the updated version of the package.
To update a package to its latest version with the Wix CLI for Sites: 1. Open a terminal to your project's root directory. 2. Update the package of your choice by running the following command: ```bash wix update ``` 3. Open the `package.json` file in your project to see the package's new version. ## Uninstall a package You can uninstall npm packages that you no longer need.
**Warning:** When you uninstall a package, make sure to update any code that relies on that package.
To uninstall a package using the Wix CLI for Sites: 1. Open a terminal to your project's root directory. 2. Uninstall the package of your choice by running the following command: ```bash wix uninstall ``` 3. Open the `package.json` file in your project to see that the package has been removed. ## See also - [About packages](https://dev.wix.com/docs/develop-websites/articles/coding-with-velo/packages/about-packages.md) - [About npm packages](https://dev.wix.com/docs/develop-websites/articles/coding-with-velo/packages/about-npm-packages.md) - [Work with npm packages in the editor](https://dev.wix.com/docs/develop-websites/articles/coding-with-velo/packages/work-with-npm-packages-in-the-editor.md) --- > Portal Navigation: > > - Append `.md` to any URL under `https://dev.wix.com/docs/` to get its markdown version. > - Pages are either content pages (article or reference text) or menu pages (a list of links to child pages). > - To get a menu page, truncate any URL to a parent path and append `.md` (e.g. `https://dev.wix.com/docs/sdk.md`, `https://dev.wix.com/docs/sdk/core-modules.md`). > - Top-level index of all portals: https://dev.wix.com/docs/llms.txt > - Full concatenated docs: https://dev.wix.com/docs/llms-full.txt ## Resource: Working with Velo Packages ## Article: Working with Velo Packages Built by Wix ## Article Link: https://dev.wix.com/docs/develop-websites/articles/coding-with-velo/packages/working-with-velo-packages.md ## Article Content: # Velo: Working with Velo Packages Velo packages are code libraries written using Velo code that allow you to add specific functionality to your site, without spending hours writing complex code. You can add Velo packages to your site. If no existing Velo package meets your needs, you can [create a custom app with Wix Blocks](https://dev.wix.com/docs/develop-websites/articles/coding-with-velo/packages/about-custom-apps.md). These are some of the advantages of using Velo packages: * The use cases for Velo packages are specific to Wix websites. * Velo packages work seamlessly with Wix elements and apps.  * You can view all the code used to implement a Velo package. * Each Velo package contains a detailed README file explaining the package's functionality and the steps required for implementation. ### Package Content Velo packages can include read-only backend code files, public code files, and npm packages. An editable **config.json** file may also be included for defining specific settings for your package. A package's functionality is available for use through its exported functions, which can be imported and used in your code. >**Notes** > * Some package functions are internal and can't be used directly in your site. See the package's README for the list of exposed functions available for use. > * If a Velo package includes an npm package, you won't see the npm package in the npm section of the Code sidebar (Wix Editor) or the Code sidebar (Wix Studio). ### Setting Up a Package Velo packages can work with Wix apps or include integrations with 3rd-party services, and may require initial setup and configuration before use. To set up your site to use a package, follow the steps in the **Setup** section of the package's README file. Package prerequisites may include:  * Creating an account with a 3rd-party service. * Storing API keys and other secrets from a 3rd-party service in the [Secrets Manager](https://dev.wix.com/docs/develop-websites/articles/workspace-tools/developer-tools/secrets-manager/about-the-secrets-manager.md).  * Adding a Wix App to your site. For example, you might need to add a Wix Store or a Member's Area to your site. * Editing the package's **config.json** file to define specific settings that affect how the package works on your site. #### Backend Events A package may also include an **events.js** file for running [backend events](https://dev.wix.com/docs/develop-websites/articles/coding-with-velo/backend-code/events/about-backend-events.md) related to the package. You do not need to perform any action to run the backend events. Just like backend events are defined in your site's **events.js** file, events in your package's **events.js** are triggered automatically once you have published your site and the specific conditions associated with the event are met. ### Installing a Package To install a package: 1. Go to the **Packages & Apps** section of the Code sidebar (Wix Editor) or the Code sidebar (Wix Studio). Under **Velo Packages** click **Install Velo Package**. 2. The Package Manager opens. ![](https://wixmp-833713b177cebf373f611808.wixmp.com/images/d2d71c02e760dbf7e5e75630ca768d7b.png)
3. In the **Built by Wix** tab, search for the package you want to add to your site. Note that you can view the README for each package on the right side of the Package Manager. 4. Click **Install**. The **Install** button changes to a **View** button, and you can see an option to turn on automatic updates for future minor versions. When this option is turned on, you won't need to do anything if there are any minor updates to the package. When this option is turned off, you'll have to manually update the package if there are any minor updates to the package. Clicking **View** directs you to the **Packages & Apps** section of the Code sidebar (Wix Editor) or Code sidebar (Wix Studio) where you can see the installed Velo package. If there is a major update available for a package installed on your site, or if there is a minor update available and the automatic updates option toggle is turned off, you'll see a blue dot next to the package.  >**Note** > By installing a Velo Package that uses an npm package, you agree to that npm module's license agreement. ### Using an Installed Package Once you install a package, read the package's README file. The README includes all the information you need to work with the package: initial setup prerequisites, which exported functions are available for use, and how to use the package.  To use the package functions, you'll need to import them in your code.  Use the **@velo namespace** to import Velo packages. Note that import statements within the **@velo namespace** differ depending on the location and type of package file the function is exported from.  To import backend functions, use the following syntax: ```javascript import { } from '@velo/-backend'; ``` For example, assuming the **twitter-integration** package has been installed, you can use its **tweet()** function as follows: ```javascript import { tweet } from '@velo/twitter-integration-backend'; ``` To import public functions, use the following syntax: ```javascript import { } from '@velo/'; ``` For example, assuming the **wix-data-helpers** package has been installed, you can use its **getRandomItem()** function as follows: ```javascript import { getRandomItem } from '@velo/wix-data-helpers'; ```
**Notes** * If you want to use backend functions from a .js file in your page code, wrap the function in a [web module](https://support.wix.com/en/article/velo-web-modules-calling-server-side-code-from-the-front-end), and import the web module to your page code. * Some Velo packages include web modules. You can call web module functions directly from your backend code, public code, or page code. Import them with the syntax for importing backend functions.
To learn more about which import statements to use for each Velo package, see the package's README file. #### Package Examples To help you understand how to use specific Velo packages on your site, we added some examples to the [Coding Examples site](https://dev.wix.com/docs/coding-examples.md) that integrate Velo packages. You can open an example site and see the code we added to work with the package. You'll see a Velo Package tag on examples that integrate a Velo Package. ![](https://d2x3xhvgiqkx42.cloudfront.net/12345678-1234-1234-1234-1234567890ab/0ca9e8ba-16ed-4cd8-a1e1-58d01c4420f7/2021/03/09/d1e90191-541b-4137-b707-555c787c0cb3/3c5630de-e7cb-4c1b-9227-cad7618faacd.png)
**Note:** These package examples and their steps are based on Wix Editor sites. You can adapt the steps for a Wix Studio site by using the equivalent [Wix Studio](https://dev.wix.com/docs/develop-websites/articles/coding-with-velo/overview/about-coding-with-wix-studio.md#finding-your-way) features.
### Updating a Package's Version If there is a **minor update** to a package installed on your site: * If the automatic updates option toggle is turned on, the package will update automatically.  * If the automatic updates option toggle is turned off, you'll see a blue dot next to the package in the Code sidebar.  If there is a **major update** to a package installed on your site, you'll see a blue dot next to the package in the Code sidebar.  To update the package on your site: 1. Hover over the dot and click **See Release Notes** in the tooltip. The Package Manager opens and you can see the available update. 2. In the README on the right side of the Package Manager, scroll down to the Release Notes section to view the relevant changes for this update. 3. If you want to update the package, click **Update to X.X.X**. You can view all versions of a package by clicking the ellipsis icon **>** **See all versions**. 
**Important** After applying a package update, make sure that the code on your site is compatible with the updated version of the package.
### Uninstalling a Package To uninstall a package: 1. In the **Velo Packages** section of the Code sidebar (Wix Editor) or the Code sidebar (Wix Studio), hover over the package you want to uninstall. Click the ellipsis ![](https://d2x3xhvgiqkx42.cloudfront.net/12345678-1234-1234-1234-1234567890ab/11e10e4f-b84d-4136-a5a9-6109fab0b7d7/2020/10/25/347cc5c6-bce3-4407-82c3-e211e02cab98/398ced84-9ef5-4f70-87cd-4cb39a66dd65.png) icon, and select **Uninstall**. 2. The package is removed from the **Velo Packages** section of the Code sidebar (Wix Editor) or the Code Sidebar (Wix Studio).
**Warning** When you uninstall a package, you may break code that relies on that package.
### Requesting a Package To request that a package be added to the list of Velo packages built by Wix, click **Make a request for a new Velo package** at the bottom of the Package Manager. --- > Portal Navigation: > > - Append `.md` to any URL under `https://dev.wix.com/docs/` to get its markdown version. > - Pages are either content pages (article or reference text) or menu pages (a list of links to child pages). > - To get a menu page, truncate any URL to a parent path and append `.md` (e.g. `https://dev.wix.com/docs/sdk.md`, `https://dev.wix.com/docs/sdk/core-modules.md`). > - Top-level index of all portals: https://dev.wix.com/docs/llms.txt > - Full concatenated docs: https://dev.wix.com/docs/llms-full.txt ## Resource: About Custom Apps ## Article: Working with Your Velo Packages ## Article Link: https://dev.wix.com/docs/develop-websites/articles/coding-with-velo/packages/about-custom-apps.md ## Article Content: # About Custom Apps > **Note:** Custom apps replace Velo packages built by you. Now, instead of creating packages, functionality is managed as apps. Custom apps are applications you create using [Wix Blocks](https://dev.wix.com/docs/build-apps/develop-your-app/develop-an-app-with-blocks/about-wix-blocks.md) to add functionality that can be used across multiple Wix sites. Your custom apps are private and only you can install them on sites where you're a site contributor. Once installed, all site contributors can access the functionality of the custom app. Using custom apps allows you to unify the following functionality across your sites: - Widgets - Code - [Dashboard extensions](https://dev.wix.com/docs/build-apps/develop-your-app/extensions/dashboard-extensions/about-dashboard-extensions.md) - [Collections](https://dev.wix.com/docs/build-apps/develop-your-app/develop-an-app-with-blocks/cms-collections-in-blocks/about-cms-collections-in-blocks.md) For example, you might use custom apps to do the following across your sites: - Ensure a standardized visual design. - Centralize and reuse custom logic and code. - Add and manage custom dashboard features. - Use uniform data structures and content setups. ## Supported IDEs You can use and access functionality from your custom apps using: - The editor (Wix Studio and Wix Editor) - The Wix IDE - Your [local IDE](https://dev.wix.com/docs/develop-websites/articles/workspace-tools/developer-tools/git-integration-wix-cli/about-git-integration-wix-cli.md) > **Note:** You must have a Wix Studio account to create a Blocks app. ## Accessing custom app functionality on a site Install and manage your custom apps, including the version installed on the site, under **Custom Apps** when you click **App Market** ![App Market](https://wixmp-833713b177cebf373f611808.wixmp.com/images/b748dd69307d0adbcf2f11e76dc779c3.png) in the Editor. Once installed, a custom app's functionality is automatically available on your site. To learn how to access the functionality, see [Install a Blocks App on a Site](https://dev.wix.com/docs/build-apps/develop-your-app/develop-an-app-with-blocks/deploy-and-manage-blocks-apps/install-a-blocks-app-on-a-site.md#change-the-installed-app-version). ## See also - [Install a Blocks app on a site](https://dev.wix.com/docs/build-apps/develop-your-app/develop-an-app-with-blocks/deploy-and-manage-blocks-apps/install-a-blocks-app-on-a-site.md#change-the-installed-app-version) - [About Wix Blocks](https://dev.wix.com/docs/build-apps/develop-your-app/develop-an-app-with-blocks/about-wix-blocks.md) --- > Portal Navigation: > > - Append `.md` to any URL under `https://dev.wix.com/docs/` to get its markdown version. > - Pages are either content pages (article or reference text) or menu pages (a list of links to child pages). > - To get a menu page, truncate any URL to a parent path and append `.md` (e.g. `https://dev.wix.com/docs/sdk.md`, `https://dev.wix.com/docs/sdk/core-modules.md`). > - Top-level index of all portals: https://dev.wix.com/docs/llms.txt > - Full concatenated docs: https://dev.wix.com/docs/llms-full.txt ## Resource: About Routers ## Article: About Routers ## Article Link: https://dev.wix.com/docs/develop-websites/articles/coding-with-velo/routers/about-routers.md ## Article Content: # About Routers Wix gives you the ability to display multiple items from your data collection with [dynamic pages](https://support.wix.com/en/article/cms-about-dynamic-pages). In your site editor, you see only one dynamic item page, but visitors to your site see multiple pages with the same design, each rendering a different item from your collection. You can set a unique URL for each of these item pages. Behind the scenes, Wix creates a router that handles incoming requests to the dynamic page and directs the client to the correct URL. Wix also handles SEO for you in the background. However, if you prefer to handle requests with your own custom logic, you can create your own router. With your own router, you have full control over how your site handles incoming requests, as well as the SEO for dynamic pages. You set up a router to receive all incoming requests with a specified prefix, and define the logic of what to do when a request with that prefix is received. You decide what actions to perform, what response to return, where to route the request, and what data to pass to the page. You might want to use a router to: * Display a dynamic page using content from any data source. * Customize your URLs to make them more meaningful and yield better SEO results. * Authenticate users and then display content just for them. * Return custom HTTP response codes. In the following sections, we review the important components of creating a router for your site. ## Supported IDEs You can create routers using: * The [editor](https://dev.wix.com/docs/develop-websites/articles/workspace-tools/velo-workspace/workspaces/wix-studio-working-with-the-code-panel.md) (Wix Studio and Wix Editor). * The [Wix IDE](https://dev.wix.com/docs/develop-websites/articles/workspace-tools/velo-workspace/wix-ide/wix-studio-about-the-wix-ide.md). * Your [local IDE](https://dev.wix.com/docs/develop-websites/articles/workspace-tools/developer-tools/git-integration-wix-cli/about-git-integration-wix-cli.md) (Wix Studio and Wix Editor). ## URL prefix When you create a router, you specify a URL path prefix that follows your site's domain name. The prefix is the part of the URL shown in angle brackets in the following examples: * Premium site: `https://domain.com//category/item` * Free site: `https://user.wixsite.com/yoursite//category/item` This URL prefix determines which incoming requests your router handles. If your site receives a request with the specified prefix, it sends that request to your router for handling. The URL prefix is also used as the name for the router functions and pages. ## Routing code When you create the first router on your site, Wix automatically adds a file called `routers.js` to your site's backend folder. In this file, you write all your logic for handling incoming requests. `routers.js` contains two functions that are the entry points to your router. They are named with the following convention: * `_Router(request)` * `_Sitemap(sitemapRequest)` Note that if you add any more routers to the site, Wix adds the functions for them in the same file. For example, if you add `myRouter1` and `myRouter2` to the site, you'll see the following functions in your `routers.js` file: * `myRouter1_Router(request)` * `myRouter1_Sitemap(sitemapRequest)` * `myRouter2_Router(request)` * `myRouter2_Sitemap(sitemapRequest)` You then write the logic for each router in its respective set of functions. ### router() The [`router()`](https://dev.wix.com/docs/velo/api-reference/wix-router/introduction.md) function is where the site sends page requests with the defined prefix. The router receives a `WixRouterRequest` object containing information about the incoming request, such as the full URL used to reach the router, and where the request came from. The function then decides what to do with the request and returns the appropriate `WixRouterResponse`. Typically, the `router()` function will decide which page to show (if any) and what data to pass to the page. The response is then sent using the `forbidden()`, `notFound()`, `ok()`, `redirect()`, or `sendStatus()` functions. ### sitemap() Your sitemap is what Google uses to find your site's pages. Pages on your site that don't belong to a router are automatically added to your sitemap for you. However, since you control what pages are available through your router, you need to create your own sitemap for these router pages. The router sitemap contains all possible URLs that are connected to your router's prefix, so that Google can find each router page. The [`sitemap()`](https://dev.wix.com/docs/velo/api-reference/wix-router/sitemap.md) function handles the SEO and sitemap requests for your router. In the code for your  `sitemap()` function, you need to create and return a [`WixRouterSitemapEntry`](https://dev.wix.com/docs/velo/api-reference/wix-router/wix-router-sitemap-entry.md) object for each router page. This ensures search engines can find the links to your router's pages. As with [SEO for regular pages](https://support.wix.com/en/article/understanding-your-pages-default-seo-settings), you can define the page title, description, and social network images for router pages. The difference is that since router pages don't contain static data, their SEO information must be set dynamically, so they reflect the real content they will hold when they are viewed. Each `WixRouterSitemapEntry` includes information about a page, such as its URL, title, and name. You can also add additional information about each page, such as how often its content changes, when the last change was, and its relative priority within your site. Google uses the sitemap entries to discover all the pages in your router. The `sitemap()` function is also used to populate the items preview widget when you're previewing or editing your site, allowing you to switch between dynamic item pages. ![Items preview widget on Studio](https://wixmp-833713b177cebf373f611808.wixmp.com/images/5e73a3dbd3103e4d592d834bdcaa5c92.png) ## Router data Your `router()` function may send data to the pages it routes to. You can access that data in the frontend page code using the [`getRouterData()`](https://dev.wix.com/docs/velo/api-reference/wix-window-frontend/get-router-data.md) function of the `wix-window-frontend` module. ## See also * [Create a router](https://dev.wix.com/docs/develop-websites/articles/coding-with-velo/routers/create-a-router.md) * [About SEO and routing](https://dev.wix.com/docs/develop-websites/articles/coding-with-velo/routers/add-seo-to-your-router.md) * [Tutorial: Create dynamic pages with a custom router](https://dev.wix.com/docs/develop-websites/articles/coding-with-velo/routers/tutorial-create-dynamic-pages-with-a-custom-router.md) * [About Router Caching](https://dev.wix.com/docs/develop-websites/articles/best-practices/caching/about-router-caching.md) * [wix-router API](https://dev.wix.com/docs/velo/api-reference/wix-router/introduction.md) --- > Portal Navigation: > > - Append `.md` to any URL under `https://dev.wix.com/docs/` to get its markdown version. > - Pages are either content pages (article or reference text) or menu pages (a list of links to child pages). > - To get a menu page, truncate any URL to a parent path and append `.md` (e.g. `https://dev.wix.com/docs/sdk.md`, `https://dev.wix.com/docs/sdk/core-modules.md`). > - Top-level index of all portals: https://dev.wix.com/docs/llms.txt > - Full concatenated docs: https://dev.wix.com/docs/llms-full.txt ## Resource: Create a Router ## Article: Creating a Router ## Article Link: https://dev.wix.com/docs/develop-websites/articles/coding-with-velo/routers/create-a-router.md ## Article Content: # Create a Router Creating a [router](https://dev.wix.com/docs/develop-websites/articles/coding-with-velo/routers/about-routers.md) allows you to customize how your site handles certain incoming requests. This article shows you how to create a router for your site. ## Step 1 | Add the router in the site editor Whether you're working in the editor, [Wix IDE](https://dev.wix.com/docs/develop-websites/articles/workspace-tools/velo-workspace/wix-ide/wix-studio-about-the-wix-ide.md), or your [local IDE](https://dev.wix.com/docs/develop-websites/articles/workspace-tools/developer-tools/git-integration-wix-cli-for-sites/about-git-integration-wix-cli-for-sites.md), in order to add a router to your site you must first set it up in the site editor. If you skip this step, Wix won't create the frontend router pages that are displayed to site visitors, and you won't have another way to add them. Once you create your router in the site editor, you can add the code in your preferred IDE. The following steps explain how to add a router to your site: **Wix Studio**: 1. Make sure you [enable coding](https://dev.wix.com/docs/develop-websites/articles/workspace-tools/velo-workspace/workspaces/wix-studio-working-with-the-code-panel.md) on your site. 1. Click the **Pages** icon ![](https://github-production-user-asset-6210df.s3.amazonaws.com/91874936/255611116-bbe4fa95-9281-4246-9780-3a3641cc8bf5.png) to open the **Site Pages** panel.
1. Click the **Add New Page** icon ![](https://github-production-user-asset-6210df.s3.amazonaws.com/91874936/255386869-eac62946-357a-44c4-800c-cf8c8735b77f.png). Then, click **Add** under Router. ![Add router](https://wixmp-833713b177cebf373f611808.wixmp.com/images/8a241a042bf517eb91cd8c0739ebd206.png) >**Note:** You can also add a router from the **Page Code** section of the code panel. Hover over **Main Pages**, click the plus icon ![](https://d2x3xhvgiqkx42.cloudfront.net/12345678-1234-1234-1234-1234567890ab/0ca9e8ba-16ed-4cd8-a1e1-58d01c4420f7/2021/10/13/04083fa4-3262-4606-98d1-cbc359bf8585/1a26226e-c281-42d2-8a60-88e44fe40c61.png), and then click **Add a Router**. 1. Enter a [URL prefix](https://support.wix.com/en/article/velo-about-routers#url-prefix) for your router and click **Add & Edit Code** to add the router to your site. All incoming requests with the specified URL prefix will be sent to your router for handling.
**Wix Editor**: 1. In the sidebar, go to **Page Code** > **Main Pages**. Click on the ![](https://d2x3xhvgiqkx42.cloudfront.net/12345678-1234-1234-1234-1234567890ab/dfff8cbb-ddcb-4376-8cae-3fedb2dd4458/2017/06/11/40411987-4cca-456b-8449-c356cf794845.png) icon at the top of the **Main Pages** section, and choose **Add a Router**. ![Add a router in Wix Editor](https://wixmp-833713b177cebf373f611808.wixmp.com/images/f66c7fc39166fa58aa6209085103339d.png) 2. Enter a [URL prefix](https://dev.wix.com/docs/develop-websites/articles/coding-with-velo/routers/about-routers.md) for your router and click **Add & Edit Code**. All incoming requests with the specified URL prefix will be sent to your router for handling. After you add a router, the following occurs: **If you're working in the editor:** * Your router's [`router()`](http://wix.to/94BuAAs/wix-router.html#router) and [`sitemap()`](http://wix.to/94BuAAs/wix-router.html#sitemap) functions are added in a `routers.js` file with sample code for a simple routing scenario. The `routers.js` file is located in the **Backend & Public** section of the code panel. * A new section called **Router Pages** is created in the **Page Code** section of the code panel. Router pages are grouped together under a title based on the prefix you chose earlier. One router page is created to start with. For example, if you named your router "myRouter", a page named **myRouter-page** is added under the title **MyRouter Pages (Router)**. **If you're working in the Wix IDE:** * Your router's [`router()`](http://wix.to/94BuAAs/wix-router.html#router) and [`sitemap()`](http://wix.to/94BuAAs/wix-router.html#sitemap) functions are added in a `routers.js` file with sample code for a simple routing scenario. The `routers.js` file is located in `src/backend`. * In the site editor, a new section called **Router Pages** is created in the **Page Code** section of the code panel. Router pages are grouped together under a title based on the prefix you chose earlier. One router page is created to start with. For example, if you named your router "myRouter", a page named **myRouter-page** is added under the title **MyRouter Pages (Router)**. Add any router pages in the site editor. In the Wix IDE, those pages then appear under `src/pages`. Note that in the Wix IDE the router pages aren't grouped by router, so if you create more than one router, name each router page clearly to avoid confusion. ![Difference between router pages in Wix IDE and site editor](https://wixmp-833713b177cebf373f611808.wixmp.com/images/5bb83ef4321be58f835c8bf3a31c696e.png) **If you're working in your local IDE:** * A modal opens in your site editor containing sample code and instructions on how to add the code to your site. We recommend copying the code to make sure your router and sitemap functions are set up correctly. ![Local IDE router instructions](https://wixmp-833713b177cebf373f611808.wixmp.com/images/056d1c28d7cbdd25ab8e4cb5ba1bbbf3.png) * A new section, **Router Pages**, is created in **Page Code** section of the code panel. Router pages are grouped together under a title based on the prefix you chose earlier. One router page is created to start with. This page and any other router pages you create are added to your github repository. You can then pull them to your local repo and write the code in your IDE. > **Note:** Certain module export formats are not supported in `routers.js`. For more information, see [Module Export Syntax](https://dev.wix.com/docs/develop-websites/articles/coding-with-velo/java-script-velo/module-export-syntax.md). ## Step 2 | Coding the router Once you add the router to your site, you need to add code for it. The code for the router works the same way no matter which IDE you're working in. All your router logic goes in the `routers.js` file. There are four parts to the sample code that's added to the `routers.js` file: 1. **The `import` statement:** The default code imports some basic router functionality from the [Router API](https://dev.wix.com/docs/velo/events-service-plugins/routers/service-plugins/wix-router/introduction.md), including the [`ok()`](https://dev.wix.com/docs/velo/events-service-plugins/routers/service-plugins/wix-router/ok.md) and [`notFound()`](https://dev.wix.com/docs/velo/events-service-plugins/routers/service-plugins/wix-router/not-found.md) functions, as well as the [`WixRouterSitemapEntry`](https://dev.wix.com/docs/velo/events-service-plugins/routers/service-plugins/wix-router/wix-router-sitemap-entry.md) object. ```javascript import {ok, notFound, WixRouterSitemapEntry} from "wix-router"; ``` Keep this `import` statement when you customize your code, and use it to add any further functionality from the Router API. You may also need to import additional modules, such as the [Wix Data API](https://dev.wix.com/docs/velo/apis/wix-data/introduction.md). 2. **The sample data:** The sample code includes an object called `peopleData`, which is the data the sample router displays on the router page. For your own code, delete or replace this object. You can use the Data API to [retrieve data items](https://dev.wix.com/docs/velo/apis/wix-data/query.md) from a collection, as explained in our [router tutorial](https://dev.wix.com/docs/develop-websites/articles/coding-with-velo/routers/tutorial-create-dynamic-pages-with-a-custom-router.md). 3. **The [`router()`](https://dev.wix.com/docs/velo/events-service-plugins/routers/service-plugins/wix-router/router.md) function:** Every time you add a router to your site, Wix adds a `router()` function for it in `routers.js`. The first `router()` function added contains sample code like this: ```javascript export function myRouter_Router(request) { // Get item name from URL request const name = request.path[0]; // Get the item data by name const data = peopleData[name]; if (data) { //define SEO tags const seoData = { title: data.title, description: `This is a description of ${data.title} page`, noIndex: false, metaTags: [ {"og:title": data.title, "og:image": data.image, content: "People Data" } ] }; // Render item page return ok("myRouter-page", data, seoData); } // Return 404 if item is not found return notFound(); } ``` Let's quickly review what the sample code is doing: **Lines 3-6:** The router gets the path from the `request` parameter, which is a [`WixRouterRequest`](https://dev.wix.com/docs/velo/events-service-plugins/routers/service-plugins/wix-router/wix-router-request/introduction.md) object, and searches for it in the `peopleData` object. **Lines 8-27:** If it finds the requested name, it creates a [`HeadOptions`](https://www.wix.com/velo/reference/wix-router/wixrouterresponse/head) object that defines what goes in the HTML head of the page we respond to the request with. That object is stored in the `seoData` variable. The router then passes the data from `peopleData` and `seoData` to the [`ok()`](https://dev.wix.com/docs/velo/events-service-plugins/routers/service-plugins/wix-router/ok.md) function, which renders the requested page to the visitor. **Line 31:** If the person isn't found in `peopleData`, the router returns a 404 page by using the [`notFound()`](https://dev.wix.com/docs/velo/events-service-plugins/routers/service-plugins/wix-router/not-found.md) function. Build off the code above to customize your `router()` function: 1. Replace lines 3-6 with your own code to retrieve data from an external source or a collection on your site. 1. Change the conditional statement to match your own router logic. For example, if you need to display either an index or an item page, build a logical statement that renders one or the other based on the contents of the `path` parameter. 1. Change the [`HeadOptions`](https://www.wix.com/velo/reference/wix-router/wixrouterresponse/head) object to generate your SEO data. You can use any information you want to create the object. For example, the sample code creates `title` and `description` properties based on data from `peopleData`. You can create your own properties from the data you retrieve and populate `metaTags` with this data as well. You also have the option, as in the sample code, to set `noIndex` to false, meaning search engines should index the page, or add a `keywords` property to the [`HeadOptions`](https://www.wix.com/velo/reference/wix-router/wixrouterresponse/head) object with a string containing the page's keywords. 1. Your router function must return a [`WixRouterResponse`](https://dev.wix.com/docs/velo/events-service-plugins/routers/service-plugins/wix-router/wix-router-response/data.md) object. This object is responsible for telling the router which page to display on the frontend when a visitor makes a request: * Use the `ok()` function to render a requested page if it exists. Pass three arguments to `ok()`: * The name of the router page to render. * A data object containing the data to pass to the router page. * An object containing SEO data for the router page. * Use the `notFound()` function if the requested page isn't found. You can also use the [`forbidden()`](https://dev.wix.com/docs/velo/events-service-plugins/routers/service-plugins/wix-router/forbidden.md), [`redirect()`](https://dev.wix.com/docs/velo/events-service-plugins/routers/service-plugins/wix-router/redirect.md), or [`sendStatus()`](https://dev.wix.com/docs/velo/events-service-plugins/routers/service-plugins/wix-router/send-status.md) functions. 4. **The [`sitemap()`](http://wix.to/94BuAAs/wix-router.html#sitemap) function:** Along with the `router()` function, Wix also adds a `sitemap()` function to `routers.js` every time you add a router. As with `router()`, the first `sitemap()` function added includes sample code that you should replace with your own. Let's take a look at the sample code in the `sitemap()` function: ```javascript export function myRouter_SiteMap(sitemapRequest) { // Convert the data to site map entries const siteMapEntries = Object.keys(peopleData).map((name) => { const data = peopleData[name]; const entry = new WixRouterSitemapEntry(name); entry.pageName = "myRouter-page"; // The name of the page in the Wix Editor to render entry.url = `/myRouter/${name}`; // Relative URL of the page entry.title = data.title; // For better SEO - Help Google return entry; }); // Return the site map entries return siteMapEntries; } ``` **Lines 3-10:** The code takes the keys of the `peopleData` sample object and uses the JavaScript `map()` function to create an array of [`WixRouterSitemapEntry`](https://dev.wix.com/docs/develop-websites/articles/coding-with-velo/routers/add-seo-to-your-router.md) objects, one object for each key. Each entry is given values for the `pageName`, `url`, and `title` properties. Then the array is wrapped in a `Promise` and returned. Replace the sample code with code of your own that generates `WixRouterSitemapEntry` objects for each page. Then return these objects for SEO to use. Once you complete these steps, you have a working router. Publish your site and make page requests to test the router. ## See also * [About routers](https://dev.wix.com/docs/develop-websites/articles/coding-with-velo/routers/about-routers.md) * [About SEO and routing](https://dev.wix.com/docs/develop-websites/articles/coding-with-velo/routers/add-seo-to-your-router.md) * [Tutorial: Create dynamic pages with a custom router](https://dev.wix.com/docs/develop-websites/articles/coding-with-velo/routers/tutorial-create-dynamic-pages-with-a-custom-router.md) * [About Router Caching](https://dev.wix.com/docs/develop-websites/articles/best-practices/caching/about-router-caching.md) --- > Portal Navigation: > > - Append `.md` to any URL under `https://dev.wix.com/docs/` to get its markdown version. > - Pages are either content pages (article or reference text) or menu pages (a list of links to child pages). > - To get a menu page, truncate any URL to a parent path and append `.md` (e.g. `https://dev.wix.com/docs/sdk.md`, `https://dev.wix.com/docs/sdk/core-modules.md`). > - Top-level index of all portals: https://dev.wix.com/docs/llms.txt > - Full concatenated docs: https://dev.wix.com/docs/llms-full.txt ## Resource: Add SEO to Your Router ## Article: About SEO and Routing ## Article Link: https://dev.wix.com/docs/develop-websites/articles/coding-with-velo/routers/add-seo-to-your-router.md ## Article Content: # Add SEO to Your Router This article explains how to configure [SEO for your router pages](https://dev.wix.com/docs/develop-websites/articles/coding-with-velo/routers/about-routers.md#sitemap). There are two parts to setting up the SEO: 1. Create meta tags for Google to learn about your pages. 1. Create a sitemap for Google to use to find your pages. ## Step 1 | Set meta tags for router pages You set SEO meta tags for your router's pages in the `router()` function in [`routers.js`](https://dev.wix.com/docs/develop-websites/articles/coding-with-velo/routers/about-routers.md#routing-code): 1. Within the `router()` function, create an object that contains your desired SEO settings. This will become the [`HeadOptions`](https://www.wix.com/velo/reference/wix-router/wixrouterresponse/head) object that you pass to the router page. Use the provided sample code in the `router()` function as a starting point: ```javascript let seoData = {     title: data.title,     description: "This is a description of " + data.title + " page",     noIndex: false,     metaTags: {       "og:title": data.title,       "og:image": data.image,     },   }; ``` The example object contains several properties that are set using the data it retrieves in the `router()` function, including the following: - The `title` property, which contains the page’s SEO title. - The `description` property, which contains a short description of the page’s content. - A `noIndex` flag, set to `false`. This tells Google that it should index your page. - Additional meta tags contained in the `metaTags` property. You can add meta tags to this property. Keep or remove these properties, and add your own as needed. > **Note:** The `HeadOptions` object can also contain a `keywords` property, but Google ignores your site's keywords. 2. Once you’ve created your `HeadOptions` object, pass it to the `ok()` function as the third parameter. This object is then sent to the router page so that Google has SEO information for it. This sample code shows an example of passing the `HeadOptions` object defined above to **myRouter-page**: ```javascript return ok("myRouter-page", data, seoData); ``` ## Step 2 | Create the sitemap for your router To add your router pages to your sitemap, do the following: 1. In your router’s `sitemap()` function, create a [`WixRouterSitemapEntry`](https://dev.wix.com/docs/velo/api-reference/wix-router/wix-router-sitemap-entry.md) object for each URL the router can possibly route to. Use the sample code added to your first `sitemap()` function as a starting point: ```javascript let siteMapEntries = Object.keys(peopleData).map((name) => {     const data = peopleData[name];     let entry = new WixRouterSitemapEntry(name);     entry.pageName = "myRouter-page";     entry.url = "/myRouter/" + name;     entry.title = data.title;     return entry;   }); ``` Each `WixRouterSitemapEntry` in the example includes the router page’s URL, title, and name. The example code groups them into an array. 2. Return all the sitemap entries to create the router sitemap. Again, you can follow the example in the sample code: ```javascript return Promise.resolve(siteMapEntries); ``` ## Step 3 | Check your router sitemap To ensure that your sitemap is working properly, you can get the sitemap from your published site: 1. In a web browser, go to your published site's URL and append `/sitemap.xml` to it. For premium sites, if your site's published URL is: `https://mysite.com`, go to: `https://mysite.com/sitemap.xml`. For free sites, if your site's published URL is `https://username.wixsite.com/site-name`, go to `https://username.wixsite.com/site-name/sitemap.xml`. 2. Check that the sitemap matches the layout of your router pages. ## See also - [Create a router](https://dev.wix.com/docs/develop-websites/articles/coding-with-velo/routers/create-a-router.md) - [About routers](https://dev.wix.com/docs/develop-websites/articles/coding-with-velo/routers/about-routers.md) - [Tutorial: Create dynamic pages with a custom router](https://dev.wix.com/docs/develop-websites/articles/coding-with-velo/routers/tutorial-create-dynamic-pages-with-a-custom-router.md) --- > Portal Navigation: > > - Append `.md` to any URL under `https://dev.wix.com/docs/` to get its markdown version. > - Pages are either content pages (article or reference text) or menu pages (a list of links to child pages). > - To get a menu page, truncate any URL to a parent path and append `.md` (e.g. `https://dev.wix.com/docs/sdk.md`, `https://dev.wix.com/docs/sdk/core-modules.md`). > - Top-level index of all portals: https://dev.wix.com/docs/llms.txt > - Full concatenated docs: https://dev.wix.com/docs/llms-full.txt ## Resource: Tutorial: Create Dynamic Pages with a Custom Router ## Article: Tutorial: Create Dynamic Pages with a Custom Router ## Article Link: https://dev.wix.com/docs/develop-websites/articles/coding-with-velo/routers/tutorial-create-dynamic-pages-with-a-custom-router.md ## Article Content: # Tutorial: Create Dynamic Pages with a Custom Router When you set up [dynamic pages](https://support.wix.com/en/article/cms-about-dynamic-pages) on your site, Wix creates a router in the background to manage the pages. However, you can also choose to set up your own router to manage your dynamic pages. This gives you more control over how incoming requests to your site are handled. The [Create a Router](https://dev.wix.com/docs/develop-websites/articles/coding-with-velo/routers/create-a-router.md) article walks you through the default code that appears when you first add a router to your site. In this tutorial, we'll show you how to alter the router code to create and manage dynamic pages yourself. We'll create a very basic site for listing real estate properties. We'll then add a router and walk you through the necessary code to create an index page of listings, and a dynamic item page. In this tutorial we work directly in the editor. However, all of the code and basic website design is relevant if you're working in the Wix IDE or your local IDE. The only differences might be the names and locations of some of the files. If you're having trouble locating some of these files, see our article on [creating a router](https://dev.wix.com/docs/develop-websites/articles/coding-with-velo/routers/create-a-router.md). Before you get started, make sure you're familiar with the concepts of [routers](https://dev.wix.com/docs/develop-websites/articles/coding-with-velo/routers/about-routers.md) and dynamic pages. ## Step 1 | Create a new site with a collection and router In this step, we'll create a new site and add the features we need to build dynamic pages. This includes the following: * The collection, which we'll fill with data that will be used to populate the dynamic index and item pages. * The router, which controls the dynamic page that visitors are sent to when they request to see listings on your site. To start the setup: 1. Create a [new blank site](https://wixstudio.new/). 1. On the homepage, add the following 2 elements: - Text element: Edit the text element so its text reads "Welcome to our real estate site". - Button: Click on the button and select **Change Text**. Edit the text to say "Click here to see our listings". ![Change the button text](https://wixmp-833713b177cebf373f611808.wixmp.com/images/05d12620e8ad7a36c9200284ba176a34.png) You can leave the page code empty for now; we'll add code for the homepage later. 1. Now we need to [add a collection](https://support.wix.com/en/article/cms-formerly-content-manager-creating-a-collection) to contain the listings we want to display. We'll query the items in this collection to create our dynamic pages. Name your collection `Real Estate Listings` and make sure it has a matching collection ID `RealEstateListings`. We'll need this ID later to query the collection. Add the following four fields to the collection: - **Title**: Text field that contains the name of the listing. - **Description**: Text field that contains a brief description of the listing. - **Image**: Image field that contains an image of the property in the listing. - **Slug**: Text field that contains the slugified name of the listing. Once you set up your fields, add the following items to the collection exactly as shown in the table: | Title | Description | Image | Slug | | ------| ------------ | ------ | ------- | | Modern urban apartment | This newly built apartment has all the trimmings and appliances you need in the modern-day city. | wix:image://v1/11062b_1c8c953e6532482b974d6b30961091e2~mv2.jpg/Loft%20Style%20Apartment.jpg#originWidth=4000&originHeight=2667 | modern-urban-apartment | | Beach house | Imagine stepping outside your house and you're right on the beach. You can now achieve that dream with this piece of property. | wix:image://v1/d4dde1_954ed2d26fb14166ad634c0299d0ed2c~mv2.jpg/Large%20house%20right%20next%20to%20the%20sea.%20It%20is%20light%20blue%20with%20white%20trim%20and%20doors.%20It%20has%20a%20po#originWidth=500&originHeight=500 | beach-house | | Cute Cottage | This adorable cottage in the suburbs reminds you of old times outside while keeping a modern feel inside. | wix:image://v1/d4dde1_1f312bbf4d8743a695305a3894ac89fb~mv2.jpg/Cottage%20made%20of%20white%20stone%20with%20a%20small%20green%20lawn%20and%20a%20white%20picket%20fence%20with%20a%20gate.%20#originWidth=500&originHeight=500 | cute-cottage | | Cozy Cabin | Nestled deep in the woods, this cabin offers the peace and quiet of the wilderness away from the city. | wix:image://v1/d4dde1_0fe31ec5d1bb4ed184ff61fd6b42ce20~mv2.jpg/A%20wooden%20cabin%20nestled%20in%20between%20trees..jpg#originWidth=500&originHeight=500 | cozy-cabin | 1. [Add a router](https://dev.wix.com/docs/develop-websites/articles/coding-with-velo/routers/create-a-router.md) to your site. Set the URL prefix to `listings`. 1. After you create the router, go to the **Backend & Public** section of the code panel and locate the `routers.js` file. It should contain two functions, `listings_Router` and `listings_SiteMap`, with the sample code discussed in [Create a Router](https://dev.wix.com/docs/develop-websites/articles/coding-with-velo/routers/create-a-router.md). In addition, check that a router page called `listings-page` now appears in the code panel. Now that you have created the router, we can start adding code. ## Step 2 | Add dynamic page code In this step, we'll add page code for the dynamic item and index pages to display our property listings. In order to have both an index page and an item page, we need to add two router pages. We'll need to add code to both pages. Let's start by coding the index page, which will display all of the listings for visitor selection: 1. In the **Page Code** section of the code panel, under **Router Pages**, find the router page that was created when you first added the router. It should be called `listings_page`. Click on `listings_page` to open it in the editor. 1. Add a [repeater](https://support.wix.com/en/article/wix-editor-adding-and-managing-repeaters-lists-grids) to the page. Select an item in the repeater and open the settings menu. Click **Quick Add** to add an image and a title to the repeater item. ![Quick add an element to a repeater](https://wixmp-833713b177cebf373f611808.wixmp.com/images/64bd1ecd4d2e08edf003bf6defa1d387.png) 1. Select the repeater so it's highlighted. In the [Properties & Events Panel](https://dev.wix.com/docs/develop-websites/articles/workspace-tools/velo-workspace/properties-events-panel/about-the-properties-events-panel.md), change the ID of the repeater to `listings`. ![Change the repeater ID to listings](https://wixmp-833713b177cebf373f611808.wixmp.com/images/28380b902072e88aad787e26b0406f80.png) Repeat this with the IDs of the repeater item as well as the title and image that you added. Give the elements the following IDs: - Repeater item: `listing` - Title: `listingTitle` - Image: `listingImage` Now we're ready to add some simple code for our dynamic index page. 1. In the code editor for `listings-page`, add the following code: ```js import { getRouterData } from 'wix-window'; import { to } from 'wix-location'; $w.onReady(function () { const listings = getRouterData(); $w('#listings').onItemReady( ($item, itemData) => { $item('#listingImage').src = itemData.image; $item('#listingTitle').text = itemData.title; $item('#listing').onClick( () => { to(`/listings/${itemData.slug}`); }); } ); $w('#listings').data = listings; }); ``` **Lines 1-2:** Import the `getRouterData()` and `to()` functions. `getRouterData()` receives any data sent by the router so we can render it on the page. **Line 5:** Receive our router data and store it in the `listings` variable for later use. **Lines 7-16:** Populate the repeater items with the router data. We create an `onClick()` handler that sends users to the item page when clicked. Depending on the slug passed, the router controls which dynamic item page is rendered. We have now set up the dynamic index page so that it will display each of the items in the collection. Next, we need to add a second router page that will become our dynamic item page. 1. Under **Router Pages**, click the **More Actions** button next to **Listings Pages (Router)**. Select **Add page to router**. ![Add page to router](https://wixmp-833713b177cebf373f611808.wixmp.com/images/0880f50c08320f50312b121c2003a312.png) Label the new page `listing` and click **Add Page**. This creates a second page under the **Listings Pages (Router)**. 1. Select the `listing` page so it appears in the editor. On a real property listing you'll typically include much more detail, such as price and contact information. However, for this example, we'll keep the dynamic item page very simple and just add a single image, title, and description. Add an image and two text elements to the page, and arrange the elements so the page layout looks like this: ![Dynamic page element layout](https://wixmp-833713b177cebf373f611808.wixmp.com/images/c0c6e41ab94b1bdbbe6de9c39ccf6d9c.png) 1. In the code editor, open the page code for `listing`. We need to write some code that will accept data from the router and use it to render the correct information for the selected property. To do this we can write the following basic code: ```js import { getRouterData } from 'wix-window'; $w.onReady(function () { const listing = getRouterData(); $w('#listingTitle').text = listing.title; $w('#listingDescription').text = listing.description; $w('#listingImage').src = listing.image; }); ``` **Line 1:** Again, we import `getRouterData()` to enable our frontend page to receive data from the router. **Line 4-8:** Get the router data and populate our elements with it. We now have a functioning dynamic index and item page that will render our collection data based on requests to the router. Our next step is to write the router code so that it handles visitor requests correctly. ## Step 3 | Add the router code All the logic for your router goes in the router function added to `routers.js`. In this example, we'll write all our code in the `listings_Router()` function. This is the code that actually handles visitor requests. In the case of dynamic pages, the router logic decides which site page is rendered for the visitor. 1. In the code panel, locate the `routers.js` file in the **Public & Backend** section. The first thing we need to do is import the necessary functions. The sample code already imports several important objects for you from `wix-router`. This includes the `ok()` and `notFound()` functions and the `WixRouterSitemapEntry` object. We'll need to work with the [Wix Data API](https://dev.wix.com/docs/velo/apis/wix-data/introduction.md) to query items from our collection, so we add another line to the import statement: ```js import {ok, notFound, WixRouterSitemapEntry} from "wix-router"; import wixData from "wix-data"; // Add this line ``` The sample code also includes an object with hard-coded data. You can delete this object as we won't use it in this tutorial. 1. In the `listings_Router()` function, delete the sample code; we'll replace it with our own. Recall that we have two router pages, an index page and an item page. The router needs to know when to display one or the other. It can figure this out based on the [path](https://dev.wix.com/docs/velo/events-service-plugins/routers/service-plugins/wix-router/wix-router-request/path.md) variable in the `WixRouterRequest` object that the router receives. The path indicates which item page in our router the visitor wants to view. If the `path` variable is empty, it means the visitor has not requested a specific page in the router, so we render the index page. Therefore we can start by writing an `if` statement that checks the path: ```js export async function listings_Router(request) { if (!request.path[0]) { const { items: listings } = await wixData.query('RealEstateListings').find(); const seoData = { title: 'Property Listings', description: 'List of available properties', noIndex: false }; return ok('listings-page', listings, seoData); } } ``` **Line 2:** Check if `path` is empty. **Lines 3-5:** We query our data collection for all available listings, and store them in an array called `listings`. We pass the ID of our collection, `RealEstateListings`, to the Wix Data `query()` function to retrieve the collection items. **Lines 7-11:** Create our SEO data so Google knows how to find and display our index page in its search. **Line 13:** Call the `ok()` function to go to the index page. We pass it the `listings` data. Recall that we wrote frontend code that will pick up and display this data to the visitor.
__Tip:__ In case you don't know your collection ID, in the sidebar go to **CMS** > **Your Collections**. Open the menu for your collection and click **Edit settings**. The modal that pops up contains some information about your collection including its ID.
1. Now we need to handle the case where the `path` variable is _not_ empty. There are two cases here: - The visitor requests an existing path. - The visitor requests a path that doesn't exist. Let's start with the case where the requested path exists. Add the following `else` statement to the `if` we just wrote: ```js else { const results = await wixData.query('RealEstateListings') .eq('slug', request.path[0]) .find(); if (results) { const listing = results.items[0]; const seoData = { title: listing.title, metaTags: [ { name: 'description', content: listing.description }, { name: 'og:title', content: listing.title }, { property: 'og:image', content: listing.image } ], }; return ok('listing', listing, seoData); } } ``` **Lines 2-4:** We again query the collection, but this time we filter the data by searching for a slug that matches one in the collection. **Lines 6-8:** If we get a result, we pull the item data out and place it in a variable `listing`. **Lines 10-24:** We use the data from `listing` to populate the SEO object. **Line 26:** We pass the listing and SEO data to the `ok()` function to render the correct page to the visitor. To handle the case of a request for a non-existing path, we only need to make one simple addition: ```js else { const results = await wixData.query('RealEstateListings') .eq('slug', request.path[0]) .find(); if (results) { const listing = results.items[0]; const seoData = { title: listing.title, metaTags: [ { name: 'description', content: listing.description }, { name: 'og:title', content: listing.title }, { property: 'og:image', content: listing.image } ], }; return ok('listing', listing, seoData); } else { // Add this to handle requests for items that don't exist return notFound(); } } ``` **Line 28:** Send the requester to an error page if we don't find the slug in our collection. This completes the code for our router function. Our router now knows how to handle requests for the index page and the dynamic item pages. ## Step 4 | Add the sitemap code The sitemap is necessary for your site's SEO. When you use dynamic pages, Wix handles the SEO and site mapping for you. But when you manually create dynamic pages with your own router, you must build your own sitemap using the provided function. The sitemap function also appears in `routers.js`, immediately below the related router function. In this tutorial, the sitemap function is called `listings_SiteMap()`. 1. Delete the sample code in `listings_SiteMap()` and add the following code: ```js export async function listings_SiteMap(sitemapRequest) { const { items: listings } = await wixData.query('RealEstateListings').find(); const siteMapEntries = listings.map(listing => { const entry = new WixRouterSitemapEntry(listing.title); entry.pageName = 'listing'; entry.url = '/listings/' + listing.slug; entry.title = listing.title; return entry; }); const indexEntry = new WixRouterSitemapEntry('Property Listings'); indexEntry.pageName = 'listings-page'; indexEntry.url = '/listings' indexEntry.title = 'Property Listings'; siteMapEntries.push(indexEntry); return siteMapEntries; } ``` **Line 2:** We query the collection to get the item data, and store the data for each item in an object `listings`. **Line 4-10:** We create a new site map entry for each item in the collection and map it to a new array `siteMapEntries`. We set the sitemap entry title from the title of the listing, and use the item's slug to create the entry's URL. **Lines 12-17:** We also need to add the index page to the site map, so we create a separate sitemap entry and push it to the `siteMapEntries` array. **Line 19:** Return the sitemap. We've created the sitemap, and now have a fully functional router that works with SEO. Here's the full code of `router.js`, including the router and sitemap functions: ```js import {ok, notFound, WixRouterSitemapEntry} from "wix-router"; import wixData from "wix-data"; export async function listings_Router(request) { // If the request doesn't have a path attached, render the index page if (!request.path[0]) { const { items: listings } = await wixData.query('RealEstateListings').find(); const seoData = { title: 'Property Listings', description: 'List of available properties', noIndex: false }; return ok('listings-page', listings, seoData); } else { const results = await wixData.query('RealEstateListings') .eq('slug', request.path[0]) .find(); if (results) { const listing = results.items[0]; const seoData = { title: listing.title, metaTags: [{ name: 'description', content: listing.description }, { name: 'og:title', content: listing.title }, { property: 'og:image', content: listing.image }], }; return ok('listing', listing, seoData); } else { return notFound(); } } } export async function listings_SiteMap(sitemapRequest) { const { items: listings } = await wixData.query('RealEstateListings').find(); // Convert the data to site map entries const siteMapEntries = listings.map(listing => { const entry = new WixRouterSitemapEntry(listing.title); entry.pageName = 'listing'; // The name of the page in the Wix editor to render entry.url = '/listings/' + listing.slug; // Relative URL of the page entry.title = listing.title; // For better SEO - Help Google return entry; }); const indexEntry = new WixRouterSitemapEntry('Property Listings'); indexEntry.pageName = 'listings-page'; // The name of the page in the Wix editor to render indexEntry.url = '/listings' // Relative URL of the page indexEntry.title = 'Property Listings'; // For better SEO - Help Google siteMapEntries.push(indexEntry); return siteMapEntries; } ``` ## Step 5 | Test dynamic pages 1. Publish your site by clicking **Publish** in the top right corner of the editor. 1. Open the menu in the top left corner and click **Site** > **View Published Site**. ![View published site](https://wixmp-833713b177cebf373f611808.wixmp.com/images/288053bdb3f77fb88c6199a9ed0e7214.png) The published site opens in a new tab. You should see the homepage first: ![Router tutorial starting page](https://wixmp-833713b177cebf373f611808.wixmp.com/images/1d1cd520ed4477d14aac097973bb6845.png) 1. Click the button on the homepage to go to the listings index page. Because you're requesting to view a page with the `listings` URL prefix, Wix passes the request to your router to handle. The site should navigate to the dynamic index page you created. From there, click on any of the listings on the page. The site then navigates to the dynamic item page, correctly rendered for the item you selected. Again, this request is handled by the router. ![Dynamic item page display](https://wixmp-833713b177cebf373f611808.wixmp.com/images/bfa074e998490f6b3c9470c340756739.png) 1. You can return to the index page and test out the other listings if you wish. Each time you click on a listing, you make a request to the router and it fetches the item data from the `Real Estate Listings` collection, and renders it on the item page. This is the same thing Wix does when you add dynamic pages to your site! 1. Now that you know your router is working, let's take a brief look at the sitemap. Return to your homepage and in the address bar, add `/sitemap.xml` to your site address. It looks something like this: ```bash https://mysite.wixstudio.io/test-site/sitemap.xml ``` 1. Navigate to the address and you'll see your site's sitemap displayed in XML. For example: ```xml https://mysite.wixstudio.io/test-site/dynamic-listings-sitemap.xml 2024-10-14 https://mysite.wixstudio.io/test-site/pages-sitemap.xml 2024-10-14 ``` One of the links leads to your router pages. Copy the link and paste it back into the address bar. Navigate to the link to see the sitemap for your router: ```xml https://mysite.wixstudio.io/test-site/listings/cozy-cabin 2024-10-14 https://mysite.wixstudio.io/test-site/listings/beach-house 2024-10-14 https://mysite.wixstudio.io/test-site/listings/modern-urban-apartment 2024-10-14 https://mysite.wixstudio.io/test-site/listings 2024-10-14 https://mysite.wixstudio.io/test-site/listings/cute-cottage 2024-10-14 ``` This is the sitemap generated by your `listings_SiteMap()` function. In this tutorial, you've created your own router and used it to set up dynamic pages on your site manually. From here you can enhance the site design and adjust it to your needs, and continue building on the router so it can handle more complex tasks. ## See also * [About routers](https://dev.wix.com/docs/develop-websites/articles/coding-with-velo/routers/about-routers.md) * [Create a router](https://dev.wix.com/docs/develop-websites/articles/coding-with-velo/routers/create-a-router.md) * [About SEO and routing](https://dev.wix.com/docs/develop-websites/articles/coding-with-velo/routers/add-seo-to-your-router.md) --- > Portal Navigation: > > - Append `.md` to any URL under `https://dev.wix.com/docs/` to get its markdown version. > - Pages are either content pages (article or reference text) or menu pages (a list of links to child pages). > - To get a menu page, truncate any URL to a parent path and append `.md` (e.g. `https://dev.wix.com/docs/sdk.md`, `https://dev.wix.com/docs/sdk/core-modules.md`). > - Top-level index of all portals: https://dev.wix.com/docs/llms.txt > - Full concatenated docs: https://dev.wix.com/docs/llms-full.txt ## Resource: About Premium Plans ## Article: About Premium Plans ## Article Link: https://dev.wix.com/docs/develop-websites/articles/coding-with-velo/premium-plans/about-premium-plans.md ## Article Content: # About Premium Plans Wix allows you to extend your site's functionality and customize it to fit your needs. You can handle your site's data using the [Wix Data APIs](https://www.wix.com/velo/reference/wix-data) and [CMS (Content Management System)](https://support.wix.com/en/article/about-the-content-manager-7160473) collections. You can also add custom code to your site using [Velo](https://support.wix.com/en/article/about-velo-by-wix). Different sites require different amounts of resources, depending on the complexity and volume of their code and data use. Wix offers a number of premium plans that include different levels of data, computing, and developer features. This way, you can choose exactly what you need for your site, depending on its complexity and specific needs. To better understand what premium features are available, check out: * [Data platform](https://dev.wix.com/docs/develop-websites/articles/coding-with-velo/limits-and-optimization/data-features.md) * [Compute platform](https://dev.wix.com/docs/develop-websites/articles/coding-with-velo/limits-and-optimization/compute-features.md) * [Developer tools](https://dev.wix.com/docs/develop-websites/articles/coding-with-velo/limits-and-optimization/developer-tools-features.md) [Compare](https://www.wix.com/upgrade/website) the resources included in each plan and find the one that's right for you. You can also try out many of the premium features for free. Find out more about [Using Velo with a Free Wix Site](https://dev.wix.com/docs/develop-websites/articles/coding-with-velo/premium-plans/using-velo-with-a-free-wix-site.md). > **Note:** Premium plans added to sites before September 2023 are now considered legacy plans. If you have a site with a legacy plan, your site's resource limits won't change. Learn more about [legacy plan limits](https://dev.wix.com/docs/develop-websites/articles/coding-with-velo/premium-plans/legacy-data-compute-and-developer-tools-limits.md). --- > Portal Navigation: > > - Append `.md` to any URL under `https://dev.wix.com/docs/` to get its markdown version. > - Pages are either content pages (article or reference text) or menu pages (a list of links to child pages). > - To get a menu page, truncate any URL to a parent path and append `.md` (e.g. `https://dev.wix.com/docs/sdk.md`, `https://dev.wix.com/docs/sdk/core-modules.md`). > - Top-level index of all portals: https://dev.wix.com/docs/llms.txt > - Full concatenated docs: https://dev.wix.com/docs/llms-full.txt ## Resource: Legacy Data, Compute, and Developer Tools Limits ## Article: Legacy Data, Compute, and Developer Tools Limits ## Article Link: https://dev.wix.com/docs/develop-websites/articles/coding-with-velo/premium-plans/legacy-data-compute-and-developer-tools-limits.md ## Article Content: # Legacy Data, Compute, and Developer Tools Limits In September 2023, Wix launched new premium plans that include updated limits on data, compute platform, and developer tools features. The new limits impact existing sites, as follows: * Existing free sites moved to the new [free tier limits](https://dev.wix.com/docs/develop-websites/articles/coding-with-velo/premium-plans/using-velo-with-a-free-wix-site.md). * Existing sites with earlier premium plans continue receiving [legacy plan limits](https://support.wix.com/en/article/legacy-data-compute-and-developers-tools-limits#legacy-plan-limits). ## Checking your site's plan If your site has a premium plan, you can check if it has a legacy premium plan or a new premium plan. To check your plan type, do the following: 1. Open your site's [dashboard](https://www.wix.com/my-account/site-selector/?buttonText=Select%20Site&title=Select%20a%20Site&autoSelectOnSingleSite=true&actionUrl=https:%2F%2Fwww.wix.com%2Fdashboard%2F%7B%7BmetaSiteId%7D%7D%2Fhome). 2. Navigate to **Settings** > **Manage plan**. 3. Click **View Plan Features**. ![](https://github.com/wix-incubator/wix-code-docs/assets/89579857/cf306eea-c71f-4349-8618-00fa13e2ab49) A modal opens, displaying your site's premium plan features. 4. Scroll down to see your site's plan limits. If you see dedicated sections for **Data platform**, **Compute platform**, and **Developer tools**, your site has a new premium plan. If you don't see these sections, your site has a legacy premium plan. ![](https://github.com/wix-incubator/wix-code-docs/assets/89579857/f780c659-6c95-4400-9e34-a2a0dcdf8dd8) ## Changing your site's plan If your site has a legacy premium plan and you move to new plan, your plan's limits change. In some cases, the new plan may have lower limits for some features than your site's current usage. Downgrade behavior varies by feature. Learn more about downgrade behavior for [data platform](https://dev.wix.com/docs/develop-websites/articles/coding-with-velo/limits-and-optimization/data-features.md), [compute platform](https://dev.wix.com/docs/develop-websites/articles/coding-with-velo/limits-and-optimization/compute-features.md), and [developer tools](https://dev.wix.com/docs/develop-websites/articles/coding-with-velo/limits-and-optimization/developer-tools-features.md) features. ## Legacy plan limits These tables list the limits for legacy premium plans. ### Data platform |Feature |Limit | |---|---| |Data storage|10 GB |Data collections|1000 |Data indexes|\- |Data requests per minute|Read: 3000/minute
Write: 1500/minute |Data request timeout|5 seconds |External database integration|Yes ### Compute platform |Feature |Limit | |---|---| |Backend containers| 1 micro container |Capacity per container|1 vCPU
400 MB RAM |Backend requests per minute|7000 |Backend request timeout|14 seconds ### Developer tools |Feature |Limit | |---|---| |Scheduled jobs|Up to 20
1 hour minimum interval |Backend event handlers|Yes |Service plugins|Yes --- > Portal Navigation: > > - Append `.md` to any URL under `https://dev.wix.com/docs/` to get its markdown version. > - Pages are either content pages (article or reference text) or menu pages (a list of links to child pages). > - To get a menu page, truncate any URL to a parent path and append `.md` (e.g. `https://dev.wix.com/docs/sdk.md`, `https://dev.wix.com/docs/sdk/core-modules.md`). > - Top-level index of all portals: https://dev.wix.com/docs/llms.txt > - Full concatenated docs: https://dev.wix.com/docs/llms-full.txt ## Resource: Using Velo with a Free Wix Site ## Article: Using Velo with a Free Wix Site ## Article Link: https://dev.wix.com/docs/develop-websites/articles/coding-with-velo/premium-plans/using-velo-with-a-free-wix-site.md ## Article Content: # Using Velo with a Free Wix Site You can try out most Velo and Data features with a [free site](https://support.wix.com/en/article/building-a-website-for-free). As you develop your site you may reach some of the free site quotas, and can select a [plan](https://www.wix.com/upgrade/website) to increase the number of features and resources available for your site. >**Note:** Some Velo and data quotas are not enforced on all sites yet. The following table lists the feature and resource quotas available for free sites. You can learn more about each feature [here](https://support.wix.com/en/article/velo-about-premium-packages). |Feature|Free Site Limit| |--|--| |**Data Platform**| | |Dedicated infrastructure|Not available |Data storage|1,000 items |Data collections|1,000 |Data indexes|4 |Data requests per minute|1000 reads
60 writes |Data request timeout|5 seconds |**Compute platform**|| |Backend containers| 1 micro |Capacity per container|1 vCPU
400 MB RAM |Backend requests per minute|60 |Backend request timeout|14 seconds |**Developer tools**|| |Scheduled jobs|20 jobs
1-hour minimum interval --- > Portal Navigation: > > - Append `.md` to any URL under `https://dev.wix.com/docs/` to get its markdown version. > - Pages are either content pages (article or reference text) or menu pages (a list of links to child pages). > - To get a menu page, truncate any URL to a parent path and append `.md` (e.g. `https://dev.wix.com/docs/sdk.md`, `https://dev.wix.com/docs/sdk/core-modules.md`). > - Top-level index of all portals: https://dev.wix.com/docs/llms.txt > - Full concatenated docs: https://dev.wix.com/docs/llms-full.txt ## Resource: Data Features ## Article: Data Platform Features ## Article Link: https://dev.wix.com/docs/develop-websites/articles/coding-with-velo/limits-and-optimization/data-features.md ## Article Content: # Data Features All sites have different data capacities and resource needs. Data quotas apply to anything making data requests on a site, including the [CMS (Content Management System)](https://support.wix.com/en/article/about-the-content-manager-7160473), [Datasets](https://support.wix.com/en/article/about-datasets-6368396), and the Velo [Wix Data API](https://www.wix.com/velo/reference/wix-data). This article covers the data platform features that are available based on your [premium plan](https://dev.wix.com/docs/develop-websites/articles/coding-with-velo/premium-plans/about-premium-plans.md). Learn about the differences and [choose the plan](https://www.wix.com/upgrade/website) that's right for you. ## Data storage A site's collections and items are hosted by Wix, and there is a limit to the amount of data you can store on a site. This limit only applies to your collection items. ### Collection items Wix limits the total number of collection items a site can have. If a site reaches this limit, you won't be able to add any more data to any of your collections. The collection items limit is not applied to [Wix app collections](https://support.wix.com/en/article/content-manager-working-with-wix-app-collections) or [external database collections](https://support.wix.com/en/article/velo-adding-and-deleting-an-external-database-collection) connected to a site. It also doesn't apply to items in [sandbox collections](https://support.wix.com/en/article/cms-about-sandbox-and-live-collections-and-syncing). Collection items can also include media or other files, which have [separate limits](https://support.wix.com/en/article/about-storage-and-bandwidth).
**Notes**: - If a site exceeds its storage quota and you delete data to free up space, it may take up to 1 hour before you can add new data to your collections. - There are also some [limits](https://support.wix.com/en/article/field-type-support-and-limitations-in-the-content-manager) that are specific to certain field types. - Collections in Blocks apps also affect a [site's collection item limit](https://support.wix.com/en/article/wix-studio-cms-limits-on-free-sites) depending if the app is private or public: - **Private Blocks apps**: Items in collections from private Blocks apps count towards the site's collection item quota. - **Public Blocks apps**: Items in collections from public Blocks apps, installed from the Wix App Market, don't count towards the site's collection item quota.
Downgrade behavior If you downgrade to a lower tier plan, the storage quota changes to the one defined by the new plan. If your site has more than this amount of data when you downgrade, none of your data is deleted. However, you can't add any new data to your site until you delete enough existing data to be below the quota.
### Optimize your data storage To avoid reaching the data storage limits, read about how to [optimize your data storage](https://dev.wix.com/docs/develop-websites/articles/coding-with-velo/limits-and-optimization/optimizing-your-code.md#storage). You can also [upgrade your plan](https://www.wix.com/upgrade/website) to receive a larger storage limit. ## Data requests Every time you access your data, whether that's to read or to write it, you are making a data request. Wix limits the frequency of your requests and the amount of time a request can take. ### Requests per minute Wix limits the number of data requests your site can make per minute. Once a site reaches this quota, subsequent requests during the same minute are not processed and return an error. There are separate quotas for read requests and write requests. The following API functions count as 1 request towards the read quota: - [`get`](https://www.wix.com/velo/reference/wix-data/get) - [`find`](https://www.wix.com/velo/reference/wix-data/wixdataquery/find) - [`count`](https://www.wix.com/velo/reference/wix-data/wixdataquery/count) - [`distinct`](https://www.wix.com/velo/reference/wix-data/wixdataquery/distinct) - [`aggregate`](https://www.wix.com/velo/reference/wix-data/aggregate) - [`isReferenced`](https://www.wix.com/velo/reference/wix-data/isreferenced) - [`queryReferenced`](https://www.wix.com/velo/reference/wix-data/queryreferenced) - [`include`](https://www.wix.com/velo/reference/wix-data/wixdataquery/include) - [`next`](https://www.wix.com/velo/reference/wix-data/wixdataqueryreferencedresult/next) - [`refresh`](https://www.wix.com/velo/reference/wix-data/wixdataqueryreferencedresult/next) - [`getItems`](https://www.wix.com/velo/reference/wix-dataset/dynamicdataset/getitems) (For newly requested items that are not currently in your cache.) The following API functions count as 1 request towards the write quota: - [`insert`](https://www.wix.com/velo/reference/wix-data/insert) - [`bulkInsert`](https://www.wix.com/velo/reference/wix-data/bulkinsert) - [`update`](https://www.wix.com/velo/reference/wix-data/update) - [`bulkUpdate`](https://www.wix.com/velo/reference/wix-data/bulkupdate) - [`save`](https://www.wix.com/velo/reference/wix-data/save) - [`bulkSave`](https://www.wix.com/velo/reference/wix-data/bulksave) - [`remove`](https://www.wix.com/velo/reference/wix-data/remove) - [`bulkRemove`](https://www.wix.com/velo/reference/wix-data/bulkremove) - [`insertReference`](https://www.wix.com/velo/reference/wix-data/insertreference) - [`removeReference`](https://www.wix.com/velo/reference/wix-data/removereference) - [`replaceReferences`](https://www.wix.com/velo/reference/wix-data/replacereferences) > **Note:** Each use of [include](https://www.wix.com/velo/reference/wix-data/wixdataquery/include) in a query counts towards the request quota. For example, the following query counts as 3 read requests: ```javascript wixData.query("Movies").include("director").include("studio").find(); ``` For each request that exceeds the quota, the request fails and the following error is displayed in [Wix Logs](https://dev.wix.com/docs/develop-websites/articles/workspace-tools/developer-tools/logs/about-logs.md): `WDE0014: Requests per minute quota exceeded.` Learn more about [optimizing your data requests](https://dev.wix.com/docs/develop-websites/articles/coding-with-velo/limits-and-optimization/optimizing-your-code.md#data-requests) and [Wix Data error codes](https://dev.wix.com/docs/velo/apis/wix-data/error-codes.md). ### Request payload limits Wix Data limits the size of the request payloads. Single-item requests, such as [`update()`](https://dev.wix.com/docs/sdk/backend-modules/data/items/update.md) or [`insert()`](https://dev.wix.com/docs/sdk/backend-modules/data/items/insert.md), have a payload limit of 512 KB. Exceeding this limit results in a `WDE0009` error. Bulk operations, such as [`bulkUpdate()`](https://dev.wix.com/docs/sdk/backend-modules/data/items/bulk-update.md) or [`bulkInsert()`](https://dev.wix.com/docs/sdk/backend-modules/data/items/bulk-insert.md), have a total payload limit of 4 MB. Exceeding this limit results in a `WDE0109` error. Learn more about [Wix Data error codes](https://dev.wix.com/docs/sdk/backend-modules/data/wix-data-error-codes.md). ### Request timeout When your site makes a data request, it may take some time to receive a response. Wix Data places limits on how long a response can take before the request times out. If the response time exceeds this limit, Wix Data returns an error instead of the intended result. Request timeouts vary depending on your [Wix plan](https://www.wix.com/plans) and the type of collection you are attempting to access: | Collection Type | Wix plan | Timeout | | --------------------------------------------------------------------------------------------------------------------------------------------------------------------------- | ----------------------------------------------------------- | ---------- | | [CMS collections](https://support.wix.com/en/article/cms-formerly-content-manager-managing-your-collections) | Free sites, premium sites (excl. Elite and Business Elites) | 5 seconds | | [CMS collections](https://support.wix.com/en/article/cms-formerly-content-manager-managing-your-collections) | Business Elite & Elite Premium | 10 seconds | | [External Database Collections](https://dev.wix.com/docs/develop-websites/articles/databases/external-databases/overview/integrating-external-databases-with-your-wix-site.md) | All plans | 15 seconds | After the specified timeout, the request fails and the following error message is displayed in [Wix Logs](https://dev.wix.com/docs/develop-websites/articles/workspace-tools/developer-tools/logs/about-logs.md): `WDE0028: Operation time limit exceeded.` Learn more about [Wix Data error codes](https://dev.wix.com/docs/velo/apis/wix-data/error-codes.md). ### Blocks apps and request limits When a Blocks app is installed on a site, whether a private or a public app, data requests made by the app are subject to the site's requests per minute (RPM) limits, not the app's limits. ### Optimize your requests To avoid reaching the limits for data requests, read about how to [optimize your requests](https://dev.wix.com/docs/develop-websites/articles/coding-with-velo/limits-and-optimization/optimizing-your-code.md#data-requests). You can also [upgrade your plan](https://www.wix.com/upgrade/website) to receive larger limits for your data requests. ## Data management It's important to understand your database's infrastructure, how it affects data management, and how to use indexes to improve data requests. ### Database structure [Database collections](https://support.wix.com/en/article/content-manager-about-your-collection-fields) store dynamic content for a site, such as the content that displays on sites and site visitor generated content. Database collections for free and most premium sites are stored in large, multi-tenant databases. This doesn't mean that a site's data is exposed. It does mean that there are limits on the storage, read/write requests, and indexing resources available to a site. Database collections for sites with the Business Elite plan are stored in dedicated databases, providing them with significantly greater data resources. ### Data indexes A [database collection index](https://support.wix.com/en/article/velo-indexes-and-wix-data-collections) is a set of keys used to improve performance when searching for data in a database. Indexes can be created on a single collection field or multiple fields. Indexes are added to fields or sets of fields that are used most often when querying the collection to retrieve information. Collections can have 2 types of indexes: - **Regular:** These indexes improve retrieval performance as described above. - **Unique:** These are special indexes that improve performance and also enforce the uniqueness of values in the field that they're defined for. The Business Elite plan allows you to create a combination of unique or regular indexes up to the amount of indexes in the quota. Other plans include only 3 regular indexes and 1 unique index.
Downgrade behavior If you downgrade to a lower tier plan, the oldest indexes are maintained up to the new plan's quota. All other indexes on the site are deleted. If you downgrade to a free plan, all indexes are deleted.
--- > Portal Navigation: > > - Append `.md` to any URL under `https://dev.wix.com/docs/` to get its markdown version. > - Pages are either content pages (article or reference text) or menu pages (a list of links to child pages). > - To get a menu page, truncate any URL to a parent path and append `.md` (e.g. `https://dev.wix.com/docs/sdk.md`, `https://dev.wix.com/docs/sdk/core-modules.md`). > - Top-level index of all portals: https://dev.wix.com/docs/llms.txt > - Full concatenated docs: https://dev.wix.com/docs/llms-full.txt ## Resource: Compute Features ## Article: Compute Platform Features ## Article Link: https://dev.wix.com/docs/develop-websites/articles/coding-with-velo/limits-and-optimization/compute-features.md ## Article Content: # Compute Features Improve your site's performance and handle more backend requests with a compute platform [upgrade](https://www.wix.com/upgrade/website) to your [premium plan](https://dev.wix.com/docs/develop-websites/articles/coding-with-velo/premium-plans/about-premium-plans.md). Check out the feature differences below. ## Backend containers Velo backend code for Wix sites is run in containers. A container is a package of software containing everything that is needed for its code to run in any environment. You can think about it as a virtual computer being used to run the site’s code. Containers are limited by the amount of computing resources that are allotted for them. There are 2 types of containers available for Wix sites: * **Micro containers:** Include 1 vCPU for processing and 400 MB of RAM. * **Standard containers:** Include 2 vCPUs for processing and 600 MB of RAM. Higher tier premium plans include more containers. If your site needs to perform a lot of operations that require large amounts of processing or memory, it may benefit from a plan that includes more containers. ## Backend requests Wix limits the frequency of your backend requests and the amount of time a request can take. The following section will explain how. ### Backend requests per minute Wix limits the number of requests that can be made from your site's frontend code to its backend code. Once the quota is reached, any backend requests sent for the rest of the minute are not processed. If your site exceeds the quota, any additional requests within a 1-minute window are blocked and you receive a 429 response code. For each throttled request, the following error message is displayed in [Wix Logs](https://dev.wix.com/docs/develop-websites/articles/workspace-tools/developer-tools/logs/about-logs.md): `/backend/.js(w)/ was throttled because your site exceeded the maximum number of backend requests per minute.` The failed request also is displayed on your site’s [monitoring dashboard](https://support.wix.com/en/article/velo-monitoring#understand-the-dashboard). ### Backend request timeouts When frontend code on a site makes requests to backend code, a request is made to a Wix server. Wix places limits on how long the code on the server can run before it times out. If it takes longer, you receive a 504 response code. If your execution exceeds the quota, the code might still execute, but the connection to the client is closed, so the results do not appear in the frontend. The following error message is displayed in [Wix Logs](https://dev.wix.com/docs/develop-websites/articles/workspace-tools/developer-tools/logs/about-logs.md): `/backend/.js(w)/ timed out because it exceeded the maximum execution time.` The failed request also is displayed on your site’s [monitoring dashboard](https://support.wix.com/en/article/velo-monitoring#understand-the-dashboard). ### Optimize your requests To avoid reaching the limits for data requests, read about how to [optimize your requests](https://dev.wix.com/docs/develop-websites/articles/coding-with-velo/limits-and-optimization/optimizing-your-code.md#backend-requests). You can also [upgrade your plan](https://www.wix.com/upgrade/website) to receive larger limits for your data requests. --- > Portal Navigation: > > - Append `.md` to any URL under `https://dev.wix.com/docs/` to get its markdown version. > - Pages are either content pages (article or reference text) or menu pages (a list of links to child pages). > - To get a menu page, truncate any URL to a parent path and append `.md` (e.g. `https://dev.wix.com/docs/sdk.md`, `https://dev.wix.com/docs/sdk/core-modules.md`). > - Top-level index of all portals: https://dev.wix.com/docs/llms.txt > - Full concatenated docs: https://dev.wix.com/docs/llms-full.txt ## Resource: Developer Tools Features ## Article: Developer Tools Features ## Article Link: https://dev.wix.com/docs/develop-websites/articles/coding-with-velo/limits-and-optimization/developer-tools-features.md ## Article Content: # Developer Tools Features You can customize your site and analyze its usage with advanced developer tools. Find the [premium plan](https://dev.wix.com/docs/develop-websites/articles/coding-with-velo/premium-plans/about-premium-plans.md) that suits your needs and [choose the plan](https://www.wix.com/upgrade/website) that fits. ## Scheduled jobs You can use Velo to [schedule code](https://support.wix.com/en/article/velo-scheduling-recurring-jobs) to run on a site at regular intervals. Each scheduled function is called a job. Scheduling jobs allows certain site functions to be automated such as updating or clearing database collections and sending status reports. Wix limits the number of jobs you can define for a site and how frequently jobs can run. Most plans allow you to add up to 20 scheduled jobs that run at a minimum of 1 hour intervals. Elite and Business Elite plans allow you to add up to 30 scheduled jobs that run at a minimum of 5 minute intervals.
Downgrade behavior If you downgrade to a lower tier plan and you have more jobs on your site than the new plan allows, some of your jobs may not run.
--- > Portal Navigation: > > - Append `.md` to any URL under `https://dev.wix.com/docs/` to get its markdown version. > - Pages are either content pages (article or reference text) or menu pages (a list of links to child pages). > - To get a menu page, truncate any URL to a parent path and append `.md` (e.g. `https://dev.wix.com/docs/sdk.md`, `https://dev.wix.com/docs/sdk/core-modules.md`). > - Top-level index of all portals: https://dev.wix.com/docs/llms.txt > - Full concatenated docs: https://dev.wix.com/docs/llms-full.txt ## Resource: Optimizing Your Code ## Article: Optimizing Your Code ## Article Link: https://dev.wix.com/docs/develop-websites/articles/coding-with-velo/limits-and-optimization/optimizing-your-code.md ## Article Content: # Optimizing Your Code You may want to optimize your code to avoid reaching the limits for [data storage](#storage), [data requests](#data-requests), or [backend requests](#backend-requests). You can also [upgrade your plan](https://www.wix.com/upgrade/website) to receive more resources. Read [about premium plans](https://dev.wix.com/docs/develop-websites/articles/coding-with-velo/premium-plans/about-premium-plans.md) to understand the limitations that exist and which plans increase which limits. ## Storage You can take the following steps to reduce the amount of [storage](https://dev.wix.com/docs/develop-websites/articles/coding-with-velo/limits-and-optimization/data-features.md) your site uses: * **Delete data you don’t need:** Make sure your collections contain only data that you need for your site. * **Use an external database:** The storage quota doesn't apply to external databases. If none of the other options work for you, store your data in an external database and [integrate it with your site](https://support.wix.com/en/article/velo-adding-and-deleting-an-external-database-collection). You can still access this data using Velo's [Wix Data API](https://www.wix.com/velo/reference/wix-data-v2). ## Data requests You can optimize your data requests by reducing the number of requests you make or by decreasing the requests' processing time. ### Amount of requests You can take the following steps to reduce the number of [data requests](https://dev.wix.com/docs/develop-websites/articles/coding-with-velo/limits-and-optimization/data-features.md) in your code: * **Use the bulk functions:** If you are inserting or updating multiple items, use the `bulkInsert()` and `bulkUpdate()` functions instead of writing each item individually. These functions count as 1 request toward the quota. * **Make requests only when you need the data:** Don’t make requests for data you don’t use. For example, if you store extra product data in a separate collection, query this collection only when you need the data. ### Processing time You can take the following steps to reduce the [processing time](https://dev.wix.com/docs/develop-websites/articles/coding-with-velo/limits-and-optimization/data-features.md) of the data requests in your code: * **Request only data you need:** Avoid fetching more items from your collection than you need at once. Also avoid including reference items in your queries if you don’t need their data. * **Use indexes:** Querying with an index is faster than querying items directly. All `_id` and `_createdDate` fields are indexed by default. * **Process data in chunks:** Timeouts can happen when you process too much data with one request. Breaking your request into smaller pieces means that each individual request will complete before the time limit. If you are running a slow process or loading a large amount of data, [use pagination](https://support.wix.com/en/article/adding-and-setting-up-a-pagination-bar) or [process your data in chunks](https://support.wix.com/en/article/velo-best-practices-for-improving-performance-in-wix-sites-with-data). Don't create too many requests, as there is also a [quota on requests per minute](https://dev.wix.com/docs/develop-websites/articles/coding-with-velo/limits-and-optimization/compute-features.md). * **Use an external database:** The request timeout and processing time quotas don't apply to external databases. If none of the other options works for you, store your data in an external database and [integrate it with your site](https://support.wix.com/en/article/velo-adding-and-deleting-an-external-database-collection). You can still access this data using Velo and the Wix Data API. ## Backend requests You can optimize your backend requests by reducing the number of requests you make or by decreasing the requests' processing time. ### Amount of requests You can take the following steps to reduce the number of [backend requests](https://dev.wix.com/docs/develop-websites/articles/coding-with-velo/limits-and-optimization/compute-features.md) in your code: * **Batch your requests:** Batch multiple backend requests into one. Make sure not to batch time-consuming requests together as there's also a [time limit](https://dev.wix.com/docs/develop-websites/articles/coding-with-velo/limits-and-optimization/compute-features.md) for backend requests.
See an example Instead of calling a series of backend functions from your frontend code, like this: ```js import {getSalary, getTax, calculateFinalSalary} from 'backend/myBackend.jsw'; const salary = await getSalary(employeeId); const tax = await getTax(employeeId); const finalSalary = await calculateFinalSalary(salary, tax); ``` You can batch the requests together in the backend and make one call to the batch function from the frontend, like this:
**Frontend code** ```js import {calculateFinalSalary} from 'backend/myBackend.jsw'; const finalSalary = await computeFinalSalary(employeeId); ``` **Backend code** ```js export function computeFinalSalary(employeeId) { const salary = getSalary(employeeId); const tax = getTax(employeeId); return calculateFinalSalary(salary, tax); } ```
* **Avoid repetition:** Avoid repeating large database requests or complex calculations. If you can, [cache the result](https://support.wix.com/en/article/site-performance-caching-pages-to-optimize-loading-speed) or [aggregate database queries](https://support.wix.com/en/article/velo-working-with-aggregations-in-the-data-api). ### Processing time You can take the following steps to reduce the [processing time](https://dev.wix.com/docs/develop-websites/articles/coding-with-velo/limits-and-optimization/compute-features.md) of the backend requests in your code: * **Identify parts of your code that are running for too long:** Identify the parts of your code that are taking too long to run, and optimize them to improve performance. You can do this by including console logs before and after the code you want to test, and then checking to see how long it takes to run.
See an example To test your code’s running time using console logs, do the following: 1. In your backend code, add [`console.time()`](https://developer.mozilla.org/en-US/docs/Web/API/Console/time) before calling a function and [console.timeEnd()](https://developer.mozilla.org/en-US/docs/Web/API/Console/timeEnd) after the call. For example: ```js export function rocketModel () { console.time(); const trajectory = calculateTrajectory(velocity, direction); console.timeEnd(); } ``` 2. Open [Wix Logs](https://support.wix.com/en/article/velo-viewing-live-site-monitoring-events) log. 3. Use [Functional Testing](https://support.wix.com/en/article/velo-functional-testing-in-the-backend) to trigger your backend code. 4. Check the log to see how long it took your function to run. The results are displayed in your **Wix Logs** window: ![wix logs](https://d2x3xhvgiqkx42.cloudfront.net/12345678-1234-1234-1234-1234567890ab/11fda387-da5a-430a-ada3-46def885b67f/2022/01/01/95fb6ee8-f12b-4764-9f95-09aed6ba25e7/02319b66-272f-4932-8165-4031bac9b10b.png)
* **Check your 3rd-party APIs:** If you are using 3rd-party APIs on your site, make sure they are not too slow. For example, if you notice an API call to a 3rd-party is taking a few seconds to run, break it into smaller calls or try upgrading your 3rd-party account to improve performance. * **Process data in chunks:** If you are running a slow process or loading a large amount of data, [use pagination](https://support.wix.com/en/article/adding-and-setting-up-a-pagination-bar) or [process your data in chunks](https://support.wix.com/en/article/velo-best-practices-for-improving-performance-in-wix-sites-with-data). Don't create too many requests, as there is also a [quota on requests per minute](https://dev.wix.com/docs/develop-websites/articles/coding-with-velo/limits-and-optimization/compute-features.md). * **Use indexes:** Querying with an index is faster than querying items directly. All **\_id** and **\_createdDate** fields are indexed by default. --- > Portal Navigation: > > - Append `.md` to any URL under `https://dev.wix.com/docs/` to get its markdown version. > - Pages are either content pages (article or reference text) or menu pages (a list of links to child pages). > - To get a menu page, truncate any URL to a parent path and append `.md` (e.g. `https://dev.wix.com/docs/sdk.md`, `https://dev.wix.com/docs/sdk/core-modules.md`). > - Top-level index of all portals: https://dev.wix.com/docs/llms.txt > - Full concatenated docs: https://dev.wix.com/docs/llms-full.txt ## Resource: About Custom Actions ## Article: About Custom Actions ## Article Link: https://dev.wix.com/docs/develop-websites/articles/coding-with-velo/automations/about-custom-actions.md ## Article Content: # About Custom Actions When you create a new [automation](https://support.wix.com/en/article/wix-automations-about-the-new-automations-builder) on your site, you're presented with a variety of actions to execute after your automation is triggered. The actions available to you depend on the apps that are installed on your site. However, if none of the available actions execute the behavior you want, you also have the option to create your own custom action. This action is independent of any app and applies only to the site it's created on. You can create custom actions with the [Automations Action service plugin](https://dev.wix.com/docs/velo/events-service-plugins/automations/service-plugins/automations-actions/introduction.md). The service plugin lets you code a custom action directly in the automation builder. Examples of actions you can create with the Action service plugin include: - Create custom email notifications for specific events. - Trigger third-party APIs when a subscriber signs up on your site. - Log specific actions into a custom database for business analysis. ## Supported IDEs You can implement custom actions using: - The **code editor** (Wix Studio and Wix Editor). - The Wix IDE (Wix Studio). ## Custom action code To [create a custom action](https://dev.wix.com/docs/develop-websites/articles/coding-with-velo/automations/add-a-custom-action.md), you select the **Run Velo code** action in the automation builder. Wix creates a Javascript file where you write your action code. You then edit this file in a modal inside the builder. Wix automatically populates the JS file with the following code: ```js /** * Autocomplete function declaration, do not delete * @param {import('./__schema__.js').Payload} options */ export const invoke = async ({payload}) => { return {} // The function must return an empty object, do not delete }; ``` You must write all your code inside the [`invoke()`](https://dev.wix.com/docs/velo/events-service-plugins/automations/service-plugins/automations-actions/invoke.md) method. Wix calls this method each time the automation is triggered, and runs any code inside. It expects an empty object in return, so make sure to leave the return statement as it appears. To write your action code, use the Wix APIs just like you would in your site's public or backend files. When you create a custom action for the first time, Wix adds the Automations Action service plugin to your site's backend code files. Under the Action service plugin, Wix adds a folder for each subsequent custom action you create. This folder contains a copy of the action code you write in the builder. However, any changes you make in the backend file aren't reflected when the automation runs. Write and edit your action code only in the automation builder. Working directly in the automation builder also allows you to: - Easily verify you are working with the correct trigger. - View the full trigger payload. - Edit sample data provided by Wix and test your code with it. ## Payload data Depending on the trigger you select, your action expects to receive a payload when the automation is triggered. You can view the payload structure under the **Payload view** tab while writing your code in the builder. The structure is read-only. You can access payload data in your code with dot notation. For example: ```js /** * Autocomplete function declaration, do not delete * @param {import('./__schema__.js').Payload} options */ export const invoke = async ({payload}) => { console.log(payload.status) return {} // The function must return an empty object, do not delete }; ``` ## Editing the automation To edit your action code, return to the automation in the builder and make your changes directly in the custom action modal. The code file you create for your custom action is associated with the original trigger you selected. Editing the trigger configuration doesn't affect the custom action. However, if you change the trigger, a new code file will be created and you'll have to write new code. The initial file you create is still saved, and if you restore the trigger it is associated with, you'll be able to access it again in the automation. ## See also - [Create a Custom Action](https://dev.wix.com/docs/develop-websites/articles/coding-with-velo/automations/add-a-custom-action.md) - [Automations Actions API Reference](https://dev.wix.com/docs/velo/events-service-plugins/automations/service-plugins/automations-actions/introduction.md) --- > Portal Navigation: > > - Append `.md` to any URL under `https://dev.wix.com/docs/` to get its markdown version. > - Pages are either content pages (article or reference text) or menu pages (a list of links to child pages). > - To get a menu page, truncate any URL to a parent path and append `.md` (e.g. `https://dev.wix.com/docs/sdk.md`, `https://dev.wix.com/docs/sdk/core-modules.md`). > - Top-level index of all portals: https://dev.wix.com/docs/llms.txt > - Full concatenated docs: https://dev.wix.com/docs/llms-full.txt ## Resource: Add a Custom Action ## Article: Add a Custom Action ## Article Link: https://dev.wix.com/docs/develop-websites/articles/coding-with-velo/automations/add-a-custom-action.md ## Article Content: # Add a Custom Action The Automations Action service plugin lets you develop [custom actions](https://dev.wix.com/docs/develop-websites/articles/coding-with-velo/automations/about-custom-actions.md) directly in your site dashboard. To use a custom action as part of an automation, start by creating a new automation in your site dashboard: 1. Go to the [Automations](https://www.wix.com/my-account/site-selector/?buttonText=Select%20Site&title=Select%20a%20Site&autoSelectOnSingleSite=true&actionUrl=https:%2F%2Fwww.wix.com%2Fdashboard%2F%7B%7BmetaSiteId%7D%7D%2Ftriggers) page in your dashboard. 2. Click **New Automation**, then **Start from Scratch** to open the automation builder. 3. Select and configure a [trigger](https://support.wix.com/en/article/wix-automations-creating-an-automation-with-the-new-builder#step-2-choose-a-trigger). 4. Click the **+** to add a step and choose **Action**. In the menu on the left, select **Run Velo code**. ![Run velo code action](https://wixmp-833713b177cebf373f611808.wixmp.com/images/34472349eca2250ac5c157eaf040f2c5.png) 5. Click **Start Coding** to add your code. You'll be prompted to create a new code file. ![Start coding](https://wixmp-833713b177cebf373f611808.wixmp.com/images/ebb182e0763598c9a44bfb79d20a5e04.png) 6. Give the file a name and click **Create & Start Coding**. ![Name file and start coding](https://wixmp-833713b177cebf373f611808.wixmp.com/images/05a191f115d4928877886b5c531708e0.png) You should now see something like this: ![Write velo action code](https://static.wixstatic.com/media/d4dde1_636f1a1ad55c4c0399410db29c86912b~mv2.png) The **Write Velo Code** modal contains two tabs. The first is the .js file where you write your code. The second tab, which appears under **Payload view**, lets you view the expected structure of the trigger payload. 7. When you finish writing your code, click **Save**. Now that you have set up and coded your custom action, you can activate the automation immediately. However, we recommend testing the action code first. 8. To test your code, follow the instructions under **Run your code to test this action**, then click **Run Code**. ![Test your action code](https://wixmp-833713b177cebf373f611808.wixmp.com/images/e0961f5637cd9a5047dfc671fc8021b0.png) Wix provides sample data that matches the structure of your trigger payload. You can edit any of the fields in the sample payload to test your action. Be aware that testing the action runs the code live on your site, and may change cause changes in the site or dashboard. Once you test your code and are sure your action works, activate your automation. ## Edit your custom action To edit your action code, [edit your automation](https://support.wix.com/en/article/the-new-automation-builder-managing-your-automations#editing-duplicating-or-renaming-an-automation) and select the **Run Velo code** action, then click on **Edit Code**. Make the changes you want, save the code, and test. ## See also - [About Custom Actions](https://dev.wix.com/docs/develop-websites/articles/coding-with-velo/automations/about-custom-actions.md) - [Automations Actions service plugin](https://dev.wix.com/docs/velo/events-service-plugins/automations/service-plugins/automations-actions/introduction.md) --- > Portal Navigation: > > - Append `.md` to any URL under `https://dev.wix.com/docs/` to get its markdown version. > - Pages are either content pages (article or reference text) or menu pages (a list of links to child pages). > - To get a menu page, truncate any URL to a parent path and append `.md` (e.g. `https://dev.wix.com/docs/sdk.md`, `https://dev.wix.com/docs/sdk/core-modules.md`). > - Top-level index of all portals: https://dev.wix.com/docs/llms.txt > - Full concatenated docs: https://dev.wix.com/docs/llms-full.txt ## Resource: About Custom Triggers ## Article: About Custom Triggers ## Article Link: https://dev.wix.com/docs/develop-websites/articles/coding-with-velo/automations/about-custom-triggers.md ## Article Content: # About Custom Triggers When you create an [automation](https://support.wix.com/en/article/wix-automations-about-the-new-automations-builder) on your site, you must select a trigger that causes the automation to run. A trigger is an event that occurs on your site and gets reported to Wix. An automation only runs when the event that defines its trigger occurs. For example, if you select the **Member logs in** trigger, your automation will run when a member logs in. Most triggers are based on similar business logic, like payment information or contact management. However, you may want to run your automation when an event occurs that is not defined by existing triggers. Examples include: - Creating a new contact when a site visitor clicks a certain button. - Send a chat message offering help when a member inputs an invalid value into a text input field. - Send a coupon if a visitor is on your site for a certain period of time. With the [Custom Trigger API](https://dev.wix.com/docs/sdk/backend-modules/automations/triggers/custom-trigger/introduction.md), you can run an automation for any event that occurs by triggering the automation from your code. This gives you greater control and flexibility over when your automations run. ## Supported IDEs Once you select the code trigger in the automation builder, you can write your code in the following IDEs: - The [editor](https://dev.wix.com/docs/develop-websites/articles/workspace-tools/velo-workspace/workspaces/wix-studio-working-with-the-code-panel.md) (Wix Studio and Wix Editor). - The [Wix IDE](https://dev.wix.com/docs/develop-websites/articles/workspace-tools/velo-workspace/wix-ide/wix-studio-about-the-wix-ide.md) (Wix Studio). - Your [local IDE](https://dev.wix.com/docs/develop-websites/articles/workspace-tools/developer-tools/git-integration-wix-cli/about-git-integration-wix-cli.md) (Wix Studio and Wix Editor). ## Trigger configuration There are 2 parts to the trigger configuration: ### The trigger ID When you select the **Velo code trigger** as your automation trigger, Wix generates a unique trigger ID. When you call [Run Trigger](https://dev.wix.com/docs/sdk/backend-modules/automations/triggers/custom-trigger/run-trigger.md), you pass it the trigger ID. The method then runs the automation associated with the ID. The result is that you can run the automation from anywhere in your site code, simply by calling Run Trigger with the relevant ID. ### The payload schema In addition to the ID, you can optionally define a payload schema for the trigger, and pass a payload to Run Trigger. The structure of the payload schema is generated from sample data you enter when you configure the trigger. For example, if you enter sample data like this: ```javascript {  "firstName": "Ronald",  "id": "ed8fa327-f821-4c30-b336-1784be278541",  "age": 50,  "contactEmail": "ronald@example.com",  "favoriteFoods": ["hamburgers", "French toast", "chicken nuggets"] } ``` Your payload schema will have a structure like this: ```javascript {   firstName: string,   id: string (uuid),   age: number,   contactEmail: string (email),   favoriteFoods: [ string ] } ``` Payload fields are optional, so even if you define a payload schema, you’re not required to pass a payload when you call Run Trigger. If you choose to pass a payload, you can omit fields. Any fields you include in the payload should match the key and type defined in the schema. For example, if your payload structure looks like the one above, you can pass the following payloads to Run Trigger: ```javascript $w('#myButton1').onClick(async () => { const payload = { firstName: "Amy", id: "5d696ec4-0933-4b4d-9acd-50b316717ff2", age: 27, contactEmail: "amy@email.com", favoriteFoods: ["pizza","hamburger"] }; await runTrigger(payload); }) $w('#myButton2').onClick(async () => { const payload = { firstName: "Josh", id: "46123fae-6b6f-4edb-98f1-50f0eaded97e", contactEmail: "josh@email.com", }; await runTrigger(payload); }) $w('#myButton3').onClick(async () => { const payload = { firstName: "Jackie", favoriteFoods: ["sushi", "tiramisu"] }; await runTrigger(payload); }) ``` Make sure, however, that any fields required by actions are passed. For example, if subsequent actions need to access contact data, be sure to pass the contact ID field. #### Contact data in the payload schema If your payload schema contains one or more UUID fields, you can mark one of those fields as a contact ID. When the payload is passed to Run Trigger, Wix looks up the ID in the contact ID field. If the ID corresponds to an existing contact, Wix retrieves the contact’s data and attaches that data to the payload. The data can then be passed to any subsequent actions. > **Note:** If the ID corresponds to a new contact, you can save the contact data by executing the **Create a Contact** action after the trigger. ## Error handling Here are some common errors you might encounter and their causes: | | | | ---------------------------------------------------------------------- | --------------------------------------------------------------------------------------------------------------------- | | **Error Message** | **Cause** | | Automation not found | No automation is found for the trigger ID passed to `runTrigger()`. This may be because the automation was deleted. | | This automation can only be executed within its designated application | This only applies to preinstalled automations. An app other than the one that created the automation tries to run it. | ## See also - [Add a Custom Trigger](https://dev.wix.com/docs/develop-websites/articles/coding-with-velo/automations/add-a-custom-trigger.md) - [Custom Trigger SDK](https://dev.wix.com/docs/sdk/backend-modules/automations/triggers/custom-trigger/introduction.md) --- > Portal Navigation: > > - Append `.md` to any URL under `https://dev.wix.com/docs/` to get its markdown version. > - Pages are either content pages (article or reference text) or menu pages (a list of links to child pages). > - To get a menu page, truncate any URL to a parent path and append `.md` (e.g. `https://dev.wix.com/docs/sdk.md`, `https://dev.wix.com/docs/sdk/core-modules.md`). > - Top-level index of all portals: https://dev.wix.com/docs/llms.txt > - Full concatenated docs: https://dev.wix.com/docs/llms-full.txt ## Resource: Add a Custom Trigger ## Article: Add a Custom Trigger ## Article Link: https://dev.wix.com/docs/develop-websites/articles/coding-with-velo/automations/add-a-custom-trigger.md ## Article Content: # Add a Custom Trigger [Custom triggers](https://dev.wix.com/docs/develop-websites/articles/coding-with-velo/automations/about-custom-triggers.md) give you the ability to run an automation from anywhere in your site code. This article explains how to create a custom trigger and use the [Custom Trigger API](https://dev.wix.com/docs/sdk/backend-modules/automations/triggers/custom-trigger/introduction.md) to run your automation. ## Step 1 | Install the Automations SDK package **If you're working in the editor or Wix IDE:** 1. **Wix Studio:** In the code panel on the left of the site editor, go to **Code** ![](https://lh7-rt.googleusercontent.com/docsz/AD_4nXdfXqgbsvw2g99hQiSntBzAxxAORy6WRHLsf22RvMTIBfk1WBJpVGsF07YNTJQHDF9-15t_41vpyMexYPtsznlrxCeh3QlHt5-UWKIVXOBHAX2MLH7hiCaLj_u2qwNYg3cEHtj9tg?key=TRmYtOkLPB3ZtFBvYpkeO1-L) > **Packages & Apps**. **Wix Editor**: Make sure **Dev Mode** is [enabled](https://dev.wix.com/docs/velo/articles/getting-started/getting-oriented.md#enabling-velo). Then, in the code sidebar on the left, go to **Packages & Apps** ![](https://lh7-rt.googleusercontent.com/docsz/AD_4nXdqeMv-MqXNE-PI2_HaUzKj51PV2-k6QjjLxa5j1FbLoSO7QHpbiPee8EGecy4q0KLvUoDm5UUXvHqlyBBuyLLai7D5TalnH951XahLmXlpaoQK48QWMi3myS7yw01StZW0nj1Bag?key=TRmYtOkLPB3ZtFBvYpkeO1-L). 1. Under **npm**, click **+ Install packages from npm**. 1. Search for and install the `@wix/automations` package. ![Install the wix/automations package](https://wixmp-833713b177cebf373f611808.wixmp.com/images/1b8b13984ebc10f4447d657269922f3a.png) 1. Repeat these steps to install the `@wix/essentials` package. **If you're working in your local IDE:** 1. Install the necessary packages on your command line: ```bash npm install @wix/automations npm install @wix/essentials ``` Now that you’ve installed the `@wix/automations` package, you’re able to use the Custom Trigger API in your site code. Before you write any code, however, you need to create an automation that uses the **Velo code trigger**. ## Step 2 | Create an automation with the Velo code trigger To create a new automation: 1. Go to the [Automations](https://www.wix.com/my-account/site-selector/?buttonText=Select%20Site\&title=Select%20a%20Site\&autoSelectOnSingleSite=true\&actionUrl=https:%2F%2Fwww.wix.com%2Fdashboard%2F%7B%7BmetaSiteId%7D%7D%2Ftriggers) page in your site dashboard. 1. Click **+ New Automation** > **+ Start from Scratch** to open the builder. Give your new automation a title. 1. In the left menu, from the list of available triggers, select **Velo code trigger**. Once you select the trigger, the left panel displays instructions on how to work with the trigger, as well as the trigger ID and the payload. The bottom part of the panel also displays sample code that you can copy. ### Define the payload structure (optional) You have the option to define the trigger payload schema by inputting sample data. Wix provides you with default sample data, which you can choose to keep or replace with your own data. To define a payload schema for the trigger: 1. In the **Velo code trigger** panel, click **{..} Set Payload Data Structure**. ![Set the payload data structure](https://wixmp-833713b177cebf373f611808.wixmp.com/images/e90961c6dcabe759d298c58a059c39e6.png) 1. Edit the displayed JSON data as necessary, then click **Preview Structure >**. A preview of your payload schema opens. ![Payload structure preview](https://wixmp-833713b177cebf373f611808.wixmp.com/images/ae58f83cfc42debf8fefe5386d0cb88d.png) 1. Optionally, click **Mark Contact ID** to mark one of the UUIDs as a [contact ID](https://dev.wix.com/docs/develop-websites/articles/coding-with-velo/automations/about-custom-triggers.md#contact-data-in-the-payload-schema). ![Mark a UUID field as a contact ID](https://wixmp-833713b177cebf373f611808.wixmp.com/images/472c6319a914b597ceb0bf6e91f3296f.png) Only fields in proper UUID format appear on the list. You may only select one field to be a contact ID. Click **Save** to exit the **Mark Contact ID** modal. 1. When you’re satisfied with your payload schema structure, click **Save Structure**. You can return to edit the structure in the builder at any time. ### Copy code and complete automation setup Whether you define a payload or not, Wix provides you with the trigger ID, which you need to run your automation, as well as some example code. 1. Copy the trigger ID to use for later in your site code. At the bottom of the trigger configuration panel, click **Show code >**. ![Show the sample code to use Run Trigger](https://wixmp-833713b177cebf373f611808.wixmp.com/images/c524894dfc1c8cff746dcc7f0c09b7b4.png) The trigger setup provides you with some sample code. Copy this code for use as a starting point in your own code. 1. Click **Apply** to save your trigger setup. 1. Select and configure at least one action as part of your automation, then activate the automation. Now that you’ve configured your automation, you can write the code to run it for any event. ## Step 3 | Implement Run Trigger in site code In order to implement Run Trigger, you need to define a [web method](https://dev.wix.com/docs/velo/apis/wix-web-module/introduction.md) in the backend that calls the method. Then you can export that web method to other code files for use. 1. If you’re working in the editor, create a new [web module](https://dev.wix.com/docs/develop-websites/articles/coding-with-velo/backend-code/web-modules/about-web-modules.md) in the **Backend & Public** > **Backend** section of the code panel. If you’re working in the Wix IDE or locally, add the file under `src/backend`. 1. In the web module, paste the code you copied from the automation setup, so that your file looks like this: ```javascript import { customTrigger} from "@wix/automations"; import { auth } from '@wix/essentials'; import { Permissions, webMethod } from "wix-web-module"; export const runTrigger = webMethod(   Permissions.Anyone,   async (payload) => {     const triggerMethod = auth.elevate(automations.runTrigger);     // Your code here     await triggerMethod({       triggerId: 'triggerId',       payload,     });   } ); ``` Let’s break down the important lines in this code: **Lines 1-3**. Import necessary packages, including the `@wix/automations` package that contains the Run Trigger functionality, and the `@wix/essentials` package that provides auth functionality. **Line 5**. Create the web method to export to the frontend. **Line 8**. [Elevate](https://dev.wix.com/docs/sdk/core-modules/essentials/auth.md#elevate) Run Trigger so it runs with the correct permissions. **Lines 11-14**. Call the elevated method. In place of `triggerId`, enter the trigger ID you copied from your automation. If you defined a payload schema for your trigger, pass the `payload` argument as well. 1. Export your web method to another file, such as the frontend code for a site page. Add this line to the top of the file you want to import the method into: ```javascript import { runTrigger } from 'backend/triggers.web'; ``` 1. Call the method in the file code where necessary. To give a simple example, let’s say you add a [button](https://dev.wix.com/docs/velo/velo-only-apis/$w/button/introduction.md) element to your site page, and you want to run the automation every time a visitor clicks that button. You can then simply call Run Trigger in that button’s `onClick()` handler: ```javascript $w('#myButton').onClick(async () => {     runTrigger(); }) ``` If you defined a payload schema for your trigger, you can pass a payload object to Run Trigger. All payload fields are optional, but any fields you include in the payload should match the keys and types defined in the schema. 1. To test your code, either publish your site or [create a test site](https://support.wix.com/en/article/test-sites-creating-a-test-site). Your backend code may not work in Preview mode. ## See also - [About Custom Triggers](https://dev.wix.com/docs/develop-websites/articles/coding-with-velo/automations/about-custom-triggers.md) - [Custom Trigger SDK](https://dev.wix.com/docs/sdk/backend-modules/automations/triggers/custom-trigger/introduction.md) --- > Portal Navigation: > > - Append `.md` to any URL under `https://dev.wix.com/docs/` to get its markdown version. > - Pages are either content pages (article or reference text) or menu pages (a list of links to child pages). > - To get a menu page, truncate any URL to a parent path and append `.md` (e.g. `https://dev.wix.com/docs/sdk.md`, `https://dev.wix.com/docs/sdk/core-modules.md`). > - Top-level index of all portals: https://dev.wix.com/docs/llms.txt > - Full concatenated docs: https://dev.wix.com/docs/llms-full.txt ## Resource: Using reCAPTCHA to Protect Data Submission ## Article: Using reCAPTCHA to Protect Data Submission ## Article Link: https://dev.wix.com/docs/develop-websites/articles/code-tutorials/wix-editor-elements/using-re-captcha-to-protect-data-submission.md ## Article Content: # Velo Tutorial: Using reCAPTCHA to Protect Data Submission The [reCAPTCHA element](https://dev.wix.com/docs/velo/api-reference/$w/captcha/introduction.md) helps verify that site visitors are human before allowing actions like submitting data, logging in, or accessing private content. By adding it to your site, you can protect it from spam and automated abuse. This tutorial demonstrates how to add CAPTCHA to secure custom form submissions and database entries by performing the following steps: 1. Create a custom mailing list form where visitors provide their name and email. 2. Use the reCAPTCHA element to require visitors to complete a CAPTCHA challenge before submitting their information. 3. When the challenge is successfully completed and the CAPTCHA is first verified on the frontend, authorize the CAPTCHA token in the backend to ensure the form was completed by a human. 4. Insert the validated data into a database collection if the token is valid. If the token fails validation or expires, reset the CAPTCHA and display an error message. > **Notes:** > * You can add CAPTCHA to [Wix Forms](https://support.wix.com/en/article/adding-captcha-to-your-wix-forms) and [Wix Signup & Login](https://support.wix.com/en/article/site-members-editing-the-signup-settings-for-the-default-and-custom-forms) forms without code. > * To use CAPTCHA for data submission via a dataset, you must implement the submission using code. For example, use Wix Data APIs like [insert()](https://dev.wix.com/docs/velo/api-reference/wix-data/insert.md) or [save()](https://dev.wix.com/docs/velo/api-reference/wix-data/save.md) to handle the data operation and integrate CAPTCHA for protection. > * In addition to adding CAPTCHA for security purposes, you may want to [validate visitor inputs](https://dev.wix.com/docs/develop-websites/articles/databases/wix-data/user-input/about-validating-user-input-with-code.md) to make sure the data is in the correct format. ## Step 1 | Add elements to the page Add the following elements to the **Home** page: * Input elements for visitors to provide their name and email. * reCAPTCHA element to protect the data submission. * A button to submit the data upon successful CAPTCHA verification. * Text for displaying success and error messages.
## Step 2 | Create a database collection Create a [database collection](https://support.wix.com/en/article/cms-formerly-content-manager-creating-a-collection) called **MailingList** to store the visitor's name and email after the CAPTCHA verification is successful. Add 2 text fields, `name` and `email`. ## Step 3 | Write the backend code While frontend CAPTCHA verification ensures the site visitor successfully completes the challenge, backend validation prevents site visitors from spoofing or bypassing CAPTCHA. To ensure complete protection, you must implement [backend authorization](https://dev.wix.com/docs/velo/api-reference/wix-captcha-backend/authorize.md) to validate the CAPTCHA token securely: 1. Add a [web module](https://dev.wix.com/docs/develop-websites/articles/coding-with-velo/backend-code/web-modules/about-web-modules.md) named **submitHandler.web.js** to your backend code. 2. Use the following code to validate the CAPTCHA token and insert the data into the **MailingList** collection if the token is valid: ```javascript import { Permissions, webMethod } from 'wix-web-module'; import wixCaptcha from 'wix-captcha-backend'; import wixData from 'wix-data'; export const processSubmission = webMethod(Permissions.Anyone, (submitRequestData) => { return wixCaptcha.authorize(submitRequestData.token) .then(() => { return wixData.insert("MailingList", submitRequestData.data); }); }); ``` **Lines 1-3**: Import the `Permissions` enum and `webMethod` function from `wix-web-module`. Then import the modules you need to work with CAPTCHA in the backend and with data. **Lines 5-6**: Create a web method with permissions for anyone to call it from the frontend. **Lines 7-8**: Pass the web method a function that checks the token's authorization. **Line 9**: Insert the data into the **MailingList** collection if the token is authorized. ## Step 4 | Write the page code In your **Home** page, write the code for verifying the CAPTCHA in the frontend: 1. Import the backend function from your web module: ```javascript import { processSubmission } from 'backend/submitHandler.web'; ``` 2. Set initial element states: ```javascript $w.onReady(function () { $w("#messageText").hide(); $w("#submitButton").disable(); }); ``` **Lines 1-4**: To make sure site visitors complete a CAPTCHA challenge before being able to submit their entries, set the initial element states in the `onReady` function. Hide the text for displaying success and error messages upon submission, and disable the submit button. 2. Add the following code to enable the submit button when CAPTCHA verification is successful: ```javascript $w("#captcha").onVerified(() => { $w("#messageText").hide(); $w("#submitButton").enable(); }); ``` **Line 1**: Add an `onVerified` event handler that runs when the CAPTCHA challenge is successfully completed and the CAPTCHA is verified. **Line 2**: Hide any previous success or error messages. **Line 3**: Enable the previously disabled submit button so the site visitor can complete the submission. > **Note** > When the CAPTCHA is verified, a CAPTCHA token is automatically generated. This token is used for authorization. 3. Write code to handle data submission and reset the CAPTCHA element if the process fails: ```javascript $w("#submitButton").onClick(() => { let submitRequestData = { "token": $w("#captcha").token, "data": { "name": $w("#nameInput").value, "email": $w("#emailInput").value } }; processSubmission(submitRequestData) .then( () => { resetCaptcha("Data successfully submitted"); }) .catch( () => { resetCaptcha("Something went wrong. Redo the captcha challenge."); }); }); function resetCaptcha(messageText) { $w("#captcha").reset(); $w("#submitButton").disable(); $w("#messageText").text = messageText; $w("#messageText").show(); } ``` **Line 1**: Add an event handler that runs when a site visitor clicks the submit button. **Lines 2-7**: Prepare the submit request data. The request data includes the CAPTCHA token generated when the captcha was verified, and the data entered in the input elements. **Line 10**: Call the `processSubmission` backend function with the prepared submit request data. The `processSubmission` function validates the token and inserts the data into the **MailingList** collection. **Lines 12-24**: If authorization and data insertion are successful, display a success message and restart the CAPTCHA lifecycle for future submissions by resetting the reCAPTCHA element and disabling the submit button. If authorization or data insertion fail in the backend, restart the CAPTCHA lifecycle by resetting the reCAPTCHA element, disable the submit button, and display an error message instructing the site visitor to try again. 4. Show an error message if the CAPTCHA element loses connection with the provider: ```javascript $w("#captcha").onError(() => { $w("#messageText").text = "The reCAPTCHA element lost connection with the CAPTCHA provider. Try again later."; $w("#messageText").show() .then(() => { $w("#messageText").hide("fade", {"delay": 10000}); }); }); ``` **Lines 2-3**: If the reCAPTCHA element loses connection with the provider when the site visitor attempts to complete the CAPTCHA challenge, the reCAPTCHA element automatically resets. Set the message text to an error message asking the site visitor to try again later. **Lines 4-5**: Show the message. **Lines 6-8**: Hide the message after 10 seconds. 5. Disable the submit button if the CAPTCHA token expires: ```javascript $w("#captcha").onTimeout(() => { $w("#submitButton").disable(); }); ``` **Lines 1-3**: If the submit does not occur within 120 seconds of completing the CAPTCHA challenge, the generated token expires. When the token expires, the reCAPTCHA element automatically resets and displays a message asking the site visitor to redo the challenge. In this case, disable the submit button in the `onTimeout` event handler. ### Example code Here is the complete code for this example: #### Page code ```javascript import { processSubmission } from 'backend/submitHandler.web'; $w.onReady(function () { $w("#messageText").hide(); $w("#submitButton").disable(); }); $w("#captcha").onVerified(() => { $w("#messageText").hide(); $w("#submitButton").enable(); }); $w("#submitButton").onClick(() => { let submitRequestData = { "token": $w("#captcha").token, "data": { "name": $w("#nameInput").value, "email": $w("#emailInput").value } }; processSubmission(submitRequestData) .then( () => { resetCaptcha("Data successfully submitted"); }) .catch( () => { resetCaptcha("Something went wrong. Redo the captcha challenge."); }); }); $w("#captcha").onError(() => { $w("#messageText").text = "The reCAPTCHA element lost connection with the CAPTCHA provider. Try again later."; $w("#messageText").show() .then(() => { $w("#messageText").hide("fade", {"delay": 10000}); }); }); $w("#captcha").onTimeout(() => { $w("#submitButton").disable(); }); function resetCaptcha(messageText) { $w("#captcha").reset(); $w("#submitButton").disable(); $w("#messageText").text = messageText; $w("#messageText").show(); } ``` #### Backend code ```javascript import { Permissions, webMethod } from 'wix-web-module'; import wixCaptcha from 'wix-captcha-backend'; import wixData from 'wix-data'; export const processSubmission = webMethod(Permissions.Anyone, (submitRequestData) => { return wixCaptcha.authorize(submitRequestData.token) .then(() => { return wixData.insert("MailingList", submitRequestData.data); }); }); ``` ### See also * [$w.captcha API](https://dev.wix.com/docs/velo/api-reference/$w/captcha/introduction.md) * [wix-captcha-backend API](https://dev.wix.com/docs/velo/api-reference/wix-captcha-backend/introduction.md) --- > Portal Navigation: > > - Append `.md` to any URL under `https://dev.wix.com/docs/` to get its markdown version. > - Pages are either content pages (article or reference text) or menu pages (a list of links to child pages). > - To get a menu page, truncate any URL to a parent path and append `.md` (e.g. `https://dev.wix.com/docs/sdk.md`, `https://dev.wix.com/docs/sdk/core-modules.md`). > - Top-level index of all portals: https://dev.wix.com/docs/llms.txt > - Full concatenated docs: https://dev.wix.com/docs/llms-full.txt ## Resource: Tutorial: Using the Fetch API to Add a Currency Converter ## Article: Getting Started with Velo by Wix ## Article Link: https://dev.wix.com/docs/develop-websites/articles/code-tutorials/wix-editor-elements/tutorial-using-the-fetch-api-to-add-a-currency-converter.md ## Article Content: # Tutorial: Using the Fetch API to Add a Currency Converter In this tutorial, you'll learn how to create a simple currency converter site that uses the [wix-fetch API](https://www.wix.com/velo/reference/wix-fetch.html) to connect to a 3rd-party service. Site visitors choose source and target currencies from dropdowns and enter an amount to convert. The results are displayed in a text box.
![](https://d2x3xhvgiqkx42.cloudfront.net/12345678-1234-1234-1234-1234567890ab/0ca9e8ba-16ed-4cd8-a1e1-58d01c4420f7/2019/03/07/37a87ea6-7a20-4902-b51a-0fe6acecd54a.png)
Follow the steps below to create a currency converter with the wix-fetch API. ### Step 1: Create a New Wix Site 1. Sign into your Wix account or [sign up for a Wix account](https://users.wix.com/signin?overrideLocale=en&loginDialogContext=signup) if you don’t already have one. 2. Open a blank template in [Wix Studio](https://wixstudio.new/) or the [Wix Editor](https://editor.wix.com/html/editor/web/renderer/new?siteId=cbf36d3a-49d0-41c2-9482-1bb58d5fdda3&metaSiteId=a573279f-ae6f-46d1-8556-7c93ae9b2c84&editorSessionId=799795e9-07c2-4e7e-8a17-33dab829f776). ### Step 2: Enable Velo Dev Mode + **Wix Studio:** In the Code panel, click **Start Coding**. ![Studio start coding](https://wixmp-833713b177cebf373f611808.wixmp.com/images/d7e450ac2ad3fe809d63c73c620c9fbc.png) + **Wix Editor:** In the top bar of the Wix Editor, click **Dev Mode > Turn on Dev Mode**. ![Velo dev mode](https://wixmp-833713b177cebf373f611808.wixmp.com/images/429b079021e6918721d24e16cd100720.png) ### Step 3: Add Elements to the Page Add page elements in the editor: 1. On the left side of the editor, click **Add Elements**. 2. Add the page elements illustrated below to your site. * When you add each element, set its ID in the [Properties & Events panel](https://dev.wix.com/docs/develop-websites/articles/workspace-tools/velo-workspace/properties-events-panel/about-the-properties-events-panel.md). In Wix Studio it appears at the bottom of the code editor, and in Wix Editor, the Properties & Events panel appears on the right side of the code editor. Use the name shown below for each element, minus the hashtag. See the table below for a full list of the elements and where to find them in the Add menu.
![](https://d2x3xhvgiqkx42.cloudfront.net/12345678-1234-1234-1234-1234567890ab/11e10e4f-b84d-4136-a5a9-6109fab0b7d7/2020/10/25/0cb6d2f8-071b-4f56-90a6-f307dcae7c5f/11c3401f-811c-4a02-8c62-e89ccb83a983.png)
|Element |Location in Add Menu |Description |ID | |---|---|---|---| |Dropdown|User Input|For selecting the source currency|sourceCurrency |Dropdown|User Input|For selecting the target currency|targetCurrency |Input|User Input|For entering the amount to convert|sourceAmount |Text Box|User Input|To display the converted amount|targetAmount |Button|Button|To trigger the currency conversion when clicked|calculateButton ### Step 4: Add Code >**Notes** > * All the code for this example is added to a single page on the site. In this section we divided the code into short blocks followed by explanations. To see the complete code for this example without comments, [scroll down](https://dev.wix.com/docs/develop-websites/articles/code-tutorials/wix-editor-elements/tutorial-using-the-fetch-api-to-add-a-currency-converter.md) to the end of the tutorial.  > * See our [API Reference](https://www.wix.com/velo/reference/) to learn more about the Velo-based code in this example. **To add the code:** 1. + **Wix Studio:** On the left, click ![Code icon](https://github.com/wix-incubator/wix-code-docs/assets/50321691/2c41d3df-930f-4e0f-966f-038742adceed) **> Page Code**. + **Wix Editor:** In the Code sidebar, click **Page Code**. Under **Main Pages** double-click the page labeled **HOME**. 2. Add the following code to the top of the code in the tab before the [onReady](https://dev.wix.com/docs/develop-websites/articles/workspace-tools/velo-workspace/code-editor-ide/working-in-the-code-editor.md) function: ```javascript // The getJSON function in wix-fetch lets you retrieve a // JSON resource from the network using HTTPS. import {getJSON} from 'wix-fetch'; // Set the URL of the 3rd-party service. const url = "https://api.exchangerate.host/convert"; // Define the currency option values and text for the dropdowns. let currencyOptions = [ { "value": "USD", "label": "US Dollars"}, { "value": "EUR", "label": "Euros"}, { "value": "JPY", "label": "Japanese Yen"}, ]; ``` 3. Add the code below to the [onReady](https://dev.wix.com/docs/develop-websites/articles/workspace-tools/velo-workspace/code-editor-ide/working-in-the-code-editor.md) function. Code inside the onReady function runs when the page loads. ```js $w.onReady(function () { // Set the currency options for the dropdowns. populateDropdowns(); // Set the onClick event handler for calculateButton to calculate the target amount. $w('#calculateButton').onClick((event) => { calculateCurrency(); }) }); ``` The [`$w`](https://www.wix.com/code/reference/$w.html#$w) function can select elements on a page by ID or by type, allowing us to run functions and define the properties of the elements. Use this syntax to select an element by ID, `$w("#myElementId")`, and this syntax to select by type, `$w("ElementType")`. Here we select the button and define an `onClick` [event handler](https://dev.wix.com/docs/develop-websites/articles/coding-with-velo/frontend-code/about-event-handlers-in-wix.md) to calculate the target amount. 4. Add code to define the functions: **populateDropdowns( )** ```js // Populate the dropdowns. function populateDropdowns(){ //Set the dropdown options. $w("Dropdown").options = currencyOptions; // Set the first dropdown option as the initial option. $w("Dropdown").selectedIndex = 0; } ``` Here we select all the dropdowns by type. By calling [`$w`](https://www.wix.com/velo/reference/$w.html) with the element type "Dropdown", we select all dropdowns on the page **calculateCurrency( )** ```js // Calculate the target amount. function calculateCurrency() { // Initial amount let initialAmount = $w("#sourceAmount").value; // Original currency let sourceSymbol = $w("#sourceCurrency").value; // Target currency let targetSymbol = $w("#targetCurrency").value; // Define the full url. let fullUrl = `${url}?from=${sourceSymbol}&to=${targetSymbol}`; // Call the wix-fetch API function to retrieve the JSON resource. getJSON(fullUrl) .then(json => { // Set the target amount as the initial amount multiplied by // the conversion rate. $w("#targetAmount").value = initialAmount * json.info.rate; } )} ``` We use [template literals](https://developer.mozilla.org/en-US/docs/Web/JavaScript/Reference/Template_literals) to define the full URL, which includes the source and target currencies. The wix-fetch API [`getJSON`](https://www.wix.com/velo/reference/wix-fetch.html#getJSON) function retrieves the JSON resource using the full URL. `getJSON` returns a [promise](https://dev.wix.com/docs/develop-websites/articles/coding-with-velo/java-script-velo/working-with-promises.md), which resolves to a JSON object. We multiply the retrieved rate by the initial amount and assign it to the `targetAmount` text box. ### Step 5: See It in Action Now it's time to test your site: 1. In the top right corner of the editor, click ![Preview icon](https://github.com/wix-incubator/wix-code-docs/assets/50321691/e65d33fd-497b-430a-8719-ff4d10488773) (Wix Studio) or **Preview** (Wix Editor). 2. Enter an amount in the source currency input. 3. Click the calculate button and see the converted currency result in the target amount text box. 4. [Publish](https://support.wix.com/en/article/publishing-your-site-6980885) your site to make it live and production ready. That's it! In just a few minutes, you created a web application in Velo! No setup, no managing server infrastructure, just integrating Velo APIs with the Wix visual builder. ### Next Steps Now that you've had a taste of Velo, check out what else you can do: * Easily call backend code from the frontend using [web modules](https://dev.wix.com/docs/develop-websites/articles/coding-with-velo/backend-code/web-modules/call-backend-code-from-the-frontend.md).  * Work with Wix's [visual builder](https://support.wix.com/en/article/getting-started-with-the-wix-editor). * Add features and customize your site using [Velo APIs](https://www.wix.com/velo/reference/api-overview/introduction). Here are some examples of what you can do: * [Collect](https://dev.wix.com/docs/develop-websites/articles/code-tutorials/wix-pay/tutorial-using-the-velo-pay-api-to-collect-payments-for-a-single-product.md) payments * [Create](https://support.wix.com/en/article/velo-tutorial-expand-text-with-a-read-more-link) a show-more link * [Use](https://www.wix.com/velo/example/create-a-custom-chart) an HTML component to embed a chart on your page * Work with the data from [other Wix Apps](https://dev.wix.com/docs/develop-websites/articles/databases/wix-data/collections/working-with-wix-app-collections-and-code.md) like [Stores](https://dev.wix.com/docs/develop-websites/articles/wix-apps/wix-app-collections/wix-e-commerce-stores/wix-stores-collections-collection-fields.md), [Bookings](https://dev.wix.com/docs/develop-websites/articles/wix-apps/wix-app-collections/wix-bookings/wix-bookings-services-collection-fields.md), and [Events](https://dev.wix.com/docs/develop-websites/articles/wix-apps/wix-app-collections/other-apps/wix-events/wix-events-events-collection-fields.md) * Visit the [Velo by Wix website](https://www.wix.com/velo) to onboard and continue learning. Check out Velo [documentation](https://dev.wix.com/docs/develop-websites/articles/get-started/about-developing-websites.md) and the [API Reference](https://www.wix.com/velo/reference). ### Example Code Here is the complete code for this example, without comments: ```javascript import {getJSON} from 'wix-fetch'; const url = "https://api.exchangerate.host/convert"; let currencyOptions = [ { "value": "USD", "label": "US Dollars"}, { "value": "EUR", "label": "Euros"}, { "value": "JPY", "label": "Japanese Yen"}, ]; $w.onReady(function () { populateDropdowns(); $w('#calculateButton').onClick((event) => { calculateCurrency(); }) }); function populateDropdowns(){ $w('Dropdown').options = currencyOptions; $w('Dropdown').selectedIndex = 0; } function calculateCurrency() { let initialAmount = $w("#sourceAmount").value; let sourceSymbol = $w("#sourceCurrency").value; let targetSymbol = $w("#targetCurrency").value; let fullUrl = `${url}?from=${sourceSymbol}&to=${targetSymbol}`; getJSON(fullUrl) .then(json => { $w("#targetAmount").value = initialAmount * json.info.rate; } )} ``` --- > Portal Navigation: > > - Append `.md` to any URL under `https://dev.wix.com/docs/` to get its markdown version. > - Pages are either content pages (article or reference text) or menu pages (a list of links to child pages). > - To get a menu page, truncate any URL to a parent path and append `.md` (e.g. `https://dev.wix.com/docs/sdk.md`, `https://dev.wix.com/docs/sdk/core-modules.md`). > - Top-level index of all portals: https://dev.wix.com/docs/llms.txt > - Full concatenated docs: https://dev.wix.com/docs/llms-full.txt ## Resource: Use External API Keys Stored in the Secrets Manager to Call the OpenWeatherMap API ## Article: Use External API Keys Stored in the Secrets Manager to Call the OpenWeatherMap API ## Article Link: https://dev.wix.com/docs/develop-websites/articles/code-tutorials/wix-editor-elements/use-external-api-keys-stored-in-the-secrets-manager-to-call-the-open-weather-map-api.md ## Article Content: # Tutorial: Use External API Keys Stored in the Secrets Manager to Call the OpenWeatherMap API In this tutorial, you'll learn how to securely use external API keys stored in the [Secrets Manager](https://dev.wix.com/docs/develop-websites/articles/workspace-tools/developer-tools/secrets-manager/about-the-secrets-manager.md) to call the [OpenWeatherMap API](https://openweathermap.org/api). By keeping your API keys safe and confidential with the Secrets Manager, you can make secure API requests without exposing sensitive information in your code. We'll use the following steps to call the OpenWeatherMap API with external API keys: 1. Save your API key in the Secrets Manager. 2. Configure your code to retrieve the API key and call OpenWeatherMap. ## Step 1 | Save your API key in the Secrets Manager 1. Access the Secrets Manager. There are 2 ways to navigate to the Secrets Manager: - Select **Developer Tools** from the code panel. Under the Security section, select **Secrets Manager**. - Select **Developer Tools** in your site's dashboard, and then select **Secrets Manager**. 2. Add and save the API key for the OpenWeatherMap API. For purposes of this tutorial we have named this key "WeatherApiKey". ## Step 2 | Write code to retrieve the API key and call OpenWeatherMap Create a function in a web method to call the weather service and retrieve the data: 1. Import the functions needed to make `https` requests and to get secrets from the Secrets Manager. For example: ```javascript import {Permissions, webMethod} from "wix-web-module"; import {fetch} from 'wix-fetch'; import {getSecret} from 'wix-secrets-backend'; ``` 2. Create a new function and do the following: a. Takes in a `city` whose weather you want to look up. b. Defines the service's address. c. Retrieves the API key from the Secrets Manager. For example: ```javascript export const getCurrentTemp = webMethod(Permissions.Anyone, async (city) => { const url = 'https://api.openweathermap.org/data/2.5/weather?q='; const key = await getSecret(WeatherApiKey); // ... } ``` 3. Continue the function by constructing the full URL for the fetch request. The URL is made up of the service's address and an API key. For example: ```javascript let fullUrl = url + city + '&APPID=' + key + '&units=imperial'; ``` 4. Finish the function by receiving a response from the API call. When you receive the response, pull out the temperature data and return it. For example: ```javascript return fetch(fullUrl, {method: 'get'}) .then(response => response.json()) .then(json => json.main.temp); ``` ### Example Code Here is the complete code for this example, without comments: ```javascript // serviceModule.web.js import {Permissions, webMethod} from "wix-web-module"; import {fetch} from 'wix-fetch'; import {getSecret} from 'wix-secrets-backend'; export const getCurrentTemp = webMethod(Permissions.Anyone, async (city) => { const url = 'https://api.openweathermap.org/data/2.5/weather?q='; const key = await getSecret(WeatherApiKey); let fullUrl = url + city + '&APPID=' + key + '&units=imperial'; return fetch(fullUrl, {method: 'get'}) .then(response => response.json()) .then(json => json.main.temp); }); ``` ## See also - [Wix Fetch API](https://dev.wix.com/docs/velo/api-reference/wix-fetch/introduction.md) - [Wix Secrets Manager](https://dev.wix.com/docs/develop-websites/articles/workspace-tools/developer-tools/secrets-manager/about-the-secrets-manager.md) --- > Portal Navigation: > > - Append `.md` to any URL under `https://dev.wix.com/docs/` to get its markdown version. > - Pages are either content pages (article or reference text) or menu pages (a list of links to child pages). > - To get a menu page, truncate any URL to a parent path and append `.md` (e.g. `https://dev.wix.com/docs/sdk.md`, `https://dev.wix.com/docs/sdk/core-modules.md`). > - Top-level index of all portals: https://dev.wix.com/docs/llms.txt > - Full concatenated docs: https://dev.wix.com/docs/llms-full.txt ## Resource: Adding Custom Interactivity with Events ## Article: Adding Custom Interactivity with Events ## Article Link: https://dev.wix.com/docs/develop-websites/articles/code-tutorials/wix-editor-elements/adding-custom-interactivity-with-events.md ## Article Content: # Velo Tutorial: Adding Custom Interactivity with Events In this tutorial, we’ll show you how to set up an image so that it’s hidden when the page loads, only becoming visible when your visitor clicks a button. We’ll start by adding an image and button to a page, then set up the button to run some code when it’s clicked. Then we’ll configure an image so that it doesn’t automatically load with the page. Finally, we’ll add the code that will make the image appear, with an animation, when the button is clicked. ## 1\. Enable Velo - **Wix Editor:** Click **Dev Mode** in your site's top bar and turn on **Enable Developer Mode** in the dropdown. - **Wix Studio:** If necessary, click ![Code icon](https://github.com/wix-incubator/wix-code-docs/assets/50321691/2c41d3df-930f-4e0f-966f-038742adceed) and then **Start Coding**.. ## 2\. Set Up an Element to React to a User Action Your site can react to user actions with [event handlers](https://dev.wix.com/docs/develop-websites/articles/coding-with-velo/frontend-code/about-event-handlers-in-wix.md). When you add an event handler to an element, you’re telling your site to watch the element to see if that event occurs. If it does, you’ll want your site to run some code.  **To set up an image to display when a button is clicked:** 1. Add a **button** and an **image** to your page. 2. Select the **button** and open the **Properties & Events panel** and then add the **onClick** event handler. 3. The function for your event handler is added to your code in the code editor: ```js $w('#button1').onClick((event) => { }) ``` ## 3\. Add Code to Your Event Handler Now you’ll need to set up the image so it’s not visible when the page loads. Then add code so that the image appears when the button is clicked. Interactions are coded using the Velo APIs. For example, to make an image appear, you’ll use the [`.show()`](https://www.wix.com/velo/reference/$w/image/show) function for the image element. **To set an image to be hidden on load and to show on a button click:** 1. Select the **image** and open the **Properties & Events panel**, then select **Hidden**. 2. In the code editor, add the `.show()` function to your image element using the **image ID** which can be found in the **Properties & Events panel**. ```js $w('#button1').onClick((event) => { $w('#image1').show(); }) ``` ## 4\. Add an Animation Many functions accept an optional parameter to change how the function works. For example, you can add animations like FadeIn, Drop-In, Fly-In, and Spin-In to the `.show()` function using the `effectName` parameter. ​To add a Slide-In animation when the button is clicked, use `'slide'` as the `effectName` parameter as follows: ```js $w('#button1').onClick((event) => { $w('#image1').show('slide'); }) ``` Now when the button is clicked, the `.show()` function runs on your image with the `'slide'` animation. >**Note:** > To make your image appear without an animation, don't add any parameters to your function. ## Next Steps With Velo, you can do even more: * Add more events and event handlers using the [Velo APIs](https://www.wix.com/velo/reference/api-overview). * Make sections with alternating layouts using the [Slideshow](http://wix.to/94BuAAs/$w.Slideshow.html) element. * Add collapsible sections.  * Add interactions on elements as they enter the viewport. * Manipulate Text, Image, Gallery, Repeaters, and other elements using code. --- > Portal Navigation: > > - Append `.md` to any URL under `https://dev.wix.com/docs/` to get its markdown version. > - Pages are either content pages (article or reference text) or menu pages (a list of links to child pages). > - To get a menu page, truncate any URL to a parent path and append `.md` (e.g. `https://dev.wix.com/docs/sdk.md`, `https://dev.wix.com/docs/sdk/core-modules.md`). > - Top-level index of all portals: https://dev.wix.com/docs/llms.txt > - Full concatenated docs: https://dev.wix.com/docs/llms-full.txt ## Resource: Change the Text Label of a Button with Events ## Article: Change the Text Label of a Button with Events ## Article Link: https://dev.wix.com/docs/develop-websites/articles/code-tutorials/wix-editor-elements/change-the-text-label-of-a-button-with-events.md ## Article Content: # Velo Tutorial: Change the Text Label of a Button with Events An **Event** is something that happens to an element in your site. The **Events Handlers** section in the [Properties & Events panel](https://dev.wix.com/docs/develop-websites/articles/workspace-tools/velo-workspace/properties-events-panel/about-the-properties-events-panel.md) lets your site respond to these events by adding **Event Handlers** to your elements. For example, let's say you have a site with a "Take the tour" button. You'd like the text on the button to change to "Let's Go!" when the user hovers over it. Here's what you would do: 1. Use the Add panel to add a button to your site. 2. Change its text to "Take the tour". ![](https://wixmp-833713b177cebf373f611808.wixmp.com/images/change-the-text-label-of-a-button-with-events-md_velo-articles_code-tutorials_images_button_settings_sm.jpg) 3. The Properties & Events panel shows you the default properties for the button you just added. 4. In the Properties Panel, click on the **ID** name to rename the element to **takeTourButton** and press **Enter**. This makes the element easier to identify. (This isn't required, but it is recommended.) 5. In the **Event Handlers** section click **onMouseIn,** click the **+** , and press **Enter**. The name of the onMouseIn event handler is displayed. 6. Code is automatically added to the code editor. This is what you'll see there: ```javascript $w('#takeTourButton').onMouseIn((event) => { // Add your code for this event here: }) ``` 7. Let's add the code that changes the text on the button. Afterwards we'll go back and see how it worked. Under line 7 where it says:  **//Add your code for this event here:** add a line and type **$**.  8. A popup window opens that contains a list of all the elements in your site surrounded by some code. Use the arrow keys to move down and select **$w("#takeTourButton")**. 9. Press **Enter** to add the code for the element you selected. ```javascript $w('#takeTourButton').onMouseIn((event) => { // Add your code for this event here: $w('#takeTourButton'); }) ``` 10. Now enter a period at the end of the line and you'll see a popup window that contains a list of all the properties, methods, and events that you can use with your element. Use the arrow keys to scroll down and select the **label** property. 11. Press **Enter** to add the code you selected. ```javascript $w('#takeTourButton').onMouseIn((event) => { // Add your code for this event here: $w('#takeTourButton'); }) ``` 12. To set the label to its new value add **\= "Let's Go!";** at the end of the line and save your work. ```javascript $w('#takeTourButton').onMouseIn((event) => { // Add your code for this event here: $w('#takeTourButton').label = "Let's Go!"; }) ``` And that's it! Click **Preview** and you can test that your code works. Hover over the "Take the tour" button and it will change to look like this:
![](https://d2x3xhvgiqkx42.cloudfront.net/12345678-1234-1234-1234-1234567890ab/11e10e4f-b84d-4136-a5a9-6109fab0b7d7/2021/02/02/ee1c68d0-3157-4a4e-8242-71fc1fa02972/2d0b64ae-ea1f-481f-91b3-8a581ccb4d31.png)
### Understanding the Code When you selected the **onMouseIn** event handler in the **Event Handlers** section two things happened - one of them you can see and the other you can't. The thing you _can_ see is that these lines were added to the code editor for your page, which add the **takeTour\_mouseIn** function to your page code: ```javascript $w('#takeTourButton').onMouseIn((event) => { // Add your code for this event here: }) ``` This function is a block of code that will run whenever takeTourButton is hovered on. The way that works has to do with the thing that happened that you can't see. The thing you _can't_ see is that Velo adds code to your page that watches or "listens" to your button to see if it's ever hovered on. If it is, Velo knows it needs to run any code that's inside the takeTourButton mouseIn function. That means any code between the { and } is run whenever takeTourButton is hovered on. Now we come to the code that you created inside your event handler function. Some of what you needed to enter in the code editor is simply code syntax. Syntax is a set of rules that lets us communicate using code. In our case, the first thing we need to do is tell the code that we want to do something to takeTourButton. We do that with **$w("#takeTourButton")**. Why? You can obviously see the takeTourButton element name in there. The rest is the syntax that tells the code "This isn't just words, it's the name of an element on my page I want to do something to." Each element has certain properties, methods, and events associated with it. Properties are the things about your element that you might want to know or change. In the example above we used the label property to set the label text of our button. You may have noticed that there were other properties like `link` and `id`, and methods like `hide` and `isEnabled`, that were also in the list for the button. The list of properties, methods, and events associated with an element is specific to that element. For example, a Text Element doesn't have the `isEnabled` method because it doesn't make sense to enable a Text Element. But a button can be enabled (clickable) or disabled (not clickable). Then we added a period at the end of the element. This tells the code "Now I want to work with one of the properties, methods, or events that are associated with my element." `label` is the property that controls the text that appears on a button, so we selected it. Then all we needed to do was assign a new text to the label property, in our case "Let's Go!" The semicolon at the end is standard JavaScript syntax that says "this is the end of a line." >**Note:** > In this tutorial the event and the response to that event both happen on the same element. We add an event that watches to see if the user hovers on a button, and if they do we change the label of that button.  > > It's important to note that you aren't limited to the event and its response being on the same element and that any event on any action can create a response on any other element in your site. It all depends on what element you select in the code you put inside your function. --- > Portal Navigation: > > - Append `.md` to any URL under `https://dev.wix.com/docs/` to get its markdown version. > - Pages are either content pages (article or reference text) or menu pages (a list of links to child pages). > - To get a menu page, truncate any URL to a parent path and append `.md` (e.g. `https://dev.wix.com/docs/sdk.md`, `https://dev.wix.com/docs/sdk/core-modules.md`). > - Top-level index of all portals: https://dev.wix.com/docs/llms.txt > - Full concatenated docs: https://dev.wix.com/docs/llms-full.txt ## Resource: Expand Text with a Read More Link ## Article: Expand Text with a Read More Link ## Article Link: https://dev.wix.com/docs/develop-websites/articles/code-tutorials/wix-editor-elements/expand-text-with-a-read-more-link.md ## Article Content: # Velo Tutorial: Expand Text with a Read More Link This tutorial describes how to use [Velo](https://dev.wix.com/docs/develop-websites/articles/get-started/about-developing-websites.md) to let site visitors expand and collapse text with "Read More" and "Read Less" buttons. 
### Overview To create Read More / Read Less functionality, we use a [multi-state box](https://dev.wix.com/docs/develop-websites/articles/wix-editor-elements/other-elements/multi-state-boxes/about-multi-state-boxes.md). Multi-state boxes are great for switching between several views. They contain multiple states with different content, and display one state at a time. One state in our multi-state box will contain the shorter (collapsed) content and one state will contain the longer (expanded) content. We'll use code to enable site visitors to switch between the 2 states by clicking "Read More" and "Read Less" buttons. ### Step 1: Add a Multi-State Box **To add a multi-state box to your page:** Wix Studio: 1. If necessary, click ![Code icon](https://github.com/wix-incubator/wix-code-docs/assets/50321691/2c41d3df-930f-4e0f-966f-038742adceed) and then **Start Coding**. 2. Click the **Add** panel and select **Layout Tools > Multi-state Boxes**. 3. Drag a multi-state box element onto your page. Wix Editor: 1. Make sure Velo Dev Mode is [enabled](https://dev.wix.com/docs/develop-websites/articles/get-started/about-developing-websites.md). 2. Click **Add** ![](https://d2eyqiy4n03ve6.cloudfront.net/12345678-1234-1234-1234-1234567890ab/2015/08/05/f5f1bce8-77f0-405c-8520-f147e1035fb1.png) on the left side of the editor. 3. Click **Interactive**. 4. Drag a multi-state box element onto your page.
Remove a border from a pre-designed multi-state box and blend it in with your page background Click on the pre-designed multi-state box and update the design as follows: 1. Set the border width to 0. 2. Make sure the shadow is disabled. 3. Change the box's background color to match the color of your page's background color. >**Notes:** > - Pre-designed multi-state boxes aren't currently supported in Wix Studio. > - You can't remove the border from a blank multi-state box.
### Step 2: Rename Your Multi-State Box and State When you click your multi-state box, you can see the ID (name) of the multi-state box in the [Properties & Events panel](https://dev.wix.com/docs/develop-websites/articles/workspace-tools/velo-workspace/properties-events-panel/about-the-properties-events-panel.md). When you click **Manage States**, you can see the IDs of the default states for the multi-state box. You can rename both your multi-state box and your states in the Properties & Events panel. It's a good idea to give your IDs meaningful names, since you'll be using them in code. We renamed our multi-state box to `readMoreStatebox` and our state to `collapsedState`, since this state will have the collapsed version of the text. ### Step 3: Add Content to Your Collapsed (Short) State Now you can add your page content to your state: images, videos, text, or other elements. Make sure the elements fit within the borders of your multi-state box so they'll be attached to the state. Since this is the collapsed state, add the short version of your text. ### Step 4: Add a "Read More" Button When you're finished setting up your state, do the following: 1. Add a transparent button (with no background or border) to your state from the Add panel. 2. Change the button text to **Read More** and match the font type and size to the rest of your text. 3. Rename the button ID to `readMoreButton` in the Properties & Events panel. 4. Append the button to the end of the collapsed text. ### Step 5: Duplicate Your State Now you can duplicate your collapsed state and then adjust it to create the expanded state: 1. Click your multi-state box and click **Manage States**. 2. Click **Duplicate State**. Now you're in the second state of your multi-state box. >**Note** > You can switch between your states by clicking **Manage States** and selecting the state you want to edit. ### Step 6: Set Up Your Expanded (Long) State 1. Rename the duplicated state ID to `expandedState` in the Properties & Events panel. 2. Add the longer text to this state. You can resize the multi-state box if you need by dragging its handles at the edge of the box. 3. Change the **Read More** button text to **Read Less**. 4. Rename the button ID to `readLessButton` in the Properties & Events panel. 5. Move the button to the end of the longer text. ### Step 7: Add Code Now we need to write code to define when to switch between the collapsed state and expanded state. We use the [MultiStateBox API](https://www.wix.com/velo/reference/$w.MultiStateBox.html) to define when to switch states. 1. Open the code panel. + Learn how to work with the **Wix Studio** [code panel](https://dev.wix.com/docs/develop-websites/articles/workspace-tools/velo-workspace/workspaces/wix-studio-working-with-the-code-panel.md). + Learn how to work with the **Wix Editor** [code panel](https://dev.wix.com/docs/develop-websites/articles/workspace-tools/velo-workspace/code-editor-ide/working-in-the-code-editor.md). 2. Add the code in lines 2-8 below to your `onReady()` function so that the code on your page looks like this: ```javascript $w.onReady(function () { $w("#readMoreButton").onClick(() => { $w("#readMoreStatebox").changeState("expandedState"); }); $w("#readLessButton").onClick(() => { $w("#readMoreStatebox").changeState("collapsedState"); }); }); ``` #### Understanding the Code * **Line 2:** When the **Read More** button is clicked, do the following: * **Line 3:** Change the current state of the `readMoreStatebox` multi-state box to the `expandedState`. * **Line 6:** When the **Read Less** button is clicked, do the following: * **Line 7:** Change the current state of the `readMoreStatebox` multi-state box to the `collapsedState`. Preview your site to make sure everything is working as expected. Then go ahead and publish. --- > Portal Navigation: > > - Append `.md` to any URL under `https://dev.wix.com/docs/` to get its markdown version. > - Pages are either content pages (article or reference text) or menu pages (a list of links to child pages). > - To get a menu page, truncate any URL to a parent path and append `.md` (e.g. `https://dev.wix.com/docs/sdk.md`, `https://dev.wix.com/docs/sdk/core-modules.md`). > - Top-level index of all portals: https://dev.wix.com/docs/llms.txt > - Full concatenated docs: https://dev.wix.com/docs/llms-full.txt ## Resource: Hiding an Element on Certain Pages ## Article: Hiding an Element on Certain Pages ## Article Link: https://dev.wix.com/docs/develop-websites/articles/code-tutorials/wix-editor-elements/hiding-an-element-on-certain-pages.md ## Article Content: # Velo Tutorial: Hiding an Element on Certain Pages This tutorial explains how you can use [Velo](https://dev.wix.com/docs/develop-websites/articles/get-started/about-developing-websites.md) to show an element on all pages except for some of them. In other words, you have an element on your site that is part of a [global section](https://support.wix.com/en/article/studio-editor-using-global-sections#setting-a-global-section) (Wix Studio), or that is set to [show on all pages](https://support.wix.com/en/article/showing-an-element-on-all-pages-6533570) (Wix Editor), and you want to hide it on one or more of your pages. Note that some elements appear on all pages by default based on their functionality, without this setting (for example, the Wix Chatbox). These elements don't require this setting. You can still use the code in this tutorial to hide them. This tutorial has 2 parts: * Instructions on how to get set up, including code you can copy and paste onto your page * An explanation of what each line of code does > > The functionality described in this tutorial works only on your published site. ### Instructions 1. Start with an element that is part of a [global section](https://support.wix.com/en/article/studio-editor-using-global-sections#setting-a-global-section) (Wix Studio), or is set [to show on all pages](https://support.wix.com/en/article/wix-editor-showing-an-element-on-all-pages) (Wix Editor). 2. Navigate to a page where you don't want that element to appear. 3. Copy the code below and paste it in your page code under the line that says "// TODO: write your JavaScript here…" ```javascript // Hides the element when the page loads $w("#myElement").hide(); ``` 1. Make sure to make this substitution: * _#myElement_: the ID of the element that you want to hide on the current page (hover over it to see its ID) 2. Publish the site and view the page to make sure the element does not appear. If you want to hide other elements, just add all their element IDs to the line of code, like this: ```javascript // Hides these elements when the page loads $w("#myElement, #myElement2, ...").hide(); ``` ### Understanding the Code The image below shows what the code looks like in the code editor. ![](https://d2x3xhvgiqkx42.cloudfront.net/12345678-1234-1234-1234-1234567890ab/b0387850-90c2-4f00-a761-a0c5104e1c8c/2018/04/10/4be8155b-9790-41c8-94a7-6697fb9fe93a.png) Line 3 calls the [`onReady()`](https://www.wix.com/velo/reference/$w/onready) function. This defines the code that will run when the page is finished loading. Line 5 calls the `hide()` function, which sets the element's `hidden` property to `true`. This means the element will not be displayed on this page even if the element is part of a global section (Wix Studio), or is set to "Show on all pages" (Wix Editor). If you decide you want to display the element, you can change the `hide()` function to `show()`. One thing to keep in mind is this: a hidden element still takes up room on the page. In other words, depending on the layout of your page, even though the element is hidden, it could still leave a gap. Instead of hiding your element, you can use the `collapse()` function, because a collapsed element does not take up any space on the page. --- > Portal Navigation: > > - Append `.md` to any URL under `https://dev.wix.com/docs/` to get its markdown version. > - Pages are either content pages (article or reference text) or menu pages (a list of links to child pages). > - To get a menu page, truncate any URL to a parent path and append `.md` (e.g. `https://dev.wix.com/docs/sdk.md`, `https://dev.wix.com/docs/sdk/core-modules.md`). > - Top-level index of all portals: https://dev.wix.com/docs/llms.txt > - Full concatenated docs: https://dev.wix.com/docs/llms-full.txt ## Resource: Capturing and Displaying Ratings ## Article: Capturing and Displaying Ratings ## Article Link: https://dev.wix.com/docs/develop-websites/articles/code-tutorials/wix-editor-elements/capturing-and-displaying-ratings.md ## Article Content: # Velo Tutorial: Capture and Display Ratings This tutorial shows you how you can capture and display ratings of your items from your visitors. You will set up a Ratings Display element to display the current average rating and the total number of ratings. Then using a Ratings Input element, you'll capture your visitor's rating, calculate the new average rating and total number of ratings, and then update the collection and the Ratings Display element with the new values. 
You'll need a collection with items you want to let your visitors rate and a page with a dataset connected to that collection.  This tutorial has 3 parts: * [How to set up your collection and your page](#set-up) * [Code you can copy and paste onto your page](#the-code) * [A detailed explanation of the code](#code-explanation) ## Set up This section covers what you need to prepare in your collection and what you need to do in your page in the editor. #### In your collection 1. Make sure your collection's [permissions](https://support.wix.com/en/article/changing-your-database-collection-permissions) allow visitors to view and add content. 2. Add 3 new Number fields, for the average rating, number of ratings submitted, and sum of all the ratings submitted. You can leave these fields blank or input starting values. Remember that the average rating must be between 1 and 5. #### In your page 1. Set your dataset's [mode](https://support.wix.com/en/article/working-with-dataset-modes-and-collection-permissions) to "Read and Write." This will let your visitors update information in the collection. 2. Add the following elements: 1. A [Ratings Display](https://support.wix.com/en/article/working-with-the-connect-ratings-panel) element connected to the new Number fields in your collection. 2. A [Ratings Input](https://support.wix.com/en/article/ratings-input) element your visitors can use to pick a rating for the item. You can use the default setting for the ratings, or define your own. Don't connect it to the dataset. ## The code This section has 2 parts. The first part shows you how to add the event handler to the Ratings Input element. The second part has the actual code that you can copy and paste onto your page. #### Add the event handler An [event handler](https://dev.wix.com/docs/develop-websites/articles/workspace-tools/velo-workspace/code-editor-ide/working-in-the-code-editor.md) adds code that only runs when your visitor performs a certain action. In our code, we used the "onChange" event, so that the rating is saved when our visitor makes their selection in the Ratings Input. **To add the event handler:** 1. Select your Ratings Input. 2. In the [Properties & Events panel](https://dev.wix.com/docs/develop-websites/articles/workspace-tools/velo-workspace/properties-events-panel/about-the-properties-events-panel.md), click the "onChange" event handler. The code for the event handler is added to the bottom of your page code. The image below shows what it looked like on our page. ```js $w('#ratingsInput1').onChange((event) => { //Add your code for this event here: }) ``` #### Add the code 1. Copy the code below and paste it into the event handler method above the line that says "//Add your code for this event here:". You can delete that line if you want. ```javascript $w("#dataset1").onReady(() => { // get the current item from the dataset const currentItem = $w("#dataset1").getCurrentItem(); // get the current average rating, number of ratings, and //total ratings for the current dataset item const average = currentItem.avg; const count = currentItem.numRatings; const total = currentItem.totalRatings; // get the new rating from the ratings input const newRating = $w('#ratingsInput1').value; // calculate the new average rating based on the current //average and count const newAverageLong = (total + newRating) / (count +1); // Round the average rating to 1 decimal point const newAverageShort = Number.parseFloat(newAverageLong).toFixed(1); // set the dataset fields to the new average, total // ratings, and number of ratings $w('#dataset1').setFieldValues({ 'avg': newAverageShort, 'totalRatings': total + newRating, 'numRatings': (count + 1) }); // save the dataset fields to the collection $w('#dataset1').save() .catch((err) => { console.log('could not save new rating'); }); }); ``` 2. Make sure to make these substitutions. * `'#myDataset1'`: The ID of your dataset * `avg`: The field ID of the field in your collection that holds the average rating * `numRatings`: The field ID of the field in your collection that holds the total number of ratings received * `totalRatings`: The field ID of the field in your collection that holds the sum of all ratings received * `'#ratingsInput1'`: The ID of your Dropdown element 3. Preview your page and test out the Ratings Input element. Watch how the ratings display element updates when you add a rating.  4. Go back to the Content Management System (CMS) to see how the average rating and the total number of ratings for that item have been updated in your collection. ## Code explanation First we read the current item from the dataset. Then we define variables called `average`, `count` and `total`, and set their values to be the item's current average rating, number of ratings, and the sum of all the ratings. ```js const currentItem = $w("#myDataset").getCurrentItem(); const average = currentItem.averageRating; const count = currentItem.numRatings; ``` We define a variable called `newRating` and set its value to be the rating selected by the user in the Ratings Input. `const newRating = Number($w('#ratingsInput1').value);` Next we calculate the updated average rating and save it to a variable called `newAverageLong`. We then round the results to 1 decimal place and assign it to the variable `newAverageShort`. ```js const newAverageLong = (total + newRating) / (count + 1); const newAverageShort = Number.parseFloat(newAverageLong).toFixed(1); ``` Now we save the new average rating, sum of all the ratings, and total number of ratings to the current item. We include code to deal with errors should they occur. ```js $w('#dataset1').setFieldValues({ 'avg': newAverageShort, 'totalRatings': total + newRating, 'numRatings': (count + 1) }); $w('#dataset1').save() .catch((err) => { console.log('could not save new rating'); }); ``` --- > Portal Navigation: > > - Append `.md` to any URL under `https://dev.wix.com/docs/` to get its markdown version. > - Pages are either content pages (article or reference text) or menu pages (a list of links to child pages). > - To get a menu page, truncate any URL to a parent path and append `.md` (e.g. `https://dev.wix.com/docs/sdk.md`, `https://dev.wix.com/docs/sdk/core-modules.md`). > - Top-level index of all portals: https://dev.wix.com/docs/llms.txt > - Full concatenated docs: https://dev.wix.com/docs/llms-full.txt ## Resource: Creating a Rich Text Editor Using the HTML Component ## Article: Creating a Rich Text Editor Using the HTML Component ## Article Link: https://dev.wix.com/docs/develop-websites/articles/code-tutorials/wix-editor-elements/creating-a-rich-text-editor-using-the-html-component.md ## Article Content: # Velo Tutorial: Creating a Rich Text Editor Using the HTML Component Before reading this article, you might want to learn about [Working with the HTML Component in Velo](https://dev.wix.com/docs/develop-websites/articles/wix-editor-elements/other-elements/html-i-frame-element/working-with-the-html-iframe-element.md). In this article, we demonstrate how to use an HTML Component to add a rich text editor to your page.  We start by creating the following page:
![](https://d2x3xhvgiqkx42.cloudfront.net/12345678-1234-1234-1234-1234567890ab/dfff8cbb-ddcb-4376-8cae-3fedb2dd4458/2017/08/29/4fbb8d5d-33e3-40a8-9bb4-c83eba9855b7.png)
The left side of the page is a Wix Text element. The right side of the page is created with an HTML Component. The component contains HTML that creates a [CKEditor](https://ckeditor.com/) and a button.  Using this setup, a user can enter rich text in the rich text editor, click the **Submit text** button, and the rich text will be displayed in the Wix text element. #### Page Code The following code is added to the code editor. In the page's `onReady()` event handler, we set an event handler that runs when the page receives a message from the HTML Component. The event handler sets the text of the page's Text element to be the data sent from the HTML Component. ```javascript $w.onReady(function () { $w("#myHtmlComponent").onMessage( (event) => { $w('#myText').html = event.data; } ); } ); ```
**Note:** We are using the Text element's **html** property to set its styled text. To learn about how a Text element displays content that is set using the **html** property, see [Formatting Text Elements with Velo](https://dev.wix.com/docs/develop-websites/articles/wix-editor-elements/formatting-layout/about-formatting-text-elements.md).
#### HTML Component Code The following code is added to the HTML Component using the **Enter Code** or  **Edit Code** button. It contains three main sections. In the `` tag, we define the HTML elements that make up our page: * A `
``` ### API List The following API is used in the code in this article. To learn more, see the [API Reference](https://www.wix.com/velo/reference/). * [HtmlComponent](https://www.wix.com/velo/reference/$w.HtmlComponent.html) --- > Portal Navigation: > > - Append `.md` to any URL under `https://dev.wix.com/docs/` to get its markdown version. > - Pages are either content pages (article or reference text) or menu pages (a list of links to child pages). > - To get a menu page, truncate any URL to a parent path and append `.md` (e.g. `https://dev.wix.com/docs/sdk.md`, `https://dev.wix.com/docs/sdk/core-modules.md`). > - Top-level index of all portals: https://dev.wix.com/docs/llms.txt > - Full concatenated docs: https://dev.wix.com/docs/llms-full.txt ## Resource: Redirecting Visitors Based on Browser Language ## Article: Redirecting Visitors Based on Browser Language ## Article Link: https://dev.wix.com/docs/develop-websites/articles/code-tutorials/wix-editor-elements/redirecting-visitors-based-on-browser-language.md ## Article Content: # Velo Tutorial: Redirecting Visitors Based on Browser Language You can use Velo to redirect visitors to different language versions of your site. Most browsers have settings that let you define what language to view content in. Velo can access these settings and use them when displaying your site. For example, if your browser locale is set to an English-speaking country, you can use Velo to redirect visitors to your site in English. If your browser locale is set to a Spanish-speaking country, you can redirect visitors to the Spanish version of your site. This tutorial has 2 parts: * Instructions on how to get set up, including code you can copy and paste onto your page * An explanation of what each line of code does ### Instructions 1. Go to the page to redirect the visitor from. 2. Open the code editor. 3. Copy and paste the code below. 4. In the copied code, make sure to substitute your locale codes and URLs, removing the `<` and `\>` symbols. **Example** For French, substitute `` with `fr`. To change the URL and its locale, substitute `http:///?lang=` with `http://www.theCatalog.com/?lang=fr`. **Tip:** To get the URL, just go to your live site, navigate to the relevant page in the right language and copy it the URL. 5. Publish the page to see the redirect in action. The redirect will not work in preview mode. ```javascript import wixLocationFrontend from 'wix-location-frontend'; import wixWindowFrontend from 'wix-window-frontend'; $w.onReady(function () { setTimeout(function () { const url = wixLocationFrontend.url; const shortLocale = wixWindowFrontend.browserLocale.substring(0,2); switch (shortLocale) { case '': if (url !== 'http:///?lang=') { wixLocationFrontend.to('http:///?lang='); } break; case '': if (url !== 'http:///?lang=') { wixLocationFrontend.to('http:///?lang='); } break; ... ... ... default: if (url !== 'http:///?lang=' && url !== 'http://') { wixLocationFrontend.to('http:///?lang='); } break; } }, 6500); }); ``` A sample implementation of this code is provided below. ### Understanding the Code We are now going to understand the code using a scenario. The sample code below checks the browser locale, and then redirects the visitor to a catalog (www.theCatalog.com) in the right language. The code checks if the language of the browser is French, German, Chinese, or Spanish. If none of these match, the catalog displays in English. Import statements on lines 2 and 3 bring in the APIs we need: * [`wixWindowFrontend.browserLocale`](https://www.wix.com/velo/reference/wix-window.html#browserLocale) checks the locale setting of the browser. * [`wixLocationFrontend.to`](https://www.wix.com/velo/reference/wix-location.html#to) redirects the visitor to the specified URL. ```javascript // Import statements for the Wix Location Frontend and Window APIs. import wixLocationFrontend from 'wix-location-frontend'; import wixWindowFrontend from 'wix-window-frontend'; ``` The redirect occurs after a time delay. This gives the visitor time to see notices on the page you are redirecting from. Line 4 contains the setTimeout function that creates this delay. ```javascript $w.onReady(function () { // Adds a time delay so the visitor anticipates the redirect. setTimeout(function () { ... ... ... // The timeout value is 6500 nanoseconds. }, 6500); }); ``` We add a **switch** statement on line 16 to check the browser locale.  ```javascript import wixLocationFrontend from 'wix-location-frontend'; import wixWindowFrontend from 'wix-window-frontend'; $w.onReady(function () { // Adds a time delay so the visitor anticipates the redirect. setTimeout(function () { // Not sure which format your browser uses when // returning the locale (for example, "en" or "en-EN)? // Shorten the locale to its first two characters. const url = wixLocationFrontend.url; const shortLocale = wixWindowFrontend.browserLocale.substring(0,2); // Checks the browser locale setting. switch (shortLocale) { // Depending on the locale, redirects to a new page. // If already on the correct page, no need to // re-navigate and reload the page. case 'fr': if (url !== 'http://www.theCatalog.com/?lang=fr') { wixLocationFrontend.to('http://www.theCatalog.com/?lang=fr'); } break; case 'de': if (url !== 'http://www.theCatalog.com/?lang=de') { wixLocationFrontend.to('http://www.theCatalog.com/?lang=de'); } break; case 'zh': if (url !== 'http://www.theCatalog.com/?lang=zh') { wixLocationFrontend.to('http://www.theCatalog.com/?lang=zh'); } break; case 'es': if (url !== 'http://www.theCatalog.com/?lang=es') { wixLocationFrontend.to('http://www.theCatalog.com/?lang=es'); } break; // If locale is set to annother language, default is English. // Also, handle the case where no language code is in the URL. default: if (url !== 'http:///?lang=' && url !== 'http://') { wixLocationFrontend.to('http://www.theCatalog.com/?lang=en'); } break; } // The timeout value is 6500 nanoseconds. }, 6500); }); ```
**Notes** * In line 48, the sample code defaults to English if the locale is not French, German, Chinese, or Spanish.   * We also make sure that the page does not reload if no language code is specified in the URL.
--- > Portal Navigation: > > - Append `.md` to any URL under `https://dev.wix.com/docs/` to get its markdown version. > - Pages are either content pages (article or reference text) or menu pages (a list of links to child pages). > - To get a menu page, truncate any URL to a parent path and append `.md` (e.g. `https://dev.wix.com/docs/sdk.md`, `https://dev.wix.com/docs/sdk/core-modules.md`). > - Top-level index of all portals: https://dev.wix.com/docs/llms.txt > - Full concatenated docs: https://dev.wix.com/docs/llms-full.txt ## Resource: Sending Tracking and Analytics Events ## Article: Sending Tracking and Analytics Events ## Article Link: https://dev.wix.com/docs/develop-websites/articles/code-tutorials/wix-editor-elements/sending-tracking-and-analytics-events.md ## Article Content: # Velo Tutorial: Sending Tracking and Analytics Events Adding tracking code to your site allows you to monitor how users interact with your site. Collecting tracking data gives you insight into their online behavior and helps you to optimize your online marketing strategies. In this article, we demonstrate how to send a tracking event from your page code. We start by connecting our site to an analytics tool. Then, we set up a simple page. Finally, we add code so that a tracking event is sent when a user performs a specific interaction. ### Tracking & Analytics Tools We begin by connecting the desired tracking and analytics tools to our site. Currently, you can send events through code to Google Analytics and Facebook Pixel.
**Note** Tracking & Analytics requires you to have an account with an external analytics tool and only works with premium sites.
In our example, we've connected our site to Google Analytics. ### Page Setup You set up your page as you normally would. However, you'll need to decide when you want to send tracking events. In our example, we send an event when a user clicks a button to download a document. On our page we have a repeater that displays a list of documents stored in a collection. When one of the **Download** buttons is clicked, we send a custom Document Download event that contains the name of the document that was downloaded.
![](https://d2x3xhvgiqkx42.cloudfront.net/12345678-1234-1234-1234-1234567890ab/dfff8cbb-ddcb-4376-8cae-3fedb2dd4458/2018/04/24/3d8542e0-0aa7-4529-830d-f34466aad689.png)
On our page we have the following elements: |Type |ID |Usage | |---|---|---| |Text|docTitle|Display the document title |Button|downloadButton|Download the document |Repeater|docRepeater|Display a title and download button for each document |Dataset|docDataset|Connecting elements to document data stored in a collection The repeater, button, and text elements are connected to the dataset so that the repeater displays the title of each document and a button to download the document.  ### Tracking Code You can add the code to send a tracking event wherever it suits your needs. Most often, you will add it in an event handler that responds to a user interaction, such as a button click. In our example we want to track each time a user clicks the download button. So, we add the tracking code to an [event handler wired](https://support.wix.com/en/article/working-with-events-in-wix-code) to the download button. First, we import `wixWindowFrontend` at the top of our page code. ```javascript import wixWindowFrontend from 'wix-window-frontend'; ``` Then, we wire an event handler to the download button's click event. ```javascript export function downloadButton_click(event) { // This function was added from the Properties & Events panel. To learn more, visit http://wix.to/UcBnC-4 // Add your code for this event here: } ``` Finally, we call the `trackEvent()` function. Here, we send a custom event that indicates a download has occurred. We also grab the title of the document that was downloaded and add it to the event. When sending a custom event to Google Analytics, use the following parameters: |Key |Value Type |Required |Usage | |---|---|---|---| |eventCategory|string|yes|Object that was interacted with |eventAction|string|yes|Type of interaction |eventLabel|string|no|Event category |eventValue|integer|no|Numeric value associated with the event ```javascript wixWindowFrontend.trackEvent("CustomEvent", { "event": "Document Download", "eventCategory": "Downloads", "eventAction": "Download", "eventLabel": $w('#docDataset').getCurrentItem().title } ); ``` * * * Putting it all together, our code looks like this: ```javascript import wixWindowFrontend from 'wix-window-frontend'; export function downloadButton_click(event) { wixWindowFrontend.trackEvent("CustomEvent", { "event": "Document Download", "eventCategory": "Downloads", "eventAction": "Download", "eventLabel": $w('#dataset1').getCurrentItem().title } ); } ``` When a user clicks the download button, we'll see an event registered in our analytics tool. 
### Learn More To learn more about the types of events you can send and their corresponding parameters, see [trackEvent( )](https://www.wix.com/velo/reference/wix-window/trackevent) in the API Reference. --- > Portal Navigation: > > - Append `.md` to any URL under `https://dev.wix.com/docs/` to get its markdown version. > - Pages are either content pages (article or reference text) or menu pages (a list of links to child pages). > - To get a menu page, truncate any URL to a parent path and append `.md` (e.g. `https://dev.wix.com/docs/sdk.md`, `https://dev.wix.com/docs/sdk/core-modules.md`). > - Top-level index of all portals: https://dev.wix.com/docs/llms.txt > - Full concatenated docs: https://dev.wix.com/docs/llms-full.txt ## Resource: Displaying a Pro Gallery on Your Site Using the Pro Gallery Backend API ## Article: Displaying a Pro Gallery on Your Site Using the Pro Gallery Backend API ## Article Link: https://dev.wix.com/docs/develop-websites/articles/code-tutorials/wix-editor-elements/displaying-a-pro-gallery-on-your-site-using-the-pro-gallery-backend-api.md ## Article Content: # Velo Tutorial: Displaying a Pro Gallery on Your Site Using the Pro Gallery Backend API The [Velo Pro Gallery Backend API](https://dev.wix.com/docs/velo/api-reference/wix-pro-gallery-backend/introduction.md) allows you to create and manage pro galleries on your site's backend. When you add a pro gallery element to your site, a corresponding pro gallery is automatically created on your site's backend. However, when you use the Pro Gallery backend API to create a pro gallery on your site's backend, you need to do a few steps to display it on your site.  You may want to display a pro gallery from your site's backend on your site, for example, if you have a page with a pro gallery element where you want to display different galleries for each site member who logs in to your site. You can use this API to store the pro galleries in the backend instead of overloading the frontend. Then for each site member who logs in, you can export the relevant gallery from the backend. This article describes how you can choose an existing pro gallery on your site's backend, connect it to a pro gallery element on your page, and display it on your site. We start by calling the [listGalleries()](https://www.wix.com/velo/reference/wix-pro-gallery-backend/progallery/listgalleries) function to get a list of all the pro galleries on our site's backend. Then we choose the pro gallery we want to display on our live site. To export the gallery we want from our site's backend, we call the [getGallery()](https://www.wix.com/velo/reference/wix-pro-gallery-backend/progallery/getgallery) function with the ID of the pro gallery that we chose. To use the exported backend gallery on our frontend, we need to first write code to convert the backend gallery items to the frontend [$w() Gallery](https://www.wix.com/velo/reference/$w/gallery/currentitem) items format. This is because currently the backend gallery API and the frontend $w() Gallery API have different formats. Last, we import our converted items to our page code, and set the items to a particular gallery element on our page. This temporarily overrides the frontend gallery element's items with the converted backend gallery items. Once the site is published, the converted pro gallery items are visible on our live site. >**Note** > This example assumes you used the [createGallery()](https://www.wix.com/velo/reference/wix-pro-gallery-backend/progallery/creategallery) API to create one or more pro galleries in site's your backend. ### Before You Start Before you start working with the Wix pro gallery in code, make sure to [add a Pro Gallery to your site](https://support.wix.com/en/article/wix-pro-gallery-adding-and-setting-up-your-gallery#step-1-add-wix-pro-gallery-to-your-site). In the steps below, we'll first take a look at the code piece by piece to understand what it's doing.
**Important** Note the following limitations when converting backend gallery items to the frontend [$w() Gallery](https://www.wix.com/velo/reference/$w/gallery/currentitem) items format: * Backend galleries that contain text items can't be imported to your page code. Trying to do so throws an error, and breaks the gallery on your live site. This is because text items can't be converted to the frontend gallery items format, as the frontend [$w() Gallery](https://www.wix.com/velo/reference/$w/gallery/currentitem) items currently only support image and video types.  * Backend galleries items that contain a link with text don't appear on your site. This is because the text property in the item's link object can't be converted to the frontend gallery items format, as the frontend [$w() Gallery](https://www.wix.com/velo/reference/$w/gallery/currentitem) items object doesn't contain a link with text property.
### Step 1: List All Pro Galleries on the Backend In our example, we import the Pro Gallery API from the wix-pro-gallery-backend module. We then call the [listGalleries()](https://www.wix.com/velo/reference/wix-pro-gallery-backend/progallery/listgalleries) function to get a list of all existing galleries in our site's backend.  Here is sample backend code that we put in a **web module** (.web.js file): ```javascript import { Permissions, webMethod } from 'wix-web-module'; import { proGallery } from 'wix-pro-gallery-backend'; export const myListGalleriesFunction = webMethod(Permissions.Anyone, async () => { try { const galleryList = await proGallery.listGalleries(); return galleryList; } catch (error) { console.error(error); // Handle the error } }); ``` **Line 1**: First, we import the pro gallery API from the wix-pro-gallery-backend module.  **Lines 3-6**: Next we create and export the myListGalleriesFunction() that awaits and returns the listGalleries() function.  **Lines 7-11**: We catch and handle any potential errors.
**Important** The function in this web module is used for functional testing only. If you don't want to expose all your backend gallery contents, [change the function's permissions to "Admin"](https://dev.wix.com/docs/develop-websites/articles/coding-with-velo/backend-code/web-modules/about-web-modules.md#permissions).
### Step 2: Select a Gallery to Display on Live Site Next we use [functional testing](https://dev.wix.com/docs/develop-websites/articles/workspace-tools/testing-monitoring/functional-testing/about-functional-testing.md) to run the code above. The code returns list of backend galleries. We then select the gallery we want to display on our live site, recording its ID to be able to identify it in a later step. In our case, we want the ID shown below. Your list of backend galleries should look something like this: 
Now that we know which gallery we want to use, we create a new function. This function calls the getGallery() function with the ID of the gallery that we chose. It then returns the gallery object that we selected.  ```javascript export const mySelectGalleryFunction = webMethod(Permissions.Anyone, async () => { const selectedGalleryId = "63ffd8e7-101b-49be-9498-00c2e6f5b65c"; try { const selectedGallery = await proGallery.getGallery(selectedGalleryId); // Function continues below ``` **Line 1**: We create and export the mySelectGalleryFunction() that awaits the getGallery() function. **Lines 2-6**: We declare the gallery ID that we chose in step 1 as a variable, and pass it as a parameter in the getGallery() function. ### Step 3: Convert Backend Gallery Items to Frontend Format We need to take the backend gallery that we chose, and convert the items to the frontend [$w() Gallery](https://www.wix.com/velo/reference/$w/gallery/currentitem) items. ```javascript // Function continued from above // Convert the selected backend gallery's items to the frontend gallery items format. const convertedItems = selectedGallery.items.map(item => convertToFrontend(item)); return convertedItems; } catch (error) { console.error(error); // Handle the error } }); function convertToFrontend(item) { return { slug: item._id, type: item.type, src: item.image ? item.image.imageInfo : item.video.videoInfo, description: item.description, title: item.title, link: item.link ? item.link.url : undefined } } ``` **Lines 1-6**: We map the selected backend gallery object's items to the frontend gallery object's items. We do this by calling the convertToFrontend() function that we create later on. Then we return these converted items.  **Lines 7-12**: We catch and handle any potential errors. **Lines 13-23**: We create a function to convert the backend gallery items to the frontend gallery items. Note that the src is either image or video only, as the frontend $w() Gallery object doesn't support text items. ### Step 4: Import Converted Gallery Items to our Page Code To bring the converted gallery items to the frontend, we need to import the mySelectGalleryFunction function to our page code. We add a button element to our page, and call the imported mySelectGalleryFunction() function on button click. Then we set the frontend gallery element's items to the converted gallery items.  We add the following code to our **page code**:  ```javascript import { mySelectGalleryFunction } from 'backend/myWebModuleFile.web'; $w('#galleryButton').onClick(async () => { try { // Call the mySelectGalleryFunction function to select the backend gallery and convert the backend gallery's items to the frontend items format. const newlyConvertedGalleryItems = await mySelectGalleryFunction(); // Set the frontend gallery element's items to the converted backend gallery items. $w("#myGalleryElement").items = newlyConvertedGalleryItems; } catch (error) { // Gallery not created console.error(error); } }); ``` **Line 1**: First, we import the mySelectGalleryFunction function from our module (myWebModuleFile.web.js file).  **Line 2-6**: We add an onClick() event handler to the button element on our page. In the event handler, we call the mySelectGalleryFunction() function. **Lines 7-9**: Still in the event handler, we set the frontend gallery element's items to the newly converted gallery. This occurs when the button is triggered.  **Lines 10-15**: We then catch and handle any potential errors.
**Important** Setting the frontend gallery element's items to the converted gallery items temporarily overrides the frontend gallery element's items with the converted backend gallery items. However, the pro gallery element's ID remains the same. For example, if you call the [getGallery()](https://www.wix.com/velo/reference/wix-pro-gallery-backend/progallery/getgallery) function with the gallery element's ID, the original gallery element's items are returned, and not the converted backend gallery items.
### All The Code Here is the complete **backend code** (.web.js file) for this example: ```javascript import { Permissions, webMethod } from 'wix-web-module'; import { proGallery } from 'wix-pro-gallery-backend'; export const myListGalleriesFunction = webMethod(Permissions.Anyone, async () => { try { let galleryList = await proGallery.listGalleries(); return galleryList; } catch (error) { console.error(error); // Handle the error } }); export const mySelectGalleryFunction = webMethod(Permissions.Anyone, async () => { const selectedGalleryId = "63ffd8e7-101b-49be-9498-00c2e6f5b65c"; try { const selectedGallery = await proGallery.getGallery(selectedGalleryId); // Convert the selected backend gallery's items to the frontend gallery items format. const convertedItems = selectedGallery.items.map(item => convertToFrontend(item)); return convertedItems; } catch (error) { console.error(error); // Handle the error } }); function convertToFrontend(item) { return { slug: item._id, type: item.type, src: item.image ? item.image.imageInfo : item.video.videoInfo, description: item.description, title: item.title, link: item.link ? item.link.url : undefined } } ``` Here is the complete **page code** for this example: ```javascript import { mySelectGalleryFunction } from 'backend/myWebModuleFile.web'; $w('#galleryButton').onClick(async () => { try { // Call the mySelectGalleryFunction function to select the backend gallery and convert the backend gallery's items to the frontend items format. const newlyConvertedGalleryItems = await mySelectGalleryFunction(); // Set the frontend gallery element's items to the converted backend gallery items. $w("#myGalleryElement").items = newlyConvertedGalleryItems; } catch (error) { // Gallery not created console.error(error); } }); ``` --- > Portal Navigation: > > - Append `.md` to any URL under `https://dev.wix.com/docs/` to get its markdown version. > - Pages are either content pages (article or reference text) or menu pages (a list of links to child pages). > - To get a menu page, truncate any URL to a parent path and append `.md` (e.g. `https://dev.wix.com/docs/sdk.md`, `https://dev.wix.com/docs/sdk/core-modules.md`). > - Top-level index of all portals: https://dev.wix.com/docs/llms.txt > - Full concatenated docs: https://dev.wix.com/docs/llms-full.txt ## Resource: Changing the Direction of Menu Tabs Based on the Current Language ## Article: Changing the Direction of Menu Tabs Based on the Current Language ## Article Link: https://dev.wix.com/docs/develop-websites/articles/code-tutorials/wix-editor-elements/changing-the-direction-of-menu-tabs-based-on-the-current-language.md ## Article Content: # Velo Tutorial: Changing the Direction of Menu Tabs Based on the Current Language >**Note:** > This tutorial demonstrates how to use Velo to show and hide different menus in a multilingual site, based on the currently selected language. However, you can use the instructions in this tutorial to customize your page's layout and show or hide any other elements as well, based on the currently selected language. You can use Velo to display menu tabs either "right-to-left" or 'left-to-right" based on the selected language. Site visitors select the language from a language selector dropdown. For example, choosing a language that is read from right-to-left, such as Hebrew, displays the menu options from the right to the left. In the example below, ״צור קשר״  is displayed on the left of the menu, even though in English, it means "Contact Us," which is displayed on the right. This shows that the order of the tabs is based on the language selection.
![](https://d2x3xhvgiqkx42.cloudfront.net/12345678-1234-1234-1234-1234567890ab/76096845-8b12-44f1-91f6-3dc2e838fdd9/2019/08/25/00a9b6b2-dd1d-44d4-8c28-fd65e11352bb/59b425e9-9a05-423d-b28b-bd3a74579a1c.png)
This tutorial has 2 parts: * Instructions for adding menus and ordering menu tabs to your site. * Instructions on how to set up code you can copy and paste onto your page or site, including an explanation of what each line of code does. > > This tutorial assumes you enabled [Wix Multilingual](https://support.wix.com/en/article/using-wix-multilingual-to-create-a-multilingual-site) on your site, and set up the languages you need. ### Adding Menus for Each Language We will add a menu for each language. To best demonstrate how tab direction works, this tutorial adds horizontal menus. These menus are usually placed in the header or footer of a site.  1. Add a menu for each language. In the top left, click on **Add Elements** > **Menu**. For this tutorial, select one of the horizontal menus. You can place one menu element on top of the others, or have menu elements overlap, because we are going to display only one menu at a time. 2. To change the direction of each menu's tabs to either **Left to Right** or **Right to Left**, click **Layout**.
**Tip:** For languages that read **Right to Left**, you should also change the alignment of the text to right-aligned under **Menu Layout** > **Text Alignment**.
### Coding the Redirection of Menu Tabs The sample code below checks the language the user selected using [Wix Multilingual'](https://support.wix.com/en/article/using-wix-multilingual-to-create-a-multilingual-site)s language selector dropdown element and then shows only the menu in the correct language with the correctly-ordered tabs. All other menus are hidden. #### Instructions 1. Open the Code panel. + **Wix Studio:** Click the ![Code icon](https://github.com/wix-incubator/wix-code-docs/assets/50321691/b5b2d7b8-0a53-4239-9e87-0e72bd8189b8) on the left sidebar. The [code editor](https://dev.wix.com/docs/develop-websites/articles/workspace-tools/velo-workspace/workspaces/wix-studio-working-with-the-code-panel.md) appears at the bottom of the page. You can drag it up to adjust the size. + **Wix Editor:** If [Dev mode](https://dev.wix.com/docs/develop-websites/articles/get-started/about-developing-websites.md) is enabled, the [code editor](https://dev.wix.com/docs/develop-websites/articles/workspace-tools/velo-workspace/code-editor-ide/working-in-the-code-editor.md) appears at the bottom of the page. You can drag it up to adjust the size. 2. Copy the code below and paste it either in the page tab that has your menus, or in **masterPage.js** located in the Page Code section of the Code sidebar (Wix Studio), or the Velo sidebar (Wix Editor). 3. In the code, make sure to substitute your own menu IDs from the Properties & Events panel (you can hover over the element to see the ID) and the [language codes](https://support.wix.com/en/article/languages-available-in-wix-multilingual) used on your site. 4. Preview or publish the page. ```javascript import wixWindowFrontend from 'wix-window-frontend'; $w.onReady(function () { let myLang = wixWindowFrontend.multilingual.currentLanguage; if (myLang === 'he') { $w('#LTREnglishMenu').hide(); $w('#RTLHebrewMenu').show(); } else { $w('#RTLHebrewMenu').hide(); $w('#LTREnglishMenu').show(); }; }); ``` #### Understanding the Code **Line 1**: Import the `wix-window-frontend` API for Wix Multilingual. **Line 2**: Add your code to the `onReady()` function to make sure all elements are loaded and available. **Line 3**: Use the `currentLanguage` property to determine what language the site visitor chose from the language selector. **Lines 4-6**: If the language is Hebrew, show the Hebrew menu, with tabs ordered from right-to-left. **Lines 7-9**: If the language is not Hebrew, show the English menu, with tabs ordered from left-to-right. --- > Portal Navigation: > > - Append `.md` to any URL under `https://dev.wix.com/docs/` to get its markdown version. > - Pages are either content pages (article or reference text) or menu pages (a list of links to child pages). > - To get a menu page, truncate any URL to a parent path and append `.md` (e.g. `https://dev.wix.com/docs/sdk.md`, `https://dev.wix.com/docs/sdk/core-modules.md`). > - Top-level index of all portals: https://dev.wix.com/docs/llms.txt > - Full concatenated docs: https://dev.wix.com/docs/llms-full.txt ## Resource: Creating a One-Time Popup ## Article: Creating a One-Time Popup ## Article Link: https://dev.wix.com/docs/develop-websites/articles/code-tutorials/wix-editor-elements/creating-a-one-time-popup.md ## Article Content: # Velo Tutorial: Creating a One-Time Popup > **Note:** The terms popup and lightbox refer to the same element. While the editor and dashboard now refer to it as a [popup](https://support.wix.com/en/article/studio-editor-using-popups), the API methods continue to use the term lightbox for backward compatibility. The documentation uses both terms accordingly. In this article we demonstrate how to create a popup that appears the first time a visitor visits your site. We use a popup to create the experience and we use the `wix-storage-frontend` API to determine if the current visitor has already seen the popup. ### Popup We begin by adding a popup to the site. When you add a popup, it appears in the **Popups** section of your site pages. We don't want the popup to show for site visitors unless we specifically open it using code. To make sure the popup doesn't open automatically, select the popup and click the **Set Triggers** button. Set the popup so that it doesn't automatically display on pages. While the popup is still selected, click **Set Triggers** to set the **Popup Settings**. Here you can give your popup a meaningful name. In this example, we name our popup **Announcement**. The name will be used later in the code to open the popup using the [Lightbox API](https://dev.wix.com/docs/velo/apis/wix-window-frontend/lightbox/introduction.md). Now you can design the popup to fit your needs. You can add, delete, and modify any of the elements that are contained in the popup. You can also change the layout and design of the popup. ### Code The code works using the following model. Each time a visitor visits your site we check the visitor's browser storage for a flag that we set the first time a visitor visits your site. If we don't find the flag, we know this is the visitor's first time visiting the site. So we show the popup and set the flag for the next time the visitor visits the site. If we find the flag, we know the visitor has visited the site already and we don't show the popup. The following code is added to the **Global Code** section of the Code sidebar (Wix Studio), or to the **masterPage.js** file located in the **Page Code** section of the Code sidebar (Wix Editor). Because the code is shared across all of your pages, it doesn't make a difference which page you are viewing when you add the code. #### Imports In this example we use the `wix-storage-frontend` API to store a value that tells us whether a visitor has seen the popup already. The `wix-storage-frontend` API uses the storage of a visitor's browser. We also use the `wix-window-frontend` API to open the popup. So our importing code looks like this: ```javascript import {session} from 'wix-storage-frontend'; import wixWindowFrontend from 'wix-window-frontend'; ``` #### onReady( ) In the `onReady()` event handler, we check to see if the `firstTimePopupShown` key exists in the user's browser storage. The name of the key we check and set doesn't really matter. We just need to be consistent and make sure we check the same key that we set. If the key doesn't exist, we open the popup using the popup's name. We also set a value for the `firstTimePopupShown` key so the key will be found the next time the user visits any of the site's pages. So our `onReady` code looks like this: ```javascript $w.onReady(function () { // flag is not found if(!session.getItem("firstTimePopupShown")) { // open lightbox (popup) wixWindowFrontend.openLightbox("Announcement"); // set flag for future visits session.setItem("firstTimePopupShown", "yes"); } } ); ``` > **Note:** If you've named your popup anything other than **Announcement**, you need to edit the code above to reflect your popup's name. ### Customization In this example, we've created a popup that appears the first time a visitor visits any page in your site during a single browsing session. With some minor adjustments, you can customize the example to behave in a different manner as described below.   #### Session Storage vs. Local Storage In this example, we used **session** storage to hold the flag that tells us if a visitor has seen the popup already. Session storage persists as long as the visitor's web session is active. The session ends when the visitor closes the browser tab or window. That means, using session storage, we show the popup the first time the visitor views the site for each individual session. If the visitor closes the browser tab and then visits the site again in a different tab, the popup will be shown again. If you want to show the popup only once, regardless of whether a visitor is in the same browser tab or a new one, you can use **local** storage. Local storage never expires, even if a visitor closes your page. That means, using local storage, we show the popup the first time a visitor views the site. If a visitor closes the browser tab and then visits the site again in a different tab, the popup will not be shown again. To change the code above so that it uses local storage instead of session storage, change all the instances of `session` to `local`. That means the code should look like this: ```javascript import {local} from 'wix-storage-frontend'; import wixWindowFrontend from 'wix-window-frontend'; $w.onReady(function () { if(!local.getItem("firstTimePopupShown")) { wixWindowFrontend.openLightbox("Announcement"); local.setItem("firstTimePopupShown", "yes"); } } ); ``` #### Site vs Page In this example, we placed our code in the **Global Code** section of the Code sidebar (Wix Studio), or the **masterPage.js** file in the **Page code** section of the Code sidebar (Wix Editor). Code in **masterPage.js** runs on all the pages in a site. That means the popup will appear on the first page a visitor visits, regardless of which page it is. If you want the popup to appear the first time a visitor visits a specific page, instead of any page on a site, move the code above into the page code for the page you want the popup to appear on. ### API List The following APIs are used in the code in this article. To learn more, see the [API Reference](https://www.wix.com/velo/reference/). * [wix-storage-frontend](https://www.wix.com/velo/reference/wix-storage)  * [wix-window-frontend](https://www.wix.com/velo/reference/wix-window.html) --- > Portal Navigation: > > - Append `.md` to any URL under `https://dev.wix.com/docs/` to get its markdown version. > - Pages are either content pages (article or reference text) or menu pages (a list of links to child pages). > - To get a menu page, truncate any URL to a parent path and append `.md` (e.g. `https://dev.wix.com/docs/sdk.md`, `https://dev.wix.com/docs/sdk/core-modules.md`). > - Top-level index of all portals: https://dev.wix.com/docs/llms.txt > - Full concatenated docs: https://dev.wix.com/docs/llms-full.txt ## Resource: Using the Upload Button with Code ## Article: Using the Upload Button with Code ## Article Link: https://dev.wix.com/docs/develop-websites/articles/code-tutorials/wix-editor-elements/using-the-upload-button-with-code.md ## Article Content: # Velo Tutorial: Using the Upload Button with Code
Visit the Velo by Wix website to onboard and continue learning.
## File Upload Scenario The typical file upload scenario is a two-part process. First your site visitor chooses the file to upload and then they trigger the actual upload. This usually requires at least two page elements, an upload button element and a regular button. The site visitor chooses which file to upload by clicking the upload button and selecting the file in a native file chooser dialog. (The site visitor can only choose from the specified file type.) Then the site visitor clicks the regular button to trigger some code that performs the upload.
**Note** The file types of the images, documents, videos, and audios that can be uploaded are listed [here](https://support.wix.com/en/article/supported-media-file-types-and-file-sizes).
## Upload Example Let's create a simple form that uploads an image to better understand how this process works. We'll add elements to a page, wire some elements to a bit of code, and then test the form. ### Prerequisites Before you create an upload form, you'll need to be somewhat comfortable with JavaScript code, especially [event handlers](https://dev.wix.com/docs/develop-websites/articles/workspace-tools/velo-workspace/properties-events-panel/about-the-properties-events-panel.md) and Promises. ### Add Page Elements Add the following elements to the page: * An upload button for choosing a file. The upload buttons are found in the **Input** section of the **Add Elements** menu. * A regular button to trigger the upload code. * A text element to display messages to the site visitor. * An image element. Any image is fine. We're only using it as a placeholder for the uploaded image. Feel free to change the design and text of any of the elements we've just added. The complete form should look something like this:
![](https://d2x3xhvgiqkx42.cloudfront.net/12345678-1234-1234-1234-1234567890ab/dfff8cbb-ddcb-4376-8cae-3fedb2dd4458/2017/06/05/a98afa4f-ed3b-49fd-9f7c-138189ecdd73.png)
### Wire Upload Code The upload button takes care of the site visitor choosing the file for us. But we have to wire code to the regular button to perform the actual upload. We'll start by [adding](https://dev.wix.com/docs/develop-websites/articles/workspace-tools/velo-workspace/properties-events-panel/about-the-properties-events-panel.md) an onClick event handler for the button. Next, we'll add the code that performs the upload. In the onClick event handler add the following code so the full function is as follows:  ```javascript export function button1_click(event) { if($w("#uploadButton1").value.length > 0) { $w("#text1").text = "Uploading " + $w("#uploadButton1").value[0].name; $w("#uploadButton1").uploadFiles() .then( (uploadedFiles) => { $w("#text1").text = "Upload successful"; $w("#image1").src = uploadedFiles[0].fileUrl; }) .catch( (uploadError) => { $w("#text1").text = "File upload error"; console.log("File upload error: " + uploadError.errorCode); console.log(uploadError.errorDescription); }); } else { $w("#text1").text = "Please choose a file to upload."; } } ``` Let's take a look at this code piece by piece to understand what it's doing. First, on line 2, we check to see if the site visitor has chosen a file. We did not specify a file type, so "image" is assumed. `if($w("#uploadButton1").value.length > 0) {` The `value` property of the upload button returns an array of `File` objects, each representing a file the site visitor has chosen to upload. So we check its `length` to see if this array has at least one item in it, meaning the site visitor has chosen at least one file. * * * If the array returned by `value` is empty, we move to the `else` on lines 15-17 to display a message to the site visitor in the text element. ```js else { $w("#text1").text = "Please choose a file to upload."; } ``` That ends the upload attempt. The site visitor can then choose a file and start the upload again. If the array has a `File` element in it, meaning the site visitor chose a file to upload, we continue with the upload process. * * * On line 3, we start the upload process by displaying a message to the site visitor that we are uploading the chosen file. `$w("#text1").text = "Uploading " + $w("#uploadButton1").value[0].name;` * * * Next, on line 4, we call the upload button's `uploadFiles()` function, which performs the actual upload. `$w("#uploadButton1").uploadFiles()` It returns a Promise that resolves to an array of `UploadedFile` objects with information about the uploaded files if the upload was successful or rejects to an `UploadError` object with information about the error that occurred if the upload was not successful. * * * If the upload is successful, the Promise continues with the `then()` on lines 5-8. ```js .then( (uploadedFiles) => { $w("#text1").text = "Upload successful"; $w("#image1").src = uploadedFiles[0].fileUrl; }) ``` Here we display a message to the site visitor saying that the upload was successful and we display the uploaded image. We display the image by getting the `fileUrl` property of the first `UploadedFile` object in the array, which returns the Wix URL where the uploaded file is stored. * * * If the upload is unsuccessful, the Promise rejects with the `catch()` on lines 9-13. ```js .catch( (uploadError) => { $w("#text1").text = "File upload error"; console.log("File upload error: " + uploadError.errorCode); console.log(uploadError.errorDescription); }); ``` Here we display a message to the site visitor saying that the upload was not successful. We also log the error information from the `uploadError` object using its `errorCode` and `errorDescription` properties. ### Testing Now we can test our form by publishing the site and attempting to upload an image.  First, on the live site, let's try to click the **Start Upload** button before we choose a file. We should see the status line change to **Please choose a file to upload**. Next, let's use the upload button to choose a file and then click the **Start Upload** button. We should see the status line change to **Uploading some\_file.png** and then after a few moments change again to **Upload successful**. The image we uploaded should also be displayed on the page. Finally, let's return to the Editor and find the uploaded file. Select the upload button and click **Settings**. In the Button Settings panel, scroll down to **Manage visitor files** and click **View Uploaded Files**, which opens the images that have been received by your site. There you should see the image you just uploaded. --- > Portal Navigation: > > - Append `.md` to any URL under `https://dev.wix.com/docs/` to get its markdown version. > - Pages are either content pages (article or reference text) or menu pages (a list of links to child pages). > - To get a menu page, truncate any URL to a parent path and append `.md` (e.g. `https://dev.wix.com/docs/sdk.md`, `https://dev.wix.com/docs/sdk/core-modules.md`). > - Top-level index of all portals: https://dev.wix.com/docs/llms.txt > - Full concatenated docs: https://dev.wix.com/docs/llms-full.txt ## Resource: Hiding a Video Player When There Is No Video to Play ## Article: Hiding a Video Player When There Is No Video to Play ## Article Link: https://dev.wix.com/docs/develop-websites/articles/code-tutorials/wix-editor-elements/hiding-a-video-player-when-there-is-no-video-to-play.md ## Article Content: # Velo Tutorial: Hiding a Video Player When There Is No Video to Play When you [connect](https://support.wix.com/en/article/cms-formerly-content-manager-displaying-collection-content-in-the-single-video-player) a Video Player element to a URL field in your collection, when the page is viewed, the player displays the associated video. If there is no URL for a given item, the video player displays the default video defined in its [Social Video Settings panel](https://support.wix.com/en/article/social-video-settings). If you'd rather not have any video play, you can automatically hide the Video Player when the item in your collection has no URL. This tutorial shows you how to do this using [Velo](https://dev.wix.com/docs/develop-websites/articles/get-started/about-developing-websites.md). This tutorial has 2 parts: * Instructions on how to get set up, including code you can copy and paste onto your page * An explanation of what each line of code does ### Instructions >**Before you begin:** > Make sure you have a [collection](https://support.wix.com/en/article/about-database-collections) that has a field of type "URL" where you store the video locations. There should be at least one item that has the URL field blank. 1. Add a [dataset](https://support.wix.com/en/article/about-datasets-and-connecting-data) to your page and connect it to your collection. 2. Add a Video Player and [connect](https://support.wix.com/en/article/cms-formerly-content-manager-displaying-collection-content-in-the-single-video-player) it to the URL field. 3. Open the code editor for your page. 4. Copy and paste the code below. ```javascript $w.onReady(() => { $w("#myDataset").onReady(() => { // Gets the current item properties and stores them in a variable called item const item = $w("#myDataset").getCurrentItem(); // Checks if the current item has a value in the "video" field if (!item.video) { // Collapses the video player if there is no value for "video" $w("#videoPlayer").collapse(); } }); }); ``` 1. Make sure to make these replacements: * _#myDataset_: the ID of the dataset * _video_: the [field ID](https://support.wix.com/en/article/cms-formerly-content-manager-about-your-collection-fields#field-id-velo-by-wix-only) of the field in your collection that stores the video URL * _#videoPlayer_: the ID of the video player 2.  Preview your page for an item that does not have a URL and check that the video player is not displayed. >**Note:** Open the Properties & Events panel to see and update the IDs of your elements. ### Understanding the Code This section explains the main lines of the code. Each function has a link to its more detailed explanation in the [wix-dataset API](https://www.wix.com/velo/reference/wix-dataset.html). Line 1 calls the [`onReady()`](https://www.wix.com/velo/reference/$w.html#onReady) function. This defines the code that will run when the page is finished loading. $w.onReady(() => { Line 2 calls the [`dataset onReady()`](https://www.wix.com/velo/reference/wix-dataset/dataset/onready) function. This defines the code that will run after the dataset has loaded all the information for the current item. $w("#myDataset").onReady(() => { Line 4 defines a variable called `item` and then sets its value to be the object returned by the [`getCurrentItem()`](https://www.wix.com/velo/reference/wix-dataset/dataset/getcurrentitem) function. const item = $w("#myDataset").getCurrentItem(); This object contains the properties (fields) in the current item and their respective values. When a given field is blank in the current item, the object does not contain the corresponding property. Line 6 checks to see if the `item` variable from the previous line includes the `video` field, which is the field in the collection that stores the video URL. if (!item.video) { If the current item's `video` field is empty, then that field is not included in the object that was returned by `getCurrentItem()` in the previous line. Line 8 collapses the video player if the `video` field is blank. $w("#videoPlayer").collapse(); If the `video` field is not blank, then this line does not run. The video player remains visible to show the video at the URL defined in your collection for this item. You could also use the [`hide()`](https://dev.wix.com/docs/velo/velo-only-apis/$w/video/hide.md) function to hide the video player instead of collapsing it. --- > Portal Navigation: > > - Append `.md` to any URL under `https://dev.wix.com/docs/` to get its markdown version. > - Pages are either content pages (article or reference text) or menu pages (a list of links to child pages). > - To get a menu page, truncate any URL to a parent path and append `.md` (e.g. `https://dev.wix.com/docs/sdk.md`, `https://dev.wix.com/docs/sdk/core-modules.md`). > - Top-level index of all portals: https://dev.wix.com/docs/llms.txt > - Full concatenated docs: https://dev.wix.com/docs/llms-full.txt ## Resource: Send Emails Using the SendGrid npm Package ## Article: Send Emails Using the SendGrid npm Package ## Article Link: https://dev.wix.com/docs/develop-websites/articles/code-tutorials/wix-editor-elements/send-emails-using-the-send-grid-npm-package.md ## Article Content: # Velo Tutorial: Send Emails Using the SendGrid npm Package
>**Note:** > This tutorial and its steps are based on a Wix Editor site. You can adapt the steps for a Wix Studio site by using the equivalent [Wix Studio features](https://dev.wix.com/docs/develop-websites/articles/coding-with-velo/overview/about-coding-with-wix-studio.md#finding-your-way). This article describes how to integrate your Wix site with the [SendGrid service](https://sendgrid.com/) and send emails directly from your site. You'll need to add the [SendGrid npm package](https://www.npmjs.com/package/@sendgrid/mail) to your site to incorporate the SendGrid functionality. This tutorial is based on the SendGrid npm Integration [example site](https://www.wix.com/velo-examples/sendgrid-npm). You can open a copy of the [site's editor](https://editor.wix.com/html/editor/web/renderer/new?siteId=5494404c-1163-4c51-8bc2-bf8466a23e34&metaSiteId=1e3b3a34-4b1e-416c-abb9-334db84d0261&autoDevMode=true) and play around with the code. >**Notes** > * If you want to work with a copy of the example site, you'll need to create your own SendGrid account and save your email address and the SendGrid API key in the [Secrets Manager](https://dev.wix.com/docs/develop-websites/articles/workspace-tools/developer-tools/secrets-manager/about-the-secrets-manager.md) (see detailed instructions [below](https://support.wix.com/en/article/velo-tutorial-send-emails-using-the-sendgrid-npm-package#step-2a-store-secrets-in-the-secrets-manager)). > * You can also integrate your Wix site with SendGrid using the [Fetch API](https://www.wix.com/velo/reference/wix-fetch). ## Overview To set up your site to send emails with the SendGrid service, you'll need to perform the following steps: 1. Create a SendGrid account. 2. Store the SendGrid API key and your sender email address in the Secrets Manager. 3. Add the SendGrid npm package to your site. 4. Add a custom form to your page for getting the recipient email address and email text from site visitors.  5. Write code in a backend web module to get the API key from the Secrets Manager and send an email using an npm package function. 6. Write page code to use the imported backend function to send an email, using the email data entered in the form fields. >**Note** > This tutorial describes how to use a custom form to get email data such as email addresses and body text from site visitors. You might have a different use case, such as constructing the emails yourself as a site admin. You might use email data stored in a database collection, enter the email data directly in your code, or use the custom form but on a [Dashboard page](https://support.wix.com/en/article/velo-working-with-dashboard-pages). In any case, you'll need to adjust your code to get the email data from its source and pass it to the [sendEmail()](https://dev.wix.com/docs/develop-websites/articles/code-tutorials/wix-editor-elements/send-emails-using-the-send-grid-npm-package.md) function. ## Step 1: Create an Account with SendGrid To use the SendGrid service on your Wix site, you'll need to create a [SendGrid account](https://signup.sendgrid.com/). The email address you verify in the account will be the sender address for the emails you send from your Wix site. Once you've created an account, do the following: 1. In the SendGrid site, navigate to the left menu. 2. Go to **Settings > Sender Authentication** and verify your email address. 3. Go to **Settings > API Keys** and generate an API key.  4. Copy the key from your dashboard and store it in the [Secrets Manager](https://dev.wix.com/docs/develop-websites/articles/code-tutorials/wix-editor-elements/send-emails-using-the-send-grid-npm-package.md) in your Wix site (see the next step).   ## Step 2: Set Up the Site To set up your Wix site, do the following: 1. Store secrets in the Secrets Manager. 2. [Add the SendGrid npm package to your site.](https://dev.wix.com/docs/develop-websites/articles/code-tutorials/wix-editor-elements/send-emails-using-the-send-grid-npm-package.md) 3. Add elements to your page. ### Step 2a: Store Secrets in the Secrets Manager For security purposes, it's best to store sensitive content such as API keys in the [Secrets Manager](https://dev.wix.com/docs/develop-websites/articles/workspace-tools/developer-tools/secrets-manager/about-the-secrets-manager.md).  1. In the [Code sidebar](https://dev.wix.com/docs/develop-websites/articles/coding-with-velo/overview/about-coding-with-wix-studio.md#ways-to-code-with-wix-studio), select the **Developer Tools** ![](https://d2x3xhvgiqkx42.cloudfront.net/12345678-1234-1234-1234-1234567890ab/0ca9e8ba-16ed-4cd8-a1e1-58d01c4420f7/2021/10/14/5526a3fb-4472-4c9e-9cf2-a7231343d9c6/c54e27bf-b090-4b15-adc0-6a437d141721.png)  tab.  2. Under the Security section, select **Secrets Manager**. 3. In the top right, click **Store Secret**. 4. Store both your SendGrid API key and the verified email address associated with your SendGrid account in a single secret. The secret should look like this: * Make sure to name the secret: **sendGridSecret**. * Replace `` with the value of your API key surrounded by quotation marks. * Replace `` with your email address surrounded by quotes. * Your secret value will look something like this: ```json { "key": "AB.CdPEfg1HIJk-LMnoPq2R3s.T4uVwxyZAbcd567eF8fghIjKL9mN", "senderEmail": "janedoe@example.com" } ``` 5. Click **Save**. Later you'll use the [Secrets API](https://www.wix.com/velo/reference/wix-secrets-backend/getsecret) to extract the secret and use it securely in your code (see [Step 3b](https://dev.wix.com/docs/develop-websites/articles/code-tutorials/wix-editor-elements/send-emails-using-the-send-grid-npm-package.md)). ### Step 2b: Add the SendGrid npm Package Use the [Package Manager](https://dev.wix.com/docs/develop-websites/articles/coding-with-velo/packages/about-npm-packages.md) to add the SendGrid npm package to your site: 1. In the Code sidebar, click the **Code Files** ![](https://d2x3xhvgiqkx42.cloudfront.net/12345678-1234-1234-1234-1234567890ab/0ca9e8ba-16ed-4cd8-a1e1-58d01c4420f7/2021/10/13/78515cd5-9279-4fb1-a136-6a07589a5aaa/5a63551d-467b-4d54-b039-5588426d4ff7.png)  tab.  2. In the Packages section, hover over **npm**, click the plus icon ![](https://d2x3xhvgiqkx42.cloudfront.net/12345678-1234-1234-1234-1234567890ab/0ca9e8ba-16ed-4cd8-a1e1-58d01c4420f7/2021/10/13/04083fa4-3262-4606-98d1-cbc359bf8585/1a26226e-c281-42d2-8a60-88e44fe40c61.png)  and select **Install package from npm**. ![](https://d2x3xhvgiqkx42.cloudfront.net/12345678-1234-1234-1234-1234567890ab/0ca9e8ba-16ed-4cd8-a1e1-58d01c4420f7/2021/10/13/dce8e3fb-026d-4605-b51c-c8b552f0e50d/6d6bc9e2-6b26-4d8d-a3b4-f3283469ec0d.png) The Package Manager opens. 3. In the search bar, enter '**sendgrid**'. 4. Next to the **@sendgrid/mail** package, click **Install**. You'll see the package under npm in the Packages section of your Code Files tab in the Code sidebar. ![](https://d2x3xhvgiqkx42.cloudfront.net/12345678-1234-1234-1234-1234567890ab/0ca9e8ba-16ed-4cd8-a1e1-58d01c4420f7/2021/10/13/411a1411-8247-4e53-86c0-6f21bdbe4db6/24bfd60a-d671-42b5-b611-65579ab2a1e2.png) Now you can import the package and use its functionality in your code. ### Step 2c: Add Page Elements To create a custom form, add the following elements to your **Home** page: * Input elements for the recipient's email and subject line * Text box for the email body text * Submit button for sending the email * Text element for displaying success and error messages ## Step 3: Write Backend Code in the sendEmail.web.js Web Module Since backend code is more secure, we wrote code to implement the following functionality in a [backend web module](https://dev.wix.com/docs/develop-websites/articles/coding-with-velo/backend-code/web-modules/call-backend-code-from-the-frontend.md):  1. Extract the SendGrid API key from the Secrets Manager. 2. Set the API key in SendGrid. 3. Send an email using a SendGrid npm package function. >**Note** > To see all the code for this example in a single block, [scroll down](https://dev.wix.com/docs/develop-websites/articles/code-tutorials/wix-editor-elements/send-emails-using-the-send-grid-npm-package.md) to the end of the tutorial. ### Step 3a: Add a Web Module [Web modules](https://dev.wix.com/docs/develop-websites/articles/coding-with-velo/backend-code/web-modules/call-backend-code-from-the-frontend.md) are exclusive to Velo. In a web module you can write functions that run in the backend and are easily called in your frontend code. To add a web module: 1. In the Code sidebar, select the **Code Files** ![](https://d2x3xhvgiqkx42.cloudfront.net/12345678-1234-1234-1234-1234567890ab/0ca9e8ba-16ed-4cd8-a1e1-58d01c4420f7/2021/10/21/f71f916a-a0b5-4718-bacd-4fa395f0f77d/c0ef9144-9590-4f94-9c03-4392ecd5923f.png)  tab. 2. In the Backend section, click **Add web module**. ![](https://d2x3xhvgiqkx42.cloudfront.net/12345678-1234-1234-1234-1234567890ab/0ca9e8ba-16ed-4cd8-a1e1-58d01c4420f7/2021/10/21/03237b75-04f7-4941-85a3-75f37225092c/ced5cce5-83d6-42ca-9c55-0edec8d5f754.png) 3. Name the file **sendEmail.web.js**. The file will open in the [code editor](https://dev.wix.com/docs/develop-websites/articles/workspace-tools/velo-workspace/code-editor-ide/working-in-the-code-editor.md). Place the code below in the file. ### Step 3b: Import Modules Start by importing the modules you'll need: ```javascript import { Permissions, webMethod } from 'wix-web-module'; import sgMail from "@sendgrid/mail"; import wixSecretsBackend from 'wix-secrets-backend'; ``` #### Understanding the Code **Line 1**: Import the `Permissions` enum and `webMethod` function from `wix-web-module`. **Line 2**: Import the `sgMail` module containing the functions you need from the npm package that we added to our site. **Line 3**: Import the `wix-secrets-backend` module for extracting secrets from the Secrets Manager. ### Step 3c: Extract and Set the API Key In our `sendEmail` function, we start by getting the SendGrid API key and sender email address that we saved in the Secrets Manager, and setting the API key to enable usage of the SendGrid service. ```javascript export const sendEmail = webMethod(Permissions.Anyone, async (recipient, subject, body) => { const sendGridSecret = JSON.parse(await wixSecretsBackend.getSecret('sendGridSecret')); const key = sendGridSecret.key; const senderEmail = sendGridSecret.senderEmail; sgMail.setApiKey(key); // Function continues below ``` #### Understanding the Code **Line 1**: Declare and export the asynchronous `sendEmail` function for sending the email. **Line 3**: Get the SendGrid secret from the Secrets Manager using the `getSecret` function and save it in a variable named `sendGridSecret`. The `JSON.parse` function converts the JSON string into an object. **Line 4**: Save the API key extracted from the secret as a variable called `key`. **Line 5**: Save the sender email extracted from the secret as a variable called `senderEmail`. **Line 7**: Set the API key using the `setApiKey()` function from the SendGrid npm module. ### Step 3d: Send an Email While still inside our `sendEmail()` function, we call the npm package `send()` function to send the email. ```javascript // Function continued from above const msg = { from: senderEmail, to: recipient, subject: subject, text: body }; try { return await sgMail.send(msg); } catch (error) { console.error('Error sending the email: ' + error.message); return false; } }); ``` #### Understanding the Code **Lines 1-6**: Set the data for the email to be sent, such as the recipent's email address and the text of the email body. The sender email was extracted from the Secrets Manager and the rest of the information is entered by site visitors on the frontend via input elements. **Lines 8, 10**: Use `try` and `catch` to catch any errors. **Line 9**: Call the `send()` npm package function to send the email with the email data passed to the function. ## Step 4: Write Page Code in the Frontend >**Note** > The frontend code for this tutorial is based on the setup for this example site, a custom form exposed to site visitors. If you decide to set up your site differently, you'll need to adapt the frontend code accordingly. In our page code on the frontend of our site, we do the following: 1. Get email information such as the recipient's email address and email text from site visitors via the custom form fields. 2. Validate the form fields. 3. Use the `sendEmail()` function imported from the backend with the form field values to send an email. 4. Show a success or error message. ### Step 4a: Setup First we import the function we need from the backend and set a global constant. ```javascript import { sendEmail } from 'backend/sendEmail.web'; const SUCCESS_CODE = 202; ``` #### Understanding the Code **Line 1**: Import the `sendEmail()` function that we created in the backend so that we can use it in our page code. **Line 2**: Set a `SUCCESS_CODE` constant to `202`. We'll use it to check whether the `sendEmail()` function request was successful. ### Step 4b: Validate the Form Fields We added the `checkFormFields()` function to make sure all form field input values are valid before sending an email. ```javascript function checkFormFields() { return $w('#toEmail').validity.valid && $w('#subject').validity.valid && $w('#emailContent').validity.valid; } ``` #### Understanding the Code **Line 1**: Declare the function that we'll call in the `onReady()` function. **Line 2**: If all input values are valid, return `true`. If one is not valid, return `false`. ### Step 4c: Clear the Form Fields We added the `clearFields()` function to reset the form fields following a successful email transmission. ```javascript function clearFields() { $w('#toEmail').value = ''; $w('#subject').value = ''; $w('#emailContent').value = ''; $w('#toEmail').resetValidityIndication(); $w('#subject').resetValidityIndication(); $w('#emailContent').resetValidityIndication(); } ``` #### Understanding the Code **Line 1**: Declare the function that we'll call in the `onReady()` function. **Lines 2-4**: Clear the input values. **Lines 6-8**: Reset the inputs' visual validity indications. Some elements have a visual cue, such as a red outline, that indicates when the current value isn't valid. This function clears any indications. ### Step 4d: Show Success and Error Messages We added the `showMessage()` function to temporarily show a success or error message following an attempt to send an email. ```javascript function displayMessage(message) { $w('#messageText').text = message; $w('#messageText').show(); $w('#messageText').hide('fade', { delay: 5000 }); } ``` #### Understanding the Code **Line 1**: Declare the function that we'll call in the `onReady()` function. **Line 2**: Set the message text with the text passed to the function. **Line 3**: Show the success or error message. **Line 4**: Hide the message after 5 seconds. ### Step 4e: Send the Email when the Form Is Submitted When a site visitor clicks the **Send** button, we do the following: 1. Check whether all form field values are valid. 2. If they're valid, send the email with the values extracted from the form inputs. If the form fields aren't valid, show an error message. 3. If the email transmission request is successful, clear the form fields and display a success message. If the request fails, show an error message. ```javascript $w.onReady(function () { $w('#sendButton').onClick(async () => { const passedValidations = checkFormFields(); if (passedValidations) { const emailResult = await sendEmail( $w('#toEmail').value, $w('#subject').value, $w('#emailContent').value); if (emailResult[0].statusCode === SUCCESS_CODE) { clearFields(); displayMessage('Email was sent'); } else { displayMessage('Error sending email, please verify your SendGrid account details.'); } } else { displayMessage('Validation error, please review your input fields.'); } }) }); ``` #### Understanding the Code **Line 1**: We added our code to the `onReady()` function, which runs when the page loads. **Line 2**: When a site visitor clicks the **Send** button, run the following code. **Lines 3-4**: Check if all input field values are valid. If not, see Lines 15-16. If they are, run the following code. **Lines 5-8**: Run the `sendEmail()` function that we imported from the backend with the field input values as parameters, and assign the result to a variable. **Line 9**: Check if the email transmission request was successful (returned a `202`status code). If not, see Lines 12-13. If yes, run the following code: **Line 10**: Clear the input values and reset validity indications. **Line 11**: Display a message to let site visitors know that the email was sent. **Lines 12-13**: If the email transmission request was not successful, display an error message. **Lines 15-16**: If not all input fields are valid, display an error message. ## Learn More Check out the SendGrid npm Integration [example site](https://www.wix.com/velo-examples/sendgrid-npm) or open a copy of the [site's editor](https://editor.wix.com/html/editor/web/renderer/new?siteId=5494404c-1163-4c51-8bc2-bf8466a23e34&metaSiteId=1e3b3a34-4b1e-416c-abb9-334db84d0261&autoDevMode=true) and play around with the code. Note that if you want to work with a copy of the site, you'll need to create your own account with SendGrid and save the API key in the [Secrets Manager](https://dev.wix.com/docs/develop-websites/articles/code-tutorials/wix-editor-elements/send-emails-using-the-send-grid-npm-package.md).  You can also watch a [video](https://www.youtube.com/watch?v=jNI2MAno1_o), which describes the steps in this tutorial. ## Example Code Here is the complete code for this example: #### Backend Code in sendEmail.web File ```javascript import { Permissions, webMethod } from 'wix-web-module'; import sgMail from '@sendgrid/mail'; import wixSecretsBackend from 'wix-secrets-backend'; export const sendEmail = webMethod(Permissions.Anyone, async (recipient, subject, body) => { const sendGridSecret = JSON.parse(await wixSecretsBackend.getSecret('sendGridSecret')); const key = sendGridSecret.key; const senderEmail = sendGridSecret.senderEmail; sgMail.setApiKey(key); const msg = { from: senderEmail, to: recipient, subject: subject, text: body }; try { return await sgMail.send(msg); } catch (error) { console.error('Error sending the email: ' + error.message); return false; } }); ``` #### Frontend Page Code ```javascript import { sendEmail } from 'backend/sendEmail.web'; const SUCCESS_CODE = 202; $w.onReady(function () { $w('#sendButton').onClick(async () => { const passedValidations = checkFormFields(); if (passedValidations) { const emailResult = await sendEmail($w('#toEmail').value, $w('#subject').value, $w('#emailContent').value); if (emailResult[0].statusCode === SUCCESS_CODE) { clearFields(); displayMessage('Email was sent.'); } else { displayMessage('Error sending email, please verify your SendGrid account details.'); } } else { displayMessage('Validation error, please review your input fields.'); } }) }); function checkFormFields() { return $w('#toEmail').validity.valid && $w('#subject').validity.valid && $w('#emailContent').validity.valid; } function clearFields() { $w('#toEmail').value = ''; $w('#subject').value = ''; $w('#emailContent').value = ''; $w('#toEmail').resetValidityIndication(); $w('#subject').resetValidityIndication(); $w('#emailContent').resetValidityIndication(); } function displayMessage(message) { $w('#messageText').text = message; $w('#messageText').show(); $w('#messageText').hide('fade', { delay: 5000 }); } ``` --- > Portal Navigation: > > - Append `.md` to any URL under `https://dev.wix.com/docs/` to get its markdown version. > - Pages are either content pages (article or reference text) or menu pages (a list of links to child pages). > - To get a menu page, truncate any URL to a parent path and append `.md` (e.g. `https://dev.wix.com/docs/sdk.md`, `https://dev.wix.com/docs/sdk/core-modules.md`). > - Top-level index of all portals: https://dev.wix.com/docs/llms.txt > - Full concatenated docs: https://dev.wix.com/docs/llms-full.txt ## Resource: Sending Messages with the Realtime API ## Article: Sending Messages with the Realtime API ## Article Link: https://dev.wix.com/docs/develop-websites/articles/code-tutorials/wix-editor-elements/sending-messages-with-the-realtime-api.md ## Article Content: # Velo Tutorial: Sending Messages with the Realtime API >**Note:** This tutorial and its steps are based on a Wix Editor site. You can adapt the steps for a Wix Studio site by using the equivalent [Wix Studio features](https://dev.wix.com/docs/develop-websites/articles/coding-with-velo/overview/about-coding-with-wix-studio.md#finding-your-way). The Realtime API is used to send messages in realtime over channels that your site visitors are subscribed to. In this tutorial, we demonstrate the usage of the Realtime API by sending breaking news alerts to visitors on a news site. We allow visitors who are members of our site to decide what types of news alerts they receive. Alerts are sent using an admin page where the admin can choose what type of alert to send.
__Tip:__ You can see the final product using [this template](https://editor.wix.com/html/editor/web/renderer/new?siteId=f017db9d-4b4f-413b-aaaa-f71a0340e7d5&metaSiteId=bea8a2e9-ea98-4e4c-a3ad-d2a53638a0ce). To see the site's functionality in action, you need to publish the site and have it open twice. In one instance of the site you act as a site visitor or member and in the other instance you act as the admin.
### Site Overview > **Note:** The terms popup and lightbox refer to the same element. While the editor and dashboard now refer to it as a [popup](https://support.wix.com/en/article/studio-editor-using-popups), the API methods continue to use the term lightbox for backward compatibility. The documentation uses both terms accordingly. Let's take a quick look at the final product before we dive into the details of how it works. The site contains three main visitor-facing parts: the home page, subscriptions popup, and admin page. #### Home Page
The home page of our news site contains our site's title and links to news stories. We've also added two features to this page that pertain to the breaking news functionality we're building into the site. The first feature is the breaking news display. This is where we display breaking news alerts sent using the Realtime API. This feature is hidden until it is needed. The display is built from a strip with two text elements. The first text element is a label and the second one is where we populate the text of breaking news alerts. The containing strip is set to **Hidden** using the [Properties & Events panel](https://dev.wix.com/docs/develop-websites/articles/workspace-tools/velo-workspace/properties-events-panel/about-the-properties-events-panel.md). It is shown once a breaking news alert is received. The second feature is a settings icon. This feature is hidden if the site visitor is not logged it. It appears next to the [members area login bar](https://support.wix.com/en/article/site-members-adding-and-customizing-your-login-bar). It allows site members who are logged in to open the subscriptions popup. #### Subscriptions Popup
The subscriptions popup is where site visitors who are logged in set which types of breaking news alerts they want to receive. The list of alert types is presented using a checkbox group that is populated from data stored in a database collection. That means the list can easily be changed by simply adding or removing items in a collection. #### Admin Page
Breaking news alerts are sent using the admin page. For each alert, the admin enters the alert text, what color the alert will be shown in, and which subscribers will receive the alert. Once again, the list of alert types is presented using a checkbox group that is populated from collection data. ### Realtime API Overview The Realtime API provides functionality for sending messages from a publisher to subscribers. To send a message, the sender publishes the message on a specific channel or channel resource. To receive a message, a recipient subscribes to a channel or channel resource. Each time a sender publishes a message, all the recipients who have subscribed to that channel or channel resource receive the message. When recipients subscribe to a channel or channel resource they also define what should be done with the messages when they are received. Let's see how we apply these concepts to our news site. The publisher in our site is the admin. The admin publishes breaking news alerts. We have multiple types of alerts, such as weather alerts, political updates, and regional news. Each of these types is its own channel resource. So when the admin publishes an alert it is published on one of the channel resources. Our site's members subscribe to receive specific alerts. Each alert type that they subscribe to is one of the channel resources that the admin publishes to. So when the admin publishes a weather alert on the weather channel resource, each member that is on the site at that time and is subscribed to the weather channel resource receives the alert message.  #### Channels and Channel Resources Why do we keep talking about a channel _or channel resource_? What is the difference between a channel and a channel resource? Why would I use one over the other? These are all good questions that we'll answer now. One difference is how we identify channels and channel resources. Channels only have a name. Channel resources have a channel name and a resource ID. So a channel might be named "visitors", where a channel resource might have the channel name "members" and the resource ID "weather".  Although they are named differently a channel resource's use is very similar to that of a channel. You can publish on and subscribe to both channels and channel resources. Note though that in terms of publishing and subscribing a channel resource is not related in any strict sense to a channel of the same name.  To illustrate this point, let's consider what happens if I have a channel and a channel resource. Let's say my channel is named "myChannel". And let's say my channel resource has the same channel name, "myChannel", but also has the resource ID "myResource". The following rules apply when publishing and subscribing: * Messages published on "myChannel" are not published on "myChannel:myResource" and vice versa. * If you subscribe to "myChannel", you will not receive messages from "myChannel:myResource" and vice versa. So why would you use a channel resource if it seems to be the same as a channel? That is answered by the second difference between a channel and a channel resource. When setting a permissions policy, you can set a policy for each individual channel and channel resource, or you can set a policy that applies to a channel and all its resources. If a channel resource does not have its own explicit policy, it inherits the policy of its channel. To understand this point, let's look at the channels we use in our site. We have one channel named "visitors", that we want to use for visitors who are not members of our site. We also have another channel, named "members", that has many channel resources, such as "weather" and "politics". We want to restrict access to our "members" channel resources by defining permissions. We do not need to define specific permissions for each "members" channel resource. Instead, we define one permissions policy for the "members" channel and all its channel resources inherit those permissions. Note that if we want to have a special member channel with even more restrictive permissions we could create a "members" channel resource and override the default "members" permissions or we could choose to create another channel with its own permissions policy.  ### Data Model Now let's take a look at how we store the data needed to make our site work.  First, let's consider the breaking news alerts that we send our site members. We want to have a list of the different types of alerts that members can subscribe to. We also want to be able to easily change this list, adding or removing alert types as necessary. To achieve this we store all the alert information in a collection, named **SubscriptionTypes**, where each item represents an alert type that site members can subscribe to. The items in this collection correspond to the list of alert subscription types that we saw in the subscriptions popup and admin page. Next, because we're creating a site where each member can choose which alert types they want to subscribe to, we need to store each member's subscriptions. To do so we have another collection, called **Subscriptions**, where each item in the collection represents a site member and that member's subscriptions. Since we're going to implement our subscriptions using the Realtime API, our data model reflects the entities of that API, such as channels and channel resources. Each of our subscription types is implemented using a realtime channel resource (more details about this below). So when we store a subscription type we need to store the realtime channel resource's channel name and resource ID. Now let's take a look at the fields in our collections. Notice that we use reference fields to create a relationship between the two collections. #### SubscriptionTypes Collection
![](https://d2x3xhvgiqkx42.cloudfront.net/12345678-1234-1234-1234-1234567890ab/dfff8cbb-ddcb-4376-8cae-3fedb2dd4458/2020/05/12/9d6cdbae-fea7-4d67-ad8d-fdb5190d45f3/40edf690-d0ab-4923-a368-fe8b119c1fc9.png)
* **Type (type)**: The display name of the subscription type. This shows in the subscription popup and admin page. * **Channel Name (channelName)**: Name of the realtime channel for each subscription. (You might notice that all of our channels have the same name, "members". We store this information in case we want to expand our site to use multiple channels in the future.) * **Channel Resource (channelResource)**: Name of the realtime channel resource for each alert. * **Subscriptions (subscriptions)**: A multi-reference field that points to the members in the **Subscriptions** collection who subscribe to each alert. (Here the members show as "Untitled" because of the unused Title field described below.) #### Subscriptions Collection
![](https://d2x3xhvgiqkx42.cloudfront.net/12345678-1234-1234-1234-1234567890ab/dfff8cbb-ddcb-4376-8cae-3fedb2dd4458/2020/05/12/5d524ebc-1343-41c9-b244-95b3356e86dc/7f7944d3-961b-4188-a447-79f65093c8f5.png)
The Subscriptions collection is where each member's selected alert subscriptions are stored. Each item represents a site member. The collection contains the following fields: * **Title (title)**: This field is not used to store data. However, we need to keep it because none of our other fields can serve as the primary field. * **ID (\_id)**: ID of a site member. Note that usually when using collections the ID field is automatically generated. Here we take advantage of the fact that you can assign a specific ID to an item if you create the item using the Wix Data API. So when we create a new member item in this collection we set the ID field to the member's personal ID.   * **Types (types)**: A multi-reference field that points to the subscription types in the **SubscriptionTypes** collection that each member subscribes to. ### Backend Code Let's begin our discussion of the site's code by looking at the code we've placed in the backend. In the backend we've added code for publishing realtime messages. #### realtime.web.js The first backend file we have is a [web module](https://dev.wix.com/docs/develop-websites/articles/coding-with-velo/backend-code/web-modules/call-backend-code-from-the-frontend.md) we've named **realtime.web.js**. We use a web module here because this code needs to be called from the frontend, specifically the admin page. This file contains code for publishing messages on the realtime channels and channel resources that our site members subscribe to. ```javascript import { Permissions, webMethod } from 'wix-web-module'; import { publish } from 'wix-realtime-backend'; export const publishMessage = webMethod(Permissions.Anyone, (name, resourceId, message, color) => { const now = new Date(); const channel = {name, resourceId}; const payload = {message, color, time: now.toLocaleTimeString('en-US')}; return publish(channel, payload); }); ``` As you can see, the file contains one function. We call that function from the admin page to publish messages that are received by subscribers on the home page. The function simply takes in some information and packages it up so it can be sent using the Realtime API. When calling the `publish()` function from the Realtime API we need to provide it with where we want to publish and what we want to publish. So we take the `name` and `resourceId` (if there is one) that were passed into the `publishMessage()` function and package it up as a `Channel` object. We also take the information that we want to publish and package it in an object to be sent as the payload. Here we send the textual `message`, the `color` that we want the message to be displayed in, and the `time` the message was sent. #### realtime-permissions.js The second backend file we have is named **realtime-permissions.js**. This is not a web module because this code is not called from the frontend. This is a special file that needs to be named **realtime-permissions.js**. It contains code that implements permissions checks for our realtime channels. Each time a site visitor attempts to subscribe to one of our channels the Realtime API calls the functions in this file to see if the visitor has the permissions required to subscribe to the requested channel. ```javascript import { permissionsRouter } from 'wix-realtime-backend'; permissionsRouter.default((channel, subscriber) => { return { 'read': true }; }); const membersChannel = {'name': 'members'}; permissionsRouter.add(membersChannel, (channel, subscriber) => { if (subscriber.type === 'Member' || subscriber.type === 'Admin') { return { 'read': true }; } else { return { 'read': false }; } }); export function realtime_check_permission(channel, subscriber) { return permissionsRouter.check(channel, subscriber); } ``` In our code, we've elected to use the permissions router, which allows you to create permissions policies in an organized manner. Let's analyze this code one part at a time. * * * First, we use the `default()` function to set the default permissions for all channels and channel resources. In our case, we set the default permissions to allow anyone to read. We do so by returning the permissions policy from the callback function passed when calling `default()`. ```javascript permissionsRouter.default((channel, subscriber) => { return { 'read': true }; }); ``` In our site, we have a "visitors" channel that we subscribe non-members to. Since we don't specify specific permissions for that channel, it receives the default permissions and anyone can subscribe to it. * * * Next, we create a `Channel` object to represent our "member" channel and use the `add()` function to add permissions for it. Since we don't specify specific permissions for each resource in the "members" channel, all the resources inherit the permissions we define here. ```javascript const membersChannel = {'name': 'members'}; permissionsRouter.add(membersChannel, (channel, subscriber) => { if (subscriber.type === 'Member' || subscriber.type === 'Admin') { return { 'read': true }; } else { return { 'read': false }; } }); ``` Here again, we specify the permissions by returning them from a callback function. In this case, we check if the visitor trying to subscribe to a "member" channel is a site member or the site admin. If so, we grant them read permissions. If not, we deny them read permissions. * * * Finally, we define the `realtime_check_permission()` function. This is the function that gets called each time someone tries subscribing to a channel or channel resource. It gets passed which channel someone is trying to subscribe to and who it is that is trying to subscribe. It returns the permissions that are granted to that subscriber for that channel. For example, when visitor "MsVisitor" tries to subscribe to channel "SomeChannel" the `realtime_check_permission()` function is called. The `channel` argument contains a `Channel` object corresponding to "SomeChannel" and the `subscriber` argument contains an object corresponding to "MsVisitor". In the implementation of this function you can take into account who the visitor is and what channel they are trying to subscribe to. Then you return a `ChannelPermissions` object that defines what permissions you've granted "MsVisitor" on "SomeChannel". Technically, this is the only function we need to implement in order to define realtime permissions. We could have crammed all of our permissions logic into the `realtime_check_permission()` function. Instead, we've used the permissions router, which leads to neater code. ```javascript export function realtime_check_permission(channel, subscriber) { return permissionsRouter.check(channel, subscriber); } ``` At this point, since we used the permissions router to define our permissions policies, all we need to do is have the permissions router check the permissions policy for the current subscriber on the requested channel and return the result. The permissions router will use the rules we defined above to determine which permissions to grant. * * * Now we can look at our page code and see where the backend functionality we've just discussed is used. ### Admin Page Code We've already laid much of the groundwork needed to implement our admin page, but there is still a little work to do in the page code itself. Basically, we need to add code to retrieve and display the types of alerts that an admin can publish and actually publish the alerts. ```javascript import wixData from 'wix-data'; import {publishMessage} from 'backend/realtime.web'; $w.onReady(async function () { let channels = await wixData.query('subscriptionTypes').find(); channels.items.unshift({_id: 'visitors', channelName: 'visitors', type: 'Visitors'}); let options = channels.items.map(channel => ({label: channel.type, value: channel._id})); $w('#subscriptions').options = options; $w('#sendButton').onClick( () => { $w('#sending').show(); $w('#sendButton').disable(); let promises = $w('#subscriptions').value.map( (subscription) => { let selectedChannel = channels.items.find(channel => channel._id === subscription); return publishMessage( selectedChannel.channelName, selectedChannel.channelResource, $w('#message').value, $w('#colors').value ); } ); Promise.all(promises) .then( () => { $w('#sendButton').enable(); $w('#sending').hide('fade'); } ); } ); }); ``` Once again, let's analyze this code one part at a time. * * * ```javascript $w.onReady(async function () { let channels = await wixData.query('subscriptionTypes').find(); channels.items.unshift({_id: 'visitors', channelName: 'visitors', type: 'Visitors'}); let options = channels.items.map(channel => ({label: channel.type, value: channel._id})); $w('#subscriptions').options = options; ``` When the page loads, we start by populating the checkbox group that the admin uses to select which channels to publish on. Most of the channel data comes from a query to the **SubscriptionTypes** collection. However, we also add the option of the "visitors" channel to the list. Once we have our list, we transform each channel item into a checkbox group option object and populate the checkbox group. * * * We also define what should be done when the send button is clicked. ```javascript $w('#sendButton').onClick( () => { $w('#sending').show(); $w('#sendButton').disable(); ``` First, we show a message to notify the admin that the send is in progress and we disable the send button so the admin doesn't try sending again before the current send is finished. * * * ```javascript let promises = $w('#subscriptions').value.map( (subscription) => { let selectedChannel = channels.items.find(channel => channel._id === subscription); return publishMessage( selectedChannel.channelName, selectedChannel.channelResource, $w('#message').value, $w('#colors').value ); } ); ``` Then we get all the channels that were selected by the admin from the checkbox group's `value` property. For each selected channel, we find the channel's name and resource ID and use it to publish using the function we defined in the backend **realtime.web.js** file. In addition to the channel information, we also pass the `publishMessage()` function the message entered by the admin and the color the admin chose. * * * ```javascript Promise.all(promises) .then( () => { $w('#sendButton').enable(); $w('#sending').hide('fade'); } ); } ); }); ``` Finally, we wait for all the calls to publish messages to resolve so we can enable the send button and hide the sending notification. Now the admin can publish another message. The messages published on this page are received by site visitors on the home page who are subscribed to the same channels. ### Home Page Code On the home page, we need to write code to deal with visitors logging in to the site, subscribing and unsubscribing visitors to and from channels, and handling alerts when they are received. As usual, let's take a look at the code for this page one piece at a time. #### onReady( ) ```javascript import wixData from 'wix-data'; import { authentication, currentMember } from 'wix-members-frontend'; import { openLightbox } from 'wix-window-frontend'; import { subscribe, unsubscribe } from 'wix-realtime-frontend'; $w.onReady(async function () { if (authentication.loggedIn()) { let member = await currentMember.getMember(); intializeMember(member._id); } else { subscribeToVisitorChannel(); } authentication.onLogin(async (member) => { intializeMember(member.id); unsubscribe({channel: {name: 'visitors'}}); }); }); ``` After the necessary imports, our code defines what to do when the page loads. First we check to see if the current visitor is logged in. If so, we call a function to initialize the page for the member experience. We'll take a look at the details of what that entails below. If the current visitor is not logged in, we call a function to subscribe the visitor to the "visitors" channel. We also define what happens when a visitor who was not logged in logs in. Again, we call a function to initialize the page for the member experience. We also unsubscribe the member from the "visitors" channel. Before we take a deep dive into the `intializeMember()` function, let's take a look at the simpler `subscribeToVisitorChannel()` function. #### subscribeToVisitorChannel( ) This function is used to subscribe visitors to the "visitors" channel. ```javascript function subscribeToVisitorChannel() { const visitorChannel = { name: 'visitors' }; return subscribe(visitorChannel, showBreakingNews); } ``` First, we create a `Channel` object to represent the "visitors" channel. Notice that we only use a `name` and not a `resourceId` because we don't have multiple visitor alert types. Then we call the `subscribe()` function from the Realtime API. The `subscribe()` function takes two arguments. The first is a `Channel` object and the second is a callback function to call each time a message has been published on that channel. So in this call to the `subscribe()` function, each time a message is published to the "visitors" channel we want to call the `showBreakingNews()` function to handle the incoming message. Now let's take a look at how the `showBreakingNews()` function works. #### showBreakingNews( ) This function is used to display the breaking news alerts that have been received from channels. ```javascript function showBreakingNews({ payload }) { $w('#breakingText').html = `
(${payload.time}) ${payload.message}
`; $w('#breakingStrip').show("fade"); } ``` First, we take the received payload and format it in the style we want for our breaking news alert. Remember from our discussion of the backend code that the payload contains a `message`, `color`, and `time`. Here we use the `html` property of a text element so we can change the color of the alert using the `style` attribute and populate the `time` and `message` as stylized text. Then, all we have to do is show the strip containing our text element. Now that we've seen how we handle visitors who are not logged in, let's see how we handle members that are logged in. #### intializeMember( ) This function is used to set up the page for members who are logged in and to subscribe them to all the alerts that they've set. ```javascript async function intializeMember(memberId){ let subscriptions = []; $w('#settings').show(); const initialSubscriptions = await getSubscriptions(memberId); subscribeToMemberChannels(initialSubscriptions, subscriptions); $w('#settings').onClick(() => { openLightbox('Subscriptions', subscriptions) .then(({ added, removed }) => { subscribeToMemberChannels(added, subscriptions); unsubscribeFromChannels(removed, subscriptions); }); }); } ``` First, we create an array named `subscriptions`, that will hold the member's subscriptions. We use this array to keep the current state of the member's subscriptions. Each time the member subscribes to or unsubscribes from a channel we update this array. Next, we show the settings icon using the `show()` function. Remember, that is how site members open the subscription popup to set which alerts they want to subscribe to. Then, we get the list of channels the member has subscribed to using the `getSubscriptions()` function. Remember, these are stored in the **Subscriptions** collection. Once we get the list of channels we call the `subscribeToMemberChannels()` function to subscribe the member to each of those channels. Finally, we define what happens when the settings icon is clicked using the `onClick()` function. When it's clicked we open the subscriptions popup. We also define here what happens when the popup is closed. In our case, when the popup closes it returns to the page a list of channels that the member added and a list of channels that the member removed. So we call a couple of methods to subscribe the member to the added channels and unsubscribe the member from the removed channels. Before taking a look at the functions we use to do the subscribing and unsubscribing, let see how we get the channels a member had subscribed to. #### getSubscriptions( ) This function is used to get the subscriptions that a member was subscribed to the last time they visited the site. ```javascript function getSubscriptions(memberId) { return wixData.queryReferenced('subscriptions', memberId, 'types') .then(({ result: { items } }) => items) .catch(err => { wixData.insert('subscriptions', { _id: memberId }); return []; }); } ``` Remember, the **Subscriptions** collection has a field name `types` that is a reference to all the subscription types a member is subscribed to. Here, we use the `queryReferenced()` function to get those referenced items based on the current member's ID. If the function runs successfully, we know we are dealing with a member that we have already added to our collection. However, if the function's returned promise is rejected, we are assuming that the rejection is caused by the current member being a new member without a corresponding item in the **Subscriptions** collection. In that case, we insert a new item into the collection where the item's `_id` is the current member's ID and return an empty array because a new member does not have any saved subscriptions.
**Important:** The function's promise may have been rejected for other reasons, such as connectivity issues. In the interest of simplicity, we don't deal with that possibility in this example.
#### subscribeToMemberChannels( ) This function is used to create a subscription for all the channels a member has saved in the subscriptions popup. ```javascript function subscribeToMemberChannels(channels, subscriptions) { channels.forEach(channel => { let memberChannel = { name: channel.channelName, resourceId: channel.channelResource }; subscribe(memberChannel, showBreakingNews) .then(subscriptionId => { subscriptions.push(channel); }); }); } ``` For each channel in the list passed to the function, we create a `Channel` object and call the realtime `subscribe()` function to subscribe the member to the channel. Just as we did above, we pass the `showBreakingNews()` function as the callback function to be called when a message is received on the channel. If the subscription is successful, we store the channel information in the `subscriptions` array. #### unsubscribeFromChannels( ) This function is used to unsubscribe a member from channels. It is called after a member deselects a subscription in the subscriptions popup. ```javascript function unsubscribeFromChannels(removed, subscriptions) { removed.forEach(id => { let toRemove = subscriptions.find(subscription => subscription._id === id); let toRemoveIndex = subscriptions.findIndex(subscription => subscription._id === id); unsubscribe({ channel: { name: toRemove.channelName, resourceId: toRemove.channelResource } }) .then(() => { subscriptions.splice(toRemoveIndex, 1); }); }); } ``` For each ID of a removed subscription, we find the corresponding object in the `subscriptions` array and the index of where it resides in the array. We use the object data to call the realtime `unsubscribe()` function. If the unsubscribe is successful, we use the index to remove the items from the `subscriptions` array. ### Subscriptions Popup Code In the subscriptions popup, we need to write code that allows members to choose which alerts they want to subscribe to and unsubscribe from. As we saw in the home page code, the actual subscribing and unsubscribing happens there. Here, in the subscriptions popup, we just have to collect the information and pass it to the home page.  As always, we'll analyze the code one part at a time. ```javascript import wixData from 'wix-data'; import { currentMember } from 'wix-members-frontend'; import wixWindowFrontend from 'wix-window-frontend'; $w.onReady(async function () { let member = currentMember.getMember(); let memberId = member._id; let selectedIndices = []; let startValues = []; let channels = await wixData.query('subscriptionTypes').find(); let options = channels.items.map((channel) => { return { label: channel.type, value: channel._id } }); $w('#subscriptions').options = options; // onReady() continues below... ``` After the necessary imports and declaration of some variables, the first section of code that runs when the popup opens populates the checkbox group in the popup with all the possible subscription types. We've already seen this done on the admin page, and the code here is very similar. 
**Tip:** For performance improvements, try retrieving the subscription types the first time the popup opens and then store that information using the wix-storage-frontend API for any subsequent times it opens.
* * * ```javascript // ...onReady() continued from above let subscriptionIds = wixWindowFrontend.lightbox.getContext().map((subscription) => subscription._id); options.forEach((option, index) => { if (subscriptionIds.includes(option.value)) { selectedIndices.push(index); startValues.push(option.value); } }); $w('#subscriptions').selectedIndices = selectedIndices; // onReady() continues below... ``` The next section of code that runs when the popup opens selects all the options in the checkbox group that the current member has subscribed to. The code first gets the IDs of all the subscriptions passed from the home page when opening the popup. Then, for each option in the checkbox group, it checks to see if it exists in the list of subscription IDs. If so, it sets the option to selected. The code also stores these starting subscriptions in a list. This will be used later when determining if the member selected any new subscriptions. We'll reference our ending subscription list against this starting list.  * * * ```javascript // ...onReady() continued from above $w('#save').onClick(() => { let endValues = $w('#subscriptions').value; let added = endValues.filter(x => !startValues.includes(x)).map(addedId => { return channels.items.find(channel => channel._id === addedId); }); let removed = startValues.filter(x => !endValues.includes(x)); wixData.replaceReferences('subscriptions', 'types', memberId, $w('#subscriptions').value); wixWindowFrontend.lightbox.close({added, removed}); }); // end of onReady() ``` The final section of code that runs when the popup opens defines what happens when the save button is clicked. When it is clicked, we get the list of subscriptions that the member selected. We cross-reference this list against the starting list to determine which subscriptions the member added and which ones the member removed. We update the member's entry in the **Subscriptions** table to reflect the new subscription statuses and send the list of added and removed subscriptions back to the home page to be handled there. ### Learn More To learn more about the Realtime API see the [wix-realtime-frontend](https://www.wix.com/velo/reference/wix-realtime.html) and [wix-realtime-backend](https://www.wix.com/velo/reference/wix-realtime-backend.html) sections of the API Reference. --- > Portal Navigation: > > - Append `.md` to any URL under `https://dev.wix.com/docs/` to get its markdown version. > - Pages are either content pages (article or reference text) or menu pages (a list of links to child pages). > - To get a menu page, truncate any URL to a parent path and append `.md` (e.g. `https://dev.wix.com/docs/sdk.md`, `https://dev.wix.com/docs/sdk/core-modules.md`). > - Top-level index of all portals: https://dev.wix.com/docs/llms.txt > - Full concatenated docs: https://dev.wix.com/docs/llms-full.txt ## Resource: Using SAML SSO with Velo ## Article: Using SAML SSO with Velo ## Article Link: https://dev.wix.com/docs/develop-websites/articles/code-tutorials/wix-editor-elements/using-saml-sso-with-velo.md ## Article Content: # Using SAML SSO with Velo Single Sign On (SSO) is a great way to make life easier for your site visitors and encourage them to register as a user on your site. Visitors can log in to your site using their Google, Facebook, or other accounts, or using their work account. This article describes how to implement SAML, Security Assertion Markup Language, an open standard that allows identity providers (IDP) to pass authorization credentials to service providers (SP). To learn about implementing SSO with oAuth, see [Using OAuth SSO with Velo](https://support.wix.com/en/article/using-oauth-sso-with-Velo). In our example, the service provider is our Wix site. We will also need an Identity Provider. The IDP authenticates our visitor and passes the visitor's credentials along to our site. For this tutorial we are going to use [Auth0](https://auth0.com/) as our IDP. Like many other services, Auth0 offers a free trial to help you get going. Note that while the SAML protocols are standard, each IDP has their subtle differences, so if you use a different IDP, you may need to tweak some of the settings in the functions used here. ## The SAML Authentication Sequence The sequence diagram below shows the basic flow between the browser, our Wix site (the SP), and the IDP. 1. The user clicks a sign-in button. 2. The SP generates a SAML request using the IDP and SP metadata, and passes the request and URL to the browser. 3. The browser sends the SAML request to the IDP. 4. The IDP presents a login page, based on the SAML request. 5. The user provides login credentials. 6. The IDP posts the assertion to the SP. A SAML assertion is an XML document that contains the user authorization and user credentials. 7. The SP decrypts, validates, and extracts the credentials from the assertion. 8. The SP (Wix backend) generates a session token, and passes a redirect back to the browser with the session token in the query parameters. 9. The browser redirects to the front-end page. 10. The session token is used to sign in automatically.
## Setting Up There are a number of tasks to accomplish before starting to code: 1. Set the name of the callback function that handles the assertion 2. Create an SSL certificate and private key pair. 3. Set up the IDP. 4. Download the IDP metadata. 5. Set up the SP metadata. ### Naming the Assertion Callback Function This function handles the POST request from the IDP containing the encrypted user credentials. The function is defined in the [**http-functions.js**](https://www.wix.com/velo/reference/wix-http-functions/introduction) back end file. Our function needs to handle the post of the Assertion Consumer Service (ACS) URL so let's call it **post\_assertion.** The ACS is an XML document that contains the user authorization and user credentials. If our site's URL is `https://mysite.wixsite.com/saml-demo,` then the URL of our assertion handler is `https://mysite.wixsite.com/saml-demo/\_functions/assertion` ### Creating Certificates and Keys We'll be encrypting and decrypting requests and responses between the SP and IDP. To do this we'll need an X509 private key and certificate. To generate a private key and certificate, go to your system prompt and enter the following: ``` openssl genrsa -out private.pem openssl req -new -x509 -key private.pem -out public.crt ``` You will be asked a number of questions. It is enough to answer the first one with a two-letter country code. This will produce two files, **private.pem** containing the private key and **public.crt** containing the public certificate. These files will be created in the directory where you ran the commands. Remember where you put **public.crt** as we'll need it later. >**Note** > If you are using Windows, you may need to install OpenSSL before running these commands ### Using the Secrets Manager We'll use the [Wix Secrets Manager](https://support.wix.com/en/article/Velo-about-the-secrets-manager) to securely store our private key secret. This is more secure than pasting the key into our backend code. Make sure never to expose your private key. In the Secrets Manager, set the **Name** of the secret to **spPrivateKey.** Use a text editor to copy and paste the entire contents of **private.pem** including the **\-----BEGIN RSA PRIVATE KEY-----** and **\-----END RSA PRIVATE KEY-----** lines into the **Value** field. Enter a description so that you remember what this secret is used for.
If you haven't used the Secrets Manager before, here's how to use it. 1. Go to your Wix Dashboard. 2. Select **Developer Tools** and then **Secrets Manager.** 3. Click the **Store Secret** button and enter the following details: ![](https://d2x3xhvgiqkx42.cloudfront.net/12345678-1234-1234-1234-1234567890ab/99f9f305-0415-4713-856e-b7aa93cbd4d3/2020/10/18/580ac3a4-b836-4108-bda1-6e3e7be2383b/555733bb-d5e1-4f24-b20f-d7bed6f76179.png) 4. **Name:** The name of the secret to be used in the code. 5. **Value:** Paste the text value of the secret. 6. Enter a brief description to remind you what this secret is used for, and click **Save**.
### Setting Up the IDP We need to configure IDP and export some metadata. This metadata will be used in our code when creating the SAML request, and when we want to decrypt the response and extract the credentials. Set up a trial account. For this tutorial, we used Auth0. Sign up [here](https://auth0.com/signup?&signUpData=%7B%22category%22%3A%22button%22%7D&email=undefined) for their free trial. Once you have set up your trial account, follow these steps to create an application with SAML2 capabilities. 1. Click **Applications** in the Auth0 dashboard. 2. Click **Create Application,** give your application a name, select **Regular Web Applications and** click **Create**. 3. Click **Settings** in the top bar. 4. Scroll down to **Allowed Callback URLs** and enter the URL of your assertion function. This is the URL that the IDP will call with a POST when the user signs in. In our case that's going to be `https://mysite.wixsite.com/saml-demo/\_functions/assertion` which corresponds to the function **post\_assertion** in the **http-functions.js** file. More on that when we get to the code. 5. Scroll to the bottom and click **Save Changes**. 6. Scroll back up to the top bar and click **Addons**. 7. Click **SAML2 WEB APP**. 8. The IDP needs our public certificate and Auth0 requires that it fits on a single line. The public key was that file we stored as **public.crt** earlier on. In the settings box, add **"signingCert": ** inside the curly braces.The format for the public key is: `-----BEGIN PUBLIC KEY-----nMIGf...bpP/t3\n+JGNGIRMj1hF1rnb6QIDAQAB\n-----END PUBLIC KEY-----\n`so you will need to reformat your certificate to change all newline characters (\\n) to actual "\\"s followed by "n"s. Use the following if you are on mac or linux: `$ awk '{printf "%s\\n", $0}' public.crt ` Use the following command in PowerShell if you are on Windows: `PS C:\Users\Wix> (Get-Content .\public.crt) -join "\n"` It should look like this:
9. Scroll all the way to the bottom and hit **Enable,** then **Save**. 10. Scroll up to the top of the window and click **Usage** in the top bar**.** 11. In the **Identity Provider Metadata** section, click the **Download** link and save the file. 12. Ccreate a backend file called **metadata.js**. 13. Copy the XML from the downloaded file into **metadata.js** and export it as the constant **idpMetadata.** Use backticks ( \` ) to enclose the XML so that the end of line is ignored. 14. Edit the **IDPSSODescriptor** and add **WantAuthnRequestsSigned="true"** as in Line 2 below. Your code should look like this: ```javascript export const idpMetadata =` MIIDDTCCAfWgAwIBAgIJGBvK29ZE/GY1MA0GCSqGSIb3DQEBCwUAMCQxIjAgBgNVBAMTGW15LXNhbWwtdGVzdC51cy5hdXRoMC5jb20wHhcNMjAxMDAxMDk0MjIyWhcNMzQwNjEwMDk0MjIyWjAkMSIwIAYDVQQDExlteS1zYW1sLXRlc3QudXMuYXV0aDAuY29tMIIBIjANBgkqhkiG9w0BAQEFAAOCAQ8AMIIBCgKCAQEA4yxmeg9zZn/Q1TzI27hQIknZaSklARUAlEtayykvrC9glB7SBuo1b0rz0w+M1GAKzdgcM3Ca0a0iC/wfH9a0YbXXE1vwj5tlMqISEKEPv/SOep1glPrK7m3s8ndPsfVN/4cxQbncVkLSgwORylWaU1UMU8Im3yvL7WcL0uSKCUQWr/XEbQsNqn+dDIjwXCAC2smXho7nm5Alz2xwR1bORLCLPTcJuy2pr0LxuzZiw366gADy/mG21OBOnPYqTbPZJuRE1I46av/atJVEPFrn3hklsyVaS4M3YEl7x+nW0rzenvqQvwh56ZDvF2cNUQBMqjtblclJd4ipp3x0bLuziQIDAQABo0IwQDAPBgNVHRMBAf8EBTADAQH/MB0GA1UdDgQWBBQzlOf36gQB747obsUfV8wb6jLVAjAOBgNVHQ8BAf8EBAMCAoQwDQYJKoZIhvcNAQELBQADggEBAMs2wZW/CQtZFHS7tltolBNMDTuPokrRUlZYT6KoKdTh0Uk4Okq0luCEwAoxbyidpBMEWUIKP74iEttK72QiUF8Wf93DZtd0pC/IgMlFR+ef5z7IEunFTUJ0DsutdQh6BDPZKqoo/gG3eefBeCt0lYav/aF0v2+vzHZUc9wWGYuuKs8wjp4a+hxll3/lgzX/jGvvl69ckJ1TW71LtUF42RRtZcvbj5eC1xxC9jrF6hsLrdwQpaiVB0obyp260iXetc1cSuyVVThGQL3XIq4H7ngLGikJk53lESOJknn0DoTzg1mVnKZ6t47WcWU3eOQomgUVyxszkrwEpEmEXKEc+r8= urn:oasis:names:tc:SAML:1.1:nameid-format:emailAddress urn:oasis:names:tc:SAML:2.0:nameid-format:persistent urn:oasis:names:tc:SAML:2.0:nameid-format:transient ` ``` ### Setting up the SP Metadata Now that we have our private key and certificate we can set up our service provider metadata. This metadata will be used to create and encrypt the SAML requests. To create the metadata we'll use a handy util at [https://www.samltool.com/sp\_metadata.php](https://www.samltool.com/sp_metadata.php). You should be on the **Build SP Metadata** page. 1. Chose an EntityId, any unique name is OK. Let's use **saml-demo**. 2. **Attribute Consume Service Endpoint (HTTP-POST)**: This is where you enter the Assertion Consumer Service endpoint that will handle the assertion. In our case, as we defined above, it's `https://mysite.wixsite.com/saml-demo/\_functions/assertion`. 3. **SP X.509 cert:** Open the **public.crt** file with a text editor. This is the file we created in the [**Certificates and Keys**](https://support.wix.com/en/article/using-saml-sso-with-Velo#creating-certificates-and-keys) step. Copy and paste the file's content into the **SP X.509 cert** field. 4. Set **AuthnRequestsSigned** and **WantAssertionsSigned** to **True.** 5. Scroll down and hit **BUILD SP METADATA.** 6. Copy the XML from the green **SP Metadata** box. 7. Open the backend file called **metadata.js** that you created for the IPD metadata and paste the copied XML into the file. Export it as **spMetadata.** Use back-ticks ( \` ) to enclose the XML so that the end of line is ignored.Your code should look like this : ```javascript export const spMetadata = ` MIIE6DCCAtACCQCgAlaiRpc7ITANBgkqhkiG9w0BAQsFADA2MQswCQYDVQQGEwJJTDELMAkGA1UECAwCaWwxDTALBgNVBAcMBEhlcmUxCzAJBgNVBAoMAk1lMB4XDTIwMTAwNzA4NDc1N1oXDTIwMTEwNjA4NDc1N1owNjELMAkGA1UEBhMCSUwxCzAJBgNVBAgMAmlsMQ0wCwYDVQQHDARIZXJlMQswCQYDVQQKDAJNZTCCAiIwDQYJKoZIhvcNAQEBBQADggIPADCCAgoCggIBAM1JcEsUkUWsQhqn5E61MEjzkyOJQoF91WrQTsKhNsA0KiRoVcZ4OkGUUFYWrSCZXxab3VrghBURhW9UhJE5zho9rXX1PHvqnzEtS+/hzoQgBFZG3Halo/U06HeVXD4n2uJTlb/K/1KHXbUsJ3IniIA+IRhmlP69Oi/ZVQvjkfLDBbillp4vMPcf/ReT0/IGG3zRPX61byLmVoWLxzuQlqhojilRgfdn+gvLpDgleMaw9FR0EjkolTj6VW6A7nlw5MTKaMDATUGRnfUP+pbnq4fluXdfVzcNHF3JFQ8ECvePm1XqAr9hwIk6UX50gFjUM1A+hSDt298V55iG6RugwLaoO83p5tVd3g0xkxamPRAKxxSZfNia3y4HJB8cGTVor4SnwvkL8mweIr/xmDayyFzLYl5Tux7uk/nwzFN80EG9MieEjFgTMKgXzi3TGnyJQspypM8dqyN6eUpn0N/rKB5jaeMgXnUqRhrKc0aQtMUkhqAzTMMWFnbDySAKHJhq+HI4SXFEXhf51GM2tkoEh8OBhwbcoB8tco60I7cBxT0kakqoFWHG5jCTd4ksGzUkXoTeYrQSyxE/DyCOfZBzkvljJLcqoOQwoukYV13WLOfsNgETIiAhe0PXhqi0B8kxn6SXVqhVaVKhsXiy4FbClLOefPFHH+wtViNYjWQUIVctAgMBAAEwDQYJKoZIhvcNAQELBQADggIBAM0XAs4qZGwYN34YxqYThVHGDcWljO9DiKlCt3xbBBRX9ZI8VKOWHNtswdBbdraPtAMT0D052xSWMbXOGlnGWPHxjvLCsWfGDnxJ4KCyItkzKuoIm7LRmSpQWHDwZNTKlQVm9ap192vvOgLa53mHavOZJ7NPoVkO29MC7+NyUa8exn9Zj8XbRGr2pioYK4LMub4oFthuAHVg5RIzHmIMzJpZYew8OrSYXLHLDKLWNLQHDOwDl+Bic02IQIF/hCfflviGGLCk3yjiAVP4HnpkJgtdDkgMi+YihG8znlyHpSmB60WrlSjbbxgxkdmPePEhZP5BrYeSyV6ZM2I5dpj3GpG94JN5RC44BpL23IXlS89dzRfo/cKKIZ63uA45rH6vVNEqAnKfSFGRI0OuafEdx8Cirgkw7WXMHkzqEm5wYlt4XV5akavi0PErS9rrYGlMpfUxT2csyjCww6k/UaxBDaS9GAySAMwRPsuA853XY0/eSESWNj72i0bGCjT1Dx6MWaE/UVERTSL04qxK/ACJT9aMnOAjs2r1gFYZq57l1AC5eadXtcJt/s6C/uEXgvXhyPvvHnYisu7S2lu5rOg1N9cvVftWbeRgTgAEsr3cz04CZ4ZZRADhpVpE38Shq2vPNrf4qqkjbM1BgOGcXtx/lDVUUlM4l7FEjWNfrUWbueqh MIIE6DCCAtACCQCgAlaiRpc7ITANBgkqhkiG9w0BAQsFADA2MQswCQYDVQQGEwJJTDELMAkGA1UECAwCaWwxDTALBgNVBAcMBEhlcmUxCzAJBgNVBAoMAk1lMB4XDTIwMTAwNzA4NDc1N1oXDTIwMTEwNjA4NDc1N1owNjELMAkGA1UEBhMCSUwxCzAJBgNVBAgMAmlsMQ0wCwYDVQQHDARIZXJlMQswCQYDVQQKDAJNZTCCAiIwDQYJKoZIhvcNAQEBBQADggIPADCCAgoCggIBAM1JcEsUkUWsQhqn5E61MEjzkyOJQoF91WrQTsKhNsA0KiRoVcZ4OkGUUFYWrSCZXxab3VrghBURhW9UhJE5zho9rXX1PHvqnzEtS+/hzoQgBFZG3Halo/U06HeVXD4n2uJTlb/K/1KHXbUsJ3IniIA+IRhmlP69Oi/ZVQvjkfLDBbillp4vMPcf/ReT0/IGG3zRPX61byLmVoWLxzuQlqhojilRgfdn+gvLpDgleMaw9FR0EjkolTj6VW6A7nlw5MTKaMDATUGRnfUP+pbnq4fluXdfVzcNHF3JFQ8ECvePm1XqAr9hwIk6UX50gFjUM1A+hSDt298V55iG6RugwLaoO83p5tVd3g0xkxamPRAKxxSZfNia3y4HJB8cGTVor4SnwvkL8mweIr/xmDayyFzLYl5Tux7uk/nwzFN80EG9MieEjFgTMKgXzi3TGnyJQspypM8dqyN6eUpn0N/rKB5jaeMgXnUqRhrKc0aQtMUkhqAzTMMWFnbDySAKHJhq+HI4SXFEXhf51GM2tkoEh8OBhwbcoB8tco60I7cBxT0kakqoFWHG5jCTd4ksGzUkXoTeYrQSyxE/DyCOfZBzkvljJLcqoOQwoukYV13WLOfsNgETIiAhe0PXhqi0B8kxn6SXVqhVaVKhsXiy4FbClLOefPFHH+wtViNYjWQUIVctAgMBAAEwDQYJKoZIhvcNAQELBQADggIBAM0XAs4qZGwYN34YxqYThVHGDcWljO9DiKlCt3xbBBRX9ZI8VKOWHNtswdBbdraPtAMT0D052xSWMbXOGlnGWPHxjvLCsWfGDnxJ4KCyItkzKuoIm7LRmSpQWHDwZNTKlQVm9ap192vvOgLa53mHavOZJ7NPoVkO29MC7+NyUa8exn9Zj8XbRGr2pioYK4LMub4oFthuAHVg5RIzHmIMzJpZYew8OrSYXLHLDKLWNLQHDOwDl+Bic02IQIF/hCfflviGGLCk3yjiAVP4HnpkJgtdDkgMi+YihG8znlyHpSmB60WrlSjbbxgxkdmPePEhZP5BrYeSyV6ZM2I5dpj3GpG94JN5RC44BpL23IXlS89dzRfo/cKKIZ63uA45rH6vVNEqAnKfSFGRI0OuafEdx8Cirgkw7WXMHkzqEm5wYlt4XV5akavi0PErS9rrYGlMpfUxT2csyjCww6k/UaxBDaS9GAySAMwRPsuA853XY0/eSESWNj72i0bGCjT1Dx6MWaE/UVERTSL04qxK/ACJT9aMnOAjs2r1gFYZq57l1AC5eadXtcJt/s6C/uEXgvXhyPvvHnYisu7S2lu5rOg1N9cvVftWbeRgTgAEsr3cz04CZ4ZZRADhpVpE38Shq2vPNrf4qqkjbM1BgOGcXtx/lDVUUlM4l7FEjWNfrUWbueqh urn:oasis:names:tc:SAML:1.1:nameid-format:unspecified ` ``` In the metadata, check the following items: * **SPSSODescriptor** Line 3. Make sure that **AuthnRequestsSigned="true" WantAssertionsSigned="true"** are both there. If not, or if they are false, it may cause trouble later on when creating the ServiceProvider and IdentityProvider objects. * **AssertionConsumerService Binding**, Line 19. This holds the URL that will handle the callback once our visitor has signed in. i.e. `https://mysite.wixsite.com/saml-demo/\_functions/assertion` ### Installing the Samlify Package Before we start coding we need to install the [**samlify**](https://samlify.js.org/#/) package so we can call its functions from our code. To install a package: 1. In the left sidebar of the editor, navigate to **Packages & Apps**. In Wix Studio, you can find this in the ![Code](https://wixmp-833713b177cebf373f611808.wixmp.com/images/43681438c0ad6af225fb8c944cff74b4.png "Code") tab. 2. Under **npm** click **Install packages from npm.** 3. Search for "samlify" and click **Install** next to the **samlify** package. ## Adding the Code Add the following code files to your backend files: * **saml.web.js:** Accessible from the front end, to generate SAML requests. * **create-providers.js:** To work with the samlify package to create the SP and IDP objects. This is a **.js** file and therefore not accessible from the front end. We do not want these functions accessible from the front end as they contain metadata and secrets that we do not want to expose. * **http-functions.js:** To handle the assertion callback from the IDP, and retrieve the user's details.
**Note** You must use the file name "http-functions.js" to handle the web callbacks but you can call the other files any name you like.
### Adding Landing Page Code Add a login button to your landing page. Then add the following code: ```javascript import wixLocationFrontend from 'wix-location-frontend'; import {session} from 'wix-storage-frontend'; import { generateSAMLRequest } from 'backend/saml.web'; $w.onReady(function () { $w('#loginButton').onClick(() => { generateSAMLRequest() .then((request) => { session.setItem("requestId", request.id); wixLocationFrontend.to(request.context); }); }); }); ``` #### Understanding the Code **Lines 1-2:** Import the modules that we will work with, including our backend function, `generateSAMLRequest`, which we will create below. **Lines 7-8:** When a site visitor clicks login the button, we call the backend `generateSAMLRequest` function, which will return the SAML request Id, and the URL with the SAML request. **Line 10:** Store the `requestId` in the session variables. The `requestId` will be compared to the `inResponseTo` Id that is returned in the SAML response. This will help us protect against someone copying the final log-in URL and the session token. **Line 11:** Direct the browser to the request URL with `wixLocationFrontend.to`, so the visitor can log in using their credentials on the IDP. ### Generating the SAML Request Create the sp and idp objects, using their respective metadata, and use these objects to create SAML request. Return the SAML request URL to front end. The **generateSAMLRequest** function in **saml.web.js**, returns a SAML request URL to the front end, which calls [`wixLocationFrontend.to()`](https://dev.wix.com/docs/velo/api-reference/wix-location-frontend/to.md) to direct the browser to that URL. At this point the visitor sees the IDP's sign-in window and enters their user and password. Once the IDP authenticates the visitor, it redirects back to our site, to the URL defined in the **AssertionConsumerService Binding** element in the SP metadata. This is the same URL that we set up in the IDP's console. In our example, this will redirect to the **post\_assertion** function, which is defined in **http-functions.js**. Add the following code to saml.web.js. ```javascript import { Permissions, webMethod } from 'wix-web-module'; import { notFound } from 'wix-http-functions'; import { createIdp, createSp } from 'backend/create-providers'; export const generateSAMLRequest = webMethod(Permissions.Anyone, async () => { try { //create the idp and sp objects using samlify const idp = await createIdp(); const sp = await createSp(); //create the request url and return it and the request id to the fronted page. const { id, context } = sp.createLoginRequest(idp, 'redirect') return { id, context }; } catch (error) { console.error('generateSAMLRequest error:', error.message); return notFound({ status: 404 }); } }); ``` #### Understanding the Code **Lines 1-3:** Import the modules that we will work with. **Lines 8-9:** When the front end calls `generateSAMLRequest`, we create the identity provider and service provider objects using `createIdp` and `createSp`. **Lines 12-13:** Use the samlify function, `createLoginRequest` to generate the SAML request id and URL and return them to the front end. The request id will be matched with the `inResponseTo` id in the SAML response. Create the **idp** object using the metadata in **idpMetadata**. Add the following code to create-providers.js. ```javascript import { getSecret } from 'wix-secrets-backend'; import { IdentityProvider, ServiceProvider } from 'samlify'; import { spMetadata, idpMetadata } from 'backend/metadata.js'; export function createIdp() { //create the IdentityProvider object using the metadata in idpMetadata try { const idp = IdentityProvider({ metadata: idpMetadata }); return idp; } catch (error) { console.error('Error in createIdp detected', error.message); } } ``` #### Understanding the Code **Lines 1-3:** Import the modules that we will work with. Note the import of `spMetadata` and `idpMetadata` from `backend/metadata.js`. We created the `metadata.js` file when [setting up the IDP](https://dev.wix.com/docs/develop-websites/articles/code-tutorials/wix-editor-elements/using-saml-sso-with-velo.md) and [setting up the SP metadata](https://dev.wix.com/docs/develop-websites/articles/code-tutorials/wix-editor-elements/using-saml-sso-with-velo.md). **Line 8:** Use the samlify `IdentityProvider` object and the metadata from the identity provider to create the `idp` object. This object is used when creating the login request and again when we parse the login response in the `http-functions`. **Line 11:** Return the `idp` object to the `generateSAMLRequest` function The **createSp** function retrieves the private key from the Secrets Manager, and uses it with our service provider metadata to create the **sp** object. Add the following code to create-providers.js. ```javascript export async function createSp() { try { // retrieve the private key from the Secrets Manager const spPrivateKey = await getSecret('spPrivateKey'); //create the ServiceProvider object using the metadata and the private key const sp = ServiceProvider({ metadata: spMetadata, privateKey: spPrivateKey }); return sp; } catch (error) { console.error('Error in createSp detected', error.message); } } ``` #### Understanding the Code **Line 5:** Retrieve the private key that was stored in the Secrets Manager in the [Using the Secrets Manager](https://dev.wix.com/docs/develop-websites/articles/code-tutorials/wix-editor-elements/using-saml-sso-with-velo.md) section. **Lines 8-10:** Use the samlify `ServiceProvider` object, metadata for the service provider, and the private key, to create the `sp` object. **Line 12:** Return the `sp` object to the `generateSAMLRequest` function.
**Note** If there are any mismatches between the IDP and SP metadata, it may fail at this point. The most common error is `**ERR_METADATA_CONFLICT_REQUEST_SIGNED_FLAG,**` and is caused by not setting **WantAuthnRequestsSigned="true"** in the IDP metadata when the SP metadata has**AuthnRequestsSigned="true"** in the **SPSSODescriptor,** or having **AuthnRequestsSigned="false"**.
### Handling the AssertionConsumerService Request In the **post\_assertion function**, we create the **sp** and **idp** objects to decrypt and extract the SAML response. Samlify requires that we validate the response so we call **setSchemaValidator** but we are not going deal with validation in this tutorial. For more details see [how to set up a validator](https://github.com/tngan/samlify#installation). Add the following code to http-functions.js. ```javascript import { response, ok, notFound } from 'wix-http-functions'; import { createIdp, createSp } from 'backend/create-providers.js'; import * as samlify from 'samlify'; import { authentication } from 'wix-members-backend'; const baseUrl = 'https://mysite.wixsite.com/saml-demo'; export async function post_assertion(request) { try { const [idp, sp] = await Promise.all([createIdp(), createSp()]); // we are not using the validation in our example, but if we dont call it, we'll get an error. samlify.setSchemaValidator({ validate() { return Promise.resolve('skipped'); } }); const requestBody = await request.body.text(); const samlResponse = { body: { SAMLResponse: decodeURIComponent(requestBody.split('SAMLResponse=')[1]) } } // parse and decrypt the response const parseResult = await sp.parseLoginResponse(idp, 'post', samlResponse); //extract the inResponseTo Id const inResponseTo=parseResult.extract.response.inResponseTo //extract the email address const email = parseResult.extract.attributes['http://schemas.xmlsoap.org/ws/2005/05/identity/claims/emailaddress']; //create the session token to use when logging the visitor in const sessionToken = await authentication.generateSessionToken(email); return response({ status: 302, headers: { 'Location': `${baseUrl}/signed-in?session=${sessionToken}&response=${inResponseTo}` } }); } catch (error) { const body = await request.body.text(); console.error('Error in post_asc', error.message); return notFound({ status: 404 }); } } ``` #### Understanding the Code **Line 6:** Set the base URL for the site. Change this to suite your site. **Line 8:** Create the `assertion` function to handle the `post` request from the IDP. **Line10:** Create the `idp` and `sp` objects using the `createIdp` and `createSp` imported from `saml.web.js`. **Lines13-15:** Samlify requires that the response is validated, but we are not going to deal with that in this tutorial. For more details see [how to set up a validator](https://github.com/tngan/samlify#installation). Call setSchemaValidator and return a resolved promise. **Line 19:** Get the http request body in text format. **Line20:** The response body may differ between IDPs. Take the data that comes after `SAMLResponse=` using the split function and decode it. Reconstruct the response object, adding the `body` so it can be parsed. **Line 27:** Use the samlify function `parseLoginResponse` to decrypt and extract the XML that is our readable SAML response. **Line 30:** Extract the `inResponseTo` Id which will be matched to the request Id when the user is signed in. **Line 33:** Extract the email address from the SAML response XML. Note that the attribute name for the email address will differ for each IDP. **Line 36:** Use the email address to create a Wix session token using the wix-members-backend function, [`generateSessionToken()`](https://dev.wix.com/docs/velo/api-reference/wix-members-backend/authentication/generate-session-token.md). This token will allow us to log the visitor in to our Wix site. If the email address corresponds to an existing member, a session token for that member is generated. If no member exists with that email address, a new member is created along with a session token for logging that member in. **Lines 38-41:** Return a redirect URL, directing the browser to the signed-in landing page, adding the session token and `inResponseTo` Id as query fields. ### Signed-in Landing Page The visitor lands on the signed-in landing page where the session token is used to log our visitor in. Create a page called **signed-in.** Make sure that the signed-in page has the correct URL. The URL should be `https://mysite.wixsite.com/saml-demo/signed-in`. Replace `https://mysite.wixsite.com` to suite your site. Follow [this guide](https://support.wix.com/en/article/wix-editor-changing-your-page-url) to set the URL. Add a [members area](https://support.wix.com/en/article/about-members-area#adding-a-members-area) to your site, then add a **Member Profile Card** element to your signed-in page to display who the current member is. Add the following code to the signed-in page. ```javascript import wixLocationFrontend from 'wix-location-frontend'; import { session } from 'wix-storage-frontend'; import { authentication } from 'wix-members-frontend'; $w.onReady(() => { const query = wixLocationFrontend.query; const sessionToken = query.session; const responseID = query.response; const requestID = session.getItem("requestId") if (sessionToken && (responseID === requestID)) { authentication.applySessionToken(sessionToken) } else { console.error("Signin Failed", sessionToken) wixLocationFrontend.to('https://mysite.wixsite.com/saml-demo') } }); ``` #### Understanding the Code **Lines 7-9:** Retrieve the session token and `inResponseTo` id from the query parameters. **Line 10:** Retrieve the `requestId` that was stored in the session variables before signing in. **Lines 12-13:** If the `requestId` matches the `inResponseTo` Id, then we know that this browse session is the one that made the login request. If a session token exists, apply the session token to log the visitor in. **Lines 15-16:** If there is no session token, or the Ids do not match, return the visitor to the log-in page. Change the URL on line 16 to suite your site. --- > Portal Navigation: > > - Append `.md` to any URL under `https://dev.wix.com/docs/` to get its markdown version. > - Pages are either content pages (article or reference text) or menu pages (a list of links to child pages). > - To get a menu page, truncate any URL to a parent path and append `.md` (e.g. `https://dev.wix.com/docs/sdk.md`, `https://dev.wix.com/docs/sdk/core-modules.md`). > - Top-level index of all portals: https://dev.wix.com/docs/llms.txt > - Full concatenated docs: https://dev.wix.com/docs/llms-full.txt ## Resource: Using OAuth SSO with Velo ## Article: Using OAuth SSO with Velo ## Article Link: https://dev.wix.com/docs/develop-websites/articles/code-tutorials/wix-editor-elements/using-oauth-sso-with-velo.md ## Article Content: # Using OAuth SSO with Velo Single Sign On (SSO) is a great way to make life easier for your site visitors and encourage them to register as a user on your site. Visitors can log in to your site using their Google, Facebook, or other accounts, or using their work account. This article will look at how to implement OAuth - Open Authentication protocol, which is used by many [service providers](https://en.wikipedia.org/wiki/List_of_OAuth_providers) including Google, Facebook and Twitter. To learn about implementing SSO with SAML, see [Using SAML SSO with Velo](https://support.wix.com/en/article/using-saml-sso-with-velo). ### OAuth Flow An authenticated user session is a session in which the identity of the user has been verified to the server, in the case of OAuth, by a 3rd-party. The diagram below shows the flows involved in establishing an authenticated user session on a Wix site using Google as an OAuth identity provider.  The flows are as follows: 1. The user clicks **Sign in with google**. 2. The Wix site requests an **authorization URL**. 3. The browser is forwarded to the OAuth provider using the **authorization URL,** and the user signs in. 4. The OAuth provider calls the Wix site URL, passing it an **authorization code**. 5. The Wix site backend requests an **access token** from the OAuth provider using the **authorization code**. 6. The Wix site backend requests **user information** using the **access token**. 7. The Wix site backend creates a Wix **session token** using the user's email address. 8. The Wix site backend returns a redirect URL to the OAuth provider including the **session token**. 9. The OAuth provider redirects the browser using the returned URL. 10. The browser redirects to the Wix frontend page using the URL. 11. The Wix site uses the session ID in the URL to log the user in.
### Setting up Google In the Google Cloud Platform, we're going to set up [Credentials](https://console.cloud.google.com/apis/credentials). Follow this guide to [setting up OAuth 2.0](https://support.google.com/cloud/answer/6158849?hl=en) from Google.  Copy down the **Client ID**, **Client secret** and **Authorized Redirect URL**. We're going to use them later in our code.
![](https://d2x3xhvgiqkx42.cloudfront.net/12345678-1234-1234-1234-1234567890ab/99f9f305-0415-4713-856e-b7aa93cbd4d3/2020/09/14/378d1ac6-75c8-4670-a1a8-af1c10b98476/92e49242-ea01-4a2f-8daa-2606c8d25ca1.png)
### Using the Secrets Manager We'll use the [Wix Secrets Manager](https://dev.wix.com/docs/develop-websites/articles/workspace-tools/developer-tools/secrets-manager/about-the-secrets-manager.md) to securely store our client secret. This is more secure than pasting it to our backend code. Make sure never to expose your client secret. In the Secrets Manager, store a new secret with the following values: * **Name** : **clientSecret** * **Value**: The client secret value you retrieved from the Google Cloud Platform dashboard in the previous section. * **Description**:  Something to help you remember what this secret is used for.
If you haven't used the Secrets Manager before, here's how to use it. 1. Go to your Wix Dashboard. 2. Select **Developer Tools** and then **Secrets Manager**. 3. Click the **Store Secret** button and enter the following details: 4. **Name:** The name of the secret to be used in the code. 5. **Value:** Paste the text value of the secret. 6. Enter a brief description to remind you what this secret is used for, and click **Save**.
### Setting up Velo Before we start coding we need to install the Google APIs package so we can call its functions from our code. To install a package in the editor: 1. In the left sidebar of the editor, navigate to **Packages & Apps**. In Wix Studio, you can find this in the ![Code](https://wixmp-833713b177cebf373f611808.wixmp.com/images/43681438c0ad6af225fb8c944cff74b4.png "Code") tab. 2. Under **npm** click **Install packages from npm.** 3. Search for "googleapis" and click **Install**. ### Adding the Code We'll need two code files: * **OAuth.web.js**. Where we will create a connection to Google and generate an authorization URL. * **http-functions.js**. To handle the callback from Google and retrieve the user's details. Note that you must use the file name **http-functions.js** to handle the web callbacks but you can call the other file any name you like. ### Getting the Authorization URL When the Visitor Clicks "Sign in to Google" **Landing page code** ```javascript import wixLocationFrontend from 'wix-location-frontend'; import {session} from 'wix-storage-frontend'; import { getAuthUrl } from 'backend/OAuth.web'; $w.onReady(function () { // handle the click event on the Sign in with Google button $w('#btnSignInToGoogle').onClick((event) => { googleSignin() }); }) export function googleSignin() { getAuthUrl() .then((result) => { const authorizationUrl=result.authUrl const state=result.state // store the state variable for later use session.setItem("requestState", state); // direct the bowser to the authorization Url wixLocationFrontend.to(authorizationUrl); }) } ``` When the site visitor clicks **Sign in to Google**, our site calls the **getAuthUrl** function in **OAuth.web.js** at line 13. We create a connection to the OAuth service provider (Google in this case) and request an authorization URL. The state variable is then stored for this session at line 18. It will be compared to the state variable that is returned with the session token to prevent anyone copying the returned URL and logging in with another browser. Our frontend then calls [**wixLocationFrontend.to**](https://www.wix.com/velo/reference/wix-location/to) at line 20 to direct the browser to the authorization URL. **OAuth.web.js** First, we retrieve our client secret at line 8, and use our API credentials to connect to Google's OAuth servers at line 17. ```javascript import { Permissions, webMethod } from 'wix-web-module'; import { google } from 'googleapis'; import { getSecret } from 'wix-secrets-backend'; import crypto from 'crypto'; export const getAuthUrl = webMethod(Permissions.Anyone, async () => { //retrieve the client secret from the Secret Manager const googleClientSecret = await getSecret('clientSecret'); const googleConfig = { clientId: '123456789123-12abc3def4g5hijk67lmnopqrest8u9v0.apps.googleusercontent.com', clientSecret: googleClientSecret, redirect: 'https://mywix987.wixsite.com/sso-example/_functions/getAuth', }; // create a connection to google's authentication services const authConnection = new google.auth.OAuth2( googleConfig.clientId, googleConfig.clientSecret, googleConfig.redirect ); const scope = [ 'https://www.googleapis.com/auth/userinfo.email', 'https://www.googleapis.com/auth/userinfo.profile', ]; // generate a random state variable const state = crypto.randomBytes(16).toString('hex'); // request an authorization code URL const authUrl = authConnection.generateAuthUrl({ access_type: 'offline', // 'online' (default) or 'offline' (gets refresh_token) prompt: 'consent', scope: scope, state: state, }); return { state, authUrl }; }); ``` Note the **googleConfig** object in **OAuth.web.js**. ```js const googleConfig = { clientId: '123456789123-12abc3def4g5hijk67lmnopqrest8u9v0.apps.googleusercontent.com', clientSecret: googleClientSecret, redirect: 'https://mywix987.wixsite.com/sso-example/_functions/getAuth' }; ``` These are the values from the Credentials page that we set up earlier. The **getAuth** function in the **redirect** is defined in **http-functions.js** At line 29 we generate a random value for the state variable, which will be stored by the browser, and compared to the state variable that is returned with the session token. This will prevent anyone from copying the URL with the session token and using it to log in.  At line 32, **OAuth.web.js** generates the authentication URL and returns it with the state variable, to our frontend. The frontend calls [**wixLocationFrontend.to**](https://www.wix.com/velo/reference/wix-location/to) using that URL to direct the browser to the OAuth provider - line 15 in the landing page code. At this point the visitor sees the Google sign in dialog and enters their user name and password.  Once Google authenticates the visitor, it redirects back to our site to the URL defined in **googleConfig.redirect** in our code. We also set up that URL in the Google Cloud Platform console as the authorized redirect URI. From the sample code, this will redirect to the **get\_getAuth** function which is defined in **http-functions.js**. ### Handling the Redirect from Google In **get\_getAuth,** we retrieve the client secret from the Secrets Manager at line 11. Next, we take the request URL from Google and extract the authorization code, at line 19, and the state variable at line 20. This code is used to get the access token based on our clientId and clientSecret, at line 30. Once we have the access token we use it at line 34, to get the **userInfo** object from Google. Using the email address from userInfo, at line 45 we generate a session token using the wix-members-backend function [**generateSessionToken**](https://www.wix.com/velo/reference/wix-members-backend/authentication/generatesessiontoken). This token will allow us to log the user in to our Wix site. If the email address corresponds to an existing member, a session token for logging in that member is generated. If there is no existing member with the specified email address, a new member is created and a session token for logging in that member is generated. **http-functions.js**. ```javascript import { response } from 'wix-http-functions'; import { google } from 'googleapis'; import { authentication } from 'wix-members-backend'; import { getSecret } from 'wix-secrets-backend'; import { fetch } from 'wix-fetch'; //google calls this function with a get, after the user signs in export async function get_getAuth(request) { // retrieve the client secret from the Secrets Manager const googleClientSecret = await getSecret('clientSecret'); const googleConfig = { clientId: '123456789123-12abc3def4g5hijk67lmnopqrest8u9v0.apps.googleusercontent.com', clientSecret: googleClientSecret, redirect: 'https://mywix987.wixsite.com/sso-example/_functions/getAuth' }; //get the authorization code and state variable form the request URL const code = await request.query.code const state= await request.query.state // create a connection to google's authentication services const auth2 = new google.auth.OAuth2( googleConfig.clientId, googleConfig.clientSecret, googleConfig.redirect ); //get the access token from the request with the authorization code we got from google const data = await auth2.getToken(code); const tokens = data.tokens; //get the user info using the access token const userInfoRes = await fetch(`https://www.googleapis.com/oauth2/v2/userinfo?alt=json&access_token=${tokens.access_token}`, { "method": "get" }) if (!userInfoRes.ok) { console.log("could not get user info using access token") } //extract the user's email and profile picture URL const userInfo = (await userInfoRes.json()) const userEmail = userInfo.email const profilePicture = userInfo.picture //now that we have the email we can use it to generate a Wix session token to use in the frontend const sessionToken = await authentication.generateSessionToken(userEmail); //return the url, session token, state variable, and profile picture to google to redirect the browser to our logged in page. return response({ status: 302, headers: { 'Location': `https://mywix987.wixsite.com/sso-example/loggedin?sessiontoken=${sessionToken}&responseState=${state}&profilepic=${profilePicture}` } }); } ``` ### Back to Our Site Page The last step in the **http-functions.js** process at line 49, is to return a 302 status to Google, with a redirect URL to our site's signed-in page. The URL includes the session token so that we can automatically log the user in and the state variable to protect against copying the URL. Google passes this back to the browser where our site page code uses the token to log the user in. On our signed-in page, we take the URL and extract the query parameters, including the session token and the response state variable at lines 8-11. We then remove the query parameters from the URL to make it harder to copy.  At line 17 we retrieve the state variable that we saved before signing in. On line 20, we compare the saved state variable to the state variable returned in the URL. If someone managed to intercept the returned URL, and paste it into a browser, they would not have the value of the saved state variable. The comparison would fail and they would not be signed in. If the saved state is the same as the returned state, then this is the same browser that made the sign in request, so we can sign the user in, using the wix-members-frontend [**applySessionToken**](https://www.wix.com/velo/reference/wix-members/authentication/applysessiontoken) function, at line 21 below. Create a new page called **signed-in.** Make sure that your signed-in page has the correct URL. The URL should be `https://mywix987.wixsite.com/sso-example/signed-in`, replacing **mywix987.wixsite.com** to suit your site. Follow [this guide](https://support.wix.com/en/article/wix-editor-changing-your-page-url) to set the URL. ```javascript import wixLocationFrontend from 'wix-location-frontend'; import { authentication } from 'wix-members-frontend'; import {session} from 'wix-storage-frontend'; $w.onReady(function () { // get the session token and the profile pic URL const query = wixLocationFrontend.query; const sessionToken = query.sessionToken; const userPic = query.profilePic; const responseState = query.responseState; // remove the query parameters from the URL so they can't be copied. wixLocationFrontend.queryParams.remove(['sessionToken', 'profilePic','responseState']); // retrieve the state variable data we saved before signing in const requestState=session.getItem("requestState") // if the requestState matches the responseState, log the user in using the session token if (sessionToken && (requestState === responseState)) { authentication.applySessionToken(sessionToken).then(() => { //set the profile picture on our landing page $w('#image1').src=userPic; }) } }) ``` ### Adapting the Code for Your Site Make the following changes to customize the code to work on your site: * **OAuth.web.js**  Line 10 - googleConfig - **client id** and **redirect** must be changed for your site URL and Google credentials. * **http-functions.js**.  Line 12 - googleConfig - **client id** and **redirect** must be changed for your site URL and Google credentials.     Line 51 - The **Location** URL must be changed to suit your site. --- > Portal Navigation: > > - Append `.md` to any URL under `https://dev.wix.com/docs/` to get its markdown version. > - Pages are either content pages (article or reference text) or menu pages (a list of links to child pages). > - To get a menu page, truncate any URL to a parent path and append `.md` (e.g. `https://dev.wix.com/docs/sdk.md`, `https://dev.wix.com/docs/sdk/core-modules.md`). > - Top-level index of all portals: https://dev.wix.com/docs/llms.txt > - Full concatenated docs: https://dev.wix.com/docs/llms-full.txt ## Resource: Adding a Wishlist to a Wix Stores Site ## Article: Adding a Wishlist to a Wix Stores Site ## Article Link: https://dev.wix.com/docs/develop-websites/articles/code-tutorials/wix-e-commerce-stores/adding-a-wishlist-to-a-wix-stores-site.md ## Article Content: # Velo Tutorial: Adding a Wishlist to a Wix Stores Site >**Note:** > This tutorial and its steps are based on a Wix Editor site. If you'd prefer to use Wix Studio, learn more about [working with the code panel in Wix Studio](https://dev.wix.com/docs/develop-websites/articles/workspace-tools/velo-workspace/workspaces/wix-studio-working-with-the-code-panel.md). This article describes how you can use Velo to add wishlist functionality to a Wix Stores site. Throughout this article we're going to use [this site](https://www.wix.com/code-examples/wishlist-vw) to illustrate the process. You can open the site in the Wix Editor to work with the [template](https://editor.wix.com/html/editor/web/renderer/new?siteId=62ddd72a-7d89-44de-8ce4-ddf15e414b56&metaSiteId=5f8ae7eb-e6fc-4f07-bd91-384921eed30e). We're going to explain how we set up the sample site and the code we added to make it work. You can also use the built-in wishlist feature in any editor. Learn more [here](https://support.wix.com/en/article/wix-stores-adding-and-setting-up-a-wishlist).
![](https://d2x3xhvgiqkx42.cloudfront.net/12345678-1234-1234-1234-1234567890ab/11e10e4f-b84d-4136-a5a9-6109fab0b7d7/2018/07/25/35e1d9a8-3951-495e-9ede-eddf05e4617f.png)
### Overview **In our site we added the following:** * A My Wishlist page to the Member Pages group with a repeater that displays the member's wishlist. It also has a group of elements that are displayed if the member's wishlist is empty. * A products-wishlist collection with 2 fields:  * User Id: This stores the ID of the currently signed-in member. * Product: This is a reference field that points to the product the member added to their wishlist. * Icons on the Shop Product Page that show if a product is already in the member's wishlist. We also use these icons as a toggle to let the member add or remove the item from their wishlist.  **Then we added code to do the following:** * When the Product Page loads, check to see if the current product is associated with the member in the products-wishlist collection and display the corresponding icon. * Set up the icons so that when they are clicked they either add or remove the product from the products-wishlist collection. * When the My Wishlist page loads, query the products-wishlist collection for all the products associated with the current member and display them in the repeater. Hide the repeater if there are no associated products. * Prompt the visitor to log in if they aren't and they try to add or remove an item from their wishlist. ### Step 1: Set up the Site For this example, you'll need some products stored in a collection. We added Wix Stores to our site, which automatically adds a Stores/Products collection to our site, but you can also create your own collection of products without Wix Stores. >**Note** > You may need to save or publish the site and refresh your browser to view Stores collections in the Database. This is what some of the data in our Products collection looks like:
![](https://d2x3xhvgiqkx42.cloudfront.net/12345678-1234-1234-1234-1234567890ab/ef9147e1-f2d9-4773-9a14-7bc889c76065/2020/10/27/ab85421f-1c74-4588-8119-69b341e504e3/7fd6f72c-409f-47d2-b4e8-faa0ceff0aec.png)
We also added a products-wishlist collection. Click the **Databases** button in the **Velo Sidebar**, then hover over **Content Collections** and click the plus icon to create the collection.
![](https://d2x3xhvgiqkx42.cloudfront.net/12345678-1234-1234-1234-1234567890ab/ef9147e1-f2d9-4773-9a14-7bc889c76065/2020/10/29/1116c9b2-a2c4-4157-8b9f-47f4b68d920c/5e7effee-a13c-4725-a6e7-c13c679cd3ef.png)
The products-wishlist collection has two fields: - **Product**: A reference to the product the member added. - **User Id**: The ID of the member who adds a product to their wishlist.
The products-wishlist collection maintains all the wishlist information for all the site members. Each item in the collection associates a member's ID with a product they selected to add to their wishlist. With that information in the collection, we can then query the collection for a member's ID and the results represent the member's wishlist products. In our example we made User Id the Primary field and deleted the Title field from the collection. You can see a copy of the data from the Collections, Products, and products-wishlist collection [here](https://github.com/jeffreya/WixCode-RelatedProducts-data). The Products and Collections collections are created automatically when you have a site with Wix Stores. Because these collections are read-only, you must use the Store Manager to create your product list.  ### Step 2: Set up the Shop Product Page On the Shop Product Page we added: * A group of elements that prompt the visitor to log in if they need to. * Heart icons that tell the member if the product is in their wishlist. The icons also work as a toggle to add or remove the item from their wishlist. > **Note**: > In the image below the two icons are displayed side-by-side. > On the actual site, they're overlapping and the code controls which is displayed.
![](https://d2x3xhvgiqkx42.cloudfront.net/12345678-1234-1234-1234-1234567890ab/11e10e4f-b84d-4136-a5a9-6109fab0b7d7/2018/06/20/65fbdc3a-136e-4880-a07d-07071bf5967a.png)
### Step 3: Create and Set Up the My Wishlist Page To set up the My Wishlist page, complete the following steps: 1. Click the **Pages** button, then **Member Pages**, then **\+ Add a Member Page**. ![](https://d2x3xhvgiqkx42.cloudfront.net/12345678-1234-1234-1234-1234567890ab/ef9147e1-f2d9-4773-9a14-7bc889c76065/2020/10/29/7a2c194f-a282-47db-aa4a-5a8b08158823/a8930133-07c7-4efc-8aec-4d36cecbdf76.png) 2. Make the My Wishlist page a **Private Page**. ![](https://d2x3xhvgiqkx42.cloudfront.net/12345678-1234-1234-1234-1234567890ab/ef9147e1-f2d9-4773-9a14-7bc889c76065/2020/10/29/1a38bede-0c34-4b4b-94d9-a7009aeadf03/52882f34-9348-4d7c-bca1-1ee9cf48d5ab.png) 3. Then rename the new member page by accessing the page's settings. Change the name to My Wishlist. ![](https://d2x3xhvgiqkx42.cloudfront.net/12345678-1234-1234-1234-1234567890ab/ef9147e1-f2d9-4773-9a14-7bc889c76065/2020/10/29/655d684b-5515-496e-86e2-b6abacd01a10/579014a3-878d-45f9-9473-cea418f8115c.png) 4. Access and edit the My Wishlist page by clicking the **Page Code** button in the **Velo Sidebar**, then **My Wishlist** in the **Member's Area (members)** dropdown. ![](https://d2x3xhvgiqkx42.cloudfront.net/12345678-1234-1234-1234-1234567890ab/ef9147e1-f2d9-4773-9a14-7bc889c76065/2020/10/29/4b96f6fe-830f-474b-b494-8c6e5ff90e35/855fe0d8-450e-4d69-a278-f8a35e86e7c9.png) On the My Wishlist page we added: * A container box that contains a text box and a button labelled Go Shopping. The container box is set to "Collapsed on load" in the Properties & Events panel and is only displayed if the member's wishlist is empty or if they aren't signed in. * A repeater that will display the wishlist. Because the container box is set to be collapsed if there's a wishlist, the repeater moves up to take its space when there is a wishlist.
### Step 4: Create the Add to Wishlist Function on the Product Page On the Product Page we start by importing the modules we need to prompt visitors to log in and to work with our collections in code. Then we create a function that builds and inserts the item into the products-wishlist collection. This function is called by the click event handler for when the member clicks the empty heart icon. We'll define that function in the next step. >**Note:** > Throughout this example we use the [async/await](https://codeburst.io/javascript-es-2017-learn-async-await-by-example-48acc58bad65) JavaScript functionality. ```javascript import wixData from 'wix-data'; import wixMembersFrontend from 'wix-members-frontend'; let product; let member = await wixMembersFrontend.currentMember.getMember(); $w.onReady(async function () { product = await $w('#productPage1').getProduct(); }); async function addToWishlist() { let wishListItem = { product: product._id, userId: member._id }; let result = await wixData.insert("Wishlist", wishListItem); } ``` #### Understanding the Code **Lines 1-2**: Import the modules we need to work with [Wix Data](https://www.wix.com/code/reference/wix-data.html) and [Wix Members Frontend](https://www.wix.com/velo/reference/wix-members-frontend) libraries. **Line 4**: Define the `product` variable. **Line 5**: Set the `member` variable to the current member. **Lines 7-9**: Get the current product from the Product page. **Lines 11-15**: Create the `addToWishList` function. Build the `wishListItem` object. This object contains the product ID for the current product and the ID of the member currently logged in. **Line 17**: Insert the `wishListItem` object to the `products-wishlist` collection. #### Identifiers you may need to change based on your site's elements If you want to use this exact scenario and code in your site, you may need to modify these items to match the ones on your site: * `#productPage1` * `wishlist` ### Step 5: Create the notInWishList\_click Function on the Product Page `notInWishList_click` is the function that runs when the empty heart icon is clicked. It hides the empty heart icon, displays the full icon, and then calls the `addToWishList` function we defined in step 4 that handles adding the product to the member's wishlist. To create the function, on the Product Page, select the empty heart icon in the editor and then use the Properties & Events panel to add a click event to it. Where it says "//Add your code for this event here:" add the following code: ```javascript export function notInWishList_click(event, $w) { if (wixMembersFrontend.authentication.loggedIn()) { addToWishlist(); $w('#notInWishList').hide('fade', {duration: 100}); $w('#inWishList').show('fade', {duration: 100}); } else $w('#loginMessage').show(); } ``` #### Understanding the Code **Line 2**: Check to see if the current visitor is logged in. **Line 3**: If a member is logged in, call `addToWishList`, which adds the current product to the member's wishlist. **Lines 4-5**: Hide the empty heart and show the full heart, indicating to the member that the product is now in their wishlist. **Lines 7-8**: Prompt the visitor to log in if they aren't. #### Identifiers you may need to change based on your site's collections If you want to use this exact scenario and code in your site, you may need to modify these items to match the ones on your site: * `#notInWishList` * `#inWishList` * `#loginMessage` ### Step 6: Create the removeFromWishList Function on the Product Page On the Product page we create a function that removes the item from the products-wishlist collection. This function is called by the click event handler for when the member clicks the full heart icon. We'll define that function in the next step. We'll also show and hide the appropriate icons, similar to what we did in step 5. ```javascript async function removeFromWishlist() { let wishListResult = await wixData.query("products-wishlist") .eq("product", product._id) .eq("userId", member._id) .find(); if (wishListResult.length > 0) { $w('#notInWishList').show('fade', {duration: 100}); $w('#inWishList').hide('fade', {duration: 100}); await wixData.remove("Wishlist", wishListResult.items[0]._id) } } ``` #### Understanding the Code **Lines 2-5**: Run a query on the `products-wishlist` collection for the current product for the signed in member. **Line 7**: Check that the item exists in `products-wishlist` for the current member (results of the query are greater than 0). **Lines 8-9**: Display the empty heart icon and hide the full heart icon. **Line 10**: Call `wixData.remove` to remove the current product from the `products-wishlist` collection. #### Identifiers you may need to change based on your site's collections If you want to use this exact scenario and code in your site, you may need to modify these items to match the ones on your site: * `wishlist` * `product` * `userID` * `#notInWishlist` * `#inwishlist` ### Step 7: Create the inWishList\_click Function on the Product Page `inWishList_click` is the function that runs when the member clicks the full heart icon and wants to remove a product from their wishlist. It checks to see that a member is logged in and then calls the `removeFromWishlist` function we defined in step 6. To create the function, select the full heart icon in the editor and then use the Properties & Events panel to add a click event to it. Where it says "//Add your code for this event here:" add the following code: ```javascript export function inWishList_click(event, $w) { if (wixMembersFrontend.authentication.loggedIn()) removeFromWishlist(); } ``` #### Understanding the Code **Line 2**: Check if the current visitor is logged in. **Line 3**: Call `removeFromWishlist` to remove the current product from the member's wishlist and change the displayed icons. There are no identifiers you would need to change here to make this code work on your site. ### Step 8: Create the checkWishlist Function on the Product Page `checkWishlist` is the function that runs when the Product Page loads. It checks to see if the current product is in the member's wishlist. Here also the appropriate icon is displayed depending on the product's wishlist status. If the current visitor isn't logged in, the empty heart icon is also displayed. First, add the code below to the Product Page. ```javascript async function checkWishlist() { if (wixMembersFrontend.authentication.loggedIn()) { let wishListResult = await wixData.query("products-wishlist") .eq("product", product._id) .eq("userId", member._id) .find(); if(wishListResult.items.length > 0) { $w('#inWishList').show('fade', {duration: 100}); } else { $w('#notInWishList').show('fade', {duration: 100}); } } else { $w('#notInWishList').show('fade', {duration: 100}); } } ``` #### Understanding the Code **Line 2**: Check that the current visitor is logged in. **Lines 3-6**: Query the `products-wishlist` collection for the current product and the signed in member. **Line 8**: Check that the product exists in the wishlist for the current member (results of the query are greater than 0). **Lines 9-12**: If the product is in the member's wishlist, display the full heart icon. If not, display the empty heart icon. **Lines 15-16**: If the current visitor isn't logged in, display the empty heart icon. Then, add this code to the onReady function for the Product Page where it says //TODO: write your page related code here... ```javascript checkWishlist(); ``` #### Identifiers you may need to change based on your site's elements If you want to use this exact scenario and code in your site, you may need to modify these items to match the ones on your site: * `wishlist` * `product` * `userId` * `#inWishList` * `#notInWishList` ### Step 9: Create the loginMessageClick Function on the Product Page When we set up our site we added a group of elements to the Product Page that prompt the visitor to log in if they aren't already. Now we need to create the `loginMessageClick` function that displays the login prompt if the visitor clicks an element in that group. The `loginMessageClick` function displays the login prompt to the visitor, and we want it to run when a visitor clicks anywhere in the group. We can't use the Properties & Events panel to add a click event handler to a group, so instead we'll create that event handler directly in the code. We'll create this event handler in the `onReady` function for the Product Page. First, add the following to the Product Page's code: ```javascript async function loginMessageClick() { let options = {"mode": "login"}; $w('#loginMessage').hide(); await wixMembersFrontend.authentication.promptLogin(options); } ``` #### Understanding the Code **Line 2**: Create an `options` object that will be sent to the `promptLogin` function. This sets the login to prompt the visitor to log in as opposed to sign up. **Line 3**: Hide the `loginMessage` group of elements. **Line 4**: Call `wixMembersFrontend.authentication.promptLogin()` with the `options` object. Then, add this code to the onReady function for the Product Page where it says //TODO: write your page related code here... ```javascript $w('#loginMessage').onClick(loginMessageClick); ``` #### Understanding the Code **Line 1**: Create an `onClick` event for the `loginMessage` group of elements that calls the `loginMessageClick` function. #### Identifiers you may need to change based on your site's elements If you want to use this exact scenario and code in your site, you may need to modify these items to match the ones on your site: * `#loginMessage` ### Step 10: Create the loadWishlist Function on the My Wishlist Page When we set up our site we added a My Wishlist page to the Member Pages group of pages. This page has a repeater to display their wishlist when it has products, and a group of elements that displays a message to the member if their wishlist is empty. First let's import the modules we need to work with the Wix Data, Wix Members Frontend, and Wix Location libraries. This code needs to be at the top of the page. ```javascript import wixData from 'wix-data'; import wixMembersFrontend from 'wix-members-frontend'; import wixLocationFrontend from 'wix-location-frontend'; ``` Now we need to add the code to that page that will either display the wishlist in the repeater or the empty wishlist message. ```javascript async function loadWishlist(){ let member = await wixMembersFrontend.currentMember.getMember(); let wishlistResult = await wixData.query("products-wishlist") .eq("userId", member._id) .include('product') .find() if (wishlistResult.length > 0) { $w("#wishlist").expand(); $w("#emptyWishlist").collapse(); $w("#wishlist").data = wishlistResult.items; $w('#wishlist').onItemReady(myItemReady); } else { $w("#wishlist").collapse(); $w("#emptyWishlist").expand(); } } ``` #### Understanding the Code **Lines 3-6**: Query the `products-wishlist` collection for all the products in the member's wishlist. Use `.include` to include the referenced product. **Line 8**: Check if there are products in the member's wishlist (query results are greater than 0). **Lines 9-10**: Display the repeater and hide the empty wishlist message. **Line 11**: Set the data for the repeater to be the results of the query. **Line 12**: Set the `onItemReady` function for the repeater to `myItemReady`. We'll define that function in step 11. **Line 14-16**: If the query on the `products-wishlist` collection returns no results, hide the repeater and display the empty wishlist message. #### Identifiers you may need to change based on your site's elements If you want to use this exact scenario and code in your site, you may need to modify these items to match the ones on your site: * `wishlist` * `userId` * `product` * `#wishlist` * `#emptyWishlist` * `#loginMessage` ### Step 11: Create the myItemReady Function on the My Wishlist Page `myItemReady` is the [onItemReady](https://www.wix.com/code/reference/$w.Repeater.html#onItemReady) function for the repeater. It's the function that runs when a new repeater item is created, which we call in line 11 of the code in step 10. Add the following code to the My Wishlist page: ```javascript function myItemReady($w, wishlistItem){ let product = wishlistItem.product; $w('#productImage').src = product.mainMedia; $w('#name').text = product.name; $w('#price').text = product.formattedPrice; $w('#productImage').onClick(()=>{ wixLocationFrontend.to(product.productPageUrl); }); $w('#removeItem').onClick(removeItem(wishlistItem._id)); } ``` #### Understanding the Code **Line 2**: Get the current product from the wishlist for the repeater item. **Lines 3-5**: Bind each element in the repeater to the corresponding data for the product. **Lines 6-7**: Set the `onClick` property of the `productImage` element to open the product page for the specific product. **Line 9**: Add a click event handler for the `removeItem` icon for the product displayed in the repeater item, to call the `removeItem` function. This will remove the item from the member's wishlist if they click the `removeItem` icon. We'll define this function in the next step. #### Identifiers you may need to change based on your site's elements If you want to use this exact scenario and code in your site, you may need to modify these items to match the ones on your site: * `#productImage` * `#name` * `#price` * `#removeItem` ### Step 12: Create the removeItem Function on the My Wishlist Page `removeItem` removes an item from a member's wishlist. It's the function that runs when a member clicks the 'X' for a product in their wishlist, which we call in line 9 of the code in step 11. ```javascript function removeItem(id) { return async function() { await wixData.remove('products-wishlist', id); loadWishlist(); } } ``` #### Understanding the Code **Line 3**: Remove the current product from the member's wishlist. **Line 4**: Call `loadWishlist` to reload the wishlist after the product was removed. #### Identifiers you may need to change based on your site's elements If you want to use this exact scenario and code in your site, you may need to modify these items to match the ones on your site: * `wishlist` ### Step 13: Display the Member's Wishlist or Hide It for Non-Members If the site visitor is signed in we need to call `loadwishList` to display their wishlist, if they have one. If they aren't signed in, we hide the wishlist and display the empty wishlist message. We'll add this code to the `onReady` function of the My Wishlist page. ```javascript $w.onReady(async function () { if(wixMembersFrontend.authentication.loggedIn()) { loadWishlist(); } else { $w('#wishlist').collapse(); $w('#emptyWishlist').expand(); } }); ``` #### Understanding the Code **Lines 2-3**: Check to see that a member is logged in and, if they are, call `loadWishlist` to load their wishlist. Because `loadwishlist` is returned by the `onReady` function, the function stops running here. **Lines 5-7**: Only if the visitor isn't logged in, hide the wishlist and display the empty wishlist message. #### Identifiers you may need to change based on your site's elements If you want to use this exact scenario and code in your site, you may need to modify these items to match the ones on your site: * `#wishList` * `#emptyWishlist` ### Next Steps * Open [this example](https://editor.wix.com/html/editor/web/renderer/new?siteId=62ddd72a-7d89-44de-8ce4-ddf15e414b56&metaSiteId=5f8ae7eb-e6fc-4f07-bd91-384921eed30e) in the Wix Editor to work with the template. * Publish the site and refresh your browser so the Stores collections appear in the Database. * Try other Velo Store examples: * [Adding a Related Products Area to a Wix Store Product Page](https://dev.wix.com/docs/develop-websites/articles/code-tutorials/wix-e-commerce-stores/adding-a-related-products-area-to-a-wix-store-product-page.md) * [Adding Multiple Items to the Cart in a Wix Stores Site](https://support.wix.com/en/article/adding-multiple-items-to-the-cart-in-a-wix-stores-site) * [Adding a Gift Quiz to a Wix Stores Site](https://dev.wix.com/docs/develop-websites/articles/code-tutorials/wix-e-commerce-stores/adding-ratings-and-reviews-to-a-wix-stores-site.md) * [Adding a Product Configurator to a Wix Stores Site](https://dev.wix.com/docs/develop-websites/articles/code-tutorials/wix-e-commerce-stores/adding-a-product-configurator-to-a-wix-stores-site.md) * [Adding Ratings and Reviews to a Wix Stores Site](https://dev.wix.com/docs/develop-websites/articles/code-tutorials/wix-e-commerce-stores/adding-ratings-and-reviews-to-a-wix-stores-site.md) --- > Portal Navigation: > > - Append `.md` to any URL under `https://dev.wix.com/docs/` to get its markdown version. > - Pages are either content pages (article or reference text) or menu pages (a list of links to child pages). > - To get a menu page, truncate any URL to a parent path and append `.md` (e.g. `https://dev.wix.com/docs/sdk.md`, `https://dev.wix.com/docs/sdk/core-modules.md`). > - Top-level index of all portals: https://dev.wix.com/docs/llms.txt > - Full concatenated docs: https://dev.wix.com/docs/llms-full.txt ## Resource: Adding Ratings and Reviews to a Wix Stores Site ## Article: Adding Ratings and Reviews to a Wix Stores Site ## Article Link: https://dev.wix.com/docs/develop-websites/articles/code-tutorials/wix-e-commerce-stores/adding-ratings-and-reviews-to-a-wix-stores-site.md ## Article Content: # Velo Tutorial: Adding Ratings and Reviews to a Wix Stores Site > **Note:** > This tutorial and its steps are based on a Wix Editor site. You can adapt the steps for a Wix Studio site by using the equivalent [Wix Studio features](https://dev.wix.com/docs/develop-websites/articles/coding-with-velo/overview/about-coding-with-wix-studio.md#finding-your-way). This article describes how you can use Velo to add ratings and reviews to a Wix Stores site. Throughout this article we're going to use [this site](https://www.wix.com/code-examples/shop-reviews-vw/product-page/pom-pom-body-mist) to illustrate the process. We're going to explain how we set up the sample site and the code we added to make it work.
![](https://d2x3xhvgiqkx42.cloudfront.net/12345678-1234-1234-1234-1234567890ab/0ca9e8ba-16ed-4cd8-a1e1-58d01c4420f7/2018/10/02/288a6751-a709-4af5-8b23-38479a226200.png)
### Overview **In our site we added the following:** * A Review Box popup with user input elements for review submissions. * A repeater on the Product page to display the individual reviews. * A group of elements on the Product page that display the average rating results and the percentage of members who recommend the product. * A reviews collection to store review information. * A review-stats collection to store rating statistics for each product.  **Then we added code to do the following:** * When the Product page loads, display the current statistics under the product description and display the reviews in the repeater. * When the reviewer clicks the "Write a Review" button, open the Review Box popup. * When a reviewer posts a review in the Review Box popup, save the new review data to the reviews collection, update the statistics in the review-stats collection, close the popup, and refresh the reviews and statistics in the Product page. > **Note:** The terms popup and lightbox refer to the same element. While the editor and dashboard now refer to it as a [popup](https://support.wix.com/en/article/studio-editor-using-popups), the API methods continue to use the term lightbox for backward compatibility. The documentation uses both terms accordingly. ### Step 1: Set up the Site To recreate this functionality, you'll need to have Wix Stores added to your site with some products. Once you add Stores to your site, you'll see pages and collections automatically added to your site.
![](https://d2x3xhvgiqkx42.cloudfront.net/12345678-1234-1234-1234-1234567890ab/ef9147e1-f2d9-4773-9a14-7bc889c76065/2020/10/25/8741b360-a9b7-48e1-aacb-f5ec209c9d5c/219ec892-04c3-40b6-9393-101d97300b47.png)
>**Note** > You may need to save or publish the site and refresh your browser to view the Stores collections in the Database. This is what some of the data in our site looks like:
![](https://d2x3xhvgiqkx42.cloudfront.net/12345678-1234-1234-1234-1234567890ab/11e10e4f-b84d-4136-a5a9-6109fab0b7d7/2018/05/31/3e666892-ef06-4012-b36a-654e3a99d4cc.png)
The Products and Collections collections are created automatically when you have a site with Wix Stores. Because these collections are read-only, you must use the Store Manager to create your product list. In this example we don't work with the Collections collection, although it is in our sample site's store. We also added a Review Box popup to the site, and review-stats and reviews collections to our database. We'll describe the Review Box popup's setup later in this article.
![](https://d2x3xhvgiqkx42.cloudfront.net/12345678-1234-1234-1234-1234567890ab/ef9147e1-f2d9-4773-9a14-7bc889c76065/2020/10/25/b3d2c337-d237-40fa-9fb5-b66aac156405/f060268e-e7a8-4490-8621-8a1a061f081e.png)
The review-stats collection has the following fields: * rating: The sum of all ratings the product received * count: The number of times the product was rated * recommended: The number of times the product was recommended * ID: The ID of the product (hidden by default)
![](https://d2x3xhvgiqkx42.cloudfront.net/12345678-1234-1234-1234-1234567890ab/ef9147e1-f2d9-4773-9a14-7bc889c76065/2020/10/25/fb3ce682-f32d-4ece-bb15-9ca0679d614b/77f27182-dfd2-4e08-a572-8d2cf19766ae.png)
We use the statistics stored in the review-stats collection to calculate the number of reviews, the average rating, and the recommended percentage for each product. The reviews collection has fields to store the review information entered via the Review Box popup, plus a field that references the item in the Products collection.
![](https://d2x3xhvgiqkx42.cloudfront.net/12345678-1234-1234-1234-1234567890ab/ef9147e1-f2d9-4773-9a14-7bc889c76065/2020/10/25/1be2cbee-c727-4e0e-b254-8f07dbd32896/36e0629c-6113-4226-87b7-18234b3590ce.png)
We use the data stored in the reviews collection to display each review on the Product page, and to calculate the statistics for each product stored in the review-stats collection. ### Step 2: Set up the Shop Product Page On the Shop Product Page we added: * A group of elements that display the average rating results: * A Ratings Display showing the number of ratings and the average rating for this product * Text displaying the percentage of reviewers who recommended the product * A thank you message, which is displayed after a review is added * A Write a Review button, which opens the review form in the Review Box popup.
![](https://d2x3xhvgiqkx42.cloudfront.net/12345678-1234-1234-1234-1234567890ab/0ca9e8ba-16ed-4cd8-a1e1-58d01c4420f7/2018/09/20/9d9b9c36-86db-4df2-b826-80ada8437ac7.png)
We also added: * A Reviews dataset for displaying review details stored in the reviews collection. * A repeater to display the reviews. Each review contains: * Text elements for the reviewer's name, location, review title, and review text * An optional review image * A ratings display to show the individual reviewer's rating * Text stating whether the reviewer recommends the product * Text containing the review submission date and time * "load more" text at the bottom of the page for loading additional reviews.
![](https://d2x3xhvgiqkx42.cloudfront.net/12345678-1234-1234-1234-1234567890ab/0ca9e8ba-16ed-4cd8-a1e1-58d01c4420f7/2018/09/20/9392034d-9d05-441c-a096-7421c8fbb8ef.png)
Note that there are two types of ratings displayed on the Product page: * An average rating of the product and overall percentage of reviewers who recommended the product. This is displayed beneath the product description. * Each individual reviewer's rating and recommendation (or not) of the product, displayed in each review. ### Step 3: Set Up the Review Box Popup
![](https://d2x3xhvgiqkx42.cloudfront.net/12345678-1234-1234-1234-1234567890ab/ef9147e1-f2d9-4773-9a14-7bc889c76065/2020/10/25/aec8294e-c9f8-40e7-9d6e-9d49820e9cf2/c8aa46f5-d177-41fa-b3e8-cb4083e3650b.png)
In the Review Box popup we added: * A SubmitReviews dataset to connect the data entered by the reviewer to the reviews collection. * A container box to hold all the input elements. * Two sets of radio buttons for rating and recommending the product. * Input elements to collect the reviewer's identification information and their review of the product. * A "Choose File" upload button for uploading an optional review image. * A "Post Review" button for submitting the review. Data is sent to the reviews and review-stats collections.
### Step 4: Prepare the Product Page On the Product Page we start by importing the modules we need to work with data collections and popups in our code. Then we define a global variable to represent the current product. Finally, we run the `initReviews` function to load the current product's ratings and reviews on the page. >**Note:** > Throughout this example we use the [async/await](https://codeburst.io/javascript-es-2017-learn-async-await-by-example-48acc58bad65) JavaScript functionality. ```javascript import wixData from 'wix-data'; import wixWindowFrontend from 'wix-window-frontend'; import wixLocationFrontend from 'wix-location-frontend'; let product; $w.onReady(async function () { product = await $w('#productPage1').getProduct(); initReviews(); wixLocationFrontend.onChange(async (location) => { product = await $w('#productPage1').getProduct(); initReviews(); }) }) ``` #### Understanding the Code **Lines 1-3**: Import the modules we need to work with [Wix Data](https://www.wix.com/velo/reference/wix-data.html), [Wix Window Frontend](https://www.wix.com/velo/reference/wix-window.html), and [Wix Location Frontend](https://www.wix.com/velo/reference/wix-location) libraries. **Line 5**: Define the global `product` variable. **Line 7**: When the page loads, do the following: **Line 8**: Using the `getProduct` function on the current product page, set the `product` variable to the currently displayed product. **Line 9**: Run the `initReviews` function to load the current product's ratings and reviews. **Line 11**: Some functionalities change the product without refreshing the page (for example, [next/previous buttons](https://support.wix.com/en/article/velo-tutorial-creating-previous-and-next-buttons-for-a-dynamic-item-page-with-code) and [related products gallery](https://support.wix.com/en/article/wix-stores-adding-a-related-products-gallery)). This change triggers Wix Location Frontend's [onChange()](https://www.wix.com/velo/reference/wix-location/onchange) API, then: **Line 12**: Update the `product` variable for the newly displayed product. **Line 13**: Run the `initReviews` function to load the current product's ratings and reviews. #### Identifiers you may need to change based on your site's elements If you want to use this exact scenario and code in your site, you may need to modify these items to match the ones on your site: * `#productPage1` ### Step 5: Create the initReviews Function on the Product Page The `initReviews` function filters the `Reviews` dataset to contain only reviews of the currently displayed product, and then displays the product's reviews and statistics. >**Note** > There are two ways to filter a dataset: using code (as in this example) or via the [Dataset Settings](https://support.wix.com/en/article/filtering-and-sorting-datasets) panel of the dataset. ```javascript async function initReviews() { await $w('#Reviews').setFilter(wixData.filter().eq('productId', product._id)); showReviews(); loadStatistics(); } ``` #### Understanding the Code **Line 2**: Chain an `eq` function to `setFilter` to filter out all items in the `Reviews` dataset where the product ID doesn't match the ID of the currently displayed product. **Line 3**: Run the `showReviews` function to display all filtered reviews. **Line 4**: Run the `loadStatistics` function to load and display statistics for the current product. #### Identifiers you may need to change based on your site's collections If you want to use this exact scenario and code in your site, you may need to modify these items to match the ones on your site: * `#Reviews` * `productId` ### Step 6: Create the loadStatistics Function on the Product Page The `loadStatistics` function gets and displays statistics for the current product. ```javascript async function loadStatistics() { const stats = await wixData.get('review-stats', product._id); if (stats) { let avgRating = (Math.round(stats.rating * 10 / stats.count) / 10); let percentRecommended = Math.round(stats.recommended / stats.count * 100); let ratings = $w('#generalRatings'); ratings.rating = avgRating; ratings.numRatings = stats.count; $w('#recoPercent').text = `${percentRecommended} % would recommend`; $w('#generalRatings').show(); } else { $w('#recoPercent').text = 'There are no reviews yet'; } $w('#recoPercent').show(); } ``` #### Understanding the Code **Line 2**: Use the current product's ID to get the product's statistics from the `review-stats` collection and assign them to the `stats` variable. **Line 3**: Check whether there are any statistics related to the current product, indicating that one or more users have rated the product. If there are stats, do the following: **Line 4**: Calculate the average rating of the product by dividing the sum of all ratings the product received from all reviewers by the number of times the product was rated, multiplying by ten, and rounding the number. **Line 5**: Calculate the percentage of people who recommended the product by dividing the total number of recommendations the product received by the number of times the product was rated, multiplying by 100, and rounding the number. **Line 6**: Get the `generalRatings` ratings element and assign it to the `ratings` variable. **Line 7**: Set the ratings element's rating value to the average rating calculated above. **Line 8**: Set the ratings element's total number of ratings from the `count` field in the `review-stats` collection for the current product. **Line 9**: Set the text that displays the recommended percent. **Line 10**: Show the ratings element. **Lines 11-14**: If there are no stats (indicating that no reviewers have rated the product yet), display text stating that there are no reviews yet. #### Identifiers you may need to change based on your site's collections If you want to use this exact scenario and code in your site, you may need to modify these items to match the ones on your site: * `review-stats` * `#generalRatings` * `#recoPercent` ### Step 7: Create the reviewsRepeater\_itemReady Function on the Product Page We selected the `reviewsRepeater` element and, in the Properties & Events panel, added an [`onItemReady`](https://www.wix.com/velo/reference/$w.Repeater.html#onItemReady) [event handler](https://dev.wix.com/docs/develop-websites/articles/workspace-tools/velo-workspace/code-editor-ide/working-in-the-code-editor.md). In [Step 5](https://dev.wix.com/docs/develop-websites/articles/code-tutorials/wix-e-commerce-stores/adding-ratings-and-reviews-to-a-wix-stores-site.md) the `initReviews` function filters the `Reviews` dataset to contain only reviews of the currently displayed product. Each filtered item (row) in the collection is passed to the `reviewsRepeater_itemReady` event handler as the `itemData` parameter. After the page loads and the filtered dataset connects to the repeater, `reviewsRepeater_itemReady` loads data from the collection into each element in the repeater. ```javascript export function reviewsRepeater_itemReady($w, itemData, index) { if (itemData.recommends) { $w('#recommendation').text = 'I recommend this product.'; } else { $w('#recommendation').text = "I don't recommend this product."; } if (itemData.photo) { $w('#reviewImage').src = itemData.photo; $w('#reviewImage').expand(); } $w('#oneRating').rating = itemData.rating; let date = itemData._createdDate; $w('#submissionTime').text = date.toLocaleString(); } ``` #### Understanding the Code **Line 2**: Check if the reviewer recommended the product using the boolean `recommends` field in the `reviews` collection of the current item. **Lines 3-4**: Display text that states whether the reviewer recommended or didn't recommend the product. **Lines 7-9**: If the reviewer uploaded a photo, set the image URL from the item photo and expand the image. **Line 11**: Set the rating value for the review in the `oneRating` ratings display as the rating of the current item. **Line 12**: Get the date the review was submitted and assign it to the `date` variable. **Line 13**: Use the `toLocalString` function to format the date text according to date format settings on the visitor's computer. #### Identifiers you may need to change based on your site's collections If you want to use this exact scenario and code in your site, you may need to modify these items to match the ones on your site: * `#recommendation` * `#reviewImage` * `#oneRating` * `#submissionTime` ### Step 8: Create the showReviews Function on the Product Page `showReviews` expands or collapses the review strip that displays the reviews depending on whether any reviews were submitted. ```javascript export function showReviews() { if ($w('#Reviews').getTotalCount() > 0) { $w('#reviewsStrip').expand(); } else { $w('#reviewsStrip').collapse(); } } ``` #### Understanding the Code **Line 2**: Use the `getTotalCount` function to check whether there are any reviews in the `Reviews` dataset for the current product. **Lines 3-5**: If there are reviews, expand the review strip. If there are no reviews, collapse the review strip. #### Identifiers you may need to change based on your site's elements If you want to use this exact scenario and code in your site, you may need to modify these items to match the ones on your site: * `#Reviews` * `#reviewsStrip` ### Step 9: Create the addReview\_click Function on the Product Page `addReview_click` runs when the reviewer clicks the "Write a Review" button. We selected the "Write a Review" button and, in the Properties & Events panel, added an [`onClick`](https://www.wix.com/velo/reference/$w.Text.html#onClick) [event handler](https://dev.wix.com/docs/develop-websites/articles/workspace-tools/velo-workspace/code-editor-ide/working-in-the-code-editor.md). The function opens the Review Box popup, sends it the current product's ID, and waits for the popup to close. After the popup has closed, the function refreshes the `Reviews` dataset so the new reviews appear on the page, reloads the product statistics to reflect the new rating, and displays a thank you message. ```javascript export async function addReview_click(event, $w) { const dataForLightbox = { productId: product._id }; let result = await wixWindowFrontend.openLightbox('Review Box', dataForLightbox); $w('#Reviews').refresh(); setTimeout(() => { loadStatistics(); }, 2000); $w('#thankYouMessage').show(); } ``` #### Understanding the Code **Lines 2-3**: Create a `dataForLightbox` object containing the current product's ID to be sent to the Review Box popup. **Line 5**: Open the Review Box popup, send it the product ID object created above, and wait for it to close. **Line 6**: After the review popup is closed, refresh the `Reviews` dataset so the new review appears on the page. **Line 7-9**: Reload the current products statistics to reflect the new rating. **Line 10**: Show a thank you message. #### Identifiers you may need to change based on your site's elements If you want to use this exact scenario and code in your site, you may need to modify these items to match the ones on your site: * `#Reviews` * `#thankYouMessage` ### Step 10: Create the resultsPages\_click Function on the Product Page `resultsPages_click` runs when the reviewer clicks the "load more" text at the bottom of the Product page. We selected the "load more" text and, in the Properties & Events panel, added an [`onClick`](https://www.wix.com/velo/reference/$w.Text.html#onClick) [event handler](https://dev.wix.com/docs/develop-websites/articles/coding-with-velo/frontend-code/about-event-handlers-in-wix.md). When the visitor clicks the text, the `resultsPages_click` event handler loads another page (chunk) of reviews into the `reviewsRepeater`. >**Note** > The number of reviews displayed in each page (chunk) of the repeater is defined in the Reviews dataset. Click the dataset, click **Manage Dataset**, and enter the **Number of items to display**. ```javascript export function resultsPages_click(event, $w) { $w('#Reviews').loadMore(); } ``` #### Understanding the Code **Lines 1-2**: When the event handler is triggered, the `Reviews` dataset loads the next page (chunk) of reviews using the `loadMore` function. #### Identifiers you may need to change based on your site's elements If you want to use this exact scenario and code in your site, you may need to modify these items to match the ones on your site: * `#Reviews` ### Step 11: Prepare the Review Box Popup In the Review Box popup, we started by importing the modules we need to work with data collections and popups in our code. Then we declare a variable to store the current product ID.  When the popup finishes loading, we get the current product ID passed to the popup in [Step 9](#step-9-create-the-addreview_click-function-on-the-product-page) via the `openLightbox` function. After reviewers complete their review and click the "Post Review" button, the new review data is sent to the `SubmitReview` dataset. Before the new review is saved to the `reviews` collection, we use the `onBeforeSave` event handler to check whether the reviewer rated the product. If the user did not rate the product, an error message is displayed and the review is not saved. After the new review is saved to the `reviews` collection, we use the `onAfterSave` event handler to update the statistics for the current product, and to close the popup. First, add the following to the popup page's code: ```javascript import wixWindowFrontend from 'wix-window-frontend'; import wixData from 'wix-data'; let productId; ``` #### Understanding the Code **Lines 1-2**: Import the modules we need to work with [Wix Data](https://www.wix.com/velo/reference/wix-data.html) and [Wix Window Frontend](https://www.wix.com/velo/reference/wix-window.html) libraries. **Line 4**: Declare a global variable to store the product ID. Then, add the following code to the onReady function: ```javascript $w.onReady(function () { productId = wixWindowFrontend.lightbox.getContext().productId; $w('#SubmitReviews').onBeforeSave(() => { if ($w('#radioRating').value === '') { $w('#rateError').show(); return Promise.reject(); } $w('#SubmitReviews').setFieldValues({ productId, rating: $w('#radioRating').value, recommends: $w('#radioGroup1').value }); }); }); ``` #### Understanding the Code **Line 3**: When the page loads, use the `getContext` function to get the object passed to the popup when it was opened. In this case, the object contains the current product ID. **Line 5**: Set the action that occurs before the new review is saved to the `reviews` collection via the `SubmitReviews` dataset. **Line 6**: Check if the reviewer rated the product. **Lines 7-8**: If the reviewer did not rate the product, show the `rateError` error message and do not save the new review. **Line 11**: If the reviewer did rate the product, use the `setFieldValues` function to update the `SubmitReviews` dataset. **Lines 12-14**: Update the dataset item with the input element values. The item will then be saved to the `reviews` collection. And finally, add the following code to the onReady function: ```javascript $w('#SubmitReviews').onAfterSave(async () => { await updateStatistics($w('#radioGroup1').value); wixWindowFrontend.lightbox.close(); }); ``` #### Understanding the Code **Line 1**: Set the action that occurs after the new review is saved to the `reviews` collection via the `SubmitReviews` dataset. **Line 2**: Update the product's statistics using the `updateStatistics` function. The reviewer's recommendation (or not), as stored in the `radioGroup1` radio buttons, is sent as a parameter to the function. **Line 3**: After the statistics are updated, close the popup to return the reviewer to the Product page. #### Identifiers you may need to change based on your site's elements If you want to use this exact scenario and code in your site, you may need to modify these items to match the ones on your site: * `productID` * `#SubmitReviews` * `#radioRating` * `#rateError` * `#radioGroup1` ### Step 12: Create the updateStatistics Function in the Review Box Popup This function updates the statistics stored in the `review-stats` collection to include data from the current review. If no previous statistics exist for the current product, it creates a new statistics item. ```javascript async function updateStatistics(isRecommended) { let stats = await wixData.get('review-stats', productId); if (stats) { stats.rating += parseInt($w('#radioRating').value, 10); stats.count += 1; stats.recommended += (isRecommended === "true") ? 1 : 0; return wixData.update('review-stats', stats) } stats = { _id: productId, rating: parseInt($w('#radioRating').value, 10), count: 1, recommended: (isRecommended === "true") ? 1 : 0 } return wixData.insert('review-stats', stats) } ``` #### Understanding the Code **Line 2**: Get the review statistics for the current product from the `review-stats` collection. **Line 4**: If statistics data already exist for this product, do the following: **Line 5**: Extract the string representing the value of the radio button rating selected by the user. Use the `parseInt` function to convert the string to an integer. Add the integer to the total rating points. **Line 6**: Increase the ratings count by one. **Line 7**: Check if the reviewer recommended the product. If the `isRecommended` input parameter from the `reviews` collection is true, increase the recommendation count by one. **Line 8**: Update the product's statistics in the `review-stats` collection. **Line 11**: If no previous statistics data exist for this product, create a new statistics item: **LIne 12**: Set the statistics item's ID to the current product's ID. **Line 13**: Extract the string representing the value of the radio button rating selected by the user. Use the `parseInt` function to convert the string to an integer. Set the statistics item's rating to the integer. **Line 14**: Set the statistics item's ratings count to 1 because this is the first rating. **Line 15**: Check if the reviewer recommended the product. If they did, set the recommendation count to 1. **Line 17**: Insert the new product's statistics into the `review-stats` collection. #### Identifiers you may need to change based on your site's elements If you want to use this exact scenario and code in your site, you may need to modify these items to match the ones on your site: * `review-stats` * `#radioRating` ### Step 13: Create the radioRating\_change Function in the Review Box Popup `radioRating_change` runs when the reviewer chooses a rating. We selected the `radioRating` radio buttons element under "Overall Rating" and, in the Properties & Events panel, added an [`onChange`](https://www.wix.com/velo/reference/$w.RadioButtonGroup.html#onChange) [event handler](https://dev.wix.com/docs/develop-websites/articles/coding-with-velo/frontend-code/about-event-handlers-in-wix.md). When the visitor chooses a rate, the `radioRating_change` event handler hides the error message displayed when a visitor fails to rate the product. ```javascript export function radioRating_change(event, $w) { $w('#rateError').hide(); } ``` #### Understanding the Code **Lines 1-2**: When the visitor selects a rate, hide the error message stating "Please rate this product". #### Identifiers you may need to change based on your site's elements If you want to use this exact scenario and code in your site, you may need to modify these items to match the ones on your site: * `#rateError` ### Next Steps * Open [this example](https://editor.wix.com/html/editor/web/renderer/edit/a3686528-4030-475c-b332-721b2548f11a?metaSiteId=d449c6cf-57f8-438b-a284-a0642ca0f7ca) in the Editor to work with the template. * Publish the site and refresh your browser so the Stores collections appear in the Database. * Try other Velo Store examples: * [Adding a Related Products Area to a Wix Store Product Page](https://dev.wix.com/docs/develop-websites/articles/code-tutorials/wix-e-commerce-stores/adding-a-related-products-area-to-a-wix-store-product-page.md) * [Adding Multiple Items to the Cart in a Wix Stores Site](https://dev.wix.com/docs/develop-websites/articles/code-tutorials/wix-e-commerce-stores/adding-multiple-items-to-the-cart-in-a-wix-stores-site.md) * [Adding a Gift Quiz to a Wix Stores Site](https://dev.wix.com/docs/develop-websites/articles/code-tutorials/wix-e-commerce-stores/adding-ratings-and-reviews-to-a-wix-stores-site.md) * [Adding a Product Configurator to a Wix Stores Site](https://dev.wix.com/docs/develop-websites/articles/code-tutorials/wix-e-commerce-stores/adding-a-product-configurator-to-a-wix-stores-site.md) * [Adding a Wishlist to a Wix Stores Site](https://dev.wix.com/docs/develop-websites/articles/code-tutorials/wix-e-commerce-stores/adding-a-wishlist-to-a-wix-stores-site.md) --- > Portal Navigation: > > - Append `.md` to any URL under `https://dev.wix.com/docs/` to get its markdown version. > - Pages are either content pages (article or reference text) or menu pages (a list of links to child pages). > - To get a menu page, truncate any URL to a parent path and append `.md` (e.g. `https://dev.wix.com/docs/sdk.md`, `https://dev.wix.com/docs/sdk/core-modules.md`). > - Top-level index of all portals: https://dev.wix.com/docs/llms.txt > - Full concatenated docs: https://dev.wix.com/docs/llms-full.txt ## Resource: Adding a Related Products Area to a Wix Store Product Page ## Article: Adding a Related Products Area to a Wix Store Product Page ## Article Link: https://dev.wix.com/docs/develop-websites/articles/code-tutorials/wix-e-commerce-stores/adding-a-related-products-area-to-a-wix-store-product-page.md ## Article Content: # Velo Tutorial: Adding a Related Products Area to a Wix Store Product Page > **Note:** This tutorial and its steps are based on a Wix Editor site. You can adapt the steps for a Wix Studio site by using the equivalent [Wix Studio features](https://dev.wix.com/docs/develop-websites/articles/coding-with-velo/overview/about-coding-with-wix-studio.md). This article describes how you can use Velo to add a Related Products area to a Wix Stores Product page. Throughout this article, we're going to use the same site to illustrate the process. You can open the site in the Editor to work with the [template](https://editor.wix.com/html/editor/web/renderer/new?siteId=fac42b60-8aaa-465b-97ef-b193d4042a4c&metaSiteId=23658898-7d95-413f-9e0f-3b21746cb8e9). We're going to explain what we did in the sample site, the code we added to make it work, and give you guidance on how you can modify each step to do something similar on your site.
![](https://d2x3xhvgiqkx42.cloudfront.net/12345678-1234-1234-1234-1234567890ab/11e10e4f-b84d-4136-a5a9-6109fab0b7d7/2018/06/01/0ba2a67a-527e-4406-8f5c-e3c687416760.png)
### Overview In our example we add a repeater inside a strip that we add to the Stores Product page. This serves as the Related Products area. We define related products in two ways: 1. Products that we manually define as relating to the current product. We create that relationship in a relatedProducts collection. 2. Products whose price is 20% greater or 20% less than the current product. The code then follows the following logic: 1. Get the ID of the currently displayed product. 2. Query the relatedProducts collection and return the products that we defined manually as relating to the currently displayed product.  3. Query the Products collection for items whose price falls within a specific range, relative to the current item's price.  4. Add the results of both queries into an array. 5. First try to display the products that we defined manually as relating to the currently displayed product. If there are none, then display the items whose price falls within a specific range. Display a maximum of four related items. 6. If neither query returns results, hide the repeater. ### Step 1: Site Setup To recreate this functionality you'll need to have Wix Stores added to your site with some products. Once you add Stores to your site, you'll see pages (by clicking on Page Code in the Code sidebar) and collections (by clicking on Databases in the Code sidebar) automatically added to your site.
![](https://d2x3xhvgiqkx42.cloudfront.net/12345678-1234-1234-1234-1234567890ab/ef9147e1-f2d9-4773-9a14-7bc889c76065/2020/10/25/24df29a9-c9ad-45a2-925d-d194c6ec230d/90c33992-f283-4b9b-8f1d-3d244cc6253a.png)
>**Note** > You may need to save or publish the site and refresh your browser to view the Stores collections in the Databases. #### Database Setup This is what some of the data in our site looks like:
![](https://d2x3xhvgiqkx42.cloudfront.net/12345678-1234-1234-1234-1234567890ab/12345678-1234-1234-1234-1234567890ab/2020/10/26/c2c4e658-1e1d-4417-8bbb-916142879c23/2d2b3f6e-01f7-4c6a-921c-6df5590239fc.png)
In our example we don't work with the Collections collection, although it is in our sample site's store. 
![](https://d2x3xhvgiqkx42.cloudfront.net/12345678-1234-1234-1234-1234567890ab/12345678-1234-1234-1234-1234567890ab/2020/10/26/ab2361a0-1ba4-4fa6-b78d-172242c9ccd1/ea98355d-ebb5-43c0-8532-3161471cebc8.png)
The relatedProducts collection has two fields: Product A and Product B, which are both reference fields. For each item, Product A values reference an item in the Products collection. Product B values then reference the product related to the item in Product A. Note that a product may appear in both the Product A or Product B fields. Note also that the field IDs for the two fields are `productA` and `productB`. This is what the relatedProducts collection looks like:
![](https://d2x3xhvgiqkx42.cloudfront.net/12345678-1234-1234-1234-1234567890ab/12345678-1234-1234-1234-1234567890ab/2020/10/26/44d16720-0946-4578-a8ae-726302854f6a/5a64c95b-17c2-4c05-8a63-715cad65d1e2.png)
You can see a copy of the data from the Collections, Products, and relatedProducts collections [here](https://github.com/jeffreya/WixCode-RelatedProducts-data). The Products and Collections collections are created automatically when you have a site with Wix Stores. Because these collections are read-only, you must use the Store Manager to create your product list.  ### Step 2: Setting up the Related Products Area In our example we use a repeater inside a strip as the Related Products area, and we set up the page with the following IDs. 
![](https://d2x3xhvgiqkx42.cloudfront.net/12345678-1234-1234-1234-1234567890ab/11e10e4f-b84d-4136-a5a9-6109fab0b7d7/2018/05/31/b3d1c41f-ad2b-417b-97d4-2f39c874119d.png)
How you can set it up differently To work with the method we use in this example, you'll need somewhere to display the products that relate to the product being displayed on the products page. Repeating elements like repeaters or tables work well, but you can also bind the related products data to other display elements.
### Step 3: Create the loadRelatedProducts Function `loadRelatedProducts` is called from onReady. It gets the current product from the product page and passes that to the functions that find the related products. It then calls the functions to display the results. >**Note:** > Throughout this example we use the new [async/await](https://codeburst.io/javascript-es-2017-learn-async-await-by-example-48acc58bad65) JavaScript functionality. ```javascript import wixData from 'wix-data'; import wixLocationFrontend from 'wix-location-frontend'; $w.onReady(function () { loadRelatedProducts(); }); async function loadRelatedProducts() { let product = await $w('#productPage').getProduct(); let relatedProductResults = await Promise.all([ relatedProductsByTable(product), relatedProductsByPrice(product) ]); if (relatedProductResults[0].length > 0) showRelatedProducts(relatedProductResults[0]); else showRelatedProducts(relatedProductResults[1]); }; ``` #### Understanding the Code **Line 1-2**: Import the modules we need to work with Wix Data and Wix Location Frontend libraries. **Lines 4-5**: Call `loadRelatedProducts` inside the page's onReady function. `loadRelatedProducts` calls the functions that run the related product queries. It then calls the function to display the query results. Note that we don't return the `loadRelatedProducts` result promise from `$w.onReady`. If we return a promise from `$w.onReady`, it will delay the page load until the promise is resolved. By not returning the promise, we allow the page to load as fast as possible while the related products load in the background. **Line 9**: Get the current product from the Product page. **Lines 10-12**: Create the `relatedProductResults` array from the results of the `relatedProductsByTable` and `relatedProductsByPrice` functions. Each of these functions accepts the current product as a parameter and returns an array of related products. **Lines 15-18**: If the `relatedProductResults` isn't empty, then first try to display the results of `relatedProductsByTable`. If there are none, display the results of `relatedProductsByPrice`. #### Identifiers you may need to change based on your site's elements If you want to use this exact scenario and code in your site, you may need to modify these items to match the ones on your site: * `productPage`
How you can set it up differently In our example we use two different methods to determine the related products. loadRelatedProducts runs both those methods and prioritizes the relatedProductsByTable results over the relatedProductsByPrice results. You may choose to have a different number of methods for determining the related products and could modify the code accordingly.  Regardless of your methods, you need to follow this basic flow: 1. Get the current product 2. Search for related products 3. Display related products
### Step 4: Create the relatedProductsByTable Function `relatedproductsByTable` finds all the products that relate to the current product, based on the relationships defined in the relatedProducts collection. ```javascript async function relatedProductsByTable(product) { let productId = product._id; // find related products by relation table let relatedByTable = await Promise.all([ wixData.query('relatedProducts') .eq('productA', productId) .include('productB') .find(), wixData.query('relatedProducts') .eq('productB', productId) .include('productA') .find() ]); let relatedProducts = [ ...relatedByTable[0].items.map(_ => _.productB), ...relatedByTable[1].items.map(_ => _.productA) ]; return relatedProducts; }; ``` #### Understanding the Code **Lines 5-14**: Run two parallel queries on the `relatedProducts` collection. Each query returns the value in the productA or productB fields that relate to the currently displayed product. Use `.include` to include all the data from the referenced field for the related product. **Lines 16-19**: Use the spread operator and map function to build an array of related products from both fields. The spread operator flattens the results of both queries into one array. The map function extracts only the related product from the item object of the query results while removing the current product. Note that the \_ is a variable that represents the current element being processed in the array. #### Items you may need to change based on your site's collections If you want to use this exact scenario and code in your site, you may need to modify these items to match the ones on your site: * `relatedProducts` * `productA` * `productB`
How you can set it up differently You can create any criteria you want for defining related products. If you choose to change the logic of this function, you will need to make sure that the relatedProductsByTable function returns the items object of the results of a wixData query.
### Step 5: Create the relatedProductsByPrice Function `relatedproductsByPrice` finds all the products that relate to the current product, based on a price range. ```javascript async function relatedProductsByPrice(product) { let productId = product._id; // find related products by price let relatedByPrice = await wixData.query('Stores/Products') .between('price', product.price * 0.8, product.price * 1.2) .ne('_id', productId) .find(); return relatedByPrice.items; }; ``` #### Understanding the Code **Lines 5-8**: Run a query on the Products collection for any products whose price is within 20% of the price of the currently displayed product. Use `.ne` to exclude the current product from the results. **Line 9**: Return the `.items` object of the query results.
How you can set it up differently You can create any criteria you want for defining related products. If you choose to change the logic of this function, you will need to make sure that the relatedProductsByPrice function returns the items object of the results of a wixData query.
### Step 6: Create the showRelatedProducts Function `showrelatedProducts` accepts the results of `relatedProductsByTable` or `relatedProductsByPrice` and truncates the results so only a maximum of four items are displayed. It then sets the [`onItemReady`](https://www.wix.com/code/reference/$w.Repeater.html#onItemReady) function for the repeater, defines the repeater data, and decide whether to hide or display the repeater. ```javascript function showRelatedProducts(relatedProducts) { if (relatedProducts.length > 0) { relatedProducts.splice(4, relatedProducts.length); $w('#relatedItemsRepeater').onItemReady(relatedItemReady); $w("#relatedItemsRepeater").data = relatedProducts; $w("#relatedItems").expand(); } else { $w("#relatedItems").collapse(); } }; ``` #### Understanding the Code **Line 2**: Check if `relatedProducts` contains data. If it does, run lines 3-6. **Line 3**: Remove all but the first four results from `relatedProducts`. **Line 4**: Set the `onItemReady` function for the repeater to `relatedItemReady`. We'll define that function in the next step. **Line 5**: Set the `data` property for the repeater. **Line 6**: Expand the repeater. **Line 7-8**: If the `relatedProducts` does not contains data, collapse it. #### Identifiers you may need to change based on your site's elements If you want to use this exact scenario and code in your site, you may need to modify these items to match the ones on your site: * `relatedItemsRepeater` * `relatedItems`
How you can set it up differently To work with the method we use in this example, you'll need somewhere to display the related products. Repeating elements like repeaters or tables work well, but you can also bind the related products data to other display elements. It's a good idea to check if there are related products, and if not, prevent those elements from appearing.
### Step 7: Create the relatedItemReady Function `relatedItemReady` is the [onItemReady](https://www.wix.com/code/reference/$w.Repeater.html#onItemReady) function for the repeater. It's the function that runs when a new repeated item is created. ```javascript function relatedItemReady($w, product) { $w("#productImage").src = product.mainMedia; $w("#productName").text = product.name; $w("#productPrice").text = product.formattedPrice; $w('#productImage').onClick(() => { wixLocationFrontend.to(product.productPageUrl); }); }; ``` #### Understanding the Code **Lines 2-4**: Bind each element in the repeater to the corresponding data for the product. **Lines 5-6**: Set the `onClick` property of the `productImage` element to open the product page for the specific product. #### Identifiers you may need to change based on your site's elements If you want to use this exact scenario and code in your site, you may need to modify these items to match the ones on your site: * `productImage` * `productName` * `productPrice` * `productImage`
How you can set it up differently Depending on how you choose to display the related products, you'll need to set up those elements to display the product data. It's a good idea to make at least one element something your users can click that points to the product page for the related product.
### Next Steps * Open [this example](https://editor.wix.com/html/editor/web/renderer/new?siteId=fac42b60-8aaa-465b-97ef-b193d4042a4c&metaSiteId=23658898-7d95-413f-9e0f-3b21746cb8e9) in the Editor to work with the template. * Publish the site and refresh your browser so the Stores collections appear in the Database. * Try other Velo Store examples: * [Adding a Wishlist to a Wix Stores Site](https://dev.wix.com/docs/develop-websites/articles/code-tutorials/wix-e-commerce-stores/adding-a-wishlist-to-a-wix-stores-site.md) * [Adding Multiple Items to the Cart in a Wix Stores Site](https://dev.wix.com/docs/develop-websites/articles/code-tutorials/wix-e-commerce-stores/adding-multiple-items-to-the-cart-in-a-wix-stores-site.md) * [Adding a Gift Quiz to a Wix Stores Site](https://dev.wix.com/docs/develop-websites/articles/code-tutorials/wix-e-commerce-stores/adding-ratings-and-reviews-to-a-wix-stores-site.md) * [Adding a Product Configurator to a Wix Stores Site](https://dev.wix.com/docs/develop-websites/articles/code-tutorials/wix-e-commerce-stores/adding-a-product-configurator-to-a-wix-stores-site.md) * [Adding Ratings and Reviews to a Wix Stores Site](https://dev.wix.com/docs/develop-websites/articles/code-tutorials/wix-e-commerce-stores/adding-ratings-and-reviews-to-a-wix-stores-site.md) --- > Portal Navigation: > > - Append `.md` to any URL under `https://dev.wix.com/docs/` to get its markdown version. > - Pages are either content pages (article or reference text) or menu pages (a list of links to child pages). > - To get a menu page, truncate any URL to a parent path and append `.md` (e.g. `https://dev.wix.com/docs/sdk.md`, `https://dev.wix.com/docs/sdk/core-modules.md`). > - Top-level index of all portals: https://dev.wix.com/docs/llms.txt > - Full concatenated docs: https://dev.wix.com/docs/llms-full.txt ## Resource: Adding Multiple Items to the Cart in a Wix Stores Site ## Article: Adding Multiple Items to the Cart in a Wix Stores Site ## Article Link: https://dev.wix.com/docs/develop-websites/articles/code-tutorials/wix-e-commerce-stores/adding-multiple-items-to-the-cart-in-a-wix-stores-site.md ## Article Content: # Velo Tutorial: Adding Multiple Items to the Cart in a Wix Stores Site >**Note:** > This tutorial and its steps are based on a Wix Editor site. You can adapt the steps for a Wix Studio site by using the equivalent [Wix Studio features](https://dev.wix.com/docs/develop-websites/articles/coding-with-velo/overview/about-coding-with-wix-studio.md). This article describes how you can use Velo to add multiple items at once to the shopping cart in a Wix Stores site. Throughout this article, we're going to use [this site](https://www.wix.com/code-examples/bulk-add-to-cart-vw) to illustrate the process. You can follow along by opening the site [in the Wix Editor](https://editor.wix.com/html/editor/web/renderer/new?siteId=11e2a942-7c54-4bbb-9ffb-cce15e010fb1&metaSiteId=635e3b99-e23b-428e-8947-0fd14be46ddc&autoDevMode=true). We're going to explain how we set up the sample site and the code we added to make it work.
![](https://d2x3xhvgiqkx42.cloudfront.net/12345678-1234-1234-1234-1234567890ab/dfff8cbb-ddcb-4376-8cae-3fedb2dd4458/2018/08/23/e7babbdc-7174-402a-909c-2ea03039e9c8.png)
### Overview Our site allows visitors to create a custom charm bracelet. Visitors choose the material of the bracelet and 5 charms to add to it. When the site visitor finishes the customization process, the bracelet—along with all of the chosen charms—are added to the shopping cart.  Our site contains a Wix Store with all the different bracelet and charm types. **We also added a Charm Bracelet page which contains:** * An image of a charm bracelet with five overlaid images for charms that are added to the bracelet. The overlaid images are hidden on load. * Three collapsible sections implemented using container boxes. These sections represent the three steps a site visitor is required to complete before purchasing a custom bracelet. Steps 1 and 2 contain a button to move to the next section, and step 3 contains a button to add the items to the cart. Site visitors can also move between sections by clicking on the text elements that serve as the section headers.  * The first section contains three buttons for choosing the bracelet material. * The second section contains a repeater that shows the available and selected charms. * The third section contains a text element that shows which material bracelet was chosen, a repeater that shows which charms were chosen, and another text element that shows the total price. * A shopping cart.  **Then we added code to do the following:** * Set up the page's navigation so site visitors can easily switch between sections. * Get the product information for the bracelet and all the charms. * Add repeater data and logic for selecting and displaying bracelet charms. * Calculate the price of the selected bracelet and charms, and add them to the store's shopping cart. ### Step 1: Set Up the Site To recreate this functionality, you'll need to have Wix Stores added to your site with some products. In our site, the products are the different bracelet and charm types. Once you add Stores to your site, you'll see pages and collections automatically added to your site.
![](https://d2x3xhvgiqkx42.cloudfront.net/12345678-1234-1234-1234-1234567890ab/ef9147e1-f2d9-4773-9a14-7bc889c76065/2020/10/26/9eead11a-f966-496b-9ce1-b894241c64b3/4447e177-1051-43f3-9f81-7a09abf1e757.jpg)
>**Notes:** > * In this example we don't work with the Collections collection, although it is in our sample site's store.  > * You may need to save or publish the site and refresh your browser to view the Stores collections in the Database. This is what some of the data in our site looks like:
![](https://d2x3xhvgiqkx42.cloudfront.net/12345678-1234-1234-1234-1234567890ab/ef9147e1-f2d9-4773-9a14-7bc889c76065/2020/10/26/3bb22b8c-26be-433f-a443-2af5feddcc86/8716af1f-c618-4d68-ad62-5cd3ae2558a0.png)
### Step 2: Set Up the Charm Bracelet Page Here's everything we added on the Charm Bracelet page: * A dataset connected to the Products collection. * A shopping cart. ![](https://d2x3xhvgiqkx42.cloudfront.net/12345678-1234-1234-1234-1234567890ab/dfff8cbb-ddcb-4376-8cae-3fedb2dd4458/2018/09/03/944df7ca-2d4b-478f-a743-8eb7dd176fd5.png) * Images for the bracelet and charms. The bracelet image changes based on the chosen material. The charmPlace images change based on the selected charms.   ![](https://d2x3xhvgiqkx42.cloudfront.net/12345678-1234-1234-1234-1234567890ab/dfff8cbb-ddcb-4376-8cae-3fedb2dd4458/2018/08/23/4d766cde-97d6-4ddb-9610-0ecdfe7d3ab6.png) * Some text elements for displaying explanatory information. ![](https://d2x3xhvgiqkx42.cloudfront.net/12345678-1234-1234-1234-1234567890ab/dfff8cbb-ddcb-4376-8cae-3fedb2dd4458/2018/08/23/644c3ae0-c20a-468f-a8f4-581ddad0e58e.png) * Three buttons styled to look like section headings. ![](https://d2x3xhvgiqkx42.cloudfront.net/12345678-1234-1234-1234-1234567890ab/dfff8cbb-ddcb-4376-8cae-3fedb2dd4458/2018/08/23/624554ed-8a03-4232-bda3-3d97e67c153a.png) * Three container boxes for the three steps in the customization process. Elements are grouped in a container boxes so that they can easily be collapsed and expanded together. * The first container box contains buttons for choosing the bracelet material, and a button for moving to the next step. ![](https://d2x3xhvgiqkx42.cloudfront.net/12345678-1234-1234-1234-1234567890ab/dfff8cbb-ddcb-4376-8cae-3fedb2dd4458/2018/08/23/bbe02a71-d69f-4cff-9872-51131f131f99.png) * The second container box contains a repeater for choosing the bracelet charms, and a button for moving to the next step. Each repeater item consists of three layers: * A charm overlay for indicating whether the charm is still available for selection. * A charm image that shows the actual charm. * A charm border for indicating whether the charm is selected. ![](https://d2x3xhvgiqkx42.cloudfront.net/12345678-1234-1234-1234-1234567890ab/dfff8cbb-ddcb-4376-8cae-3fedb2dd4458/2018/08/23/47436fff-2773-4133-ad57-97f9012babea.png) * The third container box contains elements for reviewing the customized bracelet and adding the items to the shopping cart. * A text element to show the material of the selected bracelet. * A repeater to show the selected charms. * A text element to show the price of the selected bracelet and charms. * A button to add all the selected items to the cart. ![](https://d2x3xhvgiqkx42.cloudfront.net/12345678-1234-1234-1234-1234567890ab/dfff8cbb-ddcb-4376-8cae-3fedb2dd4458/2018/08/23/2f435bfe-d0d1-4908-9550-6d72089a0636.png) ### Step 3: Create an Import and Global Variables All of the code in this site is added to the Charm Bracelet page.  The code begins with an import statement and some variable declarations. ```javascript import wixData from 'wix-data'; const MAX_NUMBER_OF_CHARMS = 5; const selectedCharms = []; let braceletsMap = {}; let selectedBracelet; ``` **Line 1**: Import the `wix-data` module, which is used to query the site's collections. **Line 3**: Create a constant that determines the maximum number of charms that can be added to the bracelet. **Line 4**: Create an array that will contain the charms that are selected by the site visitor. **Line 5**: Create an object that will contain the product information for the various types of bracelets. **Line 6**: Create a variable to store the type of bracelet selected. ### Step 4: Create the onReady Function When the page loads, get the product information for the various types of bracelets and store it in a convenient way to use later. >**Note:** > Throughout this example we use the [async/await](https://codeburst.io/javascript-es-2017-learn-async-await-by-example-48acc58bad65) JavaScript functionality. ```javascript $w.onReady(async () => { const braceletNames = ['Silver Bracelet', 'Rose Gold Bracelet', 'Gold Bracelet']; let newQuery = await wixData.query("Stores/Products") .hasSome("name", braceletNames).find(); const allBracelets = newQuery.items; allBracelets.forEach(product => { const keyName = product.name.split(' ')[0].toLowerCase(); braceletsMap[keyName] = product; }); }); ``` **Line 1**: Declare the `onReady()` event handler. **Line 2**: Create an array of all the available bracelet types. **Line 3-4**: Query the Products collection to find the products that match the bracelet names from the list created in line 2. **Line 5**: Get the items returned in the query results. **Line 6-8**: For each item returned by the query, create a key in the `braceletsMap` object corresponding to the bracelet type (e.g., the key for `'Silver Bracelet'` is set as `silver`). Then set the value for that key to the product information retrieved for that type of bracelet. ### Step 5: Create onClick Functions for Each Header Each step in the customization process has a header. The header is actually a button that site visitors can click to expand the relevant section and collapse all other sections. ```javascript export function selectBraceletText_click(event, $w) { $w('#braceletSelectionStrip').expand(); $w('#charmsSelectionStrip').collapse(); $w('#addToCartStrip').collapse(); }; export function chooseCharmsText_click(event, $w) { $w('#braceletSelectionStrip').collapse(); $w('#charmsSelectionStrip').expand(); $w('#addToCartStrip').collapse(); }; export function reviewBraceletText_click(event, $w) { $w('#braceletSelectionStrip').collapse(); $w('#charmsSelectionStrip').collapse(); $w('#addToCartStrip').expand(); }; ``` **Lines 1-5, 7-11, 13-17**: When a header button is clicked, expand the corresponding section and collapse all others. ### Step 6: Create onClick Functions for Each Material Button In step 1 of the customization process, site visitors choose the material of the charm bracelet using one of three buttons. The buttons are wired to similar `onClick` event handlers. ```javascript export function gold_click(event, $w) { selectBracelet(braceletsMap.gold); }; export function silver_click(event, $w) { selectBracelet(braceletsMap.silver); }; export function rosegold_click(event, $w) { selectBracelet(braceletsMap.rose); }; ``` **Lines 1-3, 5-7, 9-11**: The button event handlers call the `selectBracelet()` function, passing the product information corresponding to the chosen material. The `selectBracelet()` function performs all the necessary changes to the page's elements when the chosen material of the bracelet changes and is described in detail in step 7 of this article. ### Step 7: Create the selectBracelet Function The `selectBracelet()` function receives the information from the Products collection corresponding to the chosen bracelet material. ```javascript function selectBracelet(bracelet) { selectedBracelet = bracelet; $w('#bracelet').src = bracelet.mainMedia; $w('#nextButton').enable(); $w('#chooseCharmsText').enable(); $w('#selectedBracelet').text = bracelet.name + " + these charms:"; $w('#selectedBracelet').show(); }; ``` **Line 2**: Set the `selectedBracelet` global variable to the product information of the chosen bracelet. **Line 3**: Set the bracelet image to the main image from the chosen bracelet's product information. **Line 4**: Enable the button used to move to the next step of the customization process. See step 8 of this article for a description of the code that runs when this button is clicked. **Line 5**: Enable the heading used to move to the next step of the customization process. See step 5 of this article for a description of the code that runs when this button is clicked. **Line 6**: Set the review text in step 3 of the customization process to reflect the selected bracelet type. **Line 7**: Show the review text in step 3 of the customization process. ### Step 8: Create the nextButton\_click Function The `nextButton_click()` function is wired to the next button in step 1 of the customization process. The button is used to move to step 2. ```javascript export function nextButton_click(event, $w) { $w('#braceletSelectionStrip').collapse(); $w('#charmsSelectionStrip').expand(); $w('#chooseCharmsText').enable(); } ``` **Line 2**: Collapse the first section. **Line 3**: Expand the second section. **Line 4**: Enable the header button of the second section. ### Step 9: Create the charmsRepeater\_itemReady Function The `charmsRepeater_itemReady()` function is wired to the repeater used to select charms in step 2 of the customization process. The function is called for each repeater item as it is created. It sets what happens when a specific charm is clicked. ```javascript export function charmsRepeater_itemReady($w, itemData, index) { $w('#charmImage').onClick(() => { if ($w('#charmBorder').hidden) { selectedCharms.push(itemData); $w('#charmBorder').show(); showCharmOnBracelet(itemData.mainMedia); $w('#selectedCharmsRepeater').data = selectedCharms; if (selectedCharms.length === MAX_NUMBER_OF_CHARMS) { disableCharmsSelection(); } } else { if (selectedCharms.length === MAX_NUMBER_OF_CHARMS) { enableCharmsSelection(); } const indexOfCharm = selectedCharms.findIndex(item => item._id === itemData._id); selectedCharms.splice(indexOfCharm, 1); $w('#selectedCharmsRepeater').data = selectedCharms; hideCharmFromBracelet(itemData.mainMedia); $w('#charmBorder').hide(); } }); }; ``` **Line 2**: Create an `onClick` event handler on the charm image. **Line 3**: If the item's border is hidden, meaning the charm is not currently selected: **Line 4**: Add the clicked charm to the list of selected charms. **Line 5**: Show the border to indicate that the charm is now selected. **Line 6**: Call the `showCharmOnBracelet()` function with the selected charms image. The `showCharmOnBracelet()` function adds the specified charm image to the next open spot on the bracelet image, as described in step 10 of this article. **Line 7**: Reset the repeater in step 3 of the customization process to reflect the newly selected charm. **Lines 8-10**: If the selection means the maximum number of charms has been reached, disable further charm selection by calling the `disableCharmsSelection()` function described in step 11 of this article. **Line 11**: If the item's border is shown, meaning the charm is currently selected: **Lines 12-14**: If the deselection means the maximum number of charms is no longer selected, enable further charm selection by calling the `enableCharmsSelection()` function described in step 11 of this article. **Lines 15-16**: Find the index of the charm that is being deselected and remove it from the list of selected charms. **Line 17**: Reset the repeater in step 3 of the customization process to reflect the newly deselected charm. **Line 18**: Call the `hideCharmFromBracelet()` function with the selected charms image. The `hideCharmFromBracelet()` function removes the specified charm image from the bracelet image, as described in step 10 of this article. **Line 19**: Hide the border to indicate that the charm is no longer selected. ### Step 10: Create the showCharmOnBracelet and hideCharmFromBracelet Functions The `showCharmOnBracelet()` and `hideCharmFromBracelet()` functions are used to add or remove charms from the bracelet image when they are selected in step 2 of the customization process. ```javascript function showCharmOnBracelet(charmImage) { for (let i = 1; i <= 5; i++) { if ($w(`#charmPlace${i}`).hidden) { $w(`#charmPlace${i}`).src = charmImage; $w(`#charmPlace${i}`).show(); break; } } }; function hideCharmFromBracelet(charmImage) { for (let i = 1; i <= 5; i++) { if ($w(`#charmPlace${i}`).src === charmImage) { $w(`#charmPlace${i}`).src = 'http://'; $w(`#charmPlace${i}`).hide(); break; } } }; ``` **Lines 2-8**: Find the first charm place with a hidden charm image, set its image to be the passed in image, and then show the charm image. **Lines 12-18**: Find the charm place that matches the passed in image, set its image source to a blank image, and then hide the charm image. ### Step 11: Create the disableCharmsSelection and enableCharmsSelection Functions The `disableCharmsSelection()` and `enableCharmsSelection()` functions are used to disable or enable the selection of charms in step 2 of the customization process. ```javascript function disableCharmsSelection() { $w('#charmsRepeater').forEachItem(($w, itemData) => { if (!isCharmSelected(itemData)) { $w('#charmOverlay').show(); } }); }; function enableCharmsSelection() { $w('#charmsRepeater').forEachItem($w => { $w('#charmOverlay').hide(); }); }; ``` **Lines 2-6**: For each item in the charms repeater, if the charm isn't selected, show the overlay, which stops the item from being selected. To determine if the charm is selected, the `isCharmSelected()` function is called. The `isCharmSelected()` function is described in step 12 of this article. **Lines 9-12**: For each item in the charms repeater, hide the overlay, which allows the charms to be selected. ### Step 12: Create the isCharmSelected Function The `isCharmSelected()` function checks to see if a specific charm is selected. ```javascript function isCharmSelected(charmItem) { return selectedCharms.findIndex(item => item._id === charmItem._id) > -1; }; ``` **Line 2**: Use the JavaScript `findIndex()` function to check if the specified charm exists in the list of selected charms. ### Step 13: Create the selectedCharmsRepeater\_itemReady Function The `selectedCharmsRepeater_itemReady()` function is wired to the repeater used to display the selected charms in step 3 of the customization process. The function is called for each repeater item as it is created. ```javascript export function selectedCharmsRepeater_itemReady($w, itemData, index) { $w('#selectedCharmImage').src = itemData.mainMedia; }; ``` **Line 2**: Set the item's image to the specified image from the repeater's data. ### Step 14: Create the finishButton\_click Function The `finishButton_click()` function is wired to the finish button in step 2 of the customization process. The button is used to move to step 3 of the process. ```javascript export function finishButton_click(event, $w) { $w('#braceletSelectionStrip').collapse(); $w('#charmsSelectionStrip').collapse(); calcAndShowPrice(); $w('#addToCartStrip').expand(); $w('#reviewBraceletText').enable(); $w('#addToCartButton').enable(); }; ``` **Line 2-3**: Collapse sections one and two. **Line 4**: Calculate the price of the bracelet and charms to be displayed in section three using the `calcAndShowPrice()` function. The `calcAndShowPrice()` function is described in step 15 of this article. **Line 5**: Expand the third section. **Line 6**: Enable the heading used to move to step 3 of the customization process. See step 5 of this article for a description of the code that runs when this button is clicked. **Line 7**: Enable the button that adds the bracelet and selected charms to the store's shopping cart. See step 16 of this article for a description of the code that runs when this button is clicked. ### Step 15: Create the calcAndShowPrice Function The `calcAndShowPrice()` function calculates the price of the selected bracelet and charms. It then shows the price in the third section. ```javascript function calcAndShowPrice() { let price = selectedBracelet.price; selectedCharms.forEach(charm => { price += charm.price; }); $w('#price').text = price.toString(); }; ``` **Line 2**: Get the price of the selected bracelet. **Lines 3-5**: For each selected charm, add its price to the total price. **Line 6**: Show the calculated price in the third section. ### Step 16: Create the addToCartButton\_click Function The `addToCartButton_click()` function is wired to the add to cart button in step 3 of the customization process. The button is used to add the selected bracelet and charms to the store's shopping cart. ```javascript export async function addToCartButton_click(event, $w) { let itemsToAdd = [{ productID: selectedBracelet._id, quantity: 1, options: {} }]; selectedCharms.forEach(function (charm) { itemsToAdd.push({ productID: charm._id, quantity: 1, options: {} }); }); let res = await $w('#shoppingCartIcon').addProductsToCart(itemsToAdd); }; ``` **Lines 2-4**: Define the bracelet and charms to be added to the shopping cart. **Line 6**: Add the bracelet and selected charms all at once to the store's shopping cart. ### Next Steps * Open [this example](http://editor.wix.com/html/editor/web/renderer/new?siteId=11e2a942-7c54-4bbb-9ffb-cce15e010fb1&metaSiteId=635e3b99-e23b-428e-8947-0fd14be46ddc) in the Editor to work with the template. * Publish the site and refresh your browser so the Stores collections appear in the Database. * Try other Velo Stores examples: * [Adding a Related Products Area to a Wix Store Product Page](https://support.wix.com/en/article/adding-a-related-products-area-to-a-wix-store-product-page) * [Adding a Wishlist to a Wix Stores Site](https://support.wix.com/en/article/adding-a-wishlist-to-a-wix-stores-site) * [Adding a Product Configurator to a Wix Stores Site](https://support.wix.com/en/article/adding-a-product-configurator-to-a-wix-stores-site) * [Adding Ratings and Reviews to a Wix Stores Site](https://support.wix.com/en/article/adding-ratings-and-reviews-to-a-wix-stores-site) --- > Portal Navigation: > > - Append `.md` to any URL under `https://dev.wix.com/docs/` to get its markdown version. > - Pages are either content pages (article or reference text) or menu pages (a list of links to child pages). > - To get a menu page, truncate any URL to a parent path and append `.md` (e.g. `https://dev.wix.com/docs/sdk.md`, `https://dev.wix.com/docs/sdk/core-modules.md`). > - Top-level index of all portals: https://dev.wix.com/docs/llms.txt > - Full concatenated docs: https://dev.wix.com/docs/llms-full.txt ## Resource: Adding a Product Configurator to a Wix Stores Site ## Article: Adding a Product Configurator to a Wix Stores Site ## Article Link: https://dev.wix.com/docs/develop-websites/articles/code-tutorials/wix-e-commerce-stores/adding-a-product-configurator-to-a-wix-stores-site.md ## Article Content: # Velo Tutorial: Adding a Product Configurator to a Wix Stores Site > **Note:** This tutorial and its steps are based on a Wix Editor site. You can adapt the steps for a Wix Studio site by using the equivalent [Wix Studio features](https://dev.wix.com/docs/develop-websites/articles/coding-with-velo/overview/about-coding-with-wix-studio.md). This article describes how you can use Velo to add a product configurator to a Wix Stores site. The product configurator allows site visitors to choose different patterns and colors to design a custom sweater. Throughout this article we're going to use the same site to illustrate the process. You can open the site in the Editor to work with the [template](https://editor.wix.com/html/editor/web/renderer/new?siteId=9c0ebabc-9cbc-4bf8-bf52-c9170f6a8524&metaSiteId=ba59d309-8678-451d-a4bc-2c8ba968e452&autoDevMode=true). We're going to explain how we set up the sample site and the code we added to make it work.
![](https://d2x3xhvgiqkx42.cloudfront.net/12345678-1234-1234-1234-1234567890ab/0ca9e8ba-16ed-4cd8-a1e1-58d01c4420f7/2018/08/27/6509a260-ea37-422a-8fbb-764bcba8eda7.png)
### Overview **In our site we added the following:** * A Sweater page including: * A default sweater image and overlaid images for the body, sleeves, pocket, and neckline.  * Elements to display the name, price, and description. * Sections for selecting the pattern or color for each sweater part. Each section has a collapsible container with a repeater containing buttons for selecting a pattern or color, plus a header button for expanding and collapsing each container. * A combinedMaterialsImages collection. The collection has an item (row) for each pattern or color option available for each sweater part. The items includes images for displaying the pattern or color. **Then we added code to do the following:** * When the Sweater page loads, clear sweater customization settings. * When a visitor clicks a header button, expand the container holding the repeater, displaying buttons with patterns or colors for the selection. Collapse containers in other sections. * When a visitor clicks a button, store the visitor's choice in an object. * When all selections are made, enable the Add to Cart button. When the visitor clicks the button, add the customized product to the shopping cart. ### Step 1: Set Up the Site To recreate this functionality, you'll need to have Wix Stores added to your site with at least one product. Once you add Stores to your site, you'll see pages and collections automatically added to your site.
![](https://d2x3xhvgiqkx42.cloudfront.net/12345678-1234-1234-1234-1234567890ab/ef9147e1-f2d9-4773-9a14-7bc889c76065/2020/10/26/6da6f237-6b81-4850-a27b-74fc75a5c4c4/35207879-0d8b-4cf4-bf9f-7636d67a92e2.jpg)
The Products and Collections collections are created automatically when you have a site with Wix Stores. Because these collections are read-only, you must use the Store Manager to create your product list. In this example we don't work with the Collections collection, although it is in our sample site's store. >**Note** > You may need to save or publish the site and refresh your browser to view the Stores collections in the Database. This example is based on the Patchwork Sweater product, one of the products in the Products collection.
![](https://d2x3xhvgiqkx42.cloudfront.net/12345678-1234-1234-1234-1234567890ab/ef9147e1-f2d9-4773-9a14-7bc889c76065/2020/10/26/9b191748-9992-49ba-b96c-3b3208227f74/975218c8-fe98-4174-b4a0-7d956d79a906.png)
We also added a Sweater page and a combinedMaterialsImages collection to our database. We'll describe the Sweater page's setup later in this article.
![](https://d2x3xhvgiqkx42.cloudfront.net/12345678-1234-1234-1234-1234567890ab/ef9147e1-f2d9-4773-9a14-7bc889c76065/2020/10/26/dc2a31c6-eb2b-4357-9571-1708b6c92f88/707e0e23-fbf0-4264-bec6-9607dcd4e9df.jpg)
The combinedMaterialsImages collection has four fields: * Title: The name of the pattern or color for the sweater part * option: The part of the sweater that the pattern or color modifies * choiceImage: A sample image of the pattern or color * displayImage: An image of the sweater part with the specific pattern or color
![](https://d2x3xhvgiqkx42.cloudfront.net/12345678-1234-1234-1234-1234567890ab/ef9147e1-f2d9-4773-9a14-7bc889c76065/2020/10/26/4d006738-20d6-4e39-aa3d-d1b6d1016e4b/df7eb8ba-013c-4a2d-b7e1-82e6afef8243.png)
The choiceImage images are used to display a sample of the pattern or color for each sweater part and the displayImage images display the selected pattern/color in the sweater picture. ### Step 2: Set Up the Sweater Page On the Sweater page we added: * A strip to keep page elements neat and organized. * A default image of the sweater, overlaid by images of each sweater part. The default sweater image looks like this:
![](https://d2x3xhvgiqkx42.cloudfront.net/12345678-1234-1234-1234-1234567890ab/0ca9e8ba-16ed-4cd8-a1e1-58d01c4420f7/2018/08/29/b13c02c4-d244-46a0-8d4d-e0b37ea55b95.png)
The individual parts of the sweater look like this: 
![](https://d2x3xhvgiqkx42.cloudfront.net/12345678-1234-1234-1234-1234567890ab/0ca9e8ba-16ed-4cd8-a1e1-58d01c4420f7/2018/08/29/539a95d0-8e49-4990-8c99-bf7e78fcb602.png)
* We also added a refresh button to reset to the default sweater image and restart the sweater customization process. Note that when the page is loaded or the refresh button is clicked, the individual sweater part images are hidden and the default sweater image is displayed.  * The sweater's title, price, and description from the Products collection. * A container for customizing each sweater part, which collapses and expands.  * A repeater inside each container with buttons for selecting the sweater part color or pattern. When the visitor hovers over a button, a black border appears (the hover effect is added using [Button Design](https://support.wix.com/en/article/wix-editor-customizing-the-design-of-your-buttons) without code). Clicking a button selects a pattern or color for the sweater part. * A header button above each repeater with the name of the sweater part, and up and down arrows. Clicking the button expands the container holding the repeater for that sweater part, and collapses the containers for other sweater parts. > **Note**: In the image below, the two arrows are displayed separately. On the actual site, they're overlapping and the code controls which one is displayed. * Five datasets: * A Products collection dataset for displaying the title, price, and description of the product.  * Four filtered datasets connected to the combinedMaterialsImages collection, one for each sweater part. The datasets are filtered by option (body, sleeves, pocket, neckline). Each filtered dataset is connected to the buttons in the corresponding repeater. ![](https://d2x3xhvgiqkx42.cloudfront.net/12345678-1234-1234-1234-1234567890ab/0ca9e8ba-16ed-4cd8-a1e1-58d01c4420f7/2018/08/29/ff6cf4ea-7784-42fe-91a1-477511cf9f6f.png) * An Add to Cart button for adding the customized sweater to the visitor's cart. The Add to Cart button is disabled and appears gray by default. After selecting patterns or colors for all sweater parts, the button is enabled and appears black. ![](https://d2x3xhvgiqkx42.cloudfront.net/12345678-1234-1234-1234-1234567890ab/0ca9e8ba-16ed-4cd8-a1e1-58d01c4420f7/2018/08/28/487ca509-e4fa-4356-835b-712718de4b1f.png) * A shopping cart icon that displays the number of products added to the cart. Clicking the cart brings the visitor to the Cart page, where they can check out. ### Step 3: Prepare the Sweater Page On the Sweater page we start by importing the module we need to work with the [Wix Window Frontend](https://www.wix.com/code/reference/wix-window.html). We use this module to check whether the visitor is on a desktop or mobile device. This code needs to be added at the top of the code editor. Then we declare global variables to be used throughout the code. Finally, we call the `clearSelection` function to clear customization settings and return the sweater to its default state. >**Note** > All code for this example is located on the Sweater page. ```javascript import wixWindowFrontend from 'wix-window-frontend'; import { cart } from 'wix-stores-frontend'; const NUMBER_OF_CHOICES = 4; const productId = "ad8e5eee-5939-d0aa-6094-e620986543fe"; let selectedOptions = {}; $w.onReady(function () { clearSelection(); }); ``` #### Understanding the Code **Line 1**: Import the module we need to work with the Wix Window Frontend library. **Line 2**: Import the module we need to work with the Wix Stores Cart API in [Step 11](https://support.wix.com/en/article/velo-tutorial-adding-a-product-configurator-to-a-wix-stores-site#step-11-create-the-addtocartbutton_click-function). **Lines 3-5**: Define the following variables: * `NUMBER_OF_CHOICES`: Number of sweater parts that can be customized * `productId`: Hard-coded product ID of the sweater from the Products collection * `selectedOptions`: An object that stores the selected pattern or color for each sweater part **Lines 7-8**: When the page loads, call the `clearSelection` function to clear customization settings. There are no identifiers you would need to change here to make this code work on your site. ### Step 4: Create the refreshButton\_click Function When the refresh button on the sweater image is clicked, the `refreshButton_click` [event handler](https://dev.wix.com/docs/develop-websites/articles/workspace-tools/velo-workspace/code-editor-ide/working-in-the-code-editor.md) clears sweater customization settings by calling the `clearSelection` function. ```javascript export function refreshButton_click(event, $w) { clearSelection(); }; ``` #### Understanding the Code **Lines 1-2**: When the refresh button is clicked, run the `clearSelection` function to clear sweater customization settings. There are no identifiers you would need to change here to make this code work on your site. ### Step 5: Create the clearSelection Function The `clearSelection` function clears all the customized selections so the sweater reverts back to the default setting. `clearSelection` runs when the Sweater page loads and when a visitor clicks the refresh button on the sweater image. ```javascript function clearSelection() { selectedOptions = {}; $w('#bodyImg').hide(); $w("#sleevesImg").hide(); $w('#necklineImg').hide(); $w("#pocketImg").hide(); $w("#bodyImg").src = 'https://'; $w("#sleevesImg").src = 'https://'; $w("#pocketImg").src = 'https://'; $w("#necklineImg").src = 'https://'; $w("#addToCartButton").disable(); }; ``` #### Understanding the Code **Line 2**: Clear the `selectedOptions` object, which contains the visitor's pattern or color selections for each sweater part. **Lines 3-6**: Hide the overlaid sweater part images so that only the default sweater is displayed. **Lines 7-10**: Clear the sweater part images. **Line 11**: Disable the Add to Cart button. #### Identifiers you may need to change based on your site's collections If you want to use this exact scenario and code in your site, you may need to modify these items to match the ones on your site: * `#bodyImg` * `#sleevesImg` * `#necklineImg` * `#pocketImg` * `#addToCartButton` ### Step 6: Create the bodySelectionRepeater\_itemReady Function >**Note** > In this section, we use the "body" part of the sweater as an example. The code is the same for the other sweater parts, except for the following: > > * The word "body" is replaced with "sleeves", "pocket", or "neckline". > * The toggleFold parameter (1) is replaced by the corresponding index number (2, 3, and 4) for each sweater part. We selected the repeater element and, in the Properties & Events panel, added an [`onItemReady`](https://www.wix.com/code/reference/$w.Repeater.html#onItemReady) [event handler](https://dev.wix.com/docs/develop-websites/articles/workspace-tools/velo-workspace/code-editor-ide/working-in-the-code-editor.md). The `bodyDataset` filters the `combinedMaterialsImages` collection to include only items in the collection whose `option` field is `body`. Each filtered item (row) in the collection is passed to the `bodySelectionRepeater_itemReady` event handler as the `itemData` parameter. After the page loads and the filtered dataset connects to the repeater, `bodySelectionRepeater_itemReady` loads each pattern/color image associated with "body" items into a button in the repeater. When the visitor clicks a button in the repeater, an `onClick` event handler runs the `selectChoiceForOption` function. If the visitor is using a mobile device, when they click a button, the `toggleFold` function runs, collapsing the container holding the repeater. ```javascript export function bodySelectionRepeater_itemReady($w, itemData, index) { $w('#selectBodyButton').onClick(() => { selectChoiceForOption($w, 'body', itemData); if (wixWindowFrontend.formFactor === 'Mobile') { toggleFold(1); } }); }; ``` #### Understanding the Code **Line 1**: Set up each item in the `bodySelectionRepeater` as it's loaded. **Line 2**: Set the action that occurs when a visitor clicks a choice for the body option. **Line 3**: When a button is clicked, run the `selectChoiceForOption` function for the body sweater part with the selected `itemData` from the collection. **Lines 4-5**: Check whether the site is being viewed on a mobile device. If it is, run `toggleFold` with the index number associated with the body sweater part to collapse the container holding the repeater. #### Identifiers you may need to change based on your site's collections If you want to use this exact scenario and code in your site, you may need to modify these items to match the ones on your site: * `#selectBodyButton` * `body` ### Step 7: Create the selectChoiceForOption Function The `selectChoiceForOption` function runs when a visitor selects a particular pattern or color for a sweater part. It adds the selection to the `selectedOptions` object, displays the selected pattern or color on the sweater part, and when all sweater part selections are finished, enables the Add to Cart button. ```javascript function selectChoiceForOption($w, option, choiceData) { selectedOptions[capitalizeFirstLetter(option)] = choiceData.title; $w(`#${option}Img`).src = choiceData.displayImage; $w(`#${option}Img`).show(); if (Object.keys(selectedOptions).length === NUMBER_OF_CHOICES) { $w('#addToCartButton').enable(); }; }; ``` #### Understanding the Code **Line 1**: Run the function with the following parameters: * `$w`: Global selector * `option`: The current sweater part (e.g., body) * `choiceData`: The item from the combinedMaterialsImages collection that was selected. **Line 2**: Add the name of the pattern/color for the selected choice to the `selectedOptions` object (e.g., `Body: Stripe Pattern`). Since the sweater part options are capitalized in the Product collection, we first capitalize the option key. **Line 3**: Use ${expression} inside a template literal (string indicated by backticks) to extract the name of the sweater part image from the `option` parameter. Change the image to the selected choice's `displayImage` from the `combinedMaterialsImages` collection. **Line 4**: Show the selected image in the sweater. **Line 5**: Check if the `selectedOptions` object contains selections for all sweater parts. This is done by comparing the length of the object (using the `Object.keys` function) to the number of choices. **Line 6**: If all sweater part selections were made, enable the `addToCartButton` button. #### Identifiers you may need to change based on your site's elements If you want to use this exact scenario and code in your site, you may need to modify these items to match the ones on your site: * `#${option}Img` * `#addToCartButton` ### Step 8: Create the capitalizeFirstLetter Function The `capitalizeFirstLetter` function capitalizes the first letter of the string passed to the function. ```javascript function capitalizeFirstLetter(string) { return string.charAt(0).toUpperCase() + string.slice(1); }; ``` #### Understanding the Code **Line 2**: Capitalize the first letter of the input string. This is done by using the `chartAt` function to return the first letter of the string, using `toUpperCase` to capitalize the letter, and using `slice` to remove the second (lowercase) letter. There are no identifiers you would need to change here to make this code work on your site. ### Step 9: Create the option1Button\_click Function >**Note** > In this section, we use the "body" part of the sweater as an example. The code is the same for the other sweater parts, except for the following: > > * Replace the number "1" in option**1**button\_click by the corresponding option number (2, 3, and 4). > * Replace the number "1" by the corresponding option number (2, 3, and 4) for the parameter passed to the toggleFold function. `option1Button_click` is an `onClick` event handler that calls the `toggleFold` function when the button above the repeater is clicked. We explain `toggleFold` in [Step 10](https://dev.wix.com/docs/develop-websites/articles/code-tutorials/wix-e-commerce-stores/adding-a-product-configurator-to-a-wix-stores-site.md). ```javascript export function option1Button_click(event, $w) { toggleFold(1); }; ``` #### Understanding the Code **Line 2**: Call the `toggleFold` function with an index of "1". There are no identifiers you would need to change here to make this code work on your site. ### Step 10: Create the toggleFold Function `toggleFold` expands or collapses the container under the button clicked by the visitor. If the container is currently collapsed, the function expands the container. If the container is currently expanded, the function collapses the container. `toggleFold` also collapses all other sweater part containers. ```javascript function toggleFold(index) { let $fold = $w(`#option${index}Box`); let $arrowDown = $w(`#arrowDown${index}`); let $arrowUp = $w(`#arrowUp${index}`); if ($fold.collapsed) { $fold.expand(); $arrowDown.show(); $arrowUp.hide(); } else { $fold.collapse(); $arrowDown.hide(); $arrowUp.show(); } for (let i = 1; i <= NUMBER_OF_CHOICES; i++) { if (i !== index) { $w(`#option${i}Box`).collapse(); $w(`#arrowDown${i}`).hide(); $w(`#arrowUp${i}`).show(); }; }; }; ``` #### Understanding the Code **Lines 2-4**: Define identifiers for the current sweater part's container, up arrow, and down arrow. **Lines 5-8**: If the current container is collapsed, expand it, hide the up arrow, and show the down arrow. **Lines 9-13**: If the current container is expanded, collapse it, hide the down arrow, and show the up arrow. **Line 14**: Collapse all other containers. For each sweater part index: **Line 15-18**: If the index is not associated with the current sweater part, collapse the container, hide the down arrow, and show the up arrow. #### Identifiers you may need to change based on your site's elements If you want to use this exact scenario and code in your site, you may need to modify these items to match the ones on your site: * `#option1Box` * `#arrowUp` * `#arrowDown` ### Step 11: Create the addToCartButton\_click Function `addToCartButton` is an [event handler](https://dev.wix.com/docs/develop-websites/articles/workspace-tools/velo-workspace/code-editor-ide/working-in-the-code-editor.md) that runs when the Add to Cart button is clicked. It runs the Wix Stores Frontend API [`cart.addProducts`](https://www.wix.com/velo/reference/wix-stores/cart/addproducts) function, adding the customized product to the cart. ```javascript // Start with clean slate when page loads. $w.onReady(function () { $w('#addToCartButton').onClick((event) => { cart.addProducts([{ "productId": productId, "quantity": 1, "options": { choices: selectedOptions } }]) }) }); ``` #### Understanding the Code **Line 2**: Run the `addToCart` function on the shopping cart with the following inputs: * The sweater's product ID * Quantity of customized sweaters to add to cart * Sweater options selected by the visitor contained in the `selectedOptions` object #### Identifiers you may need to change based on your site's elements If you want to use this exact scenario and code in your site, you may need to modify these items to match the ones on your site: * `shoppingCartIcon1` ### Next Steps * Open [this example](http://editor.wix.com/html/editor/web/renderer/new?siteId=7dfed114-5619-42da-9a30-9a95a6428270&metaSiteId=2cbc3f84-7b5a-4511-81af-a97fd016cba0) in the Editor to work with the template. * Publish the site and refresh your browser so the Stores collections appear in the Database. * Try other Velo Store examples: * [Adding a Related Products Area to a Wix Store Product Page](https://dev.wix.com/docs/develop-websites/articles/code-tutorials/wix-e-commerce-stores/adding-a-related-products-area-to-a-wix-store-product-page.md) * [Adding a Wishlist to a Wix Stores Site](https://dev.wix.com/docs/develop-websites/articles/code-tutorials/wix-e-commerce-stores/adding-a-wishlist-to-a-wix-stores-site.md) * [Adding Multiple Items to the Cart in a Wix Stores Site](https://dev.wix.com/docs/develop-websites/articles/code-tutorials/wix-e-commerce-stores/adding-multiple-items-to-the-cart-in-a-wix-stores-site.md) * [Adding a Product Configurator to a Wix Stores Site](https://dev.wix.com/docs/develop-websites/articles/code-tutorials/wix-e-commerce-stores/adding-a-product-configurator-to-a-wix-stores-site.md) * [Adding Ratings and Reviews to a Wix Stores Site](https://dev.wix.com/docs/develop-websites/articles/code-tutorials/wix-e-commerce-stores/adding-ratings-and-reviews-to-a-wix-stores-site.md) --- > Portal Navigation: > > - Append `.md` to any URL under `https://dev.wix.com/docs/` to get its markdown version. > - Pages are either content pages (article or reference text) or menu pages (a list of links to child pages). > - To get a menu page, truncate any URL to a parent path and append `.md` (e.g. `https://dev.wix.com/docs/sdk.md`, `https://dev.wix.com/docs/sdk/core-modules.md`). > - Top-level index of all portals: https://dev.wix.com/docs/llms.txt > - Full concatenated docs: https://dev.wix.com/docs/llms-full.txt ## Resource: Cross-Selling a Product in Your Store with Velo by Wix ## Article: Cross-Selling a Product in Your Store with Velo by Wix ## Article Link: https://dev.wix.com/docs/develop-websites/articles/code-tutorials/wix-e-commerce-stores/cross-selling-a-product-in-your-store-with-velo-by-wix.md ## Article Content: # Velo Tutorial: Cross-Selling a Product in Your Store with Velo by Wix > **Note:** > This tutorial and its steps are based on a Wix Editor site. You can adapt the steps for a Wix Studio site by using the equivalent [Wix Studio features](https://dev.wix.com/docs/develop-websites/articles/coding-with-velo/overview/about-coding-with-wix-studio.md). ## Overview In this tutorial, you'll learn how to use Velo to implement cross-selling in your store. Cross-selling means suggesting a product to your customers when they get to the checkout page. Cross-selling can increase cart value, overall revenue, and conversion rates while improving the shopping experience. You can see a similar implementation of the functionality described in this tutorial on [this site](https://www.wix.com/corvid-examples/upsell-products/cart-page?appSectionParams=%7B%22origin%22%3A%22cart-popup%22%7D), but with a different code solution. In both this tutorial and the example site, the site promotes Jasmine soap only if customers have one of the other products in their cart, but not Jasmine.
### How to Build This Promotion In the first part of this tutorial, we are going to set up the Cart Page using standard Editor elements. Then we'll use Velo and code to customize the Cart. ## Part I - Setting up the Cart Page ### Step 1: Start Working with Velo * Enable Velo Dev Mode in the Wix Editor to let you work with code. Click **Dev Mode** in your site's top bar and turn on **Enable Developer Mode** in the dropdown. ![](https://d2x3xhvgiqkx42.cloudfront.net/12345678-1234-1234-1234-1234567890ab/703598e8-0a86-4968-a251-e6562cdf4684/2022/12/19/4070d4d3-bc7f-4740-b56e-14999e262e15/3c57ef51-8cdd-4f74-ae81-3568e830e83f.png) You will see the **Code sidebar** on the left-hand side of your screen, and the **Properties & Events** **panel** in the bottom-right corner of the Editor. * To get to the Cart page in your store, click the **Page Code** button in the **Code sidebar** on the left-hand side of the Editor, then **Cart page**. ### Step 2: Adding Elements Now we're going to add an element to hold the details of the product you want to promote: name, price, image, and description. 1. Click **Add** on the left side of the **Editor,** then **Box**, and then select **Container Boxes**. 2. Add a text element to the Container for the product name, another for the price, and one more for the description. 3. Add an image (choose one from your gallery). 4. Add a button and change its text to **Add to cart**. > **Note:** > Make sure you see the Attach to Box message before dropping all your elements into the container box. 5. Customize the elements in the Editor to match your store's design. ## Part II - Customizing the Cart Page with Code Now that you've set up your Cart page you can add the code to cross-sell your product. ### Step 3: Element IDs in the Properties Panel You need to start working with your site's elements in code. One of the first things to do is to give your elements meaningful IDs. That will make it easier to work with them in code. You change an element's ID in the Properties & Events Panel. When you select an element, its properties are displayed in the Properties & Events Panel.
> > If you can't see the Properties & Events Panel, click Tools in your site's top bar and check the box next to Properties & Events Panel in the dropdown. Select each element that you added to the container and change their IDs as described below: * Container box: crossSellBox * First text element: productName * Second text element: productPrice * Third text element: productDescription * The image: productImage * The button: addToCart
![](https://d2x3xhvgiqkx42.cloudfront.net/12345678-1234-1234-1234-1234567890ab/ef9147e1-f2d9-4773-9a14-7bc889c76065/2020/08/20/15f5af53-b39e-47ba-b403-7e105ce25222/65fe81c0-403e-4755-9060-3cfc9b50ed7f.png)
### Step 4: Product SKU 1. Navigate to the product section of your store dashboard. 2. Choose the product you plan to promote. 3. Note the product's SKU (stock keeping unit). This number is very useful for keeping track of inventory. You will need to assign SKUs to your products. Learn more about [Adding and Customizing Product Options](https://support.wix.com/en/article/wix-stores-adding-and-customizing-product-options#setting-inventory-preferences).
![](https://d2x3xhvgiqkx42.cloudfront.net/12345678-1234-1234-1234-1234567890ab/ef9147e1-f2d9-4773-9a14-7bc889c76065/2020/08/24/c5e04567-99b6-46c4-9b69-92e0ded7c12d/5e8e406f-a70a-42c7-b176-6bb884e0942d.png)
### Step 5: Cart Page Code Editor 1. Go back to the **Cart page** in the Editor. 2. In the Editor, paste the following code into the code editor for the Cart Page. >**Note:** > If you already have code in the Cart Page, take care to avoid clashes between the code you've written and the code provided below. Pay particular attention to the [onReady function](https://support.wix.com/en/article/corvid-best-practices-for-building-a-corvid-website#code-only-one-onready-per-page). ```javascript import wixData from 'wix-data'; import { getCurrentCart } from 'backend/cart.web'; const CROSS_SELL_PRODUCT_SKU = "0002"; $w.onReady(function () { checkIfProductMissingFromCart().then(isProductMissingFromCart => { const shouldShowCrossSellProduct = isProductMissingFromCart; if (shouldShowCrossSellProduct) { getCrossSellProduct().then(crossSellProduct => { renderCrossSellProduct(crossSellProduct); }) } else { $w("#crossSellBox").collapse(); } }) }) async function checkIfProductMissingFromCart() { const { lineItems } = await getCurrentCart(); const isProductMissingFromCart = lineItems.every(lineItem => lineItem.sku !== CROSS_SELL_PRODUCT_SKU); return isProductMissingFromCart; } async function getCrossSellProduct() { const { items: productsMatchingSKU } = await wixData.query('Stores/Products').eq('sku', CROSS_SELL_PRODUCT_SKU).find(); const crossSellProduct = productsMatchingSKU[0]; return crossSellProduct; } function renderCrossSellProduct(product) { $w("#productName").text = product.name; $w("#productPrice").text = product.formattedPrice; $w("#productImage").src = product.mainMedia; const productDescriptionWithoutTags = product.description.replace(/(<([^>]+)>)/ig, ""); $w("#productDescription").text = productDescriptionWithoutTags; $w("#addToCart").onClick(async () => { await $w("#shoppingCartIcon1").addToCart(product._id, 1); }) } ``` #### Understanding the Code **Line 1**: Import the module you need to work with Wix Data. **Line 2**: Import your backend code. **Line 4**: This is where you will insert your product's SKU. If you'd like to promote a different product, replace **only** the number inside the double quotes with a different SKU. For example, if your product's SKU is 213, replace line 4 with: `const CROSS_SELL_PRODUCT_SKU = "213";` **Lines 6-13**: When the page loads, call the other functions in the code to: check for your promoted product in the cart (lines 20-25); find the product in your products database (lines 27-32); display the product information in the cross-sell box (lines 34-44). **Lines 14-15**: If the buyer visiting your store has already added your promoted product to their cart, don't show the cross-sell box. **Lines 20-25**: Check the currently displayed cart for the product you've decided to promote. **Lines 27-32**: Find the promoted product in your products database and get its information. **Lines 34-44**: Display the product name, price, image, and description in the elements inside the cross-sell box. ### Step 6: Backend Code 1. Click the **Code Files** button in the **Code sidebar**, then hover over **Backend**, click the plus icon, and select **Add Web Module.** 2. Name this module cart.web.js. 3. Delete the provided sample code and paste the following code into the Web Module. ```javascript import { Permissions, webMethod } from 'wix-web-module'; import wixStores from 'wix-stores-backend'; export const getCurrentCart = webMethod(Permissions.Anyone, () => { return wixStores.getCurrentCart(); }); ``` #### Understanding the Code **Line 1**: Import the `Permissions` enum and `webMethod` from `wix-web-module`. **Line 2**: Import the module you need to work with Wix Stores. **Line 4-5**: Export the `getCurrentCart()` function for use on the front-end (line 2 of the cart page code). Learn more [here](https://dev.wix.com/docs/develop-websites/articles/coding-with-velo/backend-code/web-modules/call-backend-code-from-the-frontend.md). ### Step 7: Save and Publish your Site. * In the top right corner of the Editor, save and preview to check your progress. * To see the live version of the site, click **Publish.**
--- > Portal Navigation: > > - Append `.md` to any URL under `https://dev.wix.com/docs/` to get its markdown version. > - Pages are either content pages (article or reference text) or menu pages (a list of links to child pages). > - To get a menu page, truncate any URL to a parent path and append `.md` (e.g. `https://dev.wix.com/docs/sdk.md`, `https://dev.wix.com/docs/sdk/core-modules.md`). > - Top-level index of all portals: https://dev.wix.com/docs/llms.txt > - Full concatenated docs: https://dev.wix.com/docs/llms-full.txt ## Resource: Tutorial: Request a Quote ## Article: Tutorial: Request a Quote ## Article Link: https://dev.wix.com/docs/develop-websites/articles/code-tutorials/wix-e-commerce-stores/tutorial-request-a-quote.md ## Article Content: # Tutorial: Adding a Request A Quote Option to a Wix Store Product Page > This feature is currently only available for [Wix Studio](https://dev.wix.com/docs/develop-websites/articles/coding-with-velo/overview/about-coding-with-wix-studio.md) sites. This article demonstrates how you can add an option for site visitors to request a quote for a specific product on a Wix Stores Product Page. A site visitor may want to add this option, for example, to request a discount when purchasing a large quantity of a specific product, or to request a product with custom dimensions and specifications. In this example, we show how you can replace either the **Add To Cart** or the **Buy Now** button with a **Request a quote** button on a Wix Store Product Page. When a site visitor clicks **Request a quote**, a modal with a submission form opens to submit the quote request to the site owner. The site owner can then see the submission in the **Form submissions** tab in the site's dashboard. > **Note:** The terms popup and lightbox refer to the same element. While the editor and dashboard now refer to it as a [popup](https://support.wix.com/en/article/studio-editor-using-popups), the API methods continue to use the term lightbox for backward compatibility. The documentation uses both terms accordingly. To do this, we: 1. Add a [popup](https://support.wix.com/en/article/studio-editor-using-popups) to create the modal. 2. Create a submission form and add it to the popup. 3. Write the code for our Product Page to change the specific product's **Add To Cart** button's label to **Request a quote**, and to connect the button to the modal. 4. Implement the [eCommerce Validations SPI custom extension](https://www.wix.com/velo/reference/spis/wix-ecom/ecom-validations). You can also use this example for other use cases such as adding a **Contact us to Purchase** option. >**Note:** This tutorial provides an example of how you can override the **Add To Cart** or **Buy Now** button's functionality using the [`onAddToCart()`](https://www.wix.com/velo/reference/$w/productpage/onaddtocart) or [`onBuyNow()`](https://www.wix.com/velo/reference/$w/productpage/onbuynow) function. ## Before You Begin + This article assumes you have a [Wix Stores Product Page](https://support.wix.com/en/article/wix-stores-customizing-the-new-product-page) on your site. + For any product in a Wix Stores Product Page, you can provide site visitors with the option to either purchase a product (with predefined specifications, quantities, and price), or to request a quote. However, if you only want to provide site visitors with the option to request a quote for a specific product, and don't want them to be able to purchase it, you need to implement the [eCommerce Validations SPI custom extension](https://www.wix.com/velo/reference/spis/wix-ecom/ecom-validations). This custom extension can be used to validate the site visitor's cart and checkout to make sure that the specific product can't be purchased. We show this implementation in the last step of this tutorial. To learn more about custom extensions, see [Custom App Extensions Using SPIs](https://dev.wix.com/docs/develop-websites/articles/coding-with-velo/integrations/service-plugins-formerly-spis/about-service-plugins.md). ## Introduction We created the following custom bookshelf on a Wix Store Product Page for this tutorial. When a site visitor navigates to this Product Page, we want them to see a **Request a quote** button instead of the **Add To Cart** button. When a site visitor selects their [product options](https://support.wix.com/en/article/wix-stores-adding-and-customizing-product-options) for the bookshelf and clicks the **Request a quote** button, we want a modal with a submission form to open, and we want to stop the site visitor from proceeding with the Wix Checkout process. Once the site visitor fills out and submits the form, we want the site owner to receive the form information along with the site visitor's selected product option choices. ![product page add to cart](https://wixmp-833713b177cebf373f611808.wixmp.com/images/2de05a3808854f230a3c7dda42c1cc70.png) ## Step 1: Create the modal First we create the modal by adding a [popup](https://support.wix.com/en/article/studio-editor-using-popups) to our site from the **Layout Tools** section of the **Add** panel. We name our popup 'Request a quote'. ## Step 2: Create a submission form Next, we add a submission form from the **Contact & Forms** section of the **Add** panel, and place it in the popup. Our form has the following fields and looks like this: ![request a quote popup](https://wixmp-833713b177cebf373f611808.wixmp.com/images/e0f09f843980e40eb827068a4177cd30.png) ## Step 3: Write the code Last, we write the code for our Product page. We break the code into steps to understand how it works: 1. First we import our frontend modules and declare our variables. ```js import wixWindowFrontend from 'wix-window-frontend'; import wixLocationFrontend from 'wix-location-frontend'; let product; const bookshelfId = 'cd59cd36-b6d2-2cf3-9d48-81793a7bdbbd'; ``` **Understanding the Code** **Lines 1-2:** We import the `wixWindowFrontend` and `wixLocationFrontend` modules. **Lines 4-5:** We declare our variables to be used later in our code, including the bookshelf ID. To get the bookshelf ID, do the following: 1. In the editor, open the CMS panel on the left and click **Wix App collections**. 2. Scroll down to the **Stores** section and click **Products** to open the Products collection. 3. Find the bookshelf item in your collection, and copy the value in the `ID (_id)` field. In our example, the value should be `cd59cd36-b6d2-2cf3-9d48-81793a7bdbbd`. This is your bookshelf ID. To learn more, see [Working with Wix App Collections and Code](https://dev.wix.com/docs/develop-websites/articles/databases/wix-data/collections/working-with-wix-app-collections-and-code.md). 2. When the Product Page loads or when a site visitor selects a different product in the Product Page, we get the product's information. If the ID of the product on the Product Page matches the bookshelf's product ID, then we change the **Add To Cart** button's label to **Request a quote**, and add an event handler that runs when this button is clicked. ```js $w.onReady(function () { initProductPage(); }); wixLocationFrontend.onChange((location) => { let newPath = location.path; if (newPath?.[0] === 'product-page') { initProductPage(); } }); async function initProductPage() { product = await $w('#productPage1').getProduct(); if (product._id === bookshelfId) { $w('#productPage1').setAddToCartLabel('Request a quote'); $w('#productPage1').onAddToCart(onAddToCartHandler); } } ``` **Understanding the Code** **Lines 1-3:** When the Product Page loads, we call the `initProductPage()` function. **Lines 5-10:** When a site visitor selects a different product on the Product Page, we call the `initProductPage()` function. **Lines 12-13:** In the `initProductPage()` function, we get the information of the product on the Product Page. **Lines 14-18:** If the ID of the product on the Product Page matches the bookshelf's product ID, then we use the `setAddToCartLabel()` function to change the **Add To Cart** button's label to **Request a quote**, and call the `onAddToCart()` event handler when this button is clicked. >**Note:** You can change the **Buy Now** button's label to **Request a quote** instead by replacing the [`setAddToCartLabel()`](https://www.wix.com/velo/reference/$w/productpage/setaddtocartlabel) function with the [`setBuyNowLabel()`](https://www.wix.com/velo/reference/$w/productpage/setbuynowlabel) function, and the [`onAddToCart()`](https://www.wix.com/velo/reference/$w/productpage/onaddtocart) function with the [`onBuyNow()`](https://www.wix.com/velo/reference/$w/productpage/onbuynow) function. After implementing the code, the Product Page should look like this: ![product page request a quote](https://wixmp-833713b177cebf373f611808.wixmp.com/images/3a06f7acc786919c1bee0dd20a679b4c.png) 3. When a site visitor clicks the **Request a quote** button, get the site visitor's selected product option choices (color, number of shelves, and measurements), open the modal with the submission form, and stop the site visitor from proceeding with the Wix Checkout process. ``` js async function onAddToCartHandler(resume, cancel) { const data = await getSelectedProductData(); wixWindowFrontend.openLightbox('Request a quote', data) .then((bookshelfOptionData) => { console.log(bookshelfOptionData) cancel(); }); } async function getSelectedProductData() { const bookshelfQuantity = await $w('#productPage1').getQuantity(); const bookshelfChoices = await $w('#productPage1').getSelectedChoices(); const bookshelfCustomText = await $w('#productPage1').getCustomText(); return { product: product, quantity: bookshelfQuantity, choices: bookshelfChoices, customTextFields: bookshelfCustomText, } } ``` **Understanding the Code** **Line 1:** We write an `onAddToCartHandler()` function to handle the event when a site visitor clicks the **Request a quote** button, and pass in the `resume` and `cancel` functions. **Lines 2-8:** In the `onAddToCartHandler()` function, we call the `getSelectedProductData()` function to get the bookshelf option choices that the site visitor selected. Next we open our 'Request a quote' popup, passing in the bookshelf option data. We then console log the data and call the `cancel()` function to stop the site visitor from proceeding with the Wix Checkout process. **Lines 10-20:** In the `getSelectedProductData()` function, we use the `getQuantity()` function to get the bookshelf's quantity, the `getSelectedChoices()` function to get the selected color and number of shelves, and the `getCustomText()` function to get the measurements (Width/Height/Depth). We then return this data. ### Full Code Example ```js import wixWindowFrontend from 'wix-window-frontend'; import wixLocationFrontend from 'wix-location-frontend'; let product; const bookshelfId = 'cd59cd36-b6d2-2cf3-9d48-81793a7bdbbd'; $w.onReady(function () { initProductPage(); }); wixLocationFrontend.onChange((location) => { let newPath = location.path; if (newPath?.[0] === 'product-page') { initProductPage(); } }); async function initProductPage() { product = await $w('#productPage1').getProduct(); if (product._id === bookshelfId) { $w('#productPage1').setAddToCartLabel('Request a Quote'); $w('#productPage1').onAddToCart(onAddToCartHandler); } } async function onAddToCartHandler(resume, cancel) { const data = await getProductInfo(); wixWindowFrontend.openLightbox('Request a quote', data) .then((results) => { cancel(); }); } async function getProductInfo() { const bookshelfQuantity = await $w('#productPage1').getQuantity(); const bookshelfChoices = await $w('#productPage1').getSelectedChoices(); const bookshelfCustomText = await $w('#productPage1').getCustomText(); return { product: product, quantity: bookshelfQuantity, choices: bookshelfChoices, customTextFields: bookshelfCustomText, } } ``` ## Step 4: Implement the Validation SPI custom extension The last step we need to do is validate the cart and checkout using the [eCommerce Validations SPI custom extension](https://www.wix.com/velo/reference/spis/wix-ecom/ecom-validations) to make sure that a site visitor can only request a quote for the bookshelf and can't purchase it. To do this: 1. In the Studio Editor, click ![](https://d2x3xhvgiqkx42.cloudfront.net/12345678-1234-1234-1234-1234567890ab/76096845-8b12-44f1-91f6-3dc2e838fdd9/2022/08/29/23d50509-633d-4616-9f56-65add8fa6d0b/d910e041-d150-4f35-aa75-30ad262abc7a.png), then **Packages & Apps**. 2. Hover over Custom Extensions and click **eComm Validation SPI** to add the validations integration. Then follow the prompts to add the extension and accept any terms and conditions that display. 3. Enter a name for your integration and click **Add & Edit Code**. We named ours **validation-spi**. The name can't contain spaces or special characters. Open the Wix IDE, and go to **/src/backend/__spi__**. You should see the spi folder there. It should look something like **ecom-validations/validation-spi**. If the Custom Extension doesn't appear, try refreshing both the Studio Editor and the Wix IDE. 4. In this spi folder, you should see 2 files, **validation-spi.js** and **validation-spi-config.js**. We write the following code in the **validation-spi-config.js** file to validate the cart as well as the checkout. ```js import * as ecomValidations from 'interfaces-ecommerce-v1-validations-provider'; export function getConfig() { return {validateInCart: true}; } ``` **Understanding the Code** **Line 1:** We import all modules from the ecom validations provider. **Lines 3-5:** We want to also validate a site visitor's cart, so we set the `validateInCart` parameter to `true` in the exported config function. 6. We write the following code in the **validation-spi.js** file to validate whether the bookshelf is in the site visitor's cart or checkout. If so, we return the validation violation and give a violation description. ```js import * as ecomValidations from 'interfaces-ecommerce-v1-validations-provider'; const bookshelfId = 'cd59cd36-b6d2-2cf3-9d48-81793a7bdbbd'; export const getValidationViolations = async (options, context) => { let violations = []; const severity = ecomValidations.Severity.ERROR; const description = "You can't purchase this product. You can only request a quote." const requestAQuoteLineItem = options.validationInfo.lineItems.find(lineItem => isBookshelf(lineItem.catalogReference?.catalogItemId)); if (requestAQuoteLineItem != undefined) { const quantity = requestAQuoteLineItem.quantity; if (quantity > 0 && quantity < 200) { violations.push({ severity, target: { lineItem: { name: ecomValidations.NameInLineItem.LINE_ITEM_DEFAULT, _id: requestAQuoteLineItem._id } }, description: description }); } } return { violations }; }; const isBookshelf = (catalogItemId) => { return catalogItemId != undefined && (catalogItemId == bookshelfId); } ``` **Understanding the Code** **Line 1:** We import all modules from the ecom validations provider. **Line 3:** We declare the bookshelf product ID as a variable. **Line 5:** We declare a validation logic to run on each item in the cart and checkout. **Line 6:** We declare an empty array of validation violations. **Lines 7-8:** We define the validation to prevent the site visitor from proceeding with the Wix Checkout process, and define the validation message. **Line 9:** This line searches for a specific line item in the `options.validationInfo.lineItems` array. It uses the find method and a callback function that checks if the line item’s `catalogItemId` matches the `bookshelfId` using the `isBookshelf()` helper function. **Line 10-25:** If we find a match, we add a validation rule to prevent the site visitor from purchasing this item. --- > Portal Navigation: > > - Append `.md` to any URL under `https://dev.wix.com/docs/` to get its markdown version. > - Pages are either content pages (article or reference text) or menu pages (a list of links to child pages). > - To get a menu page, truncate any URL to a parent path and append `.md` (e.g. `https://dev.wix.com/docs/sdk.md`, `https://dev.wix.com/docs/sdk/core-modules.md`). > - Top-level index of all portals: https://dev.wix.com/docs/llms.txt > - Full concatenated docs: https://dev.wix.com/docs/llms-full.txt ## Resource: Tutorial: Payment Settings Service Plugin ## Article: Tutorial: Payment Settings Custom Extension ## Article Link: https://dev.wix.com/docs/develop-websites/articles/code-tutorials/wix-e-commerce-stores/tutorial-payment-settings-service-plugin.md ## Article Content: # Tutorial: Payment Settings Service Plugin Wix service plugins (formerly SPIs and custom extensions) allow you to implement custom logic to change how your site behaves and displays. For example, when you set up a Wix eCommerce site there are a number of settings that apply by default during the payment process. The payment settings service plugin allows you to implement your own payment settings using code. These settings will then apply during the payment process. With the Payment Settings service plugin you can apply custom payment settings, such as requiring an additional layer of security, to an order during the payment process. Learn more about on how to implement a [service plugin](https://dev.wix.com/docs/develop-websites/articles/coding-with-velo/integrations/service-plugins-formerly-spis/custom-app-extensions-using-spis.md). ## Introduction This tutorial explains how to set up and implement a payment settings service plugin on your site using Velo. We created an example to demonstrate how you can use plugins to apply [3-Domain Security](https://support.wix.com/en/article/about-3d-secure-3ds-payments-with-third-party-payment-providers)(3DS) when the price of the order is greater than or equal to $50. The process has 3 steps: 1. Create a new payment settings service plugin on your site. 2. Implement your service plugin with custom code. 3. Deploy the plugin. ### Before you begin To collect payments, a Wix site must [connect a payment provider](https://support.wix.com/en/article/connecting-a-payment-provider). Once a payment provider is connected you may use the Payment Settings service plugin to enforce additional payment settings to your site's transactions. For example, a site may require additional [3d secure payments](https://support.wix.com/en/article/about-3d-secure-3ds-payments-with-third-party-payment-providers) (3DS) for certain orders. Note that each payment provider may have specific payment settings they accept with their Wix integration. For example, [Tranzila](https://support.wix.com/en/article/connecting-tranzila-as-a-payment-provider) is a payment provider that supports 3DS payments, but not all payment providers offer this feature. We recommend [contacting payment providers directly](https://support.wix.com/en/article/receiving-payouts-from-third-party-payment-providers) to confirm which payment settings they have implemented as part of their Wix integration. Currently, the only payment setting available to customize is whether to apply 3DS to an order. If 3DS is required, the customer will have to pass an additional layer of security before completing their payment. For example, they will have to pass a window like this before continuing: ## Step 1: Create a new payment settings service plugin The first step in setting up your new service plugin is to add it to your site. This process creates a new folder in the **Service Plugins** section of the Code sidebar (Wix Editor), or the **/src/backend/spi** section of the Wix IDE Explorer (Wix Studio), which contains the files for your code. 1. If necessary, [add the Wix Stores app](https://support.wix.com/en/article/wix-stores-adding-wix-stores) to your site. 2. Enable coding: + **Wix Studio:** If necessary, in the Code sidebar, click `{}` and then **Start Coding**. + **Wix Editor:** Enable [Velo Dev Mode](https://support.wix.com/en/article/about-velo-by-wix#to-enable-velo-on-your-site), and then click the **Public & Backend** `{}` tab in the Code sidebar. 3. Go to the Service Plugins section: + **Wix Studio:** Click **Public & Backend**. + **Wix Editor:** Scroll down to the Service Plugins panel at the bottom of the sidebar. 4. Hover over **Service Plugins** and click ![](https://d2x3xhvgiqkx42.cloudfront.net/12345678-1234-1234-1234-1234567890ab/76096845-8b12-44f1-91f6-3dc2e838fdd9/2022/08/29/badbd3b0-193b-4ada-b213-dc3233752d5c/7dca33d4-2b2d-4d12-9082-bafdf7ca5440.png), then click **Payment Settings**. 5. Follow the prompts to add the plugin and accept any terms and conditions that display. 6. Enter a name for your service plugin and click **Add & Edit Code**. The name can't contain spaces or special characters. In our example, we named ours **require-3ds-50**. 7. **Wix Studio:** Open the Wix IDE, and go to **/src/backend/__spi__/**. If your service plugin doesn't appear, try refreshing both the Studio Editor and the Wix IDE. 8. **Publish** your site. ## Step 2: Implement the service plugin The procedure in the previous section creates a folder in the **Service Plugins** section of the Code sidebar (Wix Editor), or in the Wix IDE's Explorer (Wix Studio), called **ecom-payment-settings**. Inside this is another folder with the name of the plugin we set up. This folder contains 2 default service plugin files: * `-config.js`: The code in this file defines a function that returns an object containing values used to configure your plugin. * `.js`: The code in this file defines a function specific to the service plugin, such as `getPaymentSettings()`. The function is called by Wix to retrieve the data provided by your plugin. We implement the custom code for your service plugin in these files. In our example, the folder looks like this (Wix Studio): ![Payment Settings Plugin](https://wixmp-833713b177cebf373f611808.wixmp.com/images/f86b7bfc7660639acf6bb00f7d89dfbe.png "Payment Settings Plugin") ## require-3ds-50-config.js This file is where we write the code for setting up the plugin's configuration. The code in this file defines a function named `getConfig()` that returns an object containing a default configuration for our payment settings. In our example, we set `fallbackValueForRequired3dSecure` to `true` so if the call fails it will, by default, return `paymentSettings.requires3dSecure` set to `true` which tells the payment provider to require 3DS for the order. ```js import * as ecomPaymentSettings from 'interfaces-ecommerce-v1-payment-settings-provider'; export function getConfig() { return { fallbackValueForRequired3dSecure: true}; } ``` ## require-3ds-50.js This file is where we write the code to require 3DS to an order during payment if the price of the order is $50 or greater. The code in this file defines a function named `getPaymentSettings()`. This function is called by Wix eCommerce during the payment process to retrieve the specific payment settings to apply to an order. The function accepts the following parameter: `options`: An object containing information about the order. For details on what's included in the order, see the [service plugin reference](https://www.wix.com/velo/reference/spis/wix-ecom/ecom-payment-settings/getpaymentsettings). The `getPaymentSettings()` function returns a `paymentSettings` object containing the payment settings to apply to the order. Currently, the only setting included is `requires3dSecure`. ## The code: ```js import * as ecomPaymentSettings from 'interfaces-ecommerce-v1-payment-settings-provider'; export const getPaymentSettings = async (options, context) => { return { paymentSettings: { requires3dSecure: parseFloat(options.order.priceSummary.subtotal.amount) >= 50 } }; }; ``` **Line 1-3:** First we import the eCom payment settings module. Then we export the `getPaymentSettings()` function where we set the custom logic to apply to the order. **Line 6:** We extract the subtotal price from the order (`options.order.priceSummary.subtotal.amount`) and apply `parseFloat` to convert the string into a floating-point number. We then check if that number is equal or greater than `50`. If so, `requires3dSecure` is set to `true`, meaning that 3DS is required for this order. If this logic fails, for example if somehow the `amount` isn't a number, then `requires3dSecure` will be set to the value set for `fallbackValueForRequires3DSecure` in the config.js file. ## Optional: Add files to the service plugin If you don't want to keep all of your code in the main service plugin files, you can add files to the plugin's folder and import functions and objects into the main files. + **Wix Editor:** + Hover over the service plugin folder's name and click **Show More** ![](https://d2x3xhvgiqkx42.cloudfront.net/12345678-1234-1234-1234-1234567890ab/76096845-8b12-44f1-91f6-3dc2e838fdd9/2022/09/04/45269098-373f-4d2c-8168-2fc5242c6024/c890c6a3-6762-4501-bdb4-e44c678108df.png) . + Select **New.js**. + **Wix Studio:** Create a new file in the plugin's folder in the Wix IDE Explorer. To import from these files to the main files, use the following syntax: ```js import { functionName } from '.myFileName.js'; ``` ## Optional: Test the service plugin (Wix Editor) You can test your plugin before publishing your site using [functional testing](https://support.wix.com/en/article/velo-functional-testing-in-the-backend) in the Wix Editor like you would with any backend Velo code. Make sure your `getPaymentSettings()` function's return values are properly formatted. Note that functional testing is not currently supported in Wix Studio. To test your plugin after deploying, add console logs to your code. The results appear in [Wix Logs](https://support.wix.com/en/article/velo-about-site-monitoring). ## Step 3: Deploy the plugin Once your code files are ready, publish your site. Navigate to your site and place an order. If the order is $50 or greater than 3DS should be required to complete the payment process. >**Note:** > > There may be a delay between publishing the site and the new payment settings applying on the live site. ## Example We built a [sample site](https://editor.wix.com/html/editor/web/renderer/new?siteId=16f79a4d-9bc2-4888-a12d-1c0f1ce1c31c&metaSiteId=3bf2529d-f59f-485d-a5f1-136755294d13&autoDevMode=true) where you can see this code in action. > **Note:** Clicking the link to the sample site opens a copy of the site. Publishing the copy adds it to your Wix account. ## Remove a plugin You can remove an plugin from your site. **Wix Editor:** 1. In the **Public & Backend** section of the Code sidebar, under **Service Plugins**, hover over the plugin's folder and click **Show More** ![](https://d2x3xhvgiqkx42.cloudfront.net/12345678-1234-1234-1234-1234567890ab/76096845-8b12-44f1-91f6-3dc2e838fdd9/2022/09/04/c4ff84cb-4d96-4e1a-966a-9c6b66dca0b2/062297c2-c368-4aee-b705-f0a55abc5bf6.png) . 2. Select **Delete**. 3. Click **Delete**. **Wix Studio:** Right click on the plugin's folder and select **Delete Permanently**. ## Legal notices If you connect to a 3rd-party provider using service plugins, you agree to the [Wix.com Terms of Use](https://www.wix.com/about/terms-of-use). Wix is not responsible for your use of such a 3rd-party provider, and any liability resulting from such use will be your responsibility. --- > Portal Navigation: > > - Append `.md` to any URL under `https://dev.wix.com/docs/` to get its markdown version. > - Pages are either content pages (article or reference text) or menu pages (a list of links to child pages). > - To get a menu page, truncate any URL to a parent path and append `.md` (e.g. `https://dev.wix.com/docs/sdk.md`, `https://dev.wix.com/docs/sdk/core-modules.md`). > - Top-level index of all portals: https://dev.wix.com/docs/llms.txt > - Full concatenated docs: https://dev.wix.com/docs/llms-full.txt ## Resource: eCommerce Additional Fees Service Plugin ## Article: eCommerce Additional Fees Custom Extension ## Article Link: https://dev.wix.com/docs/develop-websites/articles/code-tutorials/wix-e-commerce-stores/e-commerce-additional-fees-service-plugin.md ## Article Content: # Velo Tutorial: eCommerce Additional Fees Service Plugin Wix service plugins (formerly SPIs and custom extensions) allow you to implement custom logic to change how your site behaves and displays. For example, when you set up a Wix eCommerce site, there are limitations to how you can charge buyers of your products. What if you want to charge buyers an extra fee for gift-wrapping an item? What if you want to charge a carbon emission fee? The answer is service plugins. Read more information on how to implement a [service plugin](https://dev.wix.com/docs/develop-websites/articles/coding-with-velo/integrations/service-plugins-formerly-spis/custom-app-extensions-using-spis.md). With the Additional Fees service plugin, you can define the additional fees that fit your site's needs. You can also customize code to calculate different types of additional fees.  For example, you can add some of the following additional fees to your checkout flow:  * Gift wrapping fees * Shipping insurance fees * Item warranty fees * Credit card service fees * Shipping and handling fees * Fragile packaging fees * Carbon offset fees These additional fees are displayed in your store's **Cart** and **Checkout** pages.  This article explains how to set up an Additional Fees plugin on your site using Velo. The process has 3 steps: 1. Create a new Additional Fees service plugin on your site. 2. Implement your plugin with custom code. 3. Deploy the plugin. >**Note** > In order to add the Additional Fees service plugin to your site, you need to install the [Wix Stores App](https://support.wix.com/en/article/wix-stores-adding-wix-stores) or the [Wix Bookings App](https://support.wix.com/en/article/wix-bookings-adding-wix-bookings-from-the-wix-owner-app). ## Step 1: Create a new Additional Fees service plugin The first step in setting up your new plugin is to add it to your site. This process creates a new folder in the **Service Plugins** section of the Code sidebar (Wix Editor), or the **/src/backend/__spi__** section of the Wix IDE Explorer (Wix Studio), which contains the files for your code. 1. Add the [Wix Stores app](https://support.wix.com/en/article/wix-stores-adding-wix-stores) or the [Wix Bookings app](https://support.wix.com/en/article/wix-bookings-adding-wix-bookings-from-the-wix-owner-app) to your site. 2. Enable coding: + **Wix Studio:** If necessary, click ![Code icon](https://github.com/wix-incubator/wix-code-docs/assets/50321691/2c41d3df-930f-4e0f-966f-038742adceed) and then **Start Coding**. + **Wix Editor:** Enable [Velo Dev Mode](https://support.wix.com/en/article/about-velo-by-wix#to-enable-velo-on-your-site), and then click the **Public & Backend** ![](https://d2x3xhvgiqkx42.cloudfront.net/12345678-1234-1234-1234-1234567890ab/76096845-8b12-44f1-91f6-3dc2e838fdd9/2022/08/29/23d50509-633d-4616-9f56-65add8fa6d0b/d910e041-d150-4f35-aa75-30ad262abc7a.png) tab in the Code sidebar. 3. Go to the Service Plugins section: + **Wix Studio:** Click **Public & Backend**. + **Wix Editor:** Scroll down to the Service Plugins panel at the bottom of the sidebar. 4. Hover over **Service Plugins** and click ![](https://d2x3xhvgiqkx42.cloudfront.net/12345678-1234-1234-1234-1234567890ab/11fda387-da5a-430a-ada3-46def885b67f/2022/03/02/65d645bd-dee9-40dc-9f91-c44b06d72492/289e91de-47c5-429c-b61d-67bd8d4fd1ec.png) , then click **Additional Fees**. 5. Follow the prompts to add the plugin and accept any terms and conditions that display. 6. Enter a name for your integration and click **Add & Edit Code**. The name can't contain spaces or special characters. 7. **Wix Studio:** Open the Wix IDE, and go to **/src/backend/__spi__/ecom-additional-fees**. If your service plugin doesn't appear, try refreshing both the Studio Editor and the Wix IDE. 8. **Publish** your site. ## Step 2: Implement the plugin The procedure in the previous step creates a folder in the service plugins section of the Code sidebar (Wix Editor), or in the Wix IDE's Explorer (Wix Studio). The name of the folder is based on the plugin you chose. Inside this is another folder with the name of the plugin you set up. This folder contains 2 files, `.js` and `-config.js`. Implement the custom code for your plugin in these files. Below are some guidelines for writing your code.  ### `.js` The code in this file defines a function called `calculateAdditionalFees()`. This function is called by Wix eCommerce when an action occurs in the cart or on the checkout page, and then receives the additional fees provided by your plugin. The function contains the following parameter: * **options**: An object containing data and shipping information about the items in your cart. Your plugin can use this data to calculate any additional fees. For more details, see the [Additional Fees Service Plugin Reference.](https://www.wix.com/velo/reference/spis/wix-ecom/ecom-additional-fees)  Example **options** object: ```json [ { "lineItems":[ { "physicalProperties":{ "sku":"0001", "shippable":true }, "quantity":1, "price":"4.00", "_id":"00000000-0000-0000-0000-000000000004", "rootCatalogItemId":"cb688748-3f3d-e5f4-accb-5bf894a4ecd0", "productName":"Luxury glass", "catalogReference":{ "catalogItemId":"cb688748-3f3d-e5f4-accb-5bf894a4ecd0", "appId":"215238eb-22a5-4c36-9e7b-e7c08025e04e", "options":{ "options":{ }, "variantId":"00000000-0000-0000-0000-000000000000" } } } ], "shippingInfo":{ "selectedCarrierServiceOption":{ "code":"fc538775-9417-87a9-6808-c71996de4723", "logistics":{ "deliveryTime":"3-5 days", "instructions":"Deliver during opening hours.", "pickupDetails":{} }, "carrierId":"c8a08776-c095-4dec-8553-8f9698d86adc", "title":"standard shipping", "requestedShippingOption":"true", }, "carrierServiceOptions":[ { "carrierId":"c8a08776-c095-4dec-8553-8f9698d86adc", "shippingOptions":[ { "code":"fc538775-9417-87a9-6808-c71996de4723", "title":"standard shipping", "logistics":{ "deliveryTime":"3-5 days", "instructions":"Deliver during opening hours.", "pickupDetails":{} } } ] } ] } } ] ``` The `calculateAdditionalFees()` function returns an object containing an array called `additionalFees` and a property called `currency`, defining the additional fees and currency that appears in the **Cart** and on the **Checkout** pages. For more details, see the [Additional Fees Service Plugin Reference](https://www.wix.com/velo/reference/spis/wix-ecom/ecom-additional-fees). Example return value: ```json { additionalFees: [ { code: "wrapping-fee", name: "Wrapping Fee", price: "5", taxDetails: { taxable: false } } ], currency: "EUR" } ``` >**Note** > The **currency** you return must be the same as the site's currency. ### `-config.js` The code in this file defines a function named `getConfig()` that returns an empty object. Example: ```json export function getConfig() { return {}; } ``` ### Add files to the plugin If you don't want to keep all of your code in the main files, you can add files to the plugin's folder and import functions and objects into the main files. + **Wix Editor:** 1. Hover over the plugin folder's name and click **Show More** ![](https://d2x3xhvgiqkx42.cloudfront.net/12345678-1234-1234-1234-1234567890ab/76096845-8b12-44f1-91f6-3dc2e838fdd9/2022/09/04/45269098-373f-4d2c-8168-2fc5242c6024/c890c6a3-6762-4501-bdb4-e44c678108df.png). 2. Select the **New.js** file. + **Wix Studio:** Create a new file in the plugin's folder. To import from these files to the main files, use the following syntax: ``` import { functionName } from './myFileName.js'; ``` ## Test the plugin You can test your plugin before publishing your site in the Wix Editor using [functional testing](https://dev.wix.com/docs/develop-websites/articles/workspace-tools/testing-monitoring/functional-testing/test-backend-functions-with-functional-testing.md) like you would any backend Velo code. Make sure your `calculateAdditionalFees()` function's return values are properly formatted. You can test your plugin after deploying for both Wix Editor and Wix Studio. To test your plugin after deploying, add console log statements to your code. The results appear in [Wix Logs](https://dev.wix.com/docs/develop-websites/articles/workspace-tools/developer-tools/logs/about-logs.md). ## Step 3: Deploy the plugin Once your code files are ready, publish your site. Navigate to your site, and add an item to your Cart. Any additional fees you've customized are displayed in the cart and on the checkout pages. if they pertain to your cart items.  1. Once your code files are ready, click **Save**.  2. **Publish** your site.  3. After your service plugins are published, open your site. 4. Navigate to your **Cart** or **Checkout** page, and make a change. For example, add an item to your cart, or select a shipping location. 5. See your custom additional fees appear in your site's **Cart** and in your site's **Checkout** pages.  ![](https://d2x3xhvgiqkx42.cloudfront.net/12345678-1234-1234-1234-1234567890ab/a551efd3-24d0-48fe-8aec-00f810ffc5fc/2022/09/01/99f540fc-3cc3-4b45-b952-c921ce89f03a/f6f5cbe0-8ef0-4ec1-ae09-333b98e7d6c7.png) ## Example We created an example to demonstrate how you can use the service plugins feature to extend the additional fees on your site.  > **Note:** This example and its steps are based on a Wix Editor site. You can adapt the steps for a Wix Studio site by using the equivalent [Wix Studio features](https://dev.wix.com/docs/develop-websites/articles/coding-with-velo/overview/about-coding-with-wix-studio.md#finding-your-way). ### Wrapping Fee In this example, a wrapping fee has been integrated into a store's site. The code in the `additional-fees.js` file counts all the items in the cart that contain the words `glass`, `bowls`, `vase`, or `plates` in their names. These items are considered fragile. The wrapping fee for each fragile item in a customer's cart is then calculated. If a cart contains at least 5 fragile items, the wrapping fee is not applied. We built a sample site where you can see this code in action. To set up a working copy of the sample site, do the following: 1. Open a copy of the [sample site](https://editor.wix.com/html/editor/web/renderer/new?siteId=fc57098b-9c22-415e-950a-ce5edce5e1e2&metaSiteId=97fcc7f0-2cb2-4b33-86e3-45fbe430fc5e). 2. [Publish the site](https://support.wix.com/en/article/wix-editor-publishing-your-site#publishing-your-site) to save the copy to your Wix account. 3. In your new site's dashboard, [go to Settings](https://www.wix.com/my-account/site-selector/?buttonText=Open%20Settings&title=Select%20a%20Site&autoSelectOnSingleSite=true&actionUrl=https://www.wix.com/dashboard/{{metaSiteId}}/settings). 4. Click **Language & Region**. 5. Scroll down to **Site Currency**. 6. Click the **Currency** drop-down menu and select **US Dollar - USD ($)**. 7. Click **Save**. >**Note** > The sample site is not a premium Wix site. This means you can only see the extra fees displayed in the site's cart and not on the checkout page. ## Remove an plugin You can remove an plugin from your site. **Wix Editor:** 1. In the **Public & Backend** section of the Code sidebar, under **Service Plugins**, hover over the plugin's folder and click **Show More** ![](https://d2x3xhvgiqkx42.cloudfront.net/12345678-1234-1234-1234-1234567890ab/76096845-8b12-44f1-91f6-3dc2e838fdd9/2022/09/04/c4ff84cb-4d96-4e1a-966a-9c6b66dca0b2/062297c2-c368-4aee-b705-f0a55abc5bf6.png) . 2. Select **Remove**. 3. Click **Remove**. **Wix Studio:** Right click on the plugin's folder and select **Delete Permanently**. --- > Portal Navigation: > > - Append `.md` to any URL under `https://dev.wix.com/docs/` to get its markdown version. > - Pages are either content pages (article or reference text) or menu pages (a list of links to child pages). > - To get a menu page, truncate any URL to a parent path and append `.md` (e.g. `https://dev.wix.com/docs/sdk.md`, `https://dev.wix.com/docs/sdk/core-modules.md`). > - Top-level index of all portals: https://dev.wix.com/docs/llms.txt > - Full concatenated docs: https://dev.wix.com/docs/llms-full.txt ## Resource: eCommerce Catalog Service Plugin ## Article: eCommerce Catalog Custom Extension (Beta) ## Article Link: https://dev.wix.com/docs/develop-websites/articles/code-tutorials/wix-e-commerce-stores/e-commerce-catalog-service-plugin.md ## Article Content: # Velo Tutorial: eCommerce Catalog Service Plugin Wix service plugins (formerly SPIs and custom extensions) allow you to implement custom logic to change how your site behaves and displays. For example, when you set up a Wix eCommerce site, there are a limited number of catalogs to choose from and some limitations on how you can define the products and services you wish to sell. To describe your product in a way that is not currently natively supported, or create a simplified catalog of services, you can use a service plugin. Read more information on how to implement a [service plugin](https://dev.wix.com/docs/develop-websites/articles/coding-with-velo/integrations/service-plugins-formerly-spis/about-service-plugins.md). This guide explains how to set up a catalog service plugin on your site using Velo. The process has 3 steps: 1. Create a new catalog service plugin on your site. 2. Implement your plugin with custom code. 3. Deploy the plugin. ## Step 1: Create a new catalog service plugin The first step in setting up your new plugin is to add it to your site. This process creates a new folder in the **Service Plugins** section of the Velo sidebar (Wix Editor), or the **/src/backend/__spi__** section of the Wix IDE Explorer (Wix Studio), which contains the files for your code. 1. [Add the Wix Stores app](https://support.wix.com/en/article/wix-stores-adding-wix-stores) to your site. 2. Enable coding: + **Wix Studio:** If necessary, click ![Code icon](https://github.com/wix-incubator/wix-code-docs/assets/50321691/2c41d3df-930f-4e0f-966f-038742adceed) and then **Start Coding**. + **Wix Editor:** Enable [Velo Dev Mode](https://support.wix.com/en/article/about-velo-by-wix#to-enable-velo-on-your-site), and then click the **Public & Backend** ![](https://d2x3xhvgiqkx42.cloudfront.net/12345678-1234-1234-1234-1234567890ab/76096845-8b12-44f1-91f6-3dc2e838fdd9/2022/08/29/23d50509-633d-4616-9f56-65add8fa6d0b/d910e041-d150-4f35-aa75-30ad262abc7a.png) tab in the Velo sidebar. 3. Go to the Service Plugins section: + **Wix Studio:** Click **Packages & Apps**. + **Wix Editor:** Scroll down to the Service Plugins panel at the bottom of the sidebar. 4. Hover over **Service Plugins** and click ![](https://d2x3xhvgiqkx42.cloudfront.net/12345678-1234-1234-1234-1234567890ab/11fda387-da5a-430a-ada3-46def885b67f/2022/03/02/65d645bd-dee9-40dc-9f91-c44b06d72492/289e91de-47c5-429c-b61d-67bd8d4fd1ec.png) , then click **Catalog**. 5. Follow the prompts to add the plugin and accept any terms and conditions that display. 6. Enter a name for your integration and click **Add & Edit Code**. The name can't contain spaces or special characters. 7. **Wix Studio:** Open the Wix IDE, and go to **/src/backend/__spi__/ecom-catalog**. If your service plugin doesn't appear, try refreshing both the Studio Editor and the Wix IDE. 8. **Publish** your site. 9. **Open** [Wix Logs](https://dev.wix.com/docs/develop-websites/articles/workspace-tools/developer-tools/logs/about-logs.md) window and keep it open. There should be a log with the text: Your site was published with an update to the ecom catalog plugin, 'my-plugin-name' (**appId: ``**). 10. Save/copy the **appId** you received in the log. You will need this when returning catalog items from your plugin. ## Step 2: Implement the plugin The procedure in the previous step creates a folder in the service plugins section of the Velo sidebar (Wix Editor), or in the Wix IDE's Explorer (Wix Studio). The name of the folder is based on the plugin you chose. Inside this is another folder with the name of the plugin you set up. This folder contains 2 files, `.js` and `-config.js`. Implement the custom code for your plugin in these files. Below are some guidelines for writing your code.  ### ``.js The code in this file defines a function named `getCatalogItems()`. This function is called by Wix eCommerce to retrieve the catalog items provided by your service plugin. The function accepts the following parameter: `options`: An object containing catalog item references (within your own catalog), quantities, and weight unit. This data is to be used by your plugin to retrieve your catalog items. These details are requested by Wix eCommerce when, for example, an item is added to your site's cart. For more details, see the [service plugin Reference](https://www.wix.com/velo/reference/spis/wix-ecom/ecom-catalog/introduction). >**Note** > If you also have Wix Stores and Wix Bookings catalogs on your site, when `getCatalogItems()` is called, the `options` parameter only contains references to your custom catalog items. The Wix Stores and Wix Bookings catalog items are automatically returned. Example **options** object: ```json { "catalogReferences": [ { "catalogReference": { "catalogItemId": "2", "appId": "7ff4b539-e3bf-4d8e-84d4-2ed180fce336", "options": { "week": "3" } }, "quantity": 1 } ], "weightUnit": "LB" } ``` >**Note** > The value of `weightUnit` is based on the regional format set on your site. To set a regional format open your site’s [dashboard](https://www.wix.com/my-account/site-selector/?buttonText=Go%20to%20Dashboard&title=Select%20a%20Site&autoSelectOnSingleSite=true&actionUrl=https://www.wix.com/dashboard/%7B%7BmetaSiteId%7D%7D/home/) and go to **Settings > Language & Region**. The `getCatalogItems()` function must return an object with a key called `catalogItems`. The value of this key is an array of `catalogReference` and `data` objects. These objects define the catalog items' references in your catalog, as well as each item's data. For the value of `catalogReference.appId`, use the `appId` you received in the log from [Step 1.9](#step-1-create-a-new-catalog-custom-extension) described above. In the `data` object, `productName`, `itemType`, and `price` are required fields. For more details, see the [service plugin reference](https://www.wix.com/velo/reference/spis/wix-ecom/ecom-catalog/getcatalogitems). Example return value: ```json { "catalogItems": [ { "catalogReference": { "appId": "", "catalogItemId": "2", "options": { "week": "3" } }, "data": { "productName": { "original": "EuroCamper" }, "itemType": { "preset": "PHYSICAL" }, "price": "540", "media": "wix:image://v1/11062b_7fba2fc327a04e1493f1a28213e8cae8~mv2.jpeg/camping-site#originWidth=6924&originHeight=3130", "descriptionLines": [ { "name": { "original": "Beds" }, "plainText": { "original": "Type: Double, Quantity: 1\nType: King, Quantity: 1" } }, { "name": { "original": "Size" }, "plainText": { "original": "7x3x3" } }, { "name": { "original": "Description" }, "plainText": { "original": "Professional Travelers RV for road trips, Enjoy a comfortable mobile home for the best family experience !" } }, { "name": { "original": "Additional Info" }, "plainText": { "original": "Deposit fee is 40$ per item\nReturning the item: return shipping is included with your order. All\nyou have to do is re-pack the hardware and it will be picked up by\nthe shipping company at the rental end date. If you cannot be\nreached, late fees will apply.\nCancelation: Orders will receive a full refund when canceled 10\nbusiness days before the rental start date." } }, { "name": { "original": "Week" }, "plainText": { "original": "3" } } ], "physicalProperties": { "shippable": false }, "quantityAvailable": 2 } } ] } ``` ### `-config.js` The code in this file defines a function named `getConfig()` that returns an object containing configurations for the catalog. Currently no configurations are available. Example return object: ```json export function getConfig() { return {} } ``` ### Add files to the plugin If you don't want to keep all of your code in the main files, you can add files to the plugin's folder and import functions and objects into the main files. + **Wix Editor:** 1. Hover over the plugin folder's name and click **Show More** ![](https://d2x3xhvgiqkx42.cloudfront.net/12345678-1234-1234-1234-1234567890ab/76096845-8b12-44f1-91f6-3dc2e838fdd9/2022/09/04/45269098-373f-4d2c-8168-2fc5242c6024/c890c6a3-6762-4501-bdb4-e44c678108df.png) . 2. Select the **New.js** file. + **Wix Studio:** Create a new file in the plugin's folder. To import from these files to the main files, use the following syntax: ``` import { functionName } from './myFileName.js'; ``` ### Test the plugin To test your plugin, create a custom product page based on your catalog's items. Write code that calls the [`addToCurrentCart()`](https://dev.wix.com/docs/velo/api-reference/wix-ecom-backend/current-cart/add-to-current-cart.md) function (see [Limitations](#Limitations) section below). Make sure to pass the items' catalog references in the `options.lineItems.catalogReference` parameter. This should be similar to the `catalogReference` object [described above](#my-integration-namejs). Make sure to use your catalog's `appId` - see [Step 1.9](#step-1-create-a-new-custom-catalog-extension). You can test your plugin before publishing your site in the Wix Editor using [functional testing](https://dev.wix.com/docs/develop-websites/articles/workspace-tools/testing-monitoring/functional-testing/test-backend-functions-with-functional-testing.md) like you would any backend Velo code. Make sure your `getCatalogItems()` function's return values are properly formatted. You can test your plugin after deploying for both Wix Editor and Wix Studio. To test your plugin after deploying, add console logs to your code. The results appear in [Wix Logs](https://dev.wix.com/docs/develop-websites/articles/workspace-tools/developer-tools/logs/about-logs.md). ## Step 3: Deploy the plugin Once your code files are ready, publish your site. Any catalog items you've integrated into dynamic pages are displayed on the relevant pages. When you add an item to the cart, the item details are displayed in the cart (and then later in the checkout and order flows).  ## Examples We created some examples to demonstrate how you can use service plugins to create your own custom catalog. > **Note:** These examples and their steps are based on Wix Editor sites. If you'd prefer to use Wix Studio, learn more about [working with the code panel in Wix Studio](https://dev.wix.com/docs/develop-websites/articles/workspace-tools/velo-workspace/workspaces/wix-studio-working-with-the-code-panel.md). ### Poems Catalog In this example, a simple catalog of poems has been integrated into the site. The catalog plugin uses a [collection in the Content Management System (CMS)](https://support.wix.com/en/article/content-manager-creating-a-collection) as the catalog source. The `poems-catalog.js` plugin file includes code that fetches catalog item info from the poems collection using the [wix-data API](https://www.wix.com/velo/reference/wix-data), as well as a `toCatalogItems()` function that constructs the catalog item to be returned by the service plugin. We built a [sample site](https://editor.wix.com/html/editor/web/renderer/new?siteId=95d384b1-0f26-41fc-b8f2-08fb873d9b73&metaSiteId=0e57ff6f-b239-4b1c-aa20-891c6f8c6bf5) where you can see this code in action. >**Note** > Clicking the link to the sample site opens a copy of the site. Publishing the copy adds it to your Wix account. ### RV Rentals Catalog In this more complex example, several collections are used together to implement an RV rental catalog. Some collections hold the RV details themselves, while others hold availability and stock data. The site includes detailed dynamic product pages that display not only product info but also availability status depending on the selected rental dates. Have a look at the [sample site](https://editor.wix.com/html/editor/web/renderer/new?siteId=38fa7176-950b-46a2-a82c-50563d81e23b&metaSiteId=0ffe1191-0cf6-4927-98bd-c2ed3e338d51) where you can go through the code to see the implementation for yourself.  >**Note** > Clicking the link to the sample site opens a copy of the site. Publishing the copy adds it to your Wix account. ### Limitations After adding an item to the cart, the cart might not refresh. To fix this, implement the following code: * Put `import wixEcomFrontend from "wix-ecom-frontend";` at the top of the file. * Use the [`refreshCart();`](https://dev.wix.com/docs/velo/api-reference/wix-ecom-frontend/refresh-cart.md) function to force refresh the cart. --- > Portal Navigation: > > - Append `.md` to any URL under `https://dev.wix.com/docs/` to get its markdown version. > - Pages are either content pages (article or reference text) or menu pages (a list of links to child pages). > - To get a menu page, truncate any URL to a parent path and append `.md` (e.g. `https://dev.wix.com/docs/sdk.md`, `https://dev.wix.com/docs/sdk/core-modules.md`). > - Top-level index of all portals: https://dev.wix.com/docs/llms.txt > - Full concatenated docs: https://dev.wix.com/docs/llms-full.txt ## Resource: Tutorial: Custom Discount Trigger Service Plugin ## Article: Tutorial: Custom Discount Trigger Service Plugin ## Article Link: https://dev.wix.com/docs/develop-websites/articles/code-tutorials/wix-e-commerce-stores/tutorial-custom-discount-trigger-service-plugin.md ## Article Content: # Tutorial: Custom Discount Trigger Service Plugin Wix service plugins (formerly SPIs and custom extensions) allow you to implement custom logic to change how your site displays and behaves. For example, with Wix Stores or Wix Restaurants your site can set up discounts that apply automatically for specific products or based on specific conditions, such as a minimum quantity of items or a minimum order subtotal. This service plugin allows you to implement your own custom conditions that will trigger a discount for a customer. Read more information on how to implement a [service plugin](https://dev.wix.com/docs/develop-websites/articles/coding-with-velo/integrations/service-plugins-formerly-spis/custom-app-extensions-using-spis.md). With the Custom Discount Trigger service plugin you can define which conditions will trigger an automatic discount. Possible custom triggers could apply discounts on the following: * For members only. * A restaurant's menu based on the time of day. * Digital products. * Specific items based on size or color. * A bundle of related items in a cart. ## Introduction This tutorial explains how to set up and implement a custom discount trigger plugin on your site using Velo. We created an example to demonstrate how you can use service plugins to create custom triggers that apply automatic discounts for your customers. We use the example of a restaurant that wants to offer a 25% off discount on all menu items between the hours of 4-6 pm. The process has 4 steps: 1. Create a new custom discount trigger plugin on your site. 2. Implement your plugin with custom code. 3. Create a new discount and assign the custom trigger that triggers it. 4. Deploy the plugin. ## Step 1: Create a new custom discount trigger plugin The first step in setting up your new plugin is to add it to your site. This process creates a new folder in the **/src/backend/__spi__** section of the Wix IDE Explorer (Wix Studio), which contains the files for your code, or the **Service Plugins** section of the Velo sidebar (Wix Editor). 1. [Add the Wix Restaurants app](https://support.wix.com/en/article/wix-restaurants-an-overview) to your site. 2. Enable coding: + **Wix Studio:** If necessary, click ![Code icon](https://github.com/wix-incubator/wix-code-docs/assets/50321691/2c41d3df-930f-4e0f-966f-038742adceed) and then **Start Coding**. + **Wix Editor:** Enable [Velo Dev Mode](https://support.wix.com/en/article/about-velo-by-wix#to-enable-velo-on-your-site), and then click the **Public & Backend** ![](https://d2x3xhvgiqkx42.cloudfront.net/12345678-1234-1234-1234-1234567890ab/76096845-8b12-44f1-91f6-3dc2e838fdd9/2022/08/29/23d50509-633d-4616-9f56-65add8fa6d0b/d910e041-d150-4f35-aa75-30ad262abc7a.png) tab in the Velo sidebar. 3. Go to the Service Plugins section: + **Wix Studio:** Click **Public & Backend**. + **Wix Editor:** Scroll down to the Service Plugins panel at the bottom of the sidebar. 4. Next to **Service Plugins**, click ![](https://d2x3xhvgiqkx42.cloudfront.net/12345678-1234-1234-1234-1234567890ab/11fda387-da5a-430a-ada3-46def885b67f/2022/03/02/65d645bd-dee9-40dc-9f91-c44b06d72492/289e91de-47c5-429c-b61d-67bd8d4fd1ec.png), then click **Custom Discount**. (In Wix Editor you need to hover over **Service Plugins**.) 5. Follow the prompts to add the plugin and accept any terms and conditions that display. 6. Enter a name for your integration and click **Add & Edit Code**. The name can't contain spaces or special characters. In this example, we named it **custom-triggers**. 7. **Wix Studio:** Open the Wix IDE, and go to **/src/backend/__spi__/ecom-discounts-trigger**. If your service plugin doesn't appear, try refreshing both the Studio Editor and the Wix IDE. 8. **Publish** your site. ## Step 2: Implement the plugin The procedure in the previous step creates a folder in the Wix IDE's Explorer (Wix Studio), or in the service plugins section of the Velo sidebar (Wix Editor). The name of the folder is based on the plugin you chose. Inside this is another folder with the name of the plugin you set up. This folder contains 2 files, **custom-triggers-config.js** and **custom-triggers.js**. We implement the custom code for our plugin in these files. ![](https://wixmp-833713b177cebf373f611808.wixmp.com/images/e-commerce-tutorial-custom-discount-trigger-service-plugin-md_velo-articles_wix-stores-with-velo_images_custom-trigger-plugin.png) ### custom-triggers-config.js This file is where we write the code for setting up the plugin's configuration. The code in this file defines a function named `getConfig()` that returns an object containing the configuration of your custom discount trigger plugin. Currently no configurations are available for this plugin, so set `getConfig()` to return an empty object. ```js import * as ecomDiscountsTrigger from 'interfaces-ecommerce-v1-custom-trigger'; export function getConfig() { return {}; } ``` ### custom-triggers.js This file is where we write the custom code that determines whether or not to trigger a discount. In our example, we want to trigger a 25% discount on all menu items if the customer is making the order between 4-6 pm. The code in this file creates a custom trigger with the `listTriggers()` function by returning an object with an `_id` and a `name`. Then, with the `getEligibleTriggers()` function we define the custom logic for when to apply the trigger we created. ```js import * as ecomDiscountsTrigger from 'interfaces-ecommerce-v1-custom-trigger'; // Define all custom triggers export const listTriggers = async () => { return { customTriggers: [ { _id: "d11eda27-4484-4eee-b2a9-13f72c49a277", name: "Happy Hour Custom Trigger" } ] } }; // Retrieve eligible triggers to apply export const getEligibleTriggers = async (options, context) => { var trigger = options.triggers.find(trigger => trigger.customTrigger._id === "d11eda27-4484-4eee-b2a9-13f72c49a277") const userCurrentDateTime = new Date; const userCurrentHour = userCurrentDateTime.getHours(); var result // Trigger is eligible if the time is between 4-6pm if (userCurrentHour >= 16 && userCurrentHour <= 18) { result = { eligibleTriggers: [ { customTriggerId : "d11eda27-4484-4eee-b2a9-13f72c49a277", identifier: trigger.identifier } ] } } else { result = { eligibleTriggers: [] } } return result }; ``` **Lines 1-4**: First we import the eCom custom triggers module. Then we export the `listTriggers()` function where we define any custom triggers we want to create. **Lines 6-11**: We return an array of `customTriggers`, giving each one an `_id` and a `name`. **Line 16**: Then we export the `getEligibleTriggers()` function where we define the custom logic to determine whether or not to apply the custom trigger. **Lines 18-21**: We declare our variables. **Line 24**: We check if the current time is between 4-6pm. **Lines 26-31**: If so, then the trigger we created in `listTriggers()` function is eligible and should trigger the applicable discount. **Lines 33-37**: If not, then `eligibleTriggers` is an empty array as there are no eligible triggers to apply. ### Optional: Add files to the plugin If you don't want to keep all of your code in the main files, you can add files to the plugin's folder and import functions and objects into the main files. + **Wix Studio:** Create a new file in the plugin's folder. To import from these files to the main files, use the following syntax: ``` import { functionName } from './myFileName.js'; ``` + **Wix Editor:** 1. Hover over the plugin folder's name and click **Show More** ![](https://d2x3xhvgiqkx42.cloudfront.net/12345678-1234-1234-1234-1234567890ab/76096845-8b12-44f1-91f6-3dc2e838fdd9/2022/09/04/45269098-373f-4d2c-8168-2fc5242c6024/c890c6a3-6762-4501-bdb4-e44c678108df.png) . 2. Select the **New.js** file. ## Step 3: Create a new discount and assign the custom trigger Create an automatic discount with the [Discount Rules API](https://dev.wix.com/docs/velo/api-reference/wix-ecom-backend/discount-rules/create-discount-rule.md), or by [using the dashboard](https://support.wix.com/en/article/wix-stores-creating-automatic-discounts) and set the custom trigger using the `name` of the custom trigger we created in our `listTriggers()` function. In our example, `"Happy Hour Custom Trigger"`. ### Optional: Test the plugin Once the discount is created and connected to your custom trigger, you can test your plugin before publishing your site in the Wix Editor using [functional testing](https://support.wix.com/en/article/velo-functional-testing-in-the-backend) like you would with any backend Velo code. Make sure your `getEligibleTriggers()` function's return values are properly formatted. You can test your plugin after deploying for both Wix Editor and Wix Studio. To test your plugin after deploying, add console logs to your code. The results appear in the [Site Events log](https://support.wix.com/en/article/velo-about-site-monitoring). ## Step 4: Deploy the plugin When your code files are ready, you can publish your site and then try it out for yourself to see the custom discount trigger in action. 1. Once your code files are ready, click **Save**. Then publish your site. 2. After your service plugins are published, visit your site. If you visit your site between 4-6pm you should see the 25% discount applied to all menu items. ## Remove the plugin To remove the plugin from your site, follow these steps: + **Wix Studio:** Right-click on the plugin's folder and select **Delete Permanently**. + **Wix Editor:** 1. In the **Public & Backend** section of the Velo sidebar, under **Service Plugins**, hover over the plugin's folder and click **Show More** ![](https://d2x3xhvgiqkx42.cloudfront.net/12345678-1234-1234-1234-1234567890ab/76096845-8b12-44f1-91f6-3dc2e838fdd9/2022/09/04/c4ff84cb-4d96-4e1a-966a-9c6b66dca0b2/062297c2-c368-4aee-b705-f0a55abc5bf6.png) . 2. Select **Remove**. 3. Click **Remove**. --- > Portal Navigation: > > - Append `.md` to any URL under `https://dev.wix.com/docs/` to get its markdown version. > - Pages are either content pages (article or reference text) or menu pages (a list of links to child pages). > - To get a menu page, truncate any URL to a parent path and append `.md` (e.g. `https://dev.wix.com/docs/sdk.md`, `https://dev.wix.com/docs/sdk/core-modules.md`). > - Top-level index of all portals: https://dev.wix.com/docs/llms.txt > - Full concatenated docs: https://dev.wix.com/docs/llms-full.txt ## Resource: eCommerce Shipping Rates Service Plugin ## Article: eCommerce Shipping Rates Custom Extension ## Article Link: https://dev.wix.com/docs/develop-websites/articles/code-tutorials/wix-e-commerce-stores/e-commerce-shipping-rates-service-plugin.md ## Article Content: # Velo Tutorial: eCommerce Shipping Rates Service Plugin Wix service plugins (formerly SPIs and custom extensions) allow you to expand what your site can do by integrating with 3rd-party services not currently supported by Wix. They also allow you to implement custom logic to change how your site displays and behaves. Read more information on how to implement a [service plugin](https://dev.wix.com/docs/develop-websites/articles/coding-with-velo/integrations/service-plugins-formerly-spis/custom-app-extensions-using-spis.md). With a Shipping Rates service plugin, you can connect your site to shipping rates providers not currently supported by Wix. You can also implement custom shipping rates and options using code. These rates are displayed on your store's **Cart** and **Checkout** pages.  This guide explains how to set up a shipping rates plugin on your site using Velo. The process has 3 steps: 1. Create a new shipping rates plugin on your site. 2. Implement your plugin with custom code. 3. Deploy the plugin. >**Note** > This feature is still in beta testing and may change significantly before the final release. Elements that are not fully functional are noted below. ## Step 1: Create a new shipping rates plugin The first step in setting up your new plugin is to add it to your site. This process creates a new folder in the **Service Plugins** section of the Code sidebar (Wix Editor), or the **/src/backend/__spi__** section of the Wix IDE Explorer (Wix Studio), which contains the files for your code. 1. [Add the Wix Stores app](https://support.wix.com/en/article/wix-stores-adding-wix-stores) to your site. 2. Enable coding: + **Wix Studio:** If necessary, click ![Code icon](https://github.com/wix-incubator/wix-code-docs/assets/50321691/2c41d3df-930f-4e0f-966f-038742adceed) and then **Start Coding**. + **Wix Editor:** Enable [Velo Dev Mode](https://support.wix.com/en/article/about-velo-by-wix#to-enable-velo-on-your-site), and then click the **Public & Backend** ![](https://d2x3xhvgiqkx42.cloudfront.net/12345678-1234-1234-1234-1234567890ab/76096845-8b12-44f1-91f6-3dc2e838fdd9/2022/08/29/23d50509-633d-4616-9f56-65add8fa6d0b/d910e041-d150-4f35-aa75-30ad262abc7a.png) tab in the Code sidebar. 3. Go to the Service Plugins section: + **Wix Studio:** Click **Public & Backend**. + **Wix Editor:** Scroll down to the Service Plugins panel at the bottom of the sidebar. 4. Hover over **Service Plugins** and click ![](https://d2x3xhvgiqkx42.cloudfront.net/12345678-1234-1234-1234-1234567890ab/11fda387-da5a-430a-ada3-46def885b67f/2022/03/02/65d645bd-dee9-40dc-9f91-c44b06d72492/289e91de-47c5-429c-b61d-67bd8d4fd1ec.png) , then click **Shipping Rates**. 5. Follow the prompts to add the plugin and accept any terms and conditions that display. 6. Enter a name for your integration and click **Add & Edit Code**. The name can't contain spaces or special characters. 7. **Wix Studio:** Open the Wix IDE, and go to **/src/backend/__spi__/ecom-shipping-rates**. If your service plugin doesn't appear, try refreshing both the Studio Editor and the Wix IDE. 8. **Publish** your site. ## Step 2: Implement the plugin The procedure in the previous step creates a folder in the service plugins section of the Code sidebar (Wix Editor), or in the Wix IDE's Explorer (Wix Studio). The name of the folder is based on the plugin you chose. Inside this is another folder with the name of the plugin you set up. This folder contains 2 files, `.js` and `-config.js`. Implement the custom code for your plugin in these files. Here are some guidelines for writing your code: ### `.js` The code in this file defines a function named `getShippingRates()`. This function is called by Wix eCommerce to retrieve the shipping rates provided by your plugin. The function accepts the following parameter: `options`: An object containing data about line items, the shipping destination, the shipping origin, and general configurations. For more details, see the [service plugin reference](https://www.wix.com/velo/reference/spis/wix-ecom/ecom-shipping-rates). Examples options object: ```json { "lineItems": [ { "name": "toy plane", "quantity": 1, "catalogReference": { "appId": "215238eb-22a5-4c36-9e7b-e7c08025e04e", "catalogItemId": "1a2d7e83-4bef-31d5-09e1-3326ee271c09" }, "physicalProperties": { "sku": "0002", "shippable": true, "weight": 1 }, "price": "200", "priceBeforeDiscount": "250", "totalPrice": "200", "totalPriceBeforeDiscount": "250" } ], "shippingDestination": { "addressLine1": "34 Elizabeth Street", "addressLine2": "4th floor", "city": "Melbourne", "country": "AU", "postalCode": "3000", "subdivision": "VIC" }, "shippingOrigin": { "addressLine1": "235 West 23rd Street", "addressLine2": "3rd floor", "city": "New York", "country": "US", "postalCode": "10011", "subdivision": "US-NY" }, "buyerDetails": {}, "weightUnit": "KG" } ``` >**Notes** > * Item objects don't include the physical dimensions of the products in your store. You might need to include these to retrieve 3rd-party shipping rates. In this case, store them in a separate collection together with a unique identifier such as an SKU. You can retrieve the dimensions from this collection in your service plugin code using the [wix-data API](https://www.wix.com/velo/reference/wix-data) and include them in your 3rd-party API call. > * The value of shippingOrigin is based on the business address set on your site. To set a business address open your site’s [dashboard](https://www.wix.com/my-account/site-selector/?buttonText=Go%20to%20Dashboard&title=Select%20a%20Site&autoSelectOnSingleSite=true&actionUrl=https://www.wix.com/dashboard/{{metaSiteId}}/home/) and go to **Settings > Business Info > Location & Contact Info > Address**. The `getShippingRates()` function must return an object with a key called `shippingRates`. The value of this key is an array of `shippingRate` objects. These objects define the shipping rate options that site visitors see on the **Cart** and **Checkout** pages. For more details, see the [service plugin reference](https://www.wix.com/velo/reference/spis/wix-ecom/ecom-shipping-rates). Example return value: ```json { "shippingRates": [{ "code": "123456-abcdef", // A unique identifier "title": "USPS - International", "cost": { "price": "15", "currency": "EUR", "additionalCharges": [{ "price": "12", "details": "Shipping surcharges and handling fees" }] }, "logistics": { "deliveryTime": "2-5 days", "instructions": "Please be available" } }] } ``` >**Note** > The currency property of each `shippingRate` object must match the site's currency. Shipping rates with other currencies are not displayed on the site. Include any currency conversions in your implementation. ### `-config.js` The code in this file defines a function named `getConfig()` that returns an object containing the values used to display the extended shipping rate on your site's dashboard. Example return object: ```json { "name": "best_shipping_rates_provider" "description": "Shipping rates for the US east-coast" } ``` >**Note** > Displaying the details provided by `getConfig()` is not supported in beta testing. For the purposes of testing, use a dummy value for your `getConfig()` return object, such as the one above. ### Add files to the plugin If you don't want to keep all of your code in the main files, you can add files to the plugin's folder and import functions and objects into the main files. + **Wix Editor:** 1. Hover over the plugin folder's name and click **Show More** ![](https://d2x3xhvgiqkx42.cloudfront.net/12345678-1234-1234-1234-1234567890ab/76096845-8b12-44f1-91f6-3dc2e838fdd9/2022/09/04/45269098-373f-4d2c-8168-2fc5242c6024/c890c6a3-6762-4501-bdb4-e44c678108df.png) . 2. Select the **New.js** file. + **Wix Studio:** Create a new file in the plugin's folder. To import from these files to the main files, use the following syntax: ``` import { functionName } from './myFileName.js'; ``` ### Test the plugin You can test your plugin before publishing your site in the Wix Editor using [functional testing](https://dev.wix.com/docs/develop-websites/articles/workspace-tools/testing-monitoring/functional-testing/test-backend-functions-with-functional-testing.md) like you would with any backend Velo code. Make sure your `getShippingRates` function's return values are properly formatted. You can test your plugin after deploying for both Wix Editor and Wix Studio. To test your plugin after deploying, add console logs to your code. The results appear in [Wix Logs](https://dev.wix.com/docs/develop-websites/articles/workspace-tools/developer-tools/logs/about-logs.md). ## Step 3: Deploy the plugin Once your code files are ready, you need to deploy your plugin and enable it on your site's dashboard. 1. Publish your site. > **Note:** > There may be a delay between publishing the site and the new shipping rates options appearing on your site's dashboard. 2. Go to the [Shipping & Fulfillment](https://www.wix.com/my-account/site-selector/?buttonText=Manage%20Shipping&title=Select%20a%20Site&autoSelectOnSingleSite=true&actionUrl=https://www.wix.com/dashboard/%7B%7BmetaSiteId%7D%7D/store/shipping-and-tax/list?referralInfo=sidebar) settings on your site's dashboard. 3. Click the region where you want to apply the new shipping rates. 4. Under **Installed Apps** click the toggle for your new shipping rates plugin. ![](https://d2x3xhvgiqkx42.cloudfront.net/12345678-1234-1234-1234-1234567890ab/11fda387-da5a-430a-ada3-46def885b67f/2022/04/14/a46bda1b-a8b2-47f4-8de0-499e862f9c10/517b4381-0385-4d7c-9de7-73ee3a72c817.png) > **Note:** > The names of the shipping rates options don't appear in the beta version. The different options available are listed based on the order in which you add them to your site. 5. Click **Save**.   6. Once your service plugin is deployed, your custom shipping rates appear on your site's **Cart** and **Checkout** pages. ![](https://d2x3xhvgiqkx42.cloudfront.net/12345678-1234-1234-1234-1234567890ab/11fda387-da5a-430a-ada3-46def885b67f/2022/03/02/6594569d-aead-47ff-beb5-eb7e9076fe0c/1b7d35f4-fb86-4b3b-8761-730d5cc7fc82.png) ## Examples Service plugins allow you to implement shipping rates with custom logic and display them on your site. We created some examples to demonstrate how you can use service plugins to extend the shipping rates options on your site. > **Note:** These examples and their steps are based on Wix Editor sites. You can adapt the steps for a Wix Studio site by using the equivalent [Wix Studio features](https://dev.wix.com/docs/develop-websites/articles/workspace-tools/velo-workspace/workspaces/wix-studio-working-with-the-code-panel.md). ### Display rates by expected delivery In this example, shipping options for a variety of shipping times are displayed. To test this code, paste it into your **.js** file. ```javascript export const getShippingRates = async (options) => { return { shippingRates: [{ title: 'Same day delivery', code: 'one_day_rush', logistics: { deliveryTime: 'Today', instructions: 'Please be available', }, cost: { price: "20.00", currency: 'EUR', additionalCharges: [], } }, { title: 'Next Day', code: 'next-day', logistics: { deliveryTime: 'Tomorrow', instructions: 'Please be available', }, cost: { price: '15.00', currency: 'EUR', additionalCharges: [], } }, { title: '2 Days', code: 'two_days', logistics: { deliveryTime: '2 Days', instructions: 'Please be available', }, cost: { price: '12.00', currency: 'EUR', additionalCharges: [], } }] } }; ``` ### Display rates based on product and cart data In this example, product weight and quantity data is used to determine shipping rates. The plugin includes 2 helper files. One, `rates-by-weight`, includes code that calculates a shipping rate based on the total weight of the shipment. The second file, `rates-by-quantity`, calculates a shipping rate based on the total number of items being shipped. Both the weight and quantity values are calculated using the product data that’s passed into the plugin's `getShippingRates` function. The code in the example’s `getShippingRates` function calculates the rates for shipping by weight or by quantity and returns the lower of the two. We built a [sample site](https://manage.wix.com/edit-template/from?originTemplateId=dec2dc1f-740e-42a3-bf1e-625c2df3c4f1&templateId=f17e3efd-2877-47c2-b202-3c9f2641ba14&autoDevMode=true) where you can see this code in action. >**Note:** > Clicking the link to the sample site opens a copy of the site. Publishing the copy adds it to your Wix account. ### 3rd-party plugin We built [a sample site](https://manage.wix.com/edit-template/from?originTemplateId=103d0e2e-46f3-42ec-928c-f61a328495c3&templateId=9e9f7487-d7a5-4548-b4a4-65fedbf08199&autoDevMode=true) that demonstrates 3rd-party integrations. This site integrates with shipping rates provider [Easyship](http://www.easyship.com) and displays the provided rates on the site. >**Note:** > Clicking the link to the sample site opens a copy of the site. Publishing the copy adds it to your Wix account. To get the example working you need to get an easyship API key, store the key in a secret on your copy of the sample site, and add a business address to the site: #### Step 1: Retrieve and save an easyship API key 1. Publish a copy of the template site to save it to your Wix account. 2. Sign up for a free [easyship](http://www.easyship.com/) account. 3. On your account dashboard click **Create an Api**. ![](https://d2x3xhvgiqkx42.cloudfront.net/12345678-1234-1234-1234-1234567890ab/11fda387-da5a-430a-ada3-46def885b67f/2022/03/02/2723858b-0fe5-48d2-b16a-52069273d078/1f878ea7-5319-4ea7-a0c4-5ac42ccf4c5e.png) 4. Enter a name for your API integration and click **Connect**. 5. Copy the production API key. ![](https://d2x3xhvgiqkx42.cloudfront.net/12345678-1234-1234-1234-1234567890ab/11fda387-da5a-430a-ada3-46def885b67f/2022/03/02/f556c4a1-3a8c-4652-89c3-4febf0c23ca1/2fc42273-179d-479f-b817-a2d0cd514a40.png) 6. Open your site’s [**Secrets Manager**](https://dev.wix.com/docs/develop-websites/articles/workspace-tools/developer-tools/secrets-manager/about-the-secrets-manager.md) and create a new secret named \`easy-ship-api-token\` with your easyship API key as the value. #### Step 2: Add a business address to your site 1. On your site’s dashboard, go to **Settings > Business Info > Location & Contact Info > Address**. 2. Add a business address for the site. 3. Click **Save**. --- > Portal Navigation: > > - Append `.md` to any URL under `https://dev.wix.com/docs/` to get its markdown version. > - Pages are either content pages (article or reference text) or menu pages (a list of links to child pages). > - To get a menu page, truncate any URL to a parent path and append `.md` (e.g. `https://dev.wix.com/docs/sdk.md`, `https://dev.wix.com/docs/sdk/core-modules.md`). > - Top-level index of all portals: https://dev.wix.com/docs/llms.txt > - Full concatenated docs: https://dev.wix.com/docs/llms-full.txt ## Resource: Tutorial: Validations Service Plugin ## Article: Tutorial: Validations Custom Extension ## Article Link: https://dev.wix.com/docs/develop-websites/articles/code-tutorials/wix-e-commerce-stores/tutorial-validations-service-plugin.md ## Article Content: # Tutorial: Validations Service Plugin Wix Service Plugins (formerly SPIs and custom extensions) allow you to implement custom logic to change how your site behaves and displays. For example, when you set up a Wix eCommerce site, there are a small number of validations to choose from. The validations service plugin allows you to implement your own validations and options using code. You can also connect your site to validation providers not currently supported by Wix. Any violations to these validations are displayed on your store's Checkout and Cart pages. Read more information on how to implement a [service plugin](https://dev.wix.com/docs/develop-websites/articles/coding-with-velo/integrations/service-plugins-formerly-spis/about-service-plugins.md). With the Validations service plugin you can define the validations for a cart or checkout that fit your site's needs. Possible validations include: - Minimum subtotal amount to qualify for free shipping. - Age of a customer before they proceed to checkout. - Specific items to ship only to specific regions. - Restrict purchases to site members only. - Close the checkout on certain days. ## Introduction This tutorial explains how to set up and implement a validation plugin on your site using Velo. We created an example to demonstrate how you can use service plugins to validate your checkout and cart pages. We use the example of a wholesale store where a customer must purchase a minimum total of 300 items, and if a customer purchases toothbrushes, then they must purchase at least 200 toothbrushes. The process has 3 steps: 1. Create a new validations plugin on our site. 2. Implement our plugin with custom code. 3. Deploy the plugin. ## Step 1: Create a new validation plugin The first step in setting up your new plugin is to add it to your site. This process creates a new folder in the **Service Plugins** section of the Code sidebar (Wix Editor), or the **/src/backend/**spi\*\*\*\* section of the Wix IDE Explorer (Wix Studio), which contains the files for your code. 1. [Add the Wix Stores app](https://support.wix.com/en/article/wix-stores-adding-wix-stores) to your site. 2. Enable coding: - **Wix Studio:** If necessary, click ![Code icon](https://github.com/wix-incubator/wix-code-docs/assets/50321691/2c41d3df-930f-4e0f-966f-038742adceed) and then **Start Coding**. - **Wix Editor:** Enable [Velo Dev Mode](https://support.wix.com/en/article/about-velo-by-wix#to-enable-velo-on-your-site), and then click the **Public & Backend** ![](https://d2x3xhvgiqkx42.cloudfront.net/12345678-1234-1234-1234-1234567890ab/76096845-8b12-44f1-91f6-3dc2e838fdd9/2022/08/29/23d50509-633d-4616-9f56-65add8fa6d0b/d910e041-d150-4f35-aa75-30ad262abc7a.png) tab in the Code sidebar. 3. Go to the Service Plugins section: - **Wix Studio:** Click **Public & Backend**. - **Wix Editor:** Scroll down to the Service Plugins panel at the bottom of the sidebar. 4. Next to **Service Plugins**, click ![](https://d2x3xhvgiqkx42.cloudfront.net/12345678-1234-1234-1234-1234567890ab/11fda387-da5a-430a-ada3-46def885b67f/2022/03/02/65d645bd-dee9-40dc-9f91-c44b06d72492/289e91de-47c5-429c-b61d-67bd8d4fd1ec.png), then click **eCommerce Validation**. (In Wix Editor you need to hover over **Service Plugins**.) 5. Follow the prompts to add the plugin and accept any terms and conditions that display. 6. Enter a name for your integration and click **Add & Edit Code**. The name can't contain spaces or special characters. 7. **Wix Studio:** Open the Wix IDE, and go to **/src/backend/**spi**/ecom-validations**. If your service plugin doesn't appear, try refreshing both the Studio Editor and the Wix IDE. 8. **Publish** your site. ## Step 2: Implement the plugin The procedure in the previous step creates a folder in the service plugins section of the Code sidebar (Wix Editor), or in the Wix IDE's Explorer (Wix Studio). The name of the folder is based on the plugin you chose. Inside this is another folder with the name of the plugin you set up. This folder contains 2 files, **minimums.js** and **minimums-config.js**. We implement the custom code for our plugin in these files. ![](https://wixmp-833713b177cebf373f611808.wixmp.com/images/3b636fad10dac2f141d6e756b43b9bf8.png) ## minimum-config.js This file is where write the code for setting up the plugin's configuration. The code in this file defines a function named `getConfig()` that returns an object containing the values used to display the eCommerce validations on your site's dashboard. By default, the Validations service plugin only validates a site visitor's checkout. In our example, we want to also validate a site visitor's cart, so we set the `validateInCart` parameter to `true` in the service plugin's configuration file. ```js import * as ecomValidations from "interfaces-ecommerce-v1-validations-provider"; export function getConfig() { return { validateInCart: true }; } ``` ## minimum.js This file is where we write the code for validating the minimum total item quantity, and the minimum quantity of toothbrushes (a line item's quantity). A customer must purchase a total of at least 300 items, and if the customer is purchasing toothbrushes, they must purchase at least 200 toothbrushes. If there are any violations to these validations, they are shown in a site visitor's cart and checkout pages(see images in step 3). The code in this file defines a function named `getValidationViolations()`. This function is called by Wix eCommerce to retrieve any violations to the validations provided by our plugin. The function accepts the following parameter: `options`: An object containing data about the source of the request, and the cart or checkout information to validate. This information includes line items, gift cards, applied discounts, shipping information, and billing information. For more details, see the [service plugin reference](https://www.wix.com/velo/reference/spis/wix-ecom/ecom-validations). The `getValidationViolations()` function returns an array of validation objects (any validation violations in a site visitor's cart or checkout). These validation violations are displayed in the site visitor's cart and checkout pages. If there are no validation violations, the response is an object containing an empty list. ## The code: ```js import * as ecomValidations from "interfaces-ecommerce-v1-validations-provider"; export const getValidationViolations = async (options, context) => { let violations = []; const source = options.sourceInfo.source; const severity = source == ecomValidations.Source.CART ? ecomValidations.Severity.WARNING : ecomValidations.Severity.ERROR; const bambooDescription = "You must purchase at least 200 Bamboo Toothbrushes."; const bambooLineItem = options.validationInfo.lineItems.find((lineItem) => isBambooTooth(lineItem.catalogReference?.catalogItemId) ); if (bambooLineItem != undefined) { const quantity = bambooLineItem.quantity; if (quantity > 0 && quantity < 200) { violations.push({ severity, target: { lineItem: { name: ecomValidations.NameInLineItem.LINE_ITEM_DEFAULT, _id: bambooLineItem._id, }, }, description: bambooDescription, }); } } const cartQuantityDescription = "You must purchase a minimum of 300 items."; const cartQuantity = options.validationInfo.lineItems.reduce( (partialSum, lineItem) => partialSum + lineItem.quantity, 0 ); if (cartQuantity < 300) { violations.push({ severity, target: { other: { name: ecomValidations.NameInOther.OTHER_DEFAULT } }, description: cartQuantityDescription, }); } return { violations }; }; const isBambooTooth = (catalogItemId) => { const bambooToothCatalogItemId = "cd59cd36-b6d2-2cf3-9d48-81793a7bdbbd"; const ifBambooTooth = catalogItemId != undefined && catalogItemId == bambooToothCatalogItemId; return ifBambooTooth; }; ``` **Line 1-3**: First we import the eCom validations provider module. Then we export the `getValidationViolations()` function where we set the custom logic for our validations. **Lines 4-5**: We declare our variables. **Line 6**: For the severity, if the source of the validation is a `CART`, then we want any violations to the cart to display as a warning. Otherwise (if the source of the validation is a checkout), then we want any violations to the checkout to display as an error. **Line 7**: Set the violation description that will be displayed when there is a violation to the toothbrush validation. **Lines 9-11**: Check the line items in the cart or checkout to see if they contain a toothbrush. We do this by calling a function that we create later in our code to check whether the catalog ID of the toothbrush in the cart or checkout matches the catalog item ID in the list of catalog items. If it matches, get the toothbrush's quantity. **Lines 12-20**: If the toothbrush's quantity is between 1-200, set the severity, target, and description of the violation and push them into a violations array. The target is set to the line item's default since the validation violation is on a specific line item. **Line 21**: Set the violation description that will be displayed when there is a violation to the minimum total item quantity validation. **Lines 22- 32**: Calculate the cart's total quantity. If the quantity is less than 300, set the severity, target, and description of the violation and push them into a violations array. The target is set to the other (general) validation violation default since the validation violation is not on a specific line item, rather on the total item quantity of the cart checkout. **Lines 33- 37**: Here we create a function to check whether the ID we pass into the function (the catalog ID of the toothbrush in the cart or checkout) matches the catalog item ID in the list of catalog items. ## Optional: Add files to the plugin If you don't want to keep all of your code in the main files, you can add files to the plugin's folder and import functions and objects into the main files. - **Wix Editor:** 1. Hover over the plugin folder's name and click **Show More** ![](https://d2x3xhvgiqkx42.cloudfront.net/12345678-1234-1234-1234-1234567890ab/76096845-8b12-44f1-91f6-3dc2e838fdd9/2022/09/04/45269098-373f-4d2c-8168-2fc5242c6024/c890c6a3-6762-4501-bdb4-e44c678108df.png) . 2. Select the **New.js** file. - **Wix Studio:** Create a new file in the plugin's folder. To import from these files to the main files, use the following syntax: ``` import { functionName } from './myFileName.js'; ``` ## Optional: Test the plugin You can test your plugin before publishing your site in the Wix Editor using [functional testing](https://support.wix.com/en/article/velo-functional-testing-in-the-backend) like you would with any backend Velo code. Make sure your `getValidationViolations()` function's return values are properly formatted. You can test your plugin after deploying for both Wix Editor and Wix Studio. To test your plugin after deploying, add console logs to your code. The results appear in [Wix Logs](https://support.wix.com/en/article/velo-about-site-monitoring). ## Step 3: Deploy the plugin Once your code files are ready, publish your site. Navigate to your site, and add an item to your Cart or Checkout. Any violations to the validations you've customized are displayed on the checkout or the cart pages. 1. Once your code files are ready, click **Save**. Then Publish your site. 2. After your service plugins are published, open your site. 3. Your service plugin is then deployed, and any validation violations should appear on your site's **Checkout** and **Cart** pages. If a customer adds only 20 Bamboo Toothbrushes to their cart. They will receive the following warnings displayed in their cart. ![](https://d2x3xhvgiqkx42.cloudfront.net/12345678-1234-1234-1234-1234567890ab/b4ae9703-4364-4550-a797-1cc95ed8046e/2023/07/02/bc4371d4-0736-42f8-b5ba-fb2b5a9b6be3/f428b826-c1e0-463d-b588-8330711b58fa.png) The validation violation response for the cart will look like this: ```js { "violations": [{ "severity": "WARNING", "target": { "lineItem": { "_id": "00000000-0000-0000-0000-000000000001" "name": "LINE_ITEM_DEFAULT" } }, "description": "You must purchase at least 200 Bamboo Toothbrushes." }, { "severity": "WARNING", "target": { "other": { "name": "OTHER_DEFAULT" } }, "description": "You must purchase a minimum of 300 items." }] } ``` If the same customer from above proceeds to the checkout page, they will see the following errors displayed at the top of the checkout page: ![Checkout violations - top](https://wixmp-833713b177cebf373f611808.wixmp.com/images/301fbadd7fe7e9df8ddcdd126d0812b3.png) And again at the button of the page. The button is disabled until the errors are resolved: ![Checkout violations - bottom](https://wixmp-833713b177cebf373f611808.wixmp.com/images/a2168d9ffd289b9ef48df76e0cef0016.png) The validation violation response for the checkout will look like this: ```js { "violations": [{ "severity": "ERROR", "target": { "lineItem": { "name": "LINE_ITEM_DEFAULT" } }, "description": "You must purchase at least 200 Bamboo Toothbrushes." }, { "severity": "ERROR", "target": { "other": { "name": "OTHER_DEFAULT" } }, "description": "You must purchase a minimum of 300 items." } ] } ``` > **Note:** > > By default, the Validations service plugin only validates a site visitor's checkout. If you want to also validate a site visitor's cart, set the `validateInCart` parameter to `true` in the service plugin's configuration file. ## Remove the plugin You can remove the plugin from your site. Do the following: **Wix Editor:** 1. In the **Public & Backend** section of the Code sidebar, under **Service Plugins**, hover over the plugin's folder and click **Show More** ![](https://d2x3xhvgiqkx42.cloudfront.net/12345678-1234-1234-1234-1234567890ab/76096845-8b12-44f1-91f6-3dc2e838fdd9/2022/09/04/c4ff84cb-4d96-4e1a-966a-9c6b66dca0b2/062297c2-c368-4aee-b705-f0a55abc5bf6.png) . 2. Select **Remove**. 3. Click **Remove**. **Wix Studio:** Right-click on the plugin's folder and select **Delete Permanently**. --- > Portal Navigation: > > - Append `.md` to any URL under `https://dev.wix.com/docs/` to get its markdown version. > - Pages are either content pages (article or reference text) or menu pages (a list of links to child pages). > - To get a menu page, truncate any URL to a parent path and append `.md` (e.g. `https://dev.wix.com/docs/sdk.md`, `https://dev.wix.com/docs/sdk/core-modules.md`). > - Top-level index of all portals: https://dev.wix.com/docs/llms.txt > - Full concatenated docs: https://dev.wix.com/docs/llms-full.txt ## Resource: Tutorial: eCommerce Recommendations Service Plugin ## Article: Tutorial: eCommerce Recommendations Service Plugin ## Article Link: https://dev.wix.com/docs/develop-websites/articles/code-tutorials/wix-e-commerce-stores/tutorial-e-commerce-recommendations-service-plugin.md ## Article Content: # Tutorial: Recommendations Service Plugin Wix service plugins (formerly SPIs and custom extensions) allow you to expand what your site can do by integrating with 3rd-party services not currently supported by Wix. They also allow you to implement custom logic to change how your site displays and behaves. Read more information on how to implement a [service plugin](https://dev.wix.com/docs/develop-websites/articles/coding-with-velo/integrations/service-plugins-formerly-spis/about-service-plugins.md). With the Recommendations Service Plugin, your service can seamlessly integrate with Wix to provide advanced recommendation algorithms, helping site owners deliver personalized suggestions that enhance user engagement and overall experience. This guide explains how to set up a recommendations plugin on your site. The process has 3 steps: 1. Create a new recommendations plugin on your site. 2. Implement your plugin with custom code. 3. Deploy the plugin. ## Step 1: Create a new recommendations plugin The first step in setting up your new plugin is to add it to your site. This process creates a new folder in the **Service Plugins** section of the Code sidebar (Wix Editor), or the **/src/backend/__spi__** section of the Wix IDE Explorer (Wix Studio), which contains the files for your code. 1. [Add the Wix Stores app](https://support.wix.com/en/article/wix-stores-adding-wix-stores) to your site. 2. [Add a Related Products gallery](https://support.wix.com/en/article/wix-stores-adding-a-related-products-gallery) to any page where you would like to display recommendations. On the product page, you can recommend related products. On any other page, you can display generic recommendations for the store or current visitor. 2. Enable coding: + **Wix Studio:** If necessary, click ![Code icon](https://github.com/wix-incubator/wix-code-docs/assets/50321691/2c41d3df-930f-4e0f-966f-038742adceed) and then **Start Coding**. + **Wix Editor:** Enable [Velo Dev Mode](https://support.wix.com/en/article/about-velo-by-wix#to-enable-velo-on-your-site), and then click the **Public & Backend** ![](https://d2x3xhvgiqkx42.cloudfront.net/12345678-1234-1234-1234-1234567890ab/76096845-8b12-44f1-91f6-3dc2e838fdd9/2022/08/29/23d50509-633d-4616-9f56-65add8fa6d0b/d910e041-d150-4f35-aa75-30ad262abc7a.png) tab in the Code sidebar. 3. Go to the Service Plugins section: + **Wix Studio:** Click **Backend & Public**. + **Wix Editor:** Scroll down to the Service Plugins panel at the bottom of the sidebar. 4. Hover over **Service Plugins** and click ![](https://d2x3xhvgiqkx42.cloudfront.net/12345678-1234-1234-1234-1234567890ab/11fda387-da5a-430a-ada3-46def885b67f/2022/03/02/65d645bd-dee9-40dc-9f91-c44b06d72492/289e91de-47c5-429c-b61d-67bd8d4fd1ec.png), then click **Item recommendations**. 5. Follow the prompts to add the plugin and accept any terms and conditions that display. 6. Enter a name for your integration and click **Add & Edit Code**. The name can't contain spaces or special characters. 7. **Wix Studio:** Open the Wix IDE, and go to **/src/backend/___spi___/ecom-recommendations-provider**. If your service plugin doesn't appear, try refreshing both the Studio Editor and the Wix IDE. 8. **Publish** your site. ## Step 2: Implement the plugin The procedure in the previous step creates a folder in the service plugins section of the Code sidebar (Wix Editor), or in the Wix IDE's Explorer (Wix Studio). The name of the folder is based on the plugin you chose. Inside, there is another folder with the name of the plugin you set up. This folder contains 2 files, `.js` and `-config.js`. Implement the custom code for your plugin in these files. Here are some guidelines for writing your code: ### `-config.js` The code in this file defines a function named `getConfig()` that returns an object containing the values used to display the recommendations algorithms in the Related Products gallery settings in the editor. By configuring the Related Products category, you can select which algorithms to get items from. Wix sends requests for those algorithms when the Recommended Products gallery loads. Example of a valid config: ```json { "catalogAppIds": ["215238eb-22a5-4c36-9e7b-e7c08025e04e"], "supportedAlgorithms": [ { "algorithmId": "945a457f-0a57-4cf4-95a1-95991b545119", "name": "In stock from the same category", "description": "If selected product is out of stock, suggest in-stock products from the same category.", "additionalInfo": "Works best on product page.", "algorithmType": "RELATED_ITEMS" }, { "algorithmId": "97f48eb2-4d42-4296-b620-13862dd0353e", "name": "Cheapest in the store", "description": "The cheapest products in the store.", "algorithmType": "GLOBAL" } ] } ``` ### `.js` The code in this file defines a function named `getRecommendations()`. This function is called by Wix to retrieve the recommended items provided by your plugin. The function accepts the following parameter: `options`: An object that includes the `algorithmId` of the selected algorithm. If the Related Products gallery is installed on a products page, the `items` field will be populated with the product ID as `catalogItemId` and the Stores App ID as `appId`. On any other page, the `items` field will be empty. Example of options object: ```json { "algorithmIds": ["945a457f-0a57-4cf4-95a1-95991b545119"], "items": [ { "catalogItemId": "ec7914e8-208b-0069-5850-1a965643508d", "appId": "215238eb-22a5-4c36-9e7b-e7c08025e04e" } ] } ``` The `getRecommendations()` function must return an object with a key called `recommendationPerAlgorithm`. The value of this key is an array of recommended items. Example of returned value: ```json { "recommendationPerAlgorithm": [ { "algorithmId": "945a457f-0a57-4cf4-95a1-95991b545119", "recommendedItems": [ { "catalogItemId": "1ce6198f-5fad-5ac9-5b36-ecb2175929ef", "appId": "215238eb-22a5-4c36-9e7b-e7c08025e04e" }, { "catalogItemId": "58a7ab15-5c65-d836-7934-86f78b17996b", "appId": "215238eb-22a5-4c36-9e7b-e7c08025e04e" } ] } ] } ``` >**Note**: `catalogItemId` must be a valid product ID from the store app. ### Add files to the plugin If you don't want to keep all of your code in the main files, you can add files to the plugin's folder and import functions and objects into the main files. + **Wix Editor:** 1. Hover over the plugin folder's name and click **Show More** ![](https://d2x3xhvgiqkx42.cloudfront.net/12345678-1234-1234-1234-1234567890ab/76096845-8b12-44f1-91f6-3dc2e838fdd9/2022/09/04/45269098-373f-4d2c-8168-2fc5242c6024/c890c6a3-6762-4501-bdb4-e44c678108df.png) . 2. Select the **New.js** file. + **Wix Studio:** Create a new file in the plugin's folder. To import from these files to the main files, use the following syntax: ``` import { functionName } from './myFileName.js'; ``` ### Test the plugin You can test your plugin before publishing your site in the Wix Editor using [functional testing](https://dev.wix.com/docs/develop-websites/articles/workspace-tools/testing-monitoring/functional-testing/test-backend-functions-with-functional-testing.md) like you would with any backend site code. Make sure your `getRecommendations` function's return values are properly formatted. You can test your plugin after deploying for both Wix Editor and Wix Studio. To test your plugin after deploying, add console logs to your code. The results appear in [Wix Logs](https://dev.wix.com/docs/develop-websites/articles/workspace-tools/developer-tools/logs/about-logs.md). ## Step 3: Deploy the plugin Once your code files are ready, you need to deploy your plugin and enable it on your site's dashboard. 1. Publish your site. 2. Go to the page with the Related Products gallery. 3. Click "Settings" on the gallery. Your recommendation algorithms appear in the dropdown, alongside other algorithms provided by the Stores app. Algorithms with the `algorithmType` of `RELATED_ITEMS` are listed under the "Related Products" section. 4. Select the algorithm you want to use. The recommended products will appear in the gallery. ## Examples ### Cheapest products in the store You can return the top 10 cheapest products in the Store Products Wix collection. ```javascript import wixData from 'wix-data'; /** * Returns lists of items recommended by each requested algorithm. * * If the algorithm's type is `RELATED_ITEMS` then the `items` field is required in the request, and the response will contain items related to those submitted. * How the related items are selected based on the requested items depends on the algorithm. Some examples include items related by category or those frequently bought or watched together. * @param {import('interfaces-ecom-v1-recommendations-provider').GetRecommendationsOptions} options * @param {import('interfaces-ecom-v1-recommendations-provider').Context} context * @returns {Promise} */ export const getRecommendations = async (options, context) => { const recommendations = await Promise.all(options.algorithmIds.map((algorithmId) => { if (algorithmId === "97f48eb2-4d42-4296-b620-13862dd0353e") { return wixData.query("Stores/Products") .ascending("price") .limit(10) .find() .then((results) => { return { algorithmId: algorithmId, recommendedItems: results.items.map((item) => { return { catalogItemId: item._id, appId: "215238eb-22a5-4c36-9e7b-e7c08025e04e" } }) } }); } })); return { "recommendationPerAlgorithm": recommendations } }; ``` --- > Portal Navigation: > > - Append `.md` to any URL under `https://dev.wix.com/docs/` to get its markdown version. > - Pages are either content pages (article or reference text) or menu pages (a list of links to child pages). > - To get a menu page, truncate any URL to a parent path and append `.md` (e.g. `https://dev.wix.com/docs/sdk.md`, `https://dev.wix.com/docs/sdk/core-modules.md`). > - Top-level index of all portals: https://dev.wix.com/docs/llms.txt > - Full concatenated docs: https://dev.wix.com/docs/llms-full.txt ## Resource: Creating Bookings Resources Using Velo ## Article: Creating Bookings Resources using Velo ## Article Link: https://dev.wix.com/docs/develop-websites/articles/code-tutorials/wix-bookings/creating-bookings-resources-using-velo.md ## Article Content: # Creating Bookings Resources using Velo In Wix Bookings, resources are anything you need to provide a service. It can be a staff member, a room, or a piece of equipment. This tutorial focuses on creating staff resources, but apart from the “staff” tag, there is very little difference between types of resources. For the first part of this tutorial, we’ll create a staff resource with availability during the business's appointment hours. In the second part, we’ll create a staff resource with its own set of available hours. The available hours for a resource are the hours during which they can be booked for a service. A resource is a simple object that has an ID, basic contact details, its schedule ID and a tags array. You can use the tags array for grouping resource types. The Bookings app uses the tag "staff" to mark the resource as a staff member. This will make it show up in the [**Staff**](https://www.wix.com/my-account/site-selector/?buttonText=Select%20Site&title=Select%20a%20Site&autoSelectOnSingleSite=true&actionUrl=https:%2F%2Fwww.wix.com%2Fdashboard%2F%7B%7BmetaSiteId%7D%7D%2Fbookings/staff) section of the Bookings app in the dashboard. The Bookings app creates a special resource with "business" in the tag and name properties. This special resource has a schedule that defines the [business's appointment hours](https://www.wix.com/my-account/site-selector/?buttonText=Select%20Site&title=Select%20a%20Site&autoSelectOnSingleSite=true&actionUrl=https:%2F%2Fwww.wix.com%2Fdashboard%2F%7B%7BmetaSiteId%7D%7D%2Fbookings/scheduler/owner/calendar-settings). Use the business resource's schedule to set up a staff or other resource's available hours to match the business's appointment hours. A resource object looks like this: ```json { "_id": "6235c808-c3c6-49f2-a000-bc8eded9f106", "name": "John Doe", "email": "john@doe.com", "phone": "555 4567", "description": "Fitness Instructor", "tags": [ "staff" ], "scheduleIds": [ "a5d20a3a-eb25-497a-9fc1-f546ac8422fc" ], "status": "CREATED" } ``` Resources have schedules, which define when the resource is available. A basic resource schedule looks like this: ```json { "_id": "a5d20a3a-eb25-497a-9fc1-f546ac8422fc", "scheduleOwnerId": "6235c808-c3c6-49f2-a000-bc8eded9f106", "availability": { "linkedSchedules": [ "scheduleId": "48ed1477-443b-40f4-bd71-7a04e863cafd" ], "start": "Mon May 01 2021 09:00:00" } } ``` * `_id` is the unique schedule ID. * `scheduleOwnerID` is the ID of the entity that owns the schedule, in this case a resource. * The `availability` object has the `start` time from which the schedule begins, and an array of linked schedules. * The `linkedSchedules` array contains a list of other schedules that add to this schedule’s availability. In this case we have the business's appointment hours that are stored in the bookings app as a schedule. By linking the business's appointment hours schedule to this resource’s schedule we are making the resource available during the business's appointment hours. Not all schedules have linked schedules. You can define custom hours for a resource by creating sessions. More on sessions later. ### Install the Bookings App Before you try the code below, make sure to install the Bookings app if you haven't already. You can learn more about installing apps [here](https://support.wix.com/en/article/studio-editor-adding-apps) (Wix Studio) or [here](https://support.wix.com/en/article/adding-an-app-to-your-site) (Wix Editor). ### Creating a Staff Resource that uses the Business's Appointment Hours To create a staff resource that uses the business's appointment hours, we need to collect the following information: * The resource’s name, email, and phone number. * The business schedule ID. For resource details, let's assume that we have a page containing a form. The form has fields for resource name, email, phone number, and a brief description. The form also has  a submit button that calls our backend function to create a resource, and passes the form details in an object. The following frontend page code collects the input data from the form when the submit button is clicked and calls the createStaffWithBusinessHours function defined in the backend file "resources.web.js" that we will create. ```javascript import { createStaffWithBusinessHours } from 'backend/resources.web' export function buttonSubmit_click(event) { const resourceInfo = { name: $w('#inputName').value, email: $w('#inputEmail').value, phone: $w('#inputPhone').value, description: $w('#textBoxDescription').value } createStaffWithBusinessHours(resourceInfo) .then((resource) => { console.log("Resource:", resource); }) .catch((error) => { console.error("Failed to create the resource:", error) }); } ``` Create a file called resources.web.js in the backend file section of your site.  This file will contain all of the backend code used in this tutorial. The code below has 2 functions: * Get the business resource's schedule ID.  * Create the resource. The business's scheduleId is the ID of the schedule that contains the business's appointment hours. These hours can be set in the dashboard under Settings, Bookings, [Appointment Hours](https://www.wix.com/my-account/site-selector/?buttonText=Select%20Site&title=Select%20a%20Site&autoSelectOnSingleSite=true&actionUrl=https://www.wix.com/dashboard/{{metaSiteId}}/bookings/scheduler/owner/bookings-options/calendar-settings).   To create a resource that uses the business's appointment hours, add the business resource's  `scheduleId` to the `linkedSchedules` array of the new resource's schedule. ```javascript import { Permissions, webMethod } from "wix-web-module"; import { resources } from "wix-bookings-backend"; // Get the business resource's schedule that contains the business's appointment hours. export const getBusinessSchedule = webMethod(Permissions.Anyone, () => { return resources .queryResourceCatalog() .eq("slugs.name", "business") .find() .then((results) => { const businessResource = results.items[0].resource; const businessResourceScheduleId = businessResource.scheduleIds[0]; return businessResourceScheduleId; }); }); // Get the schedule ID for the business resource. export const createStaffWithBusinessHours = webMethod(Permissions.Anyone, async (staffInfo) => { const businessResourceScheduleId = await getBusinessSchedule(); // Add the business schedule ID to the linkedSchedules array. const scheduleInfo = [ { availability: { linkedSchedules: [ { scheduleId: businessResourceScheduleId, }, ], start: new Date(), }, }, ]; const resourceInfo = { name: staffInfo.name, email: staffInfo.email, phone: staffInfo.phone, description: staffInfo.description, tags: ["staff"], }; const options = { suppressAuth: true }; // Create the resource and return the result. return resources .createResource(resourceInfo, scheduleInfo, options) .then((resource) => { return resource; }) .catch((error) => { console.error("Failed to create resource: ", error); return error; }); }); ``` #### Understanding the code. **Get the business resource's schedule ID.** **Line 1:** Import `Permissions` enum and `webMethod` function from `wix-web-module`. **Line 2:** Import the resource APIs from the `wix-bookings-backend module`. **Line 7:** Using `queryResourceCatalog` get the resource where the slugs name is "business". **Line 11:** The query returns an array of items, each item containing a resource, schedule and slug object. We want the resource object from the first and only item in the array. **Line 12:** From the resource, take the first ID in the `scheduleIds` array. **Line 13:** Return the schedule ID to the calling function. **Create the resource** **Line 19:** Call `getBusinessSchedule()` to get the schedule ID for the business's appointment hours. **Line 22:** Create the `scheduleInfo` object using the business schedule ID in the `linkedSchedules` array. This gives the resource the same available hours as defined for the business. **Line 30:** Set the date for this schedule to start, in this case immediately. **Line 34:** Create the `resourceInfo` object using the values from the front-end form, and adding the tag `"staff"` to the `tags` array. **Line 42:** Configure the options object to set `supressAuth` to `true`. This will suppress the checking of user permissions and let anyone execute the `createResource` function. **Line 45:** Call `createResource` using the `resourceInfo`, `scheduleInfo` and `options` objects. **Line 47:** If the promise resolves, return the created resource to the front end. **Line 50:** If the promise is rejected, log the error to the console, and return it to the front end. [See if it worked](https://support.wix.com/en/#check-that-it-worked) by looking at your site's dashboard. ### Creating a Resource with Custom Hours In this part of the tutorial, we will create a resource that has its own custom working hours. We will make the resource available on Mondays, Wednesdays, and Fridays between 10 AM and 4 PM.  To create resource with its own custom hours, we need to do the following: 1. Create a resource and its schedule. 2. Add sessions to the resource's schedule to define its availability. A [session](https://www.wix.com/velo/reference/wix-bookings-backend/sessions/introduction) is a defined period of time on a schedule and is one of the following: * `"EVENT"`: Reserved period of time on any [schedule](https://www.wix.com/velo/reference/wix-bookings-backend/sessions/introduction#wix-bookings-backend_sessions_introduction_schedules). For example, an appointment, class, or course. Events are visible in the Dashboard on the Bookings app's [**Booking Calendar**](https://support.wix.com/en/article/wix-bookings-about-the-wix-bookings-calendar) page. * `"WORKING_HOURS"` : Placeholder for available time on a resource’s schedule. In this tutorial we will create "`WORKING_HOURS"` sessions to define the resource's availability. A session can be an individual session or a recurring session. An individual session has a discrete start and end date, while a recurring session defines a series of repeating sessions. In this tutorial, when adding the sessions to the schedule, we will create recurring sessions using recurrence rules to specify how often each session repeats. **Create a function to manage the process.** First we need a function that will manage the process for us. This function will call the `createStaffMember` function to create the resource, then use the new resource's `scheduleId` to add sessions to the schedule. ```javascript import { Permissions, webMethod } from "wix-web-module"; import { resources, sessions } from "wix-bookings-backend"; // A function that creates a resource and adds recurring sessions to its schedule. export const createStaffWithCustomHours = webMethod(Permissions.Anyone, async (staffInfo) => { // Create a resource with no linked schedules. try { var resource = await createStaffMember(staffInfo); } catch (error) { console.error("Failed to create a resource", error); return error; } // Using the schedule ID of the resource created above, create recurring sessions. return createRecurringSessions(resource.scheduleIds[0]) .then((sessions) => { //create an object with the resource and a list of sessions. const resourceSessions = { resource: resource, sessions: sessions, }; return resourceSessions; }) .catch((error) => { console.error("Failed to create a session", error); return error; }); }); ``` #### Understanding the code. **Line 1:** Import `Permissions` enum and `webMethod` function from `wix-web-module`. **Line 2:** Import both resources and sessions from `wix-bookings-backend module`. **Line 5:** `createStaffWithCustomHours` takes staff information from the page form, and creates a resource. It then uses the new resource’s `scheduleId` to create recurring sessions. **Line 8:** Call `createStaffMember` to create a new resource. Note that the resource variable is defined with `var` so that it is visible outside the try/catch scope. **Line 16:** Call `createRecurringSessions` using the resource’s scheduleId. **Line 19:** Create `resourceSessions` as a return object consisting of the resource and an array of its sessions. **Line 23:** Return the `resourceSessions` object to the front end. #### Create the resource Creating the resource is the same as creating a resource with the business's appointment hours, but in this case we leave out the business schedule from the linkedSchedules array in the scheduleInfo object. ```javascript // A function that creates staff resources with no linkedShedules in its schedule. export const createStaffMember = webMethod(Permissions.Anyone, async (staffInfo) => { // Create resource information with a "staff" tag. const resourceInfo = { name: staffInfo.name, email: staffInfo.email, phone: staffInfo.phone, description: staffInfo.description, tags: ['staff'], }; // Schedule information with no linked schedules. const scheduleInfo = [{ availability: { linkedSchedules: [], start: new Date(), } }]; // Set the option to suppress permissions checking. const options = { suppressAuth: true } // Create the resource and return it to the calling function. return resources.createResource(resourceInfo, scheduleInfo, options) .then((resource) => { return resource; }) .catch((error) => { console.error('Failed to create resource: ', error); return error; }); }); ``` #### Understanding the code. **Line 5:** Create the `resourceInfo` object using the values from the front-end form, adding the tag `"staff"` to the tags array. **Line 14:** Create the `scheduleInfo` object with an empty `linkedSchedules` array and the current date and time for the `start` date. **Line 22:** Configure the `options` object to set `supressAuth` to `true`. This will suppress the checking of user permissions and let anyone execute the `createResource` function. **Line 25:** Call `createResource` using the `resourceInfo`, `scheduleInfo` and `options` objects and return the result to the calling function. #### Create recurring sessions. Now that we have a resource and its schedule, we can add sessions to the schedule.  We are going to add recurring sessions that occur on Mondays Wednesdays and Fridays between 10 AM and 4 PM. The recurrence rule for this as follows: `'FREQ=WEEKLY;INTERVAL=1;BYDAY=MO;UNTIL=20220101T000000Z'` * `FREQ=WEEKLY`: Repeat the sessions on a weekly basis * `INTERVAL=1`: Repeat the sessions every week. If you want to repeat every second week, set the interval to "2" * `BYDAY=MO`: The session occurs on Mondays. * `UNTIL=20220101T000000Z`: Repeat the sessions until midnight, January 1 2021 We will have 3 recurrence rules. One for Monday, `BYDAY=MO`, one for Wednesday, `BYDAY=WE`, and one for Friday, `BYDAY=FR.` The session type is set to `'WORKING_HOURS'` to tell the bookings backend that these sessions set the resource’s availability. ```javascript // A function that creates recurring sessions for a given schedule ID. export const createRecurringSessions = webMethod(Permissions.Anyone, async (resourceScheduleId) => { // Set the option to suppress permissions checking. const options = { suppressAuth: true }; // Create the recurring session object, leaving the recurrence rule to be populated later. let sessionInfo = { scheduleId: resourceScheduleId, start: { localDateTime: { year: 2021, monthOfYear: 5, dayOfMonth: 1, hourOfDay: 10, minutesOfHour: 0, }, }, end: { localDateTime: { year: 2021, monthOfYear: 5, dayOfMonth: 1, hourOfDay: 16, minutesOfHour: 0, }, }, // Set the session type to "WORKING_HOURS" to define the session as a resource availability session. type: "WORKING_HOURS", recurrence: "recurrence rule placeholder", }; let resourceSessions = []; try { // Populate the recurrence rule in the recurringSession object for Monday, Wednesday, and Friday, then call createSession for each rule. // Add each session the resourceSessions array sessionInfo.recurrence = "FREQ=WEEKLY;INTERVAL=1;BYDAY=MO;UNTIL=20220101T000000Z"; resourceSessions.push(await sessions.createSession(sessionInfo, options)); sessionInfo.recurrence = "FREQ=WEEKLY;INTERVAL=1;BYDAY=WE;UNTIL=20220101T000000Z"; resourceSessions.push(await sessions.createSession(sessionInfo, options)); sessionInfo.recurrence = "FREQ=WEEKLY;INTERVAL=1;BYDAY=FR;UNTIL=20220101T000000Z"; resourceSessions.push(await sessions.createSession(sessionInfo, options)); return resourceSessions; } catch (error) { console.error("Failed to create a session", error); return error; } }); ``` #### Understanding the code. **Line 8:** Create the sessionInfo object using the scheduleId from the resource we created earlier. **Lines 10 and 19:** Set the duration of the session by setting the `start.locatDateTime` and `end.localDateTime` properties. **Line 29:** Set the session type to `”WORKING_HOURS”`. This tells the bookings app that these sessions set the resource’s availability. **Line 30:** Define the `recurrence` rule as a placeholder. We will populate this property with a set of recurrence rules. **Line 33:** Declare an array to hold the sessions that we are going to create. **Line 37:** Set the recurrence rule for the first recurring session to `'FREQ=WEEKLY;INTERVAL=1;BYDAY=MO;UNTIL=20220101T000000Z'` The rule defines sessions that will recur on a weekly basis, on a Monday, repeating until midnight, January 1, 2021. **Line 38:** Call `createSession` with the `sessionInfo` and `options` objects, storing the result in the `resourceSessions` array that we created earlier. **Lines 40 to 44:** Repeat the session creation, changing the recurrence rule each time to repeat on Wednesdays, then Fridays. **Line 46:** Return the `resourceSessions` array, containing three recurring sessions, to the `createStaffWithCustomHours` function. ### Check that it worked. How do we check that this worked ? The easiest way is to go to the [Staff](https://www.wix.com/my-account/site-selector/?buttonText=Select%20Site&title=Select%20a%20Site&autoSelectOnSingleSite=true&actionUrl=https:%2F%2Fwww.wix.com%2Fdashboard%2F%7B%7BmetaSiteId%7D%7D%2Fbookings/staff) page of the Bookings app in your site's dashboard. You can also use the [queyResourceCatalog()](https://www.wix.com/velo/reference/wix-bookings-backend/resources/queryresourcecatalog) and use the resourceId  or the resource's scheduleId in [querySessions().](https://www.wix.com/velo/reference/wix-bookings-backend/sessions/querysessions) The Staff page in the dashboard. ![](https://d2x3xhvgiqkx42.cloudfront.net/12345678-1234-1234-1234-1234567890ab/99f9f305-0415-4713-856e-b7aa93cbd4d3/2021/05/26/82aa4297-ae2e-47f7-9b20-99e3b725f830/9b592896-891e-4c5d-8ec5-19042b7b8f3a.png) ![](https://d2x3xhvgiqkx42.cloudfront.net/12345678-1234-1234-1234-1234567890ab/99f9f305-0415-4713-856e-b7aa93cbd4d3/2021/05/26/b6620360-9f10-4f7d-8dd6-77ff4c082182/b9bc21c1-bce4-44f4-aadd-d3d829ffe185.png)
Hover over a staff member and hit **edit** to see their available hours.
Click **Edit Staff Availability.** You can see if the staff member uses default or custom appointment hours. 
--- > Portal Navigation: > > - Append `.md` to any URL under `https://dev.wix.com/docs/` to get its markdown version. > - Pages are either content pages (article or reference text) or menu pages (a list of links to child pages). > - To get a menu page, truncate any URL to a parent path and append `.md` (e.g. `https://dev.wix.com/docs/sdk.md`, `https://dev.wix.com/docs/sdk/core-modules.md`). > - Top-level index of all portals: https://dev.wix.com/docs/llms.txt > - Full concatenated docs: https://dev.wix.com/docs/llms-full.txt ## Resource: Blocking Off Time in the Wix Bookings Calendar ## Article: Blocking Off Time in the Wix Bookings Calendar ## Article Link: https://dev.wix.com/docs/develop-websites/articles/code-tutorials/wix-bookings/blocking-off-time-in-the-wix-bookings-calendar.md ## Article Content: # Velo: Blocking Off Time in the Wix Bookings Calendar The Wix Bookings backend module lets you manage bookings resources using Velo APIs. When managing staff resource schedules, a common use case is setting up the times that staff are available, and the times that they're not. What if you want to block off some time in the middle of the work day when your staff resource is not available ? You can do this by using the `createSession()` function to create "blocked time".  To set up blocked time, you need to create a session of type `"EVENT"` with a tag value of `"Blocked"`. The session can be a [single session or a recurring session](https://www.wix.com/velo/reference/wix-bookings-backend/sessions/introduction#wix-bookings-backend_sessions_introduction_recurrence). In the first example, we'll create a function that takes a resource ID and creates a single blocked time session on the resource's schedule. We'll also see how to create a dropdown element containing all of your resources. Once we have that working, in the second example, we'll add some functionality to make recurring blocked time sessions. Let's assume you already have some staff members defined. If you don't, take a look at [Creating Bookings Resources using Velo](https://dev.wix.com/docs/develop-websites/articles/code-tutorials/wix-bookings/creating-bookings-resources-using-velo.md), or create some using the dashboard [Staff](https://www.wix.com/my-account/site-selector/?buttonText=Select%20Site&title=Select%20a%20Site&autoSelectOnSingleSite=true&actionUrl=https:%2F%2Fwww.wix.com%2Fdashboard%2F%7B%7BmetaSiteId%7D%7D%2Fbookings/staff) page.
Before we go on, you need to install the Bookings app. If you haven't installed it yet, here's how to do it. 1. Select the Add Apps icon in the editor.
2. Type "Bookings" in the search field and select the Wix Bookings App. 3. Click "Add to Site."
### Setting up our site page
Create a page with the elements shown above. Put the **Recurrence Rule** text and **inRecurrenceRule** input element inside the container box **box1**. In the Properties and Events panel for **box1**, select **Collapsed** under **Default Values**. Set the **default text** as shown above for the **From**, **To**, and **Recurrence Rule** input elements. >**Timestamps and Recurrence Rules.** > Make sure that the format of the timestamps and recurrence rule are correct. To reduce complexity, we are not going to validate them in this tutorial. > > Timestamp example: `2021-06-15T13:00:00.000-05:00`  > > Recurrence Rule example: `FREQ=WEEKLY;INTERVAL=1;BYDAY=MO;UNTIL=20220101T000000Z`. #### Query Resources to Load the Dropdown Element. We'll load the dropdown element with a list of resources, display the resource name and use the resource ID as the value. Create a backend file called `blockedSessions.web.js`. This file will hold all of our backend code for this tutorial.   First import the `Permissions` enum and `webMethod` function from `wix-web-module`, and then import the `resources` and `sessions` APIs from the `wix-bookings-backend` module. ```javascript import { Permissions, webMethod } from 'wix-web-module'; import { resources, sessions } from "wix-bookings-backend"; ``` Create a function called `getResourceList()` that returns an array of all resources. The code will look like this: ```javascript import { Permissions, webMethod } from 'wix-web-module'; import { resources, sessions } from 'wix-bookings-backend'; export const getResourceList = webMethod(Permissions.Anyone, async () => { try { const results = await resources.queryResourceCatalog().find(); return results.items; } catch (error) { return error; } }); ``` Now in your page code, create the `loadResourceDropdown()` function to load the dropdown element. Call the `loadResourceDropdown()` function from the `onReady` code block so the dropdown is loaded when the page is displayed.  Don't forget to import `getResourceList` from the APIs from the `blockedSessions` backend file.  Add the following code to your page to load the  `ddResource` dropdown with resource names and their schedule IDs: * Call `getResourceList()` to get a list of all of your resources.  * Use the  `map` function to build the `resourceSchedules` array from the resource name and scheduleId for each resource in the `resourceCatalog` array. * Set the `options` property of the dropdown element to the array of resource names and schedule IDs. ```javascript import { getResourceList, createSingleBlockedSession } from 'backend/blockedSessions.web' $w.onReady(function () { loadResourceDropdown(); }); export async function loadResourceDropdown() { let resourceCatalog = await getResourceList(); const resourceSchedules = resourceCatalog.map(resource1 => { let resourceEntry = { label: resource1.resource.name, value: resource1.resource.scheduleIds[0] }; return resourceEntry; }); $w('#ddResource').options = resourceSchedules; } ``` Now create an `onClick` function for the button that will gather the information we need, and call the function to create the blocking sessions. ```javascript export async function btnCreateSession_click(event) { let fromDateTime = $w('#inFrom').value; let toDateTime = $w('#inTo').value; let scheduleID = $w('#ddResource').value; try { const session = await createSingleBlockedSession(scheduleID, fromDateTime, toDateTime); console.log("Session", session); } catch (err) { console.error("Session creation failed.", err); } } ``` ### Create A Single Blocked Time Now we can create our blocking session. Create a function in the `blockedSessions.web.js` backend code file called `createSingleBlockedSession()`. ```javascript export const createSingleBlockedSession = webMethod(Permissions.Anyone, async (resourceScheduleId, startDate, endDate) => { try { const sessionInfo = { scheduleId: resourceScheduleId, start: { timestamp: new Date(startDate), }, end: { timestamp: new Date(endDate), }, type: "EVENT", tags: ["Blocked"], }; const options = { suppressAuth: true }; return sessions.createSession(sessionInfo, options); } catch (error) { console.error(error); // Handle the error } }); ``` #### Understanding the code. **Line 4:** Create the `sessionInfo` object using the date from the function's parameters. **Lines 12,13:** Set the session `type` to "`EVENT`" and the `tag` to "`Blocked`". **Line 16:** If you want any user to be able to create a blocked time session, set the `suppressAuth` option to `true`. **Line 17:** Call `createSession()` to create the blocked time session and return the session details to the calling function. This returns to the page code that called the `createSingleBlockedSession()` function, and the created session is displayed in the console. The returned session looks like this: ```json { "_id": "2mmoW0vwKcSFyxtOfCdMeoE8hsC05dc6rdVucf52tUuT6FFcAWCPTKHipQaFL7nOW9qlB9c6Fjm00bZxYfABQpF6kQSpWw6TqFx7", "scheduleId": "278012f1-674e-4a2b-93d2-29f8894ee732", "scheduleOwnerId": "3cdb6d0f-be29-450b-a2e0-184975d95cb3", "start": { "timestamp": "Tue Jun 15 2021 23:00:00 GMT+0300 (Israel Daylight Time)" }, "end": { "timestamp": "Wed Jun 16 2021 00:00:00 GMT+0300 (Israel Daylight Time)" }, "status": "CONFIRMED", "tags": [ "Blocked" ], "type": "EVENT", "notes": "" } ``` ### Recurring Blocked Times Now that we've seen single blocked times working, let's take it up a level and create a series of blocked times using recurrence rules. Recurrence rules specify when and how often an event repeats. A session that repeats every second week on a Monday until January 7, 2022 at 8 AM, is specified using the following recurrence rule:`"FREQ=WEEKLY;INTERVAL=2;BYDAY=MO;UNTIL=20220107T080000Z"` #### Page Code When we defined our page, we set the container box to `collapsed`. Expand the box based on the checkbox `cbRecurrence` using the following code: ```javascript export function cbRecurring_click(event) { if ($w('#cbRecurring').checked === true) { $w('#box1').expand(); } else { $w('#box1').collapse(); } } ``` Now that we see the recurrence rule, we can use it to create recurring sessions. Update the button's `onClick`  function with the code below, to add processing for recurring sessions. If the `cbRecurring` checkbox is checked, call  `createRecurringBlockedSession()`, passing the recurrence rule. Otherwise, call `createSingleBlockedSession().` ```javascript export async function btnCreateSession_click(event) { let fromDateTime = $w('#inFrom').value; let toDateTime = $w('#inTo').value; let scheduleID = $w('#ddResource').value; let recurrenceRule = $w('#inRecurrenceRule').value; console.log(scheduleID, fromDateTime, toDateTime); let session = ""; try { if ($w('#cbRecurring').checked) { session = await createRecurringBlockedSession(scheduleID, fromDateTime, toDateTime, recurrenceRule); } else { session = await createSingleBlockedSession(scheduleID, fromDateTime, toDateTime); } console.log("Session", session); } catch (err) { console.error("Session creation failed.", err); } } ``` #### Create A Recurring Blocked Time Session Now we can create our recurring blocking session. Create a function in the `blockedSessions.web.js` backend code file called `createRecurringBlockedSession().` In your page code, add `createRecurringBlockedSession` to your `import` statement. >**Note:** > You must use the `localDateTime` objects for `start` and `end` when defining a recurring session. For single sessions you can use the `timestamp` properties. > Remember that `localDateTime` uses the business's timezone . ```javascript export const createRecurringBlockedSession = webMethod(Permissions.Anyone, async (resourceScheduleId, startDate, endDate, recurrenceRule) => { try { //Create the recurring session object, breaking the start and end dates into their components. const sessionInfo = { scheduleId: resourceScheduleId, start: { localDateTime: { year: startDate.substr(0, 4), monthOfYear: startDate.substr(5, 2), dayOfMonth: startDate.substr(8, 2), hourOfDay: startDate.substr(11, 2), minutesOfHour: startDate.substr(14, 2), }, }, end: { localDateTime: { year: endDate.substr(0, 4), monthOfYear: endDate.substr(5, 2), dayOfMonth: endDate.substr(8, 2), hourOfDay: endDate.substr(11, 2), minutesOfHour: endDate.substr(14, 2), }, }, // Set the session type to "EVENT" and add "Blocked" to the tags array. type: "EVENT", tags: ["Blocked"], recurrence: recurrenceRule, }; //Set the option to suppress permissions checking. const options = { suppressAuth: true }; return sessions.createSession(sessionInfo, options); } catch (error) { console.error(error); // Handle the error } }); ``` #### Understanding The Code **Line 5:** Create the sessionInfo object. You have to break the dates into their components for the `localDateTime` objects. You cannot use the `timestamp` properties for recurring sessions. **Line 26:** Set the session `type` to `"EVENT"`. **LIne 27:** Add `"Blocked"` to the `tags` array. **Line 32:** If you want any user to be able to create a blocked time session, set the `suppressAuth` option to `true`. **Line 33:** Call `createSession()` using the `sessionInfo` and `options` objects, and return the promise to the calling function on the site page. You'll get a session object displayed on the console, similar to the one below. ```json { "_id": "ce6e440d1ef941c08f0e317d75fe5cbc-885c479078d145f992b2bad2a2b5f151", "notes": "", "recurrence": "FREQ=WEEKLY;INTERVAL=1;BYDAY=TU;UNTIL=20220101T000000Z", "scheduleId": "ce6e440d-1ef9-41c0-8f0e-317d75fe5cbc", "scheduleOwnerId": "3df00036-ac5a-4f8b-bf0d-4f77b1795b1d", "start": { "localDateTime": { "year": 2021, "monthOfYear": 7, "dayOfMonth": 1, "hourOfDay": 9, "minutesOfHour": 0 } }, "end": { "localDateTime": { "year": 2021, "monthOfYear": 7, "dayOfMonth": 1, "hourOfDay": 10, "minutesOfHour": 0 } }, "status": "UNDEFINED", "tags": [ "Blocked" ], "type": "EVENT" } ``` ### Check that it Worked. In addition to the returned session object, you can also check your [calendar](https://www.wix.com/my-account/site-selector/?buttonText=Select%20Site&title=Select%20a%20Site&autoSelectOnSingleSite=true&actionUrl=https:%2F%2Fwww.wix.com%2Fdashboard%2F%7B%7BmetaSiteId%7D%7D%2Fbookings/scheduler/owner/calendar) to confirm that the blocked time appears for your resource at the time that you specified.
### All the Code Below is all of the code used in the tutorial in one place. #### Page Code ```javascript import { getResourceList, createSingleBlockedSession ,createRecurringBlockedSession} from 'backend/blockedSessions.web' $w.onReady(function () { loadResourceDropdown(); }); export async function loadResourceDropdown() { let resourceCatalog = await getResourceList() const resourceSchedules = resourceCatalog.map(resource1 => { let resourceEntry = { label: resource1.resource.name, value: resource1.resource.scheduleIds[0] } return resourceEntry }) $w('#ddResource').options = resourceSchedules; } export async function btnCreateSession_click(event) { let fromDateTime = $w('#inFrom').value; let toDateTime = $w('#inTo').value; let scheduleID = $w('#ddResource').value; let recurrenceRule = $w('#inRecurrenceRule').value; console.log(scheduleID, fromDateTime, toDateTime); let session = ""; try { if ($w('#cbRecurring').checked) { session = await createRecurringBlockedSession(scheduleID, fromDateTime, toDateTime, recurrenceRule); } else { session = await createSingleBlockedSession(scheduleID, fromDateTime, toDateTime); } console.log("Session", session); } catch (err) { console.error("Session creation failed.", err); } } export function cbRecurring_click(event) { if ($w('#cbRecurring').checked === true) { $w('#box1').expand() } else { $w('#box1').collapse() } } ``` #### blockedSessions.web.js ```javascript import { Permissions, webMethod } from "wix-web-module"; import { resources, sessions } from "wix-bookings-backend"; export const getResourceList = webMethod(Permissions.Anyone, async () => { try { const results = await resources.queryResourceCatalog().find(); return results.items; } catch (error) { throw error; } }); export const createSingleBlockedSession = webMethod(Permissions.Anyone, async (resourceScheduleId, startDate, endDate) => { const sessionInfo = { scheduleId: resourceScheduleId, start: { timestamp: new Date(startDate), }, end: { timestamp: new Date(endDate), }, type: "EVENT", tags: ["Blocked"], }; const options = { suppressAuth: true }; try { return await sessions.createSession(sessionInfo, options); } catch (error) { throw error; } }); export const createRecurringBlockedSession = webMethod(Permissions.Anyone, async (resourceScheduleId, startDate, endDate, recurrenceRule) => { //Create the recurring session object, breaking the start and end dates into their components. const sessionInfo = { scheduleId: resourceScheduleId, start: { localDateTime: { year: startDate.substr(0, 4), monthOfYear: startDate.substr(5, 2), dayOfMonth: startDate.substr(8, 2), hourOfDay: startDate.substr(11, 2), minutesOfHour: startDate.substr(14, 2), }, }, end: { localDateTime: { year: endDate.substr(0, 4), monthOfYear: endDate.substr(5, 2), dayOfMonth: endDate.substr(8, 2), hourOfDay: endDate.substr(11, 2), minutesOfHour: endDate.substr(14, 2), }, }, // Set the session type to "EVENT" and add "Blocked" to the tags array. type: "EVENT", tags: ["Blocked"], recurrence: recurrenceRule, }; //Set the option to suppress permissions checking. const options = { suppressAuth: true }; try { return await sessions.createSession(sessionInfo, options); } catch (error) { throw error; } }); ``` --- > Portal Navigation: > > - Append `.md` to any URL under `https://dev.wix.com/docs/` to get its markdown version. > - Pages are either content pages (article or reference text) or menu pages (a list of links to child pages). > - To get a menu page, truncate any URL to a parent path and append `.md` (e.g. `https://dev.wix.com/docs/sdk.md`, `https://dev.wix.com/docs/sdk/core-modules.md`). > - Top-level index of all portals: https://dev.wix.com/docs/llms.txt > - Full concatenated docs: https://dev.wix.com/docs/llms-full.txt ## Resource: Creating a Custom Bookings Experience ## Article: Creating a Custom Bookings Experience ## Article Link: https://dev.wix.com/docs/develop-websites/articles/code-tutorials/wix-bookings/creating-a-custom-bookings-experience.md ## Article Content: # Velo Tutorial: Creating a Custom Bookings Experience Using the Velo Bookings API you can create a custom booking experience for the services you offer on your site. ### Prerequisites Before working with the Bookings API, [set up your services](https://support.wix.com/en/wix-bookings/setting-up-wix-bookings) using the Bookings App. If you will be taking payments for bookings, you need to set up your site to accept payments before using the Bookings API. To learn more, see [About Accepting Payments](https://support.wix.com/en/article/about-accepting-payments). To check out bookings with the Bookings API you need to [upgrade to a Business Premium Plan](https://support.wix.com/en/article/upgrading-wix-bookings).
**Note:** When setting up your site to accept payments, be sure to select the payment methods you want to offer and [set your payment currency](https://support.wix.com/en/article/setting-your-currency-for-accepting-payments).
### Bookings API The Bookings API consists of two client-side functions used to get a service's available slots and to book one of the available slots: * `getServiceAvailability()` - Called to retrieve available slots for a given service. Before calling this function you must first retrieve the ID of the service to be booked. * `checkoutBooking()` - Called to book a service and to prompt the current site visitor to enter payment information if required. This function requires you to pass the specific service slot to be booked and values for any form fields that are needed when booking the service. For detailed information on the Bookings API see [wix-bookings-frontend](https://dev.wix.com/docs/velo/api-reference/wix-bookings-frontend/introduction.md) in the API Reference. ### Bookings Lifecycle The following list outlines the steps taken in a standard booking lifecycle to demonstrate how the Bookings API can be used. Remember, you do not need to follow this flow. You can use the Bookings API to create a custom booking flow that meets your site's specific needs. 1. You get a list of services from the **Bookings/Services** collection and display them. 2. A user selects one of the displayed services. 3. You call the `getServiceAvailability()` function using the selected service's **Service ID** (`_id`) value. You get that ID from the results of the query performed above. (Optionally, you can pass a `ServiceAvailabilityOptions` object to change the limits on the slots that are returned.) 4. You display the returned slots. You may also want to retrieve the staff member items that relate to the returned slots from the **Bookings/Staff** collection. 5. You also display input elements to gather the service's form fields if there are any. You retrieve the list of form fields from results of the query performed above in the `fields` property. 6. A user enters values for the form fields and indicates that the booking should be checked out. 7. You call the `checkoutBooking()` function. You pass the selected slot object, the values for the form fields, and the payment type if necessary. Note, the specified payment type must match the service's configuration in your site's **Dashboard**. You cannot book a paid service as if it were free. * If the service is free, you do not need to pass a `paymentOptions` object. * If the service is not free and you pass a `paymentOptions` object indicating the payment should be online, a payment popup is presented for the user to enter payment information, such as credit card information. * If the service is not free and you pass a `paymentOptions` object indicating the payment should be offline, the payment popup is not presented to the user. ### Bookings Example The following is an example that shows how to use page elements and code to achieve the sample bookings lifecycle described above. The example steps correspond to the numbers in the list above.
**Note:** In this example, we focus on the code that drives the bookings lifecycle. We do not include any additional code that helps guide the user through the booking process. You might want to split the lifecycle into sections on your page and expand or collapse the sections depending on what is relevant for the user at a given point  in the lifecycle.
#### Step 1: Retrieve and Display Services You can retrieve your site's list of services and display them in a number of ways. In this example, we use a dataset connected to a repeater. This allows us to fully customize what service data is displayed and how we display it using the least amount of code. Another option for retrieving the service list is: * Query your site's **Bookings/Services** collection.  Other options for displaying the service list are: * Table * Gallery * Dropdown * Radio Buttons * Checkboxes In our example, we add a dataset with the ID **bookingsDataset** connected to the **Bookings/Services** collection. The following page elements are connected to fields in the collection through the dataset: |Type |ID |Connected to field | |---|---|---| |Repeater|servicesRepeater|\- |Text|titleText|Service Name |Image|serviceImage|Service Image |Text|taglineText|Service Tagline |Text|priceText|Price Summary |Button|bookButton|\-
![](https://d2x3xhvgiqkx42.cloudfront.net/12345678-1234-1234-1234-1234567890ab/dfff8cbb-ddcb-4376-8cae-3fedb2dd4458/2018/11/20/9a8edf94-1715-4dae-9a00-9f5e05b55d28.png)
#### Step 2: User Selects Service Depending on how you choose to display your services, you will need to react to a user's selection of a service differently. The bottom line is that you have to get the ID of the service that the user selected. In our example, the user clicks a button in a repeater connected to dataset, so we can use the button's click event to get the ID of the selected service. We add an **onClick** event handler to the **bookButton** using the Properties & Events Panel.  ```javascript export function bookButton_click(event) { } ``` #### Step 3: Retrieve Available Slots You retrieve the selected service's available slots by calling `getServiceAvailability()`. The function requires that we pass it the ID of the selected service. In our example, we've already gotten the ID of the selected service. So all we need to do is use it when calling `getServiceAvailability()`. First, we need to import the Bookings API all the way at the top of our page's code. ```javascript import wixBookingsFrontend from 'wix-bookings-frontend'; ``` Then, we can add the function call to the event handler we created in the previous step. We need to store the slot information for later, so we also create the following variables: * availableSlots * slotOptions * selectedSlot * slotIndex ```javascript let availableSlots; let slotOptions; let selectedSlot; let slotIndex; export function bookButton_click(event) { wixBookingsFrontend.getServiceAvailability(event.context.itemId) .then( (availability) => { availableSlots = availability.slots; } ); } ``` When calling `getServiceAvailability()`, you can optionally pass an object that defines a datetime range that refines which slots will be returned. #### Step 4: Display Available Slots Once again, you can display the data we just retrieved in a number of ways. In this example, we use a table to display all the available slots. We have to do a little processing of the slot data to get it into the right format for the table.  Our table's ID is **slotTable**, it has only 1 column whose **Field Name** is **slotDate**. Again, we add some code to the event handler created above. We store the slot options in the slotOptions array, although we only display the **slotDate** property in the table. We'll use the **ID** property later in Step 8.  ```javascript export function bookButton_click(event) { wixBookingsFrontend.getServiceAvailability(event.context.itemId) .then( (availability) => { availableSlots = availability.slots; //---Added in this step---// slotOptions = availableSlots.map((slot) => { let date = slot.startDateTime; return { "slotDate": date.toLocaleDateString() + " " + date.toLocaleTimeString(), } }); $w('#slotTable').rows = slotOptions; //---End of added in this step---// } ); } ``` #### Step 5: Store the User's Selected Slot We'll need to know which slot the user selected in the table. To do that we need to go to the table setting and set **Clicking selects** to **Rows**. Then we'll use the Properties & Events Panel to add an **onRowSelect** event to the table.  When the user clicks on a row we want to store the slot information for their selected row, so we'll add code to the event handler: ```javascript export function slotTable_rowSelect(event) selectedSlot = event.rowData; slotIndex = event.rowIndex; } ``` #### Step 6: Display Form Fields We also need to display input elements to gather the selected service's form fields. Here we use a repeater with the ID **formFieldRepeater**. Each item in the repeater consists of a single text input with the ID **fieldInput**. Each item in the repeater will be used to collect one of the service's form fields. Here, we also choose to only collect the required information. First, we add some code to the event handler created above. ```javascript export function bookButton_click(event) { wixBookingsFrontend.getServiceAvailability(event.context.itemId) .then((availability) => { availableSlots = availability.slots; slotOptions = availableSlots.map((slot) => { let date = slot.startDateTime; return { "slotDate": date.toLocaleDateString() + " " + date.toLocaleTimeString(), } }); $w('#slotTable').rows = slotOptions; }); //---Added in this step---// let $item = $w.at(event.context); let formFields = $item("#bookingsDataset").getCurrentItem().form.fields; formFields = formFields.filter(field => field.constraints.required) $w('#formFieldRepeater').data = formFields; //---End of added in this step---// } ); } ``` Then, we add an event handler for the repeater that sets the placeholder text in each of the text input elements. ```javascript export function formFieldRepeater_itemReady($item, itemData, index) { $item("#fieldInput").placeholder = itemData.label; } ``` The repeater looks like this in the editor (there is an input element inside the repeater):
![](https://d2x3xhvgiqkx42.cloudfront.net/12345678-1234-1234-1234-1234567890ab/dfff8cbb-ddcb-4376-8cae-3fedb2dd4458/2018/11/20/a1df6093-09b2-46ed-9e99-23dc1df56209.png)
And it looks like this on the site when populated:
![](https://d2x3xhvgiqkx42.cloudfront.net/12345678-1234-1234-1234-1234567890ab/dfff8cbb-ddcb-4376-8cae-3fedb2dd4458/2018/11/20/93a53bed-4f3c-4391-b427-2966aafa8ddd.png)
#### Step 7: User Enters Form Field Values and Books Service At this point, the user enters values for the form fields in the repeater we just set up. Then the user indicates that we should process the booking. In our example, we use a button with the ID **checkoutButton** for this purpose. We add an **onClick** event handler to the **checkoutButton** using the Settings Panel. Here we'll collect all of the data that the user entered into the form fields. ```javascript export function checkoutButton_click(event) { let formFieldValues = []; // list of values user entered // for each item in the repeater $w('#formFieldRepeater').forEachItem( ($item, itemData, index) => { // add an object containing the corresponding form field's // ID and the value that the user entered formFieldValues.push( { "_id": itemData._id, "value": $item("#fieldInput").value } ); } ); } ``` #### Step 8: Booking Checkout You perform a booking checkout by calling `checkoutBooking()`. The function requires that we pass it the selected slot object and the form field values that the user entered. We package these together in an object named `bookingInfo`. Remember, we've already collected the form field data in a variable named `formFieldValues`. When calling `checkoutBooking()`, you can optionally pass an object that defines the payment options. In our example, we are using services which are paid for offline, so we will not be passing any payment options. We also handle the result returned by the checkout. We display the checkout status to the user in a text element with the ID **confirmationText**. ```javascript export function checkoutButton_click(event) { let formFieldValues = []; $w('#formFieldRepeater').forEachItem( ($item, itemData, index) => { formFieldValues.push( { "_id": itemData._id, "value": $item("#fieldInput").value } ); } ); //---Added in this step---// // build bookingInfo object let bookingInfo = { // selected slot object "slot": availableSlots[slotIndex], // form filed values collected above "formFields": formFieldValues }; // booking checkout wixBookingsFrontend.checkoutBooking(bookingInfo) .then( (results) => { $w("#confirmationText").text = `Booking ID: ${results.bookingId} Status: ${results.status}`; } ); //---End of added in this step---// } ``` When a checkout is performed, the user is presented with an experience that reflects the service's payment type. * If the service is free, the checkout is booked without any other input. * If the service is not free and you pass a `paymentOptions` object indicating the payment should be online, a payment popup is presented for the user to enter payment information, such as credit card information. * If the service is not free and you pass a `paymentOptions` object indicating the payment should be offline, the payment popup is not presented to the user. --- > Portal Navigation: > > - Append `.md` to any URL under `https://dev.wix.com/docs/` to get its markdown version. > - Pages are either content pages (article or reference text) or menu pages (a list of links to child pages). > - To get a menu page, truncate any URL to a parent path and append `.md` (e.g. `https://dev.wix.com/docs/sdk.md`, `https://dev.wix.com/docs/sdk/core-modules.md`). > - Top-level index of all portals: https://dev.wix.com/docs/llms.txt > - Full concatenated docs: https://dev.wix.com/docs/llms-full.txt ## Resource: Tutorial: Bookings Pricing Service Plugin ## Article: Bookings Pricing Custom Extension ## Article Link: https://dev.wix.com/docs/develop-websites/articles/code-tutorials/wix-bookings/tutorial-bookings-pricing-service-plugin.md ## Article Content: # Velo Tutorial: Bookings Pricing Service Plugin Wix service plugins allow you to expand what your site can do by integrating with 3rd-party services not currently supported by Wix. They also allow you to implement custom logic to change how your site displays and behaves. For example, when you set up Wix Bookings, there is only a single price per service. What if you want to offer different service prices to your customers, such as varied pricing based on different choices? Or different rates for weekends and holidays? Service plugins are the answer.  You can manage multiple service plugins from the **Public & Backend Code** section in the [Code sidebar](https://docs.google.com/spreadsheets/d/1tCBuqrexV3XCAKCozkUufXO5qFeXmf9hX2DZ3UJC07U/edit?usp=sharing). Learn more about [service plugins](https://dev.wix.com/docs/develop-websites/articles/coding-with-velo/integrations/service-plugins-formerly-spis/about-service-plugins.md).  With a Bookings Custom Pricing plugin, you can implement custom pricing options using code. You can also connect your site to external pricing rate providers whose functionality is not currently supported by Wix. These prices can be displayed on your site's checkout pages.  This tutorial explains how to set up a custom pricing plugin on your site using Velo. The process has 3 steps: 1. Create a Bookings Pricing plugin on your site. 2. Implement your plugin with custom code. 3. Deploy the plugin. ## Step 1: Create a Bookings Pricing plugin The first step in setting up your new plugin is to add it to your site. This process creates a new folder in the **Service Plugins** section of the Code sidebar that contains the files for your backend code. 1. [Add Wix Bookings](https://www.wix.com/app-market/web-solution/bookings) to your site. 2. With Velo Dev Mode enabled, click the **Public & Backend** ![](https://d2x3xhvgiqkx42.cloudfront.net/12345678-1234-1234-1234-1234567890ab/11fda387-da5a-430a-ada3-46def885b67f/2022/03/02/1c4d0337-43f1-4f62-a125-758ae18c0228/618cf4f4-ac25-4ab2-8998-d3f511c91d30.png)  tab on the Code sidebar. 3. Scroll down to the **Service Plugins** panel at the bottom of the sidebar.
![](https://wixmp-833713b177cebf373f611808.wixmp.com/images/3b28ebcfbf8f2b6165f835d528f2f55c.png)
4. Hover over **Service Plugins** and click ![](https://d2x3xhvgiqkx42.cloudfront.net/12345678-1234-1234-1234-1234567890ab/11fda387-da5a-430a-ada3-46def885b67f/2022/03/02/65d645bd-dee9-40dc-9f91-c44b06d72492/289e91de-47c5-429c-b61d-67bd8d4fd1ec.png) . 5. Select **Bookings Pricing**.
![](https://wixmp-833713b177cebf373f611808.wixmp.com/images/ddfb53fdbbc7d7293d05109b3f5f7cec.png)
6. Enter a name for your plugin and click **Add & Edit Code**. The name can't contain spaces or special characters. Hyphens are allowed.
![](https://wixmp-833713b177cebf373f611808.wixmp.com/images/66410b374e87edca734a3aa7445fc02e.png)
## Step 2: Implement the plugin The procedure in the previous section creates a folder called **bookings-custom-pricing** under **Service Plugins** in the **Public & Backend Code** section of the Code sidebar. Inside this folder is another folder with the name of the plugin you set up. This folder contains 2 default plugin files: * `.js`: The code in this file generally defines a function named after the purpose of the service plugin, such a `calculatePrice()`. The function is called by Wix to retrieve the data provided by your plugin. * `-config.js`: The code in this file generally defines the name of the main service plugin function. Implement the custom code for your plugin in these files. Here are some guidelines for writing your code: ### .js The code in this file defines a function named `calculatePrice()`. Wix Bookings calls this function at checkout to retrieve the custom pricing options provided by your plugin. The function accepts the following parameters: * **options:** An object holding information about the booking, including the service, location, time, and participants. For more details, see the [service plugin reference](https://dev.wix.com/docs/velo/events-service-plugins/bookings/service-plugins-spis/bookings-custom-pricing/introduction.md). Sample **options** object: ```json { "options": { "booking": { "numberOfParticipants": 2, "endDate": "2023-04-11T19:00:00.000Z", "bookingSource": { "platform": "WEB", "actor": "CUSTOMER" }, "sendSmsReminder": false, "flowControlSettings": { "withRefund": false }, "revision": "1", "_id": "35f6fd1f-df83-4195-bd67-7f7237b428b5", "createdBy": { "anonymousVisitorId": "869f0e9d-40be-4f2b-a415-14f1316f295e" }, "selectedPaymentOption": "ONLINE", "contactDetails": { "firstName": "Joy Smith", "email": "joysmith@company.com", "phone": "0001231234" }, "additionalFields": [ { "_id": "709498bf-e275-4c82-aa9c-e76d3d4e9af6", "value": "1", "label": "Addon 1" }, { "_id": "35a296f6-d71e-4d61-b8ef-cd2973cd9e99", "value": "1", "label": "Addon 2" }, { "_id": "e3fe7974-3142-4fd5-993c-41472f36f697", "value": "0", "label": "Addon 3" }, { "_id": "9f1252be-0625-457b-b5cf-96a1fa42281a", "value": "false", "label": "weekendRate", "valueType": "CHECK_BOX" } ], "bookedEntity": { "slot": { "location": { "_id": "f8290483-b327-418e-8aab-0a661c80a46f", "name": "5th Avenue", "formattedAddress": "1002 5th Avenue, New York, NY, USA", "locationType": "OWNER_BUSINESS" }, "endDate": "2023-04-11T15:00:00.000-04:00", "timezone": "America/New_York", "resource": { "_id": "76570209-101f-409b-af97-b445bdb63125", "name": "Bathhouse Staff", "scheduleId": "7046edd2-0ee0-43d1-a60f-2ed9cfd36b64" }, "scheduleId": "c4f2bde3-c327-4424-a99f-7fe0294d419c", "sessionId": "4jOkD28c0FrsNUSgzQzuLRkA2t1rv1FLTwquKmJyctoZm00vdeKFMyH4n9cCLtmQe8wwAEJlPoJAU9LSPJu26G42joedYythPDtgGeAtC7N5ThJYEmZmm8qrccxj7YxJ36UA6sb9deXOfkwnK2r9A5KWYeM77OPTjaIupKlbIU186GE5wQEBmM2uHCyMUqOvOtoDPyGMJXTlr3DAVEYYiIL0N3VXBmHbBVD25LmgexOYDN2MqqZ3eLMX5wVArHPeJPAWeI5bfVKgSi0ozO16W66hj6HudqeIem8fuHQdEqDXgfkVsUE8QPagmlsf8abmjGqFtSPEI7jsoOb", "startDate": "2023-04-11T12:00:00.000-04:00", "serviceId": "851bca8b-dd5b-4575-8e66-f0bcaca2bfdf" }, "title": "Bathhouse session", "tags": [ "GROUP" ] }, "startDate": "2023-04-11T16:00:00.000Z", "participantNotification": { "notifyParticipants": true }, "_updatedDate": "2023-04-09T10:48:19.751Z", "totalParticipants": 2, "_createdDate": "2023-04-09T10:48:19.751Z" } } } ``` * **context:** An object that holds the values or variables that are available and relevant within the scope of the function during its execution. The `calculatePrice()` function must return an object with a `calculatedPrice` integer. This objects defines the booking's price that site visitors see on the **Checkout** page. For more details, see the [service plugin reference](https://dev.wix.com/docs/velo/events-service-plugins/bookings/service-plugins-spis/bookings-custom-pricing/introduction.md). Example return value: ```json { "calculatedPrice": 16.0 } ``` ### -config.js The code in this file defines a function named `getConfig()` that returns the name of the main service plugin function that is defined in the `.js` file as an object. This is important because you can have multiple `.js` files and multiple functions in these `.js` files. In our case, the main service plugin function name is `calculatePrice()`. Example `getConfig()` function: ```js export function getConfig() { return {pricingProviderName: "calculatePrice"} } ``` Example return object:  ```json { "pricingProviderName": "calculatePrice" } ``` ### Add files to the plugin If you don't want to keep all of your code in the main plugin files, you can add files to the plugin's folder and import functions and objects into the main files. 1. Hover over the plugin folder's name and click **Show More** ![](https://d2x3xhvgiqkx42.cloudfront.net/12345678-1234-1234-1234-1234567890ab/11fda387-da5a-430a-ada3-46def885b67f/2022/03/02/d7a7ee13-5c33-4de8-bba0-d8a883585472/f793ba37-bd42-4377-bd93-b3936e7215c5.png) . 2. Select **New .js file**. 3. To import from these files to the main plugin files, use the following syntax: ```javascript import { functionName } from './myFileName.js'; ``` ### Test the plugin You can test your plugin before publishing your site using [functional testing](https://dev.wix.com/docs/develop-websites/articles/workspace-tools/testing-monitoring/functional-testing/test-backend-functions-with-functional-testing.md) like you would with any backend Velo code. Make sure your `calculatePrice()` function's return values are properly formatted. To test your plugin after deploying, add console logs to your code. The results appear in [Wix Logs](https://support.wix.com/en/article/velo-about-site-monitoring). ## Step 3: Deploy the plugin Once your code files are ready, you need to publish the site. 1. Publish your site. > **Note** > There may be a delay between publishing the site and the new bookings pricing options appearing on the live site. ## Update the plugin You can make updates to your plugin as necessary. Make sure to publish your site for your updates to take effect. ## Remove the plugin You can remove the plugin from your site from the Code sidebar. 1. Hover over the plugin's folder and click **Show More** ![](https://d2x3xhvgiqkx42.cloudfront.net/12345678-1234-1234-1234-1234567890ab/11fda387-da5a-430a-ada3-46def885b67f/2022/03/02/d7a7ee13-5c33-4de8-bba0-d8a883585472/f793ba37-bd42-4377-bd93-b3936e7215c5.png) . 2. Select **Remove.
3. Click **Remove**. ## Example We created an example to demonstrate how you can use service plugins to extend the pricing for bookings on your site. ### Offer custom pricing for add-ons and weekend rates In this example, we calculate and display custom pricing that offers lower rates for weekdays and varied pricing for different addon options. To test this code, paste it into your **.js** file. Custom plugins allow you to implement pricing with your own customized business logic and display the new pricing on your site during checkout. In this example, we calculate and display custom pricing that offers lower rates for weekdays and varied pricing for different addon options. We use the `addtionalFields` property of the booking to get the weekend rate and the price of each addon. To test this code, paste it into your `.js` file. ```javascript import { getPrices } from 'backend/queries'; export const calculatePrice = async (options, context) => { const prices = getPrices(); const additionalFields = options.booking.additionalFields; const numberOfParticipants = options.booking.numberOfParticipants; const weekendRate = getFieldValue(additionalFields, "weekendRate"); const addon1Value = getFieldValue(additionalFields, "Addon 1"); const addon2Value = getFieldValue(additionalFields, "Addon 2"); const addon3Value = getFieldValue(additionalFields, "Addon 3"); const rate = weekendRate === "true" ? prices.weekend : prices.weekday; const finalPrice === numberOfParticipants * rate + addon1Value * prices.addon1 + addon2Value * prices.addon2 + addon3Value * prices.addon3; return {calculatedPrice: finalPrice}; }; export function getFieldValue(additionalFields, text) { const foundFieldArray = additionalFields.filter(additionalField => additionalField.label === text); return foundFieldArray.length === 0 ? undefined : foundFieldArray[0].value; } ``` In this example, the booking's price is modified based on add-ons the customer can add to their booking, and a more expensive rate if the booking is for the weekend. We built a [sample site](https://www.wix.com/velo-examples/custom-service-price/bookflow) where you can see this code in action. --- > Portal Navigation: > > - Append `.md` to any URL under `https://dev.wix.com/docs/` to get its markdown version. > - Pages are either content pages (article or reference text) or menu pages (a list of links to child pages). > - To get a menu page, truncate any URL to a parent path and append `.md` (e.g. `https://dev.wix.com/docs/sdk.md`, `https://dev.wix.com/docs/sdk/core-modules.md`). > - Top-level index of all portals: https://dev.wix.com/docs/llms.txt > - Full concatenated docs: https://dev.wix.com/docs/llms-full.txt ## Resource: Creating a Custom Registration Form with Code ## Article: Creating a Custom Registration Form with Code ## Article Link: https://dev.wix.com/docs/develop-websites/articles/code-tutorials/wix-members/creating-a-custom-registration-form-with-code.md ## Article Content: # Velo Tutorial: Creating a Custom Registration Form with Code When you add membership functionality to your site, you receive a default form for registering site visitors as site members. Sometimes the standard form doesn't meet the specific needs of your site. In this article, we demonstrate how to build a custom registration form that you can design to match your site's branding, and use it to collect specific information from your site visitors in the registration process. Here we create an example custom registration form for a store called The Tall Shop. To create a custom registration form we: 1. Enable custom site registration using Velo Forms. 2. Build a custom Velo Form with input and design elements. 3. Set up the custom fields and labels in our site's Contact List. 4. Write page code to perform membership registration using the information captured from our custom form. ### Prerequisites Make sure you’ve [added a Members Area to your site](https://support.wix.com/en/article/adding-a-members-area-to-your-site). This article assumes you are familiar with the following: * [Creating an input form](https://dev.wix.com/docs/develop-websites/articles/databases/wix-data/user-input/processing-user-input-before-it-is-stored-in-a-collection-with-data-hooks.md) * [Wix Members Area](https://support.wix.com/en/article/about-the-members-area) * [Popups](https://support.wix.com/en/article/wix-editor-adding-and-setting-up-a-lightbox) * [Your site's Contact List](https://support.wix.com/en/article/about-your-contact-list) ### Step 1 | Enable Custom Site Registration To get started, follow the steps below to enable custom site registration using Velo forms. 1. [Add a popup to your site](https://support.wix.com/en/article/studio-editor-using-popups). In our example, we name our popup **Custom Registration Form**. 2. Navigate to your **Pages** on the left side of your editor. Under **Signup & Login**, click **Member Signup Form**.  
3. In the dropdown menu, change the default form to **Velo Form**, and link it to the **Custom Registration Form** popup we created earlier. This step changes the default member signup form to the Velo custom registration form. Also, disable **Only allow backend calls for Signup and Login APIs**.
We can now go to our popup page to start building our form. ### Step 2 | Build a Custom Form Next, we set up our site's contact list so that we can specify additional information to the contact entry created when a member registers using our custom form. You can skip this step if you don't need any additional data from your site members. In our example, we set up some labels and a custom field. > **Notes:** > * When a site visitor signs up using a Velo custom registration form, they automatically become a site member, as the member Signup Setting defaults to automatic approval for everyone who signs up. If you want to manually approve them before becoming a member, set your member Signup Setting to **Only people who I approve manually**.  > * Choosing manual approval means that site visitors who register will have the status of ‘Pending’ until you manually approve them. You’ll have to go to your site's Contact List to approve them. To learn more, see the [Automatic vs. Manual Approval](https://www.wix.com/velo/reference/wix-members/authentication/register#wix-members_authentication_register_automatic-vs-manual-approval) section of the register() API. > * If you choose manual approval, you may want to use the [register() API from the wix-members-backend module](https://www.wix.com/velo/reference/wix-members-backend/authentication/register) instead. This allows you to build more secure approval flows by keeping tokens hidden from the frontend. Your site’s Contact List has multiple fields built in, such as ‘Name’, ‘Email’, and ‘Phone’, shown below. If you want to collect this data from your site visitors, simply add input elements to your site for these fields. The data collected from the input elements is stored in the corresponding fields in your site’s Contact List.
**Important** Your form must include at least 2 input elements to collect your site visitor’s email and password. This data is required for adding a new contact entry for your site visitor in your site’s Contact List, and for registering them as a site member.  If you want to collect additional data from your site visitors aside from the default fields in your site’s Contact List, you’ll need to add custom fields to your site’s Contact List. In our example, we create a custom field to store our site visitor’s height, and we add an input element to our form to collect this information.
To build our custom registration form, we add input elements to our popup page. We include inputs for required fields (email and password), for existing fields in your site’s Contact List (first name and last name), and we add an additional input element for collecting our site visitor’s height. Lastly, we add a register button to submit the form and register the site visitor as a new member.  Add the following elements to your popup page: * First Name  * Last Name   * Email address   * Password   * Height  * Register button Your custom registration form should look something like this:
|Type |ID |Usage | |---|---|---| |Input - Text|firstName|For entering a first name |Input - Text|lastName|For entering a last name |Input - Email|email|For entering an email address |Input - Password|password|For entering a password |Input - Number|height|For entering a height |Button|register|For triggering the registration code ### Step 3 | Create a Custom Field [Custom fields](https://support.wix.com/en/article/adding-custom-fields-to-contacts) are used to store additional information about your site's contacts.  In the previous step, we added an additional input element to our form to collect our site visitor’s height. Now we add a corresponding custom field in our site’s Contact List to store our contact’s height. In your site’s Dashboard, go to your contact list and click **More Actions > Manage custom fields** and add a new field named **height**. Set the **height** field's type to **Number**. Note that you can add any custom fields that suit the needs of your site.
### Step 4 | Add Labels [Labels](https://support.wix.com/en/article/creating-contact-labels) are used to organize your contacts into meaningful groups. In our example, we use labels to organize our members into different height groups. In our code, we calculate a new member's label based on the height they provide in our registration form. In your site’s Dashboard, go to your site’s Contact List and click **More Actions > Manage labels**. Add the following labels in your site’s Contact List: * Not Tall * Tall * Very Tall * Too Tall
### Step 5 | Add Code The last step is writing the code for our popup page. Let's first take a look at this code piece by piece to understand what it's doing. #### Import the API and Declare Variables ```javascript import { authentication } from 'wix-members-frontend'; let emails = []; let labels = []; ``` **Line 1**: First, we import the authentication API from the wix-members-frontend module. **Lines 3- 4**: We declare 2 arrays to store the new member's email address and label. Note that in our example, new members will have only one email address and one label. However, the API requires that both of these are passed as arrays. #### Set up the Form Event Handler to Retrieve Input Values ```javascript $w.onReady(function () { $w('#register').onClick( () => { const password = $w('#password').value; const height = Number($w('#height').value); const email = $w('#email').value; emails.push(email); ``` **Lines 1- 2**: In the onReady() function, we add an onClick() event handler to the register button. When a site visitor finishes entering their information in our form and clicks **Register**, the data they provided for each input element is used to automatically add a new contact to our site's contact list.  **Line 3- 5**: In the event handler, we set the password, height, and email variables to the corresponding input values. **Line 6**: We take the email address the site visitor provided in the form, and store it in the emails array. #### Add a Height Label to the Contact ```javascript // Calculate the proper height label if(height < 74){ labels.push('Not Tall'); } else if (height < 78) { labels.push('Tall'); } else if (height < 82) { labels.push('Very Tall'); } else { labels.push('Too Tall'); } ``` To learn more about the register function, see the [register() function](https://www.wix.com/velo/reference/wix-members/authentication/register) in the API Reference. **Lines 1- 10**: We calculate which label (‘Not Tall’, ‘Tall’, ‘Very Tall’, or ‘Too Tall’), to add to the new contact based on the height value provided in the form. This height label is added to the contact’s entry along with the other data provided in the form.  #### Register Site Visitor with the Details Provided in the Form ```javascript let options = { contactInfo: { firstName: $w('#firstName').value, lastName: $w('#lastName').value, emails: emails, labels: labels, height: Number($w('#height').value) }, privacyStatus: 'PUBLIC' } authentication.register(email, password, options) .then((registrationResult) => { const status = registrationResult.status; // When the site is configured for automatic approval, status is "ACTIVE" and the member is approved and logged in. console.log('Member registered and logged in:', registrationResult); }) .catch((error) => { console.error(error); }); }); }); ``` **Lines 1- 10**: Before calling the register() function, we first set the options we want to pass in. The options object includes a contactInfo object with the fields and labels in our site’s Contact List, and their corresponding data values collected from our form. We also set the new member’s [privacy status](https://support.wix.com/en/article/wix-groups-member-privacy-settings-for-groups) to 'PUBLIC' upon registering. Note that our contactInfo object reflects the information we collect in our form. It also reflects the specific labels and custom fields that we created in our site’s Contacts List. **Line 12**: We call the authentication API’s register() function and pass the email and password collected in the form, as well as the registration options we set above.  **Lines 13- 22**: We use the .then() function to retrieve the  registrationResult object returned by the register() function. If this object’s status property is ‘ACTIVE’, the member is approved and logged in. Last, we log the registrationResult object to the console.  Here is the complete code for this example: ```javascript import { authentication } from 'wix-members-frontend'; let emails = []; let labels = []; $w.onReady(function () { $w('#register').onClick( () => { const password = $w('#password').value; const height = Number($w('#height').value); const email = $w('#email').value; emails.push(email); // Calculate the proper height label if(height < 74){ labels.push('Not Tall'); } else if (height < 78) { labels.push('Tall'); } else if (height < 82) { labels.push('Very Tall'); } else { labels.push('Too Tall'); } let options = { contactInfo: { firstName: $w('#firstName').value, lastName: $w('#lastName').value, emails: emails, labels: labels, height: Number($w('#height').value) }, privacyStatus: 'PUBLIC' } authentication.register(email, password, options) .then((registrationResult) => { const status = registrationResult.status; // When the site is configured for automatic approval, status is "ACTIVE" and the member is approved and logged in. console.log('Member registered and logged in:', registrationResult); }) .catch((error) => { console.error(error); }); }); }); ``` --- > Portal Navigation: > > - Append `.md` to any URL under `https://dev.wix.com/docs/` to get its markdown version. > - Pages are either content pages (article or reference text) or menu pages (a list of links to child pages). > - To get a menu page, truncate any URL to a parent path and append `.md` (e.g. `https://dev.wix.com/docs/sdk.md`, `https://dev.wix.com/docs/sdk/core-modules.md`). > - Top-level index of all portals: https://dev.wix.com/docs/llms.txt > - Full concatenated docs: https://dev.wix.com/docs/llms-full.txt ## Resource: Building Your Own Members Area ## Article: Building Your Own Members Area ## Article Link: https://dev.wix.com/docs/develop-websites/articles/code-tutorials/wix-members/building-your-own-members-area.md ## Article Content: # Velo Tutorial: Building Your Own Members Area
Visit the Velo by Wix website to onboard and continue learning.
>**Note:** > You can now [add a members area to your site](https://support.wix.com/en/article/adding-a-members-area-to-your-site) without using code. You can also [create a page that displays items based on the currently logged-in member](https://support.wix.com/en/article/creating-custom-member-profile-pages) without using code. In this article we demonstrate how to create a profile page for each of your site members. The data for the dynamic profile page is created when a site visitor first logs in to your site. Members can view and update their personal profiles at any time.   >**Note:** > The functionality for logging members in and out of your site only works fully when viewing your published site. You will not be able to fully test your member profile pages in preview mode. To create our member profile pages we build: * A members collection * A profile page * An update page * A login page This article assumes you are familiar with the following concepts: * [Database collections](https://support.wix.com/en/article/about-database-collections) * [Collection permissions](https://support.wix.com/en/article/about-database-collection-permissions) * [Page permissions](https://support.wix.com/en/article/applying-page-permissions) * [Dynamic item pages](https://support.wix.com/en/article/setting-up-a-dynamic-list-page) * [Dataset Modes](https://support.wix.com/en/article/working-with-dynamic-page-dataset-settings) * [Data Binding](https://support.wix.com/en/article/about-data-binding-and-datasets) ### Members Collection We begin by creating a collection named **Members**, which is where we store all of the member data. Each item in the collection is another member. Because we want to restrict access to members so they can only view and update their own items, we set the permissions for the **Members** collection to **Custom Use** and choose the following: * Who can read content from this collection? - **Site member author** * Who can create content for this collection? - **Site member** * Who can update content from this collection? - **Site member author** * Who can delete content from this collection? - **Admin** The collection can contain whatever member data you want. In this example, we use the following fields: |Field Name |Field ID |Type | |---|---|---| |Title|title|Text |First Name|firstName|Text |Last Name|lastName|Text |Email|email|Text |Phone|phone|Text |About|about|Text ### Profile Page Next, we create a page to display member profiles. It is a dynamic item page connected to the **Members** collection. Because we are creating a dynamic item page, we need to choose a field to add to the URL that uniquely identifies each member. Here we use each member's automatically generated IDs to uniquely identify them.  The URL looks like this:
![](https://d2x3xhvgiqkx42.cloudfront.net/12345678-1234-1234-1234-1234567890ab/91f39f0c-8c58-4db6-a1e9-4c658c9723c1/2017/12/04/72d0bc8d-b3ee-4b9f-a8eb-717a27785b36.jpg)
Because we're only using this page to display data, we set the dynamic dataset's mode to **Read-only**. We also set the page's permissions to **Members Only** using the **Permissions** tab of the **Page Settings** so that only members who are logged in can reach the page. The page itself is designed with elements for displaying the information in a member's profile. In our example, that means text elements that are connected through the page's dynamic dataset to the fields in the **Members** collection. Finally, we add a button element. When we create the update page, we will connect the link of the button to navigate to the update page for the current member. When members check their profile pages, they will see something like this:
![](https://d2x3xhvgiqkx42.cloudfront.net/12345678-1234-1234-1234-1234567890ab/dfff8cbb-ddcb-4376-8cae-3fedb2dd4458/2019/02/26/67dae2e0-381c-4e50-b149-61d95b767a2a.png)
### Update Page The update page is very similar to the profile page. It is also a dynamic item page connected to the **Members** collection. It also uses the members' IDs as the unique identifying field. However, because we can't have two pages with the same URL in our site, we add **Update** to the URL so it looks like this: 
![](https://d2x3xhvgiqkx42.cloudfront.net/12345678-1234-1234-1234-1234567890ab/91f39f0c-8c58-4db6-a1e9-4c658c9723c1/2017/12/04/4d4c8e20-c73e-4a39-8088-802bd42c5c76.jpg)
Because we're displaying data on this page and allowing members to edit their data, we set the dynamic dataset's mode to **Read & Write**. Once again we set the page's permissions to **Members Only** using the **Permissions** tab of the **Page Settings** so that only members who are logged in can reach the page. This time the page is designed with elements for displaying and editing the information in a member's profile. In our example, we'll use a dropdown element, some text input elements, and a text box element. All these elements are connected through the page's dynamic dataset to the fields in the **Members** collection. Finally, we add a button element for submitting edited data. We connect the submit button using the **Connect to CMS** button as follows: | Field | Value | | ------------------------ | ---------------- | | Choose a dataset | Members Item | | Click action connects to | Profile Page | When members see their update pages, they will see something like this:
![](https://d2x3xhvgiqkx42.cloudfront.net/12345678-1234-1234-1234-1234567890ab/dfff8cbb-ddcb-4376-8cae-3fedb2dd4458/2019/02/26/49208fe8-9e4e-4009-a15e-07599033f187.png)
Now that we've created the update page, we can return to the profile page to link the update button. We connect the update button using the **Connect to CMS** button as follows: | Field | Value | | ------------------------ | ---------------- | | Choose a dataset | Members Item | | Click action connects to | Update Page | ### Login Page In our example we have a dedicated page for members to use for logging into the site. However, you can set this page as your homepage, add the contents of this page to any page, or [show them on all pages](https://support.wix.com/en/article/showing-an-element-on-all-pages-6533570).  >**Note:** > Because we have a dedicated login page, we'll be adding the code below to this page. However, if you're showing the elements on all pages, you need to add the code below to **masterPage.js**. The design of our login page is very simple. It contains two buttons. The first button is used for either logging in or logging out, depending on whether the current member is already logged in or not. The second button is used to navigate to a member's profile page. It is only shown for members who are already logged in.
![](https://d2x3xhvgiqkx42.cloudfront.net/12345678-1234-1234-1234-1234567890ab/dfff8cbb-ddcb-4376-8cae-3fedb2dd4458/2017/09/04/4f007dec-b68d-4c07-9a88-02b300b2cb3a.png)
#### Code The code on our login page consists of four parts: * Imports for the APIs used in the rest of the code * An onReady event handler for setting up the page when it loads * A login button onClick event handler for either: * logging in a member and possibly creating a new item in the **Members** collection if it is a first-time login * logging out a member who is already logged in * A profile button onClick event handler for navigating members to their profile pages * * * Let's take a look at the code piece by piece to understand what it's doing. **Import APIs and Declare Variables** ```javascript import { currentMember, authentication } from 'wix-members-frontend'; import wixData from 'wix-data'; import wixLocationFrontend from 'wix-location-frontend'; let memberId, memberEmail; ``` **Lines 1-3**: First, we import all the APIs we need for our example: [wix-members-frontend](https://www.wix.com/velo/reference/wix-members): For getting information about the current member and for logging members in and out. [wix-data](https://www.wix.com/velo/reference/wix-data.html): For querying and inserting into the Members collection. [wix-location-frontend](https://www.wix.com/velo/reference/wix-location.html): For navigating to other pages **Line 5**: We declare 2 global variables, `memberId` and `memberEmail`. **Check if the Current Member is Logged In** ```javascript async function checkIfLoggedIn(){ const thisMember = await currentMember.getMember(); return thisMember ? true : false; } ``` **Lines 1-2**: We add an [async](https://dev.wix.com/docs/develop-websites/articles/coding-with-velo/java-script-velo/working-with-promises.md) function to check if the current member is logged in, and await the current member. **Lines 3-4**: We return the current member. If we can get the current member, `thisMember` is `true`, and if not, then `thisMember` is `false`. **Set Up the 'login/logout' Buttons** ```javascript $w.onReady( () => { if (wixWindowFrontend.rendering.env === "browser") { checkIfLoggedIn().then(res => { if (res === true) { $w("#loginButton").label = "Logout"; $w("#profileButton").show(); } else { $w("#loginButton").label = "Login"; $w("#profileButton").hide(); } }) ``` **Lines 1-3**: In the `onReady()` function, we set the window rendering environment to ‘browser’ to prevent the code in the `onReady()` function from running twice. We then call the `checkIfLoggedIn()` function to see if the current member is logged in. **Lines 4-6**: If the current member is logged in, we label the button ‘Logout’, and show the profile button. **Lines 7-11**: If the current member is not logged in, we label the button ‘Login', and hide the profile button. **Authenticate the Member on Log In** ```javascript authentication.onLogin(async (member) => { const loggedInMember = await member.getMember(); memberId = loggedInMember._id; memberEmail = loggedInMember.loginEmail; return wixData.query("Members") .eq("_id", memberId) .find() .then((results) => { if (results.Members.length === 0) { const toInsert = { "_id": memberId, "email": memberEmail }; wixData.insert("Members", toInsert) .catch( (err) => { console.log(err); } ); } }) .catch( (err) => { console.log(err); }); }); } }); ``` **Lines 1-2**: Still in the `onReady()` function, we add an async function authenticating the member when they log in, and await the current member data. **Lines 3-4**: We set the current member ID and email, returned from the current member data to variables. **Lines 5-25**: We search the ‘Members’ data collection for the current member’s ID. If no results are found, then we insert a new item in the ‘Members’ collection for the new member, with their ID and email. **When the Login Button is Clicked** ```javascript export async function loginButton_click(event) { if(await checkIfLoggedIn() === true) { authentication.logout(); console.log('Member is logged out.') $w("#loginButton").label = "Login"; $w("#profileButton").hide(); } else { authentication.promptLogin({"mode": "login"}) .then(() => { console.log('Member is logged in.'); $w("#loginButton").label = "Logout"; $w("#profileButton").show(); }) .catch((error) => { console.error(error); }); } } ``` **Lines 1-6**: We add an async event handler to the login button. When a member clicks the login button, the function first checks if the member is logged in. If the member is logged in, the button’s label already shows ‘Logout’ from the logic in the `onReady()` function above. So when the member clicks the (logout) button, they are logged out, the button label changes to 'Login', and the profile button is hidden. **Lines 7-18**: If the member is not logged in, the button’s label already shows ‘Login’ from the logic in the `onReady()` function above. So when the member clicks the (login) button, they are prompted to log in, the button label then changes to 'Logout', and the profile button is shown. **When the Profile Button is Clicked** ```javascript export async function profileButton_click(event) { let loggedInMember = await currentMember.getMember(); memberId = loggedInMember._id; wixLocationFrontend.to(`/items/${memberId}`); } ``` **Lines 1-2**: We add an async event handler to the profile button. When a member clicks the profile button, the function first gets the current member data. **Lines 3-5**: We set the current member ID, returned from the current member data to a variable. We pass the variable to the `wix-location-frontend.to()` function, sending members to their personal profile page. * * * **Full Example Code** Here is the complete code for this example: ```javascript import { currentMember, authentication } from 'wix-members-frontend'; import wixData from 'wix-data'; import wixLocationFrontend from 'wix-location-frontend'; let memberId, memberEmail; async function checkIfLoggedIn(){ const thisMember = await currentMember.getMember(); return thisMember ? true : false; } $w.onReady( () => { if (wixWindowFrontend.rendering.env === "browser") { checkIfLoggedIn().then(res => { if (res === true) { $w("#loginButton").label = "Logout"; $w("#profileButton").show(); } else { $w("#loginButton").label = "Login"; $w("#profileButton").hide(); } }) authentication.onLogin(async (member) => { const loggedInMember = await member.getMember(); memberId = loggedInMember._id; memberEmail = loggedInMember.loginEmail; return wixData.query("Members") .eq("_id", memberId) .find() .then((results) => { if (results.Members.length === 0) { const toInsert = { "_id": memberId, "email": memberEmail }; wixData.insert("Members", toInsert) .catch( (err) => { console.log(err); } ); } }) .catch( (err) => { console.log(err); }); }); } }); export async function loginButton_click(event) { if(await checkIfLoggedIn() === true) { authentication.logout(); console.log('Member is logged out.') $w("#loginButton").label = "Login"; $w("#profileButton").hide(); } else { authentication.promptLogin({"mode": "login"}) .then(() => { console.log('Member is logged in.'); $w("#loginButton").label = "Logout"; $w("#profileButton").show(); }) .catch((error) => { console.error(error); }); } } export async function profileButton_click(event) { let loggedInMember = await currentMember.getMember(); memberId = loggedInMember._id; wixLocationFrontend.to(`/items/${memberId}`); } ``` To learn more about the [wix-members-frontend module](https://www.wix.com/velo/reference/wix-members), see the API Reference. --- > Portal Navigation: > > - Append `.md` to any URL under `https://dev.wix.com/docs/` to get its markdown version. > - Pages are either content pages (article or reference text) or menu pages (a list of links to child pages). > - To get a menu page, truncate any URL to a parent path and append `.md` (e.g. `https://dev.wix.com/docs/sdk.md`, `https://dev.wix.com/docs/sdk/core-modules.md`). > - Top-level index of all portals: https://dev.wix.com/docs/llms.txt > - Full concatenated docs: https://dev.wix.com/docs/llms-full.txt ## Resource: Enabling Custom Site Registration ## Article: Enabling Custom Site Registration ## Article Link: https://dev.wix.com/docs/develop-websites/articles/code-tutorials/wix-members/enabling-custom-site-registration.md ## Article Content: # Velo: Enabling Custom Site Registration Velo allows you to [create a custom site registration form](https://support.wix.com/en/article/how-to-create-a-custom-registration-form) using code.  After creating a custom site registration form, you must enable custom site registration so your visitors will be directed to your custom form. > **Note:** > To learn about creating a custom member signup form without code, click [here](https://support.wix.com/en/article/creating-a-custom-signup-form-for-your-members-area). ### To enable custom site registration using Velo forms: 1. Add a popup to your site. 2. [Create a custom registration form](https://dev.wix.com/docs/develop-websites/articles/code-tutorials/wix-members/creating-a-custom-registration-form-with-code.md) in the popup using Velo. >**Notes:** > - The above tutorial uses the [frontend `register()`](https://www.wix.com/velo/reference/wix-members-frontend/authentication/register) function. To enable custom site registration using Velo forms, use the [backend `register()`](https://www.wix.com/velo/reference/wix-members-backend/authentication/register) function. > - Check [your member signup settings](https://support.wix.com/en/article/editing-your-member-signup-settings-for-the-default-form#editing-the-member-signup-settings-for-the-custom-signup-form) when creating the form, specifically whether a new member may join and log in immediately, or they need to wait for a manual approval. 3. Enable Velo Form signup settings: 1. Click **Pages** ![](https://d2x3xhvgiqkx42.cloudfront.net/12345678-1234-1234-1234-1234567890ab/030571df-9516-496b-bc2a-2a8af88f13dd/2022/02/02/0e066fda-f14d-4190-b4de-70959d4f70ba/db90c9fb-861c-40a8-9889-e06dbddd6da4.png) on the left side of the Editor. 2. Click **Signup & Login**. 3. Click **Member Signup Form** (Wix Editor), or **Signup** (Wix Studio). 4. Click the drop-down menu and select **Velo Form**. Note that for this option to be available, you need to enable **Dev Mode** (Wix Editor), or click ![Code icon](https://github.com/wix-incubator/wix-code-docs/assets/50321691/2c41d3df-930f-4e0f-966f-038742adceed) and then **Start Coding** (Wix Studio). 5. Choose the popup from the **What does it link to?** drop-down menu. 6. Select **Advanced Settings** and enable **Only allow backend calls for Signup and Login APIs**. To enable this setting, note that you must complete steps 4 and 5 for the **Member Login Form** (located under the **Login** tab in Wix Studio). This is an important step to ensure that site visitors can't verify themselves by modifying page code. --- > Portal Navigation: > > - Append `.md` to any URL under `https://dev.wix.com/docs/` to get its markdown version. > - Pages are either content pages (article or reference text) or menu pages (a list of links to child pages). > - To get a menu page, truncate any URL to a parent path and append `.md` (e.g. `https://dev.wix.com/docs/sdk.md`, `https://dev.wix.com/docs/sdk/core-modules.md`). > - Top-level index of all portals: https://dev.wix.com/docs/llms.txt > - Full concatenated docs: https://dev.wix.com/docs/llms-full.txt ## Resource: Tutorial: Processing Payments ## Article: Processing Payments ## Article Link: https://dev.wix.com/docs/develop-websites/articles/code-tutorials/wix-pay/tutorial-processing-payments.md ## Article Content: # Velo Tutorial: Processing Payments Using the Velo Pay API you can collect payments from your site's visitors outside the context of a Wix App like Wix Stores. The API allows you to collect a payment when triggered by any user interaction on any page.
**Warning:** Before starting with payments, it is important that you fully understand how to handle the security concerns detailed below that arise when collecting payments.
### Prerequisites Before using the Pay API, you need to set up your site to accept payments. To learn more, see [About Accepting Payments](https://support.wix.com/en/article/about-accepting-payments).
**Note:** When setting up your site to accept payments, be sure to select the payment methods you want to offer and [set your payment currency](https://support.wix.com/en/article/setting-your-currency-for-accepting-payments).
Additionally, you will need to be familiar with creating backend web modules and calling the functions defined in them from page code. To learn more, see [Calling Server-Side Code from the Front-End with Web Modules.](https://dev.wix.com/docs/develop-websites/articles/coding-with-velo/backend-code/web-modules/call-backend-code-from-the-frontend.md) You also might want to familiarize yourself with who can see and call your site's code. To learn more, see the [Code Visibility](https://dev.wix.com/docs/develop-websites/articles/best-practices/security-best-practices.md) section of [Security Considerations When Working with Velo](https://dev.wix.com/docs/develop-websites/articles/best-practices/security-best-practices.md). ### Pay API
**Note:** To work with the Pay API, you need to save and publish your site.
The Pay API is split between backend and client-side functions to facilitate a secure payment process as described [below](https://support.wix.com/en/article/how-to-process-payments-with-code#security-considerations). It consists of two functions and one event: * `createPayment()` - Called in backend code to create a payment and generate a `paymentId`. * `startPayment()` - Called in client-side code to prompt the current site visitor to enter the payment information. * `onPaymentUpdate()` - Fired in backend code when a payment's status has changed. For detailed information on the Pay API see [wix-pay-frontend](https://dev.wix.com/docs/velo/apis/wix-pay-frontend/introduction.md) and [wix-pay-backend](https://dev.wix.com/docs/velo/apis/wix-pay-backend/introduction.md) in the API Reference. ### Payment Lifecycle The following list outlines the steps taken in a typical payment lifecycle: 1. A site visitor clicks a button to start the payment process. 2. The button's event handler calls a backend function. 3. A `PaymentInfo` object containing information about the payment, such as the payment amount, is created in the backend function. 4. The backend function calls `createPayment()` using the `PaymentInfo` object and returns the generated `Payment` object to the calling client-side event handler. 5. The event handler then calls the `startPayment()` function with the `id` from the `Payment` object, which opens the payment popup on your site. 6. The site visitor enters the payment information. 7. The event handler optionally handles the returned `PaymentResult`. 8. Handle additional status updates to the payment transaction using the `onPaymentUpdate()` event. > **Note:** The terms popup and lightbox refer to the same element. While the editor and dashboard now refer to it as a [popup](https://support.wix.com/en/article/studio-editor-using-popups), the API methods continue to use the term lightbox for backward compatibility. The documentation uses both terms accordingly. ### Payment Code Example The following is an example showing the payment lifecycle in code. The numbered comments correspond to the numbered steps in the payment lifecycle described above. ```javascript /******************** * client-side code * ********************/ import { createMyPayment } from 'backend/pay.web'; import wixPayFrontend from 'wix-pay-frontend'; import wixWindowFrontend from 'wix-window-frontend'; // Step 1 - User clicks a button. export function myButton_click(event) { // Step 2 - Call backend function. // (Next, see step 3 in the backend code below.) createMyPayment() // When the payment has been created and a paymentId has been returned: .then( (payment) => { // Step 5 - Call the startPayment() function with the paymentId. // Include PaymentOptions to customize the payment experience. wixPayFrontend.startPayment(payment.id, { "showThankYouPage": false, "termsAndConditionsLink": "https://mysite.com/terms" }) // Step 6 - Visitor enters the payment information. // When the payment form is completed: .then( (result) => { // Step 7 - Handle the payment result. // (Next, see step 8 in the backend code below.) if (result.status === "Successful") { wixWindowFrontend.openLightbox("Success Box"); } else if (result.status === "Pending") { wixWindowFrontend.openLightbox("Pending Box"); } } ); } ); } ``` ```javascript /************************** * backend code - pay.web.js * **************************/ import { Permissions, webMethod } from 'wix-web-module'; import wixPay from 'wix-pay-backend'; export const createMyPayment = webMethod(Permissions.Anyone, () => { // Step 3 - Create payment info object. // Here we use static data. You might want to use data from a // collection. To see an example of such a usage, see the API Reference. let paymentInfo = { "items": [ { name: "Product 1", price: 9.99 }, { name: "Product 2", price: 19.99 } ], amount: 29.98 } // Step 4 - Call createPayment() with the payment information // and return the paymentId. // (Next, see step 5 in the client-side code above.) return wixPay.createPayment(paymentInfo); }); ``` ```javascript /***************************** * backend code - events.js * *****************************/ export function wixPay_onPaymentUpdate(event) { // Step 8 - Handle additional status updates using // the onPaymentUpdate() event. let paymentId = event.payment.id; let newTransactionStatus = event.status; let userInfo = event.userInfo; // Handle new payment status. } ``` ### Security Considerations For security reasons you should always create the `PaymentInfo` object (step 3 above) in backend code. **Do not pass payment information from client-side code.** Passing payment information from client-side code opens a vulnerability which is easily exploited. Since malicious site visitors can call your exported backend functions from the browser, they would be able to alter the payment information that is passed to the backend code. For example, if you pass the price of an item being purchased from client-side code, a user can change the price of the item. To securely process a payment, always define the payment information in the backend. Even though malicious users can call the backend function, they cannot see or change what happens in that function. If needed, you can also include additional validations in your backend function. If you want to perform operations based on a payment's status, always use the status updates received by the backend payment events. Status information that is received in client-side code should only be used for display purposes. --- > Portal Navigation: > > - Append `.md` to any URL under `https://dev.wix.com/docs/` to get its markdown version. > - Pages are either content pages (article or reference text) or menu pages (a list of links to child pages). > - To get a menu page, truncate any URL to a parent path and append `.md` (e.g. `https://dev.wix.com/docs/sdk.md`, `https://dev.wix.com/docs/sdk/core-modules.md`). > - Top-level index of all portals: https://dev.wix.com/docs/llms.txt > - Full concatenated docs: https://dev.wix.com/docs/llms-full.txt ## Resource: Tutorial: Using the Velo Pay API to Collect Payments for a Single Product ## Article: Using the Velo Pay API to Collect Payments for a Single Product ## Article Link: https://dev.wix.com/docs/develop-websites/articles/code-tutorials/wix-pay/tutorial-using-the-velo-pay-api-to-collect-payments-for-a-single-product.md ## Article Content: # Velo Tutorial: Using the Velo Pay API to Collect Payments for a Single Product This article describes how you can use the Velo Pay API to collect payments from your site's visitors for a single predefined product, outside the context of a Wix App (like Wix Stores). This article is based on this [Wix Editor example site](https://velo-examples.wixsite.com/toystore). You can open the site in the Wix Editor to work with the [template](http://editor.wix.com/html/editor/web/renderer/new?siteId=5eb2ea3b-6527-4b5e-899a-bbf130adfab0&metaSiteId=146f29a1-b47c-4a03-acac-eb05894259ec). >**Note:** > The example site and template are built on Wix Editor sites. This tutorial will be slightly different from the example site and template as its steps have been updated for a Wix Studio site with the [Wix Studio features](https://dev.wix.com/docs/develop-websites/articles/coding-with-velo/overview/about-coding-with-wix-studio.md). To learn how to use the Velo Pay API for products stored in a collection, see [Velo: Using the Wix Pay API to Collect Payments for Products in a Database Collection](https://dev.wix.com/docs/develop-websites/articles/code-tutorials/wix-pay/tutorial-using-the-velo-pay-api-to-collect-payments-for-products-in-a-database-collection.md).
### Overview **In our site we added the following:** * Text elements and an image on the Pay API page, displaying a single product for sale. * A "Buy Now" button on the Pay API page, which visitors can click to purchase the product. **Then we added code to do the following:** 1. When a visitor clicks the "Buy Now" button, the button's event handler calls a backend function. 2. The backend function creates and returns a payment object to the client side. The payment object contains payment information for the product as defined in the backend code. 3. On the client side, a payment procedure is initiated using the ID from the payment object, causing a payment window to appear. 4. The visitor enters payment information and completes the transaction. ### Before You Start Before you start working with Wix payments in code, make sure you do the following: * Understand the [necessary security precautions](https://dev.wix.com/docs/develop-websites/articles/code-tutorials/wix-pay/tutorial-processing-payments.md) for working with payments in code. Specifically, make sure to always define payment information in the backend. This prevents malicious users from accessing and possibly manipulating payment information or the payment process. * Set up [accepted payment methods](https://support.wix.com/en/article/about-accepting-payments) on your site. We also recommend that you understand the [typical payment process](https://www.wix.com/velo/reference/wix-pay.html) before proceeding. ### Step 1: Set up the Pay API Page On the Pay API page we added: * An image of the robot for sale. * Text elements for the name, price, and description of the robot. * A Buy Now button to trigger the payment process. In the [Properties & Events panel](https://dev.wix.com/docs/develop-websites/articles/code-tutorials/wix-editor-elements/adding-custom-interactivity-with-events.md) of the button, we added an onClick [event handler](https://dev.wix.com/docs/develop-websites/articles/coding-with-velo/frontend-code/about-event-handlers-in-wix.md). ### Step 2: Create the createPaymentForProduct Function in the Backend We created a web module called `BE_PayAPI.web.js`. Then we imported the function that we need to work with payments in backend code, as well as the `webMethod` function and the `Permissions` enum from the `wix-web-module` module. Then we declared the `createPaymentForProduct` function, which creates and returns a payment object. We also export the function so it can be used on the client side. Note that `amount` is the sum of the `price` property for all `items`. In this example, there is only one `item` so `amount` and `price` are identical. ```javascript import {Permissions, webMethod} from "wix-web-module"; import wixPayFrontend from 'wix-pay-backend'; export const createPaymentForProduct = webMethod(Permissions.Anyone, () => { return wixPayFrontend.createPayment( { amount: 0.50, items: [{name: 'DIY Robot', price: 0.50}], } ); }) ``` #### Understanding the Code **Line 1**: Import the `webMethod` function and the `Permissions` enum from the `wix-web-module` module. **Line 2**: Import the module we need to work with the [Wix Pay Backend](https://www.wix.com/velo/reference/wix-pay-backend.html) library. **Line 4**: Declare the `createPaymentForProduct` function, and export it with the `webMethod` function and `Permissions.Anyone` so it can be used on the client side. In the function, do the following: **Line 5**: Return the result of the [`wix-backend-pay`](https://www.wix.com/velo/reference/wix-pay-backend.html) [`createPayment`](https://www.wix.com/velo/reference/wix-pay-backend.html#createPayment) function, which takes a [`PaymentInfo`](https://www.wix.com/velo/reference/wix-pay-backend/introduction) object and creates a new payment object. **Lines 6-9**: Define the `PaymentInfo` (product payment information) directly in the code. #### Identifiers you may need to change based on your site's elements If you want to use this exact scenario and code in your site, you may need to modify these items to match the ones on your site: * `0.50` (`amount`) * `DIY Robot` (`name`) * `0.50` (`price`) ### Step 3: Prepare the Pay API Page On the Pay API page, we start by importing the module we need to work with payments in code. We also import the `createPaymentForProduct` function from the backend. ```javascript import wixPayFrontend from 'wix-pay-frontend'; import {createPaymentForProduct} from 'backend/BE_PayAPI.web'; ``` #### Understanding the Code **Line 1**: Import the module we need to work with the [Wix Pay Frontend](https://www.wix.com/velo/reference/wix-pay) library. **Line 2**: Import the `createPaymentForProduct` function from the web method where it was created (see [Step 2](https://dev.wix.com/docs/develop-websites/articles/code-tutorials/wix-pay/tutorial-using-the-velo-pay-api-to-collect-payments-for-a-single-product.md)). This function creates a payment object based on payment information for a single product defined in the backend. There are no identifiers you would need to change here to make this code work on your site. ### Step 4: Create the button1\_click function on the Pay API Page The `button1_click` [event handler](https://dev.wix.com/docs/develop-websites/articles/coding-with-velo/frontend-code/about-event-handlers-in-wix.md) runs when a visitor clicks the Buy Now button. The event handler calls backend code that returns a payment object based on product payment information. The event handler then runs the wixPayFrontend [`startPayment`](https://www.wix.com/velo/reference/wix-pay.html#startPayment) function with the payment object returned from the backend. This opens a payment window and prompts the user to select a payment method and continue the payment process. In our example, we included a `termsAndConditionsLink`, one of the [payment options](https://www.wix.com/velo/reference/wix-pay/startpayment) available for payments. ```javascript export function button1_click(event) { createPaymentForProduct().then(payment => { wixPayFrontend.startPayment(payment.id, {"termsAndConditionsLink": "https://www.wix.com/"}); }); } ``` #### Understanding the Code **Line 1**: When the "Buy Now" button is clicked, run an event handler that does the following: **Line 2**: Run the `createPaymentForProduct` function, which was imported from the backend. With the payment object that is returned, do the following: **Line 3**: Run the wixPayFrontend [`startPayment`](https://www.wix.com/velo/reference/wix-pay.html#startPayment) function with the ID of the payment object. A payment window opens prompting the user for payment information. The `startPayment` function runs with an optional `termsAndConditionsLink` [`PaymentOption`](https://www.wix.com/velo/reference/wix-pay/startpayment). A checkbox with a link to a terms and conditions page is included in the payment window. There are no identifiers you would need to change here to make this code work on your site. In the payment window, the site visitor selects a payment method, fills in payment information, clicks **Pay Now**, and the transaction is completed. The visitor receives an email confirming the payment. ### Next Steps * Open [this example](http://editor.wix.com/html/editor/web/renderer/new?siteId=5eb2ea3b-6527-4b5e-899a-bbf130adfab0&metaSiteId=146f29a1-b47c-4a03-acac-eb05894259ec) in the Editor to work with the template. * Publish the site. * Learn more: * [Velo: Using the Wix Pay API to Collect Payments for Products in a Database Collection](https://dev.wix.com/docs/develop-websites/articles/code-tutorials/wix-pay/tutorial-using-the-velo-pay-api-to-collect-payments-for-products-in-a-database-collection.md) * [Velo Tutorial: Processing Payments](https://dev.wix.com/docs/develop-websites/articles/code-tutorials/wix-pay/tutorial-processing-payments.md) * [wix-pay-frontend API](https://www.wix.com/velo/reference/wix-pay.html) * [wix-pay-backend API](https://www.wix.com/velo/reference/wix-pay-backend.html) --- > Portal Navigation: > > - Append `.md` to any URL under `https://dev.wix.com/docs/` to get its markdown version. > - Pages are either content pages (article or reference text) or menu pages (a list of links to child pages). > - To get a menu page, truncate any URL to a parent path and append `.md` (e.g. `https://dev.wix.com/docs/sdk.md`, `https://dev.wix.com/docs/sdk/core-modules.md`). > - Top-level index of all portals: https://dev.wix.com/docs/llms.txt > - Full concatenated docs: https://dev.wix.com/docs/llms-full.txt ## Resource: Tutorial: Using the Velo Pay API to Collect Payments for Products in a Database Collection ## Article: Using the Velo Pay API to Collect Payments for Products in a Database Collection ## Article Link: https://dev.wix.com/docs/develop-websites/articles/code-tutorials/wix-pay/tutorial-using-the-velo-pay-api-to-collect-payments-for-products-in-a-database-collection.md ## Article Content: # Velo Tutorial: Using the Velo Pay API to Collect Payments for Products in a Database Collection >**Note:** This tutorial and its steps are based on a Wix Editor site. You can adapt the steps for a Wix Studio site by using the equivalent [Wix Studio features](https://dev.wix.com/docs/develop-websites/articles/coding-with-velo/overview/about-coding-with-wix-studio.md). This article describes how you can use the Velo Pay API to collect payments from your site's visitors for a product stored in a database collection, outside the context of a Wix App (like Wix Stores). Throughout this article we're going to use the same site to illustrate the process. You can open the site in the Editor to work with the [template](http://editor.wix.com/html/editor/web/renderer/new?siteId=712f4cc1-af6b-4223-a799-085d304242d4&metaSiteId=a9b9d72c-ee33-48e3-9b4a-1427aa561c50). We're going to explain how we set up the sample site and the code we added to make it work.
>**Note** > To learn how to use the Velo Pay API for a single predefined product, see [Velo: Using the Velo Pay API to Collect Payments for a Single Product](https://support.wix.com/en/article/velo-tutorial-using-the-velo-pay-api-to-collect-payments-for-a-single-product). ### Overview **In our site we added the following:** * A Products collection with a list of products for sale. Each product needs a title, image, and price. * A Collection & Repeater page. A repeater displays products from the Products collection. Each product in the repeater has a Buy Now button, which visitors can click to purchase the product. **Then we added code to do the following:** 1. When a visitor clicks the Buy Now button, the button's event handler calls a backend function. 2. The backend function retrieves product payment information from the Products collection, and creates and returns a payment object to the client side. 3. On the client side, a payment procedure is initiated using the ID from the payment object, causing a payment window to appear. 4. The visitor enters payment information and completes the transaction. ### Before You Start Before you start working with Wix payments in code, make sure you do the following: * Understand the [necessary security precautions](https://support.wix.com/en/article/velo-tutorial-processing-payments#security-considerations) for working with payments in code. Specifically, make sure to: * Always define payment information in the backend.  * Assign [collection permissions](https://dev.wix.com/docs/develop-websites/articles/databases/wix-data/collections/working-with-wix-app-collections-and-code.md) that protect payment information stored in your database. Make sure only site Admins can create, update, and delete content. * Set up [accepted payment methods](https://support.wix.com/en/article/about-accepting-payments) on your site. We also recommend that you understand the [typical payment process](https://www.wix.com/velo/reference/wix-pay.html) before proceeding. ### Step 1: Set up the Site For this example, you'll need some products for sale that are stored in a collection. We added Wix Stores to our site, which automatically adds a Stores/Products collection, but you can also create your own collection of products without Wix Stores. >**Note** > You may need to save or publish the site and refresh your browser to view Stores collections in Content Collections in the Databases section of the Code sidebar. This is what some of the data in our Products collection looks like:
We also added a Collection & Repeater page to the site to display our products, and we created the BE\_Collection.web.js backend module to securely run code related to payment information.
### Step 2: Set up the Collection & Repeater Page On the Collection & Repeater page we added: * A repeater to display the products. * Text and image elements in the repeater to display the name, price, and picture of each product for sale. * A Buy Now button in the repeater to trigger the payment process for the selected product. * A dataset connected to our Stores/Products collection for connecting data in the collection to the repeater.
>**Note** > When you [display data from a collection in a repeater](https://dev.wix.com/docs/develop-websites/articles/databases/wix-data/displaying-data/display-database-collection-content-in-a-repeater.md), you must first connect the repeater to the dataset, and then connect each element in the repeater to the dataset. * In the [Properties & Events panel](https://dev.wix.com/docs/develop-websites/articles/code-tutorials/wix-editor-elements/adding-custom-interactivity-with-events.md) of the repeater, we added an [onItemReady](https://www.wix.com/velo/reference/$w.Repeater.html#onItemReady) [event handler](https://dev.wix.com/docs/develop-websites/articles/coding-with-velo/frontend-code/about-event-handlers-in-wix.md) that will run when the repeater is ready to be loaded. * In the [Properties & Events panel](https://dev.wix.com/docs/develop-websites/articles/code-tutorials/wix-editor-elements/adding-custom-interactivity-with-events.md) of the Buy Now button, we added an [onClick](https://dev.wix.com/docs/velo/api-reference/$w/button/on-click.md) [event handler](https://dev.wix.com/docs/develop-websites/articles/coding-with-velo/frontend-code/about-event-handlers-in-wix.md) that will run when the button is clicked. ![](https://d2x3xhvgiqkx42.cloudfront.net/12345678-1234-1234-1234-1234567890ab/76096845-8b12-44f1-91f6-3dc2e838fdd9/2020/10/25/db68d0e6-ad19-4040-92ce-24e4c4dbeecd/a15a0149-a856-46f9-adcd-8bc0c2472387.png) ### Step 3: Create the createPaymentForProduct Function in the Backend We created a backend module called `BE_Collection.web.js`. In the backend, we start by importing the modules we need to work with backend payments and data in code. Then we created the `createPaymentForProduct` function, which retrieves product data from the collection, and creates and returns a payment object based on the data. We also export the function so it can be used on the client side. Note that `amount` is the sum of the `price` property for all `items`. In this example, there is only one `item` so `amount` and `price` are identical. >**Note:** > Throughout this example we use the [async/await](https://codeburst.io/javascript-es-2017-learn-async-await-by-example-48acc58bad65) JavaScript functionality. ```javascript import { Permissions, webMethod } from 'wix-web-module'; import wixPay from 'wix-pay-backend'; import wixData from 'wix-data'; export const createPaymentForProduct = webMethod(Permissions.Anyone, async (productId) => { let product = await wixData.get('Stores/Products', productId); return wixPay.createPayment( { amount: product.discountedPrice, items: [ { name: product.name, price: product.discountedPrice } ] } ); }); ``` #### Understanding the Code **Line 1**: Import the `Permissions` enum and `webMethod` function from `wix-web-module`. **Line 2**: Import the module we need to work with the [Wix Pay Backend](https://www.wix.com/velo/reference/wix-pay-backend.html) library. **Line 3**: Import the module we need to work with the [Wix Data](https://www.wix.com/velo/reference/wix-data.html) library. **Line 5**: Declare the `createPaymentForProduct` function and export it so it can be used on the client side. **Line 6**: Use the Wix Data [`get`](https://www.wix.com/velo/reference/wix-data.html#get) function to retrieve product information from the collection and assign it to the `product` variable. The `get` function uses the ID of the product selected by the visitor to "know" which product data to retrieve. **Line 7**: Return the result of the [`wix-pay-backend`](https://www.wix.com/velo/reference/wix-pay-backend.html) [`createPayment`](https://www.wix.com/velo/reference/wix-pay-backend.html#createPayment) function, which takes a [`PaymentInfo`](https://www.wix.com/velo/reference/wix-pay-backend/introduction) object and creates a new payment object. **Lines 8-10**: Define the `PaymentInfo` object using payment information stored in the `product` variable. #### Identifiers you may need to change based on your site's elements If you want to use this exact scenario and code in your site, you may need to modify this item to match the one on your site: * `Stores/Products` ### Step 4: Prepare the Collection & Repeater Page On the Collection & Repeater page we start by importing the module we need to work with payments in code. We also import the `createPaymentForProduct` function from the backend. ```javascript import wixPayFrontend from 'wix-pay-frontend'; import {createPaymentForProduct} from 'backend/BE_Collection.web'; ``` #### Understanding the Code **Line 1**: Import the module we need to work with the [Wix Pay Frontend](https://www.wix.com/velo/reference/wix-pay) library. **Line 2**: Import the `createPaymentForProduct` function from the backend module where it was created (see [Step 3](https://support.wix.com/en/article/velo-tutorial-using-the-velo-pay-api-to-collect-payments-for-products-in-a-database-collection#step-3-create-the-createpaymentforproduct-function-in-the-backend-1)). This function creates a payment object based on payment information for a product stored in the Products collection. There are no identifiers you would need to change here to make this code work on your site. ### Step 5: Create the repeater1\_itemReady function on the Collection & Repeater page The `repeater1_itemReady` [event handler](https://dev.wix.com/docs/develop-websites/articles/coding-with-velo/frontend-code/about-event-handlers-in-wix.md) runs when the repeater is ready to be loaded. The function runs for each item (product) in the collection. The current item is passed to the event handler as the `itemData` parameter. First the function loads the item into the repeater, displaying product information. Then it checks if the user clicked the Buy Now button for this particular item. If the button for this item was clicked, the `onClick()` [event handler](https://dev.wix.com/docs/develop-websites/articles/coding-with-velo/frontend-code/about-event-handlers-in-wix.md) runs the backend `createPaymentForProduct` function that creates a payment object for the selected product. The event handler then runs the wixPayFrontend [`startPayment`](https://www.wix.com/velo/reference/wix-pay.html#startPayment) function with the payment object returned from the backend. This opens a payment window and prompts the user to select a payment method and continue the payment process. In our example, we also included a `termsAndConditionsLink`, one of the available [payment options](https://www.wix.com/velo/reference/wix-pay/startpayment). ```javascript export function repeater1_itemReady($item, itemData, index) { let itemId = itemData._id; $item('#button1').onClick(async () => { let payment = await createPaymentForProduct(itemId); await wixPayFrontend.startPayment((payment.id), { "termsAndConditionsLink": "https://www.wix.com/" }); }); } ``` #### Understanding the Code **Line 1**: For each item (product) in the Stores/Products dataset, set up the item in the repeater and then do the following: **Line 2**: Store the ID of the item in the `itemID` variable. **Line 3**: If the "Buy Now" button is clicked for this item, run an event handler that does the following: **Line 4**: Run the `createPaymentForProduct` function, which was imported from the backend, with the ID of the selected product. Store the payment object that is returned in the `payment` variable. **Line 5**: Run the Wix Pay Frontend [`startPayment`](https://www.wix.com/velo/reference/wix-pay.html#startPayment) function with the ID of the payment object. A payment window opens prompting the user for payment information. The `startPayment` function runs with an optional `termsAndConditionsLink` [`PaymentOption`](https://www.wix.com/velo/reference/wix-pay/startpayment). A checkbox with a link to a terms and conditions page is included in the payment window. #### Identifiers you may need to change based on your site's elements If you want to use this exact scenario and code in your site, you may need to modify this item to match the one on your site: * `#button1` In the payment window, the site visitor selects a payment method, fills in payment information, clicks **Pay Now**, and the transaction is completed. The visitor receives an email confirming the payment. ### Next Steps * Open [this example](http://editor.wix.com/html/editor/web/renderer/new?siteId=712f4cc1-af6b-4223-a799-085d304242d4&metaSiteId=a9b9d72c-ee33-48e3-9b4a-1427aa561c50) in the Editor to work with the template. * Publish the site. * Learn more: * [Velo: Using Wix Pay API to Collect Payments for a Single Product](https://dev.wix.com/docs/develop-websites/articles/code-tutorials/wix-pay/tutorial-using-the-velo-pay-api-to-collect-payments-for-a-single-product.md) * [Velo Tutorial: Processing Payments](https://dev.wix.com/docs/develop-websites/articles/code-tutorials/wix-pay/tutorial-processing-payments.md) * [wix-pay-frontend API](https://www.wix.com/velo/reference/wix-pay.html) * [wix-pay-backend API](https://www.wix.com/velo/reference/wix-pay-backend.html) --- > Portal Navigation: > > - Append `.md` to any URL under `https://dev.wix.com/docs/` to get its markdown version. > - Pages are either content pages (article or reference text) or menu pages (a list of links to child pages). > - To get a menu page, truncate any URL to a parent path and append `.md` (e.g. `https://dev.wix.com/docs/sdk.md`, `https://dev.wix.com/docs/sdk/core-modules.md`). > - Top-level index of all portals: https://dev.wix.com/docs/llms.txt > - Full concatenated docs: https://dev.wix.com/docs/llms-full.txt ## Resource: Tutorial: Payment Provider Service Plugin ## Article: Payment Provider Custom Extension ## Article Link: https://dev.wix.com/docs/develop-websites/articles/code-tutorials/wix-pay/tutorial-payment-provider-service-plugin.md ## Article Content: # Velo Tutorial: Payment Provider Service Plugin > **Before getting started** > > In this tutorial, you'll learn how to write the code to integrate a new payment provider with your site. If you're not a developer, check out these helpful links: > * [Available Payment Providers in Your Country](https://support.wix.com/en/article/available-payment-providers-in-your-country) > * [Requesting Additional Payment Providers & Methods](https://support.wix.com/en/article/requesting-additional-payment-providers-methods) > * [Hire a Developer for Your Project](https://www.wix.com/velo/hire-a-developer) Wix service plugins (formerly SPIs and custom extensions) allow you to expand what your site can do by integrating with 3rd-party services not currently supported by Wix. They also allow you to implement custom logic to change how your site displays and behaves using Velo. Learn more about [service plugins](https://support.wix.com/en/article/velo-custom-business-app-extensions-using-spis-beta). You can manage service plugins from your site's dashboard, and they behave just like the ones Wix already supports. With the payment provider service plugin, you can integrate your site with payment providers that aren't currently supported by Wix. You can also customize the transaction and refund flows to match your site's specific needs. This guide explains how to set up a payment provider service plugin on your site using Velo. The process has 3 steps: 1. Create a new payment provider plugin on your site. 2. Implement your plugin with custom code. 3. Deploy the plugin. > > **Note:** > You can only use this service plugin to integrate payment providers with your own sites. You can't publish the plugin you create on the [Wix App Market](https://www.wix.com/app-market/). If you are a payment service provider who wants to make your services available on Wix sites, use the REST [Payment Service Provider service plugin](https://dev.wix.com/docs/rest/business-management/payments/service-plugins/payment-service-provider-service-plugin/introduction.md). ## Step 1: Create a new payment provider plugin The first step in setting up your new plugin is to add it to your site. This process creates a new folder in the **Service Plugins** section of the Code sidebar that contains the files for your code. 1. With [Wix developer mode](https://dev.wix.com/docs/develop-websites/articles/get-started/quick-start.md) enabled, click **Public & Backend** ![](https://d2x3xhvgiqkx42.cloudfront.net/12345678-1234-1234-1234-1234567890ab/11fda387-da5a-430a-ada3-46def885b67f/2022/03/02/1c4d0337-43f1-4f62-a125-758ae18c0228/618cf4f4-ac25-4ab2-8998-d3f511c91d30.png) on the Code sidebar. 2. Scroll down to **Service Plugins**. ![](https://wixmp-833713b177cebf373f611808.wixmp.com/images/3b28ebcfbf8f2b6165f835d528f2f55c.png) 3. Hover over **Service Plugins** and click ![](https://d2x3xhvgiqkx42.cloudfront.net/12345678-1234-1234-1234-1234567890ab/11fda387-da5a-430a-ada3-46def885b67f/2022/03/02/65d645bd-dee9-40dc-9f91-c44b06d72492/289e91de-47c5-429c-b61d-67bd8d4fd1ec.png) . 4. Select **Payment**. ![](https://wixmp-833713b177cebf373f611808.wixmp.com/images/08e20148dd45b2dd641501f937cedd71.png) 5. Enter a name for your plugin and click **Add & Edit Code**. The name can't contain spaces or special characters. ## Step 2: Implement the plugin The procedure in the previous section creates a folder in the **Service Plugins** section of the Code sidebar called **payment-provider**. Inside this is another folder with the name of the plugin you set up. This folder contains 2 files, **-config.js** and **.js**. ![](https://wixmp-833713b177cebf373f611808.wixmp.com/images/861431e65a6fd40b97725e76e5cf47b8.png) To implement your plugin, you need to: * Add custom code in these files to integrate with a payment provider. * Expose HTTP endpoints on your site that the payment provider can use to send your site updates about transactions and refunds. Here are some guidelines for writing your code: ### \-config.js The code in this file defines a function named `getConfig()` that returns an object containing the values used to display information about your plugin in 3 different locations on your site: 1. The **Connect ** page where you connect a payment provider to your site. 3. The **Accept Payments** page where you see the payment methods you've connected to your site. 5. The **Checkout** page where your site visitors finalize their shipping and payment details and place orders. The object returned by `getConfig()` includes the following properties: * **`title`**: (required) The name of the payment service provider as a string. This name is displayed when selecting payment providers to connect to on your site's dashboard. * **`paymentMethods`**: (required) An array of `paymentMethod` objects defining the different payment methods supported by this provider. Each payment method object has a key whose value is the name of payment method. For now, only `'hostedPage'` is supported. The value of this key is an object that can include the following properties: * **`title`**: (required) The payment method title as a string. This title is used to display the payment method on your site's dashboard. * **`logos`**: An object containing URLs to the payment method's logo as strings. These logos are displayed on the site's dashboard and the checkout cart. You can provide different logos for white and colored backgrounds. See the example return object below for details. * **`billingAddressMandatoryFields`**: An array of strings representing the billing address fields that buyers must include in order to use this payment method. Options: `'ZIPCODE'`, `'CITY'`, `'STATE'`, `'ADDRESS'`, `'COUNTRY_CODE'`, `'EMAIL'`, `'PHONE'`, `'FIRST_NAME'`, `'LAST_NAME'`, `'STREET'`, `'HOUSE_NUMBER'`, `'TAX_IDENTIFIER'` * **`credentialsFields`**: (at least 1 credentials object is required) An array of objects representing the credentials required to connect an account for the payment provider. The credentials fields are displayed on the **Connect ** page in your site's dashboard. The following credentials objects are supported: * **`simpleField`**: An object representing a text field. * **`name`**: The key to use for the field in your code as a string. * **`label`**: The label of the field to display on the dashboard as a string. * **`checkboxField`**: An object representing a checkbox field. * **`name`**: The key to use for the field in your code as a string. * **`label`**: The label of the field to display on the dashboard as a string. * **`tooltip`**: Tooltip text to display when the user hovers over the field as a string. * **`dropdownField`**: An object representing a dropdown field. * **`name`**: The key to use for the field in your code as a string. * **`label`**: The label of the field to display on the dashboard as a string. * **`options`**: An array of objects representing the options to display in the dropdown field. Each options object contains the following properties: * **`key`**: The name of the option to use in your code as a string. * **`value`**: The label of the option to display on the dashboard as a string. Example return object: ```javascript { title: 'Banana Payments', paymentMethods: [{ hostedPage: { title: 'Banana Payments', billingAddressMandatoryFields: ['CITY'], logos: { white: { svg: 'https://static.wixstatic.com/shapes/94b5e2_403ceb582027431cb92f38fd18d1843c.svg', png: 'https://freesvg.org/img/15930333081593032446pitr_Bananas_icon.png' }, colored: { svg: 'https://static.wixstatic.com/shapes/94b5e2_403ceb582027431cb92f38fd18d1843c.svg', png: 'https://freesvg.org/img/15930333081593032446pitr_Bananas_icon.png' } } } }], credentialsFields: [{ simpleField: { name: 'clientId', label: 'API id' } }, { simpleField: { name: 'clientSecret', label: 'API secret' } }] } ``` ### \.js The code in this file defines the [`connectAccount()`](https://support.wix.com/en/article/velo-tutorial-payment-provider-custom-extension-beta#connectaccount), [`createTransaction()`](https://support.wix.com/en/article/velo-tutorial-payment-provider-custom-extension-beta#createtransaction) and [`refundTransaction()`](https://support.wix.com/en/article/velo-tutorial-payment-provider-custom-extension-beta#refundtransaction) functions. These functions are called by Wix at different points in the payment processing flow. The following sections describe the usage, parameters, and return values of these functions. #### connectAccount() This function is called when you click the **Connect** button on the **Connect ** page in your site's dashboard. You can use it to create a new account for the payment provider you want to connect to, and return the account information to Wix. The function accepts the following parameters: `options`: An object containing the credentials you entered on the **Connect ** page together with other information about the site that you might need to connect to the payment provider. For more details, see the [service plugin reference](https://www.wix.com/velo/reference/spis/wix-payments/payment-provider/connectaccount). Example options object: ```javascript { credentials: { client_id: 'da5a42c8914a-568-4d-5f25b-44438d6a', client_secret: '38d6a2c5f25b8-568-4d-914a-da5a4444' }, country: 'US', currency: 'USD', wixMerchantId: '3e01ddt8-134e-4dd7-a28f-ht6jf276c876' } ``` > > **Note:** > This function has a second parameter called `context`. This parameter is for internal Wix use only. You don't need to use it in your code. The `createAccount()` function must return an object containing the account information and credentials for the payment provider you're connecting to. Wix uses the return values from this function to set up the payment provider on your site. The account credentials returned by this function are also passed to your plugin's [`createTransaction()`](https://support.wix.com/en/article/velo-tutorial-payment-provider-custom-extension-beta#createtransaction) and [`refundTransaction()`](https://support.wix.com/en/article/velo-tutorial-payment-provider-custom-extension-beta#refundtransaction) functions. This way, you can use them to make requests to the payment provider's API. If the payment provider fails to create an account, return an error object instead of the account details. For more details, see the [service plugin reference](https://www.wix.com/velo/reference/spis/wix-payments/payment-provider/connectaccount). Example return value: ```javascript { credentials: { client_id: 'da5a42c8914a-568-4d-5f25b-44438d6a', client_secret: '38d6a2c5f25b8-568-4d-914a-da5a4444' }, accountId: '1o3k5234-2342kk334', accountName: 'john@doe.com' } ``` #### createTransaction() This function is called when a site visitor clicks the **Place Order** button on your site's **Checkout** page. Use it to send a request to a payment provider to create a new transaction. The function accepts the following parameters: `options`: An object containing information about your site, the site visitor's order, and redirect URLs for payment processing. For more details, see the [service plugin reference](https://www.wix.com/velo/reference/spis/wix-payments/payment-provider/createtransaction). Example options object: ```json { "wixTransactionId": "6b264d6f-f54e-426a-a8ed-b6f103c86d46", "paymentMethod": "385f25b8-79c0-4d44-914a-d6568a2cda5a", "merchantCredentials": { "client_id": "da5a42c8914a-568-4d-5f25b-44438d6a", "client_secret": "38d6a2c5f25b8-568-4d-914a-da5a4444" }, "order": { "_id": "fb591a7c-8471-464a-a64c-181c449b07ed", "description": { "billingAddress": { "city": "New York", "email": "jane@doe.com", "state": "NY", "zipCode": "10014", "lastName": "Jane", "firstName": "Doe", "countryCode": "US", "address": "100 Gansevoort St", "phone": "212-555-0100" }, "items": [ { "_id": "baeb40f5-a48a-4424-cec2-253c9772ad42", "name": "Banana shirt", "quantity": 1, "price": "10000" } ], "totalAmount": "10000", "charges": {}, "buyerInfo": { "buyerId": "9b5d1bed-6a1d-4980-9d2e-82713fb6bf0e", "buyerLanguage": "en" }, "currency": "EUR", "shippingAddress": { "city": "New York", "email": "jane@doe.com", "state": "NY", "zipCode": "10014", "lastName": "Jane", "firstName": "Doe", "countryCode": "US", "address": "100 Gansevoort St", "phone": "212-555-0100" } }, "returnUrls": { "successUrl": "https://cashier-services.wix.com/_api/payment-services-web/redirect/success/b5f106b4-f78e-426a-a8ed-3c76d4696d6f", "errorUrl": "https://cashier-services.wix.com/_api/payment-services-web/redirect/error/b5f106b4-f78e-426a-a8ed-3c76d4696d6f?pmName=EmptyPayment&pmUrl=&failureCode=6000", "cancelUrl": "https://cashier-services.wix.com/_api/payment-services-web/redirect/cancel/b5f106b4-f78e-426a-a8ed-3c76d4696d6f", "pendingUrl": "https://cashier-services.wix.com/_api/payment-services-web/redirect/pending/b5f106b4-f78e-426a-a8ed-3c76d4696d6f" } }, "wixMerchantId": "ed2bfda6-134e-4cc9-a37f-756c6843e01d", "fraudInformation": { "remoteIp": "145.231.63.45" } } ``` > > **Note:** > This function has a second parameter called `context`. This parameter is for internal Wix use only. You don't need to use it in your code. The `createTransaction()` function must return an object with a `pluginTransactionId` property that represents payment provider's ID for the created transaction. Other properties may be included depending on the type of transaction you're creating and the results of the request. For more details, see the [service plugin reference](https://www.wix.com/velo/reference/spis/wix-payments/payment-provider/createtransaction). Example return value: ```json { "pluginTransactionId": "e89b-12d3-a456-42665", "redirectUrl": "https://www.example.com/redirect" } ``` To receive updates from the payment provider about the success or failure or the transaction, [expose an HTTP endpoint](https://support.wix.com/en/article/velo-tutorial-payment-provider-custom-extension-beta#http-endpoints) for this purpose. Provide the URL to the payment provider as part of the request to create the transaction. Use the [submitEvent()](https://dev.wix.com/docs/velo/apis/wix-payment-provider-backend/submit-event.md) function to in the logic for your endpoint to mark the transaction as completed. Once this happens, the order associated with the transaction appears in the [Orders](https://www.wix.com/my-account/site-selector/?buttonText=Manage%20Orders&title=Select%20a%20Site&autoSelectOnSingleSite=true&actionUrl=https://www.wix.com/dashboard/{{metaSiteId}}/store/orders) tab in your site's dashboard. #### refundTransaction() This function is called when you [initiate the refund](https://support.wix.com/en/article/refunding-customers-cancelling-orders) of a transaction from your connected payment provider on the [Orders](https://www.wix.com/my-account/site-selector/?buttonText=Manage%20Orders&title=Select%20a%20Site&autoSelectOnSingleSite=true&actionUrl=https://www.wix.com/dashboard/{{metaSiteId}}/store/orders) tab in your site's dashboard. Use this function to send a request to the payment provider to create a refund for the transaction. The function accepts the following parameters: `options`: An object containing information about the transaction being refunded and the refund amount. For more details, see the [service plugin reference](https://www.wix.com/velo/reference/spis/wix-payments/payment-provider/refundtransaction). Example options object: ```json { "wixTransactionId": "6b264d6f-f54e-426a-a8ed-b6f103c86d46", "pluginTransactionId": "e89b-12d3-a456-42665", "wixRefundId": "4j7lk09d-0ok8-edh5-hj89-1kg9ds8n50lo9", "merchantCredentials": { "client_id": "da5a42c8914a-568-4d-5f25b-444" }, "refundAmount": 10000, "reason" : "REQUESTED_BY_CUSTOMER" } ``` > > **Note:** > This function has a second parameter called `context`. This parameter is for internal Wix use only. You don't need to use it in your code. The `refundTransaction()` function must return an object with a `pluginRefundId` property that represents the ID of the refund created by the payment provider. If the request to the payment provider isn't approved, the return object should include information about why this happened. For more details, see the [service plugin reference](https://www.wix.com/velo/reference/spis/wix-payments/payment-provider/refundtransaction). Example return value for a successful refund: ```json { "pluginRefundId": "e89b-12d3-a456-42665" } ``` Example return value for a failed refund: ```json { "pluginRefundId": "e89b-12d3-a456-42665", "reasonCode": 3025, "errorCode": "INSUFFICIENT_FUNDS_FOR_REFUND", "errorMessage": "Insufficient funds for refund" } ``` To receive updates from the payment provider about the refund, [expose an HTTP endpoint](https://support.wix.com/en/article/velo-tutorial-payment-provider-custom-extension-beta#http-endpoints) for this purpose. Provide the URL to the payment provider as part of the request to create the refund. Use the [submitEvent()](https://dev.wix.com/docs/velo/apis/wix-payment-provider-backend/submit-event.md) function in the logic for your endpoint to mark the refund as completed. Once this happens, the order associated with the refund is marked as refunded on you site's dashboard. ### HTTP Endpoints When you create a transaction or refund with your payment provider, you need to supply a URL for an HTTP endpoint that the provider can use to send your site updates for the statuses of transactions and refunds. To [expose](https://support.wix.com/en/article/velo-exposing-a-site-api-with-http-functions) these endpoints on your site, use the [Wix HTTP Functions API](https://www.wix.com/velo/reference/wix-http-functions). In the code for these endpoints, use the [submitEvent()](https://dev.wix.com/docs/velo/apis/wix-payment-provider-backend/submit-event.md) function to update the statuses of transactions and refunds on your site. Example endpoint code. This code must be saved in a backend file called `http-functions.js`: ```javascript import wixPaymentProviderBackend from 'wix-payment-provider-backend'; // An endpoint for receiving updates about transactions. export async function post_updateTransaction(request) { const transactionRequestBody = await request.body.json() const response = { 'headers': { 'Content-Type': 'application/json' } }; // Validate the request content. if (transactionRequestBody.state === 'Payment_Received') { // Update the transaction status on your site. This code assumes that the Wix // transaction ID and the payment provider's transaction ID are included in // the URL as query parameters. await wixPaymentProviderBackend.submitEvent({ 'event': { 'transaction': { 'wixTransactionId': request.query['wixTransactionId'], 'pluginTransactionId': request.query['pluginTransactionId'] } } }) return ok(response); } else { return badRequest(response); } } // An endpoint for receiving updates about refunds. export async function post_updateRefund(request) { const refundRequestBody = await request.body.json() const response = { 'headers': { 'Content-Type': 'application/json' } }; // Validate the request content. if (refundRequestBody.state === 'approved') { // Update the refund status on your site. This code assumes that Wix // transaction and refund IDs as well as other refund information are // included in the URL as query parameters. await wixPaymentProviderBackend.submitEvent({ 'event': { 'refund': { 'wixTransactionId': request.query['wixTransactionId'], 'wixRefundId': request.query['wixRefundId'], 'pluginRefundId': refundRequestBody.reference_id, 'amount': request.query['amount'] } } }) return ok(response); } else { return badRequest(response); } } ``` ### Add files to the plugin If you don't want to keep all of your code in the main plugin files, you can add files to the plugin's folder and import functions and objects into the main files. 1. Hover over the plugin folder's name and click **More Actions** ![](https://d2x3xhvgiqkx42.cloudfront.net/12345678-1234-1234-1234-1234567890ab/11fda387-da5a-430a-ada3-46def885b67f/2022/03/02/d7a7ee13-5c33-4de8-bba0-d8a883585472/f793ba37-bd42-4377-bd93-b3936e7215c5.png) . 2. Select **New .js file**. 3. To import from these files to the main plugin files, use the following syntax: ``` import { functionName } from './myFileName.js'; ``` ### Test the plugin You can test your plugin before publishing your site using [functional testing](https://support.wix.com/en/article/velo-functional-testing-in-the-backend) like you would with any backend Velo code. Make sure your `createAccount()`, `createTransaction()`, and `refundTransaction()` functions' return values are properly formatted. To test your plugin after deploying, add console logs to your code. The results appear in [Wix Logs](https://support.wix.com/en/article/velo-about-site-monitoring). ## Step 3: Deploy the plugin Once your code files are ready, you need to deploy your plugin and enable it on your site's dashboard. 1. Publish your site. 2. Go to the [Accept Payments](https://www.wix.com/my-account/site-selector/?buttonText=Set%20Up%20Payments&title=Select%20a%20Site&autoSelectOnSingleSite=true&actionUrl=https://www.wix.com/dashboard/%7b%7bmetaSiteId%7d%7d/payments/) settings on your site's dashboard. 3. Click **See More Payment Options**. 4. Find the payment provider from your service plugin in the list and click **Connect**. 6. Enter the account credential information for the payment provider and click **Connect**. 8. Once your service plugin is deployed, the new payment provider appears on your site's **Checkout** page. ## Example Integration The payment provider service plugin allows you to implement a variety of different transaction flows. We created a [sample site](https://editor.wix.com/html/editor/web/renderer/new?siteId=3f28d8a0-f627-43b0-b053-b48a56f9f433&metaSiteId=01fab04f-60a2-46fa-b821-6304b12dc6f1) that demonstrates a basic transaction and refund integration with [Tazapay](https://tazapay.com/). > > **Note:** > Clicking the link to the sample site opens a copy of the site. Publishing the copy adds it to your Wix account. In order to get your copy of the sample site working, you need to create and save a Tazapay API key, and make some small changes to the site's code. ### Create and save a Tazapay API key Do the following to generate a Tazapay API key and use it to connect Tazapay as a payment provider on your copy of the sample site: 1. Publish a copy of the template site to save it to your Wix account. 2. Sign up for a free Tazapay sandbox account and log in. 3. On your Tazapay dashboard, click **API keys**. An API key and API secret are generated. Copy these values. 5. Open the [Tazapay API Reference](https://docs.tazapay.com/reference/create-checkout). 6. Under **Authentication**, enter your API key for **username** and your API secret for **password**. Your API authorization token, starting with `Basic`, is displayed in the sample request panel. Copy the token. 8. Open the [Accept Payments](https://www.wix.com/my-account/site-selector/?buttonText=Set%20Up%20Payments&title=Select%20a%20Site&autoSelectOnSingleSite=true&actionUrl=https://www.wix.com/dashboard/%7b%7bmetaSiteId%7d%7d/payments/) page for your copy of the sample site. 9. Click **See More Payment Options**. 10. Find the Tazapay payment provider and click **Connect**. 11. Enter your API authorization token in the **API Auth Token** field. 12. Click **Connect**. ### Code setup Make the following 2 changes to your sample site's code to get it working: 1. On the Code sidebar, click **Public & Backend** ![](https://d2x3xhvgiqkx42.cloudfront.net/12345678-1234-1234-1234-1234567890ab/11fda387-da5a-430a-ada3-46def885b67f/2022/03/02/) . 2. Under **Service Plugins**, select **payment-provider** > **Tazapay** > **Tazapay.js**. 3. In the `createCheckoutSession` function, change the value of `callbackUrl` to reflect the details of your site. Change `` to your Wix account name and `` to the name of your copy of the sample site. ![](https://user-images.githubusercontent.com/89579857/207433821-3db59881-bdaa-46f1-ad40-0cfed500ae22.png) 4. Make the same changes to the `callbackUrl` value in the `createRefund` function. 5. Publish your site. --- > Portal Navigation: > > - Append `.md` to any URL under `https://dev.wix.com/docs/` to get its markdown version. > - Pages are either content pages (article or reference text) or menu pages (a list of links to child pages). > - To get a menu page, truncate any URL to a parent path and append `.md` (e.g. `https://dev.wix.com/docs/sdk.md`, `https://dev.wix.com/docs/sdk/core-modules.md`). > - Top-level index of all portals: https://dev.wix.com/docs/llms.txt > - Full concatenated docs: https://dev.wix.com/docs/llms-full.txt ## Resource: Tutorial: Form Submission Service Plugin ## Article: Tutorial: Form Submission Custom Extension ## Article Link: https://dev.wix.com/docs/develop-websites/articles/code-tutorials/wix-forms/tutorial-form-submission-service-plugin.md ## Article Content: # Tutorial: Form Submission Service Plugin Wix Service Plugins (formerly SPIs and custom extensions) allow you to implement custom logic to change how your site behaves and displays using Velo SPIs. For example, when you set up a form from the Wix Form app, there are a small number of validations to choose from. The form submission service plugin allows you to implement your own submission validations and options using code. You can also connect your site to form validation providers not currently supported by Wix. Any violations to these validations can be displayed on the form. You can manage service plugins from your site's dashboard, and they behave just like the ones Wix already supports. Learn more about using [service plugins](https://support.wix.com/en/article/velo-custom-app-extensions-using-spis). With the Form Submission service plugin you can define the submission validations for a form that fit your site's needs. Possible validations include: - Field validations: Check if the name contains only alphabetic characters. - Prevent duplicate submissions: Check for duplicate submissions based on certain criteria and prevent site visitors from submitting the same form multiple times. - Verify fields: Call a local post API call to check if the entered postal code is local. ## About this tutorial This tutorial explains how to set up and implement a form submission plugin on your site using Velo. We demonstrate how to validate your form submission by checking whether a site visitor entered a name correctly in alphabetical characters only. The process has 3 steps: 1. Create a new form submission validation plugin on our site. 1. Implement our plugin with custom code. 1. Deploy the plugin. ## Step 1: Create a new form submission plugin The first step in setting up your new plugin is to add it to your site. This process creates a new folder in the **Service Plugins** section of the Velo sidebar, which contains the files for your code. 1. [Add the Wix Forms app](https://www.wix.com/app-market/wix-forms) to your site. 1. Enable coding. If necessary, click ![Code icon](https://github.com/wix-incubator/wix-code-docs/assets/50321691/2c41d3df-930f-4e0f-966f-038742adceed) and then **Start Coding**. 1. Go to the **Service Plugins** section by clicking **Public & Backend**. 1. Hover over **Service Plugins** and click ![](https://d2x3xhvgiqkx42.cloudfront.net/12345678-1234-1234-1234-1234567890ab/11fda387-da5a-430a-ada3-46def885b67f/2022/03/02/65d645bd-dee9-40dc-9f91-c44b06d72492/289e91de-47c5-429c-b61d-67bd8d4fd1ec.png). Then click **Form Submission**. 1. Follow the prompts to add the plugin and accept any terms and conditions that display. 1. Enter a name for your integration and click **Add & Edit Code**. The name can't contain spaces or special characters. 1. **Publish** your site. ![Extension](https://wixmp-833713b177cebf373f611808.wixmp.com/images/wix-forms-tutorial-submission-custom-extension-md_velo-articles_wix-forms-with-velo_images_service-plugin.png) ## Step 2: Implement the plugin The procedure in the previous step creates a folder in the service plugins section of the Velo sidebar. The name of the folder is based on the plugin you chose. Inside this is another folder with the name of the plugin you set up. This folder contains 2 files, **your-plugin-config.js** and **your-plugin.js**. In our case the files are named **submission-config.js** and **submission.js**. We implement the custom code for our plugin in these files. ## submission-config.js This file is where we write the code for setting up the plugin's configuration. The code in this file defines a function named `getConfig()` that returns an object containing the values used to display the form submission validations on your site. There are several apps that use forms. To validate form submission for a specific Wix app, we need to configure the file by defining the relevant `namespace` field in the plugin. In our example, we want to validate a form in the Wix Forms app, so we set the `namespace` value as `wix.form_app.form` in the service plugin's configuration file and enable the validation. ```js import * as formsSubmissionsExtensionProvider from 'interfaces-forms-v4-submission-extension'; export function getConfig() { return { namespaceConfigs: [ { namespace: "wix.form_app.form", submissionValidationEnabled: true } ] }; }; ``` ## submission.js This file is where we write the code for validating the first name form field. A site visitor tries to enter a first name with a non-alphabetical character. If there are any violations to the submission validation, a warning message can appear on the form as a text box. The code in this file defines a function named `validateSubmission()`. This function is called by Wix Forms to retrieve any violations to the validations provided by our plugin. The function accepts the following parameter: `options`: An object containing data about the source of the request, and the form submission information to validate. This information must include form ID. For more details, see the [Service Plugin Reference](https://www.wix.com/velo/reference/spis/wix-ecom/ecom-validations). The `validateSubmission()` function returns an array of validation objects (any validation violations in a site visitor's form). These validation violations can be displayed in the site visitor's form as text boxes with warnings. If there are no validation violations, the response is an object containing an empty list. ## The code: ```js import * as formsSubmissionsExtensionProvider from 'interfaces-forms-v4-submission-extension'; const options = { "submission": { "formId": "e9e8c6ff-a771-401b-b46e-82f7c742ef3d"; }; }; export const validateSubmission = async (options, context) => { const firstNameValidation = options.submission.submissions["first_name_abae"]; const alphabeticalPattern = new RegExp("^[a-zA-Z]+$"); if (!firstNameValidation.match(alphabeticalPattern)) { return { errors: [{ errorPath: "first_name", customErrorMessage: "First name can only contain alphabetical characters!" }] }; } else { return {} }; }; ``` **Line 1**: First we import the Wix Forms submission provider module. **Line 3-7**: We need to define the form ID so that the code would know which form to validate. To get the form ID, call [`querySubmissionsByNamespace()`](https://www.wix.com/velo/reference/wix-forms-v2/submissions/querysubmissionsbynamespace). We don't need to define the form field values separately in the `submissions` object, as the values will be taken directly from the published site form. **Line 9**: Then we export the `validateSubmission()` function where we set the custom logic for our validations. **Lines 10**: We save the first name field value into the `firstNameValidation` variable. **Line 11**: Define the [Regex](https://developer.mozilla.org/en-US/docs/Web/JavaScript/Guide/Regular_expressions) pattern so that the field only accepts alphabetical characters. **Line 12**: Here we check if a first name field value matches the Regex pattern. **Lines 13-20**: Set the violation description that can be displayed when there is a violation to the set pattern. If the form field value doesn't match the pattern, you get an error, and also form submission is aborted. ## Optional: Add files to the plugin If you don't want to keep all of your code in the main files, you can add files to the plugin's folder and import functions and objects into the main files. To do this, create a new file in the plugin's folder. To import from these files to the main files, use the following syntax: ```js import { functionName } from './myFileName.js'; ``` ## Optional: Test the plugin You can test your plugin before publishing your site using [functional testing](https://support.wix.com/en/article/velo-functional-testing-in-the-backend) like you would with any backend Velo code. Make sure your `validateSubmission()` function's return values are properly formatted. You can test your plugin after deploying. To do this, add console logs to your code. The results appear in the [Site Events log](https://support.wix.com/en/article/velo-about-site-monitoring). ## Step 3: Deploy the plugin Once your code files are ready, publish your site. Navigate to your site, and fill in a form. Any violations to the validations you've customized are displayed on the form. 1. Once your code files are ready, click **Save**, and then **Publish** your site. 1. After your service plugins are published, open your site. 1. Your service plugin is then deployed, and any validation violations should appear on your form. If a site visitor tries to enter a first name with non-alphabetical characters, there will be an error message that could be shown on the site. The validation violation response looks like this: ```js { "errors": [ { "errorPath": "first_name_abae", "customErrorMessage": "First name can only contain alphabetical characters!" } ] } ``` ## Remove the plugin You can remove the plugin from your site. Do the following: 1. In the **Public & Backend** section of the Velo sidebar, under **Service Plugins**, hover over the plugin's folder and click **Show More** ![](https://d2x3xhvgiqkx42.cloudfront.net/12345678-1234-1234-1234-1234567890ab/76096845-8b12-44f1-91f6-3dc2e838fdd9/2022/09/04/c4ff84cb-4d96-4e1a-966a-9c6b66dca0b2/062297c2-c368-4aee-b705-f0a55abc5bf6.png) . 1. Click **Delete**. 1. Delete the plugin in the prompt. --- > Portal Navigation: > > - Append `.md` to any URL under `https://dev.wix.com/docs/` to get its markdown version. > - Pages are either content pages (article or reference text) or menu pages (a list of links to child pages). > - To get a menu page, truncate any URL to a parent path and append `.md` (e.g. `https://dev.wix.com/docs/sdk.md`, `https://dev.wix.com/docs/sdk/core-modules.md`). > - Top-level index of all portals: https://dev.wix.com/docs/llms.txt > - Full concatenated docs: https://dev.wix.com/docs/llms-full.txt ## Resource: About Formatting and Layout When Coding ## Article: About Formatting and Layout When Coding ## Article Link: https://dev.wix.com/docs/develop-websites/articles/wix-editor-elements/formatting-layout/about-formatting-and-layout-when-coding.md ## Article Content: # About Formatting and Layout When Coding When you're developing your site, it's important to format the text and layout the page the way you want it. You can use code to dynamically [format your text elements](https://dev.wix.com/docs/develop-websites/articles/wix-editor-elements/formatting-layout/about-formatting-text-elements.md) and to correctly [format dates](https://dev.wix.com/docs/develop-websites/articles/wix-editor-elements/formatting-layout/formatting-dates.md) in text. It's also essential to understand how [page elements interact with each other as they change size](https://dev.wix.com/docs/develop-websites/articles/wix-editor-elements/formatting-layout/how-page-layout-is-affected-when-elements-change-size.md). This knowledge will help you create a responsive design and maintain control over how your site appears. --- > Portal Navigation: > > - Append `.md` to any URL under `https://dev.wix.com/docs/` to get its markdown version. > - Pages are either content pages (article or reference text) or menu pages (a list of links to child pages). > - To get a menu page, truncate any URL to a parent path and append `.md` (e.g. `https://dev.wix.com/docs/sdk.md`, `https://dev.wix.com/docs/sdk/core-modules.md`). > - Top-level index of all portals: https://dev.wix.com/docs/llms.txt > - Full concatenated docs: https://dev.wix.com/docs/llms-full.txt ## Resource: About Formatting Text Elements ## Article: About Formatting Text Elements ## Article Link: https://dev.wix.com/docs/develop-websites/articles/wix-editor-elements/formatting-layout/about-formatting-text-elements.md ## Article Content: # About Formatting Text Elements Formatting [text elements](https://dev.wix.com/docs/velo/api-reference/$w/text/introduction.md) is important for making your site's text content visually appealing and consistent. You can edit text elements directly in the editor using the **Edit Text** button. However, sometimes you might want to change their formatting or content dynamically through code. This method is especially useful for adjusting text based on user interactions or when working with data-driven content. For example, you might want to: - Change the formatting or content based on user interaction or other events. - Apply [data from a dataset to page elements](https://dev.wix.com/docs/develop-websites/articles/databases/wix-data/displaying-data/calculating-and-displaying-collection-data.md#text-elements) dynamically. When you edit the content of a text element using the [`text`](#the-text-property) or [`html`](#the-html-property) property, it will affect its formatting. > **Note:** You can also format text elements using the [text CSS classes](https://dev.wix.com/docs/velo/api-reference/$w/text/css-classes.md). ## Supported IDEs - The editor (Wix Studio and Wix Editor) - The Wix IDE (Wix Studio) - Git Integration (Wix Studio and Wix Editor) ## The `text` property When you change a text element's content using it's [`text`](https://dev.wix.com/docs/velo/api-reference/$w/text/text.md) property, it keeps the existing formatting. The formatting in the text element will be uniform across all its content, meaning different parts of the text cannot have different formats. If you applied more than one format in the editor, the first style will be used for all the content set with the text property. ## The `html` property When you change a text element's content using it's [`html`](https://dev.wix.com/docs/velo/api-reference/$w/text/html.md) property, its formatting is set by the markup you apply. You can format the content using supported [HTML formatting](https://dev.wix.com/docs/velo/api-reference/$w/text/introduction.md#api-reference_$w_text_formatting-text). ### Themes When using [heading or paragraph tags](https://dev.wix.com/docs/velo/api-reference/$w/text/introduction.md#api-reference_$w_text_text-theme-translation), the text inside the tags is formatted according to the [site's themes](https://support.wix.com/en/article/studio-editor-about-site-styles). > **Note:** Themes are defined site-wide, so when you update the formatting of a theme, all relevant text formatting will update as well. --- > Portal Navigation: > > - Append `.md` to any URL under `https://dev.wix.com/docs/` to get its markdown version. > - Pages are either content pages (article or reference text) or menu pages (a list of links to child pages). > - To get a menu page, truncate any URL to a parent path and append `.md` (e.g. `https://dev.wix.com/docs/sdk.md`, `https://dev.wix.com/docs/sdk/core-modules.md`). > - Top-level index of all portals: https://dev.wix.com/docs/llms.txt > - Full concatenated docs: https://dev.wix.com/docs/llms-full.txt ## Resource: Formatting Dates ## Article: Formatting Dates ## Article Link: https://dev.wix.com/docs/develop-websites/articles/wix-editor-elements/formatting-layout/formatting-dates.md ## Article Content: # Format Dates in Text Elements with Code Formatting dates within [text elements](https://dev.wix.com/docs/velo/api-reference/$w/text/introduction.md) using code allows you to display dates dynamically and tailor them to different locales. Use JavaScript's `Date` class' [`toLocaleDateString`](https://developer.mozilla.org/en-US/docs/Web/JavaScript/Reference/Global_Objects/Date/toLocaleDateString) method to format dates on your site. ## Format dates on your site 1. To render a date in the site visitor's locale settings on their computer, call `toLocaleDateString()` on your date object without specifying any parameters. For example: ```js $w("currentDate").text = new Date().toLocaleDateString(); // Examples: // en-US - 1/30/2025 // en-UK - 30/01/2025 ``` 1. Add [parameters](https://developer.mozilla.org/en-US/docs/Web/JavaScript/Reference/Global_Objects/Date/toLocaleDateString#parameters) to customize the date's locale. For example: ```js const options = { day: "numeric", month: "short", year: "numeric", }; $w("currentDate").text = new Date().toLocaleDateString("en-US", options); // Jan 30, 2025 ``` ## Format dates from a dataset on your site If you're displaying dates retrieved from a dataset, you can format all dates retrieved from your dataset in the same way using the [dataset](https://dev.wix.com/docs/velo/api-reference/$w/dataset/introduction.md) element's [`onReady()`](https://dev.wix.com/docs/velo/api-reference/$w/dataset/on-ready.md) and [`getCurrentItem()`](https://dev.wix.com/docs/velo/api-reference/$w/dataset/get-current-item.md) with `toLocaleDateString()`. For example: ```js $w("#myDataset").onReady(() => { const date = $w("#myDataset").getCurrentItem().dateField; // The dateText is linked to the dataset and is initially hidden. $w("#dateText").text = new Date(date).toLocaleDateString(); $w("#dateText").show(); }); ``` > **Note:** You can also [format dates from a dataset](https://support.wix.com/en/article/cms-formatting-live-site-date-and-time-content-from-your-collection) in the editor without code. ## See also - [About formatting text elements](https://dev.wix.com/docs/develop-websites/articles/wix-editor-elements/formatting-layout/about-formatting-text-elements.md) - [Text element](https://dev.wix.com/docs/velo/api-reference/$w/text/introduction.md) --- > Portal Navigation: > > - Append `.md` to any URL under `https://dev.wix.com/docs/` to get its markdown version. > - Pages are either content pages (article or reference text) or menu pages (a list of links to child pages). > - To get a menu page, truncate any URL to a parent path and append `.md` (e.g. `https://dev.wix.com/docs/sdk.md`, `https://dev.wix.com/docs/sdk/core-modules.md`). > - Top-level index of all portals: https://dev.wix.com/docs/llms.txt > - Full concatenated docs: https://dev.wix.com/docs/llms-full.txt ## Resource: How Page Layout is Affected When Elements Change Size ## Article: How Page Layout Is Affected When Elements Change Size ## Article Link: https://dev.wix.com/docs/develop-websites/articles/wix-editor-elements/formatting-layout/how-page-layout-is-affected-when-elements-change-size.md ## Article Content: # Effect of Resizing Elements on Page Layout
Important: This article is only relevant for the Wix Editor. The way elements interact with each other in Wix Studio depends on the properties and structure you implement when building your site. Learn more about Wix Studio page structure.
When you add code to your site, the height of your page elements can change due to expanding, collapsing, or dynamically resizing elements. These changes can affect your page layout and the overall height of the page. This article explains the rules that determine when and how changes in the height of page elements affect your layout, helping you control how your page looks in different situations. Note that these rules only apply to elements that are above/below one another on the page.
Tip: Use a container box to group elements that you want to react together. Set the container box to transparent if you don't want it to be visible on the page. Learn more about container boxes.
## Why elements shift on a page Elements on page can shift due to other elements: - [Collapsing or expanding](#collapsing-and-expanding-elements). - [Growing](#growing-elements) to accommodate more content. Elements on a page don't shift due to animations, or other elements being hidden or shown. In this context, a page footer acts like an element if an element above it collapses, expands, or grows.
Tips:
  • To remove an unwanted gap between your footer and the last element on the page, double-click the footer handle.
  • If you can't see elements at the bottom of the page and they aren't hidden, double-click the footer handle to increase the page size to include all the elements.
## Collapsing and expanding elements When an element collapses, the elements below it can either move up to take its position or remain where they are. This behavior depends on the following factors: - **The size of the gap between elements.**\ If the gap is 70 pixels or less, the gap disappears, causing the element below the collapsed element to shift up. If the gap is greater than 70 pixels, the elements below stay in place. Similarly, when an element expands, the elements below it move down if the gap is 70 pixels or less; otherwise, they stay where they are.
Calculating the gap between elements The gap is the distance from the bottom of the higher element to the top of the lower element. In order to calculate the gap, you must know the exact size and position of each element. You can see this information in the Wix Editor Toolbar.

To calculate the gap:
  1. Find the bottom edge of the higher element by adding its Y value to its height. In the example below, the blue element is positioned at 150 pixels and has a height of 50 pixels, so its bottom edge would be at 200 pixels (150 + 50). 
  2. Calculate the gap by subtracting the bottom edge of the higher element from the Y value of the lower element. In the example below, the purple element is at 250 pixels, so the gap is 50 pixels (250 - 200).

We use the same process to find that, in the example below, the gap between the purple and green elements is 100 pixels.
- **Whether there is an [anchor](https://support.wix.com/en/article/wix-editor-about-anchors-9563) directly above the collapsed elements.**\ If an element directly below an anchor collapses, the elements below don't move up to take its place. ### Knock-on effect When an element collapses and the element below it has a gap of less than 70 pixels, it moves up. Then, if the gap between this element and the one below is greater than 70 pixels, the one below stays in place. Otherwise, it moves up to maintain its gap from the element above. Similarly, when an element expands and the element below it moves down, if the gap between this element and the one below is greater than 70 pixels, the one below stays in place. Otherwise, it moves down to maintain its gap from the element above.
Example: A 50px gap and a 100px gap In the image above, the gap between the blue and purple elements is 50 pixels. Since this gap is less than 70 pixels, when the blue element collapses, the purple element moves up. However, the gap between the purple and green elements is 100 pixels. Since this gap is greater than 70 pixels, when the blue element collapses, the purple element moves up, but the green element does not move because of the larger gap.
Example: A 50px gap and another 50px gap In this example, both gaps are 50 pixels. Consequently, when the blue element collapses, both the purple and green elements move up into the space previously occupied by the blue and purple elements, respectively.
## Growing elements The height of an element can increase when its content increases. For example, elements connected to a dataset may need to expand to display additional information. When an element grows, the elements below may move down to accommodate the extra space: - **Gaps that are 70 pixels or less are maintained.**\ Elements 70 pixels or less below the growing element maintain the size of the gap. For example, if the gap started at 50 pixels, it stays at 50 pixels, regardless of how much the higher element grows. - **Gaps that are more than 70 pixels shrink until they reach 10 pixels.**\ If the gap is initially greater than 70 pixels, the elements below the growing element do not move, unless the gap would shrink to less than 10 pixels. In that case, the element moves down to maintain a 10 pixel gap. ### Knock-on effect When an element grows and the element below it moves down as a result, and the gap between this element and the one below is greater than 70 pixels, it doesn't move unless that gap falls to less than 10 pixels, in which case it maintains a 10 pixel gap. If the gap is 70 pixels or less, the gap is maintained. ## Vertical overlap The rules in this article do not apply to elements positioned next to each other. However, if the lower element overlaps vertically by more than half, meaning its top edge is higher than the vertical middle of the higher element, it does not affect the elements below it when it collapses. For example:
On the left side, the purple element does not overlap vertically with the blue element. Therefore, because the gap between the purple and green elements is less than 70 pixels, when the purple element collapses, the green element moves up. However, on the right side, the purple element overlaps vertically with the blue element. Therefore, regardless of the size of the gap between the purple and green elements, when the purple element collapses, the green element is unaffected. ## Container boxes A [container box](https://dev.wix.com/docs/velo/api-reference/$w/box/introduction.md) is an element that contains other elements. Elements attached to the same container box affect each other, as do different container boxes. Elements attached to different container boxes do not affect each other. ## Grouped elements When elements are [grouped together](https://support.wix.com/en/article/wix-editor-grouping-and-ungrouping-elements), they behave as a single element. This means that if an element above the group collapses, expands, or grows, all elements in the group move together. Similarly, the rules apply if the group itself collapses, expands, or grows. The top of the group is equal to the top of the highest element in the group, while the bottom, right, and left of the group are calculated from the lowest, right-most, and left-most elements, respectively. These values are used to determine gap sizes and vertical overlap. ## See also - [Wix Editor: Working with elements](https://support.wix.com/en/article/wix-editor-working-with-elements) - [Using your Editor toolbar](https://support.wix.com/en/article/using-your-editor-toolbar) - [Container box](https://dev.wix.com/docs/velo/api-reference/$w/box/introduction.md) --- > Portal Navigation: > > - Append `.md` to any URL under `https://dev.wix.com/docs/` to get its markdown version. > - Pages are either content pages (article or reference text) or menu pages (a list of links to child pages). > - To get a menu page, truncate any URL to a parent path and append `.md` (e.g. `https://dev.wix.com/docs/sdk.md`, `https://dev.wix.com/docs/sdk/core-modules.md`). > - Top-level index of all portals: https://dev.wix.com/docs/llms.txt > - Full concatenated docs: https://dev.wix.com/docs/llms-full.txt ## Resource: About Repeater Item Templates ## Article: About Repeater Item Templates ## Article Link: https://dev.wix.com/docs/develop-websites/articles/wix-editor-elements/repeaters/about-repeater-item-templates.md ## Article Content: # Velo Repeaters: About Repeater Item Templates A repeater has an item template that contains the elements and initial data that are used when new items are created. The template's initial state is the state of the first repeated item that appears in the Editor. When new repeated items are created, the values of the repeated elements are set to the values from the item template by default. You can then override those default values by connecting the repeated items to a dataset or by using the `onItemReady()` event handler that runs when new items are created. Using code, you can set the properties of, get the properties of, or call functions on the elements of the item template by selecting the elements from the [global scope](https://dev.wix.com/docs/develop-websites/articles/wix-editor-elements/repeaters/understanding-the-scope-of-selector-functions.md) with the `$w()` function. ### Example To demonstrate how the item template affects your items and how you can change the item template with code, we will use the following simplified example.
![](https://d2x3xhvgiqkx42.cloudfront.net/12345678-1234-1234-1234-1234567890ab/dfff8cbb-ddcb-4376-8cae-3fedb2dd4458/2017/11/29/dc996ffc-debf-4afc-a4e5-409206ad2e00.png)
The example has the following page elements: - Two buttons: - The **Add next item** button adds an item to the repeater from a static array of data. - The **Change content globally** button changes the repeater's item template by setting a value in one of its element's properties from a [global scope](https://dev.wix.com/docs/develop-websites/articles/wix-editor-elements/repeaters/understanding-the-scope-of-selector-functions.md) selector. - A repeater where each repeated item in the repeater contains two text elements: - The text element on the left shows the item's ID. - The text element on the right shows the item's content. The example has the code shown below that: - Defines the static data that will be used in the repeater. - Defines an `onReady()` event handler that: - Sets the initial data of the repeater to be an empty array. - Adds the event handlers that make the buttons work. - Adds a repeater `onItemReady()` event handler, which runs when new items are created. It sets the `text` values of the text elements to values from the new item's corresponding data. If there is no `content` value, the new item will have the default value given to it by the repeater's item template. ```javascript const exampleData = [ { _id: "1", content: "First item" }, { _id: "2" }, { _id: "3", content: "Third item" }, { _id: "4" }, ]; let added = 0; $w.onReady(function () { $w("#myRepeater").data = []; $w("#addNext").onClick((event) => { $w("#myRepeater").data = exampleData.slice(0, ++added); }); $w("#changeGlobally").onClick((event) => { $w("#repeatedText").text = "New template text"; }); $w("#myRepeater").onItemReady(($item, itemData, index) => { $item("#repeatedId").text = itemData._id; if (itemData.content) { $item("#repeatedText").text = itemData.content; } }); }); ``` ### Scenario We will now run through a simple scenario to demonstrate how the item template is used. --- When the page first loads, the `onReady()` function runs, setting all the event handlers mentioned above and clearing out the repeater's data. That means, when the page loads, you won't see the repeater at all. Remember, the initial values for the item template are defined in the Editor. That means the text value of the `repeatedText` element in the item template is now `Original template text`. --- If we then click the **Add next item button**, the first element from the data array (`{"_id": "1", "content": "First item"},`) is added to the repeater. Since the first element contains values for the `_id` and content properties, the `onItemReady()` event handler will assign these values to the repeated elements of the new item, overwriting the default values from the item template. The repeater now looks like this:
![](https://d2x3xhvgiqkx42.cloudfront.net/12345678-1234-1234-1234-1234567890ab/dfff8cbb-ddcb-4376-8cae-3fedb2dd4458/2017/11/28/6318e227-9858-4f98-8fb0-99680c5e7f56.png)
And the `text` value of the `repeatedText` element in the item template is `Original template text`. --- If we then click the **Add next item** button again, the second element from the data array (`{"_id": "2"}`) is added to the repeater. Since the second element does not contain the `content` property, the `onItemReady()` event handler does not assign a value to the `text` property of the new item's `repeatedText` element. So the default `text` value from the item template is not overridden. The repeater now looks like this:
![](https://d2x3xhvgiqkx42.cloudfront.net/12345678-1234-1234-1234-1234567890ab/dfff8cbb-ddcb-4376-8cae-3fedb2dd4458/2017/11/28/58081870-31a8-4561-a42f-202a645e1d98.png)
And the `text` value of the `repeatedText` element in the item template is still `Original template text`. --- If we then click the **Change content globally** button, which selects the `repeatedText` element using a [global scope](https://dev.wix.com/docs/develop-websites/articles/wix-editor-elements/repeaters/understanding-the-scope-of-selector-functions.md) selector, the `text` value of the `repeatedText` elements in the current repeated items will change. Because the `repeatedText` element was selected with a [global scope](https://dev.wix.com/docs/develop-websites/articles/wix-editor-elements/repeaters/understanding-the-scope-of-selector-functions.md) selector, changing its `text` value also changes the value in the item template. The repeater now looks like this:
![](https://d2x3xhvgiqkx42.cloudfront.net/12345678-1234-1234-1234-1234567890ab/dfff8cbb-ddcb-4376-8cae-3fedb2dd4458/2017/11/28/1470a6d1-8697-46b0-b791-9188022a0711.png)
And the `text` value of the `repeatedText` element in the item template is now `New template text`. --- If we then click the `Add next item` button, the third element from the data array (`{"_id": "3", "content": "Third item"}`) is added to the repeater. Since the third element contains values for the `_id` and `content` properties, the `onItemReady()` function will assign these values to the repeated elements of the new item, overwriting the default values from the item template. The repeater now looks like this:
![](https://d2x3xhvgiqkx42.cloudfront.net/12345678-1234-1234-1234-1234567890ab/dfff8cbb-ddcb-4376-8cae-3fedb2dd4458/2017/11/28/fac61b81-0666-49f8-9f5d-58d316301f42.png)
And the `text` value of the `repeatedText` element in the item template is still `New template text`. --- Finally, if we click the **Add next item** button again, the fourth element from the data array (`{"_id": "4"}`) is added to the repeater. Since the fourth element does not contain the `content` property, the `onItemReady()` event handler does not assign a value to the `text` property of the new item's `repeatedText` element. So the default `text` value from the item template is not overridden. The repeater now looks like this:
![](https://d2x3xhvgiqkx42.cloudfront.net/12345678-1234-1234-1234-1234567890ab/dfff8cbb-ddcb-4376-8cae-3fedb2dd4458/2017/11/28/e24e315b-2918-4915-89c1-a84e9c838308.png)
And the `text` value of the `repeatedText` element in the item template is still `New template text`.
**Tip:** Adding items to the repeater might [affect your page layout](https://dev.wix.com/docs/develop-websites/articles/wix-editor-elements/formatting-layout/how-page-layout-is-affected-when-elements-change-size.md).
--- > Portal Navigation: > > - Append `.md` to any URL under `https://dev.wix.com/docs/` to get its markdown version. > - Pages are either content pages (article or reference text) or menu pages (a list of links to child pages). > - To get a menu page, truncate any URL to a parent path and append `.md` (e.g. `https://dev.wix.com/docs/sdk.md`, `https://dev.wix.com/docs/sdk/core-modules.md`). > - Top-level index of all portals: https://dev.wix.com/docs/llms.txt > - Full concatenated docs: https://dev.wix.com/docs/llms-full.txt ## Resource: Understanding the Scope of Selector Functions ## Article: Understanding the Scope of Selector Functions ## Article Link: https://dev.wix.com/docs/develop-websites/articles/wix-editor-elements/repeaters/understanding-the-scope-of-selector-functions.md ## Article Content: # Velo Repeaters: Understanding the Scope of Selector Functions
Visit the Velo by Wix website to onboard and continue learning.
A **selector** function is used to select specific page elements so you can work with them in code. A **scope** defines which elements you can select and how they behave when they are selected. Depending on which **selector** you use, you will be able to select elements from the different **scopes** described below and the selected elements will behave accordingly. There are two types of selector functions: * Global Scope Selectors * Repeated Item Scope Selectors ### Global Scope The `$w()` function that is available to your **Page Code** and **masterPage.js** files selects elements in the global scope. A selector with global scope can be used to select any element that is not contained in a repeater. You can also use it to select an element that is contained in a repeater, but it is important to understand what that selection means. * * * When you select an element contained in a repeater from the global scope, and you get the value of one of the element's properties, you receive the value of that element's property from the repeater's [item template](https://dev.wix.com/docs/develop-websites/articles/wix-editor-elements/repeaters/about-repeater-item-templates.md). For example, here `templateText` will be the `text` value of the `myRepeatedText` element from the repeater's item template. $w.onReady( function () { let templateText = $w("#myRepeatedText").text; } ); * * * When you select an element contained in a repeater from the global scope and you set the value of one of the element's properties or call one of the element's functions, the value is set or the function is called on the repeater's [item template](https://dev.wix.com/docs/develop-websites/articles/wix-editor-elements/repeaters/about-repeater-item-templates.md) **and** all repeated instances of that element. For example, here the item template will change so that `"New Text"` will be the `text` value of the `myRepeatedText` element. Also, all existing repeated items will have the `text` value of their `myRepeatedText` element set to `"New Text"`. $w.onReady( function () { $w("#myRepeatedText").text = "New Text"; } ); And here the item template will change so that the `myRepeatedImage` element is hidden. Also, all existing repeated items will have their `myRepeatedImage` element hidden. $w.onReady( function () { $w("#myRepeatedImage").hide(); } ); ### Repeated Item Scope There are two instances where you get a repeated item scope selector: * The `$item` parameter of the [`forEachItem()`](https://www.wix.com/velo/reference/$w.Repeater.html#forEachItem), [`forItems()`](https://www.wix.com/velo/reference/$w.Repeater.html#forItems), and [`onItemReady()`](https://www.wix.com/velo/reference/$w.Repeater.html#onItemReady) event handlers. * When calling the [`$w.at()`](https://www.wix.com/velo/reference/$w.html#at) function and passing it an `event` whose `context` is `"COMPONENT_SCOPE"`. This is usually done in an event handler that handles events on an element inside a repeater. A selector with repeated item scope selects the instance of a repeating element in the current repeating item and its descendants. You cannot change the item template using a selector with repeated item scope. For example, here when the `myRepeatedImage` element is clicked, the `text` value of the `myRepeatedText` element from the repeated item where the image was clicked will be changed to `"Selected"`. All the other `myRepeatedText` elements in the other items of the repeater will not be affected. $w.onReady( function () { $w("#myRepeatedImage").onClick( (event) => { let $item = $w.at(event.context); $item("#myRepeatedText").text = "Selected"; } ); } ); ### Example To demonstrate the different selector scopes and what selecting from those scopes means, we will use the following example.
![](https://d2x3xhvgiqkx42.cloudfront.net/12345678-1234-1234-1234-1234567890ab/dfff8cbb-ddcb-4376-8cae-3fedb2dd4458/2017/11/26/c5c5418d-6d9d-4d2f-b2a3-f2cedc73510f.png)
Here we have a repeater that contains a number of items set in the editor. Each item can be either "selected" or "unselected". The selected status of each item is indicated by that item's **itemSelected** text element. The number of selected items in the repeater is indicated by the page's **numSelected** text element.  There are several ways a user can select elements: * Click the **selectAll** button to select all the items. * Click the **selectLeft** or the **selectRight** buttons to select all the items in the left or right column. * Click a **repeatedImage** instance to select the item with that image. Here is the code: ```javascript $w.onReady( () => { $w("#selectAll").onClick( (event) => { $w("#itemSelected").text = "Selected"; $w("#numSelected").text = $w("#myRepeater").data.length.toString(); } ); $w("#repeatedImage").onClick( (event) => { let $item = $w.at(event.context); if($item("#itemSelected").text === "Unselected") { $item("#itemSelected").text = "Selected"; $w("#numSelected").text = (Number($w("#numSelected").text) + 1).toString(); } else { $item("#itemSelected").text = "Unselected"; $item("#numSelected").text = (Number($w("#numSelected").text) - 1).toString(); } } ); $w("#selectLeft").onClick( (event) => { selectColumn(0, 2); } ); $w("#selectRight").onClick( (event) => { selectColumn(1, 2); } ); } ); function selectColumn(columnIndex, numColumns) { $w("#myRepeater").forEachItem( ($item, itemData, index) => { if(index % numColumns === columnIndex && $item("#itemSelected").text === "Unselected") { $item("#itemSelected").text = "Selected"; $item("#numSelected").text = (Number($w("#numSelected").text) + 1).toString(); } } ); } ``` Let's analyze this code one section at a time. * * * First, let's look at the `onClick()` event handler for the `selectAll` button. ```javascript $w("#selectAll").onClick( (event) => { $w("#itemSelected").text = "Selected"; $w("#numSelected").text = $w("#myRepeater").data.length.toString(); } ); ``` All selectors in this snippet are global selectors. That means that the selection of the `itemSelected` text element on line 2 is from the global scope. So when its `text` value is set, the `text` value of the `itemSelected` element in the repeater's item template and the `text` values of all the repeated `itemSelected` elements in all of the repeated items are set to `"Selected"`. This is what allows us to "select" all the items in one line of code. (We have also changed the item template. But since we will not be creating any new items, the change is of no consequence.) * * * Next, let's look at the `onClick()` event handler for the `repeatedImage` element. ```javascript $w("#repeatedImage").onClick( (event) => { let $item = $w.at(event.context); if($item("#itemSelected").text === "Unselected") { $item("#itemSelected").text = "Selected"; $w("#numSelected").text = (Number($w("#numSelected").text) + 1).toString(); } else { $item("#itemSelected").text = "Unselected"; $item("#numSelected").text = (Number($w("#numSelected").text) - 1).toString(); } } ); ``` On line 2 we create a repeated item scope selector. That means all the selections using that selector in the body of the function are repeated item scope selections. So when we select a repeated element, such as the `itemSelected` text element, we are selecting the individual instance of that element that is in the same repeated item as the image that was clicked. All the other `itemSelected` elements in the other items of the repeater will not be affected. Notice that on lines 5 and 9 we also use a global selector to select an element outside the repeater and change the value of one of its properties. * * * Finally, let's look at the `onClick()` event handler for the `selectLeft` and `selectRight` buttons. ```javascript $w("#selectLeft").onClick( (event) => { selectColumn(0, 2); } ); $w("#selectRight").onClick( (event) => { selectColumn(1, 2); } ); ``` Both of these event handlers call the `selectColumn()` function which "selects" all of the items in a given column. ```javascript function selectColumn(columnIndex, numColumns) { $w("#myRepeater").forEachItem( ($item, itemData, index) => { if(index % numColumns === columnIndex && $item("#itemSelected").text === "Unselected") { $item("#itemSelected").text = "Selected"; $item("#numSelected").text = (Number($w("#numSelected").text) + 1).toString(); } } ); } ``` The `$item` parameter of the `forEachItem()` function is a repeated item scope selector. That means all the selections using that selector in the body of the function are repeated item scope selections. So when we select the `itemSelected` text element, which is a repeated element, we are selecting the individual instance of that element for the specific item of the current iteration of the `forEach` loop. All the other `itemSelected` elements in the other items of the repeater will not be affected. --- > Portal Navigation: > > - Append `.md` to any URL under `https://dev.wix.com/docs/` to get its markdown version. > - Pages are either content pages (article or reference text) or menu pages (a list of links to child pages). > - To get a menu page, truncate any URL to a parent path and append `.md` (e.g. `https://dev.wix.com/docs/sdk.md`, `https://dev.wix.com/docs/sdk/core-modules.md`). > - Top-level index of all portals: https://dev.wix.com/docs/llms.txt > - Full concatenated docs: https://dev.wix.com/docs/llms-full.txt ## Resource: The Lifecycle of Repeated Items ## Article: The Lifecycle of Repeated Items ## Article Link: https://dev.wix.com/docs/develop-websites/articles/wix-editor-elements/repeaters/the-lifecycle-of-repeated-items.md ## Article Content: # Velo Repeaters: The Lifecycle of Repeated Items When working with a repeater using code, it is important to understand how the items in the repeater are created, updated, and deleted. But first, you need to understand the relationship in a repeater between its repeated items and its data.  A repeater's data is stored as an array of objects. You get and set that array using the repeater's `data` property. Each object in the array must contain a unique `_id` property which is used to match the object's data to the individual repeated items of the repeater as described below. The value of the `_id` property can only be comprised of alphanumeric characters and hyphens (`-`). Other than `_id`, the objects in the repeater's data array can contain anything you want. For example, a simple array of repeater data may look like this: ```javascript [ { "_id": "1", "firstName": "John", "lastName": "Doe", "image": "http://someImageUrl/john.jpg" }, { "_id": "2", "firstName": "Jane", "lastName": "Doe", "image": "http://someImageUrl/jane.jpg" } ] ``` Repeater data is not automatically applied to the elements in the repeated items. You choose how to use the repeater's data in the `onItemReady()`, `onItemRemoved()`, `forItems()`, and `forEachItem()` callback functions. Most often, you will be applying the data of a repeated item to the properties and functions of the repeated elements contained in that repeated item. For more information on these functions, see the [API Reference](https://www.wix.com/velo/reference/$w.Repeater.html). ### Creating New Items When you set a repeater's `data` property, new repeated items are created for each object that has an `_id` value that is not already present in the current array of data objects. The elements in the new items are first populated with the data of the repeater's item template. Then the `onItemReady()` event handler is triggered for each of the new items. Usually, you will overwrite some or all of the data populated from the item template in the `onItemReady()` event handler with the data for that specific item. When all of the `onItemReady()` event handlers have finished running, the new items are displayed. For example, if the repeater's `data` property currently contains the following array: [{"_id": "1", "content": "First"}] And then you set its value to this array: [{"_id": "1", "content": "First"},{"_id": "2", "content": "Second"}] One new repeated item is created because an item with ID `"2"` did not yet exist. The `onItemReady()` event handler will run once for the new item. There you can set up its contents. ### Updating Existing Items When you set a repeater's data property, nothing occurs to repeated items whose IDs were already in the array of data objects, even if other data in the object has changed. To update repeated items with the new data, use the `forEachItem()` or `forItems()` functions. For example, if the repeater's `data` property currently contains the following array: [{"_id": "1", "content": "First"}] And then you set its value to this array: [{"_id": "1", "content": "New First"}] The content of elements in the existing repeated item will not change because an item with ID `"1"` already exists. To update the contents you need to call either the `forEachItem()` or `forItems()` functions. ### Removing Items When you set a repeater's `data` property, repeated items are removed if their IDs are no longer in the array of data objects. The `onItemRemoved()` event handler is triggered for each of the removed items. For example, if the repeater's `data` property currently contains the following array: [{"_id": "1", "content": "First"},{"_id": "2", "content": "Second"}] And then you set its value to this array: [{"_id": "1", "content": "First"}] One repeated item is removed because an item with ID `"2"` no longer exists. The `onItemRemoved()` event handler will run once for the removed item. ### Example To demonstrate the full lifecycle of repeated items, we will use the following simplified example. 
![](https://d2x3xhvgiqkx42.cloudfront.net/12345678-1234-1234-1234-1234567890ab/dfff8cbb-ddcb-4376-8cae-3fedb2dd4458/2017/11/29/1c9e7e93-ef4c-44aa-a495-ae82d5c10a91.png)
The example has the following page elements: * Three buttons: * The **Add** button adds more items to the repeater. * The **Remove** button removes the added items from the repeater. * The **Update** button updates the first item in the repeater. * A repeater where each repeated item in the repeater contains two text elements: * The text element on the left shows the item's ID. * The text element on the right shows the item's content. The example has the code shown below that: * Defines two static arrays of data that we will use for the repeater. * An `onReady()` function that: * Sets the initial data of the repeater. * Adds the event handlers that make the buttons work. * Adds the repeater `onItemReady()` and `onItemRemoved()` event handlers that run when new items are created and removed. ```javascript const sampleData1 = [ {"_id": "1", "content": "First item"}, {"_id": "2", "content": "Second item"} ]; const sampleData2 = [ {"_id": "3", "content": "Third item"}, {"_id": "4", "content": "Fourth item"} ]; $w.onReady(function () { $w("#myRepeater").data = sampleData1; $w("#addButton").onClick( (event, $w) => { let repeaterData = $w("#myRepeater").data; $w("#myRepeater").data = repeaterData.concat(sampleData2); } ); $w("#removeButton").onClick( (event, $w) => { $w("#myRepeater").data = sampleData1; } ); $w("#updateButton").onClick( (event, $w) => { let repeaterData = $w("#myRepeater").data; repeaterData[0].content = "Changed item"; $w("#myRepeater").data = repeaterData; $w("#myRepeater").forItems( ["1"], ($w, itemData, index) => { $w("#repeatedId").text = itemData._id; $w("#repeatedText").text = itemData.content; } ); } ); $w("#myRepeater").onItemReady( ($w, itemData, index) => { $w("#repeatedId").text = itemData._id; $w("#repeatedText").text = itemData.content; } ); $w("#myRepeater").onItemRemoved( (itemData) => { console.log(`Removed: ${itemData.content}`); } ); } ); ``` #### Scenario We will now run through a simple scenario to demonstrate the complete item lifecycle. * * * When the page first loads, the `onReady()` function runs, setting all the event handlers mentioned above and setting the value of the repeater's `data` property to be the first array of sample data. $w("#myRepeater").data = sampleData1; That means, when the page loads, the repeater's single item defined in the Editor will be replaced by two new items. The `onItemRemoved()` event handler does not run for the item that was removed because it was a static item defined in the Editor. However, the `onItemReady()` event handler runs for each of the new items that are added. In our case, we've defined the event handler to set the `text` values of the repeated item's elements from the corresponding data in the repeater's `data` array. The repeater now looks like this:
![](https://d2x3xhvgiqkx42.cloudfront.net/12345678-1234-1234-1234-1234567890ab/dfff8cbb-ddcb-4376-8cae-3fedb2dd4458/2017/11/29/96b71417-777e-41ea-bde7-0294d3d64887.png)
* * * If we then click the **Add** button, the repeater's `data` property is reset with a new array that contains the elements from both sample data arrays. let repeaterData = $w("#myRepeater").data; $w("#myRepeater").data = repeaterData.concat(sampleData2); Because two of the elements in the `data` array are new, two corresponding new items are added to the repeater and the `onItemReady()` event handler runs once for each of these new items. The repeater now looks like this:
![](https://d2x3xhvgiqkx42.cloudfront.net/12345678-1234-1234-1234-1234567890ab/dfff8cbb-ddcb-4376-8cae-3fedb2dd4458/2017/11/29/5005b6a3-d619-4c88-a205-d563bd53a52f.png)
* * * If we then click the **Remove** button, the repeater's `data` property is reset back to the first array of sample data. $w("#myRepeater").data = sampleData1; Because two of the elements from the `data` array are removed, the two corresponding items are removed from the repeater and the `onItemRemoved()` event handler runs once for each of these removed items. $w("#myRepeater").onItemRemoved( (itemData) => { console.log(`Removed: ${itemData.content}`); } ); The repeater now looks like this:
![](https://d2x3xhvgiqkx42.cloudfront.net/12345678-1234-1234-1234-1234567890ab/dfff8cbb-ddcb-4376-8cae-3fedb2dd4458/2017/11/29/ab0d010e-fdf6-4a57-98fa-462586d2ed71.png)
* * * Finally, if we click the **Update** button, the repeater's `data` property is reset with an array with the same items as before, but with one value changed. let repeaterData = $w("#myRepeater").data; repeaterData[0].content = "Changed item"; $w("#myRepeater").data = repeaterData; Because the IDs of the elements in the `data` array have not changed, nothing happens automatically. We need to manually call the `forItems()` function to update the elements in the corresponding repeated item. $w("#myRepeater").forItems( ["1"], ($w, itemData, index) => { $w("#repeatedId").text = itemData._id; $w("#repeatedText").text = itemData.content; } ); The repeater now looks like this:
![](https://d2x3xhvgiqkx42.cloudfront.net/12345678-1234-1234-1234-1234567890ab/dfff8cbb-ddcb-4376-8cae-3fedb2dd4458/2017/11/29/72fd4185-f76e-41df-9263-8d4a40d0cd50.png)
--- > Portal Navigation: > > - Append `.md` to any URL under `https://dev.wix.com/docs/` to get its markdown version. > - Pages are either content pages (article or reference text) or menu pages (a list of links to child pages). > - To get a menu page, truncate any URL to a parent path and append `.md` (e.g. `https://dev.wix.com/docs/sdk.md`, `https://dev.wix.com/docs/sdk/core-modules.md`). > - Top-level index of all portals: https://dev.wix.com/docs/llms.txt > - Full concatenated docs: https://dev.wix.com/docs/llms-full.txt ## Resource: Using Connected Datasets and Repeaters ## Article: Using Connected Datasets and Repeaters ## Article Link: https://dev.wix.com/docs/develop-websites/articles/wix-editor-elements/repeaters/using-connected-datasets-and-repeaters.md ## Article Content: # Velo Repeaters: Using Connected Datasets and Repeaters
Visit the Velo by Wix website to onboard and continue learning.
Sometimes you will need to connect a repeater and its elements to two datasets, one of which is filtered by the other. If you then want to control the datasets with code, you need to understand how the datasets behave when selected from different [scopes](https://support.wix.com/en/article/understanding-the-scope-of-w-selectors). For example, suppose you have some collections related to music. One collection stores information about bands and another collection stores information about songs. You can create a repeater which has an item for each band. The band items could also list all the songs related to each band. 
![](https://d2x3xhvgiqkx42.cloudfront.net/12345678-1234-1234-1234-1234567890ab/dfff8cbb-ddcb-4376-8cae-3fedb2dd4458/2017/12/26/08be89bb-a23b-4666-a750-9d5343d85023.png)
To create the repeater shown above, you need two datasets, one for the **Bands** collection and another for the **Songs** collection. The **Bands dataset** is connected to the repeater itself. That causes the repeater to create an item for each band in your collection. You can also connect some of the elements contained in the repeater's items to the **Bands dataset**. For example, you can display the band's name and picture in each item. The **Songs dataset** is also connected to some of the elements contained in the repeater's items. For example, you can display a list of songs by the band in an item using a table. The **Bands dataset** and **Songs dataset** need to be connected in some manner. The connection allows you to show the correct songs in each band's repeater item. ### Connecting Datasets There are two ways you can connect the two datasets. The way you choose depends on how your collections are set up.  If your Songs collection contains a reference field that refers to items in the Bands collection, you can set a filter on the Songs dataset as shown here:
![](https://d2x3xhvgiqkx42.cloudfront.net/12345678-1234-1234-1234-1234567890ab/dfff8cbb-ddcb-4376-8cae-3fedb2dd4458/2017/12/26/14670565-e34e-44ad-bd0c-b8bbc3450e97.png)
If your Songs collection contains a regular field that matches a field in the Bands collection, you can set a filter on the Songs dataset as shown here:
![](https://d2x3xhvgiqkx42.cloudfront.net/12345678-1234-1234-1234-1234567890ab/dfff8cbb-ddcb-4376-8cae-3fedb2dd4458/2017/12/26/dba369c9-59e8-4140-b410-df611ebfe630.png)
### Using the Connected Datasets with Code Before discussing each individual case, it is important to understand what is happening behind the scenes when you connect the datasets mentioned above to the elements in a repeater's items. Even though there is only one **Bands dataset** and one **Songs dataset**, we want those datasets to contain different items, depending on the context in which they are being used.  For example, above we connected a table which appears in each of the repeater's items to the **Songs dataset**. We don't want all of the songs in the **Songs** collection to appear in each repeater item. Instead, we only want to display the songs relevant to a particular item's band.  In order to make that work, a virtual **Songs dataset** is created for each repeater item. When you select the Songs dataset using a [repeated item scope selector](https://dev.wix.com/docs/develop-websites/articles/wix-editor-elements/repeaters/understanding-the-scope-of-selector-functions.md), you are selecting one of these virtual datasets. However, if you select the Songs dataset using a [global scope selector](https://dev.wix.com/docs/develop-websites/articles/wix-editor-elements/repeaters/understanding-the-scope-of-selector-functions.md), you are selecting the regular dataset.   We will now discuss each individual case of how to use the types of datasets mentioned above with repeaters: * Using the Filtered Dataset inside the Repeater * Using the Filtered Dataset outside the Repeater * Using the Unfiltered Dataset inside the Repeater * Using the Unfiltered Dataset outside the Repeater #### Using the Filtered Dataset inside the Repeater When you select a dataset that is filtered using one of the methods mentioned above from a [repeated item scope selector](https://dev.wix.com/docs/develop-websites/articles/wix-editor-elements/repeaters/understanding-the-scope-of-selector-functions.md), you are selecting a virtual dataset. That virtual dataset only contains the items that relate to the current item in the dataset it is connected to via a filter. It also only controls elements that are connected to it in the current repeater item. For example, in each repeater item we only see the songs that are related to that item's band. If we want to let users sort that list of songs, we could use the dataset `setSort()` function. In the repeater shown above, what looks like the table header is actually a group of three buttons. Each of those buttons has an `onClick` event handler that sorts the songs table based on a field. ```javascript import wixData from 'wix-data'; $w.onReady( () => { $w("titleSort").onClick( (event) => { let $item = $w.at(event.context); $item("#songsDataset").setSort(wixData.sort().ascending("title")); } ); $w("lengthSort").onClick( (event) => { let $item = $w.at(event.context); $item("#songsDataset").setSort(wixData.sort().ascending("length")); } ); $w("albumSort").onClick( (event) => { let $item = $w.at(event.context); $item("#songsDataset").setSort(wixData.sort().ascending("album")); } ); } ); ``` Since the Songs dataset is selected using a repeated item scope selector, the sort is applied to a virtual dataset. So when a user clicks a button to sort the songs in one of the items the songs in all the other items are not affected. Note that we don't have to write the sorting code for each virtual dataset. We write the code only once and it is applied to the correct item automatically.  #### Using the Filtered Dataset outside the Repeater When you select a dataset that is filtered using one of the methods above from a [global scope selector](https://dev.wix.com/docs/develop-websites/articles/wix-editor-elements/repeaters/understanding-the-scope-of-selector-functions.md), you are selecting a regular dataset. That regular dataset only controls the elements connected to it that are not contained in repeater items. The elements inside repeater items are not affected even though they are connected to the same dataset. For example, let's say we had a button outside the repeater shown above. If we called the dataset `setSort()` function in the button's `onClick` event handler nothing would happen to any of the songs tables in the repeater's items. If there was a table outside of the repeater connected to the dataset, its items would be sorted. #### Using the Unfiltered Dataset inside the Repeater When you select the dataset that the repeater itself is connected to using a [repeated item scope selector](https://dev.wix.com/docs/develop-websites/articles/wix-editor-elements/repeaters/understanding-the-scope-of-selector-functions.md), you are selecting a virtual dataset. That virtual dataset contains only one item, the one that the current repeater item is based on. For example, each item in the repeater shown above has its own virtual **Bands dataset**. That dataset contains only one band, the band in the current repeater item. #### Using the Unfiltered Dataset outside the Repeater When you select the dataset which the repeater itself is connected to using a [global scope selector](https://dev.wix.com/docs/develop-websites/articles/wix-editor-elements/repeaters/understanding-the-scope-of-selector-functions.md), you are selecting a regular dataset. That regular dataset controls the number and order of the repeater items and any elements connected to it that are not contained in repeater items. The elements inside repeater items are not affected even though they are connected to the same dataset. For example, let's say we had a button outside the repeater shown above. We could use it to sort the items in the repeater by calling the dataset `setSort()` function in the button's `onClick` event handler. Nothing would happen to any of the elements inside the repeated items, but the items themselves would be sorted. ```javascript import wixData from 'wix-data'; $w.onReady( () => { $w("repeaterSort").onClick( (event) => { if(event.target.label === "A-Z"){ $w("#bandsDataset").setSort(wixData.sort().ascending("name")); event.target.label = "Z-A"; } else { $w("#bandsDataset").setSort(wixData.sort().descending("name")); event.target.label = "A-Z"; } } ); } ); ``` --- > Portal Navigation: > > - Append `.md` to any URL under `https://dev.wix.com/docs/` to get its markdown version. > - Pages are either content pages (article or reference text) or menu pages (a list of links to child pages). > - To get a menu page, truncate any URL to a parent path and append `.md` (e.g. `https://dev.wix.com/docs/sdk.md`, `https://dev.wix.com/docs/sdk/core-modules.md`). > - Top-level index of all portals: https://dev.wix.com/docs/llms.txt > - Full concatenated docs: https://dev.wix.com/docs/llms-full.txt ## Resource: About Multi-State Boxes ## Article: About Multi-State Boxes ## Article Link: https://dev.wix.com/docs/develop-websites/articles/wix-editor-elements/other-elements/multi-state-boxes/about-multi-state-boxes.md ## Article Content: # Velo: About Multi-State Boxes Use multi-state boxes to display different content for different situations. For example, you can: - Show different site content if a shopping cart is empty or full. - Display an error state when something goes wrong. - Show a preloader while a page is loading. - Switch between "sale," "new," and "out of stock" badges for your products. - Show different site content depending on whether there's an upcoming event.
You can also use multi-state boxes to let site visitors easily navigate multiple displays. For example, visitors can: - Navigate what appear to be multiple tabs. - Switch between a brief description and a detailed block of text.
Multi-state boxes generally contain two or more states, each with different content. A specific state is displayed either because a particular condition exists (an empty shopping cart), or because a site visitor chose to navigate to that state (clicked a button to read expanded text).
**Tip:** Changing the box state might [impact your page layout](https://dev.wix.com/docs/develop-websites/articles/wix-editor-elements/formatting-layout/how-page-layout-is-affected-when-elements-change-size.md).
## See also - Learn how to [set up your multi-state box](https://dev.wix.com/docs/develop-websites/articles/wix-editor-elements/other-elements/multi-state-boxes/setting-up-your-multi-state-box.md). - Learn how to [work with your multi-state box and code](https://dev.wix.com/docs/develop-websites/articles/wix-editor-elements/other-elements/multi-state-boxes/working-with-multi-state-boxes-and-code.md). --- > Portal Navigation: > > - Append `.md` to any URL under `https://dev.wix.com/docs/` to get its markdown version. > - Pages are either content pages (article or reference text) or menu pages (a list of links to child pages). > - To get a menu page, truncate any URL to a parent path and append `.md` (e.g. `https://dev.wix.com/docs/sdk.md`, `https://dev.wix.com/docs/sdk/core-modules.md`). > - Top-level index of all portals: https://dev.wix.com/docs/llms.txt > - Full concatenated docs: https://dev.wix.com/docs/llms-full.txt ## Resource: Setting Up Your Multi-State Box ## Article: Setting Up Your Multi-State Box ## Article Link: https://dev.wix.com/docs/develop-websites/articles/wix-editor-elements/other-elements/multi-state-boxes/setting-up-your-multi-state-box.md ## Article Content: # Velo: Setting Up Your Multi-State Box
Visit the Velo by Wix website to onboard and continue learning.
A [multi-state box](https://dev.wix.com/docs/develop-websites/articles/wix-editor-elements/other-elements/multi-state-boxes/about-multi-state-boxes.md) contains multiple states with different content, and displays one state at a time. Add a multi-state box to your site and set up each state. Then [add code](https://dev.wix.com/docs/develop-websites/articles/wix-editor-elements/other-elements/multi-state-boxes/working-with-multi-state-boxes-and-code.md) to define when each state will appear in your site. ### Add a Multi-State Box **To add a multi-state box to your page:** Wix Editor: 1. Make sure Velo Dev Mode is [enabled](https://dev.wix.com/docs/develop-websites/articles/getting-started/resources/about-velo-by-wix.md#to-enable-velo-on-your-site). 2. Click **Add** ![](https://d2eyqiy4n03ve6.cloudfront.net/12345678-1234-1234-1234-1234567890ab/2015/08/05/f5f1bce8-77f0-405c-8520-f147e1035fb1.png) on the left side of the Editor. 3. Click **Interactive**. 4. Drag a multi-state box element onto your page. Wix Studio: 1. If necessary, click ![Code icon](https://github.com/wix-incubator/wix-code-docs/assets/50321691/2c41d3df-930f-4e0f-966f-038742adceed) and then **Start Coding**. 2. Click **Add** ![Add icon](https://wixmp-833713b177cebf373f611808.wixmp.com/images/setting-up-your-multi-state-box-md__tmp_git-push-event18c2b4b9f1e04cbd18daa0d3fff592ee_velo-articles_wix-editor-elements-with-velo_images_add-icon.png) and select **Layout Tools > Multi-state Boxes**. 3. Drag a multi-state box element onto your page. ### Navigate Your States To navigate between the different states of your multi-state box in the editor, click the element, click the dropdown next to the **Multi-State Box** label, and select a state. Wix Editor:
Wix Studio: ![multi-state box studio](https://wixmp-833713b177cebf373f611808.wixmp.com/images/setting-up-your-multi-state-box-md__tmp_git-push-event18c2b4b9f1e04cbd18daa0d3fff592ee_velo-articles_wix-editor-elements-with-velo_images_multi-state-box.png) Now you can add content to and customize each state in your multi-state box. ### Set Up Your Multi-State Box You can customize the design and setup of your multi-state box and each state in your box.  #### Set Up Your Box * **Manage States:** Add, duplicate, delete, and change the order of your states. You can also edit the IDs of your states. [Learn more](https://dev.wix.com/docs/develop-websites/articles/wix-editor-elements/other-elements/multi-state-boxes/working-with-multi-state-boxes-and-code.md). * ![](https://d2x3xhvgiqkx42.cloudfront.net/12345678-1234-1234-1234-1234567890ab/0ca9e8ba-16ed-4cd8-a1e1-58d01c4420f7/2019/07/07/f02a0a76-9718-4b2a-a874-e5fbd4a5a39d/e2e9e303-c924-4d20-b3e1-c140d32cb2b9.png) **Settings:** Add animations for transitioning between states. [Learn more](https://support.wix.com/en/article/multi-state-box-settings). * ![](https://d2x3xhvgiqkx42.cloudfront.net/12345678-1234-1234-1234-1234567890ab/0ca9e8ba-16ed-4cd8-a1e1-58d01c4420f7/2019/07/07/a583318c-dc34-4eb7-bdfb-fea1d97151da/f48acc51-2fc9-4e7f-88c1-b134999a6755.png) **Design:** Customize the border and shadow of your multi-state box. [Learn more](https://dev.wix.com/docs/develop-websites/articles/wix-editor-elements/other-elements/multi-state-boxes/setting-up-your-multi-state-box.md). * ![](https://d2x3xhvgiqkx42.cloudfront.net/12345678-1234-1234-1234-1234567890ab/0ca9e8ba-16ed-4cd8-a1e1-58d01c4420f7/2019/08/20/f3b92254-d4ae-42a5-a415-9484d2784aab/f2ce3281-1bc3-4d77-b184-e510816053ab.png) **Animation:** Add an animation to your multi-state box. [Learn more](https://support.wix.com/en/article/choose-animation).
**Tip** Duplicate states and then edit them to keep a consistent design throughout your multi-state box.
#### Set Up Your States [Navigate](https://dev.wix.com/docs/develop-websites/articles/wix-editor-elements/other-elements/multi-state-boxes/working-with-multi-state-boxes-and-code.md) to the state you want to edit and then do any of the following: * **Add content:** Add whatever content you want to each state including text, images, buttons, and videos. * **Change Background:** Choose a color, image, or video for the background of the state, and then customize background settings. You can also apply a background to other states. [Learn more](https://support.wix.com/en/article/change-background-7730640). * **Resize:** Click the multi-state box and drag one of the resize handles on the edge of the box.  Note that the width of the multi-state box applies to all states, but you can adjust the height for each individual state. ### Multi-State Box and State IDs Each multi-state box and state has an ID instead of a name. The IDs of multi-state boxes and their states are significant because you use them in code.
**Important** Changing the ID of a multi-state box or state will break any existing code that uses the old ID. If you change an ID, make sure to update any related code.
* You can view and edit the ID of your multi-state box in the [Properties & Events panel](https://dev.wix.com/docs/develop-websites/articles/workspace-tools/velo-workspace/properties-events-panel/about-the-properties-events-panel.md). * You can view and edit the IDs of your states in the [Manage States](https://dev.wix.com/docs/develop-websites/articles/wix-editor-elements/other-elements/multi-state-boxes/setting-up-your-multi-state-box.md) panel. You can also do this in the [Properties & Events panel](https://dev.wix.com/docs/develop-websites/articles/workspace-tools/velo-workspace/properties-events-panel/about-the-properties-events-panel.md). #### To change a multi-state box ID in the Properties & Events panel: 1. Click your multi-state box. 2. In the Properties & Events panel, click the **ID** field and enter the new ID. ![](https://d2x3xhvgiqkx42.cloudfront.net/12345678-1234-1234-1234-1234567890ab/0ca9e8ba-16ed-4cd8-a1e1-58d01c4420f7/2019/07/09/1a499ed4-6bd8-4145-8820-9f669c37c4e6/2feb84ff-9dd4-48b2-b1a1-c41a031b546b.png) #### To change a state ID in the Properties & Events panel: 1. Double click your multi-state box. 2. [Navigate](https://dev.wix.com/docs/develop-websites/articles/wix-editor-elements/other-elements/multi-state-boxes/working-with-multi-state-boxes-and-code.md) to the state you want to change. 3. In the Properties & Events panel, click the **State ID** field and enter the new ID. ![](https://d2x3xhvgiqkx42.cloudfront.net/12345678-1234-1234-1234-1234567890ab/0ca9e8ba-16ed-4cd8-a1e1-58d01c4420f7/2019/08/20/3be0812e-c645-44d0-a1e2-ee7e52e86307/d25eb90e-315c-4efc-9761-003a7f371783.png) #### To change a state ID in the Manage States panel: 1. Click your multi-state box. 2. Click **Manage States**. 3. In the Manage States panel, click the state box that you want, then click **Show More** ![](https://d2x3xhvgiqkx42.cloudfront.net/12345678-1234-1234-1234-1234567890ab/76096845-8b12-44f1-91f6-3dc2e838fdd9/2022/09/04/45269098-373f-4d2c-8168-2fc5242c6024/c890c6a3-6762-4501-bdb4-e44c678108df.png) **> Edit ID**. 4. Enter the new ID. ![Manage States panel](https://wixmp-833713b177cebf373f611808.wixmp.com/images/setting-up-your-multi-state-box-md__tmp_git-push-event18c2b4b9f1e04cbd18daa0d3fff592ee_velo-articles_wix-editor-elements-with-velo_images_manage-states.png) > > Now that you've set up your multi-state box, get it up and running with code. Click [here](https://dev.wix.com/docs/develop-websites/articles/wix-editor-elements/other-elements/multi-state-boxes/working-with-multi-state-boxes-and-code.md) to see a tutorial on working with multi-state boxes and Velo. --- > Portal Navigation: > > - Append `.md` to any URL under `https://dev.wix.com/docs/` to get its markdown version. > - Pages are either content pages (article or reference text) or menu pages (a list of links to child pages). > - To get a menu page, truncate any URL to a parent path and append `.md` (e.g. `https://dev.wix.com/docs/sdk.md`, `https://dev.wix.com/docs/sdk/core-modules.md`). > - Top-level index of all portals: https://dev.wix.com/docs/llms.txt > - Full concatenated docs: https://dev.wix.com/docs/llms-full.txt ## Resource: Working with Multi-State Boxes and Code ## Article: Working with Multi-State Boxes and Code ## Article Link: https://dev.wix.com/docs/develop-websites/articles/wix-editor-elements/other-elements/multi-state-boxes/working-with-multi-state-boxes-and-code.md ## Article Content: # Velo Tutorial: Working with Multi-State Boxes and Code A [multi-state box](https://dev.wix.com/docs/develop-websites/articles/wix-editor-elements/other-elements/multi-state-boxes/about-multi-state-boxes.md) contains multiple states with different content, and displays one state at a time. Each state corresponds to a specific situation or status. You need to add code to your site to define when each state is displayed. This article demonstrates how to set up your multi-state box using code from [Velo](https://dev.wix.com/docs/develop-websites/articles/get-started/about-developing-websites.md). ## Set Up Your Multi-State Box To set up your multi-state box, follow this general procedure: 1. [Add](https://dev.wix.com/docs/develop-websites/articles/wix-editor-elements/other-elements/multi-state-boxes/setting-up-your-multi-state-box.md) a multi-state box to your page. 2. [Set up](https://dev.wix.com/docs/develop-websites/articles/wix-editor-elements/other-elements/multi-state-boxes/setting-up-your-multi-state-box.md) your states. 3. Add [code](https://www.wix.com/velo/reference/$w.MultiStateBox.html) to define when each state will be displayed: 1. Define a condition (for example, a site visitor clicked a button, a product is out of stock). 2. Select your multi-state box using its ID. 3. Apply the [changeState()](https://www.wix.com/velo/reference/$w.MultiStateBox.html#changeState) function with the state you want to move to.   ## Example 1: Site Visitors Change the State This example shows how to set up your multi-state box so that site visitors can switch between states by clicking a button and then focus on the button in the currently displayed state to enhance keyboard and screen reader functionality for visitors with disabilities. We added a multi-state box to our page called `myStateBox`, with two states called `state1` and `state2`. Then we added a button to each state for switching between the states. >**Note** > You can view and change your multi-state box and state IDs in the [Properties & Events panel](https://dev.wix.com/docs/develop-websites/articles/workspace-tools/velo-workspace/properties-events-panel/about-the-properties-events-panel.md). ### State 1 Wix Editor: ![state1](https://wixmp-833713b177cebf373f611808.wixmp.com/images/7752a1ac284983f8cbfa1db804b7b048.png) Wix Studio: ![state2](https://wixmp-833713b177cebf373f611808.wixmp.com/images/3178f431f403ecad057a52a7c1dc6c73.png) * `myStateBox`: ID of my multi-state box. * `state1`: ID of the current state, State 1. * `button1`: ID of button to click to move to State 2. ### State 2 Wix Editor: ![state1](https://wixmp-833713b177cebf373f611808.wixmp.com/images/63b0b1f87233e5336d19c8545da8563f.png) Wix Studio: ![state2](https://wixmp-833713b177cebf373f611808.wixmp.com/images/0f9601371fc7d40caea115f580d0b852.png) * `myStateBox`: ID of my multi-state box. * `state2`: ID of the current state, State 2. * `button2`: ID of button to click to move to State 1. ### Code We added the following code to our [page tab](https://dev.wix.com/docs/develop-websites/articles/workspace-tools/velo-workspace/code-editor-ide/working-in-the-code-editor.md): ```javascript $w.onReady(function () { $w("#button1").onClick(() => { $w("#myStateBox").changeState("state2"); $w("#button2").focus() } ); $w("#button2").onClick(() => { $w("#myStateBox").changeState("state1"); $w("#button1").focus() } ); }); ``` ### Understanding the Code - **Line 2-5**: Add an onClick event handler to `button1` in State 1. - **Line 3**: Run the [`changeState()`](https://www.wix.com/velo/reference/$w.MultiStateBox.html#changeState) function on the `myStateBox` multi-state box, moving it from State 1 to State 2. - **Line 4**: Run the [`focus()`](https://dev.wix.com/docs/velo/velo-only-apis/$w/button/focus.md) function on the `button2` element displayed in State 2. - **Line 6-9**: Add an onClick event handler to `button2` in State 2. - **Line 7**: Run the [`changeState()`](https://www.wix.com/velo/reference/$w.MultiStateBox.html#changeState) function on the `myStateBox` multi-state box, moving it from State 2 to State 1. - **Line 8**: Run the [`focus()`](https://dev.wix.com/docs/velo/velo-only-apis/$w/button/focus.md) function on the `button1` element displayed in State 1. ### Adapt this Scenario You can adapt this scenario to enable site visitors to: * Switch between a brief description and a detailed block of text. * Fill out a custom multi-step form. * Navigate what appear to be multiple tabs. ## Example 2: State per Status >**Note:** >The images in this example show the multi-state box in the Wix Editor. The multi-state box in Wix Studio functions similarly to Wix Editor, with the only difference being its appearance, as demonstrated in the example above. This example shows how to set up your multi-state box with code so that a different state is displayed depending on a particular status. The example uses Wix Store products, but you can adapt the example for other scenarios. We added a multi-state box to our Wix Stores [product page](https://support.wix.com/en/article/customizing-your-wix-stores-product-page) that displays a different badge depending on the product's status. We added 3 states to our multi-state box: * Out of Stock * On Sale * Featured ### State 1: Out of Stock
![](https://d2x3xhvgiqkx42.cloudfront.net/12345678-1234-1234-1234-1234567890ab/99f9f305-0415-4713-856e-b7aa93cbd4d3/2020/10/25/7bc07b83-f67f-4522-801e-66477cd5c59e/8ad62ecf-4117-43c2-8d9a-17df21e31e69.png)
* `badgeStatebox`: ID of my multi-state box. * `outOfStock`: ID of the current state. For products that are out of stock. ### State 2: On Sale
![](https://d2x3xhvgiqkx42.cloudfront.net/12345678-1234-1234-1234-1234567890ab/99f9f305-0415-4713-856e-b7aa93cbd4d3/2020/10/25/84b78ce0-f0cb-4bca-80fa-a1e6dac279e1/068ac0e1-66e9-4d3f-8e30-e9849b50c7eb.png)
* `badgeStatebox`: ID of my multi-state box. * `onSale`: ID of the current state. For products that are on sale. ### State 3: Featured
![](https://d2x3xhvgiqkx42.cloudfront.net/12345678-1234-1234-1234-1234567890ab/99f9f305-0415-4713-856e-b7aa93cbd4d3/2020/10/25/3c614f0c-dfa5-4393-83ee-1a8b1ef39eaa/54b1d32f-b100-46b1-b0c9-1d549fa17df8.png)
* `badgeStatebox`: ID of my multi-state box. * `featured`: ID of the current state. For products that are not on sale or out of stock. ### Code Then we added the following code to the [page tab](https://dev.wix.com/docs/develop-websites/articles/workspace-tools/velo-workspace/code-editor-ide/working-in-the-code-editor.md) of our [product page](https://www.wix.com/velo/reference/$w.ProductPage.html): ```javascript $w.onReady( function () { wixLocationFrontend.onChange(() => { $w('#myProductPage').getProduct() .then( (product) => { if (!product.inStock) { $w('#badgeStatebox').changeState("outOfStock"); } else if (product.price !== product.discountedPrice) { $w('#badgeStatebox').changeState("onSale"); } else { $w('#badgeStatebox').changeState("featured"); } } ) .catch( (error) => { console.log(error); } ); } ); } ); ``` ### Understanding the Code **Line 2**: Use the [`wixLocationFrontend.onChange()`](https://www.wix.com/velo/reference/wix-location.html#onChange) function to check when a site visitor navigates to a new product on the product page. When the current product changes, do the following: **Line 3**: Get all the information about the current product using the [`getProduct()`](https://www.wix.com/velo/reference/$w.ProductPage.html#getProduct) function. **Lines 5-6**: If the current product is not in stock, change the multi-state box's state to `outOfStock` to display the Out of Stock badge. **Line 8-9**: If the current product's discounted price is different than the regular price, this indicates that the product is currently on sale. If the product is on sale, change the multi-state box's state to `onSale` to display the On Sale badge. **Lines 11-12**: If the product is neither out of stock nor on sale, change the multi-state box's state to `featured` to display the Featured badge. **Lines 15-16**: If an error occurs while getting the product information, log the error to the console.
**Tip** If you want some products not to display a badge at all, you could [hide()](https://www.wix.com/velo/reference/$w.MultiStateBox.html#hide) the multi-state box when particular conditions are met.
### Adapt this Scenario You can adapt this scenario to: * Show different site content if a shopping cart is empty or full. * Display an error state when something goes wrong. * Show different site content depending on whether there's an upcoming event. * Display a preloader while the page is loading. ## Learn More * [$w.MultiStateBox API](https://www.wix.com/velo/reference/$w.MultiStateBox.html) * [$w.State API](https://www.wix.com/velo/reference/$w.State.html) * [About Multi-State Boxes](https://dev.wix.com/docs/develop-websites/articles/wix-editor-elements/other-elements/multi-state-boxes/about-multi-state-boxes.md) * [Use a multi-state box to expand text with a Read More link](https://dev.wix.com/docs/develop-websites/articles/wix-editor-elements/other-elements/multi-state-boxes/working-with-multi-state-boxes-and-code.md) --- > Portal Navigation: > > - Append `.md` to any URL under `https://dev.wix.com/docs/` to get its markdown version. > - Pages are either content pages (article or reference text) or menu pages (a list of links to child pages). > - To get a menu page, truncate any URL to a parent path and append `.md` (e.g. `https://dev.wix.com/docs/sdk.md`, `https://dev.wix.com/docs/sdk/core-modules.md`). > - Top-level index of all portals: https://dev.wix.com/docs/llms.txt > - Full concatenated docs: https://dev.wix.com/docs/llms-full.txt ## Resource: Working with the HTML iframe Element ## Article: Working with the HTML iframe Element ## Article Link: https://dev.wix.com/docs/develop-websites/articles/wix-editor-elements/other-elements/html-i-frame-element/working-with-the-html-iframe-element.md ## Article Content: # About HTML iFrame Elements HTML iframe elements allow you to embed raw HTML or another website within your page. In general, you don't have access to the HTML and full code of your site's pages. This can be limiting when you want to add 3rd-party code to your site. Using an HTML element you can sometimes overcome these limitations by embedding raw HTML to your page. ## Supported IDEs You can embed HTML iframe elements in the [editor](https://dev.wix.com/docs/develop-websites/articles/workspace-tools/velo-workspace/workspaces/wix-studio-working-with-the-code-panel.md) (Wix Studio and Wix Editor). You can view and access any HTML iframe elements created in the editor when using other IDEs, such as the Local IDE. The IDEs synchronize with the editor to ensure consistency. You can also add more detailed code using: - The [Wix IDE](https://dev.wix.com/docs/develop-websites/articles/workspace-tools/velo-workspace/wix-ide/wix-studio-about-the-wix-ide.md) (Wix Studio). - Your [local IDE](https://dev.wix.com/docs/develop-websites/articles/workspace-tools/developer-tools/git-integration-wix-cli/about-git-integration-wix-cli.md) (Wix Studio and Wix Editor). ## How HTML iFrame Elements Work The HTML element creates a sandboxed environment (an iframe) that does not have direct access to the other elements on your page. This means that widgets or libraries that need access to the rest of your page will not work in an HTML element. You can, however, pass data between your page code and the code in an HTML element so you can use it in all sorts of situations to do things you can't normally do directly. You can see a working [example site](https://www.wix.com/velo-examples/hello-html-comp) of an HTML element that passes data to and from the page. Open the [Hello HTML Component template](https://manage.wix.com/edit-template/from?originTemplateId=d39789d7-13ee-4208-8467-8a939cd8ed8c&templateId=cfd24f07-e15f-4091-b110-2b8b889fa1e3&autoDevMode=true) in the editor to work with site's code. To learn more about using HTML elements, see [Embedding a Site or a Widget](https://support.wix.com/en/article/wix-editor-embedding-a-site-or-a-widget). ## What You Can Embed You can embed the following elements using an HTML element: - [Sites](https://dev.wix.com/docs/develop-websites/articles/wix-editor-elements/other-elements/html-i-frame-element/embedding-a-site-in-an-html-i-frame-element.md): Display an external site page within an element on your page. - [Code](https://dev.wix.com/docs/develop-websites/articles/wix-editor-elements/other-elements/html-i-frame-element/embedding-a-code-widget-in-an-html-i-frame-element.md): Embed your own HTML code, or functionality from an external provider, for example a badge, a newsletter signup form, or a YouTube video. For an example of how to create a widget within an HTML iframe component, see [Creating a Rich Text Editor Using the HTML Component](https://dev.wix.com/docs/develop-websites/articles/code-tutorials/wix-editor-elements/creating-a-rich-text-editor-using-the-html-component.md). ## Using a JavaScript Library There are many JavaScript libraries that you can use in an HTML element. The library you add will only be able to interact with the elements inside your HTML element. To interact with the library from your page code or to interact with your page elements from the library, you need to use the messaging model described in [Messaging Between a Site Page and an HTML Element](https://dev.wix.com/docs/velo/velo-only-apis/$w/html-component/messaging-between-a-site-page-and-an-html-element.md). You can see a working [example site](https://www.wix.com/code-examples/v2-embed-chart) of an HTML element that uses the [Chart.js](http://www.chartjs.org/) library to create a chart. Open the [Custom Chart template](https://manage.wix.com/edit-template/from?originTemplateId=775c65bf-60ee-49aa-97dd-a171e369e3b1&templateId=b4662007-17e0-4fca-a4e6-2b774b16871a&autoDevMode=true) in the editor to work with site's code. ## See Also - [Embedding a Site in an HTML iFrame Element](https://dev.wix.com/docs/develop-websites/articles/wix-editor-elements/other-elements/html-i-frame-element/embedding-a-site-in-an-html-i-frame-element.md) - [Embedding a Code Widget in an HTML iFrame Element](https://dev.wix.com/docs/develop-websites/articles/wix-editor-elements/other-elements/html-i-frame-element/embedding-a-code-widget-in-an-html-i-frame-element.md) - [Tutorial: Creating a Rich Text Editor Using the HTML Component](https://dev.wix.com/docs/develop-websites/articles/code-tutorials/wix-editor-elements/creating-a-rich-text-editor-using-the-html-component.md) --- > Portal Navigation: > > - Append `.md` to any URL under `https://dev.wix.com/docs/` to get its markdown version. > - Pages are either content pages (article or reference text) or menu pages (a list of links to child pages). > - To get a menu page, truncate any URL to a parent path and append `.md` (e.g. `https://dev.wix.com/docs/sdk.md`, `https://dev.wix.com/docs/sdk/core-modules.md`). > - Top-level index of all portals: https://dev.wix.com/docs/llms.txt > - Full concatenated docs: https://dev.wix.com/docs/llms-full.txt ## Resource: Embedding a Site in an HTML iFrame Element ## Article: Embedding a Site in an HTML iFrame Element ## Article Link: https://dev.wix.com/docs/develop-websites/articles/wix-editor-elements/other-elements/html-i-frame-element/embedding-a-site-in-an-html-i-frame-element.md ## Article Content: # Embedding a Site in an HTML iFrame Element You can embed an entire website within an [HTML iFrame element](https://dev.wix.com/docs/develop-websites/articles/wix-editor-elements/other-elements/html-i-frame-element/working-with-the-html-iframe-element.md). Typically, when you want to embed another site in your site, you add an HTML element and use its settings to add the address of the website you want to embed. For example, to embed a [Wikipedia](https://www.wikipedia.org/) page in your site, add an HTML element to your page and set its **Website Address** to be the URL of the page you want to embed.
![](https://wixmp-833713b177cebf373f611808.wixmp.com/images/a83464186a3bd2fb7bcb92d0c292afdc)
**Warning:** The site you embed using the instructions above must have a URL that begins with HTTPS, not HTTP. If you try to embed a site with an HTTP URL, it may work in preview mode, but it will not function on your published site.
To embed a site with a URL that begins with the HTTP protocol, embed the site using the HTTPS protocol: 1. From the **Embed* code* section of the **Add** menu, select **Embed Site**. The element is added to your page. 1. In the HTML element's settings panel, select **Website Address**. 1. Enter the URL of the website you want to embed (with an "s" added to the "http"). ## See Also - [About HTML iFrame Elements](https://dev.wix.com/docs/develop-websites/articles/wix-editor-elements/other-elements/html-i-frame-element/working-with-the-html-iframe-element.md) - [Embedding a Code Widget in an HTML iFrame Element](https://dev.wix.com/docs/develop-websites/articles/wix-editor-elements/other-elements/html-i-frame-element/embedding-a-code-widget-in-an-html-i-frame-element.md) --- > Portal Navigation: > > - Append `.md` to any URL under `https://dev.wix.com/docs/` to get its markdown version. > - Pages are either content pages (article or reference text) or menu pages (a list of links to child pages). > - To get a menu page, truncate any URL to a parent path and append `.md` (e.g. `https://dev.wix.com/docs/sdk.md`, `https://dev.wix.com/docs/sdk/core-modules.md`). > - Top-level index of all portals: https://dev.wix.com/docs/llms.txt > - Full concatenated docs: https://dev.wix.com/docs/llms-full.txt ## Resource: Embedding a Code Widget in an HTML iFrame Element ## Article: Embedding a Code Widget in an HTML iFrame Element ## Article Link: https://dev.wix.com/docs/develop-websites/articles/wix-editor-elements/other-elements/html-i-frame-element/embedding-a-code-widget-in-an-html-i-frame-element.md ## Article Content: # Embedding a Code Widget in an HTML iFrame Element You can embed code within an [HTML iframe element](https://dev.wix.com/docs/develop-websites/articles/wix-editor-elements/other-elements/html-i-frame-element/working-with-the-html-iframe-element.md) to address a wide range of scenarios. If you want to embed a widget from a third party in your site, you'll need to add some code provided by the widget's creator.  Note that widgets that need to collect information about the Wix elements on your page will not work when their code is pasted into an HTML element. For example, [Google's Website Translator](https://translate.google.com/manager/website/) is a widget that translates the contents of your page into another language. Since it needs to know about your page elements to translate them, you can't add it to your site using an HTML element and have it translate the rest of your page. You can, however, add it to an HTML element and have it translate the contents of the element itself. Widgets that do not need to know any information about your site will usually work when their code is pasted into an HTML element. For example, the [weatherwidget.io](https://weatherwidget.io/) Current Weather Widget is a widget that displays the current weather. Since it doesn't need to know anything about your page elements, you can add it to your site using an HTML element. To add a code widget to your page: 1. From the **Embed code** section of the **Add** menu, select an **Embed code** element (Wix Studio) / **Embed HTML** element (Wix Editor). The element is added to your page. 1. Go to the relevant widget creator's website and collect a code snippet. 1. In the HTML element's settings panel, select **Code** and paste the widget code. ## See Also - [About HTML iFrame Elements](https://dev.wix.com/docs/develop-websites/articles/wix-editor-elements/other-elements/html-i-frame-element/working-with-the-html-iframe-element.md) - [Embedding a Site in an HTML iFrame Element](https://dev.wix.com/docs/develop-websites/articles/wix-editor-elements/other-elements/html-i-frame-element/embedding-a-site-in-an-html-i-frame-element.md) --- > Portal Navigation: > > - Append `.md` to any URL under `https://dev.wix.com/docs/` to get its markdown version. > - Pages are either content pages (article or reference text) or menu pages (a list of links to child pages). > - To get a menu page, truncate any URL to a parent path and append `.md` (e.g. `https://dev.wix.com/docs/sdk.md`, `https://dev.wix.com/docs/sdk/core-modules.md`). > - Top-level index of all portals: https://dev.wix.com/docs/llms.txt > - Full concatenated docs: https://dev.wix.com/docs/llms-full.txt ## Resource: Working with the Progress Bar Element ## Article: Working with the Progress Bar Element ## Article Link: https://dev.wix.com/docs/develop-websites/articles/wix-editor-elements/other-elements/progress-bar/working-with-the-progress-bar-element.md ## Article Content: # Velo: Working with the Progress Bar Element
Visit the Velo by Wix website to onboard and continue learning.
A [progress bar](https://support.wix.com/en/article/cms-adding-and-setting-up-a-progress-bar) allows you to visually display the status of an ongoing process. Some common uses for progress bars are to display: * How much of a process a user has completed. * How many stages of a purchase process have been completed. * How many tasks are marked as done on a to-do list. * Percentage completed of a user profile.  * How much progress has been made towards a goal. * The amount of money raised towards a fundraising goal. * The number of people who signed a petition. Progress is measured as a number between 0 and the target value that you set. The current progress status is referred to as the value of the progress bar. The area indicating the progress that has already been made is colored in the foreground color and the remaining area until the target value is colored in the background color. 
![](https://d2x3xhvgiqkx42.cloudfront.net/12345678-1234-1234-1234-1234567890ab/dfff8cbb-ddcb-4376-8cae-3fedb2dd4458/2019/07/16/e054245d-5ce0-4654-8118-0bc66e8eaff3/b3bcaa83-ad1b-47d1-b46b-a23d5d0e5ac6.png)
### API The progress bar's API allows you to get or set the value and target value. You can also set the styling of the background color, foreground color, border color, and border width. To learn more, see [ProgressBar](https://www.wix.com/velo/reference/$w.ProgressBar.html) in the API Reference. ```javascript // Set the target value as 50 $w('#myProgressBar').targetValue = 50; // Set the progress as 20 $w('#myProgressBar').value = 20; ``` ### Indicating Progress To indicate progress in a progress bar, you change the progress bar's value in code. Sometimes you simply change the value to a new value. In other cases, you need to first calculate the new value before setting it.  #### Example: Profile Completion Let's say you're using a progress bar to indicate how much of a profile a user has completed. After every step the user completes, you can change the progress bar's value to one more than the current value.  #### Example: Fundraising Goal Let's say you're using a progress bar to show how much money has been raised. Typically, you need to calculate that value by [running an aggregation](https://dev.wix.com/docs/develop-websites/articles/databases/wix-data/aggregations/working-with-aggregations-in-the-data-api.md) on a database collection where you store individual contributions as items. Then, use the result of the aggregation to set the value in the progress bar.  You can do this on-the-fly when displaying the progress bar using only code. Or you can perform the aggregation each time a contribution has been made and store that value in a collection. Then, you can [connect](https://support.wix.com/en/article/connecting-page-elements-to-a-dataset) the progress bar to that stored value using a dataset. --- > Portal Navigation: > > - Append `.md` to any URL under `https://dev.wix.com/docs/` to get its markdown version. > - Pages are either content pages (article or reference text) or menu pages (a list of links to child pages). > - To get a menu page, truncate any URL to a parent path and append `.md` (e.g. `https://dev.wix.com/docs/sdk.md`, `https://dev.wix.com/docs/sdk/core-modules.md`). > - Top-level index of all portals: https://dev.wix.com/docs/llms.txt > - Full concatenated docs: https://dev.wix.com/docs/llms-full.txt ## Resource: Working with Forms ## Article: Working with Forms ## Article Link: https://dev.wix.com/docs/develop-websites/articles/wix-editor-elements/other-elements/forms/working-with-forms.md ## Article Content: # Velo: Working with Forms You can work with Forms using Velo APIs in 2 different ways:  * Use the Wix Forms app and its APIs. * Create your own custom form with input elements and submit buttons. Then use Velo to save the data to a collection. Let's present each approach so you can decide which to use. ## Wix Forms APIs Wix Forms is an app solution that provides you with a built-in suite of form functionalities, such as an out-of-the-box submission button, database collection creation, and auto-generated emails after submission. First use the [Wix Forms app](https://support.wix.com/en/article/about-wix-forms) to set up your forms quickly and efficiently, taking advantage of Wix Forms features. You even get a starter [collection](https://dev.wix.com/docs/develop-websites/articles/databases/wix-data/collections/working-with-wix-app-collections-and-code.md) for your form that you can use to store the form data. Then use the [WixForms Velo APIs](https://www.wix.com/velo/reference/$w/form) to customize the visitor experience even more. For example, you can display a personalized thank you message when a visitor submits the form.
Check out the benefits of the Wix Forms app! * Choose from a variety of designs for your form from a set of templates. * You can design and customize the layout of the form in the Editor.  * Each form design comes with its own collection for storing form data. You don't have to create your own from scratch. * Each field on your form is automatically connected to the collection. You don't have to connect fields one by one. * The Wix Forms app sets up email notifications so you don't have to. The information is saved for your contacts, and goes through the Inbox (Wix CRM). * The Wix Forms app makes it easy to set up payment forms, multi-step forms, and subscription forms.
> > Without a Premium Plan, the Wix Forms app has limited features and capabilities. Learn more about [upgrading your Wix Forms app with a Premium Plan](https://support.wix.com/en/article/wix-forms-upgrading-wix-forms-with-a-premium-plan). ### Wix Forms starter collections When [you add the Wix Forms app](https://support.wix.com/en/article/adding-and-setting-up-a-form-on-your-site) to your site, you pick the type of form you want. Depending on the form you pick, you get a collection specifically built for that form. In addition to the form appearing in the Form Submissions tab in the Dashboard's Customer Management area, you can also see the collection in the Database section of the Code sidebar. You can use the collection "as is" or you can change the collection to meet your needs. For example, when we add a Donations form to our site, we get a starter collection called Donors with basic fields. Here we customized the collection by adding a Signature field. 
![](https://d2x3xhvgiqkx42.cloudfront.net/12345678-1234-1234-1234-1234567890ab/76096845-8b12-44f1-91f6-3dc2e838fdd9/2020/07/09/959cf02a-5169-499b-b603-ca81c15f0963/bddc7123-0703-4035-91ae-997a14bb504c.png)
The fields on the Donations form are connected to the fields in the Donors collection. This means that each time a visitor submits a form, the form field data is stored in the corresponding field in the collection.  > > The opposite is not true. Adding a field to a starter collection does not add a corresponding field to the form. ### The WixForms API 1. [Add and set up a Wix Form](https://support.wix.com/en/article/adding-and-setting-up-a-form-on-your-site) on your site in the Wix Editor. 2. Enable [Velo Dev Mode](https://dev.wix.com/docs/develop-websites/articles/get-started/quick-start.md). You will see a WixForms **wixForms1** element and its corresponding form element **form1** on your page. ![](https://d2x3xhvgiqkx42.cloudfront.net/12345678-1234-1234-1234-1234567890ab/76096845-8b12-44f1-91f6-3dc2e838fdd9/2020/07/08/75ab0794-4a76-4011-b701-b3f9ac1c1974/b4845dda-020d-4a5b-81b7-89c6d3a553fe.png) The Form element is a container for the input elements and buttons in the Wix Form. If you hide or collapse either the WixForms or Form element, the other element is also hidden/collapsed. Note that we apply the WixForms functions and events to the WixForms element, not the Form element. 3. **Client-side event handlers:** Write the code for the client-side event handlers [onWixFormSubmitted( )](https://dev.wix.com/docs/velo/velo-only-apis/$w/wix-forms/on-wix-form-submitted.md) and [onWixFormSubmittedError( )](https://dev.wix.com/docs/velo/velo-only-apis/$w/wix-forms/on-wix-form-submitted-error.md) to handle what happens when a visitor submits the form. onWixFormSubmitted() provides information, such as field names and field values, that is available only on the client side. You can code operations to run on the client side, such as displaying a message after form submission. This event fires when the server indicates that the submission was received, even if the server is still asynchronously processing. Here is sample code for displaying a personalized message on the page thanking the visitor for a donation. ```javascript $w("#wixForms1").onWixFormSubmitted( {fields} => { let firstName = fields[0].fieldValue; let lastName = fields[1].fieldValue; let donation = fields[2].fieldValue; let email = fields[3].fieldValue; $w('#text1').text = `Thank you, ${firstName} ${lastName}, for your generous donation of ${donation}.`; }); /* fields array of objects: * [ * { * "id":"inputFirstName", * "fieldValue":"Maria", * "fieldName":"Enter first name" * } * { * "id":"inputLastName", * "fieldValue":"Santora", * "fieldName":"Enter last name" * }, * { * "id":"inputDonation", * "fieldValue":"1000", * "fieldName":"Enter donation amount" * }, * { * "id":"inputEmail", * "fieldValue":"ms@theCompany", "fieldName":"Enter email" * } * ] */ ``` 1. **Backend Event Handler:** Write the code for the backend [onFormSubmit()](https://www.wix.com/velo/reference/wix-crm-backend/events/onformsubmit) event handler function to perform operations on the server side when the visitor submits a form. \`onFormSubmit()\` provides additional information that the page does not have, such as the form's submission time and the contact ID. Keep in mind that the functions on the server run asynchronously and do not hold up onWixFormSubmitted( ) operations. ## Custom forms To provide your site visitors with a fully customized form experience that you totally control, you can create custom forms manually. Add user input elements and buttons to the page, and code their usage to act like a form.  Using Velo APIs to create your own custom forms may take a bit more time and coding than using the Wix Forms app, but customizing your own forms can offer some advantages, such as enabling additional field types and using advanced functionality with code, without needing a Premium Plan. ### Use APIs for custom forms 1. Use standard $w input elements and buttons to create your form. The user input elements on your form can use functionality provided by [WixForms](https://dev.wix.com/docs/velo/velo-only-apis/$w/wix-forms-v2/introduction.md).  2. Write code for the event handlers to customize your visitors' experience.  Here are some examples and tutorial articles to help you get started.  **Tutorial Articles** * [Sending an Email on Form Submission](https://support.wix.com/en/article/corvid-tutorial-sending-an-email-on-form-submission) * [Creating a Custom Registration Form with Code](https://dev.wix.com/docs/develop-websites/articles/wix-editor-elements/other-elements/forms/working-with-forms.md) **Example sites and templates** - Multistage Forms ([example site](https://www.wix.com/code-examples/v2-multistage_form) | [template](https://manage.wix.com/edit-template/from?originTemplateId=472a1901-f9e2-4e1d-851f-eefb9f41b66b&templateId=0dc1daf7-3df9-4215-92cf-af382e8bb4c0&autoDevMode=true)) - Custom Validations ([example site](https://www.wix.com/code-examples/show-v2-custom-valid) | [template](https://manage.wix.com/edit-template/from?originTemplateId=d50002c3-0e20-4f3f-ba56-92a4b12a4a1a&templateId=b5a305df-bb8b-46bc-adb0-c1aab287d99c&autoDevMode=true)) - Collapsing Forms ([example site](https://www.wix.com/code-examples/show-v2-collapsing-f) | [template](https://manage.wix.com/edit-template/from?originTemplateId=3d745ed0-79ee-41ec-ab2e-9a36e072ec91&templateId=6ed673e9-315d-44b0-8dd0-1e877ea3aec7&autoDevMode=true)) - Using reCAPTCHA with Forms ([example site](https://www.wix.com/velo-examples/captchaexamp-vw) | [template](https://manage.wix.com/edit-template/from?originTemplateId=3f901ca5-31f5-40d0-a455-5735d0b6ade4&templateId=29d3fa87-469e-4464-a060-a88a3bd51577&autoDevMode=true)) --- > Portal Navigation: > > - Append `.md` to any URL under `https://dev.wix.com/docs/` to get its markdown version. > - Pages are either content pages (article or reference text) or menu pages (a list of links to child pages). > - To get a menu page, truncate any URL to a parent path and append `.md` (e.g. `https://dev.wix.com/docs/sdk.md`, `https://dev.wix.com/docs/sdk/core-modules.md`). > - Top-level index of all portals: https://dev.wix.com/docs/llms.txt > - Full concatenated docs: https://dev.wix.com/docs/llms-full.txt ## Resource: About Wix Data Management Solutions ## Article: About Wix Data Management Solutions ## Article Link: https://dev.wix.com/docs/develop-websites/articles/databases/about-wix-data-management-solutions.md ## Article Content: # About Wix Data Management Solutions Wix offers a variety of data management solutions to accommodate common user needs. This includes support for internal databases hosted directly on Wix as well as for external databases hosted outside the Wix ecosystem. This article explains the internal database capabilities Wix provides, and the available options for working with external databases. ## Supported IDEs You can work with Wix's data management solutions in the following IDEs: - The [editor](https://dev.wix.com/docs/develop-websites/articles/workspace-tools/velo-workspace/workspaces/wix-studio-working-with-the-code-panel.md) (Wix Studio and Wix Editor). - The [Wix IDE](https://dev.wix.com/docs/develop-websites/articles/workspace-tools/velo-workspace/wix-ide/wix-studio-about-the-wix-ide.md) (Wix Studio). - Your [local IDE](https://dev.wix.com/docs/develop-websites/articles/workspace-tools/developer-tools/git-integration-wix-cli-for-sites/about-git-integration-wix-cli-for-sites.md) (Wix Studio and Wix Editor). ## The Wix Content Management System Wix's built-in data management solution is the [Wix Content Management System (CMS)](https://support.wix.com/en/article/cms-content-management-system-an-overview). CMS data collections are document-oriented databases, optimized to store and retrieve websites’ content. They are globally replicated and have native support for PII encryption and GDPR. They run on secure, shared infrastructure, and are fully managed by Wix. CMS data collections can be managed via the [Wix Data APIs](https://dev.wix.com/docs/sdk/backend-modules/data/introduction.md), and used (with or without [datasets](https://dev.wix.com/docs/velo/velo-only-apis/$w/dataset/introduction.md)) to populate Wix UI elements like [repeaters](https://dev.wix.com/docs/develop-websites/articles/databases/wix-data/displaying-data/display-database-collection-content-in-a-repeater.md) and [tables](https://support.wix.com/en/article/cms-formerly-content-manager-displaying-collection-content-in-a-table). For more information about using Wix Data to work with the CMS on a Wix site, see [Working with Wix Data](https://dev.wix.com/docs/develop-websites/articles/databases/wix-data/data-api/working-with-wix-data.md). ## Support for external databases While CMS collections cover a wide range of use cases for content-driven websites and applications, some projects may have specific requirements that can't be addressed by the integrated database solution. To address such cases, Wix allows users to connect an external database to Wix sites using an external database adaptor. Once the connection is set up, users can interact with these databases and use them to populate site elements as though they were Wix CMS collections. For more information about connecting to external databases, see [Integrating External Databases with Your Wix Site](https://dev.wix.com/docs/develop-websites/articles/databases/external-databases/overview/integrating-external-databases-with-your-wix-site.md). ## Choose the right database engine for your site workload If you haven't already chosen a database engine, there's a lot of material on the internet about database comparisons and benchmarks that can help you decide. We suggest taking the following into account: - Use the Wix-integrated [CMS](https://support.wix.com/en/article/cms-content-management-system-an-overview) collections for: - CRUD operations for 1 to 10k items or up to 100k items, depending on the size of the data - Query operations of 1 to 10k items while using indexes. - Use relational databases for: - User facing operational workloads, including aggregates and data consistency validations. They scale according to the actual data and capacity planning for specific workloads - Use analytical databases for: - Reporting or analytical workloads when the dataset is mainly used for reporting or aggregates and, the dataset size exceeds the capacity of the relational database instance - Dedicated analytical databases include Google BigQuery or Snowflake. > **Note:** Wix created out-of-the-box container image adaptors for a number of databases that can run on AWS, Azure, and Google Cloud Platform. Using these out of the box adaptors can make integration with the supported databases simpler. See which databases are [supported with an out-of-the-box adaptor](https://dev.wix.com/docs/develop-websites/articles/databases/external-databases/overview/integrating-external-databases-with-your-wix-site.md#deploy-an-out-of-the-box-external-database-adaptor). ## See also - [CMS (Content Management System): An Overview](https://support.wix.com/en/article/cms-content-management-system-an-overview) - [Working with Wix Data](https://dev.wix.com/docs/develop-websites/articles/databases/wix-data/data-api/working-with-wix-data.md) --- > Portal Navigation: > > - Append `.md` to any URL under `https://dev.wix.com/docs/` to get its markdown version. > - Pages are either content pages (article or reference text) or menu pages (a list of links to child pages). > - To get a menu page, truncate any URL to a parent path and append `.md` (e.g. `https://dev.wix.com/docs/sdk.md`, `https://dev.wix.com/docs/sdk/core-modules.md`). > - Top-level index of all portals: https://dev.wix.com/docs/llms.txt > - Full concatenated docs: https://dev.wix.com/docs/llms-full.txt ## Resource: Working with Wix Data ## Article: Working with Wix Data ## Article Link: https://dev.wix.com/docs/develop-websites/articles/databases/wix-data/data-api/working-with-wix-data.md ## Article Content: # Velo: Working with Wix Data [Wix Data](https://support.wix.com/en/article/welcome-to-wix-data) lets you work with database collections, user input elements, and dynamic pages on your site. This article explains how you can enhance Wix Data functionality using [Velo](https://dev.wix.com/docs/develop-websites/articles/get-started/about-developing-websites.md) or with [Wix Studio](https://dev.wix.com/docs/develop-websites/articles/coding-with-velo/overview/about-coding-with-wix-studio.md). ## Enable Wix Data To enable Wix Data: **Wix Editor**: - Make sure Velo Dev Mode is [enabled](https://dev.wix.com/docs/develop-websites/articles/get-started/about-developing-websites.md). - Click the **Add** icon ![Add](https://d2eyqiy4n03ve6.cloudfront.net/12345678-1234-1234-1234-1234567890ab/2015/08/03/e486e9b2-0bf2-4a17-8fd7-4445d938d6c3.png) on the left. Click **CMS**, then click **Start Now**. Once enabled, your database collections appear in the **Databases** panel of the Velo sidebar, and your dynamic pages appear in the **Page Code** panel. ![](https://wixmp-833713b177cebf373f611808.wixmp.com/images/b26d22c561e999d1737ee6c1fb282c89.png)
![](https://wixmp-833713b177cebf373f611808.wixmp.com/images/5e6485644fcbe9d657adbbb293433a7f.png) > **Note** > Dynamic pages are grouped in the Velo sidebar according to dynamic page URL prefixes. [Learn more](https://support.wix.com/en/article/velo-making-dynamic-page-urls-meaningful-with-prefixes). **Wix Studio**: - If you haven't done so already, click ![Code icon](https://github.com/wix-incubator/wix-code-docs/assets/50321691/2c41d3df-930f-4e0f-966f-038742adceed) on the left, then click **Start Coding**. - Click **Add** ![Add](https://wixmp-833713b177cebf373f611808.wixmp.com/images/0edf787becd53682d716f1c9c6a56fc1.png) on the left. Click **CMS**, then click **Start Now**. Once enabled, your database collections appear under **Your Collections** in the **CMS** panel, and your dynamic pages appear in the **Pages** panel. ![](https://wixmp-833713b177cebf373f611808.wixmp.com/images/087441697cb69d3327e710b26504cea7.png)
![](https://wixmp-833713b177cebf373f611808.wixmp.com/images/275d8e90c193e195b92079ae0bc54ea3.png) > **Note:** > Enabling Velo Dev Mode (Wix Editor) or code (Wix Studio) automatically enables Wix Data.  > However, enabling Wix Data does not enable Velo Dev Mode or code. ### Managing Collections and Dynamic Pages From the sidebar, you can perform the following Wix Data actions:
Manage Collections - **Create a collection:** - Wix Editor: Click **Databases** and hover over Your Collections, click the plus![](https://d2x3xhvgiqkx42.cloudfront.net/12345678-1234-1234-1234-1234567890ab/0ca9e8ba-16ed-4cd8-a1e1-58d01c4420f7/2018/12/09/7908fa24-67cc-4489-969b-210529b83321.png) icon, and click **New Collection**. - Wix Studio: Click **CMS**, then click **Create Collection**. - **Edit a collection:** - Wix Editor: Click **Databases**, and click the collection. - Wix Studio: Click **CMS**, navigate to the **Your Collections** tab and click the collection. - **Edit collection permissions:** Hover over a collection and click the **Show More** ![](https://d2x3xhvgiqkx42.cloudfront.net/12345678-1234-1234-1234-1234567890ab/0ca9e8ba-16ed-4cd8-a1e1-58d01c4420f7/2020/10/27/9e7506ba-4048-4864-b26e-afcb489ae6d5/1665a276-48df-4061-92aa-c17d5df6cdb2.png) icon. Click **Edit Settings**, then click the **Permissions & privacy** tab. Select a permission preset or **Custom** from the dropdown menu and then set the **Custom Content Permissions**. - **Delete a collection:** Hover over a collection, click the **Show More** icon, and click **Delete Collection**.
Manage Dynamic Pages - **Add a dynamic page:** In **Databases** (Wix Editor) or **CMS** (Wix Studio), hover over a collection, click the **Show More** ![](https://d2x3xhvgiqkx42.cloudfront.net/12345678-1234-1234-1234-1234567890ab/0ca9e8ba-16ed-4cd8-a1e1-58d01c4420f7/2020/10/27/051f9df6-b1cb-4e3d-983d-0b674e3f9dba/f22e2f9f-f84b-4445-ab63-fe0400797e98.png) icon, and click **Add dynamic page**. - **Rename a dynamic page:** In **Page Code** (Wix Editor) or **Site Pages** (Wix Studio), hover over the dynamic page, click the **Show More** icon, and click **Rename**. - **Convert a dynamic page to a regular page:** In **Page Code** (Wix Editor) or **Site Pages** (Wix Studio), hover over the dynamic page, click the **Show More** icon, and click **Remove Connections**. - **Delete a dynamic page:** In **Page Code** (Wix Editor) or **Site Pages** (Wix Studio), hover over the dynamic page, click the **Show More** icon, and click **Delete**.
View Page Settings - **View page settings:** In **Page Code** (Wix Editor) or **Site Pages** (Wix Studio), hover over a regular or dynamic page, click the **Show More** icon, and click **Settings**.
### Collections With Wix Data you can create and manage database collections on your site. Velo lets you expand your capabilities when working with collections. Keep the following information in mind when working with collections and code: #### Field IDs When you add a field to your collection, a Field ID is automatically created based on the Field Name. Field IDs are only visible if Velo Dev Mode (Wix Editor) or code (Wix Studio) is enabled. You can specify your own Field ID, if you wish.
![](https://wixmp-833713b177cebf373f611808.wixmp.com/images/bf3648e2dc43489e8d86463b249fdbf3.png)
> **Important** > > - You cannot change the Field ID once the field has been created. > - Field IDs cannot begin with $ or contain a period '.' Field IDs are used when working with fields in code using the [Data API](https://dev.wix.com/docs/develop-websites/articles/databases/wix-data/data-api/working-with-the-data-api.md) or [Dataset API](http://wix.to/94BuAAs/wix-dataset.html). For example, if you want to insert an item into a collection using the Data API, you can use the following code: ```javascript wixData.insert("MyCollectionName", { someFieldKey: "someValue" }); ``` #### Hooks The [Data API](https://dev.wix.com/docs/develop-websites/articles/databases/wix-data/data-api/working-with-the-data-api.md) contains hooks that allow you to run code before or after you interact with a collection. To add a hook to a collection, hover over the collection name in the **Databases** panel (Wix Editor) or the **CMS** panel (Wix Studio) on the left, click the **Show More** ![](https://d2x3xhvgiqkx42.cloudfront.net/12345678-1234-1234-1234-1234567890ab/0ca9e8ba-16ed-4cd8-a1e1-58d01c4420f7/2020/10/27/37ff9473-4cf0-4d6b-845e-d93462da44eb/2c4c1bdd-afc8-407e-a434-7e47492e2ba6.png) icon and select **Add Data Hooks**. Learn more about [data hooks](https://dev.wix.com/docs/develop-websites/articles/databases/wix-data/hooks/using-data-hooks.md). #### Non-Schema Fields When you add fields to your collection using code, the fields are not automatically added to the collection structure and must be added manually. In the CMS, these fields appear with a warning icon, indicating that the field isn't defined yet. Learn more about the [structure of your database collection](https://support.wix.com/en/article/about-the-structure-of-your-database-collection). You can click on the field name to define the field type and add it to the structure.
![](https://d2x3xhvgiqkx42.cloudfront.net/12345678-1234-1234-1234-1234567890ab/11e10e4f-b84d-4136-a5a9-6109fab0b7d7/2020/04/16/c086062c-507c-48e2-a000-d9f0598455c5/a2606c49-b54e-4592-99a8-e80a6ce37da7.png)
#### Removing and Restoring Collections If you remove a collection that is referenced in code, the code will no longer work and will generate an error in the Editor and in the published site. You can replace the collection name with a different one if relevant. If you restore a collection you removed, the code will work again. #### Data APIs The Velo [Data API](https://www.wix.com/velo/reference/wix-data.html) and [Dataset API](https://www.wix.com/velo/reference/wix-dataset.html) provide additional functionality for working with data collections in your site. You can create customized searches and filters, manage and manipulate your data, and work with pagination, permissions, and hooks. Learn more about [working with the Data API](https://support.wix.com/en/article/velo-working-with-the-data-api). #### Data Quotas Wix places quotas on the amount of data resources your site can use. These quotas affect things like the number of collections your site can have and the number of data requests your site can make per minute. If your site requires additional resources, Wix offers a variety of [premium plans](https://www.wix.com/upgrade/website) to suit your needs. To find out more about the [data resources](https://dev.wix.com/docs/develop-websites/articles/coding-with-velo/limits-and-optimization/data-features.md) available for each package. Learn more about [premium plans](https://dev.wix.com/docs/develop-websites/articles/coding-with-velo/premium-plans/about-premium-plans.md). **Note:** If you have Blocks apps installed on your site, how they affect your quotas depends on whether they are private or public apps. Learn more about [Blocks apps and CMS quotas](https://dev.wix.com/docs/develop-websites/articles/coding-with-velo/limits-and-optimization/data-features.md#blocks-apps-and-collection-quotas). #### Request timeouts When your site makes a data request, it may take some time to receive a response. Wix Data places limits on how long a response can take before the request times out. If the response time exceeds this limit, Wix Data returns an error instead of the intended result. Request timeouts vary depending on your [Wix plan](https://www.wix.com/plans) and the type of collection you are attempting to access: | Collection Type | Wix plan | Timeout | | --------------------------------------------------------------------------------------------------------------------------------------------------------------------------- | ----------------------------------------------------------- | ---------- | | [CMS collections](https://support.wix.com/en/article/cms-formerly-content-manager-managing-your-collections) | Free sites, premium sites (excl. Elite and Business Elites) | 5 seconds | | [CMS collections](https://support.wix.com/en/article/cms-formerly-content-manager-managing-your-collections) | Business Elite & Elite Premium | 10 seconds | | [External Database Collections](https://dev.wix.com/docs/develop-websites/articles/databases/external-databases/overview/integrating-external-databases-with-your-wix-site.md) | All plans | 15 seconds | After the specified timeout, the request fails and the following error message is displayed in [Wix Logs](https://dev.wix.com/docs/develop-websites/articles/workspace-tools/developer-tools/logs/about-logs.md): `WDE0028: Operation time limit exceeded.` Learn more about [Wix Data error codes](https://dev.wix.com/docs/velo/apis/wix-data/error-codes.md). ### User Input With Wix Data you can create user input forms and store user data in your collections. Velo provides additional layers of functionality when working with user input elements: #### Input Validation When collecting user input data, you want to make sure that the data entered is valid. Some input validation is available via the user input element Settings panel, but with code you can provide additional validation measures. Learn more about [input validation](https://dev.wix.com/docs/develop-websites/articles/databases/wix-data/user-input/about-validating-user-input-with-code.md). #### Convert Regular Elements into Submit Buttons Without code, you can create a form using [user input elements](https://support.wix.com/en/article/about-user-input-elements) and a "submit" element that saves the data into your collection when clicked. Only selected elements, such as buttons and images, can act as submit elements. With code, you can add submit functionality to elements without a Submit option in the Connect panel. You can also add submit [success and error messages](https://support.wix.com/en/article/velo-adding-success-and-error-messages-for-elements-without-a-submit-option) when using those elements to submit. #### Create a Custom Signup Form With Velo you can create your own [custom signup form](https://support.wix.com/en/article/velo-tutorial-creating-a-custom-registration-form-with-code) to replace the standard one. Then [enable custom signup](https://support.wix.com/en/article/velo-enabling-custom-site-registration) so your visitors are directed to your custom form for site registration. ### Dynamic Pages With Wix Data you can create dynamic pages to display content from your database collection on multiple pages in your site. You can also use Velo to interact with dynamic pages: #### Hiding Dynamic Pages in Mobile Without code, you can hide dynamic pages on your site when displayed on different devices such as a mobile device, by hiding the elements that link to the pages. Any code on your site connected to a hidden element will generate an error. Therefore it's best to use the [`formFactor`](https://dev.wix.com/docs/velo/apis/wix-window-frontend/form-factor.md) property of the Window API to determine if the visitor is viewing the site from a different device, and use the elements' `hide()` or `collapse()` functions to visually remove the elements from the page. Learn more about [hiding elements on different devices](https://support.wix.com/en/article/hiding-an-element-in-the-mobile-editor).
**Important:** Hiding an element using the mobile Editor (Wix Editor) or [breakpoints](https://support.wix.com/en/article/studio-editor-designing-across-breakpoints) (Wix Studio) removes that element from the page completely. This causes any code that relies on the hidden element's existence to break.
#### Dynamic Pages and Hooks You can add hooks to dynamic pages: 1. Click **Menus & Pages**  ![](https://wixmp-833713b177cebf373f611808.wixmp.com/images/d226e37c6d3758dfd97efce30f8683fc.png) (Wix Editor) or click **Site Pages** ![](https://wixmp-833713b177cebf373f611808.wixmp.com/images/fb0ea95cfbee93a0602286780732a828.png) (Wix Studio) on the left side. 1. Click the **Show More** icon  ![](https://wixmp-833713b177cebf373f611808.wixmp.com/images/1617580fa1f44c7a618a2ffb45634efc.png)  next to the dynamic page. 1. Click **Settings** and select the **Page Info** tab. 1. Open the **Advanced Settings** tab, then click **Add hooks**. 1. Select the hooks you want to add, then click **Add & Edit Code**. When a request comes in for one of your dynamic pages, a router uses the URL of the request to decide which page to show and what data to bind to the page's dataset. You can add a [data binding router hook](https://dev.wix.com/docs/develop-websites/articles/databases/wix-data/hooks/about-data-hooks-for-dynamic-pages.md) to intercept this process at certain points and insert additional logic. ### Working with Wix App Collections in Your Code You reference the collections that Wix Apps add to your site similar to how you reference collections you create yourself, with one difference. To reference a collection in your code that you created yourself, you just use the collection name in the code. For example, this code retrieves an item with an ID of 00001 from the collection named myCollection: ```javascript wixData.get("myCollection", "00001"); ``` To reference a collection that a Wix App added to your site you need to also include the App name in the path of the collection name. For example, let's say you also want to retrieve an item with an ID of 00001, but this time from the PrivateMembersData collection inside the Members database.
![](https://d2x3xhvgiqkx42.cloudfront.net/12345678-1234-1234-1234-1234567890ab/0ca9e8ba-16ed-4cd8-a1e1-58d01c4420f7/2020/10/27/fbf05d8d-0a27-42a9-ba52-99787277835b/9b82d183-f5db-462a-a763-4005a85ef6d0.png)
In this case, you need to include Members in the path for the collection name, like this: ```javascript wixData.get("Members/PrivateMembersData", "00001"); ``` You can also use Wix Data to add and update information in some Wix App collections. For example: ```javascript let collectionToInsert = { title: "New Collection", }; wixData.insert("Portfolio/Collections", collectionToInsert).then((item) => { console.log(item); }); ``` You can find many examples using the Wix Editor in the **Business Solutions** section of the [Coding Examples site](https://dev.wix.com/docs/coding-examples.md). --- > Portal Navigation: > > - Append `.md` to any URL under `https://dev.wix.com/docs/` to get its markdown version. > - Pages are either content pages (article or reference text) or menu pages (a list of links to child pages). > - To get a menu page, truncate any URL to a parent path and append `.md` (e.g. `https://dev.wix.com/docs/sdk.md`, `https://dev.wix.com/docs/sdk/core-modules.md`). > - Top-level index of all portals: https://dev.wix.com/docs/llms.txt > - Full concatenated docs: https://dev.wix.com/docs/llms-full.txt ## Resource: Working with the Data API ## Article: Working with the Data API ## Article Link: https://dev.wix.com/docs/develop-websites/articles/databases/wix-data/data-api/working-with-the-data-api.md ## Article Content: # Velo: Working with the Data API ### Introduction The [Wix Data API](https://www.wix.com/velo/reference/wix-data/introduction) lets you work with your database collections using code and gives you more capabilities than what is available in the editor alone. To learn more about managing your data without using the Data API and how the database is structured, see [About Database Collections](https://support.wix.com/en/article/about-database-collections). Wix Data includes functions that enable you to manage the data in existing collections, build queries on collections, and register hooks on different operations. With the [Collections API](https://www.wix.com/velo/reference/wix-data-v2/collections/introduction) you can create new collections and manage their structure. **Important:** - You must first create a collection either in the [CMS](https://support.wix.com/en/article/cms-formerly-content-manager-creating-a-collection) or by using the [Collections API](https://www.wix.com/velo/reference/wix-data-v2/collections/createdatacollection) before you can work with it using the Wix Data API. - To use the Wix Data API, you need to import the module as follows: ```javascript // Add the following to the top of your code to import wixData: import wixData from "wix-data"; ``` - Wix places quotas on requests made by your site using the Wix Data API. These quotas affect things like the number of requests your site can make per minute and the amount of time your requests can run for. Learn more about [data quotas](https://dev.wix.com/docs/develop-websites/articles/coding-with-velo/premium-plans/legacy-data-compute-and-developer-tools-limits.md#legacy-plan-limits) and how to work with them. ### Wix Data API The Wix Data API allows you to manipulate the data in your collections and retrieve it in meaningful and useful ways. It contains: - `wix-data`: Functions that let you query and manipulate the data in your collections. - **Hooks**: Code you can set to run before or after you interact with a collection. Hooks are added to a collection in the Velo sidebar (Wix Editor) or CMS panel (Wix Studio) when you hover over the collection name. The code for the hooks are written in the data.js file which resides in the backend. - `WixDataFilter`: Functions for filtering a `WixDataQuery`. - `WixDataQuery`: An object that contains a query definition and functions that enable you to refine a query. - `WixDataQueryResult`: An object that contains a query's results, other information about the query, and pagination methods. - `WixDataSort`: Functions for sorting a `WixDataQuery`. > **Note:** > Wix places [quotas](https://dev.wix.com/docs/develop-websites/articles/coding-with-velo/premium-plans/legacy-data-compute-and-developer-tools-limits.md#legacy-plan-limits) on data requests made by your site, as well as the amount of data your site can contain. These quotas affect the number of requests your site can make per minute and the amount of time your requests can run for. Let's say you are building a database of customers who have registered on your online jewelry store. Your registration form would collect basic personal information about each customer. It might also ask customers for other information, such as relatives they may shop for, so you could know when to send them notifications of special offers and sales. You may also want to know about their general interests so that you can provide better purchase suggestions. When a customer makes a purchase, you would save the details of their purchase as well. An item in your collection may look like this: ```javascript let newCustomer = { name: "Mary", age: 47, _id: "mary.jones@myemail.com", phone: "(345)123-4567", pic: "Mary.jpg", labels: ["female", "adult", "hiking"], relatives: ["husband", "daughter"], purchases: [ { item: "watch", material: "gold", price: "2000.00" }, { item: "ring", material: "platinum", price: "500.00" }, { item: "bracelet", material: "silver", price: "250.00" }, ], }; ``` You would then add this item to your collection with the `insert` method: ```javascript wixData.insert("Customer", newCustomer); ``` As your customer list grows and your site has more traffic, as well as repeat visits from customers, you would use [`save()`](http://wix.to/94BuAAs/wix-data.html#save), [`update()`](http://wix.to/94BuAAs/wix-data.html#update), [`remove()`](http://wix.to/94BuAAs/wix-data.html#remove), and [`get()`](http://wix.to/94BuAAs/wix-data.html#get) to modify the items in your collection. It is important to familiarize yourself with the Wix Data model and [`query()`](http://wix.to/94BuAAs/wix-data.WixDataQuery.html) methods so that you can use the most effective data modeling when you create your collections. ### Working with Permissions in Wix Data When you use Wix Data methods in your Public and Pages files you need to consider the permissions your site visitors will have. Some methods modify data in collections while other methods only read data. Your site visitor needs to have the corresponding permissions for these methods to work. If a method is called with insufficient permissions the method will fail. For more information, see [About Database Collection Permissions](https://support.wix.com/en/article/about-database-collection-permissions). By default, your site visitor's permissions apply to Wix Data methods you call from your backend code also. However, you can call Wix Data methods from backend code without checking permissions by passing the method the `WixDataOptions` object as the `options` parameter with the property:value pair `suppressAuth: true`. ### Working with Hooks in Wix Data The `wix-data` module contains hooks that allow you to run code before or after you interact with a collection. See [How to Use Data Hooks](https://dev.wix.com/docs/develop-websites/articles/databases/wix-data/hooks/using-data-hooks.md) to learn more. When a method is called in your code, the system first checks that the method was called with the correct permissions. If you registered hooks to a method, they will run only if the method passes the permissions check. You can call Wix Data methods from the backend without their registered hooks by passing the `options` parameter for the method a `WixDataOptions` object with the property:value pair `suppressHooks: true`. ### Querying Your Collection A collection of data is only useful if you can retrieve the data in meaningful ways. To query a collection, use the [`query`](https://www.wix.com/code/reference/wix-data.WixDataQuery.html) method. By default, `query` returns the first 50 items in a collection in descending order of their `_createdDate` value. Items that are marked as [hidden](https://support.wix.com/en/article/cms-controlling-live-site-item-visibility-from-your-collection?tabs=Editor#changing-item-statuses-to-visible-or-hidden) are not returned. For example, the following query logs to the console the first 50 items in the Customer collection, sorted in descending order of their `_createdDate` values: ```javascript wixData .query("Customer") .find() .then((results) => { console.log(results.items); }); ``` The [`find()`](https://www.wix.com/velo/reference/wix-data.WixDataQuery.html#find) function is chained to the query, and it runs the query. The `find()` function returns a [Promise](https://support.wix.com/en/article/working-with-javascript-in-developer-tools#es2015-feature-support) that resolves to a [`WixDataQueryResult`](https://www.wix.com/velo/reference/wix-data.WixDataQueryResult.html) object. Because `find()` returns a Promise, `then()` is also chained to the query to display the results. To display the items that the query returns, use the `items` property of the `WixDataQueryResult` object. #### Request Timeouts When your site makes a data request, it may take some time to receive a response. Wix Data places limits on how long a response can take before the request times out. If the response time exceeds this limit, Wix Data returns an error instead of the intended result. Learn more about [request timeouts in Wix Data](https://dev.wix.com/docs/develop-websites/articles/databases/wix-data/data-api/working-with-wix-data.md#request-timeouts). ### Refining Your Query To refine the results of a query, chain [`WixDataQuery`](https://www.wix.com/velo/reference/wix-data.WixDataQuery.html) methods to the query. For example, let's say you want to query the Customer collection for all customers over the age of 20. You would chain the [`gt()`](https://www.wix.com/velo/reference/wix-data.WixDataQuery.html#gt) (greater than) function to the query, like this: ```javascript wixData .query("Customer") .gt("age", 20) .find() .then((results) => { console.log(results.items); }); ``` The `query()` function returns a `WixDataQuery` object, which contains the definition of the query. Each `WixDataQuery` method also returns a `WixDataQuery` object. Since they both return the same type of object, you can chain multiple `WixDataQuery` methods onto a call to `query()`, which further refines the query results. For example, let's say you want to take the results of the previous query, but return only the male customers. You would add the `hasSome` method to your query, with `labels` as the `paremeterName` and `Male` as the value: ```javascript wixData .query("Customer") .gt("age", 20) .hasSome("labels", "Male") .find() .then((results) => { console.log(results.items); }); ``` This adds the `gt()` and `hasSome()` conditions to the query definition that is stored in the `WixDataQuery` object. Now when you call `find()`, it uses these conditions to run the query. ### Query Results Query results are returned in a `WixDataQueryResult` object. This object has the following properties: - `currentPage`: The index (zero-based) of the current results page number. - `items`: An array that holds the results of the query. - `length`: The number of items in the current results page. - `pageSize`: The query page size, based on the defined limit. - `query`: The `WixDataQuery` object used in the query. - `totalCount`: The total number of items that match the query. - `totalPages`: The total number of pages the query produces, based on the defined `skip` and `limit` values. For example, the following would display the number of results for the query for male customers over the age of 20: ```javascript wixData .query("Customer") .gt("age", 20) .hasSome("labels", "Male") .find() .then((results) => { console.log(results.totalCount); }); ``` ### Pagination `WixDataQueryResult` has [`next()`](https://www.wix.com/velo/reference/wix-data.WixDataQueryResult.html#next) and [`prev()`](https://www.wix.com/velo/reference/wix-data.WixDataQueryResult.html#prev) functions that enable you to easily page forward and backward in your results. For example, let's say you want to filter the Customer collection for all female customers 20 years or older who have purchased a ring. You also want each page of results to display 15 items. You use the [`limit`](https://www.wix.com/velo/reference/wix-data.WixDataQuery.html#limit) method to limit the number of results a query returns. ```javascript let femaleRingTwenty; wixData .query("Customer") .ge("age", 20) .hasSome("labels", "Female") .eq("purchases.item", "ring") .limit(15) .find() .then((results) => { console.log(results.items); femaleRingTwenty = results; }); ``` This displays the first 15 results from the query, starting at the first result and ending at the 15th. To display the next page of results, you would call `next` on the results: ```javascript femaleRingTwenty.next().then(function (results) { console.log(results.items); femaleRingTwenty = results; }); ``` The `next()` function also returns a Promise, so you chain `then()` to the call to `next` and log the resolution of the Promise to the console, which returns the 16th through 30th results. Also, assign `femaleRingTwenty` the results of `next()` so that you can call `prev()` or `next()` on `femaleRingTwenty` to get the previous or next page of results. ### Manual Pagination with Prev and Next The `skip()` function enables `next()` and `prev()` to provide a page of query results that skips the first number of results from the total results that match the query. For example, when you query the collection in the pagination example above, it returns results with a `limit()` of 15, but it also has a default `skip()` value of 0. This returns the query results starting at the 1st result and ending at the 15th. When you then call `next()` for the first time, it returns results with a `skip()` value of 15 and a `limit()` of 15. This tells Wix Data to return the query results starting at the 16th result and ending at the 30th result. If you call `femaleRingTwenty.next()` again, it returns results with a `skip()` value of 30 and a limit of 15, returning results starting at the 31st result and ending at the 45th. When you call `prev()` and `next()`, they handle changing the `skip()` value to match the requested range of results. You can also manually assign a value to `skip()`. This would be useful if you want to enable jumping to a specific page of results without having to use `next()` or `prev()` multiple times. For example, using the query in the previous example, if you want to get the 5th page of results with 12 results per page, you would query your collection with a skip of 48 (limit \* (5-1)) and a limit of 12: ```javascript let queryResults; wixData .query("Customer") .ge("age", 20) .hasSome("labels", "Female") .eq("purchases.item", "ring") .skip(48) .limit(12) .find() .then((results) => { console.log(results.items); queryResults = results; }); ``` This logs the 49th through 60th results. If you then call `next()` or `prev()` on `queryResults`, they return the next or previous 12 results. ### Date Fields Wix Data supports 2 kinds of date fields: - **Date and Time** - **Date** These kinds of fields have different data types and should be used differently in your code. #### Date **Date** fields are represented as strings in [ISO 8601](https://en.wikipedia.org/wiki/ISO_8601) date format (YYY-MM-DD). When you retrieve an item with this kind of field, or write to one, you should use this format. #### Date and Time **Date and Time** fields are represented as JavaScript [Date](https://developer.mozilla.org/en-US/docs/Web/JavaScript/Reference/Global_Objects/Date) objects. When working with this type of field, you should use this format. If you assign a **Date and Time** field a value of an ISO date string, Wix Data treats it as it would any other string. For example, you can use a JavaScript Date object as the value for a Date and Time field when creating a new Wix Data item. In this example, `birthday` is assigned a date: ```javascript let newCustomer = { name: "Mary", age: 47, _id: "mary.jones@myemail.com", pic: "Mary.jpg", labels: ["Female", "Adult", "Hiking"], relatives: ["husband", "daughter"], birthday: new Date(1975, 10, 5), }; // Use wixData.insert to add a new item to the Customer collection let entry = wixData.insert("Customer", newCustomer); ``` Wix Data always saves Date objects and displays them in the console as a string with a UTC timezone. For example, if you display the results of the previous insert: ```javascript entry.then((results) => { console.log(results); }); ``` it logs: ```javascript { name: "Mary", age: 47, _id: "mary.jones@myemail.com", pic: "Mary.jpg", labels: ["Female", "Adult", "Hiking"], relatives: ["husband", "daughter"], birthday: "1975-10-05T14:24:20Z", _createdDate: "2004-04-01T01:04:45Z", _UpdatedDate: "2006-02-15T12:35:20Z", } ``` If you need to convert one type of date data to the other, you can do the following. To convert ISO date strings to Date objects: ```javascript const dateString = "1985-11-23"; const dateObject = new Date(dateString); ``` To convert a Date object into an ISO date string: ```javascript const dateString = dateObject.toISOString().substring(0, 10); ``` ### Media Fields Wix Data supports video, image, and other common media files. One of the collection fields must be the media file's unique Media Manager URL. This URL has a specific format that varies based on media type and file specifications. #### Working with uploaded media using Wix Media V2 Follow these steps to upload and insert media files into your data collection using `wix-media.v2` and Axios. 1. Import the relevant API modules and packages. > **Notes**: > > - Axios needs to be [installed](https://dev.wix.com/docs/develop-websites/articles/coding-with-velo/packages/about-npm-packages.md) in your site. > - The `wix-media.v2` methods require elevated permissions. ```javascript import axios from "axios"; import { files } from "wix-media.v2"; import { elevate } from "wix-auth"; ``` 2. Call [`generateFileUploadUrl()`](https://www.wix.com/velo/reference/wix-media-v2/files/generatefileuploadurl) to create and return the upload URL. ```javascript export async function myGenerateFileUploadUrl { const elevatedGenerateFileUploadUrl = elevate(files.generateFileUploadUrl); const result = await elevatedGenerateFileUploadUrl(mimeType, options); const uploadUrl = result.uploadUrl; return uploadUrl; } const uploadUrl = myGenerateFileUploadUrl(); ``` 3. Use the [Upload API](https://www.wix.com/velo/reference/wix-media-v2/files/upload-api) to make an Axios HTTP POST request. The request uploads the media file using the upload URL that was generated in the previous step. Pass in the upload URL as one of the request parameters. A successful request results in the media file being uploaded to your [Media Manager](https://support.wix.com/en/article/wix-media-about-the-media-manager). ```javascript const params = { filename: "testImage.jpeg", }; const headers = { "Content-Type": "application/octet-stream", Accept: "application/json", }; const uploadResponse = await axios.put(uploadUrl, myImageFileData, { headers, params, validateStatus: () => true, }); ``` 4. To get the compatible Media Manager URL, call [`getFileDescriptor()`](https://www.wix.com/velo/reference/wix-media-v2/files/getfiledescriptor). Pass the `file.id` property from the Upload API's [response object](https://www.wix.com/velo/reference/wix-media-v2/files/upload-api#wix-media-v2_files_upload-api_response) as the function's only parameter. ```javascript const elevatedGetFileDescriptor = elevate(files.getFileDescriptor); const fileDescriptorResponse = await elevatedGetFileDescriptor( uploadResponse.data.file.id ); ``` 5. Locate the Media Manager URL in the file descriptor response object. The Media Manager URL is located in the response's `media` property, however, the exact location of the URL depends on the [type of media file](https://support.wix.com/en/article/wix-media-supported-media-file-types-and-file-sizes?tabs=Images) that was uploaded. The following table illustrates where the Media Manager URLs are located in the `getFileDescriptor()` response object: | Media type | Property name | | ------------------ | -------------------- | | Audio files | `media.audio._id` | | Video files | `media.video` | | Image files | `media.image.image` | | Document files | `media.document` | | Vector image files | `media.vector.image` | | Archive files | `media.archive.url` | 6. Insert the Media Manager URL into your data collection. ```javascript const imageUrl = fileDescriptorResponse.media.image.image; const newMediaFile = { title: "myImage", src: imageUrl, }; // Use wixData.insert to add a new item to the data collection let entry = wixData.insert("MyMedia", newMediaFile); ``` --- > Portal Navigation: > > - Append `.md` to any URL under `https://dev.wix.com/docs/` to get its markdown version. > - Pages are either content pages (article or reference text) or menu pages (a list of links to child pages). > - To get a menu page, truncate any URL to a parent path and append `.md` (e.g. `https://dev.wix.com/docs/sdk.md`, `https://dev.wix.com/docs/sdk/core-modules.md`). > - Top-level index of all portals: https://dev.wix.com/docs/llms.txt > - Full concatenated docs: https://dev.wix.com/docs/llms-full.txt ## Resource: Overview of the Wix Data and Wix Dataset APIs ## Article: Overview of the Wix Data and Wix Dataset APIs ## Article Link: https://dev.wix.com/docs/develop-websites/articles/databases/wix-data/data-api/overview-of-the-wix-data-and-wix-dataset-apis.md ## Article Content: # Velo: Overview of the Wix Data and Wix Dataset APIs Data is an integral part of many websites. Data refers to information your site displays or collects from site visitors. For example, real estate sites, sites with a store, and sites with a form all contain data. Velo provides you with many ways to manage and manipulate your site data. This article provides an overview of the different data operations you can perform using Velo. >**Note** > Wix places [quotas](https://dev.wix.com/docs/develop-websites/articles/coding-with-velo/limits-and-optimization/optimizing-your-code.md#data-requests) on data requests made by your site, as well as the amount of data your site can contain. These quotas affect the number of requests your site can make per minute and the amount of time your requests can run for. ## Data Building Blocks There are 3 components involved in managing your site's data: * [Database collections](https://support.wix.com/en/article/about-the-content-manager-7160473#collections): Where you store your site's data. * [Datasets](https://support.wix.com/en/article/about-datasets-6368396): An element hidden from site visitors that acts as a connector between your collection and page elements. * [Page elements:](https://support.wix.com/en/article/connecting-page-elements-to-a-dataset) The elements on your site that display or gather data. For example, a [repeater](https://support.wix.com/en/article/wix-editor-adding-and-managing-repeaters-lists-grids) displays data, and [user inputs](https://support.wix.com/en/article/about-user-input-elements) collect data from site visitors. ## No Code Required Before jumping into code, it's helpful to know that there are many data operations you can perform without any code. By connecting the content stored in your database collection with your page elements via a dataset, you can do the following without using any code: * [Display content](https://dev.wix.com/docs/develop-websites/articles/databases/wix-data/displaying-data/display-database-collection-content-in-a-repeater.md) from your collection in page elements on your site. * [Filter and sort](https://support.wix.com/en/article/cms-formerly-content-manager-hiding-sorting-and-filtering-fields-in-your-collection-view) the content that is displayed in your page elements. * Display content from multiple collections using [reference fields](https://support.wix.com/en/article/displaying-content-from-multiple-content-collections-using-reference-fields). * [Create a custom form](https://support.wix.com/en/article/creating-a-form-with-user-input-elements) using user input elements and store site visitors' answers in a collection. * [Create dynamic pages](https://support.wix.com/en/article/about-dynamic-pages-4488730), which are multiple pages with the same design and layout but different content. * [Create an index page](https://support.wix.com/en/article/cms-adding-an-index-for-your-collection) for your dynamic pages. ## Dataset plus Code If you are using a [dataset](https://support.wix.com/en/article/about-datasets-6368396) to connect your database collection content with your page elements, you can extend your dataset's built-in capabilities by adding code from the [wix-dataset APIs](https://www.wix.com/velo/reference/wix-dataset) to your site.  The wix-dataset APIs are divided into 2 sections:  * [Dataset](https://www.wix.com/velo/reference/wix-dataset/dataset): For regular datasets.  * [DynamicDataset](https://www.wix.com/velo/reference/wix-dataset/dynamicdataset): For [dynamic datasets](https://support.wix.com/en/article/changing-your-dynamic-page-dataset-settings), special datasets for [dynamic pages](https://support.wix.com/en/article/about-dynamic-pages-4488730) that control how the  elements on your dynamic pages interact with the data in your collections. This section includes all the functions in the Dataset section, plus a couple additional functions specific to dynamic datasets. ### Dataset Mode The [mode](https://support.wix.com/en/article/working-with-dataset-connector-modes-and-collection-permissions#dataset-modes) of your dataset affects which dataset functions you can call. For example, if you set your dataset mode to **Read-only**, you won't be able to call the [save()](https://www.wix.com/velo/reference/wix-dataset/dataset/save) function on your dataset, since it writes from your dataset to your collection. ### Dataset onReady() Event Handler Most wix-dataset functions run properly only if they're called after the dataset has loaded its data. * If you are calling a dataset function in the page's [onReady()](https://www.wix.com/velo/reference/$w/onready) function, you should make sure that the dataset is ready by calling the function you'd like to use from inside the **dataset's** [onReady()](https://www.wix.com/velo/reference/wix-dataset/dataset/onready) function (not to be confused with the **page's** [onReady()](https://www.wix.com/velo/reference/$w/onready) function mentioned above). To check whether the dataset function you are using requires onReady(), see the [Velo API Reference](https://www.wix.com/velo/reference/wix-dataset).  ```javascript $w.onReady(function () { // Page onReady() function $w("#myDataset").onReady( () => { // Dataset onReady() function console.log("The dataset is ready"); }); }); ``` * If you're calling the dataset function outside the page's [onReady()](https://www.wix.com/velo/reference/$w/onready) function (for example, in an event handler), you can assume the dataset has loaded it's data already. In fact you should **not** call the dataset function from inside the dataset's onReady() function, since if the dataset has already loaded its data, the dataset onReady() function may never run, and your code may not execute. To summarize: Wrap your dataset function in the dataset's onReady() event handler only if the function requires that the dataset's data must be loaded first, and if the function is called inside the page's onReady() function. > **Note:** Your `onReady()` may be called twice when a [page renders](https://dev.wix.com/docs/develop-websites/articles/coding-with-velo/frontend-code/page-rendering/about-page-rendering.md#rendering-process). This could cause your dataset function to run twice. Use the [Rendering API](https://dev.wix.com/docs/velo/apis/wix-window-frontend/rendering/introduction.md) to avoid these side effects. ### Work with the Current Dataset Item You can get and set information for the current dataset item. Examples of a current dataset item are the current item in a dynamic page, a repeater item in which a contextual event occurred (such as a button click), or the currently displayed item on a regular page with previous and next buttons. * [getCurrentItem( )](https://www.wix.com/velo/reference/wix-dataset/dataset/getcurrentitem): Gets an object representing the current item of the dataset. * [setCurrentItemIndex( )](https://www.wix.com/velo/reference/wix-dataset/dataset/getcurrentitemindex): Saves the current item in the collection, sets the current item as the item with the specified index, and updates connected page elements with the new current item's values. * [getCurrentItemIndex( )](https://www.wix.com/velo/reference/wix-dataset/dataset/getcurrentitemindex): Gets the index of the current item in the dataset (starts from 0). * [setFieldValue( )](https://www.wix.com/velo/reference/wix-dataset/dataset/setfieldvalue): Sets the value of a field in the current item. Does not save the new value in the database collection. * [setFieldValues( )](https://www.wix.com/velo/reference/wix-dataset/dataset/setfieldvalues): Sets the value of multiple fields in the current item. Does not save the new values in the database collection. * [new( )](https://www.wix.com/velo/reference/wix-dataset/dataset/new): Saves the current item and creates a new blank item immediately following the current item. ### Filter and Sort Your Dataset's Data You can apply a variety of filters to your dataset, as well as sort the dataset's data in ascending or descending order. * [setFilter( )](https://www.wix.com/velo/reference/wix-dataset/dataset/setfilter): Filters the items in the dataset using one or more [WixDataFilter](https://www.wix.com/velo/reference/wix-data/wixdatafilter) functions. * [setSort( )](https://www.wix.com/velo/reference/wix-dataset/dataset/setsort): Sorts the items in the dataset. ### Update the Dataset and Database Collection The following functions update either the dataset or database collection and synchronize the items in the collection, dataset, and page elements. * [save( )](https://www.wix.com/velo/reference/wix-dataset/dataset/save): Saves the current dataset item in the collection and updates connected page elements with the current item's new value. * [refresh( )](https://www.wix.com/velo/reference/wix-dataset/dataset/refresh): Resends collection content to the dataset and updates connected page elements. * [revert( )](https://www.wix.com/velo/reference/wix-dataset/dataset/revert): Reverts the current item to its saved state in the collection and updates connected page elements with the current item's old values. * [remove( )](https://www.wix.com/velo/reference/wix-dataset/dataset/remove): Deletes the current dataset item from the database collection and updates connected page elements with the next item's values. ### Paginate You can use dataset pagination functions to navigate dynamic pages, load more content into a repeater, get the index of the current page, and more. A dataset's page size determines how many items are initially displayed in a repeater connected to the dataset. You can then paginate through each 'page' of the dataset, loading the next batch of items into the repeater.  Here are the dataset functions available for pagination: **Size, Index & Count** * [setPageSize( )](https://www.wix.com/velo/reference/wix-dataset/dataset/setpagesize): Sets the dataset's page size. * [getPageSize( )](https://www.wix.com/velo/reference/wix-dataset/dataset/getpagesize): Gets the dataset's page size. * [getCurrentPageIndex( )](https://www.wix.com/velo/reference/wix-dataset/dataset/getcurrentpageindex): Gets the index of the current dataset page (starts from 1). * [getTotalCount( )](https://www.wix.com/velo/reference/wix-dataset/dataset/gettotalcount): Gets the total number of items in a dataset. If a filter is applied to the dataset, gets the number of items that match the filter's criteria. * [getTotalPageCount( )](https://www.wix.com/velo/reference/wix-dataset/dataset/gettotalpagecount): Gets the number of pages in a dataset: the number of total items divided by the page size. **Previous and Next Item** * [hasPrevious( )](https://www.wix.com/velo/reference/wix-dataset/dataset/hasprevious): Checks whether the current item is the first item in the dataset. * [previous( )](https://www.wix.com/velo/reference/wix-dataset/dataset/previous): Saves the current item and moves to the previous item in the dataset. * [getPreviousDynamicPage( )](https://www.wix.com/velo/reference/wix-dataset/dynamicdataset/getpreviousdynamicpage): Gets the URL of the previous dynamic page (dynamic datasets only). * [hasNext( )](https://www.wix.com/velo/reference/wix-dataset/dataset/hasnext): Checks whether the current item is the last item in the dataset. * [next( )](https://www.wix.com/velo/reference/wix-dataset/dataset/next): Saves the current item in the collection and moves to the next item in the dataset. * [getNextDynamicPage( )](https://www.wix.com/velo/reference/wix-dataset/dynamicdataset/getnextdynamicpage): Gets the URL of the next dynamic page (dynamic datasets only). **Previous and Next Page** * [hasPreviousPage( )](https://www.wix.com/velo/reference/wix-dataset/dataset/haspreviouspage): Checks whether the current page is the first page in the dataset. * [previousPage( )](https://www.wix.com/velo/reference/wix-dataset/dataset/previouspage): Saves the current item and moves to the previous page of items. * [hasNextPage( )](https://www.wix.com/velo/reference/wix-dataset/dataset/hasnextpage): Checks whether the current page is the last page in the dataset. * [nextPage( )](https://www.wix.com/velo/reference/wix-dataset/dataset/nextpage): Saves the current item in the collection and moves to the next page of items. **Load Content** * [loadMore( )](https://www.wix.com/velo/reference/wix-dataset/dataset/loadmore): Loads the next page of items **in addition** to the current page of items. * [loadPage( )](https://www.wix.com/velo/reference/wix-dataset/dataset/loadpage): Loads the specified page of the dataset. ### Event Handlers: Run Code Before and After Dataset Operations * [onAfterSave( )](https://www.wix.com/velo/reference/wix-dataset/dataset/onaftersave): Perform actions right after a dataset [save( )](https://www.wix.com/velo/reference/wix-dataset/dataset/save) operation. * [onBeforeSave( )](https://www.wix.com/velo/reference/wix-dataset/dataset/onbeforesave): Perform actions right before a dataset [save( )](https://www.wix.com/velo/reference/wix-dataset/dataset/save) operation. * [onCurrentIndexChanged( )](https://www.wix.com/velo/reference/wix-dataset/dataset/oncurrentindexchanged): Perform actions right after the current index changes. * [onError( )](https://www.wix.com/velo/reference/wix-dataset/dataset/onerror): Perform actions right after a dataset operation causes an error. * [onItemValuesChanged( )](https://www.wix.com/velo/reference/wix-dataset/dataset/onitemvalueschanged): Perform actions right after a value of the current item changes. * [onReady( )](https://www.wix.com/velo/reference/wix-dataset/dataset/onready): Perform actions right after the dataset is ready. ## Only Code Sometimes you might need additional functionality for your data that isn't available with datasets. Or you might find it easier to organize your data operations by handling them only with code instead of via the UI. You can use the [wix-data APIs](https://www.wix.com/velo/reference/wix-data#top) for this purpose. The Data APIs provide you with additional functionality and customization options for managing and manipulating your site content. Here's an overview of what you can do with wix-data: > **Note:** If you're calling these functions from the page's `onReady()` event handler, be aware that `onReady()` may be called twice during the page rendering process. This can cause side effects, such as inserting or updating items, to happen twice. To avoid this, use [`wix-window-frontend.rendering.env`](https://dev.wix.com/docs/velo/apis/wix-window-frontend/rendering/env.md) to determine where your code is being executed. Learn more about [page rendering and side effects](https://dev.wix.com/docs/develop-websites/articles/coding-with-velo/frontend-code/page-rendering/about-page-rendering.md#side-effects). ### Save Content to a Collection * [insert()](https://www.wix.com/velo/reference/wix-data/insert): Add a new item to a collection. Will not update an existing item. Use this function when you don't want to overwrite the item if it already exists in the collection. * [update()](https://www.wix.com/velo/reference/wix-data/update): Update an item in a collection. Will not add a new item if the item doesn't already exist. * [save()](https://www.wix.com/velo/reference/wix-data/save): Add or update an item in a collection. If the item exists, it will update. If not, the new item is added. * [bulkInsert()](https://www.wix.com/velo/reference/wix-data/bulkinsert): Add multiple items to a collection. * [bulkSave()](https://www.wix.com/velo/reference/wix-data/bulksave): Add or update multiple items in a collection. * [bulkUpdate()](https://www.wix.com/velo/reference/wix-data/bulkupdate): Update multiple items in a collection. ### Delete Content from a Collection * [remove()](https://www.wix.com/velo/reference/wix-data/remove): Remove an item from a collection. * [bulkRemove()](https://www.wix.com/velo/reference/wix-data/bulkremove): Remove multiple items from a collection. * [truncate()](https://dev.wix.com/docs/velo/apis/wix-data/truncate.md): Remove all items from a collection. ### Get Content from a Collection and Display It on Your Site * [get()](https://dev.wix.com/docs/velo/apis/wix-data/get.md): Retrieve a single item from a collection. * [query()](https://www.wix.com/velo/reference/wix-data/query): Start a process that will retrieve 1 or more items from a collection. The process is completed when you run the [find()](https://www.wix.com/velo/reference/wix-data/wixdataquery/find) function. #### Filter and Sort Your Retrieved Data * [WixDataQuery](https://www.wix.com/velo/reference/wix-data/wixdataquery) functions: Apply these to a [query](https://www.wix.com/velo/reference/wix-data/query) to filter or sort your retrieved data. #### Limit Your Retrieved Data * [limit()](https://www.wix.com/velo/reference/wix-data/wixdataquery/limit): Limit the number of items a [query](https://www.wix.com/velo/reference/wix-data/query) returns. * [skip()](https://www.wix.com/velo/reference/wix-data/wixdataquery/skip): Set the number of items to skip before returning [query](https://www.wix.com/velo/reference/wix-data/query) results. #### Get the Results of a Query Once you have added filters, a sort, or limited your query, you can get the query results: * [WixDataQuery.find( )](https://www.wix.com/velo/reference/wix-data/wixdataquery/find): Run the query and return the results. * [WixDataQueryResult.items](https://www.wix.com/velo/reference/wix-data/wixdataqueryresult/items): The returned query items. #### Paginate Your Query Results You can use the [WixDataQueryResult](https://www.wix.com/velo/reference/wix-data/wixdataqueryresult) functions and properties to paginate your query results. * [totalCount](https://www.wix.com/velo/reference/wix-data/wixdataqueryresult/totalcount): Total number of items in the query result. * [pageSize](https://www.wix.com/velo/reference/wix-data/wixdataqueryresult/pagesize): The number of items in a query results page. Defined by the [limit()](https://www.wix.com/velo/reference/wix-data/wixdataquery/limit) function. * [length](https://www.wix.com/velo/reference/wix-data/wixdataqueryresult/length): The number of items in the current page of query results. Defined by the [limit()](https://www.wix.com/velo/reference/wix-data/wixdataquery/limit) function. Identical to **pageSize** except for the last page of results, which depends on the remaining number of items. * [totalPages](https://www.wix.com/velo/reference/wix-data/wixdataqueryresult/totalpages): Total number of pages in the query result. * [currentPage](https://www.wix.com/velo/reference/wix-data/wixdataqueryresult/currentpage): Index of the current results page. * [hasNext( )](https://www.wix.com/velo/reference/wix-data/wixdataqueryresult/hasnext): Whether there is another page of query results. * [hasPrev( )](https://www.wix.com/velo/reference/wix-data/wixdataqueryresult/hasprev): Whether there is a previous page of query results. * [next( )](https://www.wix.com/velo/reference/wix-data/wixdataqueryresult/next): Retrieves the next page of query results. * [prev( )](https://www.wix.com/velo/reference/wix-data/wixdataqueryresult/prev): Retrieves the previous page of query results. You can also paginate the [results of a referenced query](https://www.wix.com/velo/reference/wix-data/wixdataqueryreferencedresult). ### Work with Collection Reference Fields Use [reference fields](https://support.wix.com/en/article/displaying-content-from-multiple-content-collections-using-reference-fields) to connect one database collection with another database collection. * [insertReference()](https://www.wix.com/velo/reference/wix-data/insertreference): Insert a reference to an item/items. * [isReferenced()](https://www.wix.com/velo/reference/wix-data/isreferenced): Check whether a reference to an item exists. * [queryReferenced()](https://www.wix.com/velo/reference/wix-data/queryreferenced): Get full referenced items. Can be used to overcome the limitations of a standard [query()](https://www.wix.com/velo/reference/wix-data/query) with an [include()](https://www.wix.com/velo/reference/wix-data/wixdataquery/include) function. * [removeReference()](https://www.wix.com/velo/reference/wix-data/removereference): Remove a reference. * [replaceReferences()](https://www.wix.com/velo/reference/wix-data/replacereferences): Replace references with other references. * [WixDataQuery.include()](https://www.wix.com/velo/reference/wix-data/wixdataquery/include): Refines a query so that the items returned in the query's results include the full referenced items for the specified properties. * [WixDataQueryResult.partialIncludes](https://www.wix.com/velo/reference/wix-data/wixdataqueryresult/partialincludes): Whether a query that used [include()](https://www.wix.com/velo/reference/wix-data/wixdataquery/include) to add referenced items to the result returned a trimmed result due to exceeding the 50-reference item limit. You can use [queryReferenced()](https://www.wix.com/velo/reference/wix-data/queryreferenced) to overcome the limits of include(). ### Aggregate: Perform Calculations on Collection Data * [aggregate()](https://www.wix.com/velo/reference/wix-data/aggregate): Build an aggregation. After performing calculations on your aggregation, you use the [run()](https://www.wix.com/velo/reference/wix-data/wixdataaggregate/run) function to run the aggregation and return the results. * [sum()](https://www.wix.com/velo/reference/wix-data/wixdataaggregate/sum): Calculate the sum of all values of a collection field. * [avg()](https://www.wix.com/velo/reference/wix-data/wixdataaggregate/avg): Calculate the average value of a collection field. * [count()](https://www.wix.com/velo/reference/wix-data/wixdataaggregate/count): Calculate the item count of each aggregation group. * [max()](https://www.wix.com/velo/reference/wix-data/wixdataaggregate/max): Get the maximum value from each aggregation group. * [min()](https://www.wix.com/velo/reference/wix-data/wixdataaggregate/min): Get the minimum value from each aggregation group. You can [sort](https://www.wix.com/velo/reference/wix-data/wixdataaggregate/ascending), [filter](https://www.wix.com/velo/reference/wix-data/wixdataaggregate/filter), [group](https://www.wix.com/velo/reference/wix-data/wixdataaggregate/group), [limit](https://www.wix.com/velo/reference/wix-data/wixdataaggregate/limit), or [skip](https://www.wix.com/velo/reference/wix-data/wixdataaggregate/skip) items in an aggregation. You can also [paginate](https://www.wix.com/velo/reference/wix-data/wixdataaggregateresult/next) the [results](https://www.wix.com/velo/reference/wix-data/wixdataaggregateresult) of an aggregation. ### Hooks: Perform Actions Before or After Specific Data Operations You can run any code you want via a [hook](https://www.wix.com/velo/reference/wix-data/hooks) immediately prior to or following specific data operations, such as [insert()](https://www.wix.com/velo/reference/wix-data/insert), [remove()](https://www.wix.com/velo/reference/wix-data/remove), [update()](https://www.wix.com/velo/reference/wix-data/update), and [query()](https://www.wix.com/velo/reference/wix-data/query). For example, let's say you wanted to perform a calculation on some data or capitalize some strings before you insert them into a database collection, you could use the [beforeInsert()](https://www.wix.com/velo/reference/wix-data/hooks/beforeinsert) hook. >**Notes** > • If you receive a "**Collection didn't load due to a syntax error**" message, review your **data.js** file and confirm that the syntax and formatting of your hooks are correct. > > • We recommend implementing \`afterQuery()`\ with in-memory operations only. Don't use network calls such as REST API requests or other wix-data operations, as these can lead to timeouts and issues loading collection data. --- > Portal Navigation: > > - Append `.md` to any URL under `https://dev.wix.com/docs/` to get its markdown version. > - Pages are either content pages (article or reference text) or menu pages (a list of links to child pages). > - To get a menu page, truncate any URL to a parent path and append `.md` (e.g. `https://dev.wix.com/docs/sdk.md`, `https://dev.wix.com/docs/sdk/core-modules.md`). > - Top-level index of all portals: https://dev.wix.com/docs/llms.txt > - Full concatenated docs: https://dev.wix.com/docs/llms-full.txt ## Resource: About Caching Data Query Results ## Article: About Caching Data Query Results ## Article Link: https://dev.wix.com/docs/develop-websites/articles/databases/wix-data/data-api/about-caching-data-query-results.md ## Article Content: # About Caching Data Query Results Data caching significantly speeds up data queries. Wix automatically caches the results of certain data queries to a Content Delivery Network (CDN). When a visitor makes a query whose results are cached, Wix provides the cached results instead of querying the database again. ## When does data caching occur? Whether the results of a data query are cached depends on several factors. ### Which data query results are cached? Data query results are only cached when: - The query does not modify the collection or any of its items. - The collection permissions do not allow [anonymous site visitors to add, update, or delete items](https://support.wix.com/en/article/cms-collection-permissions-overview#use-the-show-content-permission-for-view-only-access). - The queried collection is a [native Wix Data collection](https://support.wix.com/en/article/cms-formerly-content-manager-creating-a-collection). - The query does not trigger any [data hooks](https://dev.wix.com/docs/develop-websites/articles/databases/wix-data/hooks/about-data-hooks.md). - The request is made by code that runs on the [site frontend](https://dev.wix.com/docs/develop-websites/articles/get-started/website-development-features.md). - The request is made on behalf of a [site visitor](https://dev.wix.com/docs/sdk/articles/work-with-the-sdk/about-identities.md). - The request does not contain [Personally Identifiable Information (PII)](https://support.wix.com/en/article/about-personally-identifiable-information-pii). - [Eventual consistency](#cache-invalidation-and-eventual-consistency) is not overridden. - The collection does not have [item visibility](https://support.wix.com/en/article/cms-controlling-live-site-item-visibility-from-your-collection) enabled. ### Which data request results are not cached? Results of data requests are not cached when: - The request modifies the collection or the items it contains, such as by calling [`insert()`](https://dev.wix.com/docs/velo/apis/wix-data/insert.md) or [`remove()`](https://dev.wix.com/docs/velo/apis/wix-data/remove.md). - The collection permissions [allow site visitors to add, update, or delete items](https://support.wix.com/en/article/cms-collection-permissions-overview#set-advanced-permissions-for-more-access-control). - The data request is to a [Wix app collection](https://dev.wix.com/docs/develop-websites/articles/databases/wix-data/collections/working-with-wix-app-collections-and-code.md), an [external collection](https://dev.wix.com/docs/develop-websites/articles/databases/external-databases/overview/integrating-external-databases-with-your-wix-site.md), or to a [shared collection](https://support.wix.com/en/article/wix-enterprise-sharing-cms-collections-with-sites-and-templates). - The request triggers a [data hook](https://dev.wix.com/docs/develop-websites/articles/databases/wix-data/hooks/about-data-hooks.md). - The request is made by code that runs on the [site backend](https://dev.wix.com/docs/develop-websites/articles/coding-with-velo/backend-code/about-the-site-backend.md). - The data request is made on behalf of a [site member](https://dev.wix.com/docs/sdk/articles/work-with-the-sdk/about-identities.md). - The request contains [Personally Identifiable Information (PII)](https://support.wix.com/en/article/about-personally-identifiable-information-pii). - [Eventual consistency](#cache-invalidation-and-eventual-consistency) is overridden. - The collection has [item visibility](https://support.wix.com/en/article/cms-controlling-live-site-item-visibility-from-your-collection) enabled. ## Data cache invalidation Cache invalidation allows new, updated data to be cached and returned to visitors in future queries. The cache is automatically cleared when: - A request makes changes to the collection or to any of its items. Any cached results that reference the modified collection are also cleared. - The [site is published](https://dev.wix.com/docs/develop-websites/articles/coding-with-velo/overview/publishing-your-site.md). - Results have been cached for one week or longer. To make the best of Wix's data caching, avoid frequent or unnecessary cache invalidations. This might require splitting some collections into two separate collections: one that contains data likely to change frequently, and another whose data is not likely to be modified often, so its associated cache is less likely to be invalidated. ### Cache invalidation and eventual consistency Since cache invalidation might take a few seconds to complete, it increases the chance that out-of-date data could be returned to site visitors. This can make the effects of [eventual consistency](https://dev.wix.com/docs/velo/apis/wix-data-v2/eventual-consistency.md) more noticeable. To ensure that query results contain the most up-to-date data, you can override [eventual consistency](https://dev.wix.com/docs/velo/apis/wix-data-v2/eventual-consistency.md). When running the data query using [`find()`](https://dev.wix.com/docs/velo/apis/wix-data/wix-data-query/find.md), [`count()`](https://dev.wix.com/docs/velo/apis/wix-data/wix-data-query/count.md), or [`distinct()`](https://dev.wix.com/docs/velo/apis/wix-data/wix-data-query/distinct.md), set the `options.consistentRead` parameter to `true`. For example: ```js import { items } from "@wix/data"; async function findItems() { const results = await items.query("myCollection").find({ consistentRead: true, }); } ``` ## Data caching and site monitoring Wix's [site monitoring dashboard](https://dev.wix.com/docs/develop-websites/articles/workspace-tools/testing-monitoring/monitoring-your-published-site/working-with-the-monitoring-dashboard.md) allows site collaborators to view and analyze site performance. At present, user requests that are served cached results are monitored but not displayed on the dashboard. ## See also - [Wix data and eventual consistency](https://dev.wix.com/docs/velo/apis/wix-data-v2/eventual-consistency.md) - [Working with Wix app collections and code](https://dev.wix.com/docs/develop-websites/articles/databases/wix-data/collections/working-with-wix-app-collections-and-code.md) - [Working with the monitoring dashboard](https://dev.wix.com/docs/develop-websites/articles/workspace-tools/testing-monitoring/monitoring-your-published-site/working-with-the-monitoring-dashboard.md) - [About page caching](https://dev.wix.com/docs/develop-websites/articles/best-practices/caching/about-page-caching.md) --- > Portal Navigation: > > - Append `.md` to any URL under `https://dev.wix.com/docs/` to get its markdown version. > - Pages are either content pages (article or reference text) or menu pages (a list of links to child pages). > - To get a menu page, truncate any URL to a parent path and append `.md` (e.g. `https://dev.wix.com/docs/sdk.md`, `https://dev.wix.com/docs/sdk/core-modules.md`). > - Top-level index of all portals: https://dev.wix.com/docs/llms.txt > - Full concatenated docs: https://dev.wix.com/docs/llms-full.txt ## Resource: Indexes and Wix Data Collections ## Article: Indexes and Wix Data Collections ## Article Link: https://dev.wix.com/docs/develop-websites/articles/databases/wix-data/collections/indexes-and-wix-data-collections.md ## Article Content: # Velo: Indexes and Wix Data Collections
**Important:** Additional indexes are available for sites with premium plans. If you need additional indexes, you can [upgrade your site](https://www.wix.com/upgrade/website). Learn more about [premium plans](https://dev.wix.com/docs/develop-websites/articles/coding-with-velo/premium-plans/about-premium-plans.md).
Wix data collections give you the ability to add indexes to your collections. Use indexes to speed up data retrieval times and manage your data. ## What is an index? An index is a set of keys used to improve performance when searching for data in a database. Indexes work by using a lookup key to quickly locate the requested data without having to search the entire data collection. For example, in a textbook, you look in the index for the subject that you are interested in, then go directly to the page number without searching through the whole book. An index in a database works the same way. It helps the database go directly to the requested item without scanning through the whole collection. You can create a database index on a single field or on multiple fields. If a single field is not specific enough to help find your data, adding additional fields to the index can make it faster. Indexes have a sort order. When you define an index, you specify whether the index is ascending or descending, based on how you regularly access the data. A unique index is a special index that enforces the uniqueness of the field that it is defined for. If the index is a unique index, only one item in the collection can have a given value for the indexed field. ## What can I do with an index? Use indexes to speed up data retrieval and get faster response times for database reads on your site. You can also use indexes to avoid duplicate data in your database. By creating a unique index for a given field, the database rejects new or updated items that have the same value for the index field as an existing item. Indexes also speed up sorting when the fields use `.eq` filters and `.ascending` or `.descending`. Add a unique index on a data collection to prevent duplicates. While indexes greatly enhance data retrieval speeds, they can slow down the write speed slightly. The write speed for creating and updating items is a bit slower because the database has to write the index as well as the item data. Additionally, there is a small increase in the amount of data you have to store because your database is now storing the index as well as the item data. **When to add an Index** Using an index can improve your query speeds if: - You have a large data collection and your query times are slow. - You have queries that are used often and need to return data quickly. - Your queries are not slow yet, but your collection is expected to grow significantly. **When not to add an Index.** Indexes are not always necessary. You don't need to add an index in the following cases: - If you write to the collection frequently, but it's not read by the main application. For example, a log file. - If the collection is not expected to grow significantly. - If the collection already has an index. > **Note:** > All Wix collections are created with 2 indexes: > > - \_id ascending > - \_createdDate descending, \_id descending. ## Indexes and your Wix collections See [Adding an Index for Your Collection](https://support.wix.com/en/article/content-manager-adding-an-index-for-your-collection) to learn how to add an index to your Wix collections. You can create both regular and unique indexes for Wix sites: - Regular indexes can include up to 3 fields. - Unique indexes ensure that none of the items in your collection have identical values for the indexed field. Unique indexes can include only 1 field. Unique indexes also function like a regular index. The number of indexes you can add to your site depends on the [premium plan](https://www.wix.com/upgrade/website) you have. Learn more about the [data platform resources](https://dev.wix.com/docs/develop-websites/articles/coding-with-velo/limits-and-optimization/data-features.md) available for premium plans. > **Notes:** > > - A unique index also functions like a regular index. > - Some premium plans include an additional 8 regular indexes per collection. ### Which fields make good indexes? Which indexes to create and which fields those indexes contain, is determined by the queries that your site uses. Define your indexes using the fields that you would search by, and that are commonly used in your site's queries. For example, in the product collection, if your site visitors often search for products by name, add an index on product name. The index makes querying by product name faster. ```javascript wixData.query("Products").eq("productName", "Watermelon"); ``` If your site visitors browse by category and price, add an index on`category`(ascending) and`price`(ascending). The index speeds up the querying by both fields. ```javascript wixData.query("Products").eq("category", "Fruit").eq("price", 1.39); ``` In big collections, it may not be possible to get items in order, especially when fetching by page using `.skip()`. In the example below, the database skips the first 5000 items, then performs the sort. Ordering by an index solves this problem as the database sorts first, and then skips the first 5000 items. ```javascript wixData.query("Products").skip(5000).ascending("category").ascending("price"); ``` You are not restricted to the index fields in your query. You can use other fields in the query and still get the benefit of the index. Additionally, the order that you specify the fields in your query does not matter. ```javascript wixData .query("Products") .eq("category", "Fruit") .gt("price", 1.29) .eq("origin", "Spain"); ``` ### Which fields make bad indexes? Indexes work best when the fields that they are defined for have a diverse range of values. Fields that have a narrow range of values, like booleans, do not make good indexes. If color is a common search filter, adding an index on product color makes those queries faster. If however, you only offer black or white products, the index does not result in any improvement in your query speeds. ### Working with unique indexes When adding a unique index, if the field that you are using for your index is not unique, an error occurs. Wix Data functions that write to your collection throw errors if the unique index constraint is violated. For [save()](https://www.wix.com/velo/reference/wix-data/save), [insert()](https://www.wix.com/velo/reference/wix-data/insert), and [update()](https://www.wix.com/velo/reference/wix-data/update)), the operation will fail and the collection will not be modified if the index constraint is violated. For bulk functions, [bulkInsert()](https://www.wix.com/velo/reference/wix-data/bulkinsert), [bulkSave()](https://www.wix.com/velo/reference/wix-data/bulksave), and [bulkUpdate()](https://www.wix.com/velo/reference/wix-data/bulkupdate), items that violate the unique index constraint are not modified and are added to the errors array of the response object. Items that do not violate the index constraint are updated or added to the collection. ### Supported operators Indexes improve query speeds for the following logical operators: - eq - gt - gte - lt - lte - hasSome The [filter()](https://www.wix.com/velo/reference/wix-data/wixdataaggregate/filter) function in [WixDataAggregate](https://www.wix.com/velo/reference/wix-data/wixdataaggregate/introduction) makes use of indexes. Indexes also speed up [distinct](https://www.wix.com/velo/reference/wix-data/wixdataquery/distinct) queries. ### Supported data types You can define indexes on all scalar data types: - Text - Number - String - Boolean Other Wix Data types that map to the above primitive types are also supported, for example, URLs. Indexes work with arrays that hold scalar data types, for example Tags. ### Using more than 1 index A collection is limited to 3 indexes. However, 3 indexes may not be enough in cases where your site visitor can choose a number of filters, and some filters may be left blank. For example, 3 fields: `name`, `phone`, and `email` can be filtered in the following combinations: 1. `name` 2. `phone` 3. `email` 4. `name, phone` 5. `name, email` 6. `phone, email` 7. `name, phone, email` There are 7 combinations but only three indexes available. In this case define 3 indexes as follows: - Index 1: `name` - Index 2: `phone` - Index 3: `email` The Wix Data engine chooses one, or combines several of the indexes to speed up the query. ### Writing queries to make use of indexes Not all queries will make the best use of your indexes, but if you write your query correctly, the performance can be greatly improved. Use the following principles when writing queries so that they make use of indexes: - If your index has multiple fields, use as many as possible. If you do not use all of the fields in the index, you must include them in the order that they were specified. For example, if an index is defined for `name`, `phone`, and `email`, filtering on `name`, or on `name` and `phone` will use the index, but filtering on `phone` and `email` will not. - To use a field for ordering, all fields defined before it in an index must appear in `.eq`  filters or ordering clauses. - To use a field in range filter (`.gt, .lt, .ge, .le`) all fields defined before it in an index must appear in `.eq` filters. - Ordering will use an index if ordering directions for the fields match index direction. The following examples show when an index defined for  `category(ascending)`and `price(ascending)`speeds up the query and when it does not. **Equality** The following query makes full use of the index: ```javascript wixData.query("Products").eq("category", "Fruit").eq("price", 1.39); ``` **Range Filters** The index speeds up range queries on `price`, when filtering by  `category:` ```javascript wixData.query("Products").eq("category", "Fruit").gt("price", 1.5); ``` The index will not speed up range queries on `price`, when filtering by another field, like `size`. In the following query, only the `category` field filter would benefit from an index. This is because in order for the filter for `price` to use the index, all fields defined before it in the index must appear in `.eq` filters, and `category` is using a `.gt` filter. ```javascript wixData.query("Products").gt("category", "C").gt("price", 1.4); ``` **Partial Index** The index will also speed up queries on a subset of the indexed fields, as long as they are used in the order that they are defined in the index. For example, the following query will be improved by the index: ```javascript wixData.query("Products").eq("category", "Fruit"); ``` The query below however, will not be faster because the `category` field is defined first in the index and must be present in the query. ```javascript wixData.query("Products").gt("price", 1.5); ``` Given the following index: `brand: ascending, name: ascending, color: ascending` The  following filters will make efficient use of the index - `eq('brand', …)` - `eq('brand', …) .eq('name', …)` - `eq('brand', …) .eq('name’, …) .eq('color',`…) **Sorting** Indexes also speed up ordering when the fields use `.eq` filters, and `.ascending` or `.descending`. This query will return faster: ```javascript wixData.query("Products").eq("category", "Fruit").ascending("price"); ``` This query will not run any faster as the `category` field filter is using `.gt` not `.eq`: ```javascript wixData.query("Products").gt("category", "Fruit").ascending("price"); ``` ## Automatic indexes For large collections with high query volumes, Wix automatically identifies slow-running queries and creates indexes to improve performance. [Automatic indexes](https://support.wix.com/en/article/cms-adding-an-index-for-your-collection#about-automatic-indexes) are created behind the scenes to optimize data retrieval without any action required from you. ## Available indexes Basic plans and most premium plans support 4 indexes, 3 regular and 1 unique. Certain tier premium plans support 15 indexes, 5 regular (up to 3 fields), 2 unique, and 8 additional regular fields (1 field). If you need additional indexes than your plan offers, you can [upgrade your site](https://www.wix.com/upgrade/website). --- > Portal Navigation: > > - Append `.md` to any URL under `https://dev.wix.com/docs/` to get its markdown version. > - Pages are either content pages (article or reference text) or menu pages (a list of links to child pages). > - To get a menu page, truncate any URL to a parent path and append `.md` (e.g. `https://dev.wix.com/docs/sdk.md`, `https://dev.wix.com/docs/sdk/core-modules.md`). > - Top-level index of all portals: https://dev.wix.com/docs/llms.txt > - Full concatenated docs: https://dev.wix.com/docs/llms-full.txt ## Resource: Working with Wix App Collections and Code ## Article: Working with Wix App Collections and Code ## Article Link: https://dev.wix.com/docs/develop-websites/articles/databases/wix-data/collections/working-with-wix-app-collections-and-code.md ## Article Content: # Velo: Working with Wix App Collections and Code This article explains what Wix App collections are and how you can work with them. ### What Are Wix App Collections? Wix App collections are special collections that come from the Wix Apps that you add to your site. These collections appear automatically in your [Content Management System (CMS)](https://support.wix.com/en/article/about-the-content-manager-7160473) when you have [Wix Data enabled](https://support.wix.com/en/article/adding-the-content-manager-to-your-site) on your site. Each app will have different collections. For example, if you have the Wix Billing app on your site, you will see Billing collections such as Invoices and PriceQuotes grouped together in a section called "Billing." If your site has the Wix Bookings app, you will see Bookings collections such as Schedule, Services and Staff listed in a section called "Bookings." **Wix Editor:** ![Wix Editor - Wix App Collections](https://wixmp-833713b177cebf373f611808.wixmp.com/images/b6bf6413c24855aaaee739b940dbc3dd.png) **Wix Studio:** ![Wix Studio - Wix App Collections](https://wixmp-833713b177cebf373f611808.wixmp.com/images/a1c7611bab06f3c3c6a9c4a558e863dc.png) Click a collection to open it. ## How Do Wix App Collections Work? Wix App collections contain information about the items in your Wix App. For example, if you have Wix Stores on your site, your Products collection will contain information about the products you sell in your store. The fields (columns) in the collection provide information about each item (row), such as the item's name, stock number, price, and image. Every time you add a new app item or make changes to an existing app item in your dashboard, the changes are automatically reflected in your app collection. - Some Wix App collections are read-only (that's why the table cells are all gray), so any changes you want to make must be done in the relevant app manager. - Some Wix App collections contain fields that are read-write and can be managed from the collection itself. The table cells for those fields are white. For example, see Wix Portfolio's collections. For more information about the specific fields in each Wix App collection, see the app's section under [Wix Apps](https://dev.wix.com/docs/develop-websites/articles/wix-apps/about-apps-made-by-wix.md). ### What Can I Do with Wix App Collections? You can use the information in these collections just like you would use information in a collection you created yourself. With the data in Wix App collections you can do the following: - [Display content](https://dev.wix.com/docs/develop-websites/articles/databases/wix-data/hooks/about-data-hooks.md) from Wix App collections in your page elements. - [Link](https://support.wix.com/en/article/about-linking-to-a-dynamic-page) to your app's pages: You can create a customized page with elements that link to your app's built-in dynamic pages such as Stores/Product pages or Bookings/Service pages. - Create your own customized [dynamic pages](https://support.wix.com/en/article/about-dynamic-pages-6513588) based on your app collections. - Create a collection with additional information about the items in your app, and use [reference fields](https://support.wix.com/en/article/adding-a-reference-field-to-a-database-collection) or [dataset filtering](https://support.wix.com/en/article/cms-formerly-content-manager-about-filtering-and-sorting-live-site-content-with-datasets) to display the additional information on your site. - Create, update, and delete data in some regular Wix App collections. This is only applicable for fields that are read-write. > **Note:** Some Wix App collections are read-only and cannot be edited. You can also write code that references these collections to add customized features to your apps. Learn how [here](https://dev.wix.com/docs/develop-websites/articles/databases/wix-data/data-api/working-with-the-data-api.md). See the app examples in the [Coding Examples site](https://dev.wix.com/docs/coding-examples.md), as well as the app code articles for each app. ### Wix App Collection Fields You can view information about the specific fields (columns) of a Wix App's collections in the app's section under [Wix Apps](https://dev.wix.com/docs/develop-websites/articles/wix-apps/about-apps-made-by-wix.md). Each article lists the fields in the collection, including the [field name](https://support.wix.com/en/article/about-your-database-collection-fields#field-name), [field ID](https://support.wix.com/en/article/cms-formerly-content-manager-about-your-collection-fields#field-id-velo-by-wix-only), [field type](https://support.wix.com/en/article/about-your-database-collection-fields#field-type), a brief description, whether the field can connect to data, whether it can be sorted or filtered, and whether it is read-only or read-write. > **Note:** Some Wix App collection fields are read-only and can only be changed from the relevant app manager in your Dashboard, while some are read-write and can be created and edited manually. Learn more about [Wix App Collection Fields](https://dev.wix.com/docs/develop-websites/articles/wix-apps/wix-app-collections/working-with-wix-app-collection-fields.md). ### Wix App Collection Permissions Wix App collections have limited [permissions](https://support.wix.com/en/article/about-collection-permissions) that cannot be changed. Each collection permission (read, create, update, delete) is assigned a [role](https://support.wix.com/en/article/about-collection-permissions#roles). You can see the collection's permission settings by clicking **View permissions** in the CMS. ![View Permissions](https://wixmp-833713b177cebf373f611808.wixmp.com/images/54b9ea3110fca89375986360d45ea896.png) Permissions affect what your visitors can do with the collection content. #### Examples For the Stores/Products collection, anyone can read collection content, and no one can create, update, or delete collection content. This means the following: - You can display all Products collection content that can connect to data in page elements, and all visitors will see the content. - You cannot connect user input elements to your Products collection and have visitors update the collection. For the Members/PrivateMembersData collection, only [site member authors](https://support.wix.com/en/article/about-collection-permissions#roles) can read collection content, and no one can create, update, or delete collection content. This means the following: - You can display PrivateMembersData content that can connect to data in page elements, but each member will only see the content from their own member item. - You cannot connect user input elements to your PrivateMembersData collection and have visitors update the collection. For the Portfolio/Projects collection, anyone can read collection content, and only admins can create, update, or delete collection content. - You can display all Projects collection content that can connect to data in page elements, and all visitors will see the content. - You cannot connect user input elements to your Products collection and have visitors update the collection. When using code to perform data operations, you can [override collection permission restrictions](https://support.wix.com/en/article/cms-collection-permissions-overview#velo-by-wix-authorization-suppression). ### Show or Hide Wix App Collections You can hide Wix App collections, so they are not displayed anywhere in the CMS: 1. Go to [CMS](https://www.wix.com/my-account/site-selector/?buttonText=Open%20Content%20Manager&title=Select%20a%20Site&autoSelectOnSingleSite=true&actionUrl=https://www.wix.com/dashboard/%7B%7BmetaSiteId%7D%7D/database/) in your site's dashboard. 2. Click **More Actions** and select **Advanced Settings**. 3. Click the Wix App Collections toggle to show or hide these collections. ![Advanced Settings panel with the Wix App Collections toggle enabled.](https://wixmp-833713b177cebf373f611808.wixmp.com/images/878a430637037bc892522bfe41d2bdb9.jpeg) --- > Portal Navigation: > > - Append `.md` to any URL under `https://dev.wix.com/docs/` to get its markdown version. > - Pages are either content pages (article or reference text) or menu pages (a list of links to child pages). > - To get a menu page, truncate any URL to a parent path and append `.md` (e.g. `https://dev.wix.com/docs/sdk.md`, `https://dev.wix.com/docs/sdk/core-modules.md`). > - Top-level index of all portals: https://dev.wix.com/docs/llms.txt > - Full concatenated docs: https://dev.wix.com/docs/llms-full.txt ## Resource: Importing and Exporting Collection Data with Code ## Article: Importing and Exporting Collection Data with Code ## Article Link: https://dev.wix.com/docs/develop-websites/articles/databases/wix-data/collections/importing-and-exporting-collection-data-with-code.md ## Article Content: # Velo Tutorial: Importing and Exporting Collection Data with Code In this article we will demonstrate how to import data into a collection and export data from a collection using code. We create a simple form and then write some code that imports and exports JSON data from your collections using the `wix-data` API. > **Note:** > You can also [import](https://support.wix.com/en/article/content-manager-importing-your-content-into-a-collection) and [export](https://support.wix.com/en/article/content-manager-exporting-content-from-your-collection) collection data using the CMS. ### Prerequisites Since the `wix-data` API requires that your data be in JSON format, you'll need to be familiar with converting your data to and from JSON. > **Note:** > In this article we assume you are starting with your data in a spreadsheet or database application. **To import data into a collection:** 1. Use a spreadsheet or database application to export your data in the CSV format. 2. Use an online tool, such as [convertcsv.com](http://www.convertcsv.com/csv-to-json.htm), to convert your CSV data to the JSON format. 3. Use the form as described below to import the JSON data into your collection. **To export data from a collection:** 1. Use the form as described below to export the JSON data from your collection. 2. Use an online tool, such as [convertcsv.com](http://www.convertcsv.com/json-to-csv.htm), to convert your JSON data to the CSV format. 3. Use a spreadsheet or database application to view or import your data from the CSV format. ### Data Setup Since we are going to use the `wix-data` API to import data, your data will need to use the **Field ID**, and not the **Field Name**, to identify which fields you are using in your data source. Meaning, the first row of your CSV file should contain your collection's field IDs. To find the **Field ID** for your collection's fields, click the vertical ellipses that appears when you hover over a field in the Editor and select **Manage Properties**. If you want to provide your own IDs for the items you are adding into your collection, add a field with the key `_id` that contains the ID values. If you don't provide your own ID values, each item will get a unique, auto-generated ID value.
**Important:** The API will not check the data you are importing to ensure it matches the **Field Type** of the field you are importing the data into. Data with the wrong type will be imported successfully and an error indication will be shown in the CMS.
### Form Start with a new page in your site and create a form similar to the one shown here:
![](https://d2x3xhvgiqkx42.cloudfront.net/12345678-1234-1234-1234-1234567890ab/dfff8cbb-ddcb-4376-8cae-3fedb2dd4458/2017/08/10/a134b82e-129e-46c3-b6d0-7b143666be68.png)
| Type | ID | Usage | | ---------- | --------------- | ------------------------------------------------------------------------------ | | Text Input | collectionInput | For entering the collection to import to or export from | | Text Box | textBox | For entering data to be imported or for displaying data that has been exported | | Button | importButton | For triggering an import | | Button | exportButton | For triggering an export | ### Code In the **Page Code** panel (Wix Editor) or the **code editor** (Wix Studio), start by importing the `wix-data` API as the very first line of code. ```javascript import wixData from "wix-data"; ``` #### Import Code Select the Import button we created above and use the **Properties & Events** panel to add an **onClick** event handler. In the **Page Code** panel (Wix Editor) or the **code editor** (Wix Studio), add the code below to the event handler: ```javascript export function importButton_onClick(event) { const items = JSON.parse($w("#textBox").value); const collection = $w("#collectionInput").value; items.forEach((item) => { wixData .insert(collection, item) .then((results) => { console.log(`Added item: ${JSON.stringify(results)}`); }) .catch((err) => { console.log(err); }); }); $w("#textBox").value = ""; } ``` This code pulls the name of the collection and the JSON items from the form elements. It then loops through each JSON item and adds it to the collection using the `insert()` function. #### Export Code Select the Export button we created above and use the **Properties & Events** panel to add an **onClick** event handler. In the **Page Code** panel (Wix Editor) or the **code editor** (Wix Studio), add the code below to the event handler: ```javascript export function exportButton_onClick(event) { let collection = $w("#collectionInput").value; wixData .query(collection) .find() .then((results) => { $w("#textBox").value = JSON.stringify(results.items); }) .catch((err) => { console.log(err); }); } ``` This code pulls the name of the collection from the form element and uses it to query the collection using the `query()` and `find()` functions. The above code will export up to 50 items from your collection. If your collection has more than 50 items, you need to add a limit that specifies the maximum number of items that the query will return: ```javascript export function exportButton_onClick(event) { let collection = $w("#collectionInput").value; wixData .query(collection) .limit(1000) .find() .then((results) => { $w("#textBox").value = JSON.stringify(results.items); }) .catch((err) => { console.log(err); }); } ``` The maximum allowable limit is 1000. So if you want to export more than 1000 items from your collection, you will need to perform multiple queries. ### Using the Form **To import data using the form:** 1. Enter the name of the collection you want to import the data into. 2. Paste the data in JSON format into the text box. 3. Click the **Import** button. 4. As each item is imported into the collection, a success or error message is logged to the console. **To export data using the form:** 1. Enter the name of the collection you want to export the data from. 2. Click the **Export** button. 3. The exported data is displayed in the text box or an error is logged to the console. ### Additional Considerations When you [enable Sandbox for your collections](https://support.wix.com/en/article/about-sandbox-and-live-collections-and-syncing) importing or exporting can be performed on your [Sandbox or Live collection](https://support.wix.com/en/article/about-sandbox-and-live-data). If you import or export while you're previewing your site, the operation will be performed using your Sandbox collection. If you import or export on your published site, the operation will be performed using your Live collection.
**Warning:** Publishing your site with the form created above is a potential security risk. Either don't publish your site with the form or take measures to ensure that it is only accessible to visitors with the proper permissions.
You may need to use the form on your site only once to import or export data from the Live collection. In that case you should consider if you want to publish your site to work with the Live collection or work with the Live collection through the Sandbox collection to avoid the potential security risk described above. #### Using the form with the Live Collection without publishing your site **To export the data from your Live collection through the Sandbox:** 1. Create the form and add the code. 2. [Copy the items from your Live collection to your Sandbox collection](https://support.wix.com/en/article/cms-about-sandbox-and-live-collections-and-syncing#syncing-a-sandbox-collection-to-a-live-collection). 3. Preview your site and use the form to export your data. 4. Delete the page that contains the form before your next site publish. **To import data to your Live collection through the Sandbox:** 1. Create the form and add the code. 2. Preview your site and use the form to import your data. 3. [Copy the imported items from your Sandbox to your Live collection](https://support.wix.com/en/article/cms-about-sandbox-and-live-collections-and-syncing#syncing-a-sandbox-collection-to-a-live-collection). 4. Delete the page that contains the form before your next site publish. #### Using the form on your published site If you are going to import or export more than once and need the form for future use: 1. Create the form and add the code. 2. [Hide the form's page](https://support.wix.com/en/article/hiding-a-page-from-the-menu) so it doesn't appear in your site's menu. 3. [Password protect the form's page](https://support.wix.com/en/article/password-protecting-your-site-or-a-specific-page) so visitors can't access the page even if they have its URL. 4. [Add a Member Login bar](https://support.wix.com/en/article/site-members-adding-and-customizing-your-login-bar) if necessary (see note below). 5. Publish your site. 6. Use the form when previewing your site to import and export using your Sandbox collection. 7. Use the form on your published site to import and export using your Live collection. >**Note:** >If your site contains a Member Login button and you log into your published site, you will be assigned the Admin role, >giving you full permissions to the collections you want to import and export from. If you are not logged into the >published site, you will be assigned the Visitor role. You will only be able to import into collections where the create >permission is set to Anyone, and you will only be able to export from collections where the read permission is set to >Anyone. ### API List The following APIs are used in the code in this article. To learn more, see the [API Reference](https://www.wix.com/velo/reference/). **$w.TextBox** - [$w.TextBox.value](http://wix.to/94BuAAs/$w.TextBox.html#value) - Sets or gets an element's value. **$w.TextInput** - [$w.TextInput.value](http://wix.to/94BuAAs/$w.TextInput.html#value) - Sets or gets an element's value. **wix-data** - [wix-data.insert( )](http://wix.to/94BuAAs/wix-data.html#insert) - Adds an item to a collection. - [wix-data.query( )](http://wix.to/94BuAAs/wix-data.html#query) - Creates a query. - [wix-data.WixDataQuery.find( )](http://wix.to/94BuAAs/wix-data.WixDataQuery.html#find) - Returns the items that match a query. - [wix-data.WixDataQuery.limit( )](http://wix.to/94BuAAs/wix-data.WixDataQuery.html#limit) - Limits the number of items a query returns. --- > Portal Navigation: > > - Append `.md` to any URL under `https://dev.wix.com/docs/` to get its markdown version. > - Pages are either content pages (article or reference text) or menu pages (a list of links to child pages). > - To get a menu page, truncate any URL to a parent path and append `.md` (e.g. `https://dev.wix.com/docs/sdk.md`, `https://dev.wix.com/docs/sdk/core-modules.md`). > - Top-level index of all portals: https://dev.wix.com/docs/llms.txt > - Full concatenated docs: https://dev.wix.com/docs/llms-full.txt ## Resource: About Validating User Input with Code ## Article: About Validating User Input with Code ## Article Link: https://dev.wix.com/docs/develop-websites/articles/databases/wix-data/user-input/about-validating-user-input-with-code.md ## Article Content: # Velo: About Validating User Input with Code When creating a form, you may want to validate user input before it is added to your collection. Validating the data entered in your form ensures that you receive all of the data you expect and that the data is in the proper format. Whenever possible, your form validation should prevent users from entering invalid values. In cases where you can't prevent the invalid data from being entered, you should check the data before submitting it and notify the user if it's invalid. Velo allows you to set up some field-level validation using the settings of the User Input elements. Additional validation can be added using JavaScript code. This article focuses on the code-based validations. To learn more about field-level validations using the settings of the User Input elements, see [Validating User Input with Settings](https://support.wix.com/en/article/validating-user-input-with-settings).  Code-based validations allow you to add validations that are not available through the Input element settings, including validations that depend on more than one element. The functionality for code based validations can be found in `onCustomValidation()` in each supported element's [API reference](https://dev.wix.com/docs/velo/api-reference/$w/introduction.md). See the table in [About User Input Elements](https://support.wix.com/en/article/cms-about-user-input-elements) for a list of supported elements. Note that custom validations are not run on Input elements when they don't have a value. ### Typical Validation Scenario Typically, to add custom validation you add custom validation logic in an event handler that you set using the Input element's `onCustomValidation()` function. Within that handler, you call the `reject()` function to indicate that the element is invalid. The element's validity is checked when the value of the element changes either by user interaction or programmatically. ### Example Let's take a look at a simple example. Suppose we have a form that has an email field and we want to limit users to entering email addresses with a certain domain. To do so we add the following code in the page's `onReady()` function: ```javascript $w.onReady(function () { $w("#textInput1").onCustomValidation( (value, reject) => { if( !value.endsWith("@wix.com") ) { reject("Email address must be a wix.com address."); } }); }); ``` On line 2 we call the element's `onCustomValidation()` function to register the event handler that is called when the element is being validated. That function receives two parameters, `value` and `reject`. The `value` parameter is the current value of the element that is being validated. The `reject` parameter is a function that we can call to invalidate the element. On line 3 we check to see if the `value` doesn't end with `wix.com`. On line 4, which is reached only if the `value` doesn't end with `wix.com`, we invalidate the element using the `reject()` function and pass it a rejection message. ### Additional Validation Functionality The [Velo API](https://dev.wix.com/docs/velo/api-reference/$w/introduction.md) contains some additional functionality that can be used when performing custom validations. See the table in [About User Input Elements](https://support.wix.com/en/article/cms-about-user-input-elements) for a list of supported elements. #### valid The `valid` property indicates if an element's value is valid. It takes both standard and custom validation into consideration. #### validity The `validity` property returns a `ValidityState` object that contains detailed information about why an element is invalid. #### validationMessage The `validationMessage` property returns a message indicating why an invalid element is invalid. You can set the `validationMessage` using the `reject()` function. If you don't set a custom message, the `validationMessage` may contain a standard validation message, such as `"value missing"` or `"type mismatch"`. #### resetValidityIndication() The `resetValidityIndication()` function clears the visual cue that signifies that an element is invalid. #### updateValidityIndication() The `updateValidityIndication()` function updates the visual cue that signifies whether an element is invalid based on the element's current validity state. --- > Portal Navigation: > > - Append `.md` to any URL under `https://dev.wix.com/docs/` to get its markdown version. > - Pages are either content pages (article or reference text) or menu pages (a list of links to child pages). > - To get a menu page, truncate any URL to a parent path and append `.md` (e.g. `https://dev.wix.com/docs/sdk.md`, `https://dev.wix.com/docs/sdk/core-modules.md`). > - Top-level index of all portals: https://dev.wix.com/docs/llms.txt > - Full concatenated docs: https://dev.wix.com/docs/llms-full.txt ## Resource: Processing User Input Before it is Stored in a Collection with Data Hooks ## Article: Processing User Input Before it is Stored in a Collection with Data Hooks ## Article Link: https://dev.wix.com/docs/develop-websites/articles/databases/wix-data/user-input/processing-user-input-before-it-is-stored-in-a-collection-with-data-hooks.md ## Article Content: # Velo Tutorial: Processing User Input Before it is Stored in a Collection with Data Hooks Sometimes you want to validate, alter, or otherwise manipulate user input that you collect using a form before it is stored in your collection. To do so, you can create a [data hook](https://support.wix.com/en/article/about-data-hooks) that intercepts newly created items before they are stored in your collection. Then you can change the item any way you like and that changed item will be what is added to your collection. To demonstrate this concept we use an example of a real estate site that has an inquiry form. Users will fill out the form to submit their information. Before the user data is saved in a collection, we will use a hook to format some of the data and add some information to the new item if certain conditions are met. ### Prerequisites This article assumes you are familiar with creating [database collections](https://support.wix.com/en/article/about-database-collections) and [user input forms](https://support.wix.com/en/article/cms-creating-a-custom-form-with-input-elements-that-submit-to-your-collection). You also might want to read more about [data hooks](https://dev.wix.com/docs/develop-websites/articles/databases/wix-data/hooks/about-data-hooks.md) before continuing. ### Collection We begin by creating a database collection that stores the information users submit using a form. Since we are using the collection to store user input, we set its permissions using the **Form Submission** preset.  For our example, we call our collection PotentialClients and it has the following fields: * First Name - Text * Last Name - Text * Email - Text * Phone - Text * Type -Text (Value will be "Buy" or "Rent") * Bedrooms - Number * Bathrooms - Number * Price - Number * Priority - Boolean ### Input Form The next step is to create a user input form. Because a hook will be used to modify the collection item that is created when a user submits the form, the fields in the form do not need to exactly match the items in the collection.  In our example, we use the following form:
![](https://d2x3xhvgiqkx42.cloudfront.net/12345678-1234-1234-1234-1234567890ab/dfff8cbb-ddcb-4376-8cae-3fedb2dd4458/2018/01/16/05ee94d0-a3a4-4bd5-a820-07f3de369d98.png)
The form contains input elements that match almost all of the fields in the PotentialClients collection. Notice that there is no input element that corresponds to the Priority field. That is because the value for the Priority field will be set in the hook that gets called with a user submits the form. ### Hook The final step is to [create a hook](https://support.wix.com/en/article/how-to-use-data-hooks) that modifies the newly created item before it gets inserted into the collection. The beforeInsert hook is triggered when a new item is being inserted into a collection. The hook receives the item that is about to be inserted. In the hook's code, you can modify that item any way you like or create a totally new item. When you're done, you return the modified or new item. That returned item is inserted into the collection instead of the item that the hook received. The code for hooks is written in the **data.js** file in the **Code Files, Backend** section of your site. To learn more about creating hooks, see [How to Use Data Hooks](https://dev.wix.com/docs/develop-websites/articles/databases/wix-data/hooks/using-data-hooks.md). In our example, the following beforeInsert hook does two things: * Formats the first and last names so that regardless of how users type their names they: * Start with a capital letter.  * The rest of the letters are lowercase. * Checks to see if the potential client is a priority client or not and sets the priority field accordingly. ```javascript export function PotentialClients_beforeInsert(item, context) { item.firstName = toUpperFirst(item.firstName); item.lastName = toUpperFirst(item.lastName); if(item.price > 1000000 && item.type === 'Buy') { item.priority = true; } return item; } function toUpperFirst(s) { return s.charAt(0).toUpperCase() + s.slice(1); } ``` Let's take a look at the code one piece at a time. * * * On line 1, we begin the hook function definition. Hook functions are named with the following convention: `_`. So our hook is named `PotentialClients_beforeInsert`. export function PotentialClients_beforeInsert(item, context) { * * * On lines 2-3, the hook takes the first and last names and formats them using the `toUpperFirst()` function imported above. item.firstName = toUpperFirst(item.firstName); item.lastName = toUpperFirst(item.lastName);
**Note:** You may want to create the **toUpperFirst()** function in a separate file and import it in **data.js**. That will allow you to use the function elsewhere.
* * * On lines 5-7, the hook checks the values of the `price` and `type` properties. If the potential client is looking to buy a property over $1,000,000, the item in the collection will be marked as a priority item. if(item.price > 1000000 && item.type === 'Buy') { item.priority = true; } * * * Finally, on line 9, the hook returns the modified item. That means the item inserted into the collection will have the formatted names and the priority field set correctly. return item; --- > Portal Navigation: > > - Append `.md` to any URL under `https://dev.wix.com/docs/` to get its markdown version. > - Pages are either content pages (article or reference text) or menu pages (a list of links to child pages). > - To get a menu page, truncate any URL to a parent path and append `.md` (e.g. `https://dev.wix.com/docs/sdk.md`, `https://dev.wix.com/docs/sdk/core-modules.md`). > - Top-level index of all portals: https://dev.wix.com/docs/llms.txt > - Full concatenated docs: https://dev.wix.com/docs/llms-full.txt ## Resource: Adding Success and Error Messages for Elements Without a Submit Option ## Article: Adding Success and Error Messages for Elements Without a Submit Option ## Article Link: https://dev.wix.com/docs/develop-websites/articles/databases/wix-data/user-input/adding-success-and-error-messages-for-elements-without-a-submit-option.md ## Article Content: # Velo: Adding Success and Error Messages for Elements Without a Submit Option
Visit the Velo by Wix website to onboard and continue learning.
When you create an input form using [User Input elements](https://support.wix.com/en/article/working-with-user-input-elements-2499809), you can add customized success and error messages that are displayed only when a user tries to submit data to a collection. For any element that allows you to add a link (e.g. a button), you can automatically add success and error messages to your form in the Connect panel of the element.  What if you want to use code to trigger form submission based on some other user action besides clicking an element that has a link? For example, you may want a radio button selection to trigger the submit. As long as you connect the input elements to the same dataset as the triggering element and use any of the dataset APIs that trigger a save, the submit messages will be displayed.
**Note:** You can only add form submit messages if your connected dataset is set to either Write-only or Read & Write.
### To trigger a submit message from elements that don't have a submit option: 1. Add input elements to create your form and connect them to the same dataset. 2. Add a Text element to your page where you want the submit message to appear, modify the text for your message, and click ![](https://d2x3xhvgiqkx42.cloudfront.net/12345678-1234-1234-1234-1234567890ab/b0387850-90c2-4f00-a761-a0c5104e1c8c/2017/12/05/147c47a5-dda3-44c0-a653-d373834cfe4b.png) **Connect to Data.** 3. Connect the Text element to the same dataset as the input elements for your form. 4. In the **Connection Options** section under **Form Messages**, select either **Submit Succeeded** or **Submit Failed**.
![](https://d2x3xhvgiqkx42.cloudfront.net/12345678-1234-1234-1234-1234567890ab/11e10e4f-b84d-4136-a5a9-6109fab0b7d7/2018/01/17/f3345c6c-c976-4942-8498-953514064d0e.png)
1. Add an event handler for the event that you want to the trigger the submit. 2. Inside the event handler function call one of the APIs that saves the current dataset item. 3. Repeat steps 2 through 4 to create both messages, if needed.
**Tip:** Because success and failure messages never appear together, you can position one text element to completely overlap another on your page so the messages take up less space. Only the relevant message is displayed when a user attempts to submit data.
--- > Portal Navigation: > > - Append `.md` to any URL under `https://dev.wix.com/docs/` to get its markdown version. > - Pages are either content pages (article or reference text) or menu pages (a list of links to child pages). > - To get a menu page, truncate any URL to a parent path and append `.md` (e.g. `https://dev.wix.com/docs/sdk.md`, `https://dev.wix.com/docs/sdk/core-modules.md`). > - Top-level index of all portals: https://dev.wix.com/docs/llms.txt > - Full concatenated docs: https://dev.wix.com/docs/llms-full.txt ## Resource: About Creating Searches and Filters of Displayed Data ## Article: About Creating Searches and Filters of Displayed Data ## Article Link: https://dev.wix.com/docs/develop-websites/articles/databases/wix-data/displaying-data/about-creating-searches-and-filters-of-displayed-data.md ## Article Content: # Velo: About Creating Searches and Filters of Displayed Data To let your users search or filter the data you display on a page you start by adding User Input elements to your page. These elements are where your users will enter the criteria they want to use to search or filter your data. Then you write the code that runs the search or filter. For example, you could add code to an input box so that visitors can type their search text, or add code to a dropdown list or radio buttons to allow visitors to filter content based on their selection. It's important to remember not to connect your user input element to data when using it as input for searches and filters. To learn more about creating searches and filters via code, see the following articles: - [Velo Tutorial: Adding Collection Data Search Functionality](https://support.wix.com/en/article/how-to-add-a-search-of-your-data-collection-to-a-page) - The [wix-data API](https://www.wix.com/velo/reference/wix-data.html) - The [wix-dataset API](https://www.wix.com/velo/reference/wix-dataset/dataset.html#setFilter). You can also watch our demos on how to create searches and filters for your collection: `youtube:https://www.youtube.com/watch?v=Hx7_8-lRsW0` `youtube:https://www.youtube.com/watch?v=VbROpL-FsLs`
**Tip** You can also [use input elements to allow visitors to filter content](https://support.wix.com/en/article/cms-formerly-content-manager-setting-up-filters-for-site-visitors-using-input-elements) directly in the Wix Editor, without code.
--- > Portal Navigation: > > - Append `.md` to any URL under `https://dev.wix.com/docs/` to get its markdown version. > - Pages are either content pages (article or reference text) or menu pages (a list of links to child pages). > - To get a menu page, truncate any URL to a parent path and append `.md` (e.g. `https://dev.wix.com/docs/sdk.md`, `https://dev.wix.com/docs/sdk/core-modules.md`). > - Top-level index of all portals: https://dev.wix.com/docs/llms.txt > - Full concatenated docs: https://dev.wix.com/docs/llms-full.txt ## Resource: Display Database Collection Content in a Repeater ## Article: Display Database Collection Content in a Repeater ## Article Link: https://dev.wix.com/docs/develop-websites/articles/databases/wix-data/displaying-data/display-database-collection-content-in-a-repeater.md ## Article Content: # Velo Tutorial: Display Database Collection Content in a Repeater This tutorial for Velo beginners explains how to display database collection content in a repeater using code. >**Note** > You can also [display database content in a repeater](https://support.wix.com/en/article/displaying-collection-content-in-a-repeater) without any code using a dataset, but using code provides you with additional functionality and options. ## Overview [Database collections](https://support.wix.com/en/article/creating-a-content-collection) are where you store your site's data. For example, if you have a real estate site, you'll store details about each property in a collection. If you have a custom form on your site, you'll store the answers to the form in a collection. You might want to display your database collection content in a [repeater](https://support.wix.com/en/article/wix-editor-adding-and-managing-repeaters-lists-grids). Repeaters are lists of items. Each item has the same design and layout, but different content. If you have a real estate site, you can display each property and its details in a different repeater item.
To display database content in a repeater, we'll do the following: 1. Query (extract data from) the database collection. 2. Set the queried data as our repeater's data. 3. Specify which fields of the queried collection data populate each element in our repeater. ## Step 1: Query the Database Collection To query a collection, you'll need to get the collection ID: 1. Select the **Databases** tab ![](https://d2x3xhvgiqkx42.cloudfront.net/12345678-1234-1234-1234-1234567890ab/0ca9e8ba-16ed-4cd8-a1e1-58d01c4420f7/2021/11/25/3f283226-fc27-4797-9b28-fdfe0132de6b/745eeae0-aea8-48ea-a2cb-bc1370d0466e.png) in the [Code sidebar](https://dev.wix.com/docs/develop-websites/articles/workspace-tools/velo-workspace/workspaces/wix-editor-working-with-the-code-sidebar.md) (Wix Editor) or [Code panel](https://dev.wix.com/docs/develop-websites/articles/workspace-tools/velo-workspace/workspaces/wix-studio-working-with-the-code-panel.md) (Wix Studio). 2. Hover over your collection, click the **Show More** icon ![](https://d2x3xhvgiqkx42.cloudfront.net/12345678-1234-1234-1234-1234567890ab/0ca9e8ba-16ed-4cd8-a1e1-58d01c4420f7/2021/11/25/a74aec3c-c995-4984-86b3-859dc344dd37/1f0534ae-fdab-431c-bcca-a89c83138cea.png) and select **Edit Settings**. 3. Copy the collection ID to use in your code. Once you have the collection ID you can query the collection. We'll start by importing the [`wix-data`](https://www.wix.com/velo/reference/wix-data) module, which contains the data [`query()`](https://www.wix.com/corvid/reference/wix-data/query) function. The `wix-data` APIs contain functionality for working with your database collections with code. ```javascript import wixData from 'wix-data'; ``` We run the query on our `MyCollection` database collection: ```javascript wixData.query('MyCollection') .find() .then((results) => { if (results.totalCount > 0) { console.log("Query results:", results.items); } }) .catch((error) => { console.error(error); }); ``` ### Understanding the Code * **Line 1:** Run the `query()` function on the `MyCollection` database collection. * **Line 2:** Complete the query by calling the `find()` function. * **Line 3:** Get the results of the query after the [promise](https://support.wix.com/en/article/velo-working-with-promises) resolves. * **Lines 4-5:** If there are results, print the result items to the [console](https://dev.wix.com/docs/develop-websites/articles/workspace-tools/testing-monitoring/testing-troubleshooting/about-debugging-your-code.md) to view them. * **Lines 8-9:** If there's an error, print the error to the console. The query result [`items`](https://www.wix.com/velo/reference/wix-data/wixdataqueryresult/items) are an array of objects representing each item in your database collection. For example, if you have database collection fields with [field IDs](https://support.wix.com/en/article/cms-formerly-content-manager-about-your-collection-fields#field-id-velo-by-wix-only) named `title`, `price`, `image`, and `url`, you'll have properties in each object in your results object `items` array called `title`, `price`, `image`, and `url`. ```json [ { "_id": "1234", "_createdDate": "2021-05-29T08:35:52.344Z", "title": "DOWN AVENUE", "price": 500,000, "image": "wix:image://v1/68d3a9_1de7529c444b4c9eb38401f8efe0cad2.jpg/down-avenue.jpg", "url": "https://users.wixsite.com/best-real-estate-site/listings/down-avenue" }, { "_id": "5678", "_createdDate": "2021-05-25T12:48:56.572Z", "title": "QUEENS WAY", "price": 450,000, "image": "wix:image://v1/79e4b0_2ee8539d456c5c0fb48502g9fge1dbe4.jpg/queens-way.jpg", "url": "https://users.wixsite.com/best-real-estate-site/listings/queens-way" }, ... ] ``` ## Step 2: Set the Repeater's Data Setting a repeater's [data](https://www.wix.com/velo/reference/$w/repeater/data) adds new items to the repeater. We take the results of the query that we extracted from the database collection and set it as the repeater's data.  ```javascript $w('#myRepeater').data = results.items; ``` Setting a repeater's data also triggers the repeater's [onItemReady()](https://www.wix.com/corvid/reference/$w/repeater/onitemready) event handler. ## Step 3: Connect Queried Data Fields with Repeater Elements Now we need to specify which field from the queried database collection content connects to each repeater element. For example, the database field called `title` might connect to a text element in the repeater, and a database field called `url` might connect to a read more button's `link` property. We make the connection using the [`onItemReady()`](https://www.wix.com/velo/reference/$w/repeater/onitemready) function, which is used to apply the repeated item's data to the properties of the repeated elements. `onItemReady()` is an event handler that is triggered when the items of the repeater are ready to be loaded. The event handler runs for each item in the repeater. In the code below, `title`, `price`, `image`, and `url` are [field IDs](https://support.wix.com/en/article/cms-formerly-content-manager-about-your-collection-fields#field-id-velo-by-wix-only) from the `MyCollection` database collection. [`$item`](https://www.wix.com/velo/reference/$w/repeater/introduction#$w_repeater_introduction_repeated-item-scope) is a special selector which selects elements in a specific repeater item. The `onItemReady()` function loops through each item in the repeater and connects the repeater elements in each item with the queried data. ```javascript $w("#myRepeater").onItemReady(($item, itemData, index) => { $item("#myTitleText").text = itemData.title; $item("#myPriceText").text = itemData.price; $item("#myImage").src = itemData.image; $item("#myButton").link = itemData.url; }); ``` >**Note** > The code for onItemReady() must be located before the code for setting the repeater's data. After applying the code to your page, you'll see your database content displayed in your repeater. ## Optional: Filter and Sort the Displayed Content As an additional step, you can optionally chain [`WixDataQuery`](https://www.wix.com/velo/reference/wix-data/wixdataquery) functions to your query to filter, sort, and limit the results of the query. For example, we filtered the items so that only properties whose price is less than $500,000 appear in the repeater. We also sorted the items in alphabetical order according to the property title. To do this we chained a 'less than' [`lt()`](https://www.wix.com/velo/reference/wix-data/wixdataquery/lt) filter and a [`descending()`](https://www.wix.com/velo/reference/wix-data/wixdataquery/descending) sort to the query, before executing the query with the `find()` function: ```javascript wixData.query('MyCollection') .lt('price', '500000') .descending('title') .find() .then((results) => { if (results.totalCount > 0) { $w('#myRepeater').data = results.items; } }); ``` ## Complete Code Here is the complete code for the example: ```javascript import wixData from 'wix-data'; $w.onReady(function () { $w("#myRepeater").onItemReady(($item, itemData, index) => { $item("#myTitleText").text = itemData.title; $item("#myPriceText").text = itemData.price; $item("#myImage").src = itemData.image; $item("#myButton").link = itemData.url; }); wixData.query("MyCollection") .lt('price', '500000') .descending('title') .find() .then((results) => { if (results.totalCount > 0) { $w("#myRepeater").data = results.items; } }) .catch((error) => { console.error(error); }); }); ``` ## Learn More * [Working with database collections and code](https://support.wix.com/en/article/velo-overview-of-the-wix-data-and-wix-dataset-apis) * [Wix Data APIs](https://www.wix.com/velo/reference/) --- > Portal Navigation: > > - Append `.md` to any URL under `https://dev.wix.com/docs/` to get its markdown version. > - Pages are either content pages (article or reference text) or menu pages (a list of links to child pages). > - To get a menu page, truncate any URL to a parent path and append `.md` (e.g. `https://dev.wix.com/docs/sdk.md`, `https://dev.wix.com/docs/sdk/core-modules.md`). > - Top-level index of all portals: https://dev.wix.com/docs/llms.txt > - Full concatenated docs: https://dev.wix.com/docs/llms-full.txt ## Resource: Calculating and Displaying Collection Data ## Article: Calculating and Displaying Collection Data ## Article Link: https://dev.wix.com/docs/develop-websites/articles/databases/wix-data/displaying-data/calculating-and-displaying-collection-data.md ## Article Content: # Velo Tutorial: Calculating and Displaying Collection Data
Visit the Velo by Wix website to onboard and continue learning.
There are many instances when you want to display data that does not come directly from one of your collections. Instead, you want to calculate values based on the data stored in a collection and display those calculated values. Sometimes you want to calculate data for each item you're displaying and other times you want to calculate aggregated values based on a number of items. In this article, we demonstrate how to display such data using a variety of different page elements. ### Per-Item Calculations There are several ways to calculate and display data on a per-item basis. Here, we will explain how to do so using a [data hook](https://dev.wix.com/docs/develop-websites/articles/databases/wix-data/hooks/about-data-hooks.md). To generate a template for a hook using the sidebar: 1. Find your collection in the **CMS** section of the sidebar and mouse over it. 2. Click the Show More ![](https://d2x3xhvgiqkx42.cloudfront.net/12345678-1234-1234-1234-1234567890ab/0ca9e8ba-16ed-4cd8-a1e1-58d01c4420f7/2020/10/27/37ff9473-4cf0-4d6b-845e-d93462da44eb/2c4c1bdd-afc8-407e-a434-7e47492e2ba6.png) icon and select **Add data hooks**.  3. Select the hooks you want to create, then click **Add & Edit Code**. Templates for each of the hooks you choose are automatically generated and added to a file named **data.js** in your site's backend code. The idea is to create an **afterQuery** hook that intercepts the data from your collection before it reaches your page code. The hook runs for each item that is retrieved by a dataset or query. The hook performs the desired calculations and adds the calculated data to each item before it gets to the page. Then, in your page code, you can get the calculated data and apply it to your page's elements.  For example, let's say you have a collection named **Employees** that contains information about employees. The collection might store an employee's first name and last name in separate fields. It also might store an employee's date of birth. But for display purposes, you want to show employee names together in one element and employee ages instead of dates of birth. To get started, you write an **afterQuery** hook for the **Employees** collection: ```javascript // In file backend/data.js export function Employees_afterQuery(item, context) { item.fullName = item.lastName + ", " + item.firstName; item.age = ageFromDob(item.dob); return item; } ``` The hook receives the item from the collection and adds two new properties to it. First, it adds a `fullName` property that concatenates the employee's name in a "lastName, firstName" format. Second, it adds an `age` property that calculates an employee's age based on the date stored in the `dob` field. The hook uses the following function, which can also be included in the data.js file: ```javascript function ageFromDob(dob) { const now = new Date(); const days = now.getDate() - dob.getDate(); const months = now.getMonth() - dob.getMonth(); let age = now.getFullYear() - dob.getFullYear(); if (months < 0 || (months === 0 && days < 0)) { age--; } return age.toString(); } ```
**Note:** You may want to create the **ageFromDob** function in a separate file and import it in **data.js**. That will allow you to use the function elsewhere.
A page that retrieves items from the **Employees** collection using a dataset or query will now have the new properties that you've added to each item. The next step is to apply the values from those properties to the page's elements. In the following examples, we will assume that the page receives its data using a dataset. Generally, this means that you can connect your page elements to any non-calculated data as you would normally do. However, since your calculated data is not part of the database [schema](https://support.wix.com/en/article/about-database-collection-schemas), you will have to "connect" the data to page elements using code. If you use a query instead of a dataset to retrieve your page's information, you can use a similar approach to apply the calculated data to your page elements. #### Text Elements To apply calculated data to a text element, you set the value of the text element's `text` property to the value of one of the item's calculated properties in the dataset's `onReady()` function. If your page's dataset contains more than one item and you allow your site visitors to click through multiple items using previous and next buttons, you also need to set the value of the text element's `text` property in the dataset's `onCurrentIndexChanged` function. You can connect all the other elements on your page to their corresponding non-calculated fields as you would normally do. For example, assuming the employee data mentioned above, you connect non-calculated fields, such as address and job title, to page elements using their connect panels. However, you leave the elements that will show the calculated data, the employee name and age, unconnected. Those connections are dealt with in the following code. ```javascript $w.onReady(function () { $w("#dataset1").onReady(() => { populateCalculatedFields(); } ); $w("#dataset1").onCurrentIndexChanged( (index) => { populateCalculatedFields(); } ); } ); function populateCalculatedFields() { const currentItem = $w("#dataset1").getCurrentItem(); $w("#textFullName").text = currentItem.fullName; $w("#textAge").text = currentItem.age; } ``` Here, the `populateCalculatedFields()` function takes the calculated data from the dataset and applies it to the corresponding page elements. It is called when the dataset is first ready and then every time the current item is changed. #### Table To apply calculated data to a table, you reset the table's columns using its `columns` property to include columns for each item's calculated values. You then set the data of the table using the table's `rows` property. You begin by connecting the table to a dataset as you would normally do. Then, use the table's **Manage Table** panel to delete any columns that you don't want to be shown in your table because you're going to calculate their data. For example, assuming the employee data mentioned above, after you connect your table to the dataset, you will delete the **First Name**, **Last, Name**, and **DOB** columns. The columns that are remaining will receive their data from the dataset. The columns that will display your calculated data are created in the following code. ```javascript $w.onReady(function () { const currentColumns = $w("#employeeTable").columns; const calculatedColumns = [ { "id": "colFullName", "dataPath": "fullName", "label": "Name", "type": "string", }, { "id": "colAge", "dataPath": "age", "label": "Age", "type": "string", } ]; $w("#employeeTable").columns = calculatedColumns.concat(currentColumns); ``` Here, the code begins by getting the current columns from the table using the `columns` property. Remember, those will correspond to the fields from the dataset, minus the columns we deleted. Next, it creates an array of two new columns that will hold the calculated data. Then, it puts both sets of columns together and uses that to reset the table's `columns` property. #### Repeater To apply calculated data to a repeater, you set the values of the corresponding elements using the repeater's `onItemReady()` function. You can connect all the other elements in your repeater to their corresponding non-calculated fields as you would normally do. For example, assuming the employee data mentioned above, you connect non-calculated fields, such as address and job title, to elements in your repeater using their connect panels. However, you leave the elements that will show the calculated data, the employee name and age, unconnected. Those connections are dealt with in the following code. ```javascript $w.onReady(function () { $w("#employeeRepeater").onItemReady( ($item, itemData, index) => { $item("#repeaterFullName").text = itemData.fullName; $item("#repeaterAge").text = itemData.age; } ); } ); ``` Here, the repeater `onItemReady()` function takes the calculated data from the dataset and applies it to the corresponding elements in the repeater items. It is called for each item in the repeater as they are created. ### Aggregations If you want to display aggregated values, using a data hook is not necessarily the best option since hooks work on a per item basis. Instead, it is usually better to perform your aggregation calculations in your page code. 
**Note:** This example only works if there are 1000 items or less in your collection. That is because the **query()** function is limited to retrieving at most 1000 items. If you have more than 1000 items, you can work around the limitation by performing multiple queries.
For example, let's say you have a collection named **Expenses** that contains information about monthly expenses. The collection might store the month, type, and amount of each individual expense. There can be multiple items for each month. Instead of displaying all the expense items individually, you want to just display a total for each month. We can use the following code to populate a table with the aggregated expense data: ```javascript import wixData from 'wix-data'; import {monthSort} from 'public/utils'; $w.onReady(function () { $w("#aggTable").columns = [ { "id": "col1", "dataPath": "month", "label": "Month", "type": "string" }, { "id": "col2", "dataPath": "total", "label": "Total Expenses", "visible": true, "type": "number" } ]; wixData.query("Expenses") .ascending("month") .limit(1000) // include a limit if you have more than 50 items .find() .then( (result) => { const months = result.items.map(x => x.month) .filter((obj, index, self) => index === self.indexOf(obj)) .sort(monthSort); const aggregated = months.map(x => { return { month: x, total: result.items.filter(obj => obj.month === x) .map(z => z.amount) .reduce((sum, current) => sum + current) }; } ); $w("#aggTable").rows = aggregated; } ); } ); ``` The code begins by setting the columns of a table. There will be two columns, one for the name of the month and another for the total expenses during that month. Next, the code performs a query on the expenses collection. Once it receives the results of the query, it uses standard JavaScript array functions to calculate the total expenditures for each month. In this particular case, the code first extracts a sorted list of the months found in the collection. It uses the following function from a public file to sort the months list: ```javascript const months = ["January", "February", "March", "April", "May", "June", "July", "August", "September", "October", "November", "December"]; export function monthSort(a, b) { return months.indexOf(a) - months.indexOf(b); } ``` Then, for each of those months, it creates an object with two key:value pairs. The first pair corresponds to the name of the month. The second pair corresponds to the total expenditures for that month. Finally, the objects that were just created are set to be the row data for the table. --- > Portal Navigation: > > - Append `.md` to any URL under `https://dev.wix.com/docs/` to get its markdown version. > - Pages are either content pages (article or reference text) or menu pages (a list of links to child pages). > - To get a menu page, truncate any URL to a parent path and append `.md` (e.g. `https://dev.wix.com/docs/sdk.md`, `https://dev.wix.com/docs/sdk/core-modules.md`). > - Top-level index of all portals: https://dev.wix.com/docs/llms.txt > - Full concatenated docs: https://dev.wix.com/docs/llms-full.txt ## Resource: Adding Collection Data Search Functionality ## Article: Adding Collection Data Search Functionality ## Article Link: https://dev.wix.com/docs/develop-websites/articles/databases/wix-data/displaying-data/adding-collection-data-search-functionality.md ## Article Content: # Velo Tutorial: Adding Collection Data Search Functionality
Visit the Velo by Wix website to onboard and continue learning.
This article assumes some understanding of [database collections](https://support.wix.com/en/article/about-database-collections) and [datasets](https://support.wix.com/en/article/about-datasets-6368396) and how they are used in Velo.  With Velo you can add a database collection to your site and display the data in many ways. Visitors to your site can also search that data. You can add this search functionality to your site by adding user input elements to the page and then adding some code to enable the search. There are different ways you can let your visitors search your collection. This article covers the following options: * Adding an **input field** where visitors enter a search string. * Adding a **dropdown list** where visitors select a value from a list. While the results can be displayed however you want them to appear on the page, in this article we'll cover how to display the data in a table. At the end of the tutorial we'll also cover how to optionally collapse the table until you are ready to display the results. ## Search Using an Input Element Let's say you have a list of recipes in your collection and you want users to be able to search for them by entering their name in a user input element. Once the visitor clicks a search button, the results are displayed in a table on the same page. To do this, you add to your page an input element where the user enters a search term, a button that enables the search, and a table to display the results. Then you add code to make the table only display data that matches the user input. In this example, the table is not connected to a dataset, so code is needed to set up the table columns to match the data structure. #### 1\. Add the input, button, and table elements to the page 1. Add an input box, a button, and a table to your page.  You can customize them as you like. For example, you could change the text of the button to "Search" and configure the placeholder text of the input box to read "Search recipes." 2. Consider changing the IDs of each element that you just added to make them meaningful.  #### 2\. Add the code for inputting a search string Now configure the search button so that when it's clicked, the search is performed on the collection based on what a user entered into the input box. Then you need to have those results populate the table you added. 1. Add the import statement for the Wix Data API to the top of your code: ```javascript import wixData from "wix-data"; ``` 2. Add an [onClick event](https://www.wix.com/velo/reference/$w.Button.html#onClick) to the button. The following code is added to your page. ```javascript export function searchButton_click(event) { //Add your code for this event here: } ``` 3. Replace existing text with the following code: ```javascript // Runs a query on the "recipes" collection wixData.query("recipes") // Query the collection for any items whose "Name" field contains // the value the user entered in the input element .contains("name", $w("#searchBox").value) .find() // Run the query .then(res => { // Set the table data to be the results of the query $w("#resultsTable").rows = res.items; }); ``` #### 3\. Define the table columns Because your table isn't connected to a dataset, you need to define the columns using the [API for tables](https://www.wix.com/velo/reference/$w.Table.html#columns). You do this by defining a JSON object that lists the properties for each column and their values. The code is placed in the onReady function and looks like this: ```javascript $w.onReady(function () { $w("#resultsTable").columns = [ { "id": "col1", // ID of the column for code purposes // The field ID in the collection whose data this column displays "dataPath": "field1", "label": "Field 1", // The column header "width": 100, // Column width "type": "string", // Data type for the column // Path for the column if it contains a link "linkPath": "link-field-or-property" }, { "id": "col2", "dataPath": "field2", "label": "Field 2", "visible": true, "type": "image", "linkPath": "link-field-or-property" } //, // more column objects here if necessary // ... // ... }]; }); ``` For example, the column definitions of a table that shows the results of a search on your recipes collection might look like this: ```javascript $w.onReady(function () { $w("#resultsTable").columns = [{ "id": "col1", "dataPath": "title", "label": "Recipe", "type": "string", }, { "id": "col2", "dataPath": "course", "label": "Course", "type": "string", }, { "id": "col3", "dataPath": "meal", "label": "Meal", "type": "string", }]; }); ``` You can copy all this code directly into your page code. You need to replace the following element IDs and the collection name with those in your site. Just hover over the element to see its ID. * `wixData.query("recipes")` - Replace `recipes` with the name of your collection. * `.contains("name", $w("#searchBox")` - Replace `name` with the [field ID](https://support.wix.com/en/article/about-database-collections#field-id-velo-by-wix-only) of the field in the collection that is being searched. Replace `searchBox` with the element ID of your input box where visitors enter the string to search. * `$w("#resultsTable")` - Replace `resultsTable` with the element ID of your table that displays the search results. * `"dataPath value"` - Replace with the field IDs in your collection. You can now preview your page and check that everything works as expected.  ## Filter Using a Dropdown Element Now let's say you want users to select a value from a dropdown list of courses so they can filter your recipes. The list of courses is already in your collection. First, we add the dropdown and connect it to the collection via a dataset to populate the options directly from the collection. Then we add a table to display the selection, and finally we write the code. 
**Tip** You can also [filter displayed data based on a user selection in a dropdown](https://support.wix.com/en/article/cms-formerly-content-manager-setting-up-filters-for-site-visitors-using-input-elements) directly in the editor, without code.
#### 1\. Add the dropdown and table elements to the page 1. Add a dropdown list element and a [dataset](https://support.wix.com/en/article/adding-and-setting-up-a-dataset) to your page. Make sure the dataset is set to **Read** mode or **Read & Write** mode. 2. In the [Connect Dropdown](https://support.wix.com/en/article/cms-connecting-elements-to-a-collection-using-a-dataset) panel, select **Filter content**. 3. Add a table element to your page. #### 2\. Add the code for the dropdown selection to filter the collection Now add the code so that the user's selection in the dropdown is used to filter your collection. 1. Add the import statement for the Wix Data API to the top of your code: ```javascript import wixData from "wix-data"; ``` 2. Add an [onChange event](https://www.wix.com/velo/reference/$w.Dropdown.html#onChange) to the dropdown list. The following code is added to your page. ```javascript export function searchList_change(event) { //Add your code for this event here: } ``` 3. Replace existing text with the following code: ```javascript // Runs a query on the "recipes" collection wixData.query("recipes") // Query the collection for any items whose "Name" field contains // the value the user selected in the dropdown .contains("course", $w("#myDropdown").value) .find() // Run the query .then(res => { // Set the table data to be the results of the query $w("#resultsTable").rows = res.items; }); ``` #### 3\. Define the table columns Follow the instructions in the previous example to define the results table. Then preview your page and check that everything is working as expected. ## Filter Dropdown Options Distinctly In the last step, we displayed all recipes for a selected course in a table on the page. We might have many recipes for each course in our collection, so our table displays the course multiple times, once for each recipe.  We do not, however, want to display duplicate course values in the dropdown's options. We want each dropdown option to be distinct from the others.  First, we modify the dropdown we already added by disconnecting it from the collection in the editor. We then add code to populate the options directly from the collection.   #### 1\. Disconnect the dropdown from the collection We will populate the dropdown from the collection but with code. So let's disconnect it from the collection in the editor. 1. **Select** the dropdown list element on your page.  2. In the [Connect Dropdown](https://support.wix.com/en/article/cms-connecting-elements-to-a-collection-using-a-dataset) panel, under the **Choose a dataset** section, select the option **Not connected**.  #### 2\. Add code to populate the dropdown with distinct options We now add a function to populate our dropdown using [`distinct`](https://www.wix.com/velo/reference/wix-data.WixDataQuery.html#distinct) function. We call this function `loadOptions()`. The `distinct()` function queries the collection and returns field values that do not contain duplicates. To populate the dropdown, the distinct query results have to be formatted as an array of strings in a certain format. `loadOptions()` calls the `buildOptions()` function for this purpose. This example also demonstrates how to insert an extra **All Courses** option to our dropdown so users can reset the filter from the dropdown. You can copy the following code for these functions directly into your page code. You need to replace the element IDs and the collection name with those in your site. ```javascript function loadOptions() { // Run a query that returns distinct items in the collection wixData.query("recipes") // Set the course as the field that must be distinct .distinct("course") .then(results => { // Call another function to reformat the distinct items // the way the dropdown element expects let distinctList = buildOptions(results.items); // Use `unshift()` to add another dropdown option at // the beginning of the array, in the correct format distinctList.unshift({ "value": '', "label": 'All Continents' }); // Set the options of the dropdown $w("#myDropdown").options = distinctList; }); } ``` Let's now code the `loadOptions()` function. This function takes each distinct item from the collection and reformats the option in the [format expected by the dropdown](https://www.wix.com/velo/reference/$w/dropdown/options): `{ "label": "uniqueTitle", "value": "uniqueTitle" }` ```javascript function buildOptions(dropdownItems) { return items.map(currentItem => { return { "label": "currentItem", "value": "currentItem" }; }); } ``` Now call the `loadOptions()` function in the `$w.onReady()`, to load the options into the dropdown. Replace `resultsTable` with the ID of your table. ```javascript $w.onReady(() => { loadOptions(); $w("#resultsTable").columns = [{ ... ... ... }]; }); ``` Preview your page and check that everything works as expected.  ## Optionally Collapse the Table on Load The way both searches are set up, an empty table appears when the page loads. You can collapse the table so that it does not take up any space on the page and configure it to expand only after the search is performed. 1. In the [Properties & Events panel](https://dev.wix.com/docs/develop-websites/articles/workspace-tools/velo-workspace/properties-events-panel/about-the-properties-events-panel.md) for the table, select **Collapsed on load**. 2. In the code you added for the search, right below where you instructed the table to be populated with the results of the query on the data collection, add this line to expand the table.  ```javascript $w("#resultsTable").expand(); ``` Replace `resultsTable` with the ID of your table. For example, the code for performing the search with a dropdown would look like this for a table whose index key is `resultsTable`: ```javascript wixData.query("recipes") .contains("name", $w("#searchList").value) .find() .then(res => { $w("#resultsTable").rows = res.items; $w("#resultsTable").expand(); }); } ``` ## API List The following APIs are used in the code in this article. To learn more, see the [API Reference](https://www.wix.com/velo/reference/). **wix-data** * [wix-data.query( )](http://wix.to/94BuAAs/wix-data.html#query) - Creates a query. * [wix-data.WixDataQuery.find( )](http://wix.to/94BuAAs/wix-data.WixDataQuery.html#find) - Returns the items that match a query. * [wix-data.WixDataQuery.distinct( )](http://wix.to/94BuAAs/wix-data.WixDataQuery.html#distinct) - Returns the distinct items that match a query. --- > Portal Navigation: > > - Append `.md` to any URL under `https://dev.wix.com/docs/` to get its markdown version. > - Pages are either content pages (article or reference text) or menu pages (a list of links to child pages). > - To get a menu page, truncate any URL to a parent path and append `.md` (e.g. `https://dev.wix.com/docs/sdk.md`, `https://dev.wix.com/docs/sdk/core-modules.md`). > - Top-level index of all portals: https://dev.wix.com/docs/llms.txt > - Full concatenated docs: https://dev.wix.com/docs/llms-full.txt ## Resource: Querying Items that Reference Other Items ## Article: Querying Items that Reference Other Items ## Article Link: https://dev.wix.com/docs/develop-websites/articles/databases/wix-data/reference-fields/querying-items-that-reference-other-items.md ## Article Content: # Velo: Querying Items that Reference Other Items Some collections contain items that reference items that are stored in a different collection. For example, a **Books** collection may contain a **Writer** field, which references an **Authors** collection. Using Velo, you can retrieve referenced items' details using different techniques. This article explains how.
In this example, a book is the "item" and the author is the "referenced item." ### Retrieving Referenced Item IDs Using Velo, when you query an item that references other items, by default you receive the IDs of the referenced items in the query's results. Let's query our Books collection for novels. For each novel, we want to see the referenced author. Consider the following code that runs the query and displays the results in the table we created above. ```javascript function theRegularFindExample() { // Query the Books collection for novels only wixData .query("Books") .eq("genre", "Novel") .find() .then((myResults) => { // Set up table columns $w("#table1").columns = [ { id: "col1", dataPath: "title", label: "Book", width: 100, visible: true, type: "string", }, { id: "col2", dataPath: "genre", label: "Genre", width: 100, visible: true, type: "string", }, { id: "col3", dataPath: "writer", label: "Author", width: 200, visible: true, type: "richText", linkPath: "doc", }, ]; // Display the query results in the table $w("#table1").rows = myResults.items; }); } ``` We see that the **Author** field contains ID values. We can't see the author's name, nationality, and so on.
![](https://d2x3xhvgiqkx42.cloudfront.net/12345678-1234-1234-1234-1234567890ab/76096845-8b12-44f1-91f6-3dc2e838fdd9/2019/09/25/de82a016-eea8-4612-a11c-21a81c9a5e7c/4edb219a-7571-4fcb-aa78-cf05b17d680b.png)
To see the referenced information in addition to the IDs, there are other Velo functions we can use: [`queryReferenced()`](https://www.wix.com/velo/reference/wix-data.html#queryReferenced) and [`include()`](https://www.wix.com/velo/reference/wix-data.WixDataQuery.html#include). At the end of this article, we describe [when to use each of these functions](#when-to-use-each-function). ### Retrieving Referenced Items with queryReferenced() Use the [`queryReferenced()`](https://www.wix.com/velo/reference/wix-data.html#queryReferenced) function to include referenced items for the specified properties in your query's results. For example, we want to see novels in our Books collections along with the author's name and nationality. The author's name and nationality exist in an Authors collection. #### Example Let's query our Books collection again for novels, but this time we want to see the author's name and nationality. First, let's look at the following code that sets up our table. We're going to take this opportunity to demonstrate how to set up table columns for an object, because we won't be loading rows directly from a collection. We'll add rows to the table using an object that we create instead. Now let's look at code that runs the query and displays the both the results and the referenced results in our table: Now we see the **Author** and **Nationality** field values.
### Retrieving Referenced Items with include() Add the [`include()`](https://www.wix.com/velo/reference/wix-data.WixDataQuery.html#include) function to your query chain to include referenced items in your query's results. This function is a bit simpler to use than `queryReferenced()`. But it does have limitations. Review the [comparison](#when-to-use-each-function) between `queryReferenced()` and `include()` to decide which function to use. When setting up our columns, we use the period  **.**  notation to access the nested, referenced items. Because the referenced items are in a different collection, we prefix their names with the name of the referencing property from the first collection. #### Example Let's query our Books collection again for novels. Again, we want to see the author's name and nationality. This time we will demonstrate how to use `include()` instead of `queryReferenced()`. Consider the following code that runs the query and displays the results in a table: ```javascript async function theIncludeExample() { wixData .query("Books") .eq("genre", "Novel") .include("writer") .find() .then((myResults) => { if (myResults.items.length > 0) { let books = myResults.items; $w("#table2").rows = books; } else { console.log("No results found."); } }); } ``` Now we see the **Author** and **Nationality** field values.
See how `include()` is used in a live demo: `youtube:https://www.youtube.com/watch?v=bGfTcp5hATM` ### When to Use Each Function This table can help you decide when to use `queryReferenced()` and `include()`. | Functionality / Limitation | queryReferenced() | include() | | ------------------------------------------------------------------------------------------------------------------------------------------------------------------------------- | ----------------- | --------- | | **Can reference multiple items in one query**

If you want to see many items and their referenced data in one query, it's easier to use **include()**. | No | Yes | | **Can reference one item that references multiple items in one query** | Yes | No | | **Can reference multiple items that reference multiple items in one query** | No | No | | **Can trigger hooks** | No | Yes | | **Can reference more than 50 items**

Use **queryReferenced()** if you anticipate more than 50 items as a result of your query, even if you use the **limit()** function. | Yes | No | | **Can list up to 50 referenced items**

Use **queryReferenced( )** if you anticipate more than 50 referenced items will be returned as a result of your query. | Yes | No | | **Works with promises**

Working with promises lets you catch errors and send alerts. | Yes | No | ## See also - [Webinar: Planning for scale: large data design considerations](https://youtu.be/BGnpQ_LTHPg?feature=shared&t=1275) --- > Portal Navigation: > > - Append `.md` to any URL under `https://dev.wix.com/docs/` to get its markdown version. > - Pages are either content pages (article or reference text) or menu pages (a list of links to child pages). > - To get a menu page, truncate any URL to a parent path and append `.md` (e.g. `https://dev.wix.com/docs/sdk.md`, `https://dev.wix.com/docs/sdk/core-modules.md`). > - Top-level index of all portals: https://dev.wix.com/docs/llms.txt > - Full concatenated docs: https://dev.wix.com/docs/llms-full.txt ## Resource: About Data Hooks ## Article: About Data Hooks ## Article Link: https://dev.wix.com/docs/develop-websites/articles/databases/wix-data/hooks/about-data-hooks.md ## Article Content: # About Data Hooks
This feature is not yet supported in [Wix Blocks](https://dev.wix.com/docs/build-apps/develop-your-app/develop-an-app-with-blocks/about-wix-blocks.md).
Data hooks run code before or after certain interactions with your site's collections. A data hook allows you to intercept the interaction immediately before or immediately after it occurs. The hook's code can even be used to affect the interaction itself. For example, you may want to intercept an item before it is added to your collection to perform a final validation or to tweak the data that actually makes it into the collection. > **Note**: Data hooks run on the server. This means that any logs your code produces do not appear in the Developer Console in [Preview mode](https://support.wix.com/en/article/wix-editor-saving-previewing-and-publishing-your-site#previewing-your-site). Instead, use the built-in [Wix Logs](https://dev.wix.com/docs/develop-websites/articles/workspace-tools/developer-tools/logs/view-logs-using-wix-logs.md) tool to see your logs. In general, hooks are run whether the interaction with your collection is initiated by a page element or programmatically using the [Data API](https://dev.wix.com/docs/develop-websites/articles/databases/wix-data/data-api/working-with-the-data-api.md). However, a Data API call from the backend code of your site may pass the optional `WixDataOptions` object and use it to suppress hooks from being called on that particular interaction. See [Using Data Hooks](https://dev.wix.com/docs/develop-websites/articles/databases/wix-data/hooks/using-data-hooks.md) to find out how to register hooks on your collections. ### Hook Types There are a number of different points in the lifecycle of a data interaction that you can hook into. Different hooks receive different arguments and return different values. For more information, see the [Data API reference](http://wix.to/94BuAAs/wix-data.html). - `item`: The current item. For example, in `beforeInsert`, this is the item that is about to be inserted. If there are many items, such as can happen with `afterQuery` for example, the hook function will be called repeatedly, once for each of the items. - `itemId`: The current item's ID value. - `query`: The `WixDataQuery` object that will be executed. - `count`: The number of items in the count. - `error`: An error object. | Hook Name | Receives | | ------------ | -------- | | beforeInsert | item | | afterInsert | item | | beforeUpdate | item | | afterUpdate | item | | beforeRemove | itemId | | afterRemove | item | | beforeGet | itemId | | afterGet | item | | beforeQuery | query | | afterQuery | item | | beforeCount | query | | afterCount | count | | onFailure | error | --- > Portal Navigation: > > - Append `.md` to any URL under `https://dev.wix.com/docs/` to get its markdown version. > - Pages are either content pages (article or reference text) or menu pages (a list of links to child pages). > - To get a menu page, truncate any URL to a parent path and append `.md` (e.g. `https://dev.wix.com/docs/sdk.md`, `https://dev.wix.com/docs/sdk/core-modules.md`). > - Top-level index of all portals: https://dev.wix.com/docs/llms.txt > - Full concatenated docs: https://dev.wix.com/docs/llms-full.txt ## Resource: Using Data Hooks ## Article: Using Data Hooks ## Article Link: https://dev.wix.com/docs/develop-websites/articles/databases/wix-data/hooks/using-data-hooks.md ## Article Content: # Velo: Using Data Hooks
You may want to read [About Data Hooks](https://dev.wix.com/docs/develop-websites/articles/databases/wix-data/hooks/about-data-hooks.md) before following these instructions.
**Note**: Data hooks run on the server. This means that any logs your code produces do not appear in the Developer Console in [Preview mode](https://support.wix.com/en/article/wix-editor-saving-previewing-and-publishing-your-site#previewing-your-site). Rather, use the built-in [Wix Logs](https://dev.wix.com/docs/develop-websites/articles/workspace-tools/developer-tools/logs/view-logs-using-wix-logs.md) tool to see your logs. The code for data hooks is stored in a file called **data.js** in the **Backend** section of your site. You can add this code to the file by writing it yourself, or generate template code using the [Code sidebar](https://dev.wix.com/docs/develop-websites/articles/coding-with-velo/overview/about-coding-with-wix-studio.md#built-in-code-panel). To generate a template for a hook using the sidebar: 1. Hover over the collection name in the **Databases** section of the sidebar. 2. Click the Show More ![](https://d2x3xhvgiqkx42.cloudfront.net/12345678-1234-1234-1234-1234567890ab/0ca9e8ba-16ed-4cd8-a1e1-58d01c4420f7/2020/10/27/37ff9473-4cf0-4d6b-845e-d93462da44eb/2c4c1bdd-afc8-407e-a434-7e47492e2ba6.png) icon and select **Add/Remove Hooks**. 3. Choose which hooks you want to create, and click **Add & Edit Code**. Templates for each of the hooks you choose are automatically generated. The code that registers a hook follows the following format: ```javascript export function _(, context) { //hook code goes here } ``` The `collectionName` is the name of the collection that the hook will be registered to. The `hookName` is the [type of hook](https://dev.wix.com/docs/develop-websites/articles/databases/wix-data/hooks/about-data-hooks.md). The hook function takes two parameters. The first parameter is dependent on which hook was called. It can be either the current item, the current item's ID, the query, count, or error. The second parameter is an object that contains contextual information about the hook, such as the name of the collection the hook affects, the current user's ID, and the permissions role of the current user. The hook function is expected to return a specific type. If it returns a value of a different type, that value is ignored. For full details on parameters and expected return values for the different types of hooks, see the [Data API reference](http://wix.to/94BuAAs/wix-data.html). A hook on an interaction that affects multiple items in the collection will be called repeatedly, once for each of the items. > **Notes:** > > - The specialized functions for modifying reference fields, such as [insertReference()](https://www.wix.com/velo/reference/wix-data/insertreference), do not trigger hook functions. > - If you receive a "**Collection didn't load due to a syntax error**" message, review your **data.js** file and confirm that the syntax and formatting is correct. Also see the note below in **"After" Hooks**. > - Certain module export formats are not supported in `data.js`. For more information, see [Module Export Syntax](https://dev.wix.com/docs/develop-websites/articles/coding-with-velo/java-script-velo/module-export-syntax.md). In general terms, hooks work in the following manner: 1. An interaction with a collection occurs. 2. The hook function is called, receiving whatever is interacting with the collection. 3. The function performs whatever logic it wishes to, including possibly modifying whatever is interacting with the collection. 4. The function returns a version of what it has received. For example, in the following hook: 1. An item is being inserted into the collection. 2. We intercept the item before it is inserted. 3. We change the value of the item's title field to be all uppercase letters. 4. We return the changed item. ```javascript export function collection_beforeInsert(item, context) { item.title = item.title.toUpperCase(); return item; } ``` If we look at the item inserted into the collection, we'll see that its title is in all uppercase letters. Watch a demo of how to use data hooks in your code: `youtube:https://www.youtube.com/watch?v=3IHukvehUto` ### Example Data Hook Uses #### Validating Data Before Inserting You can use hooks to prevent the addition of an item to a collection if it doesn't meet certain requirements. The following example uses the `beforeInsert()` hook to validate an email address field. If the email is invalid, the function returns `Promise.reject()` and the item is not added to the collection. ```javascript export function MyCollection_beforeInsert(item, context) { const emailRegex = /^\w+([\.-]?\w+)*@\w+([\.-]?\w+)*(\.\w{2,3})+$/; if (emailRegex.test(item.email)) { return item; } else { return Promise.reject("Invalid email address."); } } ``` #### "After" Hooks Hooks that trigger after a function has executed do not affect the item in the collection. They can only affect the item returned by the function, which is a copy of the item in the collection. > **Note** > Do not use the \`afterQuery()\` hook to modify collection data. This can cause the Content Management System (CMS) to fail when loading. If you need to modify the results of queries before performing other data operations use the appropriate hook, such as [\`beforeInsert()\`](https://www.wix.com/velo/reference/wix-data/hooks/beforeinsert) or [\`beforeUpdate()\`](https://www.wix.com/velo/reference/wix-data/hooks/beforeupdate). ### API List The following API is used in the code in this article. To learn more, see the [API Reference](https://www.wix.com/velo/reference/). - [wix-data.Hooks](https://www.wix.com/velo/reference/wix-data.Hooks.html) --- > Portal Navigation: > > - Append `.md` to any URL under `https://dev.wix.com/docs/` to get its markdown version. > - Pages are either content pages (article or reference text) or menu pages (a list of links to child pages). > - To get a menu page, truncate any URL to a parent path and append `.md` (e.g. `https://dev.wix.com/docs/sdk.md`, `https://dev.wix.com/docs/sdk/core-modules.md`). > - Top-level index of all portals: https://dev.wix.com/docs/llms.txt > - Full concatenated docs: https://dev.wix.com/docs/llms-full.txt ## Resource: About Data Hooks for Dynamic Pages ## Article: About Data Hooks for Dynamic Pages ## Article Link: https://dev.wix.com/docs/develop-websites/articles/databases/wix-data/hooks/about-data-hooks-for-dynamic-pages.md ## Article Content: # Velo: About Data Hooks for Dynamic Pages When a request comes in for one of your dynamic pages, [a router uses the URL of the request](https://support.wix.com/en/article/cms-about-dynamic-pages#dynamic-item-pages) to decide which page to show and what data to bind to the page's dataset. You can add a data binding router hook to intercept this process at certain points and insert additional logic. Some hooks can be used with [router pages](https://dev.wix.com/docs/develop-websites/articles/coding-with-velo/routers/about-routers.md) as well. **Note:** If you duplicate a dynamic page and change a router prefix, you must also update the hook function. ## Router Hooks After defining a router for your site, you can define data binding router hooks in **routers.js** located in the Public & Backend section of the Code sidebar (Wix Studio), or the Code sidebar (Wix Editor). **Note:** To define data hooks, you must first create a router and add it your site. See how to create a router in [Wix Studio](https://dev.wix.com/docs/develop-websites/articles/coding-with-velo/routers/create-a-router.md), or in the [Wix Editor](https://dev.wix.com/docs/develop-websites/articles/coding-with-velo/routers/create-a-router.md). The hook functions are named with the following convention: _() The router prefix is the first part of the URL you chose when creating your dynamic page. You can find the URL of your dynamic page in the page's settings.  For example, if you have a page with the URL `/dishes/name` and you want to create a `beforeRouter` hook, the function would look like this: export function dishes_beforeRouter(request) { // function code } The hooks you can register are listed here in the order they run: * beforeRouter * customizeQuery * afterRouter To learn more about the hook functions, see the [Router API reference](http://wix.to/94BuAAs/wix-router.html). You can also register [data hooks](https://dev.wix.com/docs/develop-websites/articles/databases/wix-data/hooks/about-data-hooks.md) that run code before or after certain interactions with your site's collections. If you’ve done so, the data hooks will run between `customizeQuery()` and `afterRouter()`. ### beforeRouter() This hook is triggered before the router goes to the requested page. You can use this hook to route requests to a different page or return an error response. For example, you can check who is requesting the page and then decide based on the user's role whether to let the router continue to the next step or to return an error type response code. ### customizeQuery() This hook is triggered before the page's data query is executed. You can use this hook to further refine or change the query that will determine what data is bound to your page's dataset. For example, you can filter the query to only return items that have a status field set to active. ### afterRouter() This hook is triggered after the router has bound the data, but before the page is displayed. You can use this hook to change the router's response based on the data that was retrieved. For example, you can have two versions of a page, one for portrait oriented images and another for landscape oriented ones. After the image is pulled from the database, you can show the page that corresponds to the image's orientation. --- > Portal Navigation: > > - Append `.md` to any URL under `https://dev.wix.com/docs/` to get its markdown version. > - Pages are either content pages (article or reference text) or menu pages (a list of links to child pages). > - To get a menu page, truncate any URL to a parent path and append `.md` (e.g. `https://dev.wix.com/docs/sdk.md`, `https://dev.wix.com/docs/sdk/core-modules.md`). > - Top-level index of all portals: https://dev.wix.com/docs/llms.txt > - Full concatenated docs: https://dev.wix.com/docs/llms-full.txt ## Resource: Creating Data Hooks for Dynamic Pages ## Article: Creating Data Hooks for Dynamic Pages ## Article Link: https://dev.wix.com/docs/develop-websites/articles/databases/wix-data/hooks/creating-data-hooks-for-dynamic-pages.md ## Article Content: # Velo: Creating Data Hooks for Dynamic Pages Creating a data binding router hook allows you to intercept the process of a dynamic page's data getting bound to the page. This article takes you through what code you have to write in order to make a data binding router work. To learn more about what a data binding router hook is and why you would want to create one, see [About Data Binding Router Hooks](https://dev.wix.com/docs/develop-websites/articles/databases/wix-data/hooks/about-data-hooks-for-dynamic-pages.md). ### Add a Data Binding Router Hook To add a data binding router hook: 1. Go to your dynamic page located in your site's pages. 2. Click the Show More icon ![](https://d2x3xhvgiqkx42.cloudfront.net/12345678-1234-1234-1234-1234567890ab/0ca9e8ba-16ed-4cd8-a1e1-58d01c4420f7/2020/10/25/30a7b8cf-6ad0-4562-8edb-40f5f54d27db/7c21e80f-9095-4668-90bf-14127f990bb9.png) and then click **Settings** to open the page's settings. 3. In the **Page Info** tab, scroll down to **Advanced Settings**, and click **Add Hooks** to display the Add Hooks panel. When adding a data binding router hook, function stubs for the data binding router hooks you chose are added to the **routers.js** file in your site's backend code. The data binding router hook functions are named with the following convention: _(params...) So if your dynamic page has the [prefix](https://dev.wix.com/docs/develop-websites/articles/databases/wix-data/dynamic-pages/making-dynamic-page-urls-meaningful-with-prefixes.md) **myPrefix**, the code added to the routers.js file for the **beforeRouter** hook should look like: myPrefix_beforeRouter(request) { // routing code ...} The hooks you can register are listed here in the order they run: * beforeRouter * customizeQuery * afterRouter To learn more about the hook functions, see the [Router API reference](http://wix.to/94BuAAs/wix-router.html). You can also register [data hooks](https://dev.wix.com/docs/develop-websites/articles/databases/wix-data/hooks/about-data-hooks.md) that run code before or after certain interactions with your site's collections. If you’ve done so, the data hooks will run between `customizeQuery()` and `afterRouter()`. ### beforeRouter( ) This hook is triggered before the router goes to the requested dynamic page. You can use this hook to route requests to a different page or return an error response. If you need the data that will be bound to the page to determine the correct response, use the `afterRouter()` hook instead. The `beforeRouter()` hook receives a [`WixRouterRequest`](http://wix.to/94BuAAs/wix-router.WixRouterRequest.html) object that contains information about the incoming request. The object has information about the URL used to reach the router, where the request came from, and who the request came from. Within the body of the hook you can write any code you want. The code you write there should help you determine how you want to respond to the request. The function needs to return a [`WixRouterResponse`](http://wix.to/94BuAAs/wix-router.WixRouterResponse.html) object that causes the router to continue its routing, or respond with an HTTP response code. If you want the router to continue to the same page it was originally going to with the same data, use the [`next()`](http://wix.to/94BuAAs/wix-router.html#next) function to return the appropriate [`WixRouterResponse`](http://wix.to/94BuAAs/wix-router.WixRouterResponse.html). However, if you want the router to do something other than it was originally going to do before reaching your hook, you can use the [`forbidden()`](http://wix.to/94BuAAs/wix-router.html#forbidden), [`notFound()`](http://wix.to/94BuAAs/wix-router.html#notFound), [`redirect()`](http://wix.to/94BuAAs/wix-router.html#redirect), or [`sendStatus()`](http://wix.to/94BuAAs/wix-router.html#sendStatus) functions to return a [`WixRouterResponse`](http://wix.to/94BuAAs/wix-router.WixRouterResponse.html). #### Example In this example we create a hook on the **dynamic** prefix that restricts certain requests from being routed to their intended target. The following code is placed in the **routers.js** file in your site's backend code. ```javascript import {forbidden, next} from 'wix-router'; export function dynamic_beforeRouter(request) { if (request.path.length > 1 && request.path[0] === "admin") { if (request.user && request.user.role == "siteOwner") return next(); else return forbidden(); } return next(); } ``` The functionality used to create data binding router hooks is contained in the [Router API](http://wix.to/94BuAAs/wix-router.html). To use some of this functionality, you need to import it.  Here we import the [`forbidden()`](http://wix.to/94BuAAs/wix-router.html#forbidden) and [`next()`](http://wix.to/94BuAAs/wix-router.html#next) functions. import {forbidden, next} from 'wix-router'; If you want to use more of the functionality from the Router API, you need to add it to the `import` statement. * * * In the hook function, we start by checking if the path begins with the string `"admin"`: if (request.path.length > 1 && request.path[0] === "admin") { // ... } If the path starts with anything other than "admin", the `if` is skipped and we tell the router to continue to where it was going before being intercepted by the hook: return next(); * * * However, if the path starts with `"admin"`, we check to see what type of user is making the request: if (request.user && request.user.role == "siteOwner") { // ... } If the user is the owner of the site, we once again tell the router to continue to where it was going before being intercepted by the hook: return next(); But if the user in not the owner of the site, we return a 403 response: return forbidden(); ### customizeQuery( ) This hook is triggered before the page's data query is executed. You can use this hook to further refine or change the query that will determine what data is bound to your page's dataset. The `customizeQuery()` hook receives a [`WixRouterRequest`](http://wix.to/94BuAAs/wix-router.WixRouterRequest.html) object that contains information about the incoming request, a string with the current route, and a [`WixDataQuery`](http://wix.to/94BuAAs/wix-data.WixDataQuery.html) object containing query which is going to be used to get the data for the page being routed to. Within the body of the hook you can write any code you want. The code you write there should help you determine if you want to continue with the initial data or if you want to change it in some way. The function needs to return a [`WixDataQuery`](http://wix.to/94BuAAs/wix-data.WixDataQuery.html) object that will be used to get the final data to be passed to the page that will be routed to. If you want the router to continue with the same data it was originally going to bind to the page, return the object that the function received in the `query` parameter. However, if you want the router use different data, you can either refine the current query using the functions of the [Data API](http://wix.to/94BuAAs/wix-data.html) or create a new query. #### Example In this example we create a hook on the **dynamic** prefix that filters the query for a certain route to only find active users. The following code is placed in the **routers.js** file in your site's backend code. ```javascript export function myRouter_customizeQuery(request, route, query) { if (route === "/users/{name}") return query.eq("status", "active"); else return query; } ``` The functionality used to create queries is contained in the [Data API](http://wix.to/94BuAAs/wix-data.html). To use some of this functionality, you need to import it.  * * * In the hook function, we start by checking if the route is going to a dynamic page that will be displaying users: if (route === "/users/{name}") // ... If it is going there, we refine the query to only get `"active"` users: return query.eq("status", "active"); Otherwise, we return the same query we received: return query; ### afterRouter( ) This hook is triggered after the router has bound the data, but before the page is displayed. You can use this hook to change the router's response based on the data that was retrieved.  The `afterRouter()` hook receives a [`WixRouterRequest`](http://wix.to/94BuAAs/wix-router.WixRouterRequest.html) object that contains information about the incoming request and a [`WixRouterResponse`](http://wix.to/94BuAAs/wix-router.WixRouterResponse.html) object containing information about the router's response. Within the body of the hook you can write any code you want. The code you write there should help you determine if you want to continue with the initial response or if you want to change it to another response. The function needs to return a [`WixRouterResponse`](http://wix.to/94BuAAs/wix-router.WixRouterResponse.html) object that causes the router to continue its routing, or respond with an HTTP response code. If you want the router to continue to the same page it was originally going to with the same data, return the object that the function received in the `response` parameter. However, if you want the router to do something other than it was originally going to do before reaching your hook, you can use the [`ok()`](http://wix.to/94BuAAs/wix-router.html#ok), [`forbidden()`](http://wix.to/94BuAAs/wix-router.html#forbidden), [`notFound()`](http://wix.to/94BuAAs/wix-router.html#notFound), [`redirect()`](http://wix.to/94BuAAs/wix-router.html#redirect), or [`sendStatus()`](http://wix.to/94BuAAs/wix-router.html#sendStatus) functions to return a [`WixRouterResponse`](http://wix.to/94BuAAs/wix-router.WixRouterResponse.html). To use the data from the router on a page that is different than the one the router was originally going to route to, you can use the \[`ok()`\] function to choose the page and pass it the `response.data` and `response.header` from the original response. For an example of this use case, see below. #### Example In this example we create a hook on the **dynamic** prefix that routes the user to one of two pages. We have two versions of a page, one for horizontal oriented images and another for vertical oriented ones. After the image is pulled from the database, we check which type of picture is to be shown and route to the page that corresponds to that image's orientation. The following code is placed in the **routers.js** file in your site's backend code. ```javascript import {ok} from 'wix-router'; export function myRouter_afterRouter(request, response) { if(response.status === 200 && response.page === "horizontal-pic") { if(response.data.picture.orientation === "vertical") return ok("vertical-pic", response.data, response.head); else return response; } return response; } ``` The functionality used to create data binding router hooks is contained in the [Router API](http://wix.to/94BuAAs/wix-router.html). To use some of this functionality, you need to import it.  Here we import the [`ok()`](http://wix.to/94BuAAs/wix-router.html#ok) function. import {ok} from 'wix-router'; If you want to use more of the functionality from the Router API, you need to add it to the `import` statement. * * * In the hook function, we start by checking if the response `status` is the okay status and if the page the response is routing to is the page that displays pictures with a horizontal orientation: if(response.status === 200 && response.page === "horizontal-pic") { // ... } If we find any other status or if the page we're responding with is not the one we have two versions of, we just return the original response: return response; * * * However, if the router is about to route to the page that displays horizontal images, we check the orientation of the image that will be displayed on the page. We do so by pulling the orientation information from the router's current response: if(response.data.picture.orientation === "vertical") // ... If the picture's orientation doesn't match the page it was being sent to, we route to a different page that does match its orientation and we take the `data` and `head` information from the original response and send it to the new page as well: return ok("vertical-pic", response.data, response.head); But if the picture's orientation already matches the page it was being sent to, we send it to where it was already going. return response; --- > Portal Navigation: > > - Append `.md` to any URL under `https://dev.wix.com/docs/` to get its markdown version. > - Pages are either content pages (article or reference text) or menu pages (a list of links to child pages). > - To get a menu page, truncate any URL to a parent path and append `.md` (e.g. `https://dev.wix.com/docs/sdk.md`, `https://dev.wix.com/docs/sdk/core-modules.md`). > - Top-level index of all portals: https://dev.wix.com/docs/llms.txt > - Full concatenated docs: https://dev.wix.com/docs/llms-full.txt ## Resource: Working with Aggregations in the Data API ## Article: Working with Aggregations in the Data API ## Article Link: https://dev.wix.com/docs/develop-websites/articles/databases/wix-data/aggregations/working-with-aggregations-in-the-data-api.md ## Article Content: # Velo: Working with Aggregations in the Data API  
**Note:** Before reading this article, you should be familiar with using the Data API. To learn more, see [Working with the Data API](https://dev.wix.com/docs/develop-websites/articles/databases/wix-data/data-api/working-with-the-data-api.md).
Using the aggregation functionality of the [Data API](http://wix.to/94BuAAs/wix-data.html) you can perform certain calculations on your collection data, as whole or on groups of items that you define, to retrieve meaningful summaries. You can also add filtering and sorting to your aggregations to retrieve exactly what you need. 
**Note:** Aggregations can only be used on collections you have created. They cannot be used on [Wix App Collections](https://dev.wix.com/docs/develop-websites/articles/databases/wix-data/collections/working-with-wix-app-collections-and-code.md).
### Sample Data For demonstration purposes we use the following sample data. The data represents population statistics for cities collected over multiple years. In our examples, we assume the data is contained in a collection named **PopulationData**.  City, Population, State, Year Buffalo, 292000, NY, 2000 Buffalo, 261000, NY, 2010 Los Angeles, 3703000, CA, 2000 Los Angeles, 3796000, CA, 2010 Miami, 362000, FL, 2000 Miami, 401000, FL, 2010 New York, 8015000, NY, 2000 New York, 8192000, NY, 2010 Orlando, 195000, FL, 2000 Orlando, 240000, FL, 2010 San Diego 1228000, CA, 2000 San Diego 1306000, CA, 2010 San Francisco, 777000, CA, 2000 San Francisco, 805000, CA, 2010 If you want to follow along with the examples in this article, you can: 1. Create a collection on your site named **PopulationData**. 2. Save the above data in a .csv file. 3. [Import](https://support.wix.com/en/article/how-to-import-collection-data-in-the-content-manager) the .csv file into the **PopulationData** collection.  4. Copy and paste the code snippets found below into the code editor on one of your sites pages. ### Importing wix-data To work with aggregations, you will need to import `wix-data`. ```javascript import wixData from 'wix-data'; ``` ### Running Aggregations Running an aggregation is similar to running a query, but with some important differences.  To run an aggregation: 1. Create an aggregation using the `aggregate()` function. 2. Refine the aggregation using the functions described below. 3. Run the aggregation using the `run()` function. 4. Handle the aggregation results. For example, here is a simple aggregation that finds the largest population value in the **PopulationData** collection. ```javascript wixData.aggregate("PopulationData") .max("population") .run() .then( (results) => { let populationMax = results.items[0].populationMax; } ); ``` You can also use the following functions with an aggregation to modify the results you receive: * [`skip()`](http://wix.to/94BuAAs/wix-data.WixDataAggregate.html#skip) - Sets the number of items or groups to skip before returning aggregation results. * [`limit()`](http://wix.to/94BuAAs/wix-data.WixDataAggregate.html#limit) - Limits the number of items or groups the aggregation returns. ### Aggregation Results To handle aggregation results, use the following properties and functions on the object returned in the `aggregate()` function's Promise: * [`items`](http://wix.to/94BuAAs/wix-data.WixDataAggregateResult.html#items) - An array of the aggregated items or groups. Each value is contained in an object that is an element of the array. The structure of the objects depends on which aggregations have been run. * [`length`](http://wix.to/94BuAAs/wix-data.WixDataAggregateResult.html#length) - The number of items or groups in the aggregate results. * [`hasNext()`](http://wix.to/94BuAAs/wix-data.WixDataAggregateResult.html#hasNext) - Indicates if the aggregation has more results. Aggregation results are paged. So if your aggregation returns more results than the page size, you will have multiple pages of results. * [`next()`](http://wix.to/94BuAAs/wix-data.WixDataAggregateResult.html#next) - Retrieves the next page of aggregate results. >**Note:** Sometimes, the function that you run with the aggregation can cause the `_id`s to not be returned as strings, meaning the aggregated values would not be able to be used with repeaters. Learn more about repeaters and workarounds for this issue in [Working with Repeaters](https://dev.wix.com/docs/velo/articles/getting-started/working-with-repeaters.md). ### Aggregations Structure An aggregation is built with the following basic structure, where each part is optional.  The parts of an aggregation are explained below using the following example aggregation, which finds the cities whose population in 2010 was the largest in their respective states and the population was over 1,000,000.  ```javascript import wixData from 'wix-data'; // ... const filter = wixData.filter().eq("year", 2010); const having = wixData.filter().gt("maxPopulation", 1000000); wixData.aggregate("PopulationData") .filter(filter) .group("state") .max("population", "maxPopulation") .having(having) .descending("maxPopulation") .run() .then( (results) => { console.log(results.items); console.log(results.length); console.log(results.hasNext()); } ) .catch( (error) => { console.log(error.message); console.log(error.code); } ); ``` #### filter() Use the [`filter()`](http://wix.to/94BuAAs/wix-data.WixDataAggregate.html#filter) function to narrow down which items are included in an aggregation. For example, on line 9 of the aggregation above, the filter is used to filter out items where the `year` is not `2010`. The aggregate `filter()` function takes a [`WixDataFilter`](http://wix.to/94BuAAs/wix-data.WixDataFilter.html) object created using the [`wix-data.filter()`](http://wix.to/94BuAAs/wix-data.html#filter) function (line 5 above). Use any of the `WixDataFilter` filtering functions to build your `WixDataFilter` object. #### group() Use the [`group()`](http://wix.to/94BuAAs/wix-data.WixDataAggregate.html#group) function to group retrieved items together and then optionally calculate aggregated values and further filter the groups. Grouping is a powerful tool that allows you to aggregate data in groups instead of across a whole collection or part of a collection. When grouping is employed, aggregations are performed on the unique combinations that define each group. For example, without grouping you can find the city with the largest population in a collection or you can find the city with the largest population in a specific state. However, with grouping you can find the city with the largest population in each state. For example, on line 10 of the aggregation above, grouping is used to group together all cities in the same state. Then, on line 11, the [`max()`](https://www.wix.com/velo/reference/wix-data/wixdataaggregate/max) function is used to get the largest population value from each of the state groups. You can perform the following aggregated calculations on groups: * [`min()`](https://www.wix.com/velo/reference/wix-data.WixDataAggregate.html#min) * [`max()`](https://www.wix.com/velo/reference/wix-data.WixDataAggregate.html#max) * [`avg()`](https://www.wix.com/velo/reference/wix-data.WixDataAggregate.html#avg) * [`sum()`](https://www.wix.com/velo/reference/wix-data.WixDataAggregate.html#sum) * [`count()`](https://www.wix.com/velo/reference/wix-data.WixDataAggregate.html#count) The `group()` function can also be used to create groups based on multiple fields. #### having() Use the [`having()`](http://wix.to/94BuAAs/wix-data.WixDataAggregate.html#having) function to narrow down which groups are included in an aggregation. The `having()` function differs from filter in that it is applied after the groupings are made. So `filter()` filters out **items** from the collection that you don't want considered at all while `having()` filters out **groups** that don't match the given criteria. For example, on line 12 of the aggregation above, the having is used to filter out groups where the `maxPopulation` is less or equal to `1000000`. The `having()` function takes a [`WixDataFilter`](http://wix.to/94BuAAs/wix-data.WixDataFilter.html) object created using the [`wix-data.filter()`](http://wix.to/94BuAAs/wix-data.html#filter) function (line 6 above). Use any of the `WixDataFilter` filtering functions to build your `WixDataFilter` object. #### Sorting Use the [`ascending()`](http://wix.to/94BuAAs/wix-data.WixDataAggregate.html#ascending) and [`decending()`](https://www.wix.com/velo/reference/wix-data/wixdataaggregate/descending) functions to sort the aggregation's resulting items or groups. For example, on line 13 of the aggregation above, the results are sorted in descending order based on the aggregated `maxPopulation` values. You can sort based on actual fields from your collection or virtual fields that are created as part of the grouping and aggregation process. For example, the sort on line 13 above is performed on the `maxPopulation` field, which is not a field in the collection, but a field created by the `max()` aggregation. ### Examples Here we present a number of common scenarios that demonstrate how to use aggregations in various ways. #### max() This example finds the largest population value of all the cities across all years. Notice that the key in the results is named `"populationMax"` because we are calling the `max()` function and passing it the `"population"` field ID. ```javascript wixData.aggregate("PopulationData") .max("population") .run() .then( (results) => { let items = results.items; } ); /* items is: * [{"_id": "0", "populationMax": 8192000}] */ ``` #### group(), max() This example finds the largest population value in each state across all years. ```javascript wixData.aggregate("PopulationData") .group("state") .max("population") .run() .then( (results) => { let items = results.items; } ); /* items is: * [ * {"_id": "FL", "populationMax": 401000}, * {"_id": "CA", "populationMax": 3796000}, * {"_id": "NY", "populationMax": 8192000} * ] */ ``` #### group(), count() This example finds the number of items for each state across all years. ```javascript wixData.aggregate("PopulationData") .group("state") .count() .run() .then( (results) => { let items = results.items; } ); /* items is: * [ * {"_id":"FL","count":4}, * {"_id":"CA","count":6}, * {"_id":"NY","count":4} * ] */ ``` #### group(...multiple-fields), max() You can also create groups based on multiple fields and then run aggregations on those groups. When grouping by multiple fields, each group is defined by a unique combination of all the fields in the group. For example, here is an aggregation that finds the largest population in each state for each year with population data. ```javascript wixData.aggregate("PopulationData") .group("state", "year") .max("population") .run() .then( (results) => { let items = results.items; } ); /* items is: * [ * { * "_id": {"state": "NY", "year": 2000}, * "populationMax": 8015000, * "state": "NY", * "year": 2000 * },{ * "_id": {"state": "FL", "year": 2000}, * "populationMax": 362000, * "state": "FL", * "year": 2000 * },{ * "_id": {"state": "CA", "year": 2000}, * "populationMax": 3703000, * "state": "CA", * "year": 2000 * },{ * "_id": {"state": "FL", "year": 2010}, * "populationMax": 401000, * "state": "FL", * "year": 2010 * },{ * "_id": {"state": "CA", "year": 2010}, * "populationMax": 3796000, * "state": "CA", * "year": 2010 * },{ * "_id":{"state": "NY", "year": 2010}, * "populationMax": 8192000, * "state": "NY", * "year": 2010 * } * ] */ ``` #### group(...multiple-fields), count() This example finds the number of items for each state per year. ```javascript wixData.aggregate("PopulationData") .group("state", "year") .count() .run() .then( (results) => { let items = results.items; } ); /* items is: * [ * { * "_id": {"state": "NY", "year": 2000}, * "count": 2, * "state": "NY", * "year": 2000 * },{ * "_id": {"state": "FL", "year": 2000}, * "count": 2, * "state": "FL", * "year": 2000 * },{ * "_id": {"state": "CA", "year": 2000}, * "count": 3, * "state": "CA", * "year": 2000 * },{ * "_id": {"state": "FL", "year": 2010}, * "count": 2, * "state": "FL", * "year": 2010 * },{ * "_id": {"state": "CA", "year": 2010}, * "count": 3, * "state": "CA", * "year": 2010 * },{ * "_id": {"state": "NY", "year": 2010}, * "count": 2, * "state": "NY", * "year": 2010 * } * ] */ ``` #### filter(), max() This example uses a filter to find the city with the largest population in the year 2000. ```javascript let filter = wixData.filter().eq("year", 2000); wixData.aggregate("PopulationData") .filter(filter) .max("population") .run() .then( (results) => { let items = results.items; } ); // items is: [{"_id": "0", "populationMax": 8015000}] ``` #### group(), max(), ascending() This example uses a sort to find the largest population in each state across all years and sorts them from least to greatest. ```javascript wixData.aggregate("PopulationData") .group("state") .max("population") .ascending("populationMax") .run() .then( (results) => { let items = results.items; } ); /* items is: * [ * {"_id": "FL", "populationMax": 401000}, * {"_id": "CA", "populationMax": 3796000}, * {"_id": "NY", "populationMax": 8192000} * ] */ ``` --- > Portal Navigation: > > - Append `.md` to any URL under `https://dev.wix.com/docs/` to get its markdown version. > - Pages are either content pages (article or reference text) or menu pages (a list of links to child pages). > - To get a menu page, truncate any URL to a parent path and append `.md` (e.g. `https://dev.wix.com/docs/sdk.md`, `https://dev.wix.com/docs/sdk/core-modules.md`). > - Top-level index of all portals: https://dev.wix.com/docs/llms.txt > - Full concatenated docs: https://dev.wix.com/docs/llms-full.txt ## Resource: Making Dynamic Page URLs Meaningful with Prefixes ## Article: Making Dynamic Page URLs Meaningful with Prefixes ## Article Link: https://dev.wix.com/docs/develop-websites/articles/databases/wix-data/dynamic-pages/making-dynamic-page-urls-meaningful-with-prefixes.md ## Article Content: # Velo: Making Dynamic Page URLs Meaningful with Prefixes >**Before reading this article you may want to read:** > * [About Dynamic Pages](https://support.wix.com/en/article/cms-about-dynamic-pages) > * [Creating A Unique Dynamic Page URL](https://support.wix.com/en/article/creating-a-unique-dynamic-page-url)   > * [Linking to Dynamic Pages](https://support.wix.com/en/article/cms-linking-to-dynamic-pages) The first section after the domain name of a [dynamic page URL](https://support.wix.com/en/article/creating-a-unique-dynamic-page-url) is the prefix. The prefix can help make your page URLs more meaningful for your visitors. For example, **recipes** is the prefix in the following URL:
![](https://d2x3xhvgiqkx42.cloudfront.net/12345678-1234-1234-1234-1234567890ab/11e10e4f-b84d-4136-a5a9-6109fab0b7d7/2017/05/07/2fc37dda-f085-41cd-9a4b-4485c0c7afd7.png)
Every time you use a new prefix for a dynamic page URL, a new section is created in the sidebar for all pages with that prefix. This allows you to group pages in one section even if they are connected to different collections in your database.
**Tip:** When you create a dynamic page, the name of the collection that your page connects to is automatically added as the prefix to the URL. This prefix is only a suggested default and does not affect how your page connects to your collection. If you want to use a different prefix for your page, edit the URL and change it manually.
Let's look at an example to understand why this is useful. Let's say you have a site for a restaurant, and you keep your menu information in different collections: meals and beverages. Your meals collection has fields like dish name, allergy information, calories, which meal it's served for, and other meal-related information. Your beverages collection has fields like name, type of drink, domestic or imported, price per glass or bottle, and other drink-related information. Now you want to create dynamic pages to display your meals and beverages by category, but you want all those pages to be under the common URL prefix **menu**. To do this, you would create your dynamic pages with the URL `https://my-restaurant/menu` followed by other sections that make your URLs meaningful, and then fields that filter the dynamic content. In the end, you might have the following dynamic URLs: * `https://my-restaurant/menu/dishes/{meal}` * `https://my-restaurant/menu/drinks/{type}` In this case, **menu** is the prefix and **dishes** and **drinks** are additional sections you might manually add to your URLs to make them more meaningful. Your final page URLs would look like this: * `https://my-restaurant/menu/dishes/breakfast` * `https://my-restaurant/menu/dishes/lunch` * `https://my-restaurant/menu/dishes/dinner` * `https://my-restaurant/menu/drinks/beer` * `https://my-restaurant/menu/drinks/wine` * `https://my-restaurant/menu/drinks/scotch` * `https://my-restaurant/menu/drinks/soda` Now your page URLs communicate meaningful information for your visitors. The prefix also controls how your dynamic pages are grouped in the Pages menu. --- > Portal Navigation: > > - Append `.md` to any URL under `https://dev.wix.com/docs/` to get its markdown version. > - Pages are either content pages (article or reference text) or menu pages (a list of links to child pages). > - To get a menu page, truncate any URL to a parent path and append `.md` (e.g. `https://dev.wix.com/docs/sdk.md`, `https://dev.wix.com/docs/sdk/core-modules.md`). > - Top-level index of all portals: https://dev.wix.com/docs/llms.txt > - Full concatenated docs: https://dev.wix.com/docs/llms-full.txt ## Resource: Creating Previous and Next Buttons for a Dynamic Item Page with Code ## Article: Creating Previous and Next Buttons for a Dynamic Item Page with Code ## Article Link: https://dev.wix.com/docs/develop-websites/articles/databases/wix-data/dynamic-pages/creating-previous-and-next-buttons-for-a-dynamic-item-page-with-code.md ## Article Content: # Velo Tutorial: Creating Previous and Next Buttons for a Dynamic Item Page with Code When you want to add previous and next buttons to a dynamic page, you may be tempted to add two buttons, connect them to your page's dataset, and choose **Previous** and **Next** from the **Actions** list as you would on a regular page. Doing so will not work. To understand why it doesn't work, we need to understand a little bit about how dynamic item pages work. A dynamic item page decides which item to display using the [dynamic sections of the URL](https://support.wix.com/en/article/cms-creating-unique-dynamic-page-urls) that was used to reach the page. When the page loads, the proper item is then fetched from the database and is accessible to the page through the page's dynamic dataset. Since it is an item page, there will only be one item in the dataset. Therefore, there are no "previous" or "next" items to navigate to using the **Previous** and **Next** actions of the dataset. This article will demonstrate how you can use code to create previous and next buttons for a dynamic item page. We will do so by adding code to two pages. First, in an index page that your users use to reach your dynamic item pages, we will add code to store all the relevant item page links. Then, in the dynamic item page, we will add code to retrieve the links and use them in previous and next buttons that we will add to the page. In this article we assume that you are using an index page to present multiple items from one of your collections on a single page. Users select one of the items on your index page to reach the relevant dynamic item page. The order of the previous and next items on your item page will be determined by the index page that the user came from.
**Note:** You can also use the [getPreviousDynamicPage( )](https://www.wix.com/velo/reference/wix-dataset.DynamicDataset.html#getPreviousDynamicPage) and [getNextDynamicPage( )](https://www.wix.com/velo/reference/wix-dataset.DynamicDataset.html#getNextDynamicPage) functions or the **Previous dynamic page** and **Next dynamic page** [dataset actions](https://support.wix.com/en/article/dataset-actions-for-buttons-and-images) to create previous and next buttons on a dynamic item page. However, you cannot control the item order when using these functions.
### Index Page The index page can be a regular page or a dynamic list page. In either case, the page will have a dataset that is connected to your collection and a table or gallery that is set to link each item to a dynamic item page. To create the previous and next buttons on the dynamic item page we don't need to change the index page at all. We just need to add some code that will work behind the scenes. 
**Note:** The order of the previous and next items on your dynamic item page will be determined by the sort order of the dataset on the index page.
The code we will add to the index page does the following: * Retrieves the collection items from the dataset * Gets the relative URLs for the dynamic item page for each of the items * Stores the URLs in the user's local browser storage for us to use later Add the following code to your index page in the Page Code section. ```javascript import {local} from 'wix-storage-frontend'; const linkField = "link-to-item"; // replace this value $w.onReady(function () { $w("#myDataset").onReady(() => { const numberOfItems = $w("#myDataset").getTotalCount(); $w("#myDataset").getItems(0, numberOfItems) .then( (result) => { const dynamicPageURLs = result.items.map(item => item[linkField]); local.setItem('dynamicPageURLs', dynamicPageURLs); } ) .catch( (err) => { console.log(err.code, err.message); } ); } ); } ); ```
**Note:** See the appendix below to learn how to optimize the above code.
You'll need to do two things to make sure this code works for your specific situation. First, this code assumes your page's dataset has the ID **myDataset**. If it does not have that ID, you need to either change the dataset's ID to **myDataset** or change the code wherever it says `"#myDataset"` to reflect your dataset's actual ID. You can change an element's ID by selecting the element and editing the ID field in the Properties & Events panel. Second, this code needs to get the URLs to your dynamic item page from your collection. It can only do so if it knows which field in your collection the URLs are stored in. Since the field ID for that field will be different for every situation, you need to edit the code to reflect the proper field ID. On this line `const linkField = "link-to-item"; // replace this value` change the value inside double quotes to the correct field ID. Remember, each time you add a dynamic page, a field is automatically created in your collection with relative URLs for that page. In the Content Management System (CMS), you need to locate the field with the URLs for the dynamic item page that you want to add previous and next buttons to.  To find the **field ID** for a collection field, click on the vertical ellipses that appears when you hover over a field in the CMS and select **Edit**. You will see the **field ID** in the **Edit Field** window that pops up. Be sure to use the **field ID** and not the **Field Name**.
**Important:** This code gets the URLs for all the items in the dataset. If you have a very large collection, you may want to limit the number of items retrieved from the dataset.
**Note:** If you have more than one index page that leads to the same dynamic item page, you will need to add this code to each of those pages.
### Item Page On the dynamic item page, begin by adding two buttons to the page. Feel free to change the design and text of the buttons, but make sure not to add any links to the buttons. The code we will add to the dynamic item page does the following: * Disables the previous and next buttons * Retrieves the URLs stored in the user's local browser storage * Retrieves the URL of the current page * Gets the location of the current page's URL within the list of all the URLs * If there is a URL to a "previous" page, sets the previous button's link to that URL and enables the previous button * If there is a URL to a "next" page, sets the next button's link to that URL and enables the next button Add the following code to your dynamic item page in the Page Code section. ```javascript import {local} from 'wix-storage-frontend'; import wixLocationFrontend from 'wix-location-frontend'; $w.onReady(function () { $w("#previous").disable(); $w("#next").disable(); if (local.getItem('dynamicPageURLs')) { const dynamicPageURLs = local.getItem('dynamicPageURLs').split(','); const currentPage = '/' + wixLocationFrontend.prefix + '/' + wixLocationFrontend.path.join('/'); const currentPageIndex = dynamicPageURLs.indexOf(currentPage); if (currentPageIndex > 0) { $w("#previous").link = dynamicPageURLs[currentPageIndex - 1]; $w("#previous").enable(); } if (currentPageIndex < dynamicPageURLs.length - 1) { $w("#next").link = dynamicPageURLs[currentPageIndex + 1]; $w("#next").enable(); } } } ); ```
**Note:** See the appendix below to learn how to optimize the above code.
This code assumes that your buttons have the IDs **previous** and **next**. If your buttons do not have those IDs, you need to either change the IDs of the buttons to **previous** and **next** or change the code wherever it says `"#previous"` and `"#next"` to reflect actual IDs of your buttons. You can change an element's ID by selecting the element and editing the ID field in the Properties & Events panel.
Advanced: Storage Type In the code snippets above we use browser's storage to pass information between pages. There are two types of browser storage that you can access using the wix-storage-frontend API. In this article we use **local** storage. To use **session** storage instead, all you need to do is change the import statements in both code snippets accordingly. For more information, see [wix-storage-frontend](http://wix.to/94BuAAs/wix-storage.html) in the API Reference.
### API List The following APIs are used in the code in this article. To learn more, see the [API Reference](https://www.wix.com/velo/reference/). **$w** * [$w.onReady( )](http://wix.to/94BuAAs/$w.html#onReady) - Sets the function that runs when all a page's elements have finished loading. **$w.Button** * [$w.Button.disable( )](http://wix.to/94BuAAs/$w.Button.html#disable) - Disables an element. * [$w.Button.enable( )](http://wix.to/94BuAAs/$w.Button.html#enable) - Enables an element. * [$w.Button.link](http://wix.to/94BuAAs/$w.Button.html#link) - Sets or gets the element's link. **wix-dataset** * [wix-dataset.getItems( )](https://www.wix.com/velo/reference/wix-dataset/dataset/getitems) - Returns the selected items from a dataset. * [wix-dataset.getTotalCount( )](https://www.wix.com/velo/reference/wix-dataset/dataset/gettotalcount) - Returns the number of items in a dataset that match its filter criteria. * [wix-dataset.onReady( )](https://www.wix.com/velo/reference/wix-dataset/dataset/onready) - Adds an event handler that runs when a dataset is ready. **wix-location-frontend** * [wix-location-frontend.prefix](http://wix.to/94BuAAs/wix-location.html#prefix) - Gets the prefix of the page's URL. * [wix-location-frontend.path](http://wix.to/94BuAAs/wix-location.html#path) - Gets the path of the page's URL. * [wix-location-frontend.to( )](http://wix.to/94BuAAs/wix-location.html#to) - Directs the browser to navigate to the specified URL. **wix-storage-frontend** * [wix-storage-frontend.getItem( )](http://wix.to/94BuAAs/wix-storage.Storage.html#getItem) - Gets an item from local or session storage. * [wix-storage-frontend.setItem( )](http://wix.to/94BuAAs/wix-storage.Storage.html#setItem) - Stores an item in local or session storage. **wix-window-frontend** * [wix-window-frontend.rendering.env](http://wix.to/94BuAAs/wix-window.rendering.html#env) - Gets the rendering environment. --- > Portal Navigation: > > - Append `.md` to any URL under `https://dev.wix.com/docs/` to get its markdown version. > - Pages are either content pages (article or reference text) or menu pages (a list of links to child pages). > - To get a menu page, truncate any URL to a parent path and append `.md` (e.g. `https://dev.wix.com/docs/sdk.md`, `https://dev.wix.com/docs/sdk/core-modules.md`). > - Top-level index of all portals: https://dev.wix.com/docs/llms.txt > - Full concatenated docs: https://dev.wix.com/docs/llms-full.txt ## Resource: Integrating External Databases with Your Wix Site ## Article: Integrating External Databases with Your Wix Site ## Article Link: https://dev.wix.com/docs/develop-websites/articles/databases/external-databases/overview/integrating-external-databases-with-your-wix-site.md ## Article Content: # About Integrating External Databases with Your Wix Site Wix's built-in data management solution is the [Wix Content Management System (CMS)](https://support.wix.com/en/article/cms-content-management-system-an-overview). While CMS collections cover a wide range of use cases for content-driven websites and applications, some projects may have specific requirements that can't be addressed by the integrated database solution. To address such cases, Wix allows users to connect an external database to Wix sites using an external database adaptor. Once the connection is set up, users can interact with these databases and use them to populate site elements as though they were Wix CMS collections. This article gives an overview of the ways you can connect an external database to Wix sites using an external database adaptor. ## Supported IDEs You can work CMS collections and connected external databases in the following IDEs: - The [editor](https://dev.wix.com/docs/develop-websites/articles/workspace-tools/velo-workspace/workspaces/wix-studio-working-with-the-code-panel.md) (Wix Studio and Wix Editor). - The [Wix IDE](https://dev.wix.com/docs/develop-websites/articles/workspace-tools/velo-workspace/wix-ide/wix-studio-about-the-wix-ide.md) (Wix Studio). - Your [local IDE](https://dev.wix.com/docs/develop-websites/articles/workspace-tools/developer-tools/git-integration-wix-cli-for-sites/about-git-integration-wix-cli-for-sites.md) (Wix Studio and Wix Editor). ## External database adaptors To establish a connection between a site and an external database, you need to prepare an external database adaptor. An external database adaptor is a server that translates Wix Data requests from your site to an external database’s protocol and translates the response back to a Wix Data format. From the Wix site’s point of view, the external database is a data collection and behaves exactly like an internal collection. This means that your external database collections can be managed via the [Wix Data APIs](https://dev.wix.com/docs/rest/business-solutions/cms/introduction.md), and used (with or without [datasets](https://dev.wix.com/docs/velo/velo-only-apis/$w/dataset/introduction.md)) to populate Wix UI elements like [repeaters](https://dev.wix.com/docs/develop-websites/articles/databases/wix-data/displaying-data/display-database-collection-content-in-a-repeater.md) and [tables](https://support.wix.com/en/article/cms-formerly-content-manager-displaying-collection-content-in-a-table). **External database flows:**
![](https://wixmp-833713b177cebf373f611808.wixmp.com/images/f95cac67dd41ecd29bc34fdd19f91d35.png)
1. A Wix Data request is made to an external database collection. The request is sent to the adaptor. 2. The adaptor validates the request and translates it to a native database request in the required protocol. 3. The native protocol request is sent to the external database. 4. The external database sends a response in its native protocol and format. 5. The adaptor translates the response to a Wix Data format. 6. The translated response is sent to the Wix site and processed in the same way as an internal data response. ### Preparing an adaptor You can prepare an external database adaptor in one of the following ways: - [Deploy an out-of-the-box external database adaptor](#out-of-the-box-external-database-adaptors) for a single site. - [Build and deploy your own external database adaptor](https://dev.wix.com/docs/sdk/backend-modules/data/external-database-connections/sample-flows.md#backend-modules_data_external-database-connections_build-your-own-adaptor). ### Out-of-the-box external database adaptors Wix created out-of-the-box container image adaptors for several databases on external platforms, including AWS, Azure, and Google Cloud Platform. The following database types are supported with out-of-the-box adaptors:
Click to expand list of supported databases **MySQL** [MySQL](https://www.mysql.com/) supports vanilla MySQL versions 5.7 to 8.0. This includes variants like MariaDB and Percona Server for MySQL, as MySQL APIs are fully compatible. The following managed versions of MySQL are supported: - [Google Cloud SQL for MySQL](https://cloud.google.com/sql) - [Amazon RDS for MySQL and MariaDB](https://aws.amazon.com/rds/mysql/) - [Amazon Aurora](https://aws.amazon.com/rds/aurora/mysql-features/) - [Microsoft Azure MySQL](https://azure.microsoft.com/en-us/services/mysql/#overview) **Postgres** Open-source versions 9 to 13. The following managed versions are supported: - [Google Cloud SQL for Postgres](https://cloud.google.com/sql) - [Amazon RDS for PostgreSQL](https://aws.amazon.com/rds/postgresql/) - [Amazon Aurora](https://aws.amazon.com/rds/aurora) - [Microsoft Azure Postgres](https://azure.microsoft.com/en-us/services/postgresql) **MS SQL** [Microsoft SQL Server](https://www.microsoft.com/en-us/sql-server/sql-server-2019) server can be connected both as an on-premises, self-managed installation or managed version where available: - [Google Cloud SQL](https://cloud.google.com/sql/docs/sqlserver/quickstart) - [Amazon RDS for SQL Server](https://aws.amazon.com/rds/sqlserver/) - [Microsoft Azure SQL database](https://azure.microsoft.com/en-us/products/azure-sql/database/#overview) **Google Cloud Spanner** - [Google Cloud Spanner](https://cloud.google.com/spanner): Fully managed relational database with unlimited scale, strong consistency, and up to 99.999% availability from Google. **Google Cloud BigQuery** - [Google Cloud BigQuery](https://cloud.google.com/bigquery): Fully managed, scalable, and serverless data warehouse by Google with built-in machine learning capabilities.

Learn how to deploy an out-of-the-box external database adaptor for: - [AWS](https://dev.wix.com/docs/develop-websites/articles/databases/external-databases/aws/integrate-your-aws-databases-with-your-wix-site.md) - [Google Cloud](https://dev.wix.com/docs/develop-websites/articles/databases/external-databases/google/integrate-your-google-cloud-platform-databases-with-your-wix-site.md) - [Microsoft Azure](https://dev.wix.com/docs/develop-websites/articles/databases/external-databases/microsoft-azure/integrate-your-microsoft-azure-database-with-your-wix-site.md) ## Connecting to an external database Once you've prepared an external database adaptor, you can use it to connect Wix sites to the external database. If you implemented your adaptor as part of a Wix app, the connection is made automatically when the app is installed on a site. Otherwise, you need to make the connection manually using either of the following methods: - [Add an external database collection in the Wix editor](https://dev.wix.com/docs/develop-websites/articles/databases/external-databases/overview/adding-and-deleting-an-external-database-collection.md). - Call [Create External Database Connection](https://dev.wix.com/docs/rest/business-solutions/cms/external-database-connection/create-external-database-connection.md) in the External Database Connections API. See the API's [sample flows](https://dev.wix.com/docs/rest/business-solutions/cms/external-database-connection/sample-flows.md) for detailed instructions. ### Use existing data You can use existing data from your external database in your Wix site. If you want your existing database table to be read-write on your site, it must contain the following columns: - **\_id** - **\_createdDate** - **\_updatedDate** - **\_owner** Tables without these columns are read-only in your Wix site. When creating new tables, include these columns to make the table writable from your site. ## See also - [CMS (Content Management System): An Overview](https://support.wix.com/en/article/cms-content-management-system-an-overview) - [About the Wix Data API](https://dev.wix.com/docs/rest/business-solutions/cms/introduction.md) --- > Portal Navigation: > > - Append `.md` to any URL under `https://dev.wix.com/docs/` to get its markdown version. > - Pages are either content pages (article or reference text) or menu pages (a list of links to child pages). > - To get a menu page, truncate any URL to a parent path and append `.md` (e.g. `https://dev.wix.com/docs/sdk.md`, `https://dev.wix.com/docs/sdk/core-modules.md`). > - Top-level index of all portals: https://dev.wix.com/docs/llms.txt > - Full concatenated docs: https://dev.wix.com/docs/llms-full.txt ## Resource: Adding and Deleting an External Database Collection ## Article: Adding and Deleting an External Database Collection ## Article Link: https://dev.wix.com/docs/develop-websites/articles/databases/external-databases/overview/adding-and-deleting-an-external-database-collection.md ## Article Content: # Adding and Deleting External Database Collections > **Note:** This feature is only available for sites with certain premium plans. If you need to use this feature, you can [upgrade your site](https://www.wix.com/upgrade/website). Learn more about [premium plans](https://dev.wix.com/docs/develop-websites/articles/coding-with-velo/premium-plans/about-premium-plans.md). Wix lets you [connect your site to an external database](https://dev.wix.com/docs/develop-websites/articles/databases/external-databases/overview/integrating-external-databases-with-your-wix-site.md) and then work with that database's collections in your site just as you would with our built-in collections. This article explains how to add and delete external database collections for your site. ## Before you begin Before adding an external database to your Wix site you need to set up or create an [external database adaptor](https://dev.wix.com/docs/develop-websites/articles/databases/external-databases/overview/integrating-external-databases-with-your-wix-site.md#external-database-adaptors). > **Note:** You can also add external database collections to your site by calling [`createExternalDatabaseCollection()`](https://dev.wix.com/docs/sdk/backend-modules/data/external-database-connections/create-external-database-connection.md). For detailed instructions, see the [sample flows](https://dev.wix.com/docs/rest/business-solutions/cms/external-database-connection/sample-flows.md) of the External Database Connections API. ## Add external database collections 1. Select **Databases** from the Code sidebar (Wix Editor) or the Code sidebar (Wix Studio). 2. Click the ![](https://d2x3xhvgiqkx42.cloudfront.net/12345678-1234-1234-1234-1234567890ab/99f9f305-0415-4713-856e-b7aa93cbd4d3/2021/09/29/c0043bd2-1c97-4c1b-80b0-704e57d1e60f/e996cdd7-afcb-481f-be55-4414dd4895b1.png) icon next to **External Databases** and select **Add external database**. ![](https://wixmp-833713b177cebf373f611808.wixmp.com/images/90f9e838c8293d91715aa5aac9cfd555.png) 3. Choose the provider of the external database you wish to add and click **Next**.
4. In the Connect External Database screen: 1. Choose a namepace to group the external database's collections under. 2. Enter your endpoint URL for the external database adaptor. 3. Enter the database adaptor's secret key.
Your external database collections are now listed under the namespace you chose, and you can work with them as you would your other collections. ## Delete an external database collection Delete an external database collection from your site in the same way that you would delete a built-in data collection, using the Show More icon ![](https://d2x3xhvgiqkx42.cloudfront.net/12345678-1234-1234-1234-1234567890ab/76096845-8b12-44f1-91f6-3dc2e838fdd9/2022/09/04/45269098-373f-4d2c-8168-2fc5242c6024/c890c6a3-6762-4501-bdb4-e44c678108df.png). > **Note:** This only deletes the collection from your site. It does not delete it from the external database. --- > Portal Navigation: > > - Append `.md` to any URL under `https://dev.wix.com/docs/` to get its markdown version. > - Pages are either content pages (article or reference text) or menu pages (a list of links to child pages). > - To get a menu page, truncate any URL to a parent path and append `.md` (e.g. `https://dev.wix.com/docs/sdk.md`, `https://dev.wix.com/docs/sdk/core-modules.md`). > - Top-level index of all portals: https://dev.wix.com/docs/llms.txt > - Full concatenated docs: https://dev.wix.com/docs/llms-full.txt ## Resource: Integrate Your Google Cloud Platform Databases with Your Wix Site ## Article: Integrate Your Google Cloud Platform Databases with Your Wix Site ## Article Link: https://dev.wix.com/docs/develop-websites/articles/databases/external-databases/google/integrate-your-google-cloud-platform-databases-with-your-wix-site.md ## Article Content: # Integrate Your Google Cloud Platform Databases with Your Wix Site > **Note:** This feature is only available for sites with certain premium plans. If you need to use this feature, you can [upgrade your site](https://www.wix.com/upgrade/website). Learn more about [premium plans](https://dev.wix.com/docs/develop-websites/articles/coding-with-velo/premium-plans/about-premium-plans.md). Wix allows users to connect an external database to Wix sites using an [external database adaptor](https://dev.wix.com/docs/develop-websites/articles/databases/external-databases/overview/integrating-external-databases-with-your-wix-site.md#external-database-adaprots). Once the connection is set up, users can interact with these databases and use them to populate site elements as though they were Wix CMS collections. With an external database adaptor, you can use your database hosted on GCP (Google Cloud Platform), and fully integrate it into your Wix site. This means your GCP data can be managed via the [Wix Data APIs](https://dev.wix.com/docs/rest/business-solutions/cms/introduction.md), and used (with or without [datasets](https://dev.wix.com/docs/velo/velo-only-apis/$w/dataset/introduction.md)) to populate Wix UI elements like [repeaters](https://dev.wix.com/docs/develop-websites/articles/databases/wix-data/displaying-data/display-database-collection-content-in-a-repeater.md) and [tables](https://support.wix.com/en/article/cms-formerly-content-manager-displaying-collection-content-in-a-table). ## Overview This article walks you through the following steps: 1. Create secrets to securely store your database credentials. 2. Create and deploy a new Cloud Run service to host the Wix database adaptor. 3. Test Your Service 4. Connect your Wix site to your database. This tutorial assumes you already have your own database on GCP with a table containing some data. If you don't have this set up, refer to the [GCP documentation](https://cloud.google.com/docs) for instructions. This tutorial uses a container image with all the functionality needed to interface between your database and your Wix site. If you want to look under the hood, you can have a look at the [service plugin specifications](https://www.wix.com/velo/reference/spis/external-database-collections) for external database collections, and an overview of what's involved in [building your own adaptor](https://support.wix.com/en/article/velo-working-with-external-database-collections). ### Supported Databases Wix currently supports the following GCP databases: - [Cloud SQL for MySQL](https://cloud.google.com/sql/mysql) - [Cloud SQL for Postgres](https://cloud.google.com/sql/postgresql) - [Cloud SQL for Microsoft SQL Server](https://cloud.google.com/sql/sqlserver) - [Google BigQuery](https://cloud.google.com/bigquery) - [Google Cloud Spanner](https://cloud.google.com/spanner)
**Prerequisites for Read-Write Access to Your Database Tables:**
If you want your table to be read-write on your Wix site, it must contain the following columns: - `_id` - `_createdDate` - `_updatedDate` - `_owner` Tables without these columns will be read-only in your Wix site.
## Step 1 | Create secrets to securely store your database credentials The external database adaptor requires you to set some environment variables. Some of these variables, like the DB credentials, are sensitive and shouldn't be visible. Use the [GCP Secret Manager](https://console.cloud.google.com/security/secret-manager) to store and access these variables securely. > **Note:** We don't provide specific instructions for any configuration in GCP, as GCP's UI and flows may change. For further details on any of the instructions below, see the [Secret Manager documentation](https://cloud.google.com/secret-manager/docs/overview). ### Configure Secrets Store the following secret values for **all databases**: - **SECRET_KEY** A secret key that is used when connecting your Wix site to the adaptor. To create a level of authentication between your site and the adaptor, each request your site sends to the adaptor contains this value in the payload. - **PERMISSIONS (optional)** A JSON object that defines the read and write permissions for the tables in your database. If you don't set permissions, they default to admin. With admin permissions, only site admins can read or write to the external database from a Wix site. API calls or CMS connections to the database don't work for anyone who isn't a site admin. This means site code that communicates with the external database might not work for site visitors. When setting up permissions, make sure you use the ID of the table you want to read and write to, and not the database ID.
Learn more about configuring database permissions You can use the **PERMISSIONS** secret to customize the permission settings for each table in a database. The JSON object contains one key, **collectionPermissions**, whose value is an array of objects. Each object in this array contains the permissions settings for one of the collections in the database, using the following parameters: - **id:** The collection ID. - **read**: An array of strings representing which roles can read from the collection. Options: 'Admin', 'Member', 'Visitor' - **write**: An array of strings representing which roles can write to the collection. Options: 'Admin', 'Member', 'Visitor' Example **PERMISSIONS** value: ```json { "collectionPermissions": [ { "id": "Contacts", "read": ["Admin", "Member"], "write": ["Admin"] } ] } ``` > **Note:** You can save this object as a .json file and upload it to GCP as the value for the **PERMISSIONS** secret.
Customizing permissions for external databases is currently a developer preview feature, and may change. Changes to permissions settings aren't reflected in the editor.
#### Database-Specific Secrets Configuration In addition to the secrets above, each database requires its own specific secret configurations:
MySQL, Postgres, and MsSQL secret names and values - **USER:**  The username used to connect to your database instance. For Postgres instances, the default user name is **postgres**. For MySQL instances, the default user name is **root.** - **PASSWORD:**  The password used to connect to your SQL instance. - **DB:**  The database name to connect to. - **CLOUD_SQL_CONNECTION_NAME:**  The connection name for your DB instance.
BigQuery secret names and values - **DATABASE_ID:**  The BigQuery dataset ID. - **PROJECT_ID:**  Your Google Cloud Project ID.
Spanner secret names and values - **INSTANCE_ID:**  The Spanner instance ID. - **PROJECT_ID:**  Your Google Cloud Project ID.  
Make sure to create all of the required secrets for your database. All databases must include a **SECRET_KEY**.
### Create Secrets To create the secrets, go to the GCP Secret Manager and create a secret with the appropriate configuration. | Database | Secret Configurations | | -------------------------- | ------------------------------------------------------------------------- | | MySQL, Postgres, and MsSQL | SECRET_KEY
USER
PASSWORD
DB
CLOUD_SQL_CONNECTION_NAME | | BigQuery | SECRET_KEY
DATABASE_ID
PROJECT_ID | | Spanner | SECRET_KEY
INSTANCE_ID
DATABASE_ID
PROJECT_ID | To create a **PERMISSIONS** secret, instead of entering a **Secret value**, provide the .json file that contains your permission settings. ## Step 2 | Create and deploy a new Cloud Run service to host the Wix database adaptor Next, deploy the external database adaptor as a service on Cloud Run. To do this, you'll need to create the service using a prebuilt container, configured secrets, and environment variables. Then you'll need to configure the database connections. For further details on any of the instructions below, see the [Google Cloud Run documentation](https://cloud.google.com/run/docs). ### Create a Service Create a new service for your cloud run project with the following configuration: 1. Enter the following as the **Container Image URL**: ```bash gcr.io/wix-velo-api/velo-external-db ``` The **Service name** will default to **velo-external-db**. 2. Select the **All** for Autoscaling, and select **Allow unauthenticated invocations** for Authentication. ### Configure Access Roles, Secrets, and Environment Variables Configure the secrets that you defined earlier as environment variables for the service. To do this, perform the following steps: 1. Create a new service account that will run the Cloud Run service. 2. Grant access roles to the new account. 3. Create environment variables and assign the secrets' values. 4. Set the **Service account name**. We recommend you set the Service account name to match the Cloud Run instance name so that you can easily know which account is used by which instance. 5. Grant the following roles to the service account according to your database: All Databases: - **Secret Manager Secret Accessor** MySQL, Postgres, MsSQL: - **Cloud SQL Editor** BigQuery: - **BigQueryAdmin** Spanner: - **Cloud Spanner Database User** 6. Define 2 environment variables according to your database. The names and values for the variables are as follows: | NAME | VALUE | | ------------ | ---------------------------------------------------------------------------------------------------------------------------------------------------------------------------- | | TYPE | MySQL database: **mysql
**Postgres database: **postgres**
MsSQL server database: **mssql**
BigQuery database: **bigquery**
Spanner database: **spanner** | | CLOUD_VENDOR | Google Cloud Platform: **gcp** | 7. Make the secrets you configured and created in step 1 [accessible to Cloud Run](https://cloud.google.com/run/docs/configuring/services/secrets) by adding the secrets information and exposing them as a environmental variables. Refer to [the table above](#create-secrets) to see which secrets your database needs. For each secret, assign the environment variable the same name as the secret and ensure you've selected the latest version.
If you get a warning that the service account doesn't have permissions to access the selected secret, you are no longer configuring the service account that you set up in the previous steps.
### Configure the Database Connection [Deploy the container](https://cloud.google.com/run/docs/quickstarts/deploy-container). Get the cloud run service's URL. This URL is used to connect to your database adaptor service and to configure the external collection on your Wix site. **Note:** If you change the value of a secret, you must redeploy the service for the new value to take effect. ## Step 3 | Test Your Service You can test that your service is working by making a quick request using Curl. Use the Curl command below, replacing the URL with your URL from Step 2 above, and replacing the  **secretKey** value with your secret. ```bash curl -L -X POST 'https://velo-postgres-db-cacacapca-uc.a.run.app/schemas/list' \ -H 'Content-Type: application/json' \ --data-raw '{ "requestContext": { "settings": { "secretKey": "ourLittleSecret" }, "role": "OWNER" } }' ``` The output provides a list of tables and their columns from your database. If you have python installed, you can pipe the output to  **python -m json.tool** and it will give you nicely formatted JSON. The formatted output contains the list of tables and their columns from your database. ```json { "schemas": [ { "id": "contacts", "displayName": "contacts", "allowedOperations": [ "get", "find", "count", "update", "insert", "remove" ], "maxPageSize": 50, "ttl": 3600, "fields": { "name": { "displayName": "name", "type": "text", "queryOperators": [ "eq", "lt", "gt", "hasSome", "and", "lte", "gte", "or", "not", "ne", "startsWith", "endsWith" ] }, "_createddate": { "displayName": "_createddate", "type": "datetime", "queryOperators": [ "eq", "lt", "gt", "hasSome", "and", "lte", "gte", "or", "not", "ne", "startsWith", "endsWith" ] }, "email": { "displayName": "email", "type": "text", "queryOperators": [ "eq", "lt", "gt", "hasSome", "and", "lte", "gte", "or", "not", "ne", "startsWith", "endsWith" ] } } } ] } ``` ## Step 4 | Connect your Wix site to your database Now that you have a database and an adaptor service, you're ready to add the database as an external collection on your site. > **Note:** You can only add external collections to your site if you have a [premium plan](https://dev.wix.com/docs/develop-websites/articles/coding-with-velo/premium-plans/about-premium-plans.md). 1. Go to the **Databases** section of the Code sidebar (Wix Editor) or the Code sidebar (Wix Studio). 2. Click the ![](https://d2x3xhvgiqkx42.cloudfront.net/12345678-1234-1234-1234-1234567890ab/99f9f305-0415-4713-856e-b7aa93cbd4d3/2021/09/29/c0043bd2-1c97-4c1b-80b0-704e57d1e60f/e996cdd7-afcb-481f-be55-4414dd4895b1.png) icon next to **External Databases** and select **Add external database**. ![](https://wixmp-833713b177cebf373f611808.wixmp.com/images/7529ef4e207ccfa2e9b533d6a4bf14c6.png) 3. Choose **Google Cloud** as the cloud provider of the external collection being added, then click **Next**. ![Choosing Google on Connect External Database window](https://wixmp-833713b177cebf373f611808.wixmp.com/images/ec776e88f9f4a9bc8e35f11a0df3edb1.png) 4. Enter a **name** for your external collection's namespace. 5. Copy and paste your adaptor service's URL into the **endpoint URL** field. 6. Enter your database adaptor's **secret key**. 7. Click **Connect**. ![Configuring the external database connection](https://wixmp-833713b177cebf373f611808.wixmp.com/images/bc1c51b43b4810317173c04b12074214.png) The collection displays the tables. If your table contains the **\_id**, **\_createdDate**, **\_updatedDate**, and **\_owner** fields, you can add data to the table directly from the CMS.
**Important:** The CMS doesn't currently support deleting from external collections. You can delete records from your collection using Wix Data's [`remove()`](https://dev.wix.com/docs/sdk/backend-modules/data/items/remove.md) method.
The external connection and its collections are displayed under **External Databases**. ![External database connections in Wix Studio](https://wixmp-833713b177cebf373f611808.wixmp.com/images/42e8f9cc4d9a7c51dcd3032189e2a5c9.png) You can now use the [Wix Data API](https://dev.wix.com/docs/sdk/backend-modules/data/introduction.md) with this collection as well as connect [repeaters](https://dev.wix.com/docs/develop-websites/articles/databases/wix-data/displaying-data/display-database-collection-content-in-a-repeater.md) and [tables](https://support.wix.com/en/article/displaying-collection-content-in-a-table) to your MySQL, Postgres, MsSQL, BigQuery, and Spanner databases. Try the following [Wix Javascript SDK](https://dev.wix.com/docs/sdk/articles/get-started/about-the-wix-java-script-sdk.md) code to query your external data using your collection name and table name: ```javascript import { items } from '@wix/data'; export async function externalQuery() { try { const results = await items.query("/").find(); return results; } catch (err) { return err; } } ``` > **Notes:** > - You must first install the `@wix/data` package on your site. > - You can only call this code from your site's backend. --- > Portal Navigation: > > - Append `.md` to any URL under `https://dev.wix.com/docs/` to get its markdown version. > - Pages are either content pages (article or reference text) or menu pages (a list of links to child pages). > - To get a menu page, truncate any URL to a parent path and append `.md` (e.g. `https://dev.wix.com/docs/sdk.md`, `https://dev.wix.com/docs/sdk/core-modules.md`). > - Top-level index of all portals: https://dev.wix.com/docs/llms.txt > - Full concatenated docs: https://dev.wix.com/docs/llms-full.txt ## Resource: Integrate Your AWS Databases with Your Wix Site ## Article: Integrate Your AWS Databases with Your Wix Site ## Article Link: https://dev.wix.com/docs/develop-websites/articles/databases/external-databases/aws/integrate-your-aws-databases-with-your-wix-site.md ## Article Content: # Integrate Your AWS Databases with Your Wix Site
__Important:__ This guide relies on AWS App Runner, which is closed to new customers as of April 30, 2026. New AWS customers who sign up after that date won’t be able to follow this guide as written. Existing App Runner customers are not affected and can continue to use the service as normal. For more details, see [AWS App Runner availability change](https://docs.aws.amazon.com/apprunner/latest/dg/apprunner-availability-change.html).
> **Note:** This feature is only available for sites with certain premium plans. If you need to use this feature, you can [upgrade your site](https://www.wix.com/upgrade/website). Learn more about [premium plans](https://dev.wix.com/docs/develop-websites/articles/coding-with-velo/premium-plans/about-premium-plans.md). Wix allows users to connect an external database to Wix sites using an [external database adaptor](https://dev.wix.com/docs/develop-websites/articles/databases/external-databases/overview/integrating-external-databases-with-your-wix-site.md#external-database-adaprots). Once the connection is set up, users can interact with these databases and use them to populate site elements as though they were Wix CMS collections. With an external database adaptor, you can use your database hosted on GCP (Google Cloud Platform), and fully integrate it into your Wix site. This means your GCP data can be managed via the [Wix Data APIs](https://dev.wix.com/docs/rest/business-solutions/cms/introduction.md), and used (with or without [datasets](https://dev.wix.com/docs/velo/velo-only-apis/$w/dataset/introduction.md)) to populate Wix UI elements like [repeaters](https://dev.wix.com/docs/develop-websites/articles/databases/wix-data/displaying-data/display-database-collection-content-in-a-repeater.md) and [tables](https://support.wix.com/en/article/cms-formerly-content-manager-displaying-collection-content-in-a-table). ## Overview This article walks you through the following: 1. Creating secrets to securely store your database credentials and your Wix Secret Key. 2. Creating and deploying a new App Runner service to host the Wix database adaptor. 3. Testing your service 4. Connecting your Wix site to your database. This tutorial assumes you already have your own database on AWS with a table containing some data. If you don't have this set up, refer to the [AWS documentation](https://docs.aws.amazon.com/) for instructions. This tutorial uses a container image with all the functionality needed to interface between your database and your Wix site. If you want to look under the hood, you can have a look at the [service plugin specifications](https://www.wix.com/velo/reference/spis/external-database-collections) for external database collections, and an overview of what's involved in [building your own adaptor](https://support.wix.com/en/article/velo-working-with-external-database-collections). ### Supported Databases We currently support the following AWS databases: - [Amazon RDS for MySQL](https://aws.amazon.com/rds/mysql/) - [Amazon RDS for PostgreSQL](https://aws.amazon.com/rds/postgresql/) - [Amazon Aurora](https://aws.amazon.com/rds/aurora/features/#:~:text=Close-,Amazon%20RDS,-RDS%20for%20MySQL)
**Prerequisites for Read-Write Access to Your Database Tables:**
If you want your table to be read-write on your Wix site, it must contain the following columns: - `_id` - `_createdDate` - `_updatedDate` - `_owner` Tables without these columns will be read-only in your Wix site.
## Step 1 | Create secrets to securely store your database credentials and your Wix Secret Key The external database adaptor requires you to set some environment variables. Some of these variables, like the DB credentials, are sensitive and should not be visible. Use the [AWS Secrets Manager](https://us-east-1.console.aws.amazon.com/secretsmanager/listsecrets) to store and access these variables securely. > **Note:** We don't provide specific instructions for any configuration in AWS, as AWS's UI and flows may change. For further details on any of the instructions below, see the [AWS Secrets Manager documentation](https://docs.aws.amazon.com/secretsmanager/latest/userguide/create_secret.html). #### Create a New Secret for RDS Databases For RDS databases, you need to store 5 secret values: - **USERNAME** The username used to connect to your database instance. - **PASSWORD** The password used to connect to your database instance. - **DB** The name of the database to connect to. - **SECRET_KEY** A secret key used to connect your Wix site to the adaptor. To create a level of authentication between your site and the adaptor, each request your site sends to the adaptor contains this value in the payload. - **PERMISSIONS (optional)** A stringified JSON object that defines the read and write permissions for the tables in your database. It's important to note the following about setting permissions: - If you don't set permissions, they default to admin. With admin permissions, only site admins can read or write to the external database from a Wix site. API calls or CMS connections to the database don't work for anyone who isn't a site admin. This means site code that communicates with the external database might not work for site visitors. - When setting up permissions, make sure you use the ID of the table you want to read and write to, and not the database ID. **Note:** Customizing permissions for external databases is currently a developer preview feature, and may change. Changes to permissions settings are not reflected in the Wix Editor.
Learn more about configuring database permissions You can use the **PERMISSIONS** secret to customize the permission settings for each table in a database. The JSON object contains one key, **collectionPermissions**, whose value is an array of objects. Each object in this array contains the permissions settings for one of the collections in the database, using the following parameters: - **id:** The collection ID. - **read**: An array of strings representing which roles can read from the collection. Options: 'Admin', 'Member', 'Visitor' - **write**: An array of strings representing which roles can write to the collection. Options: 'Admin', 'Member', 'Visitor' Example **PERMISSIONS** value: ```json { "collectionPermissions": [ { "id": "Contacts", "read": ["Admin", "Member"], "write": ["Admin"] } ] } ``` Note that you need to store the **PERMISSIONS** JSON object as a string. To do this, first write the object as usual and use a tool such as your browser's developer tools console to stringify it.
> **Note** > When you store a new secret and select **Credentials for Amazon RDS database,** the Secrets Manager automatically stores the **USERNAME**, **PASSWORD**, and other connection information for you. You will need to manually add the **SECRET_KEY**, **DB**, and **PERMISSIONS** (optional) values as shown in the steps below. ### Create a new role for an RDS instance Create a new role for an RDS Instance in AWS's IAM manager console with permission to access the above secrets. See the [IAM documentation](https://docs.aws.amazon.com/IAM/latest/UserGuide/introduction.html) for more details. You'll assign this role to the App Runner service you create in the next step. ## Step 2 | Create and deploy a new App Runner service to host the Wix database adaptor Now you'll create the service that will run the adaptor and make it available to your Wix site. For further details on any of the instructions below, see the [AWS Management Console documentation](https://docs.aws.amazon.com/awsconsolehelpdocs/latest/gsg/what-is.html). 1. Create a new AWS App Runner from the AWS Management Console. 2. Enter the following as the **Container Image URL**: ```bash public.ecr.aws/p2z5s3h8/wix-velo/velo-external-db:latest ``` 3. Add the following additional key/value pairs: | Source | Environment variable name | Environment variable value | | ---------- | ------------------------- | -------------------------------------------------------------------------------------------------------------------------------- | | Plain text | **CLOUD_VENDOR** | All databases: **aws** | | Plain text | **TYPE** | MySQL database: **mysql**
PostgreSQL database: **postgres**
Aurora_mysql:**mysql**
Aurora_postgresql:**postgres** | | Plain text | **SECRET_NAME** | All databases:
The secret you created for your database. Ours is **tutorial_secret** | 4. Assign the runner the role you created in step 1. 5. Create and deploy the service. 6. Record the URL of you App Runner. ## Step 3 | Test Your Service You can test that your service is working by making a quick request using Curl. Use the Curl command below, replacing the URL with the URL of your App Runner, and replacing the **secretKey** value with your secret. ```bash curl -L -X POST 'https://abcdbajfc.us-east-1.awsapprunner.com/schemas/list' \ -H 'Content-Type: application/json' \ --data-raw '{ "requestContext": { "settings": { "secretKey": "myBigSecret" }, "role": "OWNER" } }' ``` The output provides a list of tables and their columns from your database. If you have python installed, you can pipe the output to **python -m json.tool** and it will give you nicely formatted JSON. The formatted output containing a list of tables and their columns: ```json { "schemas": [ { "id": "contacts", "displayName": "contacts", "allowedOperations": [ "get", "find", "count", "update", "insert", "remove" ], "maxPageSize": 50, "ttl": 3600, "fields": { "name": { "displayName": "name", "type": "text", "queryOperators": [ "eq", "lt", "gt", "hasSome", "and", "lte", "gte", "or", "not", "ne", "startsWith", "endsWith" ] }, "_createddate": { "displayName": "_createddate", "type": "datetime", "queryOperators": [ "eq", "lt", "gt", "hasSome", "and", "lte", "gte", "or", "not", "ne", "startsWith", "endsWith" ] }, "email": { "displayName": "email", "type": "text", "queryOperators": [ "eq", "lt", "gt", "hasSome", "and", "lte", "gte", "or", "not", "ne", "startsWith", "endsWith" ] } } } ] } ``` ## Step 4 | Connect your Wix site to your database Now that you have a database and an adaptor service, you're ready to add the database as an external collection on your site. > **Note:** You can only add external collections to your site if you have a [premium plan](https://dev.wix.com/docs/develop-websites/articles/coding-with-velo/premium-plans/about-premium-plans.md). 1. Go to the **Databases** section of the Code sidebar (Wix Editor) or the Code sidebar (Wix Studio). 2. Click the ![](https://d2x3xhvgiqkx42.cloudfront.net/12345678-1234-1234-1234-1234567890ab/99f9f305-0415-4713-856e-b7aa93cbd4d3/2021/09/29/c0043bd2-1c97-4c1b-80b0-704e57d1e60f/e996cdd7-afcb-481f-be55-4414dd4895b1.png) icon next to **External Databases** and select **Add external database**. ![](https://wixmp-833713b177cebf373f611808.wixmp.com/images/7529ef4e207ccfa2e9b533d6a4bf14c6.png) 3. Choose **Amazon Web Services** as the provider of the external collection being added, then click **Next**. ![Choosing AWS on Connect External Database window](https://wixmp-833713b177cebf373f611808.wixmp.com/images/84c4e9fb57b8f168be8346ed3452bef1.png) 4. Enter a **name** for your external collection's namespace. 5. Copy and paste your adaptor service's URL into the **endpoint URL** field. 6. Enter your database adaptor's **secret key**. 7. Click **Connect**. ![Configuring the external database connection](https://wixmp-833713b177cebf373f611808.wixmp.com/images/d2f2fef57820aad78b7d2bfc25426af7.png) The Content Management System (CMS) displays the tables. If your table contains the **\_id**, **\_createdDate**, **\_updatedDate**, and **\_owner** fields, you can add data to the table directly from the CMS.
--- > Portal Navigation: > > - Append `.md` to any URL under `https://dev.wix.com/docs/` to get its markdown version. > - Pages are either content pages (article or reference text) or menu pages (a list of links to child pages). > - To get a menu page, truncate any URL to a parent path and append `.md` (e.g. `https://dev.wix.com/docs/sdk.md`, `https://dev.wix.com/docs/sdk/core-modules.md`). > - Top-level index of all portals: https://dev.wix.com/docs/llms.txt > - Full concatenated docs: https://dev.wix.com/docs/llms-full.txt ## Resource: Integrate Your Microsoft Azure Database with Your Wix Site ## Article: Integrate your Microsoft Azure Database with your Wix Site ## Article Link: https://dev.wix.com/docs/develop-websites/articles/databases/external-databases/microsoft-azure/integrate-your-microsoft-azure-database-with-your-wix-site.md ## Article Content: # Integrate your Microsoft Azure Database with your Wix Site > **Note:** This feature is only available for sites with certain premium plans. If you need to use this feature, you can [upgrade your site](https://www.wix.com/upgrade/website). Learn more about [premium plans](https://dev.wix.com/docs/develop-websites/articles/coding-with-velo/premium-plans/about-premium-plans.md). Wix allows users to connect an external database to Wix sites using an [external database adaptor](https://dev.wix.com/docs/develop-websites/articles/databases/external-databases/overview/integrating-external-databases-with-your-wix-site.md#external-database-adaprots). Once the connection is set up, users can interact with these databases and use them to populate site elements as though they were Wix CMS collections. With an external database adaptor, you can use your MySQL database hosted on Azure and fully integrate it into your Wix site. This means your Azure data can be managed via the [Wix Data APIs](https://dev.wix.com/docs/rest/business-solutions/cms/introduction.md), and used (with or without [datasets](https://dev.wix.com/docs/velo/velo-only-apis/$w/dataset/introduction.md)) to populate Wix UI elements like [repeaters](https://dev.wix.com/docs/develop-websites/articles/databases/wix-data/displaying-data/display-database-collection-content-in-a-repeater.md) and [tables](https://support.wix.com/en/article/cms-formerly-content-manager-displaying-collection-content-in-a-table). ## Overview This article walks you through the following: 1. Creating a web app. 2. Setting up a key vault and secrets. 3. Testing your adaptor. 4. Connecting your Wix site. This tutorial assumes you already have your own Azure database server for MySQL with a table containing some data. If you don't have this set up, refer to the [Azure Database for MySQL documentation](https://learn.microsoft.com/en-us/azure/mysql/) for instructions. This tutorial uses a container image with all the functionality needed to interface between your database and your Wix site. If you want to look under the hood, you can have a look at the [service plugin specifications](https://www.wix.com/velo/reference/spis/external-database-collections) for external database collections, and an overview of what's involved in [building your own adaptor](https://support.wix.com/en/article/velo-working-with-external-database-collections).
**Prerequisites for Read-Write Access to Your Database Tables:**
If you want your table to be read-write on your Wix site, it must contain the following columns: - `_id` - `_createdDate` - `_updatedDate` - `_owner` Tables without these columns will be read-only in your Wix site.
> **Note:** We don't provide specific instructions for any configuration in Azure, as Azure's UI and flows may change. For further details on any of the instructions below, see the [Azure Database for MySQL documentation](https://learn.microsoft.com/en-us/azure/mysql/). ## Step 1 | Create a Web App A web app service is needed to run the adaptor and make it accessible to your Wix site. To deploy the adaptor as a web app: 1. Create a web app service to run the container. 2. Use the following **Container Image URL**: ```bash veloex/velo-external-db:latest ``` 3. Add the virtual network to the web app. ## Step 2 | Set up a Key Vault and secrets The external database adaptor uses environment variables to configure database credentials and connection details. Some of these variables are sensitive and shouldn't be visible. Use the Key Vault to store and access these variables securely. 1. Create a new Key Vault. 2. Define and then create the following 5 secrets: * **HOST**: The host name of your database instance. It can be found on your instance's overview page as the **Server name**. * **USER**: The username used to connect to your database instance. It can be found on your instance's overview page as the **Server admin login name** as shown below. * **PASSWORD**: The server admin login password used to connect to your SQL instance. * **DB**: The database name. When you created your database in the previous steps, you called the database **mysqlTutorial.** You can find this in the MySQL database server overview - under **Available Resources** at the bottom of the page. * **SECRETKEY**: A secret key that's used when connecting your Wix site to the adaptor. To create a level of authentication between your site and the adaptor, each request your site sends to the adaptor contains this value in the payload. For the tutorial, use **myBigSecret** as the SECRETKEY value. * **PERMISSIONS** (optional) A stringified JSON object that defines the read and write permissions for the tables in your database. When setting up permissions, note a couple of important things: - If you don't set permissions, they default to admin. With admin permissions, only site admins can read or write to the external database from a Wix site. API calls or CMS connections to the database don't work for anyone who isn't a site admin. This means site code that communicates with the external database might not work for site visitors. - When setting up permissions, make sure you use the ID of the table you want to read and write to, and not the database ID. > **Note:** > Customizing permissions for external databases is currently a developer preview feature, and may change. > Changes to permission settings are not reflected in the editor.
Learn more about configuring database permissions You can use the **PERMISSIONS** secret to customize the permission settings for each table in a database. The JSON object contains one key, **collectionPermissions**, whose value is an array of objects. Each object in this array contains the permissions settings for one of the collections in the database, using the following parameters: * **id:** The collection ID. * **read**: An array of strings representing which roles can read from the collection. Options: 'Admin', 'Member', 'Visitor' * **write**: An array of strings representing which roles can write to the collection. Options: 'Admin', 'Member', 'Visitor' Example **PERMISSIONS** value: ```json { "collectionPermissions": [ { "id": "Contacts", "read": ["Admin", "Member"], "write": ["Admin"] } ] } ``` Note that you need to store the **PERMISSIONS** JSON object as a string. To do this, first write the object as usual and use a tool such as your browser’s developer tools console to stringify it.
3. Create an identity for the web app. 4. Add the web app's Identity to the Key Vault's access policies. 5. Configure Web App Environment Variables For each of the secrets you created in the previous section, add an application setting as per the table below: Substitute the value for "VaultName" with your own key vault name. | Name | Value | | ----------- | -------------------------------------------------------------------------- | | USER | @Microsoft.KeyVault(VaultName=my-velo-DB-key-vault;SecretName=USER) | | HOST | @Microsoft.KeyVault(VaultName=my-velo-DB-key-vault;SecretName=HOST) | | DB | @Microsoft.KeyVault(VaultName=my-velo-DB-key-vault;SecretName=DB) | | PASSWORD | @Microsoft.KeyVault(VaultName=my-velo-DB-key-vault;SecretName=PASSWORD) | | SECRET_KEY | @Microsoft.KeyVault(VaultName=my-velo-DB-key-vault;SecretName=SECRETKEY) | | PERMISSIONS | @Microsoft.KeyVault(VaultName=my-velo-DB-key-vault;SecretName=PERMISSIONS) | > **Note:** > When configuring the **SECRETKEY,** the application setting is **SECRET\_KEY** but the secret name is **SECRETKEY.** This is because you cant use an "\_" in a secret name in Azure. 6. Add 2 more application settings as per the table below: | Name | Value | | ------------ | ----- | | TYPE | mysql | | CLOUD_VENDOR | azure | ## Step 3 | Test your adaptor You can test that your service is working by making a quick request using Curl. Use the curl command below, replacing the URL with your URL from the web app overview page, and replacing the **secretKey** value with your secret key. ```bash curl -L -X POST 'https://velo-external-db.azurewebsites.net/schemas/list' \ -H 'Content-Type: application/json' \ --data-raw '{ "requestContext": { "settings": { "secretKey": "myBigSecret" }, "role": "OWNER" } }' ``` The output provides a list of tables and their columns from your database. If you have python installed, you can pipe the output to **python -m json.tool** and it will give you nicely formatted JSON. The formatted output containing a list of tables and their columns: ```json { "schemas": [ { "id": "contacts", "displayName": "contacts", "allowedOperations": [ "get", "find", "count", "update", "insert", "remove" ], "maxPageSize": 50, "ttl": 3600, "fields": { "name": { "displayName": "name", "type": "text", "queryOperators": [ "eq", "lt", "gt", "hasSome", "and", "lte", "gte", "or", "not", "ne", "startsWith", "endsWith" ] }, "_createddate": { "displayName": "_createddate", "type": "datetime", "queryOperators": [ "eq", "lt", "gt", "hasSome", "and", "lte", "gte", "or", "not", "ne", "startsWith", "endsWith" ] }, "email": { "displayName": "email", "type": "text", "queryOperators": [ "eq", "lt", "gt", "hasSome", "and", "lte", "gte", "or", "not", "ne", "startsWith", "endsWith" ] }, ... ``` ## Step 4 | Connect to your Wix site Now that you have a database and an adaptor service, you're ready to add the database as an external collection on your site. > **Note:** You can only add external collections to your site if you have a [premium plan](https://dev.wix.com/docs/develop-websites/articles/coding-with-velo/premium-plans/about-premium-plans.md). 1. In the editor, select **Databases** from the Code sidebar (Wix Editor) or Code sidebar (Wix Studio). 2. Click the ![](https://d2x3xhvgiqkx42.cloudfront.net/12345678-1234-1234-1234-1234567890ab/99f9f305-0415-4713-856e-b7aa93cbd4d3/2021/09/29/c0043bd2-1c97-4c1b-80b0-704e57d1e60f/e996cdd7-afcb-481f-be55-4414dd4895b1.png) icon next to **External Databases** and select **Add external database**. ![Add external database](https://wixmp-833713b177cebf373f611808.wixmp.com/images/7529ef4e207ccfa2e9b533d6a4bf14c6.png) 3. Choose **Azure** as the provider of the external collection being added, then click **Next**. ![Choosing Azure on Connect External Database window](https://wixmp-833713b177cebf373f611808.wixmp.com/images/261877204acb39f6b2f0f15439e6c488.png) 4. Enter a **name** for your external collection's namespace. 5. Copy and paste your adaptor service's URL into the **endpoint URL** field. 6. Enter your database adaptor's **secret key**. 7. Click **Connect**. ![Configuring the external database connection](https://wixmp-833713b177cebf373f611808.wixmp.com/images/861290b834b1a0f5297ede8335a5e4bd.png) The Content Management System (CMS) displays the tables. If your table contains **_id**, **_createdDate**, **_updatedDate**, and **_owner** fields, you can add data to the table directly from the CMS.
--- > Portal Navigation: > > - Append `.md` to any URL under `https://dev.wix.com/docs/` to get its markdown version. > - Pages are either content pages (article or reference text) or menu pages (a list of links to child pages). > - To get a menu page, truncate any URL to a parent path and append `.md` (e.g. `https://dev.wix.com/docs/sdk.md`, `https://dev.wix.com/docs/sdk/core-modules.md`). > - Top-level index of all portals: https://dev.wix.com/docs/llms.txt > - Full concatenated docs: https://dev.wix.com/docs/llms-full.txt ## Resource: About Apps Made by Wix ## Article: About Apps Made by Wix ## Article Link: https://dev.wix.com/docs/develop-websites/articles/wix-apps/about-apps-made-by-wix.md ## Article Content: # About Apps Created by Wix Wix offers a range of apps and [business solutions](https://support.wix.com/en/business-solutions-apps), enabling users to sell products and services, run events, write blogs, manage restaurants, and more. Wix business solutions are comprehensive apps created by Wix for managing a specific type of business. Users add Wix business solutions to their sites by installing [apps created by Wix](https://www.wix.com/app-market/collection/made-by-wix). To make an informed choice about how to work with these apps, follow the path below. ## Get acclimated First, we recommend you review the [Integrating with Wix's Business Solutions](https://dev.wix.com/docs/develop-websites/articles/getting-started/integrate-with-wix-s-business-solutions.md) article. In addition to Wix's business solutions, Wix also offers other solutions you can integrate with, such as media support, form submission, location management, loyalty programs, and more. ## Get started A great way to learn about Wix's business solutions is to try out tutorials related to the business solutions relevant to you. ## Get integrated You can integrate with Wix’s business solutions and resources in the following ways: * **APIs** for connecting your services to Wix sites by gaining access to a business solution’s [data](https://dev.wix.com/docs/sdk/backend-modules/data/introduction.md). We use the term *API* here broadly to include [Velo APIs](https://dev.wix.com/docs/build-apps/develop-your-app/api-integrations/velo-for-blocks.md), [SDKs](https://dev.wix.com/docs/build-apps/develop-your-app/api-integrations/java-script-sdk.md) and [GraphQL](https://dev.wix.com/docs/build-apps/develop-your-app/api-integrations/graph-ql.md). * **Service plugins** for injecting your own functionality directly into a Wix business solution. Learn more about [service plugins](https://dev.wix.com/docs/develop-websites/articles/coding-with-velo/integrations/service-plugins-formerly-spis/custom-app-extensions-using-spis.md). * **Replacement of business solution pages** for customizing the user experience by replacing default Wix business solution pages with your own. Learn more about [replacing a Wix Business solution's app page](https://dev.wix.com/docs/develop-websites/articles/wix-apps/replace-a-wix-business-app-page-with-your-own-custom-version.md). ## See also - [Integrating with Wix's Business Solutions](https://dev.wix.com/docs/develop-websites/articles/getting-started/integrate-with-wix-s-business-solutions.md) - [Service Plugins](https://dev.wix.com/docs/develop-websites/articles/coding-with-velo/integrations/service-plugins-formerly-spis/custom-app-extensions-using-spis.md) - [Replacing a Wix Business Solution's App Page with your Own Custom Version](https://dev.wix.com/docs/develop-websites/articles/wix-apps/replace-a-wix-business-app-page-with-your-own-custom-version.md) --- > Portal Navigation: > > - Append `.md` to any URL under `https://dev.wix.com/docs/` to get its markdown version. > - Pages are either content pages (article or reference text) or menu pages (a list of links to child pages). > - To get a menu page, truncate any URL to a parent path and append `.md` (e.g. `https://dev.wix.com/docs/sdk.md`, `https://dev.wix.com/docs/sdk/core-modules.md`). > - Top-level index of all portals: https://dev.wix.com/docs/llms.txt > - Full concatenated docs: https://dev.wix.com/docs/llms-full.txt ## Resource: Replace a Wix Business App Page with Your Own Custom Version ## Article: Build a custom Wix Business app page ## Article Link: https://dev.wix.com/docs/develop-websites/articles/wix-apps/replace-a-wix-business-app-page-with-your-own-custom-version.md ## Article Content: # Replace a Wix Business App Page with Your Own Custom Version You can replace some of the Wix's default app pages, such as the Booking Calendar or the Plans & Pricing page, with your own customized versions. Modify or extend the page’s design and functionality however you like to suit your precise business needs. By adding Velo code to the page and using Wix APIs, you can easily integrate with the app’s page flow and access contextual app data, providing users with a seamless app experience. ## 📖  Step-by-step guides For detailed instructions on how to implement each type of custom page, see: * [Build a custom Booking Service page](https://dev.wix.com/docs/develop-websites/articles/wix-apps/wix-app-collections/wix-bookings/build-a-custom-booking-service-page.md) * [Build a custom Booking Calendar](https://dev.wix.com/docs/develop-websites/articles/wix-apps/wix-app-collections/wix-bookings/build-a-custom-booking-calendar-page.md) * [Build a custom Pricing Plans page](https://dev.wix.com/docs/develop-websites/articles/wix-apps/wix-app-collections/other-apps/wix-pricing-plans/build-a-custom-pricing-plans-page.md) ## ⚙️  How custom app pages work To implement a custom page's functionality and integrate it into the app's page flow, you need to add code to the page and use Velo APIs. Your code has to do several things: 1. Fetch data from the Wix app about the content to display. 2. Handle UI initialization and interactions, and implement any customized business logic. 3. Direct users to the next page in the app's flow. ![replace-diagram](https://wixmp-833713b177cebf373f611808.wixmp.com/images/bc177ef473d2d6ab29e7c031ef0090c4.gif) ## 📽️  Demo video Watch a quick demo to see how easy it is to build you own custom page. ## 🎮  Example site Check out our [example site](https://www.wix.com/velo-examples/bookings-reflow) and [template](https://manage.wix.com/edit-template/from?originTemplateId=905d81a9-4473-44cb-bf1e-058ef27dd476&templateId=4548e92c-e357-43d3-b348-37c86000b80d&autoDevMode=true) to explore the code and APIs and learn how to build a custom Booking Calendar page. [![reflow-example-image](https://wixmp-833713b177cebf373f611808.wixmp.com/images/2c661a879b35f0abe9e7d8247da4afdf.png)](https://www.wix.com/velo-examples/bookings-reflow) --- > Portal Navigation: > > - Append `.md` to any URL under `https://dev.wix.com/docs/` to get its markdown version. > - Pages are either content pages (article or reference text) or menu pages (a list of links to child pages). > - To get a menu page, truncate any URL to a parent path and append `.md` (e.g. `https://dev.wix.com/docs/sdk.md`, `https://dev.wix.com/docs/sdk/core-modules.md`). > - Top-level index of all portals: https://dev.wix.com/docs/llms.txt > - Full concatenated docs: https://dev.wix.com/docs/llms-full.txt ## Resource: Wix Stores "Products" Collection Fields ## Article: Wix Stores "Products" Collection Fields ## Article Link: https://dev.wix.com/docs/develop-websites/articles/wix-apps/wix-app-collections/wix-e-commerce-stores/wix-stores-products-collection-fields.md ## Article Content: # Velo: Wix Stores "Products" Collection Fields
**Tip:** Before continuing, make sure you've read [Working with Wix App Collections](https://dev.wix.com/docs/develop-websites/articles/databases/wix-data/collections/working-with-wix-app-collections-and-code.md).
To use the Products collection in code, refer to it as `"Stores/Products"`. ```javascript // Query all products wixData .query("Stores/Products") .find() .then((results) => { // handle the results }); // Query all products, including variants wixData .query("Stores/Products") .find({ appOptions: { // Include product variants in the query. Defaults to `false`. includeVariants: true, }, }) .then((results) => { // handle the results }); ``` This document describes the permissions and fields in your Products collection.
**Important:** - You can query up to 100 items from the Products collection. Trying to query more than 100 items by raising the wix-data [limit](https://www.wix.com/corvid/reference/wix-data.WixDataQuery.html#limit) will result in an error. - You can use up to 5 filters in one query. This limit can be extended by using the 'and' operator to combine queries.
By default, querying hidden products requires the appropriate permissions. However, you can allow your visitors to [temporarily bypass this requirement](https://dev.wix.com/docs/develop-websites/articles/best-practices/security-best-practices.md#temporarily-bypassing-collection-permissions) by setting the `suppressAuth` property to `true`. ```javascript // Query all products, including variants and hidden products wixData.query("Stores/Products") .find({ appOptions: { // Include product variants in the query. Defaults to `false`. includeVariants: true, // Explicitly allow querying hidden products. Defaults to `false`. suppressAuth: true // Include hidden products in the query. Defaults to `false`. includeHiddenProducts: true } }) .then((results) => { // handle the results }); ``` ### Permissions The Products collection has the following [permissions](https://support.wix.com/en/article/about-collection-permissions): - **Read:** Anyone - **Create:** None - **Update:** None - **Delete:** None You cannot change the Products collection's permissions. ### Fields > **Note:** > This app collection contains read-only fields that cannot be managed from the collection. You can update the fields from the relevant app in your site’s [dashboard](https://support.wix.com/en/article/accessing-your-sites-dashboard). The field name is listed as the heading of each section, with the field ID listed in parentheses, like this: Name (name). The fields appear in this document in the order in which they appear in your collection by default. #### ID (\_id) **Description**: The product ID (GUID) that was created by the server. This is a system field and is hidden by default. **Type**: Text **Can connect to data**: Yes **Can use in dynamic page URL**: No **Can be sorted**: Yes **Can be filtered**: eq, ne, hasSome, contains, startsWith **Read-only**: Yes #### Name (name) **Description**: The name of the product. **Type**: Text **Can connect to data**: Yes **Can use in dynamic page URL**: No **Can be sorted**: Yes **Can be filtered**: eq, ne, hasSome, contains, startsWith **Read-only**: Yes #### Updated Date (\_updatedDate) **Description**: Date and time the product was last changed. **Type**: Date **Can connect to data**: Yes **Can use in dynamic page URL**: No **Can be sorted**: Yes **Can be filtered**: eq, ne, lt, lte, gt, gte **Read-only**: Yes #### Description (description) **Description**: The product description in rich text. **Type**: Rich text **Can connect to data**: Yes **Can use in dynamic page URL**: No **Can be sorted**: No **Can be filtered**: eq, ne, hasSome, contains, startsWith **Read-only**: Yes #### Main Media (mainMedia) **Description**: Displays the main media item (image or video) for this product as it appears in the Store Manager. **Type**: Image **Can connect to data**: Yes **Can use in dynamic page URL**: No **Can be sorted**: No **Can be filtered**: No **Read-only**: Yes #### Media Items (mediaItems) **Description**: Lists all the media items available for this product in an array of JSON objects. **Type**: Media Gallery **Can connect to data**: No **Can use in dynamic page URL**: No **Can be sorted**: No **Can be filtered**: No **Read-only**: Yes ```javascript [ { type: "Image", src: "wix:image://v1/68d3a9_1de7529c444b4c9eb38401f8efe0cad2.jpg/flowers.jpg/#originWidth=1970&originHeight=1120", title: "title", description: "whatever first line\nthe second line.", link: "https://www.whatever.com", }, { type: "Video", src: "wix:video://v1/11062b_03c50f8fe4a34cc297a984e483a282ef/simpsons.mov#posterUri=96fbec_52cd5b00f7fd48e0a83bc1fb1dfb06ea.jpg &posterWidth=1920&posterHeight=1080", title: "title", description: "whatever first line\nthe second line.", link: "https://www.whatever.com", thumbnail: "wix:image://v1/68d3a9_1de7529c444b4c9eb38401f8efe0cad2.jpg/flowers.jpg/#originWidth=1970&originHeight=1120", }, ]; ``` #### SKU (sku) **Description**: The product's stock-keeping unit number. **Type**: Text **Can connect to data**: Yes **Can use in dynamic page URL**: No **Can be sorted**: Yes  **Can be filtered**: Yes **Read-only**: Yes #### Ribbon (ribbon) **Description**: The product's ribbon. Used to highlight relevant information about a product. For example, `"New Arrival"` or `"5 items left"`. **Note**: This field replaces the deprecated \`ribbons\` field. **Type**: Text **Can connect to data**: No **Can use in dynamic page URL**: No **Can be sorted**: No **Can be filtered**: No **Read-only**: No #### Currency (currency) **Description**: The product's currency. Because stores only have one currency, this value is the same for all products. **Type**: Text **Can connect to data**: Yes **Can use in dynamic page URL**: No **Can be sorted**: No **Can be filtered**: No **Read-only**: Yes #### Price (price) **Description**: The product's price. **Type**: Number **Can connect to data**: Yes **Can use in dynamic page URL**: No **Can be sorted**: Yes **Can be filtered**: eq, ne, hasSome, lt, lte, gt, gte **Read-only**: Yes #### Discounted Price (discountedPrice) **Description**: The discounted price, if any. If no discount is configured, the full price is displayed. **Type**: Number **Can connect to data**: Yes **Can use in dynamic page URL**: No **Can be sorted**: No **Can be filtered**: No **Read-only**: Yes #### Formatted Price (formattedPrice) **Description**: The price formatted with the currency (e.g., $20). **Type**: Text **Can connect to data**: Yes **Can use in dynamic page URL**: No **Can be sorted**: No **Can be filtered**: No **Read-only**: Yes #### Formatted Discounted Price (formattedDiscountedPrice) **Description**: The discounted price formatted with the currency (e.g., $15). **Type**: Text **Can connect to data**: Yes **Can use in dynamic page URL**: No **Can be sorted**: No **Can be filtered**: No **Read-only**: Yes #### Price Per Unit (pricePerUnit) **Description**: The product's base price per unit, automatically calculated based on provided pricePerUnitData (e.g., 0.3). **Type**: Number **Can connect to data**: Yes **Can use in dynamic page URL**: No **Can be sorted**: Yes **Can be filtered**: No **Read-only**: Yes #### Formatted Price Per Unit (formattedPricePerUnit) **Description**: The product's base price per unit, formatted with the currency (e.g., $0.30) **Type**: Text **Can connect to data**: Yes **Can use in dynamic page URL**: No **Can be sorted**: No **Can be filtered**: No **Read-only**: Yes #### Price Per Unit Data (pricePerUnitData) **Description**: Price per unit quantities and measurement units. **Type**: JSON **Can connect to data**: No **Can use in dynamic page URL**: No **Can be sorted**: No **Can be filtered**: No **Read-only**: No ```javascript { "totalQuantity": 1, "totalMeasurementUnit": "KG", "baseQuantity": 100, "baseMeasurementUnit": "G" } ``` #### Track Inventory (trackInventory) **Description**: Indicates whether inventory is tracked for this product. **Type**: Boolean **Can connect to data**: Yes **Can use in dynamic page URL**: No **Can be sorted**: No **Can be filtered**: No **Read-only**: Yes #### In Stock (inStock) **Description**: Indicates whether the product is in stock. **Type**: Boolean **Can connect to data**: Yes **Can use in dynamic page URL**: No **Can be sorted**: No **Can be filtered**: No **Read-only**: Yes #### Quantity In Stock (quantityInStock) **Description**: The number of items currently in stock. Only relevant for products whose "TrackInventory" field is "True". **Type**: Number **Can connect to data**: Yes **Can use in dynamic page URL**: No **Can be sorted**: No **Can be filtered**: No **Read-only**: Yes #### Additional Info Sections (additionalInfoSections) **Description**: Displays the Additional Info sections you have in your store in an array of JSON objects. **Type**: JSON **Can connect to data**: No **Can use in dynamic page URL**: No **Can be sorted**: No **Can be filtered**: No **Read-only**: Yes ```javascript [ { "title": "PRODUCT INFO", "description": "I'm a product detail." }, ... ] ``` #### Product Options (productOptions) **Description**: Displays the defined product options and choices as a complex JSON object. Also supports easy querying and filtering. **Type**: JSON **Can connect to data**: No **Can use in dynamic page URL**: No **Can be sorted**: No **Can be filtered**: No **Read-only**: Yes You can query the Products collection and filter datasets connected to the collection based on the product options you have defined in your store. The product options are stored in a complex JSON object, with the choices for each option stored as an array of objects (see below). Rather than searching through each choice, you can use special syntax that only requires the product option name and the values of choices available for that option. You can filter this field using these functions: eq, ne, hasSome, hasAll. For example, if you have a product option called "Size," you can use `productOptions.size.value` in your code (note that the case of the name doesn't matter). If you have a product option called "Color," you use `productOptions.color.value`. You can also use any custom options you may have defined. The name you use is the name of the option in your store. ```javascript // filter a dataset by color import wixData from 'wix-data'; $w('#myDataset').setFilter(wixData.filter() .hasSome('productOptions.color.value', ['#0000ff', ...]) ) ``` ```javascript // query the "Stores/Products" collection by color import wixData from 'wix-data'; wixData.query('Stores/Products') .hasSome('productOptions.color.value', ['#0000ff', ...]) .find() .then(console.log) ``` Format of the JSON object ```javascript { "Option1": { "optionType": "color", "name": "Option1", "choices": [ { "value": "#0000ff", "mainMedia": "missing-media.png", "mediaItems": [], "inStock": true, "visible": true } ] ... }, "Option2": { "optionType": "drop_down", "name": "Size", "choices": [ { "value": "Large", "mainMedia": "wix:image://v1/anImage.jpg/file.jpg#originWidth=1000&originHeight=1000", "mediaItems": [ { "id": "anImage.jpg", "src": "wix:image://v1/anImage.jpg/file.jpg#originWidth=1000&originHeight=1000", "description": "", "title": "title", "type": "Image" }, ... ] "inStock": true, "visible": true }, ... ] } } ``` #### Product Page Url (productPageUrl) **Description**: Displays the URL for the product's page on your site. **Type**: URL **Can connect to data**: Yes **Can use in dynamic page URL**: No **Can be sorted**: No **Can be filtered**: No **Read-only**: Yes #### Manage Variants (manageVariants) **Description**: Indicates whether product variants are managed for this store. **Type**: Boolean **Can connect to data**: Yes **Can use in dynamic page URL**: No **Can be sorted**: No **Can be filtered**: No **Read-only**: Yes #### Custom Text Fields (customTextFields) **Description**: Displays any custom fields you may have set up in an array of JSON objects. **Type**: JSON **Can connect to data**: No **Can use in dynamic page URL**: No **Can be sorted**: No **Can be filtered**: No **Read-only**: Yes ```javascript [ { "title": "custom text", "maxLength": 500, "mandatory": true } ... ] ``` #### Product Type (productType) **Description**:The type of product (physical or digital). **Type**: Text **Can connect to data**: Yes **Can use in dynamic page URL**: No **Can be sorted**: Yes **Can be filtered**: eq, ne, hasSome, contains, startsWith **Read-only**: Yes #### Slug (slug) **Description**: The product's slug, which is its URL-friendly name that is unique across the store. **Type**: Text **Can connect to data**: Yes **Can use in dynamic page URL**: Yes **Can be sorted**: Yes **Can be filtered**: eq, ne, hasSome, contains, startsWith **Read-only**: Yes #### Weight (weight) **Description**: The product's weight. **Type**: Number **Can connect to data**: Yes **Can use in dynamic page URL**: No **Can be sorted**: No **Can be filtered**: No **Read-only**: Yes #### Collections (collections) **Description**: The collections the product belongs to. **Type**: Reference (Multiple Items) **Can connect to data**: No **Can use in dynamic page URL**: No **Can be sorted**: No **Can be filtered**: hasSome **Read-only**: Yes #### Inventory Item (inventoryItemId) **Description**: The item's ID in the Stores/InventoryItems collection that corresponds to the product. **Type**: Text **Can connect to data**: No **Can use in dynamic page URL**: No **Can be sorted**: No **Can be filtered**: No **Read-only**: Yes #### Discount (discount) **Description**: Discount deducted from the product's original price. **Type**: JSON **Can connect to data**: No **Can use in dynamic page URL**: No **Can be sorted**: No **Can be filtered**: No **Read-only**: No **Note:** "type" is one of the following: - "NONE": Pass this value to remove a discount. - "AMOUNT": Discount amount. In the example below, the discount is 5 ($ / € / £ / ¥ / etc.), depending on the [product's currency](https://support.wix.com/en/article/corvid-wix-stores-products-collection-fields#currency-currency). - "PERCENT": Discount is a percentage. ```javascript { "type": "AMOUNT", "value": 5 } ``` #### SEO Data (seoData) **Description**: Lists any custom SEO data for the product as an array of SEO tag JSON objects. [Learn more.](https://support.wix.com/en/search?term=seo) **Type**: JSON **Can connect to data**: No **Can use in dynamic page URL**: No **Can be sorted**: No **Can be filtered**: No **Read-only**: No ```javascript { "tags": [ { "type": "title", "children": "Indonesian Blend", "custom": false, "disabled": false }, { "type": "meta", "props": { "name": "description", "content": "Half Java Arabica, half Bali Robusta - big flavor with a biggish kick." }, "children": "", "custom": false, "disabled": false }, { "type": "meta", "props": { "name": "robots", "content": "index" }, "children": "", "custom": false, "disabled": false } ... ] } ``` #### Brand (brand) **Description**: Product brand. **Type**: Text **Can connect to data**: Yes **Can use in dynamic page URL**: No **Can be sorted**: No **Can be filtered**: Yes **Read-only**: Yes --- > Portal Navigation: > > - Append `.md` to any URL under `https://dev.wix.com/docs/` to get its markdown version. > - Pages are either content pages (article or reference text) or menu pages (a list of links to child pages). > - To get a menu page, truncate any URL to a parent path and append `.md` (e.g. `https://dev.wix.com/docs/sdk.md`, `https://dev.wix.com/docs/sdk/core-modules.md`). > - Top-level index of all portals: https://dev.wix.com/docs/llms.txt > - Full concatenated docs: https://dev.wix.com/docs/llms-full.txt # Method name: find(options: WixDataQueryOptions) # Method package: wixData # Method menu location: wixData --> WixDataQuery --> find # Method Link: https://dev.wix.com/docs/velo/apis/wix-data/wix-data-query/find.md # Method Description: Returns the items that match the query. The `find()` function returns a Promise that resolves to the results found by the query and some information about the results. The Promise is rejected if `find()` is called with incorrect permissions or if any of the functions used to refine the query is invalid. Calling the `find()` function triggers the [`beforeQuery()`](wix-data.Hooks.html#beforeQuery) and [`afterQuery()`](wix-data.Hooks.html#afterQuery) hooks if they have been defined. Use the `options` parameter to override default preferences: + Override permission checks with `suppressAuth`. + Ensure the most up-to-date data is retrieved with `consistentRead`. + Prevent hooks from running with `suppressHooks`. + Speed up execution with `omitTotalCount`, if you don't need a count of items matching the query. If you build a query and don't refine it with any `wixDataQuery` functions, `find()` returns the entire collection. > **Notes:**: > - Calling `find()` triggers hooks for the specified collection only. It doesn’t trigger hooks for referenced collections. > - `find()` returns the full items that match the query. To specify which fields to return for each retrieved item, use the `fields()` method. # Method Code Examples: *** Note: do not assume any prop names or enum values other than the ones in the example. ## Perform a find on a query ```javascript query.find() .then((results) => { if(results.items.length > 0) { let items = results.items; let firstItem = items[0]; let totalCount = results.totalCount; let pageSize = results.pageSize; let currentPage = results.currentPage; let totalPages = results.totalPages; let hasNext = results.hasNext(); let hasPrev = results.hasPrev(); let length = results.length; let query = results.query; } else { // handle case where no matching items found } }) .catch((error) => { let errorMsg = error.message; let code = error.code; }); ``` ## Create a query and run it ```javascript import wixData from 'wix-data'; // ... wixData.query("myCollection") .find() .then((results) => { if(results.items.length > 0) { let items = results.items; let firstItem = items[0]; let totalCount = results.totalCount; let pageSize = results.pageSize; let currentPage = results.currentPage; let totalPages = results.totalPages; let hasNext = results.hasNext(); let hasPrev = results.hasPrev(); let length = results.length; let query = results.query; } else { // handle case where no matching items found } }) .catch((error) => { let errorMsg = error.message; let code = error.code; }); ``` ## Create a query, add functions to the query, and run it ```javascript import wixData from 'wix-data'; // ... wixData.query("myCollection") .eq("status", "active") .gt("age", 25) .ascending("last_name", "first_name") .find() .then((results) => { if (results.items.length > 0) { let items = results.items; let firstItem = items[0]; let totalCount = results.totalCount; let pageSize = results.pageSize; let currentPage = results.currentPage; let totalPages = results.totalPages; let hasNext = results.hasNext(); let hasPrev = results.hasPrev(); let length = results.length; let query = results.query; } else { // handle case where no matching items found } }) .catch((error) => { let errorMsg = error.message; let code = error.code; }); ``` ## Create a query with options and run it ```javascript import wixData from 'wix-data'; // ... let options = {     "suppressAuth": true,     "suppressHooks": true }; wixData.query("myCollection") .find(options) .then((results) => { if(results.items.length > 0) { let items = results.items; let firstItem = items[0]; } else { // handle case where no matching items found } }) .catch((error) => { let errorMsg = error.message; let code = error.code; }); ``` --- --- > Portal Navigation: > > - Append `.md` to any URL under `https://dev.wix.com/docs/` to get its markdown version. > - Pages are either content pages (article or reference text) or menu pages (a list of links to child pages). > - To get a menu page, truncate any URL to a parent path and append `.md` (e.g. `https://dev.wix.com/docs/sdk.md`, `https://dev.wix.com/docs/sdk/core-modules.md`). > - Top-level index of all portals: https://dev.wix.com/docs/llms.txt > - Full concatenated docs: https://dev.wix.com/docs/llms-full.txt # Method name: count(options: WixDataOptions) # Method package: wixData # Method menu location: wixData --> WixDataQuery --> count # Method Link: https://dev.wix.com/docs/velo/apis/wix-data/wix-data-query/count.md # Method Description: Returns the number of items that match the query. The `count()` function returns a Promise that resolves to the number of items that match the query. The Promise is rejected if `count()` is called with incorrect permissions or if any of the functions used to refine the query is invalid. Calling the `count()` function triggers the [`beforeCount()`](wix-data.Hooks.html#beforeCount) and [`afterCount()`](wix-data.Hooks.html#afterCount) hooks if they have been defined. Use the `options` parameter to run `count()` without checking for permissions or without its registered hooks. Any function that does not filter query results (e.g., [`ascending()`](#ascending)) does not affect the result of `count()`. If you build a query and don't refine it with any `WixDataQuery` functions, `count()` returns the total number of items in the collection. If you have already run a query with [`find()`](#find), you can retrieve the number of query results without calling `count()`. The [`find()`](#find) function returns a Promise that resolves to a [`WixDataQueryResult`](https://dev.wix.com/docs/velo/api-reference/wix-data/wix-data-query-result/introduction.md) object, which has a `totalCount` property whose value is the number of results. # Method Code Examples: *** Note: do not assume any prop names or enum values other than the ones in the example. ## Perform a count on a query ```javascript query.count() .then((num) => { let numberOfItems = num; }) .catch((error) => { let errorMsg = error.message; let code = error.code; }); ``` ## Create a query and perform a count on it ```javascript import wixData from 'wix-data'; // ... wixData.query("myCollection") .count() .then((num) => { let numberOfItems = num; }) .catch((error) => { let errorMsg = error.message; let code = error.code; }); ``` ## Create a query and perform a count on it ```javascript import wixData from 'wix-data'; // ... wixData.query("myCollection") .eq("status", "active") .gt("age", 25) .count() .then((num) => { let numberOfItems = num; }) .catch((error) => { let errorMsg = error.message; let code = error.code; }); ``` --- --- > Portal Navigation: > > - Append `.md` to any URL under `https://dev.wix.com/docs/` to get its markdown version. > - Pages are either content pages (article or reference text) or menu pages (a list of links to child pages). > - To get a menu page, truncate any URL to a parent path and append `.md` (e.g. `https://dev.wix.com/docs/sdk.md`, `https://dev.wix.com/docs/sdk/core-modules.md`). > - Top-level index of all portals: https://dev.wix.com/docs/llms.txt > - Full concatenated docs: https://dev.wix.com/docs/llms-full.txt # Method name: distinct(propertyName: string, options: WixDataQueryOptions) # Method package: wixData # Method menu location: wixData --> WixDataQuery --> distinct # Method Link: https://dev.wix.com/docs/velo/apis/wix-data/wix-data-query/distinct.md # Method Description: Returns the distinct values that match the query, without duplicates. The `distinct()` function returns a Promise that resolves to: + The distinct values found in the specified field when running the query. + Additional information about the results, such as the number of values that match the query. Unlike `find()`, which returns all item objects that match the query, `distinct()` returns matching field values, and eliminates duplicate field values from the query result. You cannot use `find()` and `distinct()` together. For an item to be resolved as distinct, only the specified field must be distinct. Other fields for that item in the collection are not evaluated when resolving the promise. The Promise is rejected if `distinct()` is called with incorrect permissions or if any of the functions used to refine the query is invalid. > **Notes:** > - Only site visitors with [Data Read](https://support.wix.com/en/article/collection-permissions-an-overview#permissions) permissions can retrieve and view data. You can override the permissions by setting the `suppressAuth` option to `true`. - `distinct()` returns the full distinct items that match the query. To specify which fields to return for each retrieved item, use the `fields()` method. # Method Code Examples: *** Note: do not assume any prop names or enum values other than the ones in the example. ## Get distinct values from a query ```javascript query.distinct("state") .then((results) => { if(results.items.length > 0) { let items = results.items; let firstItem = items[0]; let totalCount = results.totalCount; let pageSize = results.pageSize; let currentPage = results.currentPage; let totalPages = results.totalPages; let hasNext = results.hasNext(); let hasPrev = results.hasPrev(); let length = results.length; let query = results.query; } else { // handle case where no matching items found } }) .catch((error) => { let errorMsg = error.message; let code = error.code; }); ``` ## Create a distinct query and run it ```javascript import wixData from 'wix-data'; // ... wixData.query("myCollection") .distinct("state") .then((results) => { if(results.items.length > 0) { let items = results.items; let firstItem = items[0]; let totalCount = results.totalCount; let pageSize = results.pageSize; let currentPage = results.currentPage; let totalPages = results.totalPages; let hasNext = results.hasNext(); let hasPrev = results.hasPrev(); let length = results.length; let query = results.query; } else { // handle case where no matching items found } }) .catch((error) => { let errorMsg = error.message; let code = error.code; }); ``` ## Create a query, add functions to the query, and find distinct values ```javascript import wixData from 'wix-data'; // ... wixData.query("myCollection") .eq("status", "active") .gt("age", 25) .distinct("state") .then((results) => { if (results.items.length > 0) { let items = results.items; let firstItem = items[0]; let totalCount = results.totalCount; let pageSize = results.pageSize; let currentPage = results.currentPage; let totalPages = results.totalPages; let hasNext = results.hasNext(); let hasPrev = results.hasPrev(); let length = results.length; let query = results.query; } else { // handle case where no matching items found } }) .catch((error) => { let errorMsg = error.message; let code = error.code; }); ``` ## Create a distinct query with options and run it ```javascript import wixData from 'wix-data'; // ... let options = { "suppressAuth": true }; wixData.query("myCollection") .distinct("state", options) .then((results) => { if(results.items.length > 0) { let items = results.items; let firstItem = items[0]; } else { // handle case where no matching items found } }) .catch((error) => { let errorMsg = error.message; let code = error.code; }); ``` --- --- > Portal Navigation: > > - Append `.md` to any URL under `https://dev.wix.com/docs/` to get its markdown version. > - Pages are either content pages (article or reference text) or menu pages (a list of links to child pages). > - To get a menu page, truncate any URL to a parent path and append `.md` (e.g. `https://dev.wix.com/docs/sdk.md`, `https://dev.wix.com/docs/sdk/core-modules.md`). > - Top-level index of all portals: https://dev.wix.com/docs/llms.txt > - Full concatenated docs: https://dev.wix.com/docs/llms-full.txt ## Resource: Working with Wix App Collection Fields ## Article: Working with Wix App Collection Fields ## Article Link: https://dev.wix.com/docs/develop-websites/articles/wix-apps/wix-app-collections/working-with-wix-app-collection-fields.md ## Article Content: # Working with Wix App Collection Fields [Wix app collections](https://dev.wix.com/docs/develop-websites/articles/databases/wix-data/collections/working-with-wix-app-collections-and-code.md) are special collections added by some [apps made by Wix](https://dev.wix.com/docs/develop-websites/articles/wix-apps/about-apps-made-by-wix.md) when they are installed on a site. These collections have fixed permissions that cannot be changed. The fields in each collection support different data query and site integration functionalities, such as [sorting](https://dev.wix.com/docs/velo/api-reference/wix-data/wix-data-sort/introduction.md), [filtering](https://dev.wix.com/docs/velo/api-reference/wix-data/wix-data-filter/introduction.md), or [connecting the collection data to a site](https://support.wix.com/en/article/cms-formerly-content-manager-displaying-collection-content-on-your-page). When working with a Wix app collection, check whether its fields support the action you want to perform. You can find information about each Wix app collection in the articles below. The following table lists the potential functionalities each field might support: | Functionality | Description | | --------------------- | ------------------------------------------------------------------------------------------------------------------------------------------------------------------------------------------------------------------------------------------------------------------------------------------------------------------------------------------------------------------------------------------ | | Type | [Field type](https://support.wix.com/en/article/cms-formerly-content-manager-supported-content-in-collection-field-types). | | Connecting to data | Whether the field can be used to [display data on the site](https://support.wix.com/en/article/cms-formerly-content-manager-displaying-collection-content-on-your-page). | | Used in a dynamic URL | Whether the field can be used in a [dynamic page URL](https://dev.wix.com/docs/develop-websites/articles/databases/wix-data/dynamic-pages/making-dynamic-page-urls-meaningful-with-prefixes.md). | | Sorting | Whether the field can be used to [sort](https://support.wix.com/en/article/cms-formerly-content-manager-hiding-sorting-and-filtering-fields-in-your-collection-view#sorting-items-in-your-collection) the collection. | | Filtering | Whether the field can be used to [filter](https://support.wix.com/en/article/cms-formerly-content-manager-hiding-sorting-and-filtering-fields-in-your-collection-view#adding-filters-to-fields-in-your-collection-views) the collection. If yes, the [filter methods](https://dev.wix.com/docs/velo/api-reference/wix-data/wix-data-filter/introduction.md) that can be called on the fields. | | Read-only | Whether the field is read-only. Some fields cannot be edited or managed from the collection. You can only update these fields from the relevant app in the [site's dashboard](https://support.wix.com/en/article/accessing-your-sites-dashboard). | ## See also - [About apps made by Wix](https://dev.wix.com/docs/develop-websites/articles/wix-apps/about-apps-made-by-wix.md) - [Working with Wix app collections and code](https://dev.wix.com/docs/develop-websites/articles/databases/wix-data/collections/working-with-wix-app-collections-and-code.md) - [Querying Wix app collections](https://dev.wix.com/docs/develop-websites/articles/wix-apps/wix-app-collections/querying-wix-app-collections.md) --- > Portal Navigation: > > - Append `.md` to any URL under `https://dev.wix.com/docs/` to get its markdown version. > - Pages are either content pages (article or reference text) or menu pages (a list of links to child pages). > - To get a menu page, truncate any URL to a parent path and append `.md` (e.g. `https://dev.wix.com/docs/sdk.md`, `https://dev.wix.com/docs/sdk/core-modules.md`). > - Top-level index of all portals: https://dev.wix.com/docs/llms.txt > - Full concatenated docs: https://dev.wix.com/docs/llms-full.txt ## Resource: Wix Bookings "Services" Collection Fields ## Article: Wix Bookings "Services" Collection Fields ## Article Link: https://dev.wix.com/docs/develop-websites/articles/wix-apps/wix-app-collections/wix-bookings/wix-bookings-services-collection-fields.md ## Article Content: # Velo: Wix Bookings "Services" Collection Fields
**Tip:** Before continuing, make sure you've read [Working with Wix App Collections](https://dev.wix.com/docs/develop-websites/articles/databases/wix-data/collections/working-with-wix-app-collections-and-code.md).
To use the Services collection in code, refer to it as `"Bookings/Services"`. ```javascript wixData.query("Bookings/Services") .find() .then( (results) => { // handle the results } ); ``` This document describes the properties and fields in your Services collection. ### Permissions The Services collection has the following [permissions](https://support.wix.com/en/article/about-collection-permissions): * **Read:** Anyone  * **Create:** None * **Update:** None * **Delete:** None You cannot change the Services collection's permissions.  ### Fields >**Note:** > This app collection contains read-only fields that cannot be managed from the collection. You can update the fields from the relevant app in your site’s [dashboard](https://support.wix.com/en/article/accessing-your-sites-dashboard). The field name is listed as the heading of each section, with the field ID listed in parentheses, like this: Name (name). The fields appear in this document in the order in which they appear in your collection by default.
**Deprecation Notice:** As of January 31, 2025, Wix Bookings [integrates with Wix Forms APIs](https://dev.wix.com/docs/api-reference/business-solutions/bookings/wix-forms-integration.md), which affects how you can manage booking form data. This integration means the `form` fields aren't populated for services created after the integration. Services created before the integration also lose this data when they're updated. To reliably manage booking form data, follow [these sample flows](https://dev.wix.com/docs/api-reference/business-solutions/bookings/wix-forms-integration?apiView=SDK.md#sample-flows).
#### ID (\_id) **Description**: The service ID that was created by the server. This is a system field and is hidden by default. **Type**: Text **Can connect to data**: Yes **Can use in dynamic page URL**: No **Can be sorted**: No **Can be filtered**: No **Read-only**: Yes #### Service Name (serviceName) **Description**: The name of the service. **Type**: Text **Can connect to data**: Yes **Can use in dynamic page URL**: No **Can be sorted**: No **Can be filtered**: No **Read-only**: Yes #### Service Type (serviceType) **Description**: The type of service offered (Appointment, Class, Course). **Type**: Text **Can connect to data**: Yes **Can use in dynamic page URL**: No **Can be sorted**: No **Can be filtered**: No **Read-only**: Yes #### Service Image (imageURL) **Description**: Displays the photo for this service as it appears in the Booking Manager. **Type**: Image **Can connect to data**: Yes **Can use in dynamic page URL**: No **Can be sorted**: No **Can be filtered**: No **Read-only**: Yes #### Service Description (description) **Description**: The service description. **Type**: Text **Can connect to data**: Yes **Can use in dynamic page URL**: No **Can be sorted**: No **Can be filtered**: No **Read-only**: Yes #### Service Tagline (tagLine) **Description**: The service tagline. **Type**: Text **Can connect to data**: Yes **Can use in dynamic page URL**: No **Can be sorted**: No **Can be filtered**: No **Read-only**: Yes #### Slug (slug) **Description**: The service's slug, which is its URL-friendly name that is unique across the site. **Type**: Text **Can connect to data**: Yes **Can use in dynamic page URL**: Yes **Can be sorted**: Yes **Can be filtered**: Yes **Read-only**: Yes #### Service Page URL (servicePageURL) **Description**: The link to the service's page on your site. **Type**: URL **Can connect to data**: Yes **Can use in dynamic page URL**: No **Can be sorted**: No **Can be filtered**: No **Read-only**: Yes #### Booking Flow Entry URL (bookingFlowEntryURL) **Description**: The link to the service's calendar page for appointments & classes, or to the service's page for courses. **Type**: URL **Can connect to data**: Yes **Can use in dynamic page URL**: No **Can be sorted**: No **Can be filtered**: No **Read-only**: Yes #### Price Summary (priceSummary) **Description**: The price summary, as follows: * For paid bookings, displays "Amount + Currency". * For free bookings, displays "Free" or any custom text specified. **Type**: Text **Can connect to data**: Yes **Can use in dynamic page URL**: No **Can be sorted**: No **Can be filtered**: No **Read-only**: Yes #### Payment Type (paymentType) **Description**: The payment method defined for this service. **Type**: Text **Can connect to data**: Yes **Can use in dynamic page URL**: No **Can be sorted**: No **Can be filtered**: No **Read-only**: Yes #### Part of Pricing Plan (partOfPricingPlan) **Description**: Indicates whether the service is associated with a pricing plan, such as a membership deal. **Type**: Boolean **Can connect to data**: Yes **Can use in dynamic page URL**: No **Can be sorted**: No **Can be filtered**: No **Read-only**: Yes #### Price Amount (priceAmount) **Description**: The cost of a single session of this service. **Type**: Number **Can connect to data**: Yes **Can use in dynamic page URL**: No **Can be sorted**: No **Can be filtered**: No **Read-only**: Yes #### Deposit Amount (depositAmount) **Description**: The deposit required to book this service, if any. **Type**: Number **Can connect to data**: Yes **Can use in dynamic page URL**: No **Can be sorted**: No **Can be filtered**: No **Read-only**: Yes #### Currency (currency) **Description**: The currency for this service. **Type**: Text **Can connect to data**: Yes **Can use in dynamic page URL**: No **Can be sorted**: No **Can be filtered**: No **Read-only**: Yes #### Max Session Capacity (maxSessionCapacity) **Description**: The maximum number of participants that can be booked for a single session of this service. For appointments, this value is always one. **Type**: Number **Can connect to data**: Yes **Can use in dynamic page URL**: No **Can be sorted**: No **Can be filtered**: No **Read-only**: Yes #### Max Number Of Participants Per Reservation (maxNumberOfParticipantsPerReservation) **Description**: The number of participants a single customer can sign up for one session of this service. For example, you can define that one customer can book up to 3 participants for a given session. For appointments, this value is always one. **Type**: Number **Can connect to data**: Yes **Can use in dynamic page URL**: No **Can be sorted**: No **Can be filtered**: No #### Form Fields (form) **Description**: List of additional values needed for booking a session of the service.
**Breaking change:** This field isn't populated for services created after the [Wix Forms integration](https://dev.wix.com/docs/api-reference/business-solutions/bookings/wix-forms-integration.md). Services created before the integration may still have this data, but it is lost when the service is updated. To reliably manage booking form data, follow [these sample flows](https://dev.wix.com/docs/api-reference/business-solutions/bookings/wix-forms-integration?apiView=SDK.md#sample-flows).
**Type**: Reference **Can connect to data**: No **Can use in dynamic page URL**: No **Can be sorted**: No **Can be filtered**: No **Read-only**: Yes ```json { "fields":[ { "id":"20657271-c55f-43d6-adfd-39b7acc38e11", "type":"text", "label":"Name", "constraints":{ "required":true } }, { "id":"87edd4e0-42b1-4802-8766-584f3eeb6436", "type":"email", "label":"Email", "constraints":{ "required":true } }, { "id":"78bdd186-648e-420d-b8c7-59ebbadb6a4b", "type":"tel", "label":"Phone Number", "constraints":{ "required":false } }, { "id":"2f37d76d-3462-466f-b1f2-e05ebf1889ad", "type":"text", "label":"Add Your Message", "constraints":{ "required":false } }, { "id":"61997cef-9fa2-4f67-9773-67ade57f8754", "type":"text", "label":"Street", "constraints":{ "required":true } }, { "id":"1a4d2b86-bb03-4f3a-ac18-3055e284066b", "type":"text", "label":"Apt. / Floor No.", "constraints":{ "required":false } }, { "id":"cf34b269-ddd7-4290-aa2e-5b535f5e9fbe", "type":"text", "label":"City", "constraints":{ "required":true } } ] } ``` --- > Portal Navigation: > > - Append `.md` to any URL under `https://dev.wix.com/docs/` to get its markdown version. > - Pages are either content pages (article or reference text) or menu pages (a list of links to child pages). > - To get a menu page, truncate any URL to a parent path and append `.md` (e.g. `https://dev.wix.com/docs/sdk.md`, `https://dev.wix.com/docs/sdk/core-modules.md`). > - Top-level index of all portals: https://dev.wix.com/docs/llms.txt > - Full concatenated docs: https://dev.wix.com/docs/llms-full.txt ## Resource: Wix Bookings "Schedule" Collection Fields ## Article: Wix Bookings "Schedule" Collection Fields ## Article Link: https://dev.wix.com/docs/develop-websites/articles/wix-apps/wix-app-collections/wix-bookings/wix-bookings-schedule-collection-fields.md ## Article Content: # Velo: Wix Bookings "Schedule" Collection Fields
**Tip:** Before continuing, make sure you've read [Working with Wix App Collections](https://dev.wix.com/docs/develop-websites/articles/databases/wix-data/collections/working-with-wix-app-collections-and-code.md).
To use the Schedule collection in code, refer to it as `"Bookings/Schedule"`. ```javascript wixData.query("Bookings/Schedule") .find() .then( (results) => { // handle the results } ); ``` This document describes the permissions and fields in your Schedule collection.  ### Permissions The Schedule collection has the following [permissions](https://support.wix.com/en/article/about-collection-permissions): * **Read:** Anyone  * **Create:** None * **Update:** None * **Delete:** None You cannot change the Schedule collection's permissions.  ### Fields >**Note:** > This app collection contains read-only fields that cannot be managed from the collection. You can update the fields from the relevant app in your site’s [dashboard](https://support.wix.com/en/article/accessing-your-sites-dashboard). The field name is listed as the heading of each section, with the field ID listed in parentheses, like this: Name (name). The fields appear in this document in the order in which they appear in your collection by default. >**Note** > You cannot create a dynamic page based on the Schedule collection. #### ID (\_id) **Description**: Displays the service name from the Services collection. **Type**: Reference **Can connect to data**: Yes **Can be sorted**: No **Can be filtered**: No **Read-only**: Yes #### Service Schedule (serviceSchedule) **Description**: A JSON object that represents the schedule that has been defined for this service. **Type**: Reference **Can connect to data**: Yes **Can be sorted**: No **Can be filtered**: No **Read-only**: Yes ```json { "mon": [ { "staffid": "7b14c662-ef34-439a-45a6-8g43b8e15ba7", "startTime": "10:00:00:000", "endTime": "11:30:00:000" } ... ], "tue": [], ... } ``` #### Service Duration in Minutes (serviceDurationInMinutes) **Description**: The duration of this service, in minutes. For example, if your class lasts an hour and a half, this field displays 90. **Type**: Number **Can connect to data**: Yes **Can be sorted**: No **Can be filtered**: No **Read-only**: Yes #### Repeats Every X Weeks (repeatsEveryXWeeks) **Description**: How often this service recurs. For example, if the sessions repeat every 2 weeks, this field displays 2. **Type**: Number **Can connect to data**: Yes **Can be sorted**: No **Can be filtered**: No **Read-only**: Yes --- > Portal Navigation: > > - Append `.md` to any URL under `https://dev.wix.com/docs/` to get its markdown version. > - Pages are either content pages (article or reference text) or menu pages (a list of links to child pages). > - To get a menu page, truncate any URL to a parent path and append `.md` (e.g. `https://dev.wix.com/docs/sdk.md`, `https://dev.wix.com/docs/sdk/core-modules.md`). > - Top-level index of all portals: https://dev.wix.com/docs/llms.txt > - Full concatenated docs: https://dev.wix.com/docs/llms-full.txt ## Resource: Wix Bookings "Staff" Collection Fields ## Article: Wix Bookings "Staff" Collection Fields ## Article Link: https://dev.wix.com/docs/develop-websites/articles/wix-apps/wix-app-collections/wix-bookings/wix-bookings-staff-collection-fields.md ## Article Content: # Velo: Wix Bookings "Staff" Collection Fields
**Tip:** Before continuing, make sure you've read [Working with Wix App Collections](https://dev.wix.com/docs/develop-websites/articles/databases/wix-data/collections/working-with-wix-app-collections-and-code.md).
To use the Staff collection in code, refer to it as `"Bookings/Staff"`. ```javascript wixData.query("Bookings/Staff") .find() .then( (results) => { // handle the results } ); ``` This document describes the permissions and fields in your Staff collection. ### Permissions The Staff collection has the following [permissions](https://support.wix.com/en/article/about-collection-permissions): * **Read:** Anyone  * **Create:** None * **Update:** None * **Delete:** None You cannot change the Staff collection's permissions.  ### Fields >**Note:** > This app collection contains read-only fields that cannot be managed from the collection. You can update the fields from the relevant app in your site’s [dashboard](https://support.wix.com/en/article/accessing-your-sites-dashboard). The field name is listed as the heading of each section, with the field ID listed in parentheses, like this: Name (name). The fields appear in this document in the order in which they appear in your collection by default. >**Note** > You cannot create a dynamic page based on the Staff collection. #### ID (\_id) **Description**: Unique staff member ID. **Type**: Text **Can connect to data**: Yes **Can be sorted**: No **Can be filtered**: No **Read-only**: Yes #### Staff Name (name) **Description**: The staff member's name. **Type**: Text **Can connect to data**: Yes **Can be sorted**: No **Can be filtered**: No **Read-only**: Yes #### Staff Image (image) **Description**: The staff member's image. **Type**: Image **Can connect to data**: Yes **Can be sorted**: No **Can be filtered**: No **Read-only**: Yes --- > Portal Navigation: > > - Append `.md` to any URL under `https://dev.wix.com/docs/` to get its markdown version. > - Pages are either content pages (article or reference text) or menu pages (a list of links to child pages). > - To get a menu page, truncate any URL to a parent path and append `.md` (e.g. `https://dev.wix.com/docs/sdk.md`, `https://dev.wix.com/docs/sdk/core-modules.md`). > - Top-level index of all portals: https://dev.wix.com/docs/llms.txt > - Full concatenated docs: https://dev.wix.com/docs/llms-full.txt ## Resource: Ideas for Working with Your Wix Bookings App Collections ## Article: Ideas for Working with Your Wix Bookings App Collections ## Article Link: https://dev.wix.com/docs/develop-websites/articles/wix-apps/wix-app-collections/wix-bookings/ideas-for-working-with-your-wix-bookings-app-collections.md ## Article Content: # Velo: Ideas for Working with Your Wix Bookings App Collections >**Note:** > This tutorial and its steps are based on a Wix Editor site. You can adapt the steps for a Wix Studio site by using the equivalent [Wix Studio features](https://dev.wix.com/docs/develop-websites/articles/coding-with-velo/overview/about-coding-with-wix-studio.md). This article presents some ideas for how you can enhance your Bookings site with Velo. Throughout this article we refer to [this site](https://www.urbannomadoregon.com/) to illustrate the process. It is a travel site that offers tours in different locations. It features a page that lists all the services at each location as well as a customized booking page for each service. Specifically, we'll describe: * The collections we created and how we connected them to our Wix Bookings App [**Services**](https://dev.wix.com/docs/develop-websites/articles/wix-apps/wix-app-collections/wix-bookings/wix-bookings-services-collection-fields.md) collection. * The customized pages we designed to showcase our services using information from our collections, and how we linked them to existing pages from the Bookings app. * The form we built to get reviews from our customers and how we displayed those reviews on our page. Most of the ideas in this article do not require any code. The page that displays the reviews and the form that lets visitors add reviews, however, do require some simple code that we include here in the article. You'll be able to copy and paste the code onto your page and make some minor adjustments to get it to work. ## New Collections The first thing we did was to create new collections to store the information we wanted to showcase on our site. We used [reference fields](https://support.wix.com/en/article/cms-creating-multi-reference-fields) to connect our new collections to the **Services** collection that comes from the Wix Bookings app. Later in this article, you'll see how we filtered datasets based on these reference fields so that our pages display only relevant information each time. #### Locations collection This collection stores the locations where our services take place. It includes images, various descriptions, and a field for the dynamic page URL. We'll use this collection to create a dynamic item page for our locations.
![](https://d2x3xhvgiqkx42.cloudfront.net/12345678-1234-1234-1234-1234567890ab/b0387850-90c2-4f00-a761-a0c5104e1c8c/2018/06/11/ca3bf6c4-d3f3-4e1b-a7cb-a19a0085c3d5.png)
#### Service\_Locations collection This collection maps each of our services to its location using two reference fields, one pointing to the **Services** collection and the other to the **Locations** collection we just created. Later in this article, you'll see how we used this collection when we created the Locations dynamic item page to display the services available at each location.
![](https://d2x3xhvgiqkx42.cloudfront.net/12345678-1234-1234-1234-1234567890ab/b0387850-90c2-4f00-a761-a0c5104e1c8c/2018/06/13/db7dfdc8-a7ca-4cb8-ae19-f80a2ec562e6.png)
#### Extra\_Service\_Info collection This collection contains additional information about each of our services, including the pickup point, target audience, time of day, and additional images. Here again we used a reference field to connect this information to each service in the **Services** collection. Later in this article we'll use this collection when we create our [customized booking page](https://dev.wix.com/docs/develop-websites/articles/wix-apps/wix-app-collections/wix-bookings/ideas-for-working-with-your-wix-bookings-app-collections.md).
![](https://d2x3xhvgiqkx42.cloudfront.net/12345678-1234-1234-1234-1234567890ab/b0387850-90c2-4f00-a761-a0c5104e1c8c/2018/06/11/1785acfa-d236-41bb-80df-e35501bdbd94.png)
#### Service\_Reviews collection This collection stores the reviews left by users for each service. This collection also has a reference field pointing to the **Services** collection as well as fields for storing the date the review was submitted, text of the review and information about the reviewer. We made sure to set this [collection's permissions](https://support.wix.com/en/article/about-collection-permissions) so that visitors can create content for it.
![](https://d2x3xhvgiqkx42.cloudfront.net/12345678-1234-1234-1234-1234567890ab/b0387850-90c2-4f00-a761-a0c5104e1c8c/2018/06/11/8c811de0-fbe2-4f87-bcd4-636391073e11.png)
## Master/Detail Pages Our demo site has 2 master/detail pages, both of which are also dynamic item pages. Both pages use multiple datasets that are filtered by reference fields. See [this article](https://dev.wix.com/docs/develop-websites/articles/databases/wix-data/collections/working-with-wix-app-collections-and-code.md) for more information. * The first page is connected to the **Locations** collection and displays information about our locations and the services offered at each one.  * The second page is a customized booking form connected to the **Services** collection. It lists additional information for each service as well as user feedback for each service.  ### Locations Page with Details about the Services To view this page, from the home page of the [demo site](https://www.urbannomadoregon.com/), click the "[Explore](https://www.urbannomadoregon.com/Locations/PORTLAND-METRO-AREA)" button in the "Portland Metro Area" item. This page you are now viewing is a dynamic item page connected to the **Locations** collection. Note how in addition to displaying information about the Portland location, it also lists the services offered there. Let's see how we set this page up. 1. Starting from our **Locations** collection, we created and designed the dynamic item page, using text elements and images connected to the fields in the collection. 2. We added a second dataset to the page, connected it to the **Service\_Locations** collection, and then filtered it by its "Location" reference field. This causes the dataset to only display those items whose location matches the current location on our dynamic page, in this case Portland Metro Area. (See [here](https://support.wix.com/en/article/cms-formerly-content-manager-about-filtering-and-sorting-live-site-content-with-datasets#filter-datasets-for-clarity) for details on how to set up this filter.) 3. We connected a repeater to this filtered dataset. Because the reference field in the **Services\_Locations** collection points to the **Services** collection, we can connect elements to fields in the **Services** collection. This is true even though our page doesn't have a dataset connected directly to that collection. In other words, the image, service name, and price information in the repeater come directly from the information we added in our Bookings app.  4. The "Book It" button in the repeater links to our [customized booking page](https://dev.wix.com/docs/develop-websites/articles/wix-apps/wix-app-collections/wix-bookings/ideas-for-working-with-your-wix-bookings-app-collections.md).  This is what our page looks like in the Editor. Elements connected to the "Locations" dataset are marked in red. The repeater and all its elements are connected to the filtered "Services\_Locations" dataset and are marked in blue. 
![](https://d2x3xhvgiqkx42.cloudfront.net/12345678-1234-1234-1234-1234567890ab/b0387850-90c2-4f00-a761-a0c5104e1c8c/2018/06/12/822bf6d2-4f22-4bc9-81d1-cb26a996aebb.png)
### Customized Booking Page with Feedback From the Portland Metro Area page, click the "[Book It](https://www.urbannomadoregon.com/Bookings/Services/food-cart-tastings-1)" button under "Food Cart Tastings" to go to the customized booking page for that service. This is also a master/detail dynamic item page, but with a twist: it displays 2 sets of details * The first set of details is the additional information displayed at the top of the page. * The second set of details is the reviews displayed at the bottom of the page. #### Additional Service Information Details The top part of the Services dynamic item page displays the information we stored in the **Extra\_Service\_Info** collection. We built it much the same way as the previous page. 1. Starting from the Wix App **Services** collection, we created and designed the dynamic item page. The "Book It" button is linked to the "Booking Flow Entry URL" field in the **Services** collection. This means that when our visitors click "Book It," they end up at our regular Wix Bookings App calendar page. 2. We added another dataset to the page and connected it to the **Extra\_Service\_Info** collection. We filtered this dataset by its "Service" reference field. Then we connected elements to this filtered dataset. The elements under "When," "For Who," and "Pickup" are connected directly to our **Extra\_Service\_Info** collection, as are the images at the bottom of the page. ![](https://d2x3xhvgiqkx42.cloudfront.net/12345678-1234-1234-1234-1234567890ab/b0387850-90c2-4f00-a761-a0c5104e1c8c/2018/06/13/4f36d2d5-6f3f-46b4-8744-2588d7e1676c.png) #### Review Display Section The review section of the customized booking page is connected to the **Service\_Reviews** collection. It displays the reviews received for this service and a form for getting reviews. This part of the page requires some code to make it work. 1. We added a third dataset to the page, connected it to the **Service\_Reviews** collection, and then filtered it by its "Service" reference field. Because we will end up adding 2 datasets that point to the same collection, we renamed this first one to "Display Reviews" to make it meaningful. 2. In order to display the total number of reviews we've received, we added a text element to our page and wrote the following code to get the total count and then display it in the element. ```javascript $w("#displayReviews").onReady(() => { let count = $w("#displayReviews").getTotalCount(); $w('#reviewsCount').text = (count + " Reviews") }); ``` >**If you want to use this code on your site, you’ll need to make these substitutions:** > * '#displayReviews': the ID of the dataset > * '#reviewsCount': the ID of the text element that displays the number of reviews 1. We connected a repeater to this dataset, attached text elements to it, and connected them to the same dataset in order to display the text of the review and name of the reviewer.  2. In order to display a formatted version of the date, we attached a text element to the repeater and used the following code.  ```javascript $w('#reviewRepeater').onItemReady(($item, itemData, index) => { $item('#dateDisplay').text = itemData.review_date.toLocaleDateString("en-US"); }) ``` >**If you want to use this code on your site, you’ll need to make these substitutions:** > * '#reviewRepeater': the ID of the repeater > * '#dateDisplay': the ID of the text element that displays the date > * review\_date: the field ID of the date field in the collection 1. The "Book It" button links to the Wix Bookings App calendar page. In its Connect Panel, it appears as the "Booking Flow Entry URL" dynamic page. ## Form for Submitting Reviews At the bottom of the customized booking page is a form where visitors can submit reviews for the service being displayed on the dynamic item page. This is how we created it. 1. We added a 4th dataset to the page, connected it to the **Service\_Reviews** collection, and set its mode to "Write-only." We called it "Get reviews" to differentiate it from the "Display reviews" dataset we added in the previous section. 2. We added 3 input elements and connected them to the appropriate fields in the dataset. We also added a submit button and configured it to remain on this page after submit. 3. We wrote the following code to include today's date and the service being reviewed in the data being saved to the collection. ```javascript $w('#getReviews').onBeforeSave(() => { $w('#getReviews').setFieldValue('service', $w('#dynamicDataset').getCurrentItem()._id); $w('#getReviews').setFieldValue('review_date', new Date()); }) ``` >**If you want to use this code on your site, you’ll need to make these substitutions:** > * '#getReviews': the ID of the dataset connected to the Services\_Reviews collection > * 'service': the field ID of the reference field that points to the Services collection > * '#dynamicDataset': the ID of the dynamic dataset > * 'review\_date': the field ID of the date field in the Services\_Reviews collection 1. We added the following code to refresh the dataset that is displaying the reviews after the new item is saved to the collection. This means that the new review will appear on the page after it has been submitted. ```javascript $w('#getReviews').onAfterSave(() => { $w('displayReviews').refresh(); }) ``` >**If you want to use this code on your site, you’ll need to make this substitution:** > * '#getReviews': the ID of the dataset --- > Portal Navigation: > > - Append `.md` to any URL under `https://dev.wix.com/docs/` to get its markdown version. > - Pages are either content pages (article or reference text) or menu pages (a list of links to child pages). > - To get a menu page, truncate any URL to a parent path and append `.md` (e.g. `https://dev.wix.com/docs/sdk.md`, `https://dev.wix.com/docs/sdk/core-modules.md`). > - Top-level index of all portals: https://dev.wix.com/docs/llms.txt > - Full concatenated docs: https://dev.wix.com/docs/llms-full.txt ## Resource: Wix Bookings Schema for Wix Search ## Article: Wix Bookings Schema for Wix Search ## Article Link: https://dev.wix.com/docs/develop-websites/articles/wix-apps/wix-app-collections/wix-bookings/wix-bookings-schema-for-wix-search.md ## Article Content: # Wix Bookings Schema for Wix Search This article describes the Wix Booking fields you can [search](https://www.wix.com/velo/reference/wix-search.html#search), [sort](https://www.wix.com/velo/reference/wix-search.WixSearchBuilder.html#ascending), [filter](https://www.wix.com/velo/reference/wix-search.html#filter), and [apply facets](https://www.wix.com/velo/reference/wix-search.WixSearchBuilder.html#facets) to when using the [wix-search API](https://www.wix.com/velo/reference/wix-search.html). To search Wix Booking services on your site, set the search document type as `"Bookings/Services"`: ``` wixSearch.search(phrase) .documentType("Bookings/Services") .find() .then( (results) => { // handle the results } ); ``` **Notes** The Bookings fields supported by wix-search are not identical to the fields in your site's [Bookings/Services collection](https://support.wix.com/en/article/velo-wix-bookings-services-collection-fields). The following fields appear in each matching search result [document](https://www.wix.com/velo/reference/wix-search.WixSearchResult.html#documents) when searching Wix Booking services: ## documentType **Description**: Document type that was searched. In this case, "Bookings/Services". **Type**: String **Can search the content of this field**: No **Can facet**: No **Can sort**: No **Can filter**: No ## \_id **Description**: Service ID. **Type**: String **Can search the content of this field**: No **Can facet**: No **Can sort**: No **Can filter**: No ## title **Description**: Service name. **Type**: String **Can search the content of this field**: Yes **Can facet**: No **Can sort**: No **Can filter**: No ## description **Description**: Service description. **Type**: String **Can search the content of this field**: Yes **Can facet**: No **Can sort**: No **Can filter**: No ## url **Description**: Service page's link. **Type**: String **Can search the content of this field**: No **Can facet**: No **Can sort**: No **Can filter**: No ## image **Description**: File source of the image for this service. **Type**: String **Can search the content of this field**: No **Can facet**: No **Can sort**: No **Can filter**: No ## category **Description**: Category associated with the service. **Type**: String **Can search the content of this field**: Yes **Can facet**: No **Can sort**: No **Can filter**: No ## tagLine **Description**: Service's tagline (subtitle). **Type**: String **Can search the content of this field**: Yes **Can facet**: No **Can sort**: No **Can filter**: No ## staffMembers **Description**: Staff members associated with the service. **Type**: Array of Strings **Can search the content of this field**: Yes **Can facet**: Yes **Can sort**: No **Can filter**: hasSome, hasAll --- > Portal Navigation: > > - Append `.md` to any URL under `https://dev.wix.com/docs/` to get its markdown version. > - Pages are either content pages (article or reference text) or menu pages (a list of links to child pages). > - To get a menu page, truncate any URL to a parent path and append `.md` (e.g. `https://dev.wix.com/docs/sdk.md`, `https://dev.wix.com/docs/sdk/core-modules.md`). > - Top-level index of all portals: https://dev.wix.com/docs/llms.txt > - Full concatenated docs: https://dev.wix.com/docs/llms-full.txt ## Resource: Build a Custom Booking Calendar Page ## Article: Build a custom Booking Calendar page ## Article Link: https://dev.wix.com/docs/develop-websites/articles/wix-apps/wix-app-collections/wix-bookings/build-a-custom-booking-calendar-page.md ## Article Content: # Velo: Build a Custom Booking Calendar Page You can replace your site’s default [Wix Booking Calendar page](https://support.wix.com/en/article/wix-bookings-customizing-your-calendar-page) with your own customized version. This enables you to modify or extend the page’s functionality to suit your precise business needs. > **Important:** This feature is currently not supported with [Multi-service bookings appointments](https://support.wix.com/en/article/wix-bookings-scheduling-multi-service-appointments). ![bookings-flow](https://wixmp-833713b177cebf373f611808.wixmp.com/images/custom-booking-calendar-md_velo-articles_wix-bookings-with-velo_images_bookings-flow.png) To integrate the page into your [site’s booking flow](https://support.wix.com/en/article/about-wix-bookings-pages) and implement its functionality, you need to add code to the page and use Velo APIs. Your code has to do several things: * Get data about the selected service and query session availability data. * Handle UI initialization and interactions. * Implement any customized business logic. * Direct users to the next page in the flow. ## Step 1 | Add a custom Calendar page to your site To create a custom calendar page, do one of the following:
Wix Studio 1. Click ![code-icon](https://wixmp-833713b177cebf373f611808.wixmp.com/images/custom-booking-calendar-md_velo-articles_wix-bookings-with-velo_images_code-studio-icon.png) and then **Start Coding** from the sidebar on the left side of the editor. 2. Click **Pages** ![pages-icon](https://wixmp-833713b177cebf373f611808.wixmp.com/images/custom-booking-calendar-md_velo-articles_wix-bookings-with-velo_images_pages-icon-studio.png) on the sidebar. 3. On the **Booking Calendar** (under **Bookings Pages**), click the More Actions icon ![more-actions-studio](https://wixmp-833713b177cebf373f611808.wixmp.com/images/custom-booking-calendar-md_velo-articles_wix-bookings-with-velo_images_more-actions-studio.png). 4. Click **Replace with custom page**. 5. In the confirmation panel, click **Replace**. ![replace-classic](https://wixmp-833713b177cebf373f611808.wixmp.com/images/custom-booking-calendar-md_velo-articles_wix-bookings-with-velo_images_replace-bookings-page-studio.png)
Wix Editor 1. Turn on [Dev Mode](https://support.wix.com/en/article/about-velo-by-wix#to-enable-velo-on-your-site). 2. Click **Pages** ![pages-icon](https://wixmp-833713b177cebf373f611808.wixmp.com/images/custom-booking-calendar-md_velo-articles_wix-bookings-with-velo_images_pages-icon.png) on the left side of the editor. 3. Click **Bookings Pages**, and then on the **Booking Calendar** page, click ![ellipsis-icon](https://wixmp-833713b177cebf373f611808.wixmp.com/images/custom-booking-calendar-md_velo-articles_wix-bookings-with-velo_images_ellipsis-icon.png). 4. Click **Replace with custom page**. 5. In the confirmation panel, click **Replace**. ![replace-classic](https://wixmp-833713b177cebf373f611808.wixmp.com/images/custom-booking-calendar-md_velo-articles_wix-bookings-with-velo_images_replace-bookings-calendar-classic.png)
## Step 2 | Design your custom page [Add elements to the page](https://support.wix.com/en/article/wix-editor-adding-and-deleting-elements) to create your business’s customized design and functionality, such as text, buttons, and images. At a minimum, these elements must: * Display information about the selected service. * Provide the site visitor with a way to view availability and select a slot. * Provide an action button that navigates to the next page in the flow (usually the Booking Form). ## Step 3 | Add Velo code to your page 1. Use the [`getAppPageData()`](https://www.wix.com/velo/reference/wix-window-frontend/getapppagedata) function to get the [service object](https://www.wix.com/velo/reference/wix-window-frontend/app-page-data#wix-window-frontend_app-page-data_booking-calendar-page) associated with the page. For example: ``` ts import wixWindowFrontend from 'wix-window-frontend'; import { availabilityCalendar } from 'wix-bookings.v2'; import wixLocation from 'wix-location'; $w.onReady(async function () { const pageData = await wixWindowFrontend.getAppPageData(); const serviceId = pageData.service.id; }); ``` > **Note**: To receive a populated page data object using `getAppPageData()` when testing your code, do the following: > > * Create at least one Bookings service. > * Preview the Bookings Calendar page and then return to the editor. 2. Get the service’s session availability data using the [`availabilityCalendar.queryAvailability()`](https://www.wix.com/velo/reference/wix-bookings-v2/availabilitycalendar/queryavailability) function. The following example queries data for the upcoming week: ```ts const today = new Date(); const nextWeek = new Date(today.getTime() + 7 * 24 * 60 * 60 * 1000); let query = { filter: { serviceId: [serviceId], startDate: today, endDate: nextWeek, } } const selectedTimezone = Intl.DateTimeFormat().resolvedOptions().timeZone; const options = { timezone: selectedTimezone }; const availability = await availabilityCalendar.queryAvailability(query, options); const entries = availability.availabilityEntries; ``` 3. Initialize your custom page’s elements with the service information and availability data that you retrieved in the previous steps. Use the [`$w` namespace](https://www.wix.com/velo/reference/w) to control the page’s elements. For example: ```ts $w('#serviceName').text = myService.name; const slotOptions = []; entries.forEach((entry, index) => { const label = `${entry.slot.startDate}-${entry.slot.endDate}`; const value = `${index}``; slotOptions.push({ label, value }); }); $w('#dropdown').options = slotOptions; ``` 4. Depending on the functionality you’re developing, implement any business logic that your customized page requires. 5. Add an [event handler](https://support.wix.com/en/article/velo-reacting-to-user-actions-using-events) to the page’s action button so that it navigates to the next page in the flow, which is typically your site’s Booking Form. You can [create a link to a preloaded Booking Form](https://www.wix.com/velo/reference/wix-bookings/shareable-booking-form-links), specifying the appropriate query params based on the user's selections. For example: ```ts $w('#nextButton').onClick(() => { const selectedIndex = $w('#dropdown').selectedIndex; const selectedSlot = entries[selectedIndex].slot; let queryParams = `?bookings_serviceId=${serviceId}&bookings_resourceId=${selectedSlot.resource._id}&bookings_startDate=${encodeURIComponent(selectedSlot.startDate)}&bookings_endDate=${encodeURIComponent(selectedSlot.endDate)}&bookings_timezone=${selectedTimezone}`; const nextUrl = "/booking-form" + queryParams; wixLocation.to(nextUrl); }) ``` Your custom page can now display the service’s data, provide site visitors with an interface for selecting an available slot, and direct them to the next page in the booking flow. --- > Portal Navigation: > > - Append `.md` to any URL under `https://dev.wix.com/docs/` to get its markdown version. > - Pages are either content pages (article or reference text) or menu pages (a list of links to child pages). > - To get a menu page, truncate any URL to a parent path and append `.md` (e.g. `https://dev.wix.com/docs/sdk.md`, `https://dev.wix.com/docs/sdk/core-modules.md`). > - Top-level index of all portals: https://dev.wix.com/docs/llms.txt > - Full concatenated docs: https://dev.wix.com/docs/llms-full.txt ## Resource: Build a Custom Booking Service Page ## Article: Build a custom Booking Service page ## Article Link: https://dev.wix.com/docs/develop-websites/articles/wix-apps/wix-app-collections/wix-bookings/build-a-custom-booking-service-page.md ## Article Content: # Velo: Build a Custom Booking Service Page You can replace your site’s default [Wix Bookings Service page](https://support.wix.com/en/article/wix-bookings-customizing-your-service-pages) with your own customized version. This enables you to modify or extend the page’s functionality to suit your precise business needs To integrate the page into your [site’s booking flow](https://support.wix.com/en/article/about-wix-bookings-pages) and implement its functionality, you need to add code to the page and use Velo APIs. Your code has to do several things: * Get data about the selected service. * Handle UI initialization and interactions. * Implement any customized business logic. * Direct users to the next page in the flow. ## Step 1 | Add a custom Service page to your site To create a custom Service page, do one of the following:
Wix Studio 1. Clicking ![code-icon](https://wixmp-833713b177cebf373f611808.wixmp.com/images/custom-service-page-md_velo-articles_wix-bookings-with-velo_images_code-studio-icon.png) and then **Start Coding** from the sidebar on the left side of the editor. 2. Click **Pages** ![pages-icon](https://wixmp-833713b177cebf373f611808.wixmp.com/images/custom-service-page-md_velo-articles_wix-bookings-with-velo_images_pages-icon-studio.png) on the sidebar. 3. On the **Service Page** (under **Bookings Pages**), click the More Actions icon ![more-actions-studio](https://wixmp-833713b177cebf373f611808.wixmp.com/images/custom-service-page-md_velo-articles_wix-bookings-with-velo_images_more-actions-studio.png). 4. Click **Replace with custom page**. 5. In the confirmation panel, click **Replace**. ![replace-classic](https://wixmp-833713b177cebf373f611808.wixmp.com/images/custom-service-page-md_velo-articles_wix-bookings-with-velo_images_replace-bookings-page-studio.png)
Wix Editor 1. Turn on [Dev Mode](https://support.wix.com/en/article/about-velo-by-wix#to-enable-velo-on-your-site). 2. Click **Pages** ![pages-icon](https://wixmp-833713b177cebf373f611808.wixmp.com/images/custom-service-page-md_velo-articles_wix-bookings-with-velo_images_pages-icon.png) on the left side of the editor. 3. Click **Bookings Pages**, and then on the **Service Page** page, click ![ellipsis-icon](https://wixmp-833713b177cebf373f611808.wixmp.com/images/custom-service-page-md_velo-articles_wix-bookings-with-velo_images_ellipsis-icon.png). 4. Click **Replace with custom page**. 5. In the confirmation panel, click **Replace**. ![replace-classic](https://wixmp-833713b177cebf373f611808.wixmp.com/images/custom-service-page-md_velo-articles_wix-bookings-with-velo_images_replace-bookings-page-wix-editor.png)
## Step 2 | Design your custom page [Add elements to the page](https://support.wix.com/en/article/wix-editor-adding-and-deleting-elements) to create your business’s customized design and functionality, such as text, buttons, and images. At a minimum, these elements must: * Display information about the selected service. * Provide an action button that navigates to the next page in the flow (usually the Booking Calendar). ## Step 3 | Add Velo code to your page 1. Use the [`getAppPageData()`](https://www.wix.com/velo/reference/wix-window-frontend/getapppagedata) function to get the [service object](https://www.wix.com/velo/reference/wix-window-frontend/app-page-data#wix-window-frontend_app-page-data_booking-service-page) associated with the page. For example: ``` ts import wixWindowFrontend from 'wix-window-frontend'; import wixLocation from 'wix-location'; $w.onReady(async function () { const pageData = await wixWindowFrontend.getAppPageData(); const serviceName = pageData.service.name; $w('#text1').text = serviceName; }); ``` > **Note**: To receive a populated page data object using `getAppPageData()` when testing your code, do the following: > > * Create at least one Bookings service. > * Preview the Service page and then return to the editor. 2. Depending on the functionality you’re developing, implement any business logic that your customized page requires. 3. Add an [event handler](https://support.wix.com/en/article/velo-reacting-to-user-actions-using-events) to the page’s action button so that it navigates to the next page in the flow, which is typically your site’s Booking Calendar. You can [create a link to a Booking Calendar](https://www.wix.com/velo/reference/wix-bookings/shareable-booking-form-links) with preset values. > **Note**: Courses do not need a Booking Calendar. Their service page should [navigate directly to the Booking Form](https://www.wix.com/velo/reference/wix-bookings-frontend/shareable-booking-form-links). For example: ```ts $w('#nextButton').onClick(() => { const serviceSlug = pageData.service.supportedSlugs[0].name; const nextUrl = `/booking-calendar/${serviceSlug}`; wixLocation.to(nextUrl); }) ``` Your custom page can now display the service’s data and direct site visitors to the next page in the booking flow. --- > Portal Navigation: > > - Append `.md` to any URL under `https://dev.wix.com/docs/` to get its markdown version. > - Pages are either content pages (article or reference text) or menu pages (a list of links to child pages). > - To get a menu page, truncate any URL to a parent path and append `.md` (e.g. `https://dev.wix.com/docs/sdk.md`, `https://dev.wix.com/docs/sdk/core-modules.md`). > - Top-level index of all portals: https://dev.wix.com/docs/llms.txt > - Full concatenated docs: https://dev.wix.com/docs/llms-full.txt ## Resource: Wix Stores "Collections" Collection Fields ## Article: Wix Stores "Collections" Collection Fields ## Article Link: https://dev.wix.com/docs/develop-websites/articles/wix-apps/wix-app-collections/wix-e-commerce-stores/wix-stores-collections-collection-fields.md ## Article Content: # Velo: Wix Stores "Collections" Collection Fields
**Tip:** Before continuing, make sure you've read [Working with Wix App Collections](https://dev.wix.com/docs/develop-websites/articles/databases/wix-data/collections/working-with-wix-app-collections-and-code.md).
To use the Collections collection in code, refer to it as `"Stores/Collections"`. ```javascript wixData.query("Stores/Collections") .find() .then( (results) => { // handle the results } ); ``` This document describes the permissions and fields in your Collections collection.
**Important:** * You can query up to 100 items from the Collections collection. Trying to query more than 100 items by raising the wix-data [limit](https://www.wix.com/corvid/reference/wix-data.WixDataQuery.html#limit) will result in an error.
### Permissions The Collections collection has the following [permissions](https://support.wix.com/en/article/about-collection-permissions): * **Read:** Anyone  * **Create:** None * **Update:** None * **Delete:** None You cannot change the Collections collection's permissions.  ### Fields >**Note:** > This app collection contains read-only fields that cannot be managed from the collection. You can update the fields from the relevant app in your site’s [dashboard](https://support.wix.com/en/article/accessing-your-sites-dashboard). The field name is listed as the heading of each section, with the field ID listed in parentheses, like this: Name (name). The fields appear in this document in the order in which they appear in your collection by default. #### ID (\_id) **Description**: The collection ID that was created by the server. This is a system field and is hidden by default. This information also appears in the Products collection in a hidden field called "collections.id". You can copy the ID from here and then use it to query the Products collection by the collection ID. **Type**: Text **Can connect to data**: Yes **Can use in dynamic page URL**: Yes **Can be sorted**: Yes **Can be filtered**: Yes **Read-only**: Yes #### Name (name) **Description**: The name of the collection. **Type**: Text **Can connect to data**: Yes **Can use in dynamic page URL**: Yes **Can be sorted**: Yes   **Can be filtered**: Yes **Read-only**: Yes #### Main Media (mainMedia) **Description**: Displays the main media item (image or video) for this collection as it appears in the Store Manager. **Type**: Image **Can connect to data**: Yes **Can use in dynamic page URL**: No **Can be sorted**: No **Can be filtered**: No **Read-only**: Yes --- > Portal Navigation: > > - Append `.md` to any URL under `https://dev.wix.com/docs/` to get its markdown version. > - Pages are either content pages (article or reference text) or menu pages (a list of links to child pages). > - To get a menu page, truncate any URL to a parent path and append `.md` (e.g. `https://dev.wix.com/docs/sdk.md`, `https://dev.wix.com/docs/sdk/core-modules.md`). > - Top-level index of all portals: https://dev.wix.com/docs/llms.txt > - Full concatenated docs: https://dev.wix.com/docs/llms-full.txt ## Resource: Wix Stores "InventoryItems" Collection Fields ## Article: Wix Stores "InventoryItems" Collection Fields ## Article Link: https://dev.wix.com/docs/develop-websites/articles/wix-apps/wix-app-collections/wix-e-commerce-stores/wix-stores-inventory-items-collection-fields.md ## Article Content: # Velo: Wix Stores "InventoryItems" Collection Fields
**Tip:** Before continuing, make sure you've read [Working with Wix App Collections](https://dev.wix.com/docs/develop-websites/articles/databases/wix-data/collections/working-with-wix-app-collections-and-code.md).
To use the InventoryItems collection in code, refer to it as `"Stores/InventoryItems"`. ```javascript wixData.query("Stores/InventoryItems") .find() .then( (results) => { // handle the results } ); ``` This document describes the permissions and fields in your InventoryItems collection. 
**Important:** * You can query up to 100 items from the InventoryItems collection. Trying to query more than 100 items by raising the wix-data [limit](https://www.wix.com/corvid/reference/wix-data.WixDataQuery.html#limit) will result in an error.
### Permissions The InventoryItems collection has the following [permissions](https://support.wix.com/en/article/about-collection-permissions): * **Read:** Anyone  * **Create:** None * **Update:** None * **Delete:** None You cannot change the InventoryItems collection's permissions.  ### Fields >**Note:** > This app collection contains read-only fields that cannot be managed from the collection. You can update the fields from the relevant app in your site’s [dashboard](https://support.wix.com/en/article/accessing-your-sites-dashboard). The field name is listed as the heading of each section, with the field ID listed in parentheses, like this: Name (name). The fields appear in this document in the order in which they appear in your collection by default. #### ID (\_id) **Description**: The inventory item ID (GUID) that was created by the server. This is a system field and is hidden by default. **Type**: Text **Can connect to data**: Yes **Can use in dynamic page URL**: No **Can be sorted**: No **Can be filtered**: eq, ne, hasSome **Read-only**: Yes #### Updated Date (\_updatedDate) **Description**: Date and time the inventory item was last changed. **Type**: Date and Time **Can connect to data**: Yes **Can use in dynamic page URL**: No **Can be sorted**: Yes **Can be filtered**: eq, ne, lt, lte, gt, gte, hasSome **Read-only**: Yes #### External ID (externalId) **Description**: An external ID for the inventory ID in some other system. **Type**: Text **Can connect to data**: Yes **Can use in dynamic page URL**: No **Can be sorted**: No **Can be filtered**: eq, ne, hasSome **Read-only**: Yes #### Product ID (productId) **Description**: Unique identifier of the shopping cart. **Type**: Text **Can connect to data**: Yes **Can use in dynamic page URL**: **Can be sorted**: No **Can be filtered**: eq **Read-only**: Yes #### Track Quantity (trackQuantity) **Description**: Indicates whether inventory is tracked for this item. **Type**: Boolean **Can connect to data**: Yes **Can use in dynamic page URL**: No **Can be sorted**: No **Can be filtered**: No **Read-only**: Yes #### Variants (variants) **Description**: Displays the defined inventory item's variants and its inventory tracking information as a complex JSON object. **Type**: Text **Can connect to data**: No **Can use in dynamic page URL**: No **Can be sorted**: No **Can be filtered**: No **Read-only**: Yes Format of the JSON object ```javascript { "variantId" : "abc-123-456", "inStock" : true, "quantity" : 30 }, { "variantId" : "def-456-789", "inStock" : false }, { "variantId" : "ghi-789-000", "inStock" : true, "quantity" : 1 } ``` ### Related APIs The following APIs can return data from the InventoryItems collection: * [wix-stores-backend](https://www.wix.com/code/reference/wix-stores-backend.html) * [$w.ProductPage](https://www.wix.com/code/reference/$w.ProductPage.html?draft=_#getProduct) --- > Portal Navigation: > > - Append `.md` to any URL under `https://dev.wix.com/docs/` to get its markdown version. > - Pages are either content pages (article or reference text) or menu pages (a list of links to child pages). > - To get a menu page, truncate any URL to a parent path and append `.md` (e.g. `https://dev.wix.com/docs/sdk.md`, `https://dev.wix.com/docs/sdk/core-modules.md`). > - Top-level index of all portals: https://dev.wix.com/docs/llms.txt > - Full concatenated docs: https://dev.wix.com/docs/llms-full.txt ## Resource: Wix Stores "Orders" Collection Fields ## Article: Wix Stores "Orders" Collection Fields ## Article Link: https://dev.wix.com/docs/develop-websites/articles/wix-apps/wix-app-collections/wix-e-commerce-stores/wix-stores-orders-collection-fields.md ## Article Content: # Velo: Wix Stores "Orders" Collection Fields
**Tip:** Before continuing, make sure you've read [Working with Wix App Collections](https://dev.wix.com/docs/develop-websites/articles/databases/wix-data/collections/working-with-wix-app-collections-and-code.md).
To use the Orders collection in code, refer to it as `"Stores/Orders"`. ```javascript wixData.query("Stores/Orders") .find() .then( (results) => { // handle the results } ); ``` This document describes the permissions and fields in your Orders collection.
**Important:** You can query up to 100 items from the Orders collection. Trying to query more than 100 items by raising the wix-data [limit](https://www.wix.com/corvid/reference/wix-data.WixDataQuery.html#limit) will result in an error.
### Permissions The Order collection has the following [permissions](https://support.wix.com/en/article/about-collection-permissions): * **Read:** Admin  * **Create:** None * **Update:** None * **Delete:** None You cannot change the Order collection's permissions.  ### Fields >**Note:** > This app collection contains read-only fields that cannot be managed from the collection. You can update the fields from the relevant app in your site’s [dashboard](https://support.wix.com/en/article/accessing-your-sites-dashboard). The field name is listed as the heading of each section, with the field ID listed in parentheses, like this: Name (name). The fields appear in this document in the order in which they appear in your collection by default. #### Number (number) **Description**: Running order number. **Type**: Number **Can connect to data**: Yes **Can use in dynamic page URL**: Yes **Can be sorted**: Yes **Can be filtered**: eq, ne, hasSome, le, lt, gt, ge **Read-only**: Yes #### ID (\_id) **Description**: The ID of the order. This is a system field and is hidden by default. **Type**: Text **Can connect to data**: Yes **Can use in dynamic page URL**: No **Can be sorted**: Yes **Can be filtered**: eq, ne, hasSome **Read-only**: Yes #### Updated Date (\_updatedDate) **Description**: The date and time the order was last updated. This is a system field and is hidden by default. **Type**: Date **Can connect to data**: Yes **Can use in dynamic page URL**: No **Can be sorted**: Yes **Can be filtered**: eq, ne, hasSome, lt, le, gt, ge **Read-only**: Yes #### Billing Info (billingInfo) **Description**: Billing information as a JSON object. **Type**: JSON **Can connect to data**: No **Can use in dynamic page URL**: No **Can be sorted**: No **Can be filtered**: No **Read-only**: Yes ```json { "address": { "formatted": "235 W 23rd St, NYC, New York 10011, USA", "city": "NYC", "country": "USA", "addressLine": "235 W 23rd St", "addressLine2": "Apt 3", "postalCode": "10011", "subdivision": "NY" } "firstName": "John", "lastName": "Doe", "email": "john.doe@somedomain.com", "phone": "5555555555", "company" : "Company Name", "vatId": { "number": "452.765.395-39", "type": "CPF" }, "paidDate": "2000-05-24T21:00:00.000Z", "paymentMethod": "VISA", "paymentGatewayTransactionId": "29A06193U6234935D", "paymentProviderTransactionId": "7c03ca74-eaf5-4541-8678-9b857634fdcb" } ``` #### Buyer Info (buyerInfo) **Description**: Buyer information as a JSON object. **Type**: JSON **Can connect to data**: No **Can use in dynamic page URL**: No **Can be sorted**: No **Can be filtered**: No **Read-only**: Yes **Note:** "identityType" is one of the following: * "MEMBER": A logged-in site member. * "CONTACT": A Wix contact. ```json { "id": "4kf9ka09-4e9f-a02d-972f-9a5844d9d9a2", "identityType": "CONTACT", "firstName": "John", "lastName":"Doe", "phone": "5555555555", "email": "john.doe@somedomain.com" } ``` #### Buyer Note (buyerNote) **Description**: A note added by the buyer on the cart page when creating the order. **Type**: Text **Can connect to data**: Yes **Can use in dynamic page URL**: No **Can be sorted**: No **Can be filtered**: No **Read-only**: Yes #### Date Created (\_dateCreated) **Description**: Date and time the order was created. **Type**: Date **Can connect to data**: Yes **Can use in dynamic page URL**: No **Can be sorted**: Yes **Can be filtered**: eq, ne, hasSome, lt, le, gt, ge **Read-only**: Yes #### Currency (currency) **Description**: Currency of the order. **Type**: Text **Can connect to data**: Yes **Can use in dynamic page URL**: No **Can be sorted**: No **Can be filtered**: No **Read-only**: Yes #### Fulfillment Status (fulfillmentStatus) **Description**: The status of the order's fulfillment. **Type**: Text **Can connect to data**: Yes **Can use in dynamic page URL**: No **Can be sorted**: No **Can be filtered**: No **Read-only**: Yes **Note**: Value is one of: * "FULFILLED" - Order was fulfilled successfully. * "NOT\_FULFILLED" - Order is not yet fulfilled. * "CANCELLED" - Order was cancelled. * "PARTIALLY\_FULFILLED": Order was partially fulfilled. #### Archived (archived) **Description**: Whether the order is archived. **Type**: Boolean **Can connect to data**: Yes **Can use in dynamic page URL**: No **Can be sorted**: No **Can be filtered**: eq, ne **Read-only**: Yes #### Line Items (lineItems) **Description**: Lists all the line items for this order in an array of JSON objects. **Type**: JSON **Can connect to data**: No **Can use in dynamic page URL**: No **Can be sorted**: No **Can be filtered**: No **Read-only**: Yes **Note**: The "lineItemType" value is one of: * "PHYSICAL" * "DIGITAL" * "CUSTOM\_AMOUNT\_ITEM" - Item with a custom price. ```json [ { "index": 1, "quantity": 1, "discount": 0, "tax": 5, "taxGroupId": "4", "name": "Black T-Shirt", "translatedName": "Nombre traducido", "productId": "28e0d578-64ac-7c12-b675-d1944d1c4155", "sku": "364215376135191", "weight": 5.2, "lineItemType": "PHYSICAL", "notes": "Some notes here", "variantId": "0042-0005-a316f7c67df7", "fulfillerId": "0000-0420-0005-a3dcfd7e6930", "priceData": { "price": 35, "totalPrice": 40, "taxIncludedInPrice": true }, "options": [ { "option": "Color", "selection": "Red" }, { "option": "Size", "selection": "Small" } ], "customTextFields": [ { "title": "Notes for delivery", "value": "Please leave at front door" } ], "mediaItem": { "altText": "A description of the image", "id": "nsplsh_5386255~mv2_d_2977_3951_s_4_2.jpg", "externalImageUrl": "http://static.wixstatic...al_c,q_90/file.jpg", "src": "wix:image://v1/.../jpg#originWidth=1000&originHeight=1000", "type": "IMAGE" } }, ... ] ``` #### Activities (activities) **Description**: List of activities for this order in an array of JSON objects. **Type**: JSON **Can connect to data**: No **Can use in dynamic page URL**: No **Can be sorted**: No **Can be filtered**: No **Read-only**: Yes **Notes:** The "type" value is one of: * "MERCHANT\_COMMENT" - A merchant comment. * "ORDER\_PLACED" - Order placed. * "ORDER\_PAID" - Order marked as paid, either by the store owner (for offline orders), or when an online transaction is confirmed. * "ORDER\_FULFILLED" - Order shipping status set as fulfilled. * "ORDER\_NOT\_FULFILLED" - Order shipping status set as not fulfilled. * "DOWNLOAD\_LINK\_SENT" - Download link was sent (relevant for orders with digital line items). * "PICKUP\_READY\_EMAIL\_SENT" - Email notification for pickup was sent. * "TRACKING\_NUMBER\_ADDED" - Shipping tracking number was set. * "TRACKING\_NUMBER\_EDITED" - Shipping tracking number was edited. * "TRACKING\_LINK\_WAS\_SET" - Shipping tracking link was set. * "SHIPPING\_CONFIRMATION\_EMAIL\_SENT" - An email confirmation of the order shipment was sent. * "INVOICE\_WAS\_SET" - Invoice was added to the order. * "INVOICE\_WAS\_REMOVED" - Invoice was removed from the order. * "INVOICE\_WAS\_SENT" - Invoice was sent to customer via email. ```json [ { "type": "ORDER_PLACED", "timestamp": "2019-01-28T15:43:28.986Z" }, { "type": "MERCHANT_COMMENT", "author": "jane.doe@somedomain.com", "message": "Enjoy you purchase!", "timestamp": "2019-01-28T15:53:24.347Z" } ] ``` #### Payment Status (paymentStatus) **Description**: Status of the order's payment. **Type**: Text **Can connect to data**: Yes **Can use in dynamic page URL**: No **Can be sorted**: Yes **Can be filtered**: eq, ne, hasSome **Read-only**: Yes **Note**: One of:  * "PAID" * "NOT\_PAID" * "PARTIALLY\_REFUNDED" * "FULLY\_REFUNDED" The "NOT\_PAID" status is only for manual payment orders. Other non-paid orders, such as declined payments, do not appear in the orders collection. #### Shipping Info (shippingInfo) **Description**: The order's shipping information as a JSON object. **Type**: JSON **Can connect to data**: No **Can use in dynamic page URL**: No **Can be sorted**: No **Can be filtered**: No **Read-only**: Yes **Notes**:  * Either "shipmentDetails" or "pickupDetails" will be present, but not both. ```json { "deliveryOption": "PPP", "estimatedDeliveryTime": "1 day", "shippingRegion": "Domestic", "shipmentDetails": { "address": { "formatted": "235 W 23rd St, NYC, New York 10011, USA", "city": "NYC", "country": "USA", "addressLine": "235 W 23rd St", "addressLine2": "Apt 3", "postalCode": "10011", "subdivision": "NY" }, "firstName": "John", "lastName": "Doe", "email": "john.doe@somedomain.com", "phoneNumber": "55555555555", "company" : "Some Company", "vatId": { "number": "294.593.590-21", "type": "CPF" }, }, "pickupDetails": { "buyerDetails": { "firstName": "John", "lastName": "Doe", "email": "john.doe@somedomain.com", "phoneNumber": "55555555555" }, "pickupInstructions": "Some instructions", "pickupAddress": { "formatted": "235 W 23rd St, NYC, New York 10011, USA" "city": "New York", "country": "USA", "addressLine": "235 W 23rd St", "postalCode": "10011", "subdivision": "NY" } } } ``` #### Totals (totals) **Description**: The order's total information as a JSON object. **Type**: JSON **Can connect to data**: No **Can use in dynamic page URL**: No **Can be sorted**: No **Can be filtered**: No **Read-only**: Yes ```json { "discount": 0.0, "quantity": 1, "shipping": 0.0, "subtotal": 1.0, "tax": 0.0, "total": 1.0, "weight": 0.0 } ``` #### Weight Unit (weightUnit) **Description**: The unit in which the order's weight is measured ("KG" or "LB"). **Type**: Text **Can connect to data**: Yes **Can use in dynamic page URL**: No **Can be sorted**: No **Can be filtered**: No **Read-only**: Yes #### Custom Field (customField) **Description**: Information about a custom field added to the checkout process as a JSON object. **Type**: JSON **Can connect to data**: No **Can use in dynamic page URL**: No **Can be sorted**: No **Can be filtered**: No **Read-only**: Yes ```json { "title": "Notes for delivery", "translatedTitle": "Notas de entrega", "value": "Please call when outside" } ``` #### Fulfillments (fulfillments) **Description**: Lists of fulfillments for this order in an array of JSON objects. **Type**: JSON **Can connect to data**: No **Can use in dynamic page URL**: No **Can be sorted**: No **Can be filtered**: No **Read-only**: Yes ```json [ { "id": "8", "dateCreated": "2020-04-20T21:00:00.000Z", "lineItems": [ { "index": 1, "quantity": 1 } ], "trackingInfo": { "trackingNumber": "449044304137821", "shippingProvider": "FEDEX", "trackingLink": "https://www.fedex.com/...trackingnumber=449044304137821", } } ] ``` #### Buyer Language (buyerLanguage) **Description**: The site's displayed language. **Type**: Text **Can connect to data**: Yes **Can use in dynamic page URL**: No **Can be sorted**: No **Can be filtered**: No **Read-only**: Yes #### Cart ID (cartId) **Description**: The shopping cart's unique ID. **Type**: Text **Can connect to data**: Yes **Can use in dynamic page URL**: No **Can be sorted**: No **Can be filtered**: No **Read-only**: Yes #### Channel Info (channelInfo) **Description**: Information about the sales channel that submitted the order, as a JSON object. **Type**: JSON **Can connect to data**: No **Can use in dynamic page URL**: No **Can be sorted**: No **Can be filtered**: No **Read-only**: Yes ```json { "externalOrderId": "03-04896-40604", "externalOrderUrl": "http://www.eBay.com/sh/ord/details?orderid=03-04896-40604", "type": "EBAY" } ``` #### Entered By (enteredBy) **Description**: Information about the identity of the order's operator as a JSON object. **Type**: JSON **Can connect to data**: No **Can use in dynamic page URL**: No **Can be sorted**: No **Can be filtered**: No **Read-only**: Yes **Note**: The identityType value - the order was created by one of the following: * "USER" - Wix user who performed a POS transaction on behalf of the buyer. * "MEMBER" - Logged-in site member. * "CONTACT" - A Wix contact. ```json { "id": "f6c2c0f9-4e9f-a58d-a02d-9af2497294d9", "identityType": "MEMBER" } ``` #### Refunds (refunds) **Description**: Information about order refunds in an array of JSON objects. **Type**: JSON **Can connect to data**: No **Can use in dynamic page URL**: No **Can be sorted**: No **Can be filtered**: No **Read-only**: Yes **Note**: Details about externalRefund boolean field: * Indicates whether the refund was made externally. * An external refund refers to refunds processed by the payment provider and reported to the Wix orders system. * When the value is false, the refund was reported to the Wix orders system but was not processed by the payment provider. ```json [ { "id": "caa2918c-6d38-08df-b484-09b702099e2b", "dateCreated": "2021-01-13T08:20:31.638Z", "amount": "26.4", "reason": "returned", "externalRefund": true, "paymentProviderTransactionId": "19615318-2134-4160-b886-cdde9c7ae88e" }, { "id": "7079923b-1c65-1c7a-37c9-3733de32ea1d", "dateCreated": "2021-01-13T08:26:09.419Z", "amount": "60.0", "externalRefund": false } ] ``` #### Subscription Information (subscriptionInfo) **Description**: Information about an order's subscription as a JSON object. **Type**: JSON **Can connect to data**: No **Can use in dynamic page URL**: No **Can be sorted**: No **Can be filtered**: No **Read-only**: Yes **Note**: 'frequency' field - frequency of recurring payment. One of: * "DAY" - Daily * "WEEK" - Weekly * "MONTH" - Monthly * "YEAR" - Yearly ```json { "subscriptionInfo": { "id": "9275fb37-5377-434e-a484-6b6933896bc3", "cycleNumber": 3, "subscriptionSettings": { "frequency": "WEEK", "autoRenewal": true, "billingCycles": 1 }, "subscriptionOptionInfo": { "id": "0a7c4732-09c8-430c-b94e-f189cc0ce25a", "title": "Weekly", "description": "Weekly subscription" } } } ``` --- > Portal Navigation: > > - Append `.md` to any URL under `https://dev.wix.com/docs/` to get its markdown version. > - Pages are either content pages (article or reference text) or menu pages (a list of links to child pages). > - To get a menu page, truncate any URL to a parent path and append `.md` (e.g. `https://dev.wix.com/docs/sdk.md`, `https://dev.wix.com/docs/sdk/core-modules.md`). > - Top-level index of all portals: https://dev.wix.com/docs/llms.txt > - Full concatenated docs: https://dev.wix.com/docs/llms-full.txt ## Resource: Wix Stores "AbandonedCarts" Collection Fields ## Article: Wix Stores "AbandonedCarts" Collection Fields ## Article Link: https://dev.wix.com/docs/develop-websites/articles/wix-apps/wix-app-collections/wix-e-commerce-stores/wix-stores-abandoned-carts-collection-fields.md ## Article Content: # Velo: Wix Stores "AbandonedCarts" Collection Fields
**Tip:** Before continuing, make sure you've read [Working with Wix App Collections](https://dev.wix.com/docs/develop-websites/articles/databases/wix-data/collections/working-with-wix-app-collections-and-code.md).
To use the AbandonedCarts collection in code, refer to it as `"Stores/AbandonedCarts"`. ```javascript wixData.query("Stores/AbandonedCarts") .find() .then( (results) => { // handle the results } ); ``` This document describes the permissions and fields in your AbandonedCarts collection.
**Important:** You can query up to 100 items from the AbandonedCarts collection. Trying to query more than 100 items by raising the wix-data [limit](https://www.wix.com/corvid/reference/wix-data.WixDataQuery.html#limit) will result in an error.
### Permissions The AbandonedCarts collection has the following [permissions](https://support.wix.com/en/article/about-collection-permissions): * **Read:** Admin  * **Create:** None * **Update:** None * **Delete:** None You cannot change the AbandonedCarts collection's permissions.  ### Fields >**Note:** > This app collection contains read-only fields that cannot be managed from the collection. You can update the fields from the relevant app in your site’s [dashboard](https://support.wix.com/en/article/accessing-your-sites-dashboard). The field name is listed as the heading of each section, with the field ID listed in parentheses, like this: Name (name). The fields appear in this document in the order in which they appear in your collection by default. #### ID (\_id) **Description**: The ID of the abandoned cart. This is a system field and is hidden by default. **Type**: Text **Can connect to data**: Yes **Can use in dynamic page URL**: Yes **Can be sorted**: Yes **Can be filtered**: eq, ne, hasSome, contains, startsWith **Read-only**: Yes #### Buyer Info (buyerInfo) **Description**: Buyer information as a JSON object. **Type**: Object **Can connect to data**: No **Can use in dynamic page URL**: No **Can be sorted**: No **Can be filtered**: No **Read-only**: Yes **Note:** "identityType" is one of the following: * "MEMBER": Buyer is a logged-in site member. * "CONTACT": A contact has been created for the buyer. ```json { "id": "4kf9ka09-4e9f-a02d-972f-9a5844d9d9a2", "identityType": "CONTACT", "firstName": "John", "lastName":"Doe", "phone": "5555555555", "email": "john.doe@somedomain.com" } ``` ```javascript // filter a dataset by Buyer Info ID import wixData from 'wix-data'; $w("#myDataset").setFilter(wixData.filter() .eq("buyerInfo.id", ["5ceea2d0-a537-41dc-a51e-51fc8645afd9"])) ``` #### Date Abandoned (abandonTime) **Description**: Time the cart was abandoned. **Type**: Date **Can connect to data**: Yes **Can use in dynamic page URL**: No **Can be sorted**: Yes **Can be filtered**: Yes **Read-only**: Yes #### Status (status) **Description**: Status of the abandoned cart. **Type**: Text **Can connect to data**: Yes **Can use in dynamic page URL**: Yes **Can be sorted**: Yes **Can be filtered**: eq, ne **Read-only**: Yes **Notes**: Either "ABANDONED" or "RECOVERED". #### Activities (activities) **Description**: List of activities for this order in an array of JSON objects. **Type**: JSON **Can connect to data**: No **Can use in dynamic page URL**: No **Can be sorted**: No **Can be filtered**: No **Read-only**: Yes **Notes:** The "type" value is one of: * "UNRECOGNIZED\_TYPE" * "SCHEDULED" * "EMAIL\_SENT" * "EMAIL\_NOT\_SENT" * "NOTIFICATION\_SENT" * "TASK\_CREATED" * "CUSTOM\_ACTIVITY" ```json [ { "type": "SCHEDULED", "timestamp": "2019-01-28T15:43:28.986Z" }, { "type": "EMAIL_SENT", "timestamp": "2019-01-28T15:53:24.347Z" } ] ``` #### Total (total) **Description**: The order total. **Type**: Text **Can connect to data**: Yes **Can use in dynamic page URL**: No **Can be sorted**: No **Can be filtered**: No **Read-only**: Yes --- > Portal Navigation: > > - Append `.md` to any URL under `https://dev.wix.com/docs/` to get its markdown version. > - Pages are either content pages (article or reference text) or menu pages (a list of links to child pages). > - To get a menu page, truncate any URL to a parent path and append `.md` (e.g. `https://dev.wix.com/docs/sdk.md`, `https://dev.wix.com/docs/sdk/core-modules.md`). > - Top-level index of all portals: https://dev.wix.com/docs/llms.txt > - Full concatenated docs: https://dev.wix.com/docs/llms-full.txt ## Resource: Wix Stores "Variants" Collection Fields ## Article: Wix Stores "Variants" Collection Fields ## Article Link: https://dev.wix.com/docs/develop-websites/articles/wix-apps/wix-app-collections/wix-e-commerce-stores/wix-stores-variants-collection-fields.md ## Article Content: # Velo: Wix Stores "Variants" Collection Fields
**Tip:** Before continuing, make sure you've read [Working with Wix App Collections](https://dev.wix.com/docs/develop-websites/articles/databases/wix-data/collections/working-with-wix-app-collections-and-code.md).
To use the Variants collection in code, refer to it as `"Stores/Variants"`. ```javascript wixData.query("Stores/Variants") .find() .then( (results) => { // handle the results } ); ``` This document describes the permissions and fields in your Variants collection. 
**Important:** You can query up to 100 items from the Variants collection. Trying to query more than 100 items by raising the wix-data [limit](https://www.wix.com/corvid/reference/wix-data.WixDataQuery.html#limit) will result in an error.
### Permissions The Products collection has the following [permissions](https://support.wix.com/en/article/about-collection-permissions): * **Read:** Anyone  * **Create:** None * **Update:** None * **Delete:** None You cannot change the Variants collection's permissions.  ### Fields >**Note:** > This app collection contains read-only fields that cannot be managed from the collection. You can update the fields from the relevant app in your site’s [dashboard](https://support.wix.com/en/article/accessing-your-sites-dashboard). The field name is listed as the heading of each section, with the field ID listed in parentheses, like this: Name (name). The fields appear in this document in the order in which they appear in your collection by default. #### ID (\_id) **Description**: The store variant ID (GUID) created by the server. It is a system field comprised of the product ID and the product variant ID, separated by a hyphen. **Type**: Text **Can connect to data**: Yes **Can use in dynamic page URL**: Yes **Can be sorted**: Yes **Can be filtered**: eq, ne, hasSome **Read-only**: Yes #### Variant ID (variantId) **Description**: The variant ID (GUID) that was created by the server. **Type**: Text **Can connect to data**: Yes **Can use in dynamic page URL**: No **Can be sorted**: Yes **Can be filtered**: eq, ne, hasSome **Read-only**: Yes #### Full Variant Name (fullVariantName) **Description**: The full name of the variant. **Type**: Text  **Can connect to data**: Yes **Can use in dynamic page URL**: No **Can be sorted**: No **Can be filtered**: No **Read-only**: Yes #### Product ID (productId) **Description**: The product ID (GUID) that was created by the server. **Type**: Text **Can connect to data**: Yes **Can use in dynamic page URL**: No **Can be sorted**: No **Can be filtered**: eq, ne, hasSome **Read-only**: Yes #### Variant Name (variantName) **Description**: The name of the variant. **Type**: Text **Can connect to data**: Yes **Can use in dynamic page URL**: No **Can be sorted**: No **Can be filtered**: eq, ne, hasSome **Read-only**: Yes #### Product Name (productName) **Description**: The name of the product. **Type**: Text **Can connect to data**: Yes **Can use in dynamic page URL**: No **Can be sorted**: No **Can be filtered**: eq, ne, hasSome **Read-only**: Yes #### Managed Variant (managedVariant) **Description**: Indicates whether the variant is being managed for the product - enables unique SKU, price, and weight per variant. Also affects inventory data. **Type**: Boolean **Can connect to data**: Yes **Can use in dynamic page URL**: No **Can be sorted**: No **Can be filtered**: eq **Read-only**: Yes #### SKU (sku) **Description**: Variant stock-keeping unit number. **Type**: Text **Can connect to data**: Yes **Can use in dynamic page URL**: No **Can be sorted**: No **Can be filtered**: eq, ne, hasSome **Read-only**: Yes #### Stock (stock) **Description**: Stock data for this variable in a JSON object. **Type**: JSON **Can connect to data**: No **Can use in dynamic page URL**: No **Can be sorted**: No **Can be filtered**: No **Read-only**: Yes ```json "stock": { "trackQuantity": true, "quantity": 50, "inStock": true } ``` #### Choices (choices) **Description**: Displays the defined product options and choices as a JSON object. **Type**: JSON **Can connect to data**: Yes **Can use in dynamic page URL**: No **Can be sorted**: No **Can be filtered**: No **Read-only**: Yes ```json { "Size": "Medium", "Color": "Black" } ``` #### Media (media) **Description**: Displays the main media item (image or video) for this product as it appears in the Store Manager. **Type**: Image **Can connect to data**: Yes **Can use in dynamic page URL**: No **Can be sorted**: No **Can be filtered**: No **Read-only**: Yes #### Collections (collections) **Description**: The collections the variant belongs to. **Type**: Reference (Multiple Items) **Can connect to data**: No **Can use in dynamic page URL**: No **Can be sorted**: No **Can be filtered**: Yes **Read-only**: Yes --- > Portal Navigation: > > - Append `.md` to any URL under `https://dev.wix.com/docs/` to get its markdown version. > - Pages are either content pages (article or reference text) or menu pages (a list of links to child pages). > - To get a menu page, truncate any URL to a parent path and append `.md` (e.g. `https://dev.wix.com/docs/sdk.md`, `https://dev.wix.com/docs/sdk/core-modules.md`). > - Top-level index of all portals: https://dev.wix.com/docs/llms.txt > - Full concatenated docs: https://dev.wix.com/docs/llms-full.txt ## Resource: Wix Stores Schema for Wix Search ## Article: Wix Stores Schema for Wix Search ## Article Link: https://dev.wix.com/docs/develop-websites/articles/wix-apps/wix-app-collections/wix-e-commerce-stores/wix-stores-schema-for-wix-search.md ## Article Content: # Wix Stores Schema for Wix Search This article describes the Wix Store product fields you can [search](https://www.wix.com/velo/reference/wix-search.html#search), [sort](https://www.wix.com/velo/reference/wix-search.WixSearchBuilder.html#ascending), [filter](https://www.wix.com/velo/reference/wix-search.html#filter), and [apply facets](https://www.wix.com/velo/reference/wix-search.WixSearchBuilder.html#facets) to when using the [wix-search API](https://www.wix.com/velo/reference/wix-search.html). To search Wix Store products on your site, set the search document type as `"Stores/Products"`: ``` wixSearch.search(phrase) .documentType("Stores/Products") .find() .then( (results) => { // handle the results } ); ``` **Note** The Stores/Products fields supported by wix-search are not identical to the fields in your site's [Stores/Products collection](https://support.wix.com/en/article/velo-wix-stores-products-collection-fields). The following fields appear in each matching search result [document](https://www.wix.com/velo/reference/wix-search/wixsearchresult/documents) when searching Wix Store products: ## documentType **Description**: Document type that was searched. In this case, "Stores/Products". **Type**: String **Can search the content of this field**: No **Can facet**: No **Can sort**: No **Can filter**: No ## \_id **Description**: Product ID. **Type**: String **Can search the content of this field**: No **Can facet**: No **Can sort**: No **Can filter**: No ## title **Description**: Product name. **Type**: String **Can search the content of this field**: Yes **Can facet**: No **Can sort**: No **Can filter**: No ## description **Description**: Product description. **Type**: String **Can search the content of this field**: Yes **Can facet**: No **Can sort**: No **Can filter**: No ## url **Description**: Relative URL of the product's page on your site. **Type**: String **Can search the content of this field**: No **Can facet**: No **Can sort**: No **Can filter**: No ## image **Description**: File source of the main media image for this product. **Type**: String **Can search the content of this field**: No **Can facet**: No **Can sort**: No **Can filter**: No ## sku **Description**: Product's stock keeping unit number. **Type**: String **Can search the content of this field**: Yes **Can facet**: Yes **Can sort**: Yes **Can filter**: in, eq, ne, gt, ge, lt, le ## inStock **Description**: Indicates whether the product is in stock. **Type**: Boolean **Can search the content of this field**: No **Can facet**: Yes **Can sort**: Yes **Can filter**: eq, ne ## options **Description**: Product options and choices. **Type**: Array of Strings **Can search the content of this field**: Yes **Can facet**: Yes **Can sort**: No **Can filter**: hasSome, hasAll The `options` array contains product option names (for example, `Color`) followed by the descriptions of the choices for that option (for example, `blue`, `black`). If there is more than one option for a product, the options and their choice descriptions are listed in sequence. The following is an example of an `options` array for a product with 2 options: `Color` and `Size`: ``` options: ["Color", "Orange", "Blue", "Size", "Small", "Medium", "Large"] ``` **Note** Faceting products with more than 1 product option may return unexpected results. ## collections **Description**: Collections the product belongs to. **Type**: Array of Strings **Can search the content of this field**: Yes **Can facet**: Yes **Can sort**: No **Can filter**: hasSome, hasAll ## onSale **Description**: Indicates whether the product is on sale. **Type**: Boolean **Can search the content of this field**: No **Can facet**: Yes **Can sort**: Yes **Can filter**: eq, ne --- > Portal Navigation: > > - Append `.md` to any URL under `https://dev.wix.com/docs/` to get its markdown version. > - Pages are either content pages (article or reference text) or menu pages (a list of links to child pages). > - To get a menu page, truncate any URL to a parent path and append `.md` (e.g. `https://dev.wix.com/docs/sdk.md`, `https://dev.wix.com/docs/sdk/core-modules.md`). > - Top-level index of all portals: https://dev.wix.com/docs/llms.txt > - Full concatenated docs: https://dev.wix.com/docs/llms-full.txt ## Resource: Wix Members "PrivateMembersData" Collection Fields ## Article: Wix Members "PrivateMembersData" Collection Fields ## Article Link: https://dev.wix.com/docs/develop-websites/articles/wix-apps/wix-app-collections/wix-members/wix-members-private-members-data-collection-fields.md ## Article Content: # Velo: Wix Members "PrivateMembersData" Collection Fields
**Warning:** This data collection is deprecated. Use the [Wix Members "FullData" collection](https://dev.wix.com/docs/velo/api-reference/wix-members-v2/full-data-collection-fields.md) instead.
**Tip:** Before continuing, make sure you've read [Working with Wix App Collections](https://dev.wix.com/docs/develop-websites/articles/databases/wix-data/collections/working-with-wix-app-collections-and-code.md).
To use the PrivateMembersData collection in code, refer to it as `"Members/PrivateMembersData"`. ```javascript wixData.query("Members/PrivateMembersData") .find() .then( (results) => { // handle the results } ); ``` This document describes the permissions and fields in your PrivateMembersData collection.  >**Note:** > You manage your Members in the [Site Members](https://support.wix.com/en/article/viewing-your-member-list) section of your dashboard. ### Permissions The PrivateMembersData collection has the following [permissions](https://support.wix.com/en/article/about-collection-permissions): * **Read:** Site member author * **Create:** None * **Update:** None * **Delete:** None You cannot change the PrivateMembersData collection permissions. ### Fields >**Note:** > This app collection contains read-only fields that cannot be managed from the collection. You can update the fields from the relevant app in your site’s [dashboard](https://support.wix.com/en/article/accessing-your-sites-dashboard). The field name is listed as the heading of each section, with the field ID listed in parentheses, like this: Name (name). The fields appear in this document in the order in which they appear in your collection by default.  #### ID (\_id) **Description**: The member ID that was created by the server. This is a system field and is hidden by default. **Type**: Text **Can connect to data**: Yes **Can use in dynamic page URL**: Yes **Can be sorted**: Yes  **Can be filtered**: eq, ne, hasSome **Read-only**: Yes #### Login Email (loginEmail) **Description**: The email address the member uses to log in to your site. This is the address they supplied when they signed up. This is the Main field. **Type**: Text **Can connect to data**: Yes **Can use in dynamic page URL**: Yes **Can be sorted**: Yes **Can be filtered**: eq, ne, hasSome **Read-only**: Yes #### Name (name) **Description**: The member's full name. This information is concatenated from the "First Name" and "Last Name" fields. **Type**: Text **Can connect to data**: Yes **Can use in dynamic page URL**: Yes **Can be sorted**: Yes **Can be filtered**: eq, ne, hasSome **Read-only**: Yes #### First Name (firstName) **Description**: The member's first name. **Type**: Text **Can connect to data**: Yes **Can use in dynamic page URL**: Yes **Can be sorted**: Yes **Can be filtered**: eq, ne, hasSome **Read-only**: Yes #### Last Name (lastName) **Description**: The member's last name. **Type**: Text **Can connect to data**: Yes **Can use in dynamic page URL**: Yes **Can be sorted**: Yes **Can be filtered**: eq, ne, hasSome **Read-only**: Yes #### Picture (picture) **Description**: Displays the image the member uploaded to their profile, if any. **Type**: Image **Can connect to data**: Yes **Can use in dynamic page URL**: No **Can be sorted**: No **Can be filtered**: No **Read-only**: Yes #### Nickname (nickname) **Description**: Displays the name the member specified on their profile. **Type**: Text **Can connect to data**: Yes **Can use in dynamic page URL**: Yes **Can be sorted**: Yes **Can be filtered**: eq, ne, hasSome **Read-only**: Yes #### Slug (slug) **Description**: The member's URL-friendly name that is unique across your site. Typically this is made up of the member's email prefix. **Type**: Text **Can connect to data**: Yes **Can use in dynamic page URL**: Yes **Can be sorted**: Yes **Can be filtered**: eq, ne, hasSome **Read-only**: Yes #### Language (language) **Description**: Displays the member's locale based on their last login. **Type**: Text **Can connect to data**: Yes **Can use in dynamic page URL**: Yes **Can be sorted**: Yes **Can be filtered**: eq, ne, hasSome **Read-only**: Yes #### Status (status) **Description**: Indicates the member's current status: * Applicant: The member is waiting to be approved * Active: The member is approved and can access your site * Blocked: The member has been blocked and can no longer log in to your site **Type**: Text **Can connect to data**: Yes **Can use in dynamic page URL**: Yes **Can be sorted**: Yes **Can be filtered**: eq, ne, hasSome **Read-only**: Yes #### Created Date (\_createdDate) **Description**: Displays the date and time the member registered to the site. **Type**: Date and Time **Can connect to data**: Yes **Can use in dynamic page URL**: No **Can be sorted**: Yes **Can be filtered**: eq, ne, gt, lt **Read-only**: Yes #### Updated Date (\_updatedDate) **Description**: Displays the last date and time the member's details were updated. **Type**: Date and Time **Can connect to data**: Yes **Can use in dynamic page URL**: No **Can be sorted**: Yes **Can be filtered**: eq, ne, gt, lt **Read-only**: Yes #### Last Login Date (lastLogin) **Description**: Displays the date and time when the member last logged in. **Type**: Date and Time **Can connect to data**: Yes **Can use in dynamic page URL**: No **Can be sorted**: Yes **Can be filtered**: eq, ne, gt, lt **Read-only**: Yes #### Emails (emails) **Description**: Displays all the member's email addresses in an array. **Type**: No **Can connect to data**: Yes **Can use in dynamic page URL**: No **Can be sorted**: No **Can be filtered**: No **Read-only**: Yes ```json ["email1", "email2", ...] ``` #### Main Phone (mainPhone) **Description**: Displays the member's main phone number. **Type**: Text **Can connect to data**: Yes **Can use in dynamic page URL**: No **Can be sorted**: No **Can be filtered**: No **Read-only**: Yes #### Phones (phones) **Description**: Displays all the member's phone numbers in an array. **Type**: Text **Can connect to data**: No **Can use in dynamic page URL**: No **Can be sorted**: No **Can be filtered**: No **Read-only**: Yes ```json ["phone1", "phone2" ...] ``` --- > Portal Navigation: > > - Append `.md` to any URL under `https://dev.wix.com/docs/` to get its markdown version. > - Pages are either content pages (article or reference text) or menu pages (a list of links to child pages). > - To get a menu page, truncate any URL to a parent path and append `.md` (e.g. `https://dev.wix.com/docs/sdk.md`, `https://dev.wix.com/docs/sdk/core-modules.md`). > - Top-level index of all portals: https://dev.wix.com/docs/llms.txt > - Full concatenated docs: https://dev.wix.com/docs/llms-full.txt ## Resource: Wix Members "FullData" Collection Fields ## Article: Wix Members "FullData" Collection Fields ## Article Link: https://dev.wix.com/docs/develop-websites/articles/wix-apps/wix-app-collections/wix-members/wix-members-full-data-collection-fields.md ## Article Content: # Velo: Wix Members "FullData" Collection Fields
**Tip:** Before continuing, make sure you've read [Working with Wix App Collections](https://dev.wix.com/docs/develop-websites/articles/databases/wix-data/collections/working-with-wix-app-collections-and-code.md).
To use the FullData collection in code, refer to it as `"Members/FullData"`. ```javascript wixData.query("Members/FullData") .find() .then( (results) => { // handle the results } ); ``` This document describes the permissions and fields in your FullData collection. >**Note:** > You manage your Members in the [Site Members](https://support.wix.com/en/article/viewing-your-member-list) section of your dashboard.
**Important:** You can query up to 100 items from the Collections collection. Trying to query more than 100 items by raising the wix-data [limit](https://www.wix.com/corvid/reference/wix-data.WixDataQuery.html#limit) will result in an error.
### Permissions The FullData collection has the following [permissions](https://support.wix.com/en/article/about-collection-permissions): * **Read:** Anyone * **Create:** None * **Update:** None * **Delete:** None You cannot change the FullData collection permissions. ### Fields >**Note:** > This app collection contains read-only fields that cannot be managed from the collection. You can update the fields from the relevant app in your site’s [dashboard](https://support.wix.com/en/article/accessing-your-sites-dashboard). The field name is listed as the heading of each section, with the field ID listed in parentheses, like this: Name (name). The fields appear in this document in the order in which they appear in your collection by default. #### ID (\_id) **Description**: The member ID that was created by the server. This is a system field and is hidden by default. **Type**: Text **Can connect to data**: Yes **Can use in dynamic page URL**: Yes **Can be sorted**: No **Can be filtered**: eq, hasSome **Read-only**: Yes #### Login Email (loginEmail) **Description**: Email used by the member to log into the site. **Type**: Text **Can connect to data**: Yes **Can use in dynamic page URL**: No **Can be sorted**: No **Can be filtered**: hasSome, eq **Read-only**: Yes #### First Name (firstName) **Description**: Member's first name. **Type**: Text **Can connect to data**: Yes **Can use in dynamic page URL**: No **Can be sorted**: Yes **Can be filtered**: hasSome, eq **Read-only**: Yes #### Last Name (lastName) **Description**: Member's last name. **Type**: Text **Can connect to data**: Yes **Can use in dynamic page URL**: No **Can be sorted**: Yes **Can be filtered**: hasSome, eq **Read-only**: Yes #### Phone (phone) **Description**: Member's phone number. **Type**: Text **Can connect to data**: Yes **Can use in dynamic page URL**: No **Can be sorted**: No **Can be filtered**: No **Read-only**: Yes #### Email (email) **Description**: Member's email address. **Type**: Text **Can connect to data**: Yes **Can use in dynamic page URL**: No **Can be sorted**: No **Can be filtered**: No **Read-only**: Yes #### Nickname (nickname) **Description**: The name that is displayed on the member's profile page, forum and or blog. **Type**: Text **Can connect to data**: Yes **Can use in dynamic page URL**: No **Can be sorted**: Yes **Can be filtered**: hasSome, eq **Read-only**: Yes #### Slug (slug) **Description**: The member's URL-friendly name that is unique across your site. Typically this is made up of the member's email prefix. **Type**: Text **Can connect to data**: Yes **Can use in dynamic page URL**: No **Can be sorted**: No **Can be filtered**: eq **Read-only**: Yes #### Profile Photo (profilePhoto) **Description**: Displays the member's profile photo, if they uploaded one. **Type**: Image **Can connect to data**: No **Can use in dynamic page URL**: No **Can be sorted**: No **Can be filtered**: No **Read-only**: Yes ```json { "url": "wix:image://v1/8b7eef_3deb121802514be7b698d0447559f9da~mv2.png/avatar-ga890ac591_1280.png", "height": 400, "width": 450, "offsetX": 0, "offsetY": 0, } ``` #### Cover Photo (coverPhoto) **Description**: Displays the member's cover photo on their profile page. **Type**: Image **Can connect to data**: No **Can use in dynamic page URL**: No **Can be sorted**: No **Can be filtered**: No **Read-only**: Yes #### Satus (status) **Description**: Member site access status. **Type**: Text **Can connect to data**: Yes **Can use in dynamic page URL**: No **Can be sorted**: No **Can be filtered**: No **Read-only**: Yes **Note**: Field value is one of:  * "PENDING" - Member created and waiting for approval by site owner. * "APPROVED" - Member approved and able to log in. * "OFFLINE" - Member is a guest author of the site and cannot log in. * "BLOCKED" - Member is blocked and cannot log into the site. * "UNKNOWN" - Insufficient permissions to get the status. #### Privacy Status (privacyStatus) **Description**: Member's privacy status. **Type**: Text **Can connect to data**: Yes **Can use in dynamic page URL**: No **Can be sorted**: No **Can be filtered**: No **Read-only**: Yes **Note**: Field value is one of: * "PUBLIC" - The member profile is visible to everyone. * "PRIVATE" - The member profile is hidden from site visitors and members. The member is only returned to site contributors and apps with the appropriate permissions. #### Activity Status (activityStatus) **Description**: Member's activity status. **Type**: Text **Can connect to data**: Yes **Can use in dynamic page URL**: No **Can be sorted**: No **Can be filtered**: No **Read-only**: Yes **Note**: Field value is one of: * "ACTIVE" - The member can write forum posts and blog comments. * "MUTED" - The member cannot write forum posts or blog comments. #### Last Login Date (lastLoginDate) **Description**: Displays the last date and time the member last logged into the site. **Type**: Date **Can connect to data**: Yes **Can use in dynamic page URL**: No **Can be sorted**: Yes **Can be filtered**: No **Read-only**: Yes #### Title (title) **Description**: Member's title. **Type**: Text **Can connect to data**: Yes **Can use in dynamic page URL**: No **Can be sorted**: No **Can be filtered**: No **Read-only**: Yes #### Created Date (\_createdDate) **Description**: Displays the date and time the member registered to the site. This is a system field and is hidden by default. **Type**: Date **Can** **connect to data**: Yes **Can use in dynamic page URL**: No **Can be sorted**: Yes **Can be filtered**: No **Read-only**: Yes #### Updated Date (\_updatedDate) **Description**: Displays the last date and time the member's details were updated. This is a system field and is hidden by default. **Type**: Date **Can** **connect to data**: Yes **Can use in dynamic page URL**: No **Can be sorted**: No **Can be filtered**: No **Read-only**: Yes #### About Plain Text (aboutPlain) **Description**: Displays the **About** information from the member's profile as plain text. **Type**: Text **Can connect to data**: Yes **Can use in dynamic page URL**: No **Can be sorted**: No **Can be filtered**: No **Read-only**: Yes #### About Rich Text (aboutRich) **Description**: Displays the **About** information from the member's profile as rich text. **Type**: Rich Content (object) **Can connect to data**: No **Can use in dynamic page URL**: No **Can be sorted**: No **Can be filtered**: No **Read-only**: Yes --- > Portal Navigation: > > - Append `.md` to any URL under `https://dev.wix.com/docs/` to get its markdown version. > - Pages are either content pages (article or reference text) or menu pages (a list of links to child pages). > - To get a menu page, truncate any URL to a parent path and append `.md` (e.g. `https://dev.wix.com/docs/sdk.md`, `https://dev.wix.com/docs/sdk/core-modules.md`). > - Top-level index of all portals: https://dev.wix.com/docs/llms.txt > - Full concatenated docs: https://dev.wix.com/docs/llms-full.txt ## Resource: Wix Members "Badges" Collection Fields ## Article: Wix Members "Badges" Collection Fields ## Article Link: https://dev.wix.com/docs/develop-websites/articles/wix-apps/wix-app-collections/wix-members/wix-members-badges-collection-fields.md ## Article Content: # Velo: Wix Members "Badges" Collection Fields
**Tip:** Before continuing, make sure you've read [Working with Wix App Collections](https://dev.wix.com/docs/develop-websites/articles/databases/wix-data/collections/working-with-wix-app-collections-and-code.md).
To use the Badges collection in code, refer to it as `"Members/Badges"`. ```javascript wixData.query("Members/Badges") .find() .then( (results) => { // handle the results } ); ``` This document describes the permissions and fields in your Badges collection.  ### Permissions The Badges collection has the following [permissions](https://support.wix.com/en/article/about-collection-permissions): * **Read:** Admin * **Create:** None * **Update:** None * **Delete:** None You cannot change the Badges collection's permissions.  ### Fields >**Note:** > This app collection contains read-only fields that cannot be managed from the collection. You can update the fields from the relevant app in your site’s [dashboard](https://support.wix.com/en/article/accessing-your-sites-dashboard). The field name is listed as the heading of each section, with the field ID listed in parentheses, like this: Name (name). The fields appear in this document in the order in which they appear in your collection by default. #### ID (\_id) **Description**: Badge ID. **Type**: Text **Can connect to data**: Yes **Can use in dynamic page URL**: No **Can be sorted**: No **Can be filtered**: eq, ne, hasSome **Read-only**: Yes #### Title (title) **Description**: Badge title. **Type**: Text **Can connect to data**: Yes **Can use in dynamic page URL**: No **Can be sorted**: Yes **Can be filtered**: eq, ne **Read-only**: Yes #### Description (description) **Description**: Badge description. **Type**: Text **Can connect to data**: Yes **Can use in dynamic page URL**: No **Can be sorted**: No **Can be filtered**: No **Read-only**: Yes #### Background Color (backgroundColor) **Description**: Background color of the badge. **Type**: Text **Can connect to data**: Yes **Can use in dynamic page URL**: No **Can be sorted**: No **Can be filtered**: No **Read-only**: Yes #### Text Color (textColor) **Description**: Text color of the badge. **Type**: Text **Can connect to data**: Yes **Can use in dynamic page URL**: No **Can be sorted**: No **Can be filtered**: No **Read-only**: Yes #### Icon (icon) **Description**: Badge icon. **Type**: Image **Can connect to data**: Yes **Can use in dynamic page URL**: No **Can be sorted**: No **Can be filtered**: No **Read-only**: Yes #### Role ID (roleId) **Description**: ID of the badge's associated member [role](https://support.wix.com/en/article/creating-member-roles-6943237). **Type**: Text **Can connect to data**: Yes **Can use in dynamic page URL**: No **Can be sorted**: No **Can be filtered**: No **Read-only**: Yes #### Slug (slug) **Description**: The badge's unique URL as used in a dynamic page. **Type**: Text **Can connect to data**: Yes **Can use in dynamic page URL**: Yes **Can be sorted**: Yes **Can be filtered**: eq, gt, lt **Read-only**: Yes #### Created Date (\_createdDate) **Description**: Date and time the badge was created. **Type**: Date and Time **Can connect to data**: Yes **Can use in dynamic page URL**: No **Can be sorted**: No **Can be filtered**: No **Read-only**: Yes #### Updated Date (\_updatedDate) **Description**: Date and time the badge was last updated. **Type**: Date and Time **Can connect to data**: Yes **Can use in dynamic page URL**: No **Can be sorted**: No **Can be filtered**: No **Read-only**: Yes #### Members (members) **Description**: List of members the badge is assigned to. An array of member IDs. **Type**: Tags **Can connect to data**: Yes **Can use in dynamic page URL**: No **Can be sorted**: No **Can be filtered**: hasSome **Read-only**: Yes ```javascript [ "23ab456c-de7f-890g-hi12-3j45kl6m7n8o", "3bc4567d-8e9f-0g12-3456-789012hijk34", "c45678d9-f0ef-1ghi-2345-678j9012kl3m" ] ``` --- > Portal Navigation: > > - Append `.md` to any URL under `https://dev.wix.com/docs/` to get its markdown version. > - Pages are either content pages (article or reference text) or menu pages (a list of links to child pages). > - To get a menu page, truncate any URL to a parent path and append `.md` (e.g. `https://dev.wix.com/docs/sdk.md`, `https://dev.wix.com/docs/sdk/core-modules.md`). > - Top-level index of all portals: https://dev.wix.com/docs/llms.txt > - Full concatenated docs: https://dev.wix.com/docs/llms-full.txt ## Resource: Wix Members "PublicData" Collection Fields ## Article: Wix Members "PublicData" Collection Fields ## Article Link: https://dev.wix.com/docs/develop-websites/articles/wix-apps/wix-app-collections/wix-members/wix-members-public-data-collection-fields.md ## Article Content: # Velo: Wix Members "PublicData" Collection Fields
**Warning:** This data collection is deprecated. Use the [Wix Members "FullData" collection](https://dev.wix.com/docs/velo/api-reference/wix-members-v2/full-data-collection-fields.md) instead.
**Tip:** Before continuing, make sure you've read [Working with Wix App Collections](https://dev.wix.com/docs/develop-websites/articles/databases/wix-data/collections/working-with-wix-app-collections-and-code.md).
To use the PublicData collection in code, refer to it as `"Members/PublicData"`. ```javascript wixData.query("Members/PublicData") .find() .then( (results) => { // handle the results } ); ``` This document describes the permissions and fields in your PublicData collection. >**Note:** > You manage your Members in the [Site Members](https://support.wix.com/en/article/viewing-your-member-list) section of your dashboard. ### Permissions The PublicData collection has the following [permissions](https://support.wix.com/en/article/about-collection-permissions): * **Read:** Anyone * **Create:** None * **Update:** None * **Delete:** None You cannot change the PublicData collection permissions. ### Fields >**Note:** > This app collection contains read-only fields that cannot be managed from the collection. You can update the fields from the relevant app in your site’s [dashboard](https://support.wix.com/en/article/accessing-your-sites-dashboard). The field name is listed as the heading of each section, with the field ID listed in parentheses, like this: Name (name). The fields appear in this document in the order in which they appear in your collection by default.  #### \[Custom Fields\] Custom fields from your Contacts collection can be added in your site's dashboard. You can define custom fields however you like. These fields are optional. They are **not** automatically added. Custom fields from your site's Contacts can be [added to your site Members in your site's dashboard](https://support.wix.com/en/article/customizing-your-member-profile-fields). #### ID (\_id) **Description**: The member ID that was created by the server. This is a system field and is hidden by default. **Type**: Text **Can connect to data**: Yes **Can use in dynamic page URL**: Yes **Can be sorted**: No **Can be filtered**: eq, hasSome, lt, gt, ne **Read-only**: Yes #### Created Date (\_createdDate) **Description**: Displays the date and time the member registered to the site. **Type**: Date and Time **Can** **connect to data**: Yes **Can use in dynamic page URL**: No **Can be sorted**: Yes **Can be filtered**: No **Read-only**: Yes #### Updated Date (\_updatedDate) **Description**: Displays the last date and time the member's details were updated. **Type**: Date and Time **Can** **connect to data**: Yes **Can use in dynamic page URL**: No **Can be sorted**: No **Can be filtered**: No **Read-only**: Yes #### Profile Photo (profilePhoto) **Description**: Displays the image the member uploaded to their profile, if any. **Type**: Image **Can connect to data**: Yes **Can use in dynamic page URL**: No **Can be sorted**: No **Can be filtered**: No **Read-only**: Yes #### Cover Photo (coverPhoto) **Description**: Displays the cover / banner image the member uploaded to their profile, if any. **Type**: Image **Can connect to data**: Yes  **Can use in dynamic page URL**: No **Can be sorted**: No **Can be filtered**: No **Read-only**: Yes #### Nickname (nickname) **Description**: Displays the name the member specified on their profile. **Type**: Text **Can connect to data**: Yes **Can use in dynamic page URL**: No **Can be sorted**: No **Can be filtered**: eq, hasSome **Read-only**: No #### Title (title) **Description**:  The member's title. **Type**: Text **Can connect to data**: Yes **Can use in dynamic page URL**: No **Can be sorted**: No **Can be filtered**: No **Read-only**: Yes #### Slug (slug) **Description**: The member's URL-friendly name that is unique across your site. Typically this is made up of the member's email prefix. **Type**: Text **Can connect to data**: Yes **Can use in dynamic page URL**: No **Can be sorted**: No **Can be filtered**: eq **Read-only**: Yes #### About (Plain Text) (aboutPlain) **Description**: Displays the **About** information from the member's profile as plain text. **Type**: Text **Can connect to data**: Yes **Can use in dynamic page URL**: No **Can be sorted**: No **Can be filtered**: No **Read-only**: Yes #### About (Rich Text) (aboutRich) **Description**: Displays the **About** information from the member's profile as rich text. **Type**: Rich content **Can connect to data**: Yes **Can use in dynamic page URL**: No **Can be sorted**: No **Can be filtered**: No **Read-only**: Yes --- > Portal Navigation: > > - Append `.md` to any URL under `https://dev.wix.com/docs/` to get its markdown version. > - Pages are either content pages (article or reference text) or menu pages (a list of links to child pages). > - To get a menu page, truncate any URL to a parent path and append `.md` (e.g. `https://dev.wix.com/docs/sdk.md`, `https://dev.wix.com/docs/sdk/core-modules.md`). > - Top-level index of all portals: https://dev.wix.com/docs/llms.txt > - Full concatenated docs: https://dev.wix.com/docs/llms-full.txt ## Resource: Wix Blog "Categories" Collection Fields ## Article: Wix Blog "Categories" Collection Fields ## Article Link: https://dev.wix.com/docs/develop-websites/articles/wix-apps/wix-app-collections/other-apps/wix-blog/wix-blog-categories-collection-fields.md ## Article Content: # Velo: Wix Blog "Categories" Collection Fields >**Note:** > Before continuing, make sure you've read [Working with Wix App Collections](https://dev.wix.com/docs/develop-websites/articles/databases/wix-data/collections/working-with-wix-app-collections-and-code.md). This document describes the permissions and fields in your Categories collection.  ### Permissions The Categories collection has the following [permissions](https://support.wix.com/en/article/about-collection-permissions): * **Read:** Anyone  * **Create:** None * **Update:** None * **Delete:** None You cannot change the Categories collection permissions.  ### Fields The field name is listed as the heading of each section, with the field ID listed in parentheses, like this: Name (name). The fields appear in this document in the order in which they appear in your collection by default. #### ID (\_id) **Description**: The ID of the blog category. This is a system field and is hidden by default. **Type**: Text **Can connect to data**: Yes **Can use in dynamic page URL**: No **Can be sorted**: Yes **Can be filtered**: eq, ne **Read-only**: Yes #### Label (label) **Description**: The name of the category as it appears in the Blog menu.  **Type**: Text  **Can connect to data**: Yes  **Can use in dynamic page URL**: Yes **Can be sorted**: Yes **Can be filtered**: eq, ne, contains, startsWith, hasSome  **Read-only**: Yes #### Post Count (postCount) **Description**: The number of posts in the category. **Type**: Number **Can connect to data**: Yes **Can use in dynamic page URL**: No **Can be sorted**: Yes **Can be filtered**: eq, ne, lt, lte, gt, gte **Read-only**: Yes #### Posts (posts) **Description**: A list of posts in this category, referenced from the [Blog/Posts](https://dev.wix.com/docs/develop-websites/articles/wix-apps/wix-app-collections/other-apps/wix-blog/wix-blog-posts-collection-fields.md) collection. **Type**: Multiple-item reference **Can connect to data**: No **Can use in dynamic page URL**: No **Can be sorted**: No **Can be filtered**: Yes **Read-only**: Yes #### Language (language) **Description**: The category language. **Type**: Language **Can connect to data**: No **Can use in dynamic page URL**: No **Can be sorted**: No **Can be filtered**: Yes **Read-only**: Yes #### Translation ID (translationId) **Description**: ID of the category's translations.  **Type**: Text **Can connect to data**: Yes **Can use in dynamic page URL**: No **Can be sorted**: No **Can be filtered**: Yes **Read-only**: Yes #### Category Page Slug (categoryPageSlug) **Description**: The slug of the category page on your published site. **Type**: URL **Can connect to data**: Yes **Can use in dynamic page URL**: No **Can be sorted**: No **Can be filtered**: No **Read-only**: Yes #### Category Page URL (categoryPageUrl) **Description**: The URL of the category page on your published site. **Type**: URL **Can connect to data**: Yes **Can use in dynamic page URL**: No **Can be sorted**: No **Can be filtered**: No **Read-only**: Yes #### Cover Image (coverImage) **Description**: Category cover image. **Type**: Image **Can connect to data**: No **Can use in dynamic page URL**: No **Can be sorted**: No **Can be filtered**: No **Read-only**: Yes #### Description (description) **Description**: Category description. **Type**: Text **Can connect to data**: Yes **Can use in dynamic page URL**: No **Can be sorted**: No **Can be filtered**: No **Read-only**: Yes #### Slug (slug) **Description**: Slug of the category to retrieve. **Type**: Text **Can connect to data**: Yes **Can use in dynamic page URL**: Yes **Can be sorted**: No **Can be filtered**: No **Read-only**: Yes --- > Portal Navigation: > > - Append `.md` to any URL under `https://dev.wix.com/docs/` to get its markdown version. > - Pages are either content pages (article or reference text) or menu pages (a list of links to child pages). > - To get a menu page, truncate any URL to a parent path and append `.md` (e.g. `https://dev.wix.com/docs/sdk.md`, `https://dev.wix.com/docs/sdk/core-modules.md`). > - Top-level index of all portals: https://dev.wix.com/docs/llms.txt > - Full concatenated docs: https://dev.wix.com/docs/llms-full.txt ## Resource: Wix Blog "Posts" Collection Fields ## Article: Wix Blog "Posts" Collection Fields ## Article Link: https://dev.wix.com/docs/develop-websites/articles/wix-apps/wix-app-collections/other-apps/wix-blog/wix-blog-posts-collection-fields.md ## Article Content: # Velo: Wix Blog "Posts" Collection Fields >**Note:** > Before continuing, make sure you've read [Working with Wix App Collections](https://dev.wix.com/docs/develop-websites/articles/databases/wix-data/collections/working-with-wix-app-collections-and-code.md). To use the Posts collection in code, refer to it as `"Blog/Posts"`. wixData.query("Blog/Posts") .find() .then( (results) => { // handle the results } ); This document describes the permissions and fields in your Posts collection.  ### Permissions The Posts collection has the following [permissions](https://support.wix.com/en/article/about-collection-permissions): * **Read:** Anyone  * **Create:** None * **Update:** None * **Delete:** None You cannot change the Posts collection permissions.  ### Fields The field name is listed as the heading of each section, with the field ID listed in parentheses, like this: Name (name). The fields appear in this document in the order in which they appear in your collection by default. #### ID (\_id) **Description**: The ID of the post. This is a system field and is hidden by default. **Type**: Text **Can connect to data**: Yes **Can use in dynamic page URL**: No **Can be sorted**: Yes **Can be filtered**: eq, ne **Read-only**: Yes #### Title (title) **Description**: The title of the post. **Type**: Text **Can connect to data**: Yes **Can use in dynamic page URL**: Yes **Can be sorted**: Yes **Can be filtered**: eq, ne, contains, startsWith, hasSome **Read-only**: Yes #### Published Date (publishedDate) **Description**: The date the post was originally published. **Type**: Date **Can connect to data**: Yes **Can use in dynamic page URL**: No **Can be sorted**: Yes **Can be filtered**: eq, ne, lt, lte, gt, gte **Read-only**: Yes #### Cover Image (coverImage) **Description**: The cover image of the post. **Type**: Image **Can connect to data**: No **Can use in dynamic page URL**: No **Can be sorted**: No **Can be filtered**: No **Read-only**: Yes #### Categories (categories) **Description**: The categories assigned to the post, referenced from the [Blog/Categories](https://support.wix.com/en/article/velo-wix-blog-categories-collection-fields) collection. **Type**: Multiple-item reference **Can connect to data**: No **Can use in dynamic page URL**: No **Can be sorted**: No **Can be filtered**: hasAll, hasSome, contains **Read-only**: Yes #### Main Category (mainCategory) **Description**: **Type**: Reference **Can connect to data**: No **Can use in dynamic page URL**: No **Can be sorted**: No **Can be filtered**: Yes **Read-only**: Yes #### Plain Content (plainContent) **Description**: The text of the post without any formatting. **Type**: Text **Can connect to data**: Yes **Can use in dynamic page URL**: No **Can be sorted**: No **Can be filtered**: No **Read-only**: Yes #### Rich Content (richContent) **Description**: **Type**: Rich Content **Can connect to data**: No **Can use in dynamic page URL**: No **Can be sorted**: No **Can be filtered**: No **Read-only**: Yes #### Excerpt (excerpt) **Description**: A few lines of text that appear in the blog feed. Defined in Post Settings or default of first 160 characters of the post. **Type**: Text **Can connect to data**: Yes **Can use in dynamic page URL**: No **Can be sorted**: No **Can be filtered**: No **Read-only**: Yes #### Hashtags (hashtags) **Description**: List of all hashtags in the post. **Type**: Tags **Can connect to data**: Yes **Can use in dynamic page URL**: No **Can be sorted**: No **Can be filtered**: hasAll, hasSome **Read-only**: Yes #### View Count (viewCount) **Description**: The number of times the post was viewed. **Type**: Number **Can connect to data**: Yes **Can use in dynamic page URL**: No **Can be sorted**: Yes **Can be filtered**: eq, ne, lt, lte, gt, gte **Read-only**: Yes >**Note** > View Count data used on your site pages may require up to 24 hours to update. To make sure new post views are included on your site in real time, [disable caching](https://support.wix.com/en/article/caching-your-sites-pages) for any page that uses View Count data. Note that disabling caching may increase your page loading time. #### Like Count (likeCount) **Description**: The number of likes the post received (from members only). **Type**: Number **Can connect to data**: Yes **Can use in dynamic page URL**: No **Can be sorted**: Yes **Can be filtered**: eq, ne, lt, lte, gt, gte **Read-only**: Yes >**Note** > Like Count data used on your site pages may require up to 24 hours to update. To make sure new post likes are included on your site in real time, [disable caching](https://support.wix.com/en/article/caching-your-sites-pages) for any page that uses Like Count data. Note that disabling caching may increase your page loading time. #### Comment Count (commentCount) **Description**: The number of comments the post received (from members only). **Type**: Number **Can connect to data**: Yes **Can use in dynamic page URL**: No **Can be sorted**: Yes **Can be filtered**: eq, ne, lt, lte, gt, gte **Read-only**: Yes #### Featured (featured) **Description**: Indicates whether the post is set as featured in the post settings. **Type**: Boolean **Can connect to data**: Yes **Can use in dynamic page URL**: No **Can be sorted**: No **Can be filtered**: eq, ne **Read-only**: Yes #### Pinned (pinned) **Description**: Indicates whether the post was pinned to the top of the page in the live site. **Type**: Boolean **Can connect to data**: Yes **Can use in dynamic page URL**: No **Can be sorted**: No **Can be filtered**: eq, ne **Read-only**: Yes #### Last Published Date (lastPublishedDate) **Description**: The most recent publish date of the post. **Type**: Date **Can connect to data**: Yes **Can use in dynamic page URL**: No **Can be sorted**: Yes **Can be filtered**: eq, ne, lt, lte, gt, gte **Read-only**: Yes #### Cover Image Displayed (coverImageDisplayed) **Description**: Indicates whether the cover image is displayed in the feed. If false, the cover image is displayed only when you share the post on social media. **Type**: Boolean **Can connect to data**: Yes **Can use in dynamic page URL**: No **Can be sorted**: No **Can be filtered**: eq, ne **Read-only**: Yes #### Post Page URL (postPageURL) **Description**: The relative URL of the post page on your published site. **Type**: URL **Can connect to data**: Yes **Can use in dynamic page URL**: No **Can be sorted**: No **Can be filtered**: No **Read-only**: Yes #### Language (language) **Description**: **Type**: Language **Can connect to data**: No **Can use in dynamic page URL**: No **Can be sorted**: No **Can be filtered**: Yes **Read-only**: Yes #### Translation ID (translationId) **Description**: **Type**: Text **Can connect to data**: Yes **Can use in dynamic page URL**: No **Can be sorted**: No **Can be filtered**: Yes **Read-only**: Yes #### Time to Read (timeToRead) **Description**: Estimated time in minutes required to read the post. **Type**: Number **Can connect to data**: Yes **Can use in dynamic page URL**: No **Can be sorted**: No **Can be filtered**: No **Read-only**: Yes #### Related Posts (relatedPosts) **Description**: **Type**: Multi-Reference **Can connect to data**: No **Can use in dynamic page URL**: No **Can be sorted**: No **Can be filtered**: No **Read-only**: Yes #### Tags (tags) **Description**: **Type**: Multi-Reference **Can connect to data**: No **Can use in dynamic page URL**: No **Can be sorted**: No **Can be filtered**: Yes **Read-only**: Yes #### Author (author) **Description**: **Type**: Reference **Can connect to data**: No **Can use in dynamic page URL**: No **Can be sorted**: No **Can be filtered**: Yes **Read-only**: Yes #### Slug (slug) **Description**: **Type**: Text **Can connect to data**: Yes **Can use in dynamic page URL**: Yes **Can be sorted**: No **Can be filtered**: No **Read-only**: Yes #### PaidPlans (paidPlans) **Description**: **Type**: Multi-Reference **Can connect to data**: **Can use in dynamic page URL**: No **Can be sorted**: No **Can be filtered**: Yes **Read-only**: Yes --- > Portal Navigation: > > - Append `.md` to any URL under `https://dev.wix.com/docs/` to get its markdown version. > - Pages are either content pages (article or reference text) or menu pages (a list of links to child pages). > - To get a menu page, truncate any URL to a parent path and append `.md` (e.g. `https://dev.wix.com/docs/sdk.md`, `https://dev.wix.com/docs/sdk/core-modules.md`). > - Top-level index of all portals: https://dev.wix.com/docs/llms.txt > - Full concatenated docs: https://dev.wix.com/docs/llms-full.txt ## Resource: Wix Blog "Tags" Collection Fields ## Article: Wix Blog "Tags" Collection Fields ## Article Link: https://dev.wix.com/docs/develop-websites/articles/wix-apps/wix-app-collections/other-apps/wix-blog/wix-blog-tags-collection-fields.md ## Article Content: # Velo: Wix Blog "Tags" Collection Fields >**Note:** > Before continuing, make sure you've read [Working with Wix App Collections](https://dev.wix.com/docs/develop-websites/articles/databases/wix-data/collections/working-with-wix-app-collections-and-code.md). To use the Tags collection in code, refer to it as "Blog/Tags". ```javascript wixData.query("Blog/Tags") .find() .then( (results) => { // handle the results } ); ``` This document describes the permissions and fields in your Tags collection.  ### Permissions The Tags collection has the following [permissions](https://support.wix.com/en/article/about-collection-permissions): * **Read:** Anyone  * **Create:** None * **Update:** None * **Delete:** None You cannot change the Tags collection permissions.  ### Fields The field name is listed as the heading of each section, with the field ID listed in parentheses, like this: Name (name). The fields appear in this document in the order in which they appear in your collection by default. #### ID (\_id) **Description**: The ID of the blog tag. This is a system field and is hidden by default. **Type**: Text **Can connect to data**: Yes **Can use in dynamic page URL**: No **Can be sorted**: Yes **Can be filtered**: eq, ne **Read-only**: Yes #### Label (label) **Description**: The name of the tag as it appears in the Blog menu.  **Type**: Text  **Can connect to data**: Yes  **Can use in dynamic page URL**: Yes **Can be sorted**: Yes **Can be filtered**: eq, ne, contains, startsWith, hasSome  **Read-only**: Yes #### Post Count (postCount) **Description**: The number of posts with the tag. **Type**: Number **Can connect to data**: Yes **Can use in dynamic page URL**: No **Can be sorted**: Yes **Can be filtered**: eq, ne, lt, lte, gt, gte **Read-only**: Yes #### Posts (posts) **Description**: A list of posts with this tag, referenced from the [Blog/Posts](https://support.wix.com/en/article/velo-wix-blog-posts-collection-fields) collection. **Type**: Multiple-item reference **Can connect to data**: No **Can use in dynamic page URL**: No **Can be sorted**: No **Can be filtered**: Yes **Read-only**: Yes #### Tag Page URL (tagPageUrl) **Description**: The URL of the tag page on your published site. **Type**: URL **Can connect to data**: Yes **Can use in dynamic page URL**: No **Can be sorted**: No **Can be filtered**: No **Read-only**: Yes #### Slug (slug) **Description**: Slug of the tag to retrieve. **Type**: Text **Can connect to data**: Yes **Can use in dynamic page URL**: Yes **Can be sorted**: No **Can be filtered**: No **Read-only**: Yes --- > Portal Navigation: > > - Append `.md` to any URL under `https://dev.wix.com/docs/` to get its markdown version. > - Pages are either content pages (article or reference text) or menu pages (a list of links to child pages). > - To get a menu page, truncate any URL to a parent path and append `.md` (e.g. `https://dev.wix.com/docs/sdk.md`, `https://dev.wix.com/docs/sdk/core-modules.md`). > - Top-level index of all portals: https://dev.wix.com/docs/llms.txt > - Full concatenated docs: https://dev.wix.com/docs/llms-full.txt ## Resource: Wix Blog Schema for Wix Search ## Article: Wix Blog Schema for Wix Search ## Article Link: https://dev.wix.com/docs/develop-websites/articles/wix-apps/wix-app-collections/other-apps/wix-blog/wix-blog-schema-for-wix-search.md ## Article Content: # Wix Blog Schema for Wix Search This article describes the Wix Blog fields you can [search](https://www.wix.com/velo/reference/wix-search.html#search), [sort](https://www.wix.com/velo/reference/wix-search.WixSearchBuilder.html#ascending), [filter](https://www.wix.com/velo/reference/wix-search.html#filter), and [apply facets](https://www.wix.com/velo/reference/wix-search.WixSearchBuilder.html#facets) to when using the [wix-search API](https://www.wix.com/velo/reference/wix-search.html). To search Wix Blog posts on your site, set the search document type as `”Blog/Posts"`: ```javascript wixSearch.search(phrase) .documentType("Blog/Posts") .find() .then( (results) => { // handle the results } ); ``` >**Note:** > The Blog fields supported by wix-search are not identical to the fields in your site's [Blog/Posts collection](https://dev.wix.com/docs/develop-websites/articles/wix-apps/wix-app-collections/other-apps/wix-blog/wix-blog-posts-collection-fields.md). The following fields appear in each matching search result [document](https://www.wix.com/velo/reference/wix-search.WixSearchResult.html#documents) when searching Wix Blog services: #### documentType **Description**: Document type that was searched. In this case, “Blog/Posts”. **Type**: String **Can search the content of this field**: No **Can facet**: No **Can sort**: No **Can filter**: No #### \_id **Description**: The ID of the post. **Type**: String **Can search the content of this field**: No **Can facet**: No **Can sort**: No **Can filter**: No #### title **Description**: The title of the post. **Type**: String **Can search the content of this field**: Yes **Can facet**: No **Can sort**: No **Can filter**: No #### description **Description**: Text of the post. **Type**: String **Can search the content of this field**: Yes **Can facet**: No **Can sort**: No **Can filter**: No #### url **Description**: Relative URL of the post page on your site. **Type**: String **Can search the content of this field**: No **Can facet**: No **Can sort**: No **Can filter**: No #### image **Description**: File source of the post’s cover image. **Type**: String **Can search the content of this field**: No **Can facet**: No **Can sort**: No **Can filter**: No #### hashTags **Description**: List of hashtags in the post. **Type**: Array of Strings **Can search the content of this field**: No **Can facet**: Yes **Can sort**: No **Can filter**: hasSome, hasAll #### tags **Description**: List of tags in the post. **Type**: Array of Strings **Can search the content of this field**: Yes **Can facet**: Yes **Can sort**: Yes **Can filter**: hasSome, hasAll #### tagIds **Description**: List of tag IDs in the post. **Type**: Array of Strings **Can search the content of this field**: No **Can facet**: Yes **Can sort**: Yes **Can filter**: hasSome, hasAll #### publishDate **Description**: Date and time the post was originally published. **Type**: Date **Can search the content of this field**: No **Can facet**: No **Can sort**: Yes **Can filter**: in, eq, ne, gt, ge, lt, le --- > Portal Navigation: > > - Append `.md` to any URL under `https://dev.wix.com/docs/` to get its markdown version. > - Pages are either content pages (article or reference text) or menu pages (a list of links to child pages). > - To get a menu page, truncate any URL to a parent path and append `.md` (e.g. `https://dev.wix.com/docs/sdk.md`, `https://dev.wix.com/docs/sdk/core-modules.md`). > - Top-level index of all portals: https://dev.wix.com/docs/llms.txt > - Full concatenated docs: https://dev.wix.com/docs/llms-full.txt ## Resource: Wix Events "Events" Collection Fields ## Article: Wix Events "Events" Collection Fields ## Article Link: https://dev.wix.com/docs/develop-websites/articles/wix-apps/wix-app-collections/other-apps/wix-events/wix-events-events-collection-fields.md ## Article Content: # Velo: Wix Events "Events" Collection Fields
**Tip:** Before continuing, make sure you've read [Working with Wix App Collections](https://dev.wix.com/docs/develop-websites/articles/databases/wix-data/collections/working-with-wix-app-collections-and-code.md).
To use the Events collection in code, refer to it as `"Events/Events"`. ```javascript wixData.query("Events/Events") .find() .then( (results) => { // handle the results } ); ``` This document describes the permissions and fields in your Events collection. ### Permissions The Events collection has the following [permissions](https://support.wix.com/en/article/about-collection-permissions): * **Read:** Anyone  * **Create:** None * **Update:** None * **Delete:** None You cannot change the Events collection's permissions.  ### Fields >**Note:** > This app collection contains read-only fields that cannot be managed from the collection. You can update the fields from the relevant app in your site’s [dashboard](https://support.wix.com/en/article/accessing-your-sites-dashboard). The field name is listed as the heading of each section, with the field ID listed in parentheses, like this: Name (name). The fields appear in this document in the order in which they appear in your collection by default. #### ID (\_id) **Description**: The event ID that was created by the server. This is a system field and is hidden by default. **Type**: Text **Can connect to data**: Yes **Can use in dynamic page URL**: No **Can be sorted**: No **Can be filtered**: Yes **Read-only**: Yes #### Title (title) **Description**: The event's name. **Type**: Text **Can connect to data**: Yes **Can use in dynamic page URL**: Yes **Can be sorted**: Yes **Can be filtered**: lt, lte, gt, gte, hasSome, urlized **Read-only**: Yes #### Slug (slug) **Description**: The event's slug, which is its URL-friendly name that is unique across your site. **Type**: Text **Can connect to data**: Yes **Can use in dynamic page URL**: Yes **Can be sorted**: Yes **Can be filtered**: eq, ne, lt, lte, gt, gte, hasSome, urlized **Read-only**: Yes #### Description (description) **Description**: The short teaser specified in the Events Dashboard. **Type**: Text **Can connect to data**: Yes **Can use in dynamic page URL**: No **Can be sorted**: No **Can be filtered**: No **Read-only**: Yes #### About (about)
**Deprecated** This field is deprecated and replaced by `longDescription`.
**Description**: The information you entered in the "About Your Event" section of the Events Dashboard. **Type**: Rich Text **Can connect to data**: Yes **Can use in dynamic page URL**: No **Can be sorted**: No **Can be filtered**: No **Read-only**: Yes #### Long Description (longDescription) **Description**: The information you entered in the "About Your Event" section of the Events Dashboard. **Type**: Rich Content **Can connect to data**: Yes **Can use in dynamic page URL**: No **Can be sorted**: No **Can be filtered**: No **Read-only**: Yes #### Main Image (mainImage) **Description**: Displays the image for this event. **Type**: Image **Can connect to data**: Yes **Can use in dynamic page URL**: No **Can be sorted**: No **Can be filtered**: No **Read-only**: Yes #### Start (start) **Description**: The start date and time of the event, if any. If the event schedule is TBD, this field is blank. **Type**: Date and Time **Can connect to data**: Yes **Can use in dynamic page URL**: No **Can be sorted**: Yes **Can be filtered**: Yes **Read-only**: Yes #### End (end) **Description**: The end date and time of the event, if any. If the event schedule is TBD, this field is blank. **Type**: Date and Time **Can connect to data**: Yes **Can use in dynamic page URL**: No **Can be sorted**: Yes **Can be filtered**: Yes **Read-only**: Yes #### Time Zone (timeZoneId) **Description**: The time zone for your event. If the event schedule is TBD, this field is blank. **Type**: Text **Can connect to data**: Yes **Can use in dynamic page URL**: No **Can be sorted**: No **Can be filtered**: No **Read-only**: Yes #### Schedule TBD (scheduleTbd) **Description**: Indicates whether the time of this event is marked as TBD. **Type**: Boolean **Can connect to data**: Yes **Can use in dynamic page URL**: No **Can be sorted**: No **Can be filtered**: No **Read-only**: Yes #### Schedule Formatted (scheduleFormatted) **Description**: If the event has a date and time, the event's date and time, formatted according to your local settings, are displayed. Otherwise, the TBD message from the Events Dashboard is displayed. **Type**: Text **Can connect to data**: Yes **Can use in dynamic page URL**: No **Can be sorted**: No **Can be filtered**: No **Read-only**: Yes #### Start date formatted (scheduleStartDateFormatted) **Description**: The event's start date, formatted to your local settings, are displayed. If the event schedule is TBD, this field is blank. **Type**: Text **Can connect to data**: Yes **Can use in dynamic page URL**: No **Can be sorted**: No **Can be filtered**: No **Read-only**: Yes #### Start time formatted (scheduleStartTimeFormatted) **Description**: The event's start time, formatted to your local settings, are displayed. If the event schedule is TBD, this field is blank. **Type**: Text **Can connect to data**: Yes **Can use in dynamic page URL**: No **Can be sorted**: No **Can be filtered**: No **Read-only**: Yes #### Location Name (locationName) **Description**: If the event has a location, that location is displayed. Otherwise, the TBD message from the Events Dashboard is displayed. **Type**: Text **Can connect to data**: Yes **Can use in dynamic page URL**: No **Can be sorted**: No **Can be filtered**: No **Read-only**: Yes #### Location latitude (latitude) **Description**: Event location address's latitude. **Type**:Text **Can connect to data**: Yes **Can use in dynamic page URL**: No **Can be sorted**: No **Can be filtered**: No **Read-only**: Yes #### Location longitude (longitude) **Description**: Event location address's longitude. **Type**: Text **Can connect to data**: Yes **Can use in dynamic page URL**: No **Can be sorted**: No **Can be filtered**: No **Read-only**: Yes #### Location Address (locationAddress) **Description**: The full address of the location. If the location is TBD, this field is blank. **Type**: Text **Can connect to data**: Yes **Can use in dynamic page URL**: No **Can be sorted**: No **Can be filtered**: No **Read-only**: Yes #### Created (created) **Description**: Displays the date and time the event was created. **Type**: Date and Time **Can connect to data**: Yes **Can use in dynamic page URL**: No **Can be sorted**: Yes **Can be filtered**: No **Read-only**: Yes #### Modified (modified) **Description**: Displays the date and time the event was last modified. **Type**: Date and Time **Can connect to data**: Yes **Can use in dynamic page URL**: No **Can be sorted**: Yes **Can be filtered**: No **Read-only**: Yes #### Status (status) **Description**: The current status of the event, as follows: * SCHEDULED: The event date is in the future. * STARTED: The event start time has arrived. * ENDED: The event end time has passed. * CANCELED: The event was canceled. **Type**: Text **Can connect to data**: Yes **Can use in dynamic page URL**: No **Can be sorted**: No **Can be filtered**: eq, ne, hasSome **Read-only**: Yes #### Type (type) **Description**: The type of event, as follows: * RSVP: The event is set up to accept RSVP registration via your Wix page. * TICKETS: The event is set up to sell tickets. * EXTERNAL: The event is set up to accept registration via an external page **Type**: Text **Can connect to data**: Yes **Can use in dynamic page URL**: No **Can be sorted**: No **Can be filtered**: No **Read-only**: Yes #### Registration Status (registrationStatus) **Description**: The registration status, as follows: * OPEN\_RSVP: RSVP registration is open. * OPEN\_TICKETS: Ticket sales for this event are open. * OPEN\_EXTERNAL: RSVP registration or ticket sales are closed but registration via an external site is open. * OPEN-RSVP\_WAITLIST: The RSVP list is full but requests can be added to a waitlist. * CLOSED: RSVP registration or ticket sales are closed. * CLOSED\_MANUALLY: RSVP registration or ticket sales have been closed manually in the Events Dashboard. **Type**: Text **Can connect to data**: Yes **Can use in dynamic page URL**: No **Can be sorted**: No **Can be filtered**: No **Read-only**: Yes #### Lowest Price Formatted (lowestPriceFormatted) **Description**: The lowest price available, formatted with your currency. * If this event has RSVP registration or is external, this field is blank.  * If tickets are sold for this event, the lowest price available is displayed.  * If free tickets are offered, "Free" is displayed. **Type**: Text **Can connect to data**: Yes **Can use in dynamic page URL**: No **Can be sorted**: No **Can be filtered**: No **Read-only**: Yes #### Highest Price Formatted (highestPriceFormatted) **Description**: The highest price available, formatted with your currency. * If this event has RSVP registration, this field is blank.  * If tickets are sold for this event, the highest price available is displayed.  * If only free tickets are offered, "Free" is displayed. **Type**: Text **Can connect to data**: Yes **Can use in dynamic page URL**: No **Can be sorted**: No **Can be filtered**: No **Read-only**: Yes #### Google Calendar URL (googleCalendarUrl) **Description**: Displays an "Add to Google calendar" link to the event. **Type**: URL **Can connect to data**: Yes **Can use in dynamic page URL**: No **Can be sorted**: No **Can be filtered**: No **Read-only**: Yes #### iCalendar URL (iCalendarUrl) **Description**: Displays an iCalendar download link to the event. **Type**: URL **Can connect to data**: Yes **Can use in dynamic page URL**: No **Can be sorted**: No **Can be filtered**: No **Read-only**: Yes #### Site Event Page URL (siteEventPageUrl) **Description**: The event's URL-friendly name that is unique across your site. **Type**: URL **Can connect to data**: Yes **Can use in dynamic page URL**: No **Can be sorted**: No **Can be filtered**: No **Read-only**: Yes #### Registration URL (registrationURL) **Description**: Registration URL if registration for the Wix event managed externally. Guests go to this URL to register. **Type**: URL **Can connect to data**: Yes **Can use in dynamic page URL**: No **Can be sorted**: No **Can be filtered**: No **Read-only**: Yes #### Creator ID (UserID) **Description**: ID of the creator of the event.  **Type**: Text **Can connect to data**: Yes **Can use in dynamic page URL**: No **Can be sorted**: No **Can be filtered**: Yes **Read-only**: Yes --- > Portal Navigation: > > - Append `.md` to any URL under `https://dev.wix.com/docs/` to get its markdown version. > - Pages are either content pages (article or reference text) or menu pages (a list of links to child pages). > - To get a menu page, truncate any URL to a parent path and append `.md` (e.g. `https://dev.wix.com/docs/sdk.md`, `https://dev.wix.com/docs/sdk/core-modules.md`). > - Top-level index of all portals: https://dev.wix.com/docs/llms.txt > - Full concatenated docs: https://dev.wix.com/docs/llms-full.txt ## Resource: Wix Tickets "Tickets" Collection Fields ## Article: Wix Tickets "Tickets" Collection Fields ## Article Link: https://dev.wix.com/docs/develop-websites/articles/wix-apps/wix-app-collections/other-apps/wix-events/wix-tickets-tickets-collection-fields.md ## Article Content: # Velo: Wix Tickets "Tickets" Collection Fields
**Tip:** Before continuing, make sure you've read [Working with Wix App Collections](https://dev.wix.com/docs/develop-websites/articles/databases/wix-data/collections/working-with-wix-app-collections-and-code.md).
To use the Events collection in code, refer to it as `"Events/Tickets"`. ```javascript wixData.query("Events/Tickets") .find() .then( (results) => { // handle the results } ); ``` This document describes the permissions and fields in your Tickets collection. ### Permissions The Events collection has the following [permissions](https://support.wix.com/en/article/about-collection-permissions): * **Read:** Anyone  * **Create:** None * **Update:** None * **Delete:** None You cannot change the Tickets collection's permissions.  ### Fields >**Note:** > This app collection contains read-only fields that cannot be managed from the collection. You can update the fields from the relevant app in your site’s [dashboard](https://support.wix.com/en/article/accessing-your-sites-dashboard). The field name is listed as the heading of each section, with the field ID listed in parentheses, like this: Name (name). The fields appear in this document in the order in which they appear in your collection by default. #### ID (\_id) **Description**: The ticket ID that was created by the server. This is a system field and is hidden by default. **Type**: Text **Can connect to data**: Yes **Can use in dynamic page URL**: Yes **Can be sorted**: No **Can be filtered**: is, is not **Read-only**: Yes #### Name (name) **Description**: The ticket's name. **Type**: Text **Can connect to data**: Yes **Can use in dynamic page URL**: Yes **Can be sorted**: Yes **Can be filtered**: is, is not **Read-only**: Yes #### Event (event) **Description**: The event that the ticket is valid for. **Type**: Reference to the Events/Events collection **Can connect to data**: Yes, to the referenced item's fields **Can use in dynamic page URL**: No **Can be sorted**: Yes **Can be filtered**: Yes **Read-only**: Yes #### Description (description) **Description**: Description of the ticket which appears on the purchase page to give customers more details about what’s included in the ticket. **Type**: Text **Can connect to data**: Yes **Can use in dynamic page URL**: No **Can be sorted**: No **Can be filtered**: No **Read-only**: Yes #### Price (price) **Description**: The ticket price. **Type**: Number **Can connect to data**: Yes **Can use in dynamic page URL**: No **Can be sorted**: Yes **Can be filtered**: No **Read-only**: Yes #### Currency (currency) **Description**: The currency of the ticket price. **Type**: Text **Can connect to data**: Yes **Can use in dynamic page URL**: No **Can be sorted**: No **Can be filtered**: No **Read-only**: Yes #### Tax Amount (tax) **Description**: The tax charged for the ticket. **Type**: Number **Can connect to data**: Yes **Can use in dynamic page URL**: No **Can be sorted**: No **Can be filtered**: No **Read-only**: Yes #### Fee Amount (fee) **Description**: The fee for the ticket. **Type**: Number **Can connect to data**: Yes **Can use in dynamic page URL**: No **Can be sorted**: No **Can be filtered**: No **Read-only**: Yes #### Limit Per Checkout (limitPerCheckout) **Description**: Maximum number of tickets that can be checked out at once. **Type**: Number **Can connect to data**: Yes **Can use in dynamic page URL**: No **Can be sorted**: No **Can be filtered**: No **Read-only**: Yes #### Remaining Tickets (remainingTickets) **Description**: The number of remaining tickets. **Type**: Number **Can connect to data**: Yes **Can use in dynamic page URL**: No **Can be sorted**: No **Can be filtered**: No **Read-only**: Yes **Notes**: The maximum value in this field is 20. If there are more than 20 tickets remaining, the value in this field will be 20. #### Policy (policy) **Description**: The ticket policy which appears on the bottom of the ticket. **Type**: Text **Can connect to data**: Yes **Can use in dynamic page URL**: No **Can be sorted**: No **Can be filtered**: No **Read-only**: Yes #### Final Price (finalPrice) **Description**: The final price for the ticket. **Type**: Number **Can connect to data**: Yes **Can use in dynamic page URL**: No **Can be sorted**: Yes **Can be filtered**: No **Read-only**: Yes --- > Portal Navigation: > > - Append `.md` to any URL under `https://dev.wix.com/docs/` to get its markdown version. > - Pages are either content pages (article or reference text) or menu pages (a list of links to child pages). > - To get a menu page, truncate any URL to a parent path and append `.md` (e.g. `https://dev.wix.com/docs/sdk.md`, `https://dev.wix.com/docs/sdk/core-modules.md`). > - Top-level index of all portals: https://dev.wix.com/docs/llms.txt > - Full concatenated docs: https://dev.wix.com/docs/llms-full.txt ## Resource: Wix Forum "Categories" Collection Fields ## Article: Wix Forum "Categories" Collection Fields ## Article Link: https://dev.wix.com/docs/develop-websites/articles/wix-apps/wix-app-collections/other-apps/wix-forum/wix-forum-categories-collection-fields.md ## Article Content: # Velo: Wix Forum "Categories" Collection Fields
**Tip:** Before continuing, make sure you've read [Working with Wix App Collections](https://dev.wix.com/docs/develop-websites/articles/databases/wix-data/collections/working-with-wix-app-collections-and-code.md).
This document describes the permissions and fields in your Categories collection.  ### Permissions The Categories collection has the following [permissions](https://support.wix.com/en/article/about-collection-permissions): * **Read:** Anyone * **Create:** None * **Update:** None * **Delete:** None You cannot change the Categories collection's permissions.  ### Fields >**Note:** > This app collection contains read-only fields that cannot be managed from the collection. You can update the fields from the relevant app in your site’s [dashboard](https://support.wix.com/en/article/accessing-your-sites-dashboard). The field name is listed as the heading of each section, with the field ID listed in parentheses, like this: Name (name). The fields appear in this document in the order in which they appear in your collection by default. #### ID (\_id) **Description**: The category ID. **Type**: Text **Can connect to data**: Yes **Can use in dynamic page URL**: No **Can be sorted**: No **Can be filtered**: eq, ne, hasSome **Read-only**: Yes #### Parent ID (parentId) **Description**: ID of the parent category (for subcategories). **Type**: Text **Can connect to data**: Yes **Can use in dynamic page URL**: No **Can be sorted**: No **Can be filtered**: eq, ne **Read-only**: Yes #### Name (name) **Description**: Category name. **Type**: Text **Can connect to data**: Yes **Can use in dynamic page URL**: Yes **Can be sorted**: No **Can be filtered**: eq, ne, contains, startsWith, hasSome **Read-only**: Yes #### Header Title (headerTitle) **Description**: Title in the category header. **Type**: Text **Can connect to data**: Yes **Can use in dynamic page URL**: Yes **Can be sorted**: No **Can be filtered**: eq, ne, contains, startsWith, hasSome **Read-only**: Yes #### Description (description) **Description**: Description in the category header. **Type**: Text **Can connect to data**: Yes **Can use in dynamic page URL**: No **Can be sorted**: No **Can be filtered**: contains, startsWith, hasAll **Read-only**: Yes #### Header Type (headerType) **Description**: Type of category header. **Type**: String **Can connect to data**: Yes **Can use in dynamic page URL**: No **Can be sorted**: No **Can be filtered**: eq, ne **Read-only**: Yes **Notes**: Either "COLOR" or "IMAGE". #### Header Image (headerImage) **Description**: Header Image. **Type**: Image **Can connect to data**: Yes **Can use in dynamic page URL**: No **Can be sorted**: No **Can be filtered**: No **Read-only**: Yes #### Header Image Overlay Color (headerImageOverlayColor) **Description**: Header image overlay color. **Type**: Text **Can connect to data**: No **Can use in dynamic page URL**: No **Can be sorted**: No **Can be filtered**: No **Read-only**: Yes #### Header Background Color (headerBackgroundColor) **Description**: Header background color. **Type**: Text **Can connect to data**: No **Can use in dynamic page URL**: No **Can be sorted**: No **Can be filtered**: No **Read-only**: Yes #### Header Text Color (headerTextColor) **Description**: Header text color. **Type**: No **Can connect to data**: Yes **Can use in dynamic page URL**: No **Can be sorted**: No **Can be filtered**: No **Read-only**: Yes #### Rank (rank) **Description**: Category order, where 0 indicates the first category. **Type**: Number **Can connect to data**: Yes **Can use in dynamic page URL**: No **Can be sorted**: Yes **Can be filtered**: eq, ne, lt, lte, gt, gte **Read-only**: Yes #### Post Count (postCount) **Description**: Number of posts in the category. **Type**: Number **Can connect to data**: Yes **Can use in dynamic page URL**: No **Can be sorted**: Yes **Can be filtered**: eq, ne, lt, lte, gt, gte **Read-only**: Yes #### Post View Count (postViewCount) **Description**: Number of times the posts in the category have been viewed. **Type**: Number **Can connect to data**: Yes **Can use in dynamic page URL**: No **Can be sorted**: Yes **Can be filtered**: eq, ne, lt, lte, gt, gte **Read-only**: Yes #### Write Protection **Description**:  **Type**: Boolean **Can connect to data**: Yes **Can use in dynamic page URL**: No **Can be sorted**: No  **Can be filtered**: No  **Read-only**: Yes #### Page URL (pageUrl) **Description**: URL of the category page. **Type**: URL **Can connect to data**: Yes, can connect as a button click action. **Can use in dynamic page URL**: No **Can be sorted**: No **Can be filtered**: No **Read-only**: Yes #### Slug (slug) **Description**: The category's slug, which is its URL-friendly name that is unique across the forum. **Type**: Text **Can connect to data**: Yes **Can use in dynamic page URL**: Yes **Can be sorted**: No **Can be filtered**: Yes **Read-only**: Yes --- > Portal Navigation: > > - Append `.md` to any URL under `https://dev.wix.com/docs/` to get its markdown version. > - Pages are either content pages (article or reference text) or menu pages (a list of links to child pages). > - To get a menu page, truncate any URL to a parent path and append `.md` (e.g. `https://dev.wix.com/docs/sdk.md`, `https://dev.wix.com/docs/sdk/core-modules.md`). > - Top-level index of all portals: https://dev.wix.com/docs/llms.txt > - Full concatenated docs: https://dev.wix.com/docs/llms-full.txt ## Resource: Wix Forum "Comments" Collection Fields ## Article: Wix Forum "Comments" Collection Fields ## Article Link: https://dev.wix.com/docs/develop-websites/articles/wix-apps/wix-app-collections/other-apps/wix-forum/wix-forum-comments-collection-fields.md ## Article Content: # Velo: Wix Forum "Comments" Collection Fields
**Tip:** Before continuing, make sure you've read [Working with Wix App Collections](https://dev.wix.com/docs/develop-websites/articles/databases/wix-data/collections/working-with-wix-app-collections-and-code.md).
This document describes the permissions and fields in your Comments collection.  ### Permissions The Comments collection has the following [permissions](https://support.wix.com/en/article/about-collection-permissions): * **Read:** Anyone * **Create:** None * **Update:** None * **Delete:** None You cannot change the Comments collection's permissions.  ### Fields >**Note:** > This app collection contains read-only fields that cannot be managed from the collection. You can update the fields from the relevant app in your site’s [dashboard](https://support.wix.com/en/article/accessing-your-sites-dashboard). The field name is listed as the heading of each section, with the field ID listed in parentheses, like this: Name (name). The fields appear in this document in the order in which they appear in your collection by default. #### ID (\_id) **Description**: The comment ID. **Type**: Text **Can connect to data**: Yes **Can use in dynamic page URL**: No **Can be sorted**: No **Can be filtered**: eq, ne, hasSome, contains **Read-only**: Yes #### Parent ID (parentId) **Description**: ID of the parent comment (for replies). **Type**: Text **Can connect to data**: Yes **Can use in dynamic page URL**: No **Can be sorted**: No **Can be filtered**: eq, ne **Read-only**: Yes #### Post ID (postId) **Description**: ID of the post that the comment is commenting on. **Type**: Text **Can connect to data**: Yes **Can use in dynamic page URL**: No **Can be sorted**: No **Can be filtered**: eq, ne **Read-only**: Yes #### Owner ID (ownerId) **Description**: ID of the comment owner. **Type**: Text **Can connect to data**: Yes **Can use in dynamic page URL**: No **Can be sorted**: No **Can be filtered**: Yes **Read-only**: Yes #### Plain Content (plainContent) **Description**: Plain content of the comment. **Type**: Text **Can connect to data**: Yes **Can use in dynamic page URL**: No **Can be sorted**: No **Can be filtered**: No **Read-only**: Yes #### Reply Count (replyCount) **Description**: Number of replies to the comment. **Type**: Number **Can connect to data**: Yes **Can use in dynamic page URL**: No **Can be sorted**: Yes **Can be filtered**: eq, ne, lt, lte, gt, gte **Read-only**: Yes #### Like Count (likeCount) **Description**: Number of likes on the comment. **Type**: Number **Can connect to data**: Yes **Can use in dynamic page URL**: No **Can be sorted**: Yes **Can be filtered**: eq, ne, lt, lte, gt, gte **Read-only**: Yes #### Created Date (\_createdDate) **Description**: Date and time the comment was created. **Type**: Date and Time **Can connect to data**: Yes **Can use in dynamic page URL**: No **Can be sorted**: Yes **Can be filtered**: eq, ne, lt, lte, gt, gte **Read-only**: Yes #### Edited Date (\_editedDate) **Description**: Date and time the comment was last edited. **Type**: Date and Time **Can connect to data**: Yes **Can use in dynamic page URL**: No **Can be sorted**: No **Can be filtered**: eq, ne, lt, lte, gt, gte **Read-only**: Yes #### Last Activity Date (lastActivityDate) **Description**: Date and time of the last activity on the comment. **Type**: Date and Time **Can connect to data**: Yes **Can use in dynamic page URL**: No **Can be sorted**: Yes **Can be filtered**: eq, ne, lt, lte, gt, gte **Read-only**: Yes #### Page URL (pageUrl) **Description**: URL of the comment page. **Type**: URL **Can connect to data**: Yes, can connect as a button click action. **Can use in dynamic page URL**: No **Can be sorted**: No **Can be filtered**: No **Read-only**: Yes #### Upvote Count (upvoteCount) **Description**: Number of upvotes on the comment. **Type**: Number **Can connect to data**: Yes **Can use in dynamic page URL**: No **Can be sorted**: No **Can be filtered**: eq, ne, lt, lte, gt, gte **Read-only**: Yes #### Downvote Count (downvoteCount) **Description**: Number of downvotes on the comment. **Type**: Number **Can connect to data**: Yes **Can use in dynamic page URL**: No **Can be sorted**: No **Can be filtered**: eq, ne, lt, lte, gt, gte **Read-only**: Yes #### Score (score) **Description**: Number of upvotes minus the number of downvotes. **Type**: Number **Can connect to data**: Yes **Can use in dynamic page URL**: No **Can be sorted**: Yes **Can be filtered**: eq, ne, lt, lte, gt, gte **Read-only**: Yes --- > Portal Navigation: > > - Append `.md` to any URL under `https://dev.wix.com/docs/` to get its markdown version. > - Pages are either content pages (article or reference text) or menu pages (a list of links to child pages). > - To get a menu page, truncate any URL to a parent path and append `.md` (e.g. `https://dev.wix.com/docs/sdk.md`, `https://dev.wix.com/docs/sdk/core-modules.md`). > - Top-level index of all portals: https://dev.wix.com/docs/llms.txt > - Full concatenated docs: https://dev.wix.com/docs/llms-full.txt ## Resource: Wix Forum "Posts" Collection Fields ## Article: Wix Forum "Posts" Collection Fields ## Article Link: https://dev.wix.com/docs/develop-websites/articles/wix-apps/wix-app-collections/other-apps/wix-forum/wix-forum-posts-collection-fields.md ## Article Content: # Velo: Wix Forum "Posts" Collection Fields
**Tip:** Before continuing, make sure you've read [Working with Wix App Collections](https://dev.wix.com/docs/develop-websites/articles/databases/wix-data/collections/working-with-wix-app-collections-and-code.md).
This document describes the permissions and fields in your Posts collection.  ### Permissions The Posts collection has the following [permissions](https://support.wix.com/en/article/about-collection-permissions): * **Read:** Anyone * **Create:** None * **Update:** None * **Delete:** None You cannot change the Posts collection's permissions.  ### Fields >**Note:** > This app collection contains read-only fields that cannot be managed from the collection. You can update the fields from the relevant app in your site’s [dashboard](https://support.wix.com/en/article/accessing-your-sites-dashboard). The field name is listed as the heading of each section, with the field ID listed in parentheses, like this: Name (name). The fields appear in this document in the order in which they appear in your collection by default. #### ID (\_id) **Description**: The post ID. **Type**: Text **Can connect to data**: Yes **Can use in dynamic page URL**: No **Can be sorted**: No **Can be filtered**: eq, ne, hasSome **Read-only**: Yes #### Category ID (categoryId) **Description**: Post category ID. **Type**: Text **Can connect to data**: Yes **Can use in dynamic page URL**: No **Can be sorted**: No **Can be filtered**: eq, ne **Read-only**: Yes #### Owner ID (ownerId) **Description**: Post owner's ID. **Type**: Text **Can connect to data**: Yes **Can use in dynamic page URL**: No **Can be sorted**: No **Can be filtered**: eq, ne **Read-only**: Yes #### Title (title) **Description**: Post title. **Type**: Text **Can connect to data**: Yes **Can use in dynamic page URL**: Yes **Can be sorted**: No **Can be filtered**: eq, ne, contains, startsWith, hasSome **Read-only**: Yes #### Plain Content (plainContent) **Description**: Plain content of the forum post. **Type**: Text **Can connect to data**: Yes **Can use in dynamic page URL**: No **Can be sorted**: No **Can be filtered**: contains, startsWith, hasAll **Read-only**: Yes #### Best Answer Comment ID (bestAnswerCommentId) **Description**: ID of the comment marked as the best answer. **Type**: String **Can connect to data**: Yes **Can use in dynamic page URL**: No **Can be sorted**: No **Can be filtered**: eq, ne **Read-only**: Yes #### Pinned (pinned) **Description**: Whether the post is pinned. **Type**: Boolean **Can connect to data**: Yes **Can use in dynamic page URL**: No **Can be sorted**: Yes **Can be filtered**: eq, ne **Read-only**: Yes #### Commenting Disabled (commentingDisabled) **Description**: Whether comments are disabled for the post. **Type**: Boolean **Can connect to data**: Yes **Can use in dynamic page URL**: No **Can be sorted**: No **Can be filtered**: eq, ne **Read-only**: Yes #### Comment Count (commentCount) **Description**: Number of comments on the post. **Type**: Number **Can connect to data**: Yes **Can use in dynamic page URL**: No **Can be sorted**: Yes **Can be filtered**: eq, ne, lt, lte, gt, gte **Read-only**: Yes #### Like Count (likeCount) **Description**: Number of likes on the post. **Type**: Number **Can connect to data**: Yes **Can use in dynamic page URL**: No **Can be sorted**: Yes **Can be filtered**: eq, ne, lt, lte, gt, gte **Read-only**: Yes #### View Count (viewCount) **Description**: Number of times the post has been viewed. **Type**: Number **Can connect to data**: Yes **Can use in dynamic page URL**: No **Can be sorted**: Yes **Can be filtered**: eq, ne, lt, lte, gt, gte **Read-only**: Yes #### Created Date (\_createdDate) **Description**: Date and time the post was created. **Type**: Date and Time **Can connect to data**: Yes **Can use in dynamic page URL**: No **Can be sorted**: Yes **Can be filtered**: eq, ne, lt, lte, gt, gte **Read-only**: Yes #### Edited Date (\_editedDate) **Description**: Date and time the post was last edited. **Type**: Date and Time **Can connect to data**: Yes **Can use in dynamic page URL**: No **Can be sorted**: No **Can be filtered**: eq, ne, lt, lte, gt, gte **Read-only**: Yes #### Last Activity Date (lastActivityDate) **Description**: Date and time of the last activity performed on the post. **Type**: Date and Time **Can connect to data**: Yes **Can use in dynamic page URL**: No **Can be sorted**: Yes **Can be filtered**: eq, ne, lt, lte, gt, gte **Read-only**: Yes #### Page URL (pageUrl) **Description**: URL of the post page. **Type**: URL **Can connect to data**: Yes, can connect as a button click action. **Can use in dynamic page URL**: No **Can be sorted**: No **Can be filtered**: No **Read-only**: Yes #### Slug (slug) **Description**: The post's slug, which is its URL-friendly name that is unique across the forum. **Type**: Text **Can connect to data**: Yes **Can use in dynamic page URL**: Yes **Can be sorted**: No **Can be filtered**: Yes **Read-only**: Yes #### Post Type (postType) **Description**: Type of post. **Type**: Text **Can connect to data**: Yes **Can use in dynamic page URL**: No **Can be sorted**: No **Can be filtered**: eq, ne **Read-only**: Yes **Notes**: Either "DISCUSSION" or "QUESTION" --- > Portal Navigation: > > - Append `.md` to any URL under `https://dev.wix.com/docs/` to get its markdown version. > - Pages are either content pages (article or reference text) or menu pages (a list of links to child pages). > - To get a menu page, truncate any URL to a parent path and append `.md` (e.g. `https://dev.wix.com/docs/sdk.md`, `https://dev.wix.com/docs/sdk/core-modules.md`). > - Top-level index of all portals: https://dev.wix.com/docs/llms.txt > - Full concatenated docs: https://dev.wix.com/docs/llms-full.txt ## Resource: Wix Forum Schema for Wix Search ## Article: Wix Forum Schema for Wix Search ## Article Link: https://dev.wix.com/docs/develop-websites/articles/wix-apps/wix-app-collections/other-apps/wix-forum/wix-forum-schema-for-wix-search.md ## Article Content: # Wix Forum Schema for Wix Search This article describes the Wix Forum product fields you can [search](https://www.wix.com/velo/reference/wix-search.html#search), [sort](https://www.wix.com/velo/reference/wix-search.WixSearchBuilder.html#ascending), [filter](https://www.wix.com/velo/reference/wix-search.html#filter), and [apply facets](https://www.wix.com/velo/reference/wix-search.WixSearchBuilder.html#facets) to when using the [wix-search API](https://www.wix.com/velo/reference/wix-search.html). To search Wix Forum posts and comments on your site, set the search document type as `"Forum/Content"`: ```javascript wixSearch.search(phrase) .documentType("Forum/Content") .find() .then( (results) => { // handle the results } ); ``` >**Note** > The Forum fields supported by wix-search are not identical to the fields in your site's [Forum/Posts](https://support.wix.com/en/article/velo-wix-forum-posts-collection-fields) and [Forum/Comments](https://support.wix.com/en/article/velo-wix-forum-comments-collection-fields) collections. The following fields appear in each matching search result [document](https://www.wix.com/velo/reference/wix-search/wixsearchresult/documents) when searching Wix Forum content: #### documentType **Description**: Document type that was searched. In this case, "Forum/Content". **Type**: String **Can search the content of this field**: No **Can facet**: No **Can sort**: No **Can filter**: No #### \_id **Description**: Post or comment ID. **Type**: String **Can search the content of this field**: No **Can facet**: No **Can sort**: No **Can filter**: No #### title **Description**: Post title. **Type**: String **Can search the content of this field**: Yes **Can facet**: No **Can sort**: No **Can filter**: No #### description **Description**: Text of the post or comment. **Type**: String **Can search the content of this field**: Yes **Can facet**: No **Can sort**: No **Can filter**: No #### url **Description**: Relative URL of the post page on your site. For comments, the URL points to the location of the comment on your post page. **Type**: String **Can search the content of this field**: No **Can facet**: No **Can sort**: No **Can filter**: No #### image **Description**: File source of the post image. **Type**: String **Can search the content of this field**: No **Can facet**: No **Can sort**: No **Can filter**: No #### contentType **Description**: Indicates whether the document is a post or a comment. Value can be "POST" or "COMMENT". **Type**: String **Can search the content of this field**: No **Can facet**: No **Can sort**: No **Can filter**: eq, ne You can use this field to filter search results so that only Forum posts or comments are returned. For example, the following code example demonstrates how to search only for Forum comments and not posts:  ```javascript wixSearch.search(phrase) .documentType("Forum/Posts") .eq("contentType", "COMMENT") .find() .then( (results) => { // handle the results } ); ``` #### postId **Description**: ID of the post the comment is associated with. Only relevant for comments. **Type**: String  **Can search the content of this field**: No **Can facet**: Yes **Can sort**: Yes **Can filter**: in, eq, ne, gt, ge, lt, le  #### ownerId **Description**: Unique ID of the site visitor who posted the post or comment. **Type**: String  **Can search the content of this field**: No **Can facet**: Yes **Can sort**: Yes **Can filter**: in, eq, ne, gt, ge, lt, le  #### categoryId **Description**: ID of the category associated with the post. **Type**: String **Can search the content of this field**: No **Can facet**: Yes **Can sort**: No **Can filter**: in, eq, ne, gt, ge, lt, le  #### hashTags **Description**: Hashtags in the post. **Type**: Array of Strings **Can search the content of this field**: No **Can facet**: Yes **Can sort**: No **Can filter**: hasSome, hasAll #### lastActivityDate **Description**: Date and time of the last action performed on the post or comment. **Type**: Date **Can search the content of this field**: No **Can facet**: Yes **Can sort**: Yes **Can filter**: in, eq, ne, gt, ge, lt, le  #### likeCount **Description**: Number of likes the post or comment received. **Type**: Number **Can search the content of this field**: No **Can facet**: Yes **Can sort**: Yes **Can filter**: in, eq, ne, gt, ge, lt, le #### viewCount **Description**: Number of views the post received. **Type**: Number **Can search the content of this field**: No **Can facet**: Yes **Can sort**: Yes **Can filter**: in, eq, ne, gt, ge, lt, le #### totalComments **Description**: Number of comments the post received. **Type**: Number **Can search the content of this field**: No **Can facet**: Yes **Can sort**: Yes **Can filter**: in, eq, ne, gt, ge, lt, le #### postTitle **Description**: Title of the post. Only relevant for posts. **Type**: String **Can search the content of this field**: Yes **Can facet**: Yes **Can sort**: No **Can filter**: No #### categoryTitle **Description**: Title of the category. **Type**: String **Can search the content of this field**: No **Can facet**: Yes **Can sort**: Yes **Can filter**: in, eq, ne, gt, ge, lt, le #### parentId **Description**: ID of the parent comment. **Type**: String **Can search the content of this field**: No **Can facet**: Yes **Can sort**: Yes **Can filter**: in, eq, ne, gt, ge, lt, le #### createdDate **Description**: Date and time the comment or post was created. **Type**: Date **Can search the content of this field**: No **Can facet**: Yes **Can sort**: Yes **Can filter**: eq, ne, gt, ge, lt, le #### upvoteCount **Description**: Number of upvotes on the comment. **Type**: Number **Can search the content of this field**: No **Can facet**: Yes **Can sort**: Yes **Can filter**: in, eq, ne, gt, ge, lt, le #### downvoteCount **Description**: Number of downvotes on the comment. **Type**: Number **Can search the content of this field**: No **Can facet**: No **Can sort**: Yes **Can filter**: in, eq, ne, gt, ge, lt, le #### score **Description**: Number of upvotes minus the number of downvotes. **Type**: Number **Can search the content of this field**: No **Can facet**: No **Can sort**: Yes **Can filter**: in, eq, ne, gt, ge, lt, le #### editedDate **Description**: Date and time the comment or post was last edited. **Type**: Date **Can search the content of this field**: No **Can facet**: No **Can sort**: Yes **Can filter**: eq, ne, gt, ge, lt, le #### mentions **Description**: Users mentioned in the post. **Type**: Array of strings **Can search the content of this field**: No **Can facet**: No **Can sort**: No **Can filter**: No #### markedComments **Description**: IDs of the marked comments for the post (selected by forum admin or site owner). **Type**: String **Can search the content of this field**: No **Can facet**: No **Can sort**: No **Can filter**: No #### marked **Description**: Whether the comment is marked. **Type**: String **Can search the content of this field**: No **Can facet**: No **Can sort**: Yes **Can filter**: in, eq, ne, gt, ge, lt, le #### commentInteraction **Description**: Defines what interaction may be applied on the comment. **Type**: String **Can search the content of this field**: No **Can facet**: No **Can sort**: No **Can filter**: No #### images **Description**: Images from the post content. **Type**: Nested **Can search the content of this field**: No **Can filter**: in, eq, ne, gt, ge, lt, le **Nested fields**: #### images.id **Description**: WixMedia image ID (nested under `images`). **Type**: String **Can search the content of this field**: No **Can facet**: No **Can sort**: No **Can filter**: No #### images.url **Description**: URL of the image (nested under `images`). **Type**: String **Can search the content of this field**: No **Can facet**: No **Can sort**: No **Can filter**: No #### images.height **Description**: Original height of the image (nested under `images`). **Type**: String **Can search the content of this field**: No **Can facet**: No **Can sort**: No **Can filter**: No #### images.width **Description**: Original width of the image (nested under `images`). **Type**: String **Can search the content of this field**: No **Can facet**: No **Can sort**: No **Can filter**: No --- > Portal Navigation: > > - Append `.md` to any URL under `https://dev.wix.com/docs/` to get its markdown version. > - Pages are either content pages (article or reference text) or menu pages (a list of links to child pages). > - To get a menu page, truncate any URL to a parent path and append `.md` (e.g. `https://dev.wix.com/docs/sdk.md`, `https://dev.wix.com/docs/sdk/core-modules.md`). > - Top-level index of all portals: https://dev.wix.com/docs/llms.txt > - Full concatenated docs: https://dev.wix.com/docs/llms-full.txt ## Resource: Wix Marketing "Coupons" Collection Fields ## Article: Wix Marketing "Coupons" Collection Fields ## Article Link: https://dev.wix.com/docs/develop-websites/articles/wix-apps/wix-app-collections/other-apps/wix-marketing/wix-marketing-coupons-collection-fields.md ## Article Content: # Velo: Wix Marketing "Coupons" Collection Fields
**Tip:** Before continuing, make sure you've read [Working with Wix App Collections](https://dev.wix.com/docs/develop-websites/articles/databases/wix-data/collections/working-with-wix-app-collections-and-code.md).
To use the Coupons collection in code, refer to it as `"Marketing/Coupons"`. ```javascript wixData.query("Marketing/Coupons") .find() .then( (results) => { // handle the results } ); ``` This document describes the permissions and fields in your Coupons collection. ### Permissions The Coupons collection has the following [permissions](https://support.wix.com/en/article/about-collection-permissions): * **Read:** Admin  * **Create:** None * **Update:** None * **Delete:** None You cannot change the Coupons collection's permissions.  ### Fields >**Note:** > This app collection contains read-only fields that cannot be managed from the collection. You can update the fields from the relevant app in your site’s [dashboard](https://support.wix.com/en/article/accessing-your-sites-dashboard). The field name is listed as the heading of each section, with the field ID listed in parentheses, like this: Name (name). The fields appear in this document in the order in which they appear in your collection by default. #### ID (\_id) **Description**: The ID of the coupon. This is a system field and is hidden by default. **Type**: Text **Can connect to data**: Yes **Can use in dynamic page URL**: Yes **Can be sorted**: Yes **Can be filtered**: eq, ne, hasSome, contains, startsWith **Read-only**: Yes #### Name (name) **Description**: Name of the coupon. **Type**: Text **Can connect to data**: Yes **Can use in dynamic page URL**: No **Can be sorted**: Yes **Can be filtered**: eq, ne, hasSome, contains, startsWith **Read-only**: Yes #### Code (code) **Description**: Coupon code. **Type**: Text **Can connect to data**: Yes **Can use in dynamic page URL**: No **Can be sorted**: Yes **Can be filtered**: eq, ne, hasSome, contains, startsWith **Read-only**: Yes #### Start Time (startTime) **Description**: Start date and time of the coupon. **Type**: Date and Time **Can connect to data**: Yes **Can use in dynamic page URL**: No **Can be sorted**: Yes **Can be filtered**: eq, ne, hasSome, lt, lte, gt, gte **Read-only**: Yes #### Expiration Time (expirationTime) **Description**: End date and time of the coupon. **Type**: Date and Time **Can connect to data**: Yes **Can use in dynamic page URL**: No **Can be sorted**: Yes **Can be filtered**: eq, ne, hasSome, lt, lte, gt, gte **Read-only**: Yes #### Usage Limit (usageLimit) **Description**: Maximum number of times a coupon can be used. **Type**: Number **Can connect to data**: Yes **Can use in dynamic page URL**: No **Can be sorted**: Yes **Can be filtered**: eq, ne, hasSome, lt, lte, gt, gte **Read-only**: Yes #### Limit Per Customer (limitPerCustomer) **Description**: Maximum number of times the coupon can be used **per customer**. **Type**: Number **Can connect to data**: Yes **Can use in dynamic page URL**: No **Can be sorted**: Yes **Can be filtered**: eq, ne, hasSome, lt, lte, gt, gte **Read-only**: Yes #### Applies to Subscriptions (appliesToSubscriptions) **Description**:  **Type**: Boolean **Can connect to data**: Yes **Can use in dynamic page URL**:  **Can be sorted**: No **Can be filtered**: Yes **Read-only**: Yes #### Limited To One Item (limitedToOneItem) **Description**: Indicates whether the coupon is limited to 1 discount per order. If true and a customer buys multiple items that the coupon applies to, only the lowest priced item is discounted. **Type**: Boolean **Can connect to data**: **Can use in dynamic page URL**: No **Can be sorted**: No **Can be filtered**: eq, ne **Read-only**: Yes **Note:** This field only applies to coupons with Type "moneyOffAmount" or "percentOffRate". #### Active (active) **Description**: Indicates whether the coupon is currently [active](https://support.wix.com/en/article/wix-stores-deleting-a-coupon). **Type**: Boolean **Can connect to data**: Yes **Can use in dynamic page URL**: No **Can be sorted**: No **Can be filtered**: eq, ne **Read-only**: Yes #### Minimum Subtotal (minimumSubtotal) **Description**: The coupon can be used when the order subtotal is over this amount. **Type**: Number **Can connect to data**: Yes **Can use in dynamic page URL**: No **Can be sorted**: Yes **Can be filtered**: eq, ne, hasSome, lt, lte, gt, gte **Read-only**: Yes #### Scope (scope) **Description**: Scope for the coupon as defined in a JSON object. **Type**: JSON **Can connect to data**: No **Can use in dynamic page URL**: No **Can be sorted**: No **Can be filtered**: No **Read-only**: Yes ```json { "namespace": "string", "group": { "name": "string", "entityId": "string" } } ``` The following table lists the available options for Namespace and Group: |Namespace |Group | |---|---| | stores | product | | | collection | | bookings | service | | events | event | | | ticket | You can define the scope for a coupon as an entire namespace, a group within a namespace, or an item within a group. See the examples below. **Example:** Scope for the coupon is defined as all products sold in your store. ```json { "namespace": "stores" } ``` **Example:** Scope for the coupon is defined as a specific product sold in your store. ```json { "namespace": "stores", "group": { "name":"product", "entityId": "82921602-92d2-1787-08c8-207d12ef41d2" // ID of product } } ``` Since the **events** namespace has both **ticket** and **event** groups, and you can't apply a single coupon to all tickets and events at the same time, you can't define the scope as just the namespace **events**. For events you need to define the scope as a group or a specific item in a group. **Example:** Scope for the coupon is defined as all tickets for events. ```json { "namespace": "events", "group": { "name":"ticket" } } ``` **Filtering with Scope** You can filter using one of 3 scopes: * "scope.namespace" * "scope.group.name" * "scope.group.entityId" **Filtering Example:** Query the Coupons collection for coupons within the Stores namespace. ```javascript wixData.query("Marketing/Coupons").eq("scope.namespace", "stores") ``` **Filtering Example:** Query the Coupons collection for coupons applied to a specific product. ```javascript wixData.query("Marketing/Coupons").eq("scope.group.entityId", "82921602-92d2-1787-08c8-207d12ef41d2") ``` #### Type (type) **Description**: The type of coupon (see note for available options). **Type**: Text **Can connect to data**: Yes **Can use in dynamic page URL**: No **Can be sorted**: No **Can be filtered**: eq, ne, hasSome **Read-only**: Yes **Note:** The "type" value is one of the following: * "BuyXGetY" - Free products when making a purchase * "FixedPrice" - Specific sale price * "FreeShipping" - Free shipping * "MoneyOff" - Fixed price discount * "PercentOff" - Discount as a percentage #### Buy X Get Y (buyXGetY) **Description**: A JSON object representing X and Y in the following scenario: if a visitor purchases X number of products, they receive Y number of products for free. **Type**: JSON **Can connect to data**: No **Can use in dynamic page URL**: No **Can be sorted**: No **Can be filtered**: No **Read-only**: Yes ```json { "x": 3, "y": 1 } ``` #### Fixed Price Amount (fixedPriceAmount) **Description**: A specific sale price. **Type**: Number **Can connect to data**: Yes **Can use in dynamic page URL**: No **Can be sorted**: No **Can be filtered**: No **Read-only**: Yes #### Free Shipping (freeShipping) **Description**: Indicates whether shipping is free. **Type**: Boolean **Can connect to data**: Yes **Can use in dynamic page URL**: No **Can be sorted**: No **Can be filtered**: No **Read-only**: Yes #### Money Off Amount (moneyOffAmount) **Description**: A fixed amount subtracted from the original price. **Type**: Number **Can connect to data**: Yes **Can use in dynamic page URL**: No **Can be sorted**: No **Can be filtered**: No **Read-only**: Yes #### Percent Off Rate (percentOffRate) **Description**: A percentage subtracted from the original price. **Type**: Number **Can connect to data**: Yes **Can use in dynamic page URL**: No **Can be sorted**: No **Can be filtered**: No **Read-only**: Yes #### Date Created (\_dateCreated) **Description**: The date the coupon was created. **Type**: Date and Time **Can connect to data**: Yes **Can use in dynamic page URL**: No **Can be sorted**: Yes **Can be filtered**: eq, ne, hasSome, lt, lte, gt, gte **Read-only**: Yes #### Number of Usages (numberOfUsages) **Description**: The total number of times a coupon was used by all customers. **Type**: Number **Can connect to data**: Yes **Can use in dynamic page URL**: No **Can be sorted**: Yes **Can be filtered**: eq, ne, hasSome, lt, lte, gt, gte **Read-only**: Yes #### Expired (expired) **Description**: Indicates whether the expiration time passed and the coupon is expired. **Type**: Boolean **Can connect to data**: Yes **Can use in dynamic page URL**: No **Can be sorted**: No **Can be filtered**: eq, ne **Read-only**: Yes #### Display Data (displayData) **Description**: Display information for the item the coupon is applicable for defined as a JSON object (e.g. a Stores product or a Bookings service). **Type**: JSON **Can connect to data**: No **Can use in dynamic page URL**: No **Can be sorted**: No **Can be filtered**: Yes **Read-only**: Yes **Note:** This field is only relevant when the coupon is applied to a specific item. When the coupon is applied to all items in a group (e.g. all products), Display Data is empty.  ```json "displayData": { "formattedPrice": "string", "mediaItem": "string", "name": "string" } ``` #### App ID (appId) **Description**: The ID of the 3rd-party app that created the coupon. Empty if created by the site owner. **Type**: Text **Can connect to data**: No **Can use in dynamic page URL**: No **Can be sorted**: Yes **Can be filtered**: Yes **Read-only**: Yes ### Related APIs Use the following APIs to work with data from the Coupons collection: * [wix-marketing-backend.coupons](https://www.wix.com/corvid/reference/wix-marketing-backend.coupons.html) * [wix-data](https://www.wix.com/corvid/reference/wix-data.html) * [wix-dataset](https://www.wix.com/corvid/reference/wix-dataset.html) --- > Portal Navigation: > > - Append `.md` to any URL under `https://dev.wix.com/docs/` to get its markdown version. > - Pages are either content pages (article or reference text) or menu pages (a list of links to child pages). > - To get a menu page, truncate any URL to a parent path and append `.md` (e.g. `https://dev.wix.com/docs/sdk.md`, `https://dev.wix.com/docs/sdk/core-modules.md`). > - Top-level index of all portals: https://dev.wix.com/docs/llms.txt > - Full concatenated docs: https://dev.wix.com/docs/llms-full.txt ## Resource: Wix Media "Files" Collection Fields ## Article: Wix Media "Files" Collection Fields ## Article Link: https://dev.wix.com/docs/develop-websites/articles/wix-apps/wix-app-collections/other-apps/wix-media/wix-media-files-collection-fields.md ## Article Content: # Velo: Wix Media "Files" Collection Fields
**Tip:** Before continuing, make sure you've read [Working with Wix App Collections](https://dev.wix.com/docs/develop-websites/articles/databases/wix-data/collections/working-with-wix-app-collections-and-code.md).
When you add a file from your Media Manager to your site, the 'Files' collection is automatically added to your site. To use the Files collection in code, refer to it as `"Media/Files"`. ```javascript wixData.query("Media/Files") .find() .then( (results) => { // handle the results } ); ``` >**Note:** > When using this collection, you can't set up the site to [link to the next or previous dynamic page](https://support.wix.com/en/article/linking-to-a-dynamic-page#linking-to-the-next-or-previous-dynamic-page). This document describes the permissions and fields in your Files collection.  ### Permissions The Files collection has the following [permissions](https://support.wix.com/en/article/about-collection-permissions): * **Read:** Anyone * **Create:** None * **Update:** None * **Delete:** None You cannot change the Files collection permissions. ### Fields >**Note:** > This app collection contains read-only fields that cannot be managed from the collection. You can update the fields from the relevant app in your site’s [dashboard](https://support.wix.com/en/article/accessing-your-sites-dashboard). The field name is listed as the heading of each section, with the field ID listed in parentheses, like this: Name (name). The fields appear in this document in the order in which they appear in your collection by default.  #### ID (\_id) **Description**: Unique File ID. This is a system field and is hidden by default. This is the [Main field](https://support.wix.com/en/article/about-your-database-collection-fields#main-fields). **Type**: Text **Can connect to data**: Yes **Can use in dynamic page URL**: No **Can be sorted**: No **Can be filtered**: eq **Read-only**: Yes #### Media Type (mediaType) **Description**: The file's media type, such as image and document. **Type**: Text **Can connect to data**: Yes **Can use in dynamic page URL**: No **Can be sorted**: No **Can be filtered**: eq **Read-only**: Yes #### Is Private (isPrivate) **Description**: The file's privacy setting. **Type**: Boolean **Can connect to data**: No **Can use in dynamic page URL**: No **Can be sorted**: No **Can be filtered**: eq **Read-only**: Yes #### Size in Bytes (sizeInBytes) **Description**: The file's size in bytes. **Type**: Number **Can connect to data**: Yes **Can use in dynamic page URL**: No **Can be sorted**: No **Can be filtered**: No **Read-only**: Yes #### Mime Type (mimeType) **Description**: The file's mime type such as 'image/png', or 'audio/webm'. **Type**: Text **Can connect to data**: Yes **Can use in dynamic page URL**: No **Can be sorted**: No **Can be filtered**: No **Read-only**: Yes #### File URL (fileUrl) **Description**: The file's Wix media URL. **Type**: Text **Can connect to data**: Yes **Can use in dynamic page URL**: No **Can be sorted**: No **Can be filtered**: No **Read-only**: Yes Example URL: `wix:image://v1/8b7eef_3deb121802514be7b698d0447559f9da~mv2.png/avatar-ga890ac591_1280.png#originWidth=1280&originHeight=1280` #### Original File Name (originalFileName) **Description**: The file's original file name. **Type**: Text **Can connect to data**: Yes **Can use in dynamic page URL**: No **Can be sorted**: No **Can be filtered**: No **Read-only**: Yes #### Hash (hash) **Description**: The file's checksum/hash. **Type**: Text **Can connect to data**: Yes **Can use in dynamic page URL**: No **Can be sorted**: No **Can be filtered**: No **Read-only**: Yes #### Labels (labels) **Description**: The file's labels assigned to the file by the Media Manager. **Type**: Array of Strings **Can connect to data**: No **Can use in dynamic page URL**: No **Can be sorted**: No **Can be filtered**: No **Read-only**: Yes #### Parent Folder ID (parentFolderId) **Description**: The file's parent folder ID. **Type**: String **Can connect to data**: Yes **Can use in dynamic page URL**: No **Can be sorted**: No **Can be filtered**: eq **Read-only**: Yes #### Parent Folder (parentFolder) **Description**: Reference to the file's parent folder item, as listed in the Folders collection. **Type**: Reference **Can connect to data**: No **Can use in dynamic page URL**: No **Can be sorted**: No **Can be filtered**: No **Read-only**: Yes #### Icon URL (iconUrl) **Description**: The file icon's URL. **Type**: Text **Can connect to data**: Yes **Can use in dynamic page URL**: No **Can be sorted**: No **Can be filtered**: No **Read-only**: Yes #### Icon Image (iconImage) **Description**: The file's icon as an image. **Type**: Image **Can connect to data**: Yes **Can use in dynamic page URL**: No **Can be sorted**: No **Can be filtered**: No **Read-only**: Yes #### Source URL (sourceUrl) **Description**: The file's source URL, such as an external link where the file was imported from. **Type**: Text **Can connect to data**: Yes **Can use in dynamic page URL**: No **Can be sorted**: No **Can be filtered**: No **Read-only**: Yes #### Width (width) **Description**: The file's width in pixels. **Type**: Number **Can connect to data**: Yes **Can use in dynamic page URL**: No **Can be sorted**: No **Can be filtered**: No **Read-only**: Yes #### Height (height) **Description**: The file's height in pixels. **Type**: Number **Can connect to data**: Yes **Can use in dynamic page URL**: No **Can be sorted**: No **Can be filtered**: No **Read-only**: Yes #### Op Status (opStatus) **Description**: Status of the file being uploaded, for example, 'READY' or 'IN-QUEUE'. **Type**: Text **Can connect to data**: Yes **Can use in dynamic page URL**: No **Can be sorted**: No **Can be filtered**: No **Read-only**: Yes #### Created Date (\_createdDate) **Description**: Date and time the file was created. This is a system field and is hidden by default. **Type**: Date **Can connect to data**: Yes **Can use in dynamic page URL**: No **Can be sorted**: No **Can be filtered**: No **Read-only**: Yes #### Updated Date (\_updatedDate) **Description**: Date and time the file was most recently updated (created or renamed). This is a system field and is hidden by default. **Type**: Date **Can connect to data**: Yes **Can use in dynamic page URL**: No **Can be sorted**: Yes **Can be filtered**: No **Read-only**: Yes --- > Portal Navigation: > > - Append `.md` to any URL under `https://dev.wix.com/docs/` to get its markdown version. > - Pages are either content pages (article or reference text) or menu pages (a list of links to child pages). > - To get a menu page, truncate any URL to a parent path and append `.md` (e.g. `https://dev.wix.com/docs/sdk.md`, `https://dev.wix.com/docs/sdk/core-modules.md`). > - Top-level index of all portals: https://dev.wix.com/docs/llms.txt > - Full concatenated docs: https://dev.wix.com/docs/llms-full.txt ## Resource: Wix Media "Folders" Collection Fields ## Article: Wix Media "Folders" Collection Fields ## Article Link: https://dev.wix.com/docs/develop-websites/articles/wix-apps/wix-app-collections/other-apps/wix-media/wix-media-folders-collection-fields.md ## Article Content: # Velo: Wix Media "Folders" Collection Fields
**Tip:** Before continuing, make sure you've read [Working with Wix App Collections](https://dev.wix.com/docs/develop-websites/articles/databases/wix-data/collections/working-with-wix-app-collections-and-code.md).
When you add a file from your Media Manager to your site, the 'Folders' collection is automatically added to your site. To use the Folders collection in code, refer to it as `"Media/Folders"`. ```javascript wixData.query("Media/Folders") .find() .then( (results) => { // handle the results } ); ``` >**Note:** > When using this collection, you can't set up the site to [link to the next or previous dynamic page](https://support.wix.com/en/article/linking-to-a-dynamic-page#linking-to-the-next-or-previous-dynamic-page). This document describes the permissions and fields in your Folders collection.  ### Permissions The Folders collection has the following [permissions](https://support.wix.com/en/article/about-collection-permissions): * **Read:** Anyone * **Create:** None * **Update:** None * **Delete:** None You cannot change the Folders collection permissions. ### Fields >**Note:** > This app collection contains read-only fields that cannot be managed from the collection. You can update the fields from the relevant app in your site’s [dashboard](https://support.wix.com/en/article/accessing-your-sites-dashboard). The field name is listed as the heading of each section, with the field ID listed in parentheses, like this: Name (name). The fields appear in this document in the order in which they appear in your collection by default.  #### ID (\_id) **Description**: Unique ID of the folder. Same as Folder ID. This is a system field and is hidden by default. **Type**: Text **Can connect to data**: Yes **Can use in dynamic page URL**: No **Can be sorted**: No **Can be filtered**: eq **Read-only**: Yes #### Folder ID (folderId) **Description**: Unique Folder ID. Same as ID. This is the [Main field](https://support.wix.com/en/article/about-your-database-collection-fields#main-fields). **Type**: Text **Can connect to data**: Yes **Can use in dynamic page URL**: No **Can be sorted**: No **Can be filtered**: eq **Read-only**: Yes #### Folder Name (folderName) **Description**: Unique name of the folder. **Type**: Text **Can connect to data**: Yes **Can use in dynamic page URL**: No **Can be sorted**: Yes **Can be filtered**: No **Read-only**: Yes #### Parent Folder ID (parentFolderId) **Description**: The folder's parent folder ID. **Type**: String **Can connect to data**: Yes **Can use in dynamic page URL**: No **Can be sorted**: No **Can be filtered**: eq **Read-only**: Yes #### Created Date (\_createdDate) **Description**: Date and time the folder was created. This is a system field and is hidden by default. **Type**: Date **Can connect to data**: Yes **Can use in dynamic page URL**: No **Can be sorted**: No **Can be filtered**: No **Read-only**: Yes #### Updated Date (\_updatedDate) **Description**: Date and time the folder was most recently updated (created or renamed). This is a system field and is hidden by default. **Type**: Date **Can connect to data**: Yes **Can use in dynamic page URL**: No **Can be sorted**: Yes **Can be filtered**: No **Read-only**: Yes --- > Portal Navigation: > > - Append `.md` to any URL under `https://dev.wix.com/docs/` to get its markdown version. > - Pages are either content pages (article or reference text) or menu pages (a list of links to child pages). > - To get a menu page, truncate any URL to a parent path and append `.md` (e.g. `https://dev.wix.com/docs/sdk.md`, `https://dev.wix.com/docs/sdk/core-modules.md`). > - Top-level index of all portals: https://dev.wix.com/docs/llms.txt > - Full concatenated docs: https://dev.wix.com/docs/llms-full.txt ## Resource: Wix Media "FileshareFiles" Collection Fields ## Article: Wix Media "FileshareFiles" Collection Fields ## Article Link: https://dev.wix.com/docs/develop-websites/articles/wix-apps/wix-app-collections/other-apps/wix-media/wix-media-fileshare-files-collection-fields.md ## Article Content: # Velo: Wix Media "FileshareFiles" Collection Fields
**Tip:** Before continuing, make sure you've read [Working with Wix App Collections](https://dev.wix.com/docs/develop-websites/articles/databases/wix-data/collections/working-with-wix-app-collections-and-code.md).
When you add the [Wix File Share application](https://support.wix.com/en/article/about-the-file-share-app) to your site, the FileshareFiles collection is automatically added to your site. To use the FileshareFiles collection in code, refer to it as `"Media/FileshareFiles"`. ```javascript wixData.query("Media/FileshareFiles") .find() .then( (results) => { // handle the results } ); ``` This document describes the permissions and fields in your FileshareFiles collection.  ### Permissions The FileshareFiles collection has the following [permissions](https://support.wix.com/en/article/about-collection-permissions): * **Read:** Anyone * **Create:** None * **Update:** None * **Delete:** None You cannot change the FileshareFiles collection permissions. ### Fields >**Note:** > This app collection contains read-only fields that cannot be managed from the collection. You can update the fields from the relevant app in your site’s [dashboard](https://support.wix.com/en/article/accessing-your-sites-dashboard). The field name is listed as the heading of each section, with the field ID listed in parentheses, like this: Name (name). The fields appear in this document in the order in which they appear in your collection by default.  #### Name (name) **Description**: Name of file. This is the [Main field](https://support.wix.com/en/article/about-your-database-collection-fields#main-fields). **Type**: Text **Can connect to data**: Yes **Can use in dynamic page URL**: Yes **Can be sorted**: Yes **Can be filtered**: eq, ne, lt, lte, gt, gte, hasSome, hasAll, contains, startsWith, endsWith **Read-only**: Yes #### Owner (\_owner) **Description**: Unique identifier of the user who created the file. Can be a site owner, [contributor](https://support.wix.com/en/article/about-roles-permissions-contributors), or member. This is a system field and is hidden by default. **Type**: Text **Can connect to data**: Yes **Can use in dynamic page URL**: Yes **Can be sorted**: Yes **Can be filtered**: eq, ne, hasSome, hasAll, contains **Read-only**: Yes #### Date Created (\_createdDate) **Description**: The date and time the file was created. This is a system field and is hidden by default. **Type**: Date **Can connect to data**: Yes **Can use in dynamic page URL**: No **Can be sorted**: Yes **Can be filtered**: eq, ne, lt, lte, gt, gte, hasSome, hasAll, contains, startsWith, endsWith **Read-only**: Yes #### Parent Folder (parentFolder) **Description**: Reference to the file's parent folder, as listed in the [FileshareFolders](https://support.wix.com/en/article/velo-wix-media-filesharefolders-collection-fields) collection. **Type**: Reference **Can connect to data**: Yes **Can use in dynamic page URL**: No **Can be sorted**: Yes **Can be filtered**: Yes **Read-only**: Yes #### Path (path) **Description**: Array of objects representing the full path from root to the parent folder of the file. **Type**: JSON **Can connect to data**: No **Can use in dynamic page URL**: No **Can be sorted**: No **Can be filtered**: No **Read-only**: Yes ```json [ { "id": "f3788ddf-8615-4ea9-8baf-db57252f89d7", "name": "/" }, { "id": "7b1a6e48-56fd-4e33-ba2e-39fe1227190f", "name": "pictures" } ] ``` #### Favorite Count (favoriteCount) **Description**: The number of times the file was marked as a favorite. Both site members and visitors can mark a file as a favorite. **Type**: Number **Can connect to data**: Yes **Can use in dynamic page URL**: Yes **Can be sorted**: Yes **Can be filtered**: eq, ne, lt, lte, gt, gte, hasSome, hasAll, contains, startsWith, endsWith **Read-only**: Yes #### Favorite (favorite) **Description**: Indicates whether the file was marked as a favorite by the current visitor. **Type**: Boolean **Can connect to data**: Yes **Can use in dynamic page URL**: No **Can be sorted**: No **Can be filtered**: No **Read-only**: Yes #### View Count (viewCount) **Description**: The number of times unique visitors viewed the file. Note that multiple views by the same visitor and downloading the file do not increment the view count. **Type**: Number **Can connect to data**: Yes **Can use in dynamic page URL**: Yes **Can be sorted**: Yes **Can be filtered**: eq, ne, lt, lte, gt, gte, hasSome, hasAll, contains, startsWith, endsWith **Read-only**: Yes #### Viewed (viewed) **Description**: Indicates whether the current visitor viewed the file. **Type**: Boolean **Can connect to data**: Yes **Can use in dynamic page URL**: No **Can be sorted**: No **Can be filtered**: No **Read-only**: Yes #### Extension (extension) **Description**: File extension. Examples: pdf, png. **Type**: Text **Can connect to data**: Yes **Can use in dynamic page URL**: Yes **Can be sorted**: Yes **Can be filtered**: eq, ne, lt, lte, gt, gte, hasSome, hasAll, contains, startsWith, endsWith **Read-only**: Yes #### Size (size) **Description**: Size of the file in bytes. **Type**: Number **Can connect to data**: Yes **Can use in dynamic page URL**: Yes **Can be sorted**: Yes **Can be filtered**: eq, ne, lt, lte, gt, gte, hasSome, hasAll, contains, startsWith, endsWith **Read-only**: Yes #### \_id (\_id) **Description**: File ID. This is a system field and is hidden by default. **Type**: Text **Can connect to data**: No **Can use in dynamic page URL**: No **Can be sorted**: No **Can be filtered**: eq, ne, hasSome, hasAll, contains **Read-only**: Yes --- > Portal Navigation: > > - Append `.md` to any URL under `https://dev.wix.com/docs/` to get its markdown version. > - Pages are either content pages (article or reference text) or menu pages (a list of links to child pages). > - To get a menu page, truncate any URL to a parent path and append `.md` (e.g. `https://dev.wix.com/docs/sdk.md`, `https://dev.wix.com/docs/sdk/core-modules.md`). > - Top-level index of all portals: https://dev.wix.com/docs/llms.txt > - Full concatenated docs: https://dev.wix.com/docs/llms-full.txt ## Resource: Wix Media "FileshareFolders" Collection Fields ## Article: Wix Media "FileshareFolders" Collection Fields ## Article Link: https://dev.wix.com/docs/develop-websites/articles/wix-apps/wix-app-collections/other-apps/wix-media/wix-media-fileshare-folders-collection-fields.md ## Article Content: # Velo: Wix Media "FileshareFolders" Collection Fields
**Tip:** Before continuing, make sure you've read [Working with Wix App Collections](https://dev.wix.com/docs/develop-websites/articles/databases/wix-data/collections/working-with-wix-app-collections-and-code.md).
When you add the [Wix File Share application](https://support.wix.com/en/article/about-the-file-share-app) to your site, the FileshareFolders collection is automatically added to your site. To use the FileshareFolders collection in code, refer to it as `"Media/FileshareFolders"`. ```javascript wixData.query("Media/FileshareFolders") .find() .then( (results) => { // handle the results } ); ``` This document describes the permissions and fields in your FileshareFolders collection.  ### Permissions The FileshareFolders collection has the following [permissions](https://support.wix.com/en/article/about-collection-permissions): * **Read:** Anyone * **Create:** None * **Update:** None * **Delete:** None You cannot change the FileshareFolders collection permissions. ### Fields >**Note:** > This app collection contains read-only fields that cannot be managed from the collection. You can update the fields from the relevant app in your site’s [dashboard](https://support.wix.com/en/article/accessing-your-sites-dashboard). The field name is listed as the heading of each section, with the field ID listed in parentheses, like this: Name (name). The fields appear in this document in the order in which they appear in your collection by default.  #### Name (name) **Description**: Name of folder. This is the [Main field](https://support.wix.com/en/article/about-your-database-collection-fields#main-fields). **Type**: Text **Can connect to data**: Yes **Can use in dynamic page URL**: Yes **Can be sorted**: Yes **Can be filtered**: eq, ne, lt, lte, gt, gte, hasSome, hasAll, contains, startsWith, endsWith **Read-only**: Yes #### Owner (\_owner) **Description**: Unique identifier of the user who created the folder. Can be a site owner, [contributor](https://support.wix.com/en/article/about-roles-permissions-contributors), or member. This is a system field and is hidden by default. **Type**: Text **Can connect to data**: Yes **Can use in dynamic page URL**: Yes **Can be sorted**: Yes **Can be filtered**: eq, ne, hasSome, hasAll, contains **Read-only**: Yes #### Date Created (\_createdDate) **Description**: The date and time the folder was created. This is a system field and is hidden by default. **Type**: Date **Can connect to data**: Yes **Can use in dynamic page URL**: No **Can be sorted**: Yes **Can be filtered**: eq, ne, lt, lte, gt, gte, hasSome, hasAll, contains, startsWith, endsWith **Read-only**: Yes #### Parent Folder (parentFolder) **Description**: Reference to the folder's parent folder, as listed in this collection. **Type**: Reference **Can connect to data**: Yes **Can use in dynamic page URL**: No **Can be sorted**: Yes **Can be filtered**: Yes **Read-only**: Yes #### Path (path) **Description**: Array of objects representing the full path from root to folder. **Type**: JSON **Can connect to data**: No **Can use in dynamic page URL**: No **Can be sorted**: No **Can be filtered**: No **Read-only**: Yes ```json [ { "id": "f3788ddf-8615-4ea9-8baf-db57252f89d7", "name": "/" }, { "id": "7b1a6e48-56fd-4e33-ba2e-39fe1227190f", "name": "pictures" } ] ``` #### Favorite Count (favoriteCount) **Description**: The number of times the folder was marked as a favorite. Both site members and visitors can mark a folder as a favorite. **Type**: Number **Can connect to data**: Yes **Can use in dynamic page URL**: Yes **Can be sorted**: Yes **Can be filtered**: eq, ne, lt, lte, gt, gte, hasSome, hasAll, contains, startsWith, endsWith **Read-only**: Yes #### Favorite (favorite) **Description**: Indicates whether the folder was marked as a favorite by the current visitor. **Type**: Boolean **Can connect to data**: Yes **Can use in dynamic page URL**: No **Can be sorted**: No **Can be filtered**: No **Read-only**: Yes #### View Count (viewCount) **Description**: The number of times unique visitors viewed (drilled down to) the folder. Note that multiple views by the same visitor and downloading the folder do not increment the view count. **Type**: Number **Can connect to data**: Yes **Can use in dynamic page URL**: Yes **Can be sorted**: Yes **Can be filtered**: eq, ne, lt, lte, gt, gte, hasSome, hasAll, contains, startsWith, endsWith **Read-only**: Yes #### Viewed (viewed) **Description**: Indicates whether the current visitor viewed (drilled down to) the folder. **Type**: Boolean **Can connect to data**: Yes **Can use in dynamic page URL**: No **Can be sorted**: No **Can be filtered**: No **Read-only**: Yes #### Children Count (childrenCount) **Description**: The number of files and folders directly inside this folder. Note that subfolder children are not included in the count. **Type**: Number **Can connect to data**: Yes **Can use in dynamic page URL**: Yes **Can be sorted**: Yes **Can be filtered**: eq, ne, lt, lte, gt, gte, hasSome, hasAll, contains, startsWith, endsWith **Read-only**: Yes #### Last Modified (lastModified) **Description**: Date and time the folder was most recently changed (created or renamed). Note that subfolder activity does not affect this field. **Type**: Date **Can connect to data**: Yes **Can use in dynamic page URL**: No **Can be sorted**: Yes **Can be filtered**: eq, ne, lt, lte, gt, gte, hasSome, hasAll, contains, startsWith, endsWith **Read-only**: Yes #### \_id (\_id) **Description**: Folder ID. This is a system field and is hidden by default. **Type**: Text **Can connect to data**: No **Can use in dynamic page URL**: No **Can be sorted**: No **Can be filtered**: eq, ne, hasSome, hasAll, contains **Read-only**: Yes --- > Portal Navigation: > > - Append `.md` to any URL under `https://dev.wix.com/docs/` to get its markdown version. > - Pages are either content pages (article or reference text) or menu pages (a list of links to child pages). > - To get a menu page, truncate any URL to a parent path and append `.md` (e.g. `https://dev.wix.com/docs/sdk.md`, `https://dev.wix.com/docs/sdk/core-modules.md`). > - Top-level index of all portals: https://dev.wix.com/docs/llms.txt > - Full concatenated docs: https://dev.wix.com/docs/llms-full.txt ## Resource: Wix Pricing Plans "PaidPlans/Plans" Collection Fields ## Article: "Plans" Collection Fields ## Article Link: https://dev.wix.com/docs/develop-websites/articles/wix-apps/wix-app-collections/other-apps/wix-pricing-plans/wix-pricing-plans-paid-plans-plans-collection-fields.md ## Article Content: # Velo: Wix Pricing Plans "PaidPlans/Plans" Collection Fields
**Tips:** - Before continuing, make sure you've read [Working with Wix App Collections](https://dev.wix.com/docs/develop-websites/articles/databases/wix-data/collections/working-with-wix-app-collections-and-code.md). - Before continuing, make sure you've read [About Pricing Plans](https://support.wix.com/en/article/pricing-plans-an-overview).
To use the Plans collection in code, refer to it as `"PaidPlans/Plans"`. ```javascript wixData.query("PaidPlans/Plans") .find() .then( (results) => { // handle the results } ); ``` This document describes the properties and fields in your Plans collection. ### Permissions The Plans collection has the following [permissions](https://support.wix.com/en/article/about-collection-permissions): - **Read:** Anyone - **Create:** None - **Update:** None - **Delete:** None You cannot change the Plans collection's permissions. ### Fields > **Note:** > This app collection contains read-only fields that cannot be managed from the collection. You can update the fields from the relevant app in your site's [dashboard](https://support.wix.com/en/article/accessing-your-sites-dashboard). The field name is listed as the heading of each section, with the field ID listed in parentheses, like this: Name (name). The fields appear in this document in the order in which they appear in your collection by default. #### ID (_id) **Description**: The unique pricing plan ID that was created by the server. This is a system field and is hidden by default. **Type**: Text **Can connect to data**: Yes **Can use in dynamic page URL**: No **Can be sorted**: No **Can be filtered**: eq, ne, hasSome, contains **Read-only**: Yes #### Role ID (roleId) **Description**: The role ID to assign to the buyer of the plan after purchase. **Type**: Text **Can connect to data**: Yes **Can use in dynamic page URL**: No **Can be sorted**: No **Can be filtered**: No **Read-only**: Yes #### Name (name) **Description**: The name of the pricing plan. **Type**: Text **Can connect to data**: Yes **Can use in dynamic page URL**: No **Can be sorted**: No **Can be filtered**: No **Read-only**: Yes #### Tagline (tagline) **Description**: The tagline for the pricing plan. **Type**: Text **Can connect to data**: Yes **Can use in dynamic page URL**: No **Can be sorted**: No **Can be filtered**: No **Read-only**: Yes #### Ribbon (ribbon) **Description**: The ribbon available for this pricing plan. The ribbon lets you show additional information about the plan, such as "New!" **Type**: Text **Can connect to data**: No **Can use in dynamic page URL**: No **Can be sorted**: No **Can be filtered**: No **Read-only**: Yes #### Benefits (benefits) **Description**: Lists the benefits included in the plan as an array of strings. **Type**: Tags **Can connect to data**: Yes **Can use in dynamic page URL**: No **Can be sorted**: No **Can be filtered**: No **Read-only**: Yes #### Price (price) **Description**: The price of the plan. **Type**: Number **Can connect to data**: Yes **Can use in dynamic page URL**: No **Can be sorted**: No **Can be filtered**: No **Read-only**: Yes #### Currency (currency) **Description**: The plan's currency. Because plans have only one currency, this value is the same for all plans. **Type**: Text **Can connect to data**: Yes **Can use in dynamic page URL**: No **Can be sorted**: No **Can be filtered**: No **Read-only**: Yes #### Recurring (recurring) **Description**: If the plan's payments are recurring (true) or one time only (false). **Type**: Boolean **Can connect to data**: Yes **Can use in dynamic page URL**: No **Can be sorted**: No **Can be filtered**: No **Read-only**: Yes #### Valid Until Canceled (validUntilCanceled) **Description**: If the plan is valid until the user explicitly cancels the payments (true). **Type**: Boolean **Can connect to data**: Yes **Can use in dynamic page URL**: No **Can be sorted**: No **Can be filtered**: No **Read-only**: Yes #### Period Unit (periodUnit) **Description**: The payment recurrence for the plan. Valid values are WEEK, MONTH, and YEAR. **Type**: Text **Can connect to data**: Yes **Can use in dynamic page URL**: No **Can be sorted**: No **Can be filtered**: No **Read-only**: Yes #### Period Amount (periodAmount) **Description**: The plan is valid for this number of weeks, months, or years. **Type**: Number **Can connect to data**: Yes **Can use in dynamic page URL**: No **Can be sorted**: No **Can be filtered**: No **Read-only**: Yes #### Primary (primary) **Description**: Indicates if the plan is the primary plan. When viewing pricing plans on the site, the primary plan is highlighted with a customizable ribbon. **Type**: Boolean **Can connect to data**: Yes **Can use in dynamic page URL**: No **Can be sorted**: Yes **Can be filtered**: eq, ne **Read-only**: Yes #### Date Created (dateCreated) **Description**: Displays the date and time the plan was created. **Type**: Date and Time **Can connect to data**: Yes **Can use in dynamic page URL**: No **Can be sorted**: Yes **Can be filtered**: eq, ne, le, ge, lt, gt **Read-only**: Yes #### Date Updated (dateUpdated) **Description**: Displays the date and time the plan was last modified. **Type**: Date and Time **Can connect to data**: Yes **Can use in dynamic page URL**: No **Can be sorted**: Yes **Can be filtered**: eq, ne, le, ge, lt, gt **Read-only**: Yes #### Display Index (displayIndex) **Description**: The index of the plan in the order it is displayed in Manage Plans from the site's dashboard. The index of the left-most plan on the top row has the value 1, the next one has the value 2, and so on. As time passes, if plans are deleted, the indexes of the remaining plans are not renumbered. They continue to be displayed in Manage Plans in the same numeric order. **Type**: Number **Can connect to data**: Yes **Can use in dynamic page URL**: No **Can be sorted**: Yes **Can be filtered**: eq, ne, le, ge, lt, gt **Read-only**: Yes #### Slug (slug) **Description**: The plan's slug, which is its URL-friendly name that is unique across the site. **Type**: Text **Can connect to data**: Yes **Can use in dynamic page URL**: Yes **Can be sorted**: No **Can be filtered**: Yes **Read-only**: Yes --- > Portal Navigation: > > - Append `.md` to any URL under `https://dev.wix.com/docs/` to get its markdown version. > - Pages are either content pages (article or reference text) or menu pages (a list of links to child pages). > - To get a menu page, truncate any URL to a parent path and append `.md` (e.g. `https://dev.wix.com/docs/sdk.md`, `https://dev.wix.com/docs/sdk/core-modules.md`). > - Top-level index of all portals: https://dev.wix.com/docs/llms.txt > - Full concatenated docs: https://dev.wix.com/docs/llms-full.txt ## Resource: Tutorial: Using the Pricing Plans API for Pricing Plan Ordering and Payment ## Article: Using the Pricing Plans API for Pricing Plan Ordering and Payment ## Article Link: https://dev.wix.com/docs/develop-websites/articles/wix-apps/wix-app-collections/other-apps/wix-pricing-plans/tutorial-using-the-pricing-plans-api-for-pricing-plan-ordering-and-payment.md ## Article Content: # Velo Tutorial: Using the Pricing Plans API for Pricing Plan Ordering and Payment This article describes how you can use the [Velo Pricing Plans API](https://www.wix.com/velo/reference/wix-pricing-plans) to customize how you offer [pricing plans](https://support.wix.com/en/article/pricing-plans-an-overview) to your site's visitors. We're going to explain how we set up a sample site and the code we added to make it work. > **Note:** The terms popup and lightbox refer to the same element. While the editor and dashboard now refer to it as a [popup](https://support.wix.com/en/article/studio-editor-using-popups), the API methods continue to use the term lightbox for backward compatibility. The documentation uses both terms accordingly. The customization in this sample includes: * Working with dynamic pages and multiple collections. * Customizing the order and payment flow by adding popups. * Responding to the event of a plan being purchased. ### Overview **In our site we added the following:** * The Pricing Plans app.  * When adding the Pricing Plans app, a Plans collection with a list of membership plans for sale was automatically added.  * A collection for adding more details to each plan, such as testimonials and images. * A collection for tracking purchases. * A Collection & Repeater page. The repeater displays plans from the Testimonials collection, which references the Plans collection. Visitors can click a **See More** button for more details about a plan. * A Dynamic page. This page displays information from both the Plans collection and the Testimonials collection.  Visitors can click a **Buy Now** button to purchase a plan. * A popup that displays before processing with the purchase, and a different popup that displays after ordering a free plan. * An event for logging successful purchases in a collection. **Then we added code to do the following:** 1. When a visitor clicks the **See More** button, the button's click event handler calls the `to()` function to open the dynamic page. 2. When a visitor clicks the **Buy Now** button for a free plan, the button's click event handler calls the `createOnlineOrder()` function to order the plan and opens a congratulations popup. 3. When a visitor clicks the **Buy Now** button for a plan that costs money, the button's click event handler opens a confirmation popup. 4. When a visitor clicks **Yes**, the button's event handler calls the `createOnlineOrder()` function to order the plan. 5. The function checks if the visitor is logged in, and if not, prompts for login. 6. When the visitor is logged in, the function creates, and returns, a promise that resolves to an `order` object. 7. A payment procedure is initiated using the ID from the `order` object, causing a payment window to appear. 8. The visitor enters payment information and completes the transaction. This triggers the `onPlanPurchased()` event, which receives a `PlanPurchasedEvent` object. 9. The function logs an event in a collection using data from the `PlanPurchasedEvent` object. Here are the resources we created for this example: >**Note:** > This example demonstrates how, with Velo, we can _customize_ the membership plan flow. We intentionally did not use the standard Plans & Pricing page that is automatically created when adding the Pricing Plans app. ### Before You Start Before you start working with Wix pricing plans in code, make sure you do the following: * [Set up Wix Payments](https://support.wix.com/en/article/about-wix-payments) on your site. We also recommend that you understand the [typical payment process](https://www.wix.com/code/reference/wix-pay.html) before proceeding. * [Add the Pricing Plans app](https://support.wix.com/en/article/pricing-plans-adding-the-pricing-plans-app) to your site. ### Step 1: Set up Collections For this example, we added the Pricing Plans app to set up this collection:  * A PaidPlans/Plans collection, for membership plans. We manually created these collections: *  A Testimonials collection, for each plan's testimonials and images.  * A PlanEvents collection, for logging each successful purchase. >**Note:** > You may need to save/publish the site and refresh your browser to view collections. #### The PaidPlans/Plans Collection Adding the Wix Pricing Plans app to your site automatically creates the PaidPlans/Plans collection. This collection contains the basic fields necessary to work with pricing plans, such as the plan title, its price, its duration, its benefits, and so on. The Plans collection is read-only — plans can be created or modified on the Pricing Plans page in the site dashboard. This is what some of the data in our Plans collection looks like.  ![](https://wixmp-833713b177cebf373f611808.wixmp.com/images/258290dab4a8b038cc8274d7a66dd473.jpg) The plan title is saved in the **Name** field. Then, a field called **Slug** is created with similar but unique values. We used the **Slug** field to link to other collections.  #### Additional Collections You can [create additional collections](https://dev.wix.com/docs/develop-websites/articles/databases/wix-data/displaying-data/display-database-collection-content-in-a-repeater.md) for additional plan details, such as testimonials and an image for each plan. In our new Testimonials collection, we added a PlanName [reference field](https://support.wix.com/en/article/displaying-content-from-multiple-database-collections-using-reference-fields) that references the **Slug** field in our Plans collection. The reference field links the testimonials and plan images to the corresponding plan in the Plans collection. This is what some of the data in our Testimonials collection looks like: ![](https://wixmp-833713b177cebf373f611808.wixmp.com/images/b2216fbe05531bc2119d1a41281e0f40.jpg) #### PlanEvents Collection We created a collection to track successful purchases. We added a text field called **Data** to the collection. We created code in an **events.js** page to insert the live data from the `PlanPurchasedResult` object into the **Title** and **Data** fields. This code is explained in detail in Step 4. This is what some of the live data in our PlanEvents collection looks like, after we have made a few purchases.
![](https://d2x3xhvgiqkx42.cloudfront.net/12345678-1234-1234-1234-1234567890ab/76096845-8b12-44f1-91f6-3dc2e838fdd9/2019/08/28/3ae026b7-8768-4426-8747-d6ac26cc8f48/b95fe517-eb55-49dc-bbc9-2fa5ac11d5c8.png)
### Step 2: Set up the Collection & Repeater Page We created a blank new page for displaying all the plans in our collection with a repeater and named it **Collection & Repeater**. #### Design the Page On the Collection & Repeater page, we added: * A [repeater](https://support.wix.com/en/article/wix-editor-adding-and-managing-repeaters-lists-grids) to display the plans. * Text and image elements in the repeater to display the name, price, and picture of each plan. * A **See More** button in the repeater to display the selected plan using a dynamic page. (Instructions for creating the dynamic page are provided in Step 5.) * A dataset connected to our Testimonials collection for connecting data in the collection to the repeater.  Because the Testimonials collection has a reference field to our PaidPlans/Plans collection, all the data we need is accessible with this one dataset.
>**Note:** > When you [display data from a collection in a repeater](https://support.wix.com/en/article/how-to-display-database-content-in-a-repeater), you must first connect the repeater to the dataset, and then connect each element in the repeater to the dataset. #### Add Event Handlers * In our page's onReady( ) function, we added an [onClick](https://dev.wix.com/docs/velo/velo-only-apis/$w/button/on-click.md) [event handler](https://dev.wix.com/docs/develop-websites/articles/coding-with-velo/frontend-code/about-event-handlers-in-wix.md) that will run when a **See More** button is clicked. #### Code the Page We added the following code to let the visitor select and view a specific plan.  ```javascript // For navigating to a dynamic page: import wixLocationFrontend from 'wix-location-frontend'; $w.onReady( function () { // If the site visitor clicks a plan's See More button, // the browser relocates to that plan's dynamic page. $w("#button1").onClick( (event) => { let $item = $w.at(event.context); let clickedItemData = $item("#dataset1").getCurrentItem(); let slug = clickedItemData.planName.slug; // We customize the URL of the dynamic Plans page to match this code. wixLocationFrontend.to('/gameplans/'+slug); } ); } ); ``` Alternatively, we could have connected the click action for our **See More** button to PlanName: Plans (Slug) in our dataset.
![](https://d2x3xhvgiqkx42.cloudfront.net/12345678-1234-1234-1234-1234567890ab/7b865e92-14c2-4af1-bf32-e3c86be2dcbe/2022/12/19/b09924d3-6c14-4b78-9a44-5dfc5f9af81b/23dc19b9-c17d-45c9-9cd5-8c822d7cb87c.png)
### Step 3: Customize the Purchase of a Plan To demonstrate that we can customize the flow of a paid plan purchase, we will use the `createOnlineOrder()` function instead of the `startOnlinePurchase()` function. * With `createOnlineOrder()`, we can control and customize aspects of the order process. * With `startOnlinePurchase()`, we use the standard paid plan functionality as provided with the Wix Paid Plans app. The `startOnlinePurchase()` function provides a standard payment flow that starts with ordering and automatically continues to payment. This gives you less opportunity to customize, but requires less coding and design. As part of our customization, we added two popups to our site (to be used in Step 5). * The **Confirm** popup displays information about the currently-selected plan, and provides buttons for continuing or canceling the purchase. * The **Congrats** popup lets you know that you purchased a free plan. In this step, we kept it simple. However, this is the opportunity for you to really customize the process as you like.
### Step 4: Set up an Event Handler in the Backend to Log Purchases When a plan is successfully purchased or ordered, an [`onPlanPurchased`](https://dev.wix.com/docs/velo/apis/wix-pricing-plans-backend/events/on-plan-purchased.md) event is triggered. In our example, when this event is fired, we log the details about the purchase by inserting the information in our `PlanEvents` collection. Here is sample backend code that we put in an `events.js` file. ```javascript /***************************** * Backend code in events.js * *****************************/ // For inserting data into a collection. import wixData from 'wix-data'; // The onPlanPurchased() event is fired when a plan // is purchased, or a free plan is ordered. // Get the order information // from the event's order object. export function wixPricingPlans_onPlanPurchased(event) { // The PlanEvents collection has a title field, // in which we insert the type of transaction. // The collection also has a data field, // where we will insert information about the order // from the event's order object (json). if (event.order.price.amount === 0) { let orderData = { "title": "Free plan purchased", "data": event.order }; wixData.insert("PlanEvents", orderData); } else { let orderData = { "title": "Regular plan purchased", "data": event.order }; wixData.insert("PlanEvents", orderData); } } ``` ### Step 5: Customize your Dynamic Page Next, we created a new dynamic page for displaying each selected plan. We did this by going to our Plans collection in the Databases section of the Code sidebar and clicking Add Blank Dynamic Page. (If you use another method you will need to manually add the dataset for the PaidPlans/Plans collection.)
![](https://d2x3xhvgiqkx42.cloudfront.net/12345678-1234-1234-1234-1234567890ab/7b865e92-14c2-4af1-bf32-e3c86be2dcbe/2022/12/19/2ee1059a-1f86-447a-bf18-d67e3ac2b3ce/0d909389-e88a-4ff8-9c37-dc420d470385.png)
After we created the dynamic page, we [customized its URL](https://support.wix.com/en/article/creating-a-unique-dynamic-page-url) to end in "gameplans/{Slug}". #### Design the Page On this page, we added: * Text and image elements to display the details of each plan from the PaidPlans/Plans collection and the Testimonials collection. * A dataset for the Testimonials collection. The Testimonials collection is [filtered](https://support.wix.com/en/article/cms-displaying-content-from-multiple-collections-using-datasets) by planName so that any data displayed from the Testimonials collection matches the currently-displayed plan from the Plans collection. * A **Buy Now** button to order the plan.
#### Add Event Handlers * In the Properties & Events panel of the repeater, we added an `onItemReady` event handler that will run when the repeater is ready to be loaded. * In the Properties & Events panel of the `buyNow` button, we added an `onClick` event handler that will run when the **Buy Now** button is clicked.
![](https://d2x3xhvgiqkx42.cloudfront.net/12345678-1234-1234-1234-1234567890ab/99f9f305-0415-4713-856e-b7aa93cbd4d3/2020/10/25/347b2402-9287-4bb6-ba8d-eb5689e71571/63ecbd24-2c29-43cb-94da-2de3d1fd14a6.png)
#### Code the Page The code on our dynamic page consists of five parts: * Imports for the APIs used in the rest of the code. * An `onReady()` event handler for making sure all page elements are available. * Retrieval of the current plan's data from the Plans collection in a `currentPlanObject` object. * Check if the visitor is logged in. If necessary, the site prompts the visitor to log in. * A function for processing the order of free plans and the purchase of plans that cost money. Let's take a look at the code one piece at a time.  At the end of this article, you can see the code in its entirety. **The Imports** We used the following APIs: * `wix-members-frontend` - For getting information about the current member and for logging members in and out. * `wix-window-frontend` - For popups. * `wix-pricing-plans-frontend` - For ordering and purchasing pricing plans. * `wix-pay-frontend` - For processing payments. So our importing code looks like this: ```javascript import wixWindowFrontend from 'wix-window-frontend'; import wixPayFrontend from 'wix-pay-frontend'; import {checkout} from 'wix-pricing-plans-frontend'; import {authentication} from 'wix-members-frontend'; ``` **`onReady()` Event Handler** In this example, there is no special setup we need to do for our elements. So we used the standard `onReady()` event handler. ```javascript $w.onReady( () => { ... ... //Insert code here. ... ... } ); ``` **`getCurrentItem()` Function** Next, we retrieved the current plan's data from the PaidPlans\\Plans collection using the Wix Dataset [`getCurrentItem()`](https://www.wix.com/code/reference/wix-dataset/dataset.html#getCurrentItem) function with the dynamic dataset on the page. We stored the information in a `currentPlanObject` object variable. Now we have access to the information we need about the plan to continue processing the order or purchase. If you copy the code snippet below, make sure to change the dataset name to match your own. ```javascript $w.onReady( () => { ... ... const currentPlanObject = $w("#dynamicDataset").getCurrentItem(); const planId = currentPlanObject._id; const planPrice = currentPlanObject.price; ... ... //Insert more code here. ... ... } ); ``` **`onClick()` Event Handler** Most of the logic in our page is contained in the `onClick()` event handler of the `buyNow` button. If you copy the code snippet below, make sure to change the button name to match your own. ```javascript $w.onReady( () => { ... ... const currentPlanObject = $w("#dynamicDataset").getCurrentItem(); const planId = currentPlanObject._id; const planPrice = currentPlanObject.price; ... ... $w('#buyNow').onClick((event) => { ... //Insert code for handling the button click here. ... }); ... ... //Insert more code here. ... ... } ); ``` **Check if Logged In** We don't want to sell plans to visitors that are not logged in. So we used `authentication.loggedIn()` to see if the visitor is logged in. * If the visitor is not logged in, we used `authentication.promptLogin()` function to ask the visitor to log in. Then we can call a function that we named `processPlan()` to continue. * If the visitor is already logged in, we can immediately call the `processPlan()` function. ```javascript $w.onReady( () => { const currentPlanObject = $w("#dynamicDataset").getCurrentItem(); const planId = currentPlanObject._id; const planPrice = currentPlanObject.price; $w('#buyNow').onClick((event) => { let isLoggedIn = authentication.loggedIn(); if (!isLoggedIn) { authentication.promptLogin().then(() => { processPlan(planId, planPrice); }) } else { processPlan(planId, planPrice); } }); }); ``` **Process the Order** Now let's look at the function we created, `processPlan()`, to get payment for the plan. We chose to use the [`createOnlineOrder()`](https://www.wix.com/velo/reference/wix-pricing-plans/checkout/createonlineorder) function for processing because we wanted to control and customize the entire order/purchase flow. When `orderPlan()` is called, and a plan is successfully purchased or ordered, an [`onPlanPurchased`](https://www.wix.com/velo/reference/wix-pricing-plans-backend/events/onplanpurchased) event is triggered. _This is where you can enter your own code to customize your own order/purchase flow._ In our example, we customized the flow by: * If the plan costs money, asking for member confirmation using the `Confirm` popup. If the member confirms, we call `createOnlineOrder()` and then process payment with the Wix Pay Frontend [`startPayment`](https://www.wix.com/code/reference/wix-pay.html#startPayment) function. * If the plan is free, using the `Congrats` popup to let the member know the plan order is successful. The order details are contained in the `orderObject` object. When copying this snippet, make sure to change the names of your popups to match your own. ```javascript function processPlan(myId, myPrice) { if (myPrice > 0) { checkout.createOnlineOrder(myId).then(orderObject => { wixWindowFrontend.openLightbox("Confirm", orderObject) .then((goForIt) => { if (goForIt) { wixPayFrontend.startPayment(orderObject.wixPayOrderId); } }); }) } else { checkout.createOnlineOrder(myId).then(orderObject => { wixWindowFrontend.openLightbox("Congrats", orderObject); }) } } ``` **All the Code** The code in its entirety looks like this:  ```javascript import wixWindowFrontend from 'wix-window-frontend'; import wixPayFrontend from 'wix-pay-frontend'; import {checkout} from 'wix-pricing-plans-frontend'; import {authentication} from 'wix-members-frontend'; $w.onReady(function () { const currentPlanObject = $w("#dynamicDataset").getCurrentItem(); const planId = currentPlanObject._id; const planPrice = currentPlanObject.price; $w('#buyNow').onClick((event) => { let isLoggedIn = authentication.loggedIn(); if (!isLoggedIn) { authentication.promptLogin().then(() => { processPlan(planId, planPrice); }) } else { processPlan(planId, planPrice); } }); }); function processPlan(myId, myPrice) { if (myPrice > 0) { checkout.createOnlineOrder(myId).then(orderObject => { wixWindowFrontend.openLightbox("Confirm", orderObject) .then((goForIt) => { if (goForIt) { wixPayFrontend.startPayment(orderObject.wixPayOrderId); } }); }) } else { checkout.createOnlineOrder(myId).then(orderObject => { wixWindowFrontend.openLightbox("Congrats", orderObject); }) } } ``` **Tip**: Want to use the standard, "out of the box" Wix flow for letting visitors purchase a plan? * Use the [`startOnlinePurchase()`](https://www.wix.com/velo/reference/wix-pricing-plans/checkout/startonlinepurchase) function in the code instead of the `createOnlineOrder()` function. * No need to call `wixPayFrontend`. The `startOnlinePurchase( )` function does that for you. ### API List The following APIs are used in the code in this article. To learn more, see the [API Reference](https://www.wix.com/code/reference/). * [wix-pricing-plans-frontend](https://www.wix.com/velo/reference/wix-pricing-plans) \- For ordering and purchasing pricing plans. * [wix-pay-frontend](https://www.wix.com/velo/reference/wix-pay.html) - For payments. * [wix-members-frontend](https://www.wix.com/velo/reference/wix-members) - Gets information about the current member and for logging members in and out. * [wix-data](https://www.wix.com/code/reference/wix-data.html) - For inserting into collections. * [wix-location-frontend](https://www.wix.com/code/reference/wix-location.html) - For navigation. --- > Portal Navigation: > > - Append `.md` to any URL under `https://dev.wix.com/docs/` to get its markdown version. > - Pages are either content pages (article or reference text) or menu pages (a list of links to child pages). > - To get a menu page, truncate any URL to a parent path and append `.md` (e.g. `https://dev.wix.com/docs/sdk.md`, `https://dev.wix.com/docs/sdk/core-modules.md`). > - Top-level index of all portals: https://dev.wix.com/docs/llms.txt > - Full concatenated docs: https://dev.wix.com/docs/llms-full.txt ## Resource: Build a Custom Pricing Plans Page ## Article: Build a custom Pricing Plans page ## Article Link: https://dev.wix.com/docs/develop-websites/articles/wix-apps/wix-app-collections/other-apps/wix-pricing-plans/build-a-custom-pricing-plans-page.md ## Article Content: # Velo: Build a Custom Pricing Plans Page You can replace your site’s default [Wix Pricing Plans page](https://support.wix.com/en/article/customizing-the-design-of-your-pricing-plans-page) with your own customized version. This enables you to modify or extend the page’s functionality to suit your precise business needs. To integrate the page into your site’s pricing plans flow and implement its functionality, you need to add code to the page and use Velo APIs. Your code has to do several things: - Get data about the available pricing plans. - Handle UI initialization and interactions. - Implement any customized business logic. - Direct users to the next page in the flow. ## Step 1 | Add a custom Pricing Plans page to your site To create a custom Pricing Plans page, do one of the following:
Wix Studio 1. Click ![code-icon](https://wixmp-833713b177cebf373f611808.wixmp.com/images/9f782f2d59ce3d9927c773d706c594b5) and then **Start Coding** from the sidebar on the left side of the Editor. 1. Click **Pages** ![pages-icon](https://wixmp-833713b177cebf373f611808.wixmp.com/images/5e1b7a15094cb91f7f21d436b1d900bc) on the sidebar. 1. On the **Plans & Pricing** (under **Pricing Plans Pages**), click the **More Actions** icon ![more-actions-studio](https://wixmp-833713b177cebf373f611808.wixmp.com/images/f9f5b48e5e4576cf829bcd65b64f81a3). 1. Click **Replace with custom page**. 1. In the confirmation panel, click **Replace**. ![replace-classic](https://wixmp-833713b177cebf373f611808.wixmp.com/images/b7dd4ec084c55a0517d8d0b18696ea8c)
Wix Editor 1. Turn on [Dev Mode](https://support.wix.com/en/article/about-velo-by-wix#to-enable-velo-on-your-site). 1. Click **Pages** ![pages-icon](https://wixmp-833713b177cebf373f611808.wixmp.com/images/aa32565a982895a1f9a0db2c99522b91) on the left side of the editor. 1. Click **Pricing Plans Pages**, and then on the **Plans & Pricing** page, click ![ellipsis-icon](https://wixmp-833713b177cebf373f611808.wixmp.com/images/f54b38a3f22af34b0a705770ebee01ac). 1. Click **Replace with custom page**. 1. In the confirmation panel, click **Replace**. ![replace-classic](https://wixmp-833713b177cebf373f611808.wixmp.com/images/686fd1d1a85f32ac558fe952a5537c04)
## Step 2 | Design your custom page [Add elements to the page](https://support.wix.com/en/article/wix-editor-adding-and-deleting-elements) to create your business’s customized design and functionality, such as text, buttons, and images. At a minimum, these elements must: - Display information about the pricing plans and let the site visitor select the plan. - Provide an action button that navigates to the next page in the flow (usually the Checkout). ## Step 3 | Add Velo code to your page 1. Use the [`getAppPageData()`](https://www.wix.com/velo/reference/wix-window-frontend/getapppagedata) function to get the [plans object](https://dev.wix.com/docs/velo/api-reference/wix-window-frontend/app-page-data.md) associated with the page, and the [`getPricingPageOptions()`](https://dev.wix.com/docs/velo/api-reference/wix-pricing-plans-frontend/custom-purchase-flow/get-pricing-page-options.md) function to get the options set for the current Plans & Pricing page. For example: ``` js import wixWindowFrontend from 'wix-window-frontend'; $w.onReady(async function () { const { plans } = await wixWindowFrontend.getAppPageData(); const options = await customPurchaseFlow.getPricingPageOptions(); }); ``` 2. Depending on the functionality you’re developing, implement any business logic that your customized page requires. For example, define all the items in the repeater, such as text and buttons. 3. Add an [event handler](https://support.wix.com/en/article/velo-reacting-to-user-actions-using-events) to the page’s action button so that it navigates to the next page in the flow, which is typically your site’s Checkout. Use the [`navigateToCheckout()`](https://dev.wix.com/docs/velo/api-reference/wix-pricing-plans-frontend/custom-purchase-flow/navigate-to-checkout.md) function and pass the checkout options together with the ID of the plan to buy. The repeater displays plans on the page. For example: ```js $w("#repeater").onItemReady(($item, plan) => { $item("#title").text = plan.name; $item("#button").onClick(() => { customPurchaseFlow.navigateToCheckout({ planId: plan._id, ...options.checkout, }); }); }); $w('#repeater').data = plans; ``` Your custom page can now display the pricing plan’s data and direct site visitors to the next page in the flow. ## Test your code To receive a populated page data object using `wixWindowFrontend.getAppPageData()` when [testing your code](https://dev.wix.com/docs/develop-websites/articles/workspace-tools/testing-monitoring/testing-troubleshooting/testing-and-troubleshooting-your-code.md), do the following: 1. Create at least 1 pricing plan. 1. Publish a [test site](https://support.wix.com/en/article/about-test-sites). 1. Navigate to the Pricing Plans page in your test site. 1. Return to the editor. --- > Portal Navigation: > > - Append `.md` to any URL under `https://dev.wix.com/docs/` to get its markdown version. > - Pages are either content pages (article or reference text) or menu pages (a list of links to child pages). > - To get a menu page, truncate any URL to a parent path and append `.md` (e.g. `https://dev.wix.com/docs/sdk.md`, `https://dev.wix.com/docs/sdk/core-modules.md`). > - Top-level index of all portals: https://dev.wix.com/docs/llms.txt > - Full concatenated docs: https://dev.wix.com/docs/llms-full.txt ## Resource: Wix Portfolio "Project Items" Collection Fields ## Article: Wix Portfolio "Project Items" Collection Fields ## Article Link: https://dev.wix.com/docs/develop-websites/articles/wix-apps/wix-app-collections/other-apps/wix-portfolio/wix-portfolio-project-items-collection-fields.md ## Article Content: # Velo: Wix Portfolio "Project Items" Collection Fields >**Note:** > This collection contains read-write fields.
**Tip:** Before continuing, make sure you've read [Working with Wix App Collections](https://dev.wix.com/docs/develop-websites/articles/databases/wix-data/collections/working-with-wix-app-collections-and-code.md).
To use the ProjectItems collection in code, refer to it as `"Portfolio/ProjectItems"`. ```javascript wixData.query("Portfolio/ProjectItems") .find() .then( (results) => { // handle the results } ); ``` This document describes the permissions and fields in your ProjectItems collection.
**Important:** Trying to query more than 100 items exceeds the wix-data [limit](https://www.wix.com/corvid/reference/wix-data.WixDataQuery.html#limit) and results in an error.
### Permissions The Project Items collection has the following [permissions](https://support.wix.com/en/article/about-collection-permissions): * **Read:** Anyone  * **Create:** Admin * **Update:** Admin * **Delete:** Admin You cannot change the Project Items collection's permissions.  ### Fields The field name is listed as the heading of each section, with the field ID listed in parentheses, like this: Name (name). The fields appear in this document in the order in which they appear in your collection by default. #### Project (project) **Description**: The project ID that contains the project item. **Type**: Reference **Can connect to data**: Yes, to the referenced item's field. **Can use in dynamic page URL**: No **Can be sorted**: No **Can be filtered**: eq **Read-write**: Yes **Required**: Yes #### ID (\_id) **Description**: The project item ID that was created by the server. This is a system field and is hidden by default. **Type**: Text **Can connect to data**: Yes **Can use in dynamic page URL**: No **Can be sorted**: No **Can be filtered**: eq, hasSome **Read-only**: Yes **Required**: No #### Sort Order (sortOrder) **Description**: The project items sort order. **Type**: Number **Can connect to data**: Yes **Can use in dynamic page URL**: No **Can be sorted**: No **Can be filtered**: No **Read-write**: Yes **Required**: No #### Title (title) **Description**: The title of the project item. **Type**: Text **Can connect to data**: Yes **Can use in dynamic page URL**: No **Can be sorted**: No **Can be filtered**: No **Read-write**: Yes **Required**: No #### Description (description) **Description**: The description of the project item. **Type**: Text **Can connect to data**: No **Can use in dynamic page URL**: No **Can be sorted**: No **Can be filtered**: No **Read-write**: Yes **Required**: No #### Type (type) **Description**: The project item's type. **Type**: Text **Can connect to data**: No **Can use in dynamic page URL**: No **Can be sorted**: No **Can be filtered**: No **Read-only**: Yes **Required**: No **Note:** The type value is one of: * "IMAGE" * "VIDEO" #### Created Date (\_createdDate) **Description**: The date the project item was created. This is a system field and is hidden by default. **Type**: Date **Can connect to data**: Yes **Can use in dynamic page URL**: No **Can be sorted**: No **Can be filtered**: No **Read-only**: Yes **Required**: No #### Updated Date (\_updatedDate) **Description**: The date the project item was last updated. This is a system field and is hidden by default. **Type**: Date **Can connect to data**: Yes **Can use in dynamic page URL**: No **Can be sorted**: No **Can be filtered**: No **Read-only**: Yes **Required**: No #### Image (image) **Description**: A JSON object that represents a project item's image. **Type**: Object **Can connect to data**: Yes by the image's focal points. **Can use in dynamic page URL**: No **Can be sorted**: No **Can be filtered**: No **Read-write**: Yes **Required**: No ```json { "imageInfo": "wix:image://v1/8bb438_4400b236f09943f3a60eaf257d0b67dd~mv2.jpg/8bb438_4400b236f09943f3a60eaf257d0b67dd~mv2.jpg#originWidth=2400&originHeight=3600", "focalPoint": { "x": 0.5, "y": 0.5 } } ``` #### Video (video) **Description**: A JSON object that represents a project item's video. **Type**: Object **Can connect to data**: No **Can use in dynamic page URL**: No **Can be sorted**: No **Can be filtered**: No **Read-write**: Yes **Required**: No **Note:** Currently not supported in the Wix Editor. ```json { "videoInfo": "wix:video://v1/162e66_1e344b4233a5430c91d8be1310ac90a8/vecteezy_the-footage-animation-of-countdown-timer-from-5-seconds__666.mp4#posterUri=162e66_1e344b4233a5430c91d8be1310ac90a8f002.jpg&posterWidth=1920&posterHeight=1080", "durationInMillis": 6 } ``` --- > Portal Navigation: > > - Append `.md` to any URL under `https://dev.wix.com/docs/` to get its markdown version. > - Pages are either content pages (article or reference text) or menu pages (a list of links to child pages). > - To get a menu page, truncate any URL to a parent path and append `.md` (e.g. `https://dev.wix.com/docs/sdk.md`, `https://dev.wix.com/docs/sdk/core-modules.md`). > - Top-level index of all portals: https://dev.wix.com/docs/llms.txt > - Full concatenated docs: https://dev.wix.com/docs/llms-full.txt ## Resource: Wix Portfolio "Projects" Collection Fields ## Article: Wix Portfolio "Projects" Collection Fields ## Article Link: https://dev.wix.com/docs/develop-websites/articles/wix-apps/wix-app-collections/other-apps/wix-portfolio/wix-portfolio-projects-collection-fields.md ## Article Content: # Velo: Wix Portfolio "Projects" Collection Fields >**Note:** > This collection contains read-write fields.
**Tip:** Before continuing, make sure you've read [Working with Wix App Collections](https://dev.wix.com/docs/develop-websites/articles/databases/wix-data/collections/working-with-wix-app-collections-and-code.md).
To use the Projects collection in code, refer to it as `"Portfolio/Projects"`. ```javascript wixData.query("Portfolio/Projects") .find() .then( (results) => { // handle the results } ); ``` This document describes the permissions and fields in your Projects collection.
**Important:** Trying to query more than 100 items exceeds the wix-data [limit](https://www.wix.com/corvid/reference/wix-data.WixDataQuery.html#limit) and results in an error.
### Permissions The Projects collection has the following [permissions](https://support.wix.com/en/article/about-collection-permissions): * **Read:** Anyone * **Create:** Admin * **Update:** Admin * **Delete:** Admin You cannot change the Projects collection's permissions.  ### Fields The field name is listed as the heading of each section, with the field key listed in parentheses, like this: Name (name). The fields appear in this document in the order in which they appear in your collection by default. #### ID (\_id) **Description**: The project ID created by the server. This is a system field and is hidden by default. **Type**: Text **Can connect to data**: Yes **Can use in dynamic page URL**: Yes **Can be sorted**: Yes **Can be filtered**: eq, ne, hasSome, startsWith **Read-only**: Yes **Required**: No #### Revision (revision) **Description**: The current state of a project in the collection. **Type**: Text **Can connect to data**: Yes **Can use in dynamic page URL**: No **Can be sorted**: No **Can be filtered**: No **Read-only**: Yes **Required**: No #### Title (title) **Description**: The title of the project. **Type**: Text **Can connect to data**: Yes **Can use in dynamic page URL**: Yes **Can be sorted**: Yes **Can be filtered**: eq, ne, hasSome, startsWith **Read-write**: Yes **Required**: No #### Description (description) **Description**: The description of the project. **Type**: Text **Can connect to data**: Yes **Can use in dynamic page URL**: Yes **Can be sorted**: Yes **Can be filtered**: eq, ne, hasSome, startsWith **Read-write**: Yes **Required**: No #### Hidden (hidden) **Description**: Whether the project is hidden. **Type**: Boolean **Can connect to data**: Yes **Can use in dynamic page URL**: No **Can be sorted**: No **Can be filtered**: eq, ne, hasSome **Read-write**: Yes **Required**: No #### Collection Ids (collectionIds) **Description**: Array of collection IDs that the project belongs to. **Type**: Array of Strings **Can connect to data**: Yes **Can use in dynamic page URL**: No **Can be sorted**: No **Can be filtered**: eq, ne, hasSome, hasAll **Read-write**: Yes **Required**: No #### Details (details) **Description**: The details of the project. **Type**: Array of Objects **Can connect to data**: No **Can use in dynamic page URL**: No **Can be sorted**: No **Can be filtered**: No **Read-write**: Yes **Required**: No ```json [ { "label": "Project Type", "text": "Photography" }, { "label": "Date", "text": "April 2023" } ] ``` #### Slug (slug) **Description**: The project's slug, which is its URL-friendly name that is unique across the portfolio. **Type**: Text **Can connect to data**: Yes **Can use in dynamic page URL**: Yes **Can be sorted**: Yes **Can be filtered**: eq, ne, hasSome, startsWith **Read-write**: Yes **Required**: No #### Created Date (\_createdDate) **Description**: The date the project was created. This is a system field and is hidden by default. **Type**: Date **Can connect to data**: Yes **Can use in dynamic page URL**: No **Can be sorted**: Yes **Can be filtered**: eq, ne, hasSome, gt, lt **Read-only**: Yes **Required**: No #### Updated Date (\_updatedDate) **Description**: The date the project was last updated. This is a system field and is hidden by default. **Type**: Date **Can connect to data**: Yes **Can use in dynamic page URL**: No **Can be sorted**: Yes **Can be filtered**: eq, ne, hasSome, gt, lt **Read-only**: Yes **Required**: No #### Url (url) **Description**: The url of the project page. **Type**: URL **Can connect to data**: Yes **Can use in dynamic page URL**: No **Can be sorted**: No **Can be filtered**: No **Read-only**: Yes **Required**: No #### Seo Data (seoData) **Description**: A JSON object that represents Seo data of the project. **Type**: Object **Can connect to data**: No **Can use in dynamic page URL**: No **Can be sorted**: No **Can be filtered**: No **Read-write**: Yes **Required**: No ```json { "settings": { "preventAutoRedirect": "true" }, "tags": { [ "children": "", "custom": "", "disabled": "", "meta": {}, "props": {}, "type": "" ] } } ``` #### Synced Project (syncedProject) **Description**: Indicates whether the project is synced with an external platform. **Type**: Boolean **Can connect to data**: Yes **Can use in dynamic page URL**: No **Can be sorted**: No **Can be filtered**: No **Read-only**: Yes **Required**: No **Note**: Synced projects are updated from their external platform on a daily basis. #### Cover Image (coverImage) **Description**: A JSON object that represents a project's cover image. **Type**: Object **Can connect to data**: Yes, by the cover image's focal points. **Can use in dynamic page URL**: No **Can be sorted**: No **Can be filtered**: No **Read-write**: Yes **Required**: No ```json { "imageInfo": "wix:image://v1/8bb438_4400b236f09943f3a60eaf257d0b67dd~mv2.jpg/8bb438_4400b236f09943f3a60eaf257d0b67dd~mv2.jpg#originWidth=2400&originHeight=3600", "focalPoint": { "x": 0.5, "y": 0.5 } } ``` #### Cover Video (coverVideo) **Description**: A JSON object that represents a project's cover video. **Type**: Object **Can connect to data**: Yes **Can use in dynamic page URL**: No **Can be sorted**: No **Can be filtered**: No **Read-write**: Yes **Required**: No **Note:** Currently not supported in the Wix Editor. ```json { "videoInfo": "wix:video://v1/162e66_1e344b4233a5430c91d8be1310ac90a8/vecteezy_the-footage-animation-of-countdown-timer-from-5-seconds__666.mp4#posterUri=162e66_1e344b4233a5430c91d8be1310ac90a8f002.jpg&posterWidth=1920&posterHeight=1080", "durationInMillis": 6 } ``` --- > Portal Navigation: > > - Append `.md` to any URL under `https://dev.wix.com/docs/` to get its markdown version. > - Pages are either content pages (article or reference text) or menu pages (a list of links to child pages). > - To get a menu page, truncate any URL to a parent path and append `.md` (e.g. `https://dev.wix.com/docs/sdk.md`, `https://dev.wix.com/docs/sdk/core-modules.md`). > - Top-level index of all portals: https://dev.wix.com/docs/llms.txt > - Full concatenated docs: https://dev.wix.com/docs/llms-full.txt ## Resource: Wix Portfolio "Collections" Collection Fields ## Article: Wix Portfolio "Collections" Collection Fields ## Article Link: https://dev.wix.com/docs/develop-websites/articles/wix-apps/wix-app-collections/other-apps/wix-portfolio/wix-portfolio-collections-collection-fields.md ## Article Content: # Velo: Wix Portfolio "Collections" Collection Fields >**Note:** > This collection contains read-write fields.
**Tip:** Before continuing, make sure you've read [Working with Wix App Collections](https://dev.wix.com/docs/develop-websites/articles/databases/wix-data/collections/working-with-wix-app-collections-and-code.md).
To use the Collections collection in code, refer to it as `"Portfolio/Collections"`. ```javascript wixData.query("Portfolio/Collections") .find() .then( (results) => { // handle the results } ); ``` This document describes the permissions and fields in your Collections collection.
**Important:** Trying to query more than 100 items exceeds the wix-data [limit](https://www.wix.com/corvid/reference/wix-data.WixDataQuery.html#limit) and results in an error.
### Permissions The Collections collection has the following [permissions](https://support.wix.com/en/article/about-collection-permissions): * **Read:** Anyone * **Create:** Admin * **Update:** Admin * **Delete:** Admin You cannot change the Collections collection's permissions.  ### Fields The field name is listed as the heading of each section, with the field ID listed in parentheses, like this: Name (name). The fields appear in this document in the order in which they appear in your collection by default. #### ID (\_id) **Description**: The collection ID that was created by the server. This is a system field and is hidden by default. **Type**: Text **Can connect to data**: Yes **Can use in dynamic page URL**: Yes **Can be sorted**: Yes **Can be filtered**: eq, ne, hasSome, startsWith **Read-only**: Yes **Required**: No #### Revision (revision) **Description**: The current state of an item in the collection. The revision's state changes every time an item is modified. **Type**: Text **Can connect to data**: Yes **Can use in dynamic page URL**: No **Can be sorted**: No **Can be filtered**: No **Read-only**: Yes **Required**: No #### Title (title) **Description**: The title of the collection. **Type**: Text **Can connect to data**: Yes **Can use in dynamic page URL**: Yes **Can be sorted**: Yes **Can be filtered**: eq, ne, hasSome, startsWith **Read-write**: Yes **Required**: No #### Description (description) **Description**: The description of the collection. **Type**: Text **Can connect to data**: Yes **Can use in dynamic page URL**: Yes **Can be sorted**: Yes **Can be filtered**: eq, ne, hasSome **Read-write**: Yes **Required**: No #### Slug (slug) **Description**: The collection item's slug. The slug is the URL-friendly name that is unique across the portfolio. **Type**: Text **Can connect to data**: Yes **Can use in dynamic page URL**: Yes **Can be sorted**: Yes **Can be filtered**: eq, ne, hasSome, startsWith **Read-write**: Yes **Required**: No #### Cover Image (coverImage) **Description**: A JSON object that represents the cover image of the collection. **Type**: Object **Can connect to data**: Yes, by the cover image's focal points. **Can use in dynamic page URL**: No **Can be sorted**: No **Can be filtered**: No **Read-write**: Yes **Required**: No ```json { "imageInfo": "wix:image://v1/8b7eef_3deb121802514be7b698d0447559f9da~mv2.png/avatar-ga890ac591_1280.png#originWidth=1280&originHeight=1280", "focalPoint": { "x": "number", "y": "number" } } ``` #### Hidden (hidden) **Description**: Whether the collection is hidden. **Type**: Boolean **Can connect to data**: Yes **Can use in dynamic page URL**: No **Can be sorted**: No **Can be filtered**: eq, ne, hasSome **Read-write**: Yes **Required**: No #### Sort Order (sortOrder) **Description**: The collection sort order. **Type**: Number **Can connect to data**: Yes **Can use in dynamic page URL**: Yes **Can be sorted**: Yes **Can be filtered**: eq, ne, hasSome, lt, le, gt, ge **Read-write**: Yes **Required**: No #### Created Date (\_createdDate) **Description**: The date the collection was created. This is a system field and is hidden by default. **Type**: Date **Can connect to data**: Yes **Can use in dynamic page URL**: No **Can be sorted**: Yes **Can be filtered**: eq, ne, hasSome, lt, gt **Read-only**: Yes **Required**: No #### Updated Date (\_updatedDate) **Description**: The date the collection was last updated. This is a system field and is hidden by default. **Type**: Date **Can connect to data**: Yes **Can use in dynamic page URL**: No **Can be sorted**: Yes **Can be filtered**: eq, ne, hasSome, lt, gt **Read-only**: Yes **Required**: No #### Url (url) **Description**: The url of the collection page. **Type**: Text **Can connect to data**: Yes **Can use in dynamic page URL**: No **Can be sorted**: No **Can be filtered**: No **Read-only**: Yes **Required**: No #### Seo Data (seoData) **Description**: A JSON object that represents Seo data of the collection. **Type**: Object **Can connect to data**: No **Can use in dynamic page URL**: No **Can be sorted**: No **Can be filtered**: No **Read-write**: Yes **Required**: No ```json { "settings": { "preventAutoRedirect": "true" }, "tags": { [ "children": "", "custom": "", "disabled":"", "meta": {}, "props": {}, "type":"" ] } } ``` --- > Portal Navigation: > > - Append `.md` to any URL under `https://dev.wix.com/docs/` to get its markdown version. > - Pages are either content pages (article or reference text) or menu pages (a list of links to child pages). > - To get a menu page, truncate any URL to a parent path and append `.md` (e.g. `https://dev.wix.com/docs/sdk.md`, `https://dev.wix.com/docs/sdk/core-modules.md`). > - Top-level index of all portals: https://dev.wix.com/docs/llms.txt > - Full concatenated docs: https://dev.wix.com/docs/llms-full.txt ## Resource: About Caching ## Article: About Caching ## Article Link: https://dev.wix.com/docs/develop-websites/articles/best-practices/caching/about-caching.md ## Article Content: # About Caching Caching is a method used to temporarily store data in a storage location on Wix's infrastructure. With caching, you can keep frequently accessed content readily available, reducing the time it takes to retrieve information on your site and enhancing user experience. It's important to manage caching effectively to prevent site visitors from seeing outdated or incorrect content. Implementing caching can enhance the performance of your Wix site in various areas. Below are the key applications of caching: - [Page caching](#page-caching) - [Web method caching](#web-method-caching) - [Router caching](#router-caching) - [Data caching](#data-caching) ## Page caching While most site pages are automatically cached, you can manually control the cache settings according to your site's needs. Learn more [about page caching](https://dev.wix.com/docs/develop-websites/articles/best-practices/caching/about-page-caching.md). ## Web method caching By implementing web method caching in your backend code, you can limit how often your backend API calls execute. Learn more [about web method caching](https://dev.wix.com/docs/develop-websites/articles/best-practices/caching/about-web-method-caching.md). ## Router caching Router caching helps to reduce the need to fetch page data repeatedly each time a site visitor browses to a page handled by a router. Learn more [about router caching](https://dev.wix.com/docs/develop-websites/articles/best-practices/caching/about-router-caching.md). ## Data caching Data caching significantly speeds up data queries. Wix automatically caches the results of certain data queries, so when a visitor makes a query whose results are cached, Wix provides the cached results instead of querying the database again. Learn more [about caching data query results](https://dev.wix.com/docs/develop-websites/articles/databases/wix-data/data-api/about-caching-data-query-results.md). ## See also - [Control Page Caching Manually](https://dev.wix.com/docs/develop-websites/articles/best-practices/caching/control-page-caching-manually.md) - [Implement Web Method Caching](https://dev.wix.com/docs/develop-websites/articles/best-practices/caching/implement-web-method-caching.md) - [Implement Router Caching](https://dev.wix.com/docs/develop-websites/articles/best-practices/caching/implement-router-caching.md) --- > Portal Navigation: > > - Append `.md` to any URL under `https://dev.wix.com/docs/` to get its markdown version. > - Pages are either content pages (article or reference text) or menu pages (a list of links to child pages). > - To get a menu page, truncate any URL to a parent path and append `.md` (e.g. `https://dev.wix.com/docs/sdk.md`, `https://dev.wix.com/docs/sdk/core-modules.md`). > - Top-level index of all portals: https://dev.wix.com/docs/llms.txt > - Full concatenated docs: https://dev.wix.com/docs/llms-full.txt ## Resource: About Page Caching ## Article: About Page Caching ## Article Link: https://dev.wix.com/docs/develop-websites/articles/best-practices/caching/about-page-caching.md ## Article Content: # About Page Caching When a page on your site is requested for the first time, Wix caches the rendered page on a Content Delivery Network (CDN). The next time someone requests this page, Wix serves the cached version instead of rendering the page's elements and assets from scratch. Wix allows you to manage and disable caching for your site pages; however, the more pages on your site that are cached, the faster the overall experience is for your visitors.
__Important:__ All pages on your site are cached automatically, except for those accessed by logged-in members. If a visitor is logged into your site, any page they open isn't cached and is always rendered from scratch. It's not possible to enable caching for logged-in member sessions.
## Supported IDEs You can manually control the lifespan of the cache and disable caching in: - The editor (Wix Studio and Wix Editor). You can invalidate your caches manually using [code](https://dev.wix.com/docs/velo/api-reference/wix-site-backend/invalidate-cache.md) in: - The editor (Wix Studio and Wix Editor) - The Wix IDE - Your local IDE ## Cache invalidation By default, page caches are cleared or invalidated after 1 week. Additionally, page caches are automatically invalidated whenever you publish your site or when application data changes. For example, if you update the product catalog in the Stores app, the page cache is cleared, and the page is then re-cached the next time a site visitor requests the page. In situations where your page's data is updated infrequently, such as when your code fetches data from an external collection, you can invalidate the cache using the [`wix-site-backend`](https://dev.wix.com/docs/velo/api-reference/wix-site-backend/invalidate-cache.md) API. This ensures that visitors don't see outdated information on your site. ## When to control or disable caching manually Wix allows you to manage caching for your site pages. This means that you can determine how often to refresh page caches or disable caching for a page entirely. When managing page caching, it's important to consider how pages may appear differently to various site visitors. You should consider manually controlling page caching for: - Pages that retrieve data from external sources, such as product availability from an inventory management system. - Pages that display frequently changing data, like exchange rates or stock market details. - Pages that customize the display of elements based on a site visitor's geo-location, such as currency or time zone. - Pages that automatically update the date or time on a page to reflect real-time changes. These types of pages require Wix's servers to render the changes to provide the most current information. If automatic caching is enabled, visitors might initially see outdated content because the page is served from a cached version, rather than being freshly generated. For example, if the code on your page fetches exchange rates from an external resource and displays them in a TextBox element, visitors may see outdated rates from the cached version before the new rates are fetched and rendered. This can cause a temporary "flicker" effect as the page data updates. If your page's content only updates occasionally, you can keep caching enabled and invalidate the cache in your code whenever the data is updated. Properly controlling caching is essential for delivering accurate information and ensuring a smooth experience for your site visitors. > **Note:** > Code added to your site's `masterPage.js` file runs on every page of your site. This code can affect how each page is displayed and may cause incorrect content to be shown if a page is cached. If you need to We recommend checking your `masterPage.js` file and only including code that must run on every page. Move other code to the appropriate page files. ## See also - [About Caching](https://dev.wix.com/docs/develop-websites/articles/best-practices/caching/about-caching.md) - [Control Page Caching Manually](https://dev.wix.com/docs/develop-websites/articles/best-practices/caching/control-page-caching-manually.md) - [Webinar: Planning for scale: large data design considerations](https://youtu.be/BGnpQ_LTHPg?feature=shared&t=1464) - [`wix-site-backend` API](https://dev.wix.com/docs/velo/api-reference/wix-site-backend/introduction.md) --- > Portal Navigation: > > - Append `.md` to any URL under `https://dev.wix.com/docs/` to get its markdown version. > - Pages are either content pages (article or reference text) or menu pages (a list of links to child pages). > - To get a menu page, truncate any URL to a parent path and append `.md` (e.g. `https://dev.wix.com/docs/sdk.md`, `https://dev.wix.com/docs/sdk/core-modules.md`). > - Top-level index of all portals: https://dev.wix.com/docs/llms.txt > - Full concatenated docs: https://dev.wix.com/docs/llms-full.txt ## Resource: Control Page Caching Manually ## Article: Control Page Caching Manually ## Article Link: https://dev.wix.com/docs/develop-websites/articles/best-practices/caching/control-page-caching-manually.md ## Article Content: # Control Page Caching Manually Sometimes caching can cause site visitors to see outdated or incorrect content. For such cases you can manually control or disable caching for your site pages. You can manually control page caching by: - Disabling page caching in the editor. - Setting a lifespan for page caches in the editor. - Using code to invalidate page caches when necessary. ## Disable caches or manage the cache lifespan in the editor If the data on your site page changes very frequently, you can disable caching for that page, ensuring your site is always displaying the most up-to-date information. If the data on your page updates regularly, you can set your page's cache to clear and refresh at an interval that matches your needs. To disable or manage caching: 1. In the editor, click the **Pages** ![pages icon](https://wixmp-833713b177cebf373f611808.wixmp.com/images/200b9d74a1d550b51058678b2df28b0b.png) icon on the left sidebar to open the Site Pages panel. 1. Click the **More Actions** ![show more](https://wixmp-833713b177cebf373f611808.wixmp.com/images/506abdf364c2f86a8f34670cbcac015b.png) icon for the page you want to control caching, and then select **Settings**. This opens the Page Settings panel for that page. 1. Click **Advanced Settings** and turn on the **Manually control caching for this page** toggle. 1. Open the **How often do you want to reset this page's cache?** dropdown. - To disable caching for the page, select **Never (disable caching)**. - To manage the cache lifespan for the page, select the time interval that best suits your page's needs.
## Invalidate cache with code If your page’s data only updates occasionally, you can keep automatic caching enabled and add code to the page to invalidate the cache when the page's data is expected to be updated. Call the [`invalidateCache()` method](https://dev.wix.com/docs/velo/apis/wix-site-backend/invalidate-cache.md) from the `wix-site-backend` module in your backend code. ```js import { Permissions, webMethod } from "wix-web-module"; import wixSiteBackend from "wix-site-backend"; export const invalidateCache = webMethod(Permissions.Anyone, () => { return wixSiteBackend.invalidateCache(); }); ```
__Important:__ The `invalidateCache()` method invalidates the cache for the whole site, not just the page where you run the code.
## See also - [About Caching](https://dev.wix.com/docs/develop-websites/articles/best-practices/caching/about-caching.md) - [About Page Caching](https://dev.wix.com/docs/develop-websites/articles/best-practices/caching/about-page-caching.md) - [Webinar: Planning for scale: large data design considerations](https://youtu.be/BGnpQ_LTHPg?feature=shared&t=1464) - [wix-site-backend API](https://dev.wix.com/docs/velo/apis/wix-site-backend/introduction.md) --- > Portal Navigation: > > - Append `.md` to any URL under `https://dev.wix.com/docs/` to get its markdown version. > - Pages are either content pages (article or reference text) or menu pages (a list of links to child pages). > - To get a menu page, truncate any URL to a parent path and append `.md` (e.g. `https://dev.wix.com/docs/sdk.md`, `https://dev.wix.com/docs/sdk/core-modules.md`). > - Top-level index of all portals: https://dev.wix.com/docs/llms.txt > - Full concatenated docs: https://dev.wix.com/docs/llms-full.txt ## Resource: About Web Method Caching ## Article: About Function Caching in the Backend ## Article Link: https://dev.wix.com/docs/develop-websites/articles/best-practices/caching/about-web-method-caching.md ## Article Content: # About Web Method Caching Web method caching significantly enhances your site's performance by temporarily storing frequently-accessed data—specifically, the return values of your backend API calls. This allows subsequent requests for the same data to be served quickly from the cache stored on Wix's infrastructure, reducing the need to re-execute the logic each time the request is made. You can set your backend methods to cache return values for a specific duration or Time To Live (TTL). As a result, the next time a visitor makes a request that triggers your backend methods, the cached data is served immediately until the TTL expires or the cache is invalidated. Caching improves overall performance by reducing server load, decreasing response times, and minimizing resource consumption. Additionally, it provides reliability, as caches can serve as backups if the original data source is temporarily unavailable. > **Note:** The web methods in your code aren't cached automatically. ## Supported IDEs You can implement web method caching in your web modules using: - The editor (Wix Studio and Wix Editor) - The Wix IDE - Your local IDE ## When to use web method caching Web method caching is most beneficial in the following scenarios: - When there are numerous requests for the same data, such as a product catalog or popular blog posts. - When the data is mostly static or seldom changes, like company profiles, fixed schedules, or images. - When your backend methods involve heavy computations or extensive database queries that can strain server resources. Conversely, web method caching may not always be the best solution in situations where your backend methods: - Return real-time data that requires immediate accuracy, such as live stock prices or sports scores. - Return sensitive or personalized data, like user account details and preferences. - Require fresh data for each operation, as in the case of processing payments. In cases where real-time updates are essential, consider implementing caching selectively. For example, if a backend method retrieves foreign exchange rates, it may be valuable to cache that data for a 24-hour period, allowing it to refresh on a daily basis. For data that changes less frequently, you can set a longer TTL period; otherwise, web method caches have a default TTL of 1 week. ## Understanding cache invalidation Cache invalidation is a vital process that ensures the accuracy and relevance of the data being presented to site visitors. It involves clearing cached return values when the underlying data changes. Cached return values are cleared when: - The cache's TTL expires. - You republish your site after updating code. - You manually implement cache invalidation in your code. You can implement cache invalidation in your code using the `invalidateCache()` method from `wix-cache-backend`. This should be done when there are significant changes to your site's content, such as updates in product availability or the creation of a new blog post. By invalidating caches, you maintain data integrity, prevent site visitors from accessing outdated information, and optimize your site's performance and responsiveness. ## See also - [About Caching](https://dev.wix.com/docs/develop-websites/articles/best-practices/caching/about-caching.md) - [Implement Web Method Caching](https://dev.wix.com/docs/develop-websites/articles/best-practices/caching/implement-web-method-caching.md) - [About Web Modules](https://dev.wix.com/docs/develop-websites/articles/coding-with-velo/backend-code/web-modules/about-web-modules.md) - [wix-web-module API](https://dev.wix.com/docs/velo/apis/wix-web-module/introduction.md) - [wix-cache-backend API](https://dev.wix.com/docs/velo/apis/wix-cache-backend/cache/introduction.md) --- > Portal Navigation: > > - Append `.md` to any URL under `https://dev.wix.com/docs/` to get its markdown version. > - Pages are either content pages (article or reference text) or menu pages (a list of links to child pages). > - To get a menu page, truncate any URL to a parent path and append `.md` (e.g. `https://dev.wix.com/docs/sdk.md`, `https://dev.wix.com/docs/sdk/core-modules.md`). > - Top-level index of all portals: https://dev.wix.com/docs/llms.txt > - Full concatenated docs: https://dev.wix.com/docs/llms-full.txt ## Resource: Implement Web Method Caching ## Article: Implement Web Method Caching ## Article Link: https://dev.wix.com/docs/develop-websites/articles/best-practices/caching/implement-web-method-caching.md ## Article Content: # Implement Web Method Caching [Web method caching](https://dev.wix.com/docs/develop-websites/articles/best-practices/caching/about-function-caching-in-the-backend.md) is an effective way to improve the performance of your site by temporarily storing the return values of web methods in a cache. This article guides you through the process of implementing web method caching and how to invalidate it when necessary. ## Step 1 | Set up caches You must assign identifiers to cached return values of your web methods and can optionally define a cache's Time To Live (TTL). These required identifiers, called tags, allow you to easily identify caches that may need invalidation. For example, you can invalidate all caches that have the tag "math." To set up caching for your web methods: 1. Open your [web modules](https://dev.wix.com/docs/develop-websites/articles/coding-with-velo/backend-code/web-modules/about-web-modules.md) and find the methods you want to cache. 1. For each web method that you want to cache, update the code so that the [`webMethod()`](https://dev.wix.com/docs/velo/api-reference/wix-web-module/web-method.md) is called with the following `options`: - `cache`: An object containing: - `tags`: One or more identifiers of the cached return value. - `ttl`: The cache's time-to-live in seconds. If omitted, defaults to 1 week (`604800` seconds). ```js import { Permissions, webMethod } from "wix-web-module"; export const cachedMultiply = webMethod(Permissions.Anyone, (a, b) => a * b, { cache: { tags: ["multiply", "math"], ttl: 604800, }, }); ```
__Important:__ The `tags` field is required for caching. If omitted, nothing is cached.
## Step 2 | Invalidate caches Invalidating or clearing your caches causes your backend methods to re-execute upon the following request, ensuring that fresh data is retrieved and cached. To invalidate caches, use the `invalidateCache()` method from the [`wix-cache-backend`](https://dev.wix.com/docs/velo/api-reference/wix-cache-backend/cache/invalidate-cache.md) module. This method accepts the `invalidationMethods` parameter, which specifies the tags previously assigned to the caches you want to invalidate.
__Important:__ - You must specify `invalidationMethods` when invalidating your cache. - A cache can be assigned multiple tags. Any cache with at least one tag specified in the `invalidationMethods` object is invalidated when `invalidateCache()` is called. - The `invalidateCache()` method must be [elevated](https://dev.wix.com/docs/velo/api-reference/wix-auth/elevate.md) and wrapped in a [web method](https://dev.wix.com/docs/develop-websites/articles/coding-with-velo/backend-code/web-modules/about-web-modules.md#web-methods).
To invalidate caches: 1. Add the necessary imports in your web modules (backend files). ```js import { Permissions, webMethod } from "wix-web-module"; import { elevate } from "wix-auth"; import { cache } from "wix-cache-backend"; ``` 1. Create a variable to store the tags assigned to the cache. Then call `elevate()` and store its returned value in another variable. ```js const invalidationMethods = [{ tag: "math" }, { tag: "multiply" }]; const elevatedInvalidateCache = elevate(cache.invalidateCache); ``` 1. Call `webMethod()` and store its return value in an exported variable. Pass a permissions value and the elevated invalidation method. ```js export const invalidateCache = webMethod(Permissions.Admin, async () => { try { await elevatedInvalidateCache(invalidationMethods); console.log("Successfully invalidated cache."); } catch (error) { console.error(error); } }); ``` > **Notes:** > - The `wix-cache-backend` API, allows you to invalidate web method caches as well as [router caches](https://dev.wix.com/docs/velo/api-reference/wix-router/ok.md). > - To invalidate the server side rendering (SSR) cache of your site, refer to the [`invalidateCache()`](https://dev.wix.com/docs/velo/api-reference/wix-site-backend/invalidate-cache.md) method in the `wix-site-backend` module. ## See also - [About Caching](https://dev.wix.com/docs/develop-websites/articles/best-practices/caching/about-caching.md) - [About Web Method Caching](https://dev.wix.com/docs/develop-websites/articles/best-practices/caching/about-web-method-caching.md) - [About Web Modules](https://dev.wix.com/docs/develop-websites/articles/coding-with-velo/backend-code/web-modules/about-web-modules.md) - [wix-web-module API](https://dev.wix.com/docs/velo/api-reference/wix-web-module/introduction.md) - [wix-cache-backend API](https://dev.wix.com/docs/velo/api-reference/wix-cache-backend/cache/introduction.md) --- > Portal Navigation: > > - Append `.md` to any URL under `https://dev.wix.com/docs/` to get its markdown version. > - Pages are either content pages (article or reference text) or menu pages (a list of links to child pages). > - To get a menu page, truncate any URL to a parent path and append `.md` (e.g. `https://dev.wix.com/docs/sdk.md`, `https://dev.wix.com/docs/sdk/core-modules.md`). > - Top-level index of all portals: https://dev.wix.com/docs/llms.txt > - Full concatenated docs: https://dev.wix.com/docs/llms-full.txt ## Resource: About Router Caching ## Article: About Router Caching ## Article Link: https://dev.wix.com/docs/develop-websites/articles/best-practices/caching/about-router-caching.md ## Article Content: # About Router Caching Router caching can significantly enhance your site's performance. When a site visitor successfully navigates to a page handled by a router, the router processes the request and retrieves the corresponding router page data. The response, which includes this data, is sent back to the visitor using the `ok()` method in the [`wix-router`](https://dev.wix.com/docs/velo/api-reference/wix-router.md) module. With router caching implemented, the return value of the `ok()` method — which contains the same router page data — is temporarily stored on Wix's infrastructure. This allows for immediate retrieval of the cached router page data the next time the same page is requested, reducing the need for the full router and rendering process, and ultimately improving load times for subsequent visitors. You can manage caches by specifying a duration, known as Time To Live (TTL), which defines how long the return values should be stored. Additionally, you can assign identifying tags to the cache, allowing for precise cache invalidation when necessary. Caching improves overall performance by delivering content faster, reducing the server load, and enabling your site to accommodate more concurrent visitors. Caches also serve as a reliable backup if the original data source becomes temporarily unavailable. > **Note:** Router pages, unlike regular site pages, aren't cached automatically. ## Supported IDEs You can implement router caching using: - The editor (Wix Studio and Wix Editor) - The Wix IDE - Your Local IDE ## When to use router caching Router caching is particularly beneficial for: - Pages that receive high traffic. - Pages with dynamic content that infrequently changes. For instance, in an online department store, when a site visitor first accesses the "Dresses" category (located at `clothing/womens-clothing/dresses`), the page data is retrieved through the router, cached, and then rendered. As a result, subsequent visitors requesting the "Dresses" page experience significantly reduced loading times. Similarly, for router pages like popular articles on a news website, caching helps efficiently handle high view counts. Conversely, router caching is less effective for requests that depend on: - **Geo-location**: Responses that vary based on a visitor's location. - **Specific filters**: Requests that involve personalized filtering options. - **Search queries**: Responses tailored to a visitor's specific search terms. The personalized nature of these scenarios makes caching less practical. For example, caching the router response for daily weather updates on a page for a visitor in London would be irrelevant for someone in California. Additionally, caching responses based on unique user filters or search terms is inefficient, as traffic for those exact queries is generally minimal. ## Understanding cache invalidation Cache invalidation is important for maintaining the accuracy and freshness of your site. It involves clearing caches to allow for the retrieval of updated content before the cache is renewed. Router caches are cleared when: - The cache's TTL expires. - You republish your site after updating code. - You manually implement cache invalidation in your code. To invalidate caches in your code, you can use the `invalidateCache()` method from `wix-cache-backend`. This should be done when the content on your router page changes or when the page displays time sensitive information, such as updates in a clothing catalog, or weekly updates to a calendar. By invalidating caches, you maintain data integrity, prevent site visitors from accessing outdated information, and optimize your site's performance and responsiveness. ## See also - [About Caching](https://dev.wix.com/docs/develop-websites/articles/best-practices/caching/about-caching.md) - [Implement Router Caching](https://dev.wix.com/docs/develop-websites/articles/best-practices/caching/implement-router-caching.md) - [About Routers](https://dev.wix.com/docs/develop-websites/articles/coding-with-velo/routers/about-routers.md) - [Create a Router](https://dev.wix.com/docs/develop-websites/articles/coding-with-velo/routers/create-a-router.md) - [wix-router API](https://dev.wix.com/docs/velo/api-reference/wix-router/introduction.md) - [wix-cache-backend API](https://dev.wix.com/docs/velo/api-reference/wix-cache-backend/cache/introduction.md) --- > Portal Navigation: > > - Append `.md` to any URL under `https://dev.wix.com/docs/` to get its markdown version. > - Pages are either content pages (article or reference text) or menu pages (a list of links to child pages). > - To get a menu page, truncate any URL to a parent path and append `.md` (e.g. `https://dev.wix.com/docs/sdk.md`, `https://dev.wix.com/docs/sdk/core-modules.md`). > - Top-level index of all portals: https://dev.wix.com/docs/llms.txt > - Full concatenated docs: https://dev.wix.com/docs/llms-full.txt ## Resource: Implement Router Caching ## Article: Implement Router Caching ## Article Link: https://dev.wix.com/docs/develop-websites/articles/best-practices/caching/implement-router-caching.md ## Article Content: # Implement Router Caching Router caching in an effective strategy to improve your site's performance by temporarily storing the return values from the `ok()` method, which contain the same page data that is sent as the response to a router request. When visitors access a router page, the system can quickly deliver the cached data, enabling faster page loads and a better overall user experience. This article guides you through the process of implementing router caching and how to invalidate it when necessary. ## Step 1 | Set up your cache You must assign identifiers to router caches and can optionally define a cache's Time To Live (TTL). These required identifiers, called tags, allow you to easily identify caches that may need invalidation. For example, you can invalidate all caches that have the tag "dress-page." To set up caching for your routers: 1. Open the [router.js](https://dev.wix.com/docs/develop-websites/articles/coding-with-velo/overview/where-do-i-put-my-code.md#where-do-i-put-router-code) file in your backend code and find the routers you want to cache. 1. In the request for each router page you want to cache, create a variable representing the `options` parameter to store the `cache` object. Include the following fields in the `cache` object: - `tags`: One or more identifiers of the cached return value. - `ttl`: The cache's time-to-live in seconds. If omitted, defaults to 1 week (`604800` seconds). 1. In the return statement of the router request, pass the variable holding the `cache` object to the [`ok()` method](https://dev.wix.com/docs/velo/api-reference/wix-router/ok.md). ```js import { ok } from "wix-router"; export function myRouter_Router(request) { let headOptions = {}, let cacheOptions = { cache: { tags: ["routerPage"], ttl: 518400 } }; return ok("router-page", dataObj, headOptions, cacheOptions); } ```
__Important:__ The `tags` field is required for caching. If you omit `tags`, nothing is cached.
## Step 2 | Invalidate caches Invalidating or clearing your caches triggers the routing and rendering process upon the following next, ensuring that your caches hold the most up-to-date page data. To invalidate caches, use the `invalidateCache()` method from the [`wix-cache-backend`](https://dev.wix.com/docs/velo/api-reference/wix-cache-backend/cache/invalidate-cache.md) module. This method accepts the `invalidationMethods` parameter, which specifies the tags previously assigned to the caches you want to invalidate.
__Important:__ - You must specify `invalidationMethods` when invalidating your cache. - A cache can be assigned multiple caches. Any cache with at least one tag specified in the `invalidationMethods` object will be invalidated when `invalidateCache()` is called. - The `invalidateCache()` method must be [elevated](https://dev.wix.com/docs/velo/api-reference/wix-auth/elevate.md) and wrapped in a [web method](https://dev.wix.com/docs/develop-websites/articles/coding-with-velo/backend-code/web-modules/about-web-modules.md#web-methods).
To invalidate caches: 1. Add the necessary imports in your backend files. ```js import { Permissions, webMethod } from "wix-web-module"; import { elevate } from "wix-auth"; import { cache } from "wix-cache-backend"; ``` 1. Create a variable to store the tags assigned to the cache. Then call `elevate()` and store its returned value in another variable. ```js const invalidationMethods = [{ tag: "math" }, { tag: "multiply" }]; const elevatedInvalidateCache = elevate(cache.invalidateCache); ``` 1. Call `webMethod()` and store its return value in an exported variable. Pass a permissions value and the elevated invalidation method. ```js export const invalidateCache = webMethod(Permissions.Admin, async () => { try { await elevatedInvalidateCache(invalidationMethods); console.log("Successfully invalidated cache."); } catch (error) { console.error(error); } }); ``` > **Notes:** > - The `wix-cache-backend` API, allows you to invalidate web method caches as well as [router caches](https://dev.wix.com/docs/velo/api-reference/wix-router/ok.md). > - To invalidate the server side rendering (SSR) cache of your site, refer to the [`invalidateCache()`](https://dev.wix.com/docs/velo/api-reference/wix-site-backend/invalidate-cache.md) method in the `wix-site-backend` module. ## See also - [About Caching](https://dev.wix.com/docs/develop-websites/articles/best-practices/caching/about-caching.md) - [About Router Caching](https://dev.wix.com/docs/develop-websites/articles/best-practices/caching/about-router-caching.md) - [About Routers](https://dev.wix.com/docs/develop-websites/articles/coding-with-velo/routers/about-routers.md) - [Create a Router](https://dev.wix.com/docs/develop-websites/articles/coding-with-velo/routers/create-a-router.md) - [wix-router API](https://dev.wix.com/docs/velo/api-reference/wix-router/introduction.md) - [wix-cache-backend API](https://dev.wix.com/docs/velo/api-reference/wix-cache-backend/cache/introduction.md) --- > Portal Navigation: > > - Append `.md` to any URL under `https://dev.wix.com/docs/` to get its markdown version. > - Pages are either content pages (article or reference text) or menu pages (a list of links to child pages). > - To get a menu page, truncate any URL to a parent path and append `.md` (e.g. `https://dev.wix.com/docs/sdk.md`, `https://dev.wix.com/docs/sdk/core-modules.md`). > - Top-level index of all portals: https://dev.wix.com/docs/llms.txt > - Full concatenated docs: https://dev.wix.com/docs/llms-full.txt ## Resource: Best Practices for Building a Site with Velo ## Article: Best Practices for Building a Site with Velo ## Article Link: https://dev.wix.com/docs/develop-websites/articles/best-practices/best-practices-for-building-a-site-with-velo.md ## Article Content: # Velo: Best Practices for Building a Site with Velo Excited as you are to get started building your website using Velo by Wix, let's take a moment to plan ahead.  We've put together some best practices you should consider before you start enhancing your Wix website with the awesomeness provided with Velo. ### Coding with Velo Consider these best practices to help you code most efficiently using Velo by Wix. You will find here best practices for both beginning coders and experts, who want to know more about how Velo works.  #### Give Your Element IDs and Functions Meaningful Names Using meaningful names for element IDs and functions makes your code easier to write, read, and maintain. For example, suppose you have a button on your page that is used to submit data to a collection. Changing the button's ID from **button1** to **submit** will make it easier to find in the Autocomplete when you're assigning it an `onClick()` function. It will also be easier to understand what your code is doing when you or someone else looks at your code, possibly at a later date. ```javascript // do this $w('#submitButton').onClick(submitData); // don't do this $w('#button1').onClick(mysteryFunction); ``` #### Catch Errors in Your Code You should always strive to catch all the errors that might occur in your code and never let them propagate to the browser. When you catch errors before they make it to the browser, you can handle them gracefully. There are a few techniques you will need to use to catch the various types of errors that may occur. When working with asynchronous functions that return a Promise that may reject, you should always include a `catch()` to handle rejections. Also, before retrieving data that may not exist, you should check for existence before reading the data. For example, here we query a collection. We have added code to catch two types of errors. ```javascript wixData.query("myCollection") .find() .then( (results) => { // this "if" makes sure we don't try to read data that doesn't exist if(results.items.length > 0) { $w('myRepeater').data = results.items; $w('#message').hide(); } else { $w('#message').text = "No items found."; $w('#message').show(); } } ) // the catch handles cases where there is a system error in // retrieving the data. .catch( (err) => { $w('#message').text = "Error retrieving data."; $w('#message').show(); } ); ``` #### Format Your Code Code that is well-formatted is easier to read and maintain. Keeping proper indentation provides readers of your code, including yourself, with visual cues for understanding how the code is structured. Sometimes, when writing code, you are more focused on getting your code to work than writing it as neatly as possible. That's why we've provided the code formatting feature in the right-click menu. It removes extra lines and fixes your indentation. #### Code Only One onReady() Per Page The code you place in an [`onReady()`](https://www.wix.com/velo/reference/$w.html#onReady) callback runs when your page loads. Technically, you can call `onReady()` several times to create several callbacks that run when your page loads. However, doing so fragments your code, making it more difficult to read and maintain, without providing any obvious benefit. So keep to one `onReady()` per page. Note however, that if you have an `onReady()` defined in `masterPage.js` and one defined on a page, when that page loads, both `onReady()` callbacks will run. This is fine, because the site `onReady()` deals with elements that are shown on all your site's pages, whereas your page `onReady()` deals only with the elements on that specific page. #### Avoid side effects [Page rendering](https://dev.wix.com/docs/develop-websites/articles/coding-with-velo/frontend-code/page-rendering/about-page-rendering.md#side-effects) may cause your onReady() to run twice, once on the server and once in the browser. To avoid such unwanted side effects, use the [Rendering API](https://dev.wix.com/docs/velo/apis/wix-window-frontend/rendering/introduction.md) to control what code runs on the server or the browser. #### Set Events Only Once You should only set a particular event handler for an element one time. It's important to understand that each time you set an event handler, you are adding a new handler, and not replacing the old one. So, if you set an event handler for a button using its `onClick()` function and then later attempt to "reset" the event handler by calling `onClick()` again, you have now defined two `onClick()` behaviors. Meaning, when the button is clicked, they will both run and you do not know which will run first. You should also avoid using both code and the link panel from the editor to add a link to an element. 
![](https://d2x3xhvgiqkx42.cloudfront.net/12345678-1234-1234-1234-1234567890ab/11e10e4f-b84d-4136-a5a9-6109fab0b7d7/2021/04/04/6727b65c-ad3e-4b35-8377-c3588e92697b/d18ca12c-3b8d-43c2-98d8-67fc75850c1b.png)
Creating links both in the editor and code can result in a conflict that will produce unreliable functionality.  #### Try Using $w(“Type”) for Selecting Multiple Elements Did you know that there are multiple ways to select elements using the [`$w()`](https://www.wix.com/velo/reference/$w.html#$w) selector function? We all know that you can select one element at a time by providing the `$w()` function with a hashtag followed by an element ID. But you can also select elements by type by providing the `$w()` function with the type name. For example, to select all buttons on a page, you can use `$w('Button')`. The function call returns an array containing all the buttons on the page. You can then use that array to perform actions on all the buttons at once with a single function call. For example, to disable all the buttons on a page, you can use `$w('Button').disable()`. #### Use masterPage.js The masterPage.js file is located in the Page Code section of the Code sidebar (Wix Studio), or the Code sidebar (Wix Editor). Use it for elements that appear on all of your site's pages. Typically, these will be elements that you put in your site's header or footer.  Code for elements that are set to show on all pages can also be placed in masterPage.js. If you try to select a regular page element from masterPage.js, it will cause an error on all pages other than the one on which the element exists. >**Note** > Don't import functions from masterPage.js into the code files of individual pages. Doing this will cause the masterPage onReady function to run twice on that page. If there's a function that you want to use in the code for multiple pages, store it in a public .js file and import it from there. #### Declaring Variables Wisely Whenever feasible, use `const` instead of `let` to declare variables. Doing so signals your intent that the variable's value should not change. Never use `var` to declare variables. Avoid using global variables in your code. Global variables are prone to being overwritten and can hide the logic of your code. Instead of using a global variable, pass the variable as a parameter to the functions where it is needed. #### Avoid Large Blocks of Code by Using Functions Avoid writing large blocks of code. Wherever feasible, break your code down into smaller related parts and extract out to smaller functions. This makes your code easier to read and help with code reusability. #### Be Aware of Browser-Specific Code Requirements Web browsers process JavaScript code in different ways. Functionality supported by some browsers might not be supported by others. For example, on Apple iOS, the Safari and Chrome browsers do not support the regular expression **lookbehind** syntax. Many [online resources](https://caniuse.com/) allow you to quickly look up different browser requirements.  ### Security As you plan your site and consider security issues, you should review the full [Velo Security Considerations](https://support.wix.com/en/article/corvid-security-considerations#collection-permissions). The following is a summary of the issues we suggest you consider. #### Secure Private Information and Resources with the Secrets Manager You may need to add private information such as an API key to your site's code. API keys and other secrets are sensitive resources and should never be added to your page, site, and public code, since anyone can access them. Backend code is secured, but you should still follow security best practices and store your secrets separately from the code. Instead of hardcoding your secrets, you can use the [Secrets Manager](https://dev.wix.com/docs/develop-websites/articles/workspace-tools/developer-tools/secrets-manager/about-the-secrets-manager.md) and the Velo [Secrets API](https://www.wix.com/velo/reference/wix-secrets-backend.html) to safely work with secrets in your code. Using the Secrets Manager also hides secrets from Site Contributors and only allows Admins to view them. #### Secure Sensitive Information in the Backend All the code in Page Code and Public code files is visible to any user who visits your site, even the code in Page Code files on a [password-protected page](https://support.wix.com/en/article/password-protecting-your-site-or-a-specific-page) or a [members-only page](https://support.wix.com/en/article/creating-members-only-pages-596999). You should therefore only put sensitive information in Backend code files and not Page Code or Public code files. The code in Backend files is not visible to site visitors but it may still be vulnerable without appropriate security validations. You should therefore implement validation mechanisms in your Backend code files where necessary. You can [learn more about your code’s visibility](https://dev.wix.com/docs/develop-websites/articles/best-practices/security-best-practices.md) and how to protect it. #### Set Appropriate Permissions for Backend Web Modules [Web Module](https://dev.wix.com/docs/develop-websites/articles/coding-with-velo/backend-code/web-modules/about-web-modules.md#permissions) permissions allow you to control which users can work with functionality in your site that depends on your Web Module functions. Setting Web Module permissions allows you to ensure that no one can access or use your exported backend webModules in ways that you didn't intend. #### Set Appropriate Permissions for Database Collections You should always set the [permissions of your database](https://support.wix.com/en/article/corvid-security-considerations#collection-permissions) collections to be as restrictive as possible and to reflect your collection's common usage. Each permission should only be granted to the Admin role unless there is a specific reason to grant the permission to additional roles. Even when there is a reason to grant a permission to more roles, you should only grant it to the roles that need it. If you need to grant particular permissions that don’t fit the products permissions model, you should consider creating a specific flow of data access for the special use-case, without changing permissions for the entire collection, by using [webModules](https://support.wix.com/en/article/corvid-web-modules-calling-server-side-code-from-the-front-end) and the suppressAuth property of the WixDataOptions object, or with [data hooks](https://dev.wix.com/docs/develop-websites/articles/databases/wix-data/hooks/about-data-hooks.md). #### When to Use “suppressAuth” There may be times when you want to use the `suppressAuth` property to call [`wix-data`](https://dev.wix.com/docs/velo/apis/wix-data/introduction.md) functions on a collection without the permission checks that are set for that collection. You should only use `suppressAuth` after you run the appropriate security validations. For example, you may need to check that the visitor is a member of a specific group. #### Overriding Permission Requirements with elevate() Newer APIs use the `wix-auth` [`elevate()`](https://www.wix.com/velo/reference/wix-auth/elevate) function rather than `suppressAuth` to override permission requirements. Elevating a function allows it to be called by any site visitor. In some cases, elevating a function is required in order to use the function at all. Exercise caution and only elevate functions you are willing to let any site visitor call. #### Validate Authorized Requests for HTTP Functions You should validate your [http functions](https://support.wix.com/en/article/velo-exposing-a-site-api-with-http-functions) to ensure you are handling an authorized request. This is usually accomplished by checking for a shared value in an authorization header. ### Performance These tips will help you to take performance considerations into account when building your Velo website. #### Change Text Dynamically There are cases where you might want to add multiple overlapping text elements to your page and display each text when a specific condition is met (for example, success and error messages). But adding a lot of elements to your page can slow down your site.  Instead of using multiple text elements, you can use a single text element and change the displayed text dynamically. You can use [$w.Text.text](https://www.wix.com/corvid/reference/$w.Text.html#text) to change plain text and [$w.Text.html](https://www.wix.com/corvid/reference/$w.Text.html#html) to change styled text. As an added bonus, text is easier to manipulate using this method. #### Improve Performance in Sites with Database Collections Using data from database collections or from a 3rd-party source can be a powerful tool to enhance your site's functionality. However, sending a lot of data to the browser from the server (where your data is stored) can be a time-consuming operation that might negatively affect your site's loading time. Therefore, you want to minimize the amount of data that is sent from the server to the browser.  Whether you're using a [dataset](https://support.wix.com/en/article/about-datasets-6368396) or the [Data API](https://www.wix.com/velo/reference/wix-data.html), there are several approaches you can follow to [improve your site's performance](https://support.wix.com/en/article/velo-best-practices-for-improving-performance-in-wix-sites-with-data). #### Use async/await in onReady() Using [`async`/`await`](https://dev.wix.com/docs/develop-websites/articles/coding-with-velo/java-script-velo/working-with-promises.md) functionality in your [`onReady()`](https://dev.wix.com/docs/develop-websites/articles/workspace-tools/velo-workspace/code-editor-ide/working-in-the-code-editor.md) function delays the rendering of your page elements, decreasing the performance of your site. In many cases you'll want to avoid using `async`/`await` in `onReady()` for this reason. As an alternative, you can use the [`.then()`](https://dev.wix.com/docs/develop-websites/articles/coding-with-velo/java-script-velo/working-with-promises.md) function. On the other hand, delaying the rendering of your page elements allows database content to load in time for search bots to index your content, which is [important for SEO](https://dev.wix.com/docs/develop-websites/articles/best-practices/seo-best-practices.md#inside-the-onready-function). You'll need to decide what's best for your site on a case-by-case basis. For more information on handling promises with `async`/`await` or `.then`, see [Working with Promises](https://dev.wix.com/docs/develop-websites/articles/coding-with-velo/java-script-velo/working-with-promises.md). #### Avoid Code that Could Result in Repeater Performance Limitations If you’re working with dynamic repeater content that is updated fairly often, and especially if you are filtering or sorting your repeater data, you may not want to bind event handlers to repeater item elements from within the onItemReady() function. Although it is convenient to do so using the scoped $item selector, this practice may cause several event handlers to be set for the same item, as well as add multiple copies of the callback function to the event handler, affecting the performance of your site. Alternatively you can combine the use of some of the following APIs to bind your repeater items: * $w Element API [`at()`](https://www.wix.com/velo/reference/$w/at) * Repeater APIs [`forItems()`](https://www.wix.com/velo/reference/$w/repeater/foritems) and [`forEachItem()`](https://www.wix.com/corvid/reference/$w/repeater/foreachitem) * Dataset APIs [`getCurrentItem()`](https://www.wix.com/velo/reference/wix-dataset/dataset/getcurrentitem) and [`getCurrentItemIndex()`](https://www.wix.com/velo/reference/wix-dataset/dataset/getcurrentitemindex) #### Be Mindful of Data and Backend Quotas Wix places quotas on data and backend code requests on your site. Data requests include using the [Content Management System (CMS)](https://support.wix.com/en/article/about-the-content-manager-7160473), [Datasets](https://support.wix.com/en/article/about-datasets-6368396), [Wix Forms](https://support.wix.com/en/article/wix-forms-an-overview), and Velo’s [Wix Data API](https://www.wix.com/velo/reference/wix-data). Backend requests include calls to [web modules](https://dev.wix.com/docs/develop-websites/articles/coding-with-velo/backend-code/web-modules/call-backend-code-from-the-frontend.md) from your frontend code, using [routers](https://dev.wix.com/docs/develop-websites/articles/coding-with-velo/routers/create-a-router.md) hooks, and calling [HTTP functions](https://dev.wix.com/docs/develop-websites/articles/coding-with-velo/integrations/exposing-services/about-custom-site-apis.md). You can take steps to make sure your code isn't exceeding the quotas. Learn more about working with [data](https://dev.wix.com/docs/develop-websites/articles/coding-with-velo/limits-and-optimization/data-features.md) and [backend](https://dev.wix.com/docs/develop-websites/articles/coding-with-velo/limits-and-optimization/compute-features.md) quotas. ### Database Collections Take a few minutes to review these best practices for working with database collections and configuring datasets. #### Validate User Input Before Storing It in a Collection Collections are important data stores. To make sure that the data in your collection is valid, complete, and consistent, validate the input data before storing it in a collection. Validate your input data at the field level using the input element’s settings: * Data type * Maximum and minimum values * Maximum character length * Regex validation patterns For more complex validations use the `onCustomValidation()` event handler. Both the field setting and custom validations are triggered by the `valid` property. To validate entire records, use the wix-data hooks [`beforeInsert`](https://dev.wix.com/docs/velo/apis/wix-data/hooks/before-insert.md), [`beforeUpdate()`](https://dev.wix.com/docs/velo/apis/wix-data/hooks/before-update.md) and [`beforeRemove`](https://dev.wix.com/docs/velo/apis/wix-data/hooks/before-remove.md). Hooks give you the ability to control the data going into your collection with backend code, processed before it gets to your collection. Hooks are independent of the front end and will run regardless of what triggers the write – frontend code, the content manager, or importing data (Sandbox only). When using a dataset, use the [`onItemValuesChange`](https://dev.wix.com/docs/velo/velo-only-apis/$w/dataset/on-item-values-changed.md), and [`onBeforeSave`](https://dev.wix.com/docs/velo/velo-only-apis/$w/dataset/on-before-save.md) to validate data before the [`save()`](https://dev.wix.com/docs/velo/velo-only-apis/$w/dataset/save.md) is executed. See [About Validating User Input with Code](https://dev.wix.com/docs/develop-websites/articles/databases/wix-data/user-input/about-validating-user-input-with-code.md) for more information. #### Datasets: Read or Write? (Be Careful With Both!) Datasets can be configured as read, write, or read-write. Read-write datasets should only be used where both read and write or update are required. When using a read-write dataset, take care to understand all of the potential flows that may exist. Let’s take a common use case where we have a collection with existing data, a table to display that data, and a set of input elements below the table to allow the visitor to edit the selected row. We have buttons for submit, and delete, connected to the submit, and remove functions in the dataset. We also have a new button connected to the \`New\` function in the dataset which will create a new blank item, ready for editing in the input elements. The table, the input elements and the buttons, are all connected to a read-write dataset. As the visitor clicks on each row in the table, the values of the input elements are updated with the values of the selected row. The visitor can now edit the contents of a row and click submit to save the data.
The following flows can produce some unexpected outcomes: * Be careful when using lists and repeaters with read-write datasets. From our common use case above, if a row was selected, and the values changed in the input elements, selecting another row will cause the changed data to be saved without clicking **Submit**. This happens because any change to the dataset’s index will save the changed data to your collection. The index can be changed by selecting a different item in a connected list or by using the [`setCurrentItemIndex()`](https://dev.wix.com/docs/velo/velo-only-apis/$w/dataset/set-current-item-index.md) function. * Pages should only allow the selection and editing of a single item. Use the [`revert()`](https://dev.wix.com/docs/velo/velo-only-apis/$w/dataset/revert.md) function or a button connected to the `Revert` dataset action, if you want your visitors to be able to undo changes. * Avoid overwriting existing data when trying to create new items. Use the [`new()`](https://dev.wix.com/docs/velo/velo-only-apis/$w/dataset/new.md) function or a button connected to the `New` dataset action. * In our common use case, site visitors may try to delete an item by deleting the contents of each input element, and clicking **Submit**. This will update the selected item setting each field to blank but will not delete the item. Use the [`remove()`](https://dev.wix.com/docs/velo/velo-only-apis/$w/dataset/remove.md) function or a button connected to the `Delete` dataset action for any delete operations. Make sure that your site visitor can clearly identify which item is to be deleted. * A read-write dataset reads your data when the page is ready, so if you are building a form to update a collection, the read-write dataset displays the first item in the collection in your input fields. * From a performance point of view, when your page loads, a read-write dataset will take more time as it has to retrieve the data from the collection. Speed up page loading by implementing the minimum functionality required. **When to Use Datasets and When to Use Code** First of all, we recommend that you _don’t use both together_! For simple applications with little potential for change in the structure of your collections, datasets provide a fast, safe, and managed solution. Datasets are very easy to implement with no coding needed, and provide a quick and easy interface to your collections. If your application is complex, with processing required before displaying or saving your data, coding the interface using the `wix-data` API is a better choice. Coding is more flexible and easier to extend and modify than datasets. When using code, you control the entire interaction with the collection. `wix-data` provides functions, callbacks, and hooks giving you the option to run procedures and validate your data at critical points in your process. These points include before and after read, create, update, and delete operations. Coding also gives you more complex query filters and the ability to use aggregations for reporting applications. In general code runs faster than a dataset, especially if you have many datasets on the same page. However, dynamic datasets can be faster due to the way they request the data. Also bear in mind that you can use caching with a dataset but not with code.  For better code performance, you can run the code on the backend, lightening the load on the browser. If you do decide to mix code and datasets, _be careful_. Multiple processes acting on the same data can have unpredictable outcomes and lead to corruption and inconsistencies in your collections. No one wants that. ### Design The best practices, design tips, and editor tools listed here can save you time and let you focus more on your coding with Velo. #### Use SVG Images SVG is a vector graphic format based on XML that is flexible and scalable without sacrificing quality. You can easily change the image’s content, color, and shape dynamically, as opposed to when working with other graphic formats. You should use [SVG files](https://www.wix.com/velo/reference/$w.VectorImage.html) instead of other image files when you need this kind of flexibility. #### Check out Other Panels for Helpful Features Other panels in the editor contain functionalities that make your coding experience easier. For example, your page might contain many elements located closely together. It can be hard to find the element’s ID that you want to reference in your code. You can use the [Layers panel in Wix Studio](https://support.wix.com/en/article/studio-editor-using-the-layers-panel), or the [Layers panel in Wix Editor](https://support.wix.com/en/article/using-the-layers-panel) to select the element from a list and position yourself exactly on it, so you can see the element’s properties.   You can use the [Inspector Panel](https://support.wix.com/en/article/studio-editor-using-the-inspector-panel) (Wix Studio), or the [Editor Toolbar](https://support.wix.com/en/article/wix-editor-using-the-editor-toolbar-to-adjust-elements) (Wix Editor) in conjunction with Velo to quickly and easily get your design just right. For example, you can use these tools to align, position, and resize your elements. --- > Portal Navigation: > > - Append `.md` to any URL under `https://dev.wix.com/docs/` to get its markdown version. > - Pages are either content pages (article or reference text) or menu pages (a list of links to child pages). > - To get a menu page, truncate any URL to a parent path and append `.md` (e.g. `https://dev.wix.com/docs/sdk.md`, `https://dev.wix.com/docs/sdk/core-modules.md`). > - Top-level index of all portals: https://dev.wix.com/docs/llms.txt > - Full concatenated docs: https://dev.wix.com/docs/llms-full.txt ## Resource: Security Best Practices ## Article: Security Best Practices ## Article Link: https://dev.wix.com/docs/develop-websites/articles/best-practices/security-best-practices.md ## Article Content: # Security Best Practices In general, a site is secure without having to do anything. Wix takes care of that. However, there are certain situations where you have to take some precautions so that you don't expose sensitive data to a site's visitors. ## Collection permissions If you are using custom collections you should always set the permissions of your database collections to be as restrictive as possible. If the collection contains sensitive data such as PII or secrets, the **Read** permissions should be granted for the **Admin** role only, unless there is a reason to grant a specific permission for additional roles. Even when there is a reason to grant a permission for more roles, you should only grant it for the roles that need it. Also, to prevent anyone from removing or updating the data, you should set the **Update** and **Remove** permissions to the **Admin** role. Or, if there is a UX flow for users to update or remove the data, then you can set those permissions to **Site member author**. Here are some examples: |Example |Recommended permission settings | |---|---| |**Scenario: Form submission** An input form that you want anyone to be able to use. **Solution** On the collection that the form is connected to, set the **create** permissions to the **Anyone** role. Keep all the other permissions restricted to the **Admin** role.|Read: Admin
Create: Anyone
Update: Admin
Delete: Admin |**Scenario: Site content** A page that displays content from a collection to anyone. **Solution** Set the **read** permission of that collection to the **Anyone** role. Keep all the other permissions restricted to the **Admin** role.|Read: Anyone
Create: Admin
Update: Admin
Delete: Admin |**Scenario: Member-generated content** A member-generated comments section where members can post comments that anyone can see, but only the poster can update or delete the comment. **Solution** Set each permission based on who needs to access it.|Read: Anyone
Create: Site member
Update: Site member author
Delete: Site member author ## Unused permissions Be careful when granting a permission to a collection even if you don't expose that collection’s functionality in your site. Here are some examples: * **Unused create permission** If your site doesn’t contain a form for site visitors to create content for a specific collection, you may think you can safely set the **create** permission for that collection to **Anyone**. That is not the case. A malicious site visitor can inject data into your collection without a form. Make sure your collection is protected by restricting the **create** permission to the **Admin** role. * **Unused read permission** If you have a collection for internal use that you don't use on any of your site's pages, you may think you can safely set the **read** permission for that collection to **Anyone**. That is not the case. A malicious site visitor can still read the data from this collection. Make sure your collection is protected by restricting the **read** permission to the **Admin** role. ## Temporarily bypass collection permissions Sometimes, you may need to grant access to collection data only in a specific situation or only to a specific user. You may need to expose some of the data in a collection, while keeping the rest private. In these cases, extending the permissions of the collection to more users is a security risk. Doing this exposes all the collection data to users with the permitted roles all the time. Instead, set the collection permissions as appropriate for most situations. Then, when you need to grant access to the collection to a specific user or for a specific use case, perform that operation in backend code. You can grant temporary access to collections using the `suppressAuth` parameter that’s available as an option for many [Wix Data](https://www.wix.com/velo/reference/wix-data) functions. Setting `suppressAuth` to true allows a data request in backend code to interact with a collection even if the site visitor requesting the data doesn’t have permission to access that collection. To grant temporary access to a collection, define a function in your backend code that makes a data request using `suppressAuth`. Export this function for use in your frontend code. See [About Collection Permissions](https://support.wix.com/en/article/collection-permissions-an-overview) for more information. >**Note** > * A backend function that suppresses Wix Data's permissions checks must do at least one of the following: >    (a) Perform its own checks before accessing a collection. >    (b) Filter out sensitive collection data before passing anything back to frontend. > Anyone can call exported backend code, as described [below](https://dev.wix.com/docs/develop-websites/articles/best-practices/security-best-practices.md). This code therefore presents a serious security risk.  > * Only suppress permission checks when absolutely necessary. Leave Wix Data’s permissions checks enabled as much as possible. This way, even backend operations run only for users who have been granted permission for that operation. Here are 2 examples of using `suppressAuth` to grant specific and temporary access to collection data: * **Access for site members with specific roles** Wix allows you to create custom roles for site members. However, you currently can’t set collection permissions by role. To allow only members with a certain role to access a collection, set the collection’s permissions to Admin. Then, implement backend code that suppresses permission checks for site members with the desired role.
Show me how This code defines two functions: * **isPermitted()** : Uses the [Wix Members API](https://dev.wix.com/docs/velo/api-reference/wix-members-backend/introduction.md) to check if a site member has a Staff role * **queryCollection()** : Uses suppressAuth to return a collection's data if isPermitted() returns true. ```javascript import { Permissions, webMethod } from 'wix-web-module'; import { currentMember } from 'wix-members-backend'; import wixData from 'wix-data'; const isPermitted = webMethod(Permissions.Anyone, async () => { try { let hasPermittedRole = currentMember.getRoles() .then((roles) => { const staffRoleCheck = roles.filter(obj => obj.title === 'Staff'); if (staffRoleCheck.length > 0) { return true; } else { return false; } }) return hasPermittedRole; } catch (error) { console.error(error); return false; } }); ``` ```javascript export const queryCollection = webMethod(Permissions.Anyone, async () => { const accessGranted = await isPermitted(); if (accessGranted) { try { let collectionData = wixData.query('myCollection') .find({ suppressAuth: true }); return collectionData; } catch (error) { console.log(error); } } else { return "Access denied"; } }); ```
* **Access to specific collection fields** Some collections contain both private and public data. In this case, you may want to expose the public data to site visitors while keeping the private data secure. To do this, set the collection’s permissions to Admin. Then, implement backend code that suppresses permission checks and returns only the public data.
Show me how This code uses `suppressAuth` to query a collection and returns only the '\_id' and 'comment' fields. ```javascript import wixData from 'wix-data'; export function getData(){ return wixData.query("myCollection") .find({"suppressAuth": true}) .then((results) => { if (results.totalCount > 0) { const filteredResults = results.items.map( (item) => { return {"\_id" : item.\_id, "comment" : item.comment} }) return filteredResults } }) .catch((error) => { console.log("Error:", error.message); }); } ```
## Storing personal information in a collection You can store a site visitor’s personal information in a collection, provided that you set the collection permissions so that only the **Site member author** can **read**, **update**, or **delete** content. You may also want to store visitor information using the built-in [Contact List](https://support.wix.com/en/article/about-your-contact-list). This allows you to use this information with all the other contact list functionality that Wix provides. You can then also use Velo APIs to perform operations that involve site members or contact data. The following APIs are available: * [wix-crm.v2](http://www.wix.com/code/reference/wix-crm-v2.html) * [wix-crm-frontend](http://www.wix.com/code/reference/wix-crm.html) * [wix-crm-backend](http://www.wix.com/code/reference/wix-crm-backend.html) * [wix-members.v2](https://www.wix.com/velo/reference/wix-members-v2) * [wix-members-frontend](https://www.wix.com/velo/reference/wix-members) * [wix-members-backend](https://www.wix.com/velo/reference/wix-members-backend) ## Signup forms When you [set up a member signup form](https://support.wix.com/en/article/site-members-editing-the-signup-settings-for-the-default-and-custom-forms#customizing-your-default-member-signup-form) for your site, you have 2 options for limiting who is allowed to sign up: * **Everyone**: When a new member signs up, they are approved automatically. You do not need to do anything. * **People I approve**: When a new member signs up, you receive a notification, both by email and in your site's dashboard, asking if you want to approve or reject them. Only those who you approve become site members. If your site members have permissions for any of the collections on your site, then enabling automatic approval of new members sign up is the same as setting those permissions to collections to **Anyone**. This is because anyone can now become a site member and use the site member permissions. This is a potential security concern. You should think carefully about whether site members have access to any sensitive collection information before allowing anyone to become a member. ## Code visibility All page and public code is visible to any site visitor. Note that page code on a [password protected page](https://support.wix.com/en/article/wix-editor-password-protecting-a-specific-page-of-your-site) or [members only page](https://support.wix.com/en/article/studio-editor-using-the-members-area#showing-exclusive-member-only-content) can be viewed by any site visitor, including those who don't have the password and are not members. Therefore, don't expose sensitive information in page or public code, including in the `masterpage.js` file. Backend code is not visible to site visitors. It's safe to use sensitive information there and export the results to frontend code. However, even though malicious visitors can't see what exported backend functions do, they can still call those functions if they know their names.  They can do this using any arguments they want, and examine any return values. Therefore, any exported backend code should [perform validations](https://dev.wix.com/docs/develop-websites/articles/best-practices/security-best-practices.md#validations-and-checks) before carrying out potentially harmful operations or returning sensitive information. Also, backend functions that are not called from public code should not be exported from .web.js or .jsw files.
![](https://d2x3xhvgiqkx42.cloudfront.net/12345678-1234-1234-1234-1234567890ab/dfff8cbb-ddcb-4376-8cae-3fedb2dd4458/2018/06/17/41dc888c-dbe4-4ff2-ad41-67e7b9e5c625.png)
## API keys If you access a 3rd party service that requires an API key or other sensitive information, you should always store that information in the [Secrets Manager](https://dev.wix.com/docs/develop-websites/articles/workspace-tools/developer-tools/secrets-manager/about-the-secrets-manager.md). Never use API keys in page, public, or `masterpage.js` code. Instead, export a function from a [backend web module](https://dev.wix.com/docs/develop-websites/articles/coding-with-velo/backend-code/web-modules/call-backend-code-from-the-frontend.md) that uses the [Secrets API](https://dev.wix.com/docs/velo/api-reference/wix-secrets-backend/introduction.md) to extract the key and [calls the 3rd party service](https://dev.wix.com/docs/velo/apis/wix-fetch/introduction.md). Call that function from your page, public, or `masterpage.js` code. ## Signup and login forms If your site has a [Member's Area](https://support.wix.com/en/article/site-members-about-the-members-area), you can add forms using signup and login pages. One type of form you can add lets you use code to [customize member signup and login](https://dev.wix.com/docs/develop-websites/articles/code-tutorials/wix-members/creating-a-custom-registration-form-with-code.md). Because signing up and logging in involve the transfer of sensitive information, it’s best to [prevent signup & login API calls from running in the frontend](https://support.wix.com/en/article/velo-backend-signup-and-login#security-implications) when using a form. ## Validations and checks If you want to perform a security check or validation in your code, you should always do so using backend code. Any check or validation in your page, public, or `masterpage.js` code can be easily read, manipulated, and circumvented by a malicious site visitor. For example, consider the following Page code intended to reveal a secret key to a specific site visitor: ```javascript import { currentMember } from 'wix-members-frontend'; $w.onReady( () => { $w('#validateButton').onClick( () => { currentMember.getMember() .then((member) => { if(member.loginEmail === 'secretemail@mail.com') { // show secret key $w('#secretText').text = '43ne5gfou94tfe'; } else { // show denial message $w('#secretText').text = 'Access denied!'; } }) }) }); ``` There are two major problems with this code: 1. The security check is revealed to all site visitors. Anyone can see that the correct email address is `secretEmail@mail.com`. 2. Sensitive information is revealed to all site visitors. Anyone can see that the secret code is `43ne5gfou94tfe`.  The correct way to do this is to move both the security check and the secret code to a backend web module as follows: ```javascript // In backend file: secureModule.web.js import { Permissions, webMethod } from 'wix-web-module'; import { currentMember } from 'wix-members-backend'; import { getSecret } from 'wix-secrets-backend'; export const secureCheck = webMethod(Permissions.Anyone, async () => { try { const member = await currentMember.getMember({ fieldsets: ['FULL'] }); const memberEmail = member.loginEmail; const secretEmail = await getSecret("secretEmail"); // "secretemail@mail.com" if (memberEmail === secretEmail) { const secretValue = await getSecret("secretValue"); // "43ne5gfou94tfe" return secretValue; } else { return "Access denied!"; } } catch (err) { console.error(err); return "An error occurred"; } }); ``` Although malicious site visitors can call the backend function, they can't gain any information by doing so since the function doesn’t reveal any sensitive information. You can call this function safely from page code as follows: ```javascript import { secureCheck } from 'backend/secureModule.web'; $w.onReady(() => { $w('#secretButton').onClick(() => { secureCheck() .then ((message) => { $w('#secretText').text = message; }); }) }); ``` This page code is visible to any site visitor. However, since all the security check logic was moved to backend code, seeing the code doesn't reveal any sensitive information to malicious site visitors. >**Note** > You can also [set permissions](https://dev.wix.com/docs/develop-websites/articles/coding-with-velo/backend-code/web-modules/about-web-modules.md#permissions) that define who can call each individual exported function in a web module. ## See also + [About Web Modules](https://dev.wix.com/docs/develop-websites/articles/coding-with-velo/backend-code/web-modules/about-web-modules.md#permissions) + [About Collection Permissions](https://support.wix.com/en/article/cms-collection-permissions-overview) --- > Portal Navigation: > > - Append `.md` to any URL under `https://dev.wix.com/docs/` to get its markdown version. > - Pages are either content pages (article or reference text) or menu pages (a list of links to child pages). > - To get a menu page, truncate any URL to a parent path and append `.md` (e.g. `https://dev.wix.com/docs/sdk.md`, `https://dev.wix.com/docs/sdk/core-modules.md`). > - Top-level index of all portals: https://dev.wix.com/docs/llms.txt > - Full concatenated docs: https://dev.wix.com/docs/llms-full.txt ## Resource: SEO Best Practices ## Article: SEO Best Practices ## Article Link: https://dev.wix.com/docs/develop-websites/articles/best-practices/seo-best-practices.md ## Article Content: # SEO Best Practices Here are some tips for improving a site's visibility in search engines and avoiding SEO pitfalls. ## Make sure search engines can crawl your content One of the first steps to ensure effective SEO is making sure search engines can crawl and index your site content. Some of your site content may be dynamic. How can you make sure that search bots can view your content? ### Search bots like HTML Wix sites are built using editor components that are rendered into HTML. You can also customize the content and layout of your site by adding code using [Velo APIs](https://www.wix.com/velo/reference/). Search bots access your page content by sending an HTTP request to your page and reading the HTML content generated from the initial page rendering. At a later date, some search bots also render the page themselves and run any JavaScript code. Since not all search bots run JavaScript code, you should make sure the code returning the content you want to be indexed runs before your page is initially rendered. Content not included in the initial HTML output may be indexed after a long delay, indexed incorrectly, or not at all. For this reason, and also to increase the performance of your site, Wix uses server-side rendering (SSR) to render your page's components on the server and return them to the browser as HTML. How can you make sure your content is included in the SSR version of your page? ### Inside the onReady() function Anything that occurs in the [`onReady()`](https://dev.wix.com/docs/velo/velo-only-apis/$w/on-ready.md) function is rendered on the server, returned as HTML, and seen by search engines. > **Note:** As the onReady() may be called twice during the rendering process, once on the server and once in the browser, be aware to avoid any unwanted [side effects](https://dev.wix.com/docs/develop-websites/articles/coding-with-velo/frontend-code/page-rendering/about-page-rendering.md#side-effects). For most use cases, it's enough to just call the function in `onReady()`. For asynchronous functions and functions that run following a delay, the `onReady()` promise may resolve before the function's promise has a chance to resolve. In such cases, if you need the returned content to be indexed, you can block the `onReady()` from resolving until your function's promise resolves. You can indicate to the server that it should wait by returning the promise in `onReady()`. For example, let's say you have a repeater on your page that is populated with data queried from a database collection: ```javascript import wixData from 'wix-data'; $w.onReady(function () { $w("#myRepeater").onItemReady(($item, itemData, index) => { $item("#text").text = itemData.title; $item("#image").src = itemData.image; }); wixData.query("MyCollection") .find() .then((results) => { $w('#myRepeater').data = results.items; }); }); ``` In this example, the asynchronous query's promise may not resolve before the `onReady()` promise resolves, and the SSR version of your page may not include the queried repeater content. To ensure that the query resolves before `onReady()`, we can return the query in `onReady()`. See the change to Line 9: ```javascript import wixData from 'wix-data'; $w.onReady(function () { $w("#myRepeater").onItemReady(($item, itemData, index) => { $item("#text").text = itemData.title; $item("#image").src = itemData.image; }); return wixData.query("MyCollection") .find() .then((results) => { $w('#myRepeater').data = results.items; }); }); ``` Note that returning a promise in the `onReady()` function may affect the [performance](https://dev.wix.com/docs/develop-websites/articles/best-practices/best-practices-for-improving-performance-in-wix-sites-with-data.md) of your site, as all the data will load before the page is rendered. Since there is a tradeoff between SEO and performance, you might want to wait for the main content that is important for indexing, and let auxiliary content such as the time or weather information load later. >**Note:** > Database content that is loaded into page elements using a dataset (instead of code) is included in the SSR version of your page and will be seen by search engines. ### Test your site You can emulate a search bot to test your site's content by setting your browser's user agent to a specific bot. For example, you can emulate a Google bot and check which site content Google bots will initially crawl.
Show me how To emulate a Google bot in the Google Chrome browser: 1. Navigate to your published site. 2. Open [Developer Tools](https://developer.mozilla.org/en-US/docs/Learn/Common_questions/What_are_browser_developer_tools).  3. Click the 3-dots menu at the top right. 4. Select **More tools** \> **Network conditions**.
5. In the User Agent section, clear the **Select automatically** checkbox. 6. Select **Googlebot**.
7. Reload your site. Now you're viewing the page content Google bots will initially crawl and index.
## Links and SEO Search engines learn a lot about your site from internal site links. Since internal links impact your site's SEO, it's important to know how to set up and manage links on your site. ### Crawlable links Google bots only crawl links with an HTML `` tag with an `href` attribute. There are several ways to add crawlable `href` links to your Wix site: * Add a site menu to your site ([Wix Studio](https://support.wix.com/en/article/studio-editor-adding-and-managing-menus) | [Wix Editor](https://support.wix.com/en/article/adding-a-site-menu)). * Add a hyperlink to your text ([Wix Studio](https://support.wix.com/en/article/studio-editor-adding-and-customizing-text) | [Wix Editor](https://support.wix.com/en/article/wix-editor-adding-a-link-to-text)). * Use the link button to add a link to a clickable element such as a button or image. ![](https://wixmp-833713b177cebf373f611808.wixmp.com/images/05d83366dac5136f17daafad012de121.png) * Use a dataset to [connect URLs](https://support.wix.com/en/article/connecting-a-button-to-a-database-collection) from a database collection to clickable elements such as a buttons or images. Other methods of adding links to your site are not guaranteed to generate `href` links. You can add non-crawlable links to your site, but you should make sure that every page of your site is reachable from at least 1 crawlable link. ### Use page query parameters for pagination There are different ways to handle loading more page content when the content is too long to fit on a single page. One method is to use a numbered menu that loads a specific number of items for each numbered button that is clicked. If you are using a numbered menu for pagination and you want search engines to crawl and index each batch of content as an independent page, add a page query parameter to the link for each numbered button: `?page=`. Google views URLs with numbered page query parameters as links to independent pages. For example, let's say you have a numbered menu with several buttons:
![](https://d2x3xhvgiqkx42.cloudfront.net/12345678-1234-1234-1234-1234567890ab/0ca9e8ba-16ed-4cd8-a1e1-58d01c4420f7/2020/03/31/d1941aac-eb17-41a5-92a9-1d3bddafa4cc/bfef9323-9fa2-425c-a3e6-706575374078.png)
Google indexes the following as 2 separate pages: * `#button2` URL: `https://www.example.com?page=2` * `#button3` URL: `https://www.example.com?page=3` >**Note:** > For the link to the first page, don't set the query param to **?page=1** since you'll have 2 URLs pointing to the same page. Instead you can link to the main page. ### Does URL case matter? Google treats URLs as case sensitive. For example, Google views each of these URLs as unique: * `www.mysite.com/page.html` * `www.mysite.com/PAGE.html` Google recommends exposing either the uppercase or lowercase version of a URL, and not both. Even if you've set both URLs to point to the same page so that a site visitor reaches the same destination regardless, you may not want both versions out there on the web pointing to your page.   When multiple URLs point to the same page, Google chooses only one to represent the content on your page, and highlights only that URL in search results. And it might not be the URL you prefer. So which case should you choose, uppercase or lowercase? Lowercase is recommended, since it's more common and you can assume that at least some people will use the lowercase URL to link to your site. ## Images and SEO Site images play a significant role in determining your site's SEO. But how do search engines "read" your images? They check the image's alternative text (alt text), a short but meaningful description you can assign to your image. You can [add alt text](https://support.wix.com/en/article/studio-editor-adding-alt-text-to-images) to an image using the editor, but if you are displaying multiple images from a database collection, you can dynamically assign alternate text to your images with code using the [`alt`](https://dev.wix.com/docs/velo/velo-only-apis/$w/image/alt.md) image property, or by connecting to alternative text stored in a database collection using a dataset.
![](https://d2x3xhvgiqkx42.cloudfront.net/12345678-1234-1234-1234-1234567890ab/0ca9e8ba-16ed-4cd8-a1e1-58d01c4420f7/2020/04/05/32475c27-3da7-484f-bcca-6b3dc2bbba1f/24c74a65-a35d-4276-86b3-5f828c5ff24b.png)
## Dynamic pages and routers [Dynamic pages](https://support.wix.com/en/article/cms-about-dynamic-pages) and [router pages](https://dev.wix.com/docs/develop-websites/articles/coding-with-velo/routers/about-routers.md) are different than regular pages in that they contain dynamic data. SEO information for a dynamic or router page must be set dynamically, so that it reflects the real content the pages will hold when they are viewed. You can [define SEO information](https://support.wix.com/en/article/working-with-seo-settings-for-dynamic-pages) for your dynamic pages in the editor. You can dynamically [define the following SEO information](https://dev.wix.com/docs/develop-websites/articles/coding-with-velo/routers/add-seo-to-your-router.md) for your router pages: * [Meta tags](https://dev.wix.com/docs/develop-websites/articles/coding-with-velo/routers/add-seo-to-your-router.md#step-1--set-meta-tags-for-router-pages): Help search engines learn about your pages. * [Sitemap](https://dev.wix.com/docs/develop-websites/articles/coding-with-velo/routers/add-seo-to-your-router.md#step-2--create-the-sitemap-for-your-router): Help search engines find your pages. ## Build a great site structure Site structure refers to how you organize content on your site. For example, how do pages with your main content link to pages with subtopics? How many pages will a site visitor have to navigate to reach the content they want? Is the connection between pages with related content organized or random? Planning and mapping out an organized site structure will make it easier for search engines to crawl and index your site. Google awards [sitelinks](https://developers.google.com/search/docs/appearance/sitelinks?hl=en&visit_id=638694267737097538-2339297366&rd=1), additional links that appear beneath the main URL in a Google search, to sites with great site structures. Use [database collections](https://support.wix.com/en/article/creating-a-database-collection) and [dynamic pages](https://support.wix.com/en/article/creating-unlimited-site-pages-with-a-dynamic-page) to improve and organize your site structure. Consider the following factors when planning your site: * **Organized hierarchy:** Make sure the connection between pages on your site isn't random. Your site hierarchy should be organized and fairly shallow (not too many levels).  This is easy to accomplish using dynamic pages, where you can automatically generate multiple pages with similar structure and different content all relating to a main index page.  * **URL structure:** The structure of your URLs should mirror your navigation hierarchy. Each level of your site should be represented by a section of your URL containing an appropriate keyword. For example, if you've got a recipe site divided by cuisine type and then by course, a site visitor who selects Italian cuisine and then appetizer recipes should see a URL that reflects the site hierarchy: ![](https://d2x3xhvgiqkx42.cloudfront.net/12345678-1234-1234-1234-1234567890ab/0ca9e8ba-16ed-4cd8-a1e1-58d01c4420f7/2020/03/30/4eb3ef8a-8bbc-4640-8a38-30284c49662b/7269c6e8-05e5-4f2b-ac79-e0257fa455ca.png) You can automatically generate [structured URLs](https://support.wix.com/en/article/customizing-your-pages-url-structure-in-seo-settings) for your pages using dynamic list and item pages. * **Internal links:** Search engines use internal links to crawl the pages of your site. In general, the more internal links the better, but minimally every page on your website should have a link to and from another page on your site. You can create an index page or a dynamic list page to easily link to and from dynamic item pages on your site. >**Note:** > [SEO settings](https://support.wix.com/en/article/working-with-seo-settings-for-dynamic-pages) for dynamic pages are different than SEO settings for regular site pages. ## Set SEO data with the SEO API You can use the [SEO API](https://dev.wix.com/docs/velo/apis/wix-seo-frontend/introduction.md) to get and set SEO information for your site pages: * **Title tag:** Gets and sets the clickable heading that appears in search result pages. * **Link tags:** Gets and sets link relation attributes for multiple URLs that point to your page. For example, `rel canonical` lets search engines know which URL represents the master copy of your page. * **Meta tags:** Gets and sets metadata, additional information about your page. For example, you could use meta tags to control what content appears when your page is shared on Facebook, or to prevent search engines from indexing your page. * **Structured data markup:** Gets and sets additional information about your page in a standardized format that can be read by search engines. Search engines use this information to classify your page content and possibly display the search result for your page as [rich results](https://yoast.com/what-are-rich-snippets/) (snippets). For example, you can use structured data to let search engines know your page content is a recipe or contact information for an organization. >**Note:** > To ensure the SEO data you set will be read by search engines, make sure to set such data in the [`onReady()`](https://dev.wix.com/docs/velo/velo-only-apis/$w/on-ready.md) event handler. ## Track site events You can connect a 3rd-party [marketing tool](https://support.wix.com/en/article/about-marketing-integrations) such as Google Analytics or Facebook Pixel to your Wix site and collect valuable information about your visitors' behavior. Wix helps you track specific visitor events such as page views and purchases and report them to your integrated marketing tool. You can then use this information to optimize your site. If you want to track additional visitor actions not included in the default tracking events available using Wix marketing integrations, you can use the [Track Event API](https://dev.wix.com/docs/velo/apis/wix-window-frontend/track-event.md). For example, you can [add tracking code](https://dev.wix.com/docs/develop-websites/articles/code-tutorials/wix-editor-elements/sending-tracking-and-analytics-events.md) to a download button and report to a 3rd-party tool every time a visitor downloads a document.  ## See also * [Wix SEO Setup Checklist](https://support.wix.com/en/article/improving-your-online-presence-with-the-wix-seo-setup-checklist): A step-by-step plan designed to help you improve your site's SEO.  * [Wix SEO Guide](https://www.wix.com/seo/learn/wix-seo-guide): Everything you need to know to set up your website's SEO and get found online. * [Google SEO Guidelines](https://developers.google.com/search/docs/guides/get-started): Don't forget to carefully check Google's SEO guidelines. If you are experiencing SEO issues with your site, it's worthwhile to review Google's guidelines again and make sure you aren't inadvertently missing any important details. --- > Portal Navigation: > > - Append `.md` to any URL under `https://dev.wix.com/docs/` to get its markdown version. > - Pages are either content pages (article or reference text) or menu pages (a list of links to child pages). > - To get a menu page, truncate any URL to a parent path and append `.md` (e.g. `https://dev.wix.com/docs/sdk.md`, `https://dev.wix.com/docs/sdk/core-modules.md`). > - Top-level index of all portals: https://dev.wix.com/docs/llms.txt > - Full concatenated docs: https://dev.wix.com/docs/llms-full.txt ## Resource: Best Practices for Improving Performance in Wix Sites with Data ## Article: Best Practices for Improving Performance in Wix Sites with Data ## Article Link: https://dev.wix.com/docs/develop-websites/articles/best-practices/best-practices-for-improving-performance-in-wix-sites-with-data.md ## Article Content: # Velo: Best Practices for Improving Performance in Wix Sites with Data Using data from database collections or from a 3rd-party source can be a powerful tool to enhance your site's functionality. However, sending a lot of data to the browser from the server can be a time-consuming operation and negatively affect your site's loading time. Therefore, you want to minimize the amount of data that is sent from the server to the browser. This article lists a number of approaches you can use, whether you're using a dataset or the Data API, to improve your site's performance. ### Download Only the Items You Need When retrieving data on a page, you should only retrieve the items that you need. If you need to display a large number of items, you should consider only retrieving some of the items at first and then more items when needed. For example, suppose you want to display items from a collection in a repeater. Instead of showing all the items from your collection when the page loads, you can start by showing only some of the items. If necessary, you can add a way to load more items or to navigate through pages of items.
#### Elements Populated Using a Dataset Limiting the amount of data you retrieve when using datasets is easy. First, set the number of items to show in your repeater using the **Number of items to display** setting in your [dataset's settings](https://support.wix.com/en/article/adding-and-setting-up-a-dataset#step-2-setting-up-your-dataset-1). This not only limits the number of items displayed but also limits the number of items retrieved by the dataset at one time. The number of items retrieved at one time is also known as the dataset's page size. If applicable, you should also [set a filter on the dataset](https://dev.wix.com/docs/develop-websites/articles/databases/wix-data/displaying-data/display-database-collection-content-in-a-repeater.md) so it only retrieves the items you need. Next, you can optionally set up a way for site visitors to load more items or navigate through pages of items. This allows you to speed up the initial loading time of your page while still eventually displaying all items your site visitor wants to see. To do so, add a button or buttons to your page and set their click actions to the **Load More**, **Previous Page**, or **Next Page** actions.
![](https://d2x3xhvgiqkx42.cloudfront.net/12345678-1234-1234-1234-1234567890ab/dfff8cbb-ddcb-4376-8cae-3fedb2dd4458/2019/09/09/63ffe159-7950-4ac0-b0a6-fa39947cbdbc/a48e0137-7d0c-4f69-884c-4c74f86fbc7c.png)
**Learn more:** - Learn how to connect a button [here](https://support.wix.com/en/article/connecting-a-button-to-a-database-collection). - Learn more about dataset actions [here](https://support.wix.com/en/article/working-with-dataset-actions-for-buttons-and-images).
#### Elements Populated Using Code You can also limit the amount of data you retrieve when using code to populate elements. Start by using [filtering functions](https://www.wix.com/velo/reference/wix-data.WixDataFilter.html), such as `eq()` and `gt()`, to only query for relevant items. Then you can add the [`limit`](http://wix.to/94BuAAs/wix-data.WixDataQuery.html#limit) function to your query chain to only retrieve some of the relevant items at first. The limit you set also defines how many items are retrieved in each page of query results. When you need more items later, you can use the various [paging functions of the query result](https://www.wix.com/velo/reference/wix-data.WixDataQueryResult.html), such as `hasNext()` and `next()`, to retrieve additional pages of items. For example, here we populate a repeater with data from a query that only retrieves "active" items. We begin by only retrieving the first six items and show a "load more" button if there are additional items to show. When there are no more items to show, the "load more" button is collapsed. ```javascript import wixData from "wix-data"; let queryResults; $w.onReady(async function () { queryResults = await wixData .query("myCollection") .ascending("title") .eq("status", "active") .limit(6) .find(); $w("#myRepeater").data = queryResults.items; if (queryResults.hasNext()) { // load more button was set as collapsed on load $w("#loadMore").expand(); } }); export async function loadMore_click(event) { queryResults = await queryResults.next(); let data = $w("#myRepeater").data; $w("#myRepeater").data = data.concat(queryResults.items); if (!queryResults.hasNext()) { $w("#loadMore").collapse(); } } export function myRepeater_itemReady($item, itemData, index) { // set up repeater items as they are created $item("#titleText").text = itemData.title; $item("#container").background.src = itemData.pic; } ``` ### Delay Loading Data Another approach that can be used when you have a lot of data you want to display is delayed loading. When using delayed loading, you first download a small number of items, which will load quickly, and present those items to site visitors. You can then download the rest of the data at a later time. For example, suppose you want to display items from a collection in a repeater. Instead of showing all the items from your collection when the page loads, you can start by showing only the items site visitors see at first. Typically, you want to download enough data to populate what a site visitor sees when the page loads (known as "above the fold"). Additional items, those that a visitor would have to scroll to see (known as "below the fold"), you can download in the background after the page has loaded.
![](https://d2x3xhvgiqkx42.cloudfront.net/12345678-1234-1234-1234-1234567890ab/dfff8cbb-ddcb-4376-8cae-3fedb2dd4458/2020/02/09/677b415d-cbfa-4478-bf36-9f0837da06e8/bb26a9be-59c8-45f8-8205-1df3d950bb8e.png)
#### Elements Populated Using a Dataset Delayed loading of data when using datasets requires you to change the settings of the dataset and to add a little bit of code to your page. First, set the number of items to show in your repeater using the **Number of items to display** setting in your [dataset's settings](https://support.wix.com/en/article/adding-and-setting-up-a-dataset#step-2-setting-up-your-dataset-1). Set it to the number of items that are shown above the fold. This not only limits the number of items displayed but also limits the number of items retrieved by the dataset at one time. The number of items retrieved at one time is also known as the dataset's page size. If applicable, you should also [set a filter on the dataset](https://dev.wix.com/docs/develop-websites/articles/databases/wix-data/displaying-data/display-database-collection-content-in-a-repeater.md) so it only retrieves the items you need. Next, add code to your page that incrementally downloads the rest of the items from your collection one page at a time and displays them in the repeater. This code sets an event handler that runs when the dataset has loaded its first set of data. The event handler checks whether there are any additional pages of data to download. If there is, it downloads a page of data and then checks again, until there are no more pages left. ```javascript $w.onReady(function () { $w("#myDS").onReady(async () => { while ( $w("#myDS").getCurrentPageIndex() < $w("#myDS").getTotalPageCount() ) { await $w("#myDS").loadMore(); } }); }); ``` #### Elements Populated Using Code Start by using [filtering functions](https://www.wix.com/velo/reference/wix-data.WixDataFilter.html), such as `eq()` and `gt()`, to only query for relevant items. Then you can add the [`limit`](http://wix.to/94BuAAs/wix-data.WixDataQuery.html#limit) function to your query chain to only retrieve some of the relevant items at first. The limit you set also defines how many items are retrieved in each page of query results. Limit your query to the number of items that are shown above the fold. Once those items are loaded, you can use the various [paging functions of the query result](https://www.wix.com/velo/reference/wix-data.WixDataQueryResult.html), such as `hasNext()` and `next()`, to retrieve additional pages of items. For example, here we populate a repeater with data from a query that only retrieves "active" items. We begin by only retrieving the first six items, which take up all the space above the fold on our site. After those items are loaded, we query the remaining items and add them to the repeater as they are retrieved. ```javascript import wixData from "wix-data"; let queryResults; $w.onReady(async function () { queryResults = await wixData.query("Test").ascending("title").limit(6).find(); $w("#myRepeater").data = queryResults.items; loadRemaining(); }); async function loadRemaining() { while (queryResults.hasNext()) { queryResults = await queryResults.next(); let data = $w("#myRepeater").data; $w("#myRepeater").data = data.concat(queryResults.items); } } export function myRepeater_itemReady($item, itemData, index) { // set up repeater items as they are created $item("#titleText").text = itemData.title; $item("#container").background.src = itemData.pic; } ``` ### Download Only the Fields You Need When retrieving data on a page, you can retrieve only the specific fields that you need. Oftentimes, you will be retrieving data from a collection or 3rd-party source, but only use a subset of the data you retrieve. On the server, in backend code, you can map the large set of fields to the smaller subset that you actually need, and then send only that smaller subset to the browser. For example, suppose you have a collection that contains a large number of fields. To display the information you have an index page that shows just a bit of information about each item. Then, when a site visitor clicks a link, you display the rest of the data on a page dedicated to displaying one item at a time.
When loading the index page, there is no reason to retrieve all of the data that exists in the collection for each item since you will only be displaying part of that data. Instead, for the index page, you can retrieve the collection data in a [backend web method](https://dev.wix.com/docs/develop-websites/articles/coding-with-velo/backend-code/web-modules/call-backend-code-from-the-frontend.md). Then, in backend code on the server, you can map the retrieved data objects to objects with fewer properties, holding only the data you need. That way, a smaller amount of data needs to make the time-consuming trip from the server to the browser. ```javascript // in backend/queries.web.js import { Permissions, webMethod } from "wix-web-module"; export const getTeamData = webMethod(Permissions.Anyone, async () => { let results = await wixData.query("Team").find(); return results.items.map((item) => { return { _id: item._id, name: item.title, photo: item.photo, jobTitle: item.jobTitle, link: item["link-Team-title"], }; }); }); ``` Now, when you call your backend function from the browser, only the data you need is returned. You can use that data as usual to populate your repeater. ```javascript import { getTeamData } from "backend/queries.web"; $w.onReady(async function () { let data = await getTeamData(); $w("#teamRepeater").data = data; }); export function teamRepeater_itemReady($item, itemData, index) { $item("#teamImage").src = itemData.photo; $item("#teamMemberName").text = itemData.name; $item("#jobTitle").text = itemData.jobTitle; $item("#readMoreButton").link = itemData.link; } ``` When loading the item page, you don't need to add any extra code since you'll only be retrieving one item from your collection. ### Store Downloaded Data Instead of Refetching Sometimes, when a page is loading, it is better to download all the data you will eventually need and store it for later instead of downloading it incrementally as it is needed. This approach is often used when the data that is displayed will change based on a visitor interacting with it. Since you've downloaded all the data upfront, when you need to change the data that is displayed, the page transitions smoothly. If you would have to download new data every time a visitor interacts with the page, the page would react slowly and you might end up downloading the same data several times. To save some of the initial page loading time, you can combine this approach with only downloading the fields you need, as described above. For example, suppose you have an index page that displays a large number of items, but it is filterable, so they are not all shown at once. When a site visitor chooses a filter from a dropdown, the subset of items that you display changes.
![](https://d2x3xhvgiqkx42.cloudfront.net/12345678-1234-1234-1234-1234567890ab/dfff8cbb-ddcb-4376-8cae-3fedb2dd4458/2019/09/10/aa93f7b6-706c-4806-a191-087d0ce35269/1c6dafd7-a844-492d-89b2-46bbccd18641.png)
Here we can download all of the items when the page loads and store it in a global variable. When the filter changes, we don't have to download any new data. Instead, we just pull the relevant items from the data we already downloaded. Switching between filters will be very fast since all the work is done in the browser. Again, we retrieve the collection data in a [backend web method](https://dev.wix.com/docs/develop-websites/articles/coding-with-velo/backend-code/web-modules/about-web-modules.md#functions-in-web-modules). Then map the retrieved data objects to get only the fields we need. In this case, we added the **department** field. ```javascript import { Permissions, webMethod } from "wix-web-module"; export const getTeamData = webMethod(Permissions.Anyone, async () => { let results = await wixData.query("Team").find(); return results.items.map((item) => { return { _id: item._id, name: item.title, photo: item.photo, jobTitle: item.jobTitle, department: item.department, link: item["link-Team-title"], }; }); }); ``` Then, when the page loads, we call the backend function from the browser and store the retrieved data in a global variable. Every time we need to get a new subset of the data, we call the `getDepartmentData` function which filters out the data we don't need. We call it once when the page loads and then every time the value in the dropdown element changes. ```javascript import { getTeamData } from "backend/queries.web"; let teamData; $w.onReady(async function () { teamData = await getTeamData(); $w("#teamRepeater").data = getDepartmentData("Management"); }); function getDepartmentData(dept) { return teamData.filter((member) => member.department === dept); } export function departmentDropdown_change(event) { let department = event.target.value; $w("#teamRepeater").data = getDepartmentData(event.target.value); } export function teamRepeater_itemReady($item, itemData, index) { $item("#teamImage").src = itemData.photo; $item("#teamMemberName").text = itemData.name; $item("#jobTitle").text = itemData.jobTitle; $item("#readMoreButton").link = itemData.link; } ``` ### Pass Data Between Pages Often you use the same data on more than one page of your site. Instead of retrieving the data on each page that you need it, you can retrieve it just once the first time you need it. Then, you can use the **wix-storage-frontend** API to store the data to be used on other pages. For example, here we get some data that will be used on multiple pages. This code can be used on each of those pages, or you can add it to the site code if you need the data on all pages. When the page is loading we check the local storage to see if it already contains data. If it does, we simply parse the string data in a JSON object and store it in the data variable to be used elsewhere on the page. If the data doesn't already exist in storage, we query it from a collection, stringify it, and store it both in the data variable to be used elsewhere on the page and in local storage to be used on other pages. ```javascript import { local } from "wix-storage-frontend"; import wixData from "wix-data"; let data; $w.onReady(async function () { data = local.getItem("myData"); if (data) { data = JSON.parse(data); } else { let results = await wixData.query("myCollection").find(); data = results.items; local.setItem("myData", JSON.stringify(results.items)); } }); ``` In the example above we use local storage. Depending on your site's specific needs, you may want to use another type of storage. To do so, you simply substitute the type you want to use in the import statement. To learn more about the types of storage, see the [API Reference](https://www.wix.com/velo/reference/wix-storage.html). ### Use Dynamic Pages Sometimes, you create a page with data that doesn't necessarily need to be a dynamic page. Instead, you can use a regular page and add a dataset to it. For example, if you have an index page that shows all the elements from a collection, you can use a regular page with a dataset to retrieve and display your collection data. In such cases, it is often better to use a dynamic page anyway. You can set the dynamic page without any fields added to its URL so it does not filter the data and the page receives all your collection items. Because your page is a dynamic page, it is known that the page expects data and the data is therefore retrieved while the page is being rendered. On the other hand, when you use a regular page, data is retrieved much later. ### Use Bulk Data Operations When possible, use the bulk operations of the **wix-data** API instead of repeatedly calling the single-item version of the function. For example, instead of repeatedly calling [`insert()`](https://www.wix.com/velo/reference/wix-data.html#insert) to add an array of items to a collection one-by-one, you can call [`bulkInsert()`](https://www.wix.com/velo/reference/wix-data.html#bulkInsert) and add all of the items at once. ### Add Indexes to Your Data Collection
**Important:** Adding an index to a collection is in open beta and not yet available to all users.
You can add [indexes](https://support.wix.com/en/article/velo-indexes-and-wix-data-collections) to your data collection to optimize the performance of database queries and improve data retrieval speed. Without indexes, a query runs filter and sort operations that iterate through every item in the collection. For a small collection, the query time might be negligible. But as the quantity of data increases, each query takes longer to process. When you [add an index](https://support.wix.com/en/article/content-manager-adding-an-index-for-your-collection), you are providing a map of the collection's data based on specific database fields. The database uses this map to quickly identify and retrieve the rows that match a particular value, significantly reducing query response times. You can also improve the performance of sorting operations with indexes. When you create an index on the column being sorted, you enable the database to arrange data in the desired order without performing a full table scan, reducing sort times and improving query performance. Note that while indexes can enhance data retrieval speeds, they can slightly slow down write operations because these operations include updating indexes for each change in addition to making the actual change. --- > Portal Navigation: > > - Append `.md` to any URL under `https://dev.wix.com/docs/` to get its markdown version. > - Pages are either content pages (article or reference text) or menu pages (a list of links to child pages). > - To get a menu page, truncate any URL to a parent path and append `.md` (e.g. `https://dev.wix.com/docs/sdk.md`, `https://dev.wix.com/docs/sdk/core-modules.md`). > - Top-level index of all portals: https://dev.wix.com/docs/llms.txt > - Full concatenated docs: https://dev.wix.com/docs/llms-full.txt ## Resource: Contact Us ## Article: Contact Us ## Article Link: https://dev.wix.com/docs/develop-websites/articles/contact-us/contact-us.md ## Article Content: # Contact us Can't find an answer and need some help? There’s a couple of ways to get in touch. - [Contact support](https://www.wix.com/support-chatbot?nodeId=3809b091-762a-4a1a-acd7-a6b0dabc9c5a&referral=veloLeftTree): Open a ticket and we'll get back to you within 72 hours. - [Join us on Discord](https://discord.gg/aN9ubnrs2D): Connect with our team and network with other site developers. --- > Portal Navigation: > > - Append `.md` to any URL under `https://dev.wix.com/docs/` to get its markdown version. > - Pages are either content pages (article or reference text) or menu pages (a list of links to child pages). > - To get a menu page, truncate any URL to a parent path and append `.md` (e.g. `https://dev.wix.com/docs/sdk.md`, `https://dev.wix.com/docs/sdk/core-modules.md`). > - Top-level index of all portals: https://dev.wix.com/docs/llms.txt > - Full concatenated docs: https://dev.wix.com/docs/llms-full.txt ## Resource: Submit Support Requests ## Article: Submit Support Requests ## Article Link: https://dev.wix.com/docs/develop-websites/articles/contact-us/submit-support-requests.md ## Article Content: # Submit Support Requests As you develop and maintain your site, you may encounter error messages, technical glitches, or unexpected behavior. In these cases, you can open a support request using the Wix support chatbot. Follow these steps to make a successful support request. [](https://www.wix.com/support-chatbot?nodeId=3809b091-762a-4a1a-acd7-a6b0dabc9c5a&referral=veloLeftTree) ## Step 1 | Retrieve your site URL Before engaging with the Wix support chatbot, retrieve your site's URL. ## Step 2 | Locate your request ID (recommended) If the issue results from using Wix APIs in your site's code, interacting with the site dashboard, or through one of Wix's [frontend interfaces](https://dev.wix.com/docs/develop-websites/articles/get-started/the-wix-ecosystem.md), you must include the associated request ID. Every action that makes a call to Wix’s APIs is assigned a unique request ID, which is essential for tracking the root cause of an issue. This ID is included as a response header with the key name `x-wix-request-id`. For example, `1734427301.191556792796277844`. Many errors in the site dashboard display pop-up notifications at the top of the screen. These notifications often include the request ID. If you don’t see a request ID in an error notification, you need to recreate the issue to retrieve a request ID.
For issues resulting from your site's API requests to Wix: 1. Make the request again using `curl` or any other network request tool that allows you to view responses. 2. In the response header, locate the request ID under the key `x-wix-request-id`.
For issues occurring in the site dashboard, app dashboard, or site editor: 1. Trigger an action that causes the error. For example, by clicking a button. 2. Open your browser's developer tools. 3. Select the **Network** panel. 4. In the **Name** column, click the network request associated with the error. Additional request information appears. 5. Select the **Headers** tab. The request ID is located in the **Response Headers** section under the key `x-wix-request-id`.
## Step 3 | Describe the issue When the support chatbot asks for a description and the option to attach documents, you should be prepared to provide a step-by-step description of what led to the issue. Compile as many relevant details as possible, such as: - A short explanation of the issue. - Screenshots and/or videos of each stage of the process. - URLs of the pages involved in the issue. - Configuration and setup information associated with each step.
Caution: Do not include any secret keys in your description.
- Include the complete request and response of any failed network requests. - Relevant console error logs. ## Step 4 | Open the request Now you're ready to open your support request. 1. Open the [Wix support chatbot](https://www.wix.com/support-chatbot?&nodeId=e0bd5aa6-d9d8-4627-a981-17dbbb0c78db&referral=discord). 1. Begin interacting with the chatbot. Provide the information you gathered above whenever the bot requests it. --- ## [Develop Websites with SDK](https://dev.wix.com/docs/develop-websites-sdk.md) > Extend Wix sites using the Wix SDK for frontend and backend development with React-based blocks > Portal Navigation: > > - Append `.md` to any URL under `https://dev.wix.com/docs/` to get its markdown version. > - Pages are either content pages (article or reference text) or menu pages (a list of links to child pages). > - To get a menu page, truncate any URL to a parent path and append `.md` (e.g. `https://dev.wix.com/docs/sdk.md`, `https://dev.wix.com/docs/sdk/core-modules.md`). > - Top-level index of all portals: https://dev.wix.com/docs/llms.txt > - Full concatenated docs: https://dev.wix.com/docs/llms-full.txt ## Resource: About Developing Websites ## Article: About Developing Websites ## Article Link: https://dev.wix.com/docs/develop-websites-sdk/get-started/overview/about-developing-websites.md ## Article Content: # About Developing Websites Developing websites on Wix with the [JavaScript SDK](https://dev.wix.com/docs/sdk.md) offers a unique blend of flexibility, ease of use, and powerful features. Whether you're a seasoned developer or just starting, Wix provides the tools and technologies needed to craft visually appealing and fully functional dynamic web applications: - **Interactive UI:** Use Wix's powerful editors to build sites with custom UI, behaviors, and interactions. - **Full-stack development:** Leverage a robust suite of developer tools and Wix APIs to build and deploy with efficiency and security. Integrate your code with the editor UI to enhance and extend its capabilities. - **Content management:** Use the Wix CMS and its data APIs to manage, serve, and display content dynamically at scale. - **Wix business solutions:** Connect directly to production-ready solutions like eCommerce and Bookings, and extend them to deliver a tailored experience for site visitors. - **Zero-setup backend:** Implement complex workflows and automations with a fully supported Node.js environment. Wix handles infrastructure, hosting, and scaling so you can focus on your code. - **3rd-party integrations:** Expand a site's capabilities by adding apps, npm packages, and external services such as payment providers and marketing tools. ## Technologies Build with trusted, industry-standard tools tailored to Wix's platform. Utilize your existing skills and leverage the following technologies to create and manage dynamic web applications: - **JavaScript**: When developing a site with the SDK, you write both frontend and backend code in JavaScript, calling the SDK's APIs to incorporate interactive and dynamic functionality. - **Node.js**: Wix provides a robust Node.js environment for running your backend code. - **MongoDB**: Wix uses MongoDB as the database for its CMS system, offering a flexible and scalable solution for managing and storing content. - **Type safety**: The SDK provides full TypeScript support with comprehensive type definitions for enhanced development experience. ## Development environments Pick the environment that fits how you build. Wix offers several [development environments](https://dev.wix.com/docs/develop-websites-sdk/get-started/overview/development-environments.md) to match your workflow: - **Wix Studio:** Use the built-in [code editor](https://dev.wix.com/docs/develop-websites-sdk/code-your-site/developer-environments/ides/code-editor/about-the-code-editor.md) in the browser to write and manage code alongside the visual site editor. No setup required. - **Local IDE:** Use a [local IDE](https://dev.wix.com/docs/develop-websites-sdk/code-your-site/developer-environments/ides/git-integration/about-the-local-editor.md), such as VS Code, for the flexibility and power of a full-featured development environment on your own machine. Set up via GitHub integration and manage your project using the CLI. Pair with [AI tools](#wix-ai-tools) to provide local AI coding clients the context they need to build and manage your project. - **Wix IDE (Beta):** Use the [Wix IDE](https://dev.wix.com/docs/develop-websites-sdk/code-your-site/developer-environments/ides/wix-ide/about-the-wix-ide.md), a VS Code-based online IDE for Wix Studio sites. ## Wix AI tools For AI coding clients like Claude Code, Cursor, and VS Code, install the [Wix Plugin](https://dev.wix.com/docs/api-reference/articles/ai-tools/about-the-wix-plugin.md) to give your AI client the context it needs to build and manage your project. The Wix Plugin includes: - [Wix Skills](https://github.com/wix/skills/blob/main/skills): A collection of self-contained instruction sets for Wix development tasks. This includes the Wix Headless skill, which can scaffold and deploy a complete headless project from a single prompt. - [Wix MCP](https://dev.wix.com/docs/api-reference/articles/ai-tools/wix-mcp/about-the-wix-mcp.md): A Model Context Protocol server that lets your AI tool search Wix docs, scaffold code, and call Wix APIs directly from your IDE. To install just Wix Skills, run: ```bash npx skills add wix/skills ``` > **Note:** Add `-g` to install globally and make Wix Skills available across all your projects. ### Programmatic docs access Beyond the Wix Plugin, you can pull Wix docs into any tool or workflow: - **llms.txt index:** Browse a structured index of all documentation at [dev.wix.com/docs/llms.txt](https://dev.wix.com/docs/llms.txt.md). - **Markdown format:** Append `.md` to any documentation page URL to retrieve the Markdown version of that page. - **Page menu:** Use the **Ask Assistant** dropdown on any documentation page to copy the page as Markdown or get a direct link to the Markdown version. ## Developer journey Ready to get started? Here's what to expect at each stage of the development process, from a blank canvas to a fully functioning site: - **Get started:** Explore the [Wix ecosystem](https://dev.wix.com/docs/develop-websites-sdk/get-started/overview/the-wix-ecosystem.md) and [supported features](https://dev.wix.com/docs/develop-websites-sdk/get-started/overview/site-development-features.md). Browse the [API Reference](https://dev.wix.com/docs/api-reference?apiView=SDK.md) and review potential [3rd-party integrations](https://dev.wix.com/docs/develop-websites-sdk/get-started/overview/integrate-with-3rd-parties.md) to see what you can build. Take some time to review best practices and any limitations to ensure a smooth development process. - **Code:** [Start coding](https://dev.wix.com/docs/develop-websites-sdk/code-your-site/code-with-java-script/about-java-script-support.md) using 1 or more Wix [development environments](https://dev.wix.com/docs/develop-websites-sdk/get-started/overview/development-environments.md) to write, manage, and debug your code. Build both frontend and backend to deliver a fully functional and user-friendly site. - **Test:** Preview and thoroughly test your site throughout development. Use the built-in tools to test your code in isolation and as a whole. Create [test sites](https://dev.wix.com/docs/develop-websites-sdk/test-your-site/work-with-test-sites/about-test-sites.md) to experiment without affecting a live site, and use [logs](https://dev.wix.com/docs/develop-websites-sdk/test-your-site/work-with-wix-logs/about-wix-logs.md) to monitor and debug issues. - **Publish:** Use the editor or the [CLI](https://dev.wix.com/docs/develop-websites-sdk/code-your-site/developer-environments/ides/git-integration/about-git-integration-with-wix-cli.md) to publish your site once you've thoroughly tested it. - **Maintain:** Monitor your site using [logs](https://dev.wix.com/docs/develop-websites-sdk/test-your-site/work-with-wix-logs/about-wix-logs.md) and the [monitoring dashboard](https://dev.wix.com/docs/develop-websites-sdk/maintain-your-site/monitor-your-site/about-the-monitoring-dashboard.md) to track performance and resource usage. Consider [upgrading your premium plan](https://dev.wix.com/docs/develop-websites-sdk/maintain-your-site/scale-your-site/about-premium-plans.md) to scale your site effectively and avoid hitting plan limitations. - **Grow:** Become a [Certified Wix Partner](https://www.wix.com/partners/partner-program) to offer your development services or sell apps to an audience of 250M+ users. ## Community - Join the [Wix Developers Discord server](https://discord.gg/47gUT9KabP) and [forum](https://forum.wixstudio.com/) to ask questions, discuss complex topics, and collaborate with other Studio creators. - Contact [customer care](https://www.wix.com/contact) for support with platform issues, billing, or account questions. - Follow the Wix [changelog](https://dev.wix.com/docs/changelog.md) for up-to-date information about Wix features and APIs. - [Subscribe](https://www.wixforms.com/f/7394355343209268224) to the Wix newsletter to receive the latest updates and feature announcements. ## Next steps Start building or explore the resources below to go deeper: - Explore [the Wix Ecosystem](https://dev.wix.com/docs/develop-websites-sdk/get-started/overview/the-wix-ecosystem.md) and browse the [SDK Reference](https://dev.wix.com/docs/sdk.md) to understand the platform and what you can build. - Browse [tutorials](https://dev.wix.com/docs/develop-websites-sdk/get-started/tutorials/tutorials-overview.md) and [code examples](https://dev.wix.com/docs/coding-examples.md) for step-by-step guidance on implementing functionality for a site. - Follow the [Quick Start](https://dev.wix.com/docs/develop-websites-sdk/get-started/quick-start/quick-start.md) to start building. Coming from Velo? Learn how to [migrate from Velo to the SDK](https://dev.wix.com/docs/develop-websites/articles/coding-with-velo/develop-with-the-sdk/velo-to-sdk-api-mapping.md). --- > Portal Navigation: > > - Append `.md` to any URL under `https://dev.wix.com/docs/` to get its markdown version. > - Pages are either content pages (article or reference text) or menu pages (a list of links to child pages). > - To get a menu page, truncate any URL to a parent path and append `.md` (e.g. `https://dev.wix.com/docs/sdk.md`, `https://dev.wix.com/docs/sdk/core-modules.md`). > - Top-level index of all portals: https://dev.wix.com/docs/llms.txt > - Full concatenated docs: https://dev.wix.com/docs/llms-full.txt ## Resource: The Wix Ecosystem ## Article: The Wix Ecosystem ## Article Link: https://dev.wix.com/docs/develop-websites-sdk/get-started/overview/the-wix-ecosystem.md ## Article Content: # The Wix Ecosystem Before writing code for a site, it's important to have a basic understanding of the greater Wix ecosystem. Once you understand what each part of the ecosystem does and how they work together, you'll be ready to start writing code that interacts with the various parts of the ecosystem. The Wix ecosystem includes a range of tools and services that enable you to build a web presence and manage your business online. The following diagram shows the main parts of the Wix ecosystem: ![Wix ecosystem diagram](https://wixmp-833713b177cebf373f611808.wixmp.com/images/45a8810238260dae1fdc35cebe2d786b.png) ## Site creation Wix offers multiple approaches for creating websites, each designed for different needs and technical preferences. ### Drag-and-drop editors Wix offers the following drag-and-drop editors: - [Wix Studio](https://support.wix.com/en/wix-studio): An advanced web creation platform for agencies, freelancers, and enterprises. - [Wix Editor](https://support.wix.com/en/using-the-wix-editor): Wix's classic site builder. - [Wix Harmony](https://dev.wix.com/docs/develop-websites-sdk/get-started/overview/about-wix-harmony.md): An AI-powered editor designed for intuitive web creation. Note that Wix Harmony doesn't support custom code. Learn more about [Wix Harmony](https://dev.wix.com/docs/develop-websites-sdk/get-started/overview/about-wix-harmony.md). These editors offer a visual, drag-and-drop interface with AI-powered features that lets users: - Add and customize site pages, elements, widgets, and more. - Customize site functionality with code. - Manage site content including text and media. - Add and manage Wix business solutions, such as Wix Stores or Wix Bookings. - Add and manage apps built by 3rd-party developers. Sites built with these editors have a Wix-powered frontend. These are the sites documented in the [Develop Websites](https://dev.wix.com/docs/develop-websites-sdk.md) portal. Here's what Wix Studio looks like: ![Wix Studio](https://wixmp-833713b177cebf373f611808.wixmp.com/images/602c65a5abe17eba3931fee886a3cbf8.png) ### Other site creation approaches While the Develop Websites documentation focuses on drag-and-drop editor development, Wix offers additional site creation approaches: - **[Wix Vibe](https://support.wix.com/en/article/wix-vibe-an-overview)**: A conversational website creation tool that builds sites through natural language prompts. While Vibe includes visual editing components, these aren't as fully-featured as the dedicated drag-and-drop editors. Sites built with Vibe take the form of Wix-managed Headless sites, with a React based frontend and use the Astro framework. - **[Wix Headless](https://dev.wix.com/docs/go-headless.md)**: Enables developers to build custom frontends using any technology while leveraging Wix's backend infrastructure. Sites built with Wix Vibe or Wix Headless are documented in the [Go Headless](https://dev.wix.com/docs/go-headless.md) portal. ## Site management Once you create a site, Wix provides tools for ongoing management and operation. ### Site dashboard The dashboard is the site's control center. Whether a site was built using the drag-and-drop editors, created with Vibe, or developed as a headless project, all sites use the same unified dashboard. Only you and your collaborators have access to the dashboard. Most dashboard functionality comes out of the box and enables you to set up, manage, and operate a site and its installed apps. You can also design and code custom dashboard pages. In the dashboard, you can: - Configure site settings. - Manage site content including text and media. - Manage payments, customers, online marketing, automations, and more. - Add and manage business solutions, such as Wix Stores or Wix Bookings. - Add and manage apps built by 3rd-party developers. - Monitor site metrics, such as SEO performance, sales reports, and site traffic. Here's what the dashboard looks like: ![Wix dashboard](https://wixmp-833713b177cebf373f611808.wixmp.com/images/46cca8591e446c4e032473b4c8b65301.jpeg) ## Development and integration Wix's platform offers an extensive array of services and tools for developers to integrate with and extend the Wix ecosystem. ### APIs Wix APIs give you access to Wix's services and resources, providing a gateway that enables you to easily integrate with different areas of the Wix ecosystem. APIs include: - **Business solutions**: Interact with Wix's business solutions, such as Stores, Bookings, Events, and Restaurants. - **Payments**: Manage payments with Pricing Plans, Payments, and Billing modules. - **CRM and Members**: Interact with and manage site contacts and members. - **Data**: Work with data stored in Wix-hosted and external databases using type-safe operations. - **Automations**: Streamline work processes and send notifications. - **Web methods**: Create secure backend functions accessible from the frontend. ### CMS Wix's Content Management System (CMS) is where you manage your site's content, such as text, media, videos, products, and booking services. The CMS seamlessly integrates with Wix's site-building tools, providing a user-friendly interface for creating and editing content, as well as mechanisms for easily connecting CMS data to site elements. With the SDK, you can programmatically interact with CMS content using type-safe APIs. ### Wix business solutions At the heart of Wix's backend are its native business solutions, which cater to diverse industries with advanced solutions for bookings, online stores, events, payments, eCommerce, loyalty programs, and more. These apps built by Wix are designed to integrate seamlessly with Wix websites, as well as with external clients that take advantage of Wix's [headless](https://dev.wix.com/docs/go-headless.md) infrastructure. The JavaScript SDK provides dedicated modules for interacting with these business solutions. ### Apps When building a site, you can install apps built by Wix or 3rd-party app developers from the [Wix App Market](https://www.wix.com/app-market/) to add pre-built functionality to your site. #### 3rd-party apps Wix apps are packages of reusable functionality, created by 3rd-party vendors, that you can add to your site. They can contain anything from a simple site widget to a complete business solution, with backend logic, user interfaces, and database collections. Wix apps are listed in the [Wix App Market](https://www.wix.com/app-market/). You can also [build your own apps](https://dev.wix.com/docs/build-apps.md) to share functionality across multiple sites or to offer functionality you've built to other Wix users. ## What's next - [Quick Start](https://dev.wix.com/docs/develop-websites-sdk/get-started/quick-start/quick-start.md) - [Development Environments](https://dev.wix.com/docs/develop-websites-sdk/get-started/overview/development-environments.md) --- > Portal Navigation: > > - Append `.md` to any URL under `https://dev.wix.com/docs/` to get its markdown version. > - Pages are either content pages (article or reference text) or menu pages (a list of links to child pages). > - To get a menu page, truncate any URL to a parent path and append `.md` (e.g. `https://dev.wix.com/docs/sdk.md`, `https://dev.wix.com/docs/sdk/core-modules.md`). > - Top-level index of all portals: https://dev.wix.com/docs/llms.txt > - Full concatenated docs: https://dev.wix.com/docs/llms-full.txt ## Resource: Site Development Features ## Article: Site Development Features ## Article Link: https://dev.wix.com/docs/develop-websites-sdk/get-started/overview/site-development-features.md ## Article Content: # Site Development Features Wix offers a robust suite of features that support an efficient and productive development workflow. This overview covers the key features that help you develop, test, publish, and maintain custom sites with advanced functionality. ## Developer environment Leverage Wix's suite of tools and IDE options designed for efficient site development. **IDE options**: Choose from the code editor built into Wix Studio and the Wix Editor, the online Wix IDE, or a local IDE like VS Code. **Git integration and Wix CLI**: When working in a local IDE, use Git and the Wix CLI to manage version control and local development, allowing easy collaboration, change tracking, and branching. **Secrets Manager**: Store sensitive information securely with the Secrets Manager, which keeps API keys and other sensitive credentials hidden from your code. **Packages and apps**: Add functionality with npm packages, Velo packages, or custom apps tailored to your project's needs. **AI Assistants**: Use AI-powered tools to speed up development, offering code suggestions, debugging support, and productivity enhancements. ## Build a custom backend Develop backend code, hosted by Wix, to build advanced features and integrations, all managed securely on the platform. **Web modules**: Write backend code that securely handles business logic and can easily be called from the frontend. **Recurring jobs**: Automate tasks, such as data updates and email notifications, to run on a regular schedule. **HTTP functions**: Expose your site functionality as a service by creating endpoints that external applications can call, opening up integration possibilities. **Routers**: Take full control of your site's URL structure and routing by customizing how requests to specified paths are handled. **Event handlers**: Add backend event handlers to respond to actions that occur on your site, such as a new contact being created or a customer abandoning their cart. ## Build a custom frontend Enhance the pages you've designed in the Wix editor by adding custom code to create interactive and dynamic user interfaces, allowing you to fully tailor the user experience. **$w API**: The $w API lets you interact with UI elements. With support for over 100 element types, from simple elements like images, buttons, and input fields to advanced components like repeaters, galleries, and multi-state boxes, the $w API enables you to add interactivity, manage user input, and customize element behavior on the page. **CSS**: Use CSS to customize the appearance of your site, from colors and fonts to sizes and positions of elements. Work with the existing Wix CSS classes or create your own custom classes. **Custom elements**: Create custom HTML elements and integrate them seamlessly into your site, enabling unique functionality and design beyond what the built-in components provide. ## Data Manage your site's content and data with Wix's integrated database solutions, allowing for dynamic, data-driven web experiences. **Wix CMS**: Manage structured content with the Wix CMS, allowing you to store, query, and display data programmatically or using no-code features. **External databases**: Connect to external databases, so you can integrate data from other sources using the same APIs and no-code features that you use with native Wix data. **Dynamic pages**: Use dynamic pages to create multiple pages from a single design by connecting page elements to database content. Use the Dataset API to programmatically fine-tune the functionality of dynamic pages. **Data API**: Access and manipulate CMS and external content programmatically with the Data API, enabling you to create, read, update, and delete data directly from your code. ## Wix business solutions Leverage Wix's robust suite of business solutions to incorporate features such as eCommerce and bookings, while having the flexibility to extend and integrate with these solutions to fit your business needs. **Wix business solution APIs**: Integrate directly with Wix's business solutions, such as Wix Bookings and Wix Stores, using dedicated APIs to access and manage bookings, orders, and more. **Service plugins**: Enhance Wix business solutions by creating custom service plugins that inject your own custom logic or integrate 3rd-party services into Wix flows. For example, you can create a service plugin to customize price calculations for services booked using Wix Bookings or to add an unsupported payment provider as an additional payment option. **Replace business solution pages**: Customize the user experience by replacing default Wix business solution pages with your own, giving you full control over design and functionality. For example, you can replace the default Wix Bookings service page with your own custom version. Your page will appear in the booking flow instead of Wix's default page. ## Test your site Ensure your site performs optimally and provides a seamless user experience by utilizing Wix's testing features to identify and rectify issues before going live. **Preview**: Use preview mode in the editor to test your code in a controlled environment. You can interact with a preview version of your site and see errors and logs in the developer console, without affecting the live version of your site. **Functional testing**: Run tests on backend methods in isolation to ensure they work as expected, without having to write extraneous testing code. **Test sites**: Create a dedicated test site to experiment with features, test integrations, and refine functionality without impacting your live site. This is especially useful for complex updates or collaborative testing. ## Maintain your site Keep your site updated and running smoothly with Wix's maintenance tools, ensuring long-term performance and security. **Monitoring**: Keep track of your site's performance, monitor your storage usage, and troubleshoot site issues with the [monitoring dashboard](https://dev.wix.com/docs/develop-websites-sdk/maintain-your-site/monitor-your-site/about-the-monitoring-dashboard.md). Keeping tabs on monitoring data allows you to proactively address issues and ensure a smooth user experience. **Logs**: Access detailed logs to review site activity, debug issues, and gain insights into user interactions. You can view logs in real time within Wix and connect to Google Cloud Logs to store logs and perform analysis, generate visual depictions of log data, and to extract meaningful insights from your logs. ## What's next - [Quick Start](https://dev.wix.com/docs/develop-websites-sdk/get-started/quick-start/quick-start.md) - [The Wix Ecosystem](https://dev.wix.com/docs/develop-websites-sdk/get-started/overview/the-wix-ecosystem.md) --- > Portal Navigation: > > - Append `.md` to any URL under `https://dev.wix.com/docs/` to get its markdown version. > - Pages are either content pages (article or reference text) or menu pages (a list of links to child pages). > - To get a menu page, truncate any URL to a parent path and append `.md` (e.g. `https://dev.wix.com/docs/sdk.md`, `https://dev.wix.com/docs/sdk/core-modules.md`). > - Top-level index of all portals: https://dev.wix.com/docs/llms.txt > - Full concatenated docs: https://dev.wix.com/docs/llms-full.txt ## Resource: Development Environments ## Article: Development Environments ## Article Link: https://dev.wix.com/docs/develop-websites-sdk/get-started/overview/development-environments.md ## Article Content: # Development Environments When writing code, having the right development environment can greatly enhance your productivity. Wix provides development options that let you work directly in Wix or work with the tools you already use. The development environments are: - The built-in [code editor](#code-editor) in Wix Studio or the Wix Editor. - The online [Wix IDE](#wix-ide) for Wix Studio sites. - A [local IDE](#local-ide) of your choice, such as VS Code, when using Wix Studio or the Wix Editor. You can use a local IDE, in conjunction with the Wix CLI, after connecting your site to GitHub. The development environment you should choose depends on your project needs and workflow. Each option offers unique advantages, and you can mix and match environments to some extent as needed. > **Note**: Some Wix website development features are only available in specific development environments. See each feature’s documentation for a list of development environments that support it. ## Code editor The built-in code editor is a browser-based environment available directly in the Wix Studio or Wix Editor. It provides an easy way to write and manage code alongside the visual site editor, enabling you to write code without leaving the Wix platform. ![Code editor](https://wixmp-833713b177cebf373f611808.wixmp.com/images/edd17d777e317076582b7df9b22178ed.png) ## Wix IDE The Wix IDE is an advanced, VS Code-based online development environment available for Wix Studio sites. The Wix IDE opens in a separate browser tab or window with hot reloading. This gives you more space for both coding and site editing. Having a window to design and preview and a second window to code is especially useful if you're working with a multi-monitor setup. The Wix IDE also enables concurrent editing, allowing multiple developers to work in the Wix IDE at the same time. When working in the Wix IDE, you can utilize the [Wix AI Assistant](https://dev.wix.com/docs/develop-websites-sdk/code-your-site/developer-environments/ai-assistants/about-ai-assistants.md#wix-ai-assistant-in-the-wix-ide), an intelligent companion that offers real-time coding assistance. ![Wix IDE](https://wixmp-833713b177cebf373f611808.wixmp.com/images/80f327c068d3c46954bf4d585e6b3b1d.png) ## Local IDE Use a local IDE, such as VS Code, for the flexibility and power of a full-featured development environment on your own machine. With a local setup, you can customize your environment and use the extensions and shortcuts that you use for all your non-Wix projects. To support local development, use the Wix CLI, which connects your local code to your site through GitHub. Once you connect a site to GitHub, you can only edit the site’s code in your local IDE. The CLI, along with a local editor, allows you to write, test, sync, and publish your code from your local environment. Because your code is stored in a Git repository, you can manage branches, versions, and team collaboration just like you would for any other Git project. ![Local IDE](https://wixmp-833713b177cebf373f611808.wixmp.com/images/8c45c4e13c906cf619e1d4a0eb69565e.png) ## What's next - [Quick Start](https://dev.wix.com/docs/develop-websites-sdk/get-started/quick-start/quick-start.md) - [The Wix Ecosystem](https://dev.wix.com/docs/develop-websites-sdk/get-started/overview/the-wix-ecosystem.md) --- > Portal Navigation: > > - Append `.md` to any URL under `https://dev.wix.com/docs/` to get its markdown version. > - Pages are either content pages (article or reference text) or menu pages (a list of links to child pages). > - To get a menu page, truncate any URL to a parent path and append `.md` (e.g. `https://dev.wix.com/docs/sdk.md`, `https://dev.wix.com/docs/sdk/core-modules.md`). > - Top-level index of all portals: https://dev.wix.com/docs/llms.txt > - Full concatenated docs: https://dev.wix.com/docs/llms-full.txt ## Resource: Integrate with Wix Business Solutions ## Article: Integrate with Wix Business Solutions ## Article Link: https://dev.wix.com/docs/develop-websites-sdk/get-started/overview/integrate-with-wix-business-solutions.md ## Article Content: # Integrate with Wix Business Solutions Wix offers a range of powerful business solutions, enabling you to sell products and services, run events, write blogs, manage restaurants, and more—all seamlessly integrated with your website. These solutions are built to work out-of-the-box on Wix sites, but with custom code, you can extend their capabilities and tailor them to fit your specific needs. Your site can integrate with Wix's business solutions in the following ways: - [Wix business solution APIs](#wix-business-solution-apis): Leverage functionality from Wix's business solutions like Wix Stores and Wix Bookings. - [Service plugins](#service-plugins): Inject custom functionality or 3rd-party integrations into Wix business solutions. - [Replace business solution pages](#replace-business-solution-pages): Customize user experience by replacing Wix's default business solution pages with your own. ## Wix business solution APIs Wix business solution APIs allow you to programmatically interact with Wix's business solutions, such as Wix Stores and Wix Bookings. This enables you to extend their capabilities, integrate with external systems, and create custom functionality tailored to your site's specific requirements. For example, you can use Wix business solution APIs for: - **Personalized recommendations**: Use customer data to generate personalized Wix Stores product recommendations on your site. - **Custom service availability UI**: Retrieve and display the availability status of Wix Bookings services in a custom UI. - **Customer data sync**: Sync Wix Member profiles and purchasing history with data from an external CRM system for a unified customer view. ## Service plugins [Service plugins](https://dev.wix.com/docs/develop-websites-sdk/code-your-site/extend-wix-business-solutions/service-plugins/about-service-plugins.md) allow you to inject additional functionality or integrate 3rd-party services directly into Wix's business solutions. Plugins consist of functions that are called automatically by Wix apps at defined points in their flows. These functions receive and return data in specific formats, enabling seamless integration with the Wix app's business logic. For example, you can use service plugins for: - **Custom shipping rate**: Integrate 3rd-party logistics services to provide customized shipping rates in Wix Stores. - **Custom bookings pricing**: Implement dynamic pricing models for services in Wix Bookings, such as surge pricing or member-only discounts. - **Custom payments provider**: Integrate a 3rd-party payment gateway to offer additional payment options for customers in Wix Stores. ## Replace business solution pages Customize the user experience by replacing default Wix business solution pages with your own. Design a page and add functionality to it using the $w API for page elements and the Wix business solution APIs. When the business solution flow reaches the predetermined step, your page is presented to site visitors instead of the usual Wix page. Once visitors finish interacting with your page, you redirect them back to the next Wix page in the flow. For example, you can replace the following pages with your own versions: - **Bookings service page**: Replace the default Wix Bookings service page with a custom-designed page that includes unique features, such as custom booking options and additional information specific to your services. - **Stores product page**: Replace the default Wix Stores product page with a custom version where you can showcase your products with enhanced visuals, custom layout, and unique interactive elements to improve the shopping experience. - **Custom plans & pricing page**: Replace the default Plans & Pricing page from the Wix Pricing Plans app with a custom-designed page that highlights your pricing plans with a unique layout and interactive pricing details to better attract and convert visitors. ## What's next - [Quick Start](https://dev.wix.com/docs/develop-websites-sdk/get-started/quick-start/quick-start.md) - [Site Development Features](https://dev.wix.com/docs/develop-websites-sdk/get-started/overview/site-development-features.md) --- > Portal Navigation: > > - Append `.md` to any URL under `https://dev.wix.com/docs/` to get its markdown version. > - Pages are either content pages (article or reference text) or menu pages (a list of links to child pages). > - To get a menu page, truncate any URL to a parent path and append `.md` (e.g. `https://dev.wix.com/docs/sdk.md`, `https://dev.wix.com/docs/sdk/core-modules.md`). > - Top-level index of all portals: https://dev.wix.com/docs/llms.txt > - Full concatenated docs: https://dev.wix.com/docs/llms-full.txt ## Resource: Integrate with 3rd Parties ## Article: Integrate with 3rd Parties ## Article Link: https://dev.wix.com/docs/develop-websites-sdk/get-started/overview/integrate-with-3rd-parties.md ## Article Content: # Integrate with 3rd-Parties Integrating 3rd-party services into your site allows you to save time, extend functionality beyond native features, and connect seamlessly with existing systems you have already invested in. Your site can integrate with 3rd-party solutions in the following ways: - [Fetch API](#fetch-api): Connect with 3rd-party APIs securely. - [npm packages](#npm-packages): Leverage 3rd-party functionality within your Wix site. - [HTTP functions](#http-functions): Expose your site's functionality so 3rd-parties can call your site's APIs. - [Service plugins](#service-plugins): Inject 3rd-party services into Wix business solutions. ## Fetch API Use the standard Fetch API to connect your site to 3rd-party APIs. Store sensitive credentials, such as API keys, in the Secrets Manager to keep your API calls secure. For example, you can use the Fetch API for: - **Weather updates**: Display live weather updates by fetching data from a weather service API. - **Inventory sync**: Keep your store inventory synced with a 3rd-party inventory management system. - **Analytics**: Send custom event data to an analytics service. ## npm Packages With [npm packages](https://dev.wix.com/docs/develop-websites-sdk/code-your-site/developer-environments/packages/npm/about-npm-packages.md) you can leverage a vast array of prebuilt 3rd-party modules to extend the functionality of your site. By integrating these packages, you can easily add complex features without having to build them from scratch. For example, you can use npm packages for: - **PDF generator**: Use a PDF generator module to dynamically create and customize PDF documents on your site. - **SMS messaging**: Send SMS notifications to visitors for order confirmations, appointment reminders, or promotional messages. - **QR code generation**: Integrate a module to dynamically generate QR codes for promotional offers or mobile app links. ## HTTP functions With [HTTP functions](https://dev.wix.com/docs/develop-websites-sdk/code-your-site/build-a-custom-backend/expose-services/about-custom-site-apis.md) you can expose your site as a service and allow 3rd-party systems to interact with your site data and functionality. For example, you can use HTTP functions for: - **Webhooks**: Set up an HTTP function to receive and process webhooks from external services, such as payment notifications or delivery updates. - **Alternative frontends**: Use HTTP functions to expose the logic and data of your site to alternative frontends such as mobile apps, smartwatch apps, or other IoT devices. - **Automation services**: Integrate your Wix site with automation services. You can create endpoints that automation platforms can trigger as part of an automation workflow. ## Service plugins [Service plugins](https://dev.wix.com/docs/develop-websites-sdk/code-your-site/extend-wix-business-solutions/service-plugins/about-service-plugins.md) allow you to inject additional functionality or integrate 3rd-party services directly into Wix's business solutions. For example, you can use service plugins for: - **Custom shipping rate**: Integrate 3rd-party logistics services to provide customized shipping rates in Wix Stores. - **Custom bookings pricing**: Implement dynamic pricing models for services in Wix Bookings, such as surge pricing or member-only discounts. - **Custom payments provider**: Integrate a 3rd-party payment gateway to offer additional payment options for customers in Wix Stores. ## What's next - [Quick Start](https://dev.wix.com/docs/develop-websites-sdk/get-started/quick-start/quick-start.md) - [Integrate with Wix Business Solutions](https://dev.wix.com/docs/develop-websites-sdk/get-started/overview/integrate-with-wix-business-solutions.md) - [Site Development Features](https://dev.wix.com/docs/develop-websites-sdk/get-started/overview/site-development-features.md) --- > Portal Navigation: > > - Append `.md` to any URL under `https://dev.wix.com/docs/` to get its markdown version. > - Pages are either content pages (article or reference text) or menu pages (a list of links to child pages). > - To get a menu page, truncate any URL to a parent path and append `.md` (e.g. `https://dev.wix.com/docs/sdk.md`, `https://dev.wix.com/docs/sdk/core-modules.md`). > - Top-level index of all portals: https://dev.wix.com/docs/llms.txt > - Full concatenated docs: https://dev.wix.com/docs/llms-full.txt ## Resource: About Wix Harmony ## Article: About Wix Harmony ## Article Link: https://dev.wix.com/docs/develop-websites-sdk/get-started/overview/about-wix-harmony.md ## Article Content: # About Wix Harmony Wix Harmony is a new Wix Editor that offers a flexible, intuitive platform for building sites. It brings together advanced AI tools, including Aria for prompt-based creation, paired with freeform drag-and-drop capabilities. Harmony is designed for self-creators who want an AI-assisted site building experience without code. Wix Harmony doesn't support site code. If your projects require code customization, continue using [Wix Editor](https://www.wix.com) or [Wix Studio](https://www.wix.com/studio). However, you can use [custom code](https://dev.wix.com/docs/develop-websites-sdk/code-your-site/build-a-custom-frontend/custom-code/about-custom-code.md) to add HTML, JavaScript, and CSS snippets to Harmony sites. > **Note:** If you're building apps with Wix Blocks, see [About Wix Harmony and Blocks](https://dev.wix.com/docs/build-apps/develop-your-app/frameworks/wix-blocks/about-wix-harmony-and-blocks.md). ## Existing sites Existing Wix sites with site code will continue to work normally. You can still access and edit your sites and code through the Wix Editor or Wix Studio. Existing sites are not being migrated to Harmony. ## Build with Wix Studio For projects that require site code, Wix Studio is your development platform. Wix Studio supports: - Full coding capabilities with the Wix JavaScript SDK and Velo APIs. - Pixel-perfect layouts with responsive design systems. - Collaboration tools for working with team members. - Professional tooling including IDE integration and Git workflows. Learn more about [Wix Studio](https://www.wix.com/studio). ## Features not available in Wix Harmony Features not available in Wix Harmony include: - [Custom site code](https://dev.wix.com/docs/develop-websites-sdk/code-your-site/code-with-java-script/about-code-placement.md), including page code and backend code - [Custom CSS](https://dev.wix.com/docs/develop-websites-sdk/code-your-site/build-a-custom-frontend/css/about-custom-css.md) - [HTTP functions](https://dev.wix.com/docs/develop-websites-sdk/code-your-site/build-a-custom-backend/expose-services/about-custom-site-apis.md) - [Routers](https://dev.wix.com/docs/develop-websites-sdk/code-your-site/build-a-custom-backend/routers/about-routers.md) - [Data hooks](https://dev.wix.com/docs/develop-websites-sdk/code-your-site/work-with-data/data-api/about-data-hooks.md) - [Backend event handlers](https://dev.wix.com/docs/develop-websites-sdk/code-your-site/build-a-custom-backend/backend-events/about-backend-events.md) - [Web modules](https://dev.wix.com/docs/develop-websites-sdk/code-your-site/build-a-custom-backend/web-modules/about-web-modules.md) - [Scheduled jobs](https://dev.wix.com/docs/develop-websites-sdk/code-your-site/build-a-custom-backend/scheduled-jobs/about-scheduled-jobs.md) ## What's next We're working on bringing the AI creation experience to Wix Studio. The new features aim to give you the best of both worlds: powerful AI tools combined with full development capabilities. Stay tuned for updates. ## Get support We're here to answer your questions and concerns. [Contact us](https://www.wix.com/support-chatbot?nodeId=3809b091-762a-4a1a-acd7-a6b0dabc9c5a&referral=veloLeftTree). ## See also - [About Developing Websites](https://dev.wix.com/docs/develop-websites-sdk/get-started/overview/about-developing-websites.md) - [About Wix Harmony and Apps](https://dev.wix.com/docs/build-apps/get-started/overview/about-wix-harmony-and-apps.md) - [About Wix Harmony and Blocks](https://dev.wix.com/docs/build-apps/develop-your-app/frameworks/wix-blocks/about-wix-harmony-and-blocks.md) - [About Custom Code](https://dev.wix.com/docs/develop-websites-sdk/code-your-site/build-a-custom-frontend/custom-code/about-custom-code.md) --- > Portal Navigation: > > - Append `.md` to any URL under `https://dev.wix.com/docs/` to get its markdown version. > - Pages are either content pages (article or reference text) or menu pages (a list of links to child pages). > - To get a menu page, truncate any URL to a parent path and append `.md` (e.g. `https://dev.wix.com/docs/sdk.md`, `https://dev.wix.com/docs/sdk/core-modules.md`). > - Top-level index of all portals: https://dev.wix.com/docs/llms.txt > - Full concatenated docs: https://dev.wix.com/docs/llms-full.txt ## Resource: Glossary ## Article: Glossary ## Article Link: https://dev.wix.com/docs/develop-websites-sdk/get-started/overview/glossary.md ## Article Content: # Glossary ## $w $w is the selector syntax you use to select elements in code (for example, `$w('#myButton')`). After selecting an element, use APIs to work with its properties and functions. ## Blocks [Wix Blocks](https://support.wix.com/en/article/creating-a-velo-package-3964385) allows you to build [apps](https://dev.wix.com/docs/build-apps/develop-your-app/develop-an-app-with-blocks/get-started/a-blocks-app-workflow.md), and reuse your code across multiple Wix sites. ## CMS role Together with [collection permissions](https://dev.wix.com/docs/develop-websites-sdk/code-your-site/work-with-data/introduction/about-collections.md#permissions), [CMS roles](https://support.wix.com/en/article/cms-formerly-content-manager-creating-custom-roles-and-permissions) give you control over which visitors are allowed to interact with the data in your collections and what they're allowed to do. Every person that visits your site falls into one of 4 roles: admin, site member author, site member, and anyone. You can assign specific permissions to each role. ## Database collection A [database collection](https://dev.wix.com/docs/develop-websites-sdk/code-your-site/work-with-data/introduction/about-collections.md) is a table used on a Wix site. Each row is an item, and each column is a field, including: - [System fields](https://support.wix.com/en/article/about-database-collections#system-fields): Auto-added, hidden, non-editable fields, including ID, Date Created, Last Updated and Owner fields. - [Primary field](https://support.wix.com/en/article/cms-using-reference-fields-to-display-content-from-multiple-collections): Text field used for references between collections, marked with a lock icon. Default is Title, but any text field can be set as the primary field. - Field ID: Immutable identifier used in code for a field, different from the Field Name shown in the UI. You can connect elements in your site to fields in your collection using [connecting to data](https://support.wix.com/en/article/connecting-page-elements-to-data) and [datasets](#dataset). [Permissions](https://dev.wix.com/docs/develop-websites-sdk/code-your-site/work-with-data/introduction/about-collections.md#permissions) control which site [roles](#roles) (Anyone, Site member, Site member author, Admin) can create, read, update, and delete items in a collection. Permissions apply to the collection, not individual fields, and work together with the dataset's [mode](https://support.wix.com/en/article/working-with-dataset-modes-and-collection-permissions). ## Database schema/structure A [database schema](https://support.wix.com/en/article/about-database-collection-schemas) is the definition of a database's structure. The schema defines which fields are in each of your collections and their [type](https://dev.wix.com/docs/develop-websites-sdk/code-your-site/work-with-data/introduction/about-collection-fields.md#field-types). However, in some cases, your collections can contain fields that aren't part of the schema. ## Dataset A [dataset](https://support.wix.com/en/article/cms-about-datasets) is a component that connects page elements to your [collections](#database-collection). It selects the collection and controls sorting, filtering, and what elements can do via the [dataset's mode](https://support.wix.com/en/article/working-with-dataset-modes-and-collection-permissions) (Read & Write, Read-only, Write-only). Works on regular and dynamic pages and isn't displayed on the live site. ## Dynamic page A [dynamic page](https://support.wix.com/en/article/cms-about-dynamic-pages) uses a single layout to display different items from a collection. Content is determined by the page URL - its [prefix](https://support.wix.com/en/article/url-prefixes-and-page-grouping) and dynamic segments are saved on each item as a [calculated field](https://support.wix.com/en/article/about-calculated-fields). There are 2 types of dynamic pages: [dynamic item page](https://support.wix.com/en/article/cms-setting-up-a-dynamic-item-page) and [dynamic list page](https://support.wix.com/en/article/cms-setting-up-a-dynamic-list-page). ## Dynamic page dataset A [dynamic page dataset](https://support.wix.com/en/article/about-data-binding-and-datasets#about-dynamic-page-datasets) is a component that's added to your page automatically when you create a dynamic page. Like a regular [dataset](#dataset), it enables you to connect the elements on your page to your collections. It also allows you to add more filters and to sort the content on your page. ## Functional testing With [functional testing](https://dev.wix.com/docs/develop-websites-sdk/test-your-site/test-backend-functions/about-functional-testing.md), you can easily and quickly [test and debug your backend code directly in the code editor](https://dev.wix.com/docs/develop-websites-sdk/test-your-site/test-backend-functions/test-backend-functions-with-functional-testing.md). Functional Testing saves you the time and effort of building your own system for triggering and testing your backend functions. ## HTTP function An [HTTP function](https://dev.wix.com/docs/develop-websites-sdk/code-your-site/build-a-custom-backend/expose-services/about-custom-site-apis.md) allows you to expose your site's functionality as an HTTP endpoint. Call these endpoints from external services or apps to integrate with your Wix site. ## Hook A [hook](https://dev.wix.com/docs/develop-websites-sdk/code-your-site/work-with-data/data-api/about-data-hooks.md) runs code before or after certain operations. Use data hooks to intercept collection operations, or router hooks to customize dynamic page data binding. ## Live database The [live database](https://support.wix.com/en/article/managing-your-sandbox-and-live-data#live-data) is your published site's data storage. It appears on the live site and stores data collected there. You can [sync](https://support.wix.com/en/article/cms-accessing-and-syncing-your-sandbox-and-live-collections) between sandbox and live (copy sandbox to live, or overwrite sandbox with live) from the sandbox. Sandbox and live aren't always enabled for your collections. Learn more about [sandbox, live collections and syncing](https://support.wix.com/en/article/about-sandbox-and-live-collections-and-syncing). ## Monitoring dashboard Use the [monitoring dashboard](https://dev.wix.com/docs/develop-websites-sdk/maintain-your-site/monitor-your-site/about-the-monitoring-dashboard.md) to track site performance, especially for backend code and data requests. Access it from Developer Tools in the Code sidebar. You can also use [Wix Logs](https://dev.wix.com/docs/develop-websites-sdk/test-your-site/work-with-wix-logs/about-wix-logs.md) to monitor the site's performance. ## Properties panel Use the [properties panel](https://dev.wix.com/docs/develop-websites-sdk/code-your-site/developer-environments/ides/code-editor/about-the-properties-events-panel.md) to configure elements, add [event handlers](https://dev.wix.com/docs/develop-websites-sdk/code-your-site/build-a-custom-frontend/event-handlers/about-event-handlers.md) and set default behavior on page load. ## Regular editor The remote Wix Editor for editing and previewing your site's UI and code, as opposed to the [local editor](https://dev.wix.com/docs/develop-websites-sdk/code-your-site/developer-environments/ides/git-integration/about-the-local-editor.md) when using [Git Integration & Wix CLI](https://dev.wix.com/docs/develop-websites-sdk/code-your-site/developer-environments/ides/git-integration/about-git-integration-with-wix-cli.md). ## Release manager Use the [Release Manager](https://support.wix.com/en/article/accessing-the-release-manager) to view the current published version and [test site](https://dev.wix.com/docs/develop-websites-sdk/test-your-site/work-with-test-sites/about-test-sites.md), and to create, edit, or delete test versions. ## Repeater A repeater reuses a single layout for multiple items, where each item has the same layout with different content. Use static content set in the Editor, or connect to the [data in a collection](https://support.wix.com/en/article/displaying-database-content-in-a-repeater) to display data-bound lists. ## Revision Every time you manually save or publish your site following a change, a new revision of your site is created. You can view and manage your revisions in your [Site History](https://support.wix.com/en/article/viewing-and-managing-your-site-history). You can also create a [test site](https://support.wix.com/en/article/creating-a-test-site) or [monitor Wix Logs](https://dev.wix.com/docs/develop-websites-sdk/test-your-site/work-with-wix-logs/about-wix-logs.md) for a specific revision of your site. ## Router A [router](https://dev.wix.com/docs/develop-websites-sdk/code-your-site/build-a-custom-backend/routers/about-routers.md) lets you control how your site handles incoming requests and SEO. Customize routing logic and the content returned for specific paths. ## Sandbox database The [sandbox database](https://support.wix.com/en/article/managing-your-sandbox-and-live-data) is your development data storage. Its data doesn't appear on the published site unless you [sync](https://support.wix.com/en/article/cms-accessing-and-syncing-your-sandbox-and-live-collections) to the [live database](https://support.wix.com/en/article/managing-your-sandbox-and-live-data#live-data). Preview mode updates sandbox data. Sandbox and live aren't always enabled for your collections. Learn more [here](https://support.wix.com/en/article/about-sandbox-and-live-collections-and-syncing). ## Selector scope A scope defines which elements you can select with a selector function, such as [$w( )](#w), and how those elements behave when they're selected. Depending on which context you received a selector function from, it will either select from the global scope or the repeated item scope. ## Service plugin [Service plugins](https://dev.wix.com/docs/develop-websites-sdk/code-your-site/extend-wix-business-solutions/service-plugins/about-service-plugins.md) allow you to extend and customize your site's functionality. You can use [service plugins](https://www.wix.com/velo/reference/spis/getting-started) to inject your own custom logic into a part of an existing, out-of-the-box app's flow. You can also use service plugins to integrate with 3rd-party services so that your Wix site and the external services can communicate seamlessly. ## Sidebar The [Code sidebar](https://dev.wix.com/docs/develop-websites-sdk/code-your-site/developer-environments/editors/about-development-workspaces.md) shows all of the files that make up your site, including pages, popups, files, routers, and database collections. Working in the sidebar, you can perform a variety of actions that affect your site. ## Sync (copy/overwrite) [Sync](https://support.wix.com/en/article/cms-accessing-and-syncing-your-sandbox-and-live-collections) allows you to move your data between your [sandbox](https://support.wix.com/en/article/managing-your-sandbox-and-live-data) and [live](https://support.wix.com/en/article/cms-accessing-and-syncing-your-sandbox-and-live-collections#accessing-and-syncing-sandbox-and-live-collections) databases. You can copy selected or all items in a collection from a sandbox collection to the live version of that collection. You can also overwrite a sandbox collection with all the data from the live version, or overwrite all your sandbox collections with the data from their live versions. You can only initiate sync operations from the sandbox database. Sandbox and live aren't always enabled for your collections. Learn more [about sandbox and live collections](https://support.wix.com/en/article/about-sandbox-and-live-collections-and-syncing). ## Test site A [test site](https://dev.wix.com/docs/develop-websites-sdk/test-your-site/work-with-test-sites/about-test-sites.md) is a version of your site released to a percentage of visitors so you can validate changes before publishing. Manage test sites in the [Release Manager](https://support.wix.com/en/article/accessing-the-release-manager). ## User input element [User input elements](https://support.wix.com/en/article/cms-about-user-input-elements) capture and store user data in a collection. Connect them to a [dataset](https://support.wix.com/en/article/cms-about-datasets) with [mode](https://support.wix.com/en/article/working-with-dataset-modes-and-collection-permissions) set to Write-only or Read & Write. ## Validation Validate data entered via [user input elements](https://support.wix.com/en/article/cms-about-user-input-elements) against your criteria, using either the [settings panel](https://support.wix.com/en/article/validating-user-input-with-the-settings-panel) or [code](https://support.wix.com/en/article/validating-user-input-with-code). ## Web module [Web modules](https://dev.wix.com/docs/develop-websites-sdk/code-your-site/build-a-custom-backend/web-modules/about-web-modules.md) enable you to write functions in the backend and call them from your frontend code. You import functions from backend web modules into your frontend, and the functions execute on the backend. Wix handles all the all the backend-frontend communication required to enable this access. --- > Portal Navigation: > > - Append `.md` to any URL under `https://dev.wix.com/docs/` to get its markdown version. > - Pages are either content pages (article or reference text) or menu pages (a list of links to child pages). > - To get a menu page, truncate any URL to a parent path and append `.md` (e.g. `https://dev.wix.com/docs/sdk.md`, `https://dev.wix.com/docs/sdk/core-modules.md`). > - Top-level index of all portals: https://dev.wix.com/docs/llms.txt > - Full concatenated docs: https://dev.wix.com/docs/llms-full.txt ## Resource: Quick Start ## Article: Quick Start ## Article Link: https://dev.wix.com/docs/develop-websites-sdk/get-started/quick-start/quick-start.md ## Article Content: # Quick Start With Wix you can easily extend a site's functionality using code. This tutorial walks you through creating a simple button that changes text when clicked. Want to see it in action? Check out our [Hello World example](https://dev.wix.com/docs/coding-examples/getting-started/hello-world/hello-world.md). In this tutorial, you'll: - [Enable coding in Wix Studio.](#step-1--enable-coding) - [Add elements and set IDs.](#step-2--add-elements-and-set-ids) - [Set initial text with `onReady()`.](#step-3--set-initial-text-with-onready) - [Add an event handler.](#step-4--add-an-event-handler) - [Preview and test your code.](#step-5--preview-your-code) ## Before you begin Sign up for a [Wix Studio account](https://www.wix.com/studio) and log in. ## Step 1 | Enable coding In the left sidebar, click ![Code icon](https://wixmp-833713b177cebf373f611808.wixmp.com/images/9c7667c9a288fa900e86664602c5a94e.png) and then **Start Coding**. ![Wix Studio start coding](https://wixmp-833713b177cebf373f611808.wixmp.com/images/7bbc652d39e238e85896ddc1798c9823.png) This enables the built-in code editor at the bottom of your page and gives you access to the site's code files, databases, and other developer tools. ## Step 2 | Add elements and set IDs Add a text element and button to your page, then set meaningful IDs: 1. Add a **Text** element and set its ID to `helloText` 2. Add a **Button** element and set its ID to `clickMeButton` > **Tip:** Always use descriptive IDs for elements you'll reference in code. To access these elements in your code, you'll use Wix's `$w` selector: ```js // Select elements by ID $w("#clickMeButton"); // Button $w("#helloText"); // Text element ``` > **Note:** You can't use standard DOM APIs or libraries like jQuery to access Wix page elements. ## Step 3 | Set initial text with `onReady()` Wix provides an `onReady()` handler that runs when page elements finish loading. Use it to set the initial text of your element: ```js $w.onReady(function () { $w("#helloText").text = "Hello There"; }); ``` ## Step 4 | Add an event handler Now add a click event handler to the button that changes the text: ```js $w("#clickMeButton").onClick(() => { $w("#helloText").text = "Hello Wix!"; }); ``` Note that you can add the event handler directly in the `onReady()` handler, or outside it if you prefer. ## Step 5 | Preview your code Click **Run** in the code editor or the Preview icon ![Preview icon](https://wixmp-833713b177cebf373f611808.wixmp.com/images/396535a2065ce724807326c1f5071d43.png) to test your code. The developer console shows at the bottom for debugging. ## Next steps Now that you understand Wix's core patterns, explore these resources to learn more: - **[Coding Examples](https://dev.wix.com/docs/coding-examples.md)**: Interactive examples with working code previews - **[$w API Reference](https://dev.wix.com/docs/velo/velo-only-apis/$w/introduction.md)**: Complete guide to the selector API - **[Backend code](https://dev.wix.com/docs/develop-websites-sdk/code-your-site/build-a-custom-backend/web-modules/about-web-modules.md)**: backend functions and web modules - **[Data API](https://dev.wix.com/docs/develop-websites-sdk/code-your-site/work-with-data/data-api/about-the-data-api.md)**: Database operations and CMS integration - **[npm packages](https://dev.wix.com/docs/develop-websites-sdk/code-your-site/developer-environments/packages/npm/about-npm-packages.md)**: Adding 3rd-party libraries --- > Portal Navigation: > > - Append `.md` to any URL under `https://dev.wix.com/docs/` to get its markdown version. > - Pages are either content pages (article or reference text) or menu pages (a list of links to child pages). > - To get a menu page, truncate any URL to a parent path and append `.md` (e.g. `https://dev.wix.com/docs/sdk.md`, `https://dev.wix.com/docs/sdk/core-modules.md`). > - Top-level index of all portals: https://dev.wix.com/docs/llms.txt > - Full concatenated docs: https://dev.wix.com/docs/llms-full.txt ## Resource: Tutorial | Block Off Time in the Bookings Calendar ## Article: Tutorial | Block Off Time in the Bookings Calendar ## Article Link: https://dev.wix.com/docs/develop-websites-sdk/get-started/tutorials/bookings/tutorial-block-off-time-in-the-bookings-calendar.md ## Article Content: # Tutorial | Block Off Time in the Bookings Calendar Using the [Calendar APIs](https://dev.wix.com/docs/api-reference/business-management/calendar/introduction.md), you can programmatically block time slots in your staff's Bookings calendars. This tutorial demonstrates how to build an interface that allows Wix users to efficiently manage staff availability by creating blocked time sessions for individual staff members or resources. This functionality is useful for scenarios such as staff vacation and time off, equipment maintenance, or training sessions. By the end of this tutorial, you'll have a resource availability management interface that allows Wix users to: - Select specific staff members or resources to manage. - Block single time slots on staff calendars. - Create recurring blocked time patterns.
**Caution:** The interface created in this tutorial should only be accessible in a protected area, not exposed to regular site visitors. Consider implementing this functionality in a [dashboard page](https://dev.wix.com/docs/develop-websites-sdk/code-your-site/build-a-custom-dashboard/about-dashboard-pages.md) or on a [members-only page](https://support.wix.com/en/article/wix-editor-creating-members-only-pages) with appropriate permissions.
> The code in this article was written using the following module versions: > > - @wix/bookings (v1.0.1017) > - @wix/calendar (v1.0.148) > - @wix/web-methods (v1.0.11) > - @wix/essentials (v0.1.28) > > Learn how to install npm packages [in the editor](https://dev.wix.com/docs/develop-websites-sdk/code-your-site/developer-environments/packages/npm/work-with-npm-packages-in-the-editor.md) or [using the CLI](https://dev.wix.com/docs/develop-websites-sdk/code-your-site/developer-environments/packages/npm/work-with-npm-packages-with-the-cli.md). Use the following steps to build the functionality: 1. [Set up page elements.](#step-1--set-up-page-elements) 2. [Add backend code.](#step-2--add-backend-code) 3. [Add page code.](#step-3--add-page-code) ## Before you begin It's important to note the following points before doing this tutorial: - The site must have the [Wix Bookings app](https://www.wix.com/app-market/wix-bookings) installed. - The site must have at least 1 staff member or resource set up in the Bookings dashboard. - For recurring blocked time, only intervals of 1 or more weeks are supported. ## Step 1 | Add elements to your page This step creates an interface for Wix users to set up blocked time events. At the end of this step, you'll have a functional page with all the necessary input elements for blocking time slots, including options for recurring patterns. The interface should look like this: ![Block off time interface](https://wixmp-833713b177cebf373f611808.wixmp.com/images/33eb39b5c8d5ae5e3fec707576dee046.png) To create the interface: Add the following elements to your page: - A [dropdown](https://dev.wix.com/docs/velo/velo-only-apis/$w/dropdown/introduction.md) for selecting staff members/resources. Set the dropdown ID to `resourcesDropdown`. - A [date picker](https://dev.wix.com/docs/velo/velo-only-apis/$w/date-picker/introduction.md) for selecting the start date. Set the date picker ID to `startDate`. - A [time picker](https://dev.wix.com/docs/velo/velo-only-apis/$w/time-picker/introduction.md) for selecting the start time. Set the time picker ID to `startTime`. - A [date picker](https://dev.wix.com/docs/velo/velo-only-apis/$w/date-picker/introduction.md) for selecting the end date. Set the date picker ID to `endDate`. - A [time picker](https://dev.wix.com/docs/velo/velo-only-apis/$w/time-picker/introduction.md) for selecting the end time. Set the time picker ID to `endTime`. - A [checkbox](https://dev.wix.com/docs/velo/velo-only-apis/$w/checkbox/introduction.md) to enable recurring blocked time. Set the checkbox ID to `recurrenceCheckbox`. - A [container](https://dev.wix.com/docs/velo/velo-only-apis/$w/container/introduction.md) to hold recurring-specific elements. Set the container ID to `recurrenceContainer`. - A [date picker](https://dev.wix.com/docs/velo/velo-only-apis/$w/date-picker/introduction.md) for selecting the cutoff date of recurrence. Set the date picker ID to `untilDate`. - A [time picker](https://dev.wix.com/docs/velo/velo-only-apis/$w/time-picker/introduction.md) for selecting the cutoff time of recurrence. Set the time picker ID to `untilTime`. - A [dropdown](https://dev.wix.com/docs/velo/velo-only-apis/$w/dropdown/introduction.md) for selecting the recurrence interval, in weeks. Set the dropdown ID to `intervalDropdown`. - A [button](https://dev.wix.com/docs/velo/velo-only-apis/$w/button/introduction.md) for creating the blocked time event. Set the button ID to `button`. 2. Place `untilDate`, `untilTime`, and `intervalDropdown` inside `recurrenceContainer`. 3. In the **Properties & Events** panel, set `recurrenceContainer` to **Collapsed** by default. 4. Select `intervalDropdown`, and then select **Manage Choices** to populate the dropdown with options. Each option represents a number of weeks to set as the interval between recurring events. The panel should look like this: ![Choices panel, showing the options: 1:1, 2:2, 3:3, 4:4](https://wixmp-833713b177cebf373f611808.wixmp.com/images/00f231e02cc8bf4d1325daa363553886.png) ## Step 2 | Add backend code This step creates a backend code file with methods that call Wix APIs. At the end of this step, you'll have 2 backend methods: - A method that retrieves Bookings resources and responds with a list of options for a dropdown element. - A method that creates a blocked off event in the Bookings calendar. To add backend code: 1. Create a new backend file called `blockedOffTime.web.js` in your backend folder. 2. Add the required imports: ```javascript import { webMethod, Permissions } from "@wix/web-methods"; import { auth } from "@wix/essentials"; import { resources } from "@wix/bookings"; import { events } from "@wix/calendar"; ``` 3. Define a [web method](https://dev.wix.com/docs/sdk/core-modules/web-methods/introduction?apiView=SDK.md) that gets a list of Bookings resources by calling `queryResources()`, and returns a mapping of the resource into objects with the following fields: - `label`: The name of the resource, to display as a dropdown option. - `value`: A resource ID, to provide as a value for the dropdown option. ```javascript export const getResourceList = webMethod(Permissions.Anyone, async () => { try { const results = await resources.queryResources({}); const mappedResults = results.items.map((resource) => { return { label: resource.name, value: resource.eventsSchedule.scheduleId, }; }); return mappedResults; } catch (error) { console.error(error); return error; } }); ``` 4. Create a second web method that receives an `event` object. The method defines an [elevated](https://dev.wix.com/docs/sdk/articles/work-with-the-sdk/about-elevated-permissions?apiView=SDK.md) call to the Calendar API's `createEvent()` method, and makes the call with the specified `event` object. > **Note:** > Elevated permissions are unnecessary if the implementation is in a dashboard page. ```javascript export const createBlockedOffTimeEvent = webMethod( Permissions.Anyone, async (event) => { try { const elevatedCreateEvent = auth.elevate(events.createEvent); return elevatedCreateEvent(event); } catch (error) { return error; } } ); ``` ## Complete backend code ```javascript // blockedOffTime.web.js import { webMethod, Permissions } from "@wix/web-methods"; import { auth } from "@wix/essentials"; import { resources } from "@wix/bookings"; import { events } from "@wix/calendar"; export const getResourceList = webMethod(Permissions.Anyone, async () => { try { const results = await resources.queryResources({}); const mappedResults = results.items.map((resource) => { return { label: resource.name, value: resource.eventsSchedule.scheduleId, }; }); return mappedResults; } catch (error) { console.error(error); return error; } }); export const createBlockedOffTimeEvent = webMethod( Permissions.Anyone, async (event) => { try { const elevatedCreateEvent = auth.elevate(events.createEvent); return elevatedCreateEvent(event); } catch (error) { return error; } } ); ``` ## Step 3 | Add frontend code This step ties everything together. We use page code to define the behavior of some page elements and call our backend methods. At the end of this step, you'll have page code that: - Populates `resourcesDropdown` with options using our backend method. - Expands and collapses `recurrenceContainer` based on `recurrenceCheckbox`. - Calls the backend method `createBlockedOffTimeEvent` when the button is pressed. To add the following code to your page: 1. Import the methods you created in step 2: ```javascript import { getResourceList, createBlockedOffTimeEvent, } from "backend/blockedOffTime.web"; ``` 2. When the page loads, populate the resources dropdown, and set up an `onClick` event handler for the button and an `onChange` event handler for the checkbox. The next steps define these methods. ```javascript $w.onReady(function () { loadResourceDropdown(); $w("#recurrenceCheckbox").onChange(toggleRecurrenceContainer); $w("#button").onClick(blockOffTime); }); ``` 3. Define a method that calls `getResourceList()` from the backend and populates `resourcesDropdown` with the response. ```javascript async function loadResourceDropdown() { try { $w("#resourcesDropdown").options = await getResourceList(); } catch (error) { console.error("Failed to fetch resources.", error); } } ``` 4. Define a method that expands or collapses `recurrenceContainer` when `recurrenceCheckbox` becomes checked or unchecked. ```javascript function toggleRecurrenceContainer() { if ($w("#recurrenceCheckbox").checked) { $w("#recurrenceContainer").expand(); } else { $w("#recurrenceContainer").collapse(); } } ``` 5. Define a helper method that formats a date and a time into a single string. The Events API requires the following format for `localDate` fields: `YYYY-MM-DDTHH:mm:ss`. The `'en-CA'` locale provides the correct format for the date. ```javascript function formatLocalDate(date, time) { return date.toLocaleDateString("en-CA") + "T" + time; } ``` 6. Define a method to block off time in the calendar. First, get data from page elements, format it to match the requirements of the [Calendar API](https://dev.wix.com/docs/api-reference/business-management/calendar/events-v3/create-event?apiView=SDK.md), and then create an `event` object. ```javascript async function blockOffTime() { const startTime = formatLocalDate( $w("#startDate").value, $w("#startTime").value ); const endTime = formatLocalDate($w("#endDate").value, $w("#endTime").value); try { let event = { scheduleId: $w("#resourcesDropdown").value, start: { localDate: startTime }, end: { localDate: endTime }, }; // Put the code from the next steps here. } catch (error) { console.error("Event creation failed.", error); } } ``` 7. If `recurrenceCheckbox` is checked, add recurrence data to the `event` object. The `'en-CA'` locale and `{ weekday: 'long' }` provide the chosen date's weekday in English. ```javascript if ($w("#recurrenceCheckbox").checked) { const recurrenceDay = $w("#startDate") .value.toLocaleDateString("en-CA", { weekday: "long" }) .toUpperCase(); const untilTime = formatLocalDate( $w("#untilDate").value, $w("#untilTime").value ); event = { ...event, recurrenceRule: { frequency: "WEEKLY", interval: $w("#intervalDropdown").value, days: [recurrenceDay], until: { localDate: untilTime }, }, }; } // Put the code from the next step here. ``` 8. Finish the method by calling the `createBlockedOffTimeEvent()` method from the backend, specifying the constructed `event` object. ```javascript createBlockedOffTimeEvent(event); ``` You've successfully created an interface that allows Wix users to block off time slots in staff calendars, including support for both single time blocks and recurring patterns. ## Complete page code ```javascript import { getResourceList, createBlockedOffTimeEvent, } from "backend/blockedOffTime.web"; $w.onReady(function () { loadResourceDropdown(); $w("#recurrenceCheckbox").onChange(toggleRecurrenceContainer); $w("#button").onClick(blockOffTime); }); async function loadResourceDropdown() { try { $w("#resourcesDropdown").options = await getResourceList(); } catch (error) { console.error("Failed to fetch resources.", error); } } function toggleRecurrenceContainer() { if ($w("#recurrenceCheckbox").checked) { $w("#recurrenceContainer").expand(); } else { $w("#recurrenceContainer").collapse(); } } function formatLocalDate(date, time) { return date.toLocaleDateString("en-CA") + "T" + time; } async function blockOffTime() { const startTime = formatLocalDate( $w("#startDate").value, $w("#startTime").value ); const endTime = formatLocalDate($w("#endDate").value, $w("#endTime").value); try { let event = { scheduleId: $w("#resourcesDropdown").value, start: { localDate: startTime }, end: { localDate: endTime }, }; if ($w("#recurrenceCheckbox").checked) { const recurrenceDay = $w("#startDate") .value.toLocaleDateString("en-CA", { weekday: "long" }) .toUpperCase(); const untilTime = formatLocalDate( $w("#untilDate").value, $w("#untilTime").value ); event = { ...event, recurrenceRule: { frequency: "WEEKLY", interval: $w("#intervalDropdown").value, days: [recurrenceDay], until: { localDate: untilTime }, }, }; } createBlockedOffTimeEvent(event); } catch (error) { console.error("Session creation failed.", error); } } ``` ## See also - [Recurring Events](https://dev.wix.com/docs/api-reference/business-management/calendar/events-v3/recurring-events.md) - [Calendar Events API](https://dev.wix.com/docs/api-reference/business-management/calendar/events-v3/introduction.md) - [Bookings API](https://dev.wix.com/docs/api-reference/business-solutions/bookings/services/introduction.md) --- > Portal Navigation: > > - Append `.md` to any URL under `https://dev.wix.com/docs/` to get its markdown version. > - Pages are either content pages (article or reference text) or menu pages (a list of links to child pages). > - To get a menu page, truncate any URL to a parent path and append `.md` (e.g. `https://dev.wix.com/docs/sdk.md`, `https://dev.wix.com/docs/sdk/core-modules.md`). > - Top-level index of all portals: https://dev.wix.com/docs/llms.txt > - Full concatenated docs: https://dev.wix.com/docs/llms-full.txt ## Resource: Tutorial | Create a Custom Bookings Experience for Appointment Services ## Article: Tutorial | Create a Custom Bookings Experience for Appointment Services ## Article Link: https://dev.wix.com/docs/develop-websites-sdk/get-started/tutorials/bookings/tutorial-create-a-custom-bookings-experience-for-appointment-services.md ## Article Content: # Tutorial | Create a Custom Bookings Experience for Appointment Services Using the JavaScript SDK [Bookings APIs](https://dev.wix.com/docs/sdk/backend-modules/bookings/introduction.md), you can create a custom booking experience for the [appointment-based services](https://dev.wix.com/docs/sdk/backend-modules/bookings/services/about-service-types.md) you offer on your site. This tutorial demonstrates how to build a complete booking flow that integrates with [Wix eCommerce](https://dev.wix.com/docs/sdk/backend-modules/ecom/introduction.md) for payment processing.
This tutorial covers appointment-based services only. For class and course services, the availability checking and booking processes are different and require separate implementation approaches.
## What you'll build By the end of this tutorial, you'll have a fully functional booking flow that allows site visitors to: - Browse available appointment services. - Select an appointment time slot. - Enter their contact information. - Complete payment through Wix eCommerce. To build the custom bookings experience, follow these steps: 1. [Set up the page elements and structure](#step-1--set-up-the-page-elements-and-structure). 2. [Build the backend logic to fetch available time slots](#step-2--build-the-backend-logic-to-fetch-available-time-slots). 3. [Build the backend logic to create bookings and process payments](#step-3--build-the-backend-logic-to-create-bookings-and-process-payments). 4. [Create the basic booking flow framework](#step-4--create-the-basic-booking-flow-framework). 5. [Enable customers to browse and select services](#step-5--enable-customers-to-browse-and-select-services). 6. [Display available appointment times to customers](#step-6--display-available-appointment-times-to-customers). 7. [Allow customers to choose their preferred time slot](#step-7--allow-customers-to-choose-their-preferred-time-slot). 8. [Process the booking and redirect to Wix eCommerce checkout](#step-8--process-the-booking-and-redirect-to-wix-ecommerce-checkout).
The code in this article was written using the following module versions: - @wix/site-ecom (v1.10.0) - @wix/bookings (v1.0.944) - @wix/ecom (v1.0.1243) - @wix/web-methods (v1.0.0) Learn how to install npm packages [in the editor](https://dev.wix.com/docs/develop-websites-sdk/code-your-site/developer-environments/packages/npm/work-with-npm-packages-in-the-editor.md) or [using the CLI](https://dev.wix.com/docs/develop-websites-sdk/code-your-site/developer-environments/packages/npm/work-with-npm-packages-with-the-cli.md).
## Before you begin It's important to note the following points before doing this tutorial: - [Set up your services](https://support.wix.com/en/wix-bookings/setting-up-wix-bookings) using the Bookings app. - This tutorial covers [appointment-based services](https://dev.wix.com/docs/sdk/backend-modules/bookings/services/about-service-types.md) only. Class and course services have different availability patterns and booking flows that aren't covered in this tutorial. - For paid bookings, [set up payment processing](https://support.wix.com/en/article/about-accepting-payments) before using the Bookings APIs. ## Step 1 | Add elements to your page This step sets up the page elements needed for the booking flow. At the end of this step, you'll have a complete page structure ready for implementing the booking functionality. To set up the page structure: 1. Add a dataset and connect it to the **Bookings/Services** collection. Learn more about [Adding a Dataset](https://support.wix.com/en/article/cms-formerly-content-manager-adding-and-setting-up-a-dataset). 2. Add the following elements to your page for services display and connect the repeater elements to their respective fields from the **Bookings/Services** collection through the dataset: | Type | ID | Connected to collection/field | | -------- | --------------- | ----------------------------- | | Section | serviceSection | - | | Repeater | serviceRepeater | Bookings/Services | | Text | titleText | Service Name (Text) | | Image | serviceImage | Service Image (Image) | | Text | descriptionText | Service Description (Text) | | Text | priceText | Price Summary (Text) | | Button | bookButton | - | The layout should look like this: ![Service section layout](https://wixmp-833713b177cebf373f611808.wixmp.com/images/74bce1b41a1679a562fd270c3676e4d8.png) 3. Add the following page elements for time slots display. | Type | ID | Purpose | | -------- | ------------ | ---------------------------- | | Section | slotSection | Contains slot selection UI | | Repeater | slotRepeater | Display available time slots | | Text | dateText | Show slot date | | Text | timeText | Show slot time | | Text | durationText | Show slot duration | | Button | slotButton | Select time slot | The layout should look like this: ![Time slots section layout with element IDs](https://wixmp-833713b177cebf373f611808.wixmp.com/images/175ab69ef9bdd4eadbe2d05707a8eb41.png) 4. Add the following page elements for the booking form. | Type | ID | Purpose | | ------- | -------------- | ------------------------------ | | Section | formSection | Contains customer input fields | | Input | firstNameInput | Customer first name | | Input | lastNameInput | Customer last name | | Input | emailInput | Customer email | | Input | phoneInput | Customer phone number | | Button | checkoutButton | Add booking to cart | The layout should look like this: ![Booking form section layout with element IDs](https://wixmp-833713b177cebf373f611808.wixmp.com/images/6a74ba8a32f852ec91df771b2bd00e4b.png) ## Step 2 | Add backend code This step creates the backend web module for checking slot availability. At the end of this step, you'll have a backend web module that handles slot availability: fetching a list of available slots and verifying that a specific slot is still bookable right before creating a booking.
The availability checking methods in this step work with appointment-based services. Class and course services use different availability patterns and require [different API methods](https://dev.wix.com/docs/sdk/backend-modules/bookings/time-slots/introduction.md).
1. Create a new backend file called `bookings-availability.web.js` in your backend folder. 2. Add the required imports. ```javascript /***************************************** * Backend code - bookings-availability.web.js * ****************************************/ import { webMethod, Permissions } from "@wix/web-methods"; import { availabilityTimeSlots } from "@wix/bookings"; ``` 3. Add a [web method](https://dev.wix.com/docs/sdk/core-modules/web-methods/web-method.md) to list available slots. It calls [`listAvailabilityTimeSlots()`](https://dev.wix.com/docs/sdk/backend-modules/bookings/time-slots/availability-time-slots/list-availability-time-slots.md) to retrieve available booking slots for a service. The frontend code passes the required parameters: `serviceId`, `fromDate`, `toDate`, `timeSlotsPerDay`, and `timeZone`: ```javascript // Get available time slots for a service using the Time Slots API export const listAvailableSlots = webMethod( Permissions.Anyone, async (serviceId, fromDate, toDate, timeSlotsPerDay, timeZone) => { try { const response = await availabilityTimeSlots.listAvailabilityTimeSlots( { serviceId: serviceId, fromLocalDate: fromDate, toLocalDate: toDate, timeSlotsPerDay: timeSlotsPerDay, timeZone: timeZone, } ); return { success: true, timeSlots: response.timeSlots || [], totalSlots: response.timeSlots ? response.timeSlots.length : 0, }; } catch (error) { console.error("Error fetching availability:", error); return { success: false, error: error.message || "Unknown error occurred", timeSlots: [], totalSlots: 0, }; } } ); ``` 4. Add the second method to verify slot availability. This prevents double-booking by checking if a slot is still available right before creating the booking. It calls [`getAvailabilityTimeSlot()`](https://dev.wix.com/docs/sdk/backend-modules/bookings/time-slots/availability-time-slots/get-availability-time-slot.md) to verify a specific time slot is still bookable. The method checks the slot's `bookable` property to determine if it can still accept bookings. The frontend code passes the required parameters: `serviceId`, `localStartDate`, `localEndDate`, `timeZone`, and `location`. ```javascript // Verify a specific time slot is still available export const verifyTimeSlotAvailability = webMethod( Permissions.Anyone, async (serviceId, localStartDate, localEndDate, timeZone, location) => { // Validate required parameters if (!serviceId || !localStartDate || !localEndDate) { console.error("Missing required parameters for verification"); return { success: false, error: "Missing required parameters", isAvailable: false, }; } try { const response = await availabilityTimeSlots.getAvailabilityTimeSlot( serviceId, localStartDate, localEndDate, timeZone, location ); return { success: true, timeSlot: response.timeSlot, isAvailable: response.timeSlot && response.timeSlot.bookable, }; } catch (error) { console.error("Error verifying slot:", error); return { success: false, error: error.message || "Slot verification failed", isAvailable: false, }; } } ); ``` ## Step 3 | Build booking and payment logic This step creates the backend web module for booking creation and cart integration. The backend web module handles a 2-step process: first creating a booking and then adding it to the eCommerce cart for payment processing. 1. Create a new backend file called `bookings-checkout.web.js` in your backend folder. 2. Add the required imports. ```javascript /***************************************** * Backend code - bookings-checkout.web.js * ****************************************/ import { Permissions, webMethod } from "@wix/web-methods"; import { currentCart } from "@wix/ecom"; import { bookings } from "@wix/bookings"; ``` 3. Add a helper function to prepare booking data. ```javascript // Helper function to prepare booking data from the frontend options function prepareBookingData(bookingOptions) { return { bookedEntity: { slot: bookingOptions.bookedEntity.slot, }, contactDetails: { firstName: bookingOptions.contactDetails.firstName, lastName: bookingOptions.contactDetails.lastName, email: bookingOptions.contactDetails.email, phone: bookingOptions.contactDetails.phone, }, numberOfParticipants: bookingOptions.numberOfSpots || 1, }; } ``` 4. Add a helper function to create the booking. This function calls [`createBooking()`](https://dev.wix.com/docs/sdk/backend-modules/bookings/bookings/create-booking.md) and handles any errors that occur during booking creation. ```javascript // Helper function to create a booking and handle errors async function createBookingWithErrorHandling(bookingData) { try { const createdBookingResponse = await bookings.createBooking(bookingData); // Validate booking creation before proceeding if (!createdBookingResponse || !createdBookingResponse.booking._id) { console.error("Booking creation returned invalid result"); return { success: false, error: "Booking creation failed - no booking ID returned", step: "booking_validation", }; } return { success: true, booking: createdBookingResponse, }; } catch (bookingError) { console.error("Failed to create booking:", bookingError); return { success: false, error: "Failed to create booking: " + (bookingError.message || "Unknown booking error"), step: "booking_creation", details: bookingError.details || null, }; } } ``` 5. Add a helper function to add the booking to the cart. This function uses [`addToCurrentCart()`](https://dev.wix.com/docs/sdk/backend-modules/ecom/current-cart/add-to-current-cart.md) to add the created booking to the eCommerce cart by specifying the Wix Bookings app ID and the booking ID. ```javascript // Helper function to add booking to cart and handle errors async function addBookingToCartWithErrorHandling(bookingId) { try { const cartOptions = { lineItems: [ { catalogReference: { appId: "13d21c63-b5ec-5912-8397-c3a5ddb27a97", // Wix Bookings app ID catalogItemId: bookingId, }, quantity: 1, }, ], }; const updatedCurrentCart = await currentCart.addToCurrentCart( cartOptions ); return { success: true, cart: updatedCurrentCart, }; } catch (cartError) { console.error("Error adding booking to cart:", cartError); return { success: false, error: "Failed to add booking to cart: " + (cartError.message || "Unknown cart error"), step: "cart_addition", details: cartError.details || null, }; } } ``` 6. Implement the main web method that coordinates the helper functions. ```javascript // Main web method that coordinates booking creation and cart addition export const addBookingToCart = webMethod( Permissions.Anyone, async (bookingOptions) => { // Step 1: Prepare the booking data const bookingData = prepareBookingData(bookingOptions); // Step 2: Create the booking const bookingResult = await createBookingWithErrorHandling(bookingData); if (!bookingResult.success) { return bookingResult; // Return error from booking creation } // Step 3: Add booking to cart const cartResult = await addBookingToCartWithErrorHandling( bookingResult.booking.booking._id ); if (!cartResult.success) { // In a production site, handle this partial success scenario carefully. // The booking exists but is unpaid - consider canceling it or notifying site owners for follow-up. console.log( "Booking created but cart addition failed. Booking ID:", bookingResult.booking.booking._id ); return { ...cartResult, booking: bookingResult.booking, // Include booking info even if cart failed }; } // Step 4: Return success response return { booking: bookingResult.booking, cart: cartResult.cart, success: true, message: "Booking created and added to cart successfully", }; } ); ``` ## Step 4 | Add frontend code This step sets up the frontend code structure for the booking flow. You'll create the imports, utility functions, and basic UI setup needed for the booking functionality. At the end of this step, you'll have a page with form validation and checkout button handling, ready to integrate with the service and slot selection features. To set up the booking infrastructure: 1. Add the imports and global variables at the top of your page code. ```javascript import { ecom } from "@wix/site-ecom"; import { listAvailableSlots, verifyTimeSlotAvailability, } from "backend/bookings-availability.web.js"; import { addBookingToCart } from "backend/bookings-checkout.web.js"; // Global variables let availableSlots = []; let selectedSlot = null; let selectedServiceId = null; ``` 2. Add utility and helper functions. ```javascript // Optional: Utility method to format dates for API calls function toLocalISOString(date) { // Convert date to local time ISO string const offset = date.getTimezoneOffset(); // Adjust for timezone: getTimezoneOffset() returns minutes, so multiply by 60*1000 to get milliseconds // Subtract because getTimezoneOffset() returns positive values for timezones behind UTC const localDate = new Date(date.getTime() - offset * 60 * 1000); // Convert to ISO string and remove the 'Z' suffix // slice(0, -1) removes the last character ('Z') to indicate local time, not UTC return localDate.toISOString().slice(0, -1); } // Helper function to validate form input and slot selection function validateFormInput() { // Check if a slot has been selected if (!selectedSlot) { console.error("No slot selected or slot data missing"); return false; } // Validate form inputs and remove leading/trailing whitespace with trim() const firstName = $w("#firstNameInput").value.trim(); const lastName = $w("#lastNameInput").value.trim(); const email = $w("#emailInput").value.trim(); const phone = $w("#phoneInput").value.trim(); // Confirm all required input fields are filled if (!firstName || !lastName || !email) { // In a production site, consider displaying a message to the site visitor. // For example: $w("#errorMessage").text = "Please fill in all required fields"; console.log("Please fill in all required fields"); return false; } return true; } ``` 3. Set up the `$w.onReady()` function with complete functionality. ```javascript $w.onReady(function () { // Initially hide slot and form sections (service section visible by default) $w("#slotSection").hide(); $w("#formSection").hide(); // Add event listener for the checkout button $w("#checkoutButton").onClick(() => { // Validate form input and slot selection if (!validateFormInput()) { return; } // Process the booking (create booking and add to cart) processBooking(); }); }); ``` ## Step 5 | Enable customers to browse and select services This step implements the service selection user interface. At the end of this step, clicking a service's book button shows the slot selection section though slots don't load yet. To set up service selection: 1. Add the service repeater item ready function. This function handles when a service item is displayed in the repeater and sets up the book button click handler. ```javascript export function serviceRepeaterItemReady($item, itemData, index) { $item("#bookButton").onClick(async () => { selectedServiceId = itemData._id; if (selectedServiceId) { try { await loadAvailableSlots(selectedServiceId); // Show slotSection when bookButton is clicked $w("#slotSection").show(); } catch (error) { console.error("Error loading available slots:", error); // In a production site, consider displaying a message to site visitors via UI elements. // For example: $w("#serviceErrorMessage").text = "Unable to load available times. Please try again."; } } else { // In a production site, consider displaying a message to site visitors via UI elements. // For example: $w("#serviceErrorMessage").text = "Service unavailable. Please try again."; console.log("No service ID found"); } }); } ``` 2. Add the service repeater registration to your `$w.onReady()` function. ```javascript $w.onReady(function () { // ... existing code ... // Register the service repeater item ready method $w("#serviceRepeater").onItemReady(serviceRepeaterItemReady); }); ``` ## Step 6 | Display available appointment times to customers This step implements the actual slot loading functionality by replacing the stub function with a real implementation. At the end of this step, site visitors can view available time slots for their selected service. To load and display available slots: 1. Add the `loadAvailableSlots` function to your page code. When a site visitor selects a service by clicking the book button, this function fetches available time slots for that service. This example queries availability for the next 7 days and limits results to 1 slot per day. You can adjust the time range and slots per day to better suit your business needs and user experience requirements. ```javascript // Load available time slots for the selected service async function loadAvailableSlots(serviceId) { try { // Set up the date range and time zone parameters const today = new Date(); const endRange = new Date(); // Set query time range (the example uses 7 days ahead, you can customize this range as needed) endRange.setDate(today.getDate() + 7); // Limit to 1 slot per day - increase for more options let slotsPerDay = 1; // Use the customer's timezone or default to UTC // Note: UTC fallback may cause timezone mismatches for international customers let timeZone = Intl.DateTimeFormat().resolvedOptions().timeZone || "UTC"; // Call the backend method to fetch available slots const availability = await listAvailableSlots( serviceId, toLocalISOString(today), toLocalISOString(endRange), slotsPerDay, timeZone ); // Handle the response and call the slot population function if (availability && availability.timeSlots) { availableSlots = availability.timeSlots; populateSlotRepeater(); } else { // In a production site, consider showing a message to the site visitor. // For example: $w("#noSlotsMessage").show(); console.log("No available slots found"); $w("#slotRepeater").data = []; } } catch (error) { console.error("Error fetching slots:", error); $w("#slotRepeater").data = []; } } ``` ## Step 7 | Allow customers to choose their preferred time slot This step implements the slot selection functionality with helper functions for cleaner, more maintainable code. At the end of this step, site visitors can choose from available appointment times. To display and interact with time slots: 1. Add the `populateSlotRepeater` function to your page code.
[Repeaters](https://dev.wix.com/docs/develop-websites-sdk/code-your-site/build-a-custom-frontend/editor-elements/repeaters/about-repeater-item-templates.md) require each data item to have an `_id` field that doesn't contain underscores within its value. The raw slot data from the [`listAvailabilityTimeSlots()`](https://dev.wix.com/docs/sdk/backend-modules/bookings/time-slots/availability-time-slots/list-availability-time-slots.md) doesn't include an `id` field, so you must transform the data. For example, by using the `map()` method. Without this transformation, the repeater won't display any items while no error is logged.
```javascript // Populate the time slots repeater function populateSlotRepeater() { try { if (!availableSlots || availableSlots.length === 0) { // In a production site, consider showing a message to site visitors via UI elements. // For example: $w("#noSlotsMessage").text = "No available time slots. Please try different dates."; console.log("No slots to display"); $w("#slotRepeater").data = []; return; } // Show slot section $w("#slotSection").show(); // Transform slots for repeater compatibility // IMPORTANT: Repeaters require each item to have an _id field that doesn't contain underscores // The raw slot data from the API doesn't meet this requirement, so we must map it const repeaterData = availableSlots.map((slot, index) => { return { _id: `slot-${index}`, // Simple ID for repeater (no underscores in the value) fullSlot: slot, // Nest the original slot data here }; }); // Set the repeater data $w("#slotRepeater").data = repeaterData; } catch (error) { console.error("Error populating repeater:", error); } } ``` 2. Add a helper function to format slot display data. ```javascript // Helper function to format slot data for display function formatSlotForDisplay(slotData) { const startDate = new Date(slotData.localStartDate); const endDate = new Date(slotData.localEndDate); // OPTIONAL: Format date using US locale with abbreviated month (e.g., "Jul 1, 2025") // Customize this formatting to match your preferences const dateStr = startDate.toLocaleDateString("en-US", { month: "short", // Abbreviated month name (Jan, Feb, etc.) day: "numeric", // Day without leading zero year: "numeric", // Full year }); // OPTIONAL: Format time using US locale with 12-hour format (e.g., "2:00 PM") // You can use 24-hour format or other locale settings as needed const timeStr = startDate.toLocaleTimeString("en-US", { hour: "numeric", // Hour without leading zero minute: "2-digit", // Minutes with leading zero if needed hour12: true, // Use 12-hour format with AM/PM }); // OPTIONAL: Calculate and display slot duration // You might prefer to show this information differently const durationMinutes = Math.round( (endDate.getTime() - startDate.getTime()) / (1000 * 60) ); const durationStr = `${durationMinutes} min`; return { dateStr, timeStr, durationStr }; } ``` 3. Add a helper function to handle slot selection. ```javascript // Helper function to handle slot selection function handleSlotSelection(slotData) { // Store the selected slot for booking creation selectedSlot = slotData; // Show your custom booking form $w("#formSection").show(); } ``` 4. Implement the main slot repeater item ready method that uses the helper functions. ```javascript export function slotRepeaterItemReady($item, itemData, index) { try { // Access the slot data from the fullSlot property due to our data transformation const slotData = itemData.fullSlot; // Format the slot data for display const { dateStr, timeStr, durationStr } = formatSlotForDisplay(slotData); // Set the formatted values to the repeater item's text elements $item("#dateText").text = dateStr; $item("#timeText").text = timeStr; $item("#durationText").text = durationStr; // Add event listener for the slot button - this is the core functionality // When clicked, this stores the selected slot and shows the booking form $item("#slotButton").onClick(() => { handleSlotSelection(slotData); }); } catch (error) { console.error("Error in slot repeater itemReady:", error); } } ``` 5. Add the slot repeater registration to your `$w.onReady()` function. ```javascript $w.onReady(function () { // ... existing code ... // Register the slot repeater item ready method $w("#slotRepeater").onItemReady(slotRepeaterItemReady); }); ``` ## Step 8 | Process the booking and redirect to Wix eCommerce checkout This step implements the booking creation functionality with a comprehensive set of helper functions for better code organization. The frontend `processBooking()` function calls the backend web module `addBookingToCart()` (created in step 3) that handles both creating the booking and adding it to the eCommerce cart. At the end of this step, you create the booking and automatically redirect customers to the cart page to complete their purchase. To implement the booking process: 1. Add helper functions to collect form data and validate slot selection. ```javascript // Helper function to collect form data function getFormData() { // Get form values and remove leading/trailing whitespace with trim() const firstName = $w("#firstNameInput").value.trim(); const lastName = $w("#lastNameInput").value.trim(); const email = $w("#emailInput").value.trim(); const phone = $w("#phoneInput").value.trim(); return { firstName, lastName, email, phone }; } // Helper function to validate slot selection function validateSlotSelection() { // Check if selectedSlot and its properties exist if (!selectedSlot) { throw new Error("No slot selected or slot data missing"); } // Ensure we have the required data if (!selectedSlot.localStartDate || !selectedSlot.localEndDate) { throw new Error("Slot missing start or end date"); } } ``` 2. Add a helper function to transform slot data for booking creation. You must transform the `slot` object returned from `listAvailabilityTimeSlots()` before specifying it in `createBooking()`. The required transformations are: - **Rename date fields**: `localStartDate`/`localEndDate` → `startDate`/`endDate`. - **Select a resource**: Choose 1 resource from the `availableResources` array. - **Map location type**: Convert between different enum values. | From `listAvailabilityTimeSlots()` | To `createBooking()` | | ---------------------------------- | -------------------- | | `CUSTOMER` | `OWNER_CUSTOM` | | `CUSTOM` | `CUSTOM` | | `BUSINESS` | `OWNER_BUSINESS` | ```javascript // Helper function to transform slot data for booking creation function transformSlotForBooking(contactDetails) { // Map location type from time slots API to bookings API format const locationTypeMap = { CUSTOMER: "OWNER_CUSTOM", CUSTOM: "CUSTOM", BUSINESS: "OWNER_BUSINESS", }; // Transform slot data for booking creation return { bookedEntity: { slot: { ...selectedSlot, startDate: selectedSlot.localStartDate, endDate: selectedSlot.localEndDate, location: { ...selectedSlot.location, locationType: locationTypeMap[selectedSlot.location.locationType] || "OWNER_BUSINESS", }, resource: { ...selectedSlot.resource, // Select a resource, it doesn't have to be the first resource. id: selectedSlot.availableResources[0].resources[0]._id, }, }, }, contactDetails, numberOfSpots: 1, }; } ``` 3. Add a helper function to verify slot availability. ```javascript // Helper function to verify slot availability before booking async function verifySlotAvailability() { // Use the customer's timezone or default to UTC // Note: UTC fallback may cause timezone mismatches for international customers const timeZone = Intl.DateTimeFormat().resolvedOptions().timeZone || "UTC"; // Verify slot is still available const slotVerification = await verifyTimeSlotAvailability( selectedServiceId, selectedSlot.localStartDate, selectedSlot.localEndDate, timeZone, selectedSlot.location ); if (!slotVerification.success) { throw new Error( `Error verifying slot availability: ${slotVerification.error}` ); } if (!slotVerification.isAvailable) { throw new Error("Slot is no longer available for booking"); } } ``` 4. Implement the main `processBooking` function that coordinates the helper functions. This function orchestrates the entire booking process using the helper functions in a clear 6-step workflow. ```javascript // Process booking: validate, create booking, and add to cart async function processBooking() { try { // Step 1: Validate slot selection validateSlotSelection(); // Step 2: Collect form data const contactDetails = getFormData(); // Step 3: Transform slot data for booking const bookingOptions = transformSlotForBooking(contactDetails); // Step 4: Verify slot is still available await verifySlotAvailability(); // Step 5: Create the booking and add it to the cart const cartResult = await addBookingToCart(bookingOptions); // Step 6: Navigate to cart page for checkout await ecom.navigateToCartPage(); } catch (error) { console.error("Error processing booking:", error); // In a production site, consider displaying an error message to site visitors via UI elements. // For example: $w("#errorMessage").text = "Error processing booking. Please try again."; console.log("Error processing booking. Please try again."); } } ``` ## What happens next After the booking is added to the cart and the customer is redirected, they continue through the standard Wix eCommerce checkout flow: 1. **Cart page**: Site visitors review their booking details and continue to checkout. 2. **Checkout page**: Site visitors enter payment information and billing details. 3. **Confirmation**: Site visitors receive booking confirmation after successful payment. Congratulations. You've successfully created a custom bookings experience that integrates with Wix eCommerce for payment processing. You can continue building upon this example by adding features like booking confirmations, customer notifications, or apply what you learned in this tutorial to create entirely new booking workflows. ## Complete implementation code
Page code (frontend) ```javascript import { ecom } from "@wix/site-ecom"; import { listAvailableSlots, verifyTimeSlotAvailability, } from "backend/bookings-availability.web.js"; import { addBookingToCart } from "backend/bookings-checkout.web.js"; // Global variables let availableSlots = []; let selectedSlot = null; let selectedServiceId = null; function toLocalISOString(date) { // Convert date to local time ISO string const offset = date.getTimezoneOffset(); // Adjust for timezone: getTimezoneOffset() returns minutes, so multiply by 60*1000 to get milliseconds // Subtract because getTimezoneOffset() returns positive values for timezones behind UTC const localDate = new Date(date.getTime() - offset * 60 * 1000); // Convert to ISO string and remove the 'Z' suffix // slice(0, -1) removes the last character ('Z') to indicate local time, not UTC return localDate.toISOString().slice(0, -1); } // Load available time slots for the selected service async function loadAvailableSlots(serviceId) { try { // Set up the date range and time zone parameters const today = new Date(); const endRange = new Date(); // Set query time range (the example uses 7 days ahead, you can customize this range as needed) endRange.setDate(today.getDate() + 7); // Limit to 1 slot per day - increase for more options let slotsPerDay = 1; // Use the customer's timezone or default to UTC // Note: UTC fallback may cause timezone mismatches for international customers let timeZone = Intl.DateTimeFormat().resolvedOptions().timeZone || "UTC"; // Call the backend method to fetch available slots const availability = await listAvailableSlots( serviceId, toLocalISOString(today), toLocalISOString(endRange), slotsPerDay, timeZone ); // Handle the response and call the slot population function if (availability && availability.timeSlots) { availableSlots = availability.timeSlots; populateSlotRepeater(); } else { console.log("No available slots found"); // In a production site, consider showing a message to the site visitor. // For example: $w("#noSlotsMessage").show(); $w("#slotRepeater").data = []; } } catch (error) { console.error("Error fetching slots:", error); $w("#slotRepeater").data = []; } } // Populate the time slots repeater function populateSlotRepeater() { try { if (!availableSlots || availableSlots.length === 0) { $w("#slotRepeater").data = []; return; } // Show slot section $w("#slotSection").show(); // Transform slots for repeater compatibility // IMPORTANT: Repeaters require each item to have an _id field that doesn't contain underscores // The raw slot data from the API doesn't meet this requirement, so we must map it const repeaterData = availableSlots.map((slot, index) => { return { _id: `slot-${index}`, // Simple ID for repeater (no underscores in the value) fullSlot: slot, // Nest the original slot data here }; }); // Set the repeater data $w("#slotRepeater").data = repeaterData; } catch (error) { console.error("Error populating repeater:", error); } } // Helper function to format slot data for display function formatSlotForDisplay(slotData) { const startDate = new Date(slotData.localStartDate); const endDate = new Date(slotData.localEndDate); // OPTIONAL: Format date using US locale with abbreviated month (e.g., "Jul 1, 2025") // Customize this formatting to match your preferences const dateStr = startDate.toLocaleDateString("en-US", { month: "short", // Abbreviated month name (Jan, Feb, etc.) day: "numeric", // Day without leading zero year: "numeric", // Full year }); // OPTIONAL: Format time using US locale with 12-hour format (e.g., "2:00 PM") // You can use 24-hour format or other locale settings as needed const timeStr = startDate.toLocaleTimeString("en-US", { hour: "numeric", // Hour without leading zero minute: "2-digit", // Minutes with leading zero if needed hour12: true, // Use 12-hour format with AM/PM }); // OPTIONAL: Calculate and display slot duration // You might prefer to show this information differently const durationMinutes = Math.round( (endDate.getTime() - startDate.getTime()) / (1000 * 60) ); const durationStr = `${durationMinutes} min`; return { dateStr, timeStr, durationStr }; } // Helper function to handle slot selection function handleSlotSelection(slotData) { // Store the selected slot for booking creation selectedSlot = slotData; // Show your custom booking form $w("#formSection").show(); } // Helper function to validate form input and slot selection function validateFormInput() { // Check if a slot has been selected if (!selectedSlot) { console.error("No slot selected or slot data missing"); return false; } // Validate form inputs and remove leading/trailing whitespace with trim() const firstName = $w("#firstNameInput").value.trim(); const lastName = $w("#lastNameInput").value.trim(); const email = $w("#emailInput").value.trim(); const phone = $w("#phoneInput").value.trim(); // Confirm all required input fields are filled if (!firstName || !lastName || !email) { // In a production site, consider displaying a message to the site visitor. // For example: $w("#errorMessage").text = "Please fill in all required fields"; console.log("Please fill in all required fields"); return false; } return true; } // Helper function to collect form data function getFormData() { // Get form values and remove leading/trailing whitespace with trim() const firstName = $w("#firstNameInput").value.trim(); const lastName = $w("#lastNameInput").value.trim(); const email = $w("#emailInput").value.trim(); const phone = $w("#phoneInput").value.trim(); return { firstName, lastName, email, phone }; } // Helper function to validate slot selection function validateSlotSelection() { // Check if selectedSlot and its properties exist if (!selectedSlot) { throw new Error("No slot selected or slot data missing"); } // Ensure we have the required data if (!selectedSlot.localStartDate || !selectedSlot.localEndDate) { throw new Error("Slot missing start or end date"); } } // Helper function to transform slot data for booking creation function transformSlotForBooking(contactDetails) { // Map location type from time slots API to bookings API format const locationTypeMap = { CUSTOMER: "OWNER_CUSTOM", CUSTOM: "CUSTOM", BUSINESS: "OWNER_BUSINESS", }; // Transform slot data for booking creation return { bookedEntity: { slot: { ...selectedSlot, startDate: selectedSlot.localStartDate, endDate: selectedSlot.localEndDate, location: { ...selectedSlot.location, locationType: locationTypeMap[selectedSlot.location.locationType] || "OWNER_BUSINESS", }, resource: { ...selectedSlot.resource, // Select a resource, it doesn't have to be the first resource. id: selectedSlot.availableResources[0].resources[0]._id, }, }, }, contactDetails, numberOfSpots: 1, }; } // Helper function to verify slot availability before booking async function verifySlotAvailability() { // Use the customer's timezone or default to UTC // Note: UTC fallback may cause timezone mismatches for international customers const timeZone = Intl.DateTimeFormat().resolvedOptions().timeZone || "UTC"; // Verify slot is still available const slotVerification = await verifyTimeSlotAvailability( selectedServiceId, selectedSlot.localStartDate, selectedSlot.localEndDate, timeZone, selectedSlot.location ); if (!slotVerification.success) { throw new Error( `Error verifying slot availability: ${slotVerification.error}` ); } if (!slotVerification.isAvailable) { throw new Error("Slot is no longer available for booking"); } } // Process booking: validate, create booking, and add to cart async function processBooking() { try { // Step 1: Validate slot selection validateSlotSelection(); // Step 2: Collect form data const contactDetails = getFormData(); // Step 3: Transform slot data for booking const bookingOptions = transformSlotForBooking(contactDetails); // Step 4: Verify slot is still available await verifySlotAvailability(); // Step 5: Create the booking and add it to the cart const cartResult = await addBookingToCart(bookingOptions); // Step 6: Navigate to cart page for checkout await ecom.navigateToCartPage(); } catch (error) { console.error("Error processing booking:", error); // In a production site, consider displaying an error message to site visitors via UI elements. // For example: $w("#errorMessage").text = "Error processing booking. Please try again."; console.log("Error processing booking. Please try again."); } } export function serviceRepeaterItemReady($item, itemData, index) { $item("#bookButton").onClick(async () => { selectedServiceId = itemData._id; if (selectedServiceId) { try { await loadAvailableSlots(selectedServiceId); // Show slotSection when bookButton is clicked $w("#slotSection").show(); } catch (error) { console.error("Error loading available slots:", error); // In a production site, consider displaying a message to site visitors via UI elements. // For example: $w("#serviceErrorMessage").text = "Unable to load available times. Please try again."; } } else { console.log("No service ID found"); } }); } export function slotRepeaterItemReady($item, itemData, index) { try { // Access the slot data from the fullSlot property due to our data transformation const slotData = itemData.fullSlot; // Format the slot data for display const { dateStr, timeStr, durationStr } = formatSlotForDisplay(slotData); // Set the formatted values to the repeater item's text elements $item("#dateText").text = dateStr; $item("#timeText").text = timeStr; $item("#durationText").text = durationStr; // Add event listener for the slot button - this is the core functionality // When clicked, this stores the selected slot and shows the booking form $item("#slotButton").onClick(() => { handleSlotSelection(slotData); }); } catch (error) { console.error("Error in slot repeater itemReady:", error); } } $w.onReady(function () { // Initially hide slot and form sections (service section visible by default) $w("#slotSection").hide(); $w("#formSection").hide(); // Register the item ready methods for the slot and the service repeater $w("#slotRepeater").onItemReady(slotRepeaterItemReady); $w("#serviceRepeater").onItemReady(serviceRepeaterItemReady); // Add event listener for the checkout button $w("#checkoutButton").onClick(() => { // Validate form input and slot selection if (!validateFormInput()) { return; } // Process the booking (create booking and add to cart) processBooking(); }); }); ```
bookings-availability.web.js ```javascript /***************************************** * Backend code - bookings-availability.web.js * ****************************************/ import { webMethod, Permissions } from "@wix/web-methods"; import { availabilityTimeSlots } from "@wix/bookings"; /** * Get available time slots for a service using the Availability API */ export const listAvailableSlots = webMethod( Permissions.Anyone, async (serviceId, fromDate, toDate, timeSlotsPerDay, timeZone) => { try { const response = await availabilityTimeSlots.listAvailabilityTimeSlots({ serviceId: serviceId, fromLocalDate: fromDate, toLocalDate: toDate, timeSlotsPerDay: timeSlotsPerDay, timeZone: timeZone, }); return { success: true, timeSlots: response.timeSlots || [], totalSlots: response.timeSlots ? response.timeSlots.length : 0, }; } catch (error) { console.error("Error fetching availability:", error); return { success: false, error: error.message || "Unknown error occurred", timeSlots: [], totalSlots: 0, }; } } ); // Verify a specific time slot is still available export const verifyTimeSlotAvailability = webMethod( Permissions.Anyone, async (serviceId, localStartDate, localEndDate, timeZone, location) => { // Validate required parameters if (!serviceId || !localStartDate || !localEndDate) { console.error("Missing required parameters for verification"); return { success: false, error: "Missing required parameters", isAvailable: false, }; } try { const response = await availabilityTimeSlots.getAvailabilityTimeSlot( serviceId, localStartDate, localEndDate, timeZone, location ); return { success: true, timeSlot: response.timeSlot, isAvailable: response.timeSlot && response.timeSlot.bookable, }; } catch (error) { console.error("Error verifying slot:", error); return { success: false, error: error.message || "Slot verification failed", isAvailable: false, }; } } ); ```
bookings-checkout.web.js ```javascript /***************************************** * Backend code - bookings-checkout.web.js * ****************************************/ import { Permissions, webMethod } from "@wix/web-methods"; import { currentCart } from "@wix/ecom"; import { bookings } from "@wix/bookings"; // Helper function to prepare booking data from the frontend options function prepareBookingData(bookingOptions) { return { bookedEntity: { slot: bookingOptions.bookedEntity.slot, }, contactDetails: { firstName: bookingOptions.contactDetails.firstName, lastName: bookingOptions.contactDetails.lastName, email: bookingOptions.contactDetails.email, phone: bookingOptions.contactDetails.phone, }, numberOfParticipants: bookingOptions.numberOfSpots || 1, }; } // Helper function to create a booking and handle errors async function createBookingWithErrorHandling(bookingData) { try { const createdBookingResponse = await bookings.createBooking(bookingData); // Validate booking creation before proceeding if (!createdBookingResponse || !createdBookingResponse.booking._id) { console.error("Booking creation returned invalid result"); return { success: false, error: "Booking creation failed - no booking ID returned", step: "booking_validation", }; } return { success: true, booking: createdBookingResponse, }; } catch (bookingError) { console.error("Failed to create booking:", bookingError); return { success: false, error: "Failed to create booking: " + (bookingError.message || "Unknown booking error"), step: "booking_creation", details: bookingError.details || null, }; } } // Helper function to add booking to cart and handle errors async function addBookingToCartWithErrorHandling(bookingId) { try { const cartOptions = { lineItems: [ { catalogReference: { appId: "13d21c63-b5ec-5912-8397-c3a5ddb27a97", // Wix Bookings app ID catalogItemId: bookingId, }, quantity: 1, }, ], }; const updatedCurrentCart = await currentCart.addToCurrentCart(cartOptions); return { success: true, cart: updatedCurrentCart, }; } catch (cartError) { console.error("Error adding booking to cart:", cartError); return { success: false, error: "Failed to add booking to cart: " + (cartError.message || "Unknown cart error"), step: "cart_addition", details: cartError.details || null, }; } } // Main web method that coordinates booking creation and cart addition export const addBookingToCart = webMethod( Permissions.Anyone, async (bookingOptions) => { // Step 1: Prepare the booking data const bookingData = prepareBookingData(bookingOptions); // Step 2: Create the booking const bookingResult = await createBookingWithErrorHandling(bookingData); if (!bookingResult.success) { return bookingResult; // Return error from booking creation } // Step 3: Add booking to cart const cartResult = await addBookingToCartWithErrorHandling( bookingResult.booking.booking._id ); if (!cartResult.success) { // In a production site, handle this partial success scenario carefully. // The booking exists but is unpaid - consider canceling it or notifying site owners for follow-up. console.log( "Booking created but cart addition failed. Booking ID:", bookingResult.booking.booking._id ); return { ...cartResult, booking: bookingResult.booking, // Include booking info even if cart failed }; } // Step 4: Return success response return { booking: bookingResult.booking, cart: cartResult.cart, success: true, message: "Booking created and added to cart successfully", }; } ); ```
## See also - [Wix Bookings API Reference](https://dev.wix.com/docs/sdk/backend-modules/bookings/introduction.md) - [Wix Bookings architecture and data flow](https://dev.wix.com/docs/rest/business-solutions/bookings/architecture-and-data-flow.md) - [Wix eCommerce API Reference](https://dev.wix.com/docs/sdk/backend-modules/ecom/introduction.md) - [Wix eCommerce architecture and data flow](https://dev.wix.com/docs/rest/business-solutions/e-commerce/architecture-data-flow.md) - [Working with Web Modules](https://dev.wix.com/docs/develop-websites-sdk/code-your-site/build-a-custom-backend/web-modules/about-web-modules.md) --- > Portal Navigation: > > - Append `.md` to any URL under `https://dev.wix.com/docs/` to get its markdown version. > - Pages are either content pages (article or reference text) or menu pages (a list of links to child pages). > - To get a menu page, truncate any URL to a parent path and append `.md` (e.g. `https://dev.wix.com/docs/sdk.md`, `https://dev.wix.com/docs/sdk/core-modules.md`). > - Top-level index of all portals: https://dev.wix.com/docs/llms.txt > - Full concatenated docs: https://dev.wix.com/docs/llms-full.txt ## Resource: Tutorial | Add Data Search and Filtering Functionality ## Article: Tutorial | Add Data Search and Filtering Functionality ## Article Link: https://dev.wix.com/docs/develop-websites-sdk/get-started/tutorials/data/tutorial-add-data-search-and-filtering-functionality.md ## Article Content: # Tutorial | Add Data Search and Filtering Functionality When you have a database collection with lots of content, site visitors need an easy way to find what they're looking for. You can add powerful search and filtering capabilities to your site, transforming static content displays into interactive, user-friendly experiences. This tutorial demonstrates how to build: - **Real-time text search** - Site visitors type in a search field and see results update instantly as they type. - **Dropdown filtering** - Site visitors select from predefined categories using a dropdown menu populated with unique values from your collection. You'll learn to query collections, handle user input, and create interfaces that enhance the user experience. We'll use the following steps to query a database collection and dynamically display matching results: 1. [Set up site elements](#step-1--add-elements-to-your-site). 1. [Query and display all content on page load](#step-2--query-and-display-all-content-on-page-load). 1. [Add search and filter functionality](#step-3--filter-the-repeater). > The code in this article was written using the following module versions: > > - @wix/data (v1.0.244) > > Learn how to install npm packages [in the editor](https://dev.wix.com/docs/develop-websites-sdk/code-your-site/developer-environments/packages/npm/work-with-npm-packages-in-the-editor.md) or [using the CLI](https://dev.wix.com/docs/develop-websites-sdk/code-your-site/developer-environments/packages/npm/work-with-npm-packages-with-the-cli.md). ## Before you begin You need to note the following points before starting to code: - Create a [collection](https://support.wix.com/en/article/cms-formerly-content-manager-creating-a-collection) on your site. ## Step 1 | Add elements to your page This step sets up the user interface elements needed for search and filtering functionality. 1. Add a [repeater](https://support.wix.com/en/article/studio-editor-adding-and-customizing-repeaters) to your page. Set the repeater ID to `articlesList`. Inside the repeater, add: - An image element. Set the image ID to `itemImage`. - Two text elements. Set the text IDs to `itemCountry` and `itemContent` 2. Add an input field for searching. Set the input ID to `inputTitle`. 3. Add a dropdown element. Set the dropdown ID to `inputContinent`. ## Step 2 | Query and display all content on page load This step retrieves all items from your collection and prepares them for display. When the page loads, you'll display all the items before any filtering is applied. To query a collection, you'll need to get the collection ID. The way you get the ID depends on the editor you're using: ::::tabs :::Wix-Studio 1. Click on the **CMS** tab in the Code panel. 1. Hover over your collection, click the **Show More** icon, and select **Edit settings**. 1. Copy the collection ID to use in your code. ::: :::Wix-Editor 1. Click on the **Databases** tab in the Code sidebar. 1. Hover over your collection, click the **Show More** icon, and select **Edit settings**. 1. Copy the collection ID to use in your code. ::: :::: Now that you have the collection ID, you can query your data: 1. Import the [`@wix/data`](https://dev.wix.com/docs/sdk/backend-modules/data/items/introduction.md) module, which provides the [`query()`](https://dev.wix.com/docs/sdk/backend-modules/data/items/query.md) method for retrieving collection data. Also, save the collection ID to the `collectionName` variable. ```javascript import { items } from "@wix/data"; const collectionName = "Articles"; ``` 2. Define a function that runs the query using the ID you retrieved above. Set the repeater's [data](https://www.wix.com/velo/reference/$w/repeater/data) property to your collection results: ```javascript async function loadAllResults() { const results = await items.query(collectionName).find(); $w("#articlesList").data = results.items; } ``` The query returns an array of [`items`](https://dev.wix.com/docs/sdk/backend-modules/data/items/query.md), where each item represents an item from your collection. Collection [field IDs](https://dev.wix.com/docs/develop-websites-sdk/code-your-site/work-with-data/introduction/about-collection-fields.md#field-ids) become object properties, so fields such as `image`, `country`, `content` appear as properties with the same names in each result object. 3. Use the [`onItemReady()`](https://www.wix.com/velo/reference/$w/repeater/onitemready) event handler to map your collection field values to specific repeater elements. This event runs automatically for each new element in the repeater's `.data` array. The handler receives an [`$item`](https://www.wix.com/velo/reference/$w/repeater/introduction#$w_repeater_introduction_repeated-item-scope) selector, which selects specific instances of repeated elements. In this example, `image`, `country`, and `content` are [field IDs](https://dev.wix.com/docs/develop-websites-sdk/code-your-site/work-with-data/introduction/about-collection-fields.md#field-ids) from your database collection: ```javascript function initRepeater() { $w("#articlesList").onItemReady(($item, itemData) => { $item("#itemImage").src = itemData.image; $item("#itemCountry").text = itemData.country; $item("#itemContent").text = itemData.content; }); } ``` 4. Define a function to query your collection and populate the dropdown with all unique, non-empty `continent` values. Add a default option labeled "All" with the value `All`. This option allows site visitors to view all items, unfiltered. ```javascript async function initDropdown() { const queryResults = await items.query(collectionName).find(); const uniqueContinents = [ ...new Set(queryResults.items.map((item) => item.continent)), ] .filter(Boolean) .sort((a, b) => a.localeCompare(b)); $w("#inputContinent").options = [ { value: "All", label: "All" }, ...uniqueContinents.map((c) => ({ value: c, label: c })), ]; } ``` 5. Call the `initRepeater()`, `loadAllResults()`, and `initDropdown()` functions in the `$w.onReady()` handler: ```javascript $w.onReady(async function () { await initDropdown(); initRepeater(); await loadAllResults(); }); ``` ## Step 3 | Filter the repeater This step adds the interactive functionality that allows site visitors to search and filter the displayed content in real time. 1. Define a function called `buildFilterAndPopulateRepeater()`. It filters your repeater results by checking if the "country" field contains the input text. When a dropdown value is selected, this function filters the collection and updates the repeater. Also, set the repeater's [data](https://www.wix.com/velo/reference/$w/repeater/data) property to your collection results: ```javascript async function buildFilterAndPopulateRepeater(inputSearch, continent) { let dataQuery = items.query(collectionName); if (inputSearch) { dataQuery = dataQuery.contains("country", inputSearch); } if (continent && continent !== "All") { dataQuery = dataQuery.contains("continent", continent); } const results = await dataQuery.find(); $w("#articlesList").data = results.items; } ``` 2. For filtering by input, add an event handler that listens for any input changes in the search field. To prevent triggering too many queries, use a short delay after each keystroke. This technique, called [debouncing](https://developer.mozilla.org/en-US/docs/Glossary/Debounce), improves both performance and user experience by ensuring the search only runs after the site visitor has stopped typing for a specified period: ```javascript let debounceTimer; $w("#inputTitle").onInput(() => { clearTimeout(debounceTimer); debounceTimer = setTimeout(() => { const searchValueContinent = $w("#inputContinent").value; const searchValueInput = $w("#inputTitle").value; buildFilterAndPopulateRepeater(searchValueInput, searchValueContinent); }, 400); }); ``` 3. For filtering by dropdown, add an event handler that listens for any changes in the dropdown. ```javascript $w("#inputContinent").onChange(() => { const searchValueContinent = $w("#inputContinent").value; const searchValueInput = $w("#inputTitle").value; buildFilterAndPopulateRepeater(searchValueInput, searchValueContinent); }); ``` ## Complete code Here's the complete working code: ```javascript import { items } from "@wix/data"; const collectionName = "Articles"; let debounceTimer; $w.onReady(async function () { await initDropdown(); initRepeater(); await loadAllResults(); }); $w("#inputTitle").onInput(() => { clearTimeout(debounceTimer); debounceTimer = setTimeout(() => { const searchValueContinent = $w("#inputContinent").value; const searchValueInput = $w("#inputTitle").value; buildFilterAndPopulateRepeater(searchValueInput, searchValueContinent); }, 400); }); $w("#inputContinent").onChange(() => { const searchValueContinent = $w("#inputContinent").value; const searchValueInput = $w("#inputTitle").value; buildFilterAndPopulateRepeater(searchValueInput, searchValueContinent); }); async function initDropdown() { const queryResults = await items.query(collectionName).find(); const uniqueContinents = [ ...new Set(queryResults.items.map((item) => item.continent)), ] .filter(Boolean) .sort((a, b) => a.localeCompare(b)); $w("#inputContinent").options = [ { value: "All", label: "All" }, ...uniqueContinents.map((c) => ({ value: c, label: c })), ]; } async function loadAllResults() { const results = await items.query(collectionName).find(); $w("#articlesList").data = results.items.length; } async function buildFilterAndPopulateRepeater(inputSearch, continent) { let dataQuery = items.query(collectionName); if (inputSearch) { dataQuery = dataQuery.contains("country", inputSearch); } if (continent && continent !== "All") { dataQuery = dataQuery.contains("continent", continent); } const results = await dataQuery.find(); $w("#articlesList").data = results.items.length; } function initRepeater() { $w("#articlesList").onItemReady(($item, itemData) => { $item("#itemImage").src = itemData.image; $item("#itemCountry").text = itemData.country; $item("#itemContent").text = itemData.content; }); } ``` ## See also - [$item](https://www.wix.com/velo/reference/$w/repeater/introduction#$w_repeater_introduction_repeated-item-scope) - [Data Items API](https://dev.wix.com/docs/sdk/backend-modules/data/items/introduction.md) --- > Portal Navigation: > > - Append `.md` to any URL under `https://dev.wix.com/docs/` to get its markdown version. > - Pages are either content pages (article or reference text) or menu pages (a list of links to child pages). > - To get a menu page, truncate any URL to a parent path and append `.md` (e.g. `https://dev.wix.com/docs/sdk.md`, `https://dev.wix.com/docs/sdk/core-modules.md`). > - Top-level index of all portals: https://dev.wix.com/docs/llms.txt > - Full concatenated docs: https://dev.wix.com/docs/llms-full.txt ## Resource: Tutorial | Add Navigation to a Dynamic Page ## Article: Tutorial | Add Navigation to a Dynamic Page ## Article Link: https://dev.wix.com/docs/develop-websites-sdk/get-started/tutorials/data/tutorial-add-navigation-to-a-dynamic-page.md ## Article Content: # Tutorial | Add Navigation to a Dynamic Page When you use dynamic pages, you often have a dynamic list page that displays multiple items and individual dynamic item pages for each item. If you want visitors to navigate between the individual items in a specific order, you need to ensure the navigation follows the sorted order of your dynamic list page. The built-in [`getPreviousDynamicPage()`](https://dev.wix.com/docs/velo/velo-only-apis/$w/dynamic-dataset/get-previous-dynamic-page.md) and [`getNextDynamicPage()`](https://dev.wix.com/docs/velo/velo-only-apis/$w/dynamic-dataset/get-next-dynamic-page.md) methods don't guarantee that the navigation order matches the sort order of your dynamic list page. Rather, these methods determine the previous and next pages based on the [lexicographical order](https://en.wikipedia.org/wiki/Lexicographic_order) of the dynamic page relative URL's. In this tutorial, we'll use the following steps to add previous and next buttons that follow the sort order of your dynamic list page: 1. [Store item page links in local storage](#step-1--store-item-page-links-in-local-storage). 2. [Add navigation buttons to your dynamic page](#step-2--add-navigation-buttons-to-your-dynamic-page). > The code in this article was written using the following module versions: > > - @wix/site-storage (v1.21.0) > - @wix/site-location (v1.26.0) > > Learn how to install npm packages [in the editor](https://dev.wix.com/docs/develop-websites-sdk/code-your-site/developer-environments/packages/npm/work-with-npm-packages-in-the-editor.md) or [using the CLI](https://dev.wix.com/docs/develop-websites-sdk/code-your-site/developer-environments/packages/npm/work-with-npm-packages-with-the-cli.md). ## Before you begin Before you start this tutorial, make sure you set up the following: 1. A dynamic list page that displays multiple items and a dynamic item page for each item. An easy way to set up these dynamic pages is with a [preset](https://support.wix.com/en/article/add-dynamic-pages-with-presets). For this tutorial, we'll use the **Team** preset as our example. Alternatively, you can set up your [dynamic pages manually](https://support.wix.com/en/article/cms-about-dynamic-pages). 2. Sort your dynamic list page in the order you want the visitors to navigate through the dynamic item pages by [sorting the dataset attached to your dynamic list page](https://support.wix.com/en/article/cms-changing-your-dynamic-page-dataset-settings). ## Step 1 | Store item page links in local storage In this step, you'll collect the unique page links for each item in the Team collection on your dynamic list page and store them in the browser's local storage. 1. Get the field ID from your collection. When you add a dynamic item page to your collection, Wix automatically creates a field containing the relative URLs for each item's page. In the **Team** collection, this field is called **Team (Item)**. To find the field ID for the **Team (Item)** field, click on the vertical ellipses that appears when you hover over the **Team (Item)** field in your collection and select **Edit**. You'll see the field ID, for example `link-team-title`, in the **Edit Field** window that pops up. 2. Import `@wix/site-storage`. ```javascript //Dynamic list page import { local } from "@wix/site-storage"; //code in next step... ``` 3. Retrieve the dynamic page URLs for every item in your collection. Use the field ID to extract the dynamic page URLs from dynamic dataset. The field ID in our example is `link-team-title`. ```javascript //...code from previous step $w.onReady(function () { $w("#dynamicDataset").onReady(() => { const repeaterData = $w("#myRepeater").data; const dynamicPageURLs = repeaterData.map(item => item["link-team-title"]); }); }); //code in next step... ``` 4. Save the dynamic page URLs in local storage. Save the list of dynamic page URLs to the browser's local storage. ```javascript //...code from previous step local.setItem('dynamicPageURLs', JSON.stringify(dynamicPageURLs)); ``` >**Note:** >If your site has more than 1 dynamic list page that links to the same dynamic item page, you need to add this code on each of those dynamic list pages. ## Step 2 | Add navigation buttons to your dynamic page In this step, you'll add the code to your dynamic item page that makes your `previousButton` and `nextButton` work. This code uses the list of dynamic page URLs you saved earlier to navigate between items in the correct order when a site visitor clicks the buttons. 1. Add navigation buttons to your dynamic item page On the dynamic item page, add 2 buttons and give them the IDs `previousButton` and `nextButton`. Don't add any links to the buttons. 1. Import `@wix/site-storage` and `@wix/site-location`. ```javascript //Dynamic item page import { local } from "@wix/site-storage"; import { location } from "@wix/site-location"; //code in next step... ``` 2. Disable the `previousButton` and `nextButton` when the page loads. ```javascript //...code from previous step $w.onReady(async function () { $w("#previousButton").disable(); $w("#nextButton").disable(); //code in next step... }); ``` 3. Retrieve the URLs from local storage. ```javascript //...code from previous step const stored = await local.getItem('dynamicPageURLs'); const dynamicPageURLs = stored ? JSON.parse(stored) : []; //code in next step... ``` 4. Get the URL of the current page. ```javascript //...code from previous step const prefix = await location.prefix(); const pathArray = await location.path(); const currentPage = '/' + prefix + '/' + pathArray.join('/'); //code in next step... ``` 5. Get the index of the current page's URL in the array of stored URLs. ```javascript //...code from previous step const currentPageIndex = dynamicPageURLs.indexOf(currentPage); //code in next step... ``` 6. If there is a URL to a previous page, set the `previousButton`'s link to that URL and enable the `previousButton`. ```javascript //...code from previous step if (currentPageIndex > 0) { $w("#previousButton").link = dynamicPageURLs[currentPageIndex - 1]; $w("#previousButton").enable(); } //code in next step... ``` 7. If there is a URL to a next page, set the `nextButton`'s link to that URL and enable the `nextButton`. ```javascript //...code from previous step if (currentPageIndex < dynamicPageURLs.length - 1 && currentPageIndex !== -1) { $w("#nextButton").link = dynamicPageURLs[currentPageIndex + 1]; $w("#nextButton").enable(); } ``` ## Full code example ```javascript //Dynamic list page import { local } from "@wix/site-storage"; $w.onReady(function () { $w("#dynamicDataset").onReady(() => { const repeaterData = $w("#myRepeater").data; const dynamicPageURLs = repeaterData.map(item => item["link-team-title"]); local.setItem('dynamicPageURLs', JSON.stringify(dynamicPageURLs)); }); }); ``` ```javascript //Dynamic item page import { local } from "@wix/site-storage"; import { location } from "@wix/site-location"; $w.onReady(async function () { $w("#previous").disable(); $w("#next").disable(); const stored = await local.getItem('dynamicPageURLs'); const dynamicPageURLs = stored ? JSON.parse(stored) : []; const prefix = await location.prefix(); const pathArray = await location.path(); const currentPage = '/' + prefix + '/' + pathArray.join('/'); const currentPageIndex = dynamicPageURLs.indexOf(currentPage); if (currentPageIndex > 0) { $w("#previous").link = dynamicPageURLs[currentPageIndex - 1]; $w("#previous").enable(); } if (currentPageIndex < dynamicPageURLs.length - 1 && currentPageIndex !== -1) { $w("#next").link = dynamicPageURLs[currentPageIndex + 1]; $w("#next").enable(); } }); ``` --- > Portal Navigation: > > - Append `.md` to any URL under `https://dev.wix.com/docs/` to get its markdown version. > - Pages are either content pages (article or reference text) or menu pages (a list of links to child pages). > - To get a menu page, truncate any URL to a parent path and append `.md` (e.g. `https://dev.wix.com/docs/sdk.md`, `https://dev.wix.com/docs/sdk/core-modules.md`). > - Top-level index of all portals: https://dev.wix.com/docs/llms.txt > - Full concatenated docs: https://dev.wix.com/docs/llms-full.txt ## Resource: Tutorial | Create Dynamic Pages with Custom Router ## Article: Tutorial | Create Dynamic Pages with Custom Router ## Article Link: https://dev.wix.com/docs/develop-websites-sdk/get-started/tutorials/data/tutorial-create-dynamic-pages-with-custom-router.md ## Article Content: # Tutorial | Create Dynamic Pages with a Custom Router This tutorial demonstrates how to set up your own router to create and manage dynamic pages. You'll create a basic site for listing real estate properties, and then add a router and update the code to create an index page of listings and a dynamic item page. Creating a custom router gives you more control over how incoming requests to a site are handled. This tutorial uses the following steps to set up a router to create dynamic pages: - [Create a new site with a collection and router](#step-1--create-a-new-site-with-a-collection-and-router) - [Add dynamic page code](#step-2--add-dynamic-page-code) - [Add the router code](#step-3--add-the-router-code) - [Add the sitemap code](#step-4--add-the-sitemap-code) - [Test the dynamic pages](#step-5--test-dynamic-pages) > **Notes:** > - Routers currently require Velo APIs and file naming conventions. While you can use the JavaScript SDK alongside Velo, router handlers must be defined using Velo syntax in the `routers.js` backend file. > > - The code in this article was written using the following JavaScript SDK module versions: > - @wix/site-window (v1.43.0) > - @wix/site-location (v1.27.0) > - @wix/data (1.0.283) > > Learn how to install npm packages [in the editor](https://dev.wix.com/docs/develop-websites-sdk/code-your-site/developer-environments/packages/npm/work-with-npm-packages-in-the-editor.md) or [using the CLI](https://dev.wix.com/docs/develop-websites-sdk/code-your-site/developer-environments/packages/npm/work-with-npm-packages-with-the-cli.md). ## Before you begin It's important to note the following points before doing this tutorial: - You should be familiar with the concepts of [routers](https://dev.wix.com/docs/develop-websites-sdk/code-your-site/build-a-custom-backend/routers/about-routers.md) and [dynamic pages](https://support.wix.com/en/article/cms-about-dynamic-pages). - This tutorial is done directly in the editor. However, all of the code and basic website design are relevant if you're working in the Wix IDE or your local IDE. The only differences might be the names and locations of some files. If you're having trouble locating some of these files, see the [Create a Router](https://dev.wix.com/docs/develop-websites-sdk/code-your-site/build-a-custom-backend/routers/create-a-router.md) article. ## Step 1 | Create a new site with a collection and router In this step, you'll create a new site and add the features needed to build dynamic pages, including: * The collection, which you'll fill with data to populate the dynamic index and item pages. * The router, which controls the dynamic page that visitors are sent to when they request to see listings on your site. 1. Create a [new blank site](https://wixstudio.new/). 1. On the homepage, add the following 2 elements: - **Text element:** Edit the text element so its text reads "Welcome to our real estate site". - **Button:** Click on the button and select **Change Text**. Edit the text to say "Click here to see our listings". ![Click here to see our listings button](https://wixmp-833713b177cebf373f611808.wixmp.com/images/05d12620e8ad7a36c9200284ba176a34.png) Leave the page code empty for now. 1. [Add a collection](https://support.wix.com/en/article/cms-formerly-content-manager-creating-a-collection) to a site and name it `Real Estate Listings`. Copy the collection ID for later. 1. Add the following 4 fields to the collection: - **Title**: Text field that contains the name of the listing. - **Description**: Text field that contains a brief description of the listing. - **Image**: Image field that contains an image of the property in the listing. - **Slug**: Text field that contains the slugified name of the listing. Once you set up your fields, add the following items to the collection exactly as shown in the table: | Title | Description | Image | Slug | | ------| ------------ | ------ | ------- | | Modern urban apartment | This newly built apartment has all the trimmings and appliances you need in the modern-day city. | wix:image://v1/11062b_1c8c953e6532482b974d6b30961091e2~mv2.jpg/Loft%20Style%20Apartment.jpg#originWidth=4000&originHeight=2667 | modern-urban-apartment | | Beach house | Imagine stepping outside your house and you're right on the beach. You can now achieve that dream with this piece of property. | wix:image://v1/d4dde1_954ed2d26fb14166ad634c0299d0ed2c~mv2.jpg/Large%20house%20right%20next%20to%20the%20sea.%20It%20is%20light%20blue%20with%20white%20trim%20and%20doors.%20It%20has%20a%20po#originWidth=500&originHeight=500 | beach-house | | Cute Cottage | This adorable cottage in the suburbs reminds you of old times outside while keeping a modern feel inside. | wix:image://v1/d4dde1_1f312bbf4d8743a695305a3894ac89fb~mv2.jpg/Cottage%20made%20of%20white%20stone%20with%20a%20small%20green%20lawn%20and%20a%20white%20picket%20fence%20with%20a%20gate.%20#originWidth=500&originHeight=500 | cute-cottage | | Cozy Cabin | Nestled deep in the woods, this cabin offers the peace and quiet of the wilderness away from the city. | wix:image://v1/d4dde1_0fe31ec5d1bb4ed184ff61fd6b42ce20~mv2.jpg/A%20wooden%20cabin%20nestled%20in%20between%20trees..jpg#originWidth=500&originHeight=500 | cozy-cabin | 1. [Add a router](https://dev.wix.com/docs/develop-websites-sdk/code-your-site/build-a-custom-backend/routers/create-a-router.md) to your site and set the URL prefix to `listings`. 1. Navigate to the **Backend & Public** section of the Code panel and locate the `routers.js` file. It should contain 2 methods, `listings_Router` and `listings_SiteMap`, with the same sample code explained in [Create a Router](https://dev.wix.com/docs/develop-websites-sdk/code-your-site/build-a-custom-backend/routers/create-a-router.md). Additionally, a router page called `listings-page` should now appear in the Code panel. ## Step 2 | Add dynamic page code In this step, you'll add the page code that displays property listings for 2 router pages: the index page and the dynamic item pages. Start by coding the index page, which will display all of the listings for visitor selection: 1. In the **Page Code** section of the Code panel, under **Router Pages** find and open the `listings_page` in the editor. 1. Add a [repeater](https://support.wix.com/en/article/wix-editor-adding-and-managing-repeaters-lists-grids) to the page. Select an item in the repeater and open the settings menu. Click **Quick Add** to add an image and a title to the repeater item. ![Repeater settings menu with Quick Add option highlighted, showing image and title elements to add](https://wixmp-833713b177cebf373f611808.wixmp.com/images/64bd1ecd4d2e08edf003bf6defa1d387.png) 1. Select the repeater and rename the ID of the repeater to `listings` using the [Properties & Events Panel](https://dev.wix.com/docs/develop-websites-sdk/code-your-site/developer-environments/ides/code-editor/about-the-properties-events-panel.md). ![Properties & Events Panel showing ID field with 'listings' entered as the new repeater ID](https://wixmp-833713b177cebf373f611808.wixmp.com/images/28380b902072e88aad787e26b0406f80.png) Repeat this step with the IDs of the repeater item, title, and image that you previously added to the repeater. Select each element and give them the following IDs: - Repeater item: `listing` - Title: `listingTitle` - Image: `listingImage` 1. In the code editor for `listings-page`, add the following code: This code retrieves data from the router and populates the repeater with listing information, setting up click handlers to navigate to individual item pages. The router controls which dynamic item page to render based on the specified slug. ```js import { getRouterData } from '@wix/site-window'; import { to } from '@wix/site-location'; $w.onReady(function () { const listings = getRouterData(); $w('#listings').onItemReady( ($item, itemData) => { $item('#listingImage').src = itemData.image; $item('#listingTitle').text = itemData.title; $item('#listing').onClick( () => { to(`/listings/${itemData.slug}`); }); } ); $w('#listings').data = listings; }); ``` The index page is now set up so that it will display all of the items in the collection. Next, add dynamic item router page: 1. In the **Page Code** section of the Code panel, under **Router Pages**, click the **More Actions** button next to **Listings Pages (Router)**. Select **Add page to router**. ![Code panel showing More Actions menu next to Listings Pages (Router) with 'Add page to router' option highlighted](https://wixmp-833713b177cebf373f611808.wixmp.com/images/0880f50c08320f50312b121c2003a312.png) 1. Label the new page `listing` and click **Add Page**. You'll see a second router page under **Listings Pages (Router)**. 1. Select the `listing` page so it appears in the editor. Typically, the page would include more detail, such as price and contact information. However, for this example, keep the dynamic item page simple with a single image, title, and description. Add an image and 2 text elements to the page, and arrange the elements so the page layout looks like this: ![Dynamic item page layout showing an image at the top, followed by a title and description text below](https://wixmp-833713b177cebf373f611808.wixmp.com/images/c0c6e41ab94b1bdbbe6de9c39ccf6d9c.png) 1. In the code editor, open the page code for `listing`. Add the following code: This code retrieves the specific listing data from the router and populates the elements with it on the dynamic item page. ```js import { getRouterData } from '@wix/site-window'; $w.onReady(function () { const listing = getRouterData(); $w('#listingTitle').text = listing.title; $w('#listingDescription').text = listing.description; $w('#listingImage').src = listing.image; }); ``` You now have a functioning index and dynamic item page that will render your collection data based on requests to the router. ## Step 3 | Add the router code This step implements the backend logic that handles visitor requests and determines which page to display. 1. Open the `routers.js` file located in the **Public & Backend** section of the Code panel. 1. Import the [Wix Data API](https://dev.wix.com/docs/sdk/backend-modules/data/introduction.md). The sample code already includes the import statement for `wix-router`. Your code should look like this: ```js import {ok, notFound, WixRouterSitemapEntry} from "wix-router"; import { items } from "@wix/data"; ``` The sample code also includes an object with hard-coded data. You can delete this object as it's not necessary for this tutorial. 1. In the `listings_Router()` method, delete the sample code and replace it with the code below. This code checks if the visitor is requesting a specific item page or the index page. If the `path` variable is empty, the code queries the collection and displays the index page with all property listings. It also provides SEO data for search engines. ```js export async function listings_Router(request) { if (!request.path[0]) { const { documents: listings } = await items.query('RealEstateListings').find(); const seoData = { title: 'Property Listings', description: 'List of available properties', noIndex: false }; return ok('listings-page', listings, seoData); } } ```
__Tip:__ To find your collection ID, go to **CMS** > **Your Collections** in the sidebar. Open the menu for your collection and click **Edit settings**. Copy the collection ID that appears when the modal opens.
1. Add the code below after the `if` statement you previously added. This code handles the following 2 cases when the `path` variable is _not_ empty: - The visitor requests an existing path. - The visitor requests a path that doesn't exist. The code queries the collection for a matching `slug` and returns the specific listing with SEO data. If the item doesn't exist in the collection, an error page is displayed. ```js else { const results = await items.query('RealEstateListings') .eq('slug', request.path[0]) .find(); if (results) { const listing = results.items[0]; const seoData = { title: listing.title, metaTags: [ { name: 'description', content: listing.description }, { name: 'og:title', content: listing.title }, { property: 'og:image', content: listing.image } ], }; return ok('listing', listing, seoData); } else { return notFound(); } } ``` ## Step 4 | Add the sitemap code Update the sitemap method that helps search engines discover and index your dynamic pages. In the `routers.js` file, find the `listings_SiteMap()` method and replace the sample code with the code below. This code queries the collection to get all listings and creates a sitemap entry for each item using its slug and title. It then adds the index page to ensure search engines can discover all your dynamic pages: ```js export async function listings_SiteMap(sitemapRequest) { const { items: listings } = await items.query('RealEstateListings').find(); const siteMapEntries = listings.map(listing => { const entry = new WixRouterSitemapEntry(listing.title); entry.pageName = 'listing'; entry.url = '/listings/' + listing.slug; entry.title = listing.title; return entry; }); const indexEntry = new WixRouterSitemapEntry('Property Listings'); indexEntry.pageName = 'listings-page'; indexEntry.url = '/listings'; indexEntry.title = 'Property Listings'; siteMapEntries.push(indexEntry); return siteMapEntries; } ``` Here's the complete code for the `routers.js` file, including both the router and sitemap methods: ```js import {ok, notFound, WixRouterSitemapEntry} from "wix-router"; import { items } from "@wix/data"; export async function listings_Router(request) { if (!request.path[0]) { const { items: listings } = await items.query('RealEstateListings').find(); const seoData = { title: 'Property Listings', description: 'List of available properties', noIndex: false }; return ok('listings-page', listings, seoData); } else { const results = await items.query('RealEstateListings') .eq('slug', request.path[0]) .find(); if (results) { const listing = results.items[0]; const seoData = { title: listing.title, metaTags: [{ name: 'description', content: listing.description }, { name: 'og:title', content: listing.title }, { property: 'og:image', content: listing.image }], }; return ok('listing', listing, seoData); } else { return notFound(); } } } export async function listings_SiteMap(sitemapRequest) { const { items: listings } = await items.query('RealEstateListings').find(); const siteMapEntries = listings.map(listing => { const entry = new WixRouterSitemapEntry(listing.title); entry.pageName = 'listing'; entry.url = '/listings/' + listing.slug; entry.title = listing.title; return entry; }); const indexEntry = new WixRouterSitemapEntry('Property Listings'); indexEntry.pageName = 'listings-page'; indexEntry.url = '/listings'; indexEntry.title = 'Property Listings'; siteMapEntries.push(indexEntry); return siteMapEntries; } ``` ## Step 5 | Test dynamic pages In this step, you'll check that the router and dynamic pages work correctly by testing them on a published site. 1. Click **Publish** in the top right corner of the editor. 1. Open the menu in the top left corner and click **Site** > **View Published Site**. ![Editor menu opened showing Site option with 'View Published Site' highlighted](https://wixmp-833713b177cebf373f611808.wixmp.com/images/288053bdb3f77fb88c6199a9ed0e7214.png) The published site opens in a new tab. ![Published homepage displaying 'Welcome to our real estate site' text and 'Click here to see our listings' button](https://wixmp-833713b177cebf373f611808.wixmp.com/images/1d1cd520ed4477d14aac097973bb6845.png) 1. Click the button on the homepage to go to the listings index page. Each time you click on a listing from the index page, you make a request to the router. The router redirects you to the item page, fetches the item data from the `Real Estate Listings` collection, and renders it on the page. ![Individual property item page showing a single property with its image, title, and description](https://wixmp-833713b177cebf373f611808.wixmp.com/images/bfa074e998490f6b3c9470c340756739.png) Now that you know your router is working, take a look at the sitemap: 1. Return to your homepage and in the address bar, add `/sitemap.xml` to your site address: ```bash https://mysite.wixstudio.io/test-site/sitemap.xml ``` 1. Navigate to the new address and you'll see your site's sitemap displayed in XML. For example: ```xml https://mysite.wixstudio.io/test-site/dynamic-listings-sitemap.xml 2024-10-14 https://mysite.wixstudio.io/test-site/pages-sitemap.xml 2024-10-14 ``` 1. Copy the link that goes to your router page and paste it back into the address bar. Navigate to the link to see the sitemap for your router: ```xml https://mysite.wixstudio.io/test-site/listings/cozy-cabin 2024-10-14 https://mysite.wixstudio.io/test-site/listings/beach-house 2024-10-14 https://mysite.wixstudio.io/test-site/listings/modern-urban-apartment 2024-10-14 https://mysite.wixstudio.io/test-site/listings 2024-10-14 https://mysite.wixstudio.io/test-site/listings/cute-cottage 2024-10-14 ``` This is the sitemap generated by your `listings_SiteMap()` method. Congratulations! You've created a custom router and successfully set up dynamic pages for a real estate listings site. You can continue building on this router example to enhance the site design, or apply what you learned in this tutorial to create dynamic pages for an entirely different type of content. ## See also * [About routers](https://dev.wix.com/docs/develop-websites-sdk/code-your-site/build-a-custom-backend/routers/about-routers.md) * [Create a router](https://dev.wix.com/docs/develop-websites-sdk/code-your-site/build-a-custom-backend/routers/create-a-router.md) * [About SEO and routing](https://dev.wix.com/docs/develop-websites-sdk/code-your-site/build-a-custom-backend/routers/add-seo-to-your-router.md) --- > Portal Navigation: > > - Append `.md` to any URL under `https://dev.wix.com/docs/` to get its markdown version. > - Pages are either content pages (article or reference text) or menu pages (a list of links to child pages). > - To get a menu page, truncate any URL to a parent path and append `.md` (e.g. `https://dev.wix.com/docs/sdk.md`, `https://dev.wix.com/docs/sdk/core-modules.md`). > - Top-level index of all portals: https://dev.wix.com/docs/llms.txt > - Full concatenated docs: https://dev.wix.com/docs/llms-full.txt ## Resource: Tutorial | Display Database Collection Content in a Repeater ## Article: Tutorial | Display Database Collection Content in a Repeater ## Article Link: https://dev.wix.com/docs/develop-websites-sdk/get-started/tutorials/data/tutorial-display-database-collection-content-in-a-repeater.md ## Article Content: # Tutorial | Display Database Collection Content in a Repeater This tutorial for beginners explains how to display database collection content in a repeater using code. > **Note:** You can also [display database content in a repeater](https://support.wix.com/en/article/displaying-collection-content-in-a-repeater) without any code using a dataset, but using code provides you with additional functionality and options. > The code in this article was written using the following module versions: > > - @wix/data (v1.0.244) > > Learn how to install npm packages [in the editor](https://dev.wix.com/docs/develop-websites-sdk/code-your-site/developer-environments/packages/npm/work-with-npm-packages-in-the-editor.md) or [using the CLI](https://dev.wix.com/docs/develop-websites-sdk/code-your-site/developer-environments/packages/npm/work-with-npm-packages-with-the-cli.md). ## About database collections and repeaters [Database collections](https://dev.wix.com/docs/develop-websites-sdk/code-your-site/work-with-data/introduction/about-collections.md) store your site's data in structured records. Whether you're managing property listings on a real estate site or storing form submissions, collections organize your content into manageable datasets. [Repeaters](https://support.wix.com/en/article/wix-editor-adding-and-managing-repeaters-lists-grids) are great for displaying collection data because they create consistent layouts for multiple items. Think of them as templates that repeat for each record in your collection, for example, showcasing property listings, blog posts, or product catalogs. We'll use the following steps to display database collection content in a repeater: 1. Query the database collection to retrieve your data. 2. Bind the data to your repeater component. 3. Map collection fields to specific repeater elements. The result should look like this: ![Repeater displaying collection content](https://wixmp-833713b177cebf373f611808.wixmp.com/images/34976e758c70d518dbfcb4f948e0f410.png) ## Step 1 | Add a repeater on your site Add a [repeater](https://support.wix.com/en/article/studio-editor-adding-and-customizing-repeaters) on your site. ## Step 2 | Open the page code file Open the code file for your page where you added the repeater. The way you open the file depends on the IDE you're using. ::::tabs :::Editor 1. Navigate to **Page Code** in the Code sidebar. 1. Select your page. A page code file opens. The file includes a sample `onReady()` function. ::: :::Wix-IDE-or-Local-IDE Open the file in the `Pages` folder. The file includes a sample `onReady()` function. ::: :::: ## Step 3 | Query the database collection This step retrieves all records from your collection and prepares them for display. To query a collection, you'll need to get the collection ID. The way you get the ID depends on the editor you're using: ::::tabs :::Wix-Studio 1. Click on the **CMS** tab in the Code panel. 1. Hover over your collection, click the **Show More** icon, and select **Edit settings**. 1. Copy the collection ID to use in your code. ::: :::Wix-Editor 1. Click on the **Databases** tab in the Code sidebar. 1. Hover over your collection, click the **Show More** icon, and select **Edit settings**. 1. Copy the collection ID to use in your code. ::: :::: Now that you have the collection ID, you can query your data: 1. Import the [`@wix/data`](https://dev.wix.com/docs/sdk/backend-modules/data/items/introduction.md) module, which provides the [`query()`](https://dev.wix.com/docs/sdk/backend-modules/data/items/query.md) method for retrieving collection data. ```javascript import { items } from "@wix/data"; ``` > Learn more about using [npm packages](https://dev.wix.com/docs/develop-websites-sdk/code-your-site/developer-environments/packages/npm/about-npm-packages.md) when developing sites. 2. Run the query using the ID you retrieved above: ```javascript const { items: collectionData } = await items.query("MyCollection").find(); ``` The query returns an array of [`items`](https://dev.wix.com/docs/sdk/backend-modules/data/items/query.md), where each item represents a record from your collection. Collection [field IDs](https://dev.wix.com/docs/develop-websites-sdk/code-your-site/work-with-data/introduction/about-collection-fields.md#field-ids) become object properties, so fields such as `title`, `price`, `image`, and `url` appear as properties with the same names in each result object. ```json [ { "_id": "1234", "_createdDate": "2021-05-29T08:35:52.344Z", "title": "DOWN AVENUE", "price": 500.000, "image": "wix:image://v1/68d3a9_1de7529c444b4c9eb38401f8efe0cad2.jpg/down-avenue.jpg", "url": "https://users.wixsite.com/best-real-estate-site/listings/down-avenue" }, { "_id": "5678", "_createdDate": "2021-05-25T12:48:56.572Z", "title": "QUEENS WAY", "price": 450.000, "image": "wix:image://v1/79e4b0_2ee8539d456c5c0fb48502g9fge1dbe4.jpg/queens-way.jpg", "url": "https://users.wixsite.com/best-real-estate-site/listings/queens-way" }, ... ] ``` ## Step 4 | Bind the data to a repeater This step connects your queried collection data to the repeater, creating individual items for each record. Set the repeater's [data](https://www.wix.com/velo/reference/$w/repeater/data) property to your collection results: ```javascript $w("#myRepeater").data = collectionData; ``` > **Note:** This automatically triggers the repeater's [onItemReady()](https://www.wix.com/velo/reference/$w/repeater/onitemready) event handler, which we'll use in the next step. ## Step 5 | Map collection fields to specific repeater elements This step defines how collection fields populate specific elements within each repeater item. For example, a `title` field might display in a text element, while a `url` field connects to a button's link property. Use the [`onItemReady()`](https://www.wix.com/velo/reference/$w/repeater/onitemready) event handler to map your data. This event runs automatically for each new element in the repeater's `.data` array and is used to connect collection values to repeater elements. The handler receives the [`$item`](https://www.wix.com/velo/reference/$w/repeater/introduction#$w_repeater_introduction_repeated-item-scope) selector, which selects specific instances of repeated elements. In this example, `title`, `price`, `image`, and `url` are [field IDs](https://dev.wix.com/docs/develop-websites-sdk/code-your-site/work-with-data/introduction/about-collection-fields.md#field-ids) from the `MyCollection` database collection: ```javascript $w("#myRepeater").onItemReady(($item, itemData, index) => { $item("#myTitleText").text = itemData.title; $item("#myPriceText").text = itemData.price; $item("#myImage").src = itemData.image; $item("#myButton").link = itemData.url; }); ``` After applying the code to your page, you'll see your database content displayed in your repeater. ## Complete code Here is the complete code for the example: ```javascript import { items } from "@wix/data"; $w.onReady(async method () { const { items: collectionData } = await items.query("MyCollection").find(); $w("#myRepeater").data = collectionData; $w("#myRepeater").onItemReady(($item, itemData, index) => { $item("#myTitleText").text = itemData.title; $item("#myPriceText").text = itemData.price; $item("#myImage").src = itemData.image; $item("#myButton").link = itemData.url; }); }); ``` ## See also - [$item](https://www.wix.com/velo/reference/$w/repeater/introduction#$w_repeater_introduction_repeated-item-scope) - [Wix JavaScript SDK](https://dev.wix.com/docs/sdk/articles/get-started/about-the-wix-java-script-sdk.md) --- > Portal Navigation: > > - Append `.md` to any URL under `https://dev.wix.com/docs/` to get its markdown version. > - Pages are either content pages (article or reference text) or menu pages (a list of links to child pages). > - To get a menu page, truncate any URL to a parent path and append `.md` (e.g. `https://dev.wix.com/docs/sdk.md`, `https://dev.wix.com/docs/sdk/core-modules.md`). > - Top-level index of all portals: https://dev.wix.com/docs/llms.txt > - Full concatenated docs: https://dev.wix.com/docs/llms-full.txt ## Resource: Tutorial | Call APIs with Secrets ## Article: Tutorial | Call APIs with Secrets ## Article Link: https://dev.wix.com/docs/develop-websites-sdk/get-started/tutorials/integrations/tutorial-call-apis-with-secrets.md ## Article Content: # Tutorial | Call APIs with Secrets In this tutorial, you'll learn how to securely use an external API key stored in the [Secrets Manager](https://dev.wix.com/docs/develop-websites-sdk/code-your-site/developer-environments/secrets/about-the-secrets-manager.md) to call the [OpenWeatherMap API](https://openweathermap.org/api). By keeping API keys safe and confidential with the Secrets Manager, you can make secure API requests without exposing sensitive information in your code. At the end of this tutorial, you'll have a working [web method](https://dev.wix.com/docs/sdk/core-modules/web-methods/introduction.md) that securely retrieves weather data for any city, using a stored API key. We'll use the following steps to build this functionality: 1. Set up your API key in the Secrets Manager. 2. Create a web method to retrieve the API key and call the OpenWeatherMap API. ## Before you begin It's important to note the following before doing this tutorial: - You'll need an OpenWeatherMap API key. You can get one by signing up for a free account at [OpenWeatherMap](https://openweathermap.org/api). > The code in this article was written using the following module versions: > > - @wix/web-methods (v1.0.0) > - @wix/secrets (v1.0.0) > - @wix/essentials (v1.0.0) > > Learn how to install npm packages [in the editor](https://dev.wix.com/docs/develop-websites-sdk/code-your-site/developer-environments/packages/npm/work-with-npm-packages-in-the-editor.md) or [using the CLI](https://dev.wix.com/docs/develop-websites-sdk/code-your-site/developer-environments/packages/npm/work-with-npm-packages-with-the-cli.md). ## Step 1 | Set up your API key in the Secrets Manager This step stores your OpenWeatherMap API key securely in the Secrets Manager. At the end of this step, your API key will be safely stored and ready to use in your code. To set up your API key: 1. Access the Secrets Manager using one of these methods: - In the editor, navigate to **Developer Tools** in the Code sidebar. Under the Security section, select **Secrets Manager**. - In the dashboard, select **Developer Tools**, and then select **Secrets Manager**. 2. Add and save the API key for the OpenWeatherMap API. For purposes of this tutorial, name this key "WeatherApiKey". ## Step 2 | Create a web method to retrieve weather data This step creates a backend web method that retrieves your API key from the Secrets Manager and uses it to call the OpenWeatherMap API. At the end of this step, you'll have a working function that can fetch weather data for any city. To create the web method: 1. Create a new file called `serviceModule.web.js` in the site's backend folder. 2. Add the import statements at the top of the file: ```javascript import { Permissions, webMethod } from "@wix/web-methods"; import { secrets } from "@wix/secrets"; import { auth } from "@wix/essentials"; ``` 3. Create an [elevated](https://dev.wix.com/docs/sdk/articles/work-with-the-sdk/about-elevated-permissions.md) function to access site secrets with proper permissions: ```javascript const elevatedGetSecretValue = auth.elevate(secrets.getSecretValue); ``` 4. Create a web method function that accepts a `city` parameter and retrieves the API key you stored in a site secret: ```javascript export const getCurrentTemp = webMethod(Permissions.Anyone, async (city) => { const { value } = await elevatedGetSecretValue("WeatherApiKey"); // Continue with the API call code in the next steps }); ``` 5. Continue the function by constructing the full URL for the fetch request: ```javascript const url = "https://api.openweathermap.org/data/2.5/weather?q="; const fullUrl = url + city + "&APPID=" + value; ``` 6. Finish the function by making the API call and returning the temperature data: ```javascript return fetch(fullUrl) .then((response) => response.json()) .then((json) => json.main.temp); ``` You've now successfully created a secure weather API integration using the Wix JavaScript SDK and the Secrets Manager. You can extend this example to retrieve additional weather data or integrate it into your site's user interface.
**Tip:** You can test backend code in the editor without developing a frontend using Wix's [functional testing](https://dev.wix.com/docs/develop-websites-sdk/test-your-site/test-backend-functions/about-functional-testing.md) feature.
## Complete code example Here's the complete code for your `serviceModule.web.js` file: ```javascript // serviceModule.web.js import { Permissions, webMethod } from "@wix/web-methods"; import { secrets } from "@wix/secrets"; import { auth } from "@wix/essentials"; const elevatedGetSecretValue = auth.elevate(secrets.getSecretValue); export const getCurrentTemp = webMethod(Permissions.Anyone, async (city) => { const { value } = await elevatedGetSecretValue("WeatherApiKey"); const url = "https://api.openweathermap.org/data/2.5/weather?q="; const fullUrl = url + city + "&APPID=" + value; return fetch(fullUrl) .then((response) => response.json()) .then((json) => json.main.temp); }); ``` ## See also - [Web Methods API](https://dev.wix.com/docs/sdk/core-modules/web-methods/introduction.md) - [Elevated Permissions](https://dev.wix.com/docs/sdk/articles/work-with-the-sdk/about-elevated-permissions.md) - [Secrets API](https://dev.wix.com/docs/api-reference/business-management/secrets/introduction?apiView=SDK.md) --- > Portal Navigation: > > - Append `.md` to any URL under `https://dev.wix.com/docs/` to get its markdown version. > - Pages are either content pages (article or reference text) or menu pages (a list of links to child pages). > - To get a menu page, truncate any URL to a parent path and append `.md` (e.g. `https://dev.wix.com/docs/sdk.md`, `https://dev.wix.com/docs/sdk/core-modules.md`). > - Top-level index of all portals: https://dev.wix.com/docs/llms.txt > - Full concatenated docs: https://dev.wix.com/docs/llms-full.txt ## Resource: Tutorial | Call External APIs with Fetch ## Article: Tutorial | Call External APIs with Fetch ## Article Link: https://dev.wix.com/docs/develop-websites-sdk/get-started/tutorials/integrations/tutorial-call-external-apis-with-fetch.md ## Article Content: # Tutorial | Call External APIs with Fetch In this tutorial, you'll learn how to use the fetch API to connect to an external service and display data items retrieved from that service. Site visitors can click a button to fetch and display a collection of greetings in different languages. > **Note:** To see this example in action, see [Hello Fetch](https://dev.wix.com/docs/coding-examples/getting-started/hello-world/hello-fetch.md). By the end of this tutorial, you'll have a working example that fetches greetings data from an external API and displays it on your site using a repeater element. ![Fetch many example](https://wixmp-833713b177cebf373f611808.wixmp.com/images/4789c3978a0be343919ee225b9083e6d.png) ## Step 1 | Add elements to your page Add the following elements to your page: - A [button](https://dev.wix.com/docs/velo/velo-only-apis/$w/button/introduction.md) to fetch the greetings. Set the button ID to `fetchGreetingsButton`. - A [repeater](https://dev.wix.com/docs/velo/velo-only-apis/$w/repeater/introduction.md) to display multiple data items. Set the repeater ID to `greetingsRepeater`. - A [text](https://dev.wix.com/docs/velo/velo-only-apis/$w/text/introduction.md) element to display the greeting's language inside the repeater. Set the text element ID to `repeatedLanguage`. - A text element to display the greeting inside the repeater. Set the text element ID to `repeatedGreeting`. ## Step 2 | Add backend code Create a new [web module](https://dev.wix.com/docs/develop-websites-sdk/code-your-site/build-a-custom-backend/web-modules/about-web-modules.md) file called `dataFetcher.web.js` and add the following code to fetch greetings from an external API: ```javascript import { webMethod, Permissions } from "wix-web-module"; export const getGreetings = webMethod(Permissions.Anyone, async () => { try { const response = await fetch( "https://velo-examples.wixstudio.com/examples-backends/_functions/greetings" ); const json = await response.json(); return json; } catch (error) { return { error: "Failed to fetch greetings." }; } }); ``` ## Step 3 | Add frontend code In the code for the page where you added the elements above: 1. Add the import statement, hide the repeater, and set up a button click event handler: ```javascript import { getGreetings } from "backend/dataFetcher.web.js"; $w.onReady(function () { $w("#greetingsRepeater").hide(); $w("#fetchGreetingsButton").onClick(async () => { // Button click logic will go here }); }); ``` 1. Disable the button during fetch to prevent multiple clicks: ```javascript $w("#fetchGreetingsButton").disable(); ``` 1. Call the backend function to retrieve the greetings data: ```javascript const fetchedData = await getGreetings(); ``` 1. Transform the data by adding `_id` properties, as required by repeater elements: ```javascript const repeaterData = fetchedData.map((item) => { item._id = item.id.toString(); return item; }); ``` 1. Populate the repeater with the transformed data: ```javascript $w("#greetingsRepeater").data = repeaterData; ``` 1. Make the previously hidden repeater visible: ```javascript $w("#greetingsRepeater").show(); ``` 1. Change the button label to indicate completion: ```javascript $w("#fetchGreetingsButton").label = "Done"; ``` This completes the code requirements within the `onReady` function. 1. In a new code block, set up how each item in the repeater displays its data: ```javascript $w("#greetingsRepeater").onItemReady(($item, itemData) => { $item("#repeatedLanguage").text = itemData.language; $item("#repeatedGreeting").text = itemData.greeting; }); ``` ## Complete code example ### Backend ```javascript // In the dataFetcher.web.js file import { webMethod, Permissions } from "wix-web-module"; export const getGreetings = webMethod(Permissions.Anyone, async () => { try { const response = await fetch( "https://velo-examples.wixstudio.com/examples-backends/_functions/greetings" ); const json = await response.json(); return json; } catch (error) { return { error: "Failed to fetch greetings." }; } }); ``` ### Frontend ```javascript import { getGreetings } from "backend/dataFetcher.web.js"; $w.onReady(function () { $w("#greetingsRepeater").hide(); $w("#fetchGreetingsButton").onClick(async () => { $w("#fetchGreetingsButton").disable(); const fetchedData = await getGreetings(); const repeaterData = fetchedData.map((item) => { item._id = item.id.toString(); return item; }); $w("#greetingsRepeater").data = repeaterData; $w("#greetingsRepeater").show(); $w("#fetchGreetingsButton").label = "Done"; }); $w("#greetingsRepeater").onItemReady(($item, itemData) => { $item("#repeatedLanguage").text = itemData.language; $item("#repeatedGreeting").text = itemData.greeting; }); }); ``` ## See also - [Web Methods API](https://dev.wix.com/docs/sdk/core-modules/web-methods/introduction.md) - [The Lifecycle of Repeated Items](https://dev.wix.com/docs/velo/velo-only-apis/$w/repeater/the-lifecycle-of-repeated-items.md) --- > Portal Navigation: > > - Append `.md` to any URL under `https://dev.wix.com/docs/` to get its markdown version. > - Pages are either content pages (article or reference text) or menu pages (a list of links to child pages). > - To get a menu page, truncate any URL to a parent path and append `.md` (e.g. `https://dev.wix.com/docs/sdk.md`, `https://dev.wix.com/docs/sdk/core-modules.md`). > - Top-level index of all portals: https://dev.wix.com/docs/llms.txt > - Full concatenated docs: https://dev.wix.com/docs/llms-full.txt ## Resource: Tutorial | Create a Custom Registration Form ## Article: Tutorial | Create a Custom Registration Form ## Article Link: https://dev.wix.com/docs/develop-websites-sdk/get-started/tutorials/members-contacts/tutorial-create-a-custom-registration-form.md ## Article Content: # Tutorial | Create a Custom Registration Form When a site adds a [Members Area](https://support.wix.com/en/article/site-members-about-the-members-area), it includes a default registration form that allows site visitors to sign up as members. Sometimes the standard form doesn't meet the specific needs of a site. In this tutorial, we build a custom registration form that can be designed to match a site's branding, and use it to collect specific information from site visitors in the registration process. Here we create an example custom registration form that includes confirmation fields for email address and password. In this tutorial, you'll learn how to: - [Enable a custom site registration form.](#step-1--enable-custom-site-registration) - [Build a custom form with custom input and design elements.](#step-2--build-a-custom-form) - [Write page code to validate confirmation fields.](#step-3--add-frontend-code) - [Write page code to register a new member](#step-4--add-registration-logic) ## Before you begin It's important to note the following points before doing this tutorial: - Your site must have [a Members Area](https://support.wix.com/en/article/site-members-add-and-set-up-a-members-area). > The code in this tutorial was written using the following module versions: > > - @wix/sdk (v1.12.0) > - @wix/members (v1.0.0) > > Learn how to install npm packages [in the editor](https://dev.wix.com/docs/develop-websites-sdk/code-your-site/developer-environments/packages/npm/work-with-npm-packages-in-the-editor.md) or [using the CLI](https://dev.wix.com/docs/develop-websites-sdk/code-your-site/developer-environments/packages/npm/work-with-npm-packages-with-the-cli.md). ## Step 1 | Enable custom site registration To get started, follow the steps below to enable custom site registration using custom forms. 1. [Add a popup to a site](https://support.wix.com/en/article/studio-editor-using-popups#adding-a-popup). In our example, we [name our popup](https://support.wix.com/en/article/studio-editor-using-popups#customizing-a-popup) **Custom Registration Form**. 2. Navigate to **Pages** on the left side of your editor. Under **Signup & Login**, click **Signup (Default)**. ![Signup & Login pages menu](https://wixmp-833713b177cebf373f611808.wixmp.com/images/199c3d82b20e6efbe1f959706fd60839.png) 3. In the dropdown menu, change the default form to **Velo Form**, and link it to the **Custom Registration Form** popup created earlier. This step changes the default member signup form to the custom registration form. ![Link custom registration form](https://wixmp-833713b177cebf373f611808.wixmp.com/images/932470693e4303eabee3d13d516e066d.png) > **Note:** When a site visitor signs up using a Velo custom registration form, they automatically become a site member, as the member signup settings default to automatic approval for `Everyone who signs up`. To require manual approval before becoming a member, adjust the settings in **Additional Signup & Login Settings**. You can now go to the popup page to start building the form. ## Step 2 | Build a custom form To add fields to a custom registration form: 1. Click on **Signup (Custom)**, under **Signup & Login**. This opens the popup. 2. To add fields to the popup, click Add Elements ![Add Elements icon](https://wixmp-833713b177cebf373f611808.wixmp.com/images/b720ae0219e0c5e373ab3fd18a634caf.png "Add Elements icon") on the left side of the editor. Then, drag and drop the relevant element. 3. Add the following fields: - A text input for entering a first name. Set the text ID to `firstName`. - A text input for entering a last name. Set the text ID to `lastName`. - An email input for entering an email address. Set the email ID to `email`. - An email input for confirming an email address. Set the email ID to `confirmEmail`. - A password input for entering a password. Set the password ID to `password`. - A password input for confirming a password. Set the password ID to `confirmPassword`. 4. Add text elements below the confirmation fields to display error messages if a site visitor's entries don't match. Set the default values for these text elements as "Hidden" in the [Properties & Events panel](https://dev.wix.com/docs/develop-websites-sdk/code-your-site/developer-environments/ides/code-editor/about-the-properties-events-panel.md). - A text element for noting the 2 email fields don't match. Set the text ID to `emailMismatchText`. - A text element for noting the 2 password fields don't match. Set the text ID to `passwordMismatchText`. 5. Add a register button to submit the form and register the site visitor as a new member. Set the button ID to `register`. The form should look like this: ![Custom registration form layout](https://wixmp-833713b177cebf373f611808.wixmp.com/images/4063bbb25ca381b916de21576067953e.png) > **Note:** A registration form must include input elements to collect a site visitor's email and password. This data is required for adding a new contact entry for a site visitor in a site's Contact List, and for registering them as a site member. > > If you want to collect additional data from site visitors aside from the default fields in a site's Contact List, you'll need to add custom fields to the site's Contact List. ## Step 3 | Add frontend code In this step, you'll add code to validate the confirmation fields in your popup. 1. Import the required module at the top of your page code. ```javascript import { authentication } from "@wix/site-members"; ``` 2. In the `onReady()` method, add an `onClick()` event handler to the register button, and retrieve the values from all input fields, including the confirmation fields. ```javascript $w.onReady(function () { $w('#register').onClick(async () => { const password = $w('#password').value; const confirmPassword = $w('#confirmPassword').value; const email = $w('#email').value; const confirmEmail = $w('#confirmEmail').value; ``` 3. Reset and hide any error messages when they're no longer needed. ```javascript // Reset error messages. $w("#emailMismatchText").hide(); $w("#passwordMismatchText").hide(); ``` 4. When a site visitor finishes entering their information and clicks **Sign Up**, first validate that the email and password confirmation fields match their respective original fields. If either validation fails, display the appropriate error message and stop the registration process. ```javascript // Validate email confirmation. if (email !== confirmEmail) { // Stop execution if emails don't match and display the error message for it. $w("#emailMismatchText").show(); return; } // Validate password confirmation. if (password !== confirmPassword) { // Stop execution if passwords don't match and display the error message for it. $w("#passwordMismatchText").show(); return; } ``` ## Step 4 | Add registration logic If the validation above passes, continue registering the new member. 1. Set the new member's contact info. > **Note:** The API requires that this is passed as an array. So even in our example, where new members only have 1 email address, this is passed as an array. ```javascript try { // Register the member using the members API. const registrationOptions = { contactInfo: { firstName: $w('#firstName').value, lastName: $w('#lastName').value, emails: [email] } }; ``` 2. Register the site visitor. ```javascript const registrationResult = await authentication.register( email, password, registrationOptions ); ``` 3. Check the registration status. ```javascript // Check the registration status. if (registrationResult.state === 'ACTIVE') { // Handle successful registration, like display a success message or redirect new member. console.log('Member registered successfully:', registrationResult); } else { // Handle pending registration cases, like email verification or manual admin approval. console.log('Registration requires additional steps:', registrationResult.state); } } catch (error) { // Handle registration errors. console.error('Registration failed:', error); } }); }); ``` ## Complete code example Here is the complete code for this example: ```javascript import { authentication } from "@wix/site-members"; $w.onReady(function () { $w("#register").onClick(async () => { const password = $w("#password").value; const confirmPassword = $w("#confirmPassword").value; const email = $w("#email").value; const confirmEmail = $w("#confirmEmail").value; // Reset error messages. $w("#emailMismatchText").hide(); $w("#passwordMismatchText").hide(); // Validate email confirmation. if (email !== confirmEmail) { // Stop execution if emails don't match and display the error message for it. $w("#emailMismatchText").show(); return; } // Validate password confirmation. if (password !== confirmPassword) { // Stop execution if passwords don't match and display the error message for it. $w("#passwordMismatchText").show(); return; } try { // Register the member using the members API. const registrationOptions = { contactInfo: { firstName: $w("#firstName").value, lastName: $w("#lastName").value, emails: [email], }, }; const registrationResult = await authentication.register( email, password, registrationOptions ); // Check the registration status. if (registrationResult.state === "ACTIVE") { // Handle successful registration, like display a success message or redirect new member. console.log("Member registered successfully:", registrationResult); } else { // Handle pending registration cases, like email verification or manual admin approval. console.log( "Registration requires additional steps:", registrationResult.state ); } } catch (error) { // Handle registration errors. console.error("Registration failed:", error); } }); }); ``` --- > Portal Navigation: > > - Append `.md` to any URL under `https://dev.wix.com/docs/` to get its markdown version. > - Pages are either content pages (article or reference text) or menu pages (a list of links to child pages). > - To get a menu page, truncate any URL to a parent path and append `.md` (e.g. `https://dev.wix.com/docs/sdk.md`, `https://dev.wix.com/docs/sdk/core-modules.md`). > - Top-level index of all portals: https://dev.wix.com/docs/llms.txt > - Full concatenated docs: https://dev.wix.com/docs/llms-full.txt ## Resource: Tutorial | Send a Triggered Email to Members ## Article: Tutorial | Send a Triggered Email to Members ## Article Link: https://dev.wix.com/docs/develop-websites-sdk/get-started/tutorials/members-contacts/tutorial-send-a-triggered-email-to-members.md ## Article Content: # Tutorial | Send a Triggered Email to Members In this tutorial, you'll learn how to automatically send a personalized email to the currently logged-in site member using [Triggered Emails](https://dev.wix.com/docs/develop-websites/articles/workspace-tools/developer-tools/triggered-emails/about-triggered-emails.md) and an input form. You'll use a form submission as the trigger, but you can adapt this approach to send emails from anywhere in your code. You'll build a simple form where site members can enter their name, select their favorite sport, and add comments. When the form is submitted, your site will send a personalized Triggered Email to the logged-in member with the information they provided. We'll use the following steps to send a triggered email to a member: 1. [Set up your Triggered Email template.](#step-1--set-up-your-triggered-email-template) 2. [Create a form for member input.](#step-2--create-a-form-for-member-input) 3. [Send the email on form submission.](#step-3--send-the-email-on-form-submission) ## Before you begin It's important to note the following before starting this tutorial: - Members must be able to [login to your site](https://support.wix.com/en/article/adding-a-members-area-to-your-site). - Triggered Emails may not work properly in preview mode. Publish your site to test the code. - Make sure to have a collection, such as `sportsEmail`, that you can connect to a dataset later. > The code in this article was written using the following module versions: > > - @wix/site-crm (v1.31.0) > - @wix/members (v1.0.306) > > Learn how to install npm packages [in the editor](https://dev.wix.com/docs/develop-websites-sdk/code-your-site/developer-environments/packages/npm/work-with-npm-packages-in-the-editor.md) or [using the CLI](https://dev.wix.com/docs/develop-websites-sdk/code-your-site/developer-environments/packages/npm/work-with-npm-packages-with-the-cli.md). ## Step 1 | Set up your Triggered Email template In this step, you'll create a Triggered Email template with variables for personalization. To set up your Triggered Email: 1. Go to `Developer Tools` on your site's dashboard and select `Triggered Emails`. 2. Add sender details, including the sender's name and email address. 3. Create a new Triggered Email and add variables such as `name`, `sport`, and `comments`. 4. Give your email template a meaningful name, such as `sportMail`. 5. Publish the Triggered Email. 6. Copy the code snippet for emailing site members. You'll use this code in a later step. The code should look like this: > The following code snippet uses the Velo API by importing the `'wix-crm'` package. > To use the SDK version, change the import to `'@wix/site-crm'`. ```javascript import { triggeredEmails } from 'wix-crm'; //... triggeredEmails.emailMember('sportMail', , { variables: { name: , sport: , comments: , } }); ``` > For a full, detailed walkthrough, see [Set Up a Triggered Email](https://dev.wix.com/docs/develop-websites/articles/workspace-tools/developer-tools/triggered-emails/set-up-a-triggered-email.md). ## Step 2 | Create a form for member input In this step, you'll build a simple form that collects input from the site member. The form includes input fields for each variable you set up in your Triggered Email, as well as a submit button. All elements should be connected to the same dataset. To create the form: 1. Add input elements for each variable that you set up in your Triggered Email, such as name, sport, comments. In our example, we add: - An input element for entering a name. Set the input ID to `nameInput`. - A dropdown for selecting a sport. Set the dropdown ID to `sportDropdown`. - A text box for entering comments. Set the text box ID to `commentsInput`. - A button for submitting the data. Set the button ID to `submitButton`. - A dataset for connecting elements. Set the dataset ID to `sportDataset`. 2. Add a submit button. 3. Create a dataset called `sportDataset` that's connected to the `sportsEmail` collection you created earlier. 4. Connect each input element to the same dataset, such as `sportDataset`. 5. Connect the button to the same dataset and set it to the **Submit** action. ## Step 3 | Add frontend code In this step, you'll add code that sends the Triggered Email to the site member when the form is submitted. 1. Import the required modules at the top of your page code: ```javascript import { triggeredEmails } from "@wix/site-crm"; import { members } from "@wix/members"; ``` 2. Register an `onAnAfterSave()` event handler for your dataset to run the code each time the form is successfully submitted. ```javascript $w("#sportDataset").onAfterSave(async () => { // Code in next step goes here... }); ``` 3. Get the values from the input elements. ```javascript // ...Code from previous step const name = $w("#nameInput").value; const sport = $w("#sportDropdown").value; const comments = $w("#commentsInput").value; // Code in next step goes here... ``` 4. Get the currently logged in member `userId`. ```javascript // ...Code from previous step const currentMember = await members.getCurrentMember(); if (currentMember) { const userId = currentMember.member._id; // Code in next step goes here... } ``` 5. Paste the Triggered Email code snippet from earlier. Replace the placeholders in the code snippet with the values you saved from the form, and the member ID, to personalize the email. ```javascript // ...Code from previous step triggeredEmails.emailMember("sportMail", userId, { variables: { name: name, sport: sport, comments: comments, }, }); ``` ## Full example The following example includes error handling for both successful and failed email attempts. ```javascript $w.onReady(function () { $w("#sportDataset").onAfterSave(async () => { try { const name = $w("#nameInput").value; const sport = $w("#sportDropdown").value; const comments = $w("#commentsInput").value; const currentMember = await members.getCurrentMember(); if (currentMember) { const userId = currentMember.member._id; await triggeredEmails.emailMember("sportMail", userId, { variables: { name: name, sport: sport, comments: comments, }, }); console.log("email sent successfully"); } } catch (err) { console.log("error sending email", err); } }); }); ``` ## See also - [Triggered Emails](https://dev.wix.com/docs/develop-websites-sdk/code-your-site/build-a-custom-frontend/triggered-emails/about-triggered-emails.md) - [Create a Triggered Email](https://dev.wix.com/docs/develop-websites-sdk/code-your-site/build-a-custom-frontend/triggered-emails/create-a-triggered-email.md) --- > Portal Navigation: > > - Append `.md` to any URL under `https://dev.wix.com/docs/` to get its markdown version. > - Pages are either content pages (article or reference text) or menu pages (a list of links to child pages). > - To get a menu page, truncate any URL to a parent path and append `.md` (e.g. `https://dev.wix.com/docs/sdk.md`, `https://dev.wix.com/docs/sdk/core-modules.md`). > - Top-level index of all portals: https://dev.wix.com/docs/llms.txt > - Full concatenated docs: https://dev.wix.com/docs/llms-full.txt ## Resource: Tutorial | Send Emails with the SendGrid npm Package ## Article: Tutorial | Send Emails with the SendGrid npm Package ## Article Link: https://dev.wix.com/docs/develop-websites-sdk/get-started/tutorials/members-contacts/tutorial-send-emails-with-the-send-grid-npm-package.md ## Article Content: # Tutorial | Send Emails with the SendGrid npm Package In this tutorial, you'll learn how to set up a complete email system that allows site visitors to send emails through a custom form on your Wix site. The solution uses SendGrid's API to handle email delivery while maintaining security best practices by storing sensitive API keys in Wix's Secrets Manager. SendGrid is a cloud-based email delivery platform that provides reliable email infrastructure for businesses and developers. By integrating SendGrid with your Wix site, you can send emails such as contact form submissions, order confirmations, password resets, or custom notifications to your users. This approach gives you more control over email delivery, better tracking capabilities, and higher deliverability rates compared to basic email services. To set up your site to send emails with the SendGrid service, you'll need to perform the following steps: 1. [Create a SendGrid account](#step-1--create-a-sendgrid-account). 1. [Set up your site](#step-2--set-up-the-site). 1. [Write the backend code](#step-3--write-backend-code). 1. [Write the frontend code](#step-4--write-frontend-code). > The code in this article was written using the following module versions: > > - @wix/secrets (v1.0.53) > - @wix/web-methods (v.1.0.11) > > Learn how to install npm packages [in the editor](https://dev.wix.com/docs/develop-websites-sdk/code-your-site/developer-environments/packages/npm/work-with-npm-packages-in-the-editor.md) or [using the CLI](https://dev.wix.com/docs/develop-websites-sdk/code-your-site/developer-environments/packages/npm/work-with-npm-packages-with-the-cli.md). ## Step 1 | Create a SendGrid account To use the SendGrid service on your Wix site, you'll need to create a [SendGrid account](https://signup.sendgrid.com/). The email address you verify in the account will be the sender address for the emails you send from your Wix site. Once you've created an account, [create an API key](https://www.twilio.com/docs/sendgrid/ui/account-and-settings/api-keys#creating-an-api-key). Copy the key from your dashboard and store it in the Secrets Manager in your Wix site (see the next step). ## Step 2 | Set up the site In this step, you'll configure your Wix site by securely storing your SendGrid credentials and installing the required npm package. For security purposes, it's best to store sensitive content such as API keys in the [Secrets Manager](https://dev.wix.com/docs/develop-websites-sdk/code-your-site/developer-environments/secrets/about-the-secrets-manager.md): 1. Navigate to **Developer Tools** in the Code sidebar. 1. Under the **Security** section, select **Secrets Manager**. 1. In the top right, click **Add Secret**. 1. Set the **Secret Name** to `sendGridSecret`. 1. Store both your SendGrid API key and the verified email address associated with your SendGrid account in the secret value. Your secret value will look like this: ```json { "key": "AB.CdPEfg1HIJk-LMnoPq2R3s.T4uVwxyZAbcd567eF8fghIjKL9mN", "senderEmail": "janedoe@example.com" } ``` 1. Click **Save**. 1. Go back to the site editor and install the [npm package](https://dev.wix.com/docs/develop-websites-sdk/code-your-site/developer-environments/packages/npm/work-with-npm-packages-in-the-editor.md). ## Step 3 | Create a custom form On your **Home** page, create a custom form and add the following elements: - Input elements for the recipient's email and subject line. Give elements the IDs of `#toEmail` and `#subject`. - Text box for the email body text. Give the element the ID of `#emailContent`. - Submit button for sending the email. Give the element the ID of `#sendButton`. - Text element for displaying success and error messages. Give the element the ID of `#messageText`. ## Step 4 | Add backend code In this step, you'll securely retrieve your SendGrid credentials and handle the email sending process using SendGrid's API. 1. Add a [web module](https://dev.wix.com/docs/develop-websites-sdk/code-your-site/build-a-custom-backend/web-modules/about-web-modules.md) to your site code and call it `sendEmail.web.js`. 1. Import the modules you'll need: ```javascript import { Permissions, webMethod } from "@wix/web-methods"; import sgMail from "@sendgrid/mail"; import { secrets } from "@wix/secrets"; ``` 1. In the `sendEmail` function, get the SendGrid API key and sender email address that you saved in the Secrets Manager, and set the API key to enable usage of the SendGrid service. For this, use the [Secrets API](https://dev.wix.com/docs/sdk/backend-modules/secrets/introduction.md): ```javascript export const sendEmail = webMethod(Permissions.Anyone, async (recipient, subject, body) => { const sendGridSecret = JSON.parse((await secrets.getSecretValue('sendGridSecret')).value); const key = sendGridSecret.key; const senderEmail = sendGridSecret.senderEmail; sgMail.setApiKey(key); // Function continues below ``` 1. Set the data for the email to be sent, such as the recipient's email address and the text of the email body. The sender email was extracted from the Secrets Manager and the rest of the information is entered by site visitors on the frontend by using input elements. Call the `send()` function to send the email. ```javascript // Function continued from above const msg = { from: senderEmail, to: recipient, subject: subject, text: body }; try { const result = await sgMail.send(msg); return { success: true, result: result }; } catch (error) { console.error('Error sending the email: ' + error.message); return { success: false, error: error.message }; } }); ``` ## Step 5 | Add frontend code In this step, you'll handle user interactions with the email form, validate input fields, and communicate with the backend function to send emails. 1. Open the page code file and import the function from the backend: ```javascript import { sendEmail } from "backend/sendEmail.web"; ``` 1. Add the `checkFormFields()` function to make sure all form field input values are valid before sending an email: ```javascript function checkFormFields() { return ( $w("#toEmail").validity.valid && $w("#subject").validity.valid && $w("#emailContent").validity.valid ); } ``` 1. Add the `clearFields()` function to reset the form fields following a successful email transmission. The `resetValidityIndication()` function resets the inputs' visual validity indications. Some elements have a visual cue, such as a red outline, that indicates when the current value isn't valid. This function clears any indications. ```javascript function clearFields() { $w("#toEmail").value = ""; $w("#subject").value = ""; $w("#emailContent").value = ""; $w("#toEmail").resetValidityIndication(); $w("#subject").resetValidityIndication(); $w("#emailContent").resetValidityIndication(); } ``` 1. Add the `displayMessage()` function to temporarily show a success or error message following an attempt to send an email: ```javascript function displayMessage(message) { $w("#messageText").text = message; $w("#messageText").show(); $w("#messageText").hide("fade", { delay: 5000 }); } ``` 1. When a site visitor clicks the **Send** button, do the following: 1. Check whether all form field values are valid. 2. If they're valid, send the email with the values extracted from the form inputs. If the form fields aren't valid, show an error message. 3. If the email transmission request is successful, clear the form fields and display a success message. If the request fails, show an error message. ```javascript $w.onReady(function () { $w("#sendButton").onClick(async () => { const passedValidations = checkFormFields(); if (passedValidations) { const emailResult = await sendEmail( $w("#toEmail").value, $w("#subject").value, $w("#emailContent").value ); if (emailResult.success) { clearFields(); displayMessage("Email was sent"); } else { displayMessage("Error sending email: " + emailResult.error); } } else { displayMessage("Validation error, please review your input fields."); } }); }); ``` ## Example code Here is the complete code for this example: ### Backend code file ```javascript import { Permissions, webMethod } from "@wix/web-methods"; import sgMail from "@sendgrid/mail"; import { secrets } from "@wix/secrets"; export const sendEmail = webMethod( Permissions.Anyone, async (recipient, subject, body) => { const sendGridSecret = JSON.parse( (await secrets.getSecretValue("sendGridSecret")).value ); const key = sendGridSecret.key; const senderEmail = sendGridSecret.senderEmail; sgMail.setApiKey(key); const msg = { from: senderEmail, to: recipient, subject: subject, text: body, }; try { const result = await sgMail.send(msg); return { success: true, result: result }; } catch (error) { console.error("Error sending the email: " + error.message); return { success: false, error: error.message }; } } ); ``` ### Frontend code file ```javascript import { sendEmail } from "backend/sendEmail.web"; $w.onReady(function () { $w("#sendButton").onClick(async () => { const passedValidations = checkFormFields(); if (passedValidations) { const emailResult = await sendEmail( $w("#toEmail").value, $w("#subject").value, $w("#emailContent").value ); if (emailResult.success) { clearFields(); displayMessage("Email was sent."); } else { displayMessage("Error sending email: " + emailResult.error); } } else { displayMessage("Validation error, please review your input fields."); } }); }); function checkFormFields() { return ( $w("#toEmail").validity.valid && $w("#subject").validity.valid && $w("#emailContent").validity.valid ); } function clearFields() { $w("#toEmail").value = ""; $w("#subject").value = ""; $w("#emailContent").value = ""; $w("#toEmail").resetValidityIndication(); $w("#subject").resetValidityIndication(); $w("#emailContent").resetValidityIndication(); } function displayMessage(message) { $w("#messageText").text = message; $w("#messageText").show(); $w("#messageText").hide("fade", { delay: 5000 }); } ``` --- > Portal Navigation: > > - Append `.md` to any URL under `https://dev.wix.com/docs/` to get its markdown version. > - Pages are either content pages (article or reference text) or menu pages (a list of links to child pages). > - To get a menu page, truncate any URL to a parent path and append `.md` (e.g. `https://dev.wix.com/docs/sdk.md`, `https://dev.wix.com/docs/sdk/core-modules.md`). > - Top-level index of all portals: https://dev.wix.com/docs/llms.txt > - Full concatenated docs: https://dev.wix.com/docs/llms-full.txt ## Resource: Tutorial | Generate Logs to Debug a Site ## Article: Tutorial | Generate Logs to Debug a Site ## Article Link: https://dev.wix.com/docs/develop-websites-sdk/get-started/tutorials/monitoring/tutorial-generate-logs-to-debug-a-site.md ## Article Content: # Tutorial | Generate Logs to Debug a Site This tutorial demonstrates how to generate and view logs from site code. The logs are viewed using [Wix Logs](https://dev.wix.com/docs/develop-websites-sdk/test-your-site/work-with-wix-logs/about-wix-logs.md). In this tutorial, you'll: 1. [Add a button to a site](#step-1--add-a-button-to-a-site) 1. [Generate and view a log](#step-2--generate-and-view-a-log) > **Note**: In this tutorial, logs are generated from page code. However, you can also generate logs from backend code. ## Step 1 | Add a button to a site Add a button to a site and create an event handler: 1. Add a button labeled `button1` to a site's home page. Here's how it should look: ![Button added to site home page](https://wixmp-833713b177cebf373f611808.wixmp.com/images/949a3dd03f5f11dd9dc3211af1b2c85f.png) 1. In the site's home page code, add an [event handler](https://dev.wix.com/docs/develop-websites-sdk/code-your-site/build-a-custom-frontend/event-handlers/about-event-handlers.md) that runs whenever the button is clicked. > **Note**: This tutorial uses the `$w()` selector for frontend element interaction, which is a Velo API that remains necessary for frontend code even when using the JavaScript SDK for backend development. For the purposes of this tutorial, produce an error by defining `factor3` instead of `factor2.` ```js $w("#button1").onClick(() => { const factor1 = 10; const factor3 = 5; try { console.log("Button clicked!"); console.log(factor1 + " * " + factor2 + " = " + factor1 * factor2); } catch (error) { console.error("An error occurred during multiplication:", error); console.warn("Make sure to specify 2 factors for multiplication."); } }); ``` 1. Preview or publish the site. > **Note:** You can generate logs when previewing a site, but some log information is available only when the site is published. ## Step 2 | Generate and view a log Generate a log and view it [using Wix Logs](https://dev.wix.com/docs/develop-websites-sdk/test-your-site/work-with-wix-logs/view-logs-with-wix-logs.md) as follows: 1. In a separate browser tab or window, [open the Wix Logs page](https://dev.wix.com/docs/develop-websites-sdk/test-your-site/work-with-wix-logs/view-logs-with-wix-logs.md#view-the-logs). ![Wix Logs window](https://wixmp-833713b177cebf373f611808.wixmp.com/images/6f82b8af9105b4198ffe5babf7d6114d.png) 1. In the live site's home page or in Preview mode, click the button you created. The logs appear in the Wix Logs page: ![Wix Logs error example](https://wixmp-833713b177cebf373f611808.wixmp.com/images/dbf2dc66af923e4d2c64564f8332de90.png) 1. Click **View** for the log with the error to see its full details on the right: ![Wix Logs log details](https://wixmp-833713b177cebf373f611808.wixmp.com/images/123b0719f98d5699cf242c68c1813b02.png) Check out the `jsonPayload` to see an explanation for the error. ## See also - [About Wix Logs](https://dev.wix.com/docs/develop-websites-sdk/test-your-site/work-with-wix-logs/about-wix-logs.md) - [View logs with Wix Logs](https://dev.wix.com/docs/develop-websites-sdk/test-your-site/work-with-wix-logs/view-logs-with-wix-logs.md) - [View logs with Google Cloud Logs](https://dev.wix.com/docs/develop-websites-sdk/test-your-site/work-with-wix-logs/view-logs-with-google-cloud-logs.md) - [View logs with an external logging tool](https://dev.wix.com/docs/develop-websites-sdk/test-your-site/work-with-wix-logs/view-logs-with-an-external-logging-tool.md) - [Log object structure](https://dev.wix.com/docs/develop-websites-sdk/test-your-site/work-with-wix-logs/log-object-structure.md) --- > Portal Navigation: > > - Append `.md` to any URL under `https://dev.wix.com/docs/` to get its markdown version. > - Pages are either content pages (article or reference text) or menu pages (a list of links to child pages). > - To get a menu page, truncate any URL to a parent path and append `.md` (e.g. `https://dev.wix.com/docs/sdk.md`, `https://dev.wix.com/docs/sdk/core-modules.md`). > - Top-level index of all portals: https://dev.wix.com/docs/llms.txt > - Full concatenated docs: https://dev.wix.com/docs/llms-full.txt ## Resource: Tutorial | Send Tracking and Analytics Events ## Article: Tutorial | Send Tracking and Analytics Events ## Article Link: https://dev.wix.com/docs/develop-websites-sdk/get-started/tutorials/monitoring/tutorial-send-tracking-and-analytics-events.md ## Article Content: # Tutorial | Send Tracking and Analytics Events You can add tracking code to monitor how site visitors interact with your site. This gives you insight into your site visitors' online behavior and can help you optimize your online marketing strategies. By the end of this tutorial, you'll have a site that sends custom events to an analytics tool (like Google Analytics) whenever a site visitor clicks the `download` button on your site. You'll use the following steps to send a tracking event from your page code: - [Connect your site to an analytics tool](#step-1--connect-an-analytics-tool) - [Set up a simple page](#step-2--set-up-your-page) - [Add code that sends a tracking event when a user performs a specific interaction](#step-3--add-tracking-code) > The code in this article was written using the following module versions: > > - @wix/site-window (v1.3.8) > - @wix/data (v1.0.241) > > Learn how to install npm packages [in the editor](https://dev.wix.com/docs/develop-websites-sdk/code-your-site/developer-environments/packages/npm/work-with-npm-packages-in-the-editor.md) or [using the CLI](https://dev.wix.com/docs/develop-websites-sdk/code-your-site/developer-environments/packages/npm/work-with-npm-packages-with-the-cli.md). > **Note** > > - Tracking & Analytics requires you to have an account with an external analytics tool and only works with premium sites. > - If your custom event isn't appearing in Google Analytics, you can use the [Google Tag Assistant](https://tagassistant.google.com/) to verify the event is being sent correctly. ## Step 1 | Connect an analytics tool Connect the desired tracking and analytics tool to your site. This tutorial connects to [Google Analytics](https://support.wix.com/en/article/tracking-events-on-your-wix-site-with-a-google-analytics-property), but the same concepts apply when connecting to [Meta Pixel](https://support.wix.com/en/article/connecting-a-facebook-pixel-and-the-conversions-api-to-your-wix-site-7351813). ## Step 2 | Set up your page 1. Add page elements. Add the following elements to your page: - A repeater to display a title and download button for each document. Set the repeater ID to `docRepeater`. - A text element (repeated) to display the document title. Set the text ID to `docTitle`. - A button (repeated) to download the document. Set the button ID to `downloadButton`. - A collection to store document data. Set the collection ID to `docData`. 2. Connect elements to your data. Query the `docData` collection and use the results to populate the repeater and its repeated elements. ```javascript import { items } from "@wix/data"; $w.onReady(async function () { const { items } = await items.query("docData").find(); $w("#docRepeater").data = items; $w("#docRepeater").onItemReady(($item, itemData) => { $item("#docTitle").text = itemData.title; }); }); ``` The result should look like this: ![Repeater with titles](https://wixmp-833713b177cebf373f611808.wixmp.com/images/38a99262e177152da44c3e763c6f4272.png) ## Step 3 | Add frontend code 1. Import the `window` module. Add this import statement at the top of your page code: ```javascript import { window } from "@wix/site-window"; ``` 2. Add an `onClick()` event to the repeated `download` button. Add an `onClick()` event handler to the repeater's `onReady()` handler: ```javascript $w("#docRepeater").onItemReady(($item, itemData) => { $item("#docTitle").text = itemData.title; $item("#downloadButton").onClick(async () => { // add the tracking code here in the next step }); }); ``` 3. Call the `trackEvent()` method. Add the tracking code inside the `onClick()` event. This sends Google Analytics a custom event that indicates a download occurred. When sending a custom event to Google Analytics, use these parameters: | Key | Value Type | Required | Usage | | --------------- | ---------- | -------- | --------------------------------------- | | `eventCategory` | string | yes | Object that was interacted with | | `eventAction` | string | yes | Type of interaction | | `eventLabel` | string | no | Event category | | `eventValue` | number | no | Numeric value associated with the event | ```javascript $item("#downloadButton").onClick(async () => { await window.trackEvent("CustomEvent", { event: "Document Download", eventCategory: "Downloads", eventAction: "Download", eventLabel: itemData.title, }); }); ``` Now, when a user clicks the download button, you'll see an event registered in your analytics tool. ## Complete code Here's the complete code for your page: ```javascript import { window } from "@wix/site-window"; import { items } from "@wix/data"; $w.onReady(async function () { const { items } = await items.query("docData").find(); $w("#docRepeater").data = items; $w("#docRepeater").onItemReady(($item, itemData) => { $item("#docTitle").text = itemData.title; $item("#downloadButton").onClick(async () => { await window.trackEvent("CustomEvent", { event: "Document Download", eventCategory: "Downloads", eventAction: "Download", eventLabel: itemData.title, }); }); }); }); ``` ## See also To learn more about the types of events you can send and their corresponding parameters, see [`trackEvent( )`](https://dev.wix.com/docs/sdk/frontend-modules/window/track-event.md) in the API Reference. --- > Portal Navigation: > > - Append `.md` to any URL under `https://dev.wix.com/docs/` to get its markdown version. > - Pages are either content pages (article or reference text) or menu pages (a list of links to child pages). > - To get a menu page, truncate any URL to a parent path and append `.md` (e.g. `https://dev.wix.com/docs/sdk.md`, `https://dev.wix.com/docs/sdk/core-modules.md`). > - Top-level index of all portals: https://dev.wix.com/docs/llms.txt > - Full concatenated docs: https://dev.wix.com/docs/llms-full.txt ## Resource: Tutorial | Create a One-Time Popup ## Article: Tutorial | Create a One-Time Popup ## Article Link: https://dev.wix.com/docs/develop-websites-sdk/get-started/tutorials/user-interface/tutorial-create-a-one-time-popup.md ## Article Content: # Tutorial | Create a One-Time Popup > **Note:** The terms popup and lightbox refer to the same element. While the editor and dashboard now refer to it as a [popup](https://support.wix.com/en/article/studio-editor-using-popups), the API methods continue to use the term lightbox for backward compatibility. The documentation uses both terms accordingly. In this tutorial, we demonstrate how to create a popup that appears only on a visitor's first page load during a browser session. We'll create the popup element and use the [Storage API](https://dev.wix.com/docs/sdk/frontend-modules/storage/storage/introduction.md) to track whether a visitor has already seen the popup in their current session. One-time popups are perfect for displaying important announcements, special offers, or welcome messages without repeatedly annoying visitors during their session. We'll use the following steps to build the one-time popup: - [Tutorial | Create a One-Time Popup](#tutorial--create-a-one-time-popup) - [Before you begin](#before-you-begin) - [Step 1 | Set up the popup](#step-1--set-up-the-popup) - [Step 2 | Implement the popup display and storage functionality](#step-2--implement-the-popup-display-and-storage-functionality) - [Complete code example](#complete-code-example) - [See also](#see-also) > **Note:** The code in this article was written using the following module versions: > > - @wix/site-storage (v1.0.0) > - @wix/site-window (v1.0.0) > > Learn how to install npm packages [in the editor](https://dev.wix.com/docs/develop-websites-sdk/code-your-site/developer-environments/packages/npm/work-with-npm-packages-in-the-editor.md) or [using the CLI](https://dev.wix.com/docs/develop-websites-sdk/code-your-site/developer-environments/packages/npm/work-with-npm-packages-with-the-cli.md). ## Before you begin It's important to note the following points before doing this tutorial: - This tutorial uses session storage, but you can optionally switch to [local storage](https://dev.wix.com/docs/sdk/frontend-modules/storage/introduction.md). - The code should be added to your site's **masterpage.js** file so that it works across all of your site pages. ## Step 1 | Set up the popup In this step, you'll configure the popup element that will serve as the popup on your site. To set up your popup: 1. Add a popup to your site through the **Add** menu if you haven't already. 2. Select the popup element and click the **Set Triggers** button. 3. In **Popup Settings**, configure the popup so that it doesn't automatically display on pages. 4. Give your popup a meaningful name, such as **Announcement**. We'll use this name in the code. 5. Design the popup content to fit your needs. You can add, delete, and modify any elements within the popup. ## Step 2 | Implement the popup display and storage functionality In this step, you'll implement the code for tracking and displaying the popup. 1. Add the following import statements at the top of your **masterPage.js** file: ```javascript import { session } from "@wix/site-storage"; import { window } from "@wix/site-window"; ``` > **Note:** Adding our code to the **masterPage.js** file ensures the popup appears immediately when a visitor first arrives at your site, regardless of which page they land on. To show the popup only on specific pages, add the code to those individual page files instead. 2. Add the main popup logic using the `onReady()` event handler. When the page is ready, check session storage for `firstTimePopupShown`. If it's missing, open the "Announcement" popup and set the key so that the popup doesn't open again. ```javascript $w.onReady(async function () { if (!(await session.getItem("firstTimePopupShown"))) { window.openLightbox("Announcement"); session.setItem("firstTimePopupShown", "yes"); } }); ``` > **Note:** This tutorial uses session storage, so the popup appears once per browsing session. To display the popup only once ever, use local storage instead. Change the import statement from `session` to `local` and update all instances of `session` to `local` in your code. ## Complete code example ```javascript import { session } from "@wix/site-storage"; import { window } from "@wix/site-window"; $w.onReady(async function () { // Check if the lightbox (popup) has been shown before if (!(await session.getItem("firstTimePopupShown"))) { // Open the lightbox (popup) window.openLightbox("Announcement"); // Mark that the lightbox (popup) has been shown session.setItem("firstTimePopupShown", "yes"); } }); ``` ## See also - [Using Popups](https://support.wix.com/en/article/studio-editor-using-popups) - [Storage API](https://dev.wix.com/docs/sdk/frontend-modules/storage/introduction.md) - [Window API](https://dev.wix.com/docs/sdk/frontend-modules/window/introduction.md) --- > Portal Navigation: > > - Append `.md` to any URL under `https://dev.wix.com/docs/` to get its markdown version. > - Pages are either content pages (article or reference text) or menu pages (a list of links to child pages). > - To get a menu page, truncate any URL to a parent path and append `.md` (e.g. `https://dev.wix.com/docs/sdk.md`, `https://dev.wix.com/docs/sdk/core-modules.md`). > - Top-level index of all portals: https://dev.wix.com/docs/llms.txt > - Full concatenated docs: https://dev.wix.com/docs/llms-full.txt ## Resource: Tutorial | Customize a Wix Form ## Article: Tutorial | Customize a Wix Form ## Article Link: https://dev.wix.com/docs/develop-websites-sdk/get-started/tutorials/user-interface/tutorial-customize-a-wix-form.md ## Article Content: # Tutorial | Customize a Wix Form When you use the [Wix Forms app](https://support.wix.com/en/article/about-wix-forms) to create a form on your site, it comes with built-in functionalities. However, you might still want to customize the form further. In this tutorial, you'll learn how to customize a Wix Form using the JavaScript SDK. You'll display a custom thank you message using user input from the form submission. You'll complete the following steps to customize your form: 1. [Set up a Wix Form on your site](#step-1-add-and-set-up-a-wix-form) 2. [Display a personalized thank you message](#step-2-display-a-personalized-thank-you-message) ## Step 1: Add and set up a Wix Form 1. [Add and set up a Wix Form](https://support.wix.com/en/article/adding-and-setting-up-a-form-on-your-site) on your site in the Wix Editor. 2. Configure your form with the following fields: - **First Name** (text input) - **Last Name** (text input) - **Donation Amount** (number input) 3. Change the form's default ID to `myForm`. You'll use this ID to reference the form in your code in the next step. ## Step 2: Display a personalized thank you message In this step, you'll add code to display a custom thank you message when a form is submitted. It'll include personalized information from the form elements. 1. Add an empty [text element](https://support.wix.com/en/article/studio-editor-adding-and-customizing-text) with the ID `thankYouText` to your site to display the thank you message. 2. Set up the form submit success handler and get form field values. ```javascript $w("#myForm").onSubmitSuccess(() => { const formData = $w("#myForm").getFieldValues(); // Code in next step goes here... }); ``` 3. Extract specific field values from the form data. ```javascript // ...Code from previous step const firstName = formData.first_name; const lastName = formData.last_name; const donation = formData.donation; // Code in next step goes here... ``` 4. Display the personalized thank you message: ```javascript // ...Code from previous step $w( "#thankYouText" ).text = `Thank you ${firstName} ${lastName}, for your generous donation of $${donation}!`; ``` ## Full code ```javascript $w("#myForm").onSubmitSuccess(() => { const formData = $w("#myForm").getFieldValues(); const firstName = formData.first_name; const lastName = formData.last_name; const donation = formData.donation; $w( "#thankYouText" ).text = `Thank you ${firstName} ${lastName}, for your generous donation of $${donation}!`; }); ``` --- > Portal Navigation: > > - Append `.md` to any URL under `https://dev.wix.com/docs/` to get its markdown version. > - Pages are either content pages (article or reference text) or menu pages (a list of links to child pages). > - To get a menu page, truncate any URL to a parent path and append `.md` (e.g. `https://dev.wix.com/docs/sdk.md`, `https://dev.wix.com/docs/sdk/core-modules.md`). > - Top-level index of all portals: https://dev.wix.com/docs/llms.txt > - Full concatenated docs: https://dev.wix.com/docs/llms-full.txt ## Resource: Tutorial | Display Elements in Mobile Only ## Article: Tutorial | Display Elements in Mobile Only ## Article Link: https://dev.wix.com/docs/develop-websites-sdk/get-started/tutorials/user-interface/tutorial-display-elements-in-mobile-only.md ## Article Content: # Tutorial | Display Elements in Mobile Only > The code in this article was written using the following module versions: > > - @wix/site-window (v1.38.0) > > Learn how to install npm packages [in the editor](https://dev.wix.com/docs/develop-websites-sdk/code-your-site/developer-environments/packages/npm/work-with-npm-packages-in-the-editor.md) or [using the CLI](https://dev.wix.com/docs/develop-websites-sdk/code-your-site/developer-environments/packages/npm/work-with-npm-packages-with-the-cli.md). You can use code to control elements so they act or display differently in the mobile version of your site. ## Step 1 | Add the elements on your site Add elements to your site that you'd like to customize for the mobile version. ## Step 2 | Open the page code file Open the code file for your page where you added the elements. The way you open the file depends on the IDE you're using. ::::tabs :::Editor 1. Navigate to **Page Code** in the Code sidebar. 1. Select your page. A page code file opens. The file includes a sample `onReady()` function. ::: :::Wix-IDE-or-Local-IDE Open the file in the `Pages` folder. The file includes a sample `onReady()` function. ::: :::: ## Step 3 | Check the device type Check whether your site is being viewed on a mobile device. 1. In the first line of your code, import the [@wix/site-window](https://dev.wix.com/docs/sdk/frontend-modules/window/introduction.md) API. It lets you determine the type of device your site is being viewed on. ```js import { window } from "@wix/site-window"; ``` Learn more about using [npm packages](https://dev.wix.com/docs/develop-websites-sdk/code-your-site/developer-environments/packages/npm/about-npm-packages.md) when developing sites. 1. Wrap the code for the element in an `if` statement to handle the various devices on which the element exists. ```js $w.onReady(async function () { if ( (await window.formFactor()) === "Mobile" || (await window.formFactor()) === "Tablet" ) { } else { } }); ``` ## Step 4 | Customize actions on elements In the conditional statement write any actions you’d like to do with your elements in the mobile version. For example, here is code for hiding a button when viewed on a desktop screen, but showing the button on mobile and tablet screens: ```js import { window } from "@wix/site-window"; $w.onReady(async function () { if ( (await window.formFactor()) === "Mobile" || (await window.formFactor()) === "Tablet" ) { $w("#button1").show(); } else { $w("#button1").hide(); } }); ``` ## Step 5 | Test If you want to test how your code works on mobile devices, publish your site and view the published version on a mobile device or in a mobile device emulator.
**Important:** If you preview your site, it will always behave as if it's being viewed on a desktop device, even if you preview from the mobile editor.
To test your site on a desktop machine as if it's being viewed on a mobile device: 1. Publish your site. 1. View the published site. 1. Open your browser's [developer tools](https://developer.mozilla.org/en-US/docs/Learn/Common_questions/What_are_browser_developer_tools). 1. Use your browser's developer tools to emulate a mobile device. For example, for Google Chrome, this is called **Toggle device toolbar** and turned on using this icon ![toggle device toolbar](https://wixmp-833713b177cebf373f611808.wixmp.com/images/70adbe3c880a3585698dcb51ddc466e3.png). 1. Refresh the page so your site now loads as if it were on a mobile device. ## See also - [About Mobile Sites with Code](https://dev.wix.com/docs/develop-websites-sdk/code-your-site/build-a-custom-frontend/mobile/about-mobile-sites-with-code.md) --- > Portal Navigation: > > - Append `.md` to any URL under `https://dev.wix.com/docs/` to get its markdown version. > - Pages are either content pages (article or reference text) or menu pages (a list of links to child pages). > - To get a menu page, truncate any URL to a parent path and append `.md` (e.g. `https://dev.wix.com/docs/sdk.md`, `https://dev.wix.com/docs/sdk/core-modules.md`). > - Top-level index of all portals: https://dev.wix.com/docs/llms.txt > - Full concatenated docs: https://dev.wix.com/docs/llms-full.txt ## Resource: Tutorial | Hide a Video Player When There's No Video ## Article: Tutorial | Hide a Video Player When There's No Video ## Article Link: https://dev.wix.com/docs/develop-websites-sdk/get-started/tutorials/user-interface/tutorial-hide-a-video-player-when-there-s-no-video.md ## Article Content: # Tutorial | Hide a Video Player When There's No Video Learn how to automatically hide a [video player](https://dev.wix.com/docs/velo/velo-only-apis/$w/video-player/introduction.md) element when the connected collection item has no video URL, instead of showing a default placeholder. This is useful when the page shows various collection items that contain multiple fields, and may or may not include a video. In this tutorial we create a collection of minimal items, displayed in a [repeater](https://dev.wix.com/docs/velo/velo-only-apis/$w/repeater/introduction.md). We'll use the following steps to create this functionality: 1. [Create a collection.](#step-1--create-a-collection) 2. [Set up page elements.](#step-2--set-up-page-elements) 3. [Add code.](#step-3--add-code) ## Step 1 | Create a collection 1. Create a collection with a URL type field. Name the field `url`. 2. Add to the collection at least 1 item with a valid video URL in the `url` field, and at least 1 item with an empty `url` field. ## Step 2 | Add elements to your page 1. Add a repeater to your page. Set the repeater ID to `repeater`. 2. [Connect](https://support.wix.com/en/article/about-datasets-and-connecting-data) the repeater to the collection. 3. Add a video player element to the repeater items. 4. Connect the video player to the collection. 5. [Connect](https://support.wix.com/en/article/cms-formerly-content-manager-displaying-collection-content-in-the-single-video-player) the video player's **Video source** to the `url` field. ## Step 3 | Add frontend code Add this code to your page to wait for the repeater items to load, and hide the video player in items that contain no video URL: ```javascript $w("#repeater").onItemReady(($item, itemData) => { if (!itemData.url) { $item("#videoPlayer").collapse(); } }); ``` ## Test your implementation In edit mode, video players will show some default content even if they don't contain a video. To test your implementation, preview your site. In items with an empty `url` field, the video player will automatically collapse. ## See also - [About Collections](https://dev.wix.com/docs/develop-websites-sdk/code-your-site/work-with-data/introduction/about-collections.md) - [Video Player API](https://dev.wix.com/docs/velo/velo-only-apis/$w/video-player/introduction.md) --- > Portal Navigation: > > - Append `.md` to any URL under `https://dev.wix.com/docs/` to get its markdown version. > - Pages are either content pages (article or reference text) or menu pages (a list of links to child pages). > - To get a menu page, truncate any URL to a parent path and append `.md` (e.g. `https://dev.wix.com/docs/sdk.md`, `https://dev.wix.com/docs/sdk/core-modules.md`). > - Top-level index of all portals: https://dev.wix.com/docs/llms.txt > - Full concatenated docs: https://dev.wix.com/docs/llms-full.txt ## Resource: Tutorial | Use the Upload Button with Code ## Article: Tutorial | Use the Upload Button with Code ## Article Link: https://dev.wix.com/docs/develop-websites-sdk/get-started/tutorials/user-interface/tutorial-use-the-upload-button-with-code.md ## Article Content: # Tutorial | Use the Upload Button with Code In this tutorial, we demonstrate how to create a file upload form that allows site visitors to upload files to your site's Media Manager using the JavaScript SDK. Site visitors click the upload button to choose a file and then click the regular button to perform the upload.
**Tip:** For more complex file upload scenarios, you can use the [Media API](https://dev.wix.com/docs/sdk/backend-modules/media/introduction.md).
We'll use the following steps to build the file upload functionality: 1. Add page elements. 2. Add code to handle file selection and upload. ## Step 1 | Add elements to your page Add the following elements to your page: - An [upload button](https://dev.wix.com/docs/velo/velo-only-apis/$w/upload-button/introduction.md) for choosing a file. Set the upload button ID to `uploadButton`. - A regular [button](https://dev.wix.com/docs/velo/velo-only-apis/$w/button/introduction.md) to trigger the upload code. Set the button ID to `button`. - A [text](https://dev.wix.com/docs/velo/velo-only-apis/$w/text/introduction.md) element to display messages to site visitors. Set the text ID to `text`. - An [image](https://dev.wix.com/docs/velo/velo-only-apis/$w/image/introduction.md) element. Any image is fine. We're only using it as a placeholder for the uploaded image. Set the image ID to `image`. The form should look like this:
![File upload form with progress feedback](https://wixmp-833713b177cebf373f611808.wixmp.com/images/f5468bf0682ef0ecc9d9e54d74052a37.png)
## Step 2 | Add frontend code The upload button handles site visitors choosing the file. We'll add an `onClick()` function to make the regular button perform the actual upload. To create the `onClick()` function: 1. In the page code panel, add an `onClick()` event handler for the button: ```javascript $w("#button").onClick(async () => { // Code in the next steps goes here. }); ``` 2. Start the handler function with a check to see if the visitor has chosen a file with the upload button. If not, prompt the visitor to choose a file: ```javascript if ($w("#uploadButton").value.length > 0) { // Code in the next steps goes here. } else { $w("#text").text = "Choose a file to upload."; } ``` 3. Continue the handler function code for when a file is selected. Display feedback text, upload the selected file by calling the `uploadFiles()` async method, and then display the uploaded image and an appropriate message: ```javascript $w("#text").text = "Uploading " + $w("#uploadButton").value[0].name; try { const uploadedFiles = await $w("#uploadButton").uploadFiles(); $w("#text").text = "File uploaded successfully"; $w("#image").src = uploadedFiles[0].fileUrl; } // Code in the next step goes here. ``` 4. Handle failed uploads by displaying an appropriate message: ```javascript catch { $w("#text").text = "Upload failed. Try again or choose a different file."; } ``` ## Complete code example Here's the complete code for your page: ```javascript $w("#button").onClick(async () => { if ($w("#uploadButton").value.length > 0) { $w("#text").text = "Uploading " + $w("#uploadButton").value[0].name; try { const uploadedFiles = await $w("#uploadButton").uploadFiles(); $w("#text").text = "File uploaded successfully"; $w("#image").src = uploadedFiles[0].fileUrl; } catch { $w("#text").text = "Upload failed. Try again or choose a different file."; } } else { $w("#text").text = "Choose a file to upload."; } }); ``` ## See also - [Upload button](https://dev.wix.com/docs/velo/velo-only-apis/$w/upload-button/introduction.md) - [Supported media files](https://support.wix.com/en/article/supported-media-file-types-and-file-sizes) --- > Portal Navigation: > > - Append `.md` to any URL under `https://dev.wix.com/docs/` to get its markdown version. > - Pages are either content pages (article or reference text) or menu pages (a list of links to child pages). > - To get a menu page, truncate any URL to a parent path and append `.md` (e.g. `https://dev.wix.com/docs/sdk.md`, `https://dev.wix.com/docs/sdk/core-modules.md`). > - Top-level index of all portals: https://dev.wix.com/docs/llms.txt > - Full concatenated docs: https://dev.wix.com/docs/llms-full.txt ## Resource: Tutorial | Work with Multi-State Boxes ## Article: Tutorial | Work with Multi-State Boxes ## Article Link: https://dev.wix.com/docs/develop-websites-sdk/get-started/tutorials/user-interface/tutorial-work-with-multi-state-boxes.md ## Article Content: # Tutorial | Work with Multi-State Boxes A [multi-state box](https://dev.wix.com/docs/velo/velo-only-apis/$w/multi-state-box/introduction.md) contains multiple states with different content, and displays a single state at a time. Each state corresponds to a specific situation or status. You need to add code to your site to define when each state is displayed. This article demonstrates how to set up your multi-state box using code. ## Set up your multi-state box To set up your multi-state box, follow this general procedure: 1. Add a multi-state box to your page. 2. Set up the multi-state box's states. 3. Add code to define when each state will be displayed: 1. Define a condition (for example, a site visitor clicked a button, a product is out of stock). 2. Select your multi-state box using its ID. 3. Apply the [`changeState()`](https://www.wix.com/velo/reference/$w.MultiStateBox.html#changeState) function with the state you want to move to. ## Example 1: Site visitors change the state This example shows how to set up your multi-state box so that site visitors can switch between states by clicking a button and then focus on the button in the currently displayed state to enhance keyboard and screen reader functionality for visitors with disabilities. We added a multi-state box to our page called `myStateBox`, with 2 states called `state1` and `state2`. Then we added a button to each state for switching between the states. > **Note** > You can view and change your multi-state box and state IDs in the [Properties & Events panel](https://dev.wix.com/docs/develop-websites-sdk/code-your-site/developer-environments/ides/code-editor/about-the-properties-events-panel.md). ### State 1 ::::tabs :::Wix-Editor ![state1](https://wixmp-833713b177cebf373f611808.wixmp.com/images/7752a1ac284983f8cbfa1db804b7b048.png) ::: :::Wix-Studio ![state2](https://wixmp-833713b177cebf373f611808.wixmp.com/images/3178f431f403ecad057a52a7c1dc6c73.png) ::: :::: - `myStateBox`: ID of my multi-state box. - `state1`: ID of the current state, State 1. - `button1`: ID of button to click to move to State 2. ### State 2 ::::tabs :::Wix-Editor ![state1](https://wixmp-833713b177cebf373f611808.wixmp.com/images/63b0b1f87233e5336d19c8545da8563f.png) ::: :::Wix-Studio ![state2](https://wixmp-833713b177cebf373f611808.wixmp.com/images/0f9601371fc7d40caea115f580d0b852.png) ::: :::: - `myStateBox`: ID of my multi-state box. - `state2`: ID of the current state, State 2. - `button2`: ID of button to click to move to State 1. ### Code Add the following code to your page. This code sets up click handlers for both buttons that switch between states and focus on the appropriate button in each state: ```javascript $w.onReady(function () { $w("#button1").onClick(() => { $w("#myStateBox").changeState("state2"); $w("#button2").focus(); }); $w("#button2").onClick(() => { $w("#myStateBox").changeState("state1"); $w("#button1").focus(); }); }); ``` ### Adapt this scenario You can adapt this scenario to enable site visitors to: - Switch between a brief description and a detailed block of text. - Fill out a custom multi-step form. - Navigate what appear to be multiple tabs. ## Example 2: State per status > **Note:** > The images in this example show the multi-state box in the Wix Editor. The multi-state box in Wix Studio functions similarly to Wix Editor, with the only difference being its appearance, as demonstrated in the example above. This example shows how to set up your multi-state box with code so that a different state is displayed depending on a particular status. The example uses Wix Store products, but you can adapt the example for other scenarios. We added a multi-state box to our Wix Stores [product page](https://support.wix.com/en/article/customizing-your-wix-stores-product-page) that displays a different badge depending on the product's status. We added 3 states to our multi-state box: - Out of Stock - On Sale - Featured ### State 1: Out of stock
!["Out of Stock" badge state](https://wixmp-833713b177cebf373f611808.wixmp.com/images/8fda887037df964c06c9b8a9a0daeaeb.png)
- `badgeStatebox`: ID of my multi-state box. - `outOfStock`: ID of the current state. For products that are out of stock. ### State 2: On sale !["On Sale" badge state](https://wixmp-833713b177cebf373f611808.wixmp.com/images/a9c0b02dc533fb8e1a0799cfd23ca60e.png) - `badgeStatebox`: ID of my multi-state box. - `onSale`: ID of the current state. For products that are on sale. ### State 3: Featured
!["Featured" badge state](https://wixmp-833713b177cebf373f611808.wixmp.com/images/4140c40182c7a54879d704c27e136b39.png)
- `badgeStatebox`: ID of my multi-state box. - `featured`: ID of the current state. For products that aren't on sale or out of stock. ### Code Add the following code to your [product page](https://www.wix.com/velo/reference/$w.ProductPage.html). This code listens for product changes and displays the appropriate badge state based on the product's availability and pricing: ```javascript import { location } from "@wix/site-location"; $w.onReady(function () { location.onChange(() => { $w("#myProductPage") .getProduct() .then((product) => { if (!product.inStock) { $w("#badgeStatebox").changeState("outOfStock"); } else if (product.price !== product.discountedPrice) { $w("#badgeStatebox").changeState("onSale"); } else { $w("#badgeStatebox").changeState("featured"); } }) .catch((error) => { console.log(error); }); }); }); ```
**Tip** If you want some products not to display a badge at all, you could [hide()](https://www.wix.com/velo/reference/$w.MultiStateBox.html#hide) the multi-state box when particular conditions are met.
### Adapt this scenario You can adapt this scenario to: - Show different site content if a shopping cart is empty or full. - Display an error state when something goes wrong. - Show different site content depending on whether there's an upcoming event. - Display a preloader while the page is loading. ## See also - [$w.MultiStateBox API](https://www.wix.com/velo/reference/$w.MultiStateBox.html) - [$w.State API](https://www.wix.com/velo/reference/$w.State.html) - [About Multi-State Boxes](https://dev.wix.com/docs/velo/velo-only-apis/$w/multi-state-box/introduction.md) --- > Portal Navigation: > > - Append `.md` to any URL under `https://dev.wix.com/docs/` to get its markdown version. > - Pages are either content pages (article or reference text) or menu pages (a list of links to child pages). > - To get a menu page, truncate any URL to a parent path and append `.md` (e.g. `https://dev.wix.com/docs/sdk.md`, `https://dev.wix.com/docs/sdk/core-modules.md`). > - Top-level index of all portals: https://dev.wix.com/docs/llms.txt > - Full concatenated docs: https://dev.wix.com/docs/llms-full.txt ## Resource: Tutorial | Create a Staff Vacation Management Interface ## Article: Tutorial | Create a Staff Vacation Management Interface ## Article Link: https://dev.wix.com/docs/develop-websites-sdk/get-started/tutorials/bookings/tutorial-create-a-staff-vacation-management-interface.md ## Article Content: # Tutorial | Create a Staff Vacation Management Interface Using the [Bookings APIs](https://dev.wix.com/docs/api-reference/business-solutions/bookings/services/introduction.md) and [Calendar APIs](https://dev.wix.com/docs/api-reference/business-management/calendar/introduction.md), you can create a backend interface where [staff members](https://support.wix.com/en/article/about-staff-members-in-wix-bookings) can block their vacation time. This tutorial shows you how to build a [dashboard page](https://dev.wix.com/docs/develop-websites-sdk/code-your-site/build-a-custom-dashboard/about-dashboard-pages.md) where [site collaborators](https://support.wix.com/en/article/inviting-people-to-contribute-to-your-site) select a staff member, choose vacation dates, and block that time in the [Bookings calendar](https://support.wix.com/en/article/wix-bookings-about-the-wix-booking-calendar). During those periods, the staff member is unavailable for bookings. ## How staff members, resources, and schedules interact To schedule staff vacations, you need to understand how Wix Bookings manages staff members, resources, and calendars. Wix Bookings automatically creates and manages an associated [resource](https://dev.wix.com/docs/api-reference/business-solutions/bookings/resources/resources-v2/introduction.md) for each staff member. Each resource has an associated [schedule](https://dev.wix.com/docs/api-reference/business-management/calendar/schedules-v3/introduction.md), which Wix Bookings uses to manage that resource's availability. The entries on the schedule are [events](https://dev.wix.com/docs/api-reference/business-management/calendar/events-v3/introduction.md), during which the resource can't be booked. Therefore, to schedule a staff member's vacation time, you need the full resource object associated with that staff member, which contains the ID of the events schedule associated with that resource. To [create the vacation event](https://dev.wix.com/docs/api-reference/business-management/calendar/events-v3/create-event.md), you must specify that schedule ID. Learn more about [scheduling and availability in Wix Bookings](https://dev.wix.com/docs/api-reference/business-solutions/bookings/introduction.md#scheduling-and-availability) and how [Wix Bookings uses the Calendar APIs](https://dev.wix.com/docs/api-reference/business-management/calendar/wix-bookings-integration.md). ## What you'll build By the end of this tutorial, you'll have a [dashboard page](https://dev.wix.com/docs/develop-websites-sdk/code-your-site/build-a-custom-dashboard/about-dashboard-pages.md) that: - Displays a dropdown list of all staff members. - Lets site collaborators choose vacation start and end dates. - Creates blocked time events on the staff member's calendar. - Automatically prevents bookings during blocked vacation periods. > The code in this article was written using the following module versions: > > - @wix/bookings (v1.0.1167) > - @wix/web-methods (v1.0.0) > - @wix/calendar (v1.0.185) > - @wix/essentials (v1.0.0) > > Learn how to install npm packages [in the editor](https://dev.wix.com/docs/develop-websites/articles/coding-with-velo/packages/work-with-npm-packages-in-the-editor.md) or [using the CLI](https://dev.wix.com/docs/develop-websites/articles/coding-with-velo/packages/work-with-npm-packages-with-the-wix-cli.md). Use the following steps to build the functionality: 1. [Create backend methods for staff availability management.](#step-1--create-backend-methods-for-staff-availability-management) 2. [Create the frontend interface.](#step-2--create-the-frontend-interface) ## Before you begin It's important to note the following points before starting to code: - The Wix user must install the [Wix Bookings](https://www.wix.com/app-market/web-solution/bookings) app on their site. - The user must [add at least one staff member](https://support.wix.com/en/article/wix-bookings-adding-staff-members) in their Wix Bookings settings. ## Step 1 | Create backend methods for staff availability management Create backend methods to query staff members and create vacation events on their schedules: 1. In your site's [backend folder](https://dev.wix.com/docs/develop-websites-sdk/code-your-site/build-a-custom-backend/about-the-site-backend.md), create a new file called `staff-management.web.js`. 2. Add the following import statements: ```javascript import { Permissions, webMethod } from "@wix/web-methods"; import { staffMembers } from "@wix/bookings"; ``` 3. Create a [web method](https://dev.wix.com/docs/sdk/core-modules/web-methods/introduction.md) to query all staff members. Specify `RESOURCE_DETAILS` in the optional `fields` array to retrieve the full resource object. It contains the schedule ID needed to create vacation events: ```javascript export const queryStaff = webMethod(Permissions.SiteMember, async () => { try { const { items } = await staffMembers .queryStaffMembers({ options: { fields: ["RESOURCE_DETAILS"] } }); return items; } catch (error) { console.error("Failed to query staff members:", error); throw error; } }); ``` 4. Create a second backend file called `event-management.web.js` to manage vacation events. 5. Add the following import statements to this file: ```javascript import { Permissions, webMethod } from "@wix/web-methods"; import { events } from "@wix/calendar"; import { auth } from "@wix/essentials"; ``` 6. Create a web method to set up a staff member's vacation. This method receives the staff member details and date range, constructs an event object, and creates a blocked calendar event: ```javascript export const createVacationEvent = webMethod( Permissions.SiteMember, async (member, startDate, endDate) => { // Use the schedule ID from the staff member's associated resource to create the vacation event const vacationEvent = { scheduleId: member.resource.eventsSchedule._id, title: `${member.name} is on holiday!`, start: { localDate: `${startDate}T00:00:00`, }, end: { localDate: `${endDate}T23:59:59`, }, resource: [member.resource], }; try { const elevatedCreateEvent = auth.elevate(events.createEvent); const createdEvent = await elevatedCreateEvent(vacationEvent); return createdEvent; } catch (error) { console.error( `Failed to create vacation event for ${member.name}:`, error ); throw new Error(`Failed to create vacation: ${error.message}`); } } ); ``` These backend methods allow site members to query staff and create vacation events on their schedules. ## Step 2 | Create the frontend interface This step creates a dashboard page interface that allows site collaborators to select a staff member, choose vacation dates, and create blocked time events. To build the frontend interface: 1. [Add a dashboard page](https://dev.wix.com/docs/develop-websites-sdk/code-your-site/build-a-custom-dashboard/add-a-dashboard-page.md) to your site. 2. Add the following elements to the dashboard page: - A dropdown element with ID **staffDropdown** for selecting staff members. - A date picker with ID **datePickerStart** for selecting the vacation start date. - A date picker with ID **datePickerEnd** for selecting the vacation end date. - A button with ID **setupButton** to trigger the vacation setup. - A text element with ID **statusText** to display status messages. Your dashboard page should look like this: ![Staff members dashboard page](https://wixmp-833713b177cebf373f611808.wixmp.com/images/defe7cdf4b85a969da1ad6b20c8fee1f.png) 3. In your dashboard page's code editor, add the following code to import the backend methods and initialize a variable to store the queried staff members: ```javascript import { queryStaff } from "backend/staff-management.web.js"; import { createVacationEvent } from "backend/event-management.web.js"; let staffMembers; ``` 4. Add methods to format dates and set up the details of the vacation event: ```javascript // Helper method to format dates into YYYY-MM-DD format required by the Wix Calendar API function formatDate(dateObj) { const date = String(dateObj.getDate()).padStart(2, "0"); const month = String(dateObj.getMonth() + 1).padStart(2, "0"); const year = dateObj.getFullYear(); return `${year}-${month}-${date}`; } async function setUpVacation(startDateObj, endDateObj) { try { await $w("#setupButton").disable(); const selectedIndex = $w("#staffDropdown").selectedIndex; const staffName = $w("#staffDropdown").options[selectedIndex].label; $w("#statusText").text = `Setting up vacation for ${staffName}...`; // Find the selected staff member const selectedMemberId = $w("#staffDropdown").options[selectedIndex].value; const selectedMember = staffMembers.find( (member) => member._id === selectedMemberId ); // Format the selected dates const startDate = formatDate(startDateObj); const endDate = formatDate(endDateObj); // Create vacation event await createVacationEvent(selectedMember, startDate, endDate); $w("#statusText").text = `${staffName} has scheduled their vacation.`; await $w("#setupButton").enable(); } catch (error) { console.error("Failed to setup vacation: ", error); $w("#statusText").text = "Failed to schedule vacation."; await $w("#setupButton").enable(); } } ``` 5. Add a method to query staff members and populate the dropdown menu: ```javascript async function populateStaffDropdown() { try { staffMembers = await queryStaff(); const staffOptions = staffMembers.map((member) => ({ label: member.name, value: member._id, })); $w("#staffDropdown").options = staffOptions; $w("#staffDropdown").selectedIndex = 0; $w("#statusText").text = "Select vacation dates and click Set Up Vacation"; await $w("#setupButton").enable(); } catch (error) { console.error("Failed to load staff members: ", error); $w("#statusText").text = "Failed to load staff members"; } } ``` 6. Set up the dashboard page interface: ```javascript async function setUpPage() { let startDate; let endDate; // Set up date pickers $w("#datePickerStart").dateFormat = "YYYY/MM/DD"; $w("#datePickerStart").value = new Date(); $w("#datePickerEnd").dateFormat = "YYYY/MM/DD"; $w("#datePickerEnd").value = new Date(); // Register event handlers $w("#datePickerStart").onChange(async (event) => { await $w("#setupButton").enable(); startDate = event.target.value; }); $w("#datePickerEnd").onChange(async (event) => { await $w("#setupButton").enable(); endDate = event.target.value; }); // Set up the setup button $w("#setupButton").onClick(() => { setUpVacation(startDate, endDate); }); $w("#staffDropdown").onChange(async () => { await $w("#setupButton").enable(); }); // Disable setup button until dropdown is populated await $w("#setupButton").disable(); // Populate the dropdown menu with staff members populateStaffDropdown(); } ``` 7. In the page's [`onReady()`](https://dev.wix.com/docs/velo/velo-only-apis/$w/on-ready.md) method, set up the dashboard page: ```js $w.onReady(function () { setUpPage(); }); ``` When a site collaborator chooses vacation dates and clicks the setup button, the code creates a blocked event in the Bookings Calendar. ![Blocked Vacation Time on Bookings Calendar](https://wixmp-833713b177cebf373f611808.wixmp.com/images/36ad82b0449d7d628aa9bd76164188f4.png) ## Complete code Here is the complete tutorial code: ### Backend code Here are the complete backend files: #### staff-management.web.js ```javascript import { Permissions, webMethod } from "@wix/web-methods"; import { staffMembers } from "@wix/bookings"; export const queryStaff = webMethod(Permissions.SiteMember, async () => { try { const { items } = await staffMembers .queryStaffMembers({ options: { fields: ["RESOURCE_DETAILS"] } }); if (!items || items.length === 0) { throw new Error("No staff members found"); } return items; } catch (error) { console.error("Failed to query staff members:", error); throw error; } }); ``` #### event-management.web.js ```javascript import { Permissions, webMethod } from "@wix/web-methods"; import { events } from "@wix/calendar"; import { auth } from "@wix/essentials"; export const createVacationEvent = webMethod( Permissions.SiteMember, async (member, startDate, endDate) => { const vacationEvent = { scheduleId: member.resource.eventsSchedule._id, title: `${member.name} is on holiday!`, start: { localDate: `${startDate}T00:00:00`, }, end: { localDate: `${endDate}T23:59:59`, }, resource: [member.resource], }; try { const elevatedCreateEvent = auth.elevate(events.createEvent); const createdEvent = await elevatedCreateEvent(vacationEvent); return createdEvent; } catch (error) { console.error(`Failed to create vacation event:`, error); throw new Error(`Failed to create vacation: ${error.message}`); } } ); ``` ### Dashboard page code Here's the complete dashboard page code: ```javascript import { queryStaff } from "backend/staff-management.web.js"; import { createVacationEvent } from "backend/event-management.web.js"; let staffMembers; // Helper method to format dates into YYYY-MM-DD format required by the Wix Calendar API function formatDate(dateObj) { const date = String(dateObj.getDate()).padStart(2, "0"); const month = String(dateObj.getMonth() + 1).padStart(2, "0"); const year = dateObj.getFullYear(); return `${year}-${month}-${date}`; } async function setUpVacation(startDateObj, endDateObj) { try { await $w("#setupButton").disable(); const selectedIndex = $w("#staffDropdown").selectedIndex; const staffName = $w("#staffDropdown").options[selectedIndex].label; $w("#statusText").text = `Setting up vacation for ${staffName}...`; // Find the selected staff member const selectedMemberId = $w("#staffDropdown").options[selectedIndex].value; const selectedMember = staffMembers.find( (member) => member._id === selectedMemberId ); // Format the selected dates const startDate = formatDate(startDateObj); const endDate = formatDate(endDateObj); // Create vacation event await createVacationEvent(selectedMember, startDate, endDate); $w("#statusText").text = `${staffName} has scheduled their vacation.`; await $w("#setupButton").enable(); } catch (error) { console.error("Failed to setup vacation: ", error); $w("#statusText").text = "Failed to schedule vacation."; await $w("#setupButton").enable(); } } async function populateStaffDropdown() { try { staffMembers = await queryStaff(); const staffOptions = staffMembers.map((member) => ({ label: member.name, value: member._id, })); $w("#staffDropdown").options = staffOptions; $w("#staffDropdown").selectedIndex = 0; $w("#statusText").text = "Select vacation dates and click Set Up Vacation"; await $w("#setupButton").enable(); } catch (error) { console.error("Failed to load staff members: ", error); $w("#statusText").text = "Failed to load staff members."; } } async function setUpPage() { let startDate; let endDate; $w("#datePickerStart").dateFormat = "YYYY/MM/DD"; $w("#datePickerStart").value = new Date(); $w("#datePickerEnd").dateFormat = "YYYY/MM/DD"; $w("#datePickerEnd").value = new Date(); $w("#datePickerStart").onChange(async (event) => { await $w("#setupButton").enable(); startDate = event.target.value; }); $w("#datePickerEnd").onChange(async (event) => { await $w("#setupButton").enable(); endDate = event.target.value; }); $w("#setupButton").onClick(() => { setUpVacation(startDate, endDate); }); $w("#staffDropdown").onChange(async () => { await $w("#setupButton").enable(); }); await $w("#setupButton").disable(); populateStaffDropdown(); } $w.onReady(function () { setUpPage(); }); ``` ## See also - [About in Wix Bookings APIs](https://dev.wix.com/docs/api-reference/business-solutions/bookings/introduction.md) - [Bookings: Staff Members API](https://dev.wix.com/docs/api-reference/business-solutions/bookings/staff-members/staff-members/introduction.md) - [Bookings: Resources API](https://dev.wix.com/docs/api-reference/business-solutions/bookings/resources/resources-v2/introduction.md) - [Calendar Events API](https://dev.wix.com/docs/api-reference/business-management/calendar/events-v3/introduction.md) - [About Dashboard Pages](https://dev.wix.com/docs/develop-websites-sdk/code-your-site/build-a-custom-dashboard/about-dashboard-pages.md) - [Tutorial: Block Off Time in the Bookings Calendar](https://dev.wix.com/docs/develop-websites-sdk/get-started/tutorials/bookings/tutorial-block-off-time-in-the-bookings-calendar.md) --- > Portal Navigation: > > - Append `.md` to any URL under `https://dev.wix.com/docs/` to get its markdown version. > - Pages are either content pages (article or reference text) or menu pages (a list of links to child pages). > - To get a menu page, truncate any URL to a parent path and append `.md` (e.g. `https://dev.wix.com/docs/sdk.md`, `https://dev.wix.com/docs/sdk/core-modules.md`). > - Top-level index of all portals: https://dev.wix.com/docs/llms.txt > - Full concatenated docs: https://dev.wix.com/docs/llms-full.txt ## Resource: About JavaScript Support ## Article: About JavaScript Support ## Article Link: https://dev.wix.com/docs/develop-websites-sdk/code-your-site/code-with-java-script/about-java-script-support.md ## Article Content: # About JavaScript Support Wix supports working in JavaScript to develop websites, as well as some special features, including: - Support for JavaScript features - Support for modules - Support for the JavaScript Fetch API - Sharing JavaScript code naturally between the backend and frontend using [web modules](https://dev.wix.com/docs/develop-websites-sdk/code-your-site/build-a-custom-backend/web-modules/about-web-modules.md) ## Supported IDEs You can work in JavaScript in: - The [editor](https://dev.wix.com/docs/develop-websites-sdk/code-your-site/developer-environments/ides/code-editor/about-the-code-editor.md) (Wix Studio and Wix Editor). - The [Wix IDE](https://dev.wix.com/docs/develop-websites-sdk/code-your-site/developer-environments/ides/wix-ide/about-the-wix-ide.md) (Wix Studio). - Your [local IDE](https://dev.wix.com/docs/develop-websites-sdk/code-your-site/developer-environments/ides/git-integration/about-git-integration-with-wix-cli.md) (Wix Studio and Wix Editor). ## JavaScript feature support (ECMAScript 2020) Wix supports modern JavaScript features up through and including the [ES2020](https://tc39.es/ecma262/2020/) standard. You can use promises, async/await, and arrow functions, which were introduced with ES2017. Browsers are gradually adopting the ES2019 standard. Until these standards are fully implemented, Wix transpiles your code into ES5, so it can run in current browsers. Wix supports [source maps](https://developer.mozilla.org/en-US/docs/Web/HTTP/Headers/SourceMap), so that even though the browser runs transpiled ES5 code, you can debug your ES2019 source code in your browser's developer tools. ## Module support (ECMAScript 2015) Wix supports the native module functionality included in the ES2015 release of JavaScript. To use ES2015 module functionality, you need to follow the [ES2015 Module Syntax](http://www.2ality.com/2014/09/es6-modules-final.html). Only those items specifically exported in a module are exposed to other files. All other items in your module are internal to the module only. For examples of how to use this functionality, see MDN's [JavaScript modules guide](https://developer.mozilla.org/en-US/docs/Web/JavaScript/Guide/Modules). > **Notes:** > > - You can only export functions in files that are located in the Public or Backend sections of your site's code. You can't export functions from page or popup files. > - Certain module export formats aren't supported in `events.js`, `data.js`, or `routers.js` files. For more information, see [Module Export Syntax](https://dev.wix.com/docs/develop-websites-sdk/code-your-site/code-with-java-script/module-export-syntax.md). ### Module scope The following is a list of guidelines that define how you can share modules and functions between, and in, the backend and public scopes: - A JavaScript file or script in backend can import a module from any file in backend or public. - A file in public can import a module from any file in public. - You can import functions from backend and use them in public, using a [web module](https://dev.wix.com/docs/develop-websites-sdk/code-your-site/build-a-custom-backend/web-modules/about-web-modules.md). - You can use relative paths to refer to files with the "." prefix. - You can import a module from backend with the _backend/_ prefix. - You can import a module from public with the _public/_ prefix. - Modules can import other modules. ## See also - [About Promises](https://dev.wix.com/docs/develop-websites-sdk/code-your-site/code-with-java-script/about-promises.md) - [Module export syntax](https://dev.wix.com/docs/develop-websites-sdk/code-your-site/code-with-java-script/module-export-syntax.md) --- > Portal Navigation: > > - Append `.md` to any URL under `https://dev.wix.com/docs/` to get its markdown version. > - Pages are either content pages (article or reference text) or menu pages (a list of links to child pages). > - To get a menu page, truncate any URL to a parent path and append `.md` (e.g. `https://dev.wix.com/docs/sdk.md`, `https://dev.wix.com/docs/sdk/core-modules.md`). > - Top-level index of all portals: https://dev.wix.com/docs/llms.txt > - Full concatenated docs: https://dev.wix.com/docs/llms-full.txt ## Resource: Module Export Syntax ## Article: Module Export Syntax ## Article Link: https://dev.wix.com/docs/develop-websites-sdk/code-your-site/code-with-java-script/module-export-syntax.md ## Article Content: # Module Export Syntax Wix supports working in JavaScript to develop websites, as well as [support for modules](https://dev.wix.com/docs/develop-websites-sdk/code-your-site/code-with-java-script/about-java-script-support.md#module-support-ecmascript-2015). This allows you to export modules from your code files and import them into other code files. This article explains the supported syntax for exporting modules. ## Supported export syntax When exporting functions in the following files, use the standard export syntax contained in the documentation's code examples: - [`events.js`](https://dev.wix.com/docs/develop-websites-sdk/code-your-site/build-a-custom-backend/backend-events/define-backend-event-handlers.md) - [`data.js`](https://dev.wix.com/docs/develop-websites-sdk/code-your-site/work-with-data/data-api/about-data-hooks.md#hook-conventions) - [`routers.js`](https://dev.wix.com/docs/develop-websites-sdk/code-your-site/build-a-custom-backend/routers/about-routers.md) - [Service plugin code files](https://dev.wix.com/docs/develop-websites-sdk/code-your-site/build-a-custom-backend/automations/about-custom-actions.md) You can also use other export formats that are part of the [ES6 (ES2015) module export syntax](https://developer.mozilla.org/en-US/docs/web/javascript/reference/statements/export). However, the following export formats are **not** supported in `events.js`, `data.js`, `routers.js`, or service plugin code files: - **Re-exporting a function:** Directly re-exporting a function imported from an npm or Velo package. For example, this **doesn't** work: ```javascript import { myFunction } from "myPackage"; export const wixMediaManager_onFileUploaded = myFunction; ``` The following alternative syntax **is** supported: ```javascript import { myFunction } from "myPackage"; export const wixMediaManager_onFileUploaded = (paramA, paramB) => myFunction(paramA, paramB); ``` - **Dynamic exports:** Exports including a dynamic operation or expression that requires execution to resolve. For example, this **doesn't** work: ```javascript import myPackage from "myPackage"; export const myRouter_Router = myPackage.router((paramA, paramB) => { // ... }); ``` The following alternative syntax **is** supported: ```javascript import myPackage from "myPackage"; const functionForExport = myPackage.router((paramA, paramB) => { // ... }); export const myRouter_Router = (paramA, paramB) => functionForExport(paramA, ParamB); ``` - **Exports wrapped in objects:** Exports where functions are defined as properties of an object. For example, this **doesn't** work: ```javascript const dataHooks = { beforeInsert: (paramA, paramB) => { // ... }, }; export const MyCollection_beforeInsert = dataHooks.beforeInsert; ``` The following alternative syntax **is** supported: ```javascript const dataHooks = { beforeInsert: (paramA, paramB) => { // ... }, }; export const MyCollection_beforeInsert = (paramA, paramB) => dataHooks.beforeInsert(paramA, paramB); ``` - **CommonJS exports:** Exports in the CommonJS (CJS) format that preceded ES6 (ES2015). For example, this **doesn't** work: ```javascript module.exports = { MyCollection_beforeInsert: () => {}, }; ``` ## See also - [About JavaScript support](https://dev.wix.com/docs/develop-websites-sdk/code-your-site/code-with-java-script/about-java-script-support.md) - [About the Wix JavaScript SDK](https://dev.wix.com/docs/sdk/articles/get-started/about-the-wix-java-script-sdk.md) --- > Portal Navigation: > > - Append `.md` to any URL under `https://dev.wix.com/docs/` to get its markdown version. > - Pages are either content pages (article or reference text) or menu pages (a list of links to child pages). > - To get a menu page, truncate any URL to a parent path and append `.md` (e.g. `https://dev.wix.com/docs/sdk.md`, `https://dev.wix.com/docs/sdk/core-modules.md`). > - Top-level index of all portals: https://dev.wix.com/docs/llms.txt > - Full concatenated docs: https://dev.wix.com/docs/llms-full.txt ## Resource: About Promises ## Article: About Promises ## Article Link: https://dev.wix.com/docs/develop-websites-sdk/code-your-site/code-with-java-script/about-promises.md ## Article Content: # About Promises > **Note:** This article is intended for coders with limited JavaScript experience, and serves as an introduction to this basic JavaScript content. Some of the code you write when developing with the Wix JavaScript SDK is asynchronous code. Asynchronous code doesn't execute in the order it's written, unlike synchronous code. Instead, it returns a promise. A [promise](https://developer.mozilla.org/en-US/docs/Web/JavaScript/Guide/Using_promises) is an object that represents the eventual completion (or failure) of an asynchronous operation and its resulting value. While the promise is pending, synchronous code continues to run. When developing your website, there are some cases where you need to work with promises. For example: - [Calling backend functions](https://dev.wix.com/docs/develop-websites-sdk/code-your-site/build-a-custom-backend/web-modules/call-backend-code-from-the-frontend.md) from your page code. - Calling SDK APIs that return promises. Promises are a regular JavaScript concept, so it's easy to use AI chatbots or search engines to troubleshoot. ## Handle a promise Handling a promise means telling your code to read and use the value of the promise only once its resolved value is known. This means the asynchronous code has finished running. At any given time, a promise has one of the following statuses: - **Pending**: The asynchronous code is still running. - **Fulfilled**/**resolved**: The asynchronous code has finished running and has successfully returned a value. - **Rejected**: The asynchronous code has finished running and has thrown an error. You can tell your code to expect a promise and to wait for the asynchronous code to finish running in the following ways: - [`async`/`await`](#asyncawait): Allows you to treat asynchronous code as if it's synchronous, meaning the next line of code won't run until the promise is resolved. - [`then()`](#then): Allows you to run other synchronous code while your asynchronous code is running. You have more control over when your code runs, but it's less readable. ## `async`/`await` The `async`/`await` syntax allows you to handle promises in a way that makes your asynchronous code appear synchronous. This can make your code more readable, as the next line of code won't run until the promise is resolved. ### Define asynchronous functions Asynchronous functions are functions that contain asynchronous code. An asynchronous function's return value is always a promise. To define a function as asynchronous, add `async` before the function declaration. For example: ```js async function myFunction() {} const myFunction = async () => {}; ``` > **Note:** This method isn't supported at the top level, because top level code is synchronous. Add `await` before the call to an asynchronous function to make your code wait for the function to resolve before moving on to the next line. For example: ```js const myPromiseValue = await myAsyncFunction(); ``` Then you can use the value of the resolved promise on the next line. For example: ```js async function myFunction() { const myPromiseValue = await myAsyncFunction(); console.log(myPromiseValue); } ``` ### Handle errors with `async`/`await` If your promise is rejected, something has gone wrong in the asynchronous code and you need to handle the error. Use the [`try...catch` block](https://developer.mozilla.org/en-US/docs/Web/JavaScript/Reference/Statements/try...catch) to handle errors. For example: ```js async function myFunction() { try { const myPromiseValue = await myAsyncFunction(); console.log(myPromiseValue); } catch (error) { console.log(error); } } ``` ## `then()` With the `then()` syntax, you can instruct your code to handle promises by running a function once the promise is resolved. For example: ```js asyncFunc().then((resolvedPromiseValue) => { // Do something with resolvedPromiseValue. console.log(resolvedPromiseValue); }); ``` ### Handle `then()` return value If you return a value in the function passed to `then()`, that value is always a promise. For example: ```js const returnValue = asyncFunc().then((resolvedPromiseValue) => { return "The value of the resolved promise is: " + resolvedPromiseValue; }); // returnValue is a promise. ``` You can handle this promise in the same way as any other promise: - Use `async`/`await` to use the value synchronously in your code. For example: ```js async function myFunction() { const secondPromiseValue = await firstAsyncFunc().then( (firstPromiseValue) => { return secondAsyncFunc(firstPromiseValue); } ); console.log(secondPromiseValue); } ``` - Chain `then()` methods. For example: ```js firstAsyncFunc() .then((firstPromiseValue) => { return secondAsyncFunc(firstPromiseValue); }) .then((secondPromiseValue) => { console.log(secondPromiseValue); }); ``` Both of the above examples log the same value to the console. ### Handle errors with `then()` If your promise is rejected, then something has gone wrong in the asynchronous code and you need to handle the error. Use the [`catch()` method](https://developer.mozilla.org/en-US/docs/Web/JavaScript/Reference/Global_Objects/Promise/catch) to handle errors: ```js myAsyncFunction() .then((myPromiseValue) => { console.log(myPromiseValue); }) .catch((error) => { console.log(error); }); ``` ## Handle multiple promises simultaneously Waiting for multiple promises to be fulfilled before the execution of some code is supported. You can run multiple asynchronous functions and wait for their promises simultaneously using the [`Promise.all()`](https://developer.mozilla.org/en-US/docs/Web/JavaScript/Reference/Global_Objects/Promise/all) method. It accepts multiple promises in an array, and returns an array of resolved values. If any of the promises are rejected, the method throws an error. For example: ```js Promise.all([promise1, promise2, promise3]).then((values) => { console.log(values); // Expected output: [ // promise1ResolvedValue, // promise2ResolvedValue, // promise3ResolvedValue // ] }); ``` --- > Portal Navigation: > > - Append `.md` to any URL under `https://dev.wix.com/docs/` to get its markdown version. > - Pages are either content pages (article or reference text) or menu pages (a list of links to child pages). > - To get a menu page, truncate any URL to a parent path and append `.md` (e.g. `https://dev.wix.com/docs/sdk.md`, `https://dev.wix.com/docs/sdk/core-modules.md`). > - Top-level index of all portals: https://dev.wix.com/docs/llms.txt > - Full concatenated docs: https://dev.wix.com/docs/llms-full.txt ## Resource: About Code Placement ## Article: About Code Placement ## Article Link: https://dev.wix.com/docs/develop-websites-sdk/code-your-site/code-with-java-script/about-code-placement.md ## Article Content: # About Code Placement When developing websites, it's important to understand where to place your code so it runs in the right context, whether that's in the browser, on the server, or across all pages. This article gives an overview of the different types of code files available, and explains when and how to use each one. ## Supported IDEs You can store your code using the following IDEs: - The [editor](https://dev.wix.com/docs/develop-websites-sdk/code-your-site/developer-environments/ides/code-editor/about-the-code-editor.md) (Wix Studio and Wix Editor). - The [Wix IDE](https://dev.wix.com/docs/develop-websites-sdk/code-your-site/developer-environments/ides/wix-ide/about-the-wix-ide.md) (Wix Studio). - Your [local IDE](https://dev.wix.com/docs/develop-websites-sdk/code-your-site/developer-environments/ides/git-integration/about-git-integration-with-wix-cli.md) (Wix Studio and Wix Editor). ## Frontend code Frontend code runs in the site visitor's browser and here you define the interactive parts of your site. This includes things like: - Responding to user input - Updating the UI - Making calls to backend services Since this code is exposed to the public, avoid including sensitive information, such as API keys or private logic. Use frontend code for: - Customizing how a page looks or behaves - Listening for events like button clicks or form submissions - Calling functions defined in backend [web modules](https://dev.wix.com/docs/develop-websites-sdk/code-your-site/build-a-custom-backend/web-modules/about-web-modules.md) (`.web.js`) ### Running code on all pages with global code Global code is code that runs on every page of your site. This is logic that's shared across all pages, such as managing a universal header or footer, or controlling global UI elements like a site-wide search bar or shopping cart icon. To add global code, edit the `masterPage.js` file. You'll find it in: - Wix Studio: The **Page Code** section of the **Code** panel - Wix Editor: The **Page Code** section of the the **Code** sidebar - Local IDE: The `src/pages` folder when using [Git integration](https://dev.wix.com/docs/develop-websites-sdk/code-your-site/developer-environments/ides/git-integration/about-git-integration-with-wix-cli.md)
**Important:** `masterPage.js` has its own `onReady` event handler. Be careful not to duplicate logic from individual page `onReady` handlers, as both run in parallel.
#### Retaining an element's state You can also use global code to retain an element's state across pages. For example, if you change the source of an image element that appears on all pages, that change won't persist when navigating to another page, or even when returning to the original page. To make changes persistent across pages, use the [Storage API](https://dev.wix.com/docs/sdk/frontend-modules/storage/introduction.md): 1. In the relevant event handler, call [`setItem( )`](https://dev.wix.com/docs/sdk/frontend-modules/storage/storage/set-item.md) to store a value that reflects the element's new state. 1. In the `masterPage.js` `onReady` function, read the stored value and update the element accordingly. > **Note:** Avoid importing functions from `masterPage.js` into individual page files. Doing this causes the `onReady` function in `masterPage.js` to run twice on those pages. For shared logic, create code on a separate public file and import it where needed. ### Running code on a specific page Each page on your site has its own code file. Use these files to add functionality that's specific to that page, for example: - Handling user input - Customizing UI behavior - Calling backend functions. #### Public files If you find yourself repeating the same code across multiple page files, it's better to move shared logic to a separate **public** file. That way, you can write it once and import it wherever it's needed: Whether in a page file, a backend file, or another public file. To share a function across multiple files: 1. Create a public file and export the function from it. 1. Import the function into any page where it's needed. You can find your public files in: - Wix Studio: The **Backend & Public** section of the **Code** panel - Wix Editor: The **Backend & Public** section of the the **Code** sidebar - Local IDE: The `src/public` folder when using [Git integration](https://dev.wix.com/docs/develop-websites-sdk/code-your-site/developer-environments/ides/git-integration/about-git-integration-with-wix-cli.md) Use ES module syntax (`import`/`export`) to access functions between files. Always include the function name in curly braces when importing a named export: ```js import { myFunction } from 'public/bookings.js' ``` Leaving out the curly braces attempts to import a default export: ```js import myFunction from 'public/bookings.js' ``` To access all functions from a module, import the entire module without curly braces: ```js import * as wixSiteStores from '@wix/site-stores'; ```
**Tip:** Your page code, which is also publicly accessible, doesn't appear in the list of public files. To see your page code, go to the **Page Code** section and click on the page in the menu.
### Responding to element actions with event handlers Page elements like buttons, text, and input fields can trigger events when site visitors interact with them. The functions that handle these events are called event handlers. There are following types of event handlers: - Dynamic event handlers. Learn how to add an event handler in [Add an Event Handler](https://dev.wix.com/docs/develop-websites-sdk/code-your-site/build-a-custom-frontend/event-handlers/add-an-event-handler.md). - Static event handlers (deprecated). Learn more about static event handlers in [About Static Event Handlers](https://dev.wix.com/docs/develop-websites-sdk/code-your-site/build-a-custom-frontend/event-handlers/about-static-event-handlers.md). ### HTML Adding raw HTML directly in the code editor isn't supported. That said, there are several ways to include or work with HTML on your site: - Add marketing code using [marketing integrations](https://support.wix.com/en/marketing-tools/marketing-integrations-tracking). - Set the [HTML property](https://www.wix.com/velo/reference/$w/text/html) of a text element to render HTML content. - Display external HTML content by [embedding a site element](https://support.wix.com/en/article/wix-editor-using-iframes-to-display-visible-content-on-your-site). - Insert [custom code snippets](https://support.wix.com/en/article/embedding-custom-code-to-your-site) into the head or body of your site pages. - Use [custom elements](https://support.wix.com/en/article/wix-editor-adding-a-custom-element-to-your-site) to define and embed your own HTML-based components. ## Backend code Backend code runs on Wix's secure servers and isn't exposed to site visitors. This is the place for logic that needs to be protected, like: - Interacting with sensitive data - Sending emails - Handling payments - Verifying permissions Use backend code for: - Performing secure database operations - Responding to frontend requests by using web modules - Handling server-side events and scheduled tasks - Exposing custom HTTP methods to other services ### Backend files Backend files are where you define server-side logic. They include code that runs securely on the web server rather than in the browser. This is where you define functions from backend libraries such as `@wix/pay`, `@wix/members`, or `@wix/events`. You can find your backend files in: - Wix Studio: The **Backend & Public** section of the **Code** panel - Wix Editor: The **Backend & Public** section of the the **Code** sidebar - Local IDE: The `src/backend` folder when using [Git Integration](https://dev.wix.com/docs/develop-websites-sdk/code-your-site/developer-environments/ides/git-integration/about-git-integration-with-wix-cli.md) There are 2 main file types used in the backend: - **.web.js:** Web modules that can be called from the frontend. You can configure permissions for each function to control who can access them. Learn more about the .web.js files in [About Web Modules](https://dev.wix.com/docs/develop-websites-sdk/code-your-site/build-a-custom-backend/web-modules/about-web-modules.md). - **.js:** Internal backend files that can't be accessed directly from the frontend. Use these for secure server-side logic. > **Note:** You may also see `.jsw` files in older projects. These have been deprecated in favor of `.web.js` files but are still supported. Learn more about `.jsw` files in [Call Backend Code from a jsw Web Module](https://dev.wix.com/docs/develop-websites-sdk/code-your-site/build-a-custom-backend/web-modules/call-backend-code-from-the-frontend.md). #### Accessing functions from a .js file To access functions from a `.js` file in the frontend, import the function into a `.web.js` file first, then import that `.web.js` function into your frontend code. Import the `.js` file into the `.web.js` file: ```js import { webMethod, Permissions } from '@wix/web-methods'; import { deleteStaffMember } from 'backend/bookings' export const deleteStaff = webMethod( Permissions.Anyone, async (staffMemberid) => { return await deleteStaffMember(staffMemberid); } ); ``` Import the `.web.js` file in your page file: ```js import { deleteStaff } from 'backend/staff.web' ``` If you try to import a `.js` file directly into a frontend file, you'll see this error: ``` Access to backend script 'backend/calculations.js' denied! Client-side scripts can only import web-modules from backend code context. ``` ### Backend events Many Wix modules provide built-in events that trigger when specific actions occur. For example, uploading a file to the Media Manager triggers the `onFileUploaded` event, and successfully paying an invoice triggers the `onInvoicePaid` event. These events let you run custom logic in response to key moments in your site's workflow. To run an event, you need to add an `events.js` file. Learn more about adding backend events in [About Backend Events](https://dev.wix.com/docs/develop-websites-sdk/code-your-site/build-a-custom-backend/backend-events/about-backend-events.md). ### Handling HTTP requests To expose your site's functionality to the outside world, like enabling `GET`, `PUT`, `POST`, or `DELETE` requests from external services, you can define custom HTTP functions. To create an HTTP function, you need to add an `http-functions.js` file. Learn more about the HTTP functions in [About Custom Site APIs](https://dev.wix.com/docs/develop-websites-sdk/code-your-site/build-a-custom-backend/expose-services/about-custom-site-apis.md). ### Using data hooks when data collection changes Data hooks let you run code before or after changes are made to your site's data collections. They're useful for validating, modifying, or responding to data operations like insert, update, or remove. To create data hooks, add a `data.js` file to your backend code. You can then define functions that correspond to specific data operations on your collections. Learn more [About Data Hooks](https://dev.wix.com/docs/develop-websites-sdk/code-your-site/work-with-data/data-api/about-data-hooks.md). ### Routers By default, Wix uses built-in routers to handle dynamic page URLs and SEO. If you need more control over how incoming requests are handled, you can create your own custom router to define the logic, routing, and data for each request. The code for both routers and data binding router hooks is defined in the `routers.js` file. Learn more about routers in [About Routers](https://dev.wix.com/docs/develop-websites-sdk/code-your-site/build-a-custom-backend/routers/about-routers.md). ## Secrets Manager For sensitive information like API keys, OAuth tokens, or configuration settings, use the [Secrets Manager](https://dev.wix.com/docs/develop-websites-sdk/code-your-site/developer-environments/secrets/about-the-secrets-manager.md) instead of hardcoding values into your code. Secrets are stored securely in your [site's dashboard](https://www.wix.com/my-account/site-selector/?buttonText=Select%20Site&title=Select%20a%20Site&autoSelectOnSingleSite=true&actionUrl=https:%2F%2Fwww.wix.com%2Fdashboard%2F%7B%7BmetaSiteId%7D%7D%2F/developer-tools/secrets-manager) and can be retrieved in code using the [Secrets API](https://dev.wix.com/docs/sdk/backend-modules/secrets/introduction.md). Storing secrets in the Secrets Manager improves your site's security, especially when you're collaborating with others or using version control. Each secret has a unique name, and you can access it safely in backend code without exposing it to site visitors. ## See also - [About Event Handlers](https://dev.wix.com/docs/develop-websites-sdk/code-your-site/build-a-custom-frontend/event-handlers/about-event-handlers.md) - [Secrets Manager](https://dev.wix.com/docs/develop-websites-sdk/code-your-site/developer-environments/secrets/about-the-secrets-manager.md) --- > Portal Navigation: > > - Append `.md` to any URL under `https://dev.wix.com/docs/` to get its markdown version. > - Pages are either content pages (article or reference text) or menu pages (a list of links to child pages). > - To get a menu page, truncate any URL to a parent path and append `.md` (e.g. `https://dev.wix.com/docs/sdk.md`, `https://dev.wix.com/docs/sdk/core-modules.md`). > - Top-level index of all portals: https://dev.wix.com/docs/llms.txt > - Full concatenated docs: https://dev.wix.com/docs/llms-full.txt ## Resource: About Development Workspaces ## Article: About Development Workspaces ## Article Link: https://dev.wix.com/docs/develop-websites-sdk/code-your-site/developer-environments/editors/about-development-workspaces.md ## Article Content: # About Development Workspaces The Wix development workspaces provide integrated tools for managing site architecture, codebase, and resources across Wix Studio and the Wix Editor. These workspaces enable you to organize, write, and manage a site's code and dependencies through a unified development experience. ## Core development capabilities The development environment enables you to perform the following tasks: - Organize and manage site page code and structure. - Search your codebase. - Integrate with GitHub for local development. - Manage dependencies and package installations. - Configure and manage data collections. - Access debugging and monitoring tools. ## Page code management Manage code organization for different page types and their associated functionality: - **Main pages**: Standard site pages with custom code. - **[Global page](https://dev.wix.com/docs/develop-websites-sdk/code-your-site/code-with-java-script/about-code-placement.md#running-code-on-all-pages-with-global-code)**: Site-wide code that runs on every page of a site. - **[CSS](https://dev.wix.com/docs/develop-websites-sdk/code-your-site/build-a-custom-frontend/css/about-custom-css.md)**: Global styling and design system management. - **App-specific pages**: Custom pages for installed apps that extend a site's functionality. - **[Dashboard pages](https://dev.wix.com/docs/develop-websites-sdk/code-your-site/build-a-custom-dashboard/about-dashboard-pages.md)**: Custom pages for a site's dashboard for admin and collaborators. - **[Dynamic pages](https://support.wix.com/en/article/cms-about-dynamic-pages)**: Content-driven pages linked with a site's [CMS](#data-management). - **[Router pages](https://dev.wix.com/docs/develop-websites-sdk/code-your-site/build-a-custom-backend/routers/about-routers.md)**: Custom routing and navigation logic. - **[Popups](https://support.wix.com/en/article/studio-editor-using-popups)**: Site modals and popups. ## Code organization Manage your codebase with the following categories for security and organization: - **Page Code**: Code that runs on individual pages to respond to user actions, customize page behavior, and integrate with public and backend functions. - **[Public](https://dev.wix.com/docs/develop-websites-sdk/code-your-site/code-with-java-script/about-code-placement.md#public-files)**: Shared functions and logic that can be imported and used across multiple page files. - **Backend**: Backend code that runs securely on Wix's servers. - **[Service plugins](https://dev.wix.com/docs/develop-websites-sdk/code-your-site/extend-wix-business-solutions/service-plugins/about-service-plugins.md)**: APIs used to inject custom logic, 3rd-party integrations, and new workflows into Wix. ## Data management Manage the following types of data collections: - **[Your collections](https://dev.wix.com/docs/develop-websites-sdk/code-your-site/work-with-data/introduction/about-collections.md)**: Custom data collections that you create using the CMS with configurable fields, data types, and permissions. - **[Wix app collections](https://dev.wix.com/docs/develop-websites-sdk/code-your-site/work-with-data/introduction/about-collections.md#app-collections)**: Data collections of installed Wix apps. - **External collections**: Data from external databases and services that you integrate with your Wix site. ## Dependency management Handle the following external dependencies and custom extensions: - **[npm packages](https://dev.wix.com/docs/develop-websites-sdk/code-your-site/developer-environments/packages/npm/about-npm-packages.md)**: Public registry of reusable JavaScript libraries. - **[Velo packages](https://dev.wix.com/docs/develop-websites-sdk/code-your-site/developer-environments/packages/velo-packages/about-velo-packages.md)**: Wix code libraries written using Velo. - **[Custom apps](https://dev.wix.com/docs/develop-websites-sdk/code-your-site/developer-environments/packages/custom-apps/about-custom-apps.md)**: Wix Apps that you create or install to extend a site's capabilities with specialized features. ## GitHub integration Connect your development environment to GitHub for version control, collaboration, and local development workflows. For more information, see [integrating a site with GitHub](https://dev.wix.com/docs/develop-websites-sdk/code-your-site/developer-environments/ides/git-integration/about-git-integration-with-wix-cli.md). ## Development tools Access the following development and debugging capabilities: - **Build status**: Monitor code compilation and deployment processes in real-time. - **Monitoring**: Monitor backend requests, data requests, and a site's collection storage. - **[Logging tools](https://dev.wix.com/docs/develop-websites-sdk/test-your-site/work-with-wix-logs/about-wix-logs.md)**: View, filter, and search through logs using Wix logs, Google Cloud logs, or an external logging tool. - **[Secrets manager](https://dev.wix.com/docs/develop-websites-sdk/code-your-site/developer-environments/secrets/about-the-secrets-manager.md)**: Securely store and manage sensitive information like API keys, passwords, and configuration data. - **[Automations](https://support.wix.com/en/article/wix-automations-about-the-new-automations-builder)**: Manage custom workflows that trigger actions based on specific events or conditions. ## Test and troubleshoot Run tests and troubleshoot your code: - **[Debugging](https://dev.wix.com/docs/develop-websites-sdk/test-your-site/debug-your-code/about-debugging-your-code.md)**: Debug using the Wix Developer Console. - **[Functional testing](https://dev.wix.com/docs/develop-websites-sdk/test-your-site/test-backend-functions/about-functional-testing.md)**: Individual testing of backend methods to verify functionality and debug. - **[Test sites](https://dev.wix.com/docs/develop-websites-sdk/test-your-site/work-with-test-sites/about-test-sites.md)**: Isolated testing site where you can safely test changes and new features before deploying to a live site. ## AI code assistants Access AI-powered code assistance for faster development and improved code quality. For more information, see [About AI Assistants](https://dev.wix.com/docs/develop-websites-sdk/code-your-site/developer-environments/ai-assistants/about-ai-assistants.md). ## See also - [About Code Placement](https://dev.wix.com/docs/develop-websites-sdk/code-your-site/code-with-java-script/about-code-placement.md) - [Development Environments](https://dev.wix.com/docs/develop-websites-sdk/get-started/overview/development-environments.md) - [Site Development Features](https://dev.wix.com/docs/develop-websites-sdk/get-started/overview/site-development-features.md) --- > Portal Navigation: > > - Append `.md` to any URL under `https://dev.wix.com/docs/` to get its markdown version. > - Pages are either content pages (article or reference text) or menu pages (a list of links to child pages). > - To get a menu page, truncate any URL to a parent path and append `.md` (e.g. `https://dev.wix.com/docs/sdk.md`, `https://dev.wix.com/docs/sdk/core-modules.md`). > - Top-level index of all portals: https://dev.wix.com/docs/llms.txt > - Full concatenated docs: https://dev.wix.com/docs/llms-full.txt ## Resource: Manage Sites, Pages, and Elements ## Article: Manage Sites, Pages, and Elements ## Article Link: https://dev.wix.com/docs/develop-websites-sdk/code-your-site/developer-environments/editors/manage-sites-pages-and-elements.md ## Article Content: # Manage Sites, Pages, and Elements When working on a Wix site with code, it's important to understand how duplication and deletion affect a site's functionality. Whether you're copying an entire site, a page, or an individual element, or deleting elements with connected code, the outcome depends on how you structure and wire your code. ## Duplicating pages and sites You can duplicate [sites](https://support.wix.com/en/article/duplicating-your-site-1472847) and [pages](https://support.wix.com/en/article/wix-editor-managing-your-sites-pages), as well as [clone](https://support.wix.com/en/article/wix-studio-managing-sites-in-a-workspace) and [transfer](https://support.wix.com/en/article/transferring-a-free-site-to-another-wix-account) your Wix sites. Whether you're duplicating a single page, an entire site, or cloning or transferring a site, the new version maintains the code and events. ### Secrets If a site uses the [Secrets Manager](https://dev.wix.com/docs/develop-websites-sdk/code-your-site/developer-environments/secrets/about-the-secrets-manager.md) to store sensitive information like API keys or tokens, be aware that secrets behave differently during site operations: - **Site transfer**: The system transfers secrets to the new owner along with the site. - **Site duplication**: Secrets aren't transferred to the duplicate site. You need to manually recreate any required secrets in the duplicate site's Secrets Manager. ## Duplicating elements When you copy and paste an element that has associated code, the system duplicates the element itself, but doesn't include any events, wiring, or code linked to it.
**Important:** If you're building a Wix site that others can edit, make sure they understand the implications of changing elements that have associated code. For more information, see [Working with Collaborators](https://dev.wix.com/docs/develop-websites-sdk/code-your-site/developer-environments/editors/collaboration/about-site-collaboration.md).
## Deleting elements When you delete elements from a site, the behavior of any associated code depends on the type of event handler used. For both static and dynamic frontend event handlers, the code itself isn't automatically removed, but how it's connected to the element changes. > **Note:** In the editor, if a collaborator tries to delete elements referenced by code, a confirmation prompt displays. The prompt helps prevent accidental deletions that can impact your code. The prompt displays for: > > - Elements directly referenced by code. A ![Code indicator](https://wixmp-833713b177cebf373f611808.wixmp.com/images/b2e602834297db1e0836bd83e1de9f8a.png) icon displays for these elements as an indicator. > - Parent elements whose nested elements code references. ### Deleting an element with dynamic event handler When you delete an element with a [dynamic event handler](https://dev.wix.com/docs/develop-websites-sdk/code-your-site/build-a-custom-frontend/event-handlers/about-event-handlers.md), the associated code isn't removed. If you add a new element and give it the same ID as the deleted one, the existing code continues to work as expected. ### Deleting an element with static event handler When you delete an element with [static event handler](https://dev.wix.com/docs/develop-websites-sdk/code-your-site/build-a-custom-frontend/event-handlers/about-static-event-handlers.md), the associated code remains, but the system removes the event wiring. Because you can no longer wire static events, this means that the event handler no longer works. If you want to continue to use the event handler code, you need to change the code to use a dynamic event handler registered to an existing element. ## See also - [About Code Placement](https://dev.wix.com/docs/develop-websites-sdk/code-your-site/code-with-java-script/about-code-placement.md) - [Working with Collaborators](https://dev.wix.com/docs/develop-websites-sdk/code-your-site/developer-environments/editors/collaboration/about-site-collaboration.md) --- > Portal Navigation: > > - Append `.md` to any URL under `https://dev.wix.com/docs/` to get its markdown version. > - Pages are either content pages (article or reference text) or menu pages (a list of links to child pages). > - To get a menu page, truncate any URL to a parent path and append `.md` (e.g. `https://dev.wix.com/docs/sdk.md`, `https://dev.wix.com/docs/sdk/core-modules.md`). > - Top-level index of all portals: https://dev.wix.com/docs/llms.txt > - Full concatenated docs: https://dev.wix.com/docs/llms-full.txt ## Resource: About Site Collaboration ## Article: About Site Collaboration ## Article Link: https://dev.wix.com/docs/develop-websites-sdk/code-your-site/developer-environments/editors/collaboration/about-site-collaboration.md ## Article Content: # About Site Collaboration [Collaborators](https://support.wix.com/en/article/studio-editor-collaborating-on-a-site) let you develop a website together with other people. You can invite teammates to collaborate on site content, write and edit code, or manage business settings. You can also transfer a site to a new owner but still continue collaborating on updates and maintenance. For example, you might: - Hire a developer to build custom functionality on your site. - Work with a designer to adjust layouts and styles. - Transfer a completed site to a client and keep editing features as needed. - Share editing and testing responsibilities with a team. ## Roles and permissions To edit a site's code and functionality, collaborators must be assigned a role with **Edit Site** permissions. You do not need to give collaborators **Publish** permissions to allow code editing, but note that without it, they cannot publish changes or test features on the live site.
Tip: If a collaborator adds functionality that requires live testing, they won’t be able to test without Publish permissions.
If you should be able to work on a site after transferring it to a new owner, ask the new owner to invite you back as a collaborator with **Edit Site** permissions (see [Inviting people to collaborate on your site](https://support.wix.com/en/article/inviting-people-to-contribute-to-your-site)) and accept the invitation. ## See also - [Collaborating on a site](https://support.wix.com/en/article/studio-editor-collaborating-on-a-site) - [Inviting people to collaborate on your site](https://support.wix.com/en/article/inviting-people-to-contribute-to-your-site) - [Information for site collaborators](https://support.wix.com/en/article/roles-permissions-information-for-site-collaborators) - [Transferring a premium site to another Wix account](https://support.wix.com/en/article/transferring-a-premium-site-to-another-wix-account) - [Transferring a free site to another Wix account](https://support.wix.com/en/article/transferring-a-free-site-to-another-wix-account) - [Considerations when working as a collaborator](https://dev.wix.com/docs/develop-websites-sdk/code-your-site/developer-environments/editors/collaboration/considerations-for-collaboration.md) --- > Portal Navigation: > > - Append `.md` to any URL under `https://dev.wix.com/docs/` to get its markdown version. > - Pages are either content pages (article or reference text) or menu pages (a list of links to child pages). > - To get a menu page, truncate any URL to a parent path and append `.md` (e.g. `https://dev.wix.com/docs/sdk.md`, `https://dev.wix.com/docs/sdk/core-modules.md`). > - Top-level index of all portals: https://dev.wix.com/docs/llms.txt > - Full concatenated docs: https://dev.wix.com/docs/llms-full.txt ## Resource: Considerations for Collaboration ## Article: Considerations for Collaboration ## Article Link: https://dev.wix.com/docs/develop-websites-sdk/code-your-site/developer-environments/editors/collaboration/considerations-for-collaboration.md ## Article Content: # Considerations for Collaboration If you develop a site with code for someone else that you can both edit, you need to understand the limitations of what you or the other user can do with the site and its elements. Keep in mind, for example, the other user might be a designer with no coding experience. ## Site-related considerations When you duplicate a page or site, or when you clone or transfer a site, the code and events are copied to the new version but remain unchanged in the original. ## Element-related considerations - When you copy and paste an element that's connected to a dataset, the new element maintains the connection settings from the element it was copied from. - When you move an element from one page to another, the element won't work as expected since the associated code is on the original page and isn't moved to the new page. - If an element is connected to a dataset, and both are set to show on only one page, setting the element to [Show on All Pages](https://support.wix.com/en/article/showing-an-element-on-all-pages-6533570), breaks the connection to the dataset. - In the editor, if a collaborator tries to delete elements referenced by code, a confirmation prompt displays. The prompt helps prevent accidental deletions that can impact your code. The prompt displays for: - Elements directly referenced by code. A ![code](https://wixmp-833713b177cebf373f611808.wixmp.com/images/b2e602834297db1e0836bd83e1de9f8a.png) icon displays for these elements as an indicator. - Parent elements whose nested elements are referenced by code. - When you copy and paste an element that has (deprecated) event handlers associated with it, the new element won't work as expected since the event wiring and code isn't copied. ## See also - [Collaborating on a site](https://support.wix.com/en/article/studio-editor-collaborating-on-a-site) - [Inviting people to collaborate on your site](https://support.wix.com/en/article/inviting-people-to-contribute-to-your-site) - [About site collaboration](https://dev.wix.com/docs/develop-websites-sdk/code-your-site/developer-environments/editors/collaboration/about-site-collaboration.md) - [Transferring a premium site to another Wix account](https://support.wix.com/en/article/transferring-a-premium-site-to-another-wix-account) - [Transferring a free site to another Wix account](https://support.wix.com/en/article/transferring-a-free-site-to-another-wix-account) --- > Portal Navigation: > > - Append `.md` to any URL under `https://dev.wix.com/docs/` to get its markdown version. > - Pages are either content pages (article or reference text) or menu pages (a list of links to child pages). > - To get a menu page, truncate any URL to a parent path and append `.md` (e.g. `https://dev.wix.com/docs/sdk.md`, `https://dev.wix.com/docs/sdk/core-modules.md`). > - Top-level index of all portals: https://dev.wix.com/docs/llms.txt > - Full concatenated docs: https://dev.wix.com/docs/llms-full.txt ## Resource: IDEs Overview ## Article: IDEs Overview ## Article Link: https://dev.wix.com/docs/develop-websites-sdk/code-your-site/developer-environments/ides/ides-overview.md ## Article Content: # IDEs Overview Wix provides multiple development environment options for writing code, each designed to fit different workflows and project needs. Choose the environment that best matches your development style and project requirements. ## Code editor The built-in [code editor](https://dev.wix.com/docs/develop-websites-sdk/code-your-site/developer-environments/ides/code-editor/about-the-code-editor.md) is available directly in Wix Studio and the Wix Editor. It provides syntax highlighting, autocompletion, error detection, and integrated debugging tools, enabling you to write and manage code without leaving the Wix platform. ## Git integration [Git Integration & CLI](https://dev.wix.com/docs/develop-websites-sdk/code-your-site/developer-environments/ides/git-integration/about-git-integration-with-wix-cli.md) allows you to develop in your preferred local IDE with full version control through GitHub. This option provides the most flexibility for professional development workflows, team collaboration, and automated deployments. ## Wix IDE The [Wix IDE](https://dev.wix.com/docs/develop-websites-sdk/code-your-site/developer-environments/ides/wix-ide/about-the-wix-ide.md) is an advanced, browser-based development environment built on Visual Studio Code. It provides a full-featured coding experience with hot reloading, concurrent editing for multiple developers, and AI-powered assistance through the Wix AI Assistant. --- > Portal Navigation: > > - Append `.md` to any URL under `https://dev.wix.com/docs/` to get its markdown version. > - Pages are either content pages (article or reference text) or menu pages (a list of links to child pages). > - To get a menu page, truncate any URL to a parent path and append `.md` (e.g. `https://dev.wix.com/docs/sdk.md`, `https://dev.wix.com/docs/sdk/core-modules.md`). > - Top-level index of all portals: https://dev.wix.com/docs/llms.txt > - Full concatenated docs: https://dev.wix.com/docs/llms-full.txt ## Resource: About the Code Editor ## Article: About the Code Editor ## Article Link: https://dev.wix.com/docs/develop-websites-sdk/code-your-site/developer-environments/ides/code-editor/about-the-code-editor.md ## Article Content: # About the Code Editor The code editor is Wix's built-in development environment that allows you to write, edit, and manage code directly in Wix Studio and the Wix Editor. It provides essential tools for site development without requiring external software. ## Key features - Syntax highlighting - Code autocompletion and IntelliSense support - Error detection and real-time syntax checking - File management - Integrated debugging tools and console output - JSDoc support ## See also - [About Development Workspaces](https://dev.wix.com/docs/develop-websites-sdk/code-your-site/developer-environments/editors/about-development-workspaces.md) - [About the Wix IDE](https://dev.wix.com/docs/develop-websites-sdk/code-your-site/developer-environments/ides/wix-ide/about-the-wix-ide.md) - [About Git Integration with Wix CLI](https://dev.wix.com/docs/develop-websites-sdk/code-your-site/developer-environments/ides/git-integration/about-git-integration-with-wix-cli.md) --- > Portal Navigation: > > - Append `.md` to any URL under `https://dev.wix.com/docs/` to get its markdown version. > - Pages are either content pages (article or reference text) or menu pages (a list of links to child pages). > - To get a menu page, truncate any URL to a parent path and append `.md` (e.g. `https://dev.wix.com/docs/sdk.md`, `https://dev.wix.com/docs/sdk/core-modules.md`). > - Top-level index of all portals: https://dev.wix.com/docs/llms.txt > - Full concatenated docs: https://dev.wix.com/docs/llms-full.txt ## Resource: About the Properties & Events Panel ## Article: About the Properties & Events Panel ## Article Link: https://dev.wix.com/docs/develop-websites-sdk/code-your-site/developer-environments/ides/code-editor/about-the-properties-events-panel.md ## Article Content: # About the Properties & Events Panel The Properties & Events panel allows you to add properties and functionality to your page elements. With the panel you can: - Access the [API reference](https://dev.wix.com/docs/velo/velo-only-apis/$w/introduction.md) for the selected element. - View and manually update the ID of the selected element. - Set default values for the properties of the selected element. - Add an event handler to your code to interact with the selected element.
The Properties & Events panel changes content when you select an element. The properties and event handlers listed in the panel differ based on the element that you select. ## Supported IDEs You can access the Properties & Events panel in the editor (Wix Studio and Wix Editor). It's located to the right of the code editor. ::::tabs :::Wix-Studio ![Properties & Events panel in Wix Studio](https://wixmp-833713b177cebf373f611808.wixmp.com/images/48d5758eae44d6ee60f50f963f8e2a9f.png) ::: :::Wix-Editor ![Properties & Events panel in Wix Editor](https://wixmp-833713b177cebf373f611808.wixmp.com/images/e2bb59634d954873c36925900971f8eb.png) ::: :::: ## The ID property All elements come with a default ID value. When you select an element, its ID is displayed in the panel. You can manually change the ID of your element. Assigning meaningful IDs to your elements can make your code easier to maintain.

Important:
If you change the ID of an element, make sure to update any existing code that uses the ID of that element.

## Default state properties Certain boolean properties for your selected element appear under the Default Values section of the panel. They allow you to set an element's state when the page loads. This limits the need to set an element's initial state with code, keeping your code cleaner and more concise. Set the element's initial state by selecting or clearing the checkbox to the left of the property. The available default state properties are: - **Hidden:** Hides the element from your site visitors when your page loads. You can use code to unhide the element upon an action or after a set amount of time. Hidden elements take up space on your page and appear faded in the editor until they're selected. An element's hidden state can also depend on whether its parent element is hidden or collapsed. - **Collapsed:** Collapses the element and hides it from your site visitors when your page loads. You can use code to expand the element upon an action or after a set amount of time. Collapsed elements don't take up space on your page and appear with diagonal hatching lines in the editor until they're selected. Collapsing and expanding can cause other elements to shift on your page. An element's collapse state can also depend on whether its parent element is hidden or collapsed. - **Enabled:** Enables interactive elements such as [buttons](https://dev.wix.com/docs/velo/velo-only-apis/$w/button/introduction.md) and [text inputs](https://dev.wix.com/docs/velo/velo-only-apis/$w/text-input/introduction.md). Elements with this property are initially in an enabled state. Clear the checkbox to disable the element when the page loads. You can use code to later enable the element when you want visitors to interact with it. Disabled elements appear faded in the editor. >**Notes:** > - The properties displayed in the panel change depending on the selected element. > - To get or set properties with code, see the [Velo API reference](https://dev.wix.com/docs/velo/velo-only-apis/$w/introduction.md) for a full list of an element's properties. ## Event handlers Event handlers appear under the **Event Handlers** section of the Properties & Events panel. Event handlers allow you to add code that defines what happens when site visitors interact with this element. Clicking on an event handler in the panel adds the event handler's function declaration to your page code for you. ```js $w('#myButton').onClick((event) => { // Add code here }) ``` Like properties, event handlers are specific to the element. Common event handlers that appear in the panel for many elements include: - `onBlur()` - `onClick()` - `onDblClick()` - `onFocus()` - `onMouseIn()` - `onMouseOut()` - `onViewportEnter()` - `onViewportLeave()` Other event handlers can appear in the panel depending on the element that's selected. For example, when a [Gallery element](https://dev.wix.com/docs/velo/velo-only-apis/$w/gallery/introduction.md) is selected, the panel includes additional event handlers to some of the ones listed above, such as: - `onCurrentItemChanged()` - `onItemClicked()` - `onPlay()` - `onPause()` See the [Velo API reference](https://dev.wix.com/docs/velo/velo-only-apis/$w/introduction.md) for descriptions of all the event handlers for each element. ## Events AI assistant in Wix Studio The Properties & Events panel in Wix Studio also comes with an AI Assistant button. ![AI Assistant button in Properties & Events panel](https://wixmp-833713b177cebf373f611808.wixmp.com/images/246ca4e3721894c89e2d67399846e850.png) Use the AI assistant to help create interactive code for your event handlers. The AI assistant allows you to select an event handler and then describe what the code should do. It generates a code example that you can add to your page code. ![AI Assistant interface](https://wixmp-833713b177cebf373f611808.wixmp.com/images/7f633dd6c2099d996fe2ee5bb8fa6f26.png) ![AI Assistant generated code example](https://wixmp-833713b177cebf373f611808.wixmp.com/images/e88f2c787c0b892c03ac8cb601a162f6.png) It's important to note that AI can make mistakes and that you should double check that any AI generated code is accurate before using it. >**Note:** > The AI Assistant button is only supported in Wix Studio. ## Using the JavaScript SDK with event handlers Although event handlers are created using Velo APIs, you can use the JavaScript SDK in the body of a event handler. For example, you can connect a button click to a data query from a collection: ```js import {items} from "@wix/data"; $w.onReady(function () { $w('#myButton').onClick(async (event) => { // Use SDK code inside the Velo event handler const results = await items.query("MyCollection").find(); console.log('Found items:', results.items); }); }); ``` See [Develop Websites with the SDK](https://dev.wix.com/docs/develop-websites/articles/coding-with-velo/develop-with-the-sdk/develop-websites-with-the-sdk.md) for guidance on how to use the JavaScript SDK alongside Velo in your Wix projects. ## See also - [About Event Handlers in Wix](https://dev.wix.com/docs/develop-websites-sdk/code-your-site/build-a-custom-frontend/event-handlers/about-event-handlers.md) - [Add an Event Handler](https://dev.wix.com/docs/develop-websites-sdk/code-your-site/build-a-custom-frontend/event-handlers/add-an-event-handler.md) - [Velo API reference](https://dev.wix.com/docs/velo.md) --- > Portal Navigation: > > - Append `.md` to any URL under `https://dev.wix.com/docs/` to get its markdown version. > - Pages are either content pages (article or reference text) or menu pages (a list of links to child pages). > - To get a menu page, truncate any URL to a parent path and append `.md` (e.g. `https://dev.wix.com/docs/sdk.md`, `https://dev.wix.com/docs/sdk/core-modules.md`). > - Top-level index of all portals: https://dev.wix.com/docs/llms.txt > - Full concatenated docs: https://dev.wix.com/docs/llms-full.txt ## Resource: About JSDoc Tags ## Article: About JSDoc Tags ## Article Link: https://dev.wix.com/docs/develop-websites-sdk/code-your-site/developer-environments/ides/code-editor/about-jsdoc-tags.md ## Article Content: # About JSDoc Tags [JSDoc](https://jsdoc.app/) is a popular markup language used to document JavaScript code. You can use JSDoc in a Wix environment in the same way as you would in any JavaScript environment. Adding JSDoc to your custom code allows you to benefit from [type checking and code autocompletion](#type-checking-and-autocompletion). ## Supported IDEs You can add and benefit from JSDoc using: - The [editor](https://dev.wix.com/docs/develop-websites-sdk/code-your-site/developer-environments/ides/code-editor/about-the-code-editor.md) (Wix Studio and Wix Editor). - The [Wix IDE](https://dev.wix.com/docs/develop-websites-sdk/code-your-site/developer-environments/ides/wix-ide/about-the-wix-ide.md) (Wix Studio). - Your [local IDE](https://dev.wix.com/docs/develop-websites-sdk/code-your-site/developer-environments/ides/git-integration/about-git-integration-with-wix-cli.md) (Wix Studio and Wix Editor). You can only [import JSDoc](https://dev.wix.com/docs/develop-websites-sdk/code-your-site/developer-environments/ides/code-editor/import-types-with-jsdoc.md) in the editor. ## JSDoc tags and definitions Add JSDoc tags to JavaScript files as comments. Each line of JSDoc defines an item using the following format: ```js /** * @ {} */ ```
JSDoc tags | Variable | Description | | ------------- | --------------------------------------------------------------------------------------------------------------------------------------------------------------------------------------------------------- | | `jsdoc-tag` | [JSDoc tag](https://jsdoc.app/) that defines what the item is.
For example, use `@typedef` to define a new type, `@property` to define the property of an object, and `@param` to define a parameter. | | `type` | Data type of the item. For example, `object`. | | `item-name` | Name or identifier for the item being documented. | | `description` | Description of the item.
Optional. |
### Where to add JSDoc in your code You can add JSDoc to your code as you would to any JavaScript code, by including the annotations just above the code you are documenting. However, when defining a method parameter type using the `@param` tag, place the JSDoc definition directly above the method declaration. #### JSDoc example In the following example, we define an `employee` type that's then applied to a method parameter. ```js /** * @typedef {object} employee * @property {string} name Employee's name. * @property {number} seniority The number of years the employee has worked at the company. * @property {number} hours The number of hours the employee works a week. * * @param {employee} employee */ export function salaryCalculator(employee) { return `Salary for ${employee.name}: ${ employee.hours * employee.seniority * 100 }`; } ``` ## Type checks and autocompletion When you apply JSDoc types to parameters, the editor can perform type checking and provide autocomplete suggestions for method arguments. ![Type checking with JSDoc](https://wixmp-833713b177cebf373f611808.wixmp.com/images/ba3ab0ee4de81306214582fd0b19be3a.png) ![Autocomplete with JSDoc](https://wixmp-833713b177cebf373f611808.wixmp.com/images/db33be3b82f536a20db5803e5a77ca58.png) ## File types You can add JSDoc in any JavaScript file, meaning the file's suffix is `.js`. This includes JavaScript files in [custom apps](https://dev.wix.com/docs/build-apps/get-started/overview/about-wix-apps.md), allowing anyone using the custom app to use type checking and autocomplete. You can import types defined by Wix in some specific file types. For example, you can import backend event objects to [`events.js` files](https://dev.wix.com/docs/develop-websites-sdk/code-your-site/build-a-custom-backend/backend-events/about-backend-events.md).
Important: Web.md modules files with the suffix `.jsw` support autocomplete, but not type checking.
## See also - [JSDoc documentation](https://jsdoc.app/) - [Import Types with JSDoc](https://dev.wix.com/docs/develop-websites-sdk/code-your-site/developer-environments/ides/code-editor/import-types-with-jsdoc.md) --- > Portal Navigation: > > - Append `.md` to any URL under `https://dev.wix.com/docs/` to get its markdown version. > - Pages are either content pages (article or reference text) or menu pages (a list of links to child pages). > - To get a menu page, truncate any URL to a parent path and append `.md` (e.g. `https://dev.wix.com/docs/sdk.md`, `https://dev.wix.com/docs/sdk/core-modules.md`). > - Top-level index of all portals: https://dev.wix.com/docs/llms.txt > - Full concatenated docs: https://dev.wix.com/docs/llms-full.txt ## Resource: Import Types with JSDoc ## Article: Import Types with JSDoc ## Article Link: https://dev.wix.com/docs/develop-websites-sdk/code-your-site/developer-environments/ides/code-editor/import-types-with-jsdoc.md ## Article Content: # Import Types with JSDoc Import [JSDoc types](https://dev.wix.com/docs/develop-websites-sdk/code-your-site/developer-environments/ides/code-editor/about-jsdoc-tags.md) into your JavaScript code to enable type checking and autocomplete functionality. ## Step 1 | Define and export a type To use a custom type, you first need to define it. If you want to use your defined type in other files, you must export the type. You can skip this step when using types defined by Wix. To define and export a type using JSDoc: 1. Use [JSDoc tags and definitions](https://dev.wix.com/docs/develop-websites-sdk/code-your-site/developer-environments/ides/code-editor/about-jsdoc-tags.md#jsdoc-tags-and-definitions) to define a type. For example: ```js /** * @typedef {object} employee * @property {string} name Employee's name. * @property {number} seniority The number of years the employee has worked at the company. * @property {number} hours The number of hours the employee works a week. */ ``` 1. Choose how to make your type available to other files: - **Global type:** By default, your type is available in any file across the site without importing. This is convenient but can cause naming conflicts if you use the same type name in different files. - **Restricted type:** Add `export {};` below your JSDoc definition to keep the type contained within its file. This prevents naming conflicts and requires explicit importing when used elsewhere. ```js /** * @typedef {object} employee * @property {string} name Employee's name. * @property {number} seniority The number of years the employee has worked at the company. * @property {number} hours The number of hours the employee works a week. */ export {}; // Makes this type file-specific ``` ## Step 2 | Access a JSDoc type The way that you import a JSDoc type depends on where and how you expose the type - [Global types](#global-types) - [Restricted types](#restricted-types) - [Editor elements](#editor-elements) - [Backend event handlers](#backend-event-handlers) - [Router methods](#router-methods) ### Global types Use the type directly without importing it. For example: ```js /** * @param {employee} employee */ export function salaryCalculator(employee) { return `Salary for ${employee.name}: ${ employee.hours * employee.seniority * 100 }`; } ``` ### Restricted types Import your type using `import('').` directly in the JSDoc tag. For example: ```js /** * @param {import('backend/myJSDocFile.js).employee} employee */ export function salaryCalculator(employee) { return `Salary for ${employee.name}: ${ employee.hours * employee.seniority * 100 }`; } ``` ### Editor elements You can use [Wix Editor elements](https://dev.wix.com/docs/velo/velo-only-apis/$w/introduction.md) directly in JSDoc types without importing them. Define the JSDoc data type using `$w. Element`. For example: ```js /** @param {$w.Text} textElement */ ``` ### Backend event handlers By default, the file for [backend event handlers](https://dev.wix.com/docs/develop-websites-sdk/code-your-site/build-a-custom-backend/backend-events/about-backend-events.md), `events.js`, doesn't know the type of the parameter you are passing to a method. To tell your `events.js` file the parameter's type: 1. Check the event's `EventObjectName`. You can find it in the method declaration in [API reference](https://dev.wix.com/docs/velo.md). 1. Add the following code above the method declaration: ```js /** @param {import('api-module-name').Events.} parameterName */ ```
Example: onBookingCreated(.md) To add JSDoc to wix-bookings.v2 event, onBookingCreated():
  1. Open the API reference for onBookingCreated(.md). Find the EventObjectName.
    Booking created event object
  2. Add the following JSDoc annotation above the event handler method in the events.js file:
    /** @param {import('api-module-name').Events. BookingCreated} event */

/** @param {import('api-module-name').Events. BookingCreated} event */
export function wixBookings_onBookingCreated(event) {
  // Handle your event
}
### Routers By default, the [routers.js](https://dev.wix.com/docs/develop-websites-sdk/code-your-site/build-a-custom-backend/routers/about-routers.md) file doesn't support autocomplete or type checking for [WixRouterRequest](https://dev.wix.com/docs/velo/events-service-plugins/routers/service-plugins/wix-router/wix-router-request/introduction.md) objects passed to router methods. To support autocomplete or type-checking in a `routers.js` file, add the following JSDoc annotation above the router methods: ```js /** @param {import('wix-router').WixRouterRequest} parameterName */ ``` --- > Portal Navigation: > > - Append `.md` to any URL under `https://dev.wix.com/docs/` to get its markdown version. > - Pages are either content pages (article or reference text) or menu pages (a list of links to child pages). > - To get a menu page, truncate any URL to a parent path and append `.md` (e.g. `https://dev.wix.com/docs/sdk.md`, `https://dev.wix.com/docs/sdk/core-modules.md`). > - Top-level index of all portals: https://dev.wix.com/docs/llms.txt > - Full concatenated docs: https://dev.wix.com/docs/llms-full.txt ## Resource: About the Wix IDE ## Article: About the Wix IDE ## Article Link: https://dev.wix.com/docs/develop-websites-sdk/code-your-site/developer-environments/ides/wix-ide/about-the-wix-ide.md ## Article Content: # About the Wix IDE
**Note**: Some features described in this article aren't yet available to all users.
Wix Studio includes a code editor for adding code directly to a site's pages. For a more advanced option, the Wix IDE provides a browser-based environment built on Visual Studio Code. The Wix IDE also features the [Wix AI Assistant](https://dev.wix.com/docs/develop-websites/articles/workspace-tools/developer-tools/ai-assistants/ai-assistant-in-the-wix-ide/about-the-wix-ai-assistant.md), an intelligent companion that offers real-time coding assistance. > **Note:** > The Wix IDE is currently unavailable for sites using [Git Integration](https://dev.wix.com/docs/develop-websites-sdk/code-your-site/developer-environments/ides/git-integration/about-git-integration-with-wix-cli.md). ## Understanding the site file structure Wix sites have a specific file structure that Wix uses to run your code.
![IDE file tree](https://wixmp-833713b177cebf373f611808.wixmp.com/images/b13a044d60b940ae69a2f2e73333ae1c.png)
A site's file structure includes these files and folders: - The `src` folder, that contains the following folders: - [backend](#backend-folder) - [pages](#pages-folder) - [public](#public-folder) - [styles](#styles-folder) - The `jsconfig.json` file and `.wix` folder found in the repo's root folder. > **Important:** > The `jsconfig.json` file and `.wix` folder are used to support type checking and autocomplete in the IDE. You don't need to edit these files. Changes to these files aren't synced to your site and are lost when you close the IDE. > **Note:** > Wix doesn't support adding files for web crawlers and bots such as `robots.txt`, `ads.txt`, and `security.txt` to a site. If you add these files, they're ignored by Wix. Here is an explanation of the different subfolders in the `src` folder: ### Backend folder This folder contains the backend code files for a site. Some backend code files are automatically added to this folder, for example, when you add a router to a site, a `router.js` file is added to your backend folder. If you don't see the file that you need, you can create it. The backend folder may contain the following files: - **Web Module files:** These are files that allow you to expose [web methods](https://dev.wix.com/docs/develop-websites-sdk/code-your-site/build-a-custom-backend/web-modules/about-web-modules.md) in a site's backend that you can easily call from the frontend. These files require a `.web.js` file extension. * **data.js** A file for [adding data hooks](https://dev.wix.com/docs/develop-websites-sdk/code-your-site/work-with-data/data-api/about-data-hooks.md) to a site's collections. * **routers.js** A file for implementing [routing and sitemap](https://dev.wix.com/docs/develop-websites-sdk/code-your-site/build-a-custom-backend/routers/about-routers.md) functionality for a site. * **events.js** A file for implementing a site's [backend event handlers](https://dev.wix.com/docs/develop-websites-sdk/code-your-site/build-a-custom-backend/backend-events/about-backend-events.md). * **http-functions.js** A file for implementing [HTTP methods](https://dev.wix.com/docs/develop-websites-sdk/code-your-site/build-a-custom-backend/expose-services/about-custom-site-apis.md) that are exposed on a site. * **jobs.config** A file for [scheduling recurring jobs](https://dev.wix.com/docs/develop-websites-sdk/code-your-site/build-a-custom-backend/scheduled-jobs/schedule-recurring-jobs.md). Jobs consist of backend code that's run at regular intervals. * **General backend files** JavaScript code files. You can import code from these files into any other backend file on a site. These files require a `.js` file extension. Use the following syntax to import code from backend files: ```js import { myFunctionName } from "backend/myFileName"; ``` Trying to import from the relative path in a site's files doesn't work. #### Config folder If you add a [Velo Package built by Wix](https://dev.wix.com/docs/develop-websites/articles/coding-with-velo/packages/working-with-velo-packages.md) to a site, the backend folder contains a folder called `__config__`. This folder contains an editable `config.json` file for defining specific settings for your package. #### Service plugin folder If you add [service plugins](https://dev.wix.com/docs/develop-websites-sdk/code-your-site/extend-wix-business-solutions/service-plugins/about-service-plugins.md) to a site, the backend folder contains a folder called `__spi__`. This folder contains subfolders with the code files for each service plugin. Learn more about [implementing service plugins](https://dev.wix.com/docs/develop-websites-sdk/code-your-site/extend-wix-business-solutions/service-plugins/implement-service-plugins.md).
permissions.json > **Important:** > You only need to use this file if you export backend methods from `.jsw` files. We recommend using web methods and exporting backend methods from `.web.js` files instead. Learn more about [web modules](https://dev.wix.com/docs/develop-websites-sdk/code-your-site/build-a-custom-backend/web-modules/about-web-modules.md). The backend folder also contains the `permissions.json` file. This file defines [permissions](https://dev.wix.com/docs/develop-websites-sdk/code-your-site/build-a-custom-backend/web-modules/about-web-modules.md#permissions) for the methods in your web module files. The file contains a key, `"web-methods"` which contains an object. Each key in that object corresponds to a web module file in your backend folder. Name these keys with the following syntax: `"backend/{path to file}/myFile.jsw"`. The value for each file name key is an object that contains keys named after the methods in that file. Those objects contain keys for each permission level. For example: ```json { "web-methods": { "backend/myFileName.jsw": { "myFunction": { "siteOwner" : { "invoke" : // Boolean }, "siteMember" : { "invoke" : // Boolean }, "anonymous" : { "invoke" : // Boolean } } } } } ``` Set the permissions for each method using the following values: - **Owner-only access**: - `siteOwner.invoke`: `true` - `siteMember.invoke`: `false` - `anonymous.invoke` : `false` - **Site member access**: - `siteOwner.invoke`: `true` - `siteMember.invoke`: `true` - `anonymous.invoke` : `false` - **Anyone can access**: - `anonymous.invoke`: `true` - `siteMember.invoke` : `true` - `anonymous.invoke`: `true` The `"web-methods"` object must also contain a `"*"` key. The value for this key defines the default permissions that are applied to any method whose permissions you don't set manually. Here is a sample `permissions.json` file for a site with a backend file called `helperFunctions.jsw`. The file's methods are called `calculate`, `fetchData`, and `syncWithServer`. In this case anyone can call `calculate`, site members can call `syncWithServer`, and only Wix users can call `fetchData`. ```json { "web-methods": { "*": { "*": { "siteOwner": { "invoke": true }, "siteMember": { "invoke": true }, "anonymous": { "invoke": true } } }, "backend/helperFunctions.jsw": { "calculate": { "siteOwner": { "invoke": true }, "siteMember": { "invoke": true }, "anonymous": { "invoke": true } }, "fetchData": { "siteOwner": { "invoke": true }, "siteMember": { "invoke": false }, "anonymous": { "invoke": false } }, "syncWithServer": { "siteOwner": { "invoke": true }, "siteMember": { "invoke": true }, "anonymous": { "invoke": false } } } } } ```
### Pages folder This folder contains code files for each of the pages on a site as well as the masterpage.js file for global code. The code you add to these files runs when visitors open pages on your site. When you add a page to a site in the editor, a code file for that page is added to this folder. The name of the file has 2 components: the name of the page that you define when you create it, and an ID for internal use. The sections are separated by a period. For example, the code file for the home page on a site may be named `Home.c1dmp.js`. The `Home` part of the file name is the name of the page, and the `c1dmp` part is an ID that Wix uses to identify the page. When you [add a dynamic page](https://support.wix.com/en/article/content-manager-about-dynamic-pages#adding-dynamic-pages) to a site, 2 code files are added to this folder corresponding to the dynamic list and dynamic item pages. When you open a page's code file, you see the same sample code that appears in the Wix Studio code editor. When you delete a page in the editor, the page's corresponding code file is deleted as well. > **Warning:** > Don't rename code files for pages. Wix uses these file names to associate the files with the appropriate pages on your site. If you rename a file, your code is ignored and a new code file is created for the page. ### Public folder This folder contains the public code files for a site. You can import code from these files into any other file on a site. Use the following syntax to import code from public files: ```js import { myFunctionName } from "public/myFileName"; ``` Trying to import from the relative path in a site's files doesn't work. ### Styles folder This folder contains custom CSS files for a site. Add custom CSS to a site in a file called `global.css`. If you don't see this file, you can create it. The styles defined in this file are applied to all the pages on the site. Many [Wix Editor Elements](https://www.wix.com/velo/reference/$w/introduction) have specially defined class names that you can use to style them. You can also create custom class names to use in your CSS code. To learn about supported elements and their class names, see the [Velo API Reference](https://www.wix.com/velo/reference/$w/styling-elements-with-css). You can also see an element's predefined classes and add custom class names to an element in the [**CSS Classes panel**](https://support.wix.com/en/article/coding-with-the-wix-studio-sidebar#css-classes-panel). Learn more about [writing CSS code for a site](https://www.wix.com/velo/reference/$w/styling-elements-with-css). ## Use the Wix IDE To use the Wix IDE, do the following: 1. Click **Code in Wix IDE** in the top right corner of the code editor. 2. The Wix IDE opens in a new browser tab. You can now edit the site's code. Changes saved in the IDE are automatically synced to the site. The IDE's autosave feature is enabled by default. You can [disable autosave](https://code.visualstudio.com/docs/editor/codebasics#_save-auto-save) in the IDE's Settings editor. **Note:** To use backend methods in your public and page code files, export methods from your backend files using [web modules](https://dev.wix.com/docs/develop-websites-sdk/code-your-site/build-a-custom-backend/web-modules/about-web-modules.md). 3. Test your code using a [test site](https://dev.wix.com/docs/develop-websites-sdk/test-your-site/work-with-test-sites/about-test-sites.md) or by [previewing the site](https://support.wix.com/en/article/wix-editor-saving-previewing-and-publishing-your-site#previewing-your-site). You can see messages logged from your code in [Wix Logs](https://dev.wix.com/docs/develop-websites-sdk/test-your-site/work-with-wix-logs/view-logs-with-wix-logs.md) or by [connecting your site](https://dev.wix.com/docs/develop-websites-sdk/test-your-site/work-with-wix-logs/view-logs-with-google-cloud-logs.md) to Google Cloud Logs (Cloud Logging). 4. When your code is ready, publish the site to make your changes live. ## Editor-only actions You need to do certain parts of the Wix development flow in the editor. These include: - Adding [npm packages](https://dev.wix.com/docs/develop-websites-sdk/code-your-site/developer-environments/packages/npm/about-npm-packages.md), [Velo packages](https://dev.wix.com/docs/develop-websites-sdk/code-your-site/developer-environments/packages/velo-packages/about-velo-packages.md), and [custom apps](https://dev.wix.com/docs/develop-websites-sdk/code-your-site/developer-environments/packages/custom-apps/about-custom-apps.md). Once you add these packages in the editor, you can import them in your code files in the IDE. - [Adding](https://support.wix.com/en/article/wix-editor-adding-a-page-to-your-site#adding-a-new-page), changing, or deleting pages. - [Changing](https://dev.wix.com/docs/develop-websites-sdk/code-your-site/developer-environments/ides/code-editor/about-the-properties-events-panel.md) element IDs or properties. - [Previewing](https://support.wix.com/en/article/wix-editor-saving-previewing-and-publishing-your-site#previewing-your-site) a site or [creating a test site](https://support.wix.com/en/article/creating-a-test-site). - [Publishing](https://support.wix.com/en/article/wix-editor-saving-previewing-and-publishing-your-site#publishing-your-site) a site. - Creating a [service plugin](https://dev.wix.com/docs/develop-websites-sdk/code-your-site/extend-wix-business-solutions/service-plugins/about-service-plugins.md). ## Concurrent editing support Two or more site contributors can edit a site's code at the same time in the Wix IDE. Edits made in one instance of the IDE are synced to the other instance in real time. However, you can't edit a site's code in both the Wix IDE and the Wix Studio Code panel at the same time. You also can't edit your code in the Code panel if other site contributors are editing in the Wix IDE. When you open the Wix IDE, the Code panel switches to read-only mode. The Code panel displays the following message: ``` Code panel is read-only because Wix IDE is open in another tab. ``` If you want to edit a site's code in the Code panel, all site contributors must close the Wix IDE. You can then click **Start Coding** in the Code panel. You will see the following message: ``` Other user(s) have stopped editing code. Do you want to start coding? ``` --- > Portal Navigation: > > - Append `.md` to any URL under `https://dev.wix.com/docs/` to get its markdown version. > - Pages are either content pages (article or reference text) or menu pages (a list of links to child pages). > - To get a menu page, truncate any URL to a parent path and append `.md` (e.g. `https://dev.wix.com/docs/sdk.md`, `https://dev.wix.com/docs/sdk/core-modules.md`). > - Top-level index of all portals: https://dev.wix.com/docs/llms.txt > - Full concatenated docs: https://dev.wix.com/docs/llms-full.txt ## Resource: About the Wix IDE Beta Release ## Article: About the Wix IDE Beta Release ## Article Link: https://dev.wix.com/docs/develop-websites-sdk/code-your-site/developer-environments/ides/wix-ide/about-the-wix-ide-beta-release.md ## Article Content: # About the Wix IDE Beta Release The Wix IDE is currently in beta release. While this release is stable and can be safely used for building and modifying production sites, it still lacks important functionality as listed in the [known issues](#known-issues) section. As we continuously improve the Wix IDE, you can stay informed about new updates in the [release notes](#wix-ide-beta-release-notes) below. As a separate environment from the editor, the Wix IDE allows you to focus on code and instantly see your code changes in Preview mode on a separate tab. Although the tutorial upon opening the Wix IDE isn't yet fully tailored to the Wix environment, you can enjoy the IDE features such as refactoring capabilities, go to definition, command palette, split view, improved navigation, and more. Learn more about working with the [Wix IDE](https://dev.wix.com/docs/develop-websites-sdk/code-your-site/developer-environments/ides/wix-ide/about-the-wix-ide.md). You can also check out the README file in your project's root level. ![Wix IDE README file interface](https://wixmp-833713b177cebf373f611808.wixmp.com/images/c0f2e69771cb77b916d7c19b1aca5018.png) ## Known issues Before getting started with the Wix IDE, it's important to note the following known issues that we're working to fix: - **Auto-complete isn't fully functional** [IntelliSense](https://code.visualstudio.com/docs/editor/intellisense), VS Code's language support feature, doesn't currently recognize all npm packages, Velo packages, Wix Blocks apps, backend modules, and editor elements as expected. You may experience false positive error highlighting for valid code that can run successfully. - **Functional testing is unavailable** [Functional testing](https://dev.wix.com/docs/develop-websites-sdk/test-your-site/test-backend-functions/about-functional-testing.md) isn't currently available in the Wix IDE. For functional testing, use the code editor. - **Terminal isn't fully supported** The Wix IDE doesn't require the terminal console to work. While the terminal is available for use, it only offers limited functionality. - **Built-in Git functionality isn't supported** Currently, you can't initialize a local Git repository or publish to GitHub from the Wix IDE. - **Git Integration and Wix IDE can't connect simultaneously** You can't use both the [Git Integration](https://dev.wix.com/docs/develop-websites-sdk/code-your-site/developer-environments/ides/git-integration/about-git-integration-with-wix-cli.md) and the Wix IDE at the same time. If you connect a site to GitHub with Git Integration, the Wix IDE is unavailable until you disconnect the site from GitHub. The reverse is also true. - **Settings and extensions don't persist between sessions** In the Wix IDE you can modify settings and install extensions from the [Open VSX Registry](https://open-vsx.org/). However, settings and extensions only apply to the IDE of the site you're currently working in, and aren't retained between Wix IDE sessions for the same site. You must reset your settings and re-install your extensions at the start of each new session. Note that a session concludes after 30 minutes of inactivity. ## Wix IDE beta release notes Stay up to date on the latest changes and additions as we continue to improve the Wix IDE. Your feedback is important to us. Please help us by reporting any issues that you notice while working with the Wix IDE. | Date | Description | | -------------- | ----------------------------------------------------------------------------------------------------------------------------------------------------------- | | August 2, 2023 | Wix IDE beta available in Wix Studio. | | March 10, 2024 | Element IDs automatically sync with your IDE when you make changes to a site. ID changes were previously out of sync and required you to sync manually. | | March 26, 2024 | The **Display IDs** toggle is now visible in the **Layers** panel of the editor, while working in the Wix IDE. ![Layers toggle](https://wixmp-833713b177cebf373f611808.wixmp.com/images/f80b9b5e0ae3c659803e27e3d5ffa867.png) | --- > Portal Navigation: > > - Append `.md` to any URL under `https://dev.wix.com/docs/` to get its markdown version. > - Pages are either content pages (article or reference text) or menu pages (a list of links to child pages). > - To get a menu page, truncate any URL to a parent path and append `.md` (e.g. `https://dev.wix.com/docs/sdk.md`, `https://dev.wix.com/docs/sdk/core-modules.md`). > - Top-level index of all portals: https://dev.wix.com/docs/llms.txt > - Full concatenated docs: https://dev.wix.com/docs/llms-full.txt ## Resource: About Git Integration with Wix CLI ## Article: About Git Integration with Wix CLI ## Article Link: https://dev.wix.com/docs/develop-websites-sdk/code-your-site/developer-environments/ides/git-integration/about-git-integration-with-wix-cli.md ## Article Content: # About Git Integration with Wix CLI Git Integration & Wix CLI is a set of tools that allows you to write, test, preview, and publish code for a Wix site using your preferred IDE. The site code is stored in a GitHub repository, giving you version control and making collaboration easy.
## Code in your preferred IDE Git Integration & Wix CLI allows you to connect a site to GitHub and develop using your preferred IDE. Wix sets up a repository for your project, which you can clone to your computer or cloud workspace and write code in as you would in any other non-Wix project. Read how to [set up Git integration & Wix CLI](https://dev.wix.com/docs/develop-websites-sdk/code-your-site/developer-environments/ides/git-integration/set-up-git-integration-with-wix-cli.md). ## Test your code with the Local Editor The [Local Editor](https://dev.wix.com/docs/develop-websites-sdk/code-your-site/developer-environments/ides/git-integration/about-the-local-editor.md) allows you to test changes made to a site in real time. The code in your IDE is synced with the Local Editor so you can test your changes before committing them to your repo. You can also change the site's design in the Local Editor and sync it with your IDE. ## Preview and publish with the Wix CLI The [Wix CLI](https://dev.wix.com/docs/develop-websites-sdk/code-your-site/developer-environments/ides/git-integration/wix-cli-commands.md) is a tool that allows you to work with a site locally from the terminal. You can use it to build a preview version of the site and publish it. You can also use the CLI to install [npm packages](https://dev.wix.com/docs/develop-websites-sdk/code-your-site/developer-environments/packages/npm/about-npm-packages.md) to the site. ## Work with multiple collaborators at once Git Integration & Wix CLI extends Wix Studio's [concurrent editing](https://support.wix.com/en/article/studio-editor-collaborating-on-a-site) capabilities. Invite other developers as collaborators on your [site](https://support.wix.com/en/article/inviting-people-to-contribute-to-your-site) and your [GitHub repo](https://docs.github.com/en/account-and-profile/setting-up-and-managing-your-personal-account-on-github/managing-access-to-your-personal-repositories/inviting-collaborators-to-a-personal-repository). Multiple developers can work on a site's code at once. ## Version control With Git integration, every change to a site's code is tracked in your GitHub repository, giving you a clear history of edits and the ability to revert to previous versions when needed. This makes it easy to manage updates, resolve conflicts, and maintain a stable development workflow—even when working with multiple collaborators. ## Get started - To get started, read how to [Set Up Git Integration & Wix CLI](https://dev.wix.com/docs/develop-websites-sdk/code-your-site/developer-environments/ides/git-integration/set-up-git-integration-with-wix-cli.md). --- > Portal Navigation: > > - Append `.md` to any URL under `https://dev.wix.com/docs/` to get its markdown version. > - Pages are either content pages (article or reference text) or menu pages (a list of links to child pages). > - To get a menu page, truncate any URL to a parent path and append `.md` (e.g. `https://dev.wix.com/docs/sdk.md`, `https://dev.wix.com/docs/sdk/core-modules.md`). > - Top-level index of all portals: https://dev.wix.com/docs/llms.txt > - Full concatenated docs: https://dev.wix.com/docs/llms-full.txt ## Resource: Set Up Git Integration with Wix CLI ## Article: Set Up Git Integration with Wix CLI ## Article Link: https://dev.wix.com/docs/develop-websites-sdk/code-your-site/developer-environments/ides/git-integration/set-up-git-integration-with-wix-cli.md ## Article Content: # Set Up Git Integration with Wix CLI [Git Integration & Wix CLI](https://dev.wix.com/docs/develop-websites-sdk/code-your-site/developer-environments/ides/git-integration/about-git-integration-with-wix-cli.md) allows you to write, test, preview, and publish code for a Wix site from your preferred IDE. This article explains how to set up Git Integration & Wix CLI by connecting a site to GitHub, cloning the site's GitHub repository to your computer, and installing the CLI. > **Note:** You can also clone the repo to a cloud IDE workspace, then install and use the CLI there. ## Step 1 | Connect a site to GitHub To write a site's code locally from your computer, first create a GitHub repo to store the site's code and connect it to the site.
**Important:** - You can't connect a site to GitHub if you have [Velo packages](https://dev.wix.com/docs/develop-websites-sdk/code-your-site/developer-environments/packages/velo-packages/about-velo-packages.md) set up on the site. This feature isn't supported when using Git Integration & Wix CLI. However, you can connect a site to GitHub if you have [npm packages](https://dev.wix.com/docs/develop-websites-sdk/code-your-site/developer-environments/packages/npm/about-npm-packages.md) installed on the site. - Once you connect a site to GitHub be careful not to delete the site's repo or revoke the Velo app's access to this repo. These actions may cause the site's GitHub connection to stop working even if you restore the repo or reinstall the app.
1. Go to the GitHub Integration section of your editor: ::::tabs :::Wix-Studio In the Code sidebar, click **GitHub** then **Connect to GitHub**. ![Connect to GitHub](https://wixmp-833713b177cebf373f611808.wixmp.com/images/2975acc2f04e09b584d7445e64fb1107.png) ::: :::Wix-Editor Click the **GitHub Integration** ![GitHub Integration icon](https://wixmp-833713b177cebf373f611808.wixmp.com/images/2b82d51bac04c8cc7a75a04789b97475.png) icon in the Code sidebar and then **Connect to GitHub**. ::: :::: 2. Click **Continue**. ![GitHub Continue button](https://wixmp-833713b177cebf373f611808.wixmp.com/images/651ae528670f7aff87352339776dd7ed.png) 3. Click **Sign In**. Follow the prompts to sign in to your GitHub account and authorize Velo to create a new repo for you. 4. Choose an owner and enter a name for the new repo to connect to the site. Optionally, you can add a custom description as well. Click **Create**. ![GitHub Create repository dialog](https://wixmp-833713b177cebf373f611808.wixmp.com/images/df0351c67d99b9a80306dd59a9197f3f.png) 5. Click **Install** to start installing the Velo GitHub app on your new repo. This app allows the site to communicate with GitHub. You may need to authenticate your identity in GitHub before continuing. 6. Make sure that both **Only select repositories** and your new repo are selected. Click **Approve and Install**. ![GitHub Approve and Install dialog](https://wixmp-833713b177cebf373f611808.wixmp.com/images/2f5b703a13d58cb46441c8cec881037d.png) 7. Copy the displayed terminal commands. You need them for the next section of the setup. ![GitHub terminal commands display](https://wixmp-833713b177cebf373f611808.wixmp.com/images/229c0690b02246b6a8affc58e71c321e.png) 8. Click **Close**. Your repo name and default branch are displayed in the **GitHub Integration** panel. ![GitHub Integration panel details](https://wixmp-833713b177cebf373f611808.wixmp.com/images/d2a2eb8831668eb1640e1d29361fe29d.png) Once you connect a site to GitHub, your editor enters [read-only mode](https://support.wix.com/en/article/velo-working-with-editor-x-and-github-integration#about-read-only-mode). You can always choose to [disconnect your site from GitHub](https://dev.wix.com/docs/develop-websites-sdk/code-your-site/developer-environments/ides/git-integration/disconnect-a-site-from-git-hub.md). ## Step 2 | Set up your local environment Once the site's repo it set up, you can clone it to your computer and install the Wix CLI. The commands used in this procedure accomplish the following: - Clone the site's repo to your computer. - Install the repo's dependencies. - Install the [Wix CLI](https://dev.wix.com/docs/develop-websites-sdk/code-your-site/developer-environments/ides/git-integration/wix-cli-commands.md) globally on your computer. Before getting started, make sure you have the following things installed: - [Git](https://git-scm.com/download) - [Node](https://nodejs.org/en/download/), version 20.11 or later. - [npm](https://docs.npmjs.com/downloading-and-installing-node-js-and-npm) or [yarn](https://yarnpkg.com/getting-started/install) - An SSH key [added to your GitHub account](https://docs.github.com/en/authentication/connecting-to-github-with-ssh/adding-a-new-ssh-key-to-your-github-account). To set up your local environment, do the following: 1. Open the terminal on your computer. 2. Navigate to the directory where you want to store your repo's files. 3. Run the commands you copied down in the previous section. Depending on your computer's setup, you may need administrator privileges to run the commands. To see the commands again, open the site's editor and click **Local Dev Setup**. ![Local Dev Setup button](https://wixmp-833713b177cebf373f611808.wixmp.com/images/781d050053508b55f896e6a28aa3bbbf.png) The default commands use npm as the package manager for installations. You can also use yarn to manage packages. To do this, make the following changes: - Change `npm install` to `yarn install`. - Change `npm install -g @wix/cli` to `yarn global add @wix/cli`. After the installation, the [Local Editor](https://dev.wix.com/docs/develop-websites-sdk/code-your-site/developer-environments/ides/git-integration/about-the-local-editor.md) opens in your default web browser. 4. Open the repo in your favorite local IDE to start writing code. > **Note:** Run [`wix install `](https://dev.wix.com/docs/develop-websites-sdk/code-your-site/developer-environments/ides/git-integration/wix-cli-commands.md) in your project directory to install Wix packages. For example: `wix install @wix/events`. ## Next steps You're ready to start writing the site's code, and [testing it with the Local Editor](https://dev.wix.com/docs/develop-websites-sdk/code-your-site/developer-environments/ides/git-integration/test-your-code-in-the-local-editor.md) --- > Portal Navigation: > > - Append `.md` to any URL under `https://dev.wix.com/docs/` to get its markdown version. > - Pages are either content pages (article or reference text) or menu pages (a list of links to child pages). > - To get a menu page, truncate any URL to a parent path and append `.md` (e.g. `https://dev.wix.com/docs/sdk.md`, `https://dev.wix.com/docs/sdk/core-modules.md`). > - Top-level index of all portals: https://dev.wix.com/docs/llms.txt > - Full concatenated docs: https://dev.wix.com/docs/llms-full.txt ## Resource: Git Repository File Structure ## Article: Git Repository File Structure ## Article Link: https://dev.wix.com/docs/develop-websites-sdk/code-your-site/developer-environments/ides/git-integration/git-repository-file-structure.md ## Article Content: # Git Repository File Structure The repo's file structure matches the public, backend, and page code sections in the Code sidebar of the Wix editors. The file structure includes these important elements: - The [wix.config.json](#wixconfigjson) file found in the repo's root folder. - The **src** folder, that contains the following: - The [Backend folder](#backend-folder) - The [Pages folder](#pages-folder) - The [Public folder](#public-folder) - The [velo.dependencies.json](#velodependenciesjson) file (only exists once the first npm package is installed) Add code in either the **Pages**, **Backend**, or **Public** folders. Files or folders added to the root of the **src** folder are ignored. > **Notes:** > The following Velo features can't be added to a site when using Git Integration & Wix CLI: > > - [Custom Apps](https://dev.wix.com/docs/develop-websites-sdk/code-your-site/developer-environments/packages/custom-apps/about-custom-apps.md) > - [Velo Packages](https://dev.wix.com/docs/develop-websites-sdk/code-your-site/developer-environments/packages/velo-packages/about-velo-packages.md) ## Pages folder This folder contains code files for each of the pages on a site as well as the `masterpage.js` file. The code you add to these files runs when visitors open pages on the site. These files correspond to the ones found in the **Main Pages** section of the **Page Code** tab in the Code sidebar. When you add a page to a site in a Wix editor in your browser, a code file for that page gets added to the repo. The name of the file has 2 components: the name of the page that you define in the editor, and an internal ID string. The sections are separated by a period. ![Page name and ID](https://wixmp-833713b177cebf373f611808.wixmp.com/images/e709462e23ad2fdbb330efaacc3c3f41.png) When you [add a dynamic page](https://support.wix.com/en/article/content-manager-about-dynamic-pages#adding-dynamic-pages) to a site 2 code files are added to the site's repo corresponding to the dynamic list and dynamic item pages. When you open a page's code file, you see the same sample code that appears in these code files in Wix editors in your browser. ![Sample code](https://wixmp-833713b177cebf373f611808.wixmp.com/images/50c249b2e60957f6e2a3e0335ff1eed5.png) When you delete a page in a Wix editor in your browser, the page's corresponding code file is deleted from the repo. > **Notes:** > > - You can't create new code files for pages from the IDE. To add a file, create a new page for the site in a Wix editor in your browser, and [sync](https://dev.wix.com/docs/develop-websites-sdk/code-your-site/developer-environments/ides/git-integration/working-with-the-local-editor.md#sync-design-changes-to-your-ide) the site with the local IDE. > - Don't rename code files for pages. Wix uses these file names to associate the files with the appropriate pages on the site. If you rename a file, the code is ignored and a new code file is created for the page. ## Backend folder This folder contains the backend code files for a site. These files correspond to the ones found in the **Backend** section of the **Public & Backend** tab in the Code sidebar. Add the following files to this folder to include them in the site: - [**Web Modules:**](https://dev.wix.com/docs/develop-websites-sdk/code-your-site/build-a-custom-backend/web-modules/about-web-modules.md) These are files that allow you to expose functions in a site's backend that you can run in frontend code. These files require a `.web.js` file extension. > **Note:** For web modules with a `.jsw` extension, permissions are managed using the [permissions.json](#permissionsjson) file. Note that `.jsw` web modules are deprecated, although still supported for backward compatibility for both Wix Editor and Wix Studio. - **data.js:** A file for [adding data hooks](https://dev.wix.com/docs/develop-websites-sdk/code-your-site/work-with-data/data-api/about-data-hooks.md) to the site's collections. - **routers.js:** A file for implementing [routing and sitemap](https://dev.wix.com/docs/develop-websites-sdk/code-your-site/build-a-custom-backend/routers/about-routers.md#routing-code) functionality for the site. - **events.js:** A file for implementing the site's [backend event handlers](https://dev.wix.com/docs/develop-websites-sdk/code-your-site/build-a-custom-backend/backend-events/about-backend-events.md). - **http-functions.js:** A file for implementing [HTTP endpoints](https://www.wix.com/velo/reference/wix-http-functions/introduction) that are exposed on the site. - **jobs.config:** A file for [scheduling recurring jobs](https://dev.wix.com/docs/develop-websites-sdk/code-your-site/build-a-custom-backend/scheduled-jobs/schedule-recurring-jobs.md). Jobs consist of other backend code that's run at regular intervals. - **General backend files:** JavaScript code files. You can import code from these files into any other backend file on the site. These files require a `.js` file extension. Use the following syntax to import code from backend files: ```javascript import { myFunctionName } from "backend/myFileName"; ``` Trying to import from the relative path in the site's repo doesn't work. ### permissions.json
When using `.jsw` (deprecated) web modules, you can't change permissions in the editor when using Git Integration & Wix CLI. Instead, use the permissions.json file to set function permissions.   The backend folder also contains the **permissions.json** file. This file defines [permissions](https://dev.wix.com/docs/develop-websites-sdk/code-your-site/build-a-custom-backend/web-modules/about-web-modules.md#permissions) for the functions in web module files. The file contains a key, `"web-methods"`, whose value is an object that contains keys named after the web module files in the backend folder. Name these keys with the following syntax: `"backend/{path to file}/myFile.jsw"`. The value for each file name key is an object that contains keys named after the functions in that file. Each function key has a value with the following format: ```json "myFunction": { "siteOwner" : { "invoke" : // Boolean }, "siteMember" : { "invoke" : // Boolean }, "anonymous" : { "invoke" : // Boolean } } ``` These values reflect the different levels of web module function permissions. You should set them using the following options: - **Owner-only access**: - `siteOwner.invoke`: `true` - `siteMember.invoke`: `false` - `anonymous.invoke` : `false` - **Site member access**: - `siteOwner.invoke`: `true` - `siteMember.invoke`: `true` - `anonymous.invoke` : `false` - **Anyone can access**: - `anonymous.invoke`: `true` - `siteMember.invoke` : `true` - `anonymous.invoke`: `true` The `"web-methods"` object must also contain a `"*"` key. The value for this key defines the default permissions that are applied to any function whose permissions you don't set manually. Here is an example `permissions.json` file for a site with a backend file called `helperFunctions.jsw`. The file's functions are called `calculate`, `fetchData`, and `syncWithServer`. In this case anyone can call `calculate`, site members can call `syncWithServer`, and only site owners can call `fetchData`. ```json { "web-methods": { "*": { "*": { "siteOwner": { "invoke": true }, "siteMember": { "invoke": true }, "anonymous": { "invoke": true } } }, "backend/helperFunctions.jsw": { "calculate": { "siteOwner": { "invoke": true }, "siteMember": { "invoke": true }, "anonymous": { "invoke": true } }, "fetchData": { "siteOwner": { "invoke": true }, "siteMember": { "invoke": false }, "anonymous": { "invoke": false } }, "syncWithServer": { "siteOwner": { "invoke": true }, "siteMember": { "invoke": true }, "anonymous": { "invoke": false } } } } } ```
## Public folder This folder contains the public code files for a site. These files correspond to the ones found in the **Public** section of the **Public & Backend** tab in the Code sidebar. You can import code from these files into any other file on the site. Use the following syntax to import code from public files: ```javascript import { myFunctionName } from "public/myFileName"; ``` Trying to import from the relative path in the site's repo doesn't work. ## velo.dependencies.json This file is created automatically when you install the first npm package. Wix uses this file to track the [npm packages](https://dev.wix.com/docs/develop-websites-sdk/code-your-site/developer-environments/packages/npm/about-npm-packages.md) installed on a site. The file is updated automatically when you [install a package](https://dev.wix.com/docs/develop-websites-sdk/code-your-site/developer-environments/ides/git-integration/wix-cli-commands.md#wix-install) with the Wix CLI. Don't change this file manually. ## wix.config.json Wix uses this file to associate a repo's code with a particular site and [UI version](https://dev.wix.com/docs/develop-websites-sdk/code-your-site/developer-environments/ides/git-integration/about-the-local-editor.md). This file is updated automatically when the repo is synced with the Wix editors. Don't change this file manually. ## See also - [Publish a Site with Git Integration & Wix CLI](https://dev.wix.com/docs/develop-websites-sdk/code-your-site/developer-environments/ides/git-integration/publish-a-site-with-git-integration-and-wix-cli.md) - [Test Code in the Local Editor](https://dev.wix.com/docs/develop-websites-sdk/code-your-site/developer-environments/ides/git-integration/test-code-in-the-local-editor.md) - [Fix a Broken Git Integration](https://dev.wix.com/docs/develop-websites-sdk/code-your-site/developer-environments/ides/git-integration/fix-a-broken-git-integration.md) --- > Portal Navigation: > > - Append `.md` to any URL under `https://dev.wix.com/docs/` to get its markdown version. > - Pages are either content pages (article or reference text) or menu pages (a list of links to child pages). > - To get a menu page, truncate any URL to a parent path and append `.md` (e.g. `https://dev.wix.com/docs/sdk.md`, `https://dev.wix.com/docs/sdk/core-modules.md`). > - Top-level index of all portals: https://dev.wix.com/docs/llms.txt > - Full concatenated docs: https://dev.wix.com/docs/llms-full.txt ## Resource: Wix CLI Commands ## Article: Wix CLI Commands ## Article Link: https://dev.wix.com/docs/develop-websites-sdk/code-your-site/developer-environments/ides/git-integration/wix-cli-commands.md ## Article Content: # Wix CLI Commands This article documents the CLI commands for working with a Wix site. For a detailed explanation of the process and how to initially set up the CLI, see [Set up Git Integration & Wix CLI](https://dev.wix.com/docs/develop-websites-sdk/code-your-site/developer-environments/ides/git-integration/set-up-git-integration-with-wix-cli.md). ## Command overview | Command | Description | | ------------------------------- | -------------------------------------------------------- | | [wix dev](#wix-dev) | Opens a local development environment for a Wix site. | | [wix install](#wix-install) | Installs a package to a site. | | [wix update](#wix-update) | Updates a package installed on a site. | | [wix uninstall](#wix-uninstall) | Uninstalls a package from a site. | | [wix publish](#wix-publish) | Publishes a site to production. | | [wix preview](#wix-preview) | Creates a shareable version of a site before going live. | | [wix login](#wix-login) | Logs in to a Wix account. | | [wix whoami](#wix-whoami) | Displays the username of the logged-in Wix user. | | [wix logout](#wix-logout) | Logs out of a Wix account. | ## wix -h ```bash wix -h ``` Displays a list of supported CLI commands in the terminal. You can also run `wix [command] -h` to get detailed help for a command. ## wix dev ```bash wix dev ``` Opens a site's Local Editor. ### wix dev flags | Flag | Description | | ---------- | --------------------------------------------------------------------------------------- | | `--tunnel` | Use this flag to allow the editor to connect to the CLI when running it on a cloud IDE. | ## wix install ```bash wix install [options] ``` Installs a code package to a site's repo. If the site's repo has a `yarn.lock` file, the installer uses yarn to install packages by default. Otherwise, the installer uses npm by default. To specify which package manager to use, include an `--npm` or `--yarn` options flag. Example install command: ```bash wix install --yarn marked ``` Once the package is installed, a message is displayed in the terminal. ```bash marked@4.0.16 successfully installed. ``` ### wix install flags | Flag | Description | | -------- | -------------------------------------------------------- | | `--npm` | Forces the installer to use npm as the package manager. | | `--yarn` | Forces the installer to use yarn as the package manager. | ## wix update ```bash wix update [options] ``` Updates a code package installed on a site's repository. ## wix uninstall ```bash wix uninstall [options] ``` Uninstalls a code package from a site's repository. ## wix publish ```bash wix publish ``` Publishes a site. You can choose to use either the code in the default branch of a site's repo or the local code in your IDE as the publishing source. ```bash ? What would you like to publish? › - Use arrow-keys. Return to submit. ❯ Latest commit from origin/main Local code ```
**Important:** Publishing local code leaves the live site and the site's GitHub repo out of sync. If you publish from the repo later without pushing the local code, the local code is overwritten and may be lost.
For more information, see [Publish a Site with Git Integration & Wix CLI](https://dev.wix.com/docs/develop-websites-sdk/code-your-site/developer-environments/ides/git-integration/publish-a-site-with-git-integration-and-wix-cli.md). ## wix preview ```bash wix preview ``` Builds a preview version of a site. You can only use this command if you have previously published the site. You can build the preview from the code in the default branch of a site's repo or from the local code in your IDE. ```bash ? What would you like to preview? › - Use arrow-keys. Return to submit. ❯ Latest commit from origin/main Local code ``` Once the preview site is ready, a URL to the site is displayed in the terminal. ```bash Creating preview deployment... Your preview deployment is now available at http://wix.to/JOaBagO ``` > **Note:** > > - This preview isn't a [test site](https://dev.wix.com/docs/develop-websites-sdk/test-your-site/work-with-test-sites/about-test-sites.md) and doesn't appear in the Release Manager. > - The preview uses the live versions of any [HTTP functions](https://www.wix.com/velo/reference/wix-http-functions) exposed on the site. This means you can't use the preview to test changes to HTTP functions. To test HTTP functions, commit and push them to the site's repo and use [functional testing](https://dev.wix.com/docs/develop-websites-sdk/test-your-site/test-backend-functions/test-backend-functions-with-functional-testing.md) in the editor. ## wix login ```bash wix login ``` Logs in to a Wix account. This allows the CLI to perform actions on that account's sites. ## wix whoami ```bash wix whoami ``` Displays the username of the currently logged-in Wix user. ## wix logout ```bash wix logout ``` Logs out of a Wix account. ## See also - [About Automated Workflows and the Wix CLI](https://dev.wix.com/docs/develop-websites-sdk/code-your-site/developer-environments/ides/git-integration/about-automated-workflows-and-the-wix-cli.md) - [Testing your code with the Local Editor](https://dev.wix.com/docs/develop-websites-sdk/code-your-site/developer-environments/ides/git-integration/test-code-in-the-local-editor.md) --- > Portal Navigation: > > - Append `.md` to any URL under `https://dev.wix.com/docs/` to get its markdown version. > - Pages are either content pages (article or reference text) or menu pages (a list of links to child pages). > - To get a menu page, truncate any URL to a parent path and append `.md` (e.g. `https://dev.wix.com/docs/sdk.md`, `https://dev.wix.com/docs/sdk/core-modules.md`). > - Top-level index of all portals: https://dev.wix.com/docs/llms.txt > - Full concatenated docs: https://dev.wix.com/docs/llms-full.txt ## Resource: About the Local Editor ## Article: About the Local Editor ## Article Link: https://dev.wix.com/docs/develop-websites-sdk/code-your-site/developer-environments/ides/git-integration/about-the-local-editor.md ## Article Content: # About the Local Editor > **Note:** > This article refers to 2 different versions of the editor: > > - **Regular Editor**: The editor that's generally used to build Wix sites. > - **Local Editor**: A specialized version of the Regular Editor that's used when developing a site in a local IDE. The Local Editor is a tool for testing code added to a site in a local IDE using [Git Integration & Wix CLI](https://dev.wix.com/docs/develop-websites-sdk/code-your-site/developer-environments/ides/git-integration/about-git-integration-with-wix-cli.md). You can use the Local Editor to test code in real time and make changes to a site's design that you can sync with the IDE. For detailed instructions on this flow, see [Test Code in the Local Editor](https://dev.wix.com/docs/develop-websites-sdk/code-your-site/developer-environments/ides/git-integration/test-code-in-the-local-editor.md). ## Differences in the Local Editor Working in the Local Editor is different from working in the Regular Editor. Please note the following changes: - The **Publish** button is replaced with the **Save** button. - Code files are read-only. To make changes to a site's code, use the local IDE. - Packages & Apps are read-only. To add, update, or delete packages and apps, use the local IDE. - The Wix IDE is disabled, use the local IDE instead. - If you duplicate a page on a site, the page's code isn't included in the copy. - Changes to [collection fields](https://dev.wix.com/docs/develop-websites-sdk/code-your-site/work-with-data/introduction/about-collection-fields.md) are immediately reflected on the live site, even before you publish. ## Making changes to site design The Local Editor allows you to make changes to a site's design such as adding or modifying elements and pages. These changes generate a new UI version for the site which you need to sync with the IDE. Once the UI version is synced with the IDE, code files for newly added pages appear in the repo. Autocomplete is also enabled for any newly added page elements. ### About UI versions UI versions are snapshots of a site's design. Saving any design changes to a site including adding a new page or adding or modifying elements generates a new UI version. UI versions are generated in both the Local Editor and the Regular Editor. Wix uses UI versions to match the code in the IDE with a site's design. The current UI version for the code in a site's repo is indicated in the [wix.config.json](https://dev.wix.com/docs/develop-websites-sdk/code-your-site/developer-environments/ides/git-integration/git-repository-file-structure.md#wixconfigjson) file. ```json { "siteId": "7a6f62c7-bc3c-4d9d-8e06-29741d71c704", "uiVersion": "4" } ``` ## See also - [Test Code in the Local Editor](https://dev.wix.com/docs/develop-websites-sdk/code-your-site/developer-environments/ides/git-integration/test-code-in-the-local-editor.md) --- > Portal Navigation: > > - Append `.md` to any URL under `https://dev.wix.com/docs/` to get its markdown version. > - Pages are either content pages (article or reference text) or menu pages (a list of links to child pages). > - To get a menu page, truncate any URL to a parent path and append `.md` (e.g. `https://dev.wix.com/docs/sdk.md`, `https://dev.wix.com/docs/sdk/core-modules.md`). > - Top-level index of all portals: https://dev.wix.com/docs/llms.txt > - Full concatenated docs: https://dev.wix.com/docs/llms-full.txt ## Resource: Test Code in the Local Editor ## Article: Test Code in the Local Editor ## Article Link: https://dev.wix.com/docs/develop-websites-sdk/code-your-site/developer-environments/ides/git-integration/test-code-in-the-local-editor.md ## Article Content: # Test Code in the Local Editor > **Note** > This article refers to 2 different versions of the editor: > > - **Regular Editor**: The editor that's generally used to build Wix sites. > - **Local Editor**: A specialized version of the Regular Editor that's used when developing a site in a local IDE. The [Local Editor](https://dev.wix.com/docs/develop-websites-sdk/code-your-site/developer-environments/ides/git-integration/about-the-local-editor.md) is a tool for testing code added to a site in a local IDE using [Git Integration & Wix CLI](https://dev.wix.com/docs/develop-websites-sdk/code-your-site/developer-environments/ides/git-integration/about-git-integration-with-wix-cli.md). You can use the Local Editor to test your code in real time and make changes to the site's design that you can sync with your IDE. This article explains how to test your code in the Local Editor and sync any design changes you make. ## Step 1 | Open the Local Editor Open the Local Editor from your computer using the [Wix CLI](https://dev.wix.com/docs/develop-websites-sdk/code-your-site/developer-environments/ides/git-integration/wix-cli-commands.md). 1. In a terminal, navigate to the clone of the site's GitHub repository. 2. Run: `wix dev`. A new tab with the Local Editor opens in your default browser. Notice the **Local Editor** tag in the top bar on the left. > **Note:** If you're running the CLI on a cloud provider's IDE, such as GitHub Codespaces, add the `--tunnel` flag to the `wix dev` command. This makes the full command `wix dev --tunnel`. ### Reopen a closed Local Editor The Local Editor needs both the terminal and a browser tab open to run. If you close the browser tab, your terminal displays a URL you can use to reopen the editor in your browser. You can also do this by pressing `e` in the terminal. If you close your terminal, the browser displays an error screen. In this case, you need to open the Local Editor again by running `wix dev` in your terminal. ## Step 2 | Test your code Once the Local Editor is open, you can use it to test your code in real time. 1. Edit the site's code in your IDE and save it. ```js $w.onReady(function () { console.log("Hello World!"); }); ``` Your code is automatically synced with the Local Editor. You can see it in the editor's code panel. 2. In the Local Editor, click **Preview**. The site code runs. > **Note:** Even though you can see your code changes in the Local Editor, they don't appear in the Regular Editor until you [push them to GitHub](https://dev.wix.com/docs/develop-websites-sdk/code-your-site/developer-environments/ides/git-integration/publish-a-site-with-git-integration-and-wix-cli.md#step-1--push-code-to-github). Changes don't appear on your live site until you [publish](https://dev.wix.com/docs/develop-websites-sdk/code-your-site/developer-environments/ides/git-integration/publish-a-site-with-git-integration-and-wix-cli.md#step-2--publish-the-site). ### Sync design changes to your IDE If your testing reveals the need for design changes, you can make the changes directly in the Local Editor. The Local Editor and Regular Editor are synced, so any changes made in one are immediately reflected in the other. However, they aren't reflected in the code in your IDE. To sync the changes with your IDE, do the following: 1. Click **Save**. Clicking this button creates a new UI version. 2. If you see a modal asking you to save changes in the editor to local code, click **Continue**. ## Next steps When you're happy with the way your code runs, [push it to GitHub and publish the site](https://dev.wix.com/docs/develop-websites-sdk/code-your-site/developer-environments/ides/git-integration/publish-a-site-with-git-integration-and-wix-cli.md). --- > Portal Navigation: > > - Append `.md` to any URL under `https://dev.wix.com/docs/` to get its markdown version. > - Pages are either content pages (article or reference text) or menu pages (a list of links to child pages). > - To get a menu page, truncate any URL to a parent path and append `.md` (e.g. `https://dev.wix.com/docs/sdk.md`, `https://dev.wix.com/docs/sdk/core-modules.md`). > - Top-level index of all portals: https://dev.wix.com/docs/llms.txt > - Full concatenated docs: https://dev.wix.com/docs/llms-full.txt ## Resource: About the Regular Editor when Connected to GitHub ## Article: About the Regular Editor When Connected to GitHub ## Article Link: https://dev.wix.com/docs/develop-websites-sdk/code-your-site/developer-environments/ides/git-integration/about-the-regular-editor-when-connected-to-git-hub.md ## Article Content: # About the Regular Editor when Connected to GitHub > **Note:** > This article refers to 2 different versions of the editor: > > - **Regular Editor**: The editor that's generally used to build Wix sites. > - **Local Editor**: A specialized version of the Regular Editor that's used when developing a site in a local IDE. When you connect a site to GitHub, the Regular Editor undergoes some changes to facilitate code management and version control. The code in the Regular Editor is automatically synced with the [default branch](https://docs.github.com/en/pull-requests/collaborating-with-pull-requests/proposing-changes-to-your-work-with-pull-requests/about-branches#about-the-default-branch) of the connected repo. Because a connected site's code is managed outside of the editor, the code in the Regular Editor is in [read-only mode](#about-read-only-mode). The name of the connected repo as well as the details of commits to the default branch appear in the **GitHub Integration** panel of the sidebar. ![GitHub Integration panel](https://wixmp-833713b177cebf373f611808.wixmp.com/images/d2a2eb8831668eb1640e1d29361fe29d.png) ## About read-only mode While a site is connected to GitHub, the Regular Editor is in read-only mode. This involves the following changes: - Code files are read-only. You can't make any changes to the site's code or add new files. Use the local IDE to [add new files and change code](https://dev.wix.com/docs/develop-websites-sdk/code-your-site/developer-environments/ides/git-integration/git-repository-file-structure.md). - You can add [dynamic event handlers](https://dev.wix.com/docs/develop-websites-sdk/code-your-site/build-a-custom-frontend/event-handlers/about-event-handlers.md) to elements using code. To see the event handlers supported for each element, check the [Velo API Reference](https://dev.wix.com/docs/velo/velo-only-apis/$w/introduction.md). - Changes to the [fields](https://dev.wix.com/docs/develop-websites-sdk/code-your-site/work-with-data/introduction/about-collection-fields.md) in a collection are immediately reflected on the live site, even before you publish. - If you duplicate a page on the site, the page's code isn't included in the copy. ## See also - [Test Code in the Local Editor](https://dev.wix.com/docs/develop-websites-sdk/code-your-site/developer-environments/ides/git-integration/test-code-in-the-local-editor.md) - [Publish a Site with Git Integration and Wix CLI](https://dev.wix.com/docs/develop-websites-sdk/code-your-site/developer-environments/ides/git-integration/publish-a-site-with-git-integration-and-wix-cli.md) --- > Portal Navigation: > > - Append `.md` to any URL under `https://dev.wix.com/docs/` to get its markdown version. > - Pages are either content pages (article or reference text) or menu pages (a list of links to child pages). > - To get a menu page, truncate any URL to a parent path and append `.md` (e.g. `https://dev.wix.com/docs/sdk.md`, `https://dev.wix.com/docs/sdk/core-modules.md`). > - Top-level index of all portals: https://dev.wix.com/docs/llms.txt > - Full concatenated docs: https://dev.wix.com/docs/llms-full.txt ## Resource: About Automated Workflows and the Wix CLI ## Article: About Automated Workflows and the Wix CLI ## Article Link: https://dev.wix.com/docs/develop-websites-sdk/code-your-site/developer-environments/ides/git-integration/about-automated-workflows-and-the-wix-cli.md ## Article Content: # About Automated Workflows and the Wix CLI You can use the Wix CLI in your preferred automated workflow environment by [authenticating it with an API key](https://support.wix.com/en/article/about-wix-api-keys). For example, you can create [GitHub Actions](https://docs.github.com/en/actions) workflows to streamline and automate site development tasks, such as creating preview deployments and publishing updates to a site. Learn how to [Set Up GitHub Actions to Work with the Wix CLI](https://dev.wix.com/docs/develop-websites-sdk/code-your-site/developer-environments/ides/git-integration/set-up-git-hub-actions.md). ## Suggested workflows Setting up GitHub Actions workflows to work with the Wix CLI allows you to streamline and automate site development procedures. Some suggested workflows include: 1. Create a preview deployment: Build a live, shareable preview version of a site whenever a new pull request is opened, based the updated code in the pull request's branch. 2. Publish when pushing changes: Automatically publish a site whenever changes are pushed to the default branch of the site's repo. ## See also - [Set Up GitHub Actions to Work with the Wix CLI](https://dev.wix.com/docs/develop-websites-sdk/code-your-site/developer-environments/ides/git-integration/set-up-github-actions-to-work-with-the-wix-cli.md) - [Learn more about GitHub Actions](https://docs.github.com/en/actions) --- > Portal Navigation: > > - Append `.md` to any URL under `https://dev.wix.com/docs/` to get its markdown version. > - Pages are either content pages (article or reference text) or menu pages (a list of links to child pages). > - To get a menu page, truncate any URL to a parent path and append `.md` (e.g. `https://dev.wix.com/docs/sdk.md`, `https://dev.wix.com/docs/sdk/core-modules.md`). > - Top-level index of all portals: https://dev.wix.com/docs/llms.txt > - Full concatenated docs: https://dev.wix.com/docs/llms-full.txt ## Resource: Set Up GitHub Actions ## Article: Set Up GitHub Actions ## Article Link: https://dev.wix.com/docs/develop-websites-sdk/code-your-site/developer-environments/ides/git-integration/set-up-git-hub-actions.md ## Article Content: # Set Up GitHub Actions To enable a GitHub Actions workflow to perform actions on a Wix site, the workflow must set up and authenticate the Wix CLI using an API key. This allows you to automate tasks like creating preview deployments and publishing site updates directly from your GitHub repository. Follow the steps below to set up GitHub Actions with the Wix CLI. ## Prerequisites Before setting up GitHub Actions, ensure you have: - A Wix site [connected to GitHub](https://dev.wix.com/docs/develop-websites-sdk/code-your-site/developer-environments/ides/git-integration/set-up-git-integration-with-wix-cli.md) - Admin access to your Wix account (required for API key generation) - Admin access to the GitHub repository > **Note:** You can also [set up Git Integration & Wix CLI](https://dev.wix.com/docs/develop-websites-sdk/code-your-site/developer-environments/ides/git-integration/set-up-git-integration-with-wix-cli.md#step-2--set-up-your-local-environment) locally for testing. ## Step 1 | Generate an API key An API key allows GitHub Actions to authenticate with your Wix account and perform CLI operations on your sites. To generate an API key: 1. Go to the [API Keys Manager](https://manage.wix.com/account/api-keys) 2. Click **Generate API Key** 3. Select the **Wix CLI - Git Integration** permission 4. Copy and securely store the generated key > **Important:** Keep your API key secure and never commit it directly to your repository. ## Step 2 | Store the API key as a GitHub secret Visit the site's GitHub repo and [create a repository secret](https://docs.github.com/en/actions/security-guides/using-secrets-in-github-actions#creating-secrets-for-a-repository) to store the API key. This makes your API key available to use securely in the repo's GitHub Actions workflows. ## Step 3 | Set up the CLI in the GitHub Actions workflow Configure the GitHub Actions workflow to set up and authenticate the Wix CLI: 1. In the GitHub Actions workflow, [set up the Wix CLI](https://dev.wix.com/docs/develop-websites-sdk/code-your-site/developer-environments/ides/git-integration/set-up-git-integration-with-wix-cli.md#set-up-git-integration-with-wix-cli) by including the following command: ```sh npm install ``` 2. Next, authenticate it by including the following command: ```sh npm run wix login -- --api-key ${{ secrets.WIX_CLI_API_KEY }} ``` ## Step 4 | Include CLI commands The workflow can now run authenticated Wix CLI commands to interact with the site. For example: - Include `npm run wix preview` in the workflow to [build a preview version of the site](https://dev.wix.com/docs/develop-websites-sdk/code-your-site/developer-environments/ides/git-integration/wix-cli-commands.md#wix-preview) based on the current branch. You can set up a workflow to create a preview version whenever a new PR is created. - Include `npm run wix publish` in the workflow to [publish the site](https://dev.wix.com/docs/develop-websites-sdk/code-your-site/developer-environments/ides/git-integration/wix-cli-commands.md#wix-publish) based on the repo's default branch. You can set up a workflow whenever a PR is merged to the default branch. ## See also - [About Automated Workflows and the Wix CLI](https://dev.wix.com/docs/develop-websites-sdk/code-your-site/developer-environments/ides/git-integration/about-automated-workflows-and-the-wix-cli.md) - [Wix CLI Commands](https://dev.wix.com/docs/develop-websites-sdk/code-your-site/developer-environments/ides/git-integration/wix-cli-commands.md) - [Generate an API Key](https://dev.wix.com/docs/go-headless/getting-started/setup/authentication/generate-an-api-key-for-admins.md) - [Using Secrets in GitHub Actions](https://docs.github.com/en/actions/security-guides/using-secrets-in-github-actions) --- > Portal Navigation: > > - Append `.md` to any URL under `https://dev.wix.com/docs/` to get its markdown version. > - Pages are either content pages (article or reference text) or menu pages (a list of links to child pages). > - To get a menu page, truncate any URL to a parent path and append `.md` (e.g. `https://dev.wix.com/docs/sdk.md`, `https://dev.wix.com/docs/sdk/core-modules.md`). > - Top-level index of all portals: https://dev.wix.com/docs/llms.txt > - Full concatenated docs: https://dev.wix.com/docs/llms-full.txt ## Resource: Publish a Site with Git Integration and Wix CLI ## Article: Publish a Site with Git Integration and Wix CLI ## Article Link: https://dev.wix.com/docs/develop-websites-sdk/code-your-site/developer-environments/ides/git-integration/publish-a-site-with-git-integration-and-wix-cli.md ## Article Content: # Publish a Site with Git Integration & Wix CLI Once you've used [Git Integration & Wix CLI](https://dev.wix.com/docs/develop-websites-sdk/code-your-site/developer-environments/ides/git-integration/about-git-integration-with-wix-cli.md) to edit a site's code and test it, you're ready to move it to the live site. This process includes 2 stages: 1. Pushing the code to the site's GitHub repository. 2. Publishing the site. ## Step 1 | Push code to GitHub A site's editor is synced with the [default branch](https://docs.github.com/en/pull-requests/collaborating-with-pull-requests/proposing-changes-to-your-work-with-pull-requests/about-branches#about-the-default-branch) of the site's GitHub repository. Usually, this is the `main` branch, but you can [change it](https://docs.github.com/en/repositories/configuring-branches-and-merges-in-your-repository/managing-branches-in-your-repository/changing-the-default-branch) to any branch you want. To sync the code with the editor, push a commit to the repo's default branch. You can use other GitHub features like branches, pull requests, and reviews as you normally would. Once you push a commit to the default branch, the code appears in the editor. The commit details appear in the **GitHub Integration** panel of the Code sidebar (Wix Editor), or in the **Github** section of the Code sidebar (Wix Studio). ![GitHub Integration panel](https://wixmp-833713b177cebf373f611808.wixmp.com/images/d2a2eb8831668eb1640e1d29361fe29d.png) > **Note:** > There may be a delay between when you push a commit to GitHub and when it appears in the editor. ## Step 2 | Publish the site When working with Git Integration & Wix CLI, you can publish a site either from the editor or from the [Wix CLI](https://dev.wix.com/docs/develop-websites-sdk/code-your-site/developer-environments/ides/git-integration/wix-cli-commands.md). The different publishing options use different copies of the site's code and different [UI versions](https://dev.wix.com/docs/develop-websites-sdk/code-your-site/developer-environments/ides/git-integration/about-the-local-editor.md#about-ui-versions), as follows: | Publishing Method | Code Version | UI Version | | ------------------- | ------------------------------------------------------------------- | ------------------------------------------------------------------------------------------------------------------------------------------------------------------------------------------------------------------------------------------------- | | Editor | The code in the default branch of the site's repo. | The latest UI version, even if this version doesn't align with the code in the site's repo. | | CLI - Latest commit | The code in the default branch of the site's repo. | The UI version indicated in the [wix.config.json](https://dev.wix.com/docs/develop-websites-sdk/code-your-site/developer-environments/ides/git-integration/git-repository-file-structure.md#wixconfigjson) file in the site's repo. | | CLI - Local code | The code saved in your IDE even if you haven't pushed it to GitHub. | The UI version indicated in the [wix.config.json](https://dev.wix.com/docs/develop-websites-sdk/code-your-site/developer-environments/ides/git-integration/git-repository-file-structure.md#wixconfigjson) file in the site's repo. | > **Note:** Before you publish your site, make sure to save any changes you've made in the editor. Unsaved changes won't be included in the published site. ### Publish from the editor To publish a site from the editor do the following: 1. Open the editor. 2. Click **Publish** on the top-right. 3. Note that a modal may appear warning you that you are about to publish the latest UI version. Click **Continue**. ### Publish from the CLI To publish a site from the CLI, do the following: 1. Open a terminal and navigate to the site's repo. 2. Run this command: `wix publish`. 3. When you publish from the CLI, you can either use the code in the repo's default branch, or the code saved in your IDE. - To publish from the default branch, select `Latest commit from {the repo's default branch}`. - To publish from the code on your local environment, select `Local code`. **Important:** Publishing local code leaves the live site and the site's GitHub repo out of sync. If you publish from the repo later without pushing your local code, your local code is overwritten and may be lost. 4. Once you make a selection, the source of the code and UI version that are being used to publish are displayed in the terminal. A link to a preview site is also displayed. If you're sure you want to publish, press `y`. The terminal displays the URL of the published site and links to view logs and backend traffic. ## See also - [Wix CLI commands](https://dev.wix.com/docs/develop-websites-sdk/code-your-site/developer-environments/ides/git-integration/wix-cli-commands.md) - [About Automated Workflows and the Wix CLI](https://dev.wix.com/docs/develop-websites-sdk/code-your-site/developer-environments/ides/git-integration/about-automated-workflows-and-the-wix-cli.md) - [Fix a Broken Git Integration](https://dev.wix.com/docs/develop-websites-sdk/code-your-site/developer-environments/ides/git-integration/fix-a-broken-git-integration.md) --- > Portal Navigation: > > - Append `.md` to any URL under `https://dev.wix.com/docs/` to get its markdown version. > - Pages are either content pages (article or reference text) or menu pages (a list of links to child pages). > - To get a menu page, truncate any URL to a parent path and append `.md` (e.g. `https://dev.wix.com/docs/sdk.md`, `https://dev.wix.com/docs/sdk/core-modules.md`). > - Top-level index of all portals: https://dev.wix.com/docs/llms.txt > - Full concatenated docs: https://dev.wix.com/docs/llms-full.txt ## Resource: Disconnect a Site from GitHub ## Article: Disconnect a Site from GitHub ## Article Link: https://dev.wix.com/docs/develop-websites-sdk/code-your-site/developer-environments/ides/git-integration/disconnect-a-site-from-git-hub.md ## Article Content: # Disconnect a Site from GitHub If you need to, you can disconnect a site from GitHub. When you do this, the site retains the code from the most recent commit to the GitHub repo's default branch. After disconnecting, the repo still exists in GitHub but changes to it aren't reflected on the site. Once a site is disconnected from GitHub, the editor exits read-only mode.
**Important:** Once you disconnect a site from GitHub and from a repo, you can't reconnect the site to that repo again. If you reconnect a site to GitHub later, a new repo is created.
To disconnect from GitHub: 1. Click the **GitHub Integration** icon on the sidebar. 2. Hover over the repo's name and click the **More Actions** icon. 3. Select **Disconnect from GitHub**. 4. In the modal, click **Disconnect from GitHub**. --- > Portal Navigation: > > - Append `.md` to any URL under `https://dev.wix.com/docs/` to get its markdown version. > - Pages are either content pages (article or reference text) or menu pages (a list of links to child pages). > - To get a menu page, truncate any URL to a parent path and append `.md` (e.g. `https://dev.wix.com/docs/sdk.md`, `https://dev.wix.com/docs/sdk/core-modules.md`). > - Top-level index of all portals: https://dev.wix.com/docs/llms.txt > - Full concatenated docs: https://dev.wix.com/docs/llms-full.txt ## Resource: Fix a Broken Git Integration ## Article: Fix a Broken Git Integration ## Article Link: https://dev.wix.com/docs/develop-websites-sdk/code-your-site/developer-environments/ides/git-integration/fix-a-broken-git-integration.md ## Article Content: # Fix a Broken Git Integration [Git Integration](https://dev.wix.com/docs/develop-websites-sdk/code-your-site/developer-environments/ides/git-integration/about-git-integration-with-wix-cli.md) relies on the [Velo GitHub App](https://github.com/apps/velo-app) to maintain the connection between a site and its GitHub repository. If the app is uninstalled or suspended, the site's Git integration stops working. Git integration can also stop working if you make changes to the repo's settings or to your GitHub account settings. When the connection between a site and GitHub is lost, a modal indicating the problem appears in the editor. The following sections explain each of the modals you might see in the editor, and the steps you can take to fix Git integration. ## Repository not found The **GitHub repository can't be found** modal indicates that the Velo GitHub App can't find the site's repo. This happens in the following cases: - You deleted the repo. - You changed the repo's name. - You transferred the repo to another GitHub account or organization. - You changed your GitHub username. - You revoked the Velo App's access to the repo. In the first 4 cases, you need to disconnect the site from GitHub. You can do this by clicking the **Disconnect From GitHub** button in the modal. Once you've done this, [connect the site to GitHub](https://dev.wix.com/docs/develop-websites-sdk/code-your-site/developer-environments/ides/git-integration/set-up-git-integration-with-wix-cli.md#step-1--connect-a-site-to-github) again and create a new repo for the site. Please note that you can't reconnect the site to the original repo. In the last case, you can restore the connection to the site's repo by granting the Velo App access to it: 1. Open [GitHub](https://www.github.com) in a new tab in your browser. 2. In the upper-right corner, click your profile photo and select **Settings**. ![GitHub profile settings](https://wixmp-833713b177cebf373f611808.wixmp.com/images/441ce793f9e0e906e13045bae00f3da7.png) 3. On the left sidebar, under **Integrations**, click **Applications**. ![GitHub applications](https://wixmp-833713b177cebf373f611808.wixmp.com/images/b23426c2de1f30bce9271e327a08250b.png) 4. With the **Installed GitHub Apps** tab selected, find the Velo App and click **Configure**. ![GitHub installed apps](https://wixmp-833713b177cebf373f611808.wixmp.com/images/530fb69bf394c74539ac1ef7de7f27cf.png) 5. In the **Repository access** section, click **Select repositories**. Select the site's repository from the dropdown list. Click **Save**. ![GitHub repo access and save](https://wixmp-833713b177cebf373f611808.wixmp.com/images/15850febaa9b2fdc2af55ebf1aae07d3.png) 6. Return to the editor and refresh the page. ## Velo app uninstalled The **Velo App on GitHub was uninstalled** modal indicates that you have uninstalled the Velo App from your GitHub account. To reinstall the app, take the following steps: 1. Open the [Velo App](https://github.com/apps/velo-app) page in a new tab in your browser. 2. Click **Configure**. ![GitHub Velo app](https://wixmp-833713b177cebf373f611808.wixmp.com/images/0803fab62897ddb052397586264ccc47.png) 3. Select where you want to install the app. 4. Select **Only select repositories** and select the site's repository from the dropdown list. ![GitHub select repos](https://wixmp-833713b177cebf373f611808.wixmp.com/images/22048c4962dd3eb4c94e68a8e4e231fc.png) 5. Click **Install**. 6. Return to the editor and refresh the page. ## Velo app suspended The **Velo App on GitHub was suspended** modal indicates that you have suspended the Velo App's access to your GitHub account. To unsuspend the app, take the following steps: 1. Open [GitHub](https://www.github.com) in a new tab in your browser. 2. In the upper-right corner, click your profile photo and select **Settings**. ![GitHub settings](https://wixmp-833713b177cebf373f611808.wixmp.com/images/441ce793f9e0e906e13045bae00f3da7.png) 3. On the left sidebar, under **Integrations**, click **Applications**. ![GitHub applications](https://wixmp-833713b177cebf373f611808.wixmp.com/images/b23426c2de1f30bce9271e327a08250b.png) 4. With the **Installed GitHub Apps** tab selected, find the Velo App and click **Configure**. ![GitHub installed apps](https://wixmp-833713b177cebf373f611808.wixmp.com/images/530fb69bf394c74539ac1ef7de7f27cf.png) 5. In the **Danger Zone** section, click **Unsuspend**. ![GitHub danger zone](https://wixmp-833713b177cebf373f611808.wixmp.com/images/d7fbbf528fdfbe40fda82d893f78d981.png) 6. Return to the editor and refresh the page. ## See also - [Test Code in the Local Editor](https://dev.wix.com/docs/develop-websites-sdk/code-your-site/developer-environments/ides/git-integration/test-code-in-the-local-editor.md) - [Publish a Site with Git Integration & Wix CLI](https://dev.wix.com/docs/develop-websites-sdk/code-your-site/developer-environments/ides/git-integration/publish-a-site-with-git-integration-and-wix-cli.md) --- > Portal Navigation: > > - Append `.md` to any URL under `https://dev.wix.com/docs/` to get its markdown version. > - Pages are either content pages (article or reference text) or menu pages (a list of links to child pages). > - To get a menu page, truncate any URL to a parent path and append `.md` (e.g. `https://dev.wix.com/docs/sdk.md`, `https://dev.wix.com/docs/sdk/core-modules.md`). > - Top-level index of all portals: https://dev.wix.com/docs/llms.txt > - Full concatenated docs: https://dev.wix.com/docs/llms-full.txt ## Resource: About Packages ## Article: About Packages ## Article Link: https://dev.wix.com/docs/develop-websites-sdk/code-your-site/developer-environments/packages/about-packages.md ## Article Content: # About Packages When writing code, you often need to build some complex feature or functionality. Sometimes you discover that someone else already wrote and implemented the functionality that you need. Instead of reinventing the wheel and writing the same code over again, you can find a pre-built package or app written by others and incorporate it into your own code. Using pre-built packages is a great way to minimize your development time and the amount of code you need to write. There are 4 types of pre-built packages and solutions available to add to a Wix site: - [SDK modules](#sdk-modules) - [Velo packages](#velo-packages) - [NPM packages](#npm-packages) - [Custom apps](#custom-apps) ## SDK modules The Wix JavaScript SDK provides a comprehensive set of modules that give you access to Wix's services and resources. These modules are specifically designed for Wix websites and work seamlessly with Wix elements and business solutions. SDK modules are npm packages with the `@wix/` namespace. For example: ```javascript import { items } from "@wix/data"; import { webMethod, Permissions } from "@wix/web-methods"; ``` Each SDK module contains detailed documentation explaining the module's functionality and implementation steps. To learn more, see the [SDK documentation](https://dev.wix.com/docs/sdk/articles/get-started/about-the-wix-java-script-sdk.md). ## Velo packages Built using the Velo APIs, Velo packages are created specifically for Wix websites and work seamlessly with Wix elements and apps. Unlike non-Wix packages, Velo package use cases are very specific to your Wix site. You can use Velo packages alongside the SDK in your development. A Velo package can include backend code files, public code files, and npm packages. A Velo package's functionality is available for use through its exported functions. An editable **config.json** file may also be included for defining specific settings for a package. You can import the functions and use them in site code just like you import and use exported functions that you write in .js and .web.js files. > **Note:** If a Velo package includes an npm package, you won't see the package installed on your site. Each Velo package contains a detailed README file explaining the package's functionality and the steps required for implementation. Some package functions are internal and can't be used directly in your site. See the package's README for the list of exposed functions available for use. To learn more, see [Working with Velo packages](https://dev.wix.com/docs/develop-websites-sdk/code-your-site/developer-environments/packages/velo-packages/about-velo-packages.md). ## npm packages The npm registry is the most popular registry of pre-built JavaScript packages. You can install public npm packages in a site directly from the npm registry. It's your responsibility to follow the npm package's developer guidelines to understand the package's functionality, in what situations it can be used, and in what situations it shouldn't be used. Once installed, you can import the package and use it in your code. To learn more, see [Working with npm packages](https://dev.wix.com/docs/develop-websites-sdk/code-your-site/developer-environments/packages/npm/about-npm-packages.md). ## Custom apps You can build custom apps using [Wix Blocks](https://dev.wix.com/docs/build-apps/develop-your-app/develop-an-app-with-blocks/about-wix-blocks.md) to share custom functionality across your sites. Once a custom app is installed on your site, the site can import custom app code, use the custom app's widgets, and the custom app's [dashboard extensions](https://dev.wix.com/docs/build-apps/develop-your-app/extensions/dashboard-extensions/about-dashboard-extensions.md) and [collections](https://dev.wix.com/docs/build-apps/develop-your-app/develop-an-app-with-blocks/cms-collections-in-blocks/about-cms-collections-in-blocks.md) are automatically added to the site. Learn more about [custom apps](https://dev.wix.com/docs/develop-websites-sdk/code-your-site/developer-environments/packages/custom-apps/about-custom-apps.md) and how to [install custom apps on a site](https://dev.wix.com/docs/build-apps/develop-your-app/develop-an-app-with-blocks/deploy-and-manage-blocks-apps/install-a-blocks-app-on-a-site.md). --- > Portal Navigation: > > - Append `.md` to any URL under `https://dev.wix.com/docs/` to get its markdown version. > - Pages are either content pages (article or reference text) or menu pages (a list of links to child pages). > - To get a menu page, truncate any URL to a parent path and append `.md` (e.g. `https://dev.wix.com/docs/sdk.md`, `https://dev.wix.com/docs/sdk/core-modules.md`). > - Top-level index of all portals: https://dev.wix.com/docs/llms.txt > - Full concatenated docs: https://dev.wix.com/docs/llms-full.txt ## Resource: About npm Packages ## Article: About npm Packages ## Article Link: https://dev.wix.com/docs/develop-websites-sdk/code-your-site/developer-environments/packages/npm/about-npm-packages.md ## Article Content: # About npm Packages [Node Package Manager (npm)](https://www.npmjs.com/) is a popular registry of reusable JavaScript code. In npm, each reusable library of code is referred to as a package. When developing Wix sites, you can utilize the following types of packages from npm: - **Wix packages**: Packages from the [Wix JavaScript SDK](https://dev.wix.com/docs/sdk.md). Use these packages to create an interactive UI, work with data-driven content, and integrate with Wix business solutions and 3rd-party services. - **Non-Wix packages**: Packages written by 3rd-party developers. Use these packages to save time instead of redeveloping functionality that already exists. After you install an npm package, you can import it in a site's code and use it. Here are some examples of Wix and non-Wix npm packages you could use: - `@wix/data`: Manage data in your Wix CMS. - `@wix/stores`: Manage product and inventory for Wix Stores. - `@wix/site-stores`: Manage the current cart and retrieve information about product variants and availability. - `lodash`: Manipulate strings, arrays, and optimize common operations. - `@sendgrid/mail`: Easily send emails using the SendGrid service. - `axios`: Make HTTP requests from a browser or Node.js environment. ## Supported IDEs You can use npm packages with: - The [editor](https://dev.wix.com/docs/develop-websites-sdk/code-your-site/developer-environments/ides/code-editor/about-the-code-editor.md) (Wix Studio and Wix Editor) - The [Wix IDE](https://dev.wix.com/docs/develop-websites-sdk/code-your-site/developer-environments/ides/wix-ide/about-the-wix-ide.md) (Wix Studio) - Your [local IDE](https://dev.wix.com/docs/develop-websites-sdk/code-your-site/developer-environments/ides/git-integration/about-git-integration-with-wix-cli.md) (Wix Studio and Wix Editor) You can't install or update npm packages directly from the Wix IDE, but you can use packages that were installed or updated using the editor. Follow [instructions](https://dev.wix.com/docs/develop-websites-sdk/code-your-site/developer-environments/packages/npm/work-with-npm-packages-in-the-editor.md) for installing and updating packages in the editor, then import and use the package in the Wix IDE. ## Package support When you install a non-Wix npm package on a site, it's important that you understand the package's functionality, appropriate use cases, and limitations. Note that certain types of packages aren't supported, including [private packages](https://docs.npmjs.com/about-private-packages), packages requiring specific hardware, and packages that may pose a security risk. Here are some important considerations for using non-Wix npm packages in your code: - **Package security:** Packages are 3rd-party code and aren't verified by Wix. Therefore, installing them can put a site and users at risk. It's your responsibility to make sure that packages are safe before installing them on a site. - **Frontend vs backend code:** Make sure you use packages in the context they were designed to be used. Some packages are intended exclusively for frontend code, while others are meant for backend code. - **DOM interactions:** With Wix, you use [\$w APIs](https://dev.wix.com/docs/velo/velo-only-apis/$w/$w.md) to interact with page elements instead of directly manipulating the DOM. Therefore, some packages that include interaction with the DOM may have limited use in a site. - **React compatibility:** Some packages are designed to work with [React](https://reactjs.org/). Currently, you can only use these packages in conjunction with [custom elements](https://dev.wix.com/docs/velo/velo-only-apis/$w/custom-element/introduction.md). - **Error handling:** Errors that originate from a package's functionality are reflected in the browser console. These errors are generated by the implementation of the package itself, and not from Wix. Refer to the package's documentation for more information on resolving these errors. ## Performance considerations - Importing npm packages in frontend code increases the page's payload and may adversely affect a site's performance. ## Package limitations The non-Wix packages you install and use on a site must be compatible with Wix's runtime environment or they may not run properly. - ES modules and packages containing native modules are incompatible with Wix. - A package won't execute during runtime unless it aligns with Wix's [current Node.js version](https://dev.wix.com/docs/develop-websites-sdk/code-your-site/code-with-java-script/about-java-script-support.md). - Wix has runtime limitations: terminal commands aren't supported. - For a package to be compatible with Wix, all its dependent packages must also be compatible. Otherwise, the package may not run. ## See also - [About packages](https://dev.wix.com/docs/develop-websites-sdk/code-your-site/developer-environments/packages/about-packages.md) - [Work with npm packages in the editor](https://dev.wix.com/docs/develop-websites-sdk/code-your-site/developer-environments/packages/npm/work-with-npm-packages-in-the-editor.md) - [Work with npm packages with the Wix CLI](https://dev.wix.com/docs/develop-websites-sdk/code-your-site/developer-environments/packages/npm/work-with-npm-packages-with-the-cli.md) - [Wix JavaScript SDK](https://dev.wix.com/docs/sdk.md) --- > Portal Navigation: > > - Append `.md` to any URL under `https://dev.wix.com/docs/` to get its markdown version. > - Pages are either content pages (article or reference text) or menu pages (a list of links to child pages). > - To get a menu page, truncate any URL to a parent path and append `.md` (e.g. `https://dev.wix.com/docs/sdk.md`, `https://dev.wix.com/docs/sdk/core-modules.md`). > - Top-level index of all portals: https://dev.wix.com/docs/llms.txt > - Full concatenated docs: https://dev.wix.com/docs/llms-full.txt ## Resource: Work with npm Packages in the Editor ## Article: Work with npm Packages in the Editor ## Article Link: https://dev.wix.com/docs/develop-websites-sdk/code-your-site/developer-environments/packages/npm/work-with-npm-packages-in-the-editor.md ## Article Content: # Work with npm Packages in the Editor Wix allows you to install [npm packages](https://dev.wix.com/docs/develop-websites-sdk/code-your-site/developer-environments/packages/npm/about-npm-packages.md) on a site. This article explains how to install, update, and uninstall npm packages when working in the editor (Wix Studio and Wix Editor) or Wix IDE. You can also use npm packages in your local IDE with the [Wix CLI](https://dev.wix.com/docs/develop-websites-sdk/code-your-site/developer-environments/packages/npm/work-with-npm-packages-with-the-cli.md). > **Wix IDE:** You can't install or update npm packages directly from the Wix IDE, but you can use packages that were installed or updated using the editor. Follow the instructions below for installing and updating packages in the editor, then import and use the package in the Wix IDE.
## Install an npm package Before using an npm package, you need to install it.
**Important:** By installing an npm package, you agree to the package's license agreement.
To install an npm package in the editor: 1. Navigate to **Packages & Apps** in the Code sidebar. 1. Hover over **npm** in Packages & Apps, click the plus icon ![Plus icon](https://wixmp-833713b177cebf373f611808.wixmp.com/images/174671ebdfa1dffd306ef30c4c4d4af5.png), and select **Install npm package**. The Package Manager opens. Note that the 10 most popular npm packages used on Wix sites are displayed in the Package Manager.
Package Manager interface
1. In the npm section of the Package Manager, search for the package you want to add. Instructions for how to use the package are displayed on the right side of the Package Manager. 1. Click **Install** next to the package of your choice. Once installed, you can find the package under npm in the Packages & Apps section of the Code sidebar. 1. Learn how to use the installed package from its README file. There are several ways to view the README file: - In the **Packages & Apps** section of the Code sidebar, click the npm package to view the README file in the code editor. - Hover over the package, click the **More actions** ![More actions](https://wixmp-833713b177cebf373f611808.wixmp.com/images/0e583769d1305e30a5e8d6ca6ed59453.png) icon, and then select **View Documentation** to view the npm package documentation in a new browser. - Search for your package's README file at [npmjs.com](http://npmjs.com/). ## Change a package's version In the editor, you can update an npm package to its latest version, or you can change it to a previous version.
**Important:** After changing a package's version, make sure that your code is compatible with the updated version of the package.
To change a package version in the editor: 1. Navigate to **Packages & Apps** in the Code sidebar. 1. Hover over **npm** in Packages & Apps, click the plus icon ![Plus icon](https://wixmp-833713b177cebf373f611808.wixmp.com/images/174671ebdfa1dffd306ef30c4c4d4af5.png), and select **Install npm package**. 1. In the Package Manager, select **Installed Packages**. 1. Hover over the package you want to update, click the **More Actions** ![More actions](https://wixmp-833713b177cebf373f611808.wixmp.com/images/0e583769d1305e30a5e8d6ca6ed59453.png) icon, and select **Choose a version**. ![Change version](https://wixmp-833713b177cebf373f611808.wixmp.com/images/3efd4b23b92dda69d0bf42d8ae95b491.png) 1. Find the version you want and click **Install**. ![npm versions](https://wixmp-833713b177cebf373f611808.wixmp.com/images/6122f99e11216c28784295483494b29e.png) ## Uninstall a package You can uninstall npm packages that you no longer need.
**Warning:** When you uninstall a package, make sure to update any code that relies on that package.
To uninstall a package in the editor: 1. Navigate to **Packages & Apps** in the Code sidebar. 2. In the npm section, hover over the package you want to uninstall, click the **More Actions** ![More actions](https://wixmp-833713b177cebf373f611808.wixmp.com/images/0e583769d1305e30a5e8d6ca6ed59453.png) icon, and select **Uninstall**. ## See also - [About packages](https://dev.wix.com/docs/develop-websites-sdk/code-your-site/developer-environments/packages/about-packages.md) - [About npm packages](https://dev.wix.com/docs/develop-websites-sdk/code-your-site/developer-environments/packages/npm/about-npm-packages.md) - [Work with npm packages with the Wix CLI](https://dev.wix.com/docs/develop-websites-sdk/code-your-site/developer-environments/packages/npm/work-with-npm-packages-with-the-cli.md) --- > Portal Navigation: > > - Append `.md` to any URL under `https://dev.wix.com/docs/` to get its markdown version. > - Pages are either content pages (article or reference text) or menu pages (a list of links to child pages). > - To get a menu page, truncate any URL to a parent path and append `.md` (e.g. `https://dev.wix.com/docs/sdk.md`, `https://dev.wix.com/docs/sdk/core-modules.md`). > - Top-level index of all portals: https://dev.wix.com/docs/llms.txt > - Full concatenated docs: https://dev.wix.com/docs/llms-full.txt ## Resource: Work with npm Packages with the CLI ## Article: Work with npm Packages with the CLI ## Article Link: https://dev.wix.com/docs/develop-websites-sdk/code-your-site/developer-environments/packages/npm/work-with-npm-packages-with-the-cli.md ## Article Content: # Work with npm Packages with the CLI Wix allows you to install [npm packages](https://dev.wix.com/docs/develop-websites-sdk/code-your-site/developer-environments/packages/npm/about-npm-packages.md) on a site. This article explains how to install, update, and uninstall npm packages in your local IDE with the CLI. You can also [use npm packages in the editor or the Wix IDE](https://dev.wix.com/docs/develop-websites-sdk/code-your-site/developer-environments/packages/npm/work-with-npm-packages-in-the-editor.md). ## Install an npm package Before using an npm package, you need to install it.
**Important:** By installing an npm package, you agree to that npm module's license agreement.
To install a package in your local IDE with the CLI: 1. Open a terminal to your project's root directory. 2. Install the package of your choice by running the following command: ```bash wix install ``` 3. Open the `package.json` file in your project to see the installed package. 4. Learn how to use the installed package from its README file. You can find your package's README file at [npmjs.com](http://npmjs.com/). ## Change a package's version Using the CLI, you can update an npm package to its latest version. Currently, you can't switch to previous versions of your package using the CLI.
**Important:** After changing a package's version, make sure that your code is compatible with the updated version of the package.
To update a package to its latest version with the CLI: 1. Open a terminal to your project's root directory. 2. Update the package of your choice by running the following command: ```bash wix update ``` 3. Open the `package.json` file in your project to see the package's new version. ## Uninstall a package You can uninstall npm packages that you no longer need.
**Warning:** When you uninstall a package, make sure to update any code that relies on that package.
To uninstall a package using the CLI: 1. Open a terminal to your project's root directory. 2. Uninstall the package of your choice by running the following command: ```bash wix uninstall ``` 3. Open the `package.json` file in your project to see that the package has been removed. ## See also - [About packages](https://dev.wix.com/docs/develop-websites-sdk/code-your-site/developer-environments/packages/about-packages.md) - [About npm packages](https://dev.wix.com/docs/develop-websites-sdk/code-your-site/developer-environments/packages/npm/about-npm-packages.md) - [Work with npm packages in the editor](https://dev.wix.com/docs/develop-websites-sdk/code-your-site/developer-environments/packages/npm/work-with-npm-packages-in-the-editor.md) --- > Portal Navigation: > > - Append `.md` to any URL under `https://dev.wix.com/docs/` to get its markdown version. > - Pages are either content pages (article or reference text) or menu pages (a list of links to child pages). > - To get a menu page, truncate any URL to a parent path and append `.md` (e.g. `https://dev.wix.com/docs/sdk.md`, `https://dev.wix.com/docs/sdk/core-modules.md`). > - Top-level index of all portals: https://dev.wix.com/docs/llms.txt > - Full concatenated docs: https://dev.wix.com/docs/llms-full.txt ## Resource: About Velo Packages ## Article: About Velo Packages ## Article Link: https://dev.wix.com/docs/develop-websites-sdk/code-your-site/developer-environments/packages/velo-packages/about-velo-packages.md ## Article Content: # About Velo Packages Velo packages are code libraries written using Velo code that allow you to add specific functionality to a site without spending hours writing complex code. They provide ready-made functionality that you can use as-is or extend with custom code. Although Velo packages are written using Velo APIs, you can use them alongside the Wix JavaScript SDK. ## What you can do with Velo packages - Add production-ready features maintained by Wix - Reduce boilerplate and implementation time - Use package APIs on the frontend or backend depending on the package - Combine package capabilities with SDK modules and a site's business logic ## Package content Velo packages can include read-only backend code files, public code files, and npm packages. An editable `config.json` file may also be included for defining specific settings for your package. A package's functionality is available through its exported APIs, which you can import and call in your code. > **Note**: > > - Some package APIs are internal and can't be called directly in a site. See the package's README for the list of exposed APIs available for use. > - If a Velo package includes an npm package as a dependency, it doesn't appear in the npm section of the Code sidebar in Wix Editor or Wix Studio. ## See also - Manage installation, configuration, updates, and removal: [Manage Velo packages](https://dev.wix.com/docs/develop-websites-sdk/code-your-site/developer-environments/packages/velo-packages/manage-velo-packages.md) - Learn common usage patterns and testing guidance: [Use Velo packages in code](https://dev.wix.com/docs/develop-websites-sdk/code-your-site/developer-environments/packages/velo-packages/use-velo-packages-in-code.md) --- > Portal Navigation: > > - Append `.md` to any URL under `https://dev.wix.com/docs/` to get its markdown version. > - Pages are either content pages (article or reference text) or menu pages (a list of links to child pages). > - To get a menu page, truncate any URL to a parent path and append `.md` (e.g. `https://dev.wix.com/docs/sdk.md`, `https://dev.wix.com/docs/sdk/core-modules.md`). > - Top-level index of all portals: https://dev.wix.com/docs/llms.txt > - Full concatenated docs: https://dev.wix.com/docs/llms-full.txt ## Resource: Manage Velo Packages ## Article: Manage Velo Packages ## Article Link: https://dev.wix.com/docs/develop-websites-sdk/code-your-site/developer-environments/packages/velo-packages/manage-velo-packages.md ## Article Content: # Manage Velo Packages [Velo Packages](https://dev.wix.com/docs/develop-websites-sdk/code-your-site/developer-environments/packages/velo-packages/about-velo-packages.md) are code libraries written using Velo code. Learn how to install, configure, update, and remove Velo packages from a site. ## Install a Velo package 1. Navigate to **Packages & Apps** in the Code sidebar. 1. Hover over **Velo Packages** in **Packages & Apps**, click the plus icon, and select **Install Velo package**. 1. Choose a package from the list and click **Install**. 1. Review the package's README and follow any additional setup instructions. > **Note:** By installing a Velo package that uses an npm package, you agree to that npm module's license agreement. ## Configure Velo packages Depending on the package, configuration may include: - Creating an account with a 3rd-party service. - Adding secrets in the Secrets Manager. - Adding a Wix app, such as Wix Store, to the site. - Editing the package's `config.json` file to define specific settings that affect how the package works. ## Update a Velo package version If there is an update available for a package installed on a site, you'll see a blue dot next to the package in the Code sidebar. To update a package: 1. Hover over the package name and click the more icon. 1. Select **See update**. 1. In the Package Manager, review package updates in the release notes. 1. Click **Update to X.X.X**.
**Important:** After applying a package update, make sure that the code on the site is compatible with the updated version of the package.
## Uninstall a Velo package 1. Ensure no code references remain to the package's APIs. 1. Navigate to **Packages & Apps** in the Code sidebar. 1. Hover over **Velo Packages** in **Packages & Apps**, click **Uninstall**.
**Warning:** Uninstalling a package can break code that depends on it.
## See also - [About Velo packages](https://dev.wix.com/docs/develop-websites-sdk/code-your-site/developer-environments/packages/velo-packages/about-velo-packages.md) - [Use Velo packages in code](https://dev.wix.com/docs/develop-websites-sdk/code-your-site/developer-environments/packages/velo-packages/use-velo-packages-in-code.md) --- > Portal Navigation: > > - Append `.md` to any URL under `https://dev.wix.com/docs/` to get its markdown version. > - Pages are either content pages (article or reference text) or menu pages (a list of links to child pages). > - To get a menu page, truncate any URL to a parent path and append `.md` (e.g. `https://dev.wix.com/docs/sdk.md`, `https://dev.wix.com/docs/sdk/core-modules.md`). > - Top-level index of all portals: https://dev.wix.com/docs/llms.txt > - Full concatenated docs: https://dev.wix.com/docs/llms-full.txt ## Resource: Use Velo Packages in Code ## Article: Use Velo Packages in Code ## Article Link: https://dev.wix.com/docs/develop-websites-sdk/code-your-site/developer-environments/packages/velo-packages/use-velo-packages-in-code.md ## Article Content: # Use Velo Packages in Code [Velo Packages](https://dev.wix.com/docs/develop-websites-sdk/code-your-site/developer-environments/packages/velo-packages/about-velo-packages.md) are code libraries written using Velo code. Once installed, you can import and call APIs from Velo packages in your code. Although Velo packages are written using Velo APIs, you can use them alongside the Wix JavaScript SDK. ## Use a package Once you install a package, read the package's README. It explains setup prerequisites, which APIs are exported for use, and how to use the package. To use a package's APIs, import them in your code. Use `@velo` in import paths for Velo packages. Import paths differ depending on whether the API is exported from backend or public files. ## Import backend APIs To import backend APIs, use this syntax: ```javascript import { } from '@velo/-backend'; ``` For example, assuming you installed the `twitter-integration` package, you can call its `tweet()` API as follows: ```javascript import { tweet } from "@velo/twitter-integration-backend"; ``` > **Notes:** > > - If you want to call backend APIs from a `.js` file in page code, wrap the backend API in a [web module](https://dev.wix.com/docs/develop-websites-sdk/code-your-site/build-a-custom-backend/web-modules/about-web-modules.md), then import and call the web module from page code. > - Some Velo packages include web modules. You can call web module APIs directly from backend code, public code, or page code. Import them with the syntax for importing backend APIs. ## Import public APIs To import public APIs, use this syntax: ```javascript import { } from '@velo/'; ``` For example, assuming you installed the `wix-data-helpers` package, you can call its `getRandomItem()` API as follows: ```javascript import { getRandomItem } from "@velo/wix-data-helpers"; ``` ## See also - [About Velo packages](https://dev.wix.com/docs/develop-websites-sdk/code-your-site/developer-environments/packages/velo-packages/about-velo-packages.md) - [Manage Velo packages](https://dev.wix.com/docs/develop-websites-sdk/code-your-site/developer-environments/packages/velo-packages/manage-velo-packages.md) --- > Portal Navigation: > > - Append `.md` to any URL under `https://dev.wix.com/docs/` to get its markdown version. > - Pages are either content pages (article or reference text) or menu pages (a list of links to child pages). > - To get a menu page, truncate any URL to a parent path and append `.md` (e.g. `https://dev.wix.com/docs/sdk.md`, `https://dev.wix.com/docs/sdk/core-modules.md`). > - Top-level index of all portals: https://dev.wix.com/docs/llms.txt > - Full concatenated docs: https://dev.wix.com/docs/llms-full.txt ## Resource: About Custom Apps ## Article: About Custom Apps ## Article Link: https://dev.wix.com/docs/develop-websites-sdk/code-your-site/developer-environments/packages/custom-apps/about-custom-apps.md ## Article Content: # About Custom Apps Custom apps are applications you create using [Wix Blocks](https://dev.wix.com/docs/build-apps/develop-your-app/develop-an-app-with-blocks/about-wix-blocks.md) to add reusable functionality across multiple Wix sites. Your custom apps are private and only you can install them on sites where you're a site collaborator. Once installed, all site collaborators can access the functionality of the custom app. > **Note:** Custom apps replace Velo packages built by you. Now, instead of creating packages, functionality is managed as apps. Using custom apps allows you to unify the following functionality across sites: - Widgets - Code - [Dashboard extensions](https://dev.wix.com/docs/build-apps/develop-your-app/extensions/dashboard-extensions/about-dashboard-extensions.md) - [Collections](https://dev.wix.com/docs/build-apps/develop-your-app/develop-an-app-with-blocks/cms-collections-in-blocks/about-cms-collections-in-blocks.md) For example, you might use custom apps to do the following across multiple sites: - Ensure a standardized visual design. - Centralize and reuse custom logic and code. - Add and manage custom dashboard features. - Use uniform data structures and content setups. ## Supported IDEs You can use and access functionality from your custom apps using: - The editor (Wix Studio and Wix Editor) - The Wix IDE - Your [local IDE](https://dev.wix.com/docs/develop-websites-sdk/code-your-site/developer-environments/ides/git-integration/about-git-integration-with-wix-cli.md) > **Note:** You must have a Wix Studio account to create a Blocks app. ## Access custom app functionality on a site Install and manage your custom apps, including the version installed on the site, under **Custom Apps** when you click **App Market** ![App Market](https://wixmp-833713b177cebf373f611808.wixmp.com/images/b748dd69307d0adbcf2f11e76dc779c3.png) in the Editor. Once installed, a custom app's functionality is automatically available on the site. To learn how to access the functionality, see [Install a Blocks App on a Site](https://dev.wix.com/docs/build-apps/develop-your-app/develop-an-app-with-blocks/deploy-and-manage-blocks-apps/install-a-blocks-app-on-a-site.md#change-the-installed-app-version). ## See also - [Install a Blocks app on a site](https://dev.wix.com/docs/build-apps/develop-your-app/develop-an-app-with-blocks/deploy-and-manage-blocks-apps/install-a-blocks-app-on-a-site.md#change-the-installed-app-version) - [About Wix Blocks](https://dev.wix.com/docs/build-apps/develop-your-app/develop-an-app-with-blocks/about-wix-blocks.md) --- > Portal Navigation: > > - Append `.md` to any URL under `https://dev.wix.com/docs/` to get its markdown version. > - Pages are either content pages (article or reference text) or menu pages (a list of links to child pages). > - To get a menu page, truncate any URL to a parent path and append `.md` (e.g. `https://dev.wix.com/docs/sdk.md`, `https://dev.wix.com/docs/sdk/core-modules.md`). > - Top-level index of all portals: https://dev.wix.com/docs/llms.txt > - Full concatenated docs: https://dev.wix.com/docs/llms-full.txt ## Resource: About AI Assistants ## Article: About AI Assistants ## Article Link: https://dev.wix.com/docs/develop-websites-sdk/code-your-site/developer-environments/ai-assistants/about-ai-assistants.md ## Article Content: # About AI Assistants The AI assistants are tools that use artificial intelligence to help you generate, debug, and understand code across your Wix site. Wix offers several AI assistants, each designed for specific development environments and use cases. - [AI Code assistant in the Wix Studio code panel](#ai-code-assistant-in-the-wix-studio-code-panel) - [Wix AI assistant in the Wix IDE](#wix-ai-assistant-in-the-wix-ide) - [Wix MCP](#wix-mcp) ## Supported IDEs Each of the Wix AI assistants are intended for use with a specific IDE. Use the: - [AI Code assistant](#ai-code-assistant-in-the-wix-studio-code-panel) when working in [Wix Studio](https://www.wix.com/studio). - [Wix AI assistant](#wix-ai-assistant-in-the-wix-ide) when working in the [Wix IDE](https://dev.wix.com/docs/develop-websites-sdk/code-your-site/developer-environments/ides/wix-ide/about-the-wix-ide.md). - [Wix MCP](#wix-mcp) when working in a [local IDE](https://dev.wix.com/docs/develop-websites-sdk/code-your-site/developer-environments/ides/git-integration/about-git-integration-with-wix-cli.md). ## AI code assistant in the Wix Studio code panel The AI code assistant in the Wix Studio code panel is an AI chatbot built into [Wix Studio](https://www.wix.com/studio). ### Use cases You can use the AI Code assistant to: - **Generate frontend and backend code:** Create custom code using both Velo APIs and the JavaScript SDK. - **Add interactive features:** Generate event handlers that respond to user interactions with site elements. - **Debug and fix errors:** Get help troubleshooting and resolving issues in your existing code. > **Note:** The assistant doesn't support requests that require interactions with 3rd-party services, external APIs, or npm packages. ## Wix AI assistant in the Wix IDE The Wix AI assistant in the Wix IDE is an AI Chatbot built into the [Wix IDE](https://dev.wix.com/docs/develop-websites-sdk/code-your-site/developer-environments/ides/wix-ide/about-the-wix-ide.md). ### Use cases You can use the Wix AI assistant to: * **Generate code:** Create frontend and backend code using Velo. * **Debug and fix errors:** Get help troubleshooting and resolving issues in your existing code. * **Search documentation:** Access information from [Wix's Velo API reference](https://dev.wix.com/docs/velo.md) and learn about new features. You can ask up to 2 follow-up questions after your initial query. After this, the assistant starts a new conversation. > **Note:** The Wix AI assistant in the Wix IDE currently supports only code using Velo APIs. JavaScript SDK-based output isn't supported yet. ## Wix MCP The [Wix MCP](https://dev.wix.com/docs/sdk/articles/use-the-wix-mcp/about-the-wix-mcp.md#required-configuration) allows you to work with Wix tools and services in your chosen AI Client. ### Use cases You can use the Wix MCP Server to: * **Search documentation:** Search information about Wix APIs. * **Generate frontend and backend code:** Create custom code using both Velo APIs and the JavaScript SDK. * **Make API calls:** Perform actions or queries for a specified account and selected site. * **Manage Sites:** Retrieve site data and perform site-level actions. ## See also * [Wix IDE](https://dev.wix.com/docs/develop-websites-sdk/code-your-site/developer-environments/ides/wix-ide/about-the-wix-ide.md) * [About the Wix MCP](https://dev.wix.com/docs/sdk/articles/use-the-wix-mcp/about-the-wix-mcp.md) * [Wix MCP sample prompts](https://dev.wix.com/docs/sdk/articles/use-the-wix-mcp/mcp-sample-prompts.md) --- > Portal Navigation: > > - Append `.md` to any URL under `https://dev.wix.com/docs/` to get its markdown version. > - Pages are either content pages (article or reference text) or menu pages (a list of links to child pages). > - To get a menu page, truncate any URL to a parent path and append `.md` (e.g. `https://dev.wix.com/docs/sdk.md`, `https://dev.wix.com/docs/sdk/core-modules.md`). > - Top-level index of all portals: https://dev.wix.com/docs/llms.txt > - Full concatenated docs: https://dev.wix.com/docs/llms-full.txt ## Resource: About the Secrets Manager ## Article: About the Secrets Manager ## Article Link: https://dev.wix.com/docs/develop-websites-sdk/code-your-site/developer-environments/secrets/about-the-secrets-manager.md ## Article Content: # About the Secrets Manager The [Secrets Manager](https://www.wix.com/my-account/site-selector/?buttonText=Select%20Site&title=Select%20a%20Site&autoSelectOnSingleSite=true&actionUrl=https:%2F%2Fwww.wix.com%2Fdashboard%2F%7B%7BmetaSiteId%7D%7D%2Fdeveloper-tools/secrets-manager) allows you to securely store and manage secrets. A secret is any piece of sensitive information used in your site's code, such as API keys, OAuth tokens, and environment configuration settings. [Add secrets](https://dev.wix.com/docs/develop-websites-sdk/code-your-site/developer-environments/secrets/manage-secrets-in-the-secrets-manager.md#add-a-secret) to the Secrets Manager in your dashboard by assigning each secret a [unique name](#secret-fields). You can then use that name to retrieve the secret in code using the [Secrets API](https://dev.wix.com/docs/sdk/backend-modules/secrets/introduction.md). ![Secrets list](https://wixmp-833713b177cebf373f611808.wixmp.com/images/fac07305a04f0a5ebfd1e1a7823a8816.png) ## Enhanced security Hardcoding secrets into your code can create security risks for your site, which can lead to data breaches and unauthorized access to your site. Here's how the Secrets Manager improves your site's security: * **Code sharing**: You may want to collaborate and share your code with others or manage it in a public repository, increasing the potential for accidentally leaking secrets. * **Code reusability**: Since code is often reused, your hardcoded secrets may be copied, increasing risk of exposure. ## Secret fields It’s important to understand the rules and limitations of a secret within the Secrets Manager. | Field name | Field description | Requirements | Required field | |-------------|-------------------------------------------------------------------------------------------------------------------------------------------------|--------------------------------------------------------------------------------------------------------------------------------------------------------------|----------------| | Name | ID you assign to the secret. Access it in code using the [Secrets API](https://dev.wix.com/docs/sdk/backend-modules/secrets/introduction.md). |
  • 40 character maximum. Only letters (a-z) and numbers.
  • No spaces or special characters except hyphens (`-`) and underscores (`_`).
  • Can't begin with `wix`, regardless of case.
| Yes | | Value | Value of the secret. |
  • 3,500 character maximum.
| Yes | | Description | Information about the secret. |
  • 200 characters maximum.
| No | ## Roles and permissions Only site collaborators with the general role of **Admin (Co-Owner)** or **Website Manager** have access to the Secrets Manager. Learn more about [roles and permissions](https://support.wix.com/en/article/roles-permissions-overview). > **Important:** > - [Transferring a site](https://support.wix.com/en/article/transferring-a-free-site-to-another-wix-account) results in secrets being transferred to the new owner. > - [Duplicating a site](https://support.wix.com/en/article/duplicating-your-site-1472847?tabs=Dashboard) **doesn't** result in secrets being transferred to the duplicate site. ## See also - [Manage Secrets in the Secrets Manager](https://dev.wix.com/docs/develop-websites-sdk/code-your-site/developer-environments/secrets/manage-secrets-in-the-secrets-manager.md) in the Secrets Manager. - [About the Wix Secrets API](https://dev.wix.com/docs/sdk/backend-modules/secrets/introduction.md) --- > Portal Navigation: > > - Append `.md` to any URL under `https://dev.wix.com/docs/` to get its markdown version. > - Pages are either content pages (article or reference text) or menu pages (a list of links to child pages). > - To get a menu page, truncate any URL to a parent path and append `.md` (e.g. `https://dev.wix.com/docs/sdk.md`, `https://dev.wix.com/docs/sdk/core-modules.md`). > - Top-level index of all portals: https://dev.wix.com/docs/llms.txt > - Full concatenated docs: https://dev.wix.com/docs/llms-full.txt ## Resource: Manage Secrets in the Secrets Manager ## Article: Manage Secrets in the Secrets Manager ## Article Link: https://dev.wix.com/docs/develop-websites-sdk/code-your-site/developer-environments/secrets/manage-secrets-in-the-secrets-manager.md ## Article Content: # Manage Secrets in the Secrets Manager The [Secrets Manager](https://dev.wix.com/docs/develop-websites-sdk/code-your-site/developer-environments/secrets/about-the-secrets-manager.md) allows you to access and manage secrets securely, and use them in your site's code.
## Step 1 | Access the Secrets Manager There are multiple ways to access the [Secrets Manager](https://www.wix.com/my-account/site-selector/?buttonText=Select%20Site&title=Select%20a%20Site&autoSelectOnSingleSite=true&actionUrl=https:%2F%2Fwww.wix.com%2Fdashboard%2F%7B%7BmetaSiteId%7D%7D%2Fdeveloper-tools/secrets-manager), depending on which interface you are using. ::::tabs :::Wix-Studio-or-Wix-Editor 1. Navigate to **Developer Tools** in the code panel. 1. Click on **Secrets Manager** in the **Security** section. ::: :::Dashboard 1. Navigate to **Developer Tools** in the dashboard menu. 1. Click on **Secrets Manager**. ::: :::: ## Step 2 | Manage your secrets Use the Secrets Manager to add, edit, and delete secrets in the Secrets Manager. ![manage secrets in ui](https://wixmp-833713b177cebf373f611808.wixmp.com/images/6606e7105dbffe49663ea9e3b4ac49bc.png) > **Note:** Changes in the Secrets Manager are applied immediately and don't require publishing the site.
Add a secret To add a secret: 1. At the top right of the Secrets Manager, click **Add Secret**. 2. In the **Add secret** modal, fill in the [fields](https://dev.wix.com/docs/develop-websites-sdk/code-your-site/developer-environments/secrets/about-the-secrets-manager.md#secret-fields). ![add panel](https://wixmp-833713b177cebf373f611808.wixmp.com/images/eaecc8c9a1c15ab26b6f4262ab89045c.jpg) 3. Click **Add Secret**. The secret is added and stored in the Secrets Manager. The name and description are displayed, and the secret value is hidden. ![added secret](https://wixmp-833713b177cebf373f611808.wixmp.com/images/d6adc9302c5c0e6d4b013964c122c0fa.png)
Edit a secret To edit a secret:
Warning: Changing a secret's name or value breaks all code that implements the secret.
1. For the secret you want to edit, select **Edit** in the secret's **More Actions** ![More actions](https://wixmp-833713b177cebf373f611808.wixmp.com/images/0e583769d1305e30a5e8d6ca6ed59453.png) menu. The **Edit secret** modal appears. ![Edit secret modal](https://wixmp-833713b177cebf373f611808.wixmp.com/images/ed42e58ec02ea298865601cfc38f5a54.png) 2. - To change the secret's **Name** or **Description**, click the [fields](https://dev.wix.com/docs/develop-websites-sdk/code-your-site/developer-environments/secrets/about-the-secrets-manager.md#secret-fields) to edit the text. - To change the secret's value, click **Retrieve value**, then click inside the secret's **Value** field that appears. 3. Click **Change Secret**.
Delete a secret To delete a secret:
Warning:
  • Deleting a secret breaks all code that implements the secret.
  • You can't restore a deleted secret.
1. For the secret you want to delete, select **Delete secret** in the secret's **More Actions** ![More actions icon](https://wixmp-833713b177cebf373f611808.wixmp.com/images/0e583769d1305e30a5e8d6ca6ed59453.png) menu. The **Delete secret?** modal appears. 2. Click **Delete Secret** to confirm. The secret is removed from the Secrets Manager.
## See also - [About the Secrets Manager](https://dev.wix.com/docs/develop-websites-sdk/code-your-site/developer-environments/secrets/about-the-secrets-manager.md) - [About the Wix Secrets API](https://dev.wix.com/docs/sdk/backend-modules/secrets/introduction.md) --- > Portal Navigation: > > - Append `.md` to any URL under `https://dev.wix.com/docs/` to get its markdown version. > - Pages are either content pages (article or reference text) or menu pages (a list of links to child pages). > - To get a menu page, truncate any URL to a parent path and append `.md` (e.g. `https://dev.wix.com/docs/sdk.md`, `https://dev.wix.com/docs/sdk/core-modules.md`). > - Top-level index of all portals: https://dev.wix.com/docs/llms.txt > - Full concatenated docs: https://dev.wix.com/docs/llms-full.txt ## Resource: About n8n Integration ## Article: About n8n Integration ## Article Link: https://dev.wix.com/docs/develop-websites-sdk/code-your-site/developer-environments/integrations/about-n8n-integration.md ## Article Content: # About n8n Integration [n8n](https://n8n.io/) is a workflow automation platform that lets you connect apps and services to create automated workflows. With the Wix n8n integration, you can automate tasks involving your Wix site without writing code, connecting Wix to hundreds of other services available in the n8n ecosystem. A key capability of n8n is its built-in AI agent. By combining Wix triggers with an AI agent, you can create workflows that analyze incoming data, determine appropriate actions, and execute them automatically. Before getting started, [connect n8n to your Wix site](https://dev.wix.com/docs/develop-websites-sdk/code-your-site/developer-environments/integrations/connect-n8n-to-your-wix-site.md). ## What you can do with the integration The Wix n8n integration provides two types of nodes, both powered by [Wix APIs](https://dev.wix.com/docs/api-reference.md): - Wix trigger node: Starts workflows automatically when an event occurs on your site. [Wix Automations](https://dev.wix.com/docs/api-reference/business-management/automations/triggers/about-triggers?apiView=SDK.md) powers the triggers and provides events across Wix business solutions, such as form submissions, new orders, booking confirmations, contact updates, and membership sign-ups. - Wix node: Performs actions on your Wix site, such as managing products and orders in your Wix Store. You can create, update, delete, and query data as part of your n8n workflows. When configuring a Wix node, you can specify parameter values manually, map them from the trigger output, or use an AI agent to generate them dynamically based on the workflow context. To see the full list of available triggers and actions, browse the options in the Wix nodes' configuration panels in n8n. Learn more about [n8n nodes](https://docs.n8n.io/workflows/components/nodes/).
**Important:** The Wix nodes are currently community nodes. Before you can use them, you must install the `@wix/n8n-nodes-wix` package. See the n8n guide on [installing community nodes](https://docs.n8n.io/integrations/community-nodes/installation/).
## AI-powered workflows The built-in AI agent in n8n is a key advantage of using n8n with Wix. Instead of building complex conditional logic, you can use an AI agent to interpret trigger data and decide what actions to take. The agent can analyze incoming information, determine the appropriate response, and generate the parameters needed for any action in your workflow, whether that's a Wix node, an email service, a CRM, or any other n8n integration. For example, you can create a workflow that recovers abandoned checkouts. When a checkout is abandoned on your site, n8n triggers the workflow and an AI agent analyzes the details and generates the parameters for a discounted recovery order and a personalized email. The workflow then creates the order and sends the email to win back the customer. To expand the capabilities of your AI agent beyond the actions available in the Wix node, you can connect the [Wix MCP server](https://dev.wix.com/docs/api-reference/articles/wix-mcp/about-the-wix-mcp.md) as a tool. Connecting the Wix MCP gives your AI agent access to additional Wix APIs. ## Authentication To connect n8n to your Wix site, you need an [API key](https://dev.wix.com/docs/api-reference/articles/authentication/about-api-keys.md) and the site ID of the site you want to connect. These are added as credentials in n8n. To learn how to set up Wix authentication in n8n, see [Connect n8n to Your Wix Site](https://dev.wix.com/docs/develop-websites-sdk/code-your-site/developer-environments/integrations/connect-n8n-to-your-wix-site.md). ## Use cases Here are some examples of what you can automate with the Wix n8n integration: - Abandoned checkout recovery: When a checkout is abandoned, an AI agent analyzes the details and generates parameters for a discounted recovery order and personalized email. The workflow then creates the order and sends the email. - Smart lead routing: When a form is submitted, an AI agent evaluates the submission and categorizes the lead. The workflow then routes the lead to the appropriate team member or CRM. - Automated content moderation: When a new blog comment or forum post is published, an AI agent analyzes the content and decides whether to approve, flag, or remove it. The workflow then performs the appropriate action. - Dynamic customer support: When a chat message is received, an AI agent analyzes the query, retrieves relevant order or booking information, and generates a response. The workflow then sends the response to the customer. - Cross-platform sync: When product data changes in your Wix Store, automatically update inventory in external systems like spreadsheets or software solutions like Enterprise Resource Planning (ERP). ## n8n marketplace You can search the [n8n workflows](https://n8n.io/workflows/) for workflow templates built by others that use Wix nodes. If you're a developer looking to extend the Wix n8n integration or create your own Wix-related nodes, you can build and publish them to the marketplace for other Wix users to benefit from. ## See also - [n8n Docs](https://docs.n8n.io/) - [Connect n8n to Your Wix Site](https://dev.wix.com/docs/develop-websites-sdk/code-your-site/developer-environments/integrations/connect-n8n-to-your-wix-site.md) --- > Portal Navigation: > > - Append `.md` to any URL under `https://dev.wix.com/docs/` to get its markdown version. > - Pages are either content pages (article or reference text) or menu pages (a list of links to child pages). > - To get a menu page, truncate any URL to a parent path and append `.md` (e.g. `https://dev.wix.com/docs/sdk.md`, `https://dev.wix.com/docs/sdk/core-modules.md`). > - Top-level index of all portals: https://dev.wix.com/docs/llms.txt > - Full concatenated docs: https://dev.wix.com/docs/llms-full.txt ## Resource: Connect n8n to Your Wix Site ## Article: Connect n8n to Your Wix Site ## Article Link: https://dev.wix.com/docs/develop-websites-sdk/code-your-site/developer-environments/integrations/connect-n8n-to-your-wix-site.md ## Article Content: # Connect n8n to Your Wix Site Connect your Wix site to n8n to automate workflows using Wix triggers and actions. For an overview of the Wix n8n integration and what you can do with it, see [About n8n Integration](https://dev.wix.com/docs/develop-websites-sdk/code-your-site/developer-environments/integrations/about-n8n-integration.md). This guide walks you through creating API credentials and configuring n8n to work with your site. After completing this task, you can create workflows that react to events on your Wix site, perform Wix actions, connect to other n8n integrations, and use AI agents to power your automations.
**Important:** Wix n8n nodes are currently community nodes. Before you can use them, you must install the `@wix/n8n-nodes-wix` package. See the n8n guide on [installing community nodes](https://docs.n8n.io/integrations/community-nodes/installation/).
## Step 1 | Create an API key in Wix Create an [API key](https://dev.wix.com/docs/api-reference/articles/authentication/about-api-keys.md) in your Wix account with the permissions needed for the triggers and actions you want to use. To create an API key: 1. Go to the [API Keys Manager](https://manage.wix.com/account/api-keys) in your Wix account. 2. Click **Create API Key**. 3. Enter a name for your API key, such as "n8n Integration". 4. Select the permissions for the APIs you want to access. The permissions you need depend on which triggers and actions you plan to use. For example: - For product operations, select **Wix Stores** permissions. - For order operations, select **Wix eCommerce** permissions. 5. Click **Create**. 6. Copy and securely store your API key. You can't view it again.
__Important:__ Store your API key securely and never expose it in frontend code.
## Step 2 | Find your site ID Locate the ID of the Wix site you want to connect to n8n. To find your site ID: 1. Go to your [site's dashboard](https://www.wix.com/my-account/site-selector/?buttonText=Select%20Site&title=Select%20a%20Site&autoSelectOnSingleSite=true&actionUrl=https:%2F%2Fwww.wix.com%2Fdashboard%2F%7B%7BmetaSiteId%7D%7D%2Fhome). 2. Check the URL in your browser. The site ID appears after `/dashboard/` in the URL. For example, in `https://manage.wix.com/dashboard/12345678-1234-1234-1234-123456789012/home`, the site ID is `12345678-1234-1234-1234-123456789012`. Alternatively, you can use the [Query Sites](https://dev.wix.com/docs/api-reference/account-level/sites/sites/query-sites?apiView=SDK.md) API to retrieve all site IDs associated with your account. ## Step 3 | Configure Wix credentials in n8n Add your Wix API credentials to n8n to authenticate your workflows. To configure credentials: 1. In n8n, go to **Settings > Credentials**. 2. Click **Add Credential**. 3. Search for and select **Wix API**. 4. Enter your credentials: - **API Key**: Paste the API key you created in Step 1. - **Site ID**: Paste the site ID you found in Step 2. 5. Click **Save**. ## Step 4 | Test the connection Verify that your credentials are working by creating a simple workflow. To test the connection: 1. Create a new workflow in n8n. 2. Add a Wix node to the canvas. 3. When configuring the node, select your saved Wix API credentials. 4. Browse the available resources and operations to see what actions you can perform. 5. Select an operation and click **Test step** to execute it. If the connection is successful, you see results from your Wix site. ## See also - [About n8n Integration](https://dev.wix.com/docs/develop-websites-sdk/code-your-site/developer-environments/integrations/about-n8n-integration.md) - [About API Keys](https://dev.wix.com/docs/rest/articles/authentication/about-api-keys.md) --- > Portal Navigation: > > - Append `.md` to any URL under `https://dev.wix.com/docs/` to get its markdown version. > - Pages are either content pages (article or reference text) or menu pages (a list of links to child pages). > - To get a menu page, truncate any URL to a parent path and append `.md` (e.g. `https://dev.wix.com/docs/sdk.md`, `https://dev.wix.com/docs/sdk/core-modules.md`). > - Top-level index of all portals: https://dev.wix.com/docs/llms.txt > - Full concatenated docs: https://dev.wix.com/docs/llms-full.txt ## Resource: About Zapier Integration ## Article: About Zapier Integration ## Article Link: https://dev.wix.com/docs/develop-websites-sdk/code-your-site/developer-environments/integrations/about-zapier-integration.md ## Article Content: # About Zapier Integration [Zapier](https://zapier.com/) is a workflow automation platform that lets you connect apps and services to create automated workflows called Zaps. With the built-in Wix Zapier integration, you can automate tasks involving a Wix site without writing code, connecting Wix to thousands of other apps available in the Zapier ecosystem. To get started, see [Create a Zap with a Wix Trigger](https://dev.wix.com/docs/develop-websites-sdk/code-your-site/developer-environments/integrations/create-a-zap-with-a-wix-trigger.md). ## What you can do with the integration The Wix Zapier integration is powered by [Wix Automations](https://dev.wix.com/docs/api-reference/business-management/automations/triggers/about-triggers?apiView=SDK.md). It provides instant triggers that activate when events occur on a Wix site, such as form submissions, new orders, and booking confirmations. When a trigger activates, the connected Zap performs actions in other apps. For example, a Zap can add a row to a Google Sheet, send an email, or create a task in a project management tool.
__Tip:__ The Wix integration provides triggers only. To send data from Zapier back to a Wix site, use the [Webhook Received trigger](https://support.wix.com/en/article/wix-automations-setting-up-a-webhook-trigger) in Wix Automations to receive data from a Zapier Zap.
### Available trigger categories The integration supports triggers across many Wix business solutions. Some examples include: | Category | Example triggers | |---|---| | Blog | New blog post published, site visitor comments on a post | | Bookings | Session starts, session ends, client books, client checks in | | eCommerce | Order placed, checkout abandoned | | Events | Event ends, ticket ordered, guest joins the waitlist | | Forms | Form submitted | | Members and Contacts | Contact created, group status changes, post activity | | Payments | Payment received, payment method updated | | Pricing Plans | Plan purchased, canceled, or soon to expire | | Restaurants | Order created, order accepted, delivery order ready | For a complete list of available triggers, see the [Wix integrations page on Zapier](https://zapier.com/apps/wix/integrations#triggers-and-actions). ### Enhance Zaps with Zapier features Zapier provides built-in tools that let you build more sophisticated workflows on top of Wix triggers: - **Multi-step Zaps**: Chain multiple actions in a single Zap. For example, when a Wix Form is submitted, create a CRM contact, add a row to a spreadsheet, and send a Slack notification, all in one workflow. - **Paths**: Add conditional branching to route data based on its content. For example, route form submissions to different email lists based on the submission type. - **Filters**: Set conditions that control whether a Zap continues. For example, only trigger an action when an order total exceeds a certain amount. - **Formatter**: Transform data between steps. For example, format dates, extract text, or convert currencies before passing data to the next action. > **Note:** Some Zapier features, including those listed above, require a paid Zapier plan. ## Prerequisites and authentication To use the Wix Zapier integration, you need: - A [Zapier account](https://zapier.com/sign-up). - A Wix site with the relevant business solution installed, such as Wix Blog or Wix Forms. To connect Zapier to a Wix site, authorize the connection through an OAuth flow. When setting up a Wix Zap for the first time, Zapier prompts for Wix account sign-in and site selection. No API keys or site IDs are required. ## Pre-built templates Zapier provides pre-built templates that let you set up common Wix automations. Templates come pre-configured with a Wix trigger and an action in another app, so you only need to connect your accounts and customize the details. Some popular templates include: - Add or update Mailchimp subscribers when a Wix Form is submitted. - Create HubSpot contacts from Wix Form submissions. - Add rows to Google Sheets when a Wix Form is submitted. - Send Facebook Conversion events from Wix. - Schedule Google Meet meetings for new Wix bookings. - Create items in monday.com from Wix Form submissions. - Send WhatsApp notifications when new forms are received in Wix. - Create Google Ads contacts from Wix Form submissions. Browse all available templates on the [Wix integrations page on Zapier](https://zapier.com/apps/wix/integrations#zap-template-list). ## Use cases Here are some examples of what you can automate with the Wix Zapier integration: - Lead capture and CRM sync: When a site visitor submits a form, automatically create a contact in a CRM and notify a sales team through Slack or email. - Abandoned checkout recovery: When a checkout is abandoned, send a personalized follow-up email through your email marketing platform with a discount code to encourage the customer to complete their purchase. - Booking confirmations: When a client books an appointment, automatically create a calendar event in Google Calendar and send a confirmation message through WhatsApp or SMS. - Order management: When a new eCommerce order is placed, add the order details to a Google Sheet, create a task in your project management tool, and send a notification to your fulfillment team. - Cross-platform marketing: When a new blog post is published, automatically share it to your social media accounts and notify your email subscribers. ## See also - [Create a Zap with a Wix Trigger](https://dev.wix.com/docs/develop-websites-sdk/code-your-site/developer-environments/integrations/create-a-zap-with-a-wix-trigger.md) - [Zapier Wix integrations page](https://zapier.com/apps/wix/integrations) - [Third-Party Apps: Wix Triggers on Zapier](https://support.wix.com/en/article/third-party-apps-zapier-by-zapier) --- > Portal Navigation: > > - Append `.md` to any URL under `https://dev.wix.com/docs/` to get its markdown version. > - Pages are either content pages (article or reference text) or menu pages (a list of links to child pages). > - To get a menu page, truncate any URL to a parent path and append `.md` (e.g. `https://dev.wix.com/docs/sdk.md`, `https://dev.wix.com/docs/sdk/core-modules.md`). > - Top-level index of all portals: https://dev.wix.com/docs/llms.txt > - Full concatenated docs: https://dev.wix.com/docs/llms-full.txt ## Resource: Create a Zap with a Wix Trigger ## Article: Create a Zap with a Wix Trigger ## Article Link: https://dev.wix.com/docs/develop-websites-sdk/code-your-site/developer-environments/integrations/create-a-zap-with-a-wix-trigger.md ## Article Content: # Create a Zap with a Wix Trigger Create an automated workflow in Zapier that starts when an event occurs on a Wix site. For an overview of the Wix Zapier integration and what you can do with it, see [About Zapier Integration](https://dev.wix.com/docs/develop-websites-sdk/code-your-site/developer-environments/integrations/about-zapier-integration.md). This guide walks you through creating a Zap that uses a Wix trigger to start an automated workflow and connects it to an action in another app. ## Step 1 | Create a Zap and connect a Wix account This step creates a new Zap, selects Wix as the trigger app, and authenticates with a Wix account. To create a Zap and connect a Wix account: 1. Go to [zapier.com](https://zapier.com/) and click **+ Create** > **Zaps**. 2. In the Zapier editor, click the trigger step and select **Wix** as the trigger app. 3. In the **Trigger event** dropdown, select a trigger category. For example, select **Blog** for blog-related triggers, or **Forms** for form submission triggers. 4. In the **Account** section, connect a Wix account: - If you've previously connected a Wix account, click **Select** and choose an account from the list. - If you're connecting for the first time, click **Connect a new account**. This opens an OAuth window where you sign in to your Wix account and select a site to connect. 5. Click **Continue**. ## Step 2 | Configure and test the trigger This step selects the specific event that starts the Zap and verifies the connection by retrieving sample data from the Wix site. To configure and test the trigger: 1. In the **Select the specific trigger to use** dropdown, select the specific event that starts the Zap. For example, if you selected **Blog** in the previous step, you can select **New blog post published** or **Blog post liked**.
__Note:__ Zapier displays a note if a specific Wix app is required for the trigger to work. Make sure the app is installed on your site.
1. Click **Continue**. 1. Click **Test trigger**. Zapier checks the connection and retrieves sample data from the Wix site. 1. Review the sample data to confirm it looks correct. 1. Click **Continue with selected record** to proceed. ## Step 3 | Add an action This step connects another app to the Zap and configures it to respond to the Wix trigger. The action is the task that runs automatically whenever the trigger event occurs. To add an action: 1. Click the action step. 1. Search for and select the app you want to connect. For example, select **Google Sheets** to log data to a spreadsheet, or **Slack** to send notifications. 1. In the **Action event** dropdown, select the action to perform. For example, select **Create Spreadsheet Row** for Google Sheets. 1. Connect your account for the action app and then click **Continue**. 1. Configure the action fields: 1. Select the app-specific settings, such as which spreadsheet and worksheet to use. 1. Map the Wix trigger data to the remaining fields. Click in a field and select from the available trigger data to pass it to the action. 1. Click **Continue** and test the action to verify it works. ## Step 4 | Publish the Zap To publish the Zap: 1. Click **Publish** to activate the Zap so it runs automatically whenever the trigger event occurs on the Wix site. ## See also - [About Zapier Integration](https://dev.wix.com/docs/develop-websites-sdk/code-your-site/developer-environments/integrations/about-zapier-integration.md) - [Zapier Wix integrations page](https://zapier.com/apps/wix/integrations) --- > Portal Navigation: > > - Append `.md` to any URL under `https://dev.wix.com/docs/` to get its markdown version. > - Pages are either content pages (article or reference text) or menu pages (a list of links to child pages). > - To get a menu page, truncate any URL to a parent path and append `.md` (e.g. `https://dev.wix.com/docs/sdk.md`, `https://dev.wix.com/docs/sdk/core-modules.md`). > - Top-level index of all portals: https://dev.wix.com/docs/llms.txt > - Full concatenated docs: https://dev.wix.com/docs/llms-full.txt ## Resource: About Identities ## Article: About Identities ## Article Link: https://dev.wix.com/docs/develop-websites-sdk/code-your-site/authorization/about-identities.md ## Article Content: # About Identities When you call a method on a site or on a [custom dashboard page](https://dev.wix.com/docs/develop-websites-sdk/code-your-site/build-a-custom-dashboard/about-dashboard-pages.md), it's called by a specific identity. This identity represents the current site user who triggers the method call, regardless of whether the code making the call is in the frontend, the backend, or on a custom dashboard page. Some Wix methods are restricted based on which identities are authorized to call them. Authorization notes in the API reference indicate when a method may be restricted by identity. If necessary, you can call such methods even when the current identity lacks permissions by using [elevation](https://dev.wix.com/docs/develop-websites-sdk/code-your-site/authorization/about-elevation.md). > **Note:** Some methods may further restrict access by requiring that the calling identity has specific permissions granted through a role. You can use elevation to bypass these restrictions as well. Wix recognizes the following identities: - [Site visitor](#site-visitor) - [Site member](#site-member) - [Wix user](#wix-user) ## Site visitor Site visitors are visitors to a site who have not logged in. Methods that site visitors can call typically involve operations specific to their own experience on the site, such as: - Adding products to the current cart. - Creating a booking. - Copying text to the local clipboard. ## Site member Site members are visitors who have logged in. They can call all the same methods available to site visitors, plus additional methods that only apply to their site membership. Site members who are also [site owners or collaborators](https://support.wix.com/en/article/inviting-people-to-contribute-to-your-site) are also considered admins. Their admin status allows them to call certain administrative methods that other members can't call, such as methods to work with the files in the site's Media Manager. ## Wix user When interacting with the site dashboard, site owners or collaborators take on the Wix user identity. Although Wix users are the same people as site owners and collaborators, they assume different identities depending on context. As the dashboard is a secured admin area, Wix users can call methods with stricter authorization requirements in the dashboard. Examples of administrative methods Wix users can call in the dashboard include: - Adding products to a store. - Confirming or canceling bookings. - Approving new members. > **Note:** Although calls made from a published dashboard page are called with the authorization of a Wix user, those same calls made from a dashboard page being previewed in the editor are only called with the authorization of a site member admin. This means that calls which will work in your published dashboard page may not work when previewing the same dashboard page. ## See also - [About Elevation](https://dev.wix.com/docs/develop-websites-sdk/code-your-site/authorization/about-elevation.md) - [Roles & Permissions](https://support.wix.com/en/article/roles-permissions-overview) - [elevate()](https://dev.wix.com/docs/sdk/core-modules/essentials/auth.md#elevate) --- > Portal Navigation: > > - Append `.md` to any URL under `https://dev.wix.com/docs/` to get its markdown version. > - Pages are either content pages (article or reference text) or menu pages (a list of links to child pages). > - To get a menu page, truncate any URL to a parent path and append `.md` (e.g. `https://dev.wix.com/docs/sdk.md`, `https://dev.wix.com/docs/sdk/core-modules.md`). > - Top-level index of all portals: https://dev.wix.com/docs/llms.txt > - Full concatenated docs: https://dev.wix.com/docs/llms-full.txt ## Resource: About Elevation ## Article: About Elevation ## Article Link: https://dev.wix.com/docs/develop-websites-sdk/code-your-site/authorization/about-elevation.md ## Article Content: # About Elevation > **Note:** This article discusses elevation when developing websites, but the concepts and implementation are the same when [coding in Blocks](https://dev.wix.com/docs/build-apps/develop-your-app/develop-an-app-with-blocks/code-in-blocks/about-coding-in-blocks.md). Some Wix methods are restricted based on the [identities](https://dev.wix.com/docs/develop-websites-sdk/code-your-site/authorization/about-identities.md) and [roles](https://support.wix.com/en/article/roles-permissions-overview) authorized to call them. Elevation is a mechanism that allows you to call these restricted methods even when the calling identity lacks the necessary authorization. This process creates a temporary elevated version of a method by calling the `elevate()` method, enabling you to bypass the usual authentication checks that might otherwise restrict access. For example: ```javascript import { auth } from "@wix/essentials"; import { someModule } from "@wix/some-module"; //... const elevatedMethod = auth.elevate(someModule.methodName); elevatedMethod(param1, param2); ``` ## Methods that may require elevation Methods can be restricted based on user [identity](https://dev.wix.com/docs/develop-websites/articles/coding-with-velo/authorization/identities.md) or [roles and permissions](https://support.wix.com/en/article/roles-permissions-overview). ### Identity restriction example An example of a method restricted by identity is the [`assignBadge()`](https://dev.wix.com/docs/sdk/backend-modules/members/badges/assign-badge.md) method. This method can only be called by [Wix users](https://dev.wix.com/docs/develop-websites-sdk/code-your-site/authorization/about-identities.md#wix-user) because site members shouldn't be able to assign badges to themselves. This means that `assignBadge()` can only be called without elevation in a published dashboard page, where the caller will have the Wix user identity. In all other cases, if you need to call `assignBadge()`, you must elevate it first. For example, you might want to automatically assign a badge to users who take some specific action or reach a predetermined milestone. Since the site members who earned the badge don't have rights to assign it to themselves. In this case, you need to use elevation to assign the badge. ### Roles and permissions restriction example An example of a method restricted based on roles and permissions is the [`confirmBooking()`](https://dev.wix.com/docs/sdk/backend-modules/bookings/bookings/confirm-booking.md) method. This method can only be called by admin members with an administrative bookings role because users creating bookings shouldn't be allowed to confirm their own bookings. If you need to call `confirmBooking()` on behalf of a user who does not have an administrative Bookings role, you must elevate it first. For example, you might have a specific service that you want to confirm automatically once a site visitor books it. Since site visitors who book the service don't have permissions to confirm it themselves, you need to use elevation to confirm the booking. ## Security considerations Due to potential security risks, you can only elevate methods in backend code. While elevation offers flexibility, it's crucial to consider how and when elevation is triggered. [Web methods](https://dev.wix.com/docs/develop-websites-sdk/code-your-site/build-a-custom-backend/web-modules/about-web-modules.md) and [HTTP functions](https://dev.wix.com/docs/develop-websites-sdk/code-your-site/build-a-custom-backend/expose-services/about-custom-site-apis.md) are particularly vulnerable if not properly managed due to their open nature. Elevation in [backend events](https://dev.wix.com/docs/develop-websites-sdk/code-your-site/build-a-custom-backend/backend-events/about-backend-events.md) or code only triggered from [scheduled jobs](https://dev.wix.com/docs/develop-websites-sdk/code-your-site/build-a-custom-backend/scheduled-jobs/about-scheduled-jobs.md) presents less risk but should still be handled cautiously. ### Example To demonstrate how to properly handle elevation, consider a site that rewards frequent visitors with a special badge. To do so, the code needs to track recent member visits and call `assignBadge()` using elevation when a member has visited frequently enough. (Note that the code samples below have been simplified, removing error handling and other non-essential code.) Here is an example of an insecure approach to writing this code: ```javascript // Backend code in badges.web.js import { auth } from "@wix/essentials"; import { webMethod, Permissions } from "@wix/web-methods"; import { badges } from "@wix/members"; export const assignBadge = webMethod( Permissions.Anyone, (badgeId, memberId) => { const elevatedAssignBadge = auth.elevate(badges.assignBadge); return elevatedAssignBadge(badgeId, [memberId]); } ); export const isFrequentVisitor = webMethod(Permissions.Anyone, (memberId) => { // Query collection that tracks member visits, // determine if the specified member is a frequent visitor, // and return the result }); // Frontend code in masterPage.js import { assignBadge, isFrequentVisitor } from "backend/badges.web"; import { members } from "@wix/members"; const frequentVisitorBadgeId = "c705b8dd-aae2-4eea-a4d1-16f52421ec0a"; //... const currentMember = await members.getCurrentMember(); if (isFrequentVisitor(currentMember._id)) { assignBadge(frequentVisitorBadgeId, currentMember._id); } ``` There are several problems with the `assignBadge()` web method used in this approach: - It is open for anyone to call, even though only members can receive badges. - It doesn’t ensure that it will only assign the intended badge. - It doesn’t ensure that it will assign a badge to the currently logged in member. Because of these issues, this method can be called by a malicious user to assign any badge to any member. You can easily remedy these issues by being more careful about where you use elevation and how you expose it to be called. For example: ```javascript // In badges.web.js import { auth } from "@wix/essentials"; import { Permissions, webMethod } from "wix-web-module"; import { badges } from "@wix/members"; import { members } from '@wix/members'; const assignFrequentVisitorBadge = webMethod( Permissions.Member, async () => { const currentMember = await members.getCurrentMember(); if (isFrequentVisitor(currentMember._id)) { const frequentVisitorBadgeId = 'c705b8dd-aae2-4eea-a4d1-16f52421ec0a'; const elevatedAssignBadge = auth.elevate(badges.assignBadge); return elevatedAssignBadge(frequentVisitorBadgeId, [currentMember._id]); } } ) const isFrequentVisitor = (memberId) => { // Query collection that tracks member visits, // determine if the specified member is a frequent visitor, // and return the result } // masterPage.js import { assignFrequentVisitorBadge } from 'backend/badges.web'; //... assignFrequentVisitorBadge(); ``` In this approach, the following makes sure the elevation isn't exploited by malicious users: - The ID of the badge to assign is specified in backend code. - The current user ID is retrieved in backend code. - The web method used to trigger the badge assignment has permissions set so it can only be called by site members. ## See also - [About Identities](https://dev.wix.com/docs/develop-websites-sdk/code-your-site/authorization/about-identities.md) - [Roles & Permissions](https://support.wix.com/en/article/roles-permissions-overview) - [elevate()](https://dev.wix.com/docs/sdk/core-modules/essentials/auth.md#elevate) --- > Portal Navigation: > > - Append `.md` to any URL under `https://dev.wix.com/docs/` to get its markdown version. > - Pages are either content pages (article or reference text) or menu pages (a list of links to child pages). > - To get a menu page, truncate any URL to a parent path and append `.md` (e.g. `https://dev.wix.com/docs/sdk.md`, `https://dev.wix.com/docs/sdk/core-modules.md`). > - Top-level index of all portals: https://dev.wix.com/docs/llms.txt > - Full concatenated docs: https://dev.wix.com/docs/llms-full.txt ## Resource: About Event Handlers ## Article: About Event Handlers ## Article Link: https://dev.wix.com/docs/develop-websites-sdk/code-your-site/build-a-custom-frontend/event-handlers/about-event-handlers.md ## Article Content: # About Event Handlers Frontend event handlers in Wix work differently than in vanilla JavaScript. Normally, you would use `addEventListener()` to add event handlers, selecting DOM elements with methods like `getElementById()` or `querySelector()`. For example, you might write: ```js document.getElementById("myButton").addEventListener("click", function () { console.log("Button clicked!"); }); ``` In Wix, however, you don't access the DOM directly. Instead, you use the [$w API](https://dev.wix.com/docs/velo/velo-only-apis/$w/introduction.md) to interact with elements in the Wix Editor and add event handlers, like this: ```js $w("#myButton").onClick(() => { console.log("Button clicked!"); }); ``` ## Using SDK code in event handlers Although you need to create event handlers using the Velo API, you can use SDK code in the event handler body. For example: ```js import { items } from "@wix/data"; // Add an event handler using Velo $w("#submitButton").onClick(async () => { // Use SDK code inside the event handler const result = await items.insert("listings", { title: $w("#titleInput").value, price: Number($w("#priceInput").value), bedrooms: Number($w("#bedroomsInput").value), }); }); ``` ## Supported IDEs You can use event handlers in the following IDEs: - The [editor](https://dev.wix.com/docs/develop-websites-sdk/code-your-site/developer-environments/ides/code-editor/about-the-code-editor.md) (Wix Studio and Wix Editor) - The [Wix IDE](https://dev.wix.com/docs/develop-websites-sdk/code-your-site/developer-environments/ides/wix-ide/about-the-wix-ide.md) (Wix Studio) - Your [local IDE](https://dev.wix.com/docs/develop-websites-sdk/code-your-site/developer-environments/ides/git-integration/about-git-integration-with-wix-cli.md) (Wix Studio and Wix Editor)
Important: Wix's static event handlers have been deprecated. While [static event handlers](https://dev.wix.com/docs/develop-websites-sdk/code-your-site/build-a-custom-frontend/event-handlers/about-static-event-handlers.md) are still supported for existing sites, we recommend using dynamic event handlers for new development and when updating existing code.
## See also - [Add an Event Handler](https://dev.wix.com/docs/develop-websites-sdk/code-your-site/build-a-custom-frontend/event-handlers/add-an-event-handler.md) - [About Code Placement](https://dev.wix.com/docs/develop-websites-sdk/code-your-site/code-with-java-script/about-code-placement.md) --- > Portal Navigation: > > - Append `.md` to any URL under `https://dev.wix.com/docs/` to get its markdown version. > - Pages are either content pages (article or reference text) or menu pages (a list of links to child pages). > - To get a menu page, truncate any URL to a parent path and append `.md` (e.g. `https://dev.wix.com/docs/sdk.md`, `https://dev.wix.com/docs/sdk/core-modules.md`). > - Top-level index of all portals: https://dev.wix.com/docs/llms.txt > - Full concatenated docs: https://dev.wix.com/docs/llms-full.txt ## Resource: Add an Event Handler ## Article: Add an Event Handler ## Article Link: https://dev.wix.com/docs/develop-websites-sdk/code-your-site/build-a-custom-frontend/event-handlers/add-an-event-handler.md ## Article Content: # Add an Event Handler You can add [dynamic event handlers](https://dev.wix.com/docs/develop-websites-sdk/code-your-site/build-a-custom-frontend/event-handlers/about-event-handlers.md) to elements on a site to respond to visitor interactions like clicks, mouse movements, or form submissions. To add an event handler to an element, do the following either inside or outside of the page's [`onReady()`](https://dev.wix.com/docs/velo/velo-only-apis/$w/on-ready.md) handler: 1. Use the `$w` API to select the element you want to add an event handler to. 1. Use the appropriate event method, such as `onClick()`, `onMouseIn()`, or `onChange()`, to define the event handler. 1. Write the code you want to execute when the event occurs inside the event handler method body. For example, the following code adds a click event handler to a button that changes the text of a text element when clicked: ```js $w("#myButton").onClick((event) => { $w("#myText").text = "Hello, World!"; }); ``` > **Note:** You can also add event handlers using these alternative methods: > > - Use the Properties & Events panel in the Wix Editor to generate the event handler registration code that you add the implementation to. > - Use the [AI Code Assistant](https://dev.wix.com/docs/develop-websites-sdk/code-your-site/developer-environments/ai-assistants/about-ai-assistants.md#ai-code-assistant-in-the-wix-studio-code-panel) in Wix Studio to generate custom event handler code. ## See also - [About Event Handlers](https://dev.wix.com/docs/develop-websites-sdk/code-your-site/build-a-custom-frontend/event-handlers/about-event-handlers.md) - [About the Properties & Events Panel](https://dev.wix.com/docs/develop-websites-sdk/code-your-site/developer-environments/ides/code-editor/about-the-properties-events-panel.md) --- > Portal Navigation: > > - Append `.md` to any URL under `https://dev.wix.com/docs/` to get its markdown version. > - Pages are either content pages (article or reference text) or menu pages (a list of links to child pages). > - To get a menu page, truncate any URL to a parent path and append `.md` (e.g. `https://dev.wix.com/docs/sdk.md`, `https://dev.wix.com/docs/sdk/core-modules.md`). > - Top-level index of all portals: https://dev.wix.com/docs/llms.txt > - Full concatenated docs: https://dev.wix.com/docs/llms-full.txt ## Resource: About Static Event Handlers ## Article: About Static Event Handlers ## Article Link: https://dev.wix.com/docs/develop-websites-sdk/code-your-site/build-a-custom-frontend/event-handlers/about-static-event-handlers.md ## Article Content: # About Static Event Handlers
Deprecation Notice: This feature is deprecated but will continue to work as expected. Switch to [dynamic event handlers](https://dev.wix.com/docs/develop-websites-sdk/code-your-site/build-a-custom-frontend/event-handlers/about-event-handlers.md) for current and future projects.
A static event handler relies on the static wiring of the element to a handler function. The event handler can't be dynamically added or modified at runtime. ## Migrate from static to dynamic event handlers To migrate a static event handler to a dynamic one: 1. Open the Properties & Events panel for the element with the static event handler. 2. Find the event you want to migrate and click the yellow lightning bolt icon next to the event handler name. 3. Click the **Migrate event** link that appears. After migration, your code updates from the old static format to the new dynamic format. For example: **Old format:** ```js export function myButton_click(event) { // Existing code } ``` **New format:** ```js $w("#myButton").onClick((event) => { // Existing code }); ``` ## Delete a static event handler You can no longer use the Properties & Events panel to delete static event handlers. To delete a static event handler, delete the generated code from the page code file. ## See also - [About Event Handlers](https://dev.wix.com/docs/develop-websites-sdk/code-your-site/build-a-custom-frontend/event-handlers/about-event-handlers.md) - [Add an Event Handler](https://dev.wix.com/docs/develop-websites-sdk/code-your-site/build-a-custom-frontend/event-handlers/add-an-event-handler.md) - [About the Properties & Events Panel](https://dev.wix.com/docs/develop-websites-sdk/code-your-site/developer-environments/ides/code-editor/about-the-properties-events-panel.md) --- > Portal Navigation: > > - Append `.md` to any URL under `https://dev.wix.com/docs/` to get its markdown version. > - Pages are either content pages (article or reference text) or menu pages (a list of links to child pages). > - To get a menu page, truncate any URL to a parent path and append `.md` (e.g. `https://dev.wix.com/docs/sdk.md`, `https://dev.wix.com/docs/sdk/core-modules.md`). > - Top-level index of all portals: https://dev.wix.com/docs/llms.txt > - Full concatenated docs: https://dev.wix.com/docs/llms-full.txt ## Resource: About Custom CSS ## Article: About Custom CSS ## Article Link: https://dev.wix.com/docs/develop-websites-sdk/code-your-site/build-a-custom-frontend/css/about-custom-css.md ## Article Content: # About Custom CSS CSS allows you to customize the appearance of a site, from colors and fonts to sizes and positions of different elements. You can even add design elements that aren't yet available in the editor. For example, you can: - Create a blur filter and apply it to a site element. - Use mix-blend-mode properties to combine different elements. - Add a gradient color effect to text. ## Supported IDEs You can customize the CSS using: - The [editor](https://dev.wix.com/docs/develop-websites-sdk/code-your-site/developer-environments/ides/code-editor/about-the-code-editor.md) (Wix Studio and Wix Editor) - The [Wix IDE](https://dev.wix.com/docs/develop-websites-sdk/code-your-site/developer-environments/ides/wix-ide/about-the-wix-ide.md) (Wix Studio) - Your [local IDE](https://dev.wix.com/docs/develop-websites-sdk/code-your-site/developer-environments/ides/git-integration/about-git-integration-with-wix-cli.md) (Wix Studio and Wix Editor) ## Classes Classes group elements on a site together to easily apply the same styling to all the instances of that group. You can apply custom CSS styling to a global class, semantic class, or custom class. ### Global classes Global classes are built-in and made available to a site. Applying a style to a global class affects the CSS styling of elements of that class globally, throughout the site. To get started, see the [list of available classes](https://dev.wix.com/docs/velo/velo-only-apis/$w/styling-elements-with-css.md#available-classes). ### Semantic classes Most global classes are divided into more specific semantic classes to customize individual aspects. For example, you can apply a custom style to all buttons with `.button` or only apply a style to the label text of a button with `.button__label`. See the [documentation of each element](https://dev.wix.com/docs/velo/velo-only-apis/$w/styling-elements-with-css.md#available-classes) for specific information on supported semantic classes. ### Custom classes In addition to the built-in, global classes you can also create custom classes and apply CSS styling to just those. For example, you may want to apply a certain animation style to all subscribe buttons throughout a site, but not to all buttons in general. To do so, you can create a custom class called `.button--subscribe` and add custom styling for all elements that you add this class to. ## See also - For further information on CSS styling options, refer to the [MDN CSS reference docs](https://developer.mozilla.org/en-US/docs/Learn/CSS) - [Wix Studio webinar: Enhance your designs with CSS editing](https://www.youtube.com/watch?v=xynm4m83CqM) --- > Portal Navigation: > > - Append `.md` to any URL under `https://dev.wix.com/docs/` to get its markdown version. > - Pages are either content pages (article or reference text) or menu pages (a list of links to child pages). > - To get a menu page, truncate any URL to a parent path and append `.md` (e.g. `https://dev.wix.com/docs/sdk.md`, `https://dev.wix.com/docs/sdk/core-modules.md`). > - Top-level index of all portals: https://dev.wix.com/docs/llms.txt > - Full concatenated docs: https://dev.wix.com/docs/llms-full.txt ## Resource: Apply Custom CSS Styles ## Article: Apply Custom CSS Styles ## Article Link: https://dev.wix.com/docs/develop-websites-sdk/code-your-site/build-a-custom-frontend/css/apply-custom-css-styles.md ## Article Content: # Apply Custom CSS Styles You can apply custom [CSS styling](https://dev.wix.com/docs/develop-websites-sdk/code-your-site/build-a-custom-frontend/css/about-custom-css.md) to any supported element on a site. ## Step 1 | Add the global.css file Add a `global.css` file. ::::tabs :::Wix-Studio 1. Navigate to **Page Code** in the Code sidebar. 2. In the **CSS** section, click **+ Add global.css**. ::: :::Wix-IDE-or-Local-IDE Add a `global.css` file to the `src/styles` folder. ::: :::: ## Step 2 | (Optional) Add a custom class to a site In addition to the [available classes](https://dev.wix.com/docs/velo/velo-only-apis/$w/styling-elements-with-css.md#available-classes) you can add a new class to any supported element. ::::tabs :::Code Add 1 or more classes to the element with the `add()` method: ```javascript $w("#myElement").customClassList.add("className1", "className2"); ``` ::: :::Wix-Studio-Editor 1. Select an element. 2. In the CSS Classes panel, type your custom class in the Custom classes field: ![custom classes panel in editor](https://wixmp-833713b177cebf373f611808.wixmp.com/images/d8f840d04075e4169aee11d653dc1dfb.png) ::: :::: ## Step 3 | Apply custom styles to the class In the [`global.css` file](#step-1--add-the-globalcss-file) add custom CSS styles to apply. For example: ```css .accordion { text-transform: capitalize; color: yellow; } .button--subscribe { background: linear-gradient(to bottom right, red, yellow); } ``` You can also use [site theme CSS variables](https://dev.wix.com/docs/develop-websites-sdk/code-your-site/build-a-custom-frontend/css/site-theme-css-variables.md) to apply the site's theme colors and fonts to the class. For example: ```css .container { background-color: var(--wst-color-fill-background-primary); } ``` ## See also - [About Custom CSS](https://dev.wix.com/docs/develop-websites-sdk/code-your-site/build-a-custom-frontend/css/about-custom-css.md) - [Webinar: Enhance your designs with CSS editing](https://www.wix.com/studio/academy/webinars/enhance-your-designs-with-css-editing) - For specific examples of available classes, refer to the [API documentation](https://dev.wix.com/docs/velo/velo-only-apis/$w/styling-elements-with-css.md#available-classes) - For further information on CSS styling options, refer to the [MDN CSS reference docs](https://developer.mozilla.org/en-US/docs/Learn/CSS) --- > Portal Navigation: > > - Append `.md` to any URL under `https://dev.wix.com/docs/` to get its markdown version. > - Pages are either content pages (article or reference text) or menu pages (a list of links to child pages). > - To get a menu page, truncate any URL to a parent path and append `.md` (e.g. `https://dev.wix.com/docs/sdk.md`, `https://dev.wix.com/docs/sdk/core-modules.md`). > - Top-level index of all portals: https://dev.wix.com/docs/llms.txt > - Full concatenated docs: https://dev.wix.com/docs/llms-full.txt ## Resource: Site Theme CSS Variables ## Article: Site Theme CSS Variables ## Article Link: https://dev.wix.com/docs/develop-websites-sdk/code-your-site/build-a-custom-frontend/css/site-theme-css-variables.md ## Article Content: # Site Theme CSS Variables Wix exposes a comprehensive set of CSS variables a site's theme colors and fonts. You can use these variables when applying custom [CSS styling](https://dev.wix.com/docs/develop-websites-sdk/code-your-site/build-a-custom-frontend/css/about-custom-css.md) to supported elements on a site. These variables represent the site's color and typography styles, enabling dynamic and consistent design across all components. Use this reference to identify and apply the correct variables for colors and fonts in code. ## Color theme ### General | Style | CSS Variable | | -------------------- | --------------------------------------- | | Primary background | `--wst-color-fill-background-primary` | | Secondary background | `--wst-color-fill-background-secondary` | | Lines and dividers | `--wst-color-line` | ### Text | Style | CSS Variable | | ----------------- | ---------------------------- | | Title | `--wst-color-title` | | Subtitle | `--wst-color-subtitle` | | Body text | `--wst-color-text-primary` | | Secondary text | `--wst-color-text-secondary` | | Links and actions | `--wst-color-action` | | Disabled actions | `--wst-color-disabled` | ### Buttons #### Primary button | Style | CSS Variable | | ----------------- | -------------------------------------------- | | Fill (Regular) | `--wst-button-color-fill-primary` | | Border (Regular) | `--wst-button-color-border-primary` | | Text (Regular) | `--wst-button-color-text-primary` | | Fill (Hover) | `--wst-button-color-fill-primary-hover` | | Border (Hover) | `--wst-button-color-border-primary-hover` | | Text (Hover) | `--wst-button-color-text-primary-hover` | | Fill (Disabled) | `--wst-button-color-fill-primary-disabled` | | Border (Disabled) | `--wst-button-color-border-primary-disabled` | | Text (Disabled) | `--wst-button-color-text-primary-disabled` | #### Secondary button | Style | CSS Variable | | ----------------- | ---------------------------------------------- | | Fill (Regular) | `--wst-button-color-fill-secondary` | | Border (Regular) | `--wst-button-color-border-secondary` | | Text (Regular) | `--wst-button-color-text-secondary` | | Fill (Hover) | `--wst-button-color-fill-secondary-hover` | | Border (Hover) | `--wst-button-color-border-secondary-hover` | | Text (Hover) | `--wst-button-color-text-secondary-hover` | | Fill (Disabled) | `--wst-button-color-fill-secondary-disabled` | | Border (Disabled) | `--wst-button-color-border-secondary-disabled` | | Text (Disabled) | `--wst-button-color-text-secondary-disabled` | ### Theme colors | Style | CSS Variable | | -------- | ------------------------------- | | Base 1 | `--wst-color-fill-base-1` | | Base 2 | `--wst-color-fill-base-2` | | Shade 1 | `--wst-color-fill-base-shade-1` | | Shade 2 | `--wst-color-fill-base-shade-2` | | Shade 3 | `--wst-color-fill-base-shade-3` | | Accent 1 | `--wst-color-fill-accent-1` | | Accent 2 | `--wst-color-fill-accent-2` | | Accent 3 | `--wst-color-fill-accent-3` | | Accent 4 | `--wst-color-fill-accent-4` | ## Font theme | Style | CSS Variable | | ------------------------------------------- | ------------------------------ | | Heading 1 titles (reserved for page titles) | `--wst-font-style-h1` | | Heading 2 titles (recommended) | `--wst-font-style-h2` | | Heading 3 titles | `--wst-font-style-h3` | | Heading 4 titles | `--wst-font-style-h4` | | Heading 5 titles | `--wst-font-style-h5` | | Heading 6 titles | `--wst-font-style-h6` | | Large body text (paragraph 1) | `--wst-font-style-body-large` | | Medium body text (paragraph 2; recommended) | `--wst-font-style-body-medium` | | Small body text (paragraph 3) | `--wst-font-style-body-small` | --- > Portal Navigation: > > - Append `.md` to any URL under `https://dev.wix.com/docs/` to get its markdown version. > - Pages are either content pages (article or reference text) or menu pages (a list of links to child pages). > - To get a menu page, truncate any URL to a parent path and append `.md` (e.g. `https://dev.wix.com/docs/sdk.md`, `https://dev.wix.com/docs/sdk/core-modules.md`). > - Top-level index of all portals: https://dev.wix.com/docs/llms.txt > - Full concatenated docs: https://dev.wix.com/docs/llms-full.txt ## Resource: About Element Size Changes and Page Layout ## Article: About Element Size Changes and Page Layout ## Article Link: https://dev.wix.com/docs/develop-websites-sdk/code-your-site/build-a-custom-frontend/page-elements/about-element-size-changes-and-page-layout.md ## Article Content: # About Element Size Changes and Page Layout
**Important:** This article is only for Wix Editor sites. The way elements interact with each other in Wix Studio may differ. Learn more about [Wix Studio page structure](https://support.wix.com/en/article/studio-editor-about-page-structure-parent-child-and-sibling-elements).
Element resizing in the Wix Editor occurs when elements change size automatically. For example, a text box might expand or a repeater might grow as more items appear. These changes can shift other elements on the page and affect overall page height. Understanding how the Wix Editor positions elements and reacts to size changes helps you predict and control page behavior. ## Why elements shift on a page When elements change size, other elements on the page may shift to maintain spacing based on the gap rules defined below. Elements may shift due to: - Other elements [collapsing or expanding](#collapse-and-expand). - Other elements [growing](#elements-that-grow) to accommodate more content. Elements don't shift due to: - Animations. - Other elements being hidden or shown. ## When this matters The layout rules are particularly important when you're building: - **Dynamic content features**. For example: - Adding or removing items from [repeaters](https://dev.wix.com/docs/velo/velo-only-apis/$w/repeater/introduction.md). - Growing [text elements](https://dev.wix.com/docs/velo/velo-only-apis/$w/text/introduction.md) with user input. - Loading content via a [dataset](https://dev.wix.com/docs/velo/velo-only-apis/$w/dataset/introduction.md) that varies in size. - Displaying search results with varying content. - Displaying user-generated content that changes over time. - **Interactive elements**. For example: - Collapsible elements that site visitors can collapse and expand. - [Wix Forms](https://support.wix.com/en/article/wix-forms-an-overview) that show/hide fields conditionally. - [Multi-state boxes](https://dev.wix.com/docs/velo/velo-only-apis/$w/multi-state-box/introduction.md) with states of different sizes. For example: ```javascript $w('#myText').text = 'Much longer text that will increase the element height'; // Elements below automatically adjust based on the rules. ``` ## Element hierarchy The Wix Editor organizes content as nested containers and elements. A parent contains its children, and elements with the same parent are siblings at the same level. Parents set overall context and constraints, but a parent's effective bounds are often determined by its children. For example, a container can expand to fit new content. Top‑level elements typically include the [Header](https://dev.wix.com/docs/velo/velo-only-apis/$w/header/introduction.md), the Page (which includes [Sections](https://dev.wix.com/docs/velo/velo-only-apis/$w/section/introduction.md)), and the [Footer](https://dev.wix.com/docs/velo/velo-only-apis/$w/footer/introduction.md), while their child elements can vary in many ways. The diagram below shows a possible arrangement of elements: ![Element Hierarchy](https://wixmp-833713b177cebf373f611808.wixmp.com/images/4fa6953012e8d77fa79c1f81157f627e.png "Element Hierarchy") ## Scope of the rules These layout rules consider only vertical position and size. The system ignores horizontal positioning when determining which elements affect each other. ### Vertical gaps The **vertical gap** between elements is the empty space between them, measured from the bottom of the higher element to the top of the lower element. When deciding whether to trigger movement, the system always checks the element with the smallest gap from the resized element. This article refers to this element as **the nearest sibling**.
How to calculate the gap You need the exact size and position of each element. You can view these values in the [Wix Editor Toolbar](https://support.wix.com/en/article/using-your-editor-toolbar). To calculate the gap: 1. Calculate the Y value of the bottom edge of the higher element by adding its H (the height) to its Y value. 1. Calculate the gap by subtracting that bottom edge value from the Y value of the lower element. For example, in the illustration below: - The blue element is positioned at 150 px and has a height of 50 px, so its bottom edge is at 200 px, calculated as 150 + 50. The orange element is at 250 px, so the gap is 50 px, calculated as 250 - 200. - The same process shows that the gap between the orange and green elements is 100 px. ![Calculating the Gap](https://wixmp-833713b177cebf373f611808.wixmp.com/images/aeb1fb59ce75d83123f9f47c562eb3fe.png "Calculating the Gap")
### Rule evaluation sequence When an element changes size, the system evaluates movement in this order: 1. In the same container (siblings): Finds the nearest lower sibling by the smallest vertical gap and applies the relevant rule. Continues down the sibling chain until no more siblings need to move. 1. Container adjustment (parent): If the parent container needs more or less space to fit its children, it expands or collapses from the bottom accordingly. The children keep their relative positions. 1. Outside the container (parent's siblings): Treats the parent as a single element relative to its own nearest lower sibling and continues evaluation down that chain. 1. Repeats up the hierarchy as needed until no more elements move. > **Note:** > If multiple elements have the same smallest gap, the system treats them as equally nearest. > In that case, all of those elements move at the same time according to the applicable rules. For clarification, each of the following is treated as a single element when evaluated against its siblings: - Single elements ([Text](https://dev.wix.com/docs/velo/velo-only-apis/$w/text/introduction.md), [Image](https://dev.wix.com/docs/velo/velo-only-apis/$w/image/introduction.md), [Button](https://dev.wix.com/docs/velo/velo-only-apis/$w/button/introduction.md), and more) - [Container Box](https://dev.wix.com/docs/velo/velo-only-apis/$w/box/introduction.md) and Group - [Header](https://dev.wix.com/docs/velo/velo-only-apis/$w/header/introduction.md), [Section](https://dev.wix.com/docs/velo/velo-only-apis/$w/section/introduction.md), and [Footer](https://dev.wix.com/docs/velo/velo-only-apis/$w/footer/introduction.md)
**Tip:** To keep multiple items moving together, group them together or place them inside a container box, which you can also set to transparent.
> **Note:** > A group's bounds (top, bottom, left, and right) are derived from its children and determine gaps and overlap. The top equals the highest child's top position, and the same principle applies to the other bounds. To learn more, see [Grouping and Ungrouping Elements](https://support.wix.com/en/article/wix-editor-grouping-and-ungrouping-elements). ## Rules The rules below outline how the system evaluates and applies layout adjustments. When an element changes size, movement can cascade through the layout. The system repeatedly applies the evaluation order described in [Rule evaluation sequence](#rule-evaluation-sequence) until no more elements move. ### Collapse and expand When an element collapses or expands, elements below may shift vertically. The behavior depends on the size of the gap between elements: #### Gaps of 70 px or less Elements below move: - If the element has collapsed, they shift up to fill the space. - If the element has expanded, they move down to maintain the gap. #### Gaps greater than 70 px Elements below stay in place, regardless of whether the element above has collapsed or expanded.
Example: A 50 px gap and a 100 px gap ![Collapsing Element Example 1](https://wixmp-833713b177cebf373f611808.wixmp.com/images/0f25119a494d1a4c060443334ff15b6e.png "Collapsing Element Example 1") In the illustration above, the gap between the blue and orange elements is 50 px. Since this gap is less than 70 px, when the blue element collapses, the orange element moves up. However, the gap between the orange and green elements is 100 px. Since this gap is greater than 70 px, the green element stays in place.
Example: A 50 px gap and another 50 px gap ![Collapsing Element Example 2](https://wixmp-833713b177cebf373f611808.wixmp.com/images/b2d7e51f9b2457b465c5714933e7bb9e.png "Collapsing Element Example 2") In this example, both gaps are 50 px. Consequently, when the blue element collapses, both the orange and green elements move up into the space previously occupied by the blue and orange elements, respectively.
### Elements that grow The height of an element can increase when its content increases. For example, elements connected to a dataset may need to expand to display additional information. When an element grows, the elements below may move down to accommodate the extra space. This behavior depends on the size of the gap between elements: #### Gaps of 70 px or less Elements below move down to preserve the original gap. Their new Y value increases by the gap size. #### Gaps greater than 70 px Elements below stay in place. The exception is when the resulting gap falls below 10 px, in which case the lower element moves down to maintain a 10 px gap.
Example: A 50 px gap ![Elements that Grow Example 1](https://wixmp-833713b177cebf373f611808.wixmp.com/images/adc24a146c49fa44618a2b2a43b8ed53.png "Elements that Grow Example 1") In this example, the gap between the blue and orange elements is 50 px. Since this gap is 70 px or less, when the blue element grows by 30 px, the orange element moves down by 30 px to preserve the 50 px gap.
Example: An 80 px gap ![Elements that Grow Example 2](https://wixmp-833713b177cebf373f611808.wixmp.com/images/bd8510209f802c1d0306dfa9085cad0a.png "Elements that Grow Example 2") In this example, the gap between the blue and orange elements is 80 px. Since this gap is greater than 70 px: - In the first scenario, when the blue element grows by 30 px, the orange element stays in place because the resulting gap is 50 px, which is above the 10 px minimum. - In the second scenario, when the blue element grows by 74 px, the orange element moves down by 4 px to maintain the 10 px minimum, because the resulting gap would otherwise be 6 px.
## Vertical overlap exception Two elements are considered to vertically overlap when the lower element's top edge sits above the vertical middle of the higher element. > **Note:** > An element's vertical middle is the average of its top and bottom edges. Wix Editor calculates it as Y + H/2, where Y is the top position and H is the height. When elements overlap vertically, the normal [rules](#rules) don't fully apply. For example, the behavior for 2 vertically overlapping elements during collapse and expand works as follows: - **Single change**: If only 1 of the 2 overlapping elements collapses or expands, no other elements react. - **Both change**: If both overlapping elements collapse or expand, the normal hierarchy evaluation applies as if only the lower of the overlapping elements changed. The illustration below demonstrates this behavior: ![Overlapping Elements Example](https://wixmp-833713b177cebf373f611808.wixmp.com/images/c8c431cc93f78cbf0b27b52e0522d0d7.png "Overlapping Elements Example") In both scenarios, the orange element's top edge is above the blue element's vertical middle. Therefore, overlap rules apply: - In the first scenario, only the blue element collapses. It's a single change, therefore it doesn't cause other elements to move. - In the second scenario, both the blue and orange elements collapse. The green element then moves up to take the orange element's position.
Example: usual behavior The illustration below demonstrates 2 scenarios where elements aren't considered overlapping: ![Non-Overlapping Elements Example](https://wixmp-833713b177cebf373f611808.wixmp.com/images/ed6ff1a45c42cf6ca75a13ec3730e272.png "Non-Overlapping Elements Example") In both scenarios, the orange element's top edge isn't above the blue element's vertical middle, so normal rules apply and elements move as expected. The only difference is that in the lower scenario the blue and green elements overlap both horizontally and vertically after movement, while in the upper scenario they don't.
--- > Portal Navigation: > > - Append `.md` to any URL under `https://dev.wix.com/docs/` to get its markdown version. > - Pages are either content pages (article or reference text) or menu pages (a list of links to child pages). > - To get a menu page, truncate any URL to a parent path and append `.md` (e.g. `https://dev.wix.com/docs/sdk.md`, `https://dev.wix.com/docs/sdk/core-modules.md`). > - Top-level index of all portals: https://dev.wix.com/docs/llms.txt > - Full concatenated docs: https://dev.wix.com/docs/llms-full.txt ## Resource: About Forms ## Article: About Forms ## Article Link: https://dev.wix.com/docs/develop-websites-sdk/code-your-site/build-a-custom-frontend/forms/about-forms.md ## Article Content: # About Forms Forms are interactive parts of your website that let visitors enter and submit information, such as contact details, feedback, or survey responses. With forms on your Wix site, you can easily collect and manage valuable information from your site visitors. ## Ways to work with forms You can work with forms on your Wix site in 2 different ways: - [Wix Forms](#wix-forms): Create forms using [Wix Forms](https://support.wix.com/en/article/about-wix-forms) for quick setup with professional templates. - [Custom forms](#custom-forms): Build your own forms using code and page elements. ### Wix Forms Wix Forms is ideal when you need a fast, reliable solution with professional features and minimal setup. You can use Wix Forms to set up your forms quickly and efficiently and take advantage of useful features like: - A variety of form designs and templates to choose from - Easy customization of form layout in the editor - Automatic email notifications that save information to your contacts and go through the Inbox (Wix CRM) - Built-in support for payment forms, multi-step forms, and subscription forms - An out-of-the-box submission button - Auto-generated emails after submission When you add a Wix form to your site you automatically get a [starter collection](https://support.wix.com/en/article/cms-about-wix-form-collections). Depending on the form you pick, you get a collection specifically built for that form. The form fields are connected to the collection fields, so each time a visitor submits the form, their data is automatically stored in the corresponding collection field. You can view form submissions in the **Wix Form Collections** section in the **CMS** tab on your site's dashboard, or from the sidebar in the editor. For greater flexibility, you can also use the [Forms API](https://dev.wix.com/docs/sdk/backend-modules/forms/introduction.md) to customize the form functionality. For example, you can display a personalized thank you message when a visitor submits the form. > > **Note:** Without a Premium Plan, the Wix Forms app has limited features and capabilities. Learn more about [upgrading your Wix Forms app with a Premium Plan](https://support.wix.com/en/article/wix-forms-upgrading-wix-forms-with-a-premium-plan). ### Custom forms If you want a fully customized form, you can create your own by manually adding user input elements and buttons to your page. You can then use code to handle form submissions and add custom functionality. You can handle the data however you choose. For example, save it to a collection using datasets or the Data Items API, send it to external services, or use it for calculations without storing it. While building custom forms with code takes more time and effort than using Wix Forms, it offers several advantages such as: - Complete control over form design and layout - Custom validations - Advanced third-party API integrations ## See more - [Tutorial: Customize a Wix Form](https://dev.wix.com/docs/develop-websites-sdk/get-started/tutorials/user-interface/tutorial-customize-a-wix-form.md) --- > Portal Navigation: > > - Append `.md` to any URL under `https://dev.wix.com/docs/` to get its markdown version. > - Pages are either content pages (article or reference text) or menu pages (a list of links to child pages). > - To get a menu page, truncate any URL to a parent path and append `.md` (e.g. `https://dev.wix.com/docs/sdk.md`, `https://dev.wix.com/docs/sdk/core-modules.md`). > - Top-level index of all portals: https://dev.wix.com/docs/llms.txt > - Full concatenated docs: https://dev.wix.com/docs/llms-full.txt ## Resource: About Page Rendering ## Article: About Page Rendering ## Article Link: https://dev.wix.com/docs/develop-websites-sdk/code-your-site/build-a-custom-frontend/page-rendering/about-page-rendering.md ## Article Content: # About Page Rendering Page rendering is when your site's code is converted to a visual layout that's displayed in the browser. It occurs when visitors first enter your site, and for each subsequent page load, as they access different pages within the same site. To enhance performance, Wix render's your site code on the server and in the browser. You can use the [Rendering API](https://dev.wix.com/docs/sdk/frontend-modules/window/rendering/introduction.md) to control where your code runs in the rendering process. ## Supported IDEs You can implement the Rendering API using: - The [editor](https://dev.wix.com/docs/develop-websites-sdk/code-your-site/developer-environments/ides/code-editor/about-the-code-editor.md) (Wix Studio and Wix Editor) - The [Wix IDE](https://dev.wix.com/docs/develop-websites-sdk/code-your-site/developer-environments/ides/wix-ide/about-the-wix-ide.md) (Wix Studio) - Your [local IDE](https://dev.wix.com/docs/develop-websites-sdk/code-your-site/developer-environments/ides/git-integration/about-git-integration-with-wix-cli.md) (Wix Studio and Wix Editor) ## Rendering process When a page request is made to the server, the server executes server-side rendering and once completed returns the HTML and all the necessary data to render the page. Once the browser gets the server response it displays the HTML immediately so the page is fully visible, though not yet responsive. Then, the browser runs the same page code again, adding the interactive actions. This double rendering occurs on initial site load, first on the server and then in the browser. Navigating to different pages on the same site, however, typically renders only once in the browser for each page load. As a result of the double rendering, any code in your `onReady()` function may often execute twice, to provide faster initial loading time to access a site. ## Side effects Because your `onReady()` runs twice during double rendering, it may produce side effects. For example, if your code inserts an item into a collection, that insertion occurs twice, unless you explicitly add code to prevent that from happening. To avoid such unwanted side effects, use the [Rendering API](https://dev.wix.com/docs/sdk/frontend-modules/window/rendering/introduction.md) to conditionally control what code runs on the server or browser. You can also use [warmup data](https://dev.wix.com/docs/develop-websites-sdk/code-your-site/build-a-custom-frontend/page-rendering/about-warmup-data.md) to further optimize page loading. ## Test your code Keep the following in mind when testing code that uses the Rendering API. - Rendering never occurs in the server when [previewing](https://support.wix.com/en/article/studio-editor-saving-previewing-and-publishing-your-site#previewing-a-site) your site. - You can't see logs produced by `console.log()` calls in the Developer Console or in your browser's Developer Tools when they're performed on the server. ## See also - [About warmup data](https://dev.wix.com/docs/develop-websites-sdk/code-your-site/build-a-custom-frontend/page-rendering/about-warmup-data.md) - [Optimize page rendering with warmup data](https://dev.wix.com/docs/develop-websites-sdk/code-your-site/build-a-custom-frontend/page-rendering/optimize-page-rendering-with-warmup-data.md) - [Webinar: Planning for scale: large data design considerations](https://youtu.be/BGnpQ_LTHPg?feature=shared&t=1464) --- > Portal Navigation: > > - Append `.md` to any URL under `https://dev.wix.com/docs/` to get its markdown version. > - Pages are either content pages (article or reference text) or menu pages (a list of links to child pages). > - To get a menu page, truncate any URL to a parent path and append `.md` (e.g. `https://dev.wix.com/docs/sdk.md`, `https://dev.wix.com/docs/sdk/core-modules.md`). > - Top-level index of all portals: https://dev.wix.com/docs/llms.txt > - Full concatenated docs: https://dev.wix.com/docs/llms-full.txt ## Resource: Optimize Page Rendering with Warmup Data ## Article: Optimize Page Rendering with Warmup Data ## Article Link: https://dev.wix.com/docs/develop-websites-sdk/code-your-site/build-a-custom-frontend/page-rendering/optimize-page-rendering-with-warmup-data.md ## Article Content: # Optimize Page Rendering with Warmup Data Use [warmup data](https://dev.wix.com/docs/develop-websites-sdk/code-your-site/build-a-custom-frontend/page-rendering/about-warmup-data.md) to speed up your site's [page rendering](https://dev.wix.com/docs/develop-websites-sdk/code-your-site/build-a-custom-frontend/page-rendering/about-page-rendering.md) by reducing the number of data operations that occur during client-side rendering. ## Create a data query with warmup data Follow this procedure to make a data query that's called only once during server-side rendering. The query results are sent as warmup data for display during client-side rendering. If the data query wasn't made during server-side rendering, it's called for the first time during client-side rendering. 1. Add your import statements. ```javascript import { items } from '@wix/data'; import { window } from '@wix/site-window'; ``` 2. Define a `getData()` function that makes a data query. Use the [Window API](https://dev.wix.com/docs/sdk/frontend-modules/window/introduction.md) to conditionally set the query results as warmup data if the query is being made during server-side rendering. ```javascript async function getData() { const results = await items.query("myCollection").find(); if ((await window.rendering()).env == "backend") { await window.warmupData().set("myWarmupData", results.items); } return results; } ``` 3. In your `onReady()` code, store your data in a variable called `dataResults`. Retrieve the warmup data by calling `warmupData.get`. If server-side rendering doesn't occur, `dataResults` should default to the return value of `getData()`. ```javascript $w.onReady(async function () { const warmupData = await window.warmupData(); const dataResults = warmupData.get("myWarmupData") || await getData(); // Use your data as needed. }); ``` In this example, the `dataResults` variable is populated with the results of the query in all cases. When possible, we've optimized performance by using the warmup data initially fetched on the server, instead of running the query a second time during client-side rendering. The full page code looks like this: ```javascript import { items } from '@wix/data'; import { window } from '@wix/site-window'; async function getData() { const results = await items.query("myCollection").find(); if ((await window.rendering()).env == "backend") { await window.warmupData().set("myWarmupData", results.items); } return results; } $w.onReady(async function () { const warmupData = await window.warmupData(); const dataResults = warmupData.get("myWarmupData") || await getData(); // Use your data as needed. }); ``` ## See also - [About page rendering](https://dev.wix.com/docs/develop-websites-sdk/code-your-site/build-a-custom-frontend/page-rendering/about-page-rendering.md) - [About warmup data](https://dev.wix.com/docs/develop-websites-sdk/code-your-site/build-a-custom-frontend/page-rendering/about-warmup-data.md) - [Warmup Data API](https://dev.wix.com/docs/sdk/frontend-modules/window/warmup-data/introduction.md) --- > Portal Navigation: > > - Append `.md` to any URL under `https://dev.wix.com/docs/` to get its markdown version. > - Pages are either content pages (article or reference text) or menu pages (a list of links to child pages). > - To get a menu page, truncate any URL to a parent path and append `.md` (e.g. `https://dev.wix.com/docs/sdk.md`, `https://dev.wix.com/docs/sdk/core-modules.md`). > - Top-level index of all portals: https://dev.wix.com/docs/llms.txt > - Full concatenated docs: https://dev.wix.com/docs/llms-full.txt ## Resource: About Warmup Data ## Article: About Warmup Data ## Article Link: https://dev.wix.com/docs/develop-websites-sdk/code-your-site/build-a-custom-frontend/page-rendering/about-warmup-data.md ## Article Content: # About Warmup Data Warmup data is used to optimize [page rendering](https://dev.wix.com/docs/develop-websites-sdk/code-your-site/build-a-custom-frontend/page-rendering/about-page-rendering.md) when your site's pages are rendered on both the server and the client, ensuring that costly data operations are done only once. Generally, the server executes data operations faster than the browser. With warmup data, you can pass the results of your server operations to your frontend code. During browser rendering, you can write code to check if those operations were already done and set to warmup data, and if the warmup data exists, use it in your code. This prevents the client from performing the same expensive operations again. Use the [Rendering API](https://dev.wix.com/docs/sdk/frontend-modules/window/rendering/introduction.md) to check whether your code is being run on the client or the server, and the [Warmup Data API](https://dev.wix.com/docs/sdk/frontend-modules/window/warmup-data/introduction.md) to set and get the warmup data. ## Supported IDEs You can optimize page rendering with `warmupData` using: - The [editor](https://dev.wix.com/docs/develop-websites-sdk/code-your-site/developer-environments/ides/code-editor/about-the-code-editor.md) (Wix Studio and Wix Editor) - The [Wix IDE](https://dev.wix.com/docs/develop-websites-sdk/code-your-site/developer-environments/ides/wix-ide/about-the-wix-ide.md) (Wix Studio) - Your [local IDE](https://dev.wix.com/docs/develop-websites-sdk/code-your-site/developer-environments/ides/git-integration/about-git-integration-with-wix-cli.md) (Wix Studio and Wix Editor) ## Browser rendering When working with warmup data it's important to keep in mind that there may be cases where browser rendering happens before server-side rendering. In such cases, you can't rely on the warmup data being set on the server, and need to execute those operations directly on the client-side. Note that you can only perform the following operations in the browser: - Access the browser's storage - Use 3rd-party analytics - Create dynamic event handlers - Retrieve information about the client's browser - Navigate to another page ## See also - [About page rendering](https://dev.wix.com/docs/develop-websites-sdk/code-your-site/build-a-custom-frontend/page-rendering/about-page-rendering.md) - [Optimize page rendering with warmup data](https://dev.wix.com/docs/develop-websites-sdk/code-your-site/build-a-custom-frontend/page-rendering/optimize-page-rendering-with-warmup-data.md) --- > Portal Navigation: > > - Append `.md` to any URL under `https://dev.wix.com/docs/` to get its markdown version. > - Pages are either content pages (article or reference text) or menu pages (a list of links to child pages). > - To get a menu page, truncate any URL to a parent path and append `.md` (e.g. `https://dev.wix.com/docs/sdk.md`, `https://dev.wix.com/docs/sdk/core-modules.md`). > - Top-level index of all portals: https://dev.wix.com/docs/llms.txt > - Full concatenated docs: https://dev.wix.com/docs/llms-full.txt ## Resource: About the URL Structure of Site Pages ## Article: About the URL Structure of Site Pages ## Article Link: https://dev.wix.com/docs/develop-websites-sdk/code-your-site/build-a-custom-frontend/urls/about-the-url-structure-of-site-pages.md ## Article Content: # About the URL Structure of Site Pages Understanding the URL structure of Wix site pages is crucial for tasks such as routing, linking, SEO, and query parameter manipulation. ## Sample URLs The structure of the URLs differ between Wix premium sites and Wix free sites: - **Premium sites**: Use a custom domain, such as `domain.com`: `https://domain.com/animals/mammals/elephant?species=african-elephant`. - **Free sites**: Reflect the Wix editor as the domain followed by the site name, such as `user.wixstudio.io/zoo` for Wix Studio sites and `user.wixsite.com/zoo` for Wix Editor sites. - **Wix Studio**: `https://user.wixstudio.io/zoo/animals/mammals/elephant?species=african-elephant` - **Wix Editor**: `https://user.wixsite.com/zoo/animals/mammals/elephant?species=african-elephant` You can get the full site URL, as well as its parts, using the [Location API](https://dev.wix.com/docs/sdk/frontend-modules/location/introduction.md). ## Key parts of a URL | Term | Description | Example | | ------------ | --------------------------------------------------------------------------------------------------------------------------------------------------------------------------------------------------------------------------------------------------------------------------------------------------------------------------------------------------------------------------------------------------------- | -------------------------------------------------------------------------------------------------------- | | **Protocol** | Standard part of the URL that indicates the protocol used to access the resource. | `https://` | | **Base URL** | Represents the root domain of your site. Premium sites use a custom domain, while free Wix sites include the editor followed by the site name. | Premium: `domain.com`
Free (Wix Studio): `user.wixstudio.io`
Free (Wix Editor): `user.wixsite.com` | | **Prefix** | Component used for dynamic paths and router pages. Prefixes are useful for making Dynamic Page URLs, or for determining which incoming requests the [router](https://dev.wix.com/docs/develop-websites-sdk/code-your-site/build-a-custom-backend/routers/about-routers.md) handles. | `/animals` | | **Path** | The path typically follows the base URL or the prefix, if a prefix exists. For dynamic pages and router cases, paths are used for structure or to encode information to indicate what dynamic content to show. | `/mammals/elephant` | | **Query** | Query parameters are key-value pairs appended to the URL to pass additional data. | `?species=african-elephant` | ## See also - [Location API](https://dev.wix.com/docs/sdk/frontend-modules/location/introduction.md) - [Routers](https://dev.wix.com/docs/develop-websites-sdk/code-your-site/build-a-custom-backend/routers/about-routers.md) --- > Portal Navigation: > > - Append `.md` to any URL under `https://dev.wix.com/docs/` to get its markdown version. > - Pages are either content pages (article or reference text) or menu pages (a list of links to child pages). > - To get a menu page, truncate any URL to a parent path and append `.md` (e.g. `https://dev.wix.com/docs/sdk.md`, `https://dev.wix.com/docs/sdk/core-modules.md`). > - Top-level index of all portals: https://dev.wix.com/docs/llms.txt > - Full concatenated docs: https://dev.wix.com/docs/llms-full.txt ## Resource: About Triggered Emails ## Article: About Triggered Emails ## Article Link: https://dev.wix.com/docs/develop-websites-sdk/code-your-site/build-a-custom-frontend/triggered-emails/about-triggered-emails.md ## Article Content: # About Triggered Emails Triggered emails allow you to automatically send customized emails for specific site events. For example, you might trigger emails to send: - A coupon to customers on their birthday. - A satisfaction survey following an issued refund. - A "next steps" email after a form is submitted.
Tip: As an alternative to triggered emails, you can use Wix Automations to reach out to your visitors.
## Supported IDEs You can schedule recurring jobs using: - The [editor](https://dev.wix.com/docs/develop-websites-sdk/code-your-site/developer-environments/ides/code-editor/about-the-code-editor.md) (Wix Studio and Wix Editor) - The [Wix IDE](https://dev.wix.com/docs/develop-websites-sdk/code-your-site/developer-environments/ides/wix-ide/about-the-wix-ide.md) (Wix Studio) - Your [local IDE](https://dev.wix.com/docs/develop-websites-sdk/code-your-site/developer-environments/ides/git-integration/about-git-integration-with-wix-cli.md) (Wix Studio and Wix Editor) ## Monthly email marketing balance Every site has a quota of monthly emails available to send. You can check the current balance under **Monthly balance** in your site's [Email Marketing dashboard page](https://www.wix.com/my-account/site-selector/?buttonText=Open%20Email%20Marketing&title=Select%20a%20Site&autoSelectOnSingleSite=true&actionUrl=https://www.wix.com/dashboard/{{metaSiteId}}/shoutout/). Triggered emails count toward the [email marketing balance](https://support.wix.com/en/article/email-marketing-understanding-your-monthly-balance) but continue to send without interruption even once the quota is reached. You can also [upgrade your email marketing plan](https://www.wix.com/my-account/site-selector/?title=Select%20a%20Site&buttonText=Select%20Site&actionUrl=https%3A%2F%2Fwww.wix.com%2Fwix-emails-plans%3FmetaSiteId%3D%7B%7BmetaSiteId%7D%7D%26origin%3Dkb) for a larger sending quota. ## Statistics for triggered emails vs email marketing The [Triggered Emails dashboard page](https://www.wix.com/my-account/site-selector/?buttonText=Select%20Site&title=Select%20a%20Site&autoSelectOnSingleSite=true&actionUrl=https:%2F%2Fwww.wix.com%2Fdashboard%2F%7B%7BmetaSiteId%7D%7D%2Fdeveloper-tools/triggered-emails) maintains [statistics](https://support.wix.com/en/article/viewing-your-email-marketing-statistics) related to the triggered emails you create. Triggered email statistics are based on all emails sent, including test emails you send to yourself. This is different from the statistics for email marketing campaigns in your [Email Marketing dashboard page](https://www.wix.com/my-account/site-selector/?buttonText=Open%20Email%20Marketing&title=Select%20a%20Site&autoSelectOnSingleSite=true&actionUrl=https://www.wix.com/dashboard/{{metaSiteId}}/shoutout/), which are based on emails sent to unique contacts. Therefore, the statistics for triggered emails may seem inflated compared to email marketing statistics. ## Site collaborators [Site collaborators](https://support.wix.com/en/article/inviting-people-to-contribute-to-your-site#inviting-people-to-collaborate-on-your-site) can create and manage triggered emails. To do so, you must [give them](https://www.wix.com/my-account/site-selector/?buttonText=Manage%20this%20Site&title=Select%20a%20Site&autoSelectOnSingleSite=true&actionUrl=https://www.wix.com/dashboard/%7B%7BmetaSiteId%7D%7D/manage-website/authorization) both **Manage Triggered Emails** and **Manage Email Marketing Campaigns** [permissions](https://support.wix.com/en/article/roles-permissions-overview#roles-and-permissions). ## See also - [Create a triggered email](https://dev.wix.com/docs/develop-websites-sdk/code-your-site/build-a-custom-frontend/triggered-emails/create-a-triggered-email.md) - [Tutorial | Send a triggered email to members](https://dev.wix.com/docs/develop-websites-sdk/get-started/tutorials/members-contacts/tutorial-send-a-triggered-email-to-members.md) - [Tutorial | Send emails using the SendGrid npm package](https://dev.wix.com/docs/develop-websites-sdk/get-started/tutorials/members-contacts/tutorial-send-emails-with-the-send-grid-npm-package.md) --- > Portal Navigation: > > - Append `.md` to any URL under `https://dev.wix.com/docs/` to get its markdown version. > - Pages are either content pages (article or reference text) or menu pages (a list of links to child pages). > - To get a menu page, truncate any URL to a parent path and append `.md` (e.g. `https://dev.wix.com/docs/sdk.md`, `https://dev.wix.com/docs/sdk/core-modules.md`). > - Top-level index of all portals: https://dev.wix.com/docs/llms.txt > - Full concatenated docs: https://dev.wix.com/docs/llms-full.txt ## Resource: Create a Triggered Email ## Article: Create a Triggered Email ## Article Link: https://dev.wix.com/docs/develop-websites-sdk/code-your-site/build-a-custom-frontend/triggered-emails/create-a-triggered-email.md ## Article Content: # Create a Triggered Email Set up a [triggered email](https://dev.wix.com/docs/develop-websites-sdk/code-your-site/build-a-custom-frontend/triggered-emails/about-triggered-emails.md) to automatically send customized emails for specific events on your site. ## Step 1 | Navigate to the Triggered Emails dashboard page To access the Triggered Emails dashboard page, you can either: - Navigate to **Developer Tools** in the Code sidebar and click **Triggered Emails**. - Select **Developer Tools** from [your site’s dashboard](https://www.wix.com/my-account/site-selector/?buttonText=Select%20Site&title=Select%20a%20Site&autoSelectOnSingleSite=true&actionUrl=https:%2F%2Fwww.wix.com%2Fdashboard%2F%7B%7BmetaSiteId%7D%7D%2Fdeveloper-tools/triggered-emails) and select **Triggered Emails**. ## Step 2 | Create an email Use the editor to create and design a new email: 1. On your [Triggered Emails dashboard page](https://www.wix.com/my-account/site-selector/?buttonText=Select%20Site&title=Select%20a%20Site&autoSelectOnSingleSite=true&actionUrl=https:%2F%2Fwww.wix.com%2Fdashboard%2F%7B%7BmetaSiteId%7D%7D%2Fdeveloper-tools/triggered-emails), click **+ New Campaign** to create a new email, or click the **More Actions** ![More Actions](https://wixmp-833713b177cebf373f611808.wixmp.com/images/0e583769d1305e30a5e8d6ca6ed59453.png) icon and select **Duplicate** to duplicate an existing triggered email. 2. Design your email in the editor. ## Step 3 (Optional) | Add variables to personalize text Add variables to personalize the text of your email. The variable is a placeholder that will be replaced by a value you define in the code. 1. With a text element selected in the editor, click **+ Add Variable**: ![Add Variable button in the triggered email editor](https://wixmp-833713b177cebf373f611808.wixmp.com/images/fcaec601e7155d7ffa74cdcb27847d63.png) 2. Fill out the fields in the popup: - **Variable name**: Name the variable something meaningful so it's easy to identify later. For example, `newSubscriberName`. - **Fallback value**: A replacement text that displays here in case you're missing that specific piece of data. You can apply fallback values in the body of an email, but not in the subject line. For example, with the fallback value `there`, in a case where you don't have the new subscriber's name the email will fallback to "Hey there,". 3. Click **Add**. ## Step 4 | Test, save, or publish the email Once your email is designed you have the option at the top of the editor to preview, save, or publish the triggered email. ![Preview, Save as Draft, and Save & Continue options in the triggered email editor](https://wixmp-833713b177cebf373f611808.wixmp.com/images/de9b62255dd77d87f3eb37ee25727ff0.png) - Click **Preview & Test** to send yourself the email to see how it will appear in an inbox and to test any links you included in the email. - Click **Save as Draft** to save your email as a work-in-progress. Draft emails aren't sent when the triggering event occurs. - Click **Save & Continue**. If this is the first time ever you're creating a campaign, you'll be asked to fill out [sender details](#step-5--add-sender-details). That must be completed before publishing. ## Step 5 | Add sender details Sender details are required to send triggered emails. These details contain the information that appears as the sender's name and email address when an email from a site is received: - **Sender’s name**: This is the name that displays in the recipient's inbox. - **Reply-to email**: This is the email address that will populate as the send-to address in your reader's email when they click Reply.
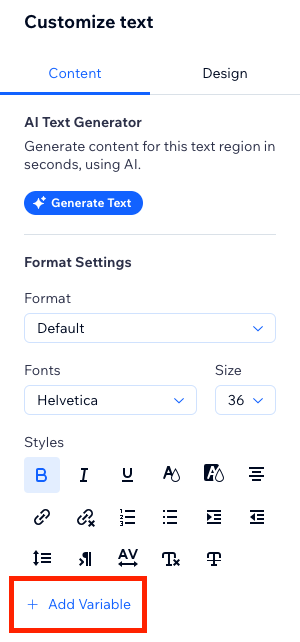

Important information about the email address included in reply-to email: - Emails sent with a reply-to email with a public domain, such as `@gmail.com` or `@yahoo.com`, tend to land in the spam or promotions category. It's better to use an email address with an authenticated domain, such as `you@yourbusiness.com`. - If you use a public domain address, Wix redirects your email through our own authenticated address `@wixemails.com` or, for free users, `@wixsitemail.com`. When someone replies to your email, their new email will automatically populate the send field with the reply-to email. - You may be asked to confirm your reply-to email. You'll receive an email in your inbox with those instructions.
Click **Save** to continue. ## Step 6 | Get the code snippet Before redirecting back to the [Triggered Emails dashboard page](https://www.wix.com/my-account/site-selector/?buttonText=Select%20Site&title=Select%20a%20Site&autoSelectOnSingleSite=true&actionUrl=https:%2F%2Fwww.wix.com%2Fdashboard%2F%7B%7BmetaSiteId%7D%7D%2Fdeveloper-tools/triggered-emails) you have the opportunity to make changes to the email ID and the audience who will receive the email: ![Email ID and code snippet window showing options to email new contacts or site members](https://wixmp-833713b177cebf373f611808.wixmp.com/images/9c5d6d3da3f03171968688308d8cc1be.png) 1. Update the unique **Email ID** to one that's more friendly to work with. For example, `newsletter_signup`. This email ID is used in the code snippet. 2. Click **Email new contacts** or **Email site members** to display the appropriate snippet. 3. Copy the code snippet now or access it later from the [Triggered Emails dashboard page](https://www.wix.com/my-account/site-selector/?buttonText=Select%20Site&title=Select%20a%20Site&autoSelectOnSingleSite=true&actionUrl=https:%2F%2Fwww.wix.com%2Fdashboard%2F%7B%7BmetaSiteId%7D%7D%2Fdeveloper-tools/triggered-emails). 4. Click **Save**. ## Step 7 | Add the code snippet to an event on your site Take the code snippet you copied from the previous window or hover over a triggered email in the [Triggered Emails dashboard page](https://www.wix.com/my-account/site-selector/?buttonText=Select%20Site&title=Select%20a%20Site&autoSelectOnSingleSite=true&actionUrl=https:%2F%2Fwww.wix.com%2Fdashboard%2F%7B%7BmetaSiteId%7D%7D%2Fdeveloper-tools/triggered-emails) and click the **View code snippet** ![View code snippet icon](https://wixmp-833713b177cebf373f611808.wixmp.com/images/9463eeb00bd681a55c5b3e55b3ea8a75.png) icon and add the snippet to your code. ## See also - [About triggered emails](https://dev.wix.com/docs/develop-websites-sdk/code-your-site/build-a-custom-frontend/triggered-emails/about-triggered-emails.md) - [Tutorial | Send a triggered email to members](https://dev.wix.com/docs/develop-websites-sdk/get-started/tutorials/members-contacts/tutorial-send-a-triggered-email-to-members.md) - [Tutorial | Send emails using the SendGrid npm package](https://dev.wix.com/docs/develop-websites-sdk/get-started/tutorials/members-contacts/tutorial-send-emails-with-the-send-grid-npm-package.md) --- > Portal Navigation: > > - Append `.md` to any URL under `https://dev.wix.com/docs/` to get its markdown version. > - Pages are either content pages (article or reference text) or menu pages (a list of links to child pages). > - To get a menu page, truncate any URL to a parent path and append `.md` (e.g. `https://dev.wix.com/docs/sdk.md`, `https://dev.wix.com/docs/sdk/core-modules.md`). > - Top-level index of all portals: https://dev.wix.com/docs/llms.txt > - Full concatenated docs: https://dev.wix.com/docs/llms-full.txt ## Resource: About Mobile Sites with Code ## Article: About Mobile Sites with Code ## Article Link: https://dev.wix.com/docs/develop-websites-sdk/code-your-site/build-a-custom-frontend/mobile/about-mobile-sites-with-code.md ## Article Content: # About Mobile Sites with Code When you build a site, Wix automatically creates a mobile version. Wix resizes your site's content to fit mobile screens and hides any elements from the desktop editor that aren't optimized for mobile. You can customize the mobile version of your site by: - Writing code to change the site's behavior when a site visitor views it on a mobile device or tablet. For example, you can show text on the desktop when hovering over an element. But this functionality isn't available on a mobile device. Instead, you can show the text when tapping. - Managing elements in the [Mobile Editor](https://support.wix.com/en/article/wix-editor-getting-started-with-the-mobile-editor) (Wix Editor) or by using [breakpoints](https://support.wix.com/en/article/studio-editor-designing-across-breakpoints) (Wix Studio). For example, you can hide a button when a visitor opens the site on a mobile device or tablet. This doesn't require coding knowledge. This article only discusses how to manage elements with code. ## Supported IDEs You can write code for mobile using: - The [editor](https://dev.wix.com/docs/develop-websites-sdk/code-your-site/developer-environments/ides/code-editor/about-the-code-editor.md) (Wix Studio and Wix Editor) - The [Wix IDE](https://dev.wix.com/docs/develop-websites-sdk/code-your-site/developer-environments/ides/wix-ide/about-the-wix-ide.md) (Wix Studio) - Your [local IDE](https://dev.wix.com/docs/develop-websites-sdk/code-your-site/developer-environments/ides/git-integration/about-git-integration-with-wix-cli.md) (Wix Studio and Wix Editor) ## Managing site behavior on different devices with code To write code that only runs on mobile devices, you first need to check what device the code is running on. You do this by wrapping the mobile-only code in a JavaScript conditional statement with the [Window API](https://dev.wix.com/docs/sdk/frontend-modules/window/introduction.md). Your code will look something like this: ```js import { window } from "@wix/site-window"; (async () => { if ((await window.formFactor()) === "Mobile") { // code that will only run on mobile } })(); ``` ## Considerations Consider the following when coding for mobile sites: - You might expect that code written in the code editor while in mobile view would only run when your site is viewed on a mobile device. However, the code actually runs regardless of the type of device on which your site is being viewed. Be sure this code doesn’t display anything unnecessary in desktop view. - Some event handlers, such as `onMouseIn()` or `onMouseOut()` don't work on mobile. You should replace these handlers with `onClick()`. For example: Code for hovering an image in desktop view: ```js import { window } from "@wix/site-window"; $w.onReady(function () { $w("#image").onMouseIn(async (event) => { await $w("#hiddenText").show("fade"); }); $w("#image").onMouseOut(async (event) => { await $w("#hiddenText").hide("fade"); }); }); //... ``` Code for tapping the same image in mobile view: ```js //... $w.onReady(function () { $w("#image").onClick(async (event) => { if ( (await window.formFactor()) === "Mobile" || (await window.formFactor()) === "Tablet" ) { if ($w("#hiddenText").hidden) { $w("#hiddenText").show("fade"); } else { $w("#hiddenText").hide("fade"); } } }); }); ``` ## See also - [Mobile Editor](https://support.wix.com/en/article/wix-editor-getting-started-with-the-mobile-editor) - [Breakpoints](https://support.wix.com/en/article/studio-editor-designing-across-breakpoints) --- > Portal Navigation: > > - Append `.md` to any URL under `https://dev.wix.com/docs/` to get its markdown version. > - Pages are either content pages (article or reference text) or menu pages (a list of links to child pages). > - To get a menu page, truncate any URL to a parent path and append `.md` (e.g. `https://dev.wix.com/docs/sdk.md`, `https://dev.wix.com/docs/sdk/core-modules.md`). > - Top-level index of all portals: https://dev.wix.com/docs/llms.txt > - Full concatenated docs: https://dev.wix.com/docs/llms-full.txt ## Resource: About Custom Code ## Article: About Custom Code ## Article Link: https://dev.wix.com/docs/develop-websites-sdk/code-your-site/build-a-custom-frontend/custom-code/about-custom-code.md ## Article Content: # About Custom Code Custom code lets you add HTML, JavaScript, and CSS snippets to the head or body of a site's pages. You can use it to integrate external services, customize site behavior, and add functionality that isn't available through the editor's built-in tools. You add custom code from the site dashboard under **Settings > Custom Code**. Custom code can be used in all Wix editors. For Wix Harmony sites, which don't support site code, custom code is one of the primary ways to extend a site's functionality beyond what the editor provides. > **Note:** To add custom code, the site must be [published](https://support.wix.com/en/article/wix-editor-publishing-your-site) and have a [connected domain](https://support.wix.com/en/article/connecting-a-domain-to-your-site-195136). ## How it works When you add a custom code snippet, you configure the following: - **Placement**: Where the snippet is injected in the page's HTML. Options include the `` tag, the start of the `` tag, or the end of the `` tag. - **Scope**: Whether the snippet loads on all pages or only on specific pages. - **Loading behavior**: Whether the snippet loads once per visit or on every page the visitor opens. Custom code snippets don't appear as elements in the editor. They run behind the scenes when the page loads, but their effects, such as applied styles, injected UI elements, or data fetched from external services, are visible to site visitors on the published site. ## Use cases You can use custom code to integrate 3rd-party services, style elements beyond what the editor offers, add interactive JavaScript, and improve SEO with structured data. ### Integrate 3rd-party services Many external services require a code snippet to be added to a website. Custom code gives you a place to paste these snippets so they load alongside the site. Common examples include: - **Site verification**: Search engines like Google and Bing require a `` tag in the site's `` to verify site ownership. - **Live chat widgets**: Customer support platforms provide a script that displays a chat widget on the site. - **Cookie consent banners**: Privacy compliance tools provide a snippet that displays a consent banner to meet GDPR or CCPA requirements. ### Add custom CSS You can inject a ` # Wix’s Development Frameworks Whether you're a seasoned developer or just dipping your toes into the world of coding, Wix offers an arsenal of developer-friendly tools and technologies to drive your [app-building journey](https://dev.wix.com/docs/build-apps/get-started/overview/about-wix-apps.md#your-app-building-journey). These tools and technologies are integrated within 3 frameworks, each providing a comprehensive development model. This article guides you through the process of choosing the development framework that’s right for you. The main choice is who manages your app's hosting and deployment: * **Wix-managed**: Wix hosts and deploys your app on the Wix cloud, with no additional setup or cost. Build it code-first with the [Wix CLI](#wix-cli), or visually with [Wix Blocks](#wix-blocks). * **Self-managed**: Use your own tech stack and [host your app yourself](#self-managed). [](https://manage.wix.com/account/custom-apps) ## Wix CLI Use Wix CLI to code and deploy with Wix’s React/Node.js stack. Get the standard JavaScript developer experience, code on your local machine with your preferred IDE, and collaborate with your team using git. Your code is deployed and hosted on the Wix cloud, with no additional costs or setup. [Learn more about Wix CLI](https://dev.wix.com/docs/wix-cli/guides/about-the-wix-cli.md) Here's what creating an app with Wix CLI looks like: ![cli](https://wixmp-833713b177cebf373f611808.wixmp.com/images/ec781a4cfa271092a735cb5cd933804d.gif) ## Self-managed With the self-managed framework, you use your own tech stack and handle deployment and hosting yourself. When setting up your application in your app's dashboard, simply provide URLs to your deployment assets, such as iframes, webhooks, and JavaScript bundles. [Learn more about self-managed apps](https://dev.wix.com/docs/build-apps/develop-your-app/develop-a-self-managed-app/about-self-managed-apps.md) Here's an example of registering a self-managed iframe in your app's dashboard: ![dev-center](https://wixmp-833713b177cebf373f611808.wixmp.com/images/55408761d7d5d5d13075f262fe59a75b.png) ## Wix Blocks If you prefer a visual, low-code approach, you can use Wix Blocks to design, code, and deploy on Wix’s native app editor. Build site and dashboard components using Wix’s drag-and-drop editor, with its powerful layout and design tools, and code your business logic using [Velo](https://dev.wix.com/docs/develop-websites/articles/get-started/about-developing-websites.md), Wix’s native coding solution. Your code is deployed and hosted on the Wix cloud, with no additional costs or setup. [Learn more about Wix Blocks](https://dev.wix.com/docs/build-apps/develop-your-app/develop-an-app-with-blocks/about-wix-blocks.md) Here's what Wix Blocks looks like: ![blocks](https://wixmp-833713b177cebf373f611808.wixmp.com/images/964d8ea6d8a139d48b9364d79b6d86fd.png) ## Choosing a framework Start by identifying the [extensions](https://dev.wix.com/docs/build-apps/get-started/overview/how-apps-extend-wix.md) your app needs, then check which frameworks support each one in the [extension catalog](https://dev.wix.com/docs/build-apps/get-started/overview/how-apps-extend-wix.md#extension-catalog). With your required extensions in mind, consider: - **Hosting and deployment**: Wix CLI and Wix Blocks deploy automatically to the Wix cloud, with no additional setup or cost. Self-managed gives you full control over hosting and deployment on your own infrastructure, in exchange for managing it yourself. - **Tech stack and tooling**: Wix CLI provides a standard TypeScript workflow in your preferred IDE. Self-managed lets you use any stack and tools you already work with. Wix Blocks uses Wix’s native online editor and coding solution. - **Collaboration and version control**: Wix CLI and self-managed both integrate with git and standard CI/CD practices. ## Combine frameworks A Wix app’s functionality is based on a set of [extensions](https://dev.wix.com/docs/build-apps/get-started/overview/how-apps-extend-wix.md) that are added to a site, for example, a dashboard page, a site widget or specific backend logic. You can build each of these extensions using one or more of Wix’s development frameworks. It’s important to understand that no matter which framework you start with, you can always continue developing your app using any of the other frameworks. Your app can contain multiple extensions, each built with a different framework. Because of this, Wix-managed and self-managed describe how an individual extension is built and hosted, not necessarily a whole app. In fact, there are several use cases that require multiple frameworks in the same app. Learn more about the [frameworks you can use to build each type of extension](https://dev.wix.com/docs/build-apps/get-started/overview/how-apps-extend-wix.md). ## Summary So which framework should you choose? Basically, it’s a question of which tech stack and tools you prefer to work with. Here’s a summary of the main features of each development framework: | **Wix CLI** | **Self-managed** | **Wix Blocks** | |---|---|---| |
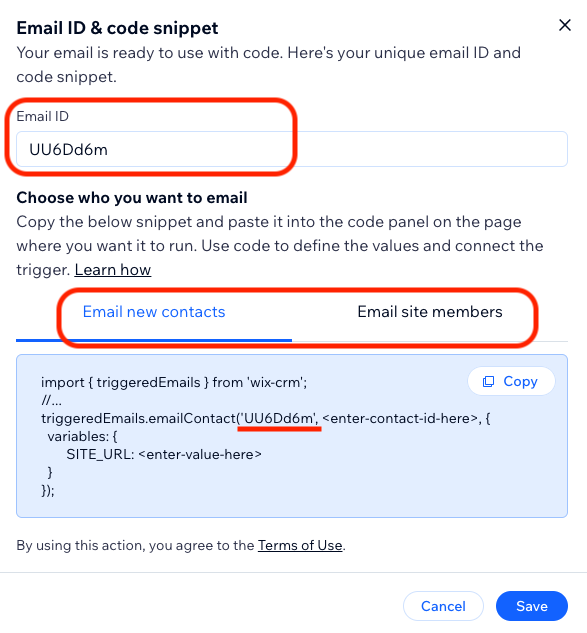
  • Standard TypeScript full-stack developer experience.
  • Your preferred local IDE.
  • App scaffolding, live preview, and deployment flows.
  • Collaboration and version control on git.
  • Hosted on the Wix cloud.
|
  • Your own tech stack and tools.
  • Limited access to Wix developer utilities.
  • You manage hosting on the platform of your choice.
|
  • Drag-and-drop UI editor.
  • Native Wix coding solution in an online IDE.
  • No-code and low-code features.
  • Frontend and backend coding, databases, and deployment flows.
  • Hosted on the Wix cloud.
| --- > Portal Navigation: > > - Append `.md` to any URL under `https://dev.wix.com/docs/` to get its markdown version. > - Pages are either content pages (article or reference text) or menu pages (a list of links to child pages). > - To get a menu page, truncate any URL to a parent path and append `.md` (e.g. `https://dev.wix.com/docs/sdk.md`, `https://dev.wix.com/docs/sdk/core-modules.md`). > - Top-level index of all portals: https://dev.wix.com/docs/llms.txt > - Full concatenated docs: https://dev.wix.com/docs/llms-full.txt ## Resource: How Apps Extend Wix ## Article: How Apps Extend Wix ## Article Link: https://dev.wix.com/docs/build-apps/get-started/overview/how-apps-extend-wix.md ## Article Content: # How Apps Extend Wix Your app can add functionality to almost every part of the [Wix ecosystem](https://dev.wix.com/docs/build-apps/get-started/overview/the-wix-ecosystem.md). It can display a widget on a Wix user's site, add a page to a site's dashboard, inject custom logic into a site's backend service, and much more. Each specific type of functionality that an app can provide is called an extension. See the full list of available extensions below. An app can contain multiple extensions that work together to expose its functionality across different user interfaces and backend services. For example, Wix's [FAQ app](https://www.wix.com/app-market/wix-faq) displays a customizable FAQ widget on a site, and also has a dashboard page where the Wix user can create and manage their FAQ categories, questions, and answers. Most extensions are built using one of Wix's [development frameworks](https://dev.wix.com/docs/build-apps/get-started/overview/wix-s-development-frameworks.md). However, some extensions only require configuration in the [app dashboard](https://dev.wix.com/docs/build-apps/develop-your-app/app-dashboard-setup/about-the-app-dashboard.md) with no coding involved. You can extend Wix's [frontend interfaces](https://dev.wix.com/docs/build-apps/get-started/overview/the-wix-ecosystem.md#frontend-interfaces) as well as various [backend capabilities](https://dev.wix.com/docs/build-apps/get-started/overview/the-wix-ecosystem.md#backend-capabilities). Frontend extensions include: - [Site extensions](#site-extensions): Components that are added to a site. - [Dashboard extensions](#dashboard-extensions): Components that are added to the dashboard. - [Editor extensions](#editor-extensions): Components that are added to the editor. Backend extensions include: - [Service plugins](#service-plugins): Business logic that's injected into a site's backend services. - [Schema plugins](#schema-plugins): Fields that are added to the database schemas of Wix business solutions. - [Notifications](#notifications): Notifications sent to Wix users. - [Automations](#automations): Triggers, actions, and pre-installed automations that automate business processes. - [APIs](#apis): Backend methods that can be called from frontend code. - [Events](#events): Code that runs when specific events occur on a site. ## App compatibility App compatibility varies depending on the type of site a Wix user has. Sites built with the drag-and-drop editors, Wix Editor and Wix Studio, can use any type of app. However, sites built with Wix Vibe and Headless projects can only use apps that only have dashboard extensions. ## Extension catalog The following tables list all available extensions: ### Frontend extensions #### Site extensions | Extension | What you create | How you build it | | ------------------------------------------------------------------------------------------------------------------------------------------ | -------------------------------------------------------------------------------------------------------------------------------------------------- | ------------------------------------------------------------------------------------------------------------------- | | [Site page](https://dev.wix.com/docs/build-apps/develop-your-app/extensions/site-extensions/site-pages/about-site-page-extensions.md) | A page that's added to a site, composed of selected widgets. | Configuration in the app dashboard | | [Site widget](https://dev.wix.com/docs/build-apps/develop-your-app/extensions/site-extensions/site-widgets/about-site-widget-extensions.md) | A draggable component that can be placed anywhere on a site. | One of the following:
  • Wix Blocks
  • Wix CLI custom element
  • Self-managed custom element
| | [Site plugin](https://dev.wix.com/docs/build-apps/develop-your-app/extensions/site-extensions/site-plugins/about-site-plugin-extensions.md) | A site component that extends an app created by Wix. It can be placed inside designated areas (called slots) within the hosting app's site widget. | One of the following:
  • Wix Blocks
  • Wix CLI custom element
  • Self-managed custom element
| | [Embedded script](https://dev.wix.com/docs/build-apps/develop-your-app/extensions/site-extensions/embedded-scripts/about-embedded-scripts.md) | A script that's injected into a site's HTML code. | One of the following:
  • Wix CLI
  • Configuration in the app dashboard
| #### Dashboard extensions | Extension | What you create | How you build it | | --------------------------------------------------------------------------------------------------------------------------------------------------------------------------------------- | ------------------------------------------------------------------------------------------------------------------------------------------------------------------------------------------------ | -------------------------------------------------------------------------------------------- | | [Dashboard page](https://dev.wix.com/docs/build-apps/develop-your-app/extensions/dashboard-extensions/dashboard-pages/about-dashboard-page-extensions.md) | A page that's added to a site's dashboard. | One of the following:
  • Wix Blocks
  • Wix CLI
  • Self-managed iframe
| | [External link](https://dev.wix.com/docs/build-apps/develop-your-app/extensions/dashboard-extensions/external-links/about-external-link-extensions.md) | A link in the dashboard's [app management page](https://support.wix.com/en/article/accessing-your-apps#accessing-your-apps-from-your-sites-dashboard-1), pointing to your external site. | Configuration in the app dashboard | | [Dashboard plugin](https://dev.wix.com/docs/build-apps/develop-your-app/extensions/dashboard-extensions/dashboard-plugins/about-dashboard-plugin-extensions.md) | A dashboard component that [extends an app created by Wix](https://dev.wix.com/docs/build-apps/get-started/overview/integrating-with-wix-s-business-solutions.md). It's placed inside a designated area (called a slot) in the hosting app's dashboard page. | One of the following:
  • Wix CLI
  • Self-managed iframe
| | [Dashboard menu plugin](https://dev.wix.com/docs/build-apps/develop-your-app/extensions/dashboard-extensions/dashboard-plugins/dashboard-menu-plugins/dashboard-menu-plugin-extensions.md) | An item that's added to a menu in a dashboard page of an app created by Wix. The menu item can trigger various actions. | One of the following:
  • Wix CLI
  • Configuration in the app dashboard
| | [Dashboard modal](https://dev.wix.com/docs/build-apps/develop-your-app/extensions/dashboard-extensions/dashboard-modals/about-dashboard-modals.md) | A modal to display in the dashboard. | One of the following:
  • Wix CLI
  • Self-managed iframe
| #### Editor extensions | Extension | What you create | How you build it | | --------------------------------------------------------------------------------------------------------------------------------- | -------------------------------------------------- | ------------------ | | [Editor Add-on](https://dev.wix.com/docs/build-apps/develop-your-app/extensions/editor-extensions/about-editor-add-on-extensions.md) | A tool that adds functionality to the Wix editors. | Self-managed iframe | ### Backend extensions #### Data collections | Extension | What you create | How you build it | | ------------------------------------------------------------------------------------------------------------------------------------------------------------------ | -------------------------------------------------------- | ---------------------------------- | | [Data collections](https://dev.wix.com/docs/build-apps/develop-your-app/extensions/backend-extensions/data-collections/about-data-collections-extensions.md) | CMS data collections that are automatically created when your app is installed on a site. | [Configuration in the app dashboard](https://dev.wix.com/docs/build-apps/develop-your-app/extensions/backend-extensions/data-collections/add-a-data-collections-extension-in-the-app-dashboard.md) | #### Service plugins | Extension | What you create | How you build it | | ------------------------------------------------ | ------------------------------------------------------------------------------------------------------------------------------------------------------------------------ | ------------------------------------------------------------------------------------------------------------------------------------------------------------------------------------------------------------------------------------------------------------------------------------------------------------------------------------------------------- | | [eCommerce additional fees service plugin](https://dev.wix.com/docs/api-reference/business-solutions/e-commerce/extensions/additional-fees/additional-fees-service-plugin/introduction.md) | Business logic for calculating additional fees for a site visitor's cart and checkout. | CLI or self-managed service plugin | | [eCommerce shipping rates service plugin](https://dev.wix.com/docs/api-reference/business-solutions/e-commerce/extensions/shipping-rates/shipping-rates-integration-service-plugin/introduction.md) | Business logic for calculating shipping rates for a site visitor's cart and checkout. | CLI or self-managed service plugin | | [eCommerce custom discount trigger service plugin](https://dev.wix.com/docs/api-reference/business-solutions/e-commerce/extensions/discounts/custom-discount-triggers-integration-service-plugin/introduction.md) | Business logic for applying discount rules to a site visitor's cart and checkout. | CLI or self-managed service plugin | | [eCommerce payment settings service plugin](https://dev.wix.com/docs/api-reference/business-solutions/e-commerce/payments/payment-settings/payment-settings-integration-service-plugin/introduction.md) | Business logic to determine whether to apply 3D Secure validation during a merchant's payment process. | CLI or self-managed service plugin | | [eCommerce validations service plugin](https://dev.wix.com/docs/api-reference/business-solutions/e-commerce/extensions/validations/validations-integration-service-plugin/introduction.md) | Business logic for validating a site visitor's cart and checkout. | CLI or self-managed service plugin | | [eCommerce recommendations service plugin](https://dev.wix.com/docs/api-reference/business-solutions/e-commerce/other-services/recommendations/recommendations-service-plugin/introduction.md) | Business logic for providing advanced recommendation algorithms, helping Wix users deliver personalized suggestions that enhance user engagement and overall experience. | Self-managed service plugin | | [eCommerce catalog service plugin](https://dev.wix.com/docs/api-reference/business-solutions/e-commerce/catalogs/catalog-service-plugin/introduction.md) | Business logic for becoming a Wix catalog provider and integrating any external repository of sellable items with the Wix eCommerce platform. | CLI or self-managed service plugin | | [eCommerce gift vouchers service plugin](https://dev.wix.com/docs/api-reference/business-solutions/e-commerce/payments/gift-cards/gift-cards-service-plugin/introduction.md) | Business logic for integrating with Wix as a gift card service provider. | CLI or self-managed service plugin | | [eCommerce inventory service plugin](https://dev.wix.com/docs/api-reference/business-solutions/e-commerce/catalogs/inventory-service-plugin/introduction.md) | Business logic for integrating with a unified inventory system, enabling decrementing and incrementing item availability based on order flows. | REST: Self-managed service plugin | | [Stores product restrictions service plugin](https://dev.wix.com/docs/api-reference/business-solutions/stores/service-plugins/product-restrictions-v3/introduction.md) | Business logic for implementing editing restrictions on product fields for 3rd-party fulfillment apps such as dropshipping and print-on-demand. | REST: Self-managed service plugin | | [Marketing keyword suggestions service plugin](https://dev.wix.com/docs/api-reference/business-management/marketing/seo/seo-keywords-suggestions-service-plugin/introduction.md) | Business logic for providing Wix users with keyword suggestions through the site dashboard. | CLI or self-managed service plugin | | [App Billing custom charges service plugin](https://dev.wix.com/docs/api-reference/app-management/app-billing/custom-charges-service-plugin/introduction.md) | Business logic for charging Wix users for using your app. | Self-managed service plugin | | [Form submission service plugin](https://dev.wix.com/docs/api-reference/crm/forms/service-plugins/form-submissions-service-plugin/introduction.md) | Business logic for adding additional form validations. | CLI or self-managed service plugin | | [Bookings pricing integration service plugin](https://dev.wix.com/docs/api-reference/business-solutions/bookings/pricing/pricing-integration-service-plugin/introduction.md) | Business logic for providing custom pricing calculations for your merchant's bookings. | REST: Self-managed service plugin | | [Data external database service plugin](https://dev.wix.com/docs/api-reference/business-solutions/cms/external-databases/external-database-service-plugin/introduction.md) | Business logic for providing custom pricing calculations for your merchant's bookings. | Self-managed service plugin | | [Automations action provider service plugin](https://dev.wix.com/docs/api-reference/business-management/automations/actions/action-provider-service-plugin/introduction.md) | Business logic for implementing custom automated actions. | REST: Self-managed service plugin | | [Payments provider service plugin](https://dev.wix.com/docs/api-reference/business-management/payments/service-plugins/payment-service-provider-service-plugin/introduction.md) | Business logic for integrating payments with Wix. | REST: Self-managed service plugin | | [Payments tax calculation service plugin](https://dev.wix.com/docs/api-reference/business-solutions/e-commerce/extensions/tax/tax-calculation-integration-service-plugin/introduction.md) | Business logic for calculating taxes. | CLI or self-managed service plugin | | [Payments tax groups service plugin](https://dev.wix.com/docs/api-reference/business-solutions/e-commerce/extensions/tax/tax-groups-integration-service-plugin/introduction.md) | Business logic for managing default tax groups to categorize products from your app's catalog based on distinct tax treatments. | REST: Self-managed service plugin | Learn more [about service plugins](https://dev.wix.com/docs/build-apps/develop-your-app/extensions/backend-extensions/service-plugins/about-service-plugin-extensions.md). #### Schema plugins | Extension | What you create | How you build it | | ------------------------------------------------------------------------------------------------------------------------------------------------------------------ | -------------------------------------------------------- | ---------------------------------- | | [Booking schema plugin](https://dev.wix.com/docs/api-reference/business-solutions/bookings/bookings/bookings-writer-v2/booking-object.md) | Fields that are added to the Wix Booking object. | Configuration in the app dashboard | | [Booking service schema plugin](https://dev.wix.com/docs/api-reference/business-solutions/bookings/services/services-v2/service-object.md) | Fields that are added to the Wix Booking Service object. | Configuration in the app dashboard | | [Checkout](https://dev.wix.com/docs/api-reference/business-solutions/e-commerce/purchase-flow/checkout/checkout/checkout-object.md) & [Order](https://dev.wix.com/docs/api-reference/business-solutions/e-commerce/orders/orders/order-object.md) schema plugin | Fields that are added to the Checkout and Order objects. | Configuration in the app dashboard | | [eCommerce catalog product schema plugin](https://dev.wix.com/docs/api-reference/business-solutions/stores/catalog-v3/products-v3/product-object.md) | Fields that are added to the Wix Stores Product object. | Configuration in the app dashboard | | [eCommerce tips settings schema plugin](https://dev.wix.com/docs/api-reference/business-solutions/e-commerce/other-services/tips/tip-settings/tip-settings-object.md) | Fields that are added to the Tips Settings object. | Configuration in the app dashboard | Learn more [about schema plugins](https://dev.wix.com/docs/build-apps/develop-your-app/extensions/backend-extensions/schema-plugins/about-schema-plugin-extensions.md). #### Notifications | Extension | What you create | How you build it | | ---------------------------------------------------------------------------------------------------------------------------------------------------- | --------------------------------------------------------------------------------------------- | ---------------------------------- | | Notification | Notifications that Wix users receive on their site dashboard and in the Wix Owner mobile app. | Self-managed notification logic | | Notification topic | Topics that you can use to group notifications when they're displayed to Wix users. | Configuration in the app dashboard | Learn more [about notification extensions](https://dev.wix.com/docs/build-apps/develop-your-app/extensions/backend-extensions/notifications/about-notification-extensions.md). #### Automations | Extension | What you create | How you build it | | --------------------------------------------------------------------------------------------------------------------------------------------------------------------------- | ----------------------------------------------------------------------------------------------------------------------- | ---------------------------------- | | [Trigger](https://dev.wix.com/docs/build-apps/develop-your-app/extensions/backend-extensions/automations/triggers/about-triggers.md) | An event that causes an automation to run, such as a visitor action or a Wix user action. | Configuration in the app dashboard | | [Action](https://dev.wix.com/docs/build-apps/develop-your-app/extensions/backend-extensions/automations/actions/about-actions.md) | An automation's response when triggered, carrying out processes such as sending an email or updating data. | Configuration in the app dashboard | | [Pre-installed automation](https://dev.wix.com/docs/build-apps/develop-your-app/extensions/backend-extensions/automations/pre-installed-automations/about-pre-installed-automations.md) | A full automation combining a trigger and 1 or more actions that's added to a user's site when they install your app. | Configuration in the app dashboard | Learn more [about automations](https://dev.wix.com/docs/build-apps/develop-your-app/extensions/backend-extensions/automations/about-automations.md). #### APIs | Extension | What you create | How you build it | | ------------------------------------------------------------------------------------------------------------------------------------------------------- | --------------------------------------------------------------------------------------------------------------- | ---------------- | | [Web method](https://dev.wix.com/docs/build-apps/develop-your-app/extensions/backend-extensions/web-methods/about-web-method-extensions.md) | A method defined in your app's backend that can be called from frontend code. Wix handles the communication. | CLI | | [HTTP function](https://dev.wix.com/docs/wix-cli/guides/development/http-endpoints/about-http-endpoints.md) | An HTTP method in your app's backend that can be called from frontend code. | CLI | #### Events | Extension | What you create | How you build it | | ----------------------------------------------------------------------------------------------------------------------------------- | ------------------------------------------------------------------------------------------------- | ---------------- | | [Event](https://dev.wix.com/docs/build-apps/develop-your-app/extensions/backend-extensions/events/about-event-extensions.md) | Code that runs when specific events occur on your app or a user's site, such as a booking confirmation. | CLI | ## See also - [Map your app's functionality to Wix's extensions](https://dev.wix.com/docs/build-apps/develop-your-app/extensions/map-your-app-s-functionality-to-wix-s-extensions.md) --- > Portal Navigation: > > - Append `.md` to any URL under `https://dev.wix.com/docs/` to get its markdown version. > - Pages are either content pages (article or reference text) or menu pages (a list of links to child pages). > - To get a menu page, truncate any URL to a parent path and append `.md` (e.g. `https://dev.wix.com/docs/sdk.md`, `https://dev.wix.com/docs/sdk/core-modules.md`). > - Top-level index of all portals: https://dev.wix.com/docs/llms.txt > - Full concatenated docs: https://dev.wix.com/docs/llms-full.txt ## Resource: Integrating with Wix's Business Solutions ## Article: Integrating with Wix's Business Solutions ## Article Link: https://dev.wix.com/docs/build-apps/get-started/overview/integrating-with-wix-s-business-solutions.md ## Article Content: # Integrating with Wix’s Business Solutions Wix offers a range of powerful [business solutions](https://support.wix.com/en/business-solutions-apps), enabling Wix users to sell products and services, run events, write blogs, manage restaurants, and more. These business solutions are designed to integrate seamlessly with Wix websites. Users add Wix business solutions to their sites by installing [apps created by Wix](https://www.wix.com/app-market/collection/made-by-wix). ## How to integrate Integrate your app’s functionality into one of Wix’s native business solutions to tap into Wix’s vast user base, gain exposure, and generate revenue. Whether your app fulfills orders with dropshipping, boosts a blog writer's audience, or helps a restaurant manage its staff, there's an opportunity for you to offer Wix users the extra features they need. Your app can integrate with Wix’s business solutions in the following ways: * **Plugins**: Inject your own functionality directly into a business solution’s user interfaces and backend capabilities. * **APIs**: Connect your services to Wix sites by gaining access to a business solution’s data and functionality. ## Plugins With plugins, you can inject your own functionality directly into the user interfaces and backend capabilities of Wix’s business solutions. The following image shows an example of the [Wix Reviews](https://support.wix.com/en/article/wix-stores-adding-and-setting-up-wix-reviews) site plugin, which adds a product rating component inside the Wix Stores product page: ![site-plugin](https://wixmp-833713b177cebf373f611808.wixmp.com/images/ba3d9720e4f1147b49de6fde6780522f.png) ### Frontend plugins Create plugins for the site and dashboard interfaces of apps created by Wix: * [Site plugins](https://dev.wix.com/docs/build-apps/develop-your-app/extensions/site-extensions/site-plugins/about-site-plugin-extensions.md): Components that users can place inside designated areas (called slots) within the site pages of an app created by Wix, such as the Stores product and checkout pages. * Dashboard plugins: * [Dashboard plugins](https://dev.wix.com/docs/build-apps/develop-your-app/extensions/dashboard-extensions/dashboard-plugins/about-dashboard-plugin-extensions.md): Components that fit into designated areas (called slots) within a dashboard page of an app created by Wix. * [Dashboard menu plugins](https://dev.wix.com/docs/build-apps/develop-your-app/extensions/dashboard-extensions/dashboard-plugins/dashboard-menu-plugins/dashboard-menu-plugin-extensions.md): Items added to the menu in the dashboard page of an app created by Wix. ### Backend plugins Create plugins for the backend capabilities of apps created by Wix: * [Service plugins](https://dev.wix.com/docs/build-apps/develop-your-app/extensions/backend-extensions/service-plugins/about-service-plugin-extensions.md): Business logic that’s injected into a site’s backend services. * [Schema plugins](https://dev.wix.com/docs/build-apps/develop-your-app/extensions/backend-extensions/schema-plugins/about-schema-plugin-extensions.md): Fields that are added to the database schema of a Wix business solution. ## APIs Take advantage of the diverse business solutions that Wix offers to enable communication and integration between your app and Wix. Wix offers multiple [API technologies](https://dev.wix.com/docs/build-apps/develop-your-app/api-integrations/about-wix-apis.md), including REST, JavaScript SDK, GraphQL, and Velo with Blocks. Each API technology offers a similar set of APIs. The main business solution APIs include: * [Wix eCommerce](https://www.wix.com/ecommerce): Manage the cart, checkout, and order phases of an online store experience. Explore [eCommerce APIs](https://dev.wix.com/docs/rest/business-solutions/e-commerce/introduction.md). * [Wix Stores](https://www.wix.com/app-market/wix-stores): Handle product catalogs, inventories, and collections. Explore [Stores APIs](https://dev.wix.com/docs/rest/business-solutions/stores/about-wix-stores.md). * [Wix Bookings](https://www.wix.com/app-market/bookings): Accept and manage bookings for services. Explore [Bookings APIs](https://dev.wix.com/docs/rest/business-solutions/bookings/about-wix-bookings.md). * [Wix Pricing Plans](https://www.wix.com/app-market/paid-plans): Access and manage customized paid membership plans for content and services. Explore [Pricing Plans APIs](https://dev.wix.com/docs/api-reference/business-solutions/pricing-plans/introduction.md). * [Wix Events](https://www.wix.com/app-market/web-solution/events?searchLocation=home): Create events, sell tickets, and collect RSVPs. Explore [Events APIs](https://dev.wix.com/docs/rest/business-solutions/events/introduction.md). * [Wix Blog](https://www.wix.com/app-market/wix-blog): Access and manage blogs, including posts, draft posts, categories, tags, and statistics. Explore [Blog APIs](https://dev.wix.com/docs/rest/business-solutions/blog/introduction.md). * [Wix Groups](https://www.wix.com/app-market/wix-groups): Create and manage groups for posting updates, sharing media, starting discussions, and more. Explore [Groups APIs](https://dev.wix.com/docs/rest/crm/community/groups/introduction.md). * [Wix Forum (deprecated)](https://support.wix.com/en/article/wix-forum-about-wix-forum): Access and manage a business's member forum, including posts and categories. Explore [Forum APIs](https://dev.wix.com/docs/rest/business-solutions/forum/introduction.md). * [Wix Loyalty Program](https://support.wix.com/en/article/wix-loyalty-program-an-overview): Create and manage loyalty programs to increase customer retention. Explore [Loyalty APIs](https://dev.wix.com/docs/rest/crm/loyalty-program/introduction.md). --- > Portal Navigation: > > - Append `.md` to any URL under `https://dev.wix.com/docs/` to get its markdown version. > - Pages are either content pages (article or reference text) or menu pages (a list of links to child pages). > - To get a menu page, truncate any URL to a parent path and append `.md` (e.g. `https://dev.wix.com/docs/sdk.md`, `https://dev.wix.com/docs/sdk/core-modules.md`). > - Top-level index of all portals: https://dev.wix.com/docs/llms.txt > - Full concatenated docs: https://dev.wix.com/docs/llms-full.txt ## Resource: Exposing Apps Publicly and Privately ## Article: App Exposure: Public or Private? ## Article Link: https://dev.wix.com/docs/build-apps/get-started/overview/exposing-apps-publicly-and-privately.md ## Article Content: # Exposing Apps Publicly and Privately When you build an app, you can decide whether you want that app to be: - **Public**: Available for general use, whether listed in the Wix App Market or distributed on your own. - **Market listed**: Listed in the Wix App Market. - **Unlisted**: Available for general use, not listed in the Wix App Market. - **Private**. Only available on your own sites or your enterprise sites. ## Public apps Public apps are applications that are available to all Wix users to install. They might be listed in the [Wix App Market](https://www.wix.com/app-market), or they might be available via [install link](https://dev.wix.com/docs/build-apps/launch-your-app/app-distribution/share-an-app-install-link.md). ### Market listed apps Market listed apps are applications that are listed in the [Wix App Market](https://www.wix.com/app-market). In the Wix App Market, your apps are visible to millions of Wix users and can be found through search engines like Google. You can choose to offer your apps for free or sell them. You can also decide on the size of your app’s audience by limiting it to certain countries or languages. For example, you could build a shipping app just for Indian users. Learn more about [listing apps in the App Market](https://dev.wix.com/docs/build-apps/launch-your-app/app-distribution/app-market-guidelines.md). ### Unlisted apps Unlisted apps are applications that you make available for general use but are not listed in the Wix App Market. Unlisted apps can be installed through: - The app dashboard (if you are an owner or contributor to the site), from the **App Distribution** page. - A [shareable URL](https://dev.wix.com/docs/build-apps/develop-your-app/app-dashboard-setup/share-your-app-with-an-install-link.md), which you can create in [Custom Apps page](https://manage.wix.com/account/custom-apps), the **App Distribution** page of your app's dashboard for Wix CLI and self-managed apps, or directly in Wix Blocks through **App** > **Share App**. ## Private apps Private apps are applications that are used on your own sites, on your enterprise sites, or for other collaborative projects. You can install these apps on as many Wix sites as you want, as long as you are an owner or contributor to the site. Enjoy the benefits of reusing the app's user-interface, code, collections, and dashboard pages. Private apps can be installed through: - The editor (if you’re the app’s creator). - The Wix Studio dashboard. - A [shareable URL](https://dev.wix.com/docs/build-apps/launch-your-app/app-distribution/share-an-app-install-link.md), which you can create in [Custom Apps page](https://manage.wix.com/account/custom-apps), the **App Distribution** page of your app's dashboard for Wix CLI and self-managed apps, or directly in Wix Blocks, through **App** > **Share App**. ### Private apps for enterprise use With a Wix enterprise account, you can build and reuse apps among all of your organization’s accounts and websites. Private apps built by enterprises can be exposed to all enterprise users through the Wix App Market using a ‘private collection’ that can appear in the Wix App Market sidebar. ## See also - [About the App Dashboard](https://dev.wix.com/docs/build-apps/develop-your-app/app-dashboard-setup/about-the-app-dashboard.md) - [The Wix App Market](https://www.wix.com/app-market) - [Publishing Your Wix Blocks App to the App Market](https://dev.wix.com/docs/build-apps/develop-your-app/develop-an-app-with-blocks/publish-blocks-apps-to-the-app-market/publish-a-blocks-app-to-the-app-market.md) --- > Portal Navigation: > > - Append `.md` to any URL under `https://dev.wix.com/docs/` to get its markdown version. > - Pages are either content pages (article or reference text) or menu pages (a list of links to child pages). > - To get a menu page, truncate any URL to a parent path and append `.md` (e.g. `https://dev.wix.com/docs/sdk.md`, `https://dev.wix.com/docs/sdk/core-modules.md`). > - Top-level index of all portals: https://dev.wix.com/docs/llms.txt > - Full concatenated docs: https://dev.wix.com/docs/llms-full.txt ## Resource: About Wix Harmony and Apps ## Article: Wix Harmony and Apps ## Article Link: https://dev.wix.com/docs/build-apps/get-started/overview/about-wix-harmony-and-apps.md ## Article Content: # About Wix Harmony and Apps Wix Harmony is Wix's new AI-powered site editor, built on a technical architecture that's different from previous editors. With Harmony, the way apps and extensions work across Wix is evolving. This overview explains app compatibility in Harmony, what's changing, and your options for supporting users across all Wix editors and frameworks. > **Note:** For information about site development, see [About Wix Harmony](https://dev.wix.com/docs/develop-websites-sdk/get-started/overview/about-wix-harmony.md). For Blocks-specific information, see [About Wix Harmony and Blocks](https://dev.wix.com/docs/build-apps/develop-your-app/frameworks/wix-blocks/about-wix-harmony-and-blocks.md). ## App compatibility at a glance Apps can be installed in Harmony, though the UI and App Market experience differs from other editors. Due to architectural and technology updates, some app types are only available in certain editors. | Extension type | Wix Harmony | Wix Editor & Wix Studio | | --------------------------------- | :---------: | :---------------------: | | Dashboard extensions | ✓ | ✓ | | Backend extensions | ✓ | ✓ | | CLI site extensions | ✓ | ✓ | | Self-managed site extensions | ✓ | ✓ | | Blocks site widgets and plugins | — | ✓ | | Legacy custom elements | — | ✓ | | Legacy iFrame widgets and pages | Partial | ✓ | | Editor React Components | ✓ | — | ## What this means for existing apps Your app's availability in Harmony depends on the types of extensions it includes: - **Supported extensions:** Your app works in Harmony with no changes required. - **Unsupported extensions:** Your app works on Wix Editor and Wix Studio, but can't be installed by Harmony users. To reach Harmony users, rebuild unsupported extensions using the [Wix CLI for Apps](https://dev.wix.com/docs/build-apps/develop-your-app/frameworks/wix-cli/about-the-wix-cli-for-apps.md) or [self-managing](https://dev.wix.com/docs/build-apps/develop-your-app/frameworks/self-hosting/about-self-hosting.md). - **Partial support (iFrames):** If your app uses legacy iFrame widgets or pages, test your app thoroughly in Harmony. If you encounter issues, [reach out to us](https://dev.wix.com/docs/build-apps/manage-your-app/contact-us/submit-support-requests.md) for help. ## Recommendations for new apps When building a new app, use frameworks supported in Harmony: - **Wix CLI:** Build app extensions using your preferred IDE, with local development, testing tools, and full control over your code. Learn more in the [Wix CLI documentation](https://dev.wix.com/docs/build-apps/develop-your-app/frameworks/wix-cli/about-the-wix-cli-for-apps.md). - **Self-managed:** Use your own infrastructure for backend, site, or dashboard extensions. Learn more about [self-managed extensions](https://dev.wix.com/docs/build-apps/develop-your-app/frameworks/self-hosting/supported-extensions/about-self-hosted-app-extensions.md). ## Test your app We recommend testing your app in Harmony to ensure it works as expected. Create a Harmony development site to test your app's functionality and user experience. To learn more, see [Test Your App on a Free Premium Site](https://dev.wix.com/docs/build-apps/launch-your-app/app-distribution/test-your-app-on-a-premium-site.md). ## FAQ ### Migration and compatibility
Can Blocks apps be migrated to the CLI or site widgets? Currently, there is no automatic migration path to convert Blocks apps directly to the new CLI or site widget tools. To move to the new architecture, you need to build a new extension. We've created a [step-by-step guide](https://dev.wix.com/docs/build-apps/develop-your-app/extensions/site-extensions/migrate-to-a-new-site-widget-or-plugin-extension.md) on how to rebuild and update your app using the new tools. We're also exploring solutions to streamline this process in the future.
What happens to existing Blocks apps when customers move from Classic/Studio to Harmony? Currently, there is no migration tool from Classic/Studio to Wix Harmony.
Is there a way to move existing users from a Blocks app to a new implementation without losing reviews or installs, or without supporting 2 app versions? You can maintain your existing reviews and install base by adding your new implementation as an additional extension within your existing app, rather than creating a new app. We will be releasing a guide to assist you in migrating your active users from the old extension to the new one.
### Business impact and App Market visibility
Why are Blocks apps not discoverable or installable for Harmony users? Wix Harmony is built on a completely new technology that doesn't support Blocks apps, which means they aren't available for installation.
How can developers quickly mitigate lost customer acquisition and revenue due to Harmony not supporting Blocks apps? The current path to compatibility with Harmony is to build site widgets using Custom Elements, managed via the [Wix CLI](https://dev.wix.com/docs/build-apps/develop-your-app/frameworks/wix-cli/about-the-wix-cli-for-apps.md) or [self-managing](https://dev.wix.com/docs/build-apps/develop-your-app/frameworks/self-hosting/about-self-hosting.md). We encourage you to adopt this approach now to regain access to that user base. Additionally, we're working on a comprehensive React-based infrastructure that will provide even more robust options for app development in the near future.
What immediate options exist so current and new users can still access these apps? Wix Editor and Wix Studio users still have full access to your apps. If you need to support Wix Harmony sites now, you can start building [self-managed](https://dev.wix.com/docs/build-apps/develop-your-app/frameworks/self-hosting/about-self-hosting.md) or [CLI](https://dev.wix.com/docs/build-apps/develop-your-app/frameworks/wix-cli/about-the-wix-cli-for-apps.md) site widgets.
### Long-term strategy and timelines
What are the timelines for deprecations and continued support for the Classic and Studio editors? We aren't breaking any existing capabilities. If at any time we move forward with deprecation, we will make sure there is a clear and concrete plan that addresses all questions and concerns.
## Get support If you encounter issues or have questions, feel free to [reach out to us](https://dev.wix.com/docs/build-apps/manage-your-app/contact-us/submit-support-requests.md) or ask in our [Discord community](https://discord.gg/wixstudio). ## See also - [About Wix Harmony and Blocks](https://dev.wix.com/docs/build-apps/develop-your-app/frameworks/wix-blocks/about-wix-harmony-and-blocks.md) - [About Wix Harmony](https://dev.wix.com/docs/develop-websites-sdk/get-started/overview/about-wix-harmony.md) - [About Extensions](https://dev.wix.com/docs/build-apps/develop-your-app/extensions/about-extensions.md) - [About Development Frameworks](https://dev.wix.com/docs/build-apps/develop-your-app/frameworks/about-development-frameworks.md) --- > Portal Navigation: > > - Append `.md` to any URL under `https://dev.wix.com/docs/` to get its markdown version. > - Pages are either content pages (article or reference text) or menu pages (a list of links to child pages). > - To get a menu page, truncate any URL to a parent path and append `.md` (e.g. `https://dev.wix.com/docs/sdk.md`, `https://dev.wix.com/docs/sdk/core-modules.md`). > - Top-level index of all portals: https://dev.wix.com/docs/llms.txt > - Full concatenated docs: https://dev.wix.com/docs/llms-full.txt ## Resource: Glossary ## Article: Glossary ## Article Link: https://dev.wix.com/docs/build-apps/get-started/overview/glossary.md ## Article Content: # Developers' Glossary ## **Access type** Authorization profile used to interact with Wix. Every actor who interacts with Wix, whether they log into Wix, visit a Wix site, or make API calls, must authorize their calls using an access type. Access types include visitor, member, user, app and API key. ## **App ID** Unique ID that identifies your app in Wix. Find it on your app’s main page and OAuth page in the app dashboard. ## **API key** Account-level access token for REST and SDK API calls, that can be used for account-level APIs as well as site-level APIs. Account-level access provides access only to the specific sites that are managed by the relevant account. Only available to select apps after App Market approval. ## **App instance** Properties that describe your app's installation on a specific site. These properties include the app instance ID, user ID, premium flag and more. ## **App instance ID** Unique ID that identifies your app's installation on a specific site. Use this ID to identify specific sites in your app's code. ## **Custom app** App that is available only on your own sites, on your clients' sites, or for other collaborative projects. Custom apps are not listed in the Wix App Market. ## **Dashboard** Interface where users can manage their site and installed apps. Dashboards aren’t exposed to site visitors. ## **Development site** Free, pre-made premium site available to all third-party app developers for testing purposes. ## **Editor** Interface where site builders design their site’s visual components. Wix currently offers 2 different editors: [Wix Editor](https://support.wix.com/en/using-the-wix-editor) and [Wix Studio](https://support.wix.com/en/wix-studio). ## **Extension** Functionality that an app adds to a site, for example, a dashboard page, a site widget or specific backend logic. ## **Extension ID** Unique ID that identifies your extension in Wix. ## **Identity** Unique identifiers Wix uses to identify actors. Each identity has their own ID and access type. Identities include visitor, member, user, app and API key. ## **Permission scope** Sets of permissions that you can request from Wix users when they install your app. These permissions enable you to access and manage relevant site data. You can configure the permissions scopes for your app in the app dashboard. ## **Plugin** Extension that adds functionality to an app created by Wix, with either a visual component or backend logic. ## **Public key** Encryption key used to verify that data payloads were sent by Wix. You’ll need this to read webhook and SPI call data. You can find your app's public key on the Webhooks page in the app dashboard. ## **Query builder** Function that builds a query to retrieve a list of items. ## **Secret key** Encryption key used to create your app’s signature. You’ll need this to sign requests to Wix APIs, and Wix uses it when sending data to your app. You can find it on the OAuth page in the app dashboard. ## **Service plugin (formerly SPI)** APIs designed to be implemented by Wix users or by third parties, enabling you to customize Wix's business logic within a specific business solution. ## **Slot** UI placeholder within a site or dashboard page of an app created by Wix, where users can place a [plugin](#plugin). ## **User ID** Unique ID that identifies a [Wix user](#wix-user). ## **Wix app** Any app that extends the Wix ecosystem, including apps made by Wix, apps made by third parties and apps made by site builders. A third-party app can be public (available on the Wix App Market) or private (see [custom app](#custom-app)). ## **Wix Blocks** [Editor](https://dev.wix.com/docs/build-apps/develop-your-app/develop-an-app-with-blocks/about-wix-blocks.md) for building responsive Wix apps. ## **Wix business solution** Comprehensive app made by Wix for managing a specific type of business, such as Wix Stores and Wix Bookings. ## **Wix CLI** [Command-line](https://dev.wix.com/docs/wix-cli/guides/about-the-wix-cli.md) interface tool that streamlines building Wix apps with minimal setup and configuration. ## **Wix Design System** [Collection](https://dev.wix.com/docs/build-apps/develop-your-app/design/about-the-wix-design-system.md) of reusable React components and clear standards for designing Wix apps with the Wix look and feel. ## **Wix Patterns** [Collection](https://dev.wix.com/docs/build-apps/develop-your-app/design/about-the-wix-design-system.md) of Wix Design System's reusable React components organized into fully-functional design and behavior presets for common types of functionality. ## **Wix user** Anyone who creates an account on wix.com. Users include site owners, who create a site, and site collaborators, who are invited by site owners to help manage the site and business. --- > Portal Navigation: > > - Append `.md` to any URL under `https://dev.wix.com/docs/` to get its markdown version. > - Pages are either content pages (article or reference text) or menu pages (a list of links to child pages). > - To get a menu page, truncate any URL to a parent path and append `.md` (e.g. `https://dev.wix.com/docs/sdk.md`, `https://dev.wix.com/docs/sdk/core-modules.md`). > - Top-level index of all portals: https://dev.wix.com/docs/llms.txt > - Full concatenated docs: https://dev.wix.com/docs/llms-full.txt ## Resource: About the Quick Starts ## Article: About the Quick Starts ## Article Link: https://dev.wix.com/docs/build-apps/get-started/quick-start/about-the-quick-starts.md ## Article Content: # About the Quick Start Tutorials Create your first app and get up and running in a few short steps. Wix offers [3 frameworks](https://dev.wix.com/docs/build-apps/get-started/overview/wix-s-development-frameworks.md) for building apps. The following tutorials walk you through the initial steps of creating a basic working app using each of these frameworks. To keep things simple, each tutorial showcases only one type of [app functionality](https://dev.wix.com/docs/build-apps/get-started/overview/how-apps-extend-wix.md). ## Choose a framework * [Wix Blocks tutorial](https://dev.wix.com/docs/build-apps/get-started/quick-start/create-an-app-with-wix-blocks.md): Design, code, and deploy a site widget using Wix’s native app editor. * [Wix CLI tutorial](https://dev.wix.com/docs/build-apps/get-started/quick-start/create-an-app-with-the-wix-cli.md): Code and deploy a dashboard page with Wix’s React/Node.js stack. * [Self-managed app tutorial](https://dev.wix.com/docs/build-apps/get-started/quick-start/create-a-self-hosted-app.md): Set up a dashboard page in the app dashboard using an externally-deployed iframe. > **Note**: You can also start by trying out one of our many [tutorials](https://dev.wix.com/docs/build-apps/get-started/tutorials/index-of-tutorials.md) or [app templates](https://dev.wix.com/docs/build-apps/get-started/templates/get-started-from-an-app-template.md). --- > Portal Navigation: > > - Append `.md` to any URL under `https://dev.wix.com/docs/` to get its markdown version. > - Pages are either content pages (article or reference text) or menu pages (a list of links to child pages). > - To get a menu page, truncate any URL to a parent path and append `.md` (e.g. `https://dev.wix.com/docs/sdk.md`, `https://dev.wix.com/docs/sdk/core-modules.md`). > - Top-level index of all portals: https://dev.wix.com/docs/llms.txt > - Full concatenated docs: https://dev.wix.com/docs/llms-full.txt ## Resource: Create an App with the Wix CLI ## Article: Quick Start a Wix CLI App ## Article Link: https://dev.wix.com/docs/build-apps/get-started/quick-start/create-an-app-with-the-wix-cli.md ## Article Content: # Quick Start a Wix CLI App This guide explains the minimum steps required to get a CLI app up and running using the Wix CLI. Prefer to watch instead? Here's the video walkthrough:
> **Note:** To develop with AI assistance, install the [Wix Plugin](https://dev.wix.com/docs/api-reference/articles/ai-tools/about-the-wix-plugin.md) for your IDE. It adds [Wix Skills](https://dev.wix.com/docs/api-reference/articles/ai-tools/about-wix-skills.md) and the [Wix MCP](https://dev.wix.com/docs/sdk/articles/use-the-wix-mcp/about-the-wix-mcp.md), giving your AI client the context it needs to help you build CLI projects. ## Before you begin Before getting started, make sure that you: + Have [Node.js](https://nodejs.org/en/) (v20.11.0 or higher). + Have Git installed and [configured](https://git-scm.com/docs/git-config). + Are logged into your Wix account. If you don't already have one, [sign up for a Wix account](https://manage.wix.com/account/custom-apps). ## Step 1 | Create a new app project 1. Run the following command to create a new app project: ```bash npm create @wix/new@latest app ``` 2. When asked what you would like to do, select **Create a new Wix App**. 3. Enter a **name for your app** and a **folder name** for your project. + The **app name** is the name that appears in your [app's dashboard](https://manage.wix.com/account/custom-apps). + The **folder name** is the name of the directory containing your project's local files. 4. Enter a **namespace** for your app. A namespace is a unique way to identify your app, in the format `@prefix/suffix`. Some extensions, such as [data collections](https://dev.wix.com/docs/build-apps/develop-your-app/extensions/backend-extensions/data-collections/about-data-collections-extensions.md) and [schema plugins](https://dev.wix.com/docs/build-apps/develop-your-app/extensions/backend-extensions/schema-plugins/about-schema-plugin-extensions.md), require a namespace. Wix suggests a namespace based on your app name. You can accept the suggestion or enter your own value. Once set, you can't change your namespace. 5. Enter a **code identifier** for your app. The code identifier is a unique, JavaScript-compatible name for your app and its extensions. Wix suggests a code identifier based on your namespace. You can accept the suggestion or enter your own value. Once set, you can't change your code identifier. Once the CLI has created your app, the [app's files](https://dev.wix.com/docs/wix-cli/guides/project-structure/project-structure.md) appear in a local directory with the folder name you chose. At this point your app appears in the [Wix app dashboard](https://manage.wix.com/account/custom-apps), but it isn't yet installed on a site for testing. ## Step 2 | Test the app 1. Run the [`dev`](https://dev.wix.com/docs/wix-cli/command-reference/project-commands/dev.md) command to start the local development environment: ```bash wix dev ``` The CLI builds a local environment for your test site and provides a menu to view your app's dashboard pages in the browser. Any changes you make to your code are immediately reflected in the browser. 2. Select a site to install your app on for testing: + **Pick an existing site:** Designates one of your existing Wix sites. + **Create a new Development Site:** Builds a new Wix [development site](https://dev.wix.com/docs/wix-cli/guides/about-the-wix-cli.md#development-sites). 3. Press `Enter` to open your browser and install the application on your test site. 4. In your IDE, open `src/extensions/dashboard/pages/my-page/my-page.tsx` and edit the `title` prop in `` to any value you like. > **Note:** Return to your browser, and see the change reflected immediately. ## Step 3 | Call a Wix API In this step, we show how to call an API from your app's dashboard page, using the [List Locations](https://dev.wix.com/docs/api-reference/business-management/locations/list-locations?apiView=SDK.md) method as an example. 1. Add the **Manage Locations** permission to your app. To do so, go to **Permissions** in your app dashboard, click **Add Permissions**, search for **Manage Locations**, select it and save. [Permissions](https://dev.wix.com/docs/build-apps/develop-your-app/access/authorization/configure-permissions-for-your-app.md) define what data your app can access on an installed site. > **Note:** After you save permission changes in the app dashboard, they apply automatically to a development site. You don't need to build or release a new app version, but it may take a few minutes for the updated permissions to take effect. 2. Install the `@wix/business-tools` package so you can work with the [Locations API](https://dev.wix.com/docs/api-reference/business-management/locations/introduction?apiView=SDK.md). ```bash npm install @wix/business-tools ``` 3. Update the code of your dashboard page extension to display a list of all the business locations in your site: 1. Open your dashboard extension's tsx file. The path should be `/src/extensions/dashboard/pages/my-page/my-page.tsx`. 2. Add the following import statements to your file: ```js import { locations } from '@wix/business-tools'; import React, { useState, useEffect } from 'react'; ``` 3. In the `DashboardPage` component add a `locationNames` state variable and a `useEffect` hook that calls `listLocations()` and extracts the list of location names to `locationNames`. Your code should look like this: ```tsx const { listLocations } = locations; const [locationNames, setLocationNames] = useState(''); useEffect(() => { listLocations().then(response => { if (response.locations) { const names = response.locations.map(location => location.name).join('\n'); setLocationNames(names); } }); }, []); ``` 4. In the `Page.Content` element of your component, change the `title` to `"Locations List"` and the `subtitle` to the value of `locationNames`. Your code should look like this: ```tsx ``` **Full example code** ```tsx import type { FC } from 'react'; import { useState, useEffect } from 'react'; import { EmptyState, Page, WixDesignSystemProvider } from '@wix/design-system'; import '@wix/design-system/styles.global.css'; import { locations } from '@wix/business-tools'; const DashboardPage: FC = () => { const { listLocations } = locations; const [locationNames, setLocationNames] = useState(''); useEffect(() => { listLocations().then(response => { if (response.locations) { const names = response.locations.map(location => location.name).join('\n'); setLocationNames(names); } }); }, []); return ( ); }; export default DashboardPage; ``` Your dashboard page is now set up to load and display the names of the site's locations. 4. Test the API call: 1. Run the [`dev`](https://dev.wix.com/docs/wix-cli/command-reference/project-commands/dev.md) command to start the local development environment: ```bash wix dev ``` 2. Click the link to open your development site's dashboard. 3. Navigate to your app's page in the dashboard under Apps. ![Select app page](https://wixmp-833713b177cebf373f611808.wixmp.com/images/89eea886639f9c7ea33f4fd878b74007.png) 4. Your app's dashboard page should load and display a list of locations. ![Locations app page](https://wixmp-833713b177cebf373f611808.wixmp.com/images/373ec501c09c732cea74f800fd7a93b8.png) ## Next steps After completing the above steps, you have a simple Wix app that you can experiment with and test locally. You can now: + [Add extensions to your app](https://dev.wix.com/docs/build-apps/develop-your-app/develop-an-app-with-the-cli/supported-extensions/about-extensions-in-the-wix-cli.md) + [Learn more about developing your app](https://dev.wix.com/docs/wix-cli/guides/about-the-wix-cli.md) + [Install the Wix Plugin](https://dev.wix.com/docs/api-reference/articles/ai-tools/about-the-wix-plugin.md) --- > Portal Navigation: > > - Append `.md` to any URL under `https://dev.wix.com/docs/` to get its markdown version. > - Pages are either content pages (article or reference text) or menu pages (a list of links to child pages). > - To get a menu page, truncate any URL to a parent path and append `.md` (e.g. `https://dev.wix.com/docs/sdk.md`, `https://dev.wix.com/docs/sdk/core-modules.md`). > - Top-level index of all portals: https://dev.wix.com/docs/llms.txt > - Full concatenated docs: https://dev.wix.com/docs/llms-full.txt ## Resource: Create a Self-Managed App ## Article: Create a Self-Hosted App ## Article Link: https://dev.wix.com/docs/build-apps/get-started/quick-start/create-a-self-managed-app.md ## Article Content: # Tutorial | Create a Self-Managed App In this tutorial, you'll create an app with a simple [dashboard page extension](https://dev.wix.com/docs/build-apps/develop-your-app/extensions/dashboard-extensions/dashboard-pages/about-dashboard-page-extensions.md) using a [self-managed](https://dev.wix.com/docs/build-apps/develop-your-app/frameworks/self-hosting/about-self-hosting-for-wix-apps.md) iframe. ## Before you begin * Make sure you're logged into your Wix account, or [create an account](https://www.wix.com/) if you don't have one yet. * If you haven't done so yet, move to the new [Wix Studio workspace](https://manage.wix.com/account/custom-apps) by [joining Wix Studio](https://support.wix.com/en/article/wix-studio-switching-to-wix-studio). ## Step 1 | Create an app in the Custom Apps page of your Wix Studio workspace We'll start off by creating a new app. 1. In the [Custom Apps page](https://manage.wix.com/account/custom-apps), go to **My Apps**, and then click **Create New App**. 2. Select **Build from scratch**. 3. Select **Self-Managed**, and then click **Get Started**. ![choose-app-framework](https://wixmp-833713b177cebf373f611808.wixmp.com/images/f834d79429fff1627157c1cb4071fabe.png) A new app is created in the Custom Apps page. ## Step 2 | Add a dashboard page extension We'll now add a dashboard page extension in your app's dashboard. This extension uses an iframe to embed a web page in the dashboard. We've already deployed a web page on an external server for you to use in this tutorial. When configuring the extension, you'll register the URL of this web page. 1. In the left sidebar, under **Develop**, select **Extensions**, and then click **Create Extension**. A panel opens, showing the available extension types. 2. Find the **Dashboard page** extension and click **Create**. 3. Fill in the following configuration data: * **Name**: `Demo page` * **iframe URL**: `https://www.quickstartselfhostedapp.com/` 4. Click **Save**. ![iframe-url](https://wixmp-833713b177cebf373f611808.wixmp.com/images/f2f1e4ce6ddc5fee7b50bb7e7e3b52dc.png) You’ve finished setting up the dashboard page extension and can now install it on a site to see it in action. ## Step 3 | Install your app on a site Wix provides a free Premium development site so you can easily install your app and see it working. In this step, you'll create a development site, install your app on the site, and try it out. 1. In the top right corner of your [app's dashboard](https://manage.wix.com/account/custom-apps), click **Test App** and select **Test on dev site**. 1. Select an existing development site or click **+ Create Dev Site** to create a new site. Select the editor and the Wix Business Solution you want to use and click **Create Dev Site**. 1. Click **Test App**. Wix installs your app and opens the site in a new tab. You can set which site page opens in your [app settings](https://dev.wix.com/app-selector?title=Select+an+App&primaryButtonText=Select+Site&actionUrl=https%3A%2F%2Fdev.wix.com%2Fapps%2F%7BappId%7D%2Fapp-settings). If you don't set a page, the site editor opens by default. Your app is now installed on the development site. You can see the external web page embedded in the dashboard. ![self-hosted-iframe](https://wixmp-833713b177cebf373f611808.wixmp.com/images/84c1722c069c39693ea2316875639fac.png) ## Next steps You now have a fully working app that can be installed on Wix sites. Take some time to play around in your app's dashboard to explore more features that you can add to your app. Use the following resources to continue building your app: * [Wix Design System](https://wixdesignsystem.com): Learn how to use Wix's React components for a cohesive user experience consistent with Wix's design standards. * [Wix APIs](https://dev.wix.com/docs/build-apps/develop-your-app/api-integrations/about-wix-apis.md): Learn how to integrate your app with Wix to transfer data between your app and the site it's installed on and extend Wix business solutions, such as Wix eCommerce or Wix Bookings. * [Extension catalog](https://dev.wix.com/docs/build-apps/get-started/overview/how-apps-extend-wix.md#extension-catalog): Learn about other extensions you can add to your app. --- > Portal Navigation: > > - Append `.md` to any URL under `https://dev.wix.com/docs/` to get its markdown version. > - Pages are either content pages (article or reference text) or menu pages (a list of links to child pages). > - To get a menu page, truncate any URL to a parent path and append `.md` (e.g. `https://dev.wix.com/docs/sdk.md`, `https://dev.wix.com/docs/sdk/core-modules.md`). > - Top-level index of all portals: https://dev.wix.com/docs/llms.txt > - Full concatenated docs: https://dev.wix.com/docs/llms-full.txt ## Resource: Create an App with Wix Blocks ## Article: Create an App with Wix Blocks ## Article Link: https://dev.wix.com/docs/build-apps/get-started/quick-start/create-an-app-with-wix-blocks.md ## Article Content: # Tutorial | Create an App in Wix Blocks In this tutorial, you'll create an app with a simple [site widget extension](https://dev.wix.com/docs/build-apps/develop-your-app/extensions/site-extensions/site-widgets/about-site-widget-extensions.md) in [Wix Blocks](https://dev.wix.com/docs/build-apps/develop-your-app/develop-an-app-with-blocks/about-wix-blocks.md). ## Before you begin * Make sure you're logged into your Wix account, or [create an account](https://www.wix.com/) if you don't have one yet. * If you haven't done so yet, move to the new [Wix Studio workspace](https://manage.wix.com/account/custom-apps) by [joining Wix Studio](https://support.wix.com/en/article/wix-studio-switching-to-wix-studio). * Make sure you have a Wix site that you can use for testing purposes. If you don’t have one yet, [create a new site](https://www.wix.com/website/templates/html/blank). ## Step 1 | Open the Wix Studio workspace and create an app You can access Wix Blocks through the Wix Studio workspace. 1. Open the [Custom Apps](https://manage.wix.com/account/custom-apps) section of the Wix Studio workspace. 1. Click **Create New App**. 1. Click **Build from scratch**. 1. Click **Wix Blocks**. Your newly-created app opens in Wix Blocks. ## Step 2 | Design and code a site widget We'll now build an interactive site widget in Blocks. 1. To get started, select **Blank canvas**. The Wix Blocks editor opens with a default widget. 2. Let's start by adding a text element to the widget. Click **Add Elements** ![add-elements-icon](https://wixmp-833713b177cebf373f611808.wixmp.com/images/11a200c11c4e62ec09419ac5aa424a6c.png) at the top of the editor, and then click **Quick Add > Title**. Your widget now looks something like this: ![text-element](https://wixmp-833713b177cebf373f611808.wixmp.com/images/797662e82632425f7bf592e9c49a6a81.png) 3. Since we'll be interacting with the elements using code, we need some way to identify them. We do that using element IDs. You can see an element's ID when you hover over it or select it. When an element is selected you can change its ID using the **Properties & Events** panel. Change the text element's ID to be `message`. ![text-id-message](https://wixmp-833713b177cebf373f611808.wixmp.com/images/d3474a44aa69bcfdaba500da6241f487.png) 1. To interact with an element in code, you first need to write code to select it. Now that our element has a unique identifier, selecting it with code is easy. We use the `$w()` selector function to select an element by ID. We simply pass the element's ID, preceded by a hashtag (`#`). So, to select an element with the ID `elementId`, we write `$w('#elementId')`. Once an element is selected, we can use its properties and functions to interact with it. So, we can use the text element's text property to change the message like this: `$w('#message').text = 'Hello World';` Place this code in the `onReady` event handler that appears in the Code Panel by default. Code in the `onReady` event handler runs during the widget loading process when all the elements in the widget have finished loading. The code should look like this: ```js $w.onReady(function () { $w('#message').text = 'Hello World'; }); ``` 1. Next, let's run some code in response to a button on our widget being clicked. ​First, we'll need to add a button to the widget. Click **Add Elements** ![add-elements-icon](https://wixmp-833713b177cebf373f611808.wixmp.com/images/11a200c11c4e62ec09419ac5aa424a6c.png) on the top of the editor, and then click **Quick Add > Button**. Give it the ID `button`. 1. We’ll change what the button says, just like we did for the text element. To change the text of a button, make sure to use the label property. The code to change the button's text should look like this together with the previous code: ```js $w.onReady(function() { $w('#message').text = 'Hello World'; $w('#button').label = 'Click Me'; }); ``` 2. Finally, we'll add code that responds to the button being clicked. We again start by using the `$w()` function to select the button. Then we use the `onClick()` function to define what happens when the button is clicked. In this case, let's change the contents of the text element when the button is clicked. Place the following code below the existing code: ```js $w('#button').onClick (() => { $w('#message').text = 'Hello from Blocks!'; }); ``` So, the complete code looks like this: ```js $w.onReady(function () { $w('#message').text = 'Hello World'; $w('#button').label = 'Click Me'; }); $w('#button').onClick(() => { $w('#message').text = 'Hello from Blocks!'; }); ``` 1. Click **Preview** ![blocks-preview](https://wixmp-833713b177cebf373f611808.wixmp.com/images/4e435e7595b65453d64691c05a9128c2.png) at the top of the editor to preview your widget. When previewing the widget, click the button on the widget to see the text change. ## Step 3 | Install your app on a site We'll now install the app on a site to see how the widget behaves in the site editor. 1. In the top-right corner, click **Test**. When prompted to provide an app name, enter any name you like and then click **Save & Continue**. 2. Select the site that you'd like to test your app on. The selected site opens in the editor. 4. Find your app under **Custom Apps** and click **Install App**. When the app is installed, the **Add Elements** panel opens, showing your widget. 5. Click the widget to add it to the current page. The widget is now added to the site. You can drag it, resize it, and modify its design using the widget's action bar. ![widget-on-site](https://wixmp-833713b177cebf373f611808.wixmp.com/images/8c3fc67b162b00c5c2e7ec9b92a2d938.png) ## Next steps You now have a fully working app that can be installed on Wix sites. Take some time to play around with the widget in Blocks and try to add more features to your app. Use the following resources to continue building your app: * [Editor elements](https://support.wix.com/en/article/studio-editor-adding-elements-4240855): Learn about the types of elements that you can add to your widget. * [Coding in Blocks](https://support.wix.com/en/article/wix-blocks-about-coding-in-blocks): Learn how to add code to an individual widget, as well as code for the entire app. * [Editor experience](https://support.wix.com/en/article/wix-blocks-about-configuration): Learn how to control the way site creators interact with your widget in the editors. * [App templates](https://dev.wix.com/apps-templates?filter=blocks): Explore templates that demonstrate how to build Blocks apps. * [Extension catalog](https://dev.wix.com/docs/build-apps/get-started/overview/how-apps-extend-wix.md#extension-catalog): Learn about other extensions you can add to your app. --- > Portal Navigation: > > - Append `.md` to any URL under `https://dev.wix.com/docs/` to get its markdown version. > - Pages are either content pages (article or reference text) or menu pages (a list of links to child pages). > - To get a menu page, truncate any URL to a parent path and append `.md` (e.g. `https://dev.wix.com/docs/sdk.md`, `https://dev.wix.com/docs/sdk/core-modules.md`). > - Top-level index of all portals: https://dev.wix.com/docs/llms.txt > - Full concatenated docs: https://dev.wix.com/docs/llms-full.txt ## Resource: Get Started From an App Template ## Article: Get Started From an App Template ## Article Link: https://dev.wix.com/docs/build-apps/get-started/templates/get-started-from-an-app-template.md ## Article Content: # Get Started From an App Template Want to build an app that enhances the functionality of Wix sites? Jumpstart your development with one of our app templates and fast-track your way to a fully functioning app. ## Why start with a template? Each of our templates provides a working foundational app that you're free to modify and build upon. By deploying a template as your starting point, you can quickly move from a concept to a fully functional app, saving valuable time and effort. Dive into our template collection and discover the possibilities for app creation. [](http://dev.wix.com/apps-templates) ![Template page screenshot](https://wixmp-833713b177cebf373f611808.wixmp.com/images/1e1cda7191005f355157ba2566338066.png) ## Select the right template for your app Wix offers templates specifically designed for each of the following development frameworks: - Wix Blocks - Wix CLI - Self-managed apps integrated with the app dashboard Choose a template that matches your preferred framework to commence your project with ease.
Wix Blocks Templates
Build a native-style Wix app in a responsive drag-and-drop editor and incorporate sophisticated functionality with Velo.
Wix CLI Templates
Get a comprehensive developer experience with minimal setup, so you can focus on coding your app.
Self-Managed App Templates
Develop and host an app on any platform, and integrate with Wix using the app dashboard.
[See all our templates ](http://dev.wix.com/apps-templates) ## Template features The Wix app templates showcase a variety of features that apps can add to Wix sites, such as: - Pages or widgets on a live Wix site. - Dashboard pages or components for site admins. - Integration with 3rd-party services. - Site analytics through embedded scripts. ## Developer tools Each template uses a different set of Wix developer tools, including: - [Wix Blocks](https://dev.wix.com/docs/build-apps/develop-your-app/develop-an-app-with-blocks/about-wix-blocks.md) and [Velo](https://dev.wix.com/docs/build-apps/develop-your-app/develop-an-app-with-blocks/code-in-blocks/about-widget-code-in-blocks.md): Combine UI design in the Wix editor with coding for advanced features, offering a comprehensive app-building experience. - [Wix Design System](https://dev.wix.com/docs/build-apps/develop-your-app/design/about-the-wix-design-system.md): Utilize Wix's collection of reusable React components to craft a visually stunning and user-friendly app interface. - [Wix CLI](https://dev.wix.com/docs/build-apps/develop-your-app/frameworks/wix-cli/about-the-wix-cli-for-apps.md): Accelerate app development and deployment with a tool that simplifies initial setup and hosting. - [REST APIs](https://dev.wix.com/docs/rest.md) and [JavaScript SDK](https://dev.wix.com/docs/sdk.md): Access and manage site data effectively from your app, enabling sophisticated site interactions. - [Webhooks](https://dev.wix.com/docs/build-apps/develop-your-app/api-integrations/events-and-webhooks/about-webhooks.md): Implement real-time responses to Wix Logs. - [Embedded scripts](https://dev.wix.com/docs/build-apps/develop-your-app/extensions/site-extensions/embedded-scripts/about-embedded-scripts.md): Integrate custom analytics and additional functionalities seamlessly. - [App dashboard](https://dev.wix.com/docs/build-apps/develop-your-app/app-dashboard-setup/about-the-app-dashboard.md): Access essential resources for app configuration, permission management, and Wix integration. --- > Portal Navigation: > > - Append `.md` to any URL under `https://dev.wix.com/docs/` to get its markdown version. > - Pages are either content pages (article or reference text) or menu pages (a list of links to child pages). > - To get a menu page, truncate any URL to a parent path and append `.md` (e.g. `https://dev.wix.com/docs/sdk.md`, `https://dev.wix.com/docs/sdk/core-modules.md`). > - Top-level index of all portals: https://dev.wix.com/docs/llms.txt > - Full concatenated docs: https://dev.wix.com/docs/llms-full.txt ## Resource: Tutorial | Set Up an App With the CLI ## Article: Tutorial | Set Up an App With the CLI ## Article Link: https://dev.wix.com/docs/build-apps/get-started/tutorials/tutorial-set-up-an-app-with-the-cli.md ## Article Content: # Tutorial | Set Up an App With the CLI This tutorial demonstrates how to use the [Wix CLI](https://dev.wix.com/docs/wix-cli/guides/about-the-wix-cli.md) to build an app named Business Buddy. The app provides an AI assistant for products in a site's Wix Stores catalog, accessible from the site owner's dashboard.
__Important:__ The chat endpoint calls [OpenAI](https://platform.openai.com/) as its AI provider. To complete this tutorial, you'll need an OpenAI account with prepaid API credits. See [Step 9](#step-9--add-backend-http-endpoints) for setup details. The same pattern applies to any AI provider with an HTTP API (Anthropic, a self-hosted model, etc.).
Business Buddy consists of: - Two dashboard pages: a Product page for selecting a product and chatting with the AI about it, and a Settings page for configuring the AI's behavior. - A backend that handles chat requests and stores per-install AI behavior directives. By following this tutorial, you'll learn how to: - Build dashboard pages using the [Wix Design System](https://www.wixdesignsystem.com/), the [Wix Dashboard SDK](https://dev.wix.com/docs/sdk/host-modules/dashboard/introduction.md), and CSS. - Work with apps built by Wix such as Stores using the [Wix JavaScript SDK](https://dev.wix.com/docs/sdk.md). - Add backend logic using [HTTP endpoints](https://dev.wix.com/docs/build-apps/develop-your-app/develop-an-app-with-the-cli/supported-extensions/backend/http-endpoints/about-http-endpoints.md) in your CLI project. - Identify the current app install on the backend to support per-install data. - Call an external AI service ([OpenAI](https://platform.openai.com/)) from your backend, with the API key managed as a Wix CLI environment variable. The end result will look like this: ![Business Buddy Product Chat](https://wixmp-833713b177cebf373f611808.wixmp.com/images/c7c1fa9d1d25177e73f6dd480360550e.png) We'll use the following steps to build the Business Buddy app: 1. [Initialize the app](#step-1--initialize-the-app). 1. [Create the dashboard pages](#step-2--create-the-dashboard-pages). 1. [Run a local development server](#step-3--run-a-local-development-server). 1. [Install dependencies](#step-4--install-dependencies). 1. [Design the Product page](#step-5--design-the-product-page). 1. [Set up calls to Wix SDKs](#step-6--set-up-calls-to-wix-react-sdks). 1. [Set up communication with the backend](#step-7--set-up-communication-with-the-backend). 1. [Design the Settings page](#step-8--design-the-settings-page). 1. [Add backend HTTP endpoints](#step-9--add-backend-http-endpoints). 1. [Build and deploy the app](#step-10--build-and-deploy-the-app). ## Before you begin Before getting started, make sure that: - You install [Node.js](https://nodejs.org/en/) (v20.11.0 or higher). - You install [npm](https://www.npmjs.com/package/npm) or [yarn](https://www.npmjs.com/package/yarn). - You’re logged into your Wix Studio account. If you don’t already have one, [sign up for a Wix Studio account](https://manage.wix.com/account/custom-apps). ## Step 1 | Initialize the app We use the Wix CLI to initialize our Business Buddy app. In the process of initializing our app, the Wix CLI automatically: - Creates a new app in the [Custom Apps page](https://manage.wix.com/account/custom-apps) of your Wix Studio workspace. - Sets up a new folder for your app in your local file system. The folder includes: - A `src` folder containing initial boilerplate code for an app with a dashboard page. - A `package.json` file containing your app dependencies. - Creates a local Git repository for your app. To initialize the app: 1. Open a terminal and navigate to the folder where you want to create your app. 2. Run the following command: ```bash npm create @wix/new@latest app ``` If prompted to install the `@wix/create-new` package, press `y`. 3. Select **Create a new Wix App**. 4. Select **Create a basic app**. 5. Enter a name for your app. Let’s name our app `Business Buddy`. 6. Press `Enter` to accept the default folder name (`business-buddy`). 7. When asked to configure Wix MCP for your IDE, select your preferred MCP. A green **Success** message confirms that your app has been registered in the [Custom Apps page](https://manage.wix.com/account/custom-apps). 8. Press `Enter` to accept the default namespace (`business-buddy`). 9. Press `Enter` to accept the default code identifier (`business_buddy`). You now have a new app in the [Custom Apps page](https://manage.wix.com/account/custom-apps), a new folder in your local file system, and a local Git repository for developing and testing your app. ## Step 2 | Create the dashboard pages In the app, we want the dashboard pages to appear in the dashboard like this: ![Sidebar structure](https://wixmp-833713b177cebf373f611808.wixmp.com/images/442d546d4258fd8311a4c3c70a7c633d.png) To create this structure, we use the CLI's `generate` command to [generate dashboard page extensions](https://dev.wix.com/docs/build-apps/develop-your-app/develop-an-app-with-the-cli/supported-extensions/dashboard/dashboard-pages/add-dashboard-page-extensions-with-the-wix-cli.md). This places dashboard page files in subfolders of the `dashboard/pages` folder. ### Create dashboard page files 1. Run the following command and follow the prompts to create a dashboard page extension: ```bash wix generate ``` 2. When prompted for the kind of extension, select **Dashboard Page**. 3. When prompted for a page title, enter **Product**. 4. When prompted for the page route, press `Enter` to accept the default (`product`). The route is the path that is appended to the dashboard base URL to access the dashboard page. Learn more about [page routes](https://dev.wix.com/docs/build-apps/develop-your-app/develop-an-app-with-the-cli/supported-extensions/dashboard/dashboard-pages/add-dashboard-page-extensions-with-the-wix-cli.md). Upon completion, the extension files will be created in your local app files under the chosen route with the following structure: ```bash src └── extensions └── dashboard └── pages └── product ├── product.extension.ts └── product.tsx ``` For more information about these files, see [Dashboard Page Extension Files and Code](https://dev.wix.com/docs/build-apps/develop-your-app/develop-an-app-with-the-cli/supported-extensions/dashboard/dashboard-pages/dashboard-page-extension-files-and-code.md). Each dashboard page is defined by a `product.extension.ts` file and a `product.tsx` file. The product.extension.ts file defines the page metadata and the `product.tsx` file defines the page UI and functionality. Each file pair exists in a folder that determines the route to a page. 5. Repeat the above steps for a second page: title **Settings**, route default `settings` (press `Enter` to accept).
**Tip:** The CLI's default scaffold also created a `my-page` extension at `src/extensions/dashboard/pages/my-page/`. You can leave it (it won't interfere with this tutorial) or delete the `my-page/` folder to keep the dashboard sidebar showing only the **Product** and **Settings** pages.
## Step 3 | Run a local development server Now that you’ve initialized the app, you can run a local development server to see the app in action, and view local changes as you develop it. To run a local development server: 1. Navigate to your newly created folder for your app. ```bash cd business-buddy ``` 1. Run the following command: ```bash wix dev ``` 1. The CLI prompts you to choose a development site (test site), which you’ll use throughout this tutorial to run and test your app. You can choose an existing Wix site as your development site, or create a new one. Let’s **Create a new Development Site**. The newly created development site is automatically named **Dev Sitex** followed by a number (for example, **Dev Sitex 12345**), and can be found in your Wix account’s list of sites. 1. Follow the prompt to open the app installation page in your default browser. If the browser doesn’t open, [install your app on your test site](https://dev.wix.com/docs/build-apps/launch-your-app/app-distribution/test-your-app/test-your-app-on-a-premium-site.md) manually and skip the next step. 1. Click **Agree & Add** to install your app on your development site. 1. In the terminal menu, select **Dashboard** to open your development site’s dashboard. 1. In the dashboard sidebar, click **Apps** to see your newly created app’s dashboard pages. We add the content of our app’s dashboard pages in step 5. Your app is now running on your development site. As you develop your app, any changes made to your app’s code are reflected in real time on your development site. If your changes don’t show up, try refreshing the page, or closing and reopening the development site. ## Step 4 | Install dependencies Before we start coding our app, we need to install some npm packages. In your terminal, run the following commands: ```bash npm install @wix/wix-ui-icons-common npm install @wix/stores npm install @tanstack/react-query npm install openai ``` > **Note:** The `@wix/dashboard`, `@wix/design-system`, and `@wix/essentials` packages come pre-installed in the project that the CLI generated, so you don't need to install them. The purpose of each of these packages will become clear as we progress. ## Step 5 | Design the Product page In our app, we want the **Product** page to look like this: ![Business Buddy Product Chat](https://wixmp-833713b177cebf373f611808.wixmp.com/images/c7c1fa9d1d25177e73f6dd480360550e.png) This design is consistent with the rest of the pages in the dashboard. To create it, we’ll use the React components provided by the [Wix Design System](https://www.wixdesignsystem.com/). The **Product** page is built from: - 2 main React components. - One wrapper component for initializing React context providers. - CSS styling. The **Product** page UI is defined in several files in `src/extensions/dashboard` as follows: - `/pages/product/product.tsx`: The header and the top cell that it used for selecting the product to chat about. - `/pages/product/ProductChat.tsx`: The bottom cell that displays the selected product and the chat. - `/pages/product/ProductChat.module.css`: CSS for the ProductChat component. - `/withProviders.tsx`: A wrapper that provides `WixDesignSystemProvider` for WDS styling and [`QueryClientProvider`](https://tanstack.com/query/v4/docs/framework/react/reference/QueryClientProvider) for data fetching. Let's take a look at the code used to build the page's UI. We'll take a look at the code for the page's functionality a bit later. ### product.tsx Notice how the code uses components from the Wix Design System to build the page. Other than that, it's a standard React component. For more information about each component, see [AutoComplete](https://www.wix-pages.com/wix-design-system/?path=/story/components-form--autocomplete), [Card](https://www.wix-pages.com/wix-design-system/?path=/story/components-layout-card--card-content), [TableActionCell](https://www.wix-pages.com/wix-design-system/?path=/story/components-lists-table--tableactioncell), [Divider](https://www.wix-pages.com/wix-design-system/?path=/story/components-layout--divider), [Layout](https://www.wix-pages.com/wix-design-system/?path=/story/components-layout--layout), and [Page](https://www.wix-pages.com/wix-design-system/?path=/story/components-layout-page--page). > **Note:** At this point, we're showing the code with a hardcoded, dummy product object just to demonstrate how the page will look once a product is selected. We'll add real products to the page later in the tutorial. Open `src/extensions/dashboard/pages/product/product.tsx` and replace its contents with the following: ```tsx import { AutoComplete, Card, Cell, Divider, Layout, Page, } from '@wix/design-system'; import '@wix/design-system/styles.global.css'; import React from 'react'; import { withProviders } from '../../withProviders'; import { ProductChat } from './ProductChat'; export default withProviders(function ProductPage() { const [currentProduct, setCurrentProduct] = React.useState({ name: 'Test Name', sku: 'Test SKU', }); const [searchQuery, setSearchQuery] = React.useState(''); return ( {currentProduct && } ); }); ``` ### ProductChat.tsx Here again, the code uses Wix Design System components to build the component UI. For more information about each component, see [Text](https://www.wix-pages.com/wix-design-system/?path=/story/components-typography-text--text), [Box](https://www.wix-pages.com/wix-design-system/?path=/story/components-layout--box), [Card](https://www.wix-pages.com/wix-design-system/?path=/story/components-layout-card--card), [Input](https://www.wix-pages.com/wix-design-system/?path=/story/components-form--input), and [Loader](https://www.wix-pages.com/wix-design-system/?path=/story/components-feedback--loader). Create a new file at `src/extensions/dashboard/pages/product/ProductChat.tsx` with the following content: ```tsx import { Text, Box, Card, Input, Loader } from '@wix/design-system'; import { products } from '@wix/stores'; import React from 'react'; import * as Icons from '@wix/wix-ui-icons-common'; import styles from './ProductChat.module.css'; type Message = { author: 'Business Buddy' | 'User'; text: string; }; export function ProductChat(props: { product: products.Product }) { const [isWaitingForBusinessBuddy, setIsWaitingForBusinessBuddy] = React.useState(false); const [messageDraft, setMessageDraft] = React.useState( undefined ); const [chatMessages, setChatMessages] = React.useState([] as Message[]); return ( } placeholder='Ask Business Buddy something...' onChange={(e) => { setMessageDraft(e.target.value); }} value={messageDraft} /> {chatMessages.map((message) => ( {message.author}: {message.text} ))} {isWaitingForBusinessBuddy && ( )} ); } ``` ### ProductChat.module.css This file defines the width of the input element for the `ProductChat` component. Create a new file at `src/extensions/dashboard/pages/product/ProductChat.module.css` with the following content: ```css .userInput { width: 100%; } ``` #### withProviders.tsx This file wraps components with `WixDesignSystemProvider` for WDS styling and `QueryClientProvider` for data fetching. Create a new file at `src/extensions/dashboard/withProviders.tsx` with the following content: ```tsx import React from 'react'; import { WixDesignSystemProvider } from '@wix/design-system'; import { QueryClient, QueryClientProvider } from '@tanstack/react-query'; export function withProviders(Component: React.ComponentType) { return function () { return ( ); }; } ``` ## Step 6 | Set up calls to Wix React SDKs In our app, on the **Product** page, users can choose a product from the site's Store. To work with the Stores app on a user's site, we use the [Wix Dashboard SDK](https://dev.wix.com/docs/sdk/host-modules/dashboard/introduction.md) and the [Wix SDK](https://dev.wix.com/docs/sdk/core-modules/sdk/introduction.md). We already showed how to set up your dashboard page extensions with the Dashboard SDK in [the previous section](https://dev.wix.com/docs/build-apps/get-started/tutorials/tutorial-set-up-an-app-with-the-cli.md). In this section, we'll use the SDK to retrieve site data to display in the app. Install Wix Stores on your development site and make sure the store has at least one product. ### Permissions Before getting started making calls with the SDK, you need to request the proper [permissions](https://dev.wix.com/docs/build-apps/develop-your-app/access/authorization/about-permissions.md). The permissions your app needs are listed in the **Permissions** section of each API reference page. Our app calls [`queryProducts`](https://dev.wix.com/docs/api-reference/business-solutions/stores/catalog-v1/catalog/query-products.md), which requires the **Read Products** permission. To add the permission: 1. Open the [`queryProducts` API reference](https://dev.wix.com/docs/api-reference/business-solutions/stores/catalog-v1/catalog/query-products.md) and scroll to the **Permissions** section. 2. Click the **READ PRODUCTS** badge. An app selector opens. 3. Select your app. The Permissions page for your app opens. 4. Click **Add Permissions**, search for **Read Products**, and add it. ### Get products After setting up permissions, our app can retrieve a list of products from the site's store. In `src/extensions/dashboard/pages/product/product.tsx`, add the following imports: ```tsx import { products } from '@wix/stores'; import { useQuery } from '@tanstack/react-query'; ``` These imports give us access to the functionality we need for retrieving products. Once we import everything, we’ll add the following hooks to our ProductPage component: 1. We use the React `useQuery()` hook to query for products whose names start with a query string. This string will be set based on what the user types in our `AutoComplete` component. We use the V1 `queryProducts()` builder pattern: call `queryProducts()` with no arguments, chain `.startsWith()` to filter by name, then call `.find()` to execute the query. We also make sure to handle any errors. ```tsx const { data: productsList, isLoading, error, } = useQuery({ queryKey: ['products', searchQuery], queryFn: () => products.queryProducts() .startsWith('name', searchQuery) .find(), }); if (error) return
Something went wrong
; ``` 2. Finally, let’s replace our dummy current product with the proper type now that we have it. ```tsx const [currentProduct, setCurrentProduct] = React.useState< products.Product | undefined >(); ``` ### Populate products Now that we have access to a list of the site’s products, we can use them to populate the `AutoComplete` component and define what happens when a user selects a product. 1. First, we set the `AutoComplete` component's `status`. ```tsx status={isLoading ? 'loading' : undefined} ``` 2. Then, we set the `AutoComplete` component's `options` to the products we got from the query by mapping them to a list of options objects with `id` and `value` properties. ```tsx options={productsList?.items.map((product) => ({ id: product._id!, value: product.name, }))} ``` 3. Next, we set up the `AutoComplete` component's `onSelect` function to set the component's current product. ```tsx onSelect={(e) => { setCurrentProduct( productsList!.items.find( (product) => product._id === (e.id as string) ) ); }} ``` While we're at it, we also set the `AutoComplete` component's `onChange` function to set the search query and clear the current product. ```tsx onChange={(e) => { setSearchQuery(e.target.value); setCurrentProduct(undefined); }} ``` 4. Finally, we set the `AutoComplete` component's `value` to the current product if there is one. ```tsx value={currentProduct?.name ?? undefined} ``` After completing the steps above, your `src/extensions/dashboard/pages/product/product.tsx` file should look like this: ```tsx import { AutoComplete, Card, Cell, Divider, Layout, Page, } from '@wix/design-system'; import '@wix/design-system/styles.global.css'; import React from 'react'; import { products } from '@wix/stores'; import { useQuery } from '@tanstack/react-query'; import { withProviders } from '../../withProviders'; import { ProductChat } from './ProductChat'; export default withProviders(function ProductPage() { const [currentProduct, setCurrentProduct] = React.useState< products.Product | undefined >(); const [searchQuery, setSearchQuery] = React.useState(''); const { data: productsList, isLoading, error, } = useQuery({ queryKey: ['products', searchQuery], queryFn: () => products.queryProducts() .startsWith('name', searchQuery) .find(), }); if (error) return
Something went wrong
; return ( ({ id: product._id!, value: product.name, }))} onSelect={(e) => { setCurrentProduct( productsList!.items.find( (product) => product._id === (e.id as string) ) ); }} onChange={(e) => { setSearchQuery(e.target.value); setCurrentProduct(undefined); }} value={currentProduct?.name ?? undefined} /> {currentProduct && } ); }); ``` ## Step 7 | Set up communication with the backend In our app, the **Product** and **Settings** dashboard pages communicate with backend [HTTP endpoints](https://dev.wix.com/docs/build-apps/develop-your-app/develop-an-app-with-the-cli/supported-extensions/backend/http-endpoints/about-http-endpoints.md): one for chat messages and one for the AI behavior settings. The endpoints live in the same CLI project, in `src/pages/api/`. We set them up in Step 9; in this step, we set up the frontend code that calls them. When you call your endpoint with [`httpClient.fetchWithAuth()`](https://dev.wix.com/docs/sdk/core-modules/essentials/http-client.md) from [`@wix/essentials`](https://dev.wix.com/docs/sdk/core-modules/essentials/introduction.md), the Wix user's access token is attached to the request automatically, and the backend can extract the app instance ID from it without you having to pass it manually. ### Send the chat request We use the `ProductChat` component to send and receive chat messages. Open `src/extensions/dashboard/pages/product/ProductChat.tsx` and make the following changes: 1. Import `httpClient` from `@wix/essentials`. ```tsx import { httpClient } from '@wix/essentials'; ``` 2. Add a `submitMessage` function inside the `ProductChat` component. This function sends the user's message to the `/api/chat/product` endpoint and updates the chat state with the response. ```tsx async function submitMessage() { const newMessage: Message = { author: 'User', text: messageDraft ?? '', }; setChatMessages((state) => [...state, newMessage]); setMessageDraft(''); setIsWaitingForBusinessBuddy(true); const baseApiUrl = new URL(import.meta.url).origin; const res = await httpClient.fetchWithAuth( `${baseApiUrl}/api/chat/product`, { method: 'POST', body: JSON.stringify({ messages: [...chatMessages, newMessage], product: JSON.stringify(props.product, null, 2), }), } ); const { message } = await res.json(); setChatMessages((state) => [ ...state, { author: 'Business Buddy', text: message, }, ]); setIsWaitingForBusinessBuddy(false); } ``` We build the full endpoint URL with `new URL(import.meta.url).origin` so it works in both local development and production. 3. Wire up `submitMessage` to the send icon and to the Enter key on the `Input` component. ```tsx ``` ```tsx onEnterPressed={submitMessage} ``` After completing the steps above, your `src/extensions/dashboard/pages/product/ProductChat.tsx` file should look like this: ```tsx import { Text, Box, Card, Input, Loader } from '@wix/design-system'; import { products } from '@wix/stores'; import React from 'react'; import * as Icons from '@wix/wix-ui-icons-common'; import styles from './ProductChat.module.css'; import { httpClient } from '@wix/essentials'; type Message = { author: 'Business Buddy' | 'User'; text: string; }; export function ProductChat(props: { product: products.Product }) { const [isWaitingForBusinessBuddy, setIsWaitingForBusinessBuddy] = React.useState(false); const [messageDraft, setMessageDraft] = React.useState( undefined ); const [chatMessages, setChatMessages] = React.useState([] as Message[]); async function submitMessage() { const newMessage: Message = { author: 'User', text: messageDraft ?? '', }; setChatMessages((state) => [...state, newMessage]); setMessageDraft(''); setIsWaitingForBusinessBuddy(true); const baseApiUrl = new URL(import.meta.url).origin; const res = await httpClient.fetchWithAuth( `${baseApiUrl}/api/chat/product`, { method: 'POST', body: JSON.stringify({ messages: [...chatMessages, newMessage], product: JSON.stringify(props.product, null, 2), }), } ); const { message } = await res.json(); setChatMessages((state) => [ ...state, { author: 'Business Buddy', text: message, }, ]); setIsWaitingForBusinessBuddy(false); } return ( } placeholder='Ask Business Buddy something...' onChange={(e) => { setMessageDraft(e.target.value); }} onEnterPressed={submitMessage} value={messageDraft} /> {chatMessages.map((message) => ( {message.author}: {message.text} ))} {isWaitingForBusinessBuddy && ( )} ); } ``` ## Step 8 | Design the Settings page Open `src/extensions/dashboard/pages/settings/settings.tsx` and replace its contents with the following: ```tsx import { Button, Card, FormField, InputArea, Loader, Page, } from '@wix/design-system'; import '@wix/design-system/styles.global.css'; import React from 'react'; import { useMutation, useQuery } from '@tanstack/react-query'; import { httpClient } from '@wix/essentials'; import { withProviders } from '../../withProviders'; import { dashboard } from '@wix/dashboard'; export default withProviders(function SettingsPage() { const { data } = useQuery<{ behaviorDirective: string; }>({ queryKey: ['settings'], queryFn: async () => { const baseApiUrl = new URL(import.meta.url).origin; const res = await httpClient.fetchWithAuth(`${baseApiUrl}/api/settings`); return res.json(); }, }); const mutation = useMutation({ mutationFn: async (newBehaviorDirective: string) => { const baseApiUrl = new URL(import.meta.url).origin; await httpClient.fetchWithAuth(`${baseApiUrl}/api/settings`, { method: 'POST', body: JSON.stringify({ behaviorDirective: newBehaviorDirective }), }); }, onSuccess: () => { dashboard.showToast({ message: 'Changes saved!', type: 'success', }); }, }); const [behaviorDirective, setBehaviorDirective] = React.useState(''); return ( { mutation.mutate(behaviorDirective); }} disabled={mutation.isPending} > {mutation.isPending ? : 'Save'} } > setBehaviorDirective(e.target.value)} /> ); }); ``` As usual, the code uses Wix Design System components to build the component UI. For more information about each component, see [Button](https://www.wix-pages.com/wix-design-system/?path=/story/components-actions--button), [Card](https://www.wix-pages.com/wix-design-system/?path=/story/components-layout-card--card), [FormField](https://www.wix-pages.com/wix-design-system/?path=/story/components-form--formfield), [InputArea](https://www.wix-pages.com/wix-design-system/?path=/story/components-form--inputarea), [Loader](https://www.wix-pages.com/wix-design-system/?path=/story/components-feedback--loader), and [Page](https://www.wix-pages.com/wix-design-system/?path=/story/components-layout-page--page). ### @tanstack/react-query In this code, we import `useMutation` and `useQuery` from `@tanstack/react-query`: - **`useQuery`** is used to fetch data from the server and handle caching. `useQuery` fetches the current `behaviorDirective` from the server and stores it in `data`. ```tsx const { data } = useQuery<{ behaviorDirective: string; }>({ queryKey: ['settings'], queryFn: async () => { const baseApiUrl = new URL(import.meta.url).origin; const res = await httpClient.fetchWithAuth(`${baseApiUrl}/api/settings`); return res.json(); }, }); ``` - **`useMutation`** is used to update data on the server. `useMutation` sends a new `behaviorDirective` to the server via a POST request: ```tsx const mutation = useMutation({ mutationFn: async (newBehaviorDirective: string) => { const baseApiUrl = new URL(import.meta.url).origin; await httpClient.fetchWithAuth(`${baseApiUrl}/api/settings`, { method: 'POST', body: JSON.stringify({ behaviorDirective: newBehaviorDirective }), }); }, }); ``` ### Adding a toast When a user changes the behavior setting on the **Settings** page, we want to show a toast at the top of the dashboard page. To show toasts, update dashboard components based on state changes, and open and close dashboard modals, we use the [Wix Dashboard SDK](https://dev.wix.com/docs/sdk/host-modules/dashboard/introduction.md). 1. Import the [`dashboard`](https://dev.wix.com/docs/sdk/host-modules/dashboard/introduction.md) module from the Dashboard SDK. ```tsx import { dashboard } from '@wix/dashboard'; ``` 2. Call `showToast()` in the `onSuccess` callback of the mutation. This shows the toast when the **Save** button's request completes successfully. ```tsx onSuccess: () => { dashboard.showToast({ message: 'Changes saved!', type: 'success', }); }, ``` ## Step 9 | Add backend HTTP endpoints The app's backend logic, handling chat requests by calling the OpenAI API and storing the per-install AI behavior directive, runs as [HTTP endpoints](https://dev.wix.com/docs/build-apps/develop-your-app/develop-an-app-with-the-cli/supported-extensions/backend/http-endpoints/about-http-endpoints.md) inside our CLI project. There's no separate server. Each file we create in `src/pages/api/` is auto-discovered and exposed at `/api/`. No registration step is required. The `httpClient.fetchWithAuth()` call we used in Step 7 and Step 8 attaches the user's access token to each request automatically. On the server, we extract the current app install's ID from that token using [`auth.getTokenInfo()`](https://dev.wix.com/docs/sdk/core-modules/essentials/auth.md) from `@wix/essentials`. We don't need to set up CORS, manage an app secret key, or parse instance strings manually. This tutorial uses [OpenAI](https://platform.openai.com/) as the AI provider for the chat endpoint. The same pattern applies to any AI provider with an HTTP API, such as Anthropic, OpenRouter, and Hugging Face. Refer to your provider's documentation for the SDK and call shape. ### Set up your OpenAI API key 1. Go to [platform.openai.com](https://platform.openai.com/) and sign up. This is OpenAI's developer platform; it's separate from chatgpt.com, and an existing ChatGPT subscription doesn't grant API access. 2. Add a payment method and credits to your account. OpenAI API access is pay-per-use; the model used below (`gpt-4o-mini`) costs fractions of a cent per chat message, but OpenAI requires a pre-funded balance. Adding a payment method alone isn't enough. We recommend a small initial deposit and a low usage limit (e.g., $5) as a safety net. 3. Go to [platform.openai.com/api-keys](https://platform.openai.com/api-keys), click **Create new secret key**, give it a name, and click **Create**. Copy the key (it starts with `sk-...`). It's only displayed once. 4. Declare the key as a secret environment variable. Add an `env` block to `astro.config.mjs`: ```js import { defineConfig, envField } from 'astro/config'; // ...existing imports export default defineConfig({ // ...existing config env: { schema: { OPENAI_API_KEY: envField.string({ context: "server", access: "secret" }), } } }); ``` 5. Store the key with the Wix CLI and pull it locally: ```bash wix env set --key OPENAI_API_KEY --value sk-...your-key... wix env pull ``` `wix env set` uploads the key to Wix's servers; it's never written to a file in your project, so you can't accidentally commit it. `wix env pull` downloads it into your local environment so `wix dev` can use it. Run `wix env pull` again whenever you change the key on Wix's servers or pull the project to a new machine. For more, see [Manage Environment Variables](https://dev.wix.com/docs/build-apps/develop-your-app/develop-an-app-with-the-cli/project-development/environment-variables/manage-environment-variables-in-the-cli.md).
__Tip:__ To use an OpenAI-compatible provider, set an `OPENAI_BASE_URL` environment variable using the same `wix env set` / `wix env pull` flow as above, and pass it as `baseURL` when constructing the `OpenAI` client. This works for providers such as Azure OpenAI, OpenRouter, and self-hosted models.
### Shared in-memory store Both endpoints we're about to create read and write the same AI behavior directive, keyed by app instance ID. We put the store in its own module so both endpoints can import it. Create the file `src/lib/directives-store.ts`: ```ts const directivesByInstance = new Map(); export function getDirective(instanceId: string): string | undefined { return directivesByInstance.get(instanceId); } export function setDirective(instanceId: string, directive: string): void { directivesByInstance.set(instanceId, directive); } ``` > **Note:** This in-memory store is for demonstration only. It loses data when the server restarts and isn't shared across server replicas. For production, replace it with a [Wix data collection](https://dev.wix.com/docs/build-apps/develop-your-app/extensions/backend-extensions/data-collections/about-data-collections-extensions.md) or your own external database. ### Settings endpoint The settings endpoint stores and retrieves the AI behavior directive for the current app install. The Settings page (Step 8) calls this endpoint via `GET` to load the saved directive and `POST` to save a new one. Create the file `src/pages/api/settings.ts`: ```ts import type { APIRoute } from 'astro'; import { auth } from '@wix/essentials'; import { getDirective, setDirective } from '../../lib/directives-store'; export const GET: APIRoute = async () => { const { instanceId } = await auth.getTokenInfo(); const behaviorDirective = getDirective(instanceId) ?? ''; return new Response( JSON.stringify({ behaviorDirective }), { headers: { 'Content-Type': 'application/json' } } ); }; export const POST: APIRoute = async ({ request }) => { const { instanceId } = await auth.getTokenInfo(); const { behaviorDirective } = await request.json(); setDirective(instanceId, behaviorDirective); return new Response(null, { status: 200 }); }; ``` `auth.getTokenInfo()` decodes the access token attached to the request by `httpClient.fetchWithAuth()` on the frontend, and returns information about the current install, including the `instanceId` we use as the storage key. Each app install gets its own directive. ### Chat endpoint The chat endpoint receives a chat message and product context from the **Product** page (Step 7), looks up the current install's behavior directive, calls OpenAI with the directive as a system prompt, and returns the assistant's reply. Create the file `src/pages/api/chat/product.ts`. The file's path under `src/pages/api/` (`chat/product.ts`) determines its URL: `/api/chat/product`. ```ts import type { APIRoute } from 'astro'; import { auth } from '@wix/essentials'; import { OPENAI_API_KEY } from 'astro:env/server'; import OpenAI from 'openai'; import { getDirective } from '../../../lib/directives-store'; type IncomingMessage = { author: 'Business Buddy' | 'User'; text: string; }; const openai = new OpenAI({ apiKey: OPENAI_API_KEY }); export const POST: APIRoute = async ({ request }) => { const { instanceId } = await auth.getTokenInfo(); const { messages, product } = (await request.json()) as { messages: IncomingMessage[]; product: string; }; const directive = getDirective(instanceId); const completion = await openai.chat.completions.create({ model: 'gpt-4o-mini', messages: [ { role: 'system', content: 'You are Business Buddy, a helpful assistant who answers questions about a specific product in a Wix store.' }, ...(directive ? [{ role: 'system' as const, content: directive }] : []), { role: 'system', content: `Product context (JSON): ${product}` }, ...messages.map((m) => ({ role: (m.author === 'User' ? 'user' : 'assistant') as 'user' | 'assistant', content: m.text, })), ], }); const message = completion.choices[0]?.message?.content ?? "Sorry, I couldn't generate a response."; return new Response( JSON.stringify({ message }), { headers: { 'Content-Type': 'application/json' } } ); }; ``` The directive saved on the **Settings** page becomes a system prompt, the product info is passed as additional context, and the chat history is the conversation. Because the endpoint runs server-side, your API key never reaches the client. After completing the steps in this section, restart `wix dev` (kill the running process and re-run, because the schema change and the new `astro:env/server` import need a clean restart). Try a chat message in the **Product** page; you should get a real AI-generated reply that reflects the Business Buddy persona, talks about the selected product, and honors any directive you've set on the **Settings** page. ## Step 10 | Build and deploy the app After testing your app and seeing that it works as expected, you can create a public preview of your app, build your app, create and manage app versions, and deploy your app. For more information on these tasks, see [Build and Deploy an App with the CLI](https://dev.wix.com/docs/build-apps/develop-your-app/develop-an-app-with-the-cli/project-development/build-and-deploy.md) ## Summary After completing this tutorial, you have a working AI chatbot Wix CLI app with two dashboard pages, backend HTTP endpoints calling OpenAI, and per-install storage so each app instance can shape Business Buddy's behavior with its own directive. At this point, you have all you need to know to develop an app. Feel free to play around with the example app some more, or get started on writing your own app. --- > Portal Navigation: > > - Append `.md` to any URL under `https://dev.wix.com/docs/` to get its markdown version. > - Pages are either content pages (article or reference text) or menu pages (a list of links to child pages). > - To get a menu page, truncate any URL to a parent path and append `.md` (e.g. `https://dev.wix.com/docs/sdk.md`, `https://dev.wix.com/docs/sdk/core-modules.md`). > - Top-level index of all portals: https://dev.wix.com/docs/llms.txt > - Full concatenated docs: https://dev.wix.com/docs/llms-full.txt ## Resource: Tutorial | Build a Locations App with the CLI ## Article: Tutorial | Build a Locations App with the CLI ## Article Link: https://dev.wix.com/docs/build-apps/get-started/tutorials/tutorial-build-a-locations-app-with-the-cli.md ## Article Content: # Tutorial | Build a Locations App Using the Wix CLI This tutorial demonstrates how to use the [Wix CLI](https://dev.wix.com/docs/wix-cli/guides/about-the-wix-cli.md) to build a Locations app on the [Wix Platform](https://dev.wix.com/docs/build-apps/get-started/overview/the-wix-ecosystem.md). The app contains a dashboard page that lists a Wix site's business locations, providing a foundation you can build on with per-location actions like editing hours. By following this tutorial, you'll learn how to: - Build a dashboard page using the [Wix Design System](https://www.wixdesignsystem.com/). - Read business locations from a site using the [Wix Locations SDK](https://dev.wix.com/docs/api-reference/business-management/locations/introduction?apiView=SDK.md). - Navigate to a built-in Wix dashboard page from within your app, using the [Wix Dashboard SDK](https://dev.wix.com/docs/sdk/host-modules/dashboard/introduction.md). The end result will look like this: ![Locations app tutorial final result](https://wixmp-833713b177cebf373f611808.wixmp.com/images/fa8f2472f7e1bb26c84e9c44e3e5c460.png) We'll use the following steps to build the Locations app: 1. [Initialize the app](#step-1--initialize-the-app). 1. [Create the dashboard page](#step-2--create-the-dashboard-page). 1. [Run a local development server](#step-3--run-a-local-development-server). 1. [Develop the app](#step-4--develop-the-app). 1. [Test the app](#step-5--test-the-app). 1. [Build and deploy the app](#step-6--build-and-deploy-the-app). ## Before you begin Before getting started, make sure that: - You install [Node.js](https://nodejs.org/en/) (v20.11.0 or higher). - You install [npm](https://www.npmjs.com/package/npm) or [yarn](https://www.npmjs.com/package/yarn). - You’re logged into your Wix Studio account. If you don’t already have one, [sign up for a Wix Studio account.](https://manage.wix.com/account/custom-apps) ## Step 1 | Initialize the app We use the Wix CLI to initialize our Locations app. In the process of initializing our app, the Wix CLI automatically: - Creates a new app in the [Custom Apps page](https://manage.wix.com/account/custom-apps) of your Wix Studio workspace. - Sets up a new folder for your app in your local file system. The folder includes: - A `src` folder containing initial boilerplate code for an app with a dashboard page. - A `package.json` file containing your app dependencies. - Creates a local Git repository for your app. To initialize the app: 1. Open a terminal and navigate to the folder where you want to create your app. 2. Run the following command: ```bash npm create @wix/new@latest app ``` If prompted to install the `@wix/create-new` package, press `y`. 3. Select **Create a new Wix App**. 4. Select **Create a basic app**. 5. Enter a name for your app. Let’s name our app `My Locations App`. 6. Press `Enter` to accept the default folder name (`my-locations-app`). 7. When asked to configure Wix MCP for your IDE, select your preferred MCP. A green **Success** message confirms that your app has been registered in the [Custom Apps page](https://manage.wix.com/account/custom-apps). 8. Press `Enter` to accept the default namespace (`my-locations-app`). 9. Press `Enter` to accept the default code identifier (`my_locations_app`). You now have a new app in the [Custom Apps page](https://manage.wix.com/account/custom-apps), a new folder in your local file system, and a local Git repository for developing and testing your app. ## Step 2 | Create the dashboard page We use the CLI's `generate` command to create a dashboard page for our app. To create the dashboard page: 1. Navigate to your newly created folder for your app. ```bash cd my-locations-app ``` 2. Run the following command and follow the prompts: ```bash wix generate ``` 3. When prompted for the kind of extension, select **Dashboard Page**. 4. When prompted for a page title, enter **Locations**. 5. When prompted for the page route, press `Enter` to accept the default (`locations`). Upon completion, the extension files are created at `src/extensions/dashboard/pages/locations/`: ```bash src └── extensions └── dashboard └── pages └── locations ├── locations.extension.ts └── locations.tsx ``` For more information about these files, see [Dashboard Page Extension Files and Code](https://dev.wix.com/docs/build-apps/develop-your-app/develop-an-app-with-the-cli/supported-extensions/dashboard/dashboard-pages/dashboard-page-extension-files-and-code.md).
**Tip:** The CLI's default scaffold also created a `my-page` extension at `src/extensions/dashboard/pages/my-page/`. You can leave it (it won't interfere with this tutorial) or delete the `my-page/` folder to keep the dashboard sidebar showing only the **Locations** page.
## Step 3 | Run a local development server Now that you’ve initialized your app, you can run a local development server to see the app in action, and view local changes as you develop your app. To run a local development server for your app: 1. In the terminal, from your app's folder, run the following command: ```bash wix dev ``` 1. The CLI prompts you to choose a development site (test site), which you’ll use throughout this tutorial to run and test your app. You can choose an existing Wix site as your development site, or create a new one. Let’s **Create a new Development Site**. The newly created development site is automatically named **Dev Sitex** followed by a number (for example, **Dev Sitex 12345**), and can be found in your Wix account’s list of sites. 1. Follow the prompt to open the app installation page in your default browser. If the browser doesn’t open, [install your app on your test site](https://dev.wix.com/docs/build-apps/launch-your-app/app-distribution/test-your-app/test-your-app-on-a-premium-site.md) manually and skip the next step. 1. Click **Agree & Add** to install your app on your development site. 1. In the terminal menu, select **Dashboard** to open your development site’s dashboard. 1. In the dashboard sidebar, click **Apps > Locations** to see your newly created app’s dashboard page. We add the content of our app’s dashboard page in the next step. ![Locations app empty state](https://wixmp-833713b177cebf373f611808.wixmp.com/images/d73c4379e54243752cc4dfbee5b866c3.png) Your app is now running on your development site. As you develop your app, any changes made to your app’s code are reflected in real time on your development site. If your changes don’t show up, try refreshing the page, or closing and reopening the development site. ## Step 4 | Develop the app In this step, we show how we develop our app further by coding our dashboard page. We use the [`queryLocations()`](https://dev.wix.com/docs/api-reference/business-management/locations/query-locations?apiView=SDK.md) function in the [Wix SDK’s Locations API](https://dev.wix.com/docs/api-reference/business-management/locations/introduction?apiView=SDK.md) to get a list of our site’s business locations. Then we use React code to display the locations on our dashboard page. ### Add API permissions To use [`queryLocations()`](https://dev.wix.com/docs/api-reference/business-management/locations/query-locations?apiView=SDK.md) in our app, we need to give our app permission requirements in the app dashboard. Once we do this, anyone installing the app will be prompted to grant the specified permissions. Our app calls `queryLocations()` to read the site’s business locations, so it needs a read locations scope. The method’s reference page (linked above) lists the exact scope it requires in its **Permission Scopes** section, including the scope’s ID (`SCOPE.DC-MULTILOCATION.READ-LOCATIONS`). To add the scope: 1. Go to the [**Permissions** tab](https://manage.wix.com/app-selector?title=Select+an+App&primaryButtonText=Select+Site&actionUrl=https%3A%2F%2Fdev.wix.com%2Fapps%2F%7BappId%7D%2Fdev-center-permissions) in your app's dashboard. 1. Click **Add Permissions**. 1. Search for the scope. Several scopes can have similar names, so match the one whose ID matches the scope ID shown on the method's reference page. 1. Check its checkbox under **Choose Permission Scopes** and click **Save**. For more information on configuring permissions, see [Configure permissions for your app](https://dev.wix.com/docs/build-apps/develop-your-app/access/authorization/configure-permissions-for-your-app.md). ### Install packages We use the following packages for coding and designing our app’s dashboard page: - **`@wix/business-tools`:** Business tools module for working with the Wix SDK [Locations API](https://dev.wix.com/docs/api-reference/business-management/locations/introduction?apiView=SDK.md). - **`@wix/dashboard`:** [Dashboard SDK](https://dev.wix.com/docs/sdk/host-modules/dashboard/introduction.md) for interacting with the site dashboard. - **`@wix/design-system`:** The [Wix Design System](https://www.wixdesignsystem.com/) for designing our dashboard page using several design components. The `@wix/dashboard` and `@wix/design-system` packages come pre-installed in the project that the CLI generated, so you don’t need to install them. However, you do need to install the `@wix/business-tools` package. To do so, open your terminal and run the following command: ```bash npm install @wix/business-tools ``` ### Write the code We'll now write code to create a dashboard page for our app. We want the dashboard page to display a list of all the business locations in our site, and a button for editing each location’s hours of operation. 1. Open your app’s folder in your IDE. Then open the `locations.tsx` file located in `src/extensions/dashboard/pages/locations/`. 2. Delete the existing code in the file. 3. Add the following import statements to your file: ```tsx import { Box, Loader, Table, TableActionCell, EmptyState, Page, TextButton, WixDesignSystemProvider } from '@wix/design-system'; import '@wix/design-system/styles.global.css'; import { locations } from '@wix/business-tools'; import * as Icons from '@wix/wix-ui-icons-common'; import React, { useState, useEffect } from 'react'; import { dashboard } from '@wix/dashboard'; ``` 4. Next, use React and components from the [Wix Design System](https://www.wixdesignsystem.com/) to create a display table for the list of locations in the dashboard, or an empty state message with an option to add a location if there is no location data. The `useEffect` hook fetches the location data using the `queryLocations()` function and updates the component's state accordingly. If the data is still loading, it displays a loading spinner. You can see the complete code for this example below. **Full Example Code** ```tsx import { Box, Loader, Table, TableActionCell, EmptyState, Page, TextButton, WixDesignSystemProvider } from '@wix/design-system'; import '@wix/design-system/styles.global.css'; import { locations } from '@wix/business-tools'; import * as Icons from '@wix/wix-ui-icons-common'; import React, { useState, useEffect } from 'react'; import { dashboard } from '@wix/dashboard'; export default function Index() { const { navigate } = dashboard; const { queryLocations } = locations; const [isLoading, setIsLoading] = useState(true); const [businessLocations, setBusinessLocations] = useState([]); useEffect(() => { const fetchLocations = async () => { try { const result = await queryLocations().find(); // Filter the development site's default location. Remove this line before publishing your app. const filteredResults = result.items.filter((location: any) => location.name !== "Location 1"); setBusinessLocations(filteredResults); setIsLoading(false); } catch (error) { console.error('Error fetching locations:', error); setIsLoading(false); } }; fetchLocations(); }, []); if (isLoading) { return ; } const columns = [ { title: 'Name', render: (location: any) => location.name, }, { title: '', render: () => ( console.log('open modal'), }} />) } ]; return ( {businessLocations.length > 0 ?
: navigate('71e35f24-8eb7-41b0-b261-c2259a76372f')} prefixIcon={}> Add Location }
); } ``` You now have a fully developed app with a dashboard page for site owners to manage their business locations and hours of operation. ## Step 5 | Test the app In the previous step, we wrote code for displaying a site’s business locations in the dashboard. However, our development site doesn’t yet have any business location content for the app to display. We need to add business locations to our development site, and test our app to see whether the table with our business locations appears. To add business locations to your site: 1. Run a local development server for your app using the `wix dev` command in your terminal. Your app’s dashboard page will now look like this: ![Add locations to your site](https://wixmp-833713b177cebf373f611808.wixmp.com/images/cdf71f12912bb644c1806d70fb488e61.png) 2. Click **Add Location**. This takes you to the Business Info Settings to add locations to your development site. 3. Add business locations to your development site. 4. Navigate back to your app’s dashboard page in the left sidebar. The page should now display a table with a list of the business locations that you just added. You now have a working app with a dashboard page that lists your site’s business locations, and a button for editing the hours of operation. ## Step 6 | Build and deploy the app After testing your app and seeing that it works as expected, you can [create a preview of your app](https://dev.wix.com/docs/build-apps/develop-your-app/develop-an-app-with-the-cli/project-development/build-and-deploy.md), [build your app](https://dev.wix.com/docs/build-apps/develop-your-app/develop-an-app-with-the-cli/project-development/build-and-deploy.md), [release and publish your app](https://dev.wix.com/docs/build-apps/develop-your-app/develop-an-app-with-the-cli/project-development/build-and-deploy.md). --- > Portal Navigation: > > - Append `.md` to any URL under `https://dev.wix.com/docs/` to get its markdown version. > - Pages are either content pages (article or reference text) or menu pages (a list of links to child pages). > - To get a menu page, truncate any URL to a parent path and append `.md` (e.g. `https://dev.wix.com/docs/sdk.md`, `https://dev.wix.com/docs/sdk/core-modules.md`). > - Top-level index of all portals: https://dev.wix.com/docs/llms.txt > - Full concatenated docs: https://dev.wix.com/docs/llms-full.txt ## Resource: Tutorial | Create a Custom Products Catalog App with the CLI ## Article: Tutorial | Create a Custom Products Catalog App with the CLI ## Article Link: https://dev.wix.com/docs/build-apps/get-started/tutorials/tutorial-create-a-custom-products-catalog-app-with-the-cli.md ## Article Content: # Tutorial | Create a Custom Products Catalog App with the CLI This tutorial demonstrates how to use the [Wix CLI](https://dev.wix.com/docs/wix-cli/guides/about-the-wix-cli.md) to build a Custom Products Catalog app on the [Wix Platform](https://dev.wix.com/docs/build-apps/get-started/overview/the-wix-ecosystem.md). The app contains a dashboard page that lists, searches, sorts, adds, and deletes products in a Wix Stores catalog. > **Note:** This tutorial uses the [Stores Catalog V3 API](https://dev.wix.com/docs/api-reference/business-solutions/stores/catalog-v3/products-v3/introduction.md) only. This is sufficient for private apps. However, apps published to the Wix App Market should support both the [V1](https://dev.wix.com/docs/api-reference/business-solutions/stores/catalog-v1/catalog/introduction.md) and [V3](https://dev.wix.com/docs/api-reference/business-solutions/stores/catalog-v3/products-v3/introduction.md) Stores Catalog APIs. For more details, see [Exposing Apps Publicly and Privately](https://dev.wix.com/docs/build-apps/get-started/overview/exposing-apps-publicly-and-privately.md). By following this tutorial, you'll learn how to: - Build a collection-style dashboard page (with toolbar, filters, sorting, bulk actions) using the [Wix Design System](https://www.wixdesignsystem.com/) and Wix Patterns. - Read, write, and bulk-delete products using the [Wix Stores Products V3 API](https://dev.wix.com/docs/api-reference/business-solutions/stores/catalog-v3/products-v3/introduction?apiView=SDK.md). - Manage SDK call state with React Query. The end result will look like this: ![App preview](https://wixmp-833713b177cebf373f611808.wixmp.com/images/2d80442fb96a66bfe7f0c50010094c9f.png) We'll use the following steps to build the Custom Products Catalog app: 1. [Initialize the app](#step-1--initialize-the-app). 1. [Create the dashboard page](#step-2--create-the-dashboard-page). 1. [Run a local development server](#step-3--run-a-local-development-server). 1. [Add permissions](#step-4--add-permissions). 1. [Set up Wix Stores](#step-5--set-up-wix-stores). 1. [Install dependencies](#step-6--install-dependencies). 1. [Set up wrappers for our dashboard page component](#step-7--set-up-wrappers-for-our-dashboard-page-component). 1. [Create hooks for our SDK calls](#step-8--create-hooks-for-our-sdk-calls). 1. [Create a "Create Product" modal](#step-9--create-a-create-product-modal). 1. [Create a dashboard page component](#step-10--create-a-dashboard-page-component). 1. [Test the app](#step-11--test-the-app). 1. [Build and deploy the app](#step-12--build-and-deploy-the-app). ## Before you begin Before getting started, make sure that: - You install [Node.js](https://nodejs.org/en/download/) (v20.11.0 or higher). - You install [npm](https://www.npmjs.com/package/npm) or [yarn](https://www.npmjs.com/package/yarn). - You're logged into your Wix Studio account. If you don't already have one, [sign up for a Wix Studio account](https://manage.wix.com/account/custom-apps). We also recommend that you check out the [Patterns documentation](https://www.wix-pages.com/wix-patterns/?path=/story/getting-started--overview). Patterns is a complex React library. Familiarizing yourself with the basics will help you better understand the code in this tutorial. ## Step 1 | Initialize the app We use the Wix CLI to initialize our Custom Products Catalog app. In the process of initializing our app, the Wix CLI automatically: - Creates a new app in the [Custom Apps page](https://manage.wix.com/account/custom-apps) of your Wix Studio workspace. - Sets up a new folder for your app in your local file system. The folder includes: - A `src` folder containing initial boilerplate code for an app with a dashboard page. - A `package.json` file containing your app dependencies. - Creates a local Git repository for your app. To initialize the app: 1. Open a terminal and navigate to the folder where you want to create your app. 1. Run the following command: ```bash npm create @wix/new@latest app ``` If prompted to install the `@wix/create-new` package, press `y`. 1. Select **Create a new Wix App**. 1. Select **Create a basic app**. 1. Enter a name for your app. Let’s name our app `Custom Products Catalog`. 1. Press `Enter` to accept the default folder name (`custom-products-catalog`). 1. When asked to configure Wix MCP for your IDE, select your preferred MCP. A green **Success** message confirms that your app has been registered in the [Custom Apps page](https://manage.wix.com/account/custom-apps). 1. Press `Enter` to accept the default namespace (`custom-products-catalog`). 1. Press `Enter` to accept the default code identifier (`custom_products_catalog`). You now have a new app in the [Custom Apps page](https://manage.wix.com/account/custom-apps), a new folder in your local file system, and a local Git repository for developing and testing your app. ## Step 2 | Create the dashboard page We use the CLI's `generate` command to create a dashboard page for our app. To create the dashboard page: 1. Navigate to your newly created folder for your app. ```bash cd custom-products-catalog ``` 2. Run the following command and follow the prompts: ```bash wix generate ``` 3. When prompted for the kind of extension, select **Dashboard Page**. 4. When prompted for a page title, enter **Custom Products Catalog**. 5. When prompted for the page route, press `Enter` to accept the default (`custom-products-catalog`). Upon completion, the extension files are created at `src/extensions/dashboard/pages/custom-products-catalog/`: ```bash src └── extensions └── dashboard └── pages └── custom-products-catalog ├── custom-products-catalog.extension.ts └── custom-products-catalog.tsx ``` For more information about these files, see [Dashboard Page Extension Files and Code](https://dev.wix.com/docs/build-apps/develop-your-app/develop-an-app-with-the-cli/supported-extensions/dashboard/dashboard-pages/dashboard-page-extension-files-and-code.md).
**Tip:** The CLI's default scaffold also created a `my-page` extension at `src/extensions/dashboard/pages/my-page/`. You can leave it (it won't interfere with this tutorial) or delete the `my-page/` folder to keep the dashboard sidebar showing only the **Custom Products Catalog** page.
## Step 3 | Run a local development server Now that you’ve initialized your app, you can run a local development server to see the app in action, and view local changes as you develop your app. To run a local development server for your app: 1. In the terminal, from your app's folder, run the following command: ```bash wix dev ```
__Important:__ This tutorial uses Stores Catalog V3. New Wix sites use V3 by default. If you choose an existing site instead, confirm it uses V3 with the [Catalog Versioning API](https://dev.wix.com/docs/rest/business-solutions/stores/catalog-versioning/introduction.md).
1. The CLI prompts you to choose a development site (test site), which you’ll use throughout this tutorial to run and test your app. You can choose an existing Wix site as your development site, or create a new one. Let’s **Create a new Development Site**. The newly created development site is automatically named **Dev Sitex** followed by a number (for example, **Dev Sitex 12345**), and can be found in your Wix account’s list of sites. 1. Follow the prompt to open the app installation page in your default browser. If the browser doesn’t open, [install your app on your test site](https://dev.wix.com/docs/build-apps/launch-your-app/app-distribution/test-your-app/test-your-app-on-a-premium-site.md) manually and skip the next step. 1. Click **Agree & Add** to install your app on your development site. 1. In the terminal menu, select **Dashboard** to open your development site’s dashboard. 1. In the dashboard sidebar, click **Apps > Custom Products Catalog** to see your newly created app’s dashboard page. We add the content of our app’s dashboard page in the next step. ![Dashboard page](https://wixmp-833713b177cebf373f611808.wixmp.com/images/ab40ce3d9bb15aee303fbe438715daa3.png) Your app is now running on your development site. As you develop your app, any changes made to your app’s code are reflected in real time on your development site. If your changes don’t show up, try refreshing the page, or closing and reopening the development site. ## Step 4 | Add permissions In this step, we'll add permissions for the app. Every SDK API requires specific permissions to use. In this app, we will use the [`searchProducts()`](https://dev.wix.com/docs/api-reference/business-solutions/stores/catalog-v3/products-v3/search-products.md), [`createProduct()`](https://dev.wix.com/docs/api-reference/business-solutions/stores/catalog-v3/products-v3/create-product.md), and [`deleteProduct()`](https://dev.wix.com/docs/api-reference/business-solutions/stores/catalog-v3/products-v3/delete-product.md) functions in the [Wix Stores Products V3 API](https://dev.wix.com/docs/api-reference/business-solutions/stores/catalog-v3/products-v3/introduction.md) to get a list of all products, and to add and delete them. To use these functions, we need to give our app permission requirements in the app dashboard. Once we do this, anyone installing the app will be prompted to grant the specified permissions. Our app calls `searchProducts()` to read products and `createProduct()`/`deleteProduct()` to add and remove them, so it needs both a read and a write product scope. Each method's reference page (linked above) lists the exact scope it requires in its **Permission Scopes** section, including the scope's ID (for example, `SCOPE.STORES.PRODUCT_READ`). To add a scope: 1. Go to the [**Permissions** tab](https://manage.wix.com/app-selector?title=Select+an+App&primaryButtonText=Select+Site&actionUrl=https%3A%2F%2Fdev.wix.com%2Fapps%2F%7BappId%7D%2Fdev-center-permissions) in your app's dashboard. 1. Click **Add Permissions**. 1. Search for the scope. Several scopes can have similar names, so match the one whose ID matches the scope ID shown on the method's reference page. 1. Check its checkbox under **Choose Permission Scopes** and click **Save**. 1. Repeat for each scope your methods require: a read scope for `searchProducts()`, and a write scope for `createProduct()` and `deleteProduct()`. For more information on configuring permissions, see [Configure permissions for your app](https://dev.wix.com/docs/build-apps/develop-your-app/access/authorization/configure-permissions-for-your-app.md). ## Step 5 | Set up Wix Stores Our app integrates with Wix Stores, so we need to set up Wix Stores on our site, then reinstall the app so that our site requests the required permissions: 1. Install the [Wix Stores](https://www.wix.com/app-market/wix-stores?searchLocation=home) app on your test site. You can create some new products, or use the sample ones provided by Wix. 1. Open your app’s dashboard in the [Custom Apps page](https://manage.wix.com/account/custom-apps). 1. Click **Test App**, then select **Test on dev site**. In the **Select a development site** dialog, choose your dev site and click **Test App**. The app is reinstalled on your dev site with the latest permissions. ## Step 6 | Install dependencies Before we start coding our app, we need to install some npm packages. The `@wix/dashboard` and `@wix/design-system` packages come pre-installed in the project that the CLI generated. In your terminal, run the following commands to install the remaining packages: ```bash npm install @wix/patterns npm install @wix/stores ``` The purpose of each of these packages will become clear as we progress. ## Step 7 | Set up wrappers for our dashboard page component It’s finally time to start writing some code! Our plan in this tutorial is to create a React component that defines our dashboard page. We’re going to wrap this component with providers that will manage our data fetching and provide Wix styling for our dashboard page component. To do this, we’ll create a higher-order component that will accept our dashboard page component and return it wrapped in the necessary providers. To create the higher-order component: 1. Create a new file in your app's repo under `src > extensions > dashboard` named `withProviders.tsx`. 1. Import `FC` from React, `WixDesignSystemProvider` from the design system, and `WixPatternsProvider` from Patterns: ```js import type { FC } from 'react'; import { WixDesignSystemProvider } from '@wix/design-system'; import { WixPatternsProvider } from '@wix/patterns/provider'; ``` - `WixDesignSystemProvider` provides styling for Wix Design System components. - `WixPatternsProvider` provides styling and data manipulation for Wix Patterns components. 1. Write a function named `withProviders` to wrap our dashboard page component in `WixDesignSystemProvider` and `WixPatternsProvider`: ```js export function withProviders

(Component: FC

) { return function WithProviders(props: P) { return ( ); }; } ``` Your complete **withProviders.tsx** file should look like this: ```js import type { FC } from 'react'; import { WixDesignSystemProvider } from '@wix/design-system'; import { WixPatternsProvider } from '@wix/patterns/provider'; export function withProviders

(Component: FC

) { return function WithProviders(props: P) { return ( ); }; } ``` ## Step 8 | Create hooks for our SDK calls Our dashboard page component will need to make SDK calls to create and delete Wix Stores product data using React hooks. To simplify our component code, we define these in a separate TypeScript file. To create your app’s React hooks: 1. Create a new folder in your app's repo under `src > extensions > dashboard` named `hooks`. 1. Create a new file in `src > extensions > dashboard > hooks` named `stores.ts`. 1. Import `productsV3` from Wix Stores so we can use the Wix Stores Products V3 API: ```js import { productsV3 } from '@wix/stores'; ``` 1. Import `useCallback`: ```js import { useCallback } from 'react'; ``` [`useCallback`](https://react.dev/reference/react/useCallback) is a react hook that caches a callback function, returning a memorized version of the function that changes only if one of the dependencies has changed. We use this hook to define how a new product is created and how a product is deleted using the `optimisticActions` prop and `createProduct`/`deleteProduct` from `productsV3`. Whenever any of these dependencies change, `useCallback` redefines the callback function. 1. Import `CollectionOptimisticActions`: ```js import { CollectionOptimisticActions } from '@wix/patterns'; ``` `CollectionOptimisticActions` is a class that provides a set of utilities for managing optimistic actions on a [Wix Collection](https://support.wix.com/en/article/cms-formerly-content-manager-creating-a-collection). It allows us to perform various actions, such as adding, updating, and deleting items from a collection while assuming that these actions will succeed, even before confirming with the server. Learn more about the [CollectionOptimisticActions class](https://www.wix-pages.com/wix-patterns/?path=/story/features-actions-updates--collectionoptimisticactions). 1. Create a function to create new products named `useCreateProduct`: ```js export function useCreateProduct(optimisticActions: CollectionOptimisticActions) {} ``` Inside this function: 1. Use `productsV3` to get the `createProduct()` function. ```js const { createProduct } = productsV3; ``` 1. Use `useCallback()` to manage our `createProduct()` call: ```js return useCallback((productName: string) => { const newProduct: productsV3.V3Product = { name: productName, productType: productsV3.ProductType.PHYSICAL, physicalProperties: {}, variantsInfo: { variants: [{ choices: [], price: { actualPrice: { amount: '10' }, }, }], }, }; optimisticActions.createOne(newProduct, { submit: async () => { const created = await createProduct(newProduct); return [created]; }, successToast: { message: `${newProduct.name} was successfully created`, type: 'SUCCESS', }, errorToast: () => 'Failed to create product', }); }, [optimisticActions, createProduct]); ``` > **Note:** The [Products V3 API](https://dev.wix.com/docs/api-reference/business-solutions/stores/catalog-v3/products-v3/create-product.md) requires several fields on every product: > > - `productType` > - The matching properties block (`physicalProperties` when `productType` is `PHYSICAL`) > - `variantsInfo.variants` with at least one variant > > A production app would normally collect these values from the user. To keep the **Create Product** modal minimal, this tutorial only asks for a product name and hardcodes the rest in `useCreateProduct`, so every new product is a physical product priced at $10. Let's break down the above code: - **Lines 2-14**: Define the properties of the new product. Only `name` comes from user input; the other fields satisfy the V3 API's required-fields contract with fixed defaults. - **Lines 16-27**: Use `optimisticActions.createOne()` to create the new product. - **Lines 17-20**: Define the `submit` function. `createProduct` takes the V3 product object directly and returns the created product, so we pass `newProduct` from the closure and wrap the response in an array for the optimistic collection. - **Lines 21-24**: Define the toast to show when a product is created successfully. - **Line 25**: Define the toast to show when product creation fails. - **Line 28**: Define the dependencies for `useCallback()`. Your function should look like this: ```js export function useCreateProduct(optimisticActions: CollectionOptimisticActions) { const { createProduct } = productsV3; return useCallback((productName: string) => { const newProduct: productsV3.V3Product = { name: productName, productType: productsV3.ProductType.PHYSICAL, physicalProperties: {}, variantsInfo: { variants: [{ choices: [], price: { actualPrice: { amount: '10' }, }, }], }, }; optimisticActions.createOne(newProduct, { submit: async () => { const created = await createProduct(newProduct); return [created]; }, successToast: { message: `${newProduct.name} was successfully created`, type: 'SUCCESS', }, errorToast: () => 'Failed to create product', }); }, [optimisticActions, createProduct]); } ``` 1. Create a function to delete products named `useDeleteProducts()`: ```js export function useDeleteProducts(optimisticActions: CollectionOptimisticActions) {} ``` Inside this function: 1. Use `productsV3` to get the `deleteProduct()` function. ```js const { deleteProduct } = productsV3; ``` 1. Use `useCallback()` to manage our `deleteProduct()` calls: ```js return useCallback((productsToDelete: productsV3.V3Product[]) => { optimisticActions.deleteMany(productsToDelete, { submit: async (deletedProducts: productsV3.V3Product[]) => ( await Promise.all( deletedProducts.map((product) => deleteProduct(product._id!)) ) ), successToast: { message: `${ productsToDelete.length > 1 ? 'Products' : 'Product' } deleted successfully`, type: 'SUCCESS', }, errorToast: () => `Failed to delete ${ productsToDelete.length > 1 ? 'Products' : 'Product' }`, }); }, [optimisticActions, deleteProduct]); ``` Let's break down the above code: - **Lines 2-17**: Use `optimisticActions.deleteMany()` to delete the products. - **Lines 3-7**: Define the submit function to handle product deletion. This function iterates over the array of products to delete and calls `deleteProduct()` for each one. `deleteProduct` takes the product ID directly as a string. - **Lines 8-13**: Define the toast to show when products are deleted successfully. - **Lines 14-16**: Define the toast to show when product deletion fails. - **Line 18**: Define the dependencies for `useCallback()`. Your function should look like this: ```js export function useDeleteProducts(optimisticActions: CollectionOptimisticActions) { const { deleteProduct } = productsV3; return useCallback((productsToDelete: productsV3.V3Product[]) => { optimisticActions.deleteMany(productsToDelete, { submit: async (deletedProducts: productsV3.V3Product[]) => ( await Promise.all( deletedProducts.map((product) => deleteProduct(product._id!)) ) ), successToast: { message: `${ productsToDelete.length > 1 ? 'Products' : 'Product' } deleted successfully`, type: 'SUCCESS', }, errorToast: () => `Failed to delete ${ productsToDelete.length > 1 ? 'Products' : 'Product' }`, }); }, [optimisticActions, deleteProduct]); } ``` Your complete `stores.ts` file should look like this: ```js import { productsV3 } from '@wix/stores'; import { useCallback } from 'react'; import { CollectionOptimisticActions } from '@wix/patterns'; export function useCreateProduct(optimisticActions: CollectionOptimisticActions) { const { createProduct } = productsV3; return useCallback((productName: string) => { const newProduct: productsV3.V3Product = { name: productName, productType: productsV3.ProductType.PHYSICAL, physicalProperties: {}, variantsInfo: { variants: [{ choices: [], price: { actualPrice: { amount: '10' }, }, }], }, }; optimisticActions.createOne(newProduct, { submit: async () => { const created = await createProduct(newProduct); return [created]; }, successToast: { message: `${newProduct.name} was successfully created`, type: 'SUCCESS', }, errorToast: () => 'Failed to create product', }); }, [optimisticActions, createProduct]); } export function useDeleteProducts(optimisticActions: CollectionOptimisticActions) { const { deleteProduct } = productsV3; return useCallback((productsToDelete: productsV3.V3Product[]) => { optimisticActions.deleteMany(productsToDelete, { submit: async (deletedProducts: productsV3.V3Product[]) => ( await Promise.all( deletedProducts.map((product) => deleteProduct(product._id!)) ) ), successToast: { message: `${ productsToDelete.length > 1 ? 'Products' : 'Product' } deleted successfully`, type: 'SUCCESS', }, errorToast: () => `Failed to delete ${ productsToDelete.length > 1 ? 'Products' : 'Product' }`, }); }, [optimisticActions, deleteProduct]); } ``` ## Step 9 | Create a "Create Product" modal We need a modal where the user can enter the name of the new product and confirm or cancel. This modal will be opened using a button on the dashboard page. To build this modal: 1. Create a new folder in your app's repo under `src > extensions > dashboard` named `components`. 1. Create a new file in `src > extensions > dashboard > components` named `create-product.tsx`. 1. Import: - `React`, `useEffect`, and `useState`. - The components of the Wix Design System required to create our modal. Learn more about the [`Modal` component](https://www.wix-pages.com/wix-design-system/?path=/story/components-overlays-modal--modal). ```js import React, { useEffect, useState } from 'react'; import { Modal, CustomModalLayout, FormField, Input, } from '@wix/design-system'; import '@wix/design-system/styles.global.css'; ``` 1. Create a `CreateProductModal` component to define the appearance and functionality of the modal. Use the following code: ```js export function CreateProductModal({ showModal, onSave }: { showModal: boolean, onSave: (name: string) => void }) { const [productName, setProductName] = useState(''); const [shown, setShown] = useState(showModal); useEffect(() => { setShown(showModal); }, [showModal]) const toggleModal = () => { setShown(!shown); setProductName(''); }; return ( { onSave(productName) setProductName('') }} secondaryButtonText="Cancel" secondaryButtonOnClick={toggleModal} onCloseButtonClick={toggleModal} content={ setProductName(e.currentTarget.value)} /> } /> ); } ``` Let’s break down the above code: - **Lines 2-3**: Initialize state variables to manage the product name and the visibility of the modal. - **Lines 5-7**: Use `useEffect()` to ensure that when the `showModal` prop updates, the `shown` state variable aligns with it. - **Lines 9-12**: Set up a function to toggle the visibility of the modal and reset the product name input whenever the modal is shown or hidden. - **Lines 15-20**: Configure the modal to close when it’s toggled or if the site owner clicks outside of it on the page. - **Lines 21-42**: Configure the modal’s layout and content. - **Lines 23-30**: Add a primary **Save** button that is enabled when a product name has been entered. When clicked, it creates a product, and then resets `productName`. - **Lines 31-32**: Add a secondary **Cancel** button. When clicked, it closes the modal. - **Lines 35-40**: Add a `FormField` component that takes an input for the product name. Your complete `create-product.tsx` file should look like this: ```js import React, { useEffect, useState } from 'react'; import { Modal, CustomModalLayout, FormField, Input, } from '@wix/design-system'; import '@wix/design-system/styles.global.css'; export function CreateProductModal({ showModal, onSave }: { showModal: boolean, onSave: (name: string) => void }) { const [productName, setProductName] = useState(''); const [shown, setShown] = useState(showModal); useEffect(() => { setShown(showModal); }, [showModal]) const toggleModal = () => { setShown(!shown); setProductName(''); }; return ( { onSave(productName) setProductName('') }} secondaryButtonText="Cancel" secondaryButtonOnClick={toggleModal} onCloseButtonClick={toggleModal} content={ setProductName(e.currentTarget.value)} /> } /> ); } ``` ## Step 10 | Create a dashboard page component Finally, we have all the pieces in place to set up our dashboard page. Open the `custom-products-catalog.tsx` file at `src/extensions/dashboard/pages/custom-products-catalog/`. 1. Delete all the contents - we're starting from scratch. 1. Add the following import statements: ```js import React, { useState } from 'react'; import { Box, Text, Image, Breadcrumbs } from '@wix/design-system'; import '@wix/design-system/styles.global.css'; import { productsV3 } from '@wix/stores'; import { CollectionPage } from '@wix/patterns/page'; import { useTableCollection, Table, PrimaryActions, useOptimisticActions, deleteSecondaryAction, MultiBulkActionToolbar, CustomColumns, CollectionToolbarFilters, dateRangeFilter, DateRangeFilter, } from '@wix/patterns'; import type { Filter, RangeItem } from '@wix/patterns'; ``` This file is where we start to use [Patterns](https://www.wix-pages.com/wix-patterns/). Patterns is a React library with advanced components that extend the functionality of the core UI React components from the [Wix Design System](https://www.wix-pages.com/wix-design-system/). It simplifies Wix app development by enabling you to easily and consistently implement complex functionalities like querying, displaying, and filtering collection data from remote servers. In our code, we use Patterns components to create a table of products that you can query, filter, and sort. The table also has functionality to create new products, delete existing products, and choose which columns to display. 1. Import everything we set up in the previous sections: ```js import { withProviders } from '../../withProviders'; import { useCreateProduct, useDeleteProducts } from '../../hooks/stores'; import { CreateProductModal } from '../../components/create-product'; ``` 1. Define a type for filtering the table's data: ```js type TableFilters = { updatedDate: Filter>; } ``` This is the product property by which the table can be filtered. We'll pass this type to the `useTableCollection` hook later. 1. Define a map from column IDs to the field paths that `searchProducts` accepts for sorting: ```js type ProductSearch = Parameters[0]; type SortableField = NonNullable[number]['fieldName']>; const sortFieldByColumnId: Record = { price: 'actualPriceRange.minValue.amount', }; ``` The `SortableField` type narrows the allowed values to the field paths that the V3 `searchProducts` endpoint accepts as sort fields. The map then translates between the table column's `id`, which we use as a short human-friendly slug, and the API's full field path. For example, the **Price** column has `id: 'price'`, but the SDK expects the full path `actualPriceRange.minValue.amount` when sorting by price. The map entry `price: 'actualPriceRange.minValue.amount'` makes the translation explicit. Columns whose `id` already equals a sortable field path don't need an entry. 1. Map product types to strings so that they display in a readable way in the table: ```js const productTypeToDisplayName: {[key in productsV3.ProductType]: string} = { [productsV3.ProductType.PHYSICAL]: 'Physical', [productsV3.ProductType.DIGITAL]: 'Digital', } ``` ### Create the `Products()` component It's finally time to make our dashboard page component. We will: - [Define and export our dashboard page component](#define-and-export-our-dashboard-page-component) - [Define the component's states, hooks, and functions](#define-the-components-states-hooks-and-functions) - [Create the page structure](#create-the-page-structure) #### Define and export our dashboard page component 1. Create a function for our dashboard page component named `Products`: ```js function Products() {} ``` 1. Export the component wrapped by `withProviders()`: ```js export default withProviders(Products); ``` The rest of the code on this page will be written inside the `Products()` function. #### Define the component's states, hooks, and functions 1. Initialize the `shown` state variable to manage the visibility of the modal we created [earlier](#step-8--create-a-create-product-modal). ```js const [shown, setShown] = useState(false); ``` 1. Use `productsV3` to get the `searchProducts()` and `deleteProduct()` functions. ```js const { searchProducts, deleteProduct } = productsV3; ``` 1. Create the [`tableState`](https://www.wix-pages.com/wix-patterns/?path=/story/base-components-collections-table-tablestate--tablestate) using [`useTableCollection`](https://www.wix-pages.com/wix-patterns/?path=%2Fstory%2Fbase-components-collections-table-usetablecollection--usetablecollection). `useTableCollection` is a hook that returns a `tableState` object. This is where we define: - Where to retrieve the data from to display in the table. - How much data to retrieve. - How to build the search request that retrieves the table data, depending on what filters and sorting are applied in the table. - The error message to display if no data is found. - How the filters are applied. ```js const tableState = useTableCollection({ queryName: 'products-catalog', itemKey: (product: productsV3.V3Product) => product._id!, itemName: (product: productsV3.V3Product) => product.name!, limit: 20, fetchData: async (query) => { const { limit, sort, filters } = query; const filter: Record = {}; const updatedDate = filters?.updatedDate; if (updatedDate?.from || updatedDate?.to) { const conditions: Record[] = []; if (updatedDate.from) { conditions.push({ _updatedDate: { $gt: updatedDate.from.toISOString() } }); } if (updatedDate.to) { conditions.push({ _updatedDate: { $lt: updatedDate.to.toISOString() } }); } if (conditions.length === 1) { Object.assign(filter, conditions[0]); } else { filter['$and'] = conditions; } } const sortSpec = (sort ?? []) .map(s => { const fieldName = (sortFieldByColumnId[s.fieldName] ?? s.fieldName) as SortableField; return { fieldName, order: s.order === 'desc' ? 'DESC' as const : 'ASC' as const }; }); const response = await searchProducts( { cursorPaging: { limit }, ...(Object.keys(filter).length > 0 ? { filter } : {}), ...(sortSpec.length > 0 ? { sort: sortSpec } : {}), }, { fields: ['THUMBNAIL', 'PLAIN_DESCRIPTION'] } ); return { items: response.products ?? [], total: response.products?.length ?? 0, }; }, fetchErrorMessage: () => 'Error fetching products', filters: { updatedDate: dateRangeFilter(), }, }); ``` Let's break down the above code: - **Lines 2-5**: Define basic data necessary for retrieving and identifying the items used to populate the table. - **Lines 7-46**: Define the function that fetches the collection data used to populate the table. It receives a `query` object and returns the matching products plus a total count. - **Line 8**: Deconstruct the `query` parameter. It contains the requested `limit`, the active `sort`, and any `filters` the user has applied. - **Lines 10-25**: Build the filter object. If the user has applied a **Last Updated** range, translate it into the V3 search filter syntax. A range with both `from` and `to` becomes two separate `_updatedDate` conditions combined with `$and`, because the V3 search filter requires a single operator per field per condition. - **Lines 27-31**: Build the sort spec. For each sort entry from the table, look up the column's `id` in `sortFieldByColumnId` to get the field path the SDK accepts, and translate the order from the patterns library's lowercase format (`asc`/`desc`) into the SDK's uppercase enum (`ASC`/`DESC`). - **Lines 33-40**: Call `searchProducts`. Pass the cursor paging limit, the filter, and the sort spec as the first argument. In the second argument, request the additional response fields `THUMBNAIL` and `PLAIN_DESCRIPTION`. These aren't returned by default, but the **Avatar** and **Description** columns need them. - **Lines 42-45**: Return the items. This sample fetches a single page of up to 20 products. V3 cursor-paginated responses don't include a total count, so we use the length of the returned page as `total`. A production app should implement cursor-based pagination using `pagingMetadata.cursors.next` from the response, and call `countProducts` to display a true total. - **Line 48**: Define the error message that will be shown if the fetch fails. - **Lines 50-52**: Define which filter factories are used with the filters. The `updatedDate` filter uses the [`dateRangeFilter`](https://wix-pages.com/wix-patterns/?path=%2Fstory%2Ffeatures-filter-factories--daterangefilter) factory. 1. Create the [`optimisticActions`](https://www.wix-pages.com/wix-patterns/?path=%2Fstory%2Ffeatures-actions-updates--collectionoptimisticactions) class using [`useOptimisticActions`](https://www.wix-pages.com/wix-patterns/?path=%2Fstory%2Ffeatures-actions-updates--useoptimisticactions). `useOptimisticActions` is a hook that returns a `CollectionOptimisticActions` class. The code below defines logic that anticipates the results of the query that we defined in the previous step. When there is a change that sends a new query to the server (for example, a new filter), this logic will be applied to the data already in the page's memory while we're waiting for the server's response. ```js const optimisticActions = useOptimisticActions(tableState.collection, { orderBy: () => [], predicate: ({ filters }) => { return (product) => { if (filters.updatedDate && product._updatedDate) { const from = filters.updatedDate.from; const to = filters.updatedDate.to; const productUpdatedDate = (new Date(product._updatedDate)).getTime(); if (from && productUpdatedDate < from.getTime()) { return false; } if (to && productUpdatedDate > to.getTime()) { return false; } } return true; } }, } ); ``` Let's break down the above code: - **Line 3**: Define that there is no default sorting for the data, apart from what is defined in the query. - **Lines 5-22**: Define a function that simulates the filtering on the server, as defined in the `tableState` above. It returns a function that returns `true` if the product would pass the filters, and `false` if it wouldn't. - **Lines 7-18**: Return `false` if the product wouldn't pass the **Last Updated** filter. - **Line 20**: Return `true` if the product would pass all of the filters. 1. Define the `createProduct()` and `deleteProducts()` functions using the hooks we created in [Step 7](#step-7--create-hooks-for-our-sdk-calls): ```js const createProduct = useCreateProduct(optimisticActions); const deleteProducts = useDeleteProducts(optimisticActions); ``` At this stage, your `Products()` function should look like this: ```js function Products() { const [shown, setShown] = useState(false); const { searchProducts, deleteProduct } = productsV3; const tableState = useTableCollection({ queryName: 'products-catalog', itemKey: (product: productsV3.V3Product) => product._id!, itemName: (product: productsV3.V3Product) => product.name!, limit: 20, fetchData: async (query) => { const { limit, sort, filters } = query; const filter: Record = {}; const updatedDate = filters?.updatedDate; if (updatedDate?.from || updatedDate?.to) { const conditions: Record[] = []; if (updatedDate.from) { conditions.push({ _updatedDate: { $gt: updatedDate.from.toISOString() } }); } if (updatedDate.to) { conditions.push({ _updatedDate: { $lt: updatedDate.to.toISOString() } }); } if (conditions.length === 1) { Object.assign(filter, conditions[0]); } else { filter['$and'] = conditions; } } const sortSpec = (sort ?? []) .map(s => { const fieldName = (sortFieldByColumnId[s.fieldName] ?? s.fieldName) as SortableField; return { fieldName, order: s.order === 'desc' ? 'DESC' as const : 'ASC' as const }; }); const response = await searchProducts( { cursorPaging: { limit }, ...(Object.keys(filter).length > 0 ? { filter } : {}), ...(sortSpec.length > 0 ? { sort: sortSpec } : {}), }, { fields: ['THUMBNAIL', 'PLAIN_DESCRIPTION'] } ); return { items: response.products ?? [], total: response.products?.length ?? 0, }; }, fetchErrorMessage: () => 'Error fetching products', filters: { updatedDate: dateRangeFilter(), }, }); const optimisticActions = useOptimisticActions(tableState.collection, { orderBy: () => [], predicate: ({ filters }) => { return (product) => { if (filters.updatedDate && product._updatedDate) { const from = filters.updatedDate.from; const to = filters.updatedDate.to; const productUpdatedDate = (new Date(product._updatedDate)).getTime(); if (from && productUpdatedDate < from.getTime()) { return false; } if (to && productUpdatedDate > to.getTime()) { return false; } } return true; } }, } ); const createProduct = useCreateProduct(optimisticActions); const deleteProducts = useDeleteProducts(optimisticActions); return () } ``` #### Create the page structure We define our page as follows: 1. Define the [`CollectionPage`](https://www.wix-pages.com/wix-patterns/?path=%2Fstory%2Fbase-components-page-layouts-collection-page--collectionpage) component that will wrap all our components on this page: ```js // All page components will go here. ``` 1. Add a [`CollectionPage.Header`](https://www.wix-pages.com/wix-patterns/?path=%2Fstory%2Fbase-components-page-layouts-collection-page--collectionpage-header) component that contains the page title, breadcrumbs, and a button that opens our **Add Product** modal: ```js } primaryAction={ setShown(!shown)} /> } /> ``` 1. Add a [`CollectionPage.Content`](https://www.wix-pages.com/wix-patterns/?path=%2Fstory%2Fbase-components-page-layouts-collection-page--collectionpage-content) component below the `CollectionPage.Header`. This will wrap the rest of the components on this page. ```js // The rest of the page components will go here. ``` 1. Add the `CreateProductModal` component that we created in [Step 8](#step-8--create-a-create-product-modal): ```js { createProduct(productName); setShown(false); }}/> ``` 1. Add a [`Table`](https://www.wix-pages.com/wix-patterns/?path=%2Fstory%2Fbase-components-collections-table-table--table) component. The following code displays a table containing our columns and fetched data. When no items are selected, there is also a button that opens an accordion to customize the columns displayed, and a button that opens an accordion to filter the data. When at least one product is selected, the table displays the number of selected products, the maximum number of products that can be selected, a **Select All** option, and a **Delete** button. ```js } bulkActionToolbar={({ selectedValues, openConfirmModal }) => { const disabled = selectedValues.length > 20; return ( { openConfirmModal({ theme: 'destructive', primaryButtonOnClick: () => { deleteProducts(selectedValues); }, }); }, }, ]} />) }} customColumns={} columns={[ { id: 'avatar', name: 'Avatar', title: '', width: '72px', render: (product) => , reorderDisabled: true, hiddenFromCustomColumnsSelection: true }, { id: 'name', title: 'Product / Description', render: (row: productsV3.V3Product) => ( {row.name} {row.plainDescription} ), width: 'auto', reorderDisabled: true, hideable: false }, { id: 'price', title: 'Price', render: (row: productsV3.V3Product) => { const amount = row.actualPriceRange?.minValue?.amount; return amount ? `$${amount}` : ''; }, width: '100px', sortable: true, }, { id: 'type', title: 'Type', render: (row: productsV3.V3Product) => { if (!row.productType) return ''; return productTypeToDisplayName[row.productType as productsV3.ProductType] ?? row.productType; }, width: '100px', }, { id: 'last-updated', title: 'Last Updated', render: (row: productsV3.V3Product) => row._updatedDate ? new Date(row._updatedDate).toLocaleDateString() : '', width: '100px', defaultHidden: true, }, ]} actionCell={(_product, _index, actionCellAPI) => ({ secondaryActions: [ deleteSecondaryAction({ optimisticActions, actionCellAPI, submit: (products: productsV3.V3Product[]) => ( Promise.all( products.map((product: productsV3.V3Product) => deleteProduct(product._id!)) ) ), successToast: { message: `${_product.name} deleted successfully.`, type: 'SUCCESS', }, errorToast: () => 'Product deletion failed.', }), ] })} /> ``` Let's identify where some of our key functionality is implemented in the above code. For more information on all the `Table` props, see [Patterns Table Component](https://www.wix-pages.com/wix-patterns/?path=%2Fstory%2Fbase-components-collections-table-table--table&tab=API). - **Lines 4-12**: Define the table's filters. We use a [`CollectionToolbarFilters`](https://www.wix-pages.com/wix-patterns/?path=%2Fstory%2Ffeatures-filter-components--toolbarfilters) component to display an accordion with the filtering options. The **Last Updated** filter uses the [`DateRangeFilter`](https://www.wix-pages.com/wix-patterns/?path=/story/features-filter-components--daterangefilter) component. - **Lines 13-35**: Use the [`MultiBulkActionToolbar`](https://www.wix-pages.com/wix-patterns/?path=%2Fstory%2Ffeatures-actions-bulk-actions--multibulkactiontoolbar) component to create a button in the toolbar that deletes all selected products. When the button is clicked, the user is asked to confirm their decision in a modal (**line 25**). - **Lines 37-94**: Define the table's columns. - **Lines 39-47**: **Product avatar** - Use the [`Image`](https://www.wix-pages.com/wix-design-system/?path=/story/components-media--image) component from the Wix Design System and feed it the URL from the product's `media.main.thumbnail.url` field. To make this field appear in the response, we requested it via the `THUMBNAIL` field in the `searchProducts` call. - **Lines 48-64**: **Product name and description** - Use a `Box` for layout with direction set to `vertical` and gap to `3px`, indicating vertical stacking with a gap of 3px. Inside this box, add two `Text` components for the product's `name` and `plainDescription`. The description comes from the `PLAIN_DESCRIPTION` requested field. - **Lines 65-74**: **Product price** - Read the product's price from `actualPriceRange.minValue.amount` and prefix it with a dollar sign. The column is `sortable: true`; sorting maps to the `actualPriceRange.minValue.amount` field path via `sortFieldByColumnId`. - **Lines 75-83**: **Product type** - Format the `productType` field using `productTypeToDisplayName` which we defined earlier. If there is no product type, return an empty string. - **Lines 84-93**: **Product last updated date** - Format the product's `_updatedDate` as a readable date. This column is `defaultHidden: true`, so the user must opt in via the columns control to see it. - **Lines 96-113**: Create a **Delete** action in the per-row action menu (**line 99**). Add success (**lines 107-110**) and error (**line 111**) toasts. Your page structure code should look like this: ```js } primaryAction={ setShown(!shown)} /> } /> { createProduct(productName); setShown(false); }}/>
} bulkActionToolbar={({ selectedValues, openConfirmModal }) => { const disabled = selectedValues.length > 20; return ( { openConfirmModal({ theme: 'destructive', primaryButtonOnClick: () => { deleteProducts(selectedValues); }, }); }, }, ]} />) }} customColumns={} columns={[ { id: 'avatar', name: 'Avatar', title: '', width: '72px', render: (product) => , reorderDisabled: true, hiddenFromCustomColumnsSelection: true }, { id: 'name', title: 'Product / Description', render: (row: productsV3.V3Product) => ( {row.name} {row.plainDescription} ), width: 'auto', reorderDisabled: true, hideable: false }, { id: 'price', title: 'Price', render: (row: productsV3.V3Product) => { const amount = row.actualPriceRange?.minValue?.amount; return amount ? `$${amount}` : ''; }, width: '100px', sortable: true, }, { id: 'type', title: 'Type', render: (row: productsV3.V3Product) => { if (!row.productType) return ''; return productTypeToDisplayName[row.productType as productsV3.ProductType] ?? row.productType; }, width: '100px', }, { id: 'last-updated', title: 'Last Updated', render: (row: productsV3.V3Product) => row._updatedDate ? new Date(row._updatedDate).toLocaleDateString() : '', width: '100px', defaultHidden: true, }, ]} actionCell={(_product, _index, actionCellAPI) => ({ secondaryActions: [ deleteSecondaryAction({ optimisticActions, actionCellAPI, submit: (products: productsV3.V3Product[]) => ( Promise.all( products.map((product: productsV3.V3Product) => deleteProduct(product._id!)) ) ), successToast: { message: `${_product.name} deleted successfully.`, type: 'SUCCESS', }, errorToast: () => 'Product deletion failed.', }), ] })} /> ``` #### Complete page code Your complete code should look like this: ```js import React, { useState } from 'react'; import { Box, Text, Image, Breadcrumbs } from '@wix/design-system'; import '@wix/design-system/styles.global.css'; import { productsV3 } from '@wix/stores'; import { CollectionPage } from '@wix/patterns/page'; import { useTableCollection, Table, PrimaryActions, useOptimisticActions, deleteSecondaryAction, MultiBulkActionToolbar, CustomColumns, CollectionToolbarFilters, dateRangeFilter, DateRangeFilter, } from '@wix/patterns'; import type { Filter, RangeItem } from '@wix/patterns'; import { withProviders } from '../../withProviders'; import { useCreateProduct, useDeleteProducts } from '../../hooks/stores'; import { CreateProductModal } from '../../components/create-product'; type TableFilters = { updatedDate: Filter>; } type ProductSearch = Parameters[0]; type SortableField = NonNullable[number]['fieldName']>; const sortFieldByColumnId: Record = { price: 'actualPriceRange.minValue.amount', }; const productTypeToDisplayName: {[key in productsV3.ProductType]: string} = { [productsV3.ProductType.PHYSICAL]: 'Physical', [productsV3.ProductType.DIGITAL]: 'Digital', } function Products() { const [shown, setShown] = useState(false); const { searchProducts, deleteProduct } = productsV3; const tableState = useTableCollection({ queryName: 'products-catalog', itemKey: (product: productsV3.V3Product) => product._id!, itemName: (product: productsV3.V3Product) => product.name!, limit: 20, fetchData: async (query) => { const { limit, sort, filters } = query; const filter: Record = {}; const updatedDate = filters?.updatedDate; if (updatedDate?.from || updatedDate?.to) { const conditions: Record[] = []; if (updatedDate.from) { conditions.push({ _updatedDate: { $gt: updatedDate.from.toISOString() } }); } if (updatedDate.to) { conditions.push({ _updatedDate: { $lt: updatedDate.to.toISOString() } }); } if (conditions.length === 1) { Object.assign(filter, conditions[0]); } else { filter['$and'] = conditions; } } const sortSpec = (sort ?? []) .map(s => { const fieldName = (sortFieldByColumnId[s.fieldName] ?? s.fieldName) as SortableField; return { fieldName, order: s.order === 'desc' ? 'DESC' as const : 'ASC' as const }; }); const response = await searchProducts( { cursorPaging: { limit }, ...(Object.keys(filter).length > 0 ? { filter } : {}), ...(sortSpec.length > 0 ? { sort: sortSpec } : {}), }, { fields: ['THUMBNAIL', 'PLAIN_DESCRIPTION'] } ); return { items: response.products ?? [], total: response.products?.length ?? 0, }; }, fetchErrorMessage: () => 'Error fetching products', filters: { updatedDate: dateRangeFilter(), }, }); const optimisticActions = useOptimisticActions(tableState.collection, { orderBy: () => [], predicate: ({ filters }) => { return (product) => { if (filters.updatedDate && product._updatedDate) { const from = filters.updatedDate.from; const to = filters.updatedDate.to; const productUpdatedDate = (new Date(product._updatedDate)).getTime(); if (from && productUpdatedDate < from.getTime()) { return false; } if (to && productUpdatedDate > to.getTime()) { return false; } } return true; } }, } ); const createProduct = useCreateProduct(optimisticActions); const deleteProducts = useDeleteProducts(optimisticActions); return ( } primaryAction={ setShown(!shown)} /> } /> { createProduct(productName); setShown(false); }}/>
} bulkActionToolbar={({ selectedValues, openConfirmModal }) => { const disabled = selectedValues.length > 20; return ( { openConfirmModal({ theme: 'destructive', primaryButtonOnClick: () => { deleteProducts(selectedValues); }, }); }, }, ]} />) }} customColumns={} columns={[ { id: 'avatar', name: 'Avatar', title: '', width: '72px', render: (product) => , reorderDisabled: true, hiddenFromCustomColumnsSelection: true }, { id: 'name', title: 'Product / Description', render: (row: productsV3.V3Product) => ( {row.name} {row.plainDescription} ), width: 'auto', reorderDisabled: true, hideable: false }, { id: 'price', title: 'Price', render: (row: productsV3.V3Product) => { const amount = row.actualPriceRange?.minValue?.amount; return amount ? `$${amount}` : ''; }, width: '100px', sortable: true, }, { id: 'type', title: 'Type', render: (row: productsV3.V3Product) => { if (!row.productType) return ''; return productTypeToDisplayName[row.productType as productsV3.ProductType] ?? row.productType; }, width: '100px', }, { id: 'last-updated', title: 'Last Updated', render: (row: productsV3.V3Product) => row._updatedDate ? new Date(row._updatedDate).toLocaleDateString() : '', width: '100px', defaultHidden: true, }, ]} actionCell={(_product, _index, actionCellAPI) => ({ secondaryActions: [ deleteSecondaryAction({ optimisticActions, actionCellAPI, submit: (products: productsV3.V3Product[]) => ( Promise.all( products.map((product: productsV3.V3Product) => deleteProduct(product._id!)) ) ), successToast: { message: `${_product.name} deleted successfully.`, type: 'SUCCESS', }, errorToast: () => 'Product deletion failed.', }), ] })} /> ); } export default withProviders(Products); ``` ## Step 11 | Test the app Now that the app’s code is ready, you can test it locally using the Wix CLI. To test your app, do the following: 1. Run a local development server for your app using the `wix dev` command in your terminal. Your app’s dashboard page will now look like this: ![App preview](https://wixmp-833713b177cebf373f611808.wixmp.com/images/2d80442fb96a66bfe7f0c50010094c9f.png) 1. Click the **Add Product** button and use the modal to add a product. 1. Select some products and click the **Delete** button. 1. If things don’t look right, open your browser’s developer tools and check for errors in the console. ## Step 12 | Build and deploy the app You have now fully developed an app that allows users to add or remove products from a Wix Stores products catalog through a dashboard page. After testing your app and seeing that it works as expected, you can [build and deploy your app](https://dev.wix.com/docs/build-apps/develop-your-app/develop-an-app-with-the-cli/project-development/build-and-deploy.md). --- > Portal Navigation: > > - Append `.md` to any URL under `https://dev.wix.com/docs/` to get its markdown version. > - Pages are either content pages (article or reference text) or menu pages (a list of links to child pages). > - To get a menu page, truncate any URL to a parent path and append `.md` (e.g. `https://dev.wix.com/docs/sdk.md`, `https://dev.wix.com/docs/sdk/core-modules.md`). > - Top-level index of all portals: https://dev.wix.com/docs/llms.txt > - Full concatenated docs: https://dev.wix.com/docs/llms-full.txt ## Resource: Tutorial | Create a “Top Blog Posts” Dashboard Page With the CLI ## Article: Tutorial | Create a “Top Blog Posts” Dashboard Page With the CLI ## Article Link: https://dev.wix.com/docs/build-apps/get-started/tutorials/tutorial-create-a-top-blog-posts-dashboard-page-with-the-cli.md ## Article Content: # Tutorial | Create a Top Blog Posts App Using the Wix CLI This tutorial demonstrates how to use the [Wix CLI](https://dev.wix.com/docs/wix-cli/guides/about-the-wix-cli.md) to build a Top Blog Posts app on the [Wix Platform](https://dev.wix.com/docs/build-apps/get-started/overview/the-wix-ecosystem.md). The app contains a dashboard page that shows the most-viewed and most-liked posts of a Wix site's blog in two cards. By following this tutorial, you'll learn how to: - Build a dashboard page using the [Wix Design System](https://www.wixdesignsystem.com/). - Query blog posts and retrieve per-post metrics using the [Wix Blog SDK](https://dev.wix.com/docs/api-reference/business-solutions/blog/introduction?apiView=SDK.md). - Navigate to a built-in Wix dashboard page from within your app, using the [Wix Dashboard SDK](https://dev.wix.com/docs/sdk/host-modules/dashboard/introduction.md). The end result will look like this: ![App preview](https://wixmp-833713b177cebf373f611808.wixmp.com/images/eace32400be38d0fabb96420f0bb3177.png) We'll use the following steps to build the Top Blog Posts app: 1. [Initialize the app](#step-1--initialize-the-app). 1. [Create the dashboard page](#step-2--create-the-dashboard-page). 1. [Run a local development server](#step-3--run-a-local-development-server). 1. [Add permissions](#step-4--add-permissions). 1. [Set up Wix Blog](#step-5--set-up-wix-blog). 1. [Develop the app](#step-6--develop-the-app). 1. [Display the top posts in the dashboard](#step-7--display-the-top-posts-in-the-dashboard). 1. [Test the app](#step-8--test-the-app). 1. [Build and deploy the app](#step-9--build-and-deploy-the-app). ## Before you begin Before getting started, make sure that: - You install [Node.js](https://nodejs.org/en/download/) (v20.11.0 or higher). - You install [npm](https://www.npmjs.com/package/npm) or [yarn](https://www.npmjs.com/package/yarn). - You're logged into your Wix Studio account. If you don't already have one, [sign up for a Wix Studio account](https://manage.wix.com/account/custom-apps). ## Step 1 | Initialize the app We use the Wix CLI to initialize our Top Blog Posts app. In the process of initializing our app, the Wix CLI automatically: - Creates a new app in the [Custom Apps page](https://manage.wix.com/account/custom-apps) of your Wix Studio workspace. - Sets up a new folder for your app in your local file system. The folder includes: - A `src` folder containing initial boilerplate code for an app with a dashboard page. - A `package.json` file containing your app dependencies. - Creates a local Git repository for your app. To initialize the app: 1. Open a terminal and navigate to the folder where you want to create your app. 2. Run the following command: ```bash npm create @wix/new@latest app ``` If prompted to install the `@wix/create-new` package, press `y`. 3. Select **Create a new Wix App**. 4. Select **Create a basic app**. 5. Enter a name for your app. Let’s name our app `Top Blog Posts`. 6. Press `Enter` to accept the default folder name (`top-blog-posts`). 7. When asked to configure Wix MCP for your IDE, select your preferred MCP. A green **Success** message confirms that your app has been registered in the [Custom Apps page](https://manage.wix.com/account/custom-apps). 8. Press `Enter` to accept the default namespace (`top-blog-posts`). 9. Press `Enter` to accept the default code identifier (`top_blog_posts`). You now have a new app in the [Custom Apps page](https://manage.wix.com/account/custom-apps), a new folder in your local file system, and a local Git repository for developing and testing your app. ## Step 2 | Create the dashboard page We use the CLI's `generate` command to create a dashboard page for our app. To create the dashboard page: 1. Navigate to your newly created folder for your app. ```bash cd top-blog-posts ``` 2. Run the following command and follow the prompts: ```bash wix generate ``` 3. When prompted for the kind of extension, select **Dashboard Page**. 4. When prompted for a page title, enter **Top Blog Posts**. 5. When prompted for the page route, press `Enter` to accept the default (`top-blog-posts`). Upon completion, the extension files are created at `src/extensions/dashboard/pages/top-blog-posts/`: ```bash src └── extensions └── dashboard └── pages └── top-blog-posts ├── top-blog-posts.extension.ts └── top-blog-posts.tsx ``` For more information about these files, see [Dashboard Page Extension Files and Code](https://dev.wix.com/docs/build-apps/develop-your-app/develop-an-app-with-the-cli/supported-extensions/dashboard/dashboard-pages/dashboard-page-extension-files-and-code.md).
**Tip:** The CLI's default scaffold also created a `my-page` extension at `src/extensions/dashboard/pages/my-page/`. You can leave it (it won't interfere with this tutorial) or delete the `my-page/` folder to keep the dashboard sidebar showing only the **Top Blog Posts** page.
## Step 3 | Run a local development server Now that you’ve initialized your app, you can run a local development server to see the app in action, and view local changes as you develop your app. To run a local development server for your app: 1. In the terminal, from your app's folder, run the following command: ```bash wix dev ``` 1. The CLI prompts you to choose a development site (test site), which you’ll use throughout this tutorial to run and test your app. You can choose an existing Wix site as your development site, or create a new one. Let’s **Create a new Development Site**. The newly created development site is automatically named **Dev Sitex** followed by a number (for example, **Dev Sitex 12345**), and can be found in your Wix account’s list of sites. 1. Follow the prompt to open the app installation page in your default browser. If the browser doesn’t open, [install your app on your test site](https://dev.wix.com/docs/build-apps/launch-your-app/app-distribution/test-your-app/test-your-app-on-a-premium-site.md) manually and skip the next step. 1. Click **Agree & Add** to install your app on your development site. 1. In the terminal menu, select **Dashboard** to open your development site’s dashboard. 1. In the dashboard sidebar, click **Apps > Top Blog Posts** to see your newly created app’s dashboard page. We add the content of our app’s dashboard page in the next step. ![Dashboard page](https://wixmp-833713b177cebf373f611808.wixmp.com/images/eb6fc85906e9be95e48eacc52ffdd8b6.png) Your app is now running on your development site. As you develop your app, any changes made to your app’s code are reflected in real time on your development site. If your changes don’t show up, try refreshing the page, or closing and reopening the development site. ## Step 4 | Add permissions In this step, we'll add permissions for the app. Every SDK API requires specific permissions to use. In this app, we will use the [`queryPosts()`](https://dev.wix.com/docs/api-reference/business-solutions/blog/posts-stats/query-posts.md) and [`getPostMetrics()`](https://dev.wix.com/docs/api-reference/business-solutions/blog/posts-stats/get-post-metrics.md) functions in the [Wix Blog API](https://dev.wix.com/docs/api-reference/business-solutions/blog/introduction?apiView=SDK.md) to get a list of posts and retrieve their metrics. To use these functions, we need to give our app permission requirements in the app dashboard. Once we do this, anyone installing the app will be prompted to grant the specified permissions. Both `queryPosts()` and `getPostMetrics()` require the same scope: a read blog scope. Each method's reference page (linked above) lists the exact scope it requires in its **Permission Scopes** section, including the scope's ID (`SCOPE.DC-BLOG.READ-BLOGS`). To add the scope: 1. Go to the [**Permissions** tab](https://manage.wix.com/app-selector?title=Select+an+App&primaryButtonText=Select+Site&actionUrl=https%3A%2F%2Fdev.wix.com%2Fapps%2F%7BappId%7D%2Fdev-center-permissions) in your app's dashboard. 1. Click **Add Permissions**. 1. Search for the scope. Several scopes can have similar names, so match the one whose ID matches the scope ID shown on the method's reference page. 1. Check its checkbox under **Choose Permission Scopes** and click **Save**. For more information on configuring permissions, see [Configure permissions for your app](https://dev.wix.com/docs/build-apps/develop-your-app/access/authorization/configure-permissions-for-your-app.md). ## Step 5 | Set up Wix Blog Before you can start coding, you need to set up Wix Blog on your site and app: 1. Install the [Wix Blog](https://www.wix.com/app-market/wix-blog?searchLocation=home) app on your test site. You can create some new blog posts, or use the sample ones provided by Wix. 1. Publish the site and “like” one of the posts. You can find the blog at `https://{your-site-url}/blog`. 1. Open your app’s dashboard in the [Custom Apps page](https://manage.wix.com/account/custom-apps). 1. Click **Test App**, then select **Test on dev site**. In the **Select a development site** dialog, choose your dev site and click **Test App**. The app is reinstalled on your dev site with the latest permissions. ## Step 6 | Develop the app Next, we will use the JavaScript SDK to retrieve blog data from the test site. ### Create a code file for your SDK code Before starting to write code for the SDK, set up a file for your code. The code for this project uses the SDK's [`blog`](https://dev.wix.com/docs/api-reference/business-solutions/blog/introduction?apiView=SDK.md) and [`dashboard`](https://dev.wix.com/docs/sdk/host-modules/dashboard/introduction.md) modules. The `dashboard` module is preinstalled by the CLI, but you'll need to install the `blog` module manually. 1. Create a file named `blog-utils.js` at `src/extensions/dashboard/pages/top-blog-posts/`, alongside the `top-blog-posts.tsx` file you generated in Step 2. 1. In your IDE terminal, run the following command: ```bash npm install @wix/blog ``` ### Retrieve blog data Next, use the blog module in the SDK to retrieve the data you need. 1. Import the `posts` submodule from the `@wix/blog` package into your file. 1. Create an `async` function called `getTopBlogPosts`. 1. Use the [`queryPosts()`](https://dev.wix.com/docs/api-reference/business-solutions/blog/posts-stats/query-posts.md) function to find the posts with the most likes and views. The query allows you to sort the posts in descending order based on likes and views. Call this function twice, once for likes and once for views. 1. Extract the first item IDs from the result and save them as `mostLiked` and `mostViewed` variables. 1. Use the [`getPostMetrics()`](https://dev.wix.com/docs/api-reference/business-solutions/blog/posts-stats/get-post-metrics.md) function to retrieve the post metrics by passing the ID of the post. These metrics include likes and views. Save these metrics as `mostLikedMetrics` and `mostViewedMetrics` variables. 1. Your function should return an object with two keys, `mostViewed` and `mostLiked`. The value for each key should be an object containing the post data and the likes and views respectively of the highest-ranking posts. Your final `blog-utils.js` file should look like this: ```js import { posts } from '@wix/blog'; export async function getTopBlogPosts() { const mostLikedPosts = await posts.queryPosts().descending('metrics.likes').find(); const mostViewedPosts = await posts.queryPosts().descending('metrics.views').find(); const mostLiked = mostLikedPosts.items[0]; const mostViewed = mostViewedPosts.items[0]; const mostLikedMetrics = await posts.getPostMetrics(mostLiked._id); const mostViewedMetrics = await posts.getPostMetrics(mostViewed._id) return { mostViewed: { post: mostViewed, views: mostViewedMetrics.metrics.views ?? 0, }, mostLiked: { post: mostLiked, likes: mostLikedMetrics.metrics.likes ?? 0, }, }; } ``` ## Step 7 | Display the top posts in the dashboard Now that we have the blog data, we can use the [Wix Design System](https://www.wix-pages.com/wix-design-system/?path=/story/getting-started--about) to display it on a dashboard page. The app framework created by the CLI includes the code for a sample dashboard page. We can use that code as the basis for a dashboard page. ### Set up the dashboard code files 1. Open the `top-blog-posts.tsx` file at `src/extensions/dashboard/pages/top-blog-posts/`. 1. Delete all the import statements and paste in the following ones: ```tsx import { Button, Card, Heading, Text, Page, WixDesignSystemProvider, Box, Loader } from "@wix/design-system"; import "@wix/design-system/styles.global.css"; import * as Icons from "@wix/wix-ui-icons-common"; import React, { useEffect, useState } from "react"; import { dashboard } from "@wix/dashboard"; import { getTopBlogPosts } from './blog-utils'; import { posts } from '@wix/blog'; ``` 1. In the return statement for the `Index()` component, delete everything in between the `` tags. When you’re done, your file should look like this: ```tsx import { Button, Card, Heading, Text, Page, WixDesignSystemProvider, Box, Loader, } from "@wix/design-system"; import "@wix/design-system/styles.global.css"; import * as Icons from "@wix/wix-ui-icons-common"; import React, { useEffect, useState } from "react"; import { dashboard } from "@wix/dashboard"; import { getTopBlogPosts } from './blog-utils'; import { posts } from '@wix/blog'; export default function Index() { return ; } ``` ### Prepare blog data for display Next, get your blog data ready to display on your dashboard page. This code goes below the import statements on your `my-page.tsx` file: 1. Define the interfaces for viewed and liked blog posts. ```js interface ViewedBlogPost { post: posts.Post; views: number; } interface LikedBlogPost { post: posts.Post; likes: number; } ``` 1. In the `Index()` component use React hooks to access the data. ```ts const [mostViewed, setMostViewed] = useState(null); const [mostLiked, setMostLiked] = useState(null); const [mostViewedPublishedDate, setMostViewedPublishedDate] = useState(null); const [mostLikedPublishedDate, setMostLikedPublishedDate] = useState(null); useEffect(() => { async function fetchBlogPosts() { try { const { mostViewed, mostLiked } = await getTopBlogPosts(); setMostViewed(mostViewed); setMostLiked(mostLiked); setMostViewedPublishedDate( mostViewed.post.lastPublishedDate ? new Date(mostViewed.post.lastPublishedDate).toDateString() : null ); setMostLikedPublishedDate( mostLiked.post.lastPublishedDate ? new Date(mostLiked.post.lastPublishedDate).toDateString() : null ); } catch (error) { console.log("Failed to fetch blog post data.", error); } } fetchBlogPosts(); }, []); ``` 1. Add a loader that displays while data are loading. ```js if (!mostViewed || !mostLiked) { return ( ); } ``` ### Create the page structure Next, add React components from the [Wix Design System](https://www.wix-pages.com/wix-design-system/?path=/story/getting-started--about) to create the page structure. 1. Add nested components between the `` tags in the return statement for the `Index()` component. Structure your components to match the following diagram. Wrap `` components in `
` tags so that they each display on a different line. ![Outline boxes](https://wixmp-833713b177cebf373f611808.wixmp.com/images/b4c306af7e075a32ab470c50c2e10c6e.png) 1. Add the following variables to the opening tag of the `Box` component to ensure the cards inside it display correctly: ```js gap="5px" direction="vertical" ``` When you’re done, your `Index()` component should look like this: ```js export default function Index() { return (
); } ``` ### Add content to the page Add static text, dynamic text, and other content to your Design System components. In some cases, text is added between the component’s opening and closing tags. In other cases, the text is passed into the component as a variable. 1. Pass these variables to the `Heading` components inside the `Card.Header` components: ```js size="medium" as="h2" ``` 1. Pass these variables to the `Heading` components inside the `Car.Content` components: ```js size="small" as="h3" ``` 1. Add an `onClick` event handler to the `Button` component in the page header actions bar. Set the variable to this function: ```js () => dashboard.navigate('social-blog'). ``` When you’re done, your `Index()` function should look like this: ```js export default function Index() { return ( } onClick={() => dashboard.navigate("social-blog")} > Edit Your Blog } /> Most Viewed } /> Title: {mostViewed.post.title} Excerpt: {mostViewed.post.excerpt}
Last published: {mostViewedPublishedDate}
Views: {mostViewed.views}
Most Liked } /> Title: {mostLiked.post.title} Excerpt: {mostLiked.post.excerpt}
Last published: {mostLikedPublishedDate}
Likes: {mostLiked.likes}
); } ``` ## Step 8 | Test the app Now that the app’s code is ready, you can test it locally using the Wix CLI. The finished code sample should look like this: ```ts import { Button, Card, Heading, Text, Page, WixDesignSystemProvider, Box, Loader, } from "@wix/design-system"; import "@wix/design-system/styles.global.css"; import * as Icons from "@wix/wix-ui-icons-common"; import React, { useEffect, useState } from "react"; import { dashboard } from "@wix/dashboard"; import { getTopBlogPosts } from './blog-utils'; import { posts } from '@wix/blog'; interface ViewedBlogPost { post: posts.Post; views: number; } interface LikedBlogPost { post: posts.Post; likes: number; } export default function Index() { const [mostViewed, setMostViewed] = useState(null); const [mostLiked, setMostLiked] = useState(null); const [mostViewedPublishedDate, setMostViewedPublishedDate] = useState(null); const [mostLikedPublishedDate, setMostLikedPublishedDate] = useState(null); useEffect(() => { async function fetchBlogPosts() { try { const { mostViewed, mostLiked } = await getTopBlogPosts(); setMostViewed(mostViewed); setMostLiked(mostLiked); setMostViewedPublishedDate( mostViewed.post.lastPublishedDate ? new Date(mostViewed.post.lastPublishedDate).toDateString() : null ); setMostLikedPublishedDate( mostLiked.post.lastPublishedDate ? new Date(mostLiked.post.lastPublishedDate).toDateString() : null ); } catch (error) { console.log("Failed to fetch blog post data.", error); } } fetchBlogPosts(); }, []); if (!mostViewed || !mostLiked) { return ( ); } return ( } onClick={() => dashboard.navigate("social-blog")} > Edit Your Blog } /> Most Viewed } /> Title: {mostViewed.post.title} Excerpt: {mostViewed.post.excerpt}
Last published: {mostViewedPublishedDate}
Views: {mostViewed.views}
Most Liked } /> Title: {mostLiked.post.title} Excerpt: {mostLiked.post.excerpt}
Last published: {mostLikedPublishedDate}
Likes: {mostLiked.likes}
); } ``` To test your app, do the following: 1. Run a local development server for your app. Your app’s dashboard page will now look like this: ![App preview](https://wixmp-833713b177cebf373f611808.wixmp.com/images/eace32400be38d0fabb96420f0bb3177.png) 1. Click the button to show top blog posts. 1. If things don’t look right, open your browser’s developer tools and check for errors in the console. ## Step 9 | Build and deploy the app After testing your app and seeing that it works as expected, you can: - [Create a public preview of your app](https://dev.wix.com/docs/build-apps/manage-your-app/versioning/about-app-versioning.md), - [Build your app](https://dev.wix.com/docs/build-apps/launch-your-app/app-distribution/about-app-distribution.md) - [Deploy your app](https://dev.wix.com/docs/build-apps/manage-your-app/versioning/release-a-new-app-version.md). --- > Portal Navigation: > > - Append `.md` to any URL under `https://dev.wix.com/docs/` to get its markdown version. > - Pages are either content pages (article or reference text) or menu pages (a list of links to child pages). > - To get a menu page, truncate any URL to a parent path and append `.md` (e.g. `https://dev.wix.com/docs/sdk.md`, `https://dev.wix.com/docs/sdk/core-modules.md`). > - Top-level index of all portals: https://dev.wix.com/docs/llms.txt > - Full concatenated docs: https://dev.wix.com/docs/llms-full.txt ## Resource: Tutorial | Adjust a CLI App to Different Pricing Plans ## Article: Adjust a CLI App to Different Pricing Plans ## Article Link: https://dev.wix.com/docs/build-apps/get-started/tutorials/tutorial-adjust-a-cli-app-to-different-pricing-plans.md ## Article Content: # Tutorial | Adjust a CLI App to Different Pricing Plans
**Deprecated** The Wix CLI for Apps is deprecated and no longer receives updates or new features. New projects should use the unified [Wix CLI](https://dev.wix.com/docs/wix-cli/guides/about-the-wix-cli.md). [Determine which CLI your project uses](https://dev.wix.com/docs/wix-cli/guides/development/determine-which-cli-your-project-uses.md).
When you publish your CLI app to the Wix App Market, you can provide Wix users with different pricing plans. For example, you can provide a free version of your app and enable users to purchase a premium version with additional features. If you provide different plans for your app, it’s your responsibility as the developer to code behavior that limits features for certain plans. Your app should also provide calls-to-action to upgrade to paid plans where applicable. As an example, think of an app that provides Wix users with a site widget that they can place in their online store. When site visitors click on the widget, it randomly generates a discount that the visitor can use when purchasing products. The app also provides a dashboard page where Wix users can adjust the range of discount amounts that can be generated. By default, the app sets a range of 1-5%. Wix users who purchase a paid plan can alter this range. The end result looks like this: ![Discount generator example widget](https://wixmp-833713b177cebf373f611808.wixmp.com/images/b39abaf836907eaa106b83385cd6d131.gif) This tutorial focuses on the dashboard code, which provides restrictive logic that prevents free plan Wix users from changing the range while allowing paid plan Wix users to do so. This tutorial uses the following steps to adjust a CLI app to different pricing plans: 1. Use the app instance to determine the plan. 2. Restrict features based on Wix user plan. 3. Include CTAs to upgrade. ## Before you begin - Create an app in the app dashboard. - Select a [business model](https://dev.wix.com/docs/build-apps/launch-your-app/pricing-and-billing/about-pricing-plans-and-business-models.md) for your app that involves multiple plans, for example a freemium model with free and paid plans. ## Step 1 | Determine the plan using the app instance This step shows how to retrieve the app instance information to determine the Wix user's current pricing plan. At the end of this step, you'll have the instance ID and plan information needed to apply feature restrictions. In order to know which app features to restrict, you need to know the user’s current plan. You can determine the user’s plan from the [app instance](https://dev.wix.com/docs/build-apps/develop-your-app/access/app-instances/about-app-instances?apiView=SDK.md). Fetch the app instance using the [`getAppInstance()`](https://dev.wix.com/docs/api-reference/app-management/app-instance/get-app-instance.md) method. The method returns an object containing information about the instance and the site it’s installed on. You can call `getAppInstance()` directly in your dashboard page code. From the returned object, you can extract several pieces of information: - The app instance ID. - The `isFree` parameter, which indicates if the user is on a free plan or not. - The `packageName` parameter, which tells you the plan the user selected. Here’s some sample code that extracts the instance ID and `isFree`: ```javascript import { appInstances } from '@wix/app-management'; const Index: FC = () => {     const [instanceId, setInstanceId] = useState(null);     const [isFree, setIsFree] = useState(true);       useEffect(() => {      const initializeInstance = async () => {       try {         const response = await appInstances.getAppInstance();         // Extract the instance ID and free status from the response         const instanceId = response.instance?.instanceId;         const isFreeStatus = response.instance?.isFree ?? true;                  setInstanceId(instanceId);         setIsFree(isFreeStatus);       } catch (error) { console.error('Failed to get app instance.', error);       } finally {         setIsLoading(false);       }     };     initializeInstance();   }, []); } ``` Once you know which plan an app instance uses, you can decide where to apply restrictive logic in your app. ## Step 2 | Restrict features based on Wix user plan This step demonstrates how to use the plan information to enable or disable app features. At the end of this step, you'll have implemented feature restrictions that differentiate between free and paid plan Wix users. If you offer a free plan and a single paid plan with your app, you can apply the `isFree` parameter to limit access to certain app features. The discount generator example sets a default range of percent discounts that can be randomly generated. We only want to allow paid plan users to alter the discount range. One way to achieve this behavior is to disable the fields that define discount ranges for free plan users, and enable them for paid plans. If you’re building a React component, you can use Wix design system elements to do this easily. Input elements such as [NumberInput](https://www.wix-pages.com/wix-design-system/?path=/story/components-form--numberinput) let you enable or disable a field using the `disabled` boolean. In the code below, we directly use the `isFree` state to disable the input fields and save button. If a user is using a paid plan, `isFree` is false and the elements are enabled, allowing the user to alter the discount range. In this way, we restrict the ability to change the range to paid users. ```javascript   %}     onChange={(value) => handleInputChange('min', value || 0)}     defaultValue="1"     disabled={isFree}   />   %}     onChange={(value) => handleInputChange('max', value || 0)}     defaultValue="5"     disabled={isFree}   /> ``` If you offer multiple paid plans, use the `packageName` parameter to create behavior specific to each plan. ## Step 3 | Include CTAs to upgrade This step shows how to add upgrade prompts for Wix users on free plans. At the end of this step, you'll have clear calls to action that encourage Wix users to upgrade to paid plans. When you limit certain features by plan, notify the Wix user and include an option for them to upgrade. The call-to-action to upgrade can take any form that suits your app’s UI. In our discount generator example, we include a text button that links to the pricing plan page. ![Discount generator example dashboard](https://wixmp-833713b177cebf373f611808.wixmp.com/images/8d95a68412682b28b88d0ead5ce9d5cc.png) The CTA appears conditionally, if the `isFree` is true: ```javascript     Upgrade to our premium plan to change the discount range.            Upgrade         ) : undefined} /> ``` ## Complete code Below is the complete dashboard page code for this example: ```javascript import React, { type FC, useState, useEffect } from 'react'; import { dashboard } from '@wix/dashboard'; import {   Button,   Card,   FormField,   Input,   NumberInput,   Page,   Loader,   WixDesignSystemProvider,   MessageBoxFunctionalLayout,   TextButton,   Box, } from '@wix/design-system'; import '@wix/design-system/styles.global.css'; import * as Icons from '@wix/wix-ui-icons-common'; import { appInstances } from '@wix/app-management'; import { members } from '@wix/members'; interface FormData {   min: number;   max: number; } const Index: FC = () => {   const [isLoading, setIsLoading] = useState(true);   const [instanceId, setInstanceId] = useState(null);   const [isFree, setIsFree] = useState(true);   const [formDataMap, setFormDataMap] = useState>(new Map());   const [currentFormData, setCurrentFormData] = useState({ min: 1, max: 5 });   const [isSaving, setIsSaving] = useState(false);   const [error, setError] = useState(null);   // Initialize on component mount   useEffect(() => {     const initializeInstance = async () => {       try {         setIsLoading(true);         const response = await appInstances.getAppInstance();         // Extract the instance ID and free status from the response         const instanceId = response.instance?.instanceId;         const isFreeStatus = response.instance?.isFree ?? true;                  setInstanceId(instanceId);         setIsFree(isFreeStatus);         // Load any existing form data for this instance         await loadFormData(instanceId);       } catch (error) { console.error('Failed to get app instance.', error);       } finally {         setIsLoading(false);       }     };     initializeInstance();   }, []);   // Load existing form data for this instance. // Local storage is used here for demo purposes.   // In production, save to your own backend with proper   // authentication and database storage.   const loadFormData = async (instanceId: string) => {     try {       const dataKey = `formData_${instanceId}`;       const savedData = localStorage.getItem(dataKey);       if (savedData) {         const parsedData = JSON.parse(savedData);         const formData = {           min: parsedData.min || 1,           max: parsedData.max || 5         };                  // Update the map and current form data         setFormDataMap(prev => new Map(prev).set(instanceId, formData));         setCurrentFormData(formData);                  dashboard.showToast({           message: 'Previous form data loaded',           type: 'standard'         });       }     } catch (error) {       console.error('Failed to load form data:', error);     }   };   // Save form data per app instance   const saveFormData = async () => {     if (!instanceId) return;     try {       setIsSaving(true);              // Update the map with current form data       setFormDataMap(prev => new Map(prev).set(instanceId, currentFormData));              // Local storage is used here for demo purposes.       // In production, save to your own backend with       // proper authentication and database storage.       const dataKey = `formData_${instanceId}`;       const dataToSave = {         ...currentFormData,         instanceId: instanceId,         timestamp: new Date().toISOString()       };              localStorage.setItem(dataKey, JSON.stringify(dataToSave));              dashboard.showToast({         message: 'Form data saved successfully!',         type: 'success'       });     } catch (error) {       console.error('Failed to save form data:', error);       dashboard.showToast({         message: 'Failed to save form data',         type: 'error'       });     } finally {       setIsSaving(false);     }   };   const handleInputChange = (field: keyof FormData, value: number) => {     setCurrentFormData(prev => ({ ...prev, [field]: value }));   };   return (                                                                                          Upgrade to our premium plan to change the discount range.                                            Upgrade                                                         ) : undefined}               />                                                                                       %}                       onChange={(value) => handleInputChange('min', value || 0)}                       defaultValue="1"                       disabled={isFree}                     />                                                                              %}                       onChange={(value) => handleInputChange('max', value || 0)}                       defaultValue="5"                       disabled={isFree}                     />                                                                                                                      ); }; export default Index; ``` ## See also - [About pricing plans and business models](https://dev.wix.com/docs/build-apps/launch-your-app/pricing-and-billing/about-pricing-plans-and-business-models.md) - [About app instances](https://dev.wix.com/docs/build-apps/develop-your-app/access/app-instances/about-app-instances.md) --- > Portal Navigation: > > - Append `.md` to any URL under `https://dev.wix.com/docs/` to get its markdown version. > - Pages are either content pages (article or reference text) or menu pages (a list of links to child pages). > - To get a menu page, truncate any URL to a parent path and append `.md` (e.g. `https://dev.wix.com/docs/sdk.md`, `https://dev.wix.com/docs/sdk/core-modules.md`). > - Top-level index of all portals: https://dev.wix.com/docs/llms.txt > - Full concatenated docs: https://dev.wix.com/docs/llms-full.txt ## Resource: Tutorial | Create a Site Plugin for the Wix Stores Product Page with the CLI ## Article: Tutorial | Create a Site Plugin for the Wix Stores Product Page with the CLI ## Article Link: https://dev.wix.com/docs/build-apps/get-started/tutorials/tutorial-create-a-site-plugin-for-the-wix-stores-product-page-with-the-cli.md ## Article Content: # Tutorial | Create a Site Plugin for the Wix Stores Product Page with the CLI In this tutorial, you'll create a digital sale banner [site plugin](https://dev.wix.com/docs/build-apps/develop-your-app/extensions/site-extensions/site-plugins/about-site-plugin-extensions.md) for the Wix Stores product page using the [CLI](https://dev.wix.com/docs/wix-cli/guides/about-the-wix-cli.md). This plugin displays a small banner on digital products to let customers know this product is part of the digital sale promotion. The plugin appears in a Wix Stores [product page slot](https://dev.wix.com/docs/build-apps/develop-your-app/extensions/site-extensions/site-plugins/supported-wix-app-pages/wix-stores/wix-stores-product-page.md#plugin-slots). Follow these steps to build the product page site plugin: 1. Create an app with the CLI. 2. Add a site plugin extension. 3. Code your plugin. 4. Test your plugin. 5. Build and deploy your app. > **Note:** Slots differ slightly depending on [which version of Wix Stores](https://support.wix.com/en/article/wix-stores-customizing-your-product-page) a user has on their site. This tutorial works for both versions. Learn more about building [product page site plugins](https://dev.wix.com/docs/build-apps/develop-your-app/extensions/site-extensions/site-plugins/supported-wix-app-pages/wix-stores/wix-stores-product-page.md). ## Step 1 | Create an app with the CLI Create a new app project using the CLI. For detailed instructions, see [Quick Start an App](https://dev.wix.com/docs/wix-cli/guides/get-started/quick-start-an-app.md). ## Step 2 | Add a site plugin extension [Add a site plugin extension](https://dev.wix.com/docs/wix-cli/guides/extensions/site-extensions/site-plugins/add-a-site-plugin-extension.md) to your app that renders on a Wix Stores product page. To add a site plugin extension, follow these steps: 1. Run the following command: ```bash npm run generate ``` 2. When prompted, make sure to select the following: - `Site Plugin` as the extension. - `Wix Stores` as the Wix app. - `product-page-details-2` as the slot under `New product page`. 3. Open your plugin's `extension.ts` file and add support for the [old product page](https://dev.wix.com/docs/build-apps/develop-your-app/extensions/site-extensions/site-plugins/supported-wix-app-pages/wix-stores/wix-stores-product-page.md) slot so your plugin works with both versions of Wix Stores. The old product page uses the same `slotId` but has different `appDefinitionId` and `widgetId` values. Add the following placement to the `placements` array: ```tsx placements: [ { //New product page appDefinitionId: "a0c68605-c2e7-4c8d-9ea1-767f9770e087", widgetId: "6a25b678-53ec-4b37-a190-65fcd1ca1a63", slotId: "product-page-details-2" }, { //Old product page appDefinitionId: "1380b703-ce81-ff05-f115-39571d94dfcd", widgetId: "13a94f09-2766-3c40-4a32-8edb5acdd8bc", slotId: "product-page-details-2" } ] ``` ## Step 3 | Code your plugin Add code to check if a product is digital and then display a sale banner on digital products. If it's not a digital product, don't display any banner.
**Important:** You must support both [Stores V1 APIs](https://dev.wix.com/docs/api-reference/business-solutions/stores/catalog-v1/catalog/get-product.md) and [Stores V3 APIs](https://dev.wix.com/docs/api-reference/business-solutions/stores/catalog-v3/products-v3/get-product.md) because different sites may have different API versions available. Your plugin should try both APIs and use whichever one works.
To code your plugin: 1. Open `src/site/plugins/custom-elements/digital-sale-banner/plugin.tsx`. 2. Delete the existing code in the file. 3. Paste the following import statements at the beginning of your file: > **Note:** Import both [Products V1 API](https://dev.wix.com/docs/api-reference/business-solutions/stores/catalog-v1/catalog/get-product.md) and [Products V3 API](https://dev.wix.com/docs/api-reference/business-solutions/stores/catalog-v3/products-v3/get-product.md). ```tsx import { products, productsV3 } from '@wix/stores'; ``` 4. Create the custom element class. Define the class that extends `HTMLElement` and set up the observed attributes: ```tsx class SaleBanner extends HTMLElement { static get observedAttributes() { return ['display-name', 'product-id']; } connectedCallback() { this.checkProductAndRender(); } attributeChangedCallback() { this.checkProductAndRender(); } ``` 5. Add the method that checks if the product is digital. This method tries both the [Products V1 API](https://dev.wix.com/docs/api-reference/business-solutions/stores/catalog-v1/catalog/get-product.md) and [Products V3 API](https://dev.wix.com/docs/api-reference/business-solutions/stores/catalog-v3/products-v3/get-product.md) and uses whichever one works: ```tsx async checkProductAndRender() { const productId = this.getAttribute('product-id'); if (!productId) { this.innerHTML = ''; return; } let isDigital = false; let foundProduct = false; // Try V1 API try { const response = await products.getProduct(productId); if (response.product) { foundProduct = true; if (response.product.productType === 'digital') { isDigital = true; } } } catch (error) { // V1 API failed, will try V3 } // If V1 didn't work, try V3 API if (!foundProduct) { try { const response = await productsV3.getProduct(productId); if (response) { foundProduct = true; if (response.productType === 'DIGITAL') { isDigital = true; } } } catch (error) { // Both APIs failed } } // Only show banner for digital products if (isDigital) { this.render(); } else { this.innerHTML = ''; } } ``` 6. Add the render method that displays the banner on the site: ```tsx render() { const customText = this.getAttribute('display-name'); const displayText = customText || 'Digital Sale'; this.innerHTML = `
${displayText}
`; } ``` 7. Export the class as the default export: ```tsx export default SaleBanner; ``` ### Complete example code ```tsx import { products, productsV3 } from '@wix/stores'; class SaleBanner extends HTMLElement { static get observedAttributes() { return ['display-name', 'product-id']; } connectedCallback() { this.checkProductAndRender(); } attributeChangedCallback() { this.checkProductAndRender(); } async checkProductAndRender() { const productId = this.getAttribute('product-id'); if (!productId) { this.innerHTML = ''; return; } let isDigital = false; let foundProduct = false; // Try V1 API try { const response = await products.getProduct(productId); if (response.product) { foundProduct = true; if (response.product.productType === 'digital') { isDigital = true; } } } catch (error) { // V1 API failed, will try V3 } // If V1 didn't work, try V3 API if (!foundProduct) { try { const response = await productsV3.getProduct(productId); if (response) { foundProduct = true; if (response.productType === 'DIGITAL') { isDigital = true; } } } catch (error) { // Both APIs failed } } // Only show banner for digital products if (isDigital) { this.render(); } else { this.innerHTML = ''; } } render() { const customText = this.getAttribute('display-name'); const displayText = customText || 'Digital Sale'; this.innerHTML = `
${displayText}
`; } } export default SaleBanner; ``` ## Step 4 | Test your plugin When you finish developing your plugin, test it in the development environment. To test your app, use the following steps: 1. Start the development server: ```bash wix dev ``` 2. Select **Editor** to open an editor in a local development environment. 3. Navigate to **Store Pages > Product Page** in the editor and click on the page to select it. 4. Click the **Plugin** icon that appears in the page toolbar. 5. In the Plugins modal, find the plugin you created and click **+ Add**. Your plugin should appear in the **product-page-details-2** slot. ## Step 5 | Build and deploy your app Build and deploy your app. For detailed instructions, see [Build and Deploy a Project](https://dev.wix.com/docs/wix-cli/guides/development/build-and-deploy-a-project.md). ## See also - [Add a Site Plugin Extension in the CLI](https://dev.wix.com/docs/wix-cli/legacy-clis/legacy-wix-cli-for-apps/supported-extensions/site-extensions/site-plugins/add-a-site-plugin-extension-in-the-cli.md) - [Site Plugin Extension Files and Code](https://dev.wix.com/docs/wix-cli/legacy-clis/legacy-wix-cli-for-apps/supported-extensions/site-extensions/site-plugins/site-plugin-extension-files-and-code.md) - [Wix Stores: Product Page](https://dev.wix.com/docs/build-apps/develop-your-app/extensions/site-extensions/site-plugins/supported-wix-app-pages/wix-stores/wix-stores-product-page.md) --- > Portal Navigation: > > - Append `.md` to any URL under `https://dev.wix.com/docs/` to get its markdown version. > - Pages are either content pages (article or reference text) or menu pages (a list of links to child pages). > - To get a menu page, truncate any URL to a parent path and append `.md` (e.g. `https://dev.wix.com/docs/sdk.md`, `https://dev.wix.com/docs/sdk/core-modules.md`). > - Top-level index of all portals: https://dev.wix.com/docs/llms.txt > - Full concatenated docs: https://dev.wix.com/docs/llms-full.txt ## Resource: Tutorial | Create a Counter Widget with Blocks ## Article: Creating a Counter Widget ## Article Link: https://dev.wix.com/docs/build-apps/get-started/tutorials/tutorial-create-a-counter-widget-with-blocks.md ## Article Content: # Tutorial | Create a Counter Widget Using Blocks
**Editor compatibility** Wix Blocks apps aren't supported in the Wix Harmony editor. Existing Blocks apps remain available for purchase on the Wix App Market for Wix Editor and Wix Studio sites. To learn more, see [About Wix Harmony and Blocks](https://dev.wix.com/docs/build-apps/develop-your-app/develop-an-app-with-blocks/about-wix-harmony-and-blocks.md).
This tutorial shows you how to build a counter widget, where you can increment and decrement a number. Through this simple widget we will walk through everything that you can do with Wix Blocks.  ![](https://d2x3xhvgiqkx42.cloudfront.net/12345678-1234-1234-1234-1234567890ab/6b5c7381-912e-4754-99e2-d23157db088c/2022/05/10/2714292d-944d-49c9-951a-83cc5c333e4b/95962bc8-fba5-4c08-b062-876165b5ca5a.gif) We recommend that you build this widget from scratch, but if you get stuck, you can [view a template of the widget in Blocks and edit it](https://blocks.wix.com/wix-blocks-new-app-creator?editorType=RESPONSIVE&originTemplateId=bac5efe0-e532-4f58-8029-58adca2fb0b4&http_referrer=documentation) under your Wix account. ## Step 1 | Create a new Widget in Blocks [Create an empty Blocks app](https://support.wix.com/en/article/wix-blocks-creating-an-app-and-opening-it). Start with a blank canvas.   * * * ## Step 2 | Add a Flexbox A flexbox is a container that allows responsiveness. It will keep the other elements organized. To add a flexbox:  1. Click the **Add Elements** **+** button in the top menu.  2. Click **Layout ->**  **Flexboxes** 3. Click the vertical 3-section flexbox. 
Show screenshot ![](https://d2x3xhvgiqkx42.cloudfront.net/12345678-1234-1234-1234-1234567890ab/21e446eb-7f73-4f2f-84b1-c6b77e64e45e/2024/05/02/4bdd5662-aa86-4936-98a3-1189be629bb0/c789550f-3ad5-42a1-9f5d-d56735202358.png)
* * * ## Step 3 | Add Widget Elements ### Adding the buttons 1. Click the **Add Elements** **+** button on the top menu.  2. Click **Buttons**.  3. Drag and drop a Primary Button onto the right section of the flexbox.
Show screenshot ![](https://d2x3xhvgiqkx42.cloudfront.net/12345678-1234-1234-1234-1234567890ab/21e446eb-7f73-4f2f-84b1-c6b77e64e45e/2024/04/24/1b75c84b-580c-44c3-b24d-b0184518d29c/5f2a673b-964a-4ad5-aaa9-daf8e24aa166.png)
### Changing the text 1\.  Click **Settings**.  2\.  Select **Text only** from the drop down list.  3\.  Change the button's text or icon to "+". 4\.  Click the **Design** ![](https://d2x3xhvgiqkx42.cloudfront.net/12345678-1234-1234-1234-1234567890ab/6b5c7381-912e-4754-99e2-d23157db088c/2022/05/12/caba4f61-8f8f-4889-a38d-cbd18d0b8f63/a5d2a21c-5e1d-4636-9cd3-a964c0fdd520.png)  icon in the **Inspector** panel ![](https://d2x3xhvgiqkx42.cloudfront.net/12345678-1234-1234-1234-1234567890ab/21e446eb-7f73-4f2f-84b1-c6b77e64e45e/2024/05/14/abd2dd03-8a0b-49bd-8cb9-af4503103bb6/28a66f5a-598c-4d9d-86ab-35062a41c17b.png)  and select **Text**. 5\.  Click **Themes** and select **Heading 6** from the drop down list.  6\. Drag and drop another square button to the left section.  7\. Change the text to "-".
Show screenshot ![text menu](https://wixmp-833713b177cebf373f611808.wixmp.com/images/ce1abc54635caea0f4e8055eea5d6429.png)
### Adding the middle number 1. Click the **Add Elements** **+** button and select **Text**. 2. Drag and drop an **32px Title** element to the central section of the flexbox.  3. Edit the text to "0" and align it to the center. 
Show screenshot ![](https://wixmp-833713b177cebf373f611808.wixmp.com/images/da3b13de4994964e8a1ec08df50fa834.png)
#### Changing the IDs 1. Click the increment button. 1. Click the **Properties and Events** ![](https://d2x3xhvgiqkx42.cloudfront.net/12345678-1234-1234-1234-1234567890ab/378fd532-728d-473b-8f03-30140bda59af/2021/10/25/b8b2d885-6d3d-45ce-b4d1-ad335143e391/c4cb59f0-340d-46ed-989c-2f1f56b3cae3.jpg)  icon in the bottom right of the screen.   2. Change the ID of your increment button to **incBtn**. 3. Change the ID of your decrement button to **decBtn**. 4. Change the ID of your text element to **countTxt**.
Show screenshot ![properties and events](https://d2x3xhvgiqkx42.cloudfront.net/12345678-1234-1234-1234-1234567890ab/6b5c7381-912e-4754-99e2-d23157db088c/2022/05/10/1e18b1f1-643c-40fb-839e-e0ee7f3dd806/142720ae-f3e7-4eec-8a87-16b469ce9014.png)
* * * ## Step 4 | Add Code to Your Elements Now it's time to make the widget do what it's supposed to do: count up and down when the buttons are clicked.  1\.  Go to the bottom part of your screen to add code to your widget. 
Show screenshot ![](https://d2x3xhvgiqkx42.cloudfront.net/12345678-1234-1234-1234-1234567890ab/21e446eb-7f73-4f2f-84b1-c6b77e64e45e/2024/04/24/2fd445d5-e777-4a22-919a-86e27f255d03/c714cacf-32e8-42c5-8e14-52bf9187397a.png)
2\.  Add the following code **before** your **onReady()** function. ```javascript //Set the count to 0 let count = 0; //Assign the count to your text element function render() { $w('#countTxt').text = count.toString(); } //Add a certain amount to the count and fire an event in the widget API function addToCount(amount) { count += amount; render(); } ``` 3\.  Add the following code **in** your **onReady()** function.  ```javascript $w('#incBtn').onClick(() => { addToCount(1); }); $w('#decBtn').onClick(() => { addToCount(-1); }); render(); ``` 4\.  Click the **Preview** button to see your widget in action.  * * * ## Step 5 | Make Your Widget Customizable with Widget API Blocks lets you [define an API for your widget](https://dev.wix.com/docs/build-apps/develop-your-app/develop-an-app-with-blocks/widget-api/about-the-widget-api.md), so that the user (a site owner who installs the widget) can customize it to their needs. The API can contain properties, events and exported functions. Let's say that you want a user to be able to decide what the "step" of the count is. Perhaps they want the step to be 2, so that the count is 0,2,4,6 etc.  To do that, let's define a property in the widget API named `step`. ### Define the `step` Property 1. Click the **Widget API** ![](https://d2x3xhvgiqkx42.cloudfront.net/12345678-1234-1234-1234-1234567890ab/12345678-1234-1234-1234-1234567890ab/2021/10/27/4e37c3ae-fd88-43a8-a374-0c6c958d897f/3db01ac0-dd5b-4e14-b878-16a6a0674532.jpg)  icon to open the Widget API panel. 2. Click **Add New Property** in the **Properties** section (or hover over the section and click the ![](https://d2x3xhvgiqkx42.cloudfront.net/12345678-1234-1234-1234-1234567890ab/378fd532-728d-473b-8f03-30140bda59af/2021/11/01/c319bb4a-e946-4229-9abd-6f4ad77f67e6/d176d48f-2f1c-45f0-b4bd-ea403358ae49.png)  icon that appears).
Show screenshot ![define new property](https://d2x3xhvgiqkx42.cloudfront.net/12345678-1234-1234-1234-1234567890ab/378fd532-728d-473b-8f03-30140bda59af/2021/10/27/af66ea44-ad74-438b-9b44-e09e76680979/972a285f-1fcb-4fc5-aee2-38043f2073d5.jpg)
### Configure the property 1. Name your property "step". 1. Give it the type **Number**. 1. Give it a default value of **1**. 
Show screenshot ![the step property](https://d2x3xhvgiqkx42.cloudfront.net/12345678-1234-1234-1234-1234567890ab/378fd532-728d-473b-8f03-30140bda59af/2021/10/27/4cfb0aaf-ab77-4b08-96a1-39f47f27ed72/af5fa679-3a56-4dbb-809b-7c3b5d0544be.jpg)
### Change Your Code to Consider Your New Property Change your code so that when the buttons are clicked, **addToCount** is called with the step from the properties rather than with the default value of 1. Use _$widget.props_ to access your properties (notice the autocomplete Velo suggestions).  ```javascript $w.onReady(function () { $w('#incBtn').onClick(() => { addToCount($widget.props.step); }); $w('#decBtn').onClick(() => { addToCount(-$widget.props.step); }); render(); }); ``` ### Test Your Property in Preview Mode 1. Click **Preview** to move to preview mode.  2. Click **Test API Properties**. 
Show screenshot ![test api properties](https://d2x3xhvgiqkx42.cloudfront.net/12345678-1234-1234-1234-1234567890ab/6b5c7381-912e-4754-99e2-d23157db088c/2022/05/10/e13ac194-8b23-45ab-89b2-9a4b13242efd/e9f325ab-9466-4bd8-8174-e06ed2d3dcf0.png)
3\.  Change the step to a different number and see how your widget works. 
Show screenshot ![change step](https://d2x3xhvgiqkx42.cloudfront.net/12345678-1234-1234-1234-1234567890ab/378fd532-728d-473b-8f03-30140bda59af/2021/10/27/aa0da482-efba-4f57-b1b0-edef9a8af4c8/921f5840-e5a5-48d2-b658-e6e55932a329.jpg)
### Add a Public Event to Your Widget API The widget API allows you to add an event that is fired whenever you decide.  Add an event that is fired when the "count" variable changes: 1. Click the **Widget API** ![](https://d2x3xhvgiqkx42.cloudfront.net/12345678-1234-1234-1234-1234567890ab/12345678-1234-1234-1234-1234567890ab/2021/10/27/4e37c3ae-fd88-43a8-a374-0c6c958d897f/3db01ac0-dd5b-4e14-b878-16a6a0674532.jpg)  icon to open the Widget API panel.  2. Click **Add New Public Event** in the **Events** section (or hover over the section and click the ![](https://d2x3xhvgiqkx42.cloudfront.net/12345678-1234-1234-1234-1234567890ab/378fd532-728d-473b-8f03-30140bda59af/2021/11/01/4812e078-ae7e-4b2e-980b-a090cb734f45/79c543fb-71dd-4dbc-aec7-74f0b7c00e00.png)  icon that appears).  3. Name your event and describe it
Show screenshot ![new event](https://d2x3xhvgiqkx42.cloudfront.net/12345678-1234-1234-1234-1234567890ab/6b5c7381-912e-4754-99e2-d23157db088c/2022/05/10/e1fa6fcf-08e4-4d92-a691-397f0fa40489/d98ef818-a6cf-42ff-9892-9fcdb21a399b.png)
4\.  Add this line to your **addToCount()** function, to fire the event when the count changes.  ```javascript $widget.fireEvent('change', count); ``` 5\.   Now, your **addToCount()** function should look like this:  ```javascript function addToCount(amount) { count += amount; render(); $widget.fireEvent('change', count); } ```
Tip: You'll need to catch your event in the site editor once you have installed your widget in your website (this will be describe in Step 8).
### Add a Public Function to Your Widget API Create and export a **reset()** function, so that site owners can easily set the count to 0.  1. Click the **Widget API** ![](https://d2x3xhvgiqkx42.cloudfront.net/12345678-1234-1234-1234-1234567890ab/12345678-1234-1234-1234-1234567890ab/2021/10/27/4e37c3ae-fd88-43a8-a374-0c6c958d897f/3db01ac0-dd5b-4e14-b878-16a6a0674532.jpg)  icon to open the Widget API panel.  2. Click **Add New Public Function** in the **Functions** section (or hover over the section and click the ![](https://d2x3xhvgiqkx42.cloudfront.net/12345678-1234-1234-1234-1234567890ab/378fd532-728d-473b-8f03-30140bda59af/2021/11/01/4812e078-ae7e-4b2e-980b-a090cb734f45/79c543fb-71dd-4dbc-aec7-74f0b7c00e00.png)  icon that appears).  3. A new empty function by the default name **myPublicFunction()** is created, with a designated JSDoc (the comments block) that can be read by anyone who will use your function on a site. 
Show screenshot ![empty function](https://wixmp-833713b177cebf373f611808.wixmp.com/images/eb294ad61ad7c50f8422da9f948f8f15.png)
4\.  Paste the following code instead of the function default code:  ```javascript export function reset(){ //This function is part of my public API count = 0; render(); } ``` 5\.  Update the JSDoc. You must keep the function's annotation in this format.   ```javascript /** *@function *@description Sets count to 0 and renders. *@returns nothing */ ``` * * * ## Step 6 | (Optional) Configure Your Widget's Edit-Time Behavior The **Configuration** tab within the **Editor Experience Panel** ![](https://d2x3xhvgiqkx42.cloudfront.net/12345678-1234-1234-1234-1234567890ab/21e446eb-7f73-4f2f-84b1-c6b77e64e45e/2024/04/24/63dbfda0-a43d-4970-87d6-189c56ed4e51/855a0542-e46e-4cd1-9ffb-ac23df8fc7d6.png)  allows you to determine the behavior of the widget and its elements when a site owner edits it in the editor.  Try out a few options in the **Configuration** tab.
Show screenshot ![](https://wixmp-833713b177cebf373f611808.wixmp.com/images/12b3f6b30d295d70a2c86d49ebef45b0.png)
Set a display name for your widget elements:  1. Select the decrement button. 2. Change its display name under **Component Name** to "My Decrement" in the Inspector ![](https://d2x3xhvgiqkx42.cloudfront.net/12345678-1234-1234-1234-1234567890ab/21e446eb-7f73-4f2f-84b1-c6b77e64e45e/2024/04/24/f17c44b5-38a3-4277-a82f-dedae6e37557/db339269-a960-4738-b5bf-2c294e6f4761.png)  panel.
Show screenshot ![decrement button](https://wixmp-833713b177cebf373f611808.wixmp.com/images/c7e86ee41cda6bf129b280464ab771c0.png)
Prevent the text element from being selectable in the editor:  1. Select the text element that represents your count.  2. Click the **Can be selected** option in the **Behavior** section of the **Inspector** ![](https://d2x3xhvgiqkx42.cloudfront.net/12345678-1234-1234-1234-1234567890ab/21e446eb-7f73-4f2f-84b1-c6b77e64e45e/2024/04/24/85c931fb-2a09-49f7-a042-ea1d8f162c7c/d074e6a3-af5d-4d3d-bbfb-a3e255568b94.png)  panel to remove the blue checkmark. 
Show screenshot ![can be selected](https://wixmp-833713b177cebf373f611808.wixmp.com/images/221258a4e64ec75a807f94d13ea324dd.png)
* * * ## Step 7 | (Optional) Create More Design Presets Blocks allows you to create various variations for your widget's design and layout, through [design presets](https://dev.wix.com/docs/build-apps/develop-your-app/develop-an-app-with-blocks/widget-design/create-and-manage-design-presets.md). To create another design preset:  1. Click the **App Interface** ![](https://d2x3xhvgiqkx42.cloudfront.net/12345678-1234-1234-1234-1234567890ab/378fd532-728d-473b-8f03-30140bda59af/2024/05/01/e381745f-b13b-46fe-a339-23e286e3ee76/5c93dafc-bc3c-4197-a7f2-1cb92acf67a4.png)  panel .  2. Go to the **Design Presets** section. 3. Click ![](https://d2x3xhvgiqkx42.cloudfront.net/12345678-1234-1234-1234-1234567890ab/378fd532-728d-473b-8f03-30140bda59af/2021/11/01/c319bb4a-e946-4229-9abd-6f4ad77f67e6/d176d48f-2f1c-45f0-b4bd-ea403358ae49.png). 4. Click the **ֿMore Actions** icon ![](https://d2x3xhvgiqkx42.cloudfront.net/12345678-1234-1234-1234-1234567890ab/378fd532-728d-473b-8f03-30140bda59af/2021/05/24/e9f11af0-679c-4bf1-8b76-e50e26ec98f6/27128ae4-51ef-4cdd-b679-854d2e85973b.jpg)   to rename your preset (you can also duplicate or delete it). 
Show screenshot ![add design preset](https://d2x3xhvgiqkx42.cloudfront.net/12345678-1234-1234-1234-1234567890ab/6b5c7381-912e-4754-99e2-d23157db088c/2022/05/10/a0fbdcd2-da90-4cee-89eb-288843484c06/62fbd714-b93b-422c-a3b0-1bf564aa08d0.png)
4\. Make some visible changes in your widget, like changing the color of the middle section.
Show screenshot ![](https://d2x3xhvgiqkx42.cloudfront.net/12345678-1234-1234-1234-1234567890ab/21e446eb-7f73-4f2f-84b1-c6b77e64e45e/2024/04/24/04e9e285-561b-41cd-8280-a0784e247a9e/a746fb8b-3500-4e24-9d63-5f5ec49b6196.png)
Move back and forth between presets to see the differences.
Tip: Note that some design and layout changes impact only your current preset, while others impact all ([learn more](https://dev.wix.com/docs/build-apps/develop-your-app/develop-an-app-with-blocks/widget-design/create-and-manage-design-presets.md#make-changes-per-preset-versus-global-changes)).
* * * ## Step 8 | Catch Your Event in the site editor Go to your site editor to catch the event from your app. First you need to register an Event Handler for the change event: 1. [Install your app](https://dev.wix.com/docs/build-apps/develop-your-app/develop-an-app-with-blocks/deploy-and-manage-blocks-apps/install-a-blocks-app-on-a-site.md) on a site and add the widget to the site. 2. Enable **Dev Mode** on the site.  3. Click on your widget and then click the **Properties and Events** ![](https://d2x3xhvgiqkx42.cloudfront.net/12345678-1234-1234-1234-1234567890ab/378fd532-728d-473b-8f03-30140bda59af/2021/10/25/b8b2d885-6d3d-45ce-b4d1-ad335143e391/c4cb59f0-340d-46ed-989c-2f1f56b3cae3.jpg)  icon. 4. Change the ID of your widget, for example, to "counter1". 5. Click **onChange( )** under Event Handlers. 6. Select **counter1\_change** in the box.
Show screenshot ![counter change event](https://d2x3xhvgiqkx42.cloudfront.net/12345678-1234-1234-1234-1234567890ab/6b5c7381-912e-4754-99e2-d23157db088c/2022/05/10/faf94d96-b2fc-4250-a583-fc4ad766af9b/744aeb30-91e5-43cb-aea3-5fb9bd23cdab.png)
Now write the function. It gets the \`count\` as a parameter and resets the count when it gets to whatever number you decide (in our example: 30). Your function should look like this: ```javascript export function counter1_change({data: count}) { // This function was added from the Properties & Events panel. To learn more, visit http://wix.to/UcBnC-4 // Add your code for this event here: if (count > 30) { $w('#counter1').reset();} } ``` Preview or publish to see your site in action. --- > Portal Navigation: > > - Append `.md` to any URL under `https://dev.wix.com/docs/` to get its markdown version. > - Pages are either content pages (article or reference text) or menu pages (a list of links to child pages). > - To get a menu page, truncate any URL to a parent path and append `.md` (e.g. `https://dev.wix.com/docs/sdk.md`, `https://dev.wix.com/docs/sdk/core-modules.md`). > - Top-level index of all portals: https://dev.wix.com/docs/llms.txt > - Full concatenated docs: https://dev.wix.com/docs/llms-full.txt ## Resource: Tutorial | Create a Countdown Widget with Blocks ## Article: Creating a Countdown Widget ## Article Link: https://dev.wix.com/docs/build-apps/get-started/tutorials/tutorial-create-a-countdown-widget-with-blocks.md ## Article Content: # Tutorial | Create a Countdown App Using Blocks
**Editor compatibility** Wix Blocks apps aren't supported in the Wix Harmony editor. Existing Blocks apps remain available for purchase on the Wix App Market for Wix Editor and Wix Studio sites. To learn more, see [About Wix Harmony and Blocks](https://dev.wix.com/docs/build-apps/develop-your-app/develop-an-app-with-blocks/about-wix-harmony-and-blocks.md).
This tutorial shows you how to build a countdown widget, which counts down to a specific date. It also contains a registration widget where site visitors can register and receive an email notification the day before your event. You will also learn how to install your countdown widget on a site and explore all the key features of Blocks. ![](https://d2x3xhvgiqkx42.cloudfront.net/12345678-1234-1234-1234-1234567890ab/6b5c7381-912e-4754-99e2-d23157db088c/2022/09/01/f5b73e4f-7108-4d53-8479-051585eff68c/09cc3e81-decc-478d-b736-4abb6bfb810e.gif) ## What you get in the template To make things easier, we've created a template so that you can get started right away. The [template](https://blocks.wix.com/wix-blocks-new-app-creator?editorType=RESPONSIVE&originTemplateId=67720f0c-6b4b-426f-aca4-918556dd36ab&http_referrer=documentation) contains: * A countdown widget. You need to complete its design and code its functions and properties. * A registration widget which you need to complete and add to your countdown widget. * Some public utilities that you can use to implement your widget's functionality. * Some backend code that you can use to implement the functions of your email notification. Get the [template](https://blocks.wix.com/wix-blocks-new-app-creator?editorType=RESPONSIVE&originTemplateId=67720f0c-6b4b-426f-aca4-918556dd36ab&http_referrer=documentation) ## Step 1 | Complete the Design of Your Widget To build this widget, start with this [template](https://blocks.wix.com/wix-blocks-new-app-creator?editorType=RESPONSIVE&originTemplateId=67720f0c-6b4b-426f-aca4-918556dd36ab&http_referrer=documentation) and edit it under your Wix account. The template has been left incomplete so that you can learn how to add elements to your widget. The widget is designed with a grid so that you can easily align and place elements. 1. Open the template.  2. Click **Countdown** under **App Interface**.  3. Click **Add Elements** ![](https://d2x3xhvgiqkx42.cloudfront.net/12345678-1234-1234-1234-1234567890ab/6b5c7381-912e-4754-99e2-d23157db088c/2022/09/01/7e9d6f8b-35db-4cf1-a7fe-4ddb986eb57c/5bd7d8c7-bb8f-4a6b-b34e-8d80bf5ff1c5.jpg)  in the top bar. 4. Select **Text**. Drag and drop a **48px Title** box into your widget. 5. Click **Edit Text** and change the text to **SS**. 6. Change the text color to white and center the text using the **Inspector** ![](https://d2x3xhvgiqkx42.cloudfront.net/12345678-1234-1234-1234-1234567890ab/21e446eb-7f73-4f2f-84b1-c6b77e64e45e/2024/04/24/7de6d233-3a18-4ea8-98ee-55f8ee0446c0/a15b0baf-86f5-4566-a434-726efc4cb811.png) .  7. Select the text box and move it into the grid square above the SECONDS label using ![](https://d2x3xhvgiqkx42.cloudfront.net/12345678-1234-1234-1234-1234567890ab/6b5c7381-912e-4754-99e2-d23157db088c/2022/09/01/134e6519-2581-42bf-98b4-cca8a97083c5/ddfb2d91-34e7-4c1b-ad36-c01f94a2433a.png) . 8. Resize it using ![](https://d2x3xhvgiqkx42.cloudfront.net/12345678-1234-1234-1234-1234567890ab/6b5c7381-912e-4754-99e2-d23157db088c/2022/09/01/41b174db-5c43-45ad-b010-7b179e22723e/c0616cbf-d732-4d3d-a616-ec14a65c2195.png) . Learn more about [designing your widget](https://dev.wix.com/docs/build-apps/develop-your-app/develop-an-app-with-blocks/get-started/a-blocks-app-workflow.md) * * *
See how it looks (editing text) ![edit text elements](https://wixmp-833713b177cebf373f611808.wixmp.com/images/083170f5402f6ab563818248f6ed3442.png)
See how it looks (adjusting the layout) ![seconds text box](https://d2x3xhvgiqkx42.cloudfront.net/12345678-1234-1234-1234-1234567890ab/6b5c7381-912e-4754-99e2-d23157db088c/2022/09/01/27484c1a-1034-4d66-832c-4c854d09fb37/5a431e1c-7ea7-418c-adbd-fcb786dbac75.png)
* * * ## Step 2 | Add and Define Your Widget's API Properties You can [define an API for your widget](https://dev.wix.com/docs/build-apps/get-started/tutorials/tutorial-create-a-countdown-widget-with-blocks.md), so that the site builder who installs the widget can interact with it through code. The API can contain properties, events and exported functions. This widget uses two properties: * **endDate**: Defines the end date when the countdown reaches zero. Using this property, site builders can change the end date so that the widget is customized for their site. * **emailId**: Determines the email message that will be sent to users when they sign up for a notification. Learn more about [widget API properties](https://dev.wix.com/docs/build-apps/develop-your-app/develop-an-app-with-blocks/widget-api/blocks-widget-properties.md) ### Give your widget elements an ID First you need to give your widget's elements an ID so that you can easily refer to them in the code. 1. Click on the text box. 2. Give the text box an ID in the **Properties & Events** ![properties icon](https://d2x3xhvgiqkx42.cloudfront.net/12345678-1234-1234-1234-1234567890ab/6b5c7381-912e-4754-99e2-d23157db088c/2022/08/25/c7256f96-e80b-4fa6-8998-db91d11f98e3/e404b243-c33a-4d17-8c87-b0f2dd651945.jpg) panel. In this example, the ID is `secondsTxt`. Note that the other elements have already been given IDs. ### Define the "endDate" and "emailId" properties 1. Click the **Widget Public API** button. 2. Click **Add New Property** in the **Properties** section. 3. Enter the property name, `endDate`. 4. Select the property type. In this case, **Date and Time** (the date is displayed in US format mm/dd/yyyy). 5. Select a default value (the site builder will be able to change this when they install your widget in the editors). 6. Hover over **Properties** and click the ![add icon](https://d2x3xhvgiqkx42.cloudfront.net/12345678-1234-1234-1234-1234567890ab/378fd532-728d-473b-8f03-30140bda59af/2021/06/10/be929c05-3c41-452d-ae3a-1503546f8883/b6abb229-8c19-4d2b-9522-d42d125dcc76.png) icon that appears. 7. Create another property for the triggered email and call it `emailId`. This is a **Text** type property with no default value. * * * ## Step 3 | Add Code to Make Your Widget Work To make your widget count down, you need to create a function in the code that calculates the remaining time until the end date. To do this, your template comes with some pre-installed utilities that you can find in the **Public & Backend** ![](https://d2x3xhvgiqkx42.cloudfront.net/12345678-1234-1234-1234-1234567890ab/6b5c7381-912e-4754-99e2-d23157db088c/2022/09/04/d47aba86-0d01-4d2a-bdf2-b04985946a9a/9ced50f0-4a85-4e63-98fc-4f3e8762ee8c.jpg)  menu.  Blocks uses a new global variable, **$widget** and the property, **$widget.props**, that holds all the properties that you have defined for your widget. Blocks also uses Velo autocomplete, so that you can write code more easily. Learn more about the [widget API](https://dev.wix.com/docs/build-apps/get-started/tutorials/tutorial-create-a-countdown-widget-with-blocks.md) ### Change the code to consider your new function 1. Click on the **Code** ![](https://d2x3xhvgiqkx42.cloudfront.net/12345678-1234-1234-1234-1234567890ab/6b5c7381-912e-4754-99e2-d23157db088c/2022/09/04/d47aba86-0d01-4d2a-bdf2-b04985946a9a/9ced50f0-4a85-4e63-98fc-4f3e8762ee8c.jpg) menu. 2. In the code panel for **Countdown** create a function, `updateTime()`, so that your countdown widget will update the count. Your new function should look like this: ```javascript $widget.onPropsChanged(function () { }); function updateTime() { const {days, hours, minutes, seconds} = getRemainingTime (new Date($widget.props.endDate)); $w('#daysTxt').text = days.toString(); $w('#hoursTxt').text = hours.toString(); $w('#minutesTxt').text = minutes.toString(); $w('#secondsTxt').text = seconds.toString(); } ``` You also need to set an interval for how often the widget updates the remaining time. To do this, add the following code **in** your `onReady()` function. This updates the widget every second. ```javascript $w.onReady(function () { updateTime(); if (wixWindow.viewMode !== "Editor") { setInterval(updateTime, 1000); } }); ```
**Edit time condition** Velo code only runs when you click preview or when you open the live site. The Blocks **onReady** code runs also during editing time, so that you can see it in action while working in the editor. We use the above condition so that your countdown widget doesn't count down during editing time.
### Preview your widget and test its API properties You are ready to preview your widget and its API properties. 1. Click **Preview**. Your widget should countdown every second to the end date. 2. Click **Test API Properties**. A panel appears with the default value you set earlier.  3. Change the date to check if the widget responds and counts down to the new date.
See how it looks ![test api properties](https://d2x3xhvgiqkx42.cloudfront.net/12345678-1234-1234-1234-1234567890ab/6b5c7381-912e-4754-99e2-d23157db088c/2022/09/12/0b5c4b84-eba0-4976-9c25-1f34e89e27ce/fee00975-4b7c-4364-85aa-2da9d3c05907.gif)
* * * ## Step 4 | Create and Code a Custom Panel You can create a custom settings panel so that site builders can change the settings of your widget when they install it on a site. In this example, the custom settings panel allows the site builder to change the end date and define an email ID that determines which email will be sent to users when they register to receive notifications. Learn more about [panels](https://dev.wix.com/docs/build-apps/develop-your-app/develop-an-app-with-blocks/editor-experience-panels/about-panels-in-blocks.md) ### Create a custom panel 1. Click on the **Custom Panels** tab in the **Editor Experience** menu. 2. Click **Create Panel**. 3. Name your panel. In this example, use "My settings". 4. Click **Create Panel**. 5. Click **\+ Add Element**. 6. Select **Text Input**. This will be for the end date. 7. Click **Properties & Events** ![propeties icon](https://d2x3xhvgiqkx42.cloudfront.net/12345678-1234-1234-1234-1234567890ab/6b5c7381-912e-4754-99e2-d23157db088c/2022/08/25/c7256f96-e80b-4fa6-8998-db91d11f98e3/e404b243-c33a-4d17-8c87-b0f2dd651945.jpg) . Give your text input an ID - `endDateInput`. 8. Select the text element and click **Settings**. 9. Add the name "End Date" in the **Field Title** field. 10. Delete the text in the **Default Text** field. 11. Set the placeholder text to "End Date". 12. Add a text divider. 13. Click **Settings**. Add a title in the **Section Title** field. In this example, use "Triggered email". 14. Add another **Text Input**. Give your text input an ID - `emailIdInput`. 15. Select the text element and click **Settings**. 16. Add the name "Email ID" in the **Field Title** field. 17. Delete the text in the **Default Text** field. 18. Set the placeholder text to "Email ID". The design of your custom panel is complete. Now you need to implement it by adding code.
See how it looks ![settings custom panel](https://d2x3xhvgiqkx42.cloudfront.net/12345678-1234-1234-1234-1234567890ab/6b5c7381-912e-4754-99e2-d23157db088c/2022/08/30/faa8fae4-9464-4528-892c-b364138b91f2/6559df8f-007e-4ae8-87cb-245dc91a1263.png)
### Add code to your custom panel You want your custom panel to display the current end date and email ID when it loads. The site builder uses the panel to change these values. You need to add code to the panel so that when these inputs change, it updates your widget. Learn more about [adding code to your custom panels](https://dev.wix.com/docs/build-apps/develop-your-app/develop-an-app-with-blocks/editor-experience-panels/add-code-to-custom-panels-in-blocks.md). To enable panel elements to interact with your widget and perform actions in the editor, you can use the Velo `wix-widget` module in your code. To use the Widget API, import `wixWidget` from the `wix-widget` module. Insert the following code **before** your `onReady()` function. ```javascript import wixWidget from 'wix-widget'; ``` You want your widget to update when the values change, so you need to register an `onChange` event. You also need to add `async` to your `onReady()` function as you will be using some asynchronous functions. Your `onReady()` function should look like this: ```javascript $w.onReady(async function () { const { endDate, emailId } = await wixWidget.getProps(); $w('#endDateInput').value = endDate; $w('#emailIdInput').value = emailId; $w('#endDateInput').onChange(e => { wixWidget.setProps({ endDate: e.target.value }); }); $w('#emailIdInput').onChange(e => { wixWidget.setProps({ emailId: e.target.value }); }); }); ``` Click ![](https://d2x3xhvgiqkx42.cloudfront.net/12345678-1234-1234-1234-1234567890ab/6b5c7381-912e-4754-99e2-d23157db088c/2022/08/31/c441d6e2-852d-4b01-819e-e5f16a84f5dd/9e2696fd-f012-4e2d-bbbd-7d8f0de70c45.png)  **Run** or **Preview** to check your code
See how it looks ![settings panel code preview](https://d2x3xhvgiqkx42.cloudfront.net/12345678-1234-1234-1234-1234567890ab/6b5c7381-912e-4754-99e2-d23157db088c/2022/08/30/5c89b383-ae8e-4401-a5a7-7d8700913388/4474db44-3092-4c89-bb5c-775cb69755d1.gif)
* * * ## Step 5 | Configure Your Widget Now that your panel is designed and coded, you need to configure your widget so that your panel connects to one of your widget's action bar buttons. The **Configuration** tab within the **Editor Experience Panel** ![](https://d2x3xhvgiqkx42.cloudfront.net/12345678-1234-1234-1234-1234567890ab/21e446eb-7f73-4f2f-84b1-c6b77e64e45e/2024/04/24/89cc2cba-4f66-4813-85bd-4d9904cae791/055c9aa5-3dc2-44f6-b0ed-425fb3fee6f2.png)  enables you to control how your widget behaves when a site builder installs and customizes it on a site. You can give your widget and its elements display names, so that it is clear to site builders what your widget does. You can also make changes to the floating action bars that appear in the editors when site builders select elements in your widget. Learn more about [configuration](https://dev.wix.com/docs/build-apps/develop-your-app/develop-an-app-with-blocks/editor-experience-configuration/about-configuration-in-blocks.md). ### Add your custom panel to your widget's floating action bar 1. Click the Editor Experience Panel icon ![](https://d2x3xhvgiqkx42.cloudfront.net/12345678-1234-1234-1234-1234567890ab/21e446eb-7f73-4f2f-84b1-c6b77e64e45e/2024/04/24/89cc2cba-4f66-4813-85bd-4d9904cae791/055c9aa5-3dc2-44f6-b0ed-425fb3fee6f2.png) . 2. Select **Configuration**.  3. Select your countdown widget. A floating action bar appears. 4. Click **Settings**. 5. Click ![](https://d2x3xhvgiqkx42.cloudfront.net/12345678-1234-1234-1234-1234567890ab/6b5c7381-912e-4754-99e2-d23157db088c/2022/09/04/520f26e0-3449-4409-bc59-acb658f7555e/0f09fa28-68e4-4aec-84e4-effb07a8cd90.png)  **Action Button Settings**. The **Main Action Settings** panel appears. 6. Select **My settings** from the dropdown list to select your custom panel.
See how it looks ![](https://d2x3xhvgiqkx42.cloudfront.net/12345678-1234-1234-1234-1234567890ab/6b5c7381-912e-4754-99e2-d23157db088c/2022/09/12/7b909ba7-417e-45dc-8450-521a9ea3a64f/0bc3fc45-d3fb-4a86-991c-676a2be8a5e0.png)
* * * ## Step 6 | Add a Second (Inner) Widget and Implement the Registration Logic The template comes with a second widget called **Registration.** You can find it under **App Interface**.  When you click **Layers** you can see that it has been created as a multi-state box with three states. It has a button labeled **Register**, which changes to **Submit** when the site visitor clicks it. It also has a field box where site visitors can add their email address. A thank-you message appears when a site visitor has registered. This widget also comes with a design preset which can be used for mobile view. Learn more about [design presets](https://dev.wix.com/docs/build-apps/develop-your-app/develop-an-app-with-blocks/widget-design/about-design-presets.md) ### Add your registration widget to the countdown widget You're now ready to add your registration widget to your first widget, the countdown widget. In Blocks, you can create lots of different widgets and add them to other widgets.  Learn more about working with [widgets within widgets](https://dev.wix.com/docs/build-apps/develop-your-app/develop-an-app-with-blocks/site-widgets/add-nested-widgets-in-blocks.md) 1. Working in the **Design** tab, select your countdown widget. 2. Click **More Options** ![more options](https://d2eyqiy4n03ve6.cloudfront.net/12345678-1234-1234-1234-1234567890ab/2015/08/03/ea5aa155-aa5e-4ef1-8bea-69375765e8c4.png) and select **Add Widget**. 3. Select **Registration**. Your inner widget appears in the middle of your countdown widget. 4. Drag and stretch your inner widget to fit the lower section of your countdown widget. 5. Change its ID to `registration` in **Properties & Events** ![propeties icon](https://d2x3xhvgiqkx42.cloudfront.net/12345678-1234-1234-1234-1234567890ab/6b5c7381-912e-4754-99e2-d23157db088c/2022/08/25/c7256f96-e80b-4fa6-8998-db91d11f98e3/e404b243-c33a-4d17-8c87-b0f2dd651945.jpg).
**Another way to add a widget** You can also add an inner widget by clicking the  ![add button](https://d2x3xhvgiqkx42.cloudfront.net/12345678-1234-1234-1234-1234567890ab/6b5c7381-912e-4754-99e2-d23157db088c/2022/09/08/65319986-7b71-49dc-9c0a-973c4ae3536c/e7978e5c-5c79-487b-8b3e-d78b9947ac57.jpg) **Add** **Elements** menu. Select **MY WIDGETS** and drag and drop the widget you want to add into the first widget.
See how it looks ![](https://d2x3xhvgiqkx42.cloudfront.net/12345678-1234-1234-1234-1234567890ab/21e446eb-7f73-4f2f-84b1-c6b77e64e45e/2024/04/24/e61248c6-db97-44c7-8bb8-914d5e4fc62f/48eac3d1-b58e-4b4d-bac5-57f9208549a5.png)
See how it looks ![drag and stretch inner widget](https://d2x3xhvgiqkx42.cloudfront.net/12345678-1234-1234-1234-1234567890ab/6b5c7381-912e-4754-99e2-d23157db088c/2022/09/12/4bfd8693-c902-465a-ac43-ef2b3435839e/5540e47b-9396-45e7-8211-640aa2ef05d5.gif)
### Implement the registration logic in the main widget's code You'll implement the code for user registration in the main widget (Countdown), using functions that are defined in the `contactUtils.js` and `collectionUtils.js` files. The `onSubmit()` function creates or updates a contact using the `wix-crm` API via the `createContact` utility, then stores the subscription data in your app's collection. The function receives the user's email address from the registration form and updates the collection. 1. Create a new async function. 2. Call it `onSubmit`. It uses the create contact utility from `contactUtils.js` and the collection name helper from `collectionUtils.js`. Your code should look like this: ```javascript async function onSubmit({ email }) { const contact = await createContact(email); wixData.insert(getSubscriptionsCollectionName(), { endDate: new Date($widget.props.endDate), emailId: $widget.props.emailId, contactId: contact.contactId }); } ``` ### Register for the onSubmit event In your `onReady()`, after your `updateTime()` function, add the following code: ```javascript $w('#registration').onSubmit(onSubmit); ```
**Backend code is already included** The backend code is already implemented in your template in Blocks. It includes an export function, **notify()**, which uses the pre-installed utilities. It checks the remaining time, triggers the email when ready and updates the collection. You need to invoke this in the editor, as explained below in Step 10.
* * * ## Step 7 | Release Your App and Give it a Namespace Now you are ready to release your app for the first time. Your first release will be a major version. Later, when you are working on your app, you can choose a minor or major version. A minor version is updated automatically on all the sites where it appears. You just need to refresh the page. In a major version, the site builder needs to update your app manually. An indication appears next to the name of the app in the **Installed Apps** panel in the Editor.  Learn more about [versions in Blocks](https://dev.wix.com/docs/build-apps/develop-your-app/develop-an-app-with-blocks/deploy-and-manage-blocks-apps/manage-blocks-app-versions.md) When you click build for the first time, Blocks prompts you to give your app a namespace. This namespace is used to refer to your collection in Velo code in the editors and in the app’s code in Blocks. Learn more about the [app namespace](https://dev.wix.com/docs/build-apps/get-started/tutorials/tutorial-create-the-recipes-app-with-blocks.md) ### Your first release 1. Click **Release**. 2. Enter a namespace for your app and click **Next**. 3. Select **Major Version** and click **Release**. 4. You get a message that Version 1.0 is built. Click **Got it** to continue working on your app. ## Step 8 | Add a Collection to Your Widget Now you need to create a collection to store all of the subscriptions. Collections in Blocks are empty placeholders that you design in Blocks, which will be filled with data once the app is installed on a site. Learn more about [collections in Blocks](https://dev.wix.com/docs/build-apps/develop-your-app/develop-an-app-with-blocks/cms-collections-in-blocks/connect-elements-to-collection-fields-with-no-code.md) The template has a pre-installed utility called `getSubscriptionsCollectionName()`, in **collectionUtils.js** under **Public & Backend**. It constructs the full name of the collection so that you don't have to add your full app namespace every time you refer to it in the code. ### Configure your collection utility To configure your collection utility: 1. Click **collectionUtils.js** under **Public & Backend**. 2. Add your app's namespace. Your code should look like this, with your own namespace: ```javascript const NAMESPACE = '@mywixaccount/my-app-namespace'; export function getSubscriptionsCollectionName() { return `${NAMESPACE}/subscriptions`; } ``` ### Create your collection To create your collection: 1. Click **CMS**. 2. Click **+ Create collection**. 3. Give your collection a meaningful name. In this example, use **Subscriptions**. 4. Click **Create**.  ### Add fields to your collection 1. Click **Add Item** to add a field to your collection. 2. Enter **Title**, for example **Subscription**. 3. Click **Add Field**. 4. Select **Date**, click **Choose Field Type**. 5. Enter **endDate** in the **Field Name** field. This will be the last date up until which people can register. 6. Click **Save**. 7. Now click **Add Field** and create a **Text** type field and call it **emailId** for the triggered email. 8. Add another **Text** type field and call it **contactId**. This will store the contact details of registered users. 9. Now create a **Boolean** type field and call it **notified**. This ensures that subscribers will be notified only once.
See how it looks ![add field in subscriptions](https://d2x3xhvgiqkx42.cloudfront.net/12345678-1234-1234-1234-1234567890ab/6b5c7381-912e-4754-99e2-d23157db088c/2022/09/04/24dfdee6-73d5-467e-bcdb-c33b89672e4b/52a0a7d7-3c94-42c5-99fa-bd56f8288d39.png)
### Set permissions for your collection You want any site visitor to be able to add content to your collection by subscribing.  1. Click **More Options** ![](https://d2x3xhvgiqkx42.cloudfront.net/12345678-1234-1234-1234-1234567890ab/6b5c7381-912e-4754-99e2-d23157db088c/2022/09/05/ae46274e-c846-4af2-ae94-3392a416ee15/d105bc7d-6e3e-4a3f-b9ea-18aad96248e6.png) for your collection from the **CMS** menu. 2. Select **Permissions & Privacy**.  3. Select the dropdown menu **Who can view this content?**. 4. Select **Anyone**. 5. Click **Save**.
See how it looks ![collections permissions and privacy](https://d2x3xhvgiqkx42.cloudfront.net/12345678-1234-1234-1234-1234567890ab/6b5c7381-912e-4754-99e2-d23157db088c/2022/09/04/03567fc0-c0fe-4322-96c6-23ff51462873/4246826e-d88b-4b15-a087-4195da644b90.png) ![edit collection settings](https://d2x3xhvgiqkx42.cloudfront.net/12345678-1234-1234-1234-1234567890ab/6b5c7381-912e-4754-99e2-d23157db088c/2022/09/05/90847e84-9da5-495f-99a8-6da370a6fd24/9da423fd-3f16-427e-b94d-1792a0ee2323.png)
* * * ## Step 9 | Install Your App on a Site in the Wix Editor You can install your widget on any of the editors. The following example uses the Wix Editor. Before you install your app, you need to release your app a second time. This will be a major release, because you have created a collection. 1. After releasing your app, open your website. 2. Click **Add apps** ![](https://d2x3xhvgiqkx42.cloudfront.net/12345678-1234-1234-1234-1234567890ab/6b5c7381-912e-4754-99e2-d23157db088c/2022/09/13/f834347c-197b-4567-b41c-0223896006be/c7ee749e-357c-4a5b-95da-7e551b526d73.png) .  3. Click **Custom Apps**. A list of all your apps appears. 4. Select your app from the **Available apps** list. 5. Click **Install App**. 6. Click **Add** **Elements** ![](https://d2x3xhvgiqkx42.cloudfront.net/12345678-1234-1234-1234-1234567890ab/6b5c7381-912e-4754-99e2-d23157db088c/2022/09/13/d5302806-c42f-4e0e-9f2b-8d63be2a4524/0a96ba99-7bb7-4f35-afb4-efa49776f90b.png) . 7. Select **My Widgets**. 8. Double click your widget to add it to your site.  Your widget is fluid and you can select its elements so that you can customize the widget to your site. You can also open the settings panel and change the default end date. 
See how it looks ![countdown widget installed in the editor](https://d2x3xhvgiqkx42.cloudfront.net/12345678-1234-1234-1234-1234567890ab/6b5c7381-912e-4754-99e2-d23157db088c/2022/08/31/e2d8fcc5-7225-4da9-9fd5-b82c373fe11e/dc03bc9d-38d4-4c1b-b3e0-790de4474d4f.gif)
### Set an Email ID Users can register for an email notification. You need to create the email that will be sent and get an ID for it so that the widget API can identify which email needs to be sent. 1. Open **My Dashboard** from the **Site** menu in the top bar. 2. Go to **Triggered Emails** in **Developer Tools**. 3. Click **Get Started**.  4. Enter a subject. 5. Design the email using the editor tools. 6. Click **Save & Continue**. 7. Add the sender details, the **From name** and the **Reply-to email**, and click **Save**. 8. Click **Got it**. 9. Click **Save & Publish** again. You get a generated identification code that links to the email that you have designed so that it will be sent to anyone who registers.  10. Enter this code in your custom panel in the **Email ID** field. ### Use Backend Code in Wix Editor to Notify Subscribers Backend code is included with your app in Blocks, but you need to invoke the notification in the editor. ### Invoke your notify function 1. Click **\+ New web module** under **Backend** in **Public & Backend** in the Wix editor. 2. Call it `backend.web.js`. 3. Import the backend function in your site's code section under **backend.wb.js**. Your code should look like this: ```javascript import { notify } from 'myWixId/my-application-name-backend'; ``` Now create an export function `invokeNotify` in **backend.jsw** in your site's code section. Your code should look like this: ```javascript export function invokeNotify() { return notify (); } ``` Now you need to create a [scheduled job](https://dev.wix.com/docs/velo/articles/getting-started/schedule-jobs.md). The widget's frontend code only runs when someone is on the page. You need a backend process that runs even when no one is visiting to check who should be notified and send emails. A Scheduled Job is the built‑in way to do that. 1. Click **Add** ![](https://d2x3xhvgiqkx42.cloudfront.net/12345678-1234-1234-1234-1234567890ab/6b5c7381-912e-4754-99e2-d23157db088c/2022/09/01/7ef91d19-d5d6-41b5-9f31-4a03269c9a61/b3f3cded-858f-4bb2-918e-d9c00f912567.png) in **Backend** 2. Click ![](https://d2x3xhvgiqkx42.cloudfront.net/12345678-1234-1234-1234-1234567890ab/6b5c7381-912e-4754-99e2-d23157db088c/2022/09/01/e0f3d35c-2ffa-4cc2-9a47-a8e01ea1c99c/cb360e28-8c01-4af5-b657-8596f865778a.png) **Add scheduled jobs**. Add the following code under **jobs.config** in your site's code section. In this example, the notify function is invoked at 10 minutes past the hour, every hour. Your code should look like this: ```javascript { "jobs": [{ "functionLocation": "/backend.jsw", "functionName": "invokeNotify", "description": "", "executionConfig": { "cronExpression": "10 * * * *" } }] } ``` > **Note:** Scheduled jobs run only on the published site. Expect up to 1–2 minutes delay. * * * ## Step 10 | Test Your App Now you are ready to test your app.  1. Publish your site.  2. Register to receive an email notification.  3. Go back to the editor and check your collection.  4. You can see that there is a new subscriber. Wait until the countdown reaches 0 days and you'll get a notification email. You will also see a tick in the **notified** field.
**Check your triggered emails** You can also check in **Triggered Emails** under **Developer Tools** in your dashboard to see if the email has been sent.
--- > Portal Navigation: > > - Append `.md` to any URL under `https://dev.wix.com/docs/` to get its markdown version. > - Pages are either content pages (article or reference text) or menu pages (a list of links to child pages). > - To get a menu page, truncate any URL to a parent path and append `.md` (e.g. `https://dev.wix.com/docs/sdk.md`, `https://dev.wix.com/docs/sdk/core-modules.md`). > - Top-level index of all portals: https://dev.wix.com/docs/llms.txt > - Full concatenated docs: https://dev.wix.com/docs/llms-full.txt ## Resource: Tutorial | Create the Recipes App with Blocks ## Article: The Recipes App ## Article Link: https://dev.wix.com/docs/build-apps/get-started/tutorials/tutorial-create-the-recipes-app-with-blocks.md ## Article Content: # Tutorial | Create a Recipes App Using Blocks
**Editor compatibility** Wix Blocks apps aren't supported in the Wix Harmony editor. Existing Blocks apps remain available for purchase on the Wix App Market for Wix Editor and Wix Studio sites. To learn more, see [About Wix Harmony and Blocks](https://dev.wix.com/docs/build-apps/develop-your-app/develop-an-app-with-blocks/about-wix-harmony-and-blocks.md).
This tutorial walks you through building the **Recipes** app. The app showcases recipes on Wix sites, so site visitors can see an image, description, and rating for each recipe. They can also subscribe to get new recipes.   The app includes: * 2 widgets - **Recipes** and **Subscribe** * A custom settings panel * A collection for holding the recipes data * A dashboard page for allowing builders to interact with data in the app **Ready to begin?** [Create your own copy of the app](https://blocks.wix.com/wix-blocks-new-app-creator?editorType=RESPONSIVE&originTemplateId=0f424cdc-4998-4c66-8a6e-19be9a9a3c23&http_referrer=documentation) in Blocks. The link leads to a template with most of the design and some of the code ready.  >**Notes:** > Throughout this tutorial, you'll move back and forth from creating the app in Wix Blocks to testing it on a Wix site.
![recipe app](https://d2x3xhvgiqkx42.cloudfront.net/12345678-1234-1234-1234-1234567890ab/378fd532-728d-473b-8f03-30140bda59af/2023/10/17/05e14192-58c5-4c5d-a7ae-0613ca96992e/808ff254-5e3c-4c0c-96ce-f02f6ba1f573.png)
* * * ## Step 1 | Create a new Design Preset [Design Presets](https://dev.wix.com/docs/build-apps/develop-your-app/develop-an-app-with-blocks/widget-design/about-design-presets.md) are Blocks' way of allowing you to have multiple designs and layouts for the same widget. They're often used for adapting the app for different devices, like desktop and mobile. The first thing we'll do is create another preset for when the widget is used on a mobile phone. This preset will be a duplicate Card Layout preset, with a few changes.  1. In case you missed this first step: click [this link](https://blocks.wix.com/wix-blocks-new-app-creator?editorType=RESPONSIVE&originTemplateId=0f424cdc-4998-4c66-8a6e-19be9a9a3c23https://blocks.wix.com/wix-blocks-new-app-creator?editorType=RESPONSIVE&originTemplateId=0f424cdc-4998-4c66-8a6e-19be9a9a3c23&http_referrer=documentation) to create your own copy of the app. 2. Name your app: go to the top bar and click on the app's temporary name. 3. Go to the **Design Presets** menu. The app template already has 3 presets and you'll create a new one now.  4. Duplicate the **Card Layout** preset (to do this, hover, then click the ![Duplicate preset icon](https://d2x3xhvgiqkx42.cloudfront.net/12345678-1234-1234-1234-1234567890ab/378fd532-728d-473b-8f03-30140bda59af/2023/10/04/6937c4d8-69a7-43f7-87b9-cd2e7d2992e7/c70f0391-204b-418b-b8d0-7a661495ce95.jpg) icon).  5. Rename the new preset to **Mobile Layout** and make sure it's selected.  6. On the right side of the screen, go to the **Design** menu of your widget. 7. Click on the **Layers** ![layers](https://d2x3xhvgiqkx42.cloudfront.net/12345678-1234-1234-1234-1234567890ab/378fd532-728d-473b-8f03-30140bda59af/2023/10/04/f7b41afc-940b-4dad-8570-be5a7c71ae97/38653f43-8499-4015-8f3f-37e02e5c3ec2.png) menu and select the entire widget. 8. Change the widget's width to 320px. 9. In the **Layout** section, click **Rows**. 10. Select your widget's first grid row. Change the first grid row height to 150px.
See screenshot ![](https://wixmp-833713b177cebf373f611808.wixmp.com/images/47cbebdc59adde0e0cb347aabac1df23.png)
11.  Go to **Layers** ![layers](https://d2x3xhvgiqkx42.cloudfront.net/12345678-1234-1234-1234-1234567890ab/378fd532-728d-473b-8f03-30140bda59af/2023/10/04/f7b41afc-940b-4dad-8570-be5a7c71ae97/38653f43-8499-4015-8f3f-37e02e5c3ec2.png) and click on the first box in the **#recipesRepeater**. Click on the **#recipesTitle**.  12.  Change the title's font size to 18.
See screenshot ![](https://wixmp-833713b177cebf373f611808.wixmp.com/images/f524fbbc4a4ff6ff47a18babd0245168.png)
13. Click on the **Description**, click ![](https://d2x3xhvgiqkx42.cloudfront.net/12345678-1234-1234-1234-1234567890ab/378fd532-728d-473b-8f03-30140bda59af/2023/12/06/eaa05edd-0484-4992-bd73-cc035912ae68/48463e03-f5cf-47a5-81bc-42d0044bf84f.jpg), then **Display**, and set it to **Hide on this preset**, to hide the description in mobile.
See screenshot ![hide description](https://wixmp-833713b177cebf373f611808.wixmp.com/images/8593cabf9ea9a88ce1223da17f0acda7.png)
12.  Go back to the **Card Layout** preset and check that the description **does** appear there. * * * ## Step 2 | Test the app Test your app on a site to see how it works. 1. Click **Test** on the top right. 2. You will be prompted to create a [namespace](https://dev.wix.com/docs/build-apps/develop-your-app/develop-an-app-with-blocks/code-in-blocks/creating-a-namespace-for-your-app.md) first. Your namespace allows your app to interact with data collections and code files in its code.   3. Create a [test version](https://dev.wix.com/docs/build-apps/develop-your-app/develop-an-app-with-blocks/deploy-and-manage-blocks-apps/test-your-app-on-a-site.md). 4. Select a site to test your app on. If you don't have a test site, click **Create Dev Site**. 5. Add your widget. Go to the **App Widgets** section of the **Add** ![Add panel icon](https://d2x3xhvgiqkx42.cloudfront.net/12345678-1234-1234-1234-1234567890ab/378fd532-728d-473b-8f03-30140bda59af/2023/10/04/8bd603e1-b2ab-4084-890c-9be46bea7546/1e172246-819f-4f89-8083-c72a6b96bf52.png) panel. Click or drag the Recipes widget to add it to your site.
See screenshot ![add widget](https://wixmp-833713b177cebf373f611808.wixmp.com/images/8e3fc0e5795a84089925d007b920f846.png)
Now let's do some actions on this widget in the site, just to see how it works. 1. Click the **Stretch** ![Stretch widget icon](https://d2x3xhvgiqkx42.cloudfront.net/12345678-1234-1234-1234-1234567890ab/378fd532-728d-473b-8f03-30140bda59af/2023/10/04/20b8e657-f5de-41a1-802a-3425e8110a69/50ca7b0b-3348-4d1a-84ef-b78677e81686.png) icon to stretch your widget in the site section.  2. Go to your desktop ![Desktop view icon](https://d2x3xhvgiqkx42.cloudfront.net/12345678-1234-1234-1234-1234567890ab/378fd532-728d-473b-8f03-30140bda59af/2023/10/04/92b0cef9-e9e6-45c8-a68b-6cff675a2f47/ab1ed920-236a-4756-ab5b-380245d4c529.png) view. Click the **Presets** ![](https://d2x3xhvgiqkx42.cloudfront.net/12345678-1234-1234-1234-1234567890ab/378fd532-728d-473b-8f03-30140bda59af/2024/05/27/2907ce70-8afe-48d0-a3b7-65097674f11c/19742c50-14ba-48de-a648-f09689a259cf.png) action button of your widget and change the preset.  3. Go to your mobile ![Mobile view icon](https://d2x3xhvgiqkx42.cloudfront.net/12345678-1234-1234-1234-1234567890ab/378fd532-728d-473b-8f03-30140bda59af/2023/10/05/a310c43d-7d52-4540-ae48-8d7eda8a2ea1/1d3e1f7c-993a-4b5f-8f62-bbd89bc3d934.png) view and change your preset again to the **Mobile Layout** preset. 4. Right-click on the widget and click **Reset Widget**, to go back to the original design.  * * * ## Step 3 | Add the recipes collection in Blocks Now, go back to Blocks to continue creating the app. 1. Go back to Blocks. 2. Click the **CMS** icon. 3. Create a collection called **recipes**. 4. Add the following fields (make sure that the names are **exactly** the same, no caps): * **image** type **Image** * **description** type **Text** * **duration** type **Text** * **rating** type **Number** 5.  Go to [our demo site](https://wixblocks.wixstudio.io/cookingwithmaria), search for the words "Collection data" and save the data file to your computer.  6. Import the data to your collection.
See screenshot ![import](https://d2x3xhvgiqkx42.cloudfront.net/12345678-1234-1234-1234-1234567890ab/378fd532-728d-473b-8f03-30140bda59af/2024/02/05/ed7d6e8e-6562-4ea5-9242-9382fecc74f3/480ebf3b-84f7-4910-9428-4e3de9090d2a.png)
7. Click **More Actions** and select **Collection settings** from the dropdown. 8. Copy the collection ID.
See screenshot ![copy](https://wixmp-833713b177cebf373f611808.wixmp.com/images/2b2a4307a151ccdecd8573dd59878bf5.png)
8. Go to **collectionUtils.js** file in the **Public and Backend** ![](https://d2x3xhvgiqkx42.cloudfront.net/12345678-1234-1234-1234-1234567890ab/378fd532-728d-473b-8f03-30140bda59af/2023/10/16/5017b79e-7eee-41c5-985d-28067e549376/efbd7898-3f64-4ed1-b25b-77505a08b8cd.png)  files. This is the file for interacting with the app's collection.  9. Change the value of **collectionName** from '@wixBlocks/recipes-app/recipes' to your collection ID.
![change collection name](https://wixmp-833713b177cebf373f611808.wixmp.com/images/aa8803c8fe8ffc10740854516a437c2c.png)
* * * ## Step 4 | Add logic to the Recipes widget This step populates the repeater with the data from the collection, using code. 
**Code snippets** You can also find the following code snippets in the **codeSnippets.js** file in the **Public and Backend** ![code files icon](https://d2x3xhvgiqkx42.cloudfront.net/12345678-1234-1234-1234-1234567890ab/378fd532-728d-473b-8f03-30140bda59af/2023/10/16/35686f9a-c8fa-4f17-88cd-c650540cc824/8a656d1d-b4a1-4dd5-adeb-d2f3f12a041a.png) section.
1. Click **App Interface** ![](https://d2x3xhvgiqkx42.cloudfront.net/12345678-1234-1234-1234-1234567890ab/378fd532-728d-473b-8f03-30140bda59af/2024/04/24/93ca045a-ae3e-4d1b-941c-c79a7144fd0e/5a9379fc-820d-4438-ae56-bbe17af6a938.png)  to go back to the **Recipes** widget. 2. Paste the following snippet in your widget code.  ```javascript // import { populateRepeater } from "public/repeaterUtils"; import { getRecipesCollectionName, queryCollectionItems } from 'public/collectionUtils' ``` 3. Create an **initRepeater()** function. For now, create the repeater to show 4 items. We'll change this later.  ```javascript async function initRepeater(){ const collectionItems = await queryCollectionItems(getRecipesCollectionName()); populateRepeater($w('#recipesRepeater'), collectionItems, 4); } ``` 4. Await the **initRepeater()** function in your widget's **onReady()** function. ```javascript $w.onReady(async function () { await initRepeater(); }); ``` This is the full widget code at the moment:  ```javascript // Full Recipes widget's code import { populateRepeater } from 'public/repeaterUtils' import { getRecipesCollectionName, queryCollectionItems } from 'public/collectionUtils' $w.onReady(async function () { await initRepeater(); }); $widget.onPropsChanged(async (oldProps, newProps) => { }); async function initRepeater(){ const collectionItems = await queryCollectionItems(getRecipesCollectionName()); populateRepeater($w('#recipesRepeater'), collectionItems, 4); } ``` ## Step 5 | Create the Recipes widget API In the previous step we defined the repeater to show 4 items from the database. But what if a site builder who installed your app wants to show a different number of items? Let's add a property to the Recipes widget API. The property will hold the number of items to display in the widget, and will replace the constant number of 4 that we added in the previous step.  1. Click the **Widget API** ![](https://d2x3xhvgiqkx42.cloudfront.net/12345678-1234-1234-1234-1234567890ab/378fd532-728d-473b-8f03-30140bda59af/2023/10/16/3fe0b030-f3ef-4433-b565-4f6f448b910b/2db07e5e-14d7-466a-8f00-85a527b9ea2a.jpg)  icon, on the right of your widget's code area.  2. Click **Add New Property** 3. Name your property **itemsToDisplay** and give it a display name (such as: "Items to Display", which is more readable). 4. Give it a type of number and a default value of 3. 
See screenshot ![items to display](https://d2x3xhvgiqkx42.cloudfront.net/12345678-1234-1234-1234-1234567890ab/378fd532-728d-473b-8f03-30140bda59af/2023/10/16/be852b9d-d70b-49bf-a6cc-1cf4a7ebf802/3e507c12-09cb-4fa3-ae54-a95e0b08f8d7.png)
5.  Update the **populateRepeater** function so that it sends the prop as a parameter instead of the 4. ```javascript populateRepeater($w('#recipesRepeater'), collectionItems, $widget.props.itemsToDisplay); ``` The **onPropsChanged()** function is triggered when an event of props changing is detected. You can add custom logic to this function. 6.  Await the **initRepeater()** function in your **onPropsChanged()** function:   ```javascript await initRepeater(); ``` Here is the full widget code, after adding the property.  ```javascript // Full Recipes widget's code import { populateRepeater } from 'public/repeaterUtils' import { getRecipesCollectionName, queryCollectionItems } from 'public/collectionUtils' $w.onReady(async function () { await initRepeater(); }); $widget.onPropsChanged(async (oldProps, newProps) => { await initRepeater(); }); async function initRepeater(){ const collectionItems = await queryCollectionItems(getRecipesCollectionName()); populateRepeater($w('#recipesRepeater'), collectionItems, $widget.props.itemsToDisplay); } ``` * * * ## Step 6 | The "My Settings" panel When a site builder installs your widget, they can change the value of the properties with an autogenerated **Settings** panel in your widget's floating menu. However, you can also build a custom panel and add custom logic to it.  1. Click the **Editor Experience** icon. 1. Click the **Custom Panels** tab. The app has a custom panel nameD **My Settings**. Look at the code tab. The code gets the property and sets a slider's value accordingly.  2. Add an **onChange()** function inside the **onReady()**, so that when the property is changed by the slider, the function notifies the panel to set the widget props again.  ```javascript $w('#panelSlider1').onChange(async event => { await wixWidget.setProps({itemsToDisplay: event.target.value}); }); ``` This is the full panel code:  ```javascript import wixWidget from 'wix-widget'; // Control your widget's properties, design presets, and more. import wixEditor from 'wix-editor'; // interact with the Editor by removing or restoring widget elements, opening Dashboard panels, and more. $w.onReady(async function () { const props = await wixWidget.getProps(); $w('#panelSlider1').value = props.itemsToDisplay; $w('#panelSlider1').onChange(async event => { await wixWidget.setProps({ itemsToDisplay: event.target.value }); }); }); ```
**Tip:** Note the [wix-widget](https://www.wix.com/velo/reference/wix-widget) and [wix-editor](https://www.wix.com/velo/reference/wix-editor) modules at the beginning of the panel code. They are unique to [Blocks custom panel code](https://dev.wix.com/docs/build-apps/develop-your-app/develop-an-app-with-blocks/editor-experience-panels/add-code-to-custom-panels-in-blocks.md).
* * * ## Step 7 | Make configuration changes The [**Configuration**](https://dev.wix.com/docs/build-apps/develop-your-app/develop-an-app-with-blocks/editor-experience-configuration/about-configuration-in-blocks.md) tab in the **Editor Experience** ![](https://d2x3xhvgiqkx42.cloudfront.net/12345678-1234-1234-1234-1234567890ab/378fd532-728d-473b-8f03-30140bda59af/2024/04/24/d885478b-0fa3-46d0-950a-801399d94383/8dc747a0-244b-4714-bd4c-7a71986a8394.png)  panel allows you to control the editor experience of a site builder who installs your app.  1. Click Editor Experience ![](https://d2x3xhvgiqkx42.cloudfront.net/12345678-1234-1234-1234-1234567890ab/378fd532-728d-473b-8f03-30140bda59af/2024/04/24/d885478b-0fa3-46d0-950a-801399d94383/8dc747a0-244b-4714-bd4c-7a71986a8394.png) . 2. Go to the **Configuration** tab.  3. Click the gray part of the widget, to edit the action bar of the Recipes widget.  4. Click the **Settings** button. 5. Click **Action Button Settings** and connect it to the **My Settings** panel.  Now, whenever a site builder clicks "Settings", they will see your custom panel. 
See screenshot ![](https://d2x3xhvgiqkx42.cloudfront.net/12345678-1234-1234-1234-1234567890ab/21e446eb-7f73-4f2f-84b1-c6b77e64e45e/2024/04/24/936d66e7-fed2-4fed-8744-c45eca8e62ce/584d64e9-5744-4f2b-a674-bf0e8562a23d.png)
Another change you can make in the **Configuration** tab is to prevent layout elements from being selected. A site builder has no reason to select the repeater in your widget.  6. Select the repeater and uncheck **Element can be selected** box. 
See screenshot ![element can be selected](https://d2x3xhvgiqkx42.cloudfront.net/12345678-1234-1234-1234-1234567890ab/378fd532-728d-473b-8f03-30140bda59af/2023/10/16/540d4880-5c57-4526-8d53-6186129185b6/a072c847-6ee3-4aee-a7e9-455610171a04.png)
* * * ## Step 8 | Check the app on your site Let's check that the app works on your site.  1. Click **Test** to test your app on the same site again. Go to your test site.   Now let's add data to the collection in the site, to check the app functionality ([learn more](https://dev.wix.com/docs/build-apps/develop-your-app/develop-an-app-with-blocks/cms-collections-in-blocks/connect-elements-to-collection-fields-with-no-code.md)).  2.  Go to the CMS ![](https://d2x3xhvgiqkx42.cloudfront.net/12345678-1234-1234-1234-1234567890ab/378fd532-728d-473b-8f03-30140bda59af/2024/02/05/e590ea43-0c7f-4530-a039-84fe1dd32350/8cec73b2-dc22-4acc-982b-c0e61121bd6e.png)  and add the CMS to your site.  3. Find your collection.  4. Click on the collection name and open it. See that the default data from Blocks was imported.
See screenshot ![cms](https://wixmp-833713b177cebf373f611808.wixmp.com/images/828374f86f48b954c894c778ca10aad8.png)
5.  Click on your widget's **Settings** button and change the number of items to display.  6.  Go to preview and see that the number of items changed. If it did, your test is complete!  * * * ## Step 9 | Add the Subscription widget Blocks allows you to create another widget and insert it inside the main widget. For example, let's say that you want to allow people to subscribe to an email list through your Recipes app. To do this, we created another widget, named Subscription. However, this is just a dummy widget for the purpose of this tutorial - we didn't implement the code. This is how you add the Subscription widget to your Recipes widget:  1. Go to Blocks.  2. Open the **Add** ![](https://d2x3xhvgiqkx42.cloudfront.net/12345678-1234-1234-1234-1234567890ab/378fd532-728d-473b-8f03-30140bda59af/2023/10/16/390641b6-b21c-400c-a931-4e4d90a7d497/3725ffab-5485-41ad-b9d9-4da11f4ffbf9.jpg)  panel. 3. Click **My Widgets**. Here you can see all the widgets and their presets. Scroll to the end of the list.  4. Drag the Subscribe widget to be on the top part of your Recipes widget.
See screenshot ![subscribe widget](https://d2x3xhvgiqkx42.cloudfront.net/12345678-1234-1234-1234-1234567890ab/378fd532-728d-473b-8f03-30140bda59af/2023/10/16/0ad23e50-f986-42b8-a8f9-05a1be12dc81/ef33736b-ee82-4ebb-ad6e-50d125cbd96b.png)
## Step 10 | Make layout changes Let's make some layout changes to adapt the Subscribe widget to the Recipes widget.  1. Click the Subscribe widget (make sure that you select the entire widget and not any internal element).  2. Go to the **Position** tab of the **Inspector** ![](https://d2x3xhvgiqkx42.cloudfront.net/12345678-1234-1234-1234-1234567890ab/21e446eb-7f73-4f2f-84b1-c6b77e64e45e/2024/04/24/a163edb8-3cc6-4a76-9f8e-bd755a114854/41687890-a25a-4ae0-b119-f5a464b40822.png) . 3. Change the margins to 42px on the top and left.  4. Right-click on the Subscribe widget and select **Use on All Presets**. Now your layout changes apply to all presets.
See screenshot ![margins](https://wixmp-833713b177cebf373f611808.wixmp.com/images/bed2548a02d65a4cc7972c3614ae6925.png)
Let's make some more changes in the mobile preset.  1.  Go back to the **Design Presets** section of **App Interface** ![](https://d2x3xhvgiqkx42.cloudfront.net/12345678-1234-1234-1234-1234567890ab/378fd532-728d-473b-8f03-30140bda59af/2024/04/24/93ca045a-ae3e-4d1b-941c-c79a7144fd0e/5a9379fc-820d-4438-ae56-bbe17af6a938.png)  and click your **Mobile Layout** preset. 2.  In the inspector, click on 3 dots and enable **Advanced sizing**. 3. Change the Width to 86%. 4.  Align to center - both vertically and horizontally. 
See screenshot ![in the inspector](https://wixmp-833713b177cebf373f611808.wixmp.com/images/7d56aa60a27fd84908d0e42c32536b7c.png)
* * * ## Step 11 | Create a Blocks Dashboard Page Now we want an easy way for users to interact with the collection of recipes, so they can add and manage their recipes. For this, we have the app's Dashboard ([learn more](https://dev.wix.com/docs/build-apps/develop-your-app/develop-an-app-with-blocks/dashboard-pages/about-dashboard-pages-in-blocks.md)). When a site builder installs your app on a site, the Dashboard page will be added with it.   1. Go to your app's Dashboard page. 
See screenshot ![dashboard](https://wixmp-833713b177cebf373f611808.wixmp.com/images/bba9bba62009ca7d3cad73a6c923661a.png)
2. Let's look at the Dashboard page. The Dashboard is made out of a large multi-state box (you can see this easily in the Layers ![](https://d2x3xhvgiqkx42.cloudfront.net/12345678-1234-1234-1234-1234567890ab/378fd532-728d-473b-8f03-30140bda59af/2023/10/03/cc8ed645-c486-4f74-a256-641916deee1e/42c93e0f-87f3-45c1-b85d-c62ffafa4e0c.png)  panel).  The multi-state box has 2 states, one to manage all the recipes and one to manage individual recipes. You can click on each state and see the difference between them. 
See screenshot ![dashboard multistate box](https://d2x3xhvgiqkx42.cloudfront.net/12345678-1234-1234-1234-1234567890ab/378fd532-728d-473b-8f03-30140bda59af/2023/10/03/ff2f8700-e2ac-4df2-87d2-c303e9d38fa6/f3de2ed6-3ab4-4ff6-9858-546ccd1bd1c6.png)
3. Look at the **#recipes** state. It has 2 buttons: * **Add Recipe:** changes the state of the multi-state box to the **form** state. * **Manage Collection:** navigates to the CMS page in the Dashboard. 4. Look at the Dashboard's code tab to see the buttons' code:  ```javascript $w('#addBtn').onClick((e) => { $w('#multiStateBox1').changeState('form'); }) $w('#manageCollectionBtn').onClick((e) => { wixDashboard.navigate('wix-databases-lazy-page-component-id'); }) ``` >**Note:** >[wixDashboard.navigate()](https://www.wix.com/velo/reference/wix-dashboard/navigate) gives you the ability to navigate >to other dashboard pages. You must enable Dev Mode in your site to do so. 5. Look at the **#form** state. It has 2 buttons:  * **Cancel** cleans the form * **Save** uploads the image and updates the repeater. 6. Look at the Dashboard's code tab to see the buttons' code:  ```javascript $w('#cancelBtn').onClick(onCancel) $w('#saveBtn').onClick(onSave); function onCancel(){ $w('#multiStateBox1').changeState('recipes'); cleanForm() } async function onSave() { let imageUrl = '' if($w('#imageInput').value.length !== 0){ const uploadedImage = await $w('#imageInput').uploadFiles(); imageUrl = uploadedImage[0].fileUrl; } await wixData.insert(getRecipesCollectionName(), { title: $w('#titleInput').value, description: $w('#descriptionInput').value, rating: Number($w('#ratingInput').value), duration: $w('#durationInput').value, image: imageUrl, }); await initRepeater(); $w('#multiStateBox1').changeState('recipes'); cleanForm(); } async function initRepeater(){ const collectionData = await queryCollectionItems(getRecipesCollectionName()); populateRepeater($w('#recipesRepeater'), collectionData); } ``` >**Note:** >The **initRepeater()** function in the dashboard code looks almost identical to the **initRepeater()** in the widget >code. They both use the functions from the **repeaterUtils.js** file. 7. In the Dashboard page, go to **Preview** and try adding another recipe. * * * ## Step 12 | Connect the dashboard to an action button 1. Go back to the **Recipes** widget.  2. Go to the **Configuration** tab.  3. Click the secondary action button, which is **Change Design**.  4. Click **Action Button Settings**.  5. Set the button to open a **Dashboard** instead of a panel.  6. Set the main action button text to **Manage Recipes** instead of **Change Design**. 
See screenshot ![](https://d2x3xhvgiqkx42.cloudfront.net/12345678-1234-1234-1234-1234567890ab/21e446eb-7f73-4f2f-84b1-c6b77e64e45e/2024/04/24/a5bf1cd8-bffb-4495-9c9e-06fff7d3cf0b/ab6a47de-3661-4792-9c0e-7799f8cd6e53.png)
Now that we finished building our app, it's time to build a major version (learn more [about versions in Blocks](https://dev.wix.com/docs/build-apps/develop-your-app/develop-an-app-with-blocks/deploy-and-manage-blocks-apps/manage-blocks-app-versions.md)). 7.  Click **Release** and select **Major Version**. * * * ## Step 13 | Check the app on your site again 1. Go to your site's editor and update the app's version. 
See screenshot ![go to latest version](https://d2x3xhvgiqkx42.cloudfront.net/12345678-1234-1234-1234-1234567890ab/378fd532-728d-473b-8f03-30140bda59af/2023/10/17/f641a161-d466-4ac3-9dff-545f47648906/776332f9-5bc8-479a-820a-debd418054d2.png)
2.  Open the site's dashboard. 3.  You'll see a new dashboard page with your app's name. Click on it. 
See screenshot ![recipes app studio dashboard](https://d2x3xhvgiqkx42.cloudfront.net/12345678-1234-1234-1234-1234567890ab/378fd532-728d-473b-8f03-30140bda59af/2023/10/17/75487cc0-69ae-44b3-b771-97311241f659/12f23d7c-c260-43d3-806f-d032b54cb4ea.png)
4.  Click **Add Recipe** and add an item in the dashboard. 5.  Click **Manage Collection**. Open the collection and view the item you just added. 6.  You can also go back to the site editor and change the number of items again.  * * * ## Step 14 | Installation settings Blocks [installation settings](https://dev.wix.com/docs/build-apps/develop-your-app/develop-an-app-with-blocks/deploy-and-manage-blocks-apps/configure-blocks-installation-settings.md) determine how this app is installed for other people's websites.  1. Go back to Blocks.  2. Click on the 3 dots next to the Subscribe widget name. 3. Click **Editor Experience** and **Edit Installation Settings**. 4. Click **Installation Settings**. 5. Set it as **Not added automatically** (to a site's **Add** ![](https://d2x3xhvgiqkx42.cloudfront.net/12345678-1234-1234-1234-1234567890ab/378fd532-728d-473b-8f03-30140bda59af/2023/10/17/4ebb2302-aa03-435e-a0e3-bd984c0c82a3/429fb7ea-3a90-47d2-b8f5-bba4ef62a425.jpg)  panel). This is because people will install the main widget and get the inner widget in it. 
See screenshot ![subscribe](https://wixmp-833713b177cebf373f611808.wixmp.com/images/7f11703043cd41a0115143436e285ed0.png)
5.  Click the **Recipes** widget. Set it to be **Added to homepage**. 6.  As a default preset, choose the **Editorial Layout**. 7.  Choose the **Mobile Layout** preset to be the default for mobile. 
See screenshot ![installation settings recipes](https://wixmp-833713b177cebf373f611808.wixmp.com/images/3bcfcd74992b173908dd7c4949338b69.png)
8.  Click **Save**. 9. Go back to Blocks and click **Release** again to apply the installation settings.  10. To see the installation settings in action, you need to uninstall and reinstall the app.  * * * ## Step 15 | Publish your app in the Wix App Market Blocks apps can be used on your own sites and save you lots of copy-and-paste. They can also be published and sold in the Wix App market and earn money. The last thing we'll do is simulate how to publish your app, in case you want to publish your own app in the future.   1. Click **WixBlocks** \-> **App**. 2. Click **Publish App**. This takes you to [Wix Developers](https://manage.wix.com/account/custom-apps).  3. Click **Pricing**. Create a Premium plan and decide on its pricing.  4. Build your app in Blocks again.  Now your app has a premium plan. The next step is to configure what happens in Blocks according to the different plans that a user purchased. What extra abilities do you want them to have? For example, in our app, we might want the subscribing option to be disabled until a user has paid. Learn more about [adapting your app to a pricing plan](https://dev.wix.com/docs/build-apps/develop-your-app/develop-an-app-with-blocks/publish-blocks-apps-to-the-app-market/adjust-a-blocks-app-to-different-pricing-plans.md). --- > Portal Navigation: > > - Append `.md` to any URL under `https://dev.wix.com/docs/` to get its markdown version. > - Pages are either content pages (article or reference text) or menu pages (a list of links to child pages). > - To get a menu page, truncate any URL to a parent path and append `.md` (e.g. `https://dev.wix.com/docs/sdk.md`, `https://dev.wix.com/docs/sdk/core-modules.md`). > - Top-level index of all portals: https://dev.wix.com/docs/llms.txt > - Full concatenated docs: https://dev.wix.com/docs/llms-full.txt ## Resource: Tutorial | Create a Site Plugin for the Wix Stores Product Page ## Article: Tutorial | Create a Site Plugin for the Wix Stores Product Page ## Article Link: https://dev.wix.com/docs/build-apps/get-started/tutorials/tutorial-create-a-site-plugin-for-the-wix-stores-product-page.md ## Article Content: # Tutorial | Create a Site Plugin for the Wix Stores Product Page In this tutorial, we demonstrate how to create the **Digital Sale Banner** [site plugin](https://dev.wix.com/docs/build-apps/develop-your-app/extensions/site-extensions/site-plugins/about-site-plugin-extensions.md) for the Wix Stores product page. This plugin displays a small banner on digital products to let customers know this product is included in the current digital sale promotion. It is meant to be embedded in a Wix Stores [product page slot](https://dev.wix.com/docs/build-apps/develop-your-app/extensions/site-extensions/site-plugins/supported-wix-app-pages/wix-stores/wix-stores-product-page.md#plugin-slots). The end result will look something like this: ![digital-sale-banner-plugin-on-site](https://wixmp-833713b177cebf373f611808.wixmp.com/images/tutorial-using-site-plugin-extensions-with-stores-product-pages-md_build-apps-portal_get-started_resources_tutorials_assets_digital-sale-site.png) We'll use the following steps to build the Digital Sale Banner site plugin: 1. Create an app. 2. Design your plugin in Wix Blocks. 3. Code your plugin in Wix Blocks. > **Note:** Slots differ slightly depending on [which version of Wix Stores](https://support.wix.com/en/article/wix-stores-customizing-your-product-page) a user has on their site. This tutorial works for both versions. Learn more about building [product page site plugins](https://dev.wix.com/docs/build-apps/develop-your-app/extensions/site-extensions/site-plugins/supported-wix-app-pages/wix-stores/wix-stores-product-page.md). ## Step 1 | Open the Wix Studio workspace and create an app You can access Wix Blocks through the Wix Studio workspace. 1. Open the [Wix Studio workspace](https://manage.wix.com/studio/). 2. Click **Custom Apps** in the left menu. 3. Click **Create New App** and then select **Build from scratch**. 4. When prompted to choose a framework, select **Wix Blocks**. Your newly-created app opens in Wix Blocks. ## Step 2 | Design your plugin’s UI Now design your plugin in Wix Blocks: 1. Open the **Widgets and Design** panel, click ![add-plugin-icon](https://wixmp-833713b177cebf373f611808.wixmp.com/images/tutorial-using-site-plugin-extensions-with-stores-product-pages-md_build-apps-portal_get-started_resources_tutorials_assets_add-plugin-icon.png), and select **Add Plugin**. 2. In the **Add a plugin panel**, set up the plugin as follows: * **Plugin name**: `Digital Sale Banner Plugin` * **Which Wix app does it extend?**: `Wix Stores` * **Slots this plugin can be added to**: `product-page-details-2 (New Product Page)` and `product-page-details-2 (Old Product Page)` > **Note**: Check [Wix Stores: Product Page](https://dev.wix.com/docs/build-apps/develop-your-app/extensions/site-extensions/site-plugins/supported-wix-app-pages/wix-stores/wix-stores-product-page.md) to see the available slots. This example uses the slots for both the new version of Wix Stores product page and the old version. This ensures a user can add your app to their site with whichever version they have. 3. Click **Create**. 4. Add an image element to the plugin. Click **Add Elements** ![add-elements-icon](https://wixmp-833713b177cebf373f611808.wixmp.com/images/tutorial-using-site-plugin-extensions-with-stores-product-pages-md_build-apps-portal_get-started_resources_tutorials_assets_add-elements-icon.png) on the left side of the editor, and then click **Image**. 5. Upload the image that you want to appear on the relevant product pages. Click **Change Image**. Select the image you want to use and click **Update**. 6. If you find your image is cut off, then reset the image. Select the image and click on ![settings-icon](https://wixmp-833713b177cebf373f611808.wixmp.com/images/tutorial-using-site-plugin-extensions-with-stores-product-pages-md_build-apps-portal_get-started_resources_tutorials_assets_settings-icon.png). Click ![reset-image](https://wixmp-833713b177cebf373f611808.wixmp.com/images/tutorial-using-site-plugin-extensions-with-stores-product-pages-md_build-apps-portal_get-started_resources_tutorials_assets_reset-image.png). 7. Next, let's make sure that when the plugin is added to a site, the image stretches across the entire width of the Wix Product page slot. Select the image element. In the Inspector panel on the right, click the **Layout** tab, and set the element's width to **100%**.
See how it looks
## Step 3 | Code your plugin We now write the code for our plugin. The code checks if the product is digital and, if so, updates the slot on the page to display the digital sale image. 1. Before coding our plugin, we need to connect our plugin to the host widget (in our case, the Wix Stores product page) by implementing the [`Product plugin API`](https://dev.wix.com/docs/build-apps/develop-your-app/extensions/site-extensions/site-plugins/supported-wix-app-pages/wix-stores/wix-stores-product-page.md#plugininterface-and-productid). To do so, add the `productId` property to your plugin's public API. In the code panel, click the **Widget Public API** ![widget-api-con](https://wixmp-833713b177cebf373f611808.wixmp.com/images/tutorial-using-site-plugin-extensions-with-stores-product-pages-md_build-apps-portal_get-started_resources_tutorials_assets_widget-api-icon.jpeg) icon, and then click **Add New Property**.
See how it looks
2. In the **New Property** panel, name the property `productId`, and then click **Create**. 3. In the code editor, add the following import statement at the beginning of your code to use Wix Stores APIs: `import { products } from 'wix-stores.v2';` 4. Make the `$widget.onPropsChanged()` function asynchronous by adding the `async` keyword: `$widget.onPropsChanged(async (oldProps, newProps) => {` 5. Inside the `$widget.onPropsChanged()` code block, add the following line to get the current product ID from the host widget: `const currentProductId = newProps.productId;` This ID identifies the product for which the type will be checked. 6. Use the Wix Stores [`getProduct()`](https://www.wix.com/velo/reference/wix-stores-v2/products/getproduct) function to query the type of product: ```javascript const currentProduct = await products.getProduct(currentProductId); const currentType = currentProduct.product.productType; ``` 7. Check if the product type is digital and, if so, display the digital sale banner: ```javascript if(currentType === 'digital') { $w('#imageX1').show() } else { $w('#imageX1').hide() } ``` Here's the complete code: ```javascript import { products } from 'wix-stores.v2'; $widget.onPropsChanged(async (oldProps, newProps) => { const currentProductId = newProps.productId; const currentProduct = await products.getProduct(currentProductId); const currentType = currentProduct.product.productType; if(currentType === 'digital') { $w('#imageX1').show() } else { $w('#imageX1').hide() } }); ``` 8. In the top-right corner, click **Build**. When prompted to provide an app name, enter "Digital Sale Banner" and then click **Save & Continue**. 9. When prompted to select the type of version to build, select **Test version**. Your plugin is now ready for use. In the next step, you'll add your plugin to a site to see it in action. ## Step 4 | See your plugin in action Plugins that you develop are immediately available for installation on your own sites, using the Plugin Explorer in the editors. Go ahead and create a new site, and then install Wix Stores. Alternatively, use a [site template which already has Wix Stores installed](https://www.wix.com/website/templates/html/online-store). 1. Open your editor. In the left sidebar, click **Pages** ![pages-icon](https://wixmp-833713b177cebf373f611808.wixmp.com/images/tutorial-using-site-plugin-extensions-with-stores-product-pages-md_build-apps-portal_get-started_resources_tutorials_assets_pages-icon.png), then **Store Pages**, and go to the **Product Page**. 2. On the Product page, click the page's widget, and then click the plugins ![plugin icon](https://wixmp-833713b177cebf373f611808.wixmp.com/images/tutorial-using-site-plugin-extensions-with-stores-product-pages-md_build-apps-portal_get-started_resources_tutorials_assets_plugin-icon.png) icon.
See how it looks
Your plugin should appear in the Plugin Explorer. 3. Hover over your plugin, and then click **Add**. When prompted for consent, select the checkbox and click **Agree & Add**. Once you install your plugin on a site, you can preview or publish the site to test the plugin's functionality and make sure it's working properly. --- > Portal Navigation: > > - Append `.md` to any URL under `https://dev.wix.com/docs/` to get its markdown version. > - Pages are either content pages (article or reference text) or menu pages (a list of links to child pages). > - To get a menu page, truncate any URL to a parent path and append `.md` (e.g. `https://dev.wix.com/docs/sdk.md`, `https://dev.wix.com/docs/sdk/core-modules.md`). > - Top-level index of all portals: https://dev.wix.com/docs/llms.txt > - Full concatenated docs: https://dev.wix.com/docs/llms-full.txt ## Resource: Tutorial | Create a Site Plugin for the Wix Bookings Service Page ## Article: Tutorial | Create a Site Plugin for the Wix Bookings Service Page ## Article Link: https://dev.wix.com/docs/build-apps/get-started/tutorials/tutorial-create-a-site-plugin-for-the-wix-bookings-service-page.md ## Article Content: # Tutorial | Create a Site Plugin for the Wix Bookings Service Page In this tutorial, we demonstrate how to create the **Next Booking Availability** [site plugin](https://dev.wix.com/docs/build-apps/develop-your-app/extensions/site-extensions/site-plugins/about-site-plugin-extensions.md) for the Wix Bookings Service page. This site plugin displays the next available date for a site visitor to book a particular service. It is meant to be embedded in the Wix Bookings [Service page slot](https://dev.wix.com/docs/build-apps/develop-your-app/extensions/site-extensions/site-plugins/supported-wix-app-pages/wix-bookings/wix-bookings-service-page.md#slots). The end result will look something like this: ![next-availability-plugin-on-site](https://wixmp-833713b177cebf373f611808.wixmp.com/images/plugin-tutorial-next-availability-md_build-apps-portal_get-started_resources_tutorials_bookings-plugin-tutorial_images_next-availability-site.png) We use the following steps to build the Next Booking Availability site plugin: 1. Create an app. 2. Design your plugin in Wix Blocks. 3. Code your plugin in Wix Blocks. ## **Before you begin** * Make sure you're logged into your Wix account, or [create an account](https://www.wix.com/) if you don't have one yet. * If you haven't done so yet, move to the new Wix Studio workspace by [joining Wix Studio](https://support.wix.com/en/article/wix-studio-switching-to-wix-studio). ## Step 1 | Open the Wix Studio workspace and create an app You can access Wix Blocks through the Wix Studio workspace. 1. Open the [Wix Studio workspace](https://manage.wix.com/studio/). 2. Click **Custom Apps** in the left menu. 3. Click **Create New App** and then select **Build from scratch**. 4. When prompted to choose a framework, select **Wix Blocks**. Your newly-created app opens in Wix Blocks. ## Step 2 | Design your plugin’s UI We now design our plugin in Wix Blocks: 1. Open the **Widgets and Design** panel, click ![add-plugin-icon](https://wixmp-833713b177cebf373f611808.wixmp.com/images/plugin-tutorial-next-availability-md_build-apps-portal_get-started_resources_tutorials_bookings-plugin-tutorial_images_add-plugin-icon.png), and select **Add Plugin**. 2. In the **Add a plugin panel**, set up the plugin as follows: * **Plugin name**: `Next Availability` * **Which Wix app does it extend?**: `Wix Bookings` * **Slots this plugin can be added to**: `slot 1 (Service Page)` 3. Click **Create**. 4. Let's add a text element to the plugin. Click **Add Elements** ![add-elements-icon](https://wixmp-833713b177cebf373f611808.wixmp.com/images/plugin-tutorial-next-availability-md_build-apps-portal_get-started_resources_tutorials_bookings-plugin-tutorial_images_add-elements-icon.png) on the left side of the editor, and then click **Title**. 5. Next, we want to make sure that the text stretches across the entire width of the plugin. When the plugin is added to a site, we want the text to stretch across the entire width of the Wix Service page slot. Select the text element. In the Inspector panel on the right, click the **Layout** tab, and set the element's width to **100%**.
See how it looks
6. Still in the Inspector panel, click the **Design** tab, and set the text alignment to **Center align**. ## Step 3 | Code your plugin We now write the code for our plugin. The code checks the availability of a specific service for the upcoming year, and updates the text element with the next available date for a site visitor to book the service. 1. Before coding our plugin, we need to connect our plugin to the host widget (in our case, the Wix Bookings Service page) by implementing the [`BOOKINGS_SERVICE`](https://dev.wix.com/docs/build-apps/develop-your-app/extensions/site-extensions/site-plugins/supported-wix-app-pages/wix-bookings/wix-bookings-service-page.md#bookings_service) API. To do so, add the `bookingsServiceId` property to your plugin's public API. In the code panel, click the **Widget Public API** ![widget-api-con](https://wixmp-833713b177cebf373f611808.wixmp.com/images/plugin-tutorial-next-availability-md_build-apps-portal_get-started_resources_tutorials_bookings-plugin-tutorial_images_widget-api-icon.jpeg) icon, and then click **Add New Property**.
See how it looks
2. In the **New Property** panel, name the property `bookingsServiceId`, and then click **Create**. 3. In the code editor, add the following import statement at the beginning of your code to use Wix Bookings APIs: `import wixBookingsFrontend from 'wix-bookings-frontend';` 4. Make the `$widget.onPropsChanged()` function asynchronous by adding the `async` keyword: `$widget.onPropsChanged(async (oldProps, newProps) => {` 5. Inside the `$widget.onPropsChanged()` code block, add the following line to get the current service ID from the host widget: `const serviceId = newProps.bookingsServiceId;` This ID identifies the service for which the availability will be checked. 6. Set up the date range for our availability query, with a `startRange` and an `endRange` that spans one year from the current date: ```javascript let startRange = new Date(); let endRange = new Date(); endRange.setDate(startRange.getDate() + 365); ``` 7. Use the Wix Bookings [`getServiceAvailability()`](https://www.wix.com/velo/reference/wix-bookings-frontend/getserviceavailability) API to query the availability for the specified service (`serviceId`) within the defined date range (`rangeOptions`): ```javascript const rangeOptions = { startDateTime: startRange, endDateTime: endRange }; const availability = await wixBookingsFrontend.getServiceAvailability(serviceId, rangeOptions); ``` 8. Extract the available slots from the returned object and get the first available slot's date: ```javascript const slots = availability.slots; const options = { weekday: 'long', day: 'numeric', month: 'short' }; const firstSlotDate = slots[0].startDateTime.toLocaleDateString('en-US', options); ``` 9. Change our text element to display the message "Next availability:" followed by the formatted date of the first available slot: ```javascript $w('#text1').text = "Next availability: " + firstSlotDate; ``` Here's the complete code: ```javascript import wixBookingsFrontend from 'wix-bookings-frontend'; $widget.onPropsChanged(async (oldProps, newProps) => { const serviceId = newProps.bookingsServiceId; let startRange = new Date(); let endRange = new Date(); endRange.setDate(startRange.getDate() + 365); // one year from now // get the service availability for the upcoming year const rangeOptions = { startDateTime: startRange, endDateTime: endRange }; const availability = await wixBookingsFrontend.getServiceAvailability(serviceId, rangeOptions); const slots = availability.slots; // get the date of the first available slot const options = { weekday: 'long', day: 'numeric', month: 'short' }; const firstSlotDate = slots[0].startDateTime.toLocaleDateString('en-US', options); $w('#text1').text = "Next availability: " + firstSlotDate; // set the text element's content }); ``` 9. In the top-right corner, click **Build**. When prompted to provide an app name, enter "Booking Availability" and then click **Save & Continue**. 10. When prompted to select the type of version to build, select **Test version**. Our plugin is now ready for use. In the next step, we add our plugin to a site to see it in action. ## Step 4 | See your plugin in action Plugins that you develop are immediately available for installation on your own sites, using the plugin explorer in the editors. Go ahead and create a new site, and then install Wix Bookings. Alternatively, use [this site template](https://manage.wix.com/edit-template/from-intro?debug=all&originTemplateId=85dec86a-afc8-41cb-8a86-c12d4a525fe5), which already has Wix Bookings installed. 1. Open your editor. In the left sidebar, click **Pages** ![pages-icon](https://wixmp-833713b177cebf373f611808.wixmp.com/images/plugin-tutorial-next-availability-md_build-apps-portal_get-started_resources_tutorials_bookings-plugin-tutorial_images_pages-icon.png), and go to **Booking Pages > Service Page**. 2. On the Service page, click the page's widget, and then click the Plugins ![plugin icon](https://wixmp-833713b177cebf373f611808.wixmp.com/images/plugin-tutorial-next-availability-md_build-apps-portal_get-started_resources_tutorials_bookings-plugin-tutorial_images_plugin-icon.png) icon.
See how it looks
Your plugin should appear in the plugin explorer. 3. Hover over your plugin, and then click **Add**. When prompted for consent, select the checkbox and click **Agree & Add**. Once you install your plugin on a site, you can preview or publish the site to test the plugin's functionality and make sure it's working properly. > **Note**: The Service page lets you reposition the plugin within the page's layout by [reordering the Service page sections](https://support.wix.com/en/article/wix-bookings-customizing-your-service-pages). --- > Portal Navigation: > > - Append `.md` to any URL under `https://dev.wix.com/docs/` to get its markdown version. > - Pages are either content pages (article or reference text) or menu pages (a list of links to child pages). > - To get a menu page, truncate any URL to a parent path and append `.md` (e.g. `https://dev.wix.com/docs/sdk.md`, `https://dev.wix.com/docs/sdk/core-modules.md`). > - Top-level index of all portals: https://dev.wix.com/docs/llms.txt > - Full concatenated docs: https://dev.wix.com/docs/llms-full.txt ## Resource: Overview ## Article: Overview ## Article Link: https://dev.wix.com/docs/build-apps/get-started/tutorials/tutorial-build-an-e-commerce-business-solution/overview.md ## Article Content: # Tutorial | Build an eCommerce Business Solution > [Next >](https://dev.wix.com/docs/build-apps/get-started/tutorials/tutorial-build-an-e-commerce-business-solution/step-1-create-a-custom-wix-app.md) As a Wix app developer, you can build a full-scale solution for a business, similar to Wix business solutions such as Bookings or Restaurants. If your business solution requires eCommerce capabilities, you can integrate it with the [Wix eCommerce platform](https://dev.wix.com/docs/rest/business-solutions/e-commerce/wix-e-commerce-platform-handbook/overview/what-is-the-wix-e-commerce-platform.md). This lets you take advantage of Wix’s built-in eCommerce infrastructure, instead of spending the time and effort to create eCommerce functionality yourself. This series of articles walks you through how to build an example business solution that integrates with Wix eCommerce. Though the example is simple, you can use the tools and structure shown throughout the tutorial to build more complex solutions for any kind of business. As part of the tutorial, we’ll build an app for selling poems. This is a multistep process that involves the following major parts: - [Step 1 | Create a Custom Wix app](https://dev.wix.com/docs/build-apps/get-started/tutorials/tutorial-build-an-e-commerce-business-solution/step-1-create-a-custom-wix-app.md) - [Step 2 | Create a Catalog Database in Blocks](https://dev.wix.com/docs/build-apps/get-started/tutorials/tutorial-build-an-e-commerce-business-solution/step-2-create-a-catalog-database-in-blocks.md) - [Step 3 | Create an Item Page in Blocks](https://dev.wix.com/docs/build-apps/get-started/tutorials/tutorial-build-an-e-commerce-business-solution/step-3-create-an-item-page-in-blocks.md) - [Step 4 | Create a Dashboard Page to Manage the Catalog](https://dev.wix.com/docs/build-apps/get-started/tutorials/tutorial-build-an-e-commerce-business-solution/step-4-create-a-dashboard-page-to-manage-the-catalog.md) - [Step 5 | Implement a Self-Managed Catalog Service Plugin](https://dev.wix.com/docs/build-apps/get-started/tutorials/tutorial-build-an-e-commerce-business-solution/step-5-implement-a-self-hosted-catalog-service-plugin.md) - [Step 6 | Test your Business Solution on a Site](https://dev.wix.com/docs/build-apps/get-started/tutorials/tutorial-build-an-e-commerce-business-solution/step-6-test-your-business-solution-on-a-site.md) Each article in the series covers a separate step. If you complete the full tutorial, you’ll have a simple business solution that implements a catalog and provides frontend functionality to both Wix users and their customers. You can use this basic app as a starting point for developing your own business solution. ## Before you begin Before getting started, make sure that: - You install [Node.js](https://nodejs.org/en/download/) (v20.11.0 or higher). - You install [npm](https://www.npmjs.com/package/npm) or [yarn](https://www.npmjs.com/package/yarn). - You’re logged into your Wix Studio account. If you don’t already have one, [sign up for a Wix Studio account](https://manage.wix.com/account/custom-apps). **Next up:** [Step 1 | Create a Custom Wix app](https://dev.wix.com/docs/build-apps/get-started/tutorials/tutorial-build-an-e-commerce-business-solution/step-1-create-a-custom-wix-app.md) --- > Portal Navigation: > > - Append `.md` to any URL under `https://dev.wix.com/docs/` to get its markdown version. > - Pages are either content pages (article or reference text) or menu pages (a list of links to child pages). > - To get a menu page, truncate any URL to a parent path and append `.md` (e.g. `https://dev.wix.com/docs/sdk.md`, `https://dev.wix.com/docs/sdk/core-modules.md`). > - Top-level index of all portals: https://dev.wix.com/docs/llms.txt > - Full concatenated docs: https://dev.wix.com/docs/llms-full.txt ## Resource: Create a Self-Managed App ## Article: Create a Self-Hosted App ## Article Link: https://dev.wix.com/docs/build-apps/get-started/quick-start/create-a-self-managed-app.md ## Article Content: # Tutorial | Create a Self-Managed App In this tutorial, you'll create an app with a simple [dashboard page extension](https://dev.wix.com/docs/build-apps/develop-your-app/extensions/dashboard-extensions/dashboard-pages/about-dashboard-page-extensions.md) using a [self-managed](https://dev.wix.com/docs/build-apps/develop-your-app/frameworks/self-hosting/about-self-hosting-for-wix-apps.md) iframe. ## Before you begin * Make sure you're logged into your Wix account, or [create an account](https://www.wix.com/) if you don't have one yet. * If you haven't done so yet, move to the new [Wix Studio workspace](https://manage.wix.com/account/custom-apps) by [joining Wix Studio](https://support.wix.com/en/article/wix-studio-switching-to-wix-studio). ## Step 1 | Create an app in the Custom Apps page of your Wix Studio workspace We'll start off by creating a new app. 1. In the [Custom Apps page](https://manage.wix.com/account/custom-apps), go to **My Apps**, and then click **Create New App**. 2. Select **Build from scratch**. 3. Select **Self-Managed**, and then click **Get Started**. ![choose-app-framework](https://wixmp-833713b177cebf373f611808.wixmp.com/images/f834d79429fff1627157c1cb4071fabe.png) A new app is created in the Custom Apps page. ## Step 2 | Add a dashboard page extension We'll now add a dashboard page extension in your app's dashboard. This extension uses an iframe to embed a web page in the dashboard. We've already deployed a web page on an external server for you to use in this tutorial. When configuring the extension, you'll register the URL of this web page. 1. In the left sidebar, under **Develop**, select **Extensions**, and then click **Create Extension**. A panel opens, showing the available extension types. 2. Find the **Dashboard page** extension and click **Create**. 3. Fill in the following configuration data: * **Name**: `Demo page` * **iframe URL**: `https://www.quickstartselfhostedapp.com/` 4. Click **Save**. ![iframe-url](https://wixmp-833713b177cebf373f611808.wixmp.com/images/f2f1e4ce6ddc5fee7b50bb7e7e3b52dc.png) You’ve finished setting up the dashboard page extension and can now install it on a site to see it in action. ## Step 3 | Install your app on a site Wix provides a free Premium development site so you can easily install your app and see it working. In this step, you'll create a development site, install your app on the site, and try it out. 1. In the top right corner of your [app's dashboard](https://manage.wix.com/account/custom-apps), click **Test App** and select **Test on dev site**. 1. Select an existing development site or click **+ Create Dev Site** to create a new site. Select the editor and the Wix Business Solution you want to use and click **Create Dev Site**. 1. Click **Test App**. Wix installs your app and opens the site in a new tab. You can set which site page opens in your [app settings](https://dev.wix.com/app-selector?title=Select+an+App&primaryButtonText=Select+Site&actionUrl=https%3A%2F%2Fdev.wix.com%2Fapps%2F%7BappId%7D%2Fapp-settings). If you don't set a page, the site editor opens by default. Your app is now installed on the development site. You can see the external web page embedded in the dashboard. ![self-hosted-iframe](https://wixmp-833713b177cebf373f611808.wixmp.com/images/84c1722c069c39693ea2316875639fac.png) ## Next steps You now have a fully working app that can be installed on Wix sites. Take some time to play around in your app's dashboard to explore more features that you can add to your app. Use the following resources to continue building your app: * [Wix Design System](https://wixdesignsystem.com): Learn how to use Wix's React components for a cohesive user experience consistent with Wix's design standards. * [Wix APIs](https://dev.wix.com/docs/build-apps/develop-your-app/api-integrations/about-wix-apis.md): Learn how to integrate your app with Wix to transfer data between your app and the site it's installed on and extend Wix business solutions, such as Wix eCommerce or Wix Bookings. * [Extension catalog](https://dev.wix.com/docs/build-apps/get-started/overview/how-apps-extend-wix.md#extension-catalog): Learn about other extensions you can add to your app. --- > Portal Navigation: > > - Append `.md` to any URL under `https://dev.wix.com/docs/` to get its markdown version. > - Pages are either content pages (article or reference text) or menu pages (a list of links to child pages). > - To get a menu page, truncate any URL to a parent path and append `.md` (e.g. `https://dev.wix.com/docs/sdk.md`, `https://dev.wix.com/docs/sdk/core-modules.md`). > - Top-level index of all portals: https://dev.wix.com/docs/llms.txt > - Full concatenated docs: https://dev.wix.com/docs/llms-full.txt ## Resource: Tutorial | Set Up an App With the App Dashboard ## Article: Tutorial | Set Up an App With the Wix Developers Center ## Article Link: https://dev.wix.com/docs/build-apps/get-started/tutorials/tutorial-set-up-an-app-with-the-app-dashboard.md ## Article Content: # Tutorial | Set Up an App with the App Dashboard This tutorial shows you how to set up a new Wix app using the app dashboard. The tutorial shows you how to create, configure, and test an externally hosted "Product of the Day" app that can be installed on a Wix site. The app lets site admins offer a daily discount on a product they choose. Upon downloading the app, the site gains access to the following features: + **In the site dashboard:** A dashboard page where a site admin can choose a product from their catalog to discount. + **In the site:** An automated chat message offering site visitors a discount coupon for the selected product. The dashboard page extension is built with [React](https://react.dev/) and the server with [Express.js](https://expressjs.com/). We provide all the code you need for this app in the [example apps GitHub repository](https://github.com/wix-incubator/wix-developers-example-apps). Regardless of the technologies you use to build your app, you can take similar steps to integrate it with the app dashboard. The end result will look like this: ![App preview](https://wixmp-833713b177cebf373f611808.wixmp.com/images/68dedb33ad087254b6b95eed8fa8132f.png) We'll take the following steps to implement the Product of the Day app: 1. Clone the app repository. 1. Create an app from the [Custom Apps page](https://manage.wix.com/account/custom-apps) in your Wix Studio workspace. 1. Configure permissions for your app. 1. Set up the dashboard page extension. 1. Set up the app's backend. 1. Test the app out locally. ## Before you begin Before getting started, make sure that: + You have [Node.js](https://nodejs.org/en/download/) (v16.4 or higher). + You're logged into your Wix Studio account. If you don't already have one, [sign up for a Wix Studio account](https://manage.wix.com/account/custom-apps). ## Step 1 | Clone the app repository This tutorial uses a pre-built app we've saved in the [example apps GitHub repository](https://github.com/wix-incubator/wix-developers-example-apps). To clone the repository to your computer, open the terminal and run the following command from the folder you want to clone the repository into: ```bash git clone https://github.com/wix/wix-developers-example-apps.git ``` Then navigate to the folder containing the Product of the Day app: ```bash cd wix-developers-example-apps/product-of-the-day ``` Within this folder you can find both the backend app server (in the `server` folder) and the frontend dashboard component (in the `client` folder). ## Step 2 | Create an app in the Custom Apps page of your Wix Studio workspace The Custom Apps page in your Wix Studio workspace is the place for managing Wix apps you develop. Follow these steps to create a Wix app that we'll connect to the external servers. 1. Go to [Wix Studio](https://manage.wix.com/account/custom-apps) and sign in. 1. If this is your first Wix app, click **Start Building**. If you already have an app, click **Create New App** in the top-right corner. This opens your new app's dashboard: ![New app page](https://wixmp-833713b177cebf373f611808.wixmp.com/images/af428af6b08fa3c35854076096ccf64d.png) 1. Click the default name generated for your app, and enter a new one, such as "Product of the Day". ## Step 3 | Configure permissions for your app This app uses Wix [REST APIs](https://dev.wix.com/docs/rest.md) to access and manage Wix site data, requiring specific permissions to access each endpoint. To ensure functionality, your app needs these permissions from any site using it. This section guides you through setting up your app to request these permissions upon installation. ### Find required permissions To find the permissions that your app requires: 1. Go to the [Wix REST API reference documentation](https://dev.wix.com/docs/rest.md). 1. Find the specific endpoints that your app calls. The Product of the Day app calls the following endpoints: * [Query Products](https://dev.wix.com/docs/rest/business-solutions/stores/catalog/query-products.md): To retrieve information about products in the site's catalog. * [Create a Coupon](https://dev.wix.com/docs/rest/business-management/marketing/coupons/coupons/create-a-coupon.md): To generate a discount coupon for the product the site owner chooses. * [Send Message](https://dev.wix.com/docs/rest/crm/communication/inbox/messages/send-message.md): To send site visitors a message with the coupon in the Wix Chat widget. 1. In each endpoint reference, look for **Permission Scopes**: ![Permission Scopes in API Ref](https://wixmp-833713b177cebf373f611808.wixmp.com/images/24a89f8c82beaf1606b5627b21f82ad7.png) The Product of the Day app requires the following permission scopes: | Endpoint | Required permissions | |--|--| | Query Products | Read Products | | Create a Coupon | Manage Coupons (with the identifier `SCOPE.DC-COUPONS.MANAGE-COUPONS`) | | Send Message | Manage Inbox Messages | ### Add permissions To add permissions for the app to request upon installation: 1. Go to **Permissions** in your app's dashboard. 1. For each permission scope: 1. In the left sidebar, click **Add Permissions**. 1. Enter the permission scope's name in the **Search by name or ID** field. 1. Check the permission scope's checkbox under **Choose Permission Scopes**. 1. Click **Save**. Now, when a site owner installs the app, Wix prompts them to grant the necessary permissions. ## Step 4 | Set up the dashboard page Every Wix site has a dashboard where site admins manage their site and business. Our app integrates with this dashboard by adding a new page where site admins can select a product of the day and apply discounts. The dashboard page is built with [React](https://react.dev/). This section guides you through adding the dashboard page to your app. ### Run a local server Our app includes two servers: one for the dashboard page UI (in the `client` folder) and one for the app's backend business logic (in the `server` folder). To run the local development server for the dashboard page UI: 1. Navigate to the `client` folder: ```bash cd client ``` 1. Install the dependencies: ```bash npm install ``` 1. Start the local server for the dashboard page: ```bash npm run start:secure ``` This runs the local dashboard page server and opens your browser to `https://localhost:3000`. > **Note:** If you encounter a security warning, click **Advanced** and then **Proceed to localhost (unsafe)**. Now, you can see the dashboard component open in your browser: ![Dashboard component](https://wixmp-833713b177cebf373f611808.wixmp.com/images/bd91f9cf19653bd26546f60197e54077.png) > **Note:** Make sure to keep the local dashboard page server running for the remainder of this tutorial. ### Add a dashboard page To set up your app to include the dashboard page: 1. In the left sidebar, click **Extensions**. 1. Click **Create Extension**. 1. Check the **Dashboard** checkbox. 1. In the **Dashboard Page** card, click **Create**. ![Create Dashboard Page extension](https://wixmp-833713b177cebf373f611808.wixmp.com/images/f310b721d4ff2cdcd7e2be55d1da3bfb.png) 1. Under **Page info**, in the **iFrame URL** field, enter the address for your local dashboard page server: `https://localhost:3000/`. ![Enter local host address](https://wixmp-833713b177cebf373f611808.wixmp.com/images/0fe0cf3dcd2da0bced52b85168ccecd4.png) 1. Under **Sidebar configuration**, in the **Page name** field, enter a name for your dashboard page. This name is shown in the dashboard sidebar menu. ![Name the dashboard page](https://wixmp-833713b177cebf373f611808.wixmp.com/images/8d44ce51d6b61c767b172c0a24f9f520.png) 1. Click **Save**. Your app is set to add a dashboard page upon installation on a site and load it from the specified URL. ## Step 5 | Set up the backend Our app contains business logic in our backend server. This section guides you through setting up the backend, including authentication for your app. ### Configure environment variables To configure environment variables for authentication: 1. In the `product-of-the-day/server` folder, create a file named `.env` with the following placeholder values: ```env APP_ID= APP_SECRET= WEBHOOK_PUBLIC_KEY="" ``` > **Note:** Only the webhook public key value needs to be enclosed in quotes. 1. In the left sidebar, click **OAuth**. 1. In the `.env` file created in the first step, replace `` with the **App ID** and `` with the **App Secret Key**. ![App ID and App Secret Key on OAuth page](https://wixmp-833713b177cebf373f611808.wixmp.com/images/35a82b2e0b808651dfa53c079f9fb74c.png) ### Add a webhook to your app Webhooks deliver real-time notifications about events in your app, other apps, or the Wix site. For this app, we'll add the [Message Sent To Business](https://dev.wix.com/docs/rest/crm/communication/inbox/messages/message-sent-to-business.md) webhook, which notifies the app whenever a site visitor sends a message in the Wix Chat widget. To add a webhook: 1. In the left sidebar, click **Webhooks**. 1. Click **Add Webhook**. 1. Under **API Category**, select **Inbox**. 1. Check the box next to **Message Sent To Business**. 1. In the **Callback URL** field, enter a temporary dummy URL, such as `https://www.test.not`. We'll replace this URL after activating the backend app server. 1. Click **Save**. This takes you back to the **Webhooks** page. 1. Under **Public key**, click **Open**. 1. Click **Copy Key**. 1. In your `.env` file, replace `` with the key value: ```env WEBHOOK_PUBLIC_KEY="" ``` ### Start the backend server To successfully set up our app, the server for the dashboard page and the backend server need to be running at the same time. To start the backend server: 1. Open a new terminal window, and navigate to `product-of-the-day/server`: ```bash cd product-of-the-day/server ``` 1. Install the app's dependencies: ```bash npm install ``` 1. Start the local app server: ```bash npm run start ``` This runs the local app server and displays several important URLs: ![App server URLs](https://wixmp-833713b177cebf373f611808.wixmp.com/images/4afbdd45000ca7d82999ed9769836799.png) * `RedirectUrl`: Endpoint Wix must redirect to after the user authenticates. * `AppUrl`: Main entry point for the app's backend functionality. * `Message received webhook`: Used for receiving callbacks from Wix. 1. Copy the `RedirectUrl`, `AppUrl`, and `Message received webhook` and keep them available for the next steps. > **Note:** Make sure to keep the backend server running for the remainder of this tutorial. ### Configure OAuth Wix uses [OAuth 2.0](https://dev.wix.com/docs/build-apps/develop-your-app/access/authentication/about-oauth.md) to authorize apps to access our APIs and receive webhooks. To configure OAuth: 1. In the left sidebar, click **OAuth**. 1. Under **URLs**: * Enter the `AppUrl` from the previous step into the **App URL** field. * Enter the `RedirectUrl` from the previous step into the **Redirect URL** field. 1. Click **Save**. ### Configure the webhook To make sure your app receives the webhook: 1. In the left sidebar, click **Webhooks**. 1. In the **Webhook List**, next to the **Message Sent to Business** webhook, click the ellipsis ![Ellipsis button](https://wixmp-833713b177cebf373f611808.wixmp.com/images/1b4b4fa19d767290c115c5d07c26e3fe.png). Then, click **Edit**. 1. In the **Callback URL** field, enter the `Message received webhook` URL from the previous step. 1. Click **Save**. Your app is now properly configured and ready to test. > **Note:** Every time you run the Product of the Day app server, it generates new URLs for the app. If you reset the server, repeat this step to configure the updated URLs. ## Step 6 | Test the app Wix provides a free Premium development site so you can easily install your app and see it working. In this step, you'll create a development site, install your app on the site, and try it out. ### Set up a development site To set up a [development site](https://dev.wix.com/docs/build-apps/launch-your-app/app-distribution/test-your-app-on-a-premium-site.md): 1. In the top right corner of your [app's dashboard](https://manage.wix.com/account/custom-apps), click **Test App** and select **Test on dev site**. 1. Click **+ Create Dev Site** to create a new site. Select your preferred editor and both **Wix Stores (Catalog v3)** and **Wix Stores (Catalog v1)** business solutions and click **Create Dev Site**. 1. Confirm that the new site you just created is selected. Note that the automatically generated name begins with **Dev Site**. If it isn't, select it, and click **Test App**. Wix installs your app and opens the site in a new tab. You can set which site page opens in your [app settings](https://dev.wix.com/app-selector?title=Select+an+App&primaryButtonText=Select+Site&actionUrl=https%3A%2F%2Fdev.wix.com%2Fapps%2F%7BappId%7D%2Fapp-settings). If you don't set a page, the site editor opens by default. 1. In your **Sites** page, find the development site you just created. Hover over the development site and click **Select & Edit Site**. This opens the site's dashboard. 1. Click **Design Site**. This opens the site's editor. 1. Add a product page to the site: 1. In the left sidebar, click **Pages** ![Pages & Menu button](https://wixmp-833713b177cebf373f611808.wixmp.com/images/906ffc254e57c7a3a3237531263f0bbe.png). 1. In the **Store Pages** tab, select **Product Page**. 1. Edit the page as desired. 1. Back in the editor, on the top right, click **Publish**. Your development site is now live. ### Install the app To install the app on your development site: 1. Return to your app's dashboard. 1. Click **Test Your App**, then click **Preview listing**. This takes you to a preview listing page for your app in the Wix App Market. 1. Click **Test on Dev Site**. 1. Next to the development site you just created, click **Select**. 1. Wix now requests the site permissions your app requires. Click **Agree & Add**. The Product of the Day app is now installed on your development site. ### Try out the dashboard page To test the app, we'll start by trying out its dashboard page, where we can choose a product of the day and apply a discount: 1. Open the development site's [dashboard](https://www.wix.com/my-account/site-selector/?buttonText=Select%20Site&title=Select%20a%20Site&autoSelectOnSingleSite=true&actionUrl=https:%2F%2Fwww.wix.com%2Fdashboard%2F%7B%7BmetaSiteId%7D%7D%2F). Your app now appears in the left dashboard sidebar under the name you entered earlier. Click your app's name in the sidebar. ![Product of the Day dashboard sidebar item](https://wixmp-833713b177cebf373f611808.wixmp.com/images/72c691b110373235aabc3e67a4679235.png) This opens your app's dashboard page. 1. Click **Choose Product**. ![Product of the Day dashboard page](https://wixmp-833713b177cebf373f611808.wixmp.com/images/289b5d3668fac8bcaae2fbd0be6132d0.png) This opens a menu to select a product. 1. Your development site's catalog is filled with example products with the name "I'm a product". To make these products appear, type "I'm" in the **Search by product name** field. Then, select a product and click **Done**. ![Select a product](https://wixmp-833713b177cebf373f611808.wixmp.com/images/134684dc89a1be5fb02b11c052a39c5d.png) 1. Adjust the percentage **Discount** to apply to the product, and click **Update**. ![Apply discount](https://wixmp-833713b177cebf373f611808.wixmp.com/images/3942717bbd157db850a5eb478c37590b.png) You've now selected a product of the day and applied a discount to it. ### Try out the site Now let's see what the experience is like for a site visitor. 1. Open your development site's editor, hover over **Publish** in the top right, then click **View Site** to open your live site. 1. In your live site, click the chat icon ![Chat Icon](https://wixmp-833713b177cebf373f611808.wixmp.com/images/b6ec7ab732ea6923688174ee1a8edddb.png) on the bottom right to open the chat widget. 1. In the chat widget, type any text. For example, "Hello". 1. After a few moments, you'll receive a response in the chat widget, offering you a discount on the product of the day: ![Chat widget with product of the day discount](https://wixmp-833713b177cebf373f611808.wixmp.com/images/6efbbd6d21b761395a625f7ec648daa8.png) 1. The chat response contains a coupon code and a link. Copy the coupon code, and click the link to go to the product page for the product of the day. 1. In the product page, click **Add to Cart**. Then, to go to the cart page, click **View Cart**. 1. Click **Enter a promo code**, paste the coupon code you copied, and click **Apply**. ![Enter promo code](https://wixmp-833713b177cebf373f611808.wixmp.com/images/e61c1d69848e235938175f98a71483bc.png) Your **Order Summary** now incorporates the Product of the Day discount: ![Order summary with discount applied](https://wixmp-833713b177cebf373f611808.wixmp.com/images/1961fa594846bc2ccdacd586b4107164.png) ## Step 7 | Customize the app The Product of the Day app is now working! To learn more about how the app works, take a look around the code files in the [GitHub repo](https://github.com/wix-incubator/wix-developers-example-apps). As an exercise to help familiarize yourself with app code a little more, you can add additional functionality to this app. For example, edit the code so that each site visitor can only receive one discount coupon per day. To do this, edit `product-of-the-day/server/src/services/ProductOfTheDayService.js`, and add the lines of code marked as `ADDED` below in the comments: ```js const dayjs = require('dayjs'); // ADDED: Import the Day.js library for date formatting. const _ = require('lodash'); // ADDED: Import the Lodash library for working with objects. class ProductOfTheDayService { // ... async sendCouponOfTheDay(instanceId, participantId) { const today = dayjs().format('DD/MM/YYYY'); // ADDED: Store the current date. const productOfTheDayData = await this.productOfTheDayDao.getBy(instanceId) const conversationResult = await this.wixInboxApis.getConversation(instanceId, participantId) const conversationId = conversationResult?.conversation?.id const coupon = await this.couponsDao.getBy(conversationId, today); // ADDED: Retrieve existing coupon for this conversation with the current date, if there is one. if(_.isEmpty(coupon)){ // ADDED: Send a coupon only if no existing coupon was retrieved for this conversation with the current date. const query = {"filter":`{\"id\": {\"$eq\": \"${productOfTheDayData.productId}\"}}`} const [productData, couponData] = await Promise.all([ this.storesApis.queryProducts(instanceId, query), this.couponsApis.createCoupon(instanceId, productOfTheDayData.productId, productOfTheDayData.discountPercentage) ]) this.couponsDao.save(instanceId, conversationId, today, couponData); // ADDED: Save the coupon in the coupon database. const message = this.generateCouponMessage(conversationId, couponData, productData?.products, productOfTheDayData.discountPercentage) console.log('sending coupon...'); return this.wixInboxApis.sendMessage(instanceId, message) } // ADDED } // ... } module.exports = { ProductOfTheDayService } ``` With this adjustment, the app now checks whether a discount coupon was already created for the site visitor on the current date. It only sends a coupon if one wasn't already sent. ## What next? Now that you've learned how to set up a pre-made, externally hosted Wix app, you can start thinking about building your own apps. Here are a few resources to get you started: + Browse the [Wix App Market](https://www.wix.com/app-market) to get inspiration from other apps. + Learn about [self-managed apps](https://dev.wix.com/docs/build-apps/develop-your-app/frameworks/self-hosting/about-self-hosting-for-wix-apps.md). + Get to know our [REST API](https://dev.wix.com/docs/rest.md) and our [JavaScript SDK](https://dev.wix.com/docs/sdk.md). + Read our [guidelines](https://dev.wix.com/docs/build-apps/launch-your-app/app-distribution/app-market-guidelines.md) for submitting an app to the Wix App Market. --- > Portal Navigation: > > - Append `.md` to any URL under `https://dev.wix.com/docs/` to get its markdown version. > - Pages are either content pages (article or reference text) or menu pages (a list of links to child pages). > - To get a menu page, truncate any URL to a parent path and append `.md` (e.g. `https://dev.wix.com/docs/sdk.md`, `https://dev.wix.com/docs/sdk/core-modules.md`). > - Top-level index of all portals: https://dev.wix.com/docs/llms.txt > - Full concatenated docs: https://dev.wix.com/docs/llms-full.txt ## Resource: Tutorial | Create a Self-hosted Custom Shipping Rates App ## Article: Tutorial | Create a Self-hosted Custom Shipping Rates App ## Article Link: https://dev.wix.com/docs/build-apps/get-started/tutorials/tutorial-create-a-self-hosted-custom-shipping-rates-app.md ## Article Content: # Tutorial | Create a Self-Managed Custom Shipping Rates App In this tutorial, we’ll show you how to create an app similar to our [Custom Shipping Rates app template](https://dev.wix.com/apps-templates/template?id=0580022b-625e-4467-9f78-28cc3e618483) from scratch. When a user installs the app on their site, it adds a dashboard page that allows them to create custom shipping rates. These rates are added to customers’ transactions in the cart and checkout pages. You’ll gain experience with the following Wix tools: * [App dashboard](https://manage.wix.com/account/custom-apps) * [Wix Design System](https://www.wix-pages.com/wix-design-system/?path=/story/getting-started--about#What_can_you_build?) * [Wix SDKs and APIs](https://dev.wix.com/docs/sdk.md) * [Wix Shipping Rates Service Plugin](https://dev.wix.com/docs/sdk/backend-modules/ecom/service-plugins/shipping-rates/introduction.md) At the end of the tutorial, you’ll have a basic app that calculates custom shipping rates and adds them at checkout. You can then extend the app however you like, either by adding your own logic or following the code in the [Github repo](https://github.com/wix/app-template-custom-shipping-rates). We’ll use the following steps to build the shipping rates app: 1. Set up the app in the Custom Apps page of your Wix Studio workspace. 2. Bootstrap a Next.js app with `create-next-app`. 3. Set up the Wix SDK. 4. Write the code for the main app logic. 5. Deploy your app. 6. Test your app out on a dev site. ## Before you begin Before getting started, make sure that: * You are signed into your [Wix account](https://manage.wix.com/account/custom-apps). * You have [Node.js](https://nodejs.org/en/) 18.17 or higher installed. ## Step 1 | Set up your app in the Custom Apps page In the [Custom Apps page](https://manage.wix.com/account/custom-apps), click **Create New App** > **Build from scratch** to create a new app. Wix generates a Wix app ID, secret, and JWT key that you will need later when configuring your app to work with the Wix SDK packages. Give your app a name, but you don’t need to configure anything else for now. ## Step 2 | Create the project with `create-next-app` This step configures a full Next.js project in your local directory. We’ll set up our project in two steps: 1. Create the Next.js app with [create-next-app](https://github.com/vercel/next.js/tree/canary/packages/create-next-app). 2. Set up the folder structure and add the files necessary to build the basic app. ### Create the app We’ll create our project using the interactive option in `create-next-app`. To create the project: 1. On the command line, navigate to the directory where you want to save your project. 2. Run the following command: ```bash npx create-next-app@latest ``` 3. Give your project a name when prompted. For example: `custom-shipping-rates`. 4. The tool will present a list of dependencies. Choose `yes` for the following: * TypeScript * ESLint * `src/` directory * App Router Once you select your dependencies, `create-next-app` will create your new application. Now you have a new project in your selected directory. The project has a basic folder structure that we are going to build on next. ### Set up the project structure In these next few steps, we’ll walk through the folder set up. We’ll also add several necessary files. 1. In this tutorial, we develop our app using the Next.js [App Router](https://nextjs.org/docs/app/building-your-application/routing#the-app-router). We start by creating a folder in `src/app/` to work with the App router. 2. We need to define the [`getShippingRates()`](https://dev.wix.com/docs/sdk/backend-modules/ecom/service-plugins/shipping-rates/get-shipping-rates.md) handler function from the [Shipping Rates service plugin](https://dev.wix.com/docs/sdk/backend-modules/ecom/service-plugins/shipping-rates/introduction.md), which is called when the service plugin endpoint receives a request. This requires us to set up an [API route handler](https://nextjs.org/docs/app/building-your-application/routing/route-handlers) in our app. Create a new directory `src/app/api/shipping-rates/v1/getRates/`. Next.js uses this folder path to determine the endpoint path for your Get Shipping Rates implementation. 3. In addition to handling service plugin requests, our app will also provide a dashboard page where a user can customize their shipping rates. Therefore, we also need to set up a [route](https://nextjs.org/docs/app/building-your-application/routing/pages) for the dashboard. Create a folder `src/app/dashboard/`. Inside this folder, add two items: 1. A file called `page.tsx`. This file provides the Next.js route for the app’s dashboard page. 2. A subfolder called `parts`. This folder will contain the different dashboard components that we create later. For now, you can leave it empty. 4. In `src/app`, create these folders: 1. `actions` 2. `client-hooks` 3. `types` 4. `utils` You can leave these folders empty for now. We will add the files and code we need later. 5. In the root directory of your project, add a file called `.env.local`. In this file, we’ll add the environment variables we need for local development. > **Note:** > Add the `.env.local` file to `.gitignore` so it is not pushed to the origin. Once you’ve added everything, your directory structure should look something like this: ``` └── .env.local └── src └── app └── actions └── api └── shipping-rates └── v1 └── getRates └── client-hooks └── dashboard └── page.tsx └── parts └── types └── utils ``` > **Note:** > Files that were automatically generated by `create-next-app` are not included here. Now that our project has the correct folder structure, we can set up the environment to work with the Wix SDK. ## Step 3 | Set up the Wix SDK We need to do a few things to make sure our app can work with the Wix platform: 1. Install the Wix SDK package. 2. Set environment variables that will be used locally for Wix Client authorization. 3. Create the Wix Client. ### Install Wix SDK Navigate to the root folder of your project on the command line, and run the following command: ```bash npm install @wix/sdk ``` This installs the Wix SDK package, which provides methods to let your app authenticate and communicate with the Wix platform. ### Set local environment variables Connect the local environment to the app you created in the Custom Apps page as follows: 1. Paste the following code into the `.env.local` file: ```bash WIX_APP_ID= WIX_APP_SECRET= WIX_APP_JWT_KEY= ``` 2. Go to your app and click on **OAuth**. Copy the App ID at the top of the page. Paste the App ID as the value for `WIX_APP_ID` in `.env.local`. 3. Next to the **App Secret Key** field, click the eye icon to show the secret key. Copy and paste it in `.env.local` as the value for `WIX_APP_SECRET`. 4. To get the value for the public key, go to **Webhooks** and scroll to the bottom of the page to the **Public Key** section. Click **Open** to show your public key. Copy the public key. > **Note**: > In order to view your public key, you first have to add a webhook. You have two options to paste the value of the public key for the value of `WIX_APP_JWT_KEY`: * Paste the value exactly as it appears in the app dashboard, and surround it with quotation marks. * Base64 encode the public key, and paste the value without quotation marks. We strongly recommend this method, as some deployment platforms don’t support multi-line environment variables. You can use an online encoder to base64 encode your public key. Your `.env.local` file should look similar to this when you are done (we used base64 encoding): ```bash WIX_APP_ID=9d8fc271-ec91-4f33-8151-75f9453be347 WIX_APP_SECRET=fa10735e-3139-4e91-a3bb-4aba7f151ac8 WIX_APP_JWT_KEY=LS0tLS1CRUdJTiBQVUJMSUMgS0VZLS0tLS0KTUlJQklqQU5CZ2txaGtpRzl3MEJBUUVGQUFPQ0FROEFNSUlCQ2dLQ0FRRUFwQjhvYzZEK1BWTDVSV0ZXWXR1SwpBSnJ2Z0hvd2hCOGw0UURHNXBLVTVBOUF5bzRPMktyeG9pWU05NzlwRmg0bUlQdW9llut4QjNnMFpWVUpza0tQCmQrc29tR1JyNlc2emNOWW5VbDgxVVFGZ3MyeTlOekQzQUFnQnVFQlhJOFpqbTRnYUlVTm10LzZCdVM0THRhU2cKV0E3Y0dLUcFLY2VOVjZTUlBFT1hBUWlrL0R0bmRjTUhQNkZzclo5UDV6R0ZYTlpQZ0k4aHVBSm5OVXJzUG5VQwpSaGlSMGowcDBJcG9MOEkwSWxhZVBzWjFUTEpIVlkxMjR2aDREUktkbHZTNS9YYkxwRVJ1Z3M3QkFXc0l5L2FLCjJ3dG80MDZkRHphM0l3TWo3WW5QaXpnVW91ODRNTTgvQVBVRjFvX0laclBaTmUxblIzcDNoSjNGT2JPT0tEbmoKcVFJREFRQUIKLS0tLS1FTkQgUFVCTElDIEtFWS0tLS0t ``` Now that we’ve set our local environment variables, we can use them to create a Wix Client. > **Note:** > You can also use the local environment to [run your code locally](#run-the-app-locally). ### Create a Wix Client with AppStrategy The [Wix Client](https://dev.wix.com/docs/sdk/core-modules/sdk/wix-client.md) allows your app to authenticate and communicate with the Wix platform. In this tutorial, we’ll set up two separate clients for our app: * A client that authenticates as an app instance. This will be used to handle app-level logic such as receiving service plugin requests and handling webhooks. * A client that authenticates on behalf of a Wix user. This client works with the dashboard. We will create this client later in the tutorial. In this step, we’ll add the code to set up the first client that authenticates as an app instance. In the `src/app/utils` directory, add a file called `wix-sdk.app.ts`. In this file, paste the following code: ```javascript import { AppStrategy } from '@wix/sdk/auth/wix-app-oauth'; import { createClient } from '@wix/sdk/client'; export const wixAppClient = createClient({ auth: AppStrategy({ appId: process.env.WIX_APP_ID!, appSecret: process.env.WIX_APP_SECRET!, publicKey: process.env.WIX_APP_JWT_KEY, }), }); ``` #### Understanding the code **Lines 1-2**: Imports [`AppStrategy`](https://dev.wix.com/docs/sdk/core-modules/sdk/app-strategy.md) and `createClient()` from the Wix SDK. Both are necessary to set up our app’s Wix Client. **Lines 4-10:** Creates a Wix Client by passing `AppStrategy` as the `auth` parameter. Inside `AppStrategy` we set the Wix app ID, secret key, and public key from the environment variables in `.env.local`. Now we can import the Wix Client to our code, which we’ll add next. ## Step 4 | Add the code Now we get to the fun part–the code! Note that we won’t cover every file in the [full code](https://github.com/wix/app-template-custom-shipping-rates) repo, but you can look at [this table](#table-of-files) that summarizes what each file does. Our goal is to walk you through the app's core logic, so you can expand on it later yourself. There are two major actions that the app performs: * Returns shipping rates data when the Get Shipping Rates endpoint receives a request from a Wix site. * Displays shipping rates data on a dashboard page where a site admin can edit them, and saves any changes. We’ll add the code in three steps: 1. Add the supporting code that needs to be imported to the rest of the app. 2. Add the logic for receiving and responding to requests. 3. Add the dashboard code. Once you’ve completed these steps, you’ll be able to install your app on a site, view the dashboard, and handle [shipping rates](https://dev.wix.com/docs/sdk/backend-modules/ecom/service-plugins/shipping-rates/introduction.md) requests from Wix. ### Add supporting code We’ll start by adding code that will be used widely across the app, such as getter and setter methods and type interfaces to define our shipping data. #### Create shipping rates data types We’re going to create several types to make our code more flexible, especially for the dashboard code. 1. Navigate to the `types` directory that we created earlier, and in this folder add a file called `app-data.model.ts`. 2. In this file, add the following two enums: ```javascript export enum ShippingUnitOfMeasure { NUM_OF_ITEMS = 'NUM_OF_ITEMS', WEIGHT_IN_KG = 'WEIGHT_IN_KG', WEIGHT_IN_LB = 'WEIGHT_IN_LB' } export enum ShippingMethodType { STANDARD = ‘STANDARD’, EXPRESS = ‘EXPRESS’ } ``` The first enum gives options on how to determine shipping rates, either by the number of items in the customer’s cart, or by weight in kilograms or pounds. The second enum gives two options for shipping, standard or express. 3. Because our app uses Typescript, which is strongly typed, we need to create interfaces that define the structure of the types for our shipping costs and data. Below the two enums, add the following two interface definitions: ```javascript export interface ShippingCosts { first: number; second: number; thirdAndUp: number; } export interface ShippingAppData { shippingMethods: { code: string; title: string; type: ShippingMethodType; unitOfMeasure: ShippingUnitOfMeasure; costs: ShippingCosts; }[]; } ``` The first interface defines three number fields. This lets users set the price on each item that a customer orders. This field is an important part of our dashboard. The second interface uses the previously defined enums and interface to define shipping rate data type. Notice that the interface contains an array of shipping methods. This lets you define multiple shipping methods in your app. The types we define here are specific to this application. You can edit them as necessary for your app later. #### Write setter and getter methods For the purposes of this tutorial, we define a default ShippingAppData object, and create basic getter and setter methods that retrieve and set values for that default object. 1. Navigate to the `actions` directory and create a file called `app-data.ts`. 2. At the top of the file, import the types we created in `src/app/types/app-data.model.ts`: ```javascript import { ShippingAppData, ShippingMethodType, ShippingUnitOfMeasure } from '@/app/types/app-data.model'; ``` 3. Now create the default shipping app data object by adding this code: ```javascript let defaultAppData: ShippingAppData = { shippingMethods: [ { code: 'example-shipping-rate-standard', title: 'Standard Delivery', type: ShippingMethodType.STANDARD, unitOfMeasure: ShippingUnitOfMeasure.NUM_OF_ITEMS, costs: { first: 5, second: 2, thirdAndUp: 1, }, }, { code: 'example-shipping-rate-express', title: 'Express Delivery', type: ShippingMethodType.EXPRESS, unitOfMeasure: ShippingUnitOfMeasure.NUM_OF_ITEMS, costs: { first: 10, second: 4, thirdAndUp: 2, }, }, ], }; ``` Our default object contains two different methods in its shipping methods array: one for standard and one for express delivery. As you’ll see later, this will be reflected in the dashboard page. Notice that for each element, we use the shipping method type and shipping unit of measure enums that we defined in `types/app-data.model.ts` to set the shipping type and rate. For both shipping methods, we apply the rates per item. 4. Below the default object code, add the getter and setter methods: ```javascript export async function getShippingAppData(): Promise { return defaultAppData; } export async function setShippingAppData(data: ShippingAppData): Promise { defaultAppData = data; } ``` For this tutorial, we store our shipping data within this object in the app itself. This allows us to write very basic getter and setter methods. This is done for simplicity. When you create your own app, create getter and setter methods that implement logic to fetch shipping rate data from your database. The code [here](https://github.com/wix/app-template-custom-shipping-rates/blob/main/src/app/actions/app-data.ts) can help you get started. We can now export the methods and types we’ve created to other parts of our app. ### Handle shipping rates requests Next, we’ll add the code to implement a [Get Shipping Rates endpoint](https://dev.wix.com/docs/rest/business-solutions/e-commerce/service-plugins/shipping-rates-integration-service-plugin/get-shipping-rates.md) with the required URL path. In the `src/app/api/shipping-rates/v1/getRates/` directory that we created earlier, add a file called `route.ts`. We’ll put all the logic for receiving and responding to requests in this file. Copy and paste the code below into `route.ts`: ```js import { wixAppClient } from '@/app/utils/wix-sdk.app'; import { getShippingAppData } from '@/app/actions/app-data'; wixAppClient.shippingRates.provideHandlers({ async getShippingRates({ request, metadata }) { const appData = await getShippingAppData({ instanceId: metadata.instanceId! }); const currency = metadata.currency; return { shippingRates: appData.shippingMethods.map(({ code, title, costs }) => ({ code, title, cost: { price: costs.first, currency, }, })), }; }, }); export async function POST(request: Request) { return wixAppClient.servicePlugins.processRequest(request); } ``` Let’s walk through this code and understand what it does: **Lines 1-2:** We import two objects: * The Wix Client that we set up in the `src/app/utils/wix-sdk.app` folder. This enables our app to communicate with the Wix platform. * The getter method we defined in `src/app/actions/app-data.ts`, which returns our default shipping data object when requested. **Line 4:** We call the `provideHandlers()` function to define handler functions that are called whenever a service plugin request is received. **Line 5:** We define the `getShippingRates()` handler function that is triggered whenever a request is received by the endpoint. All our logic goes in this function. **Line 6**: We call our getter method to return our default shipping data object. **Line 7:** We get the currency from the metadata sent with the site’s and set our currency type to match it. This ensures that the price we return is in the site's currency. **Lines 9-18:** The `getShippingRates()` handler function returns a valid response with our shipping rate data. In the function, we map our data to the fields in the [return object](https://dev.wix.com/docs/sdk/backend-modules/ecom/service-plugins/shipping-rates/get-shipping-rates.md) that Wix expects our function to return. Note that in line 15, we pass the site’s currency type to our object to ensure this shipping rate is returned in the correct currency. **Line 22:** We create a POST function that is called whenever a POST request is received by the endpoint. **Line 23:** This function does a lot of work! It parses the request our app receives from the site, validates its JWT signature, calls the handler function we defined above and passes it the request and associated metadata. Then, it returns the response as a JSON to the user's site, so the site will display the shipping rates to the customer. To learn more about what’s going on in the background, read about [verifying requests received from Wix](https://dev.wix.com/docs/build-apps/develop-your-app/access/authentication/verify-requests-received-from-wix.md) and see this [sample flow](https://dev.wix.com/docs/rest/business-solutions/e-commerce/service-plugins/shipping-rates-integration-service-plugin/sample-flow.md). This code takes care of the service plugin handling part of our app, and now we can move on to creating the dashboard. ### Develop the dashboard page The dashboard page lets a site admin interact with your app. The page we build in this app will allow users to customize their shipping rates directly from their site dashboard. The code for the dashboard is spread over a number of files. We won’t review every line of code in detail, but we will show you what files you need to add and what code they should contain. We’ll start by adding several supporting files that we need to import into the main UI code. Then we’ll write the dashboard code itself. #### Before you begin Install the following packages if you don’t have them already: * `@tanstack/react-query` * `@wix/dashboard` * `@wix/design-system` #### Create a Wix Client with Dashboard SDK Auth Previously we [created a Wix Client](#create-a-wix-client-with-appstrategy) in `wix-sdk.app.ts` that uses WixAppOAuth to authenticate as an app instance. However, to perform actions on the dashboard, our app also needs to authenticate on behalf of the user. Therefore, we use the [Dashboard SDK](https://dev.wix.com/docs/sdk/host-modules/dashboard/introduction.md) to create an additional client. 1. Navigate to the `src/app/utils` folder, and add a file called `wix-sdk.client-only.ts`. In this file, add the following code: ```javascript 'use client'; import { dashboard, SDK } from '@wix/dashboard'; import { useMemo } from 'react'; import { createClient } from '@wix/sdk/client'; function inIframe() { try { return window.self !== window.top; } catch (e) { return true; } } export const useSDK = () => { const sdk = useMemo( () => typeof window === 'undefined' || !inIframe() ? { dashboard: {} as SDK, } : createClient({ host: dashboard.host(), auth: dashboard.auth(), modules: { dashboard, }, }), [typeof window], ); return sdk; }; ``` This code contains two functions: * A utility function `inIframe()` that checks if the current window is displayed in an iFrame. This is necessary because the dashboard SDK won’t be initialized outside of an iFrame. This would make the SDK methods unusable. * A `useSDK()` function that creates a [dashboard SDK client](https://dev.wix.com/docs/sdk/host-modules/dashboard/introduction.md#setup) if it determines the window is embedded in an iFrame. Like the first client we created, `useSDK()` calls the Wix SDK’s [`createClient()`](https://dev.wix.com/docs/sdk/core-modules/sdk/wix-client.md#createclient) function. Now, however, we pass in `dashboard.host()` and `dashboard.auth()` to set up the authentication on behalf of the user. Our app now has the proper authorizations to work with the dashboard through the new Wix Client. #### Supporting files In addition to the Wix Client, we also need to add a few more supporting files. The code in these files provides necessary wrappers and enums to render our dashboard UI. 1. In `src/app/utils` add the following files: * `client-providers.tsx` * `navigation.const.ts` 2. In `client-providers.tsx`, add the following code: ```javascript 'use client'; import { QueryClient, QueryClientProvider } from '@tanstack/react-query'; import type { PropsWithChildren } from 'react'; import { WixDesignSystemProvider } from '@wix/design-system'; export const AppProviders = ({ children }: PropsWithChildren) => { const queryClient = new QueryClient(); return ( {children} ); }; ``` The purpose of this code is to create a wrapper for the dashboard React component and define global variables. 3. In `navigation.const.ts`, add: ```javascript export enum WixPageId { SHIPPING_INFO = 'stores.shipping', MANAGE_APPS = 'ad471122-7305-4007-9210-2a764d2e5e57', MANAGE_ORDERS = '8107f05f-d646-4c81-be90-adf28d321398', } ``` This enum provides the page IDs that components of your app can navigate to. For example, on our dashboard page we will include breadcrumbs that allow the user to navigate back to the [**Manage Apps**](https://www.wix.com/my-account/site-selector/?buttonText=Select%20Site&title=Select%20a%20Site&autoSelectOnSingleSite=true&actionUrl=https:%2F%2Fwww.wix.com%2Fdashboard%2F%7B%7BmetaSiteId%7D%7D%2Fmanage-installed-apps) page of their site dashboard. ![Breadcrumbs example](https://wixmp-833713b177cebf373f611808.wixmp.com/images/d12a97db12f15a96e17be9fb7824ae40.png) For the breadcrumbs to work, you have to pass the relevant page IDs, as you will see in the dashboard code. We store the page IDs here so we can easily access them from anywhere in the code. 4. Now navigate to `src/app/client-hooks`. In the `client-hooks` folder, add a file called `app-data.ts`. Add the following code to the file: ```javascript 'use client'; import { useQuery, useMutation, useQueryClient } from '@tanstack/react-query'; import { getShippingAppData, setShippingAppData } from '@/app/actions/app-data'; const queryKey = ['shipping-app-data']; export const useShippingAppData = () => { return useQuery({ queryKey, queryFn: async () => { return getShippingAppData(); }, }); }; export const useSetShippingAppData = () => { const queryClient = useQueryClient(); const { mutateAsync } = useMutation({ mutationFn: async (newData: any) => { return setShippingAppData(newData); }, onSuccess: (data) => { void queryClient.invalidateQueries({ queryKey }); }, }); return mutateAsync; }; ``` The purpose of the code in this file is to wrap the setter and getter methods we created earlier in React Query, so that we can use them with the UI. Let’s go through this file in more detail to understand what the code is doing: **Line 1**: We indicate that this file is intended for client-side code with the `'use client'` [directive](https://react.dev/reference/react/use-client). **Line 2-3**: We import necessary functions from the `@tanstack/react-query` library. We also import the setter and getter methods that we created earlier. **Line 5**: We define a unique query key for fetching and validating the data. **Line 7-14**: We wrap our getter method, `getShippingAppData()`, in React Query. Remember that in this tutorial, `getShippingAppData()` just returns our default object. In a fully functioning app, it should fetch the data from an external database. **Line 16-27**: This function wraps our setter method in React Query, so that any changes to the data from the UI are stored in the database. Now that we’ve added the supporting files, we can export them to the dashboard code. #### The dashboard code The dashboard is broken up into a few different components, as shown below. ![Shipping Rate app dashboard](https://wixmp-833713b177cebf373f611808.wixmp.com/images/d9b3d61fdd9f56eba6106f1e1f5552fa.png) For this tutorial, we’ll only add the delivery method and header sections. We’ll explain how to add the activation and order summary sections so you can do it on your own. You can find the original template code for all these sections [here](https://github.com/wix/app-template-custom-shipping-rates/tree/main/src/app/dashboard/parts). 1. Navigate to `src/app/dashboard/parts` and add the following three files: * `ShippingDeliveryMethodForm.tsx` * `ShippingRatesPage.tsx` * `ShippingRatesPageContent.tsx` 2. Let’s start by adding the code to `ShippingDeliveryMethodForm.tsx`. This sets up the two delivery method sections (one is collapsed) shown in the image above. Start by adding the import statements to the file: ```javascript import { useState } from 'react'; import { Box, Card, Cell, Collapse, Dropdown, FormField, Input, Layout, Text, TextButton } from '@wix/design-system'; import { ChevronDown, ChevronUp } from '@wix/wix-ui-icons-common'; import { ShippingCosts, ShippingMethodType, ShippingUnitOfMeasure } from '@/app/types/app-data.model'; ``` As you can see, we import the types we created for handling shipping data in line 4. These types will make it easier to set up our dashboard page. In addition, in line 2, we import a number of elements from the [Wix Design System](https://www.wix-pages.com/wix-design-system/). We use these to construct the delivery method UI. The rest of the file exports a React functional component called `ShippingDeliveryMethodForm` that controls the UI of the delivery method sections. Add the function to your file: ```javascript export function ShippingDeliveryMethodForm({ title, unitOfMeasure, shippingCosts, onUnitOfMeasureSelected, onShippingCostsChanged, expandByDefault = false, }: { title: string; unitOfMeasure: ShippingUnitOfMeasure; shippingCosts: ShippingCosts; onUnitOfMeasureSelected: (type: ShippingUnitOfMeasure) => void; onShippingCostsChanged: (shippingCosts: ShippingCosts) => void; expandByDefault?: boolean; }) { const uomName = unitOfMeasure === ShippingUnitOfMeasure.NUM_OF_ITEMS ? 'item' : unitOfMeasure === ShippingUnitOfMeasure.WEIGHT_IN_LB ? 'lb' : 'kg'; const [isOpen, setIsOpen] = useState(expandByDefault); return ( setIsOpen(!isOpen)}>{isOpen ? : }} /> sameOptionWasPicked ? null : onUnitOfMeasureSelected(option.id as ShippingUnitOfMeasure) } options={[ { id: ShippingUnitOfMeasure.NUM_OF_ITEMS, value: 'Number of items' }, { id: ShippingUnitOfMeasure.WEIGHT_IN_KG, value: 'Weight in kg' }, { id: ShippingUnitOfMeasure.WEIGHT_IN_LB, value: 'Weight in lb' }, ]} placeholder='Select parameter' /> Set conditions: $} placeholder='Select totalPrice' type='number' value={shippingCosts.first} onChange={(e) => { onShippingCostsChanged({ ...shippingCosts, first: Number(e.currentTarget.value) }); }} /> $} placeholder='Select totalPrice' type='number' value={shippingCosts.second} onChange={(e) => { onShippingCostsChanged({ ...shippingCosts, second: Number(e.currentTarget.value) }); }} /> $} suffix={per {uomName}} value={shippingCosts.thirdAndUp} onChange={(e) => { onShippingCostsChanged({ ...shippingCosts, thirdAndUp: Number(e.currentTarget.value) }); }} placeholder='Select totalPrice' type='number' /> ); } ``` Let’s review the important parts of the code: **Lines 6-21:** We pass destructured `title`, `ShippingUnitOfMeasure` and `ShippingCosts` props to `ShippingDeliveryMethodForm`. We annotate each prop with Typescript to define its expected type. We also pass two callback functions, `onUnitOfMeasureSelected` and `onShippingCostsChanged` which perform actions in the UI when the measurement unit or costs are changed. We’ll define these callbacks in `ShippingRatesPageContent.tsx`. **Line 30:** The function returns a [Card](https://www.wix-pages.com/wix-design-system/?path=/story/components-layout-card--card) component containing header and content, as shown here: ![Standard delivery section](https://wixmp-833713b177cebf373f611808.wixmp.com/images/fb6768cb98a3fbcd5c2228e95ad7cb36.png) **Lines 38-54:** The function sets up a [Box](https://www.wix-pages.com/wix-design-system/?path=/story/components-layout--box) component that contains a dropdown. This lets users select the unit of measurement they wish to use. **Lines 54-98**: The function sets up another box that contains three cells. Each cell corresponds to the per-unit cost fields. For example, lines 57-69 set up the first cost field. 3. Now we’ll add the code to `ShippingRatesPageContent.tsx`. The code in this file drives the main logic of the UI, so we will go through it in more detail. Let’s start, once again, by adding the import statements: ```javascript 'use client'; import { Box, Breadcrumbs, Button, Cell, Layout, Loader, Page } from '@wix/design-system'; import { useSDK } from '@/app/utils/wix-sdk.client'; import { useCallback, useEffect, useState } from 'react'; import { ShippingDeliveryMethodForm } from '@/app/dashboard/parts/ShippingDeliveryMethodForm'; import { WixPageId } from '@/app/utils/navigation.const'; import { useSetShippingAppData, useShippingAppData } from '@/app/client-hooks/app-data'; import { ShippingAppData, ShippingCosts, ShippingUnitOfMeasure } from '@/app/types/app-data.model'; ``` **Line 1:** We mark the file as containing client-only code. **Line 2:** We import the elements we need from the [Wix Design System](https://www.wix-pages.com/wix-design-system/?path=/story/getting-started--about). **Line 3:** We import the `useSDK()` we created in `src/app/utils/wix-sdk.client`. This function allows our code to communicate with the dashboard SDK client. **Line 4:** We import several necessary React methods. We will use these shortly to define the logic of our code. **Line 5:** We import the `ShippingDeliveryMethodForm` function that we created in the previous step. We will integrate this into the overall dashboard page UI. **Line 6:** We import the `WixPageId` enum. Recall that we need the codes in this enum to navigate from our page to other pages in the dashboard. **Line 7**: We import the wrapped setter and getter methods. We’ll use these to respond to user actions in the UI. **Line 8:** We import our shipping data types. 4. Next, we export a React functional component called ShippingRatesPageContent. ```javascript export const ShippingRatesPageContent = ({}: {}) => { // We'll add code here } ``` Currently, this function doesn’t accept props, but you can add them later if required for your app. 5. Inside the `ShippingRatesPageContent()` function, first add this code: ```javascript const { dashboard: { showToast, navigate }, } = useSDK(); ``` We destructure the `sdk` object returned from `useSDK()` and extract two functions we need, [showToast()](https://dev.wix.com/docs/sdk/host-modules/dashboard/show-toast.md) and [navigate()](https://dev.wix.com/docs/sdk/host-modules/dashboard/navigate.md). 6. Next, define a variable to contain our setter wrapper function: ```javascript const persistShippingAppData = useSetShippingAppData(); ``` 7. In the next line, add this code: ```javascript const { data: persistedShippingAppData, isLoading: isLoadingAppData } = useShippingAppData(); ``` At some point, we’ll need to fetch the shipping data we’ve stored to display on the dashboard. We’ll store the fetched data in `persistedShippingAppData`. In this tutorial, we are simply returning the default object that’s hard-coded into our app, so `isLoadingAppData` is not that relevant. But you’ll need it later when you implement logic to fetch the data from a database. 8. Next, add the following code: ```javascript const [currentShippingAppData, setCurrentShippingAppData] = useState( persistedShippingAppData, ); useEffect(() => { setCurrentShippingAppData(persistedShippingAppData); }, [persistedShippingAppData]); const [loading, setLoading] = useState(false); ``` We manage the state of the data displayed on the dashboard with the `useState()` React hook. We also manage the loading state. We use the loading state later in the UI to display a [loader](https://www.wix-pages.com/wix-design-system/?path=/story/components-feedback--loader) element. We keep the displayed shipping data up-to-date with the React hook `useEffect()`. If a user makes changes to the shipping data stored in the database, the new data is displayed on the dashboard when the component reloads. 9. Now add the callback function for saving updated shipping data: ```javascript const onSave = useCallback(() => { setLoading(true); persistShippingAppData(currentShippingAppData!) .then(() => { showToast({ message: 'Shipping rates saved successfully.', type: 'success', }); }) .catch(() => { showToast({ message: 'Failed to save shipping rates.', type: 'error', }); }) .finally(() => setLoading(false)); }, [persistShippingAppData, currentShippingAppData, showToast]); ``` The `onSave()` function passes the input shipping data to the setter method, which updates the data (in our case, in the default object; normally, in a database). While updating, it displays the loader, which is controlled by `setLoading()`. When the update completes, it uses the [showToast()](https://dev.wix.com/docs/sdk/host-modules/dashboard/show-toast.md) SDK method to indicate success or failure before clearing the loader. 10. Beneath the first callback, add another two that look like this: ```javascript const setUomForMethod = useCallback( (code: string) => (type: ShippingUnitOfMeasure) => { setCurrentShippingAppData({ ...currentShippingAppData, shippingMethods: currentShippingAppData!.shippingMethods.map((m) => m.code === code ? { ...m, unitOfMeasure: type } : m, ), }); }, [currentShippingAppData], ); const setCostsForMethod = useCallback( (code: string) => (costs: ShippingCosts) => { setCurrentShippingAppData({ ...currentShippingAppData, shippingMethods: currentShippingAppData!.shippingMethods.map((m) => (m.code === code ? { ...m, costs } : m) ), }); }, [currentShippingAppData], ); ``` These two callbacks fire when a user updates the unit of measurement or the shipping costs. They update the displayed shipping data to match the user’s selection. In `ShippingDeliveryMethodForm()`, we defined two props to receive callback functions. We’ll pass the two callback functions we define here as those arguments, as you’ll see shortly. 11. Define the UI and behavior for the button bar, using the [Box](https://www.wix-pages.com/wix-design-system/?path=/story/components-layout--box) and [Button](https://www.wix-pages.com/wix-design-system/?path=/story/components-actions--button) components from the Wix Design System: ```javascript const ButtonsBar = useCallback( () => ( ), [loading, onSave, persistedShippingAppData], ); ``` 12. Last, return the UI component. We’ll walk through the code so you can see how everything comes together. Start by adding the return statement, and inside add a [Page](https://www.wix-pages.com/wix-design-system/?path=/story/components-layout-page--page) component with a `Page.Header` and a `Page.Content` element. Inside the `Page.Content`, add a cell and wrap it in a [Layout](https://www.wix-pages.com/wix-design-system/?path=/story/components-layout--layout) element. Set the Cell component’s `span` prop to 8. It should look like this: ```javascript return ( ) ``` 13. Add code to the header element: ```javascript return ( } breadcrumbs={ navigate(id as string)} /> } title='Shipping Rate App' subtitle='Customize shipping fees based on item quantity, weight, and delivery speed, ensuring a flexible and cost-effective solution for your business.' /> ``` The page header contains the buttons bar that we set up previously, the page title and subtitle, and breadcrumbs. Notice in the [Breadcrumbs](https://www.wix-pages.com/wix-design-system/?path=/story/components-navigation--breadcrumbs) element, we pass the [page ID](https://github.com/wix/app-template-custom-shipping-rates/blob/main/src/app/utils/navigation.const.ts) for the **Manage Apps** dashboard page. This lets users navigate to **Manage Apps** from your app’s dashboard page. 14. Now add the page content. We’re going to add a ternary operator that determines the page content based on the value of `isLoadingAppData`: ```javascript {isLoadingAppData ? ( ) : ( {currentShippingAppData?.shippingMethods.map((method, index) => ( ))} )} ``` If the app is still loading the shipping data from the backend, we display a [Loader](https://www.wix-pages.com/wix-design-system/?path=/story/components-feedback--loader). Once the shipping data is loaded, we update `isLoadingAppData` to `false` to display the data. The second part of the ternary expression iterates over an array of shipping method elements fetched from the database. For each element, it populates the props of a `ShippingDeliveryMethodForm` component. The component then uses these props to create the UI of each delivery method. The dashboard page of your app now closely resembles that of the template. Here is the full code for `ShippingRatesPageContent.tsx`: ```javascript 'use client'; import { Box, Breadcrumbs, Button, Cell, Layout, Loader, Page } from '@wix/design-system'; import { useSDK } from '@/app/utils/wix-sdk.client'; import { useCallback, useEffect, useState } from 'react'; import { ShippingDeliveryMethodForm } from '@/app/dashboard/parts/ShippingDeliveryMethodForm'; import { WixPageId } from '@/app/utils/navigation.const'; import { useSetShippingAppData, useShippingAppData } from '@/app/client-hooks/app-data'; import { ShippingAppData, ShippingCosts, ShippingUnitOfMeasure } from '@/app/types/app-data.model'; export const ShippingRatesPageContent = ({}: {}) => { const { dashboard: { showToast, navigate }, } = useSDK(); const persistShippingAppData = useSetShippingAppData(); const { data: persistedShippingAppData, isLoading: isLoadingAppData } = useShippingAppData(); const [currentShippingAppData, setCurrentShippingAppData] = useState( persistedShippingAppData, ); useEffect(() => { setCurrentShippingAppData(persistedShippingAppData); }, [persistedShippingAppData]); const [loading, setLoading] = useState(false); const onSave = useCallback(() => { setLoading(true); persistShippingAppData(currentShippingAppData!) .then(() => { showToast({ message: 'Shipping rates saved successfully.', type: 'success', }); }) .catch(() => { showToast({ message: 'Failed to save shipping rates.', type: 'error', }); }) .finally(() => setLoading(false)); }, [persistShippingAppData, currentShippingAppData, showToast]); const setUomForMethod = useCallback( (code: string) => (type: ShippingUnitOfMeasure) => { setCurrentShippingAppData({ ...currentShippingAppData, shippingMethods: currentShippingAppData!.shippingMethods.map((m) => m.code === code ? { ...m, unitOfMeasure: type } : m, ), }); }, [currentShippingAppData], ); const setCostsForMethod = useCallback( (code: string) => (costs: ShippingCosts) => { setCurrentShippingAppData({ ...currentShippingAppData, shippingMethods: currentShippingAppData!.shippingMethods.map((m) => (m.code === code ? { ...m, costs } : m)), }); }, [currentShippingAppData], ); const ButtonsBar = useCallback( () => ( ), [loading, onSave, persistedShippingAppData], ); return ( } breadcrumbs={ navigate(id as string)} /> } title='Shipping Rate App' subtitle='Customize shipping fees based on item quantity, weight, and delivery speed, ensuring a flexible and cost-effective solution for your business.' /> {isLoadingAppData ? ( ) : ( {currentShippingAppData?.shippingMethods.map((method, index) => ( ))} {/* */} )} {/* */} {/* */} {/* */} ); }; ``` Notice in the complete code, two sections have been commented out. These sections define two more components that we've excluded for this tutorial: * The activation details card. * The order summary. These components aren’t necessary for the app to work, but the full app template includes them. If you want to add them to your app, you can use the code in the app template repo as follows: ##### Add activation details The activation details card provides instructions to the site admin on how to activate your app on their site. You can find the code [in the app template repo](https://github.com/wix/app-template-custom-shipping-rates/blob/main/src/app/dashboard/parts/ActivationDetailsCard.tsx). Notice that you need to use the Wix page ID to direct the user to the correct page. ##### Add order summary The order summary section provides the site admin with a list of recent orders made on their site. For this section to work, you’ll need to create a third Wix client that initializes the Wix eCommerce Orders API, and implement code to fetch the site’s last orders. There are several steps to do this: 1. Install the Wix JavaScript SDK’s `orders` module and import it into your client code file as shown [here](https://dev.wix.com/docs/sdk/backend-modules/ecom/orders/setup.md). 2. In the same file, add the [code](https://github.com/wix/app-template-custom-shipping-rates/blob/main/src/app/utils/wix-sdk.ts) for the client: ```javascript export const createSdk = (accessToken: string) => createClient({ auth: { getAuthHeaders: async () => ({ headers: { Authorization: accessToken, }, }), }, modules: { orders, }, }); ``` Pass the Orders module into `createClient()`, so that the client will initialize the module for use. 3. Now you can export the client to other files and call functions belonging to the `orders` module. For example, you can use the [`searchOrders()`](https://dev.wix.com/docs/sdk/backend-modules/ecom/orders/search-orders.md) function to get a list of orders that have been made on your site: ```javascript sdk.orders.searchOrders({ search: { cursorPaging: { limit: 3, }, }, }) ``` See the [full code](https://github.com/wix/app-template-custom-shipping-rates/blob/main/src/app/actions/orders.ts). Once you implement code to retrieve recent orders, you need to [wrap it in React Query](https://github.com/wix/app-template-custom-shipping-rates/blob/main/src/app/client-hooks/orders.ts). Then you can use the wrapped code to populate the UI with the order data. In the [app template code](https://github.com/wix/app-template-custom-shipping-rates/blob/main/src/app/dashboard/parts/ShippingMethodSummary.tsx), we use a [sticky area](https://www.wix-pages.com/wix-design-system/?path=/story/components-layout-page--page#Sticky_areas) to display the order summary. #### Render the dashboard page At this point, we’ve completed the bulk of the code needed to define our dashboard. We need to add code to two more files so our dashboard page will render on a site. 1. In `ShippingRatesPage.tsx`, add the following code: ```javascript 'use client'; import '@wix/design-system/styles.global.css'; import { AppProviders } from '@/app/utils/client-providers'; import { ShippingRatesPageContent } from '@/app/dashboard/parts/ShippingRatesPageContent'; export const ShippingRatesPage = ({}: {}) => { return ( ); }; ``` We wrap `ShippingRatesPageContent` in the `AppProviders` component we created in our supporting code. This allows the UI code we wrote to be accessed by the entire app. 2. In `page.tsx`, copy and paste this code: ```javascript import { ShippingRatesPage } from '@/app/dashboard/parts/ShippingRatesPage'; export default async function App() { return ; } ``` This will render the dashboard UI on the site. You now have a custom shipping rates Wix app with basic functionality and a dashboard page. You can continue expanding on it from here, or you can deploy and test it in the next steps. ## Step 5 | Deploy your app To deploy our app, we have to do the following: 1. Set it up on a platform like [Netlify](https://www.netlify.com/) or [Vercel](https://vercel.com/). 2. Complete the setup in the app dashboard. ### Set up your app on a deployment platform 1. Connect the Git repository containing your app code to the deployment platform you choose. 2. Add the three variables from your `.env.local` file to your site’s environment variables on the deployment platform. 3. Deploy your app and copy its deployment domain so you have it for the next steps. ### Finish configuring the app in your app's dashboard Now we’ll return to your app's dashboard to connect our deployed app. We need to add and configure the following extensions to our app so it will work on a site: 1. **Shipping Rates extension**: Enables our app to communicate with the Get Shipping Rates endpoint we implemented. 2. **Dashboard Page extension**: Integrate the dashboard UI we created in our code. #### Add a Shipping Rates Extension 1. From the app's dashboard, click **Extensions** > **Create Extension**. 2. In the modal that pops up, search for “shipping rates” in the search bar. You should see an extension called **Ecom Shipping Rates**. ![Choose shipping rates extension](https://wixmp-833713b177cebf373f611808.wixmp.com/images/a04674976e634ba681d496cc2aac00ad.png) 3. Click on the **Create** button to add a new Ecom Shipping Rates extension. This will bring up a JSON editor that looks like this: ![Shipping Rates JSON editor](https://wixmp-833713b177cebf373f611808.wixmp.com/images/a4e37ac0b8075e95f63c991fcba86302.png) 4. You’re required to define `deploymentUri` and `name` in your JSON. You can give your app any name. The deployment URI should consist of your app’s deployment domain with the path `/api/shipping-rates` appended to it: ```bash https:///api/shipping-rates ``` Below is an example of a JSON with the `name` and `deploymentUri` keys defined. ```json { "deploymentUri": "https://my-example-shipping-rates-app.vercel.app/api/shipping-rates", "name": "My Example Shipping Rates app" } ``` When your JSON is complete, save it and exit the JSON editor to return to the main **Extensions** page. #### Add a Dashboard Page extension 1. Click **Create Extension** and create a new **Dashboard Page**. ![Select Dashboard Page](https://wixmp-833713b177cebf373f611808.wixmp.com/images/34d2a49af022e9ba9921ef8215a9df92.png) > **Note:** > Select the dashboard page option that is **not** built on Wix Blocks. You should now see something like this: ![Configure dashboard page](https://wixmp-833713b177cebf373f611808.wixmp.com/images/7ec9c7611d6f4411ca6d67c6f7fa2590.png) 2. Fill out the following fields: * **Name**: This is the name of the page that you’ll see in your app's dashboard. * **iFrame URL**: This is the domain from your deployment platform. Our dashboard code is in the `dashboard` directory of our app, so we append `/dashboard` to the domain. For example, if you deployed on Vercel and your domain is `my-tutorial-app.vercel.app`, your iFrame URL should be: ```bash https://my-tutorial-app.vercel.app/dashboard ``` * **Relative route**: This will appear as your relative page URL on the user’s dashboard. For example: `shipping-rates-dashboard`. * **Page name**: This is the name of your page that will appear on the side menu on the user’s dashboard. For example: `Custom Shipping Rates`. 3. Click **Save** to exit. Your app is now set up and ready to be installed on a site. ## Step 6 | Test your app on a site Now that your app has basic functionality, you can install it on a free [development site](https://dev.wix.com/docs/build-apps/launch-your-app/app-distribution/test-your-app-on-a-premium-site.md) to test it. We’ll walk through how to set up a test site so we can use our app with it, then show you how to test the installed app itself. ### Install the app on a development site 1. In the top right corner of your [app's dashboard](https://manage.wix.com/account/custom-apps), click **Test App** and select **Test on dev site**. 1. Select an existing development site or click **+ Create Dev Site** to create a new site. Select the editor and the Wix Business Solution you want to use and click **Create Dev Site**. 1. Click **Test App**. Wix installs your app and opens the site in a new tab. You can set which site page opens in your [app settings](https://dev.wix.com/app-selector?title=Select+an+App&primaryButtonText=Select+Site&actionUrl=https%3A%2F%2Fdev.wix.com%2Fapps%2F%7BappId%7D%2Fapp-settings). If you don't set a page, the site editor opens by default. ### Try out the app Let’s start by looking at the dashboard we created: 1. Go to your development site’s [dashboard](https://www.wix.com/my-account/site-selector/?buttonText=Select%20Site&title=Select%20a%20Site&autoSelectOnSingleSite=true&actionUrl=https:%2F%2Fwww.wix.com%2Fdashboard%2F%7B%7BmetaSiteId%7D%7D%2Fhome). 2. In the left sidebar, click **Apps**. In the submenu that opens, click the name you chose for your app, such as Custom Shipping Rates. 3. You can test out the functionality of the dashboard by changing the parameter and the costs in each cell. Now let’s see the app’s logic in action: 1. Once the app is installed, go to your site dashboard and navigate to **Settings** > **[Shipping, Delivery & Fulfillment](https://www.wix.com/my-account/site-selector/?buttonText=Select%20Site&title=Select%20a%20Site&autoSelectOnSingleSite=true&actionUrl=https:%2F%2Fwww.wix.com%2Fdashboard%2F%7B%7BmetaSiteId%7D%7D%2Fstore/shipping-and-tax/list)**. 2. Click on the **Create Region** button. A new page will open. In the **Create Region** section, choose a region name, click **Add Destination** and select at least one country from the list. 3. Select delivery method and rate. On the next page, select the delivery method that you want to offer customers and choose the rate for that method. Click **Add**. 4. Enable the custom app. A new destination item is added to the page. On this destination, select **Manage your Apps** and you'll see your app. Click the toggle to turn it on. Click **Save**. 5. Go back to the editor and publish your site. View your published site and navigate to the product page. 6. Select any product and add it to the cart, then view the cart. Under **Delivery**, select the country you chose to add shipping rates to. ![Shipping rates live example](https://wixmp-833713b177cebf373f611808.wixmp.com/images/2170a5ff86aab2e3d06edaee0a56b6e3.png) You should see the delivery price change to 5 units of your site’s currency (for example, €5). This comes directly from the default shipping data object we created in `src/app/actions/app-data.ts`. We return the price of the first item as the shipping cost. ### Run the app locally Since you have already set up your local environment variables in the .env.local file, you can also run your app locally. To do so, do the following: 1. In the root folder of your project repo, install dependencies: ```bash npm install ``` 2. You need to manually change your app URL in your app's dashboard. Replace your current base URL with `https://localhost:3000/` in the following places: 1. OAuth page: App URL and Redirect URL for the [app OAuth flow](https://dev.wix.com/docs/build-apps/develop-your-app/access/authentication/about-oauth.md). 2. Webhooks page: App Removed and App Installed [webhooks](https://dev.wix.com/docs/build-apps/develop-your-app/api-integrations/events-and-webhooks/about-webhooks.md). 3. Reinstall the app on your test site. 4. To start the development server, run the command: ```bash npm run dev ``` You can now install the app on a Wix site with server code running locally. > **Note:** > Remember to revert to the deployment URLs in your app's dashboard when you are ready to switch your app to production server deployment. You'll need to reinstall the app again for the change to take effect. ## What’s next Now that your app is working and has some basic functionality, you can continue building on it. Here are some places to help you get going: * Check out the full [custom shipping rates app template code](https://github.com/wix/app-template-custom-shipping-rates) for ideas. * View our [Build Wix Apps documentation](https://dev.wix.com/docs/build-apps/get-started/overview/about-wix-apps.md) to answer any questions. ## Table of Files This table describes the purpose of each file in the original code. > **Note:** > The table does not include config files such as `.gitignore` or `package.json`, or other files generated automatically by `create-next-app`. | File path | Description | | --------- | ----------- | | `src/app/actions/app-data.ts` | Contains several functions for fetching and updating shipping rates data in an external database.| | `src/app/actions/app-instance.ts` | Parses a Wix decoded instance to extract the instance id.| | `src/app/actions/orders.ts` | Retrieves recent orders made on the site to provide the [order summary](https://github.com/wix/app-template-custom-shipping-rates/blob/main/src/app/dashboard/parts/ShippingMethodSummary.tsx) on the dashboard page.| | `src/app/api/oauth/v1/authorize/route.ts` | Sets up the request handler for the app url Oauth implementation. The user is required to add their own logic, as described in [Custom Authentication (Legacy)](https://dev.wix.com/docs/build-apps/develop-your-app/access/authentication/custom-authentication-legacy.md).| | `src/app/api/oauth/v1/signup/route.ts` | Sets up the request handler for the app url Oauth implementation. The user is required to add their own logic, as described in [Custom Authentication (Legacy)](https://dev.wix.com/docs/build-apps/develop-your-app/access/authentication/custom-authentication-legacy.md).| | `src/app/api/shipping-rates/v1/getRates/route.ts` | Provides the main logic for receiving and responding to service plugin requests from the user’s site.| | `src/app/api/webhooks/v1/install/route.ts` | An empty webhook implementation for app installation. The user can add their own logic.| | `src/app/api/webhooks/v1/uninstall/route.ts` | An empty webhook implementation for uninstalling the app. The user can add their own logic.| | `src/app/client-hooks/access-token.ts` | A React hook which uses the Wix Dashboard SDK to fetch the current user’s access token.| | `src/app/client-hooks/app-data.ts` | React hooks to define the shipping data getter and setter methods.| | `src/app/client-hooks/orders.ts` | Wraps the code to fetch the latest orders in React Query so it can be used in the UI.| | `src/app/dashboard/parts/ActivationDetailsCard.tsx` | Builds the UI for the activation instructions in the dashboard.| | `src/app/dashboard/parts/ShippingDeliveryMethodForm.tsx` | Builds the UI for the main part of the dashboard where the user can adjust shipping rates.| | `src/app/dashboard/parts/ShippingMethodSummary.tsx`| Builds the UI for the order summary in the dashboard.| | `src/app/dashboard/parts/ShippingRatesPage.tsx` | Wraps the dashboard page content in the [AppProviders](https://github.com/wix/app-template-custom-shipping-rates/blob/main/src/app/utils/client-providers.tsx) wrapper for React.| | `src/app/dashboard/parts/ShippingRatesPageContent.tsx` | Builds the overarching UI for the dashboard page and pulls in the main components: the activation details, order summary, and shipping rates forms.| | `src/app/dashboard/page.tsx` | Renders the dashboard components on the site.| | `src/app/types/app-data.model.ts` | Creates several types for handling the shipping rates data.| | `src/app/types/order.ts` | Creates an order summary type used when [fetching previous orders](https://github.com/wix/app-template-custom-shipping-rates/blob/c96a6015c03039534bb491242c014147788e1f10/src/app/actions/orders.ts#L8) for display on the dashboard page.| | `src/app/utils/client-providers.tsx` | Creates the AppProviders wrapper to wrap the dashboard page component.| | `src/app/utils/jwt-verify.ts` | Parses the Wix instance in order to pull the app instance ID.| | `src/app/utils/navigation.const.ts` | Adds page ID information to the app so it can interact with the dashboard page.| | `src/app/utils/shipping-calculator.ts` | Implements a function to calculate shipping rates prices from the ShippingAppData object.| | `src/app/utils/wix-sdk.app.ts` | Creates the Wix Client that authenticates as the app.| | `src/app/utils/wix-sdk.client-only.ts` | Creates the Wix client that authenticates with user permissions and identity. Later used in the dashboard.| | `src/app/utils/wix-sdk.ts` | Creates a Wix SDK client that can be used in both server and client components.| --- > Portal Navigation: > > - Append `.md` to any URL under `https://dev.wix.com/docs/` to get its markdown version. > - Pages are either content pages (article or reference text) or menu pages (a list of links to child pages). > - To get a menu page, truncate any URL to a parent path and append `.md` (e.g. `https://dev.wix.com/docs/sdk.md`, `https://dev.wix.com/docs/sdk/core-modules.md`). > - Top-level index of all portals: https://dev.wix.com/docs/llms.txt > - Full concatenated docs: https://dev.wix.com/docs/llms-full.txt ## Resource: Tutorial | Create an Editor Add-on that Imports Icons from a Library ## Article: Tutorial | Create an Editor Add-on that Imports Icons from a Library ## Article Link: https://dev.wix.com/docs/build-apps/get-started/tutorials/tutorial-create-an-editor-add-on-that-imports-icons-from-a-library.md ## Article Content: # Tutorial | Create an Editor Add-on that Imports Icons from a Library In this tutorial, we’ll show you how to create an [editor add-on](https://dev.wix.com/docs/build-apps/develop-your-app/extensions/editor-extensions/about-editor-add-on-extensions.md) from scratch. This add-on lets users import icons from a predefined library directly into their site by uploading them to the site's media files and applying them to a selected element in the Wix Editor. ![add-on](https://wixmp-833713b177cebf373f611808.wixmp.com/images/afce5fd79d438e21c27a5094b8537748.png) We'll follow these steps to build the app: 1. Create a React project using Vite. 2. Run the project locally. 3. Set up your app in the Wix Custom Apps page. 4. Test the app on a site. While we’re using Vite as the build tool, you can choose any local development server that suits your needs. ## Before you begin Before getting started, make sure that: * You are signed into your [Wix account](https://manage.wix.com/account/custom-apps). * You have [Node.js](https://nodejs.org/en/) 20 or higher installed. * You have a Wix site that you can use for testing purposes. If you don’t have one yet, [create a new site](https://www.wix.com/website/templates/html/blank). ## Step 1 | Set up a React project Start by setting up a new React project with Vite. We’ll follow these steps: 1. Bootstrap the React project. 2. Install dependencies. 3. Configure Vite. 4. Create React application files. ### Bootstrap a React project with Vite 1. Run the following command in your terminal: ```bash npm create vite@latest my-add-on-app -- --template react-ts ``` 2. Navigate to your new project folder: ```bash cd my-add-on-app ``` ### Add dependencies in the `package.json` file and install them Next, we'll install the required dependencies for the app. These include: * **[`@wix/design-system`](https://dev.wix.com/docs/build-apps/develop-your-app/design/about-the-wix-design-system.md)** – Ensures the UI follows Wix’s design guidelines, providing components like `Box`, `Text`, and `Button`. * **[`@wix/editor`](https://dev.wix.com/docs/sdk/host-modules/editor/introduction.md)** – Enables interaction with the Wix Editor, including selecting and modifying site elements. * **[`@wix/media`](https://dev.wix.com/docs/sdk/backend-modules/media/introduction.md)** – Handles uploading the selected icon to Wix Media storage for use on the site. * **[`@wix/sdk`](https://dev.wix.com/docs/sdk/core-modules/sdk/introduction.md)** – Provides API access to Wix services like `files` and `elements`, allowing the add-on to modify editor elements. * **`vite-plugin-mkcert`** – Enables HTTPS support for local development, which is required for secure communication with Wix. * **`vite-plugin-node-polyfills`** – Ensures compatibility with Node.js APIs within a Vite-based front-end environment. * **`@emotion/react` & `@emotion/styled`** – Required by Material UI for styling components dynamically. * **`@mui/icons-material` & `@mui/material`** – Provides the Material UI components and icons used for the icon selection interface. 1. Open `package.json` and add the following dependencies under `"dependencies"`: ```json "@emotion/react": "^11.14.0", "@emotion/styled": "^11.14.0", "@mui/icons-material": "^6.4.3", "@mui/material": "^6.4.3", "@wix/design-system": "^1.158.0", "@wix/editor": "^1.348.0", "@wix/media": "^1.0.145", "@wix/sdk": "^1.15.10" ``` 2. Under `"devDependencies"`, add: ```json "vite-plugin-mkcert": "^1.17.6", "vite-plugin-node-polyfills": "^0.23.0" ``` 2. Install the dependencies: ```bash npm install --legacy-peer-deps ``` ### Configure Vite Update the `vite.config.ts` file in your project root with the following code to enable HTTPS for local development and add Node.js polyfills: ```typescript import { defineConfig } from "vite"; import react from "@vitejs/plugin-react"; import mkcert from "vite-plugin-mkcert"; import { nodePolyfills } from "vite-plugin-node-polyfills"; export default defineConfig({ plugins: [ react(), mkcert(), // Allows serving the app over HTTPS locally nodePolyfills({ globals: { global: true, }, }), ], }); ``` ### Create application files We'll now create the core application files needed for the project: * `main.tsx`: This is the entry point of your application. Update it to import Wix Design System's style sheet. * `App.tsx`: This file contains the main structure of the app, showing a button for adding icons, a loader for upload states, and a message for the user. * `Icons.tsx`: Displays the available icons in the library using Material UI's `IconButton`. Icons can be selected, and a state is updated for the chosen icon. * `useIconsManager.tsx`: Manages icon selection, uploading, and handling interactions with the Wix media service. This includes logic for converting the selected icon into an SVG and uploading it to site's media files, and applying it to the selected element in the Wix editor. Ensure your `src` directory includes `App.tsx` and `main.tsx` files and update their content as follows:
src/main.tsx ```tsx import { StrictMode } from 'react' import { createRoot } from 'react-dom/client' import App from './App.tsx' import '@wix/design-system/styles.global.css'; createRoot(document.getElementById('root')!).render( , ) ```
src/App.tsx ```tsx import { Box, Button, Divider, Loader, Text, WixDesignSystemProvider, } from '@wix/design-system'; import { Icons } from './Icons'; import { useIconsManager } from './useIconsManager'; const App = () => { const { toggleIconSelection, selectedIcon, isUploading, uploadIcon } = useIconsManager(); return ( Select an image on the canvas and choose the icon you want to add. ); }; export default App; ```
In your `src` directory create the following files:
src/Icons.tsx ```tsx import { FC } from 'react'; import { IconButton } from '@mui/material'; // Import all required icons import AddIcon from '@mui/icons-material/Add'; import DeleteIcon from '@mui/icons-material/Delete'; import EditIcon from '@mui/icons-material/Edit'; import HomeIcon from '@mui/icons-material/Home'; import SettingsIcon from '@mui/icons-material/Settings'; import SearchIcon from '@mui/icons-material/Search'; import AccountCircleIcon from '@mui/icons-material/AccountCircle'; import AlarmIcon from '@mui/icons-material/Alarm'; import BuildIcon from '@mui/icons-material/Build'; import CloudIcon from '@mui/icons-material/Cloud'; import FavoriteIcon from '@mui/icons-material/Favorite'; import HelpIcon from '@mui/icons-material/Help'; import InfoIcon from '@mui/icons-material/Info'; import LanguageIcon from '@mui/icons-material/Language'; import LockIcon from '@mui/icons-material/Lock'; import MailIcon from '@mui/icons-material/Mail'; import MenuIcon from '@mui/icons-material/Menu'; import MoreHorizIcon from '@mui/icons-material/MoreHoriz'; import NotificationsIcon from '@mui/icons-material/Notifications'; import PauseIcon from '@mui/icons-material/Pause'; import PersonIcon from '@mui/icons-material/Person'; import PlayArrowIcon from '@mui/icons-material/PlayArrow'; import PowerIcon from '@mui/icons-material/Power'; import RefreshIcon from '@mui/icons-material/Refresh'; import SaveIcon from '@mui/icons-material/Save'; import SecurityIcon from '@mui/icons-material/Security'; import ShareIcon from '@mui/icons-material/Share'; import StarIcon from '@mui/icons-material/Star'; import { Box } from '@wix/design-system'; // Map the icons to their names const iconsMap: Record = { Add: AddIcon, Delete: DeleteIcon, Edit: EditIcon, Home: HomeIcon, Settings: SettingsIcon, Search: SearchIcon, AccountCircle: AccountCircleIcon, Alarm: AlarmIcon, Build: BuildIcon, Cloud: CloudIcon, Favorite: FavoriteIcon, Help: HelpIcon, Info: InfoIcon, Language: LanguageIcon, Lock: LockIcon, Mail: MailIcon, Menu: MenuIcon, MoreHoriz: MoreHorizIcon, Notifications: NotificationsIcon, Pause: PauseIcon, Person: PersonIcon, PlayArrow: PlayArrowIcon, Power: PowerIcon, Refresh: RefreshIcon, Save: SaveIcon, Security: SecurityIcon, Share: ShareIcon, Star: StarIcon, }; type IconsProps = { onSelect: (iconName: string) => void; selectedIcon: string | null; disabled: boolean; }; export const Icons: FC = ({ onSelect, selectedIcon, disabled }) => { return ( {Object.entries(iconsMap).map(([iconName, IconComponent]) => (
onSelect(iconName)} disabled={disabled} >
))}
); }; ```
src/useIconsManager.tsx ```tsx import { editor, elements } from '@wix/editor'; import { files } from '@wix/media'; import { createClient } from '@wix/sdk'; import { useState } from 'react'; const client = createClient({ modules: { files, elements }, host: editor.host(), auth: editor.auth(), }); const assertSelectedComponent = async (selectedIcon: string | null) => { const [selectedComponent] = await client.elements.getSelection(); if (selectedComponent.type !== 'image') { throw new Error('Selected component should be of type `image`'); } if (!selectedIcon) { throw new Error('Icon is not selected'); } const svgElement = document .getElementById(selectedIcon) ?.querySelector('svg'); if (!svgElement) { throw new Error(`Could not found an element with id ${selectedIcon}`); } return { svgElement, selectedComponent }; }; export const useIconsManager = () => { const [selectedIcon, setSelectedIcon] = useState(null); const [isUploading, setIsUploading] = useState(false); const uploadIcon = async () => { try { setIsUploading(true); setSelectedIcon(null); const { svgElement, selectedComponent } = await assertSelectedComponent( selectedIcon, ); const contentType = 'image/svg+xml'; const fileName = `${selectedIcon}.svg`; // get blob const svgString = new XMLSerializer().serializeToString(svgElement); const blob = new Blob([svgString], { type: contentType }); // Generate upload URL const { uploadUrl } = await client.files.generateFileUploadUrl( contentType, { filePath: 'images', fileName, }, ); // Define parameters const params = { filename: fileName }; const queryString = new URLSearchParams(params).toString(); // Send the request to upload the file const response = await fetch(`${uploadUrl}?${queryString}`, { method: 'PUT', headers: { 'Content-Type': contentType, }, body: blob, }); // parse the response of the image upload const { file } = await response.json(); // replace image on the page await selectedComponent.setProp('src', file.url); } catch (error) { console.log(error); } finally { setIsUploading(false); } }; const toggleIconSelection = (iconName: string) => { setSelectedIcon(selectedIcon === iconName ? null : iconName); }; return { toggleIconSelection, uploadIcon, isUploading, selectedIcon, }; }; ```
## Step 2 | Run your project Start the development server by running the following command in your terminal: ```bash npm run dev ``` Once the server starts, Vite will provide a local development URL (typically `https://localhost:5173`). Open your browser and navigate to this URL to preview your app. You can view and interact with the UI in your browser. However, the add-on functionality will not work outside the Wix Editor. In the next step, we'll set it up as a Wix app extension so we can test it properly within the Wix Editor. ## Step 3 | Set up your app in the Custom Apps page To make the add-on available for installation on sites, we'll create a Wix app and set up an add-on extension. 1. In the [Custom Apps page](https://manage.wix.com/account/custom-apps), go to **My Apps**, and then click **Create New App**. 2. Select **Build from scratch**. 3. In the left sidebar, select **Extensions**, and then click **Create Extension**. A panel opens, showing the available extension types. 4. Find the **Editor Add-on** extension and click **Create**. 5. Configure the add-on’s basic data: * **Add-on name**: Enter a name for your add-on, for example, `Get Icons`. * **Panel URL**: Enter the localhost URL provided by Vite in the previous step. * **Panel width**: Choose `Small` to match the size of most native editor panels. * **Panel height**: Set the height to `400 px`. 6. Under **Market listing**, fill in the **Teaser** field with a short description, such as `Import icons from the Material UI library`. 7. Click **Save**. 8. Add the required permissions to the app so it can access a site's media files: 1. In the left sidebar, select **Permissions**, and then click **Add Permissions**. 2. Find the **Manage Media Manager** permission scope, select it, and then click **Save**. Your add-on extension is now available for installation on a site. ## Step 4 | Test your add-on in the editor To test the add-on, we'll install it on a site: 1. In the top right corner of your [app's dashboard](https://manage.wix.com/account/custom-apps), click **Test App** and select **Test on dev site**. 1. Select an existing development site or click **+ Create Dev Site** to create a new site. Select the editor and the Wix Business Solution you want to use and click **Create Dev Site**. 1. Click **Test App**. Wix installs your app and opens the site in a new tab. You can set which site page opens in your [app settings](https://dev.wix.com/app-selector?title=Select+an+App&primaryButtonText=Select+Site&actionUrl=https%3A%2F%2Fdev.wix.com%2Fapps%2F%7BappId%7D%2Fapp-settings). If you don't set a page, the site editor opens by default. 1. In the editor's **Tools** menu, select **Editor Add-ons**, and then select your add-on. Your add-on’s panel is displayed. 1. Add an image element to the page and select it. 1. Select one of the icons in the add-on panel and click **Add Icon**. The add-on should successfully upload the icon to the site's media files and apply it to the selected image element. ## What’s next Now that you've learned how to set up a self-managed editor add-on, you can start thinking about building your own app. Here are a few resources to get you started: * Learn more about [editor add-ons](https://dev.wix.com/docs/build-apps/develop-your-app/extensions/editor-extensions/about-editor-add-on-extensions.md). * Learn more about [self-managed apps](https://dev.wix.com/docs/build-apps/develop-your-app/frameworks/self-hosting/about-self-hosting-for-wix-apps.md). * Explore our [JavaScript SDK](https://dev.wix.com/docs/sdk.md). * Discover opportunities for your next app by exploring our [list of top user-requested features](https://dev.wix.com/docs/build-apps/get-started/get-an-idea.md). --- > Portal Navigation: > > - Append `.md` to any URL under `https://dev.wix.com/docs/` to get its markdown version. > - Pages are either content pages (article or reference text) or menu pages (a list of links to child pages). > - To get a menu page, truncate any URL to a parent path and append `.md` (e.g. `https://dev.wix.com/docs/sdk.md`, `https://dev.wix.com/docs/sdk/core-modules.md`). > - Top-level index of all portals: https://dev.wix.com/docs/llms.txt > - Full concatenated docs: https://dev.wix.com/docs/llms-full.txt ## Resource: Tutorial | Create a Coffee Catalog with Blocks ## Article: Creating a Coffee Catalogue ## Article Link: https://dev.wix.com/docs/build-apps/get-started/tutorials/tutorial-create-a-coffee-catalog-with-blocks.md ## Article Content: # **Tutorial: Create a Coffee Catalog with Blocks**
**Editor compatibility** Wix Blocks apps aren't supported in the Wix Harmony editor. Existing Blocks apps remain available for purchase on the Wix App Market for Wix Editor and Wix Studio sites. To learn more, see [About Wix Harmony and Blocks](https://dev.wix.com/docs/build-apps/develop-your-app/develop-an-app-with-blocks/about-wix-harmony-and-blocks.md).
Learn how to build a coffee catalog app using **Wix Blocks**. The app includes a widget that presents the products in a repeater, including a nested repeater for various rating options. It also allows users to configure it through dashboard pages. ![see app](https://wixmp-833713b177cebf373f611808.wixmp.com/images/29796ce21d7172da29cdd707c1582903.png) ## Before You Begin To help you get started quickly, we’ve provided a template of the app. Follow the next steps to get your own copy of the template. 1. Make sure you're logged in to your Wix Studio account. If you don’t already have one, [sign up for a Wix Studio account](https://manage.wix.com/account/custom-apps). 1. Come up with a unique string for your app's namespace. If you do this tutorial more than once under the same Wix account, provide a different string each time. 1. Copy the following URL to your clipboard (but do not paste it in your browser yet). ```ts https://dev.wix.com/apps-templates/open-blocks-template?templateId=f0dbfb81-0793-4c24-a732-9c5b6dfe4273&namespace=&templateName=coffee-catalog ``` 1. Insert your unique string in the designated place, after the term `namespace=`. Make sure to delete the brackets. 1. Go to your browser and paste the link you created. Blocks will open with your own copy of the app. The app you just created includes the following segments for you to work with: - **Products widget** – You’ll complete its design and functionality. - **Taste Notes widget** – You'll add this as a nested widget inside the Products widget. - **Public utilities** – Ready-to-use functions for implementing your widget’s logic. - **Dashboard pages** - For users to edit, add and delete products. ## **Step 1 | Add a Nested Widget** First, complete the **Products widget** by adding the **Taste Notes widget** as a [nested widget](https://dev.wix.com/docs/build-apps/develop-your-app/develop-an-app-with-blocks/site-widgets/add-nested-widgets-in-blocks.md). 1. In the **App Interface** menu, select the **Products widget**. 2. Click **+ Add Elements** > **My Widgets**. 3. Click on the **Taste Notes widget** to add it inside the main widget.
See how it looks ![Add widget](https://wixmp-833713b177cebf373f611808.wixmp.com/images/1d4d14c93b891f8b354db60f543cc361.png)
## **Step 2 | Adjust the nested widget’s design** When added, the **Taste Notes widget** appears in a random location inside the **Products widget**. Let’s position it properly. 1. Click on the **Taste Notes widget** to select it. 2. Drag it to the empty space in one of the repeater columns, just above the button. 3. Open the **Inspector**, then select the fourth row to place the widget there. 4. Click the **Stretch** ![stretch](https://d2x3xhvgiqkx42.cloudfront.net/12345678-1234-1234-1234-1234567890ab/378fd532-728d-473b-8f03-30140bda59af/2023/10/04/20b8e657-f5de-41a1-802a-3425e8110a69/50ca7b0b-3348-4d1a-84ef-b78677e81686.png) icon to adjust its size. Now, the nested widget is neatly placed within the main widget.
See how it looks ![Design nested widget](https://wixmp-833713b177cebf373f611808.wixmp.com/images/6fc11bd602f63302a202faaf81234f8d.png)
## **Step 3 | Explore the Layers panel** Now is a good time to check the **Layers panel** to understand the structure of widgets and the repeaters in them: - The **main repeater** is the product catalog, named **productsRepeater**. - Inside it, there's a **nested list of taste notes**, named **notesRepeater**. - Inside the **notesRepeater**, there's another repeater displaying **intensity ratings**, named **rating**.
See how it looks ![Repeaters structure](https://wixmp-833713b177cebf373f611808.wixmp.com/images/39457987d863bcfbf38c292d0c52bd41.png)
## **Step 4 | Add and manage the Products collection** Let’s create [a collection](https://dev.wix.com/docs/build-apps/develop-your-app/develop-an-app-with-blocks/cms-collections-in-blocks/about-cms-collections-in-blocks.md), which will store data for the coffee catalog. The collection includes the following fields: - **Origin Country** – Text - **Price** – Number - **Coffee Image** – Image URL - **Taste Notes** – Array The **Taste Notes** field contains an array of title-value pairs representing flavor intensity, for example: `["crisp:3","caramel:2","nutty:2"]`
See the Taste Notes design ![Taste Notes](https://wixmp-833713b177cebf373f611808.wixmp.com/images/f25369d8ebdb86b2ccdd73aa469b8370.png)
### Download the data file and create the collection To save time, we’ve created a data file with five sample items for you. 1. [Download the file](https://8d8f933e-b7b3-441d-8a83-b8f6a97ecedf.filesusr.com/ugd/9580ec_a1e3b672f6bc432099db2bb072494478.csv?dn=Coffee.csv). 2. Click the **CMS** icon ![databases icon](https://d2x3xhvgiqkx42.cloudfront.net/12345678-1234-1234-1234-1234567890ab/378fd532-728d-473b-8f03-30140bda59af/2022/06/15/929245d2-3a89-445f-996b-623326b4b81f/1a31bddc-febf-451e-a716-773572239804.png) in the left menu. 3. Click **Create Collection**. 4. Name your app if you haven't, and give it a **namespace** (or use the default). 5. Choose **Import from CSV**, then click **Next**.
See how it looks ![Import from CSV](https://wixmp-833713b177cebf373f611808.wixmp.com/images/722864fbafd02b735c1a5b7426ecdfcf.png)
### Configure the imported fields Your new collection is currently empty. Now, let's configure the **Coffee Name** and **Taste Notes** fields to ensure the data imports correctly.
See how it looks ![Empty import](https://wixmp-833713b177cebf373f611808.wixmp.com/images/ceeb248afe76c3ce5f66d2b67c2b8e8e.png)
1. Click **More Actions** > **Import Items**, then select the file you downloaded. 2. In the **Configure Column** dropdown for **Coffee Name**, select **Existing Field**. 3. Verify that **Map to Collection Field** is now set to **Title**. 4. Check the box next to **Taste Notes** to include it in the import. 5. In the **Configure Column** dropdown, select **New Field**. 6. Change **Field Type** to **Text**, then click **Next**.
See how it looks ![Configure field](https://wixmp-833713b177cebf373f611808.wixmp.com/images/909b23f573adfe5ebfcaf14c48c9cc19.png)
7. The **Created Date**, **Updated Date**, and **Owner** fields won’t be imported—that’s fine. Click **Import** to complete the process. ### Change the type of the Taste Notes field The **Taste Notes** field was imported as plain text, but it should be an **Array** containing title-value pairs. Let’s update its type. 1. Click the three dots next to **Taste Notes**, then select **Edit**.
See how it looks ![Change field type](https://wixmp-833713b177cebf373f611808.wixmp.com/images/69dd85eb0a4ac0091fc856beaf711c23.png)
2. Click **Change Type** and scroll down to find **Array**. Select it. Accept the notification - about changing the field type.
See how it looks ![Array type](https://wixmp-833713b177cebf373f611808.wixmp.com/images/a58b8b5a1912f104c849d83313f6d313.png)
3. After making these changes, your collection should look like this:
See how it looks ![Final collection](https://wixmp-833713b177cebf373f611808.wixmp.com/images/5ead907777dd6f63f9900b08fdd08c7d.png)
You can close the collection now. ## Step 5 | Update the `collectionUtils.js` file Since you’re working with a template, update the placeholder collection name in the `collectionUtils.js` file. 1. Open the **Your Collections** tab. 2. Click the three dots next to your collection name. 3. Select **Edit Settings**. 4. Copy your **Collection ID** (e.g., `@user/coffee-catalog/Import360`). 5. Open `collectionUtils.js`. 6. Replace the placeholder text in the `return` statement of the `getCollection()` function with your **Collection ID**. For example: ```ts export function getCollectionName(){ return '@user/my-new-app-167/Import370'; } ```
See where to find collectionUtils.ja ![Final collection update](https://wixmp-833713b177cebf373f611808.wixmp.com/images/f34f5c78cd340552705c5b156685005f.png)
## Step 6 | Load the main repeater Let's load the data from the collection to the main repeater, `productsRepeater`. 1. Go to the **Products** widget code panel.
See how it looks ![product widget](https://wixmp-833713b177cebf373f611808.wixmp.com/images/ffbdb7291b3bdc7476d00cf5b13f0ed2.png)
2. Delete the boilerplate code and paste the following code, to load the repeater with the data from the collection. ```ts import {getCollectionName, queryCollectionData, populateRepeater} from 'public/collectionUtils' $w.onReady(async function () { populateRepeater($w('#productsRepeater'), await queryCollectionData(getCollectionName())); $w('#productsRepeater').onItemReady(($item, data)=>{ $item('#name').text = data.title || ''; $item('#origin').text = data.originCountry || ''; $item('#price').text = data.price ? `$${data.price}` : ''; $item('#image').src = data.coffeeImage || ''; $item('#tasteNotes1').notes = data.tasteNotes || []; }) }); ```
Note: You have an error in the `notes` property and this is expected. We'll handle it in the following steps.
3. Now click the ![Preview](https://wixmp-833713b177cebf373f611808.wixmp.com/images/a35d83e13d49f269098b1b571f9e3a7e.png) icon and preview your widget. Since we didn't connect the **Test Notes** widget yet, the notes aren't shown yet. ## Step 7 | Add a property for the Taste Notes widget In order to pass data from the **Products** widget to the nested **Taste Notes** widget, we'll create a new [widget API property](https://dev.wix.com/docs/build-apps/develop-your-app/develop-an-app-with-blocks/widget-api/blocks-widget-properties.md) in the nested widget. We'll name the property `notes`. The data from this property will be used to update the `notesRepeater` and the `rating` repeater that's nested in it. 1. Make sure that the **Taste Notes** widget is selected. 2. Click the **Widget API** ![widget-api](https://d2x3xhvgiqkx42.cloudfront.net/12345678-1234-1234-1234-1234567890ab/378fd532-728d-473b-8f03-30140bda59af/2021/06/10/9aa25a00-57bb-465d-b443-4e14a5478da3/67b8bc89-773d-4775-a0d5-b1585843da7b.jpg) icon in the widget's code panel. 3. Click **Add New Property**. 4. Name the property `notes`. 5. Set the display name to `notes`. 6. Set the type to `Text`. 7. Click **Create**.
See how it looks ![Create Property](https://wixmp-833713b177cebf373f611808.wixmp.com/images/adfb5dbf243f44d583e4f3b23a33a398.png)
## Step 8 | Add code to handle the `notes` property We’ll now add the code to handle the `notes` property in the `onPropsChanged()` function of the **Taste Notes** widget. This code will: - Transform the incoming `notes` data into a format that the repeater can use. - Split each note into a title and value. - Populate the `notesRepeater` with the transformed data. - Set up the `rating` repeater by creating a list of rating icons based on the note's value. Delete the boilerplate code in the **Taste Notes** widget and copy the following instead: ```js $widget.onPropsChanged((oldProps, newProps) => { const transformedNotes = updateListRepeater(newProps.notes); $w('#notesRepeater').data = transformedNotes; $w('#notesRepeater').onItemReady(($item, data) => { $item('#noteTitle').text = data.note; const ratingIcons = []; for (let i = 0; i < data.value; i++) { ratingIcons.push({ _id: `${data._id}-${i}` }); } $item('#rating').data = ratingIcons; }); }); function updateListRepeater(notes) { return notes.map((item, idx) => { const [note, value] = item.split(':'); return { note, value: parseInt(value), _id: `${idx}` }; }); } ``` Go to **Preview** ![Preview](https://wixmp-833713b177cebf373f611808.wixmp.com/images/a35d83e13d49f269098b1b571f9e3a7e.png) in the **Products** widget, to see that everything is working.
See how it looks ![preview](https://wixmp-833713b177cebf373f611808.wixmp.com/images/29796ce21d7172da29cdd707c1582903.png)
## Step 9 | Copy and paste the Dashboard IDs Now we'll start managing the Dashboard Pages of the app. [Dashboard pages](https://dev.wix.com/docs/build-apps/develop-your-app/develop-an-app-with-blocks/dashboard-pages/about-dashboard-pages-in-blocks.md) are the back-office of your app, enabling users to manage its data. This app includes two dashboard pages, which we have already designed: - **Manage Products**: Lets users manage all products. - **Product Form**: Lets users manage individual products. Every dashboard page has an ID, which is used in the app code. Let's copy these IDs and paste them in our `constants.js` file. 1. Click the **Dashboard Interface** ![dashboard](https://wixmp-833713b177cebf373f611808.wixmp.com/images/12f55a57377c43ded12075b3be288f03.png) icon. 2. Select the **Manage Products** dashboard page. 3. Hover over the three dots and click **Page Settings**. 4. Copy the **Page ID**.
See how it looks ![Copy ID](https://wixmp-833713b177cebf373f611808.wixmp.com/images/f7393402b6dd50d564c7dda457afa5f6.png)
5. Click the **Public & Backend** icon **{}** and open the `constants.js` file. 6. Paste the copied Page ID into the appropriate place, replacing the placeholder text in the `constants.js` file. 7. Repeat the process for the **Product Form** dashboard page to copy and paste its Page ID.
See how it looks ![Constants File](https://wixmp-833713b177cebf373f611808.wixmp.com/images/7199e7b217e49633ea16e13be83e0422.png)
## Step 10 | Add code to the Manage Products dashboard page Let's add the code for the **Manage Products** page.
See how it looks ![manage products page](https://wixmp-833713b177cebf373f611808.wixmp.com/images/28040d9f5f025b21d8a62caecd5de87a.png)
1. Select the **Manage Products** dashboard page and open its code panel. 1. First, import the required libraries and constants. These provide access to Wix's dashboard, data manipulation functions, and constants for page navigation and default settings. ```js import wixDashboard from 'wix-dashboard'; import wixData from 'wix-data'; import { getCollectionName, queryCollectionData, populateRepeater } from 'public/collectionUtils'; import { DASHBOARDS, defaultImage } from 'public/constants'; ``` 1. In the `$w.onReady()`, initializes the page by setting up two actions: - First add an event listener to the **Add Product** button so that when clicked, it navigates the user to the **Product Form** page for adding a new product - Second, query the product data from the database and populates the `productsRepeater` with the retrieved data. ```js $w.onReady(async () => { $w('#addProductBtn').onClick(() => wixDashboard.navigate({ pageId: DASHBOARDS.FORM })); populateRepeater($w('#productsRepeater'), await queryCollectionData(getCollectionName())); }); ``` 1. Still in the `$w.onReady()`, add the `$w('#productsRepeater').onItemReady()` function. This function sets up event handlers for each item in the repeater. The function: - Updates the product details like name, origin, price, and image based on the data. - Attaches click event handlers to the **Edit** button, which navigates to the **Product Form** page with a unique product ID, and the **Remove** button, which triggers the removal of the product. ```js $w('#productsRepeater').onItemReady(($item, data) => { $item('#productName').text = data.title || ''; $item('#productOrigin').text = data.originCountry || ''; $item('#productPrice').text = data.price ? `$${data.price}` : ''; $item('#productImage').src = data.coffeeImage || defaultImage; $item('#editProduct').onClick(() => wixDashboard.navigate({ pageId: DASHBOARDS.FORM, relativeUrl: data._id })); $item('#removeProduct').onClick(() => handleRemove(data._id, data.title)); }); ``` 1. Let's add the `handleRemove()` function. This function: - Removes a product from the database using its ID. - Shows a success toast message. - Updates the repeater by filtering out the removed product from the displayed data. ```js async function handleRemove(productId, productName) { await wixData.remove(getCollectionName(), productId); wixDashboard.showToast({ message: `Product "${productName}" removed successfully`, type: 'success' }); $w('#productsRepeater').data = $w('#productsRepeater').data.filter(item => item._id !== productId); } ```
See the full Manage Products code ```js import wixDashboard from 'wix-dashboard'; import wixData from 'wix-data'; import { getCollectionName, queryCollectionData, populateRepeater } from 'public/collectionUtils'; import { DASHBOARDS, defaultImage } from 'public/constants'; $w.onReady(async () => { $w('#addProductBtn').onClick(() => wixDashboard.navigate({ pageId: DASHBOARDS.FORM })); populateRepeater($w('#productsRepeater'), await queryCollectionData(getCollectionName())); $w('#productsRepeater').onItemReady(($item, data) => { $item('#productName').text = data.title || ''; $item('#productOrigin').text = data.originCountry || ''; $item('#productPrice').text = data.price ? `$${data.price}` : ''; $item('#productImage').src = data.coffeeImage || defaultImage; $item('#editProduct').onClick(() => wixDashboard.navigate({ pageId: DASHBOARDS.FORM, relativeUrl: data._id })); $item('#removeProduct').onClick(() => handleRemove(data._id, data.title)); }) }); async function handleRemove(productId, productName) { await wixData.remove(getCollectionName(), productId); wixDashboard.showToast({ message: `Product "${productName}" removed successfully`, type: 'success' }); $w('#productsRepeater').data = $w('#productsRepeater').data.filter(item => item._id !== productId); } ```
## Step 11 | Add Code to the Product Form dashboard page Let's add the code for the **Product Form** dashboard page. This form displays an empty form for adding a new product, or a form with the product details for editing an existing product. 1. Select the **Product Form** dashboard page and go to its code panel. 1. First, import some necessary modules and define two global variables, `productId` and `repeaterData`, which will be used later. ```js import wixData from 'wix-data'; import wixDashboard from 'wix-dashboard'; import { getCollectionName } from 'public/collectionUtils'; import { DASHBOARDS, defaultImage} from 'public/constants'; let productId, repeaterData = []; ``` ### Add the `$w.onReady()` function The `onReady()` function initializes the page with the following actions: * The [`observeState`](https://dev.wix.com/docs/velo/apis/wix-dashboard/observe-state.md) function listens for state changes and determines whether to load an existing product or reset the form. When the **Manage Products** page navigates to this form, it either includes a product ID or not. * **If a product ID exists**, the form loads the product data for editing. * **If no product ID exists**, the form remains empty, allowing the user to add a new product. The `onReady()` function handles the button actions according to this logic. Add this code as your `onReady()` function: ```js $w.onReady(() => { wixDashboard.observeState((_, env) => { productId = env.pageLocation.pathname.replace('/', ''); productId ? loadProduct(productId) : resetForm(); }); $w('#cancelBtn').onClick(() => { resetForm(); wixDashboard.navigate({ pageId: DASHBOARDS.MANAGE_ITEMS }); }); $w('#saveBtn').onClick(async () => { await saveProduct(); wixDashboard.navigate({ pageId: DASHBOARDS.MANAGE_ITEMS }); }); $w('#uploadButton').onChange(async () => { handleImageUpload(); }); }); ``` ### Add the `loadProduct()` function Add a `loadProduct()` function, which populates the form's inputs fields with product data. ```js async function loadProduct(id) { const product = await wixData.get(getCollectionName(), id); $w('#productName').value = product.title || ''; $w('#productOrigin').value = product.originCountry || ''; $w('#productPrice').value = product.price || ''; $w('#productImage').src = product.image; setNotesRepeaterData(product.tasteNotes || []); } ``` ### Populate the Notes Repeater Add a `setNotesRepeaterData()` function, which formats and assigns taste notes data to the repeater. The function: - Splits each taste note into note and rating. - Ensures at least three note slots are always available. - Updates the repeater with structured data. ```js function setNotesRepeaterData(tasteNotes) { let parsedNotes = []; if (Array.isArray(tasteNotes)) { parsedNotes = tasteNotes.slice(0, 3).map(noteString => { const [note, rating] = noteString.split(':'); return { note: note || "", rating: parseInt(rating, 10) || 0 }; }); } while (parsedNotes.length < 3) { parsedNotes.push({ note: "", rating: 0 }); } repeaterData = parsedNotes.map((item, i) => ({ _id: String(i), note: item.note || "", rating: item.rating || 0 })); $w('#notesRepeater').data = repeaterData; $w('#notesRepeater').onItemReady(($item, itemData) => { $item('#noteTitle').value = itemData.note; $item('#noteRating').value = itemData.rating; }); } ``` ### Reset the form Add a `resetForm()` function, which clears all form fields and sets a default image. ```js function resetForm() { $w('#productName, #productOrigin, #productPrice').value = ''; $w('#productImage').src = defaultImage; setNotesRepeaterData([]); } ``` ### Save product data Add a `saveProduct()` function. When the **Save** button is clicked, the function: - Gathers all input values from the form. - Converts taste notes into a formatted array ("note:rating"). - If the product already exists (`productId` is set), it updates the record. - If no ID exists, it creates a new product. - Displays a toast notification when the save is successful. ```js async function saveProduct() { const updatedNotes = []; $w('#notesRepeater').forEachItem(($item) => { const note = $item('#noteTitle').value; const rating = $item('#noteRating').value; updatedNotes.push(`${note}:${rating || 1}`); }); const productData = { title: $w('#productName').value, originCountry: $w('#productOrigin').value, price: parseFloat($w('#productPrice').value) || 0, image: $w('#productImage').src || defaultImage, tasteNotes: updatedNotes }; if (productId) { await wixData.update(getCollectionName(), { ...productData, _id: productId }); } else { await wixData.insert(getCollectionName(), productData); } wixDashboard.showToast({ message: 'Product "${productData.title}" saved successfully', type: 'success' }); } ``` ### Handle image upload Add a `handleImageUpload()` function, which uploads the selected file and updates the product image field. If the upload fails, it resets to the default image and shows an error toast. ```js async function handleImageUpload() { if ($w('#uploadButton').value.length === 0) { return; } try { const uploadedFiles = await $w('#uploadButton').uploadFiles(); if (uploadedFiles && uploadedFiles.length > 0) { $w('#productImage').src = uploadedFiles[0].fileUrl; } } catch (error) { console.error('File upload failed:', error); $w('#productImage').src = defaultImage; wixDashboard.showToast({ message: 'Failed to upload image', type: 'error' }); } } ```
See the full Product Form code ```js import wixData from 'wix-data'; import wixDashboard from 'wix-dashboard'; import { getCollectionName } from 'public/collectionUtils'; import { DASHBOARDS, defaultImage} from 'public/constants'; let productId, repeaterData = []; $w.onReady(() => { wixDashboard.observeState((_, env) => { productId = env.pageLocation.pathname.replace('/', ''); productId ? loadProduct(productId) : resetForm(); }); $w('#cancelBtn').onClick(() => { resetForm(); wixDashboard.navigate({ pageId: DASHBOARDS.MANAGE_ITEMS }); }); $w('#saveBtn').onClick(async () => { await saveProduct(); wixDashboard.navigate({ pageId: DASHBOARDS.MANAGE_ITEMS }); }); $w('#uploadButton').onChange(async () => { handleImageUpload(); }); }); }); async function loadProduct(id) { const product = await wixData.get(getCollectionName(), id); $w('#productName').value = product.title || ''; $w('#productOrigin').value = product.originCountry || ''; $w('#productPrice').value = product.price || ''; $w('#productImage').src = product.image; setNotesRepeaterData(product.tasteNotes || []); } function setNotesRepeaterData(tasteNotes) { let parsedNotes = []; if (Array.isArray(tasteNotes)) { parsedNotes = tasteNotes.slice(0, 3).map(noteString => { const [note, rating] = noteString.split(':'); return { note: note || "", rating: parseInt(rating, 10) || 0 }; }); } while (parsedNotes.length < 3) { parsedNotes.push({ note: "", rating: 0 }); } repeaterData = parsedNotes.map((item, i) => ({ _id: String(i), note: item.note || "", rating: item.rating || 0 })); $w('#notesRepeater').data = repeaterData; $w('#notesRepeater').onItemReady(($item, itemData) => { $item('#noteTitle').value = itemData.note; $item('#noteRating').value = itemData.rating; }); } function resetForm() { $w('#productName, #productOrigin, #productPrice').value = ''; $w('#productImage').src = defaultImage; setNotesRepeaterData([]); } async function saveProduct() { const updatedNotes = []; $w('#notesRepeater').forEachItem(($item) => { const note = $item('#noteTitle').value; const rating = $item('#noteRating').value; updatedNotes.push(`${note}:${rating || 1}`); }); const productData = { title: $w('#productName').value, originCountry: $w('#productOrigin').value, price: parseFloat($w('#productPrice').value) || 0, image: $w('#productImage').src || defaultImage, tasteNotes: updatedNotes }; if (productId) { await wixData.update(getCollectionName(), { ...productData, _id: productId }); } else { await wixData.insert(getCollectionName(), productData); } wixDashboard.showToast({ message: 'Product "${productData.title}" saved successfully', type: 'success' }); } async function handleImageUpload() { if ($w('#uploadButton').value.length === 0) { return; } try { const uploadedFiles = await $w('#uploadButton').uploadFiles(); if (uploadedFiles && uploadedFiles.length > 0) { $w('#productImage').src = uploadedFiles[0].fileUrl; } } catch (error) { console.error('File upload failed:', error); $w('#productImage').src = defaultImage; wixDashboard.showToast({ message: 'Failed to upload image', type: 'error' }); } } ```
## Step 12 | Manage Installation Settings Blocks [installation settings](https://dev.wix.com/docs/build-apps/develop-your-app/develop-an-app-with-blocks/deploy-and-manage-blocks-apps/configure-blocks-installation-settings.md) determine how your app behaves when installed on a site. Let's remove the **Taste Notes** widget from the **+ Add Elements** panel of a user's editor, since it’s a nested widget. 1. Click on the **Taste Notes** widget name. 2. Hover over the three dots and select **Editor Experience** > **Edit Installation Settings**.
See how it looks ![Installation Settings](https://wixmp-833713b177cebf373f611808.wixmp.com/images/8944bd57215360bcc3b48cc0be393213.png)
3. Uncheck the box under **Show in Add panel** to prevent the widget from appearing in the **+ Add Elements** panel.
See how it looks ![Don't Show Widget](https://wixmp-833713b177cebf373f611808.wixmp.com/images/fb6eb8dae2068f15cf1d1187317217f4.png)
## Step 13 | Hide the Product Form Dashboard Page Another step we'd like to configure for better usability is removing the **Product Form** dashboard page from the user's site menu. This form should only be reachable from the **Manage Products** page. To remove the page from the menu: 1. Click on the **Product Form** dashboard page. 2. Hover over the three dots and click **Hide from dashboard menu**.
See how it looks ![Hide Dashboard](https://wixmp-833713b177cebf373f611808.wixmp.com/images/1df35c863aa9416bbaa948f9c3086708.png)
## Step 14 | Test Your App Congratulations! Your app is now ready to be tested in the editor or installed on a site. 1. To test your app on a site, click **Test** and select a site to install your app. 1. Add your widget to the canvas. 1. To test the dashboard pages, go to your site's dashboard. It should have a folder with your app's name under **Apps**. Go to the **Manage Products** page and try adding, deleting and editing products. If you want to install the app on other sites or manage its versions, go back to Blocks. Click **Release** to create a major version, then follow the steps to [install it on a site](https://dev.wix.com/docs/build-apps/develop-your-app/develop-an-app-with-blocks/deploy-and-manage-blocks-apps/install-a-blocks-app-on-a-site.md). --- > Portal Navigation: > > - Append `.md` to any URL under `https://dev.wix.com/docs/` to get its markdown version. > - Pages are either content pages (article or reference text) or menu pages (a list of links to child pages). > - To get a menu page, truncate any URL to a parent path and append `.md` (e.g. `https://dev.wix.com/docs/sdk.md`, `https://dev.wix.com/docs/sdk/core-modules.md`). > - Top-level index of all portals: https://dev.wix.com/docs/llms.txt > - Full concatenated docs: https://dev.wix.com/docs/llms-full.txt ## Resource: Tutorial | Create a Product Widget with Blocks & CLI ## Article: Creating a Product Widget ## Article Link: https://dev.wix.com/docs/build-apps/get-started/tutorials/tutorial-create-a-product-widget-with-blocks-cli.md ## Article Content: # Tutorial: Build a Featured Product Widget with Blocks and the CLI
**Editor compatibility** Wix Blocks apps aren't supported in the Wix Harmony editor. Existing Blocks apps remain available for purchase on the Wix App Market for Wix Editor and Wix Studio sites. To learn more, see [About Wix Harmony and Blocks](https://dev.wix.com/docs/build-apps/develop-your-app/frameworks/wix-blocks/about-wix-harmony-and-blocks.md).
**Important:** This tutorial describes the Blocks-CLI integration, which only works with the Wix CLI for Apps. We're introducing a [unified Wix CLI](https://dev.wix.com/docs/wix-cli/guides/about-the-wix-cli.md), which we recommend for developing apps and headless projects. The unified Wix CLI doesn't support this integration.
This tutorial walks you through creating a Wix app that displays a featured product widget using the `@wix/stores` SDK module. Here is an image of how the widget looks on a site: ![widget on site](https://wixmp-833713b177cebf373f611808.wixmp.com/images/d46f141e7f24502665dc6a1e4877c705.png) ## Before you begin Before getting started, make sure that: + You have [Node.js](https://nodejs.org/en/) (version 20.11.0 or higher). + You’re logged into your Wix Studio account. If you don’t already have one, [sign up for a Wix Studio account](https://manage.wix.com/account/custom-apps). ## Step 1 | Set up your environment First, let's set up a development site, create the app and add the app to the site. ### Create a Site To create a development site: 1. Go to the [eCommerce templates](https://www.wix.com/studio/templates/ecommerce) page. 1. Select a site template and click **Edit**. This creates your own copy of the site. 2. Publish the site. ### Create an App To create your app: 1. Open your terminal. 1. Run: ```bash nvm use 20.11.0 npm create @wix/app@latest ``` 1. When asked what you would like to do, select **Create a new Wix App**. 1. When asked how you would like to create your new app, select **Create a basic app**. 1. Enter a name for your app. 1. Enter a project folder name. 1. Wait as the CLI creates the files for your project. 1. Navigate to the project folder: ```bash cd ``` 1. Run the generate command: ```bash npm run generate ``` This will display a list of extensions that you can add to your app. 1. Select **Site Widget**. 1. When asked which framework to use, select **Blocks**. 1. When asked if you'd like to install dependencies, type **Y**. 1. After the CLI finishes installing dependencies, install the the Wix Stores package: ```bash npm install '@wix/stores' ``` > **Note:** You can ignore the warnings in your terminal. ### Install your app on a Development Site 1. Run the following command to start up a local development server: ```bash npm run dev ``` 1. When asked to select a Development Site, select **Pick an existing site**. 1. Select the site you just created. 1. Press **Enter** to install your app on the site. 1. Click **Agree & Add** in the browser that opened. 1. Go back to your terminal and type **B** to open the Blocks editor. ## Step 2 | Design your widget in the Blocks Editor Now you are in the Blocks Editor, where you'll design your widget. 1. Click **Create Extension** > **Widget**. 1. Search for the **Featured Item** widget. 1. Select the widget and click **Add Widget**. ![featured item](https://wixmp-833713b177cebf373f611808.wixmp.com/images/e5c7a06332dd5a734c806d8345bd75ca.png) 4. Delete the first widget, **Widget1**, by clicking the three dots next to its name in the **Widgets** menu. 5. Click **Sync** and then **Sync Changes** to confirm. This syncs your app's UI to your local code files. ![ready widget](https://wixmp-833713b177cebf373f611808.wixmp.com/images/12e6aa20569275b02ea17b9799f1878b.png) ## Step 3 | Add your widget to the site 1. In the CLI, type **E** to open the site in the Editor of your Development Site. Once the site opens, your app is added to the site. 1. Click **+ Add Elements** > **App Widgets**. 1. Click on the **Featured Item** widget to add it to the canvas. ![drag widget](https://wixmp-833713b177cebf373f611808.wixmp.com/images/2c55aa73afe576e78349be9c9e31b834.png) The widget is now located on the page and uses the site theme to match look and feel of the site. ## Step 4 | Implement the widget logic In this step, you’ll define the widget logic, which presents data according to the product ID. ### Define the widget API in `api.ts` Define a property in the widget API, to hold the product ID. 1. Open the `src` folder of your project. 1. Go to the file: `site/widgets/blocks/featured-item/api.ts` 1. Delete the default event, `load`. 1. Delete the default function, `myPublicFunction()`. 1. Change the property name of the property in the `props` array from `name` to `productId`. 1. Save the file. Your code should look like this: ```ts import { defineAPI, WidgetPropertyType } from '@wix/blocks'; export default defineAPI({ props: { productId: { type: WidgetPropertyType.STRING, }, }, events: {}, functions: {}, }); ``` ### Use the property to present data in the `widget.ts` The `widget.ts` in the same folder is where you add your widget's business logic. You'll use the property you defined in the `api.ts` to present the data of the selected product. 1. Import the SDK `stores` module: ```ts import { products } from '@wix/stores'; ``` 2. Define a helper function `updateProduct` inside the `defineWidget()` callback that fetches product data using the widget's `productId` property and updates the title, subtitle, and image elements accordingly. ```ts const updateProduct = async () => { const { product } = await products.getProduct($widget.props.productId); $w('#title').text = product?.name!; $w('#subtitle').text = product?.description!; $w('#imageX1').src = product?.media?.mainMedia?.image?.url!; }; ``` > **Note:** The `?` and `!` are used because the stores API can also return `undefined`. 3. Replace the boilerplate code of the `onReady()` and `onPropsChange()` functions. Paste the following code instead, to call the `updateProduct()` function. Make sure that all these functions are within the `defineWidget()` function. ```ts $w.onReady(async () => { await updateProduct(); }); ``` ```ts $widget.onPropsChanged(async (oldProps, newProps) => { await updateProduct(); }); ``` 4. Delete the boilerplate function, `myPublicFunction`, from the return statement. 5. Save the file. ## Step 5 | Design the Settings Panel The **Featured Item** widget that you added to the app comes with a default settings panel. Let's modify this panel. 1. Go back to your open **Blocks** editor. 1. Click the **Editor Experience** ![](https://d2x3xhvgiqkx42.cloudfront.net/12345678-1234-1234-1234-1234567890ab/378fd532-728d-473b-8f03-30140bda59af/2024/04/24/d885478b-0fa3-46d0-950a-801399d94383/8dc747a0-244b-4714-bd4c-7a71986a8394.png) icon. 1. Click **Custom Panels**. You can see that the **Featured Item** widget has one custom panel, named **Settings**. 1. Delete the toggle and text elements. 1. Click **+ Add Elements** and add a dropdown element. ![add elements to panel](https://wixmp-833713b177cebf373f611808.wixmp.com/images/a89ab094914fddbc6e58aae558ce28b1.png) 1. Click the **Settings** icon and change the **Field title** to **Choose product** (or any other title you want). 1. Click **Sync** to update your UI to your code files. ## Step 6 | Add the panel logic in the **`panel.ts`** Let's implement the Settings panel logic. The panel gets the list of products and maps them to the dropdown. When the dropdown selection changes, the panel sets the property in the widget API. When the panel opens, it presents the product that was set in the widget API property. If no property was set, the panel presents the first product in the list. 1. Go to: `site/widgets/blocks/featured-item/panels/settings/panel.ts` 1. Add the following import: ```ts import { products } from '@wix/stores'; ``` 3. Replace the `onReady()` function with this code, which gets the Stores product and sets it to the widget’s `productId` property. ```ts $w.onReady(async () => { const { items } = await products.queryProducts({}); $w("#panelDropdown1").options = items.map((item: any) => ({ label: item.name, value: item._id, })); $w("#panelDropdown1").value = (await widget.getProp("productId")) ?? items[0]._id; $w("#panelDropdown1").onChange(async (event: any) => { await widget.setProp("productId", $w("#panelDropdown1").value); }); }); ``` 4. Save the file. ## Step 7 | Add a price element to the widget Back in the Blocks editor, let's add a text element to present the product price. To do this, you'll need to add a paragraph to the widget's stack. 1. Go back to the **Featured Item** widget in the **App Interface**. 1. Right click on the widget stack, which brings together the **Item Title**, the description and the button. 1. Click **Quick Add**. 1. Click **Paragraph**. ![add-paragraph](https://wixmp-833713b177cebf373f611808.wixmp.com/images/35e94df27dd0025f4f001aa72b1f7bbc.png) ### Make some design changes 1. Change the content of the paragraph you just added to be a price. For example, **75$**. 1. Make sure that the paragraph is placed in the third row of the stack (use the **Move up** and **Move down** errors if needed.) 1. Align the paragraph to the left. 1. Change the font size to 16. 1. Reduce the size of the stack gaps. 1. Change the button text to **More Info**. Your finished widget should look like this: ![see finished widget](https://wixmp-833713b177cebf373f611808.wixmp.com/images/41f3abc8926bd3ea9e08c7c780c3095d.png) > **Note:** The design changes are not necessary for the app to function. ### Rename the ID of the element you added Let's rename the new element, so that you can refer to it in your code. 1. Make sure the text element is selected. 1. Click the **Layers** icon. 1. Click the three dots next to the `#text1` element. 1. Click **Rename** and rename the element to `price`. 1. Click **Sync**. ![rename to price](https://wixmp-833713b177cebf373f611808.wixmp.com/images/dae72937462211a7c2f50fb539af01a7.png) ### Add the price to the `updateProduct()` function Let's update the `updateProduct()` function in the `widget.ts`. 1. Add this line under the other lines in the function. ```ts $w('#price').text = product?.priceData?.formatted?.price!; ``` 1. Save the file. ## Step 8 | Test Your Widget It's time to test the widget in the editor and see the product information update when the panel changes. 1. Go back to the editor to see the new price element (you can type **E** if you closed it). 1. Click the widget's **Settings** action button. 1. Select various products from the dropdown and see that the widget information updates as expected. ## Step 9 | Add a button click behavior Let's add the logic for the button to lead the user to the product page. 1. Press `Ctrl + C` in the terminal, to stop the development server. 1. Run: ```bash npm install '@wix/site-location' ``` > **Note:** You can ignore the warnings. 3. In the `widget.ts` file, add: ```ts import { location } from '@wix/site-location'; ``` 4. In the `updateProduct()` function, add: ```ts $w('#exploreButton').onClick(() => { location.to(product?.productPageUrl?.path!); }); ``` 5. Save the file. You'll be able to test the button on a live site after releasing a version of the app. ## Step 10 | Release the app to create a version Now that you're done developing your app, you can create a version. 1. Run: ```bash npm run build npm run release ``` 1. Run dev again: ```bash npm run dev ``` 1. Click **S** to open the site. 1. Go to the widget. 1. Click the button — it should navigate to the product page. Congratulations, you’ve created and connected a fully functional, data-powered featured product widget using Blocks and the CLI! --- > Portal Navigation: > > - Append `.md` to any URL under `https://dev.wix.com/docs/` to get its markdown version. > - Pages are either content pages (article or reference text) or menu pages (a list of links to child pages). > - To get a menu page, truncate any URL to a parent path and append `.md` (e.g. `https://dev.wix.com/docs/sdk.md`, `https://dev.wix.com/docs/sdk/core-modules.md`). > - Top-level index of all portals: https://dev.wix.com/docs/llms.txt > - Full concatenated docs: https://dev.wix.com/docs/llms-full.txt ## Resource: Step 1 | Create a Custom Wix app ## Article: Step 1 | Create a Custom Wix app ## Article Link: https://dev.wix.com/docs/build-apps/get-started/tutorials/tutorial-build-an-e-commerce-business-solution/step-1-create-a-custom-wix-app.md ## Article Content: # Step 1 | Create a Custom Wix app > [< Previous](https://dev.wix.com/docs/build-apps/get-started/tutorials/tutorial-build-an-e-commerce-business-solution/overview.md) | [Next >](https://dev.wix.com/docs/build-apps/get-started/tutorials/tutorial-build-an-e-commerce-business-solution/step-2-create-a-catalog-database-in-blocks.md) The first thing we’ll do is create an app in the [Custom Apps](https://manage.wix.com/account/custom-apps?referralInfo=sidebar\&shownApps=%5B%7B%22id%22%3A%22activeApps%22%2C%22name%22%3A%22All+apps%22%7D%5D\&sort=last-update+desc\&selectedColumns=name%2Capp-status%2Clatest-version%2Clast-update%2Cinstallations%2Crating%2Cdate-created+false%2Ccreated-by+false) page. The app dashboard acts as a control center for the various pieces we'll add to our app–it allows us to manage extensions, permissions, installation settings, and more. We’ll touch on a lot of this later in the tutorial. For now, we only need to do 2 things in our app dashboard: 1. Locate the app ID, public key, and app secret. These will become important a bit later when we write our server code. On the [home](https://dev.wix.com/app-selector?title=Select+an+App\&primaryButtonText=Select+Site\&actionUrl=https%3A%2F%2Fdev.wix.com%2Fapps%2F%7BappId%7D%2Fhome) page of the app dashboard, in the top right corner click the **More Actions** ![](https://wixmp-833713b177cebf373f611808.wixmp.com/images/2219a1394b03e02f815f43a1f8e97e66.png) button and choose **View ID & keys**. ![More Actions > View ID & keys](https://wixmp-833713b177cebf373f611808.wixmp.com/images/290f6b3cb535aac99c2a9059576ab3d1.png) This opens a modal called **App ID & keys** that contains your app secret key, app ID, public key, and namespace. You don’t need to do anything with these values just yet, but remember this location for later. 1. Set up our app to automatically install Wix eCommerce. In order for our business solution to take advantage of eCommerce services like cart and checkout, Wix eCommerce must be installed on a Wix user’s site. Setting up automatic installation of Wix eCommerce ensures our app will function correctly without the Wix user having to take extra action. [Follow these instructions](https://dev.wix.com/docs/rest/business-solutions/e-commerce/wix-e-commerce-platform-handbook/get-started/apps/build-a-business-solution.md#step-1--set-up-automatic-installation-of-the-ecommerce-app) to configure your app to automatically install Wix eCommerce. Now that we’re familiar with our app dashboard, let’s start building our app. In the next couple of article, we’ll be working in [Wix Blocks](https://dev.wix.com/docs/build-apps/develop-your-app/develop-an-app-with-blocks/about-wix-blocks.md). **Next up:** [Step 2 | Create a Catalog Database in Blocks](https://dev.wix.com/docs/build-apps/get-started/tutorials/tutorial-build-an-e-commerce-business-solution/step-2-create-a-catalog-database-in-blocks.md) --- > Portal Navigation: > > - Append `.md` to any URL under `https://dev.wix.com/docs/` to get its markdown version. > - Pages are either content pages (article or reference text) or menu pages (a list of links to child pages). > - To get a menu page, truncate any URL to a parent path and append `.md` (e.g. `https://dev.wix.com/docs/sdk.md`, `https://dev.wix.com/docs/sdk/core-modules.md`). > - Top-level index of all portals: https://dev.wix.com/docs/llms.txt > - Full concatenated docs: https://dev.wix.com/docs/llms-full.txt ## Resource: Step 2 | Create a Catalog Database in Blocks ## Article: Step 2 | Create a Catalog Database in Blocks ## Article Link: https://dev.wix.com/docs/build-apps/get-started/tutorials/tutorial-build-an-e-commerce-business-solution/step-2-create-a-catalog-database-in-blocks.md ## Article Content: # Step 2 | Create a Catalog Database in Blocks > [< Previous](https://dev.wix.com/docs/build-apps/get-started/tutorials/tutorial-build-an-e-commerce-business-solution/step-1-create-a-custom-wix-app.md) | [Next >](https://dev.wix.com/docs/build-apps/get-started/tutorials/tutorial-build-an-e-commerce-business-solution/step-3-create-an-item-page-in-blocks.md) In order to integrate with the Wix eCommerce platform, your business solution must provide a catalog of items for sale. In general, the catalog database can be hosted and managed wherever you prefer. In our example app, each site’s catalog database will live on the site itself. A catalog database allows users to store information about the products they want to sell, and is central to any eCommerce app. For our example business solution, we’ll create a catalog of poems as a [Wix data collection](https://dev.wix.com/docs/build-apps/develop-your-app/develop-an-app-with-blocks/cms-collections-in-blocks/about-cms-collections-in-blocks.md). When Wix users install our app, a copy of the collection is installed on their site. Wix users can then customize this collection to meet their site’s needs. To create a collection in Blocks, we first need to connect our app to Blocks. We can do this by creating a Blocks widget from the app dashboard. 1. To add a widget, return to your app dashboard and go to [extensions](https://dev.wix.com/app-selector?title=Select+an+App\&primaryButtonText=Select+Site\&actionUrl=https%3A%2F%2Fdev.wix.com%2Fapps%2F%7BappId%7D%2Fextensions). Click on **+ Create Extension**. ![Extensions tab](https://wixmp-833713b177cebf373f611808.wixmp.com/images/cf3422b83cad9ff525ac1953096a257d.png) 1. In the modal that opens, search for “widget” and find the Blocks widget extension. Click **+ Create on Blocks**. This opens a new tab in the Blocks editor. ![Create widget on Blocks](https://wixmp-833713b177cebf373f611808.wixmp.com/images/38eecd8efcf7bcf32134009325bd90a5.png) > **Note:** If a window pops up prompting you to choose a template, you can close it. In the lefthand column of the Blocks editor, you should now see something that looks like this: ![App interface widget 1](https://wixmp-833713b177cebf373f611808.wixmp.com/images/405e69e39f7928ac12ec14a07d99dad8.png) We’ll rename and design our widget in the next step, but let’s first add the product catalog. 1. In the menu on the left, click **CMS** ![](https://wixmp-833713b177cebf373f611808.wixmp.com/images/82123f77f0c38ce1ce3702a8fc82d820.png). ![Click CMS](https://wixmp-833713b177cebf373f611808.wixmp.com/images/baca8329adcc3d267efe3411a6feb3fd.png) 1. Under **Your Collections**, click **Create Collection**. A modal opens prompting you to name your app. Click **Save & Continue** to save your app name. ![Create your first collection](https://wixmp-833713b177cebf373f611808.wixmp.com/images/91dcc83e013cf6b050977ed527635abe.png) 1. Next, Blocks prompts you to create an app namespace. Wix uses this namespace to identify your apps and create the collection ID. Click **Next** to continue. A new modal that looks like this appears: ![Create app namespace modal](https://wixmp-833713b177cebf373f611808.wixmp.com/images/e1b0ea937a7694d02349b68664626824.png) The usual format of the namespace is @`accountName`/`appName`. We recommend accepting the default format. Click **Next** to continue. 1. Once you’ve set up your app name and namespace, a **Create a collection** modal appears offering you several options on how to set up your initial collection. Select the **Start from scratch** option and click **Next**. ![Create a collection modal](https://wixmp-833713b177cebf373f611808.wixmp.com/images/aae87f90ea19b0a38e1227d4d9550df9.png) 1. Name your collection **Poems** and click **Create**. Blocks opens the CMS, where you can start editing the collection structure. 1. Click **+ Add Field** to add columns to the collection. Add the following columns to the collection: | **Field name** | **Field type** | | --------------- | ---------------- | | Title | text | | Price | text | | Description | text | | Main Product ID | text | | Variants | Javascript array | Wix generates the field ID automatically when you name the field. Accept the default IDs. > **Note:** Once you save the field, you can’t change the field ID. 1. Now let’s add some sample data to get us started. Add the following items to the collection: | | | | | | | --------------- | --------- | --------------------------------------------------- | ------------------- | ----------------------------------------------------------------------------------------------------------------------------------------------------------- | | **Title** | **Price** | **Description** | **Main Product ID** | **Variants** | | Birthday Poem | 3 | Write a poem for someone’s birthday | 00003 | [  {    "label": "For partner",    "value": "v01"  },  {    "label": "For child",    "value": "v02"  },  {    "label": "For friend",    "value": "v03"  }] | | Wedding Poem | 2 | Congratulate the bride or groom with a wedding poem | 00002 | [  {    "label": "For bride",    "value": "v01"  },  {    "label": "For groom",    "value": "v02"  }] | | Graduation Poem | 1 | Celebrate a new graduate with a graduation poem | 00001 | [  {    "label": "For child",    "value": "v01"  },  {    "label": "For other relative",    "value": "v02"  }] | When a Wix user installs the app, they’ll receive these default values in their Poems collection. This completes our catalog database setup. In the next article, we’ll connect our widget to the collection to allow site visitors to view the available poems. **Next up:** [Step 3 | Create an Item Page in Blocks](https://dev.wix.com/docs/build-apps/get-started/tutorials/tutorial-build-an-e-commerce-business-solution/step-3-create-an-item-page-in-blocks.md) --- > Portal Navigation: > > - Append `.md` to any URL under `https://dev.wix.com/docs/` to get its markdown version. > - Pages are either content pages (article or reference text) or menu pages (a list of links to child pages). > - To get a menu page, truncate any URL to a parent path and append `.md` (e.g. `https://dev.wix.com/docs/sdk.md`, `https://dev.wix.com/docs/sdk/core-modules.md`). > - Top-level index of all portals: https://dev.wix.com/docs/llms.txt > - Full concatenated docs: https://dev.wix.com/docs/llms-full.txt ## Resource: Step 3 | Create an Item Page in Blocks ## Article: Step 3 | Create an Item Page in Blocks ## Article Link: https://dev.wix.com/docs/build-apps/get-started/tutorials/tutorial-build-an-e-commerce-business-solution/step-3-create-an-item-page-in-blocks.md ## Article Content: # Step 3 | Create an Item Page in Blocks > [< Previous](https://dev.wix.com/docs/build-apps/get-started/tutorials/tutorial-build-an-e-commerce-business-solution/step-2-create-a-catalog-database-in-blocks.md) | [Next >](https://dev.wix.com/docs/build-apps/get-started/tutorials/tutorial-build-an-e-commerce-business-solution/step-4-create-a-dashboard-page-to-manage-the-catalog.md) An item page is part of the app’s frontend interface that customers interact with. It allows customers to select the items they want and directs them to the cart and checkout pages. You must create at least one [item page](https://dev.wix.com/docs/rest/business-solutions/e-commerce/wix-e-commerce-platform-handbook/get-started/apps/develop-a-business-solution-item-page-with-blocks.md) for your app that implements eCommerce functionality. In this example, our item page will take the form of a widget that we can add to a site page. The widget will allow a customer to select a poem type from the site catalog, choose a variant of the poem, and set the poem length. We’ll edit the widget we created in the previous step to build a simple interface that provides this functionality. 1. Go to the **App Interface** page of the Blocks editor. In the column on the left side of the editor, click the **More Actions** ![](https://wixmp-833713b177cebf373f611808.wixmp.com/images/7860e419024a15bd57bf0e117b2894a3.png) button and rename your widget to “Item selector”. ![Rename widget](https://wixmp-833713b177cebf373f611808.wixmp.com/images/be7c7ca5b2f2d25c75ab259c6e13ef47.png) 1. Add the following elements to the widget and set their element IDs according to this table: | | | | --------------- | ---------------- | | First dropdown | #selectPoemType | | Second dropdown | #selectVariant | | Text input | #numLines | | Button | #addToCartButton | You can change the element ID by selecting the element and then going to the **Properties & Events** panel. ![Change the element IDs in the Properties & Events panel](https://wixmp-833713b177cebf373f611808.wixmp.com/images/e68a0f840fb2c345ea196f1833d1a44d.gif) 1. Select each element and click **Settings** to adjust the field title or displayed text. Your widget should look like this when you’re done: ![Completed item page widget](https://wixmp-833713b177cebf373f611808.wixmp.com/images/0304d2bded037c089976077927346369.png) 1. Now we need to add functionality to the widget. First, we want the top dropdown element (`#selectPoemType`) to display the titles of the poems in our collection. We can do this easily with a [dataset](https://dev.wix.com/docs/velo/velo-only-apis/$w/dataset/introduction.md). Start by selecting the dropdown. In the action bar, click the **Connect to CMS** ![](https://d2x3xhvgiqkx42.cloudfront.net/12345678-1234-1234-1234-1234567890ab/378fd532-728d-473b-8f03-30140bda59af/2024/02/27/0529fe32-8e09-4f9b-be94-38010664296d/82eea2f5-fe57-423a-a0e3-78bfc698c647.png) icon. Because we haven’t created a dataset yet, Blocks prompts us to create one in the menu on the right: ![Add your first dataset](https://wixmp-833713b177cebf373f611808.wixmp.com/images/047eb6779fbc9e436646989e7a7be327.png) Click **+ Add a Dataset** and select the Poems collection. Accept the default dataset name and click **Create**. The menu on the right displays 2 options for how the dropdown will be used; select the **Filter content** option. ![Select Filter content option](https://wixmp-833713b177cebf373f611808.wixmp.com/images/ce158b98fd140c1980242d67fb7e6bdd.png) Under **Connections** > **Filter content by**, select the **Title** field from the dropdown menu. Leave the condition as **Is**. The `#selectPoemType` dropdown is now connected to the **Title** field in the dataset collection, and will display all available poem titles when opened. You can preview this behavior by clicking **Preview** in the top right corner of the editor. 1. We want the second dropdown (`#selectVariant`) to display the possible variants of the selected poem type. This means that the options in the second dropdown depend on the value of the first. This behavior is too complicated for a dataset, so we’ll create it in the widget code. Open the code panel at the bottom of the editor. Delete the default code and start by adding the following: ```js import wixData from 'wix-data'; import {currentCart} from 'wix-ecom-backend'; import wixEcomFrontend from "wix-ecom-frontend"; $w.onReady(function () { $w('#selectVariant').hide(); $w('#numLines').hide(); $w('#addToCartButton').hide(); }); ``` Here’s a quick explanation of the code we just added: **Lines 1-3**: Import several modules that we need to make our widget functional. The most important to us right now is the `wixData` module, as we’ll use this to retrieve the correct options for the second dropdown. **Lines 5-9**: In the widget’s `onReady()` function, hide all elements except for the first dropdown. Once the customer selects a poem type, we’ll display the remaining elements. Whenever a user makes a selection in the `#selectPoemType` dropdown, we want to update the second dropdown to display the variants for that poem type. To set this behavior, we use the [onChange()](https://dev.wix.com/docs/velo/velo-only-apis/$w/dropdown/on-change.md) event handler as shown below: ```js $w('#selectPoemType').onChange(async (event) => { try { const result = await wixData .query("") .eq("title", event.target.value) .find(); const item = await result.items[0]; $w('#selectVariant').options = item.variants; $w('#selectVariant').show(); $w('#numLines').show(); $w('#addToCartButton').show(); } catch(error) { console.log(error); } }) ``` Let’s break down this code: **Lines 3-8**. Query the collection for the new value of the first dropdown, and store the result. This requires the collection ID, which you can find by opening the CMS and going to the collection settings. **Line 10**. Set the dropdown [options](https://dev.wix.com/docs/velo/velo-only-apis/$w/dropdown/options.md) for the second dropdown to the variants that correspond to the selected poem title. This is made easy by the fact that we created the **Variants** field in the collection as a Javascript array in the format necessary for dropdown elements. **Lines 11-13**. Display the remaining elements. The widget now displays the poem options stored in the collection to customers. Click **Preview** in the top right corner of the editor to test out this behavior and make sure everything works as expected. 1. Once the user has selected the poem they want, they should be able to add it to their cart and navigate to the cart page. To set this behavior in our widget, we’ll make use of the 2 eCommerce modules we imported at the top of our code. The first thing we do is create a function `addToCurrentCart()` which wraps the actual Wix eCom function. Beneath our `onChange()` logic, add the following function: ```js async function addToCurrentCart(lineItems) { return await currentCart.addToCurrentCart(lineItems); } ``` Inside the function, we call the [addToCurrentCart()](https://dev.wix.com/docs/sdk/backend-modules/ecom/current-cart/add-to-current-cart.md) eCom method and pass it an object called `lineItems`. This object contains a catalog reference and quantity for each item that the customer has requested. We want to call `addToCurrentCart()` when a customer clicks the **Add to cart** button. Beneath the function we just wrote, add an `onClick()` handler like this: ```js $w('#addToCartButton').onClick(async (event) => { try { const result = await wixData .query("") .eq("title", $w('#selectPoemType').value) .find(); const item = result.items[0]; const itemId = item.mainProductId; const variantId = $w('#selectVariant').value; await addToCurrentCart({ lineItems: [{ catalogReference: { appId: "", catalogItemId: itemId, options: { audience: variantId } }, quantity: parseInt($w('#numLines').value) }] }) await wixEcomFrontend.refreshCart(); wixEcomFrontend.navigateToCartPage(); } catch(error) { console.log(error); } }) ``` Let’s break down the code in the `onClick()` to understand it: **Lines 3-6**. Query the collection for the value of `#selectPoemType` again. The purpose of this query is to get the ID of the selected poem. **Lines 8-9**. Store the result of the query in `item` and parse it for the poem’s product ID, which we store in `itemId`. **Line 10**. Get the selected variant from the second dropdown `#selectVariant`. **Lines 12-23**. Call `addToCurrentCart()` and pass it an object in the correct format. The nested `catalogReference` object requires our app ID and the product ID of the poem. Recall that we can find the app ID in the [home page](https://dev.wix.com/app-selector?title=Select+an+App\&primaryButtonText=Select+Site\&actionUrl=https%3A%2F%2Fdev.wix.com%2Fapps%2F%7BappId%7D%2Fhome) of our app dashboard. For the poem’s ID, we pass the `itemId` variable. We also pass an options object to define the variants. In our solution, variants are defined by whoever is receiving the poem, so we define a single attribute `audience` and give it the value we took from the `#selectVariant` dropdown. Finally, we take the number of lines requested by the customer and pass that as the quantity. **Lines 24-25**. Call the frontend Wix eCommerce method [`refreshCart()`](https://dev.wix.com/docs/sdk/frontend-modules/ecom/open-side-cart.md) to update the cart with the latest product. Then call [`navigateToCartPage()`](https://dev.wix.com/docs/sdk/frontend-modules/ecom/navigate-to-cart-page.md) to send the customer to the cart page, where they’ll see a summary of their order. > **Note:** You can’t preview the Wix eCommerce methods in the Blocks editor. To test the behavior of eCom methods, install your app on a test site. This completes the design and code for the item page widget. In the next article, we’ll create the dashboard for the Wix user. **Next up:** [Step 4 | Create a Dashboard Page to Manage the Catalog](https://dev.wix.com/docs/build-apps/get-started/tutorials/tutorial-build-an-e-commerce-business-solution/step-4-create-a-dashboard-page-to-manage-the-catalog.md) --- > Portal Navigation: > > - Append `.md` to any URL under `https://dev.wix.com/docs/` to get its markdown version. > - Pages are either content pages (article or reference text) or menu pages (a list of links to child pages). > - To get a menu page, truncate any URL to a parent path and append `.md` (e.g. `https://dev.wix.com/docs/sdk.md`, `https://dev.wix.com/docs/sdk/core-modules.md`). > - Top-level index of all portals: https://dev.wix.com/docs/llms.txt > - Full concatenated docs: https://dev.wix.com/docs/llms-full.txt ## Resource: Step 4 | Create a Dashboard Page to Manage the Catalog ## Article: Step 4 | Create a Dashboard Page to Manage the Catalog ## Article Link: https://dev.wix.com/docs/build-apps/get-started/tutorials/tutorial-build-an-e-commerce-business-solution/step-4-create-a-dashboard-page-to-manage-the-catalog.md ## Article Content: # Step 4 | Create a Dashboard Page to Manage the Catalog > [< Previous](https://dev.wix.com/docs/build-apps/get-started/tutorials/tutorial-build-an-e-commerce-business-solution/step-3-create-an-item-page-in-blocks.md) | [Next >](https://dev.wix.com/docs/build-apps/get-started/tutorials/tutorial-build-an-e-commerce-business-solution/step-5-implement-a-self-hosted-catalog-service-plugin.md) Instead of requiring the Wix user to enter the CMS and directly edit the Poems collection, we’ll create dashboard pages where they can add and remove poems. This is a more comfortable interface, especially for a user who doesn’t work frequently with databases. In Wix Blocks you can create [dashboard pages](https://dev.wix.com/docs/build-apps/develop-your-app/develop-an-app-with-blocks/dashboard-pages/about-dashboard-pages-in-blocks.md) that are added to the dashboard of a Wix site upon installation. These pages appear under the **Apps** page in a Wix user’s dashboard. To add a dashboard page in the Blocks editor: 1. In the menu on the left, click on the **Dashboard Interface** ![dashboard interface](https://wixmp-833713b177cebf373f611808.wixmp.com/images/f03d7f8b37810a8807182a4e4da95f39.png) icon and click **+ Create Extension**. Select the **Dashboard page** option. 1. Blocks opens a new dashboard page for you in the editor. Next to the title of the dashboard page, click **More Actions** ![](https://wixmp-833713b177cebf373f611808.wixmp.com/images/9d8e1fc0ff6e1bd5c4ced7cdf3992b87.png) > **Rename** and change the name of the page to **Poems Manager**. The **Poems Manager** page already has some basic layout elements. You can see these elements more clearly by clicking the **Layers** ![](https://wixmp-833713b177cebf373f611808.wixmp.com/images/ee8c8ae7626cd241a98acdef80723868.png) icon in the left menu. 1. Hover over each of the elements in the page to understand which label corresponds to what. First, locate the label that corresponds to the title. Click **More Actions** ![](https://wixmp-833713b177cebf373f611808.wixmp.com/images/9d8e1fc0ff6e1bd5c4ced7cdf3992b87.png) > **Rename** and rename the box to `pageTitle` so that we can distinguish it later. This first dashboard page will display the poems in the catalog database, and allow the Wix user to delete poems. So let’s give it a fitting title and subtitle: - **Title**: Poems Manager - **Subtitle**: Add and remove the poems your site offers 1. Delete the **Secondary Action** button, and edit the **Main Action** button settings to change the button text to **Add a poem**. Change the element ID of the **Add a poem** button to `#mainAddPoemButton`. ![Change the text on the button to add poem](https://wixmp-833713b177cebf373f611808.wixmp.com/images/fee6fcdb03412f3a229e34c1d78e62e5.png) The upper box on the dashboard page should now look like this: ![Poems manager dashboard page title](https://wixmp-833713b177cebf373f611808.wixmp.com/images/38a9d556dd3dce6977e975ee741292dc.png) 1. Now locate the label that corresponds to the card on the dashboard page. ![Poems manager card](https://wixmp-833713b177cebf373f611808.wixmp.com/images/2632668ae36a7dfdc02308f3f4e19cfb.png) In general, we want the **Poems Manager** dashboard page to display the poems listed in the product catalog. However, if the catalog is empty, it should instead display a message prompting users to add a poem. Since our dashboard page will look different depending on the state of the collection, we need to incorporate that state into the card by using a [multi-state box](https://dev.wix.com/docs/velo/api-reference/$w/multi-state-box/introduction.md). Next to the box that corresponds to the card, click **More Actions** ![](https://wixmp-833713b177cebf373f611808.wixmp.com/images/9d8e1fc0ff6e1bd5c4ced7cdf3992b87.png), and select **Place in Multi-State Box**. ![Place in multi-state box](https://wixmp-833713b177cebf373f611808.wixmp.com/images/933350d986006f4758d27a571b374ef4.png) In the box itself, first delete the subtitle and edit the title to say **Your Poems**. This can remain the same in both states. Now rename the box `emptyState` to distinguish it from the opposite state. In the lefthand menu, click **Add Elements** ![](https://wixmp-833713b177cebf373f611808.wixmp.com/images/a84ed686eab15ec0bb4bf7d469f62590.png )> **Design Patterns** > **Empty States** and select the **Add your first product** option. ![Choose Add your first product empty state](https://wixmp-833713b177cebf373f611808.wixmp.com/images/ad75f273c3fbaa7eb13da3776e14a429.png) Edit the text and the button so that the empty state element looks like this: ![Empty state title and button](https://wixmp-833713b177cebf373f611808.wixmp.com/images/e1cfe3b9e8c065965722ccc2d2fc1b9c.png) Then, select the button and change its ID to `#addFirstPoemButton` to distinguish it from the **Add a poem** button at the top of the page. This completes the dashboard UI for the empty state. We’ll add code shortly. Let’s create the second state next. 1. Add a second box to the multi-state box and rename it `poemsList`. Again, delete the subtitle and edit the title of the box to **Your Poems**. For this state, we’ll use a [repeater](https://dev.wix.com/docs/velo/api-reference/$w/repeater/introduction.md) to display poems in the collection. Go to **Add Elements** ![](https://wixmp-833713b177cebf373f611808.wixmp.com/images/a84ed686eab15ec0bb4bf7d469f62590.png) > **Layout** > **Repeaters** and select the 4-square repeater. ![4-square repeater](https://wixmp-833713b177cebf373f611808.wixmp.com/images/56021b9784eeff3a5c13b6aa8ae3eaf2.png) Adjust the repeater’s position on the page. In the **Properties & Events** panel, change the repeater ID to `listOfPoems` and the ID of each card to `poemCard`. Then add the following elements inside the cards: - A Heading 2 text element - A Heading 4 text element - An icon button like this: ![Trash can button](https://wixmp-833713b177cebf373f611808.wixmp.com/images/af3f198ba475bff6be777d2b77fbe5e0.png) 1. We can add functionality to the `poemsList` state simply by connecting it to the CMS. Select the repeater, and in the action bar click **Connect to CMS** ![](https://d2x3xhvgiqkx42.cloudfront.net/12345678-1234-1234-1234-1234567890ab/378fd532-728d-473b-8f03-30140bda59af/2024/02/28/35acad32-03ed-4ea0-a201-df5ebcc37ceb/eb371f17-e215-41bc-9260-64ac656eade4.png). Though we already created a dataset for the item page, that dataset doesn’t apply to the dashboard interface. Therefore, we need to create a new one. In the menu on the right, click **+ Add a Dataset** to create a new dataset. Select the **Poems** collection as the one we want to connect to, and name the dataset **Poems Dashboard** so we can distinguish it from the item page dataset: ![Create a dataset for the dashboard](https://wixmp-833713b177cebf373f611808.wixmp.com/images/2e42c146516b5d7f28e3e005742c9590.png) Click **Create**. The righthand menu displays the new dataset. We first need to edit the dataset settings to allow the dashboard to write to the collection. From the righthand menu click **Dataset Settings**. ![Choose the dashboard dataset settings](https://wixmp-833713b177cebf373f611808.wixmp.com/images/841042fab47bc5fd8ace8b69325f6b59.png) Set the dataset mode to **Read & Write**. ![Set dashboard dataset mode to Read & Write](https://wixmp-833713b177cebf373f611808.wixmp.com/images/e4daa6034fd3f6761fff86842d8e5c67.png) Now connect the elements in the repeater card as follows: * Heading 2 text: Title * Heading 4 text: Description * Icon button: Under **Connections** > **Click action connects to**, select **Delete**. Our nonempty state now can display poems from the collection and delete them. Next we’ll create the capability to add poems from the dashboard. 1. In order to add poems to the collection, we’ll create an entirely new dashboard page. Return to the **Dashboard Interface** ![](https://wixmp-833713b177cebf373f611808.wixmp.com/images/f03d7f8b37810a8807182a4e4da95f39.png) section and at the bottom of the menu click **+ Create Extension**. 1. Rename the new dashboard page to **Add poem**. We actually don’t want this dashboard page to be visible in the menu–we only want a Wix user to access it from the **Poems Manager** page. To set this behavior, click **More Actions** ![](https://wixmp-833713b177cebf373f611808.wixmp.com/images/9d8e1fc0ff6e1bd5c4ced7cdf3992b87.png) > **Hide from dashboard menu**. 1. To set up the UI for the **Add poem** page, first edit the existing elements as follows: - State 01: **Add a poem** - Page subtitle: delete - Card title: **Poem Details** - Card subtitle: delete - Main Action button: Change text to **Save** and change the ID to `#savePoemButton`. - Secondary Action button: Change text to **Cancel** and change the ID to `#cancelButton`. When you complete these changes, the top of your dashboard page should look like this: ![What your add a poem dashboard page should look like](https://wixmp-833713b177cebf373f611808.wixmp.com/images/9d9ec9afda7fe6b6e59931f7daf9ed4c.png) 1. Now we’ll create a form that will allow the user to add a poem’s details. To do so, add the following elements in the order shown and set their IDs in the **Properties & Events** panel: | | | | | --------------------------------------------------------------------------------------------------------------------------------------------------------------------------------------------------------------------------------------------------------------- | ----------------- | ---------------- | | Element type | ID | Text | | Text Input | #poemTitle | Poem title | | Text Input | #poemPrice | Price per line | | Text Input | #poemDescription | Poem description | | Text Input | #poemId | Catalog ID | | Upload **+ Add Product** Button ![](https://wixmp-833713b177cebf373f611808.wixmp.com/images/97c8407ab369e478e6a22093cea3f238.png) | #addVariantButton | Add Variant | Beneath these elements, add a repeater: ![Select repeater with 3 horizontal boxes](https://wixmp-833713b177cebf373f611808.wixmp.com/images/f0ee9f13e8540ceb14423a15c279bfa5.png) We’ll use this repeater to give the Wix user control over how many variants they want to add. Adjust the size of the repeater to align with the other elements, and change the repeater’s ID to `variantsList`. With the repeater still selected, in the right menu edit the number of elements: ![Manage repeater items](https://wixmp-833713b177cebf373f611808.wixmp.com/images/7c15004896d688a201130d54d5435fce.png) We want to start with just one element in the repeater, so delete 2 of the boxes: ![Delete boxes from repeater](https://wixmp-833713b177cebf373f611808.wixmp.com/images/37b3890bf1142b4602444ec8855dc13b.png) Add the following elements to the remaining box in the repeater: | | | | | --------------------- | -------------------- | ------------- | | **Element type** | **ID** | **Text** | | Text Input | #variantLabel | Variant label | | Text Input | #variantId | Variant ID | | Trash can icon button | #deleteVariantButton | | The complete UI should look like this: ![Full add a poem dashboard page](https://wixmp-833713b177cebf373f611808.wixmp.com/images/7c98fc4763e0509080952c19de394d31.png) Now that we’ve designed the dashboard UI, in the next section we’ll add the code that will enable the user to actually add a new poem to the collection. ### Dashboard code Before we dive into the code, let’s consider exactly what we need the code to do: - Insert the user inputs into the collection when the user clicks **Save**. - Return to the **Poems Manager** page after the user clicks either **Save** or **Cancel**. - Add new fields for variant information each time the user clicks **+ Add Variant**. - Delete a set of variant fields when the user clicks `#deleteVariantButton`. As it turns out, the trickiest part of the code will be controlling the UI to add and remove variants, so we’ll start with that. 1. Open the code panel for the **Add poem** page. Delete the existing code and add the following: ```js import wixDashboard from 'wix-dashboard'; import wixData from 'wix-data'; $w.onReady(function () { let variantsArray = []; $w('#variantsList').hide(); }); ``` **Lines 1-2**. We import 2 packages for handling data and moving between dashboard pages. These packages aren’t necessary for the repeater code but will become important later. **Line 5**. Inside the `onReady()` handler, we first create a blank array called `variants` array. We’ll use this array to set the `#variantsList` repeater [data](https://dev.wix.com/docs/velo/api-reference/$w/repeater/data.md), which will control the number of variants that appear in UI. **Line 6**. Hide the variants list when the **Add poem** page first loads. 1. Next, we add the logic to add a variant: ```js $w("#variantsList").onItemReady(($item, itemData, index) => { $item("#variantId").value = itemData.value; $item("#variantLabel").value = itemData.label; $item('#deleteVariantButton').onClick( () => { variantsArray.splice(itemData.realIndex,1) variantsArray.forEach((item, index) => { item.realIndex = index; }); $w('#variantsList').data = variantsArray; }) }); $w('#addVariantButton').onClick( () => { if ($w('#variantsList').hidden) { $w('#variantsList').show(); } let highestId = 0; variantsArray.forEach((item, index) => { if(Number(item._id) >= highestId) highestId = Number(item._id) + 1; }); const newItem = { _id: highestId.toString(), value: '', label: '', realIndex: variantsArray.length }; variantsArray.push(newItem); $w('#variantsList').data = variantsArray; }); ``` Let’s start by breaking down the `onClick()` handler code first: **Lines 14-16**. Unhide the repeater in case it was still hidden. **Lines 18-21**. Perform a calculation to track the correct index. This helps later if we need to delete a variant. **Lines 23-28**. Create a new item to insert into the array. The `value` and `label` fields, which correspond to the 2 input fields in the repeater item, are blank. The result is that a new set of blank fields is added to `#variantsList`. **Lines 29-30**. Push the new item to `variantsArray` and set the repeater data equal to the updated array. This triggers the [`onItemReady()`](https://dev.wix.com/docs/velo/api-reference/$w/repeater/on-item-ready.md) handler above. This brings us back up to the top of the code: **Lines 2-3**. Create the 2 new input fields with blank values. **Lines 4-10**. Handle the behavior for when the `#deleteVariantButton` is clicked. Remove the selected item from `variantsArray` and set the repeater data equal to the reduced array. The end result of all this logic is behavior like this: ![Example of the add variant behavior](https://wixmp-833713b177cebf373f611808.wixmp.com/images/a493faf010fcb2e7732a846976ad6983.gif) 1. Let’s move on now to the part of the code that controls the save and cancel actions. When both of these actions complete, we want to navigate the user back to the **Poems Manager** dashboard page. Previously, we imported the `wix-dashboard` package. In Blocks, we can use the [`navigate()`](https://dev.wix.com/docs/sdk/host-modules/dashboard/navigate.md) function from this package to open a different dashboard page from our current one. Let’s start with the code for the **Cancel** button as it is simpler. When the user clicks the **Cancel** button, we don’t need to store anything. We can simply navigate back to **Poems Manager**: ```js $w('#cancelButton').onClick( ()=> { wixDashboard.navigate({ pageId: "1e6634d9-5584-48eb-950d-4cb867fed8bb" // Poems Manager page ID }) }) ``` The only piece of information we need here is the ID of the page we want to go to, in this case **Poems Manager**. To find this ID, open the **Dashboard Interface** ![](https://wixmp-833713b177cebf373f611808.wixmp.com/images/f03d7f8b37810a8807182a4e4da95f39.png) and click **More Actions** ![](https://wixmp-833713b177cebf373f611808.wixmp.com/images/9d8e1fc0ff6e1bd5c4ced7cdf3992b87.png) > **Page settings** next to **Poems Manager**. Next to **Page ID** click **Copy** and close out of the modal. Paste the copied ID as the value for the `pageId` parameter. We can start the **Save** logic in a similar manner: ```js $w("#savePoemButton").onClick(() => { wixDashboard.navigate({ pageId: "1e6634d9-5584-48eb-950d-4cb867fed8bb" // Poems Manager page ID }); }); ``` However, when we save we also need to store the details that the user input. To do so, add the following code before `navigate()`: ```js const data = []; $w('#variantsList').forEachItem(($item, itemData, index) => { data.push({ _id: index.toString(), label: $item("#variantLabel").value, value: $item("#variantId").value }) }); $w('#variantsList').data = data; const toInsert = { title: $w('#poemTitle').value, price: $w('#poemPrice').value, description: $w('#poemDescription').value, mainProductId: $w('#poemId').value, variants: $w('#variantsList').data } try { await wixData.insert("", toInsert); wixDashboard.navigate({ pageId: "1e6634d9-5584-48eb-950d-4cb867fed8bb" // Return to Poems Manager }); } catch(error) { console.error(error); } ``` **Lines 1-10**. Get the values from each item in the `#variantsList` repeater. **Lines 11-17**. Create a new object containing the values of all the input fields, including all the variants. **Line 18**. Using the `wix-data` package we imported at the top of code, [insert](https://dev.wix.com/docs/sdk/backend-modules/data/items/insert.md) the new poem data into the **Poems** collection. This completes the code for the **Add poem** page. Here’s the full code: ```js import wixDashboard from 'wix-dashboard'; import wixData from 'wix-data'; $w.onReady(function () { let variantsArray = []; $w('#variantsList').hide(); $w("#variantsList").onItemReady(($item, itemData, index) => { $item("#variantId").value = itemData.value; $item("#variantLabel").value = itemData.label; $item('#deleteVariantButton').onClick( () => { variantsArray.splice(itemData.realIndex,1) variantsArray.forEach((item, index) => { item.realIndex = index; }); $w('#variantsList').data = variantsArray; }) }); $w('#addVariantButton').onClick( () => { if ($w('#variantsList').hidden) { $w('#variantsList').show(); } let highestId = 0; variantsArray.forEach((item, index) => { if(Number(item._id) >= highestId) highestId = Number(item._id) + 1; }); const newItem = { _id: highestId.toString(), value: '', label: '', realIndex: variantsArray.length }; variantsArray.push(newItem); $w('#variantsList').data = variantsArray; }); $w("#savePoemButton").onClick(() => { const data = []; $w('#variantsList').forEachItem(($item, itemData, index) => { data.push({ _id: index.toString(), label: $item("#variantLabel").value, value: $item("#variantId").value }) }); $w('#variantsList').data = data; const toInsert = { title: $w('#poemTitle').value, price: $w('#poemPrice').value, description: $w('#poemDescription').value, mainProductId: $w('#poemId').value, variants: $w('#variantsList').data } try { await wixData.insert("", toInsert); wixDashboard.navigate({ pageId: "1e6634d9-5584-48eb-950d-4cb867fed8bb" // Return to Poems Manager }); wixDashboard.navigate({ pageId: "1e6634d9-5584-48eb-950d-4cb867fed8bb" // Poems Manager page ID }); } catch(error) { console.error(error); } }); $w('#cancelButton').onClick( ()=> { wixDashboard.navigate({ pageId: "1e6634d9-5584-48eb-950d-4cb867fed8bb" // Poems Manager page ID }) }) }); ``` Next, we'll write the code for **Poems Manager**. 1. Return to the **Poems Manager** page in the dashboard interface and open the code panel. We’ll start with the import statements we added on the other page: ```js import wixDashboard from 'wix-dashboard'; import wixData from 'wix-data'; ``` 1. Recall that our **Poems Manager** page has 2 states: empty and nonempty. Whenever the page loads, it needs to determine which state to display. To determine the state, we simply query the **Poems** collection to check if there are items to display. Below the import statements, add the following function: ```js async function determineManagerState() { try { const result = await wixData .query("") .find(); if (result.items.length > 0) { $w('#multiStateBox1').changeState("poemsList"); } else { $w('#multiStateBox1').changeState("emptyState"); } } catch(error) { console.log(error); } } ``` `determineManagerState()` queries the collection to see if there are poems, and based on the length of the results sets the current state of the multi-state box. Beneath `determineManagerState()`, we add an `onReady()` handler: ```js $w.onReady(async function () { determineManagerState(); $w('#listOfPoems').onItemRemoved((itemData) => { determineManagerState(); }) $w('#mainAddPoemButton').onClick( () => { wixDashboard.navigate({ pageId: "9ceebb9d-1a74-4d40-ace5-56c558987353" }) }) $w("#addFirstPoemButton").onClick(() => { wixDashboard.navigate({ pageId: "9ceebb9d-1a74-4d40-ace5-56c558987353" }) }) }); ``` **Line 2**. Determine the correct state when the page first loads. **Line 4-6**. Determine the correct state after an item has been removed from the repeater that lists the poems. This handles the edge case of a user deleting the last poem in the list. **Lines 8-18**. When a user clicks any button to add a new poem–whether in the empty state or not–navigate to the **Add poem** page. The page ID can be located in the dashboard interface section under **More Actions**. Here’s the full code for the **Poems Manager** page: ```js import wixDashboard from 'wix-dashboard'; import wixData from 'wix-data'; async function determineManagerState() { try { const result = await wixData .query("") .find(); if (result.items.length > 0) { $w('#multiStateBox1').changeState("poemsList"); } else { $w('#multiStateBox1').changeState("emptyState"); } } catch(error) { console.log(error); } } $w.onReady(async function () { determineManagerState(); $w('#listOfPoems').onItemRemoved((itemData) => { determineManagerState(); }) $w('#mainAddPoemButton').onClick( () => { wixDashboard.navigate({ pageId: "9ceebb9d-1a74-4d40-ace5-56c558987353" }) }) $w("#addFirstPoemButton").onClick(() => { wixDashboard.navigate({ pageId: "9ceebb9d-1a74-4d40-ace5-56c558987353" }) }) }); ``` Our app now has 2 functioning dashboard pages, along with a working item page. You can preview some of the features in Blocks. We’ll test everything in the last step of this tutorial, but first, we need to complete the final part of our app and implement the Get Catalog service plugin. **Next up:** [Step 5 | Implement a Self-managed Catalog](https://dev.wix.com/docs/build-apps/get-started/tutorials/tutorial-build-an-e-commerce-business-solution/step-5-implement-a-self-hosted-catalog-service-plugin.md) --- > Portal Navigation: > > - Append `.md` to any URL under `https://dev.wix.com/docs/` to get its markdown version. > - Pages are either content pages (article or reference text) or menu pages (a list of links to child pages). > - To get a menu page, truncate any URL to a parent path and append `.md` (e.g. `https://dev.wix.com/docs/sdk.md`, `https://dev.wix.com/docs/sdk/core-modules.md`). > - Top-level index of all portals: https://dev.wix.com/docs/llms.txt > - Full concatenated docs: https://dev.wix.com/docs/llms-full.txt ## Resource: Step 5 | Implement a Self-hosted Catalog Service Plugin ## Article: Step 5 | Implement a Self-hosted Catalog Service Plugin ## Article Link: https://dev.wix.com/docs/build-apps/get-started/tutorials/tutorial-build-an-e-commerce-business-solution/step-5-implement-a-self-hosted-catalog-service-plugin.md ## Article Content: # Step 5 | Implement a Self-Managed Catalog Service Plugin > [< Previous](https://dev.wix.com/docs/build-apps/get-started/tutorials/tutorial-build-an-e-commerce-business-solution/step-4-create-a-dashboard-page-to-manage-the-catalog.md) | [Next >](https://dev.wix.com/docs/build-apps/get-started/tutorials/tutorial-build-an-e-commerce-business-solution/step-6-test-your-business-solution-on-a-site.md) In [Step 2](https://dev.wix.com/docs/build-apps/get-started/tutorials/tutorial-build-an-e-commerce-business-solution/step-2-create-a-catalog-database-in-blocks.md), we created a catalog database to store the poems a Wix user sells on their site. In order to connect that catalog to the eCommerce platform, we need to create a server to implement the [Catalog service plugin](https://dev.wix.com/docs/rest/business-solutions/e-commerce/service-plugins/catalog-service-plugin/introduction.md). The service plugin includes a single method called [Get Catalog Items](https://dev.wix.com/docs/rest/business-solutions/e-commerce/service-plugins/catalog-service-plugin/get-catalog-items.md). Wix calls this method when a cart or checkout on the Wix user’s site is updated. In the call, it includes the IDs of any items in the cart, and in return it expects information from the catalog about each item. Wix doesn’t know where the catalog database is located–it only knows the location of the service plugin endpoint. Therefore, the service plugin must retrieve the items from the catalog database and return them to Wix in the correct format. In our case, this means our service plugin needs to communicate with the Wix site to access the catalog database and return the required item details. In this example app, we’ve placed the catalog database on a Wix site. But remember that in your own business solution, you can choose to locate the catalog database anywhere, including on your server or in an external database. You just need to change your server logic to fetch from that location. There are several things our server code must do to fulfill a Get Catalog Items request: 1. Verify and decode the incoming request sent as a JSON web token. 2. Extract the app instance ID and requested item IDs from the decoded payload. 3. Create a client to communicate with the Wix site that sent the request. 4. Use the client to request information from the site catalog database about each item. 5. Return all item information in a form that matches the Get Catalog Items response object. We’ll write our server code in [Express](https://expressjs.com/), so the first thing we need to do is set up Express and other necessary packages. 1. Install the following `npm` packages from Wix: ```bash npm install @wix/sdk npm install @wix/data ``` 1. [Install Express](https://expressjs.com/en/) and set up an app. Use version 4.17.0. You can choose to use `express-generator`, but it isn’t necessary for this example. 1. Once your Express app is created, open the `app.js` file and paste the following code: ```js const express = require('express'); const jose = require('jose'); const { createClient, AppStrategy } = require('@wix/sdk'); const { collections, items } = require("@wix/data"); const app = express(); const port = 3000; app.use(express.text()); async function verify(jwt) {} app.post('/get-catalog-items', async (request, response) => {}) app.listen(port, () => { console.log(`Example app listening on port ${port}`) }) module.exports = app; ``` Most of the above code is standard Express. However, we’ve added some extra lines that are specific to our business solution: **Lines 2-4**. Import 3 libraries that we’ll need in our server code: - Jose for JWT verification. - Wix SDK to create a Wix client. - Wix Data to work with collection data on a site. **Line 8**. Set up the [express.text()](https://expressjs.com/en/4x/api.html#express.text) middleware function. This function parses the incoming request, including the encoded body, into a string that our verification function can handle. **Line 10**. Create our `verify()` function, which will accept a JWT token as a string and decode it. We’ll write the code for this in a moment. **Line 12**. A POST method that receives Get Catalog Items requests from Wix and returns the correct information from the catalog. We’ll write the code for this shortly. Let’s start by writing the code for the `verify()` function. ## Verify the JWT token As with all [service plugins at Wix](https://dev.wix.com/docs/build-apps/develop-your-app/frameworks/self-hosting/supported-extensions/backend-extensions/add-self-hosted-service-plugin-extensions-with-rest.md), when a Wix site calls Get Catalog Items, it encodes the request body as a JWT. Therefore, in the service plugin we must decode the token in order to extract information like the app instance and catalog IDs. In this tutorial, we use the [jose](https://github.com/panva/jose) library for JWT verification. 1. In the `verify()` function we created before, add a `try`-`catch` block. Above the `try` block, add 2 `const` variables `alg` and `spki`. The first variable defines the RSA algorithm we’re using. In the case of requests from Wix, this is RS256, so we’ll assign the variable this value as a string: ```javascript const alg = 'RS256'; ``` The second variable, `spki`, is our public key. Each app in the Custom Apps list has a unique public key. To find this key, return to the **App ID & keys** modal in the [app dashboard](https://dev.wix.com/app-selector?title=Select+an+App&primaryButtonText=Select+Site&actionUrl=https%3A%2F%2Fdev.wix.com%2Fapps%2F%7BappId%7D%2Fhome). Copy the public key from the modal. ![Copy the public key from the App ID & keys modal in your app dashboard](https://wixmp-833713b177cebf373f611808.wixmp.com/images/a3835faeae944997fab2a4e09b30b720.png) Paste the public key as the value for `spki`. 1. Let’s start adding code to the `try` block. We first add some error checking code that ensures the `jwt` parameter is a string: ```js try { if (typeof jwt !== 'string') { throw new Error('JWT must be a string'); } } catch (error) {} ``` Next, we add the functions that actually do the decoding. The first function we add is [importSPKI()](https://github.com/panva/jose/blob/main/docs/key/import/functions/importSPKI.md): ```javascript const publicKey = await jose.importSPKI(spki, alg); ``` We pass the `spki` and `alg` variables to `importSPKI()` and store the result in a new variable called `publicKey`. We then pass this result to the [`jwtVerify()`](https://github.com/panva/jose/blob/main/docs/jwt/verify/functions/jwtVerify.md) function, along with the `jwt` parameter and an [JWTVerifyOptions](https://github.com/panva/jose/blob/main/docs/jwt/verify/interfaces/JWTVerifyOptions.md) object: ```javascript const { payload, protectedHeader } = await jose.jwtVerify(jwt, publicKey, {       issuer: 'wix.com',       audience: '',       maxTokenAge: 60,       clockTolerance: 60     }); ``` Set the attributes in the `options` parameter as shown. These options allow us to [validate](https://dev.wix.com/docs/build-apps/develop-your-app/frameworks/self-hosting/supported-extensions/backend-extensions/add-self-hosted-service-plugin-extensions-with-rest.md#validating-request-signatures) requests received from Wix. To set the `audience` value, copy your app ID from the app dashboard. Finally, we return the payload. ```js return payload; ``` 1. Now we’ll add code to the `catch` block. You can add more complex error handling later, but for now we’ll simply throw an error with a message that the verification failed. ```javascript catch (error) {     throw new Error('JWT verification failed');   } ``` The full code for the function should now look like this: ```js async function verify(jwt) { const alg = 'RS256' const spki = ``; try { if (typeof jwt !== 'string') { throw new Error('JWT must be a string'); } const publicKey = await jose.importSPKI(spki, alg) const { payload, protectedHeader } = await jose.jwtVerify(jwt, publicKey, { issuer: 'wix.com', audience: '', maxTokenAge: 60, clockTolerance: 60 }) return payload; } catch (error) { throw new Error('JWT verification failed'); } } ``` ## Implement Get Catalog Items Now that we’ve set up our `verify()` function, we can implement the [Get Catalog Items](https://dev.wix.com/docs/rest/business-solutions/e-commerce/service-plugins/catalog-service-plugin/get-catalog-items.md) endpoint, so that Wix can make calls to our server to get information about catalog products. 1. Go to the POST method we created below the `verify()` function: ```javascript app.post('/get-catalog-items', async (reqest, response) => {}) ``` Note a couple of important things here: - The path we route catalog requests to must be in snakecase. Make sure your  path is identical to the one shown above. - We will need to make asynchronous calls inside our handler function, so mark it as `async`. 1. Inside the handler function add a `try`-`catch` block. In the `try` block add the following lines of code: ```js const token = request.body; const body = await verify(token); const instanceId = body.data.metadata.instanceId; const requestedItems = body.data.request.catalogReferences; ``` Let’s break down what this code is doing: **Line 1.** Isolate the request body, which is in JWT format, and store it in a variable `token`. **Line 2**. Pass the token to `verify()`. If the token is valid, `verify()` returns the request body as a decoded object, which we store in a JS object called `body`. **Lines 3-4**. Parse `body` to extract 2 important pieces of information: - The instance ID. This tells us which instance of our app made the request. We’ll use this shortly to query the site catalog. - The list of items that the Wix site is requesting information about. This tells us which items to retrieve information about from the catalog. 1. Because our server is self-managed, we need to [create a client](https://dev.wix.com/docs/sdk/articles/work-with-the-sdk/about-the-wix-client.md) in order to make calls to a Wix site. We use the Wix SDK [createClient()](https://dev.wix.com/docs/sdk/core-modules/sdk/wix-client.md#createclient) function to do this. `createClient()` expects a configuration object with at least 2 attributes: - `modules`: The Wix SDK modules your self-managed app uses. This typically matches the modules that you imported. - Your app’s [authentication strategy](https://dev.wix.com/docs/build-apps/develop-your-app/access/authentication/about-authentication.md). In our example the app will make API calls, so we use the [`AppStrategy`](https://dev.wix.com/docs/sdk/core-modules/sdk/app-strategy.md) authentication strategy. Add the following code to the try block: ```js const wixClient = createClient({ modules: { items }, auth: AppStrategy({ appId: "", appSecret: "", publicKey: `` instanceId: instanceId, }), }); ``` **Line 2**. Define the modules we use in this client. In this case, we only use the [items](https://dev.wix.com/docs/sdk/backend-modules/data/items/introduction.md) module. **Lines 3-8**. Define the `AppStrategy` object. This object requires your app ID, app secret, and public key from the [app dashboard](https://dev.wix.com/app-selector?title=Select+an+App&primaryButtonText=Select+Site&actionUrl=https%3A%2F%2Fdev.wix.com%2Fapps%2F%7BappId%7D%2Fhome). The `AppStrategy` object also requires the ID of the app instance. This tells the app which site it’s communicating with. We take the ID we parsed from the decoded request body and pass it to the `AppStrategy` constructor. This sets up our client and prepares us to make calls to the site collection. 1. Before adding the next piece of code, we need the ID of the **Poems** collection we created in Step 2. Return to the Blocks app and go to your collection in the CMS. Click **Edit Settings** to open the collection settings. ![Go to CMS settings in Blocks to get your collection ID](https://wixmp-833713b177cebf373f611808.wixmp.com/images/26a056eb002090892cd4a3f75c87d478.png) Beneath the collection name, copy the collection ID. 1. Return to the Express code. Beneath the createClient() method we added, add this code: ```js const catalogItems = await Promise.all(requestedItems.map(async (reference) => { const results = await wixClient.items .query("") .eq("mainProductId", reference.catalogReference.catalogItemId) .find(); const item = results.items[0]; const options = (reference.catalogReference.options !== null) ? reference.catalogReference.options : {}; return { "catalogReference": { "appId": "", "catalogItemId": item.mainProductId, "options": options }, "data": { "productName": { "original": item.title }, "itemType": { "preset": "SERVICE" }, "price": item.price, "priceDescription": { "original": "Number of lines" } } }; })); response.send({catalogItems}); ``` Before we review this code line by line, it’s important to understand its overall purpose. The code takes in the `requestedItems` array we created containing catalog references for the requested items, and returns a new array of catalog items in the required format. To do so, it performs the following steps: 1. Extracts the catalog ID of each item in the `requestedItems` array. 2. Queries the site catalog for that ID. 3. Organizes the returned information from the site into an object that matches the Get Catalog Items response. Let’s break down the code line by line: **Line 1**. Wrap the Javascript `map()` function in a `Promise.all()` statement that returns the array of objects only after the query has been resolved for all items. **Lines 3-6**. Using the Wix client we created, [query](https://dev.wix.com/docs/sdk/backend-modules/data/items/query.md) the catalog database on the site. Paste your collection ID as the parameter. **Line 7**. Store the query result. **Line 8**. Extract the variant information from the requested item and place it in an object `options` that can be passed to the returned item. **Lines 10-28**. Set up the response object in the correct format. **Line 31**. Returns the complete array of catalog references `catalogItems` to the caller. 1. To complete the Get Catalog Items endpoint, we’ll fill out the `catch` block. As with `verify()`, you can add more complex error handling later, but for now we’ll just return a 400 status with an error message: ```javascript catch (error) {     response.status(400).send({ error: error.message });   } ``` 1. Our server code is complete, but we need to complete one extra step to make sure it can communicate with the product catalog on the site. In our code, we call the [`query()`](https://dev.wix.com/docs/sdk/backend-modules/data/items/query.md) method of the Wix Data `items` module. Like all API methods at Wix, in order for our app to call this method, it must have the correct [permissions](https://dev.wix.com/docs/build-apps/develop-your-app/access/authorization/about-permissions.md). We can locate these permissions in the reference above the method declaration: ![Location of API method permissions](https://wixmp-833713b177cebf373f611808.wixmp.com/images/c57e470ce368f5899f2acd26e0b56e45.png) The specific permission we need to call `query()` is **READ DATA ITEMS**. To add this permission to our app, return to the app dashboard and go to [permissions](https://dev.wix.com/app-selector?title=Select+an+App\&primaryButtonText=Select+Site\&actionUrl=https%3A%2F%2Fdev.wix.com%2Fapps%2F%7BappId%7D%2Fdev-center-permissions). Click **+ Add Permissions**. The easiest way to locate the permission you need to add is to search by name or ID. Search for “read data items”. Select the correct permission and click **Save** to add it to your app. ![Add read data items permissions to your app](https://wixmp-833713b177cebf373f611808.wixmp.com/images/8bce6c9441adf55786718d32d50ff754.png) The permission should now appear in the permissions list: ![Permissions list app dashboard](https://wixmp-833713b177cebf373f611808.wixmp.com/images/196ee15e0d1481346b419878aea7714c.png) Now our app can communicate with the product catalog on a site. Our service plugin code is now complete. Here’s the full code for `app.js`: ```js const express = require('express'); const jose = require('jose'); const { createClient, AppStrategy } = require('@wix/sdk'); const { collections, items } = require("@wix/data"); const app = express(); const port = 3000; app.use(express.json()); app.use(express.text()); async function verify(jwt) { const alg = 'RS256' const spki = ``; try { if (typeof jwt !== 'string') { throw new Error('JWT must be a string'); } const publicKey = await jose.importSPKI(spki, alg) const { payload, protectedHeader } = await jose.jwtVerify(jwt, publicKey, { issuer: 'wix.com', audience: '', maxTokenAge: 60, clockTolerance: 60 }) return payload; } catch (error) { throw new Error('JWT verification failed'); } } app.post('/get-catalog-items', async (request, response) => { try { const token = request.body; const body = await verify(token); const instanceId = body.data.metadata.instanceId; const requestedItems = body.data.request.catalogReferences; const wixClient = createClient({ modules: { collections, items }, auth: AppStrategy({ appId: "", appSecret: "", publicKey: ``, instanceId: instanceId, }), }); const catalogItems = await Promise.all(requestedItems.map(async (reference) => { const results = await wixClient.items .query("") .eq("mainProductId", reference.catalogReference.catalogItemId) .find(); const item = results.items[0]; const options = (reference.catalogReference.options !== null) ? reference.catalogReference.options : {}; return { "catalogReference": { "appId": "", "catalogItemId": item.mainProductId, "options": options }, "data": { "productName": { "original": item.title }, "itemType": { "preset": "SERVICE" }, "price": item.price, "priceDescription": { "original": "Number of lines" } } }; })); response.send({catalogItems}); } catch (error) { response.status(400).send({ error: error.message }); } }) app.listen(port, () => { console.log(`Example app listening on port ${port}`) }) module.exports = app; ``` Deploy your code on your chosen server. ## Create an Ecom Catalog in the app dashboard Once we deploy our server code, we need to tell Wix where to send its requests. To do this, we’ll return to our app dashboard and create an Ecom Catalog extension: 1. In the app dashboard, go to the [extensions](https://dev.wix.com/app-selector?title=Select+an+App\&primaryButtonText=Select+Site\&actionUrl=https%3A%2F%2Fdev.wix.com%2Fapps%2F%7BappId%7D%2Fextensions) page. 1. Click **+ Create Extension** and search for **Ecom Catalog**. Click **+ Create**. 1. In the JSON editor, add a key `deploymentUri`. As its value, paste the deployment URI of your server. For example: ```javascript {   "deploymentUri": "https://the-poems-manager.com" } ``` 1. Click **Save**. The **Ecom Catalog** extension now appears on our app’s extension list: ![Extensions list app dashboard](https://wixmp-833713b177cebf373f611808.wixmp.com/images/fb61042bfd4d2c6585761417f220d8bd.png) Our app is now complete and able to function on a site. In the last article, we'll build the app, install it on a site, and test the functionality we created throughout this tutorial. **Next up:** [Step 6 | Test your Business Solution on a Site](https://dev.wix.com/docs/build-apps/get-started/tutorials/tutorial-build-an-e-commerce-business-solution/step-6-test-your-business-solution-on-a-site.md) --- > Portal Navigation: > > - Append `.md` to any URL under `https://dev.wix.com/docs/` to get its markdown version. > - Pages are either content pages (article or reference text) or menu pages (a list of links to child pages). > - To get a menu page, truncate any URL to a parent path and append `.md` (e.g. `https://dev.wix.com/docs/sdk.md`, `https://dev.wix.com/docs/sdk/core-modules.md`). > - Top-level index of all portals: https://dev.wix.com/docs/llms.txt > - Full concatenated docs: https://dev.wix.com/docs/llms-full.txt ## Resource: Step 6 | Test your Business Solution on a Site ## Article: Step 6 | Test your Business Solution on a Site ## Article Link: https://dev.wix.com/docs/build-apps/get-started/tutorials/tutorial-build-an-e-commerce-business-solution/step-6-test-your-business-solution-on-a-site.md ## Article Content: # Step 6 | Test your Business Solution on a Site > [< Previous](https://dev.wix.com/docs/build-apps/get-started/tutorials/tutorial-build-an-e-commerce-business-solution/step-5-implement-a-self-hosted-catalog-service-plugin.md) In this article, we'll test the [poem-selling app](https://dev.wix.com/docs/build-apps/get-started/tutorials/tutorial-build-an-e-commerce-business-solution/overview.md) that we spent the past 5 articles building. In order to test the app, first make sure your server code is deployed and the server is live. Then, we need to build the app in Blocks: 1. If you haven’t already, [create a Wix site](http://wixstudio.new). 1. In the top right corner of the Blocks editor, click **Release**, then click **Release** again in the modal that opens. ![Release a build](https://wixmp-833713b177cebf373f611808.wixmp.com/images/384c8469ea58af08ec2a7f96011adcca.png) 1. Wait for your build to complete. A notification will appear on screen when the build is complete. Click **Select a Site** to open the site selector. ![Select a site to install your app on](https://wixmp-833713b177cebf373f611808.wixmp.com/images/4d0824ae5e35fb1906d5cc8aa820ff76.png) 1. Select the site you want to test on. This opens the site editor. When the site loads, click **Install App**. ![Install the app on the site](https://wixmp-833713b177cebf373f611808.wixmp.com/images/0fcadb55395a762c2588836902356a08.png) Wait while Wix adds the app to your site. 1. Once the app is installed, the site editor will display the **App Widgets** section of **Add Elements**. Select the **Item selector** widget we created in Blocks and add it to the site page. 1. Let’s check that all the components we added in Blocks are here. In the left menu, go to **CMS** ![](https://wixmp-833713b177cebf373f611808.wixmp.com/images/82123f77f0c38ce1ce3702a8fc82d820.png) > **Your Collections**. You’ll see the **Poems** collection we created in Blocks. If you open the collection, you’ll see that the items we created in Blocks still appear in the collection. This means that users who install your widget have default values that they can leave or edit. 1. Now let’s look at the dashboard. Close the CMS and in the top left corner open the menu and click **Dashboard**. ![Go to the site dashboard](https://wixmp-833713b177cebf373f611808.wixmp.com/images/31574c68c95f8ddcc59048aecb5102f7.png) 1. In the dashboard menu, hover over **Apps**. You’ll see one of the dashboard pages we created, **Poems Manager**. Note that the **Add a poem** dashboard page doesn’t appear here, because we hid it. ![Locate the Poems Manager dashboard page](https://wixmp-833713b177cebf373f611808.wixmp.com/images/156c4e902a78e317a518db8614be9f30.png) Click **Poems Manager** to go to the dashboard page. Because our collection contains items, it displays the list of poems: ![Current Poems Manager dashboard page](https://wixmp-833713b177cebf373f611808.wixmp.com/images/91f0280eb0253a663b4fd5cf8c92a9e9.png) 1. Let’s remove the current poems so that we can make sure our app recognizes the empty state. Click the icon button to remove each repeater item. We now see the empty state that we created: ![Display the empty state](https://wixmp-833713b177cebf373f611808.wixmp.com/images/5d6e3c5ffcd150ddb34a9ec6440c5151.png) 1. Next let’s add some poems to make sure the data functionality is working. Try clicking the **+ Add Poem** button inside the card. When we click the button, the site navigates us to the **Add a poem** dashboard page. ![Add a Poem dashboard page](https://wixmp-833713b177cebf373f611808.wixmp.com/images/b4ff50c059e3b8f5dc4e55a5ed646b3c.png) Click **Cancel** and make sure the site navigates you back to **Poems Manager** in its empty state. Then, you can try out the **Add a poem** button in the top right corner to return to **Add a poem**. Enter some poem details and add and remove variants. When you’re done, click **Save**. The **Poems Manager** should now be in the nonempty state and display the poem you added: ![Poems Manager updated with new poem](https://wixmp-833713b177cebf373f611808.wixmp.com/images/ad394bdd8f8b69197d71a311016263fc.png) Add a couple more poems and then return to the site editor and open the CMS. Make sure the poems you entered all appear in the CMS. 1. Now let’s test the item page. Exit out of the CMS and in the top right corner of the site editor click **Publish**. The site notifies you when publishing is complete. Click on **View Site** next to the URL to open the live site. ![Publish and view your test site](https://wixmp-833713b177cebf373f611808.wixmp.com/images/9ff701c56b9d650073e796dafa392f07.png) 1. Go to the site page where you added your widget and test the widget out to make sure it works properly. You should initially see just the first dropdown which displays the different poem titles in your **Poems** collection. Once you make a selection, the other 2 elements should appear: ![App widget in action](https://wixmp-833713b177cebf373f611808.wixmp.com/images/4c6543c5fbf4b148e8a3ee514541a71f.gif) 1. Now we’ll test the call to the server. When we click Add to cart, Wix calls the Get Catalog Items method that we set up in our server code, because we’re updating the current cart. Click **Add to cart**. If we’ve done everything correctly, you should see the cart page with the poem we added, it’s price updated to reflect the requested number of lines: ![Cart page](https://wixmp-833713b177cebf373f611808.wixmp.com/images/67bd3228960dd6bbd5dcdcdac96a01af.png) 1. Test out the cart page by adjusting the number of lines, and make sure that the order price updates. Congratulations! You’ve built a business solution and successfully integrated it with Wix eCommerce. You can continue building your own business solution based on this example, or apply what you learned in this tutorial to an entirely new app. ## See also - [What is the Wix eCommerce Platform](https://dev.wix.com/docs/rest/business-solutions/e-commerce/wix-e-commerce-platform-handbook/overview/what-is-the-wix-e-commerce-platform.md) - [Wix App Developers: Build a New eCommerce Business Solution](https://dev.wix.com/docs/rest/business-solutions/e-commerce/wix-e-commerce-platform-handbook/get-started/apps/build-a-business-solution.md) - [Develop a Business Solution Item Page with Blocks](https://dev.wix.com/docs/rest/business-solutions/e-commerce/wix-e-commerce-platform-handbook/get-started/apps/develop-a-business-solution-item-page-with-blocks.md) --- > Portal Navigation: > > - Append `.md` to any URL under `https://dev.wix.com/docs/` to get its markdown version. > - Pages are either content pages (article or reference text) or menu pages (a list of links to child pages). > - To get a menu page, truncate any URL to a parent path and append `.md` (e.g. `https://dev.wix.com/docs/sdk.md`, `https://dev.wix.com/docs/sdk/core-modules.md`). > - Top-level index of all portals: https://dev.wix.com/docs/llms.txt > - Full concatenated docs: https://dev.wix.com/docs/llms-full.txt ## Resource: Build a Wix eCom business solution ## Article: Wix App Developers: Build a Wix eCom business solution ## Article Link: https://dev.wix.com/docs/build-apps/get-started/tutorials/common-use-cases/build-a-wix-e-com-business-solution.md ## Article Content: # Wix App Developers: Build a New eCommerce Business Solution If you are developing a full-scale business solution that requires eCommerce capabilities (similar to Wix Stores, Wix Bookings, or Wix Restaurants Orders), you can integrate your app with the Wix eCommerce platform and take advantage of its features. To enable this integration, you need to: 1. [Set up automatic installation of the eCommerce app.](#step-1--set-up-automatic-installation-of-the-ecommerce-app) 1. [Integrate an external catalog with your app.](#step-2--integrate-an-external-catalog-with-your-app) 1. [Integrate with the Inventory service plugin.](#step-3--integrate-with-the-inventory-service-plugin) 1. [Integrate with additional eCommerce services.](#step-4-optional--integrate-with-additional-ecommerce-services) (Optional) For a comprehensive guide, see our [tutorial on building a business solution integrated with the Wix eCommerce platform](https://dev.wix.com/docs/build-apps/get-started/tutorials/tutorial-build-an-e-commerce-business-solution/overview.md). ## Step 1 | Set up automatic installation of the eCommerce app The eCommerce platform’s functionality can be added to a Wix site by installing the Wix Checkout & Orders app. However, the Wix Checkout & Orders app isn’t a standalone app that a site owner can install independently. To integrate eCommerce capabilities into your own business solution app, you need to make sure that your app automatically installs the Wix Checkout & Orders app as a dependency. Follow these steps to make your app install Wix eCommerce capabilities every time it's installed on a site: 1. Go to your [app's dashboard](https://dev.wix.com/apps/). 2. In the left sidebar, click **App Profile**. 3. In the sidebar submenu, click **App Audience**. 4. Under **Required Wix Products**, select **Yes, additional products are required**. 5. In the **Choose products** list, select **Wix Checkout & Orders**. ![Wix Checkout & Orders](https://wixmp-833713b177cebf373f611808.wixmp.com/images/444cfe17d5680683847c9ffc3870665c.png) 6. Click **Save**. You have now configured your app to frontload the Wix eCommerce platform. Whenever your app is installed on a site, it now automatically installs the Wix Checkout & Orders app which adds standard Wix eCommerce pages and components to the site it’s installed on. After installing your app, a Wix site will have these features: **Site pages:** + Cart Page + Checkout Page (not visible in the editor) + Thank You Page **Dashboard pages:** + Orders + Gift Cards ## Step 2 | Integrate an external catalog with your app Any business solution app that integrates with the Wix eCommerce platform needs to connect with an external [catalog](invalid-url) containing available products or services. To get your app set up with an external catalog, follow these steps: 1. Implement the Catalog service plugin to make your external catalog's data available to Wix in the required format and structure. Refer to the [Catalog service plugin documentation](https://dev.wix.com/docs/rest/business-solutions/e-commerce/introduction.md) for detailed instructions. 1. Create an [item page](https://dev.wix.com/docs/api-reference/business-solutions/e-commerce/get-started/apps/develop-a-business-solution-item-page-with-blocks.md) (a product page, a service page, or equivalent) and/or a gallery page for your app that displays information about individual items for sale. This page should include functionality for adding items to the site visitor's cart, using the [Cart API](https://dev.wix.com/docs/api-reference/business-solutions/e-commerce/purchase-flow/cart.md). For guidance on creating a page for your app, consult [About Site Page Extensions](https://dev.wix.com/docs/build-apps/develop-your-app/extensions/site-extensions/site-pages/about-site-page-extensions.md). 1. (Optional) To enable Wix users to manage catalog items from their site dashboard, develop a [dashboard page](https://dev.wix.com/docs/build-apps/develop-your-app/extensions/dashboard-extensions/dashboard-pages/about-dashboard-page-extensions.md) for your app. For detailed instructions on developing Wix apps, consult our comprehensive documentation on [building Wix apps](https://dev.wix.com/docs/build-apps.md). ## Step 3 | Integrate with the Inventory service plugin Any business solution app that integrates with the Wix eCommerce platform and manages inventory needs to prevent orders for unavailable items and keep stock levels in sync with order flows. To get your app set up with inventory management, follow these steps: 1. Implement the Inventory service plugin to integrate with Wix's unified inventory system. This enables your app to automatically decrement availability when items are ordered or paid for, and increment it when orders are canceled or refunded. Refer to the [Inventory service plugin documentation](https://dev.wix.com/docs/api-reference/business-solutions/e-commerce/catalogs/inventory-service-plugin/introduction.md) for detailed instructions. 1. (Optional) Configure multi-location inventory management if your business solution involves tracking stock across multiple physical or virtual locations. The Inventory service plugin is especially useful for business solutions involving physical products, digital goods with limited availability, or time-based services like appointments or event tickets. ## Step 4 (Optional) | Integrate with additional eCommerce services You can further customize your app's functionality by integrating with additional services available on the eCommerce platform. The [Tax Groups service plugin](https://dev.wix.com/docs/api-reference/business-solutions/e-commerce/extensions/tax/tax-groups-integration-service-plugin/introduction.md) enables you to create and manage custom tax groups to categorize items from your app's catalog based on distinct tax treatments. This integration is required to charge tax on your external catalog items. ## See also + [Tutorial | Build an eCommerce Business Solution](https://dev.wix.com/docs/build-apps/get-started/tutorials/tutorial-build-an-e-commerce-business-solution/overview.md) --- > Portal Navigation: > > - Append `.md` to any URL under `https://dev.wix.com/docs/` to get its markdown version. > - Pages are either content pages (article or reference text) or menu pages (a list of links to child pages). > - To get a menu page, truncate any URL to a parent path and append `.md` (e.g. `https://dev.wix.com/docs/sdk.md`, `https://dev.wix.com/docs/sdk/core-modules.md`). > - Top-level index of all portals: https://dev.wix.com/docs/llms.txt > - Full concatenated docs: https://dev.wix.com/docs/llms-full.txt ## Resource: Build a Wix eCom feature app ## Article: Wix App Developers: Build a Wix eCom feature app ## Article Link: https://dev.wix.com/docs/build-apps/get-started/tutorials/common-use-cases/build-a-wix-e-com-feature-app.md ## Article Content: # Wix App Developers: Build a Feature App That Extends eCommerce Functionality Many apps in the Wix App market enhance the eCommerce functionality of sites that already integrate with the Wix eCommerce platform. If you are creating such an app, your app should require that Wix users first install a business solution app that integrates the Wix eCommerce platform, such as Wix Bookings or Wix Stores. To prevent your app from being installed on sites that don't have an eCommerce business solution app already installed, follow these steps: 1. Go to your [app's dashboard](https://dev.wix.com/apps/). 2. In the left sidebar, click **App Profile**. 3. In the sidebar submenu, click **App Audience**. 4. Under **Required Wix Products**, select **Yes, additional products are required**. 5. In the **Choose products** list, select the required business solutions, such as **Wix Stores**, **Wix Bookings**, and **Wix Restaurants Orders**. If you select more than 1 app, your app will require at least 1 of the selected apps. 6. Click **Save**. To check whether a business solution is installed on a site, you can also use the [Get App Instance](https://dev.wix.com/docs/api-reference/app-management/app-instance/get-app-instance.md) method. The response object contains a list of installed Wix apps in `site.installedWixApps`. To learn more about developing a Wix app that extends eCommerce functionality, read about [integrating with Wix business solutions](https://dev.wix.com/docs/build-apps/get-started/overview/integrating-with-wix-s-business-solutions.md). If you are new to developing apps for installation on Wix sites, learn more about the [app-building journey](https://dev.wix.com/docs/build-apps/get-started/overview/about-wix-apps.md), or get started from one of our growing selection of [app templates](https://dev.wix.com/docs/build-apps/get-started/templates/get-started-from-an-app-template.md). --- > Portal Navigation: > > - Append `.md` to any URL under `https://dev.wix.com/docs/` to get its markdown version. > - Pages are either content pages (article or reference text) or menu pages (a list of links to child pages). > - To get a menu page, truncate any URL to a parent path and append `.md` (e.g. `https://dev.wix.com/docs/sdk.md`, `https://dev.wix.com/docs/sdk/core-modules.md`). > - Top-level index of all portals: https://dev.wix.com/docs/llms.txt > - Full concatenated docs: https://dev.wix.com/docs/llms-full.txt ## Resource: Extensions and APIs for Dropshipping Apps ## Article: Extensions and APIs for Dropshipping Apps ## Article Link: https://dev.wix.com/docs/build-apps/get-started/tutorials/common-use-cases/extensions-and-apis-for-dropshipping-apps.md ## Article Content: # Extensions and APIs for Dropshipping Apps Dropshipping apps allow Wix users to sell products without maintaining inventory. The app connects a Wix site to an external supplier who handles product sourcing and fulfillment. This article lists the APIs, events, and service plugins you need to use to build a dropshipping app. When developing your app, make sure to create a [dashboard extension](#extensions) to provide Wix users with an interface to connect their supplier account, browse products to import, and manage orders. ## Permissions Your app needs the following permission scopes: - **Manage Products** (`SCOPE.DC-STORES.MANAGE-PRODUCTS`): Required for creating and updating products. - **Manage Orders** (`SCOPE.DC-STORES.MANAGE-ORDERS`): Required for reading orders and creating fulfillments. ## APIs and events Use these APIs, events, and service plugins to build your dropshipping integration. > **Note:** This reference is intended as a helpful starting point. Your app may require additional resources. Explore the full [API Reference](https://dev.wix.com/docs/api-reference.md) for more options. ### Products Import products from your supplier into the Wix Stores catalog. - [Create Product](https://dev.wix.com/docs/rest/business-solutions/stores/catalog-v3/products-v3/create-product.md) / [Bulk Create Products](https://dev.wix.com/docs/rest/business-solutions/stores/catalog-v3/products-v3/bulk-create-products.md): Add new products to the Wix Stores catalog. - [Update Product](https://dev.wix.com/docs/rest/business-solutions/stores/catalog-v3/products-v3/update-product.md) / [Bulk Update Products](https://dev.wix.com/docs/rest/business-solutions/stores/catalog-v3/products-v3/bulk-update-products.md): Update product details such as price, stock, or description. - [Query Products](https://dev.wix.com/docs/rest/business-solutions/stores/catalog-v3/products-v3/query-products.md): Retrieve products from the catalog. ### Product restrictions Restrict Wix users from editing specific product fields, such as price or inventory, to keep product data consistent with your supplier. - [Product Restrictions service plugin](https://dev.wix.com/docs/api-reference/business-solutions/stores/service-plugins/product-restrictions-v3/introduction.md): Define which product fields Wix users can edit for products your app manages. ### Orders Receive and process orders to forward to your supplier. - [Order Approved event](https://dev.wix.com/docs/api-reference/business-solutions/e-commerce/orders/orders/order-approved.md): Triggers when an order is ready for fulfillment. - [Order Paid event](https://dev.wix.com/docs/api-reference/business-solutions/events/registration/ticketing/orders/order-paid.md): Triggers when payment is confirmed. - [Order Updated event](https://dev.wix.com/docs/api-reference/business-solutions/e-commerce/orders/orders/order-updated.md): Triggers when order details change, such as shipping address updates. - [Get Order](https://dev.wix.com/docs/rest/business-solutions/e-commerce/orders/orders/get-order.md): Retrieve order details to send to your supplier. ### Fulfillment Create and manage order fulfillments to track which items have been shipped and their delivery status. - [Create Fulfillment](https://dev.wix.com/docs/api-reference/business-solutions/e-commerce/orders/order-fulfillments/create-fulfillment.md) / [Bulk Create Fulfillments](https://dev.wix.com/docs/api-reference/business-solutions/e-commerce/orders/order-fulfillments/bulk-create-fulfillments.md): Creates an order fulfillment. - [Update Fulfillment](https://dev.wix.com/docs/api-reference/business-solutions/e-commerce/orders/order-fulfillments/update-fulfillment.md): Update a fulfillment's tracking info or status as it progresses through delivery. - [Delete Fulfillment](https://dev.wix.com/docs/api-reference/business-solutions/e-commerce/orders/order-fulfillments/delete-fulfillment.md): Deletes an existing order fulfillment. - [List Fulfillments For Single Order](https://dev.wix.com/docs/api-reference/business-solutions/e-commerce/orders/order-fulfillments/list-fulfillments-for-single-order.md): Retrieve all fulfillments for an order to check which items have already been shipped. ## Extensions Extensions add functionality to your app and integrate it with the Wix platform. ### Dashboard extension (required) [Dashboard extensions](https://dev.wix.com/docs/build-apps/develop-your-app/extensions/dashboard-extensions/about-dashboard-extensions.md) add customizable features like a page or plugin to the Wix Dashboard. Use a dashboard extension to let Wix users connect their supplier account, browse products to import, and manage orders. ### Checkout extensions (optional) Extend the checkout experience with your supplier's data. - [Shipping Rates service plugin](https://dev.wix.com/docs/api-reference/business-solutions/e-commerce/extensions/shipping-rates/introduction.md): Provide custom shipping rates at checkout. - [Validations service plugin](https://dev.wix.com/docs/api-reference/business-solutions/e-commerce/extensions/validations/validations-integration-service-plugin/introduction.md): Check stock availability or shipping restrictions before purchase. - [Additional Fees service plugin](https://dev.wix.com/docs/api-reference/business-solutions/e-commerce/extensions/additional-fees/additional-fees-service-plugin/introduction.md): Add handling charges, customs duties, or insurance. ## See also - [About Launching Apps](https://dev.wix.com/docs/build-apps/launch-your-app/about-launching-apps.md) - [Stores Catalog API](https://dev.wix.com/docs/rest/business-solutions/stores/catalog-v3/products-v3/introduction.md) - [eCommerce Orders API](https://dev.wix.com/docs/api-reference/business-solutions/e-commerce/orders/orders/introduction.md) - [Order Fulfillments API](https://dev.wix.com/docs/api-reference/business-solutions/e-commerce/orders/order-fulfillments/introduction.md) --- > Portal Navigation: > > - Append `.md` to any URL under `https://dev.wix.com/docs/` to get its markdown version. > - Pages are either content pages (article or reference text) or menu pages (a list of links to child pages). > - To get a menu page, truncate any URL to a parent path and append `.md` (e.g. `https://dev.wix.com/docs/sdk.md`, `https://dev.wix.com/docs/sdk/core-modules.md`). > - Top-level index of all portals: https://dev.wix.com/docs/llms.txt > - Full concatenated docs: https://dev.wix.com/docs/llms-full.txt ## Resource: Extensions and APIs for Fulfillment Apps ## Article: Extensions and APIs for Fulfillment Apps ## Article Link: https://dev.wix.com/docs/build-apps/get-started/tutorials/common-use-cases/extensions-and-apis-for-fulfillment-apps.md ## Article Content: # Extensions and APIs for Fulfillment Apps Fulfillment apps help Wix users manage the process of preparing and delivering orders to customers. These apps typically integrate with shipping carriers, warehouses, or 3rd-party logistics providers. This article lists the APIs and events you need to use to build a fulfillment app. When developing your app, make sure to create a [dashboard extension](#extensions) to provide Wix users with an interface to connect their shipping accounts, configure fulfillment settings, and manage shipments. ## Permissions Your app needs the following permission scopes: - **Read Orders** (`SCOPE.DC-STORES.READ-ORDERS`): Required for retrieving order details. - **Manage Orders** (`SCOPE.DC-STORES.MANAGE-ORDERS`): Required for creating and updating fulfillments. - **Manage Products** (`SCOPE.DC-STORES.MANAGE-PRODUCTS`): Required for updating product inventory. ## APIs and events Use these APIs and events to build your fulfillment integration. > **Note:** This reference is intended as a helpful starting point. Your app may require additional resources. Explore the full [API Reference](https://dev.wix.com/docs/api-reference.md) for more options. ### Orders Receive and retrieve orders that need fulfillment. - [Order Approved event](https://dev.wix.com/docs/api-reference/business-solutions/e-commerce/orders/orders/order-approved.md): Triggers when an order is ready for fulfillment. - [Order Paid event](https://dev.wix.com/docs/api-reference/business-solutions/events/registration/ticketing/orders/order-paid.md): Triggers when payment is confirmed. - [Order Updated event](https://dev.wix.com/docs/api-reference/business-solutions/e-commerce/orders/orders/order-updated.md): Triggers when order details change. - [Get Order](https://dev.wix.com/docs/rest/business-solutions/e-commerce/orders/orders/get-order.md): Retrieve order details. ### Fulfillment Create and manage order fulfillments to track which items have been shipped and their delivery status. - [Create Fulfillment](https://dev.wix.com/docs/api-reference/business-solutions/e-commerce/orders/order-fulfillments/create-fulfillment.md) / [Bulk Create Fulfillments](https://dev.wix.com/docs/api-reference/business-solutions/e-commerce/orders/order-fulfillments/bulk-create-fulfillments.md): Creates an order fulfillment. - [Update Fulfillment](https://dev.wix.com/docs/api-reference/business-solutions/e-commerce/orders/order-fulfillments/update-fulfillment.md): Updates an existing order fulfillment. - [Delete Fulfillment](https://dev.wix.com/docs/api-reference/business-solutions/e-commerce/orders/order-fulfillments/delete-fulfillment.md): Deletes an existing order fulfillment. - [List Fulfillments For Single Order](https://dev.wix.com/docs/api-reference/business-solutions/e-commerce/orders/order-fulfillments/list-fulfillments-for-single-order.md): Retrieves fulfillments for an order. ### Fulfillment events Listen for changes to fulfillments. - [Order With Fulfillments Updated event](https://dev.wix.com/docs/api-reference/business-solutions/e-commerce/orders/order-fulfillments/order-with-fulfillments-updated.md): Triggers when an order's fulfillments are created, updated, or deleted. ## Extensions Extensions add functionality to your app and integrate it with the Wix platform. ### Dashboard extension (required) [Dashboard extensions](https://dev.wix.com/docs/build-apps/develop-your-app/extensions/dashboard-extensions/about-dashboard-extensions.md) add customizable features like a page or plugin to the Wix Dashboard. Use a dashboard extension to let Wix users connect their shipping accounts, configure fulfillment settings, and manage shipments. ### Checkout extensions (optional) Extend the checkout experience with your shipping data. - [Shipping Rates service plugin](https://dev.wix.com/docs/api-reference/business-solutions/e-commerce/extensions/shipping-rates/introduction.md): Provide custom shipping rates at checkout. - [Validations service plugin](https://dev.wix.com/docs/api-reference/business-solutions/e-commerce/extensions/validations/validations-integration-service-plugin/introduction.md): Validate carts and checkouts with custom logic. - [Additional Fees service plugin](https://dev.wix.com/docs/api-reference/business-solutions/e-commerce/extensions/additional-fees/additional-fees-service-plugin/introduction.md): Add custom fees to carts and checkouts. ## See also - [About Launching Apps](https://dev.wix.com/docs/build-apps/launch-your-app/about-launching-apps.md) - [Order Fulfillments API](https://dev.wix.com/docs/api-reference/business-solutions/e-commerce/orders/order-fulfillments/introduction.md) - [Order Fulfillments Sample Flow](https://dev.wix.com/docs/api-reference/business-solutions/e-commerce/orders/order-fulfillments/sample-flow.md) - [eCommerce Orders API](https://dev.wix.com/docs/api-reference/business-solutions/e-commerce/orders/orders/introduction.md) --- > Portal Navigation: > > - Append `.md` to any URL under `https://dev.wix.com/docs/` to get its markdown version. > - Pages are either content pages (article or reference text) or menu pages (a list of links to child pages). > - To get a menu page, truncate any URL to a parent path and append `.md` (e.g. `https://dev.wix.com/docs/sdk.md`, `https://dev.wix.com/docs/sdk/core-modules.md`). > - Top-level index of all portals: https://dev.wix.com/docs/llms.txt > - Full concatenated docs: https://dev.wix.com/docs/llms-full.txt ## Resource: Extensions and APIs for Invoicing Apps ## Article: Extensions and APIs for Invoicing Apps ## Article Link: https://dev.wix.com/docs/build-apps/get-started/tutorials/common-use-cases/extensions-and-apis-for-invoicing-apps.md ## Article Content: # Extensions and APIs for Invoicing Apps Invoicing apps generate invoices, receipts, and manage billing for orders placed on Wix sites. This article lists the APIs and events you need to use to build an invoicing app. When developing your app, make sure to create a [dashboard extension](#extensions) to provide Wix users with an interface to view invoices, configure invoice templates, and manage billing settings. ## Permissions Your app needs the following permission scopes: - **Read Orders** (`SCOPE.DC-STORES.READ-ORDERS`): Required for retrieving order details. - **Read Bookings - Including Participants** (`SCOPE.DC-BOOKINGS.READ-BOOKINGS-SENSITIVE`): Required for retrieving booking details. - **Read Payments** (`SCOPE.DC-CASHIER.READ-PAYMENTS`): Required for retrieving payment details. ## APIs and events Use these APIs and events to build your invoicing integration. > **Note:** This reference is intended as a helpful starting point. Your app may require additional resources. Explore the full [API Reference](https://dev.wix.com/docs/api-reference.md) for more options. ### Orders Receive order notifications and retrieve order details for invoicing. - [Order Approved event](https://dev.wix.com/docs/api-reference/business-solutions/e-commerce/orders/orders/order-approved.md): Triggers when an order is approved. - [Order Paid event](https://dev.wix.com/docs/api-reference/business-solutions/events/registration/ticketing/orders/order-paid.md): Triggers when payment is confirmed. - [Order Updated event](https://dev.wix.com/docs/api-reference/business-solutions/e-commerce/orders/orders/order-updated.md): Triggers when order details change. - [Get Order](https://dev.wix.com/docs/rest/business-solutions/e-commerce/orders/orders/get-order.md): Retrieve order details. - [List Invoices For Multiple Orders](https://dev.wix.com/docs/api-reference/business-solutions/e-commerce/orders/order-invoices/list-invoices-for-multiple-orders.md): Check if invoices exist for orders. ### Billing Handle payment authorization, capture, and refunds. - [Authorize Charge With Saved Payment Method](https://dev.wix.com/docs/rest/business-solutions/e-commerce/orders/order-billing/authorize-charge-with-saved-payment-method.md): Authorizes a charge for an order. - [Capture Authorized Payments](https://dev.wix.com/docs/rest/business-solutions/e-commerce/orders/order-billing/capture-authorized-payments.md): Captures previously authorized payments. - [Void Authorized Payments](https://dev.wix.com/docs/rest/business-solutions/e-commerce/orders/order-billing/void-authorized-payments.md): Voids previously authorized payments. - [Get Order Refundability](https://dev.wix.com/docs/rest/business-solutions/e-commerce/orders/order-billing/get-order-refundability.md) / [Calculate Refund](https://dev.wix.com/docs/rest/business-solutions/e-commerce/orders/order-billing/calculate-refund.md): Check refund eligibility and calculate amounts. - [Refund Payments](https://dev.wix.com/docs/rest/business-solutions/e-commerce/orders/order-billing/refund-payments.md): Refunds order payments. - [Purchased Item Invoice Status Updated event](https://dev.wix.com/docs/rest/app-management/app-billing/billing/purchased-item-invoice-status-updated.md): Triggers when invoice status changes. ### Receipts Generate and manage receipts for completed transactions. - [Create Receipt](https://dev.wix.com/docs/rest/business-management/get-paid/receipts/receipts/create-receipt.md): Creates a receipt. - [Get Receipt](https://dev.wix.com/docs/rest/business-management/get-paid/receipts/receipts/get-receipt.md) / [Query Receipts](https://dev.wix.com/docs/rest/business-management/get-paid/receipts/receipts/query-receipts.md): Retrieve receipts. ### Billable items Manage custom products or services for invoicing. - [Create Billable Item](https://dev.wix.com/docs/rest/business-management/get-paid/billable-items/create-billable-item.md) / [Update Billable Item](https://dev.wix.com/docs/rest/business-management/get-paid/billable-items/update-billable-item.md): Create or update billable items. - [Query Billable Items](https://dev.wix.com/docs/rest/business-management/get-paid/billable-items/query-billable-items.md): Retrieve billable items. ## Extensions Extensions add functionality to your app and integrate it with the Wix platform. ### Dashboard extension (required) [Dashboard extensions](https://dev.wix.com/docs/build-apps/develop-your-app/extensions/dashboard-extensions/about-dashboard-extensions.md) add customizable features like a page or plugin to the Wix Dashboard. Use a dashboard extension to let Wix users view invoices, configure invoice templates, and manage billing settings. ## See also - [About Launching Apps](https://dev.wix.com/docs/build-apps/launch-your-app/about-launching-apps.md) - [eCommerce Orders API](https://dev.wix.com/docs/api-reference/business-solutions/e-commerce/orders/orders/introduction.md) - [Order Billing API](https://dev.wix.com/docs/api-reference/business-solutions/e-commerce/orders/order-billing/introduction.md) - [Receipts API](https://dev.wix.com/docs/api-reference/business-management/get-paid/receipts/receipts/introduction.md) - [Billable Items API](https://dev.wix.com/docs/api-reference/business-management/get-paid/billable-items/introduction.md) --- > Portal Navigation: > > - Append `.md` to any URL under `https://dev.wix.com/docs/` to get its markdown version. > - Pages are either content pages (article or reference text) or menu pages (a list of links to child pages). > - To get a menu page, truncate any URL to a parent path and append `.md` (e.g. `https://dev.wix.com/docs/sdk.md`, `https://dev.wix.com/docs/sdk/core-modules.md`). > - Top-level index of all portals: https://dev.wix.com/docs/llms.txt > - Full concatenated docs: https://dev.wix.com/docs/llms-full.txt ## Resource: Get an Idea ## Article: Get an Idea ## Article Link: https://dev.wix.com/docs/build-apps/get-started/get-an-idea.md ## Article Content: # Get an Idea for Your Next App Are you searching for your next app idea? We've gathered the top feature requests from Wix users. These are high-demand features that can boost user adoption of your apps. After you build an app based on this list, let us know so we can help promote it. [](#open-feature-requests) ## Monetize your app When your app is ready, you can add it to the [Wix App Market](https://www.wix.com/app-market) to reach millions of Wix users worldwide—and sell your apps at scale. For more information, see [About Launching Apps](https://dev.wix.com/docs/build-apps/launch-your-app/about-launching-apps.md). ## Let us know you're supporting a feature If you're supporting one of these top feature requests, mention it when you [submit your app for review](https://dev.wix.com/docs/build-apps/launch-your-app/app-distribution/about-app-distribution.md) or notify us through [WixBot](https://www.wix.com/support-chatbot?nodeId=25a57397-ccf7-4376-8b74-48d51edf7159&referral=devRels). In the message, be sure to include your app ID and app name. Apps that meet our quality standards will be promoted through internal tools, such as emails and notifications to account managers, helping users discover your feature and increasing adoption. **Ready to build?** [Get Started](https://manage.wix.com/account/custom-apps) ## Open feature requests Here's a list of highly requested features from our user community. ### eCommerce & Stores | **Feature** | **Description** | |---|---| | **Additional fees in Edit Order page (Ecomm, Stores, Bookings)**

Date Added: November 1, 2024 | **About the request:** Add fees for extra services like fragile packaging, shipping insurance, or gift wrapping at checkout. Providing these optional fees can boost customer satisfaction and generate new revenue streams for merchants by offering value-added services.

**Resources to help you get started:**
  • [Dashboard plugin on the Order page](https://dev.wix.com/docs/build-apps/develop-your-app/extensions/dashboard-extensions/dashboard-plugins/supported-wix-app-dashboard-pages/wix-e-commerce/wix-e-commerce-edit-order-page.md)
  • [Additional fees service plugin](https://dev.wix.com/docs/api-reference/business-solutions/e-commerce/extensions/additional-fees/additional-fees-service-plugin/introduction.md)
| | **Verifying Shipping Addresses (eCom/Stores)**

Date Added: December 14, 2025 | **About the request:** Systematically verifying the shipping location to ensure accurate delivery before processing the order.

**Resources to help you get started:**
  • [eCommerce validations service plugin](https://dev.wix.com/docs/api-reference/business-solutions/e-commerce/extensions/validations/validations-integration-service-plugin/introduction.md#about-the-wix-ecommerce-validations-service-plugin)
  • [Dashboard page](https://dev.wix.com/docs/build-apps/develop-your-app/extensions/dashboard-extensions/dashboard-pages/about-dashboard-page-extensions.md) to manage the areas which the verifier is working on
| | **Sticky 'Add to Cart' Button on the Product Page (Stores)**

Date Added: June 22, 2026

[Feature request ↗](https://support.wix.com/en/article/wix-stores-request-sticky-add-to-cart-button-on-the-product-page) | **About the request:** Enable a persistent 'Add to Cart' button that stays visible as shoppers scroll through product pages, keeping the purchase action always accessible without scrolling back up. This reduces friction in the buying journey and can increase conversion rates.

**Resources to help you get started:**
  • [Embedded script](https://dev.wix.com/docs/build-apps/develop-your-app/extensions/site-extensions/embedded-scripts/about-embedded-scripts.md) on the product page
  • [Wix Stores product page plugin slots](https://dev.wix.com/docs/build-apps/develop-your-app/extensions/site-extensions/site-plugins/supported-wix-app-pages/wix-stores/wix-stores-product-page.md)
| | **Creating Automatic Discounts for Subscription Products (Stores)**

Date Added: June 22, 2026

[Feature request ↗](https://support.wix.com/en/article/wix-stores-request-creating-automatic-discounts-for-subscription-products) | **About the request:** Allow merchants to create automatic discounts that apply specifically to subscription products, incentivizing customers to subscribe and boosting recurring revenue.

**Resources to help you get started:**
  • [Discount Rules API](https://dev.wix.com/docs/api-reference/business-solutions/e-commerce/extensions/discounts/discount-rules/introduction.md)
  • [`subscriptionDetails` in the Product Catalog v3](https://dev.wix.com/docs/api-reference/business-solutions/stores/catalog-v3/products-v3/product-object?apiView=SDK.md)
  • [About the Custom Discount Triggers Service Plugin](https://dev.wix.com/docs/api-reference/business-solutions/e-commerce/extensions/discounts/custom-discount-triggers-integration-service-plugin/introduction.md)
| | **Integrating with the Australia Post Shipping Solution (Stores)**

Date Added: June 22, 2026

[Feature request ↗](https://support.wix.com/en/article/wix-stores-request-integrating-with-the-australia-post-shipping-solution) | **About the request:** Connect Wix Stores to Australia Post to offer real-time shipping rates and label generation for merchants shipping to and within Australia.

**Resources to help you get started:**
  • [Shipping rates service plugin](https://dev.wix.com/docs/api-reference/business-solutions/e-commerce/extensions/shipping-rates/shipping-rates-integration-service-plugin/introduction.md)
  • [Australia Post API](https://developers.auspost.com.au/) (external)
| | **Displaying a Price Range for Products with Options (Stores)**

Date Added: June 22, 2026

[Feature request ↗](https://support.wix.com/en/article/wix-stores-request-displaying-a-price-range) | **About the request:** Show a price range (e.g. "$20 – $50") for products that have variants with different prices, rather than displaying only the lowest price. This helps customers understand pricing options before selecting a variant.

**Resources to help you get started:**
  • [Site plugin on the product page](https://dev.wix.com/docs/build-apps/develop-your-app/extensions/site-extensions/site-plugins/supported-wix-app-pages/wix-stores/wix-stores-product-page.md)
  • [About the Wix Stores Catalog V3](https://dev.wix.com/docs/api-reference/business-solutions/stores/catalog-v3/introduction.md) to read variant prices
| ### Restaurants | **Feature** | **Description** | |---|---| | **Adding Multiple Pickup Locations (Restaurants)**

Date Added: June 22, 2026

[Feature request ↗](https://support.wix.com/en/article/wix-restaurants-request-adding-multiple-pickup-locations) | **About the request:** Let restaurants with more than one physical location offer multiple pickup points in their online orders flow, so customers can choose the most convenient location at checkout.

**Resources to help you get started:**
  • [eCommerce validations service plugin](https://dev.wix.com/docs/api-reference/business-solutions/e-commerce/extensions/validations/validations-integration-service-plugin/introduction.md) to intercept checkout and inject location selection
  • [Wix Locations API](https://dev.wix.com/docs/api-reference/business-management/locations/introduction.md)
  • [Dashboard page](https://dev.wix.com/docs/build-apps/develop-your-app/extensions/dashboard-extensions/dashboard-pages/about-dashboard-page-extensions.md) to map menu items to specific locations
| | **Charging Guests a Late Cancellation or No-Show Fee (Restaurants)**

Date Added: June 22, 2026

[Feature request ↗](https://support.wix.com/en/article/wix-restaurants-request-charging-guests-a-late-cancellation-or-no-show-fee) | **About the request:** Automatically charge a fee when a diner cancels too late or doesn't show up for their reservation, helping restaurants recover lost revenue and reduce no-shows.

**Resources to help you get started:**
  • [Wix Table Reservations API](https://dev.wix.com/docs/api-reference/business-solutions/restaurants/reservations/introduction.md)
  • [Wix Payments API](https://dev.wix.com/docs/api-reference/business-management/payments/introduction.md) to charge the held card
  • [Dashboard plugin on the Reservations page](https://dev.wix.com/docs/build-apps/develop-your-app/extensions/dashboard-extensions/dashboard-plugins/supported-wix-app-dashboard-pages/wix-restaurants/wix-restaurants-table-reservations-table-reservations-page.md) to configure the cancellation policy
| | **Adding Modifiers by Item Size (Restaurants)**

Date Added: June 22, 2026

[Feature request ↗](https://support.wix.com/en/article/wix-restaurants-request-adding-modifiers-by-item-size) | **About the request:** Allow restaurants to define different modifier options per item size — for example, adjusting topping quantities for a small vs. large pizza — making ordering more accurate and reducing kitchen errors.

**Resources to help you get started:**
  • [Wix Restaurants Menus API](https://dev.wix.com/docs/api-reference/business-solutions/restaurants/menus/introduction.md)
  • [Dashboard page](https://dev.wix.com/docs/build-apps/develop-your-app/extensions/dashboard-extensions/dashboard-pages/about-dashboard-page-extensions.md) to manage conditional modifier rules
  • [Extended fields (schema plugin)](https://dev.wix.com/docs/build-apps/develop-your-app/extensions/backend-extensions/schema-plugins/about-schema-plugin-extensions.md) to store modifier rules per size variant
| ### Bookings | **Feature** | **Description** | |---|---| | **Reputation management (Bookings)**

Date Added: December 14, 2025 | **About the request:** Prompt users to rank the business on external platforms like Google, Google Maps, Facebook, and Yelp after completing a meeting.

**Note:** Developers should bring their own existing solution to manage the reviews. You can trigger this flow by sending a post-meeting email to the client.

**Resources to help you get started:**
  • [About Wix Bookings Architecture](https://dev.wix.com/docs/api-reference/business-solutions/bookings/architecture.md)
  • [Bookings Reader V2: Sample Flows](https://dev.wix.com/docs/api-reference/business-solutions/bookings/bookings/bookings-reader-v2/sample-flows.md#bookings-reader-v2-sample-flows)
  • [Query Attendance](https://dev.wix.com/docs/api-reference/business-solutions/bookings/bookings/attendance/query-attendance.md)
  • [Query Extended Bookings](https://dev.wix.com/docs/api-reference/business-solutions/bookings/bookings/bookings-reader-v2/query-extended-bookings.md)
| | **Migrating Customer Data from Another Platform to Wix (Bookings)**

Date Added: June 22, 2026

[Feature request ↗](https://support.wix.com/en/article/wix-bookings-request-migrating-customer-data-from-another-platform-to-wix) | **About the request:** Help business owners transfer existing customer records, booking history, and membership data from platforms like Acuity, Mindbody, or Calendly to Wix Bookings, eliminating manual data entry when switching platforms.

**Resources to help you get started:**
  • [Wix Bookings API](https://dev.wix.com/docs/api-reference/business-solutions/bookings/services/introduction.md)
  • [Contacts API](https://dev.wix.com/docs/api-reference/crm/members-contacts/contacts/contacts/introduction.md)
  • [Dashboard page](https://dev.wix.com/docs/build-apps/develop-your-app/extensions/dashboard-extensions/dashboard-pages/about-dashboard-page-extensions.md) for the import and field-mapping UI
| | **Sending Automated SMS Messages After Form Submission (Bookings)**

Date Added: June 22, 2026

[Feature request ↗](https://support.wix.com/en/article/wix-bookings-request-sending-automated-sms-messages-after-form-submission) | **About the request:** Automatically send an SMS from the merchant's own phone number to a lead immediately after they submit a booking inquiry form, helping businesses respond faster and increase lead conversion.

**Resources to help you get started:**
  • [Wix Automations API](https://dev.wix.com/docs/api-reference/business-management/automations/introduction.md) to trigger the SMS flow on form submission
  • [Wix Bookings API](https://dev.wix.com/docs/api-reference/business-solutions/bookings/services/introduction.md)
  • Integrate with an SMS provider (e.g. Twilio, Vonage) for message delivery
| | **Rescheduling Bookings with a Different Service (Bookings)**

Date Added: June 22, 2026

[Feature request ↗](https://support.wix.com/en/article/wix-bookings-request-rescheduling-bookings-with-a-different-service) | **About the request:** Allow customers or staff to reschedule a booking to a completely different service (not just a different time slot for the same service), giving clients more flexibility without having to cancel and rebook manually.

**Resources to help you get started:**
  • [Wix Bookings API](https://dev.wix.com/docs/api-reference/business-solutions/bookings/services/introduction.md)
  • [Site widget](https://dev.wix.com/docs/build-apps/develop-your-app/extensions/site-extensions/site-widgets/about-site-widget-extensions.md) or [About Dashboard Plugin Extensions](https://dev.wix.com/docs/build-apps/develop-your-app/extensions/dashboard-extensions/dashboard-plugins/about-dashboard-plugin-extensions.md) to provide the rescheduling UI
| ## Resolved feature requests The following feature requests have been resolved by at least 1 app, or by Wix. | **Feature** | **Description** | |---|---| | **Share Google Drive content on a site**

Date Added: January 21, 2026 | **About the request:** Let visitors view and collaborate on Google Drive files and folders directly on your site, including Docs, Sheets, Slides, Forms, Microsoft Office files and PDFs.

**Resources to help you get started:**
  • [Site widget](https://dev.wix.com/docs/build-apps/develop-your-app/extensions/site-extensions/create-a-settings-panel-for-a-site-widget-or-plugin-wix-cli-and-self-hosting.md)
| | **Interactive rotatable product image (Stores)**

Date Added: November 1, 2024 | **About the request:** Integrate rotatable 360-degree images on a Wix product page to enrich customer interaction. This shopping experience enhances understanding and boosts confidence in purchase decisions, potentially increasing sales.

**Resources to help you get started:**
  • [Site widget](https://dev.wix.com/docs/build-apps/develop-your-app/extensions/site-extensions/site-widgets/about-site-widget-extensions.md) in product page
  • [Explore a relevant template](https://dev.wix.com/apps-templates/template?id=086a1107-3d84-43cc-992e-738055e01547&http_referrer=custom-apps-studio)
| | **Site Vacation Mode (eCom/Stores)**

Date Added: December 14, 2025 | **About the request:** A time-based logic that restricts access to the checkout of defined timeframes

**Resources to help you get started:**
  • An [embedded script](https://dev.wix.com/docs/build-apps/develop-your-app/extensions/site-extensions/embedded-scripts/about-embedded-scripts.md) using [`openModal()`](https://dev.wix.com/docs/sdk/frontend-modules/window/open-modal.md) that executes on the checkout page, preventing purchases by displaying a custom "Store Closed" message during the defined timeframe, and preventing the user from completing the checkout
  • [Dashboard page](https://dev.wix.com/docs/build-apps/develop-your-app/extensions/dashboard-extensions/dashboard-pages/about-dashboard-page-extensions.md) to manage time of the vacation mode and messaging
| | **Free shipping bar in Side Cart (eCom/Stores)**

Date Added: December 14, 2025 | **About the request:** Represent the remaining amount (for example, "Missing X$ to get free shipping") based on the configured shipping rate, encouraging shoppers to add more items to their cart.

**Resources to help you get started:**
  • [Site Plugin](https://dev.wix.com/docs/build-apps/develop-your-app/extensions/site-extensions/site-plugins/supported-wix-app-pages/wix-e-commerce/wix-e-commerce-side-cart?apiView=SDK.md)
| | **Location-based service selection (Bookings)**

Date Added: February 13, 2025 | **About the request:** Add a visual interface for locations synced with Wix Bookings. When a site visitor selects a location, show a list of services specific to that location. This feature enhances user experience by making service discovery easier and more intuitive.

**Resources to help you get started:**
  • [Bookings Services](https://dev.wix.com/docs/api-reference/business-solutions/bookings/services/services-v2/introduction.md)
  • [Site widget](https://dev.wix.com/docs/build-apps/develop-your-app/extensions/site-extensions/site-widgets/about-site-widget-extensions.md)
| | **Print Daily schedule (Bookings)**

Date Added: December 14, 2025 | **About the request:** Enable business owners to generate a printable agenda of the day's appointment directly from the Booking Calendar.

**Resources to help you get started:**
  • [Dashboard menu plugin slots - More actions menu](https://dev.wix.com/docs/build-apps/develop-your-app/extensions/dashboard-extensions/dashboard-plugins/supported-wix-app-dashboard-pages/wix-bookings/wix-bookings-calendar-page.md#slot-2-more-actions-menu)
  • [Query Events](https://dev.wix.com/docs/api-reference/business-management/calendar/events-v3/query-events.md)
| | **Offer extras and add-ons for client services (Bookings)**

Date Added: November 1, 2024 | **About the request:** Enable customers to add extras during a booking checkout for a personalized experience, which can customize costs and timing, enhance efficiency, and boost user satisfaction.

**Resources to help you get started:**
  • [Site widget in checkout](https://dev.wix.com/docs/build-apps/develop-your-app/extensions/site-extensions/site-widgets/about-site-widget-extensions.md)
  • [Bookings APIs](https://dev.wix.com/docs/api-reference/business-solutions/bookings/services/introduction.md)
  • [Checkout APIs](https://dev.wix.com/docs/api-reference/business-solutions/e-commerce/purchase-flow/checkout/checkout/introduction.md)
  • [Explore a relevant template](https://dev.wix.com/apps-templates/template?id=b358e3d3-9e4c-4596-bad1-b7415fa37990&http_referrer=custom-apps-studio)
| | **Checkout and product countdown (Ecomm, Stores)**

Date Added: November 1, 2024 | **About the request:** Implement countdown timers on checkout and product pages to encourage prompt transactions, improving sales conversions by leveraging urgency and limited-time offers.

**Resources to help you get started:**
  • [Site widget in checkout and product page](https://dev.wix.com/docs/build-apps/develop-your-app/extensions/site-extensions/site-widgets/about-site-widget-extensions.md)
  • [Discount rules API](https://dev.wix.com/docs/api-reference/business-solutions/e-commerce/extensions/discounts/discount-rules/introduction.md)
  • [Explore a relevant template](https://dev.wix.com/apps-templates/template?id=086a1107-3d84-43cc-992e-738055e01547&http_referrer=custom-apps-studio)
| | **Shipping address verification (Stores, Restaurants)**

Date Added: November 1, 2024 | **About the request:** Implement shipping address verification during checkout to ensure accurate deliveries, reduce shipment failures, and enhance customer satisfaction by ensuring orders are delivered to the correct destination.

**Resources to help you get started:**
  • [eComm validations service plugin](https://dev.wix.com/docs/api-reference/business-solutions/e-commerce/extensions/validations/validations-integration-service-plugin/introduction.md)
| | **Size chart (Stores)**

Date Added: November 1, 2024 | **About the request:** Offer size charts on product pages to help customers select the right size, enhancing their shopping experience, reducing returns, and boosting sales confidence. Merchants desire the flexibility to create these charts using either images or tables.

**Resources to help you get started:**
  • [Site widget](https://dev.wix.com/docs/build-apps/develop-your-app/extensions/site-extensions/site-widgets/about-site-widget-extensions.md) in product page
  • [Explore a relevant template](https://dev.wix.com/apps-templates/template?id=086a1107-3d84-43cc-992e-738055e01547&http_referrer=custom-apps-studio)
| | **Add a PDF to a product description (Stores)**

Date Added: November 1, 2024 | **About the request:** Offer a PDF download option on product pages, providing resources like spec sheets for offline review. This enhances credibility and informs purchase decisions, potentially boosting sale conversions.

**Resources to help you get started:**
  • [Site widget](https://dev.wix.com/docs/build-apps/develop-your-app/extensions/site-extensions/site-widgets/about-site-widget-extensions.md) in product page
  • [Explore a relevant template](https://dev.wix.com/apps-templates/template?id=086a1107-3d84-43cc-992e-738055e01547&http_referrer=custom-apps-studio)
| | **Free shipping progress bar (Stores, eComm)**

Date Added: November 1, 2024 | **About the request:** Add a progress bar in the cart to show customers how close they are to qualifying for free shipping. This feature incentivizes customers to add more items, boosting average order value and increasing store revenue.

**Resources to help you get started:**
  • [Site widget](https://dev.wix.com/docs/build-apps/develop-your-app/extensions/site-extensions/site-widgets/about-site-widget-extensions.md) in checkout
  • [Discount service plugin](https://dev.wix.com/docs/build-apps/get-started/overview/how-apps-extend-wix.md#service-plugins)
  • [Explore a relevant template](https://dev.wix.com/apps-templates/template?id=b358e3d3-9e4c-4596-bad1-b7415fa37990)
| | **Zip code locator and restriction (Restaurants, Stores)**

Date Added: November 1, 2024 | **About the request:** Apply zip code restrictions for merchants offering services across multiple locations. Allow merchants to direct users to the nearest service locations, block bookings from unauthorized areas, limit bookings by zip code on specific days, and optimize schedules. The goal of this feature is to enhance efficiency and service delivery within targeted regions.

**Resources to help you get started:**
  • [eComm validation service plugin](https://dev.wix.com/docs/api-reference/business-solutions/e-commerce/extensions/validations/validations-integration-service-plugin/introduction.md)
| ## Explore more articles - [About Developing Apps](https://dev.wix.com/docs/build-apps/develop-your-app/about-developing-apps.md#about-developing-apps) - [About Launching Apps](https://dev.wix.com/docs/build-apps/launch-your-app/about-launching-apps.md) - [The Wix Choice Program](https://dev.wix.com/docs/build-apps/launch-your-app/app-promotion/promotion-by-wix/wix-choice-program.md) --- > Portal Navigation: > > - Append `.md` to any URL under `https://dev.wix.com/docs/` to get its markdown version. > - Pages are either content pages (article or reference text) or menu pages (a list of links to child pages). > - To get a menu page, truncate any URL to a parent path and append `.md` (e.g. `https://dev.wix.com/docs/sdk.md`, `https://dev.wix.com/docs/sdk/core-modules.md`). > - Top-level index of all portals: https://dev.wix.com/docs/llms.txt > - Full concatenated docs: https://dev.wix.com/docs/llms-full.txt ## Resource: About Developing Apps ## Article: About Developing Apps ## Article Link: https://dev.wix.com/docs/build-apps/develop-your-app/about-developing-apps.md ## Article Content: # About Developing Apps To support you on your app development journey, Wix offers a wide range of tools and technologies. From planning and setup to building, launching, and managing your app, we provide everything you need. This article provides an overview of the app dashboard, development frameworks, extensions, business solutions, API integrations, access protocols, and the Wix Design System, with links to more detailed articles on each topic. [](https://manage.wix.com/account/custom-apps) ## App dashboard The app dashboard is a hub for connecting and managing your app within the Wix ecosystem. Regardless of how you build your app, your journey will likely include a visit to the app dashboard. It offers various tools to help you prepare, build, integrate, launch, and manage your app. For more information, see [About the App Dashboard](https://dev.wix.com/docs/build-apps/develop-your-app/app-dashboard-setup/about-the-app-dashboard.md). ## Frameworks Wix offers several [development frameworks](https://dev.wix.com/docs/build-apps/get-started/overview/wix-s-development-frameworks.md) for building apps, each providing a comprehensive development model. Which one you choose depends on how you want to build your app and who manages its hosting. Your first decision is who manages hosting and deployment: - **Wix-managed**: Wix hosts and deploys your app on the Wix cloud, with no additional setup or cost. You can build a Wix-managed app in two ways: - **Wix CLI**: Code-first development with Wix’s React/Node.js stack. - **Wix Blocks**: Visual, low-code development in Wix’s native app editor. - **Self-managed**: You host your app yourself on your own infrastructure, using any tech stack.
**Editor compatibility** Wix Blocks apps aren't supported in the Wix Harmony editor. Existing Blocks apps remain available for purchase on the Wix App Market for Wix Editor and Wix Studio sites. To learn more, see [About Wix Harmony and Blocks](https://dev.wix.com/docs/build-apps/develop-your-app/frameworks/wix-blocks/about-wix-harmony-and-blocks.md).
For more information, see [About Development Frameworks](https://dev.wix.com/docs/build-apps/develop-your-app/frameworks/about-development-frameworks.md#about-development-frameworks). ## Extensions An [extension](https://dev.wix.com/docs/build-apps/get-started/overview/how-apps-extend-wix.md) is a specific functionality of an app, categorized into two broad types: frontend and backend. Both frontend and backend extensions are typically developed using one of Wix’s development frameworks. Frontend extensions include site extensions and dashboard extensions, focusing on user interface enhancements. Backend extensions, on the other hand, enhance backend capabilities through service plugins, schema plugins and notifications. Apps can incorporate multiple extensions that work together to offer diverse features across various user interfaces and backend services. For more information, see [About extensions](https://dev.wix.com/docs/build-apps/develop-your-app/extensions/about-extensions.md#about-extensions) and [Map your app's functionality to Wix's extensions](https://dev.wix.com/docs/build-apps/develop-your-app/extensions/map-your-app-s-functionality-to-wix-s-extensions.md) ## App Settings App settings define how the app behaves during and after installation. For example, you can specify the destination where the site owner is directed after app installation completes. With these settings, you can define and manage app-level configuration conveniently in one place. For more information, see [App Settings](https://dev.wix.com/docs/build-apps/develop-your-app/app-dashboard-setup/app-settings.md). ## Business Solutions Business solutions are native apps built by Wix that provide capabilities like eCommerce, running events, writing blogs, managing restaurants, and more. Users add Wix business solutions to their sites by installing these apps. Your app can integrate with Wix's business solutions through plugins or APIs. For more information, see [About Wix Business Solutions](https://dev.wix.com/docs/build-apps/develop-your-app/wix-business-solutions/about-wix-business-solutions.md#about-wix-business-solutions). ## API Integrations With Wix APIs, you can transfer data, extend Wix business solutions, and customize your app's interactions with site visitors. Each API includes events, which are automated responses sent to your app when specific site actions occur. Wix offers a variety of API technologies, including REST, JavaScript SDK, GraphQL, and Velo, to suit your app's requirements. These APIs enable integration with different areas of the Wix ecosystem. For more information, see [About Wix APIs](https://dev.wix.com/docs/build-apps/develop-your-app/wix-business-solutions/about-wix-business-solutions.md#about-wix-business-solutions).
**Tip:** We recommend subscribing to [app management events](https://dev.wix.com/docs/rest/app-management/app-instance/introduction.md), such as [App Instance Installed](https://dev.wix.com/docs/rest/app-management/app-instance/app-instance-installed.md), [App Instance Removed](https://dev.wix.com/docs/rest/app-management/app-instance/app-instance-removed.md), and [Paid Plan Purchased](https://dev.wix.com/docs/rest/app-management/app-instance/paid-plan-purchased.md). These events notify your app when it's installed or removed from a site, allowing you to perform essential tasks like saving instance data, provisioning resources, or cleaning up when users uninstall your app. Learn more [about events](https://dev.wix.com/docs/build-apps/develop-your-app/api-integrations/events-and-webhooks/about-events.md).
## Access Access to Wix APIs requires successful authentication and authorization. Authentication confirms the identity of the entity making the request, while authorization determines the permitted actions for that identity. Recognized identities include site visitors, site members, Wix users (or admins), and Wix apps. Third-party apps integrating with Wix APIs need to authenticate following the [OAuth](https://dev.wix.com/docs/build-apps/develop-your-app/access/authentication/about-oauth.md) protocol. Authorization protects your site data by ensuring that only authorized users can perform specific actions. For more information, see [About Access for Wix Apps](https://dev.wix.com/docs/build-apps/develop-your-app/access/about-access.md#about-access-for-wix-apps). ## App instances When a Wix user installs your app on their site, Wix generates an app instance. An app instance represents a unique installation of your app on a specific site, identified by an `instanceId`. This ID is essential for identifying users, managing site-specific data, and handling billing logic for paid apps. The app instance also provides useful information such as the site owner's email, the app's billing cycle, and the purchased pricing package. You can retrieve app instance data through webhooks, API calls, or encoded query parameters. For more information, see [About App Instances](https://dev.wix.com/docs/build-apps/develop-your-app/access/app-instances/about-app-instances.md). ## Wix Design System The Wix Design System is a comprehensive toolkit for developers and designers to craft beautiful and intuitive product experiences. The Wix Design System offers a range of resources, including React libraries, design patterns, Figma kits, component documentation, interactive playgrounds, color palettes, icons, fonts, and more. For developers, the Wix Design System includes a React library of core reusable components. For designers, the Wix Design System includes a Figma kit to integrate Wix design assets into their design workflow. For more information, see [About the Wix Design System](https://dev.wix.com/docs/build-apps/develop-your-app/design/about-the-wix-design-system.md). ## Pricing and billing If you plan to monetize your app through the Wix App Market, you'll need to set up pricing plans and implement the corresponding logic in your app. While Wix handles billing and payment processing, it's your responsibility to code the behavior that differentiates between pricing tiers. This includes identifying which plan a user has installed, restricting access to premium features for free or lower-tier users, and providing clear upgrade paths. For more information, see [Monetize Your App](https://dev.wix.com/docs/build-apps/launch-your-app/pricing-and-billing/about-monetizing-your-app.md). ## See also - [About the App Dashboard](https://dev.wix.com/docs/build-apps/develop-your-app/app-dashboard-setup/about-the-app-dashboard.md) - [About Development Frameworks](https://dev.wix.com/docs/build-apps/develop-your-app/frameworks/about-development-frameworks.md#about-development-frameworks) - [About Extensions](https://dev.wix.com/docs/build-apps/develop-your-app/extensions/about-extensions.md#about-extensions) - [Map your app's functionality to Wix's extensions](https://dev.wix.com/docs/build-apps/develop-your-app/extensions/map-your-app-s-functionality-to-wix-s-extensions.md) - [About Wix Business Solutions](https://dev.wix.com/docs/build-apps/develop-your-app/wix-business-solutions/about-wix-business-solutions.md#about-wix-business-solutions) - [About Wix APIs](https://dev.wix.com/docs/build-apps/develop-your-app/wix-business-solutions/about-wix-business-solutions.md#about-wix-business-solutions) - [About Access for Wix Apps](https://dev.wix.com/docs/build-apps/develop-your-app/access/about-access.md#about-access-for-wix-apps) - [About the Wix Design System](https://dev.wix.com/docs/build-apps/develop-your-app/design/about-the-wix-design-system.md) --- > Portal Navigation: > > - Append `.md` to any URL under `https://dev.wix.com/docs/` to get its markdown version. > - Pages are either content pages (article or reference text) or menu pages (a list of links to child pages). > - To get a menu page, truncate any URL to a parent path and append `.md` (e.g. `https://dev.wix.com/docs/sdk.md`, `https://dev.wix.com/docs/sdk/core-modules.md`). > - Top-level index of all portals: https://dev.wix.com/docs/llms.txt > - Full concatenated docs: https://dev.wix.com/docs/llms-full.txt ## Resource: About the App Workspace ## Article: About the Unified Workspace ## Article Link: https://dev.wix.com/docs/build-apps/develop-your-app/app-workspace/about-the-app-workspace.md ## Article Content: # About the App Workspace
__Alpha:__ The [AI app builder](https://dev.wix.com/docs/build-apps/develop-your-app/build-with-ai/about-building-apps-with-ai.md) is currently in alpha. This feature is subject to change and may have bugs, issues, and limitations. We're actively improving it based on your feedback.
> **Note:** The app workspace is being gradually rolled out and isn't available to all users yet. The app workspace is your central development environment for building Wix apps. You can configure your app's settings and permissions in the [App Dashboard](#app-dashboard) tab, edit your app's files in the [Code](#code) tab's VS Code-based editor, and view your app in different contexts with the [Preview](#preview) tab. A built-in [AI chat](#ai-chat) on the left side helps you build and refine your app. ![The app workspace](https://wixmp-833713b177cebf373f611808.wixmp.com/images/68208b3f79dbbe8d4e803fa17c459dd8.png) ## App Dashboard The [**App Dashboard**](https://dev.wix.com/docs/build-apps/develop-your-app/app-workspace/app-dashboard/about-the-app-dashboard.md) tab provides a management hub for your app. In the app dashboard, you can: - [Configure pricing plans](https://dev.wix.com/docs/build-apps/launch-your-app/pricing-and-billing/about-pricing-plans-and-business-models.md). - [Promote your app](https://dev.wix.com/docs/build-apps/launch-your-app/app-promotion/about-app-promotion.md). - [Set up authentication](https://dev.wix.com/docs/build-apps/develop-your-app/access/authentication/about-oauth.md). - [Add permissions](https://dev.wix.com/docs/build-apps/develop-your-app/access/authorization/configure-permissions-for-your-app.md). ## Code The [**Code tab**](https://dev.wix.com/docs/build-apps/develop-your-app/app-workspace/about-the-code-tab.md) is a VS Code-based development environment where you can edit your app's files directly. You can also work locally using [GitHub integration](https://dev.wix.com/docs/build-apps/develop-your-app/app-workspace/git-hub-integration/about-git-hub-integration.md). The Code tab only shows code for Wix-managed extensions built with the [Wix CLI](https://dev.wix.com/docs/wix-cli.md). If you're building a [self-managed app](https://dev.wix.com/docs/build-apps/develop-your-app/frameworks/self-hosting/about-self-hosting-for-wix-apps.md), your extension code lives on your own infrastructure and doesn't appear here. You can manage all of your app's extensions, including self-managed ones, from the **Extensions** page in the [App Dashboard](#app-dashboard). > **Note:** The Code tab isn't supported in Safari. ## Preview The **Preview** tab lets you view your app in different contexts without leaving the workspace. It provides the following views: - **Dashboard Page**: View your [dashboard extensions](https://dev.wix.com/docs/build-apps/develop-your-app/extensions/dashboard-extensions/about-dashboard-extensions.md) as a Wix user. - **Market Listing**: View how your app will appear in the Wix App Market. - **Editor**: View how your app behaves when integrated with the editor. - **Site**: View your [site extensions](https://dev.wix.com/docs/build-apps/develop-your-app/extensions/site-extensions/about-site-extensions.md) from the perspective of site visitors. ## AI chat The AI chat is available on the left side of the workspace. You can use it to [build a new app](https://dev.wix.com/docs/build-apps/develop-your-app/build-with-ai/get-started-with-the-ai-app-builder.md), edit existing code, ask questions, and get code explanations. The AI agent can read your project files and make changes directly in the editor. For self-managed apps, the AI chat starts collapsed. Click the toggle button in the top left to open it. For tips on getting the best results from the AI chat, see [AI prompts](https://dev.wix.com/docs/api-preview/building-apps-with-ai/get-started/best-practices-for-ai-prompts.md) and [supported features](https://dev.wix.com/docs/build-apps/develop-your-app/build-with-ai/about-the-ai-app-builder.md). ## Collaboration > **Note:** This feature is not currently supported. Multiple developers can work on the same app simultaneously. [Add collaborators](https://dev.wix.com/docs/build-apps/develop-your-app/app-dashboard-setup/manage-collaborators.md) in the App Dashboard to give other developers access. Each collaborator gets their own workspace. The App Dashboard tab is shared, but each developer has an independent [Code tab](#code) and [AI chat](#ai-chat). To share code between collaborators, sync with [GitHub](https://dev.wix.com/docs/build-apps/develop-your-app/app-workspace/git-hub-integration/about-git-hub-integration.md). Current limitations: - Only the app owner can connect to the [GitHub repo](https://dev.wix.com/docs/build-apps/develop-your-app/app-workspace/git-hub-integration/about-git-hub-integration.md). Collaborator access to the same repo isn't yet supported. - Each developer has their own AI chat. Conversations aren't shared between collaborators. - Conflict handling for simultaneous edits isn't yet supported. ## See also - [Build an App with AI](https://dev.wix.com/docs/build-apps/develop-your-app/build-with-ai/get-started-with-the-ai-app-builder.md) - [About GitHub Integration](https://dev.wix.com/docs/build-apps/develop-your-app/app-workspace/git-hub-integration/about-git-hub-integration.md) - [About Extensions](https://dev.wix.com/docs/build-apps/develop-your-app/extensions/about-extensions.md) --- > Portal Navigation: > > - Append `.md` to any URL under `https://dev.wix.com/docs/` to get its markdown version. > - Pages are either content pages (article or reference text) or menu pages (a list of links to child pages). > - To get a menu page, truncate any URL to a parent path and append `.md` (e.g. `https://dev.wix.com/docs/sdk.md`, `https://dev.wix.com/docs/sdk/core-modules.md`). > - Top-level index of all portals: https://dev.wix.com/docs/llms.txt > - Full concatenated docs: https://dev.wix.com/docs/llms-full.txt ## Resource: About the Code Tab ## Article: About the Code Tab ## Article Link: https://dev.wix.com/docs/build-apps/develop-your-app/app-workspace/about-the-code-tab.md ## Article Content: # About the Code Tab
__Alpha:__ The [AI app builder](https://dev.wix.com/docs/build-apps/develop-your-app/build-with-ai/about-building-apps-with-ai.md) is currently in alpha. This feature is subject to change and may have bugs, issues, and limitations. We're actively improving it based on your feedback.
The **Code** tab is a VS Code Web-based development environment in the [app workspace](https://dev.wix.com/docs/build-apps/develop-your-app/app-workspace/about-the-app-workspace.md) where you can edit your app's code directly in the browser. > **Note:** The Code tab isn't supported in Safari. ![The Code tab](https://wixmp-833713b177cebf373f611808.wixmp.com/images/68208b3f79dbbe8d4e803fa17c459dd8.png) ## File structure The Code tab shows Wix-managed extensions built and managed with the [Wix CLI](https://dev.wix.com/docs/wix-cli.md). These projects use [Astro](https://docs.astro.build/en/getting-started/), a web development framework optimized for performance, with React for UI components. The **src** folder holds your app's [extensions](https://dev.wix.com/docs/build-apps/develop-your-app/extensions/about-extensions.md) built with the Wix CLI. Each extension type has its own subfolder, such as **dashboard** or **site**. To manage all of your app's extensions, go to the **Extensions** page in the [App Dashboard](https://dev.wix.com/docs/build-apps/develop-your-app/app-workspace/about-the-app-workspace.md#app-dashboard).
__Caution:__ Only edit files that are in the **src** folder. Editing other files may cause unexpected behavior or damage to your project.
## IDE features The Code tab includes standard VS Code Web features like syntax highlighting, code navigation, and multi-file editing. Changes are saved automatically every few seconds. ## AI chat The AI chat sits on the left side of the Code tab. You can request code changes, ask questions, and get explanations. The AI agent reads your project files and makes edits directly in the editor. To generate dashboard pages, the AI agent uses [Auto Patterns](https://dev.wix.com/docs/build-apps/develop-your-app/design/auto-patterns/about-auto-patterns.md), a configuration-driven library that lets you build pages using JSON instead of writing React components manually. ## Wix Logs **Wix Logs** is a panel in the bottom area of the Code tab, alongside **Problems**, **Output**, **Debug Console**, and **Terminal**. It centralizes [Wix CLI](https://dev.wix.com/docs/wix-cli.md) process logs into a single, timestamp-sorted stream so you can monitor and debug what the Wix CLI is doing during development. ![The Wix Logs panel](https://wixmp-833713b177cebf373f611808.wixmp.com/images/1f44ae25dff9be76d18852644fdd9006.png) ### Filters and toolbar Use the toolbar controls to focus on the logs you need: - **Short**: Toggles the timestamp format between short (`HH:MM:SS.mmm`) and full ISO. - **Producers**: Filters logs by the part of the CLI that generated them. - **Levels**: Filters logs by severity, which includes`error`, `warn`, `info`, or `debug`. - **Search**: Searches logs. - **Pause** (‖): Pauses the log stream. - **Clear** (≡): Clears the current log output. - **Refresh** (↺): Reloads the log stream. ## GitHub integration You can connect your app project to a GitHub repository directly from the Code tab. This gives you version control, collaboration, and the flexibility to work in any external IDE. Learn more about [GitHub integration](https://dev.wix.com/docs/build-apps/develop-your-app/app-workspace/git-hub-integration/about-git-hub-integration.md). ## See also - [About the App Workspace](https://dev.wix.com/docs/build-apps/develop-your-app/app-workspace/about-the-app-workspace.md) - [About Building Apps with AI](https://dev.wix.com/docs/api-preview/building-apps-with-ai/overview/about-building-apps-with-ai.md) - [About Extensions](https://dev.wix.com/docs/build-apps/develop-your-app/extensions/about-extensions.md) - [About Auto Patterns](https://dev.wix.com/docs/build-apps/develop-your-app/design/auto-patterns/about-auto-patterns.md) - [Why Astro?](https://dev.wix.com/docs/wix-cli/guides/about-the-wix-cli.md#why-astro) --- > Portal Navigation: > > - Append `.md` to any URL under `https://dev.wix.com/docs/` to get its markdown version. > - Pages are either content pages (article or reference text) or menu pages (a list of links to child pages). > - To get a menu page, truncate any URL to a parent path and append `.md` (e.g. `https://dev.wix.com/docs/sdk.md`, `https://dev.wix.com/docs/sdk/core-modules.md`). > - Top-level index of all portals: https://dev.wix.com/docs/llms.txt > - Full concatenated docs: https://dev.wix.com/docs/llms-full.txt ## Resource: About the App Dashboard ## Article: Dev Center Overview ## Article Link: https://dev.wix.com/docs/build-apps/develop-your-app/app-workspace/app-dashboard/about-the-app-dashboard.md ## Article Content: # About the App Dashboard The [app dashboard](https://manage.wix.com/account/custom-apps) is a hub for connecting your app to the [Wix ecosystem](https://dev.wix.com/docs/build-apps/get-started/overview/the-wix-ecosystem.md) and managing it. Regardless of how you are building your app, your journey will most likely include a visit to the app dashboard. ## Working in the app dashboard The menu on the left of the dashboard guides you through the tasks for setting up your app. You can progress through most tasks in any order, and return to tasks later, according to your needs. Generally, the order of the tasks are: 1. [Plan](#which-tasks-must-i-do-which-tasks-can-i-skip) 1. [Get started](#getting-started) 1. [Develop and build](#developing-and-building-your-app) 1. [Integrate](#integrating-your-app) 1. [Launch](#launching-your-app) 1. [Manage](#managing-your-app) You will learn more about each task below. But first... it is important to note that you can skip tasks you don't need. ## Which tasks must I do? Which tasks can I skip? The tasks you do, and the tasks you skip, are based on the [framework](https://dev.wix.com/docs/build-apps/get-started/overview/wix-s-development-frameworks.md) you choose and if your app will be public. For example, if your app is private, you can skip many of the options in the Launch task, as there is no need to price, market, or handle payments for your app. Here are ideas for which tasks to do in the app dashboard, depending on the type of app you are building.
Public self-managed app - published in the Wix App Market This is a basic flow for launching a public, self-managed app that you can market and sell. | Task | Options to Consider | How | | ----- | ------------- | -- | | Get started | Log in and set up your app | app dashboard | | Develop and build | Add extensions
OAuth
Permissions
Webhooks
Test | app dashboard | | Integrate | Code and design | Using your own tech stack | | Launch | Translations
Marketing
Pricing
Contact info
Security & privacy
Payouts
Coupons
Collaborators
Company info
Submit | app dashboard | | Manage | Versions
Reviews
Stats | app dashboard |
Private enterprise app with Wix Blocks This scenario shows that: - You can share an app in your enterprise, perhaps for code reuse purposes, without ever marketing or selling your app. - You can extend Wix functionality using a combination of both Wix Blocks and other extensions in the same app. - Your enterprise app can accommodate translations even if it is never launched to the app market. | Task | Options to Consider | How | | ----- | ------------- | --- | | Get started | Log in and set up your app | app dashboard or Wix Blocks | | Develop and build with Wix Blocks | Add [supported Wix Blocks extensions](https://dev.wix.com/docs/build-apps/develop-your-app/develop-an-app-with-blocks/supported-extensions/about-extensions-in-blocks.md) | Wix Blocks | | Develop and build | Add [extensions without Wix Blocks](https://dev.wix.com/docs/build-apps/develop-your-app/develop-an-app-with-blocks/supported-extensions/about-extensions-in-blocks.md)
OAuth
Permissions
Webhooks
Test | app dashboard | | Integrate | Code and design | Wix Blocks | | Launch | Translations | app dashboard | | Manage | Versions | Wix Blocks or app dashboard |
Private app with Wix Blocks This task demonstrates that there are scenarios where you can build an app without using the app dashboard at all. - Because this scenario is a private app, there is no need to launch or market the app. - Depending on what your app needs to do, it is possible that all the tasks for designing, coding, and managing your app can be done entirely with Wix Blocks. | Task | Options to Consider | How | | ----- | ------------- | -- | | Get started | Set up your app | Wix Blocks | | Develop and build | Add [supported Wix Blocks extensions](https://dev.wix.com/docs/build-apps/develop-your-app/develop-an-app-with-blocks/supported-extensions/about-extensions-in-blocks.md) | Wix Blocks | | Integrate | Code and design | Wix Blocks | | Manage | Manage versions | Wix Blocks |
Public app with Wix CLI, published in the Wix App Market This is a basic flow for launching a public app created with the Wix CLI that you can market and sell. - Some of the development and configuration that is available in the app dashboard is also available in the CLI. - You can extend Wix functionality using a combination of extensions developed in both the Wix CLI elsewhere in the same app. | Task | Options to Consider | How | | ----- | ------------- | --- | | Get started | Log in and set up your app | Wix CLI | | Develop and build | Permissions
Webhooks
Add extensions without CLI
Permissions
Webhooks | app dashboard | | Develop and build | Add [supported CLI extensions](https://dev.wix.com/docs/build-apps/develop-your-app/develop-an-app-with-the-cli/supported-extensions/about-extensions-in-the-wix-cli.md)
Test
Create version | Wix CLI | | Integrate | Code, design, and preview | Wix CLI | | Launch | Translations
Marketing
Pricing
Contact info
Security & privacy
Payouts
Coupons
Collaborators
Company info | app dashboard | | Manage | Versions
Reviews
Stats | app dashboard |
Public app that does not require external integrations, published in the Wix App Market This type of public app is developed, marketed, and managed totally within the app dashboard. There is no need to use any frameworks at all. We can relate to the extensions used in this type of app as "configuration-only" apps. | Task | Options to Consider | How | | ----- | ------------- | -- | | Get started | Log in and set up your app | app dashboard | | Develop and build | OAuth
Permissions
Webhooks
Add "configuration-only" extensions such as:
- [Site pages](https://dev.wix.com/docs/build-apps/develop-your-app/extensions/site-extensions/site-pages/about-site-page-extensions.md)
- [External links](https://dev.wix.com/docs/build-apps/develop-your-app/extensions/dashboard-extensions/external-links/about-external-link-extensions.md)
- [Dashboard menu plugins](https://dev.wix.com/docs/build-apps/develop-your-app/extensions/dashboard-extensions/dashboard-plugins/dashboard-menu-plugins/add-dashboard-menu-plugin-extensions.md)
- [Schema plugins](https://dev.wix.com/docs/build-apps/develop-your-app/extensions/backend-extensions/schema-plugins/about-schema-plugin-extensions.md)
Test | app dashboard | | Launch | Translations
Marketing
Pricing
Contact info
Security & privacy
Payouts
Coupons
Collaborators
Company info | app dashboard | | Manage | Versions
Reviews
Stats | app dashboard |
## Getting started First, log into your Wix Studio account. If you don't already have one, [sign up for a Wix Studio account](https://manage.wix.com/account/custom-apps). Once logged in, [set up](https://dev.wix.com/docs/build-apps/get-started/overview/about-wix-apps.md) an app in the app dashboard. This task lets you set up your app so you can manage it using the app dashboard. ## Developing and building your app From within the app dashboard, you can utilize a set of tools and extensions to help you build and release apps. For example, you can: - [Extend Wix functionality](https://dev.wix.com/docs/build-apps/develop-your-app/extensions/about-extensions.md) - [Sign up to webhooks](https://dev.wix.com/docs/build-apps/develop-your-app/api-integrations/events-and-webhooks/about-webhooks.md) - [Set up permissions](https://dev.wix.com/docs/build-apps/develop-your-app/access/authorization/configure-permissions-for-your-app.md) - [Set up OAuth](https://dev.wix.com/docs/build-apps/develop-your-app/access/authentication/about-oauth.md) - [Test the app locally](https://dev.wix.com/docs/build-apps/launch-your-app/app-distribution/test-your-app/test-your-app-on-a-premium-site.md) ## Integrating your app You generally develop, code, and design your app outside of the app dashboard. This task is about integrating what you developed externally using the app dashboard. For example, using the app dashboard, you can: - Connect any iframes you coded externally, by providing the relevant URLs and settings data. - Integrate with any custom business logic you externally coded by adding a [service plugin](https://dev.wix.com/docs/build-apps/develop-your-app/extensions/backend-extensions/service-plugins/about-service-plugin-extensions.md). ## Launching your app If you are setting up a public app, use the app dashboard to: - [Price your app](https://dev.wix.com/docs/build-apps/launch-your-app/pricing-and-billing/about-pricing-plans-and-business-models.md) - [Distribute your app](https://dev.wix.com/docs/build-apps/launch-your-app/app-distribution/about-app-distribution.md) - [Set up your Market listing](https://dev.wix.com/docs/build-apps/launch-your-app/market-listing/about-market-listings.md). If your app depends on a Wix business solution being installed on a site for your app to work, [add the dependency](https://dev.wix.com/docs/build-apps/launch-your-app/market-listing/add-your-app-audience-info.md) in the app dashboard when setting up your market listing. This prevents users from installing your app until the relevant business solution is installed. - [Create promotional assets](https://dev.wix.com/docs/build-apps/launch-your-app/app-promotion/about-app-promotion.md) - [Submit your app for Wix approval](https://dev.wix.com/docs/build-apps/launch-your-app/app-distribution/submit-your-first-app-version.md). Check the bottom left of the app dashboard to see if there are any blockers. Did you skip an essential step? Is information missing? Click **Fix blockers** for a summary of the blockers to fix, including suggestions you might want to consider. ## Managing your app Once your app is up and running, you can make changes. For example, you can: - Respond to [reviews](https://dev.wix.com/docs/build-apps/manage-your-app/user-support/user-reviews.md) - Check [analytics](https://dev.wix.com/docs/build-apps/manage-your-app/data-and-analytics/bi-events.md) - Process [refunds](https://dev.wix.com/docs/build-apps/manage-your-app/user-support/issue-a-refund.md) - Track [statistics](https://dev.wix.com/docs/build-apps/manage-your-app/data-and-analytics/app-stats.md) - View [transactions](https://dev.wix.com/docs/build-apps/launch-your-app/pricing-and-billing/payouts-dashboard.md) - Provide [coupons](https://dev.wix.com/docs/build-apps/launch-your-app/app-promotion/self-promotion/create-a-coupon.md) for your app - Update your [company information](https://dev.wix.com/docs/build-apps/launch-your-app/market-listing/add-your-company-info.md) - Determine who can [collaborate](https://dev.wix.com/docs/build-apps/develop-your-app/app-workspace/app-dashboard/manage-collaborators.md) on your app - Make sure your app's users can [contact](https://dev.wix.com/docs/build-apps/develop-your-app/app-workspace/app-dashboard/add-your-contact-info.md) you ## See also - [Tutorial | Set Up an App with the App Dashboard](https://dev.wix.com/docs/build-apps/get-started/tutorials/tutorial-set-up-an-app-with-the-app-dashboard.md) --- > Portal Navigation: > > - Append `.md` to any URL under `https://dev.wix.com/docs/` to get its markdown version. > - Pages are either content pages (article or reference text) or menu pages (a list of links to child pages). > - To get a menu page, truncate any URL to a parent path and append `.md` (e.g. `https://dev.wix.com/docs/sdk.md`, `https://dev.wix.com/docs/sdk/core-modules.md`). > - Top-level index of all portals: https://dev.wix.com/docs/llms.txt > - Full concatenated docs: https://dev.wix.com/docs/llms-full.txt ## Resource: Add Your Contact Info ## Article: Add Your Contact Info ## Article Link: https://dev.wix.com/docs/build-apps/develop-your-app/app-workspace/app-dashboard/add-your-contact-info.md ## Article Content: # Add Your Contact Info Ensuring that your app's users and Wix can easily reach you is crucial for maintaining a successful app on the Wix App Market. To achieve this, it's important to keep your contact info accurate and up-to-date. To add or update your contact info: 1. Go to the **Contact Info** page in your app's dashboard. 2. Provide at least one email address for each field: - **Support email**: This email is essential for handling user support requests, both from users and the App Market team. It is displayed in the App Market for users seeking assistance. You can input up to 10 email addresses, separated by commas. - **Billing email**: All billing-related info, including periodic reports on earnings and invoice requests, is directed to this email address. Only one email address is permitted in this field. If multiple team members require access to billing information, we suggest creating a shared group email address. - **Urgent email and number**: Critical support requests from the App Market team and important updates regarding features and changes are communicated through this channel. You can enter up to 10 email addresses, separated by commas. While email will serve as the primary mode of contact, in exceptional circumstances we may use the phone number provided. 3. Click **Save**.
**Tip:** As you enter email addresses, the last one entered is registered once you click outside the field, add a comma after it, or press Enter.
## See also - [Add your company info](https://dev.wix.com/docs/build-apps/launch-your-app/market-listing/add-your-company-info.md) - [Manage team collaborators](https://dev.wix.com/docs/build-apps/develop-your-app/app-workspace/app-dashboard/manage-collaborators.md) --- > Portal Navigation: > > - Append `.md` to any URL under `https://dev.wix.com/docs/` to get its markdown version. > - Pages are either content pages (article or reference text) or menu pages (a list of links to child pages). > - To get a menu page, truncate any URL to a parent path and append `.md` (e.g. `https://dev.wix.com/docs/sdk.md`, `https://dev.wix.com/docs/sdk/core-modules.md`). > - Top-level index of all portals: https://dev.wix.com/docs/llms.txt > - Full concatenated docs: https://dev.wix.com/docs/llms-full.txt ## Resource: Manage Collaborators ## Article: Manage Collaborators ## Article Link: https://dev.wix.com/docs/build-apps/develop-your-app/app-workspace/app-dashboard/manage-collaborators.md ## Article Content: # Manage Collaborators As an App Owner, you can invite people to work on your app, assign them roles, and set their permissions in the App Dashboard. ## Role types - **App Owner**: Can perform any action in the account and is considered an admin. Only the Owner can request to close an account. - **App Co-owner**: Can edit, publish and manage the app, including creating extensions, adding webhooks and permissions, and inviting people. They can’t archive or change ownership of the app.
Note: If you need to transfer Owner rights to another user let us know and we'll do it for you.
## Invite a new collaborator 1. Go to the **Collaborators** page in your app’s dashboard. 2. Click **+ Invite Collaborators** in the top right corner. 3. Enter the email address of the collaborator. To add multiple invitees, enter each email separated by a comma. 4. Click **Send Invite**.
Tip: After you've sent the invite you can also click the **More Actions** icon next to the relevant collaborator to resend the invite or get an invite link.
## Remove a collaborator 1. Go to the **Collaborators** page in your app’s dashboard. 2. Click the **More Actions** icon next to the relevant collaborator. 3. Click **Remove**. ## See also - [Add your contact info](https://dev.wix.com/docs/build-apps/develop-your-app/app-workspace/app-dashboard/add-your-contact-info.md) - [Add your company info](https://dev.wix.com/docs/build-apps/launch-your-app/market-listing/add-your-company-info.md) --- > Portal Navigation: > > - Append `.md` to any URL under `https://dev.wix.com/docs/` to get its markdown version. > - Pages are either content pages (article or reference text) or menu pages (a list of links to child pages). > - To get a menu page, truncate any URL to a parent path and append `.md` (e.g. `https://dev.wix.com/docs/sdk.md`, `https://dev.wix.com/docs/sdk/core-modules.md`). > - Top-level index of all portals: https://dev.wix.com/docs/llms.txt > - Full concatenated docs: https://dev.wix.com/docs/llms-full.txt ## Resource: App Settings ## Article: App Settings ## Article Link: https://dev.wix.com/docs/build-apps/develop-your-app/app-workspace/app-dashboard/app-settings.md ## Article Content: # App Settings The **App Settings** page lets you customize your app's post-installation behavior, both for the app in general and for specific extensions. ## Post-installation navigation When a Wix user installs your app, the page that they're directed to by default to depends on your app's extensions: - If your app has no extensions, Wix users are directed to the [Manage Apps](https://www.wix.com/my-account/site-selector/?buttonText=Select%20Site&title=Select%20a%20Site&autoSelectOnSingleSite=true&actionUrl=https:%2F%2Fwww.wix.com%2Fdashboard%2F%7B%7BmetaSiteId%7D%7D%2Fmanage-installed-apps) page in their dashboard. - If your app has at least one site extension, such as a site widget or a site page, Wix users are directed to the editor. - If your app has only dashboard page extensions, Wix users are directed to the first dashboard page created in your app. In the **Post-installation navigation** section, you can change the default behavior. If you've added one or more dashboard page extensions, you can choose to direct Wix users to one of these pages. ## Extension installation behavior In addition to navigation, you can configure post-installation behavior for specific extensions. For example, you can choose to add a site widget to a site page upon installation, instead of requiring the Wix user to add the widget themselves. The **Extension installation behavior** section directs you to the [**Extensions**](https://dev.wix.com/app-selector?title=Select+an+App&primaryButtonText=Select+Site&actionUrl=https%3A%2F%2Fdev.wix.com%2Fapps%2F%7BappId%7D%2Fextensions) page in the app dashboard, where you can configure specific behavior for each extension. ## See also - [About the App Dashboard](https://dev.wix.com/docs/build-apps/develop-your-app/app-dashboard-setup/about-the-app-dashboard.md) - [About Extensions](https://dev.wix.com/docs/build-apps/develop-your-app/extensions/about-extensions.md) --- > Portal Navigation: > > - Append `.md` to any URL under `https://dev.wix.com/docs/` to get its markdown version. > - Pages are either content pages (article or reference text) or menu pages (a list of links to child pages). > - To get a menu page, truncate any URL to a parent path and append `.md` (e.g. `https://dev.wix.com/docs/sdk.md`, `https://dev.wix.com/docs/sdk/core-modules.md`). > - Top-level index of all portals: https://dev.wix.com/docs/llms.txt > - Full concatenated docs: https://dev.wix.com/docs/llms-full.txt ## Resource: Share Your App with an Install Link ## Article: Share Your App with an Install Link ## Article Link: https://dev.wix.com/docs/build-apps/develop-your-app/app-workspace/app-dashboard/share-your-app-with-an-install-link.md ## Article Content: # Share Your App with an Install Link An Install Link enables Wix site-creators to install your app on their site. This is useful when you want to share your app with a small number of specific site creators, early adopters, or use it for testing purposes. ## Generate an Install Link 1. Go to the **Custom Apps** page. 2. Click the **More Actions** menu next to the app you want to share. 3. Click **Share install link** to install app. 4. Click **Generate Link**. 5. Click **Copy Link**. ![Share](https://wixmp-833713b177cebf373f611808.wixmp.com/images/812f9b020d5fd1f1dfbe08f770140d3c.png) ## Disable an Install Link There can only be one Install Link at any given time. If you want to disable an Install Link, create a new link and it will disable the old one. ## See also - [Create a market listing](https://dev.wix.com/docs/build-apps/launch-your-app/market-listing/about-market-listings.md) - [About app promotions](https://dev.wix.com/docs/build-apps/launch-your-app/app-promotion/about-app-promotion.md) --- > Portal Navigation: > > - Append `.md` to any URL under `https://dev.wix.com/docs/` to get its markdown version. > - Pages are either content pages (article or reference text) or menu pages (a list of links to child pages). > - To get a menu page, truncate any URL to a parent path and append `.md` (e.g. `https://dev.wix.com/docs/sdk.md`, `https://dev.wix.com/docs/sdk/core-modules.md`). > - Top-level index of all portals: https://dev.wix.com/docs/llms.txt > - Full concatenated docs: https://dev.wix.com/docs/llms-full.txt ## Resource: Code Identifier ## Article: About the Code Identifier ## Article Link: https://dev.wix.com/docs/build-apps/develop-your-app/app-workspace/app-dashboard/code-identifier.md ## Article Content: # About the Code Identifier
__Alpha:__ The [AI app builder](https://dev.wix.com/docs/build-apps/develop-your-app/build-with-ai/about-building-apps-with-ai.md) is currently in alpha. This feature is subject to change and may have bugs, issues, and limitations. We're actively improving it based on your feedback.
The code identifier is a unique, JavaScript-compatible name for your app and its extensions. ## Set your code identifier When you build an app using AI, your namespace is generated automatically. Wix then suggests a code identifier based on that namespace. You can accept the suggestion or enter your own value. > **Note:** In the Wix CLI flow, you choose your namespace manually during app creation. Your code identifier must follow these rules: - Use only JavaScript-friendly characters. These include letters (`A-Z`, `a-z`), digits (`0-9`, but not as the first character), underscores (`_`), and dollar signs (`$`). - Avoid using the word "Wix". - Use camelCase for readability. Once set, you can't change your code identifier. ## View your code identifier To view your app's code identifier: 1. Go to [Custom Apps](https://manage.wix.com/account/custom-apps). 1. Select the app whose code identifier you want to view. 1. Click the **More Actions** icon at the top of the page. 1. Select **View ID & Keys**. Your app's code identifier appears there. --- > Portal Navigation: > > - Append `.md` to any URL under `https://dev.wix.com/docs/` to get its markdown version. > - Pages are either content pages (article or reference text) or menu pages (a list of links to child pages). > - To get a menu page, truncate any URL to a parent path and append `.md` (e.g. `https://dev.wix.com/docs/sdk.md`, `https://dev.wix.com/docs/sdk/core-modules.md`). > - Top-level index of all portals: https://dev.wix.com/docs/llms.txt > - Full concatenated docs: https://dev.wix.com/docs/llms-full.txt ## Resource: About GitHub Integration ## Article: About GitHub Integration ## Article Link: https://dev.wix.com/docs/build-apps/develop-your-app/app-workspace/git-hub-integration/about-git-hub-integration.md ## Article Content: # About GitHub Integration
__Alpha:__ The [AI app builder](https://dev.wix.com/docs/build-apps/develop-your-app/build-with-ai/about-building-apps-with-ai.md) is currently in alpha. This feature is subject to change and may have bugs, issues, and limitations. We're actively improving it based on your feedback.
GitHub integration connects an app project to a dedicated GitHub repository. This gives you GitHub's version control and collaboration capabilities, as well as the flexibility to work in whatever IDE you prefer. ## Code in your preferred IDE Develop an app using your preferred IDE. Wix sets up a repository that you can clone and develop in using standard development workflows. ## Work with multiple collaborators at once You can let others interact with an app's code by inviting them as [collaborators](https://docs.github.com/en/account-and-profile/setting-up-and-managing-your-personal-account-on-github/managing-access-to-your-personal-repositories/inviting-collaborators-to-a-personal-repository) on your GitHub repository. Multiple developers can work on an app's code at once. ## Version control GitHub integration enables version control for your project. Your app reflects the main branch of your repository. To sync your local changes, merge them to the main branch. Wix saves changes to the app's code: - Periodically while working in the **Code** tab. - When the AI agent makes a change to the app. Saved changes are tracked as commits in your GitHub repository, giving you a clear history of edits and the ability to revert to previous versions when needed. When multiple sources edit the same files simultaneously, conflicts can occur. If you push changes to the repository while the AI agent makes changes to the same files, the AI agent shows a rejection message. If your local clone of the repository has files that aren't up to date and you push changes to those files, you'll get a rejection message in your IDE. ## File structure AI app projects are built using [Astro](https://docs.astro.build/en/getting-started/), a web development framework optimized for performance. The UI components are written in React. The **src** folder contains [extensions](https://dev.wix.com/docs/build-apps/develop-your-app/extensions/about-extensions.md) that add functionality to your app. Each extension type has its own subfolder, such as **dashboard** or **site**.
__Caution:__ Only edit files that are in the **src** folder. Editing other files may cause unexpected behavior or damage to your project.
## Get started To get started with GitHub integration, [set up GitHub integration](https://dev.wix.com/docs/build-apps/develop-your-app/app-workspace/git-hub-integration/set-up-git-hub-integration.md) to connect your project to a repository. > **Note**: GitHub integration only supports creating new repositories. You can't reconnect to an existing repository. ## See also - [About the Code tab](https://dev.wix.com/docs/build-apps/develop-your-app/app-workspace/about-the-code-tab.md) --- > Portal Navigation: > > - Append `.md` to any URL under `https://dev.wix.com/docs/` to get its markdown version. > - Pages are either content pages (article or reference text) or menu pages (a list of links to child pages). > - To get a menu page, truncate any URL to a parent path and append `.md` (e.g. `https://dev.wix.com/docs/sdk.md`, `https://dev.wix.com/docs/sdk/core-modules.md`). > - Top-level index of all portals: https://dev.wix.com/docs/llms.txt > - Full concatenated docs: https://dev.wix.com/docs/llms-full.txt ## Resource: Set Up GitHub Integration ## Article: Set Up GitHub Integration ## Article Link: https://dev.wix.com/docs/build-apps/develop-your-app/app-workspace/git-hub-integration/set-up-git-hub-integration.md ## Article Content: # Set Up GitHub Integration
__Alpha:__ The [AI app builder](https://dev.wix.com/docs/build-apps/develop-your-app/build-with-ai/about-building-apps-with-ai.md) is currently in alpha. This feature is subject to change and may have bugs, issues, and limitations. We're actively improving it based on your feedback.
## Connect to GitHub Set up [GitHub integration](https://dev.wix.com/docs/build-apps/develop-your-app/app-workspace/git-hub-integration/about-git-hub-integration.md) to connect an app project to a dedicated repository created in your GitHub account. This enables version control, collaboration, and the ability to edit the app in any external IDE. To set up GitHub integration: 1. Click ![connect to GitHub icon](https://wixmp-833713b177cebf373f611808.wixmp.com/images/7d8c99e0bbac520a3e83e6dba4078b55.png) to open the GitHub integration menu. 2. In the menu, click **Connect to GitHub**. A new window opens. 3. Log in to GitHub, if needed. 4. Select your GitHub account or organization, and then click **Install & Authorize**. After installation, the window closes. 5. The GitHub integration menu now shows your connected account and a repository name. You can type in a different name for the repository. After you choose a name, click **Create Repository**. 6. To create a local clone of the repository, click **Clone to your computer** in the menu. > **Note**: GitHub integration only supports creating new repositories. You can't reconnect to an existing repository. ## Disconnect from GitHub If you need to, you can disconnect an app from GitHub. When you do this, your app retains the code from the most recent commit to its GitHub repository's default branch. After disconnecting, the repository still exists in GitHub, but changes to it aren't reflected on the app. To disconnect an app from GitHub: 1. Click ⋯ **More Actions** in the GitHub integration menu, and then click **Disconnect from GitHub**. A confirmation window opens. 2. In the confirmation window, click **Disconnect from GitHub**.
**Important:** Once you disconnect an app from its GitHub repository, you can't reconnect the app to that repository again. If you reconnect the app to GitHub later, a new repository is created.
## See also - [About GitHub Integration](https://dev.wix.com/docs/build-apps/develop-your-app/app-workspace/git-hub-integration/about-git-hub-integration.md) --- > Portal Navigation: > > - Append `.md` to any URL under `https://dev.wix.com/docs/` to get its markdown version. > - Pages are either content pages (article or reference text) or menu pages (a list of links to child pages). > - To get a menu page, truncate any URL to a parent path and append `.md` (e.g. `https://dev.wix.com/docs/sdk.md`, `https://dev.wix.com/docs/sdk/core-modules.md`). > - Top-level index of all portals: https://dev.wix.com/docs/llms.txt > - Full concatenated docs: https://dev.wix.com/docs/llms-full.txt ## Resource: About Extensions ## Article: About Extensions ## Article Link: https://dev.wix.com/docs/build-apps/develop-your-app/extensions/about-extensions.md ## Article Content: # About Extensions An [extension](https://dev.wix.com/docs/build-apps/get-started/overview/how-apps-extend-wix.md) is a specific functionality of an app. An app can have multiple extensions that work together to provide various features across different user interfaces and backend services. Most extensions, whether frontend or backend, are created using one of Wix’s [development frameworks](https://dev.wix.com/docs/build-apps/get-started/overview/wix-s-development-frameworks.md#wixs-development-frameworks). You can view your dashboard extensions in the **Extensions** tab in the [app dashboard](https://manage.wix.com/account/custom-apps). ## Frontend extensions Frontend extensions enhance Wix sites with additional functionality, including adding site pages, draggable widgets, site plugins, embedded scripts, and dashboard interfaces. - **Site Pages:** Appear in the site's main navigation menu. They function like any other page and are composed of one or more of the app’s widgets. - **Site Widgets:** Are draggable components that you can add to and place anywhere on your site. - **Editor React Components:** Are custom site widgets built in React for [Wix Harmony](https://dev.wix.com/docs/build-apps/get-started/overview/about-wix-harmony-and-apps.md). The editor automatically generates settings panels and controls from the component manifest, giving Wix users a native editing experience without you building panel UI. - **Site Plugins:** Allow you to extend Wix-created apps by being placed in designated areas within the hosting app’s site widget. - **Embedded Scripts:** Allow you to inject custom HTML code into a site’s HTML. - **Dashboard Pages:** Pages that you can add to the dashboard that are only visible to site admins with the necessary permissions. - **Dashboard Modals:** Allow you to expand Wix's dashboard capabilities by to importing a modal onto a dashboard page. - **Dashboard Plugins:** Allow you to customize Wix dashboard pages by adding new functionalities to predefined slots and introducing new items to dashboard menus. This customization directs administrators to different pages or modals within the dashboard. - **Dashboard Menu Plugins:** Allow you to place a new menu item in a predefined slot, or UI placeholder, in a menu on the dashboard page of an app built by Wix. ## Backend extensions Backend extensions allow you to customize Wix's backend business logic to suit your app's needs, enhancing the value your apps provide to site owners. - **Data Collections Extensions:** Automatically create CMS data collections when your app is installed on a site. Configure collection schemas and add optional initial data. - **Schema Plugin Extensions:** Enable field extensions to Wix's objects. They enrich and extend Wix's data by adding additional fields to service objects. - **Service Plugin Extensions:** Wix-defined APIs that apps can implement to become service providers. This enables Wix to call the service during specified flows and proceed based on the response. - **Notifications:** Send predefined alerts with customizable data to users through their site dashboard or the Wix Owner mobile app. This is useful for informing users of important updates and events. - **Web Method Extensions:** Define functions in your app's backend that you can call from your frontend code. - **Automations:** Automate business processes using triggers, actions, and pre-installed automations. - **APIs:** Expose backend methods that can be called from frontend code. - **Events:** Allow you to run custom code in response to specific events that occur on a site. ## See also - [How apps extend Wix](https://dev.wix.com/docs/build-apps/get-started/overview/how-apps-extend-wix.md) - [Mapping your app's functionality to Wix's extensions](https://dev.wix.com/docs/build-apps/develop-your-app/extensions/map-your-app-s-functionality-to-wix-s-extensions.md) - [About Site Extensions](https://dev.wix.com/docs/build-apps/develop-your-app/extensions/site-extensions/about-site-extensions.md) - [About Editor React Components](https://dev.wix.com/docs/build-apps/develop-your-app/extensions/site-extensions/editor-react-components/about-editor-react-components.md) - [About Dashboard Extensions](https://dev.wix.com/docs/build-apps/develop-your-app/extensions/dashboard-extensions/about-dashboard-extensions.md) - [About Backend Extensions](https://dev.wix.com/docs/build-apps/develop-your-app/extensions/backend-extensions/about-backend-extensions.md) --- > Portal Navigation: > > - Append `.md` to any URL under `https://dev.wix.com/docs/` to get its markdown version. > - Pages are either content pages (article or reference text) or menu pages (a list of links to child pages). > - To get a menu page, truncate any URL to a parent path and append `.md` (e.g. `https://dev.wix.com/docs/sdk.md`, `https://dev.wix.com/docs/sdk/core-modules.md`). > - Top-level index of all portals: https://dev.wix.com/docs/llms.txt > - Full concatenated docs: https://dev.wix.com/docs/llms-full.txt ## Resource: Map Your App’s Functionality to Wix’s Extensions ## Article: Map Your App’s Functionality to Wix’s Extensions ## Article Link: https://dev.wix.com/docs/build-apps/develop-your-app/extensions/map-your-app-s-functionality-to-wix-s-extensions.md ## Article Content: # Map Your App’s Functionality to Wix’s Extensions When developing a Wix app, a critical step is understanding which extensions will best deliver your app's functionality to Wix users. Start with what you want to accomplish, then select the appropriate extension types to bring your vision to life. ## Adding content to a site These extensions allow you to enhance and extend the front-end experience of Wix sites, giving Wix users more ways to engage their visitors with your app's capabilities. ### Add placeable components Need to add a component that Wix users can place anywhere on their existing pages? → Use a [site widget extension](https://dev.wix.com/docs/build-apps/develop-your-app/extensions/site-extensions/site-widgets/about-site-widget-extensions.md). Ideal for interactive elements like advanced forms, product configurators, or social media displays that Wix users can position within their content. ### Create full pages Want to create a full, dedicated page for your app's experience? → Choose a [site page extension](https://dev.wix.com/docs/build-apps/develop-your-app/extensions/site-extensions/site-pages/about-site-page-extensions.md) and fill it with a site widget extension. This is perfect for comprehensive experiences like community forums, custom galleries, or specialized landing pages that need their own real estate on a Wix site. ### Implement persistent components Creating a persistent element that should always be visible? → An [embedded script extension](https://dev.wix.com/docs/build-apps/develop-your-app/extensions/site-extensions/embedded-scripts/about-embedded-scripts.md) is your solution. Perfect for chat widgets, notification bars, or feedback buttons that "stick" to specific edges of the page. ### Track visitor behavior and metrics Tracking user behavior and page performance metrics across an entire site? → Implement an [embedded script extension](https://dev.wix.com/docs/build-apps/develop-your-app/extensions/site-extensions/embedded-scripts/about-embedded-scripts.md) for comprehensive analytics. Perfect for capturing navigation patterns, interaction heatmaps, conversion funnels, and performance benchmarks that work consistently across all pages without requiring manual placement on each one. ### Display custom modals Building a popup or modal experience that appears conditionally? → Choose an [embedded script extension](https://dev.wix.com/docs/build-apps/develop-your-app/extensions/site-extensions/embedded-scripts/about-embedded-scripts.md). Great for newsletter signups, promotional announcements, or detail views that overlay the main content. ### Integrate with a Wix site element Want to enhance an existing Wix business solution with an additional UI component? → Develop a [site plugin extension](https://dev.wix.com/docs/build-apps/develop-your-app/extensions/site-extensions/site-plugins/about-site-plugin-extensions.md) that users can place inside designated areas (called slots) within the Wix site element, to integrate directly within Wix's business tools. This allows you to add custom components to booking flows, product pages, event registrations, and more. ## Creating site building tools These extensions enhance the Wix Editor experience, giving site creators powerful new design and content creation capabilities that complement Wix's native toolset. ### Add site design tools Need to enhance the Wix Editor with custom design tools or specialized content creation capabilities? → An [Editor add-on extension](https://dev.wix.com/docs/build-apps/develop-your-app/extensions/editor-extensions/about-editor-add-on-extensions.md) is perfect for advanced typography controls, specialized layout tools, or custom content creation interfaces that empower site creators with features tailored to specific design needs right within the Editor environment. ## Creating site management tools These extensions help you build powerful administrative interfaces that let Wix users manage your app's functionality directly from their Wix dashboard. ### Provide management interfaces Building a management interface for Wix users? → A [dashboard page extension](https://dev.wix.com/docs/build-apps/develop-your-app/extensions/dashboard-extensions/dashboard-pages/about-dashboard-page-extensions.md) provides a dedicated space in the Wix dashboard where Wix users can manage your app's settings and operations. Create campaign management dashboards, inventory management interfaces, and much more. ### Integrate external dashboards Have functionality that lives on an external platform? → Choose an [external link extension](https://dev.wix.com/docs/build-apps/develop-your-app/extensions/dashboard-extensions/external-links/about-external-link-extensions.md) that allows Wix users to access your external tools directly from the Wix dashboard menu. Give Wix users one-click access to powerful tools and advanced capabilities, seamlessly accessible from their Wix environment. ### Integrate with a Wix dashboard Want to enhance existing Wix business dashboards with your tools? → Use a [dashboard plugin extension](https://dev.wix.com/docs/build-apps/develop-your-app/extensions/dashboard-extensions/dashboard-plugins/about-dashboard-plugin-extensions.md) to integrate your functionality within Wix's business solution dashboards, like adding inventory insights to the Wix Stores inventory dashboard, or adding dynamic pricing tools to the Wix Bookings services dashboard. ### Add your pages and modals to Wix dashboard menus Want to add your dashboard pages or modals to Wix business solution menus? → Implement a [dashboard menu plugin extension](https://dev.wix.com/docs/build-apps/develop-your-app/extensions/dashboard-extensions/dashboard-plugins/dashboard-menu-plugins/dashboard-menu-plugin-extensions.md) to place your functionality directly in relevant menu sections of Wix business solutions. For example, add a "Tax Compliance" option to the Wix Stores product dashboard menu for instant access to sales tax calculation tools and reporting features, or a "Contact Engagement" option to the Contact dashboard menu where Wix users can instantly access engagement history for their contacts. > **Note**: Learn more about [plugins and menu plugins for dashboard pages](https://dev.wix.com/docs/build-apps/develop-your-app/extensions/dashboard-extensions/dashboard-plugins/supported-wix-app-dashboard-pages/about-dashboard-page-slots.md). ### Display custom modals Building a popup or modal experience that appears conditionally? → A [dashboard modal extension](https://dev.wix.com/docs/build-apps/develop-your-app/extensions/dashboard-extensions/dashboard-modals/about-dashboard-modals.md) creates popup interfaces perfect for setup wizards or detailed views within the dashboard environment. Launch a wizard, an optimization flow, and so much more. ## Enhancing backend capabilities These extensions allow your app to integrate with Wix's backend systems, enabling powerful functionality that works behind the scenes to enhance the site's capabilities. ### Implement custom business logic Need to inject custom logic or connect to external systems? → [Service plugin extensions](https://dev.wix.com/docs/build-apps/develop-your-app/extensions/backend-extensions/service-plugins/about-service-plugin-extensions.md) are the answer. These allow your app to integrate with Wix's business logic for capabilities like custom shipping calculations, third-party fulfillment, or specialized payment processing. For example, implement sophisticated tax calculation logic that applies the correct international tax rates based on customer location and product type, or create a custom order fulfillment system that routes orders to the optimal warehouse based on inventory levels, proximity to customer, and shipping cost optimization. ### Extend Wix’s data models Want to extend Wix's data models with additional information? → Implement [schema plugin extensions](https://dev.wix.com/docs/build-apps/develop-your-app/extensions/backend-extensions/schema-plugins/about-schema-plugin-extensions.md) to add custom fields to Wix entities. These are perfect for adding attributes to products, services, or customer profiles that Wix doesn't natively support. ### Send notifications to Wix users Have alerts for Wix users about important events or updates related to your app? → Use [notification extensions](https://dev.wix.com/docs/build-apps/develop-your-app/extensions/backend-extensions/schema-plugins/about-schema-plugin-extensions.md) to send customizable notifications to Wix users through their site dashboard and/or the Wix Owner mobile app. These are ideal for alerts about completed processes or time-sensitive information without requiring them to be actively using your app. ### Enable automations Want to enable Wix users to automate repetitive tasks related to your app's functionality? → Implement [automation extensions](https://dev.wix.com/docs/build-apps/develop-your-app/extensions/backend-extensions/automations/about-automations.md) to create triggers, actions, or [pre-installed automations](https://dev.wix.com/docs/build-apps/develop-your-app/extensions/backend-extensions/automations/pre-installed-automations/about-pre-installed-automations.md). This allows Wix users to automate processes like sending confirmation emails, updating records, or managing workflows when specific events occur. You can provide just the trigger (event detection), just the action (what happens), or complete pre-installed automations that combine both. ## Mixing and matching for complete solutions The true power of Wix's extension framework comes from combining different extension types to create comprehensive solutions. Most successful apps utilize multiple extension types to deliver seamless experiences. For example: - A customer loyalty app might use a site widget extension to display points on the site, a site plugin extension to integrate with checkout, a dashboard page extension for program management, a service plugin extension for points calculation logic, an automation extension to automatically notify customers of awarded points when purchases are made, and notification extensions to alert Wix users when a customer has reached reward thresholds. - An inventory management solution could combine a schema plugin extension for product data enhancement, a dashboard plugin extension for inventory controls within the Wix Stores interface, a service plugin extension to connect with external warehouse systems, and an automation extension to trigger reordering when stock levels are low. - A marketing tool might use embedded scripts for promotional popups, a dashboard page extension for campaign management, notification extensions to alert Wix users about campaign performance, and automation extensions to send targeted emails when visitors take specific actions on the site. ### Extension availability by framework Keep in mind that extension availability may vary depending on which Wix development framework you're using. Not all extensions are available in every framework. For a list of supported extensions by framework: - [Supported extensions in CLI](https://dev.wix.com/docs/wix-cli/guides/extensions/about-extensions.md) - [Supported extensions in Blocks](https://dev.wix.com/docs/build-apps/develop-your-app/develop-an-app-with-blocks/supported-extensions/about-extensions-in-blocks.md) - [Supported extensions for self-managed apps](https://dev.wix.com/docs/build-apps/develop-your-app/frameworks/self-hosting/supported-extensions/about-self-hosted-app-extensions.md) ## See also - [Choose the Right Wix Framework for Your App Development Needs](https://dev.wix.com/docs/build-apps/develop-your-app/frameworks/choose-the-right-wix-framework-for-your-app-development-needs.md) - [About development frameworks](https://dev.wix.com/docs/build-apps/develop-your-app/frameworks/about-development-frameworks.md) - [How apps extend Wix](https://dev.wix.com/docs/build-apps/get-started/overview/how-apps-extend-wix.md) --- > Portal Navigation: > > - Append `.md` to any URL under `https://dev.wix.com/docs/` to get its markdown version. > - Pages are either content pages (article or reference text) or menu pages (a list of links to child pages). > - To get a menu page, truncate any URL to a parent path and append `.md` (e.g. `https://dev.wix.com/docs/sdk.md`, `https://dev.wix.com/docs/sdk/core-modules.md`). > - Top-level index of all portals: https://dev.wix.com/docs/llms.txt > - Full concatenated docs: https://dev.wix.com/docs/llms-full.txt ## Resource: About Site Extensions ## Article: About Site Extensions ## Article Link: https://dev.wix.com/docs/build-apps/develop-your-app/extensions/site-extensions/about-site-extensions.md ## Article Content: # About Site Extensions Site extensions are front-facing interfaces that enhance Wix sites with additional functionality, such as adding site pages, widgets, Editor React Components, site plugins, and embedded scripts for custom HTML code. ## Site pages A site page extension adds a page to the user's site. The page can appear in the site's main navigation menu and behaves just like any other page. Site pages are composed of one or more of your app’s widgets, and can be comprised of elements like buttons, input fields, and images, widgets. ## Site widgets Site widgets are draggable UI components that Wix site owners can add to pages on their website. They enhance a site's functionality by displaying content or enabling site visitors to perform various tasks. When working in the site editor, site owners can adjust the size of the widget, reposition it, and customize it using its settings panel. Widgets can be added to your site by using [Wix Blocks](https://dev.wix.com/docs/build-apps/develop-your-app/develop-an-app-with-blocks/site-widgets/build-a-site-widget-in-blocks.md), [Wix CLI](https://dev.wix.com/docs/wix-cli/guides/extensions/site-extensions/site-widgets/add-a-site-widget-extension.md) or a [self-managed custom element](https://dev.wix.com/docs/build-apps/develop-your-app/frameworks/self-hosting/supported-extensions/site-extensions/site-widgets-and-plugins/add-self-hosted-site-widget-extensions-with-custom-elements.md). Site widgets are [sandboxed](https://dev.wix.com/docs/build-apps/develop-your-app/extensions/site-extensions/site-widgets/about-site-widget-extensions.md#sandboxing-in-the-editor) in the editor. Learn more about [handling sandboxing in the editor](https://dev.wix.com/docs/build-apps/develop-your-app/extensions/site-extensions/handle-sandboxing-in-the-editor.md). ## Editor React Components [Editor React Components](https://dev.wix.com/docs/build-apps/develop-your-app/extensions/site-extensions/editor-react-components/about-editor-react-components.md) are custom site widgets built in React for [Wix Harmony](https://dev.wix.com/docs/build-apps/get-started/overview/about-wix-harmony-and-apps.md), Wix's AI-powered editor. They're draggable components that Wix users can add to pages and customize through auto-generated settings panels derived from the component manifest. Editor React Components aren't supported on Wix Editor or Wix Studio sites. You can add Editor React Component extensions using the [Wix CLI](https://dev.wix.com/docs/build-apps/develop-your-app/develop-an-app-with-the-cli/supported-extensions/site/editor-react-components/add-an-editor-react-component-extension-with-the-wix-cli.md). To compare with custom element site widgets, see [Custom Elements vs. Editor React Components](https://dev.wix.com/docs/build-apps/develop-your-app/frameworks/wix-cli/supported-extensions/site/custom-elements-vs-editor-react-components.md). ## Site plugins With site plugins, you can create interactive and feature-rich widgets that seamlessly integrate into Wix’s [business solutions](https://support.wix.com/en/business-solutions-apps) such as Wix Stores and Wix Bookings, extending their functionality and user experience. Plugins are built using [Wix Blocks](https://dev.wix.com/docs/build-apps/develop-your-app/develop-an-app-with-blocks/about-wix-blocks.md), which offers powerful layout and design tools, and gives you access to Velo's full-stack development platform. Wix users can easily place plugins into predefined slots (UI placeholders) within Wix apps, using the [plugin explorer](https://dev.wix.com/docs/build-apps/develop-your-app/extensions/site-extensions/site-plugins/about-site-plugin-extensions.md) available in all Wix editors. Site plugins are [sandboxed](https://dev.wix.com/docs/build-apps/develop-your-app/extensions/site-extensions/site-plugins/about-site-plugin-extensions.md#sandboxing-in-the-editor) in the editor. Learn more about [handling sandboxing in the editor](https://dev.wix.com/docs/build-apps/develop-your-app/extensions/site-extensions/handle-sandboxing-in-the-editor.md). ## Embedded scripts An embedded script is an app extension that injects an HTML code fragment into the DOM of a site. Unlike other extensions, embedded scripts aren't fully configured by default during app installation and have an [additional setup](https://dev.wix.com/docs/build-apps/develop-your-app/extensions/site-extensions/embedded-scripts/about-embedded-scripts.md) step to embed the code fragment. For example, an embedded script can be used to listen for predefined Wix events, as well as to report and listen for custom events. ## See also - [About site pages](https://dev.wix.com/docs/build-apps/develop-your-app/extensions/site-extensions/site-pages/about-site-page-extensions.md) - [About site widgets](https://dev.wix.com/docs/build-apps/develop-your-app/extensions/site-extensions/site-widgets/about-site-widget-extensions.md) - [About Editor React Components](https://dev.wix.com/docs/build-apps/develop-your-app/extensions/site-extensions/editor-react-components/about-editor-react-components.md) - [About site plugins](https://dev.wix.com/docs/build-apps/develop-your-app/extensions/site-extensions/site-plugins/about-site-plugin-extensions.md) - [About embedded scripts](https://dev.wix.com/docs/build-apps/develop-your-app/extensions/site-extensions/embedded-scripts/about-embedded-scripts.md) --- > Portal Navigation: > > - Append `.md` to any URL under `https://dev.wix.com/docs/` to get its markdown version. > - Pages are either content pages (article or reference text) or menu pages (a list of links to child pages). > - To get a menu page, truncate any URL to a parent path and append `.md` (e.g. `https://dev.wix.com/docs/sdk.md`, `https://dev.wix.com/docs/sdk/core-modules.md`). > - Top-level index of all portals: https://dev.wix.com/docs/llms.txt > - Full concatenated docs: https://dev.wix.com/docs/llms-full.txt ## Resource: About MPA Architecture ## Article: About MPA Architecture ## Article Link: https://dev.wix.com/docs/build-apps/develop-your-app/extensions/site-extensions/about-mpa-architecture.md ## Article Content: # About MPA Architecture Wix sites use Multi-Page Application (MPA) architecture to deliver fast, reliable page loading. Understanding how MPA works helps you build [site extensions](https://dev.wix.com/docs/build-apps/develop-your-app/extensions/site-extensions/about-site-extensions.md) that perform optimally. > **Note:** MPA architecture is gradually replacing Single-Page Application (SPA) architecture across Wix sites. Build your site extensions for MPA architecture to ensure optimal performance. Extensions optimized for MPA architecture won't affect the performance of sites still using SPA architecture. ## What is MPA? MPA is a website architecture in which the browser loads a separate HTML document for each page. When site visitors navigate to different pages on a Wix site, the browser loads a new HTML document for each page, similar to traditional websites. This differs from SPAs, where only the initial page loads HTML, and subsequent navigation triggers API calls to update content dynamically. ## How MPA improves site visitor experience MPA architecture provides several benefits for Wix sites: - Faster navigation: Each page loads independently, preventing slow API calls from blocking the entire navigation experience. - Better performance measurement: Standard web performance metrics measure page navigations and include them in Core Web Vitals ([CrUX](https://developer.chrome.com/docs/crux)) data. - Improved reliability: Issues with individual pages don't affect a site's navigation performance. ## Building MPA-compatible site extensions When you develop site extensions, keep in mind that each page loads independently. When site visitors navigate between pages, navigation clears any data you store in memory. Use the [session storage API](https://dev.wix.com/docs/sdk/frontend-modules/storage/session.md) instead of [memory storage](https://dev.wix.com/docs/sdk/frontend-modules/storage/memory.md) to maintain data across page navigations. Session storage persists data throughout site visitors' browser sessions, ensuring your extension works seamlessly as site visitors move between pages on a site. ## Testing your app To test your site extensions with MPA navigation, add this query parameter to your site’s URL: `?experiments=specs.thunderbolt.forceMpaNavigation`. This forces MPA navigation even on sites that normally use SPA mode. Test page loads, reloads, and back navigation to confirm your extensions reinitialize or persist data as expected. ## See also - [About Site Extensions](https://dev.wix.com/docs/build-apps/develop-your-app/extensions/site-extensions/about-site-extensions.md) - [Storage SDK](https://dev.wix.com/docs/sdk/frontend-modules/storage/introduction.md) --- > Portal Navigation: > > - Append `.md` to any URL under `https://dev.wix.com/docs/` to get its markdown version. > - Pages are either content pages (article or reference text) or menu pages (a list of links to child pages). > - To get a menu page, truncate any URL to a parent path and append `.md` (e.g. `https://dev.wix.com/docs/sdk.md`, `https://dev.wix.com/docs/sdk/core-modules.md`). > - Top-level index of all portals: https://dev.wix.com/docs/llms.txt > - Full concatenated docs: https://dev.wix.com/docs/llms-full.txt ## Resource: Handle Sandboxing in the Editor ## Article: Handle Sandboxing in the Editor ## Article Link: https://dev.wix.com/docs/build-apps/develop-your-app/extensions/site-extensions/handle-sandboxing-in-the-editor.md ## Article Content: # Handle Sandboxing in the Editor [Site widgets](https://dev.wix.com/docs/build-apps/develop-your-app/extensions/site-extensions/site-widgets/about-site-widget-extensions.md) and [site plugins](https://dev.wix.com/docs/build-apps/develop-your-app/extensions/site-extensions/site-plugins/about-site-plugin-extensions.md) run in sandboxed environments when editing and previewing a site. This means they're treated as if they come from a different domain, and Wix does not support the `allow-same-origin` directive in the sandbox attribute. As a result, your site plugin or widget can't access same-origin resources in the editor. This restriction impacts several key web storage and caching APIs: * [Cookie Store API](https://developer.mozilla.org/en-US/docs/Web/API/Cookie_Store_API), such as [`document.cookie`](https://developer.mozilla.org/en-US/docs/Web/API/Document/cookie) * [Web Storage API](https://developer.mozilla.org/en-US/docs/Web/API/Web_Storage_API), such as [`Window.localStorage`](https://developer.mozilla.org/en-US/docs/Web/API/Window/localStorage) and [`Window.sessionStorage`](https://developer.mozilla.org/en-US/docs/Web/API/Window/sessionStorage) * [IndexedDB API](https://developer.mozilla.org/en-US/docs/Web/API/IndexedDB_API) * [Cache API](https://developer.mozilla.org/en-US/docs/Web/API/Cache) You may encounter additional issues: - [Chrome Local Network Access error](#chrome-local-network-access-error): Chrome may block rendering due to local network access restrictions. - [Failed access to browser APIs](#failed-access-to-browser-apis): certain browser APIs (like `localStorage`) are unavailable in the editor. - [CORS error](#cors-error): self-managed scripts may fail to load due to missing cross-origin headers.
__Important:__ The format of the Wix editor URL is changing due to new cookies introduced for authorization. The new URL format is `{username}-{sitename}.{editor|studio|harmony}.wix.com`. If your app uses CORS and whitelists specific origins, update your allowed origins to match the new format to avoid blocked requests.
## Chrome Local Network Access error In Chrome, you may encounter a Local Network Access permissions error when rendering site plugins in the editor. To resolve: 1. Navigate to `chrome://flags/#local-network-access-check`. 2. Disable the **Local Network Access Checks** setting. 3. Restart your browser. Disabling this permission may subject you to [certain security risks](https://developer.chrome.com/blog/local-network-access). ## Failed access to browser APIs When your widget runs in the editor or preview mode, some browser APIs are unavailable to access. If your code tries to access `localStorage`, cookies, or other restricted APIs without checking the current mode, it will throw runtime errors. The code examples in this task use the [Web Storage API `localStorage` property](https://developer.mozilla.org/en-US/docs/Web/API/Window/localStorage). However, you can apply these steps to all sandboxed browser APIs and properties. If you are working with the cookies API, make sure to comply with [GDPR and data protection regulations](https://dev.wix.com/docs/build-apps/launch-your-app/legal-and-security/gdpr-compliance/about-gdpr-and-data-protection.md). There are 2 ways to handle this issue: check the current mode before each API call, or create a reusable flag for multiple API calls. ### Option 1 | Check the current mode before a single API call 1. Import `window` from the [Site Window API](https://dev.wix.com/docs/sdk/frontend-modules/window/introduction.md). 2. Check the current mode with [`viewMode()`](https://dev.wix.com/docs/sdk/frontend-modules/window/view-mode.md) before accessing the browser API: ```javascript import { window } from "@wix/site-window"; if ((await window.viewMode()) === "Site") { const item = localStorage.getItem('myKey'); } else { // Mock storage or modify your API usage accordingly } ``` ### Option 2 | Create a reusable flag for multiple API calls 1. Import `window` from the [Site Window API](https://dev.wix.com/docs/sdk/frontend-modules/window/introduction.md). 2. Set a flag using [`viewMode()`](https://dev.wix.com/docs/sdk/frontend-modules/window/view-mode.md) to indicate if the current mode is site mode: ```javascript import { window } from "@wix/site-window"; const viewMode = await window.viewMode(); const isSiteMode = viewMode === "Site"; ``` 3. Use the flag before accessing browser APIs: ```javascript if (isSiteMode) { const item = localStorage.getItem('myKey'); } else { // Mock storage or modify your API usage accordingly } ``` ## CORS error When hosting your site widget script on a 3rd-party server (such as Netlify), you can encounter a CORS error: ```curl Access to script at 'https://example.com/assets/widget.js' from origin 'null' has been blocked by CORS policy: No 'Access-Control-Allow-Origin' header is present on the requested resource. ``` This error occurs because the widget runs in a sandboxed iframe context that has an opaque origin (`null`). The browser blocks cross-origin script requests unless the hosting server explicitly allows them. To fix this, configure your hosting provider or server to return the `Access-Control-Allow-Origin` header for your script files. Below is the example script for Netlify in the `netlify.toml` file: ```toml [[headers]] for = "/assets/*" [headers.values] Access-Control-Allow-Origin = "*" Access-Control-Allow-Methods = "GET, OPTIONS" ``` ## See also - [About Site Widget Extensions](https://dev.wix.com/docs/build-apps/develop-your-app/extensions/site-extensions/site-widgets/about-site-widget-extensions.md) - [About Site Plugin Extensions](https://dev.wix.com/docs/build-apps/develop-your-app/extensions/site-extensions/site-plugins/about-site-plugin-extensions.md) - [About the Site Window API](https://dev.wix.com/docs/sdk/frontend-modules/window/introduction.md) - [`viewMode()`](https://dev.wix.com/docs/sdk/frontend-modules/window/view-mode.md) --- > Portal Navigation: > > - Append `.md` to any URL under `https://dev.wix.com/docs/` to get its markdown version. > - Pages are either content pages (article or reference text) or menu pages (a list of links to child pages). > - To get a menu page, truncate any URL to a parent path and append `.md` (e.g. `https://dev.wix.com/docs/sdk.md`, `https://dev.wix.com/docs/sdk/core-modules.md`). > - Top-level index of all portals: https://dev.wix.com/docs/llms.txt > - Full concatenated docs: https://dev.wix.com/docs/llms-full.txt ## Resource: Migrate to a New Site Widget or Plugin Extension ## Article: Migrate to a New Site Widget or Plugin Extension ## Article Link: https://dev.wix.com/docs/build-apps/develop-your-app/extensions/site-extensions/migrate-to-a-new-site-widget-or-plugin-extension.md ## Article Content: # Migrate from a Previous Site Widget or Plugin Extension to an Updated Extension If you've built a new site widget or plugin extension to replace an existing one in your app, follow these instructions so Wix users can transition smoothly. You can't delete the old extension—doing so breaks the widget or plugin for everyone who already has it installed. Keep both extensions in your app: existing installations keep using the original, while new installations get the updated extension automatically.
__Important:__ Keep the previous extension in your app. Deleting it breaks the widget or plugin for Wix users who already installed it on their sites.
## Step 1 | Configure the previous extension Adjust the previous extension's installation settings so that new installs don't add it, while keeping it working for Wix users who already have it installed. To configure the previous extension: 1. In the [**app dashboard**](https://manage.wix.com/account/custom-apps), go to **Develop** > **Extensions** in the left menu. 2. Next to the previous site widget or plugin extension you want to replace, click **Configure**. 3. Configure the following: **For widgets:** * **Where is the widget added when the app is installed?**: Select **Not added automatically** so the widget isn't automatically added to sites that install your app later. * **Show this widget in the Add Elements panel**: Turn off this option so the previous widget doesn't appear in the **Add Elements** panel for Wix users. **For plugins:** * **Plugin name**: Rename the plugin and add "Old" or "Previous" to the name so the previous plugin doesn't appear as a viable option in the plugin explorer for Wix users. * **Add this plugin automatically**: Turn off this option so the plugin isn't automatically added to sites that install your app later. 4. Click **Save**. ## Step 2 | Notify Wix users who already installed the previous extension about the updated extension Tell Wix users who already have the previous extension installed that an updated version is available. You can show the message in either of these places: * **Settings panel:** Add a notification banner or message at the top of the previous extension's settings panel. * **In the extension:** Show a message inside the widget or plugin that's visible only in the editor, not on the live site. Your notification should: * Explain that an updated extension with improved features is available. * Tell Wix users where to find the updated extension: * For widgets: In the **Add Elements** panel * For plugins: In the plugin explorer * Provide instructions on how to replace the previous extension with the updated extension. ![Notification example](https://wixmp-833713b177cebf373f611808.wixmp.com/images/0c4c24b33b5210594f50794aef76cdf0.png) ## Step 3 | Configure the updated extension Configure the updated extension to be visible to Wix users and automatically added to sites when Wix users install your app for the first time. To configure the updated extension: 1. In the **app dashboard**, go to **Develop** > **Extensions** in the left menu. 2. Next to the updated site widget or plugin extension, click **Configure**. 3. Configure the following: **For widgets:** * **Where is the widget added when the app is installed?**: Select **Added to the site homepage** or **Added to a site page** to automatically add the widget when Wix users install your app for the first time. * **Show this widget in the Add Elements panel**: Turn on this option so the updated widget appears in the **Add Elements** panel. **For plugins:** * **Plugin name**: Ensure the plugin name doesn't include "Old" or "Previous" so it appears as a viable option in the plugin explorer. * **Add this plugin automatically**: Turn on this option and select the appropriate slot so the plugin is automatically added when Wix users install your app for the first time. 4. Configure the default preset and any other installation settings as needed. 5. Click **Save**. ## Step 4 | Release so both extension configurations take effect Release your app so the previous extension is hidden for new installs and the updated extension is available. When available, release as a minor version so that Wix users on the current major version immediately see the updated extension in the **Add Elements** panel for widgets or in the plugin explorer for plugins, and receive the update automatically. 1. If your app includes extensions built with Blocks, you need to release in the Blocks editor so those extension configurations take effect. See [Manage Blocks App Versions](https://dev.wix.com/docs/build-apps/develop-your-app/develop-an-app-with-blocks/deploy-and-manage-blocks-apps/manage-blocks-app-versions.md). 2. If your app includes extensions built with other frameworks, release using whichever method matches your app's framework: * **Self-managed:** Follow the steps in [Release a New App Version](https://dev.wix.com/docs/build-apps/manage-your-app/versioning/release-a-new-app-version.md). * **Wix CLI:** Run the [`wix release`](https://dev.wix.com/docs/wix-cli/command-reference/project-commands/release.md) command. > __Note:__ If **Minor version** isn't available or appropriate for your changes, you may need to release a **Major version**. However, major updates require Wix user action to install, so use the major version option only when necessary. ## Special considerations ### For legacy custom element widgets and iframes Legacy custom element widgets and iframe components don't show in the **Add Elements** panel by default. To mark these as not added to the site, [contact Wix support](https://www.wix.com/support-chatbot?nodeId=25a57397-ccf7-4376-8b74-48d51edf7159&referral=devRels) for assistance. ## See also - [About site widget extensions](https://dev.wix.com/docs/build-apps/develop-your-app/extensions/site-extensions/site-widgets/about-site-widget-extensions.md) - [About app versioning](https://dev.wix.com/docs/build-apps/manage-your-app/versioning/about-app-versioning.md) - [Release a new app version](https://dev.wix.com/docs/build-apps/manage-your-app/versioning/release-a-new-app-version.md) --- > Portal Navigation: > > - Append `.md` to any URL under `https://dev.wix.com/docs/` to get its markdown version. > - Pages are either content pages (article or reference text) or menu pages (a list of links to child pages). > - To get a menu page, truncate any URL to a parent path and append `.md` (e.g. `https://dev.wix.com/docs/sdk.md`, `https://dev.wix.com/docs/sdk/core-modules.md`). > - Top-level index of all portals: https://dev.wix.com/docs/llms.txt > - Full concatenated docs: https://dev.wix.com/docs/llms-full.txt ## Resource: Create a Settings Panel for a Site Widget or Plugin (Wix CLI and Self-Hosting) ## Article: Create a Settings Panel for a Site Widget or Plugin (Wix CLI and Self-Hosting) ## Article Link: https://dev.wix.com/docs/build-apps/develop-your-app/extensions/site-extensions/create-a-settings-panel-for-a-site-widget-or-plugin-wix-cli-and-self-hosting.md ## Article Content: # Create a Settings Panel for a Site Widget or Plugin When creating a [self-managed site widget](https://dev.wix.com/docs/build-apps/develop-your-app/frameworks/self-hosting/supported-extensions/site-extensions/site-widgets-and-plugins/add-self-hosted-site-widget-extensions-with-custom-elements.md), a [self-managed site plugin](https://dev.wix.com/docs/build-apps/develop-your-app/develop-a-self-managed-app/supported-extensions/site-extensions/site-widgets-and-plugins/add-site-plugin-extensions-with-custom-elements.md), a [site widget built with the CLI](https://dev.wix.com/docs/wix-cli/guides/extensions/site-extensions/about-site-extensions.md#custom-element-site-widget-extensions), or a [site plugin built with the CLI for Apps](https://dev.wix.com/docs/build-apps/develop-your-app/frameworks/wix-cli/supported-extensions/site-extensions/site-plugins/add-a-site-plugin-extension-in-the-cli.md), you also need to create a settings panel, enabling users to customize the widget or plugin in the editor. The settings panel is displayed when users click the **Settings** button in the widget or plugin’s action bar. It's rendered as an iframe, giving you the flexibility to build it using any tools or frameworks you choose. > **Note**: For site widgets created with Wix Blocks, you can build [custom panels](https://dev.wix.com/docs/build-apps/develop-your-app/develop-an-app-with-blocks/editor-experience-panels/about-panels-in-blocks.md) directly within the Blocks editor. ## Design the settings panel When designing your settings panel's UI, ensure it is intuitive and user-friendly. Consider using the [Wix Design System](https://dev.wix.com/docs/build-apps/develop-your-app/design/about-the-wix-design-system.md) to maintain a cohesive design. Use components such as: * [`SidePanel`](https://www.wix-pages.com/wix-design-system/?path=/story/components-overlays--sidepanel#Settings_panel) to create a structured layout. * [`FormField`](https://www.wix-pages.com/wix-design-system/?path=/story/components-form--formfield) and input components to collect user input effectively. These tools help you design a panel that aligns with the overall Wix editor experience. ## Code the settings panel In the panel’s code, use Wix's [JavaScript SDK](https://dev.wix.com/docs/sdk.md) to [access widget properties](https://dev.wix.com/docs/sdk/host-modules/editor/widget/introduction.md) and [retrieve environmental data from the editor](https://dev.wix.com/docs/sdk/host-modules/editor/info/introduction.md), as well as access and manage Wix business solutions. To apply changes made in the settings panel to the widget, use the Widget API’s [`setProp()`](https://dev.wix.com/docs/sdk/host-modules/editor/widget/set-prop.md) function. Widget properties are bound to your custom element’s attributes, so any change in the properties automatically updates the corresponding attribute. To handle attribute updates so they are reflected in your widget in the editor, use the [`attributeChangedCallback()`](https://developer.mozilla.org/en-US/docs/Web/API/Web_components/Using_custom_elements#responding_to_attribute_changes) in your custom element's code. Here is a sample code snippet showing how to update a custom element’s attribute: ```js import { editor, widget } from '@wix/editor'; import { createClient } from '@wix/sdk'; const client = createClient({ host: editor.host(), modules: { widget } }); // Get the value of the settings panel's input control const id = 'color_input'; const element = document.getElementById(id); const val = element.value; // Update the custom element's 'color' attribute client.widget.setProp('color', val); ``` ## Integrate Wix's native color and font pickers Enhance the user experience by integrating Wix's native color and font pickers. These tools allow users to select from their site’s theme colors and fonts, ensuring consistency with the site's design. Learn more about [using Wix's color and font pickers](https://dev.wix.com/docs/build-apps/develop-your-app/extensions/site-extensions/site-widgets/integrate-wix-s-native-color-and-font-pickers-in-a-site-widget-s-settings-panel.md). ## Connect widget colors and fonts to a site theme Wix sites expose theme styles as CSS variables, which include tokens for colors and fonts. These variables enable your widget to automatically adopt the site’s theme, ensuring seamless visual integration. Learn more about [connecting colors and fonts to a site theme](https://dev.wix.com/docs/build-apps/develop-your-app/extensions/site-extensions/site-widgets/connect-a-custom-element-s-colors-and-fonts-to-a-site-theme.md). ## Identify your widget's app instance An [app instance](https://dev.wix.com/docs/build-apps/develop-your-app/access/app-instances/about-app-instances.md) represents a specific installation of your app on a Wix site, identified by a unique `instanceId`. You may need the instance ID for various purposes, such as: * **Storing Site-Specific Data**: Use the `instanceId` as a foreign key to save data like user preferences or analytics. * **Configuring Settings**: Apply site-specific configurations such as design settings and integration preferences. --- > Portal Navigation: > > - Append `.md` to any URL under `https://dev.wix.com/docs/` to get its markdown version. > - Pages are either content pages (article or reference text) or menu pages (a list of links to child pages). > - To get a menu page, truncate any URL to a parent path and append `.md` (e.g. `https://dev.wix.com/docs/sdk.md`, `https://dev.wix.com/docs/sdk/core-modules.md`). > - Top-level index of all portals: https://dev.wix.com/docs/llms.txt > - Full concatenated docs: https://dev.wix.com/docs/llms-full.txt ## Resource: Custom Elements vs. Editor React Components ## Article: Choose Custom Elements or Editor React Components for Your App ## Article Link: https://dev.wix.com/docs/build-apps/develop-your-app/extensions/site-extensions/custom-elements-vs-editor-react-components.md ## Article Content: # Custom Elements vs. Editor React Components [Custom elements](https://dev.wix.com/docs/wix-cli/guides/extensions/site-extensions/custom-elements/add-a-custom-element-extension.md) and [Editor React Components](https://dev.wix.com/docs/build-apps/develop-your-app/extensions/site-extensions/editor-react-components/about-editor-react-components.md) are two ways to build interactive components that Wix users can add to their sites. Custom elements work across all Wix editors, while Editor React Components are designed for Wix Harmony, Wix's AI-powered editor. ## Comparison at a glance | | Custom Elements | Editor React Components | |---|---|---| | **Editor support** | Wix Studio, Wix Editor, Wix Harmony | Wix Harmony | | **Panels & controls** | You must build them from scratch | Automatically generated from the component manifest | | **AI-first features** | No | Yes | ## Custom Elements Custom elements use the web components standard to build interactive components with custom HTML elements. Accompanying settings panels must be built manually. Custom elements are available on Wix Studio, Wix Editor, and Wix Harmony. Best for apps that need to reach users across all Wix editors. Learn more about [building with custom elements](https://dev.wix.com/docs/wix-cli/guides/extensions/site-extensions/custom-elements/add-a-custom-element-extension.md). ## Editor React Components Editor React Components are an AI-first feature available exclusively to developers [building apps for Wix Harmony](https://dev.wix.com/docs/build-apps/get-started/overview/about-wix-harmony-and-apps.md), Wix's new AI-powered site editor. Harmony is built on a technical architecture that's different from previous editors, and Editor React Components are designed to take full advantage of it. Editor React Components use the React framework to build components that give third-party developers the same panels, controls, and capabilities available to internal Wix developers. Settings panels and controls are automatically generated from the component manifest, meaning full parity with native Wix components, easier theme connections, and the ability to create highly customized experiences with standard React and CSS patterns. Learn more about [building with Editor React Components](https://dev.wix.com/docs/build-apps/develop-your-app/develop-an-app-with-the-cli/supported-extensions/site/editor-react-components/add-an-editor-react-component-extension-with-the-wix-cli.md). ## See also - [About Site Extensions in the Wix CLI](https://dev.wix.com/docs/wix-cli/guides/extensions/site-extensions/about-site-extensions.md) - [Create a Settings Panel for a Custom Element](https://dev.wix.com/docs/build-apps/develop-your-app/extensions/site-extensions/site-widgets/create-a-settings-panel-for-a-site-widget-or-plugin-wix-cli-and-self-hosting.md) --- > Portal Navigation: > > - Append `.md` to any URL under `https://dev.wix.com/docs/` to get its markdown version. > - Pages are either content pages (article or reference text) or menu pages (a list of links to child pages). > - To get a menu page, truncate any URL to a parent path and append `.md` (e.g. `https://dev.wix.com/docs/sdk.md`, `https://dev.wix.com/docs/sdk/core-modules.md`). > - Top-level index of all portals: https://dev.wix.com/docs/llms.txt > - Full concatenated docs: https://dev.wix.com/docs/llms-full.txt ## Resource: About Site Page Extensions ## Article: About Site Page Extensions ## Article Link: https://dev.wix.com/docs/build-apps/develop-your-app/extensions/site-extensions/site-pages/about-site-page-extensions.md ## Article Content: # About Site Page Extensions A site page extension adds a full page to the user's site. The page can appear in the site's main navigation menu and behaves just like any other page. Learn more about [how site owners manage pages](https://support.wix.com/en/article/wix-editor-managing-your-sites-pages). Your app's site pages are structured as a series of [sections](https://support.wix.com/en/article/wix-editor-adding-and-setting-up-sections), each containing a [site widget](https://dev.wix.com/docs/build-apps/develop-your-app/extensions/site-extensions/site-widgets/about-site-widget-extensions.md). A page can contain as many widgets as you like. This means that before setting up a page, your app must have at least one widget. ![site page app](https://wixmp-833713b177cebf373f611808.wixmp.com/images/63788024676d56b25d96513bea0e5d01.png) You can add multiple pages to your app. You must assign a unique ID to each page you add, which is used when referring to the page in code. When your app is installed on a site, the ID is also used as the page's default [URL slug](https://support.wix.com/en/article/wix-editor-changing-your-page-url). When setting up the page extension, you can determine whether site owners are able to duplicate the page and whether to add it automatically to the site menu after installation. > **Note**: Your app can automatically add a page only to a [regular site menu](https://support.wix.com/en/article/wix-editor-adding-a-site-menu) in the Wix Editor. It cannot add a page to [advanced menus](https://support.wix.com/en/article/wix-editor-adding-and-setting-up-advanced-menus) or to [menus in Wix Studio](https://support.wix.com/en/article/studio-editor-designing-menus). ## Implementation options Once you've created your [site widgets](https://dev.wix.com/docs/build-apps/develop-your-app/extensions/site-extensions/site-widgets/about-site-widget-extensions.md), setting up a site page extension only requires configuration in your app's dashboard, with no coding involved. Add a site page extension to your app by [setting it up in your app's dashboard](https://dev.wix.com/docs/build-apps/develop-your-app/extensions/site-extensions/site-pages/add-a-site-page-extension.md). --- > Portal Navigation: > > - Append `.md` to any URL under `https://dev.wix.com/docs/` to get its markdown version. > - Pages are either content pages (article or reference text) or menu pages (a list of links to child pages). > - To get a menu page, truncate any URL to a parent path and append `.md` (e.g. `https://dev.wix.com/docs/sdk.md`, `https://dev.wix.com/docs/sdk/core-modules.md`). > - Top-level index of all portals: https://dev.wix.com/docs/llms.txt > - Full concatenated docs: https://dev.wix.com/docs/llms-full.txt ## Resource: Add a Site Page Extension ## Article: Add a Site Page Extension ## Article Link: https://dev.wix.com/docs/build-apps/develop-your-app/extensions/site-extensions/site-pages/add-a-site-page-extension.md ## Article Content: # Add a Site Page Extension A [site page extension](https://dev.wix.com/docs/build-apps/develop-your-app/extensions/site-extensions/site-pages/about-site-page-extensions.md) adds a full page to the user's site.
__Important:__ A site page is structured as a series of [sections](https://support.wix.com/en/article/wix-editor-adding-and-setting-up-sections), each containing a [site widget](https://dev.wix.com/docs/build-apps/develop-your-app/extensions/site-extensions/site-widgets/about-site-widget-extensions.md). This means that before setting up a page, your app must already have at least one widget.
To create a site page extension: 1. In the [Custom Apps page](https://manage.wix.com/account/custom-apps), select an existing app that contains site widgets. 2. In the left menu, select **Develop > Extensions**. 3. Click **Create Extension** and select **Site Page**. 4. Configure the page’s settings: * **Page name**: This name will appear in the site's Pages panel. * **Page ID**: The ID will be used to refer to the page in code, and will also become the default URL slug. * Select whether to prevent users from duplicating the page. * Select whether to add the page automatically to the site menu after installation. > **Note**: Your app can automatically add a page only to a [regular site menu](https://support.wix.com/en/article/wix-editor-adding-a-site-menu) in the Wix Editor. It cannot add a page to [advanced menus](https://support.wix.com/en/article/wix-editor-adding-and-setting-up-advanced-menus) or to [menus in Wix Studio](https://support.wix.com/en/article/studio-editor-designing-menus). 5. To define which widgets to include in the page, click **+ Add Widgets** and select any of your app’s widgets. Each widget will be added to the page in its own section in the order that you defined. > **Note**: If you include a widget that is set as [essential to your app's functionality](https://dev.wix.com/docs/build-apps/develop-your-app/extensions/site-extensions/site-widgets/about-site-widget-extensions.md#essential-widgets), deleting the page from a site will delete the entire app. 6. Click **Save**. --- > Portal Navigation: > > - Append `.md` to any URL under `https://dev.wix.com/docs/` to get its markdown version. > - Pages are either content pages (article or reference text) or menu pages (a list of links to child pages). > - To get a menu page, truncate any URL to a parent path and append `.md` (e.g. `https://dev.wix.com/docs/sdk.md`, `https://dev.wix.com/docs/sdk/core-modules.md`). > - Top-level index of all portals: https://dev.wix.com/docs/llms.txt > - Full concatenated docs: https://dev.wix.com/docs/llms-full.txt ## Resource: About Site Lightbox Extensions ## Article: About Site Lightbox Extensions ## Article Link: https://dev.wix.com/docs/build-apps/develop-your-app/extensions/site-extensions/site-lightboxes/about-site-lightbox-extensions.md ## Article Content: # About Site Popup Extensions > **Note:** The terms popup and lightbox refer to the same element. While the editor and dashboard now refer to it as a [popup](https://support.wix.com/en/article/studio-editor-using-popups), the API methods continue to use the term lightbox for backward compatibility. The documentation uses both terms accordingly. A site popup extension adds a popup to the user's site, enabling your app to grab site visitors' attention and showcase important announcements or information. The popup can also appear in the site's navigation menu and behaves like any other popup. You can add multiple popups to your app. Learn more about [how site owners manage popups](https://support.wix.com/en/article/studio-editor-using-popups). The content of a popup extension is composed of one of your app's [site widgets](https://dev.wix.com/docs/build-apps/develop-your-app/extensions/site-extensions/site-widgets/about-site-widget-extensions.md). This means that before setting up a site popup extension, your app must have at least one widget. The popup content is surrounded by a background overlay, which blocks out the site page so that visitors can't click or interact with the site. This helps them focus on the popup. The following example shows a site popup: ![popup](https://wixmp-833713b177cebf373f611808.wixmp.com/images/25c16cad8c70a620ec33322300558d43.png) When setting up the popup extension, you can configure the default methods for site visitors to close the popup. The following options are available: * Clicking the overlay background behind the popup. * Clicking an 'X' button. When selected, an 'X' button is added to the top right corner of the popup. When testing your popup, make sure that the 'X' does not interfere with your design, as shown in the following image: ![popup](https://wixmp-833713b177cebf373f611808.wixmp.com/images/01fb7e8f3f625877bb3b56927bd5c52c.png) ## Implementation options Once you've created your [site widget](https://dev.wix.com/docs/build-apps/develop-your-app/extensions/site-extensions/site-widgets/about-site-widget-extensions.md), setting up a site popup extension only requires configuration in your app's dashboard, with no coding involved. Add a site popup extension to your app by [setting it up in your app's dashboard](https://dev.wix.com/docs/build-apps/develop-your-app/extensions/site-extensions/about-site-extensions.md). ## Open and close a popup from your app's code Your app can trigger the popup from code in its other app extensions, such as a site widget or an embedded script. To do this, use the [`openLightbox()`](https://dev.wix.com/docs/sdk/frontend-modules/window/open-lightbox.md) method. This method requires the unique extension ID of the popup. You can obtain the extension ID by clicking **Copy extension ID** in the ![more-actions](https://wixmp-833713b177cebf373f611808.wixmp.com/images/b8863ab2de70563b18ead3fb12c778dc.png) More Actions menu of your popup extensions in the **Extensions** page of you app dashboard. To close the popup from its own code, use the [`lightbox.close()`](https://dev.wix.com/docs/sdk/frontend-modules/window/lightbox/close.md) method. For example, you can add a button inside the popup that calls the `close()` method and passes data back to the code that initially opened it. ### Code example The following example demonstrates how to use a popup to confirm user details before submission: * The widget collects user details and opens a popup for confirmation. * The popup displays the details and provides a **Confirm** button. * When the user clicks **Confirm**, the popup closes and sends a confirmation response to the widget. * If the user cancels, the widget receives a cancellation response. **Widget code (opens a popup and sends user data)** ```js import { lightbox } from '@wix/site-window'; // Function triggered when the "Open" button is clicked export function openButton_click(event) { // Prepare user data to send to the lightbox (popup) const userData = { name: "John Doe", email: "johndoe@example.com" }; // Open the lightbox (popup) and pass user data lightbox.open({ extensionId: "52e53dff-27eb-4b5f-b6b8-4956bcadaea1", data: { userData } }) .then((data) => { if (data?.confirmed) { console.log("User confirmed details. Proceeding with submission..."); // Submit the form or take further action } else { console.log("User canceled confirmation."); } }); } ``` **Popup code (displays and returns the confirmation status)** ```js import { lightbox } from '@wix/site-window'; // Retrieve user data passed from the widget const { userData } = lightbox.getContext() || {}; console.log("Received user data:", userData); // Function triggered when the "Confirm" button is clicked export function confirmButton_click(event) { // Close the lightbox (popup) and return a confirmation response lightbox.close({ confirmed: true }); } // Function triggered when the "Cancel" button is clicked export function cancelButton_click(event) { // Close the lightbox (popup) and return a cancellation response lightbox.close({ confirmed: false }); } ``` --- > Portal Navigation: > > - Append `.md` to any URL under `https://dev.wix.com/docs/` to get its markdown version. > - Pages are either content pages (article or reference text) or menu pages (a list of links to child pages). > - To get a menu page, truncate any URL to a parent path and append `.md` (e.g. `https://dev.wix.com/docs/sdk.md`, `https://dev.wix.com/docs/sdk/core-modules.md`). > - Top-level index of all portals: https://dev.wix.com/docs/llms.txt > - Full concatenated docs: https://dev.wix.com/docs/llms-full.txt ## Resource: Add a Site Lightbox Extension ## Article: Add a Site Lightbox Extension ## Article Link: https://dev.wix.com/docs/build-apps/develop-your-app/extensions/site-extensions/site-lightboxes/add-a-site-lightbox-extension.md ## Article Content: # Add a Site Popup Extension A [site popup extension](https://dev.wix.com/docs/build-apps/develop-your-app/extensions/site-extensions/about-site-extensions.md) adds a pop-up to the user's site.
**Important:** The content of a popup extension is composed of one of your app's [site widgets](https://dev.wix.com/docs/build-apps/develop-your-app/extensions/site-extensions/site-widgets/about-site-widget-extensions.md). This means that before setting up a popup, your app must already have at least one widget.
To create a site popup extension: 1. In the [Custom Apps page](https://manage.wix.com/account/custom-apps), select an existing app that contains site widgets. 2. In the left menu, select **Extensions**. 3. Click **Create Extension** and select **Site Popup**. 4. Enter a name for the popup. This name will appear in the site's Pages panel. 5. Configure the options for closing the popup: * Select whether site visitors can close it by clicking the overlay background behind the popup. * Select whether site visitors can close it by clicking an 'X' button. When selected, an 'X' button is added to the top right corner of the popup. When testing your popup, make sure that the 'X' does not interfere with your design. > **Note**: If you haven't set up a way to [close the popup in its code](https://dev.wix.com/docs/build-apps/develop-your-app/extensions/site-extensions/about-site-extensions.md#open-and-close-a-popup-from-your-app's-code), we recommend selecting at least one of these options. 6. To define the widget that will appear in the popup, click **+ Add Widget** and select any of your app's widgets. > **Note**: If you include a widget that is set as [essential to your app's functionality](https://dev.wix.com/docs/build-apps/develop-your-app/extensions/site-extensions/site-widgets/about-site-widget-extensions.md#essential-widgets), deleting the popup from a site will delete the entire app. 7. Click **Save**. --- > Portal Navigation: > > - Append `.md` to any URL under `https://dev.wix.com/docs/` to get its markdown version. > - Pages are either content pages (article or reference text) or menu pages (a list of links to child pages). > - To get a menu page, truncate any URL to a parent path and append `.md` (e.g. `https://dev.wix.com/docs/sdk.md`, `https://dev.wix.com/docs/sdk/core-modules.md`). > - Top-level index of all portals: https://dev.wix.com/docs/llms.txt > - Full concatenated docs: https://dev.wix.com/docs/llms-full.txt ## Resource: About Site Widget Extensions ## Article: About Site Widget Extensions ## Article Link: https://dev.wix.com/docs/build-apps/develop-your-app/extensions/site-extensions/site-widgets/about-site-widget-extensions.md ## Article Content: # About Site Widget Extensions Site widgets are draggable UI components that Wix site owners can add to pages on their website. They enhance a site's functionality by displaying content or enabling site visitors to perform various tasks. When working in the site editor, site owners can adjust the size of the widget, reposition it, and customize it. ## Implementation options You can add a site widget extension using: * [Wix Blocks](https://dev.wix.com/docs/build-apps/develop-your-app/develop-an-app-with-blocks/site-widgets/build-a-site-widget-in-blocks.md): Create a site widget in Wix's native app editor. Design your widget using visual layout and design tools, and code your business logic using Velo, Wix's native coding solution. * [Wix CLI](https://dev.wix.com/docs/build-apps/develop-your-app/develop-an-app-with-the-cli/supported-extensions/site/custom-elements/add-a-custom-element-extension-with-the-wix-cli.md): Create a site widget using the CLI, with your code by default deployed on our servers. The creation and setup process of your widget takes place in the terminal. Then, to edit your widget, you write code directly in your CLI app project's files. * [Self-managed custom element](https://dev.wix.com/docs/build-apps/develop-your-app/frameworks/self-hosting/supported-extensions/site-extensions/site-widgets-and-plugins/add-self-hosted-site-widget-extensions-with-custom-elements.md): Create a site widget using custom element technology, with your code deployed on your own server. The custom element is essentially a new HTML tag that you define, which is made available in the Wix editors as a widget. * [Editor React Components](https://dev.wix.com/docs/build-apps/develop-your-app/develop-an-app-with-the-cli/supported-extensions/site/editor-react-components/add-an-editor-react-component-extension-with-the-wix-cli.md): An AI-first feature available exclusively on Wix Harmony. Build site widgets using the React framework with the same panels, controls, and capabilities available to internal Wix developers. ### Choosing your implementation Here are some factors to consider when choosing which implementation to work with: * Site widgets currently can't be pinned to a specific location on a page. If your app requires this, best to use an [embedded script component](https://dev.wix.com/docs/build-apps/develop-your-app/extensions/site-extensions/embedded-scripts/about-embedded-scripts.md). * Site widgets built with Wix Blocks support all the functionality available in [Wix's editor elements](https://support.wix.com/en/article/studio-editor-adding-elements-4240855#types-of-elements). If your extension should include functionality that isn't supported, use the [Wix CLI](https://dev.wix.com/docs/wix-cli/guides/extensions/site-extensions/site-widgets/add-a-site-widget-extension.md) or a [self-managed custom element](https://dev.wix.com/docs/build-apps/develop-your-app/develop-a-self-managed-app/supported-extensions/site-extensions/site-widgets-and-plugins/add-self-managed-site-widget-extensions-with-custom-elements.md). * Site widgets built with [Wix Blocks](https://dev.wix.com/docs/build-apps/develop-your-app/develop-an-app-with-blocks/site-widgets/build-a-site-widget-in-blocks.md) can connect to a site's color and typography themes, and support advanced capabilities for configuring the widget customization experience in the editor. * Editor React Components are only supported on Wix Harmony. * For a detailed comparison of custom elements and Editor React Components, see [Custom Elements vs. Editor React Components](https://dev.wix.com/docs/build-apps/develop-your-app/extensions/site-extensions/custom-elements-vs-editor-react-components.md).
**Editor compatibility** Wix Blocks apps aren't supported in the Wix Harmony editor. Existing Blocks apps remain available for purchase on the Wix App Market for Wix Editor and Wix Studio sites. To learn more, see [About Wix Harmony and Blocks](https://dev.wix.com/docs/build-apps/develop-your-app/develop-an-app-with-blocks/about-wix-harmony-and-blocks.md).
## Interact with a user site The way to interact with a user site from your site widget extension depends on your implementation. For widgets created with Blocks, use [Velo](https://dev.wix.com/docs/velo.md). For widgets created via the CLI, use the [Site API](https://dev.wix.com/docs/sdk/host-modules/site/introduction.md). > **Note:** Most widget types can't call Wix APIs while being previewed in the site editor. Editor React Components are the exception and can call platformized APIs in the site editor. ## Essential widgets An essential widget is crucial to your app's functionality. You can [set a widget to be essential](https://dev.wix.com/docs/build-apps/develop-your-app/extensions/site-extensions/site-pages/add-a-site-page-extension.md) only if the widget is added as part of a [site page extension](https://dev.wix.com/docs/build-apps/develop-your-app/extensions/site-extensions/site-pages/about-site-page-extensions.md). Deleting an essential widget from a site or deleting the section or page that contains it deletes the entire app. Wix users can add an essential widget to a site only once and can't duplicate it. > **Note**: Essential widgets are not available for Editor React Components. ## Sandboxing in the editor > **Note**: Essential widgets are not available for Editor React Components. You can set a widget to be essential only if the widget is added as part of a [site page extension](https://dev.wix.com/docs/build-apps/develop-your-app/extensions/site-extensions/site-pages/about-site-page-extensions.md).
__Important:__ The format of the Wix editor URL is changing due to new cookies introduced for authorization. The new URL format is `{username}-{sitename}.{editor|studio|harmony}.wix.com`. If your app uses CORS and whitelists specific origins, update your allowed origins to match the new format to avoid blocked requests.
Learn more about [handling sandboxing in the editor](https://dev.wix.com/docs/build-apps/develop-your-app/extensions/site-extensions/handle-sandboxing-in-the-editor.md). --- > Portal Navigation: > > - Append `.md` to any URL under `https://dev.wix.com/docs/` to get its markdown version. > - Pages are either content pages (article or reference text) or menu pages (a list of links to child pages). > - To get a menu page, truncate any URL to a parent path and append `.md` (e.g. `https://dev.wix.com/docs/sdk.md`, `https://dev.wix.com/docs/sdk/core-modules.md`). > - Top-level index of all portals: https://dev.wix.com/docs/llms.txt > - Full concatenated docs: https://dev.wix.com/docs/llms-full.txt ## Resource: Display a Site Widget in the Add Panel and Site Dashboard ## Article: Display a Custom Element Site Widget in the Add Elements Panel ## Article Link: https://dev.wix.com/docs/build-apps/develop-your-app/extensions/site-extensions/site-widgets/display-a-site-widget-in-the-add-panel-and-site-dashboard.md ## Article Content: # Display a Site Widget in the Add Panel and Site Dashboard You can display your [site widget](https://dev.wix.com/docs/build-apps/develop-your-app/extensions/site-extensions/site-widgets/about-site-widget-extensions.md) in the following areas: * The **Add Elements** panel in the site editor. * The **Manage Apps** page in the site dashboard. > **Note**: [Essential widgets](https://dev.wix.com/docs/build-apps/develop-your-app/extensions/site-extensions/site-widgets/about-site-widget-extensions.md#essential-widgets) are automatically added to a site when an app is installed and can only appear once, so they don't appear in the **Add Elements** panel or the **Manage Apps** page. When creating your site widget, configure the following content: * A short description of the widget's functionality, which appears in an info tooltip. * A preview image showcasing the widget's appearance. Learn more about creating a custom element site widget: * [Add a Custom Element Site Widget Extension in the CLI](https://dev.wix.com/docs/wix-cli/guides/extensions/site-extensions/site-widgets/add-a-site-widget-extension.md) * [Add Self-Managed Site Widget Extensions with Custom Elements](https://dev.wix.com/docs/build-apps/develop-your-app/frameworks/self-hosting/supported-extensions/site-extensions/site-widgets-and-plugins/add-self-hosted-site-widget-extensions-with-custom-elements.md#add-self-hosted-site-widget-extensions-with-custom-elements) ## Add Elements panel Your widget appears in the panel's **App Widgets** section. Wix users can find it there and add it to any page on a site. The following image shows how a widget appears in the panel: ![widget-add-panel](https://wixmp-833713b177cebf373f611808.wixmp.com/images/8db1263882dbd1393c1f2e73ea87353a.png) ## Manage Apps page Your widget appears in the **Manage Apps** page of the site dashboard. Wix users can find it listed under your app and add it to any page on a site. The following image shows how a widget appears in the Manage Apps page: ![widget-manage-apps](https://wixmp-833713b177cebf373f611808.wixmp.com/images/66f8e70e5f97754325e6b77a139d4167.png) ## Guidelines for creating a preview image The preview image you provide appears in both the **Add Elements** panel and the **Manage Apps** page. When creating your preview image, keep the following content and technical guidelines in mind. ### Content guidelines * The image should be a visual representation of the preset. It's not a banner or an ad. * If your widget displays dynamic content, include dummy content but avoid Lorem Ipsum. ### Technical guidelines * Use a screenshot of the widget to capture its actual dimensions and original pixel size. * Save at the highest quality and avoid compression. * Supported formats: JPG or PNG --- > Portal Navigation: > > - Append `.md` to any URL under `https://dev.wix.com/docs/` to get its markdown version. > - Pages are either content pages (article or reference text) or menu pages (a list of links to child pages). > - To get a menu page, truncate any URL to a parent path and append `.md` (e.g. `https://dev.wix.com/docs/sdk.md`, `https://dev.wix.com/docs/sdk/core-modules.md`). > - Top-level index of all portals: https://dev.wix.com/docs/llms.txt > - Full concatenated docs: https://dev.wix.com/docs/llms-full.txt ## Resource: Integrate Wix's Native Color and Font Pickers in a Site Widget's Settings Panel ## Article: Allow Users to Choose Colors and Fonts in Wix's Editors ## Article Link: https://dev.wix.com/docs/build-apps/develop-your-app/extensions/site-extensions/site-widgets/integrate-wix-s-native-color-and-font-pickers-in-a-site-widget-s-settings-panel.md ## Article Content: # Integrate Wix's Native Color and Font Pickers in a Site Widget's Settings Panel When creating a settings panel for a [self-managed site widget](https://dev.wix.com/docs/build-apps/develop-your-app/frameworks/self-hosting/supported-extensions/site-extensions/site-widgets-and-plugins/add-self-hosted-site-widget-extensions-with-custom-elements.md) or a [site widget built with the CLI](https://dev.wix.com/docs/wix-cli/guides/extensions/site-extensions/site-widgets/add-a-site-widget-extension.md), you can integrate Wix's native color and font pickers. These tools also allow users to select from their site's theme colors and fonts, ensuring seamless alignment with the site's design. If a user selects a theme color or font, your widget's style will automatically update whenever users modify their site's theme settings. ## Integrate the color picker in your settings panel Wix's native color picker allows users to easily select colors from their site's theme colors or pick a custom color. This can be especially useful for widgets that need to maintain design consistency with the rest of the site. ![color-picker](https://wixmp-833713b177cebf373f611808.wixmp.com/images/d74f41e45115e27d327c26d4746f2917.png) Use the Inputs API's [`selectColor()`](https://dev.wix.com/docs/sdk/host-modules/editor/inputs/select-color.md) function to open the color picker panel in the editor, prompting the user to select a color. > **Note**: If a user selects a theme color, the returned value contains a CSS variable function. This function dynamically retrieves the value of the corresponding [site theme CSS variable](https://dev.wix.com/docs/develop-websites/articles/coding-with-velo/frontend-code/custom-css/site-theme-css-variables.md). For example, it might return a value like `'var(--wst-color-line, #000000)'`. The following example shows how to create a settings panel that allows users to select and update a background color using the Wix color picker, with the selected color being saved and retrieved using `widget.getProp` and `widget.setProp`. ```js import React, { useState, useEffect, FC } from 'react'; import { FormField, FillPreview, SidePanel, Box, WixDesignSystemProvider } from '@wix/design-system'; import { widget, inputs } from '@wix/editor'; const Panel: FC = () => { const [backgroundColor, setBackgroundColor] = useState(''); // Initialize state for background color // Use useEffect to retrieve the background color when the component mounts useEffect(() => { const fetchBackgroundColor = async () => { const color = await widget.getProp('background-color'); // Retrieve the custom element's background-color attribute setBackgroundColor(color || ''); // Set the background color if available }; fetchBackgroundColor(); }, []); // Only run once when the component mounts // Handle color change after selecting a new color from the picker const handleColorChange = (newColor: string) => { setBackgroundColor(newColor); // Update local state for backgroundColor widget.setProp('background-color', newColor); // Set the new backgroundColor in the widget }; return ( {/* Color preview that opens a color picker */} inputs.selectColor(backgroundColor, { onChange: (value: string) => { handleColorChange(value ?? ''); // Handle color change }, }) } /> ); }; export default Panel; ``` ## Integrate the font picker in your settings panel Wix's native font picker allows users to select fonts directly from their site's theme styles or choose custom fonts. This ensures that your widget's typography remains consistent with the rest of the site. ![font-picker](https://wixmp-833713b177cebf373f611808.wixmp.com/images/4bf1e9a2d529b2d451ff4fadcad8e392.png) Use the Inputs API's [`selectFont()`](https://dev.wix.com/docs/sdk/host-modules/editor/inputs/select-font.md) function to open the font picker panel in the editor, prompting the user to select a font. The font picker returns an object containing the user's selected font details, including the `font` and optionally the `textDecoration` property. The value of the `font` property is a [`font` CSS shorthand property](https://developer.mozilla.org/en-US/docs/Web/CSS/font), which can include the following: * Font family * Font size * Font weight * Font style (supports `italic` only) > **Note**: If a user selects a theme font style, the returned `font` property contains a CSS variable function. This function dynamically retrieves the value of the corresponding [site theme CSS variable](https://dev.wix.com/docs/develop-websites/articles/coding-with-velo/frontend-code/custom-css/site-theme-css-variables.md). For example, it might return a value like `'var(--wst-font-style-h2)'`. The value of the `textDecoration` property is a [`text-decoration` CSS shorthand property](https://developer.mozilla.org/en-US/docs/Web/CSS/text-decoration). It can also be set to `undefined`. The following example shows how to create a settings panel that allows users to select and update a title font using the Wix font picker, with the selected font being saved and retrieved using `widget.getProp` and `widget.setProp`. ```js import React, { useState, useEffect, FC } from 'react'; import { FormField, SidePanel, Button, WixDesignSystemProvider } from '@wix/design-system'; import { widget, inputs } from '@wix/editor'; const Panel: FC = () => { const [selectedFont, setSelectedFont] = useState(''); // Initialize state for selected font string // Use useEffect to retrieve the selected font when the component mounts useEffect(() => { const fetchFont = async () => { const font = await widget.getProp('title-font'); // Retrieve the custom element's title-font property setSelectedFont(font || ''); }; fetchFont(); }, []); // Handle font change after selecting a new font from the picker const handleFontChange = (newFont: any) => { const fontString = newFont?.font || ''; // Extract the font string setSelectedFont(fontString); widget.setProp('title-font', fontString); }; return ( ); }; export default Panel; ``` ### Load the fonts used within your custom element When developing custom elements, the page's stylesheet is not aware of the fonts used within the custom element. To ensure that the custom element has access to the required font styles, call [`setPreloadFonts()`](https://dev.wix.com/docs/sdk/host-modules/editor/widget/set-preload-fonts.md) from your [settings panel](https://dev.wix.com/docs/build-apps/develop-your-app/extensions/site-extensions/site-widgets/create-a-settings-panel-for-a-site-widget-or-plugin-wix-cli-and-self-hosting.md). This function sets the list of fonts that are preloaded when the custom element is displayed on a site. > **Note**: Calling `setPreloadFonts()` overwrites any fonts that were previously set to be preloaded. This means that any fonts not included in the current call will no longer be preloaded. Make sure to pass all the fonts that need to be preloaded every time you call the function. ### Load fonts in a shadow DOM or internal iframe When working with custom elements that use a shadow DOM or an internal iframe, the page's stylesheet may be inaccessible. To ensure your custom element has access to the required font styles, call [`getFontsHtml()`](https://dev.wix.com/docs/sdk/frontend-modules/site/introduction.md) to retrieve the necessary CSS and load the fonts. The following example shows how to create a custom element with a shadow DOM that dynamically reads font configuration attributes and applies the specified styles to its content, using `getFontsHtml()` to load the necessary font CSS: ```js import { site } from '@wix/site-site'; // Import the site module for font handling // Define the custom element class FontsCustomElement extends HTMLElement { constructor() { super(); // Attach a shadow root to the element this.attachShadow({ mode: 'open' }); } connectedCallback() { // When the custom element is added to the DOM, it will read the initial attributes this.updateFonts(); } attributeChangedCallback(name, oldValue, newValue) { // This will be triggered when any attribute changes if (name === 'title-font' || name === 'body-font') { this.updateFonts(); } } static get observedAttributes() { // Define which attributes to watch for changes return ['title-font', 'body-font']; } async updateFonts() { // Dynamically read the attributes const titleFont = this.getAttribute('title-font'); const bodyFont = this.getAttribute('body-font'); // Fetch the HTML for the provided fonts dynamically const fontHtml = await site.getFontsHtml( [titleFont, bodyFont].filter(Boolean) // Only include non-empty fonts ); // Set the shadow DOM's innerHTML with the font content this.shadowRoot.innerHTML = `
${fontHtml}
This is the Title
This is the body text
`; } } // Register the custom element with the browser customElements.define('fonts-custom-element', FontsCustomElement); ``` --- > Portal Navigation: > > - Append `.md` to any URL under `https://dev.wix.com/docs/` to get its markdown version. > - Pages are either content pages (article or reference text) or menu pages (a list of links to child pages). > - To get a menu page, truncate any URL to a parent path and append `.md` (e.g. `https://dev.wix.com/docs/sdk.md`, `https://dev.wix.com/docs/sdk/core-modules.md`). > - Top-level index of all portals: https://dev.wix.com/docs/llms.txt > - Full concatenated docs: https://dev.wix.com/docs/llms-full.txt ## Resource: Connect a Custom Element's Colors and Fonts to a Site Theme ## Article: Connect a Custom Element's Colors and Fonts to a Site Theme ## Article Link: https://dev.wix.com/docs/build-apps/develop-your-app/extensions/site-extensions/site-widgets/connect-a-custom-element-s-colors-and-fonts-to-a-site-theme.md ## Article Content: # Connect a Custom Element's Colors and Fonts to a Site Theme When site owners design a Wix site, linking elements to the site's theme ensures a clean, cohesive, and professional design. A color theme provides a predefined set of colors, while a typography theme defines the appearance of site text. Learn more about [site themes in Wix Studio](https://support.wix.com/en/article/studio-editor-about-site-styles) and [site themes in Wix Editor](https://support.wix.com/en/article/wix-editor-customizing-your-sites-theme-and-design). If you're building a site widget with a custom element, you can configure it to automatically adopt the site's theme styles. This ensures your widget integrates seamlessly into the site's design, maintaining consistency across all components. ## Access theme styles with CSS variables Every site's theme styles are exposed as CSS variables on the web page, making it easy to reference and apply them to your custom elements. These variables include design tokens for the colors and fonts that match the site's theme. For a comprehensive list of available styles, refer to the [site theme CSS variables](https://dev.wix.com/docs/develop-websites/articles/coding-with-velo/frontend-code/custom-css/site-theme-css-variables.md). By using CSS variables, your custom element will automatically adapt to changes in the site's theme. This ensures your element remains consistent with the site's updated design without requiring manual intervention. ## Assign theme styles to custom elements To connect your custom element's styles to the site's theme, resolve the appropriate CSS variables and apply them in your code. The following are examples of integrating theme colors and fonts.
**Tips:** * Test your widget on sites with different themes to ensure it works well across various designs and settings. * Always use fallback values in case a theme variable is undefined. For example: ```js .title { color: var(--wst-color-text-primary, #000000); } ```
### Connect to a theme color Assign a theme's primary background color to your custom element: ```js .container { background-color: var(--wst-color-fill-background-primary); ``` Replace `--wst-color-fill-background-primary` with any other theme color variable depending on your design requirements. ### Connect to a theme font Apply a theme's font style to a text element: ```js .title { font: var(--wst-font-style-h2); ``` Ensure you use the correct CSS variable for the specific font style, such as `--wst-font-title`,`--wst-font-paragraph`, or others, depending on the text's purpose. ### Embed site theme styles in a shadow DOM or internal iframe Normally, the theme stylesheet is automatically included with the webpage, ensuring consistent styling across the site. However, when working with custom elements that use a shadow DOM or an internal iframe, the page's stylesheet may be inaccessible. When working with custom elements in Wix, you might encounter situations where the page's main stylesheet is inaccessible. In such cases, you can use [`getSiteThemeHtml()`](https://dev.wix.com/docs/sdk/frontend-modules/site/introduction.md) to dynamically embed the site's theme styles directly into your custom element, including colors and fonts. The following example shows how to use `getSiteThemeHtml()` to dynamically apply your Wix site's theme styles to a custom element's shadow DOM: ```js import { site } from '@wix/site-site'; // Import the site module for theme handling class ThemedCustomElement extends HTMLElement { constructor() { super(); } connectedCallback() { this.loadSiteTheme(); } async loadSiteTheme() { // Fetch the site's theme HTML const themeHtml = await site.getSiteThemeHtml(); // Attach the shadow DOM const shadow = this.attachShadow({ mode: 'open' }); // Embed the theme CSS and content directly into the shadow root shadow.innerHTML = ` ${themeHtml}
This is a themed element with site styles applied.
`; } } // Register the custom element customElements.define('themed-custom-element', ThemedCustomElement); ``` --- > Portal Navigation: > > - Append `.md` to any URL under `https://dev.wix.com/docs/` to get its markdown version. > - Pages are either content pages (article or reference text) or menu pages (a list of links to child pages). > - To get a menu page, truncate any URL to a parent path and append `.md` (e.g. `https://dev.wix.com/docs/sdk.md`, `https://dev.wix.com/docs/sdk/core-modules.md`). > - Top-level index of all portals: https://dev.wix.com/docs/llms.txt > - Full concatenated docs: https://dev.wix.com/docs/llms-full.txt ## Resource: About Site Plugin Extensions ## Article: About Site Plugin Extensions ## Article Link: https://dev.wix.com/docs/build-apps/develop-your-app/extensions/site-extensions/site-plugins/about-site-plugin-extensions.md ## Article Content: # About Site Plugin Extensions With site plugins, you can create interactive and feature-rich components that seamlessly [integrate into Wix’s business solutions](https://dev.wix.com/docs/build-apps/get-started/overview/integrating-with-wix-s-business-solutions.md), such as Wix Stores, Wix Bookings, and Checkout & Orders, extending their functionality and user experience. Wix users can easily place site plugins into predefined [slots](https://dev.wix.com/docs/build-apps/develop-your-app/extensions/site-extensions/site-plugins/supported-wix-app-pages/about-slots.md) within Wix apps, using the plugin explorer available in all Wix editors. ![plugin-flow](https://wixmp-833713b177cebf373f611808.wixmp.com/images/71c2ec2dcfeeff1db782f291c2441d39.gif) ## Terminology The following are key terms related to site plugins: | Term | Definition | |-----|----| | Host widget | A widget belonging to a Wix business solution, which contains 1 or more slots. | | [Slot](#slots) | A placeholder within a host widget in which Wix users can add a plugin. | | Site plugin | A component you can add inside a slot, extending the host widget's functionality. | | [Plugin API](#plugin-api) | The data each host widget exposes to your plugin at runtime. | ## How site plugins work A site plugin integrates with its host widget in 2 ways: * **Visually**, by embedding its UI inside one of the host's slots. * **Logically**, by implementing a communication interface with the host through their [plugin API](#plugin-api). ## Slots [Slots](https://dev.wix.com/docs/build-apps/develop-your-app/extensions/site-extensions/site-plugins/supported-wix-app-pages/about-slots.md) are UI placeholders where you can place plugins. Wix apps offer a range of slots across different app widgets. When developing a plugin, you must declare the specific slots Wix users can add a plugin to. Each host widget passes context data to your plugin as props, which you can use to call [Wix APIs](https://dev.wix.com/docs/build-apps/develop-your-app/api-integrations/about-wix-apis.md), implement your plugin's logic, and extend a host widget's functionality. For a list of available slots, see [About Slots](https://dev.wix.com/docs/build-apps/develop-your-app/extensions/site-extensions/site-plugins/supported-wix-app-pages/about-slots.md). ## Plugin API Each slot exposes a plugin API, which is a set of context data passed to your plugin at runtime as props. For example, the Product page plugin API provides `productId`, `selectedVariantId`, and other data about the current product. Use these props to call related [Wix APIs](https://dev.wix.com/docs/build-apps/develop-your-app/api-integrations/about-wix-apis.md) and implement your plugin's logic. ## Implementation options You can add a site plugin extension using: * [Wix CLI for Apps](https://dev.wix.com/docs/build-apps/develop-your-app/frameworks/wix-cli/supported-extensions/site-extensions/site-plugins/add-a-site-plugin-extension-in-the-cli.md): Create a site plugin using the CLI and custom element technology, with your code by default deployed on our servers. The creation and setup process of your widget takes place in the terminal. Then, to edit your plugin, you write code directly in your CLI app project's files. * [Self-managed custom element](https://dev.wix.com/docs/build-apps/develop-your-app/develop-a-self-managed-app/supported-extensions/site-extensions/site-widgets-and-plugins/add-site-plugin-extensions-with-custom-elements.md): Create a site plugin using custom element technology, with your code deployed on your own server. The custom element is essentially a new HTML tag that you define, which is made available in the Wix editors as a widget. * [Wix Blocks](https://dev.wix.com/docs/build-apps/develop-your-app/develop-an-app-with-blocks/site-plugins/build-a-site-plugin-in-blocks.md): Create a site widget in Wix's native app editor. Design your site plugin using visual layout and design tools, and code your business logic using Velo, Wix’s native coding solution.
**Editor compatibility** Wix Blocks apps aren't supported in the Wix Harmony editor. Existing Blocks apps remain available for purchase on the Wix App Market for Wix Editor and Wix Studio sites. To learn more, see [About Wix Harmony and Blocks](https://dev.wix.com/docs/build-apps/develop-your-app/develop-an-app-with-blocks/about-wix-harmony-and-blocks.md).
## Design and layout guidelines Some host widgets include design and UX guidelines for building plugins that integrate with the host widget's layout and Wix's design standards. Follow these guidelines to ensure your plugin appears native to the host widget. ## Sandboxing in the editor Site plugins are sandboxed when rendered in the editor to enhance security. This means they're treated as if they come from a different domain, which impacts access to browser storage APIs and other same-origin resources.
__Important:__ The format of the Wix editor URL is changing due to new cookies introduced for authorization. The new URL format is `{username}-{sitename}.{editor|studio|harmony}.wix.com`. If your app uses CORS and whitelists specific origins, update your allowed origins to match the new format to avoid blocked requests.
Learn more about [handling sandboxing in the editor](https://dev.wix.com/docs/build-apps/develop-your-app/extensions/site-extensions/handle-sandboxing-in-the-editor.md). --- > Portal Navigation: > > - Append `.md` to any URL under `https://dev.wix.com/docs/` to get its markdown version. > - Pages are either content pages (article or reference text) or menu pages (a list of links to child pages). > - To get a menu page, truncate any URL to a parent path and append `.md` (e.g. `https://dev.wix.com/docs/sdk.md`, `https://dev.wix.com/docs/sdk/core-modules.md`). > - Top-level index of all portals: https://dev.wix.com/docs/llms.txt > - Full concatenated docs: https://dev.wix.com/docs/llms-full.txt ## Resource: Build a Dashboard Page to Manage Your Site Plugin ## Article: Build a Dashboard Page to Manage Your Site Plugin ## Article Link: https://dev.wix.com/docs/build-apps/develop-your-app/extensions/site-extensions/site-plugins/build-a-dashboard-page-to-manage-your-site-plugin.md ## Article Content: # Build a Dashboard Page to Manage Your Site Plugin When building a [site plugin](https://dev.wix.com/docs/build-apps/develop-your-app/extensions/site-extensions/site-plugins/about-site-plugin-extensions.md), you may want to provide users with a back office management interface for the plugin. You can create one either within the Wix dashboard, or as an external dashboard on a third-party platform. [Learn about building a dashboard page extension](https://dev.wix.com/docs/build-apps/develop-your-app/extensions/dashboard-extensions/about-dashboard-extensions.md) ## Add your plugin to a slot from a dashboard page To let users add your plugin to their site through your app's [dashboard page](https://dev.wix.com/docs/build-apps/develop-your-app/extensions/dashboard-extensions/dashboard-pages/about-dashboard-page-extensions.md), create a user interface that triggers the Wix Dashboard API's `addSitePlugin()` function. Specify the desired slot when calling this function. This initiates a user flow where Wix requests the user's consent to add the plugin. If the selected slot is already occupied, the user can choose to replace the existing plugin with your plugin. Plugins for the checkout page must implement this functionality to enable users to add the plugin to their site. Depending on the framework you're using to develop your dashboard page, use one of the following APIs: * [Velo in Blocks: `addSitePlugin()`](https://dev.wix.com/docs/velo/api-reference/wix-dashboard/add-site-plugin.md). * [Wix SDK: `addSitePlugin()`](https://dev.wix.com/docs/sdk/host-modules/dashboard/add-site-plugin.md). The `addSitePlugin()` function takes the following parameters: * `pluginId`: ID of your site plugin, which you can find in your app's site plugin extension. To view the extension, go to your app's dashboard in the [Wix Studio workspace](https://manage.wix.com/studio/custom-apps). * `placement`: Details of the slot in which you want to add the plugin, including the hosting app's `appDefinitionId`, and the relevant `widgetId` and `slotId`. Learn more about the locations and identifiers of [slots that are available on Wix app pages](https://dev.wix.com/docs/build-apps/develop-your-app/extensions/site-extensions/site-plugins/supported-wix-app-pages/about-slots.md). The following example shows how to use Velo in Blocks to add a site plugin to the checkout page when a user clicks an **Add Plugin** button in the dashboard: ```js import { addSitePlugin } from 'wix-dashboard'; $w.onReady(function() { $w('#addPluginBtn').onClick(() => { const pluginId = '9fbd5efb-1b58-489e-b896-47f6851603f0'; const pluginPlacement = { appDefinitionId: "1380b703-ce81-ff05-f115-39571d94dfcd", widgetId: "14fd5970-8072-c276-1246-058b79e70c1a", slotId: "checkout:summary:before" } addSitePlugin(pluginId, { placement: pluginPlacement }) .then(() => { console.log('Plugin added successfully'); }) .catch(error => { console.error('Error adding plugin:', error); }); }) }); ``` ## Check your plugin's placement status You can check whether your plugin is currently placed in a slot on a specific site. Depending on the framework you're using to develop your dashboard page, use one of the following APIs: * [REST: Get Placement Status](https://dev.wix.com/docs/rest/app-management/site-plugins/placement-status-v1/get-placement-status.md) * [Velo in Blocks: `getPlacementStatus()`](https://dev.wix.com/docs/velo/api-reference/wix-site-plugins-v1/plugins/get-placement-status.md) Both APIs return an array of objects indicating whether each of your app's site plugins is currently placed in a slot on the user's site. For example: ```js import { plugins } from "wix-site-plugins.v1"; ... const { placementStatuses } = await plugins.getPlacementStatus(); const myPluginPlacementStatus = placementStatuses[0]; if (myPluginPlacementStatus.placedInSlot) { onPluginPlacedSuccessfully(); } ``` --- > Portal Navigation: > > - Append `.md` to any URL under `https://dev.wix.com/docs/` to get its markdown version. > - Pages are either content pages (article or reference text) or menu pages (a list of links to child pages). > - To get a menu page, truncate any URL to a parent path and append `.md` (e.g. `https://dev.wix.com/docs/sdk.md`, `https://dev.wix.com/docs/sdk/core-modules.md`). > - Top-level index of all portals: https://dev.wix.com/docs/llms.txt > - Full concatenated docs: https://dev.wix.com/docs/llms-full.txt ## Resource: About Slots ## Article: About Slots ## Article Link: https://dev.wix.com/docs/build-apps/develop-your-app/extensions/site-extensions/site-plugins/supported-wix-app-pages/about-slots.md ## Article Content: # About Slots Wix offers a range of slots across Wix app widgets where you can place [site plugins](https://dev.wix.com/docs/build-apps/develop-your-app/extensions/site-extensions/site-plugins/about-site-plugin-extensions.md). The following diagram shows how slots can appear in a host widget: ![Wireframe showing slot positions in a host widget](https://wixmp-833713b177cebf373f611808.wixmp.com/images/460c008b9392743ed24384f272b68abf.png "slots wireframe") ## How slots work A host widget can contain multiple slots, and each slot has a unique ID. When building your plugin, you declare the specific slots in which Wix users can place it. Each host widget passes context data to your plugin as props, which you can use to call [Wix APIs](https://dev.wix.com/docs/build-apps/develop-your-app/api-integrations/about-wix-apis.md) and implement your plugin's logic. A Wix user can place your plugin in a slot manually, or your plugin can be placed automatically on installation. If you configure automatic placement, your plugin is placed in the first available slot in the order you define. If that slot is occupied, it moves to the next slot, and so on. If no slots are available, it isn't placed. ## Available slots The following host widgets support slots where you can place a site plugin. Learn more about each host widget's slots and integration details. Wix eCommerce: - [Checkout page](https://dev.wix.com/docs/build-apps/develop-your-app/extensions/site-extensions/site-plugins/supported-wix-app-pages/wix-e-commerce/wix-e-commerce-checkout-page.md) - [Side cart](https://dev.wix.com/docs/build-apps/develop-your-app/extensions/site-extensions/site-plugins/supported-wix-app-pages/wix-e-commerce/wix-e-commerce-side-cart.md) - [Thank You page](https://dev.wix.com/docs/build-apps/develop-your-app/extensions/site-extensions/site-plugins/supported-wix-app-pages/about-slots.md) Wix Stores: - [Product page](https://dev.wix.com/docs/build-apps/develop-your-app/extensions/site-extensions/site-plugins/supported-wix-app-pages/wix-stores/wix-stores-product-page.md) - [Category page](https://dev.wix.com/docs/build-apps/develop-your-app/extensions/site-extensions/site-plugins/supported-wix-app-pages/wix-stores/wix-stores-category-page.md) - [Shop page](https://dev.wix.com/docs/build-apps/develop-your-app/extensions/site-extensions/site-plugins/supported-wix-app-pages/wix-stores/wix-stores-shop-page.md) - [Gallery widget](https://dev.wix.com/docs/build-apps/develop-your-app/extensions/site-extensions/site-plugins/supported-wix-app-pages/wix-stores/wix-stores-gallery-widget.md) Wix Bookings: - [Service page](https://dev.wix.com/docs/build-apps/develop-your-app/extensions/site-extensions/site-plugins/supported-wix-app-pages/wix-bookings/wix-bookings-service-page.md) Wix Events: - [Event Details page](https://dev.wix.com/docs/build-apps/develop-your-app/extensions/site-extensions/site-plugins/supported-wix-app-pages/wix-events/wix-events-event-details-page.md) Wix Blog: - [Post page](https://dev.wix.com/docs/build-apps/develop-your-app/extensions/site-extensions/site-plugins/supported-wix-app-pages/wix-blog/wix-blog-post-page.md) ## See also - [About Site Plugin Extensions](https://dev.wix.com/docs/build-apps/develop-your-app/extensions/site-extensions/site-plugins/about-site-plugin-extensions.md) --- > Portal Navigation: > > - Append `.md` to any URL under `https://dev.wix.com/docs/` to get its markdown version. > - Pages are either content pages (article or reference text) or menu pages (a list of links to child pages). > - To get a menu page, truncate any URL to a parent path and append `.md` (e.g. `https://dev.wix.com/docs/sdk.md`, `https://dev.wix.com/docs/sdk/core-modules.md`). > - Top-level index of all portals: https://dev.wix.com/docs/llms.txt > - Full concatenated docs: https://dev.wix.com/docs/llms-full.txt ## Resource: Wix eCommerce: Checkout Page ## Article: Wix eCommerce: Checkout Page ## Article Link: https://dev.wix.com/docs/build-apps/develop-your-app/extensions/site-extensions/site-plugins/supported-wix-app-pages/wix-e-commerce/wix-e-commerce-checkout-page.md ## Article Content: # Wix eCommerce (Checkout & Orders): Checkout Page The following slots and APIs are available when building a [site plugin](https://dev.wix.com/docs/build-apps/develop-your-app/extensions/site-extensions/site-plugins/about-site-plugin-extensions.md) for the Checkout Page.
Important: Some plugins may not support automatic addition upon installation, even with `autoAddToSite` enabled. In that case, you must: - [Create a dashboard page to manage your site plugin](https://dev.wix.com/docs/build-apps/develop-your-app/extensions/site-extensions/site-plugins/build-a-dashboard-page-to-manage-your-site-plugin.md) that calls [`addSitePlugin()`](https://dev.wix.com/docs/sdk/host-modules/dashboard/add-site-plugin.md) to let users add the plugin to the checkout slot. - Release at least 1 version of your app so the site plugin extension is registered with Wix for `addSitePlugin()` to work properly.
## Slots The following image shows slots in the checkout page, into which users can add plugins. ![checkout-slots](https://wixmp-833713b177cebf373f611808.wixmp.com/images/c886759054f07416b475304c52fbc31d.png) The slots are represented by the following `placement` object: ```json [ { "appDefinitionId": "", "widgetId": "", "slotId": "" } ] ``` Provide the following values for each property: | Key | Value | | ------------------ | ------- | | `appDefinitionId` | "1380b703-ce81-ff05-f115-39571d94dfcd" | | `widgetId` | "14fd5970-8072-c276-1246-058b79e70c1a" | | `slotId` | ID of the slot you want [as displayed in the image above](#slots).
Supported values:
  • `"checkout:header"`
  • `"checkout:top"`
  • `"checkout:steps:before"`
  • `"checkout:delivery-step:options:after"`
  • `"checkout:policies:after-1"`
  • `"checkout:summary:before"`
  • `"checkout:summary:lineItems:after"`
  • `"checkout:summary:lineItems:after2"`
  • `"checkout:summary:totalsBreakdown:before"`
  • `"checkout:summary:after"`
| For example, for your widget to appear before the totals breakdown in a checkout page use the following object in your configuration: ```json { "appDefinitionId": "1380b703-ce81-ff05-f115-39571d94dfcd", "widgetId": "14fd5970-8072-c276-1246-058b79e70c1a", "slotId": "checkout:summary:totalsBreakdown:before" } ``` ## Checkout plugin API Use the Checkout plugin API to integrate with the plugin's host. The API provides data about the current checkout process and lets you define a callback function that's invoked whenever changes are made in the checkout. > **Note:** The `checkout:delivery-step:options:after` slot uses a [different API](#delivery-step-options-slot-api). ### Properties | Name | Type | Description | | --------------------- | ------ | ----------- | | `checkoutId` | String | The ID of the current checkout process. | | `stepId` | String | The ID of the step currently rendered in the checkout page, which can be one of the following:
  • `'contact-details'`
  • `'delivery-method'`
  • `'payment-and-billing'`
  • `'place-order'`
  • | | `checkoutUpdatedDate` | String | Date and time the checkout was updated. | ### Functions | Name | Type | Description | | -------- | ---- | ----------- | | `onRefreshCheckout()` | `(refreshCheckoutCallback: () => void) => void` | An event handler that accepts a callback function that's invoked by a widget. The widget should call the function whenever the checkout needs to be refreshed. | ### Code example CLI custom element When building a checkout plugin with the [CLI](https://dev.wix.com/docs/wix-cli/guides/extensions/site-extensions/site-plugins/add-a-site-plugin-extension.md), the checkout API properties are passed as custom element attributes in kebab-case (for example, `checkoutId` becomes `checkout-id`). ```typescript class MyCheckoutPlugin extends HTMLElement { private refreshCheckoutCallback: (() => void) | null = null; static get observedAttributes() { return ['checkout-id', 'step-id', 'checkout-updated-date']; } connectedCallback() { this.render(); } attributeChangedCallback() { this.render(); } onRefreshCheckout(callback: () => void) { this.refreshCheckoutCallback = callback; } render() { const checkoutId = this.getAttribute('checkout-id'); const stepId = this.getAttribute('step-id'); const checkoutUpdatedDate = this.getAttribute('checkout-updated-date'); this.innerHTML = `

    Checkout ID: ${checkoutId}

    Current step: ${stepId}

    Last updated date: ${checkoutUpdatedDate}

    `; } } export default MyCheckoutPlugin; ``` ### Code example: Velo ```javascript import { checkout } from 'wix-ecom-backend'; // Global variable to use to refresh checkout let refreshCheckoutCallback; $w.onReady(async function () { // Get properties passed by the Checkout page const {checkoutId} = $widget.props; // Property usage const checkout = fetchCheckout(checkoutId); // Add selected items to the checkout on button click $w('#addItems').onClick(async () => { const itemsToAdd = $w('#itemsToChoose').value; await checkout.addToCheckout(checkoutId, {lineItems: itemsToAdd}); // Call refreshCheckoutCallback to refresh the checkout refreshCheckoutCallback(); }) }); // Export function to get the refresh checkout callback /** * @function * @description An event handler that accepts a callback function that's invoked by a widget. The widget should call the function whenever the checkout needs to be refreshed. * @param {string} callback - Callback to be trigger whenever the checkout needs to be refreshed * @returns {void} */ export function onRefreshCheckout(callback){ refreshCheckoutCallback = callback; } ``` ### Dashboard page example Checkout plugins require a [dashboard page](https://dev.wix.com/docs/build-apps/develop-your-app/extensions/site-extensions/site-plugins/build-a-dashboard-page-to-manage-your-site-plugin.md) so users can add the plugin to their checkout page. Use [`addSitePlugin()`](https://dev.wix.com/docs/sdk/host-modules/dashboard/add-site-plugin.md) to trigger the addition flow. The `pluginId` is the ID of your site plugin extension, which you can find in your [app's dashboard](https://manage.wix.com/account/custom-apps) under **Extensions**.
    Important: Some plugins may not support automatic addition upon installation, even with `autoAddToSite` enabled. In that case, you must: - [Create a dashboard page to manage your site plugin](https://dev.wix.com/docs/build-apps/develop-your-app/extensions/site-extensions/site-plugins/build-a-dashboard-page-to-manage-your-site-plugin.md) that calls [`addSitePlugin()`](https://dev.wix.com/docs/sdk/host-modules/dashboard/add-site-plugin.md) to let users add the plugin to the checkout slot. - Release at least 1 version of your app so the site plugin extension is registered with Wix for `addSitePlugin()` to work properly.
    ```typescript import React, { type FC, useState } from 'react'; import { dashboard } from '@wix/dashboard'; import { Button, Card, Page, Text, Box, WixDesignSystemProvider, } from '@wix/design-system'; import '@wix/design-system/styles.global.css'; const PLUGIN_ID = ''; const PLUGIN_PLACEMENT = { appDefinitionId: '1380b703-ce81-ff05-f115-39571d94dfcd', widgetId: '14fd5970-8072-c276-1246-058b79e70c1a', slotId: 'checkout:summary:after', }; const PluginManagerPage: FC = () => { const [isAdding, setIsAdding] = useState(false); const handleAddPlugin = async () => { setIsAdding(true); try { await dashboard.addSitePlugin(PLUGIN_ID, { placement: PLUGIN_PLACEMENT, }); dashboard.showToast({ message: 'Plugin added to checkout page!', type: 'success', }); } catch (error) { console.error('Failed to add plugin:', error); dashboard.showToast({ message: 'Could not add plugin. It may already be added.', type: 'warning', }); } finally { setIsAdding(false); } }; return ( Add your plugin to the checkout page. ); }; export default PluginManagerPage; ``` ## Delivery step options slot API The `checkout:delivery-step:options:after` slot uses a different API than the other checkout slots. ### Properties | Name | Type | Description | | --------------------- | ------ | ----------- | | `checkoutId` | String | The ID of the current checkout process. | | `checkoutUpdatedDate` | String | Date and time the checkout was updated. | | `selectedDeliveryOptionCarrierId` | String | The ID of the carrier for the selected delivery option. | | `selectedDeliveryOptionId` | String | The ID of the selected delivery option. | | `deliveryStepState` | String | The current state of the delivery step. Possible values: `'open'` or `'summary'`. | ### Functions | Name | Type | Description | | -------- | ---- | ----------- | | `onRefreshCheckout()` | `(callback: () => Promise) => void` | An event handler that accepts a callback function that's invoked by a widget. The widget should call the function whenever the checkout needs to be refreshed. | | `disableContinueButton()` | `(callback: (isDisabled: boolean) => void) => void` | An event handler that accepts a callback function to control the checkout's continue button. Call the callback with `true` to disable the button, or `false` to enable it. | ## Permissions and webhooks The following [permissions](https://dev.wix.com/docs/build-apps/develop-your-app/access/authorization/about-permissions.md) are relevant for most checkout plugins: - **Wix Developers > Manage Your App**: Added automatically. - **Stores > Read Stores**: Required for accessing product and store data. The following [webhooks](https://dev.wix.com/docs/build-apps/develop-your-app/access/authorization/about-permissions.md) are relevant to most checkout plugins: - [App Installed](https://dev.wix.com/docs/rest/app-management/app-instance/app-instance-installed.md) - [App Removed](https://dev.wix.com/docs/rest/app-management/app-instance/app-instance-removed.md) ## Design guidelines The Checkout page is the final step in the customer's purchase process. Its design is closed and can't be changed by users or third parties. All Wix eCommerce sites share the same checkout experience. To ensure your plugin fits seamlessly into the checkout: - Follow the [design specs and guidelines for the Wix Checkout page](https://zeroheight.com/462ab97c4), especially the [guidelines for building plugins](https://zeroheight.com/462ab97c4/p/590051-checkout-page-slots). - Use the [Checkout UI kit and guidelines (Figma)](https://www.figma.com/file/YTGZdwAV314Gg6EdWE5gvD/Wix-Checkout---UI-Kit-and-Guidelines-(WIP-%F0%9F%9B%A0)?node-id=0%3A1&t=1FD43rEv9yTYyCa2-1) for reference styles and components. ## Testing checkout plugins To test a checkout plugin: 1. [Create a Premium development site](https://dev.wix.com/docs/build-apps/launch-your-app/app-distribution/test-your-app/test-your-app-on-a-premium-site.md). Select Wix Stores as the business solution. 1. Install your app on the development site. 1. If your plugin requires dashboard-based installation, go to your dashboard page and add the plugin to the checkout page. 1. Initiate a checkout flow on the live site to verify your plugin appears and functions correctly. ## Related Wix backend APIs Checkout plugins usually need to integrate with Wix eCommerce's Checkout APIs, as well as other backend APIs. In your site plugin or in your app's server code, you may want to perform actions or implement logic that's dependent on the state of the current checkout or related data. The following Wix APIs may be useful: * eCommerce APIs ([JavaScript SDK](https://dev.wix.com/docs/api-reference/business-solutions/e-commerce/introduction?apiView=SDK.md), [REST](https://dev.wix.com/docs/api-reference/business-solutions/e-commerce/introduction.md), [Velo](https://dev.wix.com/docs/velo/apis/wix-ecom-backend/introduction.md)) * Stores APIs ([JavaScript SDK](https://dev.wix.com/docs/api-reference/business-solutions/stores/introduction.md), [REST](https://dev.wix.com/docs/api-reference/business-solutions/stores/introduction.md), [Velo](https://dev.wix.com/docs/velo/apis/wix-stores-v2/products/introduction.md)) --- > Portal Navigation: > > - Append `.md` to any URL under `https://dev.wix.com/docs/` to get its markdown version. > - Pages are either content pages (article or reference text) or menu pages (a list of links to child pages). > - To get a menu page, truncate any URL to a parent path and append `.md` (e.g. `https://dev.wix.com/docs/sdk.md`, `https://dev.wix.com/docs/sdk/core-modules.md`). > - Top-level index of all portals: https://dev.wix.com/docs/llms.txt > - Full concatenated docs: https://dev.wix.com/docs/llms-full.txt ## Resource: Wix eCommerce: Side Cart ## Article: Wix eCommerce: Side Cart ## Article Link: https://dev.wix.com/docs/build-apps/develop-your-app/extensions/site-extensions/site-plugins/supported-wix-app-pages/wix-e-commerce/wix-e-commerce-side-cart.md ## Article Content: # Wix eCommerce (Checkout & Orders): Side Cart The following slots and APIs are available when building a [site plugin](https://dev.wix.com/docs/build-apps/develop-your-app/extensions/site-extensions/site-plugins/about-site-plugin-extensions.md) for the [Side Cart](https://support.wix.com/en/article/customizing-the-side-cart).
    Important: Some plugins may not support automatic addition upon installation, even with `autoAddToSite` enabled. In that case, you must: - [Create a dashboard page to manage your site plugin](https://dev.wix.com/docs/build-apps/develop-your-app/extensions/site-extensions/site-plugins/build-a-dashboard-page-to-manage-your-site-plugin.md) that calls [`addSitePlugin()`](https://dev.wix.com/docs/sdk/host-modules/dashboard/add-site-plugin.md) to let users add the plugin to the checkout slot. - Release at least 1 version of your app so the site plugin extension is registered with Wix for `addSitePlugin()` to work properly.
    ## Slots The following image shows slots in the Side Cart, into which users can add plugins. ![side-cart-slots](https://wixmp-833713b177cebf373f611808.wixmp.com/images/21988d019e35da602895bbae036886bc.png) The slots are represented by the following `placement` object: ```json { "appDefinitionId": "", "widgetId": "", "slotId": "" } ``` Provide the following values for each property: | Key | Value | | ------------------ | ------- | | `appDefinitionId` | "1380b703-ce81-ff05-f115-39571d94dfcd" | | `widgetId` | "49dbb2d9-d9e5-4605-a147-e926605bf164" | | `slotId` | ID of the slot you want [as displayed in the image above](#slots).
    Supported values:
    • `"side-cart:header:after-1"`
    • `"side-cart:lineItems:after-1"`
    • `"side-cart:customer-input:after-1"`
    • `"side-cart:footer:actions:before-1"`
    • `"side-cart:footer:actions:after-1"`
    | For example, for your widget to appear before the header in the Side Cart use the following object in your configuration: ```json { "appDefinitionId": "1380b703-ce81-ff05-f115-39571d94dfcd", "widgetId": "49dbb2d9-d9e5-4605-a147-e926605bf164", "slotId": "side-cart:header:before" } ``` ## Side Cart plugin APIs Use the following APIs to integrate with the plugin's host: - [eCommerce Current Cart API](https://dev.wix.com/docs/api-reference/business-solutions/e-commerce/purchase-flow/cart/introduction.md) - [eCommerce frontend API](https://dev.wix.com/docs/sdk/frontend-modules/ecom/introduction.md) The Current Cart API allows you to manage and get information about the current cart. The eCommerce frontend API allows you to interact with the cart's UI elements. ### Code example ```javascript import { currentCart } from "@wix/ecom"; import { ecom } from "@wix/site-ecom"; $w.onReady(function() { // Get properties for the current cart. currentCart.getCurrentCart() .then((cart) => { const cartId = cart._id; const cartLineItems = cart.lineItems; }); // Add selected items to the cart on button click. $w('#addItems').onClick(async () => { const itemsToAdd = $w('#itemsToChoose').value; await currentCart.addToCurrentCart({lineItems: itemsToAdd }); // Call refreshCart() to refresh the cart components. await ecom.refreshCart(); }) }); ``` ## Related Wix backend APIs Side Cart plugins usually need to integrate with Wix eCommerce's Cart and Checkout APIs, as well as other backend APIs. In your site plugin or in your app's server code, you may want to perform actions or implement logic that is dependent on the state of the current cart or related data. The following Wix APIs may be useful: * [eCommerce APIs](https://dev.wix.com/docs/api-reference/business-solutions/e-commerce/introduction.md) * [Stores APIs](https://dev.wix.com/docs/api-reference/business-solutions/stores/introduction.md) ## Design guidelines When you create a Side Cart plugin, we recommend following these design guidelines: - Make sure your design is responsive for all screen sizes. - The Side Cart uses a `4px` baseline grid for aligning all elements, typography, and spacing between elements. Don't add extra spacing around your plugin design. The slot automatically handles spacing to maintain the Side Cart's uniform layout. - Give your designs an appropriate height, depending on the slot you use. | Slot | Recommended height | Max height | | ----------------------------------- | ------------------- | ----------- | | `side-cart:header:after-1` | `30px` | `70px` | | `side-cart:line-items:after-1` | `50px` | `150px` | | `side-cart:customer-input:after-1` | `24px` | `150px` | | `side-cart:footer:actions:before-1` | `50px` | `70px` | | `side-cart:footer:actions:after-1` | `50px` | `70px` | --- > Portal Navigation: > > - Append `.md` to any URL under `https://dev.wix.com/docs/` to get its markdown version. > - Pages are either content pages (article or reference text) or menu pages (a list of links to child pages). > - To get a menu page, truncate any URL to a parent path and append `.md` (e.g. `https://dev.wix.com/docs/sdk.md`, `https://dev.wix.com/docs/sdk/core-modules.md`). > - Top-level index of all portals: https://dev.wix.com/docs/llms.txt > - Full concatenated docs: https://dev.wix.com/docs/llms-full.txt ## Resource: Wix eCommerce: Thank You Page ## Article: Wix eCommerce: Thank You Page ## Article Link: https://dev.wix.com/docs/build-apps/develop-your-app/extensions/site-extensions/site-plugins/supported-wix-app-pages/wix-e-commerce/wix-e-commerce-thank-you-page.md ## Article Content: # Wix eCommerce (Checkout & Orders): Thank You Page The following slots and APIs are available when building a [site plugin](https://dev.wix.com/docs/build-apps/develop-your-app/extensions/site-extensions/site-plugins/about-site-plugin-extensions.md) for the [Thank you page](https://dev.wix.com/docs/build-apps/develop-your-app/wix-business-solutions/wix-e-commerce/architecture-data-flow.md#thank-you-page).
    __Important:__ Some plugins may not support automatic addition upon installation, even with `autoAddToSite` enabled. In that case, you must: - [Create a dashboard page to manage your site plugin](https://dev.wix.com/docs/build-apps/develop-your-app/extensions/site-extensions/site-plugins/build-a-dashboard-page-to-manage-your-site-plugin.md) that calls [Add Site Plugin](https://dev.wix.com/docs/sdk/host-modules/dashboard/add-site-plugin.md) to let Wix users add the plugin to a Thank you page slot. - Release at least 1 version of your app so the site plugin extension is registered with Wix for `addSitePlugin()` to work properly.
    ## Slots The following image shows slots in the Thank you page, into which Wix users can add plugins. ![thank-you-page-slots](https://wixmp-833713b177cebf373f611808.wixmp.com/images/5de65ee544e2c63bd9bbf10f707b86e6.png) The slots are represented by the following `placement` object: ```json { "appDefinitionId": "", "widgetId": "", "slotId": "" } ``` Provide the following values for each property: | Key | Value | |-------------------|---------------------------------------------------------------------------------------------------------------------------------------------------------------------------------------------------------------------------------------| | `appDefinitionId` | "1380b703-ce81-ff05-f115-39571d94dfcd" | | `widgetId` | "1380bbb4-8df0-fd38-a235-88821cf3f8a4" | | `slotId` | ID of the slot you want [as displayed in the image above](#slots).
    Supported values:
    • `"thank-you-page:details:before"`
    • `"thank-you-page:items:after"`
    • `"thank-you-page:details:after"`
    | For example, for your widget to appear between the order summary and the shipping, billing, and payment information, use the following object in your configuration: ```json { "appDefinitionId": "1380b703-ce81-ff05-f115-39571d94dfcd", "widgetId": "1380bbb4-8df0-fd38-a235-88821cf3f8a4", "slotId": "thank-you-page:items:after" } ``` ## Thank you page plugin API The Thank you page passes props to your plugin. Use them to call [related Wix backend APIs](#related-wix-backend-apis). The plugin exposes the following props: | Name | Type | Description | |-----------|--------|-------------| | `orderId` | String | Order ID. | ### Code example The following example implements a [CLI Site Plugin](https://dev.wix.com/docs/wix-cli/guides/extensions/site-extensions/site-plugins/add-a-site-plugin-extension.md) and accesses the `orderId` prop. ```typescript class ThankYouPagePlugin extends HTMLElement { static get observedAttributes() { return ['order-id']; } connectedCallback() { this.render(); } attributeChangedCallback() { this.render(); } render() { const orderId = this.getAttribute('order-id') ?? ''; this.innerHTML = `
    `; } } export default ThankYouPagePlugin; ``` ## Related Wix backend APIs Thank you page plugins integrate with the Wix eCommerce Orders APIs, as well as other backend APIs. In your site plugin or in your app's server code, you can perform actions or implement logic that's dependent on the current order or related catalog data. The following Wix APIs may be useful: * [eCommerce Orders APIs](https://dev.wix.com/docs/api-reference/business-solutions/e-commerce/orders/orders/introduction.md) * [eCommerce APIs](https://dev.wix.com/docs/api-reference/business-solutions/e-commerce/introduction.md) * [Stores APIs](https://dev.wix.com/docs/api-reference/business-solutions/stores/introduction.md) ## Design guidelines When you create a Thank you page plugin, we recommend the following content and layout guidelines. ### Content guidelines - The Thank you page is part of the post-purchase confirmation flow. Keep plugin content concise and secondary to the order confirmation details. - Avoid duplicating the page's built-in order summary, totals, shipping, billing, or payment sections unless your plugin adds distinct value. ### Layout guidelines - The page layout provides `32px` spacing between sections and plugins. Don't add large outer margins around your plugin. - All slot placeholders are designed at `70px` height. - Design for compact content and responsive behavior on smaller screens. - Use the [Thank you page design spec (Figma)](https://www.figma.com/design/YWxcr1HqP7VDTz3N5h2aMT/%F0%9F%99%8F%F0%9F%8F%BC-TYP-%7C-eCom-Platform?node-id=2933-5486&t=TVMm0mVhYcNHupHh-1) for reference styles and layout. --- > Portal Navigation: > > - Append `.md` to any URL under `https://dev.wix.com/docs/` to get its markdown version. > - Pages are either content pages (article or reference text) or menu pages (a list of links to child pages). > - To get a menu page, truncate any URL to a parent path and append `.md` (e.g. `https://dev.wix.com/docs/sdk.md`, `https://dev.wix.com/docs/sdk/core-modules.md`). > - Top-level index of all portals: https://dev.wix.com/docs/llms.txt > - Full concatenated docs: https://dev.wix.com/docs/llms-full.txt ## Resource: Wix Stores: Product Page ## Article: Wix Stores: Product Page ## Article Link: https://dev.wix.com/docs/build-apps/develop-your-app/extensions/site-extensions/site-plugins/supported-wix-app-pages/wix-stores/wix-stores-product-page.md ## Article Content: # Wix Stores: Product Page The following slots and APIs are available when building a [site plugin](https://dev.wix.com/docs/build-apps/develop-your-app/extensions/site-extensions/site-plugins/about-site-plugin-extensions.md) for the Product page.
    **Important:** The slots and APIs are different depending on [which version of Wix Stores](https://support.wix.com/en/article/wix-stores-customizing-your-product-page) a user has on their site. Your app should include placements for both versions. To check which version of Wix Stores is installed on a specific site, call the [Get App Instance](https://dev.wix.com/docs/rest/app-management/app-instance/get-app-instance.md) method and inspect the `installedWixApps` field.
    ## Slots The following images show the slots available in the Product page, into which users can add plugins. The locations of slots differ slightly depending on which version of Wix Stores and which page layout a site is using. ### New product page > **Note:** > If using the `product-page-media-1` slot, it may overlap with the thumbnail images on the left hand side in a desktop view. In this case, we recommend offering settings in your app to control the left padding.
    Mobile
    Desktop
    ### Old product page
    Mobile
    Classic
    Simple
    Sleek
    Spotlight
    Stunning
    The slots are represented by the following `placement` objects: ```json [ { "appDefinitionId": "", "widgetId": "", "slotId": "" }, { "appDefinitionId": "", "widgetId": "", "slotId": "" } ] ``` Provide the following values for each property: **New product page** | Key | Value | | ------------------ | ------- | | `appDefinitionId` | "a0c68605-c2e7-4c8d-9ea1-767f9770e087" | | `widgetId` | "6a25b678-53ec-4b37-a190-65fcd1ca1a63" | | `slotId` | ID of the slot you want [as displayed in the image above](#new-product-page). | **Old product page** | Key | Value | | ------------------ | ------- | | `appDefinitionId` | "1380b703-ce81-ff05-f115-39571d94dfcd" | | `widgetId` | "13a94f09-2766-3c40-4a32-8edb5acdd8bc" | | `slotId` | ID of the slot you want [as displayed in the image above](#old-product-page). | For example: ```json { "appDefinitionId": "a0c68605-c2e7-4c8d-9ea1-767f9770e087", "widgetId": "6a25b678-53ec-4b37-a190-65fcd1ca1a63", "slotId": "product-page-details-2" } ``` ## Product plugin API Use the Product Plugin API to integrate with the [plugin's host](https://dev.wix.com/docs/build-apps/develop-your-app/extensions/site-extensions/site-plugins/about-site-plugin-extensions.md#terminology), which in this case is the product page. The API provides data about the current event. | Property | Type | Description | |---------------------|-----------|-------------| | `productId` | string | The ID of the product on the product page. | | `selectedVariantId` | string | The ID of the selected product variant. This ID is only available after the site visitor picks all required product choices. For example selecting the color and size of the product. Until all required choices are selected, this ID is `undefined`. | | `selectedChoices` | object | An object containing all the choices the site visitor picks from the options on the product page. Each key is an option name and each value is the selected option. For example, `{ color: "green", size: "large" }`. | | `quantity` | number | The number of product items the site visitor wants to buy. The site visitor can increase or decrease this value on the product page. | | `customText` | string[] | An array of text values entered by the site visitor in custom text fields on the product page. For example, this can be used for personalization, such as adding names to a shirt. Multiple text fields are supported, so each entry in the array corresponds to a different custom text field on the product page. | ## Related Wix APIs In your site plugin or in your app's server code, you may want to perform actions or implement logic that's dependent on the current product or related data. You can do this using the Wix Stores APIs ([Velo](https://dev.wix.com/docs/velo/apis/wix-stores-v2/products/introduction.md), [REST](https://dev.wix.com/docs/rest/business-solutions/stores/about-wix-stores.md), [JavaScript SDK](https://dev.wix.com/docs/api-reference/business-solutions/stores/catalog-v1/catalog/introduction.md)). --- > Portal Navigation: > > - Append `.md` to any URL under `https://dev.wix.com/docs/` to get its markdown version. > - Pages are either content pages (article or reference text) or menu pages (a list of links to child pages). > - To get a menu page, truncate any URL to a parent path and append `.md` (e.g. `https://dev.wix.com/docs/sdk.md`, `https://dev.wix.com/docs/sdk/core-modules.md`). > - Top-level index of all portals: https://dev.wix.com/docs/llms.txt > - Full concatenated docs: https://dev.wix.com/docs/llms-full.txt ## Resource: Wix Stores: Category Page ## Article: Wix Stores: Category Page ## Article Link: https://dev.wix.com/docs/build-apps/develop-your-app/extensions/site-extensions/site-plugins/supported-wix-app-pages/wix-stores/wix-stores-category-page.md ## Article Content: # Wix Stores: Category Page The following slots and APIs are available when building a [site plugin](https://dev.wix.com/docs/build-apps/develop-your-app/extensions/site-extensions/site-plugins/about-site-plugin-extensions.md) for the Category page. > **Note:** > When selecting a slot for your plugin in the Category page, you should select the same slot for the [Shop page](https://dev.wix.com/docs/build-apps/develop-your-app/extensions/site-extensions/site-plugins/supported-wix-app-pages/wix-stores/wix-stores-shop-page.md) and the [Gallery widget](https://dev.wix.com/docs/build-apps/develop-your-app/extensions/site-extensions/site-plugins/supported-wix-app-pages/wix-stores/wix-stores-gallery-widget.md). Different Wix sites may use any of these and making these slots available for your plugin allows users to add it to their site regardless of their setup. ## Slots The following images show the slots available in the Category page, into which users can add plugins.
    Mobile
    Mobile Popup
    Desktop
    The slots are represented by the following `placement` object: ```json { "appDefinitionId": "", "widgetId": "", "slotId": "" } ``` Provide the following values for each property: | Key | Value | | ------------------ | ------- | | `appDefinitionId` | "1380b703-ce81-ff05-f115-39571d94dfcd" | | `widgetId` | "bda15dc1-816d-4ff3-8dcb-1172d5343cce" | | `slotId` | ID of the slot you want [as displayed in the image above](#slots). | For example: ```json { "appDefinitionId": "1380b703-ce81-ff05-f115-39571d94dfcd", "widgetId": "bda15dc1-816d-4ff3-8dcb-1172d5343cce", "slotId": "category-page-hero-top" } ``` ### Category plugin API Use the Category plugin API to integrate with the plugin's host. The API provides data about the current category. | Property | Type | Description | | -------- | ---- | ----------- | | `categoryId` | String | The ID of the category that is currently applied on the plugin's host. | ## Related Wix APIs In your site plugin or in your app's server code, you may want to perform actions or implement logic that is dependent on the current category or related data. You can do this using the Wix Stores APIs ([Velo](https://dev.wix.com/docs/velo/apis/wix-stores-v2/products/introduction.md), [REST](https://dev.wix.com/docs/rest/business-solutions/stores/about-wix-stores.md), [JavaScript SDK](https://dev.wix.com/docs/sdk/backend-modules/stores/products/introduction.md)). --- > Portal Navigation: > > - Append `.md` to any URL under `https://dev.wix.com/docs/` to get its markdown version. > - Pages are either content pages (article or reference text) or menu pages (a list of links to child pages). > - To get a menu page, truncate any URL to a parent path and append `.md` (e.g. `https://dev.wix.com/docs/sdk.md`, `https://dev.wix.com/docs/sdk/core-modules.md`). > - Top-level index of all portals: https://dev.wix.com/docs/llms.txt > - Full concatenated docs: https://dev.wix.com/docs/llms-full.txt ## Resource: Wix Stores: Shop Page ## Article: Wix Stores: Shop Page ## Article Link: https://dev.wix.com/docs/build-apps/develop-your-app/extensions/site-extensions/site-plugins/supported-wix-app-pages/wix-stores/wix-stores-shop-page.md ## Article Content: # Wix Stores: Shop Page The following slots and APIs are available when building a [site plugin](https://dev.wix.com/docs/build-apps/develop-your-app/extensions/site-extensions/site-plugins/about-site-plugin-extensions.md) for the Shop page. > **Note:** > When selecting a slot for your plugin in the Shop page, you should select the same slot for the [Gallery widget](https://dev.wix.com/docs/build-apps/develop-your-app/extensions/site-extensions/site-plugins/supported-wix-app-pages/wix-stores/wix-stores-gallery-widget.md) and the [Category page](https://dev.wix.com/docs/build-apps/develop-your-app/extensions/site-extensions/site-plugins/supported-wix-app-pages/wix-stores/wix-stores-category-page.md). Different Wix sites may use any of these and making these slots available for your plugin allows users to add it to their site regardless of their setup. ## Slots The following images show the slots available in the Shop page, into which users can add plugins.
    Mobile
    Mobile Popup
    Desktop
    The slots are represented by the following `placement` object: ```json { "appDefinitionId": "", "widgetId": "", "slotId": "" } ``` Provide the following values for each property: | Key | Value | | ------------------ | ------- | | `appDefinitionId` | "1380b703-ce81-ff05-f115-39571d94dfcd" | | `widgetId` | "1380bba0-253e-a800-a235-88821cf3f8a4" | | `slotId` | ID of the slot you want [as displayed in the image above](#slots). | For example: ```json { "appDefinitionId": "1380b703-ce81-ff05-f115-39571d94dfcd", "widgetId": "13afb094-84f9-739f-44fd-78d036adb028", "slotId": "gallery-products-top" } ``` ### Category plugin API Use the Category plugin API to integrate with the plugin's host. The API provides data about the current category. | Property | Type | Description | | -------- | ---- | ----------- | | `categoryId` | String | The ID of the category that is currently applied on the plugin's host. | ## Related Wix APIs In your site plugin or in your app's server code, you may want to perform actions or implement logic that is dependent on the current category or related data. You can do this using the Wix Stores APIs ([Velo](https://dev.wix.com/docs/velo/apis/wix-stores-v2/products/introduction.md), [REST](https://dev.wix.com/docs/rest/business-solutions/stores/about-wix-stores.md), [JavaScript SDK](https://dev.wix.com/docs/sdk/backend-modules/stores/products/introduction.md)). --- > Portal Navigation: > > - Append `.md` to any URL under `https://dev.wix.com/docs/` to get its markdown version. > - Pages are either content pages (article or reference text) or menu pages (a list of links to child pages). > - To get a menu page, truncate any URL to a parent path and append `.md` (e.g. `https://dev.wix.com/docs/sdk.md`, `https://dev.wix.com/docs/sdk/core-modules.md`). > - Top-level index of all portals: https://dev.wix.com/docs/llms.txt > - Full concatenated docs: https://dev.wix.com/docs/llms-full.txt ## Resource: Wix Stores: Gallery Widget ## Article: Wix Stores: Gallery Widget ## Article Link: https://dev.wix.com/docs/build-apps/develop-your-app/extensions/site-extensions/site-plugins/supported-wix-app-pages/wix-stores/wix-stores-gallery-widget.md ## Article Content: # Wix Stores: Gallery Widget The following slots and APIs are available when building a [site plugin](https://dev.wix.com/docs/build-apps/develop-your-app/extensions/site-extensions/site-plugins/about-site-plugin-extensions.md) for the Gallery widget. > **Note:** > When selecting a slot for your plugin in the Gallery widget, you should select the same slot for the [Shop page](https://dev.wix.com/docs/build-apps/develop-your-app/extensions/site-extensions/site-plugins/supported-wix-app-pages/wix-stores/wix-stores-shop-page.md) and the [Category page](https://dev.wix.com/docs/build-apps/develop-your-app/extensions/site-extensions/site-plugins/supported-wix-app-pages/wix-stores/wix-stores-category-page.md). Different Wix sites may use any of these and making these slots available for your plugin allows users to add it to their site regardless of their setup. ## Slots The following images show the slots available in the Gallery widget, into which users can add plugins.
    Mobile
    Mobile Popup
    Desktop
    The slots are represented by the following `placement` object: ```json { "appDefinitionId": "", "widgetId": "", "slotId": "" } ``` Provide the following values for each property: | Key | Value | | ------------------ | ------- | | `appDefinitionId` | "1380b703-ce81-ff05-f115-39571d94dfcd" | | `widgetId` | "13afb094-84f9-739f-44fd-78d036adb028" | | `slotId` | ID of the slot you want [as displayed in the image above](#slots). | For example: ```json { "appDefinitionId": "1380b703-ce81-ff05-f115-39571d94dfcd", "widgetId": "13afb094-84f9-739f-44fd-78d036adb028", "slotId": "gallery-products-top" } ``` ### Category plugin API Use the Category plugin API to integrate with the plugin's host. The API provides data about the current category. | Property | Type | Description | | -------- | ---- | ----------- | | `categoryId` | String | The ID of the category that is currently applied on the plugin's host. | ## Related Wix APIs In your site plugin or in your app's server code, you may want to perform actions or implement logic that is dependent on the current category or related data. You can do this using the Wix Stores APIs ([Velo](https://dev.wix.com/docs/velo/apis/wix-stores-v2/products/introduction.md), [REST](https://dev.wix.com/docs/rest/business-solutions/stores/about-wix-stores.md), [JavaScript SDK](https://dev.wix.com/docs/sdk/backend-modules/stores/products/introduction.md)). --- > Portal Navigation: > > - Append `.md` to any URL under `https://dev.wix.com/docs/` to get its markdown version. > - Pages are either content pages (article or reference text) or menu pages (a list of links to child pages). > - To get a menu page, truncate any URL to a parent path and append `.md` (e.g. `https://dev.wix.com/docs/sdk.md`, `https://dev.wix.com/docs/sdk/core-modules.md`). > - Top-level index of all portals: https://dev.wix.com/docs/llms.txt > - Full concatenated docs: https://dev.wix.com/docs/llms-full.txt ## Resource: Wix Bookings: Service Page ## Article: Wix Bookings: Service Page ## Article Link: https://dev.wix.com/docs/build-apps/develop-your-app/extensions/site-extensions/site-plugins/supported-wix-app-pages/wix-bookings/wix-bookings-service-page.md ## Article Content: # Wix Bookings: Service Page Following are the slots and APIs that are available when building a [site plugin](https://dev.wix.com/docs/build-apps/develop-your-app/extensions/site-extensions/site-plugins/about-site-plugin-extensions.md) for Wix Bookings' Service page. ## Slots The Service Page can host a single plugin that users are free to reposition within the page by [reordering the Service Page sections](https://support.wix.com/en/article/wix-bookings-customizing-your-service-pages): ![service-page-slots](https://wixmp-833713b177cebf373f611808.wixmp.com/images/4117b92be9b9cfc8cfe4330a5e9af2ab.png) The slot is represented by the following `placement` object: ```json { "appDefinitionId": "13d21c63-b5ec-5912-8397-c3a5ddb27a97", "widgetId": "a91a0543-d4bd-4e6b-b315-9410aa27bcde", "slotId": "slot1" } ``` ## Bookings Service plugin API Use the Booking Service plugin API to integrate with the plugin's host. The API provides data about the current booking service. ### Properties | Property | Type | Description | | -------- | ---- | ----------- | | `bookingsServiceId` | String | ID of the Wix Bookings service that is currently applied on the plugin's host. | ### Code example ```javascript const {bookingsServiceId} = $widget.props; ``` ## Related Wix backend APIs In your site plugin or in your app's server code, you may want to perform actions or implement logic that is dependent on the current booking or related data. You can do this using the Wix Bookings APIs ([Velo](https://www.wix.com/velo/reference/wix-bookings-v2/introduction) and [REST](https://dev.wix.com/docs/rest/business-solutions/bookings/about-wix-bookings.md)). --- > Portal Navigation: > > - Append `.md` to any URL under `https://dev.wix.com/docs/` to get its markdown version. > - Pages are either content pages (article or reference text) or menu pages (a list of links to child pages). > - To get a menu page, truncate any URL to a parent path and append `.md` (e.g. `https://dev.wix.com/docs/sdk.md`, `https://dev.wix.com/docs/sdk/core-modules.md`). > - Top-level index of all portals: https://dev.wix.com/docs/llms.txt > - Full concatenated docs: https://dev.wix.com/docs/llms-full.txt ## Resource: Wix Events: Event Details Page ## Article: Wix Events: Event Details Page ## Article Link: https://dev.wix.com/docs/build-apps/develop-your-app/extensions/site-extensions/site-plugins/supported-wix-app-pages/wix-events/wix-events-event-details-page.md ## Article Content: # Wix Events: Event Details Page Following are the slots and APIs that are available when building a [site plugin](https://dev.wix.com/docs/build-apps/develop-your-app/extensions/site-extensions/site-plugins/about-site-plugin-extensions.md) for the Event Details Page. ## Slots The following image shows slots in the Event Details page, into which users can add plugins. ![events-slots](https://wixmp-833713b177cebf373f611808.wixmp.com/images/8d4c4197e9e852d402ec74c4585f4893.png) The slots are represented by the following `placement` objects: ```json { "appDefinitionId": "140603ad-af8d-84a5-2c80-a0f60cb47351", "widgetId": "14d2abc2-5350-6322-487d-8c16ff833c8a", "slotId": "header" } ``` ```json { "appDefinitionId": "140603ad-af8d-84a5-2c80-a0f60cb47351", "widgetId": "14d2abc2-5350-6322-487d-8c16ff833c8a", "slotId": "details" } ``` ## Event plugin API Use the Event plugin API to integrate with the plugin's host. The API provides data about the current event. | Property | Type | Description | | -------- | ---- | ----------- | | `eventId` | String | The ID of the event that is currently applied on the plugin's host. | ### Code example ```javascript const {eventId} = $widget.props; ``` ## Related Wix backend APIs In your site plugin or in your app's server code, you may want to perform actions or implement logic that is dependent on the current event or related data. You can do this using the Wix Events APIs ([Velo](https://www.wix.com/velo/reference/wix-events-v2/introduction) and [REST](https://dev.wix.com/docs/rest/business-solutions/events/introduction.md)). --- > Portal Navigation: > > - Append `.md` to any URL under `https://dev.wix.com/docs/` to get its markdown version. > - Pages are either content pages (article or reference text) or menu pages (a list of links to child pages). > - To get a menu page, truncate any URL to a parent path and append `.md` (e.g. `https://dev.wix.com/docs/sdk.md`, `https://dev.wix.com/docs/sdk/core-modules.md`). > - Top-level index of all portals: https://dev.wix.com/docs/llms.txt > - Full concatenated docs: https://dev.wix.com/docs/llms-full.txt ## Resource: Wix Blog: Post Page ## Article: Wix Blog: Post Page ## Article Link: https://dev.wix.com/docs/build-apps/develop-your-app/extensions/site-extensions/site-plugins/supported-wix-app-pages/wix-blog/wix-blog-post-page.md ## Article Content: # Wix Blog: Post Page The following slots are available when building a [site plugin](https://dev.wix.com/docs/build-apps/develop-your-app/extensions/site-extensions/site-plugins/about-site-plugin-extensions.md) for the Post page. ## Slots The following image shows slots in the Post page, into which users can add plugins. ![post-slots](https://wixmp-833713b177cebf373f611808.wixmp.com/images/29722d7432e7f5c13c415900eb3cbc5c.png) The slots are represented by the following `placement` object: ```json [ { "appDefinitionId": "", "widgetId": "", "slotId": "" } ] ``` Provide the following values for each property: | Key | Value | | ------------------ | ------- | | `appDefinitionId` | "14bcded7-0066-7c35-14d7-466cb3f09103" | | `widgetId` | "211b5287-14e2-4690-bb71-525908938c81" | | `slotId` | ID of the slot you want [as displayed in the image above](#slots).
    Supported values:
    • `"above-header"`
    • `"above-content-1"`
    • `"above-content-2"`
    • `"below-content-1"`
    • `"below-content-2"`
    • `"page-bottom-1"`
    • `"page-bottom-2"`
    • `"page-bottom-3"`
    | For example: ```json { "appDefinitionId": "14bcded7-0066-7c35-14d7-466cb3f09103", "widgetId": "211b5287-14e2-4690-bb71-525908938c81", "slotId": "above-content-1" } ``` Learn more about how to [add your plugin to a slot from the dashboard page](https://dev.wix.com/docs/build-apps/develop-your-app/extensions/site-extensions/site-plugins/build-a-dashboard-page-to-manage-your-site-plugin.md). ## Post plugin API Use the Post plugin API to integrate with the plugin's host. The API provides data about the current post. ### Properties | Name | Type | Description | | -------- | ---- | ----------- | | `postId` | String | The ID of the current post. | ### Code example ```js const { postId } = $widget.props; ``` ## Related Wix backend APIs Post plugins usually need to integrate with Wix Blog Post APIs, as well as other backend APIs. In your site plugin or in your app's server code, you may want to perform actions or implement logic that is dependent on the current post or related data. You can do this using the Wix Blog APIs ([Velo](https://dev.wix.com/docs/velo/api-reference/wix-blog-backend/introduction.md), [REST](https://dev.wix.com/docs/rest/business-solutions/blog/introduction.md), [JavaScript SDK](https://dev.wix.com/docs/sdk/backend-modules/blog/introduction.md)). --- > Portal Navigation: > > - Append `.md` to any URL under `https://dev.wix.com/docs/` to get its markdown version. > - Pages are either content pages (article or reference text) or menu pages (a list of links to child pages). > - To get a menu page, truncate any URL to a parent path and append `.md` (e.g. `https://dev.wix.com/docs/sdk.md`, `https://dev.wix.com/docs/sdk/core-modules.md`). > - Top-level index of all portals: https://dev.wix.com/docs/llms.txt > - Full concatenated docs: https://dev.wix.com/docs/llms-full.txt ## Resource: About Embedded Scripts ## Article: About Embedded Scripts ## Article Link: https://dev.wix.com/docs/build-apps/develop-your-app/extensions/site-extensions/embedded-scripts/about-embedded-scripts.md ## Article Content: # About Embedded Scripts An embedded script is an app extension that injects an HTML code fragment into the DOM of a site. Unlike other extensions, embedded scripts aren't fully configured by default during app installation and an extra step is required to embed the code fragment. For detailed instructions, see: * [Add a Self-Managed Embedded Script Extension](https://dev.wix.com/docs/build-apps/develop-your-app/frameworks/self-hosting/supported-extensions/site-extensions/embedded-scripts/add-an-embedded-script-extension-to-a-self-hosted-app.md) * [Add an Embedded Script Extension Using the Wix CLI](https://dev.wix.com/docs/wix-cli/guides/extensions/site-extensions/embedded-scripts/add-an-embedded-script-extension.md) ## Example use cases Embedded scripts have a variety of uses, including: * **Analytics**: Use embedded scripts to listen to predefined Wix events as well as report and listen to custom events. Examples of predefined Wix events include clicking on a product or adding an item to a cart. For more information, see [Analyze User Behavior Using Embedded Scripts](https://dev.wix.com/docs/build-apps/develop-your-app/extensions/site-extensions/embedded-scripts/analyze-user-behavior-using-embedded-scripts.md). * **Site Interaction**: Access site data and integrate with apps made by Wix, such as Wix Stores and Wix Bookings, using the [Site API](https://dev.wix.com/docs/sdk/host-modules/site/introduction.md). The Site API is only available for embedded scripts created with the [CLI](https://dev.wix.com/docs/wix-cli/guides/extensions/site-extensions/embedded-scripts/about-embedded-scripts.md). * **Customized Behavior**: Enhance user engagement by adding dynamic features like pop-ups, sliders, or tooltips that react to user inputs. ## Embedded script types Script types determine whether site visitors consent to having your script run during their visit. Script types categorize embedded scripts for privacy and consent management purposes according to GDPR and similar data protection guidelines. For more information about meeting consent requirements and selecting a script type, see [Implement Cookie Consent Requirements](https://dev.wix.com/docs/build-apps/launch-your-app/legal-and-security/gdpr-compliance/implement-cookie-consent-requirements.md#implement-cookie-consent-requirements). Each embedded script must specify 1 of the following types: | Type | Description | Use Cases | | ------------- | ------------------------------------------------ | --------------------------------------- | | `ESSENTIAL` | Core functionality crucial to site operation. | Authentication, security features | | `FUNCTIONAL` | Remembers site visitors' choices to improve experience. | Language preferences, UI customization | | `ANALYTICS` | Provides statistics on how visitors use the site. | Google Analytics, Hotjar, Mixpanel | | `ADVERTISING` | Provides visitor data for marketing purposes. | Facebook Pixel, Google Ads, retargeting |
    Important: If a script falls into multiple types, choose the option closest to the bottom of the list (most restrictive). For example, a script with both **Analytics** and **Advertising** aspects should use `ADVERTISING`.
    ## Dynamic parameters If you have custom keys or data per user, you can use dynamic parameters in your embedded script. Dynamic parameters must: * Be strings. * Contain only alphanumeric characters (no special characters or spaces). * Be wrapped in double curly braces (`{{`). * Be enclosed in quotes (`"`) to prevent code evaluation. * Be provided upon installation when calling [Embed Script](https://dev.wix.com/docs/rest/app-management/embedded-scripts/embed-script.md). For example: ```javascript ```
    **Important:** If you add, remove, or change a dynamic parameter, users must update your app to receive the latest version of the embedded script.
    ## Troubleshooting The `MISMATCHED ANONYMOUS DEFINE() MODULES...` error is a common issue when working with AMD/UMD bundled scripts. The error occurs when an embedded script defines an anonymous module, either because it's bundled with AMD or it adds a script tag to the head containing an anonymous module. To resolve the issue, try the following: * **For the embedded script itself:** If the script is bundled with AMD/UMD, make sure that you declare only [named modules](https://requirejs.org/docs/api.html#modulename). * **For scripts loaded by the embed**: * **If you own the code:** If the scripts are bundled with AMD/UMD, make sure that you declare only [named modules](https://requirejs.org/docs/api.html#modulename). * **If you don't own the code:** Check if `requirejs` exists on the window. If it does, load the script via `requirejs` instead of adding the script to the ``. This approach is suboptimal and might still lead to race conditions and errors. For more information on this issue, see [RequireJS: Common Errors](https://requirejs.org/docs/errors.html#mismatch). ## See also * [Analyze User Behavior Using Embedded Scripts](https://dev.wix.com/docs/build-apps/develop-your-app/extensions/site-extensions/embedded-scripts/analyze-user-behavior-using-embedded-scripts.md) * [Customize Wix Stores Using Embedded Scripts](https://dev.wix.com/docs/build-apps/develop-your-app/extensions/site-extensions/embedded-scripts/customize-wix-stores-using-embedded-scripts.md) * [Add a Self-Managed Embedded Script Extension](https://dev.wix.com/docs/build-apps/develop-your-app/frameworks/self-hosting/supported-extensions/site-extensions/embedded-scripts/add-an-embedded-script-extension-to-a-self-hosted-app.md) * [Add an Embedded Script Extension Using the Wix CLI](https://dev.wix.com/docs/wix-cli/guides/extensions/site-extensions/embedded-scripts/add-an-embedded-script-extension.md) --- > Portal Navigation: > > - Append `.md` to any URL under `https://dev.wix.com/docs/` to get its markdown version. > - Pages are either content pages (article or reference text) or menu pages (a list of links to child pages). > - To get a menu page, truncate any URL to a parent path and append `.md` (e.g. `https://dev.wix.com/docs/sdk.md`, `https://dev.wix.com/docs/sdk/core-modules.md`). > - Top-level index of all portals: https://dev.wix.com/docs/llms.txt > - Full concatenated docs: https://dev.wix.com/docs/llms-full.txt ## Resource: Analyze User Behavior Using Embedded Scripts ## Article: Analyze User Behavior Using Embedded Scripts ## Article Link: https://dev.wix.com/docs/build-apps/develop-your-app/extensions/site-extensions/embedded-scripts/analyze-user-behavior-using-embedded-scripts.md ## Article Content: # Analyze User Behavior with Embedded Scripts Use an [embedded script extension](https://dev.wix.com/docs/build-apps/develop-your-app/extensions/site-extensions/embedded-scripts/about-embedded-scripts.md) to track analytics events on a site and send them to [external analytics platforms](https://support.wix.com/en/article/about-marketing-integrations) such as Google Analytics or Facebook Pixel. Call [trackEvent()](https://dev.wix.com/docs/sdk/host-modules/site/analytics/track-event.md) to report [standard events](https://dev.wix.com/docs/sdk/host-modules/site/events/about-analytics-events.md) or custom events to connected platforms. > **Notes:** > > - You must load the script on a site by calling [Embed Script](https://dev.wix.com/docs/api-reference/app-management/embedded-scripts/embed-script?apiView=SDK.md) in your code. > - This article shows how to track events using [an embedded script extension added by the CLI](https://dev.wix.com/docs/wix-cli/guides/extensions/site-extensions/embedded-scripts/add-an-embedded-script-extension.md). You can also track events using [a self-managed embedded script extension](https://dev.wix.com/docs/build-apps/develop-your-app/frameworks/self-hosting/supported-extensions/site-extensions/embedded-scripts/add-an-embedded-script-extension-to-a-self-hosted-app.md). ## Listen to standard Wix events Wix business solutions, such as Wix Stores or Wix Events, trigger [standard analytics events](https://dev.wix.com/docs/sdk/host-modules/site/events/about-analytics-events.md) when the corresponding visitor actions occur, but these events aren't automatically forwarded to external analytics platforms. To report them, you need to call `trackEvent()` in your embedded script code. For example, to report an [`AddToCart` event](https://dev.wix.com/docs/sdk/host-modules/site/events/wix-stores/add-to-cart.md) when a visitor adds a product to their cart: 1. In the embedded script extension's [`.html` file](https://dev.wix.com/docs/wix-cli/guides/extensions/site-extensions/embedded-scripts/embedded-script-extension-files-and-code.md#embeddedhtml), reference a local JavaScript module: ```html ``` 2. In the module code, import the `analytics` module and call `trackEvent()` with the standard event name and relevant data. For example, to report an `AddToCart` event: ```js import { analytics } from "@wix/site"; analytics.trackEvent("AddToCart", { id: "product-123", name: "Classic Sneakers", price: 89.99, currency: "USD", quantity: 1, }); ``` The event is reported to all analytics platforms connected to the site. ## Track custom events You can define and track custom events for visitor behaviors not covered by standard events, and report them to connected external analytics platforms: 1. In the [embedded script extension's `.html` file](https://dev.wix.com/docs/wix-cli/guides/extensions/site-extensions/embedded-scripts/embedded-script-extension-files-and-code.md#embeddedhtml), reference a local JavaScript module: ```html ``` 2. In the module code, import the `analytics` module and call `trackEvent()` with the event name and any relevant event data: ```js import { analytics } from "@wix/site"; analytics.trackEvent("HeroBannerClick", { eventCategory: "engagement", eventAction: "hero-banner-click", }); ``` The event is reported to all analytics platforms connected to the site. > **Note:** Some external analytics platforms require that the custom event contains certain properties, such as `eventCategory` and `eventAction`. ## Register event handlers You can call [registerEventListener()](https://dev.wix.com/docs/sdk/host-modules/site/analytics/register-event-listener.md) to register an event handler that runs whenever any analytics event occurs, either standard or custom. Use this for debugging, logging, or forwarding events to a custom destination. To run handlers for only specific event types, use conditional logic in your code: ```js import { analytics } from "@wix/site"; analytics.registerEventListener((eventName, eventData) => { switch (eventName) { case "PageView": console.log("Page viewed:", eventData); break; case "AddToCart": console.log("Added to cart:", eventData); break; case "HeroBannerClick": console.log("Hero banner clicked:", eventData); break; } }); ``` ## See also - [About Marketing Integrations](https://support.wix.com/en/article/about-marketing-integrations) - [Add an Embedded Script Extension Using the CLI](https://dev.wix.com/docs/wix-cli/guides/extensions/site-extensions/embedded-scripts/add-an-embedded-script-extension.md) - [Add a Self-Managed Embedded Script Extension](https://dev.wix.com/docs/build-apps/develop-your-app/frameworks/self-hosting/supported-extensions/site-extensions/embedded-scripts/add-an-embedded-script-extension-to-a-self-hosted-app.md) - [About the Analytics API](https://dev.wix.com/docs/sdk/host-modules/site/analytics/introduction.md) - [About Analytics Events](https://dev.wix.com/docs/sdk/host-modules/site/events/about-analytics-events.md) - [About Embedded Scripts](https://dev.wix.com/docs/build-apps/develop-your-app/extensions/site-extensions/embedded-scripts/about-embedded-scripts.md) --- > Portal Navigation: > > - Append `.md` to any URL under `https://dev.wix.com/docs/` to get its markdown version. > - Pages are either content pages (article or reference text) or menu pages (a list of links to child pages). > - To get a menu page, truncate any URL to a parent path and append `.md` (e.g. `https://dev.wix.com/docs/sdk.md`, `https://dev.wix.com/docs/sdk/core-modules.md`). > - Top-level index of all portals: https://dev.wix.com/docs/llms.txt > - Full concatenated docs: https://dev.wix.com/docs/llms-full.txt ## Resource: Customize Wix Stores Using Embedded Scripts ## Article: Customize Wix Stores Using Embedded Scripts ## Article Link: https://dev.wix.com/docs/build-apps/develop-your-app/extensions/site-extensions/embedded-scripts/customize-wix-stores-using-embedded-scripts.md ## Article Content: # Customize Wix Stores Using Embedded Scripts
    **Warning:** This feature isn't supported in Wix Studio sites. Instead, use a [site plugin extension](https://dev.wix.com/docs/build-apps/develop-your-app/extensions/site-extensions/site-plugins/about-site-plugin-extensions.md) with a Wix Stores [slot](https://dev.wix.com/docs/build-apps/develop-your-app/extensions/site-extensions/site-plugins/supported-wix-app-pages/about-slots.md).
    [Wix Stores](https://support.wix.com/en/article/wix-stores-about-wix-stores) provides placeholders in their default product page where you can extend the functionality by injecting embedded scripts: ![](https://d2x3xhvgiqkx42.cloudfront.net/12345678-1234-1234-1234-1234567890ac/d0d6e5d7-1e68-49aa-8fbd-c4454894592e/2020/01/02/af158566-0a4d-4a51-845b-86ca332695fa/b32408db-96ac-4522-9df4-294e901931d7.png) ## Step 1 | Locate the placeholders Below the product SKU you should find: ```html
    ``` And at the bottom of the product page you should find: ```html
    ``` The placeholders are empty divs with data-hooks that allow you to add content to these specific page locations. ## Step 2 | Inject data into a placeholder To inject data into a placeholder, follow these steps: 1. Develop the HTML content or elements you want to insert into the placeholder. 1. Write a JavaScript script to append your content to the relevant placeholder. Ensure your script waits until the page is fully loaded by using the `DOMContentLoaded` event or a similar method. The following example appends a new paragraph to the `details-placeholder`: ```javascript document.addEventListener('DOMContentLoaded', function() { var placeholder = document.querySelector('[data-hook="details-placeholder"]'); if (placeholder) { var newElement = document.createElement('p'); newElement.textContent = 'This is the new content.'; placeholder.appendChild(newElement); } }); ``` 1. Add the script to your app using an embedded script extension. You can do this in your app's dashboard or via the CLI. For detailed instructions, refer to the following resources: * [Add a Self-Managed Embedded Script Extension](https://dev.wix.com/docs/build-apps/develop-your-app/frameworks/self-hosting/supported-extensions/site-extensions/embedded-scripts/add-an-embedded-script-extension-to-a-self-hosted-app.md) * [Add an Embedded Script Extension Using the Wix CLI](https://dev.wix.com/docs/wix-cli/guides/extensions/site-extensions/embedded-scripts/add-an-embedded-script-extension.md)
    **Important:** Make sure you append your DOM elements to the placeholder's existing content. Don't replace the content as other apps may be using the same placeholder.
    ## See also * [About Embedded Scripts](https://dev.wix.com/docs/build-apps/develop-your-app/extensions/site-extensions/embedded-scripts/about-embedded-scripts.md) --- > Portal Navigation: > > - Append `.md` to any URL under `https://dev.wix.com/docs/` to get its markdown version. > - Pages are either content pages (article or reference text) or menu pages (a list of links to child pages). > - To get a menu page, truncate any URL to a parent path and append `.md` (e.g. `https://dev.wix.com/docs/sdk.md`, `https://dev.wix.com/docs/sdk/core-modules.md`). > - Top-level index of all portals: https://dev.wix.com/docs/llms.txt > - Full concatenated docs: https://dev.wix.com/docs/llms-full.txt ## Resource: About Editor React Components ## Article: About Editor React Components ## Article Link: https://dev.wix.com/docs/build-apps/develop-your-app/extensions/site-extensions/editor-react-components/about-editor-react-components.md ## Article Content: # About Editor React Component Extensions
    __Alpha:__ Editor React Components are currently in alpha. This feature is subject to change and may have bugs, issues, and limitations. We're actively improving it based on your feedback.
    Editor React Component extensions let you build custom site widgets in React that fully integrate with the editor. You describe your component's customizable parts in a declarative manifest, and the editor builds matching [auto panels](https://dev.wix.com/docs/build-apps/develop-your-app/extensions/site-extensions/editor-react-components/auto-panels/about-auto-panels.md) for Wix users. This gives Wix users the same editing experience they get with built-in Wix elements, without you having to build or maintain your own settings panels like you would with a custom element. To see auto panels appear one by one as you add manifest properties, follow the [step-by-step tutorial](https://dev.wix.com/docs/build-apps/develop-your-app/extensions/site-extensions/editor-react-components/auto-panels/tutorial-configure-auto-panels.md).
    **Editor Compatibility** Editor React Component extensions are built for [Wix Harmony](https://dev.wix.com/docs/build-apps/get-started/overview/about-wix-harmony-and-apps.md), Wix's AI-powered editor. They're not supported on Wix Editor or Wix Studio sites, and there's no way to conditionally switch between extension types based on the editor.
    For a walkthrough of Editor React Components, watch the video tutorial:
    ## How it works Your extension has 2 main parts: - **React component**: Your UI code that renders in the editor and on the live site. - **Manifest**: A configuration object that declares what's customizable about your component, so the editor knows which [auto panels](https://dev.wix.com/docs/build-apps/develop-your-app/extensions/site-extensions/editor-react-components/auto-panels/about-auto-panels.md) and controls to show to Wix users. You build the React component first. The CLI then auto-generates the large part of the manifest for you. For more information, see [Auto-generated manifest](https://dev.wix.com/docs/build-apps/develop-your-app/extensions/site-extensions/editor-react-components/manifest-reference/about-the-manifest.md). Your component code may also include additional assets like stylesheets, and you can provide separate bundles for the live site and the editor. For more details, see [`resources`](https://dev.wix.com/docs/build-apps/develop-your-app/extensions/site-extensions/editor-react-components/manifest-reference/root-properties/resources.md). When a Wix user adds your component to their site: 1. The editor reads the manifest to understand what customizations are available. 2. The editor builds the matching auto panels and controls in the editor UI. 3. As the Wix user makes changes, the editor stores those values. It passes data changes to your component as [props](https://dev.wix.com/docs/build-apps/develop-your-app/extensions/site-extensions/editor-react-components/manifest-reference/runtime-props.md) and applies style changes as CSS directly to the DOM elements that match the selectors in the manifest. TypeScript types for all props are available from the [`@wix/editor-react-types`](https://www.npmjs.com/package/@wix/editor-react-types) package. ```mermaid %%{ init: { 'theme': 'base', 'themeVariables': { 'primaryColor': '#ffffff', 'primaryTextColor': '#162D3D', 'primaryBorderColor': '#162D3D', 'lineColor': '#0C6EFC', 'secondaryColor': '#674FE6', 'tertiaryColor': '#F4F4F4', 'edgeLabelBackground': '#ffffff', 'labelTextColor': '#162D3D' } } }%% graph TD subgraph Development ["Your code"] direction LR A1[React component] --- A2[Manifest] end Development --> B([Wix user installs your app]) B --> WixEditor subgraph WixEditor ["Editor"] C[Editor reads manifest to build auto panels]--> D{User interaction} D -->|Data| E[Delivered as props] D -->|Style| F[Applied via CSS selectors] E --> G[Component rerenders] F --> G end %% Custom Wix-y Styling style Development fill:#F0EBFF,stroke:#674FE6,stroke-width:2px style WixEditor fill:#D5E6FF,stroke:#0C6EFC,stroke-width:2px style D fill:#FFF9E5,stroke:#FAAD4D style B fill:#E6F0FF,stroke:#0C6EFC ``` ## Example Here's a testimonial card built as an Editor React Component. The component code comes first, then the manifest that drives it. **React component:** ```tsx import type { Image } from '@wix/editor-react-types'; import './style.css'; interface TestimonialCardProps { className: string; quote?: string; authorName?: string; authorRole?: string; image?: Image; } export default function TestimonialCard({ className, quote, authorName, authorRole, image }: TestimonialCardProps) { return (
    {quote ?? '"This app transformed our workflow."'}
    {image?.url && {authorName}

    {authorName ?? 'Jordan Lee'}

    {authorRole ?? 'Operations Manager'}

    ); } ```
    Sample stylesheet (style.css) ```css .testimonial-card { display: flex; flex-direction: column; gap: 20px; padding: 28px; border-radius: 12px; font-family: sans-serif; } .quote { margin: 0; font-size: 16px; line-height: 1.6; font-style: italic; } .author { display: flex; align-items: center; gap: 12px; } .avatar { width: 48px; height: 48px; border-radius: 50%; object-fit: cover; } .author-name { margin: 0; font-weight: 600; } .author-role { margin: 0; font-size: 13px; color: #6b7280; } ```
    Notice how the component applies `className` to the root element and uses CSS classes like `.quote` and `.author-name` on inner elements. These patterns are part of the [component requirements](#component-requirements) that let the editor manage your component. **Manifest:** ```json { "type": "yourAppCodeIdentifier.testimonialCard", "description": "A customizable testimonial card", "resources": { ... }, "editorElement": { "selector": ".testimonial-card", "displayName": "Testimonial Card", "data": { "quote": { "dataType": "text", "displayName": "Quote" }, "authorName": { "dataType": "text", "displayName": "Author Name" }, "authorRole": { "dataType": "text", "displayName": "Author Role" }, "image": { "dataType": "image", "displayName": "Author Photo" } }, "cssProperties": { "backgroundColor": { "defaultValue": "#ffffff" }, "padding": { "defaultValue": "28px" }, "borderRadius": { "defaultValue": "12px" }, "boxShadow": { "defaultValue": "0 1px 3px rgba(0,0,0,0.08)" } } } } ``` The `selector` (`.testimonial-card`) matches the CSS class on the component's root element. Everything else in the manifest drives an auto panel. Each `data` property with `dataType: "text"` becomes an editable text field. When a Wix user clicks **Edit Text** on the component, the editor builds an Edit Text auto panel with inputs for every text property. The `displayName` value appears as the label for each input: ![The Edit Text panel, with annotations showing how each text data property in the manifest maps to a field in the panel](https://wixmp-833713b177cebf373f611808.wixmp.com/images/ff1a30b6a7d7af5981ff5006f6de9cf4.png) Properties with `dataType: "image"` surface in the **Settings** auto panel, where Wix users can upload or choose images from the Wix Media Manager: ![The Settings panel, with annotations showing how the image data property in the manifest maps to the image upload control](https://wixmp-833713b177cebf373f611808.wixmp.com/images/0de9a85121d8df161fa570b4dbba7423.png) The `cssProperties` configure a full **Design** auto panel with controls for fill colors, borders, corners, shadows, and spacing. The editor maps each CSS property to the appropriate design control: ![The Design panel, with annotations showing how cssProperties in the manifest map to the design controls](https://wixmp-833713b177cebf373f611808.wixmp.com/images/868c0d3de03e7b08fecb20755c9775b3.png) > **Note:** These are a subset of the auto panels available. The full action bar is built from your manifest, and you never write panel UI code. For the full list, see [About Auto Panels](https://dev.wix.com/docs/build-apps/develop-your-app/extensions/site-extensions/editor-react-components/auto-panels/about-auto-panels.md). ## Component requirements For the editor to style, select, and configure your component, it needs to follow these conventions: - Export a default function component. - Accept a `className` prop and apply it to the root element. The editor uses this to manage styles and layout. - Add selectors to elements you want the manifest to target. The manifest accepts any valid DOM selector. CSS classes are the recommended approach. - Name your data props to match the keys in the manifest's `data` definition. Some manifest features may require additional component-side setup, such as a wrapper element for presets and prop handling for interaction states. The [tutorial on configuring auto panels](https://dev.wix.com/docs/build-apps/develop-your-app/extensions/site-extensions/editor-react-components/auto-panels/tutorial-configure-auto-panels.md) covers these as they come up. ## Runtime props As Wix users edit your component, the editor passes updated values to it as React props. Data values like text and numbers arrive as top-level props, while style changes are applied directly to the DOM as inline CSS. Some data types, like images and vector art, use complex object formats at runtime. The [`@wix/editor-react-types`](https://www.npmjs.com/package/@wix/editor-react-types) package provides TypeScript types for these values. For the full breakdown of prop categories, see [Runtime Props](https://dev.wix.com/docs/build-apps/develop-your-app/extensions/site-extensions/editor-react-components/manifest-reference/runtime-props.md). ## What you can configure The testimonial card example covers a simple case: editable text, an image, and some design properties. Most components go further. A slideshow has navigation arrows, a menu has items with hover states, a card grid needs layout controls. Through the manifest, you can also configure inner elements with their own auto panels, interaction states, layout and resize behavior, presets, animations, and richer data types. For the full set of auto panels and the manifest properties that drive each one, see [About Auto Panels](https://dev.wix.com/docs/build-apps/develop-your-app/extensions/site-extensions/editor-react-components/auto-panels/about-auto-panels.md). For the per-property manifest reference, see [About the Manifest](https://dev.wix.com/docs/build-apps/develop-your-app/extensions/site-extensions/editor-react-components/manifest-reference/about-the-manifest.md). ## Get started You can [add an Editor React Component extension using the CLI](https://dev.wix.com/docs/build-apps/develop-your-app/develop-an-app-with-the-cli/supported-extensions/site/editor-react-components/add-an-editor-react-component-extension-with-the-wix-cli.md). The CLI scaffolds your component files, auto-generates the `editorElement` portion of the manifest from your React code, handles bundling, and manages deployment. From there, you can develop your component: - **With an AI agent**: Use [Wix skills](https://dev.wix.com/docs/api-reference/articles/ai-tools/about-wix-skills.md) from a supported AI coding agent to build and update components. The skills regenerate the manifest as it works. - **Manually**: Edit the component source directly. After manual changes, run [`wix generate manifest`](https://dev.wix.com/docs/wix-cli/command-reference/project-commands/app-only/generate-manifest.md) to update the auto-generated manifest. ## Limitations The following limitations apply to Editor React Components. For manifest-specific rules and unsupported features, see [About the Manifest](https://dev.wix.com/docs/build-apps/develop-your-app/extensions/site-extensions/editor-react-components/manifest-reference/about-the-manifest.md). - **Custom panels aren't supported.** Only [auto panels](https://dev.wix.com/docs/build-apps/develop-your-app/extensions/site-extensions/editor-react-components/auto-panels/about-auto-panels.md) are available. You can't ship your own React UI for an editor panel, so anything Wix users can configure has to map to a manifest property. - **Self-hosting**: Self-hosting for Editor React Component extensions isn't supported. Deploy components using the [CLI](https://dev.wix.com/docs/build-apps/develop-your-app/develop-an-app-with-the-cli/supported-extensions/site/editor-react-components/add-an-editor-react-component-extension-with-the-wix-cli.md). ## See also - [About Auto Panels](https://dev.wix.com/docs/build-apps/develop-your-app/extensions/site-extensions/editor-react-components/auto-panels/about-auto-panels.md) - [About the Manifest](https://dev.wix.com/docs/build-apps/develop-your-app/extensions/site-extensions/editor-react-components/manifest-reference/about-the-manifest.md) - [Tutorial | Configure Auto Panels](https://dev.wix.com/docs/build-apps/develop-your-app/extensions/site-extensions/editor-react-components/auto-panels/tutorial-configure-auto-panels.md) --- > Portal Navigation: > > - Append `.md` to any URL under `https://dev.wix.com/docs/` to get its markdown version. > - Pages are either content pages (article or reference text) or menu pages (a list of links to child pages). > - To get a menu page, truncate any URL to a parent path and append `.md` (e.g. `https://dev.wix.com/docs/sdk.md`, `https://dev.wix.com/docs/sdk/core-modules.md`). > - Top-level index of all portals: https://dev.wix.com/docs/llms.txt > - Full concatenated docs: https://dev.wix.com/docs/llms-full.txt ## Resource: About Auto Panels ## Article: About Auto Panels for Editor React Components ## Article Link: https://dev.wix.com/docs/build-apps/develop-your-app/extensions/site-extensions/editor-react-components/auto-panels/about-auto-panels.md ## Article Content: # About Auto Panels for Editor React Components
    __Alpha:__ Editor React Components are currently in alpha. This feature is subject to change and may have bugs, issues, and limitations. We're actively improving it based on your feedback.
    Auto panels are how Wix users customize your [Editor React Component](https://dev.wix.com/docs/build-apps/develop-your-app/extensions/site-extensions/editor-react-components/about-editor-react-components.md) in the editor. When a Wix user selects your component, Wix builds the panels automatically from the declarations in its manifest. You don't render any UI yourself. The CLI auto-generates most of those declarations in the [`editorElement`](https://dev.wix.com/docs/build-apps/develop-your-app/extensions/site-extensions/editor-react-components/manifest-reference/editor-element/editor-element.md) portion of the manifest by reading your React component source. For details, see [auto-generated manifest](https://dev.wix.com/docs/build-apps/develop-your-app/extensions/site-extensions/editor-react-components/manifest-reference/about-the-manifest.md#auto-generated-manifest). To see auto panels built up from scratch, see [Tutorial | Configure Auto Panels](https://dev.wix.com/docs/build-apps/develop-your-app/extensions/site-extensions/editor-react-components/panels/tutorial-configure-auto-panels.md). ## How Wix users open auto panels When a Wix user selects your component in the editor, an action bar appears with buttons for the auto panels available on it. Each button opens a panel populated with the controls you declared. Auto panels are available for the root component and, if you define them, for [inner elements](https://dev.wix.com/docs/build-apps/develop-your-app/extensions/site-extensions/editor-react-components/manifest-reference/editor-element/elements.md). Inner elements can be selected independently, each with its own action bar and auto panels. > **Note:** Auto panels appear only in the editor, while a Wix user is editing the site. They aren't shown on the live site. ## Available auto panels and controls The following panels and controls appear in the editor for your component, depending on which manifest properties you define. - [Settings](#settings) - [Edit Text](#edit-text) - [Design](#design) - [Explore Designs](#explore-designs) - [Animation](#animation) - [Action bar buttons](#action-bar-buttons) - [Sizing behavior](#sizing-behavior) ### Settings The **Settings** panel exposes editable content for your component. Each entry in your manifest's [`data`](https://dev.wix.com/docs/build-apps/develop-your-app/extensions/site-extensions/editor-react-components/manifest-reference/editor-element/data/about-data.md) becomes a labeled control, with the `dataType` determining the control type. For example, text becomes a text input, images open the Wix Media Manager, and dates show a date picker. The values Wix users enter here are passed back to your component as React [props](https://dev.wix.com/docs/build-apps/develop-your-app/extensions/site-extensions/editor-react-components/manifest-reference/runtime-props.md) at runtime. ![The Settings panel for a testimonial card, with controls for an image data item](https://wixmp-833713b177cebf373f611808.wixmp.com/images/0de9a85121d8df161fa570b4dbba7423.png) ### Edit Text When your `data` includes one or more text-based items (`text`, `richText`, `textEnum`), an **Edit Text** panel is generated alongside **Settings**, exposing only the text inputs. This gives Wix users a focused way to update copy without scrolling through unrelated controls. ![The Edit Text panel with inputs for quote, author name, and author role](https://wixmp-833713b177cebf373f611808.wixmp.com/images/ff1a30b6a7d7af5981ff5006f6de9cf4.png) ### Design The **Design** panel exposes style controls. Each entry in [`cssProperties`](https://dev.wix.com/docs/build-apps/develop-your-app/extensions/site-extensions/editor-react-components/manifest-reference/editor-element/css/standard-css-properties.md) and [`cssCustomProperties`](https://dev.wix.com/docs/build-apps/develop-your-app/extensions/site-extensions/editor-react-components/manifest-reference/editor-element/css/css-custom-properties.md) you declare becomes the appropriate control: `backgroundColor` gets a color picker, `borderRadius` gets a corner radius slider, `boxShadow` gets a shadow editor, and so on. When a Wix user changes a value, the editor applies it as an inline style on the matching DOM element. Your component doesn't need to read or handle these values. ![The Design panel with color, spacing, corners, and shadow controls](https://wixmp-833713b177cebf373f611808.wixmp.com/images/868c0d3de03e7b08fecb20755c9775b3.png) If your manifest also defines [`states`](https://dev.wix.com/docs/build-apps/develop-your-app/extensions/site-extensions/editor-react-components/manifest-reference/editor-element/states.md), a state selector appears at the top of the **Design** panel so Wix users can style each state separately. ### Explore Designs If your manifest defines [`presets`](https://dev.wix.com/docs/build-apps/develop-your-app/extensions/site-extensions/editor-react-components/manifest-reference/editor-element/presets.md), an **Explore Designs** panel appears. Each preset is a named visual variation with its own thumbnail, default values, and optional preset-scoped CSS. Switching between presets is a one-click change for Wix users. ![The Explore Designs panel with Card and Minimal preset variants](https://wixmp-833713b177cebf373f611808.wixmp.com/images/794cd89fcb40d5e52f00110c4195f1b4.png) ### Animation If your manifest defines [`interactions`](https://dev.wix.com/docs/build-apps/develop-your-app/extensions/site-extensions/editor-react-components/manifest-reference/editor-element/interactions.md), an **Animation** panel appears with controls for declarative entrance effects, scroll triggers, and other interactions you opted into. ### Action bar buttons The action bar that opens your auto panels also hosts non-panel buttons, like duplicating the component or opening a Wix-managed picker. You can opt out of the defaults with [`actions`](https://dev.wix.com/docs/build-apps/develop-your-app/extensions/site-extensions/editor-react-components/manifest-reference/editor-element/actions/native-and-custom-actions.md), and you can add your own buttons with [`customActions`](https://dev.wix.com/docs/build-apps/develop-your-app/extensions/site-extensions/editor-react-components/manifest-reference/editor-element/actions/native-and-custom-actions.md) that open URLs or trigger custom behavior. ### Sizing behavior The editor reads [`layout`](https://dev.wix.com/docs/build-apps/develop-your-app/extensions/site-extensions/editor-react-components/manifest-reference/editor-element/layout.md) to enable resize handles, content sizing, and stretch behavior in the editor, and [`installation.initialSize`](https://dev.wix.com/docs/build-apps/develop-your-app/extensions/site-extensions/editor-react-components/manifest-reference/root-properties/installation.md) to set the dimensions when the Wix user first drops the component on the page. ## Control what's in a panel You configure panel contents through manifest properties. The properties you define determine which controls appear and how they behave. - **Include or omit controls:** Only properties you declare in the manifest appear in a panel. For example, skip a `cssProperty` and that control doesn't show up. - **Set labels:** Use [`displayName`](https://dev.wix.com/docs/build-apps/develop-your-app/extensions/site-extensions/editor-react-components/manifest-reference/editor-element/editor-element.md) on data items, CSS properties, presets, and elements to control the text Wix users see. - **Set default values:** Use `defaultValue` so controls show the same value the Wix user sees in the editor. - **Constrain input:** Each data type accepts type-specific options that the editor enforces in the control. For example, `text.minLength`, `text.maxLength`, and `number.minimum`. ## Organize controls within a panel Use grouping and conditional visibility to keep each panel focused and easier to scan. - **Group related controls:** Use [`displayGroups`](https://dev.wix.com/docs/build-apps/develop-your-app/extensions/site-extensions/editor-react-components/manifest-reference/editor-element/display-groups/display-groups.md) to organize properties into named sections inside a panel. - **Show controls conditionally:** Use [`displayFilters`](https://dev.wix.com/docs/build-apps/develop-your-app/extensions/site-extensions/editor-react-components/manifest-reference/editor-element/display-filters.md) to hide controls based on the value of another data item, preset, or state. ## Customize inner elements and states You can expose advanced customization beyond the root component by configuring inner targets and state-based styling. - **Configure inner elements:** Each entry in [`elements`](https://dev.wix.com/docs/build-apps/develop-your-app/extensions/site-extensions/editor-react-components/manifest-reference/editor-element/elements.md) gets its own set of auto panels. Add `data`, `cssProperties`, `presets`, or `states` inside an element to customize its panels independently of the root. - **Expose state-specific styling:** Define [`states`](https://dev.wix.com/docs/build-apps/develop-your-app/extensions/site-extensions/editor-react-components/manifest-reference/editor-element/states.md) (like hover or disabled) for per-state styling. ## Manifest cheatsheet Use this as a quick lookup for which manifest property configures which part of the editor experience: | Manifest property | Where it surfaces | What it controls | |---|---|---| | [`data`](https://dev.wix.com/docs/build-apps/develop-your-app/extensions/site-extensions/editor-react-components/manifest-reference/editor-element/data/about-data.md) | **Settings** panel, **Edit Text** panel, and other native controls based on the `dataType` | Editable content like text, numbers, images, links, dates, and toggles. Each entry becomes a control and a runtime prop. | | [`cssProperties`](https://dev.wix.com/docs/build-apps/develop-your-app/extensions/site-extensions/editor-react-components/manifest-reference/editor-element/css/standard-css-properties.md) | **Design** panel | Standard CSS properties exposed as design controls (colors, spacing, corners, shadows, typography). Applied as inline styles. | | [`cssCustomProperties`](https://dev.wix.com/docs/build-apps/develop-your-app/extensions/site-extensions/editor-react-components/manifest-reference/editor-element/css/css-custom-properties.md) | **Design** panel | CSS variables for cases the standard properties don't cover. Applied as inline custom property values. | | [`elements`](https://dev.wix.com/docs/build-apps/develop-your-app/extensions/site-extensions/editor-react-components/manifest-reference/editor-element/elements.md) | Independent action bar and auto panels on inner parts | Makes specific inner DOM elements selectable, each with its own data, CSS, presets, and states. | | [`presets`](https://dev.wix.com/docs/build-apps/develop-your-app/extensions/site-extensions/editor-react-components/manifest-reference/editor-element/presets.md) | **Explore Designs** panel | Named visual variations with thumbnails, default values, and optional preset-scoped CSS. | | [`states`](https://dev.wix.com/docs/build-apps/develop-your-app/extensions/site-extensions/editor-react-components/manifest-reference/editor-element/states.md) | **State** selector in the **Design** panel | Conditions like hover or disabled, each stylable independently in the **Design** panel. | | [`interactions`](https://dev.wix.com/docs/build-apps/develop-your-app/extensions/site-extensions/editor-react-components/manifest-reference/editor-element/interactions.md) | **Animation** panel | Declarative animation triggers and effect groups. | | [`actions`](https://dev.wix.com/docs/build-apps/develop-your-app/extensions/site-extensions/editor-react-components/manifest-reference/editor-element/actions/native-and-custom-actions.md) | Action bar | Opt out of, override, or rename default action bar buttons. | | [`customActions`](https://dev.wix.com/docs/build-apps/develop-your-app/extensions/site-extensions/editor-react-components/manifest-reference/editor-element/actions/native-and-custom-actions.md) | Action bar | Add your own buttons to the action bar that open URLs or trigger custom behavior. | | [`displayGroups`](https://dev.wix.com/docs/build-apps/develop-your-app/extensions/site-extensions/editor-react-components/manifest-reference/editor-element/display-groups/display-groups.md) | Inside auto panels | Organize related controls into named sections. | | [`displayFilters`](https://dev.wix.com/docs/build-apps/develop-your-app/extensions/site-extensions/editor-react-components/manifest-reference/editor-element/display-filters.md) | Inside auto panels | Show or hide controls based on the value of another data item, preset, or state. | | [`layout`](https://dev.wix.com/docs/build-apps/develop-your-app/extensions/site-extensions/editor-react-components/manifest-reference/editor-element/layout.md) | Editor (resize handles and stretching) | Resize direction, content sizing, and stretch behavior. | | [`installation.initialSize`](https://dev.wix.com/docs/build-apps/develop-your-app/extensions/site-extensions/editor-react-components/manifest-reference/root-properties/installation.md) | Editor (on insert) | The size the component takes when a Wix user first adds it to the page. | ## See also - [Tutorial | Configure Auto Panels](https://dev.wix.com/docs/build-apps/develop-your-app/extensions/site-extensions/editor-react-components/panels/tutorial-configure-auto-panels.md) - [About the Manifest](https://dev.wix.com/docs/build-apps/develop-your-app/extensions/site-extensions/editor-react-components/manifest-reference/about-the-manifest.md) - [Editor Element](https://dev.wix.com/docs/build-apps/develop-your-app/extensions/site-extensions/editor-react-components/manifest-reference/editor-element/editor-element.md) - [Runtime Props Reference](https://dev.wix.com/docs/build-apps/develop-your-app/extensions/site-extensions/editor-react-components/manifest-reference/runtime-props.md) --- > Portal Navigation: > > - Append `.md` to any URL under `https://dev.wix.com/docs/` to get its markdown version. > - Pages are either content pages (article or reference text) or menu pages (a list of links to child pages). > - To get a menu page, truncate any URL to a parent path and append `.md` (e.g. `https://dev.wix.com/docs/sdk.md`, `https://dev.wix.com/docs/sdk/core-modules.md`). > - Top-level index of all portals: https://dev.wix.com/docs/llms.txt > - Full concatenated docs: https://dev.wix.com/docs/llms-full.txt ## Resource: Tutorial | Configure Auto Panels ## Article: Configure Auto Panels ## Article Link: https://dev.wix.com/docs/build-apps/develop-your-app/extensions/site-extensions/editor-react-components/auto-panels/tutorial-configure-auto-panels.md ## Article Content: # Tutorial | Configure Auto Panels for an Editor React Component
    __Alpha:__ Editor React Components are currently in alpha. This feature is subject to change and may have bugs, issues, and limitations. We're actively improving it based on your feedback.
    When a Wix user adds your [Editor React Component](https://dev.wix.com/docs/build-apps/develop-your-app/extensions/site-extensions/editor-react-components/about-editor-react-components.md) to a page, they customize it through [auto panels](https://dev.wix.com/docs/build-apps/develop-your-app/extensions/site-extensions/editor-react-components/auto-panels/about-auto-panels.md) that the editor builds automatically. You don't write any panel UI. You declare what's customizable in a [manifest](https://dev.wix.com/docs/build-apps/develop-your-app/extensions/site-extensions/editor-react-components/manifest-reference/about-the-manifest.md), and the matching native controls show up. This tutorial walks through that declaration, step by step. You'll start with a minimal manifest that just renders the component in the editor with no controls, and then add one manifest field at a time. After each step, you'll see a new auto panel (or a new control inside one) appear in the editor. Here's what we'll cover: 1. Start with a minimal manifest that renders the component without panels. 2. Add editable content for the **Settings** and **Edit Text** panels. 3. Expose CSS properties for the **Design** panel. 4. Define inner elements, each with its own action bar and auto panels. 5. Configure layout and resize behavior in the editor. 6. Set the initial size when the component is first added. 7. Create visual presets for the **Explore Designs** panel. 8. Add interaction states like hover for a state selector in the **Design** panel. Each step builds on the previous. At the end, you'll have a fully configured manifest and a clear sense of which auto panel each manifest field drives.
    **Editor Compatibility** Editor React Component extensions are built for [Wix Harmony](https://dev.wix.com/docs/build-apps/get-started/overview/about-wix-harmony-and-apps.md), Wix's AI-powered editor. They're not supported on Wix Editor or Wix Studio sites, and there's no way to conditionally switch between extension types based on the editor.
    ## Before you begin Before you begin, make sure that you: - [Create an Editor React Component extension with the CLI](https://dev.wix.com/docs/build-apps/develop-your-app/develop-an-app-with-the-cli/supported-extensions/site/editor-react-components/add-an-editor-react-component-extension-with-the-wix-cli.md). - Install the [`@wix/editor-react-types`](https://www.npmjs.com/package/@wix/editor-react-types) package for TypeScript types used by the editor. ## The component This guide uses a testimonial card that includes a quote, author info, and photo. Here's the React component: ```tsx import type { Image } from '@wix/editor-react-types'; import './style.css'; interface TestimonialCardProps { className: string; quote?: string; authorName?: string; authorRole?: string; image?: Image; } export default function TestimonialCard({ className, quote, authorName, authorRole, image }: TestimonialCardProps) { return (
    {quote ?? '"This app transformed our workflow."'}
    {image?.url && {authorName}

    {authorName ?? 'Jordan Lee'}

    {authorRole ?? 'Operations Manager'}

    ); } ```
    Stylesheet (style.css) ```css .testimonial-card { display: flex; flex-direction: column; gap: 20px; padding: 28px; border-radius: 12px; font-family: sans-serif; } .quote { margin: 0; font-size: 16px; line-height: 1.6; font-style: italic; } .author { display: flex; align-items: center; gap: 12px; } .avatar { width: 48px; height: 48px; border-radius: 50%; object-fit: cover; } .author-name { margin: 0; font-weight: 600; } .author-role { margin: 0; font-size: 13px; color: #6b7280; } ```
    For the editor to work with your component, it needs to follow the [component requirements](https://dev.wix.com/docs/build-apps/develop-your-app/extensions/site-extensions/editor-react-components/about-editor-react-components.md#component-requirements). Later steps introduce additional component-side requirements for [presets](#step-7--add-presets) and [states](#step-8--add-states). ## Step 1 | Minimal manifest Every manifest needs 3 things: - `type` to identify the component. - `resources` to tell the editor where to find the code. - `editorElement` with at least a `selector` and `displayName`. Here's a minimal manifest for our example component: ```typescript { type: 'myAppCodeIdentifier.testimonialCard', resources: { client: { componentUrl: './extensions/site/components/testimonial-card/component.js', }, }, editorElement: { selector: '.testimonial-card', displayName: 'Testimonial Card', }, } ``` Here's what each field does: - `type`: A unique identifier for your component. - `resources.client.componentUrl`: Points to your React component file, relative to the project root. When you [create your Editor React Component using the CLI](https://dev.wix.com/docs/build-apps/develop-your-app/develop-an-app-with-the-cli/supported-extensions/site/editor-react-components/add-an-editor-react-component-extension-with-the-wix-cli.md) command, this field is configured automatically. - `selector`: Must match a CSS class on your component's root DOM element. For this component, that's `.testimonial-card`. The editor uses this selector to locate your component and apply styling. - `displayName`: The label Wix users see when they select your component. ### What changes in the editor At this point, the component renders in the editor but has no editing controls. A Wix user can place it on a page, but they can't change any content or styling. ![Base component rendered in the editor with no editing controls](https://wixmp-833713b177cebf373f611808.wixmp.com/images/c3c13458816cce0d249dcfdc570e5cec.png) ## Step 2 | Add data The `data` property defines what content Wix users can edit. Each key in the `data` object becomes a prop that your component receives at runtime. The `dataType` determines what kind of editor control appears: a text field, image picker, toggle, and so on. ```typescript editorElement: { selector: '.testimonial-card', displayName: 'Testimonial Card', data: { quote: { dataType: 'text', displayName: 'Quote', defaultValue: '"This app transformed our workflow."', text: { maxLength: 500, }, }, authorName: { dataType: 'text', displayName: 'Author Name', defaultValue: 'Jordan Lee', }, authorRole: { dataType: 'text', displayName: 'Author Role', defaultValue: 'Operations Manager', }, image: { dataType: 'image', displayName: 'Author Photo', }, }, }, ``` Each data item has a few core fields: - `dataType`: Determines the editor control and the runtime value format. `'text'` gives a text input, `'image'` gives a media picker. - `displayName`: The label Wix users see in the editor panel. - `defaultValue`: The starting value shown in the editor panel. This value isn't passed to your component at runtime, so your component should handle its own fallback rendering. Some data types support additional configuration in a field named after the type. Here, `quote` uses the `text` field to set `maxLength: 500`, which limits the text input to 500 characters. The data keys `quote`, `authorName`, `authorRole`, and `image` must match the prop names in your component. The editor passes these as top-level props when it renders your component. For the full list of data types, see [Data Reference](https://dev.wix.com/docs/build-apps/develop-your-app/extensions/site-extensions/editor-react-components/manifest-reference/editor-element/data/data-overview.md). ### What changes in the editor A **Settings** button appears in the action bar. Clicking it opens a panel with text inputs for the 3 text properties. A **Media** button also appears, opening the Wix Media Manager for the image property. ![Settings panel with editable text inputs and media picker](https://wixmp-833713b177cebf373f611808.wixmp.com/images/300d9ea5600fc8b8b928afb76fceb234.png) ## Step 3 | Add CSS properties The `cssProperties` property defines which CSS styles Wix users can customize. The editor reads these definitions and configures the appropriate design panel controls. When a Wix user changes a value, the editor applies it as an inline style on the DOM element matching the `selector`. Your component doesn't need to read or handle these values. > **Note:** Not all CSS properties are supported. For more information, see [Standard CSS Properties](https://dev.wix.com/docs/build-apps/develop-your-app/extensions/site-extensions/editor-react-components/manifest-reference/editor-element/css/standard-css-properties.md). ```typescript editorElement: { selector: '.testimonial-card', displayName: 'Testimonial Card', data: { ... }, cssProperties: { backgroundColor: { defaultValue: '#ffffff', }, padding: { defaultValue: '28px', }, borderRadius: { defaultValue: '12px', }, boxShadow: { defaultValue: '0 1px 3px rgba(0,0,0,0.08)', }, }, }, ``` Each CSS property item can include: - `defaultValue`: The initial CSS value shown in the design panel. This should match the value already set in your component's CSS file. It tells the editor what the current default is so users can see it before making any changes. - `displayName`: Optional label. If omitted, the editor derives a name from the property name. If you don't need a custom default, you can pass an empty object (for example, `backgroundColor: {}`). The editor still shows the appropriate control and uses its own default value. The editor maps each CSS property to the appropriate control automatically: `backgroundColor` gets a color picker, `borderRadius` gets a corner radius control, `boxShadow` gets a shadow editor, and `padding` gets spacing inputs. ### What changes in the editor A **Design** button appears in the action bar. Clicking it opens a panel with color, spacing, corners, and shadow controls, all configured from the 4 CSS properties defined above. ![Design panel with color, spacing, corners, and shadow controls](https://wixmp-833713b177cebf373f611808.wixmp.com/images/f4c91991f19fa63f8b049650d2f548c2.png) > **Note:** Your CSS file styles the component on initial render. The manifest's `defaultValue` tells the design panel what to display as the starting value, and it should match what's already in your CSS. When a Wix user customizes a value, the editor applies it as an inline style, which overrides both. For the full reference, see [CSS Properties Reference](https://dev.wix.com/docs/build-apps/develop-your-app/extensions/site-extensions/editor-react-components/manifest-reference/editor-element/css/standard-css-properties.md). ## Step 4 | Add elements So far, all customization targets the root element. But the testimonial card has distinct parts that Wix users might want to style independently, such as the quote text and the author section. The `elements` property lets you make inner parts of your component selectable and configurable. Each element needs its own `selector` (matching a CSS class in your component), a `displayName`, and optionally its own `data`, `cssProperties`, and `behaviors`. For the full reference on what elements support, see [Elements](https://dev.wix.com/docs/build-apps/develop-your-app/extensions/site-extensions/editor-react-components/manifest-reference/editor-element/elements.md). ```typescript editorElement: { selector: '.testimonial-card', displayName: 'Testimonial Card', data: { ... }, cssProperties: { ... }, elements: { quoteText: { elementType: 'inlineElement', inlineElement: { selector: '.quote', displayName: 'Quote Text', behaviors: { selectable: true, }, cssProperties: { color: { defaultValue: '#1f2937', }, fontSize: { defaultValue: '16px', }, fontStyle: { defaultValue: 'italic', }, }, }, }, authorNameText: { elementType: 'inlineElement', inlineElement: { selector: '.author-name', displayName: 'Author Name', behaviors: { selectable: false, }, cssProperties: { color: { defaultValue: '#111827', }, fontWeight: { defaultValue: '600', }, fontSize: { defaultValue: '14px', }, }, }, }, authorRoleText: { elementType: 'inlineElement', inlineElement: { selector: '.author-role', displayName: 'Author Role', behaviors: { selectable: false, }, cssProperties: { color: { defaultValue: '#6b7280', }, fontSize: { defaultValue: '13px', }, }, }, }, }, }, ``` Each element is wrapped in an `elementType` and configuration object. The only supported type is `'inlineElement'`, an element inside your component code. The `behaviors` field controls how elements respond to interactions in the editor: - `selectable`: Whether a Wix user can click on this part independently. Elements are not selectable by default, so you must set this to `true` for any element you want users to select directly. - `removable`: Whether Wix users can remove or restore this element in the editor. When removed, the element is hidden on the live site. > **Note:** Elements can also define their own `data` properties. When they do, the values aren't passed as top-level props. Instead, they arrive in an `elementProps` object, nested by element key. This example only uses `cssProperties` on elements, so `elementProps` doesn't apply here. For details, see [Runtime Props](https://dev.wix.com/docs/build-apps/develop-your-app/extensions/site-extensions/editor-react-components/manifest-reference/runtime-props.md). Here, `quoteText` has `selectable: true`, so a Wix user can click the quote to see and edit its specific design controls. The author name and role are set to `selectable: false`, so their styling is accessible through the parent's design panel but they can't be clicked independently. This avoids cluttering the editing experience with too many selectable targets. For the full reference, see [Elements Reference](https://dev.wix.com/docs/build-apps/develop-your-app/extensions/site-extensions/editor-react-components/manifest-reference/editor-element/elements.md). ### What changes in the editor The quote text becomes independently selectable. When a Wix user clicks on it, the design panel shows controls specific to the quote (color, font size, and font style), separate from the card's overall design controls. ![Quote text selected with its own design controls](https://wixmp-833713b177cebf373f611808.wixmp.com/images/5dab3dac4037c2e41522047c69ca2654.png) ## Step 5 | Add layout The `layout` property controls how a Wix user can resize and position the component in the editor. ```typescript editorElement: { selector: '.testimonial-card', displayName: 'Testimonial Card', data: { ... }, cssProperties: { ... }, elements: { ... }, layout: { resizeDirection: 'horizontal', contentResizeDirection: 'vertical', disableStretching: false, }, }, ``` 2 fields drive most layout behavior: - `resizeDirection`: Which directions the Wix user can drag to resize. `'horizontal'` means they can adjust the width but not the height. - `contentResizeDirection`: Which directions the component automatically resizes to fit its content. `'vertical'` means the height adjusts as content grows or shrinks. Together, these create a common pattern: the Wix user controls the width, and the height auto-adjusts to fit the content. This works well for text-heavy components like the testimonial card. Setting `disableStretching: false` lets the Wix user stretch the component to fill the width of its container. For the full reference and common patterns, see [Layout Reference](https://dev.wix.com/docs/build-apps/develop-your-app/extensions/site-extensions/editor-react-components/manifest-reference/editor-element/layout/layout.md). ### What changes in the editor Resize handles appear on the left and right edges. Dragging them adjusts the width, and the height automatically follows the content. ![Resize handles on the component for horizontal resizing](https://wixmp-833713b177cebf373f611808.wixmp.com/images/f53c43c44606c83d3bfdc108fd1bdb0d.gif) ## Step 6 | Add installation The `installation` property controls how the component appears when a Wix user first adds it to a page. The most important field is `initialSize`, which sets the starting dimensions. ```typescript { type: 'myAppCodeIdentifier.testimonialCard', resources: { client: { componentUrl: './extensions/site/components/testimonial-card/component.js', }, }, installation: { initialSize: { width: { sizingType: 'pixels', pixels: 400, }, height: { sizingType: 'content', }, }, }, editorElement: { ... }, } ``` > **Note:** `installation` is a property on the same level as `editorElement`, not inside `editorElement`. Each dimension uses a sizing type: - `'pixels'`: A fixed pixel value. The component starts at exactly this size. - `'content'`: The dimension fits to the component's content. - `'stretched'`: The dimension fills its parent container. Here, the card starts 400 pixels wide with the height driven by content. This works with the `layout` from the previous step: the width is a starting point that the Wix user can then resize horizontally, and the height always follows the content. For the full reference, see [Installation Reference](https://dev.wix.com/docs/build-apps/develop-your-app/extensions/site-extensions/editor-react-components/manifest-reference/installation.md). ### What changes in the editor Installation doesn't produce a visible change in the editor UI. The effect is only apparent when a Wix user first adds the component to a page and it appears at the configured size. ## Step 7 | Add presets Presets let you offer distinct visual variants of your component. Each preset can include a CSS file, layout overrides, and default values for CSS properties and elements. Use presets for significant differences between variants, like layout changes or major style shifts. For smaller customizations, CSS properties give users direct control without switching the entire preset. For presets to work, your component needs a wrapper element with `presetsWrapperProps`. Add `Wix` from `@wix/editor-react-types` to your props interface and destructure it from props: ```tsx import type { Image, Wix } from '@wix/editor-react-types'; interface TestimonialCardProps { className: string; quote?: string; authorName?: string; authorRole?: string; image?: Image; wix?: Wix; } export default function TestimonialCard({ className, quote, authorName, authorRole, image, wix }: TestimonialCardProps) { return (
    {/* component content */}
    ); } ``` > **Note:** When using `presetsWrapperProps`, place `className` on the inner element, not the wrapper. The wrapper renders with `display: contents` and is invisible to the editor. The inner element is what the editor tracks for selection and layout. Then define presets in the manifest: ```typescript editorElement: { selector: '.testimonial-card', displayName: 'Testimonial Card', data: { ... }, cssProperties: { ... }, elements: { ... }, layout: { ... }, presets: { card: { displayName: 'Card', thumbnailUrl: 'https://example.com/thumbnails/card-thumbnail.png', presetCssUrl: './extensions/site/components/testimonial-card/presets/card.css', presetDefaults: { cssProperties: { backgroundColor: { defaultValue: '#ffffff' }, borderRadius: { defaultValue: '12px' }, boxShadow: { defaultValue: '0 1px 3px rgba(0,0,0,0.08)' }, }, }, }, minimal: { displayName: 'Minimal', thumbnailUrl: 'https://example.com/thumbnails/minimal-thumbnail.png', presetCssUrl: './extensions/site/components/testimonial-card/presets/minimal.css', presetDefaults: { cssProperties: { backgroundColor: { defaultValue: 'transparent' }, borderRadius: { defaultValue: '0px' }, boxShadow: { defaultValue: 'none' }, }, }, }, }, }, ``` Each preset supports 2 optional fields: - `presetCssUrl`: Path to a CSS file scoped to this preset, relative to the project root. Use this for style rules that go beyond what `presetDefaults` can express, such as layout changes, font declarations, or pseudo-element styling. - `thumbnailUrl`: A valid web URL (`http://` or `https://`) to a preview image shown in the **Explore Designs** panel. Each preset's `presetDefaults` replaces the base configuration when a Wix user switches to that preset. The `'card'` preset shows the card with a white background and shadow. The `'minimal'` preset strips those away for a clean, borderless look. When using presets, you also need to map screen sizes to preset keys in `installation`. The `large` key applies to desktop and tablet, and `small` applies to mobile: ```typescript installation: { presets: { large: 'card', small: 'card', }, initialSize: { ... }, }, ``` For the full reference, see [Presets](https://dev.wix.com/docs/build-apps/develop-your-app/extensions/site-extensions/editor-react-components/manifest-reference/editor-element/presets.md). ### What changes in the editor An **Explore Designs** panel appears where Wix users can switch between "Card" and "Minimal" preset variants. ![Explore Designs panel with Card and Minimal preset variants](https://wixmp-833713b177cebf373f611808.wixmp.com/images/794cd89fcb40d5e52f00110c4195f1b4.png) ## Step 8 | Add states States let Wix users style your component differently based on conditions like hover. You define a state in the manifest using up to 3 mechanisms: - A CSS pseudo-class (like `:hover`) for the live site. - A CSS class for your stylesheet. - Props that your component reads to preview the state in the editor. ```typescript editorElement: { selector: '.testimonial-card', displayName: 'Testimonial Card', data: { ... }, cssProperties: { backgroundColor: { defaultValue: '#ffffff', statesDefaultValues: { hover: '#f9fafb', }, }, boxShadow: { defaultValue: '0 1px 3px rgba(0,0,0,0.08)', statesDefaultValues: { hover: '0 4px 12px rgba(0,0,0,0.12)', }, }, padding: { ... }, borderRadius: { ... }, }, elements: { ... }, layout: { ... }, states: { hover: { displayName: 'Hover', pseudoClass: 'hover', className: 'is-hovered', props: { hovered: true, }, }, }, }, ``` Notice that `backgroundColor` and `boxShadow` now include `statesDefaultValues`. These set the initial design panel defaults for each state, so the editor knows what values to show when the Wix user switches to the hover state. The `hover` state uses all 3 mechanisms: - `pseudoClass: 'hover'`: Maps to CSS `:hover` on the live site. The browser handles this automatically. Note that `:hover` has no effect on touch/mobile devices. - `className: 'is-hovered'`: Applies this CSS class when the state is active, so you can target it in your stylesheet. - `props: { hovered: true }`: Passes this prop to your component when the state is selected in the editor, so you can show the hover appearance on stage. Your component code uses the `hovered` prop to apply the class on the editor stage: ```tsx export default function TestimonialCard({ className, hovered, ...props }: TestimonialCardProps & { hovered?: boolean }) { return (
    {/* ... */}
    ); } ``` Your CSS needs to target both the class and the pseudo-class so hover styles apply both in the editor (via the class) and on the live site (via the pseudo-class): ```css .testimonial-card.is-hovered, .testimonial-card:hover { /* Add any hover styles here that go beyond what cssProperties covers, such as pseudo-elements or transforms. For simple property changes like color and shadow, statesDefaultValues handles it. No CSS needed. */ } ``` > **Note:** When a Wix user customizes hover values in the design panel, the editor applies them as inline styles on the element. You don't need matching CSS rules for `statesDefaultValues` properties to take effect. For the full reference, see [States](https://dev.wix.com/docs/build-apps/develop-your-app/extensions/site-extensions/editor-react-components/manifest-reference/editor-element/states.md). ### What changes in the editor A state selector appears in the design panel. Wix users can switch between "Regular" and "Hover" to style each state independently. ![State selector in the design panel showing Regular and Hover options](https://wixmp-833713b177cebf373f611808.wixmp.com/images/1e3f18389607d96f91c389618bc09aef.png) ## Complete manifest Here's the full manifest with all the properties from the steps above: ```typescript { type: 'myAppCodeIdentifier.testimonialCard', resources: { client: { componentUrl: './extensions/site/components/testimonial-card/component.js', }, }, installation: { presets: { large: 'card', small: 'card', }, initialSize: { width: { sizingType: 'pixels', pixels: 400, }, height: { sizingType: 'content', }, }, }, editorElement: { selector: '.testimonial-card', displayName: 'Testimonial Card', data: { quote: { dataType: 'text', displayName: 'Quote', defaultValue: '"This app transformed our workflow."', text: { maxLength: 500, }, }, authorName: { dataType: 'text', displayName: 'Author Name', defaultValue: 'Jordan Lee', }, authorRole: { dataType: 'text', displayName: 'Author Role', defaultValue: 'Operations Manager', }, image: { dataType: 'image', displayName: 'Author Photo', }, }, cssProperties: { backgroundColor: { defaultValue: '#ffffff', statesDefaultValues: { hover: '#f9fafb', }, }, padding: { defaultValue: '28px', }, borderRadius: { defaultValue: '12px', }, boxShadow: { defaultValue: '0 1px 3px rgba(0,0,0,0.08)', statesDefaultValues: { hover: '0 4px 12px rgba(0,0,0,0.12)', }, }, }, elements: { quoteText: { elementType: 'inlineElement', inlineElement: { selector: '.quote', displayName: 'Quote Text', behaviors: { selectable: true, }, cssProperties: { color: { defaultValue: '#1f2937', }, fontSize: { defaultValue: '16px', }, fontStyle: { defaultValue: 'italic', }, }, }, }, authorNameText: { elementType: 'inlineElement', inlineElement: { selector: '.author-name', displayName: 'Author Name', behaviors: { selectable: false, }, cssProperties: { color: { defaultValue: '#111827', }, fontWeight: { defaultValue: '600', }, fontSize: { defaultValue: '14px', }, }, }, }, authorRoleText: { elementType: 'inlineElement', inlineElement: { selector: '.author-role', displayName: 'Author Role', behaviors: { selectable: false, }, cssProperties: { color: { defaultValue: '#6b7280', }, fontSize: { defaultValue: '13px', }, }, }, }, }, layout: { resizeDirection: 'horizontal', contentResizeDirection: 'vertical', disableStretching: false, }, presets: { card: { displayName: 'Card', thumbnailUrl: 'https://example.com/thumbnails/card-thumbnail.png', presetCssUrl: './extensions/site/components/testimonial-card/presets/card.css', presetDefaults: { cssProperties: { backgroundColor: { defaultValue: '#ffffff' }, borderRadius: { defaultValue: '12px' }, boxShadow: { defaultValue: '0 1px 3px rgba(0,0,0,0.08)' }, }, }, }, minimal: { displayName: 'Minimal', thumbnailUrl: 'https://example.com/thumbnails/minimal-thumbnail.png', presetCssUrl: './extensions/site/components/testimonial-card/presets/minimal.css', presetDefaults: { cssProperties: { backgroundColor: { defaultValue: 'transparent' }, borderRadius: { defaultValue: '0px' }, boxShadow: { defaultValue: 'none' }, }, }, }, }, states: { hover: { displayName: 'Hover', pseudoClass: 'hover', className: 'is-hovered', props: { hovered: true, }, }, }, }, } ``` ## See also - [About the Manifest](https://dev.wix.com/docs/build-apps/develop-your-app/extensions/site-extensions/editor-react-components/manifest-reference/about-the-manifest.md) - [Root Properties Reference](https://dev.wix.com/docs/build-apps/develop-your-app/extensions/site-extensions/editor-react-components/manifest-reference/root-properties/root-properties.md) --- > Portal Navigation: > > - Append `.md` to any URL under `https://dev.wix.com/docs/` to get its markdown version. > - Pages are either content pages (article or reference text) or menu pages (a list of links to child pages). > - To get a menu page, truncate any URL to a parent path and append `.md` (e.g. `https://dev.wix.com/docs/sdk.md`, `https://dev.wix.com/docs/sdk/core-modules.md`). > - Top-level index of all portals: https://dev.wix.com/docs/llms.txt > - Full concatenated docs: https://dev.wix.com/docs/llms-full.txt ## Resource: About the Manifest ## Article: About the Manifest ## Article Link: https://dev.wix.com/docs/build-apps/develop-your-app/extensions/site-extensions/editor-react-components/manifest-reference/about-the-manifest.md ## Article Content: # About the Manifest
    __Alpha:__ Editor React Components are currently in alpha. This feature is subject to change and may have bugs, issues, and limitations. We're actively improving it based on your feedback.
    The manifest is a TypeScript configuration object for your [Editor React Component](https://dev.wix.com/docs/build-apps/develop-your-app/extensions/site-extensions/editor-react-components/about-editor-react-components.md). It declares what's customizable about your component, such as editable text, styling, layout, and presets, so the editor can build matching [auto panels](https://dev.wix.com/docs/build-apps/develop-your-app/extensions/site-extensions/editor-react-components/panels/about-auto-panels.md). At runtime, the same manifest defines your component's [prop contract](https://dev.wix.com/docs/build-apps/develop-your-app/extensions/site-extensions/editor-react-components/manifest-reference/runtime-props.md). For the full property reference, see [Root Properties](https://dev.wix.com/docs/build-apps/develop-your-app/extensions/site-extensions/editor-react-components/manifest-reference/root-properties/root-properties.md). ## Auto-generated manifest You don't need to write the manifest from scratch. When you [scaffold a component with the CLI](https://dev.wix.com/docs/build-apps/develop-your-app/develop-an-app-with-the-cli/supported-extensions/site/editor-react-components/add-an-editor-react-component-extension-with-the-wix-cli.md), the CLI generates the initial manifest files for that scaffolded component. As you iterate on your component, keeping the manifest in sync depends on how you work: - **Manual edits**: The manifest doesn't stay in sync automatically while you edit files yourself. Regenerate it by running [`wix generate manifest`](https://dev.wix.com/docs/wix-cli/command-reference/project-commands/app-only/generate-manifest.md). - **AI edits with the Wix skill**: Manifest regeneration happens as part of the Editor React Component [Wix skill](https://dev.wix.com/docs/wix-cli/command-reference/global-commands/skills-add.md) workflow. ## How the editor uses your manifest Most of your work happens inside `editorElement`, where each property you declare drives a specific [auto panel](https://dev.wix.com/docs/build-apps/develop-your-app/extensions/site-extensions/editor-react-components/auto-panels/about-auto-panels.md) or editor behavior. For the per-property reference, see [Editor Element](https://dev.wix.com/docs/build-apps/develop-your-app/extensions/site-extensions/editor-react-components/manifest-reference/editor-element/editor-element.md). ## Immutable type properties After you create the manifest for the first time, the following type properties are immutable. Changing any of them from its originally saved value results in a validation error and blocks deployment. To use a different type, add a new variable with the desired name and type instead of modifying the existing one. - `dataType`: The type of a [data item](https://dev.wix.com/docs/build-apps/develop-your-app/extensions/site-extensions/editor-react-components/manifest-reference/editor-element/data/about-data.md). - `elementType`: The type of an [element](https://dev.wix.com/docs/build-apps/develop-your-app/extensions/site-extensions/editor-react-components/manifest-reference/editor-element/elements.md). - `cssPropertyType`: The type of a [CSS custom property](https://dev.wix.com/docs/build-apps/develop-your-app/extensions/site-extensions/editor-react-components/manifest-reference/editor-element/css/css-custom-properties.md). - `refElement.type`: The type of a [ref element](https://dev.wix.com/docs/build-apps/develop-your-app/extensions/site-extensions/editor-react-components/manifest-reference/editor-element/elements.md). ## Structural validation constraints The following structural issues result in validation errors: - A required type property is undefined. - A data item with `dataType: "data"` is missing its `data` property or has an empty `items` map. - A data item with `dataType: "arrayItems"` is missing its `arrayItems` property or doesn't define `data`, `dataItem`, or `dynamicItems`. ## Unsupported features The following manifest features aren't currently supported: - **Translations**: Some manifest properties, such as `displayName` in [data items](https://dev.wix.com/docs/build-apps/develop-your-app/extensions/site-extensions/editor-react-components/manifest-reference/editor-element/data/about-data.md), [presets](https://dev.wix.com/docs/build-apps/develop-your-app/extensions/site-extensions/editor-react-components/manifest-reference/editor-element/presets.md), and [actions](https://dev.wix.com/docs/build-apps/develop-your-app/extensions/site-extensions/editor-react-components/manifest-reference/editor-element/actions/native-and-custom-actions.md), as well as the top-level [`resources`](https://dev.wix.com/docs/build-apps/develop-your-app/extensions/site-extensions/editor-react-components/manifest-reference/root-properties/resources.md) property, support translations. However, the translation mechanism isn't yet available. - **Ref elements**: The [`refElement`](https://dev.wix.com/docs/build-apps/develop-your-app/extensions/site-extensions/editor-react-components/manifest-reference/editor-element/elements.md) element type, which lets you reference and reuse existing Wix components with optional overrides, isn't yet supported. Only [`inlineElement`](https://dev.wix.com/docs/build-apps/develop-your-app/extensions/site-extensions/editor-react-components/manifest-reference/editor-element/elements.md) is available. ## See also - [About Editor React Components](https://dev.wix.com/docs/build-apps/develop-your-app/extensions/site-extensions/editor-react-components/about-editor-react-components.md) - [Runtime Props Reference](https://dev.wix.com/docs/build-apps/develop-your-app/extensions/site-extensions/editor-react-components/manifest-reference/runtime-props.md) - [Tutorial | Configure Auto Panels for an Editor React Component](https://dev.wix.com/docs/build-apps/develop-your-app/extensions/site-extensions/editor-react-components/auto-panels/tutorial-configure-auto-panels.md) --- > Portal Navigation: > > - Append `.md` to any URL under `https://dev.wix.com/docs/` to get its markdown version. > - Pages are either content pages (article or reference text) or menu pages (a list of links to child pages). > - To get a menu page, truncate any URL to a parent path and append `.md` (e.g. `https://dev.wix.com/docs/sdk.md`, `https://dev.wix.com/docs/sdk/core-modules.md`). > - Top-level index of all portals: https://dev.wix.com/docs/llms.txt > - Full concatenated docs: https://dev.wix.com/docs/llms-full.txt ## Resource: Runtime Props ## Article: Props ## Article Link: https://dev.wix.com/docs/build-apps/develop-your-app/extensions/site-extensions/editor-react-components/manifest-reference/runtime-props.md ## Article Content: # Runtime Props Reference
    __Alpha:__ Editor React Components are currently in alpha. This feature is subject to change and may have bugs, issues, and limitations. We're actively improving it based on your feedback.
    When the editor loads your component, it reads your manifest and passes the current values for each defined property as React props. As Wix users make changes in the editor, your component receives updated props. This page documents the props your component receives at runtime and how they map to your manifest definitions. If you're new to the manifest structure, start with [About the Manifest](https://dev.wix.com/docs/build-apps/develop-your-app/extensions/site-extensions/editor-react-components/manifest-reference/about-the-manifest.md). That page explains what each manifest section configures in the editor, while this page explains how those declarations appear in your runtime component API. Your component receives the following prop categories: - **Data props**: Values from the [`data`](https://dev.wix.com/docs/build-apps/develop-your-app/extensions/site-extensions/editor-react-components/manifest-reference/editor-element/data/about-data.md) defined in your manifest. - **Element props**: Data for inner [elements](https://dev.wix.com/docs/build-apps/develop-your-app/extensions/site-extensions/editor-react-components/manifest-reference/editor-element/elements.md) defined in your manifest. - **Standard props**: The `className` prop for styling. - **Wix integration props**: The [`wix` object](#wix-integration-props) for editor features. ## Quick mapping from manifest to props Use this as a fast translation layer while implementing your component: - `editorElement.data` maps to top-level props on your component. - `editorElement.elements` maps to nested `elementProps` for inner elements. - Platform-managed integrations map to top-level `className` and optional `wix` props. ## Data props Each key in your manifest's [`data`](https://dev.wix.com/docs/build-apps/develop-your-app/extensions/site-extensions/editor-react-components/manifest-reference/editor-element/data/about-data.md) object becomes a prop in your component. The `dataType` you specify determines the runtime type and format of each prop. For example, when you define data types in your manifest: ```typescript data: { title: { dataType: "text", displayName: "Product Name" }, price: { dataType: "number", displayName: "Price" }, productImage: { dataType: "image", displayName: "Product Image" }, inStock: { dataType: "boolean", displayName: "In Stock" } } ``` In your component, each key becomes a prop name with the corresponding runtime type. TypeScript types for all props are available from the [`@wix/editor-react-types`](https://www.npmjs.com/package/@wix/editor-react-types) package: ```typescript import type { Image } from '@wix/editor-react-types'; interface Props { title: string; price: number; productImage: Image; inStock: boolean; } ``` See all available [data types](https://dev.wix.com/docs/build-apps/develop-your-app/extensions/site-extensions/editor-react-components/manifest-reference/editor-element/data/about-data.md). ## Element props When you define [elements](https://dev.wix.com/docs/build-apps/develop-your-app/extensions/site-extensions/editor-react-components/manifest-reference/editor-element/elements.md) with [data](https://dev.wix.com/docs/build-apps/develop-your-app/extensions/site-extensions/editor-react-components/manifest-reference/editor-element/data/about-data.md) in your manifest, the props for those elements appear in the `elementProps` object. For nested elements, they appear under their parent's `elementProps`. ```typescript interface ElementProps { [dataKey: string]: DataType; elementProps?: Record; } ``` > **Note:** `className` is a top-level prop and will not appear in nested `elementProps`. ### Example A card wrapper component that accesses nested element props: ```tsx interface CardWrapperProps { className: string; listTitle: string; elementProps: { cardItem: CardItemProps; }; } interface CardItemProps { cardTitle: string; } function CardWrapper({ className, listTitle, elementProps }: CardWrapperProps) { const cardItemProps = elementProps.cardItem; return (

    {listTitle}

    ); } ``` Example manifest for this component: ```typescript { type: "CardWrapper", editorElement: { selector: ".card-wrapper", displayName: "Card List", data: { listTitle: { dataType: "text", displayName: "List Title", defaultValue: "Featured Items" } }, elements: { cardItem: { elementType: "inlineElement", inlineElement: { selector: ".card-item", displayName: "Card Item", data: { cardTitle: { dataType: "text", displayName: "Card Title", defaultValue: "Card Title" } } } } } } } ``` ### Nested element props Element props can nest multiple levels deep when elements contain other elements. #### Nested props example A component demonstrating multiple levels of nesting, where child elements have their own configurable properties accessible through nested `elementProps`. ```tsx import type { VectorArt } from '@wix/editor-react-types'; interface Props { elementProps: { card: { cardTitle: string; elementProps: { cardHeader: { headerText: string; headerIcon: VectorArt; }; }; }; }; } function Component({ elementProps }: Props) { const cardProps = elementProps.card; const headerProps = cardProps.elementProps.cardHeader; return (

    {headerProps.headerText}

    {cardProps.cardTitle}

    ); } ``` Example manifest for this component: ```typescript { type: "NestedCard", editorElement: { selector: ".card", displayName: "Card", data: { cardTitle: { dataType: "text", displayName: "Card Title", defaultValue: "Card Title" } }, elements: { cardItem: { elementType: "inlineElement", inlineElement: { selector: ".card-header", displayName: "Card Header", data: { headerText: { dataType: "text", displayName: "Header Text", defaultValue: "Header" }, headerIcon: { dataType: "vectorArt", displayName: "Header Icon" } } } } } } } ``` ## Standard props Every component receives the `className` prop automatically from Wix. This prop enables styling and proper integration with the editor. > **Note:** `className` is a top-level prop only and will not appear in nested `elementProps`. ### `className` CSS class names for your component's root element, including styling from the editor and presets. #### className example Apply `className` to the root element: ```tsx interface ComponentProps { className: string; // ... other props } function MyComponent({ className, ...otherProps }: ComponentProps) { return (
    {/* Component content */}
    ); } ``` ## Wix integration props Your component receives the `wix` prop object from the Wix platform. It includes integration features such as preset styling. ```typescript import type { Wix } from '@wix/editor-react-types'; ``` ```typescript interface Wix { presetsWrapperProps?: { className: string }; } ``` ### Presets wrapper props When your component uses [presets](https://dev.wix.com/docs/build-apps/develop-your-app/extensions/site-extensions/editor-react-components/manifest-reference/editor-element/presets.md), wrap your component in a container element and apply `wix.presetsWrapperProps`. These props contain styling and tracking data for preset functionality. ```typescript type PresetWrapperProps = { className: string } ``` #### Presets wrapper example A button component that uses preset wrapper props to enable preset functionality: ```tsx import type { Wix } from '@wix/editor-react-types'; interface ButtonProps { className: string; wix?: Wix; } function Button({ className, wix }: ButtonProps) { const presetsWrapperProps = wix?.presetsWrapperProps || {}; return (
    ); } ``` ## See also - [Data Types](https://dev.wix.com/docs/build-apps/develop-your-app/extensions/site-extensions/editor-react-components/manifest-reference/editor-element/data/about-data.md) - [Elements](https://dev.wix.com/docs/build-apps/develop-your-app/extensions/site-extensions/editor-react-components/manifest-reference/editor-element/elements.md) - [Presets](https://dev.wix.com/docs/build-apps/develop-your-app/extensions/site-extensions/editor-react-components/manifest-reference/editor-element/presets.md) - [Tutorial | Configure Auto Panels for an Editor React Component](https://dev.wix.com/docs/build-apps/develop-your-app/extensions/site-extensions/editor-react-components/panels/tutorial-configure-auto-panels.md) --- > Portal Navigation: > > - Append `.md` to any URL under `https://dev.wix.com/docs/` to get its markdown version. > - Pages are either content pages (article or reference text) or menu pages (a list of links to child pages). > - To get a menu page, truncate any URL to a parent path and append `.md` (e.g. `https://dev.wix.com/docs/sdk.md`, `https://dev.wix.com/docs/sdk/core-modules.md`). > - Top-level index of all portals: https://dev.wix.com/docs/llms.txt > - Full concatenated docs: https://dev.wix.com/docs/llms-full.txt ## Resource: Root Properties ## Article: Root Properties ## Article Link: https://dev.wix.com/docs/build-apps/develop-your-app/extensions/site-extensions/editor-react-components/manifest-reference/root-properties/root-properties.md ## Article Content: import { Property, PropertyList } from "@wix/docs-ui/content"; # Root Properties
    __Alpha:__ Editor React Components are currently in alpha. This feature is subject to change and may have bugs, issues, and limitations. We're actively improving it based on your feedback.
    Each property in your manifest configures an aspect of how the editor loads, presents, and manages your [Editor React Component](https://dev.wix.com/docs/build-apps/develop-your-app/extensions/site-extensions/editor-react-components/about-editor-react-components.md). ## Manifest properties A unique identifier for the component in the format 'codeIdentifier.componentName'. Find your app's code.md identifier in the app dashboard, and choose any name for 'componentName'. The editor uses this value to identify which component to render when a Wix user adds it to their site.} /> Resources}.md required description="Declares the code and assets for your component: client and editor bundles, CSS, server rendering, SDK, translations, and animation configuration." /> Installation}.md description="Controls initial sizing, preset selection per breakpoint, and placement when a Wix user first adds the component." /> EditorElement}.md required description="The core of the manifest. Defines the component's root selector, display name, and all configurable properties including data, styling, layout, presets, states, and more." /> ## Examples ### Minimal manifest A manifest with only the required properties. The component renders in the editor but doesn't expose any customization controls. ```typescript { type: 'myApp.myWidget', resources: { client: { componentUrl: './extensions/site/components/my-widget/component.tsx', }, }, editorElement: { selector: '.my-widget', displayName: 'My Widget', }, } ``` ### Manifest with data and design controls A manifest that exposes editable text and image content, plus design controls for background color and padding. ```typescript { type: 'myApp.profileCard', resources: { client: { componentUrl: './extensions/site/components/profile-card/component.tsx', }, }, editorElement: { selector: '.profile-card', displayName: 'Profile Card', data: { name: { dataType: 'text', displayName: 'Name', defaultValue: 'Jane Doe', }, photo: { dataType: 'image', displayName: 'Photo', }, }, cssProperties: { backgroundColor: { defaultValue: '#ffffff' }, padding: { defaultValue: '24px' }, }, }, } ``` ## See also - [About the Manifest](https://dev.wix.com/docs/build-apps/develop-your-app/extensions/site-extensions/editor-react-components/manifest-reference/about-the-manifest.md) - [About Editor React Components](https://dev.wix.com/docs/build-apps/develop-your-app/extensions/site-extensions/editor-react-components/about-editor-react-components.md) --- > Portal Navigation: > > - Append `.md` to any URL under `https://dev.wix.com/docs/` to get its markdown version. > - Pages are either content pages (article or reference text) or menu pages (a list of links to child pages). > - To get a menu page, truncate any URL to a parent path and append `.md` (e.g. `https://dev.wix.com/docs/sdk.md`, `https://dev.wix.com/docs/sdk/core-modules.md`). > - Top-level index of all portals: https://dev.wix.com/docs/llms.txt > - Full concatenated docs: https://dev.wix.com/docs/llms-full.txt ## Resource: Installation ## Article: Installation ## Article Link: https://dev.wix.com/docs/build-apps/develop-your-app/extensions/site-extensions/editor-react-components/manifest-reference/root-properties/installation.md ## Article Content: import { Property, PropertyList, ExpandableSection } from "@wix/docs-ui/content"; # Installation
    __Alpha:__ Editor React Components are currently in alpha. This feature is subject to change and may have bugs, issues, and limitations. We're actively improving it based on your feedback.
    The `installation` property controls how your component appears when a Wix user first adds it to a page, including its initial dimensions, which preset it starts with, and where it's placed. It works together with [`layout`](https://dev.wix.com/docs/build-apps/develop-your-app/extensions/site-extensions/editor-react-components/manifest-reference/editor-element/layout.md): `installation` sets the starting size, and `layout` controls how the Wix user can resize from there. ## Where to define You can only define `installation` at the root level of your manifest, alongside properties like `type` and `editorElement`. See the [manifest structure](https://dev.wix.com/docs/build-apps/develop-your-app/extensions/site-extensions/editor-react-components/manifest-reference/root-properties/root-properties.md). ## Installation properties The `installation` object supports the following properties: Specify different presets for different screen sizes to ensure your component adapts appropriately. The values must match keys defined in your component's [presets](https://dev.wix.com/docs/build-apps/develop-your-app/extensions/site-extensions/editor-react-components/manifest-reference/editor-element/presets.md) configuration. ## Initial size The `initialSize` property controls the starting dimensions when a Wix user first adds your component to a page. Each dimension (`width` and `height`) is configured independently with a sizing type. ## Examples ### Fixed width with content-driven height The component has a set width but grows vertically to fit its content. This is the most common pattern, used by text components, accordions, and tabs. ```typescript installation: { initialSize: { width: { sizingType: 'pixels', pixels: 400, }, height: { sizingType: 'content', }, }, } ``` ### Full-width with content-driven height The component stretches to fill its parent section while the height adjusts to content. Useful for banners, marquees, and full-width layouts. ```typescript installation: { initialSize: { width: { sizingType: 'stretched', }, height: { sizingType: 'content', }, }, } ``` ### Fully content-driven Both dimensions adjust to the component's content. This works for components with an intrinsic size, like icon bars or badges. ```typescript installation: { initialSize: { width: { sizingType: 'content', }, height: { sizingType: 'content', }, }, } ``` ### Fixed dimensions with aspect ratio lock The component maintains its width-to-height ratio when the user resizes it. Use `preserveAspectRatio` only when both dimensions use `'pixels'` sizing. Primarily useful for media components like images, videos, and logos. ```typescript installation: { initialSize: { width: { sizingType: 'pixels', pixels: 320, }, height: { sizingType: 'pixels', pixels: 240, }, preserveAspectRatio: true, }, } ``` ### Different presets for desktop and mobile ```typescript { installation: { initialSize: { width: { sizingType: 'pixels', pixels: 320 }, height: { sizingType: 'pixels', pixels: 240 }, }, presets: { large: 'desktopCard', small: 'mobileCard', }, }, editorElement: { presets: { desktopCard: { displayName: 'Desktop Layout', presetCssUrl: './presets/desktop.css', initialSize: { width: { sizingType: 'pixels', pixels: 600 }, height: { sizingType: 'pixels', pixels: 400 }, }, }, mobileCard: { displayName: 'Mobile Layout', presetCssUrl: './presets/mobile.css', initialSize: { width: { sizingType: 'pixels', pixels: 300 }, height: { sizingType: 'pixels', pixels: 200 }, }, }, }, }, } ``` ## See also - [Layout](https://dev.wix.com/docs/build-apps/develop-your-app/extensions/site-extensions/editor-react-components/manifest-reference/editor-element/layout.md) - [About the Manifest](https://dev.wix.com/docs/build-apps/develop-your-app/extensions/site-extensions/editor-react-components/manifest-reference/about-the-manifest.md) --- > Portal Navigation: > > - Append `.md` to any URL under `https://dev.wix.com/docs/` to get its markdown version. > - Pages are either content pages (article or reference text) or menu pages (a list of links to child pages). > - To get a menu page, truncate any URL to a parent path and append `.md` (e.g. `https://dev.wix.com/docs/sdk.md`, `https://dev.wix.com/docs/sdk/core-modules.md`). > - Top-level index of all portals: https://dev.wix.com/docs/llms.txt > - Full concatenated docs: https://dev.wix.com/docs/llms-full.txt ## Resource: Resources ## Article: Resources Table ## Article Link: https://dev.wix.com/docs/build-apps/develop-your-app/extensions/site-extensions/editor-react-components/manifest-reference/root-properties/resources.md ## Article Content: import { Property, PropertyList, ExpandableSection } from "@wix/docs-ui/content"; # Resources
    __Alpha:__ Editor React Components are currently in alpha. This feature is subject to change and may have bugs, issues, and limitations. We're actively improving it based on your feedback.
    The `resources` property declares the code and assets that make up your component. When you build with the [CLI](https://dev.wix.com/docs/build-apps/develop-your-app/frameworks/wix-cli/about-the-wix-cli.md), it handles resource management automatically: bundling your code, uploading assets, and generating the resource URLs. ## Where to define You can only define `resources` at the [root level of your manifest](https://dev.wix.com/docs/build-apps/develop-your-app/extensions/site-extensions/editor-react-components/manifest-reference/root-properties/root-properties.md), alongside properties like `type` and `editorElement`. The `resources` property is required, and at minimum, you need `client.componentUrl`. ## Resources properties The `resources` object supports the following properties:
    __Important:__ Your server bundle must avoid browser-specific APIs like `window` and `document`. If your component relies on these APIs, provide a fallback that renders static content on the server.
    ## Examples ### Minimal resources The simplest configuration, with only the required `client.componentUrl`: ```typescript import componentUrl from './component.tsx?url'; resources: { client: { componentUrl, }, } ``` ### Client with default CSS A client bundle with a CSS file. The CSS is rendered once per page, regardless of how many instances of the component exist: ```typescript import componentUrl from './component.tsx?url'; import cssUrl from './styles.module.css?url'; resources: { client: { componentUrl, cssUrl, }, } ``` ### Client and editor bundles Separate bundles for the live site and the editor: ```typescript import componentUrl from './component.tsx?url'; import cssUrl from './styles.module.css?url'; import editorComponentUrl from './editor-component.tsx?url'; import editorCssUrl from './editor-styles.module.css?url'; resources: { client: { componentUrl, cssUrl, }, editor: { componentUrl: editorComponentUrl, cssUrl: editorCssUrl, }, } ``` ### Full resources configuration A complete `resources` object with all supported properties: ```typescript import componentUrl from './component.tsx?url'; import cssUrl from './styles.module.css?url'; import editorComponentUrl from './editor-component.tsx?url'; import editorCssUrl from './editor-styles.module.css?url'; import serverUrl from './server.tsx?url'; import sdkUrl from './sdk.ts?url'; resources: { client: { componentUrl, cssUrl, moduleSpecifier: '@wix/my-component', }, editor: { componentUrl: editorComponentUrl, cssUrl: editorCssUrl, moduleSpecifier: '@wix/my-component-editor', }, server: { url: serverUrl, }, sdk: { url: sdkUrl, }, } ``` ## See also - [About the Manifest](https://dev.wix.com/docs/build-apps/develop-your-app/extensions/site-extensions/editor-react-components/manifest-reference/about-the-manifest.md) - [About Editor React Components](https://dev.wix.com/docs/build-apps/develop-your-app/extensions/site-extensions/editor-react-components/about-editor-react-components.md) - [States](https://dev.wix.com/docs/build-apps/develop-your-app/extensions/site-extensions/editor-react-components/manifest-reference/editor-element/states.md) --- > Portal Navigation: > > - Append `.md` to any URL under `https://dev.wix.com/docs/` to get its markdown version. > - Pages are either content pages (article or reference text) or menu pages (a list of links to child pages). > - To get a menu page, truncate any URL to a parent path and append `.md` (e.g. `https://dev.wix.com/docs/sdk.md`, `https://dev.wix.com/docs/sdk/core-modules.md`). > - Top-level index of all portals: https://dev.wix.com/docs/llms.txt > - Full concatenated docs: https://dev.wix.com/docs/llms-full.txt ## Resource: Editor Element ## Article: Editor Element ## Article Link: https://dev.wix.com/docs/build-apps/develop-your-app/extensions/site-extensions/editor-react-components/manifest-reference/editor-element/editor-element.md ## Article Content: import { Property, PropertyList, ExpandableSection } from "@wix/docs-ui/content"; # Editor Element
    __Alpha:__ Editor React Components are currently in alpha. This feature is subject to change and may have bugs, issues, and limitations. We're actively improving it based on your feedback.
    The `editorElement` object is the core of the manifest. It defines the component's root selector and display name, and declares everything that should be customizable from data and styling to layout, presets, and states. Each property you define in `editorElement` automatically generates editor UI, so you don't need to build settings panels yourself. For a summary of what each property generates, see [About Auto Panels](https://dev.wix.com/docs/build-apps/develop-your-app/extensions/site-extensions/editor-react-components/panels/about-auto-panels.md). ## Where to define You can only define `editorElement` at the root level of your manifest, alongside properties like `type` and `resources`. ## Editor element properties The `editorElement` object supports the following properties: map<string, DataItem>}.md description="Data properties for the component. Each key is a data item name and each value is a data item definition. Passed to the component as props at runtime." /> map<string, CssPropertyItem>}.md description="Standard CSS properties applied as overrides in the scope of the component. Each key is a CSS property name and each value is the property configuration." /> map<string, CssCustomPropertyItem>}.md description="CSS custom properties (variables) applied in the scope of the component. Each key is the custom property name and each value is the property configuration." /> map<string, ElementItem>}.md description="Inner elements of the component with their own data, styling, and behaviors. Each key is a unique element identifier." /> Actions}.md description="Override default editor actions for the component. Optional, and not recommended if you want the standard editor experience." /> map<string, CustomAction>}.md description="Developer-defined custom actions for the component. Each key is a unique action identifier. Use for custom behaviors or integration with external domains." /> map<string, PresetItem>}.md description="Named visual variations of the component, each with an optional CSS file. Complementary to the default CSS file in resources. Each key is a unique preset key." /> Layout}.md description="Layout capabilities of the component, including resize behavior, content sizing, and positioning." /> map<string, StateItem>}.md description="Conditions like hover or disabled that change how the component looks based on user interactions." /> DisplayFilters}.md description="Control which properties, elements, and actions appear in the editor panels. Applied first, before preset and state filters." /> Archetype}.md description="Semantic classification of the component for AI tools and editor behaviors." /> Interactions}.md description="Triggers and effect groups for declarative animations that Wix users can configure." /> map<string, DisplayGroupItem>}.md description="Group related properties together in the editor for better organization. Each key is a unique display group identifier." /> ## Examples ### Button with data, CSS properties, and presets The following defines a button component with editable text, a style variant dropdown, a link, and a disabled toggle. It exposes background color, text color, and padding as design controls, a custom border radius variable, horizontal-only resizing, two visual presets, and a custom action that opens a panel. ```typescript editorElement: { selector: '.custom-button', displayName: 'Custom Button', archetype: 'Button', data: { text: { dataType: 'text', displayName: 'Button Text', defaultValue: 'Click me', text: { minLength: 1, maxLength: 50, }, }, variant: { dataType: 'textEnum', displayName: 'Button Animation Style', defaultValue: 'primary', textEnum: { options: [ { value: 'primary', displayName: 'Primary' }, { value: 'secondary', displayName: 'Secondary' }, { value: 'outline', displayName: 'Outline' }, ], }, }, disabled: { dataType: 'booleanValue', displayName: 'Disabled', defaultValue: 'false', }, link: { dataType: 'link', displayName: 'Button Link', link: { linkTypes: ['externalLink'], }, }, }, cssProperties: { backgroundColor: { displayName: 'Background Color', defaultValue: '#007bff', }, color: { displayName: 'Text Color', defaultValue: '#ffffff', }, padding: { displayName: 'Padding', defaultValue: '12px 24px', }, }, cssCustomProperties: { borderRadius: { cssPropertyType: 'number', displayName: 'Border Radius', defaultValue: 4, number: { minimum: 0, maximum: 50, }, }, }, layout: { resizeDirection: 'horizontal', contentResizeDirection: 'none', }, presets: { cta: { displayName: 'Call to Action', description: 'Large prominent button for primary actions', cssFile: 'https://somecdn.com/my-button-assets/button-cta.css', }, minimal: { displayName: 'Minimal', description: 'Clean minimal button style', cssFile: 'https://somecdn.com/my-button-assets/button-minimal.css', }, }, customActions: { openModal: { displayName: 'Open Modal', description: 'Opens a custom modal dialog', execution: { actionType: 'panel', panel: { panelType: 'panelId', panelId: 'a1b2c3d4-e5f6-4a5b-8c7d-9e0f1a2b3c4d', }, }, }, }, } ``` ### Card with display groups The following defines a card component that uses `displayGroups` to organize its properties into logical sections in the editor panels. Border-related CSS properties are grouped together, CSS custom properties for visual effects are grouped separately, and data items for content are in their own group. ```typescript editorElement: { selector: '.advanced-card', displayName: 'Advanced Card', cssProperties: { backgroundColor: { displayName: 'Background Color', defaultValue: '#ffffff', }, borderWidth: { displayName: 'Border Width', defaultValue: '1px', }, borderStyle: { displayName: 'Border Style', defaultValue: 'solid', }, borderColor: { displayName: 'Border Color', defaultValue: '#e0e0e0', }, }, cssCustomProperties: { shadowIntensity: { cssPropertyType: 'number', displayName: 'Shadow Intensity', defaultValue: 0.1, }, animationSpeed: { cssPropertyType: 'number', displayName: 'Animation Speed', defaultValue: 0.3, }, }, data: { title: { dataType: 'text', displayName: 'Card Title', }, subtitle: { dataType: 'text', displayName: 'Card Subtitle', }, }, displayGroups: { borderSettings: { displayName: 'Border Settings', groupType: 'border', border: { width: 'borderWidth', style: 'borderStyle', color: 'borderColor', }, }, visualEffects: { displayName: 'Visual Effects', groupType: 'cssDataType', cssDataType: { items: ['shadowIntensity', 'animationSpeed'], }, }, contentData: { displayName: 'Content', groupType: 'dataType', dataType: { items: ['title', 'subtitle'], }, }, }, } ``` ## See also - [About the Manifest](https://dev.wix.com/docs/build-apps/develop-your-app/extensions/site-extensions/editor-react-components/manifest-reference/about-the-manifest.md) - [About Editor React Components](https://dev.wix.com/docs/build-apps/develop-your-app/extensions/site-extensions/editor-react-components/about-editor-react-components.md) --- > Portal Navigation: > > - Append `.md` to any URL under `https://dev.wix.com/docs/` to get its markdown version. > - Pages are either content pages (article or reference text) or menu pages (a list of links to child pages). > - To get a menu page, truncate any URL to a parent path and append `.md` (e.g. `https://dev.wix.com/docs/sdk.md`, `https://dev.wix.com/docs/sdk/core-modules.md`). > - Top-level index of all portals: https://dev.wix.com/docs/llms.txt > - Full concatenated docs: https://dev.wix.com/docs/llms-full.txt ## Resource: Archetype ## Article: Archetype ## Article Link: https://dev.wix.com/docs/build-apps/develop-your-app/extensions/site-extensions/editor-react-components/manifest-reference/editor-element/archetype.md ## Article Content: import { Property, PropertyList, ExpandableSection } from "@wix/docs-ui/content"; # Archetype
    __Alpha:__ Editor React Components are currently in alpha. This feature is subject to change and may have bugs, issues, and limitations. We're actively improving it based on your feedback.
    The `archetype` property is a semantic classification that tells the editor what kind of component you're building. The editor and AI tools use this hint to provide appropriate default behaviors, suggestions, and capabilities for your component. ## Where to define You can define `archetype` in [`editorElement`](https://dev.wix.com/docs/build-apps/develop-your-app/extensions/site-extensions/editor-react-components/manifest-reference/editor-element/editor-element.md) and in [`elements`](https://dev.wix.com/docs/build-apps/develop-your-app/extensions/site-extensions/editor-react-components/manifest-reference/editor-element/elements.md) of type `inlineElement`. ## Archetype values ## Examples ### Button component ```typescript editorElement: { selector: '.my-button', displayName: 'My Button', archetype: 'Button', } ``` ## See also - [About the Manifest](https://dev.wix.com/docs/build-apps/develop-your-app/extensions/site-extensions/editor-react-components/manifest-reference/about-the-manifest.md) --- > Portal Navigation: > > - Append `.md` to any URL under `https://dev.wix.com/docs/` to get its markdown version. > - Pages are either content pages (article or reference text) or menu pages (a list of links to child pages). > - To get a menu page, truncate any URL to a parent path and append `.md` (e.g. `https://dev.wix.com/docs/sdk.md`, `https://dev.wix.com/docs/sdk/core-modules.md`). > - Top-level index of all portals: https://dev.wix.com/docs/llms.txt > - Full concatenated docs: https://dev.wix.com/docs/llms-full.txt ## Resource: Display Filters ## Article: Display Filters ## Article Link: https://dev.wix.com/docs/build-apps/develop-your-app/extensions/site-extensions/editor-react-components/manifest-reference/editor-element/display-filters.md ## Article Content: import { Property, PropertyList, ExpandableSection } from "@wix/docs-ui/content"; # Display Filters
    __Alpha:__ Editor React Components are currently in alpha. This feature is subject to change and may have bugs, issues, and limitations. We're actively improving it based on your feedback.
    The `displayFilters` property controls which properties appear in the editor panels when Wix users select your component. Use it to hide properties that your component uses internally but that Wix users shouldn't edit, or to show only relevant properties for a specific preset or state. ## Where to define You can define `displayFilters` in: - [`editorElement`](https://dev.wix.com/docs/build-apps/develop-your-app/extensions/site-extensions/editor-react-components/manifest-reference/editor-element/editor-element.md) {/* TODO: when refElements are supported, add here */} - [`elements`](https://dev.wix.com/docs/build-apps/develop-your-app/extensions/site-extensions/editor-react-components/manifest-reference/editor-element/elements.md) of type `inlineElement` - [Preset](https://dev.wix.com/docs/build-apps/develop-your-app/extensions/site-extensions/editor-react-components/manifest-reference/editor-element/presets.md) items (inside `presetDefaults`) - [State](https://dev.wix.com/docs/build-apps/develop-your-app/extensions/site-extensions/editor-react-components/manifest-reference/editor-element/states.md) items If multiple levels define filters, the editor applies them in the following order: 1. Element filters 2. Preset filters 3. State filters Only items that pass every applicable filter appear in the editor. ## Display filter keys Each key corresponds to a section in your manifest. Use `hide` or `show` (not both) to control which items from that section appear in the editor. If you don't define a display filter for a category, no filter is applied. - `hide`: The editor shows all items except those in the list. - `show`: The editor shows only the items in the list, everything else is hidden.
    ## Relationship with display groups [Display groups](https://dev.wix.com/docs/build-apps/develop-your-app/extensions/site-extensions/editor-react-components/manifest-reference/editor-element/display-groups/display-groups.md) and display filters operate independently. Display filters remove properties before the editor panel receives them. Display groups organize whatever properties remain. ## Examples ### Element and preset filters The following uses both `hide` and `show` across levels. At the component level, the component hides the data property `internalId`. The `'compact'` preset then uses `show` to restrict the visible data properties to just `title` and `icon`. When you select that preset, only those two appear in the editor; the editor hides `subtitle` and any other data properties. ```typescript editorElement: { displayFilters: { data: { hide: ['internalId'] }, }, presets: { compact: { displayName: 'Compact', presetDefaults: { displayFilters: { data: { show: ['title', 'icon'] }, }, }, }, }, } ``` ### All supported filter keys The following shows `displayFilters` with all supported keys configured. ```typescript editorElement: { displayFilters: { elements: { hide: ['advancedIcon', 'debugPanel'], }, cssProperties: { show: ['backgroundColor', 'color', 'fontSize', 'padding', 'margin'], }, cssCustomProperties: { show: ['borderRadius', 'shadowDepth'], }, data: { hide: ['internalConfig', 'debugMode', 'advancedSettings'], }, customActions: { show: ['editContent', 'duplicateElement', 'resetStyles'], }, actions: { hide: ['dashboard', 'manageItems'], }, states: { hide: ['open', 'loading'], }, }, } ``` ## See also - [About the Manifest](https://dev.wix.com/docs/build-apps/develop-your-app/extensions/site-extensions/editor-react-components/manifest-reference/about-the-manifest.md) --- > Portal Navigation: > > - Append `.md` to any URL under `https://dev.wix.com/docs/` to get its markdown version. > - Pages are either content pages (article or reference text) or menu pages (a list of links to child pages). > - To get a menu page, truncate any URL to a parent path and append `.md` (e.g. `https://dev.wix.com/docs/sdk.md`, `https://dev.wix.com/docs/sdk/core-modules.md`). > - Top-level index of all portals: https://dev.wix.com/docs/llms.txt > - Full concatenated docs: https://dev.wix.com/docs/llms-full.txt ## Resource: Elements ## Article: Elements ## Article Link: https://dev.wix.com/docs/build-apps/develop-your-app/extensions/site-extensions/editor-react-components/manifest-reference/editor-element/elements.md ## Article Content: import { Property, PropertyList, ExpandableSection } from "@wix/docs-ui/content"; # Elements
    __Alpha:__ Editor React Components are currently in alpha. This feature is subject to change and may have bugs, issues, and limitations. We're actively improving it based on your feedback.
    The `elements` property lets you make inner parts of your component independently selectable and configurable in the editor. Each element gets its own selector, display name, and optional data, styling, states, and actions. When a Wix user clicks on that part of your component, they see controls specific to it rather than the whole component. For example, a product card with a title, image, and buy button could define each part as a separate element. Clicking the button in the editor opens controls for just that button, such as its text, link, colors, and states, without affecting the rest of the card. ## Where to define {/* TODO: when refElements are supported, add here */} You can define `elements` in [`editorElement`](https://dev.wix.com/docs/build-apps/develop-your-app/extensions/site-extensions/editor-react-components/manifest-reference/editor-element/editor-element.md) and in other `elements` of type `inlineElement`.
    **Important:** Elements can nest multiple levels deep. When an element defines `data`, those values are passed to your component inside the `elementProps` object rather than as top-level props. Nested elements appear under their parent's `elementProps`. For more information, see [Props](https://dev.wix.com/docs/build-apps/develop-your-app/extensions/site-extensions/editor-react-components/manifest-reference/runtime-props.md).
    ## Element item Each entry in the `elements` map is an element item. It specifies the element's type and contains the corresponding configuration object. The element type. Supported values: inlineElement or refElement. Only inlineElement is currently supported.} /> InlineElement} description="Configuration for the element when elementType is 'inlineElement'." /> RefElement} description="Configuration for the element when elementType is 'refElement'. Not yet supported." /> ## Inline element An inline element is a custom element you define from scratch with its complete configuration. map<string, DataItem>}.md description="Data properties for this element, passed as props to your component." /> Actions}.md description="Native platform actions available for this element." /> map<string, CustomAction>} description="Developer-defined custom actions specific to your component." /> map<string, PresetItem>} description="Predefined style or layout variations." /> Archetype}.md description="Semantic classification hint for AI and editor features." /> map<string, ElementState>} description="Define component states for preview and testing." /> VisibleState} description="Links element visibility to a component state for conditional display." /> DisplayFilters}.md description="Control visibility of properties in the editor panel." /> map<string, CssPropertyItem>}.md description="Direct CSS properties applied to the element." /> map<string, CssCustomPropertyItem>}.md description="CSS custom properties declared with names prefixed by `--`, for reusable values referenced with `var()`." /> ## Ref element
    **Caution:** Support for ref elements is under development. See [Unsupported features](https://dev.wix.com/docs/build-apps/develop-your-app/extensions/site-extensions/editor-react-components/manifest-reference/about-the-manifest.md#unsupported-features).
    A ref element references an existing Wix component and optionally overrides its properties. Actions}.md description="Override or hide native actions from the referenced component." /> map<string, CustomAction>} description="Override custom actions from the referenced component." /> VisibleState} description="Links element visibility to a component state for conditional display." /> DisplayFilters}.md description="Control visibility of properties in the editor panel." /> ## Examples ### Progress bar with nested elements A progress bar with CSS custom properties and non-selectable sub-elements. ```typescript editorElement: { selector: '.progress-container', displayName: 'Progress Bar', data: { value: { dataType: 'number', displayName: 'Progress', defaultValue: 60, }, }, elements: { label: { elementType: 'inlineElement', inlineElement: { selector: '.progress-label', displayName: 'Label', behaviors: { selectable: false, removable: true, }, data: { text: { dataType: 'text', displayName: 'Label Text', defaultValue: 'Progress', }, }, cssProperties: { color: { displayName: 'Text Color', }, }, }, }, bar: { elementType: 'inlineElement', inlineElement: { selector: '.progress-bar', displayName: 'Bar', behaviors: { selectable: false, removable: false, }, cssCustomProperties: { barColor: { displayName: 'Bar Color', cssPropertyType: 'color', defaultValue: '#3899EC', }, barBorderRadius: { displayName: 'Bar Corner Radius', cssPropertyType: 'number', defaultValue: '4px', }, }, }, }, }, } ``` ### Removable element with display toggle A button component with a removable icon element. Setting `removable: true` lets Wix users toggle the element on or off. The `display` CSS property with `displayValues` controls which display states are available when the element is visible. ```typescript editorElement: { selector: '.button', displayName: 'Button', elements: { icon: { elementType: 'inlineElement', inlineElement: { selector: '.button-icon', displayName: 'Icon', behaviors: { selectable: false, removable: true, }, cssProperties: { display: { displayValues: ['none', 'inline-block'], }, }, }, }, }, } ``` ## See also - [About the Manifest](https://dev.wix.com/docs/build-apps/develop-your-app/extensions/site-extensions/editor-react-components/manifest-reference/about-the-manifest.md) --- > Portal Navigation: > > - Append `.md` to any URL under `https://dev.wix.com/docs/` to get its markdown version. > - Pages are either content pages (article or reference text) or menu pages (a list of links to child pages). > - To get a menu page, truncate any URL to a parent path and append `.md` (e.g. `https://dev.wix.com/docs/sdk.md`, `https://dev.wix.com/docs/sdk/core-modules.md`). > - Top-level index of all portals: https://dev.wix.com/docs/llms.txt > - Full concatenated docs: https://dev.wix.com/docs/llms-full.txt ## Resource: Interactions ## Article: Interactions ## Article Link: https://dev.wix.com/docs/build-apps/develop-your-app/extensions/site-extensions/editor-react-components/manifest-reference/editor-element/interactions.md ## Article Content: import { Property, PropertyList, ExpandableSection } from "@wix/docs-ui/content"; # Interactions
    __Alpha:__ Editor React Components are currently in alpha. This feature is subject to change and may have bugs, issues, and limitations. We're actively improving it based on your feedback.
    The `interactions` property controls which animation options appear in the editor's animation panel. It's configured with the following 2 concepts: - **Triggers**: Define when an animation starts, such as when the component enters the viewport or as the site visitor scrolls. - **Effect groups**: Define what animates, such as just the background layer while the content stays static. ## Where to define You can define `interactions` in [`editorElement`](https://dev.wix.com/docs/build-apps/develop-your-app/extensions/site-extensions/editor-react-components/manifest-reference/editor-element/editor-element.md) and in [`elements`](https://dev.wix.com/docs/build-apps/develop-your-app/extensions/site-extensions/editor-react-components/manifest-reference/editor-element/elements.md) of type `inlineElement`. ## Interactions properties Each `interactions` object accepts the following properties: Each trigger corresponds to a specific type of animation experience. ## Examples ### Full interaction support Use when you want to give Wix users access to all animation types. Good default for most components. ```typescript editorElement: { interactions: { triggers: [ 'viewEnter', 'pageVisible', 'animationEnd', 'viewProgress', 'pointerMove', ], }, } ``` ### Entrance and scroll only Use for components that should animate in and respond to scrolling, but don't need looping or mouse-tracking. Good for static content like headings, cards, or badges. ```typescript editorElement: { interactions: { triggers: [ 'viewEnter', 'viewProgress', ], }, } ``` ### Container with background effects Use for sections or wrappers where the background should animate independently of the content inside. The `'background'` effect group targets just the background layer. ```typescript editorElement: { archetype: 'Container', interactions: { triggers: [ 'viewEnter', 'pageVisible', 'animationEnd', 'viewProgress', 'pointerMove', ], effectGroups: ['background'], }, data: { children: { dataType: 'container', container: { selector: '.content', containerType: 'simple', simple: {}, }, }, }, } ``` ### Media component with background effects Use for image or video components where the media itself should animate. The `'background'` effect group applies effects to the media layer. ```typescript editorElement: { archetype: 'Image', interactions: { triggers: [ 'viewEnter', 'pageVisible', 'animationEnd', 'pointerMove', 'viewProgress', ], effectGroups: ['background'], }, } ``` ## See also - [About the Manifest](https://dev.wix.com/docs/build-apps/develop-your-app/extensions/site-extensions/editor-react-components/manifest-reference/about-the-manifest.md) --- > Portal Navigation: > > - Append `.md` to any URL under `https://dev.wix.com/docs/` to get its markdown version. > - Pages are either content pages (article or reference text) or menu pages (a list of links to child pages). > - To get a menu page, truncate any URL to a parent path and append `.md` (e.g. `https://dev.wix.com/docs/sdk.md`, `https://dev.wix.com/docs/sdk/core-modules.md`). > - Top-level index of all portals: https://dev.wix.com/docs/llms.txt > - Full concatenated docs: https://dev.wix.com/docs/llms-full.txt ## Resource: Layout ## Article: Layout ## Article Link: https://dev.wix.com/docs/build-apps/develop-your-app/extensions/site-extensions/editor-react-components/manifest-reference/editor-element/layout.md ## Article Content: import { Property, PropertyList, ExpandableSection } from "@wix/docs-ui/content"; # Layout
    __Alpha:__ Editor React Components are currently in alpha. This feature is subject to change and may have bugs, issues, and limitations. We're actively improving it based on your feedback.
    The `layout` property controls resize directions, content sizing, stretch, positioning, rotation, and duplication behavior for your component in the editor. It works together with [`installation.initialSize`](https://dev.wix.com/docs/build-apps/develop-your-app/extensions/site-extensions/editor-react-components/manifest-reference/root-properties/installation.md), which sets the starting dimensions, and `layout` controls how the Wix user can change them from there. ## Where to define You can define `layout` in [`editorElement`](https://dev.wix.com/docs/build-apps/develop-your-app/extensions/site-extensions/editor-react-components/manifest-reference/editor-element/editor-element.md), or override it per preset inside [`presetDefaults.layout`](https://dev.wix.com/docs/build-apps/develop-your-app/extensions/site-extensions/editor-react-components/manifest-reference/editor-element/presets.md).
    **Caution:** You can only apply `layout` to the root `editorElement`, not to [`elements`](https://dev.wix.com/docs/build-apps/develop-your-app/extensions/site-extensions/editor-react-components/manifest-reference/editor-element/elements.md).
    ## Layout properties The `layout` object supports the following fields: Controls which directions the Wix user can manually resize the component. This affects resize handles and editing capabilities using AI. Use `contentFill` when your component displays content that fills its entire visible area, such as an image, video, or background. This tells the editor which data item provides that content, enabling features like intelligent cropping.
    **Caution:** When `contentResizeDirection` includes a direction, the editor sizes the component's container to fit its content in that direction. This means your component's CSS can't use parent-relative values like `height: 100%` for that dimension, because the parent itself has no fixed size. Without a fixed value or content that takes up space, the component may collapse to zero.
    ## Common patterns The patterns below show how different combinations of `resizeDirection` and `contentResizeDirection` work for common component types. ### Text block The Wix user sets the width in the editor, and the height grows automatically as content wraps. ```json { "editorElement": { "layout": { "resizeDirection": "horizontal", "contentResizeDirection": "vertical", "disableStretching": true } } } ``` This pattern also works for progress bars, inline labels, and single-line inputs. ### Image The Wix user can resize freely in the editor. The image scales to fill the component without pushing its boundaries out, and `contentFill` enables the editor's cropping tools. ```json { "editorElement": { "layout": { "resizeDirection": "horizontalAndVertical", "contentResizeDirection": "none", "contentFill": { "dataItemKey": "image" } } } } ``` This pattern also works for videos, background media, and maps. ### Logo Resizing preserves the aspect ratio. The image fills the component but doesn't auto-resize. ```json { "editorElement": { "layout": { "resizeDirection": "aspectRatio", "contentResizeDirection": "none", "disableStretching": true, "contentFill": { "dataItemKey": "image" } } } } ``` This pattern also works for icons, avatars, and thumbnails. ### Button The Wix user can resize the component in both directions, while the height adjusts automatically to fit the content, such as the label, icon, or spacing. ```json { "editorElement": { "layout": { "resizeDirection": "horizontalAndVertical", "contentResizeDirection": "vertical", "disableStretching": true } } } ``` This pattern also works for tags, chips, and call-to-action banners. ### Container The Wix user controls the height in the editor. Children fill the component's visible area. To make the component span its parent's width on install, set `installation.initialSize.width.sizingType` to `'stretched'`. For details, see [`installation`](https://dev.wix.com/docs/build-apps/develop-your-app/extensions/site-extensions/editor-react-components/manifest-reference/root-properties/installation.md). ```json { "editorElement": { "layout": { "resizeDirection": "vertical", "contentFill": { "dataItemKey": "children" } } } } ``` This pattern also works for sections, panels, card groups, and sidebars. ### Fixed-size element The Wix user can't resize the component. Its content or fixed dimensions entirely determine the component's size. ```json { "editorElement": { "layout": { "resizeDirection": "none", "contentResizeDirection": "none" } } } ``` This pattern also works for badges, status indicators, and separators. --- > Portal Navigation: > > - Append `.md` to any URL under `https://dev.wix.com/docs/` to get its markdown version. > - Pages are either content pages (article or reference text) or menu pages (a list of links to child pages). > - To get a menu page, truncate any URL to a parent path and append `.md` (e.g. `https://dev.wix.com/docs/sdk.md`, `https://dev.wix.com/docs/sdk/core-modules.md`). > - Top-level index of all portals: https://dev.wix.com/docs/llms.txt > - Full concatenated docs: https://dev.wix.com/docs/llms-full.txt ## Resource: States ## Article: States ## Article Link: https://dev.wix.com/docs/build-apps/develop-your-app/extensions/site-extensions/editor-react-components/manifest-reference/editor-element/states.md ## Article Content: import { Property, PropertyList, ExpandableSection } from "@wix/docs-ui/content"; # States
    __Alpha:__ Editor React Components are currently in alpha. This feature is subject to change and may have bugs, issues, and limitations. We're actively improving it based on your feedback.
    The `states` property lets you define conditions that Wix users can style independently in the editor, such as hover, disabled, and loading. Each key in the `states` map is the **state key**, and you use it to reference the state in `statesDefaultValues`, [display filters](https://dev.wix.com/docs/build-apps/develop-your-app/extensions/site-extensions/editor-react-components/manifest-reference/editor-element/display-filters.md), and [style overrides](https://dev.wix.com/docs/build-apps/develop-your-app/extensions/site-extensions/editor-react-components/manifest-reference/editor-element/presets.md). ## Where to define {/* TODO: when refElements are supported, add here */} You can define `states` in [`editorElement`](https://dev.wix.com/docs/build-apps/develop-your-app/extensions/site-extensions/editor-react-components/manifest-reference/editor-element/editor-element.md) and in [`elements`](https://dev.wix.com/docs/build-apps/develop-your-app/extensions/site-extensions/editor-react-components/manifest-reference/editor-element/elements.md) of type `inlineElement`.
    **Tip:** You can filter which states appear in the editor using [`displayFilters`](https://dev.wix.com/docs/build-apps/develop-your-app/extensions/site-extensions/editor-react-components/manifest-reference/editor-element/display-filters.md) at the preset or element level.
    ## CSS style defaults for states To set default CSS values that the design panel shows when a state is active, use `statesDefaultValues` on your `cssProperties` or `cssCustomProperties` items. The key names must match state keys defined in the `states` map. See the [`statesDefaultValues` example](#statesdefaultvalues) below. ## State item properties Each item in the `states` map accepts the following properties: Applied when a user's pointer is over the element. Maps to CSS :hover.} /> Applied when the element has received focus. Maps to CSS :focus.} /> Applied when the element is disabled. Maps to CSS :disabled.} /> Applied when the element's value fails validation. Maps to CSS :invalid.} /> DisplayFilters}.md description="Controls which CSS properties, elements, data items, and custom actions are visible in the editor when this state is active. Applied last, after element and preset filters." /> ## Visible state The `visibleState` property is defined on elements to control an element's visibility based on a state defined on another element. When used, both fields are required. ## Examples ### statesDefaultValues Setting default CSS values per state. When a Wix user selects the hover state in the design panel, `backgroundColor` shows `#f0f0f0` instead of `#ffffff`. ```typescript editorElement: { cssProperties: { backgroundColor: { defaultValue: '#ffffff', statesDefaultValues: { hover: '#f0f0f0', }, }, }, states: { hover: { displayName: 'Hover' }, }, } ``` ### Open dropdown state The following defines a state that opens a dropdown so that its inner elements are visible on stage. ```typescript editorElement: { states: { openDropDown: { displayName: 'Open Drop Down', props: { open: true, }, }, }, } ``` ### Loading state with className The following defines a loading state with a `className` for styling and `props` to activate it on stage. ```typescript editorElement: { states: { loadingState: { displayName: 'Loading Data', className: 'loading', props: { loading: true, }, }, }, } ``` ### Hover state with pseudoClass The following defines a hover state. The `pseudoClass` handles `:hover` on the live site, while the `props` field allows the component to apply hover styles on the editor stage. Your CSS must target both. ```typescript editorElement: { states: { hover: { displayName: 'Hover', className: 'elementHover', pseudoClass: 'hover', props: { hovered: true, }, }, }, } ``` ```css .element.elementHover, .element:hover { /** YOUR CSS FOR HOVER STATE */ } ``` ### Display filters The following defines a button hover state that only shows specific CSS properties and hides certain data items when the state is selected. ```typescript editorElement: { states: { buttonHover: { displayName: 'Button Hover', className: 'btn-hover-state', pseudoClass: 'hover', props: { variant: 'primary', size: 'large', disabled: false, loading: false, }, displayFilters: { cssProperties: { show: ['backgroundColor', 'borderColor', 'color', 'transform'], }, data: { hide: ['advancedOptions', 'debugSettings'], }, }, }, }, } ``` ### Visible state The following shows a `visibleState` configuration on an inner element, making it visible only when the `showAdvanced` state is active on the element at `/settingsPanel/advancedOptions`. ```typescript editorElement: { elements: { myElement: { elementType: 'inlineElement', inlineElement: { selector: '.my-element', displayName: 'My Element', visibleState: { stateKey: 'showAdvanced', elementPath: '/settingsPanel/advancedOptions', }, }, }, }, } ``` ### States with CSS style defaults The following defines a `border` property with a dashed green default and a solid red override for the error state. ```typescript editorElement: { cssProperties: { border: { displayName: 'Main component Border', defaultValue: 'dashed 2px green', statesDefaultValues: { error: 'solid 2px red', }, }, }, states: { error: { displayName: 'Error', }, }, } ``` ## See also - [States](https://dev.wix.com/docs/build-apps/develop-your-app/extensions/site-extensions/editor-react-components/manifest-reference/editor-element/states.md) --- > Portal Navigation: > > - Append `.md` to any URL under `https://dev.wix.com/docs/` to get its markdown version. > - Pages are either content pages (article or reference text) or menu pages (a list of links to child pages). > - To get a menu page, truncate any URL to a parent path and append `.md` (e.g. `https://dev.wix.com/docs/sdk.md`, `https://dev.wix.com/docs/sdk/core-modules.md`). > - Top-level index of all portals: https://dev.wix.com/docs/llms.txt > - Full concatenated docs: https://dev.wix.com/docs/llms-full.txt ## Resource: Presets ## Article: Presets ## Article Link: https://dev.wix.com/docs/build-apps/develop-your-app/extensions/site-extensions/editor-react-components/manifest-reference/editor-element/presets.md ## Article Content: import { Property, PropertyList, ExpandableSection } from "@wix/docs-ui/content"; # Presets
    __Alpha:__ Editor React Components are currently in alpha. This feature is subject to change and may have bugs, issues, and limitations. We're actively improving it based on your feedback.
    The `presets` property lets you define named visual variations of your component. Each key in the `presets` map is the preset's unique identifier, which is referred to as the preset key throughout this documentation. Each value configures the preset's display name, thumbnail, sizing, default values, and optional style overrides. ## Where to define You can define `presets` in [`editorElement`](https://dev.wix.com/docs/build-apps/develop-your-app/extensions/site-extensions/editor-react-components/manifest-reference/editor-element/editor-element.md).
    **Important:** For presets to work, your component must wrap its root element in a container and spread `wix.presetsWrapperProps` onto it.
    ## Preset defaults vs. style overrides Each preset item has 2 fields that control its appearance: `presetDefaults` and `styleOverrides`. Both are optional, and they serve different purposes: - Use `presetDefaults` to define the initial values that apply when a Wix user switches to a preset. This includes layout behavior, CSS properties, CSS custom properties, display filters, and nested element defaults. These values replace the component's base configuration for that preset. - Use `styleOverrides` when you need breakpoint-aware or state-aware value overrides. For example, you might use `styleOverrides` to set a different hover color on mobile, or to adjust font sizes across breakpoints. Overrides in the `default` breakpoint cascade to all other breakpoints, while `small` overrides apply only to the mobile breakpoint. ## Preset item properties Each item in the `presets` map accepts the following properties: Sets default values for nested elements in a preset. This schema is recursive, so each inner element can contain its own nested `elements`. EditorElementLayout}.md description="Layout behaviors to apply when this preset is selected." /> DisplayFilters}.md description="Controls visibility of elements, properties, and actions for this preset." /> ## Installation presets The `installation.presets` object maps breakpoints to preset keys, controlling which preset the component starts with when first added to the page. ## Examples ### Basic presets The following defines 2 presets for a line component, 1 horizontal and 1 vertical, each with different initial sizes and layout defaults. ```typescript editorElement: { presets: { horizontal: { displayName: 'Horizontal', initialSize: { width: { sizingType: 'pixels', pixels: 280, }, height: { sizingType: 'content', }, }, presetDefaults: { layout: { resizeDirection: 'horizontal', contentResizeDirection: 'vertical', disableStretching: false, disablePositioning: false, }, }, }, vertical: { displayName: 'Vertical', initialSize: { width: { sizingType: 'content', }, height: { sizingType: 'pixels', pixels: 280, }, }, presetDefaults: { layout: { resizeDirection: 'vertical', contentResizeDirection: 'horizontal', disableStretching: false, disablePositioning: false, }, }, }, }, } ``` ### Preset element defaults The following configures layout, CSS property defaults, and display filters for a menu preset. The `displayFilters` object controls which elements, actions, and properties appear in the editor for this preset. In this case, it shows the `navbar` element and hides the `manageMenu` action. ```typescript editorElement: { presets: { menuPreset: { presetDefaults: { layout: { resizeDirection: 'horizontal', contentResizeDirection: 'horizontal', disableStretching: false, disablePositioning: false, disableRotation: true, }, cssProperties: { writingMode: { defaultValue: 'horizontal-tb', }, }, displayFilters: { elements: { show: ['navbar'], }, actions: { hide: ['manageMenu'], }, }, }, }, }, } ``` ### Inner element defaults The following configures CSS custom property defaults for a nested `line` element. ```typescript editorElement: { presets: { myPreset: { presetDefaults: { elements: { line: { cssCustomProperties: { type: { defaultValue: 'solid', }, lineColor: { defaultValue: '#000000', }, lineSize: { defaultValue: '1px', }, }, }, }, }, }, }, } ``` ### Component initial size The following sets the initial width to 120 pixels and the height to fit the content. ```typescript editorElement: { presets: { myPreset: { initialSize: { width: { sizingType: 'pixels', pixels: 120, }, height: { sizingType: 'content', }, }, }, }, } ``` ### Installation presets The following sets the horizontal preset for both breakpoints and defines a default initial width of 280 pixels. ```typescript installation: { presets: { default: 'horizontal', small: 'horizontal', }, initialSize: { width: { sizingType: 'pixels', pixels: 280, }, height: { sizingType: 'content', }, }, } ``` ### Style overrides The following overrides background color with state-specific hover values at the default breakpoint, and adjusts font size for mobile. ```typescript editorElement: { presets: { myPreset: { styleOverrides: { default: { style: { backgroundColor: { value: '#ffffff', statesValues: { hover: '#f0f0f0', }, }, fontSize: { value: '16px', }, }, elements: { menuItem: { style: { padding: { value: '12px 16px', }, }, }, }, }, small: { style: { fontSize: { value: '14px', }, }, elements: { menuItem: { style: { padding: { value: '8px 12px', }, }, }, }, }, }, }, }, } ``` --- > Portal Navigation: > > - Append `.md` to any URL under `https://dev.wix.com/docs/` to get its markdown version. > - Pages are either content pages (article or reference text) or menu pages (a list of links to child pages). > - To get a menu page, truncate any URL to a parent path and append `.md` (e.g. `https://dev.wix.com/docs/sdk.md`, `https://dev.wix.com/docs/sdk/core-modules.md`). > - Top-level index of all portals: https://dev.wix.com/docs/llms.txt > - Full concatenated docs: https://dev.wix.com/docs/llms-full.txt ## Resource: Native and Custom Actions ## Article: Native and Custom Actions ## Article Link: https://dev.wix.com/docs/build-apps/develop-your-app/extensions/site-extensions/editor-react-components/manifest-reference/editor-element/actions/native-and-custom-actions.md ## Article Content: import { Property, PropertyList, ExpandableSection } from "@wix/docs-ui/content"; # Native and Custom Actions
    __Alpha:__ Editor React Components are currently in alpha. This feature is subject to change and may have bugs, issues, and limitations. We're actively improving it based on your feedback.
    The `actions` and `customActions` properties control the toolbar that appears when a Wix user selects your component in the editor. ## Where to define {/* TODO: when refElements are supported, add here */} You can define `actions` and `customActions` in [`editorElement`](https://dev.wix.com/docs/build-apps/develop-your-app/extensions/site-extensions/editor-react-components/manifest-reference/editor-element/editor-element.md) and in [`elements`](https://dev.wix.com/docs/build-apps/develop-your-app/extensions/site-extensions/editor-react-components/manifest-reference/editor-element/elements.md) of type `inlineElement`. - **Native actions** are derived from your component's manifest and generated automatically by the editor. For example, `data` items produce a `settings` action, and `cssProperties` produce a `design` action. If you don't define an `actions` object at all, the editor generates these for you. You can override them using the `actions` property. - **Custom actions** are additional buttons you define using the `customActions` property. They appear as labeled text buttons before the icon-based native actions. Each action is a key-value pair. The key is the action's identifier, and the value is an object. ## Native actions Native actions are defined using the `actions` property. All fields are optional since the editor provides defaults. Defining `execution` on a native action overrides its default behavior. Label shown in the action bar. 4 to 20 characters. Translatable. Required for custom actions.} /> Execution}.md description={<>Defines what happens when the action is clicked. Required for custom actions.} /> Label shown in the action bar. 4 to 20 characters. Translatable. Required for custom actions.} /> Execution}.md description={<>Defines what happens when the action is clicked. Required for custom actions.} /> Label shown in the action bar. 4 to 20 characters. Translatable. Required for custom actions.} /> Execution}.md description={<>Defines what happens when the action is clicked. Required for custom actions.} /> Label shown in the action bar. 4 to 20 characters. Translatable. Required for custom actions.} /> Execution}.md description={<>Defines what happens when the action is clicked. Required for custom actions.} /> Unlike the other native actions, the `dashboard` action opens a dashboard page extension on top of the editor. You define which page to open using the `dashboardPageId` field. If omitted, the default dashboard page opens. Execution}.md description="Defines what happens when the action is clicked." />
    > **Note:** Additional native actions, such as `presets` for components with templates, may also appear depending on your component's capabilities. ## Custom actions Custom actions are defined using the `customActions` property. Each custom action requires a `displayName` and an `execution`. For the full list of execution types, see [Execution Types](https://dev.wix.com/docs/build-apps/develop-your-app/extensions/site-extensions/editor-react-components/manifest-reference/editor-element/actions/execution-types.md). Custom actions can be defined at the root `editorElement` level or on elements in the `elements` map, allowing child elements to have their own dedicated actions. ### Examples #### Hide a native action The following example hides the media action from the action bar: ```json { "editorElement": { "actions": { "media": { "hidden": true } } } } ``` #### Override display names The following example overrides the display name of the settings and design actions: ```json { "editorElement": { "actions": { "settings": { "displayName": "Slideshow Settings", "execution": { "actionType": "data", "data": { "dataItemKey": "slides" } } }, "design": { "displayName": "Slideshow Design", "execution": { "actionType": "cssProperty", "cssProperty": { "cssPropertyKey": "backgroundColor" } } } } } } ``` #### Redirect manageItems The following example redirects `manageItems` to target the `slides` array by providing an `execution` object: ```json { "editorElement": { "actions": { "manageItems": { "displayName": "Manage Slides", "execution": { "actionType": "data", "data": { "dataItemKey": "slides" } } } } } } ``` For the full list of execution types, see [About Execution Types](https://dev.wix.com/docs/build-apps/develop-your-app/extensions/site-extensions/editor-react-components/manifest-reference/editor-element/actions/execution-types.md). #### Dashboard action The following example opens a specific dashboard page when the user clicks the action: {/* This example is used in original documentation. Dev raised question in PR - if it has both dashboard page id and panel execution, which wins/ takes precedence? */} ```json { "editorElement": { "actions": { "dashboard": { "hidden": false, "displayName": "Analytics Dashboard", "dashboardPageId": "b2c3d4e5-f6a7-5b6c-9d8e-0f1a2b3c4d5e", "execution": { "actionType": "panel", "panel": { "panelType": "panelId", "panelId": "c3d4e5f6-a7b8-6c7d-0e9f-1a2b3c4d5e6f" } } } } } } ``` #### Custom action with panel The following example adds a "Change Colors" button that opens a panel: ```json { "editorElement": { "customActions": { "vectorArtColors": { "displayName": "Change Colors", "execution": { "actionType": "panel", "panel": { "panelType": "panelId", "panelId": "c0b164d9-cd88-41d3-a45e-51b14c54c3ea" } } } } } } ``` --- > Portal Navigation: > > - Append `.md` to any URL under `https://dev.wix.com/docs/` to get its markdown version. > - Pages are either content pages (article or reference text) or menu pages (a list of links to child pages). > - To get a menu page, truncate any URL to a parent path and append `.md` (e.g. `https://dev.wix.com/docs/sdk.md`, `https://dev.wix.com/docs/sdk/core-modules.md`). > - Top-level index of all portals: https://dev.wix.com/docs/llms.txt > - Full concatenated docs: https://dev.wix.com/docs/llms-full.txt ## Resource: Execution Types ## Article: Execution Types ## Article Link: https://dev.wix.com/docs/build-apps/develop-your-app/extensions/site-extensions/editor-react-components/manifest-reference/editor-element/actions/execution-types.md ## Article Content: import { Property, PropertyList, ExpandableSection } from "@wix/docs-ui/content"; # Execution Types
    __Alpha:__ Editor React Components are currently in alpha. This feature is subject to change and may have bugs, issues, and limitations. We're actively improving it based on your feedback.
    Every action (native or custom) can specify an `execution` object that tells the editor what happens when the user clicks the action. The `execution` object contains an `actionType` field that determines the behavior, and a corresponding payload. ## Execution properties Each `execution` object accepts the following properties: The `elementPath` must start with `.root` or `.self`. Each segment after the prefix corresponds to a key in the `elements` map of that level of the manifest. Set `actionName` to any native action name, or to `custom` for custom actions. > **Note:** Less common action names include `manageMenu`, `help`, `plugins`, `presets`, `interactions`, and more. ## Examples ### Data action The following example opens the data-editing UI for the `slides` data item: ```json { "actionType": "data", "data": { "dataItemKey": "slides" } } ``` ### Panel action with panelId The following example opens a panel registered in the app dashboard: ```json { "actionType": "panel", "panel": { "panelType": "panelId", "panelId": "c0b164d9-cd88-41d3-a45e-51b14c54c3ea" } } ``` ### Inline panel from URL The following example opens an inline panel that loads content from a URL: ```json { "actionType": "panel", "panel": { "panelType": "inline", "inline": { "displayName": "Color Settings", "contentType": "url", "url": "https://example.com/my-panel.html", "size": { "height": 300, "width": "MEDIUM" } } } } ``` ### Inline panel from code The following example opens an inline panel rendered from a React component: ```json { "actionType": "panel", "panel": { "panelType": "inline", "inline": { "displayName": "Advanced Settings", "contentType": "code", "code": { "bundleUrl": "https://example.com/panel-bundle.js", "cssUrl": "https://example.com/panel-styles.css" }, "panel_mode": "overlay" } } } ``` ### Forward action The following example forwards a custom action to a child element. The target element (`previewContainer`) must define a `customActions.togglePreview` entry in its own manifest for this to work. ```json { "actionType": "forward", "forward": { "elementPath": ".root.previewContainer", "actionName": "custom", "custom": "togglePreview" } } ``` The following example forwards the `manageMenu` native action to a child navbar element: ```json { "actionType": "forward", "forward": { "elementPath": ".self.navbar", "actionName": "manageMenu" } } ``` ### Event action The following example dispatches an `onExportData` event: ```json { "actionType": "event", "event": { "event": "onExportData" } } ``` ### CSS property action The following example opens the styling control for `backgroundColor`: ```json { "actionType": "cssProperty", "cssProperty": { "cssPropertyKey": "backgroundColor" } } ``` ### CSS custom property action The following example opens the styling control for a CSS custom property: ```json { "actionType": "cssCustomProperty", "cssCustomProperty": { "cssCustomPropertyKey": "shadowStyle" } } ``` ### Display group action The following example opens the panel for a display group: ```json { "actionType": "displayGroup", "displayGroup": { "displayGroupKey": "animations" } } ``` --- > Portal Navigation: > > - Append `.md` to any URL under `https://dev.wix.com/docs/` to get its markdown version. > - Pages are either content pages (article or reference text) or menu pages (a list of links to child pages). > - To get a menu page, truncate any URL to a parent path and append `.md` (e.g. `https://dev.wix.com/docs/sdk.md`, `https://dev.wix.com/docs/sdk/core-modules.md`). > - Top-level index of all portals: https://dev.wix.com/docs/llms.txt > - Full concatenated docs: https://dev.wix.com/docs/llms-full.txt ## Resource: Actions Examples ## Article: Actions Examples ## Article Link: https://dev.wix.com/docs/build-apps/develop-your-app/extensions/site-extensions/editor-react-components/manifest-reference/editor-element/actions/actions-examples.md ## Article Content: # Actions Examples
    __Alpha:__ Editor React Components are currently in alpha. This feature is subject to change and may have bugs, issues, and limitations. We're actively improving it based on your feedback.
    This article provides practical examples of using native actions, custom actions, and display filters in your component manifests. ## Renaming native actions A simple override that changes the labels without changing the behavior: ```json { "editorElement": { "selector": ".collapsible-text", "displayName": "Collapsible Text", "actions": { "settings": { "displayName": "Text Settings", "execution": { "actionType": "data", "data": { "dataItemKey": "text" } } }, "design": { "displayName": "Text Design", "execution": { "actionType": "cssProperty", "cssProperty": { "cssPropertyKey": "backgroundColor" } } } } } } ``` ## Event action The TemplateContainer component adds a "Settings" custom action that dispatches an event to the editor script: ```json { "editorElement": { "customActions": { "templateContainerSettings": { "displayName": "Settings", "execution": { "actionType": "event", "event": { "event": "templateContainerSettingsAction" } } } } } } ``` ## Forward action The Button component surfaces its child AnimatedIcon's customization panel. The AnimatedIcon is a ref element with `selectable: false`, so users can't select it directly. The forward action lets the parent Button expose the icon's editing UI. When using `actionName: "custom"`, the target element must have a matching `customActions` entry in its own manifest. In this case, the AnimatedIcon component defines `customActions.animatedIcon` which the forward action invokes. ```json { "editorElement": { "selector": ".button", "displayName": "Button", "elements": { "label": { "elementType": "inlineElement", "inlineElement": { "selector": ".label", "displayName": "Label", "cssProperties": { "font": {}, "color": {} } } }, "animatedIcon": { "elementType": "refElement", "refElement": { "displayName": "Icon", "selector": ".animated-icon", "type": "wixEditorElements.AnimatedIcon", "behaviors": { "selectable": false, "removable": true } } } }, "customActions": { "animatedIcon": { "displayName": "Customize Icon", "execution": { "actionType": "forward", "forward": { "elementPath": ".self.animatedIcon", "actionName": "custom", "custom": "animatedIcon" } } } } } } ``` ## Native action overrides with custom actions The Slideshow component overrides `manageItems` to manage slides, and adds a custom forward action for the navigation icon: ```json { "editorElement": { "selector": ".slideshow", "displayName": "Slideshow", "data": { "slides": { "dataType": "arrayItems", "displayName": "Slides", "arrayItems": { "data": { "items": { "name": { "dataType": "text" }, "content": { "dataType": "container", "container": { "selector": ".slide", "containerType": "simple" } } } } } }, "autoplay": { "dataType": "booleanValue", "displayName": "Autoplay", "defaultValue": false } }, "actions": { "manageItems": { "displayName": "Manage Slides", "execution": { "actionType": "data", "data": { "dataItemKey": "slides" } } } }, "customActions": { "animatedIcon": { "displayName": "Navigation Icon", "execution": { "actionType": "forward", "forward": { "elementPath": ".self.navigationButtons.animatedIcon", "actionName": "custom", "custom": "animatedIcon" } } } } } } ``` ## CSS property and display group actions Quick-access buttons for specific styling controls: ```json { "editorElement": { "cssProperties": { "backgroundColor": { "displayName": "Background", "defaultValue": "#ffffff" } }, "cssCustomProperties": { "shadowIntensity": { "cssPropertyType": "number", "displayName": "Shadow Intensity", "defaultValue": "0.1" }, "animationSpeed": { "cssPropertyType": "number", "displayName": "Animation Speed", "defaultValue": "0.3" } }, "displayGroups": { "visualEffects": { "displayName": "Visual Effects", "groupType": "cssDataType", "cssDataType": { "items": ["shadowIntensity", "animationSpeed"] } } }, "customActions": { "editBackground": { "displayName": "Background", "execution": { "actionType": "cssProperty", "cssProperty": { "cssPropertyKey": "backgroundColor" } } }, "visualEffects": { "displayName": "Visual Effects", "execution": { "actionType": "displayGroup", "displayGroup": { "displayGroupKey": "visualEffects" } } } } } } ``` ## Display filters The following example uses `hide` to remove specific actions and data items from the editor: ```json { "editorElement": { "displayFilters": { "data": { "hide": ["svg", "isDecorative"] }, "actions": { "hide": ["media", "design"] } } } } ``` The following example uses `show` to allow only the `settings` and `design` actions to be visible: ```json { "editorElement": { "displayFilters": { "actions": { "show": ["settings", "design"] } } } } ``` --- > Portal Navigation: > > - Append `.md` to any URL under `https://dev.wix.com/docs/` to get its markdown version. > - Pages are either content pages (article or reference text) or menu pages (a list of links to child pages). > - To get a menu page, truncate any URL to a parent path and append `.md` (e.g. `https://dev.wix.com/docs/sdk.md`, `https://dev.wix.com/docs/sdk/core-modules.md`). > - Top-level index of all portals: https://dev.wix.com/docs/llms.txt > - Full concatenated docs: https://dev.wix.com/docs/llms-full.txt ## Resource: Standard CSS Properties ## Article: Standard CSS Properties ## Article Link: https://dev.wix.com/docs/build-apps/develop-your-app/extensions/site-extensions/editor-react-components/manifest-reference/editor-element/css/standard-css-properties.md ## Article Content: import { Property, PropertyList, ExpandableSection } from "@wix/docs-ui/content"; # Standard CSS Properties
    __Alpha:__ Editor React Components are currently in alpha. This feature is subject to change and may have bugs, issues, and limitations. We're actively improving it based on your feedback.
    The `cssProperties` property of the manifest lets you define standard [CSS properties](https://developer.mozilla.org/en-US/docs/Web/CSS/Reference/Properties) that Wix users can customize through the editor. The editor reads these definitions and generates the appropriate design panel controls for each property. The key must be a valid CSS property name, such as `border`, `backgroundColor`, or `fontSize`. The editor applies the value directly to the element that matches the selector. ## Where to define {/* TODO: when refElements are supported, add here */} You can define `cssProperties` in [`editorElement`](https://dev.wix.com/docs/build-apps/develop-your-app/extensions/site-extensions/editor-react-components/manifest-reference/editor-element/editor-element.md) and in [`elements`](https://dev.wix.com/docs/build-apps/develop-your-app/extensions/site-extensions/editor-react-components/manifest-reference/editor-element/elements.md) of type `inlineElement`. ## cssProperties compared to cssCustomProperties The manifest supports two ways to define styling: `cssProperties` and [`cssCustomProperties`](https://dev.wix.com/docs/build-apps/develop-your-app/extensions/site-extensions/editor-react-components/manifest-reference/editor-element/css/css-custom-properties.md). Use `cssProperties` when you want to apply a standard CSS property directly to an element. The editor maps the property to the appropriate design panel control automatically. Consider [`cssCustomProperties`](https://dev.wix.com/docs/build-apps/develop-your-app/extensions/site-extensions/editor-react-components/manifest-reference/editor-element/css/css-custom-properties.md) instead when: - You need a variable name that isn't a standard CSS property. - The same value is used across multiple CSS rules. - You want a custom dropdown with specific options. - You need numeric values with min and max constraints. ## CSS property item Each item defined under `cssProperties` accepts the following properties: Default CSS values for defined component.md states.} /> Supported CSS filter functions: Supported CSS display values: Supported CSS writing-mode values: ImageCategoryTypes} description="Which image media manager category to open when the Wix user selects a background." /> VectorArtCategoryTypes} description="Which shape divider media manager category to open when the Wix user selects a background." /> ## CSS shorthand [CSS shorthand properties](https://developer.mozilla.org/en-US/docs/Web/CSS/Guides/Cascade/Shorthand_properties) allow you to set multiple related CSS properties with a single declaration. When you define a shorthand property in the manifest, the editor panel displays separate controls for the core related properties. ## Examples ### Basic CSS property with state defaults The following defines a `border` property with a dashed green default and a solid red override for the error state. ```typescript editorElement: { cssProperties: { border: { displayName: 'Main component Border', defaultValue: 'dashed 2px green', statesDefaultValues: { error: 'solid 2px red', }, }, }, } ``` ### Empty object CSS properties You can define a CSS property with an empty object to enable it with default editor behavior. ```typescript editorElement: { cssProperties: { backgroundColor: {}, border: {}, padding: {}, }, } ``` ### CSS shorthand When you define a shorthand property like `border`, the editor displays separate controls for color, width, and style for all directional variants. ```typescript editorElement: { cssProperties: { border: { displayName: 'Border', defaultValue: '2px solid blue', }, }, } ``` ### Filter and backdrop filter The following defines a `filter` property with blur, drop shadow, and contrast effects, and a `backdropFilter` with blur, brightness, and saturation effects. ```typescript editorElement: { cssProperties: { filter: { displayName: 'Image Effects', filter: { filterFunctions: ['blur', 'drop_shadow', 'contrast'], }, }, backdropFilter: { displayName: 'Backdrop Effects', backdropFilter: { filterFunctions: ['blur', 'brightness', 'saturate'], }, }, }, } ``` ### Display The following defines a `display` property that lets Wix users choose between none, flex, and block layouts. ```typescript editorElement: { cssProperties: { display: { displayName: 'Layout Type', defaultValue: 'flex', display: { displayValues: ['none', 'flex', 'block'], }, }, }, } ``` ### Writing mode The following defines a `writingMode` property that lets Wix users choose between horizontal and vertical text directions. ```typescript editorElement: { cssProperties: { writingMode: { displayName: 'Text Direction', defaultValue: 'horizontalTb', writingMode: { writingModeValues: ['horizontalTb', 'verticalRl', 'verticalLr'], }, }, }, } ``` ### Background The following defines a `background` property that opens the image media manager when a Wix user selects a background. ```typescript editorElement: { cssProperties: { background: { displayName: 'Background', background: { imageCategory: 'IMAGE_BACKGROUND', }, }, }, } ``` ## See also - [CSS Custom Properties](https://dev.wix.com/docs/build-apps/develop-your-app/extensions/site-extensions/editor-react-components/manifest-reference/editor-element/css/css-custom-properties.md) - [About the Manifest](https://dev.wix.com/docs/build-apps/develop-your-app/extensions/site-extensions/editor-react-components/manifest-reference/about-the-manifest.md) --- > Portal Navigation: > > - Append `.md` to any URL under `https://dev.wix.com/docs/` to get its markdown version. > - Pages are either content pages (article or reference text) or menu pages (a list of links to child pages). > - To get a menu page, truncate any URL to a parent path and append `.md` (e.g. `https://dev.wix.com/docs/sdk.md`, `https://dev.wix.com/docs/sdk/core-modules.md`). > - Top-level index of all portals: https://dev.wix.com/docs/llms.txt > - Full concatenated docs: https://dev.wix.com/docs/llms-full.txt ## Resource: CSS Custom Properties ## Article: CSS Custom Properties ## Article Link: https://dev.wix.com/docs/build-apps/develop-your-app/extensions/site-extensions/editor-react-components/manifest-reference/editor-element/css/css-custom-properties.md ## Article Content: import { Property, PropertyList, ExpandableSection } from "@wix/docs-ui/content"; # CSS Custom Properties
    __Alpha:__ Editor React Components are currently in alpha. This feature is subject to change and may have bugs, issues, and limitations. We're actively improving it based on your feedback.
    The `cssCustomProperties` property of the manifest lets you define [CSS custom properties (CSS variables)](https://developer.mozilla.org/en-US/docs/Web/CSS/Guides/Cascading_variables/Using_custom_properties) that Wix users can customize through the editor. Unlike [`cssProperties`](https://dev.wix.com/docs/build-apps/develop-your-app/extensions/site-extensions/editor-react-components/manifest-reference/editor-element/css/standard-css-properties.md), where keys must be standard CSS property names, `cssCustomProperties` lets you define your own variable names, giving you full control over how style values are applied to your component. ## Where to define {/* TODO: when refElements are supported, add here */} You can define `cssCustomProperties` in [`editorElement`](https://dev.wix.com/docs/build-apps/develop-your-app/extensions/site-extensions/editor-react-components/manifest-reference/editor-element/editor-element.md) and in [`elements`](https://dev.wix.com/docs/build-apps/develop-your-app/extensions/site-extensions/editor-react-components/manifest-reference/editor-element/elements.md) of type `inlineElement`. When a Wix user customizes your component, the editor sets these variables as CSS custom properties on the element. Your component's CSS must consume them using [`var()`](https://developer.mozilla.org/en-US/docs/Web/CSS/Reference/Values/var). The connection between the manifest and the rendered styles flows through your CSS, so you decide which CSS properties each variable maps to, and you can use a single variable in multiple places or combine it with other values. ## CSS custom property item `cssCustomProperties` is a map where each key is a variable name without the `--` prefix, such as `customBorder` or `iconColor`, and each value is a CSS custom property item. Every item must include a `cssPropertyType` field, which tells the editor what type of control to display for that variable. Default CSS values for defined component.md states.} /> {/* Currently, only `drop_shadow` has a fully implemented design panel control. The other filter functions are valid schema values but don't yet render UI controls in the editor. You must include `drop_shadow` in your `filterFunctions` array for the filter section to appear in the design panel. */} Which filter effects to show in the editor panel. Only relevant for the filter property.} /> Which backdrop-filter effects to show in the editor panel. Only relevant for the backdropFilter property.} /> Which display options to show in the editor panel. Only relevant for the display property.} /> Which text direction options to show in the editor panel. Only relevant for the writingMode property.} /> Which background options to show in the editor panel. Only relevant for the background property.} /> ## CSS data types Supported CSS data types: - [`angle`](https://developer.mozilla.org/en-US/docs/Web/CSS/angle) - [`blendMode`](https://developer.mozilla.org/en-US/docs/Web/CSS/blend-mode) - [`color`](https://developer.mozilla.org/en-US/docs/Web/CSS/color_value) - `customEnum` - [`length`](https://developer.mozilla.org/en-US/docs/Web/CSS/length) - [`lengthPercentage`](https://developer.mozilla.org/en-US/docs/Web/CSS/length-percentage) - [`number`](https://developer.mozilla.org/en-US/docs/Web/CSS/number) - [`percentage`](https://developer.mozilla.org/en-US/docs/Web/CSS/percentage) - [`string`](https://developer.mozilla.org/en-US/docs/Web/CSS/string) - [`time`](https://developer.mozilla.org/en-US/docs/Web/CSS/time) ## CSS property types Supported property types. **CSS data properties:** - [`angle`](https://developer.mozilla.org/en-US/docs/Web/CSS/angle), [`blendMode`](https://developer.mozilla.org/en-US/docs/Web/CSS/blend-mode), `customEnum`, [`length`](https://developer.mozilla.org/en-US/docs/Web/CSS/length), [`lengthPercentage`](https://developer.mozilla.org/en-US/docs/Web/CSS/length-percentage), [`number`](https://developer.mozilla.org/en-US/docs/Web/CSS/number), [`percentage`](https://developer.mozilla.org/en-US/docs/Web/CSS/percentage), [`string`](https://developer.mozilla.org/en-US/docs/Web/CSS/string), [`time`](https://developer.mozilla.org/en-US/docs/Web/CSS/time) **Background properties:** - [`background`](https://developer.mozilla.org/en-US/docs/Web/CSS/background), [`backgroundAttachment`](https://developer.mozilla.org/en-US/docs/Web/CSS/background-attachment), [`backgroundClip`](https://developer.mozilla.org/en-US/docs/Web/CSS/background-clip), [`backgroundColor`](https://developer.mozilla.org/en-US/docs/Web/CSS/background-color), [`backgroundImage`](https://developer.mozilla.org/en-US/docs/Web/CSS/background-image), [`backgroundOrigin`](https://developer.mozilla.org/en-US/docs/Web/CSS/background-origin), [`backgroundPosition`](https://developer.mozilla.org/en-US/docs/Web/CSS/background-position), [`backgroundRepeat`](https://developer.mozilla.org/en-US/docs/Web/CSS/background-repeat), [`backgroundSize`](https://developer.mozilla.org/en-US/docs/Web/CSS/background-size) **Margin properties:** - [`margin`](https://developer.mozilla.org/en-US/docs/Web/CSS/margin), [`marginBottom`](https://developer.mozilla.org/en-US/docs/Web/CSS/margin-bottom), [`marginInlineEnd`](https://developer.mozilla.org/en-US/docs/Web/CSS/margin-inline-end), [`marginInlineStart`](https://developer.mozilla.org/en-US/docs/Web/CSS/margin-inline-start), [`marginLeft`](https://developer.mozilla.org/en-US/docs/Web/CSS/margin-left), [`marginRight`](https://developer.mozilla.org/en-US/docs/Web/CSS/margin-right), [`marginTop`](https://developer.mozilla.org/en-US/docs/Web/CSS/margin-top) **Padding properties:** - [`padding`](https://developer.mozilla.org/en-US/docs/Web/CSS/padding), [`paddingBottom`](https://developer.mozilla.org/en-US/docs/Web/CSS/padding-bottom), [`paddingInlineEnd`](https://developer.mozilla.org/en-US/docs/Web/CSS/padding-inline-end), [`paddingInlineStart`](https://developer.mozilla.org/en-US/docs/Web/CSS/padding-inline-start), [`paddingLeft`](https://developer.mozilla.org/en-US/docs/Web/CSS/padding-left), [`paddingRight`](https://developer.mozilla.org/en-US/docs/Web/CSS/padding-right), [`paddingTop`](https://developer.mozilla.org/en-US/docs/Web/CSS/padding-top) **Border properties:** - [`border`](https://developer.mozilla.org/en-US/docs/Web/CSS/border), [`borderBottom`](https://developer.mozilla.org/en-US/docs/Web/CSS/border-bottom), [`borderBottomColor`](https://developer.mozilla.org/en-US/docs/Web/CSS/border-bottom-color), [`borderBottomLeftRadius`](https://developer.mozilla.org/en-US/docs/Web/CSS/border-bottom-left-radius), [`borderBottomRightRadius`](https://developer.mozilla.org/en-US/docs/Web/CSS/border-bottom-right-radius), [`borderBottomStyle`](https://developer.mozilla.org/en-US/docs/Web/CSS/border-bottom-style), [`borderBottomWidth`](https://developer.mozilla.org/en-US/docs/Web/CSS/border-bottom-width), [`borderColor`](https://developer.mozilla.org/en-US/docs/Web/CSS/border-color), [`borderEndEndRadius`](https://developer.mozilla.org/en-US/docs/Web/CSS/border-end-end-radius), [`borderEndStartRadius`](https://developer.mozilla.org/en-US/docs/Web/CSS/border-end-start-radius), [`borderInlineEnd`](https://developer.mozilla.org/en-US/docs/Web/CSS/border-inline-end), [`borderInlineEndColor`](https://developer.mozilla.org/en-US/docs/Web/CSS/border-inline-end-color), [`borderInlineEndStyle`](https://developer.mozilla.org/en-US/docs/Web/CSS/border-inline-end-style), [`borderInlineEndWidth`](https://developer.mozilla.org/en-US/docs/Web/CSS/border-inline-end-width), [`borderInlineStart`](https://developer.mozilla.org/en-US/docs/Web/CSS/border-inline-start), [`borderInlineStartColor`](https://developer.mozilla.org/en-US/docs/Web/CSS/border-inline-start-color), [`borderInlineStartStyle`](https://developer.mozilla.org/en-US/docs/Web/CSS/border-inline-start-style), [`borderInlineStartWidth`](https://developer.mozilla.org/en-US/docs/Web/CSS/border-inline-start-width), [`borderLeft`](https://developer.mozilla.org/en-US/docs/Web/CSS/border-left), [`borderLeftColor`](https://developer.mozilla.org/en-US/docs/Web/CSS/border-left-color), [`borderLeftStyle`](https://developer.mozilla.org/en-US/docs/Web/CSS/border-left-style), [`borderLeftWidth`](https://developer.mozilla.org/en-US/docs/Web/CSS/border-left-width), [`borderRadius`](https://developer.mozilla.org/en-US/docs/Web/CSS/border-radius), [`borderRight`](https://developer.mozilla.org/en-US/docs/Web/CSS/border-right), [`borderRightColor`](https://developer.mozilla.org/en-US/docs/Web/CSS/border-right-color), [`borderRightStyle`](https://developer.mozilla.org/en-US/docs/Web/CSS/border-right-style), [`borderRightWidth`](https://developer.mozilla.org/en-US/docs/Web/CSS/border-right-width), [`borderStartEndRadius`](https://developer.mozilla.org/en-US/docs/Web/CSS/border-start-end-radius), [`borderStartStartRadius`](https://developer.mozilla.org/en-US/docs/Web/CSS/border-start-start-radius), [`borderStyle`](https://developer.mozilla.org/en-US/docs/Web/CSS/border-style), [`borderTop`](https://developer.mozilla.org/en-US/docs/Web/CSS/border-top), [`borderTopColor`](https://developer.mozilla.org/en-US/docs/Web/CSS/border-top-color), [`borderTopLeftRadius`](https://developer.mozilla.org/en-US/docs/Web/CSS/border-top-left-radius), [`borderTopRightRadius`](https://developer.mozilla.org/en-US/docs/Web/CSS/border-top-right-radius), [`borderTopStyle`](https://developer.mozilla.org/en-US/docs/Web/CSS/border-top-style), [`borderTopWidth`](https://developer.mozilla.org/en-US/docs/Web/CSS/border-top-width), [`borderWidth`](https://developer.mozilla.org/en-US/docs/Web/CSS/border-width) **Font and text properties:** - [`color`](https://developer.mozilla.org/en-US/docs/Web/CSS/color), [`font`](https://developer.mozilla.org/en-US/docs/Web/CSS/font), [`fontFamily`](https://developer.mozilla.org/en-US/docs/Web/CSS/font-family), [`fontSize`](https://developer.mozilla.org/en-US/docs/Web/CSS/font-size), [`fontStretch`](https://developer.mozilla.org/en-US/docs/Web/CSS/font-stretch), [`fontStyle`](https://developer.mozilla.org/en-US/docs/Web/CSS/font-style), [`fontVariant`](https://developer.mozilla.org/en-US/docs/Web/CSS/font-variant), [`fontWeight`](https://developer.mozilla.org/en-US/docs/Web/CSS/font-weight), [`letterSpacing`](https://developer.mozilla.org/en-US/docs/Web/CSS/letter-spacing), [`lineHeight`](https://developer.mozilla.org/en-US/docs/Web/CSS/line-height), [`textAlign`](https://developer.mozilla.org/en-US/docs/Web/CSS/text-align), [`textDecoration`](https://developer.mozilla.org/en-US/docs/Web/CSS/text-decoration), [`textDecorationColor`](https://developer.mozilla.org/en-US/docs/Web/CSS/text-decoration-color), [`textDecorationLine`](https://developer.mozilla.org/en-US/docs/Web/CSS/text-decoration-line), [`textDecorationStyle`](https://developer.mozilla.org/en-US/docs/Web/CSS/text-decoration-style), [`textDecorationThickness`](https://developer.mozilla.org/en-US/docs/Web/CSS/text-decoration-thickness), [`textIndent`](https://developer.mozilla.org/en-US/docs/Web/CSS/text-indent), [`textOverflow`](https://developer.mozilla.org/en-US/docs/Web/CSS/text-overflow), [`textShadow`](https://developer.mozilla.org/en-US/docs/Web/CSS/text-shadow), [`textTransform`](https://developer.mozilla.org/en-US/docs/Web/CSS/text-transform), [`writingMode`](https://developer.mozilla.org/en-US/docs/Web/CSS/writing-mode) **Layout and display properties:** - [`alignItems`](https://developer.mozilla.org/en-US/docs/Web/CSS/align-items), [`alignSelf`](https://developer.mozilla.org/en-US/docs/Web/CSS/align-self), [`boxShadow`](https://developer.mozilla.org/en-US/docs/Web/CSS/box-shadow), [`columnGap`](https://developer.mozilla.org/en-US/docs/Web/CSS/column-gap), [`display`](https://developer.mozilla.org/en-US/docs/Web/CSS/display), [`flexDirection`](https://developer.mozilla.org/en-US/docs/Web/CSS/flex-direction), [`gap`](https://developer.mozilla.org/en-US/docs/Web/CSS/gap), [`height`](https://developer.mozilla.org/en-US/docs/Web/CSS/height), [`justifyContent`](https://developer.mozilla.org/en-US/docs/Web/CSS/justify-content), [`opacity`](https://developer.mozilla.org/en-US/docs/Web/CSS/opacity), [`overflow`](https://developer.mozilla.org/en-US/docs/Web/CSS/overflow), [`rowGap`](https://developer.mozilla.org/en-US/docs/Web/CSS/row-gap), [`width`](https://developer.mozilla.org/en-US/docs/Web/CSS/width) **Effects properties:** - [`backdropFilter`](https://developer.mozilla.org/en-US/docs/Web/CSS/backdrop-filter), [`filter`](https://developer.mozilla.org/en-US/docs/Web/CSS/filter), [`isolation`](https://developer.mozilla.org/en-US/docs/Web/CSS/isolation), [`mixBlendMode`](https://developer.mozilla.org/en-US/docs/Web/CSS/mix-blend-mode), [`objectFit`](https://developer.mozilla.org/en-US/docs/Web/CSS/object-fit), [`objectPosition`](https://developer.mozilla.org/en-US/docs/Web/CSS/object-position) **SVG properties:** - [`fill`](https://developer.mozilla.org/en-US/docs/Web/CSS/fill), [`fillOpacity`](https://developer.mozilla.org/en-US/docs/Web/CSS/fill-opacity), [`stroke`](https://developer.mozilla.org/en-US/docs/Web/CSS/stroke), [`strokeOpacity`](https://developer.mozilla.org/en-US/docs/Web/CSS/stroke-opacity), [`strokeWidth`](https://developer.mozilla.org/en-US/docs/Web/CSS/stroke-width) ## Examples ### Basic CSS custom properties The following defines two CSS custom properties: `iconSize` for controlling icon dimensions, and `brandColor` for setting the primary brand color with an error state variant. ```typescript editorElement: { cssCustomProperties: { iconSize: { cssPropertyType: 'length', displayName: 'Icon Size', defaultValue: '24px', }, brandColor: { cssPropertyType: 'color', displayName: 'Brand Color', defaultValue: '#007bff', statesDefaultValues: { error: '#dc3545', }, }, }, } ``` The CSS custom properties defined in the manifest don't apply any styles on their own. Your component's CSS must consume these variables using `var()` to connect them to actual style rules: ```css .icon { width: var(--iconSize, 24px); height: var(--iconSize, 24px); } .button { color: var(--brandColor, #007bff); border-color: var(--brandColor, #007bff); } ``` ### Custom enum The following defines a custom enum that lets Wix users select an icon position relative to the button text using a dropdown in the editor. ```typescript editorElement: { cssCustomProperties: { iconPosition: { cssPropertyType: 'customEnum', displayName: 'Icon Position', defaultValue: 'row', customEnum: { cssPropertyType: 'string', options: [ { value: 'row', displayName: 'Before Text' }, { value: 'row-reverse', displayName: 'After Text' }, { value: 'column', displayName: 'Below Text' }, { value: 'column-reverse', displayName: 'Above Text' }, ], }, }, }, } ``` ### CSS number with constraints The following defines a numeric CSS custom property for controlling animation speed, with constraints that limit the value between 0 and 5 seconds in increments of 0.1. ```typescript editorElement: { cssCustomProperties: { animationDuration: { cssPropertyType: 'number', displayName: 'Animation Speed', defaultValue: '0.3', number: { min: '0', max: '5', multiplier: '0.1', }, }, }, } ``` ## See also - [Standard CSS Properties](https://dev.wix.com/docs/build-apps/develop-your-app/extensions/site-extensions/editor-react-components/manifest-reference/editor-element/css/standard-css-properties.md) - [About the Manifest](https://dev.wix.com/docs/build-apps/develop-your-app/extensions/site-extensions/editor-react-components/manifest-reference/about-the-manifest.md) --- > Portal Navigation: > > - Append `.md` to any URL under `https://dev.wix.com/docs/` to get its markdown version. > - Pages are either content pages (article or reference text) or menu pages (a list of links to child pages). > - To get a menu page, truncate any URL to a parent path and append `.md` (e.g. `https://dev.wix.com/docs/sdk.md`, `https://dev.wix.com/docs/sdk/core-modules.md`). > - Top-level index of all portals: https://dev.wix.com/docs/llms.txt > - Full concatenated docs: https://dev.wix.com/docs/llms-full.txt ## Resource: How the Editor Resolves CSS Property Values ## Article: CSS Property Value Resolution ## Article Link: https://dev.wix.com/docs/build-apps/develop-your-app/extensions/site-extensions/editor-react-components/manifest-reference/editor-element/css/how-the-editor-resolves-css-property-values.md ## Article Content: import { Property, PropertyList } from "@wix/docs-ui/content"; # How the Editor Resolves CSS Property Values
    __Alpha:__ Editor React Components are currently in alpha. This feature is subject to change and may have bugs, issues, and limitations. We're actively improving it based on your feedback.
    When multiple styling sources exist for the same property, understanding which value is used is essential. This guide explains how CSS property values are resolved. ## CSS property hierarchy The editor resolves which value to apply in this order, from lowest to highest priority: ## CSS properties vs. CSS custom properties The hierarchy above applies to both `cssProperties` and `cssCustomProperties`, but they're applied differently. The editor applies `cssProperties` as inline styles, which automatically override your CSS file. For `cssCustomProperties`, the editor sets CSS variables on the element, but your CSS file must reference them with `var()` for the values to take effect. ## Switching between presets User customizations are tied to the active preset. Switching to a different preset resets any customizations the Wix user made. If they switch back, the preset's original defaults are restored, not the Wix user's previous customizations. ## CSS in states [States](https://dev.wix.com/docs/build-apps/develop-your-app/extensions/site-extensions/editor-react-components/manifest-reference/editor-element/states.md) aren't a separate priority level. Both the manifest and presets can define state-specific values using `statesDefaultValues`. The current state determines which value to read from whichever set of defaults is active. ## Display filters Display filters control which properties are visible to the user in the editor, not which values take priority. They follow their own narrowing order: Element filters apply first, then preset filters, then state filters. See [Display Filters](https://dev.wix.com/docs/build-apps/develop-your-app/extensions/site-extensions/editor-react-components/manifest-reference/editor-element/display-filters.md) for details. {/* ## See also */} --- > Portal Navigation: > > - Append `.md` to any URL under `https://dev.wix.com/docs/` to get its markdown version. > - Pages are either content pages (article or reference text) or menu pages (a list of links to child pages). > - To get a menu page, truncate any URL to a parent path and append `.md` (e.g. `https://dev.wix.com/docs/sdk.md`, `https://dev.wix.com/docs/sdk/core-modules.md`). > - Top-level index of all portals: https://dev.wix.com/docs/llms.txt > - Full concatenated docs: https://dev.wix.com/docs/llms-full.txt ## Resource: CSS Properties Examples ## Article: CSS Properties Examples ## Article Link: https://dev.wix.com/docs/build-apps/develop-your-app/extensions/site-extensions/editor-react-components/manifest-reference/editor-element/css/css-properties-examples.md ## Article Content: # CSS Properties Examples
    __Alpha:__ Editor React Components are currently in alpha. This feature is subject to change and may have bugs, issues, and limitations. We're actively improving it based on your feedback.
    This article provides practical examples of using CSS properties and CSS custom properties in your component manifests. ## Basic CSS property A simple text component with standard CSS properties: ```typescript editorElement: { selector: '.text', displayName: 'Text', cssProperties: { color: { displayName: 'Text Color', defaultValue: '#333333', }, fontSize: { displayName: 'Text Size', defaultValue: '16px', }, fontFamily: { displayName: 'Font', defaultValue: 'sans-serif', }, }, } ``` ## Basic CSS custom property A button component using CSS custom properties (CSS variables): ```typescript editorElement: { selector: '.button', displayName: 'Button', cssCustomProperties: { iconSize: { cssPropertyType: 'length', displayName: 'Icon Size', defaultValue: '24px', }, iconColor: { cssPropertyType: 'color', displayName: 'Icon Color', defaultValue: '#ffffff', }, }, } ``` Your component CSS must reference these variables: ```css .button-icon { width: var(--iconSize, 24px); height: var(--iconSize, 24px); color: var(--iconColor, #ffffff); } ``` ## Nested elements Both CSS properties and CSS custom properties can be defined on nested elements within your component. ```typescript editorElement: { selector: '.card', displayName: 'Card', cssProperties: { backgroundColor: { defaultValue: '#fff' }, boxShadow: {}, }, elements: { title: { elementType: 'inlineElement', inlineElement: { selector: '.card-title', displayName: 'Title', cssProperties: { font: {}, color: { defaultValue: '#333' }, }, }, }, }, } ``` Separate design controls are displayed to users for each element when selected. ## Button component with states A button showing CSS properties with state variations: ```typescript editorElement: { selector: '.button', displayName: 'Button', cssProperties: { backgroundColor: { displayName: 'Background', defaultValue: '#007bff', statesDefaultValues: { disabled: '#cccccc', }, }, color: { displayName: 'Text Color', defaultValue: '#ffffff', statesDefaultValues: { disabled: '#666666', }, }, borderRadius: { displayName: 'Corner Rounding', defaultValue: '4px', }, }, states: { disabled: { displayName: 'Disabled State', }, }, } ``` ## Card component with multiple elements A card component with nested text, image, a drop shadow filter, and a custom property for content spacing: ```typescript editorElement: { selector: '.card', displayName: 'Card', cssProperties: { backgroundColor: { defaultValue: '#ffffff' }, borderRadius: { defaultValue: '8px' }, padding: { defaultValue: '16px' }, filter: { filter: { filterFunctions: ['drop_shadow'], }, }, }, cssCustomProperties: { contentGap: { cssPropertyType: 'gap', displayName: 'Content Spacing', defaultValue: '12px', }, }, elements: { image: { elementType: 'inlineElement', inlineElement: { selector: '.card-image', displayName: 'Image', cssProperties: { objectFit: { defaultValue: 'cover' }, borderRadius: { defaultValue: '4px' }, }, }, }, title: { elementType: 'inlineElement', inlineElement: { selector: '.card-title', displayName: 'Title', cssProperties: { font: {}, color: { defaultValue: '#333333' }, }, }, }, description: { elementType: 'inlineElement', inlineElement: { selector: '.card-description', displayName: 'Description', cssProperties: { font: {}, color: { defaultValue: '#666666' }, }, }, }, }, } ``` Component CSS: ```css .card { display: flex; flex-direction: column; gap: var(--contentGap, 12px); } ``` --- > Portal Navigation: > > - Append `.md` to any URL under `https://dev.wix.com/docs/` to get its markdown version. > - Pages are either content pages (article or reference text) or menu pages (a list of links to child pages). > - To get a menu page, truncate any URL to a parent path and append `.md` (e.g. `https://dev.wix.com/docs/sdk.md`, `https://dev.wix.com/docs/sdk/core-modules.md`). > - Top-level index of all portals: https://dev.wix.com/docs/llms.txt > - Full concatenated docs: https://dev.wix.com/docs/llms-full.txt ## Resource: About Data ## Article: Data Overview ## Article Link: https://dev.wix.com/docs/build-apps/develop-your-app/extensions/site-extensions/editor-react-components/manifest-reference/editor-element/data/about-data.md ## Article Content: import { Property, PropertyList, ExpandableSection } from "@wix/docs-ui/content"; # About Data
    __Alpha:__ Editor React Components are currently in alpha. This feature is subject to change and may have bugs, issues, and limitations. We're actively improving it based on your feedback.
    The `data` property of your manifest controls how Wix users configure component properties and what data your component receives at [runtime](https://dev.wix.com/docs/build-apps/develop-your-app/extensions/site-extensions/editor-react-components/manifest-reference/runtime-props.md). When building custom components, you often want Wix users to configure specific properties like text, images, links, colors, or dates. Based on your data type definitions, the editor automatically generates the appropriate UI controls in panels in the editor. For example, if you define a date picker type, a date picker control appears when Wix users open the settings panel. The `displayName` you provide becomes the label Wix users see in the editor panel. ## Where to define {/* TODO: when refElements are supported, add here */} You can define `data` in: - [`editorElement`](https://dev.wix.com/docs/build-apps/develop-your-app/extensions/site-extensions/editor-react-components/manifest-reference/editor-element/editor-element.md) - [`elements`](https://dev.wix.com/docs/build-apps/develop-your-app/extensions/site-extensions/editor-react-components/manifest-reference/editor-element/elements.md) of type `inlineElement` The data property is optional. ## Data item fields Each property in your `data` object is a data item. A data item is an object with core fields that every data type shares, plus type-specific fields for additional configuration. ### Core fields Initial value when the component is first added. This is what initially appears in the settings panel for this item. Format must match the runtime.md prop format.} /> ### Type-specific fields Some data types require or allow additional configuration beyond the core fields. When a type supports extra configuration, those options go in a field named after the type itself. For example, a `text` data type can have a `text` field with validation options: ```typescript editorElement: { data: { label: { dataType: "text", displayName: "Label", defaultValue: "Click", text: { maxLength: 100, minLength: 3, }, }, }, } ``` For details on each type and its configuration options, see the type reference pages in [Available data types](#available-data-types). ## Available data types When you define data items in your manifest, you choose from a set of predefined data types. Each type comes with built-in validation, UI controls in the editor, and a [corresponding runtime format](https://dev.wix.com/docs/build-apps/develop-your-app/extensions/site-extensions/editor-react-components/manifest-reference/runtime-props.md). TypeScript types for all props are available from the [`@wix/editor-react-types`](https://www.npmjs.com/package/@wix/editor-react-types) package. Available data types organized by category: | Category | Data Type | Type-Specific Fields | Description | |----------|-----------|---------------------|-------------| | [Primitive Types](https://dev.wix.com/docs/build-apps/develop-your-app/extensions/site-extensions/editor-react-components/manifest-reference/editor-element/data/data-types/primitive.md) | `text` | ✓ | A simple text value. | | | `number` | ✓ | Numeric values with optional validation constraints. | | | `booleanValue` | ✗ | true or false. | | | `guid` | ✗ | Globally unique identifier. | | [Text Variations](https://dev.wix.com/docs/build-apps/develop-your-app/extensions/site-extensions/editor-react-components/manifest-reference/editor-element/data/data-types/text-variations.md) | `textEnum` | ✓ | A list of predefined textual values to choose from. | | | `richText` | ✓ | HTML text with inline CSS styling. | | | `regex` | ✗ | Valid regex pattern. | | | `direction` | ✗ | Text direction. | | [Date and Time](https://dev.wix.com/docs/build-apps/develop-your-app/extensions/site-extensions/editor-react-components/manifest-reference/editor-element/data/data-types/date-and-time.md) | `localDate` | ✗ | Local date in ISO-8601 format `YYYY-MM-DD`. | | | `localTime` | ✗ | Local time in ISO-8601 format `hh:mm[:ss][.sss]`. | | | `localDateTime` | ✗ | Local date-time in ISO-8601 format `YYYY-MM-DDThh:mm[:ss][.sss]`. | | [Contact Information](https://dev.wix.com/docs/build-apps/develop-your-app/extensions/site-extensions/editor-react-components/manifest-reference/editor-element/data/data-types/contact-information.md) | `email` | ✗ | Standard email address `RFC 5321`. | | | `phone` | ✗ | Phone number with common formatting characters. | | | `webUrl` | ✗ | URL with http or https scheme. | | | `hostname` | ✗ | IANA hostname. | | [Media](https://dev.wix.com/docs/build-apps/develop-your-app/extensions/site-extensions/editor-react-components/manifest-reference/editor-element/data/data-types/media.md) | `image` | ✓ | Wix Image object. | | | `video` | ✓ | Wix Video object. | | | `vectorArt` | ✓ | Wix Sanitized Vector Art (SVG). | | | `audio` | ✗ | Wix Audio object. | | [Link](https://dev.wix.com/docs/build-apps/develop-your-app/extensions/site-extensions/editor-react-components/manifest-reference/editor-element/data/data-types/link.md) | `link` | ✓ | Wix Link object. | | [Container](https://dev.wix.com/docs/build-apps/develop-your-app/extensions/site-extensions/editor-react-components/manifest-reference/editor-element/data/data-types/container.md) | `container` | ✓ | Container for child components. | | [Complex Types](https://dev.wix.com/docs/build-apps/develop-your-app/extensions/site-extensions/editor-react-components/manifest-reference/editor-element/data/data-types/complex-types.md) | `data` | ✓ | Complex nested data structure. | | | `arrayItems` | ✓ | Array of data items. | | | `menuItems` | ✗ | Site navigation menu items. | | [Accessibility](https://dev.wix.com/docs/build-apps/develop-your-app/extensions/site-extensions/editor-react-components/manifest-reference/editor-element/data/data-types/accessibility.md) | `a11y` | ✓ | Accessibility fields. | | [Event Handlers](https://dev.wix.com/docs/build-apps/develop-your-app/extensions/site-extensions/editor-react-components/manifest-reference/editor-element/data/data-types/event-handler-data.md) | `onClick` | ✗ | Click event handler. | | | `onChange` | ✗ | Input change event handler. | | | `onKeyPress` | ✗ | Key press event handler. | | | `onKeyUp` | ✗ | Key up event handler. | | | `onKeyDown` | ✗ | Key down event handler. | | | `onFocus` | ✗ | Focus event handler. | | | `onSubmit` | ✗ | Form submit event handler. | | | `function` | ✗ | Custom function handler. | --- > Portal Navigation: > > - Append `.md` to any URL under `https://dev.wix.com/docs/` to get its markdown version. > - Pages are either content pages (article or reference text) or menu pages (a list of links to child pages). > - To get a menu page, truncate any URL to a parent path and append `.md` (e.g. `https://dev.wix.com/docs/sdk.md`, `https://dev.wix.com/docs/sdk/core-modules.md`). > - Top-level index of all portals: https://dev.wix.com/docs/llms.txt > - Full concatenated docs: https://dev.wix.com/docs/llms-full.txt ## Resource: Primitive ## Article: Primitive Data Types ## Article Link: https://dev.wix.com/docs/build-apps/develop-your-app/extensions/site-extensions/editor-react-components/manifest-reference/editor-element/data/data-types/primitive.md ## Article Content: import { Property, PropertyList, ExpandableSection } from "@wix/docs-ui/content"; # Primitive Data Types
    __Alpha:__ Editor React Components are currently in alpha. This feature is subject to change and may have bugs, issues, and limitations. We're actively improving it based on your feedback.
    Primitive data types are the building blocks for component data. They represent simple values like text, numbers, and booleans. ## Text The `text` data type accepts string values with optional validation constraints. These ensure data quality and guide users toward valid input. > **Note:** Specify these additional configurations under a `text` field in your [data item](https://dev.wix.com/docs/build-apps/develop-your-app/extensions/site-extensions/editor-react-components/manifest-reference/editor-element/data/about-data.md). > **Note:** If you set a `defaultValue`, it displays when the component is first added. However, if a Wix user deletes the text, the field remains empty, it doesn't revert to the default. ### Example A text field with validation constraints: In the manifest: ```typescript editorElement: { data: { username: { dataType: "text", displayName: "Username", defaultValue: "", text: { minLength: 3, maxLength: 20, pattern: "^[a-zA-Z0-9_]+$", }, }, }, } ``` In the component: ```tsx import type { Text } from '@wix/editor-react-types'; interface UsernameProps { username?: Text; } const Username = ({ username }: UsernameProps) => {username}; ``` ## Guid The `guid` data type represents a globally unique identifier (GUID/UUID). No additional configuration is needed. ### Example A GUID field for unique identification: In the manifest: ```typescript editorElement: { data: { recordId: { dataType: "guid", displayName: "Record ID", defaultValue: "550e8400-e29b-41d4-a716-446655440000", }, }, } ``` In the component: ```tsx import type { Guid } from '@wix/editor-react-types'; interface RecordProps { recordId?: Guid; } const Record = ({ recordId }: RecordProps) => {recordId}; ``` ## Number The `number` data type accepts numeric values with optional validation constraints. Useful for ensuring values stay within acceptable ranges. > **Note:** Specify these additional configurations under a `number` field in your [data item](https://dev.wix.com/docs/build-apps/develop-your-app/extensions/site-extensions/editor-react-components/manifest-reference/editor-element/data/about-data.md). ### Example A rating field with min and max constraints: In the manifest: ```typescript editorElement: { data: { rating: { displayName: "Rating", dataType: "number", defaultValue: 3, number: { min: '1', max: '5', }, }, }, } ``` In the component: ```tsx import type { NumberType } from '@wix/editor-react-types'; interface RatingProps { rating?: NumberType; } const Rating = ({ rating }: RatingProps) => {rating} / 5; ``` ## Boolean value The `booleanValue` data type represents true or false values. ### Example A feature toggle field: In the manifest: ```typescript editorElement: { data: { isEnabled: { dataType: "booleanValue", displayName: "Enable Feature", defaultValue: true, }, }, } ``` In the component: ```tsx import type { BooleanValue } from '@wix/editor-react-types'; interface FeatureProps { isEnabled?: BooleanValue; } const Feature = ({ isEnabled }: FeatureProps) => (
    ); ``` ## See also - [Data Overview](https://dev.wix.com/docs/build-apps/develop-your-app/extensions/site-extensions/editor-react-components/manifest-reference/editor-element/data/about-data.md) - [Text Variations](https://dev.wix.com/docs/build-apps/develop-your-app/extensions/site-extensions/editor-react-components/manifest-reference/editor-element/data/data-types/text-variations.md) - [Date and Time Types](https://dev.wix.com/docs/build-apps/develop-your-app/extensions/site-extensions/editor-react-components/manifest-reference/editor-element/data/data-types/date-and-time.md) - [Contact Information Types](https://dev.wix.com/docs/build-apps/develop-your-app/extensions/site-extensions/editor-react-components/manifest-reference/editor-element/data/data-types/contact-information.md) - [Media Types](https://dev.wix.com/docs/build-apps/develop-your-app/extensions/site-extensions/editor-react-components/manifest-reference/editor-element/data/data-types/media.md) - [Complex Types](https://dev.wix.com/docs/build-apps/develop-your-app/extensions/site-extensions/editor-react-components/manifest-reference/editor-element/data/data-types/complex-types.md) --- > Portal Navigation: > > - Append `.md` to any URL under `https://dev.wix.com/docs/` to get its markdown version. > - Pages are either content pages (article or reference text) or menu pages (a list of links to child pages). > - To get a menu page, truncate any URL to a parent path and append `.md` (e.g. `https://dev.wix.com/docs/sdk.md`, `https://dev.wix.com/docs/sdk/core-modules.md`). > - Top-level index of all portals: https://dev.wix.com/docs/llms.txt > - Full concatenated docs: https://dev.wix.com/docs/llms-full.txt ## Resource: Contact Information ## Article: Contact Information Types ## Article Link: https://dev.wix.com/docs/build-apps/develop-your-app/extensions/site-extensions/editor-react-components/manifest-reference/editor-element/data/data-types/contact-information.md ## Article Content: # Contact Information Data Types
    __Alpha:__ Editor React Components are currently in alpha. This feature is subject to change and may have bugs, issues, and limitations. We're actively improving it based on your feedback.
    Contact information data types provide automatic validation for common contact-related data formats. They enforce specific patterns and conventions, ensuring data quality without requiring custom validation logic. ## Email Standard email address according to [RFC 5321, section 4.1.2](https://datatracker.ietf.org/doc/html/rfc5321#section-4.1.2). ### Example A contact email field: In the manifest: ```typescript editorElement: { data: { contactEmail: { dataType: "email", displayName: "Contact Email", defaultValue: "user@example.com", }, }, } ``` In the component: ```tsx import type { Email } from '@wix/editor-react-types'; interface ContactProps { contactEmail?: Email; } const Contact = ({ contactEmail }: ContactProps) => ( {contactEmail} ); ``` ## Phone Phone number format designed to match phone numbers with a variety of common characters, including digits (0-9), spaces, parentheses, plus sign, hyphens, and periods. ### Example A business phone field: In the manifest: ```typescript editorElement: { data: { contactPhone: { dataType: "phone", displayName: "Business Phone", defaultValue: "+1 (555) 123-4567", }, }, } ``` In the component: ```tsx import type { Phone } from '@wix/editor-react-types'; interface BusinessProps { contactPhone?: Phone; } const Business = ({ contactPhone }: BusinessProps) => ( {contactPhone} ); ``` ## Web URL A URL with scheme http or https. ### Example A website URL field: In the manifest: ```typescript editorElement: { data: { websiteUrl: { dataType: "webUrl", displayName: "Website URL", defaultValue: "https://www.example.com", }, }, } ``` In the component: ```tsx import type { WebUrl } from '@wix/editor-react-types'; interface SiteProps { websiteUrl?: WebUrl; } const SiteLink = ({ websiteUrl }: SiteProps) => ( {websiteUrl} ); ``` ## Hostname Hostname according to IANA standards. ### Example An API hostname field: In the manifest: ```typescript editorElement: { data: { apiHost: { dataType: "hostname", displayName: "API Hostname", defaultValue: "api.example.com", }, }, } ``` In the component: ```tsx import type { Hostname } from '@wix/editor-react-types'; interface ApiProps { apiHost?: Hostname; } const ApiConfig = ({ apiHost }: ApiProps) => {apiHost}; ``` ## See also - [Data Overview](https://dev.wix.com/docs/build-apps/develop-your-app/extensions/site-extensions/editor-react-components/manifest-reference/editor-element/data/about-data.md) - [Primitive Types](https://dev.wix.com/docs/build-apps/develop-your-app/extensions/site-extensions/editor-react-components/manifest-reference/editor-element/data/data-types/primitive.md) - [Date and Time Types](https://dev.wix.com/docs/build-apps/develop-your-app/extensions/site-extensions/editor-react-components/manifest-reference/editor-element/data/data-types/date-and-time.md) --- > Portal Navigation: > > - Append `.md` to any URL under `https://dev.wix.com/docs/` to get its markdown version. > - Pages are either content pages (article or reference text) or menu pages (a list of links to child pages). > - To get a menu page, truncate any URL to a parent path and append `.md` (e.g. `https://dev.wix.com/docs/sdk.md`, `https://dev.wix.com/docs/sdk/core-modules.md`). > - Top-level index of all portals: https://dev.wix.com/docs/llms.txt > - Full concatenated docs: https://dev.wix.com/docs/llms-full.txt ## Resource: Text Variations ## Article: Text Variations ## Article Link: https://dev.wix.com/docs/build-apps/develop-your-app/extensions/site-extensions/editor-react-components/manifest-reference/editor-element/data/data-types/text-variations.md ## Article Content: import { Property, PropertyList, ExpandableSection } from "@wix/docs-ui/content"; # Text Variation Data Types
    __Alpha:__ Editor React Components are currently in alpha. This feature is subject to change and may have bugs, issues, and limitations. We're actively improving it based on your feedback.
    Text variation data types provide specialized text handling beyond simple string values. These types support predefined options, rich formatting, text direction, and pattern validation. ## TextEnum The `textEnum` data type allows users to choose from a predefined set of options rather than entering free text. The editor displays this as a dropdown or radio buttons. > **Note:** Specify these additional configurations under a `textEnum` field in your [data item](https://dev.wix.com/docs/build-apps/develop-your-app/extensions/site-extensions/editor-react-components/manifest-reference/editor-element/data/about-data.md). Each option has 2 parts: the internal value and the user-facing display name. ### Example A button size selector with predefined options: In the manifest: ```typescript editorElement: { data: { size: { displayName: "Button Size", dataType: "textEnum", defaultValue: "medium", textEnum: { options: [ { value: 'small', displayName: 'Small' }, { value: 'medium', displayName: 'Medium' }, { value: 'large', displayName: 'Large' }, ], }, }, }, } ``` In the component: ```tsx import type { TextEnum } from '@wix/editor-react-types'; interface ButtonProps { size?: TextEnum; } const Button = ({ size }: ButtonProps) => ( ); ``` ## Rich text Rich text allows users to format content with HTML and inline styles, perfect for descriptions, articles, or any content needing formatting. > **Note:** Specify these additional configurations under a `richText` field in your [data item](https://dev.wix.com/docs/build-apps/develop-your-app/extensions/site-extensions/editor-react-components/manifest-reference/editor-element/data/about-data.md). ### Example A product description field with limited formatting options: In the manifest: ```typescript editorElement: { data: { description: { dataType: "richText", displayName: "Product Description", defaultValue: "

    This is bold and italic text with a link.

    ", richText: { abilities: ["font", "color", "textAlign", "bulletedList", "fontWeight"] }, }, }, } ``` In the component: ```tsx import type { RichText } from '@wix/editor-react-types'; interface ProductCardProps { description?: RichText; } const ProductCard = ({ description }: ProductCardProps) => (
    ); ``` ## Regex The `regex` data type validates that the input is a valid regular expression pattern. ### Example A validation pattern field: In the manifest: ```typescript editorElement: { data: { validationPattern: { dataType: "regex", displayName: "Validation Pattern", defaultValue: "^[A-Za-z0-9]+$", }, }, } ``` In the component: ```tsx import type { Regex } from '@wix/editor-react-types'; interface FormFieldProps { validationPattern?: Regex; } const FormField = ({ validationPattern }: FormFieldProps) => ( ); ``` ## Direction Text direction according to the [HTML `dir` attribute](https://developer.mozilla.org/en-US/docs/Web/HTML/Global_attributes/dir). There are 3 possible values: - `"ltr"`: Left-to-right - `"rtl"`: Right-to-left - `"auto"`: Automatically detect based on content ### Example A text direction field with auto-detection: In the manifest: ```typescript editorElement: { data: { contentDirection: { dataType: "direction", displayName: "Content Direction", defaultValue: "auto", }, }, } ``` In the component: ```tsx import type { Direction } from '@wix/editor-react-types'; interface TextBlockProps { contentDirection?: Direction; } const TextBlock = ({ contentDirection }: TextBlockProps) => (
    Content
    ); ``` ## See also - [Data Overview](https://dev.wix.com/docs/build-apps/develop-your-app/extensions/site-extensions/editor-react-components/manifest-reference/editor-element/data/about-data.md) - [Primitive Types](https://dev.wix.com/docs/build-apps/develop-your-app/extensions/site-extensions/editor-react-components/manifest-reference/editor-element/data/data-types/primitive.md) - [Date and Time Types](https://dev.wix.com/docs/build-apps/develop-your-app/extensions/site-extensions/editor-react-components/manifest-reference/editor-element/data/data-types/date-and-time.md) --- > Portal Navigation: > > - Append `.md` to any URL under `https://dev.wix.com/docs/` to get its markdown version. > - Pages are either content pages (article or reference text) or menu pages (a list of links to child pages). > - To get a menu page, truncate any URL to a parent path and append `.md` (e.g. `https://dev.wix.com/docs/sdk.md`, `https://dev.wix.com/docs/sdk/core-modules.md`). > - Top-level index of all portals: https://dev.wix.com/docs/llms.txt > - Full concatenated docs: https://dev.wix.com/docs/llms-full.txt ## Resource: Container ## Article: Container ## Article Link: https://dev.wix.com/docs/build-apps/develop-your-app/extensions/site-extensions/editor-react-components/manifest-reference/editor-element/data/data-types/container.md ## Article Content: import { Property, PropertyList, ExpandableSection } from "@wix/docs-ui/content"; # Container Data Types
    __Alpha:__ Editor React Components are currently in alpha. This feature is subject to change and may have bugs, issues, and limitations. We're actively improving it based on your feedback.
    Containers allow Wix users to add and arrange inner elements within your component. This is essential for building flexible, compositional components like sections, boxes, cards, or any component that should contain other elements. > **Note:** Specify these additional configurations under a `container` field in your [data item](https://dev.wix.com/docs/build-apps/develop-your-app/extensions/site-extensions/editor-react-components/manifest-reference/editor-element/data/about-data.md). > **Note:** All containers require `selector` and `containerType`. Then choose 1 container type configuration based on your `containerType` value. ### Example A card with constrained styling and vertical resize: In the manifest: ```typescript editorElement: { data: { cardContent: { dataType: "container", displayName: "Card Content", container: { selector: '.card-content', containerType: "simple", simple: { displayName: "Card Content", layout: { resizeDirection: "vertical", }, style: { border: { disableEditing: true, }, background: { displayName: "Card Background", }, }, behaviors: { selectable: true, }, }, }, }, }, } ``` In the component: ```tsx import type { Container } from '@wix/editor-react-types'; interface CardProps { cardContent?: Container; } const Card = ({ cardContent }: CardProps) => (
    {cardContent}
    ); ``` ## See also - [Data Overview](https://dev.wix.com/docs/build-apps/develop-your-app/extensions/site-extensions/editor-react-components/manifest-reference/editor-element/data/about-data.md) - [Complex Types](https://dev.wix.com/docs/build-apps/develop-your-app/extensions/site-extensions/editor-react-components/manifest-reference/editor-element/data/data-types/complex-types.md) --- > Portal Navigation: > > - Append `.md` to any URL under `https://dev.wix.com/docs/` to get its markdown version. > - Pages are either content pages (article or reference text) or menu pages (a list of links to child pages). > - To get a menu page, truncate any URL to a parent path and append `.md` (e.g. `https://dev.wix.com/docs/sdk.md`, `https://dev.wix.com/docs/sdk/core-modules.md`). > - Top-level index of all portals: https://dev.wix.com/docs/llms.txt > - Full concatenated docs: https://dev.wix.com/docs/llms-full.txt ## Resource: Media ## Article: Media Data Types ## Article Link: https://dev.wix.com/docs/build-apps/develop-your-app/extensions/site-extensions/editor-react-components/manifest-reference/editor-element/data/data-types/media.md ## Article Content: import { Property, PropertyList, ExpandableSection } from "@wix/docs-ui/content"; # Media Data Types
    __Alpha:__ Editor React Components are currently in alpha. This feature is subject to change and may have bugs, issues, and limitations. We're actively improving it based on your feedback.
    Media data types let Wix users select and configure images, videos, and vector graphics in your component. When a Wix user edits a media field, the editor opens the Wix media manager, which is the standard dialog for browsing, uploading, and choosing media. The `category` you set on each media field controls which picker the media manager opens. For example, setting the category to `IMAGE_BACKGROUND` opens the background images picker, while `SHAPE_SOCIAL` opens the social icons picker. If you omit the category, a default picker opens for that media type.
    **Tip:** You can also control which folder the media manager opens to by setting `mediaManagerInitialPath` in your display group options.
    ## Image The `image` data type provides an interface for Wix users to select and configure images. > **Note:** Specify these additional configurations under an `image` field in your [data item](https://dev.wix.com/docs/build-apps/develop-your-app/extensions/site-extensions/editor-react-components/manifest-reference/editor-element/data/about-data.md). ### Example A hero image field: In the manifest: ```typescript editorElement: { data: { heroImage: { dataType: "image", displayName: "Hero Image", defaultValue: { uri: "wix:image://v1/abc123.jpg", url: "https://static.wixstatic.com/media/abc123.jpg", name: "hero-image.jpg", width: 1920, height: 1080, quality: 90, }, image: { category: "IMAGE", }, }, }, } ``` In the component: ```tsx import type { Image } from '@wix/editor-react-types'; interface HeroProps { heroImage?: Image; } const Hero = ({ heroImage }: HeroProps) => ( {heroImage?.alt} ); ``` ## Audio The `audio` data type provides an interface for Wix users to select and configure audio tracks. ### Example An audio track field: In the manifest: ```typescript editorElement: { data: { backgroundMusic: { dataType: "audio", displayName: "Background Music", }, }, } ``` In the component: ```tsx import type { Audio } from '@wix/editor-react-types'; interface PlayerProps { backgroundMusic?: Audio; } const Player = ({ backgroundMusic }: PlayerProps) => (
row._id }, { title: 'First Name', render: (row) => row.info?.name?.first, }, { title: 'Last Name', render: (row) => row.info?.name?.last, }, ]} /> )} ); }; export default Index; ``` You would mock the backend interactions with the API using `vitest` as follows: ```javascript import React from 'react'; import { randomUUID } from 'node:crypto'; import { describe, expect, it, vi } from 'vitest'; import { render } from '@testing-library/react'; import Page from './page'; vi.mock('@wix/crm', () => ({ contacts: { queryContacts: async () => ({ items: [ { _id: randomUUID(), info: { name: { first: 'John', last: 'Doe' }, }, } ], }), }, })); describe('test page', () => { it('should display contact', async () => { const { findByText } = render(); const firstNameEl = await findByText('John'); expect(firstNameEl).toBeDefined(); const lastNameEl = await findByText('Doe'); expect(lastNameEl).toBeDefined(); }); }); ``` ## See also - [Integrate the Wix CLI into CI/CD Workflows](https://dev.wix.com/docs/build-apps/develop-your-app/frameworks/wix-cli/project-development/cd-workflows.md) --- > Portal Navigation: > > - Append `.md` to any URL under `https://dev.wix.com/docs/` to get its markdown version. > - Pages are either content pages (article or reference text) or menu pages (a list of links to child pages). > - To get a menu page, truncate any URL to a parent path and append `.md` (e.g. `https://dev.wix.com/docs/sdk.md`, `https://dev.wix.com/docs/sdk/core-modules.md`). > - Top-level index of all portals: https://dev.wix.com/docs/llms.txt > - Full concatenated docs: https://dev.wix.com/docs/llms-full.txt ## Resource: Monitor Your CLI App With Sentry ## Article: Monitor Your CLI App With Sentry ## Article Link: https://dev.wix.com/docs/build-apps/develop-your-app/develop-an-app-with-the-cli/project-development/test-and-monitor/monitor-your-cli-app-with-sentry.md ## Article Content: # Monitor Your CLI App With Sentry As you develop and deploy your CLI application to users, the importance of robust monitoring becomes crucial. Wix can send monitoring data to your [Sentry](https://sentry.io/) account, allowing you to effectively track and fix errors in your app. By setting up Sentry and connecting it to your app, you'll gain valuable, out-of-the-box insights into your app's health and comprehensive error reporting across the various Wix platforms. Learn more about [Sentry](https://open.sentry.io/benefits) and how to maximize its capabilities. This article will guide you through the process of creating a monitoring extension for your app that integrates with Sentry using your Sentry DSN (Data Source Name) and the Wix JavaScript SDK.
Important: Before making calls to the methods defined below using this solution, make sure you have the latest version of @wix/essentials.md and the Wix CLI.
## Step 1 | Get a Sentry DSN 1. Go to the [Sentry website](https://sentry.io/) and create an account if you haven't already. 2. Create a new project. Selecting the platform that aligns with your app's stack. 3. Collect the project's DSN key. You'll need the DSN key to connect your app to Sentry. ## Step 2 | Configure your app 1. Enable the monitoring feature through Wix CLI by adding the following to your `wix.config.json` file. ```json { "monitoring": { "sentry": { "dsn": "" } } } ``` When you save your changes, a monitoring extension is automatically added to your app. 2. To preview your changes, run the following command using npm or yarn: **npm** ```js npm run dev ``` **yarn** ```js yarn dev ``` Note that when Wix recognizes the changes to your `wix.config.json` file, Wix will report unhandled errors to your Sentry project automatically. You can also report errors directly in your code: - [`captureException()`](https://dev.wix.com/docs/sdk/core-modules/essentials/monitoring.md#capture-exception) - [`captureMessage()`](https://dev.wix.com/docs/sdk/core-modules/essentials/monitoring.md#capture-message) - [`addBreadcrumb()`](https://dev.wix.com/docs/sdk/core-modules/essentials/monitoring.md#add-breadcrumb) - [`startSpan()`](https://dev.wix.com/docs/sdk/core-modules/essentials/monitoring.md#start-span) ## Step 3 | Monitor in the Sentry dashboard Access your Sentry dashboard to observe logged errors and monitor app performance for real-time insights and debugging. Regularly check your Sentry dashboard to monitor errors, performance, and gain insights into your application's health and issues. Leverage features such as issue tracking, release tracking, and performance monitoring to continuously improve your application. ## Supported Wix CLI Extensions The monitoring solution is available for the following types of extensions: **Dashboard Extensions** - [Dashboard pages](https://dev.wix.com/docs/build-apps/develop-your-app/develop-an-app-with-the-cli/supported-extensions/dashboard/dashboard-pages/add-dashboard-page-extensions-with-the-wix-cli.md) - [Dashboard plugins](https://dev.wix.com/docs/build-apps/develop-your-app/develop-an-app-with-the-cli/supported-extensions/dashboard/dashboard-plugins/add-dashboard-plugin-extensions-with-the-wix-cli.md) - [Dashboard modals](https://dev.wix.com/docs/build-apps/develop-your-app/develop-an-app-with-the-cli/supported-extensions/dashboard/dashboard-modals/add-dashboard-modal-extensions-with-the-wix-cli.md) **Backend Extensions** - [Events](https://dev.wix.com/docs/build-apps/develop-your-app/develop-an-app-with-the-cli/supported-extensions/backend/events/add-event-extensions-with-the-wix-cli.md) - [Service plugins](https://dev.wix.com/docs/build-apps/develop-your-app/develop-an-app-with-the-cli/supported-extensions/backend/service-plugins/add-service-plugin-extensions-with-the-wix-cli.md) **Site Extensions** - [Embedded scripts](https://dev.wix.com/docs/build-apps/develop-your-app/develop-an-app-with-the-cli/supported-extensions/site/embedded-scripts/add-an-embedded-script-extension-with-the-wix-cli.md) - [Site widgets](https://dev.wix.com/docs/build-apps/develop-your-app/develop-an-app-with-the-cli/supported-extensions/site/custom-elements/add-a-custom-element-extension-with-the-wix-cli.md) - [Site plugins](https://dev.wix.com/docs/build-apps/develop-your-app/develop-an-app-with-the-cli/supported-extensions/site/site-plugins/add-a-site-plugin-extension-with-the-wix-cli.md) ## Best practices - Set up [alerts in Sentry](https://docs.sentry.io/product/alerts/) to notify you of critical failures. - Set up [notifications](https://docs.sentry.io/product/alerts/notifications/) in Sentry. ## See also - [Sentry documentation](https://docs.sentry.io/) --- > Portal Navigation: > > - Append `.md` to any URL under `https://dev.wix.com/docs/` to get its markdown version. > - Pages are either content pages (article or reference text) or menu pages (a list of links to child pages). > - To get a menu page, truncate any URL to a parent path and append `.md` (e.g. `https://dev.wix.com/docs/sdk.md`, `https://dev.wix.com/docs/sdk/core-modules.md`). > - Top-level index of all portals: https://dev.wix.com/docs/llms.txt > - Full concatenated docs: https://dev.wix.com/docs/llms-full.txt ## Resource: About Extensions in the Wix CLI ## Article: About Extensions in the Wix CLI ## Article Link: https://dev.wix.com/docs/build-apps/develop-your-app/develop-an-app-with-the-cli/supported-extensions/about-extensions-in-the-wix-cli.md ## Article Content: # About Extensions in the Wix CLI The Wix CLI allows you to easily extend your app's functionality with [extensions](https://dev.wix.com/docs/build-apps/develop-your-app/extensions/about-extensions.md). For example, with extensions you can add custom dashboard pages or implement backend logic to handle events. The Wix CLI supports multiple [extension types](#supported-extension-types). The creation and setup process for extensions in the CLI takes place in the terminal. Then, to edit your extensions, you write code directly in your project's local files. ## Adding extensions You can add extensions to your app using the [generate](https://dev.wix.com/docs/wix-cli/command-reference/project-commands/generate.md) command. This command starts a process that guides you through adding an extension to your app. After selecting an extension, you'll be prompted for the relevant configuration details. Your extension will then be generated in your project's local files under `src/extensions/`. If you want to move your extension files in your project, make sure the new path is specified in the `extension.ts` file. Learn more [about the `extension.ts` file](https://dev.wix.com/docs/build-apps/develop-your-app/frameworks/wix-cli/supported-extensions/about-the-extensions-ts-file.md).
__Important:__ Some extensions require you to run [`release`](https://dev.wix.com/docs/wix-cli/command-reference/project-commands/release.md) to create an app version before they work. The [`preview`](https://dev.wix.com/docs/wix-cli/command-reference/project-commands/preview.md) command uploads your code but doesn't register all extensions in your app's configuration, so extensions like embedded scripts, site widgets, and site plugins can't be tested through `preview` alone.
## Supported extension types The Wix CLI currently supports the following extensions: ### Dashboard extensions - [Dashboard pages](https://dev.wix.com/docs/build-apps/develop-your-app/develop-an-app-with-the-cli/supported-extensions/dashboard/dashboard-pages/add-dashboard-page-extensions-with-the-wix-cli.md) - [Dashboard plugins](https://dev.wix.com/docs/build-apps/develop-your-app/develop-an-app-with-the-cli/supported-extensions/dashboard/dashboard-plugins/add-dashboard-plugin-extensions-with-the-wix-cli.md) - [Dashboard menu plugins](https://dev.wix.com/docs/build-apps/develop-your-app/develop-an-app-with-the-cli/supported-extensions/dashboard/dashboard-menu-plugin/add-dashboard-menu-plugin-extensions-with-the-wix-cli.md) - [Dashboard modals](https://dev.wix.com/docs/build-apps/develop-your-app/develop-an-app-with-the-cli/supported-extensions/dashboard/dashboard-modals/add-dashboard-modal-extensions-with-the-wix-cli.md) ### Backend extensions - [Events](https://dev.wix.com/docs/build-apps/develop-your-app/develop-an-app-with-the-cli/supported-extensions/backend/events/add-event-extensions-with-the-wix-cli.md) - [Service plugins](https://dev.wix.com/docs/build-apps/develop-your-app/develop-an-app-with-the-cli/supported-extensions/backend/service-plugins/add-service-plugin-extensions-with-the-wix-cli.md) - [Data Collections](https://dev.wix.com/docs/build-apps/develop-your-app/develop-an-app-with-the-cli/supported-extensions/backend/data-collections/add-a-data-collections-extension-with-the-wix-cli.md) #### HTTP endpoints Wix CLI projects support [HTTP endpoints](https://dev.wix.com/docs/build-apps/develop-your-app/develop-an-app-with-the-cli/supported-extensions/backend/http-endpoints/about-http-endpoints.md) for backend API development. > **Note:** HTTP endpoints replace both [HTTP functions](https://dev.wix.com/docs/build-apps/develop-your-app/develop-an-app-with-the-cli/supported-extensions/backend/http-endpoints/about-http-endpoints.md) and [web methods](https://dev.wix.com/docs/build-apps/develop-your-app/extensions/backend-extensions/apis/web-methods/about-web-method-extensions.md) from the previous Wix CLI for Apps. ### Site extensions - [Embedded scripts](https://dev.wix.com/docs/build-apps/develop-your-app/develop-an-app-with-the-cli/supported-extensions/site/embedded-scripts/add-an-embedded-script-extension-with-the-wix-cli.md) - [Site widgets](https://dev.wix.com/docs/build-apps/develop-your-app/develop-an-app-with-the-cli/supported-extensions/site/custom-elements/add-a-custom-element-extension-with-the-wix-cli.md) - [Editor React Components](https://dev.wix.com/docs/build-apps/develop-your-app/develop-an-app-with-the-cli/supported-extensions/site/editor-react-components/add-an-editor-react-component-extension-with-the-wix-cli.md) - [Site plugins](https://dev.wix.com/docs/build-apps/develop-your-app/develop-an-app-with-the-cli/supported-extensions/site/site-plugins/add-a-site-plugin-extension-with-the-wix-cli.md) ## See also - [About the Wix CLI](https://dev.wix.com/docs/wix-cli/guides/about-the-wix-cli.md) - [Map your functionality to Wix's extensions](https://dev.wix.com/docs/build-apps/develop-your-app/extensions/map-your-app-s-functionality-to-wix-s-extensions.md) - [About the extensions.ts File](https://dev.wix.com/docs/build-apps/develop-your-app/frameworks/wix-cli/supported-extensions/about-the-extensions-ts-file.md) --- > Portal Navigation: > > - Append `.md` to any URL under `https://dev.wix.com/docs/` to get its markdown version. > - Pages are either content pages (article or reference text) or menu pages (a list of links to child pages). > - To get a menu page, truncate any URL to a parent path and append `.md` (e.g. `https://dev.wix.com/docs/sdk.md`, `https://dev.wix.com/docs/sdk/core-modules.md`). > - Top-level index of all portals: https://dev.wix.com/docs/llms.txt > - Full concatenated docs: https://dev.wix.com/docs/llms-full.txt ## Resource: About the extensions.ts File ## Article: About the extensions.ts File ## Article Link: https://dev.wix.com/docs/build-apps/develop-your-app/develop-an-app-with-the-cli/supported-extensions/about-the-extensions-ts-file.md ## Article Content: # About the extensions.ts File The `extensions.ts` file is the central configuration file for all [extensions](https://dev.wix.com/docs/build-apps/develop-your-app/frameworks/wix-cli/supported-extensions/about-extensions-in-the-wix-cli.md) in your Wix CLI project. This file must be located in the `src/` directory and serves as the registry where you define and organize all the extensions that add functionality to your project. ## How the extensions.ts file works The `extensions.ts` file uses a builder pattern syntax that allows you to chain extension configurations together. This approach provides a clean, readable way to manage multiple extensions in your project. The `extensions.ts` file follows this basic structure: ```typescript import { app, extensions } from '@wix/astro/builders'; export default app() .use(extensions.extensionType({ // Extension configuration })); ``` The file: - Imports the necessary builders from `@wix/astro/builders`. - Exports a default app configuration. - Uses the `.use()` method to register extensions. ### Import-based registration You can also import extension configurations from separate files and register them. For example: **extension.ts** ```typescript import { app } from '@wix/astro/builders'; import myImportedPage from './extensions/dashboard/pages/my-imported-page/my-imported-page.extension.ts'; export default app() .use(myImportedPage); ``` **my-imported-page.extension.ts** ```typescript import { extensions } from '@wix/astro/builders'; export default extensions.dashboardPage({ id: '154f642e-a705-4ff3-8421-6119354a3384', title: 'My Imported Page', routePath: 'my-imported-page', component: './extensions/dashboard/pages/my-imported-page/my-imported-page.tsx', }); ``` ## Automatic extension management You can add extensions to your project using the [generate](https://dev.wix.com/docs/wix-cli/command-reference/project-commands/generate.md) command. After running this command and following the prompts, CLI: - Creates the extension's files and code, including an `extension.ts` file containing the builder. By default, it uses the naming pattern `[extension-name].extension.ts`, however, you can rename these files to anything you want. - Adds the necessary import statement and `.use()` method call to register the new extension in the `extensions.ts` file. ## Remove deleted extensions When you delete an extension from your project, you should also remove its registration from the `extensions.ts` file. This involves removing both: - The import statement for any extension builders. - The `.use()` method call that registers the extension. ## See also - [About App Extensions in the Wix CLI](https://dev.wix.com/docs/build-apps/develop-your-app/frameworks/wix-cli/supported-extensions/about-extensions-in-the-wix-cli.md) - [Wix CLI Project Structure](https://dev.wix.com/docs/wix-cli/guides/project-structure/project-structure.md) --- > Portal Navigation: > > - Append `.md` to any URL under `https://dev.wix.com/docs/` to get its markdown version. > - Pages are either content pages (article or reference text) or menu pages (a list of links to child pages). > - To get a menu page, truncate any URL to a parent path and append `.md` (e.g. `https://dev.wix.com/docs/sdk.md`, `https://dev.wix.com/docs/sdk/core-modules.md`). > - Top-level index of all portals: https://dev.wix.com/docs/llms.txt > - Full concatenated docs: https://dev.wix.com/docs/llms-full.txt ## Resource: About Dashboard Extensions in the Wix CLI ## Article: About Dashboard Extensions in the Wix CLI ## Article Link: https://dev.wix.com/docs/build-apps/develop-your-app/develop-an-app-with-the-cli/supported-extensions/dashboard/about-dashboard-extensions-in-the-wix-cli.md ## Article Content: # About Dashboard Extensions in the Wix CLI Dashboard extensions allow you to extend the functionality of the Wix dashboard with customizable features, such as a page or a plugin. The Wix CLI allows you to easily create dashboard extensions for your projects. The following dashboard extensions are available in the Wix CLI: - [Dashboard pages](https://dev.wix.com/docs/build-apps/develop-your-app/develop-an-app-with-the-cli/supported-extensions/dashboard/dashboard-pages/add-dashboard-page-extensions-with-the-wix-cli.md) - [Dashboard modals](https://dev.wix.com/docs/build-apps/develop-your-app/develop-an-app-with-the-cli/supported-extensions/dashboard/dashboard-modals/add-dashboard-modal-extensions-with-the-wix-cli.md) - [Dashboard plugins](https://dev.wix.com/docs/build-apps/develop-your-app/develop-an-app-with-the-cli/supported-extensions/dashboard/dashboard-plugins/add-dashboard-plugin-extensions-with-the-wix-cli.md) - [Dashboard menu plugins](https://dev.wix.com/docs/build-apps/develop-your-app/develop-an-app-with-the-cli/supported-extensions/dashboard/dashboard-menu-plugin/add-dashboard-menu-plugin-extensions-with-the-wix-cli.md) ## Dashboard extension integration You can add dashboard extensions using the [generate](https://dev.wix.com/docs/wix-cli/command-reference/project-commands/generate.md) command and following the prompts to create your extension. Once created, your extension files appear in your project directory. You can preview dashboard extensions using the `npm run dev` command, which provides a link to open a preview of a dashboard in your browser. Dashboard extensions extend the functionality of the Wix dashboard to help you or your users manage site and business data. Dashboard extensions aren't visible to site visitors. ## See also - [About Extensions in the Wix CLI](https://dev.wix.com/docs/build-apps/develop-your-app/frameworks/wix-cli/supported-extensions/about-extensions-in-the-wix-cli.md) - [About the extensions.ts File](https://dev.wix.com/docs/build-apps/develop-your-app/frameworks/wix-cli/supported-extensions/about-the-extensions-ts-file.md) --- > Portal Navigation: > > - Append `.md` to any URL under `https://dev.wix.com/docs/` to get its markdown version. > - Pages are either content pages (article or reference text) or menu pages (a list of links to child pages). > - To get a menu page, truncate any URL to a parent path and append `.md` (e.g. `https://dev.wix.com/docs/sdk.md`, `https://dev.wix.com/docs/sdk/core-modules.md`). > - Top-level index of all portals: https://dev.wix.com/docs/llms.txt > - Full concatenated docs: https://dev.wix.com/docs/llms-full.txt ## Resource: Add Dashboard Page Extensions with the Wix CLI ## Article: Add Dashboard Page Extensions with the Wix CLI ## Article Link: https://dev.wix.com/docs/build-apps/develop-your-app/develop-an-app-with-the-cli/supported-extensions/dashboard/dashboard-pages/add-dashboard-page-extensions-with-the-wix-cli.md ## Article Content: # Add Dashboard Page Extensions with the Wix CLI You can add dashboard pages to your project using dashboard page extensions. These pages let you or your users manage sites and business data from the dashboard. They're not visible to site visitors. The Wix CLI makes it easy to create and develop dashboard page extensions, and to manage them in the sidebar. For general information about this extension type, read [About Dashboard Page Extensions](https://dev.wix.com/docs/build-apps/develop-your-app/develop-an-app-with-the-cli/supported-extensions/dashboard/dashboard-pages/add-dashboard-page-extensions-with-the-wix-cli.md). Follow the instructions below to: 1. Create a dashboard page extension for your project. 2. Customize your dashboard page. Once this task is complete, you have a dashboard page extension that adds a new dashboard page to your users' sites. ## Before you begin + You must have a project that was [created using the Wix CLI](https://dev.wix.com/docs/wix-cli.md). + You must be logged into your Wix account. If you don't have one, [sign up for a Wix account](https://manage.wix.com/account/custom-apps). + Learn how to interact with the Wix dashboard using the [Wix Dashboard SDK](https://dev.wix.com/docs/sdk/host-modules/dashboard/introduction.md). ## Step 1 | Create the extension 1. Run the [generate](https://dev.wix.com/docs/wix-cli/command-reference/project-commands/generate.md) command and follow the prompts to create a dashboard page extension. 1. Enter a name for your page's folder. The CLI will create this directory with the chosen name containing your page's files. 1. Enter the route for your page. The route is the path that is appended to the dashboard base URL to access the dashboard page. Upon completion, the extension files will be created in your project directory with the following structure: ```tsx src └── extensions └── dashboard └── pages └── ├── .extension.ts └── .tsx ``` > **Note:** This is the default folder structure created by the CLI. You can move these files to any location within the `src/` folder and update the references in your `extension.ts` file. Learn more about the [flexible file system](https://dev.wix.com/docs/wix-cli/guides/get-started/project-structure.md#your-custom-extension-folder). For more information about these files, see [Dashboard Page Extension Files and Code](https://dev.wix.com/docs/build-apps/develop-your-app/develop-an-app-with-the-cli/supported-extensions/dashboard/dashboard-pages/dashboard-page-extension-files-and-code.md). ## Step 2 | Customize your dashboard page 1. Run the [dev](https://dev.wix.com/docs/wix-cli/command-reference/project-commands/dev.md) command to open the `dev menu`. 1. Click the link to open the dashboard in your browser and navigate to the page you've created. Leave this window open. 2. Go to your dashboard page's `.tsx` file and change `subtitle` in `Page.Content` to `"Hello world!"`: ```tsx const DashboardPage: FC = () => { return ( ); }; export default DashboardPage; ``` 3. Save your file. 4. Navigate back to the dashboard page in your browser and see your changes. ## Dashboard menu plugins If you use a [dashboard menu plugin](https://dev.wix.com/docs/build-apps/develop-your-app/extensions/dashboard-extensions/dashboard-plugins/dashboard-menu-plugins/dashboard-menu-plugin-extensions.md) to navigate to your dashboard page, you can customize your dashboard page extension to interact with any data passed from the dashboard page that hosts the menu plugin. 1. Make sure the `@wix/dashboard` package is installed in your project. 2. Add the following import statement to your code: ```js import { dashboard } from '@wix/dashboard'; ``` 3. To retrieve the data from the dashboard page, call the [`observeState()`](https://dev.wix.com/docs/sdk/host-modules/dashboard/observe-state.md) method. ```js dashboard.observeState((componentParams) => { console.log("componentParams:", componentParams); }); ``` 4. Use React to add code and logic to your dashboard page. ## Build and deploy your project Once your project is ready for production, you can [build and deploy](https://dev.wix.com/docs/build-apps/develop-your-app/frameworks/wix-cli/project-development/build-and-deploy-a-project-with-the-wix-cli.md) it. >**Note:** > When you release an app project, you release a new version of the app allowing you to publish the app to the [Wix App Market](https://www.wix.com/app-market) or install it on a site with a direct install URL. You can view [your app's versions](https://manage.wix.com/app-selector?title=Select+an+App&primaryButtonText=Select+Site&actionUrl=https%3A%2F%2Fdev.wix.com%2Fapps%2F%7BappId%7D%2Fversions-app) in the app dashboard. ## Delete a dashboard page To delete an existing dashboard page from your project: 1. Delete the folder that contains your dashboard page extension's files. 2. Remove the import and `.use()` statements for the extension from the [`extensions.ts`](https://dev.wix.com/docs/build-apps/develop-your-app/frameworks/wix-cli/supported-extensions/about-the-extensions-ts-file.md) file.
**For app projects:** If you already have a version of your app project, you must build and deploy the project again after removing the dashboard page files.
## See also - [Dashboard Page Extension Files and Code](https://dev.wix.com/docs/build-apps/develop-your-app/develop-an-app-with-the-cli/supported-extensions/dashboard/dashboard-pages/dashboard-page-extension-files-and-code.md) - [About Dashboard Page Extensions](https://dev.wix.com/docs/build-apps/develop-your-app/extensions/dashboard-extensions/dashboard-pages/about-dashboard-page-extensions.md) --- > Portal Navigation: > > - Append `.md` to any URL under `https://dev.wix.com/docs/` to get its markdown version. > - Pages are either content pages (article or reference text) or menu pages (a list of links to child pages). > - To get a menu page, truncate any URL to a parent path and append `.md` (e.g. `https://dev.wix.com/docs/sdk.md`, `https://dev.wix.com/docs/sdk/core-modules.md`). > - Top-level index of all portals: https://dev.wix.com/docs/llms.txt > - Full concatenated docs: https://dev.wix.com/docs/llms-full.txt ## Resource: Dashboard Page Extension Files and Code ## Article: Dashboard Page Extension Files and Code ## Article Link: https://dev.wix.com/docs/build-apps/develop-your-app/develop-an-app-with-the-cli/supported-extensions/dashboard/dashboard-pages/dashboard-page-extension-files-and-code.md ## Article Content: # Dashboard Page Extension Files and Code When you generate a dashboard page extension, the CLI adds the following files to your project: - `.extension.ts`: Builds the [page](#page-builder). - `.tsx`: Defines the [page content](#page-content). ## Page builder The `.extension.ts` file contains a dashboard page's builder configuration. The page builder is defined using the following schema, shown here as a TypeScript type: ```ts export default extensions.dashboardPage({ id: string, title: string, routePath: string, component: string, }); ``` Here's an example builder definition: ```ts export default extensions.dashboardPage({ id: '40c70303-4eac-44cb-bb53-4e583a036682', title: 'My Prohect', routePath: 'my-project', component: './extensions/dashboard/pages/my-project/my-project.tsx', }); ``` ### Builder fields The following fields can be used in the configuration object: | Field | Type | Description | |--|--|--| | `id` | string | Page ID as a ([GUID](https://en.wikipedia.org/wiki/Universally_unique_identifier)). The ID is used to register the page in the [app dashboard](https://manage.wix.com/account/custom-apps). It must be unique across all pages in the app. | | `title` | string | The page title. The title is used as the browser tab title and as the dashboard sidebar label if the page is configured to appear in the sidebar. | | `routePath` | string | Route that lead to this page. Use this route in code to reference the page. | | `component` | string | A route to the page content component. | ## Page content The `.tsx` file contains a dashboard page's content. The content is defined as a [React](https://react.dev/) component that renders when the page is active. Inside a dashboard page component you can use: - The [Wix Dashboard React SDK](https://dev.wix.com/docs/sdk/host-modules/dashboard-react-deprecated/introduction.md) to navigate users to pages in the dashboard, display modals, and send users alerts using toasts. - The [Wix Design System](https://www.wixdesignsystem.com/) to display content using the same React components Wix uses to build its own dashboard pages. - The [Wix JavaScript SDK](https://dev.wix.com/docs/sdk.md) to access and manage other Wix data. - [`httpClient.fetchWithAuth`](https://dev.wix.com/docs/sdk/core-modules/essentials/http-client.md) from `@wix/essentials` to call your project's own [backend HTTP endpoints](https://dev.wix.com/docs/build-apps/develop-your-app/develop-an-app-with-the-cli/supported-extensions/backend/http-endpoints/about-http-endpoints.md). --- > Portal Navigation: > > - Append `.md` to any URL under `https://dev.wix.com/docs/` to get its markdown version. > - Pages are either content pages (article or reference text) or menu pages (a list of links to child pages). > - To get a menu page, truncate any URL to a parent path and append `.md` (e.g. `https://dev.wix.com/docs/sdk.md`, `https://dev.wix.com/docs/sdk/core-modules.md`). > - Top-level index of all portals: https://dev.wix.com/docs/llms.txt > - Full concatenated docs: https://dev.wix.com/docs/llms-full.txt ## Resource: Navigate Between Dashboard Pages ## Article: Navigate Between Dashboard Pages ## Article Link: https://dev.wix.com/docs/build-apps/develop-your-app/develop-an-app-with-the-cli/supported-extensions/dashboard/dashboard-pages/navigate-between-dashboard-pages.md ## Article Content: # Navigate Between Dashboard Pages You can connect multiple dashboard pages in your CLI project using the [Dashboard SDK's](https://dev.wix.com/docs/sdk/host-modules/dashboard/introduction.md) `navigate()` and `observeState()` methods. A common use case is the master-detail pattern: a list page that displays items and a detail page that shows information about a selected item. To navigate between dashboard pages: 1. Get the target page's component ID. 1. Navigate from the source page. 1. Retrieve data on the target page. ## Prerequisites - A Wix CLI project with at least 2 [dashboard page extensions](https://dev.wix.com/docs/build-apps/develop-your-app/develop-an-app-with-the-cli/supported-extensions/dashboard/dashboard-pages/add-dashboard-page-extensions-with-the-wix-cli.md). - The `@wix/dashboard` package installed in your project. ## Step 1 | Get the target page's component ID Find the target dashboard page's component ID in its `extension.ts` file. This is the `id` field: ```ts export default extensions.dashboardPage({ id: '1600e523-f812-497d-9323-46e82ab78bd6', title: 'Item Details', routePath: 'item-details', component: './extensions/dashboard/pages/item-details/item-details.tsx', }); ``` ## Step 2 | Navigate from the source page On the source page, use `dashboard.navigate()` to send the user to the target page. Pass data through the `relativeUrl` parameter: ```tsx import { dashboard } from '@wix/dashboard'; function ItemList({ items }) { const handleItemClick = (itemId: string) => { dashboard.navigate({ pageId: '1600e523-f812-497d-9323-46e82ab78bd6', relativeUrl: itemId, }); }; return (
    {items.map((item) => (
  • handleItemClick(item._id)}> {item.name}
  • ))}
); } ``` ## Step 3 | Retrieve data on the target page On the target page, use `dashboard.observeState()` to read the data passed through the URL. The callback fires when the page initializes and whenever the state updates. The first parameter (`pageParams`) contains a `location` object with the `pathname` passed via `relativeUrl`: ```tsx import { useEffect, useState } from 'react'; import { dashboard } from '@wix/dashboard'; function ItemDetails() { const [itemId, setItemId] = useState(null); useEffect(() => { dashboard.observeState((pageParams, environmentState) => { const id = pageParams.location.pathname.replace('/', ''); setItemId(id); }); }, []); if (!itemId) return
Loading...
; return
Showing details for item: {itemId}
; } ``` Use the retrieved ID to fetch and display the item's data from your data source. ## See also - [Add Dashboard Page Extensions with the Wix CLI](https://dev.wix.com/docs/build-apps/develop-your-app/develop-an-app-with-the-cli/supported-extensions/dashboard/dashboard-pages/add-dashboard-page-extensions-with-the-wix-cli.md) - [Dashboard Page Extension Files and Code](https://dev.wix.com/docs/build-apps/develop-your-app/develop-an-app-with-the-cli/supported-extensions/dashboard/dashboard-pages/dashboard-page-extension-files-and-code.md) - [`navigate()` API reference](https://dev.wix.com/docs/sdk/host-modules/dashboard/navigate.md) - [`observeState()` API reference](https://dev.wix.com/docs/sdk/host-modules/dashboard/observe-state.md) --- > Portal Navigation: > > - Append `.md` to any URL under `https://dev.wix.com/docs/` to get its markdown version. > - Pages are either content pages (article or reference text) or menu pages (a list of links to child pages). > - To get a menu page, truncate any URL to a parent path and append `.md` (e.g. `https://dev.wix.com/docs/sdk.md`, `https://dev.wix.com/docs/sdk/core-modules.md`). > - Top-level index of all portals: https://dev.wix.com/docs/llms.txt > - Full concatenated docs: https://dev.wix.com/docs/llms-full.txt ## Resource: Add Dashboard Modal Extensions with the Wix CLI ## Article: Add Dashboard Modal Extensions with the Wix CLI ## Article Link: https://dev.wix.com/docs/build-apps/develop-your-app/develop-an-app-with-the-cli/supported-extensions/dashboard/dashboard-modals/add-dashboard-modal-extensions-with-the-wix-cli.md ## Article Content: # Add Dashboard Modal Extensions with the Wix CLI [Dashboard modal extensions](https://dev.wix.com/docs/build-apps/develop-your-app/extensions/dashboard-extensions/dashboard-modals/about-dashboard-modals.md) allow you to add modals to site dashboards. Modals appear in your users' site's dashboard. You can control the modal using `openModal()` and `closeModal()` from the [Dashboard SDK](https://dev.wix.com/docs/sdk/host-modules/dashboard/open-modal.md). Follow the instructions below to: 1. Create a dashboard modal extension for your project. 1. Customize and test your dashboard modal extension.
**Tip:** Learn how to interact with the Wix dashboard using the [Wix Dashboard SDK](https://dev.wix.com/docs/sdk/host-modules/dashboard/introduction.md).
## Step 1 | Create the extension 1. Run the [generate](https://dev.wix.com/docs/wix-cli/command-reference/project-commands/generate.md) command and follow the prompts to create a dashboard modal extension. 1. Enter a name for your modal's folder. The CLI will create this directory with the chosen name containing your modal's files. 1. Enter the name of your modal. For app projects, this name will be used to refer to your modal in your app's dashboard. Upon completion, the extension files will be created in your project directory with the following structure: ```bash src └── extensions └── dashboard └── modals └── ├── .config.ts ├── .extension.ts └── .tsx ``` > **Note:** This is the default folder structure created by the CLI. You can move these files to any location within the `src/` folder and update the references in your `extension.ts` file. Learn more about the [flexible file system](https://dev.wix.com/docs/wix-cli/guides/get-started/project-structure.md#your-custom-extension-folder). For more on the files and their structure, see [Dashboard Modal Extensions Files and Code](https://dev.wix.com/docs/build-apps/develop-your-app/develop-an-app-with-the-cli/supported-extensions/dashboard/dashboard-modals/dashboard-modal-extensions-files-and-code.md). ## Step 2 | Customize your modal 1. Run the [dev](https://dev.wix.com/docs/wix-cli/command-reference/project-commands/dev.md) command to open the dev menu. 1. Choose a dashboard page to display. This will open a browser window previewing the dashboard page. 1. Add code to your dashboard page that triggers your modal to open. Use `openModal()` from the [Dashboard SDK](https://dev.wix.com/docs/sdk/host-modules/dashboard/open-modal.md). You can find your modal's ID in your `.extension.ts` file. 1. Edit your `.tsx` file to customize the modal itself. For example, change the text inside `` to `My Dashboard Modal`: ```tsx const Modal: FC = () => { return ( dashboard.closeModal()} secondaryButtonOnClick={() => dashboard.closeModal()} title={title} subtitle="Edit this file to customize your modal" content={ Wix CLI Modal } /> ); }; export default Modal; ``` 1. Set your dashboard modal extension to interact with custom data passed by the `openModal()` method or any data passed from the dashboard page hosting a menu plugin that navigates to your modal. 1. To retrieve the data, call the [`observeState()`](https://dev.wix.com/docs/sdk/host-modules/dashboard/observe-state.md) method. ```js dashboard.observeState((componentParams) => { console.log("componentParams:", componentParams); }); ``` 1. Use React to add code and logic to your modal. 1. Save your files. 1. Go back to your dashboard page, open your modal, and see your changes. ## Build and deploy your project Once your project is ready for production, you can [build and deploy](https://dev.wix.com/docs/build-apps/develop-your-app/frameworks/wix-cli/project-development/build-and-deploy-a-project-with-the-wix-cli.md) it. >**Note:** > When you release an app project, you release a new version of the app allowing you to publish the app to the [Wix App Market](https://www.wix.com/app-market) or install it on a site with a direct install URL. You can view [your app's versions](https://manage.wix.com/app-selector?title=Select+an+App&primaryButtonText=Select+Site&actionUrl=https%3A%2F%2Fdev.wix.com%2Fapps%2F%7BappId%7D%2Fversions-app) in the app dashboard. ## Delete a dashboard modal To delete an existing dashboard modal from your project: 1. Delete the folder that contains your dashboard modal extension's files. 2. Remove the import and `.use()` statements for the extension from the [`extensions.ts`](https://dev.wix.com/docs/build-apps/develop-your-app/frameworks/wix-cli/supported-extensions/about-the-extensions-ts-file.md) file.
**For app projects:** If you already have a version of your app project, you must build and deploy the project again after removing the dashboard modal files.
## See also - [Dashboard Modal Extension Files and Code](https://dev.wix.com/docs/build-apps/develop-your-app/develop-an-app-with-the-cli/supported-extensions/dashboard/dashboard-modals/dashboard-modal-extensions-files-and-code.md) - [About Dashboard Modal Extensions](https://dev.wix.com/docs/build-apps/develop-your-app/extensions/dashboard-extensions/dashboard-modals/about-dashboard-modals.md) --- > Portal Navigation: > > - Append `.md` to any URL under `https://dev.wix.com/docs/` to get its markdown version. > - Pages are either content pages (article or reference text) or menu pages (a list of links to child pages). > - To get a menu page, truncate any URL to a parent path and append `.md` (e.g. `https://dev.wix.com/docs/sdk.md`, `https://dev.wix.com/docs/sdk/core-modules.md`). > - Top-level index of all portals: https://dev.wix.com/docs/llms.txt > - Full concatenated docs: https://dev.wix.com/docs/llms-full.txt ## Resource: Dashboard Modal Extensions Files and Code ## Article: Dashboard Modal Extensions Files and Code ## Article Link: https://dev.wix.com/docs/build-apps/develop-your-app/develop-an-app-with-the-cli/supported-extensions/dashboard/dashboard-modals/dashboard-modal-extensions-files-and-code.md ## Article Content: # Dashboard Modal Extensions Files and Code When you generate a dashboard modal extension, the CLI adds the following files to your project: - **`.extension.ts`**: Builds the [modal](#modal-builder). - **`.tsx`**: Defines the [modal content](#modal-content). - **`.config.ts`**: Contains configurable [modal properties](#modal-configuration). ## Modal builder The `.extension.ts` file contains the dashboard modal builder configuration. The modal builder is defined using the following schema, shown here as a TypeScript type: ```ts export default extensions.dashboardModal({ id: string, title: string, width: number, height: number, component: string, }); ``` ### Builder fields | Field | Type | Description | |--------|--------|-------------| | `id` | string | The modal ID ([GUID](https://en.wikipedia.org/wiki/Universally_unique_identifier)) is automatically generated and shouldn't be changed. The ID is used to register the modal in the project dashboard. The ID must be unique across all pages in the project. | | `title`| string | The modal title. The title is used to refer to the modal in the project dashboard. | | `width` | number | Initial width of the modal while loading. | | `height` | number | Initial height of the modal while loading. | | `component` | string | Path of the modal content. | Here's an example builder definition: ```ts export default extensions.dashboardPlugin({ id: 'f9411ed6-f0da-439b-ac40-350334228bad', title: 'Events Plugin', width: config.width, height: config.height, component: './extensions/dashboard/modals/my-modal/my-modal.tsx', }); ``` ## Modal content The `.tsx` file contains the dashboard modal content. The content is defined as a [React](https://react.dev/) component that renders when the modal is active. Inside a dashboard modal component you may choose to use: - The [Wix SDK](https://dev.wix.com/docs/api-reference?apiView=SDK.md) to access Wix business solutions and site data. - The [Wix Dashboard React SDK](https://dev.wix.com/docs/sdk/host-modules/dashboard/introduction.md) to navigate users to pages in the dashboard, display other dashboard modals, or send users alerts and updates using toasts. - The [Wix Design System](https://www.wixdesignsystem.com/) to use the same React components Wix uses to build its own dashboard pages. ## Modal configuration The `.config.ts` file contains the configurable properties for the dashboard modal. Here is an example of the configuration: ```ts export default { title: 'My Modal, width: 550, height: 600, } This file is imported into the `.tsx` file to keep the modal settings organized and easily maintained. --- > Portal Navigation: > > - Append `.md` to any URL under `https://dev.wix.com/docs/` to get its markdown version. > - Pages are either content pages (article or reference text) or menu pages (a list of links to child pages). > - To get a menu page, truncate any URL to a parent path and append `.md` (e.g. `https://dev.wix.com/docs/sdk.md`, `https://dev.wix.com/docs/sdk/core-modules.md`). > - Top-level index of all portals: https://dev.wix.com/docs/llms.txt > - Full concatenated docs: https://dev.wix.com/docs/llms-full.txt ## Resource: Add Dashboard Menu Plugin Extensions with the Wix CLI ## Article: Add Dashboard Menu Plugin Extensions with the Wix CLI ## Article Link: https://dev.wix.com/docs/build-apps/develop-your-app/develop-an-app-with-the-cli/supported-extensions/dashboard/dashboard-menu-plugin/add-dashboard-menu-plugin-extensions-with-the-wix-cli.md ## Article Content: # Add Dashboard Menu Plugin Extensions with the Wix CLI [Dashboard menu plugin extensions](https://dev.wix.com/docs/build-apps/develop-your-app/extensions/dashboard-extensions/dashboard-plugins/dashboard-menu-plugins/dashboard-menu-plugin-extensions.md) add menu items into [pre-configured slots in dashboard pages](https://dev.wix.com/docs/build-apps/develop-your-app/extensions/dashboard-extensions/dashboard-plugins/supported-wix-app-dashboard-pages/about-dashboard-page-slots.md) of apps made by Wix in your project. When clicked, it either displays a dashboard modal or directs the project administrator to another dashboard page. Follow the instructions below to: 1. Create and configure a dashboard menu plugin extension for your project. 2. Customize your dashboard menu plugin. Once this task is complete, the dashboard menu you specified in the installation process will contain the item you added. ## Step 1 | Create the extension In your project directory, run the [generate](https://dev.wix.com/docs/wix-cli/command-reference/project-commands/generate.md) command and follow the prompts to create a dashboard menu plugin extension. Upon completion, the extension files will be created in your project directory with the following structure: ```bash src/ └── extensions └── dashboard/ └── menu-plugins/ └── / └── .extension.ts ``` > **Note:** This is the default folder structure created by the CLI. You can move these files to any location within the `src/` folder and update the references in your `extension.ts` file. Learn more about the [flexible file system](https://dev.wix.com/docs/wix-cli/guides/get-started/project-structure.md#your-custom-extension-folder). Learn more about the [dashboard menu plugin extension files](https://dev.wix.com/docs/build-apps/develop-your-app/develop-an-app-with-the-cli/supported-extensions/dashboard/dashboard-menu-plugin/dashboard-menu-plugin-extension-files-and-code.md). ## Step 2 | Customize your dashboard plugin 1. Run the [dev](https://dev.wix.com/docs/wix-cli/command-reference/project-commands/dev.md) command to open the dev menu. 1. Click the link to open the dashboard in the browser. Navigate to the dashboard page hosting your menu plugin. 2. Go to your `.extension.ts` file and edit the `title` to "Hello world!". ```ts export default extensions.dashboardMenuPlugin({ id: '1a096bd2-df15-41af-9db1-a037e0c89a68', title: 'My Menu Plugin', extends: 'b2af2156-d82c-4d6c-9961-cf1cec053566', iconKey: 'Sparkles', action: { navigateToPage: { pageId: '695fbcfe-ad2e-4b09-b6e5-6bbed53eaf21', } }, }); ``` 1. Save your file. 1. Navigate back to the dashboard page in your browser and see your changes. ## Build and deploy your project Once your project is ready for production, you can [build and deploy](https://dev.wix.com/docs/build-apps/develop-your-app/frameworks/wix-cli/project-development/build-and-deploy-a-project-with-the-wix-cli.md) it. >**Note:** > When you release an app project, you release a new version of the app allowing you to publish the app to the [Wix App Market](https://www.wix.com/app-market) or install it on a site with a direct install URL. You can view [your app's versions](https://manage.wix.com/app-selector?title=Select+an+App&primaryButtonText=Select+Site&actionUrl=https%3A%2F%2Fdev.wix.com%2Fapps%2F%7BappId%7D%2Fversions-app) in the app dashboard. ## Delete a dashboard menu plugin To delete an existing dashboard menu plugin from your project: 1. Delete the folder that contains your dashboard menu plugin extension's file. 2. Remove the import and `.use()` statements for the extension from the [`extensions.ts`](https://dev.wix.com/docs/build-apps/develop-your-app/frameworks/wix-cli/supported-extensions/about-the-extensions-ts-file.md) file.
**For app projects:** If you already have a version of your app project, you must build and deploy the project again after removing the dashboard menu plugin file.
## See also - [Dashboard Menu Plugin Extension Files and Code](https://dev.wix.com/docs/build-apps/develop-your-app/develop-an-app-with-the-cli/supported-extensions/dashboard/dashboard-menu-plugin/dashboard-menu-plugin-extension-files-and-code.md) - [About Dashboard Menu Plugin Extensions](https://dev.wix.com/docs/build-apps/develop-your-app/extensions/dashboard-extensions/dashboard-plugins/dashboard-menu-plugins/dashboard-menu-plugin-extensions.md) - [About Dashboard Page Slots](https://dev.wix.com/docs/build-apps/develop-your-app/extensions/dashboard-extensions/dashboard-plugins/supported-wix-app-dashboard-pages/about-dashboard-page-slots.md) --- > Portal Navigation: > > - Append `.md` to any URL under `https://dev.wix.com/docs/` to get its markdown version. > - Pages are either content pages (article or reference text) or menu pages (a list of links to child pages). > - To get a menu page, truncate any URL to a parent path and append `.md` (e.g. `https://dev.wix.com/docs/sdk.md`, `https://dev.wix.com/docs/sdk/core-modules.md`). > - Top-level index of all portals: https://dev.wix.com/docs/llms.txt > - Full concatenated docs: https://dev.wix.com/docs/llms-full.txt ## Resource: Dashboard Menu Plugin Extension Files and Code ## Article: Dashboard Menu Plugin Extension Files and Code ## Article Link: https://dev.wix.com/docs/build-apps/develop-your-app/develop-an-app-with-the-cli/supported-extensions/dashboard/dashboard-menu-plugin/dashboard-menu-plugin-extension-files-and-code.md ## Article Content: # Dashboard Menu Plugin Extension Files and Code When you generate a dashboard menu plugin extension, the CLI adds a `.extension.ts` file to your project that contains the menu plugin builder configuration. ## Menu plugin builder The `.extension.ts` file contains the dashboard menu plugin builder configuration. You can edit its fields manually to modify its appearance or behavior. However, do not change the extension's `id` field, as this is auto-generated by Wix and must remain unique across all extensions. | Field | Type | Description | |--------|-------|--------------| | `id` | String | Extension's unique identifier. The ID is used to register the menu plugin in the [app dashboard](https://dev.wix.com) and must be unique across all extensions in the project. | | `title` | String | Text of the menu item the extension adds. | | `extends` | String | Slot ID into which the extension plugs in. Find [the relevant dashboard slot](https://dev.wix.com/docs/build-apps/develop-your-app/extensions/dashboard-extensions/dashboard-plugins/supported-wix-app-dashboard-pages/about-dashboard-page-slots.md) for your app. | | `iconKey` | String | Icon that appears next to your extension's title. Select a normal-size [icon from the Wix Design System](https://www.wix-pages.com/wix-design-system-employees/?path=/story/foundations-icons--icons) and paste its name. | | `action` | Object | Navigation configuration object that determines the action taken when the extension is clicked. | | `action.navigateToPage` | Object | Page navigation configuration object. Contains the ID of the target dashboard page. | | `action.navigateToPage.pageId` | String | ID of the dashboard page to which site administrators are directed. | | `action.openModal` | Object | Modal navigation configuration object. Contains the ID of the modal page to open. | | `action.openModal.componentId` | String | ID of the modal to open. | You can set the dashboard menu plugin `action` field to either navigate to a dashboard page or open a modal. Here's an example `.extension.ts` file: ```ts export default extensions.dashboardMenuPlugin({ id: '5c51a919-5364-4ae8-a9e0-2a5100833e04', title: 'my-dashboard-plugin', extends: 'f3ad314d-0704-48e5-86b5-81acaf43e036', iconKey: 'Sparkles', action: { navigateToPage: { pageId: '02d0a5c2-7568-4ce9-b9f1-a51c95fa16bc', } }, }); ``` --- > Portal Navigation: > > - Append `.md` to any URL under `https://dev.wix.com/docs/` to get its markdown version. > - Pages are either content pages (article or reference text) or menu pages (a list of links to child pages). > - To get a menu page, truncate any URL to a parent path and append `.md` (e.g. `https://dev.wix.com/docs/sdk.md`, `https://dev.wix.com/docs/sdk/core-modules.md`). > - Top-level index of all portals: https://dev.wix.com/docs/llms.txt > - Full concatenated docs: https://dev.wix.com/docs/llms-full.txt ## Resource: Add Dashboard Plugin Extensions with the Wix CLI ## Article: Add Dashboard Plugin Extensions with the Wix CLI ## Article Link: https://dev.wix.com/docs/build-apps/develop-your-app/develop-an-app-with-the-cli/supported-extensions/dashboard/dashboard-plugins/add-dashboard-plugin-extensions-with-the-wix-cli.md ## Article Content: # Add Dashboard Plugin Extensions with the Wix CLI Dashboard plugins allow you to extend and enhance the functionality of a dashboard page for an app made by Wix. The Wix CLI makes it easy to create and develop dashboard plugins. You build your plugin using Wix's React/Node.js stack, and then your plugin is deployed and hosted on the Wix cloud. For more information on dashboard plugin extensions, read [About Dashboard Plugins](https://dev.wix.com/docs/build-apps/develop-your-app/extensions/dashboard-extensions/dashboard-plugins/about-dashboard-plugin-extensions.md). Follow the instructions below to: 1. Create a dashboard plugin extension for your project. 1. Customize your dashboard plugin. Once this task is complete, your project will have a dashboard plugin extension that adds a plugin to the dashboard page of an app made by Wix.
**Tip:** Learn how to interact with the Wix dashboard using the [Wix Dashboard SDK](https://dev.wix.com/docs/sdk/host-modules/dashboard/introduction.md).
## Step 1 | Create the plugin extension In the terminal: 1. Navigate to your project repo. 1. Run the [generate](https://dev.wix.com/docs/wix-cli/command-reference/project-commands/generate.md) command. 1. Follow the prompts for creating a dashboard plugin. Upon completion, the extension files will be created in your project directory with the following structure: ```tsx . └── / └── src/ └── extensions └── dashboard/ └── plugins/ └── / ├── .extension.ts └── .tsx ``` > **Note:** This is the default folder structure created by the CLI. You can move these files to any location within the `src/` folder and update the references in your `extension.ts` file. Learn more about the [flexible file system](https://dev.wix.com/docs/wix-cli/guides/get-started/project-structure.md#your-custom-extension-folder). For more information about these files, see [Dashboard Plugin Extension Files and Code](https://dev.wix.com/docs/build-apps/develop-your-app/develop-an-app-with-the-cli/supported-extensions/dashboard/dashboard-plugins/dashboard-plugin-extension-files-and-code.md). ## Step 2 | Customize your dashboard plugin Once you finish generating your dashboard plugin, you can find your plugin's auto-generated React component in your `.tsx` file. 1. Run the [dev](https://dev.wix.com/docs/wix-cli/command-reference/project-commands/dev.md) command to open the dev menu. 2. Follow the prompts, then click the link to open a preview of the dashboard in your browser, then navigate to the dashboard page hosting your plugin. ![page plugin](https://wixmp-833713b177cebf373f611808.wixmp.com/images/6a4cd4e474e7ccc11407f2c2a9a2ddcf.png) Leave this window open. 3. Go to your `.tsx` file and edit the text inside the `` component to "Hello world!". ```tsx const Plugin: FC = (props) => { return ( This dashboard plugin was generated with Wix CLI. Customize it according to your logic. To learn more, read our{' '} documentation . ); }; export default Plugin; ``` >**Note:** When it comes to designing the UI for your plugin, consider using the [Wix Design System](https://www.wixdesignsystem.com/), a collection of reusable React components that you can use to make your project appear and feel like a native Wix experience. 1. Customize your plugin to interact with the dashboard page data passed to the [plugin's slot](https://dev.wix.com/docs/build-apps/develop-your-app/extensions/dashboard-extensions/dashboard-plugins/supported-wix-app-dashboard-pages/about-dashboard-page-slots.md) using the [`observeState()`](https://dev.wix.com/docs/sdk/host-modules/dashboard/observe-state.md) method from the Dashboard SDK: 1. Make sure the [`@wix/dashboard`](https://dev.wix.com/docs/sdk/host-modules/dashboard/introduction.md) package is installed in your project. 1. Add the following import statement to your code: ```js import { dashboard } from '@wix/dashboard'; ``` 1. To retrieve the data from the dashboard page, call the `observeState()` method. ```js dashboard.observeState((componentParams) => { console.log("componentParams:", componentParams); }); ``` 1. Use React to add code and logic to your plugin. 1. Save your file. 1. Navigate back to the dashboard page in your browser and see your changes. ## Build and deploy your project Once your project is ready for production, you can [build and deploy](https://dev.wix.com/docs/build-apps/develop-your-app/frameworks/wix-cli/project-development/build-and-deploy-a-project-with-the-wix-cli.md) it. >**Note:** > When you release an app project, you release a new version of the app allowing you to publish the app to the [Wix App Market](https://www.wix.com/app-market) or install it on a site with a direct install URL. You can view [your app's versions](https://manage.wix.com/app-selector?title=Select+an+App&primaryButtonText=Select+Site&actionUrl=https%3A%2F%2Fdev.wix.com%2Fapps%2F%7BappId%7D%2Fversions-app) in the app dashboard. ## Delete a dashboard plugin To delete an existing dashboard plugin from your project: 1. Delete the folder that contains your dashboard plugin extension's files. 2. Remove the import and `.use()` statements for the extension from the [`extensions.ts`](https://dev.wix.com/docs/build-apps/develop-your-app/frameworks/wix-cli/supported-extensions/about-the-extensions-ts-file.md) file.
**For app projects:** If you already have a version of your app project, you must build and deploy the project again after removing the dashboard plugin files.
## See also - [Dashboard Plugin Extension Files and Code](https://dev.wix.com/docs/build-apps/develop-your-app/develop-an-app-with-the-cli/supported-extensions/dashboard/dashboard-plugins/dashboard-plugin-extension-files-and-code.md) - [About Dashboard Plugin Extensions](https://dev.wix.com/docs/build-apps/develop-your-app/extensions/dashboard-extensions/dashboard-plugins/about-dashboard-plugin-extensions.md) - [About Dashboard Page Slots](https://dev.wix.com/docs/build-apps/develop-your-app/extensions/dashboard-extensions/dashboard-plugins/supported-wix-app-dashboard-pages/about-dashboard-page-slots.md) --- > Portal Navigation: > > - Append `.md` to any URL under `https://dev.wix.com/docs/` to get its markdown version. > - Pages are either content pages (article or reference text) or menu pages (a list of links to child pages). > - To get a menu page, truncate any URL to a parent path and append `.md` (e.g. `https://dev.wix.com/docs/sdk.md`, `https://dev.wix.com/docs/sdk/core-modules.md`). > - Top-level index of all portals: https://dev.wix.com/docs/llms.txt > - Full concatenated docs: https://dev.wix.com/docs/llms-full.txt ## Resource: Dashboard Plugin Extension Files and Code ## Article: Dashboard Plugin Extension Files and Code ## Article Link: https://dev.wix.com/docs/build-apps/develop-your-app/develop-an-app-with-the-cli/supported-extensions/dashboard/dashboard-plugins/dashboard-plugin-extension-files-and-code.md ## Article Content: # Dashboard Plugin Extension Files and Code When you generate a dashboard plugin extension, the CLI adds the following files to your project: - `.extension.ts`: Builds the [plugin](#plugin-builder). - `.tsx`: Defines the [plugin content](#plugin-content). ## Plugin builder The `.extension.ts` file contains the dashboard plugin builder configuration. This file defines which dashboard page hosts your plugin. The plugin builder is defined using the following schema, shown here as a TypeScript type: ```ts export default extensions.dashboardPlugin({ id: string, title: string, extends: string, component: string, }); ``` Here's an example builder definition: ```ts export default extensions.dashboardPlugin({ id: '4f7fe48c-a3f9-48ba-9c52-a6df24d58a6f', title: 'My Dashboard Plugin', extends: '0a208a9f-3b45-449c-ba8e-13a842ea5b84', component: './extensions/dashboard/plugins/my-plugin/my-plugin.tsx', }); ``` ### Builder fields The following fields can be used in the configuration object: | Field | Type | Description | |-------|------|-------------| | `id` | string | Plugin ID as a ([GUID](https://en.wikipedia.org/wiki/Universally_unique_identifier)). The ID is automatically generated and must be unique across all extensions in the project. | | `title` | string | The plugin title. The title is used to refer to the plugin in the project dashboard. | | `extends` | string | Slot ID of the dashboard page hosting the plugin. | | `component` | string | Path to the plugin content component. | ## Plugin content The `.tsx` file contains the dashboard plugin content. The content is defined in a [React](https://react.dev/) component that renders when the page is active. Below is an example of how your `your-plugin-name.tsx` file will look upon creation: ```tsx import type { FC } from 'react'; import type { plugins } from '@wix/blog/dashboard'; import { WixDesignSystemProvider, Card, Text, TextButton, } from '@wix/design-system'; import '@wix/design-system/styles.global.css'; type Props = plugins.BlogPosts.PostsBannerParams; const Plugin: FC = (props) => { return ( This dashboard plugin was generated with Wix CLI. Customize it according to your logic. To learn more, read our{' '} documentation . ); }; export default Plugin; ``` In the dashboard plugin component, you can use: - React to add code and login to your plugin. - The [Wix SDK](https://dev.wix.com/docs/api-reference?apiView=SDK.md) to access Wix business solutions and site data. - The [Wix Dashboard SDK](https://dev.wix.com/docs/sdk/host-modules/dashboard/introduction.md) to interact with the dashboard page’s data that's passed to the slot. - The [Wix Design System](https://www.wixdesignsystem.com/) to work with the same React components Wix uses to build its own dashboard plugins. --- > Portal Navigation: > > - Append `.md` to any URL under `https://dev.wix.com/docs/` to get its markdown version. > - Pages are either content pages (article or reference text) or menu pages (a list of links to child pages). > - To get a menu page, truncate any URL to a parent path and append `.md` (e.g. `https://dev.wix.com/docs/sdk.md`, `https://dev.wix.com/docs/sdk/core-modules.md`). > - Top-level index of all portals: https://dev.wix.com/docs/llms.txt > - Full concatenated docs: https://dev.wix.com/docs/llms-full.txt ## Resource: About Wix CLI Backend Extensions ## Article: About Wix CLI Backend Extensions ## Article Link: https://dev.wix.com/docs/build-apps/develop-your-app/develop-an-app-with-the-cli/supported-extensions/backend/about-wix-cli-backend-extensions.md ## Article Content: # About Wix CLI Backend Extensions The Wix CLI allows you to add [backend extensions](https://dev.wix.com/docs/build-apps/develop-your-app/extensions/backend-extensions/about-backend-extensions.md) to your project. The following backend extensions are available in the CLI: - [Service plugin extensions](#service-plugin-extensions) - [Event extensions](#event-extensions) - [Data collections extensions](#data-collections-extensions) You can add these extensions using the [generate](https://dev.wix.com/docs/wix-cli/command-reference/project-commands/generate.md) command. You can also expose server-side logic to your frontend extensions through [backend APIs](#backend-apis), which you build using HTTP endpoints. Unlike the extensions above, HTTP endpoints aren't created with the `generate` command and aren't traditional extensions. Backend extensions built with the CLI have execution limits, rate limits, and a time limit for backend functionality in previews. Read more about [limits](#limits). ## Service plugin extensions Service plugin extensions are a set of APIs defined by Wix that you can use to enable your project to inject custom logic into existing flows or to introduce entirely new flows. For example, you can add an [Additional Fees Service Plugin](https://dev.wix.com/docs/api-reference/business-solutions/e-commerce/extensions/additional-fees/additional-fees-service-plugin/introduction?apiView=SDK.md) to add custom charges and fees to carts and checkouts based on business-specific calculations and logic. You can implement service plugin extensions in your project using the CLI. Read more about [service plugin extensions](https://dev.wix.com/docs/build-apps/develop-your-app/develop-an-app-with-the-cli/supported-extensions/backend/service-plugins/add-service-plugin-extensions-with-the-wix-cli.md). ## Event extensions Events are triggered when specific conditions on your project are met. These are conditions on a Wix user's site. For example, an event might be triggered when a [booking is confirmed](https://dev.wix.com/docs/api-reference/business-solutions/bookings/bookings/bookings-writer-v2/booking-confirmed?apiView=SDK.md). Your project can respond to these events using event extensions created in the CLI. Events in the CLI are built on JavaScript SDK webhooks, and event extensions subscribe your project to these webhooks behind the scenes. Read more about [event extensions](https://dev.wix.com/docs/build-apps/develop-your-app/develop-an-app-with-the-cli/supported-extensions/backend/events/add-event-extensions-with-the-wix-cli.md). ## Data collections extensions Data collections extensions let your app automatically create CMS data collections when it's installed on a site. You define each collection's schema, permissions, and optional initial data in your project files. When a Wix user installs your app, the collections are created in the site's CMS with the configuration you specified. Read more about [data collections extensions](https://dev.wix.com/docs/build-apps/develop-your-app/develop-an-app-with-the-cli/supported-extensions/backend/data-collections/add-a-data-collections-extension-with-the-wix-cli.md). ## Limits Backend extensions built with the CLI have execution limits, rate limits, and a time limit for backend functionality in previews.
**Important:** Limits are subject to change. We'll notify you of any upcoming changes through the CLI and [Discord](https://discord.gg/aN9ubnrs2D), and note them here in the documentation.
### Execution rate limits - **1000 CPU MS per request:** Backend requests taking longer than 1000 CPU MS to complete are terminated. - **20 sub-requests:** Sub-requests are requests made from your backend extensions, such as calls to Wix APIs, in response to a request. Your project can make up to 20 sub-requests in response to each request. Sub-requests beyond the 20th will not be made. ### Request rate limit - **1000 requests per second:** This is the limit for the total number of backend requests from your project. Requests beyond this are ignored. ### Backend functionality for previews Previews generated by `npm run preview` last indefinitely. However, any backend extensions in these previews stop functioning after 3 days. ## Backend APIs In the legacy Wix CLI for Apps, backend APIs were built with HTTP functions and web methods. In the current Wix CLI, backend APIs use [HTTP endpoints](https://dev.wix.com/docs/build-apps/develop-your-app/develop-an-app-with-the-cli/supported-extensions/backend/http-endpoints/about-http-endpoints.md) instead. Learn how to [add HTTP endpoints to your project](https://dev.wix.com/docs/build-apps/develop-your-app/develop-an-app-with-the-cli/supported-extensions/backend/http-endpoints/add-http-endpoints-to-your-project.md), or migrate existing [HTTP functions](https://dev.wix.com/docs/build-apps/develop-your-app/develop-an-app-with-the-cli/supported-extensions/backend/http-endpoints/migrate/migrate-from-http-functions-to-http-endpoints.md) or [web methods](https://dev.wix.com/docs/build-apps/develop-your-app/develop-an-app-with-the-cli/supported-extensions/backend/http-endpoints/migrate/migrate-from-web-methods-to-http-endpoints.md) to HTTP endpoints. ## See also - [About Extensions in the Wix CLI](https://dev.wix.com/docs/build-apps/develop-your-app/frameworks/wix-cli/supported-extensions/about-extensions-in-the-wix-cli.md) - [About the extensions.ts File](https://dev.wix.com/docs/build-apps/develop-your-app/frameworks/wix-cli/supported-extensions/about-the-extensions-ts-file.md) --- > Portal Navigation: > > - Append `.md` to any URL under `https://dev.wix.com/docs/` to get its markdown version. > - Pages are either content pages (article or reference text) or menu pages (a list of links to child pages). > - To get a menu page, truncate any URL to a parent path and append `.md` (e.g. `https://dev.wix.com/docs/sdk.md`, `https://dev.wix.com/docs/sdk/core-modules.md`). > - Top-level index of all portals: https://dev.wix.com/docs/llms.txt > - Full concatenated docs: https://dev.wix.com/docs/llms-full.txt ## Resource: Add a Data Collections Extension with the Wix CLI ## Article: Add a Data Collections Extension with the Wix CLI ## Article Link: https://dev.wix.com/docs/build-apps/develop-your-app/develop-an-app-with-the-cli/supported-extensions/backend/data-collections/add-a-data-collections-extension-with-the-wix-cli.md ## Article Content: # Add a Data Collections Extension with the Wix CLI The [data collections extension](https://dev.wix.com/docs/build-apps/develop-your-app/extensions/backend-extensions/data-collections/about-data-collections-extensions.md) lets your app automatically create data collections in a site's CMS. When a Wix user installs or updates your app, the collections are created with the configuration you define. Follow the instructions below to: 1. Generate the extension and 1 or more collections in your project. 2. Configure each collection's schema, permissions, and initial data. 3. Release a new app version so the collections are created on installed sites. Once complete, your app automatically creates the specified collections in the CMS whenever a Wix user installs or updates it. > **Note:** The site that installs your app must have the [CMS](https://support.wix.com/en/article/cms-formerly-content-manager-getting-started?tabs=Wix-Editor) added. Without the CMS, collections added by the extension won't appear after installation. You can bundle the CMS with your app by [adding it as a dependency](https://dev.wix.com/docs/build-apps/launch-your-app/market-listing/add-app-dependencies.md). ## Step 1 | Create the extension In the terminal: 1. Navigate to your project repo. 2. Run the [generate](https://dev.wix.com/docs/wix-cli/command-reference/project-commands/generate.md) command. 3. The CLI displays a menu of extensions to generate. Under **Backend**, select **Data Collection** and press **Enter**. 4. Enter a collection name when prompted. The name must be 1–36 characters and can only contain letters, numbers, underscores, and hyphens. The name must also be unique in the data collections extension folder. The first time you run this command, the CLI [creates the shared extension file](https://dev.wix.com/docs/build-apps/develop-your-app/frameworks/wix-cli/supported-extensions/about-the-extensions-ts-file.md) (`data-collections.extension.ts`) alongside the new collection's definition file. Subsequent runs add new collection definition files to the same shared extension and register them automatically. ## Step 2 | Configure the collection Each collection is defined in its own `.ts` file. The default export is an object that describes the collection's schema, permissions, indexes, and initial data. The object follows the schema documented in the [data collections extension JSON reference](https://dev.wix.com/docs/api-reference/business-solutions/cms/collection-management/data-collections-extension/introduction.md). You can add multiple collections with the [`generate`](https://dev.wix.com/docs/wix-cli/command-reference/project-commands/generate.md) command. The CLI generates each collection with default fields and permissions. Edit each collection's `.ts` file to fit your data model. Learn more about [data collections extension files and code](https://dev.wix.com/docs/build-apps/develop-your-app/develop-an-app-with-the-cli/supported-extensions/backend/data-collections/data-collections-extension-files-and-code.md). ## Step 3 | Build and deploy your project [Release a new app version](https://dev.wix.com/docs/wix-cli/command-reference/project-commands/release.md), then [build and deploy](https://dev.wix.com/docs/build-apps/develop-your-app/frameworks/wix-cli/project-development/build-and-deploy-a-project-with-the-wix-cli.md) your project. Learn more about [app version updates](https://dev.wix.com/docs/build-apps/develop-your-app/extensions/backend-extensions/data-collections/about-data-collections-extensions.md#app-version-updates). > **Note:** Collection changes only affect users who update to the new major version. Users on older versions retain their existing collections. Changes can take up to 5 minutes to propagate after an update. ## Delete a collection or the entire extension To delete a single collection from your extension: 1. Delete the collection's `.ts` file. 2. In `data-collections.extension.ts`, delete the matching `import` statement and the entry for that collection from the `collections` array. To delete the entire data collections extension: 1. Delete the `src/extensions/backend/data-collections/` folder. 2. Delete the `import` and `.use()` statements for the extension from your [`extensions.ts`](https://dev.wix.com/docs/build-apps/develop-your-app/frameworks/wix-cli/supported-extensions/about-the-extensions-ts-file.md) file.
__Important:__ If you already have a version of your app project, you must build and deploy the project again after removing the data collection extension files.
## See also - [Data Collections Extension Files and Code](https://dev.wix.com/docs/build-apps/develop-your-app/develop-an-app-with-the-cli/supported-extensions/backend/data-collections/data-collections-extension-files-and-code.md) - [About Data Collections Extensions](https://dev.wix.com/docs/build-apps/develop-your-app/extensions/backend-extensions/data-collections/about-data-collections-extensions.md) - [Add a Data Collections Extension in the App Dashboard](https://dev.wix.com/docs/build-apps/develop-your-app/extensions/backend-extensions/data-collections/add-a-data-collections-extension-in-the-app-dashboard.md) - [Data Collections Extension JSON Reference](https://dev.wix.com/docs/api-reference/business-solutions/cms/collection-management/data-collections-extension/introduction.md) - [About the Wix Data Collections API](https://dev.wix.com/docs/api-reference/business-solutions/cms/collection-management/data-collections/introduction.md) --- > Portal Navigation: > > - Append `.md` to any URL under `https://dev.wix.com/docs/` to get its markdown version. > - Pages are either content pages (article or reference text) or menu pages (a list of links to child pages). > - To get a menu page, truncate any URL to a parent path and append `.md` (e.g. `https://dev.wix.com/docs/sdk.md`, `https://dev.wix.com/docs/sdk/core-modules.md`). > - Top-level index of all portals: https://dev.wix.com/docs/llms.txt > - Full concatenated docs: https://dev.wix.com/docs/llms-full.txt ## Resource: Data Collections Extension Files and Code ## Article: Data Collections Extension Files and Code ## Article Link: https://dev.wix.com/docs/build-apps/develop-your-app/develop-an-app-with-the-cli/supported-extensions/backend/data-collections/data-collections-extension-files-and-code.md ## Article Content: # Data Collections Extension Files and Code When you generate a [data collections extension](https://dev.wix.com/docs/build-apps/develop-your-app/extensions/backend-extensions/data-collections/about-data-collections-extensions.md), the CLI adds the following files to your project: ```bash src/ └── extensions/ └── backend/ └── data-collections/ ├── data-collections.extension.ts # Shared extension file └── .ts # Collection definition file ``` - `data-collections.extension.ts`: Builds the [data collections extension](#data-collections-builder-file). - `.ts`: Defines the [collection's schema, permissions, indexes, and initial data](#data-collection-definition-file). Each file represents a collection. The CLI also adds an import and a `.use()` call to your project's [`extensions.ts`](https://dev.wix.com/docs/build-apps/develop-your-app/frameworks/wix-cli/supported-extensions/about-the-extensions-ts-file.md) file so the extension is registered with your project. > **Note**: You can move these files to any location in the `src/` folder and update the references in your `extensions.ts` file. Learn more about the [flexible file system](https://dev.wix.com/docs/wix-cli/guides/get-started/project-structure.md#your-custom-extension-folder). ## Data collections builder file The `data-collections.extension.ts` file contains the data collections extension's builder configuration. The builder is defined using the following schema: ```ts import { extensions } from '@wix/astro/builders'; export default extensions.dataCollections({ id: string, name: string, collections: Collection[], }); ``` Here's an example builder definition with 2 registered collections: ```ts import { extensions } from "@wix/astro/builders"; import customerFeedbackCollection from "./customer-feedback"; import productReviewsCollection from "./product-reviews"; export default extensions.dataCollections({ id: "c7bdcb61-9c98-45d5-8a1e-76ce89b407eb", name: "Data Collections", collections: [customerFeedbackCollection, productReviewsCollection], }); ``` ### Data collection builder fields The following fields can be used in the builder's configuration object: | Field | Type | Description | | ------------- | ------ | ---------------------------------------------------------------------------------------------------------------------------------------------------------------------------------------------------------------------------------------- | | `id` | string | Required. The data collections extension ID as a [GUID](https://en.wikipedia.org/wiki/Universally_unique_identifier). Wix automatically generates it when you add the extension. It must be unique across all extensions in the project. | | `name` | string | Required. A human-readable name for the extension. Defaults to `'Data Collections'`. You can edit it directly in the file, and view it in the app dashboard under **Extensions**. | | `collections` | array | Required. The default exports from each `.ts` collection definition file you want this extension to register. Each time you generate a new collection, the CLI adds it to this array. | ## Data collection definition file Each `.ts` file defines a single collection. The default export is an object that follows the schema documented in the [data collections extension JSON reference](https://dev.wix.com/docs/api-reference/business-solutions/cms/collection-management/data-collections-extension/introduction.md). Each collection definition file comes with default fields, default permissions, and other configuration that you can customize. The starting file looks like this: ```ts export const collectionIdSuffix = ""; export default { idSuffix: collectionIdSuffix, displayName: "", fields: [ { type: "TEXT", displayName: "Title", key: "title" }, { type: "IMAGE", displayName: "Image", key: "image" }, ], displayField: "title", dataPermissions: { itemInsert: "CMS_EDITOR", itemRead: "CMS_EDITOR", itemRemove: "CMS_EDITOR", itemUpdate: "CMS_EDITOR", }, indexes: [], initialData: [], }; ``` The file also exports a named constant, `collectionIdSuffix`, which has the same string used as `idSuffix`. To reference this collection elsewhere in your project, import this constant from your backend code. ### Collection fields The default export object accepts the following top-level fields. For the full schema, including supported field types, permission roles, index options, and the initial-data format, see the [data collections extension JSON reference](https://dev.wix.com/docs/api-reference/business-solutions/cms/collection-management/data-collections-extension/introduction.md). | Field | Type | Description | | ----------------- | ------ | --------------------------------------------------------------------------------------------------------------------------------------------------------------------------------------------------------------------------------------------- | | `idSuffix` | string | Required. The suffix appended to the full collection ID. The full ID in the CMS becomes `@//`. It must be 1-36 characters and can only contain letters, numbers, underscores, and hyphens. | | `displayName` | string | Required. The collection's display name in the CMS. | | `displayField` | string | Required. The `key` of the field used to identify items in this collection when they're referenced from other collections. | | `fields` | array | Required. The collection's schema. See the [supported field types](https://dev.wix.com/docs/api-reference/business-solutions/cms/collection-management/data-collections-extension/introduction.md). | | `dataPermissions` | object | Required. The role required for each [item action](https://dev.wix.com/docs/api-reference/business-solutions/cms/collection-management/data-permissions/introduction.md#item-actions): `itemInsert`, `itemRead`, `itemRemove`, and `itemUpdate`. | | `indexes` | array | Indexes to improve query performance. | | `initialData` | array | Items to seed the collection with when it's first created on a site. Each item must conform to the schema declared in `fields`. | ## See also - [Add a Data Collections Extension with the Wix CLI](https://dev.wix.com/docs/build-apps/develop-your-app/develop-an-app-with-the-cli/supported-extensions/backend/data-collections/add-a-data-collections-extension-with-the-wix-cli.md) - [About Data Collections Extensions](https://dev.wix.com/docs/build-apps/develop-your-app/extensions/backend-extensions/data-collections/about-data-collections-extensions.md) - [Data Collections Extension JSON Reference](https://dev.wix.com/docs/api-reference/business-solutions/cms/collection-management/data-collections-extension/introduction.md) - [About the Wix Data Collections API](https://dev.wix.com/docs/api-reference/business-solutions/cms/collection-management/data-collections/introduction.md) --- > Portal Navigation: > > - Append `.md` to any URL under `https://dev.wix.com/docs/` to get its markdown version. > - Pages are either content pages (article or reference text) or menu pages (a list of links to child pages). > - To get a menu page, truncate any URL to a parent path and append `.md` (e.g. `https://dev.wix.com/docs/sdk.md`, `https://dev.wix.com/docs/sdk/core-modules.md`). > - Top-level index of all portals: https://dev.wix.com/docs/llms.txt > - Full concatenated docs: https://dev.wix.com/docs/llms-full.txt ## Resource: About HTTP Endpoints ## Article: About HTTP Endpoints ## Article Link: https://dev.wix.com/docs/build-apps/develop-your-app/develop-an-app-with-the-cli/supported-extensions/backend/http-endpoints/about-http-endpoints.md ## Article Content: # About HTTP Endpoints Wix CLI projects support HTTP endpoints, which you use to build backend APIs for handling HTTP requests and coordinating frontend and backend logic. HTTP endpoints can serve any kind of data. > **Note:** HTTP endpoints replace both [HTTP functions](https://dev.wix.com/docs/wix-cli/legacy/wix-cli-for-apps/supported-extensions/backend-extensions/api/http-functions/add-http-function-extensions-with-the-cli.md) and [web methods](https://dev.wix.com/docs/build-apps/develop-your-app/extensions/backend-extensions/apis/web-methods/about-web-method-extensions.md) from the legacy Wix CLI for Apps. See the migration guides for [HTTP functions](https://dev.wix.com/docs/build-apps/develop-your-app/develop-an-app-with-the-cli/supported-extensions/backend/http-endpoints/migrate/migrate-from-http-functions-to-http-endpoints.md) and [web methods](https://dev.wix.com/docs/build-apps/develop-your-app/develop-an-app-with-the-cli/supported-extensions/backend/http-endpoints/migrate/migrate-from-web-methods-to-http-endpoints.md). ## File-based routing The location of an endpoint file in your project determines its URL. Place a file at `src/pages/api/.ts`, and it's exposed at `/api/`. For example, `src/pages/api/users.ts` becomes the route `/api/users`. Endpoints are auto-discovered from the filesystem rather than registered like typical extensions.
**Caution:** Because of this, and unlike HTTP functions and web methods in the legacy Wix CLI for Apps, HTTP endpoints aren't traditional extensions: - They aren't generated by `npm run generate`. - They aren't registered in [`src/extensions.ts`](https://dev.wix.com/docs/build-apps/develop-your-app/frameworks/wix-cli/supported-extensions/about-the-extensions-ts-file.md). - They don't appear on the **Extensions** page in the app dashboard.
## HTTP method handlers Each endpoint file exports one or more HTTP method handlers, such as `GET` or `POST`. A handler receives the standard web `Request` and returns a standard `Response`, so you can return any content type, including JSON, plain text, images, and RSS feeds. Handlers use the `APIRoute` type from `astro`, the underlying framework that powers HTTP endpoints. ## Server-side runtime Endpoints run on the server, not in the browser. This means you can: - Read [environment variables](https://dev.wix.com/docs/build-apps/develop-your-app/develop-an-app-with-the-cli/project-development/environment-variables/about-environment-variables-in-the-cli.md), including secret server variables that aren't exposed to the client. - Call external services without exposing credentials in your frontend bundle. ## Calling endpoints from frontend extensions Frontend extensions, like dashboard pages and site widgets, call endpoints using `httpClient.fetchWithAuth()` from `@wix/essentials`. This attaches the current user's access token to the request as an `Authorization` header, which the endpoint can then use to make [elevated SDK calls](https://dev.wix.com/docs/build-apps/develop-your-app/frameworks/wix-cli/project-development/elevate-api-call-permissions.md) for operations the user can't perform directly. For the full pattern, see [Add HTTP Endpoints to Your Project](https://dev.wix.com/docs/build-apps/develop-your-app/develop-an-app-with-the-cli/supported-extensions/backend/http-endpoints/add-http-endpoints-to-your-project.md). ## Permissions and security Unlike [web methods](https://dev.wix.com/docs/build-apps/develop-your-app/extensions/backend-extensions/apis/web-methods/about-web-method-extensions.md), HTTP endpoints don't have a built-in permissions model. An endpoint is reachable by anyone who knows its URL, so enforcing access control is your responsibility. To restrict access, inspect the caller's access token in your handler and decide whether to proceed: - Frontend extensions send the current user's token when they call your endpoint with [`httpClient.fetchWithAuth()`](https://dev.wix.com/docs/sdk/core-modules/essentials/http-client.md#fetchwithauth). - In the handler, use [Get Token Info](https://dev.wix.com/docs/sdk/core-modules/essentials/auth.md#gettokeninfo) from `@wix/essentials` to read the token's `subjectType`, for example, to allow only site members or admins. Without `fetchWithAuth()` on the client, no token is sent and Get Token Info has nothing to inspect. ## Use cases Use HTTP endpoints when you need to: - Integrate with external APIs or services that require HTTP requests. - Handle complex form submissions or file uploads. - Serve dynamic content like images, RSS feeds, or personalized data. - Build REST APIs with multiple HTTP methods. - Access runtime data or server-side databases. ## See also - [Add HTTP Endpoints to Your Project](https://dev.wix.com/docs/build-apps/develop-your-app/develop-an-app-with-the-cli/supported-extensions/backend/http-endpoints/add-http-endpoints-to-your-project.md) - [Elevate API Call Permissions](https://dev.wix.com/docs/build-apps/develop-your-app/frameworks/wix-cli/project-development/elevate-api-call-permissions.md) - [About Environment Variables](https://dev.wix.com/docs/build-apps/develop-your-app/develop-an-app-with-the-cli/project-development/environment-variables/about-environment-variables-in-the-cli.md) - [Migrate from HTTP Functions to HTTP Endpoints](https://dev.wix.com/docs/build-apps/develop-your-app/develop-an-app-with-the-cli/supported-extensions/backend/http-endpoints/migrate/migrate-from-http-functions-to-http-endpoints.md) - [Migrate from Web Methods to HTTP Endpoints](https://dev.wix.com/docs/build-apps/develop-your-app/develop-an-app-with-the-cli/supported-extensions/backend/http-endpoints/migrate/migrate-from-web-methods-to-http-endpoints.md) --- > Portal Navigation: > > - Append `.md` to any URL under `https://dev.wix.com/docs/` to get its markdown version. > - Pages are either content pages (article or reference text) or menu pages (a list of links to child pages). > - To get a menu page, truncate any URL to a parent path and append `.md` (e.g. `https://dev.wix.com/docs/sdk.md`, `https://dev.wix.com/docs/sdk/core-modules.md`). > - Top-level index of all portals: https://dev.wix.com/docs/llms.txt > - Full concatenated docs: https://dev.wix.com/docs/llms-full.txt ## Resource: Add HTTP Endpoints to Your Project ## Article: Add HTTP Endpoints to Your Project ## Article Link: https://dev.wix.com/docs/build-apps/develop-your-app/develop-an-app-with-the-cli/supported-extensions/backend/http-endpoints/add-http-endpoints-to-your-project.md ## Article Content: # Add HTTP Endpoints to Your Project This article shows you how to create an HTTP method in your CLI project and call it from your frontend to handle HTTP requests. These endpoints handle server-side logic and can return any kind of data to your frontend. They're sometimes also referred to as backend APIs. To create an HTTP endpoint: 1. Create an endpoint file with HTTP method handlers. 2. Add frontend code to call the endpoint.
**Caution:** HTTP endpoints in `src/pages/api/` aren't extensions in the framework sense. They're auto-discovered Astro routes: - You don't register them in [`src/extensions.ts`](https://dev.wix.com/docs/build-apps/develop-your-app/frameworks/wix-cli/supported-extensions/about-the-extensions-ts-file.md). - They aren't generated by `npm run generate`. - They don't appear on the **Extensions** page in the app dashboard. Adding or removing an endpoint file is enough, and no registration step is required.
## Step 1 | Create the endpoint file Create the backend endpoint file that handles HTTP requests. At the end of this step, you'll have a working endpoint that can respond to GET and POST requests. 1. Create a new file in the `src/pages/api/` directory with the name `.ts` in your CLI project. 2. Add endpoint handlers for the HTTP methods you want to support. Each handler receives a `request` object and returns a `Response`: ```ts import type { APIRoute } from 'astro'; export const GET: APIRoute = async ({ request }) => { console.log('Log from GET.'); // This message logs to your CLI. return new Response('Response from GET.'); // This response is visible in the browser console }; export const POST: APIRoute = async ({ request }) => { const data = await request.json(); console.log('Log POST with body: ', data); // This message logs to your CLI. return new Response(JSON.stringify(data)); // This response is visible in the browser console. }; ``` ## Step 2 | Call the endpoint from your frontend > **Note:** If you came here from [Elevate API Call Permissions](https://dev.wix.com/docs/build-apps/develop-your-app/frameworks/wix-cli/project-development/elevate-api-call-permissions.md), complete only **Step 1** above. Skip **Step 2** and return to that article, it has its own instructions for calling the endpoint from your frontend. Call your endpoint from frontend components using Wix's built-in HTTP client. At the end of this step, you'll be able to send requests to your backend endpoint and receive responses. 1. In your frontend component, use `httpClient.fetchWithAuth()` to call your endpoint: ```tsx import { httpClient } from '@wix/essentials'; function Index() { const callEndpointGET = async () => { try { const baseApiUrl = new URL(import.meta.url).origin; const res = await httpClient.fetchWithAuth(`${baseApiUrl}/api/`); const data = await res.text(); console.log('Response:', data); } catch (error) { console.error('Error:', error); } }; const callEndpointPOST = async () => { try { const baseApiUrl = new URL(import.meta.url).origin; const res = await httpClient.fetchWithAuth(`${baseApiUrl}/api/`, { method: 'POST', body: JSON.stringify({ message: 'Hello from frontend' }), }); const data = await res.json(); console.log('Response:', data); } catch (error) { console.error('Error:', error); } }; return ( ); } ``` 2. Start your local development environment to test the endpoints: ```bash npm run dev ``` 3. Press `Dashboard` to open the dashboard page in your browser, and click the buttons to execute the HTTP endpoint calls. 4. View the logs in the CLI and browser console. You should see something like: ### CLI ``` 1:13:38 PM [backend] Log from GET. 1:13:39 PM [backend] Log POST with body: { message: 'Hello from frontend' } ``` ### Browser console ``` Response: Response from GET. Response: {"message":"Hello from frontend"} ``` ## Step 3 | Build and deploy your project [Build and deploy your project](https://dev.wix.com/docs/build-apps/develop-your-app/frameworks/wix-cli/project-development/build-and-deploy-a-project-with-the-wix-cli.md) to make your endpoints available in production. Once deployed, your endpoints will be accessible at the production URLs and can handle live traffic from your site's visitors. ## Delete an HTTP endpoint To delete an HTTP endpoint from your project, delete the file under `src/pages/api/` that contains your HTTP endpoint and build and deploy again. --- > Portal Navigation: > > - Append `.md` to any URL under `https://dev.wix.com/docs/` to get its markdown version. > - Pages are either content pages (article or reference text) or menu pages (a list of links to child pages). > - To get a menu page, truncate any URL to a parent path and append `.md` (e.g. `https://dev.wix.com/docs/sdk.md`, `https://dev.wix.com/docs/sdk/core-modules.md`). > - Top-level index of all portals: https://dev.wix.com/docs/llms.txt > - Full concatenated docs: https://dev.wix.com/docs/llms-full.txt ## Resource: Migrate from HTTP Functions to HTTP Endpoints ## Article: Migrate from HTTP Functions to HTTP Endpoints ## Article Link: https://dev.wix.com/docs/build-apps/develop-your-app/develop-an-app-with-the-cli/supported-extensions/backend/http-endpoints/migrate/migrate-from-http-functions-to-http-endpoints.md ## Article Content: # Migrate from HTTP Functions to HTTP Endpoints If you're upgrading from the [Legacy Wix CLI for Apps](https://dev.wix.com/docs/wix-cli/legacy-clis/legacy-wix-cli-for-apps/about-the-legacy-wix-cli-for-apps.md), this guide helps you migrate your existing [HTTP functions](https://dev.wix.com/docs/build-apps/develop-your-app/frameworks/wix-cli/supported-extensions/backend/http-endpoints/about-http-endpoints.md) to the new Astro endpoints format. The main changes involve updating your file structure and syntax. ## Backend migration steps To migrate your HTTP functions to Astro endpoints, first update your backend code: 1. Relocate HTTP function files from `src/backend/api//api.ts` to `src/pages/api/.ts`. 2. Add the APIRoute type import: ```ts import type { APIRoute } from 'astro'; ``` 3. Change method signatures from: ```ts export async function GET(req: Request) { ``` To: ```ts export const GET: APIRoute = async ({ request }) => { ``` ## Frontend migration steps After updating your backend code, update your frontend code to call the new endpoints: Change from: ```tsx const res = await httpClient.fetchWithAuth( `${import.meta.env.BASE_API_URL}/`, ); ``` To: ```tsx const baseApiUrl = new URL(import.meta.url).origin; const res = await httpClient.fetchWithAuth(`${baseApiUrl}/api/`); ``` ## Backend example ### Previous syntax This example shows the old HTTP functions syntax used in the previous CLI version, with files located in the `src/backend/api/` directory. ```ts export async function GET(req: Request) { const url = new URL(req.url); const id = url.searchParams.get('id'); return new Response(JSON.stringify({ id })); } export async function POST(req: Request) { const data = await req.json(); return new Response(JSON.stringify({ received: data })); } ``` ### Updated syntax This example shows the new Astro endpoints syntax used in the new CLI version, with files located in the `src/pages/api/` directory. ```ts import type { APIRoute } from 'astro'; export const GET: APIRoute = async ({ request }) => { const url = new URL(request.url); const id = url.searchParams.get('id'); return new Response(JSON.stringify({ id })); }; export const POST: APIRoute = async ({ request }) => { const data = await request.json(); return new Response(JSON.stringify({ received: data })); }; ``` --- > Portal Navigation: > > - Append `.md` to any URL under `https://dev.wix.com/docs/` to get its markdown version. > - Pages are either content pages (article or reference text) or menu pages (a list of links to child pages). > - To get a menu page, truncate any URL to a parent path and append `.md` (e.g. `https://dev.wix.com/docs/sdk.md`, `https://dev.wix.com/docs/sdk/core-modules.md`). > - Top-level index of all portals: https://dev.wix.com/docs/llms.txt > - Full concatenated docs: https://dev.wix.com/docs/llms-full.txt ## Resource: Migrate from Web Methods to HTTP Endpoints ## Article: Migrate from Web Methods to HTTP Endpoints ## Article Link: https://dev.wix.com/docs/build-apps/develop-your-app/develop-an-app-with-the-cli/supported-extensions/backend/http-endpoints/migrate/migrate-from-web-methods-to-http-endpoints.md ## Article Content: # Migrate from Web Methods to HTTP Endpoints If you're upgrading from the [Legacy Wix CLI for Apps](https://dev.wix.com/docs/wix-cli/legacy-clis/legacy-wix-cli-for-apps/about-the-legacy-wix-cli-for-apps.md), this guide helps you migrate your existing [Web method extensions](https://dev.wix.com/docs/build-apps/develop-your-app/extensions/backend-extensions/apis/web-methods/about-web-method-extensions.md) to [HTTP endpoints](https://dev.wix.com/docs/build-apps/develop-your-app/frameworks/wix-cli/supported-extensions/backend/http-endpoints/about-http-endpoints.md). The main changes involve updating your file structure and syntax. ## Step 1 | Relocate your web method files Your web method files are located at `src/backend/.web.ts`. In your CLI project, create a new file in the `src/pages/api/` directory with the name `.ts`. ## Step 2 | Replace the import statement Replace the `@wix/web-methods` import statement with the `APIRoute` type. For example, the web method file uses this import: ```ts import { webMethod, Permissions } from '@wix/web-methods'; ``` HTTP endpoints use the following import: ```ts import type { APIRoute } from 'astro'; ``` ## Step 3 | Replace web method exports 1. Replace each `webMethod()` export with an HTTP method handler. 2. Each handler receives a request object. Read arguments from the `request` object. For example, extract values from the query string for `GET` requests, or from the request body for `POST` requests. 3. Implement the relevant logic and return a `Response` object with the result. For example, the web method file exports the following: ```ts import { webMethod, Permissions } from '@wix/web-methods'; export const multiply = webMethod( Permissions.Anyone, (a: number, b: number) => a * b, ); ``` The corresponding HTTP endpoint exports the following: ```ts import type { APIRoute } from 'astro'; export const POST: APIRoute = async ({ request }) => { const { a, b } = await request.json(); return new Response(JSON.stringify({ result: a * b })); }; ``` ## Step 4 | (Optional) Manage permissions Web methods specify [permissions](https://dev.wix.com/docs/build-apps/develop-your-app/extensions/backend-extensions/apis/web-methods/about-web-method-extensions.md#web-method-permissions) using the `Permissions` enum from `@wix/web-methods`. To restrict access in an HTTP endpoint, use [Get Token Info](https://dev.wix.com/docs/sdk/core-modules/essentials/auth.md#gettokeninfo) to read the caller's token and inspect its `subjectType`. > **Note:** > To enforce permissions, use [`httpClient.fetchWithAuth()`](https://dev.wix.com/docs/sdk/core-modules/essentials/http-client.md#fetchwithauth) when [calling from your frontend](#step-5--replace-web-method-imports-in-your-frontend). This passes your access token in the request to your HTTP endpoint. Without this, Get Token Info won't have a token to inspect. For example, the following web method limits access to site members: ```ts import { webMethod, Permissions } from '@wix/web-methods'; export const multiply = webMethod( Permissions.SiteMember, (a: number, b: number) => a * b, ); ``` Enforce the same permissions in an HTTP endpoint as follows: ```ts import type { APIRoute } from 'astro'; import { auth } from '@wix/essentials'; export const POST: APIRoute = async ({ request }) => { const tokenInfo = await auth.getTokenInfo(); // Restrict to site members (same intent as `Permissions.SiteMember` on the web method). if (tokenInfo.subjectType !== 'MEMBER') { return new Response('Forbidden', { status: 403 }); } // ...handler logic }; ``` ## Step 5 | Replace web method imports in your frontend In your frontend code, replace web method imports with HTTP calls. For example, the web method is called from the frontend as follows: ```ts import { multiply } from '/multiply.web'; const result = await multiply(6, 7); ``` Call an HTTP endpoint from the frontend as follows: ```ts import { httpClient } from '@wix/essentials'; const baseApiUrl = new URL(import.meta.url).origin; const res = await httpClient.fetchWithAuth(`${baseApiUrl}/api/multiply`, { method: 'POST', body: JSON.stringify({ a: 6, b: 7 }), }); const { result } = await res.json(); ``` ## Full example The following is a full example of migrating web methods to HTTP endpoints on the backend and frontend. ### Backend This example shows the backend implementation of a web method located in the `src/backend/` directory: ```ts import { webMethod, Permissions } from '@wix/web-methods'; export const multiply = webMethod( // Restrict to site members Permissions.SiteMember, (a: number, b: number) => a * b, ); ``` The equivalent HTTP endpoint is located in the `src/pages/api/` directory: ```ts import type { APIRoute } from 'astro'; import { auth } from '@wix/essentials'; export const POST: APIRoute = async ({ request }) => { const tokenInfo = await auth.getTokenInfo(); // Restrict to site members (same intent as `Permissions.SiteMember` on the web method). if (tokenInfo.subjectType !== 'MEMBER') { return new Response('Forbidden', { status: 403 }); } const { a, b } = await request.json(); return new Response(JSON.stringify({ result: a * b })); }; ``` ### Frontend This example shows a web method called from the frontend: ```ts import { multiply } from '/multiply.web'; const result = await multiply(6, 7); ``` The equivalent HTTP endpoint is called from the frontend as follows: ```ts import { httpClient } from '@wix/essentials'; const baseApiUrl = new URL(import.meta.url).origin; const res = await httpClient.fetchWithAuth(`${baseApiUrl}/api/multiply`, { method: 'POST', body: JSON.stringify({ a: 6, b: 7 }), }); const { result } = await res.json(); ``` ## See also - [About HTTP endpoints](https://dev.wix.com/docs/build-apps/develop-your-app/frameworks/wix-cli/supported-extensions/backend/http-endpoints/about-http-endpoints.md) - [About web method extensions](https://dev.wix.com/docs/build-apps/develop-your-app/extensions/backend-extensions/apis/web-methods/about-web-method-extensions.md) --- > Portal Navigation: > > - Append `.md` to any URL under `https://dev.wix.com/docs/` to get its markdown version. > - Pages are either content pages (article or reference text) or menu pages (a list of links to child pages). > - To get a menu page, truncate any URL to a parent path and append `.md` (e.g. `https://dev.wix.com/docs/sdk.md`, `https://dev.wix.com/docs/sdk/core-modules.md`). > - Top-level index of all portals: https://dev.wix.com/docs/llms.txt > - Full concatenated docs: https://dev.wix.com/docs/llms-full.txt ## Resource: Add Event Extensions with the Wix CLI ## Article: Add Event Extensions with the Wix CLI ## Article Link: https://dev.wix.com/docs/build-apps/develop-your-app/develop-an-app-with-the-cli/supported-extensions/backend/events/add-event-extensions-with-the-wix-cli.md ## Article Content: # Add Event Extensions with the Wix CLI Events are triggered when specific conditions occur in your project. These are conditions on a Wix user's site. Your project can respond to these events using event extensions. Events in the Wix CLI are built on JavaScript SDK webhooks, and event extensions subscribe your project to these webhooks behind the scenes. Learn more [about event extensions](https://dev.wix.com/docs/build-apps/develop-your-app/extensions/backend-extensions/events/about-event-extensions.md). > **Note:** Event extensions are built on [webhooks](https://dev.wix.com/docs/build-apps/develop-your-app/api-integrations/events-and-webhooks/about-webhooks.md), and changes to events automatically create a new minor app version. Learn more about [webhooks and versioning](https://dev.wix.com/docs/build-apps/develop-your-app/api-integrations/events-and-webhooks/about-webhooks.md#webhooks-and-versioning). Follow the instructions below to: 1. Create an event extension for your project. 2. Test the event extension in your project. 3. Deploy your project with the event extension. Once this task is complete, your project will have an event extension that's triggered when a specific event occurs.
**Important:** You can't have 2 event extensions listening to the same event in your app. Each event can only have one handler. This includes extensions added to your app in the [app dashboard](https://manage.wix.com/account/custom-apps), not only those in the local files for your project.
## Step 1 | Create the extension In the terminal: 1. Navigate to your project repo. 2. Run the [generate](https://dev.wix.com/docs/wix-cli/command-reference/project-commands/generate.md) command. 3. The CLI will display a menu of extensions to generate. Select **Event** and hit enter to continue. 4. The CLI will prompt you to name your event folder. This is the name of the folder in the project directory that contains the event code, and the name of the event. Only you will see this name. Upon completion, the extension files will be created in your project directory with the following structure: ```bash src/ └── extensions/ └── backend/ └── events/ └── / ├── .extension.ts └── .ts ``` > **Note:** This is the default folder structure created by the CLI. You can move these files to any location within the `src/` folder and update the references in your `extension.ts` file. Learn more about the [flexible file system](https://dev.wix.com/docs/wix-cli/guides/get-started/project-structure.md#your-custom-extension-folder). Learn more about [event extension files and code](https://dev.wix.com/docs/build-apps/develop-your-app/develop-an-app-with-the-cli/supported-extensions/backend/events/event-extension-files-and-code.md). > **For app projects**: You may need to [configure permissions for your app](https://dev.wix.com/docs/build-apps/develop-your-app/access/authorization/configure-permissions-for-your-app.md) to receive the event. ## Step 2 | Test your event extension To test your event extension you must: 1. [Release a version](https://dev.wix.com/docs/wix-cli/command-reference/project-commands/release.md) with your changes. 2. Take an action that will trigger your event. ## Build and deploy your project Once your project is ready for production, you can [build and deploy](https://dev.wix.com/docs/build-apps/develop-your-app/frameworks/wix-cli/project-development/build-and-deploy-a-project-with-the-wix-cli.md) it. >**Note:** > When you release an app project, you release a new version of the app allowing you to publish the app to the [Wix App Market](https://www.wix.com/app-market) or install it on a site with a direct install URL. You can view [your app's versions](https://manage.wix.com/app-selector?title=Select+an+App&primaryButtonText=Select+Site&actionUrl=https%3A%2F%2Fdev.wix.com%2Fapps%2F%7BappId%7D%2Fversions-app) in the app dashboard. ## Delete an event extension To delete an event extension from your project: 1. Delete the folder that contains your event extension's files. 2. Remove the import and `.use()` statements for the extension from the [`extensions.ts`](https://dev.wix.com/docs/build-apps/develop-your-app/frameworks/wix-cli/supported-extensions/about-the-extensions-ts-file.md) file.
**For app projects:** If you already have a version of your app project, you must build and deploy the project again after removing the event extension files.
## See also - [Event Extension Files and Code](https://dev.wix.com/docs/build-apps/develop-your-app/develop-an-app-with-the-cli/supported-extensions/backend/events/event-extension-files-and-code.md) - [About Events](https://dev.wix.com/docs/build-apps/develop-your-app/api-integrations/events-and-webhooks/about-events.md) - [About Event Extensions](https://dev.wix.com/docs/build-apps/develop-your-app/extensions/backend-extensions/events/about-event-extensions.md) --- > Portal Navigation: > > - Append `.md` to any URL under `https://dev.wix.com/docs/` to get its markdown version. > - Pages are either content pages (article or reference text) or menu pages (a list of links to child pages). > - To get a menu page, truncate any URL to a parent path and append `.md` (e.g. `https://dev.wix.com/docs/sdk.md`, `https://dev.wix.com/docs/sdk/core-modules.md`). > - Top-level index of all portals: https://dev.wix.com/docs/llms.txt > - Full concatenated docs: https://dev.wix.com/docs/llms-full.txt ## Resource: Event Extension Files and Code ## Article: Event Extension Files and Code ## Article Link: https://dev.wix.com/docs/build-apps/develop-your-app/develop-an-app-with-the-cli/supported-extensions/backend/events/event-extension-files-and-code.md ## Article Content: # Event Extension Files and Code When you generate an event extension, the CLI adds the following files to your project: - `.extension.ts`: Builds the [event](#event-builder). - `.ts`: Defines the [event handler logic](#event-handler). ## Event builder The `.extension.ts` file contains an event extension's builder configuration. The event builder is defined using the following schema, shown here as a TypeScript type: ```ts import { extensions } from '@wix/astro/builders'; export default extensions.event({ id: string, source: string, }); ``` Here's an example builder definition: ```ts import { extensions } from '@wix/astro/builders'; export default extensions.event({ id: '9912811d-5f5b-41f9-b4d6-ef4163b714a7', source: './extensions/backend/events/my-event/my-event.ts', }); ``` ### Builder fields The following fields can be used in the configuration object: | Field | Type | Description | |-------|------|-------------| | `id` | string | Event extension ID as a ([GUID](https://en.wikipedia.org/wiki/Universally_unique_identifier)). The ID is automatically generated and must be unique across all extensions in the project. | | `source` | string | Path to the event handler file that contains the event logic. |
**Important:** You can't have 2 event extensions listening to the same event in your app. Each event can only have one handler. This includes extensions added to your app in the [app dashboard](https://manage.wix.com/account/custom-apps), not only those in the local files for your project.
## Event handler The `.ts` file contains an event extension's handler logic. This file contains: - The relevant import statement for the event. - An event function where you can implement your custom logic. Wix calls this function when the given event occurs, passing the event object and its metadata. Event functions are documented in their module in the [JavaScript SDK reference](https://dev.wix.com/docs/sdk.md). The generated `.ts` file will contain example code for an event. The `.ts` file must be in the following format: ```ts import { } from '@wix/'; export default .((event) => { // Add your logic here }); ``` Here's an example `my-event.ts` file for the Wix CRM [onContactCreated()](https://dev.wix.com/docs/api-reference/crm/members-contacts/contacts/contacts/contact-v4/contact-created.md) event: ```ts import { contacts } from '@wix/crm'; export default contacts.onContactCreated((event) => { // Add your logic here }); ``` --- > Portal Navigation: > > - Append `.md` to any URL under `https://dev.wix.com/docs/` to get its markdown version. > - Pages are either content pages (article or reference text) or menu pages (a list of links to child pages). > - To get a menu page, truncate any URL to a parent path and append `.md` (e.g. `https://dev.wix.com/docs/sdk.md`, `https://dev.wix.com/docs/sdk/core-modules.md`). > - Top-level index of all portals: https://dev.wix.com/docs/llms.txt > - Full concatenated docs: https://dev.wix.com/docs/llms-full.txt ## Resource: Add Service Plugin Extensions with the Wix CLI ## Article: Add Service Plugin Extensions with the Wix CLI ## Article Link: https://dev.wix.com/docs/build-apps/develop-your-app/develop-an-app-with-the-cli/supported-extensions/backend/service-plugins/add-service-plugin-extensions-with-the-wix-cli.md ## Article Content: # Add Service Plugin Extensions with the Wix CLI [Service plugin extensions](https://dev.wix.com/docs/build-apps/develop-your-app/extensions/backend-extensions/service-plugins/about-service-plugin-extensions.md) are a set of APIs defined by Wix that you can use to inject custom logic into the existing backend flows of [Wix business solutions](https://dev.wix.com/docs/build-apps/develop-your-app/wix-business-solutions/about-wix-business-solutions.md) or to introduce entirely new flows to Wix sites. You can implement service plugin extensions in your project using the Wix CLI. Follow the instructions below to: 1. Create a service plugin extension for your project. 2. Test your service plugin extension. Once this task is complete, your project will have a service plugin extension with custom functions that Wix calls during a specific flow. ## Before you begin + You must have a project that was [created using the Wix CLI](https://dev.wix.com/docs/wix-cli/guides/about-the-wix-cli.md). + You must be logged into your Wix account. If you don't have one, [sign up for a Wix account](https://manage.wix.com/account/custom-apps). ## Step 1 | Create the extension In the terminal: 1. Navigate to your project repo. 1. Run the [generate](https://dev.wix.com/docs/wix-cli/command-reference/project-commands/generate.md) command. 1. The CLI will display a menu of extensions to generate. Select **Service Plugin** and hit enter to continue. 1. The CLI will prompt you to select a service plugin from a list of available service plugins. 1. The CLI will prompt you to name your service plugin. This is the name of the folder in the project repo that contains the service plugin code, and the name of the plugin that appears in your app dashboard when developing an app. Only you will see this name. Upon completion, the extension files will be created in your project directory with the following structure: ```bash src/ └── extensions/ └── backend/ └── service-plugins/ └── / ├── .extension.ts └── .ts ``` > **Note:** This is the default folder structure created by the CLI. You can move these files to any location within the `src/` folder and update the references in your `extension.ts` file. Learn more about the [flexible file system](https://dev.wix.com/docs/wix-cli/guides/get-started/project-structure.md#your-custom-extension-folder). Learn more about the [service plugin extension files](https://dev.wix.com/docs/build-apps/develop-your-app/develop-an-app-with-the-cli/supported-extensions/backend/service-plugins/service-plugin-extension-files-and-code.md). ## Step 2 | Test your service plugin extension To test your service plugin extension you must: 1. Release a version with your changes. 2. Trigger the call to your service plugin. For example, to test a service plugin extension for [Additional Fees](https://dev.wix.com/docs/sdk/backend-modules/ecom/service-plugins/additional-fees/introduction.md) that adds a $5 packaging fee to all orders: 1. Go to your site's store in the local development environment. 2. Select any product and add it to the cart, then view the cart. 3. Check if the additional fee is listed in the order summary. New service plugins or changes to existing service plugins won't take affect until you've built and released your project. ## Build and deploy your project Once your project is ready for production, you can [build and deploy](https://dev.wix.com/docs/build-apps/develop-your-app/frameworks/wix-cli/project-development/build-and-deploy-a-project-with-the-wix-cli.md) it. >**Note:** > When you release an app project, you release a new version of the app allowing you to publish the app to the [Wix App Market](https://www.wix.com/app-market) or install it on a site with a direct install URL. You can view your app's [versions](https://manage.wix.com/app-selector?title=Select+an+App&primaryButtonText=Select+Site&actionUrl=https%3A%2F%2Fdev.wix.com%2Fapps%2F%7BappId%7D%2Fversions-app) in the app dashboard. ## Delete a service plugin extension To delete a service plugin extension from your project: 1. Delete the folder under `src/extensions` that contains your service plugin extension's files. 2. Remove the import and `.use()` statements for the extension from the [`extensions.ts`](https://dev.wix.com/docs/build-apps/develop-your-app/frameworks/wix-cli/supported-extensions/about-the-extensions-ts-file.md) file.
**For app projects:** If you already have a version of your app project, you must build and deploy the project again after removing the service plugin extension files.
--- > Portal Navigation: > > - Append `.md` to any URL under `https://dev.wix.com/docs/` to get its markdown version. > - Pages are either content pages (article or reference text) or menu pages (a list of links to child pages). > - To get a menu page, truncate any URL to a parent path and append `.md` (e.g. `https://dev.wix.com/docs/sdk.md`, `https://dev.wix.com/docs/sdk/core-modules.md`). > - Top-level index of all portals: https://dev.wix.com/docs/llms.txt > - Full concatenated docs: https://dev.wix.com/docs/llms-full.txt ## Resource: Service Plugin Extension Files and Code ## Article: Service Plugin Extension Files and Code ## Article Link: https://dev.wix.com/docs/build-apps/develop-your-app/develop-an-app-with-the-cli/supported-extensions/backend/service-plugins/service-plugin-extension-files-and-code.md ## Article Content: # Service Plugin Extension Files and Code When you generate a service plugin extension, the CLI adds the following files to your project: - `.extension.ts`: Builds the [service plugin](#service-plugin-builder). - `.ts`: Defines the [service plugin handler logic](#service-plugin-handler). ## Service plugin builder The `.extension.ts` file contains the service plugin builder configuration. This file provides all required configuration for your plugin. The service plugin builder is defined using the following schema, shown here as a TypeScript type: ```ts import { extensions } from '@wix/astro/builders'; export default extensions.({ id: string, name: string, description: string, source: string, // Additional fields may vary by service plugin type }); ``` Here's an example builder definition for an eCommerce Shipping Rates service plugin: ```ts import { extensions } from '@wix/astro/builders'; export default extensions.ecomShippingRates({ id: '00eeeac1-d01a-4d96-9d76-5617d8658735', name: 'my-service-plugin', description: 'Short description about this shipping provider', fallbackDefinitionMandatory: false, source: './extensions/backend/service-plugins/my-service-plugin/my-service-plugin.ts', }); ``` ### Builder fields The following fields are commonly used in the configuration object: | Field | Type | Description | |-------|------|-------------| | `id` | string | Service plugin ID as a ([GUID](https://en.wikipedia.org/wiki/Universally_unique_identifier)). The ID is automatically generated and must be unique across all extensions in the project. | | `name` | string | The service plugin name. | | `description` | string | A short description of what the service plugin does. | | `source` | string | Path to the service plugin handler file that contains the plugin logic. | Additional fields may be required or optional depending on the specific service plugin type. You can find the details for each field by locating your service plugin in [this table](https://dev.wix.com/docs/build-apps/get-started/overview/how-apps-extend-wix.md#service-plugins) and clicking on the link to view its documentation. ## Service plugin handler The `.ts` file contains the service plugin handler logic. This file contains: - The relevant import statement for the service plugin. - Handler functions that Wix calls automatically when the relevant site action triggers them. These functions are where you add your custom logic. The generated `.ts` file will contain example code with empty placeholders for each of the functions. The `.ts` file must be in the following format: ```ts import { } from '@wix//service-plugins'; .provideHandlers({ : async ({ request, metadata }) => { // Add your logic here }, }); ``` Here's an example `my-service-plugin.ts` file for the eCommerce [Shipping Rates](https://dev.wix.com/docs/api-reference/business-solutions/e-commerce/extensions/shipping-rates/shipping-rates-integration-service-plugin/introduction.md) service plugin: ```ts import { shippingRates } from '@wix/ecom/service-plugins'; export default shippingRates.provideHandlers({ getShippingRates: async ({ request, metadata }) => { return { shippingRates: [], }; }, }); ``` Your custom logic should be placed inside each handler function. To find out what your function receives in the parameters and what it must return, see the documentation for your specific service plugin. Locate your service plugin in [this table](https://dev.wix.com/docs/build-apps/get-started/overview/how-apps-extend-wix.md#service-plugins) and click on the link to view its documentation, then navigate to the specific function in the menu. --- > Portal Navigation: > > - Append `.md` to any URL under `https://dev.wix.com/docs/` to get its markdown version. > - Pages are either content pages (article or reference text) or menu pages (a list of links to child pages). > - To get a menu page, truncate any URL to a parent path and append `.md` (e.g. `https://dev.wix.com/docs/sdk.md`, `https://dev.wix.com/docs/sdk/core-modules.md`). > - Top-level index of all portals: https://dev.wix.com/docs/llms.txt > - Full concatenated docs: https://dev.wix.com/docs/llms-full.txt ## Resource: About Site Extensions in the Wix CLI ## Article: About Site Extensions in the Wix CLI ## Article Link: https://dev.wix.com/docs/build-apps/develop-your-app/develop-an-app-with-the-cli/supported-extensions/site/about-site-extensions-in-the-wix-cli.md ## Article Content: # About Site Extensions in the Wix CLI The Wix CLI allows you to add [site extensions](https://dev.wix.com/docs/build-apps/develop-your-app/extensions/site-extensions/about-site-extensions.md) to your app project. The following site extensions are available in the Wix CLI: - [Custom element extensions](#custom-element-extensions) - [Editor React Component extensions](#editor-react-component-extensions) - [Embedded script extensions](#embedded-script-extensions) - [Site plugin extensions](https://dev.wix.com/docs/build-apps/develop-your-app/extensions/site-extensions/site-plugins/about-site-plugin-extensions.md) You can add these extensions using the [generate](https://dev.wix.com/docs/wix-cli/command-reference/project-commands/generate.md) command. ## Custom element extensions Custom elements are draggable UI components built with the [web components standard](https://developer.mozilla.org/en-US/docs/Web/API/Web_components/Using_custom_elements) that Wix site owners can add to pages on their website. They enhance a site's functionality by displaying content or enabling site visitors to perform various tasks. Available on Wix Studio, Wix Harmony, and for the Wix App Market. Learn more about [adding a custom element extension](https://dev.wix.com/docs/build-apps/develop-your-app/develop-an-app-with-the-cli/supported-extensions/site/custom-elements/add-a-custom-element-extension-with-the-wix-cli.md). ## Editor React Component extensions [Editor React Components](https://dev.wix.com/docs/build-apps/develop-your-app/extensions/site-extensions/editor-react-components/about-editor-react-components.md) are custom site widgets built in React for [Wix Harmony](https://dev.wix.com/docs/build-apps/get-started/overview/about-wix-harmony-and-apps.md), Wix's AI-powered editor. The editor automatically generates settings panels and controls from your component's manifest, so you don't build panel UI yourself. Editor React Components aren't supported on Wix Editor or Wix Studio sites. Learn more about [adding an Editor React Component extension](https://dev.wix.com/docs/build-apps/develop-your-app/develop-an-app-with-the-cli/supported-extensions/site/editor-react-components/add-an-editor-react-component-extension-with-the-wix-cli.md). To compare with custom elements, see [Custom Elements vs. Editor React Components](https://dev.wix.com/docs/build-apps/develop-your-app/extensions/site-extensions/custom-elements-vs-editor-react-components.md). ## Embedded script extensions An embedded script is an app extension that injects an HTML code fragment into the DOM of a site. Embedded scripts are used for analytics, accessing site data, interacting with other apps, customizing site behavior, and more. The CLI simplifies setup, testing, and deployment for embedded script extensions: + **Single-command setup:** Generate an embedded script extension in your app with one command. + **Easy, early testing:** Test the extension on a development site before building an app. You can specify values for dynamic parameters to use during testing. + **Use local files:** Reference any file in your app project's directory from your HTML code with a relative link. There's no need for external hosting or CORS handling. + **Simple embedding:** Offload the responsibility for embedding the script to the user, avoiding complex authentication procedures. Learn more about [adding an embedded script extension](https://dev.wix.com/docs/build-apps/develop-your-app/develop-an-app-with-the-cli/supported-extensions/site/embedded-scripts/add-an-embedded-script-extension-with-the-wix-cli.md). ## Site plugin extensions With site plugins, you can create interactive and feature-rich widgets that seamlessly integrate into Wix’s [business solutions](https://support.wix.com/en/business-solutions-apps) such as Wix Stores and Wix Bookings, extending their functionality and user experience. You can implement site plugin extensions in your app project using the CLI. Learn more about [site plugin extensions](https://dev.wix.com/docs/build-apps/develop-your-app/develop-an-app-with-the-cli/supported-extensions/site/site-plugins/add-a-site-plugin-extension-with-the-wix-cli.md). ## See also - [Add a Custom Element Extension with the Wix CLI](https://dev.wix.com/docs/build-apps/develop-your-app/develop-an-app-with-the-cli/supported-extensions/site/custom-elements/add-a-custom-element-extension-with-the-wix-cli.md) - [Add an Editor React Component Extension with the Wix CLI](https://dev.wix.com/docs/build-apps/develop-your-app/develop-an-app-with-the-cli/supported-extensions/site/editor-react-components/add-an-editor-react-component-extension-with-the-wix-cli.md) - [Add an Embedded Script Extension with the Wix CLI](https://dev.wix.com/docs/build-apps/develop-your-app/develop-an-app-with-the-cli/supported-extensions/site/embedded-scripts/add-an-embedded-script-extension-with-the-wix-cli.md) --- > Portal Navigation: > > - Append `.md` to any URL under `https://dev.wix.com/docs/` to get its markdown version. > - Pages are either content pages (article or reference text) or menu pages (a list of links to child pages). > - To get a menu page, truncate any URL to a parent path and append `.md` (e.g. `https://dev.wix.com/docs/sdk.md`, `https://dev.wix.com/docs/sdk/core-modules.md`). > - Top-level index of all portals: https://dev.wix.com/docs/llms.txt > - Full concatenated docs: https://dev.wix.com/docs/llms-full.txt ## Resource: Identify the App Instance in a Site Extension ## Article: Identify the App Instance in a Site Extension ## Article Link: https://dev.wix.com/docs/build-apps/develop-your-app/develop-an-app-with-the-cli/supported-extensions/site/identify-the-app-instance-in-a-site-extension.md ## Article Content: # Identify the App Instance in a Site Extension For security reasons, [app instance ID](https://dev.wix.com/docs/build-apps/develop-your-app/access/app-instances/about-app-instances.md) (`instanceId`) isn't directly accessible in [site extensions](https://dev.wix.com/docs/build-apps/develop-your-app/frameworks/wix-cli/supported-extensions/site/about-site-extensions-in-the-wix-cli.md) or settings panels. Instead, you can securely extract it by sending a Wix access token to an [HTTP endpoint](https://dev.wix.com/docs/build-apps/develop-your-app/develop-an-app-with-the-cli/supported-extensions/backend/http-endpoints/about-http-endpoints.md). The endpoint can decode the token, get the instance ID or instance data, and perform any necessary business logic. This article explains how to: * **Backend:** Create an HTTP endpoint to identify the app instance. * **Frontend:** Pass a Wix access token from your custom element to your HTTP endpoint. ## Step 1 | Create an HTTP endpoint To securely identify the app instance: 1. Create an [HTTP endpoint](https://dev.wix.com/docs/build-apps/develop-your-app/develop-an-app-with-the-cli/supported-extensions/backend/http-endpoints/about-http-endpoints.md) in your project's `src/pages/api/` directory. 1. In your HTTP endpoint file, import the `auth` submodule from the Essentials API: ```javascript import { auth } from "@wix/essentials"; ``` 1. Depending on your [use case](https://dev.wix.com/docs/build-apps/develop-your-app/access/app-instances/about-app-instances.md#example-use-cases-1), you may only need `instanceId` or you may need more detailed app instance data. * **To extract `instanceId`:** In your Astro endpoint's `GET` function, call [`getTokenInfo()`](https://dev.wix.com/docs/sdk/core-modules/essentials/auth.md#gettokeninfo) to extract `instanceId` from the access token. ```javascript const tokenInfo = await auth.getTokenInfo(); const instanceId = tokenInfo.instanceId; ``` * **To fetch instance data:** Elevate API call permissions to an app identity. Then, call [`getAppInstance()`](https://dev.wix.com/docs/sdk/backend-modules/app-management/app-instances/get-app-instance.md). Elevation is necessary because access tokens sent from site extensions are tied to a site visitor or member [identity](https://dev.wix.com/docs/build-apps/develop-your-app/access/about-identities.md), which don't have access to instance data. ```javascript import { appInstances } from "@wix/app-management"; import { auth } from "@wix/essentials"; // Elevate permissions in your Astro endpoint's GET function const elevatedGetAppInstance = auth.elevate(appInstances.getAppInstance); const instanceResponse = await elevatedGetAppInstance(); ``` ## Step 2 | Pass a Wix access token to your Astro endpoint To pass a Wix access token from your site extension to your Astro endpoint: 1. Add a [custom element](https://dev.wix.com/docs/build-apps/develop-your-app/develop-an-app-with-the-cli/supported-extensions/site/custom-elements/add-a-custom-element-extension-with-the-wix-cli.md) site extension. If you already have one, skip to the next step. 2. In your site extension component file, import the `httpClient` submodule from the [Essentials API](https://dev.wix.com/docs/sdk/core-modules/essentials/introduction.md). In `element.tsx`: ```javascript import { httpClient } from '@wix/essentials'; ``` 3. Call [`fetchWithAuth()`](https://dev.wix.com/docs/sdk/core-modules/essentials/http-client.md#fetchwithauth) to send a request to your Astro endpoint with a Wix access token. ```javascript const response = await httpClient.fetchWithAuth(`${import.meta.env.BASE_API_URL}/api/`); ``` For custom elements with settings panels, you can also call `fetchWithAuth()` from your `panel.tsx` file to get `instanceId` in the settings panel. ## Examples Depending on your [use case](https://dev.wix.com/docs/build-apps/develop-your-app/access/app-instances/about-app-instances.md#example-use-cases-1), the logic of your Astro endpoint will vary. For example, you may only need to extract `instanceId` and then use it to make a request to your own database. Alternatively, you may wish to request app instance data from Wix, in which case you'd need to elevate your access token. See the relevant example for your use case: * [Astro Endpoint: Extract `instanceId`](#astro-endpoint-extract-instanceid) * [Astro Endpoint: Fetch instance data](#astro-endpoint-fetch-instance-data) * [Custom Element: Call your Astro endpoint](#custom-element-call-your-astro-endpoint) ### Astro Endpoint: Extract `instanceId` The following example is based on an Astro endpoint located at `src/pages/api/get-instance.ts`. The endpoint extracts `instanceId` from the access token provided by the frontend request. ```javascript import { auth } from "@wix/essentials"; // Edit this code based on your business logic const mockDatabaseQuery = async (instanceId) => { console.log(`Mock database query with instance ID: ${instanceId}`); if (instanceId) { return { status: "Success", }; } else { return { status: "No instance ID.", }; } }; export async function GET({ request }) { try { // Extract the app instance ID from the access token const tokenInfo = await auth.getTokenInfo(); const instanceId = tokenInfo.instanceId; console.log("Instance ID:", instanceId); // Edit this code based on your business logic const data = await mockDatabaseQuery(instanceId); return new Response(JSON.stringify(data), { status: 200, headers: { "Content-Type": "application/json" }, }); } catch (error) { console.error("Error decoding token:", error); return new Response(JSON.stringify({ error: "Failed to process request" }), { status: 500, headers: { "Content-Type": "application/json" }, }); } } ``` ### Astro Endpoint: Fetch instance data The following example is based on an Astro endpoint located at `src/pages/api/get-instance.ts`. The endpoint elevates permissions and requests instance data from Wix. ```javascript import { auth } from "@wix/essentials"; import { appInstances } from "@wix/app-management"; export async function GET({ request }) { try { const elevatedGetAppInstance = auth.elevate(appInstances.getAppInstance); const instanceResponse = await elevatedGetAppInstance(); return new Response(JSON.stringify(instanceResponse.data), { status: 200, headers: { "Content-Type": "application/json" }, }); } catch (error) { console.error("Error decoding token:", error); return new Response(JSON.stringify({ error: "Failed to process request" }), { status: 500, headers: { "Content-Type": "application/json" }, }); } } ``` ### Custom Element: Call your Astro endpoint The following example creates a custom element that makes a request to the `get-instance` Astro endpoint. ```javascript import React, { useState, useEffect } from 'react'; import reactToWebComponent from 'react-to-webcomponent'; import ReactDOM from 'react-dom'; import styles from './element.module.css'; import { httpClient } from '@wix/essentials'; interface Props { displayName: string; } const CustomElement: React.FC = ({ displayName }) => { const [instanceData, setInstanceData] = useState(null); const [loading, setLoading] = useState(true); const [error, setError] = useState(null); useEffect(() => { const callMyAstroEndpoint = async () => { try { // Send the access token to your Astro endpoint const response = await httpClient.fetchWithAuth(`${import.meta.env.BASE_API_URL}/api/get-instance`); const data = await response.json(); setInstanceData(data); setLoading(false); } catch (err) { console.error("Error calling get-instance:", err); setError("Failed to fetch instance data."); setLoading(false); } }; callMyAstroEndpoint(); }, []); return (

Hello {displayName || 'Wix CLI'}

{loading ? (

Loading instance data...

) : error ? (

{error}

) : (

Success!

)}
); }; const customElement = reactToWebComponent( CustomElement, React, ReactDOM as any, { props: { displayName: 'string', }, } ); export default customElement; ``` ## See also * [About Site Extensions in the Wix CLI](https://dev.wix.com/docs/build-apps/develop-your-app/frameworks/wix-cli/supported-extensions/site/about-site-extensions-in-the-wix-cli.md) * [About App Instances](https://dev.wix.com/docs/build-apps/develop-your-app/access/app-instances/about-app-instances.md) --- > Portal Navigation: > > - Append `.md` to any URL under `https://dev.wix.com/docs/` to get its markdown version. > - Pages are either content pages (article or reference text) or menu pages (a list of links to child pages). > - To get a menu page, truncate any URL to a parent path and append `.md` (e.g. `https://dev.wix.com/docs/sdk.md`, `https://dev.wix.com/docs/sdk/core-modules.md`). > - Top-level index of all portals: https://dev.wix.com/docs/llms.txt > - Full concatenated docs: https://dev.wix.com/docs/llms-full.txt ## Resource: Add an Embedded Script Extension with the Wix CLI ## Article: Add an Embedded Script Extension with the Wix CLI ## Article Link: https://dev.wix.com/docs/build-apps/develop-your-app/develop-an-app-with-the-cli/supported-extensions/site/embedded-scripts/add-an-embedded-script-extension-with-the-wix-cli.md ## Article Content: # Add an Embedded Script Extension with the Wix CLI An embedded script is an app extension that injects an HTML code fragment into the DOM of your users' sites. Unlike other extensions, embedded scripts are not fully configured during app installation, and require an additional step to embed the code fragment. For general information about this extension type, read [About Embedded Scripts](https://dev.wix.com/docs/build-apps/develop-your-app/extensions/site-extensions/embedded-scripts/about-embedded-scripts.md). Follow the instructions below to: 1. Create an embedded script extension for a Wix CLI app project. 2. Prepare your project for production. Once this task is complete, your project will have an embedded script extension that injects its HTML code fragment into the DOM of every page of your users' sites. ## Step 1 | Create the extension In the terminal: 1. Navigate to your project repo. 2. Run the [generate](https://dev.wix.com/docs/wix-cli/command-reference/project-commands/generate.md) command and follow the prompts to create an embedded script extension. Select any [script type and placement](https://dev.wix.com/docs/build-apps/develop-your-app/develop-an-app-with-the-cli/supported-extensions/site/embedded-scripts/embedded-script-extension-files-and-code.md#embeddedjson). Upon completion, the extension files will be created in your project directory with the following structure: ```bash src/ └── extensions/ └── site/ └── embedded-scripts/ └── / ├── .extension.ts └── .html ``` > **Note:** This is the default folder structure created by the CLI. You can move these files to any location within the `src/` folder and update the references in your `extension.ts` file. Learn more about the [flexible file system](https://dev.wix.com/docs/wix-cli/guides/project-structure/project-structure.md). Learn more about the [embedded script extension files](https://dev.wix.com/docs/build-apps/develop-your-app/develop-an-app-with-the-cli/supported-extensions/site/embedded-scripts/embedded-script-extension-files-and-code.md). ## Step 2 | Load the embedded script in your code Creating the extension in Step 1 only defines the script. It doesn't inject it into the site. To load the script into the site, either you or the Wix user must call the [`embedScript()`](https://dev.wix.com/docs/api-reference/app-management/embedded-scripts/embed-script.md) method. Without this call, the script won't run on the site. When calling this method, specify the `parameters` object with key-value pairs for any [dynamic parameters](https://dev.wix.com/docs/build-apps/develop-your-app/develop-an-app-with-the-cli/supported-extensions/site/embedded-scripts/embedded-script-extension-files-and-code.md#using-dynamic-parameters-in-your-html-code) referenced in your embedded script's HTML code. The parameter values are loaded when the method is called. ### Let the site owner embed the script (recommended) If your app project has a dashboard page, you have the option to shift responsibility for this last configuration step onto site owners. > **Note**: If an app project has a dashboard page and an embedded script extension, site owners will automatically be directed to the app's dashboard page after installing the app. This API call is also used to specify the value of any dynamic parameters. For more information about using dynamic parameters, see [Using dynamic parameters in your HTML code](https://dev.wix.com/docs/build-apps/develop-your-app/develop-an-app-with-the-cli/supported-extensions/site/embedded-scripts/embedded-script-extension-files-and-code.md#using-dynamic-parameters-in-your-html-code). To use `embedScript()` in your app's dashboard page: 1. Open the dashboard page component file in your `src/dashboard/pages` folder. > **Note**: By default, the CLI generates this file as `page.tsx` with a component named `Index`, but you may have renamed these during setup. 2. Add the following import statement at the top of your page: ```tsx import { embeddedScripts } from "@wix/app-management"; ``` 3. Inside your dashboard page component, add the following code before the return statement: ```tsx const { embedScript } = embeddedScripts; ``` 4. Add the [`Embed Script`](https://dev.wix.com/docs/api-reference/app-management/embedded-scripts/embed-script.md) call somewhere in your component's code. For example, add a call to action with instructions to click a button to complete your setup. Then, when the site owner clicks the button, they call the method. If your project contains only one embedded script, call the method in the following format: ```tsx await embedScript({ parameters: { "": "", }, }); ``` If your app contains more than one embedded script, you must also pass a `componentId` using the `id` value defined in the script's `.extension.ts` file (the `id` property in the `extensions.embeddedScript()` call). In this situation, your call should be in the following format: ```tsx await embedScript( { parameters: { "": "", "": "" } }, { options: { "componentId": } } ) ``` > **Note**: On the **Extensions** page in the app dashboard, this ID is called extension ID. Make sure `parameters` contains all the dynamic parameters referenced in your embedded script. Omitting a parameter results in an error, and the script isn't embedded.
**Warning:** If your project only has 1 embedded script, don't pass the `componentId` in the request body. This action could break your app in production. The `componentId` is only relevant for projects with more than 1 embedded script.
**Example component:** ```tsx const Index: FC = () => { const { embedScript } = embeddedScripts; async function handleButtonClick(){ dashboard.showToast({ message: 'Embedded script activated!', }); await embedScript({ parameters: { "": "", }, }); } return ( // Your component code with a button that uses an onClick handler to call handleButtonClick. ); }; ```
**Important:** The `Embed Script` call won't work until you run [`release`](https://dev.wix.com/docs/wix-cli/command-reference/project-commands/release.md) to create an app version. The `release` command registers your embedded script component in your app's configuration. Running `preview` alone uploads your code but does not register extensions. See [Build and Deploy](#build-and-deploy-your-project).
For a practical example of this configuration, see the [Mixpanel Analytics template](https://github.com/wix/cli-app-templates/tree/master/mixpanel-analytics). ### Embed a script as an app developer You can also call the [Embed Script](https://dev.wix.com/docs/api-reference/app-management/embedded-scripts/embed-script.md) method from your server once the app is installed on a user's site. This requires an access token obtained through the [OAuth process](https://dev.wix.com/docs/build-apps/develop-your-app/access/authentication/about-oauth.md). ## Build and deploy your project Once your project is ready, you can [build and deploy](https://dev.wix.com/docs/build-apps/develop-your-app/frameworks/wix-cli/project-development/build-and-deploy-a-project-with-the-wix-cli.md) it. > **Note:** > When you release an app project, you release a new version of the app allowing you to publish the app to the [Wix App Market](https://www.wix.com/app-market) or install it on a site with a direct install URL. You can view [your app's versions](https://manage.wix.com/app-selector?title=Select+an+App&primaryButtonText=Select+Site&actionUrl=https%3A%2F%2Fdev.wix.com%2Fapps%2F%7BappId%7D%2Fversions-app) in the app dashboard. For more information about building and deploying your app, see [Build and Deploy an App with the CLI](https://dev.wix.com/docs/build-apps/develop-your-app/frameworks/wix-cli/project-development/build-and-deploy-a-project-with-the-wix-cli.md). ## Delete an embedded script extension To delete an existing embedded script extension from your app: 1. Delete the folder that contains your embedded script's files. 2. Remove the import and `.use()` statements for the extension from the [`extensions.ts`](https://dev.wix.com/docs/build-apps/develop-your-app/frameworks/wix-cli/supported-extensions/about-the-extensions-ts-file.md) file.
__Important:__ If you've already created a version of your app, deleting an embedded script's files from your project does not remove the embedded script from your app's latest version in the app dashboard. To remove the embedded script, create a new version after deleting the [embedded script's files](https://dev.wix.com/docs/build-apps/develop-your-app/develop-an-app-with-the-cli/supported-extensions/site/embedded-scripts/embedded-script-extension-files-and-code.md).
## See also - [Embedded Script Extension Files and Code](https://dev.wix.com/docs/build-apps/develop-your-app/develop-an-app-with-the-cli/supported-extensions/site/embedded-scripts/embedded-script-extension-files-and-code.md) - [Embed Script API reference](https://dev.wix.com/docs/api-reference/app-management/embedded-scripts/embed-script.md) - [Analyze User Behavior Using Embedded Scripts](https://dev.wix.com/docs/build-apps/develop-your-app/extensions/site-extensions/embedded-scripts/analyze-user-behavior-using-embedded-scripts.md) --- > Portal Navigation: > > - Append `.md` to any URL under `https://dev.wix.com/docs/` to get its markdown version. > - Pages are either content pages (article or reference text) or menu pages (a list of links to child pages). > - To get a menu page, truncate any URL to a parent path and append `.md` (e.g. `https://dev.wix.com/docs/sdk.md`, `https://dev.wix.com/docs/sdk/core-modules.md`). > - Top-level index of all portals: https://dev.wix.com/docs/llms.txt > - Full concatenated docs: https://dev.wix.com/docs/llms-full.txt ## Resource: Embedded Script Extension Files and Code ## Article: Embedded Script Extension Files and Code ## Article Link: https://dev.wix.com/docs/build-apps/develop-your-app/develop-an-app-with-the-cli/supported-extensions/site/embedded-scripts/embedded-script-extension-files-and-code.md ## Article Content: # Embedded Script Extension Files and Code [Add a new embedded script](https://dev.wix.com/docs/build-apps/develop-your-app/develop-an-app-with-the-cli/supported-extensions/site/embedded-scripts/add-an-embedded-script-extension-with-the-wix-cli.md) to your CLI project with the [generate](https://dev.wix.com/docs/wix-cli/command-reference/project-commands/generate.md) command and selecting **Embedded Script**. The CLI generates this directory structure in your project repo: In the embedded script folder, the following files are created: + An `embedded.extension.ts` file that defines a builder containing the configuration settings of your embedded script. + An `embedded.html` file that contains the HTML code you wish to inject into a site. It's possible to create each of these files yourself, but we don't recommend it for a couple of reasons: - You're more likely to make errors in the filepaths if you add the files and folders yourself. If the filepaths are incorrect, the CLI can't detect the embedded script and it won't work. - The auto-generated files offer template code that helps you get started developing. ## embedded.html The `embedded.html` file contains the HTML code you wish to inject. Your code is added to the page's head or body depending on your configuration. In your HTML code, you can: - [Reference local files](#referencing-local-files-in-your-html-code) - [Use dynamic parameters](#using-dynamic-parameters-in-your-html-code) - [Add global CSS](#adding-global-css-to-your-html-code) ### Referencing local files in your HTML code Wix hosts and deploys every file in your project unless you specify otherwise, including any that you add. Your HTML code can reference these files using a relative path. When referencing local files in a ` ``` > **Note:** TypeScript files are supported. ### Using dynamic parameters in your HTML code Dynamic parameters are placeholders in your code that allow for the injection of custom information specific to each site where the code is deployed. Dynamic parameters must: - Be strings. - Contain only alphanumeric characters (no special characters or spaces). - Be wrapped in double curly braces (`{{`). - Be enclosed in quotes (`"`) to prevent code evaluation. - Be declared in the `parameters` object when calling [`embedScript()`](https://dev.wix.com/docs/sdk/backend-modules/app-management/embedded-scripts/embed-script.md). Learn more about [preparing your app for production](https://dev.wix.com/docs/build-apps/develop-your-app/frameworks/wix-cli/project-development/build-and-deploy-a-project-with-the-wix-cli.md). For example, the following code contains the dynamic parameters `googleTag` and `userName`: ```tsx ``` ### Adding global CSS to your HTML code You can add CSS directly to your `embedded.html` file, or you can reference a CSS stylesheet with a link. For example: ```tsx ``` This CSS applies to a site globally. For example, the following code makes the background of every page red: ```tsx #tuckg { background: red; } ``` ## embedded.extension.ts The `embedded.extension.ts` file configures the settings for your embedded script. This file is required, so don't delete it after the embedded script is generated. If you add your own files, you must include `embedded.extension.ts`. When you generate a new embedded script in your project, you'll see the following code in `embedded.extension.ts`: ```typescript import { extensions } from "@wix/astro/builders"; export default extensions.embeddedScript({ id: "cc5c768a-ab95-4b57-af11-612255b50d22", name: "My Script", placement: "HEAD", scriptType: "ESSENTIAL", source: "./extensions/site/embedded-scripts/embedded/embedded.html", }); ``` You can edit the configuration object and add properties as follows: | Field | Type | Description | |----------------|--------|-----------------------------------------------------------------------------------------------------------------------------------------------------------------------------------------------------------------------------------------------------------------------------------------------------------------------------------------------------------------------------------------------------------------------------------------------------------| | `id` | string | A unique identifier for your script. This is a randomly generated GUID. | | `name` | string | The name of your script as it will appear in your [app's dashboard](https://manage.wix.com/account/custom-apps). It can only contain letters and the hyphen (-) character. A descriptive name will help you identify your embedded script in your Extensions page. | | `scriptType` | enum | Used by consent management apps to determine whether site visitors consent to having your script run during their visit. Possible values are:
  • `"ESSENTIAL"`: Enables site visitors to move around the site and use essential features like secure and private areas crucial to the functioning of the site.
  • `"FUNCTIONAL"`: Remembers choices site visitors make to improve their experience, such as language.
  • `"ANALYTICS"`: Provides statistics to the site owner on how visitors use the site, such as which pages they visit. This helps improve the site by identifying errors and performance issues.
  • `"ADVERTISING"`: Provides visitor information to the site owner to help market their products, such as data on the impact of marketing campaigns, re-targeted advertising, and so on.
**About types**
An embedded script must have a type. If your script falls into more than one type, choose the option closest to the bottom of the list above. For example, if your script has **Advertising** and **Analytics** aspects, choose **Advertising** as its type. It's unlikely that you'll need to mark it as **Essential**. | | `placement` | enum | Indicates where in the page's DOM the HTML code will be injected. Possible values are:
  • `"HEAD"`: Injects the code between the page's `` and `` tags. Best used for analytics or early initialization.
  • `"BODY_START"`: Injects the code immediately after the page's opening `` tag. Best used for critical functionality and noscript.
  • `"BODY_END"`: Injects the code immediately before the page's closing `` tag. Best used for performance and non-blocking scripts.
| ## Setting dynamic parameter values You can set dynamic parameter values to use in the script when it's embedded in a site. When calling the [`embedScript()`](https://dev.wix.com/docs/sdk/backend-modules/app-management/embedded-scripts/embed-script.md) method, specify a `parameters` object and list your dynamic parameters in key-value pairs. Learn more about [preparing your project for production](https://dev.wix.com/docs/build-apps/develop-your-app/frameworks/wix-cli/project-development/build-and-deploy-a-project-with-the-wix-cli.md). --- > Portal Navigation: > > - Append `.md` to any URL under `https://dev.wix.com/docs/` to get its markdown version. > - Pages are either content pages (article or reference text) or menu pages (a list of links to child pages). > - To get a menu page, truncate any URL to a parent path and append `.md` (e.g. `https://dev.wix.com/docs/sdk.md`, `https://dev.wix.com/docs/sdk/core-modules.md`). > - Top-level index of all portals: https://dev.wix.com/docs/llms.txt > - Full concatenated docs: https://dev.wix.com/docs/llms-full.txt ## Resource: Add a Site Plugin Extension with the Wix CLI ## Article: Add a Site Plugin Extension with the Wix CLI ## Article Link: https://dev.wix.com/docs/build-apps/develop-your-app/develop-an-app-with-the-cli/supported-extensions/site/site-plugins/add-a-site-plugin-extension-with-the-wix-cli.md ## Article Content: # Add a Site Plugin Extension with the Wix CLI The Wix CLI makes it easy to add and develop [site plugins](https://dev.wix.com/docs/build-apps/develop-your-app/extensions/site-extensions/site-plugins/about-site-plugin-extensions.md) in your app project. These are considered app extensions, and appear on the **Extensions** page in your [app's dashboard](https://manage.wix.com/account/custom-apps). With site plugins, you can create interactive and feature-rich components that seamlessly [integrate into Wix’s business solutions](https://dev.wix.com/docs/build-apps/get-started/overview/integrating-with-wix-s-business-solutions.md), such as Wix Stores, Wix Bookings, and Checkout & Orders, extending their functionality and user experience. Wix users can easily place site plugins into predefined **slots** (UI placeholders) within apps built by Wix, using the plugin explorer available in all Wix editors. Site plugins in the CLI are built with [custom element](https://developer.mozilla.org/en-US/docs/Web/API/Web_components/Using_custom_elements) technology. The custom element is essentially a new HTML tag that you define, which is made available in the Wix editors as a plugin. The Wix CLI creates the necessary files with template code so you can easily start developing your site plugin. It also calls [`define()`](https://developer.mozilla.org/en-US/docs/Web/API/CustomElementRegistry/define) for the custom element that the site plugin is built on, so you don't need to explicitly call it in your code. Follow the instructions below to: 1. Add a site plugin to your app project. 1. Test the site plugin on a site. 1. Deploy your project with the site plugin. ## Step 1 | Add a site plugin to your app In the terminal: 1. Navigate to your project repo. 1. Run the [generate](https://dev.wix.com/docs/wix-cli/command-reference/project-commands/generate.md) command. The CLI displays a menu of extensions to generate. Select **Site Plugin** to continue. The CLI then prompts you for the following items: + **Site plugin folder**: The name of the folder in the project repo that contains the custom element code that the site plugin is built on. + **Site plugin name**: The name of the plugin that appears in the `your-plugin-name.extension.ts` configuration file, and in the app dashboard. + **Wix app**: The Wix business solution (app made by Wix) whose slot you want to add your plugin to. + **Slot**: The slot you want to add your plugin to. Use the arrow keys to navigate the list. > **Note:** You can only choose one slot when generating your plugin, however, you can add more slots later by adding them to the plugin's [`your-plugin-name.extension.ts`](https://dev.wix.com/docs/build-apps/develop-your-app/frameworks/wix-cli/supported-extensions/about-the-extensions-ts-file.md) file. Upon completion, the extension files will be created in your project directory with the following structure: ```bash . └── / public/ └── your-plugin-name-logo.svg | src/ └── extensions/ └── site/ └── plugins/ └── / ├── .extension.ts ├── .tsx ├── .panel.tsx ``` > **Note:** This is the default folder structure created by the CLI. You can move these files to any location within the `src/` folder and update the references in your `extension.ts` file. Learn more about the [flexible file system](https://dev.wix.com/docs/wix-cli/guides/project-structure/project-structure.md). Learn more about the [site plugin extension files](https://dev.wix.com/docs/build-apps/develop-your-app/develop-an-app-with-the-cli/supported-extensions/site/site-plugins/site-plugin-extension-files-and-code.md). ## Step 2 | Test your site plugin Follow the steps below to test your site plugin: 1. Run the [dev](https://dev.wix.com/docs/wix-cli/command-reference/project-commands/dev.md) command. 1. Select the option in the CLI menu to view your site plugin in the editor. This opens the test site editor in your local development environment. 1. Navigate to the page that contains your plugin slot and click on the page to select it. 1. Click the **Plugin** icon that appears in the page toolbar. 1. In the Plugins modal, find the plugin you created and click **+ Add**. 1. Publish your site. 1. Return to the CLI menu and select the option to view your site plugin on your site. This opens your site in the local development environment. 1. Navigate to the page that contains your plugin slot. Your plugin should be visible in the slot. > **Checkout plugins** > If you are building a plugin for the checkout page, you must create a dashboard page to provide users with a way to [add the plugin to their site](https://dev.wix.com/docs/build-apps/develop-your-app/extensions/site-extensions/site-plugins/build-a-dashboard-page-to-manage-your-site-plugin.md). ## Step 3 (Optional) | Build a dashboard page to manage your site plugin If your plugin requires a back office management interface, you can create one either within the Wix dashboard, or as an external dashboard on a third-party platform. Learn about [building a dashboard page to manage your site plugin](https://dev.wix.com/docs/build-apps/develop-your-app/extensions/site-extensions/site-plugins/build-a-dashboard-page-to-manage-your-site-plugin.md). ## Build and deploy your project Once your project is ready for production, you can [build and deploy](https://dev.wix.com/docs/build-apps/develop-your-app/develop-an-app-with-the-cli/project-development/build-and-deploy.md) it. An app version allows you to publish an app to the [Wix App Market](https://www.wix.com/app-market) or install it on a site with a direct install URL. You can view your [app versions](https://manage.wix.com/app-selector?title=Select+an+App&primaryButtonText=Select+Site&actionUrl=https%3A%2F%2Fdev.wix.com%2Fapps%2F%7BappId%7D%2Fversions-app) in the app dashboard. For more information about building and deploying your app, see [Build and Deploy an App with the Wix CLI](https://dev.wix.com/docs/build-apps/develop-your-app/develop-an-app-with-the-cli/project-development/build-and-deploy.md). ## Delete a site plugin extension To delete an existing site plugin extension from your app: 1. Delete the folder that contains your site plugin's files. 1. Delete your plugin extension's logo file from the `public` folder. 1. Remove the import and `.use()` statements for the extension from the [`extensions.ts`](https://dev.wix.com/docs/build-apps/develop-your-app/develop-an-app-with-the-cli/supported-extensions/about-the-extensions-ts-file.md) file. > **Note**: If you've already [created a version](https://dev.wix.com/docs/build-apps/develop-your-app/develop-an-app-with-the-cli/project-development/build-and-deploy.md) of your app, deleting a site plugin's files from your project doesn't remove the site plugin from your app's latest version in the app dashboard. To remove the site plugin, create a new version after deleting the site plugin files. ## See also - [Tutorial: Create a Site Plugin for the Wix Stores Product Page](https://dev.wix.com/docs/build-apps/get-started/tutorials/tutorial-create-a-site-plugin-for-the-wix-stores-product-page-with-the-cli.md). - [Checkout Page Slots, APIs, and Guidelines](https://dev.wix.com/docs/build-apps/develop-your-app/extensions/site-extensions/site-plugins/supported-wix-app-pages/wix-e-commerce/wix-e-commerce-checkout-page.md) - [About Site Plugin Extensions](https://dev.wix.com/docs/build-apps/develop-your-app/extensions/site-extensions/site-plugins/about-site-plugin-extensions.md) --- > Portal Navigation: > > - Append `.md` to any URL under `https://dev.wix.com/docs/` to get its markdown version. > - Pages are either content pages (article or reference text) or menu pages (a list of links to child pages). > - To get a menu page, truncate any URL to a parent path and append `.md` (e.g. `https://dev.wix.com/docs/sdk.md`, `https://dev.wix.com/docs/sdk/core-modules.md`). > - Top-level index of all portals: https://dev.wix.com/docs/llms.txt > - Full concatenated docs: https://dev.wix.com/docs/llms-full.txt ## Resource: Site Plugin Extension Files and Code ## Article: Site Plugin Extension Files and Code ## Article Link: https://dev.wix.com/docs/build-apps/develop-your-app/develop-an-app-with-the-cli/supported-extensions/site/site-plugins/site-plugin-extension-files-and-code.md ## Article Content: # Site Plugin Extension Files and Code [Add a new site plugin](https://dev.wix.com/docs/build-apps/develop-your-app/develop-an-app-with-the-cli/supported-extensions/site/site-plugins/add-a-site-plugin-extension-with-the-wix-cli.md) to your CLI project with the [generate](https://dev.wix.com/docs/wix-cli/command-reference/project-commands/generate.md) command. The CLI generates this directory structure in your project repo: ```tsx . └── / └── public/ | └── your-plugin-name-logo.svg | └── src/ └── site/ └── plugins/ └── ├── your-plugin-name.panel.tsx ├── your-plugin-name.extension.ts └── your-plugin-name.tsx ``` The following files are created in your site plugin's folder: + A `your-plugin-name.panel.tsx` file that contains the code for the site plugin's settings panel. + A `your-plugin-name.extension.ts` file that configures how your site plugin integrates with a Wix site. It defines the locations where the plugin can be added. + A `your-plugin-name.tsx` file contains the custom element code that supports the site plugin. A `your-plugin-name-logo.svg` file is also created inside the `public` folder. It is possible to create a site plugin extension manually by adding these files yourself, but we don't recommend it for a couple of reasons: + You're more likely to make errors in the file path if you add the files and folders yourself. If the file path is incorrect, the CLI can't detect the custom element and the site plugin won't work. + The auto-generated files offer React template code that helps you get started developing. ## Plugin logo A `logo.svg` file is created inside the `public` folder when you generate this extension. The file is used as your plugin's logo in the plugin explorer in the editor. The file isn't required, however, it's referenced in the `logoUrl` field in the `your-plugin-name.extension.ts` file.
__Important:__ If you rename the file, you must update the path in `logoUrl`. If you remove the file, you must remove the `logoUrl` property entirely. The file must be a square JPG, PNG, or SVG.
## your-plugin-name.extension.ts The `your-plugin-name.extension.ts` file configures which slots your plugin can be added to. This file is required, so don't delete it after the site plugin is generated. If you add your own files, you must include a `your-plugin-name.extension.ts`. When you generate a new site plugin in your project, you'll see the following code in `your-plugin-name.extension.ts` (`placements` will contain the details of your selected plugin slot): ```ts import { extensions } from '@wix/astro/builders'; export default extensions.sitePlugin({ id: '269df530-84bf-430f-bf15-6e19ecded9e7', name: 'bookings-plugin', marketData: { name: 'bookings-plugin', description: 'Marketing Description', logoUrl: '{{BASE_URL}}/bookings-plugin-logo.svg', }, placements: [{ appDefinitionId: '13d21c63-b5ec-5912-8397-c3a5ddb27a97', widgetId: 'a91a0543-d4bd-4e6b-b315-9410aa27bcde', slotId: 'slot1', }], installation: { autoAdd: true }, tagName: 'bookings-plugin', element: './extensions/site/plugins/bookings-plugin/bookings-plugin.tsx', settings: './extensions/site/plugins/bookings-plugin/bookings-plugin.panel.tsx', }); ``` The `placements` array is generated with the details of the slot you selected. You can add slots to the `placements` array to allow your plugin to be added to multiple slots. For detailed information on each available slot, see [About Slots](https://dev.wix.com/docs/build-apps/develop-your-app/extensions/site-extensions/site-plugins/supported-wix-app-pages/about-slots.md). By default, your file is configured so that your app will add the plugin to its slots on the site automatically upon installation. If you have more than one placement for slots on a single page, the plugin will be added to the first slot in the array by default. Users may then manually move the plugin to their desired location in the editor. | Field | Type | Description | |----------------------------------|----------|--------------------------------------------------------------------------------------------------------------------------------------------------------------------------------------------------------------------------------------------------------------------------------------------------------------------------------------------| | `id` | string | A unique identifier for your site plugin. The CLI generates this GUID for you. If you add the extension file yourself, you must generate your own GUID. | | `name` | string | Your name for the plugin. | | `marketData.name` | string | The name of your plugin as it will appear in the plugin explorer in the editor and in your [app dashboard](https://manage.wix.com/account/custom-apps). | | `marketData.description` | string | The description of your plugin as it will appear in the plugin explorer in the editor and in your [app dashboard](https://manage.wix.com/account/custom-apps). | | `marketData.logoUrl` | string | The relative path from your `your-plugin-name.extension.ts` to your logo file. | | `placements` | array | An array of placement objects that define the slots your plugin can be added to. For detailed information on each available slot, see [About Slots](https://dev.wix.com/docs/build-apps/develop-your-app/extensions/site-extensions/site-plugins/supported-wix-app-pages/about-slots.md). | | `placements.appDefinitionId` | string | The ID of the app that the slot belongs to. | | `placements.widgetId` | string | The ID of the page that contains the slot. | | `placements.slotId` | string | The ID of the slot your plugin can be added to. | | `installation.autoAdd` | boolean | Whether the plugin should be added to the specified slots automatically when your app is installed on a site. | | `tagName` | string | The custom HTML element tag name for your site plugin (for example, `bookings-plugin`). This tag name is used to render your plugin as a custom element in the site, similar to standard HTML tags like `
` or `

`. Must follow [custom element naming rules](https://developer.mozilla.org/en-US/docs/Web/API/Web_components/Using_custom_elements#name) (lowercase, contain a hyphen). | | `element` | string | The relative path from your `your-plugin-name.extension.ts` to your custom element file. | | `settings` | string | The relative path from your `your-plugin-name.extension.ts` to your site plugin's settings file. | ## your-plugin-name.tsx The `your-plugin-name.tsx` file is where you write the code for the custom element that defines the site plugin. You can write code in other files and include it here, but you must return your main component in this file. This is where the CLI looks for the site plugin definition. This file is required for the site plugin to work, so don't delete it. If you add the files on your own, you must include `your-plugin-name.tsx`. When the `your-plugin-name.tsx` file is generated, it looks like this: ```ts class MyElement extends HTMLElement { static get observedAttributes() { return ['display-name']; } constructor() { super(); } connectedCallback() { this.render(); } attributeChangedCallback() { this.render(); } render() { const displayName = this.getAttribute('display-name') || `Your Widget's Title`; this.innerHTML = `

${displayName}


This is a Site Plugin generated by Wix CLI.
Edit your element's code to change this text.

`; } } export default MyElement; ``` The file sets up a [web component](https://developer.mozilla.org/en-US/docs/Web/API/Web_components/Using_custom_elements) named `MyElement` where you write the custom element code. In this example, `displayName` is fetched from the `your-plugin-name.panel.tsx` and shown in the UI. ## your-plugin-name.panel.tsx The `your-plugin-name.panel.tsx` file contains the code that defines your site plugin's settings panel. The settings panel lets site users customize the plugin after they install your app. When the `your-plugin-name.panel.tsx` file is generated, it looks like this: ```javascript import React, { type FC, useState, useEffect, useCallback } from 'react'; import { widget } from '@wix/editor'; import { SidePanel, WixDesignSystemProvider, Input, FormField, } from '@wix/design-system'; import '@wix/design-system/styles.global.css'; const Panel: FC = () => { const [displayName, setDisplayName] = useState(''); useEffect(() => { widget.getProp('display-name') .then(displayName => setDisplayName(displayName || `Your Plugin's Title`)) .catch(error => console.error('Failed to fetch display-name:', error)); }, [setDisplayName]); const handleDisplayNameChange = useCallback((event: React.ChangeEvent) => { const newDisplayName = event.target.value; setDisplayName(newDisplayName); widget.setProp('display-name', newDisplayName); }, [setDisplayName]); return ( ); }; export default Panel; ``` The file contains a React component called `Panel` where you write the code that defines the plugin's settings panel. `WixDesignSystemProvider` wraps the child components to align them with Wix's design conventions. The file also contains a `useEffect` hook to fetch and set the initial value of the `displayName` property from the plugin's properties when the component mounts. As with `your-plugin-name.tsx`, you can write code in other files and include it here, but you must return your main component in this file. The panel code must be written in React to work with the rest of the CLI project. You can manage the properties of your site plugin's custom element using the [Widget API](https://dev.wix.com/docs/sdk/host-modules/editor/widget/introduction.md). You can also use Wix's [JavaScript SDK](https://dev.wix.com/docs/sdk.md) in the panel's code to [retrieve environmental data from the editor](https://dev.wix.com/docs/sdk/host-modules/editor/info/introduction.md) and access and manage Wix business solutions. To apply changes made in the settings panel to the plugin, use the Widget API's [`setProp()`](https://dev.wix.com/docs/sdk/host-modules/editor/widget/set-prop.md) function. Widget properties are bound to your custom element's attributes, so any change in the properties automatically updates the corresponding attribute. Learn more about [creating a settings panel for a site plugin built with the CLI](https://dev.wix.com/docs/build-apps/develop-your-app/extensions/site-extensions/site-widgets/create-a-settings-panel-for-a-site-widget-or-plugin-wix-cli-and-self-hosting.md). --- > Portal Navigation: > > - Append `.md` to any URL under `https://dev.wix.com/docs/` to get its markdown version. > - Pages are either content pages (article or reference text) or menu pages (a list of links to child pages). > - To get a menu page, truncate any URL to a parent path and append `.md` (e.g. `https://dev.wix.com/docs/sdk.md`, `https://dev.wix.com/docs/sdk/core-modules.md`). > - Top-level index of all portals: https://dev.wix.com/docs/llms.txt > - Full concatenated docs: https://dev.wix.com/docs/llms-full.txt ## Resource: About Custom Element Installation with the CLI ## Article: About Custom Element Installation with the CLI ## Article Link: https://dev.wix.com/docs/build-apps/develop-your-app/develop-an-app-with-the-cli/supported-extensions/site/custom-elements/about-custom-element-installation-with-the-cli.md ## Article Content: # About Custom Element Installation with the CLI
**Deprecation notice:** `installation.autoAdd` is deprecated. If your code still uses this property, update it to `installation.staticContainer`.
When a Wix user installs your app, you can choose whether the CLI adds your custom element to their site automatically. You set `installation.staticContainer` in your widget's extension file (`element.extension.ts`). This article explains how installation works, what you can configure, and how to get your custom element on the pages you want. ## How automatic installation works Set `installation.staticContainer` to `"HOMEPAGE"` to automatically add the widget to the site's home page when the Wix user installs the app. Wix users can later move, resize, or remove it. If the field is omitted, the CLI doesn't add the widget to any page on install. It only appears in the editor's **Add** panel where Wix users must add it manually. ## Installation configuration examples ### Example 1: auto-add to home page ```typescript // element.extension.ts import { extensions } from '@wix/astro/builders'; export default extensions.customElement({ id: '...', name: 'Home Hero Widget', width: { defaultWidth: 1200, allowStretch: true }, height: { defaultHeight: 400 }, installation: { staticContainer: "HOMEPAGE", }, // ... }); ``` Use this for a main landing experience widget. Wix users can move it to another page or section if they want. ### Example 2: manual add only ```typescript // element.extension.ts import { extensions } from '@wix/astro/builders'; export default extensions.customElement({ id: '...', name: 'Header Bar Widget', width: { defaultWidth: 1400, allowStretch: true }, height: { defaultHeight: 60 }, // ... }); ``` Use this for header/footer widgets or when you want the Wix user to choose where to place the widget. You can document in your app or panel that they should add it to the header or footer and use the editor's **Show on All Pages** option so it appears site-wide. ### Example 3: multiple widgets with different strategies You can ship several widgets and set installation per widget: - 1 widget with `staticContainer: "HOMEPAGE"` for the home page. - Other widgets with the field omitted for header, footer, or specific pages, with instructions on where to add them. You define configuration per widget in each custom element's extension file. For the full list of options, see [Custom Element Extension Files and Code](https://dev.wix.com/docs/build-apps/develop-your-app/develop-an-app-with-the-cli/supported-extensions/site/custom-elements/custom-element-extension-files-and-code.md). ## What you can and can't control You can: - Auto-add the widget to the home page on install with `staticContainer: "HOMEPAGE"`. - Skip automatic installation by omitting the field, so the widget only appears in the editor's **Add** panel. - Ship multiple widgets, each with its own installation setting. You can't: - Auto-add to master pages (header/footer), all pages, or specific page types. - Control widget placement with APIs. Placement is determined only by the `staticContainer` setting and by what the Wix user does in the editor. For site-wide display, Wix users need to move the widget to the header or footer in the editor and enable **Show on All Pages**. ## Best practices for widget distribution - Set clear expectations in your app description, dashboard, or first-run experience. State that the widget appears on the home page when `staticContainer` is set to `"HOMEPAGE"`, and that Wix users can move it. - Guide Wix users when site-wide display matters. If the widget should appear across the site (for example, a chat or banner widget), use your settings panel or dashboard to explain how to add it to the header/footer and enable **Show on All Pages**. - Add in-app guidance. Consider adding a setup checklist or tooltip directly in the widget's settings panel so Wix users don't have to leave your app to find placement information. - Design the widget for different placements. Use flexible width/height and responsive layout so the same widget works on the home page, in the header, or in the footer. See the `width` and `height` options in [Custom Element Extension Files and Code](https://dev.wix.com/docs/build-apps/develop-your-app/develop-an-app-with-the-cli/supported-extensions/site/custom-elements/custom-element-extension-files-and-code.md). - Consider multiple widgets. If you need 1 hero widget on the home page and another bar widget in the header, define 2 widgets: 1 with `staticContainer: "HOMEPAGE"` and 1 with the field omitted, and document which widget to add where. ## See also - [Add a Custom Element Extension with the CLI](https://dev.wix.com/docs/build-apps/develop-your-app/develop-an-app-with-the-cli/supported-extensions/site/custom-elements/add-a-custom-element-extension-with-the-wix-cli.md) - [Custom Element Extension Files and Code](https://dev.wix.com/docs/build-apps/develop-your-app/develop-an-app-with-the-cli/supported-extensions/site/custom-elements/custom-element-extension-files-and-code.md) --- > Portal Navigation: > > - Append `.md` to any URL under `https://dev.wix.com/docs/` to get its markdown version. > - Pages are either content pages (article or reference text) or menu pages (a list of links to child pages). > - To get a menu page, truncate any URL to a parent path and append `.md` (e.g. `https://dev.wix.com/docs/sdk.md`, `https://dev.wix.com/docs/sdk/core-modules.md`). > - Top-level index of all portals: https://dev.wix.com/docs/llms.txt > - Full concatenated docs: https://dev.wix.com/docs/llms-full.txt ## Resource: Add a Custom Element Extension with the Wix CLI ## Article: Add a Custom Element Extension with the Wix CLI ## Article Link: https://dev.wix.com/docs/build-apps/develop-your-app/develop-an-app-with-the-cli/supported-extensions/site/custom-elements/add-a-custom-element-extension-with-the-wix-cli.md ## Article Content: # Add a Custom Element Extension with the Wix CLI
**Deprecation notice:** `installation.autoAdd` is deprecated. If your code still uses this property, update it to `installation.staticContainer`. Learn more about [custom element installation in the CLI](https://dev.wix.com/docs/build-apps/develop-your-app/develop-an-app-with-the-cli/supported-extensions/site/custom-elements/about-custom-element-installation-with-the-cli.md).
The Wix CLI makes it easy to add and develop custom element extensions in your app project. These are considered app extensions and appear on the **Extensions** page in your app's dashboard. Custom element extensions are built with the [web components standard](https://developer.mozilla.org/en-US/docs/Web/API/Web_components/Using_custom_elements). You define a new HTML tag, which is made available in the Wix editors as a widget. The Wix CLI creates the necessary files with template code so you can easily start developing your custom element. It also calls [`define()`](https://developer.mozilla.org/en-US/docs/Web/API/CustomElementRegistry/define) for you, so you don't need to explicitly call it in your code. Follow the instructions below to: 1. Add a custom element extension to your app project. 2. Test the custom element on a site. 3. Deploy your app with the custom element. ## Step 1 | Add a custom element to your app project In the terminal: 1. Navigate to your project repo. 2. Run the [generate](https://dev.wix.com/docs/wix-cli/command-reference/project-commands/generate.md) command. The CLI will display a menu of extensions to generate. Select **Site Widget** and hit enter. 3. When prompted, choose **Custom Element** as your framework. The CLI will then prompt you for the following items: + **Element name**: The name of the element that appears in the `element.json` configuration file. Only you will see this. + **Element folder**: The name of the folder in the project repo that contains the custom element code that the site widget is built on. Only you will see this. Upon completion, the extension files will be created in your project directory with the following structure: ```bash src/ └── extensions/ └── site/ └── widgets/ └── / ├── .extension.ts ├── .tsx ├── .panel.tsx ├── .module.css └── thumbnail.png ``` > **Note:** This is the default folder structure created by the CLI. You can move these files to any location within the `src/` folder and update the references in your `extension.ts` file. Learn more about the [flexible file system](https://dev.wix.com/docs/wix-cli/guides/get-started/project-structure.md#your-custom-extension-folder). Learn more about the [custom element extension files](https://dev.wix.com/docs/build-apps/develop-your-app/develop-an-app-with-the-cli/supported-extensions/site/custom-elements/custom-element-extension-files-and-code.md). ## Step 2 | Test your custom element You can test your custom element while you're developing by running the [dev](https://dev.wix.com/docs/wix-cli/command-reference/project-commands/dev.md) command. Select the option in the CLI menu to view your custom element in the editor. This will open your test site editor, where you can view and try it out.
Why do I get a placeholder when previewing my site widget?

In some cases, your custom element doesn't display when previewed, but does display as expected when viewed on a published site. We are currently working to fix this issue, but in the meantime, we display a placeholder. This can happen if: - You open the dashboard, site, or editor from the menu options. Run the [dev](https://dev.wix.com/docs/wix-cli/command-reference/project-commands/dev.md) command to restart your local environment. - You preview a site when the site was opened with the editor menu option. Run the [build](https://dev.wix.com/docs/wix-cli/command-reference/project-commands/build.md) command and then the [release](https://dev.wix.com/docs/wix-cli/command-reference/project-commands/release.md) command to release a new version.
**Tip:** Access to site environment data and interact with other Wix Apps, such as Wix Stores and Wix Bookings, using the [Site API](https://dev.wix.com/docs/sdk/host-modules/site/introduction.md).
## Step 3 | Build and deploy your project Once your app project is ready for production, you can build it and release a version in the app dashboard. 1. Run the [build](https://dev.wix.com/docs/wix-cli/command-reference/project-commands/build.md) command. 2. Run the [release](https://dev.wix.com/docs/wix-cli/command-reference/project-commands/release.md) command and follow the prompts to release an app version. An app version allows you to publish an app to the [Wix App Market](https://www.wix.com/app-market) or install it on a site with a direct install URL. You can view [your app versions](https://manage.wix.com/app-selector?title=Select+an+App&primaryButtonText=Select+Site&actionUrl=https%3A%2F%2Fdev.wix.com%2Fapps%2F%7BappId%7D%2Fversions-app) in the app dashboard. For more information about building and deploying your app, see [Build and Deploy an App with the Wix CLI](https://dev.wix.com/docs/build-apps/develop-your-app/frameworks/wix-cli/project-development/build-and-deploy-a-project-with-the-wix-cli.md). You can control whether your custom element is added to a site automatically when a Wix user installs your app. Set `installation.staticContainer` to `"HOMEPAGE"` in your widget's extension file (`element.extension.ts`) to add the widget to the home page on install. If you omit the field, the widget isn't added on install. Wix users can add it manually from the editor's **Add** panel. In the CLI, automatic installation applies only to the home page, not to master pages like the header or footer. For details, configuration examples, and best practices, see [About custom element installation with the CLI](https://dev.wix.com/docs/build-apps/develop-your-app/develop-an-app-with-the-cli/supported-extensions/site/custom-elements/about-custom-element-installation-with-the-cli.md). ## Delete a custom element extension To delete an existing custom element extension from your app: 1. Delete the folder that contains your custom element's files. 2. Remove the import and `.use()` statements for the extension from the [`extensions.ts`](https://dev.wix.com/docs/build-apps/develop-your-app/frameworks/wix-cli/supported-extensions/about-the-extensions-ts-file.md) file. > **Note**: If you've already created a version of your app, deleting the extension files from your project doesn't remove the custom element from your app's latest version in the app dashboard. To remove it, create a new version after deleting the extension files. --- > Portal Navigation: > > - Append `.md` to any URL under `https://dev.wix.com/docs/` to get its markdown version. > - Pages are either content pages (article or reference text) or menu pages (a list of links to child pages). > - To get a menu page, truncate any URL to a parent path and append `.md` (e.g. `https://dev.wix.com/docs/sdk.md`, `https://dev.wix.com/docs/sdk/core-modules.md`). > - Top-level index of all portals: https://dev.wix.com/docs/llms.txt > - Full concatenated docs: https://dev.wix.com/docs/llms-full.txt ## Resource: Custom Element Extension Files and Code ## Article: Custom Element Extension Files and Code ## Article Link: https://dev.wix.com/docs/build-apps/develop-your-app/develop-an-app-with-the-cli/supported-extensions/site/custom-elements/custom-element-extension-files-and-code.md ## Article Content: # Custom Element Extension Files and Code
**Deprecation notice:** `installation.autoAdd` is deprecated. If your code still uses this property, update it to `installation.staticContainer`. Learn more about [custom element installation in the CLI](https://dev.wix.com/docs/build-apps/develop-your-app/develop-an-app-with-the-cli/supported-extensions/site/custom-elements/about-custom-element-installation-with-the-cli.md).
[Add a new custom element extension](https://dev.wix.com/docs/build-apps/develop-your-app/develop-an-app-with-the-cli/supported-extensions/site/custom-elements/add-a-custom-element-extension-with-the-wix-cli.md) to your CLI project with the [generate](https://dev.wix.com/docs/wix-cli/command-reference/project-commands/generate.md) command, select **Custom Element** as the framework. The CLI generates a folder with the name you choose, containing the following files: + An `element.extension.ts` file that defines a builder containing the configuration settings for your custom element. + An `element.tsx` file that contains the main code for the custom element. + A `element.panel.tsx` file that contains the code for your widget's settings panel. + A `element.module.css` file that configures CSS styling to customize your widget's appearance. It's generated with some initial styles to help you get started. + A default `thumbnail.png` file that contains the thumbnail displayed in the **Add Elements** panel and the **Manage Apps** page for your widget. This file is optional, but without a thumbnail, your widget won't appear in the [Add Elements panel or the Manage Apps page](https://dev.wix.com/docs/build-apps/develop-your-app/extensions/site-extensions/site-widgets/display-a-site-widget-in-the-add-panel-and-site-dashboard.md). ![Custom element in add elements panel](https://wixmp-833713b177cebf373f611808.wixmp.com/images/bc25d688c71ae039fb00aa037d436140.png) It's possible to create each of these files yourself, but we don't recommend it for a couple of reasons: + You're more likely to make errors in the filepath if you add the files and folders yourself. If the filepath is incorrect, the CLI can't detect the custom element and it won't work. + The auto-generated files offer React template code that helps you get started developing. ## element.extension.ts The `element.extension.ts` file configures the settings for how your custom element appears on a user's site. This file is required, so don't delete it after the extension is generated. If you add your own files, you must include `element.extension.ts`. When you generate a new custom element in your project, you'll see the following code in `element.extension.ts`: ```typescript import { extensions } from '@wix/astro/builders'; export default extensions.customElement({ id: '9ff1170b-550b-4f14-bda9-2ead587d9c47', name: 'My Element', width: { defaultWidth: 450, allowStretch: true }, height: { defaultHeight: 250 }, installation: { staticContainer: "HOMEPAGE" }, behaviors: { dashboard: { dashboardPageComponentId: '154f642e-a705-4ff3-8421-6119354a3384' } }, tagName: 'my-element', element: './extensions/site/widgets/my-element/my-element.tsx', settings: './extensions/site/widgets/my-element/my-element.panel.tsx', presets: [{ id: '44e6714f-f81b-4824-ab77-50037439b881', name: 'My Preset', thumbnailUrl: '{{BASE_URL}}/public/thumb.png', }], }); ``` You can edit the configuration object and add properties as follows: | Key | Type | Description | |----------------------------------|----------|--------------------------------------------------------------------------------------------------------------------------------------------------------------------------------------------------------------------------------------------------------------------------------------------------------------------------------------------| | `id` | string | A unique identifier for your custom element. The CLI generates this GUID for you. If you add the JSON file yourself, you must generate your own GUID. | | `name` | string | The name of the custom element as it appears in the [app dashboard](https://manage.wix.com/account/custom-apps). The CLI prompts you for the name when you create the extension. | | `height.defaultHeight` | number | The widget's height in pixels when it is first installed on a site. | | `width.defaultWidth` | number | The widget's width in pixels when it is first installed on a site. | | `width.stretchByDefault` | boolean | Whether to stretch the widget to full width on installation. | | `width.allowStretch` | boolean | Whether to allow users to toggle the widget between full-width and default width. | | `installation.staticContainer` | string | Determines where the widget is automatically added when your app is installed. Set to `"HOMEPAGE"` to automatically add the widget to the site home page upon installation. If you omit the field, the widget isn't added upon install. | | `presets[0].id ` | string | A unique GUID identifier for the preset object containing your thumbnail. | | `presets[0].name` | string | The display name for the preset. This can be any descriptive name. | | `presets[0].thumbnailUrl` | string | The URL path to your thumbnail image. Use the format `{{BASE_URL}}/public/your-image-name.png` where `your-image-name.png` is the filename of your image in the `public` folder. | Set `installation.staticContainer` to `"HOMEPAGE"` to automatically add the widget to the site home page when the app is installed. Wix users can move the widget to any location after installation. If the field is omitted, the widget isn't added on installation and Wix users can add the widget manually from the editor's **Add** panel. In the CLI, automatic installation applies only to the home page. For details, configuration examples, and best practices, see [About custom element installation with the CLI](https://dev.wix.com/docs/build-apps/develop-your-app/develop-an-app-with-the-cli/supported-extensions/site/custom-elements/about-custom-element-installation-with-the-cli.md). ## element.tsx The `element.tsx` file is where you write the code for the custom element. You can write code in other files and include it here, but you must return your main component in this file. This is where the CLI will look for the custom element definition. This file is required for the custom element to work, so don't delete it. If you add the files on your own, you must include `element.tsx`. When the `element.tsx` file is generated, it looks like this: ```javascript import React, { type FC } from 'react'; import ReactDOM from 'react-dom'; import reactToWebComponent from 'react-to-webcomponent'; import styles from './element.module.css'; interface Props { displayName?: string; } const CustomElement: FC = ({ displayName = `Your Widget's Title`, }) => { return (

{displayName}


This is a Site Widget generated by Wix CLI.
Continue to develop this widget at 'src/site/widgets/custom-elements/your-widget-filename'.

); }; const customElement = reactToWebComponent( CustomElement, React, ReactDOM as any, { props: { displayName: 'string', }, } ); export default customElement; ``` The file sets up a React component called `CustomElement`, where you write the custom element code. It also calls [`reactToWebComponent`](https://www.npmjs.com/package/react-to-webcomponent) to convert your React component to a custom element, and exports the custom element so Wix can work with it. We recommend writing your code in React, since the rest of the CLI also works with React. However, you can also write code directly in `element.tsx` with JavaScript. If you do so, make sure to export the custom element, like in the example below: ```javascript class CustomElement extends HTMLElement { constructor() { super(); } // Element functionality written in here } export default CustomElement; ``` Note that you don't need to call `define()` even here; Wix still takes care of that for you even if you haven't defined the custom element in React. ## element.panel.tsx The `element.panel.tsx` file contains the code defining your custom element's settings panel. The settings panel lets site users customize the widget after they install your app. In the panel's code, use Wix's [JavaScript SDK](https://dev.wix.com/docs/sdk.md) to [access widget properties](https://dev.wix.com/docs/sdk/host-modules/editor/widget/introduction.md) and [retrieve environmental data from the editor](https://dev.wix.com/docs/sdk/host-modules/editor/info/introduction.md), as well as access and manage Wix business solutions. To apply changes made in the settings panel to the widget, use the Widget API's [`setProp()`](https://dev.wix.com/docs/sdk/host-modules/editor/widget/set-prop.md) function. Widget properties are bound to your custom element's attributes, so any change in the properties automatically updates the corresponding attribute. To handle attribute updates so they're reflected in your widget in the editor, use the [`attributeChangedCallback()`](https://developer.mozilla.org/en-US/docs/Web/API/Web_components/Using_custom_elements#responding_to_attribute_changes) in your custom element's code. After the custom element is generated, you'll see code like this in `element.panel.tsx` file: ```typescript import React, { type FC, useState, useEffect, useCallback } from 'react'; import { widget } from '@wix/editor'; import { SidePanel, WixDesignSystemProvider, Input, FormField, SectionHelper, } from '@wix/design-system'; import '@wix/design-system/styles.global.css'; const SITE_WIDGETS_DOCS = 'https://dev.wix.com/docs/build-apps/develop-your-app/develop-an-app-with-the-cli/supported-extensions/site/custom-elements/about-custom-element-installation-with-the-cli';.md const Panel: FC = () => { const [displayName, setDisplayName] = useState(''); useEffect(() => { widget.getProp('display-name') .then(displayName => setDisplayName(displayName || `Your Widget's Title`)) .catch(error => console.error('Failed to fetch display-name:', error)); }, [setDisplayName]); const handleDisplayNameChange = useCallback((event: React.ChangeEvent) => { const newDisplayName = event.target.value; setDisplayName(newDisplayName); widget.setProp('display-name', newDisplayName); }, [setDisplayName]); return ( Learn more about Site Widgets ); }; export default Panel; ``` The file contains a React component called `Panel` that defines the custom element's settings panel with the following key features: 1. **State Management**: Uses React hooks (`useState`, `useEffect`, `useCallback`) to manage the display name property. 2. **Widget Integration**: Uses the `widget` API from `@wix/editor` to get and set widget properties. 3. **UI Components**: Utilizes Wix Design System components like `SidePanel`, `Input`, and `FormField` for a consistent user interface. As with `element.tsx`, you can write code in other files and include it here, but you must return your main component in this file. The panel code must be written in React to work with the rest of the CLI. Learn more about [creating a settings panel for a custom element](https://dev.wix.com/docs/build-apps/develop-your-app/extensions/site-extensions/create-a-settings-panel-for-a-site-widget-or-plugin-wix-cli-and-self-hosting.md). You can also [integrate Wix's native color and font pickers in your panel](https://dev.wix.com/docs/build-apps/develop-your-app/extensions/site-extensions/site-widgets/integrate-wix-s-native-color-and-font-pickers-in-a-site-widget-s-settings-panel.md). ## Custom element thumbnail To display a thumbnail for your custom element in the **Add Elements** panel, you need to add a `presets` configuration to your `element.extension.ts` file and create a `public` folder with your thumbnail image. Add the presets configuration to your `element.extension.ts` file after the `settings` property: ```typescript presets: [{ id: '44e6714f-f81b-4824-ab77-50037439b881', name: 'My Preset', thumbnailUrl: '{{BASE_URL}}/public/thumb.png', }] ``` Create a `public` folder at the root level of your project and add your thumbnail image file.
**Important:** If you rename the thumbnail file, you must update the path in `thumbnailUrl`. Without a thumbnail, your widget won't appear in the [Add Elements panel or the Manage Apps page](https://dev.wix.com/docs/build-apps/develop-your-app/extensions/site-extensions/site-widgets/display-a-site-widget-in-the-add-panel-and-site-dashboard.md).
--- > Portal Navigation: > > - Append `.md` to any URL under `https://dev.wix.com/docs/` to get its markdown version. > - Pages are either content pages (article or reference text) or menu pages (a list of links to child pages). > - To get a menu page, truncate any URL to a parent path and append `.md` (e.g. `https://dev.wix.com/docs/sdk.md`, `https://dev.wix.com/docs/sdk/core-modules.md`). > - Top-level index of all portals: https://dev.wix.com/docs/llms.txt > - Full concatenated docs: https://dev.wix.com/docs/llms-full.txt ## Resource: Configure Custom Element Behavior ## Article: Configure Custom Element Behavior ## Article Link: https://dev.wix.com/docs/build-apps/develop-your-app/develop-an-app-with-the-cli/supported-extensions/site/custom-elements/configure-custom-element-behavior.md ## Article Content: # Configure Custom Element Behavior
**Deprecation notice:** `installation.autoAdd` is deprecated. If your code still uses this property, update it to `installation.staticContainer`. Learn more about [custom element installation in the CLI](https://dev.wix.com/docs/build-apps/develop-your-app/develop-an-app-with-the-cli/supported-extensions/site/custom-elements/about-custom-element-installation-with-the-cli.md).
When you create a custom element with the Wix CLI, you can control how site builders interact with it in the editor. These settings are defined in your widget's `element.extension.ts` file and determine things like default dimensions and whether the widget is added automatically on install. ## Available behavior settings You can configure the following settings in your widget's `element.extension.ts` file. Available settings include the widget's dimensions, installation behavior, and dashboard page association. ### Dimensions Control the widget's initial size and whether site builders can stretch it to full width: ```ts export default extensions.customElement({ // ... width: { defaultWidth: 450, allowStretch: true, stretchByDefault: false, }, height: { defaultHeight: 250, }, }); ``` | Setting | Description | |---|---| | `width.defaultWidth` | The widget's width in pixels when first installed on a site. | | `width.allowStretch` | Whether to allow site builders to toggle the widget between full-width and default width. | | `width.stretchByDefault` | Whether to stretch the widget to full width on installation. | | `height.defaultHeight` | The widget's height in pixels when first installed on a site. | ### Installation behavior Control how the widget is added to a site when your app is installed: ```ts export default extensions.customElement({ // ... installation: { staticContainer: "HOMEPAGE", }, }); ``` | Setting | Description | |---|---| | `installation.staticContainer` | Determines where the widget is automatically added when your app is installed. Set to `"HOMEPAGE"` to automatically add the widget to the site home page upon installation. If you omit the field, the widget isn't added upon install. | For more details and best practices, see [About Custom Element Installation with the CLI](https://dev.wix.com/docs/build-apps/develop-your-app/develop-an-app-with-the-cli/supported-extensions/site/custom-elements/about-custom-element-installation-with-the-cli.md). ### Dashboard page association Associate a widget with one of your app's dashboard pages. When configured, a **Manage** button appears in the widget's action bar in the editor, allowing site builders to navigate directly to the linked dashboard page. ```ts export default extensions.customElement({ // ... behaviors: { dashboard: { dashboardPageComponentId: '154f642e-a705-4ff3-8421-6119354a3384', }, }, }); ``` Set `dashboardPageComponentId` to the `id` of the dashboard page extension you want to associate with the widget. ## See also - [Custom Element Extension Files and Code](https://dev.wix.com/docs/wix-cli/legacy-clis/legacy-wix-cli-for-apps/supported-extensions/site-extensions/custom-element-site-widgets/site-widget-extension-files-and-code.md) - [About Custom Element Installation with the CLI](https://dev.wix.com/docs/build-apps/develop-your-app/develop-an-app-with-the-cli/supported-extensions/site/custom-elements/about-custom-element-installation-with-the-cli.md) --- > Portal Navigation: > > - Append `.md` to any URL under `https://dev.wix.com/docs/` to get its markdown version. > - Pages are either content pages (article or reference text) or menu pages (a list of links to child pages). > - To get a menu page, truncate any URL to a parent path and append `.md` (e.g. `https://dev.wix.com/docs/sdk.md`, `https://dev.wix.com/docs/sdk/core-modules.md`). > - Top-level index of all portals: https://dev.wix.com/docs/llms.txt > - Full concatenated docs: https://dev.wix.com/docs/llms-full.txt ## Resource: Add an Editor React Component Extension with the Wix CLI ## Article: Add an Editor React Component Extension with the Wix CLI ## Article Link: https://dev.wix.com/docs/build-apps/develop-your-app/develop-an-app-with-the-cli/supported-extensions/site/editor-react-components/add-an-editor-react-component-extension-with-the-wix-cli.md ## Article Content: # Add an Editor React Component Extension with the Wix CLI
**Editor Compatibility** Editor React Component extensions are built for [Wix Harmony](https://dev.wix.com/docs/build-apps/get-started/overview/about-wix-harmony-and-apps.md), Wix's AI-powered editor. They're not supported on Wix Editor or Wix Studio sites, and there's no way to conditionally switch between extension types based on the editor.
The Wix CLI makes it easy to add and develop Editor React Component extensions in your app project. For more general information about site extensions, see [About Site Extensions](https://dev.wix.com/docs/build-apps/develop-your-app/extensions/site-extensions/about-site-extensions.md). The CLI creates the necessary files with template code so you can easily start developing a component. Follow the instructions below to: 1. Add an Editor React Component extension to your app project. 2. Develop your component with an auto-generated manifest. 3. Test the component on a site. 4. Deploy your app with the component.
**Important:** Before you start building, review the [manifest validation rules and unsupported features](https://dev.wix.com/docs/build-apps/develop-your-app/extensions/site-extensions/editor-react-components/manifest-reference/about-the-manifest.md).
## Before you begin Make sure you have: - The [Wix CLI](https://dev.wix.com/docs/wix-cli.md) installed. - A CLI [app project](https://dev.wix.com/docs/wix-cli/guides/project-structure/project-structure.md) you can add a component to. - The [Wix skill](https://dev.wix.com/docs/api-reference/articles/ai-tools/about-wix-skills.md) installed in your project. New CLI projects include it by default. To add it to an existing project, use [`wix skills add`](https://dev.wix.com/docs/wix-cli/command-reference/global-commands/skills-add.md). ## Step 1 | Add a component to your app project Scaffold an Editor React Component by prompting an AI coding agent with the [Wix skill](https://dev.wix.com/docs/api-reference/articles/ai-tools/about-wix-skills.md) installed, or by running the CLI interactively. Both options produce the same file structure. ::::tabs :::Let-AI-do-it Paste the prompt below into your coding agent such as Claude Code, Codex, or Cursor, and replace `` with a short description of what you want to build: ```text /wix-app create editor react component - ``` For example: ```text /wix-app create editor react component - a designed contact card displaying my contact information: name, email, and mobile number. ``` ::: :::Do-it-yourself In the terminal: 1. Navigate to your project repo. 2. Run the [generate](https://dev.wix.com/docs/wix-cli/command-reference/project-commands/generate.md) command. The CLI displays a menu of extensions to generate. Select **Editor React Component** and hit enter. 3. The CLI then prompts you for the following items: + **Component name**: The display name for your component as it appears in the Wix editor. + **Component folder**: The name of the folder that contains the component code. ::: :::: Both options create the extension files in your project directory with the following structure: ```bash src/ └── extensions/ └── site/ └── components/ └── / ├── .extension.ts ├── .generated.ts ├── .tsx └── styles.module.css ``` The `.generated.ts` file holds the auto-generated `editorElement` portion of the manifest. The other manifest properties such as `type`, `installation`, and `resources` live in `.extension.ts`, which imports the `editorElement` from the generated file. For a per-file walkthrough, see [Editor React Component Extension Files and Code](https://dev.wix.com/docs/build-apps/develop-your-app/develop-an-app-with-the-cli/supported-extensions/site/editor-react-components/editor-react-component-extension-files-and-code.md). > **Note:** This is the default folder structure created by the CLI. You can move these files to any location in the `src/` folder and update the references in your `extension.ts` file. Learn more about the [flexible file system](https://dev.wix.com/docs/wix-cli/guides/get-started/project-structure.md#your-custom-extension-folder). ## Step 2 | Develop your component As you iterate on the component, `.generated.ts` needs to stay in sync with your React code. There are 2 ways this happens, depending on how you work: ::::tabs :::Let-AI-do-it When you prompt your AI coding agent to add or modify the component, the Wix skill regenerates the manifest as part of its workflow. No extra commands needed. ::: :::Do-it-yourself When you edit your component's React code, CSS, or prop types yourself, run the following commands after each round of changes: ```bash wix build wix generate manifest ``` [`wix build`](https://dev.wix.com/docs/wix-cli/command-reference/project-commands/build.md) compiles your latest component code, and [`wix generate manifest`](https://dev.wix.com/docs/wix-cli/command-reference/project-commands/app-only/generate-manifest.md) regenerates `.generated.ts` from that output. ::: :::: For details on what the generated file contains, see [Editor React Component Extension Files and Code](https://dev.wix.com/docs/build-apps/develop-your-app/develop-an-app-with-the-cli/supported-extensions/site/editor-react-components/editor-react-component-extension-files-and-code.md). ## Step 3 | Test your component You can test your component while you're developing by running the [dev](https://dev.wix.com/docs/wix-cli/command-reference/project-commands/dev.md) command. Select the option in the CLI menu to view your component in the editor. This opens the test site editor, where you can view and try out your component.
**Tip:** Access site environment data and interact with other Wix Apps, such as Wix Stores and Wix Bookings, using the [Site API](https://dev.wix.com/docs/sdk/host-modules/site/introduction.md).
## Step 4 | Build and deploy your project Once your app project is ready for production, you can build it and release a version in the app dashboard. 1. Run the [build](https://dev.wix.com/docs/wix-cli/command-reference/project-commands/build.md) command. 2. Run the [release](https://dev.wix.com/docs/wix-cli/command-reference/project-commands/release.md) command and follow the prompts to release an app version. An app version allows you to publish an app to the [Wix App Market](https://www.wix.com/app-market) or install it on a site with a direct install URL. You can view [your app versions](https://manage.wix.com/app-selector?title=Select+an+App&primaryButtonText=Select+Site&actionUrl=https%3A%2F%2Fdev.wix.com%2Fapps%2F%7BappId%7D%2Fversions-app) in the app dashboard. For more information about building and deploying your app, see [Build and Deploy an App with the Wix CLI](https://dev.wix.com/docs/build-apps/develop-your-app/frameworks/wix-cli/project-development/build-and-deploy-a-project-with-the-wix-cli.md). ## Delete the extension To delete an Editor React Component extension from your app: 1. Delete the folder that contains the component's files. 2. Remove the import and `.use()` statements for the extension from the [`extensions.ts`](https://dev.wix.com/docs/build-apps/develop-your-app/frameworks/wix-cli/supported-extensions/about-the-extensions-ts-file.md) file. > **Note**: If you've already created a version of your app, deleting the extension's files from your project doesn't remove it from your app's latest version in the app dashboard. To remove the component, create a new version after deleting the extension files. ## See also - [About Site Extensions](https://dev.wix.com/docs/build-apps/develop-your-app/extensions/site-extensions/about-site-extensions.md) - [About Editor React Components](https://dev.wix.com/docs/build-apps/develop-your-app/extensions/site-extensions/editor-react-components/about-editor-react-components.md) - [Editor React Component Extension Files and Code](https://dev.wix.com/docs/build-apps/develop-your-app/develop-an-app-with-the-cli/supported-extensions/site/editor-react-components/editor-react-component-extension-files-and-code.md) - [`wix generate manifest`](https://dev.wix.com/docs/wix-cli/command-reference/project-commands/app-only/generate-manifest.md) --- > Portal Navigation: > > - Append `.md` to any URL under `https://dev.wix.com/docs/` to get its markdown version. > - Pages are either content pages (article or reference text) or menu pages (a list of links to child pages). > - To get a menu page, truncate any URL to a parent path and append `.md` (e.g. `https://dev.wix.com/docs/sdk.md`, `https://dev.wix.com/docs/sdk/core-modules.md`). > - Top-level index of all portals: https://dev.wix.com/docs/llms.txt > - Full concatenated docs: https://dev.wix.com/docs/llms-full.txt ## Resource: Editor React Component Extension Files and Code ## Article: Editor React Component Extension Files and Code ## Article Link: https://dev.wix.com/docs/build-apps/develop-your-app/develop-an-app-with-the-cli/supported-extensions/site/editor-react-components/editor-react-component-extension-files-and-code.md ## Article Content: # Editor React Component Extension Files and Code
**Editor Compatibility** Editor React Component extensions are built for [Wix Harmony](https://dev.wix.com/docs/build-apps/get-started/overview/about-wix-harmony-and-apps.md), Wix's AI-powered editor. They're not supported on Wix Editor or Wix Studio sites, and there's no way to conditionally switch between extension types based on the editor.
When you [add an Editor React Component extension](https://dev.wix.com/docs/build-apps/develop-your-app/develop-an-app-with-the-cli/supported-extensions/site/editor-react-components/add-an-editor-react-component-extension-with-the-wix-cli.md) to your CLI project, the CLI generates a component folder with the name you choose, containing the following files: - A `.extension.ts` file that defines the component's identity, installation, and resources, and combines them with the auto-generated `editorElement`. - A `.generated.ts` file that holds the auto-generated `editorElement` portion of the manifest. This file is generated when you scaffold the component and whenever you explicitly regenerate the manifest using [`wix generate manifest`](https://dev.wix.com/docs/wix-cli/command-reference/project-commands/app-only/generate-manifest.md). - A `.tsx` file that contains the React code that defines your component. - A `styles.module.css` file with the component's default styles.
**Important:** Before you start building, review the [manifest validation rules and unsupported features](https://dev.wix.com/docs/build-apps/develop-your-app/extensions/site-extensions/editor-react-components/manifest-reference/about-the-manifest.md).
## component-name.extension.ts The `.extension.ts` file defines your component's identity, installation behavior, and code resources. It also imports the auto-generated `editorElement` from `.generated.ts` and combines it with the rest of the configuration. This file is required, so don't delete it after the component is generated. If you add your own files, you must include `.extension.ts`. You own this file and edit it manually. The CLI doesn't overwrite it when you regenerate the manifest. When you generate a new Editor React Component in your project, you'll see the following initial code in `.extension.ts`. The generated code is a sample counter component. Replace the configuration with your own logic. ```typescript import { extensions } from '@wix/astro/builders'; import { editorElement } from './my-editor-react.generated'; export default extensions.editorReactComponent({ id: '162e8174-d5ab-475e-9ff2-6284a218e334', description: 'My Editor React', type: 'my_custom_app_harmony.Myeditorreact', installation: { staticContainer: 'HOMEPAGE', initialSize: { width: { sizingType: 'pixels', pixels: 350 }, height: { sizingType: 'pixels', pixels: 250 }, }, }, editorElement, resources: { client: { componentUrl: './extensions/site/widgets/my-editor-react/my-editor-react.tsx', }, }, }); ``` The generated configuration includes: | Key | Type | Description | |-----|------|-------------| | `id` | string | Unique identifier for your component. | | `description` | string | Brief description of your component. | | `type` | string | A unique reference for your component, made up of your app's [code identifier](https://dev.wix.com/docs/build-apps/develop-your-app/app-workspace/app-dashboard/code-identifier.md) followed by a name you choose for the component. | | `installation` | object | Controls how the component is added to a page, including which page and its initial dimensions. | | `editorElement` | object | The auto-generated portion of the manifest, imported from `.generated.ts`. Declares which parts of your component Wix users can edit and how the [auto panels](https://dev.wix.com/docs/build-apps/develop-your-app/extensions/site-extensions/editor-react-components/auto-panels/about-auto-panels.md) are configured. | | `resources.client.componentUrl` | string | Path to your React component file. | This generated file provides a starting example with basic configuration. Editor React Components support options for data, styling, interactions, and editor behavior. For comprehensive documentation on configuring your manifest, see [About the Manifest](https://dev.wix.com/docs/build-apps/develop-your-app/extensions/site-extensions/editor-react-components/manifest-reference/about-the-manifest.md) and the [Manifest Walkthrough](https://dev.wix.com/docs/build-apps/develop-your-app/extensions/site-extensions/editor-react-components/auto-panels/tutorial-configure-auto-panels.md). ## component-name.generated.ts The `.generated.ts` file holds the auto-generated [`editorElement`](https://dev.wix.com/docs/build-apps/develop-your-app/extensions/site-extensions/editor-react-components/manifest-reference/editor-element/editor-element.md) portion of your manifest. The CLI produces this file by reading your React component's JSX, CSS, and prop types. As you iterate on your component, keeping the manifest in sync depends on how you work: - **Manual edits**: The manifest doesn't stay in sync automatically while you edit files yourself. Regenerate it by running [`wix generate manifest`](https://dev.wix.com/docs/wix-cli/command-reference/project-commands/app-only/generate-manifest.md). - **AI edits with the Wix skill**: Manifest regeneration happens as part of the Editor React Component [Wix skill](https://dev.wix.com/docs/wix-cli/command-reference/global-commands/skills-add.md) workflow. [`editorElement`](https://dev.wix.com/docs/build-apps/develop-your-app/extensions/site-extensions/editor-react-components/manifest-reference/editor-element/editor-element.md) is the largest part of the manifest. It declares the data your component exposes, the inner elements that Wix users can select, the CSS properties they can customize, and any presets, states, or layout behavior. The editor reads these declarations to build the matching [auto panels](https://dev.wix.com/docs/build-apps/develop-your-app/extensions/site-extensions/editor-react-components/auto-panels/about-auto-panels.md). A generated file looks like this: ```typescript import type { EditorElement } from '@wix/react-component-schema'; export const editorElement = { selector: '.my-editor-react', displayName: 'My Editor React', data: { label: { dataType: 'text', displayName: 'Label' }, step: { dataType: 'number', displayName: 'Step' }, }, // ...elements, cssProperties, presets, states, layout } as EditorElement; ```
**Caution**: Don't edit `.generated.ts` directly. Manual changes are overwritten the next time the manifest regenerates. To regenerate this file after manual changes to your component, run [`wix generate manifest`](https://dev.wix.com/docs/wix-cli/command-reference/project-commands/app-only/generate-manifest.md).
## component-name.tsx The `.tsx` file is where you write the React code that defines your component. You can write code in other files and include it here, but you must return your main component in this file. This is where the CLI will look for the component definition. The CLI reads this file when regenerating `.generated.ts`, so the structure of your JSX, CSS classes, and prop types directly shape the auto-generated `editorElement`. After you edit this file manually, run [`wix generate manifest`](https://dev.wix.com/docs/wix-cli/command-reference/project-commands/app-only/generate-manifest.md) to keep the generated manifest in sync. This file is required for the component to work, so don't delete it. If you add the files on your own, you must include `.tsx`. When the `.tsx` file is generated, it looks like this: ```typescript import { useCallback, useState } from 'react'; import type { FC } from 'react'; import s from './styles.module.css'; interface Props { id: string; className: string; label?: string; showLabel?: boolean; step?: number; } const Button: FC = ({ id, className, label = 'Counter', showLabel = true, step = 1, }) => { const [counter, setCounter] = useState(0); const incrementCounter = useCallback(() => { setCounter((prev) => prev + step); }, [step]); const decrementCounter = useCallback(() => { setCounter((prev) => prev - step); }, [step]); return (
{showLabel ? {label} : null}
{counter}
); }; export default Button; ``` The file defines a React functional component with TypeScript. The component receives props that map directly to the `data` keys in the manifest's `editorElement` (auto-generated from this file), plus `className` and `id` which are always provided by the editor. For more details, see [Runtime Props](https://dev.wix.com/docs/build-apps/develop-your-app/extensions/site-extensions/editor-react-components/manifest-reference/runtime-props.md). This is a standard React functional component, so you can use all React features including: - React hooks like `useState`, `useEffect`, `useCallback`. - Additional props as needed for your functionality. - Child components and composition. - External libraries and SDKs. ## styles.module.css The `styles.module.css` file contains the default styles for the generated component. It uses [CSS Modules](https://github.com/css-modules/css-modules), which scope class names locally to avoid conflicts with other components on the page. ## See also - [`wix generate manifest`](https://dev.wix.com/docs/wix-cli/command-reference/project-commands/app-only/generate-manifest.md) - [Manifest Validation and Unsupported Features](https://dev.wix.com/docs/build-apps/develop-your-app/extensions/site-extensions/editor-react-components/manifest-reference/about-the-manifest.md) - [Add an Editor React Component Extension with the Wix CLI](https://dev.wix.com/docs/build-apps/develop-your-app/develop-an-app-with-the-cli/supported-extensions/site/editor-react-components/add-an-editor-react-component-extension-with-the-wix-cli.md) - [About Site Extensions](https://dev.wix.com/docs/build-apps/develop-your-app/extensions/site-extensions/about-site-extensions.md) - [About the Manifest](https://dev.wix.com/docs/build-apps/develop-your-app/extensions/site-extensions/editor-react-components/manifest-reference/about-the-manifest.md) - [Tutorial | Build a Manifest Step by Step](https://dev.wix.com/docs/build-apps/develop-your-app/extensions/site-extensions/editor-react-components/auto-panels/tutorial-configure-auto-panels.md) - [Runtime Props](https://dev.wix.com/docs/build-apps/develop-your-app/extensions/site-extensions/editor-react-components/manifest-reference/runtime-props.md) - [About Wix Skills for the CLI](https://dev.wix.com/docs/api-reference/articles/ai-tools/about-wix-skills.md) --- > Portal Navigation: > > - Append `.md` to any URL under `https://dev.wix.com/docs/` to get its markdown version. > - Pages are either content pages (article or reference text) or menu pages (a list of links to child pages). > - To get a menu page, truncate any URL to a parent path and append `.md` (e.g. `https://dev.wix.com/docs/sdk.md`, `https://dev.wix.com/docs/sdk/core-modules.md`). > - Top-level index of all portals: https://dev.wix.com/docs/llms.txt > - Full concatenated docs: https://dev.wix.com/docs/llms-full.txt ## Resource: About Self-Managed Apps ## Article: About Self-hosting for Wix Apps ## Article Link: https://dev.wix.com/docs/build-apps/develop-your-app/develop-a-self-managed-app/about-self-managed-apps.md ## Article Content: # About Self-Managed Apps Wix supports several [development frameworks](https://dev.wix.com/docs/build-apps/get-started/overview/wix-s-development-frameworks.md) you can use to build your app. You can use Wix's [native frameworks](https://dev.wix.com/docs/build-apps/develop-your-app/frameworks/about-development-frameworks.md), such as [Wix Blocks](https://dev.wix.com/docs/build-apps/develop-your-app/develop-an-app-with-blocks/about-wix-blocks.md) and the [Wix CLI](https://dev.wix.com/docs/wix-cli/guides/about-the-wix-cli.md). You can also build and host your app's features yourself outside the Wix ecosystem, and integrate them with Wix using the [app dashboard](https://dev.wix.com/docs/build-apps/develop-your-app/app-dashboard-setup/about-the-app-dashboard.md). With the self-managed framework, your app can provide entirely new functionality, or integrate an existing service with the Wix ecosystem. By integrating an existing service with Wix, you can make it available to a large number of Wix site owners, easily integrate it with [Wix's business solutions](https://dev.wix.com/docs/build-apps/get-started/overview/integrating-with-wix-s-business-solutions.md), and maintain the ability to manage it across multiple platforms. The self-managed framework enables you to use the tech stack of your choice. However, to benefit from a native Wix development environment, consider using [Wix Blocks](https://dev.wix.com/docs/build-apps/develop-your-app/develop-an-app-with-blocks/about-wix-blocks.md) or the [Wix CLI](https://dev.wix.com/docs/wix-cli/guides/about-the-wix-cli.md). > **Note:** > No matter which development framework you start with, you can always continue developing your app using any of the other supported frameworks. [](https://manage.wix.com/account/custom-apps) ## Building and deploying your Wix app To start building a Wix app with the self-managed framework, [create a new app with the app dashboard](https://dev.wix.com/docs/build-apps/develop-your-app/app-dashboard-setup/about-the-app-dashboard.md) and provide the links to your app's assets. These can be hosted on any platform that exposes public, secure endpoints. Once your app is installed on a site, it can communicate with it using Wix APIs. Wix APIs allow your app to access and manage the site's data, extend the [Wix business solutions](https://dev.wix.com/docs/build-apps/get-started/overview/integrating-with-wix-s-business-solutions.md) it has installed, and customize interactions with site visitors. Wix offers multiple [API technologies](https://dev.wix.com/docs/build-apps/develop-your-app/api-integrations/about-wix-apis.md), including REST, JavaScript SDK, GraphQL, and Velo with Blocks. Each API technology offers a similar set of APIs. Learn more about [Wix APIs](https://dev.wix.com/docs/build-apps/develop-your-app/api-integrations/about-wix-apis.md) and the [JavaScript SDK](https://dev.wix.com/docs/sdk/articles/get-started/about-the-wix-java-script-sdk.md). ### Functionality as extensions On Wix, each specific type of functionality that an app can provide is called an [extension](https://dev.wix.com/docs/build-apps/get-started/overview/how-apps-extend-wix.md). Wix offers [many types of extensions](https://dev.wix.com/docs/build-apps/get-started/overview/how-apps-extend-wix.md#extension-catalog) that allow your app to extend both your site's frontend interfaces and its backend capabilities. Your app can contain multiple extensions across different interfaces and services to provide a more comprehensive solution. Since each extension is configured separately in an app's dashboard, build your app in such a way that each of its deployable self-managed assets is accessible to Wix via a separate URL. Learn more about [how apps extend Wix](https://dev.wix.com/docs/build-apps/get-started/overview/how-apps-extend-wix.md). Make sure your app includes at least one extension. You can build most extensions using one of Wix’s development frameworks, though some extensions can be added simply by [configuring them in your app's dashboard](https://dev.wix.com/docs/build-apps/develop-your-app/app-dashboard-setup/about-the-app-dashboard.md). Learn more about [self-managed app extensions](https://dev.wix.com/docs/build-apps/develop-your-app/frameworks/self-hosting/supported-extensions/about-self-hosted-app-extensions.md). ## See also * [About the App Dashboard](https://dev.wix.com/docs/build-apps/develop-your-app/app-dashboard-setup/about-the-app-dashboard.md) * [About Self-Managed Apps](https://dev.wix.com/docs/build-apps/develop-your-app/frameworks/self-hosting/about-self-hosting-for-wix-apps.md) * [Tutorial | Create a Self-Managed App](https://dev.wix.com/docs/build-apps/get-started/quick-start/create-a-self-hosted-app.md) --- > Portal Navigation: > > - Append `.md` to any URL under `https://dev.wix.com/docs/` to get its markdown version. > - Pages are either content pages (article or reference text) or menu pages (a list of links to child pages). > - To get a menu page, truncate any URL to a parent path and append `.md` (e.g. `https://dev.wix.com/docs/sdk.md`, `https://dev.wix.com/docs/sdk/core-modules.md`). > - Top-level index of all portals: https://dev.wix.com/docs/llms.txt > - Full concatenated docs: https://dev.wix.com/docs/llms-full.txt ## Resource: Elevate SDK Call Permissions for Self-Managed Extensions ## Article: Elevate API Call Permissions with Self-hosting ## Article Link: https://dev.wix.com/docs/build-apps/develop-your-app/develop-a-self-managed-app/elevate-sdk-call-permissions-for-self-managed-extensions.md ## Article Content: # Elevate SDK Call Permissions for Self-Managed Extensions In workflows that use mostly [site visitor](https://dev.wix.com/docs/build-apps/develop-your-app/access/about-identities.md#site-visitors), [site member](https://dev.wix.com/docs/build-apps/develop-your-app/access/about-identities.md#site-members), or [Wix user](https://dev.wix.com/docs/build-apps/develop-your-app/access/about-identities.md#wix-users) authentication, you may occasionally need to make calls with [elevated permissions](https://dev.wix.com/docs/sdk/articles/work-with-the-sdk/about-elevated-permissions.md). You can use the [JavaScript SDK](https://dev.wix.com/docs/build-apps/develop-your-app/api-integrations/java-script-sdk.md) to provide specific calls with [Wix app](https://dev.wix.com/docs/build-apps/develop-your-app/access/about-identities.md#wix-apps) authentication. The process involves two steps: 1. Setting up your app's backend code to handle elevated requests. 1. Sending an authenticated call from your frontend code to your app's backend. Frontend code includes [site extension](https://dev.wix.com/docs/build-apps/develop-your-app/extensions/site-extensions/about-site-extensions.md) and [dashboard extension](https://dev.wix.com/docs/build-apps/develop-your-app/extensions/dashboard-extensions/about-dashboard-extensions.md) code.
**Important:** Exposed elevated function calls create a security risk for [privilege escalation attacks](https://en.wikipedia.org/wiki/Privilege_escalation). Make sure to protect your exposed function calls with the appropriate logic.
To elevate permissions for API calls: ## Step 1 | Set up your app's backend The first step is to set up your app's backend to handle requests for elevated function calls from your frontend. To set up your backend: 1. In your code file, import the following: + `createClient` and `AppStrategy` from the Wix SDK module. + The SDK module containing the function that you want to make elevated calls to. + Express ```js import { createClient, AppStrategy } from '@wix/sdk'; import { } from '@wix/'; import express from "express"; ``` > **Note:** You can use your preferred method to expose HTTP functions from your self-managed backend. For this example, we used the [express](https://www.npmjs.com/package/express) NPM package. 1. Set up an endpoint. In your endpoint's code, extract the `authorization` header from incoming requests. When you send requests to the endpoint from your frontend code, this header's value will be an access token that includes authentication data for the site visitor or member. ```js const app = express (); app.get('/func', (req, res) => { const accessToken = req.headers['Authorization']; }); ``` 1. In your endpoint code, use [`createClient()`](https://dev.wix.com/docs/sdk/core-modules/sdk/wix-client.md#createclient) to create a client that can make authenticated SDK calls. Use [`AppStrategy`](https://dev.wix.com/docs/sdk/core-modules/sdk/app-strategy.md) to construct the `auth` value for your `createClient()` call. Chain a call to `elevated()` to your call to the `AppStrategy` constructor. Your `createClient()` call should include your app ID, app secret key, access token, and SDK module. You can find your app ID and app secret key in your [app's dashboard](https://manage.wix.com/app-selector?title=Select+an+App&primaryButtonText=Select+Site&actionUrl=https%3A%2F%2Fdev.wix.com%2Fapps%2F%7BappId%7D%2Foauth). ```js const elevatedClient = createClient({ auth: await AppStrategy({ appId: "YOUR_APP_ID", appSecret: "YOUR_APP_SECRET", accessToken: accessToken }).elevated(), modules: { } }); ``` This call to `createClient()` returns a client that can make API calls with Wix app authentication. To make calls with site visitor or site member authentication, create a second client without using `elevated()`. 1. Use the client to make elevated calls to the functions of the SDK module. ```js elevatedClient..() ``` ## Step 2 | Send authenticated requests from your frontend Next, send authenticated requests from your site's frontend code to your backend endpoint. To send requests: 1. In your app's frontend code, import `createClient()` as well as the relevant [host module](https://dev.wix.com/docs/sdk/host-modules/about-host-modules.md). ```js import { createClient} from '@wix/sdk'; // Include one of the following: import { dashboard } from "@wix/dashboard"; import { editor } from "@wix/editor"; import { site } from "@wix/site"; ``` 1. Create an SDK client using the `auth()` and `host()` functions from the appropriate host module. ```js const wixClient = createClient({ auth: < dashboard.auth() | editor.auth() >, host: < dashboard.host() | editor.host() | site.host() > }); ``` 1. Use the client's [`fetchWithAuth`](https://dev.wix.com/docs/sdk/core-modules/sdk/wix-client.md#fetchwithauth) function to make calls to your app's backend endpoint. This function automatically signs API calls with an authorization header that identifies the current site visitor or member. ```js const response = await wixClient.fetchWithAuth(`https://my-backend.com/apis/func`); ``` ## See also + [About Elevated Permissions](https://dev.wix.com/docs/sdk/articles/work-with-the-sdk/about-elevated-permissions.md) + [Elevate REST API Call Permissions for Self-Managed Extensions](https://dev.wix.com/docs/build-apps/develop-your-app/frameworks/self-hosting/elevate-rest-api-call-permissions-for-self-hosting.md) --- > Portal Navigation: > > - Append `.md` to any URL under `https://dev.wix.com/docs/` to get its markdown version. > - Pages are either content pages (article or reference text) or menu pages (a list of links to child pages). > - To get a menu page, truncate any URL to a parent path and append `.md` (e.g. `https://dev.wix.com/docs/sdk.md`, `https://dev.wix.com/docs/sdk/core-modules.md`). > - Top-level index of all portals: https://dev.wix.com/docs/llms.txt > - Full concatenated docs: https://dev.wix.com/docs/llms-full.txt ## Resource: Elevate REST API Call Permissions for Self-Managed Extensions ## Article: Elevate REST API Call Permissions for Self-hosting ## Article Link: https://dev.wix.com/docs/build-apps/develop-your-app/develop-a-self-managed-app/elevate-rest-api-call-permissions-for-self-managed-extensions.md ## Article Content: # Elevate REST API Call Permissions for Self-Managed Extensions In workflows that use mostly [site visitor](https://dev.wix.com/docs/build-apps/develop-your-app/access/about-identities.md#site-visitors), [site member](https://dev.wix.com/docs/build-apps/develop-your-app/access/about-identities.md#site-members), or [Wix user](https://dev.wix.com/docs/build-apps/develop-your-app/access/about-identities.md#wix-users) authentication, you may occasionally need to call APIs that require the elevated level of a [Wix app](https://dev.wix.com/docs/build-apps/develop-your-app/access/about-identities.md#wix-apps) identity for authentication. This can happen when coding in a frontend environment such as a [site extension](https://dev.wix.com/docs/build-apps/develop-your-app/extensions/site-extensions/about-site-extensions.md) or a [dashboard extension](https://dev.wix.com/docs/build-apps/develop-your-app/extensions/dashboard-extensions/about-dashboard-extensions.md). The process involves two steps: 1. Setting up your app's backend code to handle requests that require Wix app permissions. 1. Sending an authenticated call from your frontend code to your app's backend.
**Important:** Exposed elevated function calls create a security risk for [privilege escalation attacks](https://en.wikipedia.org/wiki/Privilege_escalation). Make sure to protect your exposed function calls with the appropriate logic.
To elevate permissions for API calls: ## Step 1 | Set up your app's backend The first step is to set up your app's backend to handle requests for API calls from your frontend. To set up your backend: 1. Set up an endpoint to receive HTTP requests. In your endpoint's code, extract the `authorization` header from incoming requests. When you send requests to the endpoint from your frontend code, this header's value will be an access token that includes authentication data for the site visitor or member. 1. Retrieve the [app `instanceId`](https://dev.wix.com/docs/build-apps/develop-your-app/access/app-instances/about-app-instances.md) from the access token. In your endpoint code, call Wix's [Token Info](https://dev.wix.com/docs/rest/app-management/oauth-2/token-info.md) endpoint. The response includes the `instanceId`. ```curl curl -X POST ֿ 'https://www.wixapis.com/oauth2/token-info' --d '{ "token": "" }' ``` 1. Create an access token with a Wix app identity. In your endpoint code, call Wix's [Create Access Token](https://dev.wix.com/docs/rest/app-management/oauth-2/create-access-token.md) endpoint and include your `instanceId` in the request body. The response includes an `accessToken` with a Wix app identity. ```curl curl -X POST ֿ 'https://www.wixapis.com/oauth2/token' -H 'Content-Type: application/json' --d '{ "instance_id": "" "grant_type": "client_credentials", "client_id": "", "client_secret": "", }' ``` 1. In your endpoint code, use the access token to authorize calls to endpoints that require a Wix app identity for authentication. ## Step 2 | Send authenticated requests from your frontend Next, use the Wix [JavaScript SDK](https://dev.wix.com/docs/build-apps/develop-your-app/api-integrations/java-script-sdk.md) to send authenticated requests from your site's frontend code to your backend endpoint. To send requests: 1. In your app's frontend code, import `createClient()` from the `@wix/sdk` package as well as the relevant [host module](https://dev.wix.com/docs/sdk/host-modules/about-host-modules.md). ```js import { createClient} from '@wix/sdk'; // Include one of the following: import { dashboard } from "@wix/dashboard"; import { editor } from "@wix/editor"; import { site } from "@wix/site"; ``` 1. Create an SDK client using the `auth()` and `host()` functions from the appropriate host module. ```js const wixClient = createClient({ auth: < dashboard.auth() | editor.auth() >, host: < dashboard.host() | editor.host() | site.host() > }); ``` 1. Use the client's [`fetchWithAuth`](https://dev.wix.com/docs/sdk/core-modules/sdk/wix-client.md#fetchwithauth) function to make calls to your app's backend endpoint. This function automatically signs API calls with an authorization header that identifies the current site visitor or member. ```js const response = await wixClient.fetchWithAuth(`https://my-backend.com/apis/func`); ``` ## See also + [About Elevated Permissions](https://dev.wix.com/docs/sdk/articles/work-with-the-sdk/about-elevated-permissions.md) + [Elevate SDK Call Permissions for Self-Managed Extensions](https://dev.wix.com/docs/build-apps/develop-your-app/frameworks/self-hosting/elevate-sdk-call-permissions-with-self-hosting.md) --- > Portal Navigation: > > - Append `.md` to any URL under `https://dev.wix.com/docs/` to get its markdown version. > - Pages are either content pages (article or reference text) or menu pages (a list of links to child pages). > - To get a menu page, truncate any URL to a parent path and append `.md` (e.g. `https://dev.wix.com/docs/sdk.md`, `https://dev.wix.com/docs/sdk/core-modules.md`). > - Top-level index of all portals: https://dev.wix.com/docs/llms.txt > - Full concatenated docs: https://dev.wix.com/docs/llms-full.txt ## Resource: About Self-Managed App Extensions ## Article: About Self-Hosted App Extensions ## Article Link: https://dev.wix.com/docs/build-apps/develop-your-app/develop-a-self-managed-app/supported-extensions/about-self-managed-app-extensions.md ## Article Content: # About Self-Managed App Extensions Self-managed extensions are app features that are hosted on an external platform and integrated with the Wix ecosystem using the [app dashboard](https://dev.wix.com/docs/build-apps/develop-your-app/app-dashboard-setup/about-the-app-dashboard.md). Your app can combine multiple extensions to provide a comprehensive service that spans across several user interfaces and backend capabilities. Browse the [extensions catalog](https://dev.wix.com/docs/build-apps/get-started/overview/how-apps-extend-wix.md#extension-catalog) to explore available extensions. Learn more about [How Apps Extend Wix](https://dev.wix.com/docs/build-apps/get-started/overview/how-apps-extend-wix.md). ## Building and adding self-managed extensions Use your preferred development environment and tools to build your extension. Once it's ready, host it on any platform that exposes public, secure endpoints. Finally, add it to your app by configuring it in your [app's dashboard](https://dev.wix.com/docs/build-apps/develop-your-app/app-dashboard-setup/about-the-app-dashboard.md). Learn more about [self-managed apps](https://dev.wix.com/docs/build-apps/develop-your-app/frameworks/self-hosting/about-self-hosting-for-wix-apps.md). ## Supported extension types Self-managed apps currently support the following extensions: ### Site extensions + [Embedded scripts](https://dev.wix.com/docs/build-apps/develop-your-app/frameworks/self-hosting/supported-extensions/site-extensions/embedded-scripts/add-an-embedded-script-extension-to-a-self-hosted-app.md) + [Site widgets with custom elements](https://dev.wix.com/docs/build-apps/develop-your-app/frameworks/self-hosting/supported-extensions/site-extensions/site-widgets-and-plugins/add-self-hosted-site-widget-extensions-with-custom-elements.md) + [Site plugins with custom elements](https://dev.wix.com/docs/build-apps/develop-your-app/develop-a-self-managed-app/supported-extensions/site-extensions/site-widgets-and-plugins/add-site-plugin-extensions-with-custom-elements.md) ### Dashboard extensions + [Dashboard pages](https://dev.wix.com/docs/build-apps/develop-your-app/frameworks/self-hosting/supported-extensions/dashboard-extensions/add-self-hosted-dashboard-page-extensions.md) + [Dashboard modals](https://dev.wix.com/docs/build-apps/develop-your-app/frameworks/self-hosting/supported-extensions/dashboard-extensions/add-self-hosted-dashboard-modal-extensions.md) + [Dashboard plugins](https://dev.wix.com/docs/build-apps/develop-your-app/frameworks/self-hosting/supported-extensions/dashboard-extensions/add-self-hosted-dashboard-plugin-extensions.md) ### Backend extensions + [Service plugins with the JavaScript SDK](https://dev.wix.com/docs/build-apps/develop-your-app/frameworks/self-hosting/supported-extensions/backend-extensions/add-self-hosted-service-plugin-extensions-with-the-sdk.md) + [Service plugins with REST](https://dev.wix.com/docs/build-apps/develop-your-app/frameworks/self-hosting/supported-extensions/backend-extensions/add-self-hosted-service-plugin-extensions-with-rest.md) ## See also * [How Apps Extend Wix](https://dev.wix.com/docs/build-apps/get-started/overview/how-apps-extend-wix.md) * [About the App Dashboard](https://dev.wix.com/docs/build-apps/develop-your-app/app-dashboard-setup/about-the-app-dashboard.md) * [About Self-Managed Apps](https://dev.wix.com/docs/build-apps/develop-your-app/frameworks/self-hosting/about-self-hosting-for-wix-apps.md) * [Map your app's functionality to Wix's extensions](https://dev.wix.com/docs/build-apps/develop-your-app/extensions/map-your-app-s-functionality-to-wix-s-extensions.md) --- > Portal Navigation: > > - Append `.md` to any URL under `https://dev.wix.com/docs/` to get its markdown version. > - Pages are either content pages (article or reference text) or menu pages (a list of links to child pages). > - To get a menu page, truncate any URL to a parent path and append `.md` (e.g. `https://dev.wix.com/docs/sdk.md`, `https://dev.wix.com/docs/sdk/core-modules.md`). > - Top-level index of all portals: https://dev.wix.com/docs/llms.txt > - Full concatenated docs: https://dev.wix.com/docs/llms-full.txt ## Resource: Add a Self-Managed Embedded Script Extension ## Article: Add an Embedded Script Extension to a Self-hosted App ## Article Link: https://dev.wix.com/docs/build-apps/develop-your-app/develop-a-self-managed-app/supported-extensions/site-extensions/embedded-scripts/add-a-self-managed-embedded-script-extension.md ## Article Content: # Add a Self-Managed Embedded Script Extension An embedded script is an app extension that injects an HTML code fragment into the DOM of your users' sites. Unlike other extensions, embedded scripts aren't fully configured by default during app installation and an extra step is required to embed the code fragment. An example of an HTML code fragment is: ```javascript ``` This article explains how to: 1. [Add an embedded script extension](#step-1--add-an-embedded-script-extension). 1. [Embed the script upon app installation](#step-2--embed-the-script-upon-app-installation). 1. [Test the embedded script on a demo site](#step-3--test-your-script). After following these steps, your app will have an embedded script extension that injects its HTML code fragment into the DOM of every page of your users' sites. ## Step 1 | Add an embedded script extension 1. Create a new app, or select an existing app from the [Custom Apps page](https://manage.wix.com/account/custom-apps) in your Wix Studio workspace. 1. Go to [**Extensions**](https://manage.wix.com/app-selector?title=Select+an+App&primaryButtonText=Select+Site&actionUrl=https%3A%2F%2Fdev.wix.com%2Fapps%2F%7BappId%7D%2Fextensions) and click **+Create Extension**. 1. Find **Embedded Script**. 1. Click **Create**. 1. Name your extension. The name can only contain letters and the hyphen (-) character. 1. Select a **Script Type**: - **Essential:** Enables site visitors to move around the website and use essential features like secure and private areas crucial to the functioning of the site. - **Functional:** Remembers choices site visitors make to improve their experience. For example, language. - **Analytics:** Helps site owners understand how visitors use their website by providing statistics, such as which pages they visit, and by identifying errors and performance issues. - **Advertising:** Lets site owners collect information to help market their products, such as data on the impact of marketing campaigns or re-targeted advertising. Site owners can allow visitors to choose whether to opt out of cookies and 3rd-party scripts. Sites check the script type against the visitor's consent policy to determine whether to run the script. > **Note:** An embedded script can't be saved without a type. If your script falls into more than 1 type, choose the option closest to the bottom of the list above. For example, if your script has **Advertising** and **Analytics** aspects, choose **Advertising** as its type. It's unlikely that you'll need to mark it as **Essential**. For more information, see our [guidelines for embedded scripts](https://dev.wix.com/docs/build-apps/launch-your-app/legal-and-security/gdpr-compliance/implement-cookie-consent-requirements.md#guidelines-for-embedded-scripts). 1. Write the custom code to embed, including any relevant [dynamic parameters](https://dev.wix.com/docs/build-apps/develop-your-app/extensions/site-extensions/embedded-scripts/about-embedded-scripts.md#dynamic-parameters). - For efficiency, load the code from an external source so that you can edit the script on the external platform instead of within the extension. This ensures that changes, except for changes made to dynamic parameters, are automatically reflected across all app versions without needing individual reviews. - Your script may not run until after the DOM has fully loaded. Therefore, you should check whether the DOM has loaded before running your code.
Example: Use the DOMContentLoaded event to check if the DOM has loaded ```js if (document.readyState === "loading") { // DOM has not finished loading document.addEventListener("DOMContentLoaded", runMyCode); } else { // DOM has loaded runMyCode(); } ```
- To call APIs using the [Wix JavaScript SDK](https://dev.wix.com/docs/sdk.md), you need to [authenticate using the Wix Client](https://dev.wix.com/docs/build-apps/develop-your-app/develop-a-self-managed-app/supported-extensions/site-extensions/embedded-scripts/authenticate-embedded-scripts-using-the-wix-client.md). 1. [Set up a dashboard page](https://dev.wix.com/docs/build-apps/develop-your-app/extensions/dashboard-extensions/dashboard-pages/about-dashboard-page-extensions.md) in the [app dashboard](https://manage.wix.com/account/custom-apps) for users to set up and customize the embedded script. ## Step 2 | Embed the script upon app installation Your app needs to make a POST request to enable the embedded script in 2 cases: 1. Register to the [App Instance Installed](https://dev.wix.com/docs/rest/app-management/app-instance/app-instance-installed.md) webhook. For guidance, see [Handle Events With Webhooks](https://dev.wix.com/docs/build-apps/develop-your-app/api-integrations/events-and-webhooks/handle-events-with-webhooks.md). 1. Use the instance ID received from the webhook to [create an access token](https://dev.wix.com/docs/rest/app-management/oauth-2/create-access-token.md). For more information, see [Authenticate Using OAuth](https://dev.wix.com/docs/build-apps/develop-your-app/access/authentication/use-oauth.md). 1. Upon receipt of the webhook, make a POST request to the [Embed Script endpoint](https://dev.wix.com/api/rest/app-management/apps/embedded-scripts/embed-script) with the access token provided in the `Authorization` header of the request: * If your script includes [dynamic parameters](https://dev.wix.com/docs/build-apps/develop-your-app/extensions/site-extensions/embedded-scripts/about-embedded-scripts.md#dynamic-parameters), include them in the request body under the `parameters` key: ```json { "properties": { "parameters": { "": "", "": "" } } } ``` * If your script doesn't include [dynamic parameters](https://dev.wix.com/docs/build-apps/develop-your-app/extensions/site-extensions/embedded-scripts/about-embedded-scripts.md#dynamic-parameters), make the call with the following request body: ```json { "properties": {} } ``` 1. (Optional) If your app includes multiple embedded scripts, each request must specify the `componentId` in the request body sent to the [Embed Script endpoint](https://dev.wix.com/api/rest/app-management/apps/embedded-scripts/embed-script): ```json { "properties": { "parameters": { "": "" } }, "componentId": "" } ``` The `componentId` can be found within the URL of the embedded script page in your [app's dashboard](https://manage.wix.com/account/custom-apps): ![Component ID](https://wixmp-833713b177cebf373f611808.wixmp.com/images/e1f261c5f91279edf3e47d2a4235cad2.png)
__Warning:__ If your app only has 1 embedded script, don't pass the `componentId` in the request body. This action could lead to your app breaking in production. The `componentId` is only relevant for apps with more than 1 embedded script.
Here's some example code that uses the [JavaScript SDK](https://dev.wix.com/docs/sdk.md) to embed a script. The SDK requires the use of the [`embedScript()`](https://dev.wix.com/docs/sdk/backend-modules/app-management/embedded-scripts/embed-script.md) method: ```js import { createClient, AppStrategy } from "@wix/sdk"; import { embeddedScripts } from "@wix/app-management"; // Get a Wix client bound to the refresh token const myClient = createClient({ auth: AppStrategy({ appId: "YOUR_APP_ID", appSecret: "YOUR_APP_SECRET", refreshToken, }), modules: { embeddedScripts, }, }); async function embedCustomScript() { const scriptProperties = { script: `` }; try { await myClient.embeddedScripts.embedScript({ properties: scriptProperties, }); console.log("Script embedded successfully."); } catch (error) { console.error("Failed to embed script:", error); } } // Call this function upon app installation embedCustomScript(); ``` Now your embedded script will be injected into a site upon app installation. ## Step 3 | Test your script To test your embedded script: 1. Install your app on a site. 1. Visit the test site where the app is installed. Inspect the site and check that the script appears in the site code. You can see the script in the network tab by filtering for "tags".
__Tip:__ If you don't see the script on the site, go to **App > Manage Apps** page within the site dashboard, and check that the script isn't disabled.
1. If you used dynamic parameters, check that they exist in the script as expected. For more information on testing, see [App Checks and Testing Guide](https://dev.wix.com/docs/build-apps/launch-your-app/app-distribution/app-checks-and-testing-guide.md). ## See also * [About Embedded Scripts](https://dev.wix.com/docs/build-apps/develop-your-app/extensions/site-extensions/embedded-scripts/about-embedded-scripts.md) * [Add an Embedded Script Extension with the Wix CLI](https://dev.wix.com/docs/wix-cli/guides/extensions/site-extensions/embedded-scripts/add-an-embedded-script-extension.md) --- > Portal Navigation: > > - Append `.md` to any URL under `https://dev.wix.com/docs/` to get its markdown version. > - Pages are either content pages (article or reference text) or menu pages (a list of links to child pages). > - To get a menu page, truncate any URL to a parent path and append `.md` (e.g. `https://dev.wix.com/docs/sdk.md`, `https://dev.wix.com/docs/sdk/core-modules.md`). > - Top-level index of all portals: https://dev.wix.com/docs/llms.txt > - Full concatenated docs: https://dev.wix.com/docs/llms-full.txt ## Resource: Authenticate Embedded Scripts Using the Wix Client ## Article: Inject an Embedded Script Extension with an Access Token ## Article Link: https://dev.wix.com/docs/build-apps/develop-your-app/develop-a-self-managed-app/supported-extensions/site-extensions/embedded-scripts/authenticate-embedded-scripts-using-the-wix-client.md ## Article Content: # Authenticate Embedded Scripts Using the Wix Client In a self-managed [embedded script extension](https://dev.wix.com/docs/build-apps/develop-your-app/extensions/site-extensions/embedded-scripts/about-embedded-scripts.md), you need to use a [Wix Client](https://dev.wix.com/docs/sdk/articles/set-up-a-client/about-the-wix-client.md) to call Wix APIs using the [SDK](https://dev.wix.com/docs/sdk.md). - To call frontend modules, the client must be initialized with the [Site host context](https://dev.wix.com/docs/sdk/host-modules/site/introduction.md). - To call backend modules, the client must be authenticated using [Site authentication](https://dev.wix.com/docs/sdk/host-modules/site/introduction.md#auth). > **Note:** We recommend always creating your client using Site host context and authentication so it can be used to call frontend and backend modules. ## Script types Before starting to code, check whether your scripts are [standard JavaScript scripts](#standard-javascript-scripts) or [JavaScript modules (ESM)](#javascript-modules-esm). - Standard JavaScript scripts either have no type specified or specify `type="text/javascript"` in the script tags. - [JavaScript modules](https://developer.mozilla.org/en-US/docs/Web/JavaScript/Guide/Modules) specify `type="module"` in the script tags and they use the `import` syntax. > **Note:** Most modern build tools like [`Vite`](https://vitejs.dev/config/build-options) and [`esBuild`](https://esbuild.github.io/getting-started/#bundling-for-the-browser) output ESM bundles, so make sure to check your app's configuration. ## JavaScript modules (ESM) In JavaScript modules, you need to export a function that Wix uses to inject your client with an access token to call backend modules. 1. For the script in which you want to call SDK methods, add `accesstoken="true"` to your script tag. 1. Create a client using [Site host context](https://dev.wix.com/docs/sdk/host-modules/site/introduction.md) and [Site authentication](https://dev.wix.com/docs/sdk/host-modules/site/introduction.md#auth). 1. Export a function exactly like this: ```js export const injectAccessTokenFunction = myWixClient.auth.getAccessTokenInjector(); ``` Wix calls this function to inject your client with an access token. 1. Use the client to call SDK methods. ### Example The following example uses an authenticated client to call: - `products.queryProducts` from the `@wix/stores` backend module - `seo.title` from the `@wix/site-seo` frontend module ```js ``` ## Standard JavaScript scripts In standard JavaScript scripts, you don't need to provide Wix with any injector functions. 1. Create a JavaScript file to host your code. This file will be your scripts `src`. 1. Create a client using [Site host context](https://dev.wix.com/docs/sdk/host-modules/site/introduction.md) and [Site authentication](https://dev.wix.com/docs/sdk/host-modules/site/introduction.md#auth). 1. Use the client to call SDK methods. 1. Create your script and add your JavaScript file as the script's `src`. ### Example The following example uses an authenticated client to call: - `products.queryProducts` from the `@wix/stores` backend module - `seo.title` from the `@wix/site-seo` frontend module ```js // my-file.js import { site } from "@wix/site"; import { createClient } from "@wix/sdk"; import { products } from '@wix/stores'; import { seo } from "@wix/site-seo"; const myWixClient = createClient({ auth: site.auth(), host: site.host({ applicationId: "" }), modules: { products, seo } }); async function fetchData() { try { const productsQueryResult = await myWixClient.products.queryProducts({}); console.log('Products query result:', productsQueryResult); const title = await myWixClient.seo.title(); console.log("Site title:", title); } catch (error) { console.error('Error fetching data:', error); } } fetchData(); ``` --- > Portal Navigation: > > - Append `.md` to any URL under `https://dev.wix.com/docs/` to get its markdown version. > - Pages are either content pages (article or reference text) or menu pages (a list of links to child pages). > - To get a menu page, truncate any URL to a parent path and append `.md` (e.g. `https://dev.wix.com/docs/sdk.md`, `https://dev.wix.com/docs/sdk/core-modules.md`). > - Top-level index of all portals: https://dev.wix.com/docs/llms.txt > - Full concatenated docs: https://dev.wix.com/docs/llms-full.txt ## Resource: Add Self-Managed Site Widget Extensions with Custom Elements ## Article: Add Self-hosted Site Widget Extensions with Custom Elements ## Article Link: https://dev.wix.com/docs/build-apps/develop-your-app/develop-a-self-managed-app/supported-extensions/site-extensions/site-widgets-and-plugins/add-self-managed-site-widget-extensions-with-custom-elements.md ## Article Content: # Add Self-Managed Site Widget Extensions with Custom Elements
**Tip:** The self-managed framework requires you to manage deployment, authentication, and ongoing maintenance. To reduce complexity, [build your widget with the Wix CLI](https://dev.wix.com/docs/wix-cli/guides/extensions/site-extensions/site-widgets/add-a-site-widget-extension.md).
You can create a site widget extension using custom element technology, with your code deployed on your own server. The custom element is essentially a new HTML tag that you define, which is made available in the Wix editors as a widget. To create this extension, you need to do the following: * Code and deploy the custom element. * Code and deploy your widget's settings panel. * Configure the widget in your app dashboard. ![custom element](https://wixmp-833713b177cebf373f611808.wixmp.com/images/48152711677e65a70503a32a610a256f.png) ## Step 1 | Code your custom element Code your custom element and its functionality in a JavaScript file. Use a class to define the element. > **Note:** For further guidance and examples on using web components, which are the foundation of custom elements, see the [MDN documentation](https://developer.mozilla.org/en-US/docs/Web/Web_Components). In your code, create a class for the custom element and register the custom element. Here is a sample code snippet: ```js class MyCustomElement extends HTMLElement { constructor() { super(); console.log(...); } connectedCallback() { ... ... ... } } customElements.define('my-custom-element', MyCustomElement); ```
Important: - Keep track of the name you used when registering the element with `customElements.define()`. You will need it when defining the tag name while configuring the widget extension in your app's dashboard. In our example, the name is `my-custom-element`. - To call APIs using the [Wix SDK](https://dev.wix.com/docs/sdk.md), you need to [authenticate using the Wix Client](https://dev.wix.com/docs/build-apps/develop-your-app/develop-a-self-managed-app/supported-extensions/site-extensions/site-widgets-and-plugins/authenticate-custom-elements-using-the-wix-client.md).
Custom elements react to DOM-related events. When you create your custom element, use MDN lifecycle callback functions such as [`connectedCallback()`](https://developer.mozilla.org/en-US/docs/Web/API/Web_components/Using_custom_elements#custom_element_lifecycle_callbacks) and [`attributeChangedCallback()`](https://developer.mozilla.org/en-US/docs/Web/API/Web_components/Using_custom_elements#responding_to_attribute_changes). When your code is ready, deploy your custom element’s JavaScript file on a remote or local server. ## Step 2 | Code your widget’s settings panel Your widget must have a settings panel in the editor, which is displayed when a user clicks the **Settings** button in the widget’s action bar. The panel is rendered as an iframe, which you can build using any tools you choose. Learn more about [building a settings panel for a self-managed site widget](https://dev.wix.com/docs/build-apps/develop-your-app/extensions/site-extensions/site-widgets/create-a-settings-panel-for-a-site-widget-or-plugin-wix-cli-and-self-hosting.md). When your code is ready, deploy your settings panel’s HTML file on a remote or local server. ## Step 3 | Configure the widget in your app dashboard Configure your widget in your app dashboard so that it can be added to sites. 1. In your Wix Studio workspace, select [Custom Apps](https://manage.wix.com/account/custom-apps), and then create a new app or select an existing app. 2. In the left menu, select **Extensions**. 3. Click **Create Extension** and select **Site Widget (Custom Element)**. 4. Configure your widget’s basic data: * **Widget name**: The element name displayed in the editor. * **Tag name**: The custom element’s tag name that is used when registering the element. The tag name should be identical to the name you use in the `customElements.define()` function in your JavaScript file. * **Script URL**: The URL where your custom element’s JavaScript code is deployed. 5. Define how your widget is sized when added to a site: * **Widget width**: Whether users can stretch the widget to full width or modify the widget’s width, and how it is sized on installation. * **Widget height**: Whether the widget’s height is adjusted automatically according to the custom element’s content or can be manually adjusted. 6. Define where your widget is added to a site and how instances of the widget are handled in the editor: * Define whether your widget is added automatically to the site and on which page. You can add your widget to the site’s homepage or to one of your app’s pages. * If you're adding your widget to one of your app's pages, define whether your widget is set as [essential](https://dev.wix.com/docs/build-apps/develop-your-app/extensions/site-extensions/site-widgets/about-site-widget-extensions.md#essential-widgets), meaning that it’s crucial to your app’s functionality. If set as essential, deleting the widget will also delete the entire app. * If your widget isn't set as essential, you can display it in the **Add Elements** panel in the editor and the **Manage Apps** page in the site dashboard. To ensure that your widget appears in both locations, it must include a thumbnail. This allows Wix users to easily find and add it to a site. Learn more about [displaying a site widget in the add panel and site dashboard](https://dev.wix.com/docs/build-apps/develop-your-app/extensions/site-extensions/site-widgets/display-a-custom-element-site-widget-in-the-add-elements-panel.md). 7. Configure your widget’s action bar in the editor: * **Settings action button**: Provide the URL where your settings panel’s HTML code is deployed. * **Manage action button** (optional): If your app has a [dashboard page](https://dev.wix.com/docs/build-apps/develop-your-app/extensions/dashboard-extensions/dashboard-pages/about-dashboard-page-extensions.md), select the page you want to open when a user clicks the **Manage** button in the widget’s action bar. 8. Click **Save**. You can now install your widget on a site. ## Step 4 | Test and preview To test your widget in the editors: 1. In the top right corner of your [app's dashboard](https://manage.wix.com/account/custom-apps), click **Test App** and select **Test on dev site**. 1. Select an existing development site or click **+ Create Dev Site** to create a new site. Select the editor and the Wix Business Solution you want to use and click **Create Dev Site**. 1. Click **Test App**. Wix installs your app and opens the site in a new tab. You can set which site page opens in your [app settings](https://dev.wix.com/app-selector?title=Select+an+App&primaryButtonText=Select+Site&actionUrl=https%3A%2F%2Fdev.wix.com%2Fapps%2F%7BappId%7D%2Fapp-settings). If you don't set a page, the site editor opens by default. Once your widget is added to the site, you can preview or publish the site to test the widget’s functionality.
__Important:__ Site widgets are sandboxed when rendered in the editor to enhance security. This means they're treated as if they come from a different domain, which impacts access to browser storage APIs and other same-origin resources. You may encounter various errors when testing. Learn more about [handling sandboxing in the editor](https://dev.wix.com/docs/build-apps/develop-your-app/extensions/site-extensions/handle-sandboxing-in-the-editor.md).
## See also - [Tutorial | Create a Self-Managed App](https://dev.wix.com/docs/build-apps/get-started/quick-start/create-a-self-hosted-app.md) --- > Portal Navigation: > > - Append `.md` to any URL under `https://dev.wix.com/docs/` to get its markdown version. > - Pages are either content pages (article or reference text) or menu pages (a list of links to child pages). > - To get a menu page, truncate any URL to a parent path and append `.md` (e.g. `https://dev.wix.com/docs/sdk.md`, `https://dev.wix.com/docs/sdk/core-modules.md`). > - Top-level index of all portals: https://dev.wix.com/docs/llms.txt > - Full concatenated docs: https://dev.wix.com/docs/llms-full.txt ## Resource: Add Site Plugin Extensions with Custom Elements ## Article: Add Self-hosted Site Plugin Extensions with Custom Elements ## Article Link: https://dev.wix.com/docs/build-apps/develop-your-app/develop-a-self-managed-app/supported-extensions/site-extensions/site-widgets-and-plugins/add-site-plugin-extensions-with-custom-elements.md ## Article Content: # Add Self-Managed Site Plugin Extensions with Custom Elements
**Tip:** The self-managed framework requires you to manage deployment, authentication, and ongoing maintenance. To reduce complexity, [build your plugin with the Wix CLI for Apps](https://dev.wix.com/docs/build-apps/develop-your-app/frameworks/wix-cli/supported-extensions/site-extensions/site-plugins/add-a-site-plugin-extension-in-the-cli.md).
A [site plugin](https://dev.wix.com/docs/build-apps/develop-your-app/extensions/site-extensions/site-plugins/about-site-plugin-extensions.md) is a type of component that site builders can place in designated locations (called *slots*) within Wix apps. Site plugins extend the functionality of their host app by providing additional UI elements and business logic. You can create a site plugin extension using custom element technology, with your code deployed on your own server. The custom element is essentially a new HTML tag that you define, which is made available in the Wix editor as a plugin. To create this extension, do the following: * Code and deploy the custom element. * Optionally, code and deploy your widget's settings panel. * In the [app dashboard](https://manage.wix.com/account/custom-apps) in Wix Studio, set up the plugin and configure additional extensions, authentication, permissions, and more. [Learn more about setting up your app in the app dashboard](https://dev.wix.com/docs/build-apps/develop-your-app/app-dashboard-setup/about-the-app-dashboard.md) You can create a new app for your site plugin or add it to an existing app. ## Step 1 | Code your custom element Code your custom element and its functionality in a JavaScript file. Use a class to define the element. > **Note:** For further guidance and examples on using web components, which are the foundation of custom elements, see the [MDN documentation](https://developer.mozilla.org/en-US/docs/Web/Web_Components). In your code, create a class for the custom element and register the custom element. Here is a sample code snippet: ```js class MyCustomElement extends HTMLElement { constructor() { super(); console.log(...); } connectedCallback() { ... ... ... } } customElements.define('my-custom-element', MyCustomElement); ```
Important: - Keep track of the name you used when registering the element with `customElements.define()`. You will need it when defining the tag name while configuring the widget extension in your app's dashboard. In our example, the name is `my-custom-element`. - To call APIs using the [Wix SDK](https://dev.wix.com/docs/sdk.md), you need to [authenticate using the Wix Client](https://dev.wix.com/docs/build-apps/develop-your-app/develop-a-self-managed-app/supported-extensions/site-extensions/site-widgets-and-plugins/authenticate-custom-elements-using-the-wix-client.md).
Custom elements react to DOM-related events. When you create your custom element, use MDN lifecycle callback functions such as [`connectedCallback()`](https://developer.mozilla.org/en-US/docs/Web/API/Web_components/Using_custom_elements#custom_element_lifecycle_callbacks) and [`attributeChangedCallback()`](https://developer.mozilla.org/en-US/docs/Web/API/Web_components/Using_custom_elements#responding_to_attribute_changes). When your code is ready, deploy your custom element’s JavaScript file on a remote or local server. ### Connect to the plugin's API To enable plugins to communicate with their hosts, each slot supports an API that provides data about the plugin's context (for example, a plugin for the product page can access the `productId` property, which the host widget sets to indicate the item that it’s currently displaying). Learn more about the [plugin APIs supported on each app page](https://dev.wix.com/docs/build-apps/develop-your-app/extensions/site-extensions/site-plugins/supported-wix-app-pages/about-slots.md). When building a plugin using a custom element, the properties provided in the plugin API are added to the custom elements as attributes. You can get their values in your code using the [`attributeChangedCallback()`](https://developer.mozilla.org/en-US/docs/Web/API/Web_components/Using_custom_elements#responding_to_attribute_changes) function, for example: ```js static get observedAttributes() { return ['product-id']; } attributeChangedCallback(name, oldValue, newValue) { if (name === 'product-id' && oldValue !== newValue) { myProductId = newValue; } } ```
**Important:** * Plugin API properties are transformed into custom element attributes using a case conversion from camel case to kebab case. This ensures compatibility with HTML standards. For example, `productId` becomes `product-id`. * Plugin API properties are passed to the custom element as stringified objects if they are not primitive types. Use `JSON.parse()` to convert them back to their original form. * Custom-element-based plugins do not support the use of plugin API functions.
![plugin-architecture](https://wixmp-833713b177cebf373f611808.wixmp.com/images/8c742d9e5598ce93c5ddb22ef4ef977b.png) ### Integrate with Wix APIs Plugins can use Wix APIs to interact with Wix’s business solutions, such as eCommerce, Stores, and Bookings. [Learn more about integrating with Wix APIs](https://dev.wix.com/docs/build-apps/develop-your-app/api-integrations/about-wix-apis.md) ## Step 2 | Code your plugin's settings panel Your plugin should have a settings panel in the editor, which is displayed when a user clicks the **Settings** button in the plugin's action bar. The panel is rendered as an iframe, which you can build using any tools you choose. Learn more about [building a settings panel for a self-managed site plugin](https://dev.wix.com/docs/build-apps/develop-your-app/extensions/site-extensions/site-widgets/create-a-settings-panel-for-a-site-widget-or-plugin-wix-cli-and-self-hosting.md). When your code is ready, deploy your settings panel’s HTML file on a remote or local server. ## Step 3 | Build your app's dashboard page If your plugin requires a back office management interface, you can create one either within the Wix dashboard, or as an external dashboard on a third-party platform. [Learn how to build a dashboard page to manage your site plugin](https://dev.wix.com/docs/build-apps/develop-your-app/extensions/site-extensions/site-plugins/build-a-dashboard-page-to-manage-your-site-plugin.md) ## Step 4 | Set up the plugin in your app dashboard To make your plugin available for installation on sites, set up the plugin in your [app dashboard](https://manage.wix.com/account/custom-apps) and configure its installation settings and market listing. Your plugin's market listing determines how it will appear to users in the [plugin explorer in the editors](https://dev.wix.com/docs/build-apps/develop-your-app/extensions/site-extensions/site-plugins/about-site-plugin-extensions.md), including the plugin's name, icon, and teaser. > **Note**: The plugin's market listing is different from the [app's market listing](https://dev.wix.com/docs/build-apps/launch-your-app/market-listing/about-market-listings.md), which determines how the entire app appears in the [Wix App Market](https://www.wix.com/app-market). 1. In your Wix Studio workspace, select [Custom Apps](https://manage.wix.com/account/custom-apps), and then create a new app or select an existing app. 2. In the left menu, select **Extensions**. 3. Click **Create Extension** and find the **Site Plugin** extension. 4. Click **+ Create** and then select **Custom Element** 5. Configure your plugin's basic data: * **Plugin name**: The plugin name that is displayed to users. * **Tag name**: The custom element’s tag name that is used when registering the element. The tag name should be identical to the name you use in the `customElements.define()` function in your JavaScript file. * **Script URL**: The URL where your custom element’s JavaScript code is deployed. 6. Configure how your plugin can be added to sites: * **Which Wix app does it extend?**: The [Wix app](https://dev.wix.com/docs/rest/articles/getting-started/wix-business-solutions.md) for which you're building the plugin. * **Slots this plugin can be added to**: Select one or more [slots](https://dev.wix.com/docs/build-apps/develop-your-app/extensions/site-extensions/site-plugins/supported-wix-app-pages/about-slots.md) that are appropriate for your plugin. Select slots in order of priority. If none of the selected slots are available, users can choose to replace a plugin that’s already been added. * **Add this plugin automatically to the site**: Whether the plugin is automatically added to a slot when a user installs your app. If you set your plugin to be automatically added to a slot on installation, it will be placed in the first available slot according to the order you defined. If that slot is occupied, it will be added in the next available slot, and so on. If there are no available slots, it will not be added. 7. Configure your widget’s action bar in the editor: * **Settings action button**: Provide the URL where your settings panel’s HTML code is deployed. * **Manage action button** (optional): If your app has a [dashboard page](https://dev.wix.com/docs/build-apps/develop-your-app/extensions/dashboard-extensions/dashboard-pages/about-dashboard-page-extensions.md), select the page you want to open when a user clicks the **Manage** button in the widget’s action bar. 8. Configure your plugin's market listing: * **Teaser**: A short promotional description for your plugin's market listing. * **Icon**: An icon for your plugin's market listing. Upload a square JPG or PNG file. 9. Click **Save**. 10. If your app is already approved and published, publish a new version in the app dashboard. ## Step 5 | Test and preview Your unpublished plugins are available for installation in the editors when you're logged in with your developer account. This makes it easy to preview and test your plugin in a real environment. To test your plugin in the editor: 1. Create a site and install the Wix app that your plugin extends. 2. Go to the page on which you want to install your plugin, and click the host widget's **Plugin** icon. Your unpublished plugins will appear in the plugin explorer. 3. Hover over your plugin, and then click **Add**. When prompted for consent, select the checkbox and click **Agree & Add**. Once you install your plugin on a site, you can preview or publish the site to test the plugin's functionality and make sure it's working properly.
__Important:__ Site plugins are sandboxed when rendered in the editor to enhance security. This means they're treated as if they come from a different domain, which impacts access to browser storage APIs and other same-origin resources. You may encounter various errors when testing. Learn more about [handling sandboxing in the editor](https://dev.wix.com/docs/build-apps/develop-your-app/extensions/site-extensions/handle-sandboxing-in-the-editor.md).
## Step 6 | Submit and publish your plugin When you’ve finished building and testing your plugin, you’re ready to launch and monetize your app. Learn more about [submitting your app for review](https://dev.wix.com/docs/build-apps/launch-your-app/app-distribution/about-app-distribution.md). --- > Portal Navigation: > > - Append `.md` to any URL under `https://dev.wix.com/docs/` to get its markdown version. > - Pages are either content pages (article or reference text) or menu pages (a list of links to child pages). > - To get a menu page, truncate any URL to a parent path and append `.md` (e.g. `https://dev.wix.com/docs/sdk.md`, `https://dev.wix.com/docs/sdk/core-modules.md`). > - Top-level index of all portals: https://dev.wix.com/docs/llms.txt > - Full concatenated docs: https://dev.wix.com/docs/llms-full.txt ## Resource: Authenticate Custom Elements Using the Wix Client ## Article: Inject a Custom Element with an Access Token ## Article Link: https://dev.wix.com/docs/build-apps/develop-your-app/develop-a-self-managed-app/supported-extensions/site-extensions/site-widgets-and-plugins/authenticate-custom-elements-using-the-wix-client.md ## Article Content: # Authenticate Custom Elements Using the Wix Client
**Tip:** The self-managed framework requires you to manage deployment, authentication, and ongoing maintenance. To reduce complexity, [build your site extensions with the Wix CLI](https://dev.wix.com/docs/wix-cli/guides/extensions/about-extensions.md).
In a [custom element](https://dev.wix.com/docs/build-apps/develop-your-app/frameworks/self-hosting/supported-extensions/site-extensions/site-widgets-and-plugins/add-self-hosted-site-widget-extensions-with-custom-elements.md) for a self-managed [site widget](https://dev.wix.com/docs/build-apps/develop-your-app/frameworks/self-hosting/supported-extensions/site-extensions/site-widgets-and-plugins/add-self-hosted-site-widget-extensions-with-custom-elements.md) or [site plugin](https://dev.wix.com/docs/build-apps/develop-your-app/develop-a-self-managed-app/supported-extensions/site-extensions/site-widgets-and-plugins/add-site-plugin-extensions-with-custom-elements.md), you need to use a [Wix Client](https://dev.wix.com/docs/sdk/articles/set-up-a-client/about-the-wix-client.md) to call Wix APIs using the [SDK](https://dev.wix.com/docs/sdk.md). - To call frontend modules, the client must be initialized with the [Site host context](https://dev.wix.com/docs/sdk/host-modules/site/introduction.md). - To call backend modules, the client must be authenticated using [Site authentication](https://dev.wix.com/docs/sdk/host-modules/site/introduction.md#auth). ## Create a client You need to provide Wix with a function that injects your client with the access token: 1. Create a client using [Site host context](https://dev.wix.com/docs/sdk/host-modules/site/introduction.md) and [Site authentication](https://dev.wix.com/docs/sdk/host-modules/site/introduction.md#auth). 1. In your class component's constructor, add: ```js this.accessTokenListener = wixClient.auth.getAccessTokenInjector(); ``` Wix calls this function to inject your client with an access token. With this setup, Wix injects your client with an access token and you can use your client to call SDK methods. ## Example The following example shows a custom element that uses an authenticated client to call: - `products.queryProducts` from the `@wix/stores` backend module - `seo.title` from the `@wix/site-seo` frontend module ```js import { site } from "@wix/site"; import { createClient } from "@wix/sdk"; import { products } from "@wix/stores"; import { seo } from "@wix/site-seo"; const myWixClient = createClient({ auth: site.auth(), host: site.host({ applicationId: "" }), modules: { products, seo }, }); class MyCustomElement extends HTMLElement { constructor() { super(); this.accessTokenListener = myWixClient.auth.getAccessTokenInjector(); } async connectedCallback() { try { const productsQueryResult = await myWixClient.products.queryProducts({}); console.log("Products query result:", productsQueryResult); const title = await myWixClient.seo.title(); console.log("Site title:", title); } catch (error) { console.error("Error:", error); } } } customElements.define(tagName, MyCustomElement); ``` --- > Portal Navigation: > > - Append `.md` to any URL under `https://dev.wix.com/docs/` to get its markdown version. > - Pages are either content pages (article or reference text) or menu pages (a list of links to child pages). > - To get a menu page, truncate any URL to a parent path and append `.md` (e.g. `https://dev.wix.com/docs/sdk.md`, `https://dev.wix.com/docs/sdk/core-modules.md`). > - Top-level index of all portals: https://dev.wix.com/docs/llms.txt > - Full concatenated docs: https://dev.wix.com/docs/llms-full.txt ## Resource: Identify the App Instance in a Self-Managed Site Widget ## Article: Identify the App Instance in a Self-Hosted Site Widget ## Article Link: https://dev.wix.com/docs/build-apps/develop-your-app/develop-a-self-managed-app/supported-extensions/site-extensions/site-widgets-and-plugins/identify-the-app-instance-in-a-self-managed-site-widget.md ## Article Content: # Identify the App Instance in a Self-Managed Site Widget For security reasons, [app instance ID](https://dev.wix.com/docs/build-apps/develop-your-app/access/app-instances/about-app-instances.md) (`instanceId`) isn’t directly accessible in [site widgets](https://dev.wix.com/docs/build-apps/develop-your-app/frameworks/self-hosting/supported-extensions/site-extensions/site-widgets-and-plugins/add-self-hosted-site-widget-extensions-with-custom-elements.md) or settings panels. Instead, you can securely extract it by sending a Wix access token to a backend API. The backend can decode the token, get the instance ID or instance data, and perform any necessary business logic. This article explains how to: * **Backend:** Expose a backend API to identify the app instance. * **Frontend:** Pass a Wix access token from your custom element to your backend. ## Step 1 | Expose a backend API To securely identify the app instance: 1. Expose a backend API. You can build and deploy your backend API using any framework. The examples in this article are based on a Node.js server. 1. In your backend API code, get the Wix access token from the `authorization` header. ```javascript const accessToken = req.headers["authorization"]; ``` 1. Depending on your [use case](https://dev.wix.com/docs/build-apps/develop-your-app/access/app-instances/about-app-instances.md#example-use-cases-1), you may only need `instanceId` or you may need more detailed app instance data. * **To extract `instanceId`:** Call [Get Token Info](https://dev.wix.com/docs/rest/app-management/oauth-2/token-info.md) to extract `instanceId` from the access token. ```javascript const tokenResponse = await axios.post("https://www.wixapis.com/oauth2/token-info", { token: accessToken, } ); const instanceId = tokenResponse.data.instanceId; ``` * **To fetch instance data:** Elevate the access token to an app identity. Then, call [Get App Instance](https://dev.wix.com/docs/rest/app-management/app-instance/get-app-instance.md). Elevation is necessary because access tokens sent from site widgets are tied to a site visitor or member [identity](https://dev.wix.com/docs/build-apps/develop-your-app/access/about-identities.md), which don't have access to instance data. The method of performing elevation varies depending on whether you're using the JavaScript SDK or REST API. **JavaScript SDK** ```javascript const elevatedClient = createClient({ auth: await AppStrategy({ appId: "", appSecret: "", accessToken: accessToken }).elevated(), modules: { appInstances } }); const instanceResponse = await elevatedClient.appInstances.getAppInstance(); ``` To learn more, see [Elevate SDK Call Permissions for Self-Managed Extensions](https://dev.wix.com/docs/build-apps/develop-your-app/frameworks/self-hosting/elevate-sdk-call-permissions-with-self-hosting.md). **REST API** ```javascript // Extract the app instance ID from the access token const tokenResponse = await axios.post("https://www.wixapis.com/oauth2/token-info", { token: accessToken, } ); const instanceId = tokenResponse.data.instanceId; // Create a new access token with an app identity const newTokenResponse = await axios.post("https://www.wixapis.com/oauth2/token", { grant_type: "client_credentials", client_id: "", client_secret: "", instanceId: instanceId }); const elevatedAccessToken = newTokenResponse.data.access_token; // Use the new token to get instance data const instanceResponse = await axios.get("https://www.wixapis.com/apps/v1/instance", { headers: { Authorization: `Bearer ${elevatedAccessToken}`, }, }); ``` To learn more, see [Elevate REST API Call Permissions for Self-Managed Extensions](https://dev.wix.com/docs/build-apps/develop-your-app/frameworks/self-hosting/elevate-rest-api-call-permissions-for-self-hosting.md). ## Step 2 | Pass a Wix access token to your backend To pass a Wix access token from your custom element to your backend: 1. [Add a self-managed site widget extension with a custom element](https://dev.wix.com/docs/build-apps/develop-your-app/frameworks/self-hosting/supported-extensions/site-extensions/site-widgets-and-plugins/add-self-hosted-site-widget-extensions-with-custom-elements.md). If you already have a site widget, skip to the next step. 1. In your custom element code, initialize a [`WixClient`](https://dev.wix.com/docs/sdk/core-modules/sdk/wix-client.md) with the [site](https://dev.wix.com/docs/sdk/host-modules/site/introduction.md) authentication and host configuration. ```javascript const myWixClient = createClient({ auth: site.auth(), host: site.host({ applicationId: "" }), }); ``` 1. Add the following line to the constructor of your custom element class to inject the Wix access token. ```javascript this.accessTokenListener = myWixClient.auth.getAccessTokenInjector(); ``` 1. Call [`fetchWithAuth()`](https://dev.wix.com/docs/sdk/core-modules/sdk/wix-client.md#fetchwithauth) to send the access token to your backend. ```javascript const response = await myWixClient.fetchWithAuth(""); ```
**Tip:** To get `instanceId` in the settings panel, initialize a [`WixClient`](https://dev.wix.com/docs/sdk/core-modules/sdk/wix-client.md) with the [editor](https://dev.wix.com/docs/sdk/host-modules/editor/introduction.md) authentication and host configuration. Then, call `fetchWithAuth()`.
## Examples Depending on your [use case](https://dev.wix.com/docs/build-apps/develop-your-app/access/app-instances/about-app-instances.md#example-use-cases-1), the logic of your backend API will vary. For example, you may only need to extract `instanceId` and then use it to make a request to your own database. Alternatively, you may wish to request app instance data from Wix, in which case you'd need to elevate your access token. See the relevant example for your use case: * [Backend: Extract `instanceId`](#backend-extract-instanceid) * [Backend: Fetch instance data with the JavaScript SDK](#backend-fetch-instance-data-with-the-javascript-sdk) * [Backend: Fetch instance data with the REST API](#backend-fetch-instance-data-with-the-rest-api) * [Frontend: Call your backend](#frontend-call-your-backend) ### Backend: Extract `instanceId` The following example creates a Node.js Express API called `get-instance`. The API extracts `instanceId` from the access token provided by the frontend request. ```javascript import express from "express"; import axios from "axios"; import cors from "cors"; const app = express(); const port = 5000; app.use(cors()); // Edit this code based on your business logic const mockDatabaseQuery = async (instanceId) => { console.log(`Mock database query with instance ID: ${instanceId}`); if (instanceId) { return { status: "Success", }; } else { return { status: "No instance ID.", }; } }; // Define a backend API app.get("/get-instance", async (req, res) => { try { // Get the Wix access token from the `authorization` header const accessToken = req.headers["authorization"]; if (!accessToken) { throw new Error("Access token is required."); } // Extract the app instance ID from the access token const tokenData = await axios.post("https://www.wixapis.com/oauth2/token-info", { token: accessToken, } ); const instanceId = tokenData.data.instanceId; console.log("Instance ID:", instanceId); // Edit this code based on your business logic const data = await mockDatabaseQuery(instanceId); return res.json(data); } catch (error) { console.error("Error processing request:", error.message); return res.status(500).json({ error: "Failed to process request" }); } }); app.listen(port, () => { console.log(`Server running at http://localhost:${port}`); }); ``` ### Backend: Fetch instance data with the JavaScript SDK The following example creates a Node.js Express API called `get-instance`. The API receives an access token from the frontend, creates a client with elevated permissions, and then uses the elevated client to fetch the app instance data. ```javascript import express from "express"; import cors from "cors"; import { createClient, AppStrategy } from "@wix/sdk"; import { appInstances } from "@wix/app-management"; const app = express(); const port = 5000; app.use(cors()); // Define a backend API app.get("/get-instance", async (req, res) => { try { // Get the Wix access token from the `authorization` header const accessToken = req.headers["authorization"]; if (!accessToken) { throw new Error("Access token is required."); } const elevatedClient = createClient({ auth: await AppStrategy({ appId: "", appSecret: "", accessToken: accessToken, }).elevated(), modules: { appInstances, }, }); const instanceResponse = await elevatedClient.appInstances.getAppInstance(); return res.json(instanceResponse.data); } catch (error) { console.error("Error processing request:", error.message); return res.status(500).json({ error: "Failed to process request" }); } }); app.listen(port, () => { console.log(`Server running at http://localhost:${port}`); }); ``` ### Backend: Fetch instance data with the REST API The following example creates a Node.js Express API called `get-instance`. The API receives an access token from the frontend, uses the token to request a new access token with the permissions of an app, and then uses the new elevated access token to fetch the app instance data. ```javascript import express from "express"; import axios from "axios"; import cors from "cors"; const app = express(); const port = 5000; app.use(cors()); // Define a backend API app.get("/get-instance", async (req, res) => { try { // Get the Wix access token from the `authorization` header const accessToken = req.headers["authorization"]; if (!accessToken) { throw new Error("Access token is required."); } // Extract the app instance ID from the access token const tokenResponse = await axios.post("https://www.wixapis.com/oauth2/token-info", { token: accessToken, } ); const instanceId = tokenResponse.data.instanceId; // Create a new access token with an app identity const newTokenResponse = await axios.post("https://www.wixapis.com/oauth2/token", { grant_type: "client_credentials", client_id: "", client_secret: "", instanceId: instanceId }); const elevatedAccessToken = newTokenResponse.data.access_token; // Use the new token to get instance data const instanceResponse = await axios.get("https://www.wixapis.com/apps/v1/instance", { headers: { Authorization: `Bearer ${elevatedAccessToken}`, }, }); return res.json(instanceResponse.data); } catch (error) { console.error("Error processing request:", error.message); return res.status(500).json({ error: "Failed to process request" }); } }); app.listen(port, () => { console.log(`Server running at http://localhost:${port}`); }); ``` ### Frontend: Call your backend The following example creates a custom element that makes a request to the `get-instance` endpoint. ```javascript import { site } from "@wix/site"; import { createClient } from "@wix/sdk"; // Create a Wix Client with site authentication and site host const myWixClient = createClient({ auth: site.auth(), host: site.host({ applicationId: "" }), }); class MyCustomElement extends HTMLElement { constructor() { super(); // Inject the Wix access token to your custom element this.accessTokenListener = myWixClient.auth.getAccessTokenInjector(); } connectedCallback() { this.innerHTML = "

My custom element loaded successfully!

"; this.callMyBackend(); } async callMyBackend() { try { // Send the access token to your backend const response = await myWixClient.fetchWithAuth("/get-instance"); const data = await response.json(); console.log("Response from get-instance:", data); } catch (error) { console.error("Error calling get-instance:", error); } } } customElements.define("", MyCustomElement); ``` ## See also * [About Site Widget Extensions](https://dev.wix.com/docs/build-apps/develop-your-app/extensions/site-extensions/site-widgets/about-site-widget-extensions.md) * [About App Instances](https://dev.wix.com/docs/build-apps/develop-your-app/access/app-instances/about-app-instances.md) --- > Portal Navigation: > > - Append `.md` to any URL under `https://dev.wix.com/docs/` to get its markdown version. > - Pages are either content pages (article or reference text) or menu pages (a list of links to child pages). > - To get a menu page, truncate any URL to a parent path and append `.md` (e.g. `https://dev.wix.com/docs/sdk.md`, `https://dev.wix.com/docs/sdk/core-modules.md`). > - Top-level index of all portals: https://dev.wix.com/docs/llms.txt > - Full concatenated docs: https://dev.wix.com/docs/llms-full.txt ## Resource: Add Self-Managed Dashboard Page Extensions ## Article: Add Self-hosted Dashboard Page Extensions ## Article Link: https://dev.wix.com/docs/build-apps/develop-your-app/develop-a-self-managed-app/supported-extensions/dashboard-extensions/add-self-managed-dashboard-page-extensions.md ## Article Content: # Add Self-Managed Dashboard Page Extensions The [dashboard page extension](https://dev.wix.com/docs/build-apps/develop-your-app/extensions/dashboard-extensions/dashboard-pages/about-dashboard-page-extensions.md) adds an iframe page to a site dashboard. Add a self-managed dashboard page in your [app's dashboard](https://manage.wix.com/account/custom-apps). > **Note:** For a more streamlined approach to developing your dashboard page, try out the [Wix CLI](https://dev.wix.com/docs/wix-cli/guides/extensions/dashboard-extensions/dashboard-pages/add-dashboard-page-extensions.md) or [Blocks](https://dev.wix.com/docs/build-apps/develop-your-app/develop-an-app-with-blocks/dashboard-pages/build-a-dashboard-page-in-blocks.md) instead of self-managing. ## Add a dashboard page 1. Build your extension using the technologies of your choice. Make sure your iframe extension: * Is hosted on a publicly accessible server. * Is served on an `https` URL, not an `http` one. For security reasons, the app dashboard does not support making requests to non-`https` servers. 2. Select an app from the [Custom Apps page](https://manage.wix.com/account/custom-apps) in your Wix Studio workspace. 3. Go to [**Extensions**](https://manage.wix.com/app-selector?title=Select+an+App&primaryButtonText=Select+Site&actionUrl=https%3A%2F%2Fdev.wix.com%2Fapps%2F%7BappId%7D%2Fextensions) and click **+ Create Extension**. 4. In the **Choose the extension you want to create** modal, select **Dashboard Page** and click **Create**. 5. On the **Dashboard Page** extension configuration page, fill in the following fields: | Field | Description | | ---- | ---- | | **General** > **Name** | **Required**. An internal name used in the app dashboard to manage this page. | | **General** > **Extension ID** | A unique Wix-generated ID used to identify this extension. Use this identifier with the Dashboard SDK to trigger navigation between your app’s pages. | | **Page Info** > **iFrame URL** | **Required**. Your app server’s address. Content hosted there is rendered in the iFrame on the dashboard.

The [app instance data](https://dev.wix.com/docs/build-apps/develop-your-app/access/app-instances/about-app-instances.md) is appended to the iFrame URL as an app instance query parameter, `instance`, so that you can identify the site owner when they view your page.

**Note**: For security reasons, your app must be hosted on an **https** address. | | **Page info** > **Relative route** | **Required**. A path suffix to append to the URL when users visit your page in the dashboard. For example, `https://manage.wix.com/dashboard//app//`. | | **Page info** > **Hide the sidebar menu when your page is open** | Whether to hide the sidebar menu when your dashboard page is viewed. | | **Setup** > **Page name** | **Required**. A full name for the dashboard page.

This name appears in search results and in the **Favorites** and **Recently Used** sections of your dashboard. You should add your top-level menu name to give it full context when it appears, for example "Custom Calendar Settings". | | **Setup** > **Page description** | **Required**. A description for the dashboard page. Appears in the dashboard search results. | | **Setup** > **Sidebar name** | **Required**. A name for the dashboard page. Appears in the sidebar menu under your app's name. | | **Setup** > **Search keywords** | Keywords that when searched for in the dashboard will return this dashboard page in the search results. | | **Search anchors** > **Search title** | Title of the section of the dashboard page. Appears in the dashboard search. | | **Search anchors** > **Search description** | A description of the section of the dashboard page. Appears in the dashboard search. | | **Search anchors** > **Search keywords** | Keywords that when searched for will return this section of the dashboard page in the search results. | | **Search anchors** > **Anchor query param** | Specific section on the dashboard page to send user to when **search title** is selected in a dashboard search. | 6. Click **Save** to save your changes. ## Manage and customize your dashboard page Now that your dashboard page is set up you can manage and customize your dashboard page. 1. Manage your dashboard page with the [dashboard SDK](https://dev.wix.com/docs/sdk/host-modules/dashboard/introduction.md). Access data from the dashboard page using the [`observeState()`](https://dev.wix.com/docs/sdk/host-modules/dashboard/observe-state.md) SDK function in your dashboard page extension: ```ts client.dashboard.observeState((componentParams) => { console.log(componentParams.customPageParameter); }); ``` >**Note:** > If you use a [menu plugin extension](https://dev.wix.com/docs/build-apps/develop-your-app/extensions/dashboard-extensions/dashboard-plugins/dashboard-menu-plugins/dashboard-menu-plugin-extensions.md) to navigate to your dashboard page, data from the page hosting the menu plugin, such as an ID, is passed through the menu plugin slot to your dashboard page extension. 1. Design your dashboard page's UI. Consider using the [Wix Design System](https://dev.wix.com/docs/build-apps/develop-your-app/design/about-the-wix-design-system.md), a collection of reusable React components that you can use to make your app appear and feel like a native Wix app. ## Link directly into your app If you want to notify a user about something that happened in your app or an action they must take, you can direct them to your [app instance](https://dev.wix.com/docs/build-apps/develop-your-app/access/app-instances/about-app-instances.md) installed on a specific Wix site. Use the following URL: `https://www.wix.com/my-account/app//`. You can get the app instance ID by [parsing it from the app instance](https://dev.wix.com/docs/build-apps/develop-your-app/access/app-instances/parse-the-encoded-instance-query-parameter.md) query parameter in the iFrame URL, or by calling the [Get App Instance](https://dev.wix.com/docs/rest/app-management/app-instance/get-app-instance.md) endpoint. ## Organize multiple dashboard pages Your app can include multiple dashboard pages, for example, an overview page and a settings page. Multiple dashboard pages are bundled in the sidebar menu under your app’s name. When a user clicks or hovers over it, a submenu appears with all your dashboard pages. To manage multiple dashboard pages: 1. Go to [**Extensions**](https://manage.wix.com/app-selector?title=Select+an+App&primaryButtonText=Select+Site&actionUrl=https%3A%2F%2Fdev.wix.com%2Fapps%2F%7BappId%7D%2Fextensions) in your app's dashboard. 2. In the top-level menu item, click the ellipsis icon and click **Change page order**. ![Changing page order](https://wixmp-833713b177cebf373f611808.wixmp.com/images/cc09400f03eaabc033a3a0902844229a.png) 3. In the Manage Dashboard pages modal, rearrange the pages as you’d like them to appear in the side menu of the user’s dashboard. ![Manage multiple dashboard pages](https://wixmp-833713b177cebf373f611808.wixmp.com/images/a909042176149f4c5c8963591dfcecf7.png) The top-level menu item displays your app’s name, with dashboard page extensions listed as sub-items. Each extension is named based on the value specified in the **Sidebar name** field on its configuration page. 4. You can rename any of these menu items by hovering over them and clicking the pencil icon. 5. Click **Save**. ## Page name and sidebar name The **page name** appears in multiple places on the user's dashboard without any additional context, such as in search results or in a user's **Favorites** section. If you don't provide the context it can be confusing. For example, if your app has a dashboard page "Settings", then when it stands alone it isn't clear what this page accesses the settings for. Therefore, we recommend using something like "App Name Settings" for the **page name**. The **sidebar name** appears in the side menu of the user's dashboard below your app's name, so no additional context is necessary. ![Setup field info](https://wixmp-833713b177cebf373f611808.wixmp.com/images/a39f0f42e8810ad69c8a61c0c13c8dda.png) ## Search anchors The information in the **Search anchors** section enables users to search for specific sections within the dashboard pages of your app. When users select one of these anchors from their search results, they navigate directly to that section of the dashboard page. ## See also * [About Dashboard Page Extensions](https://dev.wix.com/docs/build-apps/develop-your-app/extensions/dashboard-extensions/dashboard-pages/about-dashboard-page-extensions.md) * [Add Dashboard Page Extensions Using Wix Blocks](https://dev.wix.com/docs/build-apps/develop-your-app/develop-an-app-with-blocks/dashboard-pages/build-a-dashboard-page-in-blocks.md) * [Add Dashboard Page Extensions with the CLI](https://dev.wix.com/docs/wix-cli/guides/extensions/dashboard-extensions/dashboard-pages/add-dashboard-page-extensions.md) * [Tutorial | Set Up an App With the App Dashboard](https://dev.wix.com/docs/build-apps/get-started/tutorials/tutorial-set-up-an-app-with-the-app-dashboard.md) * [Tutorial | Create a Self-Managed App](https://dev.wix.com/docs/build-apps/get-started/quick-start/create-a-self-hosted-app.md) --- > Portal Navigation: > > - Append `.md` to any URL under `https://dev.wix.com/docs/` to get its markdown version. > - Pages are either content pages (article or reference text) or menu pages (a list of links to child pages). > - To get a menu page, truncate any URL to a parent path and append `.md` (e.g. `https://dev.wix.com/docs/sdk.md`, `https://dev.wix.com/docs/sdk/core-modules.md`). > - Top-level index of all portals: https://dev.wix.com/docs/llms.txt > - Full concatenated docs: https://dev.wix.com/docs/llms-full.txt ## Resource: Add Self-Managed Dashboard Modal Extensions ## Article: Add Self-hosted Dashboard Modal Extensions ## Article Link: https://dev.wix.com/docs/build-apps/develop-your-app/develop-a-self-managed-app/supported-extensions/dashboard-extensions/add-self-managed-dashboard-modal-extensions.md ## Article Content: # Add Self-Managed Dashboard Modal Extensions The [dashboard modal](https://dev.wix.com/docs/build-apps/develop-your-app/extensions/dashboard-extensions/dashboard-modals/about-dashboard-modals.md) extension lets you import a modal that you built and are hosting externally into your app. You can manage the modal in your app using the `openModal()` and `closeModal()` functions from the [dashboard SDK](https://dev.wix.com/docs/sdk/host-modules/dashboard/introduction.md). > **Note:** For a more streamlined approach to developing your dashboard modal, try out the [Wix CLI](https://dev.wix.com/docs/wix-cli/guides/extensions/dashboard-extensions/dashboard-modals/add-dashboard-modal-extensions.md) instead of self-managing. Follow these steps and you'll be ready to add a dashboard modal to your self-managed apps. ## Before you begin Before implementing a dashboard modal extension you need to: - Build and host your modal externally. - Make sure there are no restrictions on how you build your modal. - Have the URL that hosts your modal ready. ## Add a dashboard modal to your app 1. Select an app from the [Custom Apps page](https://manage.wix.com/account/custom-apps) in your Wix Studio workspace. 1. Go to the [Extensions](https://manage.wix.com/app-selector?title=Select+an+App&primaryButtonText=Select+Site&actionUrl=https%3A%2F%2Fdev.wix.com%2Fapps%2F%7BappId%7D%2Fextensions) page, and click **+ Create Extension**. 1. Search for the **dashboard modal**. Then click **+ Create**. ![Search and create modal](https://wixmp-833713b177cebf373f611808.wixmp.com/images/0bb60d642f80f0771046811829532207.png) 1. Add your modal's details in the JSON editor. This is where you provide the extension with the details it needs to render your modal in your app. This includes the URL that hosts your modal, size, and names. Use the **Documentation** tab on the right hand side of the JSON editor to help you.
__Important:__ The hosting platform must be "BUSINESS_MANAGER".
For example: ```json { "hostingPlatform": "BUSINESS_MANAGER", "iframeUrl": "https://example.com/modal", "title": "Example Modal", "width": 600, "height": 400, "componentName": "My Dashboard Modal" } ``` ## Manage and customize your dashboard modal Now that your dashboard modal extension is set up, you can manage and customize your modal. 1. Manage your modal with the [dashboard SDK](https://dev.wix.com/docs/sdk/host-modules/dashboard/introduction.md). 1. To find your modal's extension ID: - On the **Extensions** page of your app's dashboard, click the extension’s **More Actions** ![](https://d2x3xhvgiqkx42.cloudfront.net/12345678-1234-1234-1234-1234567890ab/11e10e4f-b84d-4136-a5a9-6109fab0b7d7/2020/10/25/347cc5c6-bce3-4407-82c3-e211e02cab98/398ced84-9ef5-4f70-87cd-4cb39a66dd65.png) button and select **Copy extension ID**. - Open the extension in your [app's dashboard](https://manage.wix.com/account/custom-apps) and check the URL at the top of your browser. For example: ![](https://wixmp-833713b177cebf373f611808.wixmp.com/images/92a08f51f25ed401931fbf595161776c.png) 1. Use the [`openModal()`](https://dev.wix.com/docs/sdk/host-modules/dashboard/open-modal.md) and [`closeModal()`](https://dev.wix.com/docs/sdk/host-modules/dashboard/close-modal.md) functions from the dashboard SDK in your app's dashboard page to control how your modal opens and closes. ```ts client.dashboard.openModal("1d52d058-0392-44fa-bd64-ed09275a6fcc", { }); ``` ```ts client.dashboard.closeModal({ message: "The modal is closed!" }); ``` 1. You can optionally pass custom data into the dashboard modal extension with the `openModal()` function. ```ts client.dashboard.openModal("1d52d058-0392-44fa-bd64-ed09275a6fcc", { firstName: "Name", }); ``` If you use a [menu plugin extension](https://dev.wix.com/docs/build-apps/develop-your-app/extensions/dashboard-extensions/dashboard-plugins/dashboard-menu-plugins/dashboard-menu-plugin-extensions.md) to navigate to your modal, data from the host page of the menu plugin, such as an ID, is passed through the menu plugin slot and can be accessed by your dashboard modal extension. 1. Access your custom data or the data passed through the menu plugin slot using the [`observeState()`](https://dev.wix.com/docs/sdk/host-modules/dashboard/observe-state.md) SDK function in your modal extension. ```ts client.dashboard.observeState((componentParams) => { console.log(componentParams.customPageParameter); }); ``` 1. Design your modal's UI. Consider using the [Wix Design System](https://dev.wix.com/docs/build-apps/develop-your-app/design/about-the-wix-design-system.md), a collection of reusable React components that you can use to make your app appear and feel like a native Wix app. --- > Portal Navigation: > > - Append `.md` to any URL under `https://dev.wix.com/docs/` to get its markdown version. > - Pages are either content pages (article or reference text) or menu pages (a list of links to child pages). > - To get a menu page, truncate any URL to a parent path and append `.md` (e.g. `https://dev.wix.com/docs/sdk.md`, `https://dev.wix.com/docs/sdk/core-modules.md`). > - Top-level index of all portals: https://dev.wix.com/docs/llms.txt > - Full concatenated docs: https://dev.wix.com/docs/llms-full.txt ## Resource: Add Self-Managed Dashboard Plugin Extensions ## Article: Add Self-hosted Dashboard Plugin Extensions ## Article Link: https://dev.wix.com/docs/build-apps/develop-your-app/develop-a-self-managed-app/supported-extensions/dashboard-extensions/add-self-managed-dashboard-plugin-extensions.md ## Article Content: # Add Self-Managed Dashboard Plugin Extensions This article describes how to add a [dashboard plugin extension](https://dev.wix.com/docs/build-apps/develop-your-app/extensions/dashboard-extensions/dashboard-plugins/about-dashboard-plugin-extensions.md) using the [app dashboard](https://dev.wix.com) and how to connect the extension to your plugin. > **Note:** For a more streamlined approach to developing your dashboard plugin, try out the [Wix CLI](https://dev.wix.com/docs/wix-cli/guides/extensions/dashboard-extensions/dashboard-plugins/add-dashboard-plugin-extensions.md) instead of self-managing. The end result will look like this: ![Dashboard plugin extension](https://wixmp-833713b177cebf373f611808.wixmp.com/images/82b473bbe9c9f8c4557a45431f04762f.png) ## Before you begin - Instruct your users to install the app built by Wix on their site before installing your app. - Use an existing app or create a new one in the app dashboard. ## Add a dashboard plugin 1. Select an app from the [Custom Apps page](https://manage.wix.com/account/custom-apps) in your Wix Studio workspace. 1. Go to [**Extensions**](https://manage.wix.com/app-selector?title=Select+an+App&primaryButtonText=Select+Site&actionUrl=https%3A%2F%2Fdev.wix.com%2Fapps%2F%7BappId%7D%2Fextensions) and click **+Create Extensions**. 1. Search for the **Dashboard Plugin** extension, and click **+ Create**. 1. Fill in the JSON editor with your plugin’s details. This configuration is how you integrate your plugin with Wix’s dashboard pages. Details include the name of the plugin, the size of the plugin, the slot ID of the dashboard page to place your plugin, and the URL that hosts your plugin. Use the following properties, also listed in the ** Documentation** tab on the right of the JSON editor, to fill in the JSON. | Field | Description | | ----- | ----------- | | `hostingPlatform` | **Required.** Wix platform that hosts the plugin extension. | | `extends` | **Required.** [Slot ID](https://dev.wix.com/docs/build-apps/develop-your-app/extensions/dashboard-extensions/dashboard-plugins/supported-wix-app-dashboard-pages/about-dashboard-page-slots.md) for the slot your extension plugs in to. | | `description` | Description of the plugin. | | `title` | Title of the plugin. | | `width` | Initial width of the plugin in pixels while loading. Width may be adjusted dynamically based on the content of the plugin and/or limited by the size of the slot container. | | `height` | Initial height of the plugin in pixels while loading. Height may be adjusted dynamically based on the content of the plugin and/or limited by the size of the slot container. | | `iframeUrl` | **Required.** The URL of the iframe that renders the plugin. | | `componentName` | Name for the plugin extension that appears in the app dashboard. |  
__Important:__ The hosting platform must always be "BUSINESS_MANAGER".
Below is an example of how your plugin configuration could appear in the JSON editor. ```json { "hostingPlatform": "BUSINESS_MANAGER", "iframeUrl": "https://example.com/plugin", "title": "Example Plugin", "width": 600, "height": 400, "componentName": "My Dashboard Plugin" } ``` 1. Click Save. ## Interacting with the dashboard page Now that your dashboard plugin is set up, you can write code that allows your plugin to interact with the dashboard page. This can be done with the `observeState()` function from the [dashboard SDK](https://dev.wix.com/docs/sdk/host-modules/dashboard/observe-state.md). The `observeState()` function allows you to retrieve contextual data from the dashboard page hosting your plugin: 1. Make sure the `@wix/dashboard`, package is installed in your app. 1. Add the following import statements to your code: ```js import { dashboard } from '@wix/dashboard'; import { createClient } from '@wix/sdk'; ``` 1. Create a client constant using the dashboard module. This allows you to interact with the dashboard page. ```js const client = createClient({ host: dashboard.host(), auth: dashboard.auth(), modules: { dashboard, }, }); ``` 1. To retrieve the data from the dashboard page, use the `observeState()` function. ```js client.dashboard.observeState((componentParams) => { console.log("componentParams:", componentParams); }); ``` ## See also - [About Dashboard Page Slots](https://dev.wix.com/docs/build-apps/develop-your-app/extensions/dashboard-extensions/dashboard-plugins/supported-wix-app-dashboard-pages/about-dashboard-page-slots.md) - [About Dashboard Plugin Extensions](https://dev.wix.com/docs/build-apps/develop-your-app/extensions/dashboard-extensions/dashboard-plugins/about-dashboard-plugin-extensions.md) - [About Dashboard Menu Plugin Extensions](https://dev.wix.com/docs/build-apps/develop-your-app/extensions/dashboard-extensions/dashboard-plugins/dashboard-menu-plugins/dashboard-menu-plugin-extensions.md) - [Add Dashboard Menu Plugin Extensions in the App Dashboard](https://dev.wix.com/docs/build-apps/develop-your-app/extensions/dashboard-extensions/dashboard-plugins/dashboard-menu-plugins/add-dashboard-menu-plugin-extensions.md) --- > Portal Navigation: > > - Append `.md` to any URL under `https://dev.wix.com/docs/` to get its markdown version. > - Pages are either content pages (article or reference text) or menu pages (a list of links to child pages). > - To get a menu page, truncate any URL to a parent path and append `.md` (e.g. `https://dev.wix.com/docs/sdk.md`, `https://dev.wix.com/docs/sdk/core-modules.md`). > - Top-level index of all portals: https://dev.wix.com/docs/llms.txt > - Full concatenated docs: https://dev.wix.com/docs/llms-full.txt ## Resource: Guidelines for Self-Managed Dashboard Extensions ## Article: Guidelines for Self-Hosted Dashboard Extensions ## Article Link: https://dev.wix.com/docs/build-apps/develop-your-app/develop-a-self-managed-app/supported-extensions/dashboard-extensions/guidelines-for-self-managed-dashboard-extensions.md ## Article Content: # Guidelines for Self-Managed Dashboard Extensions This article covers general guidelines for self-managed dashboard extensions that help your app feel native to the Wix platform. ## Size * **Keep the maximum width in mind**: Use the full screen, with a width up to 1200px. * **App height is based on its content**: The browser adds scrollbars when needed, so don’t add your own. ## App setup Make it easy for users to set up your app: * **Put the focus on your app’s main action**: Have one main action, and put it “above the fold.” ![](https://d2x3xhvgiqkx42.cloudfront.net/12345678-1234-1234-1234-1234567890ac/d0d6e5d7-1e68-49aa-8fbd-c4454894592e/2018/12/11/75d1a59d-1aa5-469a-8cd5-0549e55b49ef.png) * **Guide users with hint text**: For example, the default text in this image  – Free cup of coffee – gives users an idea of what to write. ![](https://d2x3xhvgiqkx42.cloudfront.net/12345678-1234-1234-1234-1234567890ac/d0d6e5d7-1e68-49aa-8fbd-c4454894592e/2018/12/11/6031183f-8ca2-4c82-b5a5-c0c0c2b48e6f.png) * **Keep explanations short**: If there’s a complicated setting, add a tooltip with more information. ![](https://d2x3xhvgiqkx42.cloudfront.net/12345678-1234-1234-1234-1234567890ac/d0d6e5d7-1e68-49aa-8fbd-c4454894592e/2018/12/11/e34723a0-ebec-4fae-9a88-089b0eb3f985.png) * **Does your app have a website extension?** Add a link that sends users directly to the website extension in the editor. ![](https://d2x3xhvgiqkx42.cloudfront.net/12345678-1234-1234-1234-1234567890ac/d0d6e5d7-1e68-49aa-8fbd-c4454894592e/2018/12/11/fc5ed700-f4da-4d9e-8bd8-6bef05e10377.png) * **Do users need to upload media files?** Open the [Wix Media Manager](https://support.wix.com/en/article/about-the-media-manager) so that users can choose a media file they already uploaded to Wix servers (image, document, audio, or SWF). ## Popups and modals If you need to open a window or dialog box in your app: * **Use the Wix modal**: It’s a popup-style window that opens over the Wix dashboard (Note for Developers: Open the Wix modal using the [Wix.Dashboard.openModal](https://dev.wix.com/docs/sdk/host-modules/dashboard/open-modal.md) SDK method). Users can close it by clicking anywhere outside of it or clicking the close button, and you can close it within the app. ![](https://d2x3xhvgiqkx42.cloudfront.net/12345678-1234-1234-1234-1234567890ac/d0d6e5d7-1e68-49aa-8fbd-c4454894592e/2018/12/18/dc1354a5-d238-4dbd-81b3-4ed8293249d5.png) * **Keep site visitors within the Wix platform**: _Don’t_ open windows in a new tab or use browser-native popups such as window.alert(), window.prompt(), and window.confirm(). * **The max height is 650px**: Don’t exceed this size for your modal. ## Premium features The best way to get more conversions is to show users why they should upgrade to a recurring plan – and make it easy for them to do.  * **Mark premium features**: Add an icon next to premium features. When users hover over the icon, you can show a tooltip with more information about the feature, and an upgrade link that opens your app’s billing page.   * **Make it easy for users to upgrade**: Add an upgrade button that opens your app’s billing page. If you only have one paid plan, make sure to hide the button once the user upgrades. ![](https://d2x3xhvgiqkx42.cloudfront.net/12345678-1234-1234-1234-1234567890ac/d0d6e5d7-1e68-49aa-8fbd-c4454894592e/2018/12/11/0a780920-9d03-4bea-a40f-4285c42ad350.png) ## Sensitive data Does your app have sensitive data, like payment info? Show it to site owners only, and hide it from contributors. On the server-side, identify the user. If a contributor is logged in, hide the setting and show this instead (get the PSD [here](https://www.dropbox.com/s/pnm9rmlpojke39d/private_content_dashboard.psd?dl=0)): ![](https://d2x3xhvgiqkx42.cloudfront.net/12345678-1234-1234-1234-1234567890ac/d0d6e5d7-1e68-49aa-8fbd-c4454894592e/2018/12/11/d557951d-9198-48df-9c59-4c2f782b90f9.png) --- > Portal Navigation: > > - Append `.md` to any URL under `https://dev.wix.com/docs/` to get its markdown version. > - Pages are either content pages (article or reference text) or menu pages (a list of links to child pages). > - To get a menu page, truncate any URL to a parent path and append `.md` (e.g. `https://dev.wix.com/docs/sdk.md`, `https://dev.wix.com/docs/sdk/core-modules.md`). > - Top-level index of all portals: https://dev.wix.com/docs/llms.txt > - Full concatenated docs: https://dev.wix.com/docs/llms-full.txt ## Resource: iframe Query Parameters for Dashboard Extensions ## Article: iframe Query Parameters for Dashboard Extensions ## Article Link: https://dev.wix.com/docs/build-apps/develop-your-app/develop-a-self-managed-app/supported-extensions/dashboard-extensions/iframe-query-parameters-for-dashboard-extensions.md ## Article Content: # iframe Query Parameters for Dashboard Extensions When a user accesses your self-managed iframe dashboard extension through a client-side action, Wix provides you with the following query parameters: ```bash [endpoint]?instance=[signed-instance-data]&locale=[locale]&cacheKiller=[cacheKiller]&viewMode=dashboard&isPublish=[isPublish]&containerProtocol=[httpProtocol]&siteUrl=[site-url] ``` | Name | Value | Comments | |--|--|--| | ```endpoint``` | The [Dashboard URL](https://dev.wix.com/docs/build-apps/develop-your-app/extensions/dashboard-extensions/dashboard-pages/about-dashboard-page-extensions.md), as provided in your app's dashboard. | | ```instance``` | The [signed app instance](https://dev.wix.com/docs/build-apps/develop-your-app/access/app-instances/about-app-instances.md). | The app instance ID (```instanceId```) is the unique identifier of your app within a specific user's website. | | `locale` | Current local value. | This is the browser's language identified with two characters. For example, English = `en`. | | ```cacheKiller``` | Ensures no caching of the iframe content by the host browser. | This is a randomly generated number to ensure the browser hasn't seen this URL before. | | ```viewMode``` | Will only get 'dashboard' as it's an iframe dashboard extension. | | ```isPublish``` | Boolean indicating if the site is published. | | ```containerProtocol``` | Indicates if it's HTTP or HTTPS. | | ```siteUrl``` | The address of the site to which the app belongs. | Relevant only if the site has already been published. | --- > Portal Navigation: > > - Append `.md` to any URL under `https://dev.wix.com/docs/` to get its markdown version. > - Pages are either content pages (article or reference text) or menu pages (a list of links to child pages). > - To get a menu page, truncate any URL to a parent path and append `.md` (e.g. `https://dev.wix.com/docs/sdk.md`, `https://dev.wix.com/docs/sdk/core-modules.md`). > - Top-level index of all portals: https://dev.wix.com/docs/llms.txt > - Full concatenated docs: https://dev.wix.com/docs/llms-full.txt ## Resource: Add Self-Managed Service Plugin Extensions with the SDK ## Article: Add Self-hosted Service Plugin Extensions with the SDK ## Article Link: https://dev.wix.com/docs/build-apps/develop-your-app/develop-a-self-managed-app/supported-extensions/backend-extensions/add-self-managed-service-plugin-extensions-with-the-sdk.md ## Article Content: # Add Self-Managed Service Plugin Extensions with the SDK Add a [service plugin](https://dev.wix.com/docs/build-apps/develop-your-app/extensions/backend-extensions/service-plugins/about-service-plugin-extensions.md) (formerly SPI) extension to your app in your [app's dashboard](https://manage.wix.com/account/custom-apps) to extend the functionality of a Wix site. With service plugins, your app can: + **Inject custom logic into existing Wix app flows:** For example, a typical eCommerce checkout process does not allow a site owner to add additional fees that are unrelated to specific line items. Your app can use the [Additional Fees service plugin](https://dev.wix.com/docs/sdk/backend-modules/ecom/service-plugins/additional-fees/introduction.md) to add extra fees, like gift wrap charges or a fee for fragile items, to the Wix checkout flow. + **Introduce entirely new flows to Wix sites:** For example, when a site owner sets up a Wix store, there are a limited number of payment and shipping rates service providers to choose from. Your app can use the [Shipping Rates service plugin](https://dev.wix.com/docs/sdk/backend-modules/ecom/service-plugins/shipping-rates/introduction.md) to offer additional 3rd-party shipping rates providers currently unavailable to Wix sites. If you prefer to host your app on Wix, you can [add a service plugin extension with the CLI](https://dev.wix.com/docs/wix-cli/guides/extensions/backend-extensions/service-plugins/add-service-plugin-extensions.md). Follow these steps to implement a self-managed service plugin with the [Wix JavaScript SDK](https://dev.wix.com/docs/sdk.md): ## Step 1 | Add a service plugin extension to your app Add a service plugin extension to your app in your app's dashboard as follows: 1. Select an app from the [Custom Apps page](https://manage.wix.com/account/custom-apps) in your Wix Studio workspace. 1. Go to the Extensions page, and click **+ Create Extension**. ![Create extension](https://wixmp-833713b177cebf373f611808.wixmp.com/images/72e71b0414df528b52e1b149f8b15114.png) 1. Filter by tag, or search to find the extension you want to add. 1. Select the relevant extension and click **+ Create**. 1. In the JSON editor, configure the parameters by referencing the **Documentation** section on the right side of the page. For each parameter, add the parameter name and value in the JSON editor. ![screenshot of json editor](https://wixmp-833713b177cebf373f611808.wixmp.com/images/8373341d8ee43e8b34c20e09776395fa.png) 1. Click **Save**. ## Step 2 | Retrieve your app's ID and public key To implement a self-managed service plugin, you'll need to retrieve these credentials from your app's dashboard: + **App ID:** Find this in your app's **OAuth** page in your app's dashboard. + **Public key:** Learn how to [retrieve your app's public key in your app's dashboard](https://dev.wix.com/docs/build-apps/develop-your-app/api-integrations/events-and-webhooks/handle-events-with-webhooks.md#step-2--save-your-public-key). ## Step 3 | Import modules and create a client In your app code, import the Wix client and service plugin modules you need, then call [`createClient()`](https://dev.wix.com/docs/sdk/core-modules/sdk/wix-client.md#createclient) with the [`AppStrategy`](https://dev.wix.com/docs/sdk/core-modules/sdk/app-strategy.md) auth strategy to create a client for making authenticated calls to Wix APIs: ```js import { createClient } from '@wix/sdk'; import { } from '@wix//service-plugins'; const wixClient = createClient({ auth: AppStrategy({ appId: , // Your app's ID publicKey: , // Your app's public key }), modules: { } }); ``` Make sure you: + Import the correct module for your service plugin and pass it in `modules` when creating the client. + Provide the app ID and public key you retrieved in the previous step. ## Step 4 | Define handler functions Now it's time to add your custom business logic. Do this by calling `provideHandlers()` and passing it an object containing handler functions for each service plugin functionality you need: ```js wixClient..provideHandlers({ : async (payload) => { const { request, metadata } = payload; // Add your logic here }, : async (payload) => { const { request, metadata } = payload; // Add your logic here } }); ``` For example, to implement the [Shipping Rates](https://dev.wix.com/docs/sdk/backend-modules/ecom/service-plugins/shipping-rates/introduction.md) service plugin, define the [`getShippingRates()`](https://dev.wix.com/docs/sdk/backend-modules/ecom/service-plugins/shipping-rates/get-shipping-rates.md) handler function as follows: ```js wixClient.shippingRates.provideHandlers({ getShippingRates: async (payload) => { const { request, metadata } = payload; // Add your logic here } }); ``` When a site action triggers one of these functions, Wix passes the function a `payload` object containing the following properties: + `request`: Details related to the specific service and action. + `metadata`: Information about the context of the request, such as the App Instance ID, site currency, language, and identity of the user who triggered the request. To find the handler functions a service plugin supports, and the precise structure of the `request` and `metadata` objects for each handler function, see the [reference documentation](https://dev.wix.com/docs/sdk.md). ## Step 5 | Expose an endpoint Define a route to handle `POST` requests from Wix. Use the `/*` wildcard to enable the endpoint to catch all requests to all sub-paths. In your route handler, call `process()` and pass it the request. This function takes care of the following for you: + It decodes the JWT-encrypted requests. + Based on the sub-path of the request, it triggers a call to the correct handler function you defined with `provideHandlers()` and passes it the request payload. For example, if you are using [Express](https://expressjs.com/), you can implement the endpoint simply as follows, regardless of which handler functions you defined: ```js express.post('/plugins-and-webhooks/*', (req, res) => { wixClient.process(req); }); ``` ## Full code example Here's an example of implementing this code for a shipping rates service plugin: ```js // Import the Wix client and service plugin modules import { createClient } from '@wix/sdk'; import { shippingRates } from '@wix/ecom/service-plugins' const wixClient = createClient({ auth: { appId: , publicKey: }, modules: { shippingRates } }); // Define handler functions with your custom logic wixClient.shippingRates.provideHandlers({ getShippingRates: async (payload: GetShippingRatesEnvelope) => { const { request, metadata } = payload; // Add your logic here } }); // Implement a router to process all requests and trigger calls to your handler functions express.post('/plugins-and-webhooks/*', (req, res) => { wixClient.process(req); }); ``` ## See also + [About service plugin extensions](https://dev.wix.com/docs/build-apps/develop-your-app/extensions/backend-extensions/service-plugins/about-service-plugin-extensions.md) + [List of available service plugins](https://dev.wix.com/docs/velo/articles/api-overview/service-plugins-spis.md#available-service-plugins) + [Add a service plugin with the CLI](https://dev.wix.com/docs/wix-cli/guides/extensions/backend-extensions/service-plugins/add-service-plugin-extensions.md) --- > Portal Navigation: > > - Append `.md` to any URL under `https://dev.wix.com/docs/` to get its markdown version. > - Pages are either content pages (article or reference text) or menu pages (a list of links to child pages). > - To get a menu page, truncate any URL to a parent path and append `.md` (e.g. `https://dev.wix.com/docs/sdk.md`, `https://dev.wix.com/docs/sdk/core-modules.md`). > - Top-level index of all portals: https://dev.wix.com/docs/llms.txt > - Full concatenated docs: https://dev.wix.com/docs/llms-full.txt ## Resource: Add Self-Managed Service Plugin Extensions with REST ## Article: Add Self-hosted Service Plugin Extensions ## Article Link: https://dev.wix.com/docs/build-apps/develop-your-app/develop-a-self-managed-app/supported-extensions/backend-extensions/add-self-managed-service-plugin-extensions-with-rest.md ## Article Content: # Add Self-Managed Service Plugin Extensions with REST Add a [service plugin](https://dev.wix.com/docs/build-apps/develop-your-app/extensions/backend-extensions/service-plugins/about-service-plugin-extensions.md) (formerly SPI) extension to your app in your [app's dashboard](https://manage.wix.com/account/custom-apps) to extend the functionality of a Wix site. With service plugins, your app can: + **Inject custom logic into existing Wix app flows:** For example, a typical eCommerce checkout process does not allow a site owner to add additional fees that are unrelated to specific line items. Your app can use the [Additional Fees service plugin](https://dev.wix.com/docs/rest/business-solutions/e-commerce/service-plugins/additional-fees-service-plugin/introduction.md) to add extra fees, like gift wrap charges or a fee for fragile items, to the Wix Checkout flow. + **Introduce entirely new flows to Wix sites:** For example, when a site owner sets up a Wix store, there are a limited number of payment and shipping rates service providers to choose from. Your app can use the [Shipping Rates service plugin](https://dev.wix.com/docs/rest/business-solutions/e-commerce/service-plugins/shipping-rates-integration-service-plugin/introduction.md) to offer additional 3rd-party shipping rates providers currently unavailable to Wix sites. ## Before you begin It's important to note before getting started that your implementation must match the API specification exactly as documented. This ensures that as a service provider, Wix can use your response in its flow. This integration includes the request envelope and signature validation as follows: ### Request envelope Each request that your endpoint receives is wrapped in an envelope with metadata and signed. The payload that your endpoint receives is in [JSON web token (JWT)](https://jwt.io/introduction/) format, with the following structure: ```json { "data": { "request": {/*as specified in the service plugin reference*/}, "metadata": {/*as explained below*/} }, "aud": "", "iss": "wix.com", "iat": , "exp": } ``` The `metadata` in the envelope is common to all service plugin endpoints, although some attributes may only appear in specific endpoints. The envelope attributes are: - `requestId`: Unique identifier of the request. You may print this ID to your logs to help with future debugging and easier correlation with Wix's logs. - `instanceId`: Service provider app's instance ID. - `currency`: [ISO 4217](https://en.wikipedia.org/wiki/ISO_4217) 3-letter currency code. - `languages`: String that represents the country and language in which the response from the service provider is expected to be returned in concatenated [ISO 639-1: 2 Alpha language-code](https://en.wikipedia.org/wiki/List_of_ISO_639_language_codes) and [ISO 3166-1: 2 Alpha country-code](https://en.wikipedia.org/wiki/ISO_3166-1) format, such as `"en-US"`. - `identity`: Object that describes the identity that triggered this request, with the following structure: - `identityType`: Type of site visitor making the request. Possible values: - `ANONYMOUS_VISITOR` - `MEMBER` - `WIX_USER` - `APP` - `anonymousVisitorId`: ID of the anonymous site visitor (if applicable). - `memberId`: ID of the site member (if applicable). - `wixUserId`: ID of a Wix user (if applicable). - `appId`: ID of an app (if applicable). ### Validating request signatures As explained above, the request payload is a signed JWT. To avoid an attack where a malicious 3rd party is sending you requests pretending to come from Wix, you must verify the JWT, as follows: - Verify the JWT signature using your [public key](https://dev.wix.com/docs/build-apps/develop-your-app/api-integrations/events-and-webhooks/handle-events-with-webhooks.md#step-2--save-your-public-key) from your app's dashboard. - Verify that the `aud` claim matches your application ID. - Verify that the `iss` claim is set to `wix.com`. - Verify that the `iat` claim is set to a timestamp _before_ the current timestamp on your server. - Verify that the `exp` claim is set to a timestamp _after_ the current timestamp on your server. We recommend that you use a standard library to parse and validate the JWT. There are libraries available for all popular languages. Check out the [official JWT site](https://jwt.io/libraries). ## Add a service plugin to your app Follow these steps to add a service plugin to your app. 1. Select an app from the [Custom Apps page](https://manage.wix.com/account/custom-apps) in your Wix Studio workspace. 1. Go to the Extensions page, and click **+ Create Extension**. ![Create extension](https://wixmp-833713b177cebf373f611808.wixmp.com/images/72e71b0414df528b52e1b149f8b15114.png) 1. Filter by tag, or search to find the extension you want to add. 1. Select the relevant extension and click **+ Create**. 1. In the JSON editor, configure the parameters by referencing the **Documentation** section on the right side of the page. For each parameter, add the parameter name and value in the JSON editor. ![screenshot of json editor](https://wixmp-833713b177cebf373f611808.wixmp.com/images/8373341d8ee43e8b34c20e09776395fa.png) 6. Click **Save**. > **Note:** > For some legacy service plugins, configuration might be managed elsewhere. Refer to the documentation of the specific service plugin you are implementing for instructions. ## Events Some flows require you to send asynchronous events (webhooks) to Wix. These flows are documented in the service plugin reference. For an example, see the [Payment Service Provider service plugin](https://dev.wix.com/docs/rest/business-management/payments/service-plugins/payment-service-provider-service-plugin/webhooks.md). To report an event, you must call the endpoint that appears in the service plugin reference and send the required payload. ### Authorization Every call must include an `Authorization` header with an access token as its value. Before you can obtain an access token, your app must have the appropriate permissions. To get these permissions, contact the Wix team mentioned in the specific documentation and confirm that your app has the necessary permission. To obtain an access token, send a `POST` request to this endpoint: ```bash https://www.wixapis.com/oauth/access ``` Include this header: ```bash Content-Type: application/json, ``` The body of the request must be a JSON object with following format: ```json { "grant_type" : "client_credentials", "scope" : "CASHIER.GET_ACCESS", "client_id" : , "client_secret" : } ``` You can [find your app ID and secret key](https://manage.wix.com/app-selector?title=Select+an+App&primaryButtonText=Select+Site&actionUrl=https%3A%2F%2Fdev.wix.com%2Fapps%2F%7BappId%7D%2Foauth) in the **OAuth** page in your app's dashboard. The response to the request has a body with the following format: ```json { "refresh_token": null, "access_token" : } ``` Use the value for `access_token` as the value for the `Authorization` header in your event requests. > **Notes:** > * Don't cache access tokens. Obtain a new one for each webhook you send. > * These access tokens are only valid for the specific service plugin. You can't use them for other Wix APIs. > * Access tokens retrieved using different `"grant_type"` values can't be used to send webhooks. ## See also - [Tutorial | Create a Self-Managed App](https://dev.wix.com/docs/build-apps/get-started/quick-start/create-a-self-hosted-app.md) - [Tutorial | Set Up an App With the App Dashboard](https://dev.wix.com/docs/build-apps/get-started/tutorials/tutorial-set-up-an-app-with-the-app-dashboard.md) --- > Portal Navigation: > > - Append `.md` to any URL under `https://dev.wix.com/docs/` to get its markdown version. > - Pages are either content pages (article or reference text) or menu pages (a list of links to child pages). > - To get a menu page, truncate any URL to a parent path and append `.md` (e.g. `https://dev.wix.com/docs/sdk.md`, `https://dev.wix.com/docs/sdk/core-modules.md`). > - Top-level index of all portals: https://dev.wix.com/docs/llms.txt > - Full concatenated docs: https://dev.wix.com/docs/llms-full.txt ## Resource: Add Self-Managed Editor Add-on Extensions ## Article: Add Self-hosted Editor Add-On Extensions ## Article Link: https://dev.wix.com/docs/build-apps/develop-your-app/develop-a-self-managed-app/supported-extensions/editor-extensions/add-self-managed-editor-add-on-extensions.md ## Article Content: # Add Self-Managed Editor Add-on Extensions An [editor add-on extension](https://dev.wix.com/docs/build-apps/develop-your-app/extensions/editor-extensions/about-editor-add-on-extensions.md) adds functionality to the Wix editors, providing site owners with new capabilities through a dedicated panel. This panel enables users to access and interact with the features of the add-on, seamlessly integrating them into their site-building experience.
**Important:** Review our [UX guidelines for add-ons](https://dev.wix.com/docs/build-apps/develop-your-app/frameworks/self-hosting/supported-extensions/editor-extensions/ux-guidelines-for-editor-add-ons.md) before you start developing.
To create an add-on extension, you need to do the following: * Code and deploy the add-on’s panel. * In the [app dashboard](https://manage.wix.com/account/custom-apps), set up the add-on extension. ## Step 1 | Code the add-on’s panel The add-on panel is rendered as an iframe, which you can build using any tools you like. When it comes to designing the UI, consider using the [Wix Design System](https://dev.wix.com/docs/build-apps/develop-your-app/design/about-the-wix-design-system.md). It is a collection of reusable React components that you can use to make your panel appear and feel like a native Wix panel. In the panel’s code, use Wix's [JavaScript SDK](https://dev.wix.com/docs/sdk.md) to interact with the Wix editor and access elements on the canvas (the page the user is designing), as well as access and manage site data. You can use the [Elements API](https://dev.wix.com/docs/sdk/host-modules/editor/elements/introduction.md) to read and modify properties of certain types of [editor elements](https://support.wix.com/en/article/wix-editor-elements-available-in-the-editor). ## Step 2 | Set up an add-on extension in your app dashboard To make your add-on available for installation on sites, set up an add-on extension in your [app dashboard](https://manage.wix.com/account/custom-apps) and configure its basic settings and market listing. Your add-on's market listing determines how it will appear to users in the add-on explorer in the editors, including the add-on's name, icon, and teaser. **Note**: The add-on's market listing is different from the [app's market listing](https://dev.wix.com/docs/build-apps/launch-your-app/market-listing/about-market-listings.md), which determines how the entire app appears in the [Wix App Market](https://www.wix.com/app-market). 1. In your Wix Studio workspace, select [Custom Apps](https://manage.wix.com/account/custom-apps), and then create a new app. 2. In the left menu, select **Extensions**. 3. Click **Create Extension** and find the **Editor Add-on** extension. 4. Click **Create**. 5. Configure your add-on’s basic data: * **Add-on name**: The add-on name that is displayed to users. * **Panel URL**: The URL where your panel’s HTML code is deployed. You can use localhost during development, as long as it's configured to use HTTPS. * **Panel width**: The width of the add-on panel, which can be one of the following: * **Small**: 288 px wide (recommended). Matches most native editor panels. * **Medium**: 404 px wide. For wider content, like panels with tabs. * **Large**: 660 px wide. For displaying larger content, like thumbnails. * **Panel height**: The height of the add-on panel. Can be between 200 and 500 px. 6. Configure your add-on's market listing: * **Teaser**: A short promotional description for your add-on's market listing. * **Icon**: An icon for your add-on's market listing. Upload a square JPG or PNG file. 7. Click **Save**.
**Important:** Your app may also need additional setup in the app dashboard for authentication, permissions, and more. [Learn more about setting up your app in the app dashboard](https://dev.wix.com/docs/build-apps/develop-your-app/app-dashboard-setup/about-the-app-dashboard.md).
Your add-on extension is now available for installation on a site. ## Step 3 | Test your add-on in the editor To test your add-on, install it on a site: 1. In the top right corner of your [app's dashboard](https://manage.wix.com/account/custom-apps), click **Test App** and select **Test on dev site**. 1. Select an existing development site or click **+ Create Dev Site** to create a new site. Select the editor and the Wix Business Solution you want to use and click **Create Dev Site**. 1. Click **Test App**. Wix installs your app and opens the site in a new tab. You can set which site page opens in your [app settings](https://dev.wix.com/app-selector?title=Select+an+App&primaryButtonText=Select+Site&actionUrl=https%3A%2F%2Fdev.wix.com%2Fapps%2F%7BappId%7D%2Fapp-settings). If you don't set a page, the site editor opens by default. 1. From the **Tools** menu, select **Editor Add-ons**, and then select your add-on. Your add-on’s panel is displayed. 1. Test your add-on, making sure that it functions as expected.
**Important:** Test your add-on on both Wix Editor and Wix Studio.
## Step 4 | Submit and publish your add-on When you’ve finished building and testing your add-on, you’re ready to launch and monetize your app. Learn more about [submitting your app for review](https://dev.wix.com/docs/build-apps/launch-your-app/app-distribution/about-app-distribution.md). ## See also [Tutorial | Create an Editor Add-on that Imports Icons from a Library](https://dev.wix.com/docs/build-apps/get-started/tutorials/tutorial-create-an-editor-add-on-that-imports-icons-from-a-library.md) --- > Portal Navigation: > > - Append `.md` to any URL under `https://dev.wix.com/docs/` to get its markdown version. > - Pages are either content pages (article or reference text) or menu pages (a list of links to child pages). > - To get a menu page, truncate any URL to a parent path and append `.md` (e.g. `https://dev.wix.com/docs/sdk.md`, `https://dev.wix.com/docs/sdk/core-modules.md`). > - Top-level index of all portals: https://dev.wix.com/docs/llms.txt > - Full concatenated docs: https://dev.wix.com/docs/llms-full.txt ## Resource: UX Guidelines for Editor Add-Ons ## Article: UX Guidelines for Editor Add-Ons ## Article Link: https://dev.wix.com/docs/build-apps/develop-your-app/develop-a-self-managed-app/supported-extensions/editor-extensions/ux-guidelines-for-editor-add-ons.md ## Article Content: # UX Guidelines for Editor Add-Ons When designing your add-on panel's UI, ensure it is intuitive and user-friendly. Consider using the [Wix Design System](https://dev.wix.com/docs/build-apps/develop-your-app/design/about-the-wix-design-system.md) to maintain a cohesive design. Use components such as: * [`SidePanel`](https://www.wix-pages.com/wix-design-system/?path=/story/components-overlays--sidepanel#Settings_panel) to create a structured layout. * [`FormField`](https://www.wix-pages.com/wix-design-system/?path=/story/components-form--formfield) and input components to collect user input effectively. These tools help you design a panel that aligns with the overall Wix editor experience. ## Panel dimensions When [setting up your add-on extension](https://dev.wix.com/docs/build-apps/develop-your-app/frameworks/self-hosting/supported-extensions/editor-extensions/add-self-hosted-editor-add-on-extensions.md), you'll need to define its dimensions. Choose the appropriate dimensions for your panel based on your add-on’s content and use case. Here are the recommended width options for your panel: * **Small**: 288 px wide (recommended). This matches the size of most native editor panels. * **Medium**: 404 px wide. Ideal for panels with additional features, such as tabs. * **Large**: 660 px wide. Best for larger content, like thumbnails. The height of the panel can be set between 200 and 500 px, depending on your needs. ![ux-guidelines](https://wixmp-833713b177cebf373f611808.wixmp.com/images/8c15464c00ad43e3faad58f84b534ed9.png) --- > Portal Navigation: > > - Append `.md` to any URL under `https://dev.wix.com/docs/` to get its markdown version. > - Pages are either content pages (article or reference text) or menu pages (a list of links to child pages). > - To get a menu page, truncate any URL to a parent path and append `.md` (e.g. `https://dev.wix.com/docs/sdk.md`, `https://dev.wix.com/docs/sdk/core-modules.md`). > - Top-level index of all portals: https://dev.wix.com/docs/llms.txt > - Full concatenated docs: https://dev.wix.com/docs/llms-full.txt ## Resource: Design Your Site Extensions ## Article: Design Your Site Extensions ## Article Link: https://dev.wix.com/docs/build-apps/develop-your-app/develop-a-self-managed-app/supported-extensions/deprecated/iframe/design-your-site-extensions.md ## Article Content: # Design Your Site Extension
**Warning:** The features discussed in this article are deprecated. If you have questions or concerns, [contact us](https://www.wix.com/support-chatbot?nodeId=25a57397-ccf7-4376-8b74-48d51edf7159&referral=devRels).
Keep these guidelines in mind when you design your widget and page extensions. ## Size Use these guidelines to determine the size of your iframe website extension. ### Widgets * **Decide on an initial size**: We recommend making the widget small, with a max height of 650px (since the most common screen resolution is 1366×768). Set the initial width and height in your app's dashboard. * **Adjust the iframe’s height dynamically**: Base this on the app’s content (Note for Developers: use the [setHeight](https://dev.wix.com/docs/client/api-reference/deprecated/iframe-sdk-deprecated/wix.md#setheight) SDK method). Don’t add scroll bars.
![](https://d2wzpmhzgtb9fu.cloudfront.net/docs/wp-content/uploads/2016/08/21140653/016_02_widget_height_adjusts.gif)
* **Make your app responsive and optimize for mobile**: Make sure your app looks great at any size, and on any device. [Learn more](#responsiveness) below. * **(Optional) You can make your app full-width**: If your app is _fully_ responsive, you can allow users to extend your app to the full width of the browser window – or you can make the app full width by default. [Learn how](#full-width) below. ### Pinned Widgets * **Decide on an initial size**: We recommend making the widget small, with a max height of 650px (since the most common screen resolution is 1366×768). Set the width and height in your app's dashboard.  Note that users can’t resize fixed-position widgets in the editor. * **(Optional) Expand your app when site visitors use it**: You can [resize the widget](https://dev.wix.com/docs/client/api-reference/deprecated/iframe-sdk-deprecated/wix.md#resizewindow) when site visitors interact with it – like a chat window that’s usually minimized, but “pops out” when a site visitor clicks on it. 
![](https://d2wzpmhzgtb9fu.cloudfront.net/docs/wp-content/uploads/2016/08/21140726/017_01_fixed_position_dynamic_size.gif)
### Pages * **Keep the default width in mind**: The default width of the page extension is 980px, just like every other page in the site. * **Adjust the iframe’s height dynamically**: Base this on the app’s content (use the [setHeight](https://dev.wix.com/docs/client/api-reference/deprecated/iframe-sdk-deprecated/wix.md#setheight) SDK method). Don’t add scroll bars.
![](https://d2wzpmhzgtb9fu.cloudfront.net/docs/wp-content/uploads/2016/08/21140755/018_02_page_height_adjusts.gif)
* **Make your app responsive and optimize for mobile**: Make sure your app looks great at any size, and on any device. [Learn more](#responsiveness) below. * **(Optional) You can make your app full-width**: If your app is _fully_ responsive, you can allow users to extend your app to the full width of the browser window – or you can make the app full width by default. [Learn how](#full-width) below. ## Popups/Modals The Wix popup is a window that opens over the user’s Wix site (live or preview). Site visitors can close it by clicking the close button, and you can close it within the app. Use the Wix.openPopup SDK method. Here’s an example of a Wix popup: ![](https://d2x3xhvgiqkx42.cloudfront.net/12345678-1234-1234-1234-1234567890ac/d0d6e5d7-1e68-49aa-8fbd-c4454894592e/2019/03/11/e5ac8d01-f374-4504-ac08-056d06dfd0ff.png) > **Note:** > > Have your own popup style? You can open our popup in a “bare style” – without a border, shadow, or close button – and put your own instead. **Wix Modal:** The Wix modal is a popup-style window that opens over the Wix site. Site visitors can close it by clicking anywhere outside of it or clicking the close button, and you can close it within the app.  Use the [Wix.openModal](https://dev.wix.com/docs/client/api-reference/deprecated/iframe-sdk-deprecated/wix.md#openmodal) SDK method. Here’s an example of a Wix modal: ![](https://d2x3xhvgiqkx42.cloudfront.net/12345678-1234-1234-1234-1234567890ac/d0d6e5d7-1e68-49aa-8fbd-c4454894592e/2019/03/11/9a2dfc47-ab2a-4d77-8a78-eebf547ccc72.png) ## Preview As Wix users edit their site in the Wix Editor, they can switch from “editing mode” to “preview mode” to see what their live site will look like. Make sure your app looks the same in “preview mode” as it does in the live site (Note for Developers: You can detect when the user is in preview mode – listen for the EDIT\_MODE\_CHANGE event in the addEventListener method. Then just display your app the same way you do in the live site). ## Responsiveness Make sure your app looks great at any size, and on any device. When the size of the iframe or device changes, adjust the layout and design to best fit the new size. Set the initial width and height of your app in your app's dashboard. Adjust the layout and design dynamically: * As the user resizes your app in the Wix Editor * According to the site visitor’s device (mobile or desktop)   Your app must look good and work well in at least 3 sizes – small, medium, and large screens. Here’s what we suggest: 1. **Design for mobile first, then think about bigger screens**: We recommend using a [grid-view](https://www.w3schools.com/css/css_rwd_grid.asp) to prepare your app’s layout for the following sizes:   1. 320px and less – follow our [mobile design](#mobile-design) guidelines 2. Between 321 and 550px 3. Between 550 and 980px 2. **Adjust the layout dynamically, as the iframe size or device changes**: Resize images, content, and sidebars to fit the new dimensions. We recommend using [media queries](https://www.w3schools.com/css/css_rwd_mediaqueries.asp) to display the best layout for the current width.  3. **Optimize your app for mobile**: [Check the device type](https://dev.wix.com/docs/client/api-reference/deprecated/iframe-sdk-deprecated/wix-utils.md#getdevicetype) using our SDK, and make sure the app works well on mobile (e.g., by supporting swiping and tapping actions). [Learn more](#mobile-design) about mobile design. 4. **(Optional) You can decide on a minimum height and width for your app**: If the user makes the app smaller, you can snap the extension back to the minimum size. Note: use the [resizeComponent](https://dev.wix.com/docs/client/api-reference/deprecated/iframe-sdk-deprecated/wix.md#resizecomponent) SDK method.
**Important:** When adjusting your app, change the app’s **layout** **only** – the functionality must be the same in all sizes.
### Example This is how the app looks when it’s added to the site: ![](https://d2x3xhvgiqkx42.cloudfront.net/12345678-1234-1234-1234-1234567890ac/d0d6e5d7-1e68-49aa-8fbd-c4454894592e/2018/12/20/b601e3dd-8786-403c-87bf-5370760fa21a.png) If the user increases the iframe width, the height changes and the layout is adjusted accordingly (also note that there is now more white space). ![](https://d2x3xhvgiqkx42.cloudfront.net/12345678-1234-1234-1234-1234567890ac/d0d6e5d7-1e68-49aa-8fbd-c4454894592e/2018/12/20/a6819abc-ebca-4a7c-8213-c0202ffb2827.png) When the user decreases the iframe width, the height automatically changes and the content is adjusted accordingly. ![](https://d2x3xhvgiqkx42.cloudfront.net/12345678-1234-1234-1234-1234567890ac/d0d6e5d7-1e68-49aa-8fbd-c4454894592e/2019/03/07/4f49f32e-47c3-4e12-b8c7-2c9ec6be9ad9.png) You can see that the functionality of the app remained the same, even when shrinking the app to its minimum size. ## Mobile design Optimize your app for mobile devices. A great mobile experience is important to Wix users, because many site visitors browse on a mobile device. How to design your app’s mobile layout: 1. **Limit the width of the app to 320px, and the content to 280px**: This leaves enough white space so that the mobile view looks clean and clutter-free. 2. **Keep it short**: If there’s a lot of data, you can provide a link, add pagination, or allow visitors to expand/collapse. If needed, you can adjust the app’s height by pushing other extensions further down the page (Note for Developers: use the [setHeight](https://dev.wix.com/docs/client/api-reference/deprecated/iframe-sdk-deprecated/wix.md#setheight) SDK method and set overflow to false). 3. **Make your text readable**: Use the following font sizes - 1. Page title (for page apps only): 34-30px 2. Heading: 24-30px, depending on the hierarchy 3. Main title: 20px 4. Subtitle: 16-18px 5. Paragraph: 14-16px 6. Button text: 16px 4. **Keep your buttons large enough to click**: Buttons should be at least 80px wide, and the height should be between 36-42px. 5. **Leave enough space between elements**:  1. Add at least 20px between two elements, for example: between text and image, between buttons, between button and text, etc. 2. Add space between two lines of text: 1. 1.4 em for running text 2. 1.2 em for titles Here’s a style guide to help you follow the guidelines above: ![](https://d2x3xhvgiqkx42.cloudfront.net/12345678-1234-1234-1234-1234567890ac/d0d6e5d7-1e68-49aa-8fbd-c4454894592e/2018/12/20/c51e657c-3007-4acf-b979-a5a2a5ce24ce.jpg) 6.  **Make important elements easily clickable**: Use single-tap buttons or horizontal bars. For example, the most important action in our Events app is to register for an event, so we made it really easy for visitors to do: ![](https://d2x3xhvgiqkx42.cloudfront.net/12345678-1234-1234-1234-1234567890ac/d0d6e5d7-1e68-49aa-8fbd-c4454894592e/2018/12/20/2c6a13d9-af31-41c8-88f2-cc4df224e398.png) 7. **Support common mobile actions**: Meet user expectations by supporting these actions: * **Tap** – Allow site visitors to tap on all interactive elements, like buttons and links. * **Swipe** – Allow site visitors to swipe right/left in slideshows and similar elements. ![](https://d2x3xhvgiqkx42.cloudfront.net/12345678-1234-1234-1234-1234567890ac/d0d6e5d7-1e68-49aa-8fbd-c4454894592e/2018/12/20/0c82f3cf-7201-4113-924c-e36e142c5079.png) ### Mobile Design Example Add our [Events](https://www.wix.com/app-market/web-solution/events) app to your website, and switch to mobile view in the editor to see an example of an optimized mobile app. Note that while the layout of the app is different between the two views, the functionality is the same. Check out the images below and compare the desktop and mobile views. **Desktop view:** ![](https://d2x3xhvgiqkx42.cloudfront.net/12345678-1234-1234-1234-1234567890ac/d0d6e5d7-1e68-49aa-8fbd-c4454894592e/2018/12/20/8166bb92-0bcd-4bd7-8a3b-7a6488f90df3.png) **Mobile view:** ![](https://d2x3xhvgiqkx42.cloudfront.net/12345678-1234-1234-1234-1234567890ac/d0d6e5d7-1e68-49aa-8fbd-c4454894592e/2018/12/20/444db411-7753-4c21-be92-c118df9b28d5.png) ## Full Width If your widget/page extension is fully responsive – meaning that it looks good in a wide range of different sizes that the user might choose – then you can allow users to extend your app to the full width of the browser window. If it makes sense for your app, you can also make your app full width by default. ### Give users the option to make your app full width Your app is added with the default dimensions you set in your app's dashboard, but you can allow users to extend your app to the full width of the browser. There are two ways to do this, and it depends on the layouts you’re offering for your app in the App Settings panel: * **If all of your layouts are fully responsive**: The Wix Editor already has the full-width option, so users can extend your app directly from the Editor. All you need to do is let us know that your app is fully responsive: 1. Select your app from the [Custom Apps page](https://manage.wix.com/account/custom-apps) in your Wix Studio workspace. 2. Go to **Extensions** in the side menu (under Build Your App). 3. Click the relevant extension.  1. For Widgets: Under Width Settings, select **Custom**. 2. For Pages: Under Page Width, select **Keep default and let users stretch page to full width**. * **If only some of your layouts are fully responsive**: You can offer an option in your App Settings panel that allows users to extend the widget to full width – just make sure to only show this option if the user chose one of the responsive layouts! (Note for Developers: Use the [setFullWidth](https://dev.wix.com/docs/client/api-reference/deprecated/iframe-sdk-deprecated/wix-settings.md#setfullwidth) SDK method.) ### Make your app full width by default You can also make your app full width by default, so that it’s already  stretched to the full width of the browser when the user adds your app. Here’s how: 1. Select your app from the [Custom Apps page](https://manage.wix.com/account/custom-apps) in your Wix Studio workspace. 2. Go to **Extensions** in the side menu (under Build Your App). 3. Click the relevant extension.  1. For Widgets: Under Width Settings, select **Full-Width**. 2. For Pages: Under Page Width, select **Set page to full width**. 4. Make sure that your app’s default layout is fully responsive and looks good in full width. If the user changes the layout to one that isn’t fully responsive, you should change the app size to the default dimensions you set in your app's dashboard. ## Color ### Integrate with the site’s colors We have a collection of different color palettes that users can choose for their site. Each color palette is a set of colors that work well together. For example:
![](https://d2wzpmhzgtb9fu.cloudfront.net/docs/wp-content/uploads/2016/08/21141306/RegColorPalette.png)
Choose your app’s colors dynamically, according to the site’s color palette. This way, your app integrates seamlessly and looks great right away – which means less work for the user. Here’s a quick look at what you need to do: 1. **Create the initial color scheme for your app**: We have a template for our color palette, and we’ll explain how it works below. Use this template to create your app’s initial color scheme. 2. **Allow users to change the app’s colors**: In the App Settings panel, add a color picker for each element in your app. During development, you need to set the initial color scheme in two places – in the color picker and in the app itself. ### Get to know our color palette template Not only do you want your app to integrate with the site’s color palette – but it’s also important that all of the colors used in your app look good together. For example – the text should always be readable against the background, the main action should stand out, etc. To make this convenient for you, we created a template that’s based on the **two left columns** of the color palette.
![](https://d2wzpmhzgtb9fu.cloudfront.net/docs/wp-content/uploads/2016/08/21141346/01_2FirstCol.png)
Use this template to create your app’s color scheme. Here’s how it works: 1. **Understand the palette structure**: 1. Each number represents a color. The actual color will depend on the specific color palette used in the site. For example: color-8 in the palette above has a purple hue, but can be blue in a different palette. 2. The first column is grayscale. 3. The second column is a range of tints for the “brand color”. The color varies, depending on the color palette. 2. **Assign a number to each element in your app**: Follow our color reference guide to create your color scheme. You can use the same color for a few different elements – we call this the “master color”.  Here’s a quick preview:
![](https://d2wzpmhzgtb9fu.cloudfront.net/docs/wp-content/uploads/2016/08/21141645/colors.png)
(We don’t recommend using a third color – but if needed, you can use the third column.)
**Tip:** Add any app (for example, the [Events](https://www.wix.com/app-market/web-solution/events) app) to your Wix site, and then change your site’s color palette so that you can see how the app changes according to different color palettes.
Here’s an example to show you how it works. You can see the app’s color scheme and how it looks with the color palette shown:
![](https://d2wzpmhzgtb9fu.cloudfront.net/docs/wp-content/uploads/2016/08/21141721/AppandPalette.png)
### Color reference guide Use this table as a guide to choose a “color” for each element in your app.
**Important:** Stick to the color values that we list below. We specifically chose these values so that the colors in your app will work well together and there will be enough contrast.
|Element |Value | |---|---| |Master color (if using)|color-8 |App background|color-1 |Border|color-2 or color-3 |Dividers|color-2, color-3, or color-4 |Title/heading text|color-5 |Running text|color-5 (for softer text, use 3 or 4) |URL / link|color-8 On hover: add a black layer with 20% opacity to text color |Button background|color-8 Special states: On hover: add a black layer with 20% opacity to bg colorDisabled buttons: add 50% opacity to the bg color |Button text|color-1On hover: add a black layer with 20% opacity to text color --- > Portal Navigation: > > - Append `.md` to any URL under `https://dev.wix.com/docs/` to get its markdown version. > - Pages are either content pages (article or reference text) or menu pages (a list of links to child pages). > - To get a menu page, truncate any URL to a parent path and append `.md` (e.g. `https://dev.wix.com/docs/sdk.md`, `https://dev.wix.com/docs/sdk/core-modules.md`). > - Top-level index of all portals: https://dev.wix.com/docs/llms.txt > - Full concatenated docs: https://dev.wix.com/docs/llms-full.txt ## Resource: Guide to Page Extensions ## Article: Guide to Page Extensions ## Article Link: https://dev.wix.com/docs/build-apps/develop-your-app/develop-a-self-managed-app/supported-extensions/deprecated/iframe/guide-to-page-extensions.md ## Article Content: # Guide to Page Extensions
**Warning:** This feature is deprecated. If you have any questions or need assistance, [contact us](https://www.wix.com/support-chatbot?nodeId=25a57397-ccf7-4376-8b74-48d51edf7159&referral=devRels).
A page extension is a full page, customisable element that's added to the user's live site. It can appear in the main navigation menu and behaves just like any other page.  It can have internal pages, each with its own URL, so it’s ideal for apps that use deep linking (like a blog, forum, or ecommerce store). In this article we'll tell you about all the things to keep in mind when developing a page extension to help you deliver the best possible experience for users. ## Things to know before getting started Here's some useful things to know about a page extension: * Users discover your app in the App Market and then add it to their website. * Users have to accept necessary permission/s for your app when they add it. * Users can add your page extension once to their website (if needed, you can allow users to add the extension more than once). * Users can adjust the size of a page extension. * A page extension is added and customized by the Wix user, but is used by the site visitors. * Deleting the page extension will revoke the app permission/s. ## Architecture A page extension is made up of two parts: * **The page iframe:** the page’s content is provided as an iframe embedded in a Wix website by the user, and is displayed in both the Wix Editor and the published website. * **The App Settings iframe:** this allows users to register, customize, and configure the page extension for their website. The App Settings iframe is embedded in the Wix Editor and is used only by the user. > **Note:** > > Both of these will need to contain our JavaScript SDK, or else they won't load. Read more about our SDK [here](https://dev.wix.com/docs/client/api-reference/deprecated/iframe-sdk-deprecated/using-the-sdk.md). ## Link the app to a site When a user adds your app, we’ll generate a unique ID for your app for this specific site – this is the [App Instance ID](https://dev.wix.com/docs/build-apps/develop-your-app/access/app-instances/about-app-instances.md). You should use this to link your app to this site.  This ID is sent to you as part of the App Instance query parameter, which is a signed parameter that allows you to identify the website and the Wix user, and verify that the calling party is indeed Wix.  All of your app’s endpoints will have the same App Instance ID, so each request sent to the page endpoint and to the App Settings endpoint includes the same App Instance ID in the iframe URL. ## App Settings panel To build a page extension, you'll need to create an [App Settings panel](https://dev.wix.com/docs/build-apps/develop-your-app/develop-a-self-managed-app/supported-extensions/deprecated/iframe/app-settings-for-site-extensions.md). Here are some things you should do to create an optimal App Settings experience: ### Update the app with the user's changes When users change a setting in your app, update the app right away in the Wix Editor – but don’t change the app on the live site until the user publishes the site. Here’s how: 1. **Store two sets of data:** Store both the data that’s visible in the Wix Editor and App Settings panel, and the data in the live site. 2. **Update the app in the Wix Editor immediately:** Show the app with these latest changes in the Wix Editor (including the App Settings panel). Read below on how to do this. * If the user doesn’t save these changes, go back to the previous settings. Listen for the ```SITE\_SAVED``` event in the [addEventListener](https://dev.wix.com/docs/client/api-reference/deprecated/iframe-sdk-deprecated/wix.md#addeventlistener) method. If the user doesn’t save the site, discard the latest changes and go back to the previous settings the next time we call your app endpoint. * Wait for the user to publish the site before updating the app in the live site. Listen for the ```SITE\_PUBLISHED``` event in the [addEventListener](https://dev.wix.com/docs/client/api-reference/deprecated/iframe-sdk-deprecated/wix.md#addeventlistener) method. When ```SITE\_PUBLISHED``` is issued, update the app in the live site. ### Update your app's settings When users change your app’s settings, here’s how to update your app right away in the Wix Editor: **1. Detect changes that the user makes in the App Settings panel:** Use the onChange or onClick function. **2. Update your database/backend server immediately** **3. Show the changes in your app:** for a better user experience, don’t refresh your app – here’s what to do instead: 1. In the App Settings panel, use [triggerSettingsUpdatedEvent](https://dev.wix.com/docs/client/api-reference/deprecated/iframe-sdk-deprecated/wix-settings.md#triggersettingsupdatedevent) to send an update event to the extension. 2. In the extension itself, use [addEventListener](https://dev.wix.com/docs/client/api-reference/deprecated/iframe-sdk-deprecated/wix.md#addeventlistener) and listen for the ```SETTINGS\_UPDATED``` event. 3. Update the app with the new settings. ## Support multiple pages Users can only add a page app once from the App Market. If users want to add secondary pages to the main page extension, it's possible for them to add them directly from your App Settings panel. For example, an ecommerce app may want to allow users to set up a few stores on their site. Here's how to support multiple page extensions in a site: 1. **Tell us which secondary page/s you want this enabled for:** [get in touch](https://www.wix.com/support-chatbot?nodeId=25a57397-ccf7-4376-8b74-48d51edf7159&referral=devRels) and we'll sort this for you. 2. **Allow users to add your page extension again:** use the [addComponent](https://dev.wix.com/docs/client/api-reference/deprecated/iframe-sdk-deprecated/wix-settings.md#addcomponent) method in your App Settings panel. 3. **To distinguish between the page extensions, use the** [**compId**](https://dev.wix.com/docs/client/api-reference/deprecated/iframe-sdk-deprecated/wix-utils.md#getcompid) **parameter:** this parameter is a unique string that identifies the extension, specified in the endpoint URL. 4. **Link each page extension to its own settings:** this allows users to customize each page differently, so that a change to the settings in one extension won’t affect the other page extensions in the site. > **Note:** > > Use the [getOrigCompId](https://dev.wix.com/docs/client/api-reference/deprecated/iframe-sdk-deprecated/wix-utils.md#getorigcompid) method to identify the page extension that opened the App Settings panel – this returns the compId of the page, so you can open the right settings panel. ## Page size Follow our [UI/UX guidelines](https://dev.wix.com/docs/build-apps/develop-your-app/frameworks/self-hosting/supported-extensions/deprecated/iframe/design-your-site-extensions.md) for your page extension’s size: * **Width:** the default width of the page extension is **980px**, just like every other page in the site. When we call your widget endpoint, we’ll include the page’s width in the endpoint URL. * **Height:** you’ll need to adjust the height according to the content on the page. Use the [setHeight](https://dev.wix.com/docs/client/api-reference/deprecated/iframe-sdk-deprecated/wix.md#setheight) SDK method and don’t add scroll bars. ## Deep linking A page extension supports deep linking for its internal pages. There are two supported forms of deep linking you can use: **server-side rendering** and **AJAX rendering**. You can also combine the two. > **Note:** > > The section-url parameter referenced in this document refers to the page iframe URL. ### AJAX rendering For AJAX apps, deep linking enables your app to update the content of your iframe without refreshing the whole iframe.  Your page extension changes its state using JavaScript and AJAX methods. After the page extension changes its state, it notifies the host website using the Wix.pushState() JavaScript method. This call will not reload your iframe. Wix will update the top window App-state part of the page URL, allowing it to be shared or copied and pasted to other locations. **Example:**  If the browser is showing this URL: ```https://site.domain.com/page-title/App-state-1``` when you call the method: ```pushState(“App-state-2”)``` the browser URL will change to ```https://site.domain.com/page-title/App-state-2```, but your page iframe will not reload.  When a user shares or copies and pastes a link, and there’s a resultant request to render a page with a deep-linked URL state of your page extension, Wix will call your page with the internal state as part of the iframe’s URL in the App-state path variable. You should load your page extension at the intended internal page state. **Example:** When a user clicks on a link with a URL such as: ```https://site.domain.com/page-title/App-state``` Wix will reload the page iframe using the URL: ```https://your-section-endpoint-url/App-state?rest-of-the-parameters``` ### Server-side rendering Deep linking for server-side apps enables your page extension to render different pages depending on the App-state path of your iframe.  A page extension supports deep linking using this flow: 1. Render links in your page extension using the section-url and target parameters (both parameters are passed to your app as part of the page iframe URL). ```section-url``` should be the base URL for your internal pages, and the target parameter should be used as the target attribute of anchor tags. 2. When viewing a page extension on a published website, Wix will pass the ```section-url``` as the URL of the page extension website page, and the target as ```\_top```. 3. When a user clicks on such a link, the top window URL changes to the new URL. Full-page reload will not occur. The new URL can be shared or copied and pasted to other locations. 4. Wix will catch the ```history-changed``` event and will update the page iframe URL, setting the App-state path parameter to the value “Appended by the App” to the ```section-url``` parameter. 5. When a user shares or copies and pastes a link, and there’s a resultant request to render a page with a deep-linked URL state of your page extension, Wix will call your page with the internal state as part of the iframe’s URL in the App-state path variable. You should load your page extension at the intended internal page state. **Example** Assume that there is a Wix website with the domain www.domain.com, which has a page extension on the page www.domain.com/page-title. Also assume that the page endpoint is www.App.com. 1. The following URL will open the page iframe: ```html www.App.com/?instance=XXX§ion-url=www.domain.com/page-title/&target=_top&.... ``` > **Note:** > > The section-url parameter will be URL encoded. This example is not encoded for readability purposes. 2. When you render a link to an internal page, such as my-internal-page, you should render: ```html href="http://www.domain.com/page-title/my-internal-page" target="_top">... ``` 3. When a user clicks on this link, the browser top window URL changes: ```html http://www.domain.com/App/my-internal-page ``` 4. Wix catches the change in the top browser window URL and updates the page iframe URL: ```html www.App.com/my-internal-page?instance=XXX§ion-url=www.domain.com/page-title/&target=_top&... ``` Using this flow, your page extension will reload in the iframe with the new URL. ## SEO Page apps must be fully optimized for search engine crawlers, to improve SEO for your users. There are two main steps to optimize your app: 1. **Optimize the app itself in the live site:** As search engines like Google can crawl JavaScript, make sure the app itself is fully optimized for SEO. 2. **Develop an SEO endpoint:** As not all search engines crawl JavaScript, we’ll call your SEO endpoint when a search engine requests the SEO version of your app ### Optimize your app in the live site Follow these dos and don’ts to optimize your app for search engines.  **Do**: * **Add alt text and src to images:** that way, these attributes are easily readable in the DOM. ```html This is an image of my app! ``` * **Use absolute, schemeless links and add the href attribute:** this is the full URL without the protocol. For example: ```html Check out this page! ``` * **Add rel=”noreferrer” for links to other site pages:** have links that go to other pages in the user’s site, like the homepage? Set the rel attribute value to “noreferrer” for links that go to these pages – excluding links to your app’s internal pages. (This ensures that users don’t see your app’s iframe URL as a referrer in Google Analytics.) ```html Check out this page! ``` **Manage internal pages in your app the right way**: 1. Use deep linking to link to internal pages. 2. Return a 404 error for deleted internal pages. 3. Set a title and description for internal pages using the [setPageMetaData](https://dev.wix.com/docs/client/api-reference/deprecated/iframe-sdk-deprecated/wix.md#setpagemetadata) SDK method. These values must match what’s in your SEO endpoint. * **Title:** insert the name of the internal page into the page title. For example, the page name in an eCommerce app would be the name of the product, e.g., ‘Green Hoodie’. * **Description:** we recommend using the first 160 characters from the page content, or allowing users to customize the description. * **Use ```h1``` only for internal pages:** For the app’s main page, **don’t** use h1. Use h2, h3, and so on, according to your app’s hierarchy. **Don't:** * **Add a noindex meta tag:** Google can crawl JavaScript, so don’t block search engines from crawling JavaScript in your app’s iframe. * **In the robots.txt file don’t block anything that’s needed for the page to load:** Contact us if you think something should be blocked. #### Develop an SEO endpoint Create a separate HTML file for the SEO endpoint. Your SEO endpoint should be an “HTML snapshot” – a  stripped down version of your app that has all the static HTML content visible on the user’s site, and none of the JavaScript or dynamic functionality. Here are some important things to keep in mind when creating your SEO endpoint: * **For your app’s main page, only include the tag**. Include visible content only – headings, lists, images, etc. * **Don't include or <meta> tags in the <head> element:** leave this data for the user to define. * **Don't include <script> tags or other dynamic/interactive content** * **Make sure the elements match the app itself.** For example, the heading structure, alt text for images, etc. * **Link to your app’s internal pages:** [deep link](https://dev.wix.com/docs/build-apps/develop-your-app/frameworks/self-hosting/supported-extensions/site-extensions/deprecated/iframe/deep-linking-for-internal-dashboard-extensions-iframe.md) to internal pages, and use absolute, schemeless links. For example: ```html <a href="//www.site.com/product-page/green-hoodie"> Green Hoodie </a> ``` * **For internal pages, include both the <head> and <body>:** unlike the app’s main page, you should include <meta> tags in the <head> element for internal pages: 1. Add the title and description you already set in the app via the [setPageMetaData](https://dev.wix.com/docs/client/api-reference/deprecated/iframe-sdk-deprecated/wix.md#setpagemetadata) SDK method. 2. Add [Open Graph tags](https://ogp.me/) for social media (title, type, URL and image). ```html //Example of an internal product page in an eComm app <head> <title> Page/Product Name ``` * **Don’t display content in the SEO endpoint that isn’t visible in the app:** search engines consider this to be bad practice, since it’s usually done to manipulate SEO ranking. Search engines detect this, and may remove suspect pages or the entire site from their index. E.g., if your app doesn’t include marketing text like “powered by MyCompany” – then don’t include it in the SEO version. * **Support SEO in other languages:** after you render the HTML for your SEO view, include an additional header in your HTTP response: Content-Type: “text/html;charset=UTF-8”. * **Make sure your endpoint is up, publicly accessible, up-to-date, and fast:** * Define a publicly accessible URL (**don’t** use a localhost hostname). * Keep the error rate low – otherwise, we’ll turn off your SEO endpoint. * Update the content dynamically so that it reflects the current content in the app. * Load the endpoint within 4 seconds. #### Main page extension examples **App HTML** ```html //App HTML page includes JS

HEADING

``` **SEO Endpoint** ```html //Static HTML code that displays the visible content

HEADING

Mazda
Volvo
Nissan
Ford
Skoda
Audi

``` #### Internal page extension examples **App HTML** ```html //App HTML page includes JS INTERNAL PAGE TITLE

HEADING

``` **SEO Endpoint** ```html //Static HTML code that displays the visible content INTERNAL PAGE TITLE

HEADING

Mazda
Volvo
Nissan
Ford
Skoda
Audi

``` #### Check your app's SEO view You can see what your app looks like to a search engine crawler – whether or not you developed a dedicated SEO endpoint by accessing the site / page with a Googlebot.  Here’s how to do it in Google Chrome: * Right click anywhere on your page and click **Inspect**. * Click **Menu** in the top right > **More tools** > **Network conditions** * Under '**User agent**' uncheck '**Use browser default**' * Select a Googlebot from the dropdown or paste one into the **Custom field** For browsers like Edge, Firefox and Safari, check out [this article](https://www.searchenginejournal.com/change-user-agent/368448/). ## Mobile endpoint Create a mobile endpoint for your app so that it works well on mobile devices.  This endpoint should have the same functionality as your web app – except for these differences: * The mobile endpoint should be created according to our mobile UI/UX guidelines. * The app width will be automatically set to **280px**. The height is unlimited, and you will be able to modify it using the [setHeight](https://dev.wix.com/docs/client/api-reference/deprecated/iframe-sdk-deprecated/wix.md#setheight) method in our JavaScript SDK. However, we recommend keeping the mobile view short, and providing a link or pagination to additional data. ## Endpoint URLs > **URL Requirements** > > * **HTTPS:** Wix uses HTTPS to maintain high security standards. All URLs, whether they are OAuth or iframe need to use HTTPS throughout the development process, otherwise they won't load on the Wix system. > * **Localhost or ngrok:** you can use both of these during development, but you'll need to change the URL before you submit your app for review. As localhost and ngrok run on your local machine, our team won't be able to check them when reviewing your app. **Page request URL template** ```html endpoint]/[app-state]?instance=[signed-instance-data]§ion-url=[section-url]&target=[target]&width=[width]&cacheKiller=[cacheKiller]&compId=[compId]&viewMode=[viewMode]&locale=[locale]&deviceType[device] ``` |Name |Value |Comments | |---|---|---| |```endpoint```|The Widget URL as provided in the app dashboard| |```app-state```|The inner state of the page extension|The app-state part of the URL may include a query string, but must not include a # |```instance```|The signed instance| |```section-url```|The base URL of the page extension| |```target```|Attribute that must be added to all href anchors within the page iframe| |```width```|The width of the iframe in pixels|Note that the frame height will auto-adjust depending on the frame content |```cacheKiller```|The cacheKiller is there to ensure no caching of the iframe content by the host browser| |```compId```|The ID of the extension|While the instanceId remain constant within the scope of the site, each iframe will have a unique and persistent compId |```viewMode```|Current view mode|"editor" or "site". "editor" is valid inside the Wix editor, while "site" is available only in a published website |```locale```|Current locale value| |```deviceType```|Current device type|"desktop" or "mobile" **App Settings request URL template** ```html [endpoint]?instance=[signed-instance-data]&width=[width]&compId=tpaSettings&origCompId=[origCompId]&locale=[locale] ``` |Name |Value |Comments | |---|---|---| |```endpoint```|The App Settings URL as provided in the app dashboard| |```instance```|The signed instance| |```width```|The width of the iframe in pixels| |```compId```|The compId value for the app settings is always **tpaSettings**| |```origCompId```|The ID of the extension which associated with the App Settings|The origCompId identifies the current extension that the user is editing |```locale```|Current locale value| ## Security and privacy It's really important to make sure your app is secure and protects the user's privacy. We've got a [dedicated guide](https://dev.wix.com/docs/build-apps/manage-your-app/legal-and-security/security-and-privacy-best-practice.md) to help you with this. --- > Portal Navigation: > > - Append `.md` to any URL under `https://dev.wix.com/docs/` to get its markdown version. > - Pages are either content pages (article or reference text) or menu pages (a list of links to child pages). > - To get a menu page, truncate any URL to a parent path and append `.md` (e.g. `https://dev.wix.com/docs/sdk.md`, `https://dev.wix.com/docs/sdk/core-modules.md`). > - Top-level index of all portals: https://dev.wix.com/docs/llms.txt > - Full concatenated docs: https://dev.wix.com/docs/llms-full.txt ## Resource: Deep Linking for iframe Page Extensions ## Article: Deep Linking for iframe Page Extensions ## Article Link: https://dev.wix.com/docs/build-apps/develop-your-app/develop-a-self-managed-app/supported-extensions/deprecated/iframe/deep-linking-for-iframe-page-extensions.md ## Article Content: # Deep Linking for iframe Page Extensions
**Warning:** This feature is deprecated. If you have any questions or need assistance, [contact us](https://www.wix.com/support-chatbot?nodeId=25a57397-ccf7-4376-8b74-48d51edf7159&referral=devRels).
A page extension supports deep linking for its internal pages. There are two supported forms of deep linking you can use: server-side rendering and AJAX rendering. You can also combine the two methods. > **Note:** The section-url parameter referenced in this document refers to the Page iframe URL. ## AJAX rendering For AJAX apps, deep linking enables your app to update the content of your iframe without refreshing the whole iframe. Your Page extension changes its state using JavaScript and AJAX methods. After the Page extension changes its state, it notifies the host website using the [Wix.pushState()](https://dev.wix.com/docs/client/api-reference/deprecated/iframe-sdk-deprecated/wix.md#pushstate) JavaScript method.  This call will not reload your iframe. Wix will update the top window App-state part of the page URL, allowing it to be shared or copied and pasted to other locations. **Example:** If the browser is showing this URL: `http://site.domain.com/page-title/App-state-1` when you call the method: ```pushState(“App-state-2”)``` the browser URL will change to `http://site.domain.com/page-title/App-state-2` but your Page iframe won't reload. When a user shares or copies and pastes a link, and there’s a resultant request to render a page with a deep-linked URL state of your page extension, Wix will call your page with the internal state as part of the iframe’s URL in the App-state path variable. You should load your page extension at the intended internal page state. **Example:** When a user clicks on a link with a URL such as: `http://site.domain.com/page-title/App-state` Wix will reload the page iframe using the URL: `http://your-section-endpoint-url/**App-state**?rest-of-the-parameters` ## Server-side rendering Deep linking for server-side apps enables your page extension to render different pages depending on the App-state path of your iframe. A page extension supports deep linking using this flow: 1. Render links in your page extension using the section-url and target parameters (both parameters are passed to your app as part of the Page iframe URL). section-url should be the base URL for your internal pages, and the target parameter should be used as the target attribute of anchor tags. 2. When viewing a page extension on a published website, Wix will pass the section-url as the URL of the page extension website page, and the target as \_top. 3. When a user clicks on such a link, the top window URL changes to the new URL. Full-page reload will not occur. The new URL can be shared or copied and pasted to other locations. 4. Wix will catch the history-changed event and will update the Page iframe URL, setting the App-state path parameter to the value “Appended by the App” to the section-url parameter. 5. When a user shares or copies and pastes a link, and there’s a resultant request to render a page with a deep-linked URL state of your page extension, Wix will call your Page with the internal state as part of the iframe’s URL in the App-state path variable. You should load your page extension at the intended internal page state. #### Example Assume that there's a Wix website with the domain www.domain.com, which has a page extension on the page www.domain.com/page-title. Also assume that the Page endpoint is www.App.com. 1. The following URL will open the Page iframe: The section-url parameter will be URL encoded. (This example is not encoded for readability.) ```html www.App.com/?instance=XXX§ion-url=www.domain.com/page-title/&target=_top&.... ``` 2. When you render a link to an internal page, such as my-internal-page, you should render: ```css ... ``` 3. When a user clicks on this link, the browser top window URL changes: ```html http://www.domain.com/App/my-internal-page ``` 4. Wix catches the change in the top browser window URL and updates the Page iframe URL: ```html www.App.com/my-internal-page?instance=XXX§ion-url=www.domain.com/page-title/&target=_top&... ``` > **Note:** Using this flow, your page extension will reload in the iframe with the new URL. --- > Portal Navigation: > > - Append `.md` to any URL under `https://dev.wix.com/docs/` to get its markdown version. > - Pages are either content pages (article or reference text) or menu pages (a list of links to child pages). > - To get a menu page, truncate any URL to a parent path and append `.md` (e.g. `https://dev.wix.com/docs/sdk.md`, `https://dev.wix.com/docs/sdk/core-modules.md`). > - Top-level index of all portals: https://dev.wix.com/docs/llms.txt > - Full concatenated docs: https://dev.wix.com/docs/llms-full.txt ## Resource: Guide to Widget Extensions (iframe) ## Article: Guide to Widget Extensions (iframe) ## Article Link: https://dev.wix.com/docs/build-apps/develop-your-app/develop-a-self-managed-app/supported-extensions/deprecated/iframe/guide-to-widget-extensions-iframe.md ## Article Content: # Guide to Widget Extensions (iframe)
**Warning:** This feature is deprecated. If you have questions or concerns, [contact us](https://www.wix.com/support-chatbot?nodeId=25a57397-ccf7-4376-8b74-48d51edf7159&referral=devRels).
A widget component is a small element on a user’s site. Site visitors can see and interact with widget components. In this article we'll tell you about all the things to keep in mind when developing a widget component to help you deliver the best possible experience for users. ### Things to know before getting started Here's some useful things to know about a widget component: * Users can add your widget more than once to their website. * Users can adjust the size of a widget component. * If it makes sense for your app, you can show the widget on all pages and pin it to a specific location in the browser. * A widget component is added and customized by the Wix user, but is used by the site visitors. * Deleting the app will revoke the app permission only if there are no other components of the same app in the user’s website. ### Architecture A widget component is made up of two parts – the widget iframe and an App Settings panel. These components talk to our systems through our iframe [SDK](https://dev.wix.com/docs/client/api-reference/deprecated/iframe-sdk-deprecated/wix.md#addeventlistener).  * **The widget iframe:** the widget’s content is provided as an iframe embedded in a Wix website by the user, and is displayed in both the Wix Editor and the published website. * **The App Settings iframe:** this allows users to register, customize, and configure the widget component for their website. The App Settings iframe is embedded in the Wix Editor and is used only by the user.
**Important:** Your widget must load the SDK in the component and App Settings endpoints, and both must support HTTPS.
### Link the app to a site When a user adds your app, we’ll generate a unique ID for your app for this specific site – this is the [App Instance ID](https://dev.wix.com/docs/build-apps/develop-your-app/access/app-instances/about-app-instances.md). You should use this to link your app to this site.  This ID is sent to you as part of the App Instance query parameter, which is a signed parameter that allows you to identify the website and the Wix user, and verify that the calling party is indeed Wix.  All of your app’s endpoints will have the same App Instance ID, so each request sent to the widget endpoint and to the App Settings endpoint includes the same App Instance ID in the iframe URL. ### App Settings panel To build a widget component, you'll need to create an [App Settings panel](https://dev.wix.com/docs/build-apps/develop-your-app/develop-a-self-managed-app/supported-extensions/deprecated/iframe/app-settings-for-site-extensions.md). Here's some things you should do to create an optimal App Settings experience: #### Update the app with the user's changes When users change a setting in your app, update the app right away in the Wix Editor – but don’t change the app on the live site until the user publishes the site. Here’s how: 1. **Store two sets of data:** store both the data that’s visible in the Wix Editor and App Settings panel, and the data in the live site. 2. **Update the app in the Wix Editor immediately:** show the app with these latest changes in the Wix Editor (including the App Settings panel). Read below on how to do this. * If the user doesn’t save these changes, go back to the previous settings. Listen for the **SITE\_SAVED** event in the [addEventListener](https://dev.wix.com/docs/client/api-reference/deprecated/iframe-sdk-deprecated/wix.md#addeventlistener) method. If the user doesn’t save the site, discard the latest changes and go back to the previous settings the next time we call your app endpoint. * Wait for the user to publish the site before updating the app in the live site. Listen for the **SITE\_PUBLISHED** event in the [addEventListener](https://dev.wix.com/docs/client/api-reference/deprecated/iframe-sdk-deprecated/wix.md#addeventlistener) method. When **SITE\_PUBLISHED** is issued, update the app in the live site. #### Update your app's settings When users change your app’s settings, here’s how to update your app right away in the Wix Editor: **1\. Detect changes that the user makes in the App Settings panel:** Use the onChange or onClick function. **2\. Update your database/backend server immediately.** **3\. Show the changes in your app:** for a better user experience, don’t refresh your app – here’s what to do instead: 1. In the App Settings panel, use [triggerSettingsUpdatedEvent](https://dev.wix.com/docs/client/api-reference/deprecated/iframe-sdk-deprecated/wix-settings.md#triggersettingsupdatedevent) to send an update event to the component. 2. In the component itself, use [addEventListener](https://dev.wix.com/docs/client/api-reference/deprecated/iframe-sdk-deprecated/wix.md#addeventlistener) and listen for the **SETTINGS\_UPDATED** event. 3. Update the app with the new settings. ### Support multiple copies of the widget Users can copy the widget component as many times as they want on their website, and they can customize each widget differently. Here’s what you should do: 1. **Use the compId parameter to distinguish between the widgets:** this is a unique string that identifies the component, specified in the [endpoint URL](https://dev.wix.com/docs/build-apps/develop-your-app/frameworks/self-hosting/supported-extensions/deprecated/iframe/guide-to-widget-extensions-iframe.md). 2. **Make sure copied widgets have the same settings as the original widget:** use the [originCompId](https://dev.wix.com/docs/build-apps/develop-your-app/frameworks/self-hosting/supported-extensions/deprecated/iframe/guide-to-widget-extensions-iframe.md) query parameter to retrieve the original widget’s settings. 3. **Link each widget to its own settings:** this makes sure when a user changes the settings of one widget, it doesn’t affect other copies of the widget in the site. Use the [getOrigCompId](https://dev.wix.com/docs/client/api-reference/deprecated/iframe-sdk-deprecated/wix-utils.md#getorigcompid) method to identify the widget that opened the App Settings panel. The method returns the compId of the widget, so you can open the right settings panel. ### Widget size You’ll set an initial size for your app, but users can resize your app in the Wix Editor. Follow our [UI/UX guidelines](https://dev.wix.com/docs/build-apps/develop-your-app/design/ux-and-ui-best-practices.md) – we’ll show you how to decide your app’s initial size, and how to create the right user experience when users resize your app in the Wix Editor. ### SEO If your widget has text or other content that’s meaningful for your users’ SEO, develop a dedicated SEO endpoint for your widget component. This will enhance your users’ SEO by allowing Wix to dynamically adjust app content displayed for search engines. Your SEO endpoint will be visible to search engine crawlers only. #### Which apps need an SEO endpoint You should only develop an SEO endpoint if your app’s content is meaningful for SEO. When we render a site’s SEO view, we use this endpoint to dynamically embed your app’s content into the SEO view. Examples of apps that **should** have an SEO endpoint: * FAQ widgets * News ticker widgets * Testimonial widgets Examples of apps that **shouldn’t** have SEO endpoints: * Chat widgets * Form builders * Social media button widgets Not sure if your widget should have an SEO endpoint? [Get in touch](https://www.wix.com/support-chatbot?nodeId=25a57397-ccf7-4376-8b74-48d51edf7159&referral=devRels). #### Develop your SEO endpoint Your SEO endpoint should be a stripped down version of your app – it should have just the static HTML content that’s visible on the user’s site, and none of the Javascript or dynamic functionality. Here are some important things to keep in mind when creating your SEO endpoint: * **From the widget’s HTML document, extract an HTML snippet of the `` tag:** include all HTML elements inside the body **–** like headings, lists, paragraphs, images, etc.  * **Don’t** **include `` or `<meta>` tags in the `<head>` element:** leave this data for the user to define. * **Just like the component itself, don’t add an `<h1>` element to the SEO endpoint:** this can cause issues for users because they may end up with more than one h1 on the page. * **Don't include `<script>` tags or other dynamic/interactive content.** * **Don’t display content in the SEO endpoint that isn’t visible in the app:** search engines consider this to be bad practice, since it’s usually done to manipulate SEO ranking. Search engines detect this, and may remove suspect pages or the entire site from their index. E.g., if your app doesn’t include marketing text like “powered by MyCompany” – then don’t include it in the SEO version. * **Make sure your endpoint is up, accessible, up-to-date, and fast:** * Define a publicly accessible URL (**don't** use a localhost hostname). * Keep the error rate low – otherwise, we’ll turn off your SEO endpoint. * Update the content dynamically so that it reflects the current content in the app. * Load the endpoint within 4 seconds. #### SEO endpoint examples **App HTML** ```html //App HTML page includes JS <html> <body> <h2>HEADING</h2> <p id="divid"></p> <script> var car_name = ["Mazda", "Volvo", "Nissan", "Ford", "Skoda", "Audi"]; var string = ""; var i; for (i = 0; i < car_name.length; i++) { string += car_name[i] + "<br>"; } document.getElementById("divid").innerHTML = string; </script> </body> </html> ``` **SEO endpoint** ```html //Static HTML code that displays the visible content <body> <h2>HEADING</h2> <p id="divid"> Mazda<br> Volvo<br> Nissan<br> Ford<br> Skoda<br> Audi<br> </p> </body> ``` #### Check your app's SEO view You can see what your app looks like to a search engine crawler – whether or not you developed a dedicated SEO endpoint by accessing the site / page with a Googlebot. Here’s how to do it in Google Chrome: * Right click anywhere on your page and click **Inspect**. * Click **Menu** in the top right > **More tools** > **Network conditions** * Under '**User agent**' uncheck '**Use browser default**' * Select a Googlebot from the dropdown or paste one into the **Custom field** For browsers like Edge, Firefox and Safari, check out [this article](https://www.searchenginejournal.com/change-user-agent/368448/). ### Mobile endpoint Create a mobile endpoint for your app so that it works well on mobile devices.  This endpoint should have the same functionality as your web app – except for these differences: * The mobile endpoint should be created according to our mobile UI/UX guidelines. * The app width will be automatically set to **280px**. The height is unlimited, and you will be able to modify it using the [setHeight](https://dev.wix.com/docs/client/api-reference/deprecated/iframe-sdk-deprecated/wix.md#setheight) method in our JavaScript SDK. However, we recommend keeping the mobile view short, and providing a link or pagination to additional data. ### Endpoint URLs <blockquote class="warning"> **URL Requirements** * **HTTPS:** Wix uses HTTPS to maintain high security standards. All URLs, whether they are OAuth or iframe need to use HTTPS throughout the development process, otherwise they won't load on the Wix system. * **Localhost or ngrok:** you can use both of these during development, but you'll need to change the URL before you submit your app for review. As localhost and ngrok run on your local machine, our team won't be able to check them when reviewing your app. </blockquote> **Widget request URL template:** ```html [endpoint]?instance=[signed-instance-data]&width=[width]&cacheKiller=[cacheKiller]&compId=[compId]&viewMode=[viewMode]&locale=[locale]&originCompId[originCompId]&deviceType=[device] ``` |Name |Value |Comments | |---|---|---| |**endpoint**|The Widget URL as provided during the app registration in the app dashboard| |**app-state**|The inner state of the widget component|The app-state part of the URL may include a query string, but must not include a # |**instance**|The signed instance| |**section-url**|The base URL of the widget component| |**target**|Attribute that must be added to all href anchors within the widget iframe| |**width**|The width of the iframe in pixels|Note that the frame height will auto-adjust depending on the frame content |**cacheKiller**|The cacheKiller is there to ensure no caching of the iframe content by the host browser| |**compId**|The ID of the component|While the instanceId remain constant within the scope of the site, each iframe will have a unique and persistent compId |**viewMode**|Current view mode|"editor" or "site". "editor" is valid inside the Wix editor, while "site" is available only in a published website |**locale**|Current locale value| |**deviceType**|Current device type|"desktop" or "mobile" **App Settings request URL template** ```html [endpoint]?instance=[signed-instance-data]&width=[width]&compId=tpaSettings&origCompId=[origCompId]&locale=[locale] ``` |Name |Value |Comments | |---|---|---| |**endpoint**|The App Settings URL as provided in the app dashboard| |**instance**|The signed instance| |**width**|The width of the iframe in pixels| |**compId**|The compId value for the app settings is always **tpaSettings**| |**origCompId**|The ID of the component which associated with the App Settings|The origCompId identifies the current component that the user is editing |**locale**|Current locale value| ### Security and privacy It's really important to make sure your app is secure and protects the user's privacy. We've got a [dedicated guide](https://dev.wix.com/docs/build-apps/launch-your-app/legal-and-security/security-and-privacy-best-practice.md) to help you with this. --- > Portal Navigation: > > - Append `.md` to any URL under `https://dev.wix.com/docs/` to get its markdown version. > - Pages are either content pages (article or reference text) or menu pages (a list of links to child pages). > - To get a menu page, truncate any URL to a parent path and append `.md` (e.g. `https://dev.wix.com/docs/sdk.md`, `https://dev.wix.com/docs/sdk/core-modules.md`). > - Top-level index of all portals: https://dev.wix.com/docs/llms.txt > - Full concatenated docs: https://dev.wix.com/docs/llms-full.txt ## Resource: About Pinned Widgets ## Article: About Pinned Widgets ## Article Link: https://dev.wix.com/docs/build-apps/develop-your-app/develop-a-self-managed-app/supported-extensions/deprecated/iframe/about-pinned-widgets.md ## Article Content: # About Pinned Widgets <blockquote class="warning"> **Warning:** This feature is deprecated. Instead, consider using an [embedded script](https://dev.wix.com/docs/build-apps/develop-your-app/extensions/site-extensions/embedded-scripts/about-embedded-scripts.md). </blockquote> A pinned widget is a small element that can be added to any or all pages of an existing website, and is automatically placed in a specific location on a page.  ### Position When a pinned widget component is added by the user, it'll be placed in the position you set when you registered your app. The user will be able to change the position of the app only if you provide this option from the App Settings. Use the dock UI control to automatically bind the widget placement to the control in the App Settings. <div style="text-align:center"> ![](https://d2x3xhvgiqkx42.cloudfront.net/12345678-1234-1234-1234-1234567890ac/d0d6e5d7-1e68-49aa-8fbd-c4454894592e/2018/12/23/ee10de95-4732-4b17-a3f0-c7d06ed68c9f.png) </div> Define your app’s default position in your app's dashboard. You can place it in one of these areas of the website: * TOP\_LEFT * TOP\_CENTER * TOP\_RIGHT * CENTER\_RIGHT * CENTER\_LEFT * BOTTOM\_LEFT * BOTTOM\_CENTER * BOTTOM\_RIGHT If you placed the widget in one of the four centered areas, you can set it to be relative to the center or fixed to the edge of the screen. * **Vertical margin:** This margin offsets the widget vertically from its center placement. * **Horizontal margin:** This margin offsets the widget horizontally from its center placement. Once the component has been added to its default position, the user can control its position from the App Settings (if you provided that option). >**Note:** > The app layout should fit all the positions you support, you may have more than one layout. #### Examples Set widget placement and margin (App Settings) ```javascript Wix.Settings.setWindowPlacement(compId, placement, verticalMargin, horizontalMargin); ``` Get widget placement and margin (App Settings) ```javascript Wix.Settings.getWindowPlacement(compId, callback); ``` Placement change event (Editor, Widget) ```javascript Wix.addEventListener(Wix.Events.WINDOW_PLACEMENT_CHANGED, handler); ``` ### Size You’ll set the default size for the pinned widget in your app's dashboard, and users won’t be able to resize it in the Wix Editor. Follow our [UI/UX guidelines](https://dev.wix.com/docs/build-apps/develop-your-app/design/ux-and-ui-best-practices.md) – we’ll show you how to decide your app’s default size, and how to create the right user experience when site visitors interact with your app. For example, you can resize the app when a site visitor interacts with it in the live site. Make sure to reset the widget back to the default size when the user switches back to Edit mode, or when the site visitors clicks out of your app. #### Example **Resize widget** ```javascript Wix.resizeWindow(newWidth, newHeight, callback); ``` --- > Portal Navigation: > > - Append `.md` to any URL under `https://dev.wix.com/docs/` to get its markdown version. > - Pages are either content pages (article or reference text) or menu pages (a list of links to child pages). > - To get a menu page, truncate any URL to a parent path and append `.md` (e.g. `https://dev.wix.com/docs/sdk.md`, `https://dev.wix.com/docs/sdk/core-modules.md`). > - Top-level index of all portals: https://dev.wix.com/docs/llms.txt > - Full concatenated docs: https://dev.wix.com/docs/llms-full.txt ## Resource: Deep Linking for Internal Dashboard Extensions (iframe) ## Article: Deep Linking for Internal Dashboard Extensions (iframe) ## Article Link: https://dev.wix.com/docs/build-apps/develop-your-app/develop-a-self-managed-app/supported-extensions/deprecated/iframe/deep-linking-for-internal-dashboard-extensions-iframe.md ## Article Content: # Deep Linking for Internal Dashboard Extensions (iframe) > **Note:** If you experience problems with deep linking, [contact us](https://www.wix.com/support-chatbot?nodeId=25a57397-ccf7-4376-8b74-48d51edf7159&referral=devRels). An internal dashboard extension supports deep linking for its internal pages. Deep linking enables your app to update the content of your iframe without refreshing the whole iframe. Your dashboard extension changes its state using JavaScript and AJAX methods. After the dashboard extension changes its state, it notifies the host website using the `relativeUrl` parameter of JavaScript Dashboard SDK's [`navigate()`](https://dev.wix.com/docs/sdk/host-modules/dashboard/navigate.md) function. This call will not reload your iframe. Wix will update the top window App-state part of the URL. ## Example If the browser is showing this URL: ```http://www.wix.com/my-account/site/<metaSite>/app/<appID>?queryParams``` when you call the method: ```Dashboard.pushState(“AppState”)``` the browser URL will change to ```http://www.wix.com/my-account/site/<metaSiteId>/app/<appID>?queryParams&appState=<appState>``` but your Dashboard iframe will not reload. When there is a request to render your Dashboard iframe with an internal state, Wix will call your Dashboard endpoint with the internal state as part of the iframe’s URL in the app-state path variable. You should load your dashboard extension at the intended internal state. ## Example When a user clicks on a link with a URL such as: ```http://www.wix.com/my-account/app/<appID>/<AppInstanceID>/<appState>``` we will load your Dashboard iframe using the URL: ```http://www.yourApp.com/<appState>``` > **Note:** If you want to notify a user about something that happened in your app or an action they should take, you can direct them to your app in a specific Wix site. Use the following URL: ```https://www.wix.com/my-account/app/<appID>/<appInstanceID>/<appState>```. --- > Portal Navigation: > > - Append `.md` to any URL under `https://dev.wix.com/docs/` to get its markdown version. > - Pages are either content pages (article or reference text) or menu pages (a list of links to child pages). > - To get a menu page, truncate any URL to a parent path and append `.md` (e.g. `https://dev.wix.com/docs/sdk.md`, `https://dev.wix.com/docs/sdk/core-modules.md`). > - Top-level index of all portals: https://dev.wix.com/docs/llms.txt > - Full concatenated docs: https://dev.wix.com/docs/llms-full.txt ## Resource: iframe Query Parameters for Extensions ## Article: iframe Query Parameters for Extensions ## Article Link: https://dev.wix.com/docs/build-apps/develop-your-app/develop-a-self-managed-app/supported-extensions/deprecated/iframe/iframe-query-parameters-for-extensions.md ## Article Content: # iframe Query Parameters for Extensions <blockquote class="warning"> **Warning:** The features discussed in this article are deprecated. If you're looking for information related to dashboard extensions, see [iframe Query Parameters for Dashboard Extensions](https://dev.wix.com/docs/build-apps/develop-your-app/frameworks/self-hosting/supported-extensions/dashboard-extensions/iframe-query-parameters-for-dashboard-extensions.md). If you have questions or concerns, [contact us](https://www.wix.com/support-chatbot?nodeId=25a57397-ccf7-4376-8b74-48d51edf7159&referral=devRels). </blockquote> ## Widget extension ```bash [endpoint]?compId[compId]&viewMode=[viewMode]deviceType=[device]&locale=[locale]&originCompId[originCompId]&width=[width]?instance=[signed-instance-data] ``` |Name |Value |Comments | |---|---|---| |```endpoint```|The Widget URL as supplied during the app registration in your app's dashboard| |```compId```|The ID of the Widget extension|While the instanceId remain constant within the scope of the site, each iframe will have a unique and persistent compId |```viewMode```|Current view mode|"editor" or "site". "editor" is valid inside the Wix editor, while "site" is available only in a published website |```deviceType```|Current device type|"desktop" or "mobile" |```locale```|Current locale value| |```originCompId```|ID of the original widget that the user copied (or cut)|When a user copies (or cuts) a widget, this query parameter appears in the pasted widget. Use it to retrieve the original widget’s design, layout, and other settings |```width```|The width of the iframe in pixels| |```instance```|The [signed instance](https://dev.wix.com/docs/build-apps/develop-your-app/access/app-instances/about-app-instances.md#app-instance-id)|The App Instance ID (```instanceId```) is the unique identifier of your app within a specific user's website. ## Widget app settings panel ```bash [endpoint]?instance=[signed-instance-data]&width=[width]&compId=tpaSettings&origCompId=[origCompId]&locale=[locale] ``` |Name |Value |Comments | |---|---|---| |```endpoint```|The App Settings URL as supplied during the app registration in your app's dashboard| |```compId```|The compId value for the app settings is always **tpaSettings**| |```instance```|The [signed instance](https://dev.wix.com/docs/build-apps/develop-your-app/access/app-instances/about-app-instances.md#app-instance-id)|The App Instance ID (```instanceId```) is the unique identifier of your app within a specific user's website. |```locale```|Current locale value| |```originCompId```|The ID of the extension which associated with the App Settings|The origCompId identifies the current extension that the user is editing |```width```|The width of the iframe in pixels| ## Page extension ```bash [endpoint]/[app-state]?&compId=[compId]viewMode=[viewMode]&deviceType[device]&locale=[locale]&width=[width]&instance=[signed-instance-data]&target=[target]§ion-url=[section-url][endpoint]/[app-state]?instance=[signed-instance-data]§ion-url=[section-url]&target=[target]&width=[width]&cacheKiller=[cacheKiller]&compId=[compId]&viewMode=[viewMode]&locale=[locale]&deviceType[device] ``` |Name |Value |Comments | |---|---|---| |```endpoint```|The Widget URL as supplied during the app registration in your app's dashboard| |viewMode|Current view mode|"editor" or "site". "editor" is valid inside the Wix editor, while "site" is available only in a published website |```deviceType```|Current device type|"desktop" or "mobile" |```locale```|Current locale value|This is the browser's language identified with two characters. E.g., English = en |```width```|The width of the iframe in pixels|The frame height will auto-adjust depending on the frame content |```instance``|The [signed instance](https://dev.wix.com/docs/build-apps/develop-your-app/access/app-instances/about-app-instances.md#app-instance-id)|The App Instance ID (```instanceId```) is the unique identifier of your app within a specific user's website. |```target```|Attribute that must be added to all href anchors within the Page iframe| |```sectionUrl```|The base URL of the page extension| |```app-state```|The inner state of the page extension|The app-state part of the URL may include a query string, but must not include a # |```compId```|The ID of the extension|While the instanceId remain constant within the scope of the site, each iframe will have a unique and persistent compId ## Page app settings panel ```bash [endpoint]?compId=tpaSettings&instance=[signed-instance-data]&locale=[locale]&origCompId=[origCompId]&width=[width] ``` |Name |Value |Comments | |---|---|---| |```endpoint```|The App Settings URL as supplied during the app registration in your app's dashboard| |```compId```|The compId value for the app settings is always **tpaSettings**| |```instance```|The [signed instance](https://dev.wix.com/docs/build-apps/develop-your-app/access/app-instances/about-app-instances.md#app-instance-id)|The App Instance ID (```instanceId```) is the unique identifier of your app within a specific user's website. |```locale```|Current locale value|This is the browser's language identified with two characters. E.g., English = en |```origCompId```|The ID of the extension which associated with the App Settings|The origCompId identifies the current extension that the user is editing |width|The width of the iframe in pixels| ## Worker extension ```bash [endpoint]?compId=[compId]&viewMode=[viewMode]&deviceType=[device]&locale=[locale]&endpointType=worker &instance=[signed-instance-data] [endpoint]?compId=[compId]&viewMode=[viewMode]&deviceType=[device]&locale=[locale]&endpointType=worker &instance=[signed-instance-data] ``` |Name |Value |Comments | |---|---|---| |```compId```|The ID of the Worker extension|While the instanceId remain constant within the scope of the site, each iframe will have a unique and persistent compId |```viewMode```|Current view mode|"editor" or "site". "editor" is valid inside the Wix editor, while "site" is available only in a published website |```deviceType```|Current device type|"desktop" or "mobile" |```locale```|Current locale value| |```endpointType```|The Worker URL as supplied during the app registration in your app's dashboard| |```instance```|The [signed instance](https://dev.wix.com/docs/build-apps/develop-your-app/access/app-instances/about-app-instances.md#app-instance-id)|The App Instance ID (```instanceId```) is the unique identifier of your app within a specific user's website. --- > Portal Navigation: > > - Append `.md` to any URL under `https://dev.wix.com/docs/` to get its markdown version. > - Pages are either content pages (article or reference text) or menu pages (a list of links to child pages). > - To get a menu page, truncate any URL to a parent path and append `.md` (e.g. `https://dev.wix.com/docs/sdk.md`, `https://dev.wix.com/docs/sdk/core-modules.md`). > - Top-level index of all portals: https://dev.wix.com/docs/llms.txt > - Full concatenated docs: https://dev.wix.com/docs/llms-full.txt ## Resource: Wix Style Parameters ## Article: Wix Style Parameters ## Article Link: https://dev.wix.com/docs/build-apps/develop-your-app/develop-a-self-managed-app/supported-extensions/deprecated/iframe/wix-style-parameters.md ## Article Content: # Wix Style Parameters You can store certain customizations that a user changed, like your app’s color, inside the Wix site (instead of saving it on your database). The ```wix-param``` key works with color/font parameters, numbers, and booleans. ## How it works Use our custom style parameter key, wix-param. Here’s the basic flow: 1. **Set a key name to identify this data**: For example, the key name for your app’s background color can be: ```backgroundColor```. 2. **Set the starting values in the UI control and in the extension itself**: For example, for the app’s color, you’ll save these values in the color picker and in the app’s CSS – see our example below for more guidance. 3. **For fonts and colors – we’ll reflect the user’s changes in the app**: When the user changes the value, we’ll automatically change the value in the Wix site, so there’s no need for you to listen for an ```onChange``` event. 4. **For booleans and numbers, listen for the STYLE\_PARAMS\_CHANGE event**: When the user changes the value,  we’ll automatically change the value in the Wix site. You should reflect these changes in your app.  Use the ```addEventListener method```. > **Note:** You can only use wix-param in UI controls that support it. ## Supported UI controls ### Color and Font Parameters * ColorPicker * ColorPickerWithOpacity * FontPicker * Font and color picker ### Number Parameters * ToggleButton * RadioButton * Dropdown * Slider ### Boolean Parameters * Checkbox * ToggleSwitch ## Color Values When setting colors in your app, you can use any value between color-1 to color-25 (color-1, color-2, color-3, etc). To decide the color value, use our [color reference guide](https://dev.wix.com/docs/build-apps/develop-your-app/develop-a-self-managed-app/supported-extensions/deprecated/iframe/design-your-site-extensions.md). ## Font Values When setting fonts in your app, you can use the values listed in the table below. To decide the font value, use our font reference guide. |Font theme you chose for your starting scheme |Font Reference Number (use in the UI control) | Font theme (use in the website extension) | | ----------------------- | ----------------------------------------- | ---------- | | Heading 1 | font\_0 | Title | | Heading 2 | font\_2 | Page-title | | Heading 3 | font\_3 | Heading-XL | | Heading 4 | font\_4 | Heading-L | | Heading 5 | font\_5 | Heading-M | | Heading 6 | font\_6 | Heading-S | | Paragraph 1 | font\_7 | Body-L | | Paragraph 2 | font\_8 | Body-M | | Paragraph 3 | font\_9 | Body-S | ## Example Here's how to implement ```wix-param```. The examples below use AngularJS, but the concepts apply to React templates/JSX and jQuery too. We'll use the Font & Color Picker as an example. 1. **Set up the font and color picker**: In your app settings panel, add the font and color picker UI control. ```javascript <wix-control name="UI.fontAndColorPicker" props="{ title: 'Description', //set up the starting color and font in your app startWithTheme: 'font_8', startWithColor: 'color-2', //We save these values inside the Wix site wix-param-font: 'myBodyFont', wix-param-color: 'myBodyColor', }"></wix-control> ``` 2. **Set the same starting values in the extension itself**: You can use the color and font style parameters inside an internal CSS within your website extension. It’s a simple template engine that uses {{value}} to interpolate the style parameters. 1. Add the wix-style attribute in the <style> element. 2. Separate the style key name and the fallback (default) value with a space, for example:  {{style.wix-param-key fallback\_value}}. > **Note:** > > Using AngularJS? Since AngularJS reads {{ }} as an expression, add the ng-non-bindable directive to the <style> element. ```javascript <style wix-style> h1 { //Font theme is paragraph 2 font:{{style.myBodyFont Body-M}} color:{{style.myBodyColor color-2}} } footer { //Background color background-color: {{color-1}}; } </style> <body> <h1>Wix Title</h1> <footer> <h2>Footer</h2> </footer> </body> ``` > **Note:** You can get all the style parameters that were set in the app’s settings. To do so, use ```Wix.Styles.getStyleParams```. ```javascript //get the style parameters Wix.addEventListener(Wix.Events.STYLE_PARAMS_CHANGE, function(data) { console.log(data); }); //returns an object with all of the style parameters { booleans: { showDescription: true showTitle: true } Colors:{ titleColor:{ themeName:"color-5" value:"#302D2D" } } fonts: { btnFont:{ displayName:"Paragraph 2" editorKey:"font_8" family:"din-next-w01-light" fontStyleParam:true preset:"Custom" Size:15 Style:{ bold:false italic:false underline:false } value:"font:normal normal normal 15px/18px din-next-w01-light, din-next-w02-light,din-next-w10-light,sans-serif;" } } Numbers:{ Animation: 2 } ``` --- > Portal Navigation: > > - Append `.md` to any URL under `https://dev.wix.com/docs/` to get its markdown version. > - Pages are either content pages (article or reference text) or menu pages (a list of links to child pages). > - To get a menu page, truncate any URL to a parent path and append `.md` (e.g. `https://dev.wix.com/docs/sdk.md`, `https://dev.wix.com/docs/sdk/core-modules.md`). > - Top-level index of all portals: https://dev.wix.com/docs/llms.txt > - Full concatenated docs: https://dev.wix.com/docs/llms-full.txt ## Resource: App Settings for Site Extensions ## Article: App Settings for Site Extensions ## Article Link: https://dev.wix.com/docs/build-apps/develop-your-app/develop-a-self-managed-app/supported-extensions/deprecated/iframe/app-settings-for-site-extensions.md ## Article Content: # App Settings for Site Extensions ## Update the app with user changes When users change a setting in your app, update the app right away in the Wix Editor, but **don’t** change the app on the live site until the user publishes the site. Here’s how: 1. **Store two sets of data**: Store both the data that’s visible in the Wix Editor and settings panel, and the data in the live site. 2. **Update the app in the Wix Editor immediately**: Show the app with these latest changes in the Wix Editor (including the App Settings panel). There are two ways to do this, depending on whether the user changed the color/font, or other values like numbers/text/booleans. 3. **Wait for the user to publish the site before updating the app in the live site**: Listen for the SITE\_PUBLISHED event in the [addEventListener](https://dev.wix.com/docs/client/api-reference/deprecated/iframe-sdk-deprecated/wix.md#addeventlistener) method. When SITE\_PUBLISHED is issued, update the app in the live site. ## Update colors and fonts For color and font settings, use our custom [wix-param](https://dev.wix.com/docs/build-apps/develop-your-app/develop-a-self-managed-app/supported-extensions/deprecated/iframe/wix-style-parameters.md) attribute in both the website extension and in the App Settings panel. When users change your app’s font or color, we’ll automatically update the app with these changes. ## Update numbers, booleans, text and other values When users change your app’s settings (except the color and font), here’s how to update your app right away in the Wix Editor: 1. **Detect changes that the user makes in the App Settings panel**: 1. **For Wix UI controls that use** [wix-param](https://dev.wix.com/docs/build-apps/develop-your-app/develop-a-self-managed-app/supported-extensions/deprecated/iframe/wix-style-parameters.md) **to save a number or boolean**: listen for the STYLE\_PARAMS\_CHANGE event in the [addEventListener](https://dev.wix.com/docs/client/api-reference/deprecated/iframe-sdk-deprecated/wix.md#addeventlistener) method. 2. **For Wix UI controls that don’t use wix-param**: use the onChange or onClick function. 2. **Update your database/backend server immediately**: This is only relevant for UI controls that aren’t using wix-param. (If the UI control uses wix-param, the change is already saved in the Wix site – so there’s no need to update your server.)   3. **Show the changes in your app**: For better user experience, don’t refresh your app. Here’s what to do instead: 1. **In the App Settings panel**: Use [triggerSettingsUpdatedEvent](https://dev.wix.com/docs/client/api-reference/deprecated/iframe-sdk-deprecated/wix-settings.md#triggersettingsupdatedevent) to send an update event to the extension. 2. **In the extension itself**: Use [addEventListener](https://dev.wix.com/docs/client/api-reference/deprecated/iframe-sdk-deprecated/wix.md#addeventlistener) and listen for these events: 1. SETTINGS\_UPDATED event – for UI controls that don’t use wix-param 2. STYLE\_PARAMS\_CHANGE – for UI controls that use wix-param 3. **Update the app** with the new settings. --- > Portal Navigation: > > - Append `.md` to any URL under `https://dev.wix.com/docs/` to get its markdown version. > - Pages are either content pages (article or reference text) or menu pages (a list of links to child pages). > - To get a menu page, truncate any URL to a parent path and append `.md` (e.g. `https://dev.wix.com/docs/sdk.md`, `https://dev.wix.com/docs/sdk/core-modules.md`). > - Top-level index of all portals: https://dev.wix.com/docs/llms.txt > - Full concatenated docs: https://dev.wix.com/docs/llms-full.txt ## Resource: Set Your iframe Dimensions ## Article: Set Your iframe Dimensions ## Article Link: https://dev.wix.com/docs/build-apps/develop-your-app/develop-a-self-managed-app/supported-extensions/deprecated/iframe/set-your-iframe-dimensions.md ## Article Content: # Set Your iframe Dimensions You set the default size of the iframe extension in the [app dashboard](https://dev.wix.com/apps). Users can change the size of the extension by resizing the iframe inside the editor, just like other Wix elements. To detect the size of the iframe, use the window resize event. Make your app responsive and change the layout of the extension according to the new size. --- > Portal Navigation: > > - Append `.md` to any URL under `https://dev.wix.com/docs/` to get its markdown version. > - Pages are either content pages (article or reference text) or menu pages (a list of links to child pages). > - To get a menu page, truncate any URL to a parent path and append `.md` (e.g. `https://dev.wix.com/docs/sdk.md`, `https://dev.wix.com/docs/sdk/core-modules.md`). > - Top-level index of all portals: https://dev.wix.com/docs/llms.txt > - Full concatenated docs: https://dev.wix.com/docs/llms-full.txt ## Resource: Optimize for SEO (iframe) ## Article: Optimize for SEO (iframe) ## Article Link: https://dev.wix.com/docs/build-apps/develop-your-app/develop-a-self-managed-app/supported-extensions/deprecated/iframe/optimize-for-seo-iframe.md ## Article Content: # Optimize Your App for SEO (iframe) Does your website component have text or other content that’s meaningful for SEO? Optimize your app for search engine crawlers, to improve SEO for your users. There are two main steps to optimize your app: 1. **Optimize the app itself in the live site:** as search engines like Google can crawl JavaScript, make sure the app itself is fully optimized for SEO. 2. **Develop an SEO endpoint:** as not all search engines crawl JavaScript, we’ll call your SEO endpoint when a search engine requests the SEO version of your app Here are a few examples of apps that **should be optimized** for search engines: * FAQ widgets * News ticker widgets * Testimonial widgets If there’s no content in your widget that’s meaningful for SEO, don’t develop an SEO endpoint – we’ll render your widget as an iframe. For example, apps like chat widgets, form builders, and social media buttons don’t need an SEO endpoint. ### Optimize your app in the live site Follow these dos and don’ts to optimize your app for search engines. **Do**: * **Add alt text and src to images**: That way, these attributes are easily readable in the DOM. ```html <img src="images/optimize-for-seo-md_build-apps-portal_develop-your-app_frameworks_self-hosting_supported-self-hosted-extensions_site-extensions_iframes_myappimage.png" alt="This is an image of my app! "> ``` * **Use absolute, schemeless links and add the href attribute**: This is the full URL _without_ the protocol. For example: ```html <a href="//www.myApp.com">Check out this page!</a> ``` * **Add rel=”noreferrer” for links to other site pages**: Have links that go to other pages in the user’s site, like the homepage? Set the rel attribute value to “noreferrer” for links that go to these pages – **excluding** links to your app’s internal pages. (This ensures that users don’t see your app’s iframe URL as a referrer in Google Analytics.) ```html <a rel="noreferrer" href="//www.site.com/">Check out this page!</a> ``` * **Manage internal pages in your app the right way:** 1. Use deep linking to link to internal pages. 2. Return a 404 error for deleted internal pages. 3. Set a title and description for internal pages using the [setPageMetaData](https://dev.wix.com/docs/client/api-reference/deprecated/iframe-sdk-deprecated/wix.md#setpagemetadata) SDK method. These values must match what’s in your SEO endpoint. * **Title:** insert the name of the internal page into the page title. For example, the page name in an eCommerce app would be the name of the product, e.g., ‘Green Hoodie’. * **Description:** we recommend using the first 160 characters from the page content, or allowing users to customize the description. * **Use ```<h1>``` only for internal pages:** for the app’s main page, **don’t** use ```<h1>```. Use ```<h2>```, ```<h3>```, and so on, according to your app’s hierarchy. **Don’t**: * **Add a noindex meta tag:** Google can crawl JavaScript, so don’t block search engines from crawling JavaScript in your app’s iframe. * **In the robots.txt file, don’t block anything that’s needed for the page to load:** contact us if you think something should be blocked. ### Develop an SEO Endpoint Create a separate HTML file for the SEO endpoint. Your SEO endpoint should be an “HTML snapshot” – a  stripped down version of your app that has all the static HTML content visible on the user’s site, and none of the JavaScript or dynamic functionality. Here are some important things to keep in mind when creating your SEO endpoint: * **For your app’s main page, only include the `<body>` tag:** Include visible content only – headings, lists, images, etc. * **Don't include `<title>` or `<meta>` tags in the `<head>` element:** leave this data for the user to define. * **Don't include `<script>` tags or other dynamic/interactive content** * **Make sure the elements match the app itself.** For example, the heading structure, alt text for images, etc. * **Link to your app’s internal pages:** [deep link](https://dev.wix.com/docs/build-apps/develop-your-app/frameworks/self-hosting/supported-extensions/site-extensions/deprecated/iframe/deep-linking-for-iframe-page-extensions.md) to internal pages, and use absolute, schemeless links. For example: ```html <a href="//www.site.com/product-page/green-hoodie"> Green Hoodie </a> ``` * **For internal pages, include both the <head> and <body>:** unlike the app’s main page, you should include <meta> tags in the <head> element for internal pages: 1. Add the title and description you already set in the app via the [setPageMetaData](https://dev.wix.com/docs/client/api-reference/deprecated/iframe-sdk-deprecated/wix.md#setpagemetadata) SDK method. 2. Add [Open Graph tags](https://ogp.me/) for social media (title, type, URL and image). ```html //Example of an internal product page in an eComm app <head> <title> Page/Product Name ``` * **Don’t display content in the SEO endpoint that isn’t visible in the app:** search engines consider this to be bad practice, since it’s usually done to manipulate SEO ranking. Search engines detect this, and may remove suspect pages or the entire site from their index. E.g., if your app doesn’t include marketing text like “powered by MyCompany” – then don’t include it in the SEO version. * **Support SEO in other languages:** after you render the HTML for your SEO view, include an additional header in your HTTP response: Content-Type: “text/html;charset=UTF-8”. * **Make sure your endpoint is up, publicly accessible, up-to-date, and fast:** \- Define a publicly accessible URL (don’t use a localhost hostname). \- Keep the error rate low – otherwise, we’ll turn off your SEO endpoint. \- Update the content dynamically so that it reflects the current content in the app. \- Load the endpoint within 4 seconds. ### SEO Endpoint examples #### Widget component examples **App HTML** ```html //App HTML includes JS

JavaScript Loops

``` **Static Endpoint** ```html //Static HTML code that displays the visible content

BMW
Volvo
Saab
Ford
Fiat
Audi

``` #### Page component examples **App HTML** ```html //App HTML page includes JS

HEADING

``` **SEO Endpoint** ```html //Static HTML code that displays the visible content

HEADING

Mazda
Volvo
Nissan
Ford
Skoda
Audi

``` #### Internal page component examples **App HTML** ```html //App HTML page includes JS INTERNAL PAGE TITLE

HEADING

``` **SEO Endpoint** ```html //Static HTML code that displays the visible content INTERNAL PAGE TITLE

HEADING

Mazda
Volvo
Nissan
Ford
Skoda
Audi

``` ### Check your app’s SEO view You can see what your app looks like to a search engine crawler – whether or not you developed a dedicated SEO endpoint by accessing the site / page with a Googlebot.  Here’s how to do it in Google Chrome: * Right click anywhere on your page and click **Inspect**. * Click **Menu** in the top right > **More tools** > **Network conditions** * Under '**User agent**' uncheck '**Use browser default**' * Select a Googlebot from the dropdown or paste one into the **Custom field** For browsers like Edge, Firefox and Safari, check out [this article](https://www.searchenginejournal.com/change-user-agent/368448/). --- > Portal Navigation: > > - Append `.md` to any URL under `https://dev.wix.com/docs/` to get its markdown version. > - Pages are either content pages (article or reference text) or menu pages (a list of links to child pages). > - To get a menu page, truncate any URL to a parent path and append `.md` (e.g. `https://dev.wix.com/docs/sdk.md`, `https://dev.wix.com/docs/sdk/core-modules.md`). > - Top-level index of all portals: https://dev.wix.com/docs/llms.txt > - Full concatenated docs: https://dev.wix.com/docs/llms-full.txt ## Resource: Legacy Custom Element (Deprecated) ## Article: Legacy Custom Element (Deprecated) ## Article Link: https://dev.wix.com/docs/build-apps/develop-your-app/develop-a-self-managed-app/supported-extensions/deprecated/legacy-custom-elements/legacy-custom-element-deprecated.md ## Article Content: # Legacy Custom Element (Deprecated) > **Deprecation Notice** > > The legacy custom element extension has been replaced by the [new site widget extension](https://dev.wix.com/docs/build-apps/develop-your-app/frameworks/self-hosting/supported-extensions/site-extensions/site-widgets-and-plugins/add-self-hosted-site-widget-extensions-with-custom-elements.md), which you can implement using custom element technology. > > You can also use Wix Blocks to build a site widget based on a custom element. Learn more about [custom elements with Blocks](https://support.wix.com/en/article/wix-blocks-adding-custom-elements). > > In your app's Extensions page, the custom element extensions are categorized as follows: > > * Legacy: **Custom Element (Beta)** > * New: **Site Widget (Custom Element)** > > The following article is relevant only for the legacy custom element extension. A custom element lets users drag and drop a **visual extension** to exactly where they want them on their site. Once a user has added it to the Wix Editor, the extension will be moveable and resizable, giving users full visual control over the extension. Custom elements need an **app settings panel** that lets Wix site owners customize the app and its content. ## 1\. Set up a custom element Here's how to build your custom element:  1. Log in and click **Create New App**. 2. Go to **Extensions** in the side menu under **Build Your App**. 3. Click **Create Extension**. 4. Find **Custom Element**. 5. Click **Create**. 6. Under **Type**, select from **Widget** or **Full page**. If you choose Widget, make sure you set its size.
![](https://d2x3xhvgiqkx42.cloudfront.net/12345678-1234-1234-1234-1234567890ac/0e041dbb-8bbe-4be4-a1ae-883b5cb05e2b/2022/06/14/9612fa5d-c938-4fc1-a187-a2c952554035/bfaa16c3-60bf-42d6-b73b-881cae9813c7.png)
7\. Under **Basic Info**, complete the following: * **Name** – the name that you want your extension to be saved as. * **Tag Name** – a unique name for your extension that'll refer to your element in the code (use dashes instead of spaces for this). * **Script URL** – a URL where the JavaScript code of your extension is located. 8\. If you have multiple widgets or pages with widgets, then you'll need to add the descriptions and an image for each under **Widget properties**.
![](https://d2x3xhvgiqkx42.cloudfront.net/12345678-1234-1234-1234-1234567890ac/0e041dbb-8bbe-4be4-a1ae-883b5cb05e2b/2022/06/14/23ccac37-d299-4649-a0c1-111304056dfb/24e86ae5-bccd-4d7d-a937-85a888478085.png)
9\. Click **Save**. ### Script code example Here's what the script looks like. Take note of the [**wixconfig**](https://dev.wix.com/docs/build-apps/develop-your-app/develop-a-self-managed-app/supported-extensions/deprecated/legacy-custom-elements/legacy-custom-element-deprecated.md) and [**wixsettings**](https://dev.wix.com/docs/build-apps/develop-your-app/develop-a-self-managed-app/supported-extensions/deprecated/legacy-custom-elements/legacy-custom-element-deprecated.md) attributes. Once you've loaded the code it'll trigger the **connectedCallback** function. ```javascript class MyComponent extends HTMLElement { constructor() { super(); } // Will be called with new wixsettings data for each change to the component data in the editor. // Will be called once on live/preview mode (on page load) connectedCallback() { const wixconfig = JSON.parse(this?.attributes?.wixconfig?.value ?? '{}'); const wixsettings= JSON.parse(this?.attributes?.wixsettings?.value ?? '{}'); // current instanceId const instanceId = wixconfig?.instanceId || ''; this.setAttribute('style', 'display:block') this.innerHTML = `

This is a Web Component demo

`; /* Will work if a dropdown field is added to the settings panel in the app dashboard with the 'dropDown' key and two options e.g., 'Dog' and 'Cat'.*/ /* this.innerHTML = `
${wixsettings.dropDown === "Dog"? "

This is a Dog

" : "

This is a Cat

"}
` */ } } //my-tag should be the same as the tag name in the custom element's definition in the app dashboard. customElements.define('my-tag', MyComponent); ``` ### Final result Here's what you'll see when the code's working correctly.
![](https://d2x3xhvgiqkx42.cloudfront.net/12345678-1234-1234-1234-1234567890ac/da11ca0e-fb46-4b51-ba87-76e646d41441/2021/03/17/cad2555f-8821-475e-b179-69b942d63235/5e83cfb3-8fc0-47b9-b90a-6ac4f28f04db.png)
## How the data flow works Each extension has a unique key that you define when adding the element. Once a user makes a change, the ```connectedCallback``` function is triggered. This returns both a ```wixconfig``` and ```wixsettings``` attribute. ### wixconfig attribute The extension will get a ```wixconfig``` attribute with the following properties: ```instanceId```: a unique ID of your app within a specific user's website, created whenever your app is installed on a site. ```ViewMode```: gets the mode the site is currently being viewed in: 1. ```Editor```: when the site is in Editor mode 2. ```Preview```: when viewing a site preview in the Editor 3. ```Site```: when viewing the published site ```DeviceType```: gets the current device type: 1. ```Mobile```: when a user accesses the site with a mobile device 2. ```Desktop```: when a user accesses the site with a desktop device > **Note:** > > If a user changes their ```viewMode```, ```connectedCallback``` will be triggered. ### wixsettings attribute The extension will get a ```wixsettings``` attribute with the following property: ```json { "wixconfig": { "instanceId": "a1179ba3-49b3-44f6-b491-0cb4d2dbe3c7", "viewMode": "Editor", }, "wixsettings": { //key:value according to settings panel saved data } } ``` * This extension data can be saved while editing the web component in the Editor. The parameters and default values are defined by the app owner and can then be updated by the site owner in the Editor. > **Note:** > > The Custom Element will be wrapped in an iframe in the Editor and Preview for security reasons. ### customParams During installation you have the option to bypass ```customParams``` data and use the default settings data instead. **Example:** ```{data:{title: “something”}}``` ### Create a data endpoint URL You'll be prompted to set a data endpoint URL. This is where all changes made in the settings panel of a custom element will be sent, allowing you to sync things on your end.  We'll send data to this endpoint URL when: * You've reached the limit of data that Wix provides for you. * A user changes the theme or its font / color (this returns the instanceID and object type). * A user publishes their site (this returns the instanceID and status ```published```). * There's any change to the app settings panel data. ![](https://d2x3xhvgiqkx42.cloudfront.net/12345678-1234-1234-1234-1234567890ac/95d410d0-ec63-44d1-8a47-9958658256c3/2023/02/14/9fa098b3-69e2-4deb-973c-e43ad76fbf9e/bbfb5b4e-421e-4a7e-808a-ef7a0144e400.png) ### Initial data and saving data When a user first adds the extension the settings will be loaded with the default parameters you’ve set up. Each time a user initiates a change (e.g., changes a color), data is sent to the widget under the ```wixsettings``` attribute. This means that the next time the user loads the settings panel, it'll show all the recent changes. If there are changes on the app side (e.g., a user changes a configuration on the app dashboard) you can load the configuration stored on the app side by setting the data endpoint URL. This URL will be called every time the settings panel is loaded in order to load the default configuration. The structure of the response should be exactly like the data object generated by the settings panel (which you can see when you click ‘**View Example Data Object**’). If something is broken on the data object, the settings panel will revert to load the settings saved on the Wix site. ## 2\. Create the app settings panel Here's how to build an effective app settings panel for your custom element: ### Before you start Do some prep work before you start designing (it’ll save time in the long run): 1. **Make a list of your app's settings and features**: this will help to quickly organize your settings into tabs. 2. **Learn about all the extensions that can be used on the panel**: this will help to make sure you've considered all types of settings. 3. **Differentiate between Editor and Dashboard actions**: the app settings panel should be for Editor actions (like design elements), while the Dashboard should be for other configuration types. ### Get started 1. Select the custom element you wish to create an app settings panel for. 4\. Click the **Settings Panel** tab. 5\. Use the Settings Panel builder to choose your [settings tabs](https://dev.wix.com/docs/build-apps/develop-your-app/develop-a-self-managed-app/supported-extensions/deprecated/legacy-custom-elements/legacy-custom-element-deprecated.md) and [components](https://dev.wix.com/docs/build-apps/develop-your-app/develop-a-self-managed-app/supported-extensions/deprecated/legacy-custom-elements/legacy-custom-element-deprecated.md). 6\. Click **Save**. ### Choose your settings tabs These tabs reflect the basic / core settings for your app. Some of these are a fixed requirement (and therefore locked), but you'll be able to edit some things within them. The rest are optional, and you should choose these based on what fits best with your app. **Main (required):** this is always the first tab. It shows: 1. The app/widget name. 2. A short description (you can edit this). 3. The main CTA button that leads to your app's dashboard (you can edit the label for this). ![](https://d2x3xhvgiqkx42.cloudfront.net/12345678-1234-1234-1234-1234567890ac/95d410d0-ec63-44d1-8a47-9958658256c3/2023/02/14/dae640b1-b182-4707-8c33-010e1cbd581b/e0915d1d-0c30-4f94-8318-24fd07db7dff.png) **Settings:**  In many cases, the custom element settings will be controlled from the app dashboard. However, if you want to guide users in setting up the app and define general functionality, this is the tab for it. * Enabling/disabling features * Defining regional settings (app’s language on the live site, measurement units, currency, etc.) **Layout:**  This is where you’ll show users the different layouts available for your app and offer adjustments to things like spacing. Make the layouts different enough from each other so that users can easily choose the best one for them. ![](https://d2x3xhvgiqkx42.cloudfront.net/12345678-1234-1234-1234-1234567890ac/95d410d0-ec63-44d1-8a47-9958658256c3/2023/02/14/df6e3887-a0ca-437b-bab4-a4aff9834f7a/989dfb7b-e060-468c-9870-924bb4e0d2be.png) **Display:**  this gives users control over which elements are shown/hidden. For example, here you might have a toggle for 'Show Title'. ![](https://d2x3xhvgiqkx42.cloudfront.net/12345678-1234-1234-1234-1234567890ac/95d410d0-ec63-44d1-8a47-9958658256c3/2023/02/14/4f9b6b7e-5843-4d3d-a45e-17be02c3fb91/1165d291-b46c-4f4f-bb47-fc4bf870fa28.png) **Design:**  This is where users will customize the color, font and styles for different elements in your app. Let users change your app’s colors: add a color picker for each element that users can customize. We have two color pickers: * Color picker with opacity: allows users to change the color and adjust the opacity. * Color picker: allows users to change the color only. * Let users change the font and color of text elements ![](https://d2x3xhvgiqkx42.cloudfront.net/12345678-1234-1234-1234-1234567890ac/95d410d0-ec63-44d1-8a47-9958658256c3/2023/02/14/07ccba89-704b-41b9-b032-b64cf5ede68e/513151e1-ce84-4026-bcda-e26ed498901f.png) **Support (required):**  This displays the following and can't be edited: 1. **Contact for support**: this is the email address you supplied in the Contact Info tab, and is where users can contact with you with questions about your app. 2. **Developer website**: this is a link to your own website, taken from the Company Info section in your app's dashboard. 3. **Privacy policy**: this is also taken from the Company Info section in your app's dashboard. 4. **Add a Review**: this button takes users to your listing to leave a review. ![](https://d2x3xhvgiqkx42.cloudfront.net/12345678-1234-1234-1234-1234567890ac/95d410d0-ec63-44d1-8a47-9958658256c3/2023/02/14/13a24ede-4af4-4a37-8aab-9538b9ec1c4e/f331eaaf-dae9-4517-984b-f420b48ee146.png) **Upgrade (conditional):**  This leads the user through the app upgrade flow, with the exception of two scenarios (in these scenarios, the Upgrade tab won't display): 1\. The user is already on the highest paid plan. 2\. You only offer a free plan. **Add Ons (conditional):**  This is added automatically if you have multiple, custom size custom elements. Additional pages will be added automatically to the user's site with the option to add further widgets via the settings tab. You need to define the widget's name, description and image on the custom element's information tab. ### Choose your components Each component allows the user to configure and send relevant data to your widget. Each component has the following configuration: * **Label**: set up the label/text next to the component. You should show an ellipsis or tooltip if the label is too long. * **Key:** the key that holds the value and is sent to your widget under the ```wixsettings``` object. The key should be unique per widget. In addition, each component will hold configuration dedicated to the specific component and an optional tooltip for extra info: ### Selectors * **Color picker**: choose a color value for an element – this could be the color of a CTA button, background of text. Check out our guide to [color wiring](https://zeroheight.com/7sjjzhgo2/p/262724-default-wiring). * **Dropdown**: select an item from a list of options. As these are hidden, it's useful for longer lists or when you want to encourage a user to select a specific option over others. * **Radio buttons:** select an item from a list of options. These are visible immediately, and best for 2-5 options. * **Toggle**: switch between two states – this could show or hide a title, or stretch your app between regular and full width. * **Slider**: select a value within a range. This works well when choosing things like border radius or spacing between images. ### Buttons * **Reset button**: lets site owners return all properties in a tab to their last saved state. If it's the first time it's been opened and nothing has been changed by the user, it'll revert to the default values. ### Text * **Text input**: allow your user to change text in your app. For example the title of an image gallery. * **Text style and color**: choose a color, size and font for any text displayed. ### Settings Panel design * **Section**: group similar items under a header. --- > Portal Navigation: > > - Append `.md` to any URL under `https://dev.wix.com/docs/` to get its markdown version. > - Pages are either content pages (article or reference text) or menu pages (a list of links to child pages). > - To get a menu page, truncate any URL to a parent path and append `.md` (e.g. `https://dev.wix.com/docs/sdk.md`, `https://dev.wix.com/docs/sdk/core-modules.md`). > - Top-level index of all portals: https://dev.wix.com/docs/llms.txt > - Full concatenated docs: https://dev.wix.com/docs/llms-full.txt ## Resource: Handle Events with Webhooks for Self-hosting Using the JavaScript SDK ## Article: Handle Events with Webhooks ## Article Link: https://dev.wix.com/docs/build-apps/develop-your-app/develop-a-self-managed-app/webhooks/handle-events-with-webhooks-for-self-hosting-using-the-java-script-sdk.md ## Article Content: # Handle Webhook Events with the JavaScript SDK > **Note:** This article explains how to handle events with webhooks using the [JavaScript SDK](https://dev.wix.com/docs/sdk.md). If you're not using the JavaScript SDK, instead read [Handle Webhook Events without the JavaScript SDK](https://dev.wix.com/docs/build-apps/develop-your-app/frameworks/self-hosting/webhooks/handle-events-with-webhooks-for-self-hosting-without-the-java-script-sdk.md). To handle [events](https://dev.wix.com/docs/build-apps/develop-your-app/api-integrations/events-and-webhooks/about-events.md) with [webhooks](https://dev.wix.com/docs/build-apps/develop-your-app/api-integrations/events-and-webhooks/about-webhooks.md), you need to subscribe to the webhook and create a webhook handler. When you subscribe to a webhook in the [app dashboard](https://manage.wix.com/account/custom-apps), you specify the endpoint where Wix should send webhook data. Then, when the event occurs, Wix sends a POST request to your handler containing event data and proceeds based on your response. > **Notes:** > > - When building apps using Blocks, [handle events using Velo](https://dev.wix.com/docs/develop-websites/articles/coding-with-velo/backend-code/events/about-backend-events.md) instead of webhooks. > - When building apps using the CLI, [handle events using event extensions](https://dev.wix.com/docs/wix-cli/guides/extensions/backend-extensions/events/add-event-extensions.md). This article outlines the process of subscribing to and processing the order canceled webhook from Wix eCommerce. ## Step 1 | Subscribe to a webhook To subscribe to a webhook: 1. Select an app from the [Custom Apps page](https://manage.wix.com/account/custom-apps) in your Wix Studio workspace. 1. In the side menu, click **Webhooks**. 1. Click **+ Create Webhook**. 1. Select an **API Category**. For example, **eCommerce**. 1. Choose a webhook event from the available options. For example, **Order Canceled**. 1. Enter your server **Callback URL**. This is where Wix sends the event data. 1. Add the relevant **Permissions**. 1. Click **Subscribe**. Your app is set up to receive the webhook. ## Step 2 | Save your public key Webhook payloads are sent in [JSON web token (JWT)](https://jwt.io/) format. Your public key allows you to verify the signature in any webhook you receive. To get your public key: 1. Select your app from the [Custom Apps page](https://manage.wix.com/account/custom-apps) in your Wix Studio workspace. 1. In the side menu, click **Webhooks**. 1. Click **Get Public Key**. ![Get public key button](https://wixmp-833713b177cebf373f611808.wixmp.com/images/d19eefe7e16042e5720bc8c1dcac36e6.png) 1. Save the public key in a secure location. You need to use this public key in your handler to verify that the request is from Wix. ## Step 3 | Handle the event The following steps demonstrate how to handle a webhook event using the [JavaScript SDK](https://dev.wix.com/docs/sdk.md): 1. Set up an Express server to handle incoming webhook requests: ```javascript import express from "express"; const app = express(); ``` 1. Create a [`WixClient`](https://dev.wix.com/docs/sdk/core-modules/sdk/wix-client.md) with the [`AppStrategy`](https://dev.wix.com/docs/sdk/core-modules/sdk/app-strategy.md). Our client is initialized with the [`orders`](https://dev.wix.com/docs/sdk/backend-modules/ecom/orders/setup.md) module, which allows us to access webhooks related to order events: ```javascript import { AppStrategy, createClient } from "@wix/sdk"; import { orders } from "@wix/ecom"; const PUBLIC_KEY = ``; const APP_ID = ""; const client = createClient({ auth: AppStrategy({ appId: APP_ID, publicKey: PUBLIC_KEY, }), modules: { orders }, }); ```
__Tip:__ Find your app ID on the **OAuth** page of your app's dashboard.
1. Use the [`onOrderCanceled`](https://dev.wix.com/docs/sdk/backend-modules/ecom/orders/on-order-canceled.md) method to register a callback function to handle order cancellation events: ```javascript client.orders.onOrderCanceled((event) => { console.log(`onOrderCanceled event received with data:`, event); console.log(`App instance ID:`, event.metadata.instanceId); // // Handle your event here // }); ``` > **Note:** You get the app instance ID in the webhook metadata. Learn more [about app instances](https://dev.wix.com/docs/build-apps/develop-your-app/access/app-instances/about-app-instances.md). 1. Define a `POST` endpoint `/webhook` on your Express server to receive incoming webhook payloads. Within the endpoint, process the incoming webhook payload using the `process` method provided by the SDK: ```javascript app.post("/webhook", express.text(), async (request, response) => { try { await client.webhooks.process(request.body); } catch (err) { console.error(err); response .status(500) .send(`Webhook error: ${err instanceof Error ? err.message : err}`); return; } response.status(200).send(); }); app.listen(3000, () => console.log("Server started on port 3000")); ```
__Important:__ You must return a 200 response upon successful receipt of the webhook.
Here's the complete code example: ```javascript import express from "express"; import { AppStrategy, createClient } from "@wix/sdk"; import { orders } from "@wix/ecom"; const app = express(); const PUBLIC_KEY = ``; const APP_ID = ""; const client = createClient({ auth: AppStrategy({ appId: APP_ID, publicKey: PUBLIC_KEY, }), modules: { orders }, }); client.orders.onOrderCanceled((event) => { console.log(`onOrderCanceled event received with data:`, event); console.log(`App instance ID:`, event.metadata.instanceId); // // Handle your event here // }); app.post("/webhook", express.text(), async (request, response) => { try { await client.webhooks.process(request.body); } catch (err) { console.error(err); response .status(500) .send(`Webhook error: ${err instanceof Error ? err.message : err}`); return; } response.status(200).send(); }); app.listen(3000, () => console.log("Server started on port 3000")); ``` > **Note:** Though not shown in this example, we recommend storing processed event IDs and checking against them before processing new webhooks to ensure you don't process the same event multiple times. ## See also * [Test a Webhook Locally](https://dev.wix.com/docs/build-apps/develop-your-app/api-integrations/events-and-webhooks/test-a-webhook-locally.md) --- > Portal Navigation: > > - Append `.md` to any URL under `https://dev.wix.com/docs/` to get its markdown version. > - Pages are either content pages (article or reference text) or menu pages (a list of links to child pages). > - To get a menu page, truncate any URL to a parent path and append `.md` (e.g. `https://dev.wix.com/docs/sdk.md`, `https://dev.wix.com/docs/sdk/core-modules.md`). > - Top-level index of all portals: https://dev.wix.com/docs/llms.txt > - Full concatenated docs: https://dev.wix.com/docs/llms-full.txt ## Resource: Test a Webhook Locally for Self-hosting ## Article: Test a Webhook Locally ## Article Link: https://dev.wix.com/docs/build-apps/develop-your-app/develop-a-self-managed-app/webhooks/test-a-webhook-locally-for-self-hosting.md ## Article Content: # Test a Webhook Locally for Self-hosting To test a webhook locally, you need to use a network tunneling solution to redirect external traffic to a locally hosted endpoint. This article explains how to test your webhook handler using [ngrok](https://ngrok.com/), a widely adopted networking tunneling tool. However, you can use any tunneling solution of your choice. In the Webhooks page of the app dashboard, each webhook includes a code sample to assist you in developing your webhook handler. These samples are configured to handle webhook events using an Express server. If you already have this sample, skip to [test your handler](#step-2--test-your-handler). Otherwise, [get a code sample](#step-1--get-a-code-sample). ## Step 1 | Get a code sample To get a code sample for an existing webhook: 1. Select your app from the [Custom Apps page](https://manage.wix.com/account/custom-apps) in your Wix Studio workspace. 1. From the side menu, click **Webhooks**. 1. Next to the relevant webhook, click on the menu icon, and select **View code sample**. ![View code sample](https://wixmp-833713b177cebf373f611808.wixmp.com/images/ffdd6202e5c99c0324d4633ecaee69cb.png) ## Step 2 | Test your handler To locally test your webhook handler without deploying your server: 1. Install and configure ngrok on your local machine. For guidance, see the [ngrok quickstart](https://ngrok.com/docs/getting-started/). 1. Start your webhook handler. To start the handler from the code sample, run the following command: ```bash node server.js ``` This action starts the webhook handler on the local port 3000. 1. Start ngrok and expose the same port as your handler. For example: ```bash ngrok http http://localhost:3000 ``` If your handler isn't listening on port 3000, substitute `3000` with the relevant port number. 1. Once ngrok is running, copy the **Forwarding** URL provided in the terminal output. 1. In the Webhooks page of your app's dashboard, click on the menu icon next to the relevant webhook and select **Edit callback URL**. 1. In the **Callback URL** field, paste the ngrok **Forwarding** URL followed by the endpoint of your handler. In the provided code sample, the endpoint is `/webhook`. > **Note:** Restarting ngrok generates a new **Forwarding** URL. In such instances, ensure to update the **Callback URL** accordingly. 1. Click **Trigger a test**. If using the code sample provided with the webhook, the handler should output the payload of the received webhook call. --- > Portal Navigation: > > - Append `.md` to any URL under `https://dev.wix.com/docs/` to get its markdown version. > - Pages are either content pages (article or reference text) or menu pages (a list of links to child pages). > - To get a menu page, truncate any URL to a parent path and append `.md` (e.g. `https://dev.wix.com/docs/sdk.md`, `https://dev.wix.com/docs/sdk/core-modules.md`). > - Top-level index of all portals: https://dev.wix.com/docs/llms.txt > - Full concatenated docs: https://dev.wix.com/docs/llms-full.txt ## Resource: Handle Events with Webhooks for Self-hosting Without the JavaScript SDK ## Article: Handle Events with Webhooks for Self-hosting Without the JavaScript SDK ## Article Link: https://dev.wix.com/docs/build-apps/develop-your-app/develop-a-self-managed-app/webhooks/handle-events-with-webhooks-for-self-hosting-without-the-java-script-sdk.md ## Article Content: # Handle Webhook Events without the JavaScript SDK > **Notes:** > This article explains how to handle events with webhooks without using the [JavaScript SDK](https://dev.wix.com/docs/sdk.md). If you're using the JavaScript SDK, instead read [Handle Webhook Events with the JavaScript SDK](https://dev.wix.com/docs/build-apps/develop-your-app/frameworks/self-hosting/webhooks/handle-events-with-webhooks-for-self-hosting.md). > The webhook data structure differs depending on whether the JavaScript SDK is used. For the webhook data structure relevant to this implementation (without the SDK), refer to the documentation in our [REST reference](https://dev.wix.com/docs/rest/articles/getting-started/webhook-structure.md). To handle [events](https://dev.wix.com/docs/build-apps/develop-your-app/api-integrations/events-and-webhooks/about-events.md) with [webhooks](https://dev.wix.com/docs/build-apps/develop-your-app/api-integrations/events-and-webhooks/about-webhooks.md), you need to subscribe to the webhook and create a webhook handler. When you subscribe to a webhook in your app dashboard, you specify the endpoint where Wix should send webhook data. Then, when the event occurs, Wix sends a POST request to your handler containing event data and proceeds based on your response. > **Notes:** > > - When building apps using Blocks, [handle events using Velo](https://dev.wix.com/docs/develop-websites/articles/coding-with-velo/backend-code/events/about-backend-events.md) instead of webhooks. > - When building apps using the CLI, [handle events using event extensions](https://dev.wix.com/docs/wix-cli/guides/extensions/backend-extensions/events/add-event-extensions.md). This article outlines the process of subscribing to and processing the order canceled webhook from Wix eCommerce. ## Step 1 | Subscribe to a webhook To subscribe to a webhook: 1. Go to the [**Webhooks** page in your app's dashboard](https://dev.wix.com/app-selector?title=Select+an+App&primaryButtonText=Select+Site&actionUrl=https%3A%2F%2Fdev.wix.com%2Fapps%2F%7BappId%7D%2Fwebhooks-page). 1. Click **+ Create Webhook**. 1. Select an **API Category**. For example, **eCommerce**. 1. Choose a webhook event from the available options. For example, **Order Canceled**.
__Tip:__ A simple code sample is provided that you can use to set up a server that handles the event. See [Step 3](#step-3--handle-the-event) for more information on handling the event. Your public key is provided in the code sample. Even if you don't use the code sample, save the public key in a secure location for use later in this flow.
1. Enter your server **Callback URL**. This is where Wix sends the event data. 1. Add the relevant **Permissions**. 1. Click **Subscribe**. Your app is set up to receive the webhook. ## Step 2 | Retrieve your public key Webhook payloads are sent in [JSON web token (JWT)](https://jwt.io/) format. Your public key allows you to verify the signature in any webhook you receive. Your public key was provided in the code sample in step 1, but if you need to retrieve it again, it's available on your app's [home page](https://manage.wix.com/app-selector) under View ID and Keys: ![View ID and keys](https://wixmp-833713b177cebf373f611808.wixmp.com/images/a3e6ab12cb694064eb2411c1be1983da.png) Save the public key in a secure location. You need to use this public key in your handler to verify that the request is from Wix. ## Step 3 | Handle the event The following steps demonstrate how to handle a webhook event. > **Note:** The following instructions are for JavaScript without the SDK. When creating a webhook in the app dashboard you can also view a JavaScript example that does use the SDK, and Python and PHP examples. 1. Set up an Express server to handle incoming webhook requests: Install the `express` package: ```bash npm install express ``` Then add the following code: ```javascript const express = require("express"); const app = express(); ``` 1. Install the `jsonwebtoken` package, which we use to verify the request. ```bash npm install jsonwebtoken ``` Then add the following code: ```javascript const jwt = require("jsonwebtoken"); ``` 1. Define a `POST` endpoint `/webhook` on your Express server to receive incoming webhook payloads. ```javascript app.post("/webhook", express.text(), async (request, response) => { //Verify the JWT and handle incoming webhook payloads. response.status(200).send(); }); app.listen(3000, () => console.log("Server started on port 3000")); ```
__Important:__ You must return a 200 response upon successful receipt of the webhook.
1. Within the endpoint, verify the token and then handle incoming webhook payloads, specifically the payload from your event. For details about the payload, see [Webhook Structure](https://dev.wix.com/docs/rest/articles/getting-started/webhook-structure.md). ```javascript let event; let eventData; try { const rawPayload = jwt.verify(request.body, PUBLIC_KEY); event = JSON.parse(rawPayload.data); eventData = JSON.parse(event.data); } catch (err) { console.error(err); response.status(400).send(`Webhook error: ${err.message}`); return; } switch (event.eventType) { case "wix.ecom.v1.order_canceled": console.log(`wix.ecom.v1.order_canceled event received with data:`, eventData); console.log(`App instance ID:`, event.instanceId); // // handle your event here // break; default: console.log(`Received unknown event type: ${event.eventType}`); break; } ``` > **Note:** The app instance ID is sent along with the event data. Learn more [about app instances](https://dev.wix.com/docs/build-apps/develop-your-app/access/app-instances/about-app-instances.md). Here's the complete code example: ```javascript const jwt = require("jsonwebtoken"); const express = require("express"); const app = express(); const PUBLIC_KEY = ``; app.post('/webhook', express.text(), (request, response) => { let event; let eventData; try { const rawPayload = jwt.verify(request.body, PUBLIC_KEY); event = JSON.parse(rawPayload.data); eventData = JSON.parse(event.data); } catch (err) { console.error(err); response.status(400).send(`Webhook error: ${err.message}`); return; } switch (event.eventType) { case "wix.ecom.v1.order_canceled": console.log(`wix.ecom.v1.order_canceled event received with data:`, eventData); console.log(`App instance ID:`, event.instanceId); // // handle your event here // break; default: console.log(`Received unknown event type: ${event.eventType}`); break; } response.status(200).send(); }); app.listen(3000, () => console.log("Server started on port 3000")); ``` > **Note:** Though not shown in this example, we recommend storing processed event IDs and checking against them before processing new webhooks to ensure you don't process the same event multiple times. ## See also * [Test a Webhook Locally](https://dev.wix.com/docs/build-apps/develop-your-app/api-integrations/events-and-webhooks/test-a-webhook-locally.md) * [Webhook Structure](https://dev.wix.com/docs/rest/articles/getting-started/webhook-structure.md) --- > Portal Navigation: > > - Append `.md` to any URL under `https://dev.wix.com/docs/` to get its markdown version. > - Pages are either content pages (article or reference text) or menu pages (a list of links to child pages). > - To get a menu page, truncate any URL to a parent path and append `.md` (e.g. `https://dev.wix.com/docs/sdk.md`, `https://dev.wix.com/docs/sdk/core-modules.md`). > - Top-level index of all portals: https://dev.wix.com/docs/llms.txt > - Full concatenated docs: https://dev.wix.com/docs/llms-full.txt ## Resource: About Wix Blocks ## Article: About Wix Blocks ## Article Link: https://dev.wix.com/docs/build-apps/develop-your-app/develop-an-app-with-blocks/about-wix-blocks.md ## Article Content: # About Wix Blocks
**Editor compatibility** Wix Blocks apps aren't supported in the Wix Harmony editor. Existing Blocks apps remain available for purchase on the Wix App Market for Wix Editor and Wix Studio sites. To learn more, see [About Wix Harmony and Blocks](https://dev.wix.com/docs/build-apps/develop-your-app/develop-an-app-with-blocks/about-wix-harmony-and-blocks.md).
Wix Blocks is an editor for designing, coding and deploying native Wix apps. It lets you build site and dashboard extensions using Wix’s drag-and-drop editor, with its powerful layout and design tools, and [add logic and APIs](https://dev.wix.com/docs/build-apps/develop-your-app/develop-an-app-with-blocks/code-in-blocks/about-coding-in-blocks.md). Your code is deployed and hosted on the Wix cloud, with no additional costs or setup by you. [](https://manage.wix.com/account/custom-apps) ![Blocks gif](https://wixmp-833713b177cebf373f611808.wixmp.com/images/2ec78b479d727ef7ef5cc3ce006a2ee7.gif) ## Extend Wix using Blocks Blocks apps can add functionality to various parts of the [Wix ecosystem](https://dev.wix.com/docs/build-apps/get-started/overview/the-wix-ecosystem.md), such as adding a page to a site’s dashboard or a widget to a site page. Each specific type of functionality that an app can provide is called an extension. Learn more about the types of [extensions that are supported on Blocks](https://dev.wix.com/docs/build-apps/develop-your-app/develop-an-app-with-blocks/supported-extensions/about-extensions-in-blocks.md). ## When you need custom UI Blocks is a composition tool that lets you rapidly create drag and drop UI from native Wix elements. If you are looking to create a rich custom visual representation, that dynamically adds elements to a widget in flexible locations, you can use one of the following options: * Create a [Custom Element](https://dev.wix.com/docs/build-apps/develop-your-app/develop-an-app-with-blocks/code-in-blocks/about-custom-elements-in-blocks.md) to embed in Blocks * Or, use the [Wix CLI](https://dev.wix.com/docs/build-apps/develop-your-app/frameworks/wix-cli/about-the-wix-cli-for-apps.md) to write your UI code Learn more about [Choosing your framework](https://dev.wix.com/docs/build-apps/get-started/overview/wix-s-development-frameworks.md). ## Access Blocks from anywhere There are several entry points across Wix's user interfaces for creating and opening Blocks app, including your Wix Studio workspace, the Wix apps templates page and the Wix Editor. Learn more about [how to access Blocks](https://dev.wix.com/docs/build-apps/develop-your-app/frameworks/wix-blocks/get-started/create-a-blocks-app-and-open-it.md). ## Make your app public You can build Blocks apps [for your own use or for sharing](https://dev.wix.com/docs/build-apps/get-started/overview/exposing-apps-publicly-and-privately.md). If you’re building an app for the Wix App Market, you'll have to set up your App Market listing, create promotional assets to showcase your app, and set up your app’s pricing plans to start making money. Finally, you'll need to submit your app for review so Wix’s team can check that everything’s working as it should. Learn more about [publishing a Blocks app to the App Market](https://dev.wix.com/docs/build-apps/develop-your-app/develop-an-app-with-blocks/publish-blocks-apps-to-the-app-market/publish-a-blocks-app-to-the-app-market.md). ## Get started with Blocks Master Blocks quickly with the help of these articles and resources: * [Blocks Unboxed](https://dev.wix.com/docs/build-apps/develop-your-app/develop-an-app-with-blocks/get-started/blocks-unboxed-a-quick-tour.md): A quick tour of the Blocks editor and what it can do. * [Blocks app workflow](https://dev.wix.com/docs/build-apps/develop-your-app/develop-an-app-with-blocks/get-started/a-blocks-app-workflow.md): An overview of the stages involved in building a Blocks app from start to finish. * [Blocks app tutorials](https://dev.wix.com/docs/build-apps/get-started/tutorials/index-of-tutorials.md#blocks-app-tutorials): Gain practical experience by building a working Blocks app through our detailed tutorials. * [Blocks templates](https://dev.wix.com/apps-templates?filter=blocks): Jumpstart your app with ready-made Blocks templates. * [Blocks Glossary](https://dev.wix.com/docs/build-apps/develop-your-app/develop-an-app-with-blocks/get-started/wix-blocks-glossary.md): Learn about the different terms you'll encounter when using Blocks. --- > Portal Navigation: > > - Append `.md` to any URL under `https://dev.wix.com/docs/` to get its markdown version. > - Pages are either content pages (article or reference text) or menu pages (a list of links to child pages). > - To get a menu page, truncate any URL to a parent path and append `.md` (e.g. `https://dev.wix.com/docs/sdk.md`, `https://dev.wix.com/docs/sdk/core-modules.md`). > - Top-level index of all portals: https://dev.wix.com/docs/llms.txt > - Full concatenated docs: https://dev.wix.com/docs/llms-full.txt ## Resource: About Wix Harmony and Blocks ## Article: Wix Harmony and Blocks ## Article Link: https://dev.wix.com/docs/build-apps/develop-your-app/develop-an-app-with-blocks/about-wix-harmony-and-blocks.md ## Article Content: # About Wix Harmony and Blocks Wix Harmony is Wix's new AI-powered site editor, built on a technical architecture that's different from previous editors. While Harmony introduces powerful new AI-driven features for site creation, its new foundation also changes how apps and extensions work. Wix Blocks apps aren't compatible with sites built on Wix Harmony. Your existing Blocks apps will continue to work and remain available for purchase on the Wix App Market for Wix Editor and Wix Studio sites. This article explains what Harmony means for Blocks developers and walks you through your options for building and supporting apps across the different Wix editors. > **Note:** If you're developing Wix sites with Velo or the JavaScript SDK, see [About Wix Harmony](https://dev.wix.com/docs/develop-websites-sdk/get-started/overview/about-wix-harmony.md). ## App compatibility at a glance The following table shows which Blocks extensions work in each editor. > **Note:** App discovery in Harmony works differently than in other editors. | Extension type | Wix Harmony | Wix Editor & Wix Studio | | ----------------- | :---------: | :---------------------: | | Dashboard pages | ✓ | ✓ | | Dashboard plugins | ✓ | ✓ | | Dashboard modals | ✓ | ✓ | | Site widgets | — | ✓ | | Site plugins | — | ✓ | ## What this means for existing apps Your app's availability in Harmony depends on the types of extensions it includes: - **Dashboard extensions only:** Your app works in Harmony with no changes required. However, for new apps, we recommend using the [Wix CLI](https://dev.wix.com/docs/build-apps/develop-your-app/frameworks/wix-cli/about-the-wix-cli-for-apps.md) or [self-managing](https://dev.wix.com/docs/build-apps/develop-your-app/frameworks/self-hosting/about-self-hosting.md) to build apps that work across all Wix editors. - **Site widgets or site plugins:** Your app works on Wix Editor and Wix Studio but not in Harmony. To support Harmony users, rebuild these extensions with the [Wix CLI](https://dev.wix.com/docs/build-apps/develop-your-app/frameworks/wix-cli/about-the-wix-cli-for-apps.md) or [self-managing](https://dev.wix.com/docs/build-apps/develop-your-app/frameworks/self-hosting/about-self-hosting.md). ## Build site extensions for Wix Harmony To create site extensions that work across all Wix editors, including Harmony, use one of these approaches: - **Wix CLI:** Build app extensions using your preferred IDE, local development, and full control over your code. For site extensions, use [embedded scripts](https://dev.wix.com/docs/wix-cli/guides/extensions/site-extensions/embedded-scripts/about-embedded-scripts.md) or [site widgets](https://dev.wix.com/docs/wix-cli/guides/extensions/site-extensions/site-widgets/add-a-site-widget-extension.md). Learn more in the [Wix CLI documentation](https://dev.wix.com/docs/wix-cli/guides/about-the-wix-cli.md). - **Self-managed:** Deploy your app on your own infrastructure and tech stack. Learn more about [self-managed extensions](https://dev.wix.com/docs/build-apps/develop-your-app/frameworks/self-hosting/supported-extensions/about-self-hosted-app-extensions.md). ## For private app developers If you've built a [private app](https://dev.wix.com/docs/build-apps/get-started/overview/exposing-apps-publicly-and-privately.md) with Blocks for specific Wix sites, the same compatibility rules apply. Your app continues to work on sites built with Wix Editor and Wix Studio. However, if your client creates a new site using Harmony, your app won't be available on that site. To ensure your app works across all editors, consider rebuilding site extensions with the [Wix CLI](https://dev.wix.com/docs/wix-cli/guides/about-the-wix-cli.md) or [self-managing](https://dev.wix.com/docs/build-apps/develop-your-app/frameworks/self-hosting/about-self-hosting.md). ## Get support Our support team is here to answer your questions and concerns. Feel free to [reach out to us directly](https://www.wix.com/support-chatbot?nodeId=25a57397-ccf7-4376-8b74-48d51edf7159&referral=devRels) or in our [Discord community](https://discord.gg/wixstudio). ## See also - [About Wix Harmony and Apps](https://dev.wix.com/docs/build-apps/get-started/overview/wix-harmony-and-apps.md) - [About Wix Harmony](https://dev.wix.com/docs/develop-websites-sdk/get-started/overview/about-wix-harmony.md) - [Choose the Right Wix Framework](https://dev.wix.com/docs/build-apps/develop-your-app/frameworks/choose-the-right-wix-framework-for-your-app-development-needs.md) --- > Portal Navigation: > > - Append `.md` to any URL under `https://dev.wix.com/docs/` to get its markdown version. > - Pages are either content pages (article or reference text) or menu pages (a list of links to child pages). > - To get a menu page, truncate any URL to a parent path and append `.md` (e.g. `https://dev.wix.com/docs/sdk.md`, `https://dev.wix.com/docs/sdk/core-modules.md`). > - Top-level index of all portals: https://dev.wix.com/docs/llms.txt > - Full concatenated docs: https://dev.wix.com/docs/llms-full.txt ## Resource: Migrate a Blocks Widget or Plugin Extension to an Updated Extension ## Article: Migrate a Blocks Widget or Plugin Extension to an Updated Extension ## Article Link: https://dev.wix.com/docs/build-apps/develop-your-app/develop-an-app-with-blocks/migrate-a-blocks-widget-or-plugin-extension-to-an-updated-extension.md ## Article Content: # Migrate from a Previous Blocks Widget or Plugin Extension to an Updated Extension You have a Blocks widget or plugin, but Blocks isn't supported in the [Wix Harmony editor](https://support.wix.com/en/article/about-wix-harmony-for-developers). To support the new editor, you add a second extension to the same app—built with another framework (for example, the Wix CLI or self-managed development). This task walks you through that migration: configure the existing Blocks extension so new installs get the new extension instead, add and publish the new extension, and keep the Blocks extension for existing users on Wix Editor and Wix Studio.
__Important:__ Keep the previous extension in your app. Deleting it breaks the widget or plugin for Wix users who already installed it on their sites.
## Step 1 | Configure the previous extension Adjust the previous extension's installation settings so that new installs don't add it, while keeping it working for Wix users who already have it installed. To configure the previous extension: 1. Open your app in the Blocks editor. To open installation settings: * **For widgets:** Select the previous widget in the **App Interface**, then click the **WixBlocks** menu > **Dashboard**. In the app dashboard, click **Installation Settings** > **Manage Settings**. Alternatively, hover over the widget name in the **App Interface**, click the 3 dots, then **Editor Experience** > **Edit Installation Settings**. * **For plugins:** In the **Widgets and Design** panel, hover over the previous plugin's name, click the **Show More** icon, then **Plugin Settings**. The [app dashboard](https://manage.wix.com/account/custom-apps) opens in a new tab. 2. Make sure you have the previous widget or plugin selected. For widgets, switch via **Extensions** in the app dashboard if needed. 3. Configure the following: **For widgets:** * **Configure how your widget is added:** Select **Not added automatically** so the widget isn't automatically added to sites that install your app later. * **Shown in Add Panel:** In the **Preset Images in Add Panel** section, turn off this option for each design preset so the previous widget doesn't appear in the **Add +** panel for Wix users. **For plugins:** * **Plugin name:** Rename the plugin and add "Old" or "Previous" to the name so the previous plugin doesn't appear as a viable option in the plugin explorer for Wix users. * **Add this plugin automatically to the site:** Turn off this option so the plugin isn't automatically added to sites that install your app later. 4. Save your changes. Then build your app again in the Blocks editor so the dashboard changes take effect. ## Step 2 | Notify Wix users who already installed the previous extension about the updated extension Tell Wix users who already have the previous (Blocks) extension installed that a replacement extension built for the new editor is available. You can show the message in either of these places: * **Settings panel:** Add a notification banner or message at the top of the previous extension's settings panel. * **In the extension:** Show a message inside the widget or plugin that's visible only in the editor, not on the live site. Your notification should: * Explain that an updated extension (built for the new editor) with improved features is available. * Tell Wix users where to find the updated extension in the editor they're using (for example, the **Add Elements** panel for widgets or the plugin explorer for plugins). * Provide instructions on how to replace the previous extension with the updated extension. ## Step 3 | Configure the updated extension Configure the updated extension to be visible to Wix users and automatically added to sites when Wix users install your app for the first time. To configure the updated extension: 1. In the [**app dashboard**](https://manage.wix.com/account/custom-apps), go to **Develop** > **Extensions** in the left menu. 2. Next to the updated site widget or plugin extension (the one built with your other framework), click **Configure**. 3. Configure the following: **For widgets:** * **Where is the widget added when the app is installed?**: Select **Added to the site homepage** or **Added to a site page** to automatically add the widget when Wix users install your app for the first time. * **Show this widget in the Add Elements panel**: Turn on this option so the updated widget appears in the **Add Elements** panel for Wix users. **For plugins:** * **Plugin name**: Use a clear name so the plugin appears as a viable option in the plugin explorer. * **Add this plugin automatically**: Turn on this option and select the appropriate slot so the plugin is automatically added when Wix users install your app for the first time. 4. Configure the default preset and any other installation settings as needed. 5. Click **Save**. ## Step 4 | Release so both extension configurations take effect You need to release in two places so the previous extension is hidden for new installs and the updated extension is available. When available, release as a minor version so that Wix users on the current major version immediately see the updated extension in the **Add +** panel for widgets or in the plugin explorer for plugins, and receive the update automatically. 1. Release in the Blocks editor (so the previous extension's settings from Step 1 take effect): 1. In the Blocks editor, click **Release**. 2. Select **Minor version** as the release type, if available. 3. Confirm to complete the release. 2. If your app also includes extensions built with a non-Blocks framework (such as the Wix CLI or self-managed development), release your app separately so those extensions go live. Release using whichever method matches the framework: * **Self-managed:** Follow the steps in [Release a New App Version](https://dev.wix.com/docs/build-apps/manage-your-app/versioning/release-a-new-app-version.md). * **Wix CLI:** Run the [`wix release`](https://dev.wix.com/docs/wix-cli/command-reference/project-commands/release.md) command. If all of your app's extensions are built with Blocks, the Blocks release in the previous step is sufficient. > __Note:__ If **Minor version** isn't available or appropriate for your changes, you may need to release a **Major version**. However, major updates require Wix user action to install, so use the major version option only when necessary. ## Step 5 | Contact the support team By default, Wix users with sites built on the [Wix Harmony editor](https://support.wix.com/en/article/about-wix-harmony-for-developers) won't see any apps that have Blocks components when they search the Wix App Market. To enable these potential customers to find your app, [contact the support team](https://www.wix.com/support-chatbot?nodeId=25a57397-ccf7-4376-8b74-48d51edf7159&referral=devRels). ## See also - [Build a Site Widget in Blocks](https://dev.wix.com/docs/build-apps/develop-your-app/develop-an-app-with-blocks/site-widgets/build-a-site-widget-in-blocks.md) - [Configure Blocks Installation Settings](https://dev.wix.com/docs/build-apps/develop-your-app/develop-an-app-with-blocks/deploy-and-manage-blocks-apps/configure-blocks-installation-settings.md) - [Manage Blocks App Versions](https://dev.wix.com/docs/build-apps/develop-your-app/develop-an-app-with-blocks/deploy-and-manage-blocks-apps/manage-blocks-app-versions.md) --- > Portal Navigation: > > - Append `.md` to any URL under `https://dev.wix.com/docs/` to get its markdown version. > - Pages are either content pages (article or reference text) or menu pages (a list of links to child pages). > - To get a menu page, truncate any URL to a parent path and append `.md` (e.g. `https://dev.wix.com/docs/sdk.md`, `https://dev.wix.com/docs/sdk/core-modules.md`). > - Top-level index of all portals: https://dev.wix.com/docs/llms.txt > - Full concatenated docs: https://dev.wix.com/docs/llms-full.txt ## Resource: Blocks Unboxed: A Quick Tour ## Article: A Quick Tour ## Article Link: https://dev.wix.com/docs/build-apps/develop-your-app/develop-an-app-with-blocks/get-started/blocks-unboxed-a-quick-tour.md ## Article Content: # Blocks Unboxed: A Quick Tour
**Editor compatibility** Wix Blocks apps aren't supported in the Wix Harmony editor. Existing Blocks apps remain available for purchase on the Wix App Market for Wix Editor and Wix Studio sites. To learn more, see [About Wix Harmony and Blocks](https://dev.wix.com/docs/build-apps/develop-your-app/develop-an-app-with-blocks/about-wix-harmony-and-blocks.md).
Wix Blocks is open to all Wix Studio users. To access Blocks, go to [Custom Apps](https://manage.wix.com/account/custom-apps) in your Studio workspace. If you want to create a Blocks app in a Studio workspace where you are not the owner, make sure to get **Co-owner** permissions from the owner.
**Welcome aboard – it's great to have you here!** The Blocks Editor is where you create apps for Wix sites. Blocks apps can be anything from simple widget layouts to full-fledged interactive web components, complete with APIs and code files – the sky is the limit. ![Gif of what an application includes](https://wixmp-833713b177cebf373f611808.wixmp.com/images/2ec78b479d727ef7ef5cc3ce006a2ee7.gif) Let's get started with a quick tour of the basics. You can then dive straight into the [Blocks app workflow](https://dev.wix.com/docs/build-apps/develop-your-app/develop-an-app-with-blocks/get-started/a-blocks-app-workflow.md) and start building apps, or try out our [Blocks tutorials](https://dev.wix.com/docs/build-apps/get-started/tutorials/index-of-tutorials.md#quick-start--create-an-app-in-wix-blocks). * * * ### Build amazing widgets for Wix sites Wix Blocks offers you all the tools you need to design professional widgets that Wix site builders (yourself included!) can add to any site. It comes with powerful layout and design tools to help you make your widgets responsive, precise, and beautiful. Build them yourself or ask the Blocks AI to do it for you! ![Widgets](https://wixmp-833713b177cebf373f611808.wixmp.com/images/01b5392be95222f9050f3111fe4c44a8.gif) * * * ### Responsive from the ground up Blocks widgets are fully responsive when added to any Wix site, adapting elegantly to any viewport or layout. ![How responsive looks](https://d2x3xhvgiqkx42.cloudfront.net/12345678-1234-1234-1234-1234567890ab/3d78bec4-05f0-4503-9b59-b76c23ec7b86/2022/07/25/6519e533-9008-49bb-bdcf-93a129bee397/6dd7592e-88bc-483e-9aeb-8a35b8fb0f08.gif) * * * ### Limitless customization out of the box In Blocks, you compose your widget out of standard Wix site [elements](https://support.wix.com/en/article/studio-editor-adding-elements-4240855), like text boxes, images and buttons. They all come with tons of built-in customization options. When site creators add your widget to their site, all those options are still available, allowing them to adjust almost anything and make your widget perfect for their needs. ![customization](https://d2x3xhvgiqkx42.cloudfront.net/12345678-1234-1234-1234-1234567890ab/3d78bec4-05f0-4503-9b59-b76c23ec7b86/2022/07/25/3022749d-d3a2-496e-80be-90f2bceed286/af9a4084-ec6b-48a6-94f0-dc0e7e44f86b.gif) * * * ### Give site builders a tailored editing experience Your widget's [configuration](https://dev.wix.com/docs/build-apps/develop-your-app/develop-an-app-with-blocks/editor-experience-configuration/about-configuration-in-blocks.md) settings control how site builders interact with the widget in the editor, for example, which widget elements can be selected or removed, and the buttons available in each action bar. You can even build your own [custom panels](https://dev.wix.com/docs/build-apps/develop-your-app/develop-an-app-with-blocks/editor-experience-panels/about-panels-in-blocks.md) for your widgets, to let site builders easily adjust your widget's settings, layout, design, and more.  ![editing experience](https://d2x3xhvgiqkx42.cloudfront.net/12345678-1234-1234-1234-1234567890ab/3d78bec4-05f0-4503-9b59-b76c23ec7b86/2022/07/25/3b7583af-b23d-4367-a736-06522139e446/ffa196d4-d03a-4217-a436-78a73e01cff5.gif) * * * ### Turbocharge your widget with code The Wix full-stack development platform empowers you to rapidly build, manage, and deploy professional apps. Add custom functionality and interactions, use the [Wix Javascript SDK](https://dev.wix.com/docs/build-apps/develop-your-app/api-integrations/java-script-sdk.md), work with your favorite tools, and enjoy serverless coding in both the frontend and backend—all on an open, extendable platform. ![Velo code](https://d2x3xhvgiqkx42.cloudfront.net/12345678-1234-1234-1234-1234567890ab/3d78bec4-05f0-4503-9b59-b76c23ec7b86/2022/07/25/6fc2b9dd-b979-4f5c-9341-9f039bfd4e22/9cc75ffb-562a-4872-98b9-80cc175ed540.gif) * * * ### Let Wix sites interact with your widget Exposing your own [API](https://dev.wix.com/docs/build-apps/develop-your-app/develop-an-app-with-blocks/widget-api/about-the-widget-api.md) allows site builders to smoothly integrate your widget into their site, by manipulating the widget's props, calling its public functions, and reacting to its events. ![velo code](https://d2x3xhvgiqkx42.cloudfront.net/12345678-1234-1234-1234-1234567890ab/3d78bec4-05f0-4503-9b59-b76c23ec7b86/2022/07/25/d4520255-77bf-4c35-b199-f01768bf9fbf/8b57d5f0-9161-4ffb-be79-05a512199950.gif) --- > Portal Navigation: > > - Append `.md` to any URL under `https://dev.wix.com/docs/` to get its markdown version. > - Pages are either content pages (article or reference text) or menu pages (a list of links to child pages). > - To get a menu page, truncate any URL to a parent path and append `.md` (e.g. `https://dev.wix.com/docs/sdk.md`, `https://dev.wix.com/docs/sdk/core-modules.md`). > - Top-level index of all portals: https://dev.wix.com/docs/llms.txt > - Full concatenated docs: https://dev.wix.com/docs/llms-full.txt ## Resource: A Blocks App Workflow ## Article: A Blocks App Workflow ## Article Link: https://dev.wix.com/docs/build-apps/develop-your-app/develop-an-app-with-blocks/get-started/a-blocks-app-workflow.md ## Article Content: # A Blocks App Workflow
**Editor compatibility** Wix Blocks apps aren't supported in the Wix Harmony editor. Existing Blocks apps remain available for purchase on the Wix App Market for Wix Editor and Wix Studio sites. To learn more, see [About Wix Harmony and Blocks](https://dev.wix.com/docs/build-apps/develop-your-app/develop-an-app-with-blocks/about-wix-harmony-and-blocks.md).
Wix Blocks is open to all Wix Studio users. To access Blocks, go to [Custom Apps](https://manage.wix.com/account/custom-apps) in your Studio workspace. If you want to create a Blocks app in a Studio workspace where you are not the owner, make sure to get **Co-owner** permissions from the owner.
Wix Blocks lets you create apps that you can reuse on as many Wix sites as you want, use on your clients' sites or publish in the Wix App Market. ## Plan Your App Here are some questions to start with, when you're planning your app: * Does your app include [site widgets](https://dev.wix.com/docs/build-apps/develop-your-app/develop-an-app-with-blocks/site-widgets/build-a-site-widget-in-blocks.md)? How many widgets? Note that you can use nested widgets. You can also easily create various [design presets](https://dev.wix.com/docs/build-apps/develop-your-app/develop-an-app-with-blocks/widget-design/about-design-presets.md) for the same widget, rather than duplicating it. * What [panels](https://dev.wix.com/docs/build-apps/develop-your-app/develop-an-app-with-blocks/editor-experience-panels/about-panels-in-blocks.md) do you need for each widget? Note that you can build designated panels for various areas of your widget - no need for one large settings panel. * Does your app use [a database](https://dev.wix.com/docs/build-apps/develop-your-app/develop-an-app-with-blocks/cms-collections-in-blocks/about-cms-collections-in-blocks.md)? If it does, consider adding a dashboard page for users to easily manage the data. * Do you want to [publish your app](https://dev.wix.com/docs/build-apps/develop-your-app/develop-an-app-with-blocks/publish-blocks-apps-to-the-app-market/publish-a-blocks-app-to-the-app-market.md) in the Wix App Market? If so, it's important to plan the app in a way that matches different pricing plans, such as free and premium. Here is an example workflow for building your app. Of course, not all apps will use all features. ## Create an app Go to [Custom Apps](https://manage.wix.com/account/custom-apps) in your Wix Studio workspace and create a new app. ## Add widgets Widgets allow you to add a user interface (UI) to your app. You can use a ready-made designed widget, ask the [Blocks AI](https://dev.wix.com/docs/build-apps/develop-your-app/develop-an-app-with-blocks/get-started/about-the-blocks-ai.md) to generate the widget for you, or design it on your own. When designing a widget, we recommend that you start with a ready-made composition, or add layout elements such as grids, flexboxes or repeaters. Read our [design guidelines](https://dev.wix.com/docs/build-apps/develop-your-app/develop-an-app-with-blocks/widget-design/blocks-widget-design-guidelines.md), to make sure that your widget behaves responsively and blends well with Wix sites. Use our [Figma kit](https://www.figma.com/community/file/1397674211519735499/wix-blocks-components-library) if you want to create your design in Figma. **To add widgets:** Go to the **App Interface** and click **Create Extension**. You'll see your widget under the **Widgets** ![icon](https://wixmp-833713b177cebf373f611808.wixmp.com/images/bd1c0eb127af93e9b1464ad364ce5c1b.png) tab. ## Add design presets [Design presets](https://dev.wix.com/docs/build-apps/develop-your-app/develop-an-app-with-blocks/widget-design/about-design-presets.md) save you lots of work if you want different layouts or styles for your widgets. Users can later choose between the presets when your app is installed on a site. **To add design presets:** Go to the **Design Presets** section in the **Widgets** ![icon](https://wixmp-833713b177cebf373f611808.wixmp.com/images/bd1c0eb127af93e9b1464ad364ce5c1b.png) tab. ## Add widget code Every widget has its own [widget code](https://dev.wix.com/docs/build-apps/develop-your-app/develop-an-app-with-blocks/code-in-blocks/about-widget-code-in-blocks.md) that holds its business logic. Every widget can also have its own [Widget API](https://dev.wix.com/docs/build-apps/develop-your-app/develop-an-app-with-blocks/widget-api/about-the-widget-api.md) with properties, events, and functions. **To add widget code:** Open the code panel at the bottom of your widget. You can work directly in this panel or use the [Wix IDE for Blocks](https://dev.wix.com/docs/build-apps/develop-your-app/develop-an-app-with-blocks/code-in-blocks/about-the-wix-ide-for-blocks.md).
**Important:** The Blocks-CLI integration only works with the [Wix CLI for Apps](https://dev.wix.com/docs/build-apps/develop-your-app/frameworks/wix-cli/about-the-wix-cli-for-apps.md). The new [Wix CLI](https://dev.wix.com/docs/wix-cli/guides/about-the-wix-cli.md), which is the recommended tool for new app projects, doesn’t support this integration.
## Configure the Editor Experience The **Editor Experience** ![](https://d2x3xhvgiqkx42.cloudfront.net/12345678-1234-1234-1234-1234567890ab/378fd532-728d-473b-8f03-30140bda59af/2024/04/24/d885478b-0fa3-46d0-950a-801399d94383/8dc747a0-244b-4714-bd4c-7a71986a8394.png) panel enables you to define the way your widget and its elements look and behave when they're installed on a site. Make sure to go over our [UX guidelines for Editor Experience](https://dev.wix.com/docs/build-apps/develop-your-app/develop-an-app-with-blocks/editor-experience-configuration/ux-guidelines-for-editor-experience-in-blocks.md) so that your widgets and panels are easy to understand and useful. In the [Configuration](https://dev.wix.com/docs/build-apps/develop-your-app/develop-an-app-with-blocks/editor-experience-configuration/about-configuration-in-blocks.md) tab, you can modify display names, set your widgets or elements as non-selectable, and configure widget and element action bars (floating panels). **To define configuration settings:** go to the **Editor Experience** ![](https://d2x3xhvgiqkx42.cloudfront.net/12345678-1234-1234-1234-1234567890ab/378fd532-728d-473b-8f03-30140bda59af/2024/04/24/d885478b-0fa3-46d0-950a-801399d94383/8dc747a0-244b-4714-bd4c-7a71986a8394.png) tab and click **Configuration**. ## Build Custom Panels Your Blocks widgets and their elements come with default panels for settings, design, presets and more. You can also [build custom panels](https://dev.wix.com/docs/build-apps/develop-your-app/develop-an-app-with-blocks/editor-experience-panels/design-custom-panels-in-blocks.md) for your widgets and their elements. **To create custom panels:** go to the **Editor Experience** ![](https://d2x3xhvgiqkx42.cloudfront.net/12345678-1234-1234-1234-1234567890ab/378fd532-728d-473b-8f03-30140bda59af/2024/04/24/d885478b-0fa3-46d0-950a-801399d94383/8dc747a0-244b-4714-bd4c-7a71986a8394.png) tab and click **Custom Panels**. ## Preview and test your widgets Preview your widgets to test how they work. You can easily test how your widget looks on various [site themes](https://dev.wix.com/docs/build-apps/develop-your-app/develop-an-app-with-blocks/widget-design/about-themes-in-blocks.md) and with various [widget API properties](https://dev.wix.com/docs/build-apps/develop-your-app/develop-an-app-with-blocks/widget-api/blocks-widget-properties.md). After previewing, make sure to [test your app on a site](https://dev.wix.com/docs/build-apps/develop-your-app/develop-an-app-with-blocks/deploy-and-manage-blocks-apps/test-your-app-on-a-site.md). Some parts of your app, like Custom Panels, can only be tested in the editor. * **To preview your widgets:** click the **Preview** ![preview](https://wixmp-833713b177cebf373f611808.wixmp.com/images/a35d83e13d49f269098b1b571f9e3a7e.png) icon. * **To test your app:** click **Test**. ## Add CMS database collections Blocks makes it easy to [add collections](https://dev.wix.com/docs/build-apps/develop-your-app/develop-an-app-with-blocks/cms-collections-in-blocks/about-cms-collections-in-blocks.md) to your app. When your app is installed on a site, it can use the default data that you provided, or data from the site. **To add CMS collections:** open the **CMS** ![cms](https://wixmp-833713b177cebf373f611808.wixmp.com/images/bb6873a07f3d330705223118bbe97763.png) tab. ## Add a Dashboard page The Blocks [Dashboard pages](https://dev.wix.com/docs/build-apps/develop-your-app/develop-an-app-with-blocks/dashboard-pages/build-a-dashboard-page-in-blocks.md) are your app's back-office. They can be used to manage your database collections or other app settings. Unlike panels, which are used per-widget, Dashboard pages serve your entire app. When a user installs your app on a site, your Dashboard pages will be added to their site Dashboard, as separate pages. **To add a Dashboard page:** click the **Dashboard Interface** ![dashboard](https://wixmp-833713b177cebf373f611808.wixmp.com/images/e08a69776974d11b95c2de12fb51e1d3.png) icon, then click **Add Dashboard Page**. ## Add code files to your app Use Blocks to easily package and reuse code with backend modules, frontend files, and a configuration file. Code files apply to your entire app. **To add code files:** go to the **Code** ![](https://d2x3xhvgiqkx42.cloudfront.net/12345678-1234-1234-1234-1234567890ab/6b5c7381-912e-4754-99e2-d23157db088c/2022/05/16/ae6caaee-a6a3-4e81-a9cd-ec610c11ca9e/f4621268-d68f-44b0-9ac6-49c9d3e18809.jpg) panel and click **Public & Backend**. ## Configure your app Installation Settings [Installation settings](https://dev.wix.com/docs/build-apps/develop-your-app/develop-an-app-with-blocks/deploy-and-manage-blocks-apps/configure-blocks-installation-settings.md) let you determine how your app is first installed on a site. You can select which widgets to show, which design presets, what to do on mobile devices, etc. **To configure installation settings:** click on the three dots next to the widget name in the **Widgets** panel. Then click **Editor Experience** > **Installation Settings**. ## Prepare your app for pricing If you plan to publish your app in the Wix App Market, consider its behavior across different pricing plans, such as free and premium. This includes different UI and logic. Learn more about [pricing plans in Blocks](https://dev.wix.com/docs/build-apps/develop-your-app/develop-an-app-with-blocks/publish-blocks-apps-to-the-app-market/adjust-a-blocks-app-to-different-pricing-plans.md). **To start publishing your app in the App Market:** go to the **WixBlocks** icon and click **App > Publish App**. ## Release a version of your app Create a [minor or major version](https://dev.wix.com/docs/build-apps/develop-your-app/develop-an-app-with-blocks/deploy-and-manage-blocks-apps/manage-blocks-app-versions.md) for your app, depending on where you are in the development process. **To release a version:** click **Release** and select your version type. ## Install your app on a site You can [install your app](https://dev.wix.com/docs/build-apps/develop-your-app/develop-an-app-with-blocks/deploy-and-manage-blocks-apps/install-a-blocks-app-on-a-site.md) on any site you own or collaborate with, as well as on your clients’ sites. You can also share it using an [install link](https://dev.wix.com/docs/build-apps/develop-your-app/app-dashboard-setup/share-your-app-with-an-install-link.md), or [publish your app](https://dev.wix.com/docs/build-apps/develop-your-app/develop-an-app-with-blocks/publish-blocks-apps-to-the-app-market/publish-a-blocks-app-to-the-app-market.md) in the Wix App Market. --- > Portal Navigation: > > - Append `.md` to any URL under `https://dev.wix.com/docs/` to get its markdown version. > - Pages are either content pages (article or reference text) or menu pages (a list of links to child pages). > - To get a menu page, truncate any URL to a parent path and append `.md` (e.g. `https://dev.wix.com/docs/sdk.md`, `https://dev.wix.com/docs/sdk/core-modules.md`). > - Top-level index of all portals: https://dev.wix.com/docs/llms.txt > - Full concatenated docs: https://dev.wix.com/docs/llms-full.txt ## Resource: Create a Blocks App ## Article: Creating an App and Opening it ## Article Link: https://dev.wix.com/docs/build-apps/develop-your-app/develop-an-app-with-blocks/get-started/create-a-blocks-app.md ## Article Content: # Create a Blocks App
**Editor compatibility** Wix Blocks apps aren't supported in the Wix Harmony editor. Existing Blocks apps remain available for purchase on the Wix App Market for Wix Editor and Wix Studio sites. To learn more, see [About Wix Harmony and Blocks](https://dev.wix.com/docs/build-apps/develop-your-app/frameworks/wix-blocks/about-wix-harmony-and-blocks.md).
Wix Blocks is open to all Wix Studio users. If you haven't created a Wix Studio account yet, [here's how to join](https://support.wix.com/en/article/wix-studio-switching-to-wix-studio). If you want to create a Blocks app in a Studio workspace where you are not the owner, make sure to get **Co-owner** permissions from the owner.
You can start building an app with a ready-made template or build from scratch, depending on your project's needs. ## Start with a template 1. Open the [Custom Apps](https://manage.wix.com/account/custom-apps) section in your Wix Studio workspace. 2. Click **Create New App**. 3. Click **Start with a template**. 4. On the left side, under **Browse by framework**, select **Wix Blocks**. 5. Select a template that best suits your needs and then click **Use Template**. Wix Blocks opens with a new app based on the selected template. [](https://dev.wix.com/apps-templates?filter=blocks) ## Build from scratch 1. Open the [Custom Apps](https://manage.wix.com/account/custom-apps) section in your Wix Studio workspace. 2. Click **Create New App**. 3. Click **Build from scratch**. 4. Select **Wix Blocks** and then click **Get Started**. Wix Blocks opens with a blank canvas. [](https://dev.wix.com/apps-templates/open-blocks-template?templateId=b4d78c69-534a-4c87-9b15-656577abacdb&templateName=Blank+Canvas) ## Next steps Go back to the [Custom Apps](https://manage.wix.com/account/custom-apps) section in your Wix Studio workspace to continue working on your app. From there, you can: * Edit your app in Blocks * Manage your app in the app dashboard --- > Portal Navigation: > > - Append `.md` to any URL under `https://dev.wix.com/docs/` to get its markdown version. > - Pages are either content pages (article or reference text) or menu pages (a list of links to child pages). > - To get a menu page, truncate any URL to a parent path and append `.md` (e.g. `https://dev.wix.com/docs/sdk.md`, `https://dev.wix.com/docs/sdk/core-modules.md`). > - Top-level index of all portals: https://dev.wix.com/docs/llms.txt > - Full concatenated docs: https://dev.wix.com/docs/llms-full.txt ## Resource: About the Blocks AI ## Article: Create with the Blocks AI ## Article Link: https://dev.wix.com/docs/build-apps/develop-your-app/develop-an-app-with-blocks/get-started/about-the-blocks-ai.md ## Article Content: # About the Blocks AI
**Editor compatibility** Wix Blocks apps aren't supported in the Wix Harmony editor. Existing Blocks apps remain available for purchase on the Wix App Market for Wix Editor and Wix Studio sites. To learn more, see [About Wix Harmony and Blocks](https://dev.wix.com/docs/build-apps/develop-your-app/develop-an-app-with-blocks/about-wix-harmony-and-blocks.md).
**Deprecation notice** Blocks AI is being deprecated. For AI-assisted development, build apps using the [Wix CLI](https://dev.wix.com/docs/wix-cli.md). Use AI agents like Claude or Cursor with [Wix AI tools](https://dev.wix.com/docs/api-reference/articles/ai-tools/about-ai-tools.md) such as [Wix Skills](https://dev.wix.com/docs/api-reference/articles/ai-tools/about-wix-skills.md) and the [Wix MCP server](https://dev.wix.com/docs/api-reference/articles/wix-mcp/about-the-wix-mcp.md).
Blocks AI helps you create and modify Wix Blocks widgets through AI-powered generation and editing capabilities. This article explains how to use Blocks AI to enhance your app development workflow. `youtube:https://www.youtube.com/watch?v=MibEaqvzeXg` ## The Blocks AI workflow The Blocks AI offers a three-stage workflow that streamlines your widget development: * **Generate widget:** Create a new widget with elements, responsive layout, and content. * **Edit widget:** Refine the widget design and structure based on your requirements. * **Generate code:** Add functionality and data by generating widget code and collections. This workflow helps you rapidly build functional widgets by leveraging AI at each development stage, from initial creation to adding business logic and data capabilities. However, it does not necessarily have to be in this order. You can also start from a widget that you designed by yourself or start from adding a collection, if that makes sense. Just keep it logical - don't try to write code that relates to a UI without creating that UI first. Click the AI icon ![blocks ai](https://wixmp-833713b177cebf373f611808.wixmp.com/images/659bd40735c034f028d208bc35716dc4.png) to open the Blocks AI panel. Then, select your option and enter a prompt. ![blocks ai](https://wixmp-833713b177cebf373f611808.wixmp.com/images/fd9acecac958af33812b12849641a793.png) ## Generate Widget The Generate Widget command creates a new widget and its contents, including: * Widget elements * Responsive layout and design * Relevant content, including images and text ### Tips for successfully generating widgets To get the best results when generating widgets: * **Provide detailed descriptions** in your prompt, including the UI elements, their position, and their purpose. * **Try different prompts** if the initial generation doesn't meet your needs. * **Use structured lists** to organize your requirements clearly and logically. For example: ```md Create a product card featuring: - Item details including an image, price, and description of the product. - Add to Cart: Incorporate a prominent 'Add to Cart' button for easy purchasing. - Highlight key benefits or features of the product. ``` ## Edit Widget The Edit Widget command makes design changes to your widgets based on your prompt. With this command, you can: * Add or delete elements * Reposition elements * Change element styles You can also always make manual changes to your widget if needed. ### Tips for successfully editing widgets To get the best results when editing widgets: * **Select the correct widget** before using Edit Widget. * **Select the preset you want to edit**. The Blocks AI cannot switch between presets and will edit the currently viewed preset. * **Create new presets manually.** Then, you can ask AI to edit them. * **Use Edit Widget for minor changes only**. For major design changes that transform the entire widget, generate a new widget instead. ### Design changes that require manual implementation Some design changes are currently not supported by the Edit Widget command and must be done manually: * Adding design presets * Adding a Stack or a Flexbox * Changing the number of items in a Repeater * Changing button properties * Changing SVG properties * Adding a shadow ## Generate Code Generate Code helps you create and modify both frontend and backend implementations, as well as data structures for your app. You can use it to generate new code or edit existing code, including frontend logic, backend services, and CMS collections for data storage. With this command, you can generate and edit: * [Widget code](https://dev.wix.com/docs/build-apps/develop-your-app/develop-an-app-with-blocks/code-in-blocks/about-widget-code-in-blocks.md): Frontend code that controls widget behavior and interactions. * [Backend code files](https://dev.wix.com/docs/build-apps/develop-your-app/develop-an-app-with-blocks/code-in-blocks/add-code-files-to-your-app.md#add-backend-files): Server-side code for handling business logic and data processing. * [CMS collections](https://dev.wix.com/docs/build-apps/develop-your-app/develop-an-app-with-blocks/cms-collections-in-blocks/about-cms-collections-in-blocks.md): Database collections for storing and managing your app's data. * [Dashboard code](https://dev.wix.com/docs/build-apps/develop-your-app/develop-an-app-with-blocks/dashboard-pages/build-a-dashboard-page-in-blocks.md#add-code-to-your-dashboard-page): Code for building custom admin interfaces and settings pages. ### Working with collections With the Generate Code command, you can perform several operations on collections: * **Create new collections** by describing the desired fields in your own words (e.g., "Create a collection for blog posts with title, content, author and publish date fields"). * **Generate collections automatically** based on the content structure of your existing widget. * **Add default data** to populate your collection for testing and development. * **Edit collection fields** after creation - add, remove, or modify fields. The Blocks AI will analyze your prompt and generate the appropriate collection structure and configuration based on your requirements.
Warning: You cannot restore data that you deleted, using the Undo button. Be careful when changing collection data.
Note: Creating a collection requires [a namespace](https://dev.wix.com/docs/build-apps/develop-your-app/develop-an-app-with-blocks/code-in-blocks/creating-a-namespace-for-your-app.md) for your app. If you haven't defined a namespace yet, you will be prompted to create one.
### Tips for successfully generating code To get the best results when generating code: * **Describe your widget clearly** to give the AI the context it needs. For example: "I have a product card showing product name, price, and an 'Add to Cart' button". * **Specify trigger events or user actions**. For example: "I want code that runs when a user clicks the Add to Cart button". * **Reference specific functions or APIs** if you know them. For example: "Use the `onClick` event for the button, and update a dataset called `Cart`". * **Describe exactly what you want to happen** in the app. For example: "When clicked, increase the cart item count and display a confirmation message". * **Mention specific element IDs**. For example: "My product card has the following elements: `productName`, `price`, and `productImage`". * **Specify output location or destination**. Indicate if the results should update the UI, store data in a collection, or trigger another action. For example: "Update the visual cart counter on the page". * **Include error handling** if needed. For example: "If the product is out of stock, show an error message instead". ### Example prompt This is an example of a complete prompt that uses the above tips: ```md Add logic for a "Product Card" app, which displays the `productName` and `productPrice`. Requirements: - The "Add to Cart" button has the ID `addToCartBtn` - Each product also has an `inStock` boolean field - When the button is clicked, first check if the product is in stock (`inStock: true`) - If in stock: save the product to a `Cart` collection, update the cart counter shown in `cartCounterLabel`, and display "Added to cart!" message - If out of stock (`inStock: false`): show an error message saying "Out of stock" - Add inline comments to explain each step --- > Portal Navigation: > > - Append `.md` to any URL under `https://dev.wix.com/docs/` to get its markdown version. > - Pages are either content pages (article or reference text) or menu pages (a list of links to child pages). > - To get a menu page, truncate any URL to a parent path and append `.md` (e.g. `https://dev.wix.com/docs/sdk.md`, `https://dev.wix.com/docs/sdk/core-modules.md`). > - Top-level index of all portals: https://dev.wix.com/docs/llms.txt > - Full concatenated docs: https://dev.wix.com/docs/llms-full.txt ## Resource: Wix Blocks Glossary ## Article: Glossary ## Article Link: https://dev.wix.com/docs/build-apps/develop-your-app/develop-an-app-with-blocks/get-started/wix-blocks-glossary.md ## Article Content: # Wix Blocks Glossary
**Editor compatibility** Wix Blocks apps aren't supported in the Wix Harmony editor. Existing Blocks apps remain available for purchase on the Wix App Market for Wix Editor and Wix Studio sites. To learn more, see [About Wix Harmony and Blocks](https://dev.wix.com/docs/build-apps/develop-your-app/develop-an-app-with-blocks/about-wix-harmony-and-blocks.md).
In this article, you can find definitions, synonyms, related links, and locations of many terms used within the Wix Blocks environment. Search this page to find the word or phrase you require.
Action Bar **Definition:** The floating menu that appears in the Wix Editors when a widget or its elements are clicked. **Related links:** [Configuring Action Bars](https://dev.wix.com/docs/build-apps/develop-your-app/develop-an-app-with-blocks/editor-experience-configuration/configure-action-bars-in-blocks.md) **Where****:** Editor Experience, Configuration Tab ![](https://d2x3xhvgiqkx42.cloudfront.net/12345678-1234-1234-1234-1234567890ab/f0656688-8ed1-488a-888d-62373b7c3a3c/2023/03/10/8b1d2762-b239-48d3-b84d-506b4620cd80/9df5dc3d-3184-4361-8ec7-9507087e91e2.png)
Action Buttons **AKA:** Action bar button, system button **Definition:** The buttons of an action bar. **Related links:** [Configuring Action Bars](https://dev.wix.com/docs/build-apps/develop-your-app/develop-an-app-with-blocks/editor-experience-configuration/configure-action-bars-in-blocks.md) **Where:** Editor Experience, Configuration Tab ![](https://d2x3xhvgiqkx42.cloudfront.net/12345678-1234-1234-1234-1234567890ab/f0656688-8ed1-488a-888d-62373b7c3a3c/2023/03/10/598e9688-d6b4-46e0-88d2-fcd2178ece09/25fc409d-bf92-406d-a385-459e26b54708.png)
App Dependencies **Definition:** Other Wix apps that are required for the Blocks app to function on a site. **Where:** Top Bar Menu ![](https://d2x3xhvgiqkx42.cloudfront.net/12345678-1234-1234-1234-1234567890ab/21e446eb-7f73-4f2f-84b1-c6b77e64e45e/2024/04/25/5679a14b-469d-4b80-98c1-fe962e677aab/8c6d444b-708f-48c2-a99d-61def2652626.png)
Backend Code **Definition:** Create JavaScript files, web modules, and other files for use in the backend, and organize these files in folders. **Related links:** [Add code files to your app](https://dev.wix.com/docs/build-apps/develop-your-app/develop-an-app-with-blocks/code-in-blocks/add-code-files-to-your-app.md) **Where:** Code Tab, Public & Backend ![code files](https://wixmp-833713b177cebf373f611808.wixmp.com/images/1bffac51c20ccefbc057449d25143595.png)
Blocks **Definition:** Blocks is an independent Editor where you can create web applications to use on Wix sites. **Related links:** [Blocks unboxed: a Quick Tour](https://dev.wix.com/docs/build-apps/develop-your-app/develop-an-app-with-blocks/get-started/blocks-unboxed-a-quick-tour.md)
Code Files **AKA:** Code Packages, Public & Backend Files **Definition:** Code libraries that you can reuse across multiple sites that allow you to add specific functionality to your site. **Related links:** [Add code files to your app](https://dev.wix.com/docs/build-apps/develop-your-app/develop-an-app-with-blocks/code-in-blocks/add-code-files-to-your-app.md) **Where:** Code Tab, Public & Backend ![code files](https://wixmp-833713b177cebf373f611808.wixmp.com/images/1bffac51c20ccefbc057449d25143595.png))
Configuration **AKA:** Widget Behavior, Editor Experience **Definition:** Defining the site builder's experience when interacting with the widget in the Wix Editors. For example, which widget elements can be selected or removed, and what buttons are available in the action bar. **Related links:** [About Configuration in Blocks](https://dev.wix.com/docs/build-apps/develop-your-app/develop-an-app-with-blocks/editor-experience-configuration/about-configuration-in-blocks.md) **Where in product:** Editor Experience, Configuration Tab ![](https://d2x3xhvgiqkx42.cloudfront.net/12345678-1234-1234-1234-1234567890ab/21e446eb-7f73-4f2f-84b1-c6b77e64e45e/2024/04/25/da8f014b-44b4-4cb0-b7fc-feb5ed5144bf/074b831c-e5b4-4a88-bb21-a2a9ffcb48ea.png)
Configuration File **AKA:** config.json **Definition:** You can add a **config.json** file to define settings that affect how the app works on a specific site. These settings typically vary from site to site, so the file you provide contains default settings that you can edit for each site. **Related links:** [Add a configuration file](https://dev.wix.com/docs/build-apps/develop-your-app/develop-an-app-with-blocks/code-in-blocks/add-code-files-to-your-app.md#add-a-configuration-file) **Where:** Code Tab, Public & Backend
Connect to theme **Definition:** Defining the widget elements so that they connect automatically to the theme of any site the widget is installed on. **Related links:** [About themes in Blocks](https://dev.wix.com/docs/build-apps/develop-your-app/develop-an-app-with-blocks/widget-design/about-themes-in-blocks.md) **Where:** Widgets ![](https://d2x3xhvgiqkx42.cloudfront.net/12345678-1234-1234-1234-1234567890ab/21e446eb-7f73-4f2f-84b1-c6b77e64e45e/2024/04/25/96298292-773b-4832-8102-7ab75763fba1/3e9a5714-781e-4e0a-893f-8f113da9e519.png)
Custom Panels **AKA:** Settings Panels **Definition:** Panels that were built in the Blocks Panels tab (as opposed to default ones). **Related links:** [Designing custom panels](https://dev.wix.com/docs/build-apps/develop-your-app/develop-an-app-with-blocks/editor-experience-panels/design-custom-panels-in-blocks.md) **Where:** Editor Experience, Custom Panels Tab ![](https://d2x3xhvgiqkx42.cloudfront.net/12345678-1234-1234-1234-1234567890ab/21e446eb-7f73-4f2f-84b1-c6b77e64e45e/2024/04/25/7242b861-9f29-4d7e-a19c-5a610a4a1ae2/d8a56cd5-6b72-4a1b-92ad-a15a0bf4b8e0.png)
Design Presets **Definition:** Different design and layout options for one widget. The functionality remains the same across the different designs. **Related links:** [About Design Presets](https://dev.wix.com/docs/build-apps/develop-your-app/develop-an-app-with-blocks/widget-design/about-design-presets.md) **Where:** Widgets ![design presets location](https://wixmp-833713b177cebf373f611808.wixmp.com/images/c308825dc6a8809c85e79c438653945b.png)
Display name **Definition:** The name of the widget and elements that appear when the widget is added to the Wix Editors. Display names can be defined in the Configuration tab. Note that this is not the Velo Element ID. **Related links:**  [Configuring widget display names and behavior](https://dev.wix.com/docs/build-apps/develop-your-app/develop-an-app-with-blocks/editor-experience-configuration/configure-display-names-and-behavior-in-blocks.md) **Where:** Editor Experience, Inspector Panel  ![](https://d2x3xhvgiqkx42.cloudfront.net/12345678-1234-1234-1234-1234567890ab/21e446eb-7f73-4f2f-84b1-c6b77e64e45e/2024/04/25/296d0958-4baf-45cc-a3c2-34c920b8c5b1/8d526071-2a7b-4fac-b4fc-79b46cfdb7ce.png)
Events **Definition:** API events can be fired by the widget when a certain condition is met. They can then be caught by event handlers in the site where the widget is installed. **Related links:** [Adding a New Event to Your Widget](https://dev.wix.com/docs/build-apps/develop-your-app/develop-an-app-with-blocks/widget-api/blocks-widget-events.md) **Where:** Widget code panel ![](https://d2x3xhvgiqkx42.cloudfront.net/12345678-1234-1234-1234-1234567890ab/f0656688-8ed1-488a-888d-62373b7c3a3c/2023/03/14/b45914bc-4ddc-45b7-83a2-59cd4f8b0c67/c8c5a129-a4ac-4d4e-aed8-703625d8d575.png)
Namespace **AKA:** Import name **Definition:** A namespace is required for importing the app’s backend and public functions, as well as content collections in the Editors and in the app’s code in Blocks. **Related links:** [Creating a namespace for your App](https://dev.wix.com/docs/build-apps/develop-your-app/develop-an-app-with-blocks/code-in-blocks/creating-a-namespace-for-your-app.md) **Where:** Prompted when building an app after adding collections or code files
Nested Widget **AKA:** Widget in Widget **Definition:** Two widgets (from the same app) where one is inserted inside the other. Eg. A button widget inside a form widget. **Related links:** [Add Nested Widgets in Blocks](https://dev.wix.com/docs/build-apps/develop-your-app/develop-an-app-with-blocks/site-widgets/add-nested-widgets-in-blocks.md) **Where:** Widgets menu  ![](https://d2x3xhvgiqkx42.cloudfront.net/12345678-1234-1234-1234-1234567890ab/21e446eb-7f73-4f2f-84b1-c6b77e64e45e/2024/04/25/29113606-50f8-494a-bfa5-936b0daade51/95e621da-a9f7-4f1f-afe2-fca5a02da61c.png)
Panel Elements **Definition:** The UI elements of a custom panel (buttons, dividers, text inputs, etc) that are used to control a widget's or element's settings. These elements are different from the regular Wix elements used in the Wix Editor. **Related links:** [Panel Elements in Blocks](https://dev.wix.com/docs/build-apps/develop-your-app/develop-an-app-with-blocks/editor-experience-panels/panel-elements-in-blocks.md) **Where:** Editor Experience, Custom Panels Tab panel  ![](https://d2x3xhvgiqkx42.cloudfront.net/12345678-1234-1234-1234-1234567890ab/21e446eb-7f73-4f2f-84b1-c6b77e64e45e/2024/04/25/6f8620d3-71bc-432c-99a5-80cac2bd6d2c/39d15a93-4567-4199-b871-7154df986dfa.png)
Panels **Definition:** The pop-up window that opens when an action bar button is clicked and gives site builders control over a widget or element's settings. For example, when you click **Design** the design panel opens. **Related links:** [About Panels in Blocks](https://dev.wix.com/docs/build-apps/develop-your-app/develop-an-app-with-blocks/editor-experience-panels/about-panels-in-blocks.md) **Where:** The panels open in the Wix Editors, when a site builder configures the widget ![](https://d2x3xhvgiqkx42.cloudfront.net/12345678-1234-1234-1234-1234567890ab/f0656688-8ed1-488a-888d-62373b7c3a3c/2023/03/14/4005d4ed-9f23-494b-a415-5cfe336bfbf4/e5b361c2-b111-48d5-829b-8c6292299b5e.png)
Plugin **AKA:** Site Plugin **Definition:** The ability for site builders to add a plugin into a dedicated container (or slot). This allows site builders to extend the functionality of their app. Usually used to extend Wix business solution apps. **Where:** App Interface **Related links:** [Build a Site Plugin in Blocks](https://dev.wix.com/docs/build-apps/develop-your-app/develop-an-app-with-blocks/site-plugins/build-a-site-plugin-in-blocks.md) ![add plugin](https://wixmp-833713b177cebf373f611808.wixmp.com/images/3b9ffb064c8c263f39fb8c25cb4db70a.png)
Properties **AKA:** Widget Properties, Widget API Properties, Props **Definition:** Certain choices that the app builder gives to the site builder regarding the widget. The properties can be changed from the widget's **Settings** panel, from a custom panel, from a dashboard page or from the site's code. **Related links:** [Working with Widget API Properties](https://dev.wix.com/docs/build-apps/develop-your-app/develop-an-app-with-blocks/widget-api/blocks-widget-properties.md) **Where:** Widget code ![](https://d2x3xhvgiqkx42.cloudfront.net/12345678-1234-1234-1234-1234567890ab/f0656688-8ed1-488a-888d-62373b7c3a3c/2023/03/14/aa8d8adb-7a9a-4ad5-91e9-0cd7482adf45/c7014ae7-3d62-4e68-aef0-0a25211a11db.png)
Public API Functions **Definition:** The widget creator can expose API functions that can be called by the code of the page where the widget is added. **Related links:** [Widget Functions](https://dev.wix.com/docs/build-apps/develop-your-app/develop-an-app-with-blocks/widget-api/blocks-widget-functions.md) **Where in product:** Widget code ![](https://d2x3xhvgiqkx42.cloudfront.net/12345678-1234-1234-1234-1234567890ab/f0656688-8ed1-488a-888d-62373b7c3a3c/2023/03/14/31e9f218-3229-49b0-a147-91eb81f0d36b/e9d4adc9-1793-4a4b-9d65-69835623ac39.png)
Site Visitor **AKA:** User of user **Definition:** The person who uses the Blocks app that's installed on a Wix site. Since your user as an app builder is the site builder, the site visitor is your "user of user".
Widget **AKA:** Site Widget, App UI **Definition:** Widgets build your app's User Interface (UI). They are the part of the app the site visitor interacts with. Widgets are usually composed of elements like buttons and input fields, as well as settings panels and action bars. Every app can have several widgets. For example, a booking form widget, countdown timer or a customized menu. **Related links:** [Blocks widgets](https://dev.wix.com/docs/build-apps/develop-your-app/develop-an-app-with-blocks/site-widgets/build-a-site-widget-in-blocks.md) **Where:** App Interface
Widget API **Definition:** The widget's properties, functions and events, exposed by the app creator and enabling site builders to interact with the widget. **Related links:** [About the Widget API](https://dev.wix.com/docs/build-apps/develop-your-app/develop-an-app-with-blocks/widget-api/about-the-widget-api.md) **Where:** Widget code ![](https://d2x3xhvgiqkx42.cloudfront.net/12345678-1234-1234-1234-1234567890ab/f0656688-8ed1-488a-888d-62373b7c3a3c/2023/03/15/5e5e6bd7-b111-46ca-ad32-3edace406847/6ee129e3-16f6-4a6d-bb9d-858f2ea23d4c.png)
--- > Portal Navigation: > > - Append `.md` to any URL under `https://dev.wix.com/docs/` to get its markdown version. > - Pages are either content pages (article or reference text) or menu pages (a list of links to child pages). > - To get a menu page, truncate any URL to a parent path and append `.md` (e.g. `https://dev.wix.com/docs/sdk.md`, `https://dev.wix.com/docs/sdk/core-modules.md`). > - Top-level index of all portals: https://dev.wix.com/docs/llms.txt > - Full concatenated docs: https://dev.wix.com/docs/llms-full.txt ## Resource: About Extensions in Blocks ## Article: About Wix Blocks extensions ## Article Link: https://dev.wix.com/docs/build-apps/develop-your-app/develop-an-app-with-blocks/supported-extensions/about-extensions-in-blocks.md ## Article Content: # About Extensions in Blocks
**Editor compatibility** Wix Blocks apps aren't supported in the Wix Harmony editor. Existing Blocks apps remain available for purchase on the Wix App Market for Wix Editor and Wix Studio sites. To learn more, see [About Wix Harmony and Blocks](https://dev.wix.com/docs/build-apps/develop-your-app/develop-an-app-with-blocks/about-wix-harmony-and-blocks.md).
Your app can add functionality to various parts of the Wix ecosystem, such as adding a page to a site's dashboard or a widget to a site page. Each specific type of functionality that an app can provide is called an extension. For general information about Wix app extensions, read [How apps extend Wix](https://dev.wix.com/docs/build-apps/get-started/overview/how-apps-extend-wix.md). Wix Blocks is a [development framework](https://dev.wix.com/docs/build-apps/get-started/overview/wix-s-development-frameworks.md#wixs-development-frameworks) for developing Wix apps, supporting the integration of extensions. It allows for the addition of extensions such as site widgets, dashboard pages and more to your app. You can easily add the following extensions from the **App Interface** and **Dashboard Interface** in Blocks. ![app interface image](https://wixmp-833713b177cebf373f611808.wixmp.com/images/c8d205f631bacacb36c0e5c1594ef110.png) ## Site widgets Widgets build your app's user interface. They are the part of the app the user interacts with. Usually composed of elements like buttons and input fields, as well as settings panels and action bars. An app can have several widgets. Learn how to [build a site widget](https://dev.wix.com/docs/build-apps/develop-your-app/develop-an-app-with-blocks/site-widgets/build-a-site-widget-in-blocks.md) using Blocks. ## Site plugins With site plugins, you can create interactive and feature-rich widgets that seamlessly integrate into Wix’s business solutions (such as Wix Stores and Wix Bookings), extending their functionality and user experience. Site plugins are built using Wix Blocks, which offers powerful layout and design tools, and give you access to Velo's full-stack development platform. Learn how to [build a site plugin](https://dev.wix.com/docs/build-apps/develop-your-app/develop-an-app-with-blocks/site-plugins/build-a-site-plugin-in-blocks.md) using Blocks. ## Site pages A page extension adds a full page to the user's site, when your app is installed on it. The page can appear in the site's main navigation menu and behaves just like any other page. [Learn more](https://dev.wix.com/docs/build-apps/develop-your-app/extensions/site-extensions/site-pages/add-a-site-page-extension.md). ## Dashboard pages Dashboard pages are administrative pages you can add to the dashboard of a Wix site or project. They do not appear on the live site, so site visitors never see them. However, dashboard pages are visible to site admins with the required permissions. Learn how to [build a dashboard page](https://dev.wix.com/docs/build-apps/develop-your-app/develop-an-app-with-blocks/dashboard-pages/build-a-dashboard-page-in-blocks.md) using Blocks. ## Self Hosted Extensions Blocks also allows you to add any **site** or **dashboard** self-managed extensions that Wix provides. [Learn more](https://dev.wix.com/docs/build-apps/develop-your-app/frameworks/self-hosting/supported-extensions/about-self-hosted-app-extensions.md) ## See also - [Map your app's functionality to Wix's extensions](https://dev.wix.com/docs/build-apps/develop-your-app/extensions/map-your-app-s-functionality-to-wix-s-extensions.md) --- > Portal Navigation: > > - Append `.md` to any URL under `https://dev.wix.com/docs/` to get its markdown version. > - Pages are either content pages (article or reference text) or menu pages (a list of links to child pages). > - To get a menu page, truncate any URL to a parent path and append `.md` (e.g. `https://dev.wix.com/docs/sdk.md`, `https://dev.wix.com/docs/sdk/core-modules.md`). > - Top-level index of all portals: https://dev.wix.com/docs/llms.txt > - Full concatenated docs: https://dev.wix.com/docs/llms-full.txt ## Resource: About Site Widgets in Blocks ## Article: About Site Widgets in Blocks ## Article Link: https://dev.wix.com/docs/build-apps/develop-your-app/develop-an-app-with-blocks/site-widgets/about-site-widgets-in-blocks.md ## Article Content: # About Site Widgets in Blocks
**Editor compatibility** Wix Blocks apps aren't supported in the Wix Harmony editor. Existing Blocks apps remain available for purchase on the Wix App Market for Wix Editor and Wix Studio sites. To learn more, see [About Wix Harmony and Blocks](https://dev.wix.com/docs/build-apps/develop-your-app/develop-an-app-with-blocks/about-wix-harmony-and-blocks.md).
Site widgets are draggable UI components that Wix site owners can add to pages on their website. They enhance a site's functionality by displaying content or enabling site visitors to perform various tasks. [Learn more about site widgets](https://dev.wix.com/docs/build-apps/develop-your-app/extensions/site-extensions/site-widgets/about-site-widget-extensions.md) Wix Blocks offers you powerful layout, design, and coding tools, enabling you to build professional widgets that site builders can add to any site. Use the following resources to get started with site widgets on Blocks: * [Build a site widget](https://dev.wix.com/docs/build-apps/develop-your-app/develop-an-app-with-blocks/site-widgets/build-a-site-widget-in-blocks.md): Learn how to build a site widget from scratch with our comprehensive guide. * [Tutorial](https://dev.wix.com/docs/build-apps/get-started/tutorials/tutorial-create-a-counter-widget-with-blocks.md): Gain practical experience by building a widget through our detailed tutorial. * [App templates](https://dev.wix.com/apps-templates?filter=blocks&http_referrer=documentation): Explore Blocks templates that demonstrate how to build site widgets. * [Design guidelines](https://dev.wix.com/docs/build-apps/develop-your-app/develop-an-app-with-blocks/widget-design/blocks-widget-design-guidelines.md): Learn how to make your widgets behave responsively and adapt to any screen size, blend beautifully with Wix sites, and offer as many design styles and layouts as you want. --- > Portal Navigation: > > - Append `.md` to any URL under `https://dev.wix.com/docs/` to get its markdown version. > - Pages are either content pages (article or reference text) or menu pages (a list of links to child pages). > - To get a menu page, truncate any URL to a parent path and append `.md` (e.g. `https://dev.wix.com/docs/sdk.md`, `https://dev.wix.com/docs/sdk/core-modules.md`). > - Top-level index of all portals: https://dev.wix.com/docs/llms.txt > - Full concatenated docs: https://dev.wix.com/docs/llms-full.txt ## Resource: Build a Site Widget in Blocks ## Article: Add a Site Widget Extension Using Wix Blocks ## Article Link: https://dev.wix.com/docs/build-apps/develop-your-app/develop-an-app-with-blocks/site-widgets/build-a-site-widget-in-blocks.md ## Article Content: # Build a Site Widget in Blocks
**Editor compatibility** Wix Blocks apps aren't supported in the Wix Harmony editor. Existing Blocks apps remain available for purchase on the Wix App Market for Wix Editor and Wix Studio sites. To learn more, see [About Wix Harmony and Blocks](https://dev.wix.com/docs/build-apps/develop-your-app/develop-an-app-with-blocks/about-wix-harmony-and-blocks.md).
A site widget is a core component of the user interface (UI) of your Wix Blocks app. Widgets are the parts of your app that visitors directly interact with, usually composed of various elements like buttons, input fields, images, and more. This article explains how to add a site widget to your app using Wix Blocks. ## Before you begin - You must be logged into your [Wix Studio](https://support.wix.com/en/article/wix-studio-switching-to-wix-studio) account. - Use an existing app or [create a new one](https://dev.wix.com/docs/build-apps/develop-your-app/frameworks/wix-blocks/get-started/create-a-blocks-app-and-open-it.md). - Open the Wix Blocks editor through [Custom Apps](https://manage.wix.com/account/custom-apps) in your Studio workspace. ## Step 1 | Add your widget in Wix Blocks 1. Navigate to the **App Interface** panel. Here you can create new widgets or find existing ones. 2. Click **Create Extension**. 3. Select **Widget** to start creating an empty widget, or use one of the pre-designed widget options. Alternatively, you can ask the [Blocks AI](https://dev.wix.com/docs/build-apps/develop-your-app/develop-an-app-with-blocks/get-started/about-the-blocks-ai.md) to generate your widget. ## Step 2 | Add elements to your widget Elements are the UI components that make up your widget. You can add text, media, shapes, and other elements to your widget. If you are designing your widget from scratch, make sure to go over our [design guidelines](https://dev.wix.com/docs/build-apps/develop-your-app/develop-an-app-with-blocks/widget-design/blocks-widget-design-guidelines.md) before adding elements. 1. Click ![add-elements-icon](https://wixmp-833713b177cebf373f611808.wixmp.com/images/da41587896ba29b80aef315adf3fc17c.png) **Add Elements** to open the **Elements** panel. 2. Drag and drop the elements you want to your widget. ## Step 3 | Add design presets to your widget [Design presets](https://dev.wix.com/docs/build-apps/develop-your-app/develop-an-app-with-blocks/widget-design/create-and-manage-design-presets.md) allow you to create multiple designs for the same widget. The functionality remains the same, only the design changes. 1. Navigate to the **Design Presets section** of the **Widgets and Design** panel. 2. Click **+ Add Design Preset**. 3. Click the ![more-actions-icon](https://wixmp-833713b177cebf373f611808.wixmp.com/images/0db5406a8a25943c7c790d67e0024cc2.png) **More Actions** icon to rename, duplicate, or delete a preset. 4. Make design changes to your widget. ## Step 4 | Configure the widget's action bar and behavior Each element of your widget has an [action bar](https://dev.wix.com/docs/build-apps/develop-your-app/develop-an-app-with-blocks/editor-experience-configuration/configure-action-bars-in-blocks.md) that you can customize. For example, you can add a main action button, animations, and other elements to the action bar. The entire widget also has an action bar, for configuring settings and adding and removing elements. These action bars are used by a site builder who installs the app, to configure the widget and its elements. 1. Navigate to the **Editor Experience > Configuration** tab. 2. Select the widget or element whose action bar you want to customize. 3. Add actions to your action bar by clicking **+ Add** and selecting which actions you want to add. 4. Modify the action buttons and connect them to custom panels or dashboard pages that you created. 5. [Modify the behavior](https://support.wix.com/en/article/wix-blocks-configuring-widget-and-elements-display-names-and-behavior) of your widget by selecting whether the widget can be **duplicated** or **resized** from the **behavior** panel. ## Step 5 | Create custom panels You can change the user interface and [create panels](https://dev.wix.com/docs/build-apps/develop-your-app/develop-an-app-with-blocks/editor-experience-configuration/about-the-editor-experience-in-blocks.md) that are unique to your widget, which direct the flow and how the widget is used. 1. Navigate to the **Editor Experience > Custom Panels** tab. 2. Click **Create Panel** and name your panel. 3. Add elements to your panel by clicking the **+ Add Element button**. For example, you can add elements such as thumbnails, buttons, dropdowns, and so on. 4. Optionally [add code](https://dev.wix.com/docs/build-apps/develop-your-app/develop-an-app-with-blocks/editor-experience-panels/add-code-to-custom-panels-in-blocks.md) to your panels to customize them. ## Step 6 | Add code to your widget [Add code](https://dev.wix.com/docs/build-apps/develop-your-app/develop-an-app-with-blocks/code-in-blocks/about-widget-code-in-blocks.md) to create your widget's custom functionality and interactions, or create your widget's public API. 1. Navigate to the **Widgets and Design** panel. 2. Open the ![code-icon](https://wixmp-833713b177cebf373f611808.wixmp.com/images/accf1cddfae694b1e940c64b4a78f721.png) **widget code** panel. 3. Click ![api-icon](https://wixmp-833713b177cebf373f611808.wixmp.com/images/89c337eb9ba3ee329024cea073e33c6a.png) **API** to add properties, functions or events to your [Widget API](https://dev.wix.com/docs/build-apps/develop-your-app/develop-an-app-with-blocks/widget-api/about-the-widget-api.md). 4. Click ![properties-events-icon](https://wixmp-833713b177cebf373f611808.wixmp.com/images/0a6b3110836d2e5eca202cb1d9051688.png) **Properties & Events** to add properties, events, and functions to your widget elements. 5. Write your code in the code editor in the bottom part of your screen. 6. Click **Preview** to test your code. Alternatively, you can ask the [Blocks AI](https://dev.wix.com/docs/build-apps/develop-your-app/develop-an-app-with-blocks/get-started/about-the-blocks-ai.md) to generate the code for your widget. ## Step 7 | Set installation settings Determine how your widget is presented in the editor with the [Blocks installation settings](https://dev.wix.com/docs/build-apps/develop-your-app/develop-an-app-with-blocks/deploy-and-manage-blocks-apps/configure-blocks-installation-settings.md). For example, which preset is the default preset and whether the widget is presented in the editor's **Add +** panel. 1. Hover over the widget name in the **App Interface**. 1. Click the three dots and select **Editor Experience** > **Edit Installation Settings**. 1. Edit the settings. 1. To switch to another widget, select a different widget and repeat the process. --- > Portal Navigation: > > - Append `.md` to any URL under `https://dev.wix.com/docs/` to get its markdown version. > - Pages are either content pages (article or reference text) or menu pages (a list of links to child pages). > - To get a menu page, truncate any URL to a parent path and append `.md` (e.g. `https://dev.wix.com/docs/sdk.md`, `https://dev.wix.com/docs/sdk/core-modules.md`). > - Top-level index of all portals: https://dev.wix.com/docs/llms.txt > - Full concatenated docs: https://dev.wix.com/docs/llms-full.txt ## Resource: Add Nested Widgets in Blocks ## Article: Creating and Managing Widgets Within Widgets ## Article Link: https://dev.wix.com/docs/build-apps/develop-your-app/develop-an-app-with-blocks/site-widgets/add-nested-widgets-in-blocks.md ## Article Content: # Add Nested Widgets in Blocks
**Editor compatibility** Wix Blocks apps aren't supported in the Wix Harmony editor. Existing Blocks apps remain available for purchase on the Wix App Market for Wix Editor and Wix Studio sites. To learn more, see [About Wix Harmony and Blocks](https://dev.wix.com/docs/build-apps/develop-your-app/develop-an-app-with-blocks/about-wix-harmony-and-blocks.md).
Blocks lets you embed one widget within another widget. This is useful in various cases, such as: * Reusing a widget in several places in your app. * Creating widgets that are elements, such as buttons. In the product image shown below, the counter is a separate widget with its own logic, embedded in the main widget. When users install this app on a site, both the external widget and the internal (nested) widget can be customized in the editor. This is the main widget: ![product widget](https://wixmp-833713b177cebf373f611808.wixmp.com/images/acd6b2b8d79df448b67e6302e824d7d2.png) This is the nested widget: ![product widget](https://wixmp-833713b177cebf373f611808.wixmp.com/images/c0553c068a10b456b4a4b870eb8f5e7f.png) ## Nesting a widget into another widget Select the outer widget, in which you want to insert an inner widget, in the **Widgets** section of the **Widgets and Design** Panel. Now, there are two ways to add another widget. ### Add a nested widget from the Widgets panel: 1. Hover over the name of your widget and click the **More Actions** ![](https://d2x3xhvgiqkx42.cloudfront.net/12345678-1234-1234-1234-1234567890ab/12345678-1234-1234-1234-1234567890ab/2021/11/24/e1f918a4-43e9-457c-9e9c-0fbc239352ab/9f3ba7b7-4535-40e6-b076-2378a71a76bd.jpg)  icon. 2. Click **Add Widget**. 3. Select the widget that you want to add. The widget is then added to your current widget.  ### Add a nested widget from the Add Elements panel: 1. Open the **Add Elements** ![](https://d2x3xhvgiqkx42.cloudfront.net/12345678-1234-1234-1234-1234567890ab/378fd532-728d-473b-8f03-30140bda59af/2022/01/25/c582389c-247c-44d8-834f-dd5f8af3ea74/6f030282-4363-40e3-abb0-fd018a7e167c.jpg) panel. 2. Click **My Widgets**. 3. Click or drag the widget that you want to add to your current widget. When you click the nested widget in the outer widget, you will see the ![](https://wixmp-833713b177cebf373f611808.wixmp.com/images/3cc9f6fd487a2faad389790c68dfad46.png) icon next to its ID, indicating that this is a nested widget. ![indication](https://wixmp-833713b177cebf373f611808.wixmp.com/images/79f4c2ce0b278d3890b16b16409e50a4.png) ## Managing the nested widget in the editor When a user adds a widget that includes a nested widget to their site, they can customize both the outer and nested widgets. Here are two main things they might want to configure: ### Change properties If your inner widget has [properties](https://dev.wix.com/docs/build-apps/develop-your-app/develop-an-app-with-blocks/widget-api/blocks-widget-properties.md), users can access them through the **Settings** panel of the inner widget. The following screenshot is from a site where the slot machine app is installed. Users can change the speed of the spinner window, which is a property of the widget. ![inner widget settings](https://wixmp-833713b177cebf373f611808.wixmp.com/images/643b87ebfb6965b38013e35b1b070349.png) Use [`getNestedWidget`](https://dev.wix.com/docs/sdk/host-modules/editor/widget/get-nested-widget.md) to get the inner widget properties in custom panel code. ### Change design presets [Design presets](https://dev.wix.com/docs/build-apps/develop-your-app/develop-an-app-with-blocks/widget-design/about-design-presets.md) allow you to create various layouts designs for the same widget. When users install the app on a site, they can easily change the design prests of the outer or nested widget, or both: ![design presets widget in widget in the editor](https://wixmp-833713b177cebf373f611808.wixmp.com/images/19ff38f304174e13805097f3525cf2db.png) ## Limit configuration abilities for nested widgets In some cases, you might want the nested widget to behave as an inseparable part of the outer widget, and limit what users can do with it. Here are two options: ### Disable selection Define the nested widget as non-selectable in the [Configuration](https://dev.wix.com/docs/build-apps/develop-your-app/develop-an-app-with-blocks/editor-experience-configuration/configure-display-names-and-behavior-in-blocks.md) tab within the Editor Experience ![](https://d2x3xhvgiqkx42.cloudfront.net/12345678-1234-1234-1234-1234567890ab/378fd532-728d-473b-8f03-30140bda59af/2024/04/24/d885478b-0fa3-46d0-950a-801399d94383/8dc747a0-244b-4714-bd4c-7a71986a8394.png) panel.  ### Hide the widget from the Add Elements panel If you don't want users to be able to add the nested widget independently, not as part as the outer widget, you can define it in the **Preset Visibility** section of your app's [Installation Settings](https://dev.wix.com/docs/build-apps/develop-your-app/develop-an-app-with-blocks/deploy-and-manage-blocks-apps/configure-blocks-installation-settings.md). To do so, uncheck the **Add panel** option for all the presets of the nested widget. --- > Portal Navigation: > > - Append `.md` to any URL under `https://dev.wix.com/docs/` to get its markdown version. > - Pages are either content pages (article or reference text) or menu pages (a list of links to child pages). > - To get a menu page, truncate any URL to a parent path and append `.md` (e.g. `https://dev.wix.com/docs/sdk.md`, `https://dev.wix.com/docs/sdk/core-modules.md`). > - Top-level index of all portals: https://dev.wix.com/docs/llms.txt > - Full concatenated docs: https://dev.wix.com/docs/llms-full.txt ## Resource: Manage Accessibility in Blocks ## Article: Managing Accessibility in Blocks ## Article Link: https://dev.wix.com/docs/build-apps/develop-your-app/develop-an-app-with-blocks/site-widgets/manage-accessibility-in-blocks.md ## Article Content: # Manage Accessibility in Blocks
**Editor compatibility** Wix Blocks apps aren't supported in the Wix Harmony editor. Existing Blocks apps remain available for purchase on the Wix App Market for Wix Editor and Wix Studio sites. To learn more, see [About Wix Harmony and Blocks](https://dev.wix.com/docs/build-apps/develop-your-app/develop-an-app-with-blocks/about-wix-harmony-and-blocks.md).
Most of the elements that you add to your Blocks app are ARIA (Accessible Rich Internet Applications Suite) -compliant. You can use the accessibility panel in Blocks to improve the accessibility of elements and widgets that are not ARIA-compliant. [Learn more about ARIA](https://www.w3.org/WAI/standards-guidelines/aria/).
**Important note about compliance:** * At Wix, we are committed to ensuring everyone, regardless of ability, can use our products and services. We are continually working on improving them, in line with accessibility standards. * Wix cannot guarantee or ensure that the use of our services is compliant with all accessibility laws and worldwide regulations.  * You are responsible for reviewing and complying with local legislation applicable to you or to your site visitors. * Note that a [custom element](https://dev.wix.com/docs/build-apps/develop-your-app/develop-an-app-with-blocks/code-in-blocks/about-custom-elements-in-blocks.md) is not accessibility friendly.
## Add accessibility attributes You can add accessibility attributes to an element or a widget. 1. Right-click the element or the widget and click **Accessibility**.
![Click on Accessibility](https://d2x3xhvgiqkx42.cloudfront.net/12345678-1234-1234-1234-1234567890ab/57e9f77c-6d15-498d-ac4e-c4d09bf3a490/2021/09/19/6d8cd0ee-3071-4394-ae17-1f06d6e7799f/242111f7-42a5-48a6-9690-18d45fe39c3e.png)
2. Click **Add Attribute**.
![Click on Add Attribute](https://d2x3xhvgiqkx42.cloudfront.net/12345678-1234-1234-1234-1234567890ab/57e9f77c-6d15-498d-ac4e-c4d09bf3a490/2021/09/19/0a07222d-8403-4eaa-87da-3b434bb3a45a/a12e7711-b4f2-459e-bc89-a8339364918c.png)
3. Choose the attribute you want to add from the drop-down menu, and then choose its value.
![Select an attribute](https://d2x3xhvgiqkx42.cloudfront.net/12345678-1234-1234-1234-1234567890ab/57e9f77c-6d15-498d-ac4e-c4d09bf3a490/2021/09/19/350b3313-aa8c-486e-8caa-8071be777158/7f8e8980-75f8-4e5a-908f-8a3f723f2ef0.png)
4. Repeat steps 2 and 3 to add more attributes. ## Reorganize elements by DOM (tabs) order DOM order is used by assistive technologies to help some visitors find the information they need ([Learn more](https://support.wix.com/en/article/studio-editor-reorganizing-elements-by-dom-order)). When a site visitor clicks "Tab" in your Blocks widget, it goes through your elements in the same order that they appear in the **Layers** panel (from bottom to top). You can edit this order as you wish, by dragging the elements in the layers panel. ![](https://wixmp-833713b177cebf373f611808.wixmp.com/images/11a7d1450478533ffbc9ba27976b6373.png) Go to **Preview** to see how it works. --- > Portal Navigation: > > - Append `.md` to any URL under `https://dev.wix.com/docs/` to get its markdown version. > - Pages are either content pages (article or reference text) or menu pages (a list of links to child pages). > - To get a menu page, truncate any URL to a parent path and append `.md` (e.g. `https://dev.wix.com/docs/sdk.md`, `https://dev.wix.com/docs/sdk/core-modules.md`). > - Top-level index of all portals: https://dev.wix.com/docs/llms.txt > - Full concatenated docs: https://dev.wix.com/docs/llms-full.txt ## Resource: Copy Widgets from App to App ## Article: Copy Widgets from App to App ## Article Link: https://dev.wix.com/docs/build-apps/develop-your-app/develop-an-app-with-blocks/site-widgets/copy-widgets-from-app-to-app.md ## Article Content: # Copy Widgets from App to App
**Editor compatibility** Wix Blocks apps aren't supported in the Wix Harmony editor. Existing Blocks apps remain available for purchase on the Wix App Market for Wix Editor and Wix Studio sites. To learn more, see [About Wix Harmony and Blocks](https://dev.wix.com/docs/build-apps/develop-your-app/develop-an-app-with-blocks/about-wix-harmony-and-blocks.md).
When copying and pasting a widget between apps, all widget elements and code are transferred to the new app. However, any resources external to the widget, such as database collections, code files, or dashboard pages, are not included. After pasting a widget, review the settings and code to ensure everything works as expected in the new app. **To copy and paste a widget:** 1. Click the ![more-actions](https://d2x3xhvgiqkx42.cloudfront.net/12345678-1234-1234-1234-1234567890ab/378fd532-728d-473b-8f03-30140bda59af/2021/05/24/2136be44-e369-4942-b48e-e5af43b32124/a6be021c-326d-40ee-bfdd-1ceb207c6077.jpg) icon next to the widget name. 1. Click **Copy**. 1. Go to the app where you want to paste the widget. 1. Click the ![more-actions](https://d2x3xhvgiqkx42.cloudfront.net/12345678-1234-1234-1234-1234567890ab/378fd532-728d-473b-8f03-30140bda59af/2021/05/24/2136be44-e369-4942-b48e-e5af43b32124/a6be021c-326d-40ee-bfdd-1ceb207c6077.jpg) icon next to any widget name. 1. Click **Paste**. ![Copy paste widget](https://wixmp-833713b177cebf373f611808.wixmp.com/images/e72aa03c444f0786d4e245d75342766f.png) > **Note:** If your browser is blocking the copy-paste action, set it to allow copying to the clipboard. Look for the definition in your browser's privacy or security settings. ## Adjust Widget Settings Not Copied The following widget settings are not copied automatically and must be updated manually: - [Data-binding](https://dev.wix.com/docs/build-apps/develop-your-app/develop-an-app-with-blocks/cms-collections-in-blocks/connect-elements-to-collection-fields-with-no-code.md): Elements connected to a collection using no-code data-binding will lose their connection. Reconnect these elements to collections in the new app. - Animations: Animations applied to widget elements will not transfer. Reapply them in the new app. - [Installation settings](https://dev.wix.com/docs/build-apps/develop-your-app/develop-an-app-with-blocks/deploy-and-manage-blocks-apps/configure-blocks-installation-settings.md): Installation settings configured for the widget must be set up again in the new app. - [Nested widgets](https://dev.wix.com/docs/build-apps/develop-your-app/develop-an-app-with-blocks/site-widgets/add-nested-widgets-in-blocks.md): Nested widgets are not copied automatically. Copy each nested widget separately and add them back to the parent widget in the new app. ## Update the namespace If your widget code references the app [namespace](https://dev.wix.com/docs/build-apps/develop-your-app/develop-an-app-with-blocks/code-in-blocks/creating-a-namespace-for-your-app.md), it will retain the namespace of the original app. Update all instances of the namespace in the widget's code to match the namespace of the new app. --- > Portal Navigation: > > - Append `.md` to any URL under `https://dev.wix.com/docs/` to get its markdown version. > - Pages are either content pages (article or reference text) or menu pages (a list of links to child pages). > - To get a menu page, truncate any URL to a parent path and append `.md` (e.g. `https://dev.wix.com/docs/sdk.md`, `https://dev.wix.com/docs/sdk/core-modules.md`). > - Top-level index of all portals: https://dev.wix.com/docs/llms.txt > - Full concatenated docs: https://dev.wix.com/docs/llms-full.txt ## Resource: Develop an item page with Blocks ## Article: Develop a Business Solution Item Page with Blocks ## Article Link: https://dev.wix.com/docs/build-apps/develop-your-app/develop-an-app-with-blocks/site-widgets/develop-an-item-page-with-blocks.md ## Article Content: # Develop a Business Solution Item Page with Blocks When you [build a business solution on top of the Wix eCommerce platform](https://dev.wix.com/docs/build-apps/get-started/tutorials/common-use-cases/build-a-wix-e-com-business-solution.md), you need at least one page in your app that exposes eCommerce functionality and allows site visitors to make purchases. This is known as an item page. When a site owner installs your app on their site, any item pages you create are included in the installation and displayed to site visitors on the site. An item page displays information about your item, including images. It uses the [Wix eCommerce frontend API](https://dev.wix.com/docs/sdk/frontend-modules/ecom/introduction.md) to allow site visitors to view their cart and navigate to checkout from the item page. An example of an item page is the Wix Stores product page. This page lets a customer on a site view details about a product, and updates the customer’s cart or navigates to checkout when the customer clicks certain buttons. The product page is installed automatically whenever a user adds Wix Stores to their site. ![Stores item page example](https://wixmp-833713b177cebf373f611808.wixmp.com/images/f7f2702328a8f63bd4fc6d4879923297.png) This article explains how to create an item page in [Blocks](https://dev.wix.com/docs/build-apps/develop-your-app/develop-an-app-with-blocks/about-wix-blocks.md) as part of your business solution. ## Before you begin Before getting started, make sure that you: - Create an app on the [Custom Apps page](https://manage.wix.com/account/custom-apps). - Configure your app to [install Wix eCom](https://dev.wix.com/docs/rest/business-solutions/e-commerce/wix-e-commerce-platform-handbook/get-started/apps/build-a-business-solution.md#step-1--set-up-automatic-installation-of-the-ecommerce-app). - Create an item catalog and implement the [Catalog service plugin](https://dev.wix.com/docs/rest/business-solutions/e-commerce/service-plugins/catalog-service-plugin/introduction.md). ## Step 1 | Design a site widget in Blocks 1. In the [Custom Apps page](https://dev.wix.com/apps), select the app you want to add the item page to and go to [Extensions](https://dev.wix.com/app-selector?title=Select+an+App\&primaryButtonText=Select+Site\&actionUrl=https%3A%2F%2Fdev.wix.com%2Fapps%2F%7BappId%7D%2Fextensions). 2. Click **+ Create Extension** and in the modal that appears, search for the **Widget** extension labeled Wix Blocks. ![Create a widget extension on Blocks](https://wixmp-833713b177cebf373f611808.wixmp.com/images/b1ea9d19905c987a31cb373732585b6d.png) 3. Click **+ Create on Blocks**. This opens the widget extension in a new page on Wix Blocks. 4. Use the Blocks Editor to design your widget to match your app’s needs. For example, if you want to create an item page that displays all available items on a site, you can add a repeater element. Or, you can combine basic elements like buttons and images to create a product page similar to Wix Stores’. 5. Connect your item catalog to the widget. If you’re hosting the catalog externally, fetch the data from the external service to populate the widget. This completes the design of your site widget. ## Step 2 | Add code to the widget to support eCommerce functionality At a minimum, your item page code should do the following: - Add items to the cart using the [`catalogReference` object](https://dev.wix.com/docs/rest/business-solutions/e-commerce/service-plugins/catalog-service-plugin/handle-item-variants.md#the-catalogreference-object). - Navigate the visitor to a cart view or checkout page. We’ll show you an example of some basic code that does this below. To add code to your item page in Blocks: 1. At the bottom of the Blocks Editor, open the [code section](https://dev.wix.com/docs/build-apps/develop-your-app/develop-an-app-with-blocks/get-started/a-blocks-app-workflow.md#add-widget-code) for your widget. 2. At the top of the code section, add the following import statements: ```javascript import {currentCart} from 'wix-ecom-backend'; import wixEcomFrontend from "wix-ecom-frontend"; ``` These lines import 2 modules that are necessary for your item page: - The [`currentCart`](https://dev.wix.com/docs/sdk/backend-modules/ecom/current-cart/setup.md) module from the Wix eCom backend API. This module lets you update the current cart on a site and create the checkout. - The [Wix eCom frontend API](https://dev.wix.com/docs/velo/api-reference/wix-ecom-frontend/introduction.md): This API lets you update the cart UI and navigate to the cart or checkout page. 3. Call `addToCurrentCart()` to add an item to the current site visitor’s cart. As part of the method arguments, pass it an object containing a reference to your item catalog. Here’s an example of what that looks like: ```javascript const catalogReferenceObject = { lineItems: [{ catalogReference: { appId: "10e5b2b7-f4cf-4063-ad08-01f38a114b48", catalogItemId: "abc123" }, quantity: 1 }] }; // Call addToCurrentCart() with the reference currentCart.addToCurrentCart(catalogReferenceObject); ``` The important part of this function is the `catalogReferenceObject` that is passed to `addToCurrentCart()`. Whenever your code uses the Wix eCommerce flow, you need to pass the eCommerce platform a catalog reference so it can retrieve the item information. The code above uses hard-coded values as an example, but normally you collect these values dynamically. For example, you might retrieve values from a repeater item. The object contains 3 required parameters: - The `appId` is the ID of your custom app. You can find this in your app’s [dashboard page](https://dev.wix.com/app-selector?title=Select+an+App\&primaryButtonText=Select+Site\&actionUrl=https%3A%2F%2Fdev.wix.com%2Fapps%2F%7BappId%7D%2F). The app ID tells the eCommerce platform which app it’s working with, so it can look up the URI of your catalog implementation. - The `catalogItemId` tells Wix eCom which item in the catalog to request information for. The ID can take any format you choose, as long as it matches an ID in your item catalog. - `quantity` indicates the requested number of items. Include an optional `options` parameter to request information for different [variants](https://dev.wix.com/docs/rest/business-solutions/e-commerce/service-plugins/catalog-service-plugin/handle-item-variants.md) of an item. For example, if an item can come in different sizes and colors, your catalog reference might look something like this: ```javascript const catalogReferenceObject = { lineItems: [{ catalogReference: { appId: "10e5b2b7-f4cf-4063-ad08-01f38a114b48", catalogItemId: "cdf456", options: { color: "Blue", size: "L" } }, quantity: 1 }] }; currentCart.addToCurrentCart(catalogReferenceObject); ``` 4. Add a clickable element such as an **Add to cart** button, and call `addToCurrentCart()` in the element’s `onClick()` handler. Inside the provided `onReady()` function, add logic that navigates customers to the checkout or cart pages using the eCom frontend API. For example, if your widget contains a **View Cart** button, call [`navigateToCartPage()`](https://dev.wix.com/docs/velo/api-reference/wix-ecom-frontend/navigate-to-cart-page.md) when it’s clicked. Before navigating to the cart view, make sure to call the [`refreshCart()`](https://dev.wix.com/docs/velo/api-reference/wix-ecom-frontend/refresh-cart.md) function. This function updates the cart UI with the latest data, and ensures that all items selected by the customer appear in the cart view. Here’s an example of logic that adds an item to the cart and then navigates to the cart page: ```javascript $w.onReady(function () {     $w('#addToCartButton').onClick(async () => {         await addToCurrentCart();         await wixEcomFrontend.refreshCart();         wixEcomFrontend.navigateToCartPage();     }) }); ``` Here’s a complete example: ```js import {currentCart} from 'wix-ecom-backend'; import wixEcomFrontend from "wix-ecom-frontend"; $w.onReady(function () {   $w('#addToCartButton').onClick(async () => { const catalogRef = {         lineItems: [{             catalogReference: {                 appId: "538b878c-03c3-477f-b5bd-74f493aa86b5",                 catalogItemId: "abc123"             },             quantity: 1         }]     };     await addToCurrentCart(catalogRef);     await wixEcomFrontend.refreshCart();   wixEcomFrontend.navigateToCartPage();    }) }); ``` Use this code as a starting point for your own logic. Here are a few suggestions for building upon the example code: - Listen to [onCartChange()](https://dev.wix.com/docs/sdk/frontend-modules/ecom/on-cart-change.md) to dynamically update the value of `quantity`, based on site visitor input. - Add support for [removing line items from the cart](https://dev.wix.com/docs/sdk/backend-modules/ecom/current-cart/remove-line-items-from-current-cart.md). * Add a **Buy Now** button to your widget and implement a flow to take the customer directly to the checkout page. A "Buy now" flow skips the cart view, so you don’t need to call `refreshCart()`. When a customer clicks the **Buy Now** button, [create a checkout directly](https://dev.wix.com/docs/sdk/backend-modules/ecom/checkout/create-checkout.md) to get a checkout ID, then pass that ID to [`navigateToCheckoutPage()`](https://dev.wix.com/docs/sdk/frontend-modules/ecom/navigate-to-checkout-page.md). You now have a fully functional site widget. ## Step 3 | Add your widget to a site page extension You want your item page to be added automatically to a site whenever a user installs your app. To make sure this happens, do the following steps: 1. In the Wix Blocks editor, go to the **Wix Blocks** menu in the top left corner and select **Dashboard**. This opens your app dashboard. ![View Blocks dashboard](https://wixmp-833713b177cebf373f611808.wixmp.com/images/fe6a36f1e97bfa74667364b275503dc7.png) 2. In your app dashboard, go to the [Extensions](https://dev.wix.com/app-selector?title=Select+an+App\&primaryButtonText=Select+Site\&actionUrl=https%3A%2F%2Fdev.wix.com%2Fapps%2F%7BappId%7D%2Fextensions) page. 3. Click **+ Create Extension**. In the modal that opens, select the **Site Page** extension. 4. Give your page a name and ID. The name is visible to users on a site. The ID is not visible to users and is used to refer to the page in code. Configure the other settings as necessary. 5. Under **Add widgets to this page**, click **+ Add Widgets** and select the site widget you created in the previous steps. Click **Save** to save the site page extension. 6. Return to the home page of your app dashboard. Under **Building your app**, click **Installation settings** > **Manage Settings**. ![Installation settings](https://wixmp-833713b177cebf373f611808.wixmp.com/images/8d5b5f8cd896e8fd467f48e591abdc7c.png) 7. Under **Installation**, select **Added to a site page** and make sure your widget is added to a page. Select the site page extension you created. ![Site page config](https://wixmp-833713b177cebf373f611808.wixmp.com/images/063526bbc5e72385b02c86b91e9d1a8b.png) Finish configuring the remaining settings and click **Save**. Now, when a user installs your app, the site page extension with the widget you created will be added automatically to the site. ## Step 4 | Test your item page on a site Now that you have a complete item page with code, you can test it on a site to make sure it works. We recommend installing and testing on a [premium test site](https://dev.wix.com/docs/build-apps/launch-your-app/app-submission/test-your-app-on-a-premium-site.md). 1. Return to your app in the app dashboard. 2. Click **Test App** > **Editor**. 3. Select a site to install and test the app on. Wix takes you to the selected test site. Click **Add to Site** to add your app and agree to the terms of use. This adds the app, along with the item page, to your site. 4. Publish your site and go to your item page. Test your widget by clicking on various buttons. Make sure that it navigates to the correct pages, and that the cart updates appropriately. ## See also - [Wix App Developers: Build a New eCommerce Business Solution](https://dev.wix.com/docs/build-apps/get-started/tutorials/common-use-cases/build-a-wix-e-com-business-solution.md) - [About the eCommerce Catalog Service Plugin](https://dev.wix.com/docs/rest/business-solutions/e-commerce/service-plugins/catalog-service-plugin/introduction.md#about-the-ecommerce-catalog-service-plugin) - [Tutorial | Build an eCommerce Business Solution](https://dev.wix.com/docs/build-apps/get-started/tutorials/tutorial-build-an-e-commerce-business-solution/overview.md) --- > Portal Navigation: > > - Append `.md` to any URL under `https://dev.wix.com/docs/` to get its markdown version. > - Pages are either content pages (article or reference text) or menu pages (a list of links to child pages). > - To get a menu page, truncate any URL to a parent path and append `.md` (e.g. `https://dev.wix.com/docs/sdk.md`, `https://dev.wix.com/docs/sdk/core-modules.md`). > - Top-level index of all portals: https://dev.wix.com/docs/llms.txt > - Full concatenated docs: https://dev.wix.com/docs/llms-full.txt ## Resource: About Site Plugins in Blocks ## Article: About Site Plugins in Blocks ## Article Link: https://dev.wix.com/docs/build-apps/develop-your-app/develop-an-app-with-blocks/site-plugins/about-site-plugins-in-blocks.md ## Article Content: # About Site Plugins in Blocks
**Editor compatibility** Wix Blocks apps aren't supported in the Wix Harmony editor. Existing Blocks apps remain available for purchase on the Wix App Market for Wix Editor and Wix Studio sites. To learn more, see [About Wix Harmony and Blocks](https://dev.wix.com/docs/build-apps/develop-your-app/develop-an-app-with-blocks/about-wix-harmony-and-blocks.md).
With site plugins, you can create interactive and feature-rich components that seamlessly integrate into Wix's business solutions (such as Wix Stores and Wix Bookings), extending their functionality and user experience. [Learn more about site plugins](https://dev.wix.com/docs/build-apps/develop-your-app/extensions/site-extensions/site-plugins/about-site-plugin-extensions.md) Use the following resources to get started with site plugins on Blocks: * [Developer guide](https://dev.wix.com/docs/build-apps/develop-your-app/develop-an-app-with-blocks/site-plugins/build-a-site-plugin-in-blocks.md): Learn how to build a site plugin from scratch with our comprehensive guide. * [Tutorial](https://dev.wix.com/docs/build-apps/get-started/tutorials/tutorial-create-a-site-plugin-for-the-wix-bookings-service-page.md): Gain practical experience by building a working site plugin through our detailed tutorial. * [App template](https://dev.wix.com/apps-templates/template?id=086a1107-3d84-43cc-992e-738055e01547): Kickstart your plugin development with a template that demonstrates how to build a site plugin for the Wix Stores product page. --- > Portal Navigation: > > - Append `.md` to any URL under `https://dev.wix.com/docs/` to get its markdown version. > - Pages are either content pages (article or reference text) or menu pages (a list of links to child pages). > - To get a menu page, truncate any URL to a parent path and append `.md` (e.g. `https://dev.wix.com/docs/sdk.md`, `https://dev.wix.com/docs/sdk/core-modules.md`). > - Top-level index of all portals: https://dev.wix.com/docs/llms.txt > - Full concatenated docs: https://dev.wix.com/docs/llms-full.txt ## Resource: Build a Site Plugin in Blocks ## Article: Add a Site Plugin Extension Using Wix Blocks ## Article Link: https://dev.wix.com/docs/build-apps/develop-your-app/develop-an-app-with-blocks/site-plugins/build-a-site-plugin-in-blocks.md ## Article Content: # Build a Site Plugin in Blocks
**Editor compatibility** Wix Blocks apps aren't supported in the Wix Harmony editor. Existing Blocks apps remain available for purchase on the Wix App Market for Wix Editor and Wix Studio sites. To learn more, see [About Wix Harmony and Blocks](https://dev.wix.com/docs/build-apps/develop-your-app/develop-an-app-with-blocks/about-wix-harmony-and-blocks.md).
A [site plugin](https://dev.wix.com/docs/build-apps/develop-your-app/extensions/site-extensions/site-plugins/about-site-plugin-extensions.md) is a type of component that site builders can place in designated locations (called *slots*) within Wix apps. Site plugins extend the functionality of their host by providing additional Ul elements and business logic. To build a site plugin, you need to do the following: * In Wix Blocks, design your site plugin's UI and code its business logic. * In the [app dashboard](https://manage.wix.com/account/custom-apps) in Wix Studio, set up your app's extensions, authentication, permissions, and more. You can create a new app for your site plugin or add it to an existing app. > **Checkout plugins** > If you're developing a site plugin for the checkout page, there are some special instructions that you must follow. Make sure to pay close attention to the dedicated notes throughout this article. ## Step 1 | Design your site plugin in Wix Blocks 1. Open an existing Blocks app or [create a new app](https://support.wix.com/en/article/wix-blocks-creating-an-app-and-opening-it). 2. Open the **App Interface** panel, click **+ Create Extension**, and select **Plugin**. 3. In the **Create Plugin** panel, do the following: * Enter your plugin's name. This is the name that will be shown to users in the editor. * Select the Wix app the your plugin extends. The selected app is automatically [added as a dependency](https://dev.wix.com/docs/build-apps/develop-your-app/develop-an-app-with-blocks/deploy-and-manage-blocks-apps/set-wix-app-dependencies-in-blocks.md). * Select the slots to which your plugin can be added. Learn more about [available slots for each app](https://dev.wix.com/docs/build-apps/develop-your-app/extensions/site-extensions/site-plugins/supported-wix-app-pages/about-slots.md). > **Note**: You can change these settings at any time in the [plugin's extension page in the app dashboard](#step-5--configure-your-plugins-settings-in-your-app-dashboard). 4. Click **Create**. 5. Click ![add-elements-icon](https://wixmp-833713b177cebf373f611808.wixmp.com/images/da41587896ba29b80aef315adf3fc17c.png) **Add Elements** to open the **Elements** panel. 6. Drag and drop the elements you need, and adjust their layout and design. Make sure to follow our [design guidelines](https://support.wix.com/en/article/wix-blocks-design-guidelines-for-applications). ## Step 2 | Code your plugin Use Wix Blocks to [code your plugin’s business logic](https://dev.wix.com/docs/build-apps/develop-your-app/develop-an-app-with-blocks/code-in-blocks/about-coding-in-blocks.md). Plugins can use [Wix App APIs](https://dev.wix.com/docs/build-apps/get-started/overview/integrating-with-wix-s-business-solutions.md#apis) to access the site’s business data (such as Stores or Bookings data). Depending on your implementation, your plugin may also need to communicate with external servers. ![plugin-architecture](https://wixmp-833713b177cebf373f611808.wixmp.com/images/cebf254ae4edc604ae9038330a5635ed.png) ### Use the plugin's API To enable site plugins to communicate with their hosts, each slot supports an API that provides data about the plugin's context (for example the `productId` of the current product on the Product page). Learn more about the [plugin APIs supported on each app page](https://dev.wix.com/docs/build-apps/develop-your-app/extensions/site-extensions/site-plugins/supported-wix-app-pages/about-slots.md). To use the plugin API in Blocks, you first need to add the [properties](https://dev.wix.com/docs/build-apps/develop-your-app/develop-an-app-with-blocks/widget-api/blocks-widget-properties.md) and [functions](https://dev.wix.com/docs/build-apps/develop-your-app/develop-an-app-with-blocks/widget-api/blocks-widget-functions.md) provided by the host widget to the plugin's Widget API. You can then use your plugin's [`onPropsChanged()` function](https://dev.wix.com/docs/velo/velo-only-apis/$widget/on-props-changed.md) to get the values set by the host widget, for example: ```js $widget.onPropsChanged((oldProps, newProps) => { const productId = newProps.productId; } ``` ## Step 3 | Configure your plugin’s editing experience > **Checkout plugins** > Because the checkout page is not available in the Wix editors, any options for customizing a checkout plugin's appearance or functionality must be exposed through your app's [dashboard page](#step-4--build-your-apps-dashboard-page) or through your own external interface. In the [Blocks Configuration tab](https://support.wix.com/en/article/wix-blocks-about-configuration) you determine how site builders will interact with your plugin when they add it to their site using any of the Wix editors. You have full control over what users will be able to change in the widget’s design and layout and how it behaves in editing time. You can also build an integrated settings panel, enabling site builders to customize the plugin. ## Step 4 | Build your app's dashboard page > **Note:** Some plugins may not support automatic addition upon installation. If your plugin isn't added automatically, create a dashboard page to provide users with a way to add the plugin to their site. If your plugin requires a back office management interface, you can create one either within the Wix dashboard, or as an external dashboard on a third-party platform. [Learn how to build a dashboard page to manage your site plugin](https://dev.wix.com/docs/build-apps/develop-your-app/extensions/site-extensions/site-plugins/build-a-dashboard-page-to-manage-your-site-plugin.md) ## Step 5 | Configure your plugin's settings in your app dashboard You can configure various settings, including the plugin's installation settings and market listing, in your app's site plugin extension page in the [app dashboard](https://manage.wix.com/account/custom-apps). You can navigate to this page directly from the Blocks editor. Your plugin's market listing determines how it will appear to users in the [plugin explorer in the editors](https://dev.wix.com/docs/build-apps/develop-your-app/extensions/site-extensions/site-plugins/about-site-plugin-extensions.md), including the plugin's name, icon, and teaser. > **Note**: The plugin's market listing is different from the [app's market listing](https://dev.wix.com/docs/build-apps/launch-your-app/market-listing/about-market-listings.md), which determines how the entire app appears in the [Wix App Market](https://www.wix.com/app-market). 1. In the **Widgets and Design** panel in the left sidebar, hover over your plugin's name and click the **Show More** ![more-actions](https://wixmp-833713b177cebf373f611808.wixmp.com/images/1fad6d86c2244770d4b4babf76455373.jpeg) icon, and then click **Plugin Settings**. The app dashboard opens in a new tab, showing your app's site plugin extension page. 2. Configure the following: * **Plugin name**: The plugin name that is displayed to users. * **Which Wix app does it extend?**: The [Wix app](https://dev.wix.com/docs/rest/articles/getting-started/wix-business-solutions.md) for which you're building the plugin. * **Slots this plugin can be added to**: Select one or more [slots](https://dev.wix.com/docs/build-apps/develop-your-app/extensions/site-extensions/site-plugins/supported-wix-app-pages/about-slots.md) that are appropriate for your plugin. Select slots in order of priority. If none of the selected slots are available, users can choose to replace a plugin that’s already been added. * **Add this plugin automatically to the site**: Whether the plugin is automatically added to a slot when a user installs your app. > **Notes:** > + If you set your plugin to be automatically added to a slot on installation, it's placed in the first available slot according to the order you defined. If that slot is occupied, it's added in the next available slot, and so on. If there are no available slots, it won't be added. > + Some plugins may not support automatic addition upon installation. If your plugin isn't added automatically, [create a dashboard page to manage your site plugin](https://dev.wix.com/docs/build-apps/develop-your-app/extensions/site-extensions/site-plugins/build-a-dashboard-page-to-manage-your-site-plugin.md). * **Teaser**: A short promotional description for your plugin's market listing. * **Icon**: An icon for your plugin's market listing. Upload a square JPG or PNG file. 3. To apply changes made in the app dashboard, go back to the Blocks editor and build the app again to create a new version. 4. If your app is already approved and published, publish a new version in the app dashboard. ## Step 6 | Test and preview Your unpublished plugins are available for installation in the editors when you're logged in with your developer account. This makes it easy to preview and test your plugin in a real environment. > **Checkout plugins** > If you're developing a plugin for the checkout page, you won't be able to test it in the editor. See how to [test a checkout plugin](#test-a-plugin-for-the-checkout-page). To test your plugin in the editor: 1. Create a site and install the Wix app that your plugin extends. 2. Go to the page on which you want to install your plugin, and click the host widget's **Plugin** icon. Your unpublished plugins will appear in the plugin explorer. 3. Hover over your plugin, and then click **Add**. When prompted for consent, select the checkbox and click **Agree & Add**. Once you install your plugin on a site, you can preview or publish the site to test the plugin's functionality and make sure it's working properly. ### Test a plugin for the checkout page If you're developing a plugin for the checkout page, make sure you've set up a way to [install your plugin from the dashboard](https://dev.wix.com/docs/build-apps/develop-your-app/extensions/site-extensions/site-plugins/build-a-dashboard-page-to-manage-your-site-plugin.md) and then do the following: 1. [Create a Premium development site](https://dev.wix.com/docs/build-apps/launch-your-app/app-distribution/test-your-app-on-a-premium-site.md). Select Wix Stores as the business solution. 2. Publish the site. 3. In your app's dashboard, from the **Test Your App** menu, install your app on the development site. 4. Go to the site's dashboard, navigate to your app's dashboard page, and add the plugin to the checkout page. 5. [Preview the checkout process](https://support.wix.com/en/article/wix-stores-previewing-the-checkout-process) on your development site. ## Step 7 | Submit and publish your plugin When you’ve finished building and testing your plugin, you’re ready to launch and monetize your app. Learn more about [submitting your app for review](https://dev.wix.com/docs/build-apps/launch-your-app/app-distribution/about-app-distribution.md). ## See also - [Tutorial | Create an App in Wix Blocks](https://dev.wix.com/docs/build-apps/get-started/quick-start/create-an-app-with-wix-blocks.md) - [Tutorial | Create a Site Plugin for the Wix Stores Product Page](https://dev.wix.com/docs/build-apps/get-started/tutorials/tutorial-create-a-site-plugin-for-the-wix-stores-product-page.md) - [Tutorial | Create a Site Plugin for the Wix Bookings Service Page](https://dev.wix.com/docs/build-apps/get-started/tutorials/tutorial-create-a-site-plugin-for-the-wix-bookings-service-page.md) --- > Portal Navigation: > > - Append `.md` to any URL under `https://dev.wix.com/docs/` to get its markdown version. > - Pages are either content pages (article or reference text) or menu pages (a list of links to child pages). > - To get a menu page, truncate any URL to a parent path and append `.md` (e.g. `https://dev.wix.com/docs/sdk.md`, `https://dev.wix.com/docs/sdk/core-modules.md`). > - Top-level index of all portals: https://dev.wix.com/docs/llms.txt > - Full concatenated docs: https://dev.wix.com/docs/llms-full.txt ## Resource: About Dashboard Pages in Blocks ## Article: About Dashboard Pages in Blocks ## Article Link: https://dev.wix.com/docs/build-apps/develop-your-app/develop-an-app-with-blocks/dashboard-pages/about-dashboard-pages-in-blocks.md ## Article Content: # About Dashboard Pages in Blocks
**Editor compatibility** Wix Blocks apps aren't supported in the Wix Harmony editor. Existing Blocks apps remain available for purchase on the Wix App Market for Wix Editor and Wix Studio sites. To learn more, see [About Wix Harmony and Blocks](https://dev.wix.com/docs/build-apps/develop-your-app/develop-an-app-with-blocks/about-wix-harmony-and-blocks.md).
Dashboard pages are administrative pages you can add to the dashboard of a Wix site. They do not appear on the live site, so site visitors never see them. However, dashboard pages are visible to site admins with the required permissions. [Learn more about dashboard pages](https://dev.wix.com/docs/build-apps/develop-your-app/extensions/dashboard-extensions/dashboard-pages/about-dashboard-page-extensions.md) Blocks enables you to add dashboard pages to your app. Dashboard pages are the back office of your app, allowing site builders to manage the app's data and settings. When a site builder installs your Blocks app on a site, the dashboard pages appear on their site's Dashboard, under **Apps** and the app name. ![see the dashboard in the editor](https://wixmp-833713b177cebf373f611808.wixmp.com/images/384ef7fc12c8dd296c297269fd7d3f61.png) Use the following resources to get started with dashboard pages on Blocks: * [Developer guide](https://dev.wix.com/docs/build-apps/develop-your-app/develop-an-app-with-blocks/dashboard-pages/build-a-dashboard-page-in-blocks.md): Learn how to build a Dashboard page from scratch with our comprehensive guide. * [App templates](https://dev.wix.com/apps-templates?filter=blocks): Explore Blocks templates that demonstrate how to build dashboard pages. * [UX guidelines](https://dev.wix.com/docs/build-apps/develop-your-app/develop-an-app-with-blocks/dashboard-pages/ux-guidelines-for-dashboard-pages-in-blocks.md): Learn how to build beautiful dashboard pages that serve your goals. --- > Portal Navigation: > > - Append `.md` to any URL under `https://dev.wix.com/docs/` to get its markdown version. > - Pages are either content pages (article or reference text) or menu pages (a list of links to child pages). > - To get a menu page, truncate any URL to a parent path and append `.md` (e.g. `https://dev.wix.com/docs/sdk.md`, `https://dev.wix.com/docs/sdk/core-modules.md`). > - Top-level index of all portals: https://dev.wix.com/docs/llms.txt > - Full concatenated docs: https://dev.wix.com/docs/llms-full.txt ## Resource: Build a Dashboard Page in Blocks ## Article: Add a dashboard page extension using Blocks ## Article Link: https://dev.wix.com/docs/build-apps/develop-your-app/develop-an-app-with-blocks/dashboard-pages/build-a-dashboard-page-in-blocks.md ## Article Content: # Build Dashboard Pages in Blocks
**Editor compatibility** Wix Blocks apps aren't supported in the Wix Harmony editor. Existing Blocks apps remain available for purchase on the Wix App Market for Wix Editor and Wix Studio sites. To learn more, see [About Wix Harmony and Blocks](https://dev.wix.com/docs/build-apps/develop-your-app/develop-an-app-with-blocks/about-wix-harmony-and-blocks.md).
Dashboard Pages are the back-office of your app, allowing site builders to manage the app's data and settings. You can see examples of Dashboard Pages in the Wix apps, such as Stores and Bookings.
Important: Read our [UX guidelines](https://dev.wix.com/docs/build-apps/develop-your-app/develop-an-app-with-blocks/dashboard-pages/ux-guidelines-for-dashboard-pages-in-blocks.md) to build useful and successful Dashboard Pages.
Examples: To see examples of dashboard pages, open the following templates and go to the **Dashboard Interface** ![dashboard](https://wixmp-833713b177cebf373f611808.wixmp.com/images/e08a69776974d11b95c2de12fb51e1d3.png) tab. - [Repeater](https://dev.wix.com/apps-templates/template?id=a4a7246f-4644-48ce-81e7-2a86aa74d9e5&http_referrer=documentation) - [Recipe list](https://dev.wix.com/apps-templates/template?id=512a7d8a-1666-40c2-9586-25874d2f69b4&http_referrer=documentation) Or, try out the [Coffee catalog tutorial](https://dev.wix.com/docs/build-apps/get-started/tutorials/tutorial-create-a-coffee-catalog-with-blocks.md), which uses multiple dashboard pages.
## Create a Dashboard Page To add dashboard pages to your Blocks app: 1. Click the **Dashboard Interface** ![dashboard](https://wixmp-833713b177cebf373f611808.wixmp.com/images/e08a69776974d11b95c2de12fb51e1d3.png)  icon in the left menu. 1. Click **Create Extension**. 1. Click **Dashboard Page**. The Dashboard Page you created includes: * A canvas where you can add elements, such as layout tools, buttons, input texts fields and so on. Blocks provides several template for a commonly used Dashboard user-interface (UI), which you can customize as you wish. Note our [UX guidelines](https://dev.wix.com/docs/build-apps/develop-your-app/develop-an-app-with-blocks/dashboard-pages/ux-guidelines-for-dashboard-pages-in-blocks.md) when designing the page. * A code section to add code to your dashboard.  ## Rename, reorder or hide your Dashboard Pages You can impact how users see your app's Dashboard Pages in their site menu. Click the **More Actions** ![more-actions](https://d2x3xhvgiqkx42.cloudfront.net/12345678-1234-1234-1234-1234567890ab/378fd532-728d-473b-8f03-30140bda59af/2021/05/24/2136be44-e369-4942-b48e-e5af43b32124/a6be021c-326d-40ee-bfdd-1ceb207c6077.jpg) icon next to the page's name to rename, reorder or hide it from the menu. ![multiple page actions](https://wixmp-833713b177cebf373f611808.wixmp.com/images/6d17d991d0cf09fd7107c95a8dea1182.png) **Naming rules:** - If you create **only one** Dashboard Page and rename it, users won't see its name. They will see it in their site's Dashboard menu, named after your app. - If you create **more than one** Dashboard Page, you can rename and reorder the pages. Users will see all the pages in their site's Dashboard menu, in a directory named under your app's name and with the names and order you determined in Blocks. ## Add code to your Dashboard Page Use your Dashboard Page's code section to add code to your Dashboard Page. Your code can include: * Business logic  * Code that handles data stored in your [app's collections](https://dev.wix.com/docs/build-apps/develop-your-app/develop-an-app-with-blocks/cms-collections-in-blocks/about-cms-collections-in-blocks.md) * Unique actions for Dashboard Pages using the [dashboard SDK](https://dev.wix.com/docs/sdk/host-modules/dashboard/introduction.md). To add code to your dashboard page, open your dashboard page and go to its code section (if you don't see the code section, click the **Maximize** ![](https://d2x3xhvgiqkx42.cloudfront.net/12345678-1234-1234-1234-1234567890ab/378fd532-728d-473b-8f03-30140bda59af/2023/04/19/14dd5d97-7610-4a3c-891d-7cc946cd53ca/6f9d41a3-d26c-42e7-a3c6-e39f36c1e4bb.png) icon). ## Assign an Action Button to the Dashboard Page One of the most common ways to open a Dashboard Page is from the Main Action Button in one of your widget's Action Buttons. To do this:  1. Go to the **Editor Experience** ![](https://d2x3xhvgiqkx42.cloudfront.net/12345678-1234-1234-1234-1234567890ab/21e446eb-7f73-4f2f-84b1-c6b77e64e45e/2024/04/25/5ad6e6ae-179c-4b7f-bb4e-ef9a1ad955fe/5c5b01ad-59b6-4913-aaeb-83dc7c46e8c1.png) **Configuration** tab. 2. Click on the widget or element that you want to configure.  3. Click **Edit Action Bar**.  4. Hover over the main action button (the left button). 5. Click **Action Button Settings**. 6. Select **Dashboard** and choose one of your dashboard pages.   ![action button settings](https://d2x3xhvgiqkx42.cloudfront.net/12345678-1234-1234-1234-1234567890ab/378fd532-728d-473b-8f03-30140bda59af/2023/04/19/9d436458-6241-4cda-866c-3ba1c1be8f72/301fc3fb-b4ba-4d6a-9cf2-239744a00f36.png) ## Open a Dashboard Page from a Custom Panel Adding a link to the Dashboard Page from a custom panel enhances its visibility and accessibility for users. - Link to the page from a panel button with [no code](https://dev.wix.com/docs/build-apps/develop-your-app/develop-an-app-with-blocks/editor-experience-panels/panel-button-rules-to-open-pages.md). - Use the `wix-editor` module to open the page using code. [See code example](https://dev.wix.com/docs/build-apps/develop-your-app/develop-an-app-with-blocks/dashboard-pages/open-a-blocks-dashboard-page-from-a-custom-panel.md) ## Open a Dashboard Page from another Dashboard Page Navigating between your Dashboard pages can create seamless workflows, such as a step-by-step wizard. Use the `dashboard` SDK to lead users from one Dashboard Page to another. [See code example](https://dev.wix.com/docs/build-apps/develop-your-app/develop-an-app-with-blocks/dashboard-pages/open-a-blocks-dashboard-page-from-a-custom-panel.md) ## Create a dashboard page for a list and another for individual items A common dashboard pattern involves creating two connected pages: one that displays a list of items (like products, orders, or users) and another that shows detailed information for individual items. This master-detail pattern allows users to browse through multiple items and then drill down into specific details. Learn how to implement this pattern using the dashboard SDK's `navigate()` and `observeState()` functions to pass data between pages. [See the complete guide](https://dev.wix.com/docs/build-apps/develop-your-app/develop-an-app-with-blocks/dashboard-pages/create-list-and-detail-dashboard-pages.md). ## Self hosted dashboard extensions You can also add [self hosted dashboard extensions](https://dev.wix.com/docs/build-apps/develop-your-app/frameworks/self-hosting/supported-extensions/dashboard-extensions/add-self-hosted-dashboard-page-extensions.md) to a Blocks app. To add a self hosted extension, go to the **Dashboard Interface** and click **Create Extension** > **Self-Managed Extensions**. --- > Portal Navigation: > > - Append `.md` to any URL under `https://dev.wix.com/docs/` to get its markdown version. > - Pages are either content pages (article or reference text) or menu pages (a list of links to child pages). > - To get a menu page, truncate any URL to a parent path and append `.md` (e.g. `https://dev.wix.com/docs/sdk.md`, `https://dev.wix.com/docs/sdk/core-modules.md`). > - Top-level index of all portals: https://dev.wix.com/docs/llms.txt > - Full concatenated docs: https://dev.wix.com/docs/llms-full.txt ## Resource: UX Guidelines for Dashboard Pages in Blocks ## Article: UX Guidelines for Dashboard Pages in Blocks ## Article Link: https://dev.wix.com/docs/build-apps/develop-your-app/develop-an-app-with-blocks/dashboard-pages/ux-guidelines-for-dashboard-pages-in-blocks.md ## Article Content: ## UX Guidelines for Designing Dashboard Pages in Blocks
**Editor compatibility** Wix Blocks apps aren't supported in the Wix Harmony editor. Existing Blocks apps remain available for purchase on the Wix App Market for Wix Editor and Wix Studio sites. To learn more, see [About Wix Harmony and Blocks](https://dev.wix.com/docs/build-apps/develop-your-app/frameworks/wix-blocks/about-wix-harmony-and-blocks.md).
Dashboard pages are the backoffice of your app, allowing site builders to manage the app's data and settings. When your app is installed on a site, the Dashboard page for your app will be part of the site Dashboard, alongside other apps from Wix. To make it easier for people to use your app, we recommend that you follow our suggested patterns when designing Dashboard pages. ## Screen sizes Dashboard pages in the Business Manager are viewed on a variety of desktop screen sizes, so aim to design layouts and content that work well on various screen sizes. Users should understand the purpose of a Dashboard page right away. The primary content should be revealed at the top area of the page, without asking users to scroll down. Content displayed in the **top 600** pixels of the page will be visible for the majority of our users. The dashboard page takes up the whole content area, with a width that's adaptable to screen size. ![screen size](https://wixmp-833713b177cebf373f611808.wixmp.com/images/b2ebc1bdaa5230f864b9204e52b61cd6.png) ## Elements Dashboard pages are designed with their own visual language and a dedicated design system. When designing your app’s Dashboard page, use elements from the **Dashboard Elements** section of the **Add Elements** panel, which contains a set of recommended elements. Note that Dashboard pages can’t contain widgets, so you will not see them in the **Add Elements** panel. ![dashboard elements](https://wixmp-833713b177cebf373f611808.wixmp.com/images/b7a3cf48bbe993406b8dec27ad764ba4.png) The **Design Patterns** section of the **Add Elements +** panel contains several basic recommended layouts for you to start designing your app’s Dashboard page. ![design patterns](https://wixmp-833713b177cebf373f611808.wixmp.com/images/b83ad47193dd861117f815a802078096.png) ## Layout The page layout defines the page structure, hierarchy, and rhythm. Choose a layout that decreases the amount of time a user needs to invest in a complex task. ![layout](https://wixmp-833713b177cebf373f611808.wixmp.com/images/ebf3cdd60e4a9a26db13be2f89d06957.png) In order to design a page with a great layout, it’s important to understand what the page content will be, how it will be segmented on the page, and how each segment will use the grid. ## Layout grids When designing your Dashboard page content, we recommend using a fluid grid layout with a fixed maximum width of 1248px. Such a grid should use columns that scale and resize the content that's placed on the grid accordingly. This means that content placement on a screen is always consistent. ### Columns For maximum flexibility, use a 12-column grid as a base when planning your page layout. Each column width is fluid and changes according to the page width. ![colunmns](https://wixmp-833713b177cebf373f611808.wixmp.com/images/34b948d03d7dfc393ed32492a62af74b.png) Such a 12-column grid will allow you to use column spans to construct layout regions of your page. Regions will be separated by a grid gutter. ![colunmns and rows](https://wixmp-833713b177cebf373f611808.wixmp.com/images/4d2695ebea5c1d2edc8c75caf2103add.png) ### Gutters Gutters are the gaps between the columns. Gutter width should have a fixed value of 24 px. ![images/gutters.png](https://wixmp-833713b177cebf373f611808.wixmp.com/images/e8aa25c1e2978ac277f272550c9d9c84.png) ### Using the grid on a page The page's content area should have 48px side margins and a 48px bottom margin. To arrange content inside of a page, use a 12-column grid. ![grid](https://wixmp-833713b177cebf373f611808.wixmp.com/images/fd2b9bdc0ad89f37e3eda8d7bc3f686f.png) A page's content area has a minimum width of 864 pixels (each grid column should be 50px wide). ![area size](https://wixmp-833713b177cebf373f611808.wixmp.com/images/e02144fe94868d45cb8d758a8deba93c.png) The maximum width of a page's content area should be 1248px (each column is 82px wide). Wider screen sizes should maintain a 1248px content area width. Side margins should automatically stretch to maintain content in a centered position. ![widget](https://wixmp-833713b177cebf373f611808.wixmp.com/images/d9f231e2adab7fa38b793998456f4b8c.png) A page can contain multiple layout regions of content (cards). Use a 24px gap between such cards both vertically and horizontally: ![cards](https://wixmp-833713b177cebf373f611808.wixmp.com/images/15a86cf3232cb3a3edeed4f1c4cf44a8.png) ## Layout intents Page layouts can be divided by intention into the following types: * Form * Display * Marketing * Wizard Let's describe these layouts. ## Form layout Forms allow users to fill-in data or edit existing data. Depending on the content, the form layout type can appear in two different ways: * 2/3 layout with an optional sidebar (8/4 column split) * Full width (12 columns) Both form page layouts include **Save** and **Cancel** actions in the header and footer areas. ### The 2/3 form layout ![2-3 layout](https://wixmp-833713b177cebf373f611808.wixmp.com/images/3078f47db561a6ca2136ecd85b7ba55f.png) The 2/3 layout provides the flexibility to expose a variety of content at the same time. Use this layout to: * Expose primary and secondary content at the same time * Keep the form easy to scan and understand The page content is easier to scan when text and data inputs have a set maximum width. Shorter lines are more pleasant to read and allow users to understand the content faster. When working on a form design, be thoughtful of the white space you use. Just like content, white space should have a purpose and intention. Use white space to: * Emphasize content * Highlight hierarchy * Group related content together ![form](https://wixmp-833713b177cebf373f611808.wixmp.com/images/947b48a32eead509afb41986eeb404cb.png) ### The full width form layout The full width form layout supports advanced needs. Use it when a form includes complex structures, such as a data table with inline editing. ![full widget layout](https://wixmp-833713b177cebf373f611808.wixmp.com/images/dbf68b35ab444b3d14f6cfca64041abe.png) Use the full width layout for forms that include complex structures such as tables: ![complete form](https://wixmp-833713b177cebf373f611808.wixmp.com/images/5706b883b3d25147b2f75ae5fa0efafb.png) ## The display layout Display pages showcase data or content in a corresponding layout. These pages do not accept input from the user side. They can contain minor actions such as data filtering. Here are some of use cases for display layout: * List or table * Grid * Dashboard * Empty state ## List or table display Lists or tables, display large databases and provide users with a quick overview. They allow users to manipulate and act on a database. Use a 12-column layout for lists and tables. Depending on the loading type, pagination may or may not be displayed at the end of the list. ![table](https://wixmp-833713b177cebf373f611808.wixmp.com/images/a4806a14c71f2781044ff6724dbcedf2.png) ![list](https://wixmp-833713b177cebf373f611808.wixmp.com/images/97c725062800682379feb473b17ddceb.png) ## Grid display Grids can display lists of different items: features, tools, photos, audio files, etc. There are multiple variations of grids available to use: * 2 columns * 3 columns * 4 columns * Custom ![grid 2 column](https://wixmp-833713b177cebf373f611808.wixmp.com/images/5ae2a7c72de1b51a7a757d285c6a1178.png) ![grid 3 column](https://wixmp-833713b177cebf373f611808.wixmp.com/images/79f558ec032756840a7d10a37556f6a2.png) ![grid 4 column](https://wixmp-833713b177cebf373f611808.wixmp.com/images/4b7c588fa06ca11297103f276c3c9de4.png) ![grid not even](https://wixmp-833713b177cebf373f611808.wixmp.com/images/576ee0a39b431f1873df9b8298cc1082.png) Selecting the right grid depends on the content you want to display. Before picking a type, you should think about: * The total amount of items that you want to show * The content that you need to display in each list item * What objects the list of items reflect. Sometimes lists reflect physical objects, such as photo albums. Photo albums tend to have a square shape most of the time in the physical world. You should stick to that shape in digital space as well to make it easily recognisable. Use a 6/6 column split to list features or tools with lengthy descriptions: ![marketing integrations](https://wixmp-833713b177cebf373f611808.wixmp.com/images/8f9d29efe500b10ef35162ffd9e7907d.png) Keep in mind that a layout that works in one case might not be the best option in another. If the list item has a number of text lines of different types, a 3/3/3/3 column split reveals more items above the fold than a 6/6 layout: ![layout 3-3-3-3](https://wixmp-833713b177cebf373f611808.wixmp.com/images/2be844fda553f1652e560b49ce329535.png) ## Dashboard Dashboards display different types of data on a specific topic. Feel free to use a combination of grid segments to display all the different types of information. ![dashboard](https://wixmp-833713b177cebf373f611808.wixmp.com/images/0e4703987c49abccd9b8671b7f976964.png) The number of columns to span the layout region across depends on the content. Use: * 3 or 4 columns: for lists of items, previews, marketing, statistics, and charts * 12 columns (full width): for tables and marketing content * 8 columns: for lists, tables with a few data columns, setup wizards, and charts * 6 columns: for lists, tables with a few data columns, and statistics Use 12 columns for marketing content to draw attention to it: ![split to categories](https://wixmp-833713b177cebf373f611808.wixmp.com/images/2876fcad7c49cdbd62532970bd5d18ae.png) Use a 6/6 column split to categorize features under the same section: ![list options](https://wixmp-833713b177cebf373f611808.wixmp.com/images/957abbfb5c5984f2ce88c46c45404202.png) Use a 3/3/3/3 layout to list the options of a feature that user can choose from: ![layout 3-3-3-3](https://wixmp-833713b177cebf373f611808.wixmp.com/images/2be844fda553f1652e560b49ce329535.png) Feel free to combine different grid for mixed data displays: ![mixed](https://wixmp-833713b177cebf373f611808.wixmp.com/images/6bd11dfbaaed7547cf15d5ec25b848e3.png) ### Empty state Use the full width layout for the empty state of a page to indicate that a feature or product: * Has no data yet * Has all data cleared * Is not set up yet (first time experience) ![empty](https://wixmp-833713b177cebf373f611808.wixmp.com/images/4f82a1f9c31ced6e0cd42150351d7876.png) Use the full width layout to clearly communicate that a page is empty, and add a clear CTA indicating what to do to fill the page with relevant content: ![CTA](https://wixmp-833713b177cebf373f611808.wixmp.com/images/55c75742370b287d067e5c26cebdf040.png) It's OK to combine the empty state with other layout elements such as marketing widgets or navigation elements: ![empty combined](https://wixmp-833713b177cebf373f611808.wixmp.com/images/5e8be7bebcd5d95e83f744e093cdcac2.png) ### Marketing A marketing layout can promote your app or products that site owners are not aware of yet. ![marketing](https://wixmp-833713b177cebf373f611808.wixmp.com/images/7b7144d2895dacd04b4e68e47a478be7.png) Marketing pages should be built using the dedicated Marketing Layouts compositions which you can find in the **Add Elements** panel. ![marketing pages](https://wixmp-833713b177cebf373f611808.wixmp.com/images/e39d863b077be54a66377c6ac38f5ab2.png) ### Wizard Wizard pages guide users through setting up a product or feature. They also split complex forms into steps so that they're easier for users to complete. ![wizard](https://wixmp-833713b177cebf373f611808.wixmp.com/images/53cad9d5d524544199ac8c0afae2b9b7.png) Create multiple Dashboard pages or use a Multi-State Box to split up complex forms or product setup into smaller steps of a wizard: ![wizard with multi-state](https://wixmp-833713b177cebf373f611808.wixmp.com/images/0fd1aaa4d8b9fd0a4348f185dd0e08b9.png) Remember that wizards need to have an explicit entry point and a final destination. After a user completes all the steps, they should end up on a relevant page: a dashboard, a details page, or any other relevant location. --- > Portal Navigation: > > - Append `.md` to any URL under `https://dev.wix.com/docs/` to get its markdown version. > - Pages are either content pages (article or reference text) or menu pages (a list of links to child pages). > - To get a menu page, truncate any URL to a parent path and append `.md` (e.g. `https://dev.wix.com/docs/sdk.md`, `https://dev.wix.com/docs/sdk/core-modules.md`). > - Top-level index of all portals: https://dev.wix.com/docs/llms.txt > - Full concatenated docs: https://dev.wix.com/docs/llms-full.txt ## Resource: Open a Blocks Dashboard Page from a Custom Panel ## Article: Using a Blocks Dashboard Page URL in a Blocks Custom Panel ## Article Link: https://dev.wix.com/docs/build-apps/develop-your-app/develop-an-app-with-blocks/dashboard-pages/open-a-blocks-dashboard-page-from-a-custom-panel.md ## Article Content: # Open a Dashboard Page in Blocks Using Code
**Editor compatibility** Wix Blocks apps aren't supported in the Wix Harmony editor. Existing Blocks apps remain available for purchase on the Wix App Market for Wix Editor and Wix Studio sites. To learn more, see [About Wix Harmony and Blocks](https://dev.wix.com/docs/build-apps/develop-your-app/develop-an-app-with-blocks/about-wix-harmony-and-blocks.md).
Use code to navigate to a dashboard page from a [custom panel](https://dev.wix.com/docs/build-apps/develop-your-app/develop-an-app-with-blocks/editor-experience-panels/add-code-to-custom-panels-in-blocks.md) or from another dashboard page in your app. First, copy the dashboard URL (for panels) or ID (for other dashboards). Then, use it in your panel or dashboard code. > **Note:** Panel buttons can also open a dashboard page [with no code](https://dev.wix.com/docs/build-apps/develop-your-app/develop-an-app-with-blocks/editor-experience-panels/panel-button-rules-to-open-pages.md). ## Copy the Dashboard URL or ID: 1. Go to the app dashboard ![app dashboard](https://wixmp-833713b177cebf373f611808.wixmp.com/images/551f9ef24d199b9acf391cb9b28279ce.png) menu. 1. Hover over the dashboard page's name and click the More Actions ![](https://d2x3xhvgiqkx42.cloudfront.net/12345678-1234-1234-1234-1234567890ab/378fd532-728d-473b-8f03-30140bda59af/2021/05/24/e9f11af0-679c-4bf1-8b76-e50e26ec98f6/27128ae4-51ef-4cdd-b679-854d2e85973b.jpg) icon. 1. Click **Dashboard Page Settings**. 1. Copy the following: - For dashboard, copy the **Page ID** - For panel, copy the **Page URL** ![](https://wixmp-833713b177cebf373f611808.wixmp.com/images/5a82b27417115bf66ac1abf292c2fcc6.png) ## In Dashboards: Use the Dashboard ID 1. Go to the code section of the dashboard page. 2. Import the `dashboard` SDK (remember to install the corresponding npm package). 3. Call the `navigate()` function with the dashboard ID. For example: ```js import {dashboard} from "@wix/dashboard" dashboard.navigate({ pageId: "2e96bad1-df32-47b6-942f-e3ecabd74e57" }); ```
See deprecated wix-dashboard example ```js import wixDashboard from `wix-dashboard`; wixDashboard.navigate({ pageId: "2e96bad1-df32-47b6-942f-e3ecabd74e57" }); ```
## In Panels: Use the Dashboard URL Opening a dashboard from a custom panel is slightly different: 1. Open your panel from the **Editor Experience > Panels** tab. 1. Go to your panel's code section. 2. Import the `wix-editor` module. 3. Use the `openDashboardPanel()` function with the correct URL. For example: ```js import wixEditor from 'wix-editor'; wixEditor.openDashboardPanel({url: '771680a8-ad76-4a3c-8bfc-4e2873de96c9/dashboard-page-2'}); ``` --- > Portal Navigation: > > - Append `.md` to any URL under `https://dev.wix.com/docs/` to get its markdown version. > - Pages are either content pages (article or reference text) or menu pages (a list of links to child pages). > - To get a menu page, truncate any URL to a parent path and append `.md` (e.g. `https://dev.wix.com/docs/sdk.md`, `https://dev.wix.com/docs/sdk/core-modules.md`). > - Top-level index of all portals: https://dev.wix.com/docs/llms.txt > - Full concatenated docs: https://dev.wix.com/docs/llms-full.txt ## Resource: Create List and Detail Dashboard Pages ## Article: Create List and Detail Dashboard Pages ## Article Link: https://dev.wix.com/docs/build-apps/develop-your-app/develop-an-app-with-blocks/dashboard-pages/create-list-and-detail-dashboard-pages.md ## Article Content: # Create List and Detail Dashboard Pages
**Editor compatibility** Wix Blocks apps aren't supported in the Wix Harmony editor. Existing Blocks apps remain available for purchase on the Wix App Market for Wix Editor and Wix Studio sites. To learn more, see [About Wix Harmony and Blocks](https://dev.wix.com/docs/build-apps/develop-your-app/frameworks/wix-blocks/about-wix-harmony-and-blocks.md).
The master-detail pattern is one of the most useful dashboard designs for managing data in your Blocks app. This pattern involves creating 2 connected dashboard pages: a master page that displays a list of items (such as products, orders, customers, or blog posts) and a detail page that shows comprehensive information about a selected item. When users click on an item in the list, they navigate to the detail page with the specific item's data automatically loaded. ![list detail](https://wixmp-833713b177cebf373f611808.wixmp.com/images/0f0f4e3695c3fdfab4b4e4c9a699ae31.png) This guide shows you how to implement this pattern using the [dashboard SDK's](https://dev.wix.com/docs/sdk/host-modules/dashboard/introduction.md) `navigate()` method to pass data between pages and the `observeState()` method to retrieve and use that data on the destination page. ### Step 1 | Copy the dashboard page ID Copy the single item dahsboard page ID from its **Page Settings**: ![page settings](https://wixmp-833713b177cebf373f611808.wixmp.com/images/e976bf24c617ef195b8ef02ab2cdd987.png) The ID should look something like this: `1600e523-f812-497d-9323-46e82ab78bd6`. ### Step 2 | Use `navigate()` to pass data This step is done in the **list** dashboard page. To send specific data to the destination dashboard page, use the `relativeUrl` parameter in the `navigate()` method. For example, pass a specific item ID to create a dynamic experience on the destination page. The code assumes a repeater with items. When an item is clicked, the single item should open. ```ts import { dashboard } from "@wix/dashboard" $w("#").onItemReady(($item, data) => { $item('#').onClick(() => dashboard.navigate({ pageId: "", relativeUrl: data._id })); }); ```
See deprecated wix-dashboard example ```ts import wixDashboard from 'wix-dashboard'; $w("#").onItemReady(($item, data) => { $item('#').onClick(() => wixDashboard.navigate({ pageId: "", relativeUrl: data._id })); }); ```
### Step 3 | Use `observeState()` to retrieve data This step is done in the **detail** dashboard page. Use the data passed to the `observeState()` callback method to dynamically update the page's content. The callback is triggered both when the dashboard page is initialized and whenever it's updated. ```ts dashboard.observeState((_, env) => { const itemId = env.pageLocation.pathname.replace('/', ''); // Add logic to handle the current item ID, for example console.log(itemId) }); ```
See deprecated wix-dashboard example ```ts import wixDashboard from 'wix-dashboard'; wixDashboard.observeState((_, env) => { const itemId = env.pageLocation.pathname.replace('/', ''); // Add logic to handle the current item ID, for example console.log(itemId) }); ```
--- > Portal Navigation: > > - Append `.md` to any URL under `https://dev.wix.com/docs/` to get its markdown version. > - Pages are either content pages (article or reference text) or menu pages (a list of links to child pages). > - To get a menu page, truncate any URL to a parent path and append `.md` (e.g. `https://dev.wix.com/docs/sdk.md`, `https://dev.wix.com/docs/sdk/core-modules.md`). > - Top-level index of all portals: https://dev.wix.com/docs/llms.txt > - Full concatenated docs: https://dev.wix.com/docs/llms-full.txt ## Resource: About Coding in Blocks ## Article: About Coding in Blocks ## Article Link: https://dev.wix.com/docs/build-apps/develop-your-app/develop-an-app-with-blocks/code-in-blocks/about-coding-in-blocks.md ## Article Content: # About Coding in Blocks
**Editor compatibility** Wix Blocks apps aren't supported in the Wix Harmony editor. Existing Blocks apps remain available for purchase on the Wix App Market for Wix Editor and Wix Studio sites. To learn more, see [About Wix Harmony and Blocks](https://dev.wix.com/docs/build-apps/develop-your-app/develop-an-app-with-blocks/about-wix-harmony-and-blocks.md).
Blocks lets you add [JavaScript](https://dev.wix.com/docs/develop-websites/articles/getting-started/about-developing-websites.md) code to your widgets and apps. You can add code to an individual widget or dashboard page, as well as code for the entire app. This overview covers the various places where you can add code to a Blocks app.
Note: Blocks is currently in a transition from using Velo modules to using the JavaScript SDK. Wherever available, this article suggests the relevant SDK modules. Learn more about [developing with the SDK](https://dev.wix.com/docs/sdk/articles/get-started/about-site-development.md)
## Widget code Add code to your widget to provide the following: * **Custom functionality and interactions** - Select widget elements using their IDs and bind them to code, work with Wix's frontend and backend APIs, and more. * **Widget API** - Your [widget API](https://dev.wix.com/docs/build-apps/develop-your-app/develop-an-app-with-blocks/widget-api/about-the-widget-api.md) enables you to add properties, functions, and events to the entire widget. These are exposed when your widget is installed on a site or when it's added inside another widget. Use your widget API with the [$widget](https://www.wix.com/velo/reference/$widget) module. ![](https://d2x3xhvgiqkx42.cloudfront.net/12345678-1234-1234-1234-1234567890ab/21e446eb-7f73-4f2f-84b1-c6b77e64e45e/2024/05/02/62aa041d-5eb1-4d8c-9d59-94da48f7295b/b45b78c8-bbeb-462a-a4c1-8c89bf227271.png) ## Panel code Blocks custom panels have their own code tab to create their logic. [Design a custom panel](https://dev.wix.com/docs/build-apps/develop-your-app/develop-an-app-with-blocks/editor-experience-panels/design-custom-panels-in-blocks.md), connect it to an action button, and [add code](https://dev.wix.com/docs/build-apps/develop-your-app/develop-an-app-with-blocks/editor-experience-panels/add-code-to-custom-panels-in-blocks.md) to determine what happens in the panel. Blocks custom panels have designated API references: * [`@wix/editor`](https://dev.wix.com/docs/sdk/host-modules/editor/widget/introduction.md) widget module in the SDK * [`wix-editor`](https://www.wix.com/velo/reference/wix-editor) Velo module * [`$w` Panel Elements](https://www.wix.com/velo/reference/$w/panelbutton) ![](https://d2x3xhvgiqkx42.cloudfront.net/12345678-1234-1234-1234-1234567890ab/21e446eb-7f73-4f2f-84b1-c6b77e64e45e/2024/05/02/544a0a26-0bd4-456c-a7f4-47949fb5800d/521b26a0-0693-486c-a590-8f67b99e9834.png) ## Dashboard code Add [Dashboard pages](https://dev.wix.com/docs/build-apps/develop-your-app/develop-an-app-with-blocks/dashboard-pages/build-a-dashboard-page-in-blocks.md) to your app to enable site builders to configure your app. Dashboard pages have a designated code tab, as well as designated APIs: * [`wix-dashboard`](https://www.wix.com/velo/reference/wix-dashboard) * [Dashboard elements](https://www.wix.com/velo/reference/$w/dashboardbutton) * [Open Dashboard from a panel](https://www.wix.com/velo/reference/wix-editor/opendashboardpanel) ![dashboard code](https://d2x3xhvgiqkx42.cloudfront.net/12345678-1234-1234-1234-1234567890ab/378fd532-728d-473b-8f03-30140bda59af/2023/09/14/61c9bf08-9350-4562-9ed0-649f18216518/ddd049c5-209e-4750-b36a-e497a4aaeeee.png) ## Collection code Blocks allows you to [create CMS collections](https://dev.wix.com/docs/build-apps/develop-your-app/develop-an-app-with-blocks/cms-collections-in-blocks/about-cms-collections-in-blocks.md) and access them in your app and site. Use the [`@wix/data`](https://dev.wix.com/docs/sdk/api-reference/data/introduction.md) SDK module to work with your collections. ## Code files and folders Add [frontend or backend code files](https://dev.wix.com/docs/build-apps/develop-your-app/develop-an-app-with-blocks/code-in-blocks/add-code-files-to-your-app.md) for your entire app. These are also referred to as "code packages". To add code to your app: 1. Click **Code** ![](https://d2x3xhvgiqkx42.cloudfront.net/12345678-1234-1234-1234-1234567890ab/378fd532-728d-473b-8f03-30140bda59af/2022/08/03/1f2f87c5-6a85-43b1-a688-1a688a8f3d0f/c9669055-bbe6-4d68-af9f-a49a96381372.png) in the left menu. 2. Select **Public & Backend** and add a file. ![public and backend](https://wixmp-833713b177cebf373f611808.wixmp.com/images/8a4a60fd30293be4d2b9ad1456e99da8.png) ## Current app instance When your app is installed on a site, you can get information about the specific [app instance](https://dev.wix.com/docs/build-apps/develop-your-app/access/app-instances/about-app-instances.md) that is currently running. For example, you can use the app instance to retrieve the pricing plan of the current user. Learn more about working with the [app instance in Blocks](https://dev.wix.com/docs/build-apps/develop-your-app/access/app-instances/identify-the-app-instance-in-backend-environments.md#blocks-backend-function). --- > Portal Navigation: > > - Append `.md` to any URL under `https://dev.wix.com/docs/` to get its markdown version. > - Pages are either content pages (article or reference text) or menu pages (a list of links to child pages). > - To get a menu page, truncate any URL to a parent path and append `.md` (e.g. `https://dev.wix.com/docs/sdk.md`, `https://dev.wix.com/docs/sdk/core-modules.md`). > - Top-level index of all portals: https://dev.wix.com/docs/llms.txt > - Full concatenated docs: https://dev.wix.com/docs/llms-full.txt ## Resource: Code in Blocks with the SDK ## Article: Code in Blocks with the SDK ## Article Link: https://dev.wix.com/docs/build-apps/develop-your-app/develop-an-app-with-blocks/code-in-blocks/code-in-blocks-with-the-sdk.md ## Article Content: # Code in Blocks with the SDK
**Editor compatibility** Wix Blocks apps aren't supported in the Wix Harmony editor. Existing Blocks apps remain available for purchase on the Wix App Market for Wix Editor and Wix Studio sites. To learn more, see [About Wix Harmony and Blocks](https://dev.wix.com/docs/build-apps/develop-your-app/frameworks/wix-blocks/about-wix-harmony-and-blocks.md).
You can now use the [Wix JavaScript SDK](https://dev.wix.com/docs/sdk.md) instead of Velo APIs for most functionality when building apps with Blocks. This marks the beginning of a gradual transition from using Velo APIs to using the next generation SDK. The Wix JavaScript SDK follows industry standards, using npm modules to make development more accessible for professional web developers. It offers greater stability and aligns with the tools used across Wix CLI and self-managed apps. You are encouraged to start using the SDK in all new and ongoing development projects. You may also want to [migrate existing code](https://dev.wix.com/docs/develop-websites/articles/coding-with-velo/develop-with-the-sdk/migrate-from-velo-to-the-sdk.md) written using Velo APIs to the SDK. ## Install the npm package Before you can import an SDK module in your code, you must install the corresponding npm package to your app. - To install the packages in Blocks, go to **Code {}** > **npm** > **Install packages from npm**. - To install the package in the [Blocks CLI integration](https://dev.wix.com/docs/build-apps/develop-your-app/frameworks/wix-blocks/code-in-blocks/about-the-blocks-cli-integration.md), use the command line.
**Important:** The Blocks-CLI integration only works with the [Wix CLI for Apps](https://dev.wix.com/docs/build-apps/develop-your-app/frameworks/wix-cli/about-the-wix-cli-for-apps.md). The new [Wix CLI](https://dev.wix.com/docs/wix-cli/guides/about-the-wix-cli.md), which is the recommended tool for new app projects, doesn’t support this integration.
## See also Learn more about the [transition from Velo APIs to the SDK](https://dev.wix.com/docs/develop-websites/articles/coding-with-velo/develop-with-the-sdk/develop-websites-with-the-sdk.md). --- > Portal Navigation: > > - Append `.md` to any URL under `https://dev.wix.com/docs/` to get its markdown version. > - Pages are either content pages (article or reference text) or menu pages (a list of links to child pages). > - To get a menu page, truncate any URL to a parent path and append `.md` (e.g. `https://dev.wix.com/docs/sdk.md`, `https://dev.wix.com/docs/sdk/core-modules.md`). > - Top-level index of all portals: https://dev.wix.com/docs/llms.txt > - Full concatenated docs: https://dev.wix.com/docs/llms-full.txt ## Resource: About Widget Code in Blocks ## Article: About the Widget Code ## Article Link: https://dev.wix.com/docs/build-apps/develop-your-app/develop-an-app-with-blocks/code-in-blocks/about-widget-code-in-blocks.md ## Article Content: # About Widget Code in Blocks
**Editor compatibility** Wix Blocks apps aren't supported in the Wix Harmony editor. Existing Blocks apps remain available for purchase on the Wix App Market for Wix Editor and Wix Studio sites. To learn more, see [About Wix Harmony and Blocks](https://dev.wix.com/docs/build-apps/develop-your-app/develop-an-app-with-blocks/about-wix-harmony-and-blocks.md).
Widget code lets you add custom functionality to your widget and expose an external API. ## What widget code is used for Add code to your widget to provide the following: * **Custom functionality and interactions**. Select widget elements using their IDs and bind them to code, work with Wix's frontend and backend APIs, and more. * **Widget API**. Your [widget API](https://dev.wix.com/docs/build-apps/develop-your-app/develop-an-app-with-blocks/widget-api/about-the-widget-api.md) lets you add properties, functions and events to the entire widget. These are exposed in the editor when your widget is installed on a site, or when it's nested inside another widget. ## Where to write widget code Where you add your widget code varies according to the tools you are using. ### Add widget code in the Blocks Editor If you are working directly in the Blocks editor: - Make sure you selected the correct widget in the **App Interface** > **Widgets** panel. - Write your widget logic in the code panel in the bottom part of your screen. - Click the **Widget API** ![widget API](https://d2x3xhvgiqkx42.cloudfront.net/12345678-1234-1234-1234-1234567890ab/378fd532-728d-473b-8f03-30140bda59af/2021/06/10/9aa25a00-57bb-465d-b443-4e14a5478da3/67b8bc89-773d-4775-a0d5-b1585843da7b.jpg) icon to add API properties, functions and events. - You can also ask the [Blocks AI](https://dev.wix.com/docs/build-apps/develop-your-app/develop-an-app-with-blocks/get-started/about-the-blocks-ai.md) to generate the widget code for you. ![](https://wixmp-833713b177cebf373f611808.wixmp.com/images/578467eb499dace3e83079d497a5d460.png) ### Add widget code in the Wix IDE for Blocks If you are using the [Wix IDE for Blocks](https://dev.wix.com/docs/build-apps/develop-your-app/develop-an-app-with-blocks/code-in-blocks/about-the-wix-ide-for-blocks.md), add your widget code in the following locations: - Write the widget code in the `site` folder in the auto-generated file that has your widget's name. - Click the **Widget API** ![widget API](https://d2x3xhvgiqkx42.cloudfront.net/12345678-1234-1234-1234-1234567890ab/378fd532-728d-473b-8f03-30140bda59af/2021/06/10/9aa25a00-57bb-465d-b443-4e14a5478da3/67b8bc89-773d-4775-a0d5-b1585843da7b.jpg) icon to add API properties, functions and events. ### Add widget code in the Blocks-CLI integration
**Important:** The Blocks-CLI integration only works with the [Wix CLI for Apps](https://dev.wix.com/docs/build-apps/develop-your-app/frameworks/wix-cli/about-the-wix-cli-for-apps.md). The new [Wix CLI](https://dev.wix.com/docs/wix-cli/guides/about-the-wix-cli.md), which is the recommended tool for new app projects, doesn’t support this integration.
If you are using the [Blocks-CLI integration](https://dev.wix.com/docs/build-apps/develop-your-app/frameworks/wix-blocks/code-in-blocks/about-the-blocks-cli-integration.md), add your widget code in the following files: - Write widget logic in the [`widget.ts`](https://dev.wix.com/docs/build-apps/develop-your-app/develop-an-app-with-the-cli/supported-extensions/site/about-site-extensions-in-the-wix-cli.md#widgetts) file. - Write widget API properties, events and functions in the [`api.ts`](https://dev.wix.com/docs/build-apps/develop-your-app/develop-an-app-with-the-cli/supported-extensions/site/about-site-extensions-in-the-wix-cli.md#apits) file. --- > Portal Navigation: > > - Append `.md` to any URL under `https://dev.wix.com/docs/` to get its markdown version. > - Pages are either content pages (article or reference text) or menu pages (a list of links to child pages). > - To get a menu page, truncate any URL to a parent path and append `.md` (e.g. `https://dev.wix.com/docs/sdk.md`, `https://dev.wix.com/docs/sdk/core-modules.md`). > - Top-level index of all portals: https://dev.wix.com/docs/llms.txt > - Full concatenated docs: https://dev.wix.com/docs/llms-full.txt ## Resource: About Custom Elements in Blocks ## Article: Custom Elements in Blocks ## Article Link: https://dev.wix.com/docs/build-apps/develop-your-app/develop-an-app-with-blocks/code-in-blocks/about-custom-elements-in-blocks.md ## Article Content: # About Custom Elements in Blocks
**Editor compatibility** Wix Blocks apps aren't supported in the Wix Harmony editor. Existing Blocks apps remain available for purchase on the Wix App Market for Wix Editor and Wix Studio sites. To learn more, see [About Wix Harmony and Blocks](https://dev.wix.com/docs/build-apps/develop-your-app/develop-an-app-with-blocks/about-wix-harmony-and-blocks.md).
Enhance your Blocks widgets with your own design features and CSS capabilities, use any web technology or third party libraries, with Custom Elements. You can add any Javascript component by linking a custom element to a server URL or a Velo file. If needed, you can set more attributes directly from Blocks.
**Important:** Custom elements in the editor are sandboxed for security, restricting access to web storage and caching APIs like cookies, local storage, and IndexedDB. To learn more, see [About Site Widgets](https://dev.wix.com/docs/build-apps/develop-your-app/extensions/site-extensions/site-widgets/about-site-widget-extensions.md#sandboxing-in-the-editor).
**Example:** To see an example of a custom element in Blocks, go to the [Pie Chart](https://dev.wix.com/apps-templates/template?id=9a55382c-c755-4f01-bda2-80b85630acdd&http_referrer=documentation&http_referrer=documentation) app template.
## What Are Custom Elements Custom elements let you use your own HTML tags in Blocks widgets. These elements work across all supported browsers, and can be used with any JavaScript ES6 library or framework that works with HTML 5. **With custom elements, you can:** * Design elements with additional functionality or CSS capabilities. * Embed any widget that requires full DOM access. **Code requirements:** * Your code must be up to date and HTML5 compatible. You should transpile your JS to ES2020. * If you are hosting your own code, it must be hosted over a secure protocol (HTTPS). Also, all HTTP calls from the code needs to be to HTTPS endpoints. * If you are hosting your own code, all relevant design settings and complex functionalities (for example the CSS and other JS files), must be bundled in a single JS file. Don’t set anything in a separate file. > **Note:** A site does not need a premium account or a domain to use a Blocks app with a custom element. * * * ## Step 1 | Adding and Setting Up a Custom Element Add as many custom elements as you need to your widget. After dragging a custom element to your widget, define its source (server URL or a [Velo file](https://support.wix.com/en/article/velo-about-custom-elements)) and give it a tag name to appear in the page registry. The tag name should be the exact name used in the `customElement.define()` function.
1. See how to add the element 1. Open or create Blocks widget in your app. 2. Open the **Add** ![](https://lh7-us.googleusercontent.com/IHfMk0LMTue7hqpCJTxAEQap3wNbuEbfWE9082BNc3YiA-cg5NAc2dsTiQ1l-6fZwayY7SPo2w0DbknUMddgIN2EdBLf7Ubx1UfsEDL3rIxBXaWPaJ2pMmzuvq3r3CfdKxKbmxH95PSu762LZx_mYA) panel. 3. Click **Embed**. 4. Drag the Custom Element onto your widget. 5. Stretch or place the element as you wish.
2. See how to define the element source file 1. Click the custom element. 2. Click **Choose Source** and select one of two options: 1. **Server URL:** enter the URL, including the file name. 2. **Velo file:** select one of your [Velo files](https://dev.wix.com/docs/build-apps/develop-your-app/develop-an-app-with-blocks/code-in-blocks/add-code-files-to-your-app.md). If you don’t have a Velo file yet, this creates a file in the **Public and Backend** section. If you don’t have a namespace, you’ll be prompted to create one.
3. See how to enter the tag name 1. Click the custom element. 2. Click **Choose Source**. 3. Enter a **Tag Name** for your element. * The tag name must be at least two words long, separated by a dash (e.g., weather-widget). * The tag name must be exactly the same as appears in your custom element's code, for example: `customElements.define('weather-widget', WeatherWidget)`.
**Tips** * To see how the custom element looks live, install your app on a site and go to the published site. This is because, for security reasons, the custom element is rendered inside an iFrame in the site-editor and in preview mode, which might affect the layout. * You can define your element's SEO settings using the [Custom Element SEO Markup property](https://www.wix.com/velo/reference/$w/customelement/seomarkup).
* * * ## Step 2 | Adjust the Custom Element by Setting Attributes The custom element HTML attributes let you adjust your element according to parameters that you control. For example, you can set dynamic texts or change colors on the go, or change the custom element inner logic according to the widget’s instance on a specific site. > Make sure that the script of your custom element **acknowledges and handles** these attributes. Otherwise, they won't function properly. There are two ways to initiate your custom element's attributes in the Blocks app: **A. Click Set Attributes:** Set and initiate your element’s attributes by adding them to this designated panel. You can also edit or remove the attributes later. 1. Click **Set Attributes** on the custom element. 2. Click **New Attribute**. 3. Enter a name for the attribute, for example, `title`. 4. Enter the value for the attribute (it can be any relevant string). **B. Use Code:** Set your element’s attributes in the widget code with the [`setAttribute()`](https://www.wix.com/velo/reference/$w/customelement/setattribute) function. For example, you can pass the [app's instance ID](https://dev.wix.com/docs/sdk/backend-modules/app-management/app-instances/get-app-instance.md) to the custom element: ### Backend ```js import { webMethod, Permissions } from "@wix/web-methods"; import { auth } from "@wix/essentials"; import { appInstances } from "@wix/app-management"; export const getInstance = webMethod(Permissions.Anyone, async () => { try { const elevatedGetAppInstance = auth.elevate(appInstances.getAppInstance); const response = await elevatedGetAppInstance(); return response; } catch { console.log("error"); } }); ``` ### Widget code ```js import { getInstance } from "backend/instance.web"; $w.onReady(async function () { try { const response = await getInstance(); $w('#myCustomElement').setAttribute('instanceIdAttribute', response.instance.instanceId); } catch (error) { console.log("Error getting instance:", error); } }); ```
See deprecated wix-application code example ```js import wixApplication from 'wix-application'; $w.onReady(function () { const instance = await wixApplication.getDecodedAppInstance(); $w('#myCustomElement').setAttribute('instanceIdAttribute', instance.instanceId); }); ```
* * * ## Step 3 | Connect the Custom Element to Your Widget's Functionality In most cases, you’ll want to use the custom element logic from one or more of these: * The widget’s panel * The site where the app is installed * Another widget in the app To do this, define [properties](https://dev.wix.com/docs/build-apps/develop-your-app/develop-an-app-with-blocks/widget-api/blocks-widget-properties.md) in the widget API. These properties should represent the Custom Element attributes. The following steps explain how.
**Tip:** If you only need to refer to the custom element's attributes inside this widget, there is no need to connect it to the widget API or add a panel.
### Add a property to the widget API 1. Click the **Widget API** ![](https://d2x3xhvgiqkx42.cloudfront.net/12345678-1234-1234-1234-1234567890ab/378fd532-728d-473b-8f03-30140bda59af/2021/06/10/9aa25a00-57bb-465d-b443-4e14a5478da3/67b8bc89-773d-4775-a0d5-b1585843da7b.jpg) icon on the bottom of your Blocks screen. 2. Click **Add New Property** or hover over **Properties** and click the ![](https://d2x3xhvgiqkx42.cloudfront.net/12345678-1234-1234-1234-1234567890ab/378fd532-728d-473b-8f03-30140bda59af/2021/06/10/be929c05-3c41-452d-ae3a-1503546f8883/b6abb229-8c19-4d2b-9522-d42d125dcc76.png) icon. 3. Name your property, select its [type](https://dev.wix.com/docs/build-apps/develop-your-app/develop-an-app-with-blocks/widget-api/blocks-widget-properties.md) and default values, add a description. 4. Click **Create.** ### Set the attribute in the onPropsChanged() and onReady() functions Define your widget's [onPropsChanged() function](https://dev.wix.com/docs/build-apps/develop-your-app/develop-an-app-with-blocks/widget-api/blocks-widget-properties.md#defining-onpropschanged) and `onReady()` functions to handle a change in this property. For example, let's say we added a property named `title`, which enables the user to change the title of the custom element. The code below sets the custom element attribute `title` to be the same as the widget's property `title`. Creating a function to apply props and using it in both the `onPropsChange()` and `onReady()` events, helps you avoid problems when your props aren't applied in preview mode, or other similar situations. ```javascript $widget.onPropsChanged((oldProps, newProps) => { applyProps(newProps) }); $w.onReady(function () { applyProps($widget.props) }); function applyProps(props) { $w('#customElement1').setAttribute('title', props.title); } ``` ### Optional: create a panel to change the property [Create a custom panel](https://support.wix.com/en/article/wix-blocks-designing-custom-panels-for-your-widgets-action-bar-buttons) that allows a site creator who installed your app to be able to change the widget properties (and therefore, the custom element attributes). 1. Click the **Panels** tab at the top of Blocks. 2. Click **Create New Panel**, or open a custom panel that you already created. 3. Add an element that can receive the new property (in our example, it's an input element named **'panelTextInput1'**). 4. Open the designated code area in the **Panels** tab. 5. Add code that will pass the property from the panel to the widget (in our example, it goes both ways): ```javascript import { widget } from '@wix/editor'; $w.onReady(async function () { const titleValue = await editor.widget.getProp('title'); $w('#panelTextInput1').value = titleValue; $w('#panelTextInput1').onChange(async () => { await widget.setProp('title', $w('#panelTextInput1').value); }); }); ```
See deprecated wix-widget example ```javascript import wixWidget from 'wix-widget'; $w.onReady(async function () { const props = await wixWidget.getProps(); $w('#panelTextInput1').value = props.title; $w('#panelTextInput1').onChange(async () => { wixWidget.setProps({ title: $w('#panelTextInput1').value }); }) }); ```
To summarize this last step: the site-creator changed the title through the panel. The new title was passed to the widget through the `title` property. When the property changed, the new title was sent to the custom element as an attribute. ### Optional: Use the Color Input panel element You can also use the `Color Input` element (in our case its name is `panelColorPicker1`) to set some style properties. For example: ```javascript import { widget } from '@wix/editor'; $w('#panelColorPicker1').onColorChange(async () => { await widget.setProp('background_color', $w('#panelColorPicker1').color); }); ```
See deprecated wix-widget example ```ts $w('#panelColorPicker1').onColorChange(async () => { wixWidget.setProps({ background_color: $w('#panelColorPicker1').color }); }) ```
Tip: When creating a custom-element-only widget, it’s best practice to make it 100% of a widget and define it as non-selectable in the Configuration tab, so that when a site builder clicks on the widget to configure its settings, they will not click on the custom element.
--- > Portal Navigation: > > - Append `.md` to any URL under `https://dev.wix.com/docs/` to get its markdown version. > - Pages are either content pages (article or reference text) or menu pages (a list of links to child pages). > - To get a menu page, truncate any URL to a parent path and append `.md` (e.g. `https://dev.wix.com/docs/sdk.md`, `https://dev.wix.com/docs/sdk/core-modules.md`). > - Top-level index of all portals: https://dev.wix.com/docs/llms.txt > - Full concatenated docs: https://dev.wix.com/docs/llms-full.txt ## Resource: Add Code Files to Your App ## Article: Adding Code Files and Folders to Your App ## Article Link: https://dev.wix.com/docs/build-apps/develop-your-app/develop-an-app-with-blocks/code-in-blocks/add-code-files-to-your-app.md ## Article Content: # Add Code Files to Your Blocks App
**Editor compatibility** Wix Blocks apps aren't supported in the Wix Harmony editor. Existing Blocks apps remain available for purchase on the Wix App Market for Wix Editor and Wix Studio sites. To learn more, see [About Wix Harmony and Blocks](https://dev.wix.com/docs/build-apps/develop-your-app/develop-an-app-with-blocks/about-wix-harmony-and-blocks.md).
Wix Blocks provides various code file types for efficient app development. Public files handle client-side logic, while backend files manage server-side operations and database interactions. Web modules offer reusable backend code snippets. Additionally, a configuration file stores app-wide settings. In addition to these core code files, widget, panel, and dashboard code are essential for building the user interface and app management features.
Note: Adding code files for the first time requires releasing a [major version](https://dev.wix.com/docs/build-apps/develop-your-app/develop-an-app-with-blocks/deploy-and-manage-blocks-apps/manage-blocks-app-versions.md).
## Where to add code files Where you add code files depends on the tool you are using. - In the Blocks editor: 1. Click **Code** ![](https://d2x3xhvgiqkx42.cloudfront.net/12345678-1234-1234-1234-1234567890ab/378fd532-728d-473b-8f03-30140bda59af/2022/08/03/1f2f87c5-6a85-43b1-a688-1a688a8f3d0f/c9669055-bbe6-4d68-af9f-a49a96381372.png) in the left menu. 2. Select **Public & Backend**. 3. Select the type of file you'd like to add and a new file is created. - In the the [Blocks-CLI integration](https://dev.wix.com/docs/build-apps/develop-your-app/frameworks/wix-blocks/code-in-blocks/about-the-blocks-cli-integration.md), add code files directly from your IDE.
**Important:** The Blocks-CLI integration only works with the [Wix CLI for Apps](https://dev.wix.com/docs/build-apps/develop-your-app/frameworks/wix-cli/about-the-wix-cli-for-apps.md). The new [Wix CLI](https://dev.wix.com/docs/wix-cli/guides/about-the-wix-cli.md), which is the recommended tool for new app projects, doesn’t support this integration.
- In the [Wix IDE for Blocks](https://dev.wix.com/docs/build-apps/develop-your-app/develop-an-app-with-blocks/code-in-blocks/about-the-wix-ide-for-blocks.md), add code files in the Wix IDE. ## Add public files Blocks public files are JavaScript files, or TypeScript files when working with the Blocks-CLI integration. These files have exported functions that can be imported and called in your app or on a website where the app is installed. ## Add backend files Blocks backend files are used to manage server-side operations and database interactions. These files are not directly accessible from the frontend, ensuring that sensitive operations and data handling are securely managed on the server side. There are several types of backend files you can add to your app: * **`.js` files:** are not directly accessible to users via front-end code. * **`.web.js` files:** are accessible to the frontend. Use these to import functions from the backend into files or scripts in page code or in public files, and the functions will run on the server. Wix handles the client-server communication. Learn more about [calling backend code from the frontend](https://dev.wix.com/docs/build-apps/develop-your-app/develop-an-app-with-blocks/code-in-blocks/call-backend-code-from-the-frontend-in-blocks.md). * **`.jws` files:** were used in the past instead of `web.js`. Currently deprecated but supported. * **Unique backend files:** * Blocks supports the use of [`events.js`](https://dev.wix.com/docs/develop-websites/articles/coding-with-velo/backend-code/events/about-backend-events.md) and [`http-functions.js`](https://dev.wix.com/docs/build-apps/develop-your-app/develop-an-app-with-blocks/code-in-blocks/expose-a-blocks-app-api-with-http-functions.md) files. * Blocks doesn't support: `data.js`, `routers.js`, `realtime-permissions.js`. You can [test backend functions](https://dev.wix.com/docs/develop-websites/articles/workspace-tools/testing-monitoring/functional-testing/test-backend-functions-with-functional-testing.md) in your app without releasing or installing the app. ## Functions exposed by your app Every exported function at the root of a public or backend directory will be exposed when installing your app on a site. Note that exported functions that aren't in the root package will not be exposed. Make sure to give your functions unique names. Blocks cannot expose two functions under the same name within the same app. ## Add a configuration file A Blocks `config.json` file to defines settings that impact how your app works on a specific site. These settings typically vary from site to site, so the file you provide contains default settings that users can edit for each site. When a user installs your app on their site, they can modify the values in configuration file through the **Packages & Apps** tab in the editor, for example: ![config-in-editor](https://wixmp-833713b177cebf373f611808.wixmp.com/images/52a7acfa759af68dc51b59d99e1dc44f.png) The data in the `config.json` file can only be imported by backend files. Examples of information you might put in a `config.json` file include: * Company name and contact info. * A site-specific default value for a function or API call. We recommend that your `README.md` file contains instructions for modifying the `config.json` file. ### Use the `config.json` settings The values in `config.json` can only be accessed by the backend code in your app. Import the `config.json` file, using [getPackageConfig](https://www.wix.com/velo/reference/wix-configs-backend/getpackageconfig): ```javascript import { getPackageConfig } from 'wix-configs-backend' ``` Use the values from the file in your backend code: ```javascript const = await getPackageConfig(''); ``` ### `config.json` examples In [Tutorial: Creating a Package for API Calls](https://support.wix.com/en/article/tutorial-creating-a-package-for-api-calls), you create a config.json file that contains a default stock symbol to use in a stock quote API call. You can edit that value on any of your sites on which you've installed the API Call package. The `config.json` file: ```json { "defaultSymbol": "wix" } ``` The tutorial's backend `apiCall.jsw` file imports that value and uses it in the code as the value for the stock symbol variable, _sym_. ```javascript import { getPackageConfig } from 'wix-configs-backend' ... const sym = await getPackageConfig('defaultSymbol'); ``` ## Add npm packages You can add [`npm`](https://www.npmjs.com/) dependencies to your app. **To add an `npm` package:** 1. Click **\+ Add file** in the **npm** section to add your first package. Or, hover over **npm** and click the ![](https://d2x3xhvgiqkx42.cloudfront.net/12345678-1234-1234-1234-1234567890ab/57e9f77c-6d15-498d-ac4e-c4d09bf3a490/2021/06/16/5f8a0aec-560c-40bc-a06e-f00c0b8a3777/fdf5cc96-79f0-4651-b7d1-4ee9b7f20c8a.png) icon to add more packages. 2. Select the package that you want to install from the **Package Manager**. Learn more about [installing npm packages](https://dev.wix.com/docs/develop-websites/articles/coding-with-velo/packages/work-with-npm-packages-in-the-editor.md#install-an-npm-package). ## Document your app Add a `README.md` [Markdown](https://www.markdownguide.org/) file to document your app. Your README should include the following sections: * An introduction that explains what the app does and why it's useful * File contents and functions provided * Packages, such as [`npm` packages](https://dev.wix.com/docs/develop-websites/articles/coding-with-velo/packages/about-npm-packages.md), included in your app, along with licensing information for those packages. For example, your users should be aware that when they install a package that uses an `npm` package, they agree to that package's license agreement. * Instructions for using the app's functions. * Usage examples. --- > Portal Navigation: > > - Append `.md` to any URL under `https://dev.wix.com/docs/` to get its markdown version. > - Pages are either content pages (article or reference text) or menu pages (a list of links to child pages). > - To get a menu page, truncate any URL to a parent path and append `.md` (e.g. `https://dev.wix.com/docs/sdk.md`, `https://dev.wix.com/docs/sdk/core-modules.md`). > - Top-level index of all portals: https://dev.wix.com/docs/llms.txt > - Full concatenated docs: https://dev.wix.com/docs/llms-full.txt ## Resource: Blocks Code Snippets ## Article: Blocks Code Snippets ## Article Link: https://dev.wix.com/docs/build-apps/develop-your-app/develop-an-app-with-blocks/code-in-blocks/blocks-code-snippets.md ## Article Content: # Blocks Code Snippets
**Editor compatibility** Wix Blocks apps aren't supported in the Wix Harmony editor. Existing Blocks apps remain available for purchase on the Wix App Market for Wix Editor and Wix Studio sites. To learn more, see [About Wix Harmony and Blocks](https://dev.wix.com/docs/build-apps/develop-your-app/develop-an-app-with-blocks/about-wix-harmony-and-blocks.md).
Here are some useful short code snippets that you can use in any type of Blocks app. Copy, adapt the names to your app and make things work! ## Get Billing information Get [billing information](https://dev.wix.com/docs/sdk/backend-modules/app-management/app-instances/get-app-instance.md) for an app instance on a site. For example, the package name, information about the free trial, and more. Learn more [about pricing in Blocks](https://dev.wix.com/docs/build-apps/develop-your-app/develop-an-app-with-blocks/publish-blocks-apps-to-the-app-market/adjust-a-blocks-app-to-different-pricing-plans.md). ### Backend Add this code to a `web.js` file: ```ts import { webMethod, Permissions } from "@wix/web-methods"; import { auth } from "@wix/essentials"; import { appInstances } from "@wix/app-management"; export const getInstance = webMethod(Permissions.Anyone, async () => { try { const elevatedGetAppInstance = auth.elevate(appInstances.getAppInstance); const response = await elevatedGetAppInstance(); return response; // Information about the billing is in the billing object of the GetAppInstanceResponse object. } catch { console.log("error"); } }) ``` ### Frontend Import the function in your fronted code: ```ts import { getInstance } from "backend/instance.web"; $w.onReady(async function () { try { const response = await getInstance(); console.log("response: ", response); } catch (error) { console.log("Error getting instance:", error); } }); ```
See deprecated wix-application Velo example ```ts import wixApplication from 'wix-application'; //... instance = await wixApplication.getDecodedAppInstance(); plan = instance.vendorProductId; //If there is no plan, the value is null. //add your logic for the different plans ```
## Get widget properties in a panel Use a custom panel to get the widget API properties. ```ts import { widget } from '@wix/editor'; // ... const prop = await widget.getProp(''); // Load panel elements with current prop $w('#').value = prop; ```
See deprecated wix-widget Velo example ```ts import wixWidget from 'wix-widget'; //... const props = await wixWidget.getProps(); //load panel elements with current props $w('#').value = props.propName; ```
Learn more about connecting panel elements to properties: - [Using code](https://dev.wix.com/docs/build-apps/develop-your-app/develop-an-app-with-blocks/editor-experience-panels/add-code-to-custom-panels-in-blocks.md#interact-with-widget-properties) - [With no code](https://dev.wix.com/docs/build-apps/develop-your-app/develop-an-app-with-blocks/editor-experience-panels/connect-panel-elements-to-props.md) ## Set widget properties in a panel Use a custom panel to set the widget API properties. ```ts import { widget } from '@wix/editor'; await widget.setProp('', ''); ```
See deprecated wix-widget Velo example ```ts import wixWidget from 'wix-widget'; await wixWidget.setProps({ : }); ```
Learn more about connecting panel elements to properties: - [Using code](https://dev.wix.com/docs/build-apps/develop-your-app/develop-an-app-with-blocks/editor-experience-panels/add-code-to-custom-panels-in-blocks.md#interact-with-widget-properties) - [With no code](https://dev.wix.com/docs/build-apps/develop-your-app/develop-an-app-with-blocks/editor-experience-panels/connect-panel-elements-to-props.md) ## Open a dashboard page from a panel Create a link in a custom panel that opens the app dashboard page. **Backend:** ```ts import { auth } from "@wix/essentials"; import { appInstances } from "@wix/app-management"; export async function getInstance() { try { const { instanceId } = await auth.getTokenInfo(); const elevatedGetAppInstance = auth.elevate(appInstances.getAppInstance); const response = await elevatedGetAppInstance(); return response; } catch { return new Response({ error: "Failed to process request" }, { status: 500 }); } } ``` **Frontend:** ```ts import { getInstance } from "backend/instance"; import wixEditor from 'wix-editor'; $w.onReady(function () { getInstance() .then((appInstance) => { $w('#').onClick(() => { wixEditor.openDashboardPanel({ url: `app/${appInstance.appDefId}` }); }); }) .catch((error) => { console.log(error); }); }); ```
See deprecated wix-application and wix-editor Velo example ```ts import wixApplication from 'wix-application'; import wixEditor from 'wix-editor'; //... const appInstance = await wixApplication.getDecodedAppInstance(); $w('#').onClick(() => { wixEditor.openDashboardPanel({ url: `app/${appInstance.appDefId}` }); }); ```
Learn more about opening a dashboard page from a panel: - [Using code](https://dev.wix.com/docs/build-apps/develop-your-app/develop-an-app-with-blocks/dashboard-pages/open-a-blocks-dashboard-page-from-a-custom-panel.md) - [With no code](https://dev.wix.com/docs/build-apps/develop-your-app/develop-an-app-with-blocks/editor-experience-panels/panel-button-rules-to-open-pages.md) ## Create an upgrade link in a panel Create a link in a custom panel that opens the app's plan picker. **Backend:** ```ts import { auth } from "@wix/essentials"; import { appInstances } from "@wix/app-management"; export async function getInstance() { try { const { instanceId } = await auth.getTokenInfo(); const elevatedGetAppInstance = auth.elevate(appInstances.getAppInstance); const response = await elevatedGetAppInstance(); return response; } catch { return new Response({ error: "Failed to process request" }, { status: 500 }); } } ``` **Frontend:** ```ts import { getInstance } from "backend/instance"; $w.onReady(function () { getInstance() .then((appInstance) => { const upgradeURL = `https://www.wix.com/apps/upgrade/${appInstance.appDefId}?appInstanceId=${appInstance.instanceId}`; $w('#').link = upgradeURL; }) .catch((error) => { console.log(error); }); }); ```
See deprecated wix-application Velo example ```ts import wixApplication from 'wix-application'; //... const appInstance = await wixApplication.getDecodedAppInstance(); const upgradeURL = `https://www.wix.com/apps/upgrade/${appInstance.appDefId}?appInstanceId=${appInstance.instanceId}`; $w('#').link = upgradeURL; ```
Learn more about: - Providing [entry points to upgrade](https://dev.wix.com/docs/build-apps/develop-your-app/develop-an-app-with-blocks/publish-blocks-apps-to-the-app-market/provide-entry-points-to-upgrade-your-app.md) your app - Creating an upgrade button [with no code](https://dev.wix.com/docs/build-apps/develop-your-app/develop-an-app-with-blocks/editor-experience-panels/panel-button-rules-to-open-pages.md) ## Access inner-widget properties from a panel Get and set properties of a nested widget from a panel in the outer widget. [Learn more](https://dev.wix.com/docs/build-apps/develop-your-app/develop-an-app-with-blocks/editor-experience-panels/add-code-to-custom-panels-in-blocks.md) ```ts import { widget } from '@wix/editor'; // ... const innerWidget = await widget.getNestedWidget('#'); const innerProp = await innerWidget.getProp(''); await innerWidget.setProp('', ''); ```
See deprecated wix-widget Velo example ```ts const innerWidget = await wixWidget.getNestedWidget("#"); const innerProps = await innerWidget.getProps(); await innerWidget.setProps({ : "" }); ```
## Expand and collapse panel elements Expand and collapse elements in a custom panel. [Learn more](https://dev.wix.com/docs/build-apps/develop-your-app/develop-an-app-with-blocks/editor-experience-panels/add-code-to-custom-panels-in-blocks.md) ```ts $w('#panelToggleSwitchID').onChange((event) => { if (event.target.checked) { $w('#panelElementID').expand(); } else { $w('#panelElementID').collapse(); } }); ``` ## Query data from a CMS database collection Use the SDK's data module to query collections in your app. ```ts import { dataItems } from '@wix/data'; // ... const results = await dataItems.query('/').find(); // Use the "results" object as needed ```
See deprecated wix-data Velo example ```ts import wixData from "wix-data"; //... wixData .query("/") .find() .then((results) => { //your code using the "results"; }); ```
Learn more about managing collections in Blocks: - [Using code](https://dev.wix.com/docs/build-apps/develop-your-app/develop-an-app-with-blocks/cms-collections-in-blocks/about-cms-collections-in-blocks.md) - [With no code](https://dev.wix.com/docs/build-apps/develop-your-app/develop-an-app-with-blocks/cms-collections-in-blocks/connect-elements-to-collection-fields-with-no-code.md) --- > Portal Navigation: > > - Append `.md` to any URL under `https://dev.wix.com/docs/` to get its markdown version. > - Pages are either content pages (article or reference text) or menu pages (a list of links to child pages). > - To get a menu page, truncate any URL to a parent path and append `.md` (e.g. `https://dev.wix.com/docs/sdk.md`, `https://dev.wix.com/docs/sdk/core-modules.md`). > - Top-level index of all portals: https://dev.wix.com/docs/llms.txt > - Full concatenated docs: https://dev.wix.com/docs/llms-full.txt ## Resource: Creating a Namespace for Your App ## Article: Creating a Namespace for Your App ## Article Link: https://dev.wix.com/docs/build-apps/develop-your-app/develop-an-app-with-blocks/code-in-blocks/creating-a-namespace-for-your-app.md ## Article Content: # Create a Namespace for Your Blocks App
**Editor compatibility** Wix Blocks apps aren't supported in the Wix Harmony editor. Existing Blocks apps remain available for purchase on the Wix App Market for Wix Editor and Wix Studio sites. To learn more, see [About Wix Harmony and Blocks](https://dev.wix.com/docs/build-apps/develop-your-app/develop-an-app-with-blocks/about-wix-harmony-and-blocks.md).
A namespace is a unique indicator of your app, in the format of: @prefix/suffix The prefix is either your account name or your company name. The suffix usually indicates your app name. **You need a namespace to:** * Import the app's [backend and public functions](https://dev.wix.com/docs/build-apps/develop-your-app/develop-an-app-with-blocks/code-in-blocks/add-code-files-to-your-app.md) in the editor. * Reference your app's [collections](https://dev.wix.com/docs/build-apps/develop-your-app/develop-an-app-with-blocks/cms-collections-in-blocks/about-cms-collections-in-blocks.md) both in the editor and in the app code in Blocks. **You don't need a namespace to:** * Create widget-only apps with no backend or public code files, or collections.
Important: Once you create a namespace you cannot change it.
* * * ## Namespace prefix There are two options for the prefix of your namespace. It can either start with your account name or with your company name. ### Account name Your account name is your Wix user name. If you are a [Wix Partner](https://www.wix.com/studio/partner-program), it's your Wix Partner account name. For this option, your namespace format is: @your-account-name/your-app-name ### Company name Your company name is defined in your [Company Info](https://dev.wix.com/docs/build-apps/launch-your-app/market-listing/add-your-company-info.md) in your app dashboard. Use this option if you plan to publish your app in the Wix App Market. For this option, your namespace format is: @your-company-name/your-app-name >**Company name requirements for namespace** > * A company name that you put in your namespace **must be unique** in Wix. If someone used your company name and you think it might involve trademark infringement, please [let us know](https://support.wix.com/en/article/reporting-trademark-infringement). > * Your namespace can only include latin letters and numbers. If your company name includes non-latin letters, you'll need to change it in the app dashboard to use it as the prefix of a namespace. > * If you change your company name in the app dashboard, it will change the namespace of **all future applications** in your account. ## Namespace suffix You can change the suffix of your namespace as you wish. Just follow these requirements: * Use only lower-case letters, and numbers. * No special characters or spaces. * Must be unique within your account. ## Using your namespace for collections To use your namespace for a collection, add the collection name after the namespace. The path created is your collection ID. ```js @yourAccountName/yourApp/yourCollection ``` To see your collection ID and copy it, click the three dots next to your collection name and then click **Edit Settings**. Here is a code example that uses a collection ID. If you want to try out this example, note that the [`insert`](https://dev.wix.com/docs/sdk/backend-modules/data/items/insert.md) function requires allowing users to write to your collection. Go to your collection's **Permissions & privacy** to configure this. ```javascript import { items } from "@wix/data"; async function insertItem() { const toInsert = { "name": "Bella", "breed": "Poodle", "age": 3 }; try { const inserted = await items.insert("@daphnet/adoption-app/DogsForAdoption", toInsert); console.log(inserted); } catch (err) { console.error(err); } } ```
See deprecated wix-data Velo example ```javascript import wixData from 'wix-data'; // ... let toInsert = { "name": "Bella", "breed": "Poodle", "age": 3 }; wixData.insert("@daphnet/adoption-app/DogsForAdoption", toInsert) .then( (results) => { let item = results; //see item below } ) .catch( (err) => { let errorMsg = err; } ); ```
## Using your namespace to import functions in the editor To import a public function from your app's code files in the editor, use this syntax: ```js import {yourFunctionName} from '@yourAccountName/yourAppName' ``` For example: ```javascript import {getStock} from '@nathanb257/stockquotesfromapi'; $w.onReady(function (){ getStock() }); ``` To import from backend files, use this syntax: ```js import {yourFunctionName} from '@yourAccountName/yourAppName-backend' ``` For example: ```javascript import { getStock } from '@nathanb257/add1-backend'; ``` --- > Portal Navigation: > > - Append `.md` to any URL under `https://dev.wix.com/docs/` to get its markdown version. > - Pages are either content pages (article or reference text) or menu pages (a list of links to child pages). > - To get a menu page, truncate any URL to a parent path and append `.md` (e.g. `https://dev.wix.com/docs/sdk.md`, `https://dev.wix.com/docs/sdk/core-modules.md`). > - Top-level index of all portals: https://dev.wix.com/docs/llms.txt > - Full concatenated docs: https://dev.wix.com/docs/llms-full.txt ## Resource: Add App Permissions in Blocks ## Article: Add Permissions to Your App ## Article Link: https://dev.wix.com/docs/build-apps/develop-your-app/develop-an-app-with-blocks/code-in-blocks/add-app-permissions-in-blocks.md ## Article Content: # Add App Permissions in Blocks
**Editor compatibility** Wix Blocks apps aren't supported in the Wix Harmony editor. Existing Blocks apps remain available for purchase on the Wix App Market for Wix Editor and Wix Studio sites. To learn more, see [About Wix Harmony and Blocks](https://dev.wix.com/docs/build-apps/develop-your-app/develop-an-app-with-blocks/about-wix-harmony-and-blocks.md).
When an app is installed on a Wix site, the app may need to access and manage some of the site's data. To enable this, the site builder must grant the required permission scopes to the app when installing it. The app permissions are specific to the APIs that you use in your app.
Important: If your app is already installed on user sites, add permissions with caution. First, [test your app on your own site](https://dev.wix.com/docs/build-apps/develop-your-app/develop-an-app-with-blocks/deploy-and-manage-blocks-apps/test-your-app-on-a-site.md). Then release a major version for user sites.
## Code that requires permissions Adding permissions **is required** in the following cases: * **If you added dependencies to Wix apps:** If you added [dependencies](https://dev.wix.com/docs/build-apps/develop-your-app/develop-an-app-with-blocks/deploy-and-manage-blocks-apps/set-wix-app-dependencies-in-blocks.md) to Wix's business-solutions apps (such as Stores or Bookings), you are probably using their APIs. You *must* add permissions, or else these APIs will cause your code to fail. * **If you need to access site data:** If your app needs to [access data from a site it's installed on](https://dev.wix.com/docs/build-apps/develop-your-app/develop-an-app-with-blocks/cms-collections-in-blocks/about-cms-collections-in-blocks.md#reference-a-site-collection-through-the-app-code), you'll need permissions to use the specific APIs required for this data. This **does not** apply to data from the app collection itself. * **If you used other APIs:** Even if you didn't add permissions and don't need to access site data, there are other APIs that require permissions. You do **not need** permissions in the following cases: * For your app's internal business logic. * For your custom panel code, including the `widget` module in `@wix/editor` SDK, `wix-widget` and `wix-editor` Velo modules. * To use the `wix-dashboard` module. * To access data from a collection that belongs to your app. ## When permissions are missing If your app requires permissions, but you haven't added them, site builders won't be able to provide consent, causing your code to fail. While everything might seem fine in Blocks (the release process won't fail), once the app is installed on a site, the site will show an error and the console will say that an API failed. ![permissions failed](https://wixmp-833713b177cebf373f611808.wixmp.com/images/f11b67597dd8872219ef2f39b7f36320.png) ## Finding the required permissions Follow these steps to make sure you have added the required permissions. Each step is only needed if the previous one wasn't successful. 1. **Check the reference:** In most cases, if an API requires permissions, you will see it in the reference, under the `Permissions` section. For example, the `bulkCreateBooking()` function requires the following permissions: * `MANAGE BOOKINGS` * `MANAGE BOOKINGS - ALL PERMISSIONS` You can click the permission to add it to your app. ![Permissions scope](https://wixmp-833713b177cebf373f611808.wixmp.com/images/eb89a312b8b382c4e4200f8552209be0.png) 1. **Check the legacy list:** If no permissions are specified in the API reference, check if it's included in the Velo [legacy APIs permissions list](https://dev.wix.com/docs/build-apps/develop-your-app/frameworks/wix-blocks/code-in-blocks/legacy-velo-api-permissions.md). 1. **No permissions needed:** Only if the API you are using has no permissions specified in the reference *and* doesn't appear in the legacy list, you can assume that no permissions are needed. ## Ways to add permissions You can add permissions in several ways: - In Blocks, click **WixBlocks** > **App** > **App Permissions**. This takes you to your app dashboard **Permissions** section. - Go directly to your app **Permissions** section in the [app dashboard](https://manage.wix.com/account/custom-apps). - Click a specific permission from the API reference and then select your app. ## See also * [About Permissions in Wix Apps](https://dev.wix.com/docs/build-apps/develop-your-app/access/authorization/about-permissions.md) * [Legacy Velo API Permissions](https://dev.wix.com/docs/build-apps/develop-your-app/frameworks/wix-blocks/code-in-blocks/legacy-velo-api-permissions.md) --- > Portal Navigation: > > - Append `.md` to any URL under `https://dev.wix.com/docs/` to get its markdown version. > - Pages are either content pages (article or reference text) or menu pages (a list of links to child pages). > - To get a menu page, truncate any URL to a parent path and append `.md` (e.g. `https://dev.wix.com/docs/sdk.md`, `https://dev.wix.com/docs/sdk/core-modules.md`). > - Top-level index of all portals: https://dev.wix.com/docs/llms.txt > - Full concatenated docs: https://dev.wix.com/docs/llms-full.txt ## Resource: Legacy Velo API Permissions ## Article: Legacy Velo API Permissions ## Article Link: https://dev.wix.com/docs/build-apps/develop-your-app/develop-an-app-with-blocks/code-in-blocks/legacy-velo-api-permissions.md ## Article Content: # Legacy API Velo Permissions
**Editor compatibility** Wix Blocks apps aren't supported in the Wix Harmony editor. Existing Blocks apps remain available for purchase on the Wix App Market for Wix Editor and Wix Studio sites. To learn more, see [About Wix Harmony and Blocks](https://dev.wix.com/docs/build-apps/develop-your-app/frameworks/wix-blocks/about-wix-harmony-and-blocks.md).
This is a list of legacy Velo APIs that require [permissions](https://dev.wix.com/docs/build-apps/develop-your-app/access/authorization/about-permissions.md). Check this list if you do not see permissions specified for your function in the [Velo references](https://dev.wix.com/docs/velo.md). If no permissions are specified in the API reference *and* the function isn't in this list - no permissions are needed. | Submodule | Function Name | Permissions | | -------------------------------------------------------- | ---------------------------------------------------------- | -------------------------------------------------------------------------------------------------------------------------- | | wix-billing-backend > Invoices | addPayment | WIX_QUOTES.MANAGE | | wix-billing-backend > Invoices | createInvoice | WIX_QUOTES.MANAGE | | wix-billing-backend > Invoices | createInvoicePreviewUrl | WIX_QUOTES.MANAGE, WIX_QUOTES.LIMITED_VIEW | | wix-billing-backend > Invoices | deleteInvoice | WIX_QUOTES.MANAGE | | wix-billing-backend > Invoices | getInvoice | WIX_QUOTES.GET_INVOICE, WIX_QUOTES.LIMITED_VIEW | | wix-billing-backend > Invoices | sendInvoice | WIX_QUOTES.MANAGE | | wix-billing-backend > Invoices | updateInvoice | WIX_QUOTES.MANAGE | | wix-billing-backend > Invoices | voidInvoice | WIX_QUOTES.MANAGE | | wix-billing-backend > PriceQuotes | createPriceQuote | wix-price-quotes.manage | | wix-billing-backend > PriceQuotes | deletePriceQuote | wix-price-quotes.manage | | wix-billing-backend > PriceQuotes | getPriceQuote | wix-price-quotes.manage, WIX_PRICE_QUOTES.VIEW, WIX_PRICE_QUOTES.LIMITED-VIEW | | wix-billing-backend > PriceQuotes | sendPriceQuote | wix-price-quotes.manage | | wix-billing-backend > PriceQuotes | updatePriceQuote | wix-price-quotes.manage | | wix-blog-backend > Categories | getCategory | BLOG.READ-CATEGORY | | wix-blog-backend > Categories | getCategoryBySlug | BLOG.READ-CATEGORY | | wix-blog-backend > Categories | listCategories | BLOG.READ-CATEGORY | | wix-blog-backend > Categories | queryCategories | BLOG.READ-CATEGORY | | wix-blog-backend > Draftposts | bulkUpdateDraftPosts | BLOG.EDIT-DRAFT | | wix-blog-backend > Draftposts | createDraftPost | BLOG.CREATE-DRAFT | | wix-blog-backend > Draftposts | deleteDraftPost | BLOG.DELETE-DRAFT | | wix-blog-backend > Draftposts | getDeletedDraftPost | BLOG.READ_DRAFT | | wix-blog-backend > Draftposts | getDraftPost | BLOG.READ_DRAFT | | wix-blog-backend > Draftposts | listDeletedDraftPosts | BLOG.READ_DRAFT | | wix-blog-backend > Draftposts | listDraftPosts | BLOG.READ_DRAFT | | wix-blog-backend > Draftposts | publishDraftPost | BLOG.PUBLISH-POST | | wix-blog-backend > Draftposts | queryDraftPosts | BLOG.READ_DRAFT | | wix-blog-backend > Draftposts | removeFromTrashBin | BLOG.DELETE-DRAFT | | wix-blog-backend > Draftposts | restoreFromTrashBin | BLOG.EDIT-DRAFT | | wix-blog-backend > Draftposts | updateDraftPost | BLOG.EDIT-DRAFT | | wix-blog-backend > Posts | getPost | BLOG.READ-PUBLICATION | | wix-blog-backend > Posts | getPostBySlug | BLOG.READ-PUBLICATION | | wix-blog-backend > Posts | getPostMetrics | BLOG.READ-PUBLICATION | | wix-blog-backend > Posts | getTotalPosts | BLOG.READ-PUBLICATION | | wix-blog-backend > Posts | listPosts | BLOG.READ-PUBLICATION | | wix-blog-backend > Posts | queryPostCountStats | BLOG.READ-PUBLICATION | | wix-blog-backend > Posts | queryPosts | BLOG.READ-PUBLICATION | | wix-blog-backend > Tags | getTag | BLOG.READ_TAG | | wix-blog-backend > Tags | getTagByLabel | BLOG.READ_TAG | | wix-blog-backend > Tags | getTagBySlug | BLOG.READ_TAG | | wix-blog-backend > Tags | queryTags | BLOG.READ_TAG | | wix-bookings-backend > Bookings | cancelBooking | BOOKINGS.BOOKING_CANCEL | | wix-bookings-backend > Bookings | confirmBooking | BOOKINGS.BOOKING_CONFIRM | | wix-bookings-backend > Bookings | declineBooking | BOOKINGS.BOOKING_DECLINE | | wix-bookings-backend > Bookings | queryBookings | BOOKINGS.BOOKING_READ | | wix-bookings-backend > Bookings | setAttendance | BOOKINGS.ATTENDANCE_SET | | wix-bookings-backend > Bookings | setBookingAsPaid | BOOKINGS.MANAGE_OWN_BOOKINGS or BOOKINGS.MANAGE_OWN_SESSIONS | | wix-bookings-backend > Bookings | updateCustomerInfo | BOOKINGS.MANAGE | | wix-bookings-backend > Bookings > BookingsQueryBuilder | query | BOOKINGS.BOOKING_READ | | wix-bookings-backend > Resources | createResource | BOOKINGS.MANAGE_RESOURCES | | wix-bookings-backend > Resources | deleteResource | BOOKINGS.MANAGE_RESOURCES | | wix-bookings-backend > Resources | queryResourceCatalog | BOOKINGS.CATALOG_READ | | wix-bookings-backend > Resources | updateResource | BOOKINGS.MANAGE_RESOURCES | | wix-bookings-backend > Resources | updateResourceSchedule | BOOKINGS.MANAGE_RESOURCES | | wix-bookings-backend > Sessions | createSession | CALENDAR.MANAGE_SCHEDULES | | wix-bookings-backend > Sessions | deleteSession | CALENDAR.MANAGE_SCHEDULES | | wix-bookings-backend > Sessions | getSession | CALENDAR.SESSION_READ, CALENDAR.SESSION_READ_PI | | wix-bookings-backend > Sessions | querySessions | CALENDAR.SESSION_READ, CALENDAR.SESSION_READ_PI | | wix-bookings-backend > Sessions | updateSession | CALENDAR.MANAGE_SCHEDULES | | wix-bookings.v1 > Resources | createResource | BOOKINGS.MANAGE_RESOURCES | | wix-bookings.v1 > Resources | deleteResource | BOOKINGS.MANAGE_RESOURCES | | wix-bookings.v1 > Resources | updateResource | BOOKINGS.MANAGE_RESOURCES | | wix-bookings.v1 > Resources | updateSchedule | BOOKINGS.MANAGE_RESOURCES | | wix-chat-backend | sendMessage | INBOX.SEND_MESSAGES | | wix-crm-backend | createContact | CONTACTS.SUBMIT | | wix-crm-backend | deleteContact | CONTACTS.MODIFY | | wix-crm-backend | getContactById | CONTACTS.VIEW | | wix-crm-backend | updateContact | CONTACTS.MODIFY | | wix-crm-backend > Contacts | appendOrCreateContact | CONTACTS.SUBMIT | | wix-crm-backend > Contacts | createContact | CONTACTS.MODIFY | | wix-crm-backend > Contacts | deleteContact | CONTACTS.MODIFY | | wix-crm-backend > Contacts | deleteExtendedField | CONTACTS_SCHEMA.MODIFY | | wix-crm-backend > Contacts | deleteLabel | CONTACTS_LABELS.MODIFY | | wix-crm-backend > Contacts | findOrCreateExtendedField | CONTACTS_SCHEMA.MODIFY | | wix-crm-backend > Contacts | findOrCreateLabel | CONTACTS_LABELS.MODIFY | | wix-crm-backend > Contacts | getContact | CONTACTS.VIEW | | wix-crm-backend > Contacts | getExtendedField | CONTACTS_SCHEMA.VIEW | | wix-crm-backend > Contacts | getLabel | CONTACTS_LABELS.VIEW | | wix-crm-backend > Contacts | labelContact | CONTACTS.MODIFY | | wix-crm-backend > Contacts | queryContacts | CONTACTS.VIEW | | wix-crm-backend > Contacts | queryExtendedFields | CONTACTS_SCHEMA.VIEW | | wix-crm-backend > Contacts | queryLabels | CONTACTS_LABELS.VIEW | | wix-crm-backend > Contacts | renameExtendedField | CONTACTS_SCHEMA.MODIFY | | wix-crm-backend > Contacts | renameLabel | CONTACTS_LABELS.MODIFY | | wix-crm-backend > Contacts | unlabelContact | CONTACTS.MODIFY | | wix-crm-backend > Contacts | updateContact | CONTACTS.MODIFY | | wix-crm-backend > Tasks | completeTask | tasks.modify | | wix-crm-backend > Tasks | createTask | tasks.modify | | wix-crm-backend > Tasks | getTask | tasks.view | | wix-crm-backend > Tasks | removeTask | tasks.modify | | wix-crm-backend > Tasks | resetTask | tasks.modify | | wix-crm-backend > Tasks | updateTaskFields | tasks.modify | | wix-crm-backend > Workflows | archiveCard | workflows.modify | | wix-crm-backend > Workflows | createCard | workflows.modify | | wix-crm-backend > Workflows | createPhase | workflows.modify | | wix-crm-backend > Workflows | createWorkflow | workflows.modify | | wix-crm-backend > Workflows | deleteCard | workflows.modify | | wix-crm-backend > Workflows | deletePhase | workflows.modify | | wix-crm-backend > Workflows | deleteWorkflow | workflows.modify | | wix-crm-backend > Workflows | getCard | workflows.view | | wix-crm-backend > Workflows | getPhaseInfo | workflows.view | | wix-crm-backend > Workflows | getWorkflowInfo | workflows.view | | wix-crm-backend > Workflows | listCards | workflows.view | | wix-crm-backend > Workflows | listPhasesInfo | workflows.view | | wix-crm-backend > Workflows | listWorkflowsInfo | workflows.view | | wix-crm-backend > Workflows | moveCard | workflows.modify | | wix-crm-backend > Workflows | movePhase | workflows.modify | | wix-crm-backend > Workflows | restoreCard | workflows.modify | | wix-crm-backend > Workflows | updateCardFields | workflows.modify | | wix-crm-backend > Workflows | updatePhaseFields | workflows.modify | | wix-crm-backend > Workflows | updateWorkflowFields | workflows.modify | | wix-crm-frontend > Contacts | appendOrCreateContact | CONTACTS.SUBMIT | | wix-data | aggregate | WIX_DATA.AGGREGATE | | wix-data | bulkInsert | WIX_DATA.BULK_INSERT | | wix-data | bulkRemove | WIX_DATA.BULK_REMOVE | | wix-data | bulkSave | WIX_DATA.BULK_SAVE | | wix-data | bulkUpdate | WIX_DATA.BULK_UPDATE | | wix-data | filter | WIX_DATA.QUERY | | wix-data | get | WIX_DATA.GET | | wix-data | insert | WIX_DATA.INSERT | | wix-data | insertReference | WIX_DATA.INSERT_REFERENCE | | wix-data | isReferenced | WIX_DATA.IS_REFERENCED | | wix-data | query | WIX_DATA.QUERY | | wix-data | queryReferenced | WIX_DATA.QUERY_REFERENCED | | wix-data | remove | WIX_DATA.REMOVE | | wix-data | removeReference | WIX_DATA.REMOVE_REFERENCE | | wix-data | replaceReferences | WIX_DATA.REPLACE_REFERENCES | | wix-data | save | WIX_DATA.SAVE | | wix-data | sort | WIX_DATA.QUERY | | wix-data | truncate | WIX_DATA.TRUNCATE | | wix-data | update | WIX_DATA.UPDATE | | wix-ecom-backend > DiscountRules | createDiscountRule | ECOM.DISCOUNT_RULES_CREATE | | wix-ecom-backend > OrderFulfillments | bulkCreateFulfillments | ECOM.MODIFY_FULFILLMENTS | | wix-ecom-backend > OrderFulfillments | createFulfillment | ECOM.MODIFY_FULFILLMENTS | | wix-ecom-backend > OrderFulfillments | deleteFulfillment | ECOM.MODIFY_FULFILLMENTS | | wix-ecom-backend > OrderFulfillments | listFulfillmentsForMultipleOrders | ECOM.READ_FULFILLMENTS | | wix-ecom-backend > OrderFulfillments | listFulfillmentsForSingleOrder | ECOM.READ_FULFILLMENTS | | wix-ecom-backend > OrderFulfillments | updateFulfillment | ECOM.MODIFY_FULFILLMENTS | | wix-ecom-backend > Orders | cancelOrder | ECOM.MODIFY_ORDERS | | wix-ecom-backend > Orders | getOrder | ECOM.READ_ORDERS | | wix-ecom-backend > OrderTransactions | listTransactionsForMultipleOrders | ECOM.READ_TRANSACTIONS | | wix-ecom-backend > OrderTransactions | listTransactionsForSingleOrder | ECOM.READ_TRANSACTIONS | | wix-ecom-backend > BackInStockNotifications | createBackInStockNotificationRequest | ECOM.CREATE_BACK_IN_STOCK_NOTIFICATION_REQUESTS | | wix-ecom-backend > BackInStockNotifications | deleteBackInStockNotificationRequest | ECOM.MODIFY_BACK_IN_STOCK_NOTIFICATION_REQUESTS | | wix-ecom-backend > BackInStockNotifications | getBackInStockNotificationRequest | ECOM.READ_BACK_IN_STOCK_NOTIFICATION_REQUESTS | | wix-ecom-backend > BackInStockNotifications | getBackInStockNotificationRequestsCountByCatalogReferences | ECOM.READ_BACK_IN_STOCK_NOTIFICATION_REQUESTS | | wix-ecom-backend > BackInStockNotifications | markAsNotificationSent | ECOM.MODIFY_BACK_IN_STOCK_NOTIFICATION_REQUESTS | | wix-ecom-backend > BackInStockNotifications | queryBackInStockNotificationRequests | ECOM.READ_BACK_IN_STOCK_NOTIFICATION_REQUESTS | | wix-ecom-backend > BackInStockNotifications | reportItemsBackInStock | ECOM.MODIFY_BACK_IN_STOCK_NOTIFICATION_REQUESTS | | wix-ecom-backend > BackInStockSettings | getSettings | ECOM.MODIFY_BACK_IN_STOCK_NOTIFICATION_SETTINGS | | wix-ecom-backend > BackInStockSettings | startCollectingRequests | ECOM.MODIFY_BACK_IN_STOCK_NOTIFICATION_SETTINGS | | wix-ecom-backend > BackInStockSettings | stopCollectingRequests | ECOM.MODIFY_BACK_IN_STOCK_NOTIFICATION_SETTINGS | | wix-ecom-backend > Cart | addToCart | ECOM.MODIFY_CARTS | | wix-ecom-backend > Cart | createCart | ECOM.MODIFY_CARTS | | wix-ecom-backend > Cart | createCheckout | ECOM.CREATE_CHECKOUT_FROM_CART | | wix-ecom-backend > Cart | deleteCart | ECOM.MODIFY_CARTS | | wix-ecom-backend > Cart | estimateTotals | ECOM.READ_CARTS | | wix-ecom-backend > Cart | getCart | ECOM.READ_CARTS | | wix-ecom-backend > Cart | removeCoupon | ECOM.MODIFY_CARTS | | wix-ecom-backend > Cart | removeLineItems | ECOM.MODIFY_CARTS | | wix-ecom-backend > Cart | updateCart | ECOM.MODIFY_CARTS | | wix-ecom-backend > Cart | updateLineItemsQuantity | ECOM.MODIFY_CARTS | | wix-ecom-backend > Checkout | addToCheckout | ECOM.MODIFY_CHECKOUTS | | wix-ecom-backend > Checkout | createCheckout | ECOM.MODIFY_CHECKOUTS | | wix-ecom-backend > Checkout | createOrder | ECOM.CREATE_ORDER_FROM_CHECKOUT | | wix-ecom-backend > Checkout | getCheckout | ECOM.READ_CHECKOUTS | | wix-ecom-backend > Checkout | getCheckoutUrl | ECOM.READ_CHECKOUTS | | wix-ecom-backend > Checkout | markCheckoutAsCompleted | ECOM.MODIFY_CHECKOUTS | | wix-ecom-backend > Checkout | removeCoupon | ECOM.MODIFY_CHECKOUTS | | wix-ecom-backend > Checkout | removeGiftCard | ECOM.MODIFY_CHECKOUTS | | wix-ecom-backend > Checkout | removeLineItems | ECOM.MODIFY_CHECKOUTS | | wix-ecom-backend > Checkout | removeOverrideCheckoutUrl | ECOM.MODIFY_CHECKOUTS | | wix-ecom-backend > Checkout | updateCheckout | ECOM.MODIFY_CHECKOUTS | | wix-ecom-backend > Checkout | updateLineItemsQuantity | ECOM.MODIFY_CHECKOUTS | | wix-ecom-backend > CheckoutTemplates | createCheckoutFromTemplate | ECOM.CHECKOUT_TEMPLATE_CREATE_CHECKOUT | | wix-ecom-backend > CheckoutTemplates | createCheckoutTemplate | ECOM.CHECKOUT_TEMPLATE_CREATE | | wix-ecom-backend > CheckoutTemplates | deleteCheckoutTemplate | ECOM.CHECKOUT_TEMPLATE_DELETE | | wix-ecom-backend > CheckoutTemplates | getCheckoutTemplate | ECOM.CHECKOUT_TEMPLATE_READ | | wix-ecom-backend > CheckoutTemplates | queryCheckoutTemplates | ECOM.CHECKOUT_TEMPLATE_READ | | wix-ecom-backend > CheckoutTemplates | updateCheckoutTemplate | ECOM.CHECKOUT_TEMPLATE_UPDATE | | wix-ecom-backend > Currentcart | addToCurrentCart | ECOM.MODIFY_CARTS | | wix-ecom-backend > Currentcart | createCheckoutFromCurrentCart | CREATE_CHECKOUT_FROM_CART | | wix-ecom-backend > Currentcart | deleteCurrentCart | ECOM.MODIFY_CARTS | | wix-ecom-backend > Currentcart | estimateCurrentCartTotals | ECOM.READ_CARTS | | wix-ecom-backend > Currentcart | getCurrentCart | ECOM.READ_CARTS | | wix-ecom-backend > Currentcart | removeCouponFromCurrentCart | ECOM.MODIFY_CARTS | | wix-ecom-backend > Currentcart | removeLineItemsFromCurrentCart | ECOM.MODIFY_CARTS | | wix-ecom-backend > Currentcart | updateCurrentCart | ECOM.MODIFY_CARTS | | wix-ecom-backend > Currentcart | updateCurrentCartLineItemQuantity | ECOM.MODIFY_CARTS | | wix-ecom-backend > DiscountRules | deleteDiscountRule | ECOM.DISCOUNT_RULES_DELETE | | wix-ecom-backend > DiscountRules | getDiscountRule | ECOM.DISCOUNT_RULES_READ | | wix-ecom-backend > DiscountRules | queryDiscountRules | ECOM.DISCOUNT_RULES_READ | | wix-ecom-backend > DiscountRules | updateDiscountRule | ECOM.DISCOUNT_RULES_UPDATE | | wix-ecom-backend > Recommendations | getRecommendation | RECOMMENDATIONS.READ | | wix-ecom-backend > Recommendations | listAvailableAlgorithms | RECOMMENDATIONS.READ | | wix-events-backend > WixEvents | cancelEvent | WIX_EVENTS.MANAGE_EVENTS | | wix-events-backend > WixEvents | copyEvent | WIX_EVENTS.MANAGE_EVENTS | | wix-events-backend > WixEvents | createEvent | WIX_EVENTS.MANAGE_EVENTS | | wix-events-backend > WixEvents | deleteEvent | WIX_EVENTS.MANAGE_EVENTS | | wix-events-backend > WixEvents | getEvent | WIX_EVENTS.READ_EVENTS, WIX_EVENTS.READ_EVENT_DASHBOARD, WIX_EVENTS.READ_ONLINE_CONFERENCING, WIX_EVENTS.READ_DRAFT_EVENTS | | wix-events-backend > WixEvents | queryEvents | WIX_EVENTS.READ_EVENTS, WIX_EVENTS.READ_EVENT_DASHBOARD, WIX_EVENTS.READ_ONLINE_CONFERENCING, WIX_EVENTS.READ_DRAFT_EVENTS | | wix-events-backend > WixEvents | updateEvent | WIX_EVENTS.MANAGE_EVENTS | | wix-events-frontend | createEventRsvpForm | WIX_EVENTS.READ_EVENTS | | wix-events-frontend | getForm | WIX_EVENTS.READ_EVENTS | | wix-events-frontend > RsvpForm | createCheckoutFromTemplate | WIX_EVENTS.READ_EVENTS | | wix-events-frontend > RsvpForm | submit | WIX_EVENTS.READ_EVENTS,WIX_EVENTS.CREATE_RSVP | | wix-events-frontend > Rvsp | createRsvp | WIX_EVENTS.READ_EVENTS,WIX_EVENTS.CREATE_RSVP | | wix-events-frontend > Tickets | checkout | WIX_EVENTS.CHECKOUT | | wix-events-frontend > Tickets | reserve | WIX_EVENTS.CHECKOUT | | wix-events-frontend > Tickets | updateOrder | WIX_EVENTS.CHECKOUT | | wix-events-frontend > Tickets | verifyCoupon | WIX_EVENTS.READ_INVOICE | | wix-groups-backend > CreateRequests | approveCreateRequests | SOCIAL-GROUPS.MANAGE | | wix-groups-backend > CreateRequests | listCreateRequests | SOCIAL-GROUPS.MANAGE | | wix-groups-backend > CreateRequests | queryCreateRequests | SOCIAL-GROUPS.MANAGE | | wix-groups-backend > CreateRequests | rejectCreateRequests | SOCIAL-GROUPS.MANAGE | | wix-groups-backend > Groups | createGroup | SOCIAL-GROUPS.MANAGE | | wix-groups-backend > Groups | deleteGroup | SOCIAL-GROUPS.MANAGE | | wix-groups-backend > Groups | getGroup | No permissions | | wix-groups-backend > Groups | getGroupBySlug | No permissions | | wix-groups-backend > Groups | listGroups | No permissions | | wix-groups-backend > Groups | queryGroups | No permissions | | wix-groups-backend > Groups | updateGroup | SOCIAL-GROUPS.MANAGE | | wix-groups-backend > JoinRequests | approveJoinRequests | SOCIAL-GROUPS.MANAGE | | wix-groups-backend > JoinRequests | listJoinRequests | No permissions | | wix-groups-backend > JoinRequests | queryJoinRequests | No permissions | | wix-groups-backend > JoinRequests | rejectJoinRequests | SOCIAL-GROUPS.MANAGE | | wix-groups-backend > Members | addGroupMembers | SOCIAL-GROUPS.MANAGE | | wix-groups-backend > Members | listGroupMembers | No permissions | | wix-groups-backend > Members | listMemberships | No permissions | | wix-groups-backend > Members | queryGroupMembers | No permissions | | wix-groups-backend > Members | queryMemberships | No permissions | | wix-groups-backend > Members | removeGroupMembers | SOCIAL-GROUPS.MANAGE | | wix-groups-backend > Roles | assignRole | SOCIAL-GROUPS.MANAGE | | wix-groups-backend > Roles | unassignRole | SOCIAL-GROUPS.MANAGE | | wix-members-backend > Badges | assignMembers | BADGES.BADGE_ASSIGN | | wix-members-backend > Badges | createBadge | BADGES.BADGE_CREATE | | wix-members-backend > Badges | deleteBadge | BADGES.BADGE_DELETE | | wix-members-backend > Badges | listMemberBadges | BADGES.BADGE_READ_MEMBERS | | wix-members-backend > Badges | listMembers | BADGES.BADGE_READ_MEMBERS | | wix-members-backend > Badges | removeMembers | BADGES.BADGE_ASSIGN | | wix-members-backend > Badges | updateBadge | BADGES.BADGE_UPDATE | | wix-members-backend > CurrentMember | getMember | MEMBERS.MEMBER_READ | | wix-members-backend > CurrentMember | makeProfilePrivate | MEMBERS.MEMBER_JOIN_COMMUNITY | | wix-members-backend > CurrentMember | makeProfilePublic | MEMBERS.MEMBER_JOIN_COMMUNITY | | wix-members-backend > CurrentMember | updateSlug | MEMBERS.MEMBER_UPDATE | | wix-members-backend > Members | deleteMember | MEMBERS.MEMBER_DELETE | | wix-members-backend > Members | deleteMemberAddresses | MEMBERS.MEMBER_UPDATE | | wix-members-backend > Members | deleteMemberEmails | MEMBERS.MEMBER_UPDATE | | wix-members-backend > Members | deleteMemberPhones | MEMBERS.MEMBER_UPDATE | | wix-members-backend > Members | getMember | MEMBERS.MEMBER_READ | | wix-members-backend > Members | updateMember | MEMBERS.MEMBER_UPDATE | | wix-Members-frontend > CurrentMember | getMember | MEMBERS.MEMBER_READ | | wix-Members-frontend > CurrentMember | makeProfilePrivate | MEMBERS.MEMBER_JOIN_COMMUNITY | | wix-Members-frontend > CurrentMember | makeProfilePublic | MEMBERS.MEMBER_JOIN_COMMUNITY | | wix-pricing-plans-backend | archivePlan | PRICING_PLANS.MANAGE_PLANS | | wix-pricing-plans-backend | arrangePlans | PRICING_PLANS.MANAGE_PLANS | | wix-pricing-plans-backend | clearPrimary | PRICING_PLANS.MANAGE_PLANS | | wix-pricing-plans-backend | createPlan | PRICING_PLANS.MANAGE_PLANS | | wix-pricing-plans-backend | getPlan | PRICING_PLANS.READ_PLANS | | wix-pricing-plans-backend | getPlanStats | PRICING_PLANS.READ_PLANS | | wix-pricing-plans-backend | listPlans | PRICING_PLANS.READ_PLANS | | wix-pricing-plans-backend | listPublicPlans | PRICING_PLANS.READ_PUBLIC_PLANS | | wix-pricing-plans-backend | makePlanPrimary | PRICING_PLANS.MANAGE_PLANS | | wix-pricing-plans-backend | queryPublicPlans | PRICING_PLANS.READ_PUBLIC_PLANS | | wix-pricing-plans-backend | setPlanVisibility | PRICING_PLANS.MANAGE_PLANS | | wix-pricing-plans-backend | updatePlan | PRICING_PLANS.MANAGE_PLANS | | wix-pricing-plans-backend > Checkout | applyCoupon | PRICING_PLANS.APPLY_COUPON | | wix-pricing-plans-backend > Checkout | changeStartDate | PRICING_PLANS.CHANGE_START_DATE | | wix-pricing-plans-backend > Checkout | createOfflineOrder | PRICING_PLANS.REGISTER_OFFLINE_ORDERS | | wix-pricing-plans-backend > Checkout | previewOfflineOrder | PRICING_PLANS.MANAGE_ORDERS | | wix-pricing-plans-backend > Checkout | previewOnlineOrder | PRICING_PLANS.PURCHASE_PLANS | | wix-pricing-plans-backend > Checkout | previewPrice | PRICING_PLANS.READ_PUBLIC_PLANS | | wix-pricing-plans-backend > Orders | cancelOrder | PRICING_PLANS.MANAGE_ORDERS | | wix-pricing-plans-backend > Orders | getCurrentMemberOrder | PRICING_PLANS.READ_OWN_ORDERS | | wix-pricing-plans-backend > Orders | getOrder | PRICING_PLANS.READ_ORDERS | | wix-pricing-plans-backend > Orders | listCurrentMemberOrders | PRICING_PLANS.READ_OWN_ORDERS | | wix-pricing-plans-backend > Orders | listOrders | PRICING_PLANS.READ_ORDERS | | wix-pricing-plans-backend > Orders | markAsPaid | PRICING_PLANS.MANAGE_ORDERS | | wix-pricing-plans-backend > Orders | pauseOrder | PRICING_PLANS.MANAGE_ORDERS | | wix-pricing-plans-backend > Orders | postponeEndDate | PRICING_PLANS.MANAGE_ORDERS | | wix-pricing-plans-backend > Orders | requestCurrentMemberOrderCancellation | PRICING_PLANS.MANAGE_OWN_ORDERS | | wix-pricing-plans-backend > Orders | resumeOrder | PRICING_PLANS.MANAGE_ORDERS | | wix-pricing-plans-frontend > Orders | listCurrentMemberOrders | PRICING_PLANS.READ_OWN_ORDERS | | wix-pricing-plans-frontend > Orders | requestCurrentMemberOrderCancellation | PRICING_PLANS.MANAGE_OWN_ORDERS | | wix-pro-Gallery-backend > ProGallery | createGallery | PRO_GALLERY.MANAGE | | wix-pro-Gallery-backend > ProGallery | createGalleryItem | PRO_GALLERY.MANAGE | | wix-pro-Gallery-backend > ProGallery | deleteGallery | PRO_GALLERY.MANAGE | | wix-pro-Gallery-backend > ProGallery | deleteGalleryItem | PRO_GALLERY.MANAGE | | wix-pro-Gallery-backend > ProGallery | getGallery | PRO_GALLERY.READ | | wix-pro-Gallery-backend > ProGallery | getGalleryItem | PRO_GALLERY.READ | | wix-pro-Gallery-backend > ProGallery | listGalleries | PRO_GALLERY.READ | | wix-pro-Gallery-backend > ProGallery | listGalleryItems | PRO_GALLERY.READ | | wix-pro-Gallery-backend > ProGallery | updateGallery | PRO_GALLERY.MANAGE | | wix-pro-Gallery-backend > ProGallery | updateGalleryItem | PRO_GALLERY.MANAGE | | wix-secrets-backend | createSecret | SECRETS_VAULT.SECRET_CREATE | | wix-secrets-backend | deleteSecret | SECRETS_VAULT.SECRET_DELETE | | wix-secrets-backend | getSecret | SECRETS_VAULT.SECRET_READ | | wix-secrets-backend | listSecretInfo | SECRETS_VAULT.SECRET_METADATA_READ | | wix-secrets-backend | updateSecret | SECRETS_VAULT.SECRET_UPDATE | | wix-site-backend > generalinfo-obj | getAddress | site-settings.view | | wix-site-backend > GeneralInfo | getBusinessName | site-settings.view | | wix-site-backend > GeneralInfo | getBusinessSchedule | site-settings.view | | wix-site-backend > GeneralInfo | getCategories | site-settings.view | | wix-site-backend > GeneralInfo | getDescription | site-settings.view | | wix-site-backend > GeneralInfo | getEmail | site-settings.view | | wix-site-backend > GeneralInfo | getFax | site-settings.view | | wix-site-backend > GeneralInfo | getLanguage | site-settings.view | | wix-site-backend > GeneralInfo | getLocale | site-settings.view | | wix-site-backend > GeneralInfo | getLogo | site-settings.view | | wix-site-backend > GeneralInfo | getMultilingual | site-settings.view | | wix-site-backend > GeneralInfo | getPaymentCurrency | site-settings.view | | wix-site-backend > GeneralInfo | getPhone | site-settings.view | | wix-site-backend > GeneralInfo | getSiteDisplayName | site-settings.view | | wix-site-backend > GeneralInfo | getTimeZone | site-settings.view | | wix-stores-backend | getOrdersLink | WIX_STORES.READ_ORDERS | | wix-stores-backend | getPackingSlipLink | WIX_STORES.READ_ORDERS | | wix-stores-backend | sendFulfillmentEmail | WIX_STORES.READ_ORDERS | | wix-stores-backend | updateFulfillment | WIX_STORES.MODIFY_FULFILLERS | | wix-stores-backend | addProductMedia | WIX_STORES.MODIFY_PRODUCTS | | wix-stores-backend | addProductMediaToChoices | WIX_STORES.MODIFY_PRODUCTS | | wix-stores-backend | addProductsToCollection | WIX_STORES.MODIFY_PRODUCTS | | wix-stores-backend | bulkAdjustProductProperty | WIX_STORES.MODIFY_PRODUCTS | | wix-stores-backend | bulkUpdateProductProperty | WIX_STORES.MODIFY_PRODUCTS | | wix-stores-backend | createFulfillment | ECOM.MODIFY_FULFILLMENTS | | wix-stores-backend | createOrder | WIX_STORES.CREATE_ORDERS | | wix-stores-backend | createProduct | WIX_STORES.MODIFY_PRODUCTS | | wix-stores-backend | decrementInventory | WIX_STORES.MODIFY_INVENTORY | | wix-stores-backend | deleteFulfillment | ECOM.MODIFY_FULFILLMENTS | | wix-stores-backend | deleteProduct | WIX_STORES.MODIFY_PRODUCTS | | wix-stores-backend | deleteProductOptions | WIX_STORES.MODIFY_PRODUCTS | | wix-stores-backend | getCurrentCart | WIX_STORES.READ_CARTS | | wix-stores-backend | getProductOptionsAvailability | WIX_STORES.READ_PRODUCTS | | wix-stores-backend | getProductVariants | WIX_STORES.READ_PRODUCTS | | wix-stores-backend | incrementInventory | WIX_STORES.MODIFY_INVENTORY | | wix-stores-backend | removeProductMedia | WIX_STORES.MODIFY_PRODUCTS | | wix-stores-backend | removeProductMediaFromChoices | WIX_STORES.MODIFY_PRODUCTS | | wix-stores-backend | removeProductsFromCollection | WIX_STORES.MODIFY_PRODUCTS | | wix-stores-backend | resetVariantData | WIX_STORES.MODIFY_PRODUCTS | | wix-stores-backend | updateInventoryVariantFields | WIX_STORES.MODIFY_INVENTORY | | wix-stores-backend | updateInventoryVariantFieldsByProductId | WIX_STORES.MODIFY_INVENTORY | | wix-stores-backend | updateProductFields | WIX_STORES.MODIFY_PRODUCTS | | wix-stores-backend | updateVariantData | WIX_STORES.MODIFY_INVENTORY | | wix-stores-frontend > Cart | addProducts | WIX_STORES.MODIFY_CARTS | | wix-stores-frontend > Cart | applyCoupon | WIX_STORES.MODIFY_CARTS | | wix-stores-frontend > Cart | getCurrentCart | WIX_STORES.READ_CARTS | | wix-stores-frontend > Cart | removeCoupon | WIX_STORES.MODIFY_CARTS | | wix-stores-frontend > Cart | removeProduct | WIX_STORES.MODIFY_CARTS | | wix-stores-frontend > Cart | updateLineItemQuantity | WIX_STORES.MODIFY_CARTS | | wix-stores-frontend > Product | getOptionsAvailability | WIX_STORES.READ_INVENTORY | | wix-stores-frontend > Product | getVariants | WIX_STORES.READ_INVENTORY | | wix-stores-frontend > Product | openQuickView | none | --- > Portal Navigation: > > - Append `.md` to any URL under `https://dev.wix.com/docs/` to get its markdown version. > - Pages are either content pages (article or reference text) or menu pages (a list of links to child pages). > - To get a menu page, truncate any URL to a parent path and append `.md` (e.g. `https://dev.wix.com/docs/sdk.md`, `https://dev.wix.com/docs/sdk/core-modules.md`). > - Top-level index of all portals: https://dev.wix.com/docs/llms.txt > - Full concatenated docs: https://dev.wix.com/docs/llms-full.txt ## Resource: Expose a Blocks App API with HTTP Functions ## Article: Exposing an App API with HTTP Functions ## Article Link: https://dev.wix.com/docs/build-apps/develop-your-app/develop-an-app-with-blocks/code-in-blocks/expose-a-blocks-app-api-with-http-functions.md ## Article Content: # Expose a Blocks App API with HTTP Functions
**Editor compatibility** Wix Blocks apps aren't supported in the Wix Harmony editor. Existing Blocks apps remain available for purchase on the Wix App Market for Wix Editor and Wix Studio sites. To learn more, see [About Wix Harmony and Blocks](https://dev.wix.com/docs/build-apps/develop-your-app/frameworks/wix-blocks/about-wix-harmony-and-blocks.md).
Blocks allows you to create functions to expose the functionality of your app as a service. You can use it in sites where your app is installed by calling your app's APIs, as defined by the functions you create in the `http-functions.js` file. This feature is very similar to [exposing site APIs through HTTP functions](https://support.wix.com/en/article/velo-exposing-a-site-api-with-http-functions), but with a slightly different syntax. **To create HTTP functions:** 1. Click the **Public and Backend** icon ![](https://d2x3xhvgiqkx42.cloudfront.net/12345678-1234-1234-1234-1234567890ab/378fd532-728d-473b-8f03-30140bda59af/2022/09/14/106ac6e3-d0ba-4030-82af-632453420d8b/9aefd48b-5126-46ea-8e33-d7bc0eadbd87.png) in the Blocks left menu. 2. Hover over the ![](https://d2x3xhvgiqkx42.cloudfront.net/12345678-1234-1234-1234-1234567890ab/378fd532-728d-473b-8f03-30140bda59af/2022/09/14/90d60fd6-e7bb-4021-a33b-4f356fb8b086/bf3b7952-ef83-4c33-ae29-a14aeb5e76a3.png) icon in the Backend section. 3. Click **Expose site API**.
![](https://d2x3xhvgiqkx42.cloudfront.net/12345678-1234-1234-1234-1234567890ab/378fd532-728d-473b-8f03-30140bda59af/2022/09/14/3078d29c-90dc-41fc-bdab-8c86381fc506/a3c01460-32cf-4ba3-9a59-135c51ce50f3.jpg)
## Endpoints Each function you define in `http-functions.js` is accessible through a unique endpoint, allowing external requests to interact with your app’s features and allowing you to test them. ### API Callers Clients consume your HTTP functions by reaching endpoints using the following pattern: * **Premium sites:** `https:/{user_domain}/_functions/-backend/?` For example: ```js https://mysite.com/_functions/@johndoe/exampleapp-backend/multiply?leftOperand=3&rightOperand=4 ``` * **Free sites:** `https://{user_name}.wixsite.com/{site_name}/_functions/-backend/?` For example: ```js https://johendoe.wixsite.com/mysite/_functions/@johndoe/exampleapp-backend/multiply?leftOperand=3&rightOperand=4 ``` ### Testing You can test your HTTP functions by reaching endpoints using the following pattern: * **Premium sites:** `https://www.{user_domain}/_functions-dev/-backend/?` For example: ```js https://mysite.com/_functions-dev/@johndoe/exampleapp-backend/multiply?leftOperand=3&rightOperand=4 ``` * **Free sites:** `https://{user_name}.wixsite.com/{site_name}/_functions-dev/-backend/?` For example: ```js https://johndoe.wixsite.com/mysite/_functions-dev/@johndoe/exampleapp-backend/multiply?leftOperand=3&rightOperand=4 ``` --- > Portal Navigation: > > - Append `.md` to any URL under `https://dev.wix.com/docs/` to get its markdown version. > - Pages are either content pages (article or reference text) or menu pages (a list of links to child pages). > - To get a menu page, truncate any URL to a parent path and append `.md` (e.g. `https://dev.wix.com/docs/sdk.md`, `https://dev.wix.com/docs/sdk/core-modules.md`). > - Top-level index of all portals: https://dev.wix.com/docs/llms.txt > - Full concatenated docs: https://dev.wix.com/docs/llms-full.txt ## Resource: Call Backend Code from the Frontend in Blocks ## Article: Call Backend Code from the Frontend in Blocks ## Article Link: https://dev.wix.com/docs/build-apps/develop-your-app/develop-an-app-with-blocks/code-in-blocks/call-backend-code-from-the-frontend-in-blocks.md ## Article Content: # Call Backend Code from the Frontend in Blocks
**Editor compatibility** Wix Blocks apps aren't supported in the Wix Harmony editor. Existing Blocks apps remain available for purchase on the Wix App Market for Wix Editor and Wix Studio sites. To learn more, see [About Wix Harmony and Blocks](https://dev.wix.com/docs/build-apps/develop-your-app/frameworks/wix-blocks/about-wix-harmony-and-blocks.md).
Web modules allow you to write backend functions that you can easily call from the frontend. The following describes how to create, export, and call web module functions, also known as web methods. ## Step 1 | Add a web module The way you add a web module file depends on which IDE you're using. ### From Blocks 1. Navigate to the **Code {}** section in the left menu. 1. Go to the **Backend** section and click **+ Add web module**. This action creates a web module file with a `.web.js` extension. ### From Wix IDE or your local IDE 1. Create a new file in the `backend` directory and name it with the `.web.js` extension. ## Step 2 | Define a web method in the backend Add an exported web method in the file you created above. The web method wraps an inner function that contains the logic you want to call from the frontend. To create a web method, call the `webMethod()` function and define the web method's permissions and its inner function: 1. Add the necessary imports: ```ts import { Permissions, webMethod } from "wix-web-module"; ``` 1. Call the `webMethod()` function and store its returned value in an exported variable. ```ts export const myFunction = webMethod(); ``` 3. Pass the `webMethod()` function a permissions value as the first argument: ```ts export const myFunction = webMethod(Permissions.SiteMember); ``` 1. Pass the `webMethod()` function an inner function as the second argument: ```ts export const myFunction = webMethod(Permissions.SiteMember, (someParam) => { // Some functionality for site members to call from the frontend return `You passed me ${someParam}`; }); ``` ## Step 3 | Call the function from the frontend To call a web method from the frontend: 1. Import the exported web method from the web module you created above: ```ts import { myFunction } from "backend/weather.web"; ``` 1. Call the imported function: ```ts const fromBackend = await myFunction(someValue); ``` Remember, web module functions are always asynchronous. --- > Portal Navigation: > > - Append `.md` to any URL under `https://dev.wix.com/docs/` to get its markdown version. > - Pages are either content pages (article or reference text) or menu pages (a list of links to child pages). > - To get a menu page, truncate any URL to a parent path and append `.md` (e.g. `https://dev.wix.com/docs/sdk.md`, `https://dev.wix.com/docs/sdk/core-modules.md`). > - Top-level index of all portals: https://dev.wix.com/docs/llms.txt > - Full concatenated docs: https://dev.wix.com/docs/llms-full.txt ## Resource: CSS Editing in Blocks ## Article: CSS Editing in Blocks ## Article Link: https://dev.wix.com/docs/build-apps/develop-your-app/develop-an-app-with-blocks/code-in-blocks/css-editing-in-blocks.md ## Article Content: # CSS Editing in Blocks
**Editor compatibility** Wix Blocks apps aren't supported in the Wix Harmony editor. Existing Blocks apps remain available for purchase on the Wix App Market for Wix Editor and Wix Studio sites. To learn more, see [About Wix Harmony and Blocks](https://dev.wix.com/docs/build-apps/develop-your-app/develop-an-app-with-blocks/about-wix-harmony-and-blocks.md).
Add your own CSS code to style elements and their individual parts. CSS expands your toolbox while designing your app, as you can apply design options and behavior changes that aren't available in Blocks. Add your code in the `widget.css` file in the **Public & Backend** section in Blocks. Your CSS code impacts all widgets in your app.
Important: You can only edit the CSS of widget elements, not of custom panel or dashboard elements.
## CSS hierarchies and overrides When site builders add a CSS file to a Studio site, that file is at the top of the design hierarchy. It overrides the site theme, as well as any design action in the editor. That's fine, because the site builder knows what they're doing in their site. It's also the same for you in Blocks - you won't be able to design elements that are defined in the CSS file. However, as an app builder, you are also responsible to provide your users with a good experience when using and configuring your app. To do so, it's important that you understand the design hierarchy when a Blocks app is installed on a site. * Top of the hierarchy: the **CSS file of the site**. If your app happens to be installed on a site that has its own CSS file, it will override your file. * Second: **your app's CSS file**. The file determines the design of all elements defined there, in all app widgets. * Third: **what users configure in the editor**. Users can design your app elements in the editor, unless you prevent this in the Editor Experience > Configuration tab in Blocks. * Fourth: **the site theme**. Your widgets [connect to site themes](https://dev.wix.com/docs/build-apps/develop-your-app/develop-an-app-with-blocks/widget-design/about-themes-in-blocks.md), unless you choose to disconnect them from the theme. ## How to let users configure your app Your CSS file overrides any change that the app user might do in their editor. For example, if you use CSS to change the background of all of your buttons, and a user tries to change a button's color on a site, nothing will happen. If you edit the CSS of an element, we recommend using one or more of the following solutions for that element: - Don't use CSS for options that can be configured through the Design and Animations and Effects panels. - If you do, remove the Design ![design button](https://wixmp-833713b177cebf373f611808.wixmp.com/images/438766095ee1eb2dbfac9e05adb63a07.png) action button of this element, since it has no impact and will just frustrate users. You can do this in the [Editor Experience > Configuration](https://dev.wix.com/docs/build-apps/develop-your-app/develop-an-app-with-blocks/editor-experience-configuration/configure-action-bars-in-blocks.md) section in Blocks. - Consider creating a [custom panel](https://dev.wix.com/docs/build-apps/develop-your-app/develop-an-app-with-blocks/editor-experience-panels/design-custom-panels-in-blocks.md) that allows users to control the CSS of this element. ## Elements you can style with CSS You can use CSS to customize many elements, like buttons, images, boxes and more. However, some elements are not yet supported. Check out our full list of [CSS classes](https://www.wix.com/velo/reference/$w/styling-elements-with-css#$w_styling-elements-with-css_available-classes) to make sure you can customize the element you want. ## Create custom classes You can create your own classes and define which elements they apply to. Enter a name for your new class under `Custom Classes` in the `widget.css` file. This lets you apply styling and formatting to a subset of elements. For example, instead of applying a class to all buttons, you can apply it only to all "Subscribe" buttons. ## See also Learn more in our articles on CSS styling for Wix sites. - [About CSS styling](https://dev.wix.com/docs/develop-websites/articles/coding-with-velo/frontend-code/custom-css/about-css-styling.md) - [About CSS custom styling](https://dev.wix.com/docs/develop-websites/articles/coding-with-velo/frontend-code/custom-css/apply-custom-css-styling.md) --- > Portal Navigation: > > - Append `.md` to any URL under `https://dev.wix.com/docs/` to get its markdown version. > - Pages are either content pages (article or reference text) or menu pages (a list of links to child pages). > - To get a menu page, truncate any URL to a parent path and append `.md` (e.g. `https://dev.wix.com/docs/sdk.md`, `https://dev.wix.com/docs/sdk/core-modules.md`). > - Top-level index of all portals: https://dev.wix.com/docs/llms.txt > - Full concatenated docs: https://dev.wix.com/docs/llms-full.txt ## Resource: Debugging Your Blocks Code ## Article: Debugging Your Code ## Article Link: https://dev.wix.com/docs/build-apps/develop-your-app/develop-an-app-with-blocks/code-in-blocks/debugging-your-blocks-code.md ## Article Content: # Debug Your Blocks Code
**Editor compatibility** Wix Blocks apps aren't supported in the Wix Harmony editor. Existing Blocks apps remain available for purchase on the Wix App Market for Wix Editor and Wix Studio sites. To learn more, see [About Wix Harmony and Blocks](https://dev.wix.com/docs/build-apps/develop-your-app/frameworks/wix-blocks/about-wix-harmony-and-blocks.md).
This article explains how to debug your code in Blocks or on a site where your app is installed. ## Debugging with the Developer Console The Wix Developer Console appears at the bottom of the page when previewing your site and in Blocks. The console displays useful debugging information, such as errors, warnings, and other messages. The console also displays debug messages that you added to the code using any [console method](https://developer.mozilla.org/en-US/docs/Web/API/console). If you are new to debugging code, learn more [further in this article](#logging-messages-to-the-console). **In Blocks:** Each message displays the widget where the relevant code can be found and a clickable link to the specific line of code that triggered the message. **In Preview mode in the site editor:** You see only the message. To view the Developer Console in Blocks or in the editor, click **Preview**. The Developer Console appears at the bottom of the page. ![developer console](https://wixmp-833713b177cebf373f611808.wixmp.com/images/951c0aa7a919f1c1fb3f6c6c77808c6d.png) ### Filtering console messages Click **Log levels** on the console menu bar, and then choose which kinds of messages you want to see. * **Verbose**: System log messages that can help you debug low-level code problems. * **Debug**: Messages you have logged to the console. * **Info**: Informational messages that require no action. * **Warning**: Messages about potential problems in your code. These are highlighted in yellow. * **Error**: Messages about actual errors in your code. These are highlighted in red. ## Functional Testing for Backend Functions Backend code debugging is challenging because you need to trigger and test the code, often by calling functions from the client side on a test site. To simplify this process, Wix enables [quick testing of backend functions](https://dev.wix.com/docs/develop-websites/articles/workspace-tools/testing-monitoring/functional-testing/test-backend-functions-with-functional-testing.md) directly from the code panel. The test tab output matches what you would see in the Developer Console when previewing your app and triggering the function. ### HTTP Functions You can debug HTTP functions by adding `console.log()` calls to them. The information you log appears in the function output when using [functional testing](https://dev.wix.com/docs/develop-websites/articles/workspace-tools/testing-monitoring/functional-testing/test-backend-functions-with-functional-testing.md). ## Debugging with Your Browser's Developer Tools
Tip: Use these debugging methods to debug your code on a site where your app is installed. You can also debug directly in Blocks, but debugging from the site shows more complete behavior.
Wix allows you to [debug](https://developer.chrome.com/docs/devtools/javascript/) your app's code like any modern JavaScript web application using browser [developer tools](https://developer.mozilla.org/en-US/docs/Learn/Common_questions/What_are_browser_developer_tools) to set breakpoints, log to the console, and more. These tools come with your browser, not Wix. If you're new to debugging, learn how to [log messages to the console](https://support.wix.com/en/article/wix-blocks-debug-your-code#logging-messages-to-the-console). You can debug your published site's code directly or use a [test site](https://support.wix.com/en/article/about-test-sites). Here are a few things you need to know before you start debugging: ### Accessing Client-Side Source Files You can open a copy of your app's client-side code files in the browser's developer tools. **There are two easy ways** to locate your code: #### Method 1: Search for your file by name 1. Identify the names of your app's client-side code files. These file names appear in the Developer Console when you preview your site. ![developer console](https://wixmp-833713b177cebf373f611808.wixmp.com/images/119daefd6e44950dea18b303e4bf56a0.png) 1. Browse to your published site and open your browser's developer tools. 2. Open the file search bar. In Chrome, press **command/Ctrl+O**. In Firefox, open the **Debugger** panel and press **command/Ctrl+P**. 3. Type the name of your code file and select it from the search results to open it. ![open file](https://d2x3xhvgiqkx42.cloudfront.net/12345678-1234-1234-1234-1234567890ab/378fd532-728d-473b-8f03-30140bda59af/2023/12/20/31bb80b1-9492-4311-98e2-e2998be874a1/53305ee0-b48d-4cbb-8830-6bf69ee28128.png) #### Method 2: Use the debugger Adding the [debugger](https://developer.mozilla.org/en-US/docs/Web/JavaScript/Reference/Statements/debugger) statement to your code halts execution at that point and displays the code file in developer tools. 1. Add debugger; at the point in your code where you want the debugger to run. 2. Open your browser's developer tools and browse to your published site. The **Sources** panel opens to your code file and points to the line where you added debugger. ![debugging file](https://d2x3xhvgiqkx42.cloudfront.net/12345678-1234-1234-1234-1234567890ab/378fd532-728d-473b-8f03-30140bda59af/2023/12/20/a0b22809-2cb8-4146-b4d2-3598e68c51bb/88f71d63-ccda-4a25-a5ac-7a7f5bacc209.png) ### Backend Code and HTTP Functions For security reasons, messages in backend code are not logged to the browser's console on your published site. HTTP functions are not browser based, so their messages are not logged to the console when viewing your published site. Use [Logs](https://dev.wix.com/docs/develop-websites/articles/workspace-tools/developer-tools/logs/about-logs.md) to view console messages from backend code and HTTP functions on your published site.
Note: source maps When debugging in the browser, your code appears just like your original source code. In reality, the browser runs a different version of your code. Source maps handle this translation behind the scenes. Wix supports the ES2017 standard, but for browser compatibility, your code is transformed to ES5. It's also minified and combined with other files for efficiency. The code running on your site is transformed, minified, and combined. Source maps let you debug your original code by mapping between the running code and your source code. When you debug, the source map finds your original code while the debugger runs the corresponding generated code. This process happens automatically. If you encounter issues, check your browser's developer tools settings to ensure source maps are enabled.
## Debugging with Logs Wix's [Logs](https://dev.wix.com/docs/develop-websites/articles/workspace-tools/developer-tools/logs/about-logs.md) tool helps you debug your installed app by generating and tracking logs. To view the logs: 1. Go to your site's dashboard. 1. Click **Developer Tools** > **Logging tools**. 1. Or, access the Logs tool in the code sidebar under **Developer Tools** > **Logging tools**.
Notes: * You can generate logs from any code in your site: client-side, backend, public, HTTP functions, or elsewhere. * You can monitor logs in both Preview mode and on your published site.
![logging tools](https://wixmp-833713b177cebf373f611808.wixmp.com/images/d9e0a17c9bbd5b90554686dd59474118.png) ### Wix Logs View logs in real-time on the Wix Logs page. Add a [console message](https://support.wix.com/en/article/wix-blocks-debug-your-code#logging-messages-to-the-console) to any code, trigger the code in Preview mode or on your published site, and the log appears in your Wix Logs page. ### Google Cloud Logs For more robust log analysis, connect your Wix logs to Google Cloud Logs, an external monitoring tool. Learn more about: * [Viewing logs using Wix Logs](https://dev.wix.com/docs/develop-websites/articles/workspace-tools/developer-tools/logs/view-logs-using-wix-logs.md) * [Connecting to Google Cloud Logs](https://dev.wix.com/docs/develop-websites/articles/workspace-tools/developer-tools/logs/view-logs-using-google-cloud-logs.md) * [How to generate logs to debug your site](https://dev.wix.com/docs/develop-websites/articles/workspace-tools/developer-tools/logs/generate-logs-to-debug-your-site.md) * [Log object structure](https://dev.wix.com/docs/develop-websites/articles/workspace-tools/developer-tools/logs/log-object-structure.md) ## Logging Messages to the Console 1. Add any [console message](https://developer.mozilla.org/en-US/docs/Web/API/console) to the code you want to debug. For example, let's say you have a function called `myFunc()` that operates on a variable called `myVar`. To check if the function is called and if the operation works as expected, add this code: ```js console.log("Inside myFunc(). Value of myVar is: ", myVar); ``` 3. In Preview mode or on your published site, perform the action that triggers `myFunc()`. 4. View the message in your chosen tool (Developer Console, Developer Tools, or Logs) to see how your code behaves.
Note: When logging nested data, only the first 5 levels appear in detail. For deeper nested items, log them directly.
## Bypassing permissions with `elevate()` Some functions require specific permissions to run. If you are receiving a 403 or FORBIDDEN error when you run a function, try using [elevate()](https://dev.wix.com/docs/velo/apis/wix-auth/elevate.md). This creates a copy of your function that includes the elevated permissions required by the original function. Exercise caution when using `elevate()`, to prevent security vulnerabilities. --- > Portal Navigation: > > - Append `.md` to any URL under `https://dev.wix.com/docs/` to get its markdown version. > - Pages are either content pages (article or reference text) or menu pages (a list of links to child pages). > - To get a menu page, truncate any URL to a parent path and append `.md` (e.g. `https://dev.wix.com/docs/sdk.md`, `https://dev.wix.com/docs/sdk/core-modules.md`). > - Top-level index of all portals: https://dev.wix.com/docs/llms.txt > - Full concatenated docs: https://dev.wix.com/docs/llms-full.txt ## Resource: About the Wix IDE for Blocks ## Article: Use the Wix IDE for Blocks ## Article Link: https://dev.wix.com/docs/build-apps/develop-your-app/develop-an-app-with-blocks/code-in-blocks/about-the-wix-ide-for-blocks.md ## Article Content: # About the Wix IDE for Blocks
**Editor compatibility** Wix Blocks apps aren't supported in the Wix Harmony editor. Existing Blocks apps remain available for purchase on the Wix App Market for Wix Editor and Wix Studio sites. To learn more, see [About Wix Harmony and Blocks](https://dev.wix.com/docs/build-apps/develop-your-app/develop-an-app-with-blocks/about-wix-harmony-and-blocks.md).
The Wix IDE provides a browser-based environment built on Visual Studio Code for writing code for Wix Studio sites and Blocks apps. To use the Wix IDE, open the Blocks code editor and click the **Code in Wix IDE** button. The Wix IDE opens in a new browser tab, allowing you to edit your app's code. Changes are automatically synced to your app, and the IDE's autosave is enabled by default. You can turn autosave off in the Wix IDE Settings editor. After coding in the Wix IDE, you can preview your app in Blocks, [test your code in the Editor](https://dev.wix.com/docs/build-apps/develop-your-app/develop-an-app-with-blocks/deploy-and-manage-blocks-apps/test-your-app-on-a-site.md), and [release a version](https://dev.wix.com/docs/build-apps/develop-your-app/develop-an-app-with-blocks/deploy-and-manage-blocks-apps/manage-blocks-app-versions.md) of your app. ## File structure Blocks apps have a specific file structure that Wix uses to run your code. When you open the Wix IDE, you will see the following file structure for your app: ![file structure](https://wixmp-833713b177cebf373f611808.wixmp.com/images/fe883a45ada673c4bc175dff79d7d828.png) ### Files and folders overview * **Backend folder:** Contains the [backend code files](https://dev.wix.com/docs/develop-websites/articles/coding-with-velo/backend-code/web-modules/about-web-modules.md) for your app. Your backend files can include: * General Javascript code files. * [Web modules](https://dev.wix.com/docs/develop-websites/articles/coding-with-velo/backend-code/web-modules/about-web-modules.md) with a `.web.js` file extensions. * An `http-functions.js` file for implementing [HTTP functions](https://dev.wix.com/docs/build-apps/develop-your-app/develop-an-app-with-blocks/code-in-blocks/expose-a-blocks-app-api-with-http-functions.md). * An `events.js` file for implementing your app's [backend event handlers](https://support.wix.com/en/article/velo-backend-events). * A `config.json` [Configuration file](https://dev.wix.com/docs/build-apps/develop-your-app/develop-an-app-with-blocks/code-in-blocks/add-code-files-to-your-app.md#add-a-configuration-file) for defining specific settings for your app. You’ll see this file only if you added a Configuration file in Blocks. * **Site folder:** Contains code files for each of the widgets or plugins in your app, including a **Panels** subfolder for their custom panels. The code you add to these files runs when visitors use the widgets on a site. Code files are created when the widgets, plugins or panels are added and deleted when removed. * **Public folder:** Contains the [public code files](https://dev.wix.com/docs/build-apps/develop-your-app/develop-an-app-with-blocks/code-in-blocks/add-code-files-to-your-app.md) for your app. You can import code from these files into any other file on your app. * **Dashboard folder:** Contains a file for every [dashboard page in your app](https://dev.wix.com/docs/build-apps/develop-your-app/develop-an-app-with-blocks/dashboard-pages/build-a-dashboard-page-in-blocks.md). Code files are created when the dashboard page is created and deleted when removed. * **README file:** A Markdown file to [document your app](https://dev.wix.com/docs/build-apps/develop-your-app/develop-an-app-with-blocks/code-in-blocks/add-code-files-to-your-app.md#document-your-app). * **Other files:** The `jsconfig.json` file and `.wix` folder are in the repo's root folder. They are used to support type checking and autocomplete in the IDE. You don't need to edit these files. Changes to these files aren't synced to your app and are lost when you close the IDE.
Important: * The Wix IDE only shows code files for extensions created in Blocks, not self hosted extensions or CLI extensions. * Wix doesn't support adding files for web crawlers and bots such as `robots.txt`, `ads.txt`, and `security.txt` to your app. If you add these files, they're ignored by Wix.
## Import syntax To import code from public files: ```ts import { myFunctionName } from "public/myFileName"; ``` To import code from backend files: ```ts import { myFunctionName } from "backend/myFileName"; ``` > **Note:** Trying to import from the relative path in your app’s files doesn't work. ## File naming The name of the file for widgets, panels and dashboard pages have two parts, separated by a period. - The prefix is the name of the widget that you define in Blocks. - The suffix is an ID string for internal use. For example: - `Widget 1.odjx6.js` - `New Panel 1.yjxgv.js`
Warning: Do not rename widget, panel, or dashboard code files. Wix uses these file names to associate files with their respective components. Renaming a file will result in your code being ignored, and a new file will be created.
## Actions that must be done in Blocks Certain actions cannot be performed in the Wix IDE and must be done in Blocks: - Adding NPM packages (once added, they can be imported in the IDE). - Adding, changing, or deleting widgets, plugins, panels, and dashboard pages. - Changing element IDs or default values. - Adding [widget API](https://dev.wix.com/docs/build-apps/develop-your-app/develop-an-app-with-blocks/widget-api/about-the-widget-api.md) properties, functions and events. - Previewing your app or [testing it in the Editor](https://dev.wix.com/docs/build-apps/develop-your-app/develop-an-app-with-blocks/deploy-and-manage-blocks-apps/test-your-app-on-a-site.md). - [Releasing a version](https://dev.wix.com/docs/build-apps/develop-your-app/develop-an-app-with-blocks/deploy-and-manage-blocks-apps/manage-blocks-app-versions.md) of your app. ## Concurrent Editing Multiple app collaborators can edit code simultaneously in the Wix IDE. Changes are synced in real-time. However, you cannot edit your app's code in both the Wix IDE and the Wix Blocks Code panel at the same time. If the Wix IDE is open, the Code panel switches to read-only mode. To edit in the Code panel, all collaborators must close the Wix IDE. You can then click **Start Coding** in the Code panel.
Important: The Wix AI Assistant is available in the Wix IDE, but it doesn’t yet support Blocks.
--- > Portal Navigation: > > - Append `.md` to any URL under `https://dev.wix.com/docs/` to get its markdown version. > - Pages are either content pages (article or reference text) or menu pages (a list of links to child pages). > - To get a menu page, truncate any URL to a parent path and append `.md` (e.g. `https://dev.wix.com/docs/sdk.md`, `https://dev.wix.com/docs/sdk/core-modules.md`). > - Top-level index of all portals: https://dev.wix.com/docs/llms.txt > - Full concatenated docs: https://dev.wix.com/docs/llms-full.txt ## Resource: About the Blocks-CLI Integration for Widgets ## Article: About the Blocks-CLI Integration ## Article Link: https://dev.wix.com/docs/build-apps/develop-your-app/develop-an-app-with-blocks/code-in-blocks/about-the-blocks-cli-integration-for-widgets.md ## Article Content: # About the Blocks-CLI Integration for Widgets
**Editor compatibility** Wix Blocks apps aren't supported in the Wix Harmony editor. Existing Blocks apps remain available for purchase on the Wix App Market for Wix Editor and Wix Studio sites. To learn more, see [About Wix Harmony and Blocks](https://dev.wix.com/docs/build-apps/develop-your-app/develop-an-app-with-blocks/about-wix-harmony-and-blocks.md).
**Important:** The Blocks-CLI integration only works with the [Wix CLI for Apps](https://dev.wix.com/docs/build-apps/develop-your-app/frameworks/wix-cli/about-the-wix-cli-for-apps.md). The new [Wix CLI](https://dev.wix.com/docs/wix-cli/guides/about-the-wix-cli.md), which is the recommended tool for new app projects, doesn't support this integration.
The Blocks-CLI integration offers a hybrid workflow that combines the **Blocks visual design** capabilities with the **CLI development** environment. This integration currently supports only [widgets](https://dev.wix.com/docs/build-apps/develop-your-app/extensions/site-extensions/site-widgets/about-site-widget-extensions.md). It does not support Blocks dashboard pages, plugins or collections. ## Where to do what Each framework serves a specific purpose in the workflow: | In the CLI | In Blocks | |--------|-----------| |
  • Create an app and integrate it with Blocks
  • Code widget logic
  • Code custom panel logic
  • Define widget API properties, functions, and events
  • Test your app in the editor and on a site
  • Release an app version
|
  • Add and design widgets
  • Configure a widget’s editor experience
  • Add and design custom panels
  • Configure installation settings
  • Preview a widget’s design
| ## Get started First, make sure to set up your app and add a widget: 1. Create a new CLI app or use an existing CLI app project. [See guide](https://dev.wix.com/docs/build-apps/develop-your-app/frameworks/wix-cli/get-started/quick-start.md) 2. Add a Blocks widget to your CLI app. [See guide](https://dev.wix.com/docs/build-apps/develop-your-app/frameworks/wix-cli/supported-extensions/site-extensions/blocks-site-widgets/add-a-blocks-site-widget-extension-in-the-cli.md) ## Design and sync the UI in Blocks When you've integrated your CLI project with Blocks, a **CLI Active** indication appears in the Blocks editor. ![blocks-cli](https://wixmp-833713b177cebf373f611808.wixmp.com/images/2be1fa6675484f490d7b17665f370c3f.png) In the Blocks editor, you design your UI and configure your widgets' editor experience and installation settings: * [Design your widgets](https://dev.wix.com/docs/build-apps/develop-your-app/develop-an-app-with-blocks/widget-design/blocks-widget-design-guidelines.md) * [Create custom panels](https://dev.wix.com/docs/build-apps/develop-your-app/develop-an-app-with-blocks/editor-experience-panels/design-custom-panels-in-blocks.md) * [Configure the editor experience](https://dev.wix.com/docs/build-apps/develop-your-app/develop-an-app-with-blocks/editor-experience-configuration/about-configuration-in-blocks.md) * [Configure installation settings](https://dev.wix.com/docs/build-apps/develop-your-app/develop-an-app-with-blocks/deploy-and-manage-blocks-apps/configure-blocks-installation-settings.md) Click **Sync** in Blocks to update the CLI environment with your latest UI changes. This does the following: * Adds or deletes files for any widgets you added or removed. * Updates code-completion suggestions for newly-added UI elements. You can sync as often as needed, as long as the local development environment is running in the CLI.
Tip: To define element IDs for selecting elements in your code, use the **Layers** ![layers](https://d2x3xhvgiqkx42.cloudfront.net/12345678-1234-1234-1234-1234567890ab/378fd532-728d-473b-8f03-30140bda59af/2023/10/04/f7b41afc-940b-4dad-8570-be5a7c71ae97/38653f43-8499-4015-8f3f-37e02e5c3ec2.png) panel, as the **Properties and Events** ![](https://d2x3xhvgiqkx42.cloudfront.net/12345678-1234-1234-1234-1234567890ab/378fd532-728d-473b-8f03-30140bda59af/2021/07/26/b734f951-abe5-4735-b65f-76cf788f13d3/26127617-e23d-47ba-b183-225adc5775a2.jpg) panel isn't available in the Blocks-CLI integration.
## Code and preview the app in the CLI When using the CLI, you write your code in TypeScript and work with the Wix JavaScript SDK. The CLI does not support Velo APIs, and its code structure differs from widget and panel code in the Blocks editor. From the CLI, you can preview and test your app in both the editor and the live site. The local development environment supports hot code reloading, so changes appear instantly in the browser. For detailed instructions on coding and previewing your app in the CLI, see the [CLI documentation](https://dev.wix.com/docs/build-apps/develop-your-app/frameworks/wix-cli/supported-extensions/site-extensions/blocks-site-widgets/add-a-blocks-site-widget-extension-in-the-cli.md). ## Release an app version When your app is ready for production, you can [release an app version in the CLI](https://dev.wix.com/docs/wix-cli/legacy/wix-cli-for-apps/app-development/build-and-deploy-an-app-with-the-cli.md#build-and-deploy-an-app-with-the-cli). This allows you to publish it to the Wix App Market or install it on a site with a direct install link or [through the editor](https://dev.wix.com/docs/build-apps/develop-your-app/develop-an-app-with-blocks/deploy-and-manage-blocks-apps/install-a-blocks-app-on-a-site.md). --- > Portal Navigation: > > - Append `.md` to any URL under `https://dev.wix.com/docs/` to get its markdown version. > - Pages are either content pages (article or reference text) or menu pages (a list of links to child pages). > - To get a menu page, truncate any URL to a parent path and append `.md` (e.g. `https://dev.wix.com/docs/sdk.md`, `https://dev.wix.com/docs/sdk/core-modules.md`). > - Top-level index of all portals: https://dev.wix.com/docs/llms.txt > - Full concatenated docs: https://dev.wix.com/docs/llms-full.txt ## Resource: About the Widget API ## Article: About the Widget API ## Article Link: https://dev.wix.com/docs/build-apps/develop-your-app/develop-an-app-with-blocks/widget-api/about-the-widget-api.md ## Article Content: # About the Widget API in Blocks
**Editor compatibility** Wix Blocks apps aren't supported in the Wix Harmony editor. Existing Blocks apps remain available for purchase on the Wix App Market for Wix Editor and Wix Studio sites. To learn more, see [About Wix Harmony and Blocks](https://dev.wix.com/docs/build-apps/develop-your-app/develop-an-app-with-blocks/about-wix-harmony-and-blocks.md).
The Widget API lets you create interactive, customizable widgets for Wix users. It serves as the bridge between your widget's internal functionality and the external interface that Wix users interact with, allowing them to customize your widget's behavior to match their specific needs. You can add properties, events, and functions to your widget API. ## Widget API properties Properties allow the Wix user get and set information to your widget. For example, in a product widget, you can add a property to represent whether the product is on sale, the number of items in stock, etc. Learn more about [widget API properties](https://dev.wix.com/docs/build-apps/develop-your-app/develop-an-app-with-blocks/widget-api/blocks-widget-properties.md). ## Widget API Events Add an event when you want to provide information about actions that happen in the widget to the Wix user. For example, when a customer adds a product to the cart. Fire your event in the widget's code in Blocks and Wix users can see it and register it in the editor. Learn more about [widget API events](https://dev.wix.com/docs/build-apps/develop-your-app/develop-an-app-with-blocks/widget-api/blocks-widget-events.md) ## Widget API Functions Add a new function to enable Wix users to perform actions related to the widgets on their websites. For example, allow a Wix user to get the address of a certain customer through a function and set the address through another function. Learn more about [widget API functions](https://dev.wix.com/docs/build-apps/develop-your-app/develop-an-app-with-blocks/widget-api/blocks-widget-functions.md) ## Using the Widget API on a Site When a Wix user installs your widget on a site they can control it through the API. Learn more about [using your Widget API when editing a site](https://dev.wix.com/docs/build-apps/develop-your-app/develop-an-app-with-blocks/widget-api/use-the-widget-api-when-editing-a-site.md). ## The `$widget` module The [`$widget`](https://dev.wix.com/docs/velo/velo-only-apis/$widget/introduction.md) module provides functionality for working with to your widget's API from within the widget code. The `$widget` module includes: * A `props` object, which contains the properties that you defined, with the values that were set to them by the user of your widget (or the default value that you've set in case they were untouched). * An `onPropsChanged()` event registrar, which allows you to register a callback that will be fired when a property value was changed, for example, when the user changes the title: `$w('#myWidget').title = 'new title'` * A `fireEvent()` method, which triggers an event that you define in the Widget API. >**Note:** >Make sure to document your widget API by describing any property, event or function you add to it. These descriptions >are available to Wix users who install your widget. --- > Portal Navigation: > > - Append `.md` to any URL under `https://dev.wix.com/docs/` to get its markdown version. > - Pages are either content pages (article or reference text) or menu pages (a list of links to child pages). > - To get a menu page, truncate any URL to a parent path and append `.md` (e.g. `https://dev.wix.com/docs/sdk.md`, `https://dev.wix.com/docs/sdk/core-modules.md`). > - Top-level index of all portals: https://dev.wix.com/docs/llms.txt > - Full concatenated docs: https://dev.wix.com/docs/llms-full.txt ## Resource: Blocks Widget Properties ## Article: Widget API Properties ## Article Link: https://dev.wix.com/docs/build-apps/develop-your-app/develop-an-app-with-blocks/widget-api/blocks-widget-properties.md ## Article Content: # Blocks Widget Properties
**Editor compatibility** Wix Blocks apps aren't supported in the Wix Harmony editor. Existing Blocks apps remain available for purchase on the Wix App Market for Wix Editor and Wix Studio sites. To learn more, see [About Wix Harmony and Blocks](https://dev.wix.com/docs/build-apps/develop-your-app/develop-an-app-with-blocks/about-wix-harmony-and-blocks.md).
Properties allow site builders to pass information to the widget and get information from it. For example, in a shopping widget, you can add properties that represent information about the product. Wix users can set property values through the default Settings panel, or by a custom panel that you create. Learn more about [using your widget API when editing a site](https://dev.wix.com/docs/build-apps/develop-your-app/develop-an-app-with-blocks/widget-api/use-the-widget-api-when-editing-a-site.md). ## To add a new property to your widget: 1. Open your app in Wix Blocks. 2. Click the **Widget API** ![](https://d2x3xhvgiqkx42.cloudfront.net/12345678-1234-1234-1234-1234567890ab/378fd532-728d-473b-8f03-30140bda59af/2021/06/10/9aa25a00-57bb-465d-b443-4e14a5478da3/67b8bc89-773d-4775-a0d5-b1585843da7b.jpg)  icon on the bottom right. 3. Click **Add New Property** or hover over **Properties** and click the ![](https://d2x3xhvgiqkx42.cloudfront.net/12345678-1234-1234-1234-1234567890ab/378fd532-728d-473b-8f03-30140bda59af/2021/06/10/be929c05-3c41-452d-ae3a-1503546f8883/b6abb229-8c19-4d2b-9522-d42d125dcc76.png)  icon. 
![add new API property](https://d2x3xhvgiqkx42.cloudfront.net/12345678-1234-1234-1234-1234567890ab/6b5c7381-912e-4754-99e2-d23157db088c/2022/07/17/cc1172d6-1213-4b69-bf62-d26541a4500b/d2c98d39-ce8e-4c11-a6d9-113dbfd8d15d.png)
4\.  Name your property, select its [type](#property-types) and default values, add a description and click **Create.**  Make sure to fill in these fields with care. The Display Name will be visible to users.
![](https://d2x3xhvgiqkx42.cloudfront.net/12345678-1234-1234-1234-1234567890ab/6b5c7381-912e-4754-99e2-d23157db088c/2022/07/17/cb3c5506-94a8-495b-bfed-e31ae5c066cd/4b8f23f0-a243-445f-bd2c-e2c4a8f473d4.png)
## Property types These are the types of properties you can add to your Widget API: * **Text:** String values. * **Number:** Number values, without spaces or special characters except for a minus sign "-", to indicate a negative value. * **Boolean:** Either true or false. * **Image:** The URL for the source of the image. The format for the URL is described [here](https://www.wix.com/code/reference/$w.Image.html#src). * **Date and Time:** See [Date and Time Conventions](https://support.wix.com/en/article/date-and-time-conventions). * **URL:** In the format `http(s)://www..`, such as [www.wix.com](http://www.wix.com/) * **Custom:** A highly-flexible property type that you design around the needs of your app. Learn more about [creating custom type properties](https://dev.wix.com/docs/build-apps/develop-your-app/develop-an-app-with-blocks/widget-api/custom-type-properties-blocks.md). * **List:** An array of any single type listed above. Learn more about [creating list type properties](https://dev.wix.com/docs/build-apps/develop-your-app/develop-an-app-with-blocks/widget-api/list-type-properties-in-blocks.md). To change the property type, hover over the property in the **Widget API** ![API icon](https://d2x3xhvgiqkx42.cloudfront.net/12345678-1234-1234-1234-1234567890ab/6b5c7381-912e-4754-99e2-d23157db088c/2022/07/31/aff3d193-fc53-4df2-9d2a-3f16bdc11810/b8765d68-4150-4299-9191-9ffc55a107d2.jpg) panel and click the **Edit** ![edit icon](https://d2x3xhvgiqkx42.cloudfront.net/12345678-1234-1234-1234-1234567890ab/6b5c7381-912e-4754-99e2-d23157db088c/2022/07/31/86efdcac-bb43-4738-bd3d-34cc6d1e5d4a/028a41b9-f00f-4167-9d4b-a28ef11fdfbe.png) icon. ## Interact with properties in your widget code Interact with properties in your widget code through the [`$widget`](https://dev.wix.com/docs/velo/velo-only-apis/$widget/introduction.md) module, using the following syntax. Internal properties are optional - they're needed only if you're using [a custom type property](https://dev.wix.com/docs/build-apps/develop-your-app/develop-an-app-with-blocks/widget-api/list-type-properties-in-blocks.md): ```javascript $widget.props.. ``` For example, let's say that you want to present the size of a shoe in a text element in your widget. The property is "shoe". Shoe is a custom type that has an internal property named "size". So the statement will look like this:  ```javascript $w('#text1').text = $widget.props.shoe.size; ``` ## Interact with properties in panels You can get or set properties in custom panels through your [panel code](https://dev.wix.com/docs/build-apps/develop-your-app/develop-an-app-with-blocks/editor-experience-panels/add-code-to-custom-panels-in-blocks.md#interact-with-widget-properties), or through [connecting properties to panel elements](https://dev.wix.com/docs/build-apps/develop-your-app/develop-an-app-with-blocks/editor-experience-panels/connect-panel-elements-to-props.md) with no code. Note that Blocks also creates a default Settings panel for any widget that has properties. ## Define `onPropsChanged()` The `onPropsChanged()` event is fired when there is a change in your widget's properties. It receives `oldProps` and `newProps` as its parameters. Here is the syntax to use in the widget code: ```javascript $widget.onPropsChanged((oldProps, newProps) => { }) ``` The initial code for `onPropsChanged()` is created automatically in every new Blocks widget. You can define what happens in this event through adding code.
![onPropsChanged code](https://d2x3xhvgiqkx42.cloudfront.net/12345678-1234-1234-1234-1234567890ab/6b5c7381-912e-4754-99e2-d23157db088c/2022/07/21/5ba32ce1-cbbe-43d5-94ab-4af7be13660e/a8816d4f-e491-42fc-ac1c-92e10fda8e3b.png)
For example, in a shopping widget, if the product id is changed - load the data for the new product and customer: ```javascript $widget.onPropsChanged((oldProps, newProps) => { loadProductData(newProps.productId); loadCustomerData(newProps.customerId); }); ``` ## Testing your widget's API properties When your widget is installed on a site, it comes with a default **Settings** panel, which includes any properties that you defined in your API (Learn more about [using your Widget API when editing a site](https://dev.wix.com/docs/build-apps/develop-your-app/develop-an-app-with-blocks/widget-api/use-the-widget-api-when-editing-a-site.md)). You can also use a custom **Settings** panel by using the [panel builder](https://support.wix.com/en/article/wix-blocks-about-custom-panels) in Blocks. Use Blocks's **Test API Properties** to see how these properties look on a site:  **To test your widget's API properties:** 1. Click **Preview**. 2. Click **Test API Properties** when you are in preview mode.
![](https://d2x3xhvgiqkx42.cloudfront.net/12345678-1234-1234-1234-1234567890ab/6b5c7381-912e-4754-99e2-d23157db088c/2022/07/21/61a88f6e-9840-4c86-80eb-83ca554efc7c/901706b5-af5d-4a25-9bd5-ba375a8db519.png)
Don't forget to document Make sure to document your widget API by describing any property, event or function you add to it. These descriptions are available to site creators who install your widget.
--- > Portal Navigation: > > - Append `.md` to any URL under `https://dev.wix.com/docs/` to get its markdown version. > - Pages are either content pages (article or reference text) or menu pages (a list of links to child pages). > - To get a menu page, truncate any URL to a parent path and append `.md` (e.g. `https://dev.wix.com/docs/sdk.md`, `https://dev.wix.com/docs/sdk/core-modules.md`). > - Top-level index of all portals: https://dev.wix.com/docs/llms.txt > - Full concatenated docs: https://dev.wix.com/docs/llms-full.txt ## Resource: Blocks Widget Events ## Article: Widget API Events ## Article Link: https://dev.wix.com/docs/build-apps/develop-your-app/develop-an-app-with-blocks/widget-api/blocks-widget-events.md ## Article Content: # Blocks Widget Events
**Editor compatibility** Wix Blocks apps aren't supported in the Wix Harmony editor. Existing Blocks apps remain available for purchase on the Wix App Market for Wix Editor and Wix Studio sites. To learn more, see [About Wix Harmony and Blocks](https://dev.wix.com/docs/build-apps/develop-your-app/develop-an-app-with-blocks/about-wix-harmony-and-blocks.md).
Add an event when you want to provide information about actions that happen in the widget to the site owner. For example, when a customer adds a product to the cart.  **To add a new event:** 1. Click the **Widget API** ![](https://d2x3xhvgiqkx42.cloudfront.net/12345678-1234-1234-1234-1234567890ab/378fd532-728d-473b-8f03-30140bda59af/2021/06/10/9aa25a00-57bb-465d-b443-4e14a5478da3/67b8bc89-773d-4775-a0d5-b1585843da7b.jpg)  icon. 2. Click **Add New Public Event** or hover over **Events** and click the ![](https://d2x3xhvgiqkx42.cloudfront.net/12345678-1234-1234-1234-1234567890ab/378fd532-728d-473b-8f03-30140bda59af/2021/06/10/be929c05-3c41-452d-ae3a-1503546f8883/b6abb229-8c19-4d2b-9522-d42d125dcc76.png)  icon. 
![add new event](https://d2x3xhvgiqkx42.cloudfront.net/12345678-1234-1234-1234-1234567890ab/6b5c7381-912e-4754-99e2-d23157db088c/2022/07/17/02590585-2653-4279-a46b-06674dce7740/8c33624a-7dd8-476f-9bf4-58b795a1f17e.png)
3\.  Name your event and provide a description. 
![](https://d2x3xhvgiqkx42.cloudfront.net/12345678-1234-1234-1234-1234567890ab/6b5c7381-912e-4754-99e2-d23157db088c/2022/07/17/92405389-0a85-400d-9713-72ea1efe3581/15528d8f-57fc-4062-a582-20e6c48addda.png)
4\. Fire the event from your widget code. Use this syntax: ```ts $widget.fireEvent('eventName', {eventObject}) ``` Define the condition for firing the event and, optionally, send event data. For example: ```javascript $w(`#button1`).onClick(() => { $widget.fireEvent('addedToCart', {productId: product.id, customerId: customer.id}) }); ``` 5\. You can [catch your event](https://dev.wix.com/docs/build-apps/develop-your-app/develop-an-app-with-blocks/widget-api/use-the-widget-api-when-editing-a-site.md) from two places * From any site where your widget is installed. * From any widget of your app to which you added this widget as an inner widget.
Don't forget to document Make sure to document your widget API by describing any property, event or function you add to it. These descriptions are available to Wix users who install your widget.
--- > Portal Navigation: > > - Append `.md` to any URL under `https://dev.wix.com/docs/` to get its markdown version. > - Pages are either content pages (article or reference text) or menu pages (a list of links to child pages). > - To get a menu page, truncate any URL to a parent path and append `.md` (e.g. `https://dev.wix.com/docs/sdk.md`, `https://dev.wix.com/docs/sdk/core-modules.md`). > - Top-level index of all portals: https://dev.wix.com/docs/llms.txt > - Full concatenated docs: https://dev.wix.com/docs/llms-full.txt ## Resource: Blocks Widget Functions ## Article: Widget API Functions ## Article Link: https://dev.wix.com/docs/build-apps/develop-your-app/develop-an-app-with-blocks/widget-api/blocks-widget-functions.md ## Article Content: # Blocks Widget Functions
**Editor compatibility** Wix Blocks apps aren't supported in the Wix Harmony editor. Existing Blocks apps remain available for purchase on the Wix App Market for Wix Editor and Wix Studio sites. To learn more, see [About Wix Harmony and Blocks](https://dev.wix.com/docs/build-apps/develop-your-app/develop-an-app-with-blocks/about-wix-harmony-and-blocks.md).
Add a new function to enable Wix users to perform actions related to the widgets on their websites. For example, a user who has a shopping widget would like to be able to get the address of a certain customer through the function `getAddress(customerId)` and set the address through the function `setAddress(customerId)`. **To add a new public function to your widget:** 1.  Click the **Widget API** ![](https://d2x3xhvgiqkx42.cloudfront.net/12345678-1234-1234-1234-1234567890ab/378fd532-728d-473b-8f03-30140bda59af/2021/06/10/9aa25a00-57bb-465d-b443-4e14a5478da3/67b8bc89-773d-4775-a0d5-b1585843da7b.jpg)  icon. 2.  Click **Add New Public Function** or hover over **Functions** and click the ![](https://d2x3xhvgiqkx42.cloudfront.net/12345678-1234-1234-1234-1234567890ab/378fd532-728d-473b-8f03-30140bda59af/2021/06/10/be929c05-3c41-452d-ae3a-1503546f8883/b6abb229-8c19-4d2b-9522-d42d125dcc76.png)  icon.  ![add new public function](https://wixmp-833713b177cebf373f611808.wixmp.com/images/e0bdea5db0dc92908be35d74226b3936.png) 3.  Add the code for your function in the code editor, where a new function "foo" appears.  4.  Change the new default name to a meaningful name and edit the function. For example, in the [counter tutorial](https://dev.wix.com/docs/build-apps/get-started/tutorials/tutorial-create-a-counter-widget-with-blocks.md#add-a-public-function-to-your-widget-api), there is a function that resets the counter and renders it. This is the code in Blocks: ```js export function reset() { //This function is part of my public API count = 0; render(); } ``` 5. You, or users, can then call the function from the editor. For example, this could be the code in the editor: ```js export function counter1_change({ data: count }) { if (count > 30) { $w("#counter1").reset(); } } ``` Learn more about [using your Widget API when editing a site](https://dev.wix.com/docs/build-apps/develop-your-app/develop-an-app-with-blocks/widget-api/use-the-widget-api-when-editing-a-site.md).
Don't forget to document When you write your function, make sure to replace the default `jsdoc` that appears above it with your own one. The user of the widget will see the `jsdoc` when using the function in a site.
--- > Portal Navigation: > > - Append `.md` to any URL under `https://dev.wix.com/docs/` to get its markdown version. > - Pages are either content pages (article or reference text) or menu pages (a list of links to child pages). > - To get a menu page, truncate any URL to a parent path and append `.md` (e.g. `https://dev.wix.com/docs/sdk.md`, `https://dev.wix.com/docs/sdk/core-modules.md`). > - Top-level index of all portals: https://dev.wix.com/docs/llms.txt > - Full concatenated docs: https://dev.wix.com/docs/llms-full.txt ## Resource: List Type Properties in Blocks ## Article: Creating and Managing List Type Properties in Widget API ## Article Link: https://dev.wix.com/docs/build-apps/develop-your-app/develop-an-app-with-blocks/widget-api/list-type-properties-in-blocks.md ## Article Content: # List Type Properties in Blocks
**Editor compatibility** Wix Blocks apps aren't supported in the Wix Harmony editor. Existing Blocks apps remain available for purchase on the Wix App Market for Wix Editor and Wix Studio sites. To learn more, see [About Wix Harmony and Blocks](https://dev.wix.com/docs/build-apps/develop-your-app/frameworks/wix-blocks/about-wix-harmony-and-blocks.md).
Sometimes you need a property that can contain a list of items, for example, colors, sizes or locations. The list type can contain a list of items of a single type, such as text strings, numbers, or values of a custom type. ### Create a List Type Property 1. Click the **Widget API** ![](https://d2x3xhvgiqkx42.cloudfront.net/12345678-1234-1234-1234-1234567890ab/378fd532-728d-473b-8f03-30140bda59af/2021/06/22/9adacb68-b183-41d9-ac02-a237db2d7c6f/b1ebd5e2-ecd8-469c-be02-cdd966d0e285.jpg)  icon. 2. Click **Add New Property** or hover over **Properties** and click the ![](https://d2x3xhvgiqkx42.cloudfront.net/12345678-1234-1234-1234-1234567890ab/378fd532-728d-473b-8f03-30140bda59af/2021/06/22/56440d76-fbfe-417e-be2d-996b8f2b50a0/3cc1493b-5fcb-45c2-a5f0-cc803b3283c5.png)  icon. 3. Give your property a significant name and a display name. 4. Select **List** in the **Property type** menu.  5. Select the type of items on the list (or create a new custom type for them).   6. Describe your list.  7. Click **Add items...** to add items to your list.  8. Click **Create**. ![](https://d2x3xhvgiqkx42.cloudfront.net/12345678-1234-1234-1234-1234567890ab/378fd532-728d-473b-8f03-30140bda59af/2021/07/21/2086baf1-48ef-4c05-a997-96828ef18b45/c33791aa-a487-48aa-a970-8db4546b9478.jpg) ### Set List Type Properties from a Website 1. Open the site in the Wix Editor or Wix Studio.  2.  Select the widget ([learn more about installing a widget](https://support.wix.com/en/article/installing-a-blocks-app-in-your-site-ga)). 3.  Click **Settings** in the widget's action bar to see the list. ![](https://d2x3xhvgiqkx42.cloudfront.net/12345678-1234-1234-1234-1234567890ab/6b5c7381-912e-4754-99e2-d23157db088c/2022/07/25/bf7b1141-6086-43ce-a5f7-94df449caa46/3842f357-dca1-4db1-98e4-3d34f06f2cc6.png)
**Edit List in Blocks Versus in a Site:** * **If you edit list items in Blocks:** Changes will come into effect wherever the widget is installed, as long as you make sure to build the app again in Blocks, and refresh the Wix Editor or Wix Studio. * **If you edit list items in the Editor:** Changes will impact only that specific instance of the widget, which is installed in your site.
--- > Portal Navigation: > > - Append `.md` to any URL under `https://dev.wix.com/docs/` to get its markdown version. > - Pages are either content pages (article or reference text) or menu pages (a list of links to child pages). > - To get a menu page, truncate any URL to a parent path and append `.md` (e.g. `https://dev.wix.com/docs/sdk.md`, `https://dev.wix.com/docs/sdk/core-modules.md`). > - Top-level index of all portals: https://dev.wix.com/docs/llms.txt > - Full concatenated docs: https://dev.wix.com/docs/llms-full.txt ## Resource: Custom Type Properties Blocks ## Article: Creating and Managing Custom Type Properties in the Widget API ## Article Link: https://dev.wix.com/docs/build-apps/develop-your-app/develop-an-app-with-blocks/widget-api/custom-type-properties-blocks.md ## Article Content: # Custom Type Properties in Blocks
**Editor compatibility** Wix Blocks apps aren't supported in the Wix Harmony editor. Existing Blocks apps remain available for purchase on the Wix App Market for Wix Editor and Wix Studio sites. To learn more, see [About Wix Harmony and Blocks](https://dev.wix.com/docs/build-apps/develop-your-app/frameworks/wix-blocks/about-wix-harmony-and-blocks.md).
In your Widget API, you can create custom property types that fit the requirements of your app. For example, if you have a shopping widget, you may want to create a type that represents a customer, or a product, such as a shoe.  The Customer type could include the following properties: _name_ (text), _address_ (text), _age_ (number) and _customerI__d_ (number). The Shoe type could include the following properties: _model_ (text or number, depending on your catalog), _size_ (number), _color_ (text) and _productId_(number). A custom type property (such as Customer or Shoe) also has properties, which are the fields of this new datatype that you created. However, these inner properties can only have simple types: text, number, boolean, image and URL. They cannot break down into more custom type properties. ## Create a Property with a Custom Type 1. Click the **Widget API** ![](https://d2x3xhvgiqkx42.cloudfront.net/12345678-1234-1234-1234-1234567890ab/378fd532-728d-473b-8f03-30140bda59af/2021/06/22/9adacb68-b183-41d9-ac02-a237db2d7c6f/b1ebd5e2-ecd8-469c-be02-cdd966d0e285.jpg)  icon. 2. Click **Add New Property** or hover over **Properties** and click the ![](https://d2x3xhvgiqkx42.cloudfront.net/12345678-1234-1234-1234-1234567890ab/378fd532-728d-473b-8f03-30140bda59af/2021/06/22/56440d76-fbfe-417e-be2d-996b8f2b50a0/3cc1493b-5fcb-45c2-a5f0-cc803b3283c5.png)  icon. 3. Give your property a significant name and a display name. 4. Expand the **Property Type** menu.  5. Click **Create New Custom** **Type**. ![new custom property type](https://d2x3xhvgiqkx42.cloudfront.net/12345678-1234-1234-1234-1234567890ab/6b5c7381-912e-4754-99e2-d23157db088c/2022/07/25/d690731c-a65f-41e6-9b83-34a346c0910d/95bc6f33-797e-4953-87a3-2fab58b2e952.png) 1. Name the custom type. 2. Click **Add Property** to add properties (fields) to the type. 3. Repeat the process until you've added all the properties of the type.  4. Click **Save**. ![](https://d2x3xhvgiqkx42.cloudfront.net/12345678-1234-1234-1234-1234567890ab/378fd532-728d-473b-8f03-30140bda59af/2021/07/21/81df923c-eeaa-4f11-8d09-cb1c20822b76/deb9ec78-55e5-456e-981c-cbdf9e070c19.jpg) 5.  Add a description to your new property.  6.  Add default values to the type's fields if you want (such as a default age for the customer).  7. Click **Create**. ![](https://d2x3xhvgiqkx42.cloudfront.net/12345678-1234-1234-1234-1234567890ab/378fd532-728d-473b-8f03-30140bda59af/2021/07/21/25ab37e1-42e9-496e-b5f3-0d3c72419c3c/5f901e89-00fa-4838-96de-17475905172d.jpg)
Tip: In the above example, the Customer type can be used for various properties in the Widget API, such as ExsitingCustomer, FirstTimeCustomer, PotentialCustomer.
### Edit a Custom Property Type Edit a custom type by hovering over the type and clicking the **Edit** ![](https://d2x3xhvgiqkx42.cloudfront.net/12345678-1234-1234-1234-1234567890ab/6b5c7381-912e-4754-99e2-d23157db088c/2022/07/30/6e5bfca9-25d6-437e-ad46-308f11dae23a/b27efe36-c2d2-4c32-9df7-6ad334d21e18.png)  icon. You can then edit or remove any of the properties in that type. If you **remove** a property from your custom type, it is removed from the Widget API properties of the custom type. If you add a property to your custom type, it is automatically added to the existing Widget API properties of that custom type.  If you **change the name** of the custom type it is automatically changed in each Widget API property that is of that type. ### Delete a Custom Property Type Delete a custom type by hovering over the type and clicking the **Delete** ![](https://d2x3xhvgiqkx42.cloudfront.net/12345678-1234-1234-1234-1234567890ab/6b5c7381-912e-4754-99e2-d23157db088c/2022/07/30/41f84058-7343-45df-ad31-37d9509179a3/77daacee-70d7-48d5-bef7-97dbbc5e2605.png)  icon. You can only delete a custom type if no Widget API properties are of that type. --- > Portal Navigation: > > - Append `.md` to any URL under `https://dev.wix.com/docs/` to get its markdown version. > - Pages are either content pages (article or reference text) or menu pages (a list of links to child pages). > - To get a menu page, truncate any URL to a parent path and append `.md` (e.g. `https://dev.wix.com/docs/sdk.md`, `https://dev.wix.com/docs/sdk/core-modules.md`). > - Top-level index of all portals: https://dev.wix.com/docs/llms.txt > - Full concatenated docs: https://dev.wix.com/docs/llms-full.txt ## Resource: Use the Widget API When Editing a Site ## Article: Using Your Widget API When Editing a Site ## Article Link: https://dev.wix.com/docs/build-apps/develop-your-app/develop-an-app-with-blocks/widget-api/use-the-widget-api-when-editing-a-site.md ## Article Content: # Use the Widget API When Editing a Site
**Editor compatibility** Wix Blocks apps aren't supported in the Wix Harmony editor. Existing Blocks apps remain available for purchase on the Wix App Market for Wix Editor and Wix Studio sites. To learn more, see [About Wix Harmony and Blocks](https://dev.wix.com/docs/build-apps/develop-your-app/develop-an-app-with-blocks/about-wix-harmony-and-blocks.md).
After a [Widget API was defined in Blocks](https://dev.wix.com/docs/build-apps/develop-your-app/develop-an-app-with-blocks/widget-api/about-the-widget-api.md) and the widget is now [installed on a site](https://support.wix.com/en/article/installing-a-blocks-app-in-your-site-ga), you can easily access the Widget API from the Wix Editor or Wix Studio. 
Note: Any changes that you make to the API while editing a site, only impact this specific site. The original widget is not impacted. If this isn't your intention and you want to edit the Widget API so that it updates on all sites using the widget, edit it in Blocks.
## Set property values There are a few ways for users to set the widget API properties. ### Set property values through the Settings panel Any widget that has properties, gets a default Settings panel. A widget with no properties will not have this panel. 1. Select the widget in Wix Studio or Wix Editor.   2. Click **Settings** in the widget's action bar to access its properties.  3. Edit the properties in the **Settings** panel. Note: Your changes will only apply to the site you're editing. 4. Click **Preview** to see how your widget works on this site.  ![](https://d2x3xhvgiqkx42.cloudfront.net/12345678-1234-1234-1234-1234567890ab/378fd532-728d-473b-8f03-30140bda59af/2021/07/21/78369f9e-9583-4fac-92d9-23867288e096/353dd159-8fa7-452a-b2ed-fb8ff9d9a138.jpg) ### Set property values through a custom panel You can also let users [set the properties through a custom panel](https://dev.wix.com/docs/build-apps/develop-your-app/develop-an-app-with-blocks/editor-experience-panels/connect-panel-elements-to-props.md) that you created. Note that if you connect your custom panel to the widget's **Settings** button, the default Settings panel will not be available. ### Set property values through code 1. Select the widget in Wix Studio or Wix Editor. 2. Click the **Properties and Events** ![](https://d2x3xhvgiqkx42.cloudfront.net/12345678-1234-1234-1234-1234567890ab/378fd532-728d-473b-8f03-30140bda59af/2021/07/26/b734f951-abe5-4735-b65f-76cf788f13d3/26127617-e23d-47ba-b183-225adc5775a2.jpg)  icon to view the widget's ID.  ![widget api properties in editor x](https://d2x3xhvgiqkx42.cloudfront.net/12345678-1234-1234-1234-1234567890ab/6b5c7381-912e-4754-99e2-d23157db088c/2022/07/24/c1615408-4f63-4d0d-803f-65d7e00c92af/1d643714-fa62-48a5-a38c-03280d122536.png) 3. Use the following syntax to set or get a property value. ```js $w("#"). ``` Use extra dots if the property is an object and you want to access its inner properties. For example, let's log the name of our customer from the shopping widget to the console.  ```javascript let name = $w("#widget11").existingCustomer.name; console.log(name); ``` ## Handle widget API events When your widget is installed on a site, site creators can see the event name in their **Properties and Events** ![](https://d2x3xhvgiqkx42.cloudfront.net/12345678-1234-1234-1234-1234567890ab/378fd532-728d-473b-8f03-30140bda59af/2021/08/25/2c401013-69e3-46d6-970b-3b53b4551600/68340d03-582d-405e-b6f2-74beb867fbfb.jpg) panel, in the format of `on`, for example, `onAddedToCart`. There are a few things they can do with this event name: ### Create a function to handle the event 1. Select the widget in the site editor. 1. Click on the name of the event in the Properties and Events panel. 1. Write the code to handle it in the empty function that appears in your code editor. ![onAddedtocart](https://d2x3xhvgiqkx42.cloudfront.net/12345678-1234-1234-1234-1234567890ab/6b5c7381-912e-4754-99e2-d23157db088c/2022/07/24/0ebbf546-8bbc-458b-b8cc-fe9d1ba7b099/bb91af0f-4fa8-4aaf-96af-81774eed6531.png) ### Get data from the event If you want to handle data from this event, you must add it as an argument (it's not added automatically). For example: ```js export function widget11_addToCart(event){ const { productId, customerId } = event.data; console.log('Product added to cart', { productId, customerId }); } ``` ### Handle the event in the `onReady()` function You can handle the event directly from the `onReady()` function of your site. For example: ```js $w.onReady( function() { $w('#widget1').onAddedToCart((event) => { const { productId, customerId } = event.data; console.log('Product added to cart', { productId, customerId }); }); } ); ```
Note: The condition for firing the event [was defined in Blocks](https://dev.wix.com/docs/build-apps/develop-your-app/develop-an-app-with-blocks/widget-api/blocks-widget-events.md), while the actions to take when handling the event are defined in the site that installed the widget. 
## Call widget API functions Call your Widget API functions in your site's code easily, with auto-complete.  For example, when an item was successfully added to the cart - you can all a function that notifies the user.  Once you begin to write the function's name (such as "add"), you get auto-completes so you can see what functions are available: ![](https://d2x3xhvgiqkx42.cloudfront.net/12345678-1234-1234-1234-1234567890ab/378fd532-728d-473b-8f03-30140bda59af/2021/09/13/2bda87ae-6649-4841-a640-b2ad36aff38b/c993b8da-6006-4003-ad37-1d0edf45588b.jpg) Then you can use the function in your code, for example: ```javascript let productAddedToCart = $w('#widget11').addItemToCart(productID, quantity)); ``` --- > Portal Navigation: > > - Append `.md` to any URL under `https://dev.wix.com/docs/` to get its markdown version. > - Pages are either content pages (article or reference text) or menu pages (a list of links to child pages). > - To get a menu page, truncate any URL to a parent path and append `.md` (e.g. `https://dev.wix.com/docs/sdk.md`, `https://dev.wix.com/docs/sdk/core-modules.md`). > - Top-level index of all portals: https://dev.wix.com/docs/llms.txt > - Full concatenated docs: https://dev.wix.com/docs/llms-full.txt ## Resource: Blocks Widget Design Guidelines ## Article: Design Guidelines for Applications ## Article Link: https://dev.wix.com/docs/build-apps/develop-your-app/develop-an-app-with-blocks/widget-design/blocks-widget-design-guidelines.md ## Article Content: # Blocks Widget Design Guidelines
**Editor compatibility** Wix Blocks apps aren't supported in the Wix Harmony editor. Existing Blocks apps remain available for purchase on the Wix App Market for Wix Editor and Wix Studio sites. To learn more, see [About Wix Harmony and Blocks](https://dev.wix.com/docs/build-apps/develop-your-app/develop-an-app-with-blocks/about-wix-harmony-and-blocks.md).
Wix Blocks allows you to design stunning apps with simple drag-and-drop abilities, with little code, in a similar way to how you build Wix websites. This article explains how to make your app widgets behave responsively and adapt to any screen size, blend beautifully with Wix sites, and offer as many design styles and layouts as you want. ## See our Figma kit The Blocks Elements [Figma kit](https://dev.wix.com/docs/build-apps/develop-your-app/design/about-app-design.md) gives you full access to Blocks widget, dashboard & panel elements, text styles and icons. If you want to start in Figma before designing in Blocks, make sure to use the kit to align with our visual standards. ## Create responsive apps Blocks allows you to build responsive apps and install them on all Wix editors. Designers can build fully fluid and functional widgets that support viewport/widget size change and customized content. This is why, before you begin to work on Blocks, it’s important to know the basics of responsive and fluid design. 
![responsive app](https://d2x3xhvgiqkx42.cloudfront.net/12345678-1234-1234-1234-1234567890ab/378fd532-728d-473b-8f03-30140bda59af/2022/03/02/ca709a90-b89d-4e61-9e99-c6ecc4e5a377/81a13abd-335c-4ba0-8a88-79cb5d058455.gif)
Building with layout elements such as flexbox, grid, stack and repeater will help you create responsive behaviors.
The 6 layout elements for creating responsive behaviors. * **Grid:** Every container and section comes with a built-in grid. You can choose the number of rows and columns your composition requires, and adjust their size in many different measurements. * **Box:** This is the simplest of the layout tools. Every other layout tool, apart from the grid, is built on a box. Stack, repeater, flexbox, and multi-state box are all built using boxes. Note that every widget comes with a default box, containing the entire widget. * **Stack:** Group several components together in a vertical arrangement, and apply collapse and expand functionality. Because it is built as a container, you can select background color and other customizations. * **Repeater:** Create a list of items with the same design and layout, but different content in each. Repeaters are arranged in a flex layout that automatically reorganizes content when it’s resized. * **Flexbox:** Add your content to a flex layout of your choice. The items inside a flexbox are containers. This allows you to drag and attach any element to an item, and it will move with the item when the flexbox is resized. * **Multi-State Box:** You can show different content for different situations in the same container box, displaying one state at a time.For example, you can create a loading state, or a "thank you: state. Choose the amount of states your box should have, design them, and give them IDs that you will later use in your code.
![layout tools](https://d2x3xhvgiqkx42.cloudfront.net/12345678-1234-1234-1234-1234567890ab/378fd532-728d-473b-8f03-30140bda59af/2022/03/02/063223ee-a5f8-4b11-b83e-9263eb461421/358af864-4a69-47a8-bb35-03c40ccfdff6.gif)
**Tip: plan ahead!** Defining your responsive behaviors and desired customizations before you start to build. This will help you decide on the structure and layout tools that you should use. For example, it will help you determine in advance how many columns you need in your grid.
## Support customizable content When you build an application in Blocks, you should take into consideration that it can be customized in the Wix editors and should support this customizable content. For example, a user who installs your app in the editor can delete some of the elements. Therefore, it’s important to adjust the design of your app to different kinds of edge-cases scenarios, such as how it will look when one of the sections is deleted. For example, look at this widget: 
![widget with image](https://d2x3xhvgiqkx42.cloudfront.net/12345678-1234-1234-1234-1234567890ab/378fd532-728d-473b-8f03-30140bda59af/2022/03/02/e88eb5a4-7db2-4ba6-a4b2-ac07686935b0/75b44574-186e-4726-81f4-ef16ad0f8cda.gif)
Here you can see the same widget after the user chose to delete the image:
![same widget no image](https://d2x3xhvgiqkx42.cloudfront.net/12345678-1234-1234-1234-1234567890ab/378fd532-728d-473b-8f03-30140bda59af/2022/03/02/81e60410-25ff-44ad-9812-e091dfc0d1ad/1255f517-3e1e-4960-8b52-89351115c0b4.gif)
To make sure that your content stays customizable: * Use elements such as grid (on min-content) and stack in order to make sure that different content lengths, and showing/hiding content will not break the layout. * Test your app with different contents (text lengths, different images, languages etc.). * Show and hide elements in order to make sure the behavior is as you expected. * * * ## Use presets for design and layout Design presets allow you to create a variety of designs for one app. Design across breakpoints and reorganize the same elements to create multiple layouts for your widget (e.g. desktop and mobile). Note that all presets contain the same elements - reordered, but not re-parented. Everything is connected with the same logic. For example, grids in all presets must have the same number of cells. Learn more about [creating and managing design presets](https://dev.wix.com/docs/build-apps/develop-your-app/develop-an-app-with-blocks/widget-design/create-and-manage-design-presets.md).
Advantages of Presets * **Variety of content:** Presets allow you to offer your user different designs and layouts. Presets use the same code and panels. User overrides can be saved when changing a preset. * **Fluid & Responsive:** Presets can be created to fit smaller screens in case your main preset is not responsive enough. * **Hidden elements:** You can choose which elements to hide on a specific preset, by clicking **Don’t display**. Elements we add/delete will be added/deleted across presets.
Limitations of Presets * **No reparenting between presets:** Reparenting is attaching an item to another container or dragging it out of its container. This is not available between presets, meaning this change will be applied on all presets. * **No content change between presets:** Just like in breakpoints - images, text, and videos cannot change from one preset to another. * **Several elements cannot change between presets:** For example - * An SVG’s shape and color. * Layout of a native gallery. * Layouts of all inputs. * **Overrides between presets (in the Wix Editors):** When adding the widget to your Editor and making overrides (editing the design), those customizations will follow to the next preset or will be reset (according to desired behavior). We can’t select certain overrides to follow, (such as font-family) and other overrides to reset (font color), it’s all or nothing.
Changes per preset versus global changes You can make some changes in a preset that only impact the current preset. Other changes impact all of them. Read more about [changes that impact your current preset, versus changes that affect all of them](https://dev.wix.com/docs/build-apps/develop-your-app/develop-an-app-with-blocks/widget-design/create-and-manage-design-presets.md).
Stay as fluid as possible Keep your widget as fluid as possible in all presets, even if using different presets for different breakpoints. Fluidity will allow the user who installs your application on a site to get a better behavior when they resize their app on a specific breakpoint. This is because different websites might have different breakpoints and you cannot predict the breakpoint of every website. ![](https://d2x3xhvgiqkx42.cloudfront.net/12345678-1234-1234-1234-1234567890ab/378fd532-728d-473b-8f03-30140bda59af/2022/03/02/3adb4c38-4cf2-4696-b520-506e6c379b02/652c91bd-1366-46cb-84c1-b48652a298a0.gif)
Use widget in widget Use the Blocks option to insert one widget into another widget when you build a complex composition. This gives you the ability to suggest inner-widget presets. This allows more customization combinations for your user. It also simplifies the structure and the work on stage. Learn more about [Nested Widgets](https://dev.wix.com/docs/build-apps/develop-your-app/develop-an-app-with-blocks/site-widgets/add-nested-widgets-in-blocks.md) in Blocks.
* * * ## Connect elements to site themes Since your widget does not stand alone but will be installed in a site, it is important to make sure when you build it, that it [connects to the site theme](https://dev.wix.com/docs/build-apps/develop-your-app/develop-an-app-with-blocks/widget-design/about-themes-in-blocks.md). #### Points on connecting elements to themes: **Connect your colors to a theme:** Make sure to [connect your elements](https://dev.wix.com/docs/build-apps/develop-your-app/develop-an-app-with-blocks/widget-design/connect-your-blocks-widget-colors-to-site-themes.md) to the site's color palette in order to: * Keep your app consistent and aligned with any Wix-site color scheme. * Make sure your app is visually accessible. **Connecting** **Text themes:** Make sure your text elements are connected to the [text theme](https://dev.wix.com/docs/build-apps/develop-your-app/develop-an-app-with-blocks/widget-design/connect-your-widget-text-styles-to-site-typography-themes.md) in order to: * Keep your app consistent and aligned with any Wix site text theme. * Make sure your app is visually accessible.  **Note:** You can [disconnect the font size](https://dev.wix.com/docs/build-apps/develop-your-app/develop-an-app-with-blocks/widget-design/connect-your-widget-text-styles-to-site-typography-themes.md) from the theme. This maintains the look of the typography when the user changes their theme from the **Theme Panel**.
**Tip: Test your theme in Preview** When you finish connecting all the elements to site themes, go to **Preview** in Blocks and click **Test Theme**. This will help you make sure that you didn't miss any element in your widget and that everything is connected perfectly.  **Make sure that:** * Your design works with different color schemes, and it is properly connected. * Your design works properly with different font families.
![connect to theme](https://d2x3xhvgiqkx42.cloudfront.net/12345678-1234-1234-1234-1234567890ab/378fd532-728d-473b-8f03-30140bda59af/2022/03/08/a67821a8-d17a-4634-bb8a-ad7101619288/23bddc03-3350-4e53-bf11-c5c87b3fe803.gif)
After you finish designing your widget, we recommend that you [install your app](https://dev.wix.com/docs/build-apps/develop-your-app/develop-an-app-with-blocks/deploy-and-manage-blocks-apps/install-a-blocks-app-on-a-site.md) to make sure it works properly. --- > Portal Navigation: > > - Append `.md` to any URL under `https://dev.wix.com/docs/` to get its markdown version. > - Pages are either content pages (article or reference text) or menu pages (a list of links to child pages). > - To get a menu page, truncate any URL to a parent path and append `.md` (e.g. `https://dev.wix.com/docs/sdk.md`, `https://dev.wix.com/docs/sdk/core-modules.md`). > - Top-level index of all portals: https://dev.wix.com/docs/llms.txt > - Full concatenated docs: https://dev.wix.com/docs/llms-full.txt ## Resource: About Design Presets ## Article: About Design Presets ## Article Link: https://dev.wix.com/docs/build-apps/develop-your-app/develop-an-app-with-blocks/widget-design/about-design-presets.md ## Article Content: # About Design Presets in Blocks
**Editor compatibility** Wix Blocks apps aren't supported in the Wix Harmony editor. Existing Blocks apps remain available for purchase on the Wix App Market for Wix Editor and Wix Studio sites. To learn more, see [About Wix Harmony and Blocks](https://dev.wix.com/docs/build-apps/develop-your-app/develop-an-app-with-blocks/about-wix-harmony-and-blocks.md).
Design presets allow you to create various designs for the same widget. When you create design presets for a widget, its functionality, elements, code, APIs and data remain the same, while the way it looks can vary.  With design presets, you can easily reuse your code and functionality across different designs, without the need to copy and paste them. You can also control how your widget looks across various viewports, through creating different presets for desktop and mobile. When site builders install the app, they can easily move between your ready-made presets. ## Example This [Banner Widget](https://dev.wix.com/apps-templates/template?id=1b7db962-6230-46bf-b908-d988ef640238&http_referrer=documentation) has four design presets. The first two presets are similar, but have a different layout. One has the text beside the image and the second one has the text over the image. Text beside image: ![](https://wixmp-833713b177cebf373f611808.wixmp.com/images/ac9dc0d82a0be5c8aecb70731973c39f.png) Text over image: ![](https://wixmp-833713b177cebf373f611808.wixmp.com/images/d50b1df7e94b877dd35fc9c03358e3e0.png) The third preset has a different style - an inverted colors preset: ![](https://wixmp-833713b177cebf373f611808.wixmp.com/images/6f365bb557111b56faeaa1f879a1b7b9.png) The fourth preset is built vertically, so it can look great on mobile devices: ![](https://wixmp-833713b177cebf373f611808.wixmp.com/images/584aaf4c19fdbc6627ee13c4ec13954a.png) Ready to use presets? Learn more about [creating and managing design presets](https://dev.wix.com/docs/build-apps/develop-your-app/develop-an-app-with-blocks/widget-design/create-and-manage-design-presets.md). --- > Portal Navigation: > > - Append `.md` to any URL under `https://dev.wix.com/docs/` to get its markdown version. > - Pages are either content pages (article or reference text) or menu pages (a list of links to child pages). > - To get a menu page, truncate any URL to a parent path and append `.md` (e.g. `https://dev.wix.com/docs/sdk.md`, `https://dev.wix.com/docs/sdk/core-modules.md`). > - Top-level index of all portals: https://dev.wix.com/docs/llms.txt > - Full concatenated docs: https://dev.wix.com/docs/llms-full.txt ## Resource: Create and Manage Design Presets ## Article: Creating and Managing Design Presets ## Article Link: https://dev.wix.com/docs/build-apps/develop-your-app/develop-an-app-with-blocks/widget-design/create-and-manage-design-presets.md ## Article Content: # Create and Manage Design Presets
**Editor compatibility** Wix Blocks apps aren't supported in the Wix Harmony editor. Existing Blocks apps remain available for purchase on the Wix App Market for Wix Editor and Wix Studio sites. To learn more, see [About Wix Harmony and Blocks](https://dev.wix.com/docs/build-apps/develop-your-app/develop-an-app-with-blocks/about-wix-harmony-and-blocks.md).
Create multiple designs for the same widget. When you create design presets for a widget, its functionality and data remain the same, while the way it looks can change a lot. You can also use presets to create different designs for different viewports, like desktop and mobile. Learn more [about design presets](https://dev.wix.com/docs/build-apps/develop-your-app/develop-an-app-with-blocks/widget-design/about-design-presets.md) in Blocks.
Examples: To see examples of design presets, open the following templates and browse through the app widgets. Also, take a look at the widgets' [installation settings](https://dev.wix.com/docs/build-apps/develop-your-app/develop-an-app-with-blocks/deploy-and-manage-blocks-apps/configure-blocks-installation-settings.md#preset-visibility-and-images). - [Banner](https://dev.wix.com/apps-templates/template?id=1b7db962-6230-46bf-b908-d988ef640238&http_referrer=documentation) - [Repeater](https://dev.wix.com/apps-templates/template?id=a4a7246f-4644-48ce-81e7-2a86aa74d9e5&http_referrer=documentation) - [Events Map](https://dev.wix.com/apps-templates/template?id=f086effa-64b8-4c8b-a5c8-61c3a7548af7&http_referrer=documentation) - [Calculator Form](https://dev.wix.com/apps-templates/template?id=3ccb81da-dff8-43fd-95c8-620563624e2b&http_referrer=documentation) - [Recipe list](https://dev.wix.com/apps-templates/template?id=512a7d8a-1666-40c2-9586-25874d2f69b4&http_referrer=documentation)
**To create and manage design presets in Blocks:** 1. Open the widget you want to design. 2. Click **\+ Add** in the **Design Presets** panel. 3. Click the **ֿMore Actions** icon ![](https://d2x3xhvgiqkx42.cloudfront.net/12345678-1234-1234-1234-1234567890ab/378fd532-728d-473b-8f03-30140bda59af/2021/05/24/e9f11af0-679c-4bf1-8b76-e50e26ec98f6/27128ae4-51ef-4cdd-b679-854d2e85973b.jpg)   to rename, duplicate or delete a preset. Note that if you only have one preset, you cannot delete it.
![add preset](https://wixmp-833713b177cebf373f611808.wixmp.com/images/91e723988631abbfdc09e6ddf6c13ec7.png)
4. To preview your design presets, click **Preview** > **Test Design Presets**. ## Make Changes Per Preset Versus Global Changes Some changes you make in one preset impact only the current one, while others impact all of them. As a rule of thumb, design changes are per-preset, while structure or data changes are global. Here's a guide to help you track what happens when. 
Changes that impact all presets * Add an element from the add panel. * Duplicate, copy, cut and paste an element. * Delete an element. * Hide an element on all other presets (click the **More Actions** icon ![](https://d2x3xhvgiqkx42.cloudfront.net/12345678-1234-1234-1234-1234567890ab/378fd532-728d-473b-8f03-30140bda59af/2021/05/24/2136be44-e369-4942-b48e-e5af43b32124/a6be021c-326d-40ee-bfdd-1ceb207c6077.jpg) in the element's action bar and then click **Display** -> **Hide on all other Presets**).  * Reparent an element. * Group and ungroup elements. * Manage the items in a repeater (reorder). * Stack, unstack, add to stack and detach from stack (however, changing the order of stack items impacts current preset only). * Text: change text content. * Text - structural changes: theme (such as Heading 1 or Paragraph 2), a link, bullets, numbering, indentation, text direction and heading tag. * Replace a decorative shape (icon).
Changes that impact only your current preset * Resize a widget. * Set widget overflow content options, position, design and adjust options. * Hide an element in this preset (click the **More Actions** icon ![more actions icon](https://d2x3xhvgiqkx42.cloudfront.net/12345678-1234-1234-1234-1234567890ab/378fd532-728d-473b-8f03-30140bda59af/2021/05/24/2136be44-e369-4942-b48e-e5af43b32124/a6be021c-326d-40ee-bfdd-1ceb207c6077.jpg) in the element's action bar and then click **Display** -> **Hide on this Preset**).  * Change an element's design and layout. * Change an image's focal point. * Hide, show and reorder widget layers. * Grids: change the number of rows or columns, define row and column size, set gaps, move elements between cells (change grid areas).  * Flexboxes: set display type, item properties, auto-wrap, margins, direction and proportions. * Reorder stack layers. * Text - design changes: font, scaling, size, bold, italic, underline, color, highlight, alignment, line spacing and character spacing.
## Define Preset Visibility in the Widget Installation Settings When users install your widget, you can allow them to select a preset from the **Add to Site** panel and later switch between presets using the **Presets** ![](https://d2x3xhvgiqkx42.cloudfront.net/12345678-1234-1234-1234-1234567890ab/378fd532-728d-473b-8f03-30140bda59af/2024/05/27/2907ce70-8afe-48d0-a3b7-65097674f11c/19742c50-14ba-48de-a648-f09689a259cf.png) button in the widget’s action bar. You can control which presets appear by configuring their visibility in the [installation settings](https://dev.wix.com/docs/build-apps/develop-your-app/develop-an-app-with-blocks/deploy-and-manage-blocks-apps/configure-blocks-installation-settings.md#preset-visibility-and-images).
The Add to Site Panel ![add widget](https://d2x3xhvgiqkx42.cloudfront.net/12345678-1234-1234-1234-1234567890ab/378fd532-728d-473b-8f03-30140bda59af/2023/10/04/e1502cb1-4742-4936-b314-8282c9194b53/fe2cbb6b-746d-434b-b335-d25cd8af5eb2.png)
The Presets Panel ![action bar icon](https://d2x3xhvgiqkx42.cloudfront.net/12345678-1234-1234-1234-1234567890ab/378fd532-728d-473b-8f03-30140bda59af/2024/05/27/85bf68a7-7595-4d25-8b1a-b49962bd2b5c/1183b330-403e-48da-82c9-ce4511745056.png) ![new presets panel](https://d2x3xhvgiqkx42.cloudfront.net/12345678-1234-1234-1234-1234567890ab/378fd532-728d-473b-8f03-30140bda59af/2024/05/27/a551024a-0acf-4fe1-804a-29817512fc20/fc29ac78-4902-4b79-a58a-725734d35caf.png)
## Change Presets According to Viewport You can create different presets for different viewports, such as vertical layouts for mobile. Wix Studio users can switch between desktop, tablet, and mobile views, while Wix Editor users can switch between desktop and mobile. When users select a viewport, they can change the preset using the **Presets** ![](https://d2x3xhvgiqkx42.cloudfront.net/12345678-1234-1234-1234-1234567890ab/378fd532-728d-473b-8f03-30140bda59af/2024/05/27/2907ce70-8afe-48d0-a3b7-65097674f11c/19742c50-14ba-48de-a648-f09689a259cf.png) button, but presets for other viewports remain unchanged. You can also set a default preset for mobile in the [installation settings](https://dev.wix.com/docs/build-apps/develop-your-app/develop-an-app-with-blocks/deploy-and-manage-blocks-apps/configure-blocks-installation-settings.md#preset-visibility-and-images). ![](https://wixmp-833713b177cebf373f611808.wixmp.com/images/6deb6b4fe104637dbd64a64dedb3e7b9.png) --- > Portal Navigation: > > - Append `.md` to any URL under `https://dev.wix.com/docs/` to get its markdown version. > - Pages are either content pages (article or reference text) or menu pages (a list of links to child pages). > - To get a menu page, truncate any URL to a parent path and append `.md` (e.g. `https://dev.wix.com/docs/sdk.md`, `https://dev.wix.com/docs/sdk/core-modules.md`). > - Top-level index of all portals: https://dev.wix.com/docs/llms.txt > - Full concatenated docs: https://dev.wix.com/docs/llms-full.txt ## Resource: Create Thumbnail Images for Your Presets ## Article: Create Thumbnail Images for Your Presets ## Article Link: https://dev.wix.com/docs/build-apps/develop-your-app/develop-an-app-with-blocks/widget-design/create-thumbnail-images-for-your-presets.md ## Article Content: # Create Thumbnail Images for Your Presets
**Editor compatibility** Wix Blocks apps aren't supported in the Wix Harmony editor. Existing Blocks apps remain available for purchase on the Wix App Market for Wix Editor and Wix Studio sites. To learn more, see [About Wix Harmony and Blocks](https://dev.wix.com/docs/build-apps/develop-your-app/frameworks/wix-blocks/about-wix-harmony-and-blocks.md).
When site builders browse through the design presets of your widget in their **Add** or **Presets** panels, they see a thumbnail image of the widget. You can use the auto-generated image, or create your own. When creating your own image, please consider the following guidelines. ### Content guidelines * The image should be a visual representation of the preset. It's not a banner or an ad.  * If your widget has dynamic content, use dummy content to prepare your image. However, don't use Lorem Ipsum.  ### Technical guidelines * Compression: do not compress, use best quality * File type: JPG or PNG * File size limit: 25 MB * Image size minimum: 304X188 px ### See how it looks You must go to the Wix Editor and Wix Studio to see how your images appear in the actual panels. Here are some examples: 
The Add Panel ![add widget](https://wixmp-833713b177cebf373f611808.wixmp.com/images/2231128d2638eb6d3b73117802825d07.png)
The Presets Panel ![action bar icon](https://wixmp-833713b177cebf373f611808.wixmp.com/images/14acd9346f9a4fe7ebfb879e410714cc.png) ![new presets panel](https://wixmp-833713b177cebf373f611808.wixmp.com/images/83eb7287ffbd31cd98c60a68d8082997.png)
--- > Portal Navigation: > > - Append `.md` to any URL under `https://dev.wix.com/docs/` to get its markdown version. > - Pages are either content pages (article or reference text) or menu pages (a list of links to child pages). > - To get a menu page, truncate any URL to a parent path and append `.md` (e.g. `https://dev.wix.com/docs/sdk.md`, `https://dev.wix.com/docs/sdk/core-modules.md`). > - Top-level index of all portals: https://dev.wix.com/docs/llms.txt > - Full concatenated docs: https://dev.wix.com/docs/llms-full.txt ## Resource: About Themes in Blocks ## Article: About Themes ## Article Link: https://dev.wix.com/docs/build-apps/develop-your-app/develop-an-app-with-blocks/widget-design/about-themes-in-blocks.md ## Article Content: # About Themes in Blocks
**Editor compatibility** Wix Blocks apps aren't supported in the Wix Harmony editor. Existing Blocks apps remain available for purchase on the Wix App Market for Wix Editor and Wix Studio sites. To learn more, see [About Wix Harmony and Blocks](https://dev.wix.com/docs/build-apps/develop-your-app/develop-an-app-with-blocks/about-wix-harmony-and-blocks.md).
When you design a Wix site and you want to keep a neat and consistent design, it's best to have your site's elements connected to a **Theme**. A **color theme** includes combinations of colors that look great together, and a **typography theme** defines the looks of your site texts (learn more about using [Wix Studio site themes](https://support.wix.com/en/article/studio-editor-managing-your-site-styles)).  When you create a widget, connecting it to a theme becomes essential. You never know where your widget or app might end up - it can be installed on an unlimited number of Wix sites. Think about a widget with a black background, designed  to stand out on a site's white background. If the widget colors are not connected to site color themes, it will be hard to spot on a site with a black background. Or, think about setting all your buttons to be pink and then importing the app to a website with a pink background - no one would be able to see the buttons. This goes for fonts too - your widget's fonts can be very different from the site's fonts. Blocks automatically connects your widget's colors and texts to any site theme - adapting the widget to the site's look and feel. You can test how your widget looks across various themes in the **Test Theme** option in **Preview** mode.  Here is an example of a simple widget. Look what happens when it is connected to a theme and when it is not.
![simple widget](https://d2x3xhvgiqkx42.cloudfront.net/12345678-1234-1234-1234-1234567890ab/378fd532-728d-473b-8f03-30140bda59af/2021/05/18/bc301c00-f33c-44ec-9265-4d648a4e9e9e/dbf92ed7-15d0-4895-a4b2-0d3a1a0150bb.jpg)
When the widget colors are not connect to the site's theme, it looks like this: 
![widget not connected](https://d2x3xhvgiqkx42.cloudfront.net/12345678-1234-1234-1234-1234567890ab/378fd532-728d-473b-8f03-30140bda59af/2021/05/18/c720e19e-1a00-4e48-b78c-4aed1986ad22/25fb4098-1993-4d9e-abe8-0885ed9f171b.jpg)
When the widget colors are connected properly to the theme, the widget blends in the site's look and feel. It looks like this: 
![widget connected](https://d2x3xhvgiqkx42.cloudfront.net/12345678-1234-1234-1234-1234567890ab/378fd532-728d-473b-8f03-30140bda59af/2021/05/18/dd4ad591-8243-46f7-b3c4-9b3a8d03f7fd/08e16c4d-2d29-47ea-a03a-39149eca2b0a.jpg)
## See Also * [Connect your Blocks widget colors to site themes](https://dev.wix.com/docs/build-apps/develop-your-app/develop-an-app-with-blocks/widget-design/connect-your-blocks-widget-colors-to-site-themes.md) * [Connect your Blocks widget text styles to site themes](https://dev.wix.com/docs/build-apps/develop-your-app/develop-an-app-with-blocks/widget-design/connect-your-widget-text-styles-to-site-typography-themes.md) --- > Portal Navigation: > > - Append `.md` to any URL under `https://dev.wix.com/docs/` to get its markdown version. > - Pages are either content pages (article or reference text) or menu pages (a list of links to child pages). > - To get a menu page, truncate any URL to a parent path and append `.md` (e.g. `https://dev.wix.com/docs/sdk.md`, `https://dev.wix.com/docs/sdk/core-modules.md`). > - Top-level index of all portals: https://dev.wix.com/docs/llms.txt > - Full concatenated docs: https://dev.wix.com/docs/llms-full.txt ## Resource: Connect Your Blocks Widget Colors to Site Themes ## Article: Connecting Your Widget Colors to Site Themes ## Article Link: https://dev.wix.com/docs/build-apps/develop-your-app/develop-an-app-with-blocks/widget-design/connect-your-blocks-widget-colors-to-site-themes.md ## Article Content: # Connect Your Blocks Widget Colors to Site Themes
**Editor compatibility** Wix Blocks apps aren't supported in the Wix Harmony editor. Existing Blocks apps remain available for purchase on the Wix App Market for Wix Editor and Wix Studio sites. To learn more, see [About Wix Harmony and Blocks](https://dev.wix.com/docs/build-apps/develop-your-app/develop-an-app-with-blocks/about-wix-harmony-and-blocks.md).
When you create a widget with Blocks, it can be installed on many different Wix sites. To ensure that your widget's colors look great on all of these sites, Blocks automatically connects it to a theme. When you change colors in your widget, we recommend keeping them connected to the theme. ### Select colors that are connected to a theme 1. Open your widget in Blocks.  2. Select a widget element (such as a container or a text input).  3. Click the **Design** icon ![](https://d2x3xhvgiqkx42.cloudfront.net/12345678-1234-1234-1234-1234567890ab/378fd532-728d-473b-8f03-30140bda59af/2021/05/04/bcdca632-813c-49d2-a35e-921fdfac0a70/08d98167-9b06-49fc-b55f-2be6d1bdab47.png)  in the **Inspector** menu ![](https://d2x3xhvgiqkx42.cloudfront.net/12345678-1234-1234-1234-1234567890ab/21e446eb-7f73-4f2f-84b1-c6b77e64e45e/2024/04/24/1ebf50de-b376-4460-8500-69273929a835/75d3a097-ae27-46ba-8eea-e935c6e476a0.png)  on the right. 4. Click the color options related to your elements, to change its colors. A box, for example, has colors for **Fill Color & Opacity**, **Border**, **Corners** or **Text**. 5. Select a color from the **Theme Palette**. Blocks uses a default palette that cannot be changed - this represents the Wix site themes. If you want to change the color, we recommend that you select the appropriate color from the five default colors presented.
![open theme palette](https://d2x3xhvgiqkx42.cloudfront.net/12345678-1234-1234-1234-1234567890ab/6b5c7381-912e-4754-99e2-d23157db088c/2022/05/19/a5789ad7-5a7b-4c70-b134-3c415a1d03f9/ab64c9d5-def3-4b54-9753-5267614143d9.png)
When a color is connected to a theme, it shows the link ![](https://d2x3xhvgiqkx42.cloudfront.net/12345678-1234-1234-1234-1234567890ab/6b5c7381-912e-4754-99e2-d23157db088c/2022/05/17/66d824bf-7821-40a1-b14f-9ed8afb59ff9/78f0b717-78bc-406a-bd35-efafab6c3952.png) indication in the color picker. . 
![linked element](https://d2x3xhvgiqkx42.cloudfront.net/12345678-1234-1234-1234-1234567890ab/6b5c7381-912e-4754-99e2-d23157db088c/2022/05/17/c1cb7aff-0487-4840-b6c9-5a3c3e730a04/03d5e0a0-63a3-4a2e-a8ea-b49088398da0.png)
If you choose a color from the **Add a Custom Color** section of the color picker and not from the Theme Palette, the color remains fixed and disconnects from site themes. You might choose to use this option in special cases, such as success and error buttons that you want to keep green and red.  > **Note:** If you a user selects a color through a [custom panel color input](https://dev.wix.com/docs/build-apps/develop-your-app/develop-an-app-with-blocks/editor-experience-panels/panel-elements-in-blocks.md), the color won't connect to a site theme, even if they select one of the 5 recommended colors. This is because panel elements behave differently. ## Test your colors Click **Test Theme** in **Preview** ![](https://wixmp-833713b177cebf373f611808.wixmp.com/images/a35d83e13d49f269098b1b571f9e3a7e.png) mode to see how your widget looks across various sites with different themes. This helps you check that all your elements are connected correctly and your widget looks great with different themes. 
![Test Theme in Preview Mode](https://d2x3xhvgiqkx42.cloudfront.net/12345678-1234-1234-1234-1234567890ab/378fd532-728d-473b-8f03-30140bda59af/2021/05/02/7540ac98-1b42-4740-b272-839f767d84fb/c5f54f69-feee-4840-affa-dd9d6c2ec7fd.gif)
--- > Portal Navigation: > > - Append `.md` to any URL under `https://dev.wix.com/docs/` to get its markdown version. > - Pages are either content pages (article or reference text) or menu pages (a list of links to child pages). > - To get a menu page, truncate any URL to a parent path and append `.md` (e.g. `https://dev.wix.com/docs/sdk.md`, `https://dev.wix.com/docs/sdk/core-modules.md`). > - Top-level index of all portals: https://dev.wix.com/docs/llms.txt > - Full concatenated docs: https://dev.wix.com/docs/llms-full.txt ## Resource: Connect Your Widget Text Styles to Site Typography Themes ## Article: Connecting Your Widgets Text Styles to Site Typography Themes ## Article Link: https://dev.wix.com/docs/build-apps/develop-your-app/develop-an-app-with-blocks/widget-design/connect-your-widget-text-styles-to-site-typography-themes.md ## Article Content: # Connect Your Blocks Widget Text Styles to Site Typography Themes
**Editor compatibility** Wix Blocks apps aren't supported in the Wix Harmony editor. Existing Blocks apps remain available for purchase on the Wix App Market for Wix Editor and Wix Studio sites. To learn more, see [About Wix Harmony and Blocks](https://dev.wix.com/docs/build-apps/develop-your-app/frameworks/wix-blocks/about-wix-harmony-and-blocks.md).
When you design a widget, you want it to look great on any site it's installed on. That's why connecting your widget's texts to a theme is so important. Styled texts, such as Heading 2 or Paragraph 2, are connected to a theme that defines their properties. ### Connect a text element to site typography themes: To look best on Wix sites, your paragraphs should be connected to **Paragraph 2** and your headings to **Heading 2**. ## Check that your texts are connected: 1. Select a text element on your widget. 1. Look at the text theme under the **Design** section in the **Inspector** ![](https://d2x3xhvgiqkx42.cloudfront.net/12345678-1234-1234-1234-1234567890ab/21e446eb-7f73-4f2f-84b1-c6b77e64e45e/2024/04/24/1ebf50de-b376-4460-8500-69273929a835/75d3a097-ae27-46ba-8eea-e935c6e476a0.png) menu. ![](https://wixmp-833713b177cebf373f611808.wixmp.com/images/bd8149afcabdfbf519566ad4ca91fd4a.png) ### Override specific typography properties You can choose to override each one of the typography properties (such as font, size, bold, etc.). Your text will stay connected to the site theme, except for the overridden properties. Your text will disconnect from the theme only if you override **all** properties. Currently, all text elements in Blocks appear with a size override, so you'll see the asterisk (*) sign next to the text Theme. ### Test your theme Click **Test Theme** in Preview ![](https://wixmp-833713b177cebf373f611808.wixmp.com/images/903729a30d93ce91cf06fde181bbba46.png) mode to see how your widget looks across various sites with different themes. This helps you check that all your elements are connected correctly and your widget looks great with different themes. 
![Test Theme in Preview Mode](https://d2x3xhvgiqkx42.cloudfront.net/12345678-1234-1234-1234-1234567890ab/378fd532-728d-473b-8f03-30140bda59af/2021/05/02/7540ac98-1b42-4740-b272-839f767d84fb/c5f54f69-feee-4840-affa-dd9d6c2ec7fd.gif)
--- > Portal Navigation: > > - Append `.md` to any URL under `https://dev.wix.com/docs/` to get its markdown version. > - Pages are either content pages (article or reference text) or menu pages (a list of links to child pages). > - To get a menu page, truncate any URL to a parent path and append `.md` (e.g. `https://dev.wix.com/docs/sdk.md`, `https://dev.wix.com/docs/sdk/core-modules.md`). > - Top-level index of all portals: https://dev.wix.com/docs/llms.txt > - Full concatenated docs: https://dev.wix.com/docs/llms-full.txt ## Resource: About the Editor Experience in Blocks ## Article: About Configuration and Panels ## Article Link: https://dev.wix.com/docs/build-apps/develop-your-app/develop-an-app-with-blocks/editor-experience-configuration/about-the-editor-experience-in-blocks.md ## Article Content: # About the Editor Experience in Blocks
**Editor compatibility** Wix Blocks apps aren't supported in the Wix Harmony editor. Existing Blocks apps remain available for purchase on the Wix App Market for Wix Editor and Wix Studio sites. To learn more, see [About Wix Harmony and Blocks](https://dev.wix.com/docs/build-apps/develop-your-app/develop-an-app-with-blocks/about-wix-harmony-and-blocks.md).
Wix Blocks is open to all Wix Studio users. To get access to Blocks, [join Wix Studio](https://support.wix.com/en/article/wix-studio-switching-to-wix-studio).
Blocks allows Wix users who install your widget to customize it in their editor. Users can change the settings of your widget and its elements, add or remove elements, see the IDs that you give to elements, and more. ![configuration GIF](https://wixmp-833713b177cebf373f611808.wixmp.com/images/a3f3669aecd81298c1b2043027972319.gif) ### Configuration Go to the Blocks [Configuration](https://dev.wix.com/docs/build-apps/develop-your-app/develop-an-app-with-blocks/editor-experience-configuration/about-configuration-in-blocks.md) tab, to determine how your widget and its elements look and behave when they're installed on a site. You can configure: * Display names of widgets and their elements * Widget behavior (for example, whether or not site creators can select) * Action bars of widgets and their elements ### Panels Every Blocks widget comes with several default [panels](https://dev.wix.com/docs/build-apps/develop-your-app/develop-an-app-with-blocks/editor-experience-panels/about-panels-in-blocks.md) for design, presets, settings and adding or removing elements. You can also go to the [Panels tab](https://dev.wix.com/docs/build-apps/develop-your-app/develop-an-app-with-blocks/editor-experience-panels/about-panels-in-blocks.md) to create custom panels. Creating custom panels has three steps: * [Design your panel](https://dev.wix.com/docs/build-apps/develop-your-app/develop-an-app-with-blocks/editor-experience-panels/design-custom-panels-in-blocks.md): plan the panel, add elements and text. * [Code your panel](https://dev.wix.com/docs/build-apps/develop-your-app/develop-an-app-with-blocks/editor-experience-panels/add-code-to-custom-panels-in-blocks.md): add the code that connects between the panel elements and the widget's behavior. * [Connect your panel to an action button](https://dev.wix.com/docs/build-apps/develop-your-app/develop-an-app-with-blocks/editor-experience-panels/design-custom-panels-in-blocks.md), so that when a site-creator clicks the button, the panel opens. --- > Portal Navigation: > > - Append `.md` to any URL under `https://dev.wix.com/docs/` to get its markdown version. > - Pages are either content pages (article or reference text) or menu pages (a list of links to child pages). > - To get a menu page, truncate any URL to a parent path and append `.md` (e.g. `https://dev.wix.com/docs/sdk.md`, `https://dev.wix.com/docs/sdk/core-modules.md`). > - Top-level index of all portals: https://dev.wix.com/docs/llms.txt > - Full concatenated docs: https://dev.wix.com/docs/llms-full.txt ## Resource: UX Guidelines for Editor Experience in Blocks ## Article: UX Guidelines for Configuration and Panels ## Article Link: https://dev.wix.com/docs/build-apps/develop-your-app/develop-an-app-with-blocks/editor-experience-configuration/ux-guidelines-for-editor-experience-in-blocks.md ## Article Content: # UX Guidelines for Editor Experience
**Editor compatibility** Wix Blocks apps aren't supported in the Wix Harmony editor. Existing Blocks apps remain available for purchase on the Wix App Market for Wix Editor and Wix Studio sites. To learn more, see [About Wix Harmony and Blocks](https://dev.wix.com/docs/build-apps/develop-your-app/develop-an-app-with-blocks/about-wix-harmony-and-blocks.md).
A Blocks widget blends seamlessly, both with the site-builder's editing environment, and the experience of the site visitor. Following these guidelines will help make the experience of whoever installs your app as easy and intuitive as possible. Whenever in doubt, use this rule of thumb: their experience should be similar to what you see in the Wix site editor. All guidelines refer to the [**Configuration**](https://dev.wix.com/docs/build-apps/develop-your-app/develop-an-app-with-blocks/editor-experience-configuration/about-configuration-in-blocks.md) and [**Panels**](https://dev.wix.com/docs/build-apps/develop-your-app/develop-an-app-with-blocks/editor-experience-panels/design-custom-panels-in-blocks.md) tabs in the **Editor Experience** ![](https://d2x3xhvgiqkx42.cloudfront.net/12345678-1234-1234-1234-1234567890ab/378fd532-728d-473b-8f03-30140bda59af/2024/04/24/d885478b-0fa3-46d0-950a-801399d94383/8dc747a0-244b-4714-bd4c-7a71986a8394.png) panel in Blocks.  ### Selecting Elements You can define whether your widget elements [can be selected](https://dev.wix.com/docs/build-apps/develop-your-app/develop-an-app-with-blocks/editor-experience-configuration/configure-display-names-and-behavior-in-blocks.md) by a site builder who installed your app, in the **Configuration** tab in the **Editor Experience** panel. In general, invisible elements, such as layout tools (for example, a stack), should be defined as non-selectable. This makes the experience of the site builder who installs the widget easier and clearer.
![](https://d2x3xhvgiqkx42.cloudfront.net/12345678-1234-1234-1234-1234567890ab/378fd532-728d-473b-8f03-30140bda59af/2024/04/24/ae08b76a-80da-4753-946c-33fc544b6bc7/6a5243b8-7438-4aed-871a-8cb8d11e2187.png)
For example, take the following widget. You can see in the **Layers** tab in Blocks that it has a layouter, an image, a stack, two texts and a button. 
See example ![all elements in Blocks](https://d2x3xhvgiqkx42.cloudfront.net/12345678-1234-1234-1234-1234567890ab/378fd532-728d-473b-8f03-30140bda59af/2023/09/27/eb755545-3427-4c53-972a-2ab9b3c85009/4fefb0ab-09aa-43bd-8318-7f04fae31e11.png)
We defined all the non-visible elements of this widget as non-selectable. When it is installed in the editor, only the image, texts and button can be selected. 
See example ![in the editor](https://d2x3xhvgiqkx42.cloudfront.net/12345678-1234-1234-1234-1234567890ab/378fd532-728d-473b-8f03-30140bda59af/2023/09/27/6810ff22-9d83-4af2-a66a-873d6c64ff35/379baf30-f443-404b-a9ed-e2a5b75dbabf.gif)
#### Exceptions In some cases, en element is not a layout tool and still you will want it to be non-selectable:  * When your widget is a [custom element.](https://dev.wix.com/docs/build-apps/develop-your-app/develop-an-app-with-blocks/code-in-blocks/about-custom-elements-in-blocks.md)  * When an element is essential for the widget and therefore cannot be removed. If you uncheck the "Can be removed" checkbox, the "Can be selected" checkbox will automatically be unchecked.  * When the entire widget is **treated as a single element**. For example, a social bar, a small rating widget, or a calendar. Here is an example of a social bar, that does not allow selecting inner elements. We defined the repeater, its items and the button non-selectable. Everything you need to configure is done through the widget's Settings panel. 
See example ![social bar exmaple](https://d2x3xhvgiqkx42.cloudfront.net/12345678-1234-1234-1234-1234567890ab/378fd532-728d-473b-8f03-30140bda59af/2023/09/27/c68fbca0-0c7c-4b7c-b9ff-0d41dc54259c/53f36310-fb0e-4060-b37b-8984865ac334.png)
* * * ### Display Names You can set display names for your widgets and their elements. The display name appears in a site builder's site-editor. For example, the button in this widget was given a meaningful display name: "Add to Cart". 
![](https://d2x3xhvgiqkx42.cloudfront.net/12345678-1234-1234-1234-1234567890ab/378fd532-728d-473b-8f03-30140bda59af/2024/04/24/fe11addc-0847-40aa-ae3f-2ce85ab5ebb7/10093252-8c10-4e6b-9269-d2d052950971.png)
* Don't use the word "Widget" in your widget's display name (you also shouldn't use it in the widget name itself).  * Give the widget elements a meaningful display name. For example, if your widget has an input element for a site-visitor to write their email address, call it "Email" and not "Input".  * Use **title case** to capitalize the display name.  * * * ### Configuring Action Bars Widgets and their elements come with default action bars (floating menus). The buttons on the action bars are called action buttons . 
![](https://d2x3xhvgiqkx42.cloudfront.net/12345678-1234-1234-1234-1234567890ab/378fd532-728d-473b-8f03-30140bda59af/2024/04/24/5cd88a25-5ddc-4e14-98e6-e9b64352d1f8/84c5f692-2fc8-47e1-9c13-8a767c20b72b.png)
#### Action Bar Design * You can remove and add action buttons. Note that the main action (the left one, which has a word on it and not only an image), can't be removed.  * If a text field has dynamic text, which the site-builder should not edit, make sure to change the main action from "Edit Text" to "Design Text". This sort of text can be changed from the [Dashboard](https://dev.wix.com/docs/build-apps/develop-your-app/develop-an-app-with-blocks/dashboard-pages/build-a-dashboard-page-in-blocks.md). * We recommend not to connect a design panel to the paintbrush action button, since it will work only in the Wix editor and not in the Studio editor.  #### Action Bar Text * Make sure that the name or icon of the action button matches the goal of the panel that opens. For example, a design icon will open a design panel.  * Make sure that the name is short and clear. For example: "Settings". It can also be a call to action (CTA), such as "Manage App".  * Use **title case** for the button names.  * * * ### Custom Panels You can [create custom panels](https://dev.wix.com/docs/build-apps/develop-your-app/develop-an-app-with-blocks/editor-experience-panels/design-custom-panels-in-blocks.md) and connect them to the widget or element action bars. Before creating a custom panel, make sure to understand the [different types of panels](https://dev.wix.com/docs/build-apps/develop-your-app/develop-an-app-with-blocks/editor-experience-panels/about-panels-in-blocks.md) in Blocks.  #### Panel Design * **Hiding elements:** only show panel elements that are needed. You can use the panel code to hide unnecessary elements. 
See example ![show and hide panel](https://d2x3xhvgiqkx42.cloudfront.net/12345678-1234-1234-1234-1234567890ab/378fd532-728d-473b-8f03-30140bda59af/2023/09/21/362873db-4caf-4ad1-bf1f-f62a41edb10d/5e22c9a1-43e3-4fd5-8ad4-c12ddc22ce4e.gif)
* **Disabling elements:** If you choose to show a disabled element instead of hiding it, use a tooltip to say why it's disabled. Every panel element has a _tooltip_ and _enabled_ property that can be changed with code (for example, see the API reference for a [Panel Button](https://dev.wix.com/docs/velo/velo-only-apis/$w/panel-button/introduction.md)). 
See example ![disable panel](https://d2x3xhvgiqkx42.cloudfront.net/12345678-1234-1234-1234-1234567890ab/378fd532-728d-473b-8f03-30140bda59af/2023/09/21/0c04b79f-6e98-43ea-9a70-88eb2405c598/eab8052c-f929-4464-b78e-0418bc053e9f.gif)
* **Autosave:** Confirmation buttons such as “OK” and “Cancel” are usually not used in panels, since the changes are applied immediately.  * **Tooltips:** Do not overload panels with text paragraphs. If you need to add more information, expose it  with a tooltip. 
See example ![section and tooltip](https://d2x3xhvgiqkx42.cloudfront.net/12345678-1234-1234-1234-1234567890ab/378fd532-728d-473b-8f03-30140bda59af/2023/09/21/4b6638c3-fdfa-4992-a232-7ebdd779aaf7/d03815e8-51be-4038-992c-500c503e03ed.gif)
#### Panel texts Panel text should e clear, concise and useful, to ease user decision making. Be consistent, use the same terminology, structure and tone of voice everywhere.  * **Capitalization:** Use title case for the panel title, and sentence case for other panel texts. * **Title length**: Approximately 20 characters.  * **Title wording**: First state the name of your widget / element and then the name of the action . For example, if your widget is a product and the button is **Settings**, name your panel: **Product Settings**.  * **Labels:** Labels should be short and clear as possible. They can be questions, but not necessarily. For example, "Choose what displays" could also be "What's displayed?" 
See example ![button settings](https://d2x3xhvgiqkx42.cloudfront.net/12345678-1234-1234-1234-1234567890ab/378fd532-728d-473b-8f03-30140bda59af/2023/11/15/7a5fa759-6821-4284-a820-3185ced8b048/857c8c7e-a2e2-45ca-8939-40d2f333f43f.png)
* **Section divider headings:** Section dividers should separate between different topics in a panel. They should not be written as a question.  * Avoid using Parentheses unless absolutely necessary. * Avoid the word "Click". Instead of **Click to Update**, just say: **Update**. --- > Portal Navigation: > > - Append `.md` to any URL under `https://dev.wix.com/docs/` to get its markdown version. > - Pages are either content pages (article or reference text) or menu pages (a list of links to child pages). > - To get a menu page, truncate any URL to a parent path and append `.md` (e.g. `https://dev.wix.com/docs/sdk.md`, `https://dev.wix.com/docs/sdk/core-modules.md`). > - Top-level index of all portals: https://dev.wix.com/docs/llms.txt > - Full concatenated docs: https://dev.wix.com/docs/llms-full.txt ## Resource: About Configuration in Blocks ## Article: About Configuration ## Article Link: https://dev.wix.com/docs/build-apps/develop-your-app/develop-an-app-with-blocks/editor-experience-configuration/about-configuration-in-blocks.md ## Article Content: # About Configuration in Blocks
**Editor compatibility** Wix Blocks apps aren't supported in the Wix Harmony editor. Existing Blocks apps remain available for purchase on the Wix App Market for Wix Editor and Wix Studio sites. To learn more, see [About Wix Harmony and Blocks](https://dev.wix.com/docs/build-apps/develop-your-app/develop-an-app-with-blocks/about-wix-harmony-and-blocks.md).
Blocks allows site builders to customize your widget when they install it on a site. The site builder can change the look and feel of your widget and remove or change elements, so that it integrates with their site. You can decide how much freedom to give site builders by configuring these different options in Blocks. With the Blocks **Configuration** tab, which is in the **Editor Experience** ![](https://d2x3xhvgiqkx42.cloudfront.net/12345678-1234-1234-1234-1234567890ab/378fd532-728d-473b-8f03-30140bda59af/2024/04/24/d885478b-0fa3-46d0-950a-801399d94383/8dc747a0-244b-4714-bd4c-7a71986a8394.png)  panel, you can determine how your widget and its elements look and behave when they're installed on a site. 
**Configurations in the editors** These configurations refer to how the widget behaves in the editors and not on the live site.
**Learn more about** [Display names](https://dev.wix.com/docs/build-apps/develop-your-app/develop-an-app-with-blocks/editor-experience-configuration/about-configuration-in-blocks.md#display-names) [Widget Behavior](https://dev.wix.com/docs/build-apps/develop-your-app/develop-an-app-with-blocks/editor-experience-configuration/about-configuration-in-blocks.md#widget-behavior) [Action Bars](https://dev.wix.com/docs/build-apps/develop-your-app/develop-an-app-with-blocks/editor-experience-configuration/about-configuration-in-blocks.md#action-bars) ### Display Names Your widget can have many different elements, such as buttons, text boxes and shapes. When you insert these elements in your widget, Blocks gives them default names. In the **Configuration** tab you can give these elements display names so the site builders can easily understand what they do.
See how it looks in Blocks ![display name in configuration tab](https://d2x3xhvgiqkx42.cloudfront.net/12345678-1234-1234-1234-1234567890ab/6b5c7381-912e-4754-99e2-d23157db088c/2022/08/22/8b3484ad-4d43-454c-acd2-315edfd71366/3f8f8b69-5d1d-4df9-bd1c-d3b8fc39a18b.png)
See how it looks in the Wix Editor ![add to cart display name in the editor](https://d2x3xhvgiqkx42.cloudfront.net/12345678-1234-1234-1234-1234567890ab/6b5c7381-912e-4754-99e2-d23157db088c/2022/08/22/e8028bb8-4f20-43de-ab12-fc613edc6bd9/e87e7e72-e891-499f-9b11-a68bfb7efe83.png)
Learn more about [configuring display names](https://dev.wix.com/docs/build-apps/develop-your-app/develop-an-app-with-blocks/editor-experience-configuration/configure-display-names-and-behavior-in-blocks.md#setting-a-display-name-for-a-widget-or-element) ### Widget Behavior The Wix Editors offer site builders a lot of freedom when they customize your widget. You can decide to limit some of these options by using the **Configuration** tab. You can define whether or not elements can be selected or removed, duplicated or resized. There may be elements in your widget that are essential to its function, an **Add to Cart** button for example. You can configure your widget so that a site builder cannot remove this element from your widget. Or, you might want to limit some options for design purposes, because you want the design to stay as it is. You can define any element as non-selectable or non-removable.  ![](https://d2x3xhvgiqkx42.cloudfront.net/12345678-1234-1234-1234-1234567890ab/6b5c7381-912e-4754-99e2-d23157db088c/2022/08/22/8e662834-1248-4d93-b97c-b5084977fd6c/72b13493-e3ff-480f-af28-ceb859abd61a.png) You also might want to prevent your widget from being duplicated (for example, if it's connected to dynamic pages and duplication might trigger conflicts or break code) or from being resized (for design reasons).    ![](https://d2x3xhvgiqkx42.cloudfront.net/12345678-1234-1234-1234-1234567890ab/6b5c7381-912e-4754-99e2-d23157db088c/2022/08/22/31775b6c-5021-45ad-ab79-7792c419c244/dcabcc43-2578-4ab5-b30a-13ce95a68d8e.png) Learn more about [widget behavior](https://dev.wix.com/docs/build-apps/develop-your-app/develop-an-app-with-blocks/editor-experience-configuration/configure-display-names-and-behavior-in-blocks.md#configuring-widget-or-element-behavior-selectable-removable-duplication-and-resize) ### Action Bars Each element of your widget has an action bar which the site builder uses to customize it. You can modify the action bars in the **Configuration** tab. You can add, remove or reorder buttons. You can determine which panel opens when a button is clicked, and more. The modification options vary, depending on whether you select a widget, or one of its elements, and which element you select.
See how it looks in Blocks ![action bar settings in configuration tab](https://d2x3xhvgiqkx42.cloudfront.net/12345678-1234-1234-1234-1234567890ab/6b5c7381-912e-4754-99e2-d23157db088c/2022/08/22/f46d9ae7-32d4-4808-ace5-e1bbd0ce89da/58175ce2-4678-4d5b-850a-a8451a03de64.png)
See how it looks in the Wix Editor ![action bar example in the editor](https://d2x3xhvgiqkx42.cloudfront.net/12345678-1234-1234-1234-1234567890ab/6b5c7381-912e-4754-99e2-d23157db088c/2022/08/22/7c1afb25-1709-44d0-9b81-1bba8c06ef57/dc47f88e-5ffd-4718-bbc7-2ca367131ccc.png)
Learn more about [configuring action bars](https://dev.wix.com/docs/build-apps/develop-your-app/develop-an-app-with-blocks/editor-experience-configuration/configure-action-bars-in-blocks.md)
**Action button panels** When you add an action button you can add a custom panel to it in the **Panels** tab.  Learn more [about panels](https://dev.wix.com/docs/build-apps/develop-your-app/develop-an-app-with-blocks/editor-experience-panels/about-panels-in-blocks.md)
--- > Portal Navigation: > > - Append `.md` to any URL under `https://dev.wix.com/docs/` to get its markdown version. > - Pages are either content pages (article or reference text) or menu pages (a list of links to child pages). > - To get a menu page, truncate any URL to a parent path and append `.md` (e.g. `https://dev.wix.com/docs/sdk.md`, `https://dev.wix.com/docs/sdk/core-modules.md`). > - Top-level index of all portals: https://dev.wix.com/docs/llms.txt > - Full concatenated docs: https://dev.wix.com/docs/llms-full.txt ## Resource: Configure Action Bars in Blocks ## Article: Configuring Action Bars ## Article Link: https://dev.wix.com/docs/build-apps/develop-your-app/develop-an-app-with-blocks/editor-experience-configuration/configure-action-bars-in-blocks.md ## Article Content: # Configure Action Bars in Blocks
**Editor compatibility** Wix Blocks apps aren't supported in the Wix Harmony editor. Existing Blocks apps remain available for purchase on the Wix App Market for Wix Editor and Wix Studio sites. To learn more, see [About Wix Harmony and Blocks](https://dev.wix.com/docs/build-apps/develop-your-app/develop-an-app-with-blocks/about-wix-harmony-and-blocks.md).
The Configuration tab in the Editor Experience panel enables you to determine the way your widget and its elements look and behave in the editor when they're installed on a site.  ### About Action Bars When a site builder installs your widget on a site and opens the editor, the widget and its elements have floating action bars, just like any other Wix site element. For example, this is the action bar of the widget's button, which allows the site builder to perform various actions on the button:
![button action bar](https://d2x3xhvgiqkx42.cloudfront.net/12345678-1234-1234-1234-1234567890ab/6b5c7381-912e-4754-99e2-d23157db088c/2022/06/09/45198d44-4dea-4982-b938-1455af3b9119/a57e6d79-599d-4cef-bbb0-58684a31209b.png)
Blocks lets you modify these action bars. You can add, remove or reorder buttons. You can determine which panel opens when a button is clicked, and more. The modification options vary, depending on whether you select a widget, or one of its elements, and which element you select. By modifying the action bars you can give site builders more options for customizing your app when they install it on their site. You can also decide that you want to limit what they can change in your widget. 
**UX guidelines** Read our [UX guidelines](https://dev.wix.com/docs/build-apps/develop-your-app/develop-an-app-with-blocks/editor-experience-configuration/ux-guidelines-for-editor-experience-in-blocks.md) for clear and effective action bars
### Modify Action Bars **To modify action bars:**  1. Click the **Editor Experience** ![](https://d2x3xhvgiqkx42.cloudfront.net/12345678-1234-1234-1234-1234567890ab/21e446eb-7f73-4f2f-84b1-c6b77e64e45e/2024/04/25/5ad6e6ae-179c-4b7f-bb4e-ef9a1ad955fe/5c5b01ad-59b6-4913-aaeb-83dc7c46e8c1.png)  panel. 2. Click the **Configuration** tab.   3. Select the correct element in your widget, or select the entire widget from the **Widgets** panel. **Now, you can modify action bars in two ways:** * From the **Edit Action Bar** that appears:
![edit widget action bar](https://d2x3xhvgiqkx42.cloudfront.net/12345678-1234-1234-1234-1234567890ab/6b5c7381-912e-4754-99e2-d23157db088c/2022/06/19/e3859b34-c6e9-44fd-8e6b-46972d5073e2/490b8070-b9c5-4a7f-895b-293cc931785b.png)
* Or from the **Action Bar** section in the **Inspector** panel on the right (if you can't see the panel, click on the **Inspector** ![](https://d2x3xhvgiqkx42.cloudfront.net/12345678-1234-1234-1234-1234567890ab/21e446eb-7f73-4f2f-84b1-c6b77e64e45e/2024/04/25/47a1ea96-8804-4a32-8959-9f910d42272f/4eb3ddd8-023e-4ce9-aa05-f8eec5a3737e.png)  icon to expand it). 
![modify action bar in inspector](https://d2x3xhvgiqkx42.cloudfront.net/12345678-1234-1234-1234-1234567890ab/6b5c7381-912e-4754-99e2-d23157db088c/2022/06/02/fd63b906-45cb-4345-ab57-4262013b13b9/c785f150-0d7b-44c6-8247-51aa65758e3c.png)
### Removing and Adding Action Buttons * Hover over the action bar buttons to see which of them can be removed, and click **Remove** to remove that button.
![edit action bar remove button](https://d2x3xhvgiqkx42.cloudfront.net/12345678-1234-1234-1234-1234567890ab/6b5c7381-912e-4754-99e2-d23157db088c/2022/06/02/098555df-3dc4-4d55-8e08-c8d2bb1343ce/b0fbdfae-3390-4329-9f26-cf0608720032.png)
* Add any buttons you removed by choosing **+** **Add** in the **Edit Action Bar** panel, or **Add Action Button** in the **Action Bar** section in the **Inspector** panel on the right (if you can't see the panel, click on the **Inspector** ![](https://d2x3xhvgiqkx42.cloudfront.net/12345678-1234-1234-1234-1234567890ab/21e446eb-7f73-4f2f-84b1-c6b77e64e45e/2024/04/25/c4aa336d-9974-45c2-bb61-8ea1936b2255/5e9c4e05-8b3b-47bc-b10c-d5892483df0c.png)  icon to expand it). ### Changing Action Button Settings 1. Hover over the action bar buttons to see which of them have settings that can be changed. 2. Click the **Action Button Settings** button.  3. At this point, you can also change the text of the action button. 
![Action Button Settings](https://d2x3xhvgiqkx42.cloudfront.net/12345678-1234-1234-1234-1234567890ab/6b5c7381-912e-4754-99e2-d23157db088c/2022/06/02/d912043c-d0b3-4ff9-9f96-776fcd78f3f7/da563aa0-6887-4dcf-911c-0ef2933a4483.png)
1. Select the [panel](https://dev.wix.com/docs/build-apps/develop-your-app/develop-an-app-with-blocks/editor-experience-panels/about-panels-in-blocks.md) or [dashboard page](https://dev.wix.com/docs/build-apps/develop-your-app/develop-an-app-with-blocks/dashboard-pages/about-dashboard-pages-in-blocks.md) that you want to open for the action button settings. You can also [create a new custom panel](https://dev.wix.com/docs/build-apps/develop-your-app/develop-an-app-with-blocks/editor-experience-panels/design-custom-panels-in-blocks.md) and then assign it to the action button. Clicking **Create Custom Panel** will take you to the **Panels** tab.
![action button settings](https://d2x3xhvgiqkx42.cloudfront.net/12345678-1234-1234-1234-1234567890ab/378fd532-728d-473b-8f03-30140bda59af/2023/11/02/3347368a-a71f-4aea-b761-d7e404fbb8c9/92c6feb2-3e05-4f53-b2f2-f399e513fd5a.png)
>**Notes** > * When you add an action button you need to make sure that you assign a [panel](https://dev.wix.com/docs/build-apps/develop-your-app/develop-an-app-with-blocks/editor-experience-panels/about-panels-in-blocks.md) or a [dashboard page](https://dev.wix.com/docs/build-apps/develop-your-app/develop-an-app-with-blocks/dashboard-pages/about-dashboard-pages-in-blocks.md). If you don't you will see a warning in the **Inspector** ![](https://d2x3xhvgiqkx42.cloudfront.net/12345678-1234-1234-1234-1234567890ab/21e446eb-7f73-4f2f-84b1-c6b77e64e45e/2024/04/25/81622adc-781e-47ea-85f8-aff67ac13734/b496597f-6d7b-4332-9f94-41a28b1f9d71.png).  > * The changes you make when you are in the Configuration tab impact all [design presets](https://dev.wix.com/docs/build-apps/develop-your-app/develop-an-app-with-blocks/widget-design/about-design-presets.md). > * Make sure to read our [UX guidelines](https://dev.wix.com/docs/build-apps/develop-your-app/develop-an-app-with-blocks/widget-design/blocks-widget-design-guidelines.md) for clear and effective action buttons --- > Portal Navigation: > > - Append `.md` to any URL under `https://dev.wix.com/docs/` to get its markdown version. > - Pages are either content pages (article or reference text) or menu pages (a list of links to child pages). > - To get a menu page, truncate any URL to a parent path and append `.md` (e.g. `https://dev.wix.com/docs/sdk.md`, `https://dev.wix.com/docs/sdk/core-modules.md`). > - Top-level index of all portals: https://dev.wix.com/docs/llms.txt > - Full concatenated docs: https://dev.wix.com/docs/llms-full.txt ## Resource: Configure Display Names and Behavior in Blocks ## Article: Configuring Widget and Elements Display Names and Behavior ## Article Link: https://dev.wix.com/docs/build-apps/develop-your-app/develop-an-app-with-blocks/editor-experience-configuration/configure-display-names-and-behavior-in-blocks.md ## Article Content: # Configure Display Names and Behavior in Blocks
**Editor compatibility** Wix Blocks apps aren't supported in the Wix Harmony editor. Existing Blocks apps remain available for purchase on the Wix App Market for Wix Editor and Wix Studio sites. To learn more, see [About Wix Harmony and Blocks](https://dev.wix.com/docs/build-apps/develop-your-app/develop-an-app-with-blocks/about-wix-harmony-and-blocks.md).
The Configuration tab in the Editor Experience panel enables you to decide how your widget and its elements look and behave when they're installed on a site. Make sure to check out our [UX guidelines](https://dev.wix.com/docs/build-apps/develop-your-app/develop-an-app-with-blocks/widget-design/blocks-widget-design-guidelines.md) for Configuration. ### Widget and Elements Display Names There are lots of ways you can help site builders get the most out of your app. Giving the elements in your app a display name makes it clear to site builders what each element does. You can also decide how they use different elements, and give them design options.  If you don't define these display names, your widget and its elements will have default display names like "widget" and "button". They will also have default Velo IDs, such as "#widget1" in the Properties and Events panel. #### Setting a display name for a widget or element When you design a widget, you want the site builders who install it on their site to understand what it does. You also want them to be sure about what each of the widget's elements does.  For example, you can make sure that your widget is called "Single Product" and that one of its buttons is "Add to Cart".  **To set the display name:** 1. Click the **Editor Experience** ![](https://d2x3xhvgiqkx42.cloudfront.net/12345678-1234-1234-1234-1234567890ab/21e446eb-7f73-4f2f-84b1-c6b77e64e45e/2024/04/25/ed55de36-fcb5-40d4-b738-c9abaf7f2e23/117b4ba6-5023-4a05-93bf-e770a46a4451.png)  panel. 2. Click the **Configuration** tab.   3. Select the correct widget from the **Widgets** panel on the left (if you want to name a specific element inside the widget, select it). 4. Click the **Inspector**  ![](https://d2x3xhvgiqkx42.cloudfront.net/12345678-1234-1234-1234-1234567890ab/21e446eb-7f73-4f2f-84b1-c6b77e64e45e/2024/04/25/18a45da9-babb-42b0-a0e1-d37bb5eeb4a2/f2c501cf-565d-4b87-b1fd-8b075523f424.png)  icon in the top right corner to expand the **Inspector** panel, if it isn't expanded yet.  5. Insert the new display name under **Component Name**. 
![](https://d2x3xhvgiqkx42.cloudfront.net/12345678-1234-1234-1234-1234567890ab/21e446eb-7f73-4f2f-84b1-c6b77e64e45e/2024/04/25/1a050513-6de9-4500-9371-fbb118b2c46f/48e5001a-5abd-49a0-b05a-e335bbe1f518.png)
See how it looks on a site ![how widget display names work on a site](https://d2x3xhvgiqkx42.cloudfront.net/12345678-1234-1234-1234-1234567890ab/6b5c7381-912e-4754-99e2-d23157db088c/2022/06/16/2f718975-5561-4ec0-9422-9d21553f11b7/b05d4a29-add7-4ea7-aac6-745f380c7192.gif)
### Configuring widget or element behavior (selectable, removable, duplication and resize) In some cases you might want to control the way the widget or its elements behave:  **Widget behavior:**   * **Can be duplicated:** You might want to prevent your widget from being duplicated by copy and pasting, (for example, if it's connected to dynamic pages and duplication might trigger conflicts or break code). In this case, uncheck this box. * **Can be resized:** You might want to prevent a widget from being resized, for design reasons.  **Element behavior:**  * **Can be selected:** You might have organized all of your widget elements in a flexbox element, for design purposes. But when someone installs your widget on a site, you don't want them to touch the flexbox - because you want the design to stay as it is. In this case, uncheck this box. * **Can be removed:** Some elements might be crucial for your app logic. For example, an **Add to Cart** button. You would probably not want a site builder to remove it from the widget. In this case, uncheck this box. #### Configuring a widget's behavior 1. Click the **Editor Experience** ![](https://d2x3xhvgiqkx42.cloudfront.net/12345678-1234-1234-1234-1234567890ab/21e446eb-7f73-4f2f-84b1-c6b77e64e45e/2024/04/25/ed55de36-fcb5-40d4-b738-c9abaf7f2e23/117b4ba6-5023-4a05-93bf-e770a46a4451.png)  panel. 2. Click the **Configuration** tab.   3. Select the widget from the **Widgets** panel.  4. Select or un-select the checkboxes **Widget can be duplicated** and **Allow widget to be resized** in the **Behavior** section of the Inspector  ![](https://d2x3xhvgiqkx42.cloudfront.net/12345678-1234-1234-1234-1234567890ab/21e446eb-7f73-4f2f-84b1-c6b77e64e45e/2024/04/25/97f05949-d871-42b9-9ba2-97334fff21c2/fe416f77-abe9-44ab-b597-8a8df8581d04.png)  panel (if you can't see the Inspector, click on the  ![](https://d2x3xhvgiqkx42.cloudfront.net/12345678-1234-1234-1234-1234567890ab/21e446eb-7f73-4f2f-84b1-c6b77e64e45e/2024/04/25/77104546-76a7-4bc9-8eee-cd779dbd2376/31b8bb93-a61d-4034-a397-04c30263ada9.png)  icon to expand it).
![widget behavior](https://d2x3xhvgiqkx42.cloudfront.net/12345678-1234-1234-1234-1234567890ab/6b5c7381-912e-4754-99e2-d23157db088c/2022/06/16/e4b9de6a-c42f-4c7f-8c05-e1f0785c33f4/39c62fbf-42b1-44ba-a038-ab40b3f8b261.png)
#### Configuring an element's behavior 1. Click the **Editor Experience** ![](https://d2x3xhvgiqkx42.cloudfront.net/12345678-1234-1234-1234-1234567890ab/21e446eb-7f73-4f2f-84b1-c6b77e64e45e/2024/04/25/ed55de36-fcb5-40d4-b738-c9abaf7f2e23/117b4ba6-5023-4a05-93bf-e770a46a4451.png)  panel. 2. Click the **Configuration** tab.   3. Select the element you want to configure.  4. Select or un-select the checkboxes **Can be selected** and **Can be removed** in the **Behavior** section of the **Inspector** panel (if you can't see the Inspector, click on the  ![](https://d2x3xhvgiqkx42.cloudfront.net/12345678-1234-1234-1234-1234567890ab/21e446eb-7f73-4f2f-84b1-c6b77e64e45e/2024/04/25/97f05949-d871-42b9-9ba2-97334fff21c2/fe416f77-abe9-44ab-b597-8a8df8581d04.png)  icon to expand it:
![layouter behavior](https://d2x3xhvgiqkx42.cloudfront.net/12345678-1234-1234-1234-1234567890ab/6b5c7381-912e-4754-99e2-d23157db088c/2022/06/16/baabfc9e-6c86-4316-932c-8c716a8f0130/6a75676c-4dba-4bb2-be67-aa5611b01f63.png)
>**Notes:** >* The changes you make when you are in the Configuration tab impact all [design presets](https://dev.wix.com/docs/build-apps/develop-your-app/develop-an-app-with-blocks/widget-design/create-and-manage-design-presets.md).  >* In the Configuration tab, you can also modify the action bars connected to each element when your widget is installed on a site. Learn more [about modifying action bars](https://dev.wix.com/docs/build-apps/develop-your-app/develop-an-app-with-blocks/editor-experience-configuration/configure-action-bars-in-blocks.md) --- > Portal Navigation: > > - Append `.md` to any URL under `https://dev.wix.com/docs/` to get its markdown version. > - Pages are either content pages (article or reference text) or menu pages (a list of links to child pages). > - To get a menu page, truncate any URL to a parent path and append `.md` (e.g. `https://dev.wix.com/docs/sdk.md`, `https://dev.wix.com/docs/sdk/core-modules.md`). > - Top-level index of all portals: https://dev.wix.com/docs/llms.txt > - Full concatenated docs: https://dev.wix.com/docs/llms-full.txt ## Resource: About Panels in Blocks ## Article: About Panels ## Article Link: https://dev.wix.com/docs/build-apps/develop-your-app/develop-an-app-with-blocks/editor-experience-panels/about-panels-in-blocks.md ## Article Content: # About Panels in Blocks
**Editor compatibility** Wix Blocks apps aren't supported in the Wix Harmony editor. Existing Blocks apps remain available for purchase on the Wix App Market for Wix Editor and Wix Studio sites. To learn more, see [About Wix Harmony and Blocks](https://dev.wix.com/docs/build-apps/develop-your-app/develop-an-app-with-blocks/about-wix-harmony-and-blocks.md).
Blocks allows site builders to customize your widget when they install it. A large part of this customization takes place through the widget's action bars. The site builder adapts the widget to their site through using the action buttons. Learn more about [action bars](https://dev.wix.com/docs/build-apps/develop-your-app/develop-an-app-with-blocks/editor-experience-configuration/configure-action-bars-in-blocks.md). Panels are a key part of the customization process. When your widget is installed on a site, the site builder clicks on the widget, or its elements, and an action bar appears. When you click on an action button, for example, the **Design** ![](https://d2x3xhvgiqkx42.cloudfront.net/12345678-1234-1234-1234-1234567890ab/6b5c7381-912e-4754-99e2-d23157db088c/2022/07/21/c89fa121-9d61-4379-aa2a-929f125bd4ea/e94ac900-234d-4d7b-88b1-39fc882c19d8.png)  button, a panel appears. You use the options available in this panel to customize your widget. >**Note:** >Panels are available for site builders in the Wix Editors, not on the live site. **Learn more about** [Blocks default panels](#default-panels) [Blocks custom panels](#custom-panels) [Panel examples](#custom-panel-design-examples) ### Default Panels Blocks uses default panels which give site builders a range of customization options. The default panels are generated automatically by the Blocks product. Available default panels:
Design presets panel (see more) The **Design** button ![editor design button](https://d2x3xhvgiqkx42.cloudfront.net/12345678-1234-1234-1234-1234567890ab/6b5c7381-912e-4754-99e2-d23157db088c/2022/08/17/b54f9864-02c1-4db3-a43f-4a90e0738ec8/bbbf5bbc-192e-463a-aaad-40e11bb8d0fd.png) opens a presets panels so that you can switch between design presets. ![default design presets panel](https://d2x3xhvgiqkx42.cloudfront.net/12345678-1234-1234-1234-1234567890ab/6b5c7381-912e-4754-99e2-d23157db088c/2022/08/17/ae5c801a-278c-4c4b-bfd7-045d7ba7c995/b269f49f-e527-43a5-9737-9b32c94de99c.png)
Add Elements panel (see more) If the site builder has hidden one of the elements of your widget the **Elements** ![](https://d2x3xhvgiqkx42.cloudfront.net/12345678-1234-1234-1234-1234567890ab/6b5c7381-912e-4754-99e2-d23157db088c/2022/08/17/c42bd1dd-83eb-4ac5-a9dd-c80f50aab89b/32dafadd-7bcc-4529-ab89-21dc3a3338b3.jpg) button opens a panel with all the hidden elements so that they can be restored. In the following example a widget button has been hidden but can be restored using the default panel.  ![default elements panel](https://d2x3xhvgiqkx42.cloudfront.net/12345678-1234-1234-1234-1234567890ab/6b5c7381-912e-4754-99e2-d23157db088c/2022/08/17/ca17a8cf-7555-4d60-aa1a-fc31fd26ae80/07da5151-648e-406e-9037-ab743fa5e785.png)
Settings panel (see more) Site builders can access your widget's API through the default settings panel. ![default settings panel](https://d2x3xhvgiqkx42.cloudfront.net/12345678-1234-1234-1234-1234567890ab/6b5c7381-912e-4754-99e2-d23157db088c/2022/08/17/fb76e02b-8bef-466c-a1b4-ba62221e8832/a5e33ab9-9e6f-459b-ba1b-6b030f1dbf5b.png)
Editor elements default panels (see more) Site builders have access to all the regular editor default panels such as design, layout and settings for every element in your widget's UI. The following screenshot shows the default design panel in the Change Design button. ![change design panel](https://d2x3xhvgiqkx42.cloudfront.net/12345678-1234-1234-1234-1234567890ab/6b5c7381-912e-4754-99e2-d23157db088c/2022/08/20/771d75d1-7c9a-43fa-9871-af4bceed73b5/34935fff-708a-4a4c-9b09-9bcb4161eb9a.png)
### Custom Panels
**API reference for panel elements** See all available panel elements and [their API reference](https://www.wix.com/velo/reference/$w/panelbutton).
The user interface of the default panels cannot be changed. By using custom panels, you can change the user interface and create panels that are unique to your widget, which direct the flow and how it's used. You can create unique [designs](https://dev.wix.com/docs/build-apps/develop-your-app/develop-an-app-with-blocks/editor-experience-panels/design-custom-panels-in-blocks.md) for your panel by using sliders, section dividers, toggles and multiple choice elements. Adding these elements makes your widget easier to customize and more functional.  After designing your panel, you need to write [code](https://dev.wix.com/docs/build-apps/develop-your-app/develop-an-app-with-blocks/editor-experience-panels/add-code-to-custom-panels-in-blocks.md) to make it work. ### Custom Panel Design Examples **Pay Button Settings Panel** If you have a shopping widget, with a pay button, for example, you can create a custom panel which allows the site builder to choose which information is displayed. The site builder can customize the widget so that on different sites it can display different information. On one site it might be important to display the price in another currency, or to show the terms and conditions.  This Pay Button Settings panel includes rich text (text with links), text input fields, dividers and a toggle, which enables the site create to decide whether or not to show the Terms & Conditions. This is how it looks when the toggle is on: ![pay button custom panel](https://d2x3xhvgiqkx42.cloudfront.net/12345678-1234-1234-1234-1234567890ab/6b5c7381-912e-4754-99e2-d23157db088c/2022/07/30/426c12ee-efbe-4061-93e9-824424d059a6/210582fe-d588-4149-a592-e1f43f9ffc4c.png) #### Login Bar Settings Panel If your widget is a login button, you can design a panel which gives the site builder the option to decide whether to display a greeting or not, or if they want to display a profile pic or name. By using a custom panel the site builder can change this on different sites. They can use the same widget on one site which displays a profile pic, and on another site the same widget displays a name only. This panel for the Login Bar Settings button has a radio button, text inputs, a divider and a toggle, which determines whether or not to show a greeting before the user's name. ![login bar custom panel](https://d2x3xhvgiqkx42.cloudfront.net/12345678-1234-1234-1234-1234567890ab/6b5c7381-912e-4754-99e2-d23157db088c/2022/07/30/b868f63d-87e7-43c9-96c5-a4a63a4c1351/dd01e8e0-2b80-4432-94cf-61b168161732.png) --- > Portal Navigation: > > - Append `.md` to any URL under `https://dev.wix.com/docs/` to get its markdown version. > - Pages are either content pages (article or reference text) or menu pages (a list of links to child pages). > - To get a menu page, truncate any URL to a parent path and append `.md` (e.g. `https://dev.wix.com/docs/sdk.md`, `https://dev.wix.com/docs/sdk/core-modules.md`). > - Top-level index of all portals: https://dev.wix.com/docs/llms.txt > - Full concatenated docs: https://dev.wix.com/docs/llms-full.txt ## Resource: Design Custom Panels in Blocks ## Article: Designing Custom Panels for Your Widget Action Bar Buttons ## Article Link: https://dev.wix.com/docs/build-apps/develop-your-app/develop-an-app-with-blocks/editor-experience-panels/design-custom-panels-in-blocks.md ## Article Content: # Design Custom Panels in Blocks
**Editor compatibility** Wix Blocks apps aren't supported in the Wix Harmony editor. Existing Blocks apps remain available for purchase on the Wix App Market for Wix Editor and Wix Studio sites. To learn more, see [About Wix Harmony and Blocks](https://dev.wix.com/docs/build-apps/develop-your-app/develop-an-app-with-blocks/about-wix-harmony-and-blocks.md).
Create custom panels for action buttons in your widget and its elements. When a Wix user clicks an action button (for example, the Settings button), the custom panel opens.  You can create as many panels as you need, to provide users with various options to customize widgets. Creating your panel has **three main stages:** 1. Design your panel, as described in this article. Use [our UX guidelines](https://dev.wix.com/docs/build-apps/develop-your-app/develop-an-app-with-blocks/editor-experience-configuration/ux-guidelines-for-editor-experience-in-blocks.md#custom-panels) to make your panels clear and effective. 2. Connect your panel to an action button. 3. Add logic to your panel to make it work.  
Important: You cannot test panels in the Blocks preview. To see your panel in action, [test it on a site](https://dev.wix.com/docs/build-apps/develop-your-app/develop-an-app-with-blocks/deploy-and-manage-blocks-apps/test-your-app-on-a-site.md).
Examples: To see examples of custom panels, open the following app templates and go to the **Editor Experience** ![](https://d2x3xhvgiqkx42.cloudfront.net/12345678-1234-1234-1234-1234567890ab/378fd532-728d-473b-8f03-30140bda59af/2024/04/24/d885478b-0fa3-46d0-950a-801399d94383/8dc747a0-244b-4714-bd4c-7a71986a8394.png) tab. - [Repeater app](https://dev.wix.com/apps-templates/template?id=a4a7246f-4644-48ce-81e7-2a86aa74d9e5&http_referrer=documentation): Panel for changing the widget layout. - [Events Map app](https://dev.wix.com/apps-templates/template?id=f086effa-64b8-4c8b-a5c8-61c3a7548af7&http_referrer=documentation): Settings panel. - [Recipe List app](https://dev.wix.com/apps-templates/template?id=512a7d8a-1666-40c2-9586-25874d2f69b4&http_referrer=documentation): Setting panel that also links to a dashboard page. - [Banner app](https://dev.wix.com/apps-templates/template?id=1b7db962-6230-46bf-b908-d988ef640238&http_referrer=documentation): Panel for adding and removing elements. - [Pie Chart app](https://dev.wix.com/apps-templates/template?id=9a55382c-c755-4f01-bda2-80b85630acdd&http_referrer=documentation&http_referrer=documentation): Settings panel for custom element in Blocks.
## Create your panel First, go to the Editor Experience panel to create a panel. 1. Click the **Editor Experience** ![](https://d2x3xhvgiqkx42.cloudfront.net/12345678-1234-1234-1234-1234567890ab/378fd532-728d-473b-8f03-30140bda59af/2024/04/24/d885478b-0fa3-46d0-950a-801399d94383/8dc747a0-244b-4714-bd4c-7a71986a8394.png) icon. 2. Click the **Custom Panels** tab. 3. Click **Create New Panel**. ## Add elements to your panel Your panel is built of [panel elements](https://dev.wix.com/docs/build-apps/develop-your-app/develop-an-app-with-blocks/editor-experience-panels/panel-elements-in-blocks.md), such as buttons, dividers, input fields and more. Before designing your panel, read our [UX guidelines for custom panels](https://dev.wix.com/docs/build-apps/develop-your-app/develop-an-app-with-blocks/editor-experience-configuration/ux-guidelines-for-editor-experience-in-blocks.md#custom-panels).  Click **\+ Add Element** and select which elements you want to add to your panel. You can add the same element as many times as you need. Then, you can customize the label text and style, and set defaults and values.  ## Customize your panel You have several customization options for the elements in your panel. You can change label text, add tool tips, set defaults and values. You do this by using the action bar connected to each element. ### Settings options Click on an element. Select **Settings** or the ![](https://d2x3xhvgiqkx42.cloudfront.net/12345678-1234-1234-1234-1234567890ab/6b5c7381-912e-4754-99e2-d23157db088c/2022/06/22/2ebb7ba4-f134-4791-96d5-df1a71214876/f01c7af3-5437-472a-b98f-c5f6d1b79996.png) icon to customize your panel. Here are some of the options:
Add field titles (see more) Fill in the **Field Title** field provide a label for your element (for example, in the following image, **Fill Color & Opacity** and **Border** are labels). To remove the label, delete the text. ![label](https://d2x3xhvgiqkx42.cloudfront.net/12345678-1234-1234-1234-1234567890ab/6b5c7381-912e-4754-99e2-d23157db088c/2022/06/23/c358ba23-3d56-4e03-bb5a-ff3cc6df1c15/a46f5126-d17e-4f8f-863b-5d22ca829fe3.png)
Add tooltips (see more) Write some text in the **Tooltip Info** box to add an info icon with a tooltip containing additional information for site builders who install the widget. To remove the info tooltip, delete the text in the field.
Define element as "read only" (see more) Toggle on **Read only** so that the user can only see and copy the text inside, but cannot type in it.
Set initial text options (see more) An input field in a panel may appear empty, or may contain initial text in several forms: * **Default text:** The input field appears with default text. * **Placeholder:** The input field appears with a message in a light shade (usually gray), which says what the user should type there and disappears once they start typing. * **Both:** The input field appears with default text, but if the user deletes it, they will see the light placeholder text.
Add pattern validation (see more) Toggle to enable [regex](http://www.codemag.com/article/0305041) (regular expression) to apply additional criteria whenever the field is validated. Use the edit box to enter and edit your regular expression.
### Multiple choice elements If you choose to add an element that has multiple options, like check boxes, radio buttons or dropdown lists, you can configure them by using the manage choices button in the action bar that appears when you select the element.
Rename choices (see more) Click **Manage Choices** to open a pop-up with the list of the choices in your element. Double click the choice you want to rename and enter the new name in the field box. You can reorder your choices using drag and drop. ![managing choices renaming a choice](https://d2x3xhvgiqkx42.cloudfront.net/12345678-1234-1234-1234-1234567890ab/6b5c7381-912e-4754-99e2-d23157db088c/2022/06/26/17dda8e0-04be-421e-acd5-5fad40bd7875/69945bb7-760a-41ea-a7b0-e06f6e1c7e3f.png)
More Actions (see more) Click **Manage Choices**, hover over the choice you want to edit and click the **More Actions** ![](https://d2x3xhvgiqkx42.cloudfront.net/12345678-1234-1234-1234-1234567890ab/6b5c7381-912e-4754-99e2-d23157db088c/2022/06/22/418cb81e-65bc-4ccd-af0a-b4a46cc9f32e/db459a87-d0cd-415b-b0d9-b66fcdfebdae.png) icon, to set defaults, edit values, and move or duplicate elements. ![more actions menu in manage choices](https://d2x3xhvgiqkx42.cloudfront.net/12345678-1234-1234-1234-1234567890ab/6b5c7381-912e-4754-99e2-d23157db088c/2022/06/26/8d817f81-ecaa-400a-9de9-778414d0c7dc/1a6a1b86-dbea-4bff-9126-dd8487f45bae.png)
## Name your panel 1. Hover over your panel name in the **Custom Panels** section .  2. Click the **More Actions** ![](https://d2x3xhvgiqkx42.cloudfront.net/12345678-1234-1234-1234-1234567890ab/378fd532-728d-473b-8f03-30140bda59af/2021/10/18/1fa8a888-57fa-46af-86cd-fff5380ef88c/67e8b665-5252-4ad7-ae7e-160dd07bbb6f.jpg)  icon when it appears.  3. Select **Rename**. 4. When naming your panel, note that this name is visible to users. See our [UX guidelines for panel texts](https://dev.wix.com/docs/build-apps/develop-your-app/develop-an-app-with-blocks/editor-experience-configuration/ux-guidelines-for-editor-experience-in-blocks.md). 5. You can also duplicate or delete your panel if needed.
![rename duplicate delete panel](https://d2x3xhvgiqkx42.cloudfront.net/12345678-1234-1234-1234-1234567890ab/6b5c7381-912e-4754-99e2-d23157db088c/2022/06/28/5d046cbe-fa14-46f8-9a53-f32be7be4013/c64c1485-d841-4b54-90fb-ca3627641d7b.png)
## Connect your panel to an action button After creating your panel, you must connect it to a button in the action bar of a widget or an element.   1. Click the **Editor Experience** ![](https://d2x3xhvgiqkx42.cloudfront.net/12345678-1234-1234-1234-1234567890ab/378fd532-728d-473b-8f03-30140bda59af/2024/04/24/d885478b-0fa3-46d0-950a-801399d94383/8dc747a0-244b-4714-bd4c-7a71986a8394.png)  icon. 2. Click the **Configuration** tab. 3. Select the desired widget from the **Widgets** panel.  4. Hover over the button to which you want to connect your panel, in the **Edit Action Bar** menu that appears. For example, if it is a settings panel, select the settings button. If it's a design panel, select the design button. You can also add a new button, name it and connect it to a panel. 5. Click ![](https://d2x3xhvgiqkx42.cloudfront.net/12345678-1234-1234-1234-1234567890ab/378fd532-728d-473b-8f03-30140bda59af/2021/09/09/83e2f61d-0005-4613-871b-24b5b264b268/874431bc-fb51-471d-a779-889744b04245.png) **Action Button Settings**. 
![select your panel](https://d2x3xhvgiqkx42.cloudfront.net/12345678-1234-1234-1234-1234567890ab/6b5c7381-912e-4754-99e2-d23157db088c/2022/06/28/5032a2a0-0f85-4c3e-92c6-593b65daee66/30bb54ac-663d-4263-b0f7-e1a6f5ce47a7.png)
![action button settings](https://d2x3xhvgiqkx42.cloudfront.net/12345678-1234-1234-1234-1234567890ab/6b5c7381-912e-4754-99e2-d23157db088c/2022/06/28/425f2f9f-3111-46e7-ada5-6ea92c16e256/862a1c3b-5da9-416f-8e99-12477b962c9b.png)
5\.  Select your panel from the **Custom Panels** section.  ## What's next Now that you have designed your panel you need to add its logic. This can include: - [Connecting widget properties](https://dev.wix.com/docs/build-apps/develop-your-app/develop-an-app-with-blocks/editor-experience-panels/connect-panel-elements-to-props.md) to panel elements, so users can change the properties. - [Creating button rules](https://dev.wix.com/docs/build-apps/develop-your-app/develop-an-app-with-blocks/editor-experience-panels/panel-button-rules-to-open-pages.md) to open a pricing page, dashboard page or an external URL. - [Adding code to your custom panel](https://dev.wix.com/docs/build-apps/develop-your-app/develop-an-app-with-blocks/editor-experience-panels/add-code-to-custom-panels-in-blocks.md) for any other logic you need. --- > Portal Navigation: > > - Append `.md` to any URL under `https://dev.wix.com/docs/` to get its markdown version. > - Pages are either content pages (article or reference text) or menu pages (a list of links to child pages). > - To get a menu page, truncate any URL to a parent path and append `.md` (e.g. `https://dev.wix.com/docs/sdk.md`, `https://dev.wix.com/docs/sdk/core-modules.md`). > - Top-level index of all portals: https://dev.wix.com/docs/llms.txt > - Full concatenated docs: https://dev.wix.com/docs/llms-full.txt ## Resource: Panel Elements in Blocks ## Article: Panel Elements ## Article Link: https://dev.wix.com/docs/build-apps/develop-your-app/develop-an-app-with-blocks/editor-experience-panels/panel-elements-in-blocks.md ## Article Content: # Panel Elements in Blocks
**Editor compatibility** Wix Blocks apps aren't supported in the Wix Harmony editor. Existing Blocks apps remain available for purchase on the Wix App Market for Wix Editor and Wix Studio sites. To learn more, see [About Wix Harmony and Blocks](https://dev.wix.com/docs/build-apps/develop-your-app/develop-an-app-with-blocks/about-wix-harmony-and-blocks.md).
Blocks [custom panels](https://dev.wix.com/docs/build-apps/develop-your-app/develop-an-app-with-blocks/editor-experience-panels/design-custom-panels-in-blocks.md) are made of unique panel elements. To reference the panel elements in your widget's code, go to the [code section of the Panels tab](https://dev.wix.com/docs/build-apps/develop-your-app/develop-an-app-with-blocks/editor-experience-panels/add-code-to-custom-panels-in-blocks.md). Use the [$w()](https://www.wix.com/velo/reference/$w/$w) [function](https://www.wix.com/velo/reference/$w/$w) to select elements by ID, for example: ```javascript let label = $w("#myPanelElement").label; ``` ## Panel element APIs The following panel elements are available to use in your panels. Click each element to see how to reference it in your panel code: * [Panel Slider](https://www.wix.com/velo/reference/$w/panelslider) * [Panel Thumbnails](https://www.wix.com/velo/reference/$w/panelthumbnails) * [Panel Button](https://www.wix.com/velo/reference/$w/panelbutton) * [Panel Checkbox Group](https://www.wix.com/velo/reference/$w/panelcheckboxgroup) * [Panel Dropdown](https://www.wix.com/velo/reference/$w/paneldropdown) * [Panel Radio Button Group](https://www.wix.com/velo/reference/$w/panelradiobuttongroup) * [Panel Rich Text](https://www.wix.com/velo/reference/$w/panelrichtext) * [Panel Text Input](https://www.wix.com/velo/reference/$w/paneltextinput) * [Panel Toggle Switch](https://dev.wix.com/docs/velo/velo-only-apis/$w/panel-toggle-switch/introduction.md) * [Panel Section Divider](https://www.wix.com/velo/reference/$w/panelsectiondivider) * [Panel Color Picker](https://www.wix.com/velo/reference/$w/panelcolorpicker) * [Panel Font and ColorPicker](https://www.wix.com/velo/reference/$w/panelfontandcolorpicker) ## Helpful SDK and Velo modules Import the following modules to interact with the panel elements in your panel code: * The [widget SDK module](https://dev.wix.com/docs/sdk/host-modules/editor/widget/introduction.md) lets you interact with your widget's properties and design presets from a panel. * The [wix-editor Velo module](https://dev.wix.com/docs/velo/apis/wix-editor/introduction.md) lets you open Dashboard pages from a panel, and remove or restore elements. ## Know the panel elements Here is a short description of each element and anything special you should know about it. ### Panel Slider Panel sliders allow users to select a number from a given range. ![slider](https://d2x3xhvgiqkx42.cloudfront.net/12345678-1234-1234-1234-1234567890ab/3d78bec4-05f0-4503-9b59-b76c23ec7b86/2022/08/12/5f168858-237d-4786-882d-7789c4bb6f99/808cfd0f-c395-4b98-87ae-1234ec772e1b.png) ### Panel Thumbnails Thumbnails allow users to select an item from a set of thumbnail images. ![thumbnails](https://d2x3xhvgiqkx42.cloudfront.net/12345678-1234-1234-1234-1234567890ab/3d78bec4-05f0-4503-9b59-b76c23ec7b86/2022/08/13/b986ab71-3ed6-45d9-989a-15eb03f135e6/27d3f321-9b1a-4022-a871-404f45897668.png) ### Panel Button A button on your panel. Add the button logic through code or [button rules](https://dev.wix.com/docs/build-apps/develop-your-app/develop-an-app-with-blocks/editor-experience-panels/panel-button-rules-to-open-pages.md). ![button](https://d2x3xhvgiqkx42.cloudfront.net/12345678-1234-1234-1234-1234567890ab/3d78bec4-05f0-4503-9b59-b76c23ec7b86/2022/08/13/49f8e404-c024-48ca-a7d8-fbdc03b2e5b0/8b1dc8f1-fe45-4823-9bc3-c72ebb44c62a.png) ### Panel Checkbox Group Checkbox groups are used for selecting any number of the given options. ![checkbox](https://d2x3xhvgiqkx42.cloudfront.net/12345678-1234-1234-1234-1234567890ab/3d78bec4-05f0-4503-9b59-b76c23ec7b86/2022/08/14/00eaf2c4-c5cc-425b-bce1-43e4e240ec2a/c95fdb7c-8194-4345-98b4-b2abfaf1e387.png) ### Panel Dropdown Drop-downs are used for selecting one of a number of options. ![drop-down](https://d2x3xhvgiqkx42.cloudfront.net/12345678-1234-1234-1234-1234567890ab/3d78bec4-05f0-4503-9b59-b76c23ec7b86/2022/08/14/e891744e-6b72-4b0f-88f6-4426b7399706/f805fe93-3d10-4dba-8c3a-e788b7e1beef.png) ### Panel Radio Button Group Radio button groups are used for selecting one of a number of options. ![radio button group](https://d2x3xhvgiqkx42.cloudfront.net/12345678-1234-1234-1234-1234567890ab/3d78bec4-05f0-4503-9b59-b76c23ec7b86/2022/08/14/87ebda86-e661-4500-b751-a7861c0ad103/e2733ef0-a50f-4046-98b9-881bdcf3bb35.png) ### Panel Text A text element (also called "rich text") is used to display text followed by a link. ![text](https://d2x3xhvgiqkx42.cloudfront.net/12345678-1234-1234-1234-1234567890ab/3d78bec4-05f0-4503-9b59-b76c23ec7b86/2022/08/14/e7ee263c-2297-4c27-b114-6d565b58f56b/8f16680e-37f8-4d95-ac63-ef9b3127c46a.png) ### Panel Text Input An input element that lets users enter small amounts of text. ### Panel Toggle Switch Toggle switches are used for a single binary choice. ![toggle](https://d2x3xhvgiqkx42.cloudfront.net/12345678-1234-1234-1234-1234567890ab/3d78bec4-05f0-4503-9b59-b76c23ec7b86/2022/08/14/ca97049a-35dc-4a2f-a413-42dee1208178/673f68e2-4077-4423-b2b0-469450179371.png) ### Panel Section Divider Section dividers display a section heading in the panel. ![section divider](https://d2x3xhvgiqkx42.cloudfront.net/12345678-1234-1234-1234-1234567890ab/3d78bec4-05f0-4503-9b59-b76c23ec7b86/2022/08/14/7b41f7a3-989b-49fd-9ef3-c1d3b8f44b0d/bb9e72ac-86c6-481e-b4b5-603636fdcb29.png) ### Panel Color Input Color pickers allow a site builder to select a color for one or multiple elements. ![color picker](https://d2x3xhvgiqkx42.cloudfront.net/12345678-1234-1234-1234-1234567890ab/378fd532-728d-473b-8f03-30140bda59af/2024/02/19/8ab275e9-57e4-4195-94e3-3b6e79867d94/5385ae86-8f18-4fda-84f8-85f363af1537.png)
Notes: * You cannot test the color in the Blocks **Preview** ![](https://d2x3xhvgiqkx42.cloudfront.net/12345678-1234-1234-1234-1234567890ab/378fd532-728d-473b-8f03-30140bda59af/2024/02/20/1614c776-069b-4a91-bfd9-567f352a84d1/fba47dd3-3bdc-4e2e-b987-370820aa54f3.png) mode. To test the color, install the app on a site. * You must add at least one line of code to see how the element works in the editor. For example: `$w('#panelColorPicker1');` * A color picker can be a good way to give site builders a possibility to customize a [custom element](https://dev.wix.com/docs/build-apps/develop-your-app/develop-an-app-with-blocks/code-in-blocks/about-custom-elements-in-blocks.md). * We recommend not to connect a custom panel to the **Design** ![](https://d2x3xhvgiqkx42.cloudfront.net/12345678-1234-1234-1234-1234567890ab/378fd532-728d-473b-8f03-30140bda59af/2024/02/19/f3e5c98a-9577-4283-a037-d4b504eb4968/98df67ef-1832-45a0-aef8-39e0f74ee8e1.png) action button, since it will not work well in the Wix Studio editor. Instead, you can create a main action named **Change Design** (learn more about [connecting action bars](https://dev.wix.com/docs/build-apps/develop-your-app/develop-an-app-with-blocks/editor-experience-configuration/configure-action-bars-in-blocks.md)).
### Panel Font and Color Input Font and color pickers allow site builders to select a font and its color. > **Note:** You must add at least one line of code to see how the element works in the editor. For example: `$w(panelFontAndColorPicker1);` ![Font and color picker](https://d2x3xhvgiqkx42.cloudfront.net/12345678-1234-1234-1234-1234567890ab/378fd532-728d-473b-8f03-30140bda59af/2024/02/19/d618f5b2-f059-4a59-bd80-5694c7252e44/88516c26-2630-455a-b67d-8f29d510debf.png) --- > Portal Navigation: > > - Append `.md` to any URL under `https://dev.wix.com/docs/` to get its markdown version. > - Pages are either content pages (article or reference text) or menu pages (a list of links to child pages). > - To get a menu page, truncate any URL to a parent path and append `.md` (e.g. `https://dev.wix.com/docs/sdk.md`, `https://dev.wix.com/docs/sdk/core-modules.md`). > - Top-level index of all portals: https://dev.wix.com/docs/llms.txt > - Full concatenated docs: https://dev.wix.com/docs/llms-full.txt ## Resource: Add Code to Custom Panels in Blocks ## Article: Adding Code to Your Custom Panels ## Article Link: https://dev.wix.com/docs/build-apps/develop-your-app/develop-an-app-with-blocks/editor-experience-panels/add-code-to-custom-panels-in-blocks.md ## Article Content: # Add Code to Custom Panels in Blocks
**Editor compatibility** Wix Blocks apps aren't supported in the Wix Harmony editor. Existing Blocks apps remain available for purchase on the Wix App Market for Wix Editor and Wix Studio sites. To learn more, see [About Wix Harmony and Blocks](https://dev.wix.com/docs/build-apps/develop-your-app/develop-an-app-with-blocks/about-wix-harmony-and-blocks.md).
Create custom panels for action buttons in your widget and its elements. When a Wix user clicks an action button (for example, the Settings button), the custom panel opens. You can create as many panels as you need, to provide users with various options to customize widgets. First, [design your panel](https://dev.wix.com/docs/build-apps/develop-your-app/develop-an-app-with-blocks/editor-experience-panels/design-custom-panels-in-blocks.md) and connect it to an action button. Then create your panel logic, to determine how it interacts with the widget or to control the behavior of the panel itself.
Notes: - You cannot test panels in the Blocks preview. To see your panel in action, [test it on a site](https://dev.wix.com/docs/build-apps/develop-your-app/develop-an-app-with-blocks/deploy-and-manage-blocks-apps/test-your-app-on-a-site.md). - You can [connect panel elements to properties](https://dev.wix.com/docs/build-apps/develop-your-app/develop-an-app-with-blocks/editor-experience-panels/connect-panel-elements-to-props.md) and [set panel buttons to open pages](https://dev.wix.com/docs/build-apps/develop-your-app/develop-an-app-with-blocks/editor-experience-panels/panel-button-rules-to-open-pages.md) with no code. - See the [panel elements $w reference](https://www.wix.com/velo/reference/$w/panelbutton).
Examples: To see examples of custom panels, open the following app templates and go to the **Editor Experience** ![](https://d2x3xhvgiqkx42.cloudfront.net/12345678-1234-1234-1234-1234567890ab/378fd532-728d-473b-8f03-30140bda59af/2024/04/24/d885478b-0fa3-46d0-950a-801399d94383/8dc747a0-244b-4714-bd4c-7a71986a8394.png) tab. - [Repeater app](https://dev.wix.com/apps-templates/template?id=a4a7246f-4644-48ce-81e7-2a86aa74d9e5&http_referrer=documentation): Panel for changing the widget layout. - [Events Map app](https://dev.wix.com/apps-templates/template?id=f086effa-64b8-4c8b-a5c8-61c3a7548af7&http_referrer=documentation): Settings panel. - [Recipe List app](https://dev.wix.com/apps-templates/template?id=512a7d8a-1666-40c2-9586-25874d2f69b4&http_referrer=documentation): Settings panel that also links to a dashboard page. - [Banner app](https://dev.wix.com/apps-templates/template?id=1b7db962-6230-46bf-b908-d988ef640238&http_referrer=documentation): Panel for adding and removing elements. - [Pie Chart app](https://dev.wix.com/apps-templates/template?id=9a55382c-c755-4f01-bda2-80b85630acdd&http_referrer=documentation&http_referrer=documentation): Settings panel for custom element in Blocks.
## To add code to your custom panel: 1. Go to **Editor Experience** ![](https://d2x3xhvgiqkx42.cloudfront.net/12345678-1234-1234-1234-1234567890ab/21e446eb-7f73-4f2f-84b1-c6b77e64e45e/2024/04/25/ed55de36-fcb5-40d4-b738-c9abaf7f2e23/117b4ba6-5023-4a05-93bf-e770a46a4451.png) in the left menu and select the **Panels** tab.  2. Make sure that your panel is selected in the **Panels** section on the left menu (or [create a new panel](https://dev.wix.com/docs/build-apps/develop-your-app/develop-an-app-with-blocks/editor-experience-panels/design-custom-panels-in-blocks.md), if you haven't created it yet). ![](https://d2x3xhvgiqkx42.cloudfront.net/12345678-1234-1234-1234-1234567890ab/6b5c7381-912e-4754-99e2-d23157db088c/2022/06/22/3aac0458-d997-49d9-9b24-ed30f7689e24/47bdb1f8-85c3-412c-addc-5bbf4ccecc71.png) 3. Go to your panel's code section and write your code there. ![](https://d2x3xhvgiqkx42.cloudfront.net/12345678-1234-1234-1234-1234567890ab/6b5c7381-912e-4754-99e2-d23157db088c/2022/06/22/fa33e0eb-46d3-4c32-8e77-1d674e04fa2e/63ea8f40-6d70-4fa5-8606-411feb9d124c.png)
Note: If you are working with the Blocks-CLI integration, write your panel code in the [panel.ts file](https://dev.wix.com/docs/build-apps/develop-your-app/frameworks/wix-cli/supported-extensions/site-extensions/blocks-site-widgets/panel-files-and-code.md).
## Panel elements Custom panels are made of unique user interface (UI) elements, such as buttons, checkboxes, drop-down lists and more. See the [list of elements](https://dev.wix.com/docs/build-apps/develop-your-app/develop-an-app-with-blocks/editor-experience-panels/panel-elements-in-blocks.md) and the [$w reference for all panel elements](https://www.wix.com/velo/reference/$w/panelbutton). ## SDK and Velo modules for Blocks custom panels To enable panel elements to interact with your widget and perform actions in the editor, you can use the following modules: ### `widget` Module The [`widget`](https://dev.wix.com/docs/sdk/host-modules/editor/widget/introduction.md) SDK module provides functionality to: - Manage widget properties and settings - Control widget design presets and appearance Import the module using: ```javascript import { widget } from '@wix/editor'; ``` ### `wix-editor` Module The [`wix-editor`](https://www.wix.com/velo/reference/wix-editor) module provides functionality to: - Remove or restore widget elements from the editor - Open Dashboard panels and navigate between editor views - Interact with the editor environment and manage element visibility Import the module using: ```javascript import wixEditor from 'wix-editor' ``` ## Interact with widget properties Panels are often used to manipulate your [widget API properties](https://dev.wix.com/docs/build-apps/develop-your-app/develop-an-app-with-blocks/widget-api/blocks-widget-properties.md). This means that when users change something in the panel, the property values change. You can connect panel elements to properties easily, [with no code](https://dev.wix.com/docs/build-apps/develop-your-app/develop-an-app-with-blocks/editor-experience-panels/connect-panel-elements-to-props.md). You can also connect panel elements with code. In this example, users can turn a "special sale" property on and off, through a toggle element in the widget's panel. ```javascript import { widget } from '@wix/editor'; $w.onReady(async function () { const saleIndicator = await widget.getProp('saleIndicator'); if (saleIndicator === "No Sale") { $w("#panelToggleSwitch1").checked = false; } }); $w("#panelToggleSwitch1").onChange(async () => { if ($w("#panelToggleSwitch1").checked) { await widget.setProp('saleIndicator', "Sale"); } else { await widget.setProp('saleIndicator', "No Sale"); } }); ```
See deprecated wix-widget Velo example ```javascript import wixWidget from 'wix-widget'; $w.onReady(async function () { const props = await wixWidget.getProps(); if (props.saleIndicator === "No Sale") { $w("#panelToggleSwitch1").checked = false; } }); $w("#panelToggleSwitch1").onChange(async () => { if ($w("#panelToggleSwitch1").checked) { await wixWidget.setProps({ saleIndicator: "Sale" }); } else { await wixWidget.setProps({ saleIndicator: "No Sale" }); } }); ```
## Show and hide widget elements Here is a way for showing and hiding an element through the panel code: ```javascript import wixEditor from 'wix-editor'; $w.onReady(async function () { $w('#panelToggleSwitch1').onChange(async (event: any) => { if (event.target.value) { await wixEditor.removeElement('#title'); } else { await wixEditor.restoreElement('#title'); } }); }); ``` ## Interact with widget design presets Here is an example of changing the widget's [design preset](https://dev.wix.com/docs/build-apps/develop-your-app/develop-an-app-with-blocks/widget-design/about-design-presets.md) from the panel code. This example assumes: - A widget with 2 presets: `vertical` and `horizontal` - A panel with two thumbnails for the two different presets - The thumbnail values are set to `vertical` and `horizontal` This is how the panel looks: ![presets-panel](https://wixmp-833713b177cebf373f611808.wixmp.com/images/2621676f4383c17f9926785ff8e7ad40.png) Here is the panel code: ```javascript import { widget } from '@wix/editor'; $w.onReady(async function () { const currentPreset = await widget.getDesignPreset(); $w("#layoutThumbnails").value = currentPreset; $w("#layoutThumbnails").onChange(() => { widget.setDesignPreset($w("#layoutThumbnails").value); }); }); ```
See deprecated wix-widget Velo example ```javascript import wixWidget from 'wix-widget'; $w.onReady(async function () { const currentPreset = await wixWidget.getDesignPreset(); $w("#layoutThumbnails").value = currentPreset; $w("#layoutThumbnails").onChange(() => { wixWidget.setDesignPreset($w("#layoutThumbnails").value); }); }); ```
## Interact with nested widget properties This example shows how to set a "Sale" or "No Sale" tag in the widget props, but for a [nested (inner) widget](https://dev.wix.com/docs/build-apps/develop-your-app/develop-an-app-with-blocks/site-widgets/add-nested-widgets-in-blocks.md). The example assumes: - An outer widget with a panel that has a toggle element. - The toggle is set to `true` by default. - A nested widget with a `saleIndicator` property that has two values: `Sale` and `No Sale`. Here is the panel code: ```js import { widget } from "@wix/editor"; $w.onReady(async function () { const innerWidget = await widget.getNestedWidget("#nestedWidget1"); const saleIndicator = await innerWidget.getProp("saleIndicator"); if (saleIndicator == "No Sale") { $w("#panelToggleSwitch1").checked = false; } }); $w("#panelToggleSwitch1").onChange(async () => { const innerWidget = await widget.getNestedWidget("#nestedWidget1"); if ($w("#panelToggleSwitch1").checked) { await innerWidget.setProp("saleIndicator", "Sale"); } else { await innerWidget.setProp("saleIndicator", "No Sale"); } }); ```
See deprecated wix-widget Velo example ```javascript $w.onReady(async function () { const innerWidget = await wixWidget.getNestedWidget("#nestedWidget1"); const innerProps = await innerWidget.getProps(); if (innerProps.saleIndicator === "No Sale") { $w("#panelToggleSwitch1").checked = false; } }); $w("#panelToggleSwitch1").onChange(async () => { const innerWidget = await wixWidget.getNestedWidget("#nestedWidget1"); if ($w("#panelToggleSwitch1").checked) { await innerWidget.setProps({ saleIndicator: "Sale" }); } else { await innerWidget.setProps({ saleIndicator: "No Sale" }); } }); ```
## Interact with the panel itself In some cases, you might want to manipulate what happens within the panel itself. For example, you might want some of the panel elements to be hidden if they are irrelevant. This panel for the Login Bar Settings button has a toggle, which determines whether or not to show a greeting before the user's name. ![](https://d2x3xhvgiqkx42.cloudfront.net/12345678-1234-1234-1234-1234567890ab/6b5c7381-912e-4754-99e2-d23157db088c/2022/08/25/808f5ed8-4a92-40eb-85c8-422257bfdff8/2caf0963-9a30-428d-a3ec-104d1b9fd0c1.gif) Here is the panel code: ```javascript $w.onReady(function () { $w('#showGreetingSwitch').onChange((event) => { if (event.target.checked) { $w('#greetingText').expand(); } else { $w('#greetingText').collapse(); } }) }); ``` ## Interact with a collection You can access your [app collections](https://dev.wix.com/docs/build-apps/develop-your-app/develop-an-app-with-blocks/cms-collections-in-blocks/about-cms-collections-in-blocks.md) in Blocks from the panel code, and perform various actions, such as query, insert, etc. You can also [access a collection on a site](https://dev.wix.com/docs/build-apps/develop-your-app/develop-an-app-with-blocks/cms-collections-in-blocks/about-cms-collections-in-blocks.md) where your app is installed. Just make sure to use the app [namespace](https://dev.wix.com/docs/build-apps/develop-your-app/develop-an-app-with-blocks/code-in-blocks/creating-a-namespace-for-your-app.md). For example, write this in the panel code to query your app's collection: ```javascript import { items } from '@wix/data'; items.query("/") .find() .then( (results) => { //your code using the "results"; }); ```
See deprecated wix-data Velo example ```javascript import wixData from 'wix-data'; wixData.query("/") .find() .then( (results) => { //your code using the "results"; }); ```
## Connect and test your panel After making your panel work, don't forget the next steps: * Connect your panel to an [action button](https://dev.wix.com/docs/build-apps/develop-your-app/develop-an-app-with-blocks/editor-experience-panels/design-custom-panels-in-blocks.md), if you haven't done it yet. When a site builder clicks that action button, your panel will open. * [Test your panel in the editor](https://dev.wix.com/docs/build-apps/develop-your-app/develop-an-app-with-blocks/deploy-and-manage-blocks-apps/test-your-app-on-a-site.md) to see that it works as planned. --- > Portal Navigation: > > - Append `.md` to any URL under `https://dev.wix.com/docs/` to get its markdown version. > - Pages are either content pages (article or reference text) or menu pages (a list of links to child pages). > - To get a menu page, truncate any URL to a parent path and append `.md` (e.g. `https://dev.wix.com/docs/sdk.md`, `https://dev.wix.com/docs/sdk/core-modules.md`). > - Top-level index of all portals: https://dev.wix.com/docs/llms.txt > - Full concatenated docs: https://dev.wix.com/docs/llms-full.txt ## Resource: Connect Panel Elements to Props ## Article: Low Code Panels ## Article Link: https://dev.wix.com/docs/build-apps/develop-your-app/develop-an-app-with-blocks/editor-experience-panels/connect-panel-elements-to-props.md ## Article Content: # Connect Panel Elements to Widget Properties With No Code
**Editor compatibility** Wix Blocks apps aren't supported in the Wix Harmony editor. Existing Blocks apps remain available for purchase on the Wix App Market for Wix Editor and Wix Studio sites. To learn more, see [About Wix Harmony and Blocks](https://dev.wix.com/docs/build-apps/develop-your-app/develop-an-app-with-blocks/about-wix-harmony-and-blocks.md).
Custom panels are often used to get input from users and set the [widget API properties](https://dev.wix.com/docs/build-apps/develop-your-app/develop-an-app-with-blocks/widget-api/blocks-widget-properties.md) accordingly. For example, in a shopping widget, users could turn a "special sale" property on and off, through a toggle element in the widget's panel. Note that you could also [do this with code](https://dev.wix.com/docs/build-apps/develop-your-app/develop-an-app-with-blocks/editor-experience-panels/add-code-to-custom-panels-in-blocks.md).
Note: You cannot test panels in the Blocks preview. To see your panel in action, [test it on a site](https://dev.wix.com/docs/build-apps/develop-your-app/develop-an-app-with-blocks/deploy-and-manage-blocks-apps/test-your-app-on-a-site.md).
## Connect a panel element to a widget property: 1. Click the panel element you want to connect to a property. In our example, we use a slider. 1. Click **Connect Slider to** in the Inspector panel (the name of the element changes according to what you selected). 1. Select the property you want to connect to this element. Note that you'll only see properties that match that element's type (see [element and property types](#element-and-property-types)). 1. At this point, you can also create a new property if you need to. ![connect element to property](https://wixmp-833713b177cebf373f611808.wixmp.com/images/64f3376ac44aa0806ef6a94c581c6bfb.png)
Warning: Deleting the property you connected to an element will cause the element to lose its functionality.
## Element and property types You can only connect panel elements to properties whose type matches the element's input behavior. For example, a toggle element can connect to a boolean property, because they both represent a choice between two options. Here is a list of panel elements and the property types they can connect to: | Panel Element | Property Type | | -------- | ------- | | Checkbox Group | List of strings | | Dropdown | String | | Radio Button Group | String | | RichText | String | | Slider | Number | | Text Input | String | | Thumbnails | String | | Toggle Switch | Boolean | ## Syncing property and element settings When you connect a panel element to a property, the property's settings, which you have set in the **New Property** panel, will automatically apply to the matching element settings. For example, when connecting this `TextProp` property to a text input element, the title, tooltip and default text were automatically taken from what we defined for the property. After you complete the process of connecting the element to the property, you will be able to change the Display Name and Tooltip from the element's settings. **Property Settings:** ![new property panel](https://wixmp-833713b177cebf373f611808.wixmp.com/images/ef11cf93b41c17b6c6ffaa2c443bfaf0.png) **Element settings automatically taken from prop settings:** ![element settings](https://wixmp-833713b177cebf373f611808.wixmp.com/images/4303d4d5f2a7721a9eff8005521487e5.png)
Note: Any values that you might have set in the element's settings panel **prior** to connecting it to a property, will be overridden by the property's settings.
--- > Portal Navigation: > > - Append `.md` to any URL under `https://dev.wix.com/docs/` to get its markdown version. > - Pages are either content pages (article or reference text) or menu pages (a list of links to child pages). > - To get a menu page, truncate any URL to a parent path and append `.md` (e.g. `https://dev.wix.com/docs/sdk.md`, `https://dev.wix.com/docs/sdk/core-modules.md`). > - Top-level index of all portals: https://dev.wix.com/docs/llms.txt > - Full concatenated docs: https://dev.wix.com/docs/llms-full.txt ## Resource: Panel Button Rules to Open Pages ## Article: Panel Button Rules ## Article Link: https://dev.wix.com/docs/build-apps/develop-your-app/develop-an-app-with-blocks/editor-experience-panels/panel-button-rules-to-open-pages.md ## Article Content: # Add Panel Button Rules to Open Pages
**Editor compatibility** Wix Blocks apps aren't supported in the Wix Harmony editor. Existing Blocks apps remain available for purchase on the Wix App Market for Wix Editor and Wix Studio sites. To learn more, see [About Wix Harmony and Blocks](https://dev.wix.com/docs/build-apps/develop-your-app/develop-an-app-with-blocks/about-wix-harmony-and-blocks.md).
Panel button rules determine which page opens when Wix users click the button in their editor. These rules can lead to one of three pages: * One of your app's [dashboard pages](https://dev.wix.com/docs/build-apps/develop-your-app/develop-an-app-with-blocks/dashboard-pages/about-dashboard-pages-in-blocks.md) * Your app's [pricing page](https://dev.wix.com/docs/build-apps/develop-your-app/develop-an-app-with-blocks/publish-blocks-apps-to-the-app-market/adjust-a-blocks-app-to-different-pricing-plans.md) * Any external URL To add a rule to a panel button: 1. Click the button. 1. Click **Rules** -> **Open a page** in the Inspector. 1. Click **+ Add Rule**. 1. Select one of the three options: dashboard page, pricing page or an external URL. ![button rule](https://wixmp-833713b177cebf373f611808.wixmp.com/images/d1b5652c3a02b19631034e09b6aa27bc.png) ## Open a dashboard page [Dashboard pages](https://dev.wix.com/docs/build-apps/develop-your-app/develop-an-app-with-blocks/dashboard-pages/about-dashboard-pages-in-blocks.md) are administrative pages that allow Wix users to manage the app's data and settings. Creating a panel button that leads to a dashboard page is a good way to increase the page's visibility. Note that you can also define a button to navigate to a dashboard page [using code](https://dev.wix.com/docs/build-apps/develop-your-app/develop-an-app-with-blocks/dashboard-pages/open-a-blocks-dashboard-page-from-a-custom-panel.md). ## Open your app's pricing page When you [add pricing plans to your app](https://dev.wix.com/docs/build-apps/develop-your-app/develop-an-app-with-blocks/publish-blocks-apps-to-the-app-market/adjust-a-blocks-app-to-different-pricing-plans.md), it gets a pricing page where users can choose their plan and upgrade their app. Providing a button that leads to that page is a good way to let users upgrade your app (you can also use [more entry points](https://dev.wix.com/docs/build-apps/develop-your-app/develop-an-app-with-blocks/publish-blocks-apps-to-the-app-market/provide-entry-points-to-upgrade-your-app.md#provide-entry-points-to-upgrade-a-blocks-app) for this). If you are creating an Upgrade button and connecting it to your pricing page, consider changing the button type to **Premium** to get the purple color. ![premium style](https://wixmp-833713b177cebf373f611808.wixmp.com/images/be8e79729860e6387133c4376345437f.png) ## Open an external URL Add the full URL of the site you'd like to open. Use this option, for example, to provide support or documentation. --- > Portal Navigation: > > - Append `.md` to any URL under `https://dev.wix.com/docs/` to get its markdown version. > - Pages are either content pages (article or reference text) or menu pages (a list of links to child pages). > - To get a menu page, truncate any URL to a parent path and append `.md` (e.g. `https://dev.wix.com/docs/sdk.md`, `https://dev.wix.com/docs/sdk/core-modules.md`). > - Top-level index of all portals: https://dev.wix.com/docs/llms.txt > - Full concatenated docs: https://dev.wix.com/docs/llms-full.txt ## Resource: About CMS Collections in Blocks ## Article: About Collections ## Article Link: https://dev.wix.com/docs/build-apps/develop-your-app/develop-an-app-with-blocks/cms-collections-in-blocks/about-cms-collections-in-blocks.md ## Article Content: # About CMS Collections in Blocks
**Editor compatibility** Wix Blocks apps aren't supported in the Wix Harmony editor. Existing Blocks apps remain available for purchase on the Wix App Market for Wix Editor and Wix Studio sites. To learn more, see [About Wix Harmony and Blocks](https://dev.wix.com/docs/build-apps/develop-your-app/develop-an-app-with-blocks/about-wix-harmony-and-blocks.md).
Wix Blocks lets you integrate CMS database collections into your app seamlessly. While managing collections in Blocks shares similarities with [managing collections in Wix sites](https://support.wix.com/en/article/cms-content-management-system-an-overview), there are a few key differences. Explore these distinctions in detail in this article.
Examples: To see examples of collections in Blocks, open the following templates and go to the **Databases** ![databases icon](https://d2x3xhvgiqkx42.cloudfront.net/12345678-1234-1234-1234-1234567890ab/378fd532-728d-473b-8f03-30140bda59af/2022/06/15/929245d2-3a89-445f-996b-623326b4b81f/1a31bddc-febf-451e-a716-773572239804.png)  tab. - [Repeater](https://dev.wix.com/apps-templates/template?id=a4a7246f-4644-48ce-81e7-2a86aa74d9e5&http_referrer=documentation) - [Recipe list](https://dev.wix.com/apps-templates/template?id=512a7d8a-1666-40c2-9586-25874d2f69b4&http_referrer=documentation)
Important: - Be mindful of [collection permissions](#permissions) and follow their [security guidelines](https://dev.wix.com/docs/develop-websites/articles/best-practices/security-best-practices.md). - How Blocks collections affect a [site's collection item limit](https://support.wix.com/en/article/wix-studio-cms-limits-on-free-sites) depends on whether the app is private or public: - **Private Blocks apps**: Items in collections from private Blocks apps count towards the site's collection item quota. - **Public Blocks apps**: Items in collections from public Blocks apps, installed from the Wix App Market, don't count towards the site's collection item quota. - When a Blocks app is installed on a site, whether a private or a public app, data requests made by the app are subject to the site's requests per minute (RPM) limits, not the app's limits. - You can also ask the [Blocks AI](https://dev.wix.com/docs/build-apps/develop-your-app/develop-an-app-with-blocks/get-started/about-the-blocks-ai.md) to add and edit collections in your app.
## A Blocks collection is a placeholder The most important thing to understand about a Blocks collection is that it is a placeholder for the data of any site it's installed on. This is because a Blocks collection can be used on multiple sites. These sites can be very different from each other and have their own databases. Think about a collection that holds customer information. Every site can have a list of their own customers, and your widget can apply to all of them. When you create a collection in Blocks, you define the fields of the collection, and make it possible to refer to it in the app's code. You can also add default data in Blocks, but you don’t have to. If you do add default data, it is automatically installed on the site together with the app, and can later be replaced by data from any site the app is installed on. If you change the structure of a collection in Blocks in a future version of your app, it impacts any site it's installed on. So work with caution and don't make changes that can break sites.   ## About the default data Data that you add to your Blocks collections will be imported to the site in which your app is installed, providing your site creators with default data for your app. If you choose to add default data, note that: * The site your app is installed on can change that data later. * The default data will only be imported in the first installation. If you release a new version of your app and change the data in the collection, it will not override the data that already exists in any site your app is installed on. ## Add a collection to your app To add a collection to your app: 1. Click the **CMS** ![databases icon](https://d2x3xhvgiqkx42.cloudfront.net/12345678-1234-1234-1234-1234567890ab/378fd532-728d-473b-8f03-30140bda59af/2022/06/15/929245d2-3a89-445f-996b-623326b4b81f/1a31bddc-febf-451e-a716-773572239804.png)  icon in your app's left menu.  2. Click **Create Collection**. 3. Create a unique [namespace](https://dev.wix.com/docs/build-apps/develop-your-app/develop-an-app-with-blocks/code-in-blocks/creating-a-namespace-for-your-app.md) for you app, if you haven't already done it. Make the namespace meaningful and clear (if you haven't named your app yet, you will be triggered to name it now).  4. Name your collection. 5. Define the structure of your collection in the **CMS**.  6. Optional - add default data to your collection.  ## See your collection in the editor When you import a Blocks app that has a collection to your site, the collection will appear in the **Content Collections** section in the **CMS** ![](https://d2x3xhvgiqkx42.cloudfront.net/12345678-1234-1234-1234-1234567890ab/378fd532-728d-473b-8f03-30140bda59af/2022/06/16/58327a82-cb4e-4e52-8d36-fe45ba37926c/afb48575-c883-4145-94b8-8b95d0b2327f.png)  panel. Your app namespace will appear next to this collection, to indicate that it's from Blocks. From now on you can [handle your collection](https://support.wix.com/en/content-manager/content-collections) like in any other Wix site. 
Important: If you delete the app from the site, the collection will be deleted as well.
## Reference collection data in code To access your collection and perform various actions, query, insert, etc, use the following syntax with the [`items`](https://dev.wix.com/docs/sdk/backend-modules/data/items/introduction.md) submodule in the `data` SDK module. For example, this is how you query a collection (note that `@wix/data` cannot be tested in Blocks Preview and must be tested on a site): ```js import { items } from "@wix/data"; $w.onReady(async function() { try { const results = await items .query("@username/my-app/MyCollection") .find(); // your code using the "results" } catch (err) { console.log(err); } }); ```
See deprecated wix-data code example You can also use the deprecated [wix-data Velo API](https://dev.wix.com/docs/develop-websites/articles/databases/wix-data/data-api/working-with-the-data-api.md) for this purpose: ```js import wixData from 'wix-data'; $w.onReady(async function() { try { const results = await wixData .query("@username/my-app/MyCollection") .find(); //your code using the "results"; } catch (err) { console.log(err); } }); ```
## Use collection data with data-binding Use data-binding to connect an element to a collection field, or let site-builders connect it themselves. This can be done easily [without code](https://dev.wix.com/docs/build-apps/develop-your-app/develop-an-app-with-blocks/cms-collections-in-blocks/connect-elements-to-collection-fields-with-no-code.md). ## Reference a site collection through the app code You might want to reference a collection on your site directly from your widget code without adding it to Blocks. There are two ways to do this: * If you know the name and structure of the collection, you can use it in your widget code. For example, if Wix Stores is installed on the site, you can use the `Stores/Products` collection. Note that if the site is not under your account, you will need to add [app permissions](#app-permissions). * You can pass the name of the collection or other information about the collection as properties in the [Widget API](https://dev.wix.com/docs/build-apps/develop-your-app/develop-an-app-with-blocks/widget-api/blocks-widget-properties.md). ## Permissions There are two types of permissions to consider when building apps that handle collections. ### Collection permissions Collection permissions determine what users can do in a collection you created in Blocks, when your app is installed on their site. This means whether users can view, add, update or delete items in your collection. To configure collection permissions, click the three dots next to the collection name and select **Permissions & privacy**. ### App permissions [App permissions](https://dev.wix.com/docs/build-apps/develop-your-app/develop-an-app-with-blocks/code-in-blocks/add-app-permissions-in-blocks.md) determine what your app can do on a site collection that **does not belong to your app**. The specific permissions you need to add depends on the function you are using. For example, [query()](https://dev.wix.com/docs/sdk/backend-modules/data/items/query.md) requires the `READ DATA ITEMS` permission. To configure app permissions, click on the **Wix Blocks** icon. Then click **App** > **App Permissions**. --- > Portal Navigation: > > - Append `.md` to any URL under `https://dev.wix.com/docs/` to get its markdown version. > - Pages are either content pages (article or reference text) or menu pages (a list of links to child pages). > - To get a menu page, truncate any URL to a parent path and append `.md` (e.g. `https://dev.wix.com/docs/sdk.md`, `https://dev.wix.com/docs/sdk/core-modules.md`). > - Top-level index of all portals: https://dev.wix.com/docs/llms.txt > - Full concatenated docs: https://dev.wix.com/docs/llms-full.txt ## Resource: Connect Elements to Collection Fields With No Code ## Article: Connect Elements to Collection Fields With No Code ## Article Link: https://dev.wix.com/docs/build-apps/develop-your-app/develop-an-app-with-blocks/cms-collections-in-blocks/connect-elements-to-collection-fields-with-no-code.md ## Article Content: # Connect Elements to Collection Fields With No Code (Data-Binding)
**Editor compatibility** Wix Blocks apps aren't supported in the Wix Harmony editor. Existing Blocks apps remain available for purchase on the Wix App Market for Wix Editor and Wix Studio sites. To learn more, see [About Wix Harmony and Blocks](https://dev.wix.com/docs/build-apps/develop-your-app/develop-an-app-with-blocks/about-wix-harmony-and-blocks.md).
If you want to connect an element to a collection field, you must choose whether you want to connect it yourself from the app, or allow site-builders to connect this element on their own. For example if you build an app with complex logic that you need to control, you would probably use the first option. If you build a more design-oriented widget and want to give site-builders the freedom to connect any field they want to the design, your would use the second.  Here are some details about these two options: ## Option 1: Connect an element to a collection in Blocks You can connect an element to a collection field in Blocks, through adding a dataset. If you do this, note that:  * An outer widget cannot connect an [inner-widget’s](https://dev.wix.com/docs/build-apps/develop-your-app/develop-an-app-with-blocks/site-widgets/add-nested-widgets-in-blocks.md) element to a dataset. You must go into the inner widget and connect the element from there. * If you connect an app’s element to a dataset, you cannot allow a site builder to connect this element to a collection on their site. Therefore, you will also not be able to add the **Connect to CMS** ![](https://d2x3xhvgiqkx42.cloudfront.net/12345678-1234-1234-1234-1234567890ab/378fd532-728d-473b-8f03-30140bda59af/2024/02/27/0529fe32-8e09-4f9b-be94-38010664296d/82eea2f5-fe57-423a-a0e3-78bfc698c647.png)  [action button](https://dev.wix.com/docs/build-apps/develop-your-app/develop-an-app-with-blocks/editor-experience-configuration/configure-action-bars-in-blocks.md) to this element’s action bar. Note that the action button will be disabled and appear gray. 
Example: Go to the [Repeater template](https://dev.wix.com/apps-templates/template?id=a4a7246f-4644-48ce-81e7-2a86aa74d9e5&http_referrer=documentation) to see an example of connecting elements to collection fields. The elements in this repeater are connected to the collection with no code.
### To connect an element to a field in Blocks: 1. Go to the **Design** tab.  2. Click on the element. 3. Click on the **Connect to CMS** ![](https://d2x3xhvgiqkx42.cloudfront.net/12345678-1234-1234-1234-1234567890ab/378fd532-728d-473b-8f03-30140bda59af/2024/02/28/35acad32-03ed-4ea0-a201-df5ebcc37ceb/eb371f17-e215-41bc-9260-64ac656eade4.png)  icon in the action bar.  4. Select a dataset, or add one if you haven't. 5. Select the field to connect to your element.  You can also [connect the elements through code](https://dev.wix.com/docs/build-apps/develop-your-app/develop-an-app-with-blocks/cms-collections-in-blocks/connect-a-dynamic-repeater-to-a-collection.md). ## Option 2: Allow site builder to connect the element on a site You can also allow site builders to connect app elements to their site’s CMS through the **Connect to CMS** ![](https://d2x3xhvgiqkx42.cloudfront.net/12345678-1234-1234-1234-1234567890ab/378fd532-728d-473b-8f03-30140bda59af/2024/02/27/6486ca16-9aa9-4cde-940e-079b07b7a136/eaf5b199-e1ad-43ef-9119-5b83c274ff9d.png)  action button. If you choose to do this, note that: * Once the app is installed on user sites and they connect the element to their collections, if you connect the same element to your collection in Blocks, it will break the app’s functionality on their site.  * If you connected an element to your own collection in Blocks, you will not be able to add this action button to the element's action bar.  ### To allow site builders to connect the element on their site: 1. Go to the **Editor Experience** tab.  2. Click on the element.  3. Click **Edit Action Bar**.  4. Click **\+ Add**. 5. Add the **Connect to CMS** ![](https://d2x3xhvgiqkx42.cloudfront.net/12345678-1234-1234-1234-1234567890ab/378fd532-728d-473b-8f03-30140bda59af/2024/02/28/18d9df96-eb85-4a98-9de8-8d4e0669f9c1/a56d3008-5703-4034-9e50-bc22323f949f.png)  button and accept the notification. 
Note: If your widget has [properties](https://dev.wix.com/docs/build-apps/develop-your-app/develop-an-app-with-blocks/widget-api/blocks-widget-properties.md), adding this button to the action bar of entire widget, allows site builders to connect the widget properties to their data.
--- > Portal Navigation: > > - Append `.md` to any URL under `https://dev.wix.com/docs/` to get its markdown version. > - Pages are either content pages (article or reference text) or menu pages (a list of links to child pages). > - To get a menu page, truncate any URL to a parent path and append `.md` (e.g. `https://dev.wix.com/docs/sdk.md`, `https://dev.wix.com/docs/sdk/core-modules.md`). > - Top-level index of all portals: https://dev.wix.com/docs/llms.txt > - Full concatenated docs: https://dev.wix.com/docs/llms-full.txt ## Resource: Connect a Dynamic Repeater to a Collection ## Article: Connecting a Repeater to a Database Collection ## Article Link: https://dev.wix.com/docs/build-apps/develop-your-app/develop-an-app-with-blocks/cms-collections-in-blocks/connect-a-dynamic-repeater-to-a-collection.md ## Article Content: # Connect a Dynamic Repeater to a Database Collection Using Code
**Editor compatibility** Wix Blocks apps aren't supported in the Wix Harmony editor. Existing Blocks apps remain available for purchase on the Wix App Market for Wix Editor and Wix Studio sites. To learn more, see [About Wix Harmony and Blocks](https://dev.wix.com/docs/build-apps/develop-your-app/develop-an-app-with-blocks/about-wix-harmony-and-blocks.md).
Blocks allows you to connect a [CMS database collection](https://dev.wix.com/docs/build-apps/develop-your-app/develop-an-app-with-blocks/cms-collections-in-blocks/about-cms-collections-in-blocks.md) to a [dynamic repeater](https://dev.wix.com/docs/build-apps/develop-your-app/develop-an-app-with-blocks/cms-collections-in-blocks/dynamic-repeaters-in-blocks.md) using code. Note that alternatively, you can connect a repeater to data [with no code](https://dev.wix.com/docs/build-apps/develop-your-app/develop-an-app-with-blocks/cms-collections-in-blocks/connect-elements-to-collection-fields-with-no-code.md).
Note: The `@wix/data` SDK cannot be tested in the Blocks Preview. [Test your app on a site](https://dev.wix.com/docs/build-apps/develop-your-app/develop-an-app-with-blocks/deploy-and-manage-blocks-apps/test-your-app-on-a-site.md) to see it work.
**To connect a dynamic repeater to a collection:** 1. Create or open a Blocks widget. 2. Go to the **Add +** panel and add a dynamic repeater to your widget. 4. Go to the **Code {}** tab and import the `@wix/data` npm package. 5. Go to widget code panel and import the [**@wix/data**](https://dev.wix.com/docs/sdk/backend-modules/data/items/introduction.md) module: ```javascript import { items } from "@wix/data"; ``` 6. Go to the **CMS** ![CMS](https://wixmp-833713b177cebf373f611808.wixmp.com/images/bb6873a07f3d330705223118bbe97763.png) tab and open **Your Collections**. If you haven't created a collection yet, create one now. 7. Click the three dots next to the collection name and then **Edit Settings**, to copy the collection ID. It should look something like this: ```js @username/my-app/MyCollection ``` 5. Query the data in the collection and use it to populate the repeater. For example: ```javascript import { items } from "@wix/data"; $w.onReady(async function () { try { const results = await items .query("@username/my-app/MyCollection") .find(); $w("#repeater1").data = results.items; } catch (err) { console.log(err); } $w("#repeater1").onItemReady(($item, itemData, index) => { $item("#text1").text = itemData.title; }); }); ```
See deprecated wix-data Velo example ```javascript import wixData from "wix-data"; $w.onReady(function () { wixData .query("@username/my-app/MyCollection") .find() .then((results) => { $w("#repeater1").data = results.items; }) .catch((err) => { console.log(err); throw new Error(err); }); $w("#repeater1").onItemReady(($item, itemData, index) => { $item("#text1").text = itemData.title; }); }); ```
## See also For an additional example, refer to [this tutorial](https://dev.wix.com/docs/develop-websites/articles/databases/wix-data/displaying-data/display-database-collection-content-in-a-repeater.md). While the tutorial focuses on standard repeaters used in site building, the same principles apply to dynamic repeaters in Blocks. When adapting the tutorial for Blocks, make sure to **add the app namespace** before the collection name in your query. --- > Portal Navigation: > > - Append `.md` to any URL under `https://dev.wix.com/docs/` to get its markdown version. > - Pages are either content pages (article or reference text) or menu pages (a list of links to child pages). > - To get a menu page, truncate any URL to a parent path and append `.md` (e.g. `https://dev.wix.com/docs/sdk.md`, `https://dev.wix.com/docs/sdk/core-modules.md`). > - Top-level index of all portals: https://dev.wix.com/docs/llms.txt > - Full concatenated docs: https://dev.wix.com/docs/llms-full.txt ## Resource: Dynamic Repeaters in Blocks ## Article: Dynamic Repeaters in Blocks ## Article Link: https://dev.wix.com/docs/build-apps/develop-your-app/develop-an-app-with-blocks/cms-collections-in-blocks/dynamic-repeaters-in-blocks.md ## Article Content: # Dynamic Repeaters in Blocks
**Editor compatibility** Wix Blocks apps aren't supported in the Wix Harmony editor. Existing Blocks apps remain available for purchase on the Wix App Market for Wix Editor and Wix Studio sites. To learn more, see [About Wix Harmony and Blocks](https://dev.wix.com/docs/build-apps/develop-your-app/develop-an-app-with-blocks/about-wix-harmony-and-blocks.md).
Dynamic repeaters are designed specifically for app building. Unlike standard repeaters used in site building, where you can edit each item individually directly on the canvas, dynamic repeaters require code or a connection to a CMS collection for content management. In dynamic repeaters, if you try to edit one item directly on the canvas, all items will be edited simultaneously. Dynamic repeaters also support advanced features like adding widgets or [nesting them](https://dev.wix.com/docs/build-apps/develop-your-app/develop-an-app-with-blocks/cms-collections-in-blocks/nest-dynamic-repeaters.md). ## Connect dynamic repeaters to collections without code You can connect a dynamic repeater to a CMS collection using data binding without writing code. However, for nested repeaters, this method is only applicable to the outer repeater. To connect a dynamic repeater to a collection without code: 1. Select the repeater in your widget. 2. Click the **Connect to CMS** ![](https://d2x3xhvgiqkx42.cloudfront.net/12345678-1234-1234-1234-1234567890ab/378fd532-728d-473b-8f03-30140bda59af/2024/02/28/35acad32-03ed-4ea0-a201-df5ebcc37ceb/eb371f17-e215-41bc-9260-64ac656eade4.png) icon. Learn more about [connecting elements to collections without code](https://dev.wix.com/docs/build-apps/develop-your-app/develop-an-app-with-blocks/cms-collections-in-blocks/connect-elements-to-collection-fields-with-no-code.md). > **Note:** If a connected dynamic repeater is nested inside another repeater, its data connection will be removed. In this case, reconnect the nested repeater using code. ## Connect dynamic repeaters to collections using code Dynamic repeaters can also be connected to CMS collections programmatically using code. This gives you more control over the content being displayed. For example: ```javascript import { items } from '@wix/data'; $w.onReady(async function() { try { const results = await items .query("@myuser/my-app-name/CollectionName") .find(); $w("#repeater1").data = results.items; } catch (err) { console.log(err); } }); ```
See deprecated wix-data Velo example ```javascript import wixData from "wix-data"; $w.onReady(async function() { try { const results = await wixData .query("@myuser/my-app-name/CollectionName") .find(); $w("#repeater1").data = results.items; } catch (err) { console.log(err); } }); ```
This allows you to manipulate and update the data in the repeater based on the query results from your collection. Learn more about [connecting dynamic repeaters to collections using code](https://dev.wix.com/docs/build-apps/develop-your-app/develop-an-app-with-blocks/cms-collections-in-blocks/connect-a-dynamic-repeater-to-a-collection.md). ## Add widgets to dynamic repeaters To add a widget to a dynamic repeater: 1. Add a repeater to your widget. 2. Create another widget in your app. 3. Open the **Add +** panel and select **My Widgets**. 4. Drag the second widget into the repeater in the first widget until the Attach indication appears. 5. The second widget will now act as a [nested widget](https://dev.wix.com/docs/build-apps/develop-your-app/develop-an-app-with-blocks/site-widgets/add-nested-widgets-in-blocks.md) and will appear in all repeater cells. If the nested widget contains its own repeater, refer to [nesting repeaters](https://dev.wix.com/docs/build-apps/develop-your-app/develop-an-app-with-blocks/cms-collections-in-blocks/nest-dynamic-repeaters.md) for additional guidance. ## Reference dynamic repeaters in code Dynamic repeaters are referenced in code using the `$w` API, similar to standard repeaters. You can manipulate their data and appearance programmatically with the [`$w.Repeater`](https://dev.wix.com/docs/velo/velo-only-apis/$w/repeater/introduction.md) methods, which provide access to all repeater-specific functionality. This allows you to update and customize dynamic repeaters directly through your app's code. ## Nest dynamic repeaters Dynamic repeaters support nesting, which can be done in two ways: 1. **Direct Nesting**: Drag one repeater directly into another. In this setup, the inner repeater can only connect to a collection through code. 2. **Nesting a Widget with a Repeater**: Create a widget that contains a repeater, then nest this widget inside another repeater.
Notes: - Learn more about [Nesting dynamic repeaters](https://dev.wix.com/docs/build-apps/develop-your-app/develop-an-app-with-blocks/cms-collections-in-blocks/nest-dynamic-repeaters.md). - Try out the [Coffee catalog tutorial](https://dev.wix.com/docs/build-apps/get-started/tutorials/tutorial-create-a-coffee-catalog-with-blocks.md), which uses nested dynamic repeaters.
## Does Blocks also have standard repeaters? You can no longer add standard repeaters in Blocks, as they are not available in the Add Panel. However, if you have older apps that include standard repeaters, they will continue to function as expected. Keep in mind that standard repeaters have limitations: they cannot be nested or hold widgets. If you attempt to use any new features, such as nesting or adding widgets, a migration process will be triggered. This process converts all standard repeaters in your app into dynamic repeaters, enabling them to support these features. --- > Portal Navigation: > > - Append `.md` to any URL under `https://dev.wix.com/docs/` to get its markdown version. > - Pages are either content pages (article or reference text) or menu pages (a list of links to child pages). > - To get a menu page, truncate any URL to a parent path and append `.md` (e.g. `https://dev.wix.com/docs/sdk.md`, `https://dev.wix.com/docs/sdk/core-modules.md`). > - Top-level index of all portals: https://dev.wix.com/docs/llms.txt > - Full concatenated docs: https://dev.wix.com/docs/llms-full.txt ## Resource: Nest Dynamic Repeaters ## Article: Nest Dynamic Repeaters ## Article Link: https://dev.wix.com/docs/build-apps/develop-your-app/develop-an-app-with-blocks/cms-collections-in-blocks/nest-dynamic-repeaters.md ## Article Content: # Nesting Dynamic Repeaters
**Editor compatibility** Wix Blocks apps aren't supported in the Wix Harmony editor. Existing Blocks apps remain available for purchase on the Wix App Market for Wix Editor and Wix Studio sites. To learn more, see [About Wix Harmony and Blocks](https://dev.wix.com/docs/build-apps/develop-your-app/develop-an-app-with-blocks/about-wix-harmony-and-blocks.md).
[Dynamic repeaters](https://dev.wix.com/docs/build-apps/develop-your-app/develop-an-app-with-blocks/cms-collections-in-blocks/dynamic-repeaters-in-blocks.md) are repeaters that are intended to get their content dynamically. This means that their content can only come through a connection to a CMS collection, or through code. You cannot edit the content of each individual item directly on the canvas.
Example: Try out the [Coffee catalog tutorial](https://dev.wix.com/docs/build-apps/get-started/tutorials/tutorial-create-a-coffee-catalog-with-blocks.md), which uses nested dynamic repeaters.
There are several ways to nest a dynamic repeater in another dynamic repeater. We recommend using nested widgets and drilling their properties. This article uses a menu app as an example. Here is the app structure: - Several menu sections, such as appetizers, main courses, desserts. - Every section contains several dishes, such as salad, pasta, chocolate cake. There are two collections in the app: - `MenuSections`: The outer collection, which stores sections. - `RestaurantDishes`: The inner one, which stores dishes. Here's what the general structure of the app looks like: ![menu structure](https://wixmp-833713b177cebf373f611808.wixmp.com/images/d30742b734cface4990c82be978b6c56.png) ## Option 1 Recommended | Two nested widgets and prop drilling In this option uses [nested widgets](https://dev.wix.com/docs/build-apps/develop-your-app/develop-an-app-with-blocks/site-widgets/add-nested-widgets-in-blocks.md). The app has three widgets: - `menuWidget`: The top level widget, representing the entire menu. - `sectionWidget`: Represents each section and is nested in `menuWidget`. - `dishWidget`: Represents each individual dish and is nested in `sectionWidget` ### Top level widget: menuWidget The top level widget, `menuWidget` holds a repeater with the menu sections. It connects this repeater to the `MenuSections` collection using [no code](https://dev.wix.com/docs/build-apps/develop-your-app/develop-an-app-with-blocks/cms-collections-in-blocks/connect-elements-to-collection-fields-with-no-code.md). Since `sectionWidget` (the second level widget), has a repeater that connects to the `RestaurantDishes` collection, the top level widget can query both collections at once, using the `include()` method. All the information is then passed to the nested widgets through prop drilling. Here is the code for `menuWidget`: ```js import { items } from '@wix/data'; $w.onReady(async function () { //Passing the data from the repeater to the properties of the nested widget $w('#sections').onItemReady(($item, data) => { $item('#sectionWidget').dishes = data.dishes1; $item('#sectionWidget').sectionTitle = data.title; }); // Querying both collections using include const {result} = await items.query('@eg/my-new-app-504/MenuSections').include('dishes1').find(); $w('#sections').data = result.items; }); ```
See deprecated wix-data example ```js import wixData from 'wix-data'; $w.onReady(async function () { //Passing the data from the repeater to the properties of the nested widget $w('#sections').onItemReady(($item, data) => { $item('#sectionWidget').dishes = data.dishes1; $item('#sectionWidget').sectionTitle = data.title; }); // Querying both collections using include() const {items} = await wixData.query('@eg/my-new-app-504/MenuSections').include('dishes1').find(); $w('#sections').data = items; }); ```
### Second level widget: sectionWidget The `sectionWidget` has two [widget properties](https://dev.wix.com/docs/build-apps/develop-your-app/develop-an-app-with-blocks/widget-api/blocks-widget-properties.md): - `dishes [Dish]`: A list of properties of a [custom type](https://dev.wix.com/docs/build-apps/develop-your-app/develop-an-app-with-blocks/widget-api/custom-type-properties-blocks.md) representing a dish. - `sectionTitle`: A text property for the section's title. ![dish type](https://wixmp-833713b177cebf373f611808.wixmp.com/images/58ffeaf397d093a9d7b41f778486068b.png) Here is the code for `sectionWidget`: ```js $w.onReady(() => { $w('#dishes').onItemReady(($item, data) => { $item('#dish1').title = data.title; $item('#dish1').description = data.description; $item('#dish1').image = data.image; }) $w('#dishes').data = $widget.props.dishes || []; }); $widget.onPropsChanged(() => { $w('#sectionTitle').text = $widget.props.sectionTitle; $w('#dishes').data = $widget.props.dishes || []; }); ``` ### Third level widget: dishWidget The `dishWidget` has three simple properties: - `title`: Text property for the dish name. - `description`: Text property for the dish description. - `image`: Image property for the dish. This is the code for `dishWidget`: ```js const syncWidget = () => { const { title, description, image } = $widget.props; $w('#title').text = title; $w('#description').text = description; $w('#imageX1').src = image; } $w.onReady(function () { syncWidget() }); $widget.onPropsChanged(() => { syncWidget() }); ``` ## Option 2 | One nested widget For this option, the app structure is simplified: - `menuWidget`: The top-level widget with a repeater connected to the main `MenuSections` collection. - `sectionWidget`: A nested widget with a repeater connected to the `RestaurantDishes` collection. - The nested widget has two [widget properties](https://dev.wix.com/docs/build-apps/develop-your-app/develop-an-app-with-blocks/widget-api/blocks-widget-properties.md): `sectionId` and `sectionTitle`. Both repeaters connect their elements (texts and images) to their respective collections [with no code](https://dev.wix.com/docs/build-apps/develop-your-app/develop-an-app-with-blocks/cms-collections-in-blocks/connect-elements-to-collection-fields-with-no-code.md). ### Top level widget: menuWidget The `menuWidget` uses code to pass the `sectionId` and `sectionTitle` to the nested widget, as widget properties cannot be connected to data with no code. Notice that since the repeater is connected to a collection with no code, you can call `onItemReady()` without setting the repeater data explicitly. Here is the code for `menuWidget`: ```js $w.onReady(function () { $w('#sections').onItemReady(($item, {_id, title}) => { $item('#section').sectionId = _id; $item('#section').sectionTitle = title; }); }); ``` ### Nested widget: sectionWidget The `sectionWidget` filters the repeater with the `sectionId` and displays only the relevant dishes. Here is the code for `sectionWidget` (note that to use filter with a dataset, we need to use Velo and not SDK): ```js import { filter } from 'wix-data'; $widget.onPropsChanged(() => { const { sectionId, sectionTitle } = $widget.props; $w('#sectionTitle').text = sectionTitle; const sectionFilter = filter().hasSome('MenuSections_dishes1', sectionId); $w('#dataset1').setFilter(sectionFilter); }); ``` Notice that because the repeaters are nested, each of the collections receives a field that references to the dataset of the other collection. ![collection structure](https://wixmp-833713b177cebf373f611808.wixmp.com/images/d5e4de5e3bdf76190b524198e0d52fce.png) ## Option 3 | Code-only solution with one widget This option uses a single widget with nested repeaters. This is the widget structure: - The top level repeater is `sections`. It connects to the `MenuSections` collection. - The nested repeater is `dishes`. It connects to the `RestaurantDishes` collection. The following query fetches the data from both collections, using the `include()` method. Here is the widget code: ```js import { items } from '@wix/data'; $w.onReady(async function () { $w('#dishes').onItemReady(($item, data) => { $item('#dish').title = data.title; $item('#dish').description = data.description; $item('#dish').image = data.image; }); $w('#sections').onItemReady(($item, data) => { $item('#dishes').data = data.dishes1; $item('#sectionTitle').text = data.title; //Set data from the collection to the widget props }); // Query both collections - dishes1 is the dataset of the RestaurantDishes collection const {result} = await items.query('@eg/my-new-app-504/MenuSections').include('dishes1').find(); $w('#sections').data = result.items; }); ```
See deprecated wix-data example ```js import wixData from 'wix-data'; $w.onReady(async function () { $w('#dishes').onItemReady(($item, data) => { $item('#dish').title = data.title; $item('#dish').description = data.description; $item('#dish').image = data.image; }); $w('#sections').onItemReady(($item, data) => { $item('#dishes').data = data.dishes1; $item('#sectionTitle').text = data.title; //Set data from the collection to the widget props }); const {items} = await wixData.query('@eg/my-new-app-504/MenuSections').include('dishes1').find(); $w('#sections').data = items; // Query both collections. `dishes1` is the dataset of the `RestaurantDishes` collection }); ```
--- > Portal Navigation: > > - Append `.md` to any URL under `https://dev.wix.com/docs/` to get its markdown version. > - Pages are either content pages (article or reference text) or menu pages (a list of links to child pages). > - To get a menu page, truncate any URL to a parent path and append `.md` (e.g. `https://dev.wix.com/docs/sdk.md`, `https://dev.wix.com/docs/sdk/core-modules.md`). > - Top-level index of all portals: https://dev.wix.com/docs/llms.txt > - Full concatenated docs: https://dev.wix.com/docs/llms-full.txt ## Resource: About Deploying and Managing Apps in Blocks ## Article: Deploy and Manage Blocks Apps ## Article Link: https://dev.wix.com/docs/build-apps/develop-your-app/develop-an-app-with-blocks/deploy-and-manage-blocks-apps/about-deploying-and-managing-apps-in-blocks.md ## Article Content: # About Deploying and Managing Apps in Blocks
**Editor compatibility** Wix Blocks apps aren't supported in the Wix Harmony editor. Existing Blocks apps remain available for purchase on the Wix App Market for Wix Editor and Wix Studio sites. To learn more, see [About Wix Harmony and Blocks](https://dev.wix.com/docs/build-apps/develop-your-app/develop-an-app-with-blocks/about-wix-harmony-and-blocks.md).
Wix Blocks offers several features for deploying and managing your app, including: * **Version management**: Create a [test](https://dev.wix.com/docs/build-apps/develop-your-app/develop-an-app-with-blocks/deploy-and-manage-blocks-apps/test-your-app-on-a-site.md), major or minor version of your app. [Manage](https://dev.wix.com/docs/build-apps/develop-your-app/develop-an-app-with-blocks/deploy-and-manage-blocks-apps/manage-blocks-app-versions.md) how versions are handled for your sites, or for other site creators. * **Installation settings**: Define [how your app is installed](https://dev.wix.com/docs/build-apps/develop-your-app/develop-an-app-with-blocks/deploy-and-manage-blocks-apps/configure-blocks-installation-settings.md) on a site. For example, what widgets and what presets are installed by default. * **Work with your team**: [Share your app](https://dev.wix.com/docs/build-apps/develop-your-app/develop-an-app-with-blocks/deploy-and-manage-blocks-apps/manage-collaborators-in-blocks.md) with team members, work on it [concurrently](https://dev.wix.com/docs/build-apps/develop-your-app/develop-an-app-with-blocks/deploy-and-manage-blocks-apps/work-on-a-blocks-app-concurrently.md), [translate ](https://dev.wix.com/docs/build-apps/develop-your-app/develop-an-app-with-blocks/deploy-and-manage-blocks-apps/translate-a-blocks-app.md) it or [duplicate](https://dev.wix.com/docs/build-apps/develop-your-app/develop-an-app-with-blocks/deploy-and-manage-blocks-apps/duplicate-a-blocks-app.md) it. * **Publish your app**: Blocks apps can be [private or public](https://dev.wix.com/docs/build-apps/get-started/overview/exposing-apps-publicly-and-privately.md), meaning that you can use them on your own sites or [publish them to the Wix App Market](https://dev.wix.com/docs/build-apps/develop-your-app/develop-an-app-with-blocks/publish-blocks-apps-to-the-app-market/publish-a-blocks-app-to-the-app-market.md) and reach millions of site creators. After you decide on your business model and pricing plans in the Wix Dev Center, make sure to [adjust your UI and code](https://dev.wix.com/docs/build-apps/develop-your-app/develop-an-app-with-blocks/publish-blocks-apps-to-the-app-market/adjust-a-blocks-app-to-different-pricing-plans.md) to these pricing plans. --- > Portal Navigation: > > - Append `.md` to any URL under `https://dev.wix.com/docs/` to get its markdown version. > - Pages are either content pages (article or reference text) or menu pages (a list of links to child pages). > - To get a menu page, truncate any URL to a parent path and append `.md` (e.g. `https://dev.wix.com/docs/sdk.md`, `https://dev.wix.com/docs/sdk/core-modules.md`). > - Top-level index of all portals: https://dev.wix.com/docs/llms.txt > - Full concatenated docs: https://dev.wix.com/docs/llms-full.txt ## Resource: Manage Blocks App Versions ## Article: Managing App Versions ## Article Link: https://dev.wix.com/docs/build-apps/develop-your-app/develop-an-app-with-blocks/deploy-and-manage-blocks-apps/manage-blocks-app-versions.md ## Article Content: # Manage Blocks App Versions
**Editor compatibility** Wix Blocks apps aren't supported in the Wix Harmony editor. Existing Blocks apps remain available for purchase on the Wix App Market for Wix Editor and Wix Studio sites. To learn more, see [About Wix Harmony and Blocks](https://dev.wix.com/docs/build-apps/develop-your-app/develop-an-app-with-blocks/about-wix-harmony-and-blocks.md).
Release a version of your app whenever you want to distribute a new feature to your users or sites. To release a version, click **Release** in Blocks. Before releasing a version, make sure to [test your app](https://dev.wix.com/docs/build-apps/develop-your-app/develop-an-app-with-blocks/deploy-and-manage-blocks-apps/test-your-app-on-a-site.md). ## Version types Choose one of two versions: * **Major version.** Release a major version when you've made changes that break compatibility. Your first release must be a major one. Changes come into effect after users manually update the app and publish their site. * **Minor version.** Release a minor version when you've made small changes that don't break compatibility. A minor version will automatically change on any site the app is installed on. It takes 5-15 minutes to update in the live site.  ## Changes that require a major version Some changes are substantial changes that cannot allow a minor version.  If you added the following items in Blocks, your next build must be major or test: * Wix app [dependencies](https://dev.wix.com/docs/build-apps/develop-your-app/develop-an-app-with-blocks/deploy-and-manage-blocks-apps/set-wix-app-dependencies-in-blocks.md) * Add [Code files](https://dev.wix.com/docs/build-apps/develop-your-app/develop-an-app-with-blocks/code-in-blocks/add-code-files-to-your-app.md) for the first time, or * Add a CMS [collection](https://dev.wix.com/docs/build-apps/develop-your-app/develop-an-app-with-blocks/cms-collections-in-blocks/about-cms-collections-in-blocks.md) for the first time If you made the following changes in your app dashboard, your next version will be a major version:   * Added or removed [Permissions](https://dev.wix.com/docs/build-apps/develop-your-app/access/authorization/about-permissions.md) * Added an [Embedded Script](https://dev.wix.com/docs/build-apps/develop-your-app/extensions/site-extensions/embedded-scripts/about-embedded-scripts.md) extension * Changed [Dynamic Key Parameters](https://dev.wix.com/docs/build-apps/develop-your-app/extensions/site-extensions/embedded-scripts/about-embedded-scripts.md#dynamic-parameters) of an Embedded Script ## Version numbering Wix Blocks automatically updates the version number. For example, if your previous release was 1.0, and you release a minor version, Blocks assigns it the version number 1.1. If your previous release was 2.2, and you release a major version, Blocks assigns it the version number 3.0.  ## Apps published in the App Market If you've [published your app in the App Market](https://dev.wix.com/docs/build-apps/develop-your-app/develop-an-app-with-blocks/publish-blocks-apps-to-the-app-market/publish-a-blocks-app-to-the-app-market.md) and want to update it to the latest version you've released, there’s no need to resubmit it for review. Minor changes will be automatically received by users, while major updates will be available if they choose to update. However, certain changes are not included in your Blocks version release and are managed directly through your app dashboard: * **Market listing:** Updates to [your app’s public information](https://dev.wix.com/docs/build-apps/launch-your-app/market-listing/about-market-listings.md), including media, contact details, etc. * **Pricing:** Changes to your [pricing plans](https://dev.wix.com/docs/build-apps/launch-your-app/pricing-and-billing/change-app-pricing.md). These also require you to resubmit your app for review. ## Apps that weren't created in Blocks If you added a Blocks extension to an already existing app that wasn't created in Blocks, make sure to release a **minor version** in Blocks. A **major** version will require a manual update of the application in all the sites it's installed on. --- > Portal Navigation: > > - Append `.md` to any URL under `https://dev.wix.com/docs/` to get its markdown version. > - Pages are either content pages (article or reference text) or menu pages (a list of links to child pages). > - To get a menu page, truncate any URL to a parent path and append `.md` (e.g. `https://dev.wix.com/docs/sdk.md`, `https://dev.wix.com/docs/sdk/core-modules.md`). > - Top-level index of all portals: https://dev.wix.com/docs/llms.txt > - Full concatenated docs: https://dev.wix.com/docs/llms-full.txt ## Resource: Test Your App on a Site ## Article: Creating and Managing a Test Version ## Article Link: https://dev.wix.com/docs/build-apps/develop-your-app/develop-an-app-with-blocks/deploy-and-manage-blocks-apps/test-your-app-on-a-site.md ## Article Content: # Test Your Blocks App
**Editor compatibility** Wix Blocks apps aren't supported in the Wix Harmony editor. Existing Blocks apps remain available for purchase on the Wix App Market for Wix Editor and Wix Studio sites. To learn more, see [About Wix Harmony and Blocks](https://dev.wix.com/docs/build-apps/develop-your-app/develop-an-app-with-blocks/about-wix-harmony-and-blocks.md).
Before launching your Blocks app, thorough testing is key to ensuring everything runs smoothly. Here's how to test your app in the Blocks preview, or on a site. Use our checklist of [what to check when testing your app](https://dev.wix.com/docs/build-apps/develop-your-app/develop-an-app-with-blocks/deploy-and-manage-blocks-apps/what-to-check-when-testing.md), to make sure you don't miss any part of your app. ## Where to test what Some parts of your app can be checked in Preview in Blocks, whereas others can only be tested in the editor of a site. Here is a list to help you understand what goes where. However, it's always good practice to also check everything in the editor. **What you can check in Preview** - Responsive behavior - How your widget elements are connected to site themes - Widget API properties - Logs (learn more about [debugging your code](https://dev.wix.com/docs/build-apps/develop-your-app/frameworks/wix-blocks/code-in-blocks/debugging-your-code.md)) **What you must test in the Editor** - Custom panels - Wix business solution apps [APIs](https://dev.wix.com/docs/build-apps/get-started/overview/integrating-with-wix-s-business-solutions.md#apis) - Wix business solution apps [Database collections](https://dev.wix.com/docs/develop-websites/articles/databases/wix-data/collections/working-with-wix-app-collections-and-code.md) ## How to test your app in the editor 1. Click **Test**. This creates a testing version of your app, updated with the latest changes. 1. Select a site to install your app on. This will be a [premium development site](https://dev.wix.com/docs/build-apps/launch-your-app/app-distribution/test-your-app-on-a-premium-site.md), allowing you to test your full app functionality. 1. Test your app as if you were a user. Make sure to follow our [checklist](https://dev.wix.com/docs/build-apps/develop-your-app/develop-an-app-with-blocks/deploy-and-manage-blocks-apps/what-to-check-when-testing.md), so you don't miss any testing steps. If you plan to publish your app on the Wix App Market, also see the [top ways to speed up your app approval](https://dev.wix.com/docs/build-apps/develop-your-app/develop-an-app-with-blocks/publish-blocks-apps-to-the-app-market/top-ways-to-speed-up-approval-in-blocks.md). ## Continuous testing When you make more changes in your app and want to test them, there is no need to install it again. Just click **Test** again, or use the keyboard shortcuts. This creates a new testing version of the app, which updates automatically on the site you installed it on. Even if you build a [minor or major version](https://dev.wix.com/docs/build-apps/develop-your-app/develop-an-app-with-blocks/deploy-and-manage-blocks-apps/manage-blocks-app-versions.md) in Blocks, the development site with the testing version of your app will always show the latest changes. ## Keyboard shortcuts - The keyboard shortcut for Preview is **Cmd+Option+P** on macOS, **Ctrl+Alt+P** on Windows. - The keyboard shortcut for Test in Editor is **Cmd+Option+T** for macOS and **Ctrl+Alt+T** for Windows.
Caution: Blocks database collections are editable in Preview mode. Make sure not to edit them by mistake.
--- > Portal Navigation: > > - Append `.md` to any URL under `https://dev.wix.com/docs/` to get its markdown version. > - Pages are either content pages (article or reference text) or menu pages (a list of links to child pages). > - To get a menu page, truncate any URL to a parent path and append `.md` (e.g. `https://dev.wix.com/docs/sdk.md`, `https://dev.wix.com/docs/sdk/core-modules.md`). > - Top-level index of all portals: https://dev.wix.com/docs/llms.txt > - Full concatenated docs: https://dev.wix.com/docs/llms-full.txt ## Resource: What to Check When Testing ## Article: Testing a Blocks App on a Site ## Article Link: https://dev.wix.com/docs/build-apps/develop-your-app/develop-an-app-with-blocks/deploy-and-manage-blocks-apps/what-to-check-when-testing.md ## Article Content: # What to Check for When Testing a Blocks App
**Editor compatibility** Wix Blocks apps aren't supported in the Wix Harmony editor. Existing Blocks apps remain available for purchase on the Wix App Market for Wix Editor and Wix Studio sites. To learn more, see [About Wix Harmony and Blocks](https://dev.wix.com/docs/build-apps/develop-your-app/develop-an-app-with-blocks/about-wix-harmony-and-blocks.md).
Here is a list of things to check when you're testing your app on a site. Make sure to go over all the items. ## Design Remember that users can configure your app elements and try to imagine all the different ways they can do it. Here are some things to check: - For each element in your app that includes configurable content, check different types of content. For example, use short and long texts, or big and small images. ![long text](https://wixmp-833713b177cebf373f611808.wixmp.com/images/090861a16aeb8354ad1df679c2575431.gif) - Remove elements from your widgets and make sure that the layout stays consistent. ![remove elements](https://wixmp-833713b177cebf373f611808.wixmp.com/images/dcd2a669f0bf61946315f94c19760094.gif) - Check that elements are connected to site themes. Begin with the **Test theme** option in the Blocks Preview. ![connect to theme](https://wixmp-833713b177cebf373f611808.wixmp.com/images/e6760e4a01569377799c9278b7880003.gif) - Change the theme in the site and see that all elements change together. ![connect to theme](https://wixmp-833713b177cebf373f611808.wixmp.com/images/c0d0f99f6d539daec5a7e946d505af9c.gif) - Check the responsiveness of your widgets. Drag the handles and see that the layout rearranges well. ![responsiveness](https://wixmp-833713b177cebf373f611808.wixmp.com/images/e8b503e3113c6614925ec947eddcfec7.gif) - Check your app on several screensizes, including mobile view. ![screen size](https://wixmp-833713b177cebf373f611808.wixmp.com/images/572e29cc23be0c026a952c34b26ec892.gif) - Check the widget's various design presets. ![presets](https://wixmp-833713b177cebf373f611808.wixmp.com/images/51180e96fdd7f1935f7820f644643357.gif) ## Editor Experience * Make sure that your action buttons go to the correct panels. Check this in Blocks and then in the site. ![buttons to panels](https://wixmp-833713b177cebf373f611808.wixmp.com/images/bc68b8f3ceedc661585c9fef7accdd04.gif) * If an element has dynamic content, make sure you remembered to remove the **Edit** action button. Check this in Blocks and then in the site. ![edit text](https://wixmp-833713b177cebf373f611808.wixmp.com/images/d20b47f90199225cdd2151be658937f8.gif) * Make sure you have defined any element that’s essential as “non-removable” or “non-selectable”. Then go to the site and check that it cannot be selected or deleted. ![selectable](https://wixmp-833713b177cebf373f611808.wixmp.com/images/bc329463c3bb7697b0d5ff005291dd96.gif) - Check the logic of all of your [custom panels](https://dev.wix.com/docs/build-apps/develop-your-app/develop-an-app-with-blocks/editor-experience-panels/add-code-to-custom-panels-in-blocks.md), and make sure they are working as expected. This cannot be checked in the Blocks Preview, only in a site. * Make sure that the [Installation Settings](https://dev.wix.com/docs/build-apps/develop-your-app/develop-an-app-with-blocks/deploy-and-manage-blocks-apps/configure-blocks-installation-settings.md) are configured correctly for each widget. ## Code * Make sure that Wix [business solutions APIs](https://dev.wix.com/docs/build-apps/get-started/overview/integrating-with-wix-s-business-solutions.md#apis) are working. * [Debug your code](https://dev.wix.com/docs/build-apps/develop-your-app/develop-an-app-with-blocks/code-in-blocks/debugging-your-blocks-code.md). ## Dashboard Page - Make sure that the [dashboard page](https://dev.wix.com/docs/build-apps/develop-your-app/develop-an-app-with-blocks/dashboard-pages/about-dashboard-pages-in-blocks.md) backend logic is working. - Make sure third party APIs are retrieving data. - Connect your Dashboard to an [action button](https://dev.wix.com/docs/build-apps/develop-your-app/develop-an-app-with-blocks/editor-experience-configuration/configure-action-bars-in-blocks.md). This is not mandatory, but is a good practice. ## Pricing Check that you configured the plans as you expected and your logic is working according to the plans. [Learn more](https://dev.wix.com/docs/build-apps/develop-your-app/develop-an-app-with-blocks/publish-blocks-apps-to-the-app-market/adjust-a-blocks-app-to-different-pricing-plans.md) ## Public apps requirements If you are planning to publish your app in the Wix App Market, make sure to go over the [top ways to speed up your app approval](https://dev.wix.com/docs/build-apps/develop-your-app/develop-an-app-with-blocks/publish-blocks-apps-to-the-app-market/top-ways-to-speed-up-approval-in-blocks.md). --- > Portal Navigation: > > - Append `.md` to any URL under `https://dev.wix.com/docs/` to get its markdown version. > - Pages are either content pages (article or reference text) or menu pages (a list of links to child pages). > - To get a menu page, truncate any URL to a parent path and append `.md` (e.g. `https://dev.wix.com/docs/sdk.md`, `https://dev.wix.com/docs/sdk/core-modules.md`). > - Top-level index of all portals: https://dev.wix.com/docs/llms.txt > - Full concatenated docs: https://dev.wix.com/docs/llms-full.txt ## Resource: Configure Blocks Installation Settings ## Article: Widget Installation Settings ## Article Link: https://dev.wix.com/docs/build-apps/develop-your-app/develop-an-app-with-blocks/deploy-and-manage-blocks-apps/configure-blocks-installation-settings.md ## Article Content: # Configure Blocks Installation Settings
**Editor compatibility** Wix Blocks apps aren't supported in the Wix Harmony editor. Existing Blocks apps remain available for purchase on the Wix App Market for Wix Editor and Wix Studio sites. To learn more, see [About Wix Harmony and Blocks](https://dev.wix.com/docs/build-apps/develop-your-app/develop-an-app-with-blocks/about-wix-harmony-and-blocks.md).
The widget installation settings let you configure what happens when a site builder installs your app. For example, should all widgets be visible in a site's Add panel? Should any of them be added automatically to a site? What will be the default preset?
Important: * Installation settings apply only **for the first install** on a site. This means that in any further update, the settings won't be updated unless the user removes and reinstalls the app.  * The installation settings you apply for your Wix Blocks App are specific to a [version of the app](https://dev.wix.com/docs/build-apps/develop-your-app/develop-an-app-with-blocks/deploy-and-manage-blocks-apps/manage-blocks-app-versions.md). The best practice is to [test your app on a site](https://dev.wix.com/docs/build-apps/develop-your-app/develop-an-app-with-blocks/deploy-and-manage-blocks-apps/test-your-app-on-a-site.md), before releasing a new version.
## Access Installation Settings There are two ways to access your widget's installation settings. First, make sure your widget is selected in the **App Interface** in Blocks. ### Method 1: From the WixBlocks Menu 1. Click the **WixBlocks** menu. 1. Click **Dashboard** to open the app dashboard. 1. In the app dashboard, click **Installation Settings** and then select **Manage Settings**. 1. To switch to another widget, return to the **Extensions** page in the app dashboard and select the widget you wish to manage. ### Method 2: From the Editor Experience 1. Hover over the widget name in the **App Interface**. 1. Click the three dots and select **Editor Experience** > **Edit Installation Settings**. 1. Hover over the widget name. 1. To switch to another widget, select a different widget and repeat the process. ## Configure how your widget is added There are several options for adding each of your widgets to a Wix site. * [Not added automatically](#not-added-automatically) * [Added to homepage](#added-to-the-site-homepage) * [Added to a site page](#added-to-a-site-page) * [Added to a site page as a popup](#added-to-a-site-page-as-a-popup) ### Not added automatically This is the default setting for Installation Settings. With this option, your widget is: * Not added to a page automatically. * Shown in the **Add +** panel as available to install on a site. If you do not want your widget to appear in the **Add +** panel (for example, if it is an [nested widget](https://dev.wix.com/docs/build-apps/develop-your-app/develop-an-app-with-blocks/site-widgets/add-nested-widgets-in-blocks.md)), deselect this option in the **Preset Images in Add Panel** section. In this example, the app has two widgets, both are defined as **Not added automatically**, and therefore seen in the **Add+** panel. 
![](https://d2x3xhvgiqkx42.cloudfront.net/12345678-1234-1234-1234-1234567890ab/378fd532-728d-473b-8f03-30140bda59af/2024/05/02/2127b66a-dada-4531-a90e-e17a04fd03c4/c577b46e-ffbf-4487-8104-d2c4cfdbb1ca.png)
### Added to the site homepage This option means that your widget is automatically added to the homepage of a site, without having to drag and drop it from the **Add +** panel. You can also set the default [preset](https://dev.wix.com/docs/build-apps/develop-your-app/develop-an-app-with-blocks/widget-design/about-design-presets.md) for your widget and define a different default preset for mobile.  ### Added to a site page Use this option when you want your widget to appear on a different [Site Page Extension](https://dev.wix.com/docs/build-apps/develop-your-app/extensions/site-extensions/site-pages/add-a-site-page-extension.md) of your app. A site page extension means that whenever your app is installed of a site, another page comes with it. **To add the widget to a page extension:** 1. Select the site page extension to add your widget to. 2. If you want to add the widget to a new site page extension, (meaning that you want to create this extension now), provide the following information:  * **Page Name:** Create a name to appear in the site menu. * **Page ID:** This will be used to refer to this page in code, and will also become the default page URL slug. The Page ID is filled in automatically based on the page name, but you can edit it. It cannot be changed once it has been saved. 3. Set the default [preset](https://dev.wix.com/docs/build-apps/develop-your-app/develop-an-app-with-blocks/widget-design/about-design-presets.md) for your widget. If you want a different preset for mobile, select it.   4. Set how the widget appears on the page: * **Original size:** This option is selected by default. Your widget appears at the size it was created. * **Stretched:** Select this option to stretch the widget to fill the page. >**Note:** > The Page ID value becomes part of the URL for the new page that this widget is installed on. This is so it can be used in code as a unique URL. You'll use this if you want to navigate to the page from your app. ### Added to a site page as a popup Use this option when you want your widget to appear as a popup. > **Note:** The terms popup and lightbox refer to the same element. While the editor and dashboard now refer to it as a [popup](https://support.wix.com/en/article/studio-editor-using-popups), the API methods continue to use the term lightbox for backward compatibility. The documentation uses both terms accordingly. **To add the widget as a popup:** 1. Click **Added to site page**. 2. Click **\+ Select popup extension**. 3. If you want to add the widget to an existing popup extension, select the name of your popup. 4. Or, if you want to create a new popup, provide the following information: * **Popup name:** This will appear in the site menu. * **Popup ID:** This is used to refer to this popup in code, and also becomes the default page URL slug. It is filled in automatically based on the popup name, but you can edit it. It cannot be changed once it has been saved (see note below). 5. Set the default [preset](https://dev.wix.com/docs/build-apps/develop-your-app/develop-an-app-with-blocks/widget-design/about-design-presets.md) for your widget. If you want a different preset for mobile, select it. > **Note:** > The Page ID value becomes part of the URL for the popup this widget is installed on. This is so it can be used in code as a unique URL. You'll use this if you want to navigate to the popup from your app.
**openLightbox()** To open the popup from the app code, use the [wix-application openLightbox()](https://www.wix.com/velo/reference/wix-application/openapplightbox) function.
*** ## Configure preset images and visibility The preset images section lets you define what widgets and presets appear in a user's **Add +**   and **Preset** panels. ### Shown in Add Panel Control the widgets users see in their **App Widgets** list in the **Add +** panel. For example, if you have [inner widgets](https://dev.wix.com/docs/build-apps/develop-your-app/develop-an-app-with-blocks/site-widgets/add-nested-widgets-in-blocks.md) that are already included within another widget, you'll need to hide them from the Add panel. You can define Add panel visibility for each [design preset](https://dev.wix.com/docs/build-apps/develop-your-app/develop-an-app-with-blocks/widget-design/create-and-manage-design-presets.md) separately.  
See an Add panel with two widgets ![Add panel](https://d2x3xhvgiqkx42.cloudfront.net/12345678-1234-1234-1234-1234567890ab/378fd532-728d-473b-8f03-30140bda59af/2024/05/08/e7335270-e324-4a4c-ad83-d6450ec5b9eb/efc69fd0-e95c-4951-94fe-07a328ea76f5.png)
See an Add panel with one widget and three presets ![add panel](https://d2x3xhvgiqkx42.cloudfront.net/12345678-1234-1234-1234-1234567890ab/378fd532-728d-473b-8f03-30140bda59af/2024/05/08/f764f8d5-1fd5-4c9f-8324-7d876dd94391/b88b0d45-2393-490f-ae16-67e22a23b1a6.png)
### Shown in Preset Panel The **Preset** ![](https://d2x3xhvgiqkx42.cloudfront.net/12345678-1234-1234-1234-1234567890ab/378fd532-728d-473b-8f03-30140bda59af/2024/05/27/2907ce70-8afe-48d0-a3b7-65097674f11c/19742c50-14ba-48de-a648-f09689a259cf.png) panel is where users can choose between the various presets of a widget. This option lets you determine which presets should appear in the Change Preset panel. 
See a Preset panel ![Change Preset panel](https://wixmp-833713b177cebf373f611808.wixmp.com/images/5fe72124c0f5a8e662157466513a4123.png)
### Choose image When users browse through the design presets of your widget in their Add or Preset panels, they see a thumbnail image of the presets. We recommend that you upload your own images, to make sure that they represent the design and functionality of your widgets. If you started building from a [Blocks template](https://dev.wix.com/apps-templates?filter=blocks), this is crucial, or else your thumbnail images will be the template's images. Click **Choose Image** to upload your images. Make sure to follow our [UX guidelines](https://dev.wix.com/docs/build-apps/develop-your-app/develop-an-app-with-blocks/widget-design/create-thumbnail-images-for-your-presets.md) for these images.  Select **Use a different preset for mobile** if you want a different preset to show on users' mobile view. *** ## Configure widget as essential to your app Set a widget as essential to your app if it is a main widget and your app has no meaning without it.  Note that you can set a widget as essential only if you add it to a page or a page as a popup. You cannot set it as essential if you add it automatically or to your homepage.  With this toggle on: * Your widget **cannot be deleted**. Deleting the widget will un-install the app from your site.  * Your widget **cannot be duplicated**. A user can't add it twice from the Add + panel, and cannot copy and paste it. 
**Reminder** Installation settings **only apply for the first install** on a site. This means that if your app is already installed on a site, the settings won't be updated unless the user removes and reinstalls the app.
--- > Portal Navigation: > > - Append `.md` to any URL under `https://dev.wix.com/docs/` to get its markdown version. > - Pages are either content pages (article or reference text) or menu pages (a list of links to child pages). > - To get a menu page, truncate any URL to a parent path and append `.md` (e.g. `https://dev.wix.com/docs/sdk.md`, `https://dev.wix.com/docs/sdk/core-modules.md`). > - Top-level index of all portals: https://dev.wix.com/docs/llms.txt > - Full concatenated docs: https://dev.wix.com/docs/llms-full.txt ## Resource: Install a Blocks App on a Site ## Article: Installing a Blocks App on a Site ## Article Link: https://dev.wix.com/docs/build-apps/develop-your-app/develop-an-app-with-blocks/deploy-and-manage-blocks-apps/install-a-blocks-app-on-a-site.md ## Article Content: # Install a Blocks App on a Site
**Editor compatibility** Wix Blocks apps aren't supported in the Wix Harmony editor. Existing Blocks apps remain available for purchase on the Wix App Market for Wix Editor and Wix Studio sites. To learn more, see [About Wix Harmony and Blocks](https://dev.wix.com/docs/build-apps/develop-your-app/develop-an-app-with-blocks/about-wix-harmony-and-blocks.md).
Install and reuse any Blocks app you created or collaborate with, as many times as you want. You can install the app on any site you own or collaborate with. Before you install the app, make sure to configure its [Installation Settings](https://dev.wix.com/docs/build-apps/develop-your-app/develop-an-app-with-blocks/deploy-and-manage-blocks-apps/configure-blocks-installation-settings.md) in Blocks. ## Install your app 1. Open the Wix or Studio editor. 1. Click the **Add Apps** ![](https://d2x3xhvgiqkx42.cloudfront.net/12345678-1234-1234-1234-1234567890ab/378fd532-728d-473b-8f03-30140bda59af/2022/08/10/adccdd51-7025-46e0-8b79-1a17f8978719/245b3a47-f76b-4c7c-a6f8-c8eeb247d67e.png)  icon in your Editor. 1. Click **Custom Apps**. 1. Click **Available Apps** and select the app you want to install.  1. Click **Install App**.  1. Wait for the success message. You'll get the most updated version release.  ![](https://d2x3xhvgiqkx42.cloudfront.net/12345678-1234-1234-1234-1234567890ab/71d20af0-560e-44a5-bb38-bf3f513b58fa/2023/07/26/f69bb290-976f-4088-b66b-14a52555aa66/432f70cf-0730-41b6-95aa-eba4fde0a232.jpg) ## Change the installed app version To move between app versions, hover over the More Actions icon ![](https://d2x3xhvgiqkx42.cloudfront.net/12345678-1234-1234-1234-1234567890ab/378fd532-728d-473b-8f03-30140bda59af/2022/09/12/f94cd9bd-9b3c-4755-bf6a-306f288dda27/4d380f0b-a5f4-4d75-8349-705d334e608a.jpg)  next to your app's name. If you released a new major version, you'll see an indication next to the app name. ![](https://d2x3xhvgiqkx42.cloudfront.net/12345678-1234-1234-1234-1234567890ab/378fd532-728d-473b-8f03-30140bda59af/2022/09/12/ca250c45-dc40-45e4-bf05-7a1a6a5c60c1/c0b7c82c-9ca7-4248-8d45-5c109b12d1ac.png) If you want to install your app just for testing purposes without releasing a version, go back to Blocks and [test your app in the editor](https://dev.wix.com/docs/build-apps/develop-your-app/develop-an-app-with-blocks/deploy-and-manage-blocks-apps/manage-blocks-app-versions.md). ## Add widgets to a site page If your app has widgets that are not automatically added to the page, you can add them to any page on your site:   1. Click **Add Elements**  ![](https://d2x3xhvgiqkx42.cloudfront.net/12345678-1234-1234-1234-1234567890ab/8696077d-830a-4b1e-bd86-9df98f89994a/2023/06/14/cef22a14-dfc9-43c7-a54f-72ed83266050/741248d2-4240-497e-a282-2a7d15d8afac.png)  on the left side of the Editor. 2. Click **App Widgets**. 3. Select your widget and drag it onto the page. You may have the option to choose between several design presets. ![](https://d2x3xhvgiqkx42.cloudfront.net/12345678-1234-1234-1234-1234567890ab/71d20af0-560e-44a5-bb38-bf3f513b58fa/2023/08/01/5f91cff2-cbec-42d2-80b0-ad6536654d92/6bc32444-d081-4571-a1bd-ebd544e0cf57.jpg)
Tip: In the Studio Editor, your app widgets are at the top of the elements list. In the Wix Editor, they appear in the middle.
## Access your app's code files If your app has public or backend code files, you can now import functions from these files.  To import **public** functions, use this syntax:  ```javascript import { } from '@/'; ``` To import **backend** functions, use this syntax: ```javascript import { } from '@/-backend'; ``` ## Manage your app's dashboard extensions If you added [dashboard extensions](https://dev.wix.com/docs/build-apps/develop-your-app/develop-an-app-with-blocks/dashboard-pages/about-dashboard-pages-in-blocks.md) to you app, you'll see them in the site's dashboard. ![dashboard](https://wixmp-833713b177cebf373f611808.wixmp.com/images/384ef7fc12c8dd296c297269fd7d3f61.png) ## Manage your app's collections If your app has a [CMS collection](https://dev.wix.com/docs/build-apps/develop-your-app/develop-an-app-with-blocks/cms-collections-in-blocks/about-cms-collections-in-blocks.md), you'll see it under your site's CMS collections, with the default data that you added in Blocks. ## Add your app's plugins If your app has a plugin extension, add it to the relevant page, depending on the plugin type. [See full guide](https://dev.wix.com/docs/build-apps/develop-your-app/develop-an-app-with-blocks/site-plugins/build-a-site-plugin-in-blocks.md#step-6--test-and-preview). --- > Portal Navigation: > > - Append `.md` to any URL under `https://dev.wix.com/docs/` to get its markdown version. > - Pages are either content pages (article or reference text) or menu pages (a list of links to child pages). > - To get a menu page, truncate any URL to a parent path and append `.md` (e.g. `https://dev.wix.com/docs/sdk.md`, `https://dev.wix.com/docs/sdk/core-modules.md`). > - Top-level index of all portals: https://dev.wix.com/docs/llms.txt > - Full concatenated docs: https://dev.wix.com/docs/llms-full.txt ## Resource: Manage Collaborators in Blocks ## Article: Managing Collaborators in Blocks ## Article Link: https://dev.wix.com/docs/build-apps/develop-your-app/develop-an-app-with-blocks/deploy-and-manage-blocks-apps/manage-collaborators-in-blocks.md ## Article Content: # Manage Collaborators in Blocks
**Editor compatibility** Wix Blocks apps aren't supported in the Wix Harmony editor. Existing Blocks apps remain available for purchase on the Wix App Market for Wix Editor and Wix Studio sites. To learn more, see [About Wix Harmony and Blocks](https://dev.wix.com/docs/build-apps/develop-your-app/frameworks/wix-blocks/about-wix-harmony-and-blocks.md).
Wix Blocks enables you to invite other Wix users to work on your app. Blocks provides these roles: * **Owner:** The owner is the creator of the app and has full control over it. They can manage, edit and install the project, invite collaborators and duplicate the app.   * **App Co-Owner:** The app co-owner can manage, edit and install the project, including inviting collaborators. There is no limit on the number of co-owners. They cannot duplicate the app.  ## Add a Collaborator 1. Click the **WixBlocks** icon. 1. Click **App** > **Collaborators**. ![collaborators](https://wixmp-833713b177cebf373f611808.wixmp.com/images/35862349845c1a49e5e20abb8bd51672.png) 1. Click **Invite Collaborators**. 2. Provide the email address(es) of the person or people whom you want to add as collaborators. Separate each address with a comma. 3. Check the **App Co-owner** box. 4. Click **Send Invite**.  Your collaborator gets the invitation by email must accept it before they can work on your project.  ## Resend the invite You can resend the invite or get the invite link by clicking the **More Actions** ![](https://d2x3xhvgiqkx42.cloudfront.net/12345678-1234-1234-1234-1234567890ab/57e9f77c-6d15-498d-ac4e-c4d09bf3a490/2021/06/01/63380403-960e-4a4c-9908-8f9ac9178675/35752514-6aff-4c4f-9075-9d70082fc269.png) icon next to your collaborator. ## Remove a Collaborator 1. Click the  **More Actions** ![](https://d2x3xhvgiqkx42.cloudfront.net/12345678-1234-1234-1234-1234567890ab/57e9f77c-6d15-498d-ac4e-c4d09bf3a490/2021/06/01/63380403-960e-4a4c-9908-8f9ac9178675/35752514-6aff-4c4f-9075-9d70082fc269.png)  icon and then click **Remove** next to the collaborator you want to remove. 1. Confirm that you want to remove that collaborator. Your collaborator receives a removal message by email. --- > Portal Navigation: > > - Append `.md` to any URL under `https://dev.wix.com/docs/` to get its markdown version. > - Pages are either content pages (article or reference text) or menu pages (a list of links to child pages). > - To get a menu page, truncate any URL to a parent path and append `.md` (e.g. `https://dev.wix.com/docs/sdk.md`, `https://dev.wix.com/docs/sdk/core-modules.md`). > - Top-level index of all portals: https://dev.wix.com/docs/llms.txt > - Full concatenated docs: https://dev.wix.com/docs/llms-full.txt ## Resource: Set Wix App Dependencies in Blocks ## Article: Setting Wix App Dependencies ## Article Link: https://dev.wix.com/docs/build-apps/develop-your-app/develop-an-app-with-blocks/deploy-and-manage-blocks-apps/set-wix-app-dependencies-in-blocks.md ## Article Content: # Integrate with Wix Apps in Blocks
**Editor compatibility** Wix Blocks apps aren't supported in the Wix Harmony editor. Existing Blocks apps remain available for purchase on the Wix App Market for Wix Editor and Wix Studio sites. To learn more, see [About Wix Harmony and Blocks](https://dev.wix.com/docs/build-apps/develop-your-app/develop-an-app-with-blocks/about-wix-harmony-and-blocks.md).
[Wix Apps](https://dev.wix.com/docs/develop-websites/articles/wix-apps/about-apps-made-by-wix.md) are business solution apps created by Wix, enabling users to sell products and services, run events, write blogs, manage restaurants and more. To integrate with Wix Apps in your Blocks app, you must first add them as dependencies. You can then use their collections or utilize their APIs. ## Add Wix App Dependencies To add a or remove a dependency: 1. Click **WixBlocks** > **App** > **App Dependencies**. 2. Click **+ Add Dependencies** and select the App that you want to add (or remove). When a user installs your app, they'll receive a notification that they need to install the Wix apps you defined in order for your app to work. ## Using Wix App Collections [Wix App collections](https://dev.wix.com/docs/develop-websites/articles/databases/wix-data/collections/working-with-wix-app-collections-and-code.md) are special collections that come from the Wix Apps that you integrate in your app. These collection appear automatically when you add a dependency to these apps. They'll also appear in any site that will use your app.
Important: Currently, you can only access the collections of Wix Stores and Wix Bookings. For other Wix Apps, use their APIs to access data.
To use Wix App collections: 1. Navigate to the **Collections** ![collections](https://wixmp-833713b177cebf373f611808.wixmp.com/images/33031d6869f7a888a4e9ad0b10ca9567.png) tab. 1. Click **Wix App Collections** and view the available collections. You can use these collections with [data-binding](https://dev.wix.com/docs/build-apps/develop-your-app/develop-an-app-with-blocks/cms-collections-in-blocks/connect-elements-to-collection-fields-with-no-code.md) or [code](https://dev.wix.com/docs/build-apps/develop-your-app/develop-an-app-with-blocks/cms-collections-in-blocks/connect-a-dynamic-repeater-to-a-collection.md) to populate Repeaters or display the data in other ways. In Preview mode, your app shows how it interacts with the default data from these collections. ## Utilizing Wix App APIs Wix App APIs are documented in the [API reference](https://dev.wix.com/docs/velo.md) and can be implemented in your app's code. To test them, go to **Test** and [run them on a site](https://dev.wix.com/docs/build-apps/develop-your-app/develop-an-app-with-blocks/deploy-and-manage-blocks-apps/test-your-app-on-a-site.md). You cannot test these APIs in the Blocks preview. --- > Portal Navigation: > > - Append `.md` to any URL under `https://dev.wix.com/docs/` to get its markdown version. > - Pages are either content pages (article or reference text) or menu pages (a list of links to child pages). > - To get a menu page, truncate any URL to a parent path and append `.md` (e.g. `https://dev.wix.com/docs/sdk.md`, `https://dev.wix.com/docs/sdk/core-modules.md`). > - Top-level index of all portals: https://dev.wix.com/docs/llms.txt > - Full concatenated docs: https://dev.wix.com/docs/llms-full.txt ## Resource: Translate a Blocks App ## Article: Translating Your App ## Article Link: https://dev.wix.com/docs/build-apps/develop-your-app/develop-an-app-with-blocks/deploy-and-manage-blocks-apps/translate-a-blocks-app.md ## Article Content: # Translate a Blocks App
**Editor compatibility** Wix Blocks apps aren't supported in the Wix Harmony editor. Existing Blocks apps remain available for purchase on the Wix App Market for Wix Editor and Wix Studio sites. To learn more, see [About Wix Harmony and Blocks](https://dev.wix.com/docs/build-apps/develop-your-app/frameworks/wix-blocks/about-wix-harmony-and-blocks.md).
When you translate a Blocks app, it is important to understand that Wix sites has two types of translations: * The live site language * The account (Editor) language. For example, a developer might want to have German as their account (Editor) language, but the site they are developing is intended for Spanish speakers, so the site language will be Spanish.  * Panel texts and action button texts are translated into the default language of the account. * Live content that is intended for the app visitors, will be translatable to the site languages.  ### Set up your app for translation The first step for translating your app is selecting the languages you'd like to be available.  1. Select **Multilingual** in the **App** section of the top menu.  2. Select the language you want to add in the popup that opens.  3. Click **Add Languages** and wait until the installation is successful.  This adds the language to the language picker in your top menu. 
![set up translation](https://d2x3xhvgiqkx42.cloudfront.net/12345678-1234-1234-1234-1234567890ab/21e446eb-7f73-4f2f-84b1-c6b77e64e45e/2024/05/13/e2fc8c65-67ad-443c-8a82-92f9b2e020e4/93877fdd-9a52-49a2-b174-dc647a0d0067.png)
### Translate your app elements The second step, is translating user-interface elements, such as button, texts and so on.   1. Select one of the languages that you added in step 1. 
![pick language](https://d2x3xhvgiqkx42.cloudfront.net/12345678-1234-1234-1234-1234567890ab/21e446eb-7f73-4f2f-84b1-c6b77e64e45e/2024/05/13/fb058e69-44e6-40b2-948e-b72808d1e6ea/99d5f673-e62c-43c7-b29d-4dbabdbb0bea.png)
1. Click on the element you want to translate. A translation bar opens. Click **Done** only after completing the next step.
![translation bar](https://d2x3xhvgiqkx42.cloudfront.net/12345678-1234-1234-1234-1234567890ab/21e446eb-7f73-4f2f-84b1-c6b77e64e45e/2024/05/13/bfd0e9fd-6dec-4a8b-96a8-ca5514f02b29/8967bf1d-e16a-457e-9c11-c9d37a596bff.png)
1. Click **Edit Translation** and translate the text, or **Auto-translate** to get an automatic translation. 
![translate an element](https://d2x3xhvgiqkx42.cloudfront.net/12345678-1234-1234-1234-1234567890ab/21e446eb-7f73-4f2f-84b1-c6b77e64e45e/2024/05/13/a07c33fc-ae59-4799-a556-ba2b28aa983c/c96c95d5-5e5a-44af-bc70-26b6868cce55.png)
Now, when your app is installed on a site that's translated to that language (for example, Spanish), these texts will appear in Spanish as well. 
**Translate a custom panel** To translate custom panel texts, go to the **Panels** tab and follow the same procedure as translating your site elements.
### Preview Your Translation To preview your translation in **Preview** mode in Blocks: 1. Click **Preview**. 2. Select the widget language:
![pick language in preview](https://d2x3xhvgiqkx42.cloudfront.net/12345678-1234-1234-1234-1234567890ab/21e446eb-7f73-4f2f-84b1-c6b77e64e45e/2024/05/13/39ac0c9e-cbe0-4407-82db-52f6fe94940d/a9fec09a-d13e-422a-a747-e2ec58337a04.png)
--- > Portal Navigation: > > - Append `.md` to any URL under `https://dev.wix.com/docs/` to get its markdown version. > - Pages are either content pages (article or reference text) or menu pages (a list of links to child pages). > - To get a menu page, truncate any URL to a parent path and append `.md` (e.g. `https://dev.wix.com/docs/sdk.md`, `https://dev.wix.com/docs/sdk/core-modules.md`). > - Top-level index of all portals: https://dev.wix.com/docs/llms.txt > - Full concatenated docs: https://dev.wix.com/docs/llms-full.txt ## Resource: Archive a Blocks App ## Article: Archiving Your App ## Article Link: https://dev.wix.com/docs/build-apps/develop-your-app/develop-an-app-with-blocks/deploy-and-manage-blocks-apps/archive-a-blocks-app.md ## Article Content: # Archive a Blocks App
**Editor compatibility** Wix Blocks apps aren't supported in the Wix Harmony editor. Existing Blocks apps remain available for purchase on the Wix App Market for Wix Editor and Wix Studio sites. To learn more, see [About Wix Harmony and Blocks](https://dev.wix.com/docs/build-apps/develop-your-app/frameworks/wix-blocks/about-wix-harmony-and-blocks.md).
Archiving your app allows you to get rid of apps that you no longer need. When you archive an app, you will not see it in your list of apps in the Blocks Editor. You will also not see it in your list of apps when importing Blocks apps to a site. You will no longer be able to edit it in Blocks, or install it on any site. 
**No unarchive** Note that once you archived an app, you cannot unarchive it.
### To archive your app 1. Click **App** in the top menu. 2. Click **Archive App**. 
![archive app](https://d2x3xhvgiqkx42.cloudfront.net/12345678-1234-1234-1234-1234567890ab/6b5c7381-912e-4754-99e2-d23157db088c/2022/06/12/21bd5a7c-2677-4047-97f9-6bdd045f0f72/8a994a49-5d41-4e14-8714-821e4cf9bc19.png)
1. A message pops up, asking you if you want to archive that specific app. Take a good look at the name of the app and click **Archive**.
![archive button](https://d2x3xhvgiqkx42.cloudfront.net/12345678-1234-1234-1234-1234567890ab/6b5c7381-912e-4754-99e2-d23157db088c/2022/06/12/b3a98515-5554-46dd-a456-7f035dfa71a1/3a90f5d0-545f-4446-9e08-be3c47fd2af4.png)
### How an archived app behaves on a site If you archived an app that is already installed on a site, it will continue to appear and function in the site. The site behavior will not be broken.  However, you will not be able to maintain the app that is installed. If you hover over the app in the **Wix Blocks >** **My Apps** menu, you'll see that you cannot open it in Blocks to edit it. 
![archived app](https://d2x3xhvgiqkx42.cloudfront.net/12345678-1234-1234-1234-1234567890ab/6b5c7381-912e-4754-99e2-d23157db088c/2022/06/12/a477bcfa-7e92-4a19-a3bb-037ac6129b81/5dfc98a5-e153-473d-a806-426a3a7c1b10.png)
--- > Portal Navigation: > > - Append `.md` to any URL under `https://dev.wix.com/docs/` to get its markdown version. > - Pages are either content pages (article or reference text) or menu pages (a list of links to child pages). > - To get a menu page, truncate any URL to a parent path and append `.md` (e.g. `https://dev.wix.com/docs/sdk.md`, `https://dev.wix.com/docs/sdk/core-modules.md`). > - Top-level index of all portals: https://dev.wix.com/docs/llms.txt > - Full concatenated docs: https://dev.wix.com/docs/llms-full.txt ## Resource: Work on a Blocks App Concurrently ## Article: Working on an App Concurrently ## Article Link: https://dev.wix.com/docs/build-apps/develop-your-app/develop-an-app-with-blocks/deploy-and-manage-blocks-apps/work-on-a-blocks-app-concurrently.md ## Article Content: # Work on a Blocks App Concurrently
**Editor compatibility** Wix Blocks apps aren't supported in the Wix Harmony editor. Existing Blocks apps remain available for purchase on the Wix App Market for Wix Editor and Wix Studio sites. To learn more, see [About Wix Harmony and Blocks](https://dev.wix.com/docs/build-apps/develop-your-app/develop-an-app-with-blocks/about-wix-harmony-and-blocks.md).
Blocks allows you to collaborate with other users, on the same app, in real time. More than one person can edit content and change design elements and layout. Collaborating with others is fast and effective. Changes made by other users appear on your screen within seconds. Learn how to [invite people to work on your app](https://dev.wix.com/docs/build-apps/develop-your-app/develop-an-app-with-blocks/deploy-and-manage-blocks-apps/manage-collaborators-in-blocks.md) >**Note:** >When you invite someone to collaborate they need to have a Wix account, or to sign up for one. ### Concurrent Editing in Blocks As soon as someone accepts your invitation they can begin editing your app. You can see who is working on your app by checking whose avatar appears in the top right of the top bar.   ![](https://d2x3xhvgiqkx42.cloudfront.net/12345678-1234-1234-1234-1234567890ab/6b5c7381-912e-4754-99e2-d23157db088c/2022/06/26/d659b7fe-813e-4d6f-ab8f-216a5479a375/687435e0-c1de-4cae-899f-b744bafac633.png) The person who is able to edit code has brackets **{ }** next to their avatar.
**Important:** * Blocks does not allow two people to work on the code at the same time. The first person to open the app can edit code. Other users can read the code but not edit it.  * Two people cannot build the app at the same time. * When you are working on the app at the same time as someone else, you can undo your changes but you can't undo anyone else's changes.
--- > Portal Navigation: > > - Append `.md` to any URL under `https://dev.wix.com/docs/` to get its markdown version. > - Pages are either content pages (article or reference text) or menu pages (a list of links to child pages). > - To get a menu page, truncate any URL to a parent path and append `.md` (e.g. `https://dev.wix.com/docs/sdk.md`, `https://dev.wix.com/docs/sdk/core-modules.md`). > - Top-level index of all portals: https://dev.wix.com/docs/llms.txt > - Full concatenated docs: https://dev.wix.com/docs/llms-full.txt ## Resource: Duplicate a Blocks App ## Article: Duplicating a Wix Blocks App ## Article Link: https://dev.wix.com/docs/build-apps/develop-your-app/develop-an-app-with-blocks/deploy-and-manage-blocks-apps/duplicate-a-blocks-app.md ## Article Content: # Duplicate a Blocks App
**Editor compatibility** Wix Blocks apps aren't supported in the Wix Harmony editor. Existing Blocks apps remain available for purchase on the Wix App Market for Wix Editor and Wix Studio sites. To learn more, see [About Wix Harmony and Blocks](https://dev.wix.com/docs/build-apps/develop-your-app/develop-an-app-with-blocks/about-wix-harmony-and-blocks.md).
Blocks enables you to duplicate an app. This is useful especially if you want to share an app with someone else, but don't want them to change the original one.  ## Duplicate Your App 1. Make sure that you are logged in to the app owner user. 2. Open the app that you want to duplicate in Blocks. 3. Click the **App** tab in the top bar.  4. Click **Duplicate**. 5. The duplicated app opens in a new tab. >**Note:** > If you don't see the new app in your [app dashboard](https://manage.wix.com/account/custom-apps), click **Build** to create a version of the app. > **Note:** [Self hosted extensions](https://dev.wix.com/docs/build-apps/develop-your-app/frameworks/self-hosting/supported-extensions/about-self-hosted-app-extensions.md) and [installation settings](https://dev.wix.com/docs/build-apps/develop-your-app/develop-an-app-with-blocks/deploy-and-manage-blocks-apps/configure-blocks-installation-settings.md) aren't duplicated in this process. Add them again to the new app. ## Share Your App Now that you duplicated your app, you can share it with more people.  1. Click the **App** tab in the top bar. 2. Click **Collaborators** to [share this app](https://dev.wix.com/docs/build-apps/develop-your-app/develop-an-app-with-blocks/deploy-and-manage-blocks-apps/manage-collaborators-in-blocks.md) with your colleagues. They will get an email inviting them to edit the app. --- > Portal Navigation: > > - Append `.md` to any URL under `https://dev.wix.com/docs/` to get its markdown version. > - Pages are either content pages (article or reference text) or menu pages (a list of links to child pages). > - To get a menu page, truncate any URL to a parent path and append `.md` (e.g. `https://dev.wix.com/docs/sdk.md`, `https://dev.wix.com/docs/sdk/core-modules.md`). > - Top-level index of all portals: https://dev.wix.com/docs/llms.txt > - Full concatenated docs: https://dev.wix.com/docs/llms-full.txt ## Resource: Publish a Blocks App to the App Market ## Article: Publishing Your App to the App Market ## Article Link: https://dev.wix.com/docs/build-apps/develop-your-app/develop-an-app-with-blocks/publish-blocks-apps-to-the-app-market/publish-a-blocks-app-to-the-app-market.md ## Article Content: # Publish Your Blocks App to the App Market
**Editor compatibility** Wix Blocks apps aren't supported in the Wix Harmony editor. Existing Blocks apps remain available for purchase on the Wix App Market for Wix Editor and Wix Studio sites. To learn more, see [About Wix Harmony and Blocks](https://dev.wix.com/docs/build-apps/develop-your-app/develop-an-app-with-blocks/about-wix-harmony-and-blocks.md).
As a Blocks app builder, you can publish your app to the [Wix App Market](https://www.wix.com/app-market) to allow Wix site builders to install and use your app. Follow this article to submit your app for review by Wix and then have it published.   ## Before you begin Here are some preliminary things to check out before publishing your app:
Get to know the app dashboard Any Blocks app that you create is added to the [Custom Apps](https://manage.wix.com/account/custom-apps) section in the in your Wix Studio workspace. You can select one of your apps to manage it in the app dashboard or edit it in Blocks. Most of the steps in this guide take place in the app dashboard.
Set up your app's pricing To monetize your app, you need to select a business model and adjust your app's UI and code to various pricing plans. Learn more about [pricing your Blocks app](https://dev.wix.com/docs/build-apps/develop-your-app/develop-an-app-with-blocks/publish-blocks-apps-to-the-app-market/adjust-a-blocks-app-to-different-pricing-plans.md) and make sure everything works before proceeding.
Prepare your app for review Go over [our checklist](https://dev.wix.com/docs/build-apps/develop-your-app/develop-an-app-with-blocks/publish-blocks-apps-to-the-app-market/top-ways-to-speed-up-approval-in-blocks.md) to make sure you didn't miss any Blocks-specific requirements, such as installation settings, custom panels, and more. All items are mandatory.
When you're ready, follow the next steps to publish your Blocks app to the App Market.  ## Step 1 | Duplicate your app in Blocks If your app is already installed on any Wix site, you should duplicate it before publishing it to the App Market. This will prevent any changes that you don't want to happen to your installed app. If your app was never installed on a user's site, you can skip this step.  ## Step 2 | Click Publish App in Blocks Click **Wix Blocks** > **App** > **Publish App**. A new tab opens with your app dashboard in the Custom Apps section of your Wix Studio workspace.  ## Step 3 | Add your app's Market Listing Provide all the information needed to publish your app. This includes: * App contact info * App icon * App teaser (one-line description)  * Three app features * App full description * App images * App search words * Privacy and security info Every time you fill in one of these topics, the count of your **Blockers** will go down by one.  ## Step 4 | Submit your app for review Once you click **Submit App**, the team reviews your app. Since every app is reviewed manually, this takes some time. Note that during the review, you cannot build, duplicate or share your app in Blocks.  Learn more about the [review process](https://dev.wix.com/docs/build-apps/launch-your-app/app-distribution/submit-your-first-app-version.md).  ## Step 5 | Your App is in the App Market! When your app is approved, you can find it in the [Wix App Market](https://www.wix.com/app-market). Install it both on the Studio editor and Wix editor to see that it works.  ## Step 6 | Release more versions After you made changes to your app, [release it again in Blocks](https://dev.wix.com/docs/build-apps/develop-your-app/develop-an-app-with-blocks/deploy-and-manage-blocks-apps/manage-blocks-app-versions.md) to create another version. Minor changes will be automatically received by users, while major updates will be available if they choose to update. However, certain changes are not included in your Blocks version release and are managed directly through your app dashboard: * **Market listing:** Updates to your app’s public information, including media, contact details, etc. * **Pricing:** Changes to your pricing plans, which will require you to [resubmit your app](https://dev.wix.com/docs/build-apps/launch-your-app/app-distribution/about-app-distribution.md) for review. --- > Portal Navigation: > > - Append `.md` to any URL under `https://dev.wix.com/docs/` to get its markdown version. > - Pages are either content pages (article or reference text) or menu pages (a list of links to child pages). > - To get a menu page, truncate any URL to a parent path and append `.md` (e.g. `https://dev.wix.com/docs/sdk.md`, `https://dev.wix.com/docs/sdk/core-modules.md`). > - Top-level index of all portals: https://dev.wix.com/docs/llms.txt > - Full concatenated docs: https://dev.wix.com/docs/llms-full.txt ## Resource: Top Ways to Speed Up Approval in Blocks ## Article: Top Ways to Speed Up Your Apps Approval ## Article Link: https://dev.wix.com/docs/build-apps/develop-your-app/develop-an-app-with-blocks/publish-blocks-apps-to-the-app-market/top-ways-to-speed-up-approval-in-blocks.md ## Article Content: # Top Ways to Speed Up App Approval in Blocks
**Editor compatibility** Wix Blocks apps aren't supported in the Wix Harmony editor. Existing Blocks apps remain available for purchase on the Wix App Market for Wix Editor and Wix Studio sites. To learn more, see [About Wix Harmony and Blocks](https://dev.wix.com/docs/build-apps/develop-your-app/develop-an-app-with-blocks/about-wix-harmony-and-blocks.md).
Before you [submit your app to the Wix App Market](https://dev.wix.com/docs/build-apps/launch-your-app/app-distribution/about-app-distribution.md), there are a few things you should check. Make sure to go over these items, as they are all mandatory. If your app was rejected for any reason, don't worry - you can fix it and resubmit. ## 1 | Handle pricing plans Your app logic should identify paid and free users and [create different experiences](https://dev.wix.com/docs/build-apps/develop-your-app/develop-an-app-with-blocks/publish-blocks-apps-to-the-app-market/adjust-a-blocks-app-to-different-pricing-plans.md) for them. Make sure to: * Check if a user is paying for a plan, and then hide or disable non-paid features on the live site, while ensuring that they work in the site editor. * Provide [entry points](https://dev.wix.com/docs/build-apps/develop-your-app/develop-an-app-with-blocks/publish-blocks-apps-to-the-app-market/provide-entry-points-to-upgrade-your-app.md) that lead users to upgrade when needed. * [Handle free trials](https://dev.wix.com/docs/build-apps/develop-your-app/frameworks/wix-blocks/publish-blocks-apps-to-the-app-market/create-a-free-trial-for-a-blocks-app.md). ![upgrade app](https://wixmp-833713b177cebf373f611808.wixmp.com/images/3245088682cfc27a58d028691c063fc5.png) ## 2 | Follow media guidelines Follow the App Market [media guidelines](https://dev.wix.com/docs/build-apps/launch-your-app/market-listing/add-your-media.md) and provide good and sufficient marketing photos and texts. ## 3 | Use custom panels Create [custom panels](https://dev.wix.com/docs/build-apps/develop-your-app/develop-an-app-with-blocks/editor-experience-panels/design-custom-panels-in-blocks.md) to allow users to adjust app elements, if relevant. Some app-builders are used to provide one large settings panel. With Blocks, you can add as many panels as you want, for the different widgets and app elements. Don’t forget to [connect your panels](https://dev.wix.com/docs/build-apps/develop-your-app/develop-an-app-with-blocks/editor-experience-panels/design-custom-panels-in-blocks.md) to the relevant action buttons. ![custom-panel](https://wixmp-833713b177cebf373f611808.wixmp.com/images/70f59089221bef4c3100286bd2f484e6.png) ## 4 | Use a dashboard page when needed Use a [dashboard page](https://dev.wix.com/docs/build-apps/develop-your-app/develop-an-app-with-blocks/dashboard-pages/about-dashboard-pages-in-blocks.md) when applicable, and create a clear experience to lead users to the dashboard. For example, to connect an account, or configure things that would affect multiple widgets at the same time, see statistics or other information on the admin side that is too long for a settings panel. ## 5 | Name your widgets and presets This step is important since users will see these names in their site editor.
To name your widgets 1. Go to the **Configuration** tab. 2. Give your widget a display name. ![widget display name](https://wixmp-833713b177cebf373f611808.wixmp.com/images/668db230d520fd8a1fb8d048b7881a8b.png)
To name your presets 1. Go to the **Design** tab. 1. Click on the three dots next to the preset name. 1. Rename the preset. ![rename preset](https://wixmp-833713b177cebf373f611808.wixmp.com/images/fbe2e0ae2e7f4715251d1124bf3caaf7.png)
## 6 | Add thumbnail images to your presets Provide good [thumbnail images](https://dev.wix.com/docs/build-apps/develop-your-app/develop-an-app-with-blocks/widget-design/create-thumbnail-images-for-your-presets.md) for every preset. This is done in your app's [installation settings](https://dev.wix.com/docs/build-apps/develop-your-app/develop-an-app-with-blocks/deploy-and-manage-blocks-apps/configure-blocks-installation-settings.md), in the **Preset Visibility** section. ![Preset thumbnail](https://wixmp-833713b177cebf373f611808.wixmp.com/images/5f61f313a1fb69b86ab66502ebf53538.png) ## 7 | Provide a user guide Provide a good explanation of how to install, configure and use your app. Some apps can get pretty complex, and without a tutorial, users will never understand how to use the apps. For example, If your app uses database collections, explain to users how to get to their CMS to update. A user guide is usually done through: * Text in the settings panel * A link to an external documentation site * Text in a dashboard page ## 8 | Test your app on a site Make sure that all areas of your app work as planned. Here is a checklist we prepared of [what to check when testing your app](https://dev.wix.com/docs/build-apps/develop-your-app/develop-an-app-with-blocks/deploy-and-manage-blocks-apps/what-to-check-when-testing.md) on a site. --- > Portal Navigation: > > - Append `.md` to any URL under `https://dev.wix.com/docs/` to get its markdown version. > - Pages are either content pages (article or reference text) or menu pages (a list of links to child pages). > - To get a menu page, truncate any URL to a parent path and append `.md` (e.g. `https://dev.wix.com/docs/sdk.md`, `https://dev.wix.com/docs/sdk/core-modules.md`). > - Top-level index of all portals: https://dev.wix.com/docs/llms.txt > - Full concatenated docs: https://dev.wix.com/docs/llms-full.txt ## Resource: Adjust a Blocks App to Different Pricing Plans ## Article: Adjusting Your Blocks App to Different Pricing Plans ## Article Link: https://dev.wix.com/docs/build-apps/develop-your-app/develop-an-app-with-blocks/publish-blocks-apps-to-the-app-market/adjust-a-blocks-app-to-different-pricing-plans.md ## Article Content: # Adjust a Blocks App to Different Pricing Plans
**Editor compatibility** Wix Blocks apps aren't supported in the Wix Harmony editor. Existing Blocks apps remain available for purchase on the Wix App Market for Wix Editor and Wix Studio sites. To learn more, see [About Wix Harmony and Blocks](https://dev.wix.com/docs/build-apps/develop-your-app/develop-an-app-with-blocks/about-wix-harmony-and-blocks.md).
When you [publish your Blocks app in the Wix App Market](https://dev.wix.com/docs/build-apps/develop-your-app/develop-an-app-with-blocks/publish-blocks-apps-to-the-app-market/publish-a-blocks-app-to-the-app-market.md), you can choose to provide different app behaviors for different pricing plans. For example, users who use a free version of your app may get several services, while those who pay for it, get more. This requires creating and managing a system that identifies the user, determines their pricing plan and impacts the app's behavior. This is an example of how users see your pricing page: ![example pricing page](https://d2x3xhvgiqkx42.cloudfront.net/12345678-1234-1234-1234-1234567890ab/378fd532-728d-473b-8f03-30140bda59af/2023/12/18/3e33e3b2-ba7f-4873-94ca-7c672c2c227b/b54b13a1-69a3-4fbf-80b0-3b8b59945592.png) ## What you need to adjust in Blocks Before you begin adjusting your app to different pricing plans, make sure to [define your business model](https://dev.wix.com/docs/build-apps/launch-your-app/pricing-and-billing/about-pricing-plans-and-business-models.md) in your app dashboard. This is the first and essential step. Now, you need to adjust your app to handle these pricing plans with your own user interface and code. This includes: * Creating a different UI for each plan * Adding code to handle each plan Also, optionally: * Configuration adjustments * Customizing panels * Installation settings
Notes: * For each plan, you can also add a [free trial](https://dev.wix.com/docs/build-apps/launch-your-app/pricing-and-billing/set-up-and-manage-free-trials.md). * If you want to add in-app purchases (also known as one-time payments), you must add a dashboard page and add [OAuth](https://dev.wix.com/docs/build-apps/develop-your-app/access/authentication/about-oauth.md). * If you already published your app, and now you want to test the app with your pricing plans, create a [test coupon](https://dev.wix.com/docs/build-apps/launch-your-app/app-promotion/create-a-coupon.md).
Example: Here is an [example Blocks app](https://dev.wix.com/docs/build-apps/develop-your-app/develop-an-app-with-blocks/publish-blocks-apps-to-the-app-market/example-app-with-pricing.md) that uses pricing plans.
## Step 1 | Create a UI for the different plans Since your app needs to behave differently to users according to their different pricing plans, the first thing you should understand is what the different users see. You can do this through a [multi-state box](https://dev.wix.com/docs/develop-websites/articles/wix-editor-elements/other-elements/multi-state-boxes/about-multi-state-boxes.md), which gives you different user interface with no code at all. Alternatively, you can delete and restore elements with the [`delete()`](https://www.wix.com/velo/reference/$w/panelthumbnails/delete?utm_source=google&utm_medium=cpc&utm_campaign=13708482663%5E124757113632&experiment_id=%5E%5E530755701296%5E%5E_DSA&gclid=CjwKCAjw8symBhAqEiwAaTA__Opbaej4Mz91N_ANHXR3YdIfGvVBLK50mPCvguckVBrKOJfVxE5FBRoCbekQAvD_BwE) and [`restore()`](https://www.wix.com/velo/reference/$w/panelthumbnails/restore?utm_source=google&utm_medium=cpc&utm_campaign=13708482663%5E124757113632&experiment_id=%5E%5E530755701296%5E%5E_DSA&gclid=CjwKCAjw8symBhAqEiwAaTA__Opbaej4Mz91N_ANHXR3YdIfGvVBLK50mPCvguckVBrKOJfVxE5FBRoCbekQAvD_BwE) methods.
**Should I use a multi-state box or delete() and restore() ?** * If you want a completely different behavior in the different plans, it's best to choose a **multi-state box**.  * If most of the behavior is similar, and you want to modify just several specific elements - use **delete()** and **restore()**.
## Step 2 | Code When your Blocks app is installed on a site, it generates a JSON Web Token (JWT) for that app instance. You can find information about the app's pricing in the `billing` field of the [app instance](https://dev.wix.com/docs/sdk/backend-modules/app-management/app-instances/sample-flows.md). The `billing` field is available only if the `isFree` value is false. Get the app instance in a backend file and then call it from the frontend.
Note: To get the app instance from **panel or dashboard code**, use the Velo `getDecodedAppInstance` function and not the SDK `getAppInstance`.
### Backend Add this code to a `web.js` file: ```js import { webMethod, Permissions } from "@wix/web-methods"; import { auth } from "@wix/essentials"; import { appInstances } from "@wix/app-management"; export const getInstance = webMethod(Permissions.Anyone, async () => { try { const elevatedGetAppInstance = auth.elevate(appInstances.getAppInstance); const response = await elevatedGetAppInstance(); return response; // Information about the billing is in the billing object of the GetAppInstanceResponse object. } catch { console.log("error"); } }) ``` ### Frontend Import the function in your frontend code: ```js import { getInstance } from "backend/instance.web"; $w.onReady(function () { // Initialize pricing plan data loadPricingPlan(); }); async function loadPricingPlan() { try { // Get instance data from backend const response = await getInstance(); // Check if app has billing (paid app) if (response?.instance?.billing?.packageName) { const pricingPlan = response.instance.billing.packageName; console.log("Paid plan: ", pricingPlan); } else { console.log("Free app - no billing information"); } } catch (error) { // Display console level error handling console.error("Error loading pricing plan:", error); } } ```
See deprecated wix-application code example Use `wix-application` if you need to get the pricing plan in the frontend: ```javascript import wixApplication from 'wix-application'; $w.onReady(async function () { instance = await wixApplication.getDecodedAppInstance(); plan = instance.vendorProductId; //You configured vendorProductId in the app dashboard. //If there is no plan, the value is null. // Now, add your logic for the different plans }); $widget.onPropsChanged((oldProps, newProps) => { }); ``` Use `wix-application-backend` if you need to get the pricing plan in a backend file: ```js import * as wixApplicationBackend from 'wix-application-backend'; export async function getInstance() { return wixApplicationBackend.getDecodedAppInstance(); } ```
## Step 3 | Handle plan cancellation Your app logic should also handle the case where users canceled the plan after they upgraded. When handling this, think about the site builder _and_ the site visitor who is the end user of their app. ### If plan is canceled: site builder experience If users cancel their plan at any point, you'll want to stop the app or some of its features from working. In this case: * Display a notification in a central, visible place in the app, and prevent the app (or premium features) from working. Note the difference between a premium app, which does not work at all unless it's paid for, and a freemium app, where you should block only the premium features.  * Provide [entry points to upgrade](https://dev.wix.com/docs/build-apps/develop-your-app/develop-an-app-with-blocks/publish-blocks-apps-to-the-app-market/provide-entry-points-to-upgrade-your-app.md) your app. This can be done in the widget's action bar, settings panel, or in the app Dashboard. ![settings panel after free trial](https://wixmp-833713b177cebf373f611808.wixmp.com/images/1af977197da35188b51f9e50e607003b.png) ### If plan is canceled: site visitor experience Your direct user is the site builder who installed your app. However, you should also think about the user of your user, the site visitor.  If users cancel their plan at any point, lock the app (or its premium features) from working. If it's a premium only app, we recommend to collapse (delete) it, so it's not seen on the site. If you can't collapse it, present an indication, such as: "This app / feature is currently unavailable, contact the Wix user for details". This is also true for dashboard apps - collapse the app or present a proper message. 
Note: To get the app instance from **panel or dashboard code**, use the Velo `getDecodedAppInstance` function and not the SDK `getAppInstance`.
Here is a code example for collapsing the widget after the cancellation: ### Backend Add this code to a `web.js` file: ```ts import { webMethod, Permissions } from "@wix/web-methods"; import { auth } from "@wix/essentials"; import { appInstances } from "@wix/app-management"; export const getInstance = webMethod(Permissions.Anyone, async () => { try { const elevatedGetAppInstance = auth.elevate(appInstances.getAppInstance); const response = await elevatedGetAppInstance(); return response; } catch { console.log("error"); } }) ``` ### Frontend Import the function in your frontend code: ```ts import { getInstance } from "backend/instance.web"; $w.onReady(function () { // Initialize widget visibility based on app plan isPlanCanceled(); }); // General functions async function isPlanCanceled() { try { // Get instance data from backend const response = await getInstance(); // Check if app is on free plan - use optional chaining for safety const isAppFree = response?.instance?.isFree; if (isAppFree) { // Remove the widget's container from the stage for free apps $w("#widgetContainer").delete(); } } catch (error) { // Display console level error handling console.error("Error checking app plan:", error); } } ```
See deprecated wix-application code example ```javascript import wixApplication from 'wix-application'; let plan, instance; $w.onReady(async function () { instance = await wixApplication.getDecodedAppInstance(); plan = instance.vendorProductId; if (plan == null) { $w('#box1').delete(); //remove the widget's container from the stage } }); ```
## Step 4 | Configuration Now, you might want to make some changes in the **Configuration** tab in Blocks.  You can define certain elements of your widget, such as a flexbox that helped you layout the elements, as non-selectable. You can also change display names. Make sure to think about all your pricing plans when making these changes.  Learn more about [configuring widget and element display names and behavior](https://dev.wix.com/docs/build-apps/develop-your-app/develop-an-app-with-blocks/editor-experience-configuration/configure-display-names-and-behavior-in-blocks.md). Once you define a pricing plan for your app, your widget automatically gets an Upgrade button in its action bar. Learn more about [configuring action bars](https://dev.wix.com/docs/build-apps/develop-your-app/develop-an-app-with-blocks/editor-experience-configuration/configure-action-bars-in-blocks.md) ![upgrade](https://wixmp-833713b177cebf373f611808.wixmp.com/images/b4b47351ba489acac6f5d0c4d8ec9fd8.png) ## Step 5 | Customize your panels You can show or hide panel elements according to the app's billing, just as you did in the widget code. This is done in the [code section](https://dev.wix.com/docs/build-apps/develop-your-app/develop-an-app-with-blocks/editor-experience-panels/add-code-to-custom-panels-in-blocks.md) of your panel in the **Panels** tab. You can also add a button or link in your panel to upgrade your app. Learn more about [entry points to upgrade your app](https://dev.wix.com/docs/build-apps/develop-your-app/develop-an-app-with-blocks/publish-blocks-apps-to-the-app-market/provide-entry-points-to-upgrade-your-app.md). ## Step 6 | App and widget installation settings Your app installation settings allow you to control what widgets are seen in a site's Add Elements panel, and more options. Make sure to think about all your pricing plans when you go over your installation settings. Learn more about [app and widget installation settings](https://dev.wix.com/docs/build-apps/develop-your-app/develop-an-app-with-blocks/deploy-and-manage-blocks-apps/configure-blocks-installation-settings.md). --- > Portal Navigation: > > - Append `.md` to any URL under `https://dev.wix.com/docs/` to get its markdown version. > - Pages are either content pages (article or reference text) or menu pages (a list of links to child pages). > - To get a menu page, truncate any URL to a parent path and append `.md` (e.g. `https://dev.wix.com/docs/sdk.md`, `https://dev.wix.com/docs/sdk/core-modules.md`). > - Top-level index of all portals: https://dev.wix.com/docs/llms.txt > - Full concatenated docs: https://dev.wix.com/docs/llms-full.txt ## Resource: Example App With Pricing ## Article: Example: Adjusting Your Blocks App to Different Pricing Plans ## Article Link: https://dev.wix.com/docs/build-apps/develop-your-app/develop-an-app-with-blocks/publish-blocks-apps-to-the-app-market/example-app-with-pricing.md ## Article Content: # Example Blocks App With Pricing
**Editor compatibility** Wix Blocks apps aren't supported in the Wix Harmony editor. Existing Blocks apps remain available for purchase on the Wix App Market for Wix Editor and Wix Studio sites. To learn more, see [About Wix Harmony and Blocks](https://dev.wix.com/docs/build-apps/develop-your-app/develop-an-app-with-blocks/about-wix-harmony-and-blocks.md).
When you [publish your Blocks app in the Wix App Market](https://dev.wix.com/docs/build-apps/develop-your-app/develop-an-app-with-blocks/publish-blocks-apps-to-the-app-market/publish-a-blocks-app-to-the-app-market.md), you can choose to provide different app behaviors for site-creators with different pricing plans. People who download a free version of your app may get several services, while those who pay for it, get more. This requires creating and managing a system that identifies the user, determines their pricing plan and impacts the app's behavior (learn more about [adjusting your Blocks app to a pricing plan](https://dev.wix.com/docs/build-apps/develop-your-app/develop-an-app-with-blocks/publish-blocks-apps-to-the-app-market/adjust-a-blocks-app-to-different-pricing-plans.md)). This [example application](https://blocks.wix.com/wix-blocks-new-app-creator?editorType=RESPONSIVE&originTemplateId=a51d653d-8db4-4534-a6f2-824e3a261d97&http_referrer=documentation) elegantly counts up until a desired number (the numbers move like in a slot machine). Click **Release** in Blocks to create your own copy of this application, inspect it and use it as you wish. ![Gif of how the app looks - numbers running up](https://d2x3xhvgiqkx42.cloudfront.net/12345678-1234-1234-1234-1234567890ab/378fd532-728d-473b-8f03-30140bda59af/2023/05/31/6cf12e6b-a7dd-40de-a170-a49a64f20444/94afdd14-1a11-4940-a3da-4ed79d58e311.gif) Our application has **three pricing plans:**  * **Basic:** Site creators can configure the items. * **Pro:** Site creators can also add and change icons.  * **No plan:** There is a watermark over everything (note that current [App Market guidelines](https://dev.wix.com/docs/build-apps/launch-your-app/app-distribution/app-market-guidelines.md) do not allow watermarks. It's only for the sake of our example).  ## What you get in the template Your copy of the application includes: * The widgets design and code * The panels and configuration settings Your copy does not include the following (define them on your own):   * Installations settings * Pricing settings in the app dashboard ## How to adapt the app to the different pricing plans Let's dive into the application and see how it was built. 1. The first step was to create the UI in Blocks. We also created 4 different [design presets](https://dev.wix.com/docs/build-apps/develop-your-app/develop-an-app-with-blocks/widget-design/about-design-presets.md). 2. Then, we imported the [`wix-application`](https://www.wix.com/velo/reference/wix-application?utm_source=google&utm_medium=cpc&utm_campaign=13708482663%5E124757113632&experiment_id=%5E%5E530755701296%5E%5E_DSA&gclid=CjwKCAjw8symBhAqEiwAaTA__Opbaej4Mz91N_ANHXR3YdIfGvVBLK50mPCvguckVBrKOJfVxE5FBRoCbekQAvD_BwE) module to our widget code.  ```javascript import wixApplication from 'wix-application' ``` 2. We used `getDecodedAppInstance()` to save the `vendorProductId` ([learn more](https://dev.wix.com/docs/build-apps/develop-your-app/develop-an-app-with-blocks/publish-blocks-apps-to-the-app-market/adjust-a-blocks-app-to-different-pricing-plans.md)). 3. We used the [`delete()`](https://www.wix.com/velo/reference/$w/panelthumbnails/delete?utm_source=google&utm_medium=cpc&utm_campaign=13708482663%5E124757113632&experiment_id=%5E%5E530755701296%5E%5E_DSA&gclid=CjwKCAjw8symBhAqEiwAaTA__Opbaej4Mz91N_ANHXR3YdIfGvVBLK50mPCvguckVBrKOJfVxE5FBRoCbekQAvD_BwE) and [`restore()`](https://www.wix.com/velo/reference/$w/panelthumbnails/restore?utm_source=google&utm_medium=cpc&utm_campaign=13708482663%5E124757113632&experiment_id=%5E%5E530755701296%5E%5E_DSA&gclid=CjwKCAjw8symBhAqEiwAaTA__Opbaej4Mz91N_ANHXR3YdIfGvVBLK50mPCvguckVBrKOJfVxE5FBRoCbekQAvD_BwE) functions to delete and restore the watermark and icon according to the pricing plan. Here is part of the widget code: ```javascript let startNum1, startNum2, startNum3, propsData; const icons = ['#icon1', '#icon2', '#icon3']; let plan, instance; $w.onReady(async function () { instance = await wixApplication.getDecodedAppInstance(); plan = instance.vendorProductId; switch (plan) { case 'basic': $w('#watermark').delete(); icons.forEach(icon => { $w(icon).delete(); }) break; case 'pro': $w('#watermark').delete(); icons.forEach(icon => { $w(icon).restore(); }) break; default: $w("#watermark").restore(); icons.forEach((icon) => { $w(icon).restore(); }); } }); ``` 3. After you got the app to work differently for different pricing plans, you can also make [configuration changes](https://dev.wix.com/docs/build-apps/develop-your-app/develop-an-app-with-blocks/editor-experience-configuration/about-configuration-in-blocks.md) and [installation settings](https://dev.wix.com/docs/build-apps/develop-your-app/develop-an-app-with-blocks/deploy-and-manage-blocks-apps/configure-blocks-installation-settings.md) changes. --- > Portal Navigation: > > - Append `.md` to any URL under `https://dev.wix.com/docs/` to get its markdown version. > - Pages are either content pages (article or reference text) or menu pages (a list of links to child pages). > - To get a menu page, truncate any URL to a parent path and append `.md` (e.g. `https://dev.wix.com/docs/sdk.md`, `https://dev.wix.com/docs/sdk/core-modules.md`). > - Top-level index of all portals: https://dev.wix.com/docs/llms.txt > - Full concatenated docs: https://dev.wix.com/docs/llms-full.txt ## Resource: Create a Free Trial for a Blocks App ## Article: Creating a free trial for your app ## Article Link: https://dev.wix.com/docs/build-apps/develop-your-app/develop-an-app-with-blocks/publish-blocks-apps-to-the-app-market/create-a-free-trial-for-a-blocks-app.md ## Article Content: # Create a Free Trial for a Blocks App
**Editor compatibility** Wix Blocks apps aren't supported in the Wix Harmony editor. Existing Blocks apps remain available for purchase on the Wix App Market for Wix Editor and Wix Studio sites. To learn more, see [About Wix Harmony and Blocks](https://dev.wix.com/docs/build-apps/develop-your-app/frameworks/wix-blocks/about-wix-harmony-and-blocks.md).
When you [set up your app's pricing](https://dev.wix.com/docs/build-apps/launch-your-app/pricing-and-billing/set-up-and-manage-free-trials.md) in the app dashboard, you can choose to provide users with a free trial. This is recommended especially if you don't provide a free version of your app, so you can let users experience your app's value before they decide whether to upgrade. ![free trial in the dev center](https://wixmp-833713b177cebf373f611808.wixmp.com/images/bb51c8fc5a9bfec8a93f6ce905cd5505.png) Once you choose to add a free trial, your app market listing will show how many days of free trial the app offers. ![app listings in the app market](https://d2x3xhvgiqkx42.cloudfront.net/12345678-1234-1234-1234-1234567890ab/378fd532-728d-473b-8f03-30140bda59af/2024/01/17/65dd33bb-218a-4604-84ae-bc42f346b992/67388481-d02f-454e-aeb8-f47eb98c17d1.png) When users are in the free trial period, their app works as if it's upgraded. When the free trial is over, Wix will automatically move them to the plan they selected. You can see information about the app's billing and the free trial in the [app instance](https://dev.wix.com/docs/sdk/backend-modules/app-management/app-instances/get-app-instance.md).
See deprecated Velo function You can also see the app's current pricing plan in the `vendorProductId` object of the Velo [`decodedAppInstance`](https://dev.wix.com/docs/velo/velo-only-apis/wix-application/get-decoded-app-instance.md) object, from the moment the user began the free trial.
## See Also Learn how to [set up and manage free trials](https://dev.wix.com/docs/build-apps/launch-your-app/pricing-and-billing/set-up-and-manage-free-trials.md). --- > Portal Navigation: > > - Append `.md` to any URL under `https://dev.wix.com/docs/` to get its markdown version. > - Pages are either content pages (article or reference text) or menu pages (a list of links to child pages). > - To get a menu page, truncate any URL to a parent path and append `.md` (e.g. `https://dev.wix.com/docs/sdk.md`, `https://dev.wix.com/docs/sdk/core-modules.md`). > - Top-level index of all portals: https://dev.wix.com/docs/llms.txt > - Full concatenated docs: https://dev.wix.com/docs/llms-full.txt ## Resource: Provide entry points to upgrade your app ## Article: Provide entry points to upgrade your app ## Article Link: https://dev.wix.com/docs/build-apps/develop-your-app/develop-an-app-with-blocks/publish-blocks-apps-to-the-app-market/provide-entry-points-to-upgrade-your-app.md ## Article Content: # Provide Entry Points to Upgrade a Blocks App
**Editor compatibility** Wix Blocks apps aren't supported in the Wix Harmony editor. Existing Blocks apps remain available for purchase on the Wix App Market for Wix Editor and Wix Studio sites. To learn more, see [About Wix Harmony and Blocks](https://dev.wix.com/docs/build-apps/develop-your-app/develop-an-app-with-blocks/about-wix-harmony-and-blocks.md).
If you [published your Blocks App](https://dev.wix.com/docs/build-apps/develop-your-app/develop-an-app-with-blocks/publish-blocks-apps-to-the-app-market/publish-a-blocks-app-to-the-app-market.md) in the Wix App Market and [adapted it to a pricing plan](https://dev.wix.com/docs/build-apps/develop-your-app/develop-an-app-with-blocks/publish-blocks-apps-to-the-app-market/adjust-a-blocks-app-to-different-pricing-plans.md), there are a few ways to allow site builders to upgrade their app to another plan. All these ways lead site builders to your app's pricing page. 
See example pricing page ![example pricing page](https://d2x3xhvgiqkx42.cloudfront.net/12345678-1234-1234-1234-1234567890ab/378fd532-728d-473b-8f03-30140bda59af/2023/12/18/3e33e3b2-ba7f-4873-94ca-7c672c2c227b/b54b13a1-69a3-4fbf-80b0-3b8b59945592.png)
## A default Upgrade action button Blocks automatically adds an upgrade ![](https://d2x3xhvgiqkx42.cloudfront.net/12345678-1234-1234-1234-1234567890ab/378fd532-728d-473b-8f03-30140bda59af/2023/12/18/8b0167ef-5780-4e93-9f19-51ef65433e86/aa7e9f4d-2450-4ef7-8b0d-25ab9dccab45.png) icon to the widget's action bar, once you set up a pricing plan for it. Note that this button cannot be removed. To see how this button works, [test you app in the editor](https://dev.wix.com/docs/build-apps/develop-your-app/develop-an-app-with-blocks/deploy-and-manage-blocks-apps/test-your-app-on-a-site.md). You'll be able to see it on a live site once the app is published in the App Market.
![Default premium action button](https://d2x3xhvgiqkx42.cloudfront.net/12345678-1234-1234-1234-1234567890ab/378fd532-728d-473b-8f03-30140bda59af/2023/12/27/380f9a9a-a961-4fcc-abc3-fbb15e418bb9/fc7cda6b-7b83-409e-8e59-ad0b848265f2.png)
## Add an Upgrade button from a panel Add a button to a custom panel and connect it to your pricing page [with no code](https://dev.wix.com/docs/build-apps/develop-your-app/develop-an-app-with-blocks/editor-experience-panels/panel-button-rules-to-open-pages.md). ![upgrade button](https://wixmp-833713b177cebf373f611808.wixmp.com/images/ee69753be5c61e196a2d65b953a63f6a.png) **To add an upgrade button:** 1. Click the button. 1. Click **+ Add rule** in the inspector. 1. Select your pricing page. 1. Click **Settings** and set the button type to premium, to get the purple color. ## Add an Upgrade link from a panel Add text and a link from a [custom panel](https://dev.wix.com/docs/build-apps/develop-your-app/develop-an-app-with-blocks/editor-experience-panels/design-custom-panels-in-blocks.md), to enable site builders to upgrade the app from a panel. ![Settings panel](https://d2x3xhvgiqkx42.cloudfront.net/12345678-1234-1234-1234-1234567890ab/378fd532-728d-473b-8f03-30140bda59af/2023/12/27/4165b682-b94f-4656-9e1e-566ed7480f66/9b24ccde-31b0-4dcc-a733-f667c2539d65.png) **To add a text and link to your panel:**  1. Go to the **Panels** tab.  2. Add a **Text** element to the panel. 3. Click the element's **Settings**.  4. Insert a short call to action in the **Text** field. 5. Set the code to the **Link** field through Velo. The link uses your App ID and Instance ID:  ```javascript import wixApplication from 'wix-application'; const appInstance = await wixApplication.getDecodedAppInstance(); const upgradeUrl = `https://www.wix.com/apps/upgrade/${appInstance.appDefId}?appInstanceId=${appInstance.instanceId}`; $w('#').link = upgradeUrl; ``` ## Add an Upgrade link or button from a Dashboard page Add a link or a button to your Dashboard page, to enable site builders to upgrade from their Dashboard. 
![Dashboard with upgrade](https://d2x3xhvgiqkx42.cloudfront.net/12345678-1234-1234-1234-1234567890ab/378fd532-728d-473b-8f03-30140bda59af/2023/12/27/8ae3669c-c7fe-4116-9bb7-9b86e25fc5ea/e4e27b41-5045-4530-9363-b901c7f3ce56.png)
**To add an upgrade button or link to your Dashboard:** 1. Go to your App's Dashboard ![](https://d2x3xhvgiqkx42.cloudfront.net/12345678-1234-1234-1234-1234567890ab/378fd532-728d-473b-8f03-30140bda59af/2023/12/18/ced5ed2f-65fd-4db5-995c-2a09d7028447/307693ce-7e82-49ba-997f-ce17ccced1fd.png)  page.  2. Add a button or text element through the Add ![](https://d2x3xhvgiqkx42.cloudfront.net/12345678-1234-1234-1234-1234567890ab/378fd532-728d-473b-8f03-30140bda59af/2023/12/18/26427f79-9d3d-4ab1-803b-2b13a95229f6/e3c73c8d-871d-4ed0-b376-5b283f2c20da.png)  panel.  3. In the Dashboard code, set the link to use your App ID and Instance ID. 4. Specify that the link should open in a new tab. For example, if it's button: ```javascript import wixApplication from 'wix-application'; const appInstance = await wixApplication.getDecodedAppInstance(); const upgradeUrl = `https://www.wix.com/apps/upgrade/${appInstance.appDefId}?appInstanceId=${appInstance.instanceId}`; $w('#').link = upgradeUrl; $w('#').target = "_blank" //opens in a new tab ``` --- > Portal Navigation: > > - Append `.md` to any URL under `https://dev.wix.com/docs/` to get its markdown version. > - Pages are either content pages (article or reference text) or menu pages (a list of links to child pages). > - To get a menu page, truncate any URL to a parent path and append `.md` (e.g. `https://dev.wix.com/docs/sdk.md`, `https://dev.wix.com/docs/sdk/core-modules.md`). > - Top-level index of all portals: https://dev.wix.com/docs/llms.txt > - Full concatenated docs: https://dev.wix.com/docs/llms-full.txt ## Resource: About the AI App Builder ## Article: About Building Apps with AI ## Article Link: https://dev.wix.com/docs/build-apps/develop-your-app/build-with-ai/about-the-ai-app-builder.md ## Article Content: # About the AI App Builder
__Alpha:__ The AI app builder is currently in alpha. This feature is subject to change and may have bugs, issues, and limitations. We're actively improving it based on your feedback.
The [AI app builder](https://dev.wix.com/app-builder) is a chat-based workflow for creating Wix apps. Instead of writing code from scratch, you describe your app idea in the AI app builder chat, and the built-in agent generates a complete app project using the [Wix CLI](https://dev.wix.com/docs/wix-cli.md). The agent writes the code, sets up your app dashboard, and configures extensions based on your requirements. You can continue to refine your app at any time in the [app workspace](#the-app-workspace), which provides all the tools you need to develop and manage your app. ## The app workspace The [app workspace](https://dev.wix.com/docs/build-apps/develop-your-app/app-workspace/about-the-app-workspace.md) is your central development environment. It combines a code editor, app management, previews, and the AI app builder chat in a single interface. ## AI app builder capabilities The AI app builder can generate specific types of [extensions](https://dev.wix.com/docs/build-apps/develop-your-app/extensions/about-extensions.md) and supports various features. > **Note:** Additional features may be supported in future updates. If you have specific requests, [contact us](https://dev.wix.com/docs/build-apps/manage-your-app/contact-us/contact-us.md). ### Supported extensions - [Dashboard pages](https://dev.wix.com/docs/build-apps/develop-your-app/extensions/dashboard-extensions/dashboard-pages/about-dashboard-page-extensions.md): Administrative pages you can add to the dashboard of a site. The AI app builder generates dashboard pages using [Auto Patterns](https://dev.wix.com/docs/build-apps/develop-your-app/design/auto-patterns/about-auto-patterns.md). - [Editor React Components](https://dev.wix.com/docs/build-apps/develop-your-app/extensions/site-extensions/editor-react-components/about-editor-react-components.md): Custom site widgets built in React that fully integrate with the editor. - [Custom element widgets](https://dev.wix.com/docs/build-apps/develop-your-app/extensions/site-extensions/site-widgets/connect-a-custom-element-s-colors-and-fonts-to-a-site-theme.md): App widgets created from custom HTML tags that you define. Editor setup panels aren't currently supported. Configure widgets through a dashboard page instead. - [Embedded scripts](https://dev.wix.com/docs/build-apps/develop-your-app/extensions/site-extensions/embedded-scripts/about-embedded-scripts.md): Extensions that inject HTML code fragments into the DOM of a site. Unlike other extensions, embedded scripts aren't fully configured by default during app installation and require an extra step to embed the code fragment. - [HTTP endpoints](https://dev.wix.com/docs/wix-cli/guides/development/http-endpoints/about-http-endpoints.md): Custom API endpoints you can create to serve any kind of data, generate files, or build API routes. - [Events](https://dev.wix.com/docs/build-apps/develop-your-app/extensions/backend-extensions/events/about-event-extensions.md): Extensions that subscribe your app to events so your app can run code when specific conditions are met. Only [Stores](https://dev.wix.com/docs/api-reference/business-solutions/stores/introduction.md) and [eCommerce](https://dev.wix.com/docs/api-reference/business-solutions/e-commerce/introduction.md) are supported. - [Service plugins](https://dev.wix.com/docs/build-apps/develop-your-app/extensions/backend-extensions/service-plugins/about-service-plugin-extensions.md): A set of APIs defined by Wix that you can use to enable your app to inject custom logic into existing app flows or to introduce entirely new flows to Wix sites. Only [Stores](https://dev.wix.com/docs/api-reference/business-solutions/stores/introduction.md) and [eCommerce](https://dev.wix.com/docs/api-reference/business-solutions/e-commerce/introduction.md) are supported. - [Data Collections](https://dev.wix.com/docs/build-apps/develop-your-app/extensions/backend-extensions/data-collections/about-data-collections-extensions.md): Extensions that add custom data structures and collections to Wix sites. > **Note**: App extensions are visible in the App Dashboard only after releasing the app. ## See also - [Get started with the AI app builder](https://dev.wix.com/docs/build-apps/develop-your-app/build-with-ai/get-started-with-the-ai-app-builder.md) - [Best Practices for AI Prompts for Building Apps](https://dev.wix.com/docs/api-preview/building-apps-with-ai/get-started/best-practices-for-ai-prompts.md) - [About Extensions](https://dev.wix.com/docs/build-apps/develop-your-app/extensions/about-extensions.md) --- > Portal Navigation: > > - Append `.md` to any URL under `https://dev.wix.com/docs/` to get its markdown version. > - Pages are either content pages (article or reference text) or menu pages (a list of links to child pages). > - To get a menu page, truncate any URL to a parent path and append `.md` (e.g. `https://dev.wix.com/docs/sdk.md`, `https://dev.wix.com/docs/sdk/core-modules.md`). > - Top-level index of all portals: https://dev.wix.com/docs/llms.txt > - Full concatenated docs: https://dev.wix.com/docs/llms-full.txt ## Resource: Get Started with the AI App Builder ## Article: Build an App with AI ## Article Link: https://dev.wix.com/docs/build-apps/develop-your-app/build-with-ai/get-started-with-the-ai-app-builder.md ## Article Content: # Get Started with the AI App Builder
__Alpha:__ The [AI app builder](https://dev.wix.com/docs/build-apps/develop-your-app/build-with-ai/about-building-apps-with-ai.md) is currently in alpha. This feature is subject to change and may have bugs, issues, and limitations. We're actively improving it based on your feedback.
This guide walks you through creating a Wix app in the [AI app builder](https://dev.wix.com/app-builder?referrer=https://dev.wix.com/docs/build-apps.md). You describe your app idea in the AI app builder chat, and the built-in agent uses the [Wix CLI](https://dev.wix.com/docs/build-apps/develop-your-app/frameworks/wix-cli/about-the-wix-cli-for-apps.md) to generate your app project. To continue editing your app after the initial build, edit directly in the [workspace](https://dev.wix.com/docs/build-apps/develop-your-app/app-workspace/about-the-app-workspace.md) or [connect to GitHub](https://dev.wix.com/docs/build-apps/develop-your-app/app-workspace/git-hub-integration/set-up-git-hub-integration.md) and use the Wix CLI.
__Tip:__ To get started quickly, select a template to create a working app in the [workspace](https://dev.wix.com/docs/build-apps/develop-your-app/app-workspace/about-the-app-workspace.md) instead of describing your app idea in the AI app builder.
## Step 1 | Generate your app Use the AI app builder to describe your app idea and generate your project. The AI app builder creates your app using [extensions](https://dev.wix.com/docs/build-apps/develop-your-app/extensions/about-extensions.md), which add functionality to your app. An app can have multiple extensions that work together to provide various features across different user interfaces and backend services. > **Note:** The AI app builder can generate some extensions, but not all. For a list of supported extensions, see [Supported Features and Limitations](https://dev.wix.com/docs/build-apps/develop-your-app/build-with-ai/about-the-ai-app-builder.md). To generate your app, follow these steps: 1. [Start a new app project](https://dev.wix.com/app-builder?referrer=https://dev.wix.com/docs/build-apps.md) and describe your app idea in the AI app builder chat. You can type a custom description or select a sample prompt. 2. The AI app builder creates a blueprint, a summary of your app's key features and structure. It then builds your app, generating the necessary code and setting up the app dashboard. - While your app is building, you see an outline of the build process in the AI app builder chat, showing which files are being created. - As files are created, they appear as clickable links in the AI app builder chat. Click any file link to jump directly to that file in the **Code** tab. - For dashboard pages, the AI app builder generates a `patterns.json` file using [Auto Patterns](https://dev.wix.com/docs/build-apps/develop-your-app/design/auto-patterns/about-auto-patterns.md) to configure your dashboard pages. ## Step 2 | Test your app Test your app to verify that all features work correctly and fix any issues before making your app available to users. Select **Test App** in the top right corner of your workspace to [test your app on a development site](https://dev.wix.com/docs/build-apps/launch-your-app/app-distribution/test-your-app-on-a-premium-site.md#test-your-app-on-a-free-development-site). > **Note:** If your app includes site extensions such as widgets, they won't appear in the **Site** preview until you complete the app setup. In the **Preview** tab, select **Editor** to complete the setup, then return to **Site** to see your extensions. ## Step 3 | Release a new app version Release a new app version to make your changes available. 1. Click **Release** in the top-right corner of the Workspace. 2. In the popup, add any version notes describing what changed in this release. 3. Click **Release Version**. > **Notes:** > - The release process may take a few minutes to complete. > - You must release your app before extensions appear in the app dashboard. ## Step 4 | Distribute your app After you release your app, you can begin the [app distribution](https://dev.wix.com/docs/build-apps/launch-your-app/app-distribution/about-app-distribution.md) process. Choose from one of the following distribution flows: - [Submit your app to the Wix App Market](https://dev.wix.com/docs/build-apps/launch-your-app/app-distribution/submit-your-first-app-version.md). - [Share your app directly with users](https://dev.wix.com/docs/build-apps/launch-your-app/app-distribution/share-an-app-install-link.md). >**Note:** When you click **Publish to App Market** at the bottom of the app dashboard, you may need to fix blockers before your app can be submitted for review. Select **Fix blockers** to see a list of issues you need to fix. You can't use the AI app builder chat to fix blockers. ## See also - [Supported Features and Limitations](https://dev.wix.com/docs/build-apps/develop-your-app/build-with-ai/about-the-ai-app-builder.md) - [Best Practices for AI Prompts](https://dev.wix.com/docs/api-preview/building-apps-with-ai/get-started/best-practices-for-ai-prompts.md) - [Test Your App's Upgrade Process](https://dev.wix.com/docs/build-apps/launch-your-app/app-distribution/test-your-app-s-upgrade-process.md) - [App Checks and Testing Guide](https://dev.wix.com/docs/build-apps/launch-your-app/app-distribution/app-checks-and-testing-guide.md) --- > Portal Navigation: > > - Append `.md` to any URL under `https://dev.wix.com/docs/` to get its markdown version. > - Pages are either content pages (article or reference text) or menu pages (a list of links to child pages). > - To get a menu page, truncate any URL to a parent path and append `.md` (e.g. `https://dev.wix.com/docs/sdk.md`, `https://dev.wix.com/docs/sdk/core-modules.md`). > - Top-level index of all portals: https://dev.wix.com/docs/llms.txt > - Full concatenated docs: https://dev.wix.com/docs/llms-full.txt ## Resource: Best Practices for AI Prompts for Building Apps ## Article: About AI Prompts for Building Apps ## Article Link: https://dev.wix.com/docs/build-apps/develop-your-app/build-with-ai/best-practices-for-ai-prompts-for-building-apps.md ## Article Content: # Best Practices for AI Prompts for Building Apps
__Alpha:__ The [AI app builder](https://dev.wix.com/docs/build-apps/develop-your-app/build-with-ai/about-building-apps-with-ai.md) is currently in alpha. This feature is subject to change and may have bugs, issues, and limitations. We're actively improving it based on your feedback.
Writing effective prompts helps the AI agent understand your requirements and generate code that matches your vision. This article explains best practices for creating prompts that produce better results when building apps with AI. ## Design your initial prompt When you create your initial prompt to build an app, use [Wix-specific terminology](#wix-specific-terminology) and [describe your app's goals and users](#describe-your-apps-goals-and-users). This style helps the AI agent understand your requirements and generate code that matches your vision. ### Wix-specific terminology Use Wix platform-specific terms in your initial prompts to help the AI understand what you need, such as: - [App extensions](https://dev.wix.com/docs/build-apps/develop-your-app/extensions/about-extensions.md) like dashboard page, site widget, custom element, or service plugins. For available extensions when building with AI, see [Supported Features and Limitations](https://dev.wix.com/docs/build-apps/develop-your-app/build-with-ai/about-the-ai-app-builder.md). - [Wix business solutions](https://dev.wix.com/docs/build-apps/develop-your-app/wix-business-solutions/about-wix-business-solutions.md) such as Wix Stores and Wix eCommerce. For available business solutions when building with AI, see [Supported Features and Limitations](https://dev.wix.com/docs/build-apps/develop-your-app/build-with-ai/about-the-ai-app-builder.md). - [CMS collections](https://support.wix.com/en/article/cms-content-management-system-an-overview) for data that needs to persist. If your app uses multiple extensions that share data, explain in your prompt how the data is shared between them. ### Describe your app's goals and users Write specific, detailed prompts and avoid open-ended descriptions. Follow these guidelines: - Describe the goal, target users, and key features in a clear, concise way. - Explain how users interact with your app and what the user experience looks like. These details help the AI understand the context and generate appropriate code. > **Note:** View the sample prompts below the AI chat for examples of effective prompts. ## Iterate on your app After the initial build, you can prompt the AI to modify your app in the following ways: - When something doesn't work, copy and paste the exact error message from the console. The AI agent can read your code but can't run your app, so it needs the error message to understand what went wrong and suggest a fix. - Request to add extensions. - Describe UI changes you want implemented in your app. - Request to add [permissions](https://dev.wix.com/docs/build-apps/develop-your-app/access/authorization/about-permissions.md). ## See also - [Get an idea for your next app](https://dev.wix.com/docs/build-apps/get-started/get-an-idea.md) --- > Portal Navigation: > > - Append `.md` to any URL under `https://dev.wix.com/docs/` to get its markdown version. > - Pages are either content pages (article or reference text) or menu pages (a list of links to child pages). > - To get a menu page, truncate any URL to a parent path and append `.md` (e.g. `https://dev.wix.com/docs/sdk.md`, `https://dev.wix.com/docs/sdk/core-modules.md`). > - Top-level index of all portals: https://dev.wix.com/docs/llms.txt > - Full concatenated docs: https://dev.wix.com/docs/llms-full.txt ## Resource: About the Wix MCP for App Development ## Article: About the Wix MCP for App Development ## Article Link: https://dev.wix.com/docs/build-apps/develop-your-app/build-with-ai/wix-mcp/about-the-wix-mcp-for-app-development.md ## Article Content: # About the Wix MCP for App Development The [Wix MCP](https://dev.wix.com/docs/sdk/articles/use-the-wix-mcp/about-the-wix-mcp.md) connects your AI client to Wix's platform, so you can search documentation, write code, and make API calls directly from your AI client. For app developers, this means you can configure extensions, integrate Wix APIs, and build features faster by describing what you need in natural language. ## What you can do With the Wix MCP configured in your AI client, you can: - Search the [Build Apps](https://dev.wix.com/docs/build-apps.md), [REST](https://dev.wix.com/docs/rest.md), and [SDK](https://dev.wix.com/docs/sdk.md) documentation directly from your AI chat. - Generate code for [extensions](https://dev.wix.com/docs/build-apps/develop-your-app/extensions/about-extensions.md) like dashboard pages, site widgets, events, and service plugins. - Make authenticated API calls to Wix sites to test your app's functionality. - Build complete app flows, from data models to dashboard UIs to site widgets. ## Get started To set up the Wix MCP, follow the configuration instructions in [About the Wix MCP](https://dev.wix.com/docs/sdk/articles/use-the-wix-mcp/about-the-wix-mcp.md#configure-the-wix-mcp). Once configured, try the [sample prompts for app developers](https://dev.wix.com/docs/build-apps/develop-your-app/build-with-ai/wix-mcp/wix-mcp-sample-prompts-for-app-developers.md) to see what's possible. ## See also - [About the Wix MCP](https://dev.wix.com/docs/sdk/articles/use-the-wix-mcp/about-the-wix-mcp.md) - [Wix MCP Sample Prompts for App Developers](https://dev.wix.com/docs/build-apps/develop-your-app/build-with-ai/wix-mcp/wix-mcp-sample-prompts-for-app-developers.md) - [About Extensions](https://dev.wix.com/docs/build-apps/develop-your-app/extensions/about-extensions.md) --- > Portal Navigation: > > - Append `.md` to any URL under `https://dev.wix.com/docs/` to get its markdown version. > - Pages are either content pages (article or reference text) or menu pages (a list of links to child pages). > - To get a menu page, truncate any URL to a parent path and append `.md` (e.g. `https://dev.wix.com/docs/sdk.md`, `https://dev.wix.com/docs/sdk/core-modules.md`). > - Top-level index of all portals: https://dev.wix.com/docs/llms.txt > - Full concatenated docs: https://dev.wix.com/docs/llms-full.txt ## Resource: Wix MCP Sample Prompts for App Developers ## Article: Wix MCP Sample Prompts for App Developers ## Article Link: https://dev.wix.com/docs/build-apps/develop-your-app/build-with-ai/wix-mcp/wix-mcp-sample-prompts-for-app-developers.md ## Article Content: # Wix MCP Sample Prompts for App Developers Looking to build a Wix app and sell it in our [app market](https://www.wix.com/app-market)? Once you decide on one of our [app frameworks](https://dev.wix.com/docs/build-apps/develop-your-app/frameworks/choose-the-right-wix-framework-for-your-app-development-needs.md) and complete the initial setup, use the [Wix MCP](https://dev.wix.com/docs/sdk/articles/use-the-wix-mcp/about-the-wix-mcp.md) to speed up your development, and get to market faster and easier than ever before. ### Add a site extension in the CLI **Prompt**: Add a site widget to my CLI app that creates a button with text "Follow Us". When clicked, the button should open a modal with a list of social media platform links. **AI Response**: The AI client follows the process to [add a site widget](https://dev.wix.com/docs/wix-cli/guides/extensions/site-extensions/site-widgets/add-a-site-widget-extension.md) (custom element) to the CLI app. It adds the necessary files, including code for a settings panel for the widget, and codes a custom element according to the requested parameters. ### Identify paid and free users with the SDK **Prompt**: Add the following logic to my Wix CLI application: - Check if the user is using a free or paid instance of the app. - If the version is paid, determine which plan it is. - On the dashboard page, display a limit on the number of items the user can add depending on their plan, with higher plans having higher limits. - Apply the same limit to the number of items the user adds. **AI Response**: The AI client adds code that uses [getAppInstance()](https://dev.wix.com/docs/sdk/backend-modules/app-management/app-instances/get-app-instance.md) to determine whether the app version is free or paid, and which plan it is if paid. It also adds code to the dashboard page that displays the limit to the user, and prevents them from adding extra items (e.g. creating more bookings or products) when they reach the limit allowed by their plan. ### Create a form in an app dashboard page **Prompt:** Create an iframe in the dashboard page of my app. The iframe should do 3 things: - When the user opens the page, decode and verify the encoded instance, and log the user in once they're verified. - Create a form with the fields "Name" and "Email". Auto-fill the Email field with information from the app instance, and leave the Name field open for the user to fill out. - Save this form per app instance. **Expected AI response**: The AI client adds an iframe in the dashboard page with code that does the following:  - Receives and decodes the base64 [encoded instance](https://dev.wix.com/docs/build-apps/develop-your-app/access/app-instances/about-app-instances.md#app-instance-query parameter) in order to verify the user. Upon verification it logs the user in. - Passes the decoded instance ID to getAppInstance() to retrieve the user’s email, and autofills it in the form. - Saves the form information for the verified instance ID in a database. ### Make authenticated API requests from a self-managed app **Prompt**: Add code to my app that does the following: - Sets up a POST method that listens for the Wix App Instance Installed webhook. - Stores the app instance ID from that webhook in a database. - Uses the stored app instance ID to create an access token. - Uses the access token to call Query Products. **AI Response**: The AI client adds backend code that does the following: - Listens for the [App Instance Installed webhook](https://dev.wix.com/docs/rest/app-management/app-instance/app-instance-installed.md). - Uses the app’s public key to verify that the webhook was sent by Wix. - Stores the instance ID it receives from that webhook in a database. - Uses the instance ID to [create an access token](https://dev.wix.com/docs/rest/app-management/oauth-2/create-access-token.md). In the dashboard code, it adds code to [query](https://dev.wix.com/docs/rest/business-solutions/stores/catalog/query-products.md) a list of products, and creates a frontend UI to display the product list. The client also provides instructions on how to set up the webhook in your app dashboard. ### Handle events in the CLI **Prompt**: Add code to my app to handle the `onBookingConfirmed()` and `onBookingRescheduled()` events per app instance. **AI Response**: The AI client runs the commands to add an [event extension](https://dev.wix.com/docs/wix-cli/guides/extensions/backend-extensions/events/add-event-extensions.md) to your CLI app and installs any necessary dependencies, including `@wix/bookings`. It then replaces the boilerplate code in [`events.ts`](https://dev.wix.com/docs/wix-cli/guides/extensions/backend-extensions/events/event-extension-files-and-code.md) with some sample code for the `onBookingConfirmed()` and `onBookingRescheduled()` SDK events, which you can use as a starting point. The sample code extracts the instance ID that generates the event so you can take actions when an event occurs on the app instance level. ### Let the MCP build a full app for you **Prompt**: Create a freemium app with the Wix CLI that displays a restaurant "dish of the day" in a site widget, and has a dashboard page where the user can schedule a rotation of dishes. **AI Response**: The AI client takes the following steps to create a full app that you can test and continue building off of: - Creates a basic app with the Wix CLI. - Sets up the directory structure to support code for a dashboard page and a site widget. - Installs the necessary packages like `@wix/dashboard` and `@wix/editor`. - Writes code for the [dashboard page](https://dev.wix.com/docs/build-apps/develop-your-app/extensions/dashboard-extensions/dashboard-pages/about-dashboard-page-extensions.md) that lets the user schedule dishes for the rotation and add new ones. The dashboard code includes a limit on the number of dishes a free plan user can add. - Codes a site widget that displays the dishes added by the user in the dashboard. The user can view the widget in their site editor. The client also codes a basic settings panel. --- > Portal Navigation: > > - Append `.md` to any URL under `https://dev.wix.com/docs/` to get its markdown version. > - Pages are either content pages (article or reference text) or menu pages (a list of links to child pages). > - To get a menu page, truncate any URL to a parent path and append `.md` (e.g. `https://dev.wix.com/docs/sdk.md`, `https://dev.wix.com/docs/sdk/core-modules.md`). > - Top-level index of all portals: https://dev.wix.com/docs/llms.txt > - Full concatenated docs: https://dev.wix.com/docs/llms-full.txt ## Resource: About Wix APIs ## Article: About Wix APIs ## Article Link: https://dev.wix.com/docs/build-apps/develop-your-app/api-integrations/about-wix-apis.md ## Article Content: # About Wix APIs Wix APIs act as the bridge between your app and the Wix ecosystem, enabling communication and integration between your app and Wix. With the Wix APIs, you can: - Transfer data between your app and the site it's installed on. - Extend [apps created by Wix](https://dev.wix.com/docs/rest/articles/getting-started/apps-created-by-wix.md), such as Wix eCommerce or Wix Bookings. - Customize your app’s interactions with site visitors.
__Important:__ Use of Wix APIs are subject to the [Wix App Market guidelines](https://dev.wix.com/docs/build-apps/launch-your-app/app-distribution/app-market-guidelines.md).
## API categories Wix offers a variety of APIs that enable integration with different areas of the Wix ecosystem, including: - **Business solutions**: Interact with Wix’s business solutions, such as eCommerce, Bookings, Events, and Restaurants. - **Payments**: Manage payments with Pricing Plans, Payments, and Billing APIs. - **CRM and Members**: Interact with and manage site contacts and members. - **Data**: Work with data stored in Wix-managed and external databases. - **Automations**: Streamline work processes and send notifications. ## API technologies Wix offers the following API technologies for integrating your app with Wix: - [REST](https://dev.wix.com/docs/rest.md) - [JavaScript SDK](https://dev.wix.com/docs/sdk.md) - [GraphQL](https://dev.wix.com/docs/graphql.md) - [Velo with Blocks](https://www.wix.com/velo/reference/api-overview) Each API technology offers a similar set of APIs, and each API technology is suitable for use in different contexts: ### REST [Wix REST APIs](https://dev.wix.com/docs/build-apps/develop-your-app/api-integrations/rest.md) use standard HTTPS protocols and authentication, and return JSON-encoded responses. REST APIs can be called from any programming language, and are the most common choice of API if you’re self-managing your app and developing it in a language other than JavaScript. ### JavaScript SDK The [Wix JavaScript SDK](https://dev.wix.com/docs/build-apps/develop-your-app/api-integrations/java-script-sdk.md) consists of npm packages containing wrapper functions for Wix REST APIs. The SDK is useful if you're building a Wix-managed app using the [Wix CLI](https://dev.wix.com/docs/wix-cli/guides/about-the-wix-cli.md), or you're [self-managing](https://dev.wix.com/docs/build-apps/develop-your-app/frameworks/self-hosting/about-self-hosting-for-wix-apps.md) your app and using JavaScript. ### GraphQL You can streamline your API calls using [GraphQL](https://dev.wix.com/docs/build-apps/develop-your-app/api-integrations/graph-ql.md). With GraphQL, the API response is clean, concise, and includes only the data that you need. ### Velo with Blocks If you’re building your app in [Wix Blocks](https://dev.wix.com/docs/build-apps/develop-your-app/develop-an-app-with-blocks/about-wix-blocks.md), you can access Wix APIs via [Velo](https://dev.wix.com/docs/build-apps/develop-your-app/api-integrations/velo-for-blocks.md), a powerful JavaScript-based developer platform. ## Events Wix APIs include [events](https://dev.wix.com/docs/build-apps/develop-your-app/api-integrations/events-and-webhooks/about-events.md), such as [webhooks](https://dev.wix.com/docs/build-apps/develop-your-app/api-integrations/events-and-webhooks/about-webhooks.md). Events are automated responses including a payload that are sent to your app when specific site actions occur. ## Service Plugins (formerly SPIs) [Service Plugins](https://dev.wix.com/docs/build-apps/develop-your-app/extensions/backend-extensions/service-plugins/about-service-plugin-extensions.md) are a way to inject custom logic into Wix backend APIs. You can set up Service Plugins in your app's dashboard and handle them on your server. --- > Portal Navigation: > > - Append `.md` to any URL under `https://dev.wix.com/docs/` to get its markdown version. > - Pages are either content pages (article or reference text) or menu pages (a list of links to child pages). > - To get a menu page, truncate any URL to a parent path and append `.md` (e.g. `https://dev.wix.com/docs/sdk.md`, `https://dev.wix.com/docs/sdk/core-modules.md`). > - Top-level index of all portals: https://dev.wix.com/docs/llms.txt > - Full concatenated docs: https://dev.wix.com/docs/llms-full.txt ## Resource: REST ## Article: REST ## Article Link: https://dev.wix.com/docs/build-apps/develop-your-app/api-integrations/rest.md ## Article Content: # REST APIs Wix REST APIs allow your app to access Wix users' site data, extend Wix business solutions, and customize interactions with site visitors. REST APIs can be used in any programming language. They use standard HTTPS and return JSON-encoded responses. ## Advantages of using REST APIs The advantage of using REST APIs over other Wix API technologies is that it gives you the flexibility to work with any programming language. It's a good choice for when you want to: - Host your own app and prefer to code in a language other than JavaScript. - Create an app that integrates with an existing external service whose codebase is in a language other than JavaScript. ## Authentication and permissions The simplest way to authenticate your app's REST API calls is by implementing [Wix's OAuth solution](https://dev.wix.com/docs/build-apps/develop-your-app/access/authentication/authenticate-using-oauth.md). To use Wix APIs, site owners must grant you explicit permission to access their data. They do this when they install your app on their site. Therefore, you must provide a list of permissions you need from the site owner in the Permissions page in your app's dashboard. You can see which permissions each endpoint requires in its Permissions Scopes section in the [REST API reference](https://dev.wix.com/docs/rest/.md). ![Permissions](https://wixmp-833713b177cebf373f611808.wixmp.com/images/5976bd7f832b550a30a80ebfc144c106.png) Read more about [permissions](https://dev.wix.com/docs/build-apps/develop-your-app/access/authorization/about-permissions.md). ## Events You can implement [webhooks](https://dev.wix.com/docs/build-apps/develop-your-app/api-integrations/events-and-webhooks/about-webhooks.md) to listen for and handle events over REST. Webhooks listen to events in real time and notify you whenever something happens in your app or on a site that your app is installed on. ## Service Plugins (formerly SPIs) Wix offers a range of service plugins that you can implement over REST, allowing you to inject custom logic into Wix services. Learn more about [Service Plugins](https://dev.wix.com/docs/build-apps/develop-your-app/extensions/backend-extensions/service-plugins/about-service-plugin-extensions.md). --- > Portal Navigation: > > - Append `.md` to any URL under `https://dev.wix.com/docs/` to get its markdown version. > - Pages are either content pages (article or reference text) or menu pages (a list of links to child pages). > - To get a menu page, truncate any URL to a parent path and append `.md` (e.g. `https://dev.wix.com/docs/sdk.md`, `https://dev.wix.com/docs/sdk/core-modules.md`). > - Top-level index of all portals: https://dev.wix.com/docs/llms.txt > - Full concatenated docs: https://dev.wix.com/docs/llms-full.txt ## Resource: JavaScript SDK ## Article: JavaScript SDK ## Article Link: https://dev.wix.com/docs/build-apps/develop-your-app/api-integrations/java-script-sdk.md ## Article Content: # Wix JavaScript SDK The [Wix JavaScript SDK](https://dev.wix.com/docs/sdk.md) consists of npm packages containing wrapper functions for Wix REST APIs. These functions enable you to access and manage Wix functionality through function calls in your JavaScript code. When using the Wix JavaScript SDK, you only need to configure authentication once. You don’t need to handle it in every API call. The Wix JavaScript SDK has two core modules - the SDK module (`@wix/sdk`) and the React SDK module (`@wix/sdk-react`). The SDK module provides: - A client for executing authenticated API requests and handling webhooks. - Authentication strategies for API requests. - Features for working with media content returned by the APIs. The React SDK module includes everything from the SDK module and enables the integration of Wix JavaScript SDK APIs within React components. The Wix JavaScript SDK is easy to integrate into your app. You simply install a core module (`@wix/sdk` or `@wix/sdk-react`), and then backend modules for each Wix domain your app uses (such as `@wix/contacts`.) ## Advantages of using the Wix JavaScript SDK The Wix JavaScript SDK’s functions represent a simpler, cleaner alternative to REST API calls for Javascript developers. It’s the natural choice if you’re building an app using the [Wix CLI](https://dev.wix.com/docs/wix-cli/guides/about-the-wix-cli.md). The Wix JavaScript SDK is also a good option if you’re building a [self-managed app](https://dev.wix.com/docs/build-apps/develop-your-app/frameworks/self-hosting/about-self-hosting-for-wix-apps.md) and coding in Javascript. ## Authentication and permissions Your Javascript SDK API calls must be authenticated using the OAuth protocol. You can authenticate either as an instance of your app, or on behalf of a user. For more information, see [About Authentication](https://dev.wix.com/docs/build-apps/develop-your-app/access/authentication/about-authentication.md). Site owners must also grant your app explicit permission to access their data. They do this when they install your app on their site. Therefore, you must provide a list of permissions you need from the site owner in the [Permissions page](https://manage.wix.com/app-selector?title=Select+an+App&primaryButtonText=Select+Site&actionUrl=https%3A%2F%2Fdev.wix.com%2Fapps%2F%7BappId%7D%2Fdev-center-permissions) in your app's dashboard. You can see which permissions each endpoint requires in its **Permissions Scopes** section in the [JavaScript SDK API reference](https://dev.wix.com/docs/sdk.md). ![Permissions](https://wixmp-833713b177cebf373f611808.wixmp.com/images/f470b0f8576bf976ec69d1cd6b492786.png) Depending on the context of your code, you may need to [elevate](https://dev.wix.com/docs/sdk/core-modules/essentials/auth.md) the method you want to call. Read more about [permissions](https://dev.wix.com/docs/build-apps/develop-your-app/access/authorization/about-permissions.md). ### Wix-managed vs self-managed apps When developing an app with the SDK, we recommend using one of Wix's native frameworks: [Wix Blocks](https://dev.wix.com/docs/build-apps/develop-your-app/develop-an-app-with-blocks/about-wix-blocks.md) or the [Wix CLI](https://dev.wix.com/docs/wix-cli/guides/about-the-wix-cli.md). These platforms provide a superior development experience for most use cases. Apps developed using these frameworks are hosted on Wix's cloud services, so server management is handled by Wix. Authentication is much simpler for these Wix-managed apps because you don't need to use a [Wix Client](https://dev.wix.com/docs/sdk/articles/set-up-a-client/about-the-wix-client.md) to make API calls with the SDK. However, if necessary, you also have the option of [self-managing](https://dev.wix.com/docs/sdk/articles/get-started/about-self-hosted-apps.md) your app outside of Wix. When self-managing, you need to handle server management yourself and use a [Wix Client](https://dev.wix.com/docs/sdk/articles/set-up-a-client/about-the-wix-client.md) to call the SDK. For more details see [About Development Frameworks](https://dev.wix.com/docs/build-apps/develop-your-app/frameworks/about-development-frameworks.md). ## Events The JavaScript SDK offers functionality for [processing Wix webhook events](https://dev.wix.com/docs/sdk/core-modules/sdk/wix-client.md#process). For an example, see [Handle Events With Webhooks](https://dev.wix.com/docs/build-apps/develop-your-app/api-integrations/events-and-webhooks/handle-events-with-webhooks.md). ## Service plugins To integrate service plugins (formerly SPIs) into your app, you need to implement REST endpoints. For more information, see [Service Provider Interfaces](https://dev.wix.com/docs/build-apps/develop-your-app/extensions/backend-extensions/service-plugins/about-service-plugin-extensions.md). --- > Portal Navigation: > > - Append `.md` to any URL under `https://dev.wix.com/docs/` to get its markdown version. > - Pages are either content pages (article or reference text) or menu pages (a list of links to child pages). > - To get a menu page, truncate any URL to a parent path and append `.md` (e.g. `https://dev.wix.com/docs/sdk.md`, `https://dev.wix.com/docs/sdk/core-modules.md`). > - Top-level index of all portals: https://dev.wix.com/docs/llms.txt > - Full concatenated docs: https://dev.wix.com/docs/llms-full.txt ## Resource: GraphQL ## Article: GraphQL ## Article Link: https://dev.wix.com/docs/build-apps/develop-your-app/api-integrations/graph-ql.md ## Article Content: # The Wix GraphQL API The Wix GraphQL API streamlines access to a Wix site’s data through GraphQL, a query language that allows the combination of multiple queries or mutations into a single request. Queries and mutations are read and write operations that allow for targeted data retrieval and modification within objects, without the need to handle the entire object. The GraphQL API is exposed over REST and can be used in the same applications as our [REST API](https://dev.wix.com/docs/build-apps/develop-your-app/api-integrations/rest.md), for querying and modifying the same data. To use the Wix GraphQL API, simply call our REST API’s GraphQL endpoint with your GraphQL query details in the request body. To get started, see the [Wix GraphQL API reference](https://dev.wix.com/docs/graphql.md). ## Advantages of using the Wix GraphQL API Use the Wix GraphQL API if you have complex query requirements or want to retrieve only specific data from larger objects. In these situations, using GraphQL can improve application performance, reduce server response times, and simplify your code. ## Authentication and permissions The simplest way to authenticate your app's Wix GraphQL API calls is by implementing [Wix's OAuth solution](https://dev.wix.com/docs/build-apps/develop-your-app/access/authentication/authenticate-as-an-app-instance.md). To use Wix APIs, site owners must grant you explicit permission to access their data. They do this when they install your app on their site. Therefore, you must provide a list of permissions you need from the site owner on the Permissions page in your app's dashboard. You can see which permissions each endpoint requires in its **Permissions Scopes** section in the [REST API reference](https://dev.wix.com/docs/rest/.md). ![Permissions](https://wixmp-833713b177cebf373f611808.wixmp.com/images/graphql-md_build-apps-portal_develop-your-app_api-integrations_assets_permissions.png) Read more about [permissions](https://dev.wix.com/docs/build-apps/develop-your-app/access/authorization/about-permissions.md). ## Events To handle events in your app, consider implementing [webhooks](https://dev.wix.com/docs/build-apps/develop-your-app/api-integrations/events-and-webhooks/about-webhooks.md) using the REST API. ## Service plugins To integrate service plugins (formerly SPIs) into your app, you need to implement REST endpoints. For more information, see [Service Provider Interfaces](https://dev.wix.com/docs/build-apps/develop-your-app/extensions/backend-extensions/service-plugins/about-service-plugin-extensions.md). --- > Portal Navigation: > > - Append `.md` to any URL under `https://dev.wix.com/docs/` to get its markdown version. > - Pages are either content pages (article or reference text) or menu pages (a list of links to child pages). > - To get a menu page, truncate any URL to a parent path and append `.md` (e.g. `https://dev.wix.com/docs/sdk.md`, `https://dev.wix.com/docs/sdk/core-modules.md`). > - Top-level index of all portals: https://dev.wix.com/docs/llms.txt > - Full concatenated docs: https://dev.wix.com/docs/llms-full.txt ## Resource: Velo for Blocks ## Article: Velo for Blocks ## Article Link: https://dev.wix.com/docs/build-apps/develop-your-app/api-integrations/velo-for-blocks.md ## Article Content: # Velo APIs for Blocks [Wix Blocks](https://dev.wix.com/docs/build-apps/develop-your-app/develop-an-app-with-blocks/about-wix-blocks.md) is a visual editor for building responsive applications for Wix sites. Like [Wix Studio](https://www.wix.com/studio), it lets you design widgets on-stage, configure floating menus and panels, and use Wix’s Velo platform to write JavaScript code and access Wix site data. [Velo](https://www.wix.com/velo/reference/getting-started) is a JavaScript-based, full-stack development platform built into Wix Blocks. It allows you to write code for individual widgets in your app, or for your app as a whole. Velo provides the APIs you need for integrating app components created with Blocks. With these APIs, you can use JavaScript functions to integrate your app with Wix business solutions, as well as to access and manage information about a site, its users, and more. ## Advantages of using Velo for Blocks Velo includes many features that benefit app development. For example, you can: - Write JavaScript code directly in the Velo IDE, and call Wix Velo APIs with simple JavaScript functions. - Enjoy serverless coding. Your app will be hosted on Wix's cloud services, so server setup, maintenance, scaling, and security are all handled by Wix. - Install [npm packages](https://dev.wix.com/docs/develop-websites/articles/coding-with-velo/packages/about-npm-packages.md), use our [fetch](https://dev.wix.com/docs/velo/apis/wix-fetch/introduction.md) to call external APIs, and [expose your app's functionality as an API](https://dev.wix.com/docs/build-apps/develop-your-app/develop-an-app-with-blocks/code-in-blocks/expose-a-blocks-app-api-with-http-functions.md). For more information about these features and more, see [About Velo by Wix](https://dev.wix.com/docs/develop-websites/articles/getting-started/about-developing-websites.md). ## Authentication and permissions In Velo for Wix Blocks, authentication is built in, as the site running your app knows the identity of the site member, visitor, or admin calling the API. >**Note**: The permissions requirements documented below are not yet implemented at the time of writing. However, you should take these requirements into account while developing your app. Site owners must also grant your app explicit permission to access their data. When developing your app in Wix Blocks, you must add the permissions scopes your app will request from site owners. For example, if you want your app to be able to read and manage the site’s business profile information, you would add the Manage Business Profile permission scope to your app’s required permissions. Site owners will then be asked to grant these permissions when installing your app. ## Events Many Velo modules include events that are triggered when required conditions are met. You can handle these events directly in Velo. Learn more about [Velo events](https://dev.wix.com/docs/develop-websites/articles/coding-with-velo/backend-code/events/about-backend-events.md). ## Service plugins To integrate service plugins (formerly SPIs) into your app, you need to implement REST endpoints. For more information, see [About Service Plugin Extensions](https://dev.wix.com/docs/build-apps/develop-your-app/extensions/backend-extensions/service-plugins/about-service-plugin-extensions.md). --- > Portal Navigation: > > - Append `.md` to any URL under `https://dev.wix.com/docs/` to get its markdown version. > - Pages are either content pages (article or reference text) or menu pages (a list of links to child pages). > - To get a menu page, truncate any URL to a parent path and append `.md` (e.g. `https://dev.wix.com/docs/sdk.md`, `https://dev.wix.com/docs/sdk/core-modules.md`). > - Top-level index of all portals: https://dev.wix.com/docs/llms.txt > - Full concatenated docs: https://dev.wix.com/docs/llms-full.txt ## Resource: About Events ## Article: About Events ## Article Link: https://dev.wix.com/docs/build-apps/develop-your-app/api-integrations/events-and-webhooks/about-events.md ## Article Content: # About Events Events are triggered when specific conditions on your app or a user’s site are met. You can write code that runs when an event occurs. For example, an event might be triggered when an eCommerce order is canceled. You can implement logic that sends an email to the site visitor when the event is triggered. How you handle events depends on which [frameworks](https://dev.wix.com/docs/build-apps/develop-your-app/frameworks/about-development-frameworks.md) you use to build your app: - **[Wix CLI](https://dev.wix.com/docs/wix-cli/guides/about-the-wix-cli.md)**: Handle events using [event extensions](https://dev.wix.com/docs/build-apps/develop-your-app/extensions/backend-extensions/events/about-event-extensions.md). Event extensions use the JavaScript SDK. - **[Wix Blocks](https://dev.wix.com/docs/build-apps/develop-your-app/develop-an-app-with-blocks/about-wix-blocks.md)**: [Handle events](https://dev.wix.com/docs/develop-websites/articles/coding-with-velo/backend-code/events/about-backend-events.md) using Velo. - **[Self-managed](https://dev.wix.com/docs/build-apps/develop-your-app/frameworks/self-hosting/about-self-hosting-for-wix-apps.md)**: Implement [webhooks](https://dev.wix.com/docs/build-apps/develop-your-app/api-integrations/events-and-webhooks/about-webhooks.md) using REST APIs or the Javascript SDK. > **Note:** Event extensions are built on [webhooks](https://dev.wix.com/docs/build-apps/develop-your-app/api-integrations/events-and-webhooks/about-webhooks.md). Changes to events automatically create a new minor app version. Learn more about [webhooks and versioning](https://dev.wix.com/docs/build-apps/develop-your-app/api-integrations/events-and-webhooks/about-webhooks.md#webhooks-and-versioning). ## Where to find event information The [API Reference](https://dev.wix.com/docs/api-reference.md) documentation sidebar lists events alongside their related API methods. For example, information about the [Cart Created](https://dev.wix.com/docs/api-reference/business-solutions/e-commerce/purchase-flow/cart/cart/cart-created.md) event is located under **eCommerce** > **Purchase Flow** > **Cart**. ## Recommended events Subscribe to [app management events](https://dev.wix.com/docs/rest/app-management/app-instance/app-instance-installed.md) to track your app's lifecycle, particularly: - **App Instance Installed**: Triggered when your app is installed on a site. Use this to save the instance ID, provision resources, or initialize settings. - **App Instance Removed**: Triggered when your app is uninstalled. Use this to clean up data or revoke access. --- > Portal Navigation: > > - Append `.md` to any URL under `https://dev.wix.com/docs/` to get its markdown version. > - Pages are either content pages (article or reference text) or menu pages (a list of links to child pages). > - To get a menu page, truncate any URL to a parent path and append `.md` (e.g. `https://dev.wix.com/docs/sdk.md`, `https://dev.wix.com/docs/sdk/core-modules.md`). > - Top-level index of all portals: https://dev.wix.com/docs/llms.txt > - Full concatenated docs: https://dev.wix.com/docs/llms-full.txt ## Resource: About Webhooks ## Article: About Webhooks ## Article Link: https://dev.wix.com/docs/build-apps/develop-your-app/api-integrations/events-and-webhooks/about-webhooks.md ## Article Content: # About Webhooks Webhooks are triggered by real-time events relevant to your app and the sites where your app is installed. Rather than continuously polling the status of the app or site through periodic API calls, webhooks enable your app to execute code directly in response to events. For example, you can trigger an action when a site admin creates a new product or a site visitor pays for their order. > **Notes:** > > - When building apps using Blocks, [handle events using Velo](https://dev.wix.com/docs/develop-websites/articles/coding-with-velo/backend-code/events/about-backend-events.md) instead of webhooks. > - When building apps using the CLI, you can also handle events using [event extensions](https://dev.wix.com/docs/wix-cli/guides/extensions/backend-extensions/events/add-event-extensions.md). Webhook events cover site operations like product creation and purchases, along with app-related actions such as installation or plan upgrades. You can explore events in the [API Reference](https://dev.wix.com/docs/api-reference.md). The documentation sidebar lists events alongside their related API methods. ## Handle webhooks with the Wix CLI To handle webhooks with the [Wix CLI](https://dev.wix.com/docs/wix-cli/guides/about-the-wix-cli.md), use [event extensions](https://dev.wix.com/docs/build-apps/develop-your-app/extensions/backend-extensions/events/about-event-extensions.md). The Wix CLI handles webhook payloads automatically. ## Handle webhooks when self-managing To handle webhooks when [self-managing](https://dev.wix.com/docs/build-apps/develop-your-app/frameworks/self-hosting/about-self-hosting-for-wix-apps.md), you need to handle the webhook payload directly in your code. Event data is sent as a [JSON web token (JWT)](https://jwt.io/) in the body of the webhook request. The JWT is signed, allowing you to verify its authenticity as originating from Wix. To verify the token, use your public key from the Webhooks page of the [app dashboard](https://manage.wix.com/account/custom-apps). ![Get public key button](https://wixmp-833713b177cebf373f611808.wixmp.com/images/d19eefe7e16042e5720bc8c1dcac36e6.png) The JavaScript SDK offers a `process` method on the [`WixClient`](https://dev.wix.com/docs/sdk/core-modules/sdk/wix-client.md) for verifying and decoding the JWT. For an example, see [Handle Events With Webhooks](https://dev.wix.com/docs/build-apps/develop-your-app/develop-a-self-managed-app/webhooks/handle-events-with-webhooks-for-self-hosting-using-the-java-script-sdk.md). Once verified and parsed, every webhook includes the following properties: * `instanceId`: The unique identifier of your app within the site. * `eventType`: A description of the webhook event. The rest of the webhook data differs depending on the specific event. > **Note:** Webhooks don’t always return the full entity. For example, some legacy webhooks only return fields that were updated as the result of the event. In such cases, you may need to make a GET request to the related entity endpoint. ## Event delivery and redundancy Webhook behavior can become complex in certain situations: * **Delayed or out of order events:** If your server fails to respond with a 200 status code within 1250 ms, additional attempts will be made to deliver the event to your app. This delay could cause subsequent events to be received before earlier ones. Resent webhooks always include the data from the time of the event. For more information, see the [Webhook Resend Policy](#resend-policy). * **Delayed webhooks:** In rare cases, webhooks may arrive later than their original timestamp. * **Duplicate events:** To minimize the risk of data loss and ensure continuity of events, multiple copies of your app events are stored on different servers. However, if a server holding a copy is inaccessible at the time of event delivery, you might receive the same event multiple times. We recommend designing your app to handle duplicate events. You can store processed event IDs and check against them before processing new webhooks to ensure you don't process the same event multiple times.
__Tip:__ The Webhooks page of your app's dashboard features a **Logs** tab where you can view a comprehensive list of all webhooks sent to your servers.
## Resend policy A webhook can fail due to a timeout error (1250 ms) or if a 200 status code isn't received. In case of failure, up to 12 additional attempts are made to send the webhook based on the following retry schedule: | Attempt | Time | |--|--| | 1 | 1 minute after failure | | 2 | 10 minutes after previous failure | | 3 | 1 hour after previous failure | | 4 | 2 hours after previous failure | | 5 | 2 hours after previous failure | | 6 | 2 hours after previous failure | | 7 | 4 hours after previous failure | | 8 | 4 hours after previous failure | | 9 | 4 hours after previous failure | | 10 | 8 hours after previous failure | | 11 | 8 hours after previous failure | | 12 | 12 hours after previous failure | > **Note:** Resending webhooks doesn't affect future webhooks sent to the same endpoint. Therefore, it's possible to receive webhooks out of order if a resent webhook arrives after a webhook that was successfully delivered on the first attempt. ## Webhooks and versioning Webhooks are versioned like any other app extension: - Adding a webhook creates a new minor version of your app. Minor versions are automatically pushed to users on the latest major version, so those users receive the new webhook right away. - Sites on older major versions won't trigger the new webhook until the site owner updates to the latest major version.
**Important:** Because sites on older major versions don't receive new webhooks, encourage your users to keep your app up to date. You can include a call to action within your app prompting users to update, redirecting them to `https://wix.com/app-installer?appId={YOUR_APP_ID}`.
For more information about how versioning works, see [About App Versioning](https://dev.wix.com/docs/build-apps/manage-your-app/versioning/about-app-versioning.md). ## Best practices * Send a status 200 response upon receipt of a webhook. * Make periodic API requests to confirm webhooks are being received and are accurate to the status of your app or site. * Ensure your server can handle out-of-order and duplicate webhooks. * Store processed event IDs and check against them before processing new webhooks to ensure you don't process the same event multiple times. * Update webhooks as soon as possible. Look for alerts on outdated webhooks on the **Webhooks** page of your app's dashboard. The alert contains information on how to update the webhook. Outdated webhooks can disrupt app functionality. * Regularly check for updates to your app, and install the latest version to prevent potential issues with webhook functionality. ## See also * [Handle Events With Webhooks](https://dev.wix.com/docs/build-apps/develop-your-app/api-integrations/events-and-webhooks/handle-events-with-webhooks.md) * [Test a Webhook Locally](https://dev.wix.com/docs/build-apps/develop-your-app/api-integrations/events-and-webhooks/test-a-webhook-locally.md) --- > Portal Navigation: > > - Append `.md` to any URL under `https://dev.wix.com/docs/` to get its markdown version. > - Pages are either content pages (article or reference text) or menu pages (a list of links to child pages). > - To get a menu page, truncate any URL to a parent path and append `.md` (e.g. `https://dev.wix.com/docs/sdk.md`, `https://dev.wix.com/docs/sdk/core-modules.md`). > - Top-level index of all portals: https://dev.wix.com/docs/llms.txt > - Full concatenated docs: https://dev.wix.com/docs/llms-full.txt ## Resource: FAQ for Webhooks ## Article: FAQ for Webhooks ## Article Link: https://dev.wix.com/docs/build-apps/develop-your-app/api-integrations/events-and-webhooks/faq-for-webhooks.md ## Article Content: # FAQ for Webhooks ## I haven’t received any webhooks in a long time. How can I know if something is wrong? It’s possible that the relevant sites haven’t had any relevant activity that would trigger webhooks. The easiest way to begin troubleshooting this is to call a related List or Query endpoint for a relevant site. For example, if you haven’t received an [Event Guest Created](https://dev.wix.com/docs/rest/business-solutions/events/event-guests/event-guest-created.md) webhook in 24 hours, you can call the [Query Event Guests](https://dev.wix.com/docs/api-reference/business-solutions/events/registration/event-guests/query-event-guests.md) endpoint, sorted by created date, and compare the returned data with the data on your server. If the returned data includes guests that your app didn’t receive webhooks for, Wix recommends the following: - Check that your servers are up and running. - Check the webhook log, available in the Webhooks page of your app's dashboard. ## Why am I receiving webhooks out of order/duplicates? Duplicate webhooks are generally sent when Wix believes that the webhook was not received - so make sure you are sending a 200 success response so Wix knows the webhook was received. Otherwise Wix will continue to send duplicates. For various reasons, including any delays from Wix's servers or when a delivery attempt fails, Wix will make additional attempts to send the webhook. See the [webhook resend policy](https://dev.wix.com/docs/build-apps/develop-your-app/api-integrations/events-and-webhooks/about-webhooks.md#resend-policy) for details. This might mean that you'll receive webhooks out of order, or occasionally receive duplicates, so make sure your app can handle these scenarios. ## I listen to webhooks and then take a specific update action based on the returned data. But I keep getting duplicate webhooks that include the old data. Why isn’t the data updating? Duplicate webhooks will always include the same data, even if the entity has been updated since. Chances are that you aren’t sending the expected 200 status, so Wix is continuing to send retries. The webhook data won’t update between retries. ## Why doesn't the webhook I signed up for include all the data I need? Most of Wix’s webhooks include the full entity that was created or updated, but in some cases, (generally legacy webhooks) it won’t return all the data stored for the entity. In these cases, if you need the data that isn’t returned in a webhook, you can call the relevant Get endpoint with the entity ID returned in the webhook to get the full entity. For example, the legacy [Wix Stores Product Changed](https://dev.wix.com/docs/rest/business-solutions/stores/catalog/product-changed.md) webhook only returns the fields that were updated in a flat list, and not according to the object structure returned in the calls. Alternatively, you might find that data that is documented as returned in a specific webhook isn’t being returned. This means that those specific parameters aren’t required, and in this instance we don’t have any data for it. ## How am I getting webhooks for a site that didn’t go through the installation flow for my app? Sometimes, when your app uses [custom authentication (legacy)](https://dev.wix.com/docs/build-apps/develop-your-app/access/authentication/about-oauth.md#advanced-oauth-settings), a site owner that has installed your app will duplicate their site, and your app will automatically be initialized for the duplicated site. Because they didn’t actively install, your app won’t have access and refresh tokens to make calls for the site, but you may automatically be signed up for webhooks for that site. Here's what you can do: - If you sign up for the [App Installed](https://dev.wix.com/docs/rest/app-management/app-instance/app-instance-installed.md) webhook, when your app is duplicated you’ll get a webhook notifying you that your app was installed and its payload will include the `originInstanceId`, which is the app instance ID from the original site, so you’ll know which user the site is associated with. - In addition, if you notice someone accessing your app's dashboard and you don't have valid tokens for them, you can ask them to update/install the app by sending them into the [installation flow](https://dev.wix.com/docs/build-apps/develop-your-app/access/authentication/about-oauth.md#advanced-oauth-settings). - Alternatively, you can use the standard [OAuth flow](https://dev.wix.com/docs/build-apps/develop-your-app/access/authentication/authenticate-using-oauth.md) for the site. With this flow, it’s common that the first notification you’ll receive about the installation to be when you receive the [App Installed](https://dev.wix.com/docs/rest/app-management/app-instance/app-instance-installed.md) webhook. ## Why do I sometimes get an error when I make a GET call immediately upon receipt of a webhook about entity creation? Wix's infrastructure is eventually-consistent. In some rare cases your server may receive a webhook while some of the database replicas are still behind. Most webhooks include the full entity that was created or updated, so whenever possible you should use the webhook response rather than making a GET call for the latest state of the entity. If your webhook handler tries to get data from the API, and fails with 404 (not found), you should retry the call after a few seconds. ## Are webhook timestamps sent in the site's time zone? Webhook `eventTime` timestamps are sent in [ISO-8601](https://en.wikipedia.org/wiki/ISO_8601) format and UTC time. For example: 2020-04-26T13\:57\:50.699Z --- > Portal Navigation: > > - Append `.md` to any URL under `https://dev.wix.com/docs/` to get its markdown version. > - Pages are either content pages (article or reference text) or menu pages (a list of links to child pages). > - To get a menu page, truncate any URL to a parent path and append `.md` (e.g. `https://dev.wix.com/docs/sdk.md`, `https://dev.wix.com/docs/sdk/core-modules.md`). > - Top-level index of all portals: https://dev.wix.com/docs/llms.txt > - Full concatenated docs: https://dev.wix.com/docs/llms-full.txt ## Resource: About Access ## Article: About Access ## Article Link: https://dev.wix.com/docs/build-apps/develop-your-app/access/about-access.md ## Article Content: # About Access for Wix Apps Access to Wix APIs requires successful authentication and authorization. Authentication confirms the identity of the entity making the request, while authorization determines the permitted actions for that identity. You can access Wix APIs using the [REST API](https://dev.wix.com/docs/rest.md), [JavaScript SDK](https://dev.wix.com/docs/sdk.md), or [Velo](https://dev.wix.com/docs/velo.md) (for Wix Blocks). ## Identities Identities are essential to managing interactions within the [Wix ecosystem](https://dev.wix.com/docs/build-apps/get-started/overview/the-wix-ecosystem.md). Recognized identities include site visitors, site members, Wix users (or admins), and Wix apps. These classifications affect both authentication and authorization processes. For more information, see [About Identities](https://dev.wix.com/docs/build-apps/develop-your-app/access/about-identities.md). ## Authentication To guarantee a secure connection, third-party apps integrating with Wix APIs need to authenticate following the [OAuth](https://dev.wix.com/docs/build-apps/develop-your-app/access/authentication/about-oauth.md) protocol. Your app can authenticate as an app instance, on behalf of a Wix user, or on behalf of a site visitor or member. For more information, see [About Authentication](https://dev.wix.com/docs/build-apps/develop-your-app/access/authentication/about-authentication.md). > **Note:** Wix offers [API keys](https://dev.wix.com/docs/rest/articles/getting-started/api-keys.md) for authentication, but they aren’t available for use in third-party Wix apps. ## Authorization App permission scopes specify the allowed actions and data access limits. When you register an app in the app dashboard, you define the required permission scopes that site owners need to approve. To understand the permissions needed for your app, refer to the documentation for each API your app uses. For more information, see [About Permissions](https://dev.wix.com/docs/build-apps/develop-your-app/access/authorization/about-permissions.md). ## See also * [About Webhooks](https://dev.wix.com/docs/build-apps/develop-your-app/api-integrations/events-and-webhooks/about-webhooks.md) --- > Portal Navigation: > > - Append `.md` to any URL under `https://dev.wix.com/docs/` to get its markdown version. > - Pages are either content pages (article or reference text) or menu pages (a list of links to child pages). > - To get a menu page, truncate any URL to a parent path and append `.md` (e.g. `https://dev.wix.com/docs/sdk.md`, `https://dev.wix.com/docs/sdk/core-modules.md`). > - Top-level index of all portals: https://dev.wix.com/docs/llms.txt > - Full concatenated docs: https://dev.wix.com/docs/llms-full.txt ## Resource: About Identities ## Article: About Identities ## Article Link: https://dev.wix.com/docs/build-apps/develop-your-app/access/about-identities.md ## Article Content: # About Identities Identities are essential to managing interactions within the [Wix ecosystem](https://dev.wix.com/docs/build-apps/get-started/overview/the-wix-ecosystem.md). Every request made to a Wix API is associated with an identity type, and the ability for an entity to use an API depends on their identity type. For example, site visitors can't create new products for the site, and apps can't add items to a visitor's cart unless authenticated on their behalf. ## Identity types The following are recognized identity types: * **[Site visitors:](#site-visitors)** Site visitors that access a Wix site for the first time or aren’t logged in as members. * **[Site members:](#site-members)** Site visitors with a member account who are logged in to the site. * **[Wix users:](#wix-users)** Site owners or collaborators that access the [site editor](https://dev.wix.com/docs/build-apps/get-started/overview/the-wix-ecosystem.md#site-editors) or [site dashboard](https://dev.wix.com/docs/build-apps/get-started/overview/the-wix-ecosystem.md#site-dashboard). * **[Wix apps:](#wix-apps)** Apps that access and integrate with any aspect of the [Wix ecosystem](https://dev.wix.com/docs/build-apps/get-started/overview/the-wix-ecosystem.md), such as the site editor, site dashboard, and Wix APIs. > **Note**: Wix apps can authenticate on behalf of other identity types. For more information, see [About Authentication for Wix Apps](https://dev.wix.com/docs/build-apps/develop-your-app/access/authentication/about-authentication.md). ### Site visitors Site visitors that access the live site for the first time or aren't logged in as members are also known as anonymous visitors. Wix assigns anonymous visitors a visitor ID and saves this ID in browser cookies.
__Warning:__ If a site visitor cleans their cookies, they’re assigned a new visitor ID, and Wix can’t associate them with their previous visits.
### Site members When a site visitor creates an account on the site, and logs in, they become a [site member](https://support.wix.com/en/article/about-the-members-area). Wix assigns a member ID to each member and stores this information in a persistent manner. Site owners can use [member roles](https://support.wix.com/en/article/site-members-creating-member-roles) to control permissions. To get member data, use [Query Members](https://dev.wix.com/docs/api-reference/crm/members-contacts/members/member-management/members/query-members.md) and [List Members](https://dev.wix.com/docs/api-reference/crm/members-contacts/members/member-management/members/list-members.md).
__Important:__ When Wix apps authenticate on behalf of Wix members, [member roles](https://support.wix.com/en/article/site-members-creating-member-roles) can affect the permissions your app is granted. This behavior is currently only supported for Wix Blocks. For more information, see [About Authentication for Wix Apps](https://dev.wix.com/docs/build-apps/develop-your-app/access/authentication/about-authentication.md).
When a site visitor first shares their contact information with a site, which commonly happens on member sign up, a contact entry is created. Therefore, members are often linked to a contact. However, contacts aren't identities, and site visitors and members aren't recognized by their contact ID during site interactions. Contact IDs are primarily used for tasks like sending emails, unrelated to the visitor identity within the site. To get contact data, use [Query Contacts](https://dev.wix.com/docs/rest/crm/members-contacts/contacts/contacts/contact-v4/query-contacts.md) or [List Contacts](https://dev.wix.com/docs/rest/crm/members-contacts/contacts/contacts/contact-v4/list-contacts.md). > **Note:** Any correlation between member ID and contact ID is coincidental. ### Wix users A Wix user is someone who is logged into their account on **.wix.com*. Users can be site owners or site collaborators, including app owners and collaborators who create test sites. Users who create a site are automatically designated as the owner of that site. When a user registers, Wix assigns them a unique user ID and an account ID. All sites that a user creates are automatically assigned to their account, as well as any domains, teams, custom templates and custom apps. Users can log in to multiple accounts using their unique login credentials. Site owners can invite collaborators and assign them specific [user roles](https://support.wix.com/en/article/roles-permissions-overview) to control permissions. Site collaborators are authenticated at the site-level and don't have access to account-level data. However, account-level access can be shared and managed via [teams](https://support.wix.com/en/article/wix-studio-managing-your-team), which offer default team roles and permissions. Accounts are particularly useful for businesses with multiple staff members who need access to manage sites or apps.
__Important:__ When Wix apps authenticate on behalf of Wix users, [user roles](https://support.wix.com/en/article/roles-permissions-overview) can affect the permissions your app is granted. For more information, see [About Authentication for Wix Apps](https://dev.wix.com/docs/build-apps/develop-your-app/access/authentication/about-authentication.md).
### Wix apps [Wix apps](https://dev.wix.com/docs/build-apps/get-started/overview/about-wix-apps.md) are packages of reusable functionality that users can add to their sites. To learn about how apps fit into the Wix ecosystem, see [How Apps Extend Wix](https://dev.wix.com/docs/build-apps/get-started/overview/how-apps-extend-wix.md). Each Wix app has a unique app ID, which can be found on the **OAuth** page of your [app's dashboard](https://dev.wix.com/apps/my-apps). When an app is installed on a Wix site, an [app instance](https://dev.wix.com/docs/build-apps/develop-your-app/access/app-instances/about-app-instances.md) is generated with a distinct ID representing the app on that particular site. Apps can authenticate as an app instance (specific to a site) or on behalf of other identity types, such as for apps featuring a [dashboard page](https://dev.wix.com/docs/build-apps/develop-your-app/extensions/dashboard-extensions/dashboard-pages/about-dashboard-page-extensions.md). For more information, see [About Authentication for Wix Apps](https://dev.wix.com/docs/build-apps/develop-your-app/access/authentication/about-authentication.md). ## Identities and API access Upon successful authentication, an access token is returned specific to the requesting identity. If you try to access an API method with an unauthorized identity type, the request results in an unauthorized error response. For example, site visitors and site members are restricted from using [Create Product](https://dev.wix.com/docs/rest/business-solutions/stores/catalog/create-product.md), and Wix users and apps are restricted from using [Add to Current Cart](https://dev.wix.com/docs/rest/business-solutions/e-commerce/cart/add-to-current-cart.md). ## Elevated API calls In some app [extensions](https://dev.wix.com/docs/build-apps/develop-your-app/extensions/about-extensions.md), your app's Wix API calls have [visitor](#site-visitors), [member](#site-members), or [Wix user](#wix-users) authentication by default. In these cases, you can use the Javascript SDK to elevate specific calls to use [Wix app](#wix-apps) authentication. Learn more about [elevated permissions](https://dev.wix.com/docs/sdk/articles/working-with-the-sdk/about-elevated-permissions.md). ## See also * [About Authentication](https://dev.wix.com/docs/build-apps/develop-your-app/access/authentication/about-authentication.md) * [About Permissions](https://dev.wix.com/docs/build-apps/develop-your-app/access/authorization/about-permissions.md) --- > Portal Navigation: > > - Append `.md` to any URL under `https://dev.wix.com/docs/` to get its markdown version. > - Pages are either content pages (article or reference text) or menu pages (a list of links to child pages). > - To get a menu page, truncate any URL to a parent path and append `.md` (e.g. `https://dev.wix.com/docs/sdk.md`, `https://dev.wix.com/docs/sdk/core-modules.md`). > - Top-level index of all portals: https://dev.wix.com/docs/llms.txt > - Full concatenated docs: https://dev.wix.com/docs/llms-full.txt ## Resource: About Authentication ## Article: About Authentication ## Article Link: https://dev.wix.com/docs/build-apps/develop-your-app/access/authentication/about-authentication.md ## Article Content: # About Authentication for Wix Apps To ensure a secure connection, third-party apps integrating with Wix APIs must authenticate using the [OAuth](https://dev.wix.com/docs/build-apps/develop-your-app/access/authentication/about-oauth.md) protocol. The access token and permissions granted vary depending on the authentication method: * [App instance](#authentication-as-an-app-instance), or an instance of your app on a specific site * [On behalf of a Wix user](#authentication-on-behalf-of-a-wix-user) * [On behalf of a site visitor or member](#authentication-on-behalf-of-a-site-visitor-or-member) To learn more, see [About Identities](https://dev.wix.com/docs/build-apps/develop-your-app/access/about-identities.md). > **Note:** Wix offers [API keys](https://dev.wix.com/docs/rest/articles/getting-started/api-keys.md) for authentication, but they aren’t available for use in third-party Wix apps. ## Authentication as an app instance
**Deprecated:** Custom authentication is no longer available for new apps. Existing apps that already use [custom authentication](https://dev.wix.com/docs/build-apps/develop-your-app/access/authentication/custom-authentication-legacy.md) can continue to do so. To migrate to the new authentication, see [Authenticate Using OAuth](https://dev.wix.com/docs/build-apps/develop-your-app/access/authentication/authenticate-using-oauth.md#migrate-from-custom-authentication-legacy).
When your app authenticates as an [app instance](https://dev.wix.com/docs/build-apps/develop-your-app/access/app-instances/about-app-instances.md), the authentication token grants access only to the permissions associated with the app. To authenticate as an app, you’ll need the app ID, app secret, and the app instance ID, which serves as a unique identifier for the app within a given website. For more information, see [Authenticate Using OAuth](https://dev.wix.com/docs/build-apps/develop-your-app/access/authentication/authenticate-using-oauth.md). ## Authentication on behalf of a Wix user Your app can authenticate on behalf of a Wix user to get an access token that includes the permissions granted to both the app and the user. With this capability, apps with a dashboard page can identify requests that match the permissions of the Wix user in the dashboard. Wix users can have distinct [user roles](https://support.wix.com/en/article/roles-permissions-overview), resulting in variations in the permissions your app is granted for each user. ![Intersection of app and user permissions](https://wixmp-833713b177cebf373f611808.wixmp.com/images/512a87e2284a7667b5db544c428db6b5.png) For example, if your app has permissions to add products to a store, but the current user doesn't, your app won't be able to add products to the store. Conversely, if the current user has permissions to add products to a store, but your app doesn't, your app won't be able to add products to the store. The only way your app can add products to a store is if both your app and the current user have permissions to do so. In Wix-managed apps, such as those built with [Wix Blocks](https://dev.wix.com/docs/build-apps/develop-your-app/develop-an-app-with-blocks/about-wix-blocks.md) or the [CLI](https://dev.wix.com/docs/wix-cli/guides/about-the-wix-cli.md), authentication is built-in. For self-managed apps, learn how to [Authenticate on behalf of a Wix User](https://dev.wix.com/docs/build-apps/develop-your-app/access/authentication/authenticate-on-behalf-of-a-wix-user.md).
__Important:__ This authentication approach is currently only supported for [dashboard pages](https://dev.wix.com/docs/build-apps/develop-your-app/extensions/dashboard-extensions/dashboard-pages/about-dashboard-page-extensions.md).
## Authentication on behalf of a site visitor or member Your app can authenticate on behalf of a site visitor or member to get an access token that includes the permissions granted to both the app and the site visitor or member. For example, APIs like [Get Current Cart](https://dev.wix.com/docs/rest/business-solutions/e-commerce/cart/get-current-cart.md), which are normally accessible only by site visitors or members, can also be called by your app if it has the required permissions listed in the API reference. In Wix-managed apps, such as those built with [Wix Blocks](https://dev.wix.com/docs/build-apps/develop-your-app/develop-an-app-with-blocks/about-wix-blocks.md) or the [CLI](https://dev.wix.com/docs/wix-cli/guides/about-the-wix-cli.md), authentication is built-in. For self-managed apps, implement this method for: * [Site widgets](https://dev.wix.com/docs/build-apps/develop-your-app/develop-a-self-managed-app/supported-extensions/site-extensions/site-widgets-and-plugins/authenticate-custom-elements-using-the-wix-client.md) * [Embedded scripts](https://dev.wix.com/docs/build-apps/develop-your-app/develop-a-self-managed-app/supported-extensions/site-extensions/embedded-scripts/authenticate-embedded-scripts-using-the-wix-client.md) ## See also * [About Identities](https://dev.wix.com/docs/build-apps/develop-your-app/access/about-identities.md) * [About Permissions](https://dev.wix.com/docs/build-apps/develop-your-app/access/authorization/about-permissions.md) --- > Portal Navigation: > > - Append `.md` to any URL under `https://dev.wix.com/docs/` to get its markdown version. > - Pages are either content pages (article or reference text) or menu pages (a list of links to child pages). > - To get a menu page, truncate any URL to a parent path and append `.md` (e.g. `https://dev.wix.com/docs/sdk.md`, `https://dev.wix.com/docs/sdk/core-modules.md`). > - Top-level index of all portals: https://dev.wix.com/docs/llms.txt > - Full concatenated docs: https://dev.wix.com/docs/llms-full.txt ## Resource: About OAuth ## Article: About OAuth ## Article Link: https://dev.wix.com/docs/build-apps/develop-your-app/access/authentication/about-oauth.md ## Article Content: # About OAuth Your app must authenticate Wix API calls using the OAuth protocol. OAuth is a secure and simple method that eliminates the need for redirects and token management. ## OAuth OAuth authentication follows the [OAuth Client Credentials protocol](https://oauth.net/2/grant-types/client-credentials/). Using this approach, you don’t need to implement an OAuth handshake for each installation of your app. Instead, your app can directly request an access token by calling [Create Access Token](https://dev.wix.com/docs/rest/app-management/oauth-2/create-access-token.md) with the following values: * App ID * App secret * The relevant [app instance ID](https://dev.wix.com/docs/build-apps/develop-your-app/access/app-instances/about-app-instances.md) OAuth has the following advantages compared to custom authentication (deprecated): * OAuth helps prevent corrupted installations. * OAuth is simpler to implement, since you don't need to setup and run a server for redirects or manage a database for refresh tokens. * With custom authentication (deprecated), cloned sites can bypass consent flows, potentially causing issues with refresh tokens. Users may need to reinstall the app to obtain the required refresh token for proper installation. To get started, see [Authenticate Using OAuth](https://dev.wix.com/docs/build-apps/develop-your-app/access/authentication/authenticate-using-oauth.md). ## Custom authentication (deprecated)
**Deprecated:** Custom authentication is no longer available for new apps. This section is only relevant for existing apps that already use custom authentication. Note that apps using custom authentication must prompt users to reinstall the app when a site is cloned. Cloning creates a new [app instance](https://dev.wix.com/docs/build-apps/develop-your-app/access/app-instances/about-app-instances.md) without triggering the consent flow, resulting in the absence of a refresh token. To migrate to the new authentication, see [Authenticate Using OAuth](https://dev.wix.com/docs/build-apps/develop-your-app/access/authentication/authenticate-using-oauth.md#migrate-from-custom-authentication-legacy).
Wix offers [custom authentication](https://dev.wix.com/docs/build-apps/develop-your-app/access/authentication/custom-authentication-deprecated.md) to allow for more control over user identification and redirection during the app installation process. Apps may use custom authentication when they need to redirect users to a URL outside the Wix ecosystem during the app installation flow. For example, when you need to automatically create an account using the [information in the access token](https://dev.wix.com/docs/rest/app-management/oauth-2/token-info.md). Custom authentication follows the industry-standard [OAuth 2.0 protocol](https://oauth.net/2/), which provides a secure way for site owners to grant your app permissions. Whenever a site owner installs your app, your app's code must complete an OAuth handshake. This requires that you set up a server to handle the relevant redirects. Then, you need to store the refresh token for the new app instance in your database. Finally, you can use the refresh token to retrieve an access token and call the relevant Wix API. With custom authentication, it's critical that your app saves the refresh token during installation. If the process fails, you're unable to retrieve access tokens using [Refresh an Access Token](https://dev.wix.com/docs/rest/app-management/oauth-2/refresh-an-access-token.md). Though from the site owner's point-of-view, it seems that the app installation has succeeded. You have 2 options in this situation: Ask the site owners to re-install your app, or fall back to retrieving access tokens with the OAuth strategy by calling [Create Access Token](https://dev.wix.com/docs/rest/app-management/oauth-2/create-access-token.md). ## See also * [Authenticate Using OAuth](https://dev.wix.com/docs/build-apps/develop-your-app/access/authentication/authenticate-using-oauth.md) --- > Portal Navigation: > > - Append `.md` to any URL under `https://dev.wix.com/docs/` to get its markdown version. > - Pages are either content pages (article or reference text) or menu pages (a list of links to child pages). > - To get a menu page, truncate any URL to a parent path and append `.md` (e.g. `https://dev.wix.com/docs/sdk.md`, `https://dev.wix.com/docs/sdk/core-modules.md`). > - Top-level index of all portals: https://dev.wix.com/docs/llms.txt > - Full concatenated docs: https://dev.wix.com/docs/llms-full.txt ## Resource: Authenticate Using OAuth ## Article: Use OAuth ## Article Link: https://dev.wix.com/docs/build-apps/develop-your-app/access/authentication/authenticate-using-oauth.md ## Article Content: # Authenticate Using OAuth This article explains how to authenticate API calls to Wix using [OAuth](https://dev.wix.com/docs/build-apps/develop-your-app/access/authentication/about-oauth.md).
**Important:** Extensions built with [Wix Blocks](https://dev.wix.com/docs/build-apps/develop-your-app/develop-an-app-with-blocks/about-wix-blocks.md) or the [Wix CLI](https://dev.wix.com/docs/wix-cli/guides/about-the-wix-cli.md) handle authentication automatically.
## Step 1 | Get app credentials and instance ID To authenticate, you need the following information: * **App ID:** Find it on the [**OAuth**](https://manage.wix.com/app-selector?title=Select+an+App&primaryButtonText=Select+Site&actionUrl=https%3A%2F%2Fdev.wix.com%2Fapps%2F%7BappId%7D%2Foauth) page of your app's dashboard. * **App secret:** Find it on the [**OAuth**](https://manage.wix.com/app-selector?title=Select+an+App&primaryButtonText=Select+Site&actionUrl=https%3A%2F%2Fdev.wix.com%2Fapps%2F%7BappId%7D%2Foauth) page of your app's dashboard. Keep this value confidential. * **App instance ID:** The unique identifier (`instanceId`) for your app on a site. There are different ways to get the `instanceId`, depending on your app's logic. The most common methods for getting it to generate an access token are: * [App Instance Installed webhook](https://dev.wix.com/docs/rest/app-management/app-instance/app-instance-installed.md): Triggered when your app is installed on a Wix site. We recommend saving the `instanceId` at this point. * [Webhook payloads](https://dev.wix.com/docs/build-apps/develop-your-app/api-integrations/events-and-webhooks/about-webhooks.md): Each webhook sent by Wix includes the `instanceId`. * [Service plugin metadata](https://dev.wix.com/docs/build-apps/develop-your-app/extensions/backend-extensions/service-plugins/about-service-plugin-extensions.md): Each service plugin request from Wix includes the `instanceId` in the metadata. * [app instance query parameter](https://dev.wix.com/docs/build-apps/develop-your-app/access/app-instances/about-app-instances.md#app-instance-query parameter): External pages and iframe extensions receive an app instance query parameter with the `instanceId`. To learn more, see [About App Instances](https://dev.wix.com/docs/build-apps/develop-your-app/access/app-instances/about-app-instances.md). ## Step 2 | Make an authenticated API request The authentication process varies depending on whether you use the JavaScript SDK or REST API. ### JavaScript SDK To make an authenticated API request with the JavaScript SDK in a self-managed extension: 1. Create a [`WixClient`](https://dev.wix.com/docs/sdk/core-modules/sdk/wix-client.md) using the [`AppStrategy`](https://dev.wix.com/docs/sdk/core-modules/sdk/app-strategy.md). ```javascript import { createClient, AppStrategy } from '@wix/sdk'; import { products } from '@wix/stores'; const myClient = createClient({ auth: AppStrategy({ appId: '', appSecret: '', publicKey: '', instanceId: '' }), modules: { products, } }); ``` 1. Make an API request. The client automatically obtains and includes the access token in the `Authorization` header. For example, call [`queryProducts()`](https://dev.wix.com/docs/rest/business-solutions/stores/catalog/query-products.md). ```javascript const { items } = await myClient.products.queryProducts({}); ```
**Important:** The [Wix CLI](https://dev.wix.com/docs/wix-cli/guides/about-the-wix-cli.md) also uses the JavaScript SDK but handles authentication automatically. To make API requests from CLI extensions, use the [httpClient](https://dev.wix.com/docs/sdk/core-modules/essentials/http-client.md).
### REST API To make an authenticated API request with the REST API: 1. Send a request to [Create Access Token](https://dev.wix.com/docs/rest/app-management/oauth-2/create-access-token.md). Include your app ID, app secret, and `instanceId` in the HTTP body. ```curl curl -X POST 'https://www.wixapis.com/oauth2/token' -H 'Content-Type: application/json' -d '{ "grant_type": "client_credentials", "client_id": "", "client_secret": "", "instance_id": "" }' ``` 1. Store the `access_token` from the response. The token is valid for 4 hours. 1. Make an API request by including the `access_token` in the `Authorization` header. For example, call [Query Products](https://dev.wix.com/docs/rest/business-solutions/stores/catalog/query-products.md). ```curl curl -X POST \ 'https://www.wixapis.com/stores/v1/products/query' \ --data-binary '{}' \ -H 'Content-Type: application/json' \ -H 'Authorization: ' ``` ## Migrate from custom authentication (legacy) To migrate from custom authentication to OAuth: 1. Replace requests to [Refresh an Access Token](https://dev.wix.com/docs/rest/app-management/oauth-2/refresh-an-access-token.md) with [Create an Access Token](https://dev.wix.com/docs/rest/app-management/oauth-2/create-access-token.md). 1. Make sure that you have a method to get `instanceId` as described in step 1. We recommend subscribing to the [App Instance Installed webhook](https://dev.wix.com/docs/rest/app-management/app-instance/app-instance-installed.md). ## See also * [About OAuth](https://dev.wix.com/docs/build-apps/develop-your-app/access/authentication/about-oauth.md) * [About Authentication for Wix Apps](https://dev.wix.com/docs/build-apps/develop-your-app/access/authentication/about-authentication.md) * [JavaScript SDK: About Self-Managed Apps](https://dev.wix.com/docs/sdk/articles/get-started/about-self-hosted-apps.md) --- > Portal Navigation: > > - Append `.md` to any URL under `https://dev.wix.com/docs/` to get its markdown version. > - Pages are either content pages (article or reference text) or menu pages (a list of links to child pages). > - To get a menu page, truncate any URL to a parent path and append `.md` (e.g. `https://dev.wix.com/docs/sdk.md`, `https://dev.wix.com/docs/sdk/core-modules.md`). > - Top-level index of all portals: https://dev.wix.com/docs/llms.txt > - Full concatenated docs: https://dev.wix.com/docs/llms-full.txt ## Resource: Custom Authentication (deprecated) ## Article: Use Advanced OAuth ## Article Link: https://dev.wix.com/docs/build-apps/develop-your-app/access/authentication/custom-authentication-deprecated.md ## Article Content: # Custom Authentication (Deprecated)
**Deprecated:** Custom authentication is no longer available for new apps. This article is only relevant for existing apps that already use custom authentication. For new apps and migration, see [Authenticate Using OAuth](https://dev.wix.com/docs/build-apps/develop-your-app/access/authentication/authenticate-using-oauth.md).
Custom authentication follows the industry-standard [OAuth 2.0 protocol](https://oauth.net/2/), which provides a secure way for site owners to grant your app permissions. Whenever a site owner installs your app, your app’s code must complete an OAuth handshake. Before you start, it's important to understand how the custom authentication flow works. The diagram below shows the complete flow including all actions that your app, Wix, and the user must take. ![custom authentication flow](https://wixmp-833713b177cebf373f611808.wixmp.com/images/6a42cc18f6365efcf8717c3b017a740f.png) ## Step 1 | Set up custom authentication in your app's dashboard Before setting up your app’s custom authentication settings, complete the OAuth settings in your [app's dashboard](https://manage.wix.com/account/custom-apps). 1. Under **Build your app,** go to **OAuth**. 1. Find your app’s **secret key** and store securely. Don’t share it with anyone or make it public in any way. 1. Enter an **App URL**. Wix redirects your new users to this URL when they install your app. You must use an HTTPS URL. During your app’s development, you may use localhost or ngrok URLs, but you need to change the URL before submitting your app for review. 1. Enter a **Redirect URL**. When a new user agrees to give your app the requested permissions, Wix redirects them to this URL. The redirect includes your app’s temporary authorization code. 1. Make sure to click **Save** before navigating away from the OAuth settings page. 1. Confirm that the [Cross-Origin-Opener-Policy](https://developer.mozilla.org/en-US/docs/Web/HTTP/Headers/Cross-Origin-Opener-Policy) of both the app URL and redirect URL is set to `unsafe-none`. This enables Wix to close the redirect window as part of the flow. If the COOP of either URL has a different value, set it to `unsafe-none`. ## Step 2 | Set up custom authentication in your app 1. When a new user installs your app, they're asked to approve the complete list of required [permissions](https://dev.wix.com/docs/build-apps/develop-your-app/access/authorization/about-permissions.md) that your app is requesting. 1. Once approved, Wix redirects the user to your app URL with the authorization token. Make sure to save the `token` query parameter value. We recommend that, at this point, you omit a sign-up or log-in step on your end. 1. Redirect the user to Wix at `https://www.wix.com/installer/install`. Include the `token`, your `appId`, and `redirectUrl` as query parameters. You may also pass a `state` to identify your customers along the installation process. 1. Wix redirects the user back to your app’s `redirectUrl`. From the redirect’s query parameters, save the `code` and `instanceId`. Wix also includes `state` as a query parameter value. If the value doesn’t match the one provided by you, the request may have been created by a third party. Then, we recommend aborting the process. 1. This temporary authorization `code` is valid for 10 minutes. Use it to request your app’s refresh and access token by calling [Request an Access Token](https://dev.wix.com/docs/rest/app-management/oauth-2/request-an-access-token.md). The access token is only valid for 5 minutes. You need to request a new access token to make Wix API calls after it expires. 1. Optional: If your app requires user login or sign-up, you can present the relevant modal to the user. Note that you can't do this prior to this point, but may choose to do at any later point. 1. Optional: If your app includes a [dashboard page](https://dev.wix.com/docs/build-apps/develop-your-app/extensions/dashboard-extensions/dashboard-pages/about-dashboard-page-extensions.md) or [dashboard extension](https://dev.wix.com/docs/build-apps/develop-your-app/extensions/dashboard-extensions/about-dashboard-extensions.md) that opens inside of Wix as an iframe, or another internal component of your app, your app needs to close the user’s browser window that has displayed the permission consent agreement. To close the consent window, redirect the user to this URL: `https://www.wix.com/installer/close-window?access_token=`. Make sure to replace `` with your app instance’s access token. 1. Optional: Update Wix about the status of your new app instance. At this point, your app instance’s `state` is`“Setup Incomplete”`. This state is useful if your app requires users to create an account or set other configuration parameters for the app to become active. If your app doesn’t require user input to become active, or after the user has completed their part, update your app instance’s state by calling [Send BI Event](https://dev.wix.com/docs/api-reference/app-management/bi-event/send-bi-event.md). Make sure to pass `{"eventName": "APP_FINISHED_CONFIGURATION"}`. ## Step 3 | Make API calls After you successfully set up custom authentication, you can call the relevant Wix APIs described in our [API Reference](https://dev.wix.com/docs/api-reference.md). 1. Request a new access token by calling [Refresh an Access token](https://dev.wix.com/docs/rest/app-management/oauth-2/refresh-an-access-token.md). Pass `{"grant_type": "refresh_token"}` and your app’s secret key as `client_secret` in the request. 1. Use the access token as an `Authorization` header in the relevant API call. The access token is only valid for 5 minutes. --- > Portal Navigation: > > - Append `.md` to any URL under `https://dev.wix.com/docs/` to get its markdown version. > - Pages are either content pages (article or reference text) or menu pages (a list of links to child pages). > - To get a menu page, truncate any URL to a parent path and append `.md` (e.g. `https://dev.wix.com/docs/sdk.md`, `https://dev.wix.com/docs/sdk/core-modules.md`). > - Top-level index of all portals: https://dev.wix.com/docs/llms.txt > - Full concatenated docs: https://dev.wix.com/docs/llms-full.txt ## Resource: Authenticate on Behalf of a Wix User ## Article: Authenticate On-Behalf-Of a Wix User ## Article Link: https://dev.wix.com/docs/build-apps/develop-your-app/access/authentication/authenticate-on-behalf-of-a-wix-user.md ## Article Content: # Authenticate on behalf of a Wix User Your app can authenticate on behalf of a Wix user to access site data and perform actions, combining the permissions of the app and the user. Wix users may have different [user roles](https://support.wix.com/en/article/roles-permissions-overview), resulting in different permissions granted to your app for each user. On behalf of user authentication is supported for [dashboard pages](https://dev.wix.com/docs/build-apps/develop-your-app/extensions/dashboard-extensions/dashboard-pages/about-dashboard-page-extensions.md), which facilitate user site and business management. It allows your app to recognize requests aligned with the permissions of the Wix user within the dashboard. This article explains how to authenticate on behalf of a Wix user using the [Javascript SDK](https://dev.wix.com/docs/sdk/core-modules/sdk/introduction.md). The SDK manages the OAuth process for you behind the scenes. This functionality isn't currently supported using the REST API.
__Important:__ This authentication strategy is currently only supported for [dashboard pages](https://dev.wix.com/docs/build-apps/develop-your-app/extensions/dashboard-extensions/dashboard-pages/about-dashboard-page-extensions.md).
## Javascript SDK To authenticate your app on behalf of a Wix user using the JavaScript SDK: 1. Install the [SDK](https://dev.wix.com/docs/sdk/core-modules/sdk/introduction.md): ```bash npm install @wix/sdk ``` The SDK module is used to communicate with the Wix platform from JavaScript code by providing a client for making authenticated calls to Wix APIs. 1. Install the [Dashboard SDK](https://dev.wix.com/docs/sdk/host-modules/dashboard/introduction.md): ```bash npm install @wix/dashboard ``` The Dashboard SDK allows code in custom dashboard components to interact with the Wix dashboard. This includes features like navigating users, displaying modals, and sending alerts and updates. 1. Create a [`WixClient`](https://dev.wix.com/docs/sdk/core-modules/sdk/wix-client.md) instance with the dashboard host and authentication strategy: ```javascript import { createClient } from '@wix/sdk'; import { dashboard } from '@wix/dashboard'; const myClient = createClient({ host: dashboard.host(), auth: dashboard.auth(), modules: { dashboard, }, }); ``` The dashboard authentication strategy considers the Wix user in context, providing an app access token with combined app and user permissions. 1. Make an API request. Behind the scenes, the client makes a request to obtain an access token and incorporates it into the `Authorization` request header. For example: ```javascript import { products } from '@wix/stores'; const { items } = await myClient.products.queryProducts({ filter: { name: { $startsWith: 'shoes' } }, cursorPaging: { limit: 4 } }); ```
__Tip:__ If a REST API isn't available in the SDK, you can still access it using the [`fetch()`](https://dev.wix.com/docs/sdk/core-modules/sdk/wix-client.md) method.
## See also * [About Authentication for Wix Apps](https://dev.wix.com/docs/build-apps/develop-your-app/access/authentication/about-authentication.md) * [About Identities](https://dev.wix.com/docs/build-apps/develop-your-app/access/about-identities.md) --- > Portal Navigation: > > - Append `.md` to any URL under `https://dev.wix.com/docs/` to get its markdown version. > - Pages are either content pages (article or reference text) or menu pages (a list of links to child pages). > - To get a menu page, truncate any URL to a parent path and append `.md` (e.g. `https://dev.wix.com/docs/sdk.md`, `https://dev.wix.com/docs/sdk/core-modules.md`). > - Top-level index of all portals: https://dev.wix.com/docs/llms.txt > - Full concatenated docs: https://dev.wix.com/docs/llms-full.txt ## Resource: Verify Requests Received from Wix ## Article: Verify Requests Received from Wix ## Article Link: https://dev.wix.com/docs/build-apps/develop-your-app/access/authentication/verify-requests-received-from-wix.md ## Article Content: # Verify Requests Received from Wix When you receive a data payload from Wix, it includes a header called `digest`. The header holds a [JSON Web Token (JWT)](https://jwt.io/introduction/) with the signed data. Before using the data you've received, you should: * Verify the JWT's signature to confirm that the data was sent by Wix. * Verify the integrity of the data (for encrypted payloads only – not webhooks). Here's a sample JWT: ```json eyJraWQiOiJxRzFrRDJkeiIsImFsZyI6IlJTMjU2In0.eyJkYXRhIjp7IlNIQTI1NiI6IjNmZDA1ZGZlNDI5ODM3ZGE4NmNiYzcxMDE5MGM5YTY3Mjk2MjAzYmJkNGJkMzE2MGFiMGZmMDdiNjU5YjAxNjAifSwiaWF0IjoxNTUwOTM2NzMxLCJleHAiOjE1NTEyMzY3MzF9.JSRB5MbSNQEXd3we4SJR9voXTIePHlVGSGOb6OXV2v7oHBfRxaisE-ZIdNDMW2Wyy_u48VbKOUxOMdaBGRbP9Vy8S7AuXwixswBYqBS-CG2VffHVAbuijTxUkRzu7Fp29xfC14nDOdF_-aOS5morA_4j-Vbcju3ZwJsk23XLvqLuNmjCgces5QHqYDYazhX8oIqncfEHr1ZJadSFrFZeDhwQmwUGr6xwW8pNi5EJqby1sOAe8r7I3OnYG6qSWrnUHaHfSNJxEzZGST-oFJhaWSc2jGJ8ZyOhtr6UA-j6zdcqEuJBpA_YFpL23eI5vDCkVs6hSOtQ8FkiyFPy07OFzQ ``` ## Step 1 | Verify that the data came from Wix To verify that the data came from Wix: 1. Select your app from the [Custom Apps page](https://manage.wix.com/studio/custom-apps) in your Wix Studio Workspace. 1. At the top of your app's home page, click **More Actions** ![](https://wixmp-833713b177cebf373f611808.wixmp.com/images/45e14aa3d153b022e301df2cea4fabfb.png) and select **View ID & keys**. 1. Copy the public key and use it to decode the JWT. Here's what the data looks like once its been decoded and verified with your public key:
![](https://d2x3xhvgiqkx42.cloudfront.net/12345678-1234-1234-1234-1234567890ac/d0d6e5d7-1e68-49aa-8fbd-c4454894592e/2019/02/24/69f3af93-5c9a-4b8a-9a97-a03009c9bc62.png)
> **Note:** View a sample decoded JWT in the [JWT debugger](https://jwt.io/#debugger-io?token=eyJraWQiOiJxRzFrRDJkeiIsImFsZyI6IlJTMjU2In0.eyJkYXRhIjp7IlNIQTI1NiI6IjNmZDA1ZGZlNDI5ODM3ZGE4NmNiYzcxMDE5MGM5YTY3Mjk2MjAzYmJkNGJkMzE2MGFiMGZmMDdiNjU5YjAxNjAifSwiaWF0IjoxNTUwOTM2NzMxLCJleHAiOjE1NTEyMzY3MzF9.JSRB5MbSNQEXd3we4SJR9voXTIePHlVGSGOb6OXV2v7oHBfRxaisE-ZIdNDMW2Wyy_u48VbKOUxOMdaBGRbP9Vy8S7AuXwixswBYqBS-CG2VffHVAbuijTxUkRzu7Fp29xfC14nDOdF_-aOS5morA_4j-Vbcju3ZwJsk23XLvqLuNmjCgces5QHqYDYazhX8oIqncfEHr1ZJadSFrFZeDhwQmwUGr6xwW8pNi5EJqby1sOAe8r7I3OnYG6qSWrnUHaHfSNJxEzZGST-oFJhaWSc2jGJ8ZyOhtr6UA-j6zdcqEuJBpA_YFpL23eI5vDCkVs6hSOtQ8FkiyFPy07OFzQ&publicKey=-----BEGIN%20PUBLIC%20KEY-----%0AMIIBIjANBgkqhkiG9w0BAQEFAAOCAQ8AMIIBCgKCAQEAlhQbczvgh7Z%2BA0G9d1VR%0A9V8eXtq2KPCagZZHaEpagm9oAeUYWoyy4ibsl3m6qMNCBgl6LXyCpGl9UtyEhx2m%0Ag80RJNRLdETagydxvYO6SwcAFs7DheVfSble852LQ2m%2BVM1TgW4JQQrwZcFObLfi%0AujfBEr7eRK7hB0i6K0zHt7BvF9THIJQifO7r9sKkMdu%2B%2FcNJxN2Q%2B%2Bs%2F9pSUlnB3%0AzEPmvZHfbf3v04A5Nl%2FZw%2ButD5u9A81FElz8RoXCgMH3CCTBmwORcriv5qDOsAYR%0A9J2gKhpvx5fxaoCzjx1k7npTp%2Fx1D5Xi3WMW338S6edZSYlEopzO7NAuP%2F%2BmdSrO%0ATwIDAQAB%0A-----END%20PUBLIC%20KEY-----%0A). ## Step 2 | Verify the integrity of the data In some cases, the payload data will be encrypted as a security precaution. If the data is encrypted, it's crucial to ensure its integrity and confirm that it hasn't been altered during transit. > **Note:** Webhook payloads are not encrypted. The encrypted payload data includes an object with a hash of the payload data, and the hash type as its key. For example:  ```json "data": { "SHA256": "3fd05dfe429837da86cbc710190c9a67296203bbd4bd3160ab0ff07b659b0160" } ``` To verify the integrity of the data: 1. Take the encrypted body data you received and hash it using the same hashing algorithm listed in the data object. In our example:  * Hash type: **SHA256** * Body data: **{"mydata":"is secured"}** 2. Compare the new hash with the hash listed in the data object. For example: **Sha256({"mydata":"is secured"})** yields **3fd05dfe429837da86cbc710190c9a67296203bbd4bd3160ab0ff07b659b0160**. --- > Portal Navigation: > > - Append `.md` to any URL under `https://dev.wix.com/docs/` to get its markdown version. > - Pages are either content pages (article or reference text) or menu pages (a list of links to child pages). > - To get a menu page, truncate any URL to a parent path and append `.md` (e.g. `https://dev.wix.com/docs/sdk.md`, `https://dev.wix.com/docs/sdk/core-modules.md`). > - Top-level index of all portals: https://dev.wix.com/docs/llms.txt > - Full concatenated docs: https://dev.wix.com/docs/llms-full.txt ## Resource: Extract Identities From Backend Requests ## Article: Extract Identities From Backend Requests ## Article Link: https://dev.wix.com/docs/build-apps/develop-your-app/access/authentication/extract-identities-from-backend-requests.md ## Article Content: # About Extracting Identities From Backend Requests When developing [backend extensions](https://dev.wix.com/docs/build-apps/develop-your-app/extensions/backend-extensions/about-backend-extensions.md) for an app or [web methods](https://dev.wix.com/docs/velo/api-reference/wix-web-module/web-method.md), you might need to know the [identity](https://dev.wix.com/docs/build-apps/develop-your-app/access/about-identities.md) of the session making the request to your backend. This identity is encoded in a token sent along with the request. To learn more about identity and access management in Wix, see [About Identities](https://dev.wix.com/docs/build-apps/develop-your-app/access/about-identities.md). To extract the identity from the request to your backend extension, you can use the [`getTokenInfo()`](https://dev.wix.com/docs/sdk/core-modules/essentials/auth.md#get-token-info) function from the `@wix/essentials` package. This function returns the information encoded in the currently active token (the token sent with the request). For an example of how to do this, see the [`getTokenInfo()`](https://dev.wix.com/docs/sdk/core-modules/essentials/auth.md#get-token-info) documentation. ## Use cases The following are examples of use cases that require the identity of the request. ### Identity-specific data Store data in a database based on the identity of whoever made the request. This can include data that only the owner of the identity should have access to. For example information bout a user's profile, or their shopping cart. ### Authentication Verify that the request is coming from an authenticated identity, ensuring that the request is made from the Wix platform and not from an unverified external source. This is critical for securing your app and ensuring that your data can't be accessed or modified by unauthenticated users. ### Authorization Determine if the identity making the request has the necessary permissions to perform the operation. By having access to the subject ID (the ID of the identity making the request), you can implement logic to determine if the identity has the necessary permissions. The logic can be based on the identity's role, group, or any other attribute that you have associated with the identity. ### Auditing Log the identity of the user or app making the request for auditing purposes. This can help you track who is making requests to your app and what operations they're performing. ### Personalization Personalize the response based on the identity of the user or app making the request. This can include showing personalized content, recommendations, or any other data specific to the identity making the request. ### Billing Implement usage-based billing based on the identity making the request. Using the identity of the user or app making the request, you can track the usage of your app and bill the user or app accordingly, such as by the number of users using the app or the number of members or visitors on the site. --- > Portal Navigation: > > - Append `.md` to any URL under `https://dev.wix.com/docs/` to get its markdown version. > - Pages are either content pages (article or reference text) or menu pages (a list of links to child pages). > - To get a menu page, truncate any URL to a parent path and append `.md` (e.g. `https://dev.wix.com/docs/sdk.md`, `https://dev.wix.com/docs/sdk/core-modules.md`). > - Top-level index of all portals: https://dev.wix.com/docs/llms.txt > - Full concatenated docs: https://dev.wix.com/docs/llms-full.txt ## Resource: About Permissions ## Article: About Permissions ## Article Link: https://dev.wix.com/docs/build-apps/develop-your-app/access/authorization/about-permissions.md ## Article Content: # About Permissions for Wix Apps Your app can access site data through API calls or webhooks. To do so, it must request the necessary permissions specified in the API and webhook references. Permissions are essential for protecting site data and ensuring only authorized users can perform specific actions. In the [app dashboard](https://dev.wix.com/apps/my-apps), you specify the permission scopes your app requires from site owners. Upon installing your app, site owners are prompted to grant these permissions. Then, when the app authenticates, an access token with the relevant permissions is returned. ## APIs In the [REST API](https://dev.wix.com/docs/rest.md), [JavaScript SDK](https://dev.wix.com/docs/sdk.md), and [Velo](https://dev.wix.com/docs/velo.md) (for Wix Blocks) reference, each endpoint and method lists supported permission scopes. To use the endpoint or method, your app needs to have at least one of the listed permission scopes. To set up permissions, see [Configure Permissions for Your App](https://dev.wix.com/docs/build-apps/develop-your-app/access/authorization/configure-permissions-for-your-app.md). ## Webhooks With [webhooks](https://dev.wix.com/docs/build-apps/develop-your-app/api-integrations/events-and-webhooks/about-webhooks.md), permissions are configured during the subscription process as follows: * If a single permission scope is required to use the webhook, Wix automatically adds that permissions scope to your app. * If there are multiple possible permission scopes that allow you use the webhook, you're prompted to select the desired permission scope. For example: ![Select permission scope during webhook subscription webhook](https://wixmp-833713b177cebf373f611808.wixmp.com/images/about-permissions-md_build-apps-portal_develop-your-app_access_authorization_assets_webhook-permissions.png) When you click **Subscribe**, the permissions are added to your app. ## App Market guidelines For your app to be approved on the app market, it must request only the necessary permissions for app functionality. This requirement includes refraining from requesting permissions that are redundant or contained within others. For example, if your app requires and requests **Manage Stores - All Permissions**, it shouldn't also request **Manage Products** because those permissions are already included in the greater permission set. ## See also * [Configure Permissions for Your App](https://dev.wix.com/docs/build-apps/develop-your-app/access/authorization/configure-permissions-for-your-app.md) --- > Portal Navigation: > > - Append `.md` to any URL under `https://dev.wix.com/docs/` to get its markdown version. > - Pages are either content pages (article or reference text) or menu pages (a list of links to child pages). > - To get a menu page, truncate any URL to a parent path and append `.md` (e.g. `https://dev.wix.com/docs/sdk.md`, `https://dev.wix.com/docs/sdk/core-modules.md`). > - Top-level index of all portals: https://dev.wix.com/docs/llms.txt > - Full concatenated docs: https://dev.wix.com/docs/llms-full.txt ## Resource: About Elevation ## Article: About Elevation ## Article Link: https://dev.wix.com/docs/build-apps/develop-your-app/access/authorization/about-elevation.md ## Article Content: # About Elevation When you use site visitor, site member, or Wix user [authentication](https://dev.wix.com/docs/rest/articles/getting-started/about-identities.md), you can only make calls to APIs that allow calls from those identity types. In some app workflows, you may be making API calls with site visitor or site member authentication, but occasionally need to call APIs that require the elevated level of a Wix app identity for authentication. This can happen when coding in a frontend environment such as a [site extension](https://dev.wix.com/docs/build-apps/develop-your-app/extensions/site-extensions/about-site-extensions.md) or a [dashboard extension](https://dev.wix.com/docs/build-apps/develop-your-app/extensions/dashboard-extensions/about-dashboard-extensions.md). For example, if an app includes a [site widget](https://dev.wix.com/docs/build-apps/develop-your-app/extensions/site-extensions/site-widgets/about-site-widget-extensions.md), most of the API calls made from the extension are probably APIs that can be called with site visitor or member authentication, such as [Create Booking](https://dev.wix.com/docs/rest/business-solutions/bookings/bookings/bookings-writer-v2/create-booking.md) to create a booking for the current visitor or member. However, the app may also need to call related APIs that require Wix app authentication, such as [Confirm Booking](https://dev.wix.com/docs/rest/business-solutions/bookings/bookings/bookings-writer-v2/confirm-booking.md) which cannot be called when authenticating as a visitor or member. In these cases, you can elevate the permissions of specific API calls in your workflow to use Wix app authentication. Elevating permissions for specific API calls allows you to move seamlessly between authentication types within your app's code. ## How to elevate API calls You can only elevate permissions in your app's backend code. You can elevate the permissions for an API call by sending an authenticated request to an endpoint or method exposed in your app's backend code. The backend code makes an elevated API call and returns the response to your frontend. The process for elevating permissions depends on: - The [API technology](https://dev.wix.com/docs/build-apps/develop-your-app/api-integrations/about-wix-apis.md#api-technologies). For example, SDK or REST. - The [development framework](https://dev.wix.com/docs/build-apps/develop-your-app/frameworks/about-development-frameworks.md) of your app's backend. For example, the Wix CLI or the self-managed framework. For step-by-step guidance, see the relevant article: - [Elevate SDK Call Permissions for Self-Managed Extensions](https://dev.wix.com/docs/build-apps/develop-your-app/frameworks/self-hosting/elevate-sdk-call-permissions-with-self-hosting.md) - [Elevate REST API Call Permissions](https://dev.wix.com/docs/build-apps/develop-your-app/frameworks/self-hosting/elevate-rest-api-call-permissions-for-self-hosting.md) - [Elevate API Calls in Blocks](https://dev.wix.com/docs/develop-websites/articles/coding-with-velo/authorization/elevation.md) ## See also - [About Identities](https://dev.wix.com/docs/build-apps/develop-your-app/access/about-identities.md) - [About Permissions](https://dev.wix.com/docs/build-apps/develop-your-app/access/authorization/about-permissions.md) --- > Portal Navigation: > > - Append `.md` to any URL under `https://dev.wix.com/docs/` to get its markdown version. > - Pages are either content pages (article or reference text) or menu pages (a list of links to child pages). > - To get a menu page, truncate any URL to a parent path and append `.md` (e.g. `https://dev.wix.com/docs/sdk.md`, `https://dev.wix.com/docs/sdk/core-modules.md`). > - Top-level index of all portals: https://dev.wix.com/docs/llms.txt > - Full concatenated docs: https://dev.wix.com/docs/llms-full.txt ## Resource: Configure Permissions for Your App ## Article: Configure Permissions for Your App ## Article Link: https://dev.wix.com/docs/build-apps/develop-your-app/access/authorization/configure-permissions-for-your-app.md ## Article Content: # Configure Permissions for Your App This article explains how to identify the required permissions and add them to your app configuration. For more information, see [About Permissions](https://dev.wix.com/docs/build-apps/develop-your-app/access/authorization/about-permissions.md).
__Important:__ When your app authenticates on behalf of a Wix user or site member, it takes into account the roles specific to that user or member, which can influence the permissions granted to your app. Learn more about [user roles](https://support.wix.com/en/article/roles-permissions-overview) and [member roles](https://support.wix.com/en/article/site-members-creating-member-roles).
## Step 1 | Identify required permissions To identify which permissions your app requires: 1. Go to the [REST API](https://dev.wix.com/docs/rest.md), [JavaScript SDK](https://dev.wix.com/docs/sdk.md), or [Velo](https://dev.wix.com/docs/velo.md) (for Wix Blocks) reference. 1. Search for the endpoints or methods your app uses. 1. Find the supported permission scopes under **Permission Scopes**: ![Permission scopes in reference](https://wixmp-833713b177cebf373f611808.wixmp.com/images/97bed4332b98ec4c4af3d615f91516c4.png) 1. Select one of the permission scopes listed to include in your app. You can click on a scope to prompt the addition to your app, as described in the next section.
__Warning:__ Only request the permissions your app requires. Apps that request unnecessary permissions aren't allowed on the app market.
## Step 2 | Add permissions to your app To add permissions to your app: 1. Go to [**Permissions**](https://manage.wix.com/app-selector?title=Select+an+App&primaryButtonText=Select+Site&actionUrl=https%3A%2F%2Fdev.wix.com%2Fapps%2F%7BappId%7D%2Fdev-center-permissions) in your app's dashboard. 1. Click **Add Permissions**. 1. Search or filter for the relevant scope. 1. Select the relevant scopes from the results.
__Tip:__ Keep in mind that some high-level permission scopes, like **Read Stores - All Read Permissions**, encompass multiple other permission scopes, such as **Read Products** and **Read Orders**. Therefore, you don't need to add the lower scopes separately.
1. Click **Save**. When a site owner installs your app, they're prompted to approve the specified permissions. > **Note:** After you save permission changes, they apply automatically to development sites. You don't need to build or release a new app version, but it may take a few minutes for the updated permissions to take effect. --- > Portal Navigation: > > - Append `.md` to any URL under `https://dev.wix.com/docs/` to get its markdown version. > - Pages are either content pages (article or reference text) or menu pages (a list of links to child pages). > - To get a menu page, truncate any URL to a parent path and append `.md` (e.g. `https://dev.wix.com/docs/sdk.md`, `https://dev.wix.com/docs/sdk/core-modules.md`). > - Top-level index of all portals: https://dev.wix.com/docs/llms.txt > - Full concatenated docs: https://dev.wix.com/docs/llms-full.txt ## Resource: About App Instances ## Article: About App Instances ## Article Link: https://dev.wix.com/docs/build-apps/develop-your-app/access/app-instances/about-app-instances.md ## Article Content: # About App Instances When a Wix user adds your app to their site, Wix generates a new app instance. An app instance represents a unique installation of your app on a specific Wix site. Each app instance has a unique ID (`instanceId`) that's shared by all of your app extensions and remains the same even if the app is uninstalled and reinstalled. The `instanceId` lets you identify your users and manage site-specific data or requirements. You can use it as a foreign key in your own database to efficiently organize data by site, while also accessing additional app instance data that Wix stores through our APIs. > **Note**: When building a [public app](https://dev.wix.com/docs/build-apps/get-started/overview/exposing-apps-publicly-and-privately.md) for the Wix App Market, you must identify users using the `instanceId`. ## Use cases for app instances App instances enable you to build scalable, secure, and personalized experiences for each site that installs your app. Depending on your use case, you may need just the `instanceId` or additional app instance data. For example, you can use app instances to do the following: - **Store site-specific data**: Store site-specific settings, configurations, and content using the `instanceId` as your database key. - **Automatically log users in**: [Automatically log users in to your app](#automatically-log-users-in-to-your-app) using the `instanceId`. - **Manage multi-site users**: [Manage users with more than one website](#manage-users-with-more-than-one-website) under a single account, ensuring proper data isolation and access control. - **Detect site duplication**: [Detect site duplication](#detect-site-duplication) to identify when a site has been duplicated and handle data migration or prompt users to reinstall when necessary. - **Monitor usage and billing**: Monitor usage and enable features based on each site's subscription plan. Learn more about the [app purchase lifecycle](https://dev.wix.com/docs/build-apps/launch-your-app/pricing-and-billing/the-app-purchase-lifecycle-in-wix.md), and how to [set up a usage-based business model](https://dev.wix.com/docs/build-apps/launch-your-app/pricing-and-billing/set-up-a-usage-based-business-model.md). - **Promote upgrades**: Send [marketing emails](https://dev.wix.com/docs/build-apps/launch-your-app/app-promotion/self-promotion/send-marketing-emails.md) based on what plan each site is currently using. Learn how to [get the app instance ID](#get-the-app-instance-id) and [fetch instance data](#fetch-instance-data-from-wix-apis).
**Tip:** Subscribe to the [App Instance Installed event](https://dev.wix.com/docs/rest/app-management/app-instance/app-instance-installed.md) to save the `instanceId` when your app is installed on a site.
### Automatically log users in to your app When users access your app through iframes or external dashboards, Wix sends them to your endpoint with a [signed app instance query parameter](#app-instance-query-parameter). This data helps you understand which user is accessing your app, from which website, and what their role is, such as website owner or contributor. Consider these approaches for automatic login: - **Authenticate users by `instanceId`**: When users access your app, use the `instanceId` from the signed app instance parameter to create a user session or link to an existing account, eliminating the need for separate login credentials. - **Differentiate access levels by role**: Check the `permissions` field to determine if the current user is the site owner or a contributor, then grant appropriate access to features and data for that specific site. - **Enable seamless multi-site access**: Use the combination of `uid` (user ID) and `instanceId` to allow the same person to access multiple sites they manage without re-authenticating, while keeping each site's data separate. ### Manage users with more than one website Wix users can create thousands of websites under the same Wix account. There are many reasons for this, ranging from small businesses creating multiple websites for different products, to large partners creating thousands of websites for their clients. That's why apps must support users with multiple sites. Consider these approaches for multi-site support: - **Separate business data per site**: Use the `instanceId` as your primary database key to isolate data between sites, even when the site owner uses the same email address across multiple business websites. This ensures that Site A's customer data, inventory, or settings don't appear when the user accesses your app from Site B. - **Control dashboard access by role**: Check the `permissions` field in the app instance data to determine if the current user is the site owner or a contributor. Use this with the `instanceId` to ensure contributors can only access data for sites where they have permissions, preventing them from switching between sites they shouldn't see. - **Enable cross-site workflows for power users**: Some users manage multiple related sites and need to switch between them frequently. Implement a site-switching feature in your external dashboard by storing the relationship between the user's Wix account ID and multiple `instanceId` values, then let verified site owners toggle between their sites without returning to Wix. ### Detect site duplication The `originInstanceId` property indicates whether the current site was [duplicated from another site](https://support.wix.com/en/article/duplicating-your-site-1472847). If `originInstanceId` is present, it contains the `instanceId` of the original installation. If it's missing or empty, the site wasn’t duplicated. Wix includes this property when you retrieve instance data using the REST API, SDK, encoded `instance` query parameter, or the app instance installed event. Consider these approaches for handling site duplication: - **Migrate data from the original site**: If your app stores site-specific data, use the `originInstanceId` to query your database for the original site's configurations, user data, or content, then copy it to the new `instanceId` to maintain continuity. - **Preserve user preferences across sites**: If your app has customizable settings, use the `originInstanceId` to inherit preferences like language, dashboard layouts, or feature configurations from the original site, then allow users to customize them for the duplicated site.
**Caution:** When a site is duplicated, a new app instance is created without triggering the consent flow. If your app uses [custom authentication (legacy)](https://dev.wix.com/docs/build-apps/develop-your-app/access/authentication/custom-authentication-legacy.md), this means no refresh token is generated. To address this, you can either: - Prompt users to reinstall the app to trigger the consent flow and generate a refresh token. - [Authenticate using OAuth](https://dev.wix.com/docs/build-apps/develop-your-app/access/authentication/authenticate-using-oauth.md) to generate an access token using the `instanceId`, app ID, and app secret.
## Get the app instance ID The `instanceId` uniquely identifies your app on a site. You can get it from: - Get [Token Info method](https://dev.wix.com/docs/rest/app-management/oauth-2/token-info.md) - [Event payloads](https://dev.wix.com/docs/build-apps/develop-your-app/api-integrations/events-and-webhooks/about-webhooks.md) - [Service plugin metadata](https://dev.wix.com/docs/build-apps/develop-your-app/extensions/backend-extensions/service-plugins/about-service-plugin-extensions.md) - [`getDecodedAppInstance()`](https://dev.wix.com/docs/velo/velo-only-apis/wix-application/get-decoded-app-instance.md) for Wix Blocks - [App instance query parameter](#app-instance-query-parameter) for iframes and external pages
**Important:** These methods don't return exactly the same set of properties.
The method depends on your environment: - **Frontend environments**: Send tokens to your backend for decoding. See [Identify the App Instance in Frontend Environments](https://dev.wix.com/docs/build-apps/develop-your-app/access/app-instances/identify-the-app-instance-in-frontend-environments.md). - **Backend environments**: Extract directly from request data or decode from tokens. See [Identify the App Instance in Backend Environments](https://dev.wix.com/docs/build-apps/develop-your-app/access/app-instances/identify-the-app-instance-in-backend-environments.md). - **iframes and external pages**: [Parse the app instance query parameter](https://dev.wix.com/docs/build-apps/develop-your-app/access/app-instances/parse-the-app-instance-query-parameter.md).
**Warning:** Don't trust an `instanceId` sent to your backend as plain text, as it can be manipulated by an attacker.
## Fetch instance data from Wix APIs Wix stores specific data about each app instance, which can be accessed using the following methods based on your use case: - **REST API and SDK**: Call [Get App Instance](https://dev.wix.com/docs/rest/app-management/app-instance/get-app-instance.md) to get details about your app on the site, independent of user context (unlike the [app instance query parameter](#app-instance-query-parameter)). - **Velo API**: Call [`getDecodedAppInstance()`](https://dev.wix.com/docs/velo/velo-only-apis/wix-application/get-decoded-app-instance.md) to get the `instanceId` and the `vendorProductId`, which is the ID of the plan that the site owner purchased. This can only be called from Blocks frontend code. > **Note**: Wix Blocks apps should generally follow the same guidance as other apps, especially if the `instanceId` is required on the backend. ## App instance query parameter When users access your app through certain frontend interactions, Wix automatically sends app instance data as an encoded `instance` query parameter to your app's endpoints. This parameter contains the `instanceId` plus additional context like user information and site details. The data is signed to ensure it hasn't been tampered with. This is particularly useful for apps that need to know which site they're running on and who the current user is without making additional API calls. Apps that receive the app instance query parameter include: - iframe apps - External dashboard apps (when a user clicks **Open App**) - Apps with an external pricing page (when a user clicks **Upgrade App**) Learn how to [parse the app instance query parameter](https://dev.wix.com/docs/build-apps/develop-your-app/access/app-instances/parse-the-app-instance-query-parameter.md).
Learn more

Data structure

The encoded instance parameter is composed of two parts separated by a dot:

  • Signature: HMACSHA-256 signature. Generated using the app secret and the data part of the instance. The signature is Base64 URL encoded.
  • Data: A Base64 URL encoded JSON object. This JSON includes the instance properties, listed below. You’ll need to decode the data to see these properties.

Here's an example of the encoded instance parameter:

// Signature                                Data
vrinSv2HB9tqbnJ6RSwoMgVamAIxpmmsA0I6eAan960.eyJpbnN0YW5jZUlkIjoiYWZmNTAxNmQtMjkxNC00ZDYzLWEzOGMtYTZk...

For examples on how to parse the parameter, see Parse.md the Encoded App Instance Parameter.

Properties

Once decoded, you'll have access to the following data:

Field Description
instanceId The instance ID of the app within Wix. Read more about the `instanceId` below.
signDate The date of the payload signature.
uid The ID of the Wix user or site member who is logged in.
permissions The permission set of the Wix user or site member:
Note: To check if the site owner is logged in, compare the uid to the siteOwnerId property.
ipAndPort (deprecated) The user's current IP address and port number.
vendorProductId (Optional, appears if the site owner upgraded the app) The Plan ID of the package the site owner purchased.
aid The ID of an anonymous site visitor.
originInstanceId The instance ID of the app in the original site. This property is only relevant for duplicated sites.
siteOwnerId The ID of the site owner. When this value is the same as the uid, it means the site owner is logged in.

Warning: For dashboard security, restrict access if the aid parameter is returned, indicating that the user attempting to access the dashboard is anonymous. This applies to users who aren't the site's owner or collaborators, identifiable by the uid.

Note: The siteOwnerId associated with a particular instanceId may change. If a site owner transfers ownership to another user, the existing instanceId becomes linked to the new owner. For instance, if User A transfers the site to User B, the app retains its instanceId but becomes associated with User B's siteOwnerId.

JSON example

{
  "instanceId":"bf296da1-75ce-48e6-9f72-14b7148d4fa2",
  "signDate":"2015-12-10T06:57:37.201Z",
  "uid":"da32cbf7-7f8b-4f9b-a97e-e67f3072ce92",
  "permissions":"OWNER",
  "ipAndPort":"91.199.119.13/35734",
  "vendorProductId":null,
  "originInstanceId":"c38e4e00-dcc1-433e-9e90-b332def7b342",
  "siteOwnerId":"da32cbf7-7f8b-4f9b-a97e-e67f3072ce92"
}
## See also - [Identify the App Instance in Frontend Environments](https://dev.wix.com/docs/build-apps/develop-your-app/access/app-instances/identify-the-app-instance-in-frontend-environments.md) - [Identify the App Instance in Backend Environments](https://dev.wix.com/docs/build-apps/develop-your-app/access/app-instances/identify-the-app-instance-in-backend-environments.md) - [Parse Encoded App Instance Data](https://dev.wix.com/docs/build-apps/develop-your-app/access/app-instances/parse-the-app-instance-query-parameter.md) --- > Portal Navigation: > > - Append `.md` to any URL under `https://dev.wix.com/docs/` to get its markdown version. > - Pages are either content pages (article or reference text) or menu pages (a list of links to child pages). > - To get a menu page, truncate any URL to a parent path and append `.md` (e.g. `https://dev.wix.com/docs/sdk.md`, `https://dev.wix.com/docs/sdk/core-modules.md`). > - Top-level index of all portals: https://dev.wix.com/docs/llms.txt > - Full concatenated docs: https://dev.wix.com/docs/llms-full.txt ## Resource: Identify the App Instance in Frontend Environments ## Article: Identify the App Instance in Frontend Environments ## Article Link: https://dev.wix.com/docs/build-apps/develop-your-app/access/app-instances/identify-the-app-instance-in-frontend-environments.md ## Article Content: # Identify the App Instance in Frontend Environments When your app is installed on multiple Wix sites, you need a way to determine which site is making a request. This is done using the [app instance](https://dev.wix.com/docs/build-apps/develop-your-app/access/app-instances/about-app-instances.md). In some cases, you may only need the `instanceId` to query your database and perform business logic. In other cases, you may want to fetch additional data about the app instance from Wix. This article covers both approaches across different frontend environments. To identify the app instance in frontend environments: 1. Send a Wix access token to a secure backend API. 1. Decode the token in the backend to retrieve the `instanceId` and apply the necessary business logic. > **Note**: The method for sending the access token depends on whether your frontend is [Wix-managed or self-managed](https://dev.wix.com/docs/sdk/articles/get-started/about-self-hosted-apps.md), as Wix-managed extensions automatically handle authentication. This article focuses on how to send an access token to your backend. To learn how to decode it, see [Identify the App Instance in Backend Environments](https://dev.wix.com/docs/build-apps/develop-your-app/access/app-instances/identify-the-app-instance-in-backend-environments.md).
**Warning:** Don't trust an `instanceId` sent to your backend as plain text, as it can be manipulated by an attacker.
## Wix-managed frontend Wix-managed frontend extensions include those built with the [CLI](#cli) or [Blocks](#blocks). ### CLI Frontend extensions built with the CLI can identify the app instance using a [CLI web method extension](https://dev.wix.com/docs/build-apps/develop-your-app/frameworks/wix-cli/supported-extensions/backend-extensions/web-methods/add-web-method-extensions-with-the-cli.md) or [CLI API extension](https://dev.wix.com/docs/build-apps/develop-your-app/frameworks/wix-cli/supported-extensions/backend-extensions/api/add-api-extensions-with-the-cli.md). Learn more [about differences between web methods and API extensions](https://dev.wix.com/docs/build-apps/develop-your-app/extensions/backend-extensions/web-methods/about-web-method-extensions.md#web-methods-vs-api-extensions). #### Web method To identify the app instance using a web method: 1. Implement a [web method](https://dev.wix.com/docs/build-apps/develop-your-app/frameworks/wix-cli/supported-extensions/backend-extensions/web-methods/add-web-method-extensions-with-the-cli.md) to decode a Wix access token, based on the [web method backend example](https://dev.wix.com/docs/build-apps/develop-your-app/access/app-instances/identify-the-app-instance-in-backend-environments.md#cli-web-method-extension). 1. Import the web method in your frontend code. For example: ```javascript import { getInstance } from "src/backend/get-instance.web.ts"; ``` 1. Call the web method. For example: ```javascript getInstance().then((result) => console.log(result)); ``` #### API extension To identify the app instance using an API extension: 1. Implement an [API extension](https://dev.wix.com/docs/build-apps/develop-your-app/frameworks/wix-cli/supported-extensions/backend-extensions/api/add-api-extensions-with-the-cli.md) to decode a Wix access token, based on the [API extension backend example](https://dev.wix.com/docs/build-apps/develop-your-app/access/app-instances/identify-the-app-instance-in-backend-environments.md#cli-api-extension). 1. Install [Essentials](https://dev.wix.com/docs/sdk/core-modules/essentials/introduction.md). 1. Import [`httpClient`](https://dev.wix.com/docs/sdk/core-modules/essentials/http-client.md). ```javascript import { httpClient } from "@wix/essentials"; ``` 1. Call your API from your frontend code using `fetchWithAuth()`. ```javascript const response = await httpClient.fetchWithAuth( `${import.meta.env.BASE_API_URL}/`, ); ``` ### Blocks Frontend extensions built with Blocks can identify the app instance using a Blocks backend function or a self-managed backend. #### Blocks backend function To identify the app instance using a Blocks backend function: 1. Create a [backend code file](https://dev.wix.com/docs/build-apps/develop-your-app/develop-an-app-with-blocks/code-in-blocks/about-coding-in-blocks.md#code-files-and-folders). 1. Implement a function in your backend file to decode a Wix access token, based on the [Blocks backend example](https://dev.wix.com/docs/build-apps/develop-your-app/access/app-instances/identify-the-app-instance-in-backend-environments.md#blocks-backend-function). 1. Call your backend from your widget code. For example: ```javascript // The import varies based on the name of your file and function. import { getInstance } from 'backend/instance'; $w.onReady(function () { getInstance().then(response => { console.log("Response from my Get Instance function", response); }) .catch(error => { console.log(error); }); }); ``` Alternatively, you can use the [`getDecodedAppInstance()`](https://dev.wix.com/docs/velo/apis/wix-application/get-decoded-app-instance.md) Velo API. #### Self-managed backend To identify the app instance using a self-managed backend: 1. Implement a backend API to decode an access token and identify the app instance, based on one of the following examples: * [Self-managed backend using the REST API](https://dev.wix.com/docs/build-apps/develop-your-app/access/app-instances/identify-the-app-instance-in-backend-environments.md#self-hosted-backend-using-the-rest-api) * [Self-managed backend using the JavaScript SDK](https://dev.wix.com/docs/build-apps/develop-your-app/access/app-instances/identify-the-app-instance-in-backend-environments.md#self-hosted-backend-using-the-javascript-sdk) 1. Install [Essentials](https://dev.wix.com/docs/sdk/core-modules/essentials/introduction.md). 1. Import [`httpClient`](https://dev.wix.com/docs/sdk/core-modules/essentials/http-client.md). ```javascript import { httpClient } from "@wix/essentials"; ``` 1. In your Blocks frontend code, send a Wix access token to your backend by calling `fetchWithAuth()`. ```javascript const response = await httpClient.fetchWithAuth(``); ``` ## Self-managed frontend For self-managed site extensions, the method of sending an access token to your backend varies depending on the technology: * [Custom element](#custom-element) * [Embedded script](#embedded-script) * [iframe](#iframe)
**Important:** The backend is responsible for decoding the token and identifying the app instance. For more information, see [Identify the App Instance in Backend Environments](https://dev.wix.com/docs/build-apps/develop-your-app/access/app-instances/identify-the-app-instance-in-backend-environments.md).
#### Custom element To identify the app instance from a self-managed custom element: 1. Implement a backend API to decode an access token and identify the app instance, based on one of the following examples: * [Self-managed backend using the REST API](https://dev.wix.com/docs/build-apps/develop-your-app/access/app-instances/identify-the-app-instance-in-backend-environments.md#self-hosted-backend-using-the-rest-api) * [Self-managed backend using the JavaScript SDK](https://dev.wix.com/docs/build-apps/develop-your-app/access/app-instances/identify-the-app-instance-in-backend-environments.md#self-hosted-backend-using-the-javascript-sdk) 1. In your frontend: 1. Create a [Wix client](https://dev.wix.com/docs/sdk/core-modules/sdk/wix-client.md) with [`site`](https://dev.wix.com/docs/sdk/host-modules/site/introduction.md) host and authentication. 1. Inject the custom element with a Wix access token. 1. Send a Wix access token to your backend by calling [`fetchWithAuth()`](https://dev.wix.com/docs/sdk/core-modules/sdk/wix-client.md). The following example demonstrates only the frontend logic. ```javascript import { site } from "@wix/site"; import { createClient } from "@wix/sdk"; // Create a Wix client with site authentication and site host const myWixClient = createClient({ auth: site.auth(), host: site.host({ applicationId: "" }), }); class MyCustomElement extends HTMLElement { constructor() { super(); // Inject the Wix access token to your custom element this.accessTokenListener = myWixClient.auth.getAccessTokenInjector(); } connectedCallback() { this.innerHTML = "

My custom element loaded successfully!

"; this.callMyBackend(); } async callMyBackend() { try { // Send a Wix access token to your backend const response = await myWixClient.fetchWithAuth(""); const data = await response.json(); console.log("Response from get-instance:", data); } catch (error) { console.error("Error calling get-instance:", error); } } } customElements.define("", MyCustomElement); ``` #### Embedded script To identify the app instance from a self-managed embedded script: 1. Implement a backend API to decode an access token and identify the app instance, based on one of the following examples: * [Self-managed backend using the REST API](https://dev.wix.com/docs/build-apps/develop-your-app/access/app-instances/identify-the-app-instance-in-backend-environments.md#self-hosted-backend-using-the-rest-api) * [Self-managed backend using the JavaScript SDK](https://dev.wix.com/docs/build-apps/develop-your-app/access/app-instances/identify-the-app-instance-in-backend-environments.md#self-hosted-backend-using-the-javascript-sdk) 1. In your frontend: 1. Create a [Wix client](https://dev.wix.com/docs/sdk/core-modules/sdk/wix-client.md) with [`site`](https://dev.wix.com/docs/sdk/host-modules/site/introduction.md) host and authentication. 1. Inject the embedded script with a Wix access token. 1. Send a Wix access token to your backend by calling [`fetchWithAuth()`](https://dev.wix.com/docs/sdk/core-modules/sdk/wix-client.md). The following examples demonstrate only the frontend logic. **ECMAScript Module** ```html ``` **Standard** ```javascript // my-file.js import { site } from "@wix/site"; import { createClient } from "@wix/sdk"; import { seo } from "@wix/site-seo"; // Create a Wix client with site authentication and site host const myWixClient = createClient({ auth: site.auth(), host: site.host({ applicationId: "" }), }); const callMyBackend = async () => { // Send a Wix access token to your backend const response = await myWixClient.fetchWithAuth(""); console.log("Response from my backend:", response.data); }; callMyBackend(); ``` #### iframe Wix provides iframes with an encoded `instance` query parameter. This is relevant for self-managed dashboard pages, dashboard plugins, settings panels, and external links. To identify the app instance from an iframe: 1. Retrieve the `instance` query parameter from the URL. 1. Pass the `instance` value as the `token` to [Token Info](https://dev.wix.com/docs/rest/app-management/oauth-2/token-info.md). 1. (Optional) Use the returned `instanceId` to create an app access token and call [Get App Instance](https://dev.wix.com/docs/rest/app-management/app-instance/get-app-instance.md). ```javascript const express = require("express"); const axios = require("axios"); const app = express(); app.get("/dashboard", async (req, res) => { const instance = req.query.instance; if (!instance) return res.status(400).send("Missing instance parameter"); try { // Fetch token info from Wix API const tokenResponse = await axios.post("https://www.wixapis.com/oauth2/token-info", { token: instance, }); const instanceId = tokenResponse.data.instanceId; console.log(`App instance ID: ${instanceId}`); // (Optional) Fetch additional app instance data from Wix const createTokenResponse = await axios.post("https://www.wixapis.com/oauth2/token", { grant_type: "client_credentials", client_id: "", client_secret: "", instanceId: instanceId, }); const accessToken = createTokenResponse.data.access_token; const instanceResponse = await axios.get("https://www.wixapis.com/apps/v1/instance", { headers: { Authorization: `Bearer ${accessToken}` }, }); console.log("Response from Get App Instance:", instanceResponse.data); res.send(` Dashboard

My Test Dashboard

Successfully retrieved app instance data.

`); } catch (err) { console.error("Error:", err); res.status(500).send("Failed to verify instance"); } }); app.listen(3000, () => console.log("Server running on port 3000")); ``` > **Note**: If your iframe content runs client-side JavaScript and needs to communicate with your server, create a [Wix Client](https://dev.wix.com/docs/sdk/core-modules/sdk/wix-client.md) and call `fetchWithAuth()` to include a Wix access token in the request. --- > Portal Navigation: > > - Append `.md` to any URL under `https://dev.wix.com/docs/` to get its markdown version. > - Pages are either content pages (article or reference text) or menu pages (a list of links to child pages). > - To get a menu page, truncate any URL to a parent path and append `.md` (e.g. `https://dev.wix.com/docs/sdk.md`, `https://dev.wix.com/docs/sdk/core-modules.md`). > - Top-level index of all portals: https://dev.wix.com/docs/llms.txt > - Full concatenated docs: https://dev.wix.com/docs/llms-full.txt ## Resource: Identify the App Instance in Backend Environments ## Article: Identify the App Instance in Backend Environments ## Article Link: https://dev.wix.com/docs/build-apps/develop-your-app/access/app-instances/identify-the-app-instance-in-backend-environments.md ## Article Content: # Identify the App Instance in Backend Environments When your app is installed on multiple Wix sites, you need a way to determine which site is making a request. This is done using the [app instance](https://dev.wix.com/docs/build-apps/develop-your-app/access/app-instances/about-app-instances.md). In some cases, you may only need the `instanceId` to query your database and perform business logic. In other cases, you may want to fetch additional data about the app instance from Wix. This article covers both approaches across different backend environments. ## CLI web method extension For [web methods](https://dev.wix.com/docs/build-apps/develop-your-app/extensions/backend-extensions/web-methods/about-web-method-extensions.md), you can: * Get `instanceId` by calling [`auth.getTokenInfo()`](https://dev.wix.com/docs/sdk/core-modules/essentials/auth.md). * Fetch instance data by passing [`getAppInstance`](https://dev.wix.com/docs/sdk/backend-modules/app-management/app-instances/get-app-instance.md) to [`auth.elevate()`](https://dev.wix.com/docs/sdk/core-modules/essentials/auth.md) and calling the elevated function. The following example logs the `instanceId`, and then elevates the access token to make a request to [`getAppInstance()`](https://dev.wix.com/docs/sdk/backend-modules/app-management/app-instances/get-app-instance.md). Elevation is necessary because web methods are called from frontend code, and frontend access tokens are associated with [site visitors or members](https://dev.wix.com/docs/build-apps/develop-your-app/access/about-identities.md), who lack permission to retrieve instance data. ```javascript import { webMethod, Permissions } from '@wix/web-methods'; import { auth } from '@wix/essentials'; import { appInstances } from "@wix/app-management"; export const getInstance = webMethod( Permissions.Anyone, async () => { const { instanceId } = await auth.getTokenInfo(); console.log(`App instance ID: ${instanceId}`); // (Optional) Fetch app instance data from Wix const elevatedGetAppInstance = auth.elevate(appInstances.getAppInstance); const { instance, site } = await elevatedGetAppInstance(); console.log("Response from Get App Instance:", { instance, site }); }, ); ``` ## CLI API extension For [CLI API extensions](https://dev.wix.com/docs/build-apps/develop-your-app/frameworks/wix-cli/supported-extensions/backend-extensions/api/add-api-extensions-with-the-cli.md), you can: * Get `instanceId` by calling [`auth.getTokenInfo()`](https://dev.wix.com/docs/sdk/core-modules/essentials/auth.md). * Fetch instance data by passing [`getAppInstance`](https://dev.wix.com/docs/sdk/backend-modules/app-management/app-instances/get-app-instance.md) to [`auth.elevate()`](https://dev.wix.com/docs/sdk/core-modules/essentials/auth.md) and calling the elevated function.
**Important:** For this to work, you must send a Wix access token from the frontend to your API extension. This can be done with [`httpClient.fetchWithAuth()`](https://dev.wix.com/docs/sdk/core-modules/essentials/http-client.md), as explained in the [Wix-managed frontend example](https://dev.wix.com/docs/build-apps/develop-your-app/access/app-instances/identify-the-app-instance-in-frontend-environments.md#wix-hosted-frontend).
The following example logs the `instanceId`, and then elevates the access token to make a request to [`getAppInstance()`](https://dev.wix.com/docs/sdk/backend-modules/app-management/app-instances/get-app-instance.md). Elevation is necessary because web methods are called from frontend code, and frontend access tokens are associated with [site visitors or members](https://dev.wix.com/docs/build-apps/develop-your-app/access/about-identities.md), who lack permission to instance data. ```javascript import { webMethod, Permissions } from '@wix/web-methods'; import { auth } from '@wix/essentials'; import { appInstances } from '@wix/app-management'; export async function GET(req) { try { const { instanceId } = await auth.getTokenInfo(); console.log(`App instance ID: ${instanceId}`); // (Optional) Fetch app instance data from Wix const elevatedGetAppInstance = auth.elevate(appInstances.getAppInstance); const { instance, site } = await elevatedGetAppInstance(); console.log("Response from Get App Instance:", { instance, site }); } catch { return new Response({ error: "Failed to process request" }, { status: 500 }); } } ``` ## Blocks backend function For [Blocks backend functions](https://dev.wix.com/docs/build-apps/develop-your-app/develop-an-app-with-blocks/code-in-blocks/add-code-files-to-your-app.md#add-backend-files), you can: * Get `instanceId` by calling [`auth.getTokenInfo()`](https://dev.wix.com/docs/sdk/core-modules/essentials/auth.md). * Fetch instance data by passing [`getAppInstance`](https://dev.wix.com/docs/sdk/backend-modules/app-management/app-instances/get-app-instance.md) to [`auth.elevate()`](https://dev.wix.com/docs/sdk/core-modules/essentials/auth.md) and calling the elevated function. Then, you can call your Blocks backend function from your Blocks frontend code. The following example logs the `instanceId`, and then elevates the access token to make a request to [`getAppInstance()`](https://dev.wix.com/docs/sdk/backend-modules/app-management/app-instances/get-app-instance.md). Elevation is necessary because Blocks backend functions are called from frontend code, and frontend access tokens are associated with [site visitors or members](https://dev.wix.com/docs/build-apps/develop-your-app/access/about-identities.md), who lack permission to instance data. ```javascript // Backend: instance.jsw import { auth } from "@wix/essentials"; import { appInstances } from "@wix/app-management"; export async function getInstance() { try { const { instanceId } = await auth.getTokenInfo(); console.log(`App instance ID: ${instanceId}`); // (Optional) Fetch app instance data from Wix const elevatedGetAppInstance = auth.elevate(appInstances.getAppInstance); const response = await elevatedGetAppInstance(); console.log("Response from Get App Instance:", response); return response; } catch { return new Response({ error: "Failed to process request" }, { status: 500 }); } } ``` > **Note**: If you're not able to use [Essentials](https://dev.wix.com/docs/sdk/core-modules/essentials/introduction.md), you can extract the Wix access token from the `authorization` header and send it to [Get Token Info](https://dev.wix.com/docs/rest/app-management/oauth-2/token-info.md). ## Self-managed backend using the JavaScript SDK For a self-managed backend using the SDK, you can: * Get `instanceId` by passing a Wix access token to [Token Info](https://dev.wix.com/docs/sdk/core-modules/essentials/auth.md). * Fetch instance data by [elevating the access token](https://dev.wix.com/docs/build-apps/develop-your-app/frameworks/self-hosting/elevate-sdk-call-permissions-with-self-hosting.md) and using it to call [`getAppInstance()`](https://dev.wix.com/docs/sdk/backend-modules/app-management/app-instances/get-app-instance.md). The following example creates a Node.js Express API called `get-instance-data`. The API receives an access token from the frontend (which has a visitor or member identity), decodes the token and logs the `instanceId`, and then creates a client with elevated permissions to fetch the app instance data. ```javascript import express from "express"; import cors from "cors"; import { createClient, AppStrategy } from "@wix/sdk"; import { appInstances } from "@wix/app-management"; const app = express(); const port = 5000; app.use(cors()); app.get("/get-instance-data", async (req, res) => { try { const accessToken = req.headers["authorization"]; if (!accessToken) { throw new Error("Access token is required."); } const tokenData = await axios.post( "https://www.wixapis.com/oauth2/token-info", { token: accessToken, }, ); const instanceId = tokenData.data.instanceId; console.log(`App instance ID: ${instanceId}`); const elevatedClient = createClient({ auth: await AppStrategy({ appId: "", appSecret: "", accessToken: accessToken, }).elevated(), modules: { appInstances, }, }); const instanceResponse = await elevatedClient.appInstances.getAppInstance(); console.log("Response from Get App Instance:", instanceResponse.data); return res.json(instanceResponse.data); } catch (error) { console.error("Error processing request:", error.message); return res.status(500).json({ error: "Failed to process request" }); } }); app.listen(port, () => { console.log(`Server running at http://localhost:${port}`); }); ``` ## Self-managed backend using the REST API For a self-managed backend using the REST API, you can: * Get `instanceId` by passing a Wix access token to [Token Info](https://dev.wix.com/docs/sdk/core-modules/essentials/auth.md). * Fetch instance data by [elevating the access token](https://dev.wix.com/docs/build-apps/develop-your-app/frameworks/self-hosting/elevate-rest-api-call-permissions-for-self-hosting.md) and using it to call [Get App Instance](https://dev.wix.com/docs/rest/app-management/app-instance/get-app-instance.md). The following example creates a Node.js Express API called `get-instance-data`. The API receives an access token from the frontend (which has a visitor or member identity), decodes the token and logs the `instanceId`, and then uses the `instanceId` to create an access token with app permissions to fetch the instance data. ```javascript import express from "express"; import axios from "axios"; import cors from "cors"; const app = express(); const port = 5000; app.use(cors()); // Define a backend API app.get("/get-instance-data", async (req, res) => { try { // Get the Wix access token from the `authorization` header const accessToken = req.headers["authorization"]; if (!accessToken) { throw new Error("Access token is required."); } // Extract the app instance ID from the access token const tokenResponse = await axios.post( "https://www.wixapis.com/oauth2/token-info", { token: accessToken, }, ); const instanceId = tokenResponse.data.instanceId; console.log(`App instance ID: ${instanceId}`); // Create a new access token with an app identity const newTokenResponse = await axios.post( "https://www.wixapis.com/oauth2/token", { grant_type: "client_credentials", client_id: "", client_secret: "", instanceId: instanceId, }, ); const elevatedAccessToken = newTokenResponse.data.access_token; // Use the new token to get instance data const instanceResponse = await axios.get( "https://www.wixapis.com/apps/v1/instance", { headers: { Authorization: `Bearer ${elevatedAccessToken}`, }, }, ); console.log("Response from Get App Instance:", instanceResponse.data); return res.json(instanceResponse.data); } catch (error) { console.error("Error processing request:", error.message); return res.status(500).json({ error: "Failed to process request" }); } }); app.listen(port, () => { console.log(`Server running at http://localhost:${port}`); }); ``` ## Service plugin extension For [service plugins](https://dev.wix.com/docs/build-apps/develop-your-app/extensions/backend-extensions/service-plugins/about-service-plugin-extensions.md), get `instanceId` from the `metadata` of the service plugin call. The following example is based on the [additional fees service plugin](https://dev.wix.com/docs/sdk/backend-modules/ecom/service-plugins/additional-fees/introduction.md). ```javascript import { additionalFees } from '@wix/ecom/service-plugins'; additionalFees.provideHandlers({ calculateAdditionalFees: async ({ request, metadata }) => { console.log(`App instance ID: ${metadata.instanceId}`); return { additionalFees: [], }; }, }); ``` ## CLI event extension For [CLI event extensions](https://dev.wix.com/docs/build-apps/develop-your-app/frameworks/wix-cli/supported-extensions/backend-extensions/events/add-event-extensions-with-the-cli.md), get `instanceId` from the `metadata` of the event. The following example is based on [`onPostCreated()`](https://dev.wix.com/docs/sdk/backend-modules/blog/posts/on-post-created.md). ```javascript import { posts } from "@wix/blog"; import { auth } from '@wix/essentials'; import { appInstances } from "@wix/app-management"; posts.onPostCreated(async (event) => { console.log(`App instance ID: ${event.metadata.instanceId}`); // (Optional) Fetch app instance data from Wix const elevatedGetAppInstance = auth.elevate(appInstances.getAppInstance); const { instance, site } = await elevatedGetAppInstance(); console.log("Response from Get App Instance:", { instance, site }); }); ``` --- > Portal Navigation: > > - Append `.md` to any URL under `https://dev.wix.com/docs/` to get its markdown version. > - Pages are either content pages (article or reference text) or menu pages (a list of links to child pages). > - To get a menu page, truncate any URL to a parent path and append `.md` (e.g. `https://dev.wix.com/docs/sdk.md`, `https://dev.wix.com/docs/sdk/core-modules.md`). > - Top-level index of all portals: https://dev.wix.com/docs/llms.txt > - Full concatenated docs: https://dev.wix.com/docs/llms-full.txt ## Resource: Parse the App Instance Query Parameter ## Article: Parse Encoded App Instance Data ## Article Link: https://dev.wix.com/docs/build-apps/develop-your-app/access/app-instances/parse-the-app-instance-query-parameter.md ## Article Content: # Parse the App Instance Query Parameter
**Warning:** This article describes a legacy approach to decoding the `instance` parameter. To implement the recommended solution, call [Token Info](https://dev.wix.com/docs/rest/app-management/oauth-2/token-info.md) and pass the `instance` value as the `token` parameter.
When a user accesses your app through a client-side action, Wix provides data about the [app instance](https://dev.wix.com/docs/build-apps/develop-your-app/access/app-instances/about-app-instances.md) as an app instance query parameter to your app endpoints. This query parameter, encoded in base64, includes the `instanceId` along with site and user information. The data is also signed to ensure its integrity and authenticity. The encoded parameter includes a signature and the data: ```json // Signature Data vrinSv2HB9tqbnJ6RSwoMgVamAIxpmmsA0I6eAan960.eyJpbnN0YW5jZUlkIjoiYWZmNTAxNmQtMjkxNC00ZDYzLWEzOGMtYTZk... ``` The following sections show examples on how to parse the parameter in various programming languages. ## Node.JS ```javascript const CryptoJS = require("crypto-js"); function verifyInstance(instance, secret) { // spilt the instance into signature and data var pair = instance.split('.'); var signature = decode(pair[0], 'binary'); var data = pair[1]; // sign the data using hmac-sha1-256 var hmac = CryptoJS.algo.HMAC.create(CryptoJS.algo.SHA256, secret); hmac.update(data); var hash = decode(hmac.finalize().toString(CryptoJS.enc.Base64), 'binary') return (signature === hash) } function decode(data, encoding) { encoding = encoding === undefined ? 'utf8' : encoding var buf = Buffer.from(data.replace(/-/g, '+').replace(/_/g, '/'), 'base64') return encoding ? buf.toString(encoding) : buf; } ``` ## PHP ```bash public static function &isWixRequest() { list( $code, $data ) = explode( '.', $_GET[ 'instance' ] ); if ( base64_decode( strtr( $code, "-_", "+/" ) ) != hash_hmac( "sha256", $data, '[APP_SECRET]', TRUE ) ) { die(); // Report error } if ( ( $json = json_decode( base64_decode( $data ) ) ) === null ) { die(); // Report error } return $json; } ``` ## Java ```java ---------------------------------------------------------------------- The following example uses the apache commons-codec library for Base64 encoding and Jackson for JSON parsing. The Maven dependencies of those libraries are: commons-codec commons-codec 1.6 com.fasterxml.jackson.core jackson-databind 2.0.4 ----------------------------------------------------------------------- import java.util.Arrays; import javax.crypto.Mac; import javax.crypto.spec.SecretKeySpec; import com.fasterxml.jackson.databind.JsonNode; import com.fasterxml.jackson.databind.ObjectMapper; import org.apache.commons.codec.binary.Base64; public class WixSignatureDecoder { public final static JsonNode decodeSignature(final String signedInstance, final String secretKey) throws Exception { // initialization final SecretKeySpec secretKeySpec = new SecretKeySpec(secretKey.getBytes(), "HMACSHA256"); final Mac mac = Mac.getInstance("HMACSHA256"); mac.init(secretKeySpec); // split the signed-instance Base64 base64 = new Base64(256, null, true); int idx = signedInstance.indexOf("."); String signature = signedInstance.substring(0, idx); String encodedJson = signedInstance.substring(idx+1); byte[] sig = base64.decode(signature.getBytes()); byte[] mySig = mac.doFinal(encodedJson.getBytes()); if (!Arrays.equals(mySig, sig)) { throw new Exception("signatures do not match"); } // objectMapper is jackson interface for reading JSON - one JSON serialization library in java return objectMapper.readTree(new String(base64.decode(encodedJson))); } } ``` ## Ruby ```ruby def parse_instance_data(signed_instance) APP_SECRET = 'YOUR_APP_SECRET_GOES_HERE' signature, encoded_json = signed_instance.split('.', 2) # Need to add Base64 padding to make base64 decode work in Ruby. (ref: http://stackoverflow.com/questions/4987772/decoding-facebooks-signed-request-in-ruby-sinatra) encoded_json_hack = encoded_json + ('=' * (4 - encoded_json.length.modulo(4))) json_str = Base64.decode64(encoded_json_hack) hmac = OpenSSL::HMAC.digest(OpenSSL::Digest::SHA256.new, APP_SECRET, encoded_json) # bug in ruby. why are there '=' chars on urlsafe_encode ?! my_signature = Base64.urlsafe_encode64(hmac).gsub('=','') raise "the signatures do not match" if (signature != my_signature) JSON.parse(json_str) end ``` > **Note:** According to the Base64 specification, the padding character (`=`) at the end of a URL-Safe Base64 encoded string is optional. Wix encoding doesn't include this padding character. In Ruby and Python, add the padding to the Base64 encoded values that you receive from Wix. ## See also * [About App Instances](https://dev.wix.com/docs/build-apps/develop-your-app/access/app-instances/about-app-instances.md) --- > Portal Navigation: > > - Append `.md` to any URL under `https://dev.wix.com/docs/` to get its markdown version. > - Pages are either content pages (article or reference text) or menu pages (a list of links to child pages). > - To get a menu page, truncate any URL to a parent path and append `.md` (e.g. `https://dev.wix.com/docs/sdk.md`, `https://dev.wix.com/docs/sdk/core-modules.md`). > - Top-level index of all portals: https://dev.wix.com/docs/llms.txt > - Full concatenated docs: https://dev.wix.com/docs/llms-full.txt ## Resource: About App Design ## Article: About Designing Apps in Wix ## Article Link: https://dev.wix.com/docs/build-apps/develop-your-app/design/about-app-design.md ## Article Content: # About App Design Creating a successful app requires implementing key user experience (UX) and user interface (UI) best practices to ensure a seamless and cohesive user experience. Wix offers various resources and tools to support you in designing apps that align with our standards and integrate well within the Wix ecosystem. ## UX and UI Best Practices To get started, explore our guide on UX/UI best practices for app development, focusing on creating a seamless, user-friendly experience. It covers essential aspects such as simplifying sign-up processes, onboarding new users, ensuring consistent and intuitive UI design, preventing errors with clear feedback, and optimizing for mobile responsiveness. See our [UX and UI best practices guide](https://dev.wix.com/docs/build-apps/develop-your-app/design/ux-and-ui-best-practices.md). ## App design in Wix Blocks When building in [Wix Blocks](https://dev.wix.com/docs/build-apps/develop-your-app/develop-an-app-with-blocks/about-wix-blocks.md), explore the following key resources and guidelines to help you design your app. * **Site widgets and plugins**: Design your app widgets to behave responsively and adapt to any screen size, blend beautifully with Wix sites, and offer as many design styles and layouts as you want. See our [design guidelines for widgets](https://dev.wix.com/docs/build-apps/develop-your-app/develop-an-app-with-blocks/widget-design/blocks-widget-design-guidelines.md). * **Editor experience (panels and configuration)**: Configure the way users can customize you app in the editor to make it as easy and intuitive as possible. See our [UX guidelines for editor experience](https://dev.wix.com/docs/build-apps/develop-your-app/develop-an-app-with-blocks/editor-experience-configuration/ux-guidelines-for-editor-experience-in-blocks.md). * **Dashboard pages**: Design your dashboard pages so that they're easy to use, fit your purpose, and appear well on various screen sizes. See our [UX guidelines for dashboard pages](https://dev.wix.com/docs/build-apps/develop-your-app/develop-an-app-with-blocks/dashboard-pages/ux-guidelines-for-dashboard-pages-in-blocks.md). * **Figma kit**: The Blocks Elements Figma kit gives you full access to Blocks widget, dashboard, and panel elements, text styles, and icons. This helps you align with our visual standards if you want to start in Figma before designing in Blocks. See the [Blocks Elements Figma kit](https://www.figma.com/community/file/1397674211519735499/wix-blocks-components-library). ## App design in Wix CLI and self-managed extensions When building [self-managed](https://dev.wix.com/docs/build-apps/develop-your-app/frameworks/self-hosting/about-self-hosting-for-wix-apps.md) or [Wix-CLI](https://dev.wix.com/docs/wix-cli/guides/about-the-wix-cli.md)-based dashboard pages and editor settings panels, consider using the Wix Design System. This comprehensive toolkit for developers and designers includes React component libraries, design patterns for best practices, a figma kit, color palettes, and more. Learn more about the [Wix Design System](https://dev.wix.com/docs/build-apps/develop-your-app/design/about-the-wix-design-system.md). --- > Portal Navigation: > > - Append `.md` to any URL under `https://dev.wix.com/docs/` to get its markdown version. > - Pages are either content pages (article or reference text) or menu pages (a list of links to child pages). > - To get a menu page, truncate any URL to a parent path and append `.md` (e.g. `https://dev.wix.com/docs/sdk.md`, `https://dev.wix.com/docs/sdk/core-modules.md`). > - Top-level index of all portals: https://dev.wix.com/docs/llms.txt > - Full concatenated docs: https://dev.wix.com/docs/llms-full.txt ## Resource: UX and UI Best Practices ## Article: UX and UI Best Practices ## Article Link: https://dev.wix.com/docs/build-apps/develop-your-app/design/ux-and-ui-best-practices.md ## Article Content: # UX / UI Best Practices Creating a successful app involves incorporating several user experience (UX) and user interface (UI) best practices to ensure a seamless and satisfying user experience. To help, we’ve compiled a best practice guide. ## Sign-up/login process (optional) If your app requires it then you should simplify the sign-up/login process by enabling auto-login or pre-filling information to streamline user onboarding. Examples: - **Social media login**: Allow users to sign up or log in using their existing social media accounts such as Facebook, Google, or Apple. - Avoid long forms and unnecessary fields. - Provide clear instructions for each field. Use placeholders and tooltips for additional guidance. ## Onboarding new users Once the user installs your app, try to provide a seamless onboarding experience with instructions on how to start using the app. Examples of best practice for onboarding: - **On arrival**: Present a welcome note or notification with clear instructions on how to get started. Ensure users can easily revisit this information. - **Contextual tooltips**: Use concise tooltips to explain specific features when users encounter them for the first time. - **Welcome emails**: A welcome email makes a great first impression, guides users, and boosts engagement and retention. [Here are 20 inspiring examples](https://www.wix.com/blog/welcome-email). ## App navigation and guidance Guide users effortlessly through the app, so they don’t get lost or need support. Examples: - **Tooltips and Hints**: Tooltips provide additional information about specific features or sections. - **Notifications**: Provide real-time feedback through notifications or messages to inform users of successful actions, errors, or required next steps. - **Easy access to support**: Make it easy for users to contact support if they encounter issues and Include a help section or FAQ within the app where users can find answers to common questions. ## Error prevention and feedback Provide clear instructions and requirements to prevent errors. If you handle errors, use clear and constructive messages to offer feedback on user actions, whether they are successful or encounter errors. Do not use browser native errors. Examples: - **Error message**: "Please enter a valid email address." - **Success message**: "Your message has been successfully sent!" - **Warning message**: "Are you sure you want to delete this file? This action cannot be undone." ## Consistent UI > **Pro-tip:** These elements come out of the box in the [Wix Design System](https://www.wix-pages.com/wix-design-system/?path=/story/getting-started--about) for dashboard pages and [Blocks](https://dev.wix.com/docs/build-apps/develop-your-app/develop-an-app-with-blocks/editor-experience-configuration/about-the-editor-experience-in-blocks.md) for site widgets’ settings panels. The app should use uniform UI elements, navigation patterns, icons, and color schemes to establish trust and familiarity. Examples: - **Spacing and alignment**: Uniform spacing and alignment of elements to create a clean and organized layout. - **Buttons**: To create a unified look, apply the same button styles, such as color, size, and shape, throughout the application. - **Navigation**: Use the same navigation bar layout across all pages so users can easily navigate the app. ## Intuitive, familiar and predictable behavior Intuitive design makes interfaces easy to use by leveraging familiar patterns and logical organization. It allows users to navigate and perform tasks effortlessly without learning or instructions. “Don’t reinvent the wheel.” Examples: - **Menus**: Most apps use the Wix business manager sidebar for navigation. - **More actions button**: A 3-dot icon button usually represents a button that opens more actions. - **Clickable icons**: The “?” icon will usually lead to a tooltip with more explanation. [Learn more about using icons](https://www.wix-pages.com/wix-design-system/?path=/story/guidelines-icons--icons#Usage). - **Feedback**: Users expect some feedback after performing a task (Success message, loader, “Completed” status). - **Table**: The table top usually has a checkbox to select all items or specific filters. ## Clean UI design > **Pro-tip:** These elements come out of the box in the [Wix Design System](https://www.wix-pages.com/wix-design-system/?path=/story/getting-started--about) for dashboard pages and [Blocks](https://dev.wix.com/docs/build-apps/develop-your-app/develop-an-app-with-blocks/editor-experience-configuration/about-the-editor-experience-in-blocks.md) for site widgets’ settings panels. Keep the user interface clutter-free to help users focus on the essential tasks without feeling overwhelmed. Examples: - **Button hierarchy**: Decide what the main action in each area is, and organize buttons to prioritize their importance (Primary, Secondary, and Contextual). - **Content sorting**: Clearly divide content using dividers and colors. - **Column layout**: Follow our guidelines for columns. ## Color scheme and roles > **Pro-tip**: These elements come out of the box in the Wix Design System for dashboard pages and Blocks for site widgets’ settings panels. Maintain a consistent color scheme throughout the app, assigning specific colors for actions like "Submit" buttons. Use colors to convey meaning, such as red for error and green for success. Ensure there is sufficient contrast between text and background to make reading easy. You can use [this checker to help](https://webaim.org/resources/contrastchecker/). Examples: - **Main action color**: This should be the most prominent color on the page. Use it wisely and scarcely. - **Error or fail color**: The convention is using red color. - **Hover colors for actions**: Hover colors let the user know this item is clickable. More resources: - [Color schemes in Wix Design System](https://www.wix-pages.com/wix-design-system/?path=/story/foundations-colors--colors) - Blog post: [Color psychology](https://www.wix.com/blog/color-psychology) ## Font hierarchy and size > **Pro-tip:** These elements come out of the box in the [Wix Design System](https://www.wix-pages.com/wix-design-system/?path=/story/getting-started--about) for dashboard pages and [Blocks](https://dev.wix.com/docs/build-apps/develop-your-app/develop-an-app-with-blocks/editor-experience-configuration/about-the-editor-experience-in-blocks.md) for site widgets’ settings panels. Maintain consistent [typography](https://www.wix.com/blog/what-is-typography) with a clear font hierarchy and appropriate font sizes for improved readability. Examples: - **Titles**: Use larger font sizes for headings and titles. - **Regular text**: Use smaller font sizes for body text. - The smallest font size should typically be 12px. [Learn more about heading and text components](https://www.wix-pages.com/wix-design-system/?path=/story/components-typography--heading). ## User support Provide easily accessible help articles or a support center to assist users with issues. Your app should also include clear documentation and instructions specific to Wix. Examples: - Dedicated FAQ section in your app or help center. - Reply to user reviews regularly in your app page on the Wix App Market. - Provide a clear link to support via email on your app. ## Clear language Use plain and easy-to-understand language to ensure everyone can comprehend the content, avoiding jargon that may not be known to everyone whenever possible. Content should be brief and to the point. Common practices for content: - Break up the content into short sentences. Include one idea per sentence, and try to use sentences of 25 words or less. - Start with the most important piece of info. - Replace overly technical words with simpler ones (Authenticate → Log in, Terminate → End). ## Responsive design and mobile optimization Design your app to be responsive, adapting seamlessly to different screen sizes and devices for optimal usability. Ensure the app [functions well on mobile devices](https://www.wix.com/blog/mobile-first-design), which behave differently than the desktop. Examples of mobile adjustments: - The mobile layout will usually be a 1 column layout due to space constraints. - Mobile buttons need to be relatively big so that users can click them using their fingers. The highest accuracy was found with buttons between 42 and 72 pixels. - You may also want to have icon buttons on mobile screens. ## Summary and additional resources By integrating these best practices into your app development process, you can create a good app that meets users' needs and provides an excellent user experience. More resources: - Blog post: [What is UX design](https://www.wix.com/blog/what-is-ux-design) - Blog post: [Inclusive design](https://www.wix.com/blog/inclusive-design) - Blog post: [UX design tools](https://www.wix.com/blog/ux-design-tools) - [Wix Patterns](https://www.wix-pages.com/wix-patterns) - [Wix Blocks guidelines for applications](https://support.wix.com/en/article/wix-blocks-design-guidelines-for-applications) - [About Wix Blocks](https://dev.wix.com/docs/build-apps/develop-your-app/develop-an-app-with-blocks/about-wix-blocks.md) ## See also - [About the Wix Design System](https://dev.wix.com/docs/build-apps/develop-your-app/design/about-the-wix-design-system.md) --- > Portal Navigation: > > - Append `.md` to any URL under `https://dev.wix.com/docs/` to get its markdown version. > - Pages are either content pages (article or reference text) or menu pages (a list of links to child pages). > - To get a menu page, truncate any URL to a parent path and append `.md` (e.g. `https://dev.wix.com/docs/sdk.md`, `https://dev.wix.com/docs/sdk/core-modules.md`). > - Top-level index of all portals: https://dev.wix.com/docs/llms.txt > - Full concatenated docs: https://dev.wix.com/docs/llms-full.txt ## Resource: About the Wix Design System ## Article: About the Wix Design System ## Article Link: https://dev.wix.com/docs/build-apps/develop-your-app/design/about-the-wix-design-system.md ## Article Content: # About the Wix Design System The [Wix Design System](https://www.wix-pages.com/wix-design-system/?path=/story/getting-started--about) is a comprehensive toolkit for developers and designers to craft beautiful and intuitive product experiences. When working with Wix CLI or building self-hosted extensions, you can use the Wix Design System to create dashboard pages and panels for Wix applications. Dashboard pages are for site admins to manage data and business operations, while panels allow them to control the design and behavior of your app. [](https://www.wix-pages.com/wix-design-system/) ![Wix Design System example](https://wixmp-833713b177cebf373f611808.wixmp.com/images/954d9fc30f592e93d662d50dbfa15da7.png) The Wix Design System offers: * A React library with core UI components. * A React library with advanced components for common functionalities. * A set of design patterns implementing best practices for Wix app development. * A Figma kit with components, icons, and ready-to-use page templates. * Detailed component documentation, including demos and props reference. * An interactive playground for hands-on exploration. * Wix color palettes. * Wix MadeFor font. * Over 400 icons. ## Developers For developers, the Wix Design System includes a React library of core reusable components. Each component is documented in Storybook, accompanied by a demo and playground for exploration. This library streamlines the rapid prototyping and development of Wix-styled applications. [Get started developing](https://www.wix-pages.com/wix-design-system/?path=/story/getting-started--get-started-developing). ### Patterns The Wix Design System also includes an advanced component library called Patterns. These advanced components offer a higher level of sophistication and functionality compared to the core components, and are specifically designed to meet typical use cases in both app design and functionality. Components in the Patterns library provide developers with ready-to-use solutions for common design patterns, enhancing the efficiency and effectiveness of developing Wix-styled applications. Use Patterns together with Wix Design System's core components to develop a robust Wix app. Start by looking for components in Patterns to quickly and easily implement common functionalities with a Wix style and layout. Components in the Patterns library are documented in Storybook, accompanied by a demo and playground for exploration. [Get started developing with Patterns](https://www.wix-pages.com/wix-patterns/). ## Designers For designers, the Wix Design System includes a Figma kit to integrate Wix design assets into their design workflow. This kit fosters enhanced collaboration and iteration throughout the design process, simplifies cooperation with developers, and ensures adherence to Wix's visual standards. [Get started designing](https://www.wix-pages.com/wix-design-system/?path=/story/getting-started--get-started-designing). --- > Portal Navigation: > > - Append `.md` to any URL under `https://dev.wix.com/docs/` to get its markdown version. > - Pages are either content pages (article or reference text) or menu pages (a list of links to child pages). > - To get a menu page, truncate any URL to a parent path and append `.md` (e.g. `https://dev.wix.com/docs/sdk.md`, `https://dev.wix.com/docs/sdk/core-modules.md`). > - Top-level index of all portals: https://dev.wix.com/docs/llms.txt > - Full concatenated docs: https://dev.wix.com/docs/llms-full.txt ## Resource: About App Accessibility ## Article: About App Accessibility ## Article Link: https://dev.wix.com/docs/build-apps/develop-your-app/design/about-app-accessibility.md ## Article Content: # About App Accessibility An accessible app is one that can be accessed and used by anyone, regardless of physical, mental, or situational disabilities, or socioeconomic restrictions on internet speed and bandwidth. Advantages of an accessible app include: * **Broader reach:** Your app can be used by a wider range of people, including those with disabilities, situational limitations, and older adults. * **Better user experience:** Your app is also easier to use for those without disabilities or limitations, resulting in an enhanced user experience. * **Fosters inclusivity:** Ensures that technology is available to everyone equitably. ## Best practices To make your app's [site extensions](https://dev.wix.com/docs/build-apps/develop-your-app/extensions/site-extensions/about-site-extensions.md) accessible, see the following articles: * [Web accessibility best practices](https://www.wix.com/blog/website-accessibility-best-practices) * [How to make your website accessible](https://www.wix.com/blog/how-to-make-a-website-accessible) > **Note:** Many of the principles for making a website accessible are applicable to all parts of your app, especially [frontend extensions](https://dev.wix.com/docs/build-apps/develop-your-app/extensions/about-extensions.md#frontend-extensions). It’s worthwhile reading the articles above even if your app doesn't include site extensions. The following list isn't exhaustive, but includes some ways you can make your app accessible. ### Accessibility guidelines Familiarize yourself with accessibility guidelines, such as the [Web Content Accessibility Guidelines](https://www.w3.org/WAI/standards-guidelines/wcag/) (WCAG). These resources provide detailed recommendations for making digital content accessible. ### Semantic HTML and proper markup Properly label your app's structure using semantic HTML elements. Use headings, lists, and [landmarks](https://www.w3schools.com/accessibility/accessibility_landmarks.php) to improve navigation for users accessing a site with screen reader. Proper markup helps assistive technologies interpret and present content accurately to users with disabilities. ### Structure and naming A screen reader should be able to understand all the important content on the page just from the HTML. Content, structure, and relationships between elements should be clear. ### Clear and consistent navigation Design intuitive navigation pathways and ensure consistency across your app's interface. Straightforward navigation aids users with cognitive disabilities and helps all users find what they need efficiently. ### Test your app using assistive technologies Test your app using screen readers, keyboard navigation, voice input, and other assistive technologies to ensure compatibility and usability for users with disabilities. Learn more about [browsing with assistive technology](https://www.youtube.com/playlist?list=PLTqm2yVMMUKVxQ6eYth4_vvbM3IcrSPlk). ## See also * [Accessibility (MDN)](https://developer.mozilla.org/en-US/docs/Learn_web_development/Core/Accessibility) * [Accessibility (web.dev)](https://web.dev/articles/accessibility) --- > Portal Navigation: > > - Append `.md` to any URL under `https://dev.wix.com/docs/` to get its markdown version. > - Pages are either content pages (article or reference text) or menu pages (a list of links to child pages). > - To get a menu page, truncate any URL to a parent path and append `.md` (e.g. `https://dev.wix.com/docs/sdk.md`, `https://dev.wix.com/docs/sdk/core-modules.md`). > - Top-level index of all portals: https://dev.wix.com/docs/llms.txt > - Full concatenated docs: https://dev.wix.com/docs/llms-full.txt ## Resource: About Auto Patterns ## Article: About Auto Patterns ## Article Link: https://dev.wix.com/docs/build-apps/develop-your-app/design/auto-patterns/about-auto-patterns.md ## Article Content: # About Auto Patterns
__Alpha:__ The [AI app builder](https://dev.wix.com/docs/build-apps/develop-your-app/build-with-ai/about-the-ai-app-builder.md) is currently in alpha. This feature is subject to change and may have bugs, issues, and limitations. We're actively improving it based on your feedback.
Auto Patterns is a configuration-driven library that helps you build dashboard pages for your Wix apps. Instead of manually building dashboards with React components, you define everything in a JSON configuration file that conforms to the [`AppConfig` type](#the-appconfig-type). Auto Patterns is built on top of [Patterns](https://www.wix-pages.com/wix-patterns/), an advanced component library that extends the [Wix Design System](https://dev.wix.com/docs/build-apps/develop-your-app/design/about-the-wix-design-system.md) and provides reusable React components. Auto Patterns uses these components and configures them automatically based on your configuration file, handling the connections between components, hooks, and providers so you can skip manual setup. This configuration-driven approach reduces development time, simplifies maintenance, and makes the app experience more intuitive and predictable. ## The patterns.json file The `patterns.json` file is a JSON file that defines the structure, style, and behavior of your dashboard pages. ## The AppConfig type `AppConfig` is a TypeScript type that defines the structure and format of your dashboard configuration. The `patterns.json` file conforms to this type, ensuring your configuration matches the expected format. Auto Patterns supports a wide range of components and features for customizing your dashboard pages that are defined as an `AppConfig` type. For a complete list of available features, see [About Auto Patterns Features](https://dev.wix.com/docs/build-apps/develop-your-app/design/auto-patterns/about-auto-patterns-features.md). ## The AutoPatternsApp component The `AutoPatternsApp` component renders your dashboard based on configuration you provide. ## Usage Import your configuration from `patterns.json` and pass it to the `AutoPatternsApp` component as the `configuration` prop: ```tsx import React, { type FC } from 'react'; import { WixDesignSystemProvider } from '@wix/design-system'; import '@wix/design-system/styles.global.css'; import { WixPatternsProvider } from '@wix/patterns/provider'; import { PatternsWizardOverridesProvider, AutoPatternsApp, type AppConfig } from '@wix/auto-patterns'; import { withDashboard } from '@wix/patterns'; import config from './patterns.json'; const CollectionPage: FC = () => { return ( ); }; export default withDashboard(CollectionPage); ``` ## See also - [About Auto Patterns Features](https://dev.wix.com/docs/build-apps/develop-your-app/design/auto-patterns/about-auto-patterns-features.md) - [Get started with the AI app builder](https://dev.wix.com/docs/build-apps/develop-your-app/build-with-ai/get-started-with-the-ai-app-builder.md) - [About the AI app builder](https://dev.wix.com/docs/build-apps/develop-your-app/build-with-ai/about-the-ai-app-builder.md) --- > Portal Navigation: > > - Append `.md` to any URL under `https://dev.wix.com/docs/` to get its markdown version. > - Pages are either content pages (article or reference text) or menu pages (a list of links to child pages). > - To get a menu page, truncate any URL to a parent path and append `.md` (e.g. `https://dev.wix.com/docs/sdk.md`, `https://dev.wix.com/docs/sdk/core-modules.md`). > - Top-level index of all portals: https://dev.wix.com/docs/llms.txt > - Full concatenated docs: https://dev.wix.com/docs/llms-full.txt ## Resource: About Auto Patterns Features ## Article: About Auto Patterns Features ## Article Link: https://dev.wix.com/docs/build-apps/develop-your-app/design/auto-patterns/about-auto-patterns-features.md ## Article Content: # Auto Patterns Features
__Alpha:__ The [AI app builder](https://dev.wix.com/docs/build-apps/develop-your-app/build-with-ai/about-the-ai-app-builder.md) is currently in alpha. This feature is subject to change and may have bugs, issues, and limitations. We're actively improving it based on your feedback.
Auto Patterns supports a comprehensive set of features from [Patterns](https://www.wix-pages.com/wix-patterns/) for building dashboard pages in your Wix apps. When you [build an app with the AI app builder](https://dev.wix.com/docs/build-apps/develop-your-app/build-with-ai/get-started-with-the-ai-app-builder.md), the built-in agent automatically generates a `patterns.json` configuration file with these features. Use the feature list below to refine your initial prompt and specify which features you want included. After the initial build, you can't use the AI assistant to update the Auto Patterns configuration file. ## Page types Auto Patterns includes the following main page types for dashboard pages: - **Collection pages**: Display a list of items in a table or grid layout. Wix users can view, search, filter, and manage multiple items at once. - **Entity pages**: Display a single item from a collection. Wix users can view and edit the item's details. Clicking an item in a collection page opens its entity page. ## Collection page features ### Layouts Collection pages support different layout types for displaying data: | Feature | Description | |---------|-------------| | Table layout | Display data in a structured table format with sortable columns, ideal for detailed data comparison and management. | | Grid layout | Display data in a card-based grid format, ideal for visual content like images or products. | | Table and grid view switch | Automatic toggle between table and grid views, allowing a site's users to switch layouts. | ### Table features Table layouts include these customization features: | Feature | Description | |---------|-------------| | Column configuration | Define columns with width, sorting, and display options. | | Sortable columns | Enable sorting per column with ascending and descending order. | | Default sort order | Set initial sort direction for the table. | | Custom columns | Allow a site's users to hide or reorder columns. | | Sticky columns | Pin columns when scrolling horizontally. | | Column overrides | Custom rendering for specific columns. | | Row data access | Access all row data in column renderers. | | Show or hide title bar | Toggle column headers visibility. | | Section renderers | Group table rows with section headers. | ### Grid features Grid layouts include card-based display options: | Feature | Description | |---------|-------------| | Card layout | Display items as cards in a grid format. | | Card descriptions | Configure card content with title, subtitle, and image fields. | | Card content modes | Full display, title-only, or empty display options. | | Image placement | Position images at the top or side of cards. | ### Actions Collection pages support various action types for managing items: #### Collection page actions General collection page action buttons: | Feature | Description | |---------|-------------| | Primary actions | Main action buttons displayed prominently, such as create buttons. | | Secondary actions | Additional actions organized in menus. | | Create actions | To create new items, navigate to an entity page. | | Custom collection actions | Execute custom JavaScript methods for collection-level operations. | #### Row-level actions Row-level actions appear on individual items in a table or grid: | Feature | Description | |---------|-------------| | Primary action | Main action per row, such as update, delete, or custom actions. | | Secondary actions | Additional row actions displayed in a popover menu. | | Update actions | To edit an item, navigate to an entity page. | | Delete actions | Before removing an item, show a delete confirmation dialog. | | Custom row actions | Execute custom JavaScript methods per row. | | Inline actions | Actions that appear inline or on hover. | | Always visible actions | Actions always shown, not just on hover. | #### Bulk operations Bulk operations allow a site's users to perform actions on multiple selected items: | Feature | Description | |---------|-------------| | Bulk delete | Delete multiple items simultaneously with confirmation. | | Custom bulk actions | Execute custom JavaScript methods on multiple selected items. | | Bulk action toolbar | Toolbar that appears when items are selected. | | Primary and secondary bulk actions | Organize bulk operations into primary and secondary actions. | | Multi-select | Checkbox selection for bulk operations. | | Select all scope | Select all items on the current page or the entire collection. | | Selection update mode | Preserve or clear selections when data changes. | ### Search and filters Collection pages include search and filtering capabilities: | Feature | Description | |---------|-------------| | Search | Full-text search across a site's collection data. | | Filters panel | Side panel with multiple filter types. | | Number filters | Min/max range filters with decimal support. | | Date and dateTime filters | Predefined presets and custom date ranges. | | Boolean filters | True/false filters with custom labels. | | Enum filters | Single or multiple selection with various option types. | | Tag labels | Visual tags showing active filters. | | Filter sections | Group related filters together. | | Open by default | Auto-expand specific filters when the page loads. | | Reflect query in URL | Sync filters, search, and sort with browser URL. | ### Query operations Collection pages include data query operations: | Feature | Description | |---------|-------------| | Pagination | Navigate through large datasets with page-based or cursor-based pagination. | | Filtering | Filter data by specific criteria. | | Sorting | Sort data by columns or fields. | ## Entity page features ### Layout Entity pages use a flexible 12-column grid system for organizing content: | Feature | Description | |---------|-------------| | 12-column grid system | Responsive layout system for organizing fields and components. | | Main section | Primary content area for main entity information. | | sidebar section | Secondary content area for additional details or actions. | | Card components | Organize content in cards for better visual grouping. | | Field layout | Display fields with configurable column spans. | | Container layout | Group related fields together. | | Custom components | Inject custom React components into entity pages. | | Nested containers | Create hierarchical layouts with nested containers. | ### Actions Entity pages support additional action types: | Feature | Description | |---------|-------------| | More actions | Additional actions menu on entity pages. | | Custom entity actions | Execute custom JavaScript methods on entity pages. | ### Forms Entity pages include built-in form functionality: | Feature | Description | |---------|-------------| | Form integration | Built-in react-hook-form integration for form handling. | | Field validation | Form validation with error messages. | | Create forms | Forms for creating new items. | | Edit forms | Forms for modifying existing items. | ## Shared features ### Data sources Collection and entity pages include the following data source types: | Feature | Description | |---------|-------------| | CMS collections | Connect a site's dashboard pages to Wix CMS collections to display and manage content stored in a site's CMS. | | Custom data sources | Connect to external APIs or databases beyond Wix CMS. | | FQDN-based custom data source | Integrates with Wix Business APIs using FQDNs. | | Schema configuration | Define field types and metadata for data sources. | ### Routing and navigation Collection and entity pages include the following routing and navigation features: | Feature | Description | |---------|-------------| | Route configuration | Define routes for collection and entity pages. | | Dynamic parameters | Use dynamic route parameters to pass data between pages, such as item IDs. | | Page relationships | Link collection and entity pages together. | | Reflect query in URL | Sync filters, search, and sort with browser URL for shareable links. | ### Customization and overrides Collection and entity pages include the following customization options: | Feature | Description | |---------|-------------| | Column overrides | Custom rendering for table columns. | | Custom components | Override field rendering or add standalone UI components. | | Slots | Inject custom components into collection pages at specific locations. | | Custom actions | Implement custom action handlers with JavaScript. | | Custom modals | Create custom modal dialogs. | | Custom data sources | Implement custom CRUD operations. | | Styling | Apply custom styles to columns, rows, or entire pages. | ### UI features Collection and entity pages include the following UI enhancements: | Feature | Description | |---------|-------------| | Empty state | Custom empty state with image, title, subtitle, and call-to-action buttons. | | Toolbar title | Title above table/grid with subtitle, and total count. | | Page title | Configure page header with title and subtitle. | | Total count display | Show or hide item counts. | | Loading states | Automatic loading indicators during data fetching. | | Error handling | Built-in error states and retry logic. | | Toast notifications | Success and error feedback messages. | | Optimistic updates | UI updates before server confirmation for better UX. | ### Advanced features Collection and entity pages include the following advanced capabilities: | Feature | Description | |---------|-------------| | Select all scope | Select all items on the page or the entire collection. | | Selection update mode | Preserve or clear selections when data changes. | ## See also - [About Auto Patterns](https://dev.wix.com/docs/build-apps/develop-your-app/design/auto-patterns/about-auto-patterns.md) - [Get started with the AI app builder](https://dev.wix.com/docs/build-apps/develop-your-app/build-with-ai/get-started-with-the-ai-app-builder.md) - [About AI Prompts for Building Apps](https://dev.wix.com/docs/build-apps/develop-your-app/build-with-ai/best-practices-for-ai-prompts-for-building-apps.md) --- > Portal Navigation: > > - Append `.md` to any URL under `https://dev.wix.com/docs/` to get its markdown version. > - Pages are either content pages (article or reference text) or menu pages (a list of links to child pages). > - To get a menu page, truncate any URL to a parent path and append `.md` (e.g. `https://dev.wix.com/docs/sdk.md`, `https://dev.wix.com/docs/sdk/core-modules.md`). > - Top-level index of all portals: https://dev.wix.com/docs/llms.txt > - Full concatenated docs: https://dev.wix.com/docs/llms-full.txt ## Resource: Tutorial | Customize a Column With Badges in Auto Patterns ## Article: Tutorial | Customize a Column With Badges in Auto Patterns ## Article Link: https://dev.wix.com/docs/build-apps/develop-your-app/design/auto-patterns/tutorial-customize-a-column-with-badges-in-auto-patterns.md ## Article Content: # Tutorial | Customize a Column with Badges in Auto Patterns
__Alpha:__ The [AI app builder](https://dev.wix.com/docs/build-apps/develop-your-app/build-with-ai/about-the-ai-app-builder.md) is currently in alpha. This feature is subject to change and may have bugs, issues, and limitations. We're actively improving it based on your feedback.
You can override default column rendering in [Auto Patterns](https://dev.wix.com/docs/build-apps/develop-your-app/design/auto-patterns/about-auto-patterns.md) to customize how columns appear in table components on dashboard pages. In this tutorial, you customize an order status column to display badges with different colors based on the order status value. The order status column displays a standard badge for `Processing`, a success badge for `Shipped` and `Delivered`, an error badge for `Canceled`, and a neutral badge for other values. Use the following steps to customize the column with badges: 1. [Create the column component](#step-1--create-the-column-component). 2. [Export the column component](#step-2--export-the-column-component). 3. [Configure the column overrides](#step-3--configure-the-column-overrides). 4. [Update the configuration file](#step-4--update-the-configuration-file). ## Step 1 | Create the column component Create a column component file such as `components/columns/orderStatus.tsx`. In this file, define a method that receives the column value and returns a React component that displays it as a badge. The method uses conditional logic to determine the badge color based on the status value: - `Processing`: standard badge - `Shipped` or `Delivered`: success badge - `Canceled`: error badge ```tsx import { Badge } from '@wix/design-system'; interface IColumnValue { value: T; } export function orderStatus({ value }: IColumnValue) { if (!value) { return -; } const skin = value === 'Processing' ? 'standard' : value === 'Shipped' || value === 'Delivered' ? 'success' : value === 'Canceled' ? 'error' : 'neutral'; return ( {value} ); } ``` ## Step 2 | Export the column component Create an index file such as `components/columns/index.tsx` that exports your column components. ```tsx import { orderStatus } from './orderStatus'; export const useColumns = () => { return { orderStatus, }; }; ``` ## Step 3 | Configure the column overrides Import the column overrides in your page component and specify them as the value for `PatternsWizardOverridesProvider`. 1. Add the import for `useColumns` from your columns directory. 2. Inside your component, call `useColumns()` to get the column overrides. 3. Wrap your `AutoPatternsApp` component with `PatternsWizardOverridesProvider` and pass the columns as the value prop. ```tsx import { type FC } from 'react'; import { WixDesignSystemProvider } from '@wix/design-system'; import '@wix/design-system/styles.global.css'; import { WixPatternsProvider } from '@wix/patterns/provider'; import { PatternsWizardOverridesProvider, AutoPatternsApp } from '@wix/auto-patterns'; import type { AppConfig } from '@wix/auto-patterns'; import { withDashboard } from '@wix/patterns'; import config from './patterns.json'; import { useColumns } from './components/columns'; const CollectionPage: FC = () => { const columns = useColumns(); return ( ); }; export default withDashboard(CollectionPage); ``` ## Step 4 | Update the configuration file In your `patterns.json` configuration file, reference the column override by its field ID. The field ID must match the name of the exported method in your column component. For example, if the field ID is `orderStatus` in the collection, Auto Patterns automatically uses the `orderStatus` method from your column overrides. When Auto Patterns renders the table, it uses your custom `orderStatus` component to display order status column values as badges. ```json { "pages": [ { "id": "my-collection-page", "type": "collectionPage", "collectionPage": { "components": [ { "type": "collection", "layout": [ { "type": "Table", "table": { "columns": [ { "id": "orderStatus", "name": "Order Status" } ] } } ] } ] } } ] } ``` ## See also - [About Auto Patterns Features](https://dev.wix.com/docs/build-apps/develop-your-app/design/auto-patterns/about-auto-patterns-features.md) --- > Portal Navigation: > > - Append `.md` to any URL under `https://dev.wix.com/docs/` to get its markdown version. > - Pages are either content pages (article or reference text) or menu pages (a list of links to child pages). > - To get a menu page, truncate any URL to a parent path and append `.md` (e.g. `https://dev.wix.com/docs/sdk.md`, `https://dev.wix.com/docs/sdk/core-modules.md`). > - Top-level index of all portals: https://dev.wix.com/docs/llms.txt > - Full concatenated docs: https://dev.wix.com/docs/llms-full.txt ## Resource: About Launching Apps ## Article: About Launching Apps ## Article Link: https://dev.wix.com/docs/build-apps/launch-your-app/about-launching-apps.md ## Article Content: # About Launching Apps Congratulations on your decision to launch your Wix app! When you’ve finished [developing your app](https://dev.wix.com/docs/build-apps/develop-your-app/about-developing-apps.md), it's time to decide how to distribute it. You can choose to list your app in the Wix App Market or to distribute it on your own. ## Set up your app’s market listing and localize Set up your [market listing](https://dev.wix.com/docs/build-apps/launch-your-app/market-listing/about-market-listings.md). Decide whether to localize your app to cater to users in different regions, including your [market listing info](https://dev.wix.com/docs/build-apps/launch-your-app/localization/translate-app-listing.md) and/or [app extension names](https://dev.wix.com/docs/build-apps/launch-your-app/localization/translate-app-extensions.md). > **Note:** Before you can distribute your app, make sure to [release a version](https://dev.wix.com/docs/build-apps/manage-your-app/versioning/release-a-new-app-version.md). ## Distribute your app All apps that should be installed on customers' sites go through one of Wix's distribution flows: - Apps that should be listed on the Wix App Market are submitted to a review process. This is to check they meet our [requirements for performance, security, content, and more](https://dev.wix.com/docs/build-apps/launch-your-app/app-distribution/app-market-guidelines.md). Some of these checks are automated in the app dashboard, while others are assessed manually by a member of the Wix team. - Apps that should be distributed publicly but aren’t intended for sale in the Wix App Market should be distributed using an [install link](https://dev.wix.com/docs/build-apps/launch-your-app/app-distribution/install-your-app/share-an-app-install-link.md), or [installed directly](https://dev.wix.com/docs/build-apps/launch-your-app/app-distribution/install-your-app/install-your-app-directly-on-sites.md) on a site within your account from the app dashboard, without going through a review process. If you decide to list your app in the Wix App Market, you'll need to set up your app's pricing and market listing, ensure that it works as expected and according to all regulatory requirements and guidelines, and then you can submit the app to the Wix App Market. ### Get listed in the Wix App Market For a walkthrough of the App Market publishing flow, watch the video tutorial:
Apps that will be listed in the Wix App Market require the following: #### 1 | Help your app get found Set up your [search keywords](https://dev.wix.com/docs/build-apps/launch-your-app/market-listing/add-your-get-found-info.md) and [audience details](https://dev.wix.com/docs/build-apps/launch-your-app/market-listing/add-your-app-audience-info.md). #### 2 | Price your app Set up your app’s pricing structure: Familiarize yourself with [Wix’s pricing plans and business models](https://dev.wix.com/docs/build-apps/launch-your-app/pricing-and-billing/about-pricing-plans-and-business-models.md), and complete the required tasks for each type: - [Freemium](https://dev.wix.com/docs/build-apps/launch-your-app/pricing-and-billing/set-up-a-freemium-business-model.md) - [Premium](https://dev.wix.com/docs/build-apps/launch-your-app/pricing-and-billing/set-up-a-premium-business-model.md) - [Usage-based](https://dev.wix.com/docs/build-apps/launch-your-app/pricing-and-billing/set-up-a-usage-based-business-model.md) (App Market approval required) - [Pay as you go](https://dev.wix.com/docs/build-apps/launch-your-app/pricing-and-billing/set-up-a-pay-as-you-go-business-model.md) (App Market approval required) Tasks include deciding whether to host your pricing page on Wix or [host your own](https://dev.wix.com/docs/build-apps/launch-your-app/pricing-and-billing/set-up-an-external-pricing-page.md), whether to [offer a free trial](https://dev.wix.com/docs/build-apps/launch-your-app/pricing-and-billing/set-up-and-manage-free-trials.md), and how to [identify and manage app users](https://dev.wix.com/docs/build-apps/launch-your-app/pricing-and-billing/identify-and-manage-app-users.md). See our [Payments and billing FAQs](https://dev.wix.com/docs/build-apps/launch-your-app/pricing-and-billing/payments-and-billing-faqs.md) for answers to common questions.
**Important:** Setting up pricing plans in the app dashboard is only part of the process. You must also implement logic in your app to identify which plan each user has installed and restrict features accordingly. Wix handles billing and payment processing, but enforcing feature limitations based on pricing tiers is your responsibility. Learn more about how to [identify and manage app users](https://dev.wix.com/docs/build-apps/launch-your-app/pricing-and-billing/identify-and-manage-app-users.md).
#### 3 | Check your app before submission - Test your app (we offer [free premium dev sites](https://dev.wix.com/docs/build-apps/launch-your-app/app-distribution/test-your-app/test-your-app-on-a-premium-site.md) for testing purposes). - Ensure your app aligns with all [App Market guidelines](https://dev.wix.com/docs/build-apps/launch-your-app/app-distribution/app-market-guidelines.md). - Ensure your app aligns with all legal and security requirements (including the [Wix terms of use policy](https://dev.wix.com/docs/build-apps/launch-your-app/legal-and-security/wix-terms-of-use-policy.md), the [Wix App Market partner agreement](https://dev.wix.com/app-market-partner-agreement), [security guidelines](https://dev.wix.com/docs/build-apps/launch-your-app/legal-and-security/security-and-privacy-best-practice.md), [GDPR](https://dev.wix.com/docs/build-apps/launch-your-app/legal-and-security/gdpr-compliance/about-gdpr-and-data-protection.md) and [cookie consent compliance](https://dev.wix.com/docs/build-apps/launch-your-app/legal-and-security/gdpr-compliance/about-gdpr-and-data-protection.md). - Check that your app meets the [App checks and testing guide](https://dev.wix.com/docs/build-apps/launch-your-app/app-distribution/test-your-app/app-checks-and-testing-guide.md). #### 4 | Submit your app Once you’ve developed your app, set up the pricing structure and market listing, and completed all pre-submission tasks, you’re ready to [submit your app](https://dev.wix.com/docs/build-apps/launch-your-app/app-distribution/submit-your-first-app-version.md)! It can take up to 15 days to hear back from the App Market team. You can track the [status](https://dev.wix.com/docs/build-apps/launch-your-app/app-distribution/about-app-distribution.md#app-submission-statuses) of your submission in your app's dashboard. ### Share your unlisted app If you aren't listing your app in the Wix App Market, you can distribute it using an [install link](https://dev.wix.com/docs/build-apps/launch-your-app/app-distribution/install-your-app/share-an-app-install-link.md), or [install it directly](https://dev.wix.com/docs/build-apps/launch-your-app/app-distribution/install-your-app/install-your-app-directly-on-sites.md) on a site within your account from the app dashboard, without going through a review process. ## Promote your app Way to go! Your app is ready for distribution. Now’s the time to: - [Write a press release](https://dev.wix.com/docs/build-apps/launch-your-app/app-promotion/self-promotion/write-a-press-release.md) - [Send marketing emails](https://dev.wix.com/docs/build-apps/launch-your-app/app-promotion/self-promotion/send-marketing-emails.md) - [Perfect your market listing](https://dev.wix.com/docs/build-apps/launch-your-app/market-listing/about-market-listings.md) - [Improve your SEO](https://dev.wix.com/docs/build-apps/launch-your-app/app-promotion/self-promotion/seo-best-practices.md) - [Run a discount coupon campaign](https://dev.wix.com/docs/build-apps/launch-your-app/app-promotion/self-promotion/create-a-coupon.md) - only for Wix App Market apps - [Share your listing on your website and social media](https://dev.wix.com/docs/build-apps/launch-your-app/app-promotion/app-promotion-assets.md) --- > Portal Navigation: > > - Append `.md` to any URL under `https://dev.wix.com/docs/` to get its markdown version. > - Pages are either content pages (article or reference text) or menu pages (a list of links to child pages). > - To get a menu page, truncate any URL to a parent path and append `.md` (e.g. `https://dev.wix.com/docs/sdk.md`, `https://dev.wix.com/docs/sdk/core-modules.md`). > - Top-level index of all portals: https://dev.wix.com/docs/llms.txt > - Full concatenated docs: https://dev.wix.com/docs/llms-full.txt ## Resource: About Monetizing Your App ## Article: Monetize your app ## Article Link: https://dev.wix.com/docs/build-apps/launch-your-app/pricing-and-billing/about-monetizing-your-app.md ## Article Content: # Monetize your app Launching and selling apps on Wix's App Market lets you reach millions of potential users and unlock new revenue streams. ## Why sell your app on the Wix App Market There are lots of great reasons why you should sell your app on Wix’s App Market: - **Flexible pricing options**: Whether you want to offer a traditional recurring subscription, usage-based pricing, or a combination, we support it. - **Competitive revenue share**: In your first year, you receive 100% of all sales revenue. After that, you keep 80%. Revenue is calculated after a 2.5% transaction fee and applicable sales tax. - **We handle payments**: You set the price and plans while the Wix pricing and checkout system takes care of the rest. - **Get paid monthly**: We pay out your revenue share on a net 30 EOM basis. - **Easy pricing adjustments**: Whether you want to offer a free trial, a discount for recurring plans, a coupon campaign, or issue a refund, our system supports it. - **Local currency and tax support**: When we list your app in other territories, our system calculates the fair market rate and tax for that location and sets the price in the local currency to optimize sales. - **Track your payout data**: You can easily see all your payout data and generate reports in your app's dashboard. ## Terminology Below are the key concepts you should be familiar with in order to make the best decisions for your app’s pricing and billing. - **Pricing plan**: A package of benefits that users can select for purchase. - **Billing model**: How each pricing plan defines the amount that users pay for the plan and the frequency of the payments. - **Business model**: A label assigned to your app that affects how it is marketed in the Wix App Market. - **Free trial**: A version of your app that would normally require purchase, but that you are providing for free for a set period of time. - **Pricing page**: A page where users can view and select paid plans for purchase or upgrade. - **Payout**: Wix’s transfer of earned revenue to your bank account. - **Instance**: An object that identifies your app on a specific site and the pricing plan that site has installed. ## How to set up your app's pricing Ready to start selling your app? Here's what you need to do to set up your app's pricing and billing: 1. [Define your pricing plans and business model](https://dev.wix.com/docs/build-apps/launch-your-app/pricing-and-billing/about-pricing-plans-and-business-models.md). 1. [Decide whether to offer a free trial](https://dev.wix.com/docs/build-apps/launch-your-app/pricing-and-billing/set-up-and-manage-free-trials.md). 1. [Choose where to host your app's pricing page](https://dev.wix.com/docs/build-apps/launch-your-app/pricing-and-billing/set-up-an-external-pricing-page.md). 1. [Identify each user and the plan they installed](https://dev.wix.com/docs/build-apps/launch-your-app/pricing-and-billing/identify-and-manage-app-users.md), implement the logic to restrict features appropriately, and [create upgrade entry points](https://dev.wix.com/docs/build-apps/launch-your-app/pricing-and-billing/identify-and-manage-app-users.md#create-upgrade-entry-points) to your pricing page.
**Important:** While Wix handles the billing and payment processing, it's your responsibility as the developer to code behavior that limits features for certain plans. You must implement logic that identifies which plan a user has installed, restricts access to premium features for free or lower-tier users, and provides clear calls-to-action to upgrade when applicable.
--- > Portal Navigation: > > - Append `.md` to any URL under `https://dev.wix.com/docs/` to get its markdown version. > - Pages are either content pages (article or reference text) or menu pages (a list of links to child pages). > - To get a menu page, truncate any URL to a parent path and append `.md` (e.g. `https://dev.wix.com/docs/sdk.md`, `https://dev.wix.com/docs/sdk/core-modules.md`). > - Top-level index of all portals: https://dev.wix.com/docs/llms.txt > - Full concatenated docs: https://dev.wix.com/docs/llms-full.txt ## Resource: About Pricing Plans and Business Models ## Article: About pricing plans and business models ## Article Link: https://dev.wix.com/docs/build-apps/launch-your-app/pricing-and-billing/about-pricing-plans-and-business-models.md ## Article Content: # About pricing plans and business models There are several ways to earn revenue from your app, each with its own benefits. This article outlines the key concepts you should be familiar with to make the best decisions for your app’s pricing and billing. ## Pricing plans A pricing plan is a package of benefits linked to a billing model, which users can select for purchase. For example, your app can offer a free plan with limited access to specific features, alongside a plan with a monthly or yearly fee for full access to all features. Each plan should be mapped to up to 4 benefits that users will enjoy when they purchase the plan. Below is an example of several pricing plans, displayed in a Wix pricing page: ![Pricing plans in pricing page](https://wixmp-833713b177cebf373f611808.wixmp.com/images/25520ac9759bf022949005b1ae1ef071.png) ### Billing models Each plan that charges a fee of any type requires a billing model that defines the amount that users pay for the plan and the frequency of the payments. Wix supports the following models: - **Free**: Your app can be installed for free by default, with no hidden charges or one-time fees in the plan. - **Single**: Single upfront fee each time users use a service provided by the app. For example, a set fee to send 100 text messages. Single fee plans can't be displayed in the Wix App Market listing or the Wix-hosted pricing page. - **Recurring** (monthly and/or yearly): A stable, recurring fee that is billed monthly or yearly. - **Usage-based** (monthly): A variable monthly fee based on actions taken within your app. For example, fees per emails sent in the last month, with or without a base monthly fee. [App Market approval](https://www.wix.com/support-chatbot?nodeId=25a57397-ccf7-4376-8b74-48d51edf7159&referral=devRels) required. - **Custom**: A variable fee charged immediately based on actions taken within your app. For example, shipping fees. [App Market approval](https://www.wix.com/support-chatbot?nodeId=25a57397-ccf7-4376-8b74-48d51edf7159&referral=devRels) required. ## Business models Your app’s business model is what determines how your app will be labeled in the Wix App Market. The business model is a reflection of the set of billing models your app offers in its pricing plans. Wix supports the following business models: - **Free**: Completely free, with no hidden charges or single (also known as: one-time) fees. - **Freemium**: One of the following combination types: - A combination of plans that include a free plan, and at least one plan with a single and/or recurring (monthly or yearly) fee. - A combination of plans that include a free plan, and at least one plan with a fee that varies month-to-month based on usage, with or without a base fee. [App Market approval](https://www.wix.com/support-chatbot?nodeId=25a57397-ccf7-4376-8b74-48d51edf7159&referral=devRels) required. - **Premium**: One of the following combination types: - A combination of plans that include single and/or recurring (monthly or yearly) fee plans, with no free plan. - One or more plans with a fee that varies month-to-month based on usage, with or without a base fee. [App Market approval](https://www.wix.com/support-chatbot?nodeId=25a57397-ccf7-4376-8b74-48d51edf7159&referral=devRels) required. - **Pay as you go**: One or more plans with a fee that is charged immediately upon usage, instead of monthly. For this model, your app will manage the billing collection externally. [App Market approval](https://www.wix.com/support-chatbot?nodeId=25a57397-ccf7-4376-8b74-48d51edf7159&referral=devRels) required. Here’s how the pricing plan billing models map to the corresponding business model for your app: ![Business and billing models](https://wixmp-833713b177cebf373f611808.wixmp.com/images/c3f303de9e3de57cb745c22ef7d62776.png) ### How your app's billing models and business model interact Wix offers a range of billing models specifically so that you can offer a range of billing options within your app. However, not all the billing models can work together. You can combine: - Recurring and single plans (without usage-based) - With a free plan = Freemium - Without a free plan = Premium - Usage-based and single plans (without recurring) - With a free plan = Freemium - Without a free plan = Premium - Custom plans - With a free plan = Pay as you go - Without a free plan = Pay as you go Wix will consider your business model when applying a label to your app’s listing in the App Market for marketing purposes. Labels include: - “Free Plan Available”. - “Free to Install”. - “From < lowest price >”. - “From < lowest price > / month”. For example, an app that offers one free plan and one recurring model pricing plan aligns with the Freemium business model, and will be labeled “Free Plan Available” in the App Market. --- > Portal Navigation: > > - Append `.md` to any URL under `https://dev.wix.com/docs/` to get its markdown version. > - Pages are either content pages (article or reference text) or menu pages (a list of links to child pages). > - To get a menu page, truncate any URL to a parent path and append `.md` (e.g. `https://dev.wix.com/docs/sdk.md`, `https://dev.wix.com/docs/sdk/core-modules.md`). > - Top-level index of all portals: https://dev.wix.com/docs/llms.txt > - Full concatenated docs: https://dev.wix.com/docs/llms-full.txt ## Resource: The App Purchase Lifecycle in Wix ## Article: The App Purchase Lifecycle in Wix ## Article Link: https://dev.wix.com/docs/build-apps/launch-your-app/pricing-and-billing/the-app-purchase-lifecycle-in-wix.md ## Article Content: # The App Purchase Lifecycle in Wix This article outlines the optional stages a Wix user may go through when installing an app, which include signing up for a free trial, upgrading to a paid plan, and canceling their subscription. By understanding the various stages, from installation and initial setup to free trials and billing cycles, you can effectively manage user interactions, troubleshoot issues, and optimize app sales. The app lifecycle can include the following stages: 1. Installation and initial setup 2. Upgrade - with or without a free trial 3. First billing cycle 4. Cancellation All stages after installation are optional, based on the Wix user's choices. ## Stage 1 | Installation and initial setup The lifecycle begins when a Wix user decides to install your app. 1. The user initiates the installation by clicking **Add to Site**. 2. The user reviews the app’s permissions and gives consent, affirming their agreement to the terms. > **Note:** The [App Instance Installed webhook](https://dev.wix.com/docs/rest/app-management/app-instance/app-instance-installed.md) is triggered. 3. Your app should collect [app instance](https://dev.wix.com/docs/build-apps/develop-your-app/access/app-instances/about-app-instances.md) data and store the user’s instance ID for subsequent interactions and associations. If using custom authentication (legacy), the app should also collect the refresh token. 4. Your app should restrict access to paid features by default. The app should display a clear call-to-action (CTA), encouraging users to upgrade for a fuller experience. Learn more about [creating an entry point to your pricing page](https://dev.wix.com/docs/build-apps/launch-your-app/pricing-and-billing/set-up-a-premium-business-model.md#step-4--create-an-upgrade-entry-point-to-your-pricing-page). 5. Your app should [identify the user](https://dev.wix.com/docs/build-apps/launch-your-app/pricing-and-billing/identify-and-manage-app-users.md) when they take an action, confirm whether the user has a free or paid version of the app, and manage their access to paid features accordingly. ### How to check if the user installed a free version of the app - **SDK/REST calls**: Call [Get App Instance](https://dev.wix.com/docs/rest/app-management/app-instance/get-app-instance.md) and check if `isFree: true`, indicating that the user is currently on a free plan. - **iFrame apps**: Check the [instance parameter](https://dev.wix.com/docs/build-apps/develop-your-app/access/app-instances/parse-the-app-instance-query-parameter.md) appended to your iframe URL when a user opens the app. No `vendorProductId` will be included. ## Stage 2 | Upgrade flow There are 2 possibilities when users upgrade an app: - With a free trial - Without a free trial Learn more about [free trials for Wix apps](https://dev.wix.com/docs/build-apps/launch-your-app/pricing-and-billing/set-up-and-manage-free-trials.md). ### Upgrade with a free trial 1. The user initiates purchase of a paid version of your app (or a plan that costs more than the one they currently have) by clicking **Upgrade**, which brings them to the upgrade process. 2. The user is offered a free trial, if one is available. The initial cost is $0, and Wix collects the user’s credit card information, making users aware of automatic charges that occur after the trial. 3. The user signs up for the free trial.
__Important:__ The [Paid Plan Purchased webhook](https://dev.wix.com/docs/rest/app-management/app-instance/paid-plan-purchased.md) is triggered when a user signs up for a free trial. This event won't be triggered again when the free trial expires.
4. Your app should confirm that the user has a free trial version of the app. 5. Your app should [identify the user](https://dev.wix.com/docs/build-apps/launch-your-app/pricing-and-billing/identify-and-manage-app-users.md) and enable access to features included in the free trial. ### How to know if the user is in their free trial period - **SDK/REST calls**: Call [Get App Instance](https://dev.wix.com/docs/rest/app-management/app-instance/get-app-instance.md). - Check if `isFree: false`, indicating that the user is currently a paying user. - Check for a billing object within the Get App Instance response data with detailed information about the user’s plan, which also contains `freeTrialInfo` and the trial status. Note that the `expirationDate` in the billing object will only be updated after the free trial is complete. - **iFrame apps**: Check the [instance parameter](https://dev.wix.com/docs/build-apps/develop-your-app/access/app-instances/parse-the-app-instance-query-parameter.md) appended to your iframe URL when a user opens the app. The `vendorProductId` will be included. (This is the same whether the user has a free trial or paid plan.) ### Upgrade without a free trial 1. The user initiates purchase of a paid version of your app, or a plan that costs more than the one they already have, by clicking **Upgrade**, which brings them to the upgrade process. 2. When there is no free trial available, or the user decides to upgrade without a trial, the full amount is charged. 3. The user completes the purchase flow for the paid plan.
__Important:__ The [Paid Plan Purchased webhook](https://dev.wix.com/docs/rest/app-management/app-instance/paid-plan-purchased.md) is triggered when a user purchases a paid plan.
4. Your app should confirm that the user has a paid version of the app. 5. Your app should [identify the user](https://dev.wix.com/docs/build-apps/launch-your-app/pricing-and-billing/identify-and-manage-app-users.md) and enable access to the features included in the purchased plan. ### How to know if the user has a paid plan - **SDK/REST calls**: Call [Get App Instance](https://dev.wix.com/docs/rest/app-management/app-instance/get-app-instance.md). - Check if `isFree: false`, indicating that the user is currently a paying user. - Check if the `expirationDate` in the billing object is updated to reflect the current date of the charge plus 30 days (or 1 year if the plan is annual). - **iFrame apps**: Check the [instance parameter](https://dev.wix.com/docs/build-apps/develop-your-app/access/app-instances/parse-the-app-instance-query-parameter.md) appended to your iframe URL when a user opens the app. The `vendorProductId` will be included. (This is the same whether the user has a free trial or paid plan.) ## Stage 3 | First billing cycle If the user signs up for a free trial and does not cancel before it ends, their first billing cycle begins, and they are charged for the plan. ### How to know if the user has completed their free trial and been charged - **SDK/REST calls**: Call [Get App Instance](https://dev.wix.com/docs/rest/app-management/app-instance/get-app-instance.md). - Check if `isFree: false`, indicating that the user is currently a paying user. - Check if the `expirationDate` in the billing object is updated to reflect the current date of the charge plus 30 days (or 1 year if the plan is annual). - **iFrame apps**: There is no indication that this change has occured. Check the [instance parameter](https://dev.wix.com/docs/build-apps/develop-your-app/access/app-instances/parse-the-app-instance-query-parameter.md) appended to your iframe URL when a user opens the app. The `vendorProductId` will be included. To confirm that the user no longer has a free trial, call [Get App Instance](https://dev.wix.com/docs/rest/app-management/app-instance/get-app-instance.md).
__Important:__ No event is triggered to indicate that a user has completed their free trial and been charged.
## Stage 4 | Cancellation Users can turn off the auto-renewal of the app's paid plan at any time. If you receive an event notifying you of an auto-renewal cancellation, take note that just because the auto-renewal is off, doesn't mean they aren't currently a paying customer. You can't downgrade the user until their subscription ends at the end of the month or year, depending on your app’s payment plan. ### How to know if the user canceled their free trial or paid plan If the user cancels their free trial or paid plan, the following occur: - **Immediately**: The [Paid Plan Auto Renewal Cancelled webhook](https://dev.wix.com/docs/rest/app-management/app-instance/paid-plan-auto-renewal-cancelled.md) is triggered. Note that the user is still considered a paid user until the plan expires. - **When the paid plan or free trial expires**: - **SDK/REST calls**: Call [Get App Instance](https://dev.wix.com/docs/rest/app-management/app-instance/get-app-instance.md). Once the user's plan or trial expires, their status reverts to `isFree: true`. - **iFrame apps**: Check the [instance parameter](https://dev.wix.com/docs/build-apps/develop-your-app/access/app-instances/parse-the-app-instance-query-parameter.md). Once the user's plan or trial expires, `vendorProductId` is not returned. If the returned expiration date has passed, but the `isFree` parameter in [Get App Instance](https://dev.wix.com/docs/rest/app-management/app-instance/get-app-instance.md) is still false - consider the user as a paid user. This means that the site owner has a billing issue. Once they either fix the issue or cancel their subscription, the date returned in the app instance data will update. ## Overview of key events | **Event** | **Webhook** | **SDK/REST call to Get App Instance** | **iFrame apps instance parameter** | |------------------|-----------------------|---------------------------------------------------------------------------------------|---------------------------------------------------------------------------------------------------| | **Installation** | App installed event | `isFree: true` (user is on a free plan) | No `vendorProductId` in the instance parameter | | **Upgrade with free trial** | Paid Plan Purchased event | `isFree: false` (user is paying), billing object with `freeTrialInfo` and trial status, and no `expirationDate` | `vendorProductId` included in the instance parameter | | **Upgrade without free trial** | Paid Plan Purchased event | `isFree: false` (user is paying), `expirationDate` updated to reflect new charge (30 days or 1 year) | `vendorProductId` included in the instance parameter | | **First billing cycle after transaction** | No event triggered | `isFree: false` (user is paying), `expirationDate` updated to reflect current date of charge plus 30 days (or 1 year for annual plans) | `vendorProductId` included in the instance parameter | | **Cancelled subscription** | Paid Plan Auto Renewal Cancelled event | `isFree: true` (user reverts to free plan) | No `vendorProductId` in the instance parameter --- > Portal Navigation: > > - Append `.md` to any URL under `https://dev.wix.com/docs/` to get its markdown version. > - Pages are either content pages (article or reference text) or menu pages (a list of links to child pages). > - To get a menu page, truncate any URL to a parent path and append `.md` (e.g. `https://dev.wix.com/docs/sdk.md`, `https://dev.wix.com/docs/sdk/core-modules.md`). > - Top-level index of all portals: https://dev.wix.com/docs/llms.txt > - Full concatenated docs: https://dev.wix.com/docs/llms-full.txt ## Resource: Pricing Page Best Practices ## Article: Pricing Page Best Practices ## Article Link: https://dev.wix.com/docs/build-apps/launch-your-app/pricing-and-billing/pricing-page-best-practices.md ## Article Content: # About Pricing Page Best Practices A well-designed pricing page can significantly increase the number of Wix users who purchase your app. This guide provides best practices for designing an effective Wix pricing page that helps Wix users make informed decisions and drives upgrades. ## Highlight plan benefits Use bullet points to describe each plan's benefits. Paragraphs are harder to scan and compare across plans. You can display up to 4 benefits per plan. Make each benefit clear and concise. You can explain additional details in the comparison table below. Keep feature names and benefits consistent across plans to make it easier to identify the differences. Focus on what Wix users achieve: - Avoid: "API access." - Write: "Connect your app to external tools with API access."

Benefits written as bullets

## Position your most popular plan in the center When you customize your Wix pricing page, choose which plan is your recommended plan. This plan gets marked as "Recommended." Position your recommended plan in the center. This creates a visual hierarchy that guides Wix users to your best option while letting them compare alternatives.

Recommended plan in center with badge

## Show clear value progression across plans Show clear value progression across your plans. Higher-priced plans should offer more benefits than lower-priced ones. Example progression: - Premium: Offers 4 advanced capabilities and higher limits. - Mid-tier: Offers 3-4 enhanced features. - Basic: Offers 2-3 core features. This progression helps Wix users understand why they should upgrade and makes the value difference clear.

Progressive benefits across plans

## Optimize pricing strategy and upgrade flow ### Yearly plan discounts The Wix pricing page automatically shows users how much they save with a yearly plan. Take advantage of this feature by offering yearly plans at a discounted rate, and encourage longer commitments. For example, if your monthly plan costs $29/month, set the yearly plan to $24/month. Wix shows users that they can save $60 annually when they choose the yearly option. ### Upgrade entry points Add **Upgrade** entry points throughout your app: - Top right navigation: Add a consistent **Upgrade** button. - Feature restrictions: Show CTAs when Wix users hit premium features. - Contextual prompts: Show prompts at moments when upgrading makes sense. ### Testing your flow Before launch: - Click **Upgrade** in your app. - Complete purchases for each plan. - Verify that features unlock correctly. - Test monthly and yearly billing. After launch, track which plans and features drive upgrades. ## See also - [Set up a Wix pricing page](https://dev.wix.com/docs/build-apps/launch-your-app/pricing-and-billing/set-up-a-wix-pricing-page.md) - [About pricing plans and business models](https://dev.wix.com/docs/build-apps/launch-your-app/pricing-and-billing/about-pricing-plans-and-business-models.md) --- > Portal Navigation: > > - Append `.md` to any URL under `https://dev.wix.com/docs/` to get its markdown version. > - Pages are either content pages (article or reference text) or menu pages (a list of links to child pages). > - To get a menu page, truncate any URL to a parent path and append `.md` (e.g. `https://dev.wix.com/docs/sdk.md`, `https://dev.wix.com/docs/sdk/core-modules.md`). > - Top-level index of all portals: https://dev.wix.com/docs/llms.txt > - Full concatenated docs: https://dev.wix.com/docs/llms-full.txt ## Resource: Set Up a Freemium Business Model ## Article: Set Up a Freemium Business Model ## Article Link: https://dev.wix.com/docs/build-apps/launch-your-app/pricing-and-billing/set-up-a-freemium-business-model.md ## Article Content: # Set Up a Freemium Business Model A freemium business model lets you offer a basic version of your app for free and encourages users to upgrade for additional, premium features. Your app is free by default, and you add at least 1 single and/or recurring (monthly or yearly) paid plan. This is what it looks like on your App Market listing: ![Pricing](https://wixmp-833713b177cebf373f611808.wixmp.com/images/424375bb32a77482d87fb26e5b987dac.png) ## In this article you will: - [Decide whether to offer a free trial](https://dev.wix.com/docs/build-apps/launch-your-app/pricing-and-billing/set-up-a-freemium-business-model.md#step-1--choose-whether-to-offer-a-free-trial). - [Set up pricing plans for you freemium business model](https://dev.wix.com/docs/build-apps/launch-your-app/pricing-and-billing/set-up-a-freemium-business-model.md#step-2--add-pricing-plans). - [Set up a pricing page for users to select their preferred plan](https://dev.wix.com/docs/build-apps/launch-your-app/pricing-and-billing/set-up-a-freemium-business-model.md#step-3--set-up-a-pricing-page). - [Learn how to identify and manage paid users](https://dev.wix.com/docs/build-apps/launch-your-app/pricing-and-billing/set-up-a-freemium-business-model.md#step-4--identify-and-manage-paid-app-users). - [Learn how to test your app](https://dev.wix.com/docs/build-apps/launch-your-app/pricing-and-billing/set-up-a-freemium-business-model.md#step-5--test-your-pricing-flow). Don’t want to offer a free plan? Set up a [premium, pay as you go, or usage-based business model instead](https://dev.wix.com/docs/build-apps/launch-your-app/pricing-and-billing/about-pricing-plans-and-business-models.md). ## Step 1 | Choose whether to offer a free trial A free trial is optional – it can be a great way to show off your app's best paid features for a limited time. After the trial, users decide if they want to pay. > **Note**: A free trial isn’t the same as the free plan in a freemium model. To do this, enable **Free Trial** and input the amount of days you want to offer it for. You manage both the UI and code for the trial on your side. Learn how to [manage free trials](https://dev.wix.com/docs/build-apps/launch-your-app/pricing-and-billing/set-up-and-manage-free-trials.md). ## Step 2 | Add Pricing Plans A freemium model always includes a free installation option. You can add multiple paid plans each offering their own set of features and benefits. > **Note:** Free apps are installed directly without going through a pricing page. The pricing page only appears when users are purchasing or upgrading to a paid plan. 1. Go to the [**Pricing**](https://manage.wix.com/app-selector?title=Select+an+App&primaryButtonText=Select+Site&actionUrl=https%3A%2F%2Fdev.wix.com%2Fapps%2F%7BappId%7D%2Fpricing) page in your app's dashboard. 2. Select **Freemium** under Business model. 3. Go to **Pricing Plans** and click **Add Plan**. 4. Choose the specific Billing model associated with this plan: - **Recurring (Monthly and / or Yearly)**: A stable, recurring fee that is billed monthly or yearly. You can offer a discount to encourage users to sign up for a Yearly plan. - **Single**: A non-recurring upfront fee each time users use a service within the app. For example, credits for sending SMSs. > **Note:** If these billing models don't meet your needs, Wix also supports flexible custom and usage-based models that handle variable fees. For example, when shipping fees are taken within your app or you charge per emails sent in the last month. Please open a ticket to request access. 5. Set a price: Add the price you want to charge for each of your app's paid plans. 6. Add plan details: - **Plan Name**: Add a name for each plan (max. 23 characters). Aim to structure the names so they have some sort of progression, such as 'Beginner', 'Intermediate', and 'Pro'. - **Benefits**: Add up to four benefits for each plan with a clear distinction and progression for each plan, with stronger benefits reserved for plans with a higher price. You can also write out the plan’s benefits in paragraph form. 7. Click **Add Plan**. 8. Use the **Visible** toggle next to each plan to control whether it is displayed in the Wix App Market. The Wix pricing page displays up to 4 recurring plans. If you add more than 4 recurring plans, mark only 4 as visible, and display the others on an external pricing page. 9. Click **Save**. 10. To check how it looks, click **Preview Listing**. > **Change a pricing plan**: You can adjust or delete your plans or add new ones for a number of reasons. For example, changes to your product, to stay competitive, or just to increase prices. Learn how to [change pricing plans](https://dev.wix.com/docs/build-apps/launch-your-app/pricing-and-billing/change-app-pricing.md). ## Step 3 | Set up a pricing page Set up a Wix pricing page to showcase your paid plans with a benefits table. The pricing page displays up to 4 recurring plans. Learn how to [set up a Wix pricing page](https://dev.wix.com/docs/build-apps/launch-your-app/pricing-and-billing/set-up-a-wix-pricing-page.md). Alternatively, if you prefer to host your own pricing page, you can [set up an external pricing page](https://dev.wix.com/docs/build-apps/launch-your-app/pricing-and-billing/set-up-an-external-pricing-page.md). ## Step 4 | Identify and manage paid app users Your app needs to present the correct user experience for each customer, depending on the plan they selected. There are 2 key elements involved in this: - Being able to detect those users and identify when changes occur to their plan. We offer several different methods for this. - Delivering the right user experience within your app. For example, activating and deactivating specific features. Learn how to [identify your users](https://dev.wix.com/docs/build-apps/launch-your-app/pricing-and-billing/identify-and-manage-app-users.md). ## Step 5 | Test your pricing flow You should test the app’s [upgrade flow](https://dev.wix.com/docs/build-apps/launch-your-app/app-distribution/test-your-app-s-upgrade-process.md) as a user. Make sure that: - Premium features that were disabled in the free plan are now enabled in the paid plan. - If you have multiple plans, check that the correct features are enabled / disabled between them. - Test your free trial flow (if offered). ## See also - [About pricing plans and business models](https://dev.wix.com/docs/build-apps/launch-your-app/pricing-and-billing/about-pricing-plans-and-business-models.md) - [Set up a premium business model](https://dev.wix.com/docs/build-apps/launch-your-app/pricing-and-billing/set-up-a-premium-business-model.md) --- > Portal Navigation: > > - Append `.md` to any URL under `https://dev.wix.com/docs/` to get its markdown version. > - Pages are either content pages (article or reference text) or menu pages (a list of links to child pages). > - To get a menu page, truncate any URL to a parent path and append `.md` (e.g. `https://dev.wix.com/docs/sdk.md`, `https://dev.wix.com/docs/sdk/core-modules.md`). > - Top-level index of all portals: https://dev.wix.com/docs/llms.txt > - Full concatenated docs: https://dev.wix.com/docs/llms-full.txt ## Resource: Set Up a Premium Business Model ## Article: Set Up a Premium Business Model ## Article Link: https://dev.wix.com/docs/build-apps/launch-your-app/pricing-and-billing/set-up-a-premium-business-model.md ## Article Content: # Set Up a Premium Business Model A premium business model includes at least one single and/or recurring (monthly or yearly) paid plan. This is what it looks like on your App Market listing: ![Pricing](https://wixmp-833713b177cebf373f611808.wixmp.com/images/9315010c7c4f562489133a034ce2ec69.png) ## In this article you will: - [Decide whether to offer a free trial](https://dev.wix.com/docs/build-apps/launch-your-app/pricing-and-billing/set-up-a-premium-business-model.md#step-1--choose-whether-to-offer-a-free-trial). - [Set up pricing plans for your premium business model](https://dev.wix.com/docs/build-apps/launch-your-app/pricing-and-billing/set-up-a-premium-business-model.md#step-2--add-pricing-plans). - [Set up a pricing page for users to select their preferred plan](https://dev.wix.com/docs/build-apps/launch-your-app/pricing-and-billing/set-up-a-premium-business-model.md#step-3--set-up-a-pricing-page). - [Learn how to identify and manage paid users](https://dev.wix.com/docs/build-apps/launch-your-app/pricing-and-billing/set-up-a-premium-business-model.md#step-4--identify-and-manage-paid-app-users). - [Learn how to test your app](https://dev.wix.com/docs/build-apps/launch-your-app/pricing-and-billing/set-up-a-premium-business-model.md#step-5--test-your-pricing-flow). Want to offer a free plan to entice users? Set up a [freemium business model instead](https://dev.wix.com/docs/build-apps/launch-your-app/pricing-and-billing/set-up-a-freemium-business-model.md). ## Step 1 | Choose whether to offer a free trial A free trial is optional – it can be a great way to show off your app's best paid features for a limited time. After the trial, users decide if they want to pay. To do this, enable Free Trial and input the amount of days you want to offer it for. You manage both the UI and code for the trial on your side. Learn how to [manage free trials](https://dev.wix.com/docs/build-apps/launch-your-app/pricing-and-billing/set-up-and-manage-free-trials.md). If you do offer a free trial, make sure your app also provides a clear call-to-action (CTA) to upgrade that leads to the pricing page. Wix's default behavior doesn't redirect users to upgrade the app after a successful installation. Users have full access to the app upon installation, and it's your responsibility to provide restriction logic. ## Step 2 | Add Pricing Plans You can add multiple paid plans each offering their own set of features and benefits. 1. Go to the [**Pricing**](https://manage.wix.com/app-selector?title=Select+an+App&primaryButtonText=Select+Site&actionUrl=https%3A%2F%2Fdev.wix.com%2Fapps%2F%7BappId%7D%2Fpricing) page in your app's dashboard. 2. Select **Premium** under Business model. 3. Go to **Pricing Plans** and click **Add Plan**. 4. Choose the specific Billing model associated with this plan: - **Recurring (Monthly and / or Yearly)**: A stable, recurring fee that is billed monthly or yearly. You can offer a discount to encourage users to sign up for a Yearly plan. - **Single**: A non-recurring upfront fee each time users use a service within the app. For example, credits for sending SMSs. > **Note:** If these billing models don't meet your needs, Wix also supports flexible custom and usage-based models that handle variable fees. For example, when shipping fees are taken within your app or you charge per emails sent in the last month. Please open a ticket to request access. 5. Set a price: Add the price you want to charge for each of your app’s paid plans. 6. Add plan details: - **Plan Name**: Add a name for each plan (max. 23 characters). Aim to structure the names so they have some sort of progression, such as 'Beginner', 'Intermediate', and 'Pro'. - **Benefits**: Add up to four benefits for each plan with a clear distinction and progression for each plan, with stronger benefits reserved for plans with a higher price. You can also write out the plan’s benefits in paragraph form. 7. Click **Add Plan**. 8. Use the **Visible** toggle next to each plan to control whether it is displayed in the Wix App Market. Your marketplace listing can display up to 4 plans. If you add more than 4 plans, mark only 4 as visible, and display the others on an external pricing page. 9. Click **Save**. 10. To check how it looks, click **Preview Listing**. > **Change a pricing plan**: You can adjust or delete your plans or add new ones for a number of reasons. For example, changes to your product, to stay competitive, or just to increase prices. Learn how to [change pricing plans](https://dev.wix.com/docs/build-apps/launch-your-app/pricing-and-billing/change-app-pricing.md). ## Step 3 | Set up a pricing page Set up a Wix pricing page to showcase your plans with a benefits table. The pricing page displays up to 4 recurring plans. Learn how to [set up a Wix pricing page](https://dev.wix.com/docs/build-apps/launch-your-app/pricing-and-billing/set-up-a-wix-pricing-page.md). Alternatively, if you prefer to host your own pricing page, you can [set up an external pricing page](https://dev.wix.com/docs/build-apps/launch-your-app/pricing-and-billing/set-up-an-external-pricing-page.md). ## Step 4 | Identify and manage paid app users Your app needs to present the correct user experience for each customer, depending on the plan they selected. There are 2 key elements involved in this: - Being able to detect those users and identify when changes occur to their plan. We offer several different methods for this. - Delivering the right user experience in your app. For example, activating and deactivating specific features. Learn how to [identify your users](https://dev.wix.com/docs/build-apps/launch-your-app/pricing-and-billing/identify-and-manage-app-users.md). ## Step 5 | Test your pricing flow You should test the app's [upgrade flow](https://dev.wix.com/docs/build-apps/launch-your-app/app-distribution/test-your-app-s-upgrade-process.md) as a user. Make sure that: - If you have multiple plans, check that the correct features are enabled / disabled between them. - Test your free trial flow (if offered). ## See also - [About pricing plans and business models](https://dev.wix.com/docs/build-apps/launch-your-app/pricing-and-billing/about-pricing-plans-and-business-models.md) - [Set up a freemium business model](https://dev.wix.com/docs/build-apps/launch-your-app/pricing-and-billing/set-up-a-freemium-business-model.md) --- > Portal Navigation: > > - Append `.md` to any URL under `https://dev.wix.com/docs/` to get its markdown version. > - Pages are either content pages (article or reference text) or menu pages (a list of links to child pages). > - To get a menu page, truncate any URL to a parent path and append `.md` (e.g. `https://dev.wix.com/docs/sdk.md`, `https://dev.wix.com/docs/sdk/core-modules.md`). > - Top-level index of all portals: https://dev.wix.com/docs/llms.txt > - Full concatenated docs: https://dev.wix.com/docs/llms-full.txt ## Resource: Set Up a Usage-Based Business Model ## Article: Set Up a Usage-Based Business Model ## Article Link: https://dev.wix.com/docs/build-apps/launch-your-app/pricing-and-billing/set-up-a-usage-based-business-model.md ## Article Content: # Set Up a Usage-Based Business Model A usage-based business model charges app users monthly based on additional fees you set in your app. For example, $0.50 per SMS message sent or 1% per transaction processed. You must set usage-based charges for this model. You can also add a flat monthly base fee. In this article you will: - [Add a usage-based pricing plan in your app dashboard](#step-1--add-a-usage-based-pricing-plan). - [Add the Custom Charges service plugin](#step-2--add-the-custom-charges-service-plugin). - [Set up an external pricing page](#step-3--set-up-an-external-pricing-page). - [Test your integration](#test-your-integration). - [Learn about current limitations](#limitations).
**Availability:** This feature isn't yet available to all users. Your app can have only 1 usage-based plan and no other plans. To add a usage-based plan to your app, [submit a request to add a usage-based plan](https://www.wix.com/support-chatbot?nodeId=25a57397-ccf7-4376-8b74-48d51edf7159&referral=devRels).
## Step 1 | Add a usage-based pricing plan At the end of this step, your app dashboard includes a usage-based plan with your pricing structure. To add a usage-based pricing plan: 1. Go to the [**Pricing**](https://manage.wix.com/app-selector?title=Select+an+App&primaryButtonText=Select+Site&actionUrl=https%3A%2F%2Fdev.wix.com%2Fapps%2F%7BappId%7D%2Fpricing) page in your app's dashboard. 2. Select either the **Freemium** or **Premium** business model. 3. Click **Add Plan**. 4. Select **Usage-based**, and fill in the plan details. 5. Choose whether to include a monthly base fee: - **With base fee**: Users pay a fixed monthly base fee on top of any of your app's additional charges. Set the base fee to $0 for your app to be displayed as "Free to install". - **Additional charges only**: Users pay only for your app's additional charges, with no monthly base fee. You must set additional charges for both options. Wix bills these charges at the end of each monthly cycle. 6. Add a short description of how usage-based charges are calculated. Be clear about the unit and trigger. For example: - $0.50 per SMS message sent. - 0.75% of additional revenue generated by the app. - $0.05 per extra order above initial 500 orders. - 1.0% transaction fee. - Additional charges may apply. > **Note**: > > - If you add a price, place it inside `{}`. For example, if you charge based on SMS usage, enter `{0.5} per SMS` so it appears as "$0.5 per SMS" in the app listing. Placing the amount inside `{}` allows it to be automatically converted to other currencies. > - The default currency is USD. > - Consider your pricing carefully. Usage-based pricing works best for apps where value directly correlates with usage, like communication tools or transaction processing services. 7. Click **Add Plan**. 8. Click **Save**. 9. To check how it looks, click **Preview Listing**. ## Step 2 | Add the Custom Charges service plugin This step adds the [Custom Charges service plugin](https://dev.wix.com/docs/api-reference/app-management/app-billing/custom-charges-service-plugin/introduction.md). At the end of this step, your app can communicate usage charges to Wix and handle billing events. To add the Custom Charges service plugin, on the **Extensions** tab of your app's dashboard, add **Custom Charges service plugin**. Adding this plugin lets you: - Add your app's charges to the invoice that Wix sends to users. - Receive notifications about charges, created invoices, or when Wix users increase their charge limit. - Keep your Wix users informed about their current app charges. ## Step 3 | Set up an external pricing page This step sets up an [external pricing page](https://dev.wix.com/docs/build-apps/launch-your-app/pricing-and-billing/set-up-an-external-pricing-page.md) for your usage-based plan. A pricing page showcases the key features of each pricing plan you are offering. The Wix Pricing Page isn't available for usage-based plans, so your pricing page needs to be external. At the end of this step, your app has a functioning external pricing page. To set up an external pricing page: 1. Implement the [Get URL method](https://dev.wix.com/docs/rest/app-management/app-billing/billing/get-url.md) with the billing cycle set to `MONTHLY`. 2. Return the URL of your external pricing page. > **Note:** If you need help testing your integration, [contact the support team](https://www.wix.com/support-chatbot?nodeId=25a57397-ccf7-4376-8b74-48d51edf7159&referral=devRels). ## How it works 1. A user chooses to upgrade to one of your usage-based plans. Wix calls the [Get Charge Limit](https://dev.wix.com/docs/rest/app-management/app-billing/custom-charges-service-plugin/get-charge-limit.md) method to retrieve the initial charge limit for a paid instance of your app. This happens every time a customer upgrades to a paid version of your app. 2. The user accepts the terms and checks out. If there is a base fee, Wix bills the user for it during checkout. 3. The user can increase the charge limit amount at any time. If the user increases the limit, the [Charge Limit Updated](https://dev.wix.com/docs/rest/app-management/app-billing/custom-charges-service-plugin/charge-limit-updated-event.md) event is triggered. A user can do this in their **Premium Subscriptions** > **More Options** > **Manage Charge Limit**. 4. The user can view the current charges at any time. Wix calls the [List Charges](https://dev.wix.com/docs/rest/app-management/app-billing/custom-charges-service-plugin/list-charges.md) method to retrieve the charges for that particular billing period. 5. At the end of the billing cycle, Wix requests the usage-based charges using the List Charges Service Plugin and verifies that the charges are within the limit. If not, Wix calls the [Charges Rejected Event](https://dev.wix.com/docs/rest/app-management/app-billing/custom-charges-service-plugin/charges-rejected-event.md). 6. After a successful charge, Wix calls the [Invoice Created](https://dev.wix.com/docs/rest/app-management/app-billing/custom-charges-service-plugin/invoice-created-event.md) event. ## Test your integration Before going live, test that your Custom Charges service plugin is working correctly using the [Get Metered Billing Charges](https://dev.wix.com/docs/api-reference/app-management/app-billing/billing/get-metered-billing-charges.md) method. When you call this method, Wix triggers your [List Custom Charges](https://dev.wix.com/docs/rest/app-management/app-billing/custom-charges-service-plugin/list-charges.md) service plugin and returns the charges you provide. This allows you to verify that your service plugin is returning the expected charges. > **Note:** The Get Metered Billing Charges method won't create invoices or charge customers. ## Limitations - The **Wix Pricing Page** and downgrades aren't supported for usage-based plans. - Mixed billing models aren't supported. An app can't have both a recurring plan and a usage-based plan. ## See also - [About pricing plans and business models](https://dev.wix.com/docs/build-apps/launch-your-app/pricing-and-billing/about-pricing-plans-and-business-models.md) - [Set up a freemium business model](https://dev.wix.com/docs/build-apps/launch-your-app/pricing-and-billing/set-up-a-freemium-business-model.md) - [Set up a premium business model](https://dev.wix.com/docs/build-apps/launch-your-app/pricing-and-billing/set-up-a-premium-business-model.md) - [Custom Charges Service Plugin](https://dev.wix.com/docs/api-reference/app-management/app-billing/custom-charges-service-plugin/introduction.md) --- > Portal Navigation: > > - Append `.md` to any URL under `https://dev.wix.com/docs/` to get its markdown version. > - Pages are either content pages (article or reference text) or menu pages (a list of links to child pages). > - To get a menu page, truncate any URL to a parent path and append `.md` (e.g. `https://dev.wix.com/docs/sdk.md`, `https://dev.wix.com/docs/sdk/core-modules.md`). > - Top-level index of all portals: https://dev.wix.com/docs/llms.txt > - Full concatenated docs: https://dev.wix.com/docs/llms-full.txt ## Resource: Set Up a Pay As You Go Business Model ## Article: Set Up a Pay As You Go Business Model ## Article Link: https://dev.wix.com/docs/build-apps/launch-your-app/pricing-and-billing/set-up-a-pay-as-you-go-business-model.md ## Article Content: # Set Up a Pay As You Go Business Model A pay as you go business model lets you set up bespoke pricing plans, not covered by the other models, such as charging per print-on-demand item or dropshipping sale. It can also be used if you have negotiable pricing for enterprises. One or more plans with a fee that's charged immediately upon usage, instead of monthly. For this model, your app manages the billing collection externally. App Market approval required. ## In this article you will: - Decide whether to offer a free trial. - Set up a pay as you go model. - Learn how to identify and manage paid users. - Learn how to test your app. Don't want to offer a pay as you go model? Set up a [premium or usage-based business model instead](https://dev.wix.com/docs/build-apps/launch-your-app/pricing-and-billing/about-pricing-plans-and-business-models.md). ## Step 1 | Choose whether to offer a free trial A free trial is optional – it can be a great way to show off your app's best paid features for a limited time. After the trial, users decide if they want to pay. > **Note**: A free trial isn’t the same as the free plan in a freemium model. To do this, enable Free Trial and input the amount of days you want to offer it for. You manage both the UI and code for the trial on your side. Learn how to [manage free trials](https://dev.wix.com/docs/build-apps/launch-your-app/pricing-and-billing/set-up-and-manage-free-trials.md). ## Step 2 | Add Pricing Plans A pay as you go model lets you add multiple plans, each offering their own set of features and benefits. 1. Go to the [**Pricing**](https://manage.wix.com/app-selector?title=Select+an+App&primaryButtonText=Select+Site&actionUrl=https%3A%2F%2Fdev.wix.com%2Fapps%2F%7BappId%7D%2Fpricing) page in your app's dashboard. 2. Select the **Pay as you go** business model. 3. Go to **Pricing Plans** and click **Add Plan**. 4. Choose the **Custom** billing model. 5. Describe the pricing structure of your pricing plan, for example 'Pay as you go' 6. Add plan details: - **Plan Name**: Add a name for each plan (max. 23 characters). Aim to structure the names so they have some sort of progression, such as 'Beginner', 'Intermediate', and 'Pro'. - **Benefits**: Add up to 4 benefits for each plan with a clear distinction and progression for each plan, with stronger benefits reserved for plans with a higher price. You can also write out the plan's benefits in paragraph form. 7. Click **Add Plan**. 8. Use the **Visible** toggle next to each plan to control whether it's displayed in the Wix App Market. If you add more than 4 plans, mark only 4 as visible, and display the others on an external pricing page. 9. Click **Save**. 10. To check how it looks, click **Preview Listing**. > **Change a pricing plan**: You can adjust or delete your plans or add new ones for a number of reasons. For example, changes to your product, to stay competitive, or just to increase prices. Learn how to [change pricing plans](https://dev.wix.com/docs/build-apps/launch-your-app/pricing-and-billing/change-app-pricing.md). ## Step 3 | Set up a pricing page Set up a Wix pricing page to showcase your plans with a benefits table. Learn how to [set up a Wix pricing page](https://dev.wix.com/docs/build-apps/launch-your-app/pricing-and-billing/set-up-a-wix-pricing-page.md). Alternatively, if you prefer to host your own pricing page, you can [set up an external pricing page](https://dev.wix.com/docs/build-apps/launch-your-app/pricing-and-billing/set-up-an-external-pricing-page.md). ## Step 4 | Identify and manage paid app users Your app needs to present the correct user experience for each customer, depending on the plan they selected. There are 2 key elements involved in this: - Being able to detect those users and identify when changes occur to their plan. We offer several different methods for this. - Delivering the right user experience in your app. For example, activating and deactivating specific features. Learn how to [identify your users](https://dev.wix.com/docs/build-apps/launch-your-app/pricing-and-billing/identify-and-manage-app-users.md). ## See also - [Set up a premium business model](https://dev.wix.com/docs/build-apps/launch-your-app/pricing-and-billing/set-up-a-premium-business-model.md) - [Set up an external pricing page](https://dev.wix.com/docs/build-apps/launch-your-app/pricing-and-billing/set-up-an-external-pricing-page.md) --- > Portal Navigation: > > - Append `.md` to any URL under `https://dev.wix.com/docs/` to get its markdown version. > - Pages are either content pages (article or reference text) or menu pages (a list of links to child pages). > - To get a menu page, truncate any URL to a parent path and append `.md` (e.g. `https://dev.wix.com/docs/sdk.md`, `https://dev.wix.com/docs/sdk/core-modules.md`). > - Top-level index of all portals: https://dev.wix.com/docs/llms.txt > - Full concatenated docs: https://dev.wix.com/docs/llms-full.txt ## Resource: Set Up One-Time Payments ## Article: Set Up One-Time Payments ## Article Link: https://dev.wix.com/docs/build-apps/launch-your-app/pricing-and-billing/set-up-one-time-payments.md ## Article Content: # Set Up One-Time Payments One-time payments let you offer packages that Wix users pay for as standalone, non-recurring purchases. For example, if your app sells custom images, you can sell each image as a one-time purchase or offer a pack of 10 images at a set fee. One-time payments use the [single billing model](https://dev.wix.com/docs/build-apps/launch-your-app/pricing-and-billing/about-pricing-plans-and-business-models.md#billing-models) and can be part of either a [freemium](https://dev.wix.com/docs/build-apps/launch-your-app/pricing-and-billing/set-up-a-freemium-business-model.md) or [premium](https://dev.wix.com/docs/build-apps/launch-your-app/pricing-and-billing/set-up-a-premium-business-model.md) business model.
__Important:__ You can't mark your app as "Free" and offer one-time payments, as this would mislead Wix users. Your app must use a freemium or premium business model.
## Step 1 | Add pricing plans Add at least 1 single pricing plan to define what Wix users can purchase in your app. 1. Go to the [**Pricing**](https://manage.wix.com/app-selector?title=Select+an+App&primaryButtonText=Select+Site&actionUrl=https%3A%2F%2Fdev.wix.com%2Fapps%2F%7BappId%7D%2Fpricing) page in your app's dashboard. 2. Select **Freemium** or **Premium** under Business model. 3. Go to **Pricing Plans** and click **Add Plan**. 4. Choose the **Single** billing model. This sets up a non-recurring upfront fee each time Wix users use a service in the app. 5. Set a price for the plan. 6. Add plan details: - **Plan Name**: Add a name for the plan (max. 23 characters). Choose a name that clearly describes what the Wix user is purchasing, such as "100 SMS Credits" or "Image Pack." - **Benefits**: Add up to 4 benefits that describe what's included in the package. 7. Click **Add Plan**. 8. Click **Save**. > **Note:** Single plans don't appear in the Wix App Market listing or on the Wix-hosted pricing page. You need to design your own pricing page to showcase these plans. See [step 2](#step-2--design-your-own-pricing-page). Repeat these steps for each package you want to offer. For example, you might create separate plans for different credit amounts or package sizes. You can always come back and [update your pricing plans](https://dev.wix.com/docs/build-apps/launch-your-app/pricing-and-billing/change-app-pricing.md) later if your needs change. ## Step 2 | Design your own pricing page Because single plans aren't supported on the Wix-hosted pricing page, you need to build your own pricing UI. Display this page in your app's settings panel or dashboard so Wix users can browse the available packages and make a purchase. Your pricing page should: - Show each available package with its name, price, and benefits. - Include a clear call-to-action button for each package. - Display the Wix user's current balance or remaining credits, if applicable. To set up the full external pricing page flow, including OAuth and webhook configuration, see [Set up an external pricing page](https://dev.wix.com/docs/build-apps/launch-your-app/pricing-and-billing/set-up-an-external-pricing-page.md). ## Step 3 | Direct Wix users to the Wix checkout When a Wix user clicks a call-to-action button on your pricing page, direct them to the Wix checkout to complete the purchase. 1. Connect each package's call-to-action button to a call to the [Billing API](https://dev.wix.com/docs/rest/app-management/app-billing/billing/introduction.md). 2. Call [Get URL](https://dev.wix.com/docs/api-reference/app-management/app-billing/billing/get-url.md) to retrieve a checkout link for the selected plan. Open this link in a new tab. 3. After the Wix user completes their purchase, Wix redirects them to the `successUrl` you specified in the Get URL call. If you don't specify a `successUrl`, Wix uses its default success page. > **Note:** Checkout links are valid for 48 hours. Call [Get URL](https://dev.wix.com/docs/api-reference/app-management/app-billing/billing/get-url.md) again to generate a fresh link before the current one expires. For apps with an internal dashboard, set the `successUrl` to `"https://www.wix.com/my-account/app//"` to redirect Wix users back to their app dashboard after purchase. You can find your app ID in the [app dashboard](https://dev.wix.com/apps), and the instance ID by calling [Get App Instance](https://dev.wix.com/docs/rest/app-management/app-instance/get-app-instance.md). ## Step 4 | Track purchases and manage balances Unlike recurring plans, one-time purchases require you to track each Wix user's balance on your server. For example, if a Wix user buys 100 SMS credits, your app needs to know how many credits they've used and how many remain. ### Listen for billing webhooks Subscribe to the following webhooks to get notified when a Wix user makes a purchase: - [Paid Plan Purchased](https://dev.wix.com/docs/rest/app-management/app-instance/paid-plan-purchased.md) - [Paid Plan Changed](https://dev.wix.com/docs/rest/app-management/app-instance/paid-plan-changed.md) Check the `cycle` property in these webhooks to identify the purchase details. ### Retrieve purchase history Use the [Get Purchase History](https://dev.wix.com/docs/rest/app-management/app-billing/billing/get-purchase-history.md) API to retrieve a Wix user's full purchase history. Don't rely solely on webhooks to know when a Wix user makes a purchase -- always validate with the API. ### Update and track balances Keep track of each Wix user's remaining balance on your server. Make sure that: - The balance persists even if the Wix user uninstalls and reinstalls your app. - Your app displays the Wix user's remaining balance so they know when to buy more. - Your app handles the case where a Wix user's balance runs out, such as by prompting them to make another purchase. ## Step 5 | Test your pricing flow All plans are automatically priced at 0.00 during development, so you can test the full purchase flow at no cost. Once your app is approved and published, the real prices you configured are activated. Test the following: - The purchase flow works end-to-end, from your pricing page through Wix checkout and back to your app. - Your app receives and processes webhooks correctly after each purchase. - The Wix user's balance updates correctly after each purchase. - The balance displays correctly to the Wix user after purchase. Learn more about [testing your app's upgrade process](https://dev.wix.com/docs/build-apps/launch-your-app/app-distribution/test-your-app-s-upgrade-process.md). ## See also - [About pricing plans and business models](https://dev.wix.com/docs/build-apps/launch-your-app/pricing-and-billing/about-pricing-plans-and-business-models.md) - [Set up a freemium business model](https://dev.wix.com/docs/build-apps/launch-your-app/pricing-and-billing/set-up-a-freemium-business-model.md) - [Set up a premium business model](https://dev.wix.com/docs/build-apps/launch-your-app/pricing-and-billing/set-up-a-premium-business-model.md) - [Set up an external pricing page](https://dev.wix.com/docs/build-apps/launch-your-app/pricing-and-billing/set-up-an-external-pricing-page.md) - [Identify and manage app users](https://dev.wix.com/docs/build-apps/launch-your-app/pricing-and-billing/identify-and-manage-app-users.md) --- > Portal Navigation: > > - Append `.md` to any URL under `https://dev.wix.com/docs/` to get its markdown version. > - Pages are either content pages (article or reference text) or menu pages (a list of links to child pages). > - To get a menu page, truncate any URL to a parent path and append `.md` (e.g. `https://dev.wix.com/docs/sdk.md`, `https://dev.wix.com/docs/sdk/core-modules.md`). > - Top-level index of all portals: https://dev.wix.com/docs/llms.txt > - Full concatenated docs: https://dev.wix.com/docs/llms-full.txt ## Resource: Set Up a Wix Pricing Page ## Article: Set Up a Wix Pricing Page ## Article Link: https://dev.wix.com/docs/build-apps/launch-your-app/pricing-and-billing/set-up-a-wix-pricing-page.md ## Article Content: # Set Up a Wix Pricing Page Wix pricing pages are pages hosted by Wix that showcase the key features of each pricing plan your app offers. This guide shows you how to set up a Wix pricing page. Alternatively, if you want to use an external pricing page, you can [set up an external pricing page](https://dev.wix.com/docs/build-apps/launch-your-app/pricing-and-billing/set-up-an-external-pricing-page.md). The end result looks like this: ![Pricing](https://wixmp-833713b177cebf373f611808.wixmp.com/images/b4fd595aec9552421dbfc2ec42b7cce6.png) Before you begin, ensure you've added at least 1 recurring pricing plan in the [app dashboard](https://manage.wix.com/app-selector?title=Select+an+App&primaryButtonText=Select+Site&actionUrl=https%3A%2F%2Fdev.wix.com%2Fapps%2F%7BappId%7D%2Fpricing). ## How the pricing page works The pricing page appears when users are purchasing or upgrading to a paid plan. It consists of 2 main stages: 1. **Plan and cycle selection**: Where users select both a subscription plan and billing cycle (monthly or yearly) in a single view. Shows up to 4 recurring plans with features in a benefits table. Users can toggle between monthly and yearly pricing for each plan. The user's current plan is disabled if upgrading. 2. **Checkout and success**: Where users enter payment details, complete the subscription, and receive confirmation that their subscription is active. > **Note:** Free apps are installed directly without taking users through the pricing page. ## Configure your page 1. Go to [**Pricing Page**](https://manage.wix.com/app-selector?title=Select+an+App&primaryButtonText=Select+Site&actionUrl=https%3A%2F%2Fdev.wix.com%2Fapps%2F%7BappId%7D%2Fpricing) in your app's dashboard. 1. Select **Wix pricing page**, then click **Customize Pricing Page**. This option isn't available if you don't have any visible paid plans. 1. Choose a **Recommended plan** from the dropdown. This plan is marked with a "POPULAR" badge on your pricing page. 1. Click **Add Feature**. 1. **Feature Details**: Add a title and description to specify what the feature includes and explain why it's useful. 1. **Comparison**: Select the plan that the feature is relevant for and add custom text (optional). We recommend distributing features so that better features are reserved for more expensive plans. 1. Click **Done**. 1. To check how it looks, click **Preview Pricing Page**. ## Link to your pricing page Add upgrade buttons or CTAs in your app that link to the pricing page where users can upgrade. All Upgrade buttons and CTAs should link to your app's pricing page opened in a new tab. To do so, use the following URL, replacing `` and `` with their respective values: ```plaintext https://www.wix.com/apps/upgrade/?appInstanceId= ``` > **Note:** If your app is built with Wix Blocks, see [Provide Entry Points to Upgrade a Blocks App](https://dev.wix.com/docs/build-apps/develop-your-app/develop-an-app-with-blocks/publish-blocks-apps-to-the-app-market/provide-entry-points-to-upgrade-your-app.md). ## See also - [Set up a freemium business model](https://dev.wix.com/docs/build-apps/launch-your-app/pricing-and-billing/set-up-a-freemium-business-model.md) - [About monetizing your app](https://dev.wix.com/docs/build-apps/launch-your-app/pricing-and-billing/about-monetizing-your-app.md) --- > Portal Navigation: > > - Append `.md` to any URL under `https://dev.wix.com/docs/` to get its markdown version. > - Pages are either content pages (article or reference text) or menu pages (a list of links to child pages). > - To get a menu page, truncate any URL to a parent path and append `.md` (e.g. `https://dev.wix.com/docs/sdk.md`, `https://dev.wix.com/docs/sdk/core-modules.md`). > - Top-level index of all portals: https://dev.wix.com/docs/llms.txt > - Full concatenated docs: https://dev.wix.com/docs/llms-full.txt ## Resource: Set Up an External Pricing Page ## Article: Set Up an External Pricing Page ## Article Link: https://dev.wix.com/docs/build-apps/launch-your-app/pricing-and-billing/set-up-an-external-pricing-page.md ## Article Content: # Set Up an External Pricing Page You can host a pricing page on your own platform to showcase the key features of each plan you offer. Add at least 1 pricing plan in the app dashboard. ## Before you begin Hosting a pricing page on your own platform requires you to monitor user actions and respond appropriately within your app, so you should: 1. Set up [OAuth](https://dev.wix.com/docs/build-apps/develop-your-app/access/authentication/about-oauth.md). 2. Subscribe to the [relevant webhooks](https://dev.wix.com/docs/build-apps/develop-your-app/api-integrations/events-and-webhooks/about-webhooks.md): - [Paid Plan Purchased](https://dev.wix.com/docs/rest/app-management/app-instance/paid-plan-purchased.md) - [Paid Plan Changed](https://dev.wix.com/docs/rest/app-management/app-instance/paid-plan-changed.md) - [Paid Plan Auto Renewal Cancelled](https://dev.wix.com/docs/rest/app-management/app-instance/paid-plan-auto-renewal-cancelled.md) 3. Use each Wix user's unique [app instance ID](https://dev.wix.com/docs/build-apps/develop-your-app/access/app-instances/about-app-instances.md#app-instance-id) to recognize them as a Wix user and display the correct settings.
**Important:** Prevent Wix users from downgrading through your external pricing page. Downgrades or switches from yearly to monthly pricing require subscription cancellation and repurchase of the lower-priced plan. This is due to how the Wix billing system handles subscription modifications to ensure accurate billing and prevent revenue discrepancies.
## Step 1 | Add a URL for your external pricing page Set a URL to direct Wix users from Wix to your platform. To add the URL: 1. In your app's dashboard, go to the [**Pricing**](https://manage.wix.com/app-selector?title=Select+an+App&primaryButtonText=Select+Site&actionUrl=https%3A%2F%2Fdev.wix.com%2Fapps%2F%7BappId%7D%2Fpricing) page. 2. Select **Link to External Pricing Page**. 3. Add the URL for your pricing page. 4. Click **Save**. Wix users can access your pricing page from: - **App Market listing**: Users can view pricing without installing your app. - **Upgrade App** button in **Manage Apps**: Users will see this if they have already installed your app. You can use a query parameter with the user's [app instance ID](https://dev.wix.com/docs/build-apps/develop-your-app/access/app-instances/about-app-instances.md#app-instance-id) to identify users, log them in, and show relevant pricing info. ## Step 2 | Connect your call-to-action buttons to the Billing API Link each plan's call-to-action button on your pricing page to a call to the [Billing API](https://dev.wix.com/docs/rest/app-management/app-billing/billing/introduction.md) to get the relevant checkout link. Refresh checkout links regularly as they're only valid for 48 hours. ## Step 3 | Redirect Wix users to the Wix checkout link When a Wix user clicks a plan's call-to-action button, direct them to the checkout link you retrieved from the [`Get URL`](https://dev.wix.com/docs/api-reference/app-management/app-billing/billing/get-url.md) API call. This checkout link directs users to complete their purchase in the Wix checkout flow. ### After purchase After a Wix user completes their purchase: 1. Wix redirects the user to the `successUrl` you specified when you called `Get URL`. If you don't specify a `successUrl`, Wix redirects them to the default Wix success page. For apps with an internal dashboard, set the `successUrl` to `"https://www.wix.com/my-account/app//"` to redirect Wix users directly to their app dashboard. 2. If you're registered for the Paid Plan Purchased event, you receive the event. Validate that the returned Plan ID matches the plan from the checkout link. 3. Validate the Wix user's premium plan by calling the [App Instance method](https://dev.wix.com/docs/rest/app-management/app-instance/get-app-instance.md). ## See also - [Set up a freemium business model](https://dev.wix.com/docs/build-apps/launch-your-app/pricing-and-billing/set-up-a-freemium-business-model.md) - [About monetizing your app](https://dev.wix.com/docs/build-apps/launch-your-app/pricing-and-billing/about-monetizing-your-app.md) --- > Portal Navigation: > > - Append `.md` to any URL under `https://dev.wix.com/docs/` to get its markdown version. > - Pages are either content pages (article or reference text) or menu pages (a list of links to child pages). > - To get a menu page, truncate any URL to a parent path and append `.md` (e.g. `https://dev.wix.com/docs/sdk.md`, `https://dev.wix.com/docs/sdk/core-modules.md`). > - Top-level index of all portals: https://dev.wix.com/docs/llms.txt > - Full concatenated docs: https://dev.wix.com/docs/llms-full.txt ## Resource: Set Up and Manage Free Trials ## Article: Set Up and Manage Free Trials ## Article Link: https://dev.wix.com/docs/build-apps/launch-your-app/pricing-and-billing/set-up-and-manage-free-trials.md ## Article Content: # Set Up and Manage Free Trials A free trial is an optional, popular marketing tactic that lets users try paid features of your app for a limited period. After the trial, users are charged automatically and need to opt out if they don't want to pay to continue using the paid features of your app. Apps with stable, recurring fees that are billed monthly or yearly and use the Wix billing system can have free trials fully managed by Wix. This includes: - Displaying a free trial's availability at various touch points on the [Wix App Market](https://www.wix.com/app-market). - Prompting users to "Start a Free Trial" after installation via Manage Apps or other locations. - Taking payment details when a user opts in for the free trial (this increases conversion). - Notifying the user by email when a free trial is purchased, canceled, and about to end. - Automatically charging the user when the free trial ends (users can immediately cancel the free trial at any point on their Wix subscriptions page). > **Note:** Apps that use external billing, usage-based pricing or offer single purchases must manage their own free trials. Learn how to [set up a self-managed free trial](#set-up-a-self-managed-free-trial). ## Set up a Wix-managed free trial The following sections explain how to set up a Wix-managed free trial, including how to: - Activate and configure a free trial in your app's dashboard. - Detect a user's free trial activity, such as when they start a free trial. - Set up UI states in your app to reflect the trial's availability and status.
**Important:** Free trials don't appear in your payouts dashboard until the trial ends and the user is successfully charged.
### Step 1 | Activate and configure a free trial 1. Go to the [**Pricing**](https://manage.wix.com/app-selector?title=Select+an+App&primaryButtonText=Select+Site&actionUrl=https%3A%2F%2Fdev.wix.com%2Fapps%2F%7BappId%7D%2Fpricing) page in your app's dashboard. 2. Enable **Free Trial**. 3. Input the amount of days you want to offer the trial for (up to 30 days). 4. Click **Save**. > **Note:** Free trials are applied to users and existing plans only after submitting, approving, and publishing a new app version. Free trials are compatible with other discounts like yearly discounts and sales. ### Step 2 | Detect a user's free trial activity When a user begins a free trial plan, Wix considers them as paying customers, and triggers [Paid Plan Purchased](https://dev.wix.com/docs/rest/app-management/app-instance/paid-plan-purchased.md). To detect if a user is on a free trial, call [Get App Instance](https://dev.wix.com/docs/rest/app-management/app-instance/get-app-instance.md). Check the returned `instance` properties, and activate or deactivate your app's paid features accordingly. - ```isFree```: ```false``` if a user is on a paid plan or free trial. - ```billing```: Only appears if `isFree` is `false`. Contains a property `freeTrialInfo` with ```status``` and ```endDate``` (to check how many days are left in the trial). - ```freeTrialAvailable```: Indicates if a user is eligible for a free trial or not. When the free trial ends, and the user's credit card is charged, you won't receive a notification. However, if the user cancels before their credit card is charged, [Paid Plan Auto Renewal Canceled](https://dev.wix.com/docs/rest/app-management/app-instance/paid-plan-auto-renewal-cancelled.md) is triggered. > **Note for Blocks developers:** Free trial fields aren't available in the [decoded instance](https://dev.wix.com/docs/velo/velo-only-apis/wix-application/get-decoded-app-instance.md) and the ```vendorProductId``` will be updated once a user upgrades to a free trial plan. We recommend using the REST/SDK instance to receive information on free trials. ### Step 3 | Set up UI states in your app For users eligible for a free trial, prompt them to start the trial with a button. You can know if a user is eligible by checking the `freeTrialAvailable` property returned from [Get App Instance](https://dev.wix.com/docs/rest/app-management/app-instance/get-app-instance.md). > **Note:** A free trial can only be used once per app per Wix account. If a Wix user has already used a free trial for your app, they aren't eligible for another one. Since a free trial is considered an upgrade, your button should link to your app's pricing page opened in a new tab. Use the following URL, replacing `` and `` with their respective values: ```plaintext https://www.wix.com/apps/upgrade/?appInstanceId= ``` > **Note:** If your app is built with Wix Blocks, see [Provide Entry Points to Upgrade a Blocks App](https://dev.wix.com/docs/build-apps/develop-your-app/develop-an-app-with-blocks/publish-blocks-apps-to-the-app-market/provide-entry-points-to-upgrade-your-app.md). If your app offers only a premium plan with a free trial, choose one of these approaches until the user starts the trial: - **Fully lock the app:** Block all functionality and prompt the user to start the free trial. - **Partially lock the app:** Keep settings accessible but disable core features. ![Fully locked app UI state example](https://wixmp-833713b177cebf373f611808.wixmp.com/images/50ffc8de2ed2ad1aaa640d50ad8c9d7e.png) ![Partially locked app UI state example](https://wixmp-833713b177cebf373f611808.wixmp.com/images/b488a5e2a02f79bf553892bcd5f9ef43.png) ### Step 4 | Test your free trial flow After you've activated a free trial as described in step 1: 1. Add a recurring pricing plan in your app's dashboard and save it. 1. Listen to relevant webhooks such as Paid Plan Purchased. 1. Install the app on your site and check the App Instance: ```isfree``` should be true. 1. Upgrade the app with free trial for the new recurring pricing plan you just created. 1. Check that you receive the Paid Plan Purchased webhook and the relevant fields in App Instance are updated. > **Note**: Wix-managed free trials are available to new users only. This means that if you tested your purchase flow, you won't be able to test the Wix-managed free trial flow afterward from the same Wix account for the same app. Create a new test app if necessary. ## Transition from a self-managed free trial to a Wix-managed free trial When your new app version is published with a Wix-managed free trial any users that are currently enrolled in the self-managed free trial will be offered the new free trial as well. Your app can prompt users to move to the new free trial and end their current one. ## Set up a self-managed free trial
**Important:** As of June 01, 2024, this workaround solution is only relevant for apps that use external billing, usage-based pricing or offer single purchases.
When a free trial is activated in the app dashboard, Wix displays a free trial’s availability in various places on the Wix App Market. However, it’s the app’s responsibility to: - Manage the user experience. - Notify users when a free trial is purchased, canceled, and about to end. - Charge users when the free trial ends. ### Step 1 | Activate a free trial in the app dashboard 1. Go to the [**Pricing**](https://manage.wix.com/app-selector?title=Select+an+App&primaryButtonText=Select+Site&actionUrl=https%3A%2F%2Fdev.wix.com%2Fapps%2F%7BappId%7D%2Fpricing) page in your app’s dashboard. 2. Enable **Free Trial**. 3. Input the amount of days you want to offer the trial for (up to 99 days). 4. Click **Save**. 5. Your app needs to be submitted, approved and published for changes to take place. ### Step 2 | Set up UI states within your app You need to set up the following ‘availability’ states within your app: 1. App is added, trial started. Usually the app has its features active during the trial days. You can also show a counter of how many days are left. 2. Trial ended after X days. The app should be locked or minimal. ![Self-managed free trial UI state example](https://wixmp-833713b177cebf373f611808.wixmp.com/images/fa56bf6af3a36b3391f42aa2560a27d7.png) ## See also - [Set up a freemium model](https://dev.wix.com/docs/build-apps/launch-your-app/pricing-and-billing/set-up-a-freemium-business-model.md) - [About pricing plans and business models](https://dev.wix.com/docs/build-apps/launch-your-app/pricing-and-billing/about-pricing-plans-and-business-models.md) --- > Portal Navigation: > > - Append `.md` to any URL under `https://dev.wix.com/docs/` to get its markdown version. > - Pages are either content pages (article or reference text) or menu pages (a list of links to child pages). > - To get a menu page, truncate any URL to a parent path and append `.md` (e.g. `https://dev.wix.com/docs/sdk.md`, `https://dev.wix.com/docs/sdk/core-modules.md`). > - Top-level index of all portals: https://dev.wix.com/docs/llms.txt > - Full concatenated docs: https://dev.wix.com/docs/llms-full.txt ## Resource: Identify and Manage App Users ## Article: Identify and Manage App Users ## Article Link: https://dev.wix.com/docs/build-apps/launch-your-app/pricing-and-billing/identify-and-manage-app-users.md ## Article Content: # Identify and Manage App Users In order to manage and customize your users’ experience in your app, you’ll need to: - Identify each site that uses your app. - Identify the site’s pricing plan and version of your app they’ve installed. - Map each pricing plan to the features it supports. ## How to identify user plans Wix provides all relevant identifying information about sites in app instance data. You can get app instance data in the following ways: - [App Instance Installed event](https://dev.wix.com/docs/api-reference/app-management/app-instance/app-instance-installed.md) - [Get App Instance method](https://dev.wix.com/docs/api-reference/app-management/app-instance/get-app-instance.md) - [App instance query parameter](https://dev.wix.com/docs/build-apps/develop-your-app/access/app-instances/parse-the-app-instance-query-parameter.md) (for iframes and external pages)
**Tip:** The `originInstanceId` field helps you identify cloned sites. If this field is present, it means the site was cloned from another site that already had your app installed, and the value shows the original installation's `instanceId`. If the field is blank or missing, the app was installed directly on this site.
### Key fields to check The field names may vary depending on how you access the app instance data. Here are the key fields organized by what you're trying to accomplish: **To identify the site:** - **`instanceId`**: Unique identifier for your app on a specific Wix site. Available in all contexts. **To determine pricing plan:** - **`vendorProductId`**: Pricing plan ID if user has a paid plan, empty if free. Available in app instance query parameter and webhooks. - **`packageName`**: Pricing plan ID if user has a paid plan, empty if free. Available in REST API or SDK response. - **`isFree`**: Boolean indicating whether the site has a free version installed. Available in REST API or SDK response. **To track billing cycles:** - **`expirationDate`**: When the current billing cycle ends (yearly/multi-yearly plans only). Available in REST API or SDK response. - **`expiresOn`**: When the current billing cycle ends (yearly/multi-yearly plans only). Available in webhooks. **To identify users:** - **`uid`**: ID of the Wix user or site member who is logged in. Available in app instance query parameter only. - **`aid`**: ID of an anonymous site visitor. Available in app instance query parameter only. The `vendorProductId` in app instance query parameter and webhook payloads, and the `packageName` in the Get App Instance method, both refer to the identifier of the paid pricing plan this site has installed, as displayed in your app's dashboard: ![Product ID in app dashboard](https://wixmp-833713b177cebf373f611808.wixmp.com/images/8734b49c26acd7e0f61d8952438d9982.png)
**Important:** If `vendorProductId` or `packageName` is missing or empty, the site is using a free plan. Note that sites who cancel a paid plan will only stop returning a `vendorProductId` / `packageName` once their paid plan expires.
## Implementing plan restrictions Once you've identified the user's plan, you need to implement logic that restricts features appropriately. ### Check the plan first Always identify the user's plan before showing your app's interface. Default to restricting premium features until you confirm they have access. ### Apply restrictions based on plan type **If you have a free plan and one paid plan:** Use the `isFree` field to determine access. When `isFree` is `true`, restrict premium features. When `isFree` is `false`, allow full access. > **Note**: Users on free trials are considered paid users (`isFree` will be `false`), so they should have access to paid features during their trial period. **If you have multiple paid plans:** Use `vendorProductId` or `packageName` to identify the specific plan, then grant features based on that plan's capabilities. ## Provide clear upgrade paths When users encounter restricted features, guide them toward upgrading by: - Explaining what premium features they're missing. - Including a prominent upgrade button or link. - Making the value proposition clear and compelling. For example, you can add an upgrade link right in your app: ![Upgrade button example](https://wixmp-833713b177cebf373f611808.wixmp.com/images/c9818ad7a6e1f1ddb0c2eeba673457f5.png) ### Create upgrade entry points You're responsible for adding entry points to the pricing page where users can upgrade. All **Upgrade** buttons and CTAs should link to your app's pricing page opened in a new tab. To do so, use the following URL, replacing `` and `` with their respective values: ```https://www.wix.com/apps/upgrade/?appInstanceId=``` If your app is built with Blocks, see [Provide Entry Points to Upgrade a Blocks App](https://dev.wix.com/docs/build-apps/develop-your-app/develop-an-app-with-blocks/publish-blocks-apps-to-the-app-market/provide-entry-points-to-upgrade-your-app.md). ## Why this matters Failure to manage this flow will enable users who haven't paid for your app to access paid features. ## See also - [The App Purchase Lifecycle in Wix](https://dev.wix.com/docs/build-apps/launch-your-app/pricing-and-billing/the-app-purchase-lifecycle-in-wix.md) - [About Pricing Plans and Business Models](https://dev.wix.com/docs/build-apps/launch-your-app/pricing-and-billing/about-pricing-plans-and-business-models.md) --- > Portal Navigation: > > - Append `.md` to any URL under `https://dev.wix.com/docs/` to get its markdown version. > - Pages are either content pages (article or reference text) or menu pages (a list of links to child pages). > - To get a menu page, truncate any URL to a parent path and append `.md` (e.g. `https://dev.wix.com/docs/sdk.md`, `https://dev.wix.com/docs/sdk/core-modules.md`). > - Top-level index of all portals: https://dev.wix.com/docs/llms.txt > - Full concatenated docs: https://dev.wix.com/docs/llms-full.txt ## Resource: Change App Pricing ## Article: Change App Pricing ## Article Link: https://dev.wix.com/docs/build-apps/launch-your-app/pricing-and-billing/change-app-pricing.md ## Article Content: # Change Pricing Plans for Published Apps You can change your apps pricing plans at any time for various reasons. For example, changes in pricing can be made to align with the marketplace, or after adding new features, or if you want to increase or reduce your prices.
30-day notice period ended: As of August 6, 2025, it is no longer necessary to give us 30 days notice of pricing changes.
## Change existing pricing plans > **Note**: Any changes you make to pricing only affect new subscriptions. Active subscriptions remain at the original price. To change the pricing plans of an app already live on the Wix App Market: 1. Go to the [**Pricing**](https://manage.wix.com/app-selector?title=Select+an+App&primaryButtonText=Select+Site&actionUrl=https%3A%2F%2Fdev.wix.com%2Fapps%2F%7BappId%7D%2Fpricing) page in your app's dashboard. 2. Click **More Actions** > **Edit** next to the plan you wish to adjust. 3. Make the changes and click **Save**. 4. Go to the **App Distribution** page and update your market listing. Your live listing will update to your updated pricing. ## Remove existing pricing plans To remove a pricing plan of an app already live on the Wix App Market: 1. Go to the [**Pricing**](https://manage.wix.com/app-selector?title=Select+an+App&primaryButtonText=Select+Site&actionUrl=https%3A%2F%2Fdev.wix.com%2Fapps%2F%7BappId%7D%2Fpricing) page in your app's dashboard. 2. Switch off the **Visible** toggle next to that plan. **Important:** Avoid deleting plans to prevent the action from affecting existing users on that plan. 3. Click **Save**. ## See also - [Set up a freemium model](https://dev.wix.com/docs/build-apps/launch-your-app/pricing-and-billing/set-up-a-freemium-business-model.md) - [About pricing plans and business models](https://dev.wix.com/docs/build-apps/launch-your-app/pricing-and-billing/about-pricing-plans-and-business-models.md) --- > Portal Navigation: > > - Append `.md` to any URL under `https://dev.wix.com/docs/` to get its markdown version. > - Pages are either content pages (article or reference text) or menu pages (a list of links to child pages). > - To get a menu page, truncate any URL to a parent path and append `.md` (e.g. `https://dev.wix.com/docs/sdk.md`, `https://dev.wix.com/docs/sdk/core-modules.md`). > - Top-level index of all portals: https://dev.wix.com/docs/llms.txt > - Full concatenated docs: https://dev.wix.com/docs/llms-full.txt ## Resource: Report Revenue for Partner Billed Apps ## Article: Partner Billed Apps Reporting ## Article Link: https://dev.wix.com/docs/build-apps/launch-your-app/pricing-and-billing/report-revenue-for-partner-billed-apps.md ## Article Content: # Report Revenue for Partner Billed Apps Partner Billed Apps are apps that charge Wix users outside of the Wix Billing system. You need to provide detailed reports on Wix user charges so that Wix can generate invoices that detail the revenue share split. Partner Billed Apps need approval from the Wix team. You can request approval by [opening a support ticket](https://www.wix.com/support-chatbot?nodeId=25a57397-ccf7-4376-8b74-48d51edf7159&referral=devRels). ## Submit a report > **Note:** If you have more than 1 app, create and submit separate reports for each app. 1. Use this [CSV template](https://d2x3xhvgiqkx42.cloudfront.net/12345678-1234-1234-1234-1234567890ac/8ea3b84d-f31b-453b-821c-e197ed07b679/2022/08/25/0572ee92-1f13-4965-ac75-23e7940503b1/partner_billed_apps_report_template.csv?response-content-disposition=attachment). Add a new row for each transaction without changing the column fields. In the CSV file you create, include the following columns in this order: - **App ID**: Include this for each row. - **App instance**: The [app instance](https://dev.wix.com/docs/build-apps/develop-your-app/access/app-instances/about-app-instances.md) for the specific instance the transaction refers to. - **Transaction Date (dd/mm/yyyy)**: The date of the transaction. Don't include the time. - **Product Name**: The name of the transaction. For example, "Blue Plan - Yearly". - **Gross Revenue, Without Sales Tax (USD)**: The amount of money you charge, excluding sales tax. - **Net app revenue (USD)**: The amount of money you charge, minus agreed-upon expenses such as shipping fees. - **How did you calculate your net app revenue**: An explanation of what you deduct from your gross revenue to get your net app revenue. - **Revenue Share Calculation**: An explanation of how you calculate the amount of revenue share owed for that transaction. If it's your app's first year and you're eligible for 0% revenue share, note that after your regular calculation. - **Owed (USD)**: The amount Wix needs to invoice you for that transaction. Note that for many apps in their first year this should be 0%. 2. Save the CSV file in the following format: `MyAppName Billing Report - Q# YYYY`. 3. Submit the report within a few days of each quarter's end (or each month if you earn more than $10,000 a month) through the [Partner Billing Reporting form](https://www.wix.com/wix-platform/partner-billing). Upload your CSV file along with the required information for the reporting period. ### What happens once you submit a report If Wix has any questions about your report, they will contact you at the reporter email address you provided in the form. Once Wix verifies the report, you'll receive an invoice and instructions on how to pay. ## Configure your app to report billing events via API In addition to submitting a report in CSV format, you're also required to report all billing events using the [External Billing Events API](https://dev.wix.com/docs/rest/app-management/app-billing/external-billing-events/introduction.md). Call the `Report External Billing Event` method for each billing event associated with your app. > **Payment terms**: All payments due to Wix shall be made in United States Dollars (USD). The payment amounts shall be grossed up to account for any and all applicable taxes, including but not limited to withholding taxes, deductions, or other levies. Under no circumstances shall Wix be responsible for the deduction, withholding, or recovery of such taxes. Partners shall ensure that Wix receives the full invoiced amount, without any reductions or withholdings, in accordance with the agreed-upon terms. ## See also - [About monetizing your app](https://dev.wix.com/docs/build-apps/launch-your-app/pricing-and-billing/about-monetizing-your-app.md) - [Set up an external pricing page](https://dev.wix.com/docs/build-apps/launch-your-app/pricing-and-billing/set-up-an-external-pricing-page.md) --- > Portal Navigation: > > - Append `.md` to any URL under `https://dev.wix.com/docs/` to get its markdown version. > - Pages are either content pages (article or reference text) or menu pages (a list of links to child pages). > - To get a menu page, truncate any URL to a parent path and append `.md` (e.g. `https://dev.wix.com/docs/sdk.md`, `https://dev.wix.com/docs/sdk/core-modules.md`). > - Top-level index of all portals: https://dev.wix.com/docs/llms.txt > - Full concatenated docs: https://dev.wix.com/docs/llms-full.txt ## Resource: Payouts Dashboard ## Article: Payouts Dashboard ## Article Link: https://dev.wix.com/docs/build-apps/launch-your-app/pricing-and-billing/payouts-dashboard.md ## Article Content: # About the Payouts Dashboard You can access the payouts dashboard if your team collaborator role is 'Owner'. The payouts dashboard allows you to: - [Track your total collections](https://dev.wix.com/docs/build-apps/launch-your-app/pricing-and-billing/payouts-dashboard.md#view-your-payouts-data). - [Download a CSV file of your payouts data](https://dev.wix.com/docs/build-apps/launch-your-app/pricing-and-billing/payouts-dashboard.md#download-your-payouts-data-as-a-csv) - [Search individual transactions](https://dev.wix.com/docs/build-apps/launch-your-app/pricing-and-billing/payouts-dashboard.md#transactions). - [Request refunds](https://dev.wix.com/docs/build-apps/manage-your-app/user-support/issue-a-refund.md). ## View your payouts data The payouts dashboard has two tabs: - **Overview**: This tab shows your total monthly collections less deductions. - **Transactions**: This tab allows you to view and manage individual transactions per user. The data is updated daily and should be considered an estimate until it's finalized on the 9th of every month (for the previous month's transactions). > **Note:** Payments for apps included in Wix Premium plans won't be shown in the payouts dashboard. For info on payments for these upgrades you need to [contact us](https://www.wix.com/support-chatbot?nodeId=25a57397-ccf7-4376-8b74-48d51edf7159&referral=devRels).
![Overview tab](https://d2x3xhvgiqkx42.cloudfront.net/12345678-1234-1234-1234-1234567890ac/bbc7e549-01a1-4c96-bf6c-b9ff1e7905a9/2022/04/14/9fc03db2-6fca-44f0-80f9-52e76de73cb7/3d993b9c-85fd-4c55-99eb-7a46c9666d77.png)
### Overview The Overview tab is broken down into several metrics, each showing the total amounts accrued in the current month. There's also a graph showing the Collections by Month for the last 12 months – hover over any column to see the exact amount of your collections and payout in that month, as well as the number of plans purchased. At the bottom of the tooltip is a link to the transaction history for that month. ### Transactions The Transactions tab allows you to search, view, and [request refunds](https://dev.wix.com/docs/build-apps/manage-your-app/user-support/issue-a-refund.md) for individual transactions. This data is displayed for one month at a time. There are five transaction types: - **Charge**: A user purchased an app plan or made an in-app purchase. - **Renewal**: Automatic renewal of the plan a user already had - can be either monthly or yearly. - **Switch:** A user upgraded from one plan to another (more expensive) plan. - **Refund**: A user requested a refund for a previous transaction. The instance ID and invoice ID will be the same as the original transaction. - **Chargeback**: A user disputed the charge with their credit card company, and was refunded. The instance ID and Invoice ID will match those of the disputed transaction. Note that Wix will automatically attempt to reverse the chargeback. ## Download your payouts data as a CSV You can download payouts data as far back as 2016. To download a CSV of your payouts data: 1. Click **Download Data**. 2. Choose the date range you want download data for in **From** and **To**. 3. Click **Generate CSV**. 4. Wait a few moments for the file to be generated and click **Download CSV**. ## See also - [View your app stats](https://dev.wix.com/docs/build-apps/manage-your-app/data-and-analytics/app-stats.md) - [Reporting for Partner Billed Apps](https://dev.wix.com/docs/build-apps/launch-your-app/pricing-and-billing/report-revenue-for-partner-billed-apps.md) --- > Portal Navigation: > > - Append `.md` to any URL under `https://dev.wix.com/docs/` to get its markdown version. > - Pages are either content pages (article or reference text) or menu pages (a list of links to child pages). > - To get a menu page, truncate any URL to a parent path and append `.md` (e.g. `https://dev.wix.com/docs/sdk.md`, `https://dev.wix.com/docs/sdk/core-modules.md`). > - Top-level index of all portals: https://dev.wix.com/docs/llms.txt > - Full concatenated docs: https://dev.wix.com/docs/llms-full.txt ## Resource: Payments and Billing FAQs ## Article: Payments and Billing FAQs ## Article Link: https://dev.wix.com/docs/build-apps/launch-your-app/pricing-and-billing/payments-and-billing-faqs.md ## Article Content: # Payments and Billing FAQs This article covers some frequently asked questions about payments and billing. It's important that you've read and understood the [Partner Agreement](https://dev.wix.com/app-market-partner-agreement), particularly **Section > 9: Pricing, Collection and Revenue Sharing**. ## How is revenue share calculated? We split all revenue with you **80/20**, with 80% going to you and 20% to us. This revenue share is paid out to you monthly. If it's your first year on our platform, you **keep 100% of everything you earn** for the first 12 months. Revenue is calculated after a 2.5% transaction fee and applicable sales tax. The revenue share applies to users that start at Wix, meaning users who aren't already paying for your app on another website. ## How and when will I receive my payouts? * As per the [Partner Agreement](https://dev.wix.com/app-market-partner-agreement), we pay out monthly so long as you've hit a minimum revenue share of **$200** in that month. * If your Collaborator role is 'Owner', you can view and manage your transactions in the Payouts dashboard. * We’ll contact you around the middle of the following month with details on your payment, with payment due to arrive in your account at the beginning of the next month. E.g., revenue earned in March would ultimately arrive at the beginning of May. ## How can I view my payouts? The [Payouts dashboard](https://dev.wix.com/docs/build-apps/launch-your-app/pricing-and-billing/payouts-dashboard.md) lets you see and manage your latest revenue, and the data is updated daily (based on the UTC timezone). You'll be able to see your total collections, the amount of your billing fees, and the amount you can expect to be paid. ## Can I offer refunds? It’s totally up to you if you want to [offer refunds for your app](https://dev.wix.com/docs/build-apps/manage-your-app/user-support/issue-a-refund.md) and you can do this directly from your app's dashboard (this feature is only accessible to Collaborators defined as 'Owners'). ## What happens when a user's payment fails? Sometimes payment fails because a user doesn't have sufficient funds on their card, or the card has expired. In such cases we give users 45 days to rectify the issue. This grace period helps to make sure we don't lose users unnecessarily. This process doesn't include fraud cases, which are handled differently and are usually identified immediately by Wix. How it works: 1. When payment fails a **45-day** grace period begins. 2. During this time our system will keep trying to take payment from the card until it's successful. 3. We'll email users every **3 days** to let them know that payment has failed, and remind them to make any necessary changes. 4. To resolve the issue, users can add funds to their card or replace the payment method. 5. If the charge goes through, the payment cycle stays the same and the start date will be the same as the first charge attempt. 6. If we've been unsuccessful in taking payment from the user after 45 days, their package will be cancelled. ## How are international taxes calculated? Wix is obliged to adhere to the local fiscal laws and, therefore, charges individuals different tax rates in different territories around the world. When users purchase an app, some territories require us to charge tax, whereas others do not.  If Wix takes care of your payments and billing, there's nothing you need to do – our system resolves this for you. If you manage billing on your own platform, then you're responsible for all applicable tax rates. * [Sales Tax in the US](https://support.wix.com/en/article/sales-tax-in-the-united-states) * [VAT in Europe](https://support.wix.com/en/article/about-vat-in-europe) * [Goods and Services Tax in Australia](https://support.wix.com/en/article/about-goods-and-services-tax-in-australia) * [Tax in Canada](https://support.wix.com/en/article/about-tax-in-canada) * [Goods and Services Tax in Singapore](https://support.wix.com/en/article/goods-and-services-tax-in-singapore) * [Sales and Service Tax in Malaysia](https://support.wix.com/en/article/about-vat-in-malaysia) * [VAT in South Korea](https://support.wix.com/en/article/about-vat-in-south-korea) * [VAT in Chile](https://support.wix.com/en/article/about-vat-in-chile) * [VAT in Moldova](https://support.wix.com/en/article/about-vat-in-moldova) ## How do I manage local currency pricing? The primary price of your app is always set in US dollars ($) by you. When we list your app in other territories, our system calculates the fair market rate for that location and sets the price in the local currency to optimize sales.  This means that the money you receive for each app sale can fluctuate up and down, depending on the territory in which it was sold. The amount shown in your Payouts dashboard will be shown in US dollars, meaning you'll likely see different dollar amounts reflecting these fluctuating sale amounts. ## What happens when exchange rates change? The exchange rate we use is updated from time to time, but we won’t increase the price for existing users. If the updated exchange rate lowers the price, we’ll lower the price for all users who pay in this currency. ## What happens if a Wix user disputes a payment for my app? If your app uses Wix’s billing, Wix will automatically attempt to reverse the chargeback. If the reversal fails, you will see the chargeback to the user in your payout data. ## See also - [Monetizing your app](https://dev.wix.com/docs/build-apps/launch-your-app/pricing-and-billing/about-monetizing-your-app.md) - [About pricing plans and business models](https://dev.wix.com/docs/build-apps/launch-your-app/pricing-and-billing/about-pricing-plans-and-business-models.md) --- > Portal Navigation: > > - Append `.md` to any URL under `https://dev.wix.com/docs/` to get its markdown version. > - Pages are either content pages (article or reference text) or menu pages (a list of links to child pages). > - To get a menu page, truncate any URL to a parent path and append `.md` (e.g. `https://dev.wix.com/docs/sdk.md`, `https://dev.wix.com/docs/sdk/core-modules.md`). > - Top-level index of all portals: https://dev.wix.com/docs/llms.txt > - Full concatenated docs: https://dev.wix.com/docs/llms-full.txt ## Resource: About Market Listings ## Article: About Market Listings ## Article Link: https://dev.wix.com/docs/build-apps/launch-your-app/market-listing/about-market-listings.md ## Article Content: # About Market Listings Whether your app is listed in the [Wix App Market](https://www.wix.com/app-market) or you are distributing your app on your own, your app's listing is one of your biggest marketing tools and tells users what your app is for, how it can help them, and more. This is your chance to make a great first impression and stand out from the pack. An App Market listing is made up of: - Basic info like a name, icon, and short teaser. - A full description of your app's benefits and features. - Images and videos. - Availability – which countries and languages your app supports. - Keywords to help you get found by users - Wix App Market only. Here's an example of a live Wix App Market listing. You should also see how other apps have set up their listings on the [Wix App Market](https://www.wix.com/app-market).
![](https://wixmp-833713b177cebf373f611808.wixmp.com/images/ef35861e073b8b7818901459c17b72e7.png)
## Best Practices Your market listing is your first chance to make an impression. To make sure it stands out: - [Add a complete description](https://dev.wix.com/docs/build-apps/launch-your-app/market-listing/add-your-app-info.md) that highlights key app features and benefits. - [Include eye-catching images](https://dev.wix.com/docs/build-apps/launch-your-app/market-listing/add-your-media.md) that showcase your app in action. - [Build a custom site template](https://support.wix.com/en/article/wix-studio-creating-and-using-custom-templates) or demo site with realistic sample data. - [Self-publish updates](https://dev.wix.com/docs/build-apps/manage-your-app/versioning/release-a-new-app-version.md#ways-changes-are-published) and test changes to refine your app listing. ## Next step - [Add your app info](https://dev.wix.com/docs/build-apps/launch-your-app/market-listing/add-your-app-info.md) --- > Portal Navigation: > > - Append `.md` to any URL under `https://dev.wix.com/docs/` to get its markdown version. > - Pages are either content pages (article or reference text) or menu pages (a list of links to child pages). > - To get a menu page, truncate any URL to a parent path and append `.md` (e.g. `https://dev.wix.com/docs/sdk.md`, `https://dev.wix.com/docs/sdk/core-modules.md`). > - Top-level index of all portals: https://dev.wix.com/docs/llms.txt > - Full concatenated docs: https://dev.wix.com/docs/llms-full.txt ## Resource: Add Your App Info ## Article: Add Your App Info ## Article Link: https://dev.wix.com/docs/build-apps/launch-your-app/market-listing/add-your-app-info.md ## Article Content: # Add Your App Info To create your market listing, you need to add some information about your app. This includes: - [An app name](https://dev.wix.com/docs/build-apps/launch-your-app/market-listing/add-your-app-info.md#step-1--add-an-app-name). - [A short teaser](https://dev.wix.com/docs/build-apps/launch-your-app/market-listing/add-your-app-info.md#step-2--add-a-teaser). - [An app icon](https://dev.wix.com/docs/build-apps/launch-your-app/market-listing/add-your-app-info.md#step-3--add-an-app-icon). - [A more detailed description of your app and its features](https://dev.wix.com/docs/build-apps/launch-your-app/market-listing/add-your-app-info.md#step-4--add-an-app-description). - [Links to a demo site and your app's terms & conditions](https://dev.wix.com/docs/build-apps/launch-your-app/market-listing/add-your-app-info.md#step-5--add-a-wix-demo-site-url). To add your app info, go to the **App Profile** > **App Info** page of your app's dashboard. ## Step 1 | Add an app name Choose a name that’s relevant, memorable, and describes what your app does. > **Best practice for app names** > - Be original: Do a quick search to make sure the name's available. > - Don't include "Wix" or imply that Wix recommends your app above others. > - Don't include prices, descriptions, or other terms in the app name. > - Avoid adjectives that are common to all apps. For example, secure, fast, and so on. > - Use titlecase and separate each word with spaces (not punctuation), unless another format is part of your established brand. > - Don't imply affiliation with another brand (we'll have to reject these). For example, "Simple YouTube Player" is okay, but "YouTube" isn't. ## Step 2 | Add a teaser Write a short promotional description that tells users what they can do with your app. Your teaser appears in several prominent places in the App Market, so make it count. > **Best practice for app teasers** > - Speak directly to users: Tell them what they can do with your app (e.g. “Create beautiful images” instead of “People can create beautiful images”). > - All descriptions must be in English and use correct spelling and grammar. > - In addition you can also submit in other languages. > - Descriptions shouldn't reference brands or trademarks that you’re not affiliated with. > - Don't promote any other product unless they're extensions of your product, directly compatible with your product, or required for your product to function. > - Don't use "Wix" or your company name in the teaser. > - Don't include inappropriate content, reference to other apps, or make unverifiable claims. ## Step 3 | Add an app icon Your app icon appears in several places on the App Market and helps your app's brand to stand out. Follow these specifications when adding your icon: - **Size:** 1,000 x 1,000 px (square, we'll round the corners into a 'squircle' for you). - **Format:** 24-bit PNG - **Color space:** sRGB We have a [Figma](https://www.figma.com/file/8xtPgazUnfkDIbRDJzwJLB/App-Logo-and-Images---create-a-duplicate-to-edit?node-id=0%3A199) file to get you started. Create a duplicate so you can edit.
![](https://d2x3xhvgiqkx42.cloudfront.net/12345678-1234-1234-1234-1234567890ac/0e041dbb-8bbe-4be4-a1ae-883b5cb05e2b/2022/01/12/96ef17d5-9a82-4ef4-8816-247195902079/314fd0eb-52de-45a4-877a-2bb97a304873.png)
Need a logo? Check out the [Wix Logo Maker](https://www.wix.com/logo/maker/esh/?referralAdditionalInfo=developers_site) for some creative inspiration. > **Best practice for app icons** > - Use a solid background color (no frames). > - Keep it simple – a couple of elements will help reduce clutter. > - It should be a graphic (no screenshots or photos). > - Avoid using text or including your business name. ## Step 4 | Add an app description Encourage users to try your app by listing its best features, followed by a detailed description. ### Features List at least three of your app's best features. > **Best practice for features** > - Space is limited here, so simple descriptions work best. > - Show off the unique features of your app. > - Make sure your best feature is at the top. ### Full description The full description is where you should focus on value and competitive advantages to encourage users to try your app. > **Best practice for full description** > - Don't use bullet points or numbering: That's what the features section is for. > - Keep it concise: Anything over 500 will be hidden under "Read more". > - All descriptions must be in English and use correct spelling and grammar (you can also submit in other languages). > - State any compatibility issues clearly (for example, it's only available in certain locations). Keep in mind that we don't generally accept apps with compatibility issues. > - Don't reference brands or trademarks that you’re not affiliated with. > - Don't describe your company here (there's a dedicated [company info](https://dev.wix.com/docs/build-apps/launch-your-app/market-listing/add-your-company-info.md) section for this). > - Don't promote any other product unless they're extensions of your product, directly compatible with your product, or required for your product to function. > - Don't include inappropriate content, reference to other apps, or make unverifiable claims. > - Use **bold** type sparingly and avoid ALL CAPS unless conforming to an established brand. > - To help users find you, think about what keywords they might search for when looking for a service that your app offers, and use them in your description where possible. ## Step 5 | Add a Wix Demo Site URL You can include an optional link to a Wix site you've set up showing the app in action. If you don't have an app that appears on a website (such as a back-office app), you can leave this section blank. ## Step 6 | Add a link to your terms & conditions Add a link to your app's terms and conditions. When users install your app, the terms and conditions will appear as part of the consent flow. ## Next step - [Add your app's media](https://dev.wix.com/docs/build-apps/launch-your-app/market-listing/add-your-media.md) --- > Portal Navigation: > > - Append `.md` to any URL under `https://dev.wix.com/docs/` to get its markdown version. > - Pages are either content pages (article or reference text) or menu pages (a list of links to child pages). > - To get a menu page, truncate any URL to a parent path and append `.md` (e.g. `https://dev.wix.com/docs/sdk.md`, `https://dev.wix.com/docs/sdk/core-modules.md`). > - Top-level index of all portals: https://dev.wix.com/docs/llms.txt > - Full concatenated docs: https://dev.wix.com/docs/llms-full.txt ## Resource: Add Your Media ## Article: Add Your Media ## Article Link: https://dev.wix.com/docs/build-apps/launch-your-app/market-listing/add-your-media.md ## Article Content: # Add Your Media To list your app on the market, you need to add some media that show what your app does. This includes: - [Some images](https://dev.wix.com/docs/build-apps/launch-your-app/market-listing/add-your-media.md#step-1--add-images). - [A high-quality video](https://dev.wix.com/docs/build-apps/launch-your-app/market-listing/add-your-media.md#step-2--add-a-video). - [A promotional banner](https://dev.wix.com/docs/build-apps/launch-your-app/market-listing/add-your-media.md#step-3--add-a-promotional-banner). To add your media, go to the **App Profile** > **Media** page of your app's dashboard. ## Step 1 | Add Images Stunning images really help to encourage users to install your app. We've got [Sketch](https://wix.to/UnbCx7N), [Figma](https://www.figma.com/file/8xtPgazUnfkDIbRDJzwJLB/App-Logo-and-Images---create-a-duplicate-to-edit?node-id=0%3A199), and [PSD](https://www.dropbox.com/s/g77qsff92glt1tp/Mockups_App.psd?dl=0) files to get you started. If you're using the Figma file you need to create a duplicate before you can edit. - **How many:** Try to add 5-6 images - **Minimum size:** 1,200 x 900 px. Ratio 4:3 - **File types:** JPG or PNG If you add text to your images, we recommend these specifications: - **Font:** [Roboto](https://fonts.google.com/specimen/Roboto) - **Size:** 20 - **Color:** Black or white ### Main Image A promotional image that shows your app's brand. It should include: - Your app's name. - A tagline showing off your app's core benefit. - An image that grabs a user's attention.
![](https://d2x3xhvgiqkx42.cloudfront.net/12345678-1234-1234-1234-1234567890ac/0e041dbb-8bbe-4be4-a1ae-883b5cb05e2b/2022/01/12/fbd1207f-e260-49a7-98cb-987dac0242f0/51fa3faa-7de5-4fad-b0af-1deafa49e8a1.png)
### Additional Images You can add extra images to show screenshots of how your app looks on the Wix platform. - **For dashboard apps:** Show 3-4 images highlighting top features.  - **For website apps:** Show 2 images as it appears on a Wix template, and 1-2 of the app's settings and customization options. - **For mobile-optimized apps:** Show 1 image of your app's mobile view. > **Best practice for images** > * Use high-quality images. > * They should follow the same general design theme. > * Use one solid background color for all your images (try to match this to your logo's dominant color). > * Screenshots should show the app in use (not just the title art, login page, or splash screen). > * Avoid images that contain only plain text or use large amounts of descriptive text. > * Avoid graphics or text that relate to sales, promotions or discounts. > * Don't copy existing official App Market sale or promotional graphics. > * Use images to tell your app's story (they should flow progressively from one to the next). ## Step 2 | Add a Video High quality videos are a great way to tell your app's story, so we highly recommend adding one using a YouTube URL. This should be a quick, promotional overview of what your app's about and shouldn't be a demo tutorial of how it works. ## Step 3 | Add a Promotional Banner From time to time we feature the very best apps in dedicated App Market collections. A promotional banner is completely optional, but we do use these to promote our favourite apps in campaigns. Here's how they look in the App Market:
![](https://d2x3xhvgiqkx42.cloudfront.net/12345678-1234-1234-1234-1234567890ac/0e041dbb-8bbe-4be4-a1ae-883b5cb05e2b/2021/03/24/0f235d37-0d54-4a4e-81c6-4d7d3e550104/9d7c9e5d-c453-4fbd-9086-f330ce14f6b5.png)
Often the image you've already uploaded as your first market listing image works well as a promotional banner. If not, follow this specification: - **Recommended size:** 540 x 360 px - **File type:** JPG > **Best practice for promotional banners** > * Use a colorful background, preferably your logo's dominant color (not white, which will fade into the white background of the App Market). > * Don't include text or your app name. Your app name and teaser will appear directly below the banner. > * Don't include your logo. It appears directly below the banner. ## Next step - [Add your app's Get Found info](https://dev.wix.com/docs/build-apps/launch-your-app/market-listing/add-your-get-found-info.md) --- > Portal Navigation: > > - Append `.md` to any URL under `https://dev.wix.com/docs/` to get its markdown version. > - Pages are either content pages (article or reference text) or menu pages (a list of links to child pages). > - To get a menu page, truncate any URL to a parent path and append `.md` (e.g. `https://dev.wix.com/docs/sdk.md`, `https://dev.wix.com/docs/sdk/core-modules.md`). > - Top-level index of all portals: https://dev.wix.com/docs/llms.txt > - Full concatenated docs: https://dev.wix.com/docs/llms-full.txt ## Resource: Add Your Get Found Info ## Article: Add Your Get Found Info ## Article Link: https://dev.wix.com/docs/build-apps/launch-your-app/market-listing/add-your-get-found-info.md ## Article Content: # Add Your Get Found Info Adding the right categories and search keywords helps your app to be found by the right people, in the right place. To add categories: 1. Go to the **App Profile** > **App Market** > **Get Found** page of your app's dashboard. 2. Select the **Category** that best fits your app from the dropdown: - **Communication:** Apps that help users connect with their site visitors using chat, forms, testimonials, and so on. - **Marketing:** Apps that help users advertise their business or grow their customer base. - **Sell Online:** Apps that help users create online stores or manage their e-commerce features. - **Design Elements:** Apps that give users tools to customize the look and layout of their sites. - **Services & Events:** Apps that help users get booked for their services, create events, or manage their business calendars. - **Media & Content:** Apps that help users add music, videos, articles, or other kinds of content to their sites. 3. Add up to 5 **Search Keywords**. They should describe what your app does, like 'accounting' or 'chat'. Don't include trademarked terms (unless authorized), names of other apps, or otherwise irrelevant terms. ## Next step - [Add your App Audience info](https://dev.wix.com/docs/build-apps/launch-your-app/market-listing/add-your-app-audience-info.md). --- > Portal Navigation: > > - Append `.md` to any URL under `https://dev.wix.com/docs/` to get its markdown version. > - Pages are either content pages (article or reference text) or menu pages (a list of links to child pages). > - To get a menu page, truncate any URL to a parent path and append `.md` (e.g. `https://dev.wix.com/docs/sdk.md`, `https://dev.wix.com/docs/sdk/core-modules.md`). > - Top-level index of all portals: https://dev.wix.com/docs/llms.txt > - Full concatenated docs: https://dev.wix.com/docs/llms-full.txt ## Resource: Add Your App Audience Info ## Article: Add Your App Audience Info ## Article Link: https://dev.wix.com/docs/build-apps/launch-your-app/market-listing/add-your-app-audience-info.md ## Article Content: # Add Your App Audience Info Adding the right App Audience info helps Wix users decide whether your app is the right solution for them and increases your app's exposure to relevant Wix users. To configure your app audience settings: 1. Go to the **App Profile** > **App Audience** page of your app's dashboard. 2. Fill out the following: - Required Wix products: If relevant, select the Wix products that your app depends on. For details, see [Add app dependencies](https://dev.wix.com/docs/build-apps/launch-your-app/market-listing/add-app-dependencies.md). Wix blocks Wix users from adding your app to their site if they don't have the relevant Wix product installed. Wix prompts them to install the required product. - Supported countries: Define your app's geographic availability. Note: The geographic availability does not prevent Wix users from adding your app to their site, regardless of their location. - Supported languages: Select the languages your app is translated into. For a language to count as translated, both site-visitor-facing and site-owner-facing assets (components) must be translated. Only select languages you provide translations for. 3. Press **Save**. ## About required Wix products When your app's functionality depends on a specific Wix product (such as Wix Stores, Wix Bookings, or Wix Events), you can designate it as a required Wix product in your App Audience settings. That designation ensures that Wix users have the necessary infrastructure in place before they can install and use your app.
**Important:** Most Wix APIs require the relevant Wix app to be installed on the site. For example, to use Stores APIs, the Wix Stores app must be installed. To use Bookings APIs, the Wix Bookings app must be installed. If your app calls these APIs, select the corresponding Wix product as required to prevent installation and runtime errors.
### Installation flow with required products The installation behavior depends on the type of dependency: #### Manual dependencies (most Wix products) For most required Wix products (such as Wix Stores, Wix Bookings, Wix Events, and Wix Restaurants Orders), they are manual dependencies: When a Wix user attempts to install your app and a required Wix product is not installed on their site: 1. Wix blocks installation: The Wix user cannot complete the installation of your app until the required product is installed. 2. Wix user is prompted: The installation flow automatically prompts the Wix user to install the required Wix product first. 3. Seamless experience: Once the Wix user installs the required product, they can proceed with installing your app. This automatic check prevents Wix users from installing your app and encountering errors or losing functionality due to missing dependencies. #### Auto-installed dependency (Checkout & Orders) **Checkout & Orders** (the eCommerce app) is a special case and is auto-installed. When you select **Checkout & Orders** as a required product, Wix automatically installs the base eCommerce app alongside your app whenever a Wix user installs it. The Wix user does not need to manually install it first—Wix installs the eCommerce app automatically in the background. This streamlined installation ensures that eCommerce functionality is immediately available when your app is installed. ## See also - Add app dependencies. - [Add your Get Found info](https://dev.wix.com/docs/build-apps/launch-your-app/market-listing/add-your-get-found-info.md). - [Add your media](https://dev.wix.com/docs/build-apps/launch-your-app/market-listing/add-your-media.md). - [Add your app info](https://dev.wix.com/docs/build-apps/launch-your-app/market-listing/add-your-app-info.md). --- > Portal Navigation: > > - Append `.md` to any URL under `https://dev.wix.com/docs/` to get its markdown version. > - Pages are either content pages (article or reference text) or menu pages (a list of links to child pages). > - To get a menu page, truncate any URL to a parent path and append `.md` (e.g. `https://dev.wix.com/docs/sdk.md`, `https://dev.wix.com/docs/sdk/core-modules.md`). > - Top-level index of all portals: https://dev.wix.com/docs/llms.txt > - Full concatenated docs: https://dev.wix.com/docs/llms-full.txt ## Resource: Add Your Company Info ## Article: Add Your Company Info ## Article Link: https://dev.wix.com/docs/build-apps/launch-your-app/market-listing/add-your-company-info.md ## Article Content: # Add Your Company Info Your app's listing in the Wix App Market includes basic info about your company. To review or update your company info: 1. Go to the **Company Info** page in your app's dashboard. 2. Complete the following fields: - **Company logo:** Square, PNG or JPG format. - **Company name:** Max 23 characters, including spaces. - **Company description:** Max 1,200 characters, including spaces. - **Company address** - **Company website** - **Privacy policy link** 3. Click **Save**. ## See also - [Add your Get Found info](https://dev.wix.com/docs/build-apps/launch-your-app/market-listing/add-your-get-found-info.md) - [Add your media](https://dev.wix.com/docs/build-apps/launch-your-app/market-listing/add-your-media.md) - [Add your app info](https://dev.wix.com/docs/build-apps/launch-your-app/market-listing/add-your-app-info.md) --- > Portal Navigation: > > - Append `.md` to any URL under `https://dev.wix.com/docs/` to get its markdown version. > - Pages are either content pages (article or reference text) or menu pages (a list of links to child pages). > - To get a menu page, truncate any URL to a parent path and append `.md` (e.g. `https://dev.wix.com/docs/sdk.md`, `https://dev.wix.com/docs/sdk/core-modules.md`). > - Top-level index of all portals: https://dev.wix.com/docs/llms.txt > - Full concatenated docs: https://dev.wix.com/docs/llms-full.txt ## Resource: Add App Dependencies ## Article: Add App Dependencies ## Article Link: https://dev.wix.com/docs/build-apps/launch-your-app/market-listing/add-app-dependencies.md ## Article Content: # Add App Dependencies Add app dependencies to help ensure Wix users have the necessary Wix products installed before they can use your app. This helps prevent installation and runtime errors when your app calls APIs that require specific Wix products. Most Wix APIs require the relevant Wix product to be installed on a site. For example, to use the Stores or Bookings APIs, the site must have Wix Stores or Wix Bookings installed. If your app calls these APIs, select the corresponding Wix product as required to prevent installation and runtime errors. When you designate a Wix product as required, Wix blocks Wix users from installing your app until that product is installed on a site. Most required products are manual dependencies: Wix prompts Wix users to install them before installing your app. Wix Checkout & Orders is a special case and is auto-installed. Wix automatically installs Checkout & Orders in the background during your app's installation. To add app dependencies: 1. Navigate to **App Profile > App Audience** on your app's dashboard. 2. In the **Required Wix products** field, select the Wix products your app depends on. 3. Click **Save**. ## See also - [Add your app audience info](https://dev.wix.com/docs/build-apps/launch-your-app/market-listing/add-your-app-audience-info.md). - [Add your app info](https://dev.wix.com/docs/build-apps/launch-your-app/market-listing/add-your-app-info.md). --- > Portal Navigation: > > - Append `.md` to any URL under `https://dev.wix.com/docs/` to get its markdown version. > - Pages are either content pages (article or reference text) or menu pages (a list of links to child pages). > - To get a menu page, truncate any URL to a parent path and append `.md` (e.g. `https://dev.wix.com/docs/sdk.md`, `https://dev.wix.com/docs/sdk/core-modules.md`). > - Top-level index of all portals: https://dev.wix.com/docs/llms.txt > - Full concatenated docs: https://dev.wix.com/docs/llms-full.txt ## Resource: About App Localization ## Article: About App Localization ## Article Link: https://dev.wix.com/docs/build-apps/launch-your-app/localization/about-app-localization.md ## Article Content: # About App Localization Wix has more than 220 million users worldwide – and many of them aren’t native English speakers. In an increasingly globalized world, app localization has become a crucial factor in reaching wider audiences and ensuring user engagement. Localization involves adapting your app's content, design, and functionality to suit the cultural, linguistic, and regional preferences of target markets. ## Benefits of app localization - **Expand your user base:** Catering to users in different regions enhances accessibility and improves user experience, leading to increased downloads and user retention. - **Boost user engagement:** When users feel that an app resonates with their language, culture, and norms, they are more likely to engage with it, leading to higher usage rates and better reviews. - **Drive revenue growth:** Localized apps have higher chances of monetization through in-app purchases, subscriptions, and ad revenue as they appeal to a broader audience. - **Enhance brand reputation:** Demonstrating commitment to inclusivity and cultural sensitivity through localization can strengthen your brand's reputation globally. ## Best practices for app localization Successfully localizing an app requires careful planning and execution. Here are some best practices to follow: - **Plan for localization from the beginning:** Incorporate localization considerations into your app development process right from the outset. Design the app architecture to support multiple languages and cultural adaptations. - **Cultural sensitivity:** Understand the cultural nuances and sensitivities of your target markets. Adapt content, imagery, and design elements to align with local customs, holidays, and cultural references. - **Use localization tools:** Leverage localization tools and platforms to streamline the translation process and manage multilingual content efficiently. - **Separate content from code:** Keep text strings, images, and other content separate from the source code to facilitate easy translation and updates. Utilize string resource files or localization frameworks for seamless management. - **Test extensively:** Conduct thorough testing of localized versions to ensure linguistic accuracy, proper formatting, and functional integrity across different languages and locales. - **Provide language switching options:** Implement intuitive language-switching mechanisms within the app interface to allow users to choose their preferred language easily. - **Monitor user feedback:** Monitor user feedback and analytics to gather insights into user preferences, issues, and opportunities for further localization improvements. ## Methods of app localization Several methods can be employed to localize your app effectively: - **Translation services:** Engage professional translators or translation agencies with expertise in your target languages to ensure accurate and culturally appropriate translations. - **In-house localization teams:** Establish an in-house localization team or designate team members responsible for managing the localization process, including translation, content adaptation, and quality assurance. - **Community translation:** Utilize crowdsourcing platforms or community-driven translation initiatives to involve native speakers in the localization process. This approach can be cost-effective and can result in high-quality translations. - **Machine translation:** Supplement human translation efforts with machine translation tools such as Google Translate or Microsoft Translator, especially for large volumes of content. However, ensure human review and validation for accuracy and context. - **Localized support:** If your app is supported in a certain language, users may ask for your help in that language. We recommend engaging with users in their native language, or if that’s not possible, in a common language. If your app becomes popular in a specific language, consider hiring a native-language speaker for that language to ensure textual accuracy and to provide user support. ## See also - [Translate your app listing](https://dev.wix.com/docs/build-apps/launch-your-app/localization/translate-app-listing.md) - [Translate your app extensions](https://dev.wix.com/docs/build-apps/launch-your-app/localization/translate-app-extensions.md) --- > Portal Navigation: > > - Append `.md` to any URL under `https://dev.wix.com/docs/` to get its markdown version. > - Pages are either content pages (article or reference text) or menu pages (a list of links to child pages). > - To get a menu page, truncate any URL to a parent path and append `.md` (e.g. `https://dev.wix.com/docs/sdk.md`, `https://dev.wix.com/docs/sdk/core-modules.md`). > - Top-level index of all portals: https://dev.wix.com/docs/llms.txt > - Full concatenated docs: https://dev.wix.com/docs/llms-full.txt ## Resource: Translate App Listing ## Article: Translate App Listing ## Article Link: https://dev.wix.com/docs/build-apps/launch-your-app/localization/translate-app-listing.md ## Article Content: # Translate Your App Market Listing You can increase your app’s reach by speaking to users in their own language. One way to do this is to translate your [App Market listing info](https://dev.wix.com/docs/build-apps/launch-your-app/market-listing/about-market-listings.md) to help users better understand your app's features and benefits. ## Before you begin - We strongly recommend recruiting a professional translator for this task. Machine translation services, e.g., Google Translate can be inaccurate, which could lead to a poor user experience. - If you translate your app listing into languages your app doesn't support, you need to make a note of the supported languages in the translated App Overview. - If a language is inactive, users with an account set to that language will see the app in its default language (usually English). To translate your App Market listing: 1. Go to the **Translations** page in your app's dashboard. 3. Click **+ Add Language**. 4. Select the languages you want to enter translations for, and click **Add**. 5. Click **Translate** next to **Market Listing & Pricing** under the language you want to work with. 6. Ensure all market listing fields have their relevant translated string next to the English version. Incomplete translations aren't accepted as most fields are mandatory. To activate a listing, all fields must be fully translated or defaulted to English using **Use English**. This feature is especially handy for links, keywords, and images that may not require translation. 7. Upload new images and a banner under **Media**. Click **Use the Same Icon/Photo** if you want to default to the English versions. 8. Preview your listing in each language by clicking **Preview Listing**. In addition, you can click **Preview Page** to view what your pricing page looks like. 9. Once you've added all the strings and assets for translation, click **Save**. 10. To show the app listing in the language that you have completed, click the toggle next to each language on the language list. 11. After activating the language(s), you need to release a new version of your app for the changes to go live. ## See also - [About app localization](https://dev.wix.com/docs/build-apps/launch-your-app/localization/about-app-localization.md) - [Create an App Market listing](https://dev.wix.com/docs/build-apps/launch-your-app/market-listing/about-market-listings.md) - [Translate your app extensions](https://dev.wix.com/docs/build-apps/launch-your-app/localization/translate-app-extensions.md) --- > Portal Navigation: > > - Append `.md` to any URL under `https://dev.wix.com/docs/` to get its markdown version. > - Pages are either content pages (article or reference text) or menu pages (a list of links to child pages). > - To get a menu page, truncate any URL to a parent path and append `.md` (e.g. `https://dev.wix.com/docs/sdk.md`, `https://dev.wix.com/docs/sdk/core-modules.md`). > - Top-level index of all portals: https://dev.wix.com/docs/llms.txt > - Full concatenated docs: https://dev.wix.com/docs/llms-full.txt ## Resource: Translate App Extensions ## Article: Translate App Extensions ## Article Link: https://dev.wix.com/docs/build-apps/launch-your-app/localization/translate-app-extensions.md ## Article Content: # Translate Your App Extensions You can increase your app’s reach by speaking to users in their own language. One way to do this is to translate your extension names to help users better understand the extension's function. You can do this for any of Wix's supported languages. ## Important to know - We strongly recommend recruiting a professional translator for this task. Machine translation services can be inaccurate, which could lead to a poor user experience. - If a language is inactive, users with an account set to that language will see the app in its default language (usually English). - Any new translations that you add won't affect old installs of your app, only new ones. To translate your app extension names: 1. Go to the **Translations** page in your app's dashboard. 2. Click **+ Add Language**. 3. Select the languages you want to enter translations for, and click **Add**. 4. Click **Translate** next to the language / extension type you want to work with. 5. Once you've added all the strings for translation, click **Save**. 6. To show the extension in the language that you have completed, click the toggle next to each language on the language list. 7. After activating the language(s), you need to release a new version of your app for the changes to go live. ## See also - [About app localization](https://dev.wix.com/docs/build-apps/launch-your-app/localization/about-app-localization.md) - [Translate your market listing](https://dev.wix.com/docs/build-apps/launch-your-app/localization/translate-app-listing.md) --- > Portal Navigation: > > - Append `.md` to any URL under `https://dev.wix.com/docs/` to get its markdown version. > - Pages are either content pages (article or reference text) or menu pages (a list of links to child pages). > - To get a menu page, truncate any URL to a parent path and append `.md` (e.g. `https://dev.wix.com/docs/sdk.md`, `https://dev.wix.com/docs/sdk/core-modules.md`). > - Top-level index of all portals: https://dev.wix.com/docs/llms.txt > - Full concatenated docs: https://dev.wix.com/docs/llms-full.txt ## Resource: Implement Localization in your App Extensions ## Article: Implement Localization in your App Extensions ## Article Link: https://dev.wix.com/docs/build-apps/launch-your-app/localization/implement-localization-in-your-app-extensions.md ## Article Content: # Implement Localization in your App Extensions When localizing your app, you may need to display text in the user's chosen language. Users can set different languages for different interfaces. For example, they may choose one language for the dashboard, but allow their site users to set a different language for the site. This means your app needs to retrieve the chosen settings for each [extension](https://dev.wix.com/docs/build-apps/develop-your-app/extensions/about-extensions.md). The essentials SDK's [`i18n` submodule](https://dev.wix.com/docs/sdk/core-modules/essentials/i18n.md) allows app extensions to access the active language and locale settings of a site's [interfaces](https://dev.wix.com/docs/build-apps/develop-your-app/extensions/about-extensions.md#frontend-interfaces). This article outlines the recommended steps for using the SDK to display localized text in different parts of your app. > **Note:** This article uses the [FormatJS' `react-intl` package](https://formatjs.io/docs/react-intl/), but you may use any other localization library. Make sure to install your chosen package in your app before starting to code. ## Step 1 | Prepare translations For each language your app supports, create a JSON file containing all your app's strings. > **Notes:** > - You can save your JSON files wherever you like in your code. > - Anything contained in `{}` represents variables. The [Intl MessageFormat](https://formatjs.io/docs/intl-messageformat) uses [ICU message syntax](https://unicode-org.github.io/icu/userguide/format_parse/messages/) and [CLDR locale data](http://cldr.unicode.org/). For example, to support English and Spanish, create 2 JSON files: **`src/intl/messages/en.json`** ```json { "greeting": "Hello, {name}!", "welcome": "Welcome to our app!", "todayIs": "Today is {ts, date, ::yyyyMMdd}" } ``` **`src/intl/messages/es.json`** ```json { "greeting": "Hola, {name}!", "welcome": "Bienvenido a nuestra aplicación!", "todayIs": "Hoy es {ts, date, ::yyyyMMdd}" } ``` ## Step 2 | Create a function to load the messages JSON file Create and export a helper function that loads the correct messages JSON based on the extension's language: 1. Create a file to host the helper function. For example, `src/intl/load-messages.js`. 1. Import `i18n` from `@wix/essentials`: ```js import { i18n } from "@wix/essentials"; ``` 1. Create and export a function that calls [`i18n.getLanguage()`](https://dev.wix.com/docs/sdk/core-modules/essentials/i18n.md#getlanguage) and returns the correct messages JSON based on the language retrieved. \ For example: ```js export async function loadMessages() { switch (i18n.getLanguage()) { case "es": return (await import("./es.json")).default; default: return (await import("./en.json")).default; } } ``` At the end of this step, your file should look similar to this: **`src/intl/load-messages.js`** ```js import { i18n } from "@wix/essentials"; export async function loadMessages() { switch (i18n.getLanguage()) { case "es": return (await import("./es.json")).default; default: return (await import("./en.json")).default; } } ``` ## Step 3 | Initialize `intl` This step is implemented differently depending on whether your app's extensions use React or plain JavaScript. ### React Render your extensions using the `IntlProvider` component from the [`react-intl` package](https://formatjs.io/docs/react-intl/). To avoid repeating this code for each of your apps' extension, create a higher order component (HOC) that you can use to wrap your extensions with `IntlProvider`: 1. Create a component called `withIntlProvider`. This is your HOC that will wrap your extensions with `IntlProvider`. 1. Create a state variable. 1. Using `useEffect()`, when the component loads, call `loadMessages()` that you defined in [Step 2](#step-2--create-a-function-to-load-the-messages-json-file), and then save the response in your state variable. 1. If `loadMessages()` doesn't return a value, the component should return `null`. 1. Return an [`IntlProvider` component](https://formatjs.io/docs/react-intl/components#intlprovider) with the following props: - Pass the loaded messages to the `messages` prop. - Pass the value of [`i18n.getLocale()`](https://dev.wix.com/docs/sdk/core-modules/essentials/i18n.md#getlanguage) to the `locale` prop. - Set the default locale. - Pass `` as the children prop. At the end of this step, your file should look like this: **`src/intl/withIntlProvider.jsx`** ```js import { i18n } from "@wix/essentials"; import React from "react"; import { IntlProvider } from "react-intl"; import { loadMessages } from "./load-messages"; // Edit according to where you saved your file. export function withIntlProvider(Component) { return (props => { const [messagesInLanguage, setMessagesInLanguage] = React.useState(null); React.useEffect(() => { loadMessages().then((data) => { setMessagesInLanguage(data) }); }, []); if (!messagesInLanguage) { return null; } return ( ) }) } ``` ### Plain JavaScript You will need an [`intl`](https://formatjs.io/docs/intl/) object instance to format your messages. To create this instance: 1. Create a file, such as `src/intl/create-intl.js` and add the following import statements: ```js import { i18n } from "@wix/essentials"; import { createIntlCache, createIntl as createIntlCore } from "react-intl"; import { loadMessages } from "./load-messages"; // Edit according to where you saved your file. ``` 1. Create and export a function called `createIntl`. 1. Your `createIntl` function should return the result of calling `createIntlCore()` and passing the following parameters. - An object containing: - `locale`: Use the value returned by [`i18n.getLocale()`](https://dev.wix.com/docs/sdk/core-modules/essentials/i18n.md#getlanguage). - `messages`: Use the value returned by `loadMessages()`, defined in [Step 2](#step-2--create-a-function-to-load-the-messages-json-file). - The value returned by [`creatIntlCache()`](https://formatjs.io/docs/intl/#createintlcache); At the end of this step, your file should look like this: **`src/intl/create-intl.js`** ```js import { i18n } from "@wix/essentials"; import { createIntlCache, createIntl as createIntlCore } from "react-intl"; import { loadMessages } from "./load-messages"; export async function createIntl() { return createIntlCore( { locale: i18n.getLocale(), messages: await loadMessages(), }, createIntlCache() ); } ``` ## Step 4 | Display localized text in your app's extensions Retrieve and render localized text. This step is implemented differently depending on whether your app's extensions use React or plain JavaScript. ### React To display localized code, wrap your extension with the `withIntlProvider()` function that you defined in [Step 3](#step-3--initialize-intl), and use the [`FormattedMessage` component](https://formatjs.io/docs/react-intl/components/#formattedmessage) to display your text. > **Note:** You only need to wrap the components in your extension that need to access the localized text. However, wrapping your main app extension component with `withIntlProvider()` makes further development smoother. #### Example The following example uses `FormattedMessage` with the following props: - `id`: The key of the message you want to render from your JSON file. - `defaultMessage`: The message to render if no message is retrieved. - `values`: An object of the variable values to use in the message. **`src/dashboard/pages/page.tsx`** ```js import React from "react"; import { withIntlProvider } from "../intl/withIntlProvider"; function MyAppPage() { return (

); } export default withIntlProvider(MyAppPage); ``` ### Plain JavaScript To display localized code: 1. Call the `createIntl()` function that you defined in [Step 3](#step-3--initialize-intl) to create an `intl` instance 1. Use the [`formatMessage` property](https://formatjs.io/docs/intl/#formatmessage) to return your translated text. For example: **`src/site/embedded-scripts/my-script/index.ts`** ```js import { createIntl } from "../../../intl/create-intl"; const intl = await createIntl(); console.log( intl.formatMessage( { id: "todayIs", defaultMessage: "Today is {ts, date, ::yyyyMMdd}" }, { ts: Date.now() } ) ); ``` --- > Portal Navigation: > > - Append `.md` to any URL under `https://dev.wix.com/docs/` to get its markdown version. > - Pages are either content pages (article or reference text) or menu pages (a list of links to child pages). > - To get a menu page, truncate any URL to a parent path and append `.md` (e.g. `https://dev.wix.com/docs/sdk.md`, `https://dev.wix.com/docs/sdk/core-modules.md`). > - Top-level index of all portals: https://dev.wix.com/docs/llms.txt > - Full concatenated docs: https://dev.wix.com/docs/llms-full.txt ## Resource: About GDPR and Data Protection ## Article: GDPR and Data Protection ## Article Link: https://dev.wix.com/docs/build-apps/launch-your-app/legal-and-security/gdpr-compliance/about-gdpr-and-data-protection.md ## Article Content: # About GDPR and Data Protection Compliance Since the implementation of the EU General Data Protection Regulation (GDPR) in May 2018, businesses worldwide have had to adhere to stricter privacy requirements. GDPR compliance is imperative. The regulation empowers Wix users, particularly EU citizens, to exercise control over their personal data stored by your app. Users may reach out to you regarding accessing, modifying, or deleting their data, necessitating proactive measures from app builders. ## About cookie consent policies Wix has implemented a [cookie policy](https://www.wix.com/about/cookie-policy) which allows all parties to adhere to the applicable laws, such as the [GDPR](https://support.wix.com/en/article/general-data-protection-regulation-gdpr) and CCPA. Every visitor to a Wix site has their own visitor consent policy that defines what types of cookies and related technologies they allow. Visitors can adjust their consent settings through consent apps that site owners add to their sites, such as cookie consent banners. When a visitor first arrives on a site, their visitor consent policy is configured to match the site's default consent policy. Site owners can customize their site's default policy themselves, or install apps that customize it.
__Important:__ All apps are bound by the [Wix Partner Agreement](https://dev.wix.com/app-market-partner-agreement), which contains obligations related to privacy regulations (including honoring each site visitor’s decision about cookies).
### Cookie consent workflow 1. Site owner sets up a consent policy which includes any or all of the following consent types: - **Essential**: lets the visitor move around the website and use essential features like secure and private areas. - **Functional**: used to remember choices users make to improve their experience (e.g. language). - **Analytics**: lets the site/app owner understand how visitors use the website (e.g. which pages they visit), to provide statistics on how the website is used, improve the website by identifying any errors, and performance issues. - **Advertising/Marketing**: used to collect information about the impact of marketing campaigns performed in other websites on users and non-users. - **Data to Third Parties**: lets the site/app owner share data with third (or fourth) parties (includes the "sale" of data, as well sharing data for essential or enhanced functionality, e.g., Google Analytics) - specifically for [CCPA compliance](https://support.wix.com/en/article/adding-a-do-not-sell-data-link-to-your-wix-site). 2. Site visitor gets a popup/banner about cookies. 3. Site visitor interacts with popup/banner, setting their consent policy – they can choose which of the options to allow. 4. At this point, and no earlier, your app must: 1. Access the consent policy per visitor. 2. Manage all applicable actions to take for their app’s functionality based on the provided consent. Access to the consent policy set by each site visitor is available using the iframe JS SDK. The JS SDK also provides access to the default site policy as set by the site owner. See [Implement Cookie Consent Requirements](https://dev.wix.com/docs/build-apps/launch-your-app/legal-and-security/gdpr-compliance/implement-cookie-consent-requirements.md) for details. ## Basic Guidelines for GDPR compliance To ensure compliance with GDPR requirements, you should familiarize yourself with the regulation. Here are essential guidelines to follow when handling user requests related to personal data: 1. **Verification of identity**: When users request access to their personal data, it's crucial to verify their identity to safeguard security. Requesting proof of identity helps prevent unauthorized access to sensitive information. 2. **Acknowledgment of user requests**: Promptly inform users that you're processing their request. Sending an acknowledgment email demonstrates transparency and reassures users that their concerns are being addressed. 3. **Timely response to requests**: Efficiently handle user requests within specified timeframes: - For edit or deletion requests, aim to fulfill them within a week, but ensure completion within 30 days at the latest. - Regarding access requests, provide the requested data within 30 days. Always utilize the same communication channel through which the user initiated contact. 4. **Adhere to visitors' data consent policies**: Compliance entails respecting policies such as cookie usage and data selling restrictions. Integrating mechanisms to uphold these policies within your app is essential for maintaining GDPR compliance. ## See also - [Test Your App for Cookie Consent Compliance](https://dev.wix.com/docs/build-apps/launch-your-app/legal-and-security/gdpr-compliance/test-your-app-for-cookie-consent-compliance.md) - [Implement Cookie Consent Requirements](https://dev.wix.com/docs/build-apps/launch-your-app/legal-and-security/gdpr-compliance/implement-cookie-consent-requirements.md) - [About Consent Apps](https://dev.wix.com/docs/build-apps/launch-your-app/legal-and-security/about-consent-apps.md) --- > Portal Navigation: > > - Append `.md` to any URL under `https://dev.wix.com/docs/` to get its markdown version. > - Pages are either content pages (article or reference text) or menu pages (a list of links to child pages). > - To get a menu page, truncate any URL to a parent path and append `.md` (e.g. `https://dev.wix.com/docs/sdk.md`, `https://dev.wix.com/docs/sdk/core-modules.md`). > - Top-level index of all portals: https://dev.wix.com/docs/llms.txt > - Full concatenated docs: https://dev.wix.com/docs/llms-full.txt ## Resource: Common GDPR Compliance Issues ## Article: Common GDPR Compliance Issues ## Article Link: https://dev.wix.com/docs/build-apps/launch-your-app/legal-and-security/gdpr-compliance/common-gdpr-compliance-issues.md ## Article Content: # Common GDPR Compliance Issues Ensuring GDPR compliance in apps presents unique challenges. The following are the most common issues we've found: ## Mismatched categorization This issue comes up when there is a lack of alignment between an app's declared cookie categorization and its actual behavior. Wix currently blocks cookies that don't align with the site's consent policy. However, if your app includes an [iframe extension](https://dev.wix.com/docs/build-apps/develop-your-app/develop-a-self-managed-app/supported-extensions/deprecated/iframe/design-your-site-extensions.md) or an [embedded script extension](https://dev.wix.com/docs/build-apps/develop-your-app/extensions/site-extensions/embedded-scripts/about-embedded-scripts.md), you must categorize your app's cookies on your own. For embedded scripts, make sure to categorize your cookies correctly in your app dashboard. ### Implications for your app Categorizing your iframe or embedded script app incorrectly can lead site owners to uninstall your app and leave negative reviews due to lack of compliance. ### What you should do [Test your app for compliance](https://dev.wix.com/docs/build-apps/launch-your-app/legal-and-security/gdpr-compliance/test-your-app-for-cookie-consent-compliance.md) and update the categorization as necessary. > **Note:** Apps with an [iframe extension](https://dev.wix.com/docs/build-apps/develop-your-app/develop-a-self-managed-app/supported-extensions/deprecated/iframe/design-your-site-extensions.md) or [embedded script extension](https://dev.wix.com/docs/build-apps/develop-your-app/extensions/site-extensions/embedded-scripts/about-embedded-scripts.md), must categorize their cookies correctly. For embedded scripts, make sure to categorize your cookies correctly in your app dashboard. ## Premature script loading This issue comes up when an app initiates scripts before checking the visitor's consent. Sometimes apps inadvertently initiate scripts before obtaining and confirming user consent, due to improper handling of default settings or lack of a comprehensive consent management system. This often occurs when scripts are embedded directly into the app's codebase and executed as soon as the app loads. ### Implications for your app Loading scripts prematurely can lead site owners to uninstall your app and leave negative reviews due to lack of compliance. ### What you should do To address this issue, you need to implement consent gates that hold off on executing these scripts until the user has explicitly granted permission, ensuring both user privacy and legal compliance. ## Not following the site visitor’s given consent This issue comes up when an app loads cookies and trackers that don't align with the visitor's consent - particularly apps with an [iFrame extension](https://dev.wix.com/docs/build-apps/develop-your-app/develop-a-self-managed-app/supported-extensions/deprecated/iframe/design-your-site-extensions.md). Apps might load cookies and trackers that do not align with a visitor's consent due to misconfigurations in their consent management systems or lack of thorough auditing of third-party dependencies. These issues can arise when default settings permit trackers to activate before consent preferences are checked or updated, causing discrepancies between user intentions and actual data practices. Additionally, third-party services integrated into apps might introduce additional cookies or trackers that aren’t immediately apparent to developers, leading to unintentional data collection. ### Implications for your app Loading cookies and trackers that don't align with the visitor's consent can lead site owners to uninstall your app and leave negative reviews due to lack of compliance. ### What you should do To ensure alignment with consent, apps must employ rigorous checks, thorough auditing of all cookies and trackers, and dynamic consent updating mechanisms to prevent any unauthorized data tracking. Make sure to [check the visitor's consent policy](https://dev.wix.com/docs/build-apps/launch-your-app/legal-and-security/gdpr-compliance/implement-cookie-consent-requirements.md) at the start of each session, build mechanisms to prevent loading any cookies and trackers that don't align with a visitor's consent, and listen to and comply with any policy changes during a session. [Test your app for compliance](https://dev.wix.com/docs/build-apps/launch-your-app/legal-and-security/gdpr-compliance/test-your-app-for-cookie-consent-compliance.md). > **Note:** Apps with an [iframe extension](https://dev.wix.com/docs/build-apps/develop-your-app/develop-a-self-managed-app/supported-extensions/deprecated/iframe/design-your-site-extensions.md) or [embedded script extension](https://dev.wix.com/docs/build-apps/develop-your-app/extensions/site-extensions/embedded-scripts/about-embedded-scripts.md) should follow the instructions in [Implement Cookie Consent Requirements](https://dev.wix.com/docs/build-apps/launch-your-app/legal-and-security/gdpr-compliance/implement-cookie-consent-requirements.md) to check the visitor's consent policy. --- > Portal Navigation: > > - Append `.md` to any URL under `https://dev.wix.com/docs/` to get its markdown version. > - Pages are either content pages (article or reference text) or menu pages (a list of links to child pages). > - To get a menu page, truncate any URL to a parent path and append `.md` (e.g. `https://dev.wix.com/docs/sdk.md`, `https://dev.wix.com/docs/sdk/core-modules.md`). > - Top-level index of all portals: https://dev.wix.com/docs/llms.txt > - Full concatenated docs: https://dev.wix.com/docs/llms-full.txt ## Resource: Implement Cookie Consent Requirements ## Article: Implement Cookie Consent Requirements ## Article Link: https://dev.wix.com/docs/build-apps/launch-your-app/legal-and-security/gdpr-compliance/implement-cookie-consent-requirements.md ## Article Content: # Implement Cookie Consent Requirements Meeting cookie consent requirements is critical for GDPR compliance and the success of your app. To prevent your app from being uninstalled by customers striving for compliance, ensure your app complies with the requirements and test it thoroughly. Make sure to: 1. Check the visitor's consent policy at the start of each session, and comply completely with the set policy. 2. Listen to changes in the policy during the session, and comply with any changes. ## Access the consent policy The method you use to access and monitor the consent policy depends on the type of extension. The following table provides the relevant methods for each extension type. | Extension | Get consent policy | Listen for changes | |--|--|--| | Custom elements, Embedded scripts, Wix Blocks apps | **JavaScript SDK** [`getCurrentConsentPolicy()`](https://dev.wix.com/docs/sdk/host-modules/site/consent-policy-manager/get-current-consent-policy.md) | **JavaScript SDK** [`onConsentPolicyChanged()`](https://dev.wix.com/docs/sdk/host-modules/site/consent-policy-manager/on-consent-policy-changed.md) | | iframe apps (Deprecated) | **wix.utils** [`getCurrentConsentPolicy`](https://dev.wix.com/docs/client/api-reference/deprecated/iframe-sdk-deprecated/wix-utils.md) | **wix.utils** [`onConsentPolicyChanged`](https://dev.wix.com/docs/client/api-reference/deprecated/iframe-sdk-deprecated/wix-utils.md) | | Worker iframe apps (Deprecated) | **wix.worker** [`Utils.getCurrentConsentPolicy`](https://dev.wix.com/docs/client/api-reference/deprecated/iframe-sdk-deprecated/wix-worker.md) | **wix.worker** [`Utils.onConsentPolicyChanged`](https://dev.wix.com/docs/client/api-reference/deprecated/iframe-sdk-deprecated/wix-worker.md) | > **Note:** For worker iframe apps, the consent policy is also passed as a query param in the iframe URL. ## Guidelines for embedded scripts Embedded scripts are automatically rendered or blocked based on the site visitor’s approval or denial of the cookie type, which corresponds to the [script type selected during setup](https://dev.wix.com/docs/build-apps/develop-your-app/extensions/site-extensions/embedded-scripts/about-embedded-scripts.md). ![Embedded Script Setup](https://wixmp-833713b177cebf373f611808.wixmp.com/images/041a741c1522287e14e5fcbec428d6f0.png) If your script falls into more than one category, always select the more restrictive category. For example, if the script is **Functional**, but also collects **Analytics** data, it should be marked as **Analytics**. If your script has marketing or analytical functionalities but needs to be listed in one of the less restrictive categories in order to carry out its main functionalities, you should do one of the following: - Create two embedded script components, each one containing the relevant script for its category. - Write conditional code to check the policy before running code that requires a more permissive policy. Your script or functionality should load only if the user has granted consent. --- > Portal Navigation: > > - Append `.md` to any URL under `https://dev.wix.com/docs/` to get its markdown version. > - Pages are either content pages (article or reference text) or menu pages (a list of links to child pages). > - To get a menu page, truncate any URL to a parent path and append `.md` (e.g. `https://dev.wix.com/docs/sdk.md`, `https://dev.wix.com/docs/sdk/core-modules.md`). > - Top-level index of all portals: https://dev.wix.com/docs/llms.txt > - Full concatenated docs: https://dev.wix.com/docs/llms-full.txt ## Resource: Test Your App for Cookie Consent Compliance ## Article: Test Your App for Cookie Consent Compliance ## Article Link: https://dev.wix.com/docs/build-apps/launch-your-app/legal-and-security/gdpr-compliance/test-your-app-for-cookie-consent-compliance.md ## Article Content: # Test Your App for Cookie Consent Compliance It's extremely important to ensure that your app complies with each site's cookie consent policy. To comply, you must ensure that your app doesn't initiate any operations before confirming the visitor's consent (referred to as "block pre-consent loading"). You can test this on your own, or use the free service provided by Usercentrics using the [Usercentrics for Wix](https://www.wix.com/app-market/cookiebot-for-wix) app. Wix highly recommends testing all flows regularly to ensure compliance. ## Check for pre-consent loading with the Usercentrics for Wix app The Usercentrics for Wix app helps you identify apps with components that load before obtaining consent. 1. Request a coupon for the Usercentrics for Wix app from Wix's [dev care support](https://www.wix.com/support-chatbot?nodeId=25a57397-ccf7-4376-8b74-48d51edf7159&referral=devRels). 2. On a published site, install the app that you want to test along with the Usercentrics for Wix app. If you have a coupon, apply it. The site can't be a development site. 4. In the site dashboard, click **Apps > Usercentrics for Wix** to open the app. 5. Click **Website Scan**, and then initiate a scan. Scans take several minutes. Once complete, the **Website Scan** tab displays information for each detected component that uses cookies: - **Component**: The component's name. - **Type**: The component's type. - **Recommended category**: The cookie category the scan determined is most appropriate for this component. - **State**: Indicates whether the component requires your attention. You can click a component to see information. Note your components' **Recommended category** for the next step. 7. In the **Components** tab, each component has a **Category** label. This reflects the category defined by the app developer. Make sure that components from your app match the **Recommended category**. 8. Click **Legal Frameworks**, and then choose the framework settings you want to test. 9. To test that your components comply with visitors' accepted cookies, toggle **Show banner** on, and then visit the site from an incognito window. Select different combinations of cookies and verify that your app behaves properly for all combinations.
__Important:__ To comply with CCPA and similar regulations, your app must respects visitors' "Do Not Sell Data" opt-out choices. To make sure it does, [add a “Do Not Sell Data” link to your test site](https://support.wix.com/en/article/adding-a-do-not-sell-data-link-to-your-wix-site) and test out your app's behavior given visitors' choices.
## See also - [Wix's cookie policy](https://www.wix.com/about/cookie-policy) - [Common GDPR Compliance Issues](https://dev.wix.com/docs/build-apps/launch-your-app/legal-and-security/gdpr-compliance/common-gdpr-compliance-issues.md) --- > Portal Navigation: > > - Append `.md` to any URL under `https://dev.wix.com/docs/` to get its markdown version. > - Pages are either content pages (article or reference text) or menu pages (a list of links to child pages). > - To get a menu page, truncate any URL to a parent path and append `.md` (e.g. `https://dev.wix.com/docs/sdk.md`, `https://dev.wix.com/docs/sdk/core-modules.md`). > - Top-level index of all portals: https://dev.wix.com/docs/llms.txt > - Full concatenated docs: https://dev.wix.com/docs/llms-full.txt ## Resource: Wix Terms of Use Policy ## Article: Wix Terms of Use Policy ## Article Link: https://dev.wix.com/docs/build-apps/launch-your-app/legal-and-security/wix-terms-of-use-policy.md ## Article Content: # Wix Developers Terms of Use Policy
**Important:** These terms are effective from March 15, 2022.
These Wix Developers Terms of Use (the “**Developer** **Terms**”) apply to your (“**You**” or “**Developer**”) access to and use of the Wix Developers service available at: [https://dev.wix.com/apps](https://manage.wix.com/account/custom-apps) (the “**Wix Developers**”) to develop, test, share and support your applications and/or software services (the “**Apps**”).  The Wix Developers is a part of the platform and services operated and offered through the [www.wix.com](http://www.wix.com) website (the “**Wix Website**”) by Wix.com Ltd. (together with its affiliated companies, “**Wix**”). Wix and Developer may be referred to herein in each as a “Party” and collectively as the “Parties”. These Developer Terms and any accompanying documentation that applies to your use of the Wix Developers, together with Wix’s [Terms of Use](http://www.wix.com/About/Terms-Of-Use), Wix’s [Privacy Policy](https://www.wix.com/about/privacy) and [App Market Guidelines](https://dev.wix.com/docs/build-apps/launch-your-app/app-distribution/app-market-guidelines.md) (collectively, the “**Wix Terms**”), are incorporated herein by reference, and shall govern the relationship between Wix and Developer, in addition to these Developer Terms. By accessing and using the Wix Developers, You acknowledge that You understand and agree to be bound by all the provisions of the Wix Terms. Wix may change, amend or terminate these Developer Terms at any time. Your use of the Wix Developers after any change or amendment means You agree to the new Developer Terms. If You do not agree to the new Developer Terms or if we terminate these Developer Terms, You must stop using the Wix Developers. ## 1\. License to You **1.1.** The Wix Developers offers various tools and documentation, such as Wix application programming interfaces (“**APIs**”), software development kits ("**SDKs**"), webhooks, app components, scripts, and other related materials and documentation, whether tangible or intangible, in whatever form or medium that are made available by Wix at the Wix Developers or as otherwise provided to You (collectively, the “**Developer Tools**”). **1.2.** Subject to your ongoing compliance with the Wix Terms, Wix grants You a limited, non-exclusive, non-assignable, non-transferable and revocable license to use the Wix Developers and the Developer Tools to develop, test, share and support your Apps that interoperate or integrate with the Wix Website and any associated websites, products or services offered by Wix, solely in the manner described in these Developer Terms and the App Market Guidelines and in the technical documentation contained in the Wix Developers, subject to the Wix Terms. **1.3.** You acknowledge that Wix retains all worldwide right, title and interest in the Wix Developers and the Developer Tools, including without limitation all intellectual property rights therein. If You acquire any rights in the Wix Developers or the Developer Tools, by operation of law or otherwise, You, at no expense to Wix, hereby assign all such rights to Wix. You may use the Wix Developers and the Developer Tools only as expressly permitted in these Developer Terms. Violation of these Developer Terms may result in the suspension or termination of your use of the Wix Developers and the Developer Tools. ## 2\. Your License to Wix You agree that Wix may monitor use of the Developer Tools to ensure quality, improve Wix products and services, and verify your compliance with the Wix Terms. This monitoring may include Wix accessing and using your Apps, for example to identify security issues that could affect Wix or Wix’s users and/or visitors (collectively, the “**Users**”). You will not interfere with this monitoring. Wix may use any technical means to overcome such interference. Wix may suspend access to the Developer Tools by You or your Apps without notice if we reasonably believe that You are in violation of the Wix Terms. ## 3\. Your Representations and Warranties You represent, warrant and covenant that: **3.1.** Developer has the power and authority to fully perform all obligations hereunder; **3.2.** If You are entering into these Developer Terms on behalf of an entity, such as your employer, you represent that you have the legal authority to bind that entity; **3.3.** Developer is at least 18 years of age (or the age of majority in jurisdiction of residence); **3.4.** All information You have provided and will provide to Wix is true, accurate and complete; **3.5.** Your Apps and their contemplated use and your use of the Wix Developers and the Developer Tools do not and will not violate any agreements to which Developer is a party or of which Developer is otherwise aware; **3.6.** Your Apps and their contemplated use and your use of the Wix Developers and the Developer Tools comply with all applicable laws including, but not limited to: (a) data protection, privacy and other laws and regulations relating to collection, use and sharing of personal information by your Apps, (b) applicable telecommunications laws, and (c) any consumer, eCommerce, products, services and related laws, including without limitation laws relating to advertising or marketing; **3.7.** The Apps and their contemplated use and your use of the Wix Developers and the Developer Tools do not infringe or misappropriate any intellectual property or personal right of any third party; **3.8.** Wix’s exercise of the rights Developer grants Wix under these Developer Terms will not obligate Wix to pay any third party any amounts; **3.9.** Developer is not included in the SDN List and is not a national of or located in, or ordinarily residing in a country that is subject to comprehensive economic sanctions by the US government or the Israeli government. ## 4\. Your Use of the Developer Tools **4.1. Complying with Wix Terms**. Any use of the Developer Tools must comply with the Wix Terms (including the App Market Guidelines) and any other policies, requirements and documentation provided by Wix, which may be modified from time to time. **4.2. Use of Developer Tools**. You will only use the Developer Tools offered and made available to You by the Wix Developers. **4.3. Prohibited Actions**. When using the Developer Tools, You will (and will ensure that your employees, agents and service providers will): **a.** Only use the Developer Tools (including APIs and SDKs) offered by the Wix Developers to develop and operate your Apps, not for anything else, and not circumvent technological measures intended to prevent direct access; **b.** Never ask for more permissions than the ones required for your Apps to function as intended; determine the scope of your Apps permissions thoroughly before requesting permissions in the Wix Developers; **c.** Prior to accessing Users’ data Users must grant You access through a consent screen provided by Wix at the time the App is installed by a User. Any other access to or use of Users’ data by You is strictly prohibited and is a violation of these Developer Terms. **d.** Not make your Apps available for use in a manner that circumvents the need for the Users to permit access through the APIs; **e.** Request, use or make available any data obtained using the APIs outside any permissions expressly granted by the Users in connection with using your Apps; **f.** Restrict disclosure of the API Credentials (as defined below), or any part thereof, to your employees, agents and services providers, who must require access to your Apps in accordance with the Wix Terms; “**API Credentials**” means the credentials that allow You to make authenticated requests to the APIs; **g.** Use only your API Credentials to access the APIs; stay within the limits we set for API requests, and keep your Apps up to date with APIs changes; **h.** Not include code in any App which performs any operations not related to the services provided by the App; **i.** Not falsify or alter any unique referral identifier in, or assigned to your Apps, or otherwise obscure or alter the source of queries coming from your Apps to hide a violation of the Wix Terms; **j.** Not engage in any activity that interferes with, harms, damages, or accesses in an unauthorized manner the servers, networks, systems, data, applications or other properties or services of Wix or any third party (collectively, the “**Wix Systems**”); **k.** Not develop Apps that excessively burden or impose an unreasonable or disproportionately large load on the Wix Systems; **l.** Not modify, reverse engineer, disassemble, reconstruct, decompile, copy, or create derivative works of the Wix Developers or the Developer Tools, or any aspect or portion thereof; **m.** Not substantially replicate products or services offered by Wix, provided that each Party agrees that the other Party may develop and publish Apps that are similar to or otherwise compete with such party’s Apps; **n.** Not develop Apps whose primary purpose is to migrate the Users off of Wix; **o.** Not develop or distribute any App that has as its primary purpose the transfer, sharing, selling, disclosing or otherwise providing of Users’ data to any third party; **p.** Not use the Wix Developers or the Developer Tools, or any data obtained using the Developer Tools, to conduct performance testing or to identify, exploit or publicly disclose any potential security vulnerabilities; **q.** Not access or use the APIs to develop or distribute Apps in any way in furtherance of criminal, fraudulent, or other unlawful activity, or otherwise violate the Wix Terms; **r.** Not install malicious software, programs or viruses onto Users’ computers or websites, run any background services not required for the purpose of your Apps or use Users' websites or resources without permission (e.g., as part of botnet or crypto-mining); **s.** Not remove or destroy any copyright notices, proprietary markings or confidentiality notices placed upon, contained within or associated with the Developer Tools; **t.** Not use the Developer Tools in a way that could create, in Wix's sole discretion and judgment, an unreasonable risk to the Users from a security or data privacy perspective; and **u.** For more information, please refer to the [developer documentation](https://dev.wix.com/docs/build-apps.md). **4.4. Share URL Tool**. You may share your Apps via the Share Your App link generator feature (“**Share URL Tool**”). The Share URL Tool may be used either (i) for testing purposes and then must not be used for distributing your Apps as public apps and must not be installed by more than eighty (80) different Users per each App (“**Installation Limits**”); or (ii) as a way of sharing your Apps that you have elected not to be listed in the App Market and in such a case you shall obtain prior written approval of Wix to use Share URL Tool for this purpose and Wix may, at its sole discretion, provide You with the Share URL Tool with a customized number of Installation Limits that may be modified at any time at Wix’s sole discretion and/or Wix may terminate your use of such Share URL Tool anytime for any reason and/or make your use of the Share URL Tool subject to additional terms. **4.5. Developer Tools Limits**. Wix may set and enforce limits on your use of the Developer Tools (e.g., limiting the number of API requests that You may make or the number of Users You may serve), in our sole discretion. You may not, and may not attempt to, circumvent such limits. ## 5\. Compliance with Privacy Laws and Regulations. Without limiting your other representations, warranties and obligations under these Developer Terms, to the extent You perform any form of Processing activity with respect to or in connection with any Personal Data of Users (collectively, “**User Data**”), then You and your App(s) must comply with all applicable data privacy, data protection and data security laws and regulations (collectively, “**Data Privacy Laws**”), including, without limitation, any and all consent or notice requirements. **5.1.** The terms below shall have the following meanings: 5.1.1 “GDPR” means the Regulation (EU) 2016/679 of the European Parliament and of the Council of 27 April 2016 on the protection of natural persons with regard to the processing of personal data and on the free movement of such data, and repealing Directive 95/46/EC (General Data Protection Regulation). 5.1.2 “Data Subject”, “Personal Data”, “Processing” or “Process”, “Controller”, as used in this Section 5, shall have the meanings given in the GDPR. **5.2. Roles of the Parties**. The Parties agree that each will act as a Controller with respect to Personal Data of Users (excluding Wix Users’ website visitors data). It is acknowledged that each Party is a separate, independent Controller of Personal Data of Users (excluding Wix Users’ website visitors data). Personal Data of Users (excluding Wix Users’ website visitors data) will not be processed by the Parties as joint controllers as referred to in Article 26 of the GDPR. Each Party shall be independently responsible for compliance with its obligations as a Controller under applicable Data Privacy Laws. **5.3. Privacy Policy**. If an App performs any form of Processing activity with respect to any User Data, You must maintain and comply with a comprehensive privacy policy. You shall be responsible for informing all Users of such privacy policy, including by providing access to such policy through a provided link and, if requested, (ii) submitting such policy to Wix for display to Users in the App Market and ensuring that Wix is able to display notice of such privacy policy in accordance with this Agreement and all applicable laws or regulations. Such privacy policy must: (i) comply with all applicable laws and regulations; (ii) inform Users regarding the information collected by the App, and the manner in which such information is processed, used, stored, secured and disclosed, including the categories of third parties to which information may be disclosed; (iii) describe the process by which You notify its Users of material changes to such privacy policy; and (iv) describe the controls that Users have over the use and sharing of their information, and how they may access their information. **5.4. Security**. You shall implement appropriate technical and organizational measures to ensure an appropriate level of security of User Data, including, as appropriate and applicable, the measures referred to in Article 32(1) of the GDPR. **5.5. Personal Data Breach**. You shall promptly notify Wix within no later than 24 hours (or a shorter period of time if required under the applicable Data Privacy Laws) and the User of any actual or suspected data security compromise involving User Data. You shall promptly take steps to contain and control any unauthorized access to or misuse of User Data and continue to promptly provide information relating to the investigation and resolution of the data security compromise until Wix determines that the data security compromise has been resolved. **5.6. Third-Party Processors**. Each Party may transfer Personal Data to and otherwise interact with third-party data Processors. Each Party agrees that if it transfers Personal Data or otherwise interacts with a third-party data Processor, it will enter into a separate contractual arrangement with each such Processor to ensure compliance with its obligations under applicable Data Privacy Laws and hereunder. **5.7. Data Minimization**. You shall limit its User Data Processing activities only to the extent required to operate your App and to provide the App’s services to the Users. You are prohibited from Processing, either directly or through a processor, any User Data provided to You by Wix for the purposes of marketing, advertising, sales, personalization, except at the instruction of the User and in compliance with applicable Data Privacy Laws. You shall not include User Data provided to You by Wix in any product or service offered by You to third parties without the applicable User consent or in manner that constitutes a “sale” under the CCPA. **5.8. Data Subject Rights**. Each Party shall assist the other Party, to the extent reasonably requested, to comply with any of such other Party’s statutory obligations concerning requests to exercise Data Subject rights under applicable Data Privacy Laws. **5.9. Retention**; **Deletion or Return of Personal Data**. Subject to applicable Data Privacy Laws, each Party will retain Personal Data only for as long as necessary to satisfy the purposes for which it was provided to such Party, or to the extent required by applicable Data Privacy Laws. **5.10. Cookies:** In case You use cookies and/or other similar tracking technologies (collectively, “**Cookies**”) to track Wix Users or any Wix Users’ website visitors, You will place a clear and comprehensive notice explaining which Cookies are used by You, the type of information You may obtain from Wix Users or any Wix Users’ website visitors by use of such Cookies, and obtain appropriate consents. In addition, You will refer, or will make available, Wix Users and any of Wix Users’ website visitors to your privacy and Cookies policies. With respect to any Wix Users’ website that uses a Cookies management tool to enable such website’s visitors to select their Cookie preferences and manage their Cookies consents, App shall adhere to and comply with the Wix Users’ website visitors cookie preferences. ## 6\. Open Source Software Some of the software packages, libraries, or components required by or included in the Developer Tools are or may become licensed under an open source software license (“**Open Source Components**”). To the limited extent that the Open Source Components license expressly supersedes these Developer Terms, your use, reproduction and distribution of any such Open Source Components is governed by the terms of the applicable open source software license and not these Developer Terms. ## 7\. Changes to the Developer Tools; Beta Tools **7.1. Changes to the Developer Tools**. We may change or discontinue the availability of some or all of the Developer Tools at any time for any reason with or without notice. Such changes may include, without limitation, removing or limiting access to specific Developer Tools, requiring fees or setting and enforcing limits on your use of additions to the Developer Tools. We may also impose limits on certain features and services or restrict your access to some or all of the Developer Tools. We may release subsequent versions of the Developer Tools and require that You use those subsequent versions, at your sole cost and expense. **7.2. Beta Tools**. From time to time, Wix may, in its sole discretion, invite You to use, on a trial basis, pre-release or beta features that are in development and not yet available to the public (“**Beta Tools**”). You understand and agree that certain Beta Tools may still contain software bugs, suffer disruptions and not operate as intended or designated. Wix makes no representations or warranties that the Beta Tools will function. Such Beta Tools and all associated conversations and materials relating thereto will be considered Confidential Information of Wix and subject to the confidentiality provisions in these Developer Terms.  ## 8\. Feedback If you provide us with any suggestions, comments or other feedback relating to the Wix Developers and/or the Developer Tools (whether existing, suggested or contemplated), which is or may be subject to any intellectual property rights (“**Feedback**”), such Feedback shall be exclusively owned by Wix. By providing such Feedback to Wix, you acknowledge and agree that it may be used by Wix in order to: (i) further develop, customize and improve of the Wix products and services, (ii) provide ongoing assistance and technical support, (iii) contact You with general or personalized Wix-related notices and/or interview requests based on your Feedback or otherwise, (iv) facilitate, sponsor and offer certain promotions, and monitor performance, (v) to create aggregated statistical data and other aggregated and/or inferred information, which Wix may use to provide and improve its services, (vi) to enhance Wix data security and fraud prevention capabilities, and (vii) to comply with any applicable laws and regulations. Wix will treat any Feedback as non-confidential and non-proprietary. You will not submit any Feedback that you consider confidential or proprietary. ## 9\. Developer Responsibility for Apps **9.1. Content and Services**. You have, and shall have, the sole responsibility for (i) all content of your Apps and (ii) the development, operation, functionality and maintenance of your Apps and the provision of services to the Users. You acknowledge and agree that Wix has no responsibility or liability for any fault in your Apps or any harm that may result from their installation or use. You are solely responsible for any liability which may arise from a Users’ access to or use of your Apps, including: (a) the development, use, marketing or distribution of or access to your Apps, including support of your Apps; or (b) your access, use, distribution or storage of Users’ data. **9.2. Responding to Claims**. If Wix receives a claim from a third party concerning your Apps, Wix may refer such claim to You. You must respond to the claim within 24 hours, and take any and all actions required for your Apps to comply with the law. If You discover or are notified that your App violates the terms of these Developer Terms or the Wix Terms, You shall be obligated to immediately take the required actions to correct such violation. ## 10\. Confidentiality **10.1. Confidential Information** (as defined below) of Wix that Wix may disclose to Developer as a result of Developer’s use of the Wix Developers may be used by Developer solely for the purpose(s) of performing Developer’s obligations or exercising Developer’s rights under these Developer Terms. Developer will not disclose any Confidential Information to any individual, entity or other person, except to those of Developer's employees who require access to such Confidential Information to perform their obligations under these Developer Terms. For purposes hereof, “Confidential Information” shall mean any proprietary and nonpublic business, marketing, or technical information of Wix, including, without limitation, data, technology, know-how, inventions, discoveries, designs, processes, formulations, models, equipment, algorithms, software programs, interfaces, documents, specifications, information concerning research and development work, and/or trade and business secrets. Confidential Information will also include information disclosed by Wix which relates to current, planned or proposed products, marketing and business plans, forecasts, projections and analyses, financial information, and customer information. In all cases, Wix’s Confidential Information shall include any information that is marked “confidential” or “proprietary” or that given its nature should reasonably be considered to be Confidential Information. Confidential Information may also include Users’ information. For the avoidance of doubt, the APIs and API Credentials are deemed to be Wix’s Confidential Information. Confidential Information shall not include, however, information that Developer can show through documentary evidence is (i) already known to Developer, or is publicly available at the time of disclosure to Developer; (ii) becomes known to the general public after disclosure through no act or omission of the Developer in breach of these Developer Terms; (iii) is disclosed to Developer by a third party who is not, to the knowledge of Developer, in breach of an obligation of confidentiality; or (iv) was, is or will be independently developed by Developer without use of the Confidential Information. **10.2. Protection of Confidential Information** Developer shall at all times keep and hold such Confidential Information in the strictest confidence, and shall not use such Confidential Information for any purpose other than as may be reasonably necessary for the performance of Developer’s obligations or exercising Developer’s rights under these Developer Terms. **10.3. Unauthorized Use or Disclosure** Developer acknowledges that any unauthorized use or disclosure of any Confidential Information may cause irreparable damage to Wix or its licensors or users.  If an unauthorized use or disclosure occurs, Developer will promptly notify Wix and take, at Developer’s expense, all steps necessary to recover the Confidential Information and to prevent its subsequent unauthorized use or dissemination, including availing itself of actions for seizure and injunctive relief. If Developer fails to take these steps in a timely and adequate manner, Wix may take them in its own or Developer’s name and at Developer’s expense. ## 11\. Disclaimer, Limitation of Liability, and Defense of Claims **11.1. DISCLAIMER OF WARRANTY** WIX PROVIDES THE WIX DEVELOPERS AND THE DEVELOPER TOOLS “AS-IS,” “WITH ALL FAULTS,” AND “AS AVAILABLE.” DEVELOPER BEARS THE RISK OF USING THE WIX DEVELOPERS AND THE DEVELOPER TOOLS. TO THE EXTENT PERMITTED BY APPLICABLE LAW, WIX EXCLUDES ANY IMPLIED WARRANTIES OR CONDITIONS, INCLUDING THOSE OF PRODUCT LIABILITY, MERCHANTABILITY, FITNESS FOR A PARTICULAR PURPOSE, WORKMANLIKE EFFORT, AND NON-INFRINGEMENT, RELATING TO THE WIX DEVELOPERS AND THE DEVELOPER TOOLS. **11.2. LIMITATION OF LIABILITY** TO THE FULLEST EXTENT PERMITTED BY LAW IN EACH APPLICABLE JURISDICTION, WIX, ITS OFFICERS, DIRECTORS, SHAREHOLDERS, EMPLOYEES, AFFILIATES AND/OR AGENTS SHALL NOT BE LIABLE TO DEVELOPER FOR ANY DIRECT, INDIRECT, INCIDENTAL, SPECIAL, CONSEQUENTIAL, OR EXEMPLARY DAMAGES, INCLUDING DAMAGES FOR LOSSES OF PROFITS, GOODWILL, USE, DATA OR OTHER INTANGIBLE LOSSES RESULTING IN ANY WAY FROM THESE DEVELOPER TERMS, THE WIX’S PRODUCTS OR SERVICES, THE WIX DEVELOPERS, THE DEVELOPER TOOLS, OR DEVELOPER RELATIONSHIP WITH ANY USER, EVEN IF WIX HAS BEEN ADVISED OF THE POSSIBILITY OF SUCH DAMAGES. IN ANY EVENT, WIX’S LIABILITY TO DEVELOPER HEREUNDER FOR ANY REASON WILL BE LIMITED TO $100 USD. THIS LIMITATION APPLIES TO ALL CAUSES OF ACTION IN THE AGGREGATE, INCLUDING BREACH OF CONTRACT, BREACH OF WARRANTY, NEGLIGENCE, STRICT LIABILITY, MISREPRESENTATIONS, AND OTHER TORTS. **11.3. Defence of Claims** Developer will defend, indemnify and hold harmless Wix and the directors, officers, employees, subcontractors and agents thereof upon Wix’s first request with respect to any claim, demand, cause of action, debt or liability (including by paying any associated costs, losses, damages or expenses and attorneys’ fees), to the extent that it is based upon or arises out of: (i) your infringement, violation, or misappropriation of any proprietary or personal right of a third party, including without limitation infringement of third parties privacy rights; (ii) your alleged breach of any term of these Developer Terms or the Wix Terms; (iii) your gross negligence or wilful misconduct; or (iv) relating to the use of or inability to use of the App and/or performance, non-performance or improper performance of the App, including any product liability claims. Wix will notify Developer promptly in writing of the claim and, at Developer’s reasonable request, provide reasonable assistance in defending the claim. Developer will reimburse Wix for any reasonable out-of-pocket expenses incurred in providing such assistance. Developer will not make any settlement or compromise of a claim, or admit or stipulate any fault or liability on Wix part with respect to any claim covered by this section without Wix’s express, prior written consent. ## 12\. Proprietary Rights **12.1.** The Wix Developers and the Developer Tools, and all software, information, documentation, and any additional intellectual or other property used by or on behalf of Wix or otherwise related to the Wix Developers, together with all copyrights, trademarks, patents, trade secrets and any other proprietary rights inherent therein and related thereto (collectively, **“Wix Property”**) will be and remain the sole and exclusive property of Wix. To the extent, if any, that ownership of any Wix Property does not automatically vest in Wix by virtue of these Developer Terms, or otherwise, and vests in Developer, Developer hereby transfers and assigns to Wix, upon the creation thereof, all rights, title and interest Developer may have in and to such Wix Property (and waives any and all moral rights, as applicable), including the right to sue and recover for past, present and future violations thereof. **12.2.** Wix does not acquire ownership in your Apps, and by using the Wix Developers and/or the Developer Tools, You do not acquire ownership of any rights in the Wix Developers and/or the Developer Tools. ## 13\. Termination Access to the Wix Developers and the Developer Tools may be terminated or suspended by Wix at any time and at Wix’s sole discretion. Without limiting the foregoing, Wix may terminate your right to use the Wix Developers and the Developer Tools if you breach the Wix Terms or any documents incorporated by reference in the Wix Terms. ## 14\. Conflicting Provisions The terms of the Partner Agreement executed between Wix and Developer will prevail over any conflicting terms in these Developer Terms. --- > Portal Navigation: > > - Append `.md` to any URL under `https://dev.wix.com/docs/` to get its markdown version. > - Pages are either content pages (article or reference text) or menu pages (a list of links to child pages). > - To get a menu page, truncate any URL to a parent path and append `.md` (e.g. `https://dev.wix.com/docs/sdk.md`, `https://dev.wix.com/docs/sdk/core-modules.md`). > - Top-level index of all portals: https://dev.wix.com/docs/llms.txt > - Full concatenated docs: https://dev.wix.com/docs/llms-full.txt ## Resource: Wix App Market Partner Agreement ## Article: Wix App Market Partner Agreement ## Article Link: https://dev.wix.com/docs/build-apps/launch-your-app/legal-and-security/wix-app-market-partner-agreement.md ## Article Content: # Wix App Market Partner Agreement We recommend that you read through our entire [Partner Agreement](https://dev.wix.com/app-market-partner-agreement) before developing. This will help you to understand the terms and conditions of launching your app in the App Market. During app submission in your app's dashboard, you'll need to acknowledge your agreement to the Partner Agreement. --- > Portal Navigation: > > - Append `.md` to any URL under `https://dev.wix.com/docs/` to get its markdown version. > - Pages are either content pages (article or reference text) or menu pages (a list of links to child pages). > - To get a menu page, truncate any URL to a parent path and append `.md` (e.g. `https://dev.wix.com/docs/sdk.md`, `https://dev.wix.com/docs/sdk/core-modules.md`). > - Top-level index of all portals: https://dev.wix.com/docs/llms.txt > - Full concatenated docs: https://dev.wix.com/docs/llms-full.txt ## Resource: Security and Privacy Best Practice ## Article: Security and Privacy Best Practice ## Article Link: https://dev.wix.com/docs/build-apps/launch-your-app/legal-and-security/security-and-privacy-best-practice.md ## Article Content: # Security and Privacy Best Practice It's really important that you make sure that your app is secure and protects the user’s privacy. In this article we will go over some basic best practices. ## Verify the user’s identity On the server side, check that the signature was signed by Wix. To do this: 1. Take the data part of the instance parameter and sign it using your secret key. - Use base64url to decode the signature sent by Wix. - Make sure value of the signed instance parameter (from step a) equals the value of the decoded signature (from step b). If these values don’t match, then don’t display your app – show an error instead. 2. When Wix calls your app settings or internal dashboard component, check (on the server side) that the value of the permission property in the signed instance is ‘OWNER’. If it isn’t, display a ‘permission denied’ message instead of the app settings or dashboard content. 3. For each save action performed in the app settings or internal dashboard component: - Make sure you include the signed-instance parameter in the request. - Before you save the changes, validate that this instance exists and that its value is the same as in the original request (when the user first opened the app settings or dashboard component). - Check the signDate – if the date of the signature is older than a day, you should display a message saying ‘Please refresh to continue editing your App’. ## Support HTTPS We support HTTPS in the Wix Dashboard, Wix Editor, and live sites, so make sure your app supports HTTPS in all endpoints. Here are a few pointers to get you started: - Install an SSL certificate on your servers. Check out [Let’s Encrypt](https://letsencrypt.org/), a free and easy to use SSL certificate authority. - Verify that all links in your app use HTTPS – links to pages, images, JavaScript, CSS, etc. - Make sure all content in your app supports HTTPS, including third-party content like statistics and CDNs. ## Prevent XSS attacks Make sure that no one can enter malicious code anywhere in your app. Check your app’s internal dashboard, settings panel, and website component for all input fields where users/site visitors can enter text. For example: comment fields, forms, search fields, title/descriptions fields, etc. ## Keep data secure Encrypt all sensitive data, and don’t store sensitive data in cookies. ## Make payment settings private Do users enter sensitive data, such payment info, in your app? Show it to site owners only – and hide it from contributors. - Site owners create and own the site. - Contributors are invited by the site owners to edit and manage an existing website. Contributors have access to all apps on the site. What this means for you: 1. Check who’s logged in: When Wix calls your endpoint, check the app instance to see if the user ID (uid) is the same as the owner ID (siteOwnerId). 2. If it’s the site owner, show your endpoint as is: You’ll know it’s the site owner, if the uid is the same as the siteOwnerId. 3. If it’s a contributor, block payment settings: You’ll know it’s a contributor, if the uid is different from the siteOwnerId. Here’s what to show in the App Settings panel and internal Dashboard component. > Tip: > > Ready to test your app? Make sure to check your app as a site owner and as a contributor. ## Protect user data Since the EU rolled out their [data protection regulation known as GDPR](https://dev.wix.com/docs/build-apps/manage-your-app/legal-and-security/gdpr-and-data-protection.md), users may contact you about accessing, changing, or deleting any personal data your app stores about users or site visitors. You can handle each request manually as it comes in, or you can develop a faster way to handle these requests automatically. We suggest learning more about GDPR so that you can understand how it affects your app. If a Wix user (who is both the site owner and an EU citizen) contacts you about their personal data, here’s what we suggest: 1. Ask them to provide details as proof of identity: this is needed to protect their security. 2. Let users know you’re processing their request: send an email to let users know you’re handling their request. 3. Complete their request as soon as possible: Once you’ve proven the user’s identity, we suggesting handling their request as follows: - If users request to edit or delete their personal data, comply without undue delay. We suggest completing this request within a week (but no more than 30 days). - If users request to access their personal data, send it within 30 days. Always send data to the same email/channel that the user reached out to you in. ## Secure passwords Does your app ask users to register/connect an account? Keep users’ passwords secure and confidential, as follows: - **Use a trusted password hashing function**: Passwords must be hashed with a secure hashing function such as SHA-256 or bcrypt. Storing raw passwords is a violation of the GDPR. - **Add a long, unique random salt or nonce to each password you store**: By making each password unique and long enough, you limit the chances of [brute-force attacks](https://en.wikipedia.org/wiki/Brute-force_attack) (when an attacker tries to guess the password or password key). - **Handle forgotten passwords securely**: - Send an email with a reset link so the user can change their password. Don’t send the raw password in an email. - Set reset links to expire within 1-2 hours. - Make sure the endpoint used for reset links is protected from brute-force attacks. ## See also - [GDPR and data protection compliance](https://dev.wix.com/docs/build-apps/manage-your-app/legal-and-security/gdpr-and-data-protection.md) --- > Portal Navigation: > > - Append `.md` to any URL under `https://dev.wix.com/docs/` to get its markdown version. > - Pages are either content pages (article or reference text) or menu pages (a list of links to child pages). > - To get a menu page, truncate any URL to a parent path and append `.md` (e.g. `https://dev.wix.com/docs/sdk.md`, `https://dev.wix.com/docs/sdk/core-modules.md`). > - Top-level index of all portals: https://dev.wix.com/docs/llms.txt > - Full concatenated docs: https://dev.wix.com/docs/llms-full.txt ## Resource: About Consent Apps ## Article: About Consent Apps ## Article Link: https://dev.wix.com/docs/build-apps/launch-your-app/legal-and-security/about-consent-apps.md ## Article Content: # About Consent Apps This article is a comprehensive guide for consent app creators that explains everything you need to know about managing consent policies on Wix sites. Only 1 consent app should be installed on a site at a time to avoid conflicting changes to consent settings. Make sure you convey this to your users. Before you read this article, make sure you're familiar with the GDPR and the cookie consent requirements that Wix apps must implement. For information on these topics, see [About GDPR and Data Protection Compliance](https://dev.wix.com/docs/build-apps/launch-your-app/legal-and-security/gdpr-compliance/about-gdpr-and-data-protection.md). ## Managing consent policies There are 2 types of consent policies to be aware of when developing a consent app: - Visitor consent policies - Default consent policies ### Visitor consent policies Every visitor to a Wix site has their own visitor consent policy that defines what types of cookies and related technologies they allow. Visitor consent policies can be managed using the [Consent Policy API](https://dev.wix.com/docs/sdk/frontend-modules/window/consent-policy/introduction.md). ### Default consent policies When a visitor first arrives on the site, their visitor consent policy is configured to match the site's default consent policy. Every site's default consent policy initially allows all types of cookies and related technologies. You can manage a site's default consent policy using the [Site Properties API](https://dev.wix.com/docs/rest/business-management/site-properties/properties/introduction.md). ## Example use cases ### Managing visitor consent in a cookie consent banner You're developing an app that adds a cookie consent banner to a site. When the visitor chooses their consent settings in the banner, you call [`setConsentPolicy()`](https://dev.wix.com/docs/sdk/frontend-modules/window/consent-policy/set-consent-policy.md) to update their policy with their chosen settings. #### Implementation examples
Basic consent banner HTML fragment for an embedded script using the Consent Policy Manager API ```html ```
Basic consent banner React component using the Consent Policy Manager API ```jsx import React, { useState, useEffect } from 'react'; import { consentPolicy } from "@wix/site-window"; const ConsentBanner = () => { const [showBanner, setShowBanner] = useState(false); const [currentPolicy, setCurrentPolicy] = useState(null); useEffect(() => { checkConsentStatus(); }, []); const checkConsentStatus = async () => { try { const policy = await consentPolicy.getCurrentConsentPolicy(); setCurrentPolicy(policy); setShowBanner(policy.defaultPolicy); } catch (error) { console.error('Error checking consent status:', error); } }; const handleAcceptAll = async () => { try { await consentPolicy.setConsentPolicy({ essential: true, functional: true, analytics: true, advertising: true, dataToThirdParty: true }); setShowBanner(false); } catch (error) { console.error('Error accepting all:', error); } }; const handleMinimalConsent = async () => { try { await consentPolicy.setConsentPolicy({ essential: true, functional: false, analytics: false, advertising: false, dataToThirdParty: false }); setShowBanner(false); } catch (error) { console.error('Error applying minimal consent:', error); } }; if (!showBanner) return null; return (

Cookie preferences

We use cookies to enhance your experience. Please choose your preferences:

); }; export default ConsentBanner; ```
### Managing the default site consent policy in a cookie consent banner You're developing an app with a cookie consent banner. When a user installs and activates your app, you want to block all types of cookies and related technologies until the visitor specifically consents to them via your banner. To do this, you configure a dashboard page where the user can activate your banner. When they activate it, you call [`updateConsentPolicy()`](https://dev.wix.com/docs/sdk/backend-modules/business-tools/site-properties/update-consent-policy.md) with all `consentPolicy` types except `essential` set to `false`. If they deactivate your banner, you call `updateConsentPolicy()` again to reset the default site consent policy to allow all types. #### Implementation examples The following are examples of functions you could implement to enable or disable a consent banner, such as in a dashboard page in your app.
Javascript SDK backend implementation example ```javascript import { siteProperties } from '@wix/business-tools'; // When enabling the consent banner, reject optional cookies by default async function enableConsentBanner() { await siteProperties.updateConsentPolicy({ essential: true, functional: false, analytics: false, advertising: false, dataToThirdParty: false }); console.log('Default policy set to require explicit consent'); } // When disabling the consent banner allow cookies by default // Used when the user disables the banner in app settings async function disableConsentBanner() { await siteProperties.updateConsentPolicy({ essential: true, functional: true, analytics: true, advertising: true, dataToThirdParty: true }); console.log('Default policy set to allow cookies'); } ```
REST API implementation example ```javascript // When enabling the consent banner, reject optional cookies by default async function enableConsentBannerREST() { const response = await fetch('https://www.wixapis.com/site-properties/v4/properties/policy', { method: 'POST', headers: { 'Authorization': `Bearer ${accessToken}`, 'Content-Type': 'application/json' }, body: JSON.stringify({ consentPolicy: { essential: true, functional: false, analytics: false, advertising: false, dataToThirdParty: false } }) }); if (response.ok) { console.log('Default policy updated successfully'); } } // When disabling the consent banner allow cookies by default // Used when the user disables the banner in app settings async function disableConsentBannerREST() { const response = await fetch('https://www.wixapis.com/site-properties/v4/properties/policy', { method: 'POST', headers: { 'Authorization': `Bearer ${accessToken}`, 'Content-Type': 'application/json' }, body: JSON.stringify({ consentPolicy: { essential: true, functional: true, analytics: true, advertising: true, dataToThirdParty: true } }) }); if (response.ok) { console.log('Default policy updated successfully'); } } ```
## Request uninstallation handling from Wix When your app is uninstalled, the default site consent policy should be reset to its original state so that your app's changes don't continue to affect the user. Apps that modify the policy need to share their app ID with the Wix team for uninstall flow handling so that Wix can remove your settings. Use the [Wix Support Chatbot](https://www.wix.com/support-chatbot?nodeId=25a57397-ccf7-4376-8b74-48d51edf7159&referral=devRels) and mention: > "I have a cookie consent app that needs to be added to the list of apps that will update the default policy in case they're deleted." This ensures that when your app gets uninstalled, Wix automatically resets the default policy to allow all types so users don't get stuck with a restrictive policy and no way to manage consent. You may also want to manually revert these settings if users can disable the functionality of your app in your app settings. For example, if your app adds a cookie consent banner and the user turns it off. ## See also + [Consent Policy API - SDK](https://dev.wix.com/docs/sdk/frontend-modules/window/consent-policy/introduction.md) + [Site Properties API - SDK](https://dev.wix.com/docs/sdk/backend-modules/business-tools/site-properties/update-consent-policy.md) + [Site Properties API - REST](https://dev.wix.com/docs/rest/business-management/site-properties/properties/update-consent-policy.md) + [GDPR Compliance Guidelines](https://gdpr.eu/) + [CCPA Information](https://oag.ca.gov/privacy/ccpa) --- > Portal Navigation: > > - Append `.md` to any URL under `https://dev.wix.com/docs/` to get its markdown version. > - Pages are either content pages (article or reference text) or menu pages (a list of links to child pages). > - To get a menu page, truncate any URL to a parent path and append `.md` (e.g. `https://dev.wix.com/docs/sdk.md`, `https://dev.wix.com/docs/sdk/core-modules.md`). > - Top-level index of all portals: https://dev.wix.com/docs/llms.txt > - Full concatenated docs: https://dev.wix.com/docs/llms-full.txt ## Resource: About App Distribution ## Article: About App Submission ## Article Link: https://dev.wix.com/docs/build-apps/launch-your-app/app-distribution/about-app-distribution.md ## Article Content: # About App Distribution All apps that should be installed on customers' sites go through one of Wix's distribution flows: - Apps that should be listed on the Wix App Market are submitted to a review process. This is to check they meet our [requirements for performance, security, content, and more](https://dev.wix.com/docs/build-apps/launch-your-app/app-distribution/app-market-guidelines.md). Some of these checks are automated in the app dashboard, while others are assessed manually by a member of the Wix team. - Apps that should be shared directly with users should be distributed using an [install link](https://dev.wix.com/docs/build-apps/launch-your-app/app-distribution/install-your-app/about-app-installation.md), or installed directly on a site within your account from the app dashboard, without going through a review process.
__Important:__ Before you can distribute your app, make sure to [release a version](https://dev.wix.com/docs/build-apps/manage-your-app/versioning/release-a-new-app-version.md).
## Review for apps listed in the Wix App Market Apps that are (or are going to be) listed in the App Market need to be submitted for review when: - You want to get listed on the [Wix App Market](https://www.wix.com/app-market). - Your app was previously reviewed and declined. Other changes to your app require that you [release a new version](https://dev.wix.com/docs/build-apps/manage-your-app/versioning/release-a-new-app-version.md), and don't require review or approval. > **Note:** Wix may audit changes to apps retroactively to ensure continued compliance. ### Prepare your app for review It's important that your app is production-ready before you submit it for review and approval. This means checking and testing the app thoroughly. Learn more about [testing your app](https://dev.wix.com/docs/build-apps/launch-your-app/app-distribution/test-your-app/about-testing-your-app.md). ### The app review process A member of the Wix team will carefully review your app. They will communicate with you via the email address you provide in the Contact info tab. Wix aims to review apps within 15 business days. Review times may vary depending on factors such as review volume, app complexity, and the need for additional changes or clarifications. You can help speed up the process by making sure you've tested thoroughly prior to submission and being responsive to any feedback the team sends. ### App submission statuses You can view your app's submission status in the **Versions** tab of your app's dashboard. | Status | Description | | -------- | ------- | | DRAFT | You're working on app development, and haven't submitted it for review. | | SUBMITTED | Once you submit your app for review you won't be able to make further changes to the 'Build Your App' and 'Publish Your App' sections of the app dashboard. | | IN REVIEW | A member of the team has begun to review your app. You can't make changes during this stage. | | DECLINED | If your app is declined, you'll receive an email with a link to a ticket containing feedback. Fix the issues and resubmit. | | PUBLISHED | Your app is now available to the public on the Wix App Market. | | ARCHIVED | Your old app version has been archived once a new one is published. | ## Distribution for unlisted apps You can distribute your app that won't be listed in the Wix App Market from the **Distribute App** button on your app dashboard's homepage. ![Distribute app page](https://wixmp-833713b177cebf373f611808.wixmp.com/images/399366e5359b03cdcf11e1da24bf1cf8.png) ## See also - [Submit your first app version for review](https://dev.wix.com/docs/build-apps/launch-your-app/app-distribution/submit-your-first-app-version.md) - [About app versioning](https://dev.wix.com/docs/build-apps/manage-your-app/versioning/about-app-versioning.md) - [About App Installation](https://dev.wix.com/docs/build-apps/launch-your-app/app-distribution/install-your-app/about-app-installation.md) - [About App Testing](https://dev.wix.com/docs/build-apps/launch-your-app/app-distribution/test-your-app/about-testing-your-app.md) --- > Portal Navigation: > > - Append `.md` to any URL under `https://dev.wix.com/docs/` to get its markdown version. > - Pages are either content pages (article or reference text) or menu pages (a list of links to child pages). > - To get a menu page, truncate any URL to a parent path and append `.md` (e.g. `https://dev.wix.com/docs/sdk.md`, `https://dev.wix.com/docs/sdk/core-modules.md`). > - Top-level index of all portals: https://dev.wix.com/docs/llms.txt > - Full concatenated docs: https://dev.wix.com/docs/llms-full.txt ## Resource: Add Security and Privacy Information ## Article: Add Security and Privacy Information ## Article Link: https://dev.wix.com/docs/build-apps/launch-your-app/app-distribution/add-security-and-privacy-information.md ## Article Content: # Add Security and Privacy Information Wix takes the security and privacy of user data seriously. Each time you submit an app for review, we ask you to answer a few questions on how you store, process, and secure user data you collect. You must complete the Security & Privacy form before submitting a new app, each time changes are made and you resubmit the app, or in cases where the app was published without the completion of this form. To add your security and privacy information: 1. Go to the **Security & Privacy** page in your app's dashboard. 2. Answer all questions in the form. Question example, "Is access to Wix user data through your networks, operating systems and databases configured to prevent unauthorised access and changes?" 3. Check the box at the bottom confirming that your answers are accurate. 4. Click **Save**. ## See also - [Create an App Market listing](https://dev.wix.com/docs/build-apps/launch-your-app/market-listing/about-market-listings.md) - [GDPR and data protection](https://dev.wix.com/docs/build-apps/manage-your-app/legal-and-security/gdpr-and-data-protection.md) --- > Portal Navigation: > > - Append `.md` to any URL under `https://dev.wix.com/docs/` to get its markdown version. > - Pages are either content pages (article or reference text) or menu pages (a list of links to child pages). > - To get a menu page, truncate any URL to a parent path and append `.md` (e.g. `https://dev.wix.com/docs/sdk.md`, `https://dev.wix.com/docs/sdk/core-modules.md`). > - Top-level index of all portals: https://dev.wix.com/docs/llms.txt > - Full concatenated docs: https://dev.wix.com/docs/llms-full.txt ## Resource: Submit Your First App Version ## Article: Submit Your First App Version ## Article Link: https://dev.wix.com/docs/build-apps/launch-your-app/app-distribution/submit-your-first-app-version.md ## Article Content: # Submit Your First App Version for Review If you'd like to list your app in the Wix App Market, you can submit the app for review once you’ve built, configured, and tested the app. For a walkthrough of the App Market publishing flow, watch the video tutorial:
**Important:** Wix aims to review apps within 15 business days. Review times may vary depending on factors such as review volume, app complexity, and the need for additional changes or clarifications. During this time, your app is locked and you can’t make any changes.
## Before you submit To help ensure a smooth and timely review, we recommend that you: - Thoroughly [test your app](https://dev.wix.com/docs/build-apps/launch-your-app/app-distribution/test-your-app/test-your-app-on-a-premium-site.md) before submission, including edge cases. - Make sure your app handles errors gracefully so they don't break core flows. - For paid apps, set up [pricing and billing](https://dev.wix.com/docs/build-apps/launch-your-app/pricing-and-billing/about-monetizing-your-app.md) and implement the logic to manage plan access. - Ensure your app complies with the [Wix App Market guidelines](https://dev.wix.com/docs/build-apps/launch-your-app/app-distribution/app-market-guidelines.md). - Verify all required fields and assets in your [App Market listing](https://dev.wix.com/docs/build-apps/launch-your-app/market-listing/about-market-listings.md). - Use the [App Market review skill](https://github.com/wix/skills/blob/main/skills/wix-app/references/APP_MARKET_REVIEW.md) to audit your app against technical review requirements before submitting. > **Note**: To avoid delays, we publish apps with outstanding App Market listing issues. For example, images that don’t meet our requirements. However, we won’t list your app in our categories until the issues are resolved, meaning you’re less likely to be discovered by users. ## Submit your app To submit your app: 1. Go to **Submit App** in your app's dashboard. 2. Open the **Submission Summary** and complete any outstanding items: - **Blockers**: These items are critical and must be fixed before you submit your app. - **Recommendations**: These items are highly recommended to support your app's success but won't prevent you submitting your app. 3. When complete, click **Submit App**. 4. Use the submission form's note section to give the reviewer everything they need to test your app: - Your demo credentials (username/email and password) with full access to your app for the duration of the review. - A quick outline of the installation flow. - Accessibility or compatibility issues (for example, if it’s geo-locked or restricted in another way). If a Wix team member won't be able to access any features, please provide a link to a video showcasing that functionality. - Attach screenshots that show us how your app uses its relevant permissions. - Confirmation that you're authorized to use specific trademarks, images, logos that are displayed in the app, include all relevant documentation proving your authorization. 6. Click **Submit**. ## Track your review status Once your app is submitted for review, you can follow its review status in the **Custom Apps** page, or the sidebar of your app's dashboard below your app's name. ## See also - [About app versioning](https://dev.wix.com/docs/build-apps/manage-your-app/versioning/about-app-versioning.md) - [Release a new app version](https://dev.wix.com/docs/build-apps/manage-your-app/versioning/release-a-new-app-version.md) --- > Portal Navigation: > > - Append `.md` to any URL under `https://dev.wix.com/docs/` to get its markdown version. > - Pages are either content pages (article or reference text) or menu pages (a list of links to child pages). > - To get a menu page, truncate any URL to a parent path and append `.md` (e.g. `https://dev.wix.com/docs/sdk.md`, `https://dev.wix.com/docs/sdk/core-modules.md`). > - Top-level index of all portals: https://dev.wix.com/docs/llms.txt > - Full concatenated docs: https://dev.wix.com/docs/llms-full.txt ## Resource: Common Reasons for App Rejection ## Article: About App Review Decline Reasons ## Article Link: https://dev.wix.com/docs/build-apps/launch-your-app/app-distribution/common-reasons-for-app-rejection.md ## Article Content: # Common Reasons for App Rejection When you submit your app to the Wix App Market, the review team checks it against a set of technical, UX, and marketing requirements. If your app doesn't meet these, it's rejected and you receive feedback explaining what needs to change. This article covers the most common reasons apps are rejected, organized by category, so you can address them before you submit, or fix them quickly if you get a rejection notice. > **Note:** Your app is locked during the review period and can't be edited until the review is complete.
__Tip:__ Before you submit, run through the [App Checks and Testing Guide](https://dev.wix.com/docs/build-apps/launch-your-app/app-distribution/test-your-app/app-checks-and-testing-guide.md) and make sure your app aligns with the [App Market Guidelines](https://dev.wix.com/docs/build-apps/launch-your-app/app-distribution/app-market-guidelines.md). You can also use the [App Market review skill](https://github.com/wix/skills/blob/main/skills/wix-app/references/APP_MARKET_REVIEW.md) to audit your app against technical review requirements before submitting.
## Bugs preventing core functionality Bugs preventing core functionality is the most common rejection reason. If the review team can't use your app's core features, your submission is rejected immediately. Common issues include: - Buttons, forms, or interactive elements that don't respond or throw errors. - Widgets that appear distorted, blank, or fail to load in the editor or on the live site. - Dashboard pages that don't update after actions (for example, adding or deleting an item requires a manual page refresh). - Features that get stuck on loading indefinitely. ### How to avoid it Test your app thoroughly on a real Wix site before submitting, including after installation, after upgrading to a paid plan, and on the published live site. Wix offers [free Premium development sites](https://dev.wix.com/docs/build-apps/launch-your-app/app-distribution/test-your-app/test-your-app-on-a-premium-site.md) for exactly this purpose. Make sure every flow a user could take actually works end to end. ## Listing and behavior mismatch Even if your app doesn't crash, it may still be rejected if it doesn't behave the way your listing says it does. The review team reads your listing description and tests the app against it. Common issues include: - Features listed in your description or App Market listing are missing or partially implemented. - Functional flows that work differently than documented (for example, a form that submits but doesn't save data correctly). - Missing in-app navigation or guidance, such as a settings panel with no instructions for users who need to complete setup steps. ### How to avoid it Align your app's actual behavior with what your listing promises. If a feature is not yet ready, don't include it in your description. If your app requires specific setup steps, make them visible in the app. Don't rely on users finding external docs on their own. ## Unclear app behavior and UX The review team assesses whether your app is intuitive to use. An app can be fully functional but still get rejected if users would find it confusing. Common issues include: - No clear indication of what the app does when first installed. - Missing onboarding or tutorial for first-time users, especially for complex setup flows. - Text, banners, or messages that are confusing, incorrect, or irrelevant to the current user state (for example, showing a message meant for the Wix user to site visitors). ### How to avoid it Follow [Wix's UX and UI best practices](https://dev.wix.com/docs/build-apps/develop-your-app/design/ux-and-ui-best-practices.md). Test your app as a first-time user would. What do they see on first install? Is it clear what to do next? If your app requires setup, prompt users to complete it. ## App profile media Your app's profile media is one of the first things users see in the App Market. Low-quality or non-compliant media is a very common rejection reason. Common issues include: - Images stretched or shrunk to fit the resolution requirements instead of being created to the correct dimensions. - Screenshots that show login or splash screens, plain text, or low-quality content rather than the app in use. ### How to avoid it Follow the full media specifications in [Add Your Media](https://dev.wix.com/docs/build-apps/launch-your-app/market-listing/add-your-media.md). Aim for 5–6 high-quality images that show your app working on a real Wix site. Use images to tell a story: show key features progressively from one image to the next. ## Market listing: App info Your App Market listing text needs to be accurate, complete, and professionally written. The review team checks that links work, the description matches the app, and the content meets quality standards. Common issues include: - Demo site URL pointing to a broken or empty page. A demo site is required when your app has a visual component on the live site. - Description written as a step-by-step guide or feature list instead of prose. - Spelling or grammar issues. - Missing or broken links to terms and conditions. - App name or description referencing brands you're not affiliated with. ### How to avoid it Review [Add Your App Info](https://dev.wix.com/docs/build-apps/launch-your-app/market-listing/add-your-app-info.md) before submission. Make sure your demo site is live, your description reads naturally, and all links work. Write your description in fluent paragraphs. The features section handles bullet points. ## App audience and required products If your app integrates with a specific Wix business solution (such as Wix Stores or Wix Bookings), you need to configure your app's audience requirements so it's only installed on compatible sites. Misconfiguring this is a common reason for rejection. Common issues include: - App requires Wix Stores but doesn't list it as an installation prerequisite. - App is listed as available worldwide but only supports specific countries. ### How to avoid it Read [Add Your App Audience Info](https://dev.wix.com/docs/build-apps/launch-your-app/market-listing/add-your-app-audience-info.md). Only require the products your app actually depends on. To verify your configuration, install your app on a site that doesn't have the required product. If configured correctly, Wix prompts the user to install the required product before your app can be installed. ## Pricing and business model Many pricing-related rejections come down to incomplete setup or a business model that needs clarification before the team can approve the app. Common issues include: - Pricing page not set up, or showing plans with no descriptions of what's included. - Pricing plans missing benefit descriptions or not clearly differentiated between tiers. - Business model set to "Free" when the app actually charges users through a mechanism not disclosed in the listing. - External pricing page is broken or leads to an error. - App uses external billing (for example, shipping fees or 3rd-party payments) without being set up as a [Partner Billed App](https://dev.wix.com/docs/build-apps/launch-your-app/pricing-and-billing/report-revenue-for-partner-billed-apps.md). ### How to avoid it Set up your pricing carefully before submitting. Use a Wix pricing page and make sure each plan has a clear name, description, and set of benefits. If your app uses external billing, configure it as a [Partner Billed App](https://dev.wix.com/docs/build-apps/launch-your-app/pricing-and-billing/report-revenue-for-partner-billed-apps.md) before submitting. ## Premium upgrade flow If your app has paid plans, you're responsible for implementing the logic that restricts features for free users and guides them toward upgrading. The review team tests this flow, and it's a frequent source of rejections. Common issues include: - No upgrade button or call-to-action in the dashboard or editor. - Free users can access paid features without upgrading. - After upgrading, the app doesn't recognize the upgrade and still shows the free-tier experience. - Site visitors see upgrade prompts or owner-facing messages on the live site, when those should only appear in the editor or dashboard. - Widgets that appear on the live site for non-upgraded users when they're meant to be hidden. ### How to avoid it Implement plan detection using the [app instance](https://dev.wix.com/docs/build-apps/develop-your-app/access/app-instances/about-app-instances.md) and enforce feature restrictions in your code. Add an upgrade CTA wherever a free user would hit a paywall. Test the full upgrade flow: install as a free user, upgrade, and verify the experience changes as expected. See [Test Your App's Upgrade Process](https://dev.wix.com/docs/build-apps/launch-your-app/app-distribution/test-your-app/test-your-app-s-upgrade-process.md) for step-by-step guidance. ## Installation failures If the review team can't successfully install your app, the review ends there. Common issues include: - After installation, the app shows an error or lands on a broken page. - No way to create a new account if accounts are required. - Login or session issues when switching between different Wix sites during testing. ### How to avoid it Test your full installation flow on a fresh Wix site before submitting. Think about how a first-time user with no prior knowledge of your app would experience the installation flow. ## Unreleased app profile version If you've made changes to your app profile but haven't released a new version, the review team sees an incomplete or outdated profile. Common issues include: - Profile changes saved as a draft but not released before submission. ### How to avoid it Before submitting, make sure you've released a new version that includes all your latest changes. Check that the version status in the app dashboard shows **Released**, not **Draft**. ## See also - [App Market Guidelines](https://dev.wix.com/docs/build-apps/launch-your-app/app-distribution/app-market-guidelines.md) - [App Checks and Testing Guide](https://dev.wix.com/docs/build-apps/launch-your-app/app-distribution/test-your-app/app-checks-and-testing-guide.md) - [About App Distribution](https://dev.wix.com/docs/build-apps/launch-your-app/app-distribution/about-app-distribution.md) - [About Market Listings](https://dev.wix.com/docs/build-apps/launch-your-app/market-listing/about-market-listings.md) - [About Pricing Plans and Business Models](https://dev.wix.com/docs/build-apps/launch-your-app/pricing-and-billing/about-pricing-plans-and-business-models.md) - [Submit Your First App Version](https://dev.wix.com/docs/build-apps/launch-your-app/app-distribution/submit-your-first-app-version.md) - [Test Your App's Upgrade Process](https://dev.wix.com/docs/build-apps/launch-your-app/app-distribution/test-your-app/test-your-app-s-upgrade-process.md) --- > Portal Navigation: > > - Append `.md` to any URL under `https://dev.wix.com/docs/` to get its markdown version. > - Pages are either content pages (article or reference text) or menu pages (a list of links to child pages). > - To get a menu page, truncate any URL to a parent path and append `.md` (e.g. `https://dev.wix.com/docs/sdk.md`, `https://dev.wix.com/docs/sdk/core-modules.md`). > - Top-level index of all portals: https://dev.wix.com/docs/llms.txt > - Full concatenated docs: https://dev.wix.com/docs/llms-full.txt ## Resource: App Market Guidelines ## Article: App Market Guidelines ## Article Link: https://dev.wix.com/docs/build-apps/launch-your-app/app-distribution/app-market-guidelines.md ## Article Content: # Wix App Market Guidelines Our guidelines are written with Wix users and their site visitors/customers in mind. Following our guidelines won't just improve the chances of your app being accepted into the App Market - it will also improve the likelihood that your app will be successful and popular. Keep in mind that these guidelines are not exhaustive. They are subject to change and you'll need to comply with new guidelines as they are updated. These guidelines come in addition to the terms of the [App Market Partner Agreement](https://dev.wix.com/docs/build-apps/manage-your-app/legal-and-security/wix-app-market-partner-agreement.md), Wix’s general [Terms of Use](http://www.wix.com/About/Terms-Of-Use) and [Privacy Policy](https://www.wix.com/about/privacy) (collectively: “Wix’s Terms”). In the case of an inconsistency between these guidelines and Wix’s Terms, Wix’s Terms shall prevail. We hope that these guidelines will help you easily create, submit, and manage successful apps in the Wix App Market. You can [contact us](https://www.wix.com/support-chatbot?nodeId=25a57397-ccf7-4376-8b74-48d51edf7159&referral=devRels) at any time about these guidelines, or with any other questions. ## General ### App Submission * Your app must integrate with Wix websites or with a Wix service. * When submitting multiple apps, make sure they’re clearly different from one another. * Tailor your app to Wix users. (If you have an existing app on other platforms, change it to suit Wix-specific workflows.) * Wix will review your app both before it is added to the App Market, and as we deem relevant once your app is live. When you submit your app for review, provide an active demo account, login information and any resources that may be needed. Keep this demo account active as long as your app is in the Wix App Market. * For more subtle features and in-app purchases, include detailed explanations in the App Review notes, as well as supporting documentation where needed. If a part of your app is inaccessible (e.g., if it’s geo-locked or restricted in another way), provide resources necessary to fully review the functionality.    * Address any issues we bring up during the review process as soon as you can, and always within the allocated time-frame. If we request corrections, don't make other, unrelated changes – this will complicate the review process, possibly leading to further delays and even rejection. * The Wix App Market is meant for public apps only. Don't submit private apps designed only for specific clients, friends or family use. * Basic setup features must be free, including color, font and text customization, site SEO,  accessibility, security and GDPR settings. ### User Reviews  * Don’t force users to rate, review, share or follow the app on social media, download other apps, or take other similar actions in order to use the app, access functionality or content. * Don't prompt users to give you a review in exchange for a discount/free trial/gift card/etc. * Don't write or solicit others to write fake reviews. All fake reviews will be removed and we will consider additional steps against those who generate such reviews. ### Promotion/Redirection * Don't promote, or redirect users to, other distribution platforms. ### Support and Customer Relationship Management * You should support all users – both paying and free – for the lifetime of your app. * Include an active customer support email address (a current email address that is regularly maintained and monitored), so that users can easily get support when they need it.  * Include clear documentation and instructions specific to Wix in your app. * Treat Wix users with respect when responding to their comments, keep your responses targeted and don't include personal information, spam, or marketing. Also keep in mind that Wix App Market customer reviews are an important part of the app experience and will influence your app's overall success. ### Cause For Immediate Rejection * If we find your app to be defamatory, libelous, obscene, harassing, threatening, incendiary, abusive, racist, offensive, deceptive or fraudulent, encouraging of criminal or harmful conduct, or otherwise violating the rights of Wix or any Third party (including any intellectual property, privacy, or contractual rights), it will be rejected immediately. * Keep all dealings with Wix legal and fair. If we find that you have engaged in any unfair, illegal or unethical behavior, e.g. cheating the review process, stealing user data, copying someone else’s work, manipulating ratings, etc, your app(s) will be removed from the Wix App Market and you’ll be banned from Wix Developers. * You are responsible for ensuring that all aspects of your app are fully compliant with our guidelines. This includes the use of ad networks, analytics services, third-party SDKs, etc. ## Payment and pricing Apps that include any type of pricing model, including a subscription service, must follow these guidelines: ### Accepting Payments * All apps that collect money for any purpose (including donations) must implement the Wix Billing System, unless we have notified you that we are willing to make an exception. ### Pricing * Your app's pricing must accurately reflect the total cost to the user. If integration is free but a service costs money, the price listing must list the service's price. * If your app includes in-app purchases, make sure the description, screenshots and previews indicate which features require purchase. * Your app's pricing is up to you. However, Wix won’t distribute apps or in-app purchase items that are clearly overpriced, and such behavior may lead to rejection. * Proper mechanisms for unlocking content and functionality are discussed in the [Wix Developers documentation](https://dev.wix.com/docs/build-apps/launch-your-app/pricing-and-billing/identify-and-manage-app-users.md). Don't use your own mechanisms to unlock content or functionality, such as license keys, QR codes, etc. * Apps may not include buttons, external links, or other calls to action that direct customers to purchasing mechanisms other than the Wix Billing System. Note: If you're a Wix Partner that offers extra professional services, you can link to your Wix Marketplace profile.  * If a user purchases credits via in-app purchase, these should not expire.  * If you raise the app's price or change the payment or subscription model, the change can only apply to new users. Every user who paid for the app must retain full access to the functionality they paid for, e.g., customers who have already paid for a premium version of your app must have continued access to the full app if you introduce a subscription model for new customers, even if you added new functionality since they upgraded. ## App experience Use these guidelines to enhance your app experience and build strong relationships with your users: ### Design and Customization * Display demo data (fictional example information) when your app is first added to a Wix site - no Lorem ipsum texts. * Use fictional account information in demos and placeholder content. * Open new windows as Wix popup or modal windows within the website component. Don't use browser native popups, except as required for OAuth. ### Functionality * If you offer more than one app in the Wix App Market, each one must work as a standalone. It should not be possible to use one app to configure another. ### User Experience * Make your app's installation, configuration, and management flows intuitive and easy to follow. * Make your app's functionality clear. Don't include any hidden or undocumented features, and don't market your app as including content or services it doesn't actually have. * All plugin extension content must directly relate to the core functionality of the host app. The content must also be appropriately contextualized within its intended placement. Any deviation from this policy is not permitted. ### Advertising, Credits and Third-Party Data * Don't build any distracting or annoying behavior into your app. Don't use JavaScript alert/confirmation boxes.  * Don't display ads to Wix site owners, including ads for your product, third party ads, and any info that isn’t relevant to Wix users. However, you may promote other apps you developed within your app in an unobtrusive way. See our guidelines on how to [Cross-Promote Your Apps](https://dev.wix.com/docs/build-apps/launch-your-app/app-promotion/cross-promote-your-apps.md). * Don't display ads to Wix site visitors, including ads for your product and "powered by" watermarks. If displaying ads to site visitors is your app's sole purpose, you must obtain all required permits and licenses for displaying these ads. ## Technical These specifications and recommendations will help you get your app to the technical level our users expect: ### Loading Times * Optimize your app so that it has fast start up (400ms or faster) and load times. ### Errors and Bugs * QA your app before you submit it for review, and follow our [testing guidelines](https://dev.wix.com/docs/build-apps/launch-your-app/app-submission/app-checks-and-testing-guide.md). Submissions with errors and bugs will be rejected. ### Multiple App Iterations * Differentiate between each of your website components in the same site, as users can add more than one and you must display the relevant settings panel, enabling users to customize each one separately. * If a user copies their site, the app content and settings should be copied as well. Don't just install a default version containing default data. ### Mobility and Accessibility * Make sure your app is responsive and optimized for all screens sizes, and every device. * Website components must be accessible to all site visitors – including those with disabilities. * Your dashboard app must be full screen (width of at least 1200px). If your app is larger than 1200px, the design should be responsive, to accommodate smaller screens. ### SEO * If your app has a widget component, don’t use ```

``` tags in its HTML document. * If your app will have content that is meaningful for SEO, optimize your app for SEO according to the industry best practices. ### Front and Backend * Include all customization options necessary for accessibility in the app settings panel, e.g., if users add images to your app, you must allow them to customize alt-text for each image from the settings panel. * UTF-8-encode your app to allow users and site visitors to enter text in different languages.  ## Security ### App Accessibility and User Security * Never ask for more permissions than the ones required for your app to function as intended. Determine the scope of your app permissions thoroughly before requesting permissions in your app's dashboard. * As per OWASP, your security must include stored salted password hashes, not actual passwords. * Protect your app against cross-site request forgery attacks (CSRF), cross-site scripting attacks (XSS) and other security vulnerabilities. * Your app must be served over HTTPS using a valid SSL certificate. * Don't force users to log in or request a user's personal information unless it is directly relevant to the core functionality of your app or if it’s required by law (pulling basic profile information, sharing to social networks, or inviting friends to use the app are NOT considered core app functionality). Users must also be able to revoke their social media account credentials and disable access to data between the app and social networks from within the app. * Secure and verify each user’s identity (Instance ID). * Keep data secure. Make sure all sensitive data is encrypted - and not stored in cookies. ### App Dashboards * If your app has an external dashboard, it must also include an interface for users to interact with. Once users authenticate the app through OAuth or approve app changes, direct them to this interface. ### Payments & Financial Security * Only allow site owners to see payments and other sensitive information. Site owners may invite contributors to access their website, including installed apps, but these contributors should not have access to sensitive information such as payments. * Your app must keep its app secret key and OAuth refresh tokens secure. * All apps that collect financial data for payments must comply with applicable laws as well as the Payment Card Industry Data Security Standards ("PCI-DSS") and the Payment Application Data Security Standards ("PA-DSS"). ### Immediate Rejection * Your app will be rejected if it attempts to install malicious software, programs or viruses onto users’ computers or websites, run any background services not required for the purpose of the app or use users' websites or resources without permission (e.g., as part of botnet or crypto-mining). ## Legal/Privacy Adhere to these legal and privacy guidelines, in addition to all relevant laws: ### General * Your app must comply with the terms of the Partner Agreement and Wix's terms of use and not expose users to legal problems or risk. * You may not use the app with bad faith, for any malicious or illegal purpose or exploit or try to exploit loopholes in these guidelines or in Wix’s terms of use or privacy policy. ### Content * Conform to the Wix Brand Guidelines. * Don't include illegal content or infringe any of Wix's or any third party's rights.  * Don’t include unauthorized trademarked names or branded content anywhere in your app. This includes images, names, description text, and content/file names which you don't own or hold the proper licence to. Any such unauthorized content will be rejected. * Don't imply that you're an individual, public figure or company/organization unless you have the (legal) right to do so. {You'll need to provide authorization on request (e.g., a contract or legal agreement).} * If your app uses, accesses, monetizes access to, or displays content from third party services, make sure you're allowed to do so under the service’s terms of use. You'll also need to provide authorization on request. * Don't facilitate illegal file sharing or allow anyone to save, copy, extract, convert, download or transmit media from third party sources (e.g. Apple Music, YouTube, etc.) without explicit authorization and licensing from those sources (you'll need to provide documentation on request), or from Wix. Keep in mind that streaming audio/video content may also violate Wix's Terms of Use. ### User Information and Data * If your app requires user data, make sure that the collection, storage, and processing of this data is transparent and in compliance with applicable law. * Your app must include a [privacy policy](https://support.wix.com/en/article/creating-a-privacy-policy) and [Terms of Use](https://support.wix.com/en/article/creating-a-terms-and-conditions-policy).  * Your app must comply with site visitor's [consent policies](https://dev.wix.com/docs/build-apps/manage-your-app/legal-and-security/about-the-cookie-consent-policy.md). * If your app may be used by users in the European Union, your app should [comply with GDPR](https://dev.wix.com/docs/build-apps/manage-your-app/legal-and-security/gdpr-and-data-protection.md). * Don't send unsolicited messages to Wix users. If your app runs marketing or advertising campaigns, you may only send emails to users who have fully opted-in and expressly consented to receive emails from you. You must allow the users to opt-out from receiving your messages. Don't send any messages to a recipient who has opted-out. * Any messages you send, for any purpose, via email, SMS or other means, must comply with applicable law. * Don’t cause Wix to violate any laws or any third party rights, through any act or omission, including but not limited to privacy rights. * Don't collect user-of-user data for your own use. You may not use information from CRM, Orders, or other APIs that access user-of user-data, to build a contact database for your own use, or to sell/distribute to third parties. ## Marketing Use these guidelines when creating promotional materials for your app: ### General  * Our review team may edit any of your app's marketing material if it doesn't conform to our rules or to correct spelling/grammar. This includes your app’s title, category, description text and keywords. We'll never edit your app’s price without your knowledge. * Make sure your app is focused on the Wix experience. Don’t include names, icons, or imagery of other platforms in your app, unless there is specific, approved functionality that requires this. ### Sales and Special Offers * Submissions promoting special offers (like a free tutorial, free guidebooks, try before you buy, etc.) will be rejected. * Don’t promote your product as being included in a Wix sale or feature unless it is actually included. ### Third-Party Affiliation * When adding the logo of a third party that your product is compatible with, don’t violate that party's brand guidelines. You may also not imply that your product is directly affiliated with that party's content. ## See also - [Wix Developers Terms of Use Policy](https://dev.wix.com/docs/build-apps/manage-your-app/legal-and-security/wix-terms-of-use-policy.md) - [Wix App Market Partner Agreement](https://dev.wix.com/docs/build-apps/manage-your-app/legal-and-security/wix-app-market-partner-agreement.md) --- > Portal Navigation: > > - Append `.md` to any URL under `https://dev.wix.com/docs/` to get its markdown version. > - Pages are either content pages (article or reference text) or menu pages (a list of links to child pages). > - To get a menu page, truncate any URL to a parent path and append `.md` (e.g. `https://dev.wix.com/docs/sdk.md`, `https://dev.wix.com/docs/sdk/core-modules.md`). > - Top-level index of all portals: https://dev.wix.com/docs/llms.txt > - Full concatenated docs: https://dev.wix.com/docs/llms-full.txt ## Resource: About Testing Your App ## Article: About App Testing ## Article Link: https://dev.wix.com/docs/build-apps/launch-your-app/app-distribution/test-your-app/about-testing-your-app.md ## Article Content: # About Testing Your App Before distributing your app, test its functionality to make sure it works as expected. Wix provides tools for: - **Functional testing**: [Test your app](https://dev.wix.com/docs/build-apps/launch-your-app/app-distribution/test-your-app/test-your-app-on-a-premium-site.md) on a free premium site, and share a test link with collaborators. - **Pre-submission checks**: Confirm your app meets all [technical and listing requirements](https://dev.wix.com/docs/build-apps/launch-your-app/app-distribution/test-your-app/app-checks-and-testing-guide.md) before submitting to the Wix App Market. - **Upgrade flow testing**: If your app has pricing plans, [test the full purchase and upgrade flow](https://dev.wix.com/docs/build-apps/launch-your-app/app-distribution/test-your-app/test-your-app-s-upgrade-process.md) to verify your app responds correctly to billing events before distributing. --- > Portal Navigation: > > - Append `.md` to any URL under `https://dev.wix.com/docs/` to get its markdown version. > - Pages are either content pages (article or reference text) or menu pages (a list of links to child pages). > - To get a menu page, truncate any URL to a parent path and append `.md` (e.g. `https://dev.wix.com/docs/sdk.md`, `https://dev.wix.com/docs/sdk/core-modules.md`). > - Top-level index of all portals: https://dev.wix.com/docs/llms.txt > - Full concatenated docs: https://dev.wix.com/docs/llms-full.txt ## Resource: Test Your App on a Premium Site ## Article: Test Your App on a Premium Site ## Article Link: https://dev.wix.com/docs/build-apps/launch-your-app/app-distribution/test-your-app/test-your-app-on-a-premium-site.md ## Article Content: # Test Your App on a Free Premium Site Wix provides a number of options for previewing and testing your app from the app dashboard before you submit it for review: - Create a free development site so that you can install your app and test its functionality. - Preview your app's listing in the App Market. - Share a test version of your app with others so they can test it on their own development site. > **Notes:** > > - [Wix Harmony](https://dev.wix.com/docs/build-apps/get-started/overview/about-wix-harmony-and-apps.md) and [Wix Vibe](https://support.wix.com/en/article/wix-vibe-an-overview) don't support every type of app extension. When you open the App Market from a Harmony or Vibe site, only compatible apps are shown. > - To test your app on a Wix Harmony site, see [test your app on a Wix Harmony site](#test-your-app-on-a-wix-harmony-site). > - To test your app on a Wix Vibe site, see [test your app on a Wix Vibe site](#test-your-app-on-a-wix-vibe-site). ## Test your app on a free development site A development site is a Wix site created specifically for testing your app before you distribute it. It includes: - Full access to an editor (Wix Harmony, Wix Studio, or Wix Editor). - Premium & Wix Payments capabilities. - Support for Wix business solutions such as Wix Stores, Events, and Services. Use a development site to simulate real user behavior and ensure your app works as expected before going live. To test your app on a free development site: 1. In the top right corner of your [app's dashboard](https://manage.wix.com/account/custom-apps), click **Test App** and select **Test on dev site**. 1. Select an existing development site or click **+ Create Dev Site** to create a new site. Select the editor and the Wix Business Solution you want to use and click **Create Dev Site**. 1. Click **Test App**. Wix installs your app and opens the site in a new tab. You can set which site page opens in your [app settings](https://dev.wix.com/app-selector?title=Select+an+App&primaryButtonText=Select+Site&actionUrl=https%3A%2F%2Fdev.wix.com%2Fapps%2F%7BappId%7D%2Fapp-settings). If you don't set a page, the site editor opens by default. Wix offers the following templates for development sites: | | | | | -------------- | ------------ | ------------------------------------------------------------------------------------------------ | | **Platform** | **Dev site** | **Included Apps** | | Classic Editor | Stores (V3) | Wix Members Area | | | Stores (V1) | Instagram Feed, Wix Members Area, Wix FAQ, Wix Site Search, Wix Forms, Wix Pro Gallery, Wix Chat | | | Restaurants | Wix Members Area, Wix Forms, Wix Pro Gallery | | | Events | Instagram Feed, Wix Members Area, Wix Forms, Wix Pro Gallery, Wix Pricing Plans, Wix Chat | | | Services | Instagram Feed, Wix Members Area, Wix Forms, Wix Pro Gallery, Wix Pricing Plans, Wix Chat | | | Blank | Only Wix Payments | | Studio | Stores (V3) | Wix Members Area | | | Stores (V1) | Wix Gift Cards, Wix Members Area, Wix Forms, Wix Blog | | | Restaurants | Wix Members Area, Wix Pro Gallery | | | Events | Wix Members Area, Wix Forms, Wix Pro Gallery, Wix Blog | | | Services | Wix Members Area, Wix Forms, Wix Pricing Plans | | | Blank | Only Wix Payments | | Harmony | Stores (V3) | Wix Members Area | | | Restaurants | Wix Members Area | | | Events | Wix Members Area | | | Bookings | Wix Members Area | ## Preview your app's market listing See a preview of your app's live market listing. This allows you to check for any issues in the listing's appearance before you [submit your app for review](https://dev.wix.com/docs/build-apps/launch-your-app/app-distribution/submit-your-first-app-version.md). 1. Click **Test App** and select **Preview listing**. Wix opens your app's listing in the App market in a new tab. 1. You can also test your app from the listing preview by clicking **Test on Dev Site**. This takes you through the same flow as above. ## Share a test version of your app A test link gives you a secure way to send a test version of your app to collaborators. To create and share a test link: 1. Click **Test App** and select **Share test link**. 1. Copy the generated link and send to others who want to test your app. 1. The link sends collaborators to a preview of the app market listing. From there, they can click **Test on Dev Site** and install the app on their own development site. > **Notes:** > > - The link sends collaborators to a test version of your app. To share an official version, [share an install link](https://dev.wix.com/docs/build-apps/launch-your-app/app-distribution/share-an-app-install-link.md). > - Generating a new test link deactivates the old one. > - Currently you can't share test links for Blocks Apps. ## Test your app on a Wix Harmony site Wix Harmony is Wix's new AI-powered site editor. Not all app extensions work in Harmony due to its different architecture. To test your app on a Wix Harmony site, follow the steps in [test your app on a free development site](#test-your-app-on-a-free-development-site) and select one of the available Harmony templates. [Contact us](https://dev.wix.com/docs/build-apps/manage-your-app/contact-us/contact-us.md) if you have questions on testing with Wix Harmony. Learn more about [app compatibility with Wix Harmony](https://dev.wix.com/docs/build-apps/get-started/overview/about-wix-harmony-and-apps.md). ## Test your app on a Wix Vibe site Wix Vibe is a conversational website creation tool that builds sites through natural language prompts. To test your app on a Wix Vibe site, [create a Wix Vibe site](https://www.wix.com/ai-website-builder) and [install your app](https://dev.wix.com/docs/build-apps/launch-your-app/app-distribution/install-your-app-directly-on-sites.md) on the site. [Contact us](https://dev.wix.com/docs/build-apps/manage-your-app/contact-us/contact-us.md) if you have questions on testing with Wix Vibe, or if you've successfully tested your app and want to make it available for Wix Vibe users. ## See also - [About app distribution](https://dev.wix.com/docs/build-apps/launch-your-app/app-distribution/about-app-distribution.md) - [App checks and testing guide](https://dev.wix.com/docs/build-apps/launch-your-app/app-distribution/app-checks-and-testing-guide.md) --- > Portal Navigation: > > - Append `.md` to any URL under `https://dev.wix.com/docs/` to get its markdown version. > - Pages are either content pages (article or reference text) or menu pages (a list of links to child pages). > - To get a menu page, truncate any URL to a parent path and append `.md` (e.g. `https://dev.wix.com/docs/sdk.md`, `https://dev.wix.com/docs/sdk/core-modules.md`). > - Top-level index of all portals: https://dev.wix.com/docs/llms.txt > - Full concatenated docs: https://dev.wix.com/docs/llms-full.txt ## Resource: Test Your App's Upgrade Process ## Article: Test Your App's Upgrade Process ## Article Link: https://dev.wix.com/docs/build-apps/launch-your-app/app-distribution/test-your-app/test-your-app-s-upgrade-process.md ## Article Content: # Test Your App’s Upgrade Process Your app can include multiple [pricing plans](https://dev.wix.com/docs/build-apps/launch-your-app/pricing-and-billing/about-pricing-plans-and-business-models.md#pricing-plans) for your users to purchase. Each plan can offer different features and tiers of access to your app. This article explains how to test your app's upgrade process to ensure that your app responds as expected when an upgrade occurs. Testing helps you verify: - That your app provides all advertised features for each pricing plan. - That your app responds as expected to [events](https://dev.wix.com/docs/build-apps/develop-your-app/api-integrations/events-and-webhooks/about-events.md) relevant to the app upgrade flow, such as [Paid Plan Changed](https://dev.wix.com/docs/rest/app-management/app-instance/paid-plan-changed.md) and [Paid Plan Purchased](https://dev.wix.com/docs/rest/app-management/app-instance/paid-plan-purchased.md). ## Simulate the app purchase flow To ensure that the upgrade process for your app's paid plans behaves as expected, simulate the user experience by installing and upgrading your app from a test site. 1. Select your app in the [app dashboard](https://dev.wix.com/app-selector?title=Select+an+App&primaryButtonText=Select+Site&actionUrl=https%3A%2F%2Fdev.wix.com%2Fapps%2F%7BappId%7D%2Fhome?referralInfo=sidebar). 2. Hover over **Test App** at the top of the page, then select **Test on dev site**. Choose a site for testing the upgrade flow. The App Market opens, prompting you to upgrade the app on your test site. 3. Select **Upgrade** on your app to proceed to the [Wix pricing page](https://dev.wix.com/docs/build-apps/launch-your-app/pricing-and-billing/set-up-a-wix-pricing-page.md). If you are using an [external pricing page](https://dev.wix.com/docs/build-apps/launch-your-app/pricing-and-billing/set-up-an-external-pricing-page.md), complete the checkout flow according to your site's configuration. > **Note:** For external pricing pages, ensure users cannot downgrade through your external pricing page. Downgrades or switches to monthly pricing require subscription cancellation and repurchase of the cheaper plan. 4. Select a paid plan to start the purchase flow. 5. Enter your payment information.
__Important:__ If you are upgrading to a plan with a [free trial](https://dev.wix.com/docs/build-apps/launch-your-app/pricing-and-billing/set-up-and-manage-free-trials.md), you must make a real transaction with a valid credit card. This transaction is a nominal amount for validation purposes only and you will be refunded immediately.
Payment depends on your app's [status](https://dev.wix.com/docs/build-apps/launch-your-app/app-distribution/about-app-distribution.md). - **Unpublished apps:** The total charge is $0. Use [test credit card details](https://developer.paypal.com/tools/sandbox/card-testing/) to complete the purchase.
**Tip:** If you're asked to enter a real credit card, set the currency to USD. Checkout currency is based on IP geolocation, so a VPN may be required.
- **Published apps:** [Create a test coupon](https://dev.wix.com/docs/build-apps/launch-your-app/app-promotion/self-promotion/create-a-coupon.md), and enter it into the **Enter promo code** section of the **Complete Your Purchase** page to complete the purchase. 6. Select **Submit Purchase** to complete your app upgrade. 7. Confirm that your upgraded app instance's functionality operates as expected. 8. To verify the upgrade for troubleshooting purposes, check that the upgrade is reflected in the app instance information. Call the following Wix APIs depending on the billing model of the upgraded plan: - **Single:** Call the [Get Purchase History](https://dev.wix.com/docs/rest/app-management/app-billing/billing/get-purchase-history.md) method and ensure that the recent upgrade is included in the `purchases` array. - **Recurring:** Call the Get App Instance method using [REST](https://dev.wix.com/docs/rest/app-management/app-instance/get-app-instance.md) or [SDK](https://dev.wix.com/docs/api-reference/app-management/app-instance/get-app-instance.md) and verify that the `isFree` field in the response object is `false`. > **Note:** By default, apps built using [Blocks](https://dev.wix.com/docs/build-apps/develop-your-app/develop-an-app-with-blocks/about-wix-blocks.md) only support plans with recurring billing models. Verify the upgrade by calling [`getDecodedAppInstance()`](https://dev.wix.com/docs/velo/velo-only-apis/wix-application/get-decoded-app-instance.md). The response object includes a `vendorProductId` field only if the app was upgraded to a paid plan or free trial on that app instance. See this [code example](https://dev.wix.com/docs/build-apps/develop-your-app/develop-an-app-with-blocks/code-in-blocks/blocks-code-snippets.md#get-pricing-plan) and learn more about [setting Blocks app pricing plans](https://dev.wix.com/docs/build-apps/develop-your-app/develop-an-app-with-blocks/publish-blocks-apps-to-the-app-market/adjust-a-blocks-app-to-different-pricing-plans.md). ## See also - [About app distribution](https://dev.wix.com/docs/build-apps/launch-your-app/app-distribution/about-app-distribution.md) - [App checks and testing guide](https://dev.wix.com/docs/build-apps/launch-your-app/app-distribution/test-your-app/app-checks-and-testing-guide.md) - [Set up a freemium business model](https://dev.wix.com/docs/build-apps/launch-your-app/pricing-and-billing/set-up-a-freemium-business-model.md) - [Set up a premium business model](https://dev.wix.com/docs/build-apps/launch-your-app/pricing-and-billing/set-up-a-premium-business-model.md) --- > Portal Navigation: > > - Append `.md` to any URL under `https://dev.wix.com/docs/` to get its markdown version. > - Pages are either content pages (article or reference text) or menu pages (a list of links to child pages). > - To get a menu page, truncate any URL to a parent path and append `.md` (e.g. `https://dev.wix.com/docs/sdk.md`, `https://dev.wix.com/docs/sdk/core-modules.md`). > - Top-level index of all portals: https://dev.wix.com/docs/llms.txt > - Full concatenated docs: https://dev.wix.com/docs/llms-full.txt ## Resource: App Checks and Testing Guide ## Article: App Checks and Testing Guide ## Article Link: https://dev.wix.com/docs/build-apps/launch-your-app/app-distribution/test-your-app/app-checks-and-testing-guide.md ## Article Content: # App Checks and Testing Guide When you submit your app to the Wix App Market for review, our team checks your app thoroughly against our [guidelines](https://dev.wix.com/docs/build-apps/launch-your-app/app-distribution/app-market-guidelines.md). This article includes the basic checks and tests you're required to make during development and before you submit your app for review. ## What you need to do All apps are built differently, so you should only check and test all of the elements that apply to you. In this article we cover: - [OAuth](https://dev.wix.com/docs/build-apps/launch-your-app/app-distribution/test-your-app/app-checks-and-testing-guide.md) - [Permissions](https://dev.wix.com/docs/build-apps/launch-your-app/app-distribution/test-your-app/app-checks-and-testing-guide.md) - [Webhooks](https://dev.wix.com/docs/build-apps/launch-your-app/app-distribution/test-your-app/app-checks-and-testing-guide.md) - [Dashboard extension](https://dev.wix.com/docs/build-apps/launch-your-app/app-distribution/test-your-app/app-checks-and-testing-guide.md) - [Embedded Script extension](https://dev.wix.com/docs/build-apps/launch-your-app/app-distribution/test-your-app/app-checks-and-testing-guide.md) - [Market listing](https://dev.wix.com/docs/build-apps/launch-your-app/app-distribution/test-your-app/app-checks-and-testing-guide.md) - [Pricing and checkout](https://dev.wix.com/docs/build-apps/launch-your-app/app-distribution/test-your-app/app-checks-and-testing-guide.md) - [App behaviour](https://dev.wix.com/docs/build-apps/launch-your-app/app-distribution/test-your-app/app-checks-and-testing-guide.md) > **Recommended: use a free Premium testing site** > > To make testing easier you can install your app on [a free Premium testing site](https://dev.wix.com/docs/build-apps/launch-your-app/app-distribution/test-your-app/test-your-app-on-a-premium-site.md). ## Test on a range of browsers It's important to test your app on a range of commonly used browsers and devices.
Desktop browsers Click the links below to download the latest versions: * [Google Chrome](https://support.google.com/chrome/answer/95346?hl=en) (version 92 and above) * [Safari for Mac](https://support.apple.com/en-us/HT204416) (version 14 and above) * [Microsoft Edge](https://www.microsoft.com/en-us/windows/microsoft-edge#2MxZCuF4JKRzb2zT.97) (version 100 and above)  * [Firefox](https://www.mozilla.org/en-US/firefox/new/) (version 91 and above)
Mobile browsers Click the links below for instructions: * [Google Chrome for Android](https://support.google.com/chrome/answer/95414?co=GENIE.Platform%3DAndroid&hl=en&oco=1) * [Google Chrome for iPhone](https://support.google.com/chrome/answer/95414?co=GENIE.Platform%3DiOS&hl=en&oco=1) * [Safari](https://support.apple.com/en-us/HT204204) (iPhone 7 and above)
Tablet and iPad browsers Wix supports viewing live sites from iPads and tablets. However, the Wix Editor is not supported on iPads or tablets. **Supported browsers on iPads and tablets**: * Google Chrome  * Safari  **Supported operating systems on iPads and tablets**: * iPads: iOS 12 and above * Android: 9.0 and above
## OAuth Make sure you've gone through everything in our dedicated [OAuth article](https://dev.wix.com/docs/build-apps/develop-your-app/access/authentication/about-oauth.md). ### Check * That you have a [dashboard page extension](https://dev.wix.com/docs/build-apps/develop-your-app/extensions/dashboard-extensions/dashboard-pages/about-dashboard-page-extensions.md) – this is a basic requirement for all OAuth apps. * Make sure that the URLs are not on a local host. ### Test 1\. In the your app's dashboard click on the **Test Your App** button and choose **Preview Listing**. 2\. Click on **Test on Dev Site**. 3\. Select a development site. 4\. Click on **Test App** - at this point Wix redirects the user to your app URL with a token. 5\. A consent modal should appear – this is how users authorize the permissions you added in your app's dashboard. If not, check your OAuth flow setup. 6\. Accept the permissions. 7\. Wix will send the user to your redirect URL, and your app dashboard should show up and commence its onboarding flow. 8\. At this point, the app is installed on the user's site and you should have their [`instanceId`](https://dev.wix.com/docs/rest/app-management/app-instance/introduction.md) – this is the unique identifier for the user's site that the app is installed on. 9\. Once the user completes the onboarding flow, call [Send BI Event](https://dev.wix.com/docs/api-reference/app-management/bi-event/send-bi-event.md), specifying `APP_SETUP_FINISHED` for the `eventName` parameter. ## Permissions Make sure you've gone through everything in our dedicated [permissions article](https://dev.wix.com/docs/build-apps/develop-your-app/access/authorization/about-permissions.md). ### Check * Make sure that you only added the minimum necessary permissions for your app to function. * If you added scopes: remove all the permissions already included in that scope. For example, the **Manage Orders** scope already includes **Read orders**, **Manage bookings** and **Read bookings**, etc. ### Test 1. Make the required API calls for your app, and make sure you don't receive errors of missing permissions. ## Webhooks Make sure you've gone through everything in our dedicated [webhooks article](https://dev.wix.com/docs/build-apps/develop-your-app/api-integrations/events-and-webhooks/about-webhooks.md). ### Check * We recommend adding the [App Installed](https://dev.wix.com/docs/rest/app-management/app-instance/app-instance-installed.md) and [App Removed](https://dev.wix.com/docs/rest/app-management/app-instance/app-instance-removed.md) webhooks in addition to any other webhooks you have. * Make sure you return a 200 response upon successful receipt of the webhook. ### Test 1. Use the **Trigger Test** button next to your webhook in your app's dashboard to make sure you receive it. 2. Trigger the webhooks using your Wix site. For example, create an order on the site and make sure that you receive the webhook response that an order has been created successfully. 3. The response in the webhook log should be 'Success' – if not check the URL and make sure to return a 200 response. ## Dashboard component Make sure you've gone through everything in our dedicated [Dashboard page extension article](https://dev.wix.com/docs/build-apps/develop-your-app/extensions/dashboard-extensions/dashboard-pages/about-dashboard-page-extensions.md). ### Check * The page URL is not on a local host. ### Test 1. Install the app. 2. If your app has an internal dashboard component the consent window should close when you've approved the permissions and your app will open in the Wix dashboard. 3. Close the app. 4. Open the app from the **Manage Apps** section in your Wix site manager – the app's dashboard should open. ## Embedded Script component Make sure you've gone through everything in our dedicated [Embedded Script article](https://dev.wix.com/docs/build-apps/develop-your-app/extensions/site-extensions/embedded-scripts/about-embedded-scripts.md). ### Check * The script: [make sure it's the correct type](https://dev.wix.com/docs/build-apps/develop-your-app/extensions/site-extensions/embedded-scripts/about-embedded-scripts.md). * That the script itself has a dynamic parameter, the recommended syntax is: `````` * Embed the script using the [API call](https://dev.wix.com/docs/rest/app-management/embedded-scripts/introduction.md). ### Test 1. Install your app on a site. 2. Enable the embedded script using the [API](https://dev.wix.com/docs/rest/app-management/embedded-scripts/introduction.md). 3. Go to a live Wix site with the app installed, and make sure that it's not disabled (there's an option to pause the script in the **Manage Apps** section). 4. The script should be shown on the site – you can also check it in the network tab, and filter 'tags' – the script should show there as well. ## Market listing Make sure you've gone through everything in our dedicated [market listing article](https://dev.wix.com/docs/build-apps/launch-your-app/market-listing/about-market-listings.md). Here are some common issues: * App name: Shouldn't be generic. * Teaser, app features, and full description: Don't mention Wix, stats, data, etc. * Media: Images should be high quality and not pixelated, you should have at least 3 images.  * Demo site: Only needed if there is a visual component on the site, this needs to be a real Wix website featuring your app. ## Pricing and checkout Make sure you've gone through everything in our dedicated [app pricing guide](https://dev.wix.com/docs/build-apps/launch-your-app/pricing-and-billing/about-pricing-plans-and-business-models.md).
Apps that use Wix internal billing * Test the entire checkout flow of the app installed on a Wix site: test each plan, cancel plan, and more. * Redirect the user within the app to Wix Pricing Page: ```https://www.wix.com/apps/upgrade/APPIDHERE?appInstanceId=INSTANCEIDHERE``` * Don't allow users to downgrade through your pricing page. Downgrades or switches from yearly to monthly pricing require subscription cancellation and repurchase of the lower-priced plan. This is due to how Wix's billing system handles subscription modifications to ensure accurate billing and prevent revenue discrepancies. * Add all the plans to your app's dashboard and connect each to Wix checkout using the [Billing API](https://dev.wix.com/docs/api-reference/app-management/app-billing/billing/introduction.md). * Test each plan, and make sure they all lead to the Wix checkout. * Make sure the prices are consistent with the ones you added in the app dashboard.
Partner Billed Apps * If you have dynamic plans or your business model is based on fees, please choose Dynamic Pricing and add plans. * Make sure all your plans are added to your app's dashboard. * Make sure to sign the relevant addendum.
## App behaviour ### Identify users by their `instanceId` Install the app on multiple Wix sites and use instanceId to make sure that you show the relevant account details for each site (separated billings, dashboard, etc.). 1. Install the app on your Wix site via your app's dashboard. 2. Go through the onboarding flow and create an account if needed, upgrade the app and use it. 3. Install the app on a second Wix site. 4. At this point, you should identify that it's a new user using `instanceId` – you shouldn't identify users by their session/cookies. 5. If the account is needed for your app, then: * Case 1: If you support multiple site connections under one account, build a flow that allows users to switch between their accounts. The user should be able to log in to your app with their existing account, but the details should be connected to the site they opened the app with and your app should distinguish between the sites that the user installed the app on by the `instanceId`. * Case 2: If you support one account per site, you should support a flow where you let the user know that they already have one site connected under their account and if they want they can disconnect it or create a new account. For both cases, billing should be separate for each site. ### Auto login flow (if account login required) After a user creates an account for your site and opens the app through **Manage Apps**, they should be auto logged in based on the instanceId we send you when the user clicks **Open App**. 1. Install the app from your app's dashboard. 2. Create an account. 3. Close the app. 4. Go back into the app through **Manage Apps**. 5. You should be auto logged in. ### Forgotten password flow If your app requires the user to log in with a password, you should check the forgotten password flow works correctly: 1. Install the app. 2. Create an account. 3. Log out. 4. Click on **Forgotten Password**. 5. Check your email – a link should be sent to create a new password. 6. Create a new password and sign in. > **Note:** > > Plaintext passwords should not be kept or sent in any scenario. ### App requirements If your app requires Wix Stores, Wix Bookings etc., then use the [Get App Instance API](https://dev.wix.com/docs/rest/app-management/app-instance/get-app-instance.md) (```installedWixApps``` field) to make sure that the user has Wix Stores installed on their site. If they don't, then please create a flow that lets the user know they need Wix Stores to use your app (a message saying so, etc.). ### Review modal You should implement the [review modal](https://dev.wix.com/docs/build-apps/manage-your-app/user-support/user-reviews.md#get-more-reviews-with-prompts) in your app flow – this helps to gather more reviews for your app, which can help with its success. ### Site duplication A [duplication](https://dev.wix.com/docs/rest/app-management/app-instance/get-app-instance.md) is effectively a new install of your app, but users skip the consent flow. This might mean that users access the app from a new instanceId without a refresh token. 1. Duplicate your test site with your app installed on it. 2. When your app endpoint is called, check if the instance parameter has an ```originInstanceId``` property. If it does, this means that the app is being copied from another site. 3. See the ```originInstanceId``` in the [App Instance Installed Webhook](https://dev.wix.com/docs/rest/app-management/app-instance/app-instance-installed.md). 4. Show a screen prompting users to go through the app installer again so that you can get the refresh token needed to complete the installation flow. ## Submit your app for review Once you've gone through everything in this list, you can [submit your app for review](https://dev.wix.com/docs/build-apps/launch-your-app/app-distribution/submit-your-first-app-version.md) and a member of our team will let you know if anything needs fixing before we publish your app. ## See also - [App Market guidelines](https://dev.wix.com/docs/build-apps/launch-your-app/app-distribution/app-market-guidelines.md) - [About app distribution](https://dev.wix.com/docs/build-apps/launch-your-app/app-distribution/about-app-distribution.md) --- > Portal Navigation: > > - Append `.md` to any URL under `https://dev.wix.com/docs/` to get its markdown version. > - Pages are either content pages (article or reference text) or menu pages (a list of links to child pages). > - To get a menu page, truncate any URL to a parent path and append `.md` (e.g. `https://dev.wix.com/docs/sdk.md`, `https://dev.wix.com/docs/sdk/core-modules.md`). > - Top-level index of all portals: https://dev.wix.com/docs/llms.txt > - Full concatenated docs: https://dev.wix.com/docs/llms-full.txt ## Resource: About App Installation ## Article: About App Installation ## Article Link: https://dev.wix.com/docs/build-apps/launch-your-app/app-distribution/install-your-app/about-app-installation.md ## Article Content: # About App Installation When a Wix user installs your app, Wix runs an app install flow, an [OAuth authentication](https://dev.wix.com/docs/build-apps/develop-your-app/access/authentication/about-oauth.md) process that grants your app the permissions you've configured in the [app dashboard](https://dev.wix.com/docs/build-apps/develop-your-app/access/authorization/configure-permissions-for-your-app.md). Your [distribution method](#distribution-methods) determines how Wix users install your app and which install flow runs. ## Standard install flow The standard install flow is the default when a Wix user adds an app from the [Wix ecosystem](https://dev.wix.com/docs/build-apps/get-started/overview/the-wix-ecosystem.md), such as the Wix App Market, editor, or site dashboard, or clicks a shared install link. Wix handles the full flow and manages authentication. The flow depends on where the install starts: - **Wix App Market**: Wix prompts the Wix user to select the intended site and grant permissions. - **Site dashboard and editors**: The Wix user triggers the install from a specific site, so Wix only prompts them to grant permissions. When the install completes, Wix redirects the Wix user to an app page based on your [app's settings](https://dev.wix.com/docs/build-apps/develop-your-app/app-workspace/app-dashboard/app-settings.md). ## External install flow The [external install flow](https://dev.wix.com/docs/build-apps/launch-your-app/app-distribution/install-your-app/about-the-external-install-flow.md) extends the standard install flow. Use it to redirect Wix users to an external location after installation and integrate external app services with Wix sites. The flow also supports custom data tracking throughout the install and provides OAuth credentials for your backend services. Use the external install flow when: - A site visitor starts the install from a live or external site, such as a published Wix site, and you want to redirect them back after install. - Your app has external backend services that call Wix APIs. Use [what Wix sends in the redirect](https://dev.wix.com/docs/build-apps/launch-your-app/app-distribution/install-your-app/about-the-external-install-flow.md#what-wix-sends-in-the-redirect) to [authenticate your API calls](https://dev.wix.com/docs/build-apps/launch-your-app/app-distribution/install-your-app/about-the-external-install-flow.md#oauth-credentials). - You want to track data across the install flow. For example, a campaign landing page where Wix users install the app, get redirected to a thank-you page, and you receive campaign or visitor details in the callback. - Your app has no [frontend extensions](https://dev.wix.com/docs/build-apps/develop-your-app/extensions/about-extensions.md#frontend-extensions), so Wix users have nothing to interact with after installing. Use the external install flow to redirect them to somewhere useful such as an onboarding or confirmation page. Learn more about [setting up the external install flow](https://dev.wix.com/docs/build-apps/launch-your-app/app-distribution/install-your-app/set-up-the-external-install-flow.md). ## Distribution methods Wix supports several distribution methods for your app. ### Wix App Market The Wix App Market is a public marketplace where Wix users discover and install apps. To distribute your app through the App Market, [submit it for review and listing](https://dev.wix.com/docs/build-apps/launch-your-app/app-distribution/about-app-distribution.md). ### Share an install link Distribute your app by sharing a link directly with Wix users or from an external location, such as a button on a published site. You can [generate an install link from your app dashboard](https://dev.wix.com/docs/build-apps/launch-your-app/app-distribution/install-your-app/share-an-app-install-link.md) or build a custom URL. The type of link determines which install flow runs: - **App dashboard link**: Triggers the standard install flow. - **Custom-built URL**: You can [configure](https://dev.wix.com/docs/build-apps/launch-your-app/app-distribution/install-your-app/about-the-external-install-flow.md#about-the-installation-url) it to trigger either the standard or external install flow. ### Install directly on sites If you have management access to the sites that should use your app, you can [install it directly on sites](https://dev.wix.com/docs/build-apps/launch-your-app/app-distribution/install-your-app/install-your-app-directly-on-sites.md) from your app dashboard without involving Wix users. Use direct install when distributing an enterprise or agency-built app to sites you manage. ## Tracking installs Wix records an app as successfully installed when a Wix user completes the standard install flow. You can view and manage [app installations](https://dev.wix.com/docs/build-apps/manage-your-app/data-and-analytics/app-installations.md) in the [app dashboard](https://dev.wix.com/docs/build-apps/develop-your-app/app-workspace/app-dashboard/about-the-app-dashboard.md). To track Wix users who started but didn't complete the install flow, set up custom events for [Google Analytics](https://dev.wix.com/docs/build-apps/manage-your-app/data-and-analytics/google-analytics.md#custom-events-for-google-analytics). ## See also - [About the External Install Flow](https://dev.wix.com/docs/build-apps/launch-your-app/app-distribution/install-your-app/about-the-external-install-flow.md) - [Set Up the External Install Flow](https://dev.wix.com/docs/build-apps/launch-your-app/app-distribution/install-your-app/set-up-the-external-install-flow.md) - [Share an App Install Link](https://dev.wix.com/docs/build-apps/launch-your-app/app-distribution/install-your-app/share-an-app-install-link.md) - [Install Your App Directly on Sites](https://dev.wix.com/docs/build-apps/launch-your-app/app-distribution/install-your-app/install-your-app-directly-on-sites.md) --- > Portal Navigation: > > - Append `.md` to any URL under `https://dev.wix.com/docs/` to get its markdown version. > - Pages are either content pages (article or reference text) or menu pages (a list of links to child pages). > - To get a menu page, truncate any URL to a parent path and append `.md` (e.g. `https://dev.wix.com/docs/sdk.md`, `https://dev.wix.com/docs/sdk/core-modules.md`). > - Top-level index of all portals: https://dev.wix.com/docs/llms.txt > - Full concatenated docs: https://dev.wix.com/docs/llms-full.txt ## Resource: About the External Install Flow ## Article: About the External Install Flow ## Article Link: https://dev.wix.com/docs/build-apps/launch-your-app/app-distribution/install-your-app/about-the-external-install-flow.md ## Article Content: # About the External Install Flow The external install flow lets you trigger a Wix app installation from outside the Wix App Market, editor, or site dashboard. For example, from a published Wix site or non-Wix site. When triggered externally, Wix supports the functionality to specify a post-installation redirect, track custom state, and provides [OAuth credentials](#oauth-credentials) to simplify integrating external app services with Wix sites. ## How it works To support the external install flow: - Build an [installation URL](#about-the-installation-url) and expose it to site visitors, such as by attaching it to a button. - Implement a [callback handler](https://dev.wix.com/docs/build-apps/launch-your-app/app-distribution/install-your-app/set-up-the-external-install-flow.md) to receive the post-installation redirect. When a site visitor navigates to the URL, the following flow starts: 1. Wix initiates the standard install flow. 2. After install, Wix redirects the site visitor to your callback URL and appends [query parameters](#what-wix-sends-in-the-redirect). 3. Your [callback handler](https://dev.wix.com/docs/build-apps/launch-your-app/app-distribution/install-your-app/set-up-the-external-install-flow.md) receives the redirect. You can use the callback handler to verify the install succeeded, handle query parameters, and [manage authentication](https://dev.wix.com/docs/build-apps/develop-your-app/access/authentication/authenticate-using-oauth.md). The external install flow also supports custom state, which is data you can pass as query parameters in the callback URL. Wix preserves your state throughout the external install flow and returns it to the callback handler. Learn more about [setting up the external install flow](https://dev.wix.com/docs/build-apps/launch-your-app/app-distribution/install-your-app/set-up-the-external-install-flow.md). ## About the installation URL To start the external install flow, you must [build](https://dev.wix.com/docs/build-apps/launch-your-app/app-distribution/install-your-app/set-up-the-external-install-flow.md) and expose an installation URL. Build the URL by appending query parameters to the base URL using standard [query string](https://developer.mozilla.org/en-US/docs/Learn_web_development/Howto/Web_mechanics/What_is_a_URL#parameters) syntax: ``` https://www.wix.com/app-installer ``` The installation URL supports the following query parameters: | Query parameter | Required | Description | |---|---|---| | `appId` | Yes | The app ID of the app you want to install. Triggers the standard install flow for the specified app. | | `postInstallationUrl` | No | Your callback URL, which you can specify at runtime. After the install completes, Wix redirects the Wix user to this URL and appends its own query parameters. Wix also preserves any query parameters you include. | | `shareUrlId` | For unlisted apps | The unique ID for a [share install link](https://dev.wix.com/docs/build-apps/launch-your-app/app-distribution/install-your-app/share-an-app-install-link.md). Required when your app is unlisted and you use the external install flow with `postInstallationUrl`. | ## Unlisted apps and share install links For **unlisted** apps, site visitors install your app through a [share install link](https://dev.wix.com/docs/build-apps/launch-your-app/app-distribution/install-your-app/share-an-app-install-link.md) you create in your app dashboard. Include the link's unique ID in the installation URL as `shareUrlId` so Wix can resolve the install path that would otherwise come from the App Market listing. Learn how to extract the ID and add it to your installation URL in [Set Up the External Install Flow](https://dev.wix.com/docs/build-apps/launch-your-app/app-distribution/install-your-app/set-up-the-external-install-flow.md).
__Important:__ The `postInstallationUrl` must be an [encoded URI component](https://developer.mozilla.org/en-US/docs/Web/JavaScript/Reference/Global_Objects/encodeURIComponent).
## What Wix sends in the redirect After the install completes, Wix redirects the Wix user to your `postInstallationUrl` and appends query parameters. [Implement a callback handler](https://dev.wix.com/docs/build-apps/launch-your-app/app-distribution/install-your-app/set-up-the-external-install-flow.md) to receive and process them.
__Important:__ Your callback handler method must use HTTPS.
The following table describes the query parameters Wix appends to the redirect URL: | Query parameter | Description | |---|---| | `appId` | Your Wix app ID. | | `tenantId` | The ID of the Wix site that installed the app. | | `instanceId` | A unique ID for this app installation. | | Custom state | Query parameters you included in the `postInstallationUrl`. |
__Important:__ The `instanceId` is a permanent credential for this app-site connection. Store it securely.
To verify that your app installed successfully, confirm that an `instanceId` exists. ## OAuth credentials Use the `instanceId` from your callback handler to [create OAuth access tokens](https://dev.wix.com/docs/build-apps/develop-your-app/access/authentication/authenticate-using-oauth.md) that grant access to the permissions you've defined in your [app dashboard](https://dev.wix.com/docs/build-apps/develop-your-app/access/authorization/configure-permissions-for-your-app.md) and enable your backend to call Wix APIs on behalf of the installed app. ## See also - [Set Up the External Install Flow](https://dev.wix.com/docs/build-apps/launch-your-app/app-distribution/install-your-app/set-up-the-external-install-flow.md) - [Share an App Install Link](https://dev.wix.com/docs/build-apps/launch-your-app/app-distribution/install-your-app/share-an-app-install-link.md) - [About OAuth](https://dev.wix.com/docs/build-apps/develop-your-app/access/authentication/about-oauth.md) --- > Portal Navigation: > > - Append `.md` to any URL under `https://dev.wix.com/docs/` to get its markdown version. > - Pages are either content pages (article or reference text) or menu pages (a list of links to child pages). > - To get a menu page, truncate any URL to a parent path and append `.md` (e.g. `https://dev.wix.com/docs/sdk.md`, `https://dev.wix.com/docs/sdk/core-modules.md`). > - Top-level index of all portals: https://dev.wix.com/docs/llms.txt > - Full concatenated docs: https://dev.wix.com/docs/llms-full.txt ## Resource: Set Up the External Install Flow ## Article: Set Up the External Install Flow ## Article Link: https://dev.wix.com/docs/build-apps/launch-your-app/app-distribution/install-your-app/set-up-the-external-install-flow.md ## Article Content: # Set Up the External Install Flow The [external install flow](https://dev.wix.com/docs/build-apps/launch-your-app/app-distribution/install-your-app/about-the-external-install-flow.md) lets you trigger a Wix app install flow from outside the App Market, editor, or site dashboard, as well as extend the [standard install flow](https://dev.wix.com/docs/build-apps/launch-your-app/app-distribution/install-your-app/about-app-installation.md#standard-install-flow) with a post-install redirect and state tracking. This article guides you through building the [installation URL](https://dev.wix.com/docs/build-apps/launch-your-app/app-distribution/install-your-app/about-the-external-install-flow.md#about-the-installation-url) and implementing the callback handler to handle the post-install redirect and manage state. The end result will be: * An [installation URL](https://dev.wix.com/docs/build-apps/launch-your-app/app-distribution/install-your-app/about-the-external-install-flow.md#about-the-installation-url) that includes your callback URL and custom state. * A callback handler that receives the redirect, verifies the install succeeded, and uses the state you passed. ## Step 1 | Get the share URL ID for unlisted apps
**Note:** If your app is listed in the Wix App Market, skip this step.
If your app is **unlisted**, include a `shareUrlId` in the installation URL. This ID comes from the [share install link](https://dev.wix.com/docs/build-apps/launch-your-app/app-distribution/install-your-app/share-an-app-install-link.md) you create in your app dashboard. At the end of this step, you have your `shareUrlId` to add to the installation URL. To get the `shareUrlId`: 1. [Create a share install link](https://dev.wix.com/docs/build-apps/launch-your-app/app-distribution/install-your-app/share-an-app-install-link.md) in your app dashboard. 2. Open the install link in your browser. A short link like `https://wix.to/g2b6Luf` redirects to a URL similar to `https://www.wix.com/app-market/install/9344930f-1a50-4edd-b7ba-efc1af3ac304`. 3. Copy the GUID at the end of the resolved URL. This is your `shareUrlId`. ## Step 2 | Build the installation URL This step builds the installation URL with an `appId` and `postInstallationUrl`. For unlisted apps, also add `shareUrlId`. At the end of this step, you have an installation URL that supports redirects and any query parameters you add. To build the installation URL: 1. Get your `appId` from the [app dashboard](https://manage.wix.com/account/custom-apps). On your app's home page, click **More Actions** and select **View ID & keys**. 2. Choose your callback URL. Use a route on your server that handles the redirect. 3. Add state to your callback URL. State is custom data you want to pass through the install flow, such as a user ID or return path. Add it as query parameters to your callback URL. The following example creates the callback URL and adds a state object as a query parameter: ```js const callbackUrl = new URL('https://yoursite.com/wix/connect') const state = { userId: '', returnTo: '/dashboard' } callbackUrl.searchParams.set('state', JSON.stringify(state)) ```
__Important:__ If your state contains sensitive data, encrypt it before adding it to the URL.
4. Encode the callback URL with [encodeURIComponent](https://developer.mozilla.org/en-US/docs/Web/JavaScript/Reference/Global_Objects/encodeURIComponent). 5. Build the installation URL with `appId` and set the `postInstallationUrl` parameter to your encoded callback URL. If your app is unlisted, also add `shareUrlId`. Provide the installation URL, such as by attaching it to a button on a site. When a site visitor navigates to the URL, such as by clicking on a button, it will trigger the external install flow. The example below shows the complete code for building the installation URL. ::::tabs :::Listed-app ```js const appId = '' const callbackUrl = new URL('https://yoursite.com/wix/connect') const state = { userId: '', returnTo: '/dashboard' } // Encrypt sensitive data before adding to URL callbackUrl.searchParams.set('state', JSON.stringify(state)) const postInstallationUrlEncoded = encodeURIComponent(callbackUrl) const installerUrl = `https://www.wix.com/app-installer?appId=${appId}&postInstallationUrl=${postInstallationUrlEncoded}` ``` ::: :::Unlisted-app ```js const appId = '' const shareUrlId = '' const callbackUrl = new URL('https://yoursite.com/wix/connect') const state = { userId: '', returnTo: '/dashboard' } // Encrypt sensitive data before adding to URL callbackUrl.searchParams.set('state', JSON.stringify(state)) const postInstallationUrlEncoded = encodeURIComponent(callbackUrl) const installerUrl = `https://www.wix.com/app-installer?appId=${appId}&shareUrlId=${shareUrlId}&postInstallationUrl=${postInstallationUrlEncoded}` ``` ::: :::: ## Step 3 | Build the callback handler This step implements the callback handler at your callback URL. After a site visitor completes the standard install flow, Wix redirects them to your callback URL. Wix appends [query parameters](https://dev.wix.com/docs/build-apps/launch-your-app/app-distribution/install-your-app/about-the-external-install-flow.md#what-wix-sends-in-the-redirect) to the URL and preserves any query parameters you added. At the end of this step, you have a working callback handler and access to the query parameters and state you passed. The following examples use a Node.js server with Express. If you use another framework or language, define a GET handler for your callback path and process the query parameters in the way your stack supports. You can also read the parameters client-side from the page URL using [browser APIs](https://developer.mozilla.org/en-US/docs/Web/API/Location).
__Important:__ Your callback handler endpoint must use HTTPS.
To build the callback handler: 1. Define a GET route for the path that matches your `postInstallationUrl` and read the query parameters. The following example registers the route and reads the query parameters from the request. ```js app.get('/wix/connect', async (req, res) => { const { appId, tenantId, instanceId, state } = req.query }) ``` 2. Verify the install succeeded. If `instanceId` is missing, the install failed or the Wix user canceled. The following example redirects to a cancellation page when `instanceId` is missing: ```js if (!instanceId) { // Log the failure server-side if needed return res.redirect('/install-cancelled') } ``` 3. Use the query parameters and state as needed. The example below shows the complete callback handler: ```js app.get('/wix/connect', async (req, res) => { const { appId, tenantId, instanceId, state } = req.query if (!instanceId) { // Log the failure server-side if needed return res.redirect('/install-cancelled') } const parsedState = JSON.parse(state) // Implement business logic to use the query parameters }) ``` ## See also - [About the External Install Flow](https://dev.wix.com/docs/build-apps/launch-your-app/app-distribution/install-your-app/about-the-external-install-flow.md) - [Share an App Install Link](https://dev.wix.com/docs/build-apps/launch-your-app/app-distribution/install-your-app/share-an-app-install-link.md) - [About App Installation](https://dev.wix.com/docs/build-apps/launch-your-app/app-distribution/install-your-app/about-app-installation.md) --- > Portal Navigation: > > - Append `.md` to any URL under `https://dev.wix.com/docs/` to get its markdown version. > - Pages are either content pages (article or reference text) or menu pages (a list of links to child pages). > - To get a menu page, truncate any URL to a parent path and append `.md` (e.g. `https://dev.wix.com/docs/sdk.md`, `https://dev.wix.com/docs/sdk/core-modules.md`). > - Top-level index of all portals: https://dev.wix.com/docs/llms.txt > - Full concatenated docs: https://dev.wix.com/docs/llms-full.txt ## Resource: Share an App Install Link ## Article: Share an App Install Link ## Article Link: https://dev.wix.com/docs/build-apps/launch-your-app/app-distribution/install-your-app/share-an-app-install-link.md ## Article Content: # Share an App Install Link Some apps aren’t intended for sale in the Wix App Market. For example, enterprise businesses may build specialized apps for their subsidiaries, agencies may build and install apps for customers’ sites, and others may choose to sell their apps privately without getting listed in the Wix App Market. These apps are designed and built to work on Wix sites, but aren’t intended for sale in the Wix App Market. In these cases, the app is considered **unlisted**, and there’s no need to go through the submission process for the Wix App Market. Instead, you can create a link in your app dashboard to share with users. To create an install link, complete the following steps: 1. Go to one of the **Share Install Link** entry points: 1. In the **Custom Apps** page, in the more actions menu ![](https://d2x3xhvgiqkx42.cloudfront.net/12345678-1234-1234-1234-1234567890ac/0e041dbb-8bbe-4be4-a1ae-883b5cb05e2b/2021/06/01/2a9acf13-da92-4860-a071-03e40202208f/39775e8b-9759-43c3-9c70-c076c64df1f7.png) for the app. 1. In your app’s dashboard, in the **Distribution** tab in the menu. 1. The **Distribute App** button in every page of the app dashboard. 1. Select **Share Install Link**. 1. If your app doesn’t have a major version yet, you’ll be prompted to release one. 1. An install link will be provided for you. When a user opens your install link, they’ll be directed to a generic app page with an install button. ## Use with the external install flow To trigger installation from outside Wix, like from a button on a published site, and add a post-install redirect, use the [external install flow](https://dev.wix.com/docs/build-apps/launch-your-app/app-distribution/install-your-app/about-the-external-install-flow.md). Unlisted apps must pass the share install link's unique ID as the `shareUrlId` query parameter in the installation URL. Learn how to extract the ID and add it to the URL in [Set Up the External Install Flow](https://dev.wix.com/docs/build-apps/launch-your-app/app-distribution/install-your-app/set-up-the-external-install-flow.md). ## See also - [About the External Install Flow](https://dev.wix.com/docs/build-apps/launch-your-app/app-distribution/install-your-app/about-the-external-install-flow.md) - [Set Up the External Install Flow](https://dev.wix.com/docs/build-apps/launch-your-app/app-distribution/install-your-app/set-up-the-external-install-flow.md) --- > Portal Navigation: > > - Append `.md` to any URL under `https://dev.wix.com/docs/` to get its markdown version. > - Pages are either content pages (article or reference text) or menu pages (a list of links to child pages). > - To get a menu page, truncate any URL to a parent path and append `.md` (e.g. `https://dev.wix.com/docs/sdk.md`, `https://dev.wix.com/docs/sdk/core-modules.md`). > - Top-level index of all portals: https://dev.wix.com/docs/llms.txt > - Full concatenated docs: https://dev.wix.com/docs/llms-full.txt ## Resource: Install Your App Directly on Sites ## Article: Install Your App Directly on Sites ## Article Link: https://dev.wix.com/docs/build-apps/launch-your-app/app-distribution/install-your-app/install-your-app-directly-on-sites.md ## Article Content: # Install Your App Directly on Sites Some apps are intended for distribution within a business. For example, enterprise businesses may develop specialized apps for their subsidiaries, and agencies may develop and install apps for the sites they build for their customers. In these cases, if you have management access to all the sites that should install your app, and you can install it directly from your app's dashboard. Unlike installing a test version of your app, which always updates automatically with every change, this functionality allows you to easily install the latest released version to any site within your account. > **Note:** If you don't have management access to all the sites that should install your app, you can [share an install link](https://dev.wix.com/docs/build-apps/launch-your-app/app-distribution/share-an-app-install-link.md) instead. To install an app directly, complete the following steps: 1. Go to one of the **Install on Site** entry points: - In your app’s dashboard, in the **Distribution** tab in the menu. - The **Distribute App** button in every page of the app dashboard. 1. Select **Install on Site**. 1. If your app doesn’t have a major version yet, you’ll be prompted to release one. 1. Select the relevant site. 1. Click **Agree & Add** to agree to the required permissions and install the app on the site. --- > Portal Navigation: > > - Append `.md` to any URL under `https://dev.wix.com/docs/` to get its markdown version. > - Pages are either content pages (article or reference text) or menu pages (a list of links to child pages). > - To get a menu page, truncate any URL to a parent path and append `.md` (e.g. `https://dev.wix.com/docs/sdk.md`, `https://dev.wix.com/docs/sdk/core-modules.md`). > - Top-level index of all portals: https://dev.wix.com/docs/llms.txt > - Full concatenated docs: https://dev.wix.com/docs/llms-full.txt ## Resource: About App Promotion ## Article: About App Promotion ## Article Link: https://dev.wix.com/docs/build-apps/launch-your-app/app-promotion/about-app-promotion.md ## Article Content: # About App Promotion Effective app promotion is key to growing your Wix user base and standing out on the Wix App Market. It's about improving discoverability and showcasing your app's value. When you promote your app well, you foster engagement and position it for long-term success. With the right strategies, you can: * **Boost visibility:** Stand out on the Wix App Market and attract more Wix users. * **Acquire Wix users:** Highlight your app's value to engage and grow your audience. * **Increase engagement:** Build relationships, gather feedback, and create advocates. This article provides an overview of both self-promotion strategies and Wix-led promotion opportunities. ## Self-promotion strategies You can actively promote your app through multiple channels to increase visibility and Wix user acquisition. Successful apps typically combine several strategies including reaching out to Wix users directly, optimizing pricing strategies, improving SEO, leveraging social media, and building relationships in the Wix community. Learn more about [best practices for app promotion](https://dev.wix.com/docs/build-apps/launch-your-app/app-promotion/self-promotion/best-practices-for-app-promotion.md). ## App promotion opportunities from Wix Wix can promote your app through programs like Wix Choice, curated placements, seasonal sales, and improved search rankings. These promotions can significantly boost your app's visibility and growth. Learn more about [app promotion opportunities from Wix](https://dev.wix.com/docs/build-apps/launch-your-app/app-promotion/promotion-by-wix/app-promotion-opportunities-from-wix.md). ## See also * [Best practices for app promotion](https://dev.wix.com/docs/build-apps/launch-your-app/app-promotion/self-promotion/best-practices-for-app-promotion.md) * [App promotion opportunities from Wix](https://dev.wix.com/docs/build-apps/launch-your-app/app-promotion/promotion-by-wix/app-promotion-opportunities-from-wix.md) * [About User support](https://dev.wix.com/docs/build-apps/manage-your-app/user-support/about-user-support.md) * [UX / UI best practices](https://dev.wix.com/docs/build-apps/develop-your-app/design/ux-and-ui-best-practices.md) --- > Portal Navigation: > > - Append `.md` to any URL under `https://dev.wix.com/docs/` to get its markdown version. > - Pages are either content pages (article or reference text) or menu pages (a list of links to child pages). > - To get a menu page, truncate any URL to a parent path and append `.md` (e.g. `https://dev.wix.com/docs/sdk.md`, `https://dev.wix.com/docs/sdk/core-modules.md`). > - Top-level index of all portals: https://dev.wix.com/docs/llms.txt > - Full concatenated docs: https://dev.wix.com/docs/llms-full.txt ## Resource: App Promotion Assets ## Article: App Promotion Assets ## Article Link: https://dev.wix.com/docs/build-apps/launch-your-app/app-promotion/app-promotion-assets.md ## Article Content: # App Promotion Assets Social media marketing is one of the most effective ways to promote your app and boost its visibility. Sharing your app listing on platforms like Facebook, Instagram, and X (Twitter) helps you reach a broader audience and encourages your followers to try it out. This article contains Wix-branded promotional badges and images that you can easily use on your website and social media posts. ## App Market badges You can promote your Wix app with our “Available in the Wix App Market” badge. Use the badge on your site and anywhere you promote your app. To add an App Market badge: 1\. Choose your favorite color and save the image:
![](https://d2x3xhvgiqkx42.cloudfront.net/12345678-1234-1234-1234-1234567890ac/0e041dbb-8bbe-4be4-a1ae-883b5cb05e2b/2023/05/09/2eac4412-78e5-4246-bece-d141923267a3/8c4dc1e2-badb-4fe2-8c5a-850731a88b8f.png)
![](https://d2x3xhvgiqkx42.cloudfront.net/12345678-1234-1234-1234-1234567890ac/0e041dbb-8bbe-4be4-a1ae-883b5cb05e2b/2023/05/09/7d776a92-c8de-4f65-98e5-5e0d584e153e/9bbdf122-dd26-43d5-97e9-1c71e4a0ca55.png)
2\. Link the badge to your app overview modal: www.wix.com/app-market/ Here are some guidelines to follow when using the badge: * Don’t modify the badge in any way except to resize it. * Keep a minimum of 20px between the Wix badge and other content and images. * Make sure that your badge is always linked to your app in the Wix App Market. * The badge shouldn’t be displayed on any website that promotes: pornography, violence, gambling, hate speech or content that violates other applicable laws. * Remember that all Wix images are proprietary and protected under intellectual laws, so please use them appropriately. > **Note:** > > Prefer to use our logo instead? You can [download our logo](https://www.wix.com/about/design-assets) and use it on your site – we just ask that you follow the guidelines listed. #### Example
![](https://d2x3xhvgiqkx42.cloudfront.net/12345678-1234-1234-1234-1234567890ac/0e041dbb-8bbe-4be4-a1ae-883b5cb05e2b/2023/05/09/ae011848-35a8-4a75-a262-00b5a24574a9/358a03a3-5d22-4fd0-b6ec-a78cfd5cf73d.png)
## Social post images Want to shout about launching on the Wix App Market across your social channels? Feel free to save and use these images.
![](https://d2x3xhvgiqkx42.cloudfront.net/12345678-1234-1234-1234-1234567890ac/0e041dbb-8bbe-4be4-a1ae-883b5cb05e2b/2023/05/09/b68947d7-ba66-47b6-a724-b73c9591bcfe/0ea9a395-f7d2-46d4-8c5b-87e4347b3a09.png)
### Download images **Facebook Ad**: [Blue](https://static.wixstatic.com/media/0ef759_e949ac1c4590433e9ec5d562119630c3~mv2.png), [Orange](https://static.wixstatic.com/media/0ef759_0061b63cd2f74e6083c7015ce573c774~mv2.png), [Purple](https://static.wixstatic.com/media/0ef759_ca60d73af7e64414a23a9862c1aad3d9~mv2.png) **Facebook Business Page Cover**: [Blue](https://static.wixstatic.com/media/0ef759_6bccd80bfd60414daab575bc627befda~mv2.png), [Orange](https://static.wixstatic.com/media/0ef759_656ef2d183b24e5caef4852cf338b5cb~mv2.png), [Purple](https://static.wixstatic.com/media/0ef759_70a9148332234367854079872e81c803~mv2.png) **Facebook Photo Post**: [Blue](https://static.wixstatic.com/media/0ef759_74bf76156ea045e389c0e7d38ac876d2~mv2.png), [Orange](https://static.wixstatic.com/media/0ef759_ddea88037f45443ea622e39631e85d51~mv2.png), [Purple](https://static.wixstatic.com/media/0ef759_4fd7cbb0fbb84f448586c2785ff2e59f~mv2.png) **Instagram Landscape:** [Blue](https://static.wixstatic.com/media/0ef759_8819e54e86fb4f0ab20ce16c3ad9f191~mv2.png), [Orange](https://static.wixstatic.com/media/0ef759_14b9756d7d20417ea4ae6b376f5db736~mv2.png), [Purple](https://static.wixstatic.com/media/0ef759_7da6c98ab90d4dc88669f9ff15d79367~mv2.png) **Instagram Portrait:** [Blue](https://static.wixstatic.com/media/0ef759_e277e9e0421b4573bfeaf64432b6bae0~mv2.png), [Orange](https://static.wixstatic.com/media/0ef759_d901184875c944a8a0d6b17bcaa29d1c~mv2.png), [Purple](https://static.wixstatic.com/media/0ef759_597e82eecedc4f69b169b41a62e1ba6e~mv2.png) **Instagram Square:** [Blue](https://static.wixstatic.com/media/0ef759_6f31c0fe8739466aa6f98a0fce8c40db~mv2.png), [Orange](https://static.wixstatic.com/media/0ef759_2b9c8fa19a304166ba7fcd47a39f8031~mv2.png), [Purple](https://static.wixstatic.com/media/0ef759_d658545f0e784ba28c902d310672be70~mv2.png) **LinkedIn Shared Link:** [Blue](https://static.wixstatic.com/media/0ef759_7bf1de8400034dc1ab8aec095039fc50~mv2.png), [Orange](https://static.wixstatic.com/media/0ef759_cfab25c0ebfb42f2b3bfd8b01468effb~mv2.png), [Purple](https://static.wixstatic.com/media/0ef759_61faae7854e54cb18cc73846ce5ccfdd~mv2.png) **LinkedIn Single Image:** [Blue](https://static.wixstatic.com/media/0ef759_5f11b6764a274cd5b53d93ad8c590ee3~mv2.png), [Orange](https://static.wixstatic.com/media/0ef759_8de157929c374bd493fc3e5a14712818~mv2.png), [Purple](https://static.wixstatic.com/media/0ef759_2cfc67ae3fca4ae7846b9994db0e9507~mv2.png) **Twitter Shared Link:** [Blue](https://static.wixstatic.com/media/0ef759_0178a6e391384ae88c7407027349f812~mv2.png), [Orange](https://static.wixstatic.com/media/0ef759_36e9a22a24964a338df7869bd1e7680c~mv2.png), [Purple](https://static.wixstatic.com/media/0ef759_ac2a9323f69d433a8e8c0fddddf6be35~mv2.png) **Twitter In-Stream Photos:** [Blue](https://static.wixstatic.com/media/0ef759_5a687a69c3c34a9abb72321f8d045dd8~mv2.png), [Orange](https://static.wixstatic.com/media/0ef759_3a616964a60b404385d44427073a23fa~mv2.png), [Purple](https://static.wixstatic.com/media/0ef759_c5a7c2b6a9b645868f7cf18becd7bc05~mv2.png) ## Social media marketing tools Wix offers built-in social media marketing tools, allowing seamless integration with popular platforms. You can automatically generate promotional videos and marketing materials using our solutions like Vimeo and Adobe Express. Learn more about [Social Media Marketing with Wix](https://support.wix.com/en/article/social-media-marketing-an-overview). ## See also - [App promotion opportunities from Wix](https://dev.wix.com/docs/build-apps/launch-your-app/app-promotion/app-promotion-opportunities-from-wix.md) - [Create an App Market listing](https://dev.wix.com/docs/build-apps/launch-your-app/market-listing/about-market-listings.md) - [SEO Best Practices](https://dev.wix.com/docs/build-apps/launch-your-app/app-promotion/seo-best-practices.md) --- > Portal Navigation: > > - Append `.md` to any URL under `https://dev.wix.com/docs/` to get its markdown version. > - Pages are either content pages (article or reference text) or menu pages (a list of links to child pages). > - To get a menu page, truncate any URL to a parent path and append `.md` (e.g. `https://dev.wix.com/docs/sdk.md`, `https://dev.wix.com/docs/sdk/core-modules.md`). > - Top-level index of all portals: https://dev.wix.com/docs/llms.txt > - Full concatenated docs: https://dev.wix.com/docs/llms-full.txt ## Resource: Best Practices for App Promotion ## Article: Self-Promotion Best Practices ## Article Link: https://dev.wix.com/docs/build-apps/launch-your-app/app-promotion/self-promotion/best-practices-for-app-promotion.md ## Article Content: # Best Practices for App Promotion Promoting your app effectively is essential for growing your user base and standing out on the Wix App Market. By using the right strategies, you can boost visibility, acquire users, and increase engagement. This article covers proven strategies that successful apps use to promote themselves and reach their target audience. ## Reach out to users Build direct connections with your audience through targeted communication: * Announce app launch and updates with [press releases](https://dev.wix.com/docs/build-apps/launch-your-app/app-promotion/self-promotion/write-a-press-release.md). * Run targeted [email campaigns](https://dev.wix.com/docs/build-apps/launch-your-app/app-promotion/self-promotion/send-marketing-emails.md) about new features and special promotions. * [Host webinars](https://www.wix.com/blog/how-to-create-webinar) using tools like [Wix Video](https://www.wix.com/app-market/video-library) or YouTube Live. ## Optimize your pricing strategy Make your app more attractive to potential users with strategic pricing: * Run promotional campaigns with [discount coupons](https://dev.wix.com/docs/build-apps/launch-your-app/app-promotion/self-promotion/create-a-coupon.md) and [sales](https://dev.wix.com/docs/build-apps/launch-your-app/app-promotion/self-promotion/offer-sales.md) for new or loyal users. * Offer [free trials](https://dev.wix.com/docs/build-apps/launch-your-app/pricing-and-billing/set-up-and-manage-free-trials.md) to let users experience premium features. * Provide a [freemium](https://dev.wix.com/docs/build-apps/launch-your-app/pricing-and-billing/set-up-a-freemium-business-model.md) option to attract users before they buy-in. * Design pricing tiers with clear benefits for different user needs. ## Improve discoverability with SEO Optimize your app's visibility in search results: * Follow the [SEO best practices](https://dev.wix.com/docs/build-apps/launch-your-app/app-promotion/self-promotion/seo-best-practices.md). * [Define app category and keywords](https://dev.wix.com/docs/build-apps/launch-your-app/market-listing/add-your-get-found-info.md) in the Wix app dashboard. * Integrate [high-quality video marketing](https://www.wix.com/blog/video-marketing) into your website and social media content. ## Maximize reach with social media Leverage social platforms to expand your audience: * Share your app market listing on platforms like Instagram, Facebook, X (Twitter), and LinkedIn. * Use Wix-branded [promotional assets](https://dev.wix.com/docs/build-apps/launch-your-app/app-promotion/app-promotion-assets.md). ## Build relationships in the Wix community Engage with the Wix developer and user community: * Join discussions on [Wix Studio forums](https://forum.wixstudio.com/?utm_source=workspace_header) and [Discord](https://discord.gg/aN9ubnrs2D). * Participate in [community events](https://www.wix.com/studio/academy/event). ## See also * [About app promotion](https://dev.wix.com/docs/build-apps/launch-your-app/app-promotion/about-app-promotion.md) * [App promotion opportunities from Wix](https://dev.wix.com/docs/build-apps/launch-your-app/app-promotion/promotion-by-wix/app-promotion-opportunities-from-wix.md) * [Cross-promote your apps](https://dev.wix.com/docs/build-apps/launch-your-app/app-promotion/self-promotion/cross-promote-your-apps.md) * [About user support](https://dev.wix.com/docs/build-apps/manage-your-app/user-support/about-user-support.md) --- > Portal Navigation: > > - Append `.md` to any URL under `https://dev.wix.com/docs/` to get its markdown version. > - Pages are either content pages (article or reference text) or menu pages (a list of links to child pages). > - To get a menu page, truncate any URL to a parent path and append `.md` (e.g. `https://dev.wix.com/docs/sdk.md`, `https://dev.wix.com/docs/sdk/core-modules.md`). > - Top-level index of all portals: https://dev.wix.com/docs/llms.txt > - Full concatenated docs: https://dev.wix.com/docs/llms-full.txt ## Resource: Create a Coupon ## Article: Create a Coupon ## Article Link: https://dev.wix.com/docs/build-apps/launch-your-app/app-promotion/self-promotion/create-a-coupon.md ## Article Content: # Create a Coupon You can create coupons in your app's dashboard. Here are the types you can create: - **Regular**: Regular coupons offer a discount to boost sales or compensate users if they encounter an issue with your app. - **Testing**: These coupons allow someone to test your app without incurring any costs. ## Before you begin There are a couple of things you need before creating a new coupon: - You need a published app with at least one recurring (monthly or yearly) pricing plan. - Only apps that use a Wix pricing page can use coupons. If you want to switch to a Wix pricing page, [let us know](https://www.wix.com/support-chatbot?nodeId=25a57397-ccf7-4376-8b74-48d51edf7159&referral=devRels). ## Create a new coupon To create a new coupon: 1. In your app's dashboard, go to the **Coupons** page and click **Add Coupon**. 2. Add your coupon's details: - **Name (for example, Summer Sale, or Test 1)**: This is seen by users, so make sure it's suitable for an external audience. - **Code (for example, SummerSale, or Test1)**: Your App ID will be added as a prefix to make sure all codes are unique. Once a code is created and saved, you can't use its name for other coupons – even if you delete that coupon. - **Discount**: Set a percentage (up to 100%), or a fixed deduction amount. You can pick from several currencies, but it's important that you select a currency relevant to your app's target audience. - **Testing coupon**: Select if this coupon is for app testing purposes. If selected it automatically sets the discount to 100%, and all other fields are set to default values. 3. Choose at least one plan and billing cycle that you want this coupon to apply to. 4. Choose a validity period, and the total amount of uses for the coupon (up to 500). You can also choose whether to limit its use to one per account. 5. Click **Save**. Your coupon is now active and ready to use.
**Promote your coupon**: Once you've got a coupon code set up, you can share it with your email subscribers and social media followers, or display it on your app's website.
## See also - [Create an App Market listing](https://dev.wix.com/docs/build-apps/launch-your-app/market-listing/about-market-listings.md) - [SEO best practice](https://dev.wix.com/docs/build-apps/launch-your-app/app-promotion/seo-best-practices.md) --- > Portal Navigation: > > - Append `.md` to any URL under `https://dev.wix.com/docs/` to get its markdown version. > - Pages are either content pages (article or reference text) or menu pages (a list of links to child pages). > - To get a menu page, truncate any URL to a parent path and append `.md` (e.g. `https://dev.wix.com/docs/sdk.md`, `https://dev.wix.com/docs/sdk/core-modules.md`). > - Top-level index of all portals: https://dev.wix.com/docs/llms.txt > - Full concatenated docs: https://dev.wix.com/docs/llms-full.txt ## Resource: Cross-Promote Your Apps ## Article: Cross-Promote Your Apps ## Article Link: https://dev.wix.com/docs/build-apps/launch-your-app/app-promotion/self-promotion/cross-promote-your-apps.md ## Article Content: # About Cross-Promoting Your Apps You can promote your other Wix apps within your app, as long as the content follows specific guidelines. This article explains these guidelines and offers design examples to help you create compliant promotional content. ## Guidelines To ensure your app promotion complies with Wix policies: * Don't promote or advertise anything other than your own Wix apps. * Limit promotional content to the following approved locations: * **Editor:** Use a settings panel to feature a link to your apps. * **Dashboard page:** Create a section in the page to showcase your apps. * Keep promotional content contained within its own area in the settings panel or dashboard page. * Maintain a clean, simple design that is unobtrusive. * Link only to the following approved destinations: * Your Wix App Market developer page. * Individual app listings on the Wix App Market. ## Design examples Use the examples below as a guide for creating compliant app promotions. ### App promotion in the editor This example features an **Explore more apps** link at the bottom of the settings panel. ![App promotion in the editor](https://wixmp-833713b177cebf373f611808.wixmp.com/images/46bbde563f955bce4f369964d2ab63fa.png) ### App promotion in the dashboard This example features an **Explore more apps** link at the bottom of the settings. ![App promotion in the dashboard small](https://wixmp-833713b177cebf373f611808.wixmp.com/images/3a8311b76cf6917d6cd93a1a6fc8340e.png) This example features a **More apps by us** area with links to multiple apps. ![App promotion in the dashboard large](https://wixmp-833713b177cebf373f611808.wixmp.com/images/ad2ebf689423caeb15aff1c6b68400a5.png) ## Publish your promotion Once your promotion is ready: 1. [Release a new app version](https://dev.wix.com/docs/build-apps/manage-your-app/versioning/release-a-new-app-version.md#how-to-release-a-new-version). 2. If your app isn't live in the Wix App Market, and you'd like to submit it, [submit your first app version](https://dev.wix.com/docs/build-apps/launch-your-app/app-distribution/submit-your-first-app-version.md). After submission, your app is added to the review queue and published upon approval. ## See also * [About App Promotion](https://dev.wix.com/docs/build-apps/launch-your-app/app-promotion/about-app-promotion.md) --- > Portal Navigation: > > - Append `.md` to any URL under `https://dev.wix.com/docs/` to get its markdown version. > - Pages are either content pages (article or reference text) or menu pages (a list of links to child pages). > - To get a menu page, truncate any URL to a parent path and append `.md` (e.g. `https://dev.wix.com/docs/sdk.md`, `https://dev.wix.com/docs/sdk/core-modules.md`). > - Top-level index of all portals: https://dev.wix.com/docs/llms.txt > - Full concatenated docs: https://dev.wix.com/docs/llms-full.txt ## Resource: Manage Site Visitor Email Subscriptions ## Article: Manage Site Visitor Email Subscriptions ## Article Link: https://dev.wix.com/docs/build-apps/launch-your-app/app-promotion/self-promotion/manage-site-visitor-email-subscriptions.md ## Article Content: # Manage Site Visitor Email Subscriptions If your app sends emails to a site’s users, it’s really important to make sure you don’t send emails to anyone that’s unsubscribed from that site’s mailing list. This helps you to comply with regulations relating to email communications (like GDPR) and maintain a positive user experience. Here’s how to manage site visitor subscriptions correctly: ## Step 1 | Check the user's subscription status Before you send any emails, check whether or not a user is subscribed. There are two ways to do this: 1. Use our [Email Subscriptions API](https://dev.wix.com/docs/rest/crm/communication/email-subscriptions/introduction.md) to query the email address and check a user’s subscription status. 2. Listen to the [Email Subscription Changed Webhook](https://dev.wix.com/docs/rest/crm/communication/email-subscriptions/emailsubscription-email-subscription-changed.md) to see whenever an email subscription changes. ## Step 2 | Update the user's subscription status When a user unsubscribes, you need to make sure that you update the email subscription status. You can either: 1. [Generate an unsubscribe link using our API](https://dev.wix.com/docs/rest/crm/communication/email-subscriptions/generate-unsubscribe-link.md): Add this to all of the emails you send to that specific email address and it automatically unsubscribes the user when they click the link 2. Use your own unsubscribe link / method if you have one: If a user does unsubscribe, you can make an API request to [update that info](https://dev.wix.com/docs/rest/crm/communication/email-subscriptions/upsert-email-subscription.md). ## See also - [Send marketing emails](https://dev.wix.com/docs/build-apps/launch-your-app/app-promotion/send-marketing-emails.md) - [About app promotion](https://dev.wix.com/docs/build-apps/launch-your-app/app-promotion/about-app-promotion.md) --- > Portal Navigation: > > - Append `.md` to any URL under `https://dev.wix.com/docs/` to get its markdown version. > - Pages are either content pages (article or reference text) or menu pages (a list of links to child pages). > - To get a menu page, truncate any URL to a parent path and append `.md` (e.g. `https://dev.wix.com/docs/sdk.md`, `https://dev.wix.com/docs/sdk/core-modules.md`). > - Top-level index of all portals: https://dev.wix.com/docs/llms.txt > - Full concatenated docs: https://dev.wix.com/docs/llms-full.txt ## Resource: Offer Sales ## Article: Offer Sales ## Article Link: https://dev.wix.com/docs/build-apps/launch-your-app/app-promotion/self-promotion/offer-sales.md ## Article Content: # Offer Sales You can create sales to boost your user base and app visibility by offering a discount on all your app's plans. The discount automatically displays on your market listing, pricing plan page, and the Manage Apps dashboard. ## App eligibility You can only create sales for apps that meet certain criteria. | Eligible apps | Non-eligible apps | | ------------- | ----------------- | | Published apps that:

  • Have recurring plans

  • Have usage-based plans

  • Are billed internally
| Apps that:

  • Aren't published

  • Are free

  • Aren't billed by Wix

  • Contain single plans only

  • With bundles/benefits
  • | ## Considerations Consider the following before creating a sale: - Only 1 sale can be active at a time. - The discount percentage applies to all of your plans. You can't offer different discounts for each plan. - For apps with [usage-based plans](https://dev.wix.com/docs/build-apps/launch-your-app/pricing-and-billing/set-up-a-usage-based-business-model.md), Wix applies the discount only to your plan's base fee. You must calculate the discounted rate of any additional charges and send the total amount after the discount to Wix. - Once you create a sale, you can edit the terms of your sale at any time up to and including the sale duration. - If you delete a plan that is on sale, the plan is no longer part of the sale. If the deleted plan was the only plan in the sale, the sale ends and is no longer active. ## Options for defining a sale Planning your sale requires consideration to maximize customer engagement and drive app adoption. When defining the sale, provide values strategically for the following: - **Sale duration**: Start and end dates for the sale. - **Discount options**: Discount percentage for the plan price. - **Supported plan cycles**: - **Yearly**: The full subscription term is discounted for the first year. - **Monthly**: Discount the first month or the first 12 months. ## Create a sale After determining the options you want your sale to offer, you are ready to create the sale. 1. Go to **Manage** > **App Market** > **Sales** in your app's dashboard. 1. Click **Create Sale**. 1. Enter a name for the sale. This name is only visible to you. 1. Enter a discount percentage from 5%-95%. 1. Select the plans to include in the sale. 1. Select the billing cycle(s): **Yearly** or **Monthly**. For monthly, choose either the first cycle or the first 12 cycles. 1. Select the sale duration, start date, and end date. 1. Click **Save**. ## Track sale performance Monitor your app's sale performance from **Payouts** in your app's dashboard, where you'll find detailed reports on sales and discounts applied. You can see the sale data under the **Offers** column. ## Helpful APIs Wix offers APIs that you can call to retrieve details about your users' participation in the sale and facilitate checkout at the sale price. While you can get this information in [Payouts](https://manage.wix.com/app-selector?title=Select+an+App&primaryButtonText=Select+Site&actionUrl=https%3A%2F%2Fdev.wix.com%2Fapps%2F%7BappId%7D%2Fpayouts), using APIs gives you instantaneous access to this data without your waiting for tables to update.
    **Tip:** You can also see information about upgrades on the [Statistics](https://manage.wix.com/app-selector?title=Select+an+App&primaryButtonText=Select+Site&actionUrl=https%3A%2F%2Fdev.wix.com%2Fapps%2F%7BappId%7D%2Fstatistics) page, but there is no indication if the upgrade came from a sale.
    You can call these APIs to export the data and extract the information you need: - [Get App Instance API](https://dev.wix.com/docs/rest/app-management/app-instance/get-app-instance.md): Call this API to check if a user upgraded during the sale. The API returns an `availablePlans` array. Each plan in the array has a `source` field that tells you where the sale originated from. The `source` field displays the sale name. - [Get URL API](https://dev.wix.com/docs/rest/app-management/app-billing/billing/get-url.md): This API returns URLs to external pricing pages, which you can use to redirect the user straight to checkout. Keep in mind that if a coupon code is applied at checkout, the coupon terms overrides the sale terms during the checkout. - [List App Plans By App Id](https://dev.wix.com/docs/rest/app-management/app-billing/app-plans/list-app-plans-by-app-id.md): Call this API to see the discounted price in the ```appPlans``` property of the response. ## See also - [About app promotion](https://dev.wix.com/docs/build-apps/launch-your-app/app-promotion/about-app-promotion.md) --- > Portal Navigation: > > - Append `.md` to any URL under `https://dev.wix.com/docs/` to get its markdown version. > - Pages are either content pages (article or reference text) or menu pages (a list of links to child pages). > - To get a menu page, truncate any URL to a parent path and append `.md` (e.g. `https://dev.wix.com/docs/sdk.md`, `https://dev.wix.com/docs/sdk/core-modules.md`). > - Top-level index of all portals: https://dev.wix.com/docs/llms.txt > - Full concatenated docs: https://dev.wix.com/docs/llms-full.txt ## Resource: Send Marketing Emails ## Article: Send Marketing Emails ## Article Link: https://dev.wix.com/docs/build-apps/launch-your-app/app-promotion/self-promotion/send-marketing-emails.md ## Article Content: # Send Marketing Emails You can send out marketing emails to let Wix users know about new features and more. If you have a Wix website, you can easily leverage our [built-in email marketing solution](https://support.wix.com/en/article/email-marketing-creating-and-sending-a-campaign-from-start-to-finish) to manage your campaigns and communicate smoothly with your clients. For other users, platforms like Mailchimp or AWeber provide similar functionality. To explore more ways to create impactful email campaigns, check out [16 Email Marketing Tips to Drive Better Campaigns](https://www.wix.com/blog/email-marketing-tips) and [Wix Email Marketing Best Practices](https://support.wix.com/en/article/wix-email-marketing-best-practices). > **Note:** When sending emails, make sure that don’t contact anyone who has unsubscribed from that site’s mailing list. This is important for complying with regulations like GDPR and maintaining a positive user experience. For further guidance, see [Manage Site Visitor Email Subscriptions](https://dev.wix.com/docs/build-apps/launch-your-app/app-promotion/manage-site-visitor-email-subscriptions.md). ## Best practices * Make sure the email has an unsubscribe option. * Make it clear from your email that it’s from your company, and not from Wix.   * Add a link to your app in the App Market ```www.wix.com/app-market/your-app-slug```, or create a direct link so that users can open your app in one of the their Wix sites. * Alternatively, if you want to direct users to a landing page make sure this page has a CTA that links to your app in Wix. * Use an email tracking service so that you can get stats about email performance. Here’s an example:
    ![](https://d2wzpmhzgtb9fu.cloudfront.net/docs/wp-content/uploads/2016/06/26130502/57_Email-Marketing_Dev-Center.jpg)
    ## Set up a direct link to your app When sending marketing emails you need to direct users to open your app in one of their Wix sites (not your own website). You will need to construct a URL to open the Wix Site Selector, so that users can choose which of their sites to open your app in. Once users select a site, they’ll be directed to your app in that site. To open the site selector you will encode the value of your app's iframe URL within the editor or internal dashboard. You will add this value at the end of the following URL: ```https://manage.wix.com/my-account/site-selector/?title=Select One of Your Sites&buttonText=Open App&actionUrl=``` Here’s how to construct and encode the iframe URL to get the actionUrl: 1. Go to your [app's dashboard](https://manage.wix.com/account/custom-apps) and get your App ID. 2. Construct the iframe URL: * Website components: Replace ```appID``` with your app’s ID in the following URL: ```https://editor.wix.com/html/editor/web/renderer/edit/{{applications.HtmlWeb.idInApp}}?metaSiteId={{metaSiteId}}&editorSessionId={{esi}}&etpa=``` * Dashboard components: Replace ```appID``` with your app’s ID in the following URL: ```https://manage.wix.com/dashboard/{{metaSiteId}}/app//?``` 3. Add the encoded iframe URL: * Encode this iframe URL with a URL encoding tool (like [this one](http://www.url-encode-decode.com/)). The encoded URL is the value for the actionURL key. * Enter the encoded URL as the actionURL key in the site selector URL above. ### Example of our site selector:
    ![](https://d2x3xhvgiqkx42.cloudfront.net/12345678-1234-1234-1234-1234567890ac/8ea3b84d-f31b-453b-821c-e197ed07b679/2021/05/11/044c1cfe-f3a3-42dd-ba65-8325cad122b6/0db7be97-e3b2-4d28-b38f-d6ae12fe30bb.png)
    ## See also - [Create a coupon campaign](https://dev.wix.com/docs/build-apps/launch-your-app/app-promotion/create-a-coupon.md) - [Improve your SEO](https://dev.wix.com/docs/build-apps/launch-your-app/app-promotion/seo-best-practices.md) --- > Portal Navigation: > > - Append `.md` to any URL under `https://dev.wix.com/docs/` to get its markdown version. > - Pages are either content pages (article or reference text) or menu pages (a list of links to child pages). > - To get a menu page, truncate any URL to a parent path and append `.md` (e.g. `https://dev.wix.com/docs/sdk.md`, `https://dev.wix.com/docs/sdk/core-modules.md`). > - Top-level index of all portals: https://dev.wix.com/docs/llms.txt > - Full concatenated docs: https://dev.wix.com/docs/llms-full.txt ## Resource: SEO Best Practices ## Article: SEO Best Practice ## Article Link: https://dev.wix.com/docs/build-apps/launch-your-app/app-promotion/self-promotion/seo-best-practices.md ## Article Content: # SEO Best Practice Guide Search Engine Optimization (SEO) is a set of strategies aimed at enhancing the performance of your app’s listing and website pages in organic search results (Google, Bing, etc.). This short guide tells you a few great ways to improve the SEO of your app listing page and increase your app’s visibility. ## Encourage user reviews Your App Market review star ratings appear in actual Google search results. Your star rating can increase the amount of users coming from Google search and promotes trust to potential users both on Google and within the Wix App Market itself. ![SEO1](https://wixmp-833713b177cebf373f611808.wixmp.com/images/acd98b572a3062d6fb4d50fe47f1789a.png) Learn how to prompt users [to leave reviews](https://dev.wix.com/docs/build-apps/manage-your-app/user-support/user-reviews.md#get-more-reviews-with-prompts). ## Optimize your App Market listing Make your App Market listing easy for users to discover with clear and descriptive information by incorporating high-quality images, videos, features, and a compelling app description. Google utilizes textual and visual content to understand and rank web pages, emphasizing the importance of using relevant keywords to enhance organic performance. Describe your product using relevant keywords to improve your organic performance. The best way to think about keywords is, “what would a user type into Google to find this product or service”. If you are starting with app store optimization, you should consider improving the copy on your page so users can find your apps using branded and non-branded keywords. - **Branded:** Your brand is included in the search. E.g., Wix Stores. Including the name of our app and the behind it helps you to quickly capture qualified leads from users who know and appreciate our work. - **Non-branded:** No brand included in the search: E.g., _eCommerce website tools_. These keywords help you reach new users who require the solutions that your app offers. Here’s an example of a branded search for “Modalyst” – you can see the App Market listing ranks immediately after their own website: Learn more about [optimizing your App Market listing](https://dev.wix.com/docs/build-apps/launch-your-app/market-listing/about-market-listings.md). ## Create an integrations page on your website This helps to show users your relevancy, and integration with a strong brand like Wix sends additional trust signals. Also for branded keyword searches, which have very high conversion intent, your integration page and App Market listing often appear in Google search results. Here are some examples of successful apps with integration pages: - [Modalyst](https://www.modalyst.co/wix/) - [Printful](https://www.printful.com/integrations/wix) - [Sprocket](https://www.spocket.co/integrations/wix) ## Develop niche-related content When users search for branded topics, the conversion intent is very high. Also it’s less competitive because fewer people are competing for that query. Here’s an example: - “How to start a Wix dropshipping store” is far less competitive than “How to create a dropshipping store”. - For branded search you can see two apps on the market created blog posts on the “Wix dropshipping” topic, and rank on page 1. Whereas for the non-branded search, the page 1 results are dominated by huge brands and affiliates. - Don’t forget about video content – YouTube is the second largest search engine in the world. ## Utilize relevant links Incorporate relevant and meaningful links within your content and to your content. Google gains context by understanding [backlinks connections](https://www.wix.com/seo/learn/resource/backlinks-101) and anchor text that lead to each page. Adding relevant links to and from your app can influence the relevancy of your page in search results. - Include a link to your homepage on your App Market listing rather than a PPC or landing page for a broader representation of your brand. - When you mention Wix, your app, or a specific Wix product (for example [Wix eCommerce](https://www.wix.com/ecommerce/website) or [Wix Blog](https://www.wix.com/start/blog)) include a link to the relevant page or your specific App Market listing. ![SEO2](https://wixmp-833713b177cebf373f611808.wixmp.com/images/d5ddc41a6edac84de1c9e4713e85f820.png) ![SE03](https://wixmp-833713b177cebf373f611808.wixmp.com/images/dafbc98b9b0150741d64e63d5c3f387f.png) ## See also - [About market listings](https://dev.wix.com/docs/build-apps/launch-your-app/market-listing/about-market-listings.md). - [About app promotion](https://dev.wix.com/docs/build-apps/launch-your-app/app-promotion/about-app-promotion.md) --- > Portal Navigation: > > - Append `.md` to any URL under `https://dev.wix.com/docs/` to get its markdown version. > - Pages are either content pages (article or reference text) or menu pages (a list of links to child pages). > - To get a menu page, truncate any URL to a parent path and append `.md` (e.g. `https://dev.wix.com/docs/sdk.md`, `https://dev.wix.com/docs/sdk/core-modules.md`). > - Top-level index of all portals: https://dev.wix.com/docs/llms.txt > - Full concatenated docs: https://dev.wix.com/docs/llms-full.txt ## Resource: Write a Press Release ## Article: Write a Press Release ## Article Link: https://dev.wix.com/docs/build-apps/launch-your-app/app-promotion/self-promotion/write-a-press-release.md ## Article Content: # Write a Press Release A press release is a great way to spread the word about your app launching on the Wix App Market. Before you can distribute your press release, it must be approved by Wix. This can take up 10 days so please allow plenty of time. To get approval you should [open a ticket](https://www.wix.com/support-chatbot?nodeId=25a57397-ccf7-4376-8b74-48d51edf7159&referral=devRels) with a link to your PR release draft along with details about your distribution plan and target outlets. The app must be fully tested and available to users at the time of the announcement. Once approved, we'll agree a distribution date / time with you. ## Press release template You can use this template to help write your press release: > A CLEAR HEADLINE: E.g. [App Name] Launches on the Wix App Market > > [Location] – [Date] – [Company Name], today announced a partnership with [Wix.com Ltd. (Nasdaq: WIX). > > The second paragraph is your chance to tell the world what makes your app innovative and the problem it solves for users. It should grab the reader’s attention. > > Next you can provide more detail and expand on your app’s key features and benefits. What differentiates your app from the competition? Why should readers care? > > “This spot should be used for a quote from an exec within your company and can add a bit more detail not already covered above. Why is this announcement so exciting?” > > “If Wix provides a quote supporting the announcement, it should go here.” > > Use this slot to talk about availability: When will your app be released, and what geographical locations and languages does it support? > > [Optional] Add your app's pricing if relevant – is there a free version users can try? What subscription model do you offer? > > About [Company Name] > > The section is for your company’s boilerplate – a general description of your company. > > Contact Info > > Include any contact info, website details or a link to your App Market listing. ### Things to avoid * Don't include Wix data – our statistics and numbers change often, and it's very important that we don't publish inaccurate numbers in the press. * Don't make any unsubstantiated, generic claims like the app is 'exclusive' or 'the best'. * Don't include Wix boilerplate. ## See also - [About app promotion](https://dev.wix.com/docs/build-apps/launch-your-app/app-promotion/about-app-promotion.md) - [Share your listing on your website and social media](https://dev.wix.com/docs/build-apps/launch-your-app/app-promotion/app-promotion-assets.md) --- > Portal Navigation: > > - Append `.md` to any URL under `https://dev.wix.com/docs/` to get its markdown version. > - Pages are either content pages (article or reference text) or menu pages (a list of links to child pages). > - To get a menu page, truncate any URL to a parent path and append `.md` (e.g. `https://dev.wix.com/docs/sdk.md`, `https://dev.wix.com/docs/sdk/core-modules.md`). > - Top-level index of all portals: https://dev.wix.com/docs/llms.txt > - Full concatenated docs: https://dev.wix.com/docs/llms-full.txt ## Resource: App Promotion Opportunities from Wix ## Article: App Promotion Opportunities from Wix ## Article Link: https://dev.wix.com/docs/build-apps/launch-your-app/app-promotion/promotion-by-wix/app-promotion-opportunities-from-wix.md ## Article Content: # App Promotion Opportunities from Wix Wix offers multiple ways to promote your app and increase your visibility to help you reach more users. Wix selects and features apps across the Wix platform, including the Wix App Market, Wix dashboard, and within specific verticals, based on various criteria. > **Note**: Not all promotion options rely on ratings, installs, or metrics alone. Some prioritize filling user needs, highlighting solutions, or supporting strategic initiatives. ## Types of promotion The following sections describe the various approaches that Wix uses to help apps gain visibility across the platform. ### Wix Choice program Wix Choice is a recognition program for high-quality apps. Learn more about the [selection criteria and benefits](https://dev.wix.com/docs/build-apps/launch-your-app/app-promotion/promotion-by-wix/wix-choice-program.md). ### Editorial and curated placements Wix teams curate placements like **Team Picks** and **Popular This Month** to highlight apps that meet specific user needs, fit seasonal initiatives, or align with strategic priorities. **Benefits:** * Featured placement even without high install numbers * Exposure to a targeted audience ### Strategic and functional placements Apps may be promoted throughout Wix based on functional gaps and strategic needs, helping users discover relevant solutions. This includes promotional banners in the Wix dashboard and vertical-specific integrations within product areas. For example, shipping apps on the Wix Stores **Dropshipping Products** page or marketing apps on the **Marketing Integrations** page. **Benefits:** * Visibility in contextually relevant locations * Higher chance of user discovery ### App Market search ranking and algorithmic discovery Apps appear in App Market search results and category browsing based on algorithmic ranking. Optimizing your [App Market listing](https://dev.wix.com/docs/build-apps/launch-your-app/market-listing/about-market-listings.md) with clear descriptions, relevant keywords, and quality signals improves visibility. **Benefits:** * Improved discoverability in App Market searches * Greater exposure to potential users ## What influences selection While each promotion opportunity has its own criteria, certain factors improve your app's chances to be promoted: * Apps that follow [UX and UI best practices](https://dev.wix.com/docs/build-apps/develop-your-app/design/ux-and-ui-best-practices.md) and provide excellent user experiences. * Positive reviews and strong engagement. * Apps that fill important needs for Wix users. * Clear, well-optimized [App Market listings](https://dev.wix.com/docs/build-apps/launch-your-app/market-listing/about-market-listings.md#best-practices). * Regular updates and responsive user support. ## Get support If you have questions about your app's visibility, search rankings, or promotional opportunities, [contact us](https://dev.wix.com/docs/build-apps/manage-your-app/contact-us/contact-us.md). ## See also - [About app promotion](https://dev.wix.com/docs/build-apps/launch-your-app/app-promotion/about-app-promotion.md) - [Wix Choice program](https://dev.wix.com/docs/build-apps/launch-your-app/app-promotion/promotion-by-wix/wix-choice-program.md) - [Wix App Market sale](https://dev.wix.com/docs/build-apps/launch-your-app/app-promotion/promotion-by-wix/wix-app-market-sale.md) - [About App Market listings](https://dev.wix.com/docs/build-apps/launch-your-app/market-listing/about-market-listings.md) --- > Portal Navigation: > > - Append `.md` to any URL under `https://dev.wix.com/docs/` to get its markdown version. > - Pages are either content pages (article or reference text) or menu pages (a list of links to child pages). > - To get a menu page, truncate any URL to a parent path and append `.md` (e.g. `https://dev.wix.com/docs/sdk.md`, `https://dev.wix.com/docs/sdk/core-modules.md`). > - Top-level index of all portals: https://dev.wix.com/docs/llms.txt > - Full concatenated docs: https://dev.wix.com/docs/llms-full.txt ## Resource: Wix App Market Sale ## Article: Wix App Market Sale ## Article Link: https://dev.wix.com/docs/build-apps/launch-your-app/app-promotion/promotion-by-wix/wix-app-market-sale.md ## Article Content: # Sign Up for the Wix App Market Holiday Sale The Wix Holiday Sale will run from October 20, 2025 – January 2, 2026. This seasonal sale is designed to help you grow your user base and boost visibility by offering discounts on your app's plans. It will be promoted across Wix, driving high traffic and exposure for all participating apps. ## Key Update for 2025–2026 Sale During the Holiday Sale, developer sales will be temporarily disabled. This ensures all traffic, promotion, and user attention is focused on the Wix Holiday Sale, giving your apps maximum exposure during this high-demand season. Once the Holiday Sale ends, you'll be able to create your own developer sales again. ## Benefits of joining the Wix App Market November sale - Your app will feature in a dedicated sale collection. - The sale will be promoted at the top of the App Market homepage and in various marketing channels across Wix. - Your app listing will feature a prominent sale banner. - Your market listing, pricing plan page and the Manage Apps dashboard will display the discount. - You will have the opportunity to gain significant exposure by joining in. ## Wix Holiday Sale overview - **Sale Duration**: October 20, 2025 – January 2, 2026. - **Discount Options**: Choose from 20%, 30%, 40%, or 50%. - **Supported Plan Cycles**: - **Yearly**: The full subscription term is discounted for the first year. - **Monthly**: Discount the first month or the first 12 months. - **Eligible Plans**: - All plans except single plans. ## How to opt-in To join the sale: 1. Go to **Manage** > **App Market** > **Sale** in your app's dashboard. 2. Click **Join Wix Holiday Sale**. 3. Choose a discount percentage: **20%**, **30%**, **40%**, or **50%**. 4. Select the plans to include in the sale (excluding single plans). 5. Select the billing cycle(s): Yearly or Yearly and Monthly. For monthly, choose either the first cycle or the first 12 cycles. 6. Click **Save**. Once you create a sale in your app's dashboard, you can opt-in, opt-out, or edit the terms of your sale at any time up to and including the holiday sale duration. You can't, however, delete the sale from your **Sales** page. > **Notes:** > - You can't offer different discounts for each app plan. The selected discount percentage applies to all of your plans. > - If you enroll apps with [usage-based plans](https://dev.wix.com/docs/build-apps/launch-your-app/pricing-and-billing/set-up-a-usage-based-business-model.md), Wix will only apply the discount to your plan's base fee. However, you must calculate the discounted rate of any additional charges and send the total amount after the discount to Wix. ## How to participate if you're not using the Wix billing system You can still take part, and a sale badge will be displayed in the App Market UI. Even with external billing, you'll benefit from the increased exposure and visibility that comes with being featured in the sale collection and promotional campaigns. Wix is not liable for your sale offering, and you will be responsible for UI and product changes on your platform to facilitate the discounts and checkout flow. To start this, create a new sale checkout and pricing pages. ## Track your performance Monitor your app's sale performance from **Payouts** in your app's dashboard, where you'll find detailed reports on sales and discounts applied. You can see the sale data under the **Offers** column. Additionally, track the increased visibility and exposure your app receives during the sale period by monitoring live installs and live upgrades from **Statistics** in your app's dashboard. This will help you measure the full impact of participating in the sale beyond just direct revenue. ## Relevant APIs Wix offers APIs that you can call to retrieve details about your users' participation in the sale and facilitate their checkout at the sale price. - [Get App Instance API](https://dev.wix.com/docs/rest/app-management/app-instance/get-app-instance.md): Check if a user upgraded during the sale. The response returns an `availablePlans` array. Each plan in the array has a `source` field that tells you where the sale originated from. If the user upgraded during the holiday sale, the `source` field displays the sale name. - [Get URL API](https://dev.wix.com/docs/rest/app-management/app-billing/billing/get-url.md): If your app has an external pricing page, you can use this URL to redirect the user straight to the checkout. If a coupon code is applied at checkout, it overrides the holiday sale terms, allowing the checkout process to proceed with the terms of that specific coupon instead. - [List App Plans By App Id](https://dev.wix.com/docs/rest/app-management/app-billing/app-plans/list-app-plans-by-app-id.md): Call this API to see the discounted price in the ```appPlans``` property of the response. ## See also - [App promotion opportunities from Wix](https://dev.wix.com/docs/build-apps/launch-your-app/app-promotion/app-promotion-opportunities-from-wix.md) - [About app promotion](https://dev.wix.com/docs/build-apps/launch-your-app/app-promotion/about-app-promotion.md) --- > Portal Navigation: > > - Append `.md` to any URL under `https://dev.wix.com/docs/` to get its markdown version. > - Pages are either content pages (article or reference text) or menu pages (a list of links to child pages). > - To get a menu page, truncate any URL to a parent path and append `.md` (e.g. `https://dev.wix.com/docs/sdk.md`, `https://dev.wix.com/docs/sdk/core-modules.md`). > - Top-level index of all portals: https://dev.wix.com/docs/llms.txt > - Full concatenated docs: https://dev.wix.com/docs/llms-full.txt ## Resource: Wix Choice Program ## Article: Wix Choice Program ## Article Link: https://dev.wix.com/docs/build-apps/launch-your-app/app-promotion/promotion-by-wix/wix-choice-program.md ## Article Content: # The Wix Choice Program Wix Choice is a program that recognizes high-quality apps within the Wix App Market. Specifically, these apps meet Wix’s high standards for user experience (UX) and user interface (UI). ## Benefits of the Wix Choice program Wix Choice apps will get a prominent badge on the Wix App Market that appears on all pages: the homepage, search results, and the app listing page. These apps will also have a higher position in the search results page. This stamp of approval will greatly increase your exposure to Wix users. ![appmarketchoice](https://wixmp-833713b177cebf373f611808.wixmp.com/images/1a58eae57b2e38f1670c819b9c945645.png) ## How apps are selected for the Wix Choice program The Wix team carefully reviews and selects apps that meet the criteria at their sole and absolute discretion. Apps must: - Meet the standard [App Market guidelines](https://dev.wix.com/docs/build-apps/launch-your-app/app-distribution/app-market-guidelines.md) - Follow and meet all of our [UX and UI best practices](https://dev.wix.com/docs/build-apps/develop-your-app/design/ux-and-ui-best-practices.md) (those that are appropriate for your app type) - Have been live on the Wix App Market for at least 60 days Your app must also meet all of the below: - **Minimum number of Wix App Market installs**: 500 installs on Premium Wix sites. - **Minimum number of Wix App Market reviews**: 45 reviews - **Minimum Wix App Market app rating**: 4.3 Apps developed in strategic partnership with Wix may also be selected. We'll reach out to let you know if your app has been selected. ## See also - [App promotion opportunities from Wix](https://dev.wix.com/docs/build-apps/launch-your-app/app-promotion/app-promotion-opportunities-from-wix.md) - [About app promotion](https://dev.wix.com/docs/build-apps/launch-your-app/app-promotion/about-app-promotion.md) - [UX and UI best practices](https://dev.wix.com/docs/build-apps/develop-your-app/design/ux-and-ui-best-practices.md) --- > Portal Navigation: > > - Append `.md` to any URL under `https://dev.wix.com/docs/` to get its markdown version. > - Pages are either content pages (article or reference text) or menu pages (a list of links to child pages). > - To get a menu page, truncate any URL to a parent path and append `.md` (e.g. `https://dev.wix.com/docs/sdk.md`, `https://dev.wix.com/docs/sdk/core-modules.md`). > - Top-level index of all portals: https://dev.wix.com/docs/llms.txt > - Full concatenated docs: https://dev.wix.com/docs/llms-full.txt ## Resource: About User Support ## Article: About Providing Support ## Article Link: https://dev.wix.com/docs/build-apps/manage-your-app/user-support/about-user-support.md ## Article Content: # About User Support Excellent user support is essential for building trust, satisfaction, and loyalty. Whether by addressing reviews or creating educational content, effective support requires listening and responding to your users. With the right strategies, you can: * **Build loyalty:** Turn satisfied users into advocates. * **Reduce churn:** Keep users engaged and prevent drop-offs. * **Enhance your reputation:** Attract new users and stand out in the market. This article covers best practices for quality user support and provides resources for continued learning. ## Best Practices Most successful apps use these strategies to deliver effective support: ### Collect and act on feedback * [Prompt users to leave reviews](https://dev.wix.com/docs/build-apps/manage-your-app/user-support/user-reviews.md#get-more-reviews-with-prompts) from within your app. * [Respond to reviews](https://dev.wix.com/docs/build-apps/manage-your-app/user-support/user-reviews.md) and inform users of actions taken based on their feedback. * Conduct user interviews with screen sharing to understand how users interact with your app. ### Educate and guide your users * [Host webinars](https://www.wix.com/blog/how-to-create-webinar) to showcase new features and answer questions. * Link to your website, documentation, and FAQ pages from within your app. * Develop step-by-step guides and video tutorials to address common use cases. * Integrate in-app help resources like tooltips and guided tours. Wix Blocks and the [Wix Design System](https://www.wix-pages.com/wix-design-system/?path=/story/components-overlays--tooltip) offer customizable tooltip elements. ### Offer real-time assistance * Use AI chatbots to handle common questions. * Add live chat with a support team for immediate help. * Release minor app updates with [self-publish](https://dev.wix.com/docs/build-apps/manage-your-app/versioning/release-a-new-app-version.md).
    **Tip:** To identify users, use the [app instance ID](https://dev.wix.com/docs/build-apps/develop-your-app/access/app-instances/about-app-instances.md) or request their email through a form.
    ### Streamline support processes * Integrate with third-party support platforms. * Include links to support within your app, passing the [app instance ID](https://dev.wix.com/docs/build-apps/develop-your-app/access/app-instances/about-app-instances.md) as a query parameter to identify the user. * Designate a primary contact for user inquiries, and organize user requests by issue type. * Track support metrics such as response time, support interactions, and user satisfaction. ### Monitor performance * Use monitoring tools and set up performance alerts before issues impact your users. * [Track app stats](https://dev.wix.com/docs/build-apps/manage-your-app/data-and-analytics/app-stats.md) like installs and upgrades. ### Provide ongoing support * Support [delisted apps](https://dev.wix.com/docs/build-apps/manage-your-app/user-support/delisting-an-app.md) for 90 days. * [Issue refunds](https://dev.wix.com/docs/build-apps/manage-your-app/user-support/issue-a-refund.md) promptly and send confirmation to users. * Keep your [contact details](https://dev.wix.com/docs/build-apps/develop-your-app/app-dashboard-setup/add-your-contact-info.md) up-to-date and notify users of any changes. ## See also * [About App Promotion](https://dev.wix.com/docs/build-apps/launch-your-app/app-promotion/about-app-promotion.md) * [UX / UI Best Practices](https://dev.wix.com/docs/build-apps/develop-your-app/design/ux-and-ui-best-practices.md) --- > Portal Navigation: > > - Append `.md` to any URL under `https://dev.wix.com/docs/` to get its markdown version. > - Pages are either content pages (article or reference text) or menu pages (a list of links to child pages). > - To get a menu page, truncate any URL to a parent path and append `.md` (e.g. `https://dev.wix.com/docs/sdk.md`, `https://dev.wix.com/docs/sdk/core-modules.md`). > - Top-level index of all portals: https://dev.wix.com/docs/llms.txt > - Full concatenated docs: https://dev.wix.com/docs/llms-full.txt ## Resource: User Reviews ## Article: User Reviews ## Article Link: https://dev.wix.com/docs/build-apps/manage-your-app/user-support/user-reviews.md ## Article Content: # Manage User Reviews User reviews are a really important part of your app's success. Reviews help you: * Learn how people use your app, the features they need, and what they love most. * Improve your offering – add requested features, fix bugs, remove unnecessary features, and more. * Build good relationships with customers by showing them that you take their feedback seriously. You can view and manage your user reviews in the Reviews page in your app's dashboard.
    ![](https://d2x3xhvgiqkx42.cloudfront.net/12345678-1234-1234-1234-1234567890ac/0e041dbb-8bbe-4be4-a1ae-883b5cb05e2b/2023/04/12/eb32276f-2c0f-4905-9274-3f02d45d91c7/8ccf0058-03b6-49da-9be1-5d0dc258012f.png)
    ## Overall rating calculation Your app's overall rating is calculated based on all user reviews, with older reviews receiving less weight than newer ones. This ensures your rating accurately reflects your app's current quality and performance. Why review age matters: * **Reflects current experience**: Recent reviews better represent your app as it exists today. * **Faster impact from improvements**: Updates and fixes are reflected more quickly in your rating. * **Less weight on past issues**: Early or temporary problems have reduced influence over time. ## Get notified about new reviews We send email notifications about new reviews to your **Support Email** with a link so that you can reply to reviews on the go. To add or update the Support Email address: 1. Go to the **Contact Info** page in your app's dashboard. 2. Add an email address in the **Support Email** field. 3. Click **Save**. ## Respond to reviews App owners can respond to reviews directly from the Reviews page. We strongly recommend checking your reviews at least once a day, and responding to questions and negative reviews within 24 hours. To respond to a review: 1. Go to the Reviews page in your app's dashboard. 2. Click the **More Actions** icon next to the review you want to respond to. ### Best practice for responding - Keep your response friendly, professional, and to the point. As it's a public page everyone can see what you write, so always be calm and polite. - Respond to frustrated customers with understanding (and don’t take it personally). - If there are minor bugs that you aren’t fixing right away, reply to let them know you’re on it, and then edit your reply once it’s fixed. - If you have any follow-up questions for users, continue the conversation over email or through your support page (include your email address or a link when you reply to the review). The Reviews page isn’t set up for conversations. - If you’re able to resolve the user’s issue, ask them to rate your app again. ## Get more reviews with prompts We encourage you to request reviews from your users when and where it makes sense within your product flow (a happy moment works well, like when a user has completed their first action). You can open a review modal as a new tab or window in any flow in your product, such as from within your product's dashboard, or refer users to it by including the link in an email. Open it by calling this URL (substituting your `App ID` in the appropriate place in the URL):   ``` https://www.wix.com/app-market/add-review/ ``` > **Note about iframe apps** > > In iframe apps, you can make it easy for users to review your app. Open the **Reviews** page directly from the App Settings panel (in the **Support** tab). ## Prohibited ways to gather reviews The following actions violate our review policy and may lead to review removal, exclusion from promotions, or app removal from the Wix App Market: - **Self-reviews**: You can't leave reviews for your own app. - **Fake reviews**: You can't write or solicit fake reviews. - **Forced reviews**: Don't block access to app features or content to compel users to leave reviews or ratings. - **Incentivized reviews**: Don't offer discounts, free trials, gift cards, or other incentives in exchange for reviews. - **Misleading UX/UI patterns**: Don't create UX flows that pressure users into leaving reviews, such as making it mandatory in an onboarding process. > Note: If we aren’t sure if a review was collected according to the guidelines and is indeed real, we will remove it. ## Removing reviews As a developer, you can request that Wix review and potentially remove user reviews under the following conditions: - **Meaningless content**: Reviews containing meaningless text, such as "sjbvhljabvhabvv". - **Irrelevant content**: Reviews unrelated to your app, such as platform-wide complaints. - **Spam or advertising**: Reviews promoting unrelated products or services. - **Offensive language**: Reviews with slurs, threats, or inappropriate language. - **Review manipulation**: Reviews that are clearly fake, duplicated, or written by affiliated individuals (developers, team members, etc.). - **Personal information**: Reviews containing private data like email addresses or phone numbers. - **Platform-related bugs**: Reviews addressing issues caused by Wix’s platform rather than the app. If you've seen a review that meets the above conditions, [open a ticket](https://www.wix.com/support-chatbot?nodeId=25a57397-ccf7-4376-8b74-48d51edf7159&referral=devRels) telling us why you believe it should be removed. If there are several reviews that need action, gather them in a spreadsheet to help us take action. ### Reviews that Wix won't remove These are common cases where removal requests will not be approved: - **Old reviews**: Reviews aren’t removed solely due to age. - **Misunderstandings and user errors**: Misunderstandings often signal usability issues in the app. - **Complaints about pricing**: Users are free to express dissatisfaction with pricing. - **Negative but honest feedback**: Honest feedback, even if critical, will remain as long as it adheres to guidelines. - **Feature requests**: Reviews requesting features are valid unless evidence shows the feature has already been implemented. - **Subjective opinions**: Opinions such as "I didn’t like the design" are valid and won’t be removed. - **Resolved bugs**: Reviews mentioning resolved issues reflect app responsiveness and reliability.
    **Important:** Wix reviews removal requests on a case-by-case basis and may keep a review even if it meets the conditions above.
    ## See also - [About providing support](https://dev.wix.com/docs/build-apps/manage-your-app/user-support/about-user-support.md) - [About app stats](https://dev.wix.com/docs/build-apps/manage-your-app/data-and-analytics/app-stats.md) --- > Portal Navigation: > > - Append `.md` to any URL under `https://dev.wix.com/docs/` to get its markdown version. > - Pages are either content pages (article or reference text) or menu pages (a list of links to child pages). > - To get a menu page, truncate any URL to a parent path and append `.md` (e.g. `https://dev.wix.com/docs/sdk.md`, `https://dev.wix.com/docs/sdk/core-modules.md`). > - Top-level index of all portals: https://dev.wix.com/docs/llms.txt > - Full concatenated docs: https://dev.wix.com/docs/llms-full.txt ## Resource: Delisting an App ## Article: App Removal ## Article Link: https://dev.wix.com/docs/build-apps/manage-your-app/user-support/delisting-an-app.md ## Article Content: # Delisting an App Apps can be delisted from the App Market for a number of reasons: - **Temporary delisting**: This can happen if a bug is discovered, and then it’s republished once the bug is resolved. - **Permanent delisting**: This can be initiated either by the developer or by the App Market team, if either wants to permanently take down the app from the App Market. ## How to delist your app [Contact us](https://www.wix.com/support-chatbot?nodeId=25a57397-ccf7-4376-8b74-48d51edf7159&referral=devRels) if you want us to remove your app from the App Market. As stated in the Partner Agreement, you need to support your app and users for a grace period of **90 days** from the moment we acknowledge your request. Here’s what to expect: * You’ll support the app and answer questions from users for up to 90 days (less if the app is permanently removed before this period is over). * We’ll remove the app from the App Market so new users can’t add it. * We’ll let your users know that the app will no longer be available, and give them an alternative solution. ## Why Wix might delist your app The App Market team might initiate a permanent delisting of an app for reasons including, but not limited to: - Technical issues that do not get resolved in a timely manner. - Inadequate or untimely support for users. - Breaches of our guidelines, or [Partner Agreement](https://dev.wix.com/app-market-partner-agreement).  As above, you need to support your app for up to 90 days. ## See also - [About providing support](https://dev.wix.com/docs/build-apps/manage-your-app/user-support/about-providing-support.md) - [Manage user reviews](https://dev.wix.com/docs/build-apps/manage-your-app/user-support/user-reviews.md) --- > Portal Navigation: > > - Append `.md` to any URL under `https://dev.wix.com/docs/` to get its markdown version. > - Pages are either content pages (article or reference text) or menu pages (a list of links to child pages). > - To get a menu page, truncate any URL to a parent path and append `.md` (e.g. `https://dev.wix.com/docs/sdk.md`, `https://dev.wix.com/docs/sdk/core-modules.md`). > - Top-level index of all portals: https://dev.wix.com/docs/llms.txt > - Full concatenated docs: https://dev.wix.com/docs/llms-full.txt ## Resource: Issue a Refund ## Article: App Refunds ## Article Link: https://dev.wix.com/docs/build-apps/manage-your-app/user-support/issue-a-refund.md ## Article Content: # Issue a Refund If you want to refund a Wix user for your app you can do it directly from your app's dashboard. This feature is only accessible to team collaborators with the **Owner** role. Note that this flow is not related to chargebacks, when a Wix user disputes a charge from your app, which are handled by Wix. To issue a refund: 1. Go to **Payouts** > **Transactions** in your app's dashboard and find the transaction you want to offer a refund for. 3. Click **More Actions**  ![](https://d2x3xhvgiqkx42.cloudfront.net/12345678-1234-1234-1234-1234567890ac/0e041dbb-8bbe-4be4-a1ae-883b5cb05e2b/2021/06/01/2a9acf13-da92-4860-a071-03e40202208f/39775e8b-9759-43c3-9c70-c076c64df1f7.png) next to the transaction, and select **Request refund**. 4. Enter the amount you wish to refund. This can be full or partial. 5. Tell Wix if we should also cancel their plan after the refund is processed. Cancelling a plan stops a user's access to premium features and prevents auto-renewal of the plan. If you keep the plan active, the user will keep their current features, and they'll be charged again at the next billing cycle. 6. Tell Wix why this user needs a refund, and any other relevant info you'd like to add. 7. Click **Review the Request** and verify that the refund details are correct. 8. If relevant, select the option to send a copy of the refund to your billing email. 9. After review, click **Request Refund**. ## When to expect payment - Requests can take up to 3 business days to process. - You can [contact us](https://www.wix.com/support-chatbot?nodeId=25a57397-ccf7-4376-8b74-48d51edf7159&referral=devRels) to cancel the request up until then. - Once the refund's been approved by our team, it'll appear in your **Transactions** within 24 hours. - It can take up to 20 business days for the refunded money to arrive in the user's account – it's your responsibility to communicate with the user on the refund's progress. ## See also - [About providing support](https://dev.wix.com/docs/build-apps/manage-your-app/user-support/about-user-support.md) - [Manage user reviews](https://dev.wix.com/docs/build-apps/manage-your-app/user-support/user-reviews.md) --- > Portal Navigation: > > - Append `.md` to any URL under `https://dev.wix.com/docs/` to get its markdown version. > - Pages are either content pages (article or reference text) or menu pages (a list of links to child pages). > - To get a menu page, truncate any URL to a parent path and append `.md` (e.g. `https://dev.wix.com/docs/sdk.md`, `https://dev.wix.com/docs/sdk/core-modules.md`). > - Top-level index of all portals: https://dev.wix.com/docs/llms.txt > - Full concatenated docs: https://dev.wix.com/docs/llms-full.txt ## Resource: About App Versioning ## Article: About App Versioning ## Article Link: https://dev.wix.com/docs/build-apps/manage-your-app/versioning/about-app-versioning.md ## Article Content: # About App Versioning During your app's life cycle, from bug fixes to new features to promotions, there are different reasons you may need to release a new version of your app. Wix categorizes releases as major or minor and handles versioning accordingly. Versioning your app follows the same process whether your app is private, unlisted, or listed in the App Market. ## Version release types There are 2 types of app version releases: - Major version release - Minor version release ### Major version release Major updates are not pushed automatically and require user action. Users receive notifications about available version releases in the **Manage Apps** page and must click the **Update** button to accept the new version release. You can also include a call to action within your app to prompt them to update to the latest version, redirecting them to `https://wix.com/app-installer?appId={appId}`. If you’re using [custom authentication (legacy)](https://dev.wix.com/docs/build-apps/develop-your-app/access/authentication/custom-authentication-legacy.md), you also need to take the site owner through the OAuth flow. You will receive an authorization code with which you must request a new refresh token. Store the refresh token in your database for later use together with the site owner's instance ID. Major version numbering: 2.10.0. In this example, '2' denotes the major version. You can always decide that a change to your app should be considered a major version and require user action for installation, but this isn't recommended, as users won't always update. ### Minor version release Most version releases are considered minor. Wix users that have installed the latest major version, automatically receive minor releases on top of that version. If they are not on the latest major version, they will be offered to update with the Update button on the Manage Apps page. This will provide the release via the major version release flow, including any new minor releases. Minor version numbering: **2.10.0.** In this example, **'10'** denotes the minor version. ## App changes and corresponding version types Below is a list of changes you might implement in your app, along with the corresponding version types they require: |Minor version |Major version (use sparingly) | |---|---| | - Changes to translations
    - Changes to app company info
    - Adding, changing or removing [extensions](https://dev.wix.com/docs/build-apps/develop-your-app/extensions/about-extensions.md)
    - Adding, changing, or removing [webhooks](https://dev.wix.com/docs/build-apps/develop-your-app/api-integrations/events-and-webhooks/about-webhooks.md) or CLI [event extensions](https://dev.wix.com/docs/wix-cli/guides/extensions/backend-extensions/events/add-event-extensions.md)
    - Changes to pre-installed automations
    - Removing [permissions](https://dev.wix.com/docs/build-apps/develop-your-app/access/authorization/about-permissions.md) | - Adding [permissions](https://dev.wix.com/docs/build-apps/develop-your-app/access/authorization/about-permissions.md)
    - Adding an [Embedded Script extension](https://dev.wix.com/docs/build-apps/develop-your-app/extensions/site-extensions/embedded-scripts/about-embedded-scripts.md)
    - Changes to [Dynamic Parameters of an Embedded Script](https://dev.wix.com/docs/build-apps/develop-your-app/extensions/site-extensions/embedded-scripts/about-embedded-scripts.md#dynamic-parameters)| You can always choose to release a major version even if the changes to your app can be considered a minor version - however this generally isn't recommended, as it requires users to actively update your app, and they don't always do so. ### App changes that don't trigger a new version The following changes are pushed to users immediately and don't require a version release: - Changes to OAuth endpoints (if using custom authentication (legacy)) - Adding or removing app team members - Changes to app contact info - Changes to market listing details The following changes require submission to the Wix App Market for review, but don't require a version release: - Changes to pricing ### How to know if your change requires a version release If you've made a change to a self-managed app that requires a version release, you'll see that you have a version that isn't updated in the **Distribute** page. If you've made a change to a Blocks app, you'll see that the **Release** button is enabled in the Blocks Editor. ## See also - [About app distribution](https://dev.wix.com/docs/build-apps/launch-your-app/app-distribution/about-app-distribution.md) - [Release a new app version](https://dev.wix.com/docs/build-apps/manage-your-app/versioning/release-a-new-app-version.md) --- > Portal Navigation: > > - Append `.md` to any URL under `https://dev.wix.com/docs/` to get its markdown version. > - Pages are either content pages (article or reference text) or menu pages (a list of links to child pages). > - To get a menu page, truncate any URL to a parent path and append `.md` (e.g. `https://dev.wix.com/docs/sdk.md`, `https://dev.wix.com/docs/sdk/core-modules.md`). > - Top-level index of all portals: https://dev.wix.com/docs/llms.txt > - Full concatenated docs: https://dev.wix.com/docs/llms-full.txt ## Resource: Release a New App Version ## Article: Release a New App Version ## Article Link: https://dev.wix.com/docs/build-apps/manage-your-app/versioning/release-a-new-app-version.md ## Article Content: # Release a New App Version Whether your app is listed in the Wix App Market or unlisted, you'll want to release new versions to your users. Wix categorizes releases as major or minor and handles versioning accordingly. If you're distributing your app, you'll be prompted to release a version if you haven't already done so. See [About App Versioning](https://dev.wix.com/docs/build-apps/manage-your-app/versioning/about-app-versioning.md) for a summary of change scenarios for major and minor versions. ## How to release a new version of your app To release a new app version in your app's dashboard: 1. Go to one of the **Release Version** entry points in the **Distribute** tab: - **App Distribution** page. - **Versions** page. 1. Click **Release Version**. 1. Select the release type, when applicable, and click **Release Version & Update**. > **Note**: Major updates are not pushed automatically and require user action. Users receive notifications about available updates in the Manage Apps page and must click the Update button to accept the new version update. ## See also - [About app versioning](https://dev.wix.com/docs/build-apps/manage-your-app/versioning/about-app-versioning.md) - [About app distribution](https://dev.wix.com/docs/build-apps/launch-your-app/app-distribution/about-app-distribution.md) - [Migrate from a previous site widget or plugin extension to an updated extension](https://dev.wix.com/docs/build-apps/develop-your-app/extensions/site-extensions/migrate-to-a-new-site-widget-or-plugin-extension.md) --- > Portal Navigation: > > - Append `.md` to any URL under `https://dev.wix.com/docs/` to get its markdown version. > - Pages are either content pages (article or reference text) or menu pages (a list of links to child pages). > - To get a menu page, truncate any URL to a parent path and append `.md` (e.g. `https://dev.wix.com/docs/sdk.md`, `https://dev.wix.com/docs/sdk/core-modules.md`). > - Top-level index of all portals: https://dev.wix.com/docs/llms.txt > - Full concatenated docs: https://dev.wix.com/docs/llms-full.txt ## Resource: Retrieve an App Instance's Version Number ## Article: Retrieve an App Instance's Version Number ## Article Link: https://dev.wix.com/docs/build-apps/manage-your-app/versioning/retrieve-an-app-instance-s-version-number.md ## Article Content: # Retrieve an App Instance's Version Number You can call [Get App Instance](https://dev.wix.com/docs/rest/app-management/app-instance/get-app-instance.md) to retrieve the internal version of your app that is installed on each Wix user's site. The response contains app information: ```"instance": { "appName": "MY_APP", "appVersion": "2.10.0", ``` It also contains site information: ```"site": { "locale": "en", "siteDisplayName": "Mysite 34", "url": "https://doereg11.wixsite.com/mysite-34", "description": "My awesome site is all about selling stuff", "ownerEmail": "site-owner@test.com", "ownerInfo": { "email": "site-owner@test.com", "emailStatus": "VERIFIED_OPT_IN" } ``` On this owner's site the app’s major version is '2' and minor version is '10'. Wix users will get minor updates automatically, to 2.11, 2.12 and so on. However, the next major version, 3.0.0, will require the Wix user to click the Update button in the App Manager or follow the instructions in your email or banner. ## See also - [About app distribution](https://dev.wix.com/docs/build-apps/launch-your-app/app-distribution/about-app-distribution.md) - [Release a new app version](https://dev.wix.com/docs/build-apps/manage-your-app/versioning/release-a-new-app-version.md) --- > Portal Navigation: > > - Append `.md` to any URL under `https://dev.wix.com/docs/` to get its markdown version. > - Pages are either content pages (article or reference text) or menu pages (a list of links to child pages). > - To get a menu page, truncate any URL to a parent path and append `.md` (e.g. `https://dev.wix.com/docs/sdk.md`, `https://dev.wix.com/docs/sdk/core-modules.md`). > - Top-level index of all portals: https://dev.wix.com/docs/llms.txt > - Full concatenated docs: https://dev.wix.com/docs/llms-full.txt ## Resource: App Stats ## Article: App Stats ## Article Link: https://dev.wix.com/docs/build-apps/manage-your-app/data-and-analytics/app-stats.md ## Article Content: # About App Stats App stats tracks an app's performance across different metrics and timeframes. Use this data to make informed decisions about updates or changes to make to your app. Stats refresh daily. > **Payouts and revenue data** > > The **Stats** page doesn't display any financial information such as payouts or revenue. To view this information, visit the [payouts dashboard](https://dev.wix.com/docs/build-apps/launch-your-app/pricing-and-billing/payouts-dashboard.md). ## View your app stats 1. Go to the **Stats** page in your app's dashboard. 2. Use the drop-down menus to display stats by **Day**, **Week**, or **Month**, and select a time period. 3. Click the **Details** tab to view the data in a table. The table breaks down your stats into 5 metrics: + **Unique app page views:** Number of unique visits to your app page, whether accessed directly from the App Market or through a site where the app is installed. + **Installs:** Number of times your app has been installed from the App Market. + **Uninstalls:** Number of times your app has been completely removed from sites. + **Upgrades:** Number of new, paid plan subscriptions. > **Apps included in bundles** > > The **Upgrades** stat includes upgrades via bundles, which may cause slight differences between your stats page and your payouts data. + **Cancelled:** Number of cancelled paid plan subscriptions.
    ![](https://d2x3xhvgiqkx42.cloudfront.net/12345678-1234-1234-1234-1234567890ac/0e041dbb-8bbe-4be4-a1ae-883b5cb05e2b/2023/04/12/93645bcc-1c9c-438b-ad09-4965999caf98/cdb29aed-91bb-4f46-ad74-c60f97086d36.png)
    ## See also - [About the payouts dashboard](https://dev.wix.com/docs/build-apps/launch-your-app/pricing-and-billing/payouts-dashboard.md) - [About BI events](https://dev.wix.com/docs/build-apps/manage-your-app/data-and-analytics/bi-events.md) --- > Portal Navigation: > > - Append `.md` to any URL under `https://dev.wix.com/docs/` to get its markdown version. > - Pages are either content pages (article or reference text) or menu pages (a list of links to child pages). > - To get a menu page, truncate any URL to a parent path and append `.md` (e.g. `https://dev.wix.com/docs/sdk.md`, `https://dev.wix.com/docs/sdk/core-modules.md`). > - Top-level index of all portals: https://dev.wix.com/docs/llms.txt > - Full concatenated docs: https://dev.wix.com/docs/llms-full.txt ## Resource: BI Events ## Article: BI Events ## Article Link: https://dev.wix.com/docs/build-apps/manage-your-app/data-and-analytics/bi-events.md ## Article Content: # About BI Events In your app, you can integrate code to capture Business Intelligence (BI) events. BI events enable Wix to gather data on specific user actions during app installation, usage, and upgrades. This event data provides valuable insights used to devise strategies aimed at guiding users towards success. For instance, if a user fails to complete setup, Wix can prompt them through product features like notifications and badges. ## Supported events Examples of supported BI events include: * App Dashboard Loaded * App Finished Configuration * App Upgraded * Primary Action Performed * Charge * Funds Returned * App Finish Business Setup * App Deployed * App Setup Finished Additionally, you have the flexibility to create custom events tailored to your specific needs. ## How to add BI events Add BI events using the [BI Events REST API](https://dev.wix.com/docs/rest/app-management/bi-event/introduction.md). > **Note:** Only incorporate the BI events that are directly relevant to your app's logic. --- > Portal Navigation: > > - Append `.md` to any URL under `https://dev.wix.com/docs/` to get its markdown version. > - Pages are either content pages (article or reference text) or menu pages (a list of links to child pages). > - To get a menu page, truncate any URL to a parent path and append `.md` (e.g. `https://dev.wix.com/docs/sdk.md`, `https://dev.wix.com/docs/sdk/core-modules.md`). > - Top-level index of all portals: https://dev.wix.com/docs/llms.txt > - Full concatenated docs: https://dev.wix.com/docs/llms-full.txt ## Resource: Google Analytics ## Article: Google Analytics ## Article Link: https://dev.wix.com/docs/build-apps/manage-your-app/data-and-analytics/google-analytics.md ## Article Content: # Google Analytics Integrate Google Analytics to gain insights into user interactions with your Wix App Market app page. Help your app stand out and attract the right audience by utilizing Google Analytics 4 to track your App Market listing, keywords, and user interactions, track traffic, and monitor user behavior. By integrating with Google Analytics, you can track and optimize your app's performance: - **Where your users are coming from**: Identify traffic sources, whether from search, direct visits, or external links, and decide whether to add more external links or adjust your app category for better visibility. - **How users interact with your app listing**: Analyze search keywords that lead users to your app and optimize them based on real user data to improve discoverability. - **App page views**: Track parameters such as traffic sources, search keywords, and whether users are premium or free. This helps you understand who your audience is, how different user types discover your app, and where your most valuable users are coming from. - **Add to site clicks**: Track which users actively add your app to their site. Understanding this behavior by user type (premium vs. free) helps you analyze engagement patterns and optimize your acquisition strategy. - **Conversion funnel insights**: Identify drop-off points and improve the user journey. If users visit your app page but don’t install, you can consider adjusting your description, screenshots, or pricing model. Wix sends events to Google Analytics, which can be found in Google Analytics' Real-time view, and can be used to build reports. Note that the custom event parameters can take up to 48 hours to propagate in your reports. ## Set up Google Analytics for your Wix App Market listing Set up Google Analytics for your Wix App Market listing in 2 parts: first in Google Analytics, then in your Wix app dashboard. ### Part A | In your Google Analytics account 1. Follow [Google's instructions](https://support.google.com/analytics/answer/9304153) to set up a Google Analytics 4 property, add a data stream, and set up data collection. 2. For the data stream, apply `www.wix.com/app-market/web-solution/` in the STREAM URL field. You can copy the URL from your app’s listing in the Wix App Market at [wix.com/app-market](https://www.wix.com/app-market). 3. Enable **Enhanced measurement**. 4. Disable page changes based on browser history events: - Under **Enhanced measurement**, select **settings**. - Under **Page views > Show advanced settings**, deselect the **Page changes based on browser history events** checkbox. - Click "Save". ![Deselect the page changes based on browser history events checkbox](https://wixmp-833713b177cebf373f611808.wixmp.com/images/b80a20033d0a8e38d66e959a0397d288.png)
    **Important:** Failing to disable page changes based on browser history events will result in Google Analytics collecting wrong data for your Wix App Market listing. For example, counting events twice.
    5. Collect your GA4 Measurement ID (`G-` followed by a combination of numbers and letters, such as `G-PSW1MY7HB4`), as you will need to provide it in your Wix app dashboard. 6. Set up the custom event parameters as [event-scoped custom dimensions](https://support.google.com/analytics/answer/14239696) for your reports. ![custom-dimension](https://wixmp-833713b177cebf373f611808.wixmp.com/images/e4d035c205c3a956498526b5be8b6236.png) > **Note:** Event data can take up to 48 hours to propagate. Data sent before events are set up will not be visible. ### Part B | In your Wix app dashboard 1. Go to the Get Found & Tracking page in your app's dashboard. You can navigate to your app's dashboard from the [custom apps page](https://manage.wix.com/account/custom-apps). 2. Enter the GA4 Measurement ID collected in Part A and click "Save". Once the setup is complete, Wix sends data to your Google Analytics account. There’s no need to republish your app. ## Custom events for Google Analytics Wix sends the following events to Google Analytics, which can be found in Google Analytics' Real-time view, and can be used to build reports: - page_view event: Fired when a user views your app's listing page in the App Market. - install_button_click event: Fired when a user clicks the **"Add to site"** button on your app's listing page. Note that in order to add the event data to reports, you must add them as [event-scoped custom dimensions](https://support.google.com/analytics/answer/14239696). ### Event parameters The following custom parameters are sent with all events: |Parameter | Description | Parameter Availability | Supported values| |---|---|---|---| |`app_market_platform`| The platform of the App Market where the user accessed your app page. | Always included. | - `dashboard`: The App Market available within a site’s dashboard.
    - `editor`: The App Market available within a site’s editor.
    - `standalone`: The App Market available outside of site context.
    | |`wix_referring_page`| Identifier of the page the user was visiting before navigating to your app page. | Always included.| - `app_market_homepage`: App Market homepage.
    - `app_market_search_result`: App Market search.
    - `app_market_collection`: App Market collection page.
    - `app_market_category`: App Market category page.
    - `app_market_subcategory`: App Market subcategory page.
    - `other`: The user navigated to the app page from another source (includes other pages within Wix, direct URLs, external links, or non-tracked referrer) | |`wix_referring_page_details`| Details about the page that the user last visited, as defined in `wix_referring_page`. | Excluded when `wix_referring_page`: `other`. | - For `app_market_homepage`, the section in the homepage where the user found the app (collection/category name) is returned.
    - For `app_market_search_result`, the user's search query is returned.
    - For `app_market_collection`, the title of the collection where the user found the app is returned.
    - For `app_market_category` and `app_market_subcategory`, returns the subcategory the user navigated from. | |`app_position_in_source`| Your app's position in the list of apps displayed on the page that the user last visited. Positions are numbered left to right, top to bottom, starting with 0. | Excluded when `wix_referring_page`: `other`. | |`premium_wix_site` | Whether the user has a Wix Premium site. | Included when site context is available. | - `true`: The user has a Wix Premium site.
    - `false`: The user doesn't have a Wix Premium site.| |`wix_site_id`| The unique identifier (GUID) of the specific Wix site the user was working on while accessing your app page. | Included when site context is available. | |`wix_user_id`| The unique identifier (GUID) of the Wix user account accessing your app page. | Included when user is logged in to Wix.| --- > Portal Navigation: > > - Append `.md` to any URL under `https://dev.wix.com/docs/` to get its markdown version. > - Pages are either content pages (article or reference text) or menu pages (a list of links to child pages). > - To get a menu page, truncate any URL to a parent path and append `.md` (e.g. `https://dev.wix.com/docs/sdk.md`, `https://dev.wix.com/docs/sdk/core-modules.md`). > - Top-level index of all portals: https://dev.wix.com/docs/llms.txt > - Full concatenated docs: https://dev.wix.com/docs/llms-full.txt ## Resource: App Installations ## Article: App Installations ## Article Link: https://dev.wix.com/docs/build-apps/manage-your-app/data-and-analytics/app-installations.md ## Article Content: # About the App Installations Page The **App Installations** page lists every installation of your app. Use it to connect [app instance](https://dev.wix.com/docs/build-apps/develop-your-app/access/app-instances/about-app-instances.md) IDs to Wix users, find contact information for support, and track how sites use your app. Each row on this page represents a single app instance: 1 installation of your app on 1 Wix site. To access the page, select your app from the [Custom Apps page](https://manage.wix.com/account/custom-apps) in your Wix Studio workspace. In the side panel, click **Manage** > **App Installations**. ## Use cases Use the **App Installations** page to: - **Monitor your app's growth**: Check install dates to see when users installed your app. This helps you spot patterns and measure the impact of marketing efforts. - **Provide support by instance ID**: When a Wix user contacts you with an instance ID (for example, from an error message in your app), search for it here. You'll find their email address and site URL so you can provide targeted support. - **Understand your audience**: Filter by plan to see how installations are distributed across pricing tiers, identify who has canceled or uninstalled, and analyze cancellation patterns.
    __Tip:__ Looking for more data on your app's performance? See [app stats](https://dev.wix.com/docs/build-apps/manage-your-app/data-and-analytics/app-stats.md).
    ## Installation data For each installation, you can see: | Column | Description | |--------|-------------| | Site URL | The Wix site where your app is installed. | | Instance ID | [The unique identifier](https://dev.wix.com/docs/build-apps/develop-your-app/access/app-instances/about-app-instances.md) for this installation. | | Email | The user's email address. See [Email availability](#email-availability) for details. | | Business name | The name of the business associated with the installation. | | Location | The site's business [location](https://dev.wix.com/docs/api-reference/business-management/locations/introduction.md). | | App plan | The pricing plan selected for this installation when your app uses the Wix pricing page. | | Billing cycle | The billing cycle for the installation. | | Version | The app version and installation status. Possible values are Installed, Uninstalled, Canceled, Upgraded, and Auto renew off. | | Install date | The date when your app was first installed on this site. | | Rating | The average rating for this installation, calculated from reviews submitted in the [Wix App Market](https://www.wix.com/app-market). The rating excludes reviews created before January 2025 on the standalone Wix App Market site or via the [Reviews API](https://dev.wix.com/docs/api-reference/crm/community/feedback-moderation/reviews/reviews/introduction.md). | The default view doesn't show all available columns. Click the **Customize** icon to choose which columns to display and reorder them. You can also filter the information shown using **Filter**, or search for a specific installation using the search bar. > **Note**: [Private apps](https://dev.wix.com/docs/build-apps/get-started/overview/exposing-apps-publicly-and-privately.md) have limited installation data. Data for ratings, plan name, and billing cycle isn't available for private apps. ### Email availability You can view the email address for each installation to provide support or follow up with your app's users. Business email is available for all installations where the user has provided one. Personal email requires the `READ SITE OWNER EMAIL` or `Read site, business, and email details` permissions. Wix automatically grants these to new apps. If your app doesn't have them, you can [add the permissions manually](https://dev.wix.com/docs/build-apps/develop-your-app/access/authorization/configure-permissions-for-your-app.md), then [release a major version](https://dev.wix.com/docs/build-apps/manage-your-app/versioning/about-app-versioning.md). Users who installed your app before the update must approve the new permissions for their email address to appear. ## Privacy and data protection Handle installation data responsibly. Use it only for legitimate purposes like supporting your users and improving your app. [Comply with GDPR](https://dev.wix.com/docs/build-apps/launch-your-app/legal-and-security/gdpr-compliance/about-gdpr-and-data-protection.md) and other applicable privacy regulations. For more information, see Wix [security and privacy best practices](https://dev.wix.com/docs/build-apps/launch-your-app/legal-and-security/security-and-privacy-best-practice.md). ## See also - [About app instances](https://dev.wix.com/docs/build-apps/develop-your-app/access/app-instances/about-app-instances.md) - [App Instances API](https://dev.wix.com/docs/api-reference/app-management/app-instance/introduction.md) - [About user support](https://dev.wix.com/docs/build-apps/manage-your-app/user-support/about-user-support.md) - [About app distribution](https://dev.wix.com/docs/build-apps/launch-your-app/app-distribution/about-app-distribution.md) --- > Portal Navigation: > > - Append `.md` to any URL under `https://dev.wix.com/docs/` to get its markdown version. > - Pages are either content pages (article or reference text) or menu pages (a list of links to child pages). > - To get a menu page, truncate any URL to a parent path and append `.md` (e.g. `https://dev.wix.com/docs/sdk.md`, `https://dev.wix.com/docs/sdk/core-modules.md`). > - Top-level index of all portals: https://dev.wix.com/docs/llms.txt > - Full concatenated docs: https://dev.wix.com/docs/llms-full.txt ## Resource: Contact Us ## Article: Contact Us ## Article Link: https://dev.wix.com/docs/build-apps/manage-your-app/contact-us/contact-us.md ## Article Content: # Contact us Can't find an answer and need some help? There’s a couple of ways to get in touch. - [Contact support](https://www.wix.com/support-chatbot?nodeId=25a57397-ccf7-4376-8b74-48d51edf7159&referral=devRels): Open a ticket and we'll get back to you within 72 hours. - [Join us on Discord](https://discord.gg/aN9ubnrs2D): Connect with our team and network with other app developers. - [Subscribe to our newsletter](https://www.wixforms.com/f/7394355343209268224): Get the latest updates, feature announcements, and development tips delivered to your inbox. --- > Portal Navigation: > > - Append `.md` to any URL under `https://dev.wix.com/docs/` to get its markdown version. > - Pages are either content pages (article or reference text) or menu pages (a list of links to child pages). > - To get a menu page, truncate any URL to a parent path and append `.md` (e.g. `https://dev.wix.com/docs/sdk.md`, `https://dev.wix.com/docs/sdk/core-modules.md`). > - Top-level index of all portals: https://dev.wix.com/docs/llms.txt > - Full concatenated docs: https://dev.wix.com/docs/llms-full.txt ## Resource: Submit Support Requests ## Article: Submit Support Requests ## Article Link: https://dev.wix.com/docs/build-apps/manage-your-app/contact-us/submit-support-requests.md ## Article Content: # Submit Support Requests As you develop and maintain your app you may encounter error messages, technical glitches, or unexpected behavior. In these cases, you can open a support request using the Wix support chatbot. Follow these steps to make a successful support request. [](https://www.wix.com/support-chatbot?nodeId=25a57397-ccf7-4376-8b74-48d51edf7159&referral=devRels) ## Step 1 | Retrieve your app ID Before engaging with the Wix support chatbot, retrieve your app ID. You can find it at the top of your [app's dashboard](https://dev.wix.com/app-selector?title=Select+an+App\&primaryButtonText=Select+Site\&actionUrl=https%3A%2F%2Fdev.wix.com%2Fapps%2F%7BappId%7D%2Fhome). ## Step 2 | Locate your request ID (optional) If the issue results from using Wix APIs in your app's code, interacting with the app dashboard, or through one of Wix's [frontend interfaces](https://dev.wix.com/docs/build-apps/get-started/overview/the-wix-ecosystem.md#frontend-interfaces), you must include the associated request ID. Every action that makes a call to Wix’s APIs is assigned a unique request ID, which is essential for tracking the root cause of an issue. This ID is included as a response header with the key name `x-wix-request-id`. For example, `1734427301.191556792796277844`. Many errors in the app dashboard display pop-up notifications at the top of the screen. These notifications often include the request ID. If you don’t see a request ID in an error notification, you need to recreate the issue to retrieve a request ID.
    For issues resulting from your app's API requests to Wix 1. Make the request again using `curl` or any other network request tool that allows you to view responses. 2. In the response header, locate the request ID under the key `x-wix-request-id`.
    For issues occurring in the app dashboard, site dashboard, or site editor 1. Trigger an action that causes the error. For example, by clicking a button. 2. Open your browser's developer tools. 3. Select the **Network** panel. 4. In the **Name** column, click the network request associated with the error. Additional request information appears. 5. Select the **Headers** tab. The request ID is located in the **Response Headers** section under the key `x-wix-request-id`.
    ## Step 3 | Describe the issue When the support chatbot asks for a description and the option to attach documents, you should be prepared to provide a step-by-step description of what led to the issue. Compile as many relevant details as possible, such as: - A short explanation of the issue. - Screenshots and/or videos of each stage of the process. - URLs and [instance IDs](https://dev.wix.com/docs/build-apps/develop-your-app/access/app-instances/about-app-instances.md#app-instance-id) of the sites you interacted with in the course of the issue’s occurrence. - Configuration and setup information associated with each step.
    Caution: Do not include any secret keys in your description.
    - Include the complete request and response of any failed network requests. - Relevant console error logs. ## Step 4 | Open the request Now you're ready to open your support request. 1. Open the [Wix support chatbot](https://www.wix.com/support-chatbot?nodeId=25a57397-ccf7-4376-8b74-48d51edf7159&referral=devRels). 1. Begin interacting with the chatbot. Provide the information you gathered above whenever the bot requests it. --- ## [Go Headless](https://dev.wix.com/docs/go-headless.md) > Build headless experiences using Wix APIs and SDKs decoupled from the Wix editor, for custom frontends and backends > Portal Navigation: > > - Append `.md` to any URL under `https://dev.wix.com/docs/` to get its markdown version. > - Pages are either content pages (article or reference text) or menu pages (a list of links to child pages). > - To get a menu page, truncate any URL to a parent path and append `.md` (e.g. `https://dev.wix.com/docs/sdk.md`, `https://dev.wix.com/docs/sdk/core-modules.md`). > - Top-level index of all portals: https://dev.wix.com/docs/llms.txt > - Full concatenated docs: https://dev.wix.com/docs/llms-full.txt ## Resource: About Wix Headless ## Article: About Wix Headless ## Article Link: https://dev.wix.com/docs/go-headless/get-started/about-wix-headless.md ## Article Content: # About Wix Headless Build a custom frontend on the stack of your choice, backed by production-ready Wix business APIs, with built-in compliance (SOC 2 Type II, HIPAA, GDPR) and a full management dashboard out of the box. Wix Headless gives you: - **Broad API coverage:** Tap into [Wix business solutions](https://dev.wix.com/docs/go-headless/project-guides/featured-business-solutions.md) such as eCommerce, bookings, events, memberships, CMS, and blog, all under a single auth model and consistent API pattern. - **Multiple frontends, one project:** A website, mobile app, and other clients can share the same underlying business data and Wix business solutions. - **Pre-built pages and logic:** Leverage [Wix-hosted pages](https://dev.wix.com/docs/go-headless/project-guides/wix-hosted-pages/about-wix-hosted-pages.md) for complex flows like checkout, booking, and ticket purchases, so you don't have to build them from scratch. ## Development paths Wix Headless offers 2 ways to build. We recommend [Wix-managed headless](https://dev.wix.com/docs/go-headless/wix-managed-headless/about-wix-managed-headless.md), where Wix hosts, runs, and deploys your frontend, so you can focus on building. When you build with Astro, either a new project or an existing one, you also get automatic authentication and extensions. If you prefer a specific framework or hosting infrastructure, you can go [self-managed](https://dev.wix.com/docs/go-headless/self-managed-headless/about-self-managed-headless.md). For a detailed comparison, see [Choose Your Development Path](https://dev.wix.com/docs/go-headless/get-started/choose-your-development-path.md). ## Get started Each quick start sets up a [Wix-managed headless](https://dev.wix.com/docs/go-headless/wix-managed-headless/about-wix-managed-headless.md) project. Choose one based on whether you're starting a new project or bringing a frontend you already have. ### Start from scratch - [Quick Start with AI](https://dev.wix.com/docs/go-headless/get-started/quick-starts/wix-managed-headless/quick-start-with-ai.md): Describe what you want to build and let your AI agent scaffold and deploy a project from a single prompt. Ideal for getting started with minimal setup. - [Quick Start with the Wix CLI](https://dev.wix.com/docs/go-headless/get-started/quick-starts/wix-managed-headless/quick-start-with-the-wix-cli.md): Scaffold a new Astro-based project from your terminal. The hands-on alternative to building with AI. ### Bring an existing frontend - [Quick Start with Claude Design](https://dev.wix.com/docs/go-headless/get-started/quick-starts/wix-managed-headless/quick-start-from-claude-design.md): Send a design you built in Claude Design straight to Wix from the **Share** menu. - [Quick Start from an Existing Astro Project](https://dev.wix.com/docs/go-headless/get-started/quick-starts/wix-managed-headless/quick-start-from-an-existing-astro-project.md): Link an Astro project you already have. You get automatic authentication and extensions, with no client setup. - [Quick Start from Your Own Frontend](https://dev.wix.com/docs/go-headless/get-started/quick-starts/wix-managed-headless/quick-start-from-your-own-frontend.md): Deploy an existing single-page app (SPA) to Wix hosting. Wix hosts and runs it, and you set up authentication yourself. To manage hosting yourself or extend an existing Wix site, see [self-managed headless](https://dev.wix.com/docs/go-headless/self-managed-headless/about-self-managed-headless.md). ## AI toolkit The [Headless AI Toolkit](https://dev.wix.com/docs/go-headless/get-started/headless-ai-toolkit.md) gives your AI client the context it needs to build and manage your headless project. It explains the available tools, including the `wix-headless.dev` skill, the Wix plugin, Wix Skills, and the Wix MCP, and helps you choose the right one for your workflow. ## Pricing Wix Headless is free to start. [Upgrade to a premium plan](https://www.wix.com/premium-purchase-plan/dynamo) to unlock payments, in-depth analytics, custom domains, and more. ## Get in touch Join the [Headless channel](https://discord.gg/47gUT9KabP) of the Devs on Wix Discord community to discuss features and connect with our growing community of developers. ## Next steps - [Quick Start a Headless Project](https://dev.wix.com/docs/go-headless/get-started/quick-starts/wix-managed-headless/quick-start-with-the-wix-cli.md): Set up a Wix-managed headless project using the CLI. - [Explore wix-headless.dev](https://wix-headless.dev/): Dive into guides and examples for building with Wix Headless. --- > Portal Navigation: > > - Append `.md` to any URL under `https://dev.wix.com/docs/` to get its markdown version. > - Pages are either content pages (article or reference text) or menu pages (a list of links to child pages). > - To get a menu page, truncate any URL to a parent path and append `.md` (e.g. `https://dev.wix.com/docs/sdk.md`, `https://dev.wix.com/docs/sdk/core-modules.md`). > - Top-level index of all portals: https://dev.wix.com/docs/llms.txt > - Full concatenated docs: https://dev.wix.com/docs/llms-full.txt ## Resource: Choose Your Development Path ## Article: Headless Development Paths ## Article Link: https://dev.wix.com/docs/go-headless/get-started/choose-your-development-path.md ## Article Content: # Choose Your Wix Headless Development Path Wix Headless lets you build a custom frontend on any stack, backed by Wix's business management platform. Before you start, choose a development path. The right path comes down to how much you want Wix to manage, above all who hosts your frontend and who handles authentication. - [Wix-managed headless](https://dev.wix.com/docs/go-headless/wix-managed-headless/about-wix-managed-headless.md) (recommended): Wix hosts your frontend and handles infrastructure. Best for getting to a deployed project fast. - [Self-managed headless](https://dev.wix.com/docs/go-headless/self-managed-headless/about-self-managed-headless.md): You bring any framework and host it yourself. Best when you need control over your framework and hosting, or are connecting an existing Wix site. ## Wix-managed headless Take advantage of a fully Wix-managed solution for developing and hosting your headless project. This is the recommended path for new headless projects. Wix hosts and runs your site with managed infrastructure, including a global CDN hosting, secrets management, analytics, and the Wix CLI. When you scaffold a new project with AI or the Wix CLI, [Wix's Astro integration](https://dev.wix.com/docs/go-headless/wix-managed-headless/authentication/about-the-astro-integration.md) configures authentication and built-in [SEO support](https://dev.wix.com/docs/go-headless/wix-managed-headless/seo/about-seo-support.md) for you, so you can focus on building. To learn more, see [About Wix-Managed Headless](https://dev.wix.com/docs/go-headless/wix-managed-headless/about-wix-managed-headless.md). ## Self-managed headless Build your own frontend from scratch with any framework or platform, and connect it directly to Wix's backend using the [Wix JavaScript SDK](https://dev.wix.com/docs/sdk.md) or the [REST API](https://dev.wix.com/docs/rest.md). You're responsible for all configuration, authentication, and hosting. ## Start from an existing Wix site You can [connect an existing Wix site to Wix Headless](https://dev.wix.com/docs/go-headless/get-started/quick-starts/self-managed-headless/quick-start-from-an-existing-wix-site.md), turning the site into the backend for your project. Use this approach to migrate to a custom frontend or to extend a site with additional frontends. The authentication strategy is the same as for any self-managed project. ## Comparison of development paths | Path | Framework | Hosting | Authentication | Best for | |------------------|-----------------------|----------|----------------|---------------------------------------| | **Wix-managed** | Astro (new or linked) | Wix | Automatic | Fastest, fully managed path | | **Self-managed** | Any | You host | You set up | Full control, or an existing Wix site | ### What each path includes | Feature | Wix-managed | Self-managed | |-------------------------------------------------|-------------|--------------| | Project scaffolding & automatic authentication | ✓ | ✗ | | Built-in SEO support | ✓ | ✗ | | Managed hosting | ✓ | ✗ | | Secrets management | ✓ | ✗ | | Analytics tracking | ✓ | ✗ | | Wix CLI | ✓ | ✗ | | App extensions | ✓ | ✗ | | Wix business APIs | ✓ | ✓ | | Any hosting solution | ✗ | ✓ | ## Next steps Choose a path and start building: - [Wix-Managed Headless](https://dev.wix.com/docs/go-headless/wix-managed-headless/about-wix-managed-headless.md) - [Self-Managed Headless](https://dev.wix.com/docs/go-headless/self-managed-headless/about-self-managed-headless.md) ## See also - [Headless AI Toolkit](https://dev.wix.com/docs/go-headless/get-started/headless-ai-toolkit.md) - [Quick Start with AI](https://dev.wix.com/docs/go-headless/get-started/quick-starts/wix-managed-headless/quick-start-with-ai.md) --- > Portal Navigation: > > - Append `.md` to any URL under `https://dev.wix.com/docs/` to get its markdown version. > - Pages are either content pages (article or reference text) or menu pages (a list of links to child pages). > - To get a menu page, truncate any URL to a parent path and append `.md` (e.g. `https://dev.wix.com/docs/sdk.md`, `https://dev.wix.com/docs/sdk/core-modules.md`). > - Top-level index of all portals: https://dev.wix.com/docs/llms.txt > - Full concatenated docs: https://dev.wix.com/docs/llms-full.txt ## Resource: Headless AI Toolkit ## Article: Headless AI Toolkit ## Article Link: https://dev.wix.com/docs/go-headless/get-started/headless-ai-toolkit.md ## Article Content: # Headless AI Toolkit The Wix Headless AI toolkit gives AI coding clients such as Claude Code, Cursor, VS Code, and Codex the context they need to build and manage a Wix Headless project from your prompts. Go from a single prompt to a deployed project, then keep prompting to extend your project's features and functionality. ## Available tools Wix integrates with your AI client in several ways, and they overlap. Use the table to compare what each option gives you and how to get it. Then use the questions below to find the right fit. | Tool | What it gives you | How to get it | |---|---|---| | [`wix-headless.dev`](#build-with-a-single-prompt) | The headless build-and-deploy workflow, referenced by URL. | Nothing to install. Paste the skill URL into your prompt. | | [Wix plugin](#install-the-wix-plugin) | Wix Skills and the Wix MCP together. | A single command in a supported client. | | [Wix Skills](#install-just-wix-skills) | Self-contained instruction sets, including the Wix Headless skill. | `npx skills add wix/skills` | | [Wix MCP](#configure-just-the-wix-mcp) | Live access to Wix docs, API calls, and project, site, and app management. | Configure it in your client. | ### Choose your tool - **Launching a project right now?** Reference the [`wix-headless.dev` skill URL](#build-with-a-single-prompt). There's nothing to install. Paste the URL into your prompt and your agent does the rest. - **Building and managing in a supported client?** Install the [Wix plugin](#install-the-wix-plugin). It bundles Wix Skills and the Wix MCP, so your client can scaffold projects, search docs, and call Wix APIs with no extra setup. - **Want the instructions, but not the live connection?** Install [Wix Skills](#install-just-wix-skills) on their own, without the Wix MCP's live access to Wix docs and APIs. - **On an unsupported client, or only need live docs and APIs?** Configure the [Wix MCP](#configure-just-the-wix-mcp) directly. This covers clients like Claude Desktop, Windsurf, and n8n. > **Note:** The Wix plugin already includes the Wix Headless skill, which is the same as the `wix-headless.dev` skill. If you've installed the plugin, you don't need to use the `wix-headless.dev` skill. Prompt your agent to build a headless project. ## Build with a single prompt You can build a fully customizable headless project with a single prompt, without installing anything. [wix-headless.dev](https://wix-headless.dev/) is a reference site that hosts a [skill.md](https://www.wix-headless.dev/skill.md) file. The skill instructs your AI agent on how to scaffold and deploy a Wix-managed headless project using the [CLI](https://dev.wix.com/docs/wix-cli.md). To start, describe what you want to build to your AI agent and include the skill URL. For example: ```bash "Build a storefront for handmade ceramics" using https://www.wix-headless.dev/skill.md ``` Your new project appears in your [dashboard](https://support.wix.com/en/article/about-your-wix-dashboard) alongside your sites. From here you can keep prompting your agent to extend your project's features and functionality, or continue developing manually with the [CLI](https://dev.wix.com/docs/wix-cli.md). To give your agent richer, persistent context for ongoing work, install the [Wix plugin](#install-the-wix-plugin). ## Install the Wix plugin For ongoing AI development, the Wix plugin adds both [Wix Skills](https://dev.wix.com/docs/api-reference/articles/ai-tools/about-wix-skills.md) and the [Wix MCP](https://dev.wix.com/docs/api-reference/articles/ai-tools/wix-mcp/about-the-wix-mcp.md) to your AI client. Once installed, the client can search Wix documentation, scaffold projects, and call Wix APIs directly from your chat. Select your client and follow the steps to get started. ::::tabs :::Cursor For development in Cursor, install the Wix plugin using either of these methods: - **From the AI chat:** Run the following command: ```text /add-plugin wix ``` - **From the marketplace:** Install it from the [Cursor marketplace](https://cursor.com/marketplace/wix). ::: :::Claude-Code For development in Claude Code, install the Wix plugin using either of these methods: - **From claude.com:** Open the [Wix plugin page](https://claude.com/plugins/wix) and click **Install in Claude Code**. Claude Code opens and installs the plugin for you. - **From Claude Code:** Run the following command: ```text /plugins install wix ``` ::: :::Codex For development with Codex: 1. In a terminal, register the Wix Skills marketplace: ```bash codex plugin marketplace add wix/skills ``` 2. In the Codex CLI, run `/plugins`, select **Wix**, and choose **Install Plugin**. ::: :::VS-Code To install the Wix plugin in VS Code: 1. Open the Command Palette by pressing `Control+Shift+P` (or `Command+Shift+P` on macOS). 2. Select **Chat: Install Plugin From Source**. 3. Enter `https://github.com/wix/skills`. ::: :::: For other AI clients like Claude Desktop, Windsurf, or n8n, [configure the Wix MCP](https://dev.wix.com/docs/api-reference/articles/ai-tools/wix-mcp/about-the-wix-mcp.md) directly. ## Install just Wix Skills If you want the skill instruction sets without the Wix MCP, install [Wix Skills](https://dev.wix.com/docs/api-reference/articles/ai-tools/about-wix-skills.md) on their own. Skills are self-contained instruction sets for Wix development tasks, including the Wix Headless skill, which can scaffold and deploy a complete headless project from a single prompt. To install Wix Skills, run: ```bash npx skills add wix/skills ``` > **Note:** Add `-g` to install globally and make Wix Skills available across all your projects. ## Configure just the Wix MCP The [Wix MCP](https://dev.wix.com/docs/api-reference/articles/ai-tools/wix-mcp/about-the-wix-mcp.md) is a Model Context Protocol server that lets your AI client search Wix docs, scaffold code, and call Wix APIs directly from your IDE. It's included in the Wix plugin, but you can also [configure it directly](https://dev.wix.com/docs/api-reference/articles/ai-tools/wix-mcp/about-the-wix-mcp.md) for clients that don't support the plugin, such as Claude Desktop, Windsurf, or n8n. ## Programmatic docs access Beyond the toolkit, you can pull Wix docs into any tool or workflow: - **llms.txt index:** Browse a structured index of all documentation at [dev.wix.com/docs/llms.txt](https://dev.wix.com/docs/llms.txt.md). - **Markdown format:** Append `.md` to any documentation page URL to retrieve the Markdown version of that page. - **Page menu:** Use the **Ask Assistant** dropdown on any documentation page to copy the page as Markdown or get a direct link to the Markdown version. ## See also - [About Wix-Managed Headless](https://dev.wix.com/docs/go-headless/wix-managed-headless/about-wix-managed-headless.md) - [Featured Business Solutions for Wix Headless](https://dev.wix.com/docs/go-headless/project-guides/featured-business-solutions.md) --- > Portal Navigation: > > - Append `.md` to any URL under `https://dev.wix.com/docs/` to get its markdown version. > - Pages are either content pages (article or reference text) or menu pages (a list of links to child pages). > - To get a menu page, truncate any URL to a parent path and append `.md` (e.g. `https://dev.wix.com/docs/sdk.md`, `https://dev.wix.com/docs/sdk/core-modules.md`). > - Top-level index of all portals: https://dev.wix.com/docs/llms.txt > - Full concatenated docs: https://dev.wix.com/docs/llms-full.txt ## Resource: About Admin Operations ## Article: About Admin Operations ## Article Link: https://dev.wix.com/docs/go-headless/get-started/about-admin-operations.md ## Article Content: # About Admin Operations Admin operations are backend API calls that require elevated permissions to access or modify a headless project's business data. ## When to use admin operations Use admin operations to perform actions that affect data beyond the current visitor's session. For example, you can: - Create, approve, or delete site members. - Add products to your store or update inventory. - Update order status, issue refunds, or fulfill orders. - Confirm, cancel, or reschedule bookings. - Query all orders, members, or bookings across your project. ## Elevation with client credentials (recommended) The recommended way to perform admin operations for all headless projects is to elevate your API calls using the Wix OAuth flow. You exchange your OAuth app's client ID and client secret for a short-lived access token, then use that token to authorize your admin API calls. ### Generate a client secret The client secret authenticates your backend code as the app itself, granting it the administrative access needed for admin operations. Unlike the client ID used for visitor and member authentication, the client secret is required only for this elevated flow. To generate a client secret: 1. In your project dashboard, go to **Settings** > **Development & integrations** > [Headless Settings](https://www.wix.com/my-account/site-selector/?buttonText=Select%20Site&title=Select%20a%20Site&autoSelectOnSingleSite=true&actionUrl=https:%2F%2Fwww.wix.com%2Fdashboard%2F%7B%7BmetaSiteId%7D%7D%2Foauth-apps-settings). 2. Next to the relevant headless client, click the more actions menu to open that client's settings. 3. In the **Client info** section, under **Client secret**, click **Generate Client Secret**. 4. Copy the client secret and store it securely.
    __Important:__ You can only view the client secret once, immediately after you generate it. If you lose it, generate a new one. Store your client secret securely and only use it in backend code.
    ### Get an access token With your OAuth app's client ID and secret, call the [Create Access Token](https://dev.wix.com/docs/api-reference/app-management/oauth-2/create-access-token.md) endpoint using the `client_credentials` grant type: - `client_id`: Your OAuth app ID. - `client_secret`: Your OAuth app secret. - `grant_type`: `client_credentials`. For example: ```bash curl -X POST 'https://www.wixapis.com/oauth2/token' \ -H 'Content-Type: application/json' \ -d '{ "grant_type": "client_credentials", "client_id": "", "client_secret": "" }' ``` The response contains a short-lived access token: ```json { "access_token": "", "token_type": "Bearer", "expires_in": 14400 } ``` Pass the access token in the `Authorization` header of your admin API calls: ```bash curl -X POST 'https://www.wixapis.com/stores/v3/products' \ -H 'Authorization: ' \ -H 'Content-Type: application/json' \ -d '{ "product": { "name": "My product" } }' ``` ### Elevation with `@wix/essentials` (Wix Astro projects) If your project uses the [Wix Astro Integration](https://dev.wix.com/docs/go-headless/wix-managed-headless/authentication/about-the-astro-integration.md), you don't need to manage credentials or tokens yourself. Authentication and elevation are handled using the [`@wix/essentials`](https://dev.wix.com/docs/sdk/core-modules/essentials/auth.md#methods) package. To perform an admin operation from your backend code, wrap a restricted SDK method with [`auth.elevate()`](https://dev.wix.com/docs/sdk/core-modules/essentials/auth.md#methods) and call the elevated version. The elevated method runs with the permissions it requires.
    __Warning:__ Elevation lets your code call methods it typically can't access. Use it intentionally and only in backend code. Pay special attention when using `elevate()` in backend code that can be triggered from the frontend or exposed as an API to outside callers.
    ## API key (self-managed projects) If you're building a [self-managed headless project](https://dev.wix.com/docs/go-headless/self-managed-headless/about-self-managed-headless.md) you can choose to authenticate with an API key. API keys grant a custom set of permissions to your backend code. Unlike OAuth tokens that represent a specific visitor or member, API keys represent administrative access to your project. To get started with API key authentication: - [Generate an API key](https://dev.wix.com/docs/api-reference/articles/authentication/api-keys/generate-an-api-key.md) - [Make API Calls with an API Key](https://dev.wix.com/docs/api-reference/articles/authentication/api-keys/make-api-calls-with-an-api-key.md)
    __Important:__ Store your API keys securely and only use them in backend code.
    ## See also - [Create Access Token](https://dev.wix.com/docs/api-reference/app-management/oauth-2/create-access-token.md) - [About API keys](https://dev.wix.com/docs/api-reference/articles/authentication/api-keys/about-api-keys.md) - [Make API Calls with an API Key](https://dev.wix.com/docs/api-reference/articles/authentication/api-keys/make-api-calls-with-an-api-key.md) - [`auth` in `@wix/essentials`](https://dev.wix.com/docs/sdk/core-modules/essentials/auth.md#methods) --- > Portal Navigation: > > - Append `.md` to any URL under `https://dev.wix.com/docs/` to get its markdown version. > - Pages are either content pages (article or reference text) or menu pages (a list of links to child pages). > - To get a menu page, truncate any URL to a parent path and append `.md` (e.g. `https://dev.wix.com/docs/sdk.md`, `https://dev.wix.com/docs/sdk/core-modules.md`). > - Top-level index of all portals: https://dev.wix.com/docs/llms.txt > - Full concatenated docs: https://dev.wix.com/docs/llms-full.txt ## Resource: Overview ## Article: Quick Starts Overview ## Article Link: https://dev.wix.com/docs/go-headless/get-started/quick-starts/overview.md ## Article Content: # Quick Starts Overview Wix Headless has several quick starts. The right one depends on what you already have and how much you want Wix to manage. To learn more about the options, see [Choose Your Development Path](https://dev.wix.com/docs/go-headless/get-started/choose-your-development-path.md). The quick starts fall into two paths: - [Wix-managed headless](#wix-managed-headless) (recommended): Wix hosts and runs your frontend. Scaffold with AI or the CLI, or link an existing Astro project, and Wix's Astro integration handles authentication for you too. - [Self-managed headless](#self-managed-headless): You host your frontend and handle authentication yourself, connecting to Wix only for business data and APIs. ## Wix-managed headless Wix hosts and runs your frontend and connects it to Wix business solutions. When building with Astro, which is the default when scaffolding with AI or the CLI, Wix's Astro integration handles authentication for you and lets you add [extensions](https://dev.wix.com/docs/build-apps/develop-your-app/develop-an-app-with-the-cli/supported-extensions/about-extensions-in-the-wix-cli.md). | Quick Start | Best for | Framework | Authentication | | --- | --- | --- | --- | | [Quick Start with AI](https://dev.wix.com/docs/go-headless/get-started/quick-starts/wix-managed-headless/quick-start-with-ai.md) | Getting to a deployed project fastest, from a prompt | New Astro project | Automatic | | [Quick Start with the Wix CLI](https://dev.wix.com/docs/go-headless/get-started/quick-starts/wix-managed-headless/quick-start-with-the-wix-cli.md) | Scaffolding a new project from your terminal | New Astro project | Automatic | | [Quick Start from an Existing Astro Project](https://dev.wix.com/docs/go-headless/get-started/quick-starts/wix-managed-headless/quick-start-from-an-existing-astro-project.md) | Linking an Astro project you already have | Existing Astro project | Automatic | | [Quick Start from Claude Design](https://dev.wix.com/docs/go-headless/get-started/quick-starts/wix-managed-headless/quick-start-from-claude-design.md) | Sending a Claude Design build directly to Wix | Claude Design | You set up | | [Quick Start from Your Own Frontend](https://dev.wix.com/docs/go-headless/get-started/quick-starts/wix-managed-headless/quick-start-from-your-own-frontend.md) | Deploying an existing single-page app to Wix hosting | Existing SPA | You set up | ## Self-managed headless You host your frontend and handle authentication yourself. Wix provides the business data and APIs. | Quick Start | Best for | Framework | | --- | --- | --- | | [Quick Start a Self-Managed Headless Project](https://dev.wix.com/docs/go-headless/get-started/quick-starts/self-managed-headless/quick-start-a-self-managed-headless-project.md) | Full control over framework, hosting, and auth | Any | | [Start from an Existing Wix Site](https://dev.wix.com/docs/go-headless/get-started/quick-starts/self-managed-headless/quick-start-from-an-existing-wix-site.md) | Extending a site you already have with a new frontend | Any | ## See also - [Choose Your Development Path](https://dev.wix.com/docs/go-headless/get-started/choose-your-development-path.md) - [Headless AI Toolkit](https://dev.wix.com/docs/go-headless/get-started/headless-ai-toolkit.md) --- > Portal Navigation: > > - Append `.md` to any URL under `https://dev.wix.com/docs/` to get its markdown version. > - Pages are either content pages (article or reference text) or menu pages (a list of links to child pages). > - To get a menu page, truncate any URL to a parent path and append `.md` (e.g. `https://dev.wix.com/docs/sdk.md`, `https://dev.wix.com/docs/sdk/core-modules.md`). > - Top-level index of all portals: https://dev.wix.com/docs/llms.txt > - Full concatenated docs: https://dev.wix.com/docs/llms-full.txt ## Resource: Quick Start with AI ## Article: Quick Start with AI ## Article Link: https://dev.wix.com/docs/go-headless/get-started/quick-starts/wix-managed-headless/quick-start-with-ai.md ## Article Content: # Quick Start with AI Go from a single prompt to a deployed Wix-managed headless project. You describe what you want to build, and your AI agent scaffolds the project, provisions the business and site, and deploys it for you. Then you keep prompting to extend it. This is the fastest way to start. There's nothing to install to try it. ## What you can build With a single prompt, your agent can build and deploy a complete, working site backed by Wix business solutions: a store, a booking system, a blog, and more. Describe what you want in plain language: - *Build a storefront for handmade ceramics with a product catalog and checkout.* ([Wix Stores](https://dev.wix.com/docs/api-reference/business-solutions/stores/introduction.md)) - *Build a booking site for a yoga studio with class schedules and online payments.* ([Wix Bookings](https://dev.wix.com/docs/api-reference/business-solutions/bookings/introduction.md)) - *Build an events page that sells tickets.* ([Wix Events](https://dev.wix.com/docs/api-reference/business-solutions/events/introduction.md)) - *Build a portfolio site for an architecture firm, with projects managed in a CMS.* ([Wix CMS](https://dev.wix.com/docs/api-reference/business-solutions/cms/introduction.md)) - *Build a membership site for a fitness coach with gated, members-only content.* ([Wix Members](https://dev.wix.com/docs/api-reference/crm/members-contacts/members/introduction.md)) Learn more about [featured business solutions for Wix Headless](https://dev.wix.com/docs/go-headless/project-guides/featured-business-solutions.md).
    **Tip**: The more detail you give, such as the desired pages, data, and design, the more complete the result. For ready to adapt examples, see the [prompt recipes](#prompt-recipes).
    ## Before you begin Make sure you have: - [Node.js](https://nodejs.org/en/) (v20.11.0 or higher). - A Wix account. If you don't have one, [sign up](https://manage.wix.com/account/custom-apps). - An AI client such as Claude Code, Cursor, Codex, or GitHub Copilot in VS Code. ## Step 1 | Build with a single prompt [wix-headless.dev](https://wix-headless.dev/) hosts a [skill.md](https://www.wix-headless.dev/skill.md) file that instructs your AI agent on how to scaffold and deploy a Wix-managed headless project using the [Wix CLI](https://dev.wix.com/docs/wix-cli.md). You don't need to install anything to use it. In your AI client, describe what you want to build and include the skill URL. For example: ```text Build a storefront for handmade ceramics using https://www.wix-headless.dev/skill.md ``` The agent provisions the business and site for you and scaffolds the local codebase in one step. For more detailed, ready-to-adapt prompts, see [Prompt recipes](#prompt-recipes). ## Step 2 | Find your project Your project lives in two places: - **On Wix**: It appears in your [Wix dashboard](https://support.wix.com/en/article/about-your-wix-dashboard) alongside your sites. From there you can open the live URL, manage the site, or connect a custom domain. - **On your computer**: The project's code is saved as a folder. Your agent chooses where to put it, so if you're not sure, ask it where it saved the project and note the location. You'll need it to keep editing later. ## Step 3 (Recommended) | Install the Wix plugin for ongoing work The single-prompt skill is enough to scaffold and deploy. For ongoing development, install the [Wix plugin](https://dev.wix.com/docs/go-headless/get-started/headless-ai-toolkit.md#install-the-wix-plugin) in your AI client. It adds [Wix Skills](https://dev.wix.com/docs/api-reference/articles/ai-tools/about-wix-skills.md) and the [Wix MCP](https://dev.wix.com/docs/api-reference/articles/ai-tools/wix-mcp/about-the-wix-mcp.md) together, giving your agent persistent Wix context so it can search Wix docs, scaffold code, and call Wix APIs directly from your chat. ## Step 4 | Keep building Keep prompting your agent to add features and functionality. Define your data model, add authentication, build UI, and redeploy. You can also continue developing manually with the [Wix CLI](https://dev.wix.com/docs/wix-cli.md) at any time. You don't need to stay in the same chat to keep working. To pick your project back up later, start a new chat with your agent in the project folder from Step 2 and tell it what you want to change. As long as the agent is working in that folder, it has your code and can keep building. ## Best practices For the best result, follow these best practices: - **Structure your prompt.** Group your requirements into functionality, pages, and design so the agent can work through them methodically. - **Name your data and its schema.** Specify required collection names and fields with their types. For example, a 'projects' collection with Project Name (text), Main Image (image), and Location (text). - **Ask to seed example content.** Request realistic sample data so the site looks complete out of the box and is easy to review. - **Specify Wix business solutions.** If you know you need Wix Stores, Bookings, Blog, or the CMS, say so to point the agent at the right APIs. - **Mention authentication early.** If members need to log in, say so up front so the agent sets it up from the start. - **Describe behavior, not structure.** Tell the agent what site visitors should be able to do, and let it choose the implementation. - **Call out responsiveness and accessibility.** Ask for a mobile-friendly layout, good color contrast, and alt text so the result is production-ready. - **Iterate.** Build the smallest working version first, then keep prompting to extend it. ## Prompt recipes A short prompt gets you started, but a detailed one gets you a finished site. The recipes below show how to structure a thorough prompt: group your requirements into functionality, pages, and design, name your data up front, and ask the agent to seed realistic example content. ### Portfolio site with a CMS ```text Using the Wix Headless skill at https://www.wix-headless.dev/skill.md, create a new site hosted on Wix for an architecture firm named Atelier Mercer to showcase their projects. FUNCTIONALITY - Use Wix CMS to store projects in a collection named 'projects' with this schema: Project Name (text), Main Image (image), Description (rich text), Location (text), Image Gallery (media gallery), Architect (text), Display on Site (boolean). - Seed the collection with 10 realistic example projects so the site looks complete out of the box. - Anywhere projects are listed, only render items where 'Display on Site' is true. - Generate a detail page for each project dynamically, using the Project Name for a clean URL slug. PAGES - Home: full-bleed hero with the firm name and tagline, then a featured grid of projects. - Projects: full grid of projects where Display on Site is true (each card shows Main Image, Project Name, and Location). - Project detail: large image, name, location, architect, description, and the image gallery. - About and Contact pages, with a contact form. DESIGN - Minimalist, editorial, and image-forward, with a near-monochrome palette and one subtle accent color. - Refined serif headings paired with a clean sans for body text; generous whitespace and a strict grid. - Fully responsive (single-column grid and hamburger nav on mobile) and accessible (good contrast, alt text driven from project data, keyboard-navigable galleries). ``` ### Online store with Wix Stores ```text Using the Wix Headless skill at https://www.wix-headless.dev/skill.md, create a new site hosted on Wix for a pet shop. Use Wix Stores for the catalog and Wix's native checkout. FUNCTIONALITY - Use Wix Stores to manage the catalog. Create 5 example products: dog food, cat food, a bird cage with a "Size" option (Small, Medium, Large, each priced differently), a fish tank with a "Capacity" option (20L, 40L, 60L, each priced differently), and a pet toy bundle. - Give each product a realistic name, description, price, and at least one image, and assign products to sensible categories (Dogs, Cats, Birds, Fish, Accessories). PAGES - Home: hero with the shop name and tagline, a few featured products, and links to categories. - Shop: product grid with image, name, price, and add-to-cart, filterable by category. - Product detail: images, name, description, price, variant and quantity selectors, and add-to-cart. - Cart: line items, quantity controls, subtotal, and a checkout button. - About and Contact pages. - Persistent header with logo, nav, and a cart icon showing the item count; footer with contact info. DESIGN - Friendly, warm, and approachable, but clean and trustworthy for e-commerce. - Warm palette (creams, soft neutrals) with one or two cheerful accent colors for buttons and highlights. - Rounded, friendly heading typeface paired with a clean, legible sans for body text. - Fully responsive and accessible (good contrast, image alt text, keyboard-navigable nav and cart). ``` ## See also - [Headless AI Toolkit](https://dev.wix.com/docs/go-headless/get-started/headless-ai-toolkit.md) - [About Wix-Managed Headless](https://dev.wix.com/docs/go-headless/wix-managed-headless/about-wix-managed-headless.md) --- > Portal Navigation: > > - Append `.md` to any URL under `https://dev.wix.com/docs/` to get its markdown version. > - Pages are either content pages (article or reference text) or menu pages (a list of links to child pages). > - To get a menu page, truncate any URL to a parent path and append `.md` (e.g. `https://dev.wix.com/docs/sdk.md`, `https://dev.wix.com/docs/sdk/core-modules.md`). > - Top-level index of all portals: https://dev.wix.com/docs/llms.txt > - Full concatenated docs: https://dev.wix.com/docs/llms-full.txt ## Resource: Quick Start with the Wix CLI ## Article: Quick Start with the Wix CLI ## Article Link: https://dev.wix.com/docs/go-headless/get-started/quick-starts/wix-managed-headless/quick-start-with-the-wix-cli.md ## Article Content: # Quick Start a Headless Project with the Wix CLI This guide explains the minimum steps required to get a [Wix-managed headless project](https://dev.wix.com/docs/go-headless/wix-managed-headless/about-wix-managed-headless.md) up and running using the [Wix CLI](https://dev.wix.com/docs/wix-cli/guides/about-the-wix-cli.md). Every CLI command used in this guide is documented in the [Command Reference](https://dev.wix.com/docs/wix-cli/command-reference/introduction.md). As part of this setup, you'll get a frontend site and [private app](https://dev.wix.com/docs/wix-cli/guides/about-the-wix-cli.md#projects-private-app) integrated with a headless project. This setup also initializes useful headless settings for your project, such as [adding allowed redirect domains](https://dev.wix.com/docs/go-headless/project-guides/wix-hosted-pages/add-allowed-redirect-domains.md) and [setting a Wix Pages domain](https://dev.wix.com/docs/go-headless/project-guides/wix-hosted-pages/set-a-wix-pages-domain.md). > **Note:** To develop with AI assistance, install the [Wix Plugin](https://dev.wix.com/docs/api-reference/articles/ai-tools/about-the-wix-plugin.md) for your IDE. It adds [Wix Skills](https://dev.wix.com/docs/api-reference/articles/ai-tools/about-wix-skills.md) and the [Wix MCP](https://dev.wix.com/docs/sdk/articles/use-the-wix-mcp/about-the-wix-mcp.md), giving your AI client the context it needs to help you build CLI projects. ## Before you begin Before getting started, make sure that you: - Have [Node.js](https://nodejs.org/en/) (v20.11.0 or higher). - Have Git installed and [configured](https://git-scm.com/docs/git-config). - Are logged into your Wix account. If you don't already have one, [sign up for a Wix account](https://manage.wix.com/account/custom-apps). ## Step 1 | Create a new headless project 1. Open a terminal and navigate to the folder where you want to create your project. 2. Run the following [command to create a new headless project](https://dev.wix.com/docs/wix-cli/command-reference/project-creation/create-headless.md): ```bash npm create @wix/new@latest headless ``` If prompted to install the `@wix/create-new` package, confirm it. You don't need to do any prior setup in the Wix dashboard. The CLI provisions a business and site for your project automatically. The CLI then prompts you for the details it needs to set up your project. > **Note:** You can run the command non-interactively, which is especially useful for automated scripts and AI agents. To do so, pass the `--folder-name`, `--business-name`, and `--site-template` flags. You can pass `--site-template` with a value to choose a specific template, or pass bare `--site-template` to use the blank starter. Omitting any of these flags causes the CLI to error out or fall back to interactive prompts. For the full list of flags, see [`npm create @wix/new headless`](https://dev.wix.com/docs/wix-cli/command-reference/project-creation/create-headless.md). 3. Enter the **name of your business**. This is the name of your headless project on Wix. The CLI creates a Wix Headless project for you with this name. This project is added to your Wix sites list. 4. Select an **initial template** for your project. For a list of available templates, see [Wix-Managed Headless Templates](https://dev.wix.com/docs/go-headless/wix-managed-headless/wix-managed-templates/astro-templates.md). 5. Enter a **folder name** for your project. The CLI generates the [local code files](https://dev.wix.com/docs/wix-cli/guides/project-structure/project-structure.md) for your project in a folder with that name. 6. Wait while the CLI generates your project. It installs dependencies, initializes a Git repository, and configures your files, then builds and publishes your site and displays your live site URL. ## Step 2 | Test the project 1. Navigate to your project folder. 2. Run the [`dev`](https://dev.wix.com/docs/wix-cli/command-reference/project-commands/dev.md) command to start the local development environment: ```bash wix dev ``` The CLI builds a local environment for your project and provides links to view your site and dashboard. The development environment supports hot reloading, so any changes you make to your code are immediately reflected in the browser. 3. Click the **Site** link to confirm your project is running locally. You can also click the **Dashboard** link to open your project's Wix dashboard. 4. Close the local development environment when you're done. ## Step 3 (Optional) | Call a Wix API > **Note:** In this step we're calling the [`listMembers()`](https://dev.wix.com/docs/api-reference/crm/members-contacts/members/member-management/members/list-members?apiView=SDK.md) method in the Wix Members API, but you can use any method in any [Wix JavaScript SDK](https://dev.wix.com/docs/api-reference?apiView=SDK.md) API. 1. Install the `@wix/members` package: ```bash npm install @wix/members ``` 2. Add the following to the [component script](https://docs.astro.build/en/basics/astro-components/#the-component-script) of your `src/pages/index.astro` file: ```ts import { members } from "@wix/members"; const memberList = await members.listMembers(); console.log("Site members:", memberList); ``` Your component script should look something like this: ```ts --- import Welcome from '../components/Welcome.astro'; import Layout from '../layouts/Layout.astro'; import { members } from "@wix/members"; const memberList = await members.listMembers(); console.log("Site members:", memberList); --- ``` 3. Run the [`dev`](https://dev.wix.com/docs/wix-cli/command-reference/project-commands/dev.md) command to start the local development environment: ```bash wix dev ``` 4. Click the **Site** link to open your site. 5. Return to the terminal. You should see the following log showing that your site currently has 0 members: ```bash Site members: { members: [], metadata: { count: 0, offset: 0, total: 0, tooManyToCount: false } } ``` > **Note**: If you added members, you may not see their data in this list due to their status being set to `PRIVATE` by default. For more information, see [List Members](https://dev.wix.com/docs/api-reference/crm/members-contacts/members/member-management/members/list-members?apiView=SDK.md). ## Next steps After completing the above steps, you have a simple headless project that you can experiment with and test locally. You can now: - [Install the Wix plugin](https://dev.wix.com/docs/api-reference/articles/ai-tools/about-the-wix-plugin.md) - [Add extensions to your project](https://dev.wix.com/docs/go-headless/wix-managed-headless/extensions/about-extensions-in-the-wix-cli.md) - [Add multilingual support](https://dev.wix.com/docs/go-headless/wix-managed-headless/feature-guides/add-multilingual-support.md) - [Track analytics events](https://dev.wix.com/docs/go-headless/wix-managed-headless/feature-guides/track-analytics-events.md) --- > Portal Navigation: > > - Append `.md` to any URL under `https://dev.wix.com/docs/` to get its markdown version. > - Pages are either content pages (article or reference text) or menu pages (a list of links to child pages). > - To get a menu page, truncate any URL to a parent path and append `.md` (e.g. `https://dev.wix.com/docs/sdk.md`, `https://dev.wix.com/docs/sdk/core-modules.md`). > - Top-level index of all portals: https://dev.wix.com/docs/llms.txt > - Full concatenated docs: https://dev.wix.com/docs/llms-full.txt ## Resource: Quick Start from an Existing Astro Project ## Article: Quick Start from an Existing Astro Project ## Article Link: https://dev.wix.com/docs/go-headless/get-started/quick-starts/wix-managed-headless/quick-start-from-an-existing-astro-project.md ## Article Content: # Quick Start from an Existing Astro Project Already have an Astro project? Link it to Wix and deploy it as a Wix-managed headless project with [Wix's Astro integration](https://dev.wix.com/docs/go-headless/get-started/choose-your-development-path.md). The integration handles hosting, authentication, and [extensions](https://dev.wix.com/docs/build-apps/develop-your-app/develop-an-app-with-the-cli/supported-extensions/about-extensions-in-the-wix-cli.md) for you, so there's no client setup or authentication to wire up yourself. The [`headless link`](https://dev.wix.com/docs/wix-cli/command-reference/project-creation/create-headless-link.md) command provisions a Wix business and site, configures your Astro setup for Wix, and installs the dependencies you need. This is the alternative to scaffolding a new Astro project. For that, see [Quick Start with the Wix CLI](https://dev.wix.com/docs/go-headless/get-started/quick-starts/wix-managed-headless/quick-start-with-the-wix-cli.md). ## Before you begin Make sure: - You're logged in to your Wix account. If you don't have one, [sign up](https://manage.wix.com/account/custom-apps). - You have [Node.js](https://nodejs.org/en/) (v20.11.0 or higher). - Your project uses Astro 5 and contains an Astro configuration file (such as `astro.config.mjs`). Astro 6 isn't supported. - Your project isn't already linked to Wix (it doesn't contain a `wix.config.json` file). ## Step 1 | Link your project to Wix 1. Navigate to the root folder of your Astro project. 2. Run: ```bash npm create @wix/new@latest -- headless link ``` 3. Enter the **name of your business**. This becomes the name of your headless project on Wix and is added to your Wix sites list. The command configures your Astro project for Wix, installs dependencies, and provisions a Wix business and site. > **Note:** You can run the command non-interactively by passing the `--business-name` flag. See the [`headless link`](https://dev.wix.com/docs/wix-cli/command-reference/project-creation/create-headless-link.md#flags) flags. ## Step 2 | Test the project Run `npm run dev` to start the local development environment, then open the link in your terminal to view your site. The environment hot-reloads, so changes appear in the browser immediately. ## Step 3 | Continue developing Your Astro project is now connected to Wix with the Astro integration handling authentication for you, so you can call [Wix SDK](https://dev.wix.com/docs/sdk.md) methods directly. From here you can: - [Call Wix APIs with the JavaScript SDK](https://dev.wix.com/docs/api-reference?apiView=SDK.md). - [Install the Wix plugin](https://dev.wix.com/docs/api-reference/articles/ai-tools/about-the-wix-plugin.md) to set up Wix Skills and the Wix MCP for AI-assisted development. - [Add extensions](https://dev.wix.com/docs/build-apps/develop-your-app/develop-an-app-with-the-cli/supported-extensions/about-extensions-in-the-wix-cli.md) for custom backend logic and dashboard UIs. ## See also - [About Wix-Managed Headless](https://dev.wix.com/docs/go-headless/wix-managed-headless/about-wix-managed-headless.md) - [create headless link](https://dev.wix.com/docs/wix-cli/command-reference/project-creation/create-headless-link.md) --- > Portal Navigation: > > - Append `.md` to any URL under `https://dev.wix.com/docs/` to get its markdown version. > - Pages are either content pages (article or reference text) or menu pages (a list of links to child pages). > - To get a menu page, truncate any URL to a parent path and append `.md` (e.g. `https://dev.wix.com/docs/sdk.md`, `https://dev.wix.com/docs/sdk/core-modules.md`). > - Top-level index of all portals: https://dev.wix.com/docs/llms.txt > - Full concatenated docs: https://dev.wix.com/docs/llms-full.txt ## Resource: Quick Start from Claude Design ## Article: Quick Start from Claude Design ## Article Link: https://dev.wix.com/docs/go-headless/get-started/quick-starts/wix-managed-headless/quick-start-from-claude-design.md ## Article Content: # Quick Start from Claude Design Send a [Claude Design](https://claude.ai/) directly to Wix and deploy it as a Wix-managed headless project. This is a Wix-managed setup, just started from Claude Design instead of the CLI.
    **Important:** Wix hosts and runs your site, but it doesn't handle authentication for you. You create a [Wix Client](https://dev.wix.com/docs/api-reference/articles/sdk-setup-and-usage/set-up-a-wix-client.md) and set up authentication yourself, the same as for [self-managed headless](https://dev.wix.com/docs/go-headless/self-managed-headless/authentication/about-authentication.md). Automatic authentication and extensions are available only with [Wix's Astro integration](https://dev.wix.com/docs/go-headless/get-started/choose-your-development-path.md).
    ## Before you begin - Connect the Wix Connector to your Claude environment (you only need to do this once): in Claude Design, click **Share** > the **Send to** tab > **Add a destination** > **Wix**. - Build your design as a single page. The Send to Wix flow deploys one HTML page, so a multi-page design won't come across as a single site. Ask Claude for a single-page site with in-page navigation between sections. ## Step 1 | Send your design to Wix 1. In Claude Design, click **Share** and select the **Send to** tab. 2. Select **Send to Wix**. This creates a `wix.config.json` file, uploads and hosts your files with SSL, CDN, and business APIs configured, and releases your site so it goes live. 3. Wait for the process to complete and verify your site is live on the success page. 4. From the success page, open the live URL, go to your site dashboard, or connect a custom domain. Your site is now live, but it isn't on your local machine yet. The success page gives you a prompt to copy to bring the project down and finish setup. The next step covers this process. ## Step 2 | Set up your local project To keep developing, you need the project on your machine, including the generated `wix.config.json` file that connects your frontend to Wix APIs. You also need to set up authentication, since Wix hosts and runs your site but doesn't handle authentication for you. Choose one of the following approaches. ::::tabs :::Use-an-AI-agent Copy the prompt from the success page and paste it into your AI agent. The agent: - Downloads your project files. - Installs dependencies and configures it to run against your live Wix site. - Connects it to Wix business solutions, such as Stores, Bookings, or the CMS. - Sets up authentication. If you no longer have the success page open, use the prompt below instead. Replace `YOUR_SITE_ID` with your site's ID. To find it, find your new project in [your sites list](https://manage.wix.com/studio/sites), select the project to open the dashboard, and copy the value in the URL immediately after `/dashboard/`. ```text Download my project from https://www.wix.com/_api/wixstro-deployments/v1/instant-sites/YOUR_SITE_ID/download.zip and follow the guide at https://wix-headless.dev/skill.md ``` > **Note:** Use this prompt for initial setup only. After the first iteration, keep developing with your agent as you normally would. Don't reuse it. The agent sets up authentication as part of this flow. If your project still isn't authenticating against Wix APIs once it finishes, complete the steps in the **Set it up yourself** tab. ::: :::Set-it-up-yourself To get your project running locally, download your files, install the SDK, and create a client that authenticates your API calls. The groundwork is already done: sending your design to Wix created an OAuth client for you and stored its client ID as the `appId` in your `wix.config.json` file. You'll use that `appId` in the following steps. > **Note:** This flow requires Node.js 18 or higher. To set up your local project: 1. Download your project files from `https://www.wix.com/_api/wixstro-deployments/v1/instant-sites/YOUR_SITE_ID/download.zip`. Replace `YOUR_SITE_ID` with your site's ID. To find it, find your new project in [your sites list](https://manage.wix.com/studio/sites), select the project to open the dashboard, and copy the value in the URL immediately after `/dashboard/`. 2. Install the [Wix JavaScript SDK](https://dev.wix.com/docs/sdk.md) and a package for each business solution you want to call. Domain packages follow the `@wix/{domain}` naming convention. For example: ```console npm install @wix/sdk @wix/stores ``` 3. Create a [Wix client](https://dev.wix.com/docs/api-reference/articles/sdk-setup-and-usage/set-up-a-wix-client?apiView=SDK.md) with `OAuthStrategy`, using the `appId` from `wix.config.json` as the client ID. Pass in the modules you installed. Create the client once and reuse it across your app. For example: ```js import { createClient, OAuthStrategy } from '@wix/sdk'; import { products } from '@wix/stores'; const wixClient = createClient({ modules: { products }, auth: OAuthStrategy({ // The appId from your wix.config.json file. clientId: '', }), }); ``` With no tokens passed, the client authenticates as an anonymous site visitor automatically, which is enough to start calling APIs. 4. Confirm the client works by calling an API. ```js const { items } = await wixClient.products.queryProducts({}); ``` To learn more, see [About Authentication for Self-Managed Headless](https://dev.wix.com/docs/go-headless/self-managed-headless/authentication/about-authentication.md). ::: :::: ## Step 3 | Continue developing After your project is set up, keep building: - **Develop your site with an AI agent.** Point your agent at the Wix Headless skill to integrate Wix business solutions and iterate on your site design and flow. For more information, see the [Headless AI Toolkit](https://dev.wix.com/docs/go-headless/get-started/headless-ai-toolkit.md). - **Keep iterating on the design in Claude Design.** If you prefer working on the style in Claude Design, you can create a new design and then export it rather than using **Send to Wix** (which creates a new site). Click **Share** > the **Export** tab, select **Standalone HTML**, and click **Download**. Attach the downloaded file to your AI agent and ask it to update your existing project with the new design. - **Manage business data in the dashboard.** Manage products, bookings, blog posts, forms, members, and more directly from your project dashboard. No code required. - **Preview and deploy with the CLI.** Supported-framework projects support `npx wix preview` to test locally, `npx wix release` to publish, and global commands like `npx wix login`. See the [CLI command reference](https://dev.wix.com/docs/wix-cli/command-reference/introduction.md). ## See also - [About Wix-Managed Headless](https://dev.wix.com/docs/go-headless/wix-managed-headless/about-wix-managed-headless.md) --- > Portal Navigation: > > - Append `.md` to any URL under `https://dev.wix.com/docs/` to get its markdown version. > - Pages are either content pages (article or reference text) or menu pages (a list of links to child pages). > - To get a menu page, truncate any URL to a parent path and append `.md` (e.g. `https://dev.wix.com/docs/sdk.md`, `https://dev.wix.com/docs/sdk/core-modules.md`). > - Top-level index of all portals: https://dev.wix.com/docs/llms.txt > - Full concatenated docs: https://dev.wix.com/docs/llms-full.txt ## Resource: Quick Start from Your Own Frontend ## Article: Quick Start from Your Own Frontend ## Article Link: https://dev.wix.com/docs/go-headless/get-started/quick-starts/wix-managed-headless/quick-start-from-your-own-frontend.md ## Article Content: # Quick Start from Your Own Frontend Deploy an existing single-page app (SPA) as a Wix-managed headless project. Wix hosts and runs your frontend and connects it to Wix business solutions, while you keep the framework you already have.
    **Important:** When you deploy your own existing frontend, Wix doesn't handle authentication for you. You create a [Wix Client](https://dev.wix.com/docs/api-reference/articles/sdk-setup-and-usage/set-up-a-wix-client.md) and set up authentication yourself, the same as for [self-managed headless](https://dev.wix.com/docs/go-headless/self-managed-headless/authentication/about-authentication.md). Automatic authentication and extensions are available only with [Wix's Astro integration](https://dev.wix.com/docs/go-headless/get-started/choose-your-development-path.md).
    > **Coming from Claude Design?** You can [send a Claude Design build directly to Wix Headless](https://dev.wix.com/docs/go-headless/get-started/quick-starts/wix-managed-headless/quick-start-from-claude-design.md). ## Before you begin Make sure: - You're logged in to your Wix account. - You have [Node.js](https://nodejs.org/en/) (v20.11.0 or higher). - Your project isn't already linked to Wix (it doesn't contain a `wix.config.json` file). ## Step 1 | Connect your project to Wix 1. Navigate to the root of your existing project directory. 2. Run: ```bash npm create @wix/new@latest init ``` This creates a new Wix Headless project and a `wix.config.json` file that links your frontend to it. If you aren't logged in, the CLI prompts you to log in. 3. Run [`npx wix release`](https://dev.wix.com/docs/wix-cli/command-reference/project-commands/release.md) to deploy your site. ## Step 2 | Set up authentication Initializing your project creates a client ID for you, stored as the `appId` in your `wix.config.json` file. Authentication is yours to wire up, but the groundwork is already done. To set up authentication, install the [Wix JavaScript SDK](https://dev.wix.com/docs/sdk.md) and create a client with `OAuthStrategy`, passing the `appId` from `wix.config.json` as your client ID. For more information on handling site visitors and members, see [About Authentication for Self-Managed Headless](https://dev.wix.com/docs/go-headless/self-managed-headless/authentication/about-authentication.md). ## Continue developing After your project is set up, keep building: - **Develop with an AI agent.** Point your agent at the Wix Headless skill to finish setup and integrate Wix business solutions. For more information, see the [Headless AI Toolkit](https://dev.wix.com/docs/go-headless/get-started/headless-ai-toolkit.md). - **Manage business data in the dashboard.** Manage products, bookings, blog posts, forms, members, and more directly from your project dashboard. No code required. - **Preview and deploy with the CLI.** Your project supports `npx wix preview` to test locally, `npx wix release` to publish, and global commands like `npx wix login`. See the [CLI command reference](https://dev.wix.com/docs/wix-cli/command-reference/introduction.md). ## See also - [About Authentication for Self-Managed Headless](https://dev.wix.com/docs/go-headless/self-managed-headless/authentication/about-authentication.md) - [About Wix-Managed Headless](https://dev.wix.com/docs/go-headless/wix-managed-headless/about-wix-managed-headless.md) --- > Portal Navigation: > > - Append `.md` to any URL under `https://dev.wix.com/docs/` to get its markdown version. > - Pages are either content pages (article or reference text) or menu pages (a list of links to child pages). > - To get a menu page, truncate any URL to a parent path and append `.md` (e.g. `https://dev.wix.com/docs/sdk.md`, `https://dev.wix.com/docs/sdk/core-modules.md`). > - Top-level index of all portals: https://dev.wix.com/docs/llms.txt > - Full concatenated docs: https://dev.wix.com/docs/llms-full.txt ## Resource: Quick Start a Self-Managed Headless Project ## Article: Quick Start a Self-Managed Headless Project ## Article Link: https://dev.wix.com/docs/go-headless/get-started/quick-starts/self-managed-headless/quick-start-a-self-managed-headless-project.md ## Article Content: # Quick Start a Self-Managed Headless Project Self-managed headless lets you build a frontend with any framework and connect it to Wix's backend, while you handle hosting and authentication yourself. This article takes you through creating a headless project, connecting your frontend, and calling a Wix API. > **Note:** For a simplified setup where Wix handles hosting and authentication for you, start with [Wix-managed headless](https://dev.wix.com/docs/go-headless/wix-managed-headless/about-wix-managed-headless.md). ## Step 1 | Create a headless project A headless project is a Wix site that uses Wix's business management platform without a Wix editor. It appears in your Wix account alongside your sites. > **Already have a Wix site?** You don't need to create a new project. See [Start from an Existing Wix Site](https://dev.wix.com/docs/go-headless/get-started/quick-starts/self-managed-headless/quick-start-from-an-existing-wix-site.md) to turn your existing site into the backend for a new frontend. To create a headless project: 1. Create a [new headless project](https://www.wix.com/intro/headless?ref=docs_vanilla). 2. Choose your project's purpose. ![Select project purpose](https://wixmp-833713b177cebf373f611808.wixmp.com/images/8aaf5120c502a09b9f3435c39aedaf83.png) 3. Choose your role. ![Select your role](https://wixmp-833713b177cebf373f611808.wixmp.com/images/3e4c070871e5c4e94d384e91fe4133c2.png) 4. Choose the business features you want to add, such as eCommerce, Bookings, Pricing Plans, or Events. You can always add more later. ![Select business solutions](https://wixmp-833713b177cebf373f611808.wixmp.com/images/f78db5a5605fdf933c78a6de058893c8.png) 5. Enter a name for your project. You can always change it later in the [project dashboard](https://www.wix.com/my-account/site-selector/?buttonText=Select%20Site&title=Select%20a%20Site&autoSelectOnSingleSite=true&actionUrl=https:%2F%2Fwww.wix.com%2Fdashboard%2F%7B%7BmetaSiteId%7D%7D%2Fhome). ![Select project name](https://wixmp-833713b177cebf373f611808.wixmp.com/images/b5bab3c73b45b579cc45c50e9df82682.png) > **Note:** You need to upgrade to a premium plan to receive payments, view detailed analytics, connect a custom domain, and access other advanced functionality. ## Step 2 | Connect your frontend To call Wix APIs, your frontend needs to be authorized. Set up a headless client for your project. This works the same whether you're connecting to a new project or an existing site. Choose an [authorization strategy](https://dev.wix.com/docs/go-headless/self-managed-headless/authentication/about-authentication.md) based on what you're building: - **[Visitors and Members (OAuth)](https://dev.wix.com/docs/go-headless/self-managed-headless/authentication/oauth/about-oauth-authentication.md)**: For a site or app used by customers, such as anonymous visitors and logged-in members. - **[Admin (API Key)](https://dev.wix.com/docs/go-headless/self-managed-headless/authentication/about-admin-operations.md)**: For a project with customized administrative access to your Wix account's sites and projects. For the full setup steps, see [Set Up a Headless Client](https://dev.wix.com/docs/go-headless/self-managed-headless/authentication/set-up-a-headless-client.md). You can use more than one strategy in the same project. ## Step 3 | Call a Wix API With a client connected, choose how you'll call Wix APIs: - **[JavaScript SDK](https://dev.wix.com/docs/sdk.md)**: If you're coding in JavaScript. - **[REST API](https://dev.wix.com/docs/rest.md)**: If you're not coding in JavaScript. You can use both the SDK and the REST API in the same project. ## Next steps - [Set Up a Headless Client](https://dev.wix.com/docs/go-headless/self-managed-headless/authentication/set-up-a-headless-client.md): Connect additional frontends, or an existing Wix site. - [Authorization Strategies](https://dev.wix.com/docs/go-headless/self-managed-headless/authentication/about-authentication.md): Understand OAuth and API key authentication in depth. - [Invite collaborators](https://dev.wix.com/docs/go-headless/project-guides/project-management/invite-collaborators.md) to help manage your project. --- > Portal Navigation: > > - Append `.md` to any URL under `https://dev.wix.com/docs/` to get its markdown version. > - Pages are either content pages (article or reference text) or menu pages (a list of links to child pages). > - To get a menu page, truncate any URL to a parent path and append `.md` (e.g. `https://dev.wix.com/docs/sdk.md`, `https://dev.wix.com/docs/sdk/core-modules.md`). > - Top-level index of all portals: https://dev.wix.com/docs/llms.txt > - Full concatenated docs: https://dev.wix.com/docs/llms-full.txt ## Resource: Quick Start from an Existing Wix Site ## Article: Start from an Existing Wix Site ## Article Link: https://dev.wix.com/docs/go-headless/get-started/quick-starts/self-managed-headless/quick-start-from-an-existing-wix-site.md ## Article Content: # Quick Start from an Existing Wix Site If you already have a Wix site, you can use it as the backend for a custom frontend, with no new project required. Use this to migrate your site to a custom frontend, or to add another frontend (such as a mobile app) that shares the same business data and functionality. This is a [self-managed headless](https://dev.wix.com/docs/go-headless/self-managed-headless/about-self-managed-headless.md) flow: your existing site provides the business data and APIs, while you host your frontend and manage authentication yourself. ## Step 1 | Choose an authorization strategy Your frontend (a "client") must be authorized before it can call your site's Wix APIs. Decide which strategy fits first. It determines the kind of client you set up in the next step: - [Visitors and Members (OAuth)](https://dev.wix.com/docs/go-headless/self-managed-headless/authentication/oauth/about-oauth-authentication.md): For a customer-facing site or app used by anonymous visitors and logged-in members. This is the most common choice. - [Admin (API key)](https://dev.wix.com/docs/go-headless/self-managed-headless/authentication/about-admin-operations.md): For administrative access to your account's sites and projects, typically from a trusted backend. ## Step 2 | Set up a headless client in your site's dashboard This step is required. In your existing site's dashboard, under **Settings > Headless Settings**, set up a headless client for the strategy you chose. This gives you the credentials your frontend needs: a client ID for OAuth, or an API key for admin access. - OAuth (visitors and members): [Set Up a Headless Client](https://dev.wix.com/docs/go-headless/self-managed-headless/authentication/set-up-a-headless-client.md) - Admin (API key): [Generate an API Key](https://dev.wix.com/docs/go-headless/self-managed-headless/authentication/about-admin-operations.md) > **Important:** If your frontend redirects visitors to Wix-hosted pages (for example, for login or checkout), you must also add your frontend's domain to the allowed redirect domains and authorization redirect URIs in **Headless Settings**, or those redirects are blocked. See [Set Up a Headless Client](https://dev.wix.com/docs/go-headless/self-managed-headless/authentication/set-up-a-headless-client.md). ## Step 3 | Connect your frontend in your code In your frontend code, create a Wix client using the credentials from Step 2, then call your site's APIs with either: - **[JavaScript SDK](https://dev.wix.com/docs/sdk.md)**: If you're coding in JavaScript. - **[REST API](https://dev.wix.com/docs/rest.md)**: If you're not coding in JavaScript. Your frontend now reads and writes the same business data as your existing site. ## Step 4 (Optional) | Add more frontends To connect additional frontends, create a separate headless client for each one. For example, one client for a website and another for a mobile app. Each client gets its own credentials. ## See also - [Set Up a Headless Client](https://dev.wix.com/docs/go-headless/self-managed-headless/authentication/set-up-a-headless-client.md) - [Quick Start a Self-Managed Headless Project](https://dev.wix.com/docs/go-headless/get-started/quick-starts/self-managed-headless/quick-start-a-self-managed-headless-project.md) - [Authorization Strategies](https://dev.wix.com/docs/go-headless/self-managed-headless/authentication/about-authentication.md) --- > Portal Navigation: > > - Append `.md` to any URL under `https://dev.wix.com/docs/` to get its markdown version. > - Pages are either content pages (article or reference text) or menu pages (a list of links to child pages). > - To get a menu page, truncate any URL to a parent path and append `.md` (e.g. `https://dev.wix.com/docs/sdk.md`, `https://dev.wix.com/docs/sdk/core-modules.md`). > - Top-level index of all portals: https://dev.wix.com/docs/llms.txt > - Full concatenated docs: https://dev.wix.com/docs/llms-full.txt ## Resource: About Wix-Managed Headless ## Article: About Wix-Managed Headless ## Article Link: https://dev.wix.com/docs/go-headless/wix-managed-headless/about-wix-managed-headless.md ## Article Content: # About Wix-Managed Headless Wix-managed headless is the recommended path for building headless projects on Wix. Wix hosts and runs your frontend and connects it to Wix business solutions, handling builds, deployments, scaling, and security, so you can focus on building. When building with Astro, which is the default when scaffolding with AI or the Wix CLI, [Wix's Astro integration](#wixs-astro-integration) handles automatic authentication and SEO, and lets you add extensions. Unlike [self-managed headless](https://dev.wix.com/docs/go-headless/self-managed-headless/about-self-managed-headless.md), you don't set up hosting or manage infrastructure. For a working example built with Wix-managed headless, see [wix-headless.dev](https://wix-headless.dev/). ## Create a project Wix-managed headless projects are built with Astro by default, and Wix's Astro integration handles authentication for you. Choose the quick start that matches how you want to start: - [Quick Start with AI](https://dev.wix.com/docs/go-headless/get-started/quick-starts/wix-managed-headless/quick-start-with-ai.md): Describe what you want to build and let your AI agent scaffold and deploy a fully managed project. The fastest way to start. - [Quick Start with the Wix CLI](https://dev.wix.com/docs/go-headless/get-started/quick-starts/wix-managed-headless/quick-start-with-the-wix-cli.md): Scaffold a new Astro project from your terminal. - [Quick Start from an Existing Astro Project](https://dev.wix.com/docs/go-headless/get-started/quick-starts/wix-managed-headless/quick-start-from-an-existing-astro-project.md): Link an Astro project you already have. You can also send a [Claude Design](https://dev.wix.com/docs/go-headless/get-started/quick-starts/wix-managed-headless/quick-start-from-claude-design.md) build directly to Wix. Whichever you choose, your new project appears in your [Wix dashboard](https://support.wix.com/en/article/about-your-wix-dashboard) alongside your sites. ## Benefits Every Wix-managed headless project runs on Wix infrastructure: - **Managed hosting with global CDN**: Wix builds, deploys, and serves your project on a global content delivery network with automatic SSL certificates and deploy previews. The infrastructure scales automatically to meet traffic demands. - **Secrets management**: Securely store and manage your project's environment variables and secrets. - **Analytics tracking**: [Track events](https://dev.wix.com/docs/go-headless/wix-managed-headless/feature-guides/track-analytics-events.md) like page views, cart actions, and purchases, and forward them to connected analytics platforms such as GA4 and Facebook Pixel. - **CLI**: Preview, release, and manage your project from the terminal, useful for both manual and AI-agent workflows. ## Wix's Astro integration Wix's Astro integration adds three capabilities on top of the managed infrastructure: - **Automatic authentication**: Visitor sessions, member login, and token management are handled for you, so you can call [Wix SDK](https://dev.wix.com/docs/sdk.md) methods directly with no client setup. - **SEO support**: Main pages get their dashboard-managed SEO tags injected automatically, with no code, and Wix serves `robots.txt` and `sitemap.xml` for you. Item pages take a small amount of code. See [About SEO Support](https://dev.wix.com/docs/go-headless/wix-managed-headless/seo/about-seo-support.md) for what's available. - **Extensions**: Add [extensions](https://dev.wix.com/docs/build-apps/develop-your-app/develop-an-app-with-the-cli/supported-extensions/about-extensions-in-the-wix-cli.md) for custom backend logic and dashboard UIs. To learn more, see [About Wix's Astro Integration](https://dev.wix.com/docs/go-headless/wix-managed-headless/authentication/about-the-astro-integration.md). ## Comparison with self-managed headless Self-managed headless gives you full control over your framework, hosting, and authentication setup. Wix-managed headless trades some of that flexibility for a faster, more automated development experience. For a detailed comparison of both paths, including a feature-by-feature table, see [About Headless Development Paths](https://dev.wix.com/docs/go-headless/get-started/choose-your-development-path.md). ## See also - [Quick Start with the Wix CLI](https://dev.wix.com/docs/go-headless/get-started/quick-starts/wix-managed-headless/quick-start-with-the-wix-cli.md) - [About Wix's Astro Integration](https://dev.wix.com/docs/go-headless/wix-managed-headless/authentication/about-the-astro-integration.md) - [About the Wix CLI](https://dev.wix.com/docs/wix-cli/guides/about-the-wix-cli.md) - [About Headless Development Paths](https://dev.wix.com/docs/go-headless/get-started/choose-your-development-path.md) --- > Portal Navigation: > > - Append `.md` to any URL under `https://dev.wix.com/docs/` to get its markdown version. > - Pages are either content pages (article or reference text) or menu pages (a list of links to child pages). > - To get a menu page, truncate any URL to a parent path and append `.md` (e.g. `https://dev.wix.com/docs/sdk.md`, `https://dev.wix.com/docs/sdk/core-modules.md`). > - Top-level index of all portals: https://dev.wix.com/docs/llms.txt > - Full concatenated docs: https://dev.wix.com/docs/llms-full.txt ## Resource: About the Wix CLI ## Article: About the Wix CLI ## Article Link: https://dev.wix.com/docs/go-headless/wix-managed-headless/project-development/about-the-wix-cli.md ## Article Content: # About the Wix CLI The Wix CLI is the command-line tool for creating, developing, and deploying [Wix-managed headless projects](https://dev.wix.com/docs/go-headless/wix-managed-headless/about-wix-managed-headless.md). It generates a complete project structure, handles initial setup and configuration, and provides commands to manage your project throughout development. New CLI projects include [Wix skills](https://dev.wix.com/docs/api-reference/articles/ai-tools/about-wix-skills.md), so AI tools can perform CLI tasks for you. This lets you focus on building the unique features of your project. To get started, see [Quick Start with the Wix CLI](https://dev.wix.com/docs/go-headless/get-started/quick-starts/wix-managed-headless/quick-start-with-the-wix-cli.md). > **Note:** Headless projects created with the CLI are [Wix-managed headless](https://dev.wix.com/docs/go-headless/wix-managed-headless/about-wix-managed-headless.md) projects. This is the recommended path for new headless projects. This article covers the CLI as a tool and the project it generates. For what Wix-managed headless is, what you get, and how to choose it, see [About Wix-Managed Headless](https://dev.wix.com/docs/go-headless/wix-managed-headless/about-wix-managed-headless.md). ## What you can build The CLI streamlines headless project development, so you can work directly with Wix's business solutions and build a custom frontend using any technology supported by Astro. You can: - Generate [extensions](https://dev.wix.com/docs/go-headless/wix-managed-headless/extensions/about-extensions-in-the-wix-cli.md) like custom dashboard pages, event handlers, and backend APIs. - Call [Wix JavaScript SDK](https://dev.wix.com/docs/sdk.md) methods directly. [Wix's Astro integration](https://dev.wix.com/docs/go-headless/wix-managed-headless/authentication/about-the-astro-integration.md) handles token management and authentication for you, with no client setup. If building with a framework other than Astro, you need to handle authentication yourself. - Use a [custom domain](https://www.wix.com/my-account/site-selector/?buttonText=Select%20Site&title=Select%20a%20Site&autoSelectOnSingleSite=true&actionUrl=https:%2F%2Fwww.wix.com%2Fdashboard%2F%7B%7BmetaSiteId%7D%7D%2Fadd-domain) for your headless frontend to provide a branded experience. ## Project structure and Astro The CLI uses a standardized project structure based on the [Astro](https://astro.build/) web framework. Astro offers a performance-focused architecture, partial hydration, and a flexible component model that lets you mix vanilla HTML/CSS/JS with React, Vue, or Svelte components as needed. The CLI also supports backend development with [HTTP endpoints](https://dev.wix.com/docs/go-headless/wix-managed-headless/extensions/backend/http-endpoints/about-http-endpoints.md). For a per-folder breakdown of the generated project, see [Wix CLI Project Structure](https://dev.wix.com/docs/wix-cli/guides/project-structure/project-structure.md). If you have an existing Astro project, you can [connect it to Wix](https://dev.wix.com/docs/go-headless/get-started/quick-starts/wix-managed-headless/quick-start-from-an-existing-astro-project.md) instead of creating a new one. > **Note:** The Astro structure, extensions, and automatic authentication apply only to Astro projects (generated or connected with the CLI). You can still use the CLI to deploy and manage [your own existing frontend](https://dev.wix.com/docs/go-headless/get-started/quick-starts/wix-managed-headless/quick-start-from-your-own-frontend.md), but you set up authentication yourself. ### Dashboard redirect The CLI adds a built-in `/admin` route to your project. When someone visits `"https://your-site.com/admin"`, the browser redirects them to your project's dashboard. Only approved [collaborators](https://dev.wix.com/docs/go-headless/project-guides/project-management/invite-collaborators.md) can access the dashboard. The redirect is enabled by default. To disable it, set `adminRedirect` to `false` in the `wix()` integration in [`astro.config.mjs`](https://dev.wix.com/docs/wix-cli/guides/project-structure/project-structure.md#astroconfigmjs): ```js wix({ adminRedirect: false, }) ``` ## Develop and test projects As you work locally with the CLI, you can open the local version of your project's site or dashboard in your browser by running the [`dev`](https://dev.wix.com/docs/wix-cli/command-reference/project-commands/dev.md) command. The development environment supports hot reloading, so any changes you make to your code are immediately reflected in the browser. ## Build, preview, and release projects After developing and testing your project locally, you can build it, create shareable previews, and release it to production. For more information, see [Build and Deploy a Project with the Wix CLI](https://dev.wix.com/docs/go-headless/wix-managed-headless/project-development/build-and-deploy-with-the-cli.md). ## Keep the CLI up to date Check which version of the CLI you have: ```bash npm list @wix/cli ``` Upgrade to the latest: ```bash npm i --save-dev @wix/cli@latest ``` > **Note:** If the latest version of the CLI includes a new command, you'll need to [add the new command to your `package.json` file](https://dev.wix.com/docs/wix-cli/guides/about-the-wix-cli.md). ## See also - [Wix CLI Command Reference](https://dev.wix.com/docs/wix-cli/command-reference/introduction.md) - [Wix CLI Project Structure](https://dev.wix.com/docs/wix-cli/guides/project-structure/project-structure.md) - [Quick Start with the Wix CLI](https://dev.wix.com/docs/go-headless/get-started/quick-starts/wix-managed-headless/quick-start-with-the-wix-cli.md) --- > Portal Navigation: > > - Append `.md` to any URL under `https://dev.wix.com/docs/` to get its markdown version. > - Pages are either content pages (article or reference text) or menu pages (a list of links to child pages). > - To get a menu page, truncate any URL to a parent path and append `.md` (e.g. `https://dev.wix.com/docs/sdk.md`, `https://dev.wix.com/docs/sdk/core-modules.md`). > - Top-level index of all portals: https://dev.wix.com/docs/llms.txt > - Full concatenated docs: https://dev.wix.com/docs/llms-full.txt ## Resource: Build and Deploy with the CLI ## Article: Build and Deploy a Headless Project with the Wix CLI ## Article Link: https://dev.wix.com/docs/go-headless/wix-managed-headless/project-development/build-and-deploy-with-the-cli.md ## Article Content: # Build and Deploy a Headless Project with the Wix CLI After developing and testing your Wix CLI headless project locally, you can take it to production. This article guides you through that process. You can also use [Wix Skills](https://dev.wix.com/docs/api-reference/articles/ai-tools/about-wix-skills.md) to implement the build and deploy process. For instructions on creating a project, see [Quick Start with the Wix CLI](https://dev.wix.com/docs/go-headless/wix-managed-headless/get-started/quick-start-with-the-wix-cli.md). ## Before you begin Before getting started, make sure that you have [Node.js](https://nodejs.org/en/) (v20.11.0 or higher). ## Step 1 | Build the project Run the [build](https://dev.wix.com/docs/wix-cli/command-reference/project-commands/build.md) command to build the assets for your project: ```bash wix build ``` ## Step 2 (Optional) | Create preview URLs A preview URL is a link you can share with team members that allows them to preview and test your project. Each preview URL directs to a unique version of your project hosted on Wix's servers. Subsequent updates to your project won't affect any previously created versions. To push your project to Wix's servers for hosting and create preview URLs, run the [preview](https://dev.wix.com/docs/wix-cli/command-reference/project-commands/preview.md) command: ```bash wix preview ``` This returns unique URLs linking to preview versions of your site and dashboard that you can share with others.
    __Important:__ The `preview` command uploads your code but does not register all extensions in your project's configuration. Some extensions won't be recognized by Wix until you run [`release`](https://dev.wix.com/docs/wix-cli/command-reference/project-commands/release.md).
    ## Step 3 | Release your project To push your project to Wix's servers for hosting and releasing a version, run the [release](https://dev.wix.com/docs/wix-cli/command-reference/project-commands/release.md) command and follow the prompts. This step also registers extensions in your project's configuration, so some extensions won't work until you've run `release`: ```bash wix release ``` Releasing pushes your project to Wix's servers and publishes your site. After releasing your project, the CLI provides the URL of your published site, and preview URLs for your project's site and dashboard.
    __Tip:__ Releasing also clears your entire site cache, so visitors get the latest version. If you've deployed an update but still see outdated content, run `wix release` again to clear the cache.
    ## Next steps You now have a fully working project. Use the following resources to continue building your project: + [Add extensions to your project](https://dev.wix.com/docs/go-headless/wix-managed-headless/extensions/about-extensions-in-the-wix-cli.md). + [Learn more about how to develop your project](https://dev.wix.com/docs/wix-cli/guides/about-the-wix-cli.md). + [Learn about the project structure](https://dev.wix.com/docs/wix-cli/guides/project-structure/project-structure.md). --- > Portal Navigation: > > - Append `.md` to any URL under `https://dev.wix.com/docs/` to get its markdown version. > - Pages are either content pages (article or reference text) or menu pages (a list of links to child pages). > - To get a menu page, truncate any URL to a parent path and append `.md` (e.g. `https://dev.wix.com/docs/sdk.md`, `https://dev.wix.com/docs/sdk/core-modules.md`). > - Top-level index of all portals: https://dev.wix.com/docs/llms.txt > - Full concatenated docs: https://dev.wix.com/docs/llms-full.txt ## Resource: Integrate the CLI into CI/CD Workflows ## Article: CD Workflows ## Article Link: https://dev.wix.com/docs/go-headless/wix-managed-headless/project-development/integrate-the-cli-into-ci-cd-workflows.md ## Article Content: # Integrate the Wix CLI into CI/CD Workflows The Wix CLI can run in any continuous integration and continuous delivery (CI/CD) pipeline, so you can automate tasks like testing and building your headless project on every push or pull request. Because the CLI is a standard command-line tool, it's pipeline-agnostic — the example below uses [GitHub Actions](https://github.com/features/actions) because it's widely used, but the same approach applies to GitLab CI, CircleCI, Jenkins, and other providers. A common setup is to run your [unit tests](https://dev.wix.com/docs/go-headless/wix-managed-headless/project-development/write-unit-tests.md) automatically on every pull request, so regressions are caught before they're merged. ## Example: run unit tests on every pull request This GitHub Actions workflow installs your dependencies and runs your unit test script whenever a pull request is opened or updated. Add it to your repository at `.github/workflows/ci.yml`: ```yaml name: CI PR on: pull_request: branches: - '*' jobs: build: runs-on: ubuntu-latest steps: - uses: actions/checkout@v4 - uses: actions/setup-node@v4 with: node-version: 22.x cache: 'npm' - name: Install run: npm install - name: Unit tests run: npm run test:unit ``` Replace `test:unit` with the name of the test script defined in your `package.json`. ## Run other CLI commands The same approach works for any CLI command. For example, you can add a step that runs [`wix build`](https://dev.wix.com/docs/wix-cli/command-reference/project-commands/build.md) to confirm your project compiles as part of your checks. ## See also - [Write Unit Tests for a Wix CLI Project](https://dev.wix.com/docs/go-headless/wix-managed-headless/project-development/write-unit-tests.md) - [Build and Deploy a Headless Project with the Wix CLI](https://dev.wix.com/docs/go-headless/wix-managed-headless/project-development/build-and-deploy-with-the-cli.md) - [Wix CLI Command Reference](https://dev.wix.com/docs/wix-cli/command-reference/introduction.md) --- > Portal Navigation: > > - Append `.md` to any URL under `https://dev.wix.com/docs/` to get its markdown version. > - Pages are either content pages (article or reference text) or menu pages (a list of links to child pages). > - To get a menu page, truncate any URL to a parent path and append `.md` (e.g. `https://dev.wix.com/docs/sdk.md`, `https://dev.wix.com/docs/sdk/core-modules.md`). > - Top-level index of all portals: https://dev.wix.com/docs/llms.txt > - Full concatenated docs: https://dev.wix.com/docs/llms-full.txt ## Resource: Write Unit Tests ## Article: Write Unit Tests for a Wix CLI Project ## Article Link: https://dev.wix.com/docs/go-headless/wix-managed-headless/project-development/write-unit-tests.md ## Article Content: # Write Unit Tests for a Wix CLI Project This article explains how to write unit tests for a CLI project using [Vitest](https://vitest.dev/) and `@testing-library/react`. > **Note:** While this article's flow uses Vitest specifically, the CLI is framework-agnostic and supports any testing library. This article covers: - Preparing your project for unit testing with Vitest. - Writing unit tests for your project. ## Before you begin + You must have a project that was [created using the Wix CLI](https://dev.wix.com/docs/wix-cli/guides/about-the-wix-cli.md). + You must be logged into your Wix account. If you don't have one, [sign up for a Wix account](https://manage.wix.com/account/custom-apps). ## Step 1 | Configure your project for tests 1. Run the following command to install the required packages: ```bash npm add vitest jsdom @testing-library/jest-dom @testing-library/user-event @testing-library/react@12 -D ``` > **Note**: Since the Wix CLI uses React 16 for dashboard extensions, we currently only support version 12 of `@testing-library/react`. 2. Create or update your `vitest.config.js` file with the following configuration: ```javascript import { defineConfig } from 'vitest/config'; export default defineConfig({ test: { include: ['src/**/*.(test|spec).ts?(x)'], exclude: ['build', 'node_modules'], environment: 'jsdom', maxConcurrency: 7, setupFiles: './tests/setup.ts', }, }); ``` 3. Create a test setup file at `tests/setup.ts`. This file is used for general test configuration with Vitest: ```javascript import { expect, afterEach } from 'vitest'; import { cleanup } from '@testing-library/react'; import * as matchers from '@testing-library/jest-dom/matchers'; expect.extend(matchers); afterEach(() => { cleanup(); }); ``` 4. Add the following script to your `package.json` file to trigger unit tests: ```json { "name": "your-wix-cli-project", "version": "1.0.0", "private": true, "scripts": { "wix": "wix", "test:unit": "vitest run" // ... }, } ``` ## Step 2 | Write unit tests Depending on your project's functionality, testing your project's react components may involve mocking Wix JavaScript SDK APIs, backend interactions, or both. ### Test a react component without the SDK or backend interactions To test a react component like a dashboard page, check that aspects of the component would be rendered correctly. For example, given the following dashboard page: ```javascript import React, { type FC } from 'react'; import { EmptyState, Page } from '@wix/design-system'; import '@wix/design-system/styles.global.css'; const Index: FC = () => { return ( ); }; export default Index; ``` You can test whether the "Dashboard Page" text would be present on the page when rendered. ```javascript import React from 'react'; import { describe, expect, it } from 'vitest'; import { render } from '@testing-library/react'; import Page from './page'; describe('Index Page', () => { it('should render the page', async () => { const { findByText } = render(); await findByText('Dashboard Page'); }); }); ``` ### Test a component that involves an SDK API call If your component's code calls a Wix JavaScript SDK API, render the component and manually mock the API. The following example demonstrates how to mock the Dashboard API's [`showToast()`](https://dev.wix.com/docs/sdk/host-modules/dashboard/show-toast.md) method. ```javascript import React from 'react'; import { beforeEach, describe, expect, it, vi } from 'vitest'; import { render } from '@testing-library/react'; import userEvent from '@testing-library/user-event'; import { dashboard } from '@wix/dashboard'; import Page from './page'; vi.mock('@wix/dashboard'); describe('Index Page', () => { beforeEach(() => { vi.clearAllMocks(); }); it('should show toast', async () => { const { findByText } = render(); const toastBtn = await findByText('Show a toast'); await userEvent.click(toastBtn); expect(dashboard.showToast).toBeCalledWith({ message: 'Your first toast message' }); expect(dashboard.showToast).toHaveBeenCalledOnce(); }); }); ``` ### Test a component that involves backend interactions If your project interacts with a backend, mock those interactions using Vitest. For example, if you have a page that calls the CRM backend to retrieve user contacts: ```javascript import React, { useEffect, useState, type FC } from 'react'; import { contacts } from '@wix/crm'; import { Page, Card, Box, Loader, Text, Table, WixDesignSystemProvider, } from '@wix/design-system'; import '@wix/design-system/styles.global.css'; const Index: FC = () => { const [userContacts, setUserContacts] = useState(); const [isLoading, setIsLoading] = useState(true); const [err, setErr] = useState(null); useEffect(() => { const fetchContacts = async () => { try { const result = await contacts.queryContacts({}); setUserContacts(result.items); } catch (queryError) { setErr(queryError); } finally { setIsLoading(false); } }; fetchContacts(); }, []); return ( {isLoading && ( )} {err && Error: {err.message}} {(userContacts?.length || 0) > 0 && ( row._id }, { title: 'First Name', render: (row) => row.info?.name?.first, }, { title: 'Last Name', render: (row) => row.info?.name?.last, }, ]} /> )} ); }; export default Index; ``` You would mock the backend interactions with the API using `vitest` as follows: ```javascript import React from 'react'; import { randomUUID } from 'node:crypto'; import { describe, expect, it, vi } from 'vitest'; import { render } from '@testing-library/react'; import Page from './page'; vi.mock('@wix/crm', () => ({ contacts: { queryContacts: async () => ({ items: [ { _id: randomUUID(), info: { name: { first: 'John', last: 'Doe' }, }, } ], }), }, })); describe('test page', () => { it('should display contact', async () => { const { findByText } = render(); const firstNameEl = await findByText('John'); expect(firstNameEl).toBeDefined(); const lastNameEl = await findByText('Doe'); expect(lastNameEl).toBeDefined(); }); }); ``` ## See also - [Integrate the Wix CLI into CI/CD Workflows](https://dev.wix.com/docs/go-headless/wix-managed-headless/project-development/integrate-the-cli-into-ci-cd-workflows.md) --- > Portal Navigation: > > - Append `.md` to any URL under `https://dev.wix.com/docs/` to get its markdown version. > - Pages are either content pages (article or reference text) or menu pages (a list of links to child pages). > - To get a menu page, truncate any URL to a parent path and append `.md` (e.g. `https://dev.wix.com/docs/sdk.md`, `https://dev.wix.com/docs/sdk/core-modules.md`). > - Top-level index of all portals: https://dev.wix.com/docs/llms.txt > - Full concatenated docs: https://dev.wix.com/docs/llms-full.txt ## Resource: About Environment Variables in the CLI ## Article: About Environment Variables in the CLI ## Article Link: https://dev.wix.com/docs/go-headless/wix-managed-headless/project-development/environment-variables/about-environment-variables-in-the-cli.md ## Article Content: # About Environment Variables in the CLI Environment variables allow you to store configuration values and secrets outside of your code, making your applications more secure and portable. The Wix CLI uses [the built-in support in Astro for environment variables](https://docs.astro.build/en/guides/environment-variables/), providing type-safe environment variables that can be used in backend or client-side code. This article explains the types of environment variables available in Wix CLI projects and when to use each type. ## Types of environment variables The Wix CLI supports the following types of environment variables, each designed for specific use cases and security requirements. | Type | Availability | Storage Location | Use case | |------|--------------|------------------|----------| | Public client variables | Client-side and backend | `.env.local` file | Non-sensitive configuration that needs to be accessed in the browser (for example, API endpoints, feature flags). | | Public server variables | Backend only | `.env.local` file | Non-sensitive server configuration (for example, port numbers, timeouts). | | Secret server variables | Backend only | Wix servers | Sensitive data like API keys, database credentials, and authentication tokens. These variables are securely stored on Wix servers and must be pulled to your local environment. | ### Secret server variables Secret server variables are designed to ensure maximum security: - Secret variables are set using the [`wix env set`](https://dev.wix.com/docs/wix-cli/command-reference/project-commands/env-set.md) command and stored securely on Wix servers, not in your local `.env.local` file. - To run your project locally with secret variables, you must pull them from Wix servers using the [`wix env pull`](https://dev.wix.com/docs/wix-cli/command-reference/project-commands/env-pull.md) command. This downloads the secret variables to your local environment temporarily. - Since secret variables aren't stored in your `.env.local` file, they're never at risk of being accidentally committed to your repository. ### Public variables on Wix servers While public variables are typically stored in your `.env.local` file, you can also manage them using `wix env set` and `wix env pull`, similar to secret variables. This approach offers additional benefits: - Store all environment variables on Wix servers instead of tracking them locally. - Team members can sync variables without sharing `.env.local` files. - Add `.env.local` to your `.gitignore` and pull variables when needed, eliminating the risk of accidentally committing sensitive configuration. ## See also - [Manage Environment Variables](https://dev.wix.com/docs/go-headless/wix-managed-headless/project-development/environment-variables/manage-environment-variables.md) - [Share Environment Variables with Collaborators](https://dev.wix.com/docs/go-headless/wix-managed-headless/project-development/environment-variables/share-environment-variables.md) - [Astro Environment Variables Documentation](https://docs.astro.build/en/guides/environment-variables/) --- > Portal Navigation: > > - Append `.md` to any URL under `https://dev.wix.com/docs/` to get its markdown version. > - Pages are either content pages (article or reference text) or menu pages (a list of links to child pages). > - To get a menu page, truncate any URL to a parent path and append `.md` (e.g. `https://dev.wix.com/docs/sdk.md`, `https://dev.wix.com/docs/sdk/core-modules.md`). > - Top-level index of all portals: https://dev.wix.com/docs/llms.txt > - Full concatenated docs: https://dev.wix.com/docs/llms-full.txt ## Resource: Manage Environment Variables ## Article: Manage Environment Variables in the CLI ## Article Link: https://dev.wix.com/docs/go-headless/wix-managed-headless/project-development/environment-variables/manage-environment-variables.md ## Article Content: # Manage Environment Variables in the CLI Configure and use environment variables in your Wix CLI project to store configuration values and secrets outside of your code. Learn about the [types of environment variables](https://dev.wix.com/docs/go-headless/wix-managed-headless/project-development/environment-variables/about-environment-variables-in-the-cli.md) available in Wix CLI projects. ## Step 1 | Define the schema In this step, you define the structure of your environment variables in `astro.config.mjs`, specifying each variable’s type, context (client or server), and access level (public or secret) before assigning actual values. ```js import { defineConfig, envField } from 'astro/config'; import wix from '@wix/astro'; import react from "@astrojs/react"; import cloudflare from "@astrojs/cloudflare"; export default defineConfig({ output: "server", adapter: cloudflare(), integrations: [wix(), react()], image: { domains: ["static.wixstatic.com"] }, devToolbar: { enabled: false }, env: { schema: { API_URL: envField.string({ context: "client", access: "public", optional: true }), PORT: envField.number({ context: "server", access: "public", default: 4321 }), API_SECRET_KEY: envField.string({ context: "server", access: "secret" }), } } }); ``` Read more about the schema definition in the [Astro documentation](https://docs.astro.build/en/guides/environment-variables/#define-your-schema). ## Step 2 | Configure environment variables In this step, you configure public or secret variables. ### Configure public client variables To configure public variables: 1. Add your variables to the `.env.local` file in your project root. ```bash API_URL=https://api.example.com PORT=8080 ``` 2. Use the `wix env set` command to set the variables. ```bash wix env set --key=API_URL --value=https://api.example.com wix env set --key=PORT --value=8080 ```
    __Important:__ Don't edit any of the `WIX_CLIENT` variables in the `.env.local` file. The Wix CLI manages these variables.
    ### Configure secret server variables To configure secret server variables: 1. Use the `wix env set` command to set the secret variable. ```bash wix env set --key=API_SECRET_KEY --value=your-secret-value ``` 2. Pull the secret variables to your development environment using the `wix env pull` command. ```bash wix env pull ``` > **Note:** You must run `wix env pull` after setting secret variables. Without running `wix env pull`, the `wix dev` command doesn't work. ## Step 3 | Use environment variables in your code In this step, you learn how to import and use environment variables. ### Use client variables Import public client variables from `astro:env/client`. The following example imports and uses the `API_URL` variable. ```js import { API_URL } from "astro:env/client"; const response = await fetch(`${API_URL}/users`); ``` ### Use backend variables Import public server and secret variables from `astro:env/server`: ```js import { API_SECRET_KEY, PORT } from "astro:env/server"; const response = await fetch("https://api.example.com/data", { headers: { "Authorization": `Bearer ${API_SECRET_KEY}` } }); const internalServiceUrl = `http://localhost:${PORT}/api/internal-service`; ``` ## Step 4 | Build and release your project After setting your environment variables, build and release your project to apply the changes. To build and release: 1. [Build](https://dev.wix.com/docs/wix-cli/command-reference/project-commands/build.md) your project. ```bash wix build ``` 2. [Release](https://dev.wix.com/docs/wix-cli/command-reference/project-commands/release.md) your project to apply the changes. ```bash wix release ``` ## See also - [About Environment Variables](https://dev.wix.com/docs/go-headless/wix-managed-headless/project-development/environment-variables/about-environment-variables-in-the-cli.md) - [Share Environment Variables with Collaborators](https://dev.wix.com/docs/go-headless/wix-managed-headless/project-development/environment-variables/share-environment-variables.md) - [Build and Deploy a Project](https://dev.wix.com/docs/go-headless/wix-managed-headless/project-development/build-and-deploy-with-the-cli.md) --- > Portal Navigation: > > - Append `.md` to any URL under `https://dev.wix.com/docs/` to get its markdown version. > - Pages are either content pages (article or reference text) or menu pages (a list of links to child pages). > - To get a menu page, truncate any URL to a parent path and append `.md` (e.g. `https://dev.wix.com/docs/sdk.md`, `https://dev.wix.com/docs/sdk/core-modules.md`). > - Top-level index of all portals: https://dev.wix.com/docs/llms.txt > - Full concatenated docs: https://dev.wix.com/docs/llms-full.txt ## Resource: Share Environment Variables ## Article: Share Environment Variables with Collaborators ## Article Link: https://dev.wix.com/docs/go-headless/wix-managed-headless/project-development/environment-variables/share-environment-variables.md ## Article Content: # Share Environment Variables with Collaborators Share secret environment variables with collaborators on your Wix-managed headless project, such as API keys for AI usage. Instead of sending the secrets to your team over insecure channels, you store them once with Wix, and each collaborator pulls them into their own local environment with the Wix CLI. Secrets are stored securely on Wix servers, not in your local `.env.local` file, so they're never at risk of being committed to your repository. > **Note:** This applies to [Wix-managed headless](https://dev.wix.com/docs/go-headless/wix-managed-headless/about-wix-managed-headless.md) projects, which Wix hosts and you develop with the Wix CLI. [Self-managed headless](https://dev.wix.com/docs/go-headless/self-managed-headless/about-self-managed-headless.md) projects run their own backend and share secrets through their framework or hosting provider. ## Before you begin Make sure that: - You have a [Wix-managed headless](https://dev.wix.com/docs/go-headless/wix-managed-headless/about-wix-managed-headless.md) project. - The people you want to share secrets with are [collaborators on your project](https://dev.wix.com/docs/go-headless/project-guides/project-management/invite-collaborators.md). ## Step 1 | Add the secret Add the secret in one of the following ways: - **Wix CLI:** Use the [`wix env set`](https://dev.wix.com/docs/wix-cli/command-reference/project-commands/env-set.md) command to set the secret from your terminal. ```bash wix env set --key= --value= ``` - **Secrets Manager:** Add and manage the secret from your dashboard, without using the CLI. This is useful for managing secrets in one place, or for team members who need to add or update a secret but don't develop with the CLI, such as a site admin. 1. Open your headless project dashboard. 1. Go to **Developer Tools** > **Secrets Manager**. 1. Click **Add Secret**. 1. Enter a **name** and **value** for the secret, then save it. > **Note:** Secrets set with `wix env set` are stored on Wix servers but don't appear in the Secrets Manager, which shows only secrets added through the dashboard. `wix env pull` retrieves secrets added either way. To keep all your secrets visible and manageable in one place, add them through the Secrets Manager. ## Step 2 | Pull the secret Each collaborator pulls the shared secrets into their own local environment using the [`wix env pull`](https://dev.wix.com/docs/wix-cli/command-reference/project-commands/env-pull.md) command, which merges them into their `.env.local` file. This includes secrets added with either `wix env set` or the Secrets Manager. ```bash wix env pull ``` After pulling, the secret is available in the collaborator's local environment for use with [`wix dev`](https://dev.wix.com/docs/wix-cli/command-reference/project-commands/dev.md). To use the secret in code, make sure it's defined in the project's schema. For more information, see [Manage Environment Variables in the CLI](https://dev.wix.com/docs/go-headless/wix-managed-headless/project-development/environment-variables/manage-environment-variables.md). ## See also - [Invite Collaborators](https://dev.wix.com/docs/go-headless/project-guides/project-management/invite-collaborators.md) - [About Environment Variables in the CLI](https://dev.wix.com/docs/go-headless/wix-managed-headless/project-development/environment-variables/about-environment-variables-in-the-cli.md) - [Manage Environment Variables in the CLI](https://dev.wix.com/docs/go-headless/wix-managed-headless/project-development/environment-variables/manage-environment-variables.md) --- > Portal Navigation: > > - Append `.md` to any URL under `https://dev.wix.com/docs/` to get its markdown version. > - Pages are either content pages (article or reference text) or menu pages (a list of links to child pages). > - To get a menu page, truncate any URL to a parent path and append `.md` (e.g. `https://dev.wix.com/docs/sdk.md`, `https://dev.wix.com/docs/sdk/core-modules.md`). > - Top-level index of all portals: https://dev.wix.com/docs/llms.txt > - Full concatenated docs: https://dev.wix.com/docs/llms-full.txt ## Resource: About Extensions in the Wix CLI ## Article: About Extensions in the Wix CLI ## Article Link: https://dev.wix.com/docs/go-headless/wix-managed-headless/extensions/about-extensions-in-the-wix-cli.md ## Article Content: # About Extensions in the Wix CLI The Wix CLI allows you to easily extend your headless project's functionality with extensions. For example, with extensions you can add custom dashboard pages or implement backend logic to handle events. The Wix CLI supports multiple [extension types](#supported-extension-types). The creation and setup process for extensions in the CLI takes place in the terminal. Then, to edit your extensions, you write code directly in your project's local files.
    **Important:** Extensions come from [Wix's Astro integration](https://dev.wix.com/docs/go-headless/about-headless/choose-your-path.md), so they require building with [Astro](https://astro.build/). If you [deployed your own existing frontend](https://dev.wix.com/docs/go-headless/get-started/quick-starts/wix-managed-headless/supported-framework/quick-start-from-a-supported-framework.md) or a Claude Design build instead, extensions aren't currently supported for your project.
    > **Note:** When you add an extension to a headless project, the CLI adds it to your project's [private Wix app](https://dev.wix.com/docs/wix-cli/guides/about-the-wix-cli.md#projects-private-app). ## Adding extensions You can add extensions to your project using the [generate](https://dev.wix.com/docs/wix-cli/command-reference/project-commands/generate.md) command. This command starts a process that guides you through adding an extension to your project. After selecting an extension, you'll be prompted for the relevant configuration details. Your extension will then be generated in your project's local files under `src/extensions/`. If you want to move your extension files in your project, make sure the new path is specified in the `extension.ts` file. Learn more [about the `extension.ts` file](https://dev.wix.com/docs/go-headless/wix-managed-headless/extensions/about-the-extensions-ts-file.md).
    __Important:__ Some extensions require you to run [`release`](https://dev.wix.com/docs/wix-cli/command-reference/project-commands/release.md) to register them in your project's app configuration before they work. The [`preview`](https://dev.wix.com/docs/wix-cli/command-reference/project-commands/preview.md) command uploads your code but doesn't register all extensions.
    ## Supported extension types The Wix CLI currently supports the following extensions for headless projects: > **Note:** The CLI also supports site extensions, but those apply only to Wix app projects, not headless projects. In a headless project you control your own frontend, so there's no need to extend it with site extensions. ### Dashboard extensions - [Dashboard pages](https://dev.wix.com/docs/go-headless/wix-managed-headless/extensions/dashboard/dashboard-pages/add-dashboard-page-extensions-with-the-wix-cli.md) - [Dashboard plugins](https://dev.wix.com/docs/go-headless/wix-managed-headless/extensions/dashboard/dashboard-plugins/add-dashboard-plugin-extensions-with-the-wix-cli.md) - [Dashboard menu plugins](https://dev.wix.com/docs/go-headless/wix-managed-headless/extensions/dashboard/dashboard-menu-plugins/add-dashboard-menu-plugin-extensions-with-the-wix-cli.md) - [Dashboard modals](https://dev.wix.com/docs/go-headless/wix-managed-headless/extensions/dashboard/dashboard-modals/add-dashboard-modal-extensions-with-the-wix-cli.md) ### Backend extensions - [Events](https://dev.wix.com/docs/go-headless/wix-managed-headless/extensions/backend/events/add-event-extensions-with-the-wix-cli.md) - [Service plugins](https://dev.wix.com/docs/go-headless/wix-managed-headless/extensions/backend/service-plugins/add-service-plugin-extensions-with-the-wix-cli.md) - [Data Collections](https://dev.wix.com/docs/go-headless/wix-managed-headless/extensions/backend/data-collections/add-a-data-collections-extension-with-the-wix-cli.md) ## HTTP endpoints Wix CLI projects support [HTTP endpoints](https://dev.wix.com/docs/go-headless/wix-managed-headless/extensions/backend/http-endpoints/about-http-endpoints.md) for backend API development. ## See also - [About the Wix CLI](https://dev.wix.com/docs/wix-cli/guides/about-the-wix-cli.md) - [About the extensions.ts File](https://dev.wix.com/docs/go-headless/wix-managed-headless/extensions/about-the-extensions-ts-file.md) --- > Portal Navigation: > > - Append `.md` to any URL under `https://dev.wix.com/docs/` to get its markdown version. > - Pages are either content pages (article or reference text) or menu pages (a list of links to child pages). > - To get a menu page, truncate any URL to a parent path and append `.md` (e.g. `https://dev.wix.com/docs/sdk.md`, `https://dev.wix.com/docs/sdk/core-modules.md`). > - Top-level index of all portals: https://dev.wix.com/docs/llms.txt > - Full concatenated docs: https://dev.wix.com/docs/llms-full.txt ## Resource: About the extensions.ts File ## Article: About the extensions.ts File ## Article Link: https://dev.wix.com/docs/go-headless/wix-managed-headless/extensions/about-the-extensions-ts-file.md ## Article Content: # About the extensions.ts File The `extensions.ts` file is the central configuration file for all [extensions](https://dev.wix.com/docs/go-headless/wix-managed-headless/extensions/about-extensions-in-the-wix-cli.md) in your Wix CLI project. This file must be located in the `src/` directory and serves as the registry where you define and organize all the extensions that add functionality to your project. ## How the extensions.ts file works The `extensions.ts` file uses a builder pattern syntax that allows you to chain extension configurations together. This approach provides a clean, readable way to manage multiple extensions in your project. The `extensions.ts` file follows this basic structure: ```typescript import { app, extensions } from '@wix/astro/builders'; export default app() .use(extensions.extensionType({ // Extension configuration })); ``` The file: - Imports the necessary builders from `@wix/astro/builders`. - Exports a default app configuration. - Uses the `.use()` method to register extensions. ### Import-based registration You can also import extension configurations from separate files and register them. For example: **extension.ts** ```typescript import { app } from '@wix/astro/builders'; import myImportedPage from './extensions/dashboard/pages/my-imported-page/my-imported-page.extension.ts'; export default app() .use(myImportedPage); ``` **my-imported-page.extension.ts** ```typescript import { extensions } from '@wix/astro/builders'; export default extensions.dashboardPage({ id: '154f642e-a705-4ff3-8421-6119354a3384', title: 'My Imported Page', routePath: 'my-imported-page', component: './extensions/dashboard/pages/my-imported-page/my-imported-page.tsx', }); ``` ## Automatic extension management You can add extensions to your project using the [generate](https://dev.wix.com/docs/wix-cli/command-reference/project-commands/generate.md) command. After running this command and following the prompts, CLI: - Creates the extension's files and code, including an `extension.ts` file containing the builder. By default, it uses the naming pattern `[extension-name].extension.ts`, however, you can rename these files to anything you want. - Adds the necessary import statement and `.use()` method call to register the new extension in the `extensions.ts` file. ## Remove deleted extensions When you delete an extension from your project, you should also remove its registration from the `extensions.ts` file. This involves removing both: - The import statement for any extension builders. - The `.use()` method call that registers the extension. ## See also - [About App Extensions in the Wix CLI](https://dev.wix.com/docs/go-headless/wix-managed-headless/extensions/about-extensions-in-the-wix-cli.md) - [Wix CLI Project Structure](https://dev.wix.com/docs/wix-cli/guides/project-structure/project-structure.md) --- > Portal Navigation: > > - Append `.md` to any URL under `https://dev.wix.com/docs/` to get its markdown version. > - Pages are either content pages (article or reference text) or menu pages (a list of links to child pages). > - To get a menu page, truncate any URL to a parent path and append `.md` (e.g. `https://dev.wix.com/docs/sdk.md`, `https://dev.wix.com/docs/sdk/core-modules.md`). > - Top-level index of all portals: https://dev.wix.com/docs/llms.txt > - Full concatenated docs: https://dev.wix.com/docs/llms-full.txt ## Resource: About Dashboard Extensions in the Wix CLI ## Article: About Dashboard Extensions in the Wix CLI ## Article Link: https://dev.wix.com/docs/go-headless/wix-managed-headless/extensions/dashboard/about-dashboard-extensions-in-the-wix-cli.md ## Article Content: # About Dashboard Extensions in the Wix CLI Dashboard extensions allow you to extend the functionality of the Wix dashboard with customizable features, such as a page or a plugin. The Wix CLI allows you to easily create dashboard extensions for your projects. The following dashboard extensions are available in the Wix CLI: - [Dashboard pages](https://dev.wix.com/docs/go-headless/wix-managed-headless/extensions/dashboard/dashboard-pages/add-dashboard-page-extensions-with-the-wix-cli.md) - [Dashboard modals](https://dev.wix.com/docs/go-headless/wix-managed-headless/extensions/dashboard/dashboard-modals/add-dashboard-modal-extensions-with-the-wix-cli.md) - [Dashboard plugins](https://dev.wix.com/docs/go-headless/wix-managed-headless/extensions/dashboard/dashboard-plugins/add-dashboard-plugin-extensions-with-the-wix-cli.md) - [Dashboard menu plugins](https://dev.wix.com/docs/go-headless/wix-managed-headless/extensions/dashboard/dashboard-menu-plugins/add-dashboard-menu-plugin-extensions-with-the-wix-cli.md) ## Dashboard extension integration You can add dashboard extensions using the [generate](https://dev.wix.com/docs/wix-cli/command-reference/project-commands/generate.md) command and following the prompts to create your extension. Once created, your extension files appear in your project directory. You can preview dashboard extensions using the `npm run dev` command, which provides a link to open a preview of a dashboard in your browser. Dashboard extensions extend the functionality of the Wix dashboard to help you manage your site and business data. Dashboard extensions aren't visible to site visitors. ## See also - [About Extensions in the Wix CLI](https://dev.wix.com/docs/go-headless/wix-managed-headless/extensions/about-extensions-in-the-wix-cli.md) - [About the extensions.ts File](https://dev.wix.com/docs/go-headless/wix-managed-headless/extensions/about-the-extensions-ts-file.md) --- > Portal Navigation: > > - Append `.md` to any URL under `https://dev.wix.com/docs/` to get its markdown version. > - Pages are either content pages (article or reference text) or menu pages (a list of links to child pages). > - To get a menu page, truncate any URL to a parent path and append `.md` (e.g. `https://dev.wix.com/docs/sdk.md`, `https://dev.wix.com/docs/sdk/core-modules.md`). > - Top-level index of all portals: https://dev.wix.com/docs/llms.txt > - Full concatenated docs: https://dev.wix.com/docs/llms-full.txt ## Resource: Add Dashboard Page Extensions with the Wix CLI ## Article: Add Dashboard Page Extensions with the Wix CLI ## Article Link: https://dev.wix.com/docs/go-headless/wix-managed-headless/extensions/dashboard/dashboard-pages/add-dashboard-page-extensions-with-the-wix-cli.md ## Article Content: # Add Dashboard Page Extensions with the Wix CLI You can add dashboard pages to your project using dashboard page extensions. These pages let you manage your site and business data from the dashboard. They're not visible to site visitors. The Wix CLI makes it easy to create and develop dashboard page extensions, and to manage them in the sidebar. For general information about this extension type, read [About Dashboard Page Extensions](https://dev.wix.com/docs/go-headless/wix-managed-headless/extensions/dashboard/about-dashboard-extensions-in-the-wix-cli.md). Follow the instructions below to: 1. Create a dashboard page extension for your project. 2. Customize your dashboard page. Once this task is complete, you have a dashboard page extension that adds a new dashboard page to your project's site. ## Before you begin + You must have a project that was [created using the Wix CLI](https://dev.wix.com/docs/wix-cli.md). + You must be logged into your Wix account. If you don't have one, [sign up for a Wix account](https://manage.wix.com/account/custom-apps). + Learn how to interact with the Wix dashboard using the [Wix Dashboard SDK](https://dev.wix.com/docs/sdk/host-modules/dashboard/introduction.md). ## Step 1 | Create the extension 1. Run the [generate](https://dev.wix.com/docs/wix-cli/command-reference/project-commands/generate.md) command and follow the prompts to create a dashboard page extension. 1. Enter a name for your page's folder. The CLI will create this directory with the chosen name containing your page's files. 1. Enter the route for your page. The route is the path that is appended to the dashboard base URL to access the dashboard page. Upon completion, the extension files will be created in your project directory with the following structure: ```tsx src └── extensions └── dashboard └── pages └── ├── .extension.ts └── .tsx ``` > **Note:** This is the default folder structure created by the CLI. You can move these files to any location within the `src/` folder and update the references in your `extension.ts` file. Learn more about the [flexible file system](https://dev.wix.com/docs/wix-cli/guides/project-structure/project-structure.md). For more information about these files, see [Dashboard Page Extension Files and Code](https://dev.wix.com/docs/go-headless/wix-managed-headless/extensions/dashboard/dashboard-pages/dashboard-page-extension-files-and-code.md). ## Step 2 | Customize your dashboard page 1. Run the [dev](https://dev.wix.com/docs/wix-cli/command-reference/project-commands/dev.md) command to open the `dev menu`. 1. Click the link to open the dashboard in your browser and navigate to the page you've created. Leave this window open. 2. Go to your dashboard page's `.tsx` file and change `subtitle` in `Page.Content` to `"Hello world!"`: ```tsx const DashboardPage: FC = () => { return ( ); }; export default DashboardPage; ``` 3. Save your file. 4. Navigate back to the dashboard page in your browser and see your changes. ## Dashboard menu plugins If you use a [dashboard menu plugin](https://dev.wix.com/docs/build-apps/develop-your-app/extensions/dashboard-extensions/dashboard-plugins/dashboard-menu-plugins/dashboard-menu-plugin-extensions.md) to navigate to your dashboard page, you can customize your dashboard page extension to interact with any data passed from the dashboard page that hosts the menu plugin. 1. Make sure the `@wix/dashboard` package is installed in your project. 2. Add the following import statement to your code: ```js import { dashboard } from '@wix/dashboard'; ``` 3. To retrieve the data from the dashboard page, call the [`observeState()`](https://dev.wix.com/docs/sdk/host-modules/dashboard/observe-state.md) method. ```js dashboard.observeState((componentParams) => { console.log("componentParams:", componentParams); }); ``` 4. Use React to add code and logic to your dashboard page. ## Build and deploy your project Once your project is ready for production, you can [build and deploy](https://dev.wix.com/docs/go-headless/wix-managed-headless/project-development/build-and-deploy-with-the-cli.md) it. ## Delete a dashboard page To delete an existing dashboard page from your project: 1. Delete the folder that contains your dashboard page extension's files. 2. Remove the import and `.use()` statements for the extension from the [`extensions.ts`](https://dev.wix.com/docs/go-headless/wix-managed-headless/extensions/about-the-extensions-ts-file.md) file.
    **Important:** If you've already released a version of your project, you must build and deploy the project again after removing the dashboard page files.
    ## See also - [Dashboard Page Extension Files and Code](https://dev.wix.com/docs/go-headless/wix-managed-headless/extensions/dashboard/dashboard-pages/dashboard-page-extension-files-and-code.md) - [About Dashboard Page Extensions](https://dev.wix.com/docs/build-apps/develop-your-app/extensions/dashboard-extensions/dashboard-pages/about-dashboard-page-extensions.md) --- > Portal Navigation: > > - Append `.md` to any URL under `https://dev.wix.com/docs/` to get its markdown version. > - Pages are either content pages (article or reference text) or menu pages (a list of links to child pages). > - To get a menu page, truncate any URL to a parent path and append `.md` (e.g. `https://dev.wix.com/docs/sdk.md`, `https://dev.wix.com/docs/sdk/core-modules.md`). > - Top-level index of all portals: https://dev.wix.com/docs/llms.txt > - Full concatenated docs: https://dev.wix.com/docs/llms-full.txt ## Resource: Navigate Between Dashboard Pages ## Article: Navigate Between Dashboard Pages ## Article Link: https://dev.wix.com/docs/go-headless/wix-managed-headless/extensions/dashboard/dashboard-pages/navigate-between-dashboard-pages.md ## Article Content: # Navigate Between Dashboard Pages You can connect multiple dashboard pages in your CLI project using the [Dashboard SDK's](https://dev.wix.com/docs/sdk/host-modules/dashboard/introduction.md) `navigate()` and `observeState()` methods. A common use case is the master-detail pattern: a list page that displays items and a detail page that shows information about a selected item. To navigate between dashboard pages: 1. Get the target page's component ID. 1. Navigate from the source page. 1. Retrieve data on the target page. ## Prerequisites - A Wix CLI project with at least 2 [dashboard page extensions](https://dev.wix.com/docs/go-headless/wix-managed-headless/extensions/dashboard/dashboard-pages/add-dashboard-page-extensions-with-the-wix-cli.md). - The `@wix/dashboard` package installed in your project. ## Step 1 | Get the target page's component ID Find the target dashboard page's component ID in its `extension.ts` file. This is the `id` field: ```ts export default extensions.dashboardPage({ id: '1600e523-f812-497d-9323-46e82ab78bd6', title: 'Item Details', routePath: 'item-details', component: './extensions/dashboard/pages/item-details/item-details.tsx', }); ``` ## Step 2 | Navigate from the source page On the source page, use `dashboard.navigate()` to send the user to the target page. Pass data through the `relativeUrl` parameter: ```tsx import { dashboard } from '@wix/dashboard'; function ItemList({ items }) { const handleItemClick = (itemId: string) => { dashboard.navigate({ pageId: '1600e523-f812-497d-9323-46e82ab78bd6', relativeUrl: itemId, }); }; return (
      {items.map((item) => (
    • handleItemClick(item._id)}> {item.name}
    • ))}
    ); } ``` ## Step 3 | Retrieve data on the target page On the target page, use `dashboard.observeState()` to read the data passed through the URL. The callback fires when the page initializes and whenever the state updates. The first parameter (`pageParams`) contains a `location` object with the `pathname` passed via `relativeUrl`: ```tsx import { useEffect, useState } from 'react'; import { dashboard } from '@wix/dashboard'; function ItemDetails() { const [itemId, setItemId] = useState(null); useEffect(() => { dashboard.observeState((pageParams, environmentState) => { const id = pageParams.location.pathname.replace('/', ''); setItemId(id); }); }, []); if (!itemId) return
    Loading...
    ; return
    Showing details for item: {itemId}
    ; } ``` Use the retrieved ID to fetch and display the item's data from your data source. ## See also - [Add Dashboard Page Extensions with the Wix CLI](https://dev.wix.com/docs/go-headless/wix-managed-headless/extensions/dashboard/dashboard-pages/add-dashboard-page-extensions-with-the-wix-cli.md) - [Dashboard Page Extension Files and Code](https://dev.wix.com/docs/go-headless/wix-managed-headless/extensions/dashboard/dashboard-pages/dashboard-page-extension-files-and-code.md) - [`navigate()` API reference](https://dev.wix.com/docs/sdk/host-modules/dashboard/navigate.md) - [`observeState()` API reference](https://dev.wix.com/docs/sdk/host-modules/dashboard/observe-state.md) --- > Portal Navigation: > > - Append `.md` to any URL under `https://dev.wix.com/docs/` to get its markdown version. > - Pages are either content pages (article or reference text) or menu pages (a list of links to child pages). > - To get a menu page, truncate any URL to a parent path and append `.md` (e.g. `https://dev.wix.com/docs/sdk.md`, `https://dev.wix.com/docs/sdk/core-modules.md`). > - Top-level index of all portals: https://dev.wix.com/docs/llms.txt > - Full concatenated docs: https://dev.wix.com/docs/llms-full.txt ## Resource: Dashboard Page Extension Files and Code ## Article: Dashboard Page Extension Files and Code ## Article Link: https://dev.wix.com/docs/go-headless/wix-managed-headless/extensions/dashboard/dashboard-pages/dashboard-page-extension-files-and-code.md ## Article Content: # Dashboard Page Extension Files and Code When you generate a dashboard page extension, the CLI adds the following files to your project: - `.extension.ts`: Builds the [page](#page-builder). - `.tsx`: Defines the [page content](#page-content). ## Page builder The `.extension.ts` file contains a dashboard page's builder configuration. The page builder is defined using the following schema, shown here as a TypeScript type: ```ts export default extensions.dashboardPage({ id: string, title: string, routePath: string, component: string, }); ``` Here's an example builder definition: ```ts export default extensions.dashboardPage({ id: '40c70303-4eac-44cb-bb53-4e583a036682', title: 'My Prohect', routePath: 'my-project', component: './extensions/dashboard/pages/my-project/my-project.tsx', }); ``` ### Builder fields The following fields can be used in the configuration object: | Field | Type | Description | |--|--|--| | `id` | string | Page ID as a ([GUID](https://en.wikipedia.org/wiki/Universally_unique_identifier)). It must be unique across all pages in the project. | | `title` | string | The page title. The title is used as the browser tab title and as the dashboard sidebar label if the page is configured to appear in the sidebar. | | `routePath` | string | Route that lead to this page. Use this route in code to reference the page. | | `component` | string | A route to the page content component. | ## Page content The `.tsx` file contains a dashboard page's content. The content is defined as a [React](https://react.dev/) component that renders when the page is active. Inside a dashboard page component you can use: - The [Wix Dashboard React SDK](https://dev.wix.com/docs/sdk/host-modules/dashboard/introduction.md) to navigate users to pages in the dashboard, display modals, and send users alerts using toasts. - The [Wix Design System](https://www.wixdesignsystem.com/) to display content using the same React components Wix uses to build its own dashboard pages. - The [Wix JavaScript SDK](https://dev.wix.com/docs/sdk.md) to access and manage other Wix data. - [`httpClient.fetchWithAuth`](https://dev.wix.com/docs/sdk/core-modules/essentials/http-client.md) from `@wix/essentials` to call your project's own [backend HTTP endpoints](https://dev.wix.com/docs/go-headless/wix-managed-headless/extensions/backend/http-endpoints/about-http-endpoints.md). --- > Portal Navigation: > > - Append `.md` to any URL under `https://dev.wix.com/docs/` to get its markdown version. > - Pages are either content pages (article or reference text) or menu pages (a list of links to child pages). > - To get a menu page, truncate any URL to a parent path and append `.md` (e.g. `https://dev.wix.com/docs/sdk.md`, `https://dev.wix.com/docs/sdk/core-modules.md`). > - Top-level index of all portals: https://dev.wix.com/docs/llms.txt > - Full concatenated docs: https://dev.wix.com/docs/llms-full.txt ## Resource: Dashboard Modal Extensions Files and Code ## Article: Dashboard Modal Extensions Files and Code ## Article Link: https://dev.wix.com/docs/go-headless/wix-managed-headless/extensions/dashboard/dashboard-modals/dashboard-modal-extensions-files-and-code.md ## Article Content: # Dashboard Modal Extensions Files and Code When you generate a dashboard modal extension, the CLI adds the following files to your project: - **`.extension.ts`**: Builds the [modal](#modal-builder). - **`.tsx`**: Defines the [modal content](#modal-content). - **`.config.ts`**: Contains configurable [modal properties](#modal-configuration). ## Modal builder The `.extension.ts` file contains the dashboard modal builder configuration. The modal builder is defined using the following schema, shown here as a TypeScript type: ```ts export default extensions.dashboardModal({ id: string, title: string, width: number, height: number, component: string, }); ``` ### Builder fields | Field | Type | Description | |--------|--------|-------------| | `id` | string | The modal ID ([GUID](https://en.wikipedia.org/wiki/Universally_unique_identifier)) is automatically generated and shouldn't be changed. The ID is used to register the modal in the project dashboard. The ID must be unique across all pages in the project. | | `title`| string | The modal title. The title is used to refer to the modal in the project dashboard. | | `width` | number | Initial width of the modal while loading. | | `height` | number | Initial height of the modal while loading. | | `component` | string | Path of the modal content. | Here's an example builder definition: ```ts export default extensions.dashboardPlugin({ id: 'f9411ed6-f0da-439b-ac40-350334228bad', title: 'Events Plugin', width: config.width, height: config.height, component: './extensions/dashboard/modals/my-modal/my-modal.tsx', }); ``` ## Modal content The `.tsx` file contains the dashboard modal content. The content is defined as a [React](https://react.dev/) component that renders when the modal is active. Inside a dashboard modal component you may choose to use: - The [Wix SDK](https://dev.wix.com/docs/api-reference?apiView=SDK.md) to access Wix business solutions and site data. - The [Wix Dashboard React SDK](https://dev.wix.com/docs/sdk/host-modules/dashboard/introduction.md) to navigate users to pages in the dashboard, display other dashboard modals, or send users alerts and updates using toasts. - The [Wix Design System](https://www.wixdesignsystem.com/) to use the same React components Wix uses to build its own dashboard pages. ## Modal configuration The `.config.ts` file contains the configurable properties for the dashboard modal. Here is an example of the configuration: ```ts export default { title: 'My Modal, width: 550, height: 600, } This file is imported into the `.tsx` file to keep the modal settings organized and easily maintained. --- > Portal Navigation: > > - Append `.md` to any URL under `https://dev.wix.com/docs/` to get its markdown version. > - Pages are either content pages (article or reference text) or menu pages (a list of links to child pages). > - To get a menu page, truncate any URL to a parent path and append `.md` (e.g. `https://dev.wix.com/docs/sdk.md`, `https://dev.wix.com/docs/sdk/core-modules.md`). > - Top-level index of all portals: https://dev.wix.com/docs/llms.txt > - Full concatenated docs: https://dev.wix.com/docs/llms-full.txt ## Resource: Add Dashboard Modal Extensions with the Wix CLI ## Article: Add Dashboard Modal Extensions with the Wix CLI ## Article Link: https://dev.wix.com/docs/go-headless/wix-managed-headless/extensions/dashboard/dashboard-modals/add-dashboard-modal-extensions-with-the-wix-cli.md ## Article Content: # Add Dashboard Modal Extensions with the Wix CLI [Dashboard modal extensions](https://dev.wix.com/docs/build-apps/develop-your-app/extensions/dashboard-extensions/dashboard-modals/about-dashboard-modals.md) allow you to add modals to site dashboards. Modals appear in your site's dashboard. You can control the modal using `openModal()` and `closeModal()` from the [Dashboard SDK](https://dev.wix.com/docs/sdk/host-modules/dashboard/open-modal.md). Follow the instructions below to: 1. Create a dashboard modal extension for your project. 1. Customize and test your dashboard modal extension.
    **Tip:** Learn how to interact with the Wix dashboard using the [Wix Dashboard SDK](https://dev.wix.com/docs/sdk/host-modules/dashboard/introduction.md).
    ## Step 1 | Create the extension 1. Run the [generate](https://dev.wix.com/docs/wix-cli/command-reference/project-commands/generate.md) command and follow the prompts to create a dashboard modal extension. 1. Enter a name for your modal's folder. The CLI will create this directory with the chosen name containing your modal's files. 1. Enter the name of your modal. Upon completion, the extension files will be created in your project directory with the following structure: ```bash src └── extensions └── dashboard └── modals └── ├── .config.ts ├── .extension.ts └── .tsx ``` > **Note:** This is the default folder structure created by the CLI. You can move these files to any location within the `src/` folder and update the references in your `extension.ts` file. Learn more about the [flexible file system](https://dev.wix.com/docs/wix-cli/guides/project-structure/project-structure.md). For more on the files and their structure, see [Dashboard Modal Extensions Files and Code](https://dev.wix.com/docs/go-headless/wix-managed-headless/extensions/dashboard/dashboard-modals/dashboard-modal-extensions-files-and-code.md). ## Step 2 | Customize your modal 1. Run the [dev](https://dev.wix.com/docs/wix-cli/command-reference/project-commands/dev.md) command to open the dev menu. 1. Choose a dashboard page to display. This will open a browser window previewing the dashboard page. 1. Add code to your dashboard page that triggers your modal to open. Use `openModal()` from the [Dashboard SDK](https://dev.wix.com/docs/sdk/host-modules/dashboard/open-modal.md). You can find your modal's ID in your `.extension.ts` file. 1. Edit your `.tsx` file to customize the modal itself. For example, change the text inside `` to `My Dashboard Modal`: ```tsx const Modal: FC = () => { return ( dashboard.closeModal()} secondaryButtonOnClick={() => dashboard.closeModal()} title={title} subtitle="Edit this file to customize your modal" content={ Wix CLI Modal } /> ); }; export default Modal; ``` 1. Set your dashboard modal extension to interact with custom data passed by the `openModal()` method or any data passed from the dashboard page hosting a menu plugin that navigates to your modal. 1. To retrieve the data, call the [`observeState()`](https://dev.wix.com/docs/sdk/host-modules/dashboard/observe-state.md) method. ```js dashboard.observeState((componentParams) => { console.log("componentParams:", componentParams); }); ``` 1. Use React to add code and logic to your modal. 1. Save your files. 1. Go back to your dashboard page, open your modal, and see your changes. ## Build and deploy your project Once your project is ready for production, you can [build and deploy](https://dev.wix.com/docs/go-headless/wix-managed-headless/project-development/build-and-deploy-with-the-cli.md) it. ## Delete a dashboard modal To delete an existing dashboard modal from your project: 1. Delete the folder that contains your dashboard modal extension's files. 2. Remove the import and `.use()` statements for the extension from the [`extensions.ts`](https://dev.wix.com/docs/go-headless/wix-managed-headless/extensions/about-the-extensions-ts-file.md) file.
    **Important:** If you've already released a version of your project, you must build and deploy the project again after removing the dashboard modal files.
    ## See also - [Dashboard Modal Extension Files and Code](https://dev.wix.com/docs/go-headless/wix-managed-headless/extensions/dashboard/dashboard-modals/dashboard-modal-extensions-files-and-code.md) - [About Dashboard Modal Extensions](https://dev.wix.com/docs/build-apps/develop-your-app/extensions/dashboard-extensions/dashboard-modals/about-dashboard-modals.md) --- > Portal Navigation: > > - Append `.md` to any URL under `https://dev.wix.com/docs/` to get its markdown version. > - Pages are either content pages (article or reference text) or menu pages (a list of links to child pages). > - To get a menu page, truncate any URL to a parent path and append `.md` (e.g. `https://dev.wix.com/docs/sdk.md`, `https://dev.wix.com/docs/sdk/core-modules.md`). > - Top-level index of all portals: https://dev.wix.com/docs/llms.txt > - Full concatenated docs: https://dev.wix.com/docs/llms-full.txt ## Resource: Dashboard Plugin Extension Files and Code ## Article: Dashboard Plugin Extension Files and Code ## Article Link: https://dev.wix.com/docs/go-headless/wix-managed-headless/extensions/dashboard/dashboard-plugins/dashboard-plugin-extension-files-and-code.md ## Article Content: # Dashboard Plugin Extension Files and Code When you generate a dashboard plugin extension, the CLI adds the following files to your project: - `.extension.ts`: Builds the [plugin](#plugin-builder). - `.tsx`: Defines the [plugin content](#plugin-content). ## Plugin builder The `.extension.ts` file contains the dashboard plugin builder configuration. This file defines which dashboard page hosts your plugin. The plugin builder is defined using the following schema, shown here as a TypeScript type: ```ts export default extensions.dashboardPlugin({ id: string, title: string, extends: string, component: string, }); ``` Here's an example builder definition: ```ts export default extensions.dashboardPlugin({ id: '4f7fe48c-a3f9-48ba-9c52-a6df24d58a6f', title: 'My Dashboard Plugin', extends: '0a208a9f-3b45-449c-ba8e-13a842ea5b84', component: './extensions/dashboard/plugins/my-plugin/my-plugin.tsx', }); ``` ### Builder fields The following fields can be used in the configuration object: | Field | Type | Description | |-------|------|-------------| | `id` | string | Plugin ID as a ([GUID](https://en.wikipedia.org/wiki/Universally_unique_identifier)). The ID is automatically generated and must be unique across all extensions in the project. | | `title` | string | The plugin title. The title is used to refer to the plugin in the project dashboard. | | `extends` | string | Slot ID of the dashboard page hosting the plugin. | | `component` | string | Path to the plugin content component. | ## Plugin content The `.tsx` file contains the dashboard plugin content. The content is defined in a [React](https://react.dev/) component that renders when the page is active. Below is an example of how your `your-plugin-name.tsx` file will look upon creation: ```tsx import type { FC } from 'react'; import type { plugins } from '@wix/blog/dashboard'; import { WixDesignSystemProvider, Card, Text, TextButton, } from '@wix/design-system'; import '@wix/design-system/styles.global.css'; type Props = plugins.BlogPosts.PostsBannerParams; const Plugin: FC = (props) => { return ( This dashboard plugin was generated with Wix CLI. Customize it according to your logic. To learn more, read our{' '} documentation . ); }; export default Plugin; ``` In the dashboard plugin component, you can use: - React to add code and login to your plugin. - The [Wix SDK](https://dev.wix.com/docs/api-reference?apiView=SDK.md) to access Wix business solutions and site data. - The [Wix Dashboard SDK](https://dev.wix.com/docs/sdk/host-modules/dashboard/introduction.md) to interact with the dashboard page’s data that's passed to the slot. - The [Wix Design System](https://www.wixdesignsystem.com/) to work with the same React components Wix uses to build its own dashboard plugins. --- > Portal Navigation: > > - Append `.md` to any URL under `https://dev.wix.com/docs/` to get its markdown version. > - Pages are either content pages (article or reference text) or menu pages (a list of links to child pages). > - To get a menu page, truncate any URL to a parent path and append `.md` (e.g. `https://dev.wix.com/docs/sdk.md`, `https://dev.wix.com/docs/sdk/core-modules.md`). > - Top-level index of all portals: https://dev.wix.com/docs/llms.txt > - Full concatenated docs: https://dev.wix.com/docs/llms-full.txt ## Resource: Add Dashboard Plugin Extensions with the Wix CLI ## Article: Add Dashboard Plugin Extensions with the Wix CLI ## Article Link: https://dev.wix.com/docs/go-headless/wix-managed-headless/extensions/dashboard/dashboard-plugins/add-dashboard-plugin-extensions-with-the-wix-cli.md ## Article Content: # Add Dashboard Plugin Extensions with the Wix CLI Dashboard plugins allow you to extend and enhance the functionality of dashboard pages provided by Wix business solutions on your headless project's site, like Wix Stores or Wix Bookings. Use them when you want to add custom UI or logic into the dashboard pages your team already uses to run the site. Under the hood, the CLI registers the plugin on your headless project's [private app](https://dev.wix.com/docs/wix-cli/guides/about-the-wix-cli.md#projects-private-app), which is the mechanism Wix uses to install extensions on your site. See [Exposing apps publicly and privately](https://dev.wix.com/docs/build-apps/get-started/overview/exposing-apps-publicly-and-privately.md) for context on private apps. The Wix CLI makes it easy to create and develop dashboard plugins. You build your plugin using Wix's React/Node.js stack, and the plugin is deployed and hosted on the Wix cloud. For more information on dashboard plugin extensions, read [About Dashboard Plugins](https://dev.wix.com/docs/build-apps/develop-your-app/extensions/dashboard-extensions/dashboard-plugins/about-dashboard-plugin-extensions.md). Follow the instructions below to: 1. Create a dashboard plugin extension for your project. 1. Customize your dashboard plugin. Once this task is complete, your headless project will have a dashboard plugin that adds custom functionality to a Wix business solution's dashboard page.
    **Tip:** Learn how to interact with the Wix dashboard using the [Wix Dashboard SDK](https://dev.wix.com/docs/sdk/host-modules/dashboard/introduction.md).
    ## Step 1 | Create the plugin extension In the terminal: 1. Navigate to your project repo. 1. Run the [generate](https://dev.wix.com/docs/wix-cli/command-reference/project-commands/generate.md) command. 1. Follow the prompts for creating a dashboard plugin. Upon completion, the extension files will be created in your project directory with the following structure: ```tsx . └── / └── src/ └── extensions └── dashboard/ └── plugins/ └── / ├── .extension.ts └── .tsx ``` > **Note:** This is the default folder structure created by the CLI. You can move these files to any location within the `src/` folder and update the references in your `extension.ts` file. Learn more about the [flexible file system](https://dev.wix.com/docs/wix-cli/guides/project-structure/project-structure.md). For more information about these files, see [Dashboard Plugin Extension Files and Code](https://dev.wix.com/docs/go-headless/wix-managed-headless/extensions/dashboard/dashboard-plugins/dashboard-plugin-extension-files-and-code.md). ## Step 2 | Customize your dashboard plugin Once you finish generating your dashboard plugin, you can find your plugin's auto-generated React component in your `.tsx` file. 1. Run the [dev](https://dev.wix.com/docs/wix-cli/command-reference/project-commands/dev.md) command to open the dev menu. 2. Follow the prompts, then click the link to open a preview of the dashboard in your browser, then navigate to the dashboard page hosting your plugin. ![page plugin](https://wixmp-833713b177cebf373f611808.wixmp.com/images/6a4cd4e474e7ccc11407f2c2a9a2ddcf.png) Leave this window open. 3. Go to your `.tsx` file and edit the text inside the `` component to "Hello world!". ```tsx const Plugin: FC = (props) => { return ( This dashboard plugin was generated with Wix CLI. Customize it according to your logic. To learn more, read our{' '} documentation . ); }; export default Plugin; ``` >**Note:** When it comes to designing the UI for your plugin, consider using the [Wix Design System](https://www.wixdesignsystem.com/), a collection of reusable React components that you can use to make your project appear and feel like a native Wix experience. 1. Customize your plugin to interact with the dashboard page data passed to the [plugin's slot](https://dev.wix.com/docs/build-apps/develop-your-app/extensions/dashboard-extensions/dashboard-plugins/supported-wix-app-dashboard-pages/about-dashboard-page-slots.md) using the [`observeState()`](https://dev.wix.com/docs/sdk/host-modules/dashboard/observe-state.md) method from the Dashboard SDK: 1. Make sure the [`@wix/dashboard`](https://dev.wix.com/docs/sdk/host-modules/dashboard/introduction.md) package is installed in your project. 1. Add the following import statement to your code: ```js import { dashboard } from '@wix/dashboard'; ``` 1. To retrieve the data from the dashboard page, call the `observeState()` method. ```js dashboard.observeState((componentParams) => { console.log("componentParams:", componentParams); }); ``` 1. Use React to add code and logic to your plugin. 1. Save your file. 1. Navigate back to the dashboard page in your browser and see your changes. ## Build and deploy your project Once your project is ready for production, you can [build and deploy](https://dev.wix.com/docs/go-headless/wix-managed-headless/project-development/build-and-deploy-with-the-cli.md) it. ## Delete a dashboard plugin To delete an existing dashboard plugin from your project: 1. Delete the folder that contains your dashboard plugin extension's files. 2. Remove the import and `.use()` statements for the extension from the [`extensions.ts`](https://dev.wix.com/docs/go-headless/wix-managed-headless/extensions/about-the-extensions-ts-file.md) file.
    **Important:** If you've already released a version of your project, you must build and deploy the project again after removing the dashboard plugin files.
    ## See also - [Dashboard Plugin Extension Files and Code](https://dev.wix.com/docs/go-headless/wix-managed-headless/extensions/dashboard/dashboard-plugins/dashboard-plugin-extension-files-and-code.md) - [About Dashboard Plugin Extensions](https://dev.wix.com/docs/build-apps/develop-your-app/extensions/dashboard-extensions/dashboard-plugins/about-dashboard-plugin-extensions.md) - [About Dashboard Page Slots](https://dev.wix.com/docs/build-apps/develop-your-app/extensions/dashboard-extensions/dashboard-plugins/supported-wix-app-dashboard-pages/about-dashboard-page-slots.md) --- > Portal Navigation: > > - Append `.md` to any URL under `https://dev.wix.com/docs/` to get its markdown version. > - Pages are either content pages (article or reference text) or menu pages (a list of links to child pages). > - To get a menu page, truncate any URL to a parent path and append `.md` (e.g. `https://dev.wix.com/docs/sdk.md`, `https://dev.wix.com/docs/sdk/core-modules.md`). > - Top-level index of all portals: https://dev.wix.com/docs/llms.txt > - Full concatenated docs: https://dev.wix.com/docs/llms-full.txt ## Resource: Dashboard Menu Plugin Extension Files and Code ## Article: Dashboard Menu Plugin Extension Files and Code ## Article Link: https://dev.wix.com/docs/go-headless/wix-managed-headless/extensions/dashboard/dashboard-menu-plugins/dashboard-menu-plugin-extension-files-and-code.md ## Article Content: # Dashboard Menu Plugin Extension Files and Code When you generate a dashboard menu plugin extension, the CLI adds a `.extension.ts` file to your project that contains the menu plugin builder configuration. ## Menu plugin builder The `.extension.ts` file contains the dashboard menu plugin builder configuration. You can edit its fields manually to modify its appearance or behavior. However, do not change the extension's `id` field, as this is auto-generated by Wix and must remain unique across all extensions. | Field | Type | Description | |--------|-------|--------------| | `id` | String | Extension's unique identifier. The ID is used to register the menu plugin and must be unique across all extensions in the project. | | `title` | String | Text of the menu item the extension adds. | | `extends` | String | Slot ID into which the extension plugs in. Find [the relevant dashboard slot](https://dev.wix.com/docs/build-apps/develop-your-app/extensions/dashboard-extensions/dashboard-plugins/supported-wix-app-dashboard-pages/about-dashboard-page-slots.md) for your project. | | `iconKey` | String | Icon that appears next to your extension's title. Select a normal-size [icon from the Wix Design System](https://www.wix-pages.com/wix-design-system-employees/?path=/story/foundations-icons--icons) and paste its name. | | `action` | Object | Navigation configuration object that determines the action taken when the extension is clicked. | | `action.navigateToPage` | Object | Page navigation configuration object. Contains the ID of the target dashboard page. | | `action.navigateToPage.pageId` | String | ID of the dashboard page to which site administrators are directed. | | `action.openModal` | Object | Modal navigation configuration object. Contains the ID of the modal page to open. | | `action.openModal.componentId` | String | ID of the modal to open. | You can set the dashboard menu plugin `action` field to either navigate to a dashboard page or open a modal. Here's an example `.extension.ts` file: ```ts export default extensions.dashboardMenuPlugin({ id: '5c51a919-5364-4ae8-a9e0-2a5100833e04', title: 'my-dashboard-plugin', extends: 'f3ad314d-0704-48e5-86b5-81acaf43e036', iconKey: 'Sparkles', action: { navigateToPage: { pageId: '02d0a5c2-7568-4ce9-b9f1-a51c95fa16bc', } }, }); ``` --- > Portal Navigation: > > - Append `.md` to any URL under `https://dev.wix.com/docs/` to get its markdown version. > - Pages are either content pages (article or reference text) or menu pages (a list of links to child pages). > - To get a menu page, truncate any URL to a parent path and append `.md` (e.g. `https://dev.wix.com/docs/sdk.md`, `https://dev.wix.com/docs/sdk/core-modules.md`). > - Top-level index of all portals: https://dev.wix.com/docs/llms.txt > - Full concatenated docs: https://dev.wix.com/docs/llms-full.txt ## Resource: Add Dashboard Menu Plugin Extensions with the Wix CLI ## Article: Add Dashboard Menu Plugin Extensions with the Wix CLI ## Article Link: https://dev.wix.com/docs/go-headless/wix-managed-headless/extensions/dashboard/dashboard-menu-plugins/add-dashboard-menu-plugin-extensions-with-the-wix-cli.md ## Article Content: # Add Dashboard Menu Plugin Extensions with the Wix CLI [Dashboard menu plugin extensions](https://dev.wix.com/docs/build-apps/develop-your-app/extensions/dashboard-extensions/dashboard-plugins/dashboard-menu-plugins/dashboard-menu-plugin-extensions.md) add menu items into [pre-configured slots in dashboard pages](https://dev.wix.com/docs/build-apps/develop-your-app/extensions/dashboard-extensions/dashboard-plugins/supported-wix-app-dashboard-pages/about-dashboard-page-slots.md) of apps made by Wix in your project. When clicked, it either displays a dashboard modal or directs the project administrator to another dashboard page. Follow the instructions below to: 1. Create and configure a dashboard menu plugin extension for your project. 2. Customize your dashboard menu plugin. Once this task is complete, the dashboard menu you specified in the installation process will contain the item you added. ## Step 1 | Create the extension In your project directory, run the [generate](https://dev.wix.com/docs/wix-cli/command-reference/project-commands/generate.md) command and follow the prompts to create a dashboard menu plugin extension. Upon completion, the extension files will be created in your project directory with the following structure: ```bash src/ └── extensions └── dashboard/ └── menu-plugins/ └── / └── .extension.ts ``` > **Note:** This is the default folder structure created by the CLI. You can move these files to any location within the `src/` folder and update the references in your `extension.ts` file. Learn more about the [flexible file system](https://dev.wix.com/docs/wix-cli/guides/project-structure/project-structure.md). Learn more about the [dashboard menu plugin extension files](https://dev.wix.com/docs/go-headless/wix-managed-headless/extensions/dashboard/dashboard-menu-plugins/dashboard-menu-plugin-extension-files-and-code.md). ## Step 2 | Customize your dashboard plugin 1. Run the [dev](https://dev.wix.com/docs/wix-cli/command-reference/project-commands/dev.md) command to open the dev menu. 1. Click the link to open the dashboard in the browser. Navigate to the dashboard page hosting your menu plugin. 2. Go to your `.extension.ts` file and edit the `title` to "Hello world!". ```ts export default extensions.dashboardMenuPlugin({ id: '1a096bd2-df15-41af-9db1-a037e0c89a68', title: 'My Menu Plugin', extends: 'b2af2156-d82c-4d6c-9961-cf1cec053566', iconKey: 'Sparkles', action: { navigateToPage: { pageId: '695fbcfe-ad2e-4b09-b6e5-6bbed53eaf21', } }, }); ``` 1. Save your file. 1. Navigate back to the dashboard page in your browser and see your changes. ## Build and deploy your project Once your project is ready for production, you can [build and deploy](https://dev.wix.com/docs/go-headless/wix-managed-headless/project-development/build-and-deploy-with-the-cli.md) it. ## Delete a dashboard menu plugin To delete an existing dashboard menu plugin from your project: 1. Delete the folder that contains your dashboard menu plugin extension's file. 2. Remove the import and `.use()` statements for the extension from the [`extensions.ts`](https://dev.wix.com/docs/go-headless/wix-managed-headless/extensions/about-the-extensions-ts-file.md) file.
    **Important:** If you've already released a version of your project, you must build and deploy the project again after removing the dashboard menu plugin file.
    ## See also - [Dashboard Menu Plugin Extension Files and Code](https://dev.wix.com/docs/go-headless/wix-managed-headless/extensions/dashboard/dashboard-menu-plugins/dashboard-menu-plugin-extension-files-and-code.md) - [About Dashboard Menu Plugin Extensions](https://dev.wix.com/docs/build-apps/develop-your-app/extensions/dashboard-extensions/dashboard-plugins/dashboard-menu-plugins/dashboard-menu-plugin-extensions.md) - [About Dashboard Page Slots](https://dev.wix.com/docs/build-apps/develop-your-app/extensions/dashboard-extensions/dashboard-plugins/supported-wix-app-dashboard-pages/about-dashboard-page-slots.md) --- > Portal Navigation: > > - Append `.md` to any URL under `https://dev.wix.com/docs/` to get its markdown version. > - Pages are either content pages (article or reference text) or menu pages (a list of links to child pages). > - To get a menu page, truncate any URL to a parent path and append `.md` (e.g. `https://dev.wix.com/docs/sdk.md`, `https://dev.wix.com/docs/sdk/core-modules.md`). > - Top-level index of all portals: https://dev.wix.com/docs/llms.txt > - Full concatenated docs: https://dev.wix.com/docs/llms-full.txt ## Resource: About Wix CLI Backend Extensions ## Article: About Wix CLI Backend Extensions ## Article Link: https://dev.wix.com/docs/go-headless/wix-managed-headless/extensions/backend/about-wix-cli-backend-extensions.md ## Article Content: # About Wix CLI Backend Extensions The Wix CLI allows you to add [backend extensions](https://dev.wix.com/docs/build-apps/develop-your-app/extensions/backend-extensions/about-backend-extensions.md) to your project. The following backend extensions are available in the CLI: - [Service plugin extensions](#service-plugin-extensions) - [Event extensions](#event-extensions) - [Data collections extensions](#data-collections-extensions) You can add these extensions using the [generate](https://dev.wix.com/docs/wix-cli/command-reference/project-commands/generate.md) command. Backend extensions built with the CLI have execution limits, rate limits, and a time limit for backend functionality in previews. Read more about [limits](#limits). ## Service plugin extensions Service plugin extensions are a set of APIs defined by Wix that you can use to enable your project to inject custom logic into existing flows or to introduce entirely new flows. For example, you can add an [Additional Fees Service Plugin](https://dev.wix.com/docs/api-reference/business-solutions/e-commerce/extensions/additional-fees/additional-fees-service-plugin/introduction?apiView=SDK.md) to add custom charges and fees to carts and checkouts based on business-specific calculations and logic. You can implement service plugin extensions in your project using the CLI. Read more about [service plugin extensions](https://dev.wix.com/docs/go-headless/wix-managed-headless/extensions/backend/service-plugins/add-service-plugin-extensions-with-the-wix-cli.md). ## Event extensions Events are triggered when specific conditions on your project are met. These are conditions on your project's site. For example, an event might be triggered when a [booking is confirmed](https://dev.wix.com/docs/api-reference/business-solutions/bookings/bookings/bookings-writer-v2/booking-confirmed?apiView=SDK.md). Your project can respond to these events using event extensions created in the CLI. Events in the CLI are built on JavaScript SDK webhooks, and event extensions subscribe your project to these webhooks behind the scenes. Read more about [event extensions](https://dev.wix.com/docs/go-headless/wix-managed-headless/extensions/backend/events/add-event-extensions-with-the-wix-cli.md). ## Data collections extensions Data collections extensions let your project automatically create CMS data collections in your project's site. You define each collection's schema, permissions, and optional initial data in your project files. When the extension is released, the collections are created in the site's CMS with the configuration you specified. Read more about [data collections extensions](https://dev.wix.com/docs/go-headless/wix-managed-headless/extensions/backend/data-collections/add-a-data-collections-extension-with-the-wix-cli.md). ## Limits Backend extensions built with the CLI have execution limits, rate limits, and a time limit for backend functionality in previews.
    **Important:** Limits are subject to change. We'll notify you of any upcoming changes through the CLI and [Discord](https://discord.gg/aN9ubnrs2D), and note them here in the documentation.
    ### Execution rate limits - **1000 CPU MS per request:** Backend requests taking longer than 1000 CPU MS to complete are terminated. - **20 sub-requests:** Sub-requests are requests made from your backend extensions, such as calls to Wix APIs, in response to a request. Your project can make up to 20 sub-requests in response to each request. Sub-requests beyond the 20th will not be made. ### Request rate limit - **1000 requests per second:** This is the limit for the total number of backend requests from your project. Requests beyond this are ignored. ### Backend functionality for previews Previews generated by `npm run preview` last indefinitely. However, any backend extensions in these previews stop functioning after 3 days. ## Backend APIs In the Wix CLI, backend APIs are built with [HTTP endpoints](https://dev.wix.com/docs/go-headless/wix-managed-headless/extensions/backend/http-endpoints/about-http-endpoints.md). Learn how to [add HTTP endpoints to your project](https://dev.wix.com/docs/go-headless/wix-managed-headless/extensions/backend/http-endpoints/add-http-endpoints-to-your-project.md). ## See also - [About Extensions in the Wix CLI](https://dev.wix.com/docs/go-headless/wix-managed-headless/extensions/about-extensions-in-the-wix-cli.md) - [About the extensions.ts File](https://dev.wix.com/docs/go-headless/wix-managed-headless/extensions/about-the-extensions-ts-file.md) --- > Portal Navigation: > > - Append `.md` to any URL under `https://dev.wix.com/docs/` to get its markdown version. > - Pages are either content pages (article or reference text) or menu pages (a list of links to child pages). > - To get a menu page, truncate any URL to a parent path and append `.md` (e.g. `https://dev.wix.com/docs/sdk.md`, `https://dev.wix.com/docs/sdk/core-modules.md`). > - Top-level index of all portals: https://dev.wix.com/docs/llms.txt > - Full concatenated docs: https://dev.wix.com/docs/llms-full.txt ## Resource: About HTTP Endpoints ## Article: About HTTP Endpoints ## Article Link: https://dev.wix.com/docs/go-headless/wix-managed-headless/extensions/backend/http-endpoints/about-http-endpoints.md ## Article Content: # About HTTP Endpoints Wix CLI projects support HTTP endpoints, which you use to build backend APIs for handling HTTP requests and coordinating frontend and backend logic. HTTP endpoints can serve any kind of data, and your project's frontend extensions, such as a dashboard page, can call them. ## File-based routing The location of an endpoint file in your project determines its URL. Place a file at `src/pages/api/.ts`, and it's exposed at `/api/`. For example, `src/pages/api/users.ts` becomes the route `/api/users`. Endpoints are auto-discovered from the filesystem rather than registered like typical extensions.
    **Caution:** HTTP endpoints aren't traditional extensions: - They aren't generated by `npm run generate`. - They aren't registered in [`src/extensions.ts`](https://dev.wix.com/docs/go-headless/wix-managed-headless/extensions/about-the-extensions-ts-file.md).
    ## HTTP method handlers Each endpoint file exports one or more HTTP method handlers, such as `GET` or `POST`. A handler receives the standard web `Request` and returns a standard `Response`, so you can return any content type, including JSON, plain text, images, and RSS feeds. Handlers use the `APIRoute` type from `astro`, the underlying framework that powers HTTP endpoints. ## Server-side runtime Endpoints run on the server, not in the browser. This means you can: - Read [environment variables](https://dev.wix.com/docs/go-headless/wix-managed-headless/project-development/environment-variables/about-environment-variables-in-the-cli.md), including secret server variables that aren't exposed to the client. - Call external services without exposing credentials in your frontend bundle. ## Calling endpoints from frontend extensions Frontend extensions, like dashboard pages and site widgets, call endpoints using `httpClient.fetchWithAuth()` from `@wix/essentials`. This attaches the current user's access token to the request as an `Authorization` header, which the endpoint can then use to make [elevated SDK calls](https://dev.wix.com/docs/go-headless/wix-managed-headless/authentication/elevate-api-call-permissions.md) for operations the user can't perform directly. For the full pattern, see [Add HTTP Endpoints to Your Project](https://dev.wix.com/docs/go-headless/wix-managed-headless/extensions/backend/http-endpoints/add-http-endpoints-to-your-project.md). ## Use cases Use HTTP endpoints when you need to: - Integrate with external APIs or services that require HTTP requests. - Handle complex form submissions or file uploads. - Serve dynamic content like images, RSS feeds, or personalized data. - Build REST APIs with multiple HTTP methods. - Access runtime data or server-side databases. ## See also - [Add HTTP Endpoints to Your Project](https://dev.wix.com/docs/go-headless/wix-managed-headless/extensions/backend/http-endpoints/add-http-endpoints-to-your-project.md) - [Elevate API Call Permissions](https://dev.wix.com/docs/go-headless/wix-managed-headless/authentication/elevate-api-call-permissions.md) - [About Environment Variables](https://dev.wix.com/docs/go-headless/wix-managed-headless/project-development/environment-variables/about-environment-variables-in-the-cli.md) --- > Portal Navigation: > > - Append `.md` to any URL under `https://dev.wix.com/docs/` to get its markdown version. > - Pages are either content pages (article or reference text) or menu pages (a list of links to child pages). > - To get a menu page, truncate any URL to a parent path and append `.md` (e.g. `https://dev.wix.com/docs/sdk.md`, `https://dev.wix.com/docs/sdk/core-modules.md`). > - Top-level index of all portals: https://dev.wix.com/docs/llms.txt > - Full concatenated docs: https://dev.wix.com/docs/llms-full.txt ## Resource: Add HTTP Endpoints to Your Project ## Article: Add HTTP Endpoints to Your Project ## Article Link: https://dev.wix.com/docs/go-headless/wix-managed-headless/extensions/backend/http-endpoints/add-http-endpoints-to-your-project.md ## Article Content: # Add HTTP Endpoints to Your Project This article shows you how to create an HTTP method in your CLI project and call it from your frontend to handle HTTP requests. These endpoints handle server-side logic and can return any kind of data to your frontend. They're sometimes also referred to as backend APIs. To create an HTTP endpoint: 1. Create an endpoint file with HTTP method handlers. 2. Add frontend code to call the endpoint.
    **Caution:** HTTP endpoints in `src/pages/api/` aren't extensions in the framework sense. They're auto-discovered Astro routes: - You don't register them in [`src/extensions.ts`](https://dev.wix.com/docs/go-headless/wix-managed-headless/extensions/about-the-extensions-ts-file.md). - They aren't generated by `npm run generate`. - They don't appear on the project's **Extensions** page. Adding or removing an endpoint file is enough, and no registration step is required.
    ## Step 1 | Create the endpoint file Create the backend endpoint file that handles HTTP requests. At the end of this step, you'll have a working endpoint that can respond to GET and POST requests. 1. Create a new file in the `src/pages/api/` directory with the name `.ts` in your CLI project. 2. Add endpoint handlers for the HTTP methods you want to support. Each handler receives a `request` object and returns a `Response`: ```ts import type { APIRoute } from 'astro'; export const GET: APIRoute = async ({ request }) => { console.log('Log from GET.'); // This message logs to your CLI. return new Response('Response from GET.'); // This response is visible in the browser console }; export const POST: APIRoute = async ({ request }) => { const data = await request.json(); console.log('Log POST with body: ', data); // This message logs to your CLI. return new Response(JSON.stringify(data)); // This response is visible in the browser console. }; ``` ## Step 2 | Call the endpoint from your frontend > **Note:** If you came here from [Elevate API Call Permissions](https://dev.wix.com/docs/go-headless/wix-managed-headless/authentication/elevate-api-call-permissions.md), complete only **Step 1** above. Skip **Step 2** and return to that article, it has its own instructions for calling the endpoint from your frontend. Call your endpoint from frontend components using Wix's built-in HTTP client. At the end of this step, you'll be able to send requests to your backend endpoint and receive responses. 1. In your frontend component, use `httpClient.fetchWithAuth()` to call your endpoint: ```tsx import { httpClient } from '@wix/essentials'; function Index() { const callEndpointGET = async () => { try { const baseApiUrl = new URL(import.meta.url).origin; const res = await httpClient.fetchWithAuth(`${baseApiUrl}/api/`); const data = await res.text(); console.log('Response:', data); } catch (error) { console.error('Error:', error); } }; const callEndpointPOST = async () => { try { const baseApiUrl = new URL(import.meta.url).origin; const res = await httpClient.fetchWithAuth(`${baseApiUrl}/api/`, { method: 'POST', body: JSON.stringify({ message: 'Hello from frontend' }), }); const data = await res.json(); console.log('Response:', data); } catch (error) { console.error('Error:', error); } }; return ( ); } ``` 2. Start your local development environment to test the endpoints: ```bash npm run dev ``` 3. Press `Dashboard` to open the dashboard page in your browser, and click the buttons to execute the HTTP endpoint calls. 4. View the logs in the CLI and browser console. You should see something like: ### CLI ``` 1:13:38 PM [backend] Log from GET. 1:13:39 PM [backend] Log POST with body: { message: 'Hello from frontend' } ``` ### Browser console ``` Response: Response from GET. Response: {"message":"Hello from frontend"} ``` ## Step 3 | Build and deploy your project [Build and deploy your project](https://dev.wix.com/docs/go-headless/wix-managed-headless/project-development/build-and-deploy-with-the-cli.md) to make your endpoints available in production. Once deployed, your endpoints will be accessible at the production URLs and can handle live traffic from your site's visitors. ## Delete an HTTP endpoint To delete an HTTP endpoint from your project, delete the file under `src/pages/api/` that contains your HTTP endpoint and build and deploy again. --- > Portal Navigation: > > - Append `.md` to any URL under `https://dev.wix.com/docs/` to get its markdown version. > - Pages are either content pages (article or reference text) or menu pages (a list of links to child pages). > - To get a menu page, truncate any URL to a parent path and append `.md` (e.g. `https://dev.wix.com/docs/sdk.md`, `https://dev.wix.com/docs/sdk/core-modules.md`). > - Top-level index of all portals: https://dev.wix.com/docs/llms.txt > - Full concatenated docs: https://dev.wix.com/docs/llms-full.txt ## Resource: Add Service Plugin Extensions with the Wix CLI ## Article: Add Service Plugin Extensions with the Wix CLI ## Article Link: https://dev.wix.com/docs/go-headless/wix-managed-headless/extensions/backend/service-plugins/add-service-plugin-extensions-with-the-wix-cli.md ## Article Content: # Add Service Plugin Extensions with the Wix CLI [Service plugin extensions](https://dev.wix.com/docs/build-apps/develop-your-app/extensions/backend-extensions/service-plugins/about-service-plugin-extensions.md) are a set of APIs defined by Wix that you can use to inject custom logic into the existing backend flows of [Wix business solutions](https://dev.wix.com/docs/build-apps/develop-your-app/wix-business-solutions/about-wix-business-solutions.md) or to introduce entirely new flows to Wix sites. You can implement service plugin extensions in your project using the Wix CLI. Follow the instructions below to: 1. Create a service plugin extension for your project. 2. Test your service plugin extension. Once this task is complete, your project will have a service plugin extension with custom functions that Wix calls during a specific flow. ## Before you begin + You must have a project that was [created using the Wix CLI](https://dev.wix.com/docs/wix-cli/guides/about-the-wix-cli.md). + You must be logged into your Wix account. If you don't have one, [sign up for a Wix account](https://manage.wix.com/account/custom-apps). ## Step 1 | Create the extension In the terminal: 1. Navigate to your project repo. 1. Run the [generate](https://dev.wix.com/docs/wix-cli/command-reference/project-commands/generate.md) command. 1. The CLI will display a menu of extensions to generate. Select **Service Plugin** and hit enter to continue. 1. The CLI will prompt you to select a service plugin from a list of available service plugins. 1. The CLI will prompt you to name your service plugin. This is the name of the folder in the project repo that contains the service plugin code. Only you will see this name. Upon completion, the extension files will be created in your project directory with the following structure: ```bash src/ └── extensions/ └── backend/ └── service-plugins/ └── / ├── .extension.ts └── .ts ``` > **Note:** This is the default folder structure created by the CLI. You can move these files to any location within the `src/` folder and update the references in your `extension.ts` file. Learn more about the [flexible file system](https://dev.wix.com/docs/wix-cli/guides/project-structure/project-structure.md). Learn more about the [service plugin extension files](https://dev.wix.com/docs/go-headless/wix-managed-headless/extensions/backend/service-plugins/service-plugin-extension-files-and-code.md). ## Step 2 | Test your service plugin extension To test your service plugin extension you must: 1. Release a version with your changes. 2. Trigger the call to your service plugin. For example, to test a service plugin extension for [Additional Fees](https://dev.wix.com/docs/api-reference/business-solutions/e-commerce/extensions/additional-fees/additional-fees-service-plugin/introduction.md) that adds a $5 packaging fee to all orders: 1. Go to your site's store in the local development environment. 2. Select any product and add it to the cart, then view the cart. 3. Check if the additional fee is listed in the order summary. New service plugins or changes to existing service plugins won't take affect until you've built and released your project. ## Build and deploy your project Once your project is ready for production, you can [build and deploy](https://dev.wix.com/docs/go-headless/wix-managed-headless/project-development/build-and-deploy-with-the-cli.md) it. ## Delete a service plugin extension To delete a service plugin extension from your project: 1. Delete the folder under `src/extensions` that contains your service plugin extension's files. 2. Remove the import and `.use()` statements for the extension from the [`extensions.ts`](https://dev.wix.com/docs/go-headless/wix-managed-headless/extensions/about-the-extensions-ts-file.md) file.
    **Important:** If you've already released a version of your project, you must build and deploy the project again after removing the service plugin extension files.
    --- > Portal Navigation: > > - Append `.md` to any URL under `https://dev.wix.com/docs/` to get its markdown version. > - Pages are either content pages (article or reference text) or menu pages (a list of links to child pages). > - To get a menu page, truncate any URL to a parent path and append `.md` (e.g. `https://dev.wix.com/docs/sdk.md`, `https://dev.wix.com/docs/sdk/core-modules.md`). > - Top-level index of all portals: https://dev.wix.com/docs/llms.txt > - Full concatenated docs: https://dev.wix.com/docs/llms-full.txt ## Resource: Service Plugin Extension Files and Code ## Article: Service Plugin Extension Files and Code ## Article Link: https://dev.wix.com/docs/go-headless/wix-managed-headless/extensions/backend/service-plugins/service-plugin-extension-files-and-code.md ## Article Content: # Service Plugin Extension Files and Code When you generate a service plugin extension, the CLI adds the following files to your project: - `.extension.ts`: Builds the [service plugin](#service-plugin-builder). - `.ts`: Defines the [service plugin handler logic](#service-plugin-handler). ## Service plugin builder The `.extension.ts` file contains the service plugin builder configuration. This file provides all required configuration for your plugin. The service plugin builder is defined using the following schema, shown here as a TypeScript type: ```ts import { extensions } from '@wix/astro/builders'; export default extensions.({ id: string, name: string, description: string, source: string, // Additional fields may vary by service plugin type }); ``` Here's an example builder definition for an eCommerce Shipping Rates service plugin: ```ts import { extensions } from '@wix/astro/builders'; export default extensions.ecomShippingRates({ id: '00eeeac1-d01a-4d96-9d76-5617d8658735', name: 'my-service-plugin', description: 'Short description about this shipping provider', fallbackDefinitionMandatory: false, source: './extensions/backend/service-plugins/my-service-plugin/my-service-plugin.ts', }); ``` ### Builder fields The following fields are commonly used in the configuration object: | Field | Type | Description | |-------|------|-------------| | `id` | string | Service plugin ID as a ([GUID](https://en.wikipedia.org/wiki/Universally_unique_identifier)). The ID is automatically generated and must be unique across all extensions in the project. | | `name` | string | The service plugin name. | | `description` | string | A short description of what the service plugin does. | | `source` | string | Path to the service plugin handler file that contains the plugin logic. | Additional fields may be required or optional depending on the specific service plugin type. You can find the details for each field by locating your service plugin in [this table](https://dev.wix.com/docs/build-apps/get-started/overview/how-apps-extend-wix.md#service-plugins) and clicking on the link to view its documentation. ## Service plugin handler The `.ts` file contains the service plugin handler logic. This file contains: - The relevant import statement for the service plugin. - Handler functions that Wix calls automatically when the relevant site action triggers them. These functions are where you add your custom logic. The generated `.ts` file will contain example code with empty placeholders for each of the functions. The `.ts` file must be in the following format: ```ts import { } from '@wix//service-plugins'; .provideHandlers({ : async ({ request, metadata }) => { // Add your logic here }, }); ``` Here's an example `my-service-plugin.ts` file for the eCommerce [Shipping Rates](https://dev.wix.com/docs/api-reference/business-solutions/e-commerce/extensions/shipping-rates/shipping-rates-integration-service-plugin/introduction.md) service plugin: ```ts import { shippingRates } from '@wix/ecom/service-plugins'; export default shippingRates.provideHandlers({ getShippingRates: async ({ request, metadata }) => { return { shippingRates: [], }; }, }); ``` Your custom logic should be placed inside each handler function. To find out what your function receives in the parameters and what it must return, see the documentation for your specific service plugin. Locate your service plugin in [this table](https://dev.wix.com/docs/build-apps/get-started/overview/how-apps-extend-wix.md#service-plugins) and click on the link to view its documentation, then navigate to the specific function in the menu. --- > Portal Navigation: > > - Append `.md` to any URL under `https://dev.wix.com/docs/` to get its markdown version. > - Pages are either content pages (article or reference text) or menu pages (a list of links to child pages). > - To get a menu page, truncate any URL to a parent path and append `.md` (e.g. `https://dev.wix.com/docs/sdk.md`, `https://dev.wix.com/docs/sdk/core-modules.md`). > - Top-level index of all portals: https://dev.wix.com/docs/llms.txt > - Full concatenated docs: https://dev.wix.com/docs/llms-full.txt ## Resource: Event Extension Files and Code ## Article: Event Extension Files and Code ## Article Link: https://dev.wix.com/docs/go-headless/wix-managed-headless/extensions/backend/events/event-extension-files-and-code.md ## Article Content: # Event Extension Files and Code When you generate an event extension, the CLI adds the following files to your project: - `.extension.ts`: Builds the [event](#event-builder). - `.ts`: Defines the [event handler logic](#event-handler). ## Event builder The `.extension.ts` file contains an event extension's builder configuration. The event builder is defined using the following schema, shown here as a TypeScript type: ```ts import { extensions } from '@wix/astro/builders'; export default extensions.event({ id: string, source: string, }); ``` Here's an example builder definition: ```ts import { extensions } from '@wix/astro/builders'; export default extensions.event({ id: '9912811d-5f5b-41f9-b4d6-ef4163b714a7', source: './extensions/backend/events/my-event/my-event.ts', }); ``` ### Builder fields The following fields can be used in the configuration object: | Field | Type | Description | |-------|------|-------------| | `id` | string | Event extension ID as a ([GUID](https://en.wikipedia.org/wiki/Universally_unique_identifier)). The ID is automatically generated and must be unique across all extensions in the project. | | `source` | string | Path to the event handler file that contains the event logic. |
    **Important:** You can't have 2 event extensions listening to the same event in your project. Each event can only have one handler.
    ## Event handler The `.ts` file contains an event extension's handler logic. This file contains: - The relevant import statement for the event. - An event function where you can implement your custom logic. Wix calls this function when the given event occurs, passing the event object and its metadata. Event functions are documented in their module in the [JavaScript SDK reference](https://dev.wix.com/docs/sdk.md). The generated `.ts` file will contain example code for an event. The `.ts` file must be in the following format: ```ts import { } from '@wix/'; export default .((event) => { // Add your logic here }); ``` Here's an example `my-event.ts` file for the Wix CRM [onContactCreated()](https://dev.wix.com/docs/api-reference/crm/members-contacts/contacts/contacts/contact-v4/contact-created.md) event: ```ts import { contacts } from '@wix/crm'; export default contacts.onContactCreated((event) => { // Add your logic here }); ``` --- > Portal Navigation: > > - Append `.md` to any URL under `https://dev.wix.com/docs/` to get its markdown version. > - Pages are either content pages (article or reference text) or menu pages (a list of links to child pages). > - To get a menu page, truncate any URL to a parent path and append `.md` (e.g. `https://dev.wix.com/docs/sdk.md`, `https://dev.wix.com/docs/sdk/core-modules.md`). > - Top-level index of all portals: https://dev.wix.com/docs/llms.txt > - Full concatenated docs: https://dev.wix.com/docs/llms-full.txt ## Resource: Add Event Extensions with the Wix CLI ## Article: Add Event Extensions with the Wix CLI ## Article Link: https://dev.wix.com/docs/go-headless/wix-managed-headless/extensions/backend/events/add-event-extensions-with-the-wix-cli.md ## Article Content: # Add Event Extensions with the Wix CLI Events are triggered when specific conditions occur in your project. These are conditions on your project's site. Your project can respond to these events using event extensions. Events in the Wix CLI are built on JavaScript SDK webhooks, and event extensions subscribe your project to these webhooks behind the scenes. Learn more [about event extensions](https://dev.wix.com/docs/build-apps/develop-your-app/extensions/backend-extensions/events/about-event-extensions.md). > **Note:** Event extensions are built on [webhooks](https://dev.wix.com/docs/build-apps/develop-your-app/api-integrations/events-and-webhooks/about-webhooks.md), and changes to events automatically create a new minor version. Learn more about [webhooks and versioning](https://dev.wix.com/docs/build-apps/develop-your-app/api-integrations/events-and-webhooks/about-webhooks.md#webhooks-and-versioning). Follow the instructions below to: 1. Create an event extension for your project. 2. Test the event extension in your project. 3. Deploy your project with the event extension. Once this task is complete, your project will have an event extension that's triggered when a specific event occurs.
    **Important:** You can't have 2 event extensions listening to the same event in your project. Each event can only have one handler. This includes extensions added to your project in the [dashboard](https://manage.wix.com/account/custom-apps), not only those in the local files for your project.
    ## Step 1 | Create the extension In the terminal: 1. Navigate to your project repo. 2. Run the [generate](https://dev.wix.com/docs/wix-cli/command-reference/project-commands/generate.md) command. 3. The CLI will display a menu of extensions to generate. Select **Event** and hit enter to continue. 4. The CLI will prompt you to name your event folder. This is the name of the folder in the project directory that contains the event code, and the name of the event. Only you will see this name. Upon completion, the extension files will be created in your project directory with the following structure: ```bash src/ └── extensions/ └── backend/ └── events/ └── / ├── .extension.ts └── .ts ``` > **Note:** This is the default folder structure created by the CLI. You can move these files to any location within the `src/` folder and update the references in your `extension.ts` file. Learn more about the [flexible file system](https://dev.wix.com/docs/wix-cli/guides/project-structure/project-structure.md). Learn more about [event extension files and code](https://dev.wix.com/docs/go-headless/wix-managed-headless/extensions/backend/events/event-extension-files-and-code.md). ## Step 2 | Test your event extension To test your event extension you must: 1. [Release a version](https://dev.wix.com/docs/wix-cli/command-reference/project-commands/release.md) with your changes. 2. Take an action that will trigger your event. ## Build and deploy your project Once your project is ready for production, you can [build and deploy](https://dev.wix.com/docs/go-headless/wix-managed-headless/project-development/build-and-deploy-with-the-cli.md) it. ## Delete an event extension To delete an event extension from your project: 1. Delete the folder that contains your event extension's files. 2. Remove the import and `.use()` statements for the extension from the [`extensions.ts`](https://dev.wix.com/docs/go-headless/wix-managed-headless/extensions/about-the-extensions-ts-file.md) file.
    **Important:** If you've already released a version of your project, you must build and deploy the project again after removing the event extension files.
    ## See also - [Event Extension Files and Code](https://dev.wix.com/docs/go-headless/wix-managed-headless/extensions/backend/events/event-extension-files-and-code.md) - [About Events](https://dev.wix.com/docs/build-apps/develop-your-app/api-integrations/events-and-webhooks/about-events.md) - [About Event Extensions](https://dev.wix.com/docs/build-apps/develop-your-app/extensions/backend-extensions/events/about-event-extensions.md) --- > Portal Navigation: > > - Append `.md` to any URL under `https://dev.wix.com/docs/` to get its markdown version. > - Pages are either content pages (article or reference text) or menu pages (a list of links to child pages). > - To get a menu page, truncate any URL to a parent path and append `.md` (e.g. `https://dev.wix.com/docs/sdk.md`, `https://dev.wix.com/docs/sdk/core-modules.md`). > - Top-level index of all portals: https://dev.wix.com/docs/llms.txt > - Full concatenated docs: https://dev.wix.com/docs/llms-full.txt ## Resource: Add a Data Collections Extension with the Wix CLI ## Article: Add a Data Collections Extension with the Wix CLI ## Article Link: https://dev.wix.com/docs/go-headless/wix-managed-headless/extensions/backend/data-collections/add-a-data-collections-extension-with-the-wix-cli.md ## Article Content: # Add a Data Collections Extension with the Wix CLI The [data collections extension](https://dev.wix.com/docs/build-apps/develop-your-app/extensions/backend-extensions/data-collections/about-data-collections-extensions.md) lets your project automatically create data collections in your site's CMS. When you release a new version of your project, the collections are created with the configuration you define. Follow the instructions below to: 1. Generate the extension and 1 or more collections in your project. 2. Configure each collection's schema, permissions, and initial data. 3. Release a new version so the collections are created on your site. Once complete, your project automatically creates the specified collections in the CMS whenever you release a new version. > **Note:** Your site must have the [CMS](https://support.wix.com/en/article/cms-formerly-content-manager-getting-started?tabs=Wix-Editor) added. Without the CMS, collections added by the extension won't appear. ## Step 1 | Create the extension In the terminal: 1. Navigate to your project repo. 2. Run the [generate](https://dev.wix.com/docs/wix-cli/command-reference/project-commands/generate.md) command. 3. The CLI displays a menu of extensions to generate. Under **Backend**, select **Data Collection** and press **Enter**. 4. Enter a collection name when prompted. The name must be 1–36 characters and can only contain letters, numbers, underscores, and hyphens. The name must also be unique in the data collections extension folder. The first time you run this command, the CLI [creates the shared extension file](https://dev.wix.com/docs/go-headless/wix-managed-headless/extensions/backend/data-collections/data-collections-extension-files-and-code.md) (`data-collections.extension.ts`) alongside the new collection's definition file. Subsequent runs add new collection definition files to the same shared extension and register them automatically. ## Step 2 | Configure the collection Each collection is defined in its own `.ts` file. The default export is an object that describes the collection's schema, permissions, indexes, and initial data. The object follows the schema documented in the [data collections extension JSON reference](https://dev.wix.com/docs/api-reference/business-solutions/cms/collection-management/data-collections-extension/introduction.md). You can add multiple collections with the [`generate`](https://dev.wix.com/docs/wix-cli/command-reference/project-commands/generate.md) command. The CLI generates each collection with default fields and permissions. Edit each collection's `.ts` file to fit your data model. Learn more about [data collections extension files and code](https://dev.wix.com/docs/go-headless/wix-managed-headless/extensions/backend/data-collections/data-collections-extension-files-and-code.md). ## Step 3 | Build and deploy your project [Release a new version](https://dev.wix.com/docs/wix-cli/command-reference/project-commands/release.md), then [build and deploy](https://dev.wix.com/docs/go-headless/wix-managed-headless/project-development/build-and-deploy-with-the-cli.md) your project. Learn more about [version updates](https://dev.wix.com/docs/build-apps/develop-your-app/extensions/backend-extensions/data-collections/about-data-collections-extensions.md#app-version-updates). > **Note:** Collection changes only take effect when you release a new major version. Older versions retain their existing collections. Changes can take up to 5 minutes to propagate after an update. ## Delete a collection or the entire extension To delete a single collection from your extension: 1. Delete the collection's `.ts` file. 2. In `data-collections.extension.ts`, delete the matching `import` statement and the entry for that collection from the `collections` array. To delete the entire data collections extension: 1. Delete the `src/extensions/backend/data-collections/` folder. 2. Delete the `import` and `.use()` statements for the extension from your [`extensions.ts`](https://dev.wix.com/docs/go-headless/wix-managed-headless/extensions/about-the-extensions-ts-file.md) file.
    __Important:__ If you've already released a version of your project, you must build and deploy the project again after removing the data collection extension files.
    ## See also - [Data Collections Extension Files and Code](https://dev.wix.com/docs/go-headless/wix-managed-headless/extensions/backend/data-collections/data-collections-extension-files-and-code.md) - [About Data Collections Extensions](https://dev.wix.com/docs/build-apps/develop-your-app/extensions/backend-extensions/data-collections/about-data-collections-extensions.md) - [Data Collections Extension JSON Reference](https://dev.wix.com/docs/api-reference/business-solutions/cms/collection-management/data-collections-extension/introduction.md) - [About the Wix Data Collections API](https://dev.wix.com/docs/api-reference/business-solutions/cms/collection-management/data-collections/introduction.md) --- > Portal Navigation: > > - Append `.md` to any URL under `https://dev.wix.com/docs/` to get its markdown version. > - Pages are either content pages (article or reference text) or menu pages (a list of links to child pages). > - To get a menu page, truncate any URL to a parent path and append `.md` (e.g. `https://dev.wix.com/docs/sdk.md`, `https://dev.wix.com/docs/sdk/core-modules.md`). > - Top-level index of all portals: https://dev.wix.com/docs/llms.txt > - Full concatenated docs: https://dev.wix.com/docs/llms-full.txt ## Resource: Data Collections Extension Files and Code ## Article: Data Collections Extension Files and Code ## Article Link: https://dev.wix.com/docs/go-headless/wix-managed-headless/extensions/backend/data-collections/data-collections-extension-files-and-code.md ## Article Content: # Data Collections Extension Files and Code When you generate a [data collections extension](https://dev.wix.com/docs/build-apps/develop-your-app/extensions/backend-extensions/data-collections/about-data-collections-extensions.md), the CLI adds the following files to your project: ```bash src/ └── extensions/ └── backend/ └── data-collections/ ├── data-collections.extension.ts # Shared extension file └── .ts # Collection definition file ``` - `data-collections.extension.ts`: Builds the [data collections extension](#data-collections-builder-file). - `.ts`: Defines the [collection's schema, permissions, indexes, and initial data](#data-collection-definition-file). Each file represents a collection. The CLI also adds an import and a `.use()` call to your project's [`extensions.ts`](https://dev.wix.com/docs/go-headless/wix-managed-headless/extensions/about-the-extensions-ts-file.md) file so the extension is registered with your project. > **Note**: You can move these files to any location in the `src/` folder and update the references in your `extensions.ts` file. Learn more about the [flexible file system](https://dev.wix.com/docs/wix-cli/guides/project-structure/project-structure.md). ## Data collections builder file The `data-collections.extension.ts` file contains the data collections extension's builder configuration. The builder is defined using the following schema: ```ts import { extensions } from '@wix/astro/builders'; export default extensions.dataCollections({ id: string, name: string, collections: Collection[], }); ``` Here's an example builder definition with 2 registered collections: ```ts import { extensions } from "@wix/astro/builders"; import customerFeedbackCollection from "./customer-feedback"; import productReviewsCollection from "./product-reviews"; export default extensions.dataCollections({ id: "c7bdcb61-9c98-45d5-8a1e-76ce89b407eb", name: "Data Collections", collections: [customerFeedbackCollection, productReviewsCollection], }); ``` ### Data collection builder fields The following fields can be used in the builder's configuration object: | Field | Type | Description | | ------------- | ------ | ---------------------------------------------------------------------------------------------------------------------------------------------------------------------------------------------------------------------------------------- | | `id` | string | Required. The data collections extension ID as a [GUID](https://en.wikipedia.org/wiki/Universally_unique_identifier). Wix automatically generates it when you add the extension. It must be unique across all extensions in the project. | | `name` | string | Required. A human-readable name for the extension. Defaults to `'Data Collections'`. You can edit it directly in the file. | | `collections` | array | Required. The default exports from each `.ts` collection definition file you want this extension to register. Each time you generate a new collection, the CLI adds it to this array. | ## Data collection definition file Each `.ts` file defines a single collection. The default export is an object that follows the schema documented in the [data collections extension JSON reference](https://dev.wix.com/docs/api-reference/business-solutions/cms/collection-management/data-collections-extension/introduction.md). Each collection definition file comes with default fields, default permissions, and other configuration that you can customize. The starting file looks like this: ```ts export const collectionIdSuffix = ""; export default { idSuffix: collectionIdSuffix, displayName: "", fields: [ { type: "TEXT", displayName: "Title", key: "title" }, { type: "IMAGE", displayName: "Image", key: "image" }, ], displayField: "title", dataPermissions: { itemInsert: "CMS_EDITOR", itemRead: "CMS_EDITOR", itemRemove: "CMS_EDITOR", itemUpdate: "CMS_EDITOR", }, indexes: [], initialData: [], }; ``` The file also exports a named constant, `collectionIdSuffix`, which has the same string used as `idSuffix`. To reference this collection elsewhere in your project, import this constant from your backend code. ### Collection fields The default export object accepts the following top-level fields. For the full schema, including supported field types, permission roles, index options, and the initial-data format, see the [data collections extension JSON reference](https://dev.wix.com/docs/api-reference/business-solutions/cms/collection-management/data-collections-extension/introduction.md). | Field | Type | Description | | ----------------- | ------ | --------------------------------------------------------------------------------------------------------------------------------------------------------------------------------------------------------------------------------------------- | | `idSuffix` | string | Required. The suffix appended to the full collection ID. The full ID in the CMS becomes `@//`. It must be 1-36 characters and can only contain letters, numbers, underscores, and hyphens. | | `displayName` | string | Required. The collection's display name in the CMS. | | `displayField` | string | Required. The `key` of the field used to identify items in this collection when they're referenced from other collections. | | `fields` | array | Required. The collection's schema. See the [supported field types](https://dev.wix.com/docs/api-reference/business-solutions/cms/collection-management/data-collections-extension/introduction.md). | | `dataPermissions` | object | Required. The role required for each [item action](https://dev.wix.com/docs/api-reference/business-solutions/cms/collection-management/data-permissions/introduction.md#item-actions): `itemInsert`, `itemRead`, `itemRemove`, and `itemUpdate`. | | `indexes` | array | Indexes to improve query performance. | | `initialData` | array | Items to seed the collection with when it's first created on a site. Each item must conform to the schema declared in `fields`. | ## See also - [Add a Data Collections Extension with the Wix CLI](https://dev.wix.com/docs/go-headless/wix-managed-headless/extensions/backend/data-collections/add-a-data-collections-extension-with-the-wix-cli.md) - [About Data Collections Extensions](https://dev.wix.com/docs/build-apps/develop-your-app/extensions/backend-extensions/data-collections/about-data-collections-extensions.md) - [Data Collections Extension JSON Reference](https://dev.wix.com/docs/api-reference/business-solutions/cms/collection-management/data-collections-extension/introduction.md) - [About the Wix Data Collections API](https://dev.wix.com/docs/api-reference/business-solutions/cms/collection-management/data-collections/introduction.md) --- > Portal Navigation: > > - Append `.md` to any URL under `https://dev.wix.com/docs/` to get its markdown version. > - Pages are either content pages (article or reference text) or menu pages (a list of links to child pages). > - To get a menu page, truncate any URL to a parent path and append `.md` (e.g. `https://dev.wix.com/docs/sdk.md`, `https://dev.wix.com/docs/sdk/core-modules.md`). > - Top-level index of all portals: https://dev.wix.com/docs/llms.txt > - Full concatenated docs: https://dev.wix.com/docs/llms-full.txt ## Resource: About the Astro Integration ## Article: About the Astro Integration ## Article Link: https://dev.wix.com/docs/go-headless/wix-managed-headless/authentication/about-the-astro-integration.md ## Article Content: # About Wix's Astro Integration Wix's Astro integration is the extra layer you get when you build a Wix-managed headless project with [Astro](https://astro.build/). On top of the managed infrastructure that every Wix-managed project gets, the integration adds two capabilities: - **Automatic authentication**: Visitor sessions, member login, and token management are handled for you, so you can call [Wix JavaScript SDK](https://dev.wix.com/docs/sdk.md) methods directly with no client setup. - **Extensions**: Add backend logic and dashboard UIs that run on Wix infrastructure. If you [deploy your own existing frontend](https://dev.wix.com/docs/go-headless/get-started/quick-starts/wix-managed-headless/quick-start-from-your-own-frontend.md) instead, Wix still hosts and runs your site, but you create a client and set up authentication yourself like in [self-managed headless](https://dev.wix.com/docs/go-headless/self-managed-headless/authentication/about-authentication.md). ## Automatic authentication When you create a project with the Astro integration, a [private app](#your-projects-private-app) is configured as your project's OAuth handler. Its credentials are stored as environment variables in your project, and the hosting infrastructure uses them to authenticate your API calls. As a result, you don't need to: - Create an OAuth app in the Wix dashboard. - Set up a Wix client in your code. - Generate, refresh, or store access tokens. - Write session management logic. You import a Wix SDK module and call its methods directly. For an example, see [Calling Wix APIs](#calling-wix-apis). ### Visitor sessions Anonymous visitors are automatically authenticated with visitor-level permissions. The hosting infrastructure's session management middleware generates and manages visitor tokens in the background and persists session data using cookies, so: - Visitors can add items to a shopping cart, and the cart persists across page views. - Visitors can start a bookings flow and continue it on another page. - Session data carries over as visitors navigate your site, without you writing any state management code. This works out of the box for every project built with the Astro integration. ### Member login For members who need to log in, the integration provides built-in login routes that handle the entire flow: redirecting to the Wix login page, exchanging tokens, and managing the authenticated session. You link to these routes from your frontend, and the integration takes care of the rest. Once a member is logged in, their identity is available to subsequent API calls, enabling features like viewing order history, managing account settings, or accessing member-only content. To learn how to add member login to your project, see [Handle Member Login Using Wix's Astro Integration](https://dev.wix.com/docs/go-headless/wix-managed-headless/authentication/handle-member-login-using-wix-s-astro-integration.md). ## Calling Wix APIs With authentication handled for you, calling a Wix API takes three steps: install the SDK package for the API you need, import it, and call the method. For example, to retrieve a list of site members: ```ts import { members } from "@wix/members"; const memberList = await members.listMembers(); ``` You don't create a Wix client or pass tokens manually. This pattern works for any [Wix JavaScript SDK](https://dev.wix.com/docs/sdk.md) module. Browse the [Wix API Reference](https://dev.wix.com/docs/api-reference?apiView=SDK.md) to see what's available. ## Elevated permissions Some SDK methods require higher permissions than the visitor or member making the request. For example, reading business data or other site-wide data may require app-level permissions. By default, your code runs with the current visitor's (or member's) permissions, so calling these methods returns a 403 Forbidden error, even from backend code, because the identity, not the location of the call, is what's missing the permission. To raise permissions for a specific call, wrap the SDK method with [`auth.elevate()`](https://dev.wix.com/docs/api-reference/articles/authentication/about-elevated-permissions.md) so it runs with the app's permissions instead of the visitor's. Elevation can only run on the server, so the call must live in backend code, such as an [HTTP endpoint](https://dev.wix.com/docs/build-apps/develop-your-app/develop-an-app-with-the-cli/supported-extensions/backend/http-endpoints/about-http-endpoints.md). For step-by-step instructions, see [Elevate API Call Permissions](https://dev.wix.com/docs/go-headless/wix-managed-headless/authentication/elevate-api-call-permissions.md). For troubleshooting 403 errors, see [Fix 403 Errors for API Calls](https://dev.wix.com/docs/go-headless/wix-managed-headless/authentication/fix-403-errors-for-api-calls.md). ## Extensions Extensions let you run custom code and UIs on Wix infrastructure alongside your frontend. Use them to handle events like order placements, customize business logic, and build dashboard UIs. Each extension you add is registered to your project's [private app](#your-projects-private-app). Extensions are available only with the Astro integration. They aren't currently supported when you deploy your own existing frontend. To learn what you can build, see [About Extensions](https://dev.wix.com/docs/build-apps/develop-your-app/develop-an-app-with-the-cli/supported-extensions/about-extensions-in-the-wix-cli.md). ## Your project's private app Both automatic authentication and extensions are powered by a private app that's configured for you when you create your project—you never set it up or manage it yourself. It serves two roles: - **Authentication**: It acts as your project's OAuth handler, which is how API calls are authenticated automatically. - **Extensions**: It's where your [extensions](#extensions) are registered. When you add an extension, it's added to this app. The private app is tied to your project and can't be shared with other projects or published to the Wix App Market. ## See also - [Handle Member Login Using Wix's Astro Integration](https://dev.wix.com/docs/go-headless/wix-managed-headless/authentication/handle-member-login-using-wix-s-astro-integration.md) - [Elevate API Call Permissions](https://dev.wix.com/docs/go-headless/wix-managed-headless/authentication/elevate-api-call-permissions.md) - [Fix 403 Errors for API Calls](https://dev.wix.com/docs/go-headless/wix-managed-headless/authentication/fix-403-errors-for-api-calls.md) - [About Extensions](https://dev.wix.com/docs/build-apps/develop-your-app/develop-an-app-with-the-cli/supported-extensions/about-extensions-in-the-wix-cli.md) --- > Portal Navigation: > > - Append `.md` to any URL under `https://dev.wix.com/docs/` to get its markdown version. > - Pages are either content pages (article or reference text) or menu pages (a list of links to child pages). > - To get a menu page, truncate any URL to a parent path and append `.md` (e.g. `https://dev.wix.com/docs/sdk.md`, `https://dev.wix.com/docs/sdk/core-modules.md`). > - Top-level index of all portals: https://dev.wix.com/docs/llms.txt > - Full concatenated docs: https://dev.wix.com/docs/llms-full.txt ## Resource: Handle Member Login Using Wix's Astro Integration ## Article: Handle Member Login Using Wix's Astro Integration ## Article Link: https://dev.wix.com/docs/go-headless/wix-managed-headless/authentication/handle-member-login-using-wix-s-astro-integration.md ## Article Content: # Handle Member Login Using Wix's Astro Integration When you build with [Wix's Astro integration](https://dev.wix.com/docs/go-headless/wix-managed-headless/authentication/about-the-astro-integration.md), it provides built-in `/api/auth/login` and `/api/auth/logout` endpoints that handle the entire login flow. Just link to these endpoints and Wix takes care of redirecting to the Wix login page, exchanging tokens, and managing the authenticated session. > **Note:** These built-in endpoints come with Wix's Astro integration. With any other framework, you redirect members to the Wix login page yourself, the same as in [self-managed headless](https://dev.wix.com/docs/go-headless/self-managed-headless/authentication/about-authentication.md). ## Log in To log in or sign up a member, redirect the browser to the following URL: `/api/auth/login`. For example: ```html ``` This redirects the browser to the Wix login page, where Wix handles the login process. You can specify the URL to redirect to after the login process using a `returnUrl` query parameter in the initial request. For example, `/api/auth/login?returnUrl=/home` redirects the browser to `/home` after the login process. If you don't specify a `returnUrl`, Wix redirects the browser to the URL that the member was on before you directed them to the login page. ## Log out To log out a member, make a `POST` request to the following URL: `/api/auth/logout`. For example: ```javascript axios.post('/api/auth/logout') ``` This logs the member out. You can specify the URL to redirect to after the logout process using a `returnUrl` query parameter in the initial request. For example, `/api/auth/logout?returnUrl=/home` redirects the browser to `/home` after the logout process. If you don't specify a `returnUrl`, Wix redirects the browser to the URL that the member was on before you logged them out. ## Troubleshooting If you encounter issues with a Wix login page, make sure that: - The `returnUrl` query parameter is listed in your [allowed authorization redirect URIs](https://dev.wix.com/docs/go-headless/self-managed-headless/authentication/members/add-allowed-authorization-redirect-uris.md), and that the values match exactly. If you provided this URL when you created your Wix-managed headless project, Wix automatically added it to the allowed authorization redirect URIs, but if it's not, you need to add it manually. - You haven't set a custom login URL in your OAuth app settings. Wix-managed headless uses Wix's login page automatically, so the **login URL** field should be empty in your [Headless Settings](https://www.wix.com/my-account/site-selector/?buttonText=Select%20Site&title=Select%20a%20Site&autoSelectOnSingleSite=true&actionUrl=https:%2F%2Fwww.wix.com%2Fdashboard%2F%7B%7BmetaSiteId%7D%7D%2Foauth-apps-settings). --- > Portal Navigation: > > - Append `.md` to any URL under `https://dev.wix.com/docs/` to get its markdown version. > - Pages are either content pages (article or reference text) or menu pages (a list of links to child pages). > - To get a menu page, truncate any URL to a parent path and append `.md` (e.g. `https://dev.wix.com/docs/sdk.md`, `https://dev.wix.com/docs/sdk/core-modules.md`). > - Top-level index of all portals: https://dev.wix.com/docs/llms.txt > - Full concatenated docs: https://dev.wix.com/docs/llms-full.txt ## Resource: Fix 403 Errors for API Calls ## Article: Fix 403 Errors for API Calls ## Article Link: https://dev.wix.com/docs/go-headless/wix-managed-headless/authentication/fix-403-errors-for-api-calls.md ## Article Content: # Fix 403 errors for API calls Some Wix SDK methods return `403 Forbidden` when called with a visitor or member context. This usually happens when the method needs higher permissions than the current identity has. For example, you have a function that returns the 403 error: ```ts const createdItem = await items.insert("uploadedimages", { _id: crypto.randomUUID(), imageTitle: "Example title", uploaderName: "Example uploader" }); ``` In Wix-managed headless projects, fix this by moving the method call to an [HTTP endpoint](https://dev.wix.com/docs/build-apps/develop-your-app/develop-an-app-with-the-cli/supported-extensions/backend/http-endpoints/add-http-endpoints-to-your-project.md) and wrapping the SDK method with [`auth.elevate()`](https://dev.wix.com/docs/sdk/core-modules/essentials/auth.md#elevate). This way the frontend calls the HTTP endpoint, and the endpoint calls the protected API on the backend. > **Notes:** > - To determine whether a method requires elevation, check that method's [reference documentation](https://dev.wix.com/docs/api-reference?apiView=SDK.md). > - In self-managed headless use [API keys](https://dev.wix.com/docs/api-reference/articles/authentication/api-keys/about-api-keys.md). ## Step 1 | Create a backend endpoint Create an [HTTP endpoint](https://dev.wix.com/docs/build-apps/develop-your-app/develop-an-app-with-the-cli/supported-extensions/backend/http-endpoints/add-http-endpoints-to-your-project.md) in your project, for example: - `src/pages/api/upload-image.ts` ## Step 2 | Import modules In your endpoint file, import: - `APIRoute` from `astro` - `auth` from `@wix/essentials` - The SDK module that contains the method you need ```ts import type { APIRoute } from "astro"; import { auth } from "@wix/essentials"; import { items } from "@wix/data"; ``` ## Step 3 | Wrap the SDK method Expose an endpoint that calls the API method you need: ```ts export const POST: APIRoute = async () => { const createdItem = await items.insert("uploadedimages", { _id: crypto.randomUUID(), imageTitle: "Example title", uploaderName: "Example uploader", }); return new Response(JSON.stringify(createdItem)); }; ``` Wrap the method with `auth.elevate()` before calling it: ```ts export const POST: APIRoute = async () => { const elevatedInsert = auth.elevate(items.insert); const createdItem = await elevatedInsert("uploadedimages", { _id: crypto.randomUUID(), imageTitle: "Example title", uploaderName: "Example uploader", }); return new Response(JSON.stringify(createdItem)); }; ``` ## Step 4 | Call the endpoint from your frontend From frontend code, send a request to your endpoint: ```ts async function uploadImage(payload) { const response = await fetch("/api/upload-image", { method: "POST", headers: { "Content-Type": "application/json" }, body: JSON.stringify(payload), }); const result = await response.json(); } ``` >**Note:** This example is applicable for headless projects only. To call the endpoint in apps, see [Elevate API Call Permissions](https://dev.wix.com/docs/build-apps/develop-your-app/develop-an-app-with-the-cli/project-development/elevate-api-call-permissions.md). ## See also - [Elevate API Call Permissions](https://dev.wix.com/docs/build-apps/develop-your-app/develop-an-app-with-the-cli/project-development/elevate-api-call-permissions.md) - [About Elevated Permissions](https://dev.wix.com/docs/api-reference/articles/authentication/about-elevated-permissions?apiView=SDK.md) - [About HTTP Endpoints](https://dev.wix.com/docs/build-apps/develop-your-app/develop-an-app-with-the-cli/supported-extensions/backend/http-endpoints/about-http-endpoints.md) --- > Portal Navigation: > > - Append `.md` to any URL under `https://dev.wix.com/docs/` to get its markdown version. > - Pages are either content pages (article or reference text) or menu pages (a list of links to child pages). > - To get a menu page, truncate any URL to a parent path and append `.md` (e.g. `https://dev.wix.com/docs/sdk.md`, `https://dev.wix.com/docs/sdk/core-modules.md`). > - Top-level index of all portals: https://dev.wix.com/docs/llms.txt > - Full concatenated docs: https://dev.wix.com/docs/llms-full.txt ## Resource: Elevate API Call Permissions ## Article: Elevate API Call Permissions ## Article Link: https://dev.wix.com/docs/go-headless/wix-managed-headless/authentication/elevate-api-call-permissions.md ## Article Content: # Elevate API Call Permissions Some SDK methods require [elevated permissions](https://dev.wix.com/docs/api-reference/articles/authentication/about-elevated-permissions?apiView=SDK.md) to access sensitive data or perform privileged operations. For example, retrieving site properties or accessing business data often requires app-level authorization that [site visitors](https://dev.wix.com/docs/api-reference/articles/authentication/about-identities?apiView=SDK.md#site-visitor), [site members](https://dev.wix.com/docs/api-reference/articles/authentication/about-identities?apiView=SDK.md#site-member), and [Wix users](https://dev.wix.com/docs/api-reference/articles/authentication/about-identities?apiView=SDK.md#wix-user) don't have. Without elevation, these calls return a 403 Forbidden error. > **Note:** To determine whether a method requires elevation, check that method's [reference documentation](https://dev.wix.com/docs/api-reference?apiView=SDK.md). To elevate API call permissions: 1. Set up your project's backend code to handle elevated requests. 2. Send a request from your frontend code to your project's backend. > **Note:** For a complete walkthrough, including an elevated endpoint call from the frontend, see [Upload Images to CMS](https://dev.wix.com/docs/go-headless/wix-managed-headless/feature-guides/upload-images-to-cms.md).
    **Important:** Exposed elevated API calls can create a security risk for [privilege escalation attacks](https://en.wikipedia.org/wiki/Privilege_escalation). Protect your exposed API calls with logic that validates who can call them and what operations they can perform.
    ## Step 1 | Set up the endpoint in your project's backend Set up your backend to handle requests for elevated API calls from your frontend. To set up your backend: 1. Create an [HTTP endpoint](https://dev.wix.com/docs/go-headless/wix-managed-headless/extensions/backend/http-endpoints/add-http-endpoints-to-your-project.md). Do only **Step 1 | Create the endpoint file** from the linked article. 2. In the file that defines your endpoint, import `APIRoute` from `astro`, the [`auth`](https://dev.wix.com/docs/sdk/core-modules/essentials/auth.md) submodule from `@wix/essentials`, and the module containing the method you want to call with elevated permissions. ```ts import type { APIRoute } from "astro"; import { auth } from "@wix/essentials"; import { } from "@wix/"; ``` 3. Expose an endpoint that calls the API method you need. Wrap the method with [`auth.elevate()`](https://dev.wix.com/docs/sdk/core-modules/essentials/auth.md#elevate) before calling it. ```ts export const GET: APIRoute = async ({ request }) => { const elevatedFunction = auth.elevate(.function); const response = await elevatedFunction(); // ... }; ``` ## Step 2 | Call the endpoint from your frontend Call your backend endpoint from your frontend code by using the standard `fetch()` API with this path: `/api/`. ```js const result = await fetch("/api/"); ``` ## Examples These examples show how to elevate [Get Site Properties](https://dev.wix.com/docs/api-reference/business-management/site-properties/properties/get-site-properties?apiView=SDK.md). ### Backend code ```ts // src/pages/api/my-api.ts import type { APIRoute } from "astro"; import { auth } from "@wix/essentials"; import { siteProperties } from "@wix/business-tools"; export const GET: APIRoute = async ({ request }) => { const elevatedGetSiteProperties = auth.elevate(siteProperties.getSiteProperties); const retrievedSiteProperties = await elevatedGetSiteProperties(); return new Response(JSON.stringify(retrievedSiteProperties)); }; ``` ### Frontend code ```astro ``` ## See also - [About Elevated Permissions](https://dev.wix.com/docs/api-reference/articles/authentication/about-elevated-permissions?apiView=SDK.md) - [Fix 403 Errors for API Calls](https://dev.wix.com/docs/go-headless/wix-managed-headless/authentication/fix-403-errors-for-api-calls.md) --- > Portal Navigation: > > - Append `.md` to any URL under `https://dev.wix.com/docs/` to get its markdown version. > - Pages are either content pages (article or reference text) or menu pages (a list of links to child pages). > - To get a menu page, truncate any URL to a parent path and append `.md` (e.g. `https://dev.wix.com/docs/sdk.md`, `https://dev.wix.com/docs/sdk/core-modules.md`). > - Top-level index of all portals: https://dev.wix.com/docs/llms.txt > - Full concatenated docs: https://dev.wix.com/docs/llms-full.txt ## Resource: About SEO Support ## Article: About SEO Support ## Article Link: https://dev.wix.com/docs/go-headless/wix-managed-headless/seo/about-seo-support.md ## Article Content: # About SEO Support Wix-managed headless projects built with the [Astro integration](https://dev.wix.com/docs/go-headless/wix-managed-headless/authentication/about-the-astro-integration.md) include a full set of SEO features. Wix generates SEO tags from the settings a Wix user edits in the dashboard, including: - Titles - Meta descriptions - Canonical links - Social tags - Robots directives - Structured data ## Page types How a page gets its SEO depends on what kind of page it is: - **Main pages** live at a single, fixed URL, such as your home, about, or contact page. Main pages get their SEO automatically, with no code. - **Item pages** render one business-solution item from a parameterized route, such as a product at `/product/[handle]`, a blog post at `/blog/[slug]`, or a single category that lists the items in it. SEO support for item pages require code, since Wix can't resolve an item's tags until it knows which item the request is for. > **Note**: A listing page is a main page too, even when it shows business-solution content. For example, an all-products page or a blog index is still one fixed URL. ## What works out of the box Wix's Astro middleware resolves the SEO tags for each main page at request time, based on the dashboard settings, and injects them into the page ``. There's nothing to install, register, or render. Each injected tag carries a `wix-seo-tag="true"` attribute, so you can recognize it in the rendered HTML. A Wix user controls these tags in the dashboard, under **SEO & GEO** > [**SEO Settings**](https://www.wix.com/my-account/site-selector/?buttonText=Select%20Site&title=Select%20a%20Site&autoSelectOnSingleSite=true&actionUrl=https:%2F%2Fwww.wix.com%2Fdashboard%2F%7B%7BmetaSiteId%7D%7D%2Fseo-home%2Fseo-settings): - **Settings for main pages**: The title tag, meta description, focus keyword, and indexability of each main page. Each page's advanced settings also cover canonical links, custom meta tags, and structured data. - **Social share**: The social tags used when a page is shared, such as Open Graph and Twitter. - **Robots.txt editor**: The contents of `robots.txt`. Wix serves `robots.txt` and `sitemap.xml` automatically. The sitemap includes your main pages and any item-page URLs from the page registry. Because the tags come from the dashboard, a Wix user can change a main page's SEO without a code change or a redeploy. To set this up and verify it on your live site, see [Manage SEO for Main Pages](https://dev.wix.com/docs/go-headless/wix-managed-headless/seo/manage-seo-for-main-pages.md).
    **Tip:** Keep each tag in one place. For main pages, let the dashboard own the title, meta description, canonical link, and social tags, and don't set those same tags in your layout.
    ## What you build in code Automatic injection covers main pages only. Anything that depends on which item a request is for, or on data your frontend fetches, you render yourself. - **Item pages**: The item pages of [business solutions](https://dev.wix.com/docs/go-headless/project-guides/featured-business-solutions.md), such as [Wix Stores](https://www.wix.com/app-market/web-solution/wix-stores) products, [Wix Bookings](https://www.wix.com/app-market/web-solution/bookings) services, [Wix Events](https://www.wix.com/app-market/web-solution/events), and [Wix Blog](https://www.wix.com/app-market/web-solution/wix-blog) posts, plus their category pages. You register each route and render its tags in code using the [`@wix/seo`](https://www.npmjs.com/package/@wix/seo) package. Registering a route also adds it to the page registry, which feeds the sitemap and the dashboard's SEO settings for that page type. As with main pages, a Wix user sets the actual tag values in the dashboard. - **Custom structured data**: schema.org JSON-LD you build from an item's data. The dashboard can emit structured data for main pages; render your own when you need it generated from item data. - **Client-side tag updates**: Re-resolving and swapping tags during in-app navigation without a full page reload. For all three, including the per-vertical values, see [Add SEO Support to Item Pages](https://dev.wix.com/docs/go-headless/wix-managed-headless/seo/add-seo-support-to-item-pages.md). ## See also - [Manage SEO for Main Pages](https://dev.wix.com/docs/go-headless/wix-managed-headless/seo/manage-seo-for-main-pages.md) - [Add SEO Support to Item Pages](https://dev.wix.com/docs/go-headless/wix-managed-headless/seo/add-seo-support-to-item-pages.md) - [About Wix's Astro Integration](https://dev.wix.com/docs/go-headless/wix-managed-headless/authentication/about-the-astro-integration.md) - [About the SEO Tags API](https://dev.wix.com/docs/api-reference/site/viewer/seo-tags/introduction.md) --- > Portal Navigation: > > - Append `.md` to any URL under `https://dev.wix.com/docs/` to get its markdown version. > - Pages are either content pages (article or reference text) or menu pages (a list of links to child pages). > - To get a menu page, truncate any URL to a parent path and append `.md` (e.g. `https://dev.wix.com/docs/sdk.md`, `https://dev.wix.com/docs/sdk/core-modules.md`). > - Top-level index of all portals: https://dev.wix.com/docs/llms.txt > - Full concatenated docs: https://dev.wix.com/docs/llms-full.txt ## Resource: Manage SEO for Main Pages ## Article: Manage SEO for Main Pages ## Article Link: https://dev.wix.com/docs/go-headless/wix-managed-headless/seo/manage-seo-for-main-pages.md ## Article Content: # Manage SEO for Main Pages On a Wix-managed headless projects built with the [Astro integration](https://dev.wix.com/docs/go-headless/wix-managed-headless/authentication/about-the-astro-integration.md), the main pages of your frontend get their SEO tags automatically, with no code. Main pages are pages at a fixed URL, such as the home, about, and contact pages. Wix's Astro middleware resolves each page's tags at request time, from the settings a Wix user edits in the dashboard, and injects them into the page ``. There's nothing to install or render. This article explains how your routes reach the dashboard, where to configure their tags, and how to confirm the tags reach your live site. For item pages, such as Wix Stores products and Wix Blog posts, see [Add SEO Support to Item Pages](https://dev.wix.com/docs/go-headless/wix-managed-headless/seo/add-seo-support-to-item-pages.md). ## How your routes reach the dashboard Wix learns your frontend's routes from a page registry. When you build and publish your site, the `@wix/astro-pages` integration included in your project registers every route into a registry that Wix serves at `/_wix/pages.json`. Your main pages then appear in the dashboard under **SEO & GEO** > [**SEO Settings**](https://www.wix.com/my-account/site-selector/?buttonText=Select%20Site&title=Select%20a%20Site&autoSelectOnSingleSite=true&actionUrl=https:%2F%2Fwww.wix.com%2Fdashboard%2F%7B%7BmetaSiteId%7D%7D%2Fseo-home%2Fseo-settings) > **Main Pages**, where a Wix user sets each page's SEO.
    **Important**: Because the dashboard reads this registry, publish your site at least once before you configure SEO. A route that hasn't been published yet won't appear in the dashboard. After a route is registered, dashboard SEO edits take effect on the live page at request time, with no redeploy needed.
    ## Step 1 | Remove hard-coded SEO tags from your layout Let the dashboard be the single source for the tags it manages. If your shared layout also hard-codes a `` or `<meta name="description">`, those compete with the dashboard-managed tags. Remove them from your layout's `<head>`. For example: ```diff <head> <meta charset="utf-8" /> <meta name="viewport" content="width=device-width, initial-scale=1" /> - <meta name="description" content={description} /> - <title>{title} ``` Keep this in mind for any tag the dashboard owns: title, meta description, canonical link, and social tags. Leave non-SEO tags, such as charset, viewport, favicon, and fonts, in place. ## Step 2 | Publish your site 1. Run the [build](https://dev.wix.com/docs/wix-cli/command-reference/project-commands/build.md) command to build the assets for your project: ```bash wix build ``` 1. Run the [release](https://dev.wix.com/docs/wix-cli/command-reference/project-commands/release.md) command to publish your project: ```bash wix release ``` Releasing pushes your project to Wix's servers and publishes your site. After releasing your project, the CLI provides the URL of your published site, and preview URLs for your project's site and dashboard. This deploys your Step 1 change and registers your routes, so they appear in the dashboard for the next step. ## Step 3 | Configure SEO in the dashboard To configure SEO to propogate through to your headless site: 1. Open your site's [SEO Settings](https://www.wix.com/my-account/site-selector/?buttonText=Select%20Site&title=Select%20a%20Site&autoSelectOnSingleSite=true&actionUrl=https:%2F%2Fwww.wix.com%2Fdashboard%2F%7B%7BmetaSiteId%7D%7D%2Fseo-home%2Fseo-settings) in the dashboard. The link opens a site selector so you can choose your site. 1. Select **Main Pages**. Each published main page appears as a row. 1. Select the relevant tab: - **Edit by page**: Select a row to set that page's title tag, meta description, focus keyword, and indexable toggle. A lock icon on a field means it's following the default pattern. Editing the row overrides the pattern for that page. - **Customize defaults**: Set the title and description patterns that apply to every main page at once, such as `{Page Name} | {Site Name}`, so you don't have to fill in each page by hand. 1. Edit `robots.txt` under **SEO & GEO** > [Robots.txt Editor](https://www.wix.com/my-account/site-selector/?buttonText=Select%20Site&title=Select%20a%20Site&autoSelectOnSingleSite=true&actionUrl=https:%2F%2Fwww.wix.com%2Fdashboard%2F%7B%7BmetaSiteId%7D%7D%2Fseo-home/robots). These edits apply to the live pages at request time. You don't need to publish again.
    **Tip**: Check out the [SEO Setup Checklist](https://www.wix.com/my-account/site-selector/?buttonText=Select%20Site&title=Select%20a%20Site&autoSelectOnSingleSite=true&actionUrl=https:%2F%2Fwww.wix.com%2Fdashboard%2F%7B%7BmetaSiteId%7D%7D%2Fget-found-on-google/seo-setup) for a personalized list of SEO setup tasks to help your site become more visible in online searches.
    ## Step 4 | Verify your setup Inspect the rendered HTML on your published site: 1. Fetch a page and look at its ``. The injected tags carry a `wix-seo-tag="true"` attribute: ```bash curl -s https:///about | grep 'wix-seo-tag' ``` You see the dashboard-resolved ``, `<meta name="description">`, and `<link rel="canonical">`, plus Open Graph and Twitter tags, each marked with the attribute. The social tags are derived automatically from the title and meta description you set. 2. Change a value in the dashboard, and then fetch the page again to confirm the change reaches the live `<head>`. > **Note**: Test on the published site only, not local `wix dev` as it doesn't run the SEO injection. <blockquote class="tip"> **Tip:** Resolved tags are edge-cached. A high-traffic route, often the home page, is served from the CDN and can take a few minutes to reflect a dashboard change, while a low-traffic route updates on the next request. When testing, edit a low-traffic page first so you see the change right away. </blockquote> ## See also - [About SEO Support](https://dev.wix.com/docs/go-headless/wix-managed-headless/seo/about-seo-support.md) - [Add SEO Support to Item Pages](https://dev.wix.com/docs/go-headless/wix-managed-headless/seo/add-seo-support-to-item-pages.md) - [About Wix's Astro Integration](https://dev.wix.com/docs/go-headless/wix-managed-headless/authentication/about-the-astro-integration.md) - [About the SEO Tags API](https://dev.wix.com/docs/api-reference/site/viewer/seo-tags/introduction.md) --- > Portal Navigation: > > - Append `.md` to any URL under `https://dev.wix.com/docs/` to get its markdown version. > - Pages are either content pages (article or reference text) or menu pages (a list of links to child pages). > - To get a menu page, truncate any URL to a parent path and append `.md` (e.g. `https://dev.wix.com/docs/sdk.md`, `https://dev.wix.com/docs/sdk/core-modules.md`). > - Top-level index of all portals: https://dev.wix.com/docs/llms.txt > - Full concatenated docs: https://dev.wix.com/docs/llms-full.txt ## Resource: Add SEO Support to Item Pages ## Article: Add SEO Support to Item Pages ## Article Link: https://dev.wix.com/docs/go-headless/wix-managed-headless/seo/add-seo-support-to-item-pages.md ## Article Content: # Add SEO Support to Item Pages An item page renders one business-solution item from a parameterized route, such as a product at `/product/[handle]` or a blog post at `/blog/[slug]`. Unlike main pages, which get their SEO tags injected automatically with no code, item pages need code to resolve an item's tags. This article explains how to add the necessary code so SEO tags a Wix user edits in the dashboard appear on your headless frontend. After a one-time layout change to expose a tag slot, you add support in 2 parts: 1. Register each item-page route so Wix knows it exists. 2. Render the Wix-resolved tags into the page at request time. For how these parts fit together, and how main pages differ, see [About SEO Support](https://dev.wix.com/docs/go-headless/wix-managed-headless/seo/about-seo-support.md). ## Before you begin Before starting to code, make sure that you have: - A Wix-managed headless project built with Astro. It should already include the `@wix/astro` and `@wix/astro-pages` packages. - [`@wix/seo`](https://www.npmjs.com/package/@wix/seo) and [`@wix/essentials`](https://www.npmjs.com/package/@wix/essentials) installed. Use `@wix/essentials` version 1.0.10 or later: ```bash npm install @wix/seo @wix/essentials ``` - Server-rendered item-page routes, configured with `output: "server"`. The calls that fetch SEO tags depend on request context, so don't set `prerender = true` or use `getStaticPaths()` on these routes. ## Step 1 | Add the SEO tags slot to your layout Expose a named `seo-tags` slot in the `<head>` of your shared layout. Item pages fill this slot with the Wix-resolved tags. Main pages leave it empty and get their tags from [automatic SEO injection](https://dev.wix.com/docs/go-headless/wix-managed-headless/seo/manage-seo-for-main-pages.md), so don't add fallback `<title>` or `<meta name="description">` tags here, since they'd duplicate the injected ones. ```astro <!-- src/components/layout/layout.astro --> <html lang="en"> <head> <meta charset="utf-8" /> <meta name="viewport" content="width=device-width, initial-scale=1" /> <slot name="seo-tags" /> </head> <body> <slot /> </body> </html> ``` ## Step 2 | Register the route In each item-page route file, export a `wixMetadata` object so the page appears in the registry at `/_wix/pages.json`. Source the app ID, page identifier, and slug token from `WIX_APPS` rather than hard-coding them: ```js import { WIX_APPS } from "@wix/essentials"; export const wixMetadata = { appDefId: WIX_APPS.<solution>.id, pageIdentifier: WIX_APPS.<solution>.<pageMetadata>.pageIdentifier, identifiers: { <routeParam>: WIX_APPS.<solution>.<pageMetadata>.identifiers.<slugToken>, }, }; ``` <blockquote class="caution"> __Caution:__ Reference `WIX_APPS` directly inside the `wixMetadata` object, as shown. Don't read it into a separate variable first, such as `const { id } = WIX_APPS.<solution>`. Because `wixMetadata` is a module-level `export`, Astro evaluates it in the module scope, where variables declared in the component body aren't available. </blockquote> <blockquote class="important"> __Important:__ The key inside `identifiers` must be the route parameter of your route file, not the token the SDK uses. A route file named `[handle].astro` uses the key `handle`; `[slug].astro` uses `slug`. </blockquote> ### Values for each page type Each SEO-supported page type pairs a page-metadata accessor and slug token from `WIX_APPS` in `@wix/essentials` with an item type from `seoTags.ItemType` in `@wix/seo`. Because the packages don't reference each other, use this list to pair them for the `wixMetadata` export in Step 2 and the `loadSEOTagsServiceConfig()` call in Step 3: - **Stores product**: - **Page metadata**: `WIX_APPS.checkoutAndOrders.productPageMetadata` - **Slug token**: `handle` - **Item type**: `seoTags.ItemType.STORES_PRODUCT` - **Stores category**: - **Page metadata**: `WIX_APPS.checkoutAndOrders.categoryPageMetadata` - **Slug token**: `collection` - **Item type**: `seoTags.ItemType.STORES_CATEGORY` - **Bookings service**: - **Page metadata**: `WIX_APPS.bookings.servicePageMetadata` - **Slug token**: `slug` - **Item type**: `seoTags.ItemType.BOOKINGS_SERVICE` - **Events page**: - **Page metadata**: `WIX_APPS.events.eventPageMetadata` - **Slug token**: `slug` - **Item type**: `seoTags.ItemType.EVENTS_PAGE` - **Blog post**: - **Page metadata**: `WIX_APPS.blogs.postPageMetadata` - **Slug token**: `slug` - **Item type**: `seoTags.ItemType.BLOG_POST` - **Blog category**: - **Page metadata**: `WIX_APPS.blogs.categoryPageMetadata` - **Slug token**: `slug` - **Item type**: `seoTags.ItemType.BLOG_CATEGORY` The `WIX_APPS` type is the source of truth for the exact accessor strings, the `pageIdentifier` each one resolves to, and the current set of supported page types. This list exists to pair each type with its `seoTags.ItemType`. > **Note**: For Stores, the accessor is `WIX_APPS.checkoutAndOrders`, not `WIX_APPS.stores`. `WIX_APPS.stores.id` is the catalog ID used for `catalogReference.appId` in cart operations. ## Step 3 | Fetch and render the SEO tags In the route's frontmatter, import the SEO helpers and call `loadSEOTagsServiceConfig()` at request time, then render the result into the `seo-tags` slot. The function takes the following fields: - `pageUrl`: The canonical URL of the current page. Use `Astro.url.href`. - `itemType`: A `seoTags.ItemType` value that identifies the page type. - `itemData`: The item's identifier, always as `{ slug: "<value>" }`. The key is literally `slug` for every page type; the value is your route parameter, such as `Astro.params.handle` on a `[handle].astro` route. ```astro --- import { SEO } from "@wix/seo/components"; import { loadSEOTagsServiceConfig } from "@wix/seo/services"; import { seoTags } from "@wix/seo"; const seoTagsServiceConfig = await loadSEOTagsServiceConfig({ pageUrl: Astro.url.href, itemType: seoTags.ItemType.<ITEM_TYPE>, itemData: { slug: Astro.params.<routeParam>! }, }); --- <Layout> <SEO.Tags seoTagsServiceConfig={seoTagsServiceConfig} slot="seo-tags" /> <!-- your page markup --> </Layout> ``` <blockquote class="tip"> __Tip:__ When the page also fetches item data, run `loadSEOTagsServiceConfig()` in parallel with that fetch using `Promise.all` to avoid an extra round trip. See the example below. </blockquote> `loadSEOTagsServiceConfig()` returns the tags Wix has already resolved for the item. A Wix user controls these values in the dashboard under **SEO & GEO** > [**SEO Settings**](https://www.wix.com/my-account/site-selector/?buttonText=Select%20Site&title=Select%20a%20Site&autoSelectOnSingleSite=true&actionUrl=https:%2F%2Fwww.wix.com%2Fdashboard%2F%7B%7BmetaSiteId%7D%7D%2Fseo-home%2Fseo-settings), where each page type, such as Blog posts, has its own settings, and individual items can override them in their own SEO fields. You don't set these values in code. Your code only renders the resolved result. ## Step 4 | Optional: Add structured data `<SEO.Tags>` covers the tags managed in the dashboard. To add [schema.org](https://schema.org) structured data for rich results, render a JSON-LD script from the item you already fetched, using the schema type that fits the page, such as `Product` for store products or `Event` for events: ```astro --- const eventJsonLd = { "@context": "https://schema.org", "@type": "Event", name: event.title, description: event.shortDescription, startDate: event.startDate, }; --- <script type="application/ld+json" set:html={JSON.stringify(eventJsonLd)} is:inline /> ``` ## Step 5 | Optional: Update tags during client-side navigation `<SEO.Tags>` resolves the tags once, on the server. If your frontend navigates between items on the client without a full page reload, such as moving from one product to another in a single-page flow, the `<head>` keeps the first item's tags unless you update them. To re-resolve tags on the client, wrap the relevant content in `<SEO.Root>`, which provides the SEO service context, and use `<SEO.UpdateTagsTrigger>`, a render-prop component that exposes an `updateSeoTags` function. Call it with the new item's type and slug to swap the tags in place: ```tsx import { SEO } from "@wix/seo/components"; import { seoTags } from "@wix/seo"; <SEO.Root seoTagsServiceConfig={seoTagsServiceConfig}> <SEO.UpdateTagsTrigger> {({ updateSeoTags }) => ( <a href="/product/another-product" onClick={() => updateSeoTags(seoTags.ItemType.STORES_PRODUCT, { slug: "another-product", }) } > Go to another product </a> )} </SEO.UpdateTagsTrigger> </SEO.Root> ``` `<SEO.UpdateTagsTrigger>` must be nested inside `<SEO.Root>`. For a server-rendered page that emits its tags once, `<SEO.Tags>` alone is enough; you don't need `<SEO.Root>`. ## Step 6 | Verify your setup To verify that your code is bringing the SEO tags as expected: 1. Run the [build](https://dev.wix.com/docs/wix-cli/command-reference/project-commands/build.md) command to build the assets for your project: ```bash wix build ``` 1. Run the [release](https://dev.wix.com/docs/wix-cli/command-reference/project-commands/release.md) command to publish your project: ```bash wix release ``` 1. Fetch a real item URL that returns `200`, not `404`, and inspect the resolved `<title>` in its `<head>`: ```bash curl -s https://<your-domain>/blog/<slug> | grep -o '<title[^>]*>[^<]*' ``` Confirm the title is that item's real title from the dashboard, not a generic page-type fallback such as `Post | `. An unregistered or mistyped route still returns fallback tags, so matching the real item's values is what proves your `` render resolved the item. 1. Open `/_wix/pages.json` and confirm your item-page routes are listed. If the list shows only your static pages, the route isn't registered, so recheck the `wixMetadata` export. This registry is what feeds the sitemap and the dashboard SEO editor. 1. Change a value in the dashboard for the relevant page type, and then fetch the page again to confirm the change reaches the live ``. > **Notes**: > > - A route registered in `/_wix/pages.json` but missing `` still ships your layout's default tags. > - A page that renders `` but exports no `wixMetadata` serves correct tags yet stays invisible to the sitemap. ## Examples Complete examples for each item-page type. Each uses the values from [Values for each page type](#values-for-each-page-type), sources them from `WIX_APPS`, and runs the item fetch in parallel with `loadSEOTagsServiceConfig()`. The fetch helpers, such as `getProduct`, and the `` component stand in for your own code. - [Stores product page](#stores-product-page) - [Stores category page](#stores-category-page) - [Bookings service page](#bookings-service-page) - [Events page](#events-page) - [Blog post page](#blog-post-page) - [Blog category page](#blog-category-page) ### Stores product page Route file: `src/pages/product/[handle].astro`. **Register the route:** ```js import { WIX_APPS } from "@wix/essentials"; export const wixMetadata = { appDefId: WIX_APPS.checkoutAndOrders.id, pageIdentifier: WIX_APPS.checkoutAndOrders.productPageMetadata.pageIdentifier, identifiers: { // `handle` is this route's parameter (product/[handle].astro). handle: WIX_APPS.checkoutAndOrders.productPageMetadata.identifiers.handle, }, }; ``` **Fetch and render the tags:** ```astro --- import { SEO } from "@wix/seo/components"; import { loadSEOTagsServiceConfig } from "@wix/seo/services"; import { seoTags } from "@wix/seo"; const handle = Astro.params.handle!; const [product, seoTagsServiceConfig] = await Promise.all([ getProduct(handle), loadSEOTagsServiceConfig({ pageUrl: Astro.url.href, itemType: seoTags.ItemType.STORES_PRODUCT, itemData: { slug: handle }, }), ]); if (!product) return new Response(null, { status: 404 }); --- ``` ### Stores category page Route file: `src/pages/search/[collection].astro`. Category pages resolve tags from the route parameter alone, so there's no item to fetch. **Register the route:** ```js import { WIX_APPS } from "@wix/essentials"; export const wixMetadata = { appDefId: WIX_APPS.checkoutAndOrders.id, pageIdentifier: WIX_APPS.checkoutAndOrders.categoryPageMetadata.pageIdentifier, identifiers: { // `collection` is this route's parameter (search/[collection].astro). collection: WIX_APPS.checkoutAndOrders.categoryPageMetadata.identifiers.collection, }, }; ``` **Fetch and render the tags:** ```astro --- import { SEO } from "@wix/seo/components"; import { loadSEOTagsServiceConfig } from "@wix/seo/services"; import { seoTags } from "@wix/seo"; const seoTagsServiceConfig = await loadSEOTagsServiceConfig({ pageUrl: Astro.url.href, itemType: seoTags.ItemType.STORES_CATEGORY, itemData: { slug: Astro.params.collection! }, }); --- ``` ### Bookings service page Route file: `src/pages/bookings/[slug].astro`. **Register the route:** ```js import { WIX_APPS } from "@wix/essentials"; export const wixMetadata = { appDefId: WIX_APPS.bookings.id, pageIdentifier: WIX_APPS.bookings.servicePageMetadata.pageIdentifier, identifiers: { // `slug` is this route's parameter (bookings/[slug].astro). slug: WIX_APPS.bookings.servicePageMetadata.identifiers.slug, }, }; ``` **Fetch and render the tags:** ```astro --- import { SEO } from "@wix/seo/components"; import { loadSEOTagsServiceConfig } from "@wix/seo/services"; import { seoTags } from "@wix/seo"; const slug = Astro.params.slug!; const [service, seoTagsServiceConfig] = await Promise.all([ getServiceBySlug(slug), loadSEOTagsServiceConfig({ pageUrl: Astro.url.href, itemType: seoTags.ItemType.BOOKINGS_SERVICE, itemData: { slug }, }), ]); if (!service) return new Response(null, { status: 404 }); --- ``` ### Events page Route file: `src/pages/events/[slug].astro`. **Register the route:** ```js import { WIX_APPS } from "@wix/essentials"; export const wixMetadata = { appDefId: WIX_APPS.events.id, pageIdentifier: WIX_APPS.events.eventPageMetadata.pageIdentifier, identifiers: { // `slug` is this route's parameter (events/[slug].astro). slug: WIX_APPS.events.eventPageMetadata.identifiers.slug, }, }; ``` **Fetch and render the tags:** ```astro --- import { SEO } from "@wix/seo/components"; import { loadSEOTagsServiceConfig } from "@wix/seo/services"; import { seoTags } from "@wix/seo"; const slug = Astro.params.slug!; const [event, seoTagsServiceConfig] = await Promise.all([ getEvent(slug), loadSEOTagsServiceConfig({ pageUrl: Astro.url.href, itemType: seoTags.ItemType.EVENTS_PAGE, itemData: { slug }, }), ]); if (!event) return new Response(null, { status: 404 }); --- ``` ### Blog post page Route file: `src/pages/blog/[slug].astro`. **Register the route:** ```js import { WIX_APPS } from "@wix/essentials"; export const wixMetadata = { appDefId: WIX_APPS.blogs.id, pageIdentifier: WIX_APPS.blogs.postPageMetadata.pageIdentifier, identifiers: { // `slug` is this route's parameter (blog/[slug].astro). slug: WIX_APPS.blogs.postPageMetadata.identifiers.slug, }, }; ``` **Fetch and render the tags:** ```astro --- import { SEO } from "@wix/seo/components"; import { loadSEOTagsServiceConfig } from "@wix/seo/services"; import { seoTags } from "@wix/seo"; const slug = Astro.params.slug!; const [post, seoTagsServiceConfig] = await Promise.all([ getBlogPost(slug), loadSEOTagsServiceConfig({ pageUrl: Astro.url.href, itemType: seoTags.ItemType.BLOG_POST, itemData: { slug }, }), ]); if (!post) return new Response(null, { status: 404 }); --- ``` ### Blog category page Route file: `src/pages/blog-category/[slug].astro`. Category pages resolve tags from the route parameter alone, so there's no item to fetch. **Register the route:** ```js import { WIX_APPS } from "@wix/essentials"; export const wixMetadata = { appDefId: WIX_APPS.blogs.id, pageIdentifier: WIX_APPS.blogs.categoryPageMetadata.pageIdentifier, identifiers: { // `slug` is this route's parameter (blog-category/[slug].astro). slug: WIX_APPS.blogs.categoryPageMetadata.identifiers.slug, }, }; ``` **Fetch and render the tags:** ```astro --- import { SEO } from "@wix/seo/components"; import { loadSEOTagsServiceConfig } from "@wix/seo/services"; import { seoTags } from "@wix/seo"; const seoTagsServiceConfig = await loadSEOTagsServiceConfig({ pageUrl: Astro.url.href, itemType: seoTags.ItemType.BLOG_CATEGORY, itemData: { slug: Astro.params.slug! }, }); --- ``` ## Troubleshooting ### The dashboard shows no pages, or `/_wix/pages.json` is empty A route file is throwing when Wix imports it, and one failing route is enough to clear the whole list. The usual cause is reading `WIX_APPS` into a variable instead of referencing it directly inside the `wixMetadata` export (see [Step 2](#step-2--register-the-route)). Fix the export, then rebuild and redeploy. ### Item URLs are missing from the sitemap The route's `wixMetadata` is missing, or the key in `identifiers` doesn't match the route's filename parameter: use `handle` for `[handle].astro` and `slug` for `[slug].astro`. Confirm the route and its `identifiers` key in `/_wix/pages.json`. ### An item page shows a generic title `loadSEOTagsServiceConfig()` didn't resolve the item, so only the fallback tags render. Check that the URL returns `200` rather than `404`, that `itemType` matches the page type, and that `itemData.slug` is the item's real slug. ### Tags don't change during client-side navigation Server-rendered tags resolve once. To re-resolve them on client navigation, wrap the content in `` and call `updateSeoTags` with ``, as shown in [Step 5](#step-5--optional-update-tags-during-client-side-navigation). ## See also - [About SEO Support](https://dev.wix.com/docs/go-headless/wix-managed-headless/seo/about-seo-support.md) - [Elevate API Call Permissions](https://dev.wix.com/docs/go-headless/wix-managed-headless/authentication/elevate-api-call-permissions.md) --- > Portal Navigation: > > - Append `.md` to any URL under `https://dev.wix.com/docs/` to get its markdown version. > - Pages are either content pages (article or reference text) or menu pages (a list of links to child pages). > - To get a menu page, truncate any URL to a parent path and append `.md` (e.g. `https://dev.wix.com/docs/sdk.md`, `https://dev.wix.com/docs/sdk/core-modules.md`). > - Top-level index of all portals: https://dev.wix.com/docs/llms.txt > - Full concatenated docs: https://dev.wix.com/docs/llms-full.txt ## Resource: Add Multilingual Support ## Article: Add Multilingual Support ## Article Link: https://dev.wix.com/docs/go-headless/wix-managed-headless/feature-guides/add-multilingual-support.md ## Article Content: # Add Multilingual Support You can support multiple languages in your [Wix-managed headless project](https://dev.wix.com/docs/go-headless/wix-managed-headless/about-wix-managed-headless.md) with the `@wix/essentials` package, which uses static content translations. Use the Wix CLI to sync translation keys between your local codebase and the [Multilingual dashboard](https://www.wix.com/my-account/site-selector/?buttonText=Select%20Site&title=Select%20a%20Site&autoSelectOnSingleSite=true&actionUrl=https:%2F%2Fwww.wix.com%2Fdashboard%2F%7B%7BmetaSiteId%7D%7D%2Fwix-multilingual/manage-languages), and use `getTranslationFunction()` from `@wix/essentials` to retrieve translated values in your code. This way, content editors can manage translations without modifying your code. To add multilingual support to your headless site: 1. Set up the Wix Headless environment. 1. Define your source translations. 1. Push translation keys to the dashboard. 1. Add translations on the dashboard. 1. Pull translations to the site. 1. Use translations in your code. The end result is a multilingual site that displays translated content based on the visitor's language preferences. ## Step 1 | Set up the Wix Headless environment This step sets up a Wix Headless site with the necessary apps and packages for multilingual support. At the end of this step, you have a Wix Headless site with the **Wix Multilingual** app installed and the `@wix/essentials` package ready to use. To set up the Wix Headless environment: 1. [Create a Wix Headless site](https://dev.wix.com/docs/go-headless/get-started/quick-starts/wix-managed-headless/quick-start-with-the-wix-cli.md). 1. Install the [Wix Multilingual](https://www.wix.com/app-market/web-solution/wix-multilingual) app on your site. 1. Set up your [multilingual dashboard](https://support.wix.com/en/article/wix-multilingual-managing-your-languages). 1. Install the `@wix/essentials` package: ```bash npm install @wix/essentials ``` ## Step 2 | Define your source translations This step creates a JSON file where you define key-value pairs for your translations. The key is the translation key you use in your code to display translated text. The value is the text in the site's main language. At the end of this step, you have a `translations.json` file with your translation keys and source text. To define your source translations: 1. Create a file named `translations.json` in your `src` folder. 2. Add your translation keys and source text as key-value pairs: ```json { "title": "Welcome to My Shop", "subtitle": "Quality products for everyone", "checkout": "Continue to checkout" } ``` You can also add a grouping level to organize related translation keys: ```json { "hero": { "title": "Welcome to My Shop", "subtitle": "Quality products for everyone" }, "cart": { "checkout": "Continue to checkout" } } ``` ## Step 3 | Push translation keys to the dashboard This step uploads your translation keys to the **Multilingual dashboard** so content editors can add translations. At the end of this step, your translation keys appear on the dashboard ready for translation. To push translation keys to the dashboard, run the following command: ```bash npm run wix translation push ``` This command uploads the translation keys defined in `src/translations.json`, such as `checkout` or `hero.title`. The keys now appear in the **Multilingual** dashboard, where editors can add languages and input translations. ## Step 4 | Add translations to the dashboard This step adds translations for each language you want to support in the dashboard. At the end of this step, your translations are stored on the dashboard and ready to pull into your project. To add translations on the dashboard: 1. In the dashboard menu, click **Website Content**, then **Multilingual**. 1. Add the languages you want to support. 1. Hover over the language section and click **Edit Translations**. 1. In the **Translation Manager**, click **Headless**. 1. [Add translations](https://support.wix.com/en/article/wix-multilingual-using-the-translation-manager). 1. Click **Save and Publish**. ## Step 5 | Pull translations from the dashboard This step fetches the translations from the dashboard so you can use them in your app. At the end of this step, you have JSON files for each language stored locally in your project. To pull translations, run the following command: ```bash npm run wix translation pull ``` This command connects to the Wix Multilingual backend, downloads translation files for all enabled languages, and stores them in the `.wix/multilingual` folder. ## Step 6 | Modify astro.config.mjs In your `astro.config.mjs` file, update the `wix` object by adding `essentials: true` and `translations: true`: ```js wix({ htmlEmbeds: isBuild, auth: true, essentials: true, translations: true }) ``` ## Step 7 | Use translations in your code This step shows how to display translated content in your app using the `getTranslationFunction()` method. At the end of this step, your app displays content in the visitor's preferred language. To use translations in your code: 1. Import `i18n` from the `@wix/essentials` package: ```javascript import { i18n } from '@wix/essentials'; ``` 2. Initialize a translation helper function. The `getTranslationFunction()` method detects the site visitor's selected language and returns the appropriate translation. ```javascript export const useTranslation = () => { const t = i18n.getTranslationFunction(); return { t } }; ``` 3. In your page component file, call `useTranslation()` to get the translation function, and then get the translated text using a key path from your `translations.json` file: ```javascript const { t } = useTranslation(); const heroTitle = t('hero.title'); ``` **Full code example** ```javascript import { i18n } from '@wix/essentials'; export const useTranslation = () => { const t = i18n.getTranslationFunction(); return { t } }; // Call useTranslation() to get the translation function const { t } = useTranslation(); // Get translated text using the key path from the translation.json file const heroTitle = t('hero.title'); ``` Site visitors can now view your content in their preferred language. ## See also - [About the Multilingual APIs](https://dev.wix.com/docs/api-reference/business-management/multilingual/introduction.md) - [Wix Multilingual: Using the Translation Manager](https://support.wix.com/en/article/wix-multilingual-using-the-translation-manager) --- > Portal Navigation: > > - Append `.md` to any URL under `https://dev.wix.com/docs/` to get its markdown version. > - Pages are either content pages (article or reference text) or menu pages (a list of links to child pages). > - To get a menu page, truncate any URL to a parent path and append `.md` (e.g. `https://dev.wix.com/docs/sdk.md`, `https://dev.wix.com/docs/sdk/core-modules.md`). > - Top-level index of all portals: https://dev.wix.com/docs/llms.txt > - Full concatenated docs: https://dev.wix.com/docs/llms-full.txt ## Resource: Track Analytics Events ## Article: Track Analytics Events ## Article Link: https://dev.wix.com/docs/go-headless/wix-managed-headless/feature-guides/track-analytics-events.md ## Article Content: # Track Analytics Events You can track analytics events in your [Wix-managed headless project](https://dev.wix.com/docs/go-headless/wix-managed-headless/about-wix-managed-headless.md) using the `@wix/site` package. Use `trackEvent()` to send standard and custom events from your headless site. Events are sent to the Wix analytics infrastructure and can be forwarded to connected external platforms such as Google Analytics (GA4), Facebook Pixel, or Google Tag Manager. To track analytics events in a headless site: 1. Install the `@wix/site` package. 1. Track standard events. 1. Optionally, track custom events. 1. Connect external analytics platforms (optional). 1. Deploy your site. ## Prerequisites - A Wix-managed headless project. See [Quick Start a Headless Project](https://dev.wix.com/docs/wix-cli/guides/get-started/quick-start-a-headless-project.md). - A custom domain connected to your site. Analytics events are only delivered on sites with a custom domain. ## Step 1 | Install the `@wix/site` package Run the following command in your project directory: ```bash npm install @wix/site ``` Then import the `analytics` module in any file where you want to track events: ```javascript import { analytics } from "@wix/site"; ``` > **Note:** In Wix-managed headless, the CLI handles authentication automatically. You don't need to create a Wix client or configure OAuth — just import and call SDK methods directly. ## Step 2 | Track standard events Use [`trackEvent()`](https://dev.wix.com/docs/sdk/host-modules/site/analytics/track-event.md) to send standard analytics events. These events are recognized by external analytics platforms like Google Analytics and Facebook Pixel. The following standard events are supported: | Event Name | Description | |---|---| | `AddPaymentInfo` | Visitor saves payment information. | | `AddProductImpression` | Visitor views a product. | | `AddToCart` | Visitor adds a product to the cart. | | `CheckoutStep` | Visitor completes a checkout step. | | `ClickProduct` | Visitor clicks on a product. | | `CompleteRegistration` | Visitor completes registration. | | `InitiateCheckout` | Visitor starts the checkout process. | | `Lead` | Visitor submits a form or subscribes to a newsletter. | | `Purchase` | Customer completes a purchase. | | `RemoveFromCart` | Visitor removes a product from the cart. | | `Schedule` | Visitor schedules a meeting or appointment. | | `StartPayment` | Visitor starts the payment process. | | `ViewContent` | Visitor views a key page, such as a product page. | For a full reference of event properties, see [About Analytics Events](https://dev.wix.com/docs/sdk/host-modules/site/events/about-analytics-events.md). ### Examples **Track a product view:** ```javascript import { analytics } from "@wix/site"; analytics.trackEvent("ViewContent", { origin: "Stores", id: "df19c1f7-07d8-a265-42f8-e8dfa824cc6e", name: "Soundbeam ERD - 3083", price: 220, currency: "USD", category: "All Products" }); ``` **Track a completed purchase:** ```javascript import { analytics } from "@wix/site"; analytics.trackEvent("Purchase", { origin: "Stores", id: "df19c1f7-07d8-a265-42f8-e8dfa824cc6e", orderId: "d86d077c-c5d2-42c6-8b15-f5e26f276807", revenue: 93.6, currency: "USD", contents: [ { id: "P001", name: "Running Shoes", price: 93.6, quantity: 1 } ] }); ``` ## Step 3 | Track custom events (optional) You can also track custom events for business-specific actions not covered by the standard event types. Pass `"CustomEvent"` as the event name and include your custom data in the event data object: ```javascript import { analytics } from "@wix/site"; analytics.trackEvent("CustomEvent", { eventCategory: "User Engagement", eventAction: "Share Product", eventLabel: "Social Media" }); ``` Custom events are forwarded to connected analytics platforms along with the data you provide. ## Step 4 | Connect external analytics platforms (optional) To forward tracked events to an external analytics platform, connect one or more of the following from your site dashboard: - [Google Analytics](https://support.wix.com/en/article/tracking-events-on-your-wix-site-with-a-google-analytics-property) - [Facebook Pixel](https://support.wix.com/en/article/connecting-a-facebook-pixel-to-your-wix-site) - [Google Tag Manager](https://support.wix.com/en/article/connecting-google-tag-manager-to-your-wix-site) Once connected, standard and custom events sent with `trackEvent()` are forwarded to the platform automatically. ## Step 5 | Deploy your site Analytics events are only sent to the Wix analytics infrastructure on your deployed site. The analytics scripts that handle event delivery are injected during the production build. To build and deploy your site: ```bash wix build wix release ``` > **Note:** During local development with `wix dev`, `trackEvent()` calls execute without errors, but events aren't delivered to the analytics backend. To verify that events are being tracked, deploy your site and check your Wix dashboard analytics or connected external platform. ## See also - [`trackEvent()` API reference](https://dev.wix.com/docs/sdk/host-modules/site/analytics/track-event.md) - [About Analytics Events](https://dev.wix.com/docs/sdk/host-modules/site/events/about-analytics-events.md) - [Tracking Events on Your Wix Site with a Google Analytics Measurement ID](https://support.wix.com/en/article/tracking-events-on-your-wix-site-with-a-google-analytics-property) - [Connecting a Facebook Pixel to Your Wix Site](https://support.wix.com/en/article/connecting-a-facebook-pixel-to-your-wix-site) --- > Portal Navigation: > > - Append `.md` to any URL under `https://dev.wix.com/docs/` to get its markdown version. > - Pages are either content pages (article or reference text) or menu pages (a list of links to child pages). > - To get a menu page, truncate any URL to a parent path and append `.md` (e.g. `https://dev.wix.com/docs/sdk.md`, `https://dev.wix.com/docs/sdk/core-modules.md`). > - Top-level index of all portals: https://dev.wix.com/docs/llms.txt > - Full concatenated docs: https://dev.wix.com/docs/llms-full.txt ## Resource: Upload Images to CMS ## Article: Upload Images to CMS ## Article Link: https://dev.wix.com/docs/go-headless/wix-managed-headless/feature-guides/upload-images-to-cms.md ## Article Content: # Tutorial | Upload Images to CMS This tutorial shows you how to let site visitors upload an image to a site collection with the collection having restricted permissions for site visitors. > **Note:** We'll be storing image content as a data URL for simplicity. You can enhance the project by using the [Media Files API](https://dev.wix.com/docs/api-reference/assets/media/media-manager/files/introduction?apiView=SDK.md). The flow in this article uses: - A [Wix-managed headless project](https://dev.wix.com/docs/go-headless/wix-managed-headless/about-wix-managed-headless.md). - An [HTTP endpoint](https://dev.wix.com/docs/build-apps/develop-your-app/develop-an-app-with-the-cli/supported-extensions/backend/http-endpoints/about-http-endpoints.md). - [Data Items](https://dev.wix.com/docs/api-reference/business-solutions/cms/data-items/introduction.md) API. - [Elevation of API Calls](https://dev.wix.com/docs/go-headless/wix-managed-headless/authentication/elevate-api-call-permissions.md). The end result is an image upload function that validates input and inserts new CMS items. We'll use the following steps to build the upload flow: 1. Create a CMS collection for uploaded images. 1. Build a secure backend upload route. 1. Add a minimal frontend upload form. ## Before you begin It's important to note the following points: - You have a [headless project](https://dev.wix.com/docs/wix-cli/guides/get-started/quick-start-a-headless-project.md) setup completed. - You have a CMS collection named `uploadedimages`. ## Step 1 | Create the CMS collection schema In this step, you'll define the collection and fields in code. At the end of this step, your `uploadedimages` collection will match the payload inserted by the HTTP endpoint. To create the schema: 1. Create an `index.ts` file in the `/src/entities` folder. 1. Add fields that match your collection fields, for example: - `uploadedImage` - `imageTitle` - `uploaderName` - `submissionDateTime` - `isApproved` ```ts export interface UploadedImages { _id: string; _createdDate?: Date; _updatedDate?: Date; uploadedImage?: string; imageTitle?: string; uploaderName?: string; submissionDateTime?: Date | string; isApproved?: boolean; } ``` ## Step 2 | Build server logic for uploading images In this step, you'll create an HTTP endpoint that accepts images from visitors and writes validated data to a collection. At the end of this step, your code will: - Validate content type and required fields. - Insert an item using an elevated backend call. To build the logic: 1. Create the `upload-image.ts` file in the `src/pages/api` folder. 1. Import the packages: ```ts import type { APIRoute } from "astro"; import { items } from "@wix/data"; import { auth } from "@wix/essentials"; ``` 1. Add constants: ```ts const COLLECTION_ID = "uploadedimages"; const MAX_IMAGE_BYTES = 8 * 1024 * 1024; ``` 1. Add helper functions for safe responses: ```ts const json = (status: number, body: unknown) => new Response(JSON.stringify(body), { status, headers: { "content-type": "application/json" }, }); const badRequest = (message: string) => json(400, { error: message }); ``` 1. Add an HTTP endpoint: ```ts export const POST: APIRoute = async ({ request }) => {} ``` 1. Inside the HTTP endpoint define helper functions for JSON responses and request validation. ```ts const contentType = request.headers.get("content-type") ?? ""; if (!contentType.includes("application/json")) { return badRequest("Content-Type must be application/json."); } let payload: { uploadedImage?: unknown; imageTitle?: unknown; uploaderName?: unknown; }; try { payload = await request.json(); } catch { return badRequest("Request body must be valid JSON."); } const uploadedImage = typeof payload.uploadedImage === "string" ? payload.uploadedImage : ""; const parsedImage = parseImageDataUrl(uploadedImage); if (!parsedImage) return badRequest("uploadedImage must be a valid base64 data URL."); ``` 1. Elevate the `insert()` function from Data API: ```ts const elevatedInsert = auth.elevate(items.insert); ``` 1. Insert a new item after all validations pass: ```ts try { const createdItem = await elevatedInsert(COLLECTION_ID, { _id: crypto.randomUUID(), uploadedImage, imageTitle, uploaderName, submissionDateTime: new Date(), isApproved: false, }); return json(201, { success: true, itemId: createdItem?._id, }); } catch (error) { console.error("Elevated upload insert failed:", error); return json(500, { error: "Upload failed. Please try again.", }); } ``` ## Step 3 | Add a minimal frontend upload form In this step, you'll create a small form component that converts a selected file into a data URL and sends it to your backend. To add the frontend form: 1. Create a page component. 1. Add inputs for file, title, and uploader name. 1. Convert the file to a base64 data URL with `FileReader`. 1. Call you backend endpoint with `fetch`. ## Full backend code ```ts // src/pages/api/upload-image.ts import type { APIRoute } from "astro"; import { items } from "@wix/data"; import { auth } from "@wix/essentials"; const COLLECTION_ID = "uploadedimages"; const MAX_IMAGE_BYTES = 8 * 1024 * 1024; const json = (status: number, body: unknown) => new Response(JSON.stringify(body), { status, headers: { "content-type": "application/json" }, }); const badRequest = (message: string) => json(400, { error: message }); export const POST: APIRoute = async ({ request }) => { const contentType = request.headers.get("content-type") ?? ""; if (!contentType.includes("application/json")) { return badRequest("Content-Type must be application/json."); } let payload: { uploadedImage?: unknown; imageTitle?: unknown; uploaderName?: unknown; }; try { payload = await request.json(); } catch { return badRequest("Request body must be valid JSON."); } const uploadedImage = typeof payload.uploadedImage === "string" ? payload.uploadedImage : ""; const parsedImage = parseImageDataUrl(uploadedImage); if (!parsedImage) return badRequest("uploadedImage must be a valid base64 data URL."); const elevatedInsert = auth.elevate(items.insert); try { const createdItem = await elevatedInsert(COLLECTION_ID, { _id: crypto.randomUUID(), uploadedImage, imageTitle, uploaderName, submissionDateTime: new Date(), isApproved: false, }); return json(201, { success: true, itemId: createdItem?._id, }); } catch (error) { console.error("Elevated upload insert failed:", error); return json(500, { error: "Upload failed. Please try again.", }); } }; ``` ## Full frontend code ```tsx import { useState } from "react"; export default function UploadForm() { const [selectedFile, setSelectedFile] = useState(null); const [uploadedImage, setUploadedImage] = useState(""); const [imageTitle, setImageTitle] = useState(""); const [uploaderName, setUploaderName] = useState(""); const [error, setError] = useState(""); const handleFileChange = (e: React.ChangeEvent) => { const file = e.target.files?.[0]; if (!file) return; setSelectedFile(file); const reader = new FileReader(); reader.onloadend = () => setUploadedImage(String(reader.result ?? "")); reader.readAsDataURL(file); }; const handleSubmit = async (e: React.FormEvent) => { e.preventDefault(); setError(""); if (!selectedFile || !uploadedImage || !imageTitle || !uploaderName) { setError("Please fill in all fields and select an image."); return; } const response = await fetch("/api/upload-image", { method: "POST", headers: { "Content-Type": "application/json" }, body: JSON.stringify({ uploadedImage, imageTitle, uploaderName }), }); if (!response.ok) { const result = await response.json().catch(() => null); setError(result?.error ?? "Upload failed."); return; } setSelectedFile(null); setUploadedImage(""); setImageTitle(""); setUploaderName(""); }; return (
    setImageTitle(e.target.value)} /> setUploaderName(e.target.value)} /> {error ?

    {error}

    : null} ); } ``` ## See also - [Wix-managed headless project](https://dev.wix.com/docs/go-headless/wix-managed-headless/about-wix-managed-headless.md) - [About admin operations](https://dev.wix.com/docs/go-headless/self-managed-headless/authentication/about-admin-operations.md) - [Elevate API calls](https://dev.wix.com/docs/go-headless/wix-managed-headless/authentication/elevate-api-call-permissions.md) --- > Portal Navigation: > > - Append `.md` to any URL under `https://dev.wix.com/docs/` to get its markdown version. > - Pages are either content pages (article or reference text) or menu pages (a list of links to child pages). > - To get a menu page, truncate any URL to a parent path and append `.md` (e.g. `https://dev.wix.com/docs/sdk.md`, `https://dev.wix.com/docs/sdk/core-modules.md`). > - Top-level index of all portals: https://dev.wix.com/docs/llms.txt > - Full concatenated docs: https://dev.wix.com/docs/llms-full.txt ## Resource: Astro Templates ## Article: Wix CLI for Headless Templates ## Article Link: https://dev.wix.com/docs/go-headless/wix-managed-headless/wix-managed-templates/astro-templates.md ## Article Content: # Astro Templates for Wix-Managed Headless When you [create a new Wix headless project](https://dev.wix.com/docs/go-headless/cli-for-headless/get-started/quick-start.md) using the CLI, you can choose from several templates to jumpstart your development. Each template is built on Astro and pre-configured for a specific business solution or use case, helping you get up and running quickly with a tailored frontend and integrated Wix APIs. ## Templates | Template | Name | Use case | Key features | |---|---|---|---| | [Commerce (Wix Stores)](https://github.com/wix/headless-templates/tree/main/astro/commerce) | `commerce` | Online stores | Product catalog management, shopping cart, checkout flows, Wix Stores integration. | | [Scheduler (Wix Bookings)](https://github.com/wix/headless-templates/tree/main/astro/scheduler) | `scheduler` | Appointment-based businesses | Scheduling, bookings, Wix Bookings integration. | | [Registration (Wix Forms)](https://github.com/wix/headless-templates/tree/main/astro/registration) | `registration` | Data collection and registrations | Form submissions, user registration, Wix Forms integration. | | [Blank](https://github.com/wix/headless-templates/tree/main/astro/blank) | `blank` | Fully custom projects | Minimal starter template, essential project structure, no prebuilt business logic. | ## Get started Run the following command, replacing the value of `--site-template` with one of the template names from the table above (`commerce`, `scheduler`, `registration`, or `blank`). To use the blank starter, you can also pass bare `--site-template` with no value: ``` npm create @wix/new@latest -- headless \ --folder-name my-store \ --business-name "My Store" \ --site-template commerce ``` To learn more about the command and its other available flags, see [create headless](https://dev.wix.com/docs/wix-cli/command-reference/project-creation/create-headless.md). --- > Portal Navigation: > > - Append `.md` to any URL under `https://dev.wix.com/docs/` to get its markdown version. > - Pages are either content pages (article or reference text) or menu pages (a list of links to child pages). > - To get a menu page, truncate any URL to a parent path and append `.md` (e.g. `https://dev.wix.com/docs/sdk.md`, `https://dev.wix.com/docs/sdk/core-modules.md`). > - Top-level index of all portals: https://dev.wix.com/docs/llms.txt > - Full concatenated docs: https://dev.wix.com/docs/llms-full.txt ## Resource: About Self-Managed Headless ## Article: Overview ## Article Link: https://dev.wix.com/docs/go-headless/self-managed-headless/about-self-managed-headless.md ## Article Content: # About Self-Managed Headless Self-managed headless lets you build your frontend with any framework and connect it to Wix's backend using the JavaScript SDK or REST API. You handle configuration, authentication, and hosting yourself. This approach is relevant for integrating Wix business solutions into existing sites, using non-standard frameworks, or building highly customized solutions. > **Note:** For a simplified setup with managed hosting and authentication, see [Wix-managed headless](https://dev.wix.com/docs/go-headless/wix-managed-headless/about-wix-managed-headless.md).
    ## How it works A headless project is a Wix site that uses Wix's business management platform without necessarily using a Wix frontend. It appears in your Wix account alongside your sites, so you can manage everything in one place. There are two ways to start: - **New project**: [Create a headless project](https://dev.wix.com/docs/go-headless/get-started/quick-starts/self-managed-headless/quick-start-a-self-managed-headless-project.md), then connect your frontend to it. - **Existing Wix site**: You don't need a new project. [Set up a headless client](https://dev.wix.com/docs/go-headless/self-managed-headless/authentication/set-up-a-headless-client.md) to turn your existing site into the backend for one or more custom frontends. ## Authorization To call Wix APIs, your frontend (a "client") must be authorized. The strategy you choose depends on what you're building: - **Visitors and Members (OAuth)**: For a site or app used by customers, such as anonymous visitors and logged-in members. - **Admin (API Key)**: For a project with customized administrative access to your Wix account's sites and projects. You can use more than one strategy in the same project. To learn more, see [Authorization Strategies](https://dev.wix.com/docs/go-headless/self-managed-headless/authentication/about-authentication.md). ## Calling Wix APIs There are two ways to interact with the Wix platform from your frontend: - **[JavaScript SDK](https://dev.wix.com/docs/sdk.md)**: If you're coding in JavaScript. - **[REST API](https://dev.wix.com/docs/rest.md)**: If you're not coding in JavaScript. In some cases, you may want to use both. ## See also - [Quick Start a Self-Managed Headless Project](https://dev.wix.com/docs/go-headless/get-started/quick-starts/self-managed-headless/quick-start-a-self-managed-headless-project.md) - [Set Up a Headless Client](https://dev.wix.com/docs/go-headless/self-managed-headless/authentication/set-up-a-headless-client.md) - [Authorization Strategies](https://dev.wix.com/docs/go-headless/self-managed-headless/authentication/about-authentication.md) - [Invite collaborators](https://dev.wix.com/docs/go-headless/project-guides/project-management/invite-collaborators.md) --- > Portal Navigation: > > - Append `.md` to any URL under `https://dev.wix.com/docs/` to get its markdown version. > - Pages are either content pages (article or reference text) or menu pages (a list of links to child pages). > - To get a menu page, truncate any URL to a parent path and append `.md` (e.g. `https://dev.wix.com/docs/sdk.md`, `https://dev.wix.com/docs/sdk/core-modules.md`). > - Top-level index of all portals: https://dev.wix.com/docs/llms.txt > - Full concatenated docs: https://dev.wix.com/docs/llms-full.txt ## Resource: About Authentication ## Article: About Authentication ## Article Link: https://dev.wix.com/docs/go-headless/self-managed-headless/authentication/about-authentication.md ## Article Content: # About Authentication for Self-Managed Headless In self-managed headless projects, you must handle authentication manually. This article explains the identities and authentication strategies you need to implement. > **Note:** In [Wix-managed headless](https://dev.wix.com/docs/go-headless/wix-managed-headless/about-wix-managed-headless.md), if you build with [Wix's Astro integration](https://dev.wix.com/docs/go-headless/wix-managed-headless/authentication/about-the-astro-integration.md), the CLI handles visitor and member authentication automatically, so you don't configure OAuth or manage tokens yourself. With any other framework, you set up authentication as described here. ## Identities When you call a Wix API from your headless project, it's called by a specific [identity](https://dev.wix.com/docs/api-reference/articles/authentication/about-identities.md). Wix restricts some methods based on which identities can call them. Authorization notes in the API reference indicate when an identity restricts a method. A headless project can use the following identities: - Visitor - Member - API key admin ## Visitor and member authentication Operations that access or manage information relating to a current site visitor, such as adding items to the current visitor's cart, require OAuth. With OAuth, your site or app can recognize individual visitors and members using tokens to access their data. - **Visitors**: Wix generates tokens automatically since visitors don't need personal authentication. You also have the option to manually generate tokens. Learn how to implement visitor authentication using [the JavaScript SDK](https://dev.wix.com/docs/go-headless/self-managed-headless/authentication/visitors/handle-visitors-using-the-js-sdk.md) or [the REST API](https://dev.wix.com/docs/go-headless/self-managed-headless/authentication/visitors/handle-visitors-using-the-rest-api.md). - **Members**: Wix must verify their identity through a login process before generating member-specific tokens. Learn how to implement different [member login options](https://dev.wix.com/docs/go-headless/self-managed-headless/authentication/members/about-member-login.md). > **Note**: Visitor and member authentication requires only a client ID, not a client secret. You need a client secret only to perform [admin operations](https://dev.wix.com/docs/go-headless/get-started/about-admin-operations.md) using the OAuth `client_credentials` flow. ## Admin authentication For API calls that require administrative access, use an API key. With a Wix API key, you can grant a custom set of permissions to a site or app for accessing or managing business data, including members, orders, products, events, bookings, and more. Learn more about [admin operations](https://dev.wix.com/docs/go-headless/get-started/about-admin-operations.md). ## See also - [Create an OAuth app](https://dev.wix.com/docs/go-headless/self-managed-headless/authentication/oauth/about-oauth-authentication.md) - [Generate an API key](https://dev.wix.com/docs/go-headless/get-started/about-admin-operations.md) --- > Portal Navigation: > > - Append `.md` to any URL under `https://dev.wix.com/docs/` to get its markdown version. > - Pages are either content pages (article or reference text) or menu pages (a list of links to child pages). > - To get a menu page, truncate any URL to a parent path and append `.md` (e.g. `https://dev.wix.com/docs/sdk.md`, `https://dev.wix.com/docs/sdk/core-modules.md`). > - Top-level index of all portals: https://dev.wix.com/docs/llms.txt > - Full concatenated docs: https://dev.wix.com/docs/llms-full.txt ## Resource: Set Up a Headless Client ## Article: Create an OAuth App ## Article Link: https://dev.wix.com/docs/go-headless/self-managed-headless/authentication/set-up-a-headless-client.md ## Article Content: # Set Up a Headless Client Wix Headless uses [OAuth 2.0 for authorization and authentication](https://dev.wix.com/docs/go-headless/self-managed-headless/authentication/about-authentication.md#authentication-strategies) of [visitors](https://dev.wix.com/docs/go-headless/self-managed-headless/authentication/about-authentication.md#visitor) and [members](https://dev.wix.com/docs/go-headless/self-managed-headless/authentication/about-authentication.md#member). The OAuth protocol allows visitors or members to grant an external app or site (a "client") access to their data on a Wix project or site, without them needing to provide the client with their login credentials for the Wix project itself. You can add an OAuth app to an existing site or a [self-managed headless project](https://dev.wix.com/docs/go-headless/get-started/quick-starts/self-managed-headless/quick-start-a-self-managed-headless-project.md). The setup process is the same for both. You can either add an OAuth app programmatically by calling [Create OAuth App](https://dev.wix.com/docs/api-reference/business-management/headless/oauth-apps/create-oauth-app.md) or manually through the UI. This enables headless functionality by allowing external sites or apps to securely access your project data using Wix APIs. Create an OAuth app for each client that you want to interact with your project. For example, if you're creating a site and a mobile app, create 2 OAuth apps, one for the site and the other for the mobile app. To create an OAuth app through the UI: 1. In your project dashboard, go to **Settings** > **Development & integrations** > [**Headless Settings**](https://www.wix.com/my-account/site-selector/?buttonText=Select%20Site&title=Select%20a%20Site&autoSelectOnSingleSite=true&actionUrl=https:%2F%2Fwww.wix.com%2Fdashboard%2F%7B%7BmetaSiteId%7D%7D%2Foauth-apps-settings). 2. In the **Headless clients** section, click **Create New Client** to create an OAuth app for your client. ![Click create new client](https://wixmp-833713b177cebf373f611808.wixmp.com/images/921e3baf09a218de0dbeb8f1b7178567.png) 3. Enter a name for the OAuth app in the **Client name** field. Choose a name that identifies the client clearly. For example, if the client is a fitness-related smartwatch app, you can name the OAuth app "Smartwatch Gym Client App". Once you enter a name, select the client type and click **Create & Continue**. ![Enter name and description](https://wixmp-833713b177cebf373f611808.wixmp.com/images/5bb7584905dbaa6d0972cc215afbfb31.png) 4. Select the stack you're using to call Wix APIs. ![Select your stack](https://wixmp-833713b177cebf373f611808.wixmp.com/images/91d5e279c4164a03dd3a8b8111fcd3b3.png) Once you select the stack, the modal expands to display code snippets for 5 apps built by Wix. Each code snippet is customized for the stack that you choose. You can copy these snippets to help you get started working with Wix APIs. ![Code snippets example](https://wixmp-833713b177cebf373f611808.wixmp.com/images/10a03aebad903eaa44234f772c5a2b3d.png) Once you choose your stack and copy any snippets you need, click **Continue**. 5. Click **View Your Setup** to close the modal and view your project's **Headless Settings**. Optionally, you can test out API calls using one of the 2 options displayed: - **Test API calls in the JavaScript playground:** Clicking **Open Playground** opens a new modal that lets you select different APIs and methods, and test out calls to them using the client ID you just created. - **See an example site in CodeSandbox**: Clicking **Go to Sandbox** opens a new tab with a CodeSandbox project. The project contains complete code that makes calls to various APIs like eCommerce and Bookings. You can copy code straight from the example, or fork the project to start editing and testing your own code. ![Choose a testing tool](https://wixmp-833713b177cebf373f611808.wixmp.com/images/9434269549aebd7477b700e230b098d2.png) 6. In the **Headless clients** section, your new OAuth app now appears with the client ID. Copy the **Client ID** and use it to connect and authenticate with your Wix project from a client. You can also retrieve the client ID later by returning to the [**Headless Settings**](https://www.wix.com/my-account/site-selector/?buttonText=Select%20Site&title=Select%20a%20Site&autoSelectOnSingleSite=true&actionUrl=https:%2F%2Fwww.wix.com%2Fdashboard%2F%7B%7BmetaSiteId%7D%7D%2Foauth-apps-settings) page. 7. Many external client sites redirect visitors to Wix-hosted pages for processes such as authentication and checkout. Wix then returns the visitor to the external site. To protect data security, Wix only ever redirects visitors to site addresses you approve in the **URLs** section. Therefore, if you want your external site to redirect to Wix-hosted pages, you need to provide approval for the following URLs: - [**Allow Redirect Domains**](https://dev.wix.com/docs/go-headless/project-guides/wix-hosted-pages/add-allowed-redirect-domains.md): Domains that Wix can redirect visitors to from Wix-hosted pages. - [**Login URL**](https://dev.wix.com/docs/go-headless/self-managed-headless/authentication/members/custom-login-page/custom-login/set-a-login-url.md): URL of your custom login interface, if you will develop one. - [**Allow Authorization Redirect URIs**](https://dev.wix.com/docs/go-headless/self-managed-headless/authentication/members/add-allowed-authorization-redirect-uris.md): URIs that Wix can redirect members back to after they complete the authorization process. > **Note:** Return to [**Headless Settings**](https://www.wix.com/my-account/site-selector/?buttonText=Select%20Site&title=Select%20a%20Site&autoSelectOnSingleSite=true&actionUrl=https:%2F%2Fwww.wix.com%2Fdashboard%2F%7B%7BmetaSiteId%7D%7D%2Foauth-apps-settings) to see a list of clients authorized for your project, to retrieve a client ID, or to edit settings. --- > Portal Navigation: > > - Append `.md` to any URL under `https://dev.wix.com/docs/` to get its markdown version. > - Pages are either content pages (article or reference text) or menu pages (a list of links to child pages). > - To get a menu page, truncate any URL to a parent path and append `.md` (e.g. `https://dev.wix.com/docs/sdk.md`, `https://dev.wix.com/docs/sdk/core-modules.md`). > - Top-level index of all portals: https://dev.wix.com/docs/llms.txt > - Full concatenated docs: https://dev.wix.com/docs/llms-full.txt ## Resource: About OAuth Authentication ## Article: About OAuth Authentication ## Article Link: https://dev.wix.com/docs/go-headless/self-managed-headless/authentication/oauth/about-oauth-authentication.md ## Article Content: # About OAuth Authentication > **Note:** If you build with [Wix's Astro integration](https://dev.wix.com/docs/go-headless/wix-managed-headless/authentication/about-the-astro-integration.md), OAuth is handled automatically. With any other framework, set up OAuth as described here. OAuth is the authentication protocol used for visitor and member authentication in headless projects. It allows your site or app to recognize individual visitors and members using tokens, enabling access to visitor-specific data like shopping carts, order history, and profile information. For administrative operations like adding products or managing orders, use an [API key](https://dev.wix.com/docs/go-headless/self-managed-headless/authentication/about-admin-operations.md) instead. ## See also - [Create a Client for Authentication with OAuth](https://dev.wix.com/docs/go-headless/self-managed-headless/authentication/oauth/create-a-client-for-authentication-with-oauth.md) - [Make REST API Calls Using OAuth](https://dev.wix.com/docs/go-headless/self-managed-headless/authentication/oauth/make-rest-api-calls-using-oauth.md) --- > Portal Navigation: > > - Append `.md` to any URL under `https://dev.wix.com/docs/` to get its markdown version. > - Pages are either content pages (article or reference text) or menu pages (a list of links to child pages). > - To get a menu page, truncate any URL to a parent path and append `.md` (e.g. `https://dev.wix.com/docs/sdk.md`, `https://dev.wix.com/docs/sdk/core-modules.md`). > - Top-level index of all portals: https://dev.wix.com/docs/llms.txt > - Full concatenated docs: https://dev.wix.com/docs/llms-full.txt ## Resource: Create a Client for Authentication with OAuth ## Article: Create a Client with OAuth ## Article Link: https://dev.wix.com/docs/go-headless/self-managed-headless/authentication/oauth/create-a-client-for-authentication-with-oauth.md ## Article Content: # Create a Client for Authentication with OAuth > **Note:** This article is relevant for [self-managed headless projects](https://dev.wix.com/docs/go-headless/self-managed-headless/about-self-managed-headless.md), and for [Wix-managed headless projects](https://dev.wix.com/docs/go-headless/wix-managed-headless/about-wix-managed-headless.md) built with a framework other than Astro. If you build with [Wix's Astro integration](https://dev.wix.com/docs/go-headless/wix-managed-headless/authentication/about-the-astro-integration.md), authentication is handled automatically, so you don't need to create an OAuth client yourself. After you [create an OAuth app](https://dev.wix.com/docs/go-headless/self-managed-headless/authentication/set-up-a-headless-client.md) for your client site or app in your project dashboard, you can begin coding by installing the Wix JavaScript SDK, importing modules in your code, and creating an SDK client.
    **Important:** To implement this flow, you must install Node.js version 18 or higher.
    ## Step 1 | Install packages Install `@wix/sdk` and the packages for the domain-specific APIs you wish to work with. Domain-specific packages follow the naming convention `@wix/{domain}`. For example: ```console npm install @wix/sdk npm install @wix/bookings npm install @wix/stores ``` or ```console yarn add @wix/sdk yarn add @wix/bookings yarn add @wix/stores ``` ## Step 2 | Import modules in your code To use the APIs you have installed, import `createClient` from the `@wix/sdk` package along with an authentication strategy, and import functionality from the desired domain-specific packages you installed. For example: ```js import { createClient, OAuthStrategy } from '@wix/sdk'; import { availabilityCalendar, services } from '@wix/bookings'; import { products } from '@wix/stores'; ``` Make sure to import both `createClient` and `OAuthStrategy` from `@wix/sdk`. ## Step 3 | Create a client > **Note:** Visitor and member authentication requires only a client ID, not a client secret. You need a client secret only to perform [admin operations](https://dev.wix.com/docs/go-headless/get-started/about-admin-operations.md) using the OAuth `client_credentials` flow. To get started connecting to a Wix project, use the [`createClient()`](https://dev.wix.com/docs/sdk/core-modules/sdk/wix-client.md) method imported from the `@wix/sdk` package to create a new client. For example: ```js const myWixClient = createClient({ modules: { products, services }, auth: OAuthStrategy({ clientId: '', tokens: { accessToken: { value: '', expiresAt: '' }, refreshToken: { value: '' } } }) }) ``` Pass the modules you want to use and authorization information when creating the client. - The `modules` property contains key:value pairs. Each value is an imported module you wish to enable in the client, and the key defines the name to use for working with that module. - The `auth` property contains the authentication method and credentials for connecting with your Wix project. To use the OAuth authentication strategy, call `OAuthStrategy()` with an object containing: - `clientId`: The **Client ID** of your OAuth app. You can find this value in your [**Headless Settings**](https://www.wix.com/my-account/site-selector/?buttonText=Select%20Site&title=Select%20a%20Site&autoSelectOnSingleSite=true&actionUrl=https:%2F%2Fwww.wix.com%2Fdashboard%2F%7B%7BmetaSiteId%7D%7D%2Foauth-apps-settings). If you haven't created an OAuth app yet, see [Set Up a Headless Client](https://dev.wix.com/docs/go-headless/self-managed-headless/authentication/set-up-a-headless-client.md). - `tokens`: Optional. An object containing access and refresh tokens for a site visitor or member. If you pass tokens, every call made by the client uses these tokens to maintain a persistent session.
    **Tip:** Create your client once and reuse it throughout your app to maintain authentication state.
    ## Step 4 | Call APIs with a client After creating a client, you can use it to call APIs. For example: ```js const { items } = await myWixClient.products.queryProducts({}); ``` ## Step 5 | Work with visitor or member sessions Often, you will need to maintain a persistent session to work with site or app visitors and members. Sessions are maintained using tokens. Most of the token management is handled by the client object, but there is some work you need to do, which differs depending on your situation. - To handle site visitor sessions, see [Handle Visitors](https://dev.wix.com/docs/go-headless/self-managed-headless/authentication/visitors/handle-visitors-using-the-js-sdk.md). - To handle member sessions with a Wix login page, see [Handle Members with Managed Login](https://dev.wix.com/docs/go-headless/self-managed-headless/authentication/members/wix-login-page/wix-managed-login-using-the-js-sdk.md). - To handle member sessions with a custom login page, see [Handle Members with Custom Login](https://dev.wix.com/docs/go-headless/self-managed-headless/authentication/members/custom-login-page/custom-login/custom-login-using-the-js-sdk.md). - To handle member sessions with an external identity provider, see [Handle Members with Externally-Managed Login](https://dev.wix.com/docs/go-headless/self-managed-headless/authentication/members/externally-managed-login-page/handle-members-with-externally-managed-login.md). - For a complete list of available methods, see the [OAuthStrategy reference](https://dev.wix.com/docs/sdk/core-modules/sdk/oauth-strategy.md). --- > Portal Navigation: > > - Append `.md` to any URL under `https://dev.wix.com/docs/` to get its markdown version. > - Pages are either content pages (article or reference text) or menu pages (a list of links to child pages). > - To get a menu page, truncate any URL to a parent path and append `.md` (e.g. `https://dev.wix.com/docs/sdk.md`, `https://dev.wix.com/docs/sdk/core-modules.md`). > - Top-level index of all portals: https://dev.wix.com/docs/llms.txt > - Full concatenated docs: https://dev.wix.com/docs/llms-full.txt ## Resource: Make REST API Calls Using OAuth ## Article: Make API Calls with OAuth ## Article Link: https://dev.wix.com/docs/go-headless/self-managed-headless/authentication/oauth/make-rest-api-calls-using-oauth.md ## Article Content: # Make REST API Calls Using OAuth > **Note:** This article is relevant for [self-managed headless projects](https://dev.wix.com/docs/go-headless/self-managed-headless/about-self-managed-headless.md), and for [Wix-managed headless projects](https://dev.wix.com/docs/go-headless/wix-managed-headless/about-wix-managed-headless.md) built with a framework other than Astro. If you build with [Wix's Astro integration](https://dev.wix.com/docs/go-headless/wix-managed-headless/authentication/about-the-astro-integration.md), authentication is handled automatically. After you set up [an OAuth app](https://dev.wix.com/docs/go-headless/self-managed-headless/authentication/oauth/about-oauth-authentication.md) for your site or app in your project dashboard, you can begin coding by getting OAuth tokens and using them to make API calls. ## Step 1 | Generate tokens There are several ways to generate tokens. Which way you choose depends on the type of user you need tokens for and whether you use a Wix login page or a custom login for members. - **Visitors**: To generate tokens for visitors who aren't logged into your site or app, see [Handle Visitors](https://dev.wix.com/docs/go-headless/self-managed-headless/authentication/visitors/handle-visitors-using-the-rest-api.md). - **Members with a Wix login page**: To generate tokens for logged in members using a Wix login page, see [Handle Members with Managed Login](https://dev.wix.com/docs/go-headless/self-managed-headless/authentication/members/wix-login-page/wix-managed-login-using-the-rest-api.md). - **Members with a custom login page**: To generate tokens for logged in members using a custom login page, see [Handle Members with Custom Login](https://dev.wix.com/docs/go-headless/self-managed-headless/authentication/members/custom-login-page/custom-login/custom-login-using-the-rest-api.md). When you generate tokens with any of the above methods, you get two tokens: - **Access token**: Access tokens are used to authorize API calls. Every time you make an API call, you need to authorize the call using a valid access token. Access tokens are short-lived. They are valid for 4 hours from the time they are created. - **Refresh token**: Refresh tokens are used to get new access tokens after your access tokens have expired. Refresh tokens are long-lived. ## Step 2 | Make an API call Once you have your tokens, you can use them to make API calls. Use the access token in the authorization header when making an API call. ```sh curl POST \ 'https://www.wixapis.com/stores/v1/products/query' \ -H 'Content-Type: application/json' \ -H 'Authorization: ' \ -d '{ "includeVariants": true }' ``` --- > Portal Navigation: > > - Append `.md` to any URL under `https://dev.wix.com/docs/` to get its markdown version. > - Pages are either content pages (article or reference text) or menu pages (a list of links to child pages). > - To get a menu page, truncate any URL to a parent path and append `.md` (e.g. `https://dev.wix.com/docs/sdk.md`, `https://dev.wix.com/docs/sdk/core-modules.md`). > - Top-level index of all portals: https://dev.wix.com/docs/llms.txt > - Full concatenated docs: https://dev.wix.com/docs/llms-full.txt ## Resource: About Handling Visitors ## Article: About Handling Visitors ## Article Link: https://dev.wix.com/docs/go-headless/self-managed-headless/authentication/visitors/about-handling-visitors.md ## Article Content: # About Handling Visitors > **Note**: If you build with [Wix's Astro integration](https://dev.wix.com/docs/go-headless/wix-managed-headless/authentication/about-the-astro-integration.md), you don't need to handle visitor tokens manually because the CLI generates and manages them for you. Otherwise, handle them as described here. Visitor tokens maintain anonymous visitor sessions, allowing you to track visitor-specific data like shopping cart contents across page visits. Without them, each API call is treated as a new visitor and session data is lost. When you create a Wix client, visitor tokens are generated automatically. To persist sessions across page loads, store and restore tokens yourself. For implementation details, see [Handle visitors using the JavaScript SDK](https://dev.wix.com/docs/go-headless/self-managed-headless/authentication/visitors/handle-visitors-using-the-js-sdk.md) or [Handle visitors using the REST API](https://dev.wix.com/docs/go-headless/self-managed-headless/authentication/visitors/handle-visitors-using-the-rest-api.md). ## See also - [Create a Client for Authentication with OAuth](https://dev.wix.com/docs/go-headless/self-managed-headless/authentication/oauth/create-a-client-for-authentication-with-oauth.md) - [Make REST API Calls Using OAuth](https://dev.wix.com/docs/go-headless/self-managed-headless/authentication/oauth/make-rest-api-calls-using-oauth.md) --- > Portal Navigation: > > - Append `.md` to any URL under `https://dev.wix.com/docs/` to get its markdown version. > - Pages are either content pages (article or reference text) or menu pages (a list of links to child pages). > - To get a menu page, truncate any URL to a parent path and append `.md` (e.g. `https://dev.wix.com/docs/sdk.md`, `https://dev.wix.com/docs/sdk/core-modules.md`). > - Top-level index of all portals: https://dev.wix.com/docs/llms.txt > - Full concatenated docs: https://dev.wix.com/docs/llms-full.txt ## Resource: Handle Visitors Using the JS SDK ## Article: Handle Visitors ## Article Link: https://dev.wix.com/docs/go-headless/self-managed-headless/authentication/visitors/handle-visitors-using-the-js-sdk.md ## Article Content: # Handle Visitors with the JavaScript SDK > **Note:** This article is relevant for [self-managed headless projects](https://dev.wix.com/docs/go-headless/self-managed-headless/about-self-managed-headless.md), and for [Wix-managed headless projects](https://dev.wix.com/docs/go-headless/wix-managed-headless/about-wix-managed-headless.md) built with a framework other than Astro. If you build with [Wix's Astro integration](https://dev.wix.com/docs/go-headless/wix-managed-headless/authentication/about-the-astro-integration.md), the CLI generates and manages visitor tokens for you automatically. Use visitor tokens to maintain anonymous visitor sessions in your self-managed headless project. The SDK uses these tokens when making requests to Wix APIs on behalf of a visitor, preserving their data such as cart items or event reservations.
    ## Step 1 | Create a client Create a Wix client with the [OAuth strategy](https://dev.wix.com/docs/sdk/core-modules/sdk/oauth-strategy.md). Before creating the client, check your storage for tokens from a previous session: - **Returning visitor:** Tokens exist in storage. Pass them to the client to resume the previous session. - **New visitor:** No tokens found. Omit tokens when creating the client and generate new tokens as described in [Step 2](#step-2--generate-visitor-tokens). ```javascript import { createClient, OAuthStrategy } from "@wix/sdk"; // Retrieve tokens from storage (see Step 3 for storage options) const storedTokens = yourGetStoredTokensMethod(); const wixClient = createClient({ auth: OAuthStrategy({ clientId: "", // Pass tokens if they exist, otherwise omit to start a new session. tokens: storedTokens ?? undefined, }), }); ``` > **Note:** Visitor and member authentication requires only a client ID, not a client secret. You need a client secret only to perform [admin operations](https://dev.wix.com/docs/go-headless/get-started/about-admin-operations.md) using the OAuth `client_credentials` flow. ## Step 2 | Generate visitor tokens Call [generateVisitorTokens()](https://dev.wix.com/docs/sdk/core-modules/sdk/oauth-strategy.md) and store tokens to persist the session. - **Returning visitor:** Visitor tokens expire after 4 hours, so you must ensure the stored tokens are still valid. The method returns the same tokens if they're still valid, or renewed tokens if they've expired. - **New visitor:** The method creates tokens for a new session. Alternatively, the client creates them automatically on your first [API call](#step-4--make-api-calls). Calling `generateVisitorTokens()` initially lets you persist tokens if the app reloads before making your first API call. ```javascript //storedTokens are undefined for new visitors const tokens = await wixClient.auth.generateVisitorTokens(storedTokens); yourStoreTokensMethod(tokens); // See Step 3 for implementation options ``` ## Step 3 | Save tokens to persist the session To persist a visitor's session across page reloads or app restarts, save the tokens to local storage, a cookie, or a file. Retrieve the active tokens with [getTokens()](https://dev.wix.com/docs/sdk/core-modules/sdk/oauth-strategy.md). ```javascript const tokens = wixClient.auth.getTokens(); ``` The method returns an object in this format: ```javascript { accessToken: { value: "OauthNG.JWS.eyJraWQiOi...3NbrhrauQ", expiresAt: 1677581109 }, refreshToken: { value: "JWS.eyJraWQiOiJZSEJzdUpwSCIsImFsZyI6IkhTMjU2In0.eyJkYXRhIjoiXCJkMDY4OTM4OS1kNTExLTRlYWMtYThjZC03MWQwMzA1NGIxM2NcIiIsImlhdCI6MTY3NzU2NjcwOSwiZXhwIjoxNzA5MTAyNzA5fQ.w2D7wECX_T-XfRzP4pXSoH8XSdHFBPnKx50FYzftRdc", role: "visitor" } } ``` Save the tokens to your preferred storage: ```javascript // Browser: Save to localStorage localStorage.setItem("wixSession", JSON.stringify(tokens)); // Browser: Save to a cookie document.cookie = `wixSession=${encodeURIComponent(JSON.stringify(tokens))}; path=/; max-age=31536000`; // Server-side: Save to your session store or database // The implementation depends on your stack (for example, Redis, a database, or your framework's session layer). await saveTokensToSession(userId, tokens); ``` ## Step 4 | Make API calls Call Wix API methods using your client. > **Note:** If you create the client without tokens or skip [Step 2](#step-2--generate-visitor-tokens), the client generates tokens automatically on your first API call. Make sure to retrieve and save the tokens as described in [Step 3](#step-3--save-tokens-to-persist-the-session). ```javascript // Make API calls const { products } = await wixClient.productsV3.searchProducts({ filter: { name: { $startsWith: "shoes" } }, cursorPaging: { limit: 4 }, }); // The visitor's cart is preserved across sessions const cart = await wixClient.currentCart.getCurrentCart(); ``` ## Example The following example shows the complete visitor session flow, from creating a client to making API calls: ```javascript import { createClient, OAuthStrategy } from "@wix/sdk"; import { currentCart } from "@wix/ecom"; import { productsV3 } from "@wix/stores"; // Retrieve tokens from a previous session, if they exist const storedTokens = localStorage.getItem("wixSession") ? JSON.parse(localStorage.getItem("wixSession")) : undefined; // Create a client - resume the previous session if tokens exist, or start a new one const wixClient = createClient({ modules: { currentCart, productsV3 }, auth: OAuthStrategy({ clientId: "", tokens: storedTokens ?? undefined, }), }); // Generate, validate, or renew visitor tokens const tokens = await wixClient.auth.generateVisitorTokens(storedTokens); //Store tokens to persist the current session localStorage.setItem("wixSession", JSON.stringify(tokens)); // Make API calls const { products } = await wixClient.productsV3.searchProducts({ filter: { name: { $startsWith: "shoes" } }, cursorPaging: { limit: 4 }, }); // The visitor's cart is preserved across sessions const cart = await wixClient.currentCart.getCurrentCart(); ``` ## Manage tokens manually In most cases, the client manages tokens automatically. Use these methods when you need manual control. ### Set tokens on an existing client If you already have a client instance and need to set tokens on it later, use [setTokens()](https://dev.wix.com/docs/sdk/core-modules/sdk/oauth-strategy.md): ```javascript const savedTokens = JSON.parse(localStorage.getItem("wixSession")); wixClient.auth.setTokens(savedTokens); ``` Once tokens are set, the visitor's data is preserved. For example, items added to a cart or tickets reserved are reflected in future API calls. ### Generate tokens explicitly Call [generateVisitorTokens()](https://dev.wix.com/docs/sdk/core-modules/sdk/oauth-strategy.md) to create tokens before making any API calls: ```javascript const tokens = await wixClient.auth.generateVisitorTokens(); ``` ### Validate or renew existing tokens Pass existing tokens to `generateVisitorTokens()` to confirm they're valid or renew them if expired: ```javascript const refreshedTokens = await wixClient.auth.generateVisitorTokens(existingTokens); ``` The method returns: - The same tokens if the access token is still valid. - A new access token if the access token expired but the refresh token is valid. - New access and refresh tokens if the refresh token is invalid. ### Force token renewal Use [renewToken()](https://dev.wix.com/docs/sdk/core-modules/sdk/oauth-strategy.md) to generate a new access token without checking if the current one is valid: ```javascript const tokens = wixClient.auth.getTokens(); const newTokens = await wixClient.auth.renewToken(tokens.refreshToken); ``` ### Check login status Use [loggedIn()](https://dev.wix.com/docs/sdk/core-modules/sdk/oauth-strategy.md) to check if the current visitor is a logged-in member: ```javascript const isLoggedIn = wixClient.auth.loggedIn(); // Returns false for anonymous visitors, true for logged-in members ``` ## See also - [About Handling Visitors](https://dev.wix.com/docs/go-headless/self-managed-headless/authentication/visitors/about-handling-visitors.md) - [OAuthStrategy API Reference](https://dev.wix.com/docs/sdk/core-modules/sdk/oauth-strategy.md) - [Handle Members with a Custom Login Page](https://dev.wix.com/docs/go-headless/self-managed-headless/authentication/members/custom-login-page/custom-login/custom-login-using-the-js-sdk.md) --- > Portal Navigation: > > - Append `.md` to any URL under `https://dev.wix.com/docs/` to get its markdown version. > - Pages are either content pages (article or reference text) or menu pages (a list of links to child pages). > - To get a menu page, truncate any URL to a parent path and append `.md` (e.g. `https://dev.wix.com/docs/sdk.md`, `https://dev.wix.com/docs/sdk/core-modules.md`). > - Top-level index of all portals: https://dev.wix.com/docs/llms.txt > - Full concatenated docs: https://dev.wix.com/docs/llms-full.txt ## Resource: Handle Visitors Using the REST API ## Article: Handle Visitors ## Article Link: https://dev.wix.com/docs/go-headless/self-managed-headless/authentication/visitors/handle-visitors-using-the-rest-api.md ## Article Content: # Handle Visitors Using the REST API > **Note:** This article is relevant for [self-managed headless projects](https://dev.wix.com/docs/go-headless/self-managed-headless/about-self-managed-headless.md), and for [Wix-managed headless projects](https://dev.wix.com/docs/go-headless/wix-managed-headless/about-wix-managed-headless.md) built with a framework other than Astro. If you build with [Wix's Astro integration](https://dev.wix.com/docs/go-headless/wix-managed-headless/authentication/about-the-astro-integration.md), the CLI generates and manages visitor tokens for you automatically. In order to handle [anonymous visitor sessions](https://dev.wix.com/docs/go-headless/self-managed-headless/authentication/about-authentication.md#visitor) you need to generate, manage, and use visitor tokens. Use these tokens when making requests to Wix APIs on behalf of a visitor to maintain the visitor's session. ## Step 1 | Generate new visitor tokens > **Note**: Visitor and member authentication requires only a client ID, not a client secret. You need a client secret only to perform [admin operations](https://dev.wix.com/docs/go-headless/get-started/about-admin-operations.md) using the OAuth `client_credentials` flow. Generate new visitor tokens using the `Token` endpoint. When calling the `Token` endpoint, send the following parameters: - **`clientId`**: The **Client ID** of your OAuth app, which can be found in your project's [**Headless Settings**](https://www.wix.com/my-account/site-selector/?buttonText=Select%20Site&title=Select%20a%20Site&autoSelectOnSingleSite=true&actionUrl=https:%2F%2Fwww.wix.com%2Fdashboard%2F%7B%7BmetaSiteId%7D%7D%2Foauth-apps-settings). - **`grantType`**: Set as `"anonymous"` to get visitor tokens. ```shell curl --location 'https://www.wixapis.com/oauth2/token' \ --header 'Content-Type: application/json' \ --data '{ "clientId": "", "grantType": "anonymous" }' ``` > **Note**: You can also get tokens using URL-encoded data instead of JSON data. > > ```shell > curl --location 'https://www.wixapis.com/oauth2/token' \ > --header 'Content-Type: application/x-www-form-urlencoded' \ > --data-urlencode 'client_id=' \ > --data-urlencode 'grant_type=anonymous' > ``` The `Token` endpoint responds with: - **`access_token`**: An access token used to authorize API calls. - **`expires_in`**: The number of seconds before the access token expires. Access tokens expire after 4 hours (14,400 seconds). - **`refresh_token`**: A refresh token used to get a new access token. ```json { "access_token": "OauthNG.JWS.eyJraWQiOiJZSEJzdUpwSCIsImFsZyI6IkhTMjU2In0...", "token_type": "Bearer", "expires_in": 14400, "refresh_token": "JWS.eyJraWQiOiJZSEJzdUpwSCIsImFsZyI6IkhTMjU2In0..." } ``` Once you have tokens, you can use them to make [authenticated calls to APIs](https://dev.wix.com/docs/go-headless/self-managed-headless/authentication/oauth/make-rest-api-calls-using-oauth.md) on behalf of the current visitor. ## Step 2 | Store tokens for later If you want to be able to restore the current session at some point later, store your visitor tokens locally, for example in [`localStorage`](https://developer.mozilla.org/en-US/docs/Web/API/Window/localStorage), a [cookie](https://developer.mozilla.org/en-US/docs/Web/API/Document/cookie), or a local file. For example, after generating a visitor token, you can store it in a cookie with a max age of 4 hours. Then, before making API calls, try reading the token from the cookie. - If the cookie still exists, you can use the access token you stored in the cookie to make the API call. - If the cookie no longer exists, you can use your refresh token to [renew your visitor tokens](#renew-visitor-tokens), and then make the API call with the new access token. ## Renew visitor tokens To renew visitor tokens, call the `Token` endpoint again, this time with the following parameters: - **`refresh_token`**: The refresh token returned from the previous call to the `Token` endpoint. - **`grantType`**: Set as `"refresh_token"` to get renewed visitor tokens based off your current refresh token. ```shell curl --location 'https://www.wixapis.com/oauth2/token' \ --header 'Content-Type: application/json' \ --data '{ "refresh_token": "", "grantType": "refresh_token" }' ``` The `Token` endpoint responds with: - **`access_token`**: An access token used to authorize API calls. - **`expires_in`**: The number of seconds before the access token expires. Access tokens expire after 4 hours (14,400 seconds). - **`refresh_token`**: A refresh token used to get a new access token. ```json { "access_token": "OauthNG.JWS.eyJraWQiOiJZSEJzdUpwSCIsImFsZyI6IkhTMjU2In0...", "token_type": "Bearer", "expires_in": 14400, "refresh_token": "JWS.eyJraWQiOiJZSEJzdUpwSCIsImFsZyI6IkhTMjU2In0..." } ``` ## See also - [About Handling Visitors](https://dev.wix.com/docs/go-headless/self-managed-headless/authentication/visitors/about-handling-visitors.md) --- > Portal Navigation: > > - Append `.md` to any URL under `https://dev.wix.com/docs/` to get its markdown version. > - Pages are either content pages (article or reference text) or menu pages (a list of links to child pages). > - To get a menu page, truncate any URL to a parent path and append `.md` (e.g. `https://dev.wix.com/docs/sdk.md`, `https://dev.wix.com/docs/sdk/core-modules.md`). > - Top-level index of all portals: https://dev.wix.com/docs/llms.txt > - Full concatenated docs: https://dev.wix.com/docs/llms-full.txt ## Resource: About Member Login ## Article: About Member Login ## Article Link: https://dev.wix.com/docs/go-headless/self-managed-headless/authentication/members/about-member-login.md ## Article Content: # About Member Login Member login allows users to authenticate and access personalized content on your site. ## Types of member login Wix Headless supports 3 types of member login: - **Wix login page**: Redirect users to a Wix login page. After authenticating, Wix redirects the member back to your site. - **Custom login page**: Use API calls to create your own custom login page with Wix-managed authentication. - **Externally-managed login**: Create your own custom login page that supports login and authentication with an external identity provider. > **Note:** [Wix-managed headless](https://dev.wix.com/docs/go-headless/wix-managed-headless/about-wix-managed-headless.md) only supports Wix login pages. ## See also - [About Wix Login Pages](https://dev.wix.com/docs/go-headless/self-managed-headless/authentication/members/wix-login-page/about-wix-login-pages.md) - [About Custom Login Pages](https://dev.wix.com/docs/go-headless/self-managed-headless/authentication/members/custom-login-page/about-custom-login-pages.md) - [About Externally-Managed Login Pages](https://dev.wix.com/docs/go-headless/self-managed-headless/authentication/members/externally-managed-login-page/about-externally-managed-login-pages.md) --- > Portal Navigation: > > - Append `.md` to any URL under `https://dev.wix.com/docs/` to get its markdown version. > - Pages are either content pages (article or reference text) or menu pages (a list of links to child pages). > - To get a menu page, truncate any URL to a parent path and append `.md` (e.g. `https://dev.wix.com/docs/sdk.md`, `https://dev.wix.com/docs/sdk/core-modules.md`). > - Top-level index of all portals: https://dev.wix.com/docs/llms.txt > - Full concatenated docs: https://dev.wix.com/docs/llms-full.txt ## Resource: Add Allowed Authorization Redirect URIs ## Article: Allowed Authorization Redirect URIs ## Article Link: https://dev.wix.com/docs/go-headless/self-managed-headless/authentication/members/add-allowed-authorization-redirect-uris.md ## Article Content: # Add Allowed Authorization Redirect URIs If you use a Wix login page to authorize site members, Wix redirects members back to your site or app after the login process is completed. In order to protect data security, Wix only redirects members to addresses you allow in advance. For authorization related redirects, you need to provide exact matching URIs. > **Notes:** > - Wix-managed Headless adds relevant redirect URIs automatically during setup. However, you can [add additional redirect URIs](https://dev.wix.com/docs/go-headless/self-managed-headless/authentication/members/add-allowed-authorization-redirect-uris.md) if needed. > - Non-authorization related redirects only require you to provide a domain, which allows redirects to all URLs under that domain. To set allowed redirect domains for non-authorization related redirects, see [Allowed Redirect Domains](https://dev.wix.com/docs/go-headless/develop-your-project/wix-hosted-pages/add-allowed-redirect-domains.md). To add allowed redirect URIs for authorization redirects: 1. In your project dashboard, go to **Settings** > **Development & integrations** > [**Headless Settings**](https://www.wix.com/my-account/site-selector/?buttonText=Select%20Site&title=Select%20a%20Site&autoSelectOnSingleSite=true&actionUrl=https:%2F%2Fwww.wix.com%2Fdashboard%2F%7B%7BmetaSiteId%7D%7D%2Foauth-apps-settings). 1. From **Headless clients**, click the three dots to the right of the OAuth app you want to edit. Choose **Settings** to open the app's settings page: ![Click OAuth App Settings](https://wixmp-833713b177cebf373f611808.wixmp.com/images/7c76d81ed8599db6b40ef817464adb44.png) 1. Under **URLs**, go to the **Allowed authorization redirect URIs** section. ![Allowed authorization redirect URIs](https://wixmp-833713b177cebf373f611808.wixmp.com/images/9ebaec8e4f819e5ef5e1823827063ca7.png) 1. Click **Add Redirect URI** and enter a precise URI you authorize Wix to redirect back to from Wix-hosted authentication pages. For example, `https://www.my-site.com/login-callback` authorizes only this path and doesn't authorize other URIs under the same domain. To authorize multiple URIs for authorization redirects, click **Add Redirect URI** again as many times as you need. 1. Click **Save** to save your changes and return to **Headless Settings**. --- > Portal Navigation: > > - Append `.md` to any URL under `https://dev.wix.com/docs/` to get its markdown version. > - Pages are either content pages (article or reference text) or menu pages (a list of links to child pages). > - To get a menu page, truncate any URL to a parent path and append `.md` (e.g. `https://dev.wix.com/docs/sdk.md`, `https://dev.wix.com/docs/sdk/core-modules.md`). > - Top-level index of all portals: https://dev.wix.com/docs/llms.txt > - Full concatenated docs: https://dev.wix.com/docs/llms-full.txt ## Resource: About Wix Login Pages ## Article: About Wix Login Pages ## Article Link: https://dev.wix.com/docs/go-headless/self-managed-headless/authentication/members/wix-login-page/about-wix-login-pages.md ## Article Content: # About Wix Login Pages > **Note:** If you build with [Wix's Astro integration](https://dev.wix.com/docs/go-headless/wix-managed-headless/authentication/about-the-astro-integration.md), member login is handled for you. To learn more, see [Handle Member Login Using Wix's Astro Integration](https://dev.wix.com/docs/go-headless/wix-managed-headless/authentication/handle-member-login-using-wix-s-astro-integration.md). Otherwise, set up login as described here. With Wix Headless, you can authenticate [members](https://dev.wix.com/docs/go-headless/self-managed-headless/authentication/about-authentication.md#identities) on a site or app using Wix as your identity provider. This allows members to securely sign in and access content or features that are specific to their account, such as their profile, saved items, order history, or other private information. Using a Wix login page is the simplest way to set up member authentication, as Wix handles the user experience and authentication process. However, you can't change the look and feel of the Wix login page. ## Login flow When using a Wix login page, you're responsible for writing the code to start the login and handle the response. Wix handles the login UI and authentication. The login flow looks like this: 1. A member starts the login on your site or app. For example, they click a "Log in" button. Your site or app redirects the member to the Wix login page. 1. The member logs in on the Wix login page. Wix then redirects the member back to your site or app using a callback URL you've configured. This URL must be one of your [allowed authorization redirect URIs](https://dev.wix.com/docs/go-headless/self-managed-headless/authentication/members/add-allowed-authorization-redirect-uris.md). ## Prerequisites for self-managed headless Before implementing a Wix login page in a self-managed project, make sure to: - [Set Up a Headless Client](https://dev.wix.com/docs/go-headless/self-managed-headless/authentication/set-up-a-headless-client.md) - [Add a Wix pages domain](https://dev.wix.com/docs/go-headless/project-guides/wix-hosted-pages/set-a-wix-pages-domain.md) - [Add an allowed redirect domain](https://dev.wix.com/docs/go-headless/project-guides/wix-hosted-pages/add-allowed-redirect-domains.md) ## See also - [Handle Member Login Using Wix's Astro Integration](https://dev.wix.com/docs/go-headless/wix-managed-headless/authentication/handle-member-login-using-wix-s-astro-integration.md) (Wix-managed Headless) - [Handle Members with a Wix Login Page Using the JS SDK](https://dev.wix.com/docs/go-headless/self-managed-headless/authentication/members/wix-login-page/wix-managed-login-using-the-js-sdk.md) (self-managed Headless) - [Handle Members with a Wix Login Page Using the REST API](https://dev.wix.com/docs/go-headless/self-managed-headless/authentication/members/wix-login-page/wix-managed-login-using-the-rest-api.md) (self-managed Headless) --- > Portal Navigation: > > - Append `.md` to any URL under `https://dev.wix.com/docs/` to get its markdown version. > - Pages are either content pages (article or reference text) or menu pages (a list of links to child pages). > - To get a menu page, truncate any URL to a parent path and append `.md` (e.g. `https://dev.wix.com/docs/sdk.md`, `https://dev.wix.com/docs/sdk/core-modules.md`). > - Top-level index of all portals: https://dev.wix.com/docs/llms.txt > - Full concatenated docs: https://dev.wix.com/docs/llms-full.txt ## Resource: Wix-Managed Login Using the JS SDK ## Article: Handle Members with Wix-Managed Login ## Article Link: https://dev.wix.com/docs/go-headless/self-managed-headless/authentication/members/wix-login-page/wix-managed-login-using-the-js-sdk.md ## Article Content: # Handle Members with a Wix Login Page Using the JS SDK This article explains how to implement [Wix-managed member login](https://dev.wix.com/docs/go-headless/self-managed-headless/authentication/members/wix-login-page/about-wix-login-pages.md) using the JavaScript SDK. You'll learn how to: - Generate and store OAuth data for the login flow. - Redirect members to the Wix login page. - Handle the callback and exchange the authorization code for member tokens. - Set tokens for authenticated API calls as the logged-in member. - Refresh access tokens using the refresh token. - Log out members using the Wix-managed logout URL. A Wix login page is the simplest way to set up member authentication, as Wix handles the user experience and authentication process. However, you can't change the look and feel of the Wix login page. If you need a custom-branded login experience, [create a custom login page](https://dev.wix.com/docs/go-headless/self-managed-headless/authentication/members/custom-login-page/custom-login/custom-login-using-the-js-sdk.md) or [use an external identity provider](https://dev.wix.com/docs/go-headless/self-managed-headless/authentication/members/externally-managed-login-page/handle-members-with-externally-managed-login.md). > **Note:** Wix login pages use the OAuth 2.0 protocol with PKCE (Proof Key for Code Exchange) for secure authentication. If you're new to these concepts, see [OAuth 2.0 and PKCE explained](https://auth0.com/docs/get-started/authentication-and-authorization-flow/authorization-code-flow-with-proof-key-for-code-exchange-pkce). ## Step 1 | Set up a Wix client To authenticate and interact with Wix APIs, create a [Wix client](https://dev.wix.com/docs/sdk/core-modules/sdk/wix-client.md) in your code. Install and import any relevant APIs, such as the [Stores Product API](https://dev.wix.com/docs/api-reference/business-solutions/stores/catalog-v1/catalog/introduction.md). For example: ```js import { createClient, OAuthStrategy } from '@wix/sdk'; import { products } from '@wix/stores'; const myWixClient = createClient({ modules: { products }, auth: OAuthStrategy({ clientId: '', }) }); ``` Replace `` with your OAuth app's **Client ID** from your [Headless Settings](https://www.wix.com/my-account/site-selector/?buttonText=Select%20Site&title=Select%20a%20Site&autoSelectOnSingleSite=true&actionUrl=https:%2F%2Fwww.wix.com%2Fdashboard%2F%7B%7BmetaSiteId%7D%7D%2Foauth-apps-settings). ## Step 2 | Generate OAuth data Use your Wix client to generate the data needed for the OAuth flow. The method takes the following 2 parameters: - **redirectURI**: The URL to which Wix redirects the member after login. This must exactly match one of your [allowed authorization redirect URIs](https://dev.wix.com/docs/go-headless/self-managed-headless/authentication/members/add-allowed-authorization-redirect-uris.md) configured in your [**Headless Settings**](https://www.wix.com/my-account/site-selector/?buttonText=Select%20Site&title=Select%20a%20Site&autoSelectOnSingleSite=true&actionUrl=https:%2F%2Fwww.wix.com%2Fdashboard%2F%7B%7BmetaSiteId%7D%7D%2Foauth-apps-settings#). - **originalURI**: The URL where the member started the login flow. The Wix login page flow returns the member to this location after authentication. ```js const loginRequestData = myWixClient.auth.generateOAuthData( "https://www.mysite.com/callback", // Redirect URI "https://www.mysite.com/login" // Original URI ); ``` The method returns an object with the following properties, used for OAuth 2.0 with PKCE (Proof Key for Code Exchange) security: - **state**: A unique string to verify the login request. - **codeVerifier**: A random string for PKCE authentication. - **codeChallenge**: A SHA256 hash of `codeVerifier` for PKCE. - **redirectURI**: The redirect URI you passed. - **originalURI**: The original URI you passed. Example: ```js { state: 'j7E61ySL9AjXP_rTQqP3UKm1y4xUw4fQR8LLKHdGRIo', codeVerifier: '499lUZPnd_pDmj5jiQdRO-Sn5Z4aHSR4UDN_qutI6wq', codeChallenge: 'v3kBNICfxero3SZe1ken2okI0kapJcVYHEL4TeHIVjs', redirectUri: 'https://www.mysite.com/callback', originalUri: 'https://www.mysite.com/login', } ``` ## Step 3 | Store OAuth data Store the OAuth data securely for use after login. For example, use [`localStorage`](https://developer.mozilla.org/en-US/docs/Web/API/Window/localStorage) or a [cookie](https://developer.mozilla.org/en-US/docs/Web/API/Document/cookie): ```js // Client-side: Store OAuth data securely localStorage.setItem("wixOAuthData", JSON.stringify(loginRequestData)); ``` ## Step 4 | Redirect members to Wix login To redirect members to the Wix login: 1. Request the login URL from your Wix client: ```js const { authUrl } = await myWixClient.auth.getAuthUrl(loginRequestData); ```
    **Important:** For this request to succeed, you must publish the Wix site connected to your headless project. Wix uses the published site to display the login page. To do this, open your project dashboard, select **Design Site** from the left panel, and then click **Publish**.
    1. Redirect the member to the Wix login page: ```js window.location.href = authUrl; ``` This redirects site members to the Wix login page, where Wix handles the login process. ## Step 5 | Perform token exchange Once members log in, Wix redirects them to the [redirect URI you specified](#step-2--generate-oauth-data) along with information you can use to confirm the login and generate member tokens for frontend API calls. If the login was successful, the page's URL contains a fragment that includes `code=` and `state=`. If the login failed, the URL contains a fragment that includes `error=` and `error_description=`. When the page loads, check for these fragments. If they exist, call a handler function to perform the token exchange. In your handler function: 1. Retrieve the stored OAuth data: ```js // Client-side: Retrieve stored OAuth data const oAuthData = JSON.parse(localStorage.getItem("wixOAuthData")); ``` 1. Parse the page's URL: ```js const returnedOAuthData = myWixClient.auth.parseFromUrl(); if (returnedOAuthData.error) { alert(`Login error: ${returnedOAuthData.errorDescription}`); return; } ``` 1. Exchange the code for tokens: ```js const tokens = await myWixClient.auth.getMemberTokens( returnedOAuthData.code, returnedOAuthData.state, oAuthData ); ``` The returned tokens object includes: ```js { accessToken: { value: "string", expiresAt: 1234567890 }, refreshToken: { value: "string" } } ``` - **Access token:** Used to make authenticated API calls. - **Refresh token:** Used to get a new access token when the current token expires. ## Step 6 | Set and refresh tokens for the client Set the tokens on your Wix client to authenticate API calls as the logged-in member: ```js myWixClient.auth.setTokens(tokens); ``` Access tokens expire after a short time for security reasons. When this happens, you can use a refresh token to request a new access token without asking the member to log in again. Your API layer should handle this automatically. Set up your logic to detect when an access token has expired, use the refresh token to get a new one, and then retry the original request. ```js // Server-side recommended: Refresh tokens securely const newTokens = await myWixClient.auth.renewToken(tokens.refreshToken); myWixClient.auth.setTokens(newTokens); ```
    **Tip:** Don't expose refresh tokens to the browser. For best security, handle token refresh on the server.
    ## Logging a member out To log a member out: 1. Get the logout URL from your Wix client: ```js const { logoutUrl } = await myWixClient.auth.logout(window.location.href); ``` 1. Redirect the member to the logout URL: ```js window.location.href = logoutUrl; ``` This logs the member out and redirects them back to your app. ## Troubleshooting If you encounter issues with a Wix login page, make sure that: - You're using the correct client ID from your [Headless Settings](https://www.wix.com/my-account/site-selector/?buttonText=Select%20Site&title=Select%20a%20Site&autoSelectOnSingleSite=true&actionUrl=https:%2F%2Fwww.wix.com%2Fdashboard%2F%7B%7BmetaSiteId%7D%7D%2Foauth-apps-settings). - The `redirectUri` parameter passed to `generateOAuthData()` is listed in your [allowed authorization redirect URIs](https://dev.wix.com/docs/go-headless/self-managed-headless/authentication/members/add-allowed-authorization-redirect-uris.md), and that the values match exactly. - You're using a single shared client instance throughout your app (not creating new instances in components). - You haven't set a custom login URL in your OAuth app settings. The **login URL** field should be empty when using Wix-managed login. A login URL is only required for [custom login pages](https://dev.wix.com/docs/go-headless/self-managed-headless/authentication/members/custom-login-page/about-custom-login-pages.md). ## See also - [Handle Visitors](https://dev.wix.com/docs/go-headless/self-managed-headless/authentication/visitors/handle-visitors-using-the-js-sdk.md) - [Handle Members with a Custom Login Page](https://dev.wix.com/docs/go-headless/self-managed-headless/authentication/members/custom-login-page/custom-login/custom-login-using-the-js-sdk.md) - [Handle Members with Externally-Managed Login](https://dev.wix.com/docs/go-headless/self-managed-headless/authentication/members/externally-managed-login-page/handle-members-with-externally-managed-login.md) - [OAuthStrategy reference](https://dev.wix.com/docs/sdk/core-modules/sdk/oauth-strategy.md) --- > Portal Navigation: > > - Append `.md` to any URL under `https://dev.wix.com/docs/` to get its markdown version. > - Pages are either content pages (article or reference text) or menu pages (a list of links to child pages). > - To get a menu page, truncate any URL to a parent path and append `.md` (e.g. `https://dev.wix.com/docs/sdk.md`, `https://dev.wix.com/docs/sdk/core-modules.md`). > - Top-level index of all portals: https://dev.wix.com/docs/llms.txt > - Full concatenated docs: https://dev.wix.com/docs/llms-full.txt ## Resource: Wix-Managed Login Using the REST API ## Article: Handle Members with Wix-Managed Login ## Article Link: https://dev.wix.com/docs/go-headless/self-managed-headless/authentication/members/wix-login-page/wix-managed-login-using-the-rest-api.md ## Article Content: # Handle Members with a Wix Login Page Using the REST API This article explains how to implement [Wix-managed member login](https://dev.wix.com/docs/go-headless/self-managed-headless/authentication/members/wix-login-page/about-wix-login-pages.md) using the REST API. You'll learn how to: - Generate and store security data for the login flow. - Redirect members to the Wix login page. - Handle the callback and exchange the authorization code for member tokens. - Log out members using the Wix-managed logout URL. A Wix login page is the simplest way to set up member authentication, as Wix handles the user experience and authentication process. However, you can't change the look and feel of the Wix login page. If you need a custom-branded login experience, [create a custom login page](https://dev.wix.com/docs/go-headless/self-managed-headless/authentication/members/custom-login-page/custom-login/custom-login-using-the-rest-api.md). > **Note:** Wix login pages use the OAuth 2.0 protocol with PKCE (Proof Key for Code Exchange) for secure authentication. If you're new to these concepts, see [OAuth 2.0 and PKCE explained](https://auth0.com/docs/get-started/authentication-and-authorization-flow/authorization-code-flow-with-proof-key-for-code-exchange-pkce). ## Step 1 | Prepare security data Before redirecting a member to login on a Wix login page you need to prepare the following: - A redirect URI for the callback page. This is the URI that the site member is redirected to after logging in. The `redirectUri` must be an [allowed authorization redirect URI](https://dev.wix.com/docs/go-headless/self-managed-headless/authentication/members/add-allowed-authorization-redirect-uris.md). - The **Client ID** of your OAuth app. You can find this value in your [**Headless Settings**](https://www.wix.com/my-account/site-selector/?buttonText=Select%20Site&title=Select%20a%20Site&autoSelectOnSingleSite=true&actionUrl=https:%2F%2Fwww.wix.com%2Fdashboard%2F%7B%7BmetaSiteId%7D%7D%2Foauth-apps-settings#). If you haven't created an OAuth app yet, see [Create an OAuth App for Visitors and Members](https://dev.wix.com/docs/go-headless/self-managed-headless/authentication/oauth/about-oauth-authentication.md) to set one up. - A [PKCE code verifier and code challenge](https://www.oauth.com/oauth2-servers/pkce/authorization-request/). These are used to prevent [CSRF attacks](https://en.wikipedia.org/wiki/Cross-site_request_forgery) and authorization code injection attacks. - An [OAuth2 state parameter](https://auth0.com/docs/secure/attack-protection/state-parameters) used to mitigate [CSRF attacks](https://en.wikipedia.org/wiki/Cross-site_request_forgery). ## Step 2 | Store security data Store the code verifier, code challenge, and state parameter locally. For example, you can store them in `localStorage` or a cookie. You need to use this data when users are redirected back to your site or app from the Wix login page. ## Step 3 | Get a login URL Call [Create Redirect Session](https://dev.wix.com/docs/api-reference/business-management/headless/redirects/create-redirect-session.md) to get a login URL for the site member.
    **Important:** For this request to succeed, you must publish the Wix site connected to your headless project. Wix uses the published site to display the login page. To do this, open your project dashboard, select **Design Site** from the left panel, and then click **Publish**.
    When calling [Create Redirect Session](https://dev.wix.com/docs/api-reference/business-management/headless/redirects/create-redirect-session.md), send the following parameters, which include the data you [prepared earlier](#step-1--prepare-security-data): - **`redirectUri`**: The redirect URI to your login callback. The `redirectUri` must be an [allowed authorization redirect URI](https://dev.wix.com/docs/go-headless/self-managed-headless/authentication/members/add-allowed-authorization-redirect-uris.md). - **`clientId`**: The **Client ID** of your OAuth app, which can be found in your project's [**Headless Settings**](https://www.wix.com/my-account/site-selector/?buttonText=Select%20Site&title=Select%20a%20Site&autoSelectOnSingleSite=true&actionUrl=https:%2F%2Fwww.wix.com%2Fdashboard%2F%7B%7BmetaSiteId%7D%7D%2Foauth-apps-settings). - **`codeChallenge`**: PKCE code challenge string. - **`codeChallengeMethod`**: Use `"S256"`. - **`responseMode`**: Use `"fragment"`. The `state` and `code` will be returned in the URL used to reach the login callback in a URL fragment. - **`responseType`**: Use `"code"`. - **`scope`**: Use `"offline_access"`. - **`state`**: A state parameter. > **Note:** In the request header, use the [access token](https://dev.wix.com/docs/go-headless/self-managed-headless/authentication/visitors/handle-visitors-using-the-rest-api.md#generate-new-visitor-tokens) of the current visitor for authorization. ```shell curl --location 'https://www.wixapis.com/_api/redirects-api/v1/redirect-session' \ --header 'authorization: ' \ --header 'content-type: application/json' \ --data '{ "auth": { "authRequest": { "redirectUri": "https://example-nextjs.vercel.app/callback", "clientId": "", "codeChallenge": "JNU5gZmEjgVL2eXfgSmU1JS2E202k4rkq4u3M_drdCY", "codeChallengeMethod": "S256", "responseMode": "fragment", "responseType": "code", "scope": "offline_access", "state": "Zq2yfJM1S7n35VnBhdMeOQyXQW7UkE2Qv7fdPLL419o" } } }' ``` The response includes: - **`id`**: Redirect session ID. - **`fullUrl`**: A URL to the Wix login page. ```json { "redirectSession": { "id": "83cab021-c3de-47b9-afa2-e93602e38b09", "fullUrl": "https://mysite.com/example/_api/oauth2/authorize?clientId=e345..." } } ``` ## Step 4 | Redirect to the Wix login page Redirect the site member to the login URL returned by [Create Redirect Session](https://dev.wix.com/docs/api-reference/business-management/headless/redirects/create-redirect-session.md). This redirects site members to the Wix login page, where Wix handles the login process. ## Step 5 | Handle the callback Once members log in, Wix redirects them back to your site or app along with information you can use to confirm the login and generate member tokens for frontend API calls. In your callback handler: 1. Get the OAuth data that you [stored locally](#step-2--store-security-data) before making the login request. Remember, this security data includes a code verifier, code challenge, and state parameter. 1. Get the login results and handle errors. If the login was successful, the URL of the callback page contains a fragment that includes `code=` and `state=`. Parse the URL to retrieve the `code` and `state` values. 1. Check that the `state` value is the same as the state value you retrieved from local storage. 1. Use the `code` to [generate member tokens](#step-6--generate-member-tokens). ## Step 6 | Generate member tokens Generate new member tokens by calling [Retrieve Tokens](https://dev.wix.com/docs/api-reference/business-management/headless/authentication/retrieve-tokens.md). When calling [Retrieve Tokens](https://dev.wix.com/docs/api-reference/business-management/headless/authentication/retrieve-tokens.md), send the following parameters: - **`clientId`**: The **Client ID** of your OAuth app, which can be found in your project's [**Headless Settings**](https://www.wix.com/my-account/site-selector/?buttonText=Select%20Site&title=Select%20a%20Site&autoSelectOnSingleSite=true&actionUrl=https:%2F%2Fwww.wix.com%2Fdashboard%2F%7B%7BmetaSiteId%7D%7D%2Foauth-apps-settings). - **`grantType`**: Set as `"authorization_code"` to get member tokens with an authorization code. - **`redirectUri`**: The same URI passed when calling the [Create Redirect Session](https://dev.wix.com/docs/api-reference/business-management/headless/redirects/create-redirect-session.md). The `redirectUri` must be an [allowed authorization redirect URI](https://dev.wix.com/docs/go-headless/self-managed-headless/authentication/members/add-allowed-authorization-redirect-uris.md). - **`code`**: The code you retrieved from the URL fragment in the previous step. - **`codeVerifier`**: The code verifier you retrieved from local storage in the previous step. ```shell curl --location 'https://www.wixapis.com/oauth2/token' \ --data '{ "clientId": "", "grantType": "authorization_code", "redirectUri": "https://example-nextjs.vercel.app/callback", "code": "OLI79QEL", "codeVerifier": "bRGwKp1zdrSY_3A_GRvK2JI9Iq2MykDV5NjXk3tcQn4" }' ``` The response includes: - **`access_token`**: An access token used to authorize API calls. - **`expires_in`**: The number of seconds before the access token expires. Access tokens expire after 4 hours (14,400 seconds). - **`refresh_token`**: A refresh token used to get a new access token. ```json { "access_token": "OauthNG.JWS.eyJraWQiOi1JzdUpwSCIsImFsZyI6IkhTMjU2In0...", "token_type": "Bearer", "expires_in": 14400, "refresh_token": "JWS.eyJraWQiOiJ1SEJzdUpwSCIsImFsZyI6IkhTMjU2In0..." } ``` Once you have tokens, you can use them to make [authenticated calls to APIs](https://dev.wix.com/docs/go-headless/self-managed-headless/authentication/oauth/make-rest-api-calls-using-oauth.md) on behalf of the current member. ## Logging a member out To log a member out, call `Redirect Session` to get a logout URL, and then redirect the member to that URL. When calling `Redirect Session`, send the following parameters: - **`clientId`**: The **Client ID** of your OAuth app, which can be found in your project's [**Headless Settings**](https://www.wix.com/my-account/site-selector/?buttonText=Select%20Site&title=Select%20a%20Site&autoSelectOnSingleSite=true&actionUrl=https:%2F%2Fwww.wix.com%2Fdashboard%2F%7B%7BmetaSiteId%7D%7D%2Foauth-apps-settings). - **`postFlowUrl`**: Where the member will be redirected after logging out. ```shell curl --location 'https://www.wixapis.com/_api/redirects-api/v1/redirect-session' \ --header 'content-type: application/json' \ --header 'authorization: ' \ --data '{ "logout": { "clientId": "" }, "callbacks": { "postFlowUrl": "https://mysite.com/" } }' ``` The response includes: - **`id`**: Redirect session ID. - **`fullUrl`**: A URL to the Wix login page. Redirect the browser to the returned `fullUrl` to log the site member out. The browser is automatically redirected back to the `postFlowUrl` that you passed to [Create Redirect Session](https://dev.wix.com/docs/api-reference/business-management/headless/redirects/create-redirect-session.md). ## Troubleshooting If you encounter issues with a Wix login page, make sure that: - You're using the correct client ID. - The `redirectUri` parameter passed to `Redirect Session` is listed in your [allowed authorization redirect URIs](https://dev.wix.com/docs/go-headless/self-managed-headless/authentication/members/add-allowed-authorization-redirect-uris.md), and that the values match exactly. - You haven't set a custom login URL in your OAuth app settings. The **login URL** field should be empty when using Wix-managed login. A login URL is only required for [custom login pages](https://dev.wix.com/docs/go-headless/self-managed-headless/authentication/members/custom-login-page/about-custom-login-pages.md). ## See also - [Handle Visitors](https://dev.wix.com/docs/go-headless/self-managed-headless/authentication/visitors/handle-visitors-using-the-rest-api.md) - [Handle Members with a Custom Login Page](https://dev.wix.com/docs/go-headless/self-managed-headless/authentication/members/custom-login-page/custom-login/custom-login-using-the-rest-api.md) --- > Portal Navigation: > > - Append `.md` to any URL under `https://dev.wix.com/docs/` to get its markdown version. > - Pages are either content pages (article or reference text) or menu pages (a list of links to child pages). > - To get a menu page, truncate any URL to a parent path and append `.md` (e.g. `https://dev.wix.com/docs/sdk.md`, `https://dev.wix.com/docs/sdk/core-modules.md`). > - Top-level index of all portals: https://dev.wix.com/docs/llms.txt > - Full concatenated docs: https://dev.wix.com/docs/llms-full.txt ## Resource: About Custom Login Pages ## Article: About Custom Login Pages ## Article Link: https://dev.wix.com/docs/go-headless/self-managed-headless/authentication/members/custom-login-page/about-custom-login-pages.md ## Article Content: # About Custom Login Pages > **Note:** Custom login pages are only available for self-managed headless projects. Wix-managed headless projects can [implement a Wix login page](https://dev.wix.com/docs/go-headless/wix-managed-headless/authentication/handle-members-with-a-wix-login-page.md). With [self-managed headless](https://dev.wix.com/docs/go-headless/self-managed-headless/about-self-managed-headless.md), you can create a fully customized login experience for your [members](https://dev.wix.com/docs/go-headless/self-managed-headless/authentication/about-authentication.md#identities). This allows members to securely sign in and access content or features that are specific to their account, such as their profile, saved items, order history, or other private information. Custom login uses Wix's authentication service while letting you design and control the entire login UI experience. This approach is best when you need to maintain a consistent branded experience throughout your site or app. > **Note:** If you don't need a custom login experience, you can use a [Wix login page](https://dev.wix.com/docs/go-headless/self-managed-headless/authentication/members/wix-login-page/about-wix-login-pages.md), where Wix handles both the login UI and authentication process. ## Prerequisites Before getting started, make sure to: - [Set Up a Headless Client](https://dev.wix.com/docs/go-headless/self-managed-headless/get-started/connect-a-frontend.md) - [Add an allowed authorization redirect URI](https://dev.wix.com/docs/go-headless/self-managed-headless/authentication/members/add-allowed-authorization-redirect-uris.md) - [Set the login URL](https://dev.wix.com/docs/go-headless/self-managed-headless/authentication/members/custom-login-page/custom-login/set-a-login-url.md) ## See also - [About reCAPTCHA](https://dev.wix.com/docs/go-headless/self-managed-headless/authentication/members/re-captcha/about-re-captcha.md) - [Handle Members with a Custom Login Page Using the JS SDK](https://dev.wix.com/docs/go-headless/self-managed-headless/authentication/members/custom-login-page/custom-login/custom-login-using-the-js-sdk.md) - [Handle Members with a Custom Login Page Using the REST API](https://dev.wix.com/docs/go-headless/self-managed-headless/authentication/members/custom-login-page/custom-login/custom-login-using-the-rest-api.md) --- > Portal Navigation: > > - Append `.md` to any URL under `https://dev.wix.com/docs/` to get its markdown version. > - Pages are either content pages (article or reference text) or menu pages (a list of links to child pages). > - To get a menu page, truncate any URL to a parent path and append `.md` (e.g. `https://dev.wix.com/docs/sdk.md`, `https://dev.wix.com/docs/sdk/core-modules.md`). > - Top-level index of all portals: https://dev.wix.com/docs/llms.txt > - Full concatenated docs: https://dev.wix.com/docs/llms-full.txt ## Resource: Custom Login Using the JS SDK ## Article: Handle Members with Custom Login ## Article Link: https://dev.wix.com/docs/go-headless/self-managed-headless/authentication/members/custom-login-page/custom-login/custom-login-using-the-js-sdk.md ## Article Content: # Handle Members with a Custom Login Page Using the JS SDK > **Note:** This article is only relevant for [self-managed headless projects](https://dev.wix.com/docs/go-headless/self-managed-headless/about-self-managed-headless.md). This article explains how to implement a [custom login page](https://dev.wix.com/docs/go-headless/self-managed-headless/authentication/members/custom-login-page/about-custom-login-pages.md) using the JavaScript SDK. You'll learn how to: - Set up a Wix client for authentication. - Check if a visitor is already logged in. - Sign up and log in members. - Exchange session tokens for access and refresh tokens. - Handle failed authentication states. - Refresh access tokens. - Log out members. ## Step 1 | Set up a Wix client To authenticate and interact with Wix APIs, create a [Wix client](https://dev.wix.com/docs/sdk/core-modules/sdk/wix-client.md) in your code. Install and import the [Members API](https://dev.wix.com/docs/sdk/backend-modules/members/members/introduction.md) to create and manage a site's members. You can also import other APIs as needed and pass to your client. ```js import { createClient, OAuthStrategy } from '@wix/sdk'; import { members } from '@wix/members'; const myWixClient = createClient({ modules: { members }, auth: OAuthStrategy({ clientId: '', }) }); ``` Replace `` with your OAuth app's **Client ID** from your [Headless Settings](https://www.wix.com/my-account/site-selector/?buttonText=Select%20Site&title=Select%20a%20Site&autoSelectOnSingleSite=true&actionUrl=https:%2F%2Fwww.wix.com%2Fdashboard%2F%7B%7BmetaSiteId%7D%7D%2Foauth-apps-settings). ## Step 2 | Check if the visitor is already logged in Before showing a login form, check if the current visitor is already logged in: ```js const isLoggedIn = myWixClient.auth.loggedIn(); if (isLoggedIn) { const { member } = await myWixClient.members.getCurrentMember(); console.log('Logged in as:', member.email); } else { showLoginForm(); } ``` If logged in, you can immediately make authenticated API calls. Otherwise, send them to your sign-up or login form. ## Step 3 | Sign up and log in members Create custom forms in your app with fields for email and password. You can design these forms to match your branding exactly. Your page should be able to: * Sign up a new member * Log in an existing member
    **Tip:** You can add [reCAPTCHA protection](https://dev.wix.com/docs/go-headless/self-managed-headless/authentication/members/custom-login-page/re-captcha/implement-re-captcha-using-the-js-sdk.md) to your custom login flows to help prevent fraud and abuse. Make sure to also [enable reCAPTCHA](https://dev.wix.com/docs/go-headless/self-managed-headless/authentication/members/re-captcha/enable-re-captcha-for-member-login.md) in your project settings.
    ### Sign up a new member To sign up a new member, use the [`register()`](https://dev.wix.com/docs/sdk/core-modules/sdk/oauth-strategy.md) method with the email and password provided by the visitor: ```js let response = await myWixClient.auth.register({ email: "", password: "", }); ``` If `response.loginState` is `SUCCESS`, [exchange the session token for access and refresh tokens](#step-4--exchange-the-session-token-for-access-and-refresh-tokens). Otherwise, [handle failed authentication states](#step-5--handle-failed-authentication-states). ### Log in an existing member To log in an existing member, use the [`login()`](https://dev.wix.com/docs/sdk/core-modules/sdk/oauth-strategy.md) method with the email and password provided by the visitor: ```js let response = await myWixClient.auth.login({ email: "", password: "", }); ``` If `response.loginState` is `SUCCESS`, [exchange the session token for access and refresh tokens](#step-4--exchange-the-session-token-for-access-and-refresh-tokens). Otherwise, [handle failed authentication states](#step-5--handle-failed-authentication-states). ## Step 4 | Exchange the session token for access and refresh tokens When authentication is successful, you need to exchange the session token for access and refresh tokens. This process is the same whether you're signing up a new member or logging in an existing member. To exchange the session token for access and refresh tokens, call [`getMemberTokensForDirectLogin()`](https://dev.wix.com/docs/sdk/core-modules/sdk/oauth-strategy.md#getmembertokensfordirectlogin), and then set the returned member tokens on your client: ```js if (response.loginState === 'SUCCESS') { const tokens = await myWixClient.auth.getMemberTokensForDirectLogin(response.data.sessionToken); myWixClient.auth.setTokens(tokens); } ```
    **Tip:** After setting tokens, you can use `myWixClient.members.getCurrentMember()` to fetch the member's info.
    ## Step 5 | Handle failed authentication states When a sign-up or login attempt fails, the `login()` and `register()` methods return an object with a `loginState` property. Your code should handle each possible state to provide a smooth user experience. The possible values include: - `SUCCESS`: Authentication was successful. - `FAILURE`: Authentication unsuccessful due to one of the following reasons, as indicated by the `errorCode`: - `invalidEmail`: The email address provided is invalid. Your code should present an error. - `invalidPassword`: The password provided is invalid. Your code should present an error. - `emailAlreadyExists`: The visitor attempted to sign up as a new member using an email address belonging to an existing member. Your code should present an error. - `resetPassword`: The member needs to reset their password. Your code needs to [send a password reset email](#send-a-password-reset-email). - `EMAIL_VERIFICATION_REQUIRED`: Authentication requires email verification. Your code needs to [process email verification](#process-email-verification). - `OWNER_APPROVAL_REQUIRED`: The site owner needs to approve registration for the new member. Your code should present a notice to inform the visitor that their membership is pending. Once their membership is approved, the member can log in. ### Send a password reset email Call the [`sendPasswordResetEmail()`](https://dev.wix.com/docs/sdk/core-modules/sdk/oauth-strategy.md) method to send a password reset email to a member. The method takes the member's email address and a URL to send the member to after they successfully change their password. ```js await myWixClient.auth.sendPasswordResetEmail( email, redirectUri ); ``` The `redirectUri` must be an [allowed authorization redirect URI](https://dev.wix.com/docs/go-headless/self-managed-headless/authentication/members/add-allowed-authorization-redirect-uris.md). When the member clicks the reset link in their email, they're taken to a Wix-managed password reset page. After successfully setting a new password, Wix redirects them to your specified URL. For example, the following code sends a password reset email to `john_doe@email.com`, and once the member resets their password on the Wix-managed page, Wix redirects the member back to your page at `http://www.my-site.com/password_changed`. ```js await myWixClient.auth.sendPasswordResetEmail( "john_doe@email.com", "http://www.my-site.com/password_changed", ); ``` ### Process email verification If the `loginState` is `EMAIL_VERIFICATION_REQUIRED`, Wix sends an email with a verification code to the member. You need to create a form or prompt to collect this verification code from the member, and then use the [`processVerification()`](https://dev.wix.com/docs/sdk/core-modules/sdk/oauth-strategy.md) method to complete the verification: ```js const response = await myWixClient.auth.processVerification({ verificationCode: verificationCode }); ``` If `response.loginState` is `SUCCESS`, [exchange the session token for access and refresh tokens](#step-4--exchange-the-session-token-for-access-and-refresh-tokens). ## Step 6 | Refresh access tokens Access tokens expire after a short time for security reasons. When this happens, you can use a refresh token to request a new access token without asking the member to log in again. Your API layer should handle this automatically. Set up your logic to detect when an access token has expired, use the refresh token to get a new one, and then retry the original request. ```js const storedRefreshToken = JSON.parse(Cookies.get(WIX_REFRESH_TOKEN) || 'null'); const myWixClient = createClient({ modules: { members }, auth: OAuthStrategy({ clientId: '', tokens: { refreshToken: storedRefreshToken, accessToken: { value: '', expiresAt: 0 } } }) }); try { const newTokens = await myWixClient.auth.refreshTokens(storedRefreshToken); myWixClient.auth.setTokens(newTokens); Cookies.set(WIX_REFRESH_TOKEN, JSON.stringify(newTokens.refreshToken), { expires: 14 }); } catch (error) { window.location.href = '/login'; } ```
    **Tip:** Don't expose refresh tokens to the browser unnecessarily. For best security, handle token refresh on the server when possible.
    ## Logging out a member To log a member out: 1. Get the logout URL from your Wix client: ```js const { logoutUrl } = await myWixClient.auth.logout(window.location.href); ``` 2. Redirect the member to the logout URL: ```js window.location.href = logoutUrl; ``` This logs the member out and redirects them back to your app. ## Troubleshooting If you encounter issues with custom login, make sure that: - You're using the correct client ID from your [Headless Settings](https://www.wix.com/my-account/site-selector/?buttonText=Select%20Site&title=Select%20a%20Site&autoSelectOnSingleSite=true&actionUrl=https:%2F%2Fwww.wix.com%2Fdashboard%2F%7B%7BmetaSiteId%7D%7D%2Foauth-apps-settings). - The `redirectUri` parameter in `sendPasswordResetEmail()` matches one of your [allowed authorization redirect URIs](https://dev.wix.com/docs/go-headless/self-managed-headless/authentication/members/add-allowed-authorization-redirect-uris.md). - If you're having token-related errors during testing, clear browser cookies and try again. - You're using a single shared client instance throughout your app (not creating new instances in components). --- > Portal Navigation: > > - Append `.md` to any URL under `https://dev.wix.com/docs/` to get its markdown version. > - Pages are either content pages (article or reference text) or menu pages (a list of links to child pages). > - To get a menu page, truncate any URL to a parent path and append `.md` (e.g. `https://dev.wix.com/docs/sdk.md`, `https://dev.wix.com/docs/sdk/core-modules.md`). > - Top-level index of all portals: https://dev.wix.com/docs/llms.txt > - Full concatenated docs: https://dev.wix.com/docs/llms-full.txt ## Resource: Custom Login Using the REST API ## Article: Handle Members with Custom Login ## Article Link: https://dev.wix.com/docs/go-headless/self-managed-headless/authentication/members/custom-login-page/custom-login/custom-login-using-the-rest-api.md ## Article Content: # Handle Members with a Custom Login Page Using the REST API This article explains how to implement a [custom login page](https://dev.wix.com/docs/go-headless/self-managed-headless/authentication/members/custom-login-page/about-custom-login-pages.md) using the REST API. ## Step 1 | Create a frontend login component Create a frontend login/sign-up component for the site or app you are building on the platform of your choice. Ensure that your UI prompts visitors for an email address and password. ## Step 2 | Sign up a new member To register a new member using an email address and password the site visitor provides, call [Register V 2](https://dev.wix.com/docs/api-reference/business-management/headless/authentication/register-v-2.md), specifying the following parameters: - **`loginId.email`**: Registering member's email address. - **`password`**: Registering member's password. - **`[profile]`**: Registering member's [profile](#profile). Include an **`authorization`** header with the temporary visitor access token. Learn how to [generate a temporary visitor access token](https://dev.wix.com/docs/go-headless/self-managed-headless/authentication/visitors/handle-visitors-using-the-rest-api.md#step-1--generate-new-visitor-tokens). ```curl curl --location 'https://www.wixapis.com/_api/iam/authentication/v2/register' \ --header 'authorization: ' \ --header 'content-type: application/json' \ --data '{ "loginId":{ "email": "john@doe.com" }, "password": "verySecurePassword", "profile": { "firstName": "John", "lastName": "Doe", "nickname": "Johnny Boy" } }' ``` > You can also add [reCAPTCHA protection](https://dev.wix.com/docs/go-headless/self-managed-headless/authentication/members/custom-login-page/re-captcha/implement-re-captcha-using-the-rest-api.md) to the registration process. Make sure to also [enable reCAPTCHA](https://dev.wix.com/docs/go-headless/self-managed-headless/authentication/members/re-captcha/enable-re-captcha-for-member-login.md) in your project settings. Register V 2 initiates a new member registration and returns a response containing the state of the registration operation and associated tokens. Its response contains the following: - **`state`**: The current [state](#step-4--handle-login-states) of the registration process. Use this `state` value to determine the next step in the registration process. - **`sessionToken`**: If the `state` value is `'SUCCESS'`, use the `sessionToken` to [get the site members tokens](#generate-member-tokens). - **`stateToken`**: If the `state` value is not `'SUCCESS'`. You will need to use the `stateToken` to continue the registration process. ```json { "state": "SUCCESS", "sessionToken": "MST.eyJraWQiOiJ3cTFCcFlDbyIsImFsZyI6IlJTMjU2In0...", "identity": { "id": "12432ed2-ef8b-6bf3-8f9n-94f3c4d0ef85", "identifiers": [ { "email": "john@doe.com" } ], "revision": "1", "createdDate": "2023-07-19T11:14:08Z", "updatedDate": "2023-07-19T11:14:08Z", "connections": [ { "authenticatorConnection": { "authenticatorConnectionId": "31ddd8fc-ea95-43ac-95c5-902497125b90", "reEnrollmentRequired": false } } ], "identityProfile": { "nickname": "Johnny Boy", "emails": [], "phones": [], "labels": [], "privacyStatus": "UNDEFINED", "customFields": [] }, "metadata": { "tags": [] }, "email": { "address": "john@doe.com", "isVerified": false }, "status": { "name": "ACTIVE", "reasons": [] } } } ``` ## Step 3 | Log in a member To log in an existing member using an email address and password the site visitor provides, call [Login V 2](https://dev.wix.com/docs/api-reference/business-management/headless/authentication/login-v-2.md), specifying the following parameters: - **`loginId.email`**: Member's email address. - **`password`**: Member's password. Include an **`authorization`** header with the temporary visitor access token generated during the prerequisites. ```curl curl --location 'https://www.wixapis.com/_api/iam/authentication/v2/login' \ --header 'authorization: ' \ --header 'content-type: application/json' \ --data '{ "loginId":{ "email": "john@doe.com" }, "password": "verySecurePassword" }' ``` > You can also add [reCAPTCHA protection](https://dev.wix.com/docs/go-headless/self-managed-headless/authentication/members/custom-login-page/re-captcha/implement-re-captcha-using-the-rest-api.md) to the login process. Make sure to also [enable reCAPTCHA](https://dev.wix.com/docs/go-headless/self-managed-headless/authentication/members/re-captcha/enable-re-captcha-for-member-login.md) in your project settings. Login V 2 initiates a member login and returns a response containing the state of the login operation and associated tokens. Its response contains the following: - **`state`**: The current [state](#step-4--handle-login-states) of the login process. Use this `state` value to determine the next step in the login process. - **`sessionToken`**: If the `state` value is `'SUCCESS'`, use the `sessionToken` to [get the site members tokens](#generate-member-tokens). - **`stateToken`**: If the `state` value is not `'SUCCESS'`. You will need to use the `stateToken` to continue the login process. ```json { "state": "SUCCESS", "sessionToken": "MST.eyJraWQiOiJ3cTFCcFlDbyIsImFsZyI6IlJTMjU2In0...", "identity": { "id": "12432ed2-ef8b-6bf3-8f9n-94f3c4d0ef85", "identifiers": [ { "email": "john@doe.com" } ], "revision": "1", "createdDate": "2023-07-19T11:14:08Z", "updatedDate": "2023-07-19T11:14:08Z", "connections": [ { "authenticatorConnection": { "authenticatorConnectionId": "31ddd8fc-ea95-43ac-95c5-902497125b90", "reEnrollmentRequired": false } } ], "identityProfile": { "nickname": "Johnny Boy", "emails": [], "phones": [], "labels": [], "privacyStatus": "UNDEFINED", "customFields": [] }, "metadata": { "tags": [] }, "email": { "address": "john@doe.com", "isVerified": false }, "status": { "name": "ACTIVE", "reasons": [] } } } ``` ## Step 4 | Handle login states Both Login V 2 and Register V 2 return a response containing the state of the login operation. The `state` property of the response object indicates the login status. For example, if the above examples are successful, `state` is `SUCCESS`. Make sure your code handles each of these `state` values: - **`REQUIRE_EMAIL_VERIFICATION`**: Login requires email verification. This occurs when you try to register a new member with an email address belonging to an existing contact. In this case, you need to [verify the email address](#step-5--verify-email-address). - **`REQUIRE_OWNER_APPROVAL`**: After registration, this indicates site owner approval is required to complete registration for the new member. Handle this by informing the visitor that their membership is pending. Whenever the site owner approves their membership, the member can log in. - **`SUCCESS`**: This indicates login was completed successfully. You can now [get the site member's access and refresh tokens](#generate-member-tokens). ## Step 5 | Verify email address If the [`loginState`](#step-4--handle-login-states) property of the object returned by [a call to Register V 2](#step-2--sign-up-a-new-member) is `REQUIRE_EMAIL_VERIFICATION`, an email containing a verification code is sent automatically to the member's email address. To complete the login process, call [Verify During Authentication](https://dev.wix.com/docs/api-reference/business-management/headless/verification/verify-during-authentication.md), specifying the following parameters: - **`code`**: The code received in the verification email. - **`stateToken`**: The state token received in response to calling Register V 2. ```curl curl --location 'https://www.wixapis.com/_api/iam/verification/v1/auth/verify' \ --header 'authorization: ' \ --header 'content-type: application/json' \ --data '{ "code": "123456", "stateToken": "AST.eyJraWQiOiJRUWpMeE1KaCIsImFsZyI6IlJTMjU2In0..." }' ``` Verify During Authentication's response contains the following: - **`state`**: The current [state](#step-4--handle-login-states) of the login process. Use this `state` value to determine the next step in the login process. - **`sessionToken`**: If the `state` value is `'SUCCESS'`, use the `sessionToken` to [get the site members tokens](#generate-member-tokens). - **`stateToken`**: If the `state` value is not `'SUCCESS'`. You will need to use the `stateToken` to continue the login process. ## Step 6 | Get the site member's access and refresh tokens If the [`state`](#step-4--handle-login-states) property of the object returned by [a call to Login V 2](#step-3--log-in-a-member), [a call to Register V 2](#step-2--sign-up-a-new-member), or [a call to Verify During Authentication](#step-5--verify-email-address) is `SUCCESS`, the member has been successfully logged in. In this case, the response object contains a `sessionToken` property. Use the `sessionToken` to call [Create Redirect Session](https://dev.wix.com/docs/api-reference/business-management/headless/redirects/create-redirect-session.md) to get the logged-in member's access and refresh tokens. Before calling Create Redirect Session, you will need to [prepare](#step-7--prepare-for-a-redirect-session) some information to be used in the call. ## Step 7 | Prepare for a redirect session Before you call Create Redirect Session, you need to prepare the following: - The **Client ID** of your OAuth app. You can find this value in your [**Headless Settings**](https://www.wix.com/my-account/site-selector/?buttonText=Select%20Site&title=Select%20a%20Site&autoSelectOnSingleSite=true&actionUrl=https:%2F%2Fwww.wix.com%2Fdashboard%2F%7B%7BmetaSiteId%7D%7D%2Foauth-apps-settings#). If you haven't created an OAuth app yet, see [Create an OAuth App for Visitors and Members](https://dev.wix.com/docs/go-headless/self-managed-headless/authentication/oauth/about-oauth-authentication.md) to set one up. The client ID isn't a secret and can be used in frontend calls. - A [PKCE code verifier and code challenge](https://www.oauth.com/oauth2-servers/pkce/authorization-request/). These are used to prevent [CSRF attacks](https://en.wikipedia.org/wiki/Cross-site_request_forgery) and authorization code injection attacks. - An [OAuth2 state parameter](https://auth0.com/docs/secure/attack-protection/state-parameters) used to mitigate [CSRF attacks](https://en.wikipedia.org/wiki/Cross-site_request_forgery). ## Step 8 | Get an authorization URL Call [Create Redirect Session](https://dev.wix.com/docs/api-reference/business-management/headless/redirects/create-redirect-session.md) to get an authorization URL for the site member. Specify the following parameters, which include the data you [prepared earlier](#step-7--prepare-for-a-redirect-session): - **`clientId`**: The **Client ID** of your OAuth app, which can be found in your project's [**Headless Settings**](https://www.wix.com/my-account/site-selector/?buttonText=Select%20Site&title=Select%20a%20Site&autoSelectOnSingleSite=true&actionUrl=https:%2F%2Fwww.wix.com%2Fdashboard%2F%7B%7BmetaSiteId%7D%7D%2Foauth-apps-settings). - **`codeChallenge`**: PKCE code challenge string. - **`codeChallengeMethod`**: Use `"S256"`. - **`responseMode`**: Use `"web_message"` for the authorization in an [iframe](#iframe), or `"query"`/`"fragment"` for a [full-page redirect](#full-page-redirect). - **`responseType`**: Use `"code"`. - **`scope`**: Use `"offline_access"`. - **`state`**: A state parameter. - **`sessionToken`**: The session token received from [a call to Login V 2](#step-3--log-in-a-member), [a call to Register V 2](#step-2--sign-up-a-new-member), or [a call to Verify During Authentication](#step-5--verify-email-address). ```curl curl --location 'https://www.wixapis.com/_api/redirects-api/v1/redirect-session' \ --header 'authorization: ' \ --header 'content-type: application/json' \ --data '{ "auth": { "authRequest": { "clientId": "", "codeChallenge": "JNU5gZmEjgVL2eXfgSmUW3S2E202k2rkq4u3M_drdCY", "codeChallengeMethod": "S256", "responseMode": "web_message", "responseType": "code", "scope": "offline_access", "state": "Z4dy7JM2S7n35VnBhdMeOQyXQW7UkE2Q1afdPLL419o", "sessionToken": "MST.eyJraWQiOiJ3cTFCcFlDbyIsImFsZyI6IlJTMjU2In0..." } } }' ``` Create Redirect Session responds with: - **`id`**: Redirect session ID. - **`fullUrl`**: An authorization URL. ```json { "redirectSession": { "id": "83cab021-c3de-47b9-afa2-e93602e38b09", "fullUrl": "https://mysite.com/example/_api/oauth2/authorize?clientId=e345..." } } ``` ## Step 9 | Authorize member Once you have an authorization URL, you can use it to authorize a member before requesting their access and refresh tokens. The authorization can be done either on the frontend (iframe), or on the backend (full-page redirect). The `responseMode` value defines the flow. ### iframe Use this flow when you want a token exchange without navigating away from your UI. The iframe doesn't need to be visible. 1. Open the authorization URL in an [iframe](https://www.w3schools.com/tags/tag_iframe.ASP). 1. Listen for a `postMessage` from the iframe. It will include a `state` parameter and a `code`. 1. Check that the `state` value is the same as the state value you passed when [getting the authorization URL](#step-8--get-an-authorization-url). 1. Use the `code` to [generate member tokens](#generate-member-tokens). ### Full-page redirect Use this flow when you want the token exchange to happen through a full-page redirect. 1. Redirect the browser to the authorization URL. 1. Wix redirects back to your callback URL with `state` and `code` included in the URL, based on your `responseMode` value: - `query`: in the URL query string (server-side). - `fragment`: in the URL fragment (client-side). 1. Check that the `state` value is the same as the state value you passed when [getting the authorization URL](#step-8--get-an-authorization-url). 1. Use the `code` to [generate member tokens](#generate-member-tokens). ### Generate member tokens After performing authorization, you have a `code` that you can use to generate access and refresh tokens for the logged-in member. Generate new member tokens using [Create Access Token](https://dev.wix.com/docs/api-reference/app-management/oauth-2/create-access-token.md). When calling Create Access Token, specify the following parameters: - **`clientId`**: The **Client ID** of your OAuth app, which can be found in your project's [**Headless Settings**](https://www.wix.com/my-account/site-selector/?buttonText=Select%20Site&title=Select%20a%20Site&autoSelectOnSingleSite=true&actionUrl=https:%2F%2Fwww.wix.com%2Fdashboard%2F%7B%7BmetaSiteId%7D%7D%2Foauth-apps-settings). - **`grantType`**: Set as `"authorization_code"` to get member tokens with an authorization code. - **`code`**: The code you [received in the authorization](#step-9--authorize-member). - **`codeVerifier`**: The code verifier you [prepared for the redirect session](#step-7--prepare-for-a-redirect-session). ```curl curl --location 'https://www.wixapis.com/oauth2/token' \ --header 'content-type: application/json' \ --data '{ "clientId": "", "grantType": "authorization_code", "code": "OLI79QEL", "codeVerifier": "bRGwKp1zdrSY_3A_GRvK2JI9Iq2MykDV5NjXk3tcQn4" }' ``` Create Access Token responds with: - **`access_token`**: An access token used to authorize API calls. - **`expires_in`**: The number of seconds before the access token expires. Access tokens expire after 4 hours (14,400 seconds). - **`refresh_token`**: A refresh token used to get a new access token. ```json { "access_token": "OauthNG.JWS.eyJraWQiOi1JzdUpwSCIsImFsZyI6IkhTMjU2In0...", "token_type": "Bearer", "expires_in": 14400, "refresh_token": "JWS.eyJraWQiOiJ1SEJzdUpwSCIsImFsZyI6IkhTMjU2In0..." } ``` Once you have tokens, you can use them to make [authenticated calls to APIs](https://dev.wix.com/docs/go-headless/self-managed-headless/authentication/oauth/make-rest-api-calls-using-oauth.md) on behalf of the current member. ## Step 10 | Send a password-reset email To enable a member to reset their password, call [Send Recovery Email](https://dev.wix.com/docs/api-reference/business-management/headless/recovery/send-recovery-email.md), specifying the following parameters: - **`email`**: Email address to send the recovery email to. - **`redirect.url`**: The full URL to redirect the member to after they change their password. The `redirect.url` must be an [allowed authorization redirect URI](https://dev.wix.com/docs/go-headless/self-managed-headless/authentication/members/add-allowed-authorization-redirect-uris.md). - **`redirect.clientId`**: The **Client ID** of your OAuth app, which can be found in your project's [**Headless Settings**](https://www.wix.com/my-account/site-selector/?buttonText=Select%20Site&title=Select%20a%20Site&autoSelectOnSingleSite=true&actionUrl=https:%2F%2Fwww.wix.com%2Fdashboard%2F%7B%7BmetaSiteId%7D%7D%2Foauth-apps-settings). ```curl curl --location 'https://www.wixapis.com/_api/iam/recovery/v1/send-email' \ --header 'content-type: application/json' \ --header 'authorization: ' \ --data '{ "email": "john@doe.com", "redirect": { "url": "https://mtsite.vercel.app", "clientId": "" } }' ``` Send Recovery Email responds with an empty response on success. ## Logging out a member To log a site member out, take the following steps: 1. Get the member's logout URL Use Create Redirect Session to get a logout URL for the site member specifying the following parameters: - **`clientId`**: The **Client ID** of your OAuth app, which can be found in your project's [**Headless Settings**](https://www.wix.com/my-account/site-selector/?buttonText=Select%20Site&title=Select%20a%20Site&autoSelectOnSingleSite=true&actionUrl=https:%2F%2Fwww.wix.com%2Fdashboard%2F%7B%7BmetaSiteId%7D%7D%2Foauth-apps-settings). - **`postFlowUrl`**: Where the member will be redirected after logging out. ```curl curl --location 'https://www.wixapis.com/_api/redirects-api/v1/redirect-session' \ --header 'content-type: application/json' \ --header 'authorization: ' \ --data '{ "logout": { "clientId": "" }, "callbacks": { "postFlowUrl": "https://mysite.com/" } }' ``` 2. Redirect to the logout URL Redirect the browser to the returned `fullUrl` to log the site member out. The browser is automatically redirected back to the `postFlowUrl` that you specified when calling Create Redirect Session. ## Profile The profile object contains the following properties: | Name | Type | Description | | :---------------- | :------- | :------------------------------------------------------------------------------------------------------------------------------------ | | `firstName` | string | First name. | | `lastName` | string | Last name. | | `nickname` | string | Nickname. | | `picture` | string | Picture. | | `labels` | string[] | Labels. | | `language` | string | Language. | | `privacyStatus` | string | One of: `'UNDEFINED'`, `'PUBLIC'`, `'PRIVATE'` | | `customFields` | object | Custom fields as an object where the keys are the field name and the values are the field values. | | `secondaryEmails` | object[] | Secondary email address objects, each with `email` and `tag` fields, where tag is one of: `UNTAGGED`, `MAIN`, `HOME`, or `WORK`. | | `phonesV2` | object[] | Phone number objects, each with `countryCode`, `phone`, and `tag` fields, where tag is one of: `UNTAGGED`, `MAIN`, `HOME`, or `WORK`. | | `addresses` | object[] | Physical address objects, each with `address` and `tag` fields, where tag is one of: `UNTAGGED`, `MAIN`, `HOME`, or `WORK`. | | `company` | string | Company name. | | `position` | string | Position. | | `birthdate` | string | Birth date.| ## See also - [Handle Visitors](https://dev.wix.com/docs/go-headless/self-managed-headless/authentication/visitors/handle-visitors-using-the-rest-api.md) - [Handle Members with a Wix Login Page](https://dev.wix.com/docs/go-headless/self-managed-headless/authentication/members/wix-login-page/wix-managed-login-using-the-rest-api.md) --- > Portal Navigation: > > - Append `.md` to any URL under `https://dev.wix.com/docs/` to get its markdown version. > - Pages are either content pages (article or reference text) or menu pages (a list of links to child pages). > - To get a menu page, truncate any URL to a parent path and append `.md` (e.g. `https://dev.wix.com/docs/sdk.md`, `https://dev.wix.com/docs/sdk/core-modules.md`). > - Top-level index of all portals: https://dev.wix.com/docs/llms.txt > - Full concatenated docs: https://dev.wix.com/docs/llms-full.txt ## Resource: Set a Login URL ## Article: Login URL ## Article Link: https://dev.wix.com/docs/go-headless/self-managed-headless/authentication/members/custom-login-page/custom-login/set-a-login-url.md ## Article Content: # Set a Login URL When you create a custom login page, you need to define a login URL that points to your custom login page. This tells Wix where to redirect users when they encounter Wix-managed business flows that require login, for example a checkout page. If you use a Wix login page instead, this setup isn't required since Wix handles the login process automatically. Learn more about [login options](https://dev.wix.com/docs/go-headless/self-managed-headless/authentication/about-authentication.md) for Headless sites. To set a login URL: 1. In your project dashboard, go to **Settings** > **Development & integrations** > [**Headless Settings**](https://www.wix.com/my-account/site-selector/?buttonText=Select%20Site&title=Select%20a%20Site&autoSelectOnSingleSite=true&actionUrl=https:%2F%2Fwww.wix.com%2Fdashboard%2F%7B%7BmetaSiteId%7D%7D%2Foauth-apps-settings). 1. From **Headless clients**, click the 3 dots to the right of the OAuth app you want to edit. Choose **Settings** to open the app's settings page: ![Click OAuth App Settings](https://wixmp-833713b177cebf373f611808.wixmp.com/images/7c76d81ed8599db6b40ef817464adb44.png) 1. Scroll down to the **URLs** section and go to the **Login URL** section. ![Login URL](https://wixmp-833713b177cebf373f611808.wixmp.com/images/61f254fa8ab844e69f56a21c7650bbc0.png) 1. Enter the URL to your custom login interface. When Wix needs to log in a member, the member will be redirected to the URL you entered. 1. Click **Save** to save your changes and return to **Headless Settings**. --- > Portal Navigation: > > - Append `.md` to any URL under `https://dev.wix.com/docs/` to get its markdown version. > - Pages are either content pages (article or reference text) or menu pages (a list of links to child pages). > - To get a menu page, truncate any URL to a parent path and append `.md` (e.g. `https://dev.wix.com/docs/sdk.md`, `https://dev.wix.com/docs/sdk/core-modules.md`). > - Top-level index of all portals: https://dev.wix.com/docs/llms.txt > - Full concatenated docs: https://dev.wix.com/docs/llms-full.txt ## Resource: Implement reCAPTCHA Using the JS SDK ## Article: Implement reCAPTCHA with Custom Login ## Article Link: https://dev.wix.com/docs/go-headless/self-managed-headless/authentication/members/custom-login-page/re-captcha/implement-re-captcha-using-the-js-sdk.md ## Article Content: # Implement reCAPTCHA with Custom Login Using the JS SDK This article explains how to implement [reCAPTCHA](https://dev.wix.com/docs/go-headless/self-managed-headless/authentication/members/re-captcha/about-re-captcha.md) with member authentication using the JavaScript SDK. You'll learn how to: - Implement reCAPTCHA in your forms. - Use reCAPTCHA tokens during sign up and login. - Handle different reCAPTCHA verification modes. ## Step 1 | Install a reCAPTCHA library Install a reCAPTCHA library for your framework. For example, if you're using React, you can install [`react-google-recaptcha-enterprise`](https://www.npmjs.com/package/react-google-recaptcha-enterprise).
    **Important:** You must use the enterprise version of a reCAPTCHA library.
    ## Step 2 | Implement reCAPTCHA in your forms Use a Wix site key, not your own, when loading the reCAPTCHA script. You can get Wix keys from the `captchaVisibleSiteKey` and `captchaInvisibleSiteKey` properties in the SDK. ### Visible reCAPTCHA Add a visible reCAPTCHA component to your registration or login form. For example: ```jsx import React, { useRef, useState } from 'react'; import ReCAPTCHA from 'react-google-recaptcha-enterprise'; const RegistrationForm = () => { const [email, setEmail] = useState(''); const [password, setPassword] = useState(''); const [captchaToken, setCaptchaToken] = useState(''); const captchaRef = useRef(null); return (
    {/* Email and password fields */} setEmail(e.target.value)} placeholder="Email" required /> setPassword(e.target.value)} placeholder="Password" required /> {/* reCAPTCHA component */} ); }; ``` ### Invisible reCAPTCHA For invisible reCAPTCHA, the component is hidden and only triggers when needed. For example: ```jsx import React, { useRef, useState } from 'react'; import ReCAPTCHA from 'react-google-recaptcha-enterprise'; const LoginForm = () => { const [email, setEmail] = useState(''); const [password, setPassword] = useState(''); const [captchaToken, setCaptchaToken] = useState(''); const captchaRef = useRef(null); const handleSubmit = async (event) => { event.preventDefault(); // Execute invisible reCAPTCHA const token = await captchaRef.current?.executeAsync(); setCaptchaToken(token); // Proceed with login await loginUser(email, password, token); }; return (
    {/* Email and password fields */} setEmail(e.target.value)} placeholder="Email" required /> setPassword(e.target.value)} placeholder="Password" required /> {/* Invisible reCAPTCHA component */} ); }; ``` ## Step 3 | Use reCAPTCHA tokens with authentication Now, you can use the reCAPTCHA tokens with the `register` and `login` methods. ### Registration with visible reCAPTCHA When registering a new member with visible reCAPTCHA, pass the token using the `recaptchaToken` property. For example: ```js const registerWithCaptcha = async (email, password, captchaToken) => { try { const response = await myWixClient.auth.register({ email, password, captchaTokens: { recaptchaToken: captchaToken }, }); // ... } catch (error) { console.error('Registration failed:', error); // Reset reCAPTCHA on error captchaRef.current?.reset(); } }; ``` ### Login with invisible reCAPTCHA When logging in with invisible reCAPTCHA, pass the token using the `invisibleRecaptchaToken` property. For example: ```js const loginWithInvisibleCaptcha = async (email, password, captchaToken) => { try { const response = await myWixClient.auth.login({ email, password, captchaTokens: { invisibleRecaptchaToken: captchaToken }, }); // ... } catch (error) { console.error('Login failed:', error); } }; ``` --- > Portal Navigation: > > - Append `.md` to any URL under `https://dev.wix.com/docs/` to get its markdown version. > - Pages are either content pages (article or reference text) or menu pages (a list of links to child pages). > - To get a menu page, truncate any URL to a parent path and append `.md` (e.g. `https://dev.wix.com/docs/sdk.md`, `https://dev.wix.com/docs/sdk/core-modules.md`). > - Top-level index of all portals: https://dev.wix.com/docs/llms.txt > - Full concatenated docs: https://dev.wix.com/docs/llms-full.txt ## Resource: Implement reCAPTCHA Using the REST API ## Article: Implement reCAPTCHA ## Article Link: https://dev.wix.com/docs/go-headless/self-managed-headless/authentication/members/custom-login-page/re-captcha/implement-re-captcha-using-the-rest-api.md ## Article Content: # Implement reCAPTCHA with Custom Login Using the REST API This article explains how to implement [reCAPTCHA](https://dev.wix.com/docs/go-headless/self-managed-headless/authentication/members/re-captcha/about-re-captcha.md) with member authentication using the REST API. You'll learn how to: - Implement reCAPTCHA using a 3rd party. - Use reCAPTCHA tokens during register and login. ## Step 1 | Implement reCAPTCHA using a 3rd party Use a 3rd-party library like [Google reCAPTCHA](https://www.google.com/recaptcha/admin/create) to implement the reCAPTCHA or choose to implement it yourself using [Google's APIs](https://cloud.google.com/recaptcha-enterprise/docs/apis). You can choose to always require reCAPTCHA verification or only require it for suspected bots. - To always require reCAPTCHA verification, use a visible site key when loading the reCAPTCHA script. - To only require reCAPTCHA verification for suspected bots, use an invisible site key when loading the reCAPTCHA script.
    **Important:** When implementing a reCAPTCHA: - Use a Wix site key, not your own, when loading the reCAPTCHA script. - **Visible site key**: `'6Ld0J8IcAAAAANyrnxzrRlX1xrrdXsOmsepUYosy'` - **Invisible site key**: `'6LdoPaUfAAAAAJphvHoUoOob7mx0KDlXyXlgrx5v'` - Be sure to load the [enterprise](https://www.google.com/recaptcha/enterprise.js) reCAPTCHA script.
    For example, [implement a visible reCAPTCHA widget with Google reCAPTCHA](https://cloud.google.com/recaptcha/docs/instrument-web-pages-with-checkbox): ```html
    ``` ## Step 2 | Use reCAPTCHA tokens to register or login Call the [`Register V2`](https://dev.wix.com/docs/rest/business-management/headless/authentication/register-v-2.md) or [`Login V2`](https://dev.wix.com/docs/rest/business-management/headless/authentication/login-v-2.md) endpoint with the appropriate reCAPTCHA token returned to your reCAPTCHA implementation. When always requiring reCAPTCHA verification, send the token using the `captcha_tokens.Recaptcha` property. ```curl curl --location 'https://www.wixapis.com/_api/iam/authentication/v2/login' \ --header 'authorization: ' \ --header 'content-type: application/json' \ --data '{ "loginId":{ "email": "john@doe.com" }, "password": "verySecurePassword", "captcha_tokens":[{ "Recaptcha": "" }] }' ``` When only requiring reCAPTCHA verification for suspected bots, send the token using the `captcha_tokens.InvisibleRecaptcha` property. ```curl curl --location 'https://www.wixapis.com/_api/iam/authentication/v2/login' \ --header 'authorization: ' \ --header 'content-type: application/json' \ --data '{ "loginId":{ "email": "john@doe.com" }, "password": "verySecurePassword", "captcha_tokens":[{ "InvisibleRecaptcha": "" }] }' ``` --- > Portal Navigation: > > - Append `.md` to any URL under `https://dev.wix.com/docs/` to get its markdown version. > - Pages are either content pages (article or reference text) or menu pages (a list of links to child pages). > - To get a menu page, truncate any URL to a parent path and append `.md` (e.g. `https://dev.wix.com/docs/sdk.md`, `https://dev.wix.com/docs/sdk/core-modules.md`). > - Top-level index of all portals: https://dev.wix.com/docs/llms.txt > - Full concatenated docs: https://dev.wix.com/docs/llms-full.txt ## Resource: About Externally Managed Login Pages ## Article: About Externally Managed Login Pages ## Article Link: https://dev.wix.com/docs/go-headless/self-managed-headless/authentication/members/externally-managed-login-page/about-externally-managed-login-pages.md ## Article Content: # About Externally-Managed Login Pages > **Note:** Custom login pages are only available for self-managed headless projects. Wix-managed headless projects can [implement a Wix login page](https://dev.wix.com/docs/go-headless/wix-managed-headless/authentication/handle-members-with-a-wix-login-page.md). You might choose to allow [members](https://dev.wix.com/docs/go-headless/self-managed-headless/authentication/about-authentication.md#member) to log in to your site or app with an external provider, using a custom login interface that syncs with Wix’s authentication. > **Notes**: > - External login with Google and Facebook are fully supported in the [Wix login page](https://dev.wix.com/docs/go-headless/self-managed-headless/authentication/members/wix-login-page/wix-managed-login-using-the-rest-api.md). When working with Google or Facebook as your external identity provider, only use this externally-managed flow if you require a custom login interface. > - See our tutorial and sample repo to [Set Up an Externally-Managed Login Flow with Next.js and GitHub](https://dev.wix.com/docs/go-headless/self-managed-headless/self-managed-tutorials/other-tutorials/set-up-an-externally-managed-login-flow-with-next-js-and-github.md). ## Prerequisites Before getting started, make sure you have the following: - An account with an external identity provider - A Wix site or [self-managed](https://dev.wix.com/docs/go-headless/self-managed-headless/about-self-managed-headless.md) Wix headless project with a JavaScript environment. - A [Wix API Key](https://dev.wix.com/docs/api-reference/articles/authentication/api-keys/generate-an-api-key.md) with Members & Contacts permission - An [OAuth App for visitors and members](https://dev.wix.com/docs/go-headless/self-managed-headless/authentication/oauth/about-oauth-authentication.md) ## See also - [Handle Members with Externally-Managed Login](https://dev.wix.com/docs/go-headless/self-managed-headless/authentication/members/externally-managed-login-page/handle-members-with-externally-managed-login.md) --- > Portal Navigation: > > - Append `.md` to any URL under `https://dev.wix.com/docs/` to get its markdown version. > - Pages are either content pages (article or reference text) or menu pages (a list of links to child pages). > - To get a menu page, truncate any URL to a parent path and append `.md` (e.g. `https://dev.wix.com/docs/sdk.md`, `https://dev.wix.com/docs/sdk/core-modules.md`). > - Top-level index of all portals: https://dev.wix.com/docs/llms.txt > - Full concatenated docs: https://dev.wix.com/docs/llms-full.txt ## Resource: Handle Members with Externally-Managed Login ## Article: Handle Members with Externally-Managed Login ## Article Link: https://dev.wix.com/docs/go-headless/self-managed-headless/authentication/members/externally-managed-login-page/handle-members-with-externally-managed-login.md ## Article Content: # Handle Members with Externally-Managed Login Complete the following steps to log a visitor into your site using an external authentication provider: 1. Authorize the member with the external provider and collect their email address. 1. Collect the relevant Wix member ID. To do so, check if this email address has a Wix member ID, and if not, create one. 1. Request and store access and refresh tokens for the Wix member ID. Once the member is logged in, you can redirect them to your home page. ## Step 1 | Authenticate with the external provider and collect the member’s email address 1. When a visitor first lands on your login interface, follow the steps in [handle visitors](https://dev.wix.com/docs/go-headless/self-managed-headless/authentication/visitors/handle-visitors-using-the-js-sdk.md) to create a client and generate new visitor tokens. 1. When a member logs in using their external provider credentials, follow the external provider’s OAuth flow to authenticate users. 1. Once the member has been authenticated, collect their email address. ## Step 2 | Collect a Wix member ID Once you have the member’s email address, you can check if any of them are associated with a Wix member ID using the [Members API](https://dev.wix.com/docs/api-reference/crm/members-contacts/members/member-management/members/introduction.md). ```js const { items } = await wixAdminClient.members .queryMembers({ filter: { loginEmail: email } }); ``` - If an associated Wix member ID exists, collect it to pass in the next step. - If no associated Wix member ID exists, create a member for them and collect the returned ID. Note that creating members without explicit registration is an admin function. Make sure to use a [WixClient](https://dev.wix.com/docs/go-headless/self-managed-headless/authentication/oauth/create-a-client-for-authentication-with-oauth.md) with an [API key](https://dev.wix.com/docs/api-reference/articles/authentication/api-keys/generate-an-api-key.md) that has permission to create members. ## Step 3 | Request and store Wix access and refresh tokens Now that you have the Wix member ID, request access and refresh tokens for the member with the [`getMemberTokensForExternalLogin()`](https://dev.wix.com/docs/sdk/core-modules/sdk/oauth-strategy.md) function.
    **Important:** Before requesting member tokens, ensure visitor [tokens are set on the client](https://dev.wix.com/docs/sdk/core-modules/sdk/oauth-strategy.md). You can either provide active tokens when creating the client or call [`wixClient.auth.generateVisitorTokens()`](https://dev.wix.com/docs/sdk/core-modules/sdk/oauth-strategy.md).
    ```js const memberTokens = await wixClient.auth.getMemberTokensForExternalLogin( member._id, ); ``` Note that getting access and refresh tokens is an admin function. Make sure to use the [WixClient](https://dev.wix.com/docs/go-headless/self-managed-headless/authentication/oauth/create-a-client-for-authentication-with-oauth.md) with your [OAuth app](https://dev.wix.com/docs/go-headless/self-managed-headless/authentication/oauth/about-oauth-authentication.md) that created this visitor, along with an [API key](https://dev.wix.com/docs/api-reference/articles/authentication/api-keys/generate-an-api-key.md) that has permission to create member access tokens, to save the visitor’s activity from before they logged in. Now all that’s left is to store the tokens for later. ## See also - [About Externally-Managed Login Pages](https://dev.wix.com/docs/go-headless/self-managed-headless/authentication/members/externally-managed-login-page/about-externally-managed-login-pages.md) - [Set Up an Externally-Managed Login Flow with Next.js and GitHub](https://dev.wix.com/docs/go-headless/self-managed-headless/self-managed-tutorials/other-tutorials/set-up-an-externally-managed-login-flow-with-next-js-and-github.md) --- > Portal Navigation: > > - Append `.md` to any URL under `https://dev.wix.com/docs/` to get its markdown version. > - Pages are either content pages (article or reference text) or menu pages (a list of links to child pages). > - To get a menu page, truncate any URL to a parent path and append `.md` (e.g. `https://dev.wix.com/docs/sdk.md`, `https://dev.wix.com/docs/sdk/core-modules.md`). > - Top-level index of all portals: https://dev.wix.com/docs/llms.txt > - Full concatenated docs: https://dev.wix.com/docs/llms-full.txt ## Resource: About reCAPTCHA ## Article: About reCAPTCHA ## Article Link: https://dev.wix.com/docs/go-headless/self-managed-headless/authentication/members/re-captcha/about-re-captcha.md ## Article Content: # About reCAPTCHA With Wix Headless, you can [enable reCAPTCHA](https://dev.wix.com/docs/go-headless/self-managed-headless/authentication/members/re-captcha/enable-re-captcha-for-member-login.md) for member registration and login flows. reCAPTCHA is a security service that helps protect sites and apps from fraud and abuse by distinguishing between real visitors and automated bots. ## Types of reCAPTCHA Wix supports 2 types of reCAPTCHA: - **Visible reCAPTCHA**: Always requires visitor interaction, such as solving a challenge or checking a box. - **Invisible reCAPTCHA**: Only prompts visitors when suspicious activity is detected. Most visitors won't see a challenge. We recommend using invisible reCAPTCHA because it provides strong security with less friction for site visitors. Invisible reCAPTCHA is generally more accessible, as most visitors won't need to solve a challenge unless suspicious activity is detected. ## Implementing reCAPTCHA The process for implementing reCAPTCHA varies slightly depending on whether you're using a Wix login page or your own custom login page. - **Wix login page:** Simply enable reCAPTCHA in your project settings, and Wix automatically adds reCAPTCHA to your member registration and login flows. - **Custom login page:** Enable reCAPTCHA in your project settings. Then, you're responsible for adding the reCAPTCHA component to your forms and passing the verification token to Wix during registration and login. For implementation details, see [Implement reCAPTCHA for Custom Login](https://dev.wix.com/docs/go-headless/self-managed-headless/authentication/members/custom-login-page/re-captcha/implement-re-captcha-using-the-js-sdk.md). --- > Portal Navigation: > > - Append `.md` to any URL under `https://dev.wix.com/docs/` to get its markdown version. > - Pages are either content pages (article or reference text) or menu pages (a list of links to child pages). > - To get a menu page, truncate any URL to a parent path and append `.md` (e.g. `https://dev.wix.com/docs/sdk.md`, `https://dev.wix.com/docs/sdk/core-modules.md`). > - Top-level index of all portals: https://dev.wix.com/docs/llms.txt > - Full concatenated docs: https://dev.wix.com/docs/llms-full.txt ## Resource: Enable reCAPTCHA for Member Login ## Article: Enable reCAPTCHA for Member Login ## Article Link: https://dev.wix.com/docs/go-headless/self-managed-headless/authentication/members/re-captcha/enable-re-captcha-for-member-login.md ## Article Content: # Enable reCAPTCHA for Member Login With Wix Headless, you can add [reCAPTCHA](https://dev.wix.com/docs/go-headless/self-managed-headless/authentication/members/re-captcha/about-re-captcha.md) to your member registration and login flows for added security. To enable reCAPTCHA, follow these steps: 1. Go to your project dashboard. 2. Navigate to **Settings** > **Site Member Settings** > **Signup & Login Security**. 3. Choose where to add reCAPTCHA: - **Add reCAPTCHA to signup**: Requires reCAPTCHA verification when a new site member registers. - **Add reCAPTCHA to login**: Requires reCAPTCHA verification when an existing site member logs in. 4. For each option, select when to require reCAPTCHA: - **Always**: All visitors must complete a reCAPTCHA challenge, such as solving a puzzle or checking a box. - **For suspected bots**: Only visitors with suspicious activity are prompted to complete a reCAPTCHA challenge. Most visitors won't see a challenge. --- > Portal Navigation: > > - Append `.md` to any URL under `https://dev.wix.com/docs/` to get its markdown version. > - Pages are either content pages (article or reference text) or menu pages (a list of links to child pages). > - To get a menu page, truncate any URL to a parent path and append `.md` (e.g. `https://dev.wix.com/docs/sdk.md`, `https://dev.wix.com/docs/sdk/core-modules.md`). > - Top-level index of all portals: https://dev.wix.com/docs/llms.txt > - Full concatenated docs: https://dev.wix.com/docs/llms-full.txt ## Resource: About Calling Site HTTP Functions ## Article: Calling Site HTTP Functions ## Article Link: https://dev.wix.com/docs/go-headless/self-managed-headless/authentication/access-site-apis/about-calling-site-http-functions.md ## Article Content: # About Calling Site HTTP Functions [HTTP functions](https://dev.wix.com/docs/velo/velo-only-apis/wix-http-functions/introduction.md) allow you to expose the functionality of a Wix site as a service in the form of REST APIs. If you’ve added functionality to a site with code and want to use it in a Headless site or app, you can expose HTTP functions and call the APIs in your client's code. Learn more about [exposing a site API with HTTP functions](https://dev.wix.com/docs/develop-websites/articles/coding-with-velo/integrations/exposing-services/about-custom-site-apis.md). ## Authentication context Authentication context is information about which [identity](https://dev.wix.com/docs/api-reference/articles/authentication/about-identities.md) is calling an API. If an HTTP function on a Wix site doesn't receive authentication context, it treats the call as if it was made by an anonymous site visitor. This restricts the methods you can use in your code without overriding authentication using [`elevate()`](https://dev.wix.com/docs/velo/apis/wix-auth/elevate.md). Providing your HTTP functions with authentication context allows you to: - Restrict HTTP function usage on your site to admins or site members. - Use functions that return different responses based on who calls them, such as [`getCurrentMember()`](https://dev.wix.com/docs/velo/apis/wix-members-v2/members/get-current-member.md). > **Note:** [Wix app identity](https://dev.wix.com/docs/api-reference/articles/authentication/about-identities.md) isn't supported. ## Implementation approaches You can call site HTTP functions using 2 approaches: - The [JavaScript SDK](https://dev.wix.com/docs/api-reference/assets/http-functions/introduction.md) to call your site's endpoints with authentication context. - The [REST API](https://dev.wix.com/docs/velo/velo-only-apis/wix-http-functions/introduction.md) using [access tokens](https://dev.wix.com/docs/rest/app-management/oauth-2/introduction.md) or [API Keys](https://dev.wix.com/docs/api-reference/articles/authentication/api-keys/about-api-keys.md) to send authentication context to your site's HTTP functions. ## See also - [Set Up a Headless Client](https://dev.wix.com/docs/go-headless/self-managed-headless/get-started/connect-a-frontend.md) - [Generate an API key](https://dev.wix.com/docs/api-reference/articles/authentication/api-keys/generate-an-api-key.md) --- > Portal Navigation: > > - Append `.md` to any URL under `https://dev.wix.com/docs/` to get its markdown version. > - Pages are either content pages (article or reference text) or menu pages (a list of links to child pages). > - To get a menu page, truncate any URL to a parent path and append `.md` (e.g. `https://dev.wix.com/docs/sdk.md`, `https://dev.wix.com/docs/sdk/core-modules.md`). > - Top-level index of all portals: https://dev.wix.com/docs/llms.txt > - Full concatenated docs: https://dev.wix.com/docs/llms-full.txt ## Resource: Quick Start ## Article: Quick Start ## Article Link: https://dev.wix.com/docs/go-headless/self-managed-headless/self-managed-tutorials/java-script-sdk-tutorials/quick-start.md ## Article Content: # Quick Start Follow this quick start tutorial to get up and running with your first headless project. This tutorial walks you through the project setup process and builds a simple site that uses tokens to maintain persistent visitor sessions and to authenticate site members. You can use the code described here as a springboard for your own project. After building the foundation here to handle visitors and members, you can continue your development by making use of the various modules in the [Wix Javascript SDK](https://dev.wix.com/docs/sdk.md). For detailed instructions for managing visitors and members, see [Handle Visitors](https://dev.wix.com/docs/go-headless/self-managed-headless/authentication/visitors/handle-visitors-using-the-js-sdk.md), [Handle Members with Managed Login](https://dev.wix.com/docs/go-headless/self-managed-headless/authentication/members/wix-login-page/wix-managed-login-using-the-js-sdk.md), [Handle Members with a Custom Login Page](https://dev.wix.com/docs/go-headless/self-managed-headless/authentication/members/custom-login-page/custom-login/custom-login-using-the-js-sdk.md), and [Handle Members with Externally-Managed Login](https://dev.wix.com/docs/go-headless/self-managed-headless/authentication/members/externally-managed-login-page/handle-members-with-externally-managed-login.md). > **Note:** If you build with [Wix's Astro integration](https://dev.wix.com/docs/go-headless/wix-managed-headless/authentication/about-the-astro-integration.md), you don't need to handle OAuth setup or create a client because it's done automatically. This tutorial shows you how to implement: - A React component that handles login and logout by redirecting the visitor to a Wix-hosted page. - A callback page that verifies login and saves member tokens in a cookie. - [Next.js middleware](https://nextjs.org/docs/14/app/building-your-application/routing/middleware) that checks for an existing member or visitor token and generates a new visitor token if one is not found. The tutorial is based on this [example site](https://wix-headless-example.vercel.app). To get the code, fork the [Headless Templates repo](https://github.com/wix/headless-templates). The site code is under [minimal examples](https://github.com/wix/headless-templates/tree/main/nextjs/minimal-examples). The site focuses on simplicity and understandability, rather than feature richness, performance or completeness. Looking for a more comprehensive example site integrating Wix Headless APIs? Check out our [starter templates](https://dev.wix.com/docs/go-headless/self-managed-headless/self-managed-templates/next-js-templates.md). > **Note:** The code in this tutorial is written in [JSX](https://react.dev/learn/writing-markup-with-jsx), but you can use the SDK in any JavaScript environment. Implementing the session management flow includes the following steps: 1. Set up the Wix Headless environment. 1. Create a login component. 1. Create a callback page. 1. Create middleware for managing tokens. ## Step 1: Set up the Wix Headless environment Before using the SDK, there are a few things you need to set up on your Wix account and in your external site or app's coding environment. To set up the Wix Headless environment, follow these steps: 1. If you haven't already, [create a project](https://dev.wix.com/docs/go-headless/get-started/quick-starts/self-managed-headless/quick-start-a-self-managed-headless-project.md). When prompted to add functionalities to your new project, select whichever business solutions your project needs. 2. Set up authorization for your site by [creating and configuring](https://dev.wix.com/docs/go-headless/self-managed-headless/authentication/about-authentication.md) an OAuth app: a. Create an OAuth app in your project's [Headless Settings](https://www.wix.com/my-account/site-selector/?buttonText=Select%20Site&title=Select%20a%20Site&autoSelectOnSingleSite=true&actionUrl=https:%2F%2Fwww.wix.com%2Fdashboard%2F%7B%7BmetaSiteId%7D%7D%2Foauth-apps-settings). Copy your Client ID - you'll need it later. b. Configure Wix-managed login URLs as [allowed redirect domains](https://dev.wix.com/docs/go-headless/develop-your-project/wix-hosted-pages/add-allowed-redirect-domains.md) in your site dashboard. 3. Install the SDK client and relevant SDK module packages by running the following commands: For NPM: ```console npm install @wix/sdk npm install @wix/members ``` For Yarn: ```console yarn add @wix/sdk yarn add @wix/members ``` 4. Install the `react` package to handle UI rendering, the `js-cookie` package to handle session cookies, and the `next/server` package with helper functions for [Next.js middleware](https://nextjs.org/docs/14/app/building-your-application/routing/middleware). For NPM: ```console npm install react npm install js-cookie npm install next/server ``` For Yarn: ```console yarn add react yarn add js-cookie yarn add next/server ``` ## Step 2: Create a login component Follow these steps to create a React component that handles login and logout by redirecting the visitor to a Wix-hosted page. ### 1. Import the SDK modules and create an SDK client To set up the code file for the login component, follow these steps: 1. Add the following import statements to the top of your code file: ```jsx import { createClient, OAuthStrategy } from '@wix/sdk'; import { members } from '@wix/members'; import { useEffect, useState } from 'react'; import Cookies from 'js-cookie'; ``` 1. Create an SDK client by adding the following code to your code file. Replace the value for `clientId` with your OAuth app's client ID. You can find the ID in your project's [**Headless Settings**](https://www.wix.com/my-account/site-selector/?buttonText=Select%20Site&title=Select%20a%20Site&autoSelectOnSingleSite=true&actionUrl=https:%2F%2Fwww.wix.com%2Fdashboard%2F%7B%7BmetaSiteId%7D%7D%2Foauth-apps-settings). The value for `tokens` is the `'session'` cookie on the visitor's browser. It's used to make calls to the Wix API. This way, you can maintain previous visitor sessions. If a token has already been generated for the visitor, this token is used. ```jsx const myWixClient = createClient({ modules: { members }, auth: OAuthStrategy({ clientId: ``, tokens: JSON.parse(Cookies.get('session') || null), }), }); ``` ### 2. Create a React component and a state variable The logic for our example login request flow is contained in a React component called `LoginBar`. To create the component, follow these steps: 1. Define the component function as a default export in your code file: ```jsx export default function LoginBar() {} ``` 1. Define a state variable by adding the following code in the component function: ```jsx const [member, setMember] = useState([]); ``` In the steps that follow, the `member` state variable stores a visitor's data if they are a logged-in site member. ### 3. Define functions to handle member sessions Add the following 3 functions for handling member sessions to the `LoginBar` component: 1. `fetchMember()` - Uses the SDK client's `auth.loggedIn()` function to check if the current site visitor is a logged-in site member. If they are, the rendered UI is updated with the member's details. This function runs when the component is mounted. ```jsx async function fetchMember() { const { member } = myWixClient.auth.loggedIn() ? await myWixClient.members.getCurrentMember() : {}; setMember(member || undefined); } ``` 1. `login()` - Uses the SDK client's `auth.generateOAuthData()` and `auth.getAuthUrl()` functions to log in a site visitor. This function runs when a **Login** button in the rendered UI is clicked. ```jsx async function login() { const data = myWixClient.auth.generateOAuthData( `${window.location.origin}/login-callback`, window.location.href ); localStorage.setItem('oauthRedirectData', JSON.stringify(data)); const { authUrl } = await myWixClient.auth.getAuthUrl(data); window.location = authUrl; } ``` The SDK client's `auth.generateOAuthData()` function generates the data needed for authorization, which is saved in local storage with the key `oauthRedirectData`. When the Wix-managed authentication process is over, Wix redirects the visitor to the URL provided in `redirectUri`. The `auth.getAuthUrl()` function returns a URL for a Wix-hosted authentication page called `authUrl`. 1. `logout()` - Uses the SDK client's `auth.logout()` function to log out a site member and remove the session cookie from their browser. This function runs when a **Logout** button in the rendered UI is clicked. ```jsx async function logout() { const { logoutUrl } = await myWixClient.auth.logout(window.location.href); Cookies.remove('session'); window.location = logoutUrl; } ``` ### 4. Add the `useEffect` hook Add the following code to the `LoginBar` component to run the `fetchMember()` function after the component is rendered. This ensures that member data is retrieved when the component mounts. ```jsx useEffect(() => { fetchMember(); }, []); ``` ### 5. Render the UI Add the following code to the `LoginBar` component function's `return` statement to render the UI. ```jsx return (
    {member !== null && (
    (myWixClient.auth.loggedIn() ? logout() : login())} >

    Hello{' '} {myWixClient.auth.loggedIn() ? member.profile?.nickname || member.profile?.slug || '' : 'visitor'} ,

    {myWixClient.auth.loggedIn() ? 'Logout' : 'Login'}
    )}
    ); ``` The UI displays the following: - If no member is logged in: **Hello visitor** and a **Login** link. - If a member is logged in: **Hello, ** and a **Logout** link. ## Step 3: Create a callback page Follow these steps to create a callback page for Wix to redirect the visitor to after handling authentication. ### 1. Import the SDK modules and create an SDK client To set up the code file for the callback page, follow these steps: 1. Add the following import statements to the top of your code file: ```jsx import Cookies from 'js-cookie'; import { useEffect, useState } from 'react'; import { createClient, OAuthStrategy } from '@wix/sdk'; ``` 1. Create an SDK client by adding the following code to your code file: ```jsx const myWixClient = createClient({ auth: OAuthStrategy({ clientId: ``, tokens: JSON.parse(Cookies.get('session') || null), }), }); ``` ### 2. Create a React component and state variables The logic for our example login request flow is contained in a React component called `LoginCallback`. To create the component, follow these steps: 1. Define the component function as a default export in your code file: ```jsx export default function LoginCallback() {} ``` 1. Define state variables by adding the following code in the component function: ```jsx const [nextPage, setNextPage] = useState(null); const [errorMessage, setErrorMessage] = useState(null); ``` In the steps that follow, the `nextPage` state variable stores the URL of the page to redirect the visitor to, and the `errorMessage` state variable stores the error received if there is an error generating a member token. ### 3. Define a function to verify login Add the following function to the `LoginCallback` component. This function first retrieves the authorization data saved in local storage by the `Login` component. Then it retrieves the authorization code and state from the callback page's URL using `auth.parseFromUrl()`. Using this data, it calls `auth.getMemberTokens()` to generate access and refresh tokens, which it stores in the `'session'` cookie. It then redirects the visitor to the page specified in `data.originalUri` if it exists, or otherwise to `/`. ```jsx async function verifyLogin() { const data = JSON.parse(localStorage.getItem('oauthRedirectData')); localStorage.removeItem('oauthRedirectData'); try { const { code, state } = myWixClient.auth.parseFromUrl(); let tokens = await myWixClient.auth.getMemberTokens(code, state, data); while (!tokens?.refreshToken?.value) { tokens = await myWixClient.auth.getMemberTokens(code, state, data); } Cookies.set('session', JSON.stringify(tokens)); window.location = data?.originalUri || '/'; } catch (e) { setNextPage(data?.originalUri || '/'); setErrorMessage(e.toString()); } } ``` ### 4. Add the `useEffect` hook Add the following code to the `LoginCallback` component to run the `verifyLogin()` function after the component is rendered. This ensures that tokens are stored when the component mounts. ```jsx useEffect(() => { verifyLogin(); }, []); ``` ### 5. Render the UI Add the following code to the `LoginCallback` component function's `return` statement to render the UI. ```jsx return (
    {errorMessage && ( <> {errorMessage}

    )} {nextPage ? Continue : <>Loading...}
    ); ``` The UI displays the following before redirecting the visitor: - If there was an error, `errorMessage` is displayed. - If login was verified, a link to the next page with the text **Continue** is rendered, along with the text **Loading...**. ## Step 4: Create middleware for managing tokens Once you've implemented a login component and a callback page, follow these steps to create [Next.js middleware](https://nextjs.org/docs/14/app/building-your-application/routing/middleware) to check a visitor's session status when loading every page. ### 1. Import the SDK modules To set up the code file for the session management middleware, follow these steps: 1. Add the following import statements to the top of your code file: ```jsx import { createClient, OAuthStrategy } from '@wix/sdk'; import { NextResponse } from '/next/server'; ``` ### 2. Create a middleware function The logic for our middleware is contained in a function called `middleware()`. This function checks if a `'session'` cookie already exists in the page request. If the cookie isn't found, it generates new visitor tokens using `auth.generateVisitorTokens()` and stores them in a `'session'` cookie to create a new anonymous session which persists when the visitor uses the site from the same browser. Implement this function as follows: ```js export async function middleware(request) { if (!request.cookies.get('session')) { const response = NextResponse.next(); const myWixClient = createClient({ auth: OAuthStrategy({ clientId: `` }), }); response.cookies.set( 'session', JSON.stringify(await myWixClient.auth.generateVisitorTokens()) ); return response; } } ``` ## Complete code examples You can use the following full code examples as a starting point for developing your own site: ### Login component ```jsx import Cookies from 'js-cookie'; import { useEffect, useState } from 'react'; import { createClient, OAuthStrategy } from '@wix/sdk'; import { members } from '@wix/members'; const myWixClient = createClient({ modules: { members }, auth: OAuthStrategy({ clientId: ``, tokens: JSON.parse(Cookies.get('session') || null), }), }); export default function LoginBar() { const [member, setMember] = useState(null); async function fetchMember() { const { member } = myWixClient.auth.loggedIn() ? await myWixClient.members.getCurrentMember() : {}; setMember(member || undefined); } async function login() { const data = myWixClient.auth.generateOAuthData( `${window.location.origin}/login-callback`, window.location.href ); localStorage.setItem('oauthRedirectData', JSON.stringify(data)); const { authUrl } = await myWixClient.auth.getAuthUrl(data); window.location = authUrl; // wix auth will send the user back to the callback page (login-callback.js) } async function logout() { const { logoutUrl } = await myWixClient.auth.logout(window.location.href); Cookies.remove('session'); window.location = logoutUrl; } useEffect(() => { fetchMember(); }, []); return (
    {member !== null && (
    (myWixClient.auth.loggedIn() ? logout() : login())} >

    Hello{' '} {myWixClient.auth.loggedIn() ? member.profile?.nickname || member.profile?.slug || '' : 'visitor'} ,

    {myWixClient.auth.loggedIn() ? 'Logout' : 'Login'}
    )}
    ); } ``` ### Callback page ```jsx import Cookies from 'js-cookie'; import { useEffect, useState } from 'react'; import { createClient, OAuthStrategy } from '@wix/sdk'; const myWixClient = createClient({ auth: OAuthStrategy({ clientId: ``, tokens: JSON.parse(Cookies.get('session') || null), }), }); export default function LoginCallback() { const [nextPage, setNextPage] = useState(null); const [errorMessage, setErrorMessage] = useState(null); async function verifyLogin() { const data = JSON.parse(localStorage.getItem('oauthRedirectData')); localStorage.removeItem('oauthRedirectData'); try { const { code, state } = myWixClient.auth.parseFromUrl(); let tokens = await myWixClient.auth.getMemberTokens(code, state, data); while (!tokens?.refreshToken?.value) { // temporary workaround tokens = await myWixClient.auth.getMemberTokens(code, state, data); } Cookies.set('session', JSON.stringify(tokens)); window.location = data?.originalUri || '/'; } catch (e) { setNextPage(data?.originalUri || '/'); setErrorMessage(e.toString()); } } useEffect(() => { verifyLogin(); }, []); return (
    {errorMessage && ( <> {errorMessage}

    )} {nextPage ? Continue : <>Loading...}
    ); } ``` ### Middleware ```js import { createClient, OAuthStrategy } from '@wix/sdk'; import { NextResponse } from 'next/server'; export async function middleware(request) { // generate a session for the visitor if no session exists if (!request.cookies.get('session')) { const response = NextResponse.next(); const myWixClient = createClient({ auth: OAuthStrategy({ clientId: `` }), }); response.cookies.set( 'session', JSON.stringify(await myWixClient.auth.generateVisitorTokens()) ); return response; } } ``` --- > Portal Navigation: > > - Append `.md` to any URL under `https://dev.wix.com/docs/` to get its markdown version. > - Pages are either content pages (article or reference text) or menu pages (a list of links to child pages). > - To get a menu page, truncate any URL to a parent path and append `.md` (e.g. `https://dev.wix.com/docs/sdk.md`, `https://dev.wix.com/docs/sdk/core-modules.md`). > - Top-level index of all portals: https://dev.wix.com/docs/llms.txt > - Full concatenated docs: https://dev.wix.com/docs/llms-full.txt ## Resource: E Commerce Quick Start ## Article: eCommerce Quick Start ## Article Link: https://dev.wix.com/docs/go-headless/self-managed-headless/self-managed-tutorials/java-script-sdk-tutorials/e-commerce-quick-start.md ## Article Content: # eCommerce Quick Start The SDK `ecom` module allows you to take advantage of Wix eCommerce services in a site or app you build on any platform. This means you can handle shopping carts and checkout flows for your Wix Store products. > **Note:** If you build with [Wix's Astro integration](https://dev.wix.com/docs/go-headless/wix-managed-headless/authentication/about-the-astro-integration.md), you don't need to handle OAuth setup or create a client because it's done automatically.
    This tutorial shows you how to create a React component with a complete eCommerce flow. The component lists products from a Wix store, allows visitors to add products to a shopping cart, and redirects visitors to a checkout page. The tutorial also demonstrates how to maintain cart sessions. The tutorial is based on this [example site](https://wix-headless-example.vercel.app/store). To get the code, fork the [Headless Templates repo](https://github.com/wix/headless-templates). The site code is under [minimal examples](https://github.com/wix/headless-templates/tree/main/nextjs/minimal-examples). This implementation focuses on simplicity and understandability, rather than feature richness, performance or completeness. For details about additional functionality, see [Wix eCommerce](https://dev.wix.com/docs/sdk/backend-modules/ecom/introduction.md) in the API Reference. Looking for a more comprehensive example site integrating Wix Headless APIs for managing an online store? Check out our [starter templates](https://dev.wix.com/docs/go-headless/self-managed-headless/get-started/self-managed-templates/next-js-templates.md). > **Note:** The code in this tutorial is written in [JSX](https://react.dev/learn/writing-markup-with-jsx), but you can use the SDK in any JavaScript environment. Implementing the eCommerce flow includes the following steps: 1. Set up the Wix Headless environment. 1. Import the SDK modules and create an SDK client. 1. Create a React component and state variables. 1. Fetch your Wix Store products. 1. Handle the cart session. 1. Implement the checkout flow. 1. Add the `useEffect` hook. 1. Render the UI. ## Step 1: Set up the Wix Headless environment Before using the SDK, there are a few things you need to set up on your Wix account and in your external site or app's coding environment. To set up the Wix Headless environment, follow these steps: 1. If you haven't already, [create a project](https://dev.wix.com/docs/go-headless/getting-started/setup/general-setup/create-a-project.md). When prompted to add functionalities to your new project, select **eCommerce**. 1. Set up authorization for your site by [creating and configuring](https://dev.wix.com/docs/go-headless/self-managed-headless/authentication/oauth/about-oauth-authentication.md) an OAuth app. 1. Set a [domain to be used by Wix-hosted pages](https://dev.wix.com/docs/go-headless/project-guides/wix-hosted-pages/set-a-wix-pages-domain.md). 1. Set a [domain that Wix can redirect to](https://dev.wix.com/docs/go-headless/project-guides/wix-hosted-pages/add-allowed-redirect-domains.md) after completing a Wix-managed process. 1. Install the API client and relevant SDK module packages by running the following commands: For NPM: ``` npm install @wix/sdk npm install @wix/stores npm install @wix/ecom npm install @wix/redirects ``` For Yarn: ``` yarn add @wix/sdk yarn add @wix/stores yarn add @wix/ecom yarn add @wix/redirects ``` 1. Install the `react` package to handle UI rendering and the `js-cookie` package to handle session cookies. Run the following commands: For NPM: ``` npm install react npm install js-cookie ``` For Yarn: ``` yarn add react yarn add js-cookie ``` ## Step 2: Import the SDK modules and create an SDK client The next step is to set up your code file to run the SDK functions. To set up the code file, follow these steps: 1. Add the following import statements to the top of your code file: ```js import Cookies from 'js-cookie'; import { useEffect, useState } from 'react'; import { createClient, OAuthStrategy } from '@wix/sdk'; import { products } from '@wix/stores'; import { currentCart } from '@wix/ecom'; import { redirects } from '@wix/redirects'; ``` 1. Create an SDK client by adding the following code to your code file. Replace the value for `clientId` with your OAuth app's client ID. You can find the ID in your project's [**Headless Settings**](https://www.wix.com/my-account/site-selector/?buttonText=Select%20Site&title=Select%20a%20Site&autoSelectOnSingleSite=true&actionUrl=https:%2F%2Fwww.wix.com%2Fdashboard%2F%7B%7BmetaSiteId%7D%7D%2Foauth-apps-settings). The value for `tokens` is the `'session'` cookie on the visitor's browser. It's used to make calls to the Wix API. This way, you can maintain previous visitor sessions. For information about managing cookies, see [Session Token Management](https://dev.wix.com/docs/go-headless/self-managed-headless/self-managed-tutorials/java-script-sdk-tutorials/quick-start.md). ```js const myWixClient = createClient({ modules: { products, currentCart, redirects }, auth: OAuthStrategy({ clientId: `` , tokens: JSON.parse( Cookies.get("session") || '{"accessToken": {}, "refreshToken": {}}', ), }) }); ``` ## Step 3: Create a React component and state variables The logic for our eCommerce flow is contained in a React component called `Store`. To create the component, follow these steps: 1. Add the following function component to your code file: ```js export default function Store() {} ``` 2. Define state variables by adding the following code to the `Store` component: The `productList` variable stores the list of products from your project's Wix Store. The `cart` variable stores the current cart session. ```js const [productList, setProductList] = useState([]); const [cart, setCart] = useState({}); ``` ## Step 4: Fetch your Wix Store products Define a function to fetch your Wix Store products by adding the following code to the `Store` component. This function runs when the component is first rendered. The function uses the [`queryProducts()`](https://dev.wix.com/docs/sdk/backend-modules/stores/products/query-products.md) function from the SDK's Stores module to query your store's products. ```js async function fetchProducts() { const productList = await myWixClient.products.queryProducts({}); setProductList(productList.items); } ``` ## Step 5: Handle the cart session Add the following 3 functions for handling cart sessions to the `Store` component. Each of these functions use functions from the `ecom` `CurrentCart` submodule. 1. `fetchCart()` - Fetches the current cart session, if there is one, using the [`getCurrentCart()`](https://dev.wix.com/docs/sdk/backend-modules/ecom/current-cart/get-current-cart.md) function. Sets the browser's session cookie to the SDK client's current access tokens. `fetchCart()` runs when the component is first rendered. ```js async function fetchCart() { try { setCart(await myWixClient.currentCart.getCurrentCart()); } catch {} } ``` 1. `addToCart()` - Adds a product to the cart using the [`addToCurrentCart()`](https://dev.wix.com/docs/sdk/backend-modules/ecom/current-cart/add-to-current-cart.md) function. `addToCart()` runs when a product rendered in the UI is clicked. ```js async function addToCart(product) { const options = product.productOptions.reduce( (selected, option) => ({ ...selected, [option.name]: option.choices[0].description, }), {} ); const { cart } = await myWixClient.currentCart.addToCurrentCart({ lineItems: [ { catalogReference: { appId: '215238eb-22a5-4c36-9e7b-e7c08025e04e', catalogItemId: product._id, options: { options }, }, quantity: 1, }, ], }); setCart(cart); } ``` 1. `clearCart()` - Clears the current cart session using the [`deleteCurrentCart()`](https://dev.wix.com/docs/sdk/backend-modules/ecom/current-cart/delete-current-cart.md) function. `clearCart()` runs when a **Clear Cart** button in the rendered UI is clicked. ```js async function clearCart() { const { cart } = await myWixClient.currentCart.deleteCurrentCart(); setCart(cart); } ``` ## Step 6: Implement the checkout flow Add a function called `createRedirect()` to the `Store` component. This function runs when a **Checkout** button in the rendered UI is clicked. The function does the following: 1. Uses the [`createCheckoutFromCurrentCart()`](https://dev.wix.com/docs/sdk/backend-modules/ecom/current-cart/create-checkout-from-current-cart.md) function to create a checkout for the products currently in the cart and retrieve a `checkoutId`. 1. Uses the [`createRedirectSession()`](https://dev.wix.com/docs/api-reference/business-management/headless/redirects/create-redirect-session.md) function with the retrieved `checkoutId` to retrieve an `ecom` checkout URL. This is the URL for a Wix-hosted checkout page that the visitor can use to complete the checkout process. 1. Redirects the browser to the checkout URL. If the checkout is successful, the visitor is redirected to a Wix thank you page. After the thank you page, or if the checkout fails, the visitor is redirected to the URL passed in the `postFlowUrl` property when calling the `createRedirectSession()` function. ```js async function createRedirect() { const { checkoutId } = await myWixClient.currentCart.createCheckoutFromCurrentCart({ channelType: currentCart.ChannelType.WEB, }); const redirect = await myWixClient.redirects.createRedirectSession({ ecomCheckout: { checkoutId }, callbacks: { postFlowUrl: window.location.href }, }); window.location = redirect.redirectSession.fullUrl; } ``` **Notes:** - When redirecting from a Wix checkout page to an external site, Wix validates that the provided redirect URL is registered under an allowed domain for the given client ID. Therefore, you must [add your domain to the OAuth app](https://dev.wix.com/docs/go-headless/project-guides/wix-hosted-pages/add-allowed-redirect-domains.md). - A visitor can choose to log in to your site or app during the Wix checkout process. ## Step 7: Add the `useEffect` hook Add the following code to the `Store` component to run the `fetchProducts()` `fetchCart()` functions after the component is rendered. This ensures that your product data, any existing cart data, and member data are available when the component mounts. ```jsx useEffect(() => { fetchProducts(); }, []); useEffect(() => { fetchCart(); }, []); ``` ## Step 8: Render the UI Add the following code to the `Store` component's `return` statement to render the UI. The UI displays the following: - A **Choose Products** section with a list of your store's products. Clicking a product adds it to the cart. - A **Cart** section with a list of the products in the cart. - A **Clear Cart** button that clears the current cart session. - A **Checkout** button that redirects the visitor to the Wix checkout page. ```jsx

    Choose Products:

    {productList.map((product) => { return (
    addToCart(product)}> {product.name}
    ); })}

    Cart:

    {cart.lineItems?.length > 0 && ( <>
    createRedirect()}>

    {cart.lineItems.length} items ({cart.subtotal.formattedAmount})

    Checkout
    clearCart()}> Clear cart
    )}
    ``` ## Complete code example You can use the following full code example as a starting point for developing your own site: ```jsx import { createClient, OAuthStrategy } from '@wix/sdk'; import { products } from '@wix/stores'; import { currentCart } from '@wix/ecom'; import { redirects } from '@wix/redirects'; import { useEffect, useState } from 'react'; import Cookies from 'js-cookie'; const myWixClient = createClient({ modules: { products, currentCart, redirects }, auth: OAuthStrategy({ clientId: ``, tokens: JSON.parse( Cookies.get("session") || '{"accessToken": {}, "refreshToken": {}}', ) }), }); export default function Store() { const [productList, setProductList] = useState([]); const [cart, setCart] = useState({}); async function fetchProducts() { const productList = await myWixClient.products.queryProducts({}); setProductList(productList.items); } async function fetchCart() { try { setCart(await myWixClient.currentCart.getCurrentCart()); } catch {} } async function addToCart(product) { const options = product.productOptions.reduce( (selected, option) => ({ ...selected, [option.name]: option.choices[0].description, }), {} ); const { cart } = await myWixClient.currentCart.addToCurrentCart({ lineItems: [ { catalogReference: { appId: '215238eb-22a5-4c36-9e7b-e7c08025e04e', catalogItemId: product._id, options: { options }, }, quantity: 1, }, ], }); setCart(cart); } async function clearCart() { await myWixClient.currentCart.deleteCurrentCart(); setCart({}); } async function createRedirect() { const { checkoutId } = await myWixClient.currentCart.createCheckoutFromCurrentCart({ channelType: currentCart.ChannelType.WEB, }); const redirect = await myWixClient.redirects.createRedirectSession({ ecomCheckout: { checkoutId }, callbacks: { postFlowUrl: window.location.href }, }); window.location = redirect.redirectSession.fullUrl; } useEffect(() => { fetchProducts(); }, []); useEffect(() => { fetchCart(); }, []); return (

    Choose Products:

    {productList.map((product) => { return (
    addToCart(product)}> {product.name}
    ); })}

    Cart:

    {cart.lineItems?.length > 0 && ( <>
    createRedirect()}>

    {cart.lineItems.length} items ({cart.subtotal.formattedAmount})

    Checkout
    clearCart()}> Clear cart
    )}
    ); } ``` --- > Portal Navigation: > > - Append `.md` to any URL under `https://dev.wix.com/docs/` to get its markdown version. > - Pages are either content pages (article or reference text) or menu pages (a list of links to child pages). > - To get a menu page, truncate any URL to a parent path and append `.md` (e.g. `https://dev.wix.com/docs/sdk.md`, `https://dev.wix.com/docs/sdk/core-modules.md`). > - Top-level index of all portals: https://dev.wix.com/docs/llms.txt > - Full concatenated docs: https://dev.wix.com/docs/llms-full.txt ## Resource: Bookings Quick Start ## Article: Bookings Quick Start ## Article Link: https://dev.wix.com/docs/go-headless/self-managed-headless/self-managed-tutorials/java-script-sdk-tutorials/bookings-quick-start.md ## Article Content: # Bookings Quick Start The SDK `bookings` module allows you to take advantage of Wix Bookings business services in a site or app you build on any platform. This means you can allow your clients to book and pay for services online. This tutorial shows you how to use the `bookings` module to create a flow where a visitor can select a service from your Wix Bookings service list, pick an available time slot, and check out. > **Note:** If you build with [Wix's Astro integration](https://dev.wix.com/docs/go-headless/wix-managed-headless/authentication/about-the-astro-integration.md), you don't need to handle OAuth setup or create a client because it's done automatically. The tutorial is based on this [example site](https://wix-headless-example.vercel.app/booking). To get the code, fork the [Headless Templates repo](https://github.com/wix/headless-templates). The site code is under [minimal examples](https://github.com/wix/headless-templates/tree/main/nextjs/minimal-examples). This implementation focuses on simplicity and understandability, rather than feature richness, performance, or completeness. For details about additional functionality, see [Wix Bookings](https://dev.wix.com/docs/sdk/backend-modules/bookings/introduction.md) in the API Reference. Looking for a more comprehensive example site integrating Wix Headless APIs for bookings management? Check out our [starter templates](https://dev.wix.com/docs/go-headless/self-managed-headless/self-managed-templates/next-js-templates.md). > **Note:** The code in this tutorial is written in [JSX](https://react.dev/learn/writing-markup-with-jsx), but you can use the SDK in any JavaScript environment. Implementing the booking flow includes the following steps: 1. Set up the Wix Headless environment. 1. Import the SDK modules and create an SDK client. 1. Create your services. 1. Fetch your services and available slots. 1. Implement checkout. 1. Display the UI. ## Step 1: Set up the Wix Headless environment Before using the SDK, there are a few things you need to set up on your Wix account and in your external site or app's coding environment. To set up the Wix Headless environment, follow these steps: 1. If you haven't already, [create a project](https://dev.wix.com/docs/go-headless/getting-started/setup/general-setup/create-a-project.md). When prompted to add functionalities to your new project, select **Bookings**. 1. Set up authorization for your site by [creating and configuring](https://dev.wix.com/docs/go-headless/self-managed-headless/authentication/oauth/about-oauth-authentication.md) an OAuth app. 1. Set a [domain to be used by Wix-hosted pages](https://dev.wix.com/docs/go-headless/project-guides/wix-hosted-pages/set-a-wix-pages-domain.md). 1. Set a [domain that Wix can redirect to](https://dev.wix.com/docs/go-headless/project-guides/wix-hosted-pages/add-allowed-redirect-domains.md) after completing a Wix-managed process. 1. Install the API client and relevant SDK module packages by running the following commands: For NPM: ``` npm install @wix/sdk npm install @wix/bookings npm install @wix/redirects ``` For Yarn: ``` yarn add @wix/sdk yarn add @wix/bookings yarn add @wix/redirects ``` 1. Install the `react` package to handle UI rendering and the `js-cookie` package to handle session cookies. Run the following commands: For NPM: ``` npm install react npm install js-cookie ``` For Yarn: ``` yarn add react yarn add js-cookie ``` ## Step 2: Import the SDK modules and create an SDK client The next step is to set up your code file to run the SDK functions. To set up the code file, follow these steps: 1. Add the following import statements to the top of your code file: ```javascript import Cookies from 'js-cookie'; import { useEffect, useState } from 'react'; import { createClient, OAuthStrategy } from '@wix/sdk'; import { availabilityTimeSlots, services } from '@wix/bookings'; import { redirects } from '@wix/redirects'; ``` 2. Create an SDK client by adding the following code to your code file. Replace the value for `clientId` with your OAuth app's client ID. You can find the ID in your project's [**Headless Settings**](https://www.wix.com/my-account/site-selector/?buttonText=Select%20Site&title=Select%20a%20Site&autoSelectOnSingleSite=true&actionUrl=https:%2F%2Fwww.wix.com%2Fdashboard%2F%7B%7BmetaSiteId%7D%7D%2Foauth-apps-settings). The value for `tokens` is the `'session'` cookie on the site visitor's browser. It's used to make calls to the Wix API. This way, you can maintain previous visitor sessions. For information about managing session cookies, see [Session Token Management](https://dev.wix.com/docs/go-headless/self-managed-headless/self-managed-tutorials/java-script-sdk-tutorials/quick-start.md). ```js const myWixClient = createClient({ modules: { services, availabilityTimeSlots, redirects }, auth: OAuthStrategy({ clientId: ``, tokens: JSON.parse(Cookies.get('session') || '{"accessToken": {}, "refreshToken": {}}') }) }); ``` ## Step 3: Create your services Create the [services](https://support.wix.com/en/article/creating-the-right-booking-service-for-your-business) your visitors will book. It's important to also define your [bookings forms](https://support.wix.com/en/article/wix-bookings-creating-and-setting-up-your-booking-forms). ## Step 4: Fetch your services and available slots Define methods to fetch your Wix Bookings services and availability. These methods use [`queryServices()`](https://dev.wix.com/docs/sdk/backend-modules/bookings/services/query-services.md) to find the services and [`listAvailabilityTimeSlots()`](https://dev.wix.com/docs/sdk/backend-modules/bookings/time-slots-v2/list-availability-time-slots.md) to find the available slots for a specified service and date. 1. Fetch your Wix Bookings services. Use the `useEffect` hook to make sure this code runs after the component is rendered. This ensure that your bookings data is available when the component mounts. ```js async function fetchServices() { const serviceList = await myWixClient.services.queryServices({}); setServiceList(serviceList.items); } useEffect(() => { fetchServices(); }, []); ``` 2. Fetch the service's related slots using [Time Slots V2](https://dev.wix.com/docs/sdk/backend-modules/bookings/time-slots-v2/list-availability-time-slots.md): ```js async function fetchAvailability(service) { const today = new Date(); const tomorrow = new Date(today); tomorrow.setDate(tomorrow.getDate() + 1); const todayStr = today.toISOString().slice(0, 19); const tomorrowStr = tomorrow.toISOString().slice(0, 19); const availability = await myWixClient.availabilityTimeSlots.listAvailabilityTimeSlots({ serviceId: service._id, fromLocalDate: todayStr, toLocalDate: tomorrowStr, bookable: true, }); setAvailabilityEntries(availability.timeSlots || []); } ``` **Note:** The `fromLocalDate` and `toLocalDate` parameters accept local datetime strings (not UTC). The response includes the business time zone in the `timeZone` field. ## Step 5: Implement checkout Once a slot is selected, the visitor can initiate Wix’s secure checkout and complete the booking process. Define a function called `createRedirect()` that's called when the checkout button in your UI is clicked. The function uses the [`createRedirectSession()`](https://dev.wix.com/docs/sdk/backend-modules/redirects/redirects/create-redirect-session.md) to create a checkout URL for a given bookings slot. The visitor is then redirected to the checkout URL to complete the checkout. A visitor can choose to log in to your site or app during the Wix checkout process. **Note:** When redirecting from Wix to an external site, Wix validates that the provided URL is registered under an allowed domain for the given client ID. Therefore, you must [add your domain to the OAuth app](https://dev.wix.com/docs/go-headless/project-guides/wix-hosted-pages/add-allowed-redirect-domains.md). ```js async function createRedirect(slotAvailability) { const redirect = await myWixClient.redirects.createRedirectSession({ bookingsCheckout: { slotAvailability, timezone: 'UTC' }, callbacks: { postFlowUrl: window.location.href }, }); window.location = redirect.redirectSession.fullUrl; } ``` ## Step 6: Display the UI Create a dynamic services list page and connect the elements on your site or app to the relevant fields from your Wix Bookings services. Use each services's slug or service ID as an identifier and present more information related to each service, such as its name. 1. The example below uses ID for simplicity, but it's common practice to create friendly urls, using the `service.mainSlug.name` value instead of service ID: ```tsx

    Choose Service:

    {serviceList.map((service) => { return
    fetchAvailability(service)}>{service.name}
    ; }
    ``` 2. Display the slots on a calendar, given a date range, for the selected service: ```tsx

    Choose Slot:

    {availabilityEntries.map((entry) => { return
    createRedirect(entry)}>{entry.localStartDate}
    ; })}
    ``` ## Complete code example You can use the following full code example as a starting point for developing your own site: ```js import { useEffect, useState } from 'react'; import { createClient, OAuthStrategy } from '@wix/sdk'; import { availabilityTimeSlots, services } from '@wix/bookings'; import { redirects } from '@wix/redirects'; const myWixClient = createClient({ modules: { services, availabilityTimeSlots, redirects }, auth: OAuthStrategy({ clientId: ``, tokens: JSON.parse(Cookies.get('session') || '{"accessToken": {}, "refreshToken": {}}') }) }); export default function Booking() { const [serviceList, setServiceList] = useState([]); const [availabilityEntries, setAvailabilityEntries] = useState([]); async function fetchServices() { const serviceList = await myWixClient.services.queryServices({}); setServiceList(serviceList.items); } async function fetchAvailability(service) { const today = new Date(); const tomorrow = new Date(today); tomorrow.setDate(tomorrow.getDate() + 1); const todayStr = today.toISOString().slice(0, 19); const tomorrowStr = tomorrow.toISOString().slice(0, 19); const availability = await myWixClient.availabilityTimeSlots.listAvailabilityTimeSlots({ serviceId: service._id, fromLocalDate: todayStr, toLocalDate: tomorrowStr, bookable: true, }); setAvailabilityEntries(availability.timeSlots || []); } async function createRedirect(slotAvailability) { const redirect = await myWixClient.redirects.createRedirectSession({ bookingsCheckout: { slotAvailability, timezone: 'UTC' }, callbacks: { postFlowUrl: window.location.href } }); window.location = redirect.redirectSession.fullUrl; } useEffect(() => { fetchServices(); }, []); return ( <>

    Choose Service:

    {serviceList.map((service) => { return (
    fetchAvailability(service)}> {service.name}
    ); })}

    Choose Slot:

    {availabilityEntries.map((entry) => { return (
    createRedirect(entry)} > {entry.localStartDate}
    ); })}
    ); } ``` --- > Portal Navigation: > > - Append `.md` to any URL under `https://dev.wix.com/docs/` to get its markdown version. > - Pages are either content pages (article or reference text) or menu pages (a list of links to child pages). > - To get a menu page, truncate any URL to a parent path and append `.md` (e.g. `https://dev.wix.com/docs/sdk.md`, `https://dev.wix.com/docs/sdk/core-modules.md`). > - Top-level index of all portals: https://dev.wix.com/docs/llms.txt > - Full concatenated docs: https://dev.wix.com/docs/llms-full.txt ## Resource: Data Quick Start ## Article: Data Quick Start ## Article Link: https://dev.wix.com/docs/go-headless/self-managed-headless/self-managed-tutorials/java-script-sdk-tutorials/data-quick-start.md ## Article Content: # Data Quick Start The SDK `data` module allows you to take advantage of Wix content management capabilities in a site or app you build on any platform. This means you can access and manage content in a Wix project from your site's code, as well as from the [Content Management System (CMS)](https://www.wix.com/my-account/site-selector/?buttonText=Select%20Site&title=Select%20a%20Site&autoSelectOnSingleSite=true&actionUrl=https:%2F%2Fwww.wix.com%2Fdashboard%2F%7B%7BmetaSiteId%7D%7D%2Fdatabase) in the Wix dashboard. > **Note:** If you build with [Wix's Astro integration](https://dev.wix.com/docs/go-headless/wix-managed-headless/authentication/about-the-astro-integration.md), you don't need to handle OAuth setup or create a client because it's done automatically.
    This tutorial shows you how to create a React component that: - Retrieves content from a data collection in a Wix project's database. - Uses the content retrieved in a dynamic UI. This implementation focuses on simplicity and understandability, rather than feature richness, performance or completeness. For details about additional functionality, see [Wix Data](https://dev.wix.com/docs/api-reference/business-solutions/cms/operations/introduction.md) in the API Reference. Looking for a more comprehensive example site integrating Wix Headless APIs for data management? Check out our [starter templates](https://dev.wix.com/docs/go-headless/self-managed-headless/self-managed-templates/next-js-templates.md). > **Note:** The code in this tutorial is written in [JSX](https://react.dev/learn/writing-markup-with-jsx), but you can use the SDK in any JavaScript environment. Implementing the Wix Data flow includes the following steps: 1. Set up the Wix Headless environment. 1. Add content in the CMS. 1. Import the SDK modules and create an SDK client. 1. Create a React component and a state variable. 1. Define a function to fetch data. 1. Add the `useEffect` hook. 1. Render the UI. ## Step 1: Set up the Wix Headless environment Before using the SDK, there are a few things you need to set up on your Wix account and in your external site or app's coding environment. To set up the Wix Headless environment, follow these steps: 1. If you haven't already, [create a project](https://dev.wix.com/docs/go-headless/get-started/quick-starts/self-managed-headless/quick-start-a-self-managed-headless-project.md). When prompted to add functionalities to your new project, you don't need to add any business solutions. Every Wix Headless project comes with CMS support installed. 2. Set up authorization for your site by [creating and configuring](https://dev.wix.com/docs/go-headless/self-managed-headless/authentication/oauth/about-oauth-authentication.md) an OAuth app. 3. Install the SDK and relevant SDK module packages by running the following commands: For NPM: ``` npm install @wix/sdk npm install @wix/data ``` For Yarn: ``` yarn add @wix/sdk yarn add @wix/data ``` 4. Install the `react` package to handle UI rendering and the `js-cookie` package to handle session cookies. For NPM: ``` npm install react npm install js-cookie ``` For Yarn: ``` yarn add react yarn add js-cookie ``` ## Step 2: Add content in the CMS Follow these steps to create a collection and add content to it: 1. Open the [CMS](https://www.wix.com/my-account/site-selector/?buttonText=Select%20Site&title=Select%20a%20Site&autoSelectOnSingleSite=true&actionUrl=https:%2F%2Fwww.wix.com%2Fdashboard%2F%7B%7BmetaSiteId%7D%7D%2Fdatabase) in the project dashboard. 1. Click **Create Collection**. 1. Enter a name and ID for your collection, select **Multiple items (Default)**, then click **Create**. For this example, create a collection with the ID `examples`. 1. You're now taken to the `examples` collection page. Click **Manage Fields**. 1. Add fields to your collection. For this example, ensure you include text fields with the IDs `title`, `description`, and `slug`, and a numerical field with the ID `orderId`: 1. In the collection page, enter the initial content for your collection. Learn more about managing data using the [CMS](https://support.wix.com/en/article/about-the-content-manager-7160473). ## Step 3: Import the SDK modules and create an SDK client The next step is to set up your code file to run the SDK functions. To set up the code file, follow these steps: 1. Add the following import statements to the top of your code file: ```jsx import Link from 'next/link'; import Cookies from 'js-cookie'; import { useEffect, useState } from 'react'; import { createClient, OAuthStrategy } from '@wix/sdk'; import { items } from '@wix/data'; ``` 1. Create an SDK client by adding the following code to your code file. Replace the value for `clientId` with your OAuth app's client ID. You can find the ID in your project's [**Headless Settings**](https://www.wix.com/my-account/site-selector/?buttonText=Select%20Site&title=Select%20a%20Site&autoSelectOnSingleSite=true&actionUrl=https:%2F%2Fwww.wix.com%2Fdashboard%2F%7B%7BmetaSiteId%7D%7D%2Foauth-apps-settings). The value for `tokens` is the `'session'` cookie on the visitor's browser. It's used to make calls to the Wix API. This way, you can maintain previous visitor sessions. For information about managing cookies, see [Session Token Management](https://dev.wix.com/docs/go-headless/self-managed-headless/self-managed-tutorials/java-script-sdk-tutorials/quick-start.md). ```jsx const myWixClient = createClient({ modules: { items }, auth: OAuthStrategy({ clientId: ``, tokens: JSON.parse(Cookies.get('session') || null), }), }); ``` ## Step 4: Create a React component and a state variable The logic for our example content retrieval and rendering flow is contained in a React component called `Examples`. To create the component, follow these steps: 1. Define the component function as a default export in your code file: ```jsx export default function Examples() {} ``` 1. Define a state variable by adding the following code in the component function: ```jsx const [examples, setExamples] = useState([]); ``` In the steps that follow, the `examples` state variable stores the data retrieved by querying the Wix project's `examples` collection. ## Step 5: Define a function to fetch data Define a function to fetch the data you need and save it to the state variable, by adding the following code to the component function: ```jsx async function fetchExamples() { const examples = await myWixClient.items .query('examples') .ascending('orderId') .find(); setExamples(examples.items); } ``` This function uses [`query()`](https://dev.wix.com/docs/sdk/business-solutions/data/items/query.md) with chained [`WixDataQuery` functions](https://dev.wix.com/docs/sdk/business-solutions/data/items/wix-data-query/introduction.md) to retrieve all items in the `examples` collection, sorted by `orderId` in ascending order. The function then stores the resulting items in the `examples` state variable. ## Step 6: Add the `useEffect` hook Add the following code to the `Examples` component to run the `fetchExamples()` function after the component is rendered. This ensures that the data is retrieved when the component mounts. ```jsx useEffect(() => { fetchExamples(); }, []); ``` ## Step 7: Render the UI You can now render the data you retrieved in the component's dynamic UI. Add the following code to the `Examples` component function's `return` statement to render the UI. This code renders a card for each item stored in the `examples` state variable. Each card displays the `title` and `description` for an item and links to its `slug`. ```jsx return (
    {examples.map((example) => (

    {example.data.title} ->

    {example.data.description}

    ))}
    ); ``` ## Complete code example You can use the following full code example as a starting point for developing your own site: ```jsx import Cookies from 'js-cookie'; import { useEffect, useState } from 'react'; import { createClient, OAuthStrategy } from '@wix/sdk'; import { items } from '@wix/data'; const myWixClient = createClient({ modules: { items }, auth: OAuthStrategy({ clientId: ``, tokens: JSON.parse(Cookies.get('session') || null), }), }); export default function Examples() { const [examples, setExamples] = useState([]); async function fetchExamples() { const examples = await myWixClient.items .query('examples') .ascending('orderId') .find(); setExamples(examples.items); } useEffect(() => { fetchExamples(); }, []); return ( ); } ``` --- > Portal Navigation: > > - Append `.md` to any URL under `https://dev.wix.com/docs/` to get its markdown version. > - Pages are either content pages (article or reference text) or menu pages (a list of links to child pages). > - To get a menu page, truncate any URL to a parent path and append `.md` (e.g. `https://dev.wix.com/docs/sdk.md`, `https://dev.wix.com/docs/sdk/core-modules.md`). > - Top-level index of all portals: https://dev.wix.com/docs/llms.txt > - Full concatenated docs: https://dev.wix.com/docs/llms-full.txt ## Resource: Pricing Plans Quick Start ## Article: Pricing Plans Quick Start ## Article Link: https://dev.wix.com/docs/go-headless/self-managed-headless/self-managed-tutorials/java-script-sdk-tutorials/pricing-plans-quick-start.md ## Article Content: # Pricing Plans Quick Start The SDK `pricing-plans` module allows you to take advantage of Wix Pricing Plans business services in a site or app you build on any platform. This means you can create and manage your pricing plans and orders. This tutorial shows you how to create a seamless pricing plans checkout. > **Note:** If you build with [Wix's Astro integration](https://dev.wix.com/docs/go-headless/wix-managed-headless/authentication/about-the-astro-integration.md), you don't need to handle OAuth setup or create a client because it's done automatically. The tutorial is based on this [example site](https://wix-headless-example.vercel.app/subscriptions). To get the code, fork the [Headless Templates repo](https://github.com/wix/headless-templates). The site code is under [minimal examples](https://github.com/wix/headless-templates/tree/main/nextjs/minimal-examples). This implementation focuses on simplicity and understandability, rather than feature richness, performance or completeness. For details about additional functionality, see [Wix Pricing Plans](https://dev.wix.com/docs/api-reference/business-solutions/pricing-plans/introduction.md) in the API Reference. Looking for a more comprehensive example site integrating Wix Headless APIs for pricing plan management? Check out our [starter templates](https://dev.wix.com/docs/go-headless/self-managed-headless/self-managed-templates/next-js-templates.md). > **Note:** The code in this tutorial is written in [JSX](https://react.dev/learn/writing-markup-with-jsx), but you can use the SDK in any JavaScript environment. Implementing the Seamless Pricing Plan Checkout includes the following steps: 1. Set up the Wix Headless environment. 1. Import the SDK modules and create an SDK client. 1. Query your Wix Pricing Plans items. 1. Map the items to your UI. 1. Create a checkout with a selected plan's details. ## Step 1: Set up the Wix Headless environment Before using the SDK, there are a few things you need to set up on your Wix account and in your external site or app's coding environment. To set up the Wix Headless environment, follow these steps: 1. If you haven't already, [create a project](https://dev.wix.com/docs/go-headless/get-started/quick-starts/self-managed-headless/quick-start-a-self-managed-headless-project.md). When prompted to add functionalities to your new project, select **Pricing Plans**. 1. Set up authorization for your site by [creating and configuring](https://dev.wix.com/docs/go-headless/self-managed-headless/authentication/oauth/about-oauth-authentication.md) an OAuth app. 1. Set a [domain to be used by Wix-hosted pages](https://dev.wix.com/docs/go-headless/project-guides/wix-hosted-pages/set-a-wix-pages-domain.md). 1. Set a [domain that Wix can redirect to](https://dev.wix.com/docs/go-headless/project-guides/wix-hosted-pages/add-allowed-redirect-domains.md) after completing a Wix-managed process. 1. Install the API client and relevant SDK module packages by running the following commands: For NPM: ``` npm install @wix/sdk npm install @wix/pricing-plans npm install @wix/redirects ``` For Yarn: ``` yarn add @wix/sdk yarn add @wix/pricing-plans yarn add @wix/redirects ``` 1. Install the `react` package to handle UI rendering and the `js-cookie` package to handle session cookies. Run the following commands: For NPM: ``` npm install react npm install js-cookie ``` For Yarn: ``` yarn add react yarn add js-cookie ``` ## Step 2: Import the SDK modules and create an SDK client The next step is to set up your code file to run the SDK functions. To set up the code file, follow these steps: 1. Add the following import statements to the top of your code file: ```javascript import Cookies from 'js-cookie'; import { useEffect, useState } from 'react'; import { createClient, OAuthStrategy } from '@wix/sdk'; import { plans } from '@wix/pricing-plans'; import { redirects } from '@wix/redirects'; ``` 1. Create an SDK client by adding the following code to your code file. Replace the value for `clientId` with your OAuth app's client ID. You can find the ID in your project's [**Headless Settings**](https://www.wix.com/my-account/site-selector/?buttonText=Select%20Site&title=Select%20a%20Site&autoSelectOnSingleSite=true&actionUrl=https:%2F%2Fwww.wix.com%2Fdashboard%2F%7B%7BmetaSiteId%7D%7D%2Foauth-apps-settings). The value for `tokens` is the `'session'` cookie on the site visitor's browser. It's used to make calls to the Wix API. This way, you can maintain previous visitor sessions. For information about managing session cookies, see [Session Token Management](https://dev.wix.com/docs/go-headless/self-managed-headless/self-managed-tutorials/java-script-sdk-tutorials/quick-start.md). ```js const myWixClient = createClient({ modules: { plans, redirects }, auth: OAuthStrategy({ clientId: `` , tokens: JSON.parse( Cookies.get("session") || '{"accessToken": {}, "refreshToken": {}}', ), }) }); ``` ## Step 3: Create a React component and state variables The logic for our pricing plans flow is contained in a React component called `Subscriptions`. To create the component, follow these steps: 1. Add the following function component to your code file: ```js export default function Subscriptions() { ``` 2. Define the state variable for the component by adding the following code to the `Subscriptions` component. The `planList` variable stores the list of pricing plans from your Wix Pricing Plans. ```jsx const [planList, setPlanList] = useState([]); ``` ## Step 4: Fetch your Wix Pricing Plans items Define a function to fetch your pricing plans by adding the following code to the `Subscriptions` component. This function runs when the component is first rendered. The function uses the [`queryPublicPlans()`](https://dev.wix.com/docs/api-reference/business-solutions/pricing-plans/plans-deprecated/query-public-plans.md) function from the SDK's Plans module to query your pricing plans. ```js async function fetchPlans() { const planList = await myWixClient.plans.queryPublicPlans({}); setPlanList(planList.items); } ``` Add the following code to the `Subscriptions` component to run the `fetchPlans()` function after the component is rendered. This ensures that the data is retrieved when the component mounts. ```jsx useEffect(() => { fetchPlans(); }, []); ``` ## Step 5: Map the items to your UI Create a list in your UI, and map each plan to a list item. Add an `onClick()` event handler to each plan. When a visitor clicks a plan, call the `createRedirect()` function that redirects a visitor to a checkout page with the selected plan's details. ```jsx return (

    Choose Plan:

    {planList.map((plan) => { return (
    createRedirect(plan)}> {plan.name}
    ); })}
    ); ``` ## Step 6: Create a checkout with a selected plan's details In the `createRedirect()` function, call the [`createRedirectSession()`](https://dev.wix.com/docs/api-reference/business-management/headless/redirects/create-redirect-session.md) function with the selected plan to get a checkout URL. Use this URL to temporarily redirect the visitor to a Wix checkout page. After checkout, the visitor is redirected to the URL defined in the `postFlowUrl` callback property. **Note:** When redirecting from Wix to an external site, Wix validates that the provided URL is registered under an allowed domain for the given client ID. Therefore, you must [add your domain to the OAuth app](https://dev.wix.com/docs/go-headless/project-guides/wix-hosted-pages/add-allowed-redirect-domains.md). ```jsx async function createRedirect(plan) { const redirect = await myWixClient.redirects.createRedirectSession({ paidPlansCheckout: { planId: plan._id }, callbacks: { postFlowUrl: window.location.href }, }); window.location = redirect.redirectSession.fullUrl; } ``` ## Complete code example You can use the following full code example as a starting point for developing your own site: ```jsx import Cookies from 'js-cookie'; import { useEffect, useState } from 'react'; import styles from '@/styles/pages.module.css'; import { createClient, OAuthStrategy } from '@wix/sdk'; import { plans } from '@wix/pricing-plans'; import { redirects } from '@wix/redirects'; const myWixClient = createClient({ modules: { plans, redirects }, auth: OAuthStrategy({ clientId: `` , tokens: JSON.parse( Cookies.get("session") || '{"accessToken": {}, "refreshToken": {}}', ), }) }); export default function Subscriptions() { const [planList, setPlanList] = useState([]); async function fetchPlans() { const planList = await myWixClient.plans.queryPublicPlans({}); setPlanList(planList.items); } async function createRedirect(plan) { const redirect = await myWixClient.redirects.createRedirectSession({ paidPlansCheckout: { planId: plan._id }, callbacks: { postFlowUrl: window.location.href }, }); window.location = redirect.redirectSession.fullUrl; } useEffect(() => { fetchPlans(); }, []); return (

    Choose Plan:

    {planList.map((plan) => { return (
    createRedirect(plan)} > {plan.name}
    ); })}
    ); } ``` --- > Portal Navigation: > > - Append `.md` to any URL under `https://dev.wix.com/docs/` to get its markdown version. > - Pages are either content pages (article or reference text) or menu pages (a list of links to child pages). > - To get a menu page, truncate any URL to a parent path and append `.md` (e.g. `https://dev.wix.com/docs/sdk.md`, `https://dev.wix.com/docs/sdk/core-modules.md`). > - Top-level index of all portals: https://dev.wix.com/docs/llms.txt > - Full concatenated docs: https://dev.wix.com/docs/llms-full.txt ## Resource: Events Quick Start ## Article: Events Quick Start ## Article Link: https://dev.wix.com/docs/go-headless/self-managed-headless/self-managed-tutorials/java-script-sdk-tutorials/events-quick-start.md ## Article Content: # Events Quick Start The SDK `events` module allows you to integrate Wix Events business services with your site or app. This means you can create and manage events, sell tickets, and retrieve information about guests. This tutorial shows you how to use the `events` module to create ticket reservations. > **Note:** If you build with [Wix's Astro integration](https://dev.wix.com/docs/go-headless/wix-managed-headless/authentication/about-the-astro-integration.md), you don't need to handle OAuth setup or create a client because it's done automatically. The tutorial is based on this [example site](https://wix-headless-example.vercel.app/tickets). To get the code, fork the [Headless Templates repo](https://github.com/wix/headless-templates). The site code is under [minimal examples](https://github.com/wix/headless-templates/tree/main/nextjs/minimal-examples). This implementation focuses on simplicity and understandability, rather than feature richness, performance or completeness. For details about additional functionality, see [Wix Events](https://dev.wix.com/docs/api-reference/business-solutions/events/event-management/introduction.md) in the API Reference. Looking for a more comprehensive example site integrating Wix Headless APIs for ticket reservations and event management? Check out our [starter templates](https://dev.wix.com/docs/go-headless/self-managed-headless/self-managed-templates/next-js-templates.md). > **Note:** The code in this tutorial is written in [JSX](https://react.dev/learn/writing-markup-with-jsx), but you can use the SDK in any JavaScript environment. Implementing the ticket reservation flow includes the following steps: 1. Set up the Wix Headless environment. 1. Import the SDK modules and create an SDK client. 1. Create a React component and state variables. 1. Fetch events and ticket availability. 1. Implement the checkout flow. 1. Add the `useEffect` hook. 1. Render the UI. ## Step 1: Set up the Wix Headless environment Before using the SDK, there are a few things you need to set up on your Wix account and in your external site or app's coding environment. To set up the Wix Headless environment, follow these steps: 1. If you haven't already, [create a project](https://dev.wix.com/docs/go-headless/get-started/quick-starts/self-managed-headless/quick-start-a-self-managed-headless-project.md). When prompted to add functionalities to your new project, select **Events**. 1. Set up authorization for your site by [creating and configuring](https://dev.wix.com/docs/go-headless/self-managed-headless/authentication/oauth/about-oauth-authentication.md) an OAuth app. 1. Set a [domain to be used by Wix-hosted pages](https://dev.wix.com/docs/go-headless/project-guides/wix-hosted-pages/set-a-wix-pages-domain.md). 1. Set a [domain that Wix can redirect to](https://dev.wix.com/docs/go-headless/project-guides/wix-hosted-pages/add-allowed-redirect-domains.md) after completing a Wix-managed process. 1. Install the API client and relevant SDK module packages by running the following commands: For NPM: ``` npm install @wix/sdk npm install @wix/events ``` For Yarn: ``` yarn add @wix/sdk yarn add @wix/events ``` 1. Install the `react` package to handle UI rendering and the `js-cookie` package to handle session cookies. Run the following commands: For NPM: ``` npm install react npm install js-cookie ``` For Yarn: ``` yarn add react yarn add js-cookie ``` ## Step 2: Import the SDK modules and create an SDK client The next step is to set up your code file to run the SDK functions. To set up the code file, follow these steps: 1. Add the following import statements to the top of your code file: ```jsx import Cookies from 'js-cookie'; import { useEffect, useState } from 'react'; import { createClient, OAuthStrategy } from '@wix/sdk'; import { wixEvents, checkout } from '@wix/events'; import { redirects } from '@wix/redirects'; ``` 2. Create an SDK client by adding the following code to your code file. Replace the value for `clientId` with your OAuth app's client ID. You can find the ID in your project's [**Headless Settings**](https://www.wix.com/my-account/site-selector/?buttonText=Select%20Site&title=Select%20a%20Site&autoSelectOnSingleSite=true&actionUrl=https:%2F%2Fwww.wix.com%2Fdashboard%2F%7B%7BmetaSiteId%7D%7D%2Foauth-apps-settings). The value for `tokens` is the `'session'` cookie on the site visitor's browser. It's used to make calls to the Wix API. This way, you can maintain previous visitor sessions. For information about managing session cookies, see [Session Token Management](https://dev.wix.com/docs/go-headless/self-managed-headless/self-managed-tutorials/java-script-sdk-tutorials/quick-start.md). ```js const myWixClient = createClient({ modules: { wixEvents, checkout, redirects }, auth: OAuthStrategy({ clientId: ``, tokens: JSON.parse(Cookies.get('session') || '{"accessToken": {}, "refreshToken": {}}'), }), }); ``` ## Step 3: Create a React component and state variables The logic for our ticket reservation flow is contained in a React component called `Tickets`. To create the component, follow these steps: 1. Add the following function component to your code file: ```javascript export default function Tickets() {} ``` 1. Define state variables by adding the following code to the `Tickets` component. The `eventsList` variable stores the list of events from your project's Wix Events. The `ticketsAvailability` variable stores available ticket information. ```javascript const [eventsList, setEventsList] = useState([]); const [ticketsAvailability, setTicketsAvailability] = useState([]); ``` ## Step 4: Fetch events and ticket availability 1. Define a function called `fetchEvents` that gets the list of events that you would like to display in your component from your project's backend. This function uses the [`queryEventsV2()`](https://dev.wix.com/docs/api-reference/business-solutions/events/event-management/events-v3/query-events.md) function to fetch your project's events. The function runs when the component is first rendered. ```javascript async function fetchEvents() { const eventsList = await myWixClient.wixEvents.queryEventsV2({ query: { paging: { limit: 10 } }, }); setEventsList(eventsList.events); } ``` 1. Define a function called `fetchTicketsAvailability` that gets the list of available tickets when an event is selected. This function uses the [`queryAvailableTickets()`](https://dev.wix.com/docs/api-reference/business-solutions/events/registration/ticketing/orders/query-available-tickets.md) function to find the available tickets for the selected event. ```javascript async function fetchTicketsAvailability(event) { const tickets = await myWixClient.checkout.queryAvailableTickets({ filter: { eventId: event._id }, limit: 10, }); setTicketsAvailability(tickets.definitions); } ``` ## Step 5: Implement the checkout flow Add a function called `createRedirect` to the `Tickets` function component. This function does the following: 1. Uses the [`createReservation()`](https://dev.wix.com/docs/api-reference/business-solutions/events/registration/ticketing/orders/create-reservation.md) function to create a reservation for the selected event. 1. Uses the [`createRedirectSession()`](https://dev.wix.com/docs/api-reference/business-management/headless/redirects/create-redirect-session.md) with the retrieved reservation ID to retrieve a checkout URL. This is the URL for a Wix-hosted checkout page that the visitor can use to complete the checkout process. 1. Redirects the browser to the checkout URL. If the checkout is successful, the visitor is redirected to a Wix thank you page. After the thank you page, or if the checkout fails, the visitor is redirected to the URL passed in the `postFlowUrl` property when calling `createRedirectSession()`. **Note:** When redirecting from Wix to an external site, Wix validates that the provided URL is registered as an allowed domain for the given client ID. Therefore, you must [add your domain to the OAuth app](https://dev.wix.com/docs/go-headless/project-guides/wix-hosted-pages/add-allowed-redirect-domains.md). ```javascript async function createRedirect(ticket) { const eventSlug = eventsList.find( (event) => event._id === ticket.eventId ).slug; const reservation = await myWixClient.checkout.createReservation( ticket.eventId, { ticketQuantities: [ { ticketDefinitionId: ticket._id, quantity: 1, }, ], } ); const redirect = await myWixClient.redirects.createRedirectSession({ eventsCheckout: { eventSlug, reservationId: reservation._id }, callbacks: { postFlowUrl: window.location.href }, }); window.location = redirect.redirectSession.fullUrl; } ``` ## Step 6: Add the `useEffect` hook Add the following code to the `Tickets` component to run the `fetchEvents()` function after the component is rendered. This ensures that the data is retrieved when the component mounts: ```javascript useEffect(() => { fetchEvents(); }, []); ``` ## Step 7: Render the UI Add the following code to the `Tickets` component's return statement to render the UI. The UI displays the following: - A **Choose Events** section with a list of your events. Clicking an event checks for available tickets. - A **Choose Tickets** section with a list of tickets for the event. ```javascript

    Choose Event:

    {eventsList.map((event) => { return
    fetchTicketsAvailability(event)}>{event.title}
    ; })}

    Choose Tickets:

    {ticketsAvailability.map((ticket) => { return
    createRedirect(ticket)}>{ticket.name}
    ; })}
    ``` ## Complete code example You can use the following full code example as a starting point for developing your own site: ```javascript import Cookies from 'js-cookie'; import { useEffect, useState } from 'react'; import { createClient, OAuthStrategy } from '@wix/sdk'; import { wixEvents, checkout } from '@wix/events'; import { redirects } from '@wix/redirects'; const myWixClient = createClient({ modules: { wixEvents, checkout, redirects }, auth: OAuthStrategy({ clientId: ``, tokens: JSON.parse(Cookies.get('session') || '{"accessToken": {}, "refreshToken": {}}'), }), }); export default function Tickets() { const [eventsList, setEventsList] = useState([]); const [ticketsAvailability, setTicketsAvailability] = useState([]); async function fetchEvents() { const eventsList = await myWixClient.wixEvents.queryEventsV2({ query: { paging: { limit: 10 } } }); setEventsList(eventsList.events); } async function fetchTicketsAvailability(event) { const tickets = await myWixClient.checkout.queryAvailableTickets({ filter: { eventId: event._id }, limit: 10, }); setTicketsAvailability(tickets.definitions); } async function createRedirect(ticket) { const eventSlug = eventsList.find((event) => event._id === ticket.eventId).slug; const reservation = await myWixClient.checkout.createReservation(ticket.eventId, { ticketQuantities: [{ ticketDefinitionId: ticket._id, quantity: 1, }], }); const redirect = await myWixClient.redirects.createRedirectSession({ eventsCheckout: { eventSlug, reservationId: reservation._id }, callbacks: { postFlowUrl: window.location.href } }); window.location = redirect.redirectSession.fullUrl; } useEffect(() => { fetchEvents(); }, []); return (

    Choose Event:

    {eventsList.map((event) => { return
    fetchTicketsAvailability(event)}>{event.title}
    ; })}

    Choose Tickets:

    {ticketsAvailability.map((ticket) => { return
    createRedirect(ticket)}>{ticket.name}
    ; })}
    ) } ``` --- > Portal Navigation: > > - Append `.md` to any URL under `https://dev.wix.com/docs/` to get its markdown version. > - Pages are either content pages (article or reference text) or menu pages (a list of links to child pages). > - To get a menu page, truncate any URL to a parent path and append `.md` (e.g. `https://dev.wix.com/docs/sdk.md`, `https://dev.wix.com/docs/sdk/core-modules.md`). > - Top-level index of all portals: https://dev.wix.com/docs/llms.txt > - Full concatenated docs: https://dev.wix.com/docs/llms-full.txt ## Resource: Create a WordPress Plugin ## Article: Create a WordPress Plugin ## Article Link: https://dev.wix.com/docs/go-headless/self-managed-headless/self-managed-tutorials/other-tutorials/create-a-word-press-plugin.md ## Article Content: # Create a WordPress Plugin WordPress is a common web content management platform that allows users to build, maintain, and publish web pages. [Wix Headless](https://dev.wix.com/docs/go-headless/get-started/about-wix-headless.md) allows you to integrate many of Wix's business solutions into your WordPress site. This tutorial shows you how to create a WordPress plugin that integrates your Wix headless project with your WordPress site. It includes implementing a "Buy Now" flow that allows your visitor to purchase a product from a list. You can find the full source code [here](https://github.com/wix-incubator/headless-tutorial-wordpress-plugin). In this tutorial, you will: 1. Set up a Wix headless project and a WordPress environment. 2. Create a script to rebuild your plugin whenever you update it. 3. Create a full authorization flow that allows your WordPress site to make requests to your headless project and Wix APIs. 4. Query and display a dynamic list of products on your WordPress site using the Wix Stores API. 5. Implement a secured checkout functionality using the Wix eCommerce API. 6. Implement the necessary routing functionality using the Wix Redirect Session API. ## Step 1: Set up the Wix headless project First, set the Wix headless project to act as your site's dashboard. Here you can install apps to add Wix functionality to your WordPress site. To set up the Wix headless project, follow these steps: 1. If you haven't already, [create a Wix headless project](https://dev.wix.com/docs/go-headless/self-managed-headless/get-started/create-a-project.md). When prompted to add functionalities to your new project, select **eCommerce**. 2. Set up authorization by [creating and configuring](https://dev.wix.com/docs/go-headless/self-managed-headless/authentication/oauth/about-oauth-authentication.md) an OAuth app on your headless project. Name the app `wix_example_client_id`. Note your client ID. You will need it later to integrate your WordPress site with the Wix headless project. ![Headless OAuth Settings Page](https://wixmp-833713b177cebf373f611808.wixmp.com/images/f068518c0806ff5ac3121e4cccdc9bce.png) 3. Finally, make sure that the Wix Stores app is installed: In your headless project dashboard, click **Apps**. If the **Wix Stores** app is not installed, install it. This Wix Stores app allows your WordPress site to access the [Wix Stores API](https://dev.wix.com/docs/api-reference/business-solutions/stores/introduction.md). ![Wix Stores App](https://wixmp-833713b177cebf373f611808.wixmp.com/images/dbfcd0d70ccd9d77b07bd802c0607099.png) ## Step 2: Set up a WordPress plugin A WordPress plugin is a `zip` file that contains one or more PHP files. These files contain the functionality you want to add to your site with some metadata. This step describes how to write a script that automatically creates a `zip` file with your updated plugin files. ### Create a script to automatically build your plugin file This script *builds* your code as a `zip` file. The script is written in JavaScript in a node.js environment. However, you can use any build tool and runtime environment you prefer. Create the plugin zip file: 1. Create a new folder named `headless-wordpress-tutorial`. This folder will contain all the plugin files, including the build script and the finalized `zip` plugin file. 2. In this folder, create a new file named `wix-headless-example.php`. In it, add the following code: ```php { if (error) { console.error(`Error: ${error.message}`); return; } if (stderr) { console.error(`stderr: ${stderr}`); return; } console.log(`Folder ${folderToZip} has been zipped successfully into ${zipFilePath}`); }); ``` This code removes any existing `zip` files, and generates a Wordpress-ready `plugin.zip` file, with all your plugin's functionality, in the `dist` folder. Whenever you add functionality to your plugin, you need to run the build script again, and upload the updated `plugin.zip` file to your Wordpress site. ### Optional: Test your plugin on your WordPress site To test whether the plugin is recognized and rendered correctly on your WordPress site, include a test shortcode: 1. Update `wix-headless-example.php` with the following code: ```php class WixHeadlessPlugin { public function __construct() { add_shortcode('initial_shortcode', array($this, 'initial_shortcode')); } public function initial_shortcode() { return "Hello, this is a minimal WordPress plugin"; } } ``` 2. From the `headless-wordpress-tutorial` root directory, type `node build/zip-plugin.js` to run the build script. 3. On your site's WP Admin panel, click `Plugins` -> `Add New` -> `Upload Plugin`, and upload `dist/zip-plugin.js` to the site. 4. Activate the plugin. 5. Launch one of your site's pages and add a shortcode block with the content `[initial_shortcode]`. 6. Save and view the page to see the result. 7. Once you've confirmed the plugin is rendered on your site, remove the code you added in [Step 1](#step-1-set-up-the-wix-headless-project). ### Create a plugin settings page on your WordPress site Once you have installed the OAuth app on your Wix headless project dashboard, your headless project is configured to provide services only to clients that carry the correct client ID. To enable communication between your WordPress site and your headless project, configure your site with the correct client ID as provided by the OAuth app in [Step 1](#step-1-set-up-the-wix-headless-project). However, since the WP Admin panel does not have a built-in settings page to enable it to integrate with Wix Headless, you need to manually create a plugin settings page. To create a plugin settings page and configure it with the client ID: 1. In the `plugin` folder, create a new folder named `templates`. 2. In `plugin/templates`, create a new file named `settings.php` with the following code: ```php

    Wix Headless

    Wix Client ID

    ``` This file creates the structure of the plugin's settings page. 3. Add the plugin's settings page to your site's Admin panel. In `wix-headless-example.php`, add the following code: ```php **Wix Headless Example**. 5. In the **Wix Client ID** input field, paste the client ID as it appears on your headless project's [**Headless Settings**](https://www.wix.com/my-account/site-selector/?buttonText=Select%20Site&title=Select%20a%20Site&autoSelectOnSingleSite=true&actionUrl=https:%2F%2Fwww.wix.com%2Fdashboard%2F%7B%7BmetaSiteId%7D%7D%2Foauth-apps-settings). ![WordPress Plugin Settings](https://wixmp-833713b177cebf373f611808.wixmp.com/images/f45ca94d6d014fa62ebc9dbb01eb63d5.png) Your WordPress site is now configured as the valid client of your Wix headless project. ## Step 3: Generate authorization tokens To access Wix APIs, a client needs to carry valid access tokens. These include the client ID as defined in the previous step, and can be found in your project's [**Headless Settings**](https://www.wix.com/my-account/site-selector/?buttonText=Select%20Site&title=Select%20a%20Site&autoSelectOnSingleSite=true&actionUrl=https:%2F%2Fwww.wix.com%2Fdashboard%2F%7B%7BmetaSiteId%7D%7D%2Foauth-apps-settings). Access tokens are only valid for several hours. When they expire, they must be refreshed. Without a valid authorization token, a client cannot make requests to a headless project. This step shows how to add a simple authorization service to your plugin. The service retrieves and checks for valid access tokens, refreshes them if necessary, and saves, or *persists*, them locally to your browser as cookies. > **Note:** For additional information about creating and using access tokens, see the [Making API Calls with OAuth](https://dev.wix.com/docs/go-headless/self-managed-headless/authentication/oauth/make-rest-api-calls-using-oauth.md) in the Wix REST API reference.
    **Important:** To keep this tutorial simple and easy to understand, this authorization service applies to all devices. You might want to handle access tokens separately for each type of device.
    To create the authorization service: 1. In your `plugin` folder, create a new folder named `services`. In it, create a new file named `wix-auth.php` and add to it the following code: ```php $currentDate; } } ``` 5. Use the Wix API to get and refresh tokens: ```php Auth::createAccessToken($raw_tokens['access_token'], $raw_tokens['expires_in']), 'refreshToken' => array( 'value' => $raw_tokens['refresh_token'], 'role' => TokenRole::VISITOR, ), ); } // Create an access token with an expiration date private static function createAccessToken(string $accessToken, int $expiresIn): array { $now = time(); return array( 'value' => $accessToken, 'expiresAt' => $expiresIn + $now, ); } // Generate a visitor token using the Wix Token endpoint public static function generateVisitorTokens(): array { $client_id = get_option('wix_example_client_id'); if (!empty($client_id)) { $token_request = Auth::$tokens['refreshToken'] && Auth::$tokens['refreshToken']['role'] == TokenRole::VISITOR ? array( 'refresh_token' => Auth::$tokens['refreshToken']['value'], 'grantType' => 'refresh_token', 'scope' => 'offline_access', ) : array( 'clientId' => $client_id, 'grantType' => 'anonymous', 'scope' => 'offline_access', ); $response = wp_remote_post('https://www.wixapis.com/oauth2/token', array( 'method' => 'POST', 'headers' => array('Content-Type' => 'application/json'), 'body' => wp_json_encode($token_request), 'data_format' => 'body', )); if (!is_wp_error($response) && $response['response']['code'] === 200) { $body = wp_remote_retrieve_body($response); $raw_tokens = json_decode($body, true); return Auth::rawTokensToTokensResult($raw_tokens); } else { error_log('Failed to get tokens : Wix request ID: '.get_wix_request_id($response).' full response '.json_encode($response)); throw new \RuntimeException('Failed to get tokens'); } } else { return []; } } } ``` This code defines two types of tokens, one for site visitors and one for logged-in site members. Then, the `generateVisitorTokens()` function creates and processes visitor tokens using the Wix REST `Token` endpoint. These tokens are required to make calls to Wix APIs on behalf of your visitor. Without them, your calls will not be authorized. You can read more about visitor tokens in the [Wix Headless REST API documentation](https://dev.wix.com/docs/go-headless/self-managed-headless/authentication/oauth/make-rest-api-calls-using-oauth.md). 6. Finally, now that tokens have been set up, set the authorization service to initialize as soon as your WordPress site initializes the plugin. 7. Still in `services/wix-auth.php`, add the service initialization function: ```php **Important:** A complete eCommerce user flow is usually comprised of a product list, a single-product page, a cart, and a checkout. However, this tutorial only covers creating a product list and a checkout. This is because this tutorial focuses on a pure server-side implementation, while implementing a product page and a cart requires client-side code using the [Wix eCommerce SDK](https://dev.wix.com/docs/go-headless/self-managed-headless/self-managed-tutorials/java-script-sdk-tutorials/e-commerce-quick-start.md). ## Query the existing products The first Wix eCommerce functionality to implement is the product list. Use the Wix Stores API to create a service that queries and lists the products in your Wix headless project's CMS. First, create the service: 1. In the `plugin/services` folder, create a new file named `wix-products.php`. 2. In `wix-products.php`, add the following code: ```php 'POST', 'headers' => array('Content-Type' => 'application/json', 'Authorization' => $tokens['accessToken']['value']), 'body' => $slug ? '{"query": {"filter": "{\"slug\": \"'.$slug.'\"}"}}' : '', 'data_format' => 'body', )); if (!is_wp_error($response) && $response['response']['code'] === 200) { $body = wp_remote_retrieve_body($response); return json_decode($body, true); } else { error_log('Failed to get products, request ID: '.get_wix_request_id($response).' full response: '.json_encode($response)); throw new \RuntimeException('Failed to get products'); } } } ``` The `getProducts()` function makes an authorized call to the Wix Stores API. It queries all products that exist in your headless project's CMS. ## Create a template to display your products Next, create a WordPress template file to display your product list: 1. In `plugin/templates`, create a new file named `product-list.php`. 2. In `product-list.php`, add the following code: ```php

    No products found.

    ``` This code creates the template for displaying a dynamic list of products. ### Render the list of products on your WordPress site Now that the products have been queried, and a template exists for displaying them, all that is left is to display them on your site. 1. In `plugin/wix-headless-example.php`, add the following code: ```php '', ), $attrs); $templates = array( $attrs['template'], 'templates/product-list.php'); $template_file = locate_template( $templates, true, true ); // If it isn't defined in the WordPress theme or attribute, use the plugin template if (!file_exists($template_file)) { $template_file = plugin_dir_path(__FILE__).'templates/product-list.php'; } extract($products); ob_start(); if (file_exists($template_file)) { include $template_file; } else { echo 'Template file not found!'; } return ob_get_clean(); } } $WixHeadlessPlugin = new WixHeadlessPlugin(); ``` This `wix_headless_render_product_list()` function queries the existing products and uses the `product-list` template file to render the products on the screen. It also registers this function for the `wixwp_products` shortcode. > **Note:** The `locate_template()` function allows the theme to override the existing template. 2. Finally, on your WordPress site, add a shortcode block with the `[wixwp_products]` shortcode. View your page to see the list of products. ## Step 6: Add a secured checkout functionality The second Wix eCommerce functionality you will implement is the Wix secured checkout. This involves implementing a dynamic "Buy Now" route for each product. When clicked, the route takes your visitor to a secured checkout page where they can complete their purchase. > **Note:** As its name suggests, the "Buy Now" functionality takes your visitor directly to a checkout page, without taking them through a product page and a shopping cart first. This means that product variants or options are not supported in this implementation. For a full eCommerce implementation, see the [Wix Headless eCommerce tutorial](https://dev.wix.com/docs/go-headless/self-managed-headless/self-managed-tutorials/java-script-sdk-tutorials/e-commerce-quick-start.md). ### Add URL slugs for the queried products To create a dynamic checkout page for each product, queried each product must first be identified with a unique, dynamic URL. In `plugin/services/wix-products.php`, update the value of the request body to include a dynamic slug: ```php $slug ? '{"query": {"filter": "{\"slug\": \"'.$slug.'\"}"}}' : '', // ... )); // ... } } ``` Now, when making a call to the Wix Stores API, the request body includes a unique URL slug for each product. ### Create the checkout service using Wix eCommerce API Wix Headless offers a secured checkout service that can be dynamically populated with each product's details. Use the Wix eCommerce API to create a secured checkout service: 1. In `plugin/services`, create a new file named `wix-checkout.php`. 2. Add to it the following code: ```php $quantity, 'catalogReference' => [ 'catalogItemId' => $productId, 'appId' => '215238eb-22a5-4c36-9e7b-e7c08025e04e', ], ]; $lineItems = [$item]; $channelType = "WEB"; $data = [ "lineItems" => $lineItems, "channelType" => $channelType ]; $response = wp_remote_post('https://www.wixapis.com/ecom/v1/checkouts', array( 'method' => 'POST', 'headers' => array('Content-Type' => 'application/json', 'Authorization' => $tokens['accessToken']['value']), 'body' => json_encode($data), 'data_format' => 'body', )); if (!is_wp_error($response) && $response['response']['code'] === 200) { $body = wp_remote_retrieve_body($response); return json_decode($body, true); } else { error_log('Failed to create checkout, request ID: '.get_wix_request_id($response).' full response: '.json_encode($response)); throw new \RuntimeException('Failed to create checkout'); } } } ``` The [`createCheckout()` function](https://dev.wix.com/docs/api-reference/business-solutions/e-commerce/purchase-flow/checkout/checkout/create-checkout.md) makes a call to the [Wix eCommerce API](https://dev.wix.com/docs/api-reference/business-solutions/e-commerce/purchase-flow/checkout/checkout/create-checkout.md) with the details of the product that was clicked. The function returns a new checkout object used to render the Wix Checkout page on your WordPress site. ### Create the redirect session Now, whenever a product is clicked, a checkout page dynamically loads with that product's details. However, the checkout page itself is a Wix page, which means it isn't hosted on your WordPress site, but rather on Wix's servers. Therefore, your visitor still needs to be redirected there to complete their purchase, and back to your WordPress site once they are done. To redirect your visitor from your WordPress site to the Wix checkout page, and then return them to your site once they have completed their purchase, you need to use the [Wix Redirect Session API](https://dev.wix.com/docs/api-reference/business-management/headless/redirects/introduction.md). Create a redirection service to handle redirecting your visitor to, and back from, the Wix checkout page: 1. Still in `plugin/services/wix-checkout.php`, add the following code: ```php $baseUrl, "postFlowUrl" => $baseUrl, ]; } public static function createCheckoutRedirectSession($checkoutId) { $tokens = Auth::getTokens(); if (! $tokens['accessToken']) { throw new \RuntimeException('No access token'); } $data = [ "ecomCheckout" => ["checkoutId" => $checkoutId], "callbacks" => CheckoutServices::createCallbackUrls() ]; $response = wp_remote_post('https://www.wixapis.com/_api/redirects-api/v1/redirect-session', array( 'method' => 'POST', 'headers' => array('Content-Type' => 'application/json', 'Authorization' => $tokens['accessToken']['value']), 'body' => json_encode($data), 'data_format' => 'body', )); if (!is_wp_error($response) && $response['response']['code'] === 200) { $body = wp_remote_retrieve_body($response); return json_decode($body, true); } else { error_log('Failed to create redirect session, request ID: '.get_wix_request_id($response).' full response: '.json_encode($response)); throw new \RuntimeException('Failed to create redirect session for checkout'); } } } ``` The [`createCheckoutRedirectSession()` function](https://dev.wix.com/docs/api-reference/business-management/headless/redirects/create-redirect-session.md) makes an authorized call to the Wix Redirect Sessions API. The `postFlowUrl` value included in the call specifies where your visitor returns upon completing their purchase. The function then returns the processed redirect session to the calling router. ### Create a router to handle the "Buy Now" flow The redirection functionality is now configured, but it is not integrated into your page. You now need to create a routing service that manages the entire "Buy Now" redirection and checkout flow. Create the routing service: 1. In `plugin/utils`, create a new file named `routes.php`. 2. In `routes.php`, write the following code: ```php 'GET', 'callback' => 'wix_headless_buy_now_callback', 'permission_callback' => '__return_true', 'args' => array( 'productSlug' => array( 'required' => true, ), 'quantity' => array( 'required' => false, ), ), )); } function wix_headless_buy_now_callback($request) { error_log('wix_headless_buy_now_callback'); $product_slug = $request->get_param('productSlug'); $quantity = intval($request->get_param('quantity') ?? '1', 10); $products = WixStoresProducts::getProducts($product_slug); $product = (object)($products['products'][0]); $checkout = CheckoutServices::createCheckout($product->id, $quantity); $redirect_session = CheckoutServices::createCheckoutRedirectSession($checkout['checkout']['id']); $response = rest_ensure_response(null); $response->set_status(302); // Set the HTTP status code to 302 (Found/Temporary Redirect) $response->header('Location', $redirect_session['redirectSession']['fullUrl']); return $response; } ``` The `wix_headless_buy_now_endpoint()` specifies which Wix REST endpoint must be called whenever a product is clicked. Its callback function, `wix_headless_buy_now_callback()`, creates both the dynamic checkout page with the clicked product's details, and the necessary redirection functionality. #### Make the business services accessible to your plugin The product list, checkout, and redirect services have been set up. You now need to let your main plugin logic know that they are available and where it can find them. Your WordPress site also needs to be aware of the Wix REST endpoints used by these services. 1. Bring the router into the scope of your plugin. In `plugin/wix-headless-example.php`, add the following lines: ```php // ...
    • // Add the "Buy Now" functionality
    ``` When a visitor clicks a product, they are redirected to the checkout page to complete their purchase, and redirected back to your site once they have completed their purchase. ## Conclusion Well done! In this tutorial you created from scratch a WordPress plugin that integrates a limited Wix Headless eCommerce user flow with your WordPress site. It was done using server-side code only. You can find the full source code [here](https://github.com/wix-incubator/headless-tutorial-wordpress-plugin). However, You can expand the existing implementation to include other business services, such as product pages and a cart, by adding client-side code. For a sample implementation, see the [Wix Headless eCommerce tutorial](https://dev.wix.com/docs/go-headless/self-managed-headless/self-managed-tutorials/java-script-sdk-tutorials/e-commerce-quick-start.md). --- > Portal Navigation: > > - Append `.md` to any URL under `https://dev.wix.com/docs/` to get its markdown version. > - Pages are either content pages (article or reference text) or menu pages (a list of links to child pages). > - To get a menu page, truncate any URL to a parent path and append `.md` (e.g. `https://dev.wix.com/docs/sdk.md`, `https://dev.wix.com/docs/sdk/core-modules.md`). > - Top-level index of all portals: https://dev.wix.com/docs/llms.txt > - Full concatenated docs: https://dev.wix.com/docs/llms-full.txt ## Resource: Working with Rich Content ## Article: Working with Rich Content ## Article Link: https://dev.wix.com/docs/go-headless/self-managed-headless/self-managed-tutorials/other-tutorials/working-with-rich-content.md ## Article Content: # Tutorial: Working with Rich Content Some of the data that the [JavaScript SDK](https://dev.wix.com/docs/sdk.md) returns, such as blog posts and database collection items, contains rich content. Rich content is enhanced text content that can include things like formatted text, link previews, images, and video. The SDK returns rich content as complex objects. If you’re creating a headless project with a custom frontend, it can be challenging to render the objects yourself. If you build your frontend using [React](https://react.dev/), you can use the `@wix/ricos` package to render rich content objects returned by the SDK. [Ricos](https://dev.wix.com/docs/ricos/getting-started/introduction.md) is designed for editing and rendering rich content objects. It supports Wix rich content objects. This tutorial explains how to use Ricos to render the rich content objects returned by the SDK. It includes examples for both the [Blog](https://dev.wix.com/docs/api-reference/business-solutions/blog/introduction.md) and [Data](https://dev.wix.com/docs/api-reference/business-solutions/cms/operations/introduction.md) modules. This process has three steps: 1. [Retrieve your headless project's rich content using the SDK.](#step-1-retrieve-rich-content-data) 1. [Create a React component that can render rich content objects.](#step-2-create-a-rich-content-viewer-component) 1. [Add the component to your page’s code.](#step-3-render-rich-content-on-a-site) ## Before you begin Before getting started, you need: * A Wix site or headless project with either the Wix Blog app installed, or with at least one database collection. * A blog post or collection item with rich content. To add rich content to a blog post, use the [Blog Post Editor](https://support.wix.com/en/article/wix-blog-writing-posts-in-wix-blog) to add things like formatted text or images to a post. Use the CMS to [add rich content](https://support.wix.com/en/article/cms-formerly-content-manager-working-with-rich-content-and-adding-it-to-a-dynamic-page) to your collection. * [Create an OAuth app](https://dev.wix.com/docs/go-headless/self-managed-headless/authentication/oauth/about-oauth-authentication.md) for your headless project. Retrieve your app’s client ID. You’ll need to use it in your code. ## Step 1. Retrieve rich content data The first step in rendering rich content is to retrieve it in your frontend code using the SDK. To do this: 1. In the terminal, run the following commands to install the necessary SDK packages: * **SDK:** `yarn add @wix/sdk` * **Blog** (if you’re retrieving Blog content): `yarn add @wix/blog` * **Data** (if you’re retrieving CMS content): `yarn add @wix/data` 1. Create a new file in your project called `rich-content-api.js`. 1. At the top of your file, add the following import statements. ```javascript import { createClient, OAuthStrategy } from '@wix/sdk'; //If you’re retrieving Blog content: import { posts } from '@wix/blog'; //If you’re retrieving CMS content: import { items } from '@wix/data'; ``` 1. Create an [SDK client](https://dev.wix.com/docs/sdk/articles/set-up-a-client/about-the-wix-client.md) by adding the following code to your code file. Fill in the value for your client ID, which can be found in your project's [**Headless Settings**](https://www.wix.com/my-account/site-selector/?buttonText=Select%20Site&title=Select%20a%20Site&autoSelectOnSingleSite=true&actionUrl=https:%2F%2Fwww.wix.com%2Fdashboard%2F%7B%7BmetaSiteId%7D%7D%2Foauth-apps-settings). Adjust the value of `modules` if you are only working with Blog or CMS: ```javascript const wixClient = createClient({ auth: OAuthStrategy({ clientId: '' }), modules: { posts, items }, }); ``` 1. Add a function to your file called `getRichContent`. This function retrieves the rich content data from your project.
    To retrieve collection items Use the SDK Data module’s [`query`](https://dev.wix.com/docs/sdk/business-solutions/data/items/query.md) method to retrieve your project’s CMS items. You can use the [query builder](https://dev.wix.com/docs/sdk/business-solutions/data/items/wix-data-query/introduction.md) to refine your results. Example code: ```javascript export async function getRichContent() { const queryResults = await wixClient.items.query('MyCollectionName').find(); return queryResults.items[0].myRichContentField; } ```
    To retrieve blog posts Use the SDK Blog module’s [`queryPosts`](https://dev.wix.com/docs/api-reference/business-solutions/blog/posts-stats/query-posts.md) method to retrieve your project’s blog posts. You must specify `{fieldsets: ["RICH_CONTENT"]}` in your `queryPosts()` call. You can use the [query builder](https://dev.wix.com/docs/api-reference/business-solutions/blog/posts-stats/query-posts.md) to refine your results. Example code: ```js export async function getRichContent() { const queryResults = await wixClient.posts.queryPosts({fieldsets: ["RICH_CONTENT"]}).find(); return queryResults.items[0].richContent; } ```
    ## Step 2. Create a rich content viewer component The next step is to create a React component that uses the `@wix/ricos` package to display rich content objects. The package includes a `RicosViewer` React component that can render rich content objects. The component doesn't support all content types by default. For some content types, you must enable the relevant [Ricos plugin](https://dev.wix.com/docs/ricos/getting-started/introduction.md#plugins). In our code, we'll import and use the `quickStartViewerPlugins` function to enable all plugins. The viewer generates a React class component with the rendered rich content. This means you can only work with this component in client code. If your project supports [React Server Components](https://react.dev/blog/2023/03/22/react-labs-what-we-have-been-working-on-march-2023#react-server-components), make sure to add `"use client"` at the top of your code file. To create your component: 1. Install the `@wix/ricos` package and its dependencies. ```bash yarn add @wix/ricos ``` 1. Create a new file in your project called `RichContentViewer.jsx`. 1. Add `"use client"` to the top of the file if needed. See the introduction to this section for details. 1. Import `React`, the Ricos viewer package, `quickStartViewerPlugins`, and the plugins css file. ```javascript import React from "react"; import { quickStartViewerPlugins, RicosViewer } from '@wix/ricos'; import '@wix/ricos/css/all-plugins-viewer.css'; ``` 1. Create an array of initialized plugin objects using `quickStartViewerPlugins()`. ```javascript const plugins = quickStartViewerPlugins(); ``` > **Note:** If you don't want to enable every plugin, import only the plugins you want to enable, and then include them specifically in the `plugins` array. > >
    > Example: Enable only the Divider and Heading plugins >
      >
    1. > Import pluginDivider and pluginHeading instead of quickStartViewerPlugins from '@wix/ricos': >
      import { pluginDivider, pluginHeadings, RicosViewer } from '@wix/ricos';
      >
    2. >
    3. > Create an array of initialized plugin objects: >
      const plugins = [pluginDivider(), pluginHeadings()];
      >
    4. >
    >
    1. Create a React component called `RichContentViewer` that accepts `content` as a prop and returns a `RicosViewer` component with `content` and the `plugins` array from the previous step passed in as props. Export the component. ```js const RichContentViewer = ({ content }) => { return ; }; export default RichContentViewer; ``` ## Step 3. Render rich content on a site The final step is to create a React component that uses the code from the previous sections to retrieve rich content and display it on a page. If you’re working in a framework like Next.js, this component would probably be a React Server Component defined in the code file for a particular page on your site. To create this component, do the following: 1. Add the following import statements to your file. Make sure to include the correct paths to your `rich-content-api` and `RichContentViewer` files. ```javascript import React from "react"; import RichContentViewer from "./RichContentViewer"; import { getRichContent } from "./rich-content-api"; ``` 1. Create a component called `RichContent` that uses your `getRichContent` function to retrieve your content, and then passes the result to your `RichContentViewer` component. ```javascript async function RichContent() { const richContent = await getRichContent(); return (
    Your rich content:
    ); } ``` 1. Export another component called `Page` that includes your `RichContent` component. In a real site, this component would likely include other elements of your page. ```js export default function Page() { return ( ); } ``` ## Example code ### rich-content-api.js ```js import { createClient, OAuthStrategy } from '@wix/sdk'; import { items } from '@wix/data'; const wixClient = createClient({ auth: OAuthStrategy({ clientId: '' }), modules: { items }, }); export async function getRichContent() { const queryResults = await wixClient.items.query('MyCollectionName').find(); return queryResults.items[0].myRichContentField; } ``` ### RichContentViewer.jsx ```js "use client"; import React from "react"; import { quickStartViewerPlugins, RicosViewer } from '@wix/ricos'; const plugins = quickStartViewerPlugins(); const RichContentViewer = ({ content }) => { return ; }; export default RichContentViewer; ``` ### page.jsx ```js import React from "react"; import RichContentViewer from "@/app/components/RichContentViewer/RichContentViewer"; import { getRichContent } from "@/app/model/rich-content-api"; async function RichContent() { const richContent = await getRichContent(); return (
    ); } export default function Page() { return ( ); } ``` You now have a basic app that can render rich content using React. For more information about working with the SDK, see the [SDK Reference](https://dev.wix.com/docs/sdk.md). --- > Portal Navigation: > > - Append `.md` to any URL under `https://dev.wix.com/docs/` to get its markdown version. > - Pages are either content pages (article or reference text) or menu pages (a list of links to child pages). > - To get a menu page, truncate any URL to a parent path and append `.md` (e.g. `https://dev.wix.com/docs/sdk.md`, `https://dev.wix.com/docs/sdk/core-modules.md`). > - Top-level index of all portals: https://dev.wix.com/docs/llms.txt > - Full concatenated docs: https://dev.wix.com/docs/llms-full.txt ## Resource: Set up an Externally-Managed Login Flow with Next.js and Github ## Article: Set up an Externally-Managed Login Flow with Next.js and Github ## Article Link: https://dev.wix.com/docs/go-headless/self-managed-headless/self-managed-tutorials/other-tutorials/set-up-an-externally-managed-login-flow-with-next-js-and-github.md ## Article Content: # Set Up an Externally-Managed Login Flow with Next.js and GitHub This tutorial shows how to use the [external identity provider code](https://github.com/wix/headless-templates/tree/main/nextjs/external-identity-provider) from the [Headless Templates repo](https://github.com/wix/headless-templates/tree/main) to set up a login flow managed by an external provider, in this case GitHub, using a custom login interface that syncs with Wix authentication. > **Note:** External login with Google and Facebook are fully supported in the [Wix login page](https://dev.wix.com/docs/go-headless/self-managed-headless/authentication/members/wix-login-page/wix-managed-login-using-the-js-sdk.md). When working with Google or Facebook as your external identity provider, only use this externally-managed login flow if you require a custom login interface. Complete the following steps to log a visitor into your site or app with their GitHub credentials: 1. [Authorize the member in GitHub](https://docs.github.com/en/apps/oauth-apps/building-oauth-apps/authorizing-oauth-apps#web-application-flow) and collect their email address. 1. Collect the relevant Wix member ID. 1. Request and store access and refresh tokens for the Wix member ID. Once the member is logged in, you can redirect them to your home page. ## Before you begin Before getting started, make sure you have the following: - A Wix account - A GitHub account - A GitHub App - In your GitHub app, be sure to set the following settings: - Homepage URL: `http://localhost:3000` - Authorization callback URL: `http://localhost:3000/api/auth/github/callback` - A Wix site or Wix Headless project - A [Wix API Key](https://dev.wix.com/docs/api-reference/articles/authentication/api-keys/generate-an-api-key.md) with Members & Contacts permission - An [OAuth App for visitors and members](https://dev.wix.com/docs/go-headless/self-managed-headless/authentication/oauth/about-oauth-authentication.md) - A copy of the [Headless Templates repo](https://github.com/wix/headless-templates/tree/main) - A custom login interface ## Step 1 | Authenticate in GitHub and collect the member’s email address 1. When a visitor first lands on your login page, follow the [handle visitors](https://dev.wix.com/docs/go-headless/self-managed-headless/authentication/visitors/handle-visitors-using-the-js-sdk.md) flow. 1. When a member chooses to log in using GitHub on your login page: a. Follow the [GitHub OAuth web flow](https://docs.github.com/en/apps/oauth-apps/building-oauth-apps/authorizing-oauth-apps#web-application-flow) to authenticate users with the `@octokit/auth-app package`. See the [`getGithubAuth`](https://github.com/wix/headless-templates/blob/main/nextjs/external-identity-provider/src/app/api/auth/github/callback/route.ts#L31) function. a. Once the member has been authenticated by GitHub, call GitHub’s [Get the authenticated user](https://docs.github.com/en/rest/users/users?apiVersion=2022-11-28#get-the-authenticated-user) endpoint. See the [`getGithubUserEmail`](https://github.com/wix/headless-templates/blob/main/nextjs/external-identity-provider/src/app/api/auth/github/callback/route.ts#L49) function. ## Step 2 | Collect a Wix member ID Once you have the member’s email addresses, check if any of them are associated with a Wix member ID. See the [`getOrCreateWixMember()`](https://github.com/wix/headless-templates/blob/main/nextjs/external-identity-provider/src/app/api/auth/github/callback/route.ts#L61) function. Call the [`queryMembers()`](https://dev.wix.com/docs/api-reference/crm/members-contacts/members/member-management/members/query-members.md) function and filter by the email address collected in step 1: ```js // ... async function getOrCreateWixMember(email: string) { const wixAdminClient = createClient({ auth: ApiKeyStrategy({ apiKey: process.env.WIX_API_KEY!, siteId: process.env.WIX_SITE_ID!, }), modules: { members, }, }); const { items } = await wixAdminClient.members .queryMembers({ filter: { loginEmail: email } }); let member; if (items.length === 0) { member = await wixAdminClient.members.createMember({ member: { loginEmail: email, status: members.Status.APPROVED, privacyStatus: members.PrivacyStatusStatus.PRIVATE, }, }); } else { member = items[0]; } return member; } ``` - If an associated Wix member ID exists, collect it and pass it in the next step. - If no associated Wix member ID exists, call the [`createMember()`](https://dev.wix.com/docs/api-reference/crm/members-contacts/members/member-management/members/create-member.md) function to create one and collect the returned ID. Note that creating members without explicit registration is an admin function. Make sure to use a [WixClient](https://dev.wix.com/docs/go-headless/self-managed-headless/authentication/oauth/create-a-client-for-authentication-with-oauth.md) and pass an [API key](https://dev.wix.com/docs/api-reference/articles/authentication/api-keys/generate-an-api-key.md) that has permission to create members. See the [serverWixClient.ts](https://github.com/wix/headless-templates/blob/main/nextjs/external-identity-provider/src/serverWixClient.ts) file in the sample project. ## Step 3 | Request and store Wix access and refresh tokens Now that you have the Wix member ID, you can request member tokens. See the [`getMemberTokensForExternalLogin()`](https://dev.wix.com/docs/sdk/core-modules/sdk/oauth-strategy.md) function, which passes the member ID collected in step 2. ```js // ... const memberTokens = await getServerWixClient().auth.getMemberTokensForExternalLogin( member._id!, process.env.WIX_API_KEY! ); ``` Note that getting access and refresh tokens is an admin function. Make sure to use the [WixClient](https://dev.wix.com/docs/go-headless/self-managed-headless/authentication/oauth/create-a-client-for-authentication-with-oauth.md) with your OAuth app that created this visitor, and pass an [API key](https://dev.wix.com/docs/api-reference/articles/authentication/api-keys/generate-an-api-key.md) that has permission to create member access tokens, to save the visitor’s activity from before they logged in. Now you can: - Store the token in a browser cookie to save the member’s session. - Redirect the member to your homepage which triggers a client and uses the token in the cookie to make requests on their behalf. --- > Portal Navigation: > > - Append `.md` to any URL under `https://dev.wix.com/docs/` to get its markdown version. > - Pages are either content pages (article or reference text) or menu pages (a list of links to child pages). > - To get a menu page, truncate any URL to a parent path and append `.md` (e.g. `https://dev.wix.com/docs/sdk.md`, `https://dev.wix.com/docs/sdk/core-modules.md`). > - Top-level index of all portals: https://dev.wix.com/docs/llms.txt > - Full concatenated docs: https://dev.wix.com/docs/llms-full.txt ## Resource: Next.js Templates ## Article: Next.js Templates ## Article Link: https://dev.wix.com/docs/go-headless/self-managed-headless/self-managed-templates/next-js-templates.md ## Article Content: # Next.js Templates With Wix Headless, you can create any site or app you like, and integrate Wix functionality and business solutions. To help get you started, we've developed several Next.js templates for sites that take advantage of the features Wix Headless offers. You can adapt these templates to create your own site quickly, or you can use them as examples to help inspire a site you develop from scratch. Each of our templates uses a different set of business solutions and APIs. ## Professional Coach ![Professional coach site](https://wixmp-833713b177cebf373f611808.wixmp.com/images/0892fce5fa28a08c2c9a71a288e1bc21.png) This template uses the [Bookings](https://dev.wix.com/docs/api-reference/business-solutions/bookings/services/introduction.md) and [Pricing Plans](https://dev.wix.com/docs/api-reference/business-solutions/pricing-plans/introduction.md) APIs. Go to the [GitHub repo](https://github.com/wix/headless-templates/tree/main/nextjs/appointments-subscriptions#readme) for instructions on getting started. ## Artist's Music Tour ![Music tour site](https://wixmp-833713b177cebf373f611808.wixmp.com/images/84b234df3fecd323cb6ceebb97ae778e.png) This template uses the [Events](https://dev.wix.com/docs/api-reference/business-solutions/events/event-management/introduction.md) and [eCommerce](https://dev.wix.com/docs/api-reference/business-solutions/e-commerce/introduction.md) APIs. Go to the [GitHub repo](https://github.com/wix/headless-templates/tree/main/nextjs/commerce-ticketing#readme) for instructions on getting started. ## Personal Trainer ![Personal trainer site](https://wixmp-833713b177cebf373f611808.wixmp.com/images/704d1d97a392f0b2f39699674b56a527.png) This template uses the [Bookings](https://dev.wix.com/docs/api-reference/business-solutions/bookings/services/introduction.md) and [Pricing Plans](https://dev.wix.com/docs/api-reference/business-solutions/pricing-plans/introduction.md) APIs. Go to the [GitHub repo](https://github.com/wix/headless-templates/tree/main/nextjs/classes-subscriptions#readme) for instructions on getting started. ## Non-Profit Organization ![Non-profit organization site](https://wixmp-833713b177cebf373f611808.wixmp.com/images/689018b06a32d82fe24d5c6ba928dbcb.png) This template uses the [Wix Data](https://dev.wix.com/docs/api-reference/business-solutions/cms/operations/introduction.md) API. Go to the [GitHub repo](https://github.com/wix/headless-templates/tree/main/nextjs/cms-education#readme) for instructions on getting started. --- > Portal Navigation: > > - Append `.md` to any URL under `https://dev.wix.com/docs/` to get its markdown version. > - Pages are either content pages (article or reference text) or menu pages (a list of links to child pages). > - To get a menu page, truncate any URL to a parent path and append `.md` (e.g. `https://dev.wix.com/docs/sdk.md`, `https://dev.wix.com/docs/sdk/core-modules.md`). > - Top-level index of all portals: https://dev.wix.com/docs/llms.txt > - Full concatenated docs: https://dev.wix.com/docs/llms-full.txt ## Resource: Netlify Quick Launch ## Article: Netlify Quick Launch ## Article Link: https://dev.wix.com/docs/go-headless/self-managed-headless/self-managed-templates/netlify-quick-launch.md ## Article Content: # Netlify Quick Launch After selecting a Next.js template, you can integrate it with a Wix site or project and deploy the site on [Netlify](https://www.netlify.com/). To connect a template with Wix and deploy it, take the following steps: 1. Open the [templates page](https://www.wix.com/developers/headless/templates). 2. Choose the template you want to use. The description for each template indicates the Wix business services it integrates with. 3. Below the preview image for the desired template, click **Deploy**. ![Deploy Wix template](https://wixmp-833713b177cebf373f611808.wixmp.com/images/netlify-quick-launch-md_headless-docs_assets_deploy-button.png) 4. On the **Deploy this Template** page, select **Netlify** and click **Continue**. A list of your existing Wix sites and projects is displayed. ![Connect template to Netlify](https://wixmp-833713b177cebf373f611808.wixmp.com/images/netlify-quick-launch-md_headless-docs_assets_deploy-to-netlify.png) 5. Hover over the project or site that you want to connect to the template and click **Connect**. To create a new project to connect to the template click **Create New** at the bottom of the list. A new tab opens in the browser. Follow the prompts to create a new project. Return to the previous tab to continue the Netlify setup. 6. Click **Agree & Add** to give Netlify access to your Wix project. ![Grant Netlify Wix permissions](https://wixmp-833713b177cebf373f611808.wixmp.com/images/netlify-quick-launch-md_headless-docs_assets_netlify-permissions.png) 7. Click **Connect to GitHub** to connect Netlify to your GitHub account. If prompted, log in to GitHub and authenticate. ![Connect Netlify project to GitHub](https://wixmp-833713b177cebf373f611808.wixmp.com/images/netlify-quick-launch-md_headless-docs_assets_netlify-connect-github.png) 8. Click **Save & Deploy** to create a repository on your GitHub account to host the template code. Netlify deploys your new site. ![Deploy your project on Netlify](https://wixmp-833713b177cebf373f611808.wixmp.com/images/netlify-quick-launch-md_headless-docs_assets_netlify-deploy.png) 9. Once the site is deployed, click **Open production deploy** to see the live site. ![View live site](https://wixmp-833713b177cebf373f611808.wixmp.com/images/netlify-quick-launch-md_headless-docs_assets_netlify-open-site.png) --- > Portal Navigation: > > - Append `.md` to any URL under `https://dev.wix.com/docs/` to get its markdown version. > - Pages are either content pages (article or reference text) or menu pages (a list of links to child pages). > - To get a menu page, truncate any URL to a parent path and append `.md` (e.g. `https://dev.wix.com/docs/sdk.md`, `https://dev.wix.com/docs/sdk/core-modules.md`). > - Top-level index of all portals: https://dev.wix.com/docs/llms.txt > - Full concatenated docs: https://dev.wix.com/docs/llms-full.txt ## Resource: Template Deployment ## Article: Template Deployment ## Article Link: https://dev.wix.com/docs/go-headless/self-managed-headless/self-managed-templates/template-deployment.md ## Article Content: # Template Deployment Our Next.js template repositories support quick-start deployment on [Netlify](https://dev.wix.com/docs/go-headless/self-managed-headless/self-managed-templates/netlify-quick-launch.md). You can also deploy our templates on any platform that supports Next.js 13 and the [App Router Roadmap](https://nextjs.org/docs/app). For example, you can deploy Next.js projects on: - [Vercel](https://nextjs.org/docs/deployment#managed-nextjs-with-vercel) - [Amazon Web Services](https://aws.amazon.com/blogs/mobile/amplify-next-js-13/) - [Azure](https://learn.microsoft.com/en-us/azure/static-web-apps/nextjs) - [Firebase](https://firebase.google.com/docs/hosting/nextjs) - [Heroku](https://elements.heroku.com/buildpacks/mars/heroku-nextjs) > **Note:** Before attempting to deploy templates on these platforms, check the most up-to-date information from the provider. For more information about deploying Next.js projects to production on a variety of platforms, see the Next.js [deployment guide](https://nextjs.org/docs/deployment). Our template repositories require a single environment variable, `NEXT_PUBLIC_WIX_CLIENT_ID`, which should contain a client ID authorizing access to a Wix project. To generate a client ID, [create a project](https://dev.wix.com/docs/go-headless/get-started/quick-starts/self-managed-headless/quick-start-a-self-managed-headless-project.md) and then [create an OAuth app](https://dev.wix.com/docs/go-headless/self-managed-headless/authentication/oauth/about-oauth-authentication.md). If you've already created an OAuth app, you can find the client ID in your project's [**Headless Settings**](https://www.wix.com/my-account/site-selector/?buttonText=Select%20Site&title=Select%20a%20Site&autoSelectOnSingleSite=true&actionUrl=https:%2F%2Fwww.wix.com%2Fdashboard%2F%7B%7BmetaSiteId%7D%7D%2Foauth-apps-settings). Want to request support for quick-start deployment on another platform? Contact us to suggest a platform. --- > Portal Navigation: > > - Append `.md` to any URL under `https://dev.wix.com/docs/` to get its markdown version. > - Pages are either content pages (article or reference text) or menu pages (a list of links to child pages). > - To get a menu page, truncate any URL to a parent path and append `.md` (e.g. `https://dev.wix.com/docs/sdk.md`, `https://dev.wix.com/docs/sdk/core-modules.md`). > - Top-level index of all portals: https://dev.wix.com/docs/llms.txt > - Full concatenated docs: https://dev.wix.com/docs/llms-full.txt ## Resource: React Native template ## Article: React Native template ## Article Link: https://dev.wix.com/docs/go-headless/self-managed-headless/self-managed-templates/react-native-template.md ## Article Content: # About the React Native Template This article introduces the [React Native mobile eCommerce template](https://github.com/wix/headless-templates/tree/main/react-native/mobile-ecommerce) for Wix Headless. The template showcases how to create a secure and flexible mobile application that integrates with Wix business solutions. The template is built using [React Native](https://reactnative.dev/docs/getting-started) and [Expo](https://docs.expo.dev/), a platform for building React applications including mobile apps for Android and iOS. You can customize this template to create your own React Native application, or use it as an example to help inspire your own mobile app. To explore all available web and mobile templates, visit [Wix Headless Templates](https://www.wix.com/studio/developers/headless/templates). ## Authentication Authentication is essential for secure interactions with a Wix Headless backend. This template provides built-in strategies for effective authentication management, including: - Management of active sessions for visitors and members - Secure redirect-based login - Silent login during a Wix redirect session ![Mobile member page](https://wixmp-833713b177cebf373f611808.wixmp.com/images/2cd0e490e0d21768eeb7140f21a5d1da.png) To learn more about authentication with Wix Headless, see [Authentication Strategies](https://dev.wix.com/docs/go-headless/self-managed-headless/authentication/about-authentication.md). ## Integration with Wix business solutions Wix Headless makes it possible to integrate a customized frontend with Wix's backend business solutions. This template exemplifies such integration within a React Native application using the following features of the [Wix eCommerce API](https://dev.wix.com/docs/api-reference/business-solutions/e-commerce/introduction.md): - Products Catalog - Product Details View - Cart functionality - Buy now button - Secure checkout ![Mobile products page](https://wixmp-833713b177cebf373f611808.wixmp.com/images/ada65e1c6fc2c6fdb479bd6f34c4f751.png) If you require a different business solution, you can adapt the template accordingly. For example, you could substitute eCommerce with Wix Bookings. For the full list of available business solutions, see the [business solutions API reference](https://dev.wix.com/docs/api-reference.md). ## Use cases This template provides the groundwork for developing a React Native application that can integrate with your own headless project. Alternatively, it can serve as a guide for integrating Wix Headless features into a different application built with your preferred technologies. To get started, clone the [React Native template](https://github.com/wix/headless-templates). --- > Portal Navigation: > > - Append `.md` to any URL under `https://dev.wix.com/docs/` to get its markdown version. > - Pages are either content pages (article or reference text) or menu pages (a list of links to child pages). > - To get a menu page, truncate any URL to a parent path and append `.md` (e.g. `https://dev.wix.com/docs/sdk.md`, `https://dev.wix.com/docs/sdk/core-modules.md`). > - Top-level index of all portals: https://dev.wix.com/docs/llms.txt > - Full concatenated docs: https://dev.wix.com/docs/llms-full.txt ## Resource: Featured Business Solutions ## Article: Wix Headless Business Solutions ## Article Link: https://dev.wix.com/docs/go-headless/project-guides/featured-business-solutions.md ## Article Content: # Featured Business Solutions for Wix Headless Most Wix Headless projects use the following business solutions: - [Stores](https://dev.wix.com/docs/api-reference/business-solutions/stores/introduction.md): Product catalogs, inventory, and collections. - [eCommerce](https://dev.wix.com/docs/api-reference/business-solutions/e-commerce/introduction.md): Cart, checkout, and order management. - [CMS](https://dev.wix.com/docs/api-reference/business-solutions/cms/introduction.md): Custom collections and content modeling with Wix Data. - [Members](https://dev.wix.com/docs/api-reference/crm/members-contacts/members/introduction.md): Site member profiles and accounts. - [Bookings](https://dev.wix.com/docs/api-reference/business-solutions/bookings/introduction.md): Service bookings, availability, and scheduling. - [Pricing Plans](https://dev.wix.com/docs/api-reference/business-solutions/pricing-plans/introduction.md): Paid memberships and subscriptions for gated content. - [Events](https://dev.wix.com/docs/api-reference/business-solutions/events/introduction.md): Events, ticketing, and RSVPs. - [Blog](https://dev.wix.com/docs/api-reference/business-solutions/blog/introduction.md): Posts, drafts, categories, and tags. - [Forms](https://dev.wix.com/docs/api-reference/crm/forms/introduction.md): Custom forms and submission management. - [Contacts](https://dev.wix.com/docs/api-reference/crm/members-contacts/contacts/introduction.md): Contact list and CRM management. - [Gift Cards](https://dev.wix.com/docs/api-reference/business-solutions/gift-cards/introduction.md): Gift card products, balances, and redemption. - [Loyalty](https://dev.wix.com/docs/api-reference/crm/loyalty-program/introduction.md): Loyalty programs, points, and rewards for customer retention. - [Restaurants](https://dev.wix.com/docs/api-reference/business-solutions/restaurants/introduction.md): Menus, online orders, and reservations. - [Marketing Tags](https://dev.wix.com/docs/api-reference/business-management/marketing/marketing-tags/introduction.md): Tracking tags for analytics, ad conversions, and integrations. > **Note**: Wix offers many more business APIs beyond this list. For the complete reference, see the [API reference](https://dev.wix.com/docs/api-reference.md). --- > Portal Navigation: > > - Append `.md` to any URL under `https://dev.wix.com/docs/` to get its markdown version. > - Pages are either content pages (article or reference text) or menu pages (a list of links to child pages). > - To get a menu page, truncate any URL to a parent path and append `.md` (e.g. `https://dev.wix.com/docs/sdk.md`, `https://dev.wix.com/docs/sdk/core-modules.md`). > - Top-level index of all portals: https://dev.wix.com/docs/llms.txt > - Full concatenated docs: https://dev.wix.com/docs/llms-full.txt ## Resource: Add Apps to a Project ## Article: Add Apps to a Project ## Article Link: https://dev.wix.com/docs/go-headless/project-guides/project-management/add-apps-to-a-project.md ## Article Content: # Add Apps to a Project When you create a Headless project, you can install apps for business solutions such as eCommerce, Bookings, Pricing Plans, or Events. If you want to add more apps later, follow these steps: 1. In the [project dashboard](https://www.wix.com/my-account/site-selector/?buttonText=Select%20Site&title=Select%20a%20Site&autoSelectOnSingleSite=true&actionUrl=https:%2F%2Fwww.wix.com%2Fdashboard%2F%7B%7BmetaSiteId%7D%7D%2Fhome) click **Apps** in the sidebar menu, then click **Explore Apps**. ![Click Explore Apps](https://wixmp-833713b177cebf373f611808.wixmp.com/images/244b4336bb602a0740d81d0496cbd7e6.png) 1. In the Headless Wix Apps menu, choose one of the business solutions to see a description of the app. ![Headless Wix Apps menu](https://wixmp-833713b177cebf373f611808.wixmp.com/images/ecf847302ad736ada36a9cb1e9a3c9b3.png) 1. Click **Add to Site** to install the app. --- > Portal Navigation: > > - Append `.md` to any URL under `https://dev.wix.com/docs/` to get its markdown version. > - Pages are either content pages (article or reference text) or menu pages (a list of links to child pages). > - To get a menu page, truncate any URL to a parent path and append `.md` (e.g. `https://dev.wix.com/docs/sdk.md`, `https://dev.wix.com/docs/sdk/core-modules.md`). > - Top-level index of all portals: https://dev.wix.com/docs/llms.txt > - Full concatenated docs: https://dev.wix.com/docs/llms-full.txt ## Resource: Invite Collaborators ## Article: Invite Collaborators ## Article Link: https://dev.wix.com/docs/go-headless/project-guides/project-management/invite-collaborators.md ## Article Content: # Invite Collaborators This article explains how to grant access to your project's [**Headless Settings**](https://www.wix.com/my-account/site-selector/?buttonText=Select%20Site&title=Select%20a%20Site&autoSelectOnSingleSite=true&actionUrl=https:%2F%2Fwww.wix.com%2Fdashboard%2F%7B%7BmetaSiteId%7D%7D%2Foauth-apps-settings). ## Step 1 | Create a custom role 1. Open your headless project dashboard. 1. Go to **Settings** > **Roles & Permissions**. 1. Click **Manage Roles**. 1. Click **Create a New Role**. Enter a **Role Title** and optional **Description**. 1. Click **Site Dashboard**, then select **Manage headless settings**. ![Permission to grant](https://wixmp-833713b177cebf373f611808.wixmp.com/images/10782c1e6d8a2cc71c6c5b673cfa11d3.png) 1. Click **Save**. Your new custom role appears in the **Manage Roles** list. ## Step 2 | Add collaborators You can assign the custom role to existing collaborators or invite new collaborators with that role. To assign the role to an existing collaborator: 1. Go to **Settings** > **Roles & Permissions**. 1. Find the collaborator you want to update. 1. Click **More Actions** ![](https://d2x3xhvgiqkx42.cloudfront.net/12345678-1234-1234-1234-1234567890ab/11e10e4f-b84d-4136-a5a9-6109fab0b7d7/2020/10/25/347cc5c6-bce3-4407-82c3-e211e02cab98/398ced84-9ef5-4f70-87cd-4cb39a66dd65.png) next to their name and select **Change role**. 1. Choose the custom role you created. 1. Click **Save**. To invite new collaborators with the role: 1. On the [**Manage Roles**](https://www.wix.com/my-account/site-selector/?buttonText=Select%20Site&title=Select%20a%20Site&autoSelectOnSingleSite=true&actionUrl=https:%2F%2Fwww.wix.com%2Fdashboard%2F%7B%7BmetaSiteId%7D%7D%2Froles-and-permissions/roles) page, find your new role and click **More Actions** ![](https://d2x3xhvgiqkx42.cloudfront.net/12345678-1234-1234-1234-1234567890ab/11e10e4f-b84d-4136-a5a9-6109fab0b7d7/2020/10/25/347cc5c6-bce3-4407-82c3-e211e02cab98/398ced84-9ef5-4f70-87cd-4cb39a66dd65.png). 1. Select **Invite collaborators**. 1. Enter the email addresses of the people to invite. 1. Click **Send Invite**. Now, the relevant collaborators can access your project's [**Headless Settings**](https://www.wix.com/my-account/site-selector/?buttonText=Select%20Site&title=Select%20a%20Site&autoSelectOnSingleSite=true&actionUrl=https:%2F%2Fwww.wix.com%2Fdashboard%2F%7B%7BmetaSiteId%7D%7D%2Foauth-apps-settings). ## See also - [Share Environment Variables with Collaborators](https://dev.wix.com/docs/go-headless/wix-managed-headless/project-development/environment-variables/share-environment-variables.md) --- > Portal Navigation: > > - Append `.md` to any URL under `https://dev.wix.com/docs/` to get its markdown version. > - Pages are either content pages (article or reference text) or menu pages (a list of links to child pages). > - To get a menu page, truncate any URL to a parent path and append `.md` (e.g. `https://dev.wix.com/docs/sdk.md`, `https://dev.wix.com/docs/sdk/core-modules.md`). > - Top-level index of all portals: https://dev.wix.com/docs/llms.txt > - Full concatenated docs: https://dev.wix.com/docs/llms-full.txt ## Resource: About Wix-Hosted Pages ## Article: About Wix Managed Business Flows ## Article Link: https://dev.wix.com/docs/go-headless/project-guides/wix-hosted-pages/about-wix-hosted-pages.md ## Article Content: # About Wix-Hosted Pages Wix Headless provides access to business solutions like eCommerce, Bookings, and Events. For certain processes that require a user interface like checkout or booking confirmation, you can redirect visitors to Wix-hosted pages instead of building them yourself. These pre-built pages handle the specific business logic, then redirect visitors back to your site or app. > **Note:** you can use Wix-hosted pages in both Wix-managed and self-managed headless projects. ## Domain configuration To use Wix-hosted pages, you must set up your domains: - Approve domains that Wix can redirect visitors back to by [adding allowed redirect domains](https://dev.wix.com/docs/go-headless/project-guides/wix-hosted-pages/add-allowed-redirect-domains.md). - Set the domain users see in their browser by [setting a Wix page domain](https://dev.wix.com/docs/go-headless/project-guides/wix-hosted-pages/set-a-wix-pages-domain.md). ## Available Wix-hosted pages Each Wix-hosted page provides a complete, pre-built solution that you can use with your headless project. The following are the available types of Wix-hosted pages: - **Booking page**: Service details and scheduling page from [Wix Bookings](https://dev.wix.com/docs/api-reference/business-solutions/bookings/introduction.md). - **Bookings checkout**: Checkout page for booking a service from [Wix Bookings](https://dev.wix.com/docs/api-reference/business-solutions/bookings/introduction.md). - **eCommerce checkout**: Checkout page for a shopping cart from [Wix eCommerce](https://dev.wix.com/docs/api-reference/business-solutions/e-commerce/introduction.md). - **Events checkout**: Checkout page for event ticket purchases from [Wix Events](https://dev.wix.com/docs/api-reference/business-solutions/events/introduction.md). - **Paid plans checkout**: Checkout page for subscription plans from [Wix Pricing Plans](https://dev.wix.com/docs/api-reference/business-solutions/pricing-plans/introduction.md). - **Product page**: Product details page from [Wix Stores](https://dev.wix.com/docs/api-reference/business-solutions/stores/introduction.md). ## Implementation You can redirect to Wix-hosted pages from your headless project using either the [JS SDK](https://dev.wix.com/docs/go-headless/project-guides/wix-hosted-pages/redirect-using-the-js-sdk.md) or [REST API](https://dev.wix.com/docs/go-headless/project-guides/wix-hosted-pages/redirect-using-the-rest-api.md). Both methods use the [Create Redirect Session API](https://dev.wix.com/docs/api-reference/business-management/headless/redirects/create-redirect-session.md) to handle the redirection process. ## See also - [Headless Redirects: Sample Flows](https://dev.wix.com/docs/api-reference/business-management/headless/redirects/sample-flows.md) - [E-commerce Quick Start](https://dev.wix.com/docs/go-headless/self-managed-headless/self-managed-tutorials/java-script-sdk-tutorials/e-commerce-quick-start.md) - [Bookings Quick Start](https://dev.wix.com/docs/go-headless/self-managed-headless/self-managed-tutorials/java-script-sdk-tutorials/bookings-quick-start.md) - [Pricing Plans Quick Start](https://dev.wix.com/docs/go-headless/self-managed-headless/self-managed-tutorials/java-script-sdk-tutorials/pricing-plans-quick-start.md) - [Events Quick Start](https://dev.wix.com/docs/go-headless/self-managed-headless/self-managed-tutorials/java-script-sdk-tutorials/events-quick-start.md) --- > Portal Navigation: > > - Append `.md` to any URL under `https://dev.wix.com/docs/` to get its markdown version. > - Pages are either content pages (article or reference text) or menu pages (a list of links to child pages). > - To get a menu page, truncate any URL to a parent path and append `.md` (e.g. `https://dev.wix.com/docs/sdk.md`, `https://dev.wix.com/docs/sdk/core-modules.md`). > - Top-level index of all portals: https://dev.wix.com/docs/llms.txt > - Full concatenated docs: https://dev.wix.com/docs/llms-full.txt ## Resource: Add Allowed Redirect Domains ## Article: Allowed Redirect Domains ## Article Link: https://dev.wix.com/docs/go-headless/project-guides/wix-hosted-pages/add-allowed-redirect-domains.md ## Article Content: # Add Allowed Redirect Domains If you use Wix-hosted pages for processes such as checkout, Wix returns the visitor to your site or app after the process is completed. To protect data security, Wix only ever redirects visitors to addresses you approve. For non-authorization related redirects, you provide a domain to allow redirects to all URLs under that domain. > Authorization related redirects require exact matching URIs. To set allowed authorization redirect URIs, see [Allowed Authorization Redirect URIs](https://dev.wix.com/docs/go-headless/self-managed-headless/authentication/members/add-allowed-authorization-redirect-uris.md). You can add allowed redirect domains: - [From the dashboard](#from-the-dashboard) - [With the API](#with-the-api) ## From the dashboard To add **Allowed redirect domains** for non-authorization redirects: 1. In your project dashboard, go to **Settings** > **Development & integrations** > [**Headless Settings**](https://www.wix.com/my-account/site-selector/?buttonText=Select%20Site&title=Select%20a%20Site&autoSelectOnSingleSite=true&actionUrl=https:%2F%2Fwww.wix.com%2Fdashboard%2F%7B%7BmetaSiteId%7D%7D%2Foauth-apps-settings). 1. From **Headless clients**, click the three dots to the right of the OAuth app you want to edit. Choose **Settings** to open the app's settings page: ![Click OAuth App Settings](https://wixmp-833713b177cebf373f611808.wixmp.com/images/7c76d81ed8599db6b40ef817464adb44.png) 1. Scroll down to the **URLs** section and go to the **Allowed redirect domains** section. ![Allowed Redirect Domains Section](https://wixmp-833713b177cebf373f611808.wixmp.com/images/b2f132f8ecc75ddc2084b60847efc4d2.png) 1. Click **Add Redirect Domain** and enter a domain you authorize Wix to redirect back to from Wix-hosted pages. For example, `www.my-site.com` authorizes all URLs under this domain. To authorize multiple domains, click **Add Redirect Domain** again as many times as you need. 1. Click **Save** to save your changes and return to the main **Headless Settings** page. ## With the API You can also manage allowed redirect domains programmatically with the Update OAuth App method. This is useful in automated or LLM-driven setup flows where the deployment domain isn't known at the time the OAuth app is first created. To update the allowed redirect domains: ::::tabs :::SDK Call [`oAuthApps.updateOAuthApp()`](https://dev.wix.com/docs/api-reference/business-management/headless/oauth-apps/update-oauth-app?apiView=SDK.md) from `@wix/auth-management`: ```js import { createClient, ApiKeyStrategy } from "@wix/sdk"; import { oAuthApps } from "@wix/auth-management"; const myWixClient = createClient({ auth: ApiKeyStrategy({ apiKey: "", accountId: "", }), modules: { oAuthApps, }, }); await myWixClient.oAuthApps.updateOAuthApp( "", { allowedRedirectDomains: ["www.my-site.com"] }, { paths: ["allowedRedirectDomains"] }, ); ``` Replace `` with your OAuth app's ID, `` with an API key that has the `SCOPE.OAUTH_APP.MANAGE` permission, and `` with your Wix account ID. ::: :::REST Call the [Update OAuth App](https://dev.wix.com/docs/api-reference/business-management/headless/oauth-apps/update-oauth-app.md) method: ```bash curl -X PATCH \ 'https://www.wixapis.com/oauth-app/v1/oauth-apps/' \ -H 'Authorization: ' \ -H 'wix-account-id: ' \ -H 'Content-Type: application/json' \ -d '{ "oAuthApp": { "allowedRedirectDomains": ["www.my-site.com"] }, "mask": { "paths": ["allowedRedirectDomains"] } }' ``` Replace `` with your OAuth app's ID, `` with an API key that has the `SCOPE.OAUTH_APP.MANAGE` permission, and `` with your Wix account ID. ::: :::: > **Note:** The `mask.paths` field is required and specifies which fields to update. Fields not included in the mask are left unchanged. To add domains without overwriting existing ones, first retrieve the current list with [Get OAuth App](https://dev.wix.com/docs/api-reference/business-management/headless/oauth-apps/get-oauth-app.md), merge your new domains into the existing list, and then send the full merged list in your update request. --- > Portal Navigation: > > - Append `.md` to any URL under `https://dev.wix.com/docs/` to get its markdown version. > - Pages are either content pages (article or reference text) or menu pages (a list of links to child pages). > - To get a menu page, truncate any URL to a parent path and append `.md` (e.g. `https://dev.wix.com/docs/sdk.md`, `https://dev.wix.com/docs/sdk/core-modules.md`). > - Top-level index of all portals: https://dev.wix.com/docs/llms.txt > - Full concatenated docs: https://dev.wix.com/docs/llms-full.txt ## Resource: Set a Wix Pages Domain ## Article: Wix Pages Domain ## Article Link: https://dev.wix.com/docs/go-headless/project-guides/wix-hosted-pages/set-a-wix-pages-domain.md ## Article Content: # Set a Wix Pages Domain Wix Headless provides you with the flexibility to create an app or site on any platform and take advantage of Wix's business solutions via APIs. However, for some processes, such as authentication and checkout, you can save time and effort by using standard pages Wix implements for you. These Wix-hosted pages are incorporated into the flow of your external site. If you use Wix-hosted pages for processes such as login and checkout, the **Wix pages domain** will be the domain visitors see when going to those pages. To set your **Wix pages domain**: 1. In your project dashboard, go to **Settings** > **Development & integrations** > [**Headless Settings**](https://www.wix.com/my-account/site-selector/?buttonText=Select%20Site&title=Select%20a%20Site&autoSelectOnSingleSite=true&actionUrl=https:%2F%2Fwww.wix.com%2Fdashboard%2F%7B%7BmetaSiteId%7D%7D%2Foauth-apps-settings). 1. On the **Headless Settings** page, scroll down to the **Manage URLs** section. 1. In the **Wix pages domain** section, you can view your free Wix domain, and you can customize the path that visitors see. For example, if your free Wix domain is `http://sandrasworld.wixsite.com/` and you enter the path `my-project`, visitors are taken to `http://sandrasworld.wixsite.com/my-project`. 1. If you've purchased a premium plan, click **custom domain** to connect a unique web address you like, instead of your free Wix domain. Follow the instructions to either connect a domain you already own or purchase a new domain. You may wish to connect a subdomain of your external site's domain, to make visitors' experience seamless. For example, if your external site is at `my-external-site.com`, you can make `portal.my-external-site.com` the URL that visitors see when they are redirected to a Wix-hosted page. (**Note:** You can connect a subdomain of your external site's domain, but you can't connect your external site's domain itself.) --- > Portal Navigation: > > - Append `.md` to any URL under `https://dev.wix.com/docs/` to get its markdown version. > - Pages are either content pages (article or reference text) or menu pages (a list of links to child pages). > - To get a menu page, truncate any URL to a parent path and append `.md` (e.g. `https://dev.wix.com/docs/sdk.md`, `https://dev.wix.com/docs/sdk/core-modules.md`). > - Top-level index of all portals: https://dev.wix.com/docs/llms.txt > - Full concatenated docs: https://dev.wix.com/docs/llms-full.txt ## Resource: Redirect Using the JS SDK ## Article: Redirect to Wix Pages ## Article Link: https://dev.wix.com/docs/go-headless/project-guides/wix-hosted-pages/redirect-using-the-js-sdk.md ## Article Content: # Redirect to Wix-Hosted Pages Using the JS SDK Wix Headless provides you with the flexibility to create an app or site on any platform and take advantage of Wix's backend business solutions via APIs. However, for certain processes, such as authentication and checkout, you can save time and effort by redirecting visitors to frontend pages Wix implements for you. For example, your site can temporarily redirect a visitor to a Wix-hosted page for authentication or for a checkout process for a Bookings, eCommerce, Events, or Paid Plans transaction. When the process is over, Wix redirects the visitor back to your external site. For instructions on redirecting to Wix for authorization, login, and logout, see [Handle Members with Managed Login](https://dev.wix.com/docs/go-headless/self-managed-headless/authentication/members/wix-login-page/wix-managed-login-using-the-js-sdk.md). To take advantage of Wix's checkout services, you need to redirect to a Wix-hosted checkout page using the [Redirects API](https://dev.wix.com/docs/sdk/backend-modules/redirects/redirects/introduction.md). ## Before you begin Before getting started, make sure you complete the following: - [Create a project](https://dev.wix.com/docs/go-headless/getting-started/setup/general-setup/create-a-project.md) - [Set Up a Headless Client](https://dev.wix.com/docs/go-headless/self-managed-headless/get-started/connect-a-frontend.md) - [Create a client with OAuth](https://dev.wix.com/docs/go-headless/self-managed-headless/authentication/oauth/create-a-client-for-authentication-with-oauth.md) - [Add a Wix pages domain](https://dev.wix.com/docs/go-headless/project-guides/wix-hosted-pages/set-a-wix-pages-domain.md) - [Add an allowed redirect domain](https://dev.wix.com/docs/go-headless/project-guides/wix-hosted-pages/add-allowed-redirect-domains.md) ## Redirect flow To use Wix-hosted checkout services: 1. [Get the data you need for the redirection](#step-1--get-the-data-you-need-for-the-redirection) 1. [Determine the post-flow URL](#step-2--determine-the-post-flow-url) 1. [Use the Redirects API to get a custom redirect session URL](#step-3--use-the-redirects-api-to-get-a-custom-redirect-session-url) 1. [Redirect your visitor to the URL provided](#step-4--redirect-your-visitor-to-the-url-provided) 1. [Handle the next stage in your visitor flow](#step-5--handle-the-next-stage-in-your-visitor-flow) ## Step 1 | Get the data you need for the redirection Determine which checkout service you need. For example, Bookings, eCommerce, Events, or Paid Plans. In the documentation for [`createRedirectSession()`](https://dev.wix.com/docs/sdk/backend-modules/redirects/redirects/create-redirect-session.md), in the `options` body parameter, find the property matching the checkout type you need. For example, `options.eventsCheckout` or `options.ecomCheckout`. In the property descriptions, find the APIs you can use to get the information you need to pass to [`createRedirectSession()`](https://dev.wix.com/docs/sdk/backend-modules/redirects/redirects/create-redirect-session.md). For example, for `options.ecomCheckout` you can use [`createCheckout()`](https://dev.wix.com/docs/sdk/backend-modules/ecom/checkout/create-checkout.md) or [`createCheckoutFromCurrentCart()`](https://dev.wix.com/docs/sdk/backend-modules/ecom/current-cart/create-checkout-from-current-cart.md). Call whichever functions are appropriate for obtaining the data you need for the desired checkout. ## Step 2 | Determine the post-flow URL To implement a redirect session, it's essential to identify the destination for visitors on your external site once the Wix-managed flow concludes. When developing your external site, determine a post-flow URL. This is the URL your visitors will be redirected back to when the Wix-managed flow is over. For greater customization, you may also provide callback URLs for specific purposes, such as a custom thank you page on your external site. If you don't provide this, a standard page is used. See [`createRedirectSession()`](https://dev.wix.com/docs/sdk/backend-modules/redirects/redirects/create-redirect-session.md) for details. > **Note:** Wix returns visitors to a URL you provide only if its domain has been authorized in advance. The URL must be under an [allowed redirect domain](https://dev.wix.com/docs/go-headless/project-guides/wix-hosted-pages/add-allowed-redirect-domains.md). ## Step 3 | Use the Redirects API to get a custom redirect session URL You now have the information you need to generate a URL for a Wix-hosted checkout. To generate the redirect session URL, call [`createRedirectSession()`](https://dev.wix.com/docs/sdk/backend-modules/redirects/redirects/create-redirect-session.md). Pass the data that is needed for your redirect session type. Also pass your post-flow URL and any optional callback URLs in the `callbacks` parameter. For example, if you're performing an eComm checkout, pass the data needed for your checkout in the appropriate property of the `options` body parameter, such as `options.eventsCheckout` or `options.ecomCheckout`. Also pass your post-flow URL and any optional callback URLs in `options.callbacks`. ```js const myRedirect = await wixClient.redirects.createRedirectSession({ ecomCheckout: { checkoutId: '7d2b240c-5c60-4580-8bc3-948bca6b4e4e', }, callbacks: { postFlowUrl: 'https://www.my-store.com', }, }); ``` The function returns a single-use redirect session URL in `redirectSession.fullUrl`. ```js { redirectSession: { id: "", fullUrl: "https://www.checkout.my-site.com/checkout?appSectionParams=%7B%22checkoutId%22%3A%227d2b240c-5c60-4580-8bc3-948bca6b4e4e%22%7D&headlessExternalUrls=~%28home~%27https*3a*2f*2fwww.my-store.com*%29" } } ``` ## Step 4 | Redirect your visitor to the URL provided Redirect your visitor to the URL returned by [`createRedirectSession()`](https://dev.wix.com/docs/api-reference/business-management/headless/redirects/create-redirect-session.md). The URL contains the information needed for Wix to process the checkout, including the post-flow URL to redirect the visitor back to on your external site. For example: ```js window.location.href = myRedirect.redirectSession.fullUrl; ``` > **Note:** You can customize the domain that visitors see when your external site redirects them to Wix-hosted pages. Learn how to [connect a domain for Wix-hosted pages](https://dev.wix.com/docs/go-headless/project-guides/wix-hosted-pages/set-a-wix-pages-domain.md). ## Step 5 | Handle the next stage in your visitor flow Wix redirects the visitor back to the URL (or URLs) you provided, so make sure to implement the next stage in your flow at this address. Upon redirecting back to your site, Wix includes a `wixMemberLoggedIn` boolean query parameter. If set to true, this indicates that a visitor successfully logged in during the preceding Wix-managed process. Additionally, Wix passes specific query parameters depending on the checkout type. For details, refer to `options.callbacks` in [`createRedirectSession()`](https://dev.wix.com/docs/api-reference/business-management/headless/redirects/create-redirect-session.md). --- > Portal Navigation: > > - Append `.md` to any URL under `https://dev.wix.com/docs/` to get its markdown version. > - Pages are either content pages (article or reference text) or menu pages (a list of links to child pages). > - To get a menu page, truncate any URL to a parent path and append `.md` (e.g. `https://dev.wix.com/docs/sdk.md`, `https://dev.wix.com/docs/sdk/core-modules.md`). > - Top-level index of all portals: https://dev.wix.com/docs/llms.txt > - Full concatenated docs: https://dev.wix.com/docs/llms-full.txt ## Resource: Redirect Using the REST API ## Article: Redirect to Wix Pages ## Article Link: https://dev.wix.com/docs/go-headless/project-guides/wix-hosted-pages/redirect-using-the-rest-api.md ## Article Content: # Redirect to Wix-Hosted Pages Using the REST API Wix Headless provides you with the flexibility to create an app or site on any platform and take advantage of Wix's backend business solutions via APIs. However, for certain processes, such as authentication and checkout, you can save time and effort by redirecting visitors to frontend pages Wix implements for you. For example, your site can temporarily redirect a visitor to a Wix-hosted page for authentication or for a checkout process for a Bookings, eCommerce, Events, or Paid Plans transaction. When the process is over, Wix redirects the visitor back to your external site. For instructions on redirecting to Wix for authorization, login, and logout, see [Handle Members with Managed Login](https://dev.wix.com/docs/go-headless/self-managed-headless/authentication/members/wix-login-page/wix-managed-login-using-the-rest-api.md). To take advantage of Wix's checkout services, you need to redirect to a Wix-hosted checkout page using the [Redirects API](https://dev.wix.com/docs/api-reference/business-management/headless/redirects/introduction.md). ## Before you begin Make sure to complete the following: - [Create a project](https://dev.wix.com/docs/go-headless/getting-started/setup/general-setup/create-a-project.md) - [Create an OAuth app for visitors and members](https://dev.wix.com/docs/go-headless/self-managed-headless/authentication/oauth/about-oauth-authentication.md) - [Add a Wix pages domain](https://dev.wix.com/docs/go-headless/project-guides/wix-hosted-pages/set-a-wix-pages-domain.md) - [Add an allowed redirect domain](https://dev.wix.com/docs/go-headless/project-guides/wix-hosted-pages/add-allowed-redirect-domains.md) ## Redirect flow To use Wix-hosted checkout services: 1. [Get the data you need for the redirection](#step-1--get-the-data-you-need-for-the-redirection) 2. [Determine the post-flow URL](#step-2--determine-the-post-flow-url) 3. [Use the Redirects API to get a custom redirect session URL](#step-3--use-the-redirects-api-to-get-a-custom-redirect-session-url) 4. [Redirect your visitor to the URL provided](#step-4--redirect-your-visitor-to-the-url-provided) 5. [Handle the next stage in your visitor flow](#step-5--handle-the-next-stage-in-your-visitor-flow) ## Step 1 | Get the data you need for the redirection Determine which checkout service you need. For example, Bookings, eCommerce, Events, or Paid Plans. In the documentation for [`Create Redirect Session`](https://dev.wix.com/docs/api-reference/business-management/headless/redirects/create-redirect-session.md), find the body parameter matching the checkout type you need. For example, `eventsCheckout` or `ecomCheckout`. In the property descriptions, find the APIs you can use to get the information you need to send to [Create Redirect Session](https://dev.wix.com/docs/api-reference/business-management/headless/redirects/create-redirect-session.md). For example, for `eventsCheckout` you can use [`Query Events`](https://dev.wix.com/docs/api-reference/business-solutions/events/event-management/events-v3/query-events.md) and [`Create Reservation`](https://dev.wix.com/docs/api-reference/business-solutions/events/registration/ticketing/orders/create-reservation.md) and for `ecomCheckout` you can use [`Create Checkout`](https://dev.wix.com/docs/api-reference/business-solutions/e-commerce/purchase-flow/checkout/checkout/create-checkout.md). Call whichever APIs are appropriate for obtaining the data you need for the desired checkout. ## Step 2 | Determine the post-flow URL To implement a redirect session, it's essential to identify the destination for visitors on your external site once the Wix-managed flow concludes. When developing your external site or app, determine a post-flow URL. This is the URL your visitors will be redirected back to when the Wix-managed flow is over. For greater customization, you may also provide callback URLs for specific purposes, such as a custom thank you page on your external site. If you don't provide this, a standard page is used. See [`Create Redirect Session`](https://dev.wix.com/docs/api-reference/business-management/headless/redirects/create-redirect-session.md) for details. > **Note:** Wix returns visitors to a URL you provide only if its domain has been authorized in advance. The URL must be under an [allowed redirect domain](https://dev.wix.com/docs/go-headless/project-guides/wix-hosted-pages/add-allowed-redirect-domains.md). ## Step 3 | Use the Redirects API to get a custom redirect session URL You now have the information you need to generate a URL for a Wix-hosted checkout. To generate the redirect session URL, call [`Create Redirect Session`](https://dev.wix.com/docs/api-reference/business-management/headless/redirects/create-redirect-session.md). Pass the data needed for your redirect session type. Also pass your post-flow URL and any optional callback URLs in the `callbacks` parameter. For example, if you're performing an eComm checkout, pass the `checkoutId` in the `ecomCheckout` property of the body and the `postFlowUrl` in the `callbacks` property. ```curl curl -X POST 'https://www.wixapis.com/redirect-session/v1/redirect-session' \ -H 'authorization: ' \ -d '{ "ecomCheckout": { "checkoutId": "7d2b240c-5c60-4580-8bc3-948bca6b4e4e" }, "callbacks": { "postFlowUrl": "https://www.my-store.com" } }' ``` The response contains a single-use redirect session URL in `redirectSession.fullUrl`. ```json { "redirectSession": { "id": "", "fullUrl": "https://www.checkout.my-site.com/checkout?appSectionParams=%7B%22checkoutId%22%3A%227d2b240c-5c60-4580-8bc3-948bca6b4e4e%22%7D&headlessExternalUrls=~%28home~%27https*3a*2f*2fwww.my-store.com*%29" } } ``` ## Step 4 | Redirect your visitor to the URL provided Redirect your visitor to the URL returned by [`Create Redirect Session`](https://dev.wix.com/docs/api-reference/business-management/headless/redirects/create-redirect-session.md). The URL contains the information needed for Wix to process the checkout, including the post-flow URL to redirect the visitor back to on your external site. > **Note:** You can customize the domain that visitors see when your external site redirects them to Wix-hosted pages. Learn how to [connect a domain for Wix-hosted pages](https://dev.wix.com/docs/go-headless/project-guides/wix-hosted-pages/set-a-wix-pages-domain.md). ## Step 5 | Handle the next stage in your visitor flow Wix redirects the visitor back to the URL (or URLs) you provided, so make sure to implement the next stage in your flow at this address. Upon redirecting back to your site, Wix includes a `wixMemberLoggedIn` boolean query parameter. If set to true, this indicates that a visitor successfully logged in during the preceding Wix-managed process. Additionally, Wix passes specific query parameters depending on the checkout type. For details, refer to `callbacks` in [`Create Redirect Session`](https://dev.wix.com/docs/api-reference/business-management/headless/redirects/create-redirect-session.md). --- > Portal Navigation: > > - Append `.md` to any URL under `https://dev.wix.com/docs/` to get its markdown version. > - Pages are either content pages (article or reference text) or menu pages (a list of links to child pages). > - To get a menu page, truncate any URL to a parent path and append `.md` (e.g. `https://dev.wix.com/docs/sdk.md`, `https://dev.wix.com/docs/sdk/core-modules.md`). > - Top-level index of all portals: https://dev.wix.com/docs/llms.txt > - Full concatenated docs: https://dev.wix.com/docs/llms-full.txt ## Resource: Add a Frontend Link for Marketing Campaigns ## Article: Frontend Link ## Article Link: https://dev.wix.com/docs/go-headless/project-guides/wix-hosted-pages/add-a-frontend-link-for-marketing-campaigns.md ## Article Content: # Add a Frontend Link for Marketing Campaigns Wix offers powerful solutions for communicating with your customers via [marketing emails](https://www.wix.com/features/email-marketing). These emails typically include a link to your site. To choose a URL for the links in emails your customers receive: 1. In your project dashboard, go to **Settings** > **Development & integrations** > [**Headless Settings**](https://www.wix.com/my-account/site-selector/?buttonText=Select%20Site&title=Select%20a%20Site&autoSelectOnSingleSite=true&actionUrl=https:%2F%2Fwww.wix.com%2Fdashboard%2F%7B%7BmetaSiteId%7D%7D%2Foauth-apps-settings). 1. Under **Manage URLs**, go to the **Frontend link** section and click **Add Link**. ![Click "Add link"](https://wixmp-833713b177cebf373f611808.wixmp.com/images/062f0b77a3b9d2d071f70b031f237895.png) 1. In the modal that opens, enter the URL for your site's frontend presence, then click **Add**. This URL will be used for links to your site in emails your customers receive. ![Enter your frontend URL](https://wixmp-833713b177cebf373f611808.wixmp.com/images/0fb93b424087f526f50b2c67adbca571.png) 1. If you successfully set the frontend link for your project, you'll see it under **Frontend link**. You can edit the link by clicking the **Edit Link** button. ![Top dashboard bar with link](https://wixmp-833713b177cebf373f611808.wixmp.com/images/2f67e1d27a4ab939f64f322ab5b0e0b4.png) --- > Portal Navigation: > > - Append `.md` to any URL under `https://dev.wix.com/docs/` to get its markdown version. > - Pages are either content pages (article or reference text) or menu pages (a list of links to child pages). > - To get a menu page, truncate any URL to a parent path and append `.md` (e.g. `https://dev.wix.com/docs/sdk.md`, `https://dev.wix.com/docs/sdk/core-modules.md`). > - Top-level index of all portals: https://dev.wix.com/docs/llms.txt > - Full concatenated docs: https://dev.wix.com/docs/llms-full.txt ## Resource: Wix MCP Sample Prompts ## Article: Wix MCP Sample Prompts for Headless ## Article Link: https://dev.wix.com/docs/go-headless/project-guides/mcp-server/wix-mcp-sample-prompts.md ## Article Content: # Wix MCP Sample Prompts for Headless Ready to build and develop your [Wix Headless](https://dev.wix.com/docs/go-headless/get-started/about-wix-headless.md) project with AI? This article showcases some sample prompts and flows that an AI client can run using the [Wix MCP](https://dev.wix.com/docs/sdk/articles/use-the-wix-mcp/about-the-wix-mcp.md). Use these prompts to launch your own project and accelerate your development. ## Set up headless projects Whether you want to start your project from scratch or use one of our [templates](https://dev.wix.com/docs/go-headless/wix-managed-headless/get-started/wix-managed-templates/astro-templates.md), the Wix MCP can help you kickstart your headless development. The MCP guides your AI client in setting up the necessary environment and files to work with Wix. ### Create a headless project **Prompt**: Create a Wix headless project for me called Aeroflex Gym Headless. Add Wix Pricing Plans and Wix Bookings solutions to the project. **Expected AI response**: The AI client creates a new headless project in your Wix account, with the Wix Pricing Plans and Bookings business solutions already installed. The new project appears in your [sites list](https://manage.wix.com/studio/sites?referralInfo=sidebar\&viewId=all-items-view). ### Create an OAuth app **Prompt**: Add a new Oauth app named Aeroflex Gym: Mobile to my headless project AeroFlex Gym Headless. **Expected AI response**: The AI client creates a new OAuth app with the requested name in your headless project [settings](https://www.wix.com/my-account/site-selector/?buttonText=Select%20Site&title=Select%20a%20Site&autoSelectOnSingleSite=true&actionUrl=https:%2F%2Fwww.wix.com%2Fdashboard%2F%7B%7BmetaSiteId%7D%7D%2Foauth-apps-settings), and returns the details for you to check. ### Use a headless template **Prompt:** Create a local project for Wix Headless based on the Professional Coach Next.js template. **Expected AI response:** The AI client clones the [Professional Coach](https://github.com/wix/headless-templates/tree/main/nextjs/appointments-subscriptions#readme) Next.js project to your local environment, installs dependencies, and sets up the required environment variables. ## Write code for headless Once you’ve created your headless project, you don’t need to write all the code by yourself. With the MCP’s help, your client can provide support for implementing Wix APIs in your project. ### Display products with Wix Stores **Prompt:** Create code that will query the product collections I have on my site, like Men's Sportswear, Women's Sportswear, etc., then dynamically display them on a **Our collections** page. When customers select one of the collections, query that collection's products and navigate to a **Product page** that displays the products. **Expected AI response**: The AI client creates an **Our Collections** page that queries the available product collections and displays them as clickable buttons to customers. It also adds code to navigate to a **Products Page** that displays the products in the selected collection. ### Add a My Cart button and summary **Prompt**: I want to add a **My Cart** button that appears on all site pages. When clicked, the button should display a summary of the customer's current cart. The customer should be able to delete items from the cart and update item quantities within this summary, as well as navigate to the full cart page. **Expected AI response**: The AI client adds a new component that displays a summary of the items in the customer’s current cart. The client writes component code that uses Wix eCommerce API methods like [`getCurrentCart()`](https://dev.wix.com/docs/sdk/backend-modules/ecom/current-cart/get-current-cart.md) and [`removeLineItemsFromCurrentCart()`](https://dev.wix.com/docs/api-reference/business-solutions/e-commerce/purchase-flow/cart/remove-line-items-from-current-cart.md) to enable the customer to update their cart directly from the summary. ### Let users create new events **Prompt**: In my local `party-planner-headless` project, add a new React component `EventBuilder` that lets the site owner create a new event. It should have fields to define the event title, description, date, and price, as well as at least one image. **Expected AI response**: The AI client adds a new React component `EventBuilder` to the `party-planner-headless` project that uses the Wix Events APIs to create a new event. If necessary, the client prompts you to import any packages such as the [Wix Events SDK](https://dev.wix.com/docs/api-reference/business-solutions/events/event-management/introduction.md) and makes adjustments to authentication code. ### Create a member profile page **Prompt**: Build a dashboard page for members of my Wix site that displays the profile of the currently logged-in member. **Expected AI response**: The AI client writes code that gets the information of the currently logged-in member, and uses the response to populate a member profile page. ### Redirect customers to the Wix Bookings checkout **Prompt**: Add code to my Wix headless project to allow a customer to book a course. As part of this code, create a redirect session that sends a user to the Wix bookings checkout, then returns them to the original site when the checkout flow completes. For now just provide an example post-flow URL. **Expected AI response**: The AI client creates a frontend UI that allows site visitors to register for a course. As part of the booking code, it sets up a [redirect session](https://dev.wix.com/docs/api-reference/business-management/headless/redirects/create-redirect-session.md) that sends the customer to the Wix Bookings checkout page, then returns them to a URL on the headless site. ## Manage headless projects When your headless site or app is up and running, you don’t need to go to [wix.com](http://wix.com) to manage it. You can manage the project directly from your client, from installing apps to publishing changes. ### Install an app **Prompt**: Install Wix Events on my headless site The Party Planner. **Expected AI response**: The AI client installs the [Wix Events](https://dev.wix.com/docs/api-reference/business-solutions/events/event-management/introduction.md) business solution on the requested site. ### Create a new collection **Prompt:** Create a collection `listings` with fields `title`, `description`, `price`, `images`, `seller phone`, `seller email`. **Expected AI response**: The AI client creates a new collection `listings` with the requested schema. --- ## [REST](https://dev.wix.com/docs/api-reference.md) > Complete API Reference documentation (REST + SDK) for all Wix platform backend APIs > Portal Navigation: > > - Append `.md` to any URL under `https://dev.wix.com/docs/` to get its markdown version. > - Pages are either content pages (article or reference text) or menu pages (a list of links to child pages). > - To get a menu page, truncate any URL to a parent path and append `.md` (e.g. `https://dev.wix.com/docs/sdk.md`, `https://dev.wix.com/docs/sdk/core-modules.md`). > - Top-level index of all portals: https://dev.wix.com/docs/llms.txt > - Full concatenated docs: https://dev.wix.com/docs/llms-full.txt ## Resource: About the Unified API Reference ## Article: About the Unified API Reference ## Article Link: https://dev.wix.com/docs/api-reference/articles/platform-overview/about-the-unified-api-reference.md ## Article Content: # About the Unified API Reference Documentation Use this guide to find different types of API content across the documentation portals. ## What's in the unified API reference The unified API reference contains comprehensive REST and SDK documentation for nearly all backend APIs and for service plugins. ## When to use the unified API reference Use the unified API reference when you need: - Backend business logic and site operations. - Service plugins for custom integrations. - Cross-platform functionality that works with both REST and SDK. - Comprehensive API documentation with both REST and SDK examples. ## What's in the SDK reference Frontend-specific and SDK-only functionality remain in the [SDK reference](https://dev.wix.com/docs/sdk.md): - **Core modules:** Essential SDK functionality for authentication and client setup. - **Host modules:** APIs for frontend environments like dashboard, editor, and site. - **Frontend modules:** Browser-specific APIs for client-side interactions. - **Business solutions:** Extensions and integrations such as dashboard plugins and dashboard pages, and specific backend APIs such as Data Items. ## When to use the SDK reference Use the SDK reference when you need: - Frontend JavaScript APIs for browser environments. - Core SDK setup and configuration. - Host-specific functionality like dashboard or editor integration. - Dashboard plugins and custom dashboard pages. - SDK-specific implementations of select backend APIs, for example Data Items. ## Use these docs with AI tools Wix developer documentation is available in machine-readable formats for use with AI coding assistants and LLMs. For more information, see [About AI Tools](https://dev.wix.com/docs/api-reference/articles/ai-tools/about-ai-tools.md). --- > Portal Navigation: > > - Append `.md` to any URL under `https://dev.wix.com/docs/` to get its markdown version. > - Pages are either content pages (article or reference text) or menu pages (a list of links to child pages). > - To get a menu page, truncate any URL to a parent path and append `.md` (e.g. `https://dev.wix.com/docs/sdk.md`, `https://dev.wix.com/docs/sdk/core-modules.md`). > - Top-level index of all portals: https://dev.wix.com/docs/llms.txt > - Full concatenated docs: https://dev.wix.com/docs/llms-full.txt ## Resource: About Wix Site Development ## Article: About Wix Site Development ## Article Link: https://dev.wix.com/docs/api-reference/articles/platform-overview/about-wix-site-development.md ## Article Content: # About Wix Site Development [Developing websites on Wix](https://dev.wix.com/docs/develop-websites.md) combines regular Wix site creation with the ability to add custom code to extend out-of-the-box functionality. You can build your site using Wix's visual editor and then enhance it with custom JavaScript code to add specific features, integrate with external services, or create unique user experiences. ## Which APIs to use Develop Wix sites using the [Wix JavaScript SDK](https://dev.wix.com/docs/sdk.md) and [Velo APIs](https://dev.wix.com/docs/velo.md). These tools allow you to add custom functionality, integrate with Wix business solutions, and build rich, interactive experiences directly in your Wix site. > **Note:** [Wix REST APIs](https://dev.wix.com/docs/rest.md) aren't intended for use in Wix site development. ## Transition from Velo to the Wix JavaScript SDK Until recently, custom code on Wix sites was written using Velo APIs. You can now also use the Wix JavaScript SDK for both site development and app building with Blocks. If you have sites with existing Velo code, you might want to [migrate](https://dev.wix.com/docs/develop-websites/articles/coding-with-velo/develop-with-the-sdk/migrate-from-velo-to-the-sdk.md) them to use the SDK instead. Wix's transition to the SDK is a gradual process. At this stage, the SDK doesn't currently support the functionality of all Velo APIs for site development or for app creation with Blocks. For functionality that isn't yet supported in the SDK, use Velo APIs alongside the SDK. The Velo APIs that you should still use at this stage fall into 2 categories: - APIs that are imported from Velo modules. - APIs that work by file and method name conventions. ### APIs that are imported from Velo modules The APIs in the [Velo-Only APIs](https://dev.wix.com/docs/velo/velo-only-apis/about-velo-only-apis-and-the-sdk.md) section of the Velo reference don't have functionality supported by the SDK. There are also APIs in the [APIs](https://dev.wix.com/docs/velo/apis/about-velo-apis-and-the-sdk.md) section of the Velo reference that don't currently have functionality that's fully supported by the SDK. To learn which Velo APIs are fully, partially, or not supported by the SDK, see [Velo to SDK API Mapping](https://dev.wix.com/docs/develop-websites/articles/coding-with-velo/develop-with-the-sdk/velo-to-sdk-api-mapping.md). If you need the functionality of these APIs, you need to use their Velo versions. When necessary, import and use these APIs as described in the [Velo reference](https://dev.wix.com/docs/velo.md). ### APIs that work by file and method name conventions The following APIs may have SDK counterparts, but the SDK versions don't work for site development and for app creation with Blocks. Therefore, if you need the functionality of these APIs, you need to use them with their Velo file and method name conventions as described below. - [**Backend event handlers**](https://dev.wix.com/docs/develop-websites/articles/coding-with-velo/backend-code/events/about-backend-events.md): Handlers for backend events, such as when a booked service is canceled. Place Velo backend event handlers in a backend **events.js** file using the naming conventions described in the Velo reference. - [**Service plugins**](https://dev.wix.com/docs/develop-websites/articles/coding-with-velo/integrations/service-plugins-formerly-spis/custom-app-extensions-using-spis.md): Plugins that allow you to inject custom logic into existing flows, such as conditionally adding additional fees on checkout. Install service plugins in the editor, update the `getConfig()` method in the plugin's **-config.js file**, and implement the main service plugin method in the **.js** file that's added to a site. - [**Data hooks**](https://dev.wix.com/docs/velo/apis/wix-data/hooks/introduction.md): Hooks that run before or after data operations, such as updating an item. Place data hooks in a backend **data.js** file using the naming conventions described in the Velo reference. - [**Routers**](https://dev.wix.com/docs/velo/events-service-plugins/routers/service-plugins/wix-router/introduction.md): For custom routing of incoming requests. Place router code in a backend **routers.js** file using the naming conventions described in the Velo reference. Note that some functionality from the Routers API works by convention while other functionality must be imported from Velo modules. ## Wix hosting Wix site code runs on Wix's cloud infrastructure, where authentication is handled automatically. When using the SDK for site development, you don't need to [create a Wix client](https://dev.wix.com/docs/sdk/articles/set-up-a-client/about-the-wix-client.md) because the SDK already knows the caller's identity. Just call the SDK's APIs directly, and authentication is taken care of for you. ## Example This example demonstrates using SDK functionality alongside Velo APIs. This example creates a router using the Velo API by using method naming conventions and some methods imported from the `wix-router` module. The router retrieves data using the `@wix/data` SDK package. ```javascript // In backend/routers.js import { items } from "@wix/data"; // SDK module import { ok, notFound } from "wix-router"; // Velo module export async function myRouter_Router(request) { // Empty path - show index page if (request.path.length < 1) { return ok("index-page"); } // Path with item - show item page with data from collection const queryResult = await items .query("myCollection") .eq("title", request.path[0]) .find(); if (queryResult.length > 0) { return ok("item-page", queryResult.items[0]); } return notFound(); } ``` --- > Portal Navigation: > > - Append `.md` to any URL under `https://dev.wix.com/docs/` to get its markdown version. > - Pages are either content pages (article or reference text) or menu pages (a list of links to child pages). > - To get a menu page, truncate any URL to a parent path and append `.md` (e.g. `https://dev.wix.com/docs/sdk.md`, `https://dev.wix.com/docs/sdk/core-modules.md`). > - Top-level index of all portals: https://dev.wix.com/docs/llms.txt > - Full concatenated docs: https://dev.wix.com/docs/llms-full.txt ## Resource: About Wix CLI Apps ## Article: About Wix CLI Apps ## Article Link: https://dev.wix.com/docs/api-reference/articles/platform-overview/about-wix-cli-apps.md ## Article Content: # About Wix CLI Apps [Wix apps](https://dev.wix.com/docs/build-apps/get-started/overview/about-wix-apps.md) are packages of reusable functionality that Wix users can add to their sites. They can contain anything from a simple site widget to a full-stack business solution, complete with backend logic, user interfaces, and databases. The [Wix CLI](https://dev.wix.com/docs/build-apps/develop-your-app/frameworks/wix-cli/about-the-wix-cli-for-apps.md) allows you to build and deploy full-stack apps using Wix's React/Node.js stack. Built for use with the Wix JavaScript SDK, this framework provides a familiar JavaScript/TypeScript development experience while integrating seamlessly with Wix's cloud hosting and deployment system. ## Which APIs to use Develop Wix CLI apps using the [Wix JavaScript SDK](https://dev.wix.com/docs/sdk.md). The SDK allows you to add custom functionality and integrate with Wix business solutions in your app. > **Note:** [Wix REST APIs](https://dev.wix.com/docs/rest.md) aren't intended for use in CLI app development. ## Wix hosting CLI app code runs on Wix's cloud infrastructure. You don't need to set up or maintain your own servers. Wix handles hosting, scaling, and security for you. ## Advantages of the Wix CLI The Wix CLI is ideal for developers who want control over their app's architecture and business logic while working in Wix's ecosystem. Key benefits of using the CLI to develop Wix apps include: - **Standard JavaScript development workflow**: Use your preferred IDE, tools, and packages. - **Simple authentication**: When developing an app with the CLI, you don't need to [create a Wix client](https://dev.wix.com/docs/sdk/articles/set-up-a-client/about-the-wix-client.md). Just call the Wix JavaScript SDK's APIs directly and authentication is taken care of for you automatically. - **Integrated hosting and deployment**: Your app is hosted on Wix's cloud services, so server setup, maintenance, scaling, and security are all handled by Wix. - **Live preview**: Test and iterate your app quickly before deploying changes. - **Seamless collaboration**: Use Git for version control and team development. ## See also To get started developing CLI apps, check out the [CLI documentation](https://dev.wix.com/docs/build-apps/develop-your-app/frameworks/wix-cli/about-the-wix-cli-for-apps.md). --- > Portal Navigation: > > - Append `.md` to any URL under `https://dev.wix.com/docs/` to get its markdown version. > - Pages are either content pages (article or reference text) or menu pages (a list of links to child pages). > - To get a menu page, truncate any URL to a parent path and append `.md` (e.g. `https://dev.wix.com/docs/sdk.md`, `https://dev.wix.com/docs/sdk/core-modules.md`). > - Top-level index of all portals: https://dev.wix.com/docs/llms.txt > - Full concatenated docs: https://dev.wix.com/docs/llms-full.txt ## Resource: About Wix Blocks Apps ## Article: About Wix Blocks Apps ## Article Link: https://dev.wix.com/docs/api-reference/articles/platform-overview/about-wix-blocks-apps.md ## Article Content: # About Wix Blocks Apps [Wix apps](https://dev.wix.com/docs/build-apps/get-started/overview/about-wix-apps.md) are packages of reusable functionality that Wix users can add to their sites. They can contain anything from a simple site widget to a full-stack business solution, complete with backend logic, user interfaces, and databases. [Wix Blocks](https://dev.wix.com/docs/build-apps/develop-your-app/develop-an-app-with-blocks/about-wix-blocks.md) is an editor for designing, coding, and deploying native Wix apps. It lets you build site and dashboard extensions using Wix's drag-and-drop editor, with its powerful layout and design tools. Your code is deployed and hosted on the Wix cloud, with no additional costs or setup by you. ## Which APIs to use Develop Wix Blocks apps using the [Wix JavaScript SDK](https://dev.wix.com/docs/sdk/articles/get-started/about-the-wix-java-script-sdk.md) and [Velo APIs](https://dev.wix.com/docs/velo.md). Most new functionality should use the SDK, but some features may still require Velo APIs. To learn about when to use the SDK and when to use Velo, see [About Wix Site Development](https://dev.wix.com/docs/api-reference/articles/platform-overview/about-wix-site-development.md#transition-from-velo-to-the-wix-javascript-sdk). > **Note:** [Wix REST APIs](https://dev.wix.com/docs/rest.md) aren't intended for use in Blocks app development. ## Wix hosting Blocks app code runs on Wix's cloud infrastructure, where authentication is handled automatically. When using the SDK for Blocks app development, you don't need to [create a Wix client](https://dev.wix.com/docs/sdk/articles/set-up-a-client/about-the-wix-client.md) because the SDK already knows the caller's identity. Just call the SDK's APIs directly, and authentication is taken care of for you. During the transition from Velo APIs to the SDK, some Velo APIs don't yet have SDK equivalents. Learn more about [which Velo APIs should still be used](https://dev.wix.com/docs/api-reference/articles/platform-overview/about-wix-site-development.md#transition-from-velo-to-the-wix-javascript-sdk). ## See also To get started creating Wix Blocks apps, check out the [Wix Blocks documentation](https://dev.wix.com/docs/build-apps/develop-your-app/develop-an-app-with-blocks/about-wix-blocks.md). --- > Portal Navigation: > > - Append `.md` to any URL under `https://dev.wix.com/docs/` to get its markdown version. > - Pages are either content pages (article or reference text) or menu pages (a list of links to child pages). > - To get a menu page, truncate any URL to a parent path and append `.md` (e.g. `https://dev.wix.com/docs/sdk.md`, `https://dev.wix.com/docs/sdk/core-modules.md`). > - Top-level index of all portals: https://dev.wix.com/docs/llms.txt > - Full concatenated docs: https://dev.wix.com/docs/llms-full.txt ## Resource: About Self-Managed Apps ## Article: About Self-Hosted Apps ## Article Link: https://dev.wix.com/docs/api-reference/articles/platform-overview/about-self-managed-apps.md ## Article Content: # About Self-Managed Apps [Wix apps](https://dev.wix.com/docs/build-apps/get-started/overview/about-wix-apps.md) are packages of reusable functionality that Wix users can add to their sites. They can contain anything from a simple site widget to a full-stack business solution, complete with backend logic, user interfaces, and databases. ## Which APIs to use The Wix APIs you call from your self-managed app depend on the language you're developing in: - If you're developing a self-managed app in a JavaScript or TypeScript environment, use the [Wix JavaScript SDK](https://dev.wix.com/docs/sdk.md). - For all other environments, use the [Wix REST APIs](https://dev.wix.com/docs/rest.md). ## Native Wix frameworks When developing an app with the SDK, we recommend hosting your app on Wix's servers using one of Wix's native frameworks: [Wix CLI](https://dev.wix.com/docs/build-apps/develop-your-app/frameworks/wix-cli/about-the-wix-cli-for-apps.md) or [Wix Blocks](https://dev.wix.com/docs/build-apps/develop-your-app/develop-an-app-with-blocks/about-wix-blocks.md). These platforms provide a superior development experience for most use cases. However, if necessary, you also have the option of self-managing your app outside of Wix. Before deciding to self-manage your app, you should consider the benefits of using Wix's native frameworks. Using Wix's native frameworks offers the following general advantages: - Your app is hosted on Wix's cloud services, so server setup, maintenance, scaling, and security are all handled by Wix. - Authentication is much simpler for apps in the Wix ecosystem. Each native framework also has its own unique benefits, such as the Wix Blocks visual editor and the CLI's local previews. For more information about the benefits of these frameworks see [About the CLI for Apps](https://dev.wix.com/docs/build-apps/develop-your-app/frameworks/wix-cli/about-the-wix-cli-for-apps.md) and [About Wix Blocks](https://dev.wix.com/docs/build-apps/develop-your-app/develop-an-app-with-blocks/about-wix-blocks.md). ## Considerations when self-managing Self-managing your app gives you the freedom to use the tech stack of your choice, which may be the best fit for your use case. However, there are several factors to consider: - You need to build and host your app's features independently, integrating them with Wix using the [Wix app dashboard](https://dev.wix.com/docs/build-apps/develop-your-app/dev-center-setup/about-the-wix-dev-center.md). - You need to manually initialize and use a [Wix client](https://dev.wix.com/docs/sdk/articles/work-with-the-sdk/about-the-wix-client.md). A Wix client is used to call functionality from the Wix JavaScript SDK and manage the authentication of SDK calls. In Wix-managed apps, such as apps created with the [Wix CLI](https://dev.wix.com/docs/build-apps/develop-your-app/frameworks/wix-cli/about-the-wix-cli-for-apps.md) or [Blocks](https://dev.wix.com/docs/build-apps/develop-your-app/develop-an-app-with-blocks/about-wix-blocks.md), the framework can initialize and use the client for you, including choosing the authentication strategy. ## Migrating to native Wix frameworks Even if you started development using the self-managed framework, you can always continue developing your app using Wix Blocks or the Wix CLI. For more information, see instructions for working with an existing app in the [Wix CLI](https://dev.wix.com/docs/build-apps/develop-your-app/frameworks/wix-cli/get-started/integrate-existing-apps.md) or [Wix Blocks](https://dev.wix.com/docs/build-apps/develop-your-app/frameworks/wix-blocks/get-started/create-a-blocks-app-and-open-it.md#enter-through-the-wix-dev-center). --- > Portal Navigation: > > - Append `.md` to any URL under `https://dev.wix.com/docs/` to get its markdown version. > - Pages are either content pages (article or reference text) or menu pages (a list of links to child pages). > - To get a menu page, truncate any URL to a parent path and append `.md` (e.g. `https://dev.wix.com/docs/sdk.md`, `https://dev.wix.com/docs/sdk/core-modules.md`). > - Top-level index of all portals: https://dev.wix.com/docs/llms.txt > - Full concatenated docs: https://dev.wix.com/docs/llms-full.txt ## Resource: About Headless Projects ## Article: About Headless Projects ## Article Link: https://dev.wix.com/docs/api-reference/articles/platform-overview/about-headless-projects.md ## Article Content: # About Headless Projects [Wix Headless](https://dev.wix.com/docs/go-headless/get-started/about-headless/about-wix-headless.md) enables you to take advantage of Wix's business management platform from any app or site you create, on any platform. For example, you can create a site's frontend using any framework and use Wix Headless to handle the site's blog, CRM, and product catalog. ## Which APIs to use The APIs you should use depend on the language you're using to develop your Headless project: - If you're developing in a JavaScript or TypeScript environment, use the [Wix JavaScript SDK](https://dev.wix.com/docs/sdk.md). - For all other environments, use the [Wix REST APIs](https://dev.wix.com/docs/rest.md). > **Note:** Frontend SDK modules aren't supported for use in Headless projects. ## Authentication and client setup The authentication method for a Headless project depends on which API you use: - If you use the Wix JavaScript SDK, you can: - [Create a client with the OAuth authentication strategy](https://dev.wix.com/docs/go-headless/coding/java-script-sdk/visitors-and-members/create-a-client-with-oauth.md) to make API calls on behalf of visitors and members. - [Create a client with API key authentication strategy](https://dev.wix.com/docs/go-headless/coding/java-script-sdk/admin/create-a-client-with-an-api-key.md) to perform administrative operations. - If you use the REST API, you can: - [Use OAuth tokens for authentication of API calls](https://dev.wix.com/docs/go-headless/coding/rest-api/visitors-and-members/make-api-calls-with-oauth.md) on behalf of visitors and members. - [Use an API key for authentication of API calls](https://dev.wix.com/docs/go-headless/coding/rest-api/admin/make-api-calls-with-an-api-key.md) that perform administrative operations. ## Templates and tutorials Templates and tutorials for headless projects are available in the [Wix Headless portal](https://dev.wix.com/docs/go-headless/get-started/about-headless/about-wix-headless.md). To quickly get started with your first Headless project, see our [Quick Start](https://dev.wix.com/docs/go-headless/tutorials-templates/java-script-sdk-tutorials/quick-start.md) article. --- > Portal Navigation: > > - Append `.md` to any URL under `https://dev.wix.com/docs/` to get its markdown version. > - Pages are either content pages (article or reference text) or menu pages (a list of links to child pages). > - To get a menu page, truncate any URL to a parent path and append `.md` (e.g. `https://dev.wix.com/docs/sdk.md`, `https://dev.wix.com/docs/sdk/core-modules.md`). > - Top-level index of all portals: https://dev.wix.com/docs/llms.txt > - Full concatenated docs: https://dev.wix.com/docs/llms-full.txt ## Resource: About Identities ## Article: About Identities ## Article Link: https://dev.wix.com/docs/api-reference/articles/authentication/about-identities.md ## Article Content: # About Identities Each Wix API method call has a specific identity type that determines access permissions. An identity defines who is calling a method and what actions they're authorized to take. By default, you can call methods using any identity. However, some methods restrict which identities can call them. For example, [Create Checkout](https://dev.wix.com/docs/rest/business-solutions/e-commerce/checkout/create-checkout.md) can be called by visitors and members, while [Bulk Update Products](https://dev.wix.com/docs/api-reference/business-solutions/stores/catalog-v3/products-v3/bulk-update-products.md) requires a Wix user or app identity. The API reference for each method notes these restrictions. The identities available to you also depend on your development context, such as whether you're building Wix sites, Wix apps, or headless projects. Each identity section below describes which contexts support that identity and how to authenticate. Wix APIs support the following identity types: - [Visitor](#visitor) - [Member](#member) - [Wix user](#wix-user) - [Wix app](#wix-app) - [API key admin](#api-key-admin) ## Visitor Methods this identity can call usually involve visitor-specific operations, such as listing products, managing a cart, and opening a login page to authenticate as a member. Contexts: Wix sites, apps, and headless projects can make calls as a visitor. ### How to authenticate - Wix sites: The SDK handles authentication automatically. You don't need additional setup. - Wix apps: - Wix-managed apps built with the CLI or Blocks: The SDK handles authentication automatically. You don't need additional setup. - Self-managed apps: Learn how to authenticate using the [site host module](https://dev.wix.com/docs/sdk/host-modules/site/introduction.md) with the JavaScript SDK in [site widgets](https://dev.wix.com/docs/build-apps/develop-your-app/develop-a-self-managed-app/supported-extensions/site-extensions/site-widgets-and-plugins/authenticate-custom-elements-using-the-wix-client.md) and [embedded scripts](https://dev.wix.com/docs/build-apps/develop-your-app/develop-a-self-managed-app/supported-extensions/site-extensions/embedded-scripts/authenticate-embedded-scripts-using-the-wix-client.md), or the [editor host module](https://dev.wix.com/docs/sdk/host-modules/editor/introduction.md) in [editor extensions](https://dev.wix.com/docs/build-apps/develop-your-app/frameworks/self-hosting/supported-extensions/editor-extensions/add-self-hosted-editor-add-on-extensions.md) used by site owners and collaborators. REST API authentication isn't available for this context. - Headless projects: - Wix-managed headless projects built with the CLI: The SDK handles authentication automatically. You don't need additional setup. - Self-managed headless projects: Learn how to handle visitors using the [JavaScript SDK](https://dev.wix.com/docs/go-headless/coding/java-script-sdk/visitors-and-members/handle-visitors.md) or [REST API](https://dev.wix.com/docs/go-headless/coding/rest-api/visitors-and-members/handle-visitors.md). ## Member A member is a visitor who has logged in. Members can call all the methods that visitors can call, plus additional methods that usually involve operations for a registered member, such as viewing or managing personal data. Contexts: Wix sites, apps, and headless projects can make calls as a member. ### How to authenticate - Wix sites: The SDK handles authentication automatically when a member logs in. You don't need additional setup. - Wix apps: - Wix-managed apps built with the CLI or Blocks: The SDK handles authentication automatically. You don't need additional setup. - Self-managed apps: Learn how to authenticate using the [site host module](https://dev.wix.com/docs/sdk/host-modules/site/introduction.md) with the JavaScript SDK in [site widgets](https://dev.wix.com/docs/build-apps/develop-your-app/develop-a-self-managed-app/supported-extensions/site-extensions/site-widgets-and-plugins/authenticate-custom-elements-using-the-wix-client.md) and [embedded scripts](https://dev.wix.com/docs/build-apps/develop-your-app/develop-a-self-managed-app/supported-extensions/site-extensions/embedded-scripts/authenticate-embedded-scripts-using-the-wix-client.md), or the [editor host module](https://dev.wix.com/docs/sdk/host-modules/editor/introduction.md) in [editor extensions](https://dev.wix.com/docs/build-apps/develop-your-app/frameworks/self-hosting/supported-extensions/editor-extensions/add-self-hosted-editor-add-on-extensions.md) used by site owners and collaborators. REST API authentication isn't available for this context. - Headless projects: - Wix-managed headless projects built with the CLI: The SDK handles authentication automatically. You don't need additional setup. - Self-managed headless projects: Learn about [member login options](https://dev.wix.com/docs/go-headless/develop-your-project/authentication/members/about-member-login.md). ## Wix user This identity is only available when calling methods from a site dashboard. Wix users include account owners and collaborators on managed accounts, as well as app developers working on their development and test sites. Wix automatically designates a Wix user who creates a site as the owner of that site. Methods this identity can call usually perform site maintenance tasks, such as managing products, media, and marketing campaigns. Wix users can invite collaborators and assign them specific [user roles](https://support.wix.com/en/article/roles-permissions-overview) to control permissions. When a collaborator makes calls, their user roles limit which methods they can access. Contexts: Wix sites and apps can make calls as a Wix user from a site dashboard. ### How to authenticate - Wix sites: The SDK handles authentication automatically. You don't need additional setup. - Wix apps: - Wix-managed apps built with the CLI or Blocks: The SDK handles authentication automatically. You don't need additional setup. - Self-managed apps: Learn how to [authenticate on behalf of a Wix user](https://dev.wix.com/docs/build-apps/develop-your-app/access/authentication/authenticate-on-behalf-of-a-wix-user.md) using the [dashboard host module](https://dev.wix.com/docs/sdk/host-modules/dashboard/introduction.md) with the JavaScript SDK. REST API authentication isn't available for this context. ## Wix app Wix apps are packages of reusable functionality that Wix users can add to their sites. When a Wix user installs or updates an app on a Wix site, Wix generates an [app instance](https://dev.wix.com/docs/build-apps/develop-your-app/access/app-instances/about-app-instances.md) with a unique ID. This ID represents the installed version of the app on that particular site. A method call authenticated with the Wix app identity is a call made by an app for a specific app instance. Methods this identity can call usually involve site-level operations, such as managing the site's data collections, contacts, or products. Each method requires specific permissions for Wix apps. To check a method's required permissions, see its API reference. Learn more about [configuring app permissions](https://dev.wix.com/docs/build-apps/develop-your-app/access/authorization/configure-permissions-for-your-app.md). **Contexts:** - **Backend extensions** always make calls as apps. This includes [events](https://dev.wix.com/docs/build-apps/develop-your-app/extensions/backend-extensions/events/about-event-extensions.md), [APIs](https://dev.wix.com/docs/build-apps/develop-your-app/extensions/backend-extensions/apis/about-api-extensions.md), and [web methods](https://dev.wix.com/docs/build-apps/develop-your-app/extensions/backend-extensions/web-methods/about-web-method-extensions.md). - **Frontend extensions** like site widgets, embedded scripts, and app dashboard pages inherit the identity of the site user: visitor, member, or Wix user. They can also [elevate](https://dev.wix.com/docs/build-apps/develop-your-app/access/authorization/about-elevation.md) their calls to authenticate as an app. See [Elevated calls](#elevated-calls) below. ### How to authenticate - Wix-managed apps built with the CLI or Blocks: The SDK handles authentication automatically. You don't need additional setup. - Self-managed apps: Learn how to [authenticate using OAuth](https://dev.wix.com/docs/build-apps/develop-your-app/access/authentication/use-oauth.md) as an app instance. ## API key admin An [API key](https://dev.wix.com/docs/api-reference/articles/authentication/api-keys/about-api-keys.md) admin is an admin with customized administrative access to sites and projects in a Wix account. Wix users and co-owners create and manage [API keys](https://support.wix.com/en/article/about-wix-api-keys) in the **[API Keys Manager](https://manage.wix.com/account/api-keys)**, where they can assign a set of permissions that determine the types of APIs each key can access. Methods this identity can call usually involve administrative operations at the site or account level, such as managing members or business data. You can also use API keys to call many of the same methods that a Wix user or Wix app can call. Learn more about [when to use an API key](https://dev.wix.com/docs/api-reference/articles/authentication/api-keys/about-api-keys.md) and [how to make API calls with an API key](https://dev.wix.com/docs/api-reference/articles/authentication/api-keys/make-api-calls-with-an-api-key.md). ## Elevated calls Elevation is a mechanism that allows you to call some restricted methods even when the calling identity lacks the necessary authorization. This process creates a temporary elevated version of a method by calling [Elevate](https://dev.wix.com/docs/sdk/core-modules/essentials/auth.md#elevate), enabling you to bypass the usual authentication checks that might otherwise restrict access. Elevation is only available when using the SDK. Learn more about [elevated permissions](https://dev.wix.com/docs/sdk/articles/working-with-the-sdk/about-elevated-permissions.md). ## See also - [Configuring app permissions](https://dev.wix.com/docs/build-apps/develop-your-app/access/authorization/configure-permissions-for-your-app.md) - [Elevated permissions](https://dev.wix.com/docs/api-reference/articles/authentication/about-elevated-permissions.md) - [API Keys](https://dev.wix.com/docs/api-reference/articles/authentication/api-keys/about-api-keys.md) --- > Portal Navigation: > > - Append `.md` to any URL under `https://dev.wix.com/docs/` to get its markdown version. > - Pages are either content pages (article or reference text) or menu pages (a list of links to child pages). > - To get a menu page, truncate any URL to a parent path and append `.md` (e.g. `https://dev.wix.com/docs/sdk.md`, `https://dev.wix.com/docs/sdk/core-modules.md`). > - Top-level index of all portals: https://dev.wix.com/docs/llms.txt > - Full concatenated docs: https://dev.wix.com/docs/llms-full.txt ## Resource: About Elevated Permissions ## Article: About Elevated Permissions ## Article Link: https://dev.wix.com/docs/api-reference/articles/authentication/about-elevated-permissions.md ## Article Content: # About Elevated Permissions Wix's permission system is designed to keep site data secure by ensuring that only authorized users can perform sensitive operations. This means that certain API methods are restricted based on user [identity](https://dev.wix.com/docs/api-reference/articles/authentication/about-identities.md) and [roles and permissions](https://support.wix.com/en/article/roles-permissions-overview). For example, [Confirm Booking](https://dev.wix.com/docs/api-reference/business-solutions/bookings/bookings/bookings-writer-v2/confirm-booking.md) can't be called by site visitors or site members, or by Wix users without an administrative bookings role. However, there are legitimate scenarios where it's necessary to call a method that requires higher-level permissions than the current user has. In Wix sites, Wix apps, and Wix-managed headless projects, you can use elevation to ensure the method is always called with the required level of authorization. > **Note:** > - In self-managed headless projects, use [API key authentication](https://dev.wix.com/docs/api-reference/articles/authentication/api-keys/about-api-keys.md) to make calls with the required level of authorization. ## Security considerations Elevation permits [identities](https://dev.wix.com/docs/api-reference/articles/authentication/about-identities.md) to call methods they typically can't access. Therefore, only use elevation intentionally and securely. Due to potential security risks, methods can only be elevated in backend code. ## Implementation approaches ::::tabs :::REST_TAB Different development contexts require different approaches for implementing elevation. For more details, see the article corresponding to your context: - [Elevation in Wix apps not made in Blocks](https://dev.wix.com/docs/build-apps/develop-your-app/access/authorization/about-elevation.md) - [Elevation in Wix sites or Blocks apps](https://dev.wix.com/docs/develop-websites/articles/coding-with-velo/authorization/elevation.md) - [Elevation in Wix-managed headless projects](https://dev.wix.com/docs/go-headless/wix-managed-headless/authentication/elevate-api-call-permissions.md) ::: :::SDK_TAB The use cases for elevating permissions are different depending on the type of project you are building. ### Elevation when building apps When building apps, calls to Wix APIs can be restricted based on user [identity](https://dev.wix.com/docs/api-reference/articles/authentication/about-identities.md). For example, if an app includes a [site widget](https://dev.wix.com/docs/build-apps/develop-your-app/extensions/site-extensions/site-widgets/about-site-widget-extensions.md) that manages bookings, most calls from the extension can be made with site visitor or member authentication. However, the app may also need to call APIs that can't be called when authenticated as a visitor or member, such as [Confirm Booking](https://dev.wix.com/docs/api-reference/business-solutions/bookings/bookings/bookings-writer-v2/confirm-booking.md). Calls to these APIs require elevation. Learn more about [elevation when building apps](https://dev.wix.com/docs/build-apps/develop-your-app/access/authorization/about-elevation.md). ### Elevation when building Wix-managed headless projects When building a Wix-managed headless project, use elevation to call methods that require higher-level permissions than the current identity has. For example, calling [Get Site Properties](https://dev.wix.com/docs/api-reference/business-management/site-properties/properties/get-site-properties.md) requires elevation. To call backend APIs from a headless client, [set up an HTTP endpoint](https://dev.wix.com/docs/wix-cli/guides/development/http-endpoints/about-http-endpoints.md) and [elevate API call permissions](https://dev.wix.com/docs/go-headless/wix-managed-headless/authentication/elevate-api-call-permissions.md). Learn more about [elevation when building Wix-managed headless projects](https://dev.wix.com/docs/go-headless/wix-managed-headless/authentication/elevate-api-call-permissions.md). > **Note:** For self-managed headless projects, use [API key authentication](https://dev.wix.com/docs/go-headless/develop-your-project/admin-operations/about-admin-operations.md). ### Elevation when developing websites When developing websites, calls to Wix APIs can be restricted based on user [identity](https://dev.wix.com/docs/api-reference/articles/authentication/about-identities.md) or [roles and permissions](https://support.wix.com/en/article/roles-permissions-overview). For example, if a page on a site manages bookings, it may need to call Confirm Booking. Only a Wix user with an administrative bookings role can call this method. Therefore, calls to this method from a page's code require elevation. Learn more about elevation when [developing websites](https://dev.wix.com/docs/develop-websites/articles/coding-with-velo/authorization/elevation.md). ::: :::: --- > Portal Navigation: > > - Append `.md` to any URL under `https://dev.wix.com/docs/` to get its markdown version. > - Pages are either content pages (article or reference text) or menu pages (a list of links to child pages). > - To get a menu page, truncate any URL to a parent path and append `.md` (e.g. `https://dev.wix.com/docs/sdk.md`, `https://dev.wix.com/docs/sdk/core-modules.md`). > - Top-level index of all portals: https://dev.wix.com/docs/llms.txt > - Full concatenated docs: https://dev.wix.com/docs/llms-full.txt ## Resource: About API Keys ## Article: About API Keys ## Article Link: https://dev.wix.com/docs/api-reference/articles/authentication/api-keys/about-api-keys.md ## Article Content: # About API Keys Account owners and co-owners can create API keys to give developers access to make authenticated API calls at the account or site level. To make a call, developers need both an API key and the relevant account or site ID. > **Note:** Only account owners and co-owners can create API keys. ## Use cases You can use API keys for the following: - **Automated workflows**: Authenticate the [CLI](https://dev.wix.com/docs/wix-cli/guides/about-the-wix-cli.md) from automated workflow environments such as [GitHub Actions](https://dev.wix.com/docs/develop-websites-sdk/code-your-site/developer-environments/ides/git-integration/set-up-git-hub-actions.md). - **External integrations**: Enable 3rd-party tools such as [n8n](https://dev.wix.com/docs/develop-websites-sdk/code-your-site/developer-environments/integrations/about-n8n-integration.md) that call Wix APIs on your behalf. - **Channel and Enterprise**: Manage admin operations across multiple sites in [Channel](https://support.wix.com/en/article/wix-channels-dashboard-overview) or [Enterprise](https://support.wix.com/en/article/wix-enterprise-an-overview) accounts. - **AI agents**: Connect the [Wix MCP server](https://dev.wix.com/docs/api-reference/articles/ai-tools/wix-mcp/about-the-wix-mcp.md) to give AI agents access to your Wix account or site. - **Self-managed headless projects**: Perform [admin operations](https://dev.wix.com/docs/go-headless/develop-your-project/self-managed-headless/authentication/perform-admin-operations.md) from a project's backend code, such as managing members, orders, or bookings. Learn more about [self-managed headless projects](https://dev.wix.com/docs/go-headless/develop-your-project/self-managed-headless/about-self-managed-headless.md). > **Notes:** > - API keys aren't available for 3rd-party Wix apps. Use [OAuth](https://dev.wix.com/docs/build-apps/develop-your-app/access/authentication/about-oauth.md) to authenticate API calls. > - When building a [Wix-managed headless project](https://dev.wix.com/docs/go-headless/wix-managed-headless/about-wix-managed-headless.md), authenticate [admin operations](https://dev.wix.com/docs/go-headless/wix-managed-headless/authentication/elevate-api-call-permissions.md) using [elevation](https://dev.wix.com/docs/api-reference/articles/authentication/about-elevated-permissions.md). ## Manage API keys Create and manage API keys in the [API Keys Manager](https://manage.wix.com/account/api-keys), where you can assign a set of permissions that determine the types of APIs the key can access. For more information, see the [About Wix API keys](https://support.wix.com/en/article/about-wix-api-keys). Site-level calls only work with API keys generated from the Wix user's account. If you work with multiple API keys, make sure you're using the correct key. Learn more about [generating an API key](https://dev.wix.com/docs/api-reference/articles/authentication/api-keys/generate-an-api-key.md). ## Site access When you create an API key, you choose which sites it can access: - **All sites:** The key can access every site in the account. - **Specific sites:** The key can access only the sites you add to it. Calls that target any other site are rejected. As a best practice, give each key access to the narrowest set of sites its integration needs. You can change a key's site access at any time in the [API Keys Manager](https://manage.wix.com/account/api-keys). ## Retrieve site IDs Calls to site-level APIs require a site ID in addition to an API key. To retrieve a site ID, use the [Query Sites](https://dev.wix.com/docs/rest/account-level/sites/sites/query-sites.md) method to get all the site IDs associated with a particular account. You can also get a site ID from the URL of the site's dashboard in your browser. The site ID appears after `'/dashboard/'` in the URL. ## Retrieve account IDs Calls to account-level APIs require an account ID in addition to an API key. To retrieve an account ID, go to the account's [API Keys Manager](https://manage.wix.com/account/api-keys). ## Make API calls Once you've generated an API key and obtained the IDs for your Wix account or Wix site, you can authenticate and [perform account or site level operations](https://dev.wix.com/docs/go-headless/develop-your-project/admin-operations/about-admin-operations.md). For detailed instructions and common errors, see [Make API Calls with an API Key](https://dev.wix.com/docs/api-reference/articles/authentication/api-keys/make-api-calls-with-an-api-key.md). ## See also - [Generate an API Key](https://dev.wix.com/docs/api-reference/articles/authentication/api-keys/generate-an-api-key.md) - [Make API Calls with an API Key](https://dev.wix.com/docs/api-reference/articles/authentication/api-keys/make-api-calls-with-an-api-key.md) - [About Admin Operations](https://dev.wix.com/docs/go-headless/develop-your-project/self-managed-headless/authentication/perform-admin-operations.md) --- > Portal Navigation: > > - Append `.md` to any URL under `https://dev.wix.com/docs/` to get its markdown version. > - Pages are either content pages (article or reference text) or menu pages (a list of links to child pages). > - To get a menu page, truncate any URL to a parent path and append `.md` (e.g. `https://dev.wix.com/docs/sdk.md`, `https://dev.wix.com/docs/sdk/core-modules.md`). > - Top-level index of all portals: https://dev.wix.com/docs/llms.txt > - Full concatenated docs: https://dev.wix.com/docs/llms-full.txt ## Resource: Generate an API Key ## Article: Generate an API Key for Admins ## Article Link: https://dev.wix.com/docs/api-reference/articles/authentication/api-keys/generate-an-api-key.md ## Article Content: # Generate an API Key Generate an [API key](https://dev.wix.com/docs/go-headless/self-managed-headless/authentication/about-authentication.md#admin-authentication) to grant [admin access](https://dev.wix.com/docs/go-headless/self-managed-headless/authentication/about-admin-operations.md) to your Wix account and site data. To generate an API key: 1. Go to the [API Keys Manager](https://manage.wix.com/account/api-keys) to enable an authorized external client to access and manage data for all sites in the account or for specific sites you select. As a best practice, give each key access to the narrowest set of sites its integration needs. You can also assign a set of permissions that determine the types of APIs each key can access.
    **Important:** Make sure to store your API keys securely and use them only in server-side code.
    2. Retrieve a Site ID or Account ID When using an API Key authentication strategy you need to provide either a Site ID, your Account ID, or both. - You can extract a Site ID from the URL in your browser when accessing the project or site dashboard. The site ID appears after **/dashboard/** in the URL. - You can retrieve your Account ID from the [API Keys Manager](https://manage.wix.com/account/api-keys) in your account settings. ## See also - [About Authentication](https://dev.wix.com/docs/go-headless/self-managed-headless/authentication/about-authentication.md#admin-authentication) - [About Admin Operations](https://dev.wix.com/docs/go-headless/self-managed-headless/authentication/about-admin-operations.md) - [Make REST API Calls with an API Key](https://dev.wix.com/docs/go-headless/self-managed-headless/authentication/about-admin-operations.md) - [Create a JavaScript SDK Client with an API Key](https://dev.wix.com/docs/go-headless/self-managed-headless/authentication/about-admin-operations.md) --- > Portal Navigation: > > - Append `.md` to any URL under `https://dev.wix.com/docs/` to get its markdown version. > - Pages are either content pages (article or reference text) or menu pages (a list of links to child pages). > - To get a menu page, truncate any URL to a parent path and append `.md` (e.g. `https://dev.wix.com/docs/sdk.md`, `https://dev.wix.com/docs/sdk/core-modules.md`). > - Top-level index of all portals: https://dev.wix.com/docs/llms.txt > - Full concatenated docs: https://dev.wix.com/docs/llms-full.txt ## Resource: Make API Calls with an API Key ## Article: Make API Calls with an API Key ## Article Link: https://dev.wix.com/docs/api-reference/articles/authentication/api-keys/make-api-calls-with-an-api-key.md ## Article Content: # Make API Calls with an API Key Once you've [generated an API key](https://dev.wix.com/docs/api-reference/articles/authentication/api-keys/generate-an-api-key.md) and obtained the IDs for your Wix account or site, you can authenticate and perform admin operations. ::::tabs :::REST_TAB ## Step 1 | Set authorization headers To make an API call using an API key, include the key from the [API Keys Manager](https://manage.wix.com/account/api-keys) in the `Authorization` header. You must also include one of the following headers, depending on the type of call: - `wix-account-id`: The ID of the Wix account that owns the API key. Required for account-level API calls. - `wix-site-id`: The ID of the Wix site or project you're working with. Required for site-level API calls. > **Notes:** > - API calls require either the `wix-account-id` header or the `wix-site-id` header, but not both. Most APIs are site-level, while account-level APIs are specified as such in the reference documentation. > - Site-level calls only work with API keys generated from the Wix user's account. A complete header for an account-level API request looks like this: ```sh curl \ '' \ -H 'Authorization: ' \ -H 'wix-account-id: ' ``` A complete header for a site-level API request looks like this: ```sh curl \ '' \ -H 'Authorization: ' \ -H 'wix-site-id: ' ``` ## Step 2 | Make a REST API call With your headers set up, call Wix APIs. The following example calls [Query Product](https://dev.wix.com/docs/api-reference/business-solutions/stores/catalog-v3/products-v3/query-products.md) and retrieves a list of visible [products](https://dev.wix.com/docs/api-reference/business-solutions/stores/catalog-v3/products-v3/introduction.md) from a specific site: ```sh curl -X POST \ 'https://www.wixapis.com/stores/v3/products/query' \ -H 'Content-Type: application/json' \ -H 'Authorization: ' \ -H 'wix-site-id: ' \ -d '{ "query": { "filter": { "visible": { "$eq": true } }, "sort": [{ "fieldName": "createdDate", "order": "DESC" }], "cursorPaging": { "limit": 10 } } }' ``` ::: :::SDK_TAB
    __Important:__ To implement this flow, you must install Node.js version 18 or higher.
    ## Step 1 | Install packages Install `@wix/sdk` and the packages for the domain-specific APIs you wish to work with. Domain-specific packages follow the naming convention `@wix/{domain}`. For example: ```console npm install @wix/sdk @wix/stores ``` Or, with Yarn: ```console yarn add @wix/sdk @wix/stores ``` ## Step 2 | Import modules To use the APIs you have installed, import `createClient` and `ApiKeyStrategy` from the `@wix/sdk` package, and import functionality from the desired domain-specific packages. For example: ```js import { createClient, ApiKeyStrategy } from "@wix/sdk"; import { productsV3 } from "@wix/stores"; ``` ## Step 3 | Create a client Use the [`createClient()`](https://dev.wix.com/docs/sdk/core-modules/sdk/wix-client.md) method to connect an external client with a Wix site: ```js const myWixClient = createClient({ auth: ApiKeyStrategy({ apiKey: "", siteId: "", accountId: "", }), modules: { productsV3, }, }); ``` The `createClient()` method returns a new Wix client. - The `modules` parameter contains key:value pairs. Each value is an imported module, and the key defines the name to use when working with that module. - The `auth` parameter contains the authentication method and credentials. Pass `ApiKeyStrategy()` with an object containing: - `apiKey`: An API key generated in the [API Keys Manager](https://manage.wix.com/account/api-keys). - `siteId`: ID of the Wix site or project you are working with. Required for site-level calls. - `accountId`: ID of the Wix account the API key belongs to. Required for account-level calls. ## Step 4 | Call an SDK method The following code example retrieves a list of visible [products](https://dev.wix.com/docs/api-reference/business-solutions/stores/catalog-v3/products-v3/introduction.md) from a specific site: ```js import { createClient, ApiKeyStrategy } from "@wix/sdk"; import { productsV3 } from "@wix/stores"; const myWixClient = createClient({ auth: ApiKeyStrategy({ apiKey: "", siteId: "", accountId: "", }), modules: { productsV3, }, }); const { products } = await myWixClient.productsV3.queryProducts({ filter: { visible: { $eq: true } }, cursorPaging: { limit: 10 }, }); ``` ::: :::: ## Common errors ### 403 forbidden ::::tabs :::REST_TAB If you receive a `403 Forbidden` error, check that you have: - An `Authorization` header with your API key. - The correct [permissions](https://dev.wix.com/docs/api-reference/articles/authentication/api-keys/about-api-keys.md) configured for your API key. - A `wix-site-id` header for site-level methods, or a `wix-account-id` header for account-level methods. - An API key that can access the site you're calling. A key scoped to specific sites only works for those sites. - An API key created by the Wix user, not a co-owner. You can check this under **Settings > Roles & Permissions**. ::: :::SDK_TAB If you receive a `403 Forbidden` error, check that you have: - The correct [permissions](https://dev.wix.com/docs/api-reference/articles/authentication/api-keys/about-api-keys.md) configured for your API key. - A `siteId` value in `ApiKeyStrategy` for site-level calls, or an `accountId` value for account-level calls. - An API key that can access the site you're calling. A key scoped to specific sites only works for those sites. - An API key created by the Wix user, not a co-owner. You can check this under **Settings > Roles & Permissions**. ::: :::: ### Unable to generate a key If you don't receive an SMS for 2-step verification when generating a key, [contact Wix Support](https://support.wix.com/en/article/contacting-wix-support). ## See also - [About API Keys](https://dev.wix.com/docs/api-reference/articles/authentication/api-keys/about-api-keys.md) - [Generate an API Key](https://dev.wix.com/docs/api-reference/articles/authentication/api-keys/generate-an-api-key.md) - [About Admin Operations](https://dev.wix.com/docs/go-headless/self-managed-headless/authentication/about-admin-operations.md) --- > Portal Navigation: > > - Append `.md` to any URL under `https://dev.wix.com/docs/` to get its markdown version. > - Pages are either content pages (article or reference text) or menu pages (a list of links to child pages). > - To get a menu page, truncate any URL to a parent path and append `.md` (e.g. `https://dev.wix.com/docs/sdk.md`, `https://dev.wix.com/docs/sdk/core-modules.md`). > - Top-level index of all portals: https://dev.wix.com/docs/llms.txt > - Full concatenated docs: https://dev.wix.com/docs/llms-full.txt ## Resource: About the Wix API Query Language ## Article: About the Wix API Query Language ## Article Link: https://dev.wix.com/docs/api-reference/articles/work-with-wix-apis/data-retrieval/about-the-wix-api-query-language.md ## Article Content: # About the Wix API Query Language The query and search language described in this article is implemented partially or in full by many Wix APIs supporting query and search capabilities. You may see some similarities between the Wix API Query Language and MongoQL, as the style of the Wix API Query Language is heavily influenced by MongoQL. Learn more about Wix's [search](https://dev.wix.com/docs/api-reference/articles/work-with-wix-apis/data-retrieval/about-search-query-and-list-methods.md#search-method-characteristics) and [query](https://dev.wix.com/docs/api-reference/articles/work-with-wix-apis/data-retrieval/about-search-query-and-list-methods.md#query-method-characteristics) methods. ## Syntax Query and Search objects consist of several optional parts: - [`filter`](#filters): Which results to return. - [`sort`](#sorting): In what order. - [`paging`](#paging): Return only some of the matched entities. - [`fields`](#fields): Field projection. Returns only part of each entity. - [`fieldsets`](#fieldsets): Predefined, named sets of fields with common use cases. This is a shorthand provided by individual APIs. - [`aggregations`](#aggregations-search-object-only) Search object only: Faceted search, a way to explore large amounts of data by displaying summaries about various partitions of the data and later allowing to narrow the navigation to a specific partition. - [`search`](#search-search-object-only) Search object only: Free text to match in searchable fields. - [`timeZone`](#time-zones-search-object-only) Search object only: Time zone for aggregations and filters by date. Each query is always a single JSON object. An empty JSON object returns all records according to the API's default paging and sort order. The query object can define a key for each of the above parts: ```json { "filter": { ... }, "sort": [ ... ], "paging": { ... }, "fields": [ ... ], "fieldsets": [ ... ], "aggregations": [ ... ], "search": [ ... ] } ``` ## Filters The filter section is a single json object { } with the following rules: ### Equality The format `{ "": }` specifies an equality condition. For example, `{ "status": "DONE" }` matches all entities where `status` is `"DONE"`. ### Operators Operators use the format `{ "": { "$": } }`. For example, `{ "status": { "$in": ["PENDING", "DONE"] } }` matches all entities where status is `"PENDING"` or `"DONE"`. The operators specified below are supported. #### Comparison operators - `$eq`: Matches values that are equal to a specified value. - `$ne`: Matches all values that aren't equal to a specified value. - `$gt`: Matches values that are greater than a specified value. - `$gte`: Matches values that are greater than or equal to a specified value. - `$lt`: Matches values that are less than a specified value. - `$lte`: Matches values that are less than or equal to a specified value. - `$in`: Matches any of the values specified in an array. - `$nin`: Matches none of the values specified in an array. - `$startsWith`: Matches strings that start with a specified value. Not case-sensitive. - `$isEmpty`: Matches strings or arrays that are empty or not empty, depending on whether the specified operand is `true` or `false`. #### Logical operators - `$and`: Joins query clauses with a logical _AND_ and returns all items that match the conditions of both clauses. - `$or`: Joins query clauses with a logical _OR_ and returns all items that match the conditions of either clause. - `$not`: Inverts the effect of a query expression and returns items that don't match the query expression. #### Element operators - `$exists`: Matches items where the specified field exists and has a non-null value. #### Array operators - `$hasAll`: Matches arrays that contain all elements specified in the query. - `$hasSome`: Matches arrays that contain at least 1 element specified in the query. ### Sample queries In the following example, the compound query returns all entities where the status equals `"A"` and either `qty` is less than `30` or `item` starts with the character `p`: ```json { "status": "A", "$or": [ { "qty": { "$lt": 30 } }, { "item": { "$startsWith": "p" } } ] } ``` The following example queries entities where the field `tags` value is an array with exactly 2 elements, `"red"` and `"blank"`, in the specified order: ```json { "tags": ["red", "blank"] } ``` The following example queries for all entities where `tags` is an array that contains the string `"red"` as one of its elements, or that `tags` is the string `"red"`: ```json { "tags": "red" } ``` The following query matches entities that don't contain the `item` field, or where the `item` field has no value: ```json { "item": { "$exists": false } } ``` ## Sorting The `sort` section is an array of field names and sort order. If `order` isn't specified for a field, the field is sorted in ascending order. Sorting is applied to the first `sort` item, then the second, and so on: ```json { "sort": [ { "fieldName": "sortField1" }, { "fieldName": "sortField2", "order": "DESC" } ] } ``` ## Paging The `paging` section describes the size of the data set to return per response and how many records to skip. Each API can support **offset paging**, **cursor paging**, or both. See your specific API for information on supported paging options. ### Offset paging With offset paging, you provide a `limit` and `offset` with each request. To retrieve additional pages, submit subsequent requests with an increased `offset` equal to the previous page's `limit` plus `offset`. For example, this offset request returns records 41 through 60: ```json { "paging": { "limit": 20, "offset": 40 } } ``` ### Cursor paging With cursor paging, each request returns a `cursors` object that contains cursor strings that point to the next page, previous page, or both. To retrieve either page, use the returned `next` or `prev` cursor in the next request's `cursor` parameter. Take this response object, for example: ```json { "pagingMetadata": { "count": 10, "offset": 0, "cursors": { "next": "eyJmaWx0ZXIiOnsiJGFuZCI6W3sibGFuZ3VhZ2UiOnsiJGluIjpbImVuIiwiaGUiXX19LHsic3RhdHVzIjoicHVibGlzaGVkIn1dfSwidmFsdWUiOnsiaXNQaW5uZWQiOmZhbHNlLCJmaXJzdFB1Ymxpc2hlZERhdGUiOiIyMDIyLTA2LTAyVDA2OjQ2OjAyLjgwMloifSwib3JkZXIiOnsiaXNQaW5uZWQiOi0xLCJmaXJzdFB1Ymxpc2hlZERhdGUiOi0xLCJpZCI6LTF9fQ==" } } } ``` You can use the returned `next` cursor to retrieve the next page of results by forming your request like this: ```json { "query": { "cursorPaging": { "cursor": "eyJmaWx0ZXIiOnsiJGFuZCI6W3sibGFuZ3VhZ2UiOnsiJGluIjpbImVuIiwiaGUiXX19LHsic3RhdHVzIjoicHVibGlzaGVkIn1dfSwidmFsdWUiOnsiaXNQaW5uZWQiOmZhbHNlLCJmaXJzdFB1Ymxpc2hlZERhdGUiOiIyMDIyLTA2LTAyVDA2OjQ2OjAyLjgwM1oifSwib3JkZXIiOnsiaXNQaW5uZWQiOi0xLCJmaXJzdFB1Ymxpc2hlZERhdGUiOi0xLCJpZCI6LTF9fQ" } } } ``` ## Fields The `fields` section is an array of field paths to return. If a field path points to an object, the entire sub-object is returned. Subsets of sub-objects can be returned by using dot notation. In this example, the returned entities contain `firstName` from the `name` sub-object and the entire `address` object: ```json { "fields": ["name.firstName", "address"] } ``` ## Fieldsets An API may provide named projections to save clients from specifying individual fields in common cases. For example, the Contacts API implements a fieldset named `BASIC` that contains only `id`, `revision`, `info.name.first`, `info.name.last`, `primaryInfo.email`, and `primaryInfo.phone`. To use a fieldset, specify its name in the `fieldsets` array. If both `fieldsets` and `fields` sections exist, the union of both is returned. For example: ```json { "fieldsets": ["BASIC"] } ``` ## Aggregations (search object only) Aggregation is a search method that groups data into different categories (called buckets) and generates summaries for each category (referred to as facets). Supported aggregation types: - `DATE_HISTOGRAM`: Calculates the count of time values from the specified field in the dataset fall in the defined time interval (hour, day, week, etc.). - `NESTED`: Calculates multiple aggregations, of any type, nested in 1 aggregation, allowing you to first group data using 1 aggregation, and then apply another aggregation in each group. - `RANGE`: Calculates the count of the values from the specified field in the dataset that fall within the range of each defined bucket. - `rangeBuckets`: categories for grouping data. Each bucket must have at least 1 range bound: - `from`: Inclusive lower bound of the range. - `to`: Exclusive upper bound of the range. - `SCALAR`: Calculates a single numerical value from a dataset, with the total count, sum, average, min, or max, summarizing the dataset into 1 key metric. - `VALUE`: Calculates the distribution of a specific field's values in a dataset. ## Search (search object only) With `search`, you can filter for specific text in any searchable field, using the following: - `mode`: How to handle multiple words in the `expression`. Supported values: `AND`, `OR`. Default: `OR`. - `expression`: Free text to search for. - `fields`: Fields to search in. Use dot notation to specify json path. Default: All searchable fields. - `fuzzy`: [Fuzzy search](https://www.techtarget.com/whatis/definition/fuzzy-search), enabling search including typos, by a managed proximity algorithm. Default: `false`. ## Time zones (search object only) UTC offset or IANA time zone. Valid values are ISO 8601 UTC offsets, such as `+02:00` or `-06:00`, and IANA time zone IDs, such as `Europe/Rome`. Affects all filters and aggregations returned values. You may override this behavior in a specific filter by providing timestamps including time zone. For example, `"2023-12-20T10:52:34.795Z"`. --- > Portal Navigation: > > - Append `.md` to any URL under `https://dev.wix.com/docs/` to get its markdown version. > - Pages are either content pages (article or reference text) or menu pages (a list of links to child pages). > - To get a menu page, truncate any URL to a parent path and append `.md` (e.g. `https://dev.wix.com/docs/sdk.md`, `https://dev.wix.com/docs/sdk/core-modules.md`). > - Top-level index of all portals: https://dev.wix.com/docs/llms.txt > - Full concatenated docs: https://dev.wix.com/docs/llms-full.txt ## Resource: About Field Projection ## Article: About Field Projection ## Article Link: https://dev.wix.com/docs/api-reference/articles/work-with-wix-apis/data-retrieval/about-field-projection.md ## Article Content: # About Field Projection Some methods support field projection, which allows you to control which fields the method returns. ## Field projection Specify a predefined enumeration in the `fields` parameter to indicate the fields you want a method to return. The enumerations may be either: - Named sets of fields for common use cases. - Individual field names. In some cases, specific `fields` values may be protected by additional permissions. ## Legacy field projection Legacy APIs offer `fieldsets` and `fields` to manage returned fields: - **Fieldsets** are predefined and named sets of fields. Fieldsets cover common use cases. The default fieldset is typically the full object, although some methods may specify a different default fieldset. See each method's documentation for specific details. - **Fields** allow you to supply a list of individual field names to return. If you specify fieldsets and projected fields together in a request, the union of all included fields is returned. For example, if you specify the `BASIC` fieldset and the `info.birthdate` field, all fields included in the `BASIC` fieldset and `info.birthdate` are returned. If neither fieldsets nor projected fields are specified, the default fieldset is returned. --- > Portal Navigation: > > - Append `.md` to any URL under `https://dev.wix.com/docs/` to get its markdown version. > - Pages are either content pages (article or reference text) or menu pages (a list of links to child pages). > - To get a menu page, truncate any URL to a parent path and append `.md` (e.g. `https://dev.wix.com/docs/sdk.md`, `https://dev.wix.com/docs/sdk/core-modules.md`). > - Top-level index of all portals: https://dev.wix.com/docs/llms.txt > - Full concatenated docs: https://dev.wix.com/docs/llms-full.txt ## Resource: About Search, Query, and List Methods ## Article: About Search, Query, and List Methods ## Article Link: https://dev.wix.com/docs/api-reference/articles/work-with-wix-apis/data-retrieval/about-search-query-and-list-methods.md ## Article Content: # About Search, Query, and List Methods When working with Wix APIs, you'll notice that some APIs provide a mix of search, query, or list methods. Understanding the differences between these methods will help you choose the most appropriate one for your use case. All 3 methods retrieve collections of items, but they're optimized for different scenarios: - **Search methods** provide powerful text search functionality, aggregations, and result counting. - **Query methods** are designed for efficient, low-latency data retrieval with predictable filtering and sorting capabilities. - **List methods** provide simple, straightforward access to collections with basic pagination options. Generally only available for collections that are limited in size. > **Note:** The Wix Data Items API has a dedicated Aggregate method. ## Key differences | Feature | Search | Query | List | | ---------------- | ----------------------------------------------------------------------------------------------- | ----------------------------------------------------------------------------------------------- | ---------------------------------------------------------- | | Purpose | Discovery and exploration | Efficient filtered data access | Basic collection access | | Complexity | Complex | Moderate | Simple | | Consistency | Eventually consistent, higher latency for availability of created and updated records than list | Eventually consistent, higher latency for availability of created and updated records than list | Eventually consistent, lower latency | | Result Count | Includes total count automatically in the first page | Not included; separate count endpoint may be available | Not included; separate count endpoint may be available | | Filtering | Advanced text and field-based filtering | Extensive field-based filtering | Limited field-based filtering | | Sorting | Flexible field-based sorting | Flexible field-based sorting | Limited, often predefined options | | Aggregations | Supported | Not supported | Not supported | | Free-text Search | Supported across multiple fields | Not supported | Not supported | | Performance | Optimized for search capabilities | Optimized for sorting and filtering | Good performance for simple queries | | Pagination | Cursor-based for efficiency, offset/limit may be available | Cursor-based for efficiency, offset/limit may be available | Cursor-based for efficiency, offset/limit may be available | ## Search method characteristics Search methods typically have these features: - Advanced text search capabilities across multiple fields. - Support for both structured filtering and free-text search. - Fuzzy matching for spelling tolerance and typo forgiveness. - Phrase matching for exact sequence detection. - Field boosting to prioritize matches in specific fields. - Automatic total result counting with the first page of results. - Complex aggregation capabilities: - Count aggregations for faceted navigation. - Sum and average calculations on numeric fields. - Min/Max value detection. - Distinct count operations. - Facet generation for filtered navigation interfaces. - Higher latency compared to List methods. - Designed for discovery-oriented user experiences. - Suitable for building search boxes, filters, and exploratory interfaces. - Often supports highlighting of matched text in results. - POST endpoints with comprehensive JSON configuration bodies. - Support for complex filtering expressions with logical operators. Common operators include: | Expression type | Operator | | ------------------------ | ------------- | | Equal to | `$eq` | | Not equal to | `$ne` | | Greater than | `$gt` | | Greater than or equal to | `$gte` | | Less than | `$lt` | | Less than or equal to | `$lte` | | In a specified list | `$in` | | Field exists check | `$exists` | | String starts with | `$startsWith` | ## Query method characteristics Query methods typically have these features: - Field-specific sorting with direction control. - Efficient cursor-based pagination for handling large datasets. - Often allows multiple filter conditions to be combined. - Optimized for low-latency data access patterns. - No support for text search or aggregations. - HTTP POST endpoints with a JSON request body. - Support for complex filtering expressions with logical operators. Common operators include: | Expression type | Operator | | ------------------------ | ------------- | | Equal to | `$eq` | | Not equal to | `$ne` | | Greater than | `$gt` | | Greater than or equal to | `$gte` | | Less than | `$lt` | | Less than or equal to | `$lte` | | In a specified list | `$in` | | Field exists check | `$exists` | | String starts with | `$startsWith` | ## List method characteristics List methods typically have these features: - Basic field-based filtering. - Usually have the simplest implementation requirements. - Limited or no sorting capabilities beyond defaults. - Suitable for dropdown menus, simple listings, and basic data display. - HTTP GET endpoints (though some use POST). ## Method selection guide When choosing between search, query, and list methods for your data retrieval needs, use the decision tree below to guide you to the most appropriate method based on your data retrieval needs, and your requirements for data freshness, filtering complexity, and caching. ![method decision tree](https://wixmp-833713b177cebf373f611808.wixmp.com/images/70152d889f4414f75750167fc4cff5c9.png) --- > Portal Navigation: > > - Append `.md` to any URL under `https://dev.wix.com/docs/` to get its markdown version. > - Pages are either content pages (article or reference text) or menu pages (a list of links to child pages). > - To get a menu page, truncate any URL to a parent path and append `.md` (e.g. `https://dev.wix.com/docs/sdk.md`, `https://dev.wix.com/docs/sdk/core-modules.md`). > - Top-level index of all portals: https://dev.wix.com/docs/llms.txt > - Full concatenated docs: https://dev.wix.com/docs/llms-full.txt ## Resource: About Sorting and Paging ## Article: About Sorting and Paging ## Article Link: https://dev.wix.com/docs/api-reference/articles/work-with-wix-apis/data-retrieval/about-sorting-and-paging.md ## Article Content: # About Sorting and Paging List, query, and search methods that return a list of entities may allow you to specify sorting and paging options in the request. This article provides a general overview of sorting and paging. The implementation syntax varies between methods. Check your API's documentation for specific details, including which fields are sortable. ## Sorting Most APIs default to sorting by `createdDate` in `DESC` (descending) order, although some APIs have a different default sort order. You can often override the default sorting by specifying a new field and order. ### Sort list results List methods are designed to be lightweight requests. For this reason, sorting is applied in REST through query parameters, typically with `sort.fieldName` and `sort.order` fields. For example, to list contacts by last name in ascending order: ```txt ?sort.fieldName=info.name.last&sort.order=ASC ``` ### Sort query results Query methods offer more robust filtering capabilities. When working with a Query method, sorting is specified in an array in the request body, typically `query.sort`, and is typically applied with the `fieldName` and `order` parameters. For example, to list payment links by created date in ascending order, and by status in descending order: ```json { "query": { "sort": [ { "fieldName": "createdDate", "order": "ASC" }, { "fieldName": "status", "order": "DESC" } ] } } ``` ### Sort search results When working with a Search method, sorting is typically specified in the `search.sort` parameter. For example, to search payment links by created date in ascending order: ```json { "search": { "sort": [ { "fieldName": "createdDate", "order": "ASC" } ] } } ``` ## Paging Paging allows you to control how many results are returned and where the result set starts. Wix APIs commonly support 1 or both of the following paging strategies: - **Offset-based** (includes `limit` and `skip`/`offset`): Specify the number of items to skip and the number to return. - **Cursor-based** (includes `nextCursor` and `prevCursor`): Use a token (cursor) to fetch the next or previous set of results. ### Paging list results List methods support paging through query parameters in REST requests and `options` objects in SDK calls. For example, to list 100 contacts, starting from contact 21, with offset paging: ```txt ?limit=100&offset=20 ``` Should return items 21-120 in the results. For calls that support cursor paging, after receiving a cursor in your first request, list the next set of entities with cursor paging: ```txt &cursorPaging.cursor=JWE.eyJhbGciOiJBMTI4S1ciLCJlbm ``` ### Paging query results Query methods handle paging through the request body in REST and method parameters in the SDK. Generally either offset-based or cursor-based strategies are supported, and occasionally both are supported. For example, to query 100 contacts, starting from contact 21, with offset paging: ```json "query": { "paging": { "limit": 100, "offset": 20 } } ``` Should return items 21-120 in the results. To query 100 payment links with cursor paging: ```json "query": { "cursorPaging": { "cursor": "JWE.eyJhbGciOiJBMTI4S1ciLCJlbm" } } ``` ### Paging search results When working with a Search method, paging is typically specified in the paging or cursorPaging parameter. Search methods typically use cursor-based paging to ensure consistent results even when the underlying data changes during pagination. For example, to search for 10 payment links, and return a cursor for paging: ```json "search": { "cursorPaging": { "limit": 10 } } ``` Should return 10 items. To retrieve the next 10 payment links with a cursor: ```json "search": { "cursorPaging": { "cursor": "JWE.eyJhbGciOiJBMTI4S1ciLCJlbm" } ``` --- > Portal Navigation: > > - Append `.md` to any URL under `https://dev.wix.com/docs/` to get its markdown version. > - Pages are either content pages (article or reference text) or menu pages (a list of links to child pages). > - To get a menu page, truncate any URL to a parent path and append `.md` (e.g. `https://dev.wix.com/docs/sdk.md`, `https://dev.wix.com/docs/sdk/core-modules.md`). > - Top-level index of all portals: https://dev.wix.com/docs/llms.txt > - Full concatenated docs: https://dev.wix.com/docs/llms-full.txt ## Resource: Migrate from SDK Query Builders to Wix API Query Language ## Article: Migrate from SDK Query Builders to Wix API Query Language ## Article Link: https://dev.wix.com/docs/api-reference/articles/work-with-wix-apis/data-retrieval/migrate-from-sdk-query-builders-to-wix-api-query-language.md ## Article Content: # Migrate from SDK Query Builders to Wix API Query Language The Wix JavaScript SDK is transitioning from query builder methods to query methods that use the Wix API Query Language. This change provides a more consistent and powerful querying experience across all Wix APIs. ## What's changed Previously, SDK query methods used a builder pattern where you chained methods to build your query. For example, methods like `queryBookings()`, `querySessions()`, and `queryResourceCatalog()` returned query builder objects with methods like `.eq()`, `.hasSome()`, `.limit()`, and `.find()`. The new approach uses the [Wix API Query Language](https://dev.wix.com/docs/api-reference/articles/work-with-wix-apis/data-retrieval/about-the-wix-api-query-language.md), where you pass a query object directly to the query method. This provides more flexibility and consistency across different Wix APIs. ## Backward compatibility The existing query builder methods continue to work. However, we strongly recommend migrating to the new query methods that use Wix API Query Language as this is our path forward for SDK development. Updating your code now ensures long-term compatibility and gives you access to the latest features and improvements. ## Code comparison Here's how the same query looks with both approaches: ### New query method with Wix API Query Language ```javascript import { menus } from '@wix/restaurants'; // Query menus with visibility true and limit to 10 results const results = await menus.queryMenus({ query: { filter: { visible: true, createdDate: { $gte: '2024-01-01T00:00:00.000Z' } }, sort: [{ fieldName: 'createdDate', order: 'DESC' }], cursorPaging: { limit: 10 } } }); console.log(results.menus); ``` ### Old query method with query builders ```javascript import { menus } from '@wix/restaurants'; // Query menus with visibility true and limit to 10 results const results = await menus.queryMenus() .eq('visible', true) .ge('createdDate', '2024-01-01T00:00:00.000Z') .descending('createdDate') .limit(10) .find(); console.log(results.items); ``` ## How to migrate your code Follow these steps to update your query methods: ### Step 1 | Identify query methods with the query builder Look for code patterns that include: - A method called `query()` followed by chained methods. - Methods like `.eq()`, `.hasSome()`, `.limit()`, `.skip()`, `.ascending()`, or `.descending()`. - A final `.find()` call. ### Step 2 | Convert the query structure Map your query builder chain into a query object. Below are some common mapping examples: #### Filters: | Old | New | |-----|-----| | `.eq('field', 'value')` | `filter: { field: 'value' }` or `filter: { field: { $eq: 'value' } }` | | `.hasSome('field', ['val1', 'val2'])` | `filter: { field: { $in: ['val1', 'val2'] } }` | | `.ge('field', 'value')` | `filter: { field: { $gte: 'value' } }` | | `.lt('field', 'value')` | `filter: { field: { $lt: 'value' } }` | #### Sorting: | Old | New | |-----|-----| | `.ascending('field')` | `sort: [{ fieldName: 'field', order: 'ASC' }]` | | `.descending('field')` | `sort: [{ fieldName: 'field', order: 'DESC' }]` | #### Paging: | Old | New | |-----|-----| | `.limit(50)` | `paging: { limit: 50 }` or `cursorPaging: { limit: 50 }` | | `.skip(20)` | `paging: { offset: 20, limit: X }` | | `.skipTo(cursor)` | `cursorPaging: { cursor: "..." }` | > **Note:** > The new query methods can support either cursor-based or offset-based paging. For offset-based paging, if you specify `offset`, you must also include `limit`. For cursor paging, the cursor value is a string token returned from previous query return values. Learn more about [paging](https://dev.wix.com/docs/api-reference/articles/work-with-wix-apis/data-retrieval/about-sorting-and-paging?apiView=SDK.md#paging). ### Step 3 | Update the method call Replace the old query method with the new one and remove the `.find()` call: #### Old query method ```javascript const results = await bookings.queryBookings() .eq('status', 'CONFIRMED') .ge('startTime', '2024-01-01T00:00:00.000Z') .limit(20) .find(); ``` #### New query method ```javascript const results = await bookings.queryBookings({ query: { filter: { status: 'CONFIRMED', startTime: { $gte: '2024-01-01T00:00:00.000Z' } }, cursorPaging: { limit: 20 } } }); ``` ### Step 4 | Test and deploy After updating, make sure to test your code in your development environment before publishing your site or deploying your project. To learn more about the API Query Language syntax, see [About the Wix API Query Language](https://dev.wix.com/docs/api-reference/articles/work-with-wix-apis/data-retrieval/about-the-wix-api-query-language?apiView=SDK.md) and [About Sorting and Paging](https://dev.wix.com/docs/api-reference/articles/work-with-wix-apis/data-retrieval/about-sorting-and-paging?apiView=SDK.md). If you prefer building queries with a chainable syntax, the SDK provides [query builder utilities](https://dev.wix.com/docs/api-reference/articles/work-with-wix-apis/data-retrieval/about-query-builder-utilities.md) that let you compose Wix API Query Language objects using method chaining. --- > Portal Navigation: > > - Append `.md` to any URL under `https://dev.wix.com/docs/` to get its markdown version. > - Pages are either content pages (article or reference text) or menu pages (a list of links to child pages). > - To get a menu page, truncate any URL to a parent path and append `.md` (e.g. `https://dev.wix.com/docs/sdk.md`, `https://dev.wix.com/docs/sdk/core-modules.md`). > - Top-level index of all portals: https://dev.wix.com/docs/llms.txt > - Full concatenated docs: https://dev.wix.com/docs/llms-full.txt ## Resource: About Query Builder Utilities ## Article: About Query Builder Utilities ## Article Link: https://dev.wix.com/docs/api-reference/articles/work-with-wix-apis/data-retrieval/about-query-builder-utilities.md ## Article Content: # About Query Builder Utilities The Wix JavaScript SDK provides query builder utility methods that let you construct query requests using a chainable syntax. You can pass the resulting query object directly to any SDK query method. ## Why use query builder utilities SDK query methods accept queries written in the [Wix API Query Language](https://dev.wix.com/docs/api-reference/articles/work-with-wix-apis/data-retrieval/about-the-wix-api-query-language.md), a JSON-based format for filtering, sorting, and paging. While this format is flexible and consistent across all Wix APIs, building these objects can be difficult, especially for complex queries. Query builder utilities offer the following benefits: - **Chainable syntax.** Construct queries by chaining method calls such as `.withFilter()` and `.withSorting()`, rather than writing JSON objects by hand. - **Programmatic composition.** Build filter and sort conditions dynamically based on runtime logic, then combine them into a single query. - **Type safety.** The utility methods are fully typed, providing autocompletion and compile-time checks in TypeScript projects. ## Available utilities Each SDK API exports the following utilities alongside its query methods: | Utility | Purpose | |---------|---------| | `Filter(fieldName)` | Creates a filter condition for a specified field. Supports operators like `.eq()`, `.ne()`, `.gt()`, `.gte()`, `.lt()`, `.lte()`, `.in()`, `.nin()`, `.exists()`, `.startsWith()`, `.isEmpty()`, `.hasAll()`, and `.hasSome()`. | | `Sort(fieldName)` | Creates a sort condition for a specified field. Supports `.asc()` for ascending and `.desc()` for descending order. | | `QueryBuilder()` | Combines filters, sorts, and paging into a complete query object. Supports `.withFilter()`, `.withSorting()`, `.withPaging()`, and `.build()`. | ## Code examples The following examples query bookings services for all services of type `"COURSE"`, sorted by `name` in ascending order. ### With query builder utilities ```javascript import { services } from '@wix/bookings'; const { QueryBuilder, Filter, Sort } = services.utils.query; const query = QueryBuilder() .withFilter(Filter('type').eq('COURSE')) .withSorting(Sort('name').asc()) .withPaging({ limit: 10, offset: 0 }) .build(); const response = await services.queryServices(query); ``` ### With a direct query object ```javascript import { services } from '@wix/bookings'; const response = await services.queryServices({ filter: { type: { $eq: 'COURSE' } }, sort: [ { fieldName: 'name', order: 'ASC' } ], paging: { limit: 10, offset: 0 } }); ``` ## Building dynamic queries Query builder utilities are particularly useful when you need to construct queries based on conditions that aren't known until runtime. Instead of manually assembling a JSON filter object, you can compose filters and sorts programmatically. For example, the following helper method builds a query for Bookings services where the filter and sort are optional and determined by the caller: ```javascript import { services } from '@wix/bookings'; const { QueryBuilder, Filter, Sort } = services.utils.query; function buildServiceQuery(options) { let builder = QueryBuilder(); if (options.type) { builder = builder.withFilter(Filter('type').eq(options.type)); } if (options.sortField) { const direction = options.sortDirection === 'DESC' ? Sort(options.sortField).desc() : Sort(options.sortField).asc(); builder = builder.withSorting(direction); } return builder.build(); } const query = buildServiceQuery({ type: 'COURSE', sortField: 'name', sortDirection: 'ASC' }); const response = await services.queryServices(query); ``` ## See also - [About Search, Query, and List Methods](https://dev.wix.com/docs/api-reference/articles/work-with-wix-apis/data-retrieval/about-search-query-and-list-methods.md) - [About the Wix API Query Language](https://dev.wix.com/docs/api-reference/articles/work-with-wix-apis/data-retrieval/about-the-wix-api-query-language.md) - [About Sorting and Paging](https://dev.wix.com/docs/api-reference/articles/work-with-wix-apis/data-retrieval/about-sorting-and-paging.md) - [Migrate from SDK Query Builders to Wix API Query Language](https://dev.wix.com/docs/api-reference/articles/work-with-wix-apis/data-retrieval/migrate-from-sdk-query-builders-to-wix-api-query-language.md) --- > Portal Navigation: > > - Append `.md` to any URL under `https://dev.wix.com/docs/` to get its markdown version. > - Pages are either content pages (article or reference text) or menu pages (a list of links to child pages). > - To get a menu page, truncate any URL to a parent path and append `.md` (e.g. `https://dev.wix.com/docs/sdk.md`, `https://dev.wix.com/docs/sdk/core-modules.md`). > - Top-level index of all portals: https://dev.wix.com/docs/llms.txt > - Full concatenated docs: https://dev.wix.com/docs/llms-full.txt ## Resource: About Search Builder Utilities ## Article: About Search Builder Utilities ## Article Link: https://dev.wix.com/docs/api-reference/articles/work-with-wix-apis/data-retrieval/about-search-builder-utilities.md ## Article Content: # About Search Builder Utilities The Wix JavaScript SDK provides search builder utility methods that let you construct search requests using a chainable syntax. You can pass the resulting search object directly to any SDK search method. ## Why use search builder utilities SDK search methods accept a search request object that specifies a full-text expression, filter conditions, sort order, and paging. While you can write these objects directly, building them can be difficult, especially when conditions depend on runtime logic. Search builder utilities offer the following benefits: - **Chainable syntax.** Construct search requests by chaining method calls such as `.withSearchClause()` and `.withFilter()`, rather than writing JSON objects by hand. - **Programmatic composition.** Build search expressions, filter, and sort dynamically based on runtime logic, then combine them into a single request. - **Type safety.** The utility methods are fully typed, providing autocompletion and compile-time checks in TypeScript projects. ## Available utilities Each SDK API exports the following utilities alongside its search methods: | Utility | Purpose | |---------|---------| | `SearchParams(expression)` | Creates a search clause for a full-text expression. Supports `.fuzzy()` for approximate matching, `.mode()` to control whether all or any terms must match, and `.fields()` to restrict the search to specific fields. | | `SearchBuilder()` | Combines a search clause, filters, sorts, and paging into a complete search request object. Supports `.withSearchClause()`, `.withFilter()`, `.withSorting()`, `.withPaging()`, and `.build()`. | | `Filter(fieldName)` | Creates a filter condition for a specified field. Supports operators like `.eq()`, `.ne()`, `.gt()`, `.gte()`, `.lt()`, `.lte()`, `.in()`, `.nin()`, `.exists()`, `.startsWith()`, `.isEmpty()`, `.hasAll()`, and `.hasSome()`. Same utility used with `QueryBuilder`. | | `Sort(fieldName)` | Creates a sort condition for a specified field. Supports `.asc()` for ascending and `.desc()` for descending order. Same utility used with `QueryBuilder`. | ## Code examples The following examples search for products matching `"running shoes"`, filter to active items, and sort by price. ### With search builder utilities ```javascript import { productsV3 } from '@wix/stores'; const { SearchBuilder, SearchParams, Filter, Sort } = productsV3.utils.search; const request = SearchBuilder() .withSearchClause(SearchParams('running shoes')).fuzzy(true) .withFilter(Filter('inventory.availabilityStatus').eq('IN_STOCK')) .withSorting(Sort('updatedDate').asc()) .withPaging({ limit: 10, offset: 0 }) .build(); const response = await productsV3.searchProducts(request); ``` ### With a direct search request object ```javascript import { productsV3 } from '@wix/stores'; const response = await productsV3.searchProducts({ search: { expression: 'running shoes' }, filter: { 'inventory.availabilityStatus': { $eq: 'IN_STOCK' } }, sort: [ { fieldName: 'updatedDate', order: 'ASC' } ], paging: { limit: 10, offset: 0 } }); ``` ## Building dynamic searches Search builder utilities are particularly useful when you need to construct search requests based on conditions that aren't known until runtime. Instead of manually assembling a JSON object, you can compose search parameters programmatically. For example, the following helper method builds a search request where the filter, sort, and fuzzy matching are optional and determined by the caller: ```javascript import { productsV3 } from '@wix/stores'; const { SearchBuilder, SearchParams, Filter, Sort } = productsV3.utils.search; function buildSearchRequest(query, options) { let builder = SearchBuilder().withSearchClause( SearchParams(query).fuzzy(options.fuzzy ?? false) ); if (options.status) { builder = builder.withFilter(Filter('inventory.availabilityStatus').eq(options.status)); } if (options.sortField) { const direction = options.sortDirection === 'DESC' ? Sort(options.sortField).desc() : Sort(options.sortField).asc(); builder = builder.withSorting(direction); } return builder.withPaging({ limit: options.limit ?? 10 }).build(); } const request = buildSearchRequest('running shoes', { fuzzy: true, status: 'IN_STOCK', sortField: 'updatedDate', sortDirection: 'ASC', limit: 20 }); const response = await productsV3.searchProducts(request); ``` ## See also - [About Search, Query, and List Methods](https://dev.wix.com/docs/api-reference/articles/work-with-wix-apis/data-retrieval/about-search-query-and-list-methods.md) - [About Query Builder Utilities](https://dev.wix.com/docs/api-reference/articles/work-with-wix-apis/data-retrieval/about-query-builder-utilities.md) - [About the Wix API Query Language](https://dev.wix.com/docs/api-reference/articles/work-with-wix-apis/data-retrieval/about-the-wix-api-query-language.md) - [About Sorting and Paging](https://dev.wix.com/docs/api-reference/articles/work-with-wix-apis/data-retrieval/about-sorting-and-paging.md) --- > Portal Navigation: > > - Append `.md` to any URL under `https://dev.wix.com/docs/` to get its markdown version. > - Pages are either content pages (article or reference text) or menu pages (a list of links to child pages). > - To get a menu page, truncate any URL to a parent path and append `.md` (e.g. `https://dev.wix.com/docs/sdk.md`, `https://dev.wix.com/docs/sdk/core-modules.md`). > - Top-level index of all portals: https://dev.wix.com/docs/llms.txt > - Full concatenated docs: https://dev.wix.com/docs/llms-full.txt ## Resource: About Apps Created by Wix ## Article: About Apps Created by Wix ## Article Link: https://dev.wix.com/docs/api-reference/articles/work-with-wix-apis/platform/about-apps-created-by-wix.md ## Article Content: # About Apps Created by Wix Wix offers a range of powerful apps and business solutions that extend the functionality of its existing products or add comprehensive new capabilities. These business solutions are apps created by Wix for managing specific types of business needs. Wix users can install one or more of these apps to manage specific data on their site or headless project. When working with Wix APIs, you may need to reference the app that manages a particular type of data. For example, some API calls require you to specify an `appId`, such as when creating a comment or coupon, and some API responses include an `appId` to indicate which app created the data. Below is a list of apps created by Wix and their corresponding IDs. Each app always has the same `appId`, regardless of the API call. | **App Created by Wix** | **App ID** | **Description** | | ---------------------------- | ------------------------------------ | ------------------------------------------------------- | | Wix Bookings | 13d21c63-b5ec-5912-8397-c3a5ddb27a97 | Schedule appointments, classes, and manage bookings. | | Wix Blog | 14bcded7-0066-7c35-14d7-466cb3f09103 | Create and manage blog content. | | Wix CMS | 675bbcef-18d8-41f5-800e-131ec9e08762 | Manage content and data. | | Wix eCommerce | 1380b703-ce81-ff05-f115-39571d94dfcd | Sell goods and services to customers. | | Wix Events | 140603ad-af8d-84a5-2c80-a0f60cb47351 | Organize events, sell tickets, and manage RSVPs. | | Wix Forms (New) | 225dd912-7dea-4738-8688-4b8c6955ffc2 | Create custom forms for data collection. | | Wix Forms (Old) | 14ce1214-b278-a7e4-1373-00cebd1bef7c | Create custom forms for data collection. Old app. | | Wix Gift Cards | d80111c5-a0f4-47a8-b63a-65b54d774a27 | Sell Gift Cards | | Wix Groups | 148c2287-c669-d849-d153-463c7486a694 | Manage groups for site member discussions and content sharing. | | Wix Hotels | 135aad86-9125-6074-7346-29dc6a3c9bcf | Manage hotel reservations. | | Wix Inbox | 141fbfae-511e-6817-c9f0-48993a7547d1 | Manage customer communications. | | Wix Invoices | 13ee94c1-b635-8505-3391-97919052c16f | Generate and send invoices to clients. | | Wix Meetings | 6646a75c-2027-4f49-976c-58f3d713ed0f | Schedule client meetings through shareable links. | | Wix Multilingual | 14d84998-ae09-1abf-c6fc-3f3cace5bf19 | Translate site content. | | Wix Music | 13bb5d67-1add-e770-a71f-001277e17c57 | Stream and sell music online. | | Wix Online Programs | 2936472a-a1ed-4ae5-9f71-614313a9f4e7 | Build and sell online courses. | | Wix Pay Button | 3575d251-42c3-4992-adff-170b2af90a2c | Process payments. | | Wix Portfolio | d90652a2-f5a1-4c7c-84c4-d4cdcc41f130 | Showcase images and videos in a customizable portfolio. | | Wix Pricing Plans | 1522827f-c56c-a5c9-2ac9-00f9e6ae12d3 | Offer subscriptions or membership plans. | | Wix Restaurants Menus | b278a256-2757-4f19-9313-c05c783bec92 | Create and manage food menus. | | Wix Restaurants Orders (New) | 9a5d83fd-8570-482e-81ab-cfa88942ee60 | Take online orders for food and drinks. | | Wix Restaurants Orders (Old) | 13e8d036-5516-6104-b456-c8466db39542 | Take online orders for food and drinks. Old app. | | Wix Services | cc552162-24a4-45e0-9695-230c4931ef40 | Showcase services and collect client inquiries. | | Wix Stores | 215238eb-22a5-4c36-9e7b-e7c08025e04e | Sell physical or digital products to customers. | | Wix Subscriptions | 8725b255-2aa2-4a53-b76d-7d3c363aaeea | Manage recurring billing and subscriptions. | | Wix Table Reservations | f9c07de2-5341-40c6-b096-8eb39de391fb | Manage table reservations. | | Wix Video | 14409595-f076-4753-8303-9a86f9f71469 | Upload and share videos on your website. | --- > Portal Navigation: > > - Append `.md` to any URL under `https://dev.wix.com/docs/` to get its markdown version. > - Pages are either content pages (article or reference text) or menu pages (a list of links to child pages). > - To get a menu page, truncate any URL to a parent path and append `.md` (e.g. `https://dev.wix.com/docs/sdk.md`, `https://dev.wix.com/docs/sdk/core-modules.md`). > - Top-level index of all portals: https://dev.wix.com/docs/llms.txt > - Full concatenated docs: https://dev.wix.com/docs/llms-full.txt ## Resource: About Developer Preview ## Article: About Developer Preview ## Article Link: https://dev.wix.com/docs/api-reference/articles/work-with-wix-apis/platform/about-developer-preview.md ## Article Content: # About Developer Preview Wix is always in active development, constantly adding new APIs. To ensure we're building the functionality you need, some APIs are released in Developer Preview mode for developer testing and feedback before full release. APIs in Developer Preview mode include the following note in their introductions. When this note is removed, the API is fully released.
    Developer Preview
    This API is subject to change. Bug fixes and new features will be released based on developer feedback throughout the preview period.
    ## Breaking changes APIs in Developer Preview are still in development. This means that Wix **may change them at any time**. Notifications about breaking changes appear in the [changelog](https://dev.wix.com/changelog) and in the API reference for the affected methods and properties. Wix won't contact you directly about breaking changes. Because Wix may introduce breaking changes to these APIs, you shouldn't use them on live sites. They're for testing and feedback purposes only. ## Time limit APIs only stay in Developer Preview mode for a maximum of 6 months. After that, they're fully released, and Wix won't make any breaking changes to them. ## Feedback We would appreciate your feedback on the APIs in Developer Preview. Let us know about: - What you're using the API for. - Anything blocking you from using the API. - Additions and features you would find useful. Please [contact us](https://discord.com/channels/1114269395317968906/1288424315838005259) with your feedback. ## Bugs If you discover a bug in a Developer Preview API, please [contact us](https://discord.com/channels/1114269395317968906/1288424315838005259) and let us know. We'll fix the bug as soon as possible. ## Methods in developer preview The following methods are currently in developer preview: ### AI Credits | Method | Description | | ------------------------------------------------------------------------------------------ | ------------------------------------------------- | | [Get Balance](https://dev.wix.com/docs/api-reference/account-level/ai-credits/get-balance.md) | Retrieves an account's current AI credit balance. | ### Account V1 | Method | Description | | ------------------------------------------------------------------------------------------------------------------------------------------------------- | ----------------------------------------------------------------------------------------------------------------------- | | [Get Long Lived Token Status](https://dev.wix.com/docs/api-reference/business-management/marketing/social-media/account-v1/get-long-lived-token-status.md) | Retrieves the connection status of a site's social channel account. | | [List Accounts](https://dev.wix.com/docs/api-reference/business-management/marketing/social-media/account-v1/list-accounts.md) | Retrieves the connected accounts for a social channel. | | [Update Account Settings](https://dev.wix.com/docs/api-reference/business-management/marketing/social-media/account-v1/update-account-settings.md) | Updates the settings for a connected social channel account, such as the default page, board, or account to publish to. | ### Accounts | Method | Description | | ------------------------------------------------------------------------------------------------------------------------------------------------------- | --------------------------------------------------------------------------------------------------- | | [Connect Account](https://dev.wix.com/docs/api-reference/business-management/payments/payment-service-provider-service-plugin/accounts/connect-account.md) | This endpoint is used to connect a merchant's Payment Service Provider (PSP) account to a Wix site. | ### Action Catalog | Method | Description | | ------------------------------------------------------------------------------------------------------------------------------------------------------------------------------ | -------------------------------------------------------------------------------------------------------------------------------------------------------------------------------------------------------------------------------------------------------------------------------------------------------------------------------------------------------------------------------------------------------------------------------------------------- | | [Get Action](https://dev.wix.com/docs/api-reference/business-management/automations/actions/action-catalog/get-action.md) | Retrieves a specific version of an action by ID. | | [Create Action](https://dev.wix.com/docs/api-reference/business-management/automations/actions/action-catalog/create-action.md) | Creates an action for the specified app | | [Update Action](https://dev.wix.com/docs/api-reference/business-management/automations/actions/action-catalog/update-action.md) | Updates the specified action for the specified app. | | [Delete Action](https://dev.wix.com/docs/api-reference/business-management/automations/actions/action-catalog/delete-action.md) | Deletes an action from the specified app. | | [Get Runtime Action](https://dev.wix.com/docs/api-reference/business-management/automations/actions/action-catalog/get-runtime-action.md) | Retrieves the version of an action that's currently active on the site. | | [Get Latest Action](https://dev.wix.com/docs/api-reference/business-management/automations/actions/action-catalog/get-latest-action.md) | Retrieves the latest version of an action, regardless of the site on which it's installed. | | [Get Action Dynamic Input Schema](https://dev.wix.com/docs/api-reference/business-management/automations/actions/action-catalog/get-action-dynamic-input-schema.md) | Retrieves an action's dynamic [input schema](https://dev.wix.com/docs/api-reference/business-management/automations/actions/the-action-input-schema.md) and [UI schema](https://dev.wix.com/docs/api-reference/business-management/automations/actions/about-actions.md#the-ui-schema), based on the [action's input mapping](https://dev.wix.com/docs/api-reference/business-management/automations/actions/about-actions.md#understanding-input-mapping). | | [Copy Input Mapping](https://dev.wix.com/docs/api-reference/business-management/automations/actions/action-catalog/copy-input-mapping.md) | Retrieves a copy of an action's input mapping, with any per-action unique values regenerated. | | [Get Action Dynamic Output Schema](https://dev.wix.com/docs/api-reference/business-management/automations/actions/action-catalog/get-action-dynamic-output-schema.md) | Retrieves an [action's dynamic output schema](https://dev.wix.com/docs/api-reference/business-management/automations/actions/about-actions.md#the-output-schema), based on the action's input mapping. | | [Bulk Get Action Dynamic Output Schemas](https://dev.wix.com/docs/api-reference/business-management/automations/actions/action-catalog/bulk-get-action-dynamic-output-schemas.md) | Retrieves dynamic output schemas for multiple actions in a single request. | | [Generate Input Mapping From Intent](https://dev.wix.com/docs/api-reference/business-management/automations/actions/action-catalog/generate-input-mapping-from-intent.md) | Generates an action's input mapping from a natural language description of the desired configuration. | | [Query Actions](https://dev.wix.com/docs/api-reference/business-management/automations/actions/action-catalog/query-actions.md) | Retrieves a list of actions, based on the provided paging, filtering, and sorting. | | [Query Latest Actions](https://dev.wix.com/docs/api-reference/business-management/automations/actions/action-catalog/query-latest-actions.md) | Retrieves a list of the latest version of each action, based on the provided paging, filtering, and sorting. | ### Action Provider Service Plugin | Method | Description | | -------------------------------------------------------------------------------------------------------------------------------------------------------------- | ------------------------------------------------------------------ | | [Validate Configuration](https://dev.wix.com/docs/api-reference/business-management/automations/actions/action-provider-service-plugin/validate-configuration.md) | This method is used to validate a Wix user's action configuration. | | [Get Quota Info](https://dev.wix.com/docs/api-reference/business-management/automations/actions/action-provider-service-plugin/get-quota-info.md) | This method retrieves quota information for an action. | | [Invoke](https://dev.wix.com/docs/api-reference/business-management/automations/actions/action-provider-service-plugin/invoke.md) | Runs your action. | ### Add-Ons | Method | Description | | ------------------------------------------------------------------------------------------------------------------------------ | -------------------------------------------------------------------------------- | | [Create Add On](https://dev.wix.com/docs/api-reference/business-solutions/bookings/services/add-ons/create-add-on.md) | Creates an add-on. | | [Get Add On](https://dev.wix.com/docs/api-reference/business-solutions/bookings/services/add-ons/get-add-on.md) | Retrieves an add-on. | | [Delete Add On](https://dev.wix.com/docs/api-reference/business-solutions/bookings/services/add-ons/delete-add-on.md) | Deletes an add-on and removes it from all add-on groups. | | [Update Add On](https://dev.wix.com/docs/api-reference/business-solutions/bookings/services/add-ons/update-add-on.md) | Updates an existing add-on. | | [Query Add Ons](https://dev.wix.com/docs/api-reference/business-solutions/bookings/services/add-ons/query-add-ons.md) | Retrieves up to 100 add-ons, given the specified filtering, sorting, and paging. | | [Bulk Create Add Ons](https://dev.wix.com/docs/api-reference/business-solutions/bookings/services/add-ons/bulk-create-add-ons.md) | Creates multiple add-ons in a single request. | | [Bulk Update Add Ons](https://dev.wix.com/docs/api-reference/business-solutions/bookings/services/add-ons/bulk-update-add-ons.md) | Updates multiple add-ons in a single request. | | [Bulk Delete Add Ons](https://dev.wix.com/docs/api-reference/business-solutions/bookings/services/add-ons/bulk-delete-add-ons.md) | Deletes multiple add-ons in a single request. | ### Additional Fees Service Plugin | Method | Description | | ------------------------------------------------------------------------------------------------------------------------------------------------------------------------------------- | --------------------------------------------------------------------------------------------------------- | | [Calculate Additional Fees](https://dev.wix.com/docs/api-reference/business-solutions/e-commerce/extensions/additional-fees/additional-fees-service-plugin/calculate-additional-fees.md) | Requests calculation of additional fees from the service plugin implementer for a given cart or checkout. | ### App Installations | Method | Description | | -------------------------------------------------------------------------------------------------------------------------- | --------------------------------------------------------------------------------------------------- | | [Query App Installations](https://dev.wix.com/docs/api-reference/app-management/app-installations/query-app-installations.md) | Retrieves a list of up to 100 app installations, with the specified paging, filtering, and sorting. | | [Search App Installation](https://dev.wix.com/docs/api-reference/app-management/app-installations/search-app-installation.md) | Retrieves a list of up to 100 app installations that match a free-text search expression. | ### Attendance | Method | Description | | ----------------------------------------------------------------------------------------------------------------------------- | ------------------------------------------------------------------------------------------------------------------------------------ | | [Count Attendances](https://dev.wix.com/docs/api-reference/business-solutions/bookings/bookings/attendance/count-attendances.md) | Counts attendance records for the calling [member](https://dev.wix.com/docs/api-reference/crm/members-contacts/members/introduction.md) | ### Authentication | Method | Description | | --------------------------------------------------------------------------------------------------------------------- | ----------------------------------------------------------------------- | | [Change Password](https://dev.wix.com/docs/api-reference/business-management/headless/authentication/change-password.md) | Changes the password of a logged-in member | | [Sign On](https://dev.wix.com/docs/api-reference/business-management/headless/authentication/sign-on.md) | Authenticates a member without credentials and returns a session token. | | [Logout](https://dev.wix.com/docs/api-reference/business-management/headless/authentication/logout.md) | Terminates the member's session and clears authentication cookies. | ### Availability Time Slots Configuration Service Plugin | Method | Description | | --------------------------------------------------------------------------------------------------------------------------------------------------------------------------------------------------------------------------- | --------------------------------------------------------------------------- | | [List Availability Time Slot Configurations](https://dev.wix.com/docs/api-reference/business-solutions/bookings/time-slots/availability-time-slots-configuration-service-plugin/list-availability-time-slot-configurations.md) | Retrieves availability time slot configurations for the specified services. | ### Booking Policy Service Plugin | Method | Description | | -------------------------------------------------------------------------------------------------------------------------------------------------------- | ------------------------------------------------------ | | [List Booking Policies](https://dev.wix.com/docs/api-reference/business-solutions/bookings/policies/booking-policy-service-plugin/list-booking-policies.md) | Retrieves booking policies for the specified services. | ### Bookings Validation Service Plugin | Method | Description | | --------------------------------------------------------------------------------------------------------------------------------------------------------------------------------------------------- | ------------------------------------------------------------------ | | [Validate Before Create](https://dev.wix.com/docs/api-reference/business-solutions/bookings/bookings/bookings-validation-service-plugin/validate-before-create.md) | Validates whether a booking can be created. | | [Validate Before Cancel](https://dev.wix.com/docs/api-reference/business-solutions/bookings/bookings/bookings-validation-service-plugin/validate-before-cancel.md) | Validates whether a booking can be canceled. | | [Validate Before Reschedule](https://dev.wix.com/docs/api-reference/business-solutions/bookings/bookings/bookings-validation-service-plugin/validate-before-reschedule.md) | Validates whether a booking can be rescheduled to a new time slot. | | [Validate Before Create Multi Service](https://dev.wix.com/docs/api-reference/business-solutions/bookings/bookings/bookings-validation-service-plugin/validate-before-create-multi-service.md) | Validates whether a multi-service booking can be created. | | [Validate Before Cancel Multi Service](https://dev.wix.com/docs/api-reference/business-solutions/bookings/bookings/bookings-validation-service-plugin/validate-before-cancel-multi-service.md) | Validates whether a multi-service booking can be canceled. | | [Validate Before Reschedule Multi Service](https://dev.wix.com/docs/api-reference/business-solutions/bookings/bookings/bookings-validation-service-plugin/validate-before-reschedule-multi-service.md) | Validates whether a multi-service booking can be rescheduled. | ### Bookings Writer V2 | Method | Description | | ------------------------------------------------------------------------------------------------------------------------------------------------------------------------------------------------- | --------------------------------------------------------------------------------------------------------------------------------------------------------------------------------- | | [Cancel Booking Anonymously](https://dev.wix.com/docs/api-reference/business-solutions/bookings/bookings/bookings-writer-v2/anonymous-booking-actions-service-cancel-booking-anonymously.md) | Cancels a booking using an anonymous token. | | [Reschedule Booking Anonymously](https://dev.wix.com/docs/api-reference/business-solutions/bookings/bookings/bookings-writer-v2/anonymous-booking-actions-service-reschedule-booking-anonymously.md) | Reschedules a booking to a new slot using an anonymous token. | | [Get Booking Anonymously](https://dev.wix.com/docs/api-reference/business-solutions/bookings/bookings/bookings-writer-v2/anonymous-booking-actions-service-get-booking-anonymously.md) | Retrieves a booking and its allowed anonymous actions using an anonymous token. | | [Get Service Anonymously](https://dev.wix.com/docs/api-reference/business-solutions/bookings/bookings/bookings-writer-v2/get-service-anonymously.md) | Retrieves the [service](https://dev.wix.com/docs/api-reference/business-solutions/bookings/services/services-v2/introduction.md) associated with a booking using an anonymous token. | | [Get Anonymous Action Token](https://dev.wix.com/docs/api-reference/business-solutions/bookings/bookings/bookings-writer-v2/get-anonymous-action-token.md) | Generates an anonymous action token for a booking. | ### Bulk Downloads | Method | Description | | ----------------------------------------------------------------------------------------------------------------------------------- | ------------------------------------------------------------------- | | [List My Bulk Downloads](https://dev.wix.com/docs/api-reference/business-management/get-paid/bulk-downloads/list-my-bulk-downloads.md) | Lists all bulk downloads available for the user that initiated them | | [Initiate Bulk Download](https://dev.wix.com/docs/api-reference/business-management/get-paid/bulk-downloads/initiate-bulk-download.md) | Initiates a bulk download process. | | [Get Bulk Download](https://dev.wix.com/docs/api-reference/business-management/get-paid/bulk-downloads/get-bulk-download.md) | Retrieves a bulk download. | | [Delete Bulk Download](https://dev.wix.com/docs/api-reference/business-management/get-paid/bulk-downloads/delete-bulk-download.md) | Deletes a bulk download. | ### Captcha | Method | Description | | ----------------------------------------------------------------------------------------- | --------------------------- | | [Authorize](https://dev.wix.com/docs/api-reference/business-management/captcha/authorize.md) | Authorizes a CAPTCHA token. | ### Categories | Method | Description | | ----------------------------------------------------------------------------------------------------------------------------------- | ---------------------------------------------------------------------------------- | | [Get Category By Slug](https://dev.wix.com/docs/api-reference/business-solutions/stores/catalog-v3/categories/get-category-by-slug.md) | Retrieves a category by its slug. | | [Create Category](https://dev.wix.com/docs/api-reference/crm/community/feedback-moderation/comments/categories/create-category.md) | Creates a new category. | | [Get Category](https://dev.wix.com/docs/api-reference/crm/community/feedback-moderation/comments/categories/get-category.md) | Retrieves a category by ID. | | [Delete Category](https://dev.wix.com/docs/api-reference/crm/community/feedback-moderation/comments/categories/delete-category.md) | Deletes a category. | | [Update Category](https://dev.wix.com/docs/api-reference/crm/community/feedback-moderation/comments/categories/update-category.md) | Updates a category. | | [Query Category](https://dev.wix.com/docs/api-reference/crm/community/feedback-moderation/comments/categories/query-category.md) | Retrieves a list of categories, with the specified paging, filtering, and sorting. | ### Custom Discount Triggers Integration Service Plugin | Method | Description | | -------------------------------------------------------------------------------------------------------------------------------------------------------------------------------------------- | ------------------------------------------------------------------------ | | [List Triggers](https://dev.wix.com/docs/api-reference/business-solutions/e-commerce/extensions/discounts/custom-discount-triggers-integration-service-plugin/list-triggers.md) | Lists all custom triggers provided by your service plugin integration. | | [Get Eligible Triggers](https://dev.wix.com/docs/api-reference/business-solutions/e-commerce/extensions/discounts/custom-discount-triggers-integration-service-plugin/get-eligible-triggers.md) | Retrieves eligible custom discount triggers based on the provided items. | ### Delivery Profiles | Method | Description | | ------------------------------------------------------------------------------------------------------------------------------------------------------------------------------------------------- | --------------------------------------------------------------------------------------------------- | | [Create Delivery Profile](https://dev.wix.com/docs/api-reference/business-solutions/e-commerce/shipping-delivery/delivery-profiles/create-delivery-profile.md) | Creates a delivery profile. | | [Get Delivery Profile](https://dev.wix.com/docs/api-reference/business-solutions/e-commerce/shipping-delivery/delivery-profiles/get-delivery-profile.md) | Retrieves a delivery profile. | | [Delete Delivery Profile](https://dev.wix.com/docs/api-reference/business-solutions/e-commerce/shipping-delivery/delivery-profiles/delete-delivery-profile.md) | Deletes a delivery profile. | | [Update Delivery Profile](https://dev.wix.com/docs/api-reference/business-solutions/e-commerce/shipping-delivery/delivery-profiles/update-delivery-profile.md) | Updates a delivery profile. | | [Query Delivery Profiles](https://dev.wix.com/docs/api-reference/business-solutions/e-commerce/shipping-delivery/delivery-profiles/query-delivery-profiles.md) | Retrieves a list of up to 100 delivery profiles, given the provided paging, filtering, and sorting. | | [Add Delivery Region](https://dev.wix.com/docs/api-reference/business-solutions/e-commerce/shipping-delivery/delivery-profiles/add-delivery-region.md) | Adds a delivery region to an existing delivery profile. | | [Update Delivery Region](https://dev.wix.com/docs/api-reference/business-solutions/e-commerce/shipping-delivery/delivery-profiles/update-delivery-region.md) | Updates a delivery region. | | [Get Delivery Profile By Delivery Region Id](https://dev.wix.com/docs/api-reference/business-solutions/e-commerce/shipping-delivery/delivery-profiles/get-delivery-profile-by-delivery-region-id.md) | Retrieves a delivery profile by delivery region ID. | | [Remove Delivery Region](https://dev.wix.com/docs/api-reference/business-solutions/e-commerce/shipping-delivery/delivery-profiles/remove-delivery-region.md) | Removes a delivery region from a delivery profile. | | [Add Delivery Carrier](https://dev.wix.com/docs/api-reference/business-solutions/e-commerce/shipping-delivery/delivery-profiles/add-delivery-carrier.md) | Adds a delivery carrier to a delivery region. | | [Remove Delivery Carrier](https://dev.wix.com/docs/api-reference/business-solutions/e-commerce/shipping-delivery/delivery-profiles/remove-delivery-carrier.md) | Removes a delivery carrier from a delivery region. | | [Update Delivery Carrier](https://dev.wix.com/docs/api-reference/business-solutions/e-commerce/shipping-delivery/delivery-profiles/update-delivery-carrier.md) | Updates a delivery carrier's settings in a delivery region. | | [List Installed Delivery Carriers](https://dev.wix.com/docs/api-reference/business-solutions/e-commerce/shipping-delivery/delivery-profiles/list-installed-delivery-carriers.md) | Retrieves a list of all delivery carriers installed on a site. | | [Get Delivery Destination Properties](https://dev.wix.com/docs/api-reference/business-solutions/e-commerce/shipping-delivery/delivery-profiles/get-delivery-destination-properties.md) | Retrieves delivery destination properties. | | [List Delivery Carriers](https://dev.wix.com/docs/api-reference/business-solutions/e-commerce/shipping-delivery/delivery-profiles/list-delivery-carriers.md) | Retrieves delivery carrier settings for a delivery profile. | | [Set Delivery Carrier Active Status](https://dev.wix.com/docs/api-reference/business-solutions/e-commerce/shipping-delivery/delivery-profiles/set-delivery-carrier-active-status.md) | Sets a delivery carrier's active status. | | [Update Extended Fields](https://dev.wix.com/docs/api-reference/business-solutions/e-commerce/shipping-delivery/delivery-profiles/update-extended-fields.md) | Updates extended fields of a delivery profile without incrementing revision. | ### Dispute Evidence Documents | Method | Description | | -------------------------------------------------------------------------------------------------------------------------------------------------------------------------------------------------------------------- | -------------------------------------------------------------------------------------------------- | | [Create Dispute Evidence Document](https://dev.wix.com/docs/api-reference/business-management/payments/disputes/dispute-evidence-documents/create-dispute-evidence-document.md) | Creates a dispute evidence document for a specific dispute. | | [Get Dispute Evidence Document](https://dev.wix.com/docs/api-reference/business-management/payments/disputes/dispute-evidence-documents/get-dispute-evidence-document.md) | Retrieves a dispute evidence document. | | [Delete Dispute Evidence Document](https://dev.wix.com/docs/api-reference/business-management/payments/disputes/dispute-evidence-documents/delete-dispute-evidence-document.md) | Deletes a dispute evidence document. | | [Query Dispute Evidence Documents](https://dev.wix.com/docs/api-reference/business-management/payments/disputes/dispute-evidence-documents/query-dispute-evidence-documents.md) | Retrieves a list of dispute evidence documents, given the provided paging, filtering, and sorting. | | [Bulk Update Dispute Evidence Document Tags](https://dev.wix.com/docs/api-reference/business-management/payments/disputes/dispute-evidence-documents/bulk-update-dispute-evidence-document-tags.md) | Updates tags on multiple dispute evidence documents by ID. | | [Bulk Update Dispute Evidence Document Tags By Filter](https://dev.wix.com/docs/api-reference/business-management/payments/disputes/dispute-evidence-documents/bulk-update-dispute-evidence-document-tags-by-filter.md) | Asynchronously updates tags on multiple dispute evidence documents based on filter criteria | ### Email Subscriptions | Method | Description | | --------------------------------------------------------------------------------------------------------------------------------------------- | --------------------------------------------------------------------------------- | | [Query Email Subscriptions](https://dev.wix.com/docs/api-reference/crm/communication/email-subscriptions/query-email-subscriptions.md) | Retrieves email subscriptions, given the provided paging, filtering, and sorting. | | [Upsert Email Subscription](https://dev.wix.com/docs/api-reference/crm/communication/email-subscriptions/upsert-email-subscription.md) | Updates or creates an email subscription for the requested email. | | [Bulk Upsert Email Subscription](https://dev.wix.com/docs/api-reference/crm/communication/email-subscriptions/bulk-upsert-email-subscription.md) | Updates or creates multiple email subscriptions. | | [Generate Unsubscribe Link](https://dev.wix.com/docs/api-reference/crm/communication/email-subscriptions/generate-unsubscribe-link.md) | Creates an unsubscribe link to be shared with the relevant recipient. | ### External Database Service Plugin | Method | Description | | ---------------------------------------------------------------------------------------------------------------------------------------------------------------------------- | ------------------------------------------------------------------------------------------------------------- | | [Query Data Items](https://dev.wix.com/docs/api-reference/business-solutions/cms/external-databases/external-database-service-plugin/query-data-items.md) | Retrieves a list of items based on the provided filtering, sorting, and paging preferences. | | [Count Data Items](https://dev.wix.com/docs/api-reference/business-solutions/cms/external-databases/external-database-service-plugin/count-data-items.md) | Counts the number of items in the specified data collection that match the filtering preferences. | | [Aggregate Data Items](https://dev.wix.com/docs/api-reference/business-solutions/cms/external-databases/external-database-service-plugin/aggregate-data-items.md) | Runs an aggregation query on the specified data collection and returns the resulting list of items. | | [Query Distinct Values](https://dev.wix.com/docs/api-reference/business-solutions/cms/external-databases/external-database-service-plugin/query-distinct-values.md) | Retrieves a list of distinct values for a given field for all items that match the query, without duplicates. | | [Insert Data Items](https://dev.wix.com/docs/api-reference/business-solutions/cms/external-databases/external-database-service-plugin/insert-data-items.md) | Adds one or more items to a collection. | | [Update Data Items](https://dev.wix.com/docs/api-reference/business-solutions/cms/external-databases/external-database-service-plugin/update-data-items.md) | Updates one or more items in a collection | | [Remove Data Items](https://dev.wix.com/docs/api-reference/business-solutions/cms/external-databases/external-database-service-plugin/remove-data-items.md) | Removes one or more items from a collection | | [Truncate Data Items](https://dev.wix.com/docs/api-reference/business-solutions/cms/external-databases/external-database-service-plugin/truncate-data-items.md) | Removes all items from a collection. | | [Query Referenced Data Items](https://dev.wix.com/docs/api-reference/business-solutions/cms/external-databases/external-database-service-plugin/query-referenced-data-items.md) | Retrieves the items referenced in the specified field of a referring item | | [Insert Data Item References](https://dev.wix.com/docs/api-reference/business-solutions/cms/external-databases/external-database-service-plugin/insert-data-item-references.md) | Inserts one or more item references into a referring field of the specified item. | | [Remove Data Item References](https://dev.wix.com/docs/api-reference/business-solutions/cms/external-databases/external-database-service-plugin/remove-data-item-references.md) | Removes one or more item references from a referring field of the specified item. | | [List Collections](https://dev.wix.com/docs/api-reference/business-solutions/cms/external-databases/external-database-service-plugin/list-collections.md) | Retrieves a list of data collections and their details. | | [Create Collection](https://dev.wix.com/docs/api-reference/business-solutions/cms/external-databases/external-database-service-plugin/create-collection.md) | Creates a new data collection. | | [Update Collection](https://dev.wix.com/docs/api-reference/business-solutions/cms/external-databases/external-database-service-plugin/update-collection.md) | Updates the structure of an existing data collection. | | [Delete Collection](https://dev.wix.com/docs/api-reference/business-solutions/cms/external-databases/external-database-service-plugin/delete-collection.md) | Deletes a data collection. | | [Get Capabilities](https://dev.wix.com/docs/api-reference/business-solutions/cms/external-databases/external-database-service-plugin/get-capabilities.md) | Lists the global capabilities the external database supports. | ### Form Submissions Service Plugin | Method | Description | | ------------------------------------------------------------------------------------------------------------------------------------------- | ----------- | | [Validate Submission](https://dev.wix.com/docs/api-reference/crm/forms/service-plugins/form-submissions-service-plugin/validate-submission.md) | | ### Fulfillment Methods | Method | Description | | -------------------------------------------------------------------------------------------------------------------------------------------------------------------------------------------------------- | -------------------------------------------------------------------------------------------- | | [List Fulfillment Methods](https://dev.wix.com/docs/api-reference/business-solutions/restaurants/online-orders/fulfillment-methods/list-fulfillment-methods.md) | Retrieves a list of up to 100 fulfillment methods. | | [Create Fulfillment Method](https://dev.wix.com/docs/api-reference/business-solutions/restaurants/online-orders/fulfillment-methods/create-fulfillment-method.md) | Creates a new fulfillment method. | | [Bulk Create Fulfillment Methods](https://dev.wix.com/docs/api-reference/business-solutions/restaurants/online-orders/fulfillment-methods/bulk-create-fulfillment-methods.md) | Create multiple fulfillment methods at once. | | [Get Fulfillment Method](https://dev.wix.com/docs/api-reference/business-solutions/restaurants/online-orders/fulfillment-methods/get-fulfillment-method.md) | Retrieves a fulfillment method. | | [Delete Fulfillment Method](https://dev.wix.com/docs/api-reference/business-solutions/restaurants/online-orders/fulfillment-methods/delete-fulfillment-method.md) | Deletes a fulfillment method. | | [Update Fulfillment Method](https://dev.wix.com/docs/api-reference/business-solutions/restaurants/online-orders/fulfillment-methods/update-fulfillment-method.md) | Updates a fulfillment method. | | [Query Fulfillment Methods](https://dev.wix.com/docs/api-reference/business-solutions/restaurants/online-orders/fulfillment-methods/query-fulfillment-methods.md) | Retrieves a list of fulfillment methods given the provided paging, filtering, and sorting | | [List Available Fulfillment Methods For Address](https://dev.wix.com/docs/api-reference/business-solutions/restaurants/online-orders/fulfillment-methods/list-available-fulfillment-methods-for-address.md) | Retrieves a list of up to 100 fulfillment methods available for a given address. | | [Get Aggregated Method Availability](https://dev.wix.com/docs/api-reference/business-solutions/restaurants/online-orders/fulfillment-methods/get-aggregated-method-availability.md) | Retrieves the aggregated availability of a list of fulfillment methods. | | [Bulk Update Fulfillment Method Tags](https://dev.wix.com/docs/api-reference/business-solutions/restaurants/online-orders/fulfillment-methods/bulk-update-fulfillment-method-tags.md) | Synchronously update tags on multiple fulfillment methods | | [Bulk Update Fulfillment Method Tags By Filter](https://dev.wix.com/docs/api-reference/business-solutions/restaurants/online-orders/fulfillment-methods/bulk-update-fulfillment-method-tags-by-filter.md) | Asynchronously update tags on multiple fulfillment methods according to the specified filter | ### Generated Content V1 | Method | Description | | ----------------------------------------------------------------------------------------------------------------------------------------------- | ------------------------------------------------------- | | [Generate Text](https://dev.wix.com/docs/api-reference/business-management/marketing/social-media/generated-content-v1/generate-text.md) | Generates post captions from a text prompt. | | [Generate Post Data](https://dev.wix.com/docs/api-reference/business-management/marketing/social-media/generated-content-v1/generate-post-data.md) | Generates post content for one or more social channels. | ### Gift Card Products | Method | Description | | -------------------------------------------------------------------------------------------------------------------------------------------- | ------------------------------------------------------------------------------------------------------ | | [Create Gift Card Product](https://dev.wix.com/docs/api-reference/business-solutions/gift-cards/gift-card-products/create-gift-card-product.md) | Creates a gift card product. | | [Get Gift Card Product](https://dev.wix.com/docs/api-reference/business-solutions/gift-cards/gift-card-products/get-gift-card-product.md) | Retrieves a gift card product. | | [Delete Gift Card Product](https://dev.wix.com/docs/api-reference/business-solutions/gift-cards/gift-card-products/delete-gift-card-product.md) | Deletes a gift card product | | [Update Gift Card Product](https://dev.wix.com/docs/api-reference/business-solutions/gift-cards/gift-card-products/update-gift-card-product.md) | Updates a gift card product. | | [Query Gift Card Products](https://dev.wix.com/docs/api-reference/business-solutions/gift-cards/gift-card-products/query-gift-card-products.md) | Retrieves a list of up to 1,000 gift card products, given the provided paging, filtering, and sorting. | ### Gift Cards Service Plugin | Method | Description | | --------------------------------------------------------------------------------------------------------------------------------------------- | ----------------------------------------------------------------------- | | [Get Balance](https://dev.wix.com/docs/api-reference/business-solutions/e-commerce/payments/gift-cards/gift-cards-service-plugin/get-balance.md) | This method retrieves gift card data from your app | | [Redeem](https://dev.wix.com/docs/api-reference/business-solutions/e-commerce/payments/gift-cards/gift-cards-service-plugin/redeem.md) | This method requests that a transaction be created by your app | | [Void](https://dev.wix.com/docs/api-reference/business-solutions/e-commerce/payments/gift-cards/gift-cards-service-plugin/void.md) | This method requests that a gift card transaction be voided by your app | ### Intake Form V1 | Method | Description | | --------------------------------------------------------------------------------------------------------------------------------------------------- | ---------------------------------------------------------------------------------------------------- | | [Create Intake Form](https://dev.wix.com/docs/api-reference/account-level/partners/content-collector/intake-form-v1/create-intake-form.md) | Creates an intake form. | | [Get Intake Form](https://dev.wix.com/docs/api-reference/account-level/partners/content-collector/intake-form-v1/get-intake-form.md) | Retrieves an intake form by ID. | | [Delete Intake Form](https://dev.wix.com/docs/api-reference/account-level/partners/content-collector/intake-form-v1/delete-intake-form.md) | Deletes an intake form. | | [Update Intake Form](https://dev.wix.com/docs/api-reference/account-level/partners/content-collector/intake-form-v1/update-intake-form.md) | Updates an intake form. | | [Query Intake Forms](https://dev.wix.com/docs/api-reference/account-level/partners/content-collector/intake-form-v1/query-intake-forms.md) | Retrieves a list of up to 100 intake forms, given the provided paging, filtering, and sorting. | | [Bulk Create Intake Forms](https://dev.wix.com/docs/api-reference/account-level/partners/content-collector/intake-form-v1/bulk-create-intake-forms.md) | Creates multiple intake forms in a single request. | | [Bulk Update Intake Forms](https://dev.wix.com/docs/api-reference/account-level/partners/content-collector/intake-form-v1/bulk-update-intake-forms.md) | Updates multiple intake forms in a single request. | | [Get Client Intake Form](https://dev.wix.com/docs/api-reference/account-level/partners/content-collector/intake-form-v1/get-client-intake-form.md) | Retrieves an intake form on behalf of the client who is filling it out. | | [Search Intake Forms](https://dev.wix.com/docs/api-reference/account-level/partners/content-collector/intake-form-v1/search-intake-forms.md) | Searches intake forms using a free-text expression matched against the client name and project name. | | [Bulk Delete Intake Forms](https://dev.wix.com/docs/api-reference/account-level/partners/content-collector/intake-form-v1/bulk-delete-intake-forms.md) | Deletes multiple intake forms in a single request. | ### Item Labels | Method | Description | | -------------------------------------------------------------------------------------------------------------------------- | --------------------------------------------------------------------------------- | | [List Labels](https://dev.wix.com/docs/api-reference/business-solutions/restaurants/menus/items/item-labels/list-labels.md) | Retrieves a list of up to 500 item labels. | | [Create Label](https://dev.wix.com/docs/api-reference/business-solutions/restaurants/menus/items/item-labels/create-label.md) | Creates an item label. | | [Get Label](https://dev.wix.com/docs/api-reference/business-solutions/restaurants/menus/items/item-labels/get-label.md) | Retrieves an item label by ID. | | [Delete Label](https://dev.wix.com/docs/api-reference/business-solutions/restaurants/menus/items/item-labels/delete-label.md) | Deletes an item label. | | [Query Labels](https://dev.wix.com/docs/api-reference/business-solutions/restaurants/menus/items/item-labels/query-labels.md) | Retrieves a list of item labels given the provided paging, filtering, and sorting | | [Update Label](https://dev.wix.com/docs/api-reference/business-solutions/restaurants/menus/items/item-labels/update-label.md) | Updates an item Label. | ### Item Modifier Groups | Method | Description | | ----------------------------------------------------------------------------------------------------------------------------------------------------------------- | ------------------------------------------------------------------------------------- | | [List Modifier Groups](https://dev.wix.com/docs/api-reference/business-solutions/restaurants/menus/items/item-modifier-groups/list-modifier-groups.md) | Retrieves a list of up to 500 modifier groups. | | [Create Modifier Group](https://dev.wix.com/docs/api-reference/business-solutions/restaurants/menus/items/item-modifier-groups/create-modifier-group.md) | Creates a modifier group. | | [Get Modifier Group](https://dev.wix.com/docs/api-reference/business-solutions/restaurants/menus/items/item-modifier-groups/get-modifier-group.md) | Retrieves a modifier group by the ID. | | [Delete Modifier Group](https://dev.wix.com/docs/api-reference/business-solutions/restaurants/menus/items/item-modifier-groups/delete-modifier-group.md) | Deletes a modifier group. | | [Query Modifier Groups](https://dev.wix.com/docs/api-reference/business-solutions/restaurants/menus/items/item-modifier-groups/query-modifier-groups.md) | Retrieves a list of modifier groups given the provided paging, filtering, and sorting | | [Count Modifier Groups](https://dev.wix.com/docs/api-reference/business-solutions/restaurants/menus/items/item-modifier-groups/count-modifier-groups.md) | Retrieves the number of modifier groups that match a specified filter. | | [Update Modifier Group](https://dev.wix.com/docs/api-reference/business-solutions/restaurants/menus/items/item-modifier-groups/update-modifier-group.md) | Updates a modifier group. | | [Bulk Create Modifier Groups](https://dev.wix.com/docs/api-reference/business-solutions/restaurants/menus/items/item-modifier-groups/bulk-create-modifier-groups.md) | Creates multiple modifier groups. | | [Bulk Update Modifier Groups](https://dev.wix.com/docs/api-reference/business-solutions/restaurants/menus/items/item-modifier-groups/bulk-update-modifier-groups.md) | Updates multiple item modifier groups at once | ### Item Modifiers | Method | Description | | ----------------------------------------------------------------------------------------------------------------------------------------------- | ------------------------------------------------------------------------------------ | | [List Modifiers](https://dev.wix.com/docs/api-reference/business-solutions/restaurants/menus/items/item-modifiers/list-modifiers.md) | Retrieves a list of up to 500 item modifiers. | | [Create Modifier](https://dev.wix.com/docs/api-reference/business-solutions/restaurants/menus/items/item-modifiers/create-modifier.md) | Creates an item modifier. | | [Get Modifier](https://dev.wix.com/docs/api-reference/business-solutions/restaurants/menus/items/item-modifiers/get-modifier.md) | Retrieves an item modifier by ID. | | [Delete Modifier](https://dev.wix.com/docs/api-reference/business-solutions/restaurants/menus/items/item-modifiers/delete-modifier.md) | | | [Update Modifier](https://dev.wix.com/docs/api-reference/business-solutions/restaurants/menus/items/item-modifiers/update-modifier.md) | Updates an item modifier. | | [Bulk Create Modifiers](https://dev.wix.com/docs/api-reference/business-solutions/restaurants/menus/items/item-modifiers/bulk-create-modifiers.md) | Creates multiple item modifiers. | | [Bulk Update Modifiers](https://dev.wix.com/docs/api-reference/business-solutions/restaurants/menus/items/item-modifiers/bulk-update-modifiers.md) | Updates multiple item modifiers at once | | [Query Modifiers](https://dev.wix.com/docs/api-reference/business-solutions/restaurants/menus/items/item-modifiers/query-modifiers.md) | Retrieves a list of item modifiers given the provided paging, filtering, and sorting | | [Count Modifiers](https://dev.wix.com/docs/api-reference/business-solutions/restaurants/menus/items/item-modifiers/count-modifiers.md) | Retrieves the number of modifiers that match a specified filter. | | [Bulk Delete Modifiers](https://dev.wix.com/docs/api-reference/business-solutions/restaurants/menus/items/item-modifiers/bulk-delete-modifiers.md) | Deletes multiple item Modifiers at once. | ### Item V1 | Method | Description | | ---------------------------------------------------------------------------------------------------------------------------------------- | ----------------------------------------------------------------------------- | | [Publish Item](https://dev.wix.com/docs/api-reference/business-management/marketing/social-media/item-v1/publish-item.md) | Publishes an item to a connected social channel. | | [Publish Item By Id](https://dev.wix.com/docs/api-reference/business-management/marketing/social-media/item-v1/publish-item-by-id.md) | Publishes a previously created item by its `id`. | | [Get Items](https://dev.wix.com/docs/api-reference/business-management/marketing/social-media/item-v1/get-items.md) | Retrieves a list of items by their IDs. | | [Create Draft Item](https://dev.wix.com/docs/api-reference/business-management/marketing/social-media/item-v1/create-draft-item.md) | Creates a draft item. | | [Get Item](https://dev.wix.com/docs/api-reference/business-management/marketing/social-media/item-v1/get-item.md) | Retrieves an item by ID. | | [Delete Item](https://dev.wix.com/docs/api-reference/business-management/marketing/social-media/item-v1/delete-item.md) | Deletes an item. | | [Query Items](https://dev.wix.com/docs/api-reference/business-management/marketing/social-media/item-v1/query-items.md) | Retrieves a list of items, given the provided paging, filtering, and sorting. | | [Cancel Scheduled Item](https://dev.wix.com/docs/api-reference/business-management/marketing/social-media/item-v1/cancel-scheduled-item.md) | Cancels the scheduling of a scheduled item. | | [Update Item](https://dev.wix.com/docs/api-reference/business-management/marketing/social-media/item-v1/update-item.md) | Updates an item. | | [Reschedule Item](https://dev.wix.com/docs/api-reference/business-management/marketing/social-media/item-v1/reschedule-item.md) | Changes the scheduled publish date of a scheduled item. | | [Bulk Publish Items](https://dev.wix.com/docs/api-reference/business-management/marketing/social-media/item-v1/bulk-publish-items.md) | Publishes multiple items in a single call. | ### Item Variants | Method | Description | | -------------------------------------------------------------------------------------------------------------------------------------------- | ----------------------------------------------------------------------------------- | | [List Variants](https://dev.wix.com/docs/api-reference/business-solutions/restaurants/menus/items/item-variants/list-variants.md) | Retrieves a list of up to 500 item variants. | | [Create Variant](https://dev.wix.com/docs/api-reference/business-solutions/restaurants/menus/items/item-variants/create-variant.md) | Creates an item variant. | | [Get Variant](https://dev.wix.com/docs/api-reference/business-solutions/restaurants/menus/items/item-variants/get-variant.md) | Retrieves an item variant by ID. | | [Delete Variant](https://dev.wix.com/docs/api-reference/business-solutions/restaurants/menus/items/item-variants/delete-variant.md) | Permanently deletes an item variant. | | [Update Variant](https://dev.wix.com/docs/api-reference/business-solutions/restaurants/menus/items/item-variants/update-variant.md) | Updates an item variant. | | [Bulk Create Variants](https://dev.wix.com/docs/api-reference/business-solutions/restaurants/menus/items/item-variants/bulk-create-variants.md) | Creates multiple item variants. | | [Bulk Update Variants](https://dev.wix.com/docs/api-reference/business-solutions/restaurants/menus/items/item-variants/bulk-update-variants.md) | Updates multiple item variants. | | [Query Variants](https://dev.wix.com/docs/api-reference/business-solutions/restaurants/menus/items/item-variants/query-variants.md) | Retrieves a list of item variants given the provided paging, filtering, and sorting | | [Count Variants](https://dev.wix.com/docs/api-reference/business-solutions/restaurants/menus/items/item-variants/count-variants.md) | Retrieves the number of item variants that match a specified filter. | | [Bulk Delete Variants](https://dev.wix.com/docs/api-reference/business-solutions/restaurants/menus/items/item-variants/bulk-delete-variants.md) | Deletes multiple item variants at once. | ### Market Listing | Method | Description | | --------------------------------------------------------------------------------------------------------------------- | ---------------------------------------------------------- | | [Search Market Listings](https://dev.wix.com/docs/api-reference/app-management/market-listing/search-market-listings.md) | Searches published market listings by keyword or app name. | ### Marketplace Provider Service Plugin | Method | Description | | -------------------------------------------------------------------------------------------------------------------------------------------------------------------- | ------------------------------------------------------------------------------------------------------------------ | | [Bulk Add Products To Store](https://dev.wix.com/docs/api-reference/business-solutions/suppliers-hub/marketplace-provider-service-plugin/bulk-add-products-to-store.md) | Retrieves full product details from the marketplace provider and adds them to the site owner's Wix Stores catalog. | | [Bulk Generate Mockups](https://dev.wix.com/docs/api-reference/business-solutions/suppliers-hub/marketplace-provider-service-plugin/bulk-generate-mockups.md) | Generates product mockup images showing the site owner's logo or custom image on the provider's products. | | [Get Inventory](https://dev.wix.com/docs/api-reference/business-solutions/suppliers-hub/marketplace-provider-service-plugin/get-inventory.md) | Retrieves current inventory levels for a product's variants. | | [Get Pricing Breakdown](https://dev.wix.com/docs/api-reference/business-solutions/suppliers-hub/marketplace-provider-service-plugin/get-pricing-breakdown.md) | Retrieves pricing breakdown for a product from the marketplace provider. | ### Marketplace Provider Submissions | Method | Description | | ------------------------------------------------------------------------------------------------------------------------------------------------------------- | --------------------------------------------------------- | | [Submit Generated Mockups](https://dev.wix.com/docs/api-reference/business-solutions/suppliers-hub/marketplace-provider-submissions/submit-generated-mockups.md) | Submits generated mockup images for one or more products. | ### Member Authentication | Method | Description | | -------------------------------------------------------------------------------------------------------------------------------------------------------------- | ------------------------------------------------------------------------ | | [Send Set Password Email](https://dev.wix.com/docs/api-reference/crm/members-contacts/members/member-management/member-authentication/send-set-password-email.md) | Sends a site member an email with a link to set or reset their password. | ### Memberships Service Plugin | Method | Description | | ----------------------------------------------------------------------------------------------------------------------------------------------------------------------------- | ----------------------------------------------------------------------- | | [Charge Membership](https://dev.wix.com/docs/api-reference/business-solutions/e-commerce/payments/memberships/memberships-service-plugin/charge-membership.md) | This method requests that a membership be charged by your app. | | [Get Membership Voidability](https://dev.wix.com/docs/api-reference/business-solutions/e-commerce/payments/memberships/memberships-service-plugin/get-membership-voidability.md) | This method retrieves from your app whether a membership can be voided. | | [Void Membership Charge](https://dev.wix.com/docs/api-reference/business-solutions/e-commerce/payments/memberships/memberships-service-plugin/void-membership-charge.md) | This method requests that a membership charge be voided by your app. | ### Menus | Method | Description | | ---------------------------------------------------------------------------------------------------------------------------------- | --------------------------------------------------------------------------- | | [Duplicate Menu](https://dev.wix.com/docs/api-reference/business-solutions/restaurants/menus/menus/duplicate-menu.md) | | | [List Menus](https://dev.wix.com/docs/api-reference/business-solutions/restaurants/menus/menus/list-menus.md) | Retrieves a list of up to 500 menus. | | [Create Menu](https://dev.wix.com/docs/api-reference/business-solutions/restaurants/menus/menus/create-menu.md) | Creates a menu. | | [Bulk Create Menus](https://dev.wix.com/docs/api-reference/business-solutions/restaurants/menus/menus/bulk-create-menus.md) | Creates multiple menus at once. | | [Get Menu](https://dev.wix.com/docs/api-reference/business-solutions/restaurants/menus/menus/get-menu.md) | Retrieves a menu by ID. | | [Delete Menu](https://dev.wix.com/docs/api-reference/business-solutions/restaurants/menus/menus/delete-menu.md) | Deletes a menu. | | [Query Menus](https://dev.wix.com/docs/api-reference/business-solutions/restaurants/menus/menus/query-menus.md) | Retrieves a list of menus given the provided paging, filtering, and sorting | | [Update Menu](https://dev.wix.com/docs/api-reference/business-solutions/restaurants/menus/menus/update-menu.md) | Updates a menu. | | [Bulk Update Menu](https://dev.wix.com/docs/api-reference/business-solutions/restaurants/menus/menus/bulk-update-menu.md) | Updates multiple menus at once. | | [Update Extended Fields](https://dev.wix.com/docs/api-reference/business-solutions/restaurants/menus/menus/update-extended-fields.md) | Updates only the `extendedFields` field. | ### Messages | Method | Description | | ------------------------------------------------------------------------------------------------------------------------------------------- | --------------------------------------------------------------------- | | [Media Attachment Upload Url](https://dev.wix.com/docs/api-reference/business-management/ai-site-chat/messages/media-attachment-upload-url.md) | Allows site visitor to create upload url to use for uploading a file. | | [Bulk Get By Inbox Messages](https://dev.wix.com/docs/api-reference/business-management/ai-site-chat/messages/bulk-get-by-inbox-messages.md) | Retrieves messages by inbox conversation ID. | ### Operations | Method | Description | | ------------------------------------------------------------------------------------------------------------------------------------------------------------------------------------------------------------------- | ---------------------------------------------------------------------------------------------- | | [Get Operation](https://dev.wix.com/docs/api-reference/business-solutions/restaurants/online-orders/operations/get-operation.md) | Retrieves an operation. | | [Update Operation](https://dev.wix.com/docs/api-reference/business-solutions/restaurants/online-orders/operations/update-operation.md) | Updates an operation. | | [Query Operation](https://dev.wix.com/docs/api-reference/business-solutions/restaurants/online-orders/operations/query-operation.md) | Retrieves a list of operations, given the provided paging, filtering, and sorting. | | [List Operations](https://dev.wix.com/docs/api-reference/business-solutions/restaurants/online-orders/operations/list-operations.md) | Retrieves a list of operations | | [Calculate First Available Time Slot Per Fulfillment Type](https://dev.wix.com/docs/api-reference/business-solutions/restaurants/online-orders/operations/calculate-first-available-time-slot-per-fulfillment-type.md) | Retrieves the first available time slot of each fulfillment type for a specified operation. | | [Calculate First Available Time Slots Per Operation](https://dev.wix.com/docs/api-reference/business-solutions/restaurants/online-orders/operations/calculate-first-available-time-slots-per-operation.md) | Retrieves the first available time slot of each fulfillment type for each specified operation. | | [Calculate First Available Time Slots Per Menu](https://dev.wix.com/docs/api-reference/business-solutions/restaurants/online-orders/operations/calculate-first-available-time-slots-per-menu.md) | Retrieves the first available time slot of each fulfillment type for each specified menu. | | [Calculate Available Time Slots For Date](https://dev.wix.com/docs/api-reference/business-solutions/restaurants/online-orders/operations/calculate-available-time-slots-for-date.md) | Retrieves all available time slots of each fulfillment type for the specified date. | | [Calculate Available Dates In Range](https://dev.wix.com/docs/api-reference/business-solutions/restaurants/online-orders/operations/calculate-available-dates-in-range.md) | Retrieves all available dates of each fulfillment type within the specified time range. | | [Validate Operation Address](https://dev.wix.com/docs/api-reference/business-solutions/restaurants/online-orders/operations/validate-operation-address.md) | Validates an operation's address. | | [Bulk Update Operation Tags](https://dev.wix.com/docs/api-reference/business-solutions/restaurants/online-orders/operations/bulk-update-operation-tags.md) | Synchronously update tags on multiple operations | | [Bulk Update Operation Tags By Filter](https://dev.wix.com/docs/api-reference/business-solutions/restaurants/online-orders/operations/bulk-update-operation-tags-by-filter.md) | Asynchronously update tags on multiple operations according to the specified filter | ### Order Billing | Method | Description | | -------------------------------------------------------------------------------------------------------------------------------- | ------------------------------------------------------------------------------------------------- | | [Redeem Gift Card](https://dev.wix.com/docs/api-reference/business-solutions/e-commerce/orders/order-billing/redeem-gift-card.md) | Redeems a gift card as payment for an order by applying the gift card balance to the order total. | | [Generate Receipts](https://dev.wix.com/docs/api-reference/business-solutions/e-commerce/orders/order-billing/generate-receipts.md) | Generates digital receipts for an order's completed payments. | ### Order Payment Requests | Method | Description | | ----------------------------------------------------------------------------------------------------------------------------------------------------------------- | --------------------------------------------------------------------------------------------------------------------------------------------------------------------------------------- | | [Create Order Payment Request](https://dev.wix.com/docs/api-reference/business-solutions/e-commerce/orders/order-payment-requests/create-order-payment-request.md) | Creates an order payment request. | | [Get Order Payment Request](https://dev.wix.com/docs/api-reference/business-solutions/e-commerce/orders/order-payment-requests/get-order-payment-request.md) | Retrieves an order payment request. | | [Delete Order Payment Request](https://dev.wix.com/docs/api-reference/business-solutions/e-commerce/orders/order-payment-requests/delete-order-payment-request.md) | Deletes an order payment request. | | [Update Order Payment Request](https://dev.wix.com/docs/api-reference/business-solutions/e-commerce/orders/order-payment-requests/update-order-payment-request.md) | Updates an order payment request. | | [Query Order Payment Requests](https://dev.wix.com/docs/api-reference/business-solutions/e-commerce/orders/order-payment-requests/query-order-payment-requests.md) | Retrieves a list of up to 1,000 order payment requests, given the provided [paging, filtering, and sorting](https://dev.wix.com/docs/api-reference/articles/work-with-wix-apis/data-retrieval/about-the-wix-api-query-language.md). | | [Get Order Payment Request URL](https://dev.wix.com/docs/api-reference/business-solutions/e-commerce/orders/order-payment-requests/get-order-payment-request-url.md) | Retrieves the payment page URL for an order payment request. | | [Update Extended Fields](https://dev.wix.com/docs/api-reference/business-solutions/e-commerce/orders/order-payment-requests/update-extended-fields.md) | Updates the extended fields of an order payment request. | ### Orders Settings | Method | Description | | -------------------------------------------------------------------------------------------------------------------------------------------- | ------------------------------------ | | [Get Orders Settings](https://dev.wix.com/docs/api-reference/business-solutions/e-commerce/orders/orders-settings/get-orders-settings.md) | Retrieves the site's order settings. | | [Update Orders Settings](https://dev.wix.com/docs/api-reference/business-solutions/e-commerce/orders/orders-settings/update-orders-settings.md) | Updates the site's orders settings. | ### Partner Profile V1 | Method | Description | | ----------------------------------------------------------------------------------------------------------------------------------------------------------- | ------------------------------------------------------------------------- | | [Find Public Partner Profile By Slug](https://dev.wix.com/docs/api-reference/account-level/partners/partner-profile-v1/find-public-partner-profile-by-slug.md) | Retrieves the verified, published profile of a partner by their URL slug. | | [Contact Partner](https://dev.wix.com/docs/api-reference/account-level/partners/partner-profile-v1/contact-partner.md) | Reserved for Wix first-party client UI use | | [Create Partner Profile](https://dev.wix.com/docs/api-reference/account-level/partners/partner-profile-v1/create-partner-profile.md) | Creates a partner profile. | | [Delete Partner Profile](https://dev.wix.com/docs/api-reference/account-level/partners/partner-profile-v1/delete-partner-profile.md) | Deletes the partner profile of the currently authenticated partner | | [Update Partner Profile](https://dev.wix.com/docs/api-reference/account-level/partners/partner-profile-v1/update-partner-profile.md) | Updates a partner profile | | [Get Current Partner Profile](https://dev.wix.com/docs/api-reference/account-level/partners/partner-profile-v1/get-current-partner-profile.md) | Retrieves the partner profile of the currently authenticated partner. | ### Payment Settings Integration Service Plugin | Method | Description | | --------------------------------------------------------------------------------------------------------------------------------------------------------------------------------------- | ----------------------------------------------------- | | [Get Payment Settings](https://dev.wix.com/docs/api-reference/business-solutions/e-commerce/payments/payment-settings/payment-settings-integration-service-plugin/get-payment-settings.md) | This method retrieves payment settings from your app. | ### Pipelines | Method | Description | | -------------------------------------------------------------------------------------------------------------------------------------------------------- | ------------------------------------------------------------------------------------------- | | [Create Pipeline](https://dev.wix.com/docs/api-reference/crm/crm/pipelines-management/pipelines/create-pipeline.md) | Creates a pipeline with defined stages and a final stage. | | [Get Pipeline](https://dev.wix.com/docs/api-reference/crm/crm/pipelines-management/pipelines/get-pipeline.md) | Retrieves a pipeline by ID. | | [Delete Pipeline](https://dev.wix.com/docs/api-reference/crm/crm/pipelines-management/pipelines/delete-pipeline.md) | Deletes a pipeline. | | [Update Pipeline](https://dev.wix.com/docs/api-reference/crm/crm/pipelines-management/pipelines/update-pipeline.md) | Updates a pipeline. | | [Query Pipelines](https://dev.wix.com/docs/api-reference/crm/crm/pipelines-management/pipelines/query-pipelines.md) | Retrieves a list of up to 100 pipelines, given the provided paging, filtering, and sorting. | | [Bulk Update Pipeline Tags](https://dev.wix.com/docs/api-reference/crm/crm/pipelines-management/pipelines/bulk-update-pipeline-tags.md) | Updates tags on multiple pipelines by specified pipeline IDs. | | [Bulk Update Pipeline Tags By Filter](https://dev.wix.com/docs/api-reference/crm/crm/pipelines-management/pipelines/bulk-update-pipeline-tags-by-filter.md) | Updates tags on multiple pipelines, using a filter to select which pipelines to update. | ### Premium Feature V1 | Method | Description | | ------------------------------------------------------------------------------------------------------------------------------------------- | ------------------------------------------------------------------------------------- | | [Get Feature Data](https://dev.wix.com/docs/api-reference/business-management/marketing/social-media/premium-feature-v1/get-feature-data.md) | Retrieves the availability and usage quota for a premium feature on the site. | | [Get Features Data](https://dev.wix.com/docs/api-reference/business-management/marketing/social-media/premium-feature-v1/get-features-data.md) | Retrieves the availability and usage quota for multiple premium features on the site. | ### Pricing Integration Service Plugin | Method | Description | | ------------------------------------------------------------------------------------------------------------------------------------------------ | ---------------------------------------------------------------------------------------- | | [Calculate Price](https://dev.wix.com/docs/api-reference/business-solutions/bookings/pricing/pricing-integration-service-plugin/calculate-price.md) | The Custom Pricing extension lets site owners add custom pricing to bookings on the site | ### Products | Method | Description | | --------------------------------------------------------------------------------------------------------------------------------------------------------- | --------------------------------------------------------------------------------------------------------------------- | | [Create Product](https://dev.wix.com/docs/api-reference/business-solutions/suppliers-hub/products/create-product.md) | Creates a product in the Marketplace. | | [Get Product](https://dev.wix.com/docs/api-reference/business-solutions/suppliers-hub/products/get-product.md) | Retrieves a product by ID. | | [Delete Product](https://dev.wix.com/docs/api-reference/business-solutions/suppliers-hub/products/delete-product.md) | Deletes a product permanently from the Marketplace. | | [Update Product](https://dev.wix.com/docs/api-reference/business-solutions/suppliers-hub/products/update-product.md) | Updates a product | | [Bulk Create Products](https://dev.wix.com/docs/api-reference/business-solutions/suppliers-hub/products/bulk-create-products.md) | Creates multiple products in a single request. | | [Bulk Update Products](https://dev.wix.com/docs/api-reference/business-solutions/suppliers-hub/products/bulk-update-products.md) | Updates multiple products in a single request. | | [Bulk Delete Products](https://dev.wix.com/docs/api-reference/business-solutions/suppliers-hub/products/bulk-delete-products.md) | Deletes multiple products permanently in a single request | | [Query Products](https://dev.wix.com/docs/api-reference/business-solutions/suppliers-hub/products/query-products.md) | Retrieves a list of products with filtering, sorting, and cursor-based pagination. | | [Search Products](https://dev.wix.com/docs/api-reference/business-solutions/suppliers-hub/products/search-products.md) | Retrieves a list of products, given the provided filtering, search expression, sorting, and cursor paging. | | [Bulk Update Product Tags](https://dev.wix.com/docs/api-reference/business-solutions/suppliers-hub/products/bulk-update-product-tags.md) | Updates tags on multiple products by product IDs. | | [Bulk Update Product Tags By Filter](https://dev.wix.com/docs/api-reference/business-solutions/suppliers-hub/products/bulk-update-product-tags-by-filter.md) | Updates tags on multiple products matching a filter. | | [Query Categories](https://dev.wix.com/docs/api-reference/business-solutions/suppliers-hub/products/query-categories.md) | Queries categories using [WQL - Wix Query Language](https://dev.wix.com/docs/api-reference/articles/work-with-wix-apis/data-retrieval/about-the-wix-api-query-language.md). | | [Bulk Add Products To Store](https://dev.wix.com/docs/api-reference/business-solutions/suppliers-hub/products/bulk-add-products-to-store.md) | Adds multiple Marketplace products to the caller's Wix store in a single request. | ### Refunds | Method | Description | | ------------------------------------------------------------------------------------------------------------------------------------------------------------ | ----------------------------------------------------------------------------------------------- | | [Refund Transaction](https://dev.wix.com/docs/api-reference/business-management/payments/payment-service-provider-service-plugin/refunds/refund-transaction.md) | This endpoint is used to send a merchant's refund requests to a Payment Service Provider (PSP). | ### Reservations | Method | Description | | ---------------------------------------------------------------------------------------------------------------------------------------------------------- | ------------------------------------------------------------------------------------------------ | | [List Reservations](https://dev.wix.com/docs/api-reference/business-solutions/restaurants/reservations/reservations/list-reservations.md) | Retrieves a list of up to 100 reservations. | | [Create Reservation](https://dev.wix.com/docs/api-reference/business-solutions/restaurants/reservations/reservations/create-reservation.md) | Creates a new reservation. | | [Get Reservation](https://dev.wix.com/docs/api-reference/business-solutions/restaurants/reservations/reservations/get-reservation.md) | Retrieves a reservation. | | [Delete Reservation](https://dev.wix.com/docs/api-reference/business-solutions/restaurants/reservations/reservations/delete-reservation.md) | Deletes a reservation | | [Update Reservation](https://dev.wix.com/docs/api-reference/business-solutions/restaurants/reservations/reservations/update-reservation.md) | Updates a reservation. | | [Create Held Reservation](https://dev.wix.com/docs/api-reference/business-solutions/restaurants/reservations/reservations/create-held-reservation.md) | Creates a new temporary reservation and holds it for the customer for 10 minutes. | | [Reserve Reservation](https://dev.wix.com/docs/api-reference/business-solutions/restaurants/reservations/reservations/reserve-reservation.md) | Reserves or requests a held reservation. | | [Cancel Reservation](https://dev.wix.com/docs/api-reference/business-solutions/restaurants/reservations/reservations/cancel-reservation.md) | Cancels a reservation. | | [Search Reservations](https://dev.wix.com/docs/api-reference/business-solutions/restaurants/reservations/reservations/search-reservations.md) | Use this method to search the fields of the table reservations on a site for a given expression. | | [Query Reservations](https://dev.wix.com/docs/api-reference/business-solutions/restaurants/reservations/reservations/query-reservations.md) | Retrieves a list of reservations given the provided paging, filtering, and sorting | | [Bulk Archive Reservations](https://dev.wix.com/docs/api-reference/business-solutions/restaurants/reservations/reservations/bulk-archive-reservations.md) | Archives multiple reservations at once. | | [Bulk Unarchive Reservations](https://dev.wix.com/docs/api-reference/business-solutions/restaurants/reservations/reservations/bulk-unarchive-reservations.md) | Unarchives multiple reservations at once. | ### Rules | Method | Description | | ------------------------------------------------------------------------------------------------------------------------------------------------------------------------- | ------------------------------------------------------------------------------ | | [Calculate Service Fees](https://dev.wix.com/docs/api-reference/business-solutions/restaurants/online-orders/service-fees/rules/calculate-service-fees.md) | Calculates service fees for an order. | | [List Rules](https://dev.wix.com/docs/api-reference/business-solutions/restaurants/online-orders/service-fees/rules/list-rules.md) | Retrieves an array of all rules. | | [Create Rule](https://dev.wix.com/docs/api-reference/business-solutions/restaurants/online-orders/service-fees/rules/create-rule.md) | Creates a rule. | | [Get Rule](https://dev.wix.com/docs/api-reference/business-solutions/restaurants/online-orders/service-fees/rules/get-rule.md) | Retrieves a rule. | | [Delete Rule](https://dev.wix.com/docs/api-reference/business-solutions/restaurants/online-orders/service-fees/rules/delete-rule.md) | Deletes a rule. | | [Update Rule](https://dev.wix.com/docs/api-reference/business-solutions/restaurants/online-orders/service-fees/rules/update-rule.md) | Updates a rule. | | [Query Rules](https://dev.wix.com/docs/api-reference/business-solutions/restaurants/online-orders/service-fees/rules/query-rules.md) | Retrieves a list of rules, given the provided paging, filtering, and sorting. | | [Bulk Create Rules](https://dev.wix.com/docs/api-reference/business-solutions/restaurants/online-orders/service-fees/rules/bulk-create-rules.md) | Bulk creates rules. | | [Bulk Update Rules](https://dev.wix.com/docs/api-reference/business-solutions/restaurants/online-orders/service-fees/rules/bulk-update-rules.md) | Bulk updates rules. | | [Bulk Delete Rules](https://dev.wix.com/docs/api-reference/business-solutions/restaurants/online-orders/service-fees/rules/bulk-delete-rules.md) | Bulk deletes rules. | | [Bulk Update Rule Tags](https://dev.wix.com/docs/api-reference/business-solutions/restaurants/online-orders/service-fees/rules/bulk-update-rule-tags.md) | Synchronously update tags on multiple rules | | [Bulk Update Rule Tags By Filter](https://dev.wix.com/docs/api-reference/business-solutions/restaurants/online-orders/service-fees/rules/bulk-update-rule-tags-by-filter.md) | Asynchronously update tags on multiple rules according to the specified filter | ### Sections | Method | Description | | --------------------------------------------------------------------------------------------------------------------------------- | ------------------------------------------------------------------------------ | | [Duplicate Section](https://dev.wix.com/docs/api-reference/business-solutions/restaurants/menus/sections/duplicate-section.md) | Duplicates a section. | | [List Sections](https://dev.wix.com/docs/api-reference/business-solutions/restaurants/menus/sections/list-sections.md) | Retrieves a list of up to 500 sections. | | [Create Section](https://dev.wix.com/docs/api-reference/business-solutions/restaurants/menus/sections/create-section.md) | Creates a section. | | [Bulk Create Sections](https://dev.wix.com/docs/api-reference/business-solutions/restaurants/menus/sections/bulk-create-sections.md) | Creates multiple sections at once. | | [Get Section](https://dev.wix.com/docs/api-reference/business-solutions/restaurants/menus/sections/get-section.md) | Retrieves a section by ID. | | [Delete Section](https://dev.wix.com/docs/api-reference/business-solutions/restaurants/menus/sections/delete-section.md) | Deletes a section. | | [Query Sections](https://dev.wix.com/docs/api-reference/business-solutions/restaurants/menus/sections/query-sections.md) | Retrieves a list of sections given the provided paging, filtering, and sorting | | [Update Section](https://dev.wix.com/docs/api-reference/business-solutions/restaurants/menus/sections/update-section.md) | Updates a section. | | [Bulk Update Section](https://dev.wix.com/docs/api-reference/business-solutions/restaurants/menus/sections/bulk-update-section.md) | Updates multiple sections at once. | | [Bulk Delete Sections](https://dev.wix.com/docs/api-reference/business-solutions/restaurants/menus/sections/bulk-delete-sections.md) | Deletes multiple sections at once. | ### Site Payment Method Types | Method | Description | | -------------------------------------------------------------------------------------------------------------------------------------------------------------- | ----------------------------------------------------------------------------------------------------------- | | [Get Site Payment Method Type](https://dev.wix.com/docs/api-reference/business-management/payments/site-payment-method-types/get-site-payment-method-type.md) | Retrieves a payment method type, with some fields localized according to the caller's language and country. | | [List Site Payment Method Types](https://dev.wix.com/docs/api-reference/business-management/payments/site-payment-method-types/list-site-payment-method-types.md) | Retrieves a list of payment method types. | ### Staff Member Settings | Method | Description | | ------------------------------------------------------------------------------------------------------------------------------------------------------------------- | ---------------------------------------------------------------------------- | | [Get Staff Member Settings](https://dev.wix.com/docs/api-reference/business-solutions/bookings/staff-members/staff-member-settings/get-staff-member-settings.md) | Retrieves the current privacy settings for staff member contact information. | | [Update Staff Member Settings](https://dev.wix.com/docs/api-reference/business-solutions/bookings/staff-members/staff-member-settings/update-staff-member-settings.md) | Updates privacy settings for staff member contact information. | ### Staff Sorting Service Plugin | Method | Description | | ------------------------------------------------------------------------------------------------------------------------------------------------------ | ------------------------------------------------------------------------------------- | | [Sort Staff Members](https://dev.wix.com/docs/api-reference/business-solutions/bookings/staff-members/staff-sorting-service-plugin/sort-staff-members.md) | Sorts staff members using custom business logic for assigning resources to a booking. | ### Storage Item | Method | Description | | ---------------------------------------------------------------------------------------------------------------------------------------------------------------------- | ------------------------------------------------------------------------------------------------------ | | [Create Storage Item](https://dev.wix.com/docs/api-reference/business-management/automations/storage-item/create-storage-item.md) | Creates a storage item. | | [Get Storage Item](https://dev.wix.com/docs/api-reference/business-management/automations/storage-item/get-storage-item.md) | Retrieves the specified storage item. | | [Update Storage Item Value](https://dev.wix.com/docs/api-reference/business-management/automations/storage-item/update-storage-item-value.md) | Updates the value of an existing storage item. | | [Update Storage Item Counter By](https://dev.wix.com/docs/api-reference/business-management/automations/storage-item/update-storage-item-counter-by.md) | Atomically increments or decrements a storage item of type `COUNTER` by the specified value. | | [Query Storage Items](https://dev.wix.com/docs/api-reference/business-management/automations/storage-item/query-storage-items.md) | Retrieves a list of storage items based on the filtering, sorting, and paging preferences you provide. | | [Bulk Update Storage Item Tags](https://dev.wix.com/docs/api-reference/business-management/automations/storage-item/bulk-update-storage-item-tags.md) | Updates tags for the specified storage items. | | [Bulk Update Storage Item Tags By Filter](https://dev.wix.com/docs/api-reference/business-management/automations/storage-item/bulk-update-storage-item-tags-by-filter.md) | Updates tags for storage items that match the specified filter criteria | ### Suppliers | Method | Description | | ------------------------------------------------------------------------------------------------------------------------------------------------------------ | ---------------------------------------------------------------------------------------------------------------------------- | | [Create Supplier](https://dev.wix.com/docs/api-reference/business-solutions/suppliers-hub/suppliers/create-supplier.md) | Creates a supplier profile. | | [Get Supplier](https://dev.wix.com/docs/api-reference/business-solutions/suppliers-hub/suppliers/get-supplier.md) | Retrieves a supplier by ID, returning complete supplier information including current revision number for update operations. | | [Delete Supplier](https://dev.wix.com/docs/api-reference/business-solutions/suppliers-hub/suppliers/delete-supplier.md) | Permanently deletes a supplier from the marketplace | | [Update Supplier](https://dev.wix.com/docs/api-reference/business-solutions/suppliers-hub/suppliers/update-supplier.md) | Updates a supplier. | | [Query Suppliers](https://dev.wix.com/docs/api-reference/business-solutions/suppliers-hub/suppliers/query-suppliers.md) | Retrieves a list of suppliers with filtering, sorting, and cursor-based pagination. | | [Bulk Create Suppliers](https://dev.wix.com/docs/api-reference/business-solutions/suppliers-hub/suppliers/bulk-create-suppliers.md) | Creates multiple suppliers in a single synchronous request. | | [Bulk Update Suppliers](https://dev.wix.com/docs/api-reference/business-solutions/suppliers-hub/suppliers/bulk-update-suppliers.md) | Updates multiple suppliers in a single synchronous request. | | [Bulk Delete Suppliers](https://dev.wix.com/docs/api-reference/business-solutions/suppliers-hub/suppliers/bulk-delete-suppliers.md) | Permanently deletes multiple suppliers in a single synchronous request | | [Bulk Update Supplier Tags](https://dev.wix.com/docs/api-reference/business-solutions/suppliers-hub/suppliers/bulk-update-supplier-tags.md) | Updates tags on multiple suppliers specified by supplier IDs in a single synchronous request. | | [Bulk Update Supplier Tags By Filter](https://dev.wix.com/docs/api-reference/business-solutions/suppliers-hub/suppliers/bulk-update-supplier-tags-by-filter.md) | Updates tags on multiple suppliers matching filter criteria in a single asynchronous request. | ### Tax Settings | Method | Description | | ------------------------------------------------------------------------------------------------------------------------------------------- | ------------------------------------------- | | [Get Tax Settings](https://dev.wix.com/docs/api-reference/business-solutions/e-commerce/extensions/tax/tax-settings/get-tax-settings.md) | Retrieves the site's tax settings. | | [Upsert Tax Settings](https://dev.wix.com/docs/api-reference/business-solutions/e-commerce/extensions/tax/tax-settings/upsert-tax-settings.md) | Creates or updates the site's tax settings. | ### Time Slots | Method | Description | | -------------------------------------------------------------------------------------------------------------------------------------------------- | ---------------------------------------------------------------------------------------------------------------------------------------------------------- | | [Get Time Slots](https://dev.wix.com/docs/api-reference/business-solutions/restaurants/reservations/time-slots/get-time-slots.md) | Returns a list of time slots at a specified reservation location on a specified `date`, and their availability for a specified `partySize`. | | [Check Time Slot](https://dev.wix.com/docs/api-reference/business-solutions/restaurants/reservations/time-slots/check-time-slot.md) | Checks a restaurant's availability to accommodate a reservation for a specified party size in a specified time slot. | | [Get Scheduled Time Slots](https://dev.wix.com/docs/api-reference/business-solutions/restaurants/reservations/time-slots/get-scheduled-time-slots.md) | Returns a list of scheduled time slots at a specified reservation location for a specified time range, and their availability for a specified `partySize`. | ### Transactions | Method | Description | | ------------------------------------------------------------------------------------------------------------------------------------------------------------------- | ------------------------------------------------------------------------------------------------------- | | [Create Transaction](https://dev.wix.com/docs/api-reference/business-management/payments/payment-service-provider-service-plugin/transactions/create-transaction.md) | This endpoint is used to send a merchant's payment requests to a Payment Service Provider (PSP). | | [Capture Transaction](https://dev.wix.com/docs/api-reference/business-management/payments/payment-service-provider-service-plugin/transactions/capture-transaction.md) | This endpoint is used to send requests to capture transactions to a Payment Service Provider (PSP). | | [Void Transaction](https://dev.wix.com/docs/api-reference/business-management/payments/payment-service-provider-service-plugin/transactions/void-transaction.md) | This endpoint is used to send requests to void transactions to a Payment Service Provider (PSP). | | [Query Gift Card Transactions](https://dev.wix.com/docs/api-reference/business-solutions/gift-cards/transactions/query-gift-card-transactions.md) | Retrieves the transaction history for a specific gift card with filtering, sorting, and paging options. | ### Translation Content | Method | Description | | -------------------------------------------------------------------------------------------------------------------------------------------------------- | ------------------------------------------------------------------------- | | [Get Content Word Count](https://dev.wix.com/docs/api-reference/business-management/multilingual/translation/translation-content/get-content-word-count.md) | Gets word counts and field counts for translatable content across a site. | ### Trigger Catalog | Method | Description | | -------------------------------------------------------------------------------------------------------------------------------------------------------------------- | -------------------------------------------------------------------------------------------------------------------------------------------------------------------------------------------------------------- | | [Create Trigger](https://dev.wix.com/docs/api-reference/business-management/automations/triggers/trigger-catalog/create-trigger.md) | Creates a trigger for the specified app | | [Update Trigger](https://dev.wix.com/docs/api-reference/business-management/automations/triggers/trigger-catalog/update-trigger.md) | Updates the specified trigger for the specified app. | | [Delete Trigger By App Id And Key](https://dev.wix.com/docs/api-reference/business-management/automations/triggers/trigger-catalog/delete-trigger-by-app-id-and-key.md) | Deletes a trigger from the specified app. | | [Query Triggers](https://dev.wix.com/docs/api-reference/business-management/automations/triggers/trigger-catalog/query-triggers.md) | Retrieves a list of triggers, given the provided paging, filtering, and sorting. | | [Get Trigger Dynamic Schema](https://dev.wix.com/docs/api-reference/business-management/automations/triggers/trigger-catalog/get-trigger-dynamic-schema.md) | Retrieves a trigger's payload schema with the user's [filter field](https://dev.wix.com/docs/build-apps/develop-your-app/extensions/backend-extensions/automations/triggers/filter-fields.md) selections applied. | ### Triggered Events | Method | Description | | ------------------------------------------------------------------------------------------------------------------------------------------------------------------------- | ---------------------------------------------- | | [Report Action Invocation Completed](https://dev.wix.com/docs/api-reference/business-management/automations/triggers/triggered-events/report-action-invocation-completed.md) | Reports to Wix that your action has completed. | ### Verification | Method | Description | | --------------------------------------------------------------------------------------------------------------------------------------------- | ------------------------------------------------------------------------------------------------------------------------------------ | | [Verify During Authentication](https://dev.wix.com/docs/api-reference/business-management/headless/verification/verify-during-authentication.md) | Continues the registration process when a member is required to verify an email address using a verification code received by email. | ### Waitlist | Method | Description | | ----------------------------------------------------------------------------------------------------------------------------------------- | -------------------------------------------------------------------------------------------------------------------------------- | | [List Waitlisted Entities](https://dev.wix.com/docs/api-reference/business-solutions/bookings/bookings/waitlist/list-waitlisted-entities.md) | Returns a list of waitlisted entries | | [Register To Waitlist](https://dev.wix.com/docs/api-reference/business-solutions/bookings/bookings/waitlist/register-to-waitlist.md) | Registers a site member to a waitlist | | [Leave Waitlist](https://dev.wix.com/docs/api-reference/business-solutions/bookings/bookings/waitlist/leave-waitlist.md) | Removes a site member's registration to a waitlist (and cancels the associated pending-state booking) | | [Book From Waitlist](https://dev.wix.com/docs/api-reference/business-solutions/bookings/bookings/waitlist/book-from-waitlist.md) | Books a site member into the session for which they are waitlisted (waiting resource), and the associated booking is checked out | ### Wix Payments Account | Method | Description | | --------------------------------------------------------------------------------------------------------------------------------------------------------------------------- | -------------------------------------------- | | [Connect Wix Payments Account](https://dev.wix.com/docs/api-reference/business-management/payments/wix-payments-provider/wix-payments-account/connect-wix-payments-account.md) | Connects a Wix Payments account to the site. | --- > Portal Navigation: > > - Append `.md` to any URL under `https://dev.wix.com/docs/` to get its markdown version. > - Pages are either content pages (article or reference text) or menu pages (a list of links to child pages). > - To get a menu page, truncate any URL to a parent path and append `.md` (e.g. `https://dev.wix.com/docs/sdk.md`, `https://dev.wix.com/docs/sdk/core-modules.md`). > - Top-level index of all portals: https://dev.wix.com/docs/llms.txt > - Full concatenated docs: https://dev.wix.com/docs/llms-full.txt ## Resource: About API Versions and Deprecation ## Article: About API Versions ## Article Link: https://dev.wix.com/docs/api-reference/articles/work-with-wix-apis/platform/about-api-versions-and-deprecation.md ## Article Content: # About API Versions and Deprecation As Wix APIs evolve, Wix releases new versions that introduce features, improvements, and occasionally breaking changes. Versioning helps you manage updates and maintain compatibility in your projects. - New versions are released at the module or submodule level. For example, the latest version of Wix Bookings' Bookings API might be v3, while the Bookings Attendance API might be v2. - When Wix releases a new version of an API, the previous version is deprecated but remains available. - Deprecated methods are marked in the documentation. ## Non-breaking changes Within the same major version, Wix may introduce non-breaking changes that enhance functionality without disrupting existing implementations. Your code should be designed to handle these updates: - **New response fields**: API responses may include additional fields over time. Ensure your code doesn't break when encountering unexpected fields in responses. - **New request fields in service plugins**: Service plugin requests may add new fields. Your service plugin implementations should gracefully ignore fields they don't recognize. - **New enum values**: Enums may be extended with new values. Handle unknown enum values appropriately, such as by treating them as a default case. ## Deprecation Wix may deprecate API components at various levels, including: - Entire APIs or modules - Specific modules or submodules - Individual entities, methods, or events - Specific parameters in methods When deprecation occurs, it follows a structured process to ensure you have time to adapt: - **Advance notice**: Impending deprecations are noted in the API reference before they take effect, including information about recommended alternatives, giving you time to plan for changes. - **Deprecated items remain functional**: Your existing code will continue to work. Wix doesn't remove or "sunset" deprecated APIs, ensuring backward compatibility. - **No new development recommended**: While deprecated items still work, you should avoid using them in new projects and consider migrating existing implementations to recommended alternatives. - **Documentation visibility**: Deprecated items are hidden from the main API reference documentation by default, but you can view them by enabling the **Show Deprecated Items** toggle in the top menu of the documentation portal. - **Changelog updates**: Deprecations are documented in the [changelog](https://dev.wix.com/changelog) to help you track changes over time. --- > Portal Navigation: > > - Append `.md` to any URL under `https://dev.wix.com/docs/` to get its markdown version. > - Pages are either content pages (article or reference text) or menu pages (a list of links to child pages). > - To get a menu page, truncate any URL to a parent path and append `.md` (e.g. `https://dev.wix.com/docs/sdk.md`, `https://dev.wix.com/docs/sdk/core-modules.md`). > - Top-level index of all portals: https://dev.wix.com/docs/llms.txt > - Full concatenated docs: https://dev.wix.com/docs/llms-full.txt ## Resource: About the Structure of Webhooks ## Article: About the Structure of Webhooks ## Article Link: https://dev.wix.com/docs/api-reference/articles/work-with-wix-apis/platform/about-the-structure-of-webhooks.md ## Article Content: # About the Structure of Events Wix APIs support event-driven integrations, allowing you to respond to changes such as create, update, and delete actions. How you handle events depends on the API you use: - REST API: The REST API delivers events via webhooks. - JavaScript SDK: The SDKs deliver events using event handlers in your code. This article describes the structure of events for both REST webhooks and SDK event handlers. ## REST webhook payloads REST webhook payloads contain a `data` object with the following fields, encoded as a JWT: | Field | Description | | :-----| :---------- | | `eventType` | The event type. For example: `wix.contacts.v4.contact_merged`. | | `instanceId` | The app instance ID, which identifies the site where the event occurred. | | `data` | [Event data](#event-data) object as a JSON string containing fields specific to the event type. The structure and fields are specific to each webhook. Refer to each webhook's reference for the exact structure and fields. | | `identity` | [Identity](#identity) object as a JSON string. | ## SDK event handlers SDK event handlers pass an event object with the following fields: | Field | Description | | :---- | :---------- | | `metadata` | An object containing event metadata, including `eventType`, `instanceId`, [`identity`](#identity), and other information about the event. The structure and fields are specific to each event. Refer to the event's reference for the exact structure and fields. | | `entity` | The state of the affected entity after the event occurs. | | [`modifiedFields`](#the-modifiedfields-object) | The updated fields and their values before the event occurred. Included for some updated events. | ## Event data In REST webhooks, the event data is in the `data.data` field. In SDK events, the event data is in the `event.metadata` field, except for entity data. The content of the event data varies by event type, but generally includes the following: - Entity data: - For created events, this is the newly created entity. - For updated events, this includes the entity after the update and sometimes the updated fields with their previous values. - For deleted events, this may include the deleted entity. - Event context: Additional details about the event, such as when it occurred or the reason for the change. - Action-specific data: For specific actions like publishing or sending, data relevant to that action. Refer to the documentation for each event to see the exact structure and fields included in its data. ### The `modifiedFields` object Some updated events include a `modifiedFields` object. This object contains the values of fields that changed, as they were before the update. Use `modifiedFields` to compare old and new values or to track what changed. The location of the `modifiedFields` object differs between REST webhooks and SDK events: - REST webhook payloads: `data.data.updatedEvent.modifiedFields` - SDK event handlers: `event.modifiedFields` ## Identity The identity information includes the type and ID of the identity that triggered the event: | Field name | Description | | :--------- | :---------- | | `identityType` | Identity type that triggered this event. Supported values: `ANONYMOUS_VISITOR`, `MEMBER`, `WIX_USER`, `APP`. See [About Identities](https://dev.wix.com/docs/api-reference/articles/authentication/about-identities.md). | | One of: | | | `anonymousVisitorId` | Site visitor ID. | | `memberId` | Site member ID. | | `wixUserId` | Wix user ID. | | `appId` | App ID. | ## Account-level webhooks Enterprise and Channels partners can subscribe to [account-level webhooks](https://dev.wix.com/docs/develop-websites-sdk/code-your-site/account-level-development/about-account-level-webhooks.md) for events such as site creation, folder changes, and team member updates. For more information, see [About Account-Level Webhooks](https://dev.wix.com/docs/develop-websites-sdk/code-your-site/account-level-development/about-account-level-webhooks.md). ## Legacy webhooks Some legacy REST webhooks don't follow the standard structure described above. For example, the legacy Wix Stores [Product Changed](https://dev.wix.com/docs/api-reference/business-solutions/stores/catalog-v1/catalog/product-changed.md) webhook returns only the fields that changed with their updated values, in a flat list rather than the full object structure. --- > Portal Navigation: > > - Append `.md` to any URL under `https://dev.wix.com/docs/` to get its markdown version. > - Pages are either content pages (article or reference text) or menu pages (a list of links to child pages). > - To get a menu page, truncate any URL to a parent path and append `.md` (e.g. `https://dev.wix.com/docs/sdk.md`, `https://dev.wix.com/docs/sdk/core-modules.md`). > - Top-level index of all portals: https://dev.wix.com/docs/llms.txt > - Full concatenated docs: https://dev.wix.com/docs/llms-full.txt ## Resource: About FQDNs ## Article: About FQDNs ## Article Link: https://dev.wix.com/docs/api-reference/articles/work-with-wix-apis/platform/about-fqdns.md ## Article Content: # About FQDNs A Fully Qualified Domain Name (FQDN) is a unique identifier for each Wix service object. Think of it as the "address" that tells Wix exactly which service object you want to work with. > **Note:** Some legacy service objects and their events don't have FQDNs. For more information, see [legacy webhooks](http://dev.wix.com/docs/api-reference/articles/work-with-wix-apis/platform/about-the-structure-of-webhooks). ## FQDN structure FQDNs follow this structure: `wix....` The `` segment is included only when the service object belongs to a sub-product within a domain. For example, `wix.ecom.v1.order` has no `` segment, while `wix.stores.catalog.v1.product` includes `catalog` as the ``. ## Wildcards When working with data extension schemas or other APIs that accept FQDNs, you can use wildcards (`*`) instead of specific version numbers to prevent issues when service objects are updated to newer versions. For example: `wix...*.` This ensures your code continues to work when Wix updates the service object to a newer version (for example, `wix.ecom.v2.order`), without requiring you to update your implementation. **Examples:** - `wix.ecom.*.order` - [Wix eCommerce Order](https://dev.wix.com/docs/api-reference/business-solutions/e-commerce/orders/orders/order-object.md) service object (any version) - `wix.ecom.v1.checkout` - [Wix eCommerce Checkout](https://dev.wix.com/docs/api-reference/business-solutions/e-commerce/purchase-flow/checkout/checkout/checkout-object.md) service object - `wix.ecom.v1.cart` - [Wix eCommerce Cart](https://dev.wix.com/docs/api-reference/business-solutions/e-commerce/purchase-flow/cart/cart-object.md) service object - `wix.multilingual.machine.*.translatable_content` - [Wix Multilingual Machine Translation](https://dev.wix.com/docs/api-reference/business-management/multilingual/machine-translation/machine-translation/translatable-content-object.md) service object (any version) ## When to use FQDNs You'll need FQDNs when: - **Working with data extension schemas** to specify which service object you want to extend with [site-specific custom fields](https://dev.wix.com/docs/build-apps/develop-your-app/extensions/backend-extensions/schema-plugins/extend-an-existing-object-with-a-site-specific-field.md). See [Data Extension Schema API](https://dev.wix.com/docs/api-reference/business-management/data-extension-schema/introduction.md). - **Using schema plugins** to define which service objects your plugin extends. See [About Schema Plugin Extensions](https://dev.wix.com/docs/build-apps/develop-your-app/extensions/backend-extensions/schema-plugins/about-schema-plugin-extensions.md). - **Calling certain APIs** to identify the specific service object type. For example, [List Data Extension Schemas](https://dev.wix.com/docs/api-reference/business-management/data-extension-schema/list-data-extension-schemas.md) requires an FQDN parameter. - **Processing events** to understand which service object triggered the event. See [Webhooks](https://dev.wix.com/docs/build-apps/develop-your-app/api-integrations/events-and-webhooks/about-webhooks.md). ## Finding FQDNs FQDNs are available in event payloads. Events that return FQDNs will have the `entityFqdn` field documented in their event reference, and the FQDN is returned as `entityFqdn` in the event data. ```json { "eventType": "order.created", "entityFqdn": "wix.ecom.v1.order", "data": { ... } } ``` --- > Portal Navigation: > > - Append `.md` to any URL under `https://dev.wix.com/docs/` to get its markdown version. > - Pages are either content pages (article or reference text) or menu pages (a list of links to child pages). > - To get a menu page, truncate any URL to a parent path and append `.md` (e.g. `https://dev.wix.com/docs/sdk.md`, `https://dev.wix.com/docs/sdk/core-modules.md`). > - Top-level index of all portals: https://dev.wix.com/docs/llms.txt > - Full concatenated docs: https://dev.wix.com/docs/llms-full.txt ## Resource: About Rich Content ## Article: About Rich Content ## Article Link: https://dev.wix.com/docs/api-reference/articles/work-with-wix-apis/platform/about-rich-content.md ## Article Content: # About Rich Content When you use APIs, you may need to handle rich content. Rich content is a block of content that incorporates multiple content types. For example, you may have a block of rich content made up of a heading, a paragraph, an image, and a caption. A block of rich content is represented in the data as an object with nodes (sections) and decorations (styles), where each one can be a distinct type. Define rich content with a Ricos Document, which is a strictly defined JSON object structure. Learn more about [Ricos](https://dev.wix.com/docs/ricos/getting-started/introduction.md). Rich content is displayed in parts of the Wix interface that include different media types and text formatting, such as [blog](https://dev.wix.com/docs/rest/business-solutions/blog/introduction.md) posts. APIs associated with these parts of the interface can receive and return rich content. ## Plugins Some of Ricos' types are universally supported, but the ones that aren't need a specific plugin to be enabled for the type to be rendered. Wix APIs that consume rich content specify which plugins are enabled in their rich content field description. In the [Ricos playground](https://ricos.dev), you can enable and disable plugins to match the plugins enabled by the API that's consuming your rich content. ## Create a Ricos document You can either convert existing content into a Ricos document, or create a Ricos document from scratch using the [Ricos Playground](https://ricos.dev/). Here's a mini version of the playground: Learn more about [creating Ricos documents](https://dev.wix.com/docs/ricos/getting-started/create-a-ricos-document.md). When [developing sites](https://dev.wix.com/docs/develop-websites.md) or building an app with [Blocks](https://dev.wix.com/docs/build-apps/develop-your-app/develop-an-app-with-blocks/about-wix-blocks.md), you can display rich content using the [`RichContentViewer`](https://dev.wix.com/docs/velo/api-reference/$w/rich-content-viewer/introduction.md) element. ## See also - [Ricos](https://dev.wix.com/docs/ricos/getting-started/introduction.md) - [Ricos plugins](https://dev.wix.com/docs/ricos/api-reference/ricos-document.md#plugins) --- > Portal Navigation: > > - Append `.md` to any URL under `https://dev.wix.com/docs/` to get its markdown version. > - Pages are either content pages (article or reference text) or menu pages (a list of links to child pages). > - To get a menu page, truncate any URL to a parent path and append `.md` (e.g. `https://dev.wix.com/docs/sdk.md`, `https://dev.wix.com/docs/sdk/core-modules.md`). > - Top-level index of all portals: https://dev.wix.com/docs/llms.txt > - Full concatenated docs: https://dev.wix.com/docs/llms-full.txt ## Resource: About Rich Text ## Article: About Rich Text ## Article Link: https://dev.wix.com/docs/api-reference/articles/work-with-wix-apis/platform/about-rich-text.md ## Article Content: # About Rich Text Some methods accept values with rich text, which you format using a subset of standard HTML tags and CSS styles. ## Supported HTML tags - `

    ` (Paragraph) - `

    `, `

    `, `

    `, `

    `, `

    `, and `
    ` (Headings) - `` (Anchor/link) - `` (Inline) - `` (Bold) - `` (Italicize) - `` (Underline) - `
      `, `
        `, and `
      1. ` (Lists) - `
        ` (Line break) ## Inline styling - `style` - `dir` ### Supported `style` properties - `font-face` - `font-size` - `font-weight` - `font-style` - `text-decoration` - `color` - `background-color` - `text-align` - `margin-left` - `text-shadow` - `line-height` - `letter-spacing` ## Quote escaping For strings in your code defined with double quotes, any double quotes in the string need to be escaped using `\`. Example: - `"

        This is red text

        "` - `'

        This is red text

        '` ## Examples ```javascript "

        This is bolded text

        "; "

        This is underlined text

        "; "

        This is red text

        "; "

        This is black text with a red background

        "; "

        This is a link

        "; ``` ```javascript `
        • This is a bullet
        • This is a second bullet
        `; ``` ```javascript `
        1. This is a numbered list item
        2. This is a second numbered list item
        `; ``` --- > Portal Navigation: > > - Append `.md` to any URL under `https://dev.wix.com/docs/` to get its markdown version. > - Pages are either content pages (article or reference text) or menu pages (a list of links to child pages). > - To get a menu page, truncate any URL to a parent path and append `.md` (e.g. `https://dev.wix.com/docs/sdk.md`, `https://dev.wix.com/docs/sdk/core-modules.md`). > - Top-level index of all portals: https://dev.wix.com/docs/llms.txt > - Full concatenated docs: https://dev.wix.com/docs/llms-full.txt ## Resource: About the Wix GraphQL API ## Article: About the Wix GraphQL API ## Article Link: https://dev.wix.com/docs/api-reference/articles/work-with-wix-apis/platform/about-the-wix-graph-ql-api.md ## Article Content: # About the Wix GraphQL API > **Developer Preview:** This API is subject to change. Bug fixes and new features will be released based on developer feedback throughout the preview period. The Wix GraphQL API exposes Wix APIs as a single unified GraphQL schema, allowing you to query and mutate Wix data with all the benefits of GraphQL. > New to GraphQL? Check out the [GraphQL Documentation](https://graphql.org/learn/) to learn more. ## Usage For the full documentation and API reference, see the [Wix GraphQL API Documentation](https://dev.wix.com/docs/graphql.md). ::::tabs :::SDK_TAB The SDK provides a `graphql()` method on an initialized [Wix client](https://dev.wix.com/docs/api-reference/articles/sdk-setup-and-usage/set-up-a-wix-client.md). This method accepts a GraphQL query or mutation and returns a `Promise` with the result. **Example:** ```js import { createClient, OAuthStrategy } from "@wix/sdk"; const wix = createClient({ auth: OAuthStrategy({ clientId: "YOUR_CLIENT_ID", }), }); const { data, errors } = await wix.graphql( ` query Products($filter: JSON!) { storesProductsV1Products(queryInput: { query: { filter: $filter }}) { items { name } } } `, { filter: { name: { $startsWith: query || "", }, }, } ); ``` #### Type inference The `graphql()` method also supports type inference for the result and variables of a GraphQL query. If you are using a solution for type inference in your project, such as [GraphQL Code Generator](https://the-guild.dev/graphql/codegen), you can pass the inferred types to the `graphql()` method and it will use them to type the result and variables of the query. ::: :::REST_TAB You can also access the Wix GraphQL API using the REST API. **Endpoint:** `POST https://www.wixapis.com/graphql` **Headers:** - `Authorization: >` - `Content-Type: application/json` **Example:** ```sh curl -X POST 'https://www.wixapis.com/graphql' \ -H 'Authorization: >' \ -H 'Content-Type: application/json' \ -d '{ "query": "query Products($filter: JSON!) { storesProductsV1Products(queryInput: { query: { filter: $filter }}) { items { name } } }", "variables": { "filter": { "name": { "$startsWith": "Coffee" } } } }' ``` ::: :::: --- > Portal Navigation: > > - Append `.md` to any URL under `https://dev.wix.com/docs/` to get its markdown version. > - Pages are either content pages (article or reference text) or menu pages (a list of links to child pages). > - To get a menu page, truncate any URL to a parent path and append `.md` (e.g. `https://dev.wix.com/docs/sdk.md`, `https://dev.wix.com/docs/sdk/core-modules.md`). > - Top-level index of all portals: https://dev.wix.com/docs/llms.txt > - Full concatenated docs: https://dev.wix.com/docs/llms-full.txt ## Resource: About Errors ## Article: About Errors ## Article Link: https://dev.wix.com/docs/api-reference/articles/work-with-wix-apis/troubleshooting/about-errors.md ## Article Content: # About Errors Errors are a fundamental component of Wix's APIs, providing critical information and guidance when something goes wrong. Most errors follow a standardized format, as described below. ## Error properties | Property | Description | | :---------- | :--------------------------------------------------------------------------------------------------------------------------------- | | Status code | See the HTTP status code table below. | | `message` | Textual description that provides a brief explanation of the error. | | `details` | Additional contextual information about the error, including either `applicationError` or `validationError`. See the tables below. | ## HTTP status codes Every API call returns a status code. If something went wrong, you'll receive an error code that defines the type of error that occurred. Status code types include: - 2xx: Everything is OK. - 4xx: There was a problem with the request. Usually you can fix the request and try again immediately. - 5xx: There was a problem in Wix's service. There's nothing wrong with the request. Try again later. | HTTP Status Code | Description | | :-------------------------- | :---------------------------------------------------------------------------------------------------------------------------------------------------------------------------------------------------------- | | 200 - OK | Success. No error. | | 400 - Bad Request | One or more request parameters is wrong or missing, or you didn't pass validation. | | 401 - Unauthorized | The system wasn't able to authenticate you. For example, there was a missing or incorrect Authorization header or an expired token. Occasionally returned when you don't have permissions to call this API. | | 403 - Permission denied | The system authenticated you, but you don't have permissions to call this API. | | 404 - Not found | Resource not found or doesn't exist. | | 409 - Conflict | The resource you are attempting to create already exists or has a different revision than the one you're attempting to update, or another conflict with the server state. | | 428 - Precondition required | Preconditions must be met for the request to be successful. For example, a required field wasn't passed, or the passed gift card is out of funds. | | 429 - Resource exhausted | Resource usage was exhausted. For example, a previously used one-time-token or too many requests. | | 500 - Internal server error | An error occurred on Wix's server. Try again later. | | 501 - Not implemented | The endpoint hasn't been implemented yet. | | 503 - Service unavailable | The service that you're trying to access is temporarily unavailable. Try again later. | | 504 - Gateway timeout | The underlying service didn't respond in a timely manner. Try again later. If you're trying to query for data, you may try a smaller page size or a simpler filter. | ## Application error data An application error occurs when the service business logic decides to reject the request. This includes codes like `UNAUTHENTICATED`, `PERMISSION_DENIED`, `NOT_FOUND`, `ALREADY_EXISTS`, `ABORTED`, and `RESOURCE_EXHAUSTED`. | Property | Description | | :------------ | :------------------------------------------------------------ | | `code` | Identifier that categorizes and signifies the specific error. | | `description` | Detailed explanation of why the error occurred. | | `data` | Additional contextual information related to the error. | ### Examples ```json { "message": "Payment failed", "details": { "applicationError": { "code": "NO_FUNDS", "description": "Payment declined due to insufficient funds", "data": { "availableFunds": 75.22 } } } } ``` ```json { "message": "Duplicate contact exists", "details": { "applicationError": { "code": "DUPLICATE_CONTACT_EXIST", "description": "Duplicate contact already exists", "data": { "duplicateContactId": "ca22360e-7f58-4613-bae6-a537f2791f84" } } } } ``` ## Validation error data A validation error occurs when input data fails to meet predefined criteria or constraints set by the system. This type of error serves to enforce rules such as correct data formats, required fields, or value ranges. This includes rules like `OUT_OF_RANGE` and `INVALID_ARGUMENT`. Multiple violations may be returned in 1 response. | Property | Description | | :----------------------------- | :---------------------------------------------------------------------------------------- | | `fieldViolations` | Array of validation issues found in individual fields. | | `fieldViolations.field` | Field name. | | `fieldViolations.description` | Detailed explanation of why the error occurred for the specified field. | | `fieldViolations.violatedRule` | Specific rule or constraint that was violated by the input in the identified field. | | `fieldViolations.ruleName` | Name of specific rule or constraint that was violated. For example, `"VALIDATION_ERROR"`. | | `fieldViolations.data` | Additional contextual information related to the field violation. | ### Example ```json { "message": "Not really valid", "details": { "validationError": { "fieldViolations": [ { "field": "fieldA", "description": "Invalid musical note. Supported notes: [do,re,mi,fa,sol,la,ti]", "violatedRule": "CUSTOM", "ruleName": "INVALID_NOTE", "data": { "value": "FI" } }, { "field": "fieldB", "description": "Field value out of range. Supported range: [0-20]", "violatedRule": "MAX", "data": { "threshold": 20 } }, { "field": "fieldC", "description": "Invalid phone number. Provide a valid phone number of size: [7-12]. Supported characters: [0-9, +, -, (, )]", "violatedRule": "FORMAT", "data": { "expected": "PHONE" } } ] } } } ``` ## System errors A system error occurs when there's an exception in the system, the server is down, or some dependent service or database is down. These errors are empty by design. ### Example ```json { "message": "", "details": {} } ``` --- > Portal Navigation: > > - Append `.md` to any URL under `https://dev.wix.com/docs/` to get its markdown version. > - Pages are either content pages (article or reference text) or menu pages (a list of links to child pages). > - To get a menu page, truncate any URL to a parent path and append `.md` (e.g. `https://dev.wix.com/docs/sdk.md`, `https://dev.wix.com/docs/sdk/core-modules.md`). > - Top-level index of all portals: https://dev.wix.com/docs/llms.txt > - Full concatenated docs: https://dev.wix.com/docs/llms-full.txt ## Resource: Troubleshooting ## Article: Troubleshooting ## Article Link: https://dev.wix.com/docs/api-reference/articles/work-with-wix-apis/troubleshooting/troubleshooting.md ## Article Content: # Troubleshooting This article provides troubleshooting steps for common issues encountered while using Wix APIs. ## Fields not returned **I expect a specific field to be returned by a method, but sometimes the field isn't returned.** Wix methods are designed to support the full list of parameters you see in the documentation. However, not all parameters will always have a value. For example, if a site customer doesn't fill in their province during checkout, then when you use a method to get an order, the `billingInfo > address > subdivision` field won't be returned. If your code is dependent on a specific field, it should be able to handle cases where the field isn't returned. ## Unknown limitations **I often come across parameters that must have limitations, but they aren't documented.** Wix's documentation displays limitations automatically, based on the method source code. However, there are various reasons why these might not show in the documentation, especially for older APIs. If you come across missing limitations, please [let us know](https://www.wix.com/support-chatbot?nodeId=25a57397-ccf7-4376-8b74-48d51edf7159&referral=devRels). ## 403 errors **I get a 403 error and don't know what to do about it.** There are 2 primary reasons for a 403 error: 1. You are developing an app and you didn't request the right permissions for the app. Make sure to add the relevant permissions to your app. 2. The current site visitor doesn't have the right permissions to call the API you are calling. Sometimes you can mitigate this problem using elevation. ## 409 errors **I get a 409 error - "entity has already changed since the requested revision".** The entity you want to update is protected by a revision number, to prevent accidental overrides. To prevent this error: 1. Use the relevant method to retrieve the entity you want to update. 1. Pull the current revision number from the entity. 1. Specify the current revision number into your method call. Note that you shouldn't rely on revision numbers received from events, as events can be delayed and may not reflect the most current state. ## 429 errors **I get a 429 error and my API calls are failing** A 429 error likely means that you've been throttled due to sending too many requests in a short period. To resolve this, wait a minute and then retry your requests. --- > Portal Navigation: > > - Append `.md` to any URL under `https://dev.wix.com/docs/` to get its markdown version. > - Pages are either content pages (article or reference text) or menu pages (a list of links to child pages). > - To get a menu page, truncate any URL to a parent path and append `.md` (e.g. `https://dev.wix.com/docs/sdk.md`, `https://dev.wix.com/docs/sdk/core-modules.md`). > - Top-level index of all portals: https://dev.wix.com/docs/llms.txt > - Full concatenated docs: https://dev.wix.com/docs/llms-full.txt ## Resource: Install SDK Packages ## Article: Install SDK Packages ## Article Link: https://dev.wix.com/docs/api-reference/articles/sdk-setup-and-usage/install-sdk-packages.md ## Article Content: # Install SDK Packages To use a package from the Wix JavaScript SDK, you need to install it and import it in your code. ## Install the package Follow the installation instructions for your development environment. | Development environment | Installation method | | ------------------------- | ----------------------------------------------------------------------------------------------------------------------------------------------------------------------- | | Wix sites (editor or IDE) | Use the [package manager](https://dev.wix.com/docs/develop-websites/articles/coding-with-velo/packages/work-with-npm-packages-in-the-editor.md). | | Wix sites (local IDE) | Run `wix install @wix/` using the [CLI](https://dev.wix.com/docs/develop-websites/articles/coding-with-velo/packages/work-with-npm-packages-with-the-wix-cli.md). | | Blocks apps | Use the same installation method as Wix sites. | | CLI and self-managed apps | Run `npm install @wix/` or `yarn add @wix/`. | | Headless sites and apps | Run `npm install @wix/` or `yarn add @wix/`. | ## Import the package To import the package in your code: ```js import { } from "@wix/"; ``` ## Example Here's an example of importing and using the `items` submodule from the `@wix/data` package: ```js import { items } from "@wix/data"; // ... const queryResult = await items .query("myCollection") .eq("status", "active") .find(); ``` --- > Portal Navigation: > > - Append `.md` to any URL under `https://dev.wix.com/docs/` to get its markdown version. > - Pages are either content pages (article or reference text) or menu pages (a list of links to child pages). > - To get a menu page, truncate any URL to a parent path and append `.md` (e.g. `https://dev.wix.com/docs/sdk.md`, `https://dev.wix.com/docs/sdk/core-modules.md`). > - Top-level index of all portals: https://dev.wix.com/docs/llms.txt > - Full concatenated docs: https://dev.wix.com/docs/llms-full.txt ## Resource: Set Up a Wix Client ## Article: Set Up a Wix Client ## Article Link: https://dev.wix.com/docs/api-reference/articles/sdk-setup-and-usage/set-up-a-wix-client.md ## Article Content: # Set Up a Wix Client A Wix client is an object you create in your code to make authenticated calls to the Wix JavaScript SDK from self-managed environments, such as self-managed apps or headless projects. The client manages authentication and provides access to the SDK modules you specify. ## When you need a client You need to create a Wix client in these environments: - [Self-managed Wix apps](https://dev.wix.com/docs/build-apps/develop-your-app/frameworks/self-hosting/about-self-hosting-for-wix-apps.md) - [Self-managed Headless sites and apps](https://dev.wix.com/docs/go-headless/getting-started/about-headless/about-wix-headless.md) You **don't** need to create a client if you are developing in these Wix-managed environments: - [Wix sites](https://dev.wix.com/docs/develop-websites.md) - [Wix CLI apps](https://dev.wix.com/docs/build-apps/develop-your-app/frameworks/wix-cli/about-the-wix-cli-for-apps.md) - [Wix Blocks apps](https://dev.wix.com/docs/build-apps/develop-your-app/develop-an-app-with-blocks/about-wix-blocks.md) - [Wix-managed Headless sites and apps](https://dev.wix.com/docs/go-headless/wix-managed-headless/about-wix-managed-headless.md) In these cases, you can call the SDK's APIs directly and authentication is handled automatically. ## Create a client In cases where you need to create a client, call the [`createClient()`](https://dev.wix.com/docs/sdk/core-modules/sdk/wix-client.md#createclient) method and provide values for: - `auth`: The [authorization strategy](#authorization-strategies-auth) for your calls. - `host`: The [host](#hosted-context-host), which is only needed in some hosted contexts, like dashboard or editor. - `modules`: The [SDK modules](#sdk-modules-modules) you want to use. Refer to the [examples](#code-examples) below to see how to create a client using these parameters for a number of different scenarios. ## Authorization strategies (`auth`) The correct strategy depends on your context and the identity you want to use. To learn more about identities, see [About Identities](https://dev.wix.com/docs/api-reference/articles/authentication/about-identities.md). The following strategies are available: - **AppStrategy:** For Wix apps. Requires app credentials and [instance ID](https://dev.wix.com/docs/build-apps/develop-your-app/access/app-instances/about-app-instances.md). - **OAuthStrategy:** For visitors or members in headless projects. Requires a client ID and tokens. - **ApiKeyStrategy:** Use for admin access in headless, channel, or enterprise contexts. Requires an [API key](https://dev.wix.com/docs/rest/articles/get-started/api-keys.md) and site or account ID. - **Host module auth:** For dashboard, editor, and site pages in Wix apps. Auth is handled by the host module. The strategy you should use depends on your context. The following table outlines the supported authorization strategies, the cases they apply to, and the parameters needed to create the strategies: | Context | Identity | Strategy | | --------------------------- | -------------------- | ------------------------------------------------------------------------------------ | | Wix app (backend extension) | App, Visitor, Member | [AppStrategy](https://dev.wix.com/docs/sdk/core-modules/sdk/app-strategy.md) | | Wix app (dashboard page) | Wix user | [Host module auth](https://dev.wix.com/docs/sdk/host-modules/dashboard/introduction.md) | | Wix app (editor/site page) | Visitor, Member | [Host module auth](https://dev.wix.com/docs/sdk/host-modules/editor/introduction.md) | | Headless site or app | Visitor, Member | [OAuthStrategy](https://dev.wix.com/docs/sdk/core-modules/sdk/oauth-strategy.md) | | Headless site or app | Admin | [ApiKeyStrategy](https://dev.wix.com/docs/sdk/core-modules/sdk/api-key-strategy.md) | | Wix Channel/Enterprise app | Admin | [ApiKeyStrategy](https://dev.wix.com/docs/sdk/core-modules/sdk/api-key-strategy.md) | Learn more about [Authorization Strategies](https://dev.wix.com/docs/sdk/articles/set-up-a-client/authorization-strategies.md). ## Hosted context (`host`) Depending on the context in which you are making API calls, you may need to specify a `host`. - In [self-managed apps](https://dev.wix.com/docs/build-apps/develop-your-app/frameworks/self-hosting/about-self-hosting-for-wix-apps.md): - When working in a hosted context, such as the dashboard or editor, use the relevant host module's `host()` method to specify the host when creating a client. - When working in a non-hosted context, such as your app backend, don't specify a `host` when creating a client. - In Headless sites and apps, you never need to specify a `host` when creating a client. - In apps created with the Wix CLI, you don't use a client, so you never need to specify a `host`. Each hosted context has its own host module. The host modules are: - [`dashboard`](https://dev.wix.com/docs/sdk/host-modules/dashboard/introduction.md) - [`editor`](https://dev.wix.com/docs/sdk/host-modules/editor/introduction.md) - [`site`](https://dev.wix.com/docs/sdk/host-modules/site/introduction.md) ## SDK modules (`modules`) In all cases, when creating a client, you need to specify which SDK modules you want to call using that client. Simply list the imported modules you want to call. ## Code examples The following code examples show how to create a client in different contexts and with different authorization strategies. ### Headless as a visitor (`OAuthStrategy`) Create a client to call Bookings Services APIs as a site visitor using the `OAuthStrategy` for a Headless site or app: ```js import { createClient, OAuthStrategy } from "@wix/sdk"; import { services } from "@wix/bookings"; //... const myWixClient = createClient({ auth: OAuthStrategy({ clientId: "", }), modules: { services } }); //... const { items } = await myWixClient.services.queryServices().find(); ``` ### Headless or Wix App as an admin (`ApiKeyStrategy`) ```js import { createClient, ApiKeyStrategy } from "@wix/sdk"; import { services } from "@wix/bookings"; const wixClient = createClient({ auth: ApiKeyStrategy({ apiKey: "", siteId: "" }), modules: { services }, }); //... const { items } = await myWixClient.services.queryServices().find(); ``` ### Wix app as a Wix app (`AppStrategy`) Create a client to call Bookings Services APIs as the Wix app identity using the `AppStrategy` for a Wix app: ```js import { createClient, AppStrategy } from "@wix/sdk"; import { services } from "@wix/bookings"; //... const myWixClient = createClient({ auth: AppStrategy({ appId: "", appSecret: "", instanceId: "" }), modules: { services } }); //... const { items } = await myWixClient.bookings.queryBookings().find(); ``` ### Wix app as a Wix user in the dashboard Create a client to call Bookings Services and Dashboard APIs as a Wix user using the dashboard host for a Wix app: ```js import { createClient } from "@wix/sdk"; import { dashboard } from "@wix/dashboard"; import { services } from "@wix/bookings"; //... const myWixClient = createClient({ host: dashboard.host(), auth: dashboard.auth(), modules: { dashboard, services } }); //... const { items } = await myWixClient.bookings.queryBookings().find(); dashboard.showToast({ message: "This is a toast!", type: "success", }); ``` ### Wix app as a site visitor or member in the editor (or site) Create a client to call Bookings Services and Editor APIs as a site visitor or member using the editor host for a Wix app: ```js import { createClient } from "@wix/sdk"; import { editor, info } from "@wix/editor"; import { services } from "@wix/bookings"; //... const myWixClient = createClient({ host: editor.host(), auth: editor.auth(), modules: { info, services } }); //... const { items } = await myWixClient.bookings.queryBookings().find(); const languageCode = await client.info.getLanguageCode(); ``` ### Wix app as a visitor or member in the backend Call Bookings Services APIs as a site visitor or member in the backend of a Wix app. To do so, you need to pass a visitor or member access token from the frontend: ```js // Frontend code const result = await fetchWithAuth('https://my-backend.com/api/func'); ``` ```js // Backend code import { services } from "@wix/bookings"; import { createClient, AppStrategy } from '@wix/sdk'; app.get('/func', (req, res) => { const accessToken = req.headers['Authorization']; const myWixClient = createClient({ auth: AppStrategy({ appId: "", appSecret: "", accessToken }), modules: { services } }); const { items } = await myWixClient.bookings.queryBookings().find(); res.send({}); }); ``` ## See also - [About Identities](https://dev.wix.com/docs/api-reference/articles/authentication/about-identities.md) - [Authorization Strategies](https://dev.wix.com/docs/sdk/articles/set-up-a-client/authorization-strategies.md) - [API Keys](https://dev.wix.com/docs/api-reference/articles/authentication/about-api-keys.md) - [Elevated Permissions](https://dev.wix.com/docs/api-reference/articles/authentication/about-elevated-permissions.md) --- > Portal Navigation: > > - Append `.md` to any URL under `https://dev.wix.com/docs/` to get its markdown version. > - Pages are either content pages (article or reference text) or menu pages (a list of links to child pages). > - To get a menu page, truncate any URL to a parent path and append `.md` (e.g. `https://dev.wix.com/docs/sdk.md`, `https://dev.wix.com/docs/sdk/core-modules.md`). > - Top-level index of all portals: https://dev.wix.com/docs/llms.txt > - Full concatenated docs: https://dev.wix.com/docs/llms-full.txt ## Resource: Work with Wix Media ## Article: Work with Wix Media ## Article Link: https://dev.wix.com/docs/api-reference/articles/sdk-setup-and-usage/work-with-wix-media.md ## Article Content: # Work with Wix Media The [SDK Media API](https://dev.wix.com/docs/sdk/core-modules/sdk/media.md) contains functionality for working with Wix Media resources. > **Note:** This API isn't necessary when [developing Wix sites](https://dev.wix.com/docs/sdk/articles/get-started/about-site-development.md) or when [coding in Blocks](https://dev.wix.com/docs/build-apps/develop-your-app/develop-an-app-with-blocks/code-in-blocks/about-coding-in-blocks.md). ## Overview The [SDK Media API](https://dev.wix.com/docs/sdk/core-modules/sdk/media.md) enables you to get absolute URLs for Wix Media resources, including scaled and cropped images. With the [SDK Media API](https://dev.wix.com/docs/sdk/core-modules/sdk/media.md), you can: - Get an absolute URL for a Wix Media resource. - Scale a Wix Media image to fit specified dimensions. - Scale a Wix Media image to fill specified dimensions. - Crop a Wix Media image. Wix APIs identify Wix Media resources using internal identifiers with the following structure: ```url wix:image://v1//#originWidth=&originHeight=[&watermark=] ``` For example, a product or cart item object may refer to its associated image with an identifier such as `"wix:image://v1/3c76e2_c5331f937348492a97df87b..."`. You can use the SDK Media API to obtain an absolute URL for such an image, so you can access and manipulate it in your own code. You can obtain a URL for the original image, or for a scaled or cropped version of the image. ## Example This example shows how to use `getImageUrl()` to obtain an absolute URL from the Wix Media identifier for an image provided by the `getCurrentCart()` method. ```javascript import { media } from "@wix/sdk"; import { currentCart } from "@wix/ecom"; const { cart } = await currentCart.getCurrentCart(); const { url } = media.getImageUrl(cart.lineItems[0].image); ``` --- > Portal Navigation: > > - Append `.md` to any URL under `https://dev.wix.com/docs/` to get its markdown version. > - Pages are either content pages (article or reference text) or menu pages (a list of links to child pages). > - To get a menu page, truncate any URL to a parent path and append `.md` (e.g. `https://dev.wix.com/docs/sdk.md`, `https://dev.wix.com/docs/sdk/core-modules.md`). > - Top-level index of all portals: https://dev.wix.com/docs/llms.txt > - Full concatenated docs: https://dev.wix.com/docs/llms-full.txt ## Resource: Migrate from the IFrame SDK ## Article: Migrate from the IFrame SDK ## Article Link: https://dev.wix.com/docs/api-reference/articles/sdk-setup-and-usage/migrate-from-the-iframe-sdk.md ## Article Content: # Migrate from the IFrame SDK As of March 2024, the [Wix IFrame SDK](https://dev.wix.com/docs/client/api-reference/deprecated/iframe-sdk-deprecated/using-the-sdk.md) is deprecated and closed to new developers. You can access the functionality of the IFrame SDK using the Wix JavaScript SDK and other Wix APIs. The following tables map popular methods from the IFrame SDK to their alternatives. ## Wix Dashboard This table maps the functions from the [Wix.Dashboard](https://dev.wix.com/docs/client/api-reference/deprecated/iframe-sdk-deprecated/wix-dashboard.md) IFrame SDK. All the alternative functions are from the Wix JavaScript SDK unless otherwise noted. Many of the alternative functions in this table are from the [Dashboard SDK](https://dev.wix.com/docs/sdk/host-modules/dashboard/introduction.md). | IFrame SDK | Alternative | | :-------------------------------------------------------------------------------------------------------------------------------------- | :-------------------------------------------------------------------------------------------------------------------------------------------------------------------------------------------------------------------------------------------------------------------------------------------------------------------------------------- | | [`closeWindow()`](https://dev.wix.com/docs/client/api-reference/deprecated/iframe-sdk-deprecated/wix-dashboard.md#closewindow) | [`closeModal()`](https://dev.wix.com/docs/sdk/host-modules/dashboard/close-modal.md) | | [`getEditorUrl()`](https://dev.wix.com/docs/client/api-reference/deprecated/iframe-sdk-deprecated/wix-dashboard.md#geteditorurl) | [`getEditorUrls()`](https://dev.wix.com/docs/sdk/backend-modules/urls/editor/get-editor-urls.md) | | [`openBillingPage()`](https://dev.wix.com/docs/client/api-reference/deprecated/iframe-sdk-deprecated/wix-dashboard.md#openbillingpage) | App Billing [Get Url](https://dev.wix.com/docs/rest/app-management/app-billing/billing/get-url.md) API. This is a REST API that requires configuration in the Wix app dashboard. Learn more about [setting up an external pricing page](https://dev.wix.com/docs/build-apps/launch-your-app/pricing-and-billing/set-up-an-external-pricing-page.md). | | [`openModal()`](https://dev.wix.com/docs/client/api-reference/deprecated/iframe-sdk-deprecated/wix-dashboard.md#openmodal) | [`openModal()`](https://dev.wix.com/docs/sdk/host-modules/dashboard/open-modal.md) | | [`openMediaDialog()`](https://dev.wix.com/docs/client/api-reference/deprecated/iframe-sdk-deprecated/wix-dashboard.md#openmediadialog) | [`openMediaManager()`](https://dev.wix.com/docs/sdk/host-modules/dashboard/open-media-manager.md) | | [`pushState()`](https://dev.wix.com/docs/client/api-reference/deprecated/iframe-sdk-deprecated/wix-dashboard.md#pushstate) | Use the `relativeUrl` parameter for [`navigate()`](https://dev.wix.com/docs/sdk/host-modules/dashboard/navigate.md) to append segments to a page's URL. | | [`revalidateSession()`](https://dev.wix.com/docs/client/api-reference/deprecated/iframe-sdk-deprecated/wix-dashboard.md#revalidatesession) | This functionality isn't relevant in the JavaScript SDK. | | [`setHeight()`](https://dev.wix.com/docs/client/api-reference/deprecated/iframe-sdk-deprecated/wix-dashboard.md#setheight-height) | This functionality isn't relevant for apps using the JavaScript SDK. IFrame heights are set automatically. | | [`getSiteViewUrl()`](https://dev.wix.com/docs/client/api-reference/deprecated/iframe-sdk-deprecated/wix-dashboard.md#getsiteviewurl) | [`listPublishedSiteUrls()`](https://dev.wix.com/docs/sdk/backend-modules/urls/site/list-published-site-urls.md) | ## Wix Utils This table maps the methods from the [Wix.Utils](https://dev.wix.com/docs/client/api-reference/deprecated/iframe-sdk-deprecated/wix-utils.md) IFrame SDK. All the alternative methods are from the Wix JavaScript SDK. Many of the alternative methods in this table are from the core [SDK module](https://dev.wix.com/docs/sdk/core-modules/sdk/introduction.md). | IFrame method | Alternative | | :------------------------------------------------------------------------------------------------------------------------------------------------------------------------------------------------------------------------------------------------------------------------------------------------------------------------------------------------------------------------------------------------------------------------------------------------------------------------------------------------- | :-------------------------------------------------------------------------------------------------------------------------------------------------------------------------------------------------------------------------------------------------------------------------------------------------------------------------------------------------------------------------------------------------------------------------- | | [`getInstanceId()`](https://dev.wix.com/docs/client/api-reference/deprecated/iframe-sdk-deprecated/wix-utils.md#getinstanceid), [`getUid()`](https://dev.wix.com/docs/client/api-reference/deprecated/iframe-sdk-deprecated/wix-utils.md#getuid), [`getSiteOwnerId()`](https://dev.wix.com/docs/client/api-reference/deprecated/iframe-sdk-deprecated/wix-utils.md#getsiteownerid), [`getSignDate()`](https://dev.wix.com/docs/client/api-reference/deprecated/iframe-sdk-deprecated/wix-utils.md#getsigndate) | Replacements for these functions aren't available yet. During a live IFrame session, the app instance data is available in the `instance` query parameter in the browser's URL. You can decrypt it to retrieve `instanceId`, `uid`, `signDate`, and `siteOwnerId`. Learn more about [parsing app instance data](https://dev.wix.com/docs/build-apps/develop-your-app/access/app-instances/about-app-instances.md). | | [`Media.getAudioUrl()`](https://dev.wix.com/docs/client/api-reference/deprecated/iframe-sdk-deprecated/wix-utils.md#mediagetaudiourl) | [`getAudioUrl()`](https://dev.wix.com/docs/sdk/core-modules/sdk/media.md#getaudiourl) | | [`Media.getDocumentUrl()`](https://dev.wix.com/docs/client/api-reference/deprecated/iframe-sdk-deprecated/wix-utils.md#mediagetdocumenturl) | [`getDocumentUrl()`](https://dev.wix.com/docs/sdk/core-modules/sdk/media.md#getdocumenturl) | | [`Media.getImageUrl()`](https://dev.wix.com/docs/client/api-reference/deprecated/iframe-sdk-deprecated/wix-utils.md#mediagetimageurl) | [`getImageUrl()`](https://dev.wix.com/docs/sdk/core-modules/sdk/media.md#getimageurl) | | [`Media.getResizedImageUrl()`](https://dev.wix.com/docs/client/api-reference/deprecated/iframe-sdk-deprecated/wix-utils.md#mediagetresizedimageurl) | Use [`getScaledToFillImageUrl()`](https://dev.wix.com/docs/sdk/core-modules/sdk/media.md#getscaledtofillimageurl), [`getScaledToFitImageUrl()`](https://dev.wix.com/docs/sdk/core-modules/sdk/media.md#getscaledtofitimageurl), and [`getCroppedImageUrl()`](https://dev.wix.com/docs/sdk/core-modules/sdk/media.md#getcroppedimageurl) as needed. | | [`Media.getSwfUrl()`](https://dev.wix.com/docs/client/api-reference/deprecated/iframe-sdk-deprecated/wix-utils.md#mediagetswfurl) | [`getVideoUrl()`](https://dev.wix.com/docs/sdk/core-modules/sdk/media.md#getvideourl) | --- > Portal Navigation: > > - Append `.md` to any URL under `https://dev.wix.com/docs/` to get its markdown version. > - Pages are either content pages (article or reference text) or menu pages (a list of links to child pages). > - To get a menu page, truncate any URL to a parent path and append `.md` (e.g. `https://dev.wix.com/docs/sdk.md`, `https://dev.wix.com/docs/sdk/core-modules.md`). > - Top-level index of all portals: https://dev.wix.com/docs/llms.txt > - Full concatenated docs: https://dev.wix.com/docs/llms-full.txt ## Resource: Develop with the SDK ## Article: Develop with the SDK ## Article Link: https://dev.wix.com/docs/api-reference/articles/sdk-setup-and-usage/develop-with-the-sdk.md ## Article Content: # Develop with the SDK This article explains how to call methods from backend SDK modules across different Wix development frameworks and environments. Backend modules are SDK packages with REST API equivalents, and you can find them in this reference. They're universal and work in both Wix-managed and self-managed environments. The approach you use depends on: - Your development environment. Learn more about [website development](https://dev.wix.com/docs/develop-websites-sdk/get-started/overview/about-developing-websites.md), [app development frameworks](https://dev.wix.com/docs/build-apps/develop-your-app/frameworks/about-development-frameworks.md), and [headless development paths](https://dev.wix.com/docs/go-headless/develop-your-project/about-headless-development-paths.md). - The context where your code runs. For example, in a site you can call SDK methods from a site page, a dashboard page, or backend code. - Whether you need [elevated permissions](https://dev.wix.com/docs/api-reference/articles/authentication/about-elevated-permissions.md) to call restricted methods. Elevation lets you call methods that require higher-level permissions than the calling identity has, such as performing administrative operations from frontend code or handling sensitive data on behalf of site visitors or members. SDK methods are asynchronous. Always call them inside an `async` function using `await`. > **Note:** The examples in this article use methods from the [`@wix/ecom`](https://dev.wix.com/docs/api-reference/business-solutions/e-commerce/introduction?apiView=SDK.md) module: > - [`currentCart.addToCurrentCart()`](https://dev.wix.com/docs/api-reference/business-solutions/e-commerce/purchase-flow/cart/cart/add-to-current-cart?apiView=SDK.md): Adds items to the current visitor's cart. Can be called with a visitor or member identity. > - [`orders.createOrder()`](https://dev.wix.com/docs/api-reference/business-solutions/e-commerce/orders/orders/create-order?apiView=SDK.md): Creates an order. Requires higher-level permissions (app or Wix user identity). > > Learn more about [identities](https://dev.wix.com/docs/api-reference/articles/authentication/about-identities.md). This article covers the majority of typical use cases. If your specific scenario isn't included, consult the relevant documentation for further guidance. ## Wix Sites When [developing websites](https://dev.wix.com/docs/develop-websites-sdk/get-started/overview/about-developing-websites.md) on Wix, you can add custom code to a site using the [code editor](https://dev.wix.com/docs/develop-websites-sdk/code-your-site/developer-environments/ides/code-editor/about-the-code-editor.md), the [Wix IDE](https://dev.wix.com/docs/develop-websites-sdk/code-your-site/developer-environments/ides/wix-ide/about-the-wix-ide.md), or a local IDE with [Git integration](https://dev.wix.com/docs/develop-websites-sdk/code-your-site/developer-environments/ides/git-integration/about-git-integration-with-wix-cli.md). In Wix Sites, authentication is handled automatically. You don't need to create a Wix client. Choose the tab that matches your use case: - Site page: Call SDK methods from a [site page](https://dev.wix.com/docs/develop-websites-sdk/code-your-site/code-with-java-script/about-code-placement.md#frontend-code) with a visitor or member [identity](https://dev.wix.com/docs/develop-websites-sdk/code-your-site/authorization/about-identities.md). - Site page with elevation: Call SDK methods from a site page using [elevation](https://dev.wix.com/docs/develop-websites-sdk/code-your-site/authorization/about-elevation.md) when they require higher-level permissions than the calling identity has. - Dashboard page: Call SDK methods from a [dashboard page](https://dev.wix.com/docs/develop-websites/articles/coding-with-velo/frontend-code/dashboard-admin-pages/about-dashboard-pages.md) with a Wix user identity. - Backend: Call SDK methods from [backend code](https://dev.wix.com/docs/develop-websites-sdk/code-your-site/build-a-custom-backend/about-the-site-backend.md) that isn't exposed to the frontend. - Backend with elevation: Call SDK methods from backend code using elevation when they require higher-level permissions than the calling identity has. ::::tabs :::Site-page To call a backend SDK method from a site page: 1. In the page code, import the SDK module: ```js import { currentCart } from "@wix/ecom"; ``` 1. Call the SDK method: ```js async function myFunction() { const result = await currentCart.addToCurrentCart({ lineItems: [{ catalogReference: { catalogItemId: "product-id-123", appId: "1380b703-ce81-ff05-f115-39571d94dfcd" }, quantity: 1 }] }); const cart = result.cart; // Use cart } ``` ::: :::Site-page-with-elevation To call a backend SDK method with elevated permissions from a site page: 1. Create a [web module](https://dev.wix.com/docs/develop-websites-sdk/code-your-site/build-a-custom-backend/web-modules/about-web-modules.md) file with a `.web.js` extension in your backend folder. 1. In the web module, import `Permissions` and `webMethod` from [`@wix/web-methods`](https://dev.wix.com/docs/sdk/core-modules/web-methods/introduction.md), [`auth`](https://dev.wix.com/docs/sdk/core-modules/essentials/auth.md) from `@wix/essentials`, and the SDK module: ```js import { Permissions, webMethod } from "@wix/web-methods"; import { auth } from "@wix/essentials"; import { orders } from "@wix/ecom"; ``` 1. Create a [web method](https://dev.wix.com/docs/develop-websites-sdk/code-your-site/build-a-custom-backend/web-modules/about-web-modules.md#web-methods) that elevates and calls the SDK method: ```js export const myWebMethod = webMethod( Permissions.Admin, async (orderData) => { const elevatedCreateOrder = auth.elevate(orders.createOrder); return await elevatedCreateOrder(orderData); } ); ``` 1. In the frontend code, import and call the web method: ```js import { myWebMethod } from "backend/myModule.web"; async function myFunction() { const newOrder = await myWebMethod({ channelInfo: { type: "WEB" }, lineItems: [{ productName: { original: "My Product" }, price: { amount: "10.00" }, quantity: 1, itemType: { preset: "PHYSICAL" }, }], priceSummary: { total: { amount: "10.00" } }, }); // Use newOrder } ``` To learn more, see [Call Backend Code from the Frontend](https://dev.wix.com/docs/develop-websites-sdk/code-your-site/build-a-custom-backend/web-modules/call-backend-code-from-the-frontend.md). Note that the linked article doesn't cover elevation. ::: :::Dashboard-page To call a backend SDK method from a dashboard page: 1. In the dashboard page code, import the SDK module: ```js import { orders } from "@wix/ecom"; ``` 1. Call the SDK method: ```js async function myFunction() { const newOrder = await orders.createOrder({ channelInfo: { type: "WEB" }, lineItems: [{ productName: { original: "My Product" }, price: { amount: "10.00" }, quantity: 1, itemType: { preset: "PHYSICAL" }, }], priceSummary: { total: { amount: "10.00" } }, }); // Use newOrder } ``` > **Note:** Some methods may still require elevation even in dashboard pages, depending on the specific permissions required. Check the method's documentation for authentication requirements. ::: :::Backend To call a backend SDK method from a backend file: 1. In the backend file, import the SDK module: ```js import { currentCart } from "@wix/ecom"; ``` 1. Call the SDK method: ```js export async function myBackendFunction(productId) { const result = await currentCart.addToCurrentCart({ lineItems: [{ catalogReference: { catalogItemId: productId, appId: "1380b703-ce81-ff05-f115-39571d94dfcd" }, quantity: 1 }] }); return result.cart; } ``` ::: :::Backend-with-elevation To call a backend SDK method with elevated permissions from a backend file: 1. In your backend file, import [`auth`](https://dev.wix.com/docs/sdk/core-modules/essentials/auth.md) from `@wix/essentials` and the SDK module: ```js import { auth } from "@wix/essentials"; import { orders } from "@wix/ecom"; ``` 1. Elevate and call the SDK method: ```js export async function myBackendFunction(orderData) { const elevatedCreateOrder = auth.elevate(orders.createOrder); return await elevatedCreateOrder(orderData); } ``` ::: :::: ## Wix-managed apps (Wix CLI) The [Wix CLI](https://dev.wix.com/docs/wix-cli/guides/about-the-wix-cli.md) is the recommended CLI for new [apps](https://dev.wix.com/docs/build-apps.md). It supports Wix app development with a unified, [Astro](https://docs.astro.build/)-based development experience. In Wix CLI app projects, authentication is handled automatically. You don't need to create a Wix client. Choose the tab that matches your use case: - Dashboard extension: Call SDK methods from a [dashboard extension](https://dev.wix.com/docs/wix-cli/guides/extensions/dashboard-extensions/about-dashboard-extensions.md) with a Wix user [identity](https://dev.wix.com/docs/api-reference/articles/authentication/about-identities?apiView=SDK.md). - Backend extension: Call SDK methods from a [backend extension](https://dev.wix.com/docs/wix-cli/guides/extensions/backend-extensions/about-backend-extensions.md) with an app identity. - Backend extension with elevation: Call SDK methods from a backend extension using [elevation](https://dev.wix.com/docs/build-apps/develop-your-app/frameworks/wix-cli/project-development/elevate-api-call-permissions.md) when they require higher-level permissions than the calling identity has. - Site extension: Call SDK methods from a [site extension](https://dev.wix.com/docs/wix-cli/guides/extensions/site-extensions/about-site-extensions.md) with a visitor or member identity. - Site extension with elevation: Call SDK methods from a site extension using elevation when they require higher-level permissions than the calling identity has. ::::tabs :::Dashboard-extension To call a backend SDK method from a dashboard extension: 1. In the dashboard extension code, import the SDK module: ```ts import { orders } from "@wix/ecom"; ``` 1. Call the SDK method: ```tsx function DashboardPage() { async function handleClick() { const newOrder = await orders.createOrder({ channelInfo: { type: "WEB" }, lineItems: [{ productName: { original: "My Product" }, price: { amount: "10.00" }, quantity: 1, itemType: { preset: "PHYSICAL" }, }], priceSummary: { total: { amount: "10.00" } }, }); console.log(newOrder); } return ; } ``` > **Note:** Some methods may still require elevation even in dashboard extensions, depending on the specific permissions required. Check the method's documentation for authentication requirements. ::: :::Backend-extension > **Note:** The following example calls the Wix SDK in an event extension, but the same principles apply to all backend extensions. To call a backend SDK method in an event extension: 1. In the event extension file, import the SDK module: ```ts import { abandonedCheckouts, orders } from "@wix/ecom"; ``` 1. Call the SDK method: ```ts export default abandonedCheckouts.onAbandonedCheckoutCreated(async (event) => { // Create a follow-up order with a discount to recover the abandoned checkout const recoveryOrder = await orders.createOrder({ channelInfo: { type: "WEB" }, lineItems: [{ productName: { original: "Checkout Recovery Offer" }, price: { amount: "5.00" }, quantity: 1, itemType: { preset: "PHYSICAL" }, }], priceSummary: { total: { amount: "5.00" } }, }); console.log("Created recovery order for abandoned checkout:", recoveryOrder); }); ``` ::: :::Backend-extension-with-elevation > **Note:** The following example calls the Wix SDK in an event extension, but the same principles apply to all backend extensions. To call a backend SDK method with elevated permissions in an event extension: 1. In the event extension file, import [`auth`](https://dev.wix.com/docs/sdk/core-modules/essentials/auth.md) from `@wix/essentials` and the SDK module: ```ts import { auth } from "@wix/essentials"; import { abandonedCheckouts, orders } from "@wix/ecom"; ``` 1. Elevate and call the SDK method: ```ts export default abandonedCheckouts.onAbandonedCheckoutCreated(async (event) => { // Create a follow-up order with a discount to recover the abandoned checkout const elevatedCreateOrder = auth.elevate(orders.createOrder); const recoveryOrder = await elevatedCreateOrder({ channelInfo: { type: "WEB" }, lineItems: [{ productName: { original: "Checkout Recovery Offer" }, price: { amount: "5.00" }, quantity: 1, itemType: { preset: "PHYSICAL" }, }], priceSummary: { total: { amount: "5.00" } }, }); console.log("Created recovery order for abandoned checkout:", recoveryOrder); }); ``` ::: :::Site-extension To call a backend SDK method from a site extension: 1. In the site extension code, import the SDK module: ```ts import { currentCart } from "@wix/ecom"; ``` 1. Call the SDK method: ```ts async function myFunction() { const result = await currentCart.addToCurrentCart({ lineItems: [{ catalogReference: { catalogItemId: "product-id-123", appId: "1380b703-ce81-ff05-f115-39571d94dfcd" }, quantity: 1 }] }); const cart = result.cart; // Use cart } ``` ::: :::Site-extension-with-elevation To call a backend SDK method with elevated permissions from a site extension: 1. Create an [Astro server endpoint](https://docs.astro.build/en/guides/endpoints/#server-endpoints-api-routes) in your `src/pages/api/` directory. 1. In the endpoint, import `APIRoute` from `astro`, [`auth`](https://dev.wix.com/docs/sdk/core-modules/essentials/auth.md) from `@wix/essentials`, and the SDK module: ```ts // src/pages/api/create-order.ts import type { APIRoute } from "astro"; import { auth } from "@wix/essentials"; import { orders } from "@wix/ecom"; ``` 1. Elevate and call the SDK method in the Astro server endpoint: ```ts export const POST: APIRoute = async ({ request }) => { const orderData = await request.json(); const elevatedCreateOrder = auth.elevate(orders.createOrder); const newOrder = await elevatedCreateOrder(orderData); return new Response(JSON.stringify(newOrder)); }; ``` 1. In the site extension code, use [`httpClient.fetchWithAuth()`](https://dev.wix.com/docs/sdk/core-modules/essentials/http-client.md#fetchwithauth) to call the endpoint: ```ts import { httpClient } from "@wix/essentials"; async function myFunction() { const response = await httpClient.fetchWithAuth("/api/create-order", { method: "POST", body: JSON.stringify({ channelInfo: { type: "WEB" }, lineItems: [{ productName: { original: "My Product" }, price: { amount: "10.00" }, quantity: 1, itemType: { preset: "PHYSICAL" }, }], priceSummary: { total: { amount: "10.00" } }, }), }); const newOrder = await response.json(); // Use newOrder } ``` ::: :::: ## Self-managed apps [Self-managed apps](https://dev.wix.com/docs/build-apps/develop-your-app/frameworks/self-hosting/about-self-hosting-for-wix-apps.md) are Wix apps where you host the code on your own infrastructure. This gives you full control over your technology stack. In self-managed apps, you must create a [Wix client](https://dev.wix.com/docs/api-reference/articles/sdk-setup-and-usage/set-up-a-wix-client.md) to make authenticated SDK calls. The [authorization strategy](https://dev.wix.com/docs/api-reference/articles/sdk-setup-and-usage/set-up-a-wix-client.md#authorization-strategies-auth) depends on the context. Choose the tab that matches your use case: - Site widget or plugin: Call SDK methods from a [site widget](https://dev.wix.com/docs/build-apps/develop-your-app/extensions/site-extensions/site-widgets/about-site-widget-extensions.md) or [site plugin](https://dev.wix.com/docs/build-apps/develop-your-app/extensions/site-extensions/site-plugins/about-site-plugin-extensions.md) (custom element) with a visitor or member [identity](https://dev.wix.com/docs/build-apps/develop-your-app/access/about-identities.md). - Embedded script: Call SDK methods from an [embedded script](https://dev.wix.com/docs/build-apps/develop-your-app/extensions/site-extensions/embedded-scripts/about-embedded-scripts.md) with a visitor or member identity. - Editor extension: Call SDK methods from an [editor extension](https://dev.wix.com/docs/build-apps/develop-your-app/extensions/editor-extensions/about-editor-extensions.md) with a Wix user identity. - Dashboard extension: Call SDK methods from a [dashboard extension](https://dev.wix.com/docs/build-apps/develop-your-app/extensions/dashboard-extensions/about-dashboard-extensions.md) with a Wix user identity. - Backend extension: Call SDK methods from a [backend extension](https://dev.wix.com/docs/build-apps/develop-your-app/extensions/backend-extensions/about-backend-extensions.md) with an app identity. > **Note:** Site, editor, and dashboard extensions in self-managed apps use host module authentication. Learn more about [host modules](https://dev.wix.com/docs/sdk/host-modules/about-host-modules.md). ::::tabs :::Site-widget-or-plugin To call a backend SDK method from a self-managed site widget or plugin (custom element): 1. Import [`createClient`](https://dev.wix.com/docs/sdk/core-modules/sdk/wix-client.md) from `@wix/sdk` and [`site`](https://dev.wix.com/docs/sdk/host-modules/site/introduction.md) from `@wix/site`: ```js import { createClient } from "@wix/sdk"; import { site } from "@wix/site"; import { currentCart } from "@wix/ecom"; ``` 1. Create a client using the site `host` and `auth`: ```js const wixClient = createClient({ host: site.host({ applicationId: "" }), auth: site.auth(), modules: { currentCart }, }); ``` 1. In your custom element class, expose the access token injector so Wix can authenticate your client: ```js class MyWidget extends HTMLElement { constructor() { super(); this.accessTokenListener = wixClient.auth.getAccessTokenInjector(); } } ``` 1. Call the SDK method using the client: ```js async function myFunction() { const result = await wixClient.currentCart.addToCurrentCart({ lineItems: [{ catalogReference: { catalogItemId: "product-id-123", appId: "1380b703-ce81-ff05-f115-39571d94dfcd" }, quantity: 1 }] }); // Use result } ``` To learn more, see [Authenticate using the Wix Client in Custom Elements](https://dev.wix.com/docs/build-apps/develop-your-app/develop-a-self-managed-app/supported-extensions/site-extensions/site-widgets-and-plugins/authenticate-custom-elements-using-the-wix-client.md). ::: :::Embedded-script > **Note:** Embedded scripts can be either standard JavaScript scripts (`type="text/javascript"` or no type) or JavaScript modules (`type="module"`). The script type affects how authentication is handled. Learn more about [script types](https://dev.wix.com/docs/build-apps/develop-your-app/develop-a-self-managed-app/supported-extensions/site-extensions/embedded-scripts/authenticate-embedded-scripts-using-the-wix-client.md#script-types). To call a backend SDK method from a self-managed embedded script: 1. Import [`createClient`](https://dev.wix.com/docs/sdk/core-modules/sdk/wix-client.md) from `@wix/sdk` and [`site`](https://dev.wix.com/docs/sdk/host-modules/site/introduction.md) from `@wix/site`: ```js import { createClient } from "@wix/sdk"; import { site } from "@wix/site"; import { currentCart } from "@wix/ecom"; ``` 1. Create a client using the site `host` and `auth`: ```js const wixClient = createClient({ host: site.host({ applicationId: "" }), auth: site.auth(), modules: { currentCart }, }); ``` 1. **JavaScript modules (ESM) only:** If your script uses `type="module"`, add `accesstoken="true"` to your script tag and export the access token injector function: ```js export const injectAccessTokenFunction = wixClient.auth.getAccessTokenInjector(); ``` 1. Call the SDK method using the client: ```js async function myFunction() { const result = await wixClient.currentCart.addToCurrentCart({ lineItems: [{ catalogReference: { catalogItemId: "product-id-123", appId: "1380b703-ce81-ff05-f115-39571d94dfcd" }, quantity: 1 }] }); // Use result } ``` To learn more, see [Authenticate using the Wix Client in Embedded Script Extensions](https://dev.wix.com/docs/build-apps/develop-your-app/develop-a-self-managed-app/supported-extensions/site-extensions/embedded-scripts/authenticate-embedded-scripts-using-the-wix-client.md). ::: :::Editor-extension To call a backend SDK method from a self-managed editor extension: 1. Import [`createClient`](https://dev.wix.com/docs/sdk/core-modules/sdk/wix-client.md) from `@wix/sdk` and [`editor`](https://dev.wix.com/docs/sdk/host-modules/editor/introduction.md) from `@wix/editor`: ```js import { createClient } from "@wix/sdk"; import { editor } from "@wix/editor"; import { orders } from "@wix/ecom"; ``` 1. Create a client using the editor `host` and `auth`: ```js const wixClient = createClient({ host: editor.host(), auth: editor.auth(), modules: { orders }, }); ``` 1. Call the SDK method using the client: ```js async function myFunction() { const newOrder = await wixClient.orders.createOrder({ channelInfo: { type: "WEB" }, lineItems: [{ productName: { original: "My Product" }, price: { amount: "10.00" }, quantity: 1, itemType: { preset: "PHYSICAL" }, }], priceSummary: { total: { amount: "10.00" } }, }); // Use newOrder } ``` ::: :::Dashboard-extension To call a backend SDK method from a self-managed dashboard extension: 1. Import [`createClient`](https://dev.wix.com/docs/sdk/core-modules/sdk/wix-client.md) from `@wix/sdk` and [`dashboard`](https://dev.wix.com/docs/sdk/host-modules/dashboard/introduction.md) from `@wix/dashboard`: ```js import { createClient } from "@wix/sdk"; import { dashboard } from "@wix/dashboard"; import { orders } from "@wix/ecom"; ``` 1. Create a client using the dashboard `host` and `auth`: ```js const wixClient = createClient({ host: dashboard.host(), auth: dashboard.auth(), modules: { orders }, }); ``` 1. Call the SDK method using the client: ```js async function myFunction() { const newOrder = await wixClient.orders.createOrder({ channelInfo: { type: "WEB" }, lineItems: [{ productName: { original: "My Product" }, price: { amount: "10.00" }, quantity: 1, itemType: { preset: "PHYSICAL" }, }], priceSummary: { total: { amount: "10.00" } }, }); // Use newOrder } ``` > **Note:** Some methods may still require elevation even in dashboard extensions, depending on the specific permissions required. Check the method's documentation for authentication requirements. ::: :::Backend-extension To call a backend SDK method from a self-managed backend extension: 1. Import [`createClient`](https://dev.wix.com/docs/sdk/core-modules/sdk/wix-client.md) and [`AppStrategy`](https://dev.wix.com/docs/sdk/core-modules/sdk/app-strategy.md) from `@wix/sdk`: ```js import { createClient, AppStrategy } from "@wix/sdk"; import { orders } from "@wix/ecom"; ``` 1. Create a client with `AppStrategy` using your app credentials: ```js const wixClient = createClient({ auth: AppStrategy({ appId: "", appSecret: "", instanceId: "", }), modules: { orders }, }); ``` To learn how to use `AppStrategy` to authenticate your client, see [AppStrategy](https://dev.wix.com/docs/sdk/core-modules/sdk/app-strategy.md). 1. Call the SDK method using the client: ```js async function myBackendFunction() { const newOrder = await wixClient.orders.createOrder({ channelInfo: { type: "WEB" }, lineItems: [{ productName: { original: "My Product" }, price: { amount: "10.00" }, quantity: 1, itemType: { preset: "PHYSICAL" }, }], priceSummary: { total: { amount: "10.00" } }, }); // Use newOrder } ``` ::: :::: ## Wix-managed headless (Wix CLI) The [Wix CLI](https://dev.wix.com/docs/wix-cli/guides/about-the-wix-cli.md) is the recommended CLI for new [headless projects](https://dev.wix.com/docs/go-headless/get-started/about-headless/about-wix-headless.md). It supports headless development with a unified, [Astro](https://docs.astro.build/)-based development experience. In Wix CLI headless projects, authentication is handled automatically. You don't need to create a Wix client. Choose the tab that matches your use case: - Dashboard extension: Call SDK methods from a [dashboard extension](https://dev.wix.com/docs/wix-cli/guides/extensions/dashboard-extensions/about-dashboard-extensions.md) with a Wix user [identity](https://dev.wix.com/docs/api-reference/articles/authentication/about-identities?apiView=SDK.md). - Backend extension: Call SDK methods from a [backend extension](https://dev.wix.com/docs/wix-cli/guides/extensions/backend-extensions/about-backend-extensions.md) with an app identity. - Backend extension with elevation: Call SDK methods from a backend extension using [elevation](https://dev.wix.com/docs/go-headless/wix-managed-headless/authentication/elevate-api-call-permissions.md) when they require higher-level permissions than the calling identity has. - Frontend: Call SDK methods from a [headless frontend](https://dev.wix.com/docs/wix-cli/guides/development/development-overview.md#astro-foundation) with a visitor or member identity. - Frontend with elevation: Call SDK methods from a headless frontend using elevation when they require higher-level permissions than the calling identity has. ::::tabs :::Dashboard-extension To call a backend SDK method from a dashboard extension: 1. In the dashboard extension code, import the SDK module: ```ts import { orders } from "@wix/ecom"; ``` 1. Call the SDK method: ```tsx function DashboardPage() { async function handleClick() { const newOrder = await orders.createOrder({ channelInfo: { type: "WEB" }, lineItems: [{ productName: { original: "My Product" }, price: { amount: "10.00" }, quantity: 1, itemType: { preset: "PHYSICAL" }, }], priceSummary: { total: { amount: "10.00" } }, }); console.log(newOrder); } return ; } ``` > **Note:** Some methods may still require elevation even in dashboard extensions, depending on the specific permissions required. Check the method's documentation for authentication requirements. ::: :::Backend-extension > **Note:** The following example calls the Wix SDK in an event extension, but the same principles apply to all backend extensions. To call a backend SDK method in an event extension: 1. In the event extension file, import the SDK module: ```ts import { abandonedCheckouts, orders } from "@wix/ecom"; ``` 1. Call the SDK method: ```ts export default abandonedCheckouts.onAbandonedCheckoutCreated(async (event) => { // Create a follow-up order with a discount to recover the abandoned checkout const recoveryOrder = await orders.createOrder({ channelInfo: { type: "WEB" }, lineItems: [{ productName: { original: "Checkout Recovery Offer" }, price: { amount: "5.00" }, quantity: 1, itemType: { preset: "PHYSICAL" }, }], priceSummary: { total: { amount: "5.00" } }, }); console.log("Created recovery order for abandoned checkout:", recoveryOrder); }); ``` ::: :::Backend-extension-with-elevation > **Note:** The following example calls the Wix SDK in an event extension, but the same principles apply to all backend extensions. To call a backend SDK method with elevated permissions in an event extension: 1. In the event extension file, import [`auth`](https://dev.wix.com/docs/sdk/core-modules/essentials/auth.md) from `@wix/essentials` and the SDK module: ```ts import { auth } from "@wix/essentials"; import { abandonedCheckouts, orders } from "@wix/ecom"; ``` 1. Elevate and call the SDK method: ```ts export default abandonedCheckouts.onAbandonedCheckoutCreated(async (event) => { // Create a follow-up order with a discount to recover the abandoned checkout const elevatedCreateOrder = auth.elevate(orders.createOrder); const recoveryOrder = await elevatedCreateOrder({ channelInfo: { type: "WEB" }, lineItems: [{ productName: { original: "Checkout Recovery Offer" }, price: { amount: "5.00" }, quantity: 1, itemType: { preset: "PHYSICAL" }, }], priceSummary: { total: { amount: "5.00" } }, }); console.log("Created recovery order for abandoned checkout:", recoveryOrder); }); ``` ::: :::Frontend To call a backend SDK method from a headless frontend: 1. In the page code, import the SDK module: ```html ``` 1. Call the SDK method: ```html ``` ::: :::Frontend-with-elevation To call a backend SDK method with elevated permissions from a headless frontend: 1. Create an [Astro server endpoint](https://docs.astro.build/en/guides/endpoints/#server-endpoints-api-routes) in your `src/pages/api/` directory. 1. In the endpoint, import `APIRoute` from `astro`, [`auth`](https://dev.wix.com/docs/sdk/core-modules/essentials/auth.md) from `@wix/essentials`, and the SDK module: ```ts // src/pages/api/admin/create-order.ts import type { APIRoute } from "astro"; import { auth } from "@wix/essentials"; import { orders } from "@wix/ecom"; ``` 1. Elevate and call the SDK method in the Astro server endpoint: ```ts export const POST: APIRoute = async ({ request }) => { const orderData = await request.json(); const elevatedCreateOrder = auth.elevate(orders.createOrder); const newOrder = await elevatedCreateOrder(orderData); return new Response(JSON.stringify(newOrder)); }; ``` 1. In the frontend code, use [`httpClient.fetchWithAuth()`](https://dev.wix.com/docs/sdk/core-modules/essentials/http-client.md#fetchwithauth) to call the endpoint: ```astro ``` ::: :::: ## Self-managed headless [Self-managed headless](https://dev.wix.com/docs/go-headless/develop-your-project/self-managed-headless/about-self-managed-headless.md) projects let you build a custom frontend with any framework while using Wix backend services. You're responsible for hosting and authentication. In self-managed headless projects, you must create a [Wix client](https://dev.wix.com/docs/sdk/core-modules/sdk/wix-client.md) with an appropriate authentication strategy. Choose the tab that matches your use case: - Visitor or member: Call SDK methods with a visitor or member [identity](https://dev.wix.com/docs/go-headless/develop-your-project/self-managed-headless/authentication/about-authentication.md). - Admin: Call SDK methods with admin-level permissions using an [API key](https://dev.wix.com/docs/rest/articles/get-started/api-keys.md). ::::tabs :::Visitor-or-member To call a backend SDK method as a visitor or member: 1. Import [`createClient`](https://dev.wix.com/docs/sdk/core-modules/sdk/wix-client.md) and [`OAuthStrategy`](https://dev.wix.com/docs/sdk/core-modules/sdk/oauth-strategy.md) from `@wix/sdk`: ```js import { createClient, OAuthStrategy } from "@wix/sdk"; import { currentCart } from "@wix/ecom"; ``` 1. Create a client with `OAuthStrategy`: ```js const wixClient = createClient({ auth: OAuthStrategy({ clientId: "", }), modules: { currentCart }, }); ``` > **Note:** Get your client ID from your project's [Headless Settings](https://www.wix.com/my-account/site-selector/?buttonText=Select%20Site&title=Select%20a%20Site&autoSelectOnSingleSite=true&actionUrl=https:%2F%2Fwww.wix.com%2Fdashboard%2F%7B%7BmetaSiteId%7D%7D%2Foauth-apps-settings) in the dashboard. 1. Call the SDK method using the client: ```js async function myFunction() { const result = await wixClient.currentCart.addToCurrentCart({ lineItems: [{ catalogReference: { catalogItemId: "product-id-123", appId: "1380b703-ce81-ff05-f115-39571d94dfcd" }, quantity: 1 }] }); // Use result } ``` For persistent sessions, you need to manage visitor and member tokens. Learn more about [handling visitors](https://dev.wix.com/docs/go-headless/self-managed-headless/authentication/visitors/about-handling-visitors.md) and [handling members](https://dev.wix.com/docs/go-headless/self-managed-headless/authentication/members/about-member-login.md). ::: :::Admin To call a backend SDK method with admin privileges: 1. [Generate an API key](https://dev.wix.com/docs/go-headless/develop-your-project/admin-operations/generate-an-api-key?apiView=SDK.md) in the [API Keys Manager](https://manage.wix.com/account/api-keys). 1. Import [`createClient`](https://dev.wix.com/docs/sdk/core-modules/sdk/wix-client.md) and [`ApiKeyStrategy`](https://dev.wix.com/docs/sdk/core-modules/sdk/api-key-strategy.md) from `@wix/sdk`, and the SDK module: ```js import { createClient, ApiKeyStrategy } from "@wix/sdk"; import { orders } from "@wix/ecom"; ``` 1. Create a client with `ApiKeyStrategy`: ```js const wixClient = createClient({ auth: ApiKeyStrategy({ apiKey: "", }), modules: { orders }, }); ``` To learn how to use `ApiKeyStrategy` to authenticate your client, see [ApiKeyStrategy](https://dev.wix.com/docs/sdk/core-modules/sdk/api-key-strategy.md). 1. Call the SDK method using the client: ```js async function myFunction() { const newOrder = await wixClient.orders.createOrder({ channelInfo: { type: "WEB" }, lineItems: [{ productName: { original: "My Product" }, price: { amount: "10.00" }, quantity: 1, itemType: { preset: "PHYSICAL" }, }], priceSummary: { total: { amount: "10.00" } }, }); // Use newOrder } ``` ::: :::: ## Wix Blocks [Wix Blocks](https://dev.wix.com/docs/build-apps/develop-your-app/develop-an-app-with-blocks/about-wix-blocks.md) is a visual editor for building Wix apps. You can create [widgets](https://dev.wix.com/docs/build-apps/develop-your-app/develop-an-app-with-blocks/site-widgets/about-site-widgets-in-blocks.md), [dashboard pages](https://dev.wix.com/docs/build-apps/develop-your-app/extensions/dashboard-extensions/dashboard-pages/about-dashboard-page-extensions.md), and other app components using drag-and-drop design tools and custom code. In Wix Blocks, authentication is handled automatically. You don't need to create a Wix client. Choose the tab that matches your use case: - Widget: Call SDK methods from a [widget](https://dev.wix.com/docs/build-apps/develop-your-app/develop-an-app-with-blocks/site-widgets/about-site-widgets-in-blocks.md) with a visitor or member [identity](https://dev.wix.com/docs/build-apps/develop-your-app/access/about-identities.md). - Widget with elevation: Call SDK methods from a widget using [elevation](https://dev.wix.com/docs/build-apps/develop-your-app/access/authorization/about-elevation.md) when they require higher-level permissions than the calling identity has. - Dashboard page: Call SDK methods from a [dashboard page](https://dev.wix.com/docs/build-apps/develop-your-app/develop-an-app-with-blocks/dashboard-pages/about-dashboard-pages-in-blocks.md) with a Wix user identity. ::::tabs :::Widget To call a backend SDK method from a widget: 1. In the widget code, import the SDK module: ```js import { currentCart } from "@wix/ecom"; ``` 1. Call the SDK method: ```js async function myFunction() { const result = await currentCart.addToCurrentCart({ lineItems: [{ catalogReference: { catalogItemId: "product-id-123", appId: "1380b703-ce81-ff05-f115-39571d94dfcd" }, quantity: 1 }] }); const cart = result.cart; // Use cart } ``` To learn more, see [Call Backend Code from the Frontend in Blocks](https://dev.wix.com/docs/build-apps/develop-your-app/develop-an-app-with-blocks/code-in-blocks/call-backend-code-from-the-frontend-in-blocks.md). ::: :::Widget-with-elevation To call a backend SDK method with elevated permissions from a widget: 1. In the Blocks editor, create a web module. This is a file in your `backend` directory with a `.web.js` extension. 1. In the web module, import `Permissions` and `webMethod` from [`@wix/web-methods`](https://dev.wix.com/docs/sdk/core-modules/web-methods/introduction.md), [`auth`](https://dev.wix.com/docs/sdk/core-modules/essentials/auth.md) from `@wix/essentials`, and the SDK module: ```js import { Permissions, webMethod } from "@wix/web-methods"; import { auth } from "@wix/essentials"; import { orders } from "@wix/ecom"; ``` 1. Create a web method that elevates and calls the SDK method: ```js export const myWebMethod = webMethod( Permissions.Admin, async (orderData) => { const elevatedCreateOrder = auth.elevate(orders.createOrder); return await elevatedCreateOrder(orderData); } ); ``` 1. In the widget code, import and call the web method: ```js import { myWebMethod } from "backend/myModule.web"; async function myFunction() { const newOrder = await myWebMethod({ channelInfo: { type: "WEB" }, lineItems: [{ productName: { original: "My Product" }, price: { amount: "10.00" }, quantity: 1, itemType: { preset: "PHYSICAL" }, }], priceSummary: { total: { amount: "10.00" } }, }); // Use newOrder } ``` To learn more, see [Call Backend Code from the Frontend in Blocks](https://dev.wix.com/docs/build-apps/develop-your-app/develop-an-app-with-blocks/code-in-blocks/call-backend-code-from-the-frontend-in-blocks.md). Note that the linked article doesn't cover elevation. ::: :::Dashboard-page To call a backend SDK method from a Blocks dashboard page: 1. In the dashboard page code, import the SDK module: ```js import { orders } from "@wix/ecom"; ``` 1. Call the SDK method: ```js $w.onReady(async () => { const newOrder = await orders.createOrder({ channelInfo: { type: "WEB" }, lineItems: [{ productName: { original: "My Product" }, price: { amount: "10.00" }, quantity: 1, itemType: { preset: "PHYSICAL" }, }], priceSummary: { total: { amount: "10.00" } }, }); // Use newOrder }); ``` > **Note:** Some methods may still require elevation even in dashboard pages, depending on the specific permissions required. Check the method's documentation for authentication requirements. ::: :::: --- > Portal Navigation: > > - Append `.md` to any URL under `https://dev.wix.com/docs/` to get its markdown version. > - Pages are either content pages (article or reference text) or menu pages (a list of links to child pages). > - To get a menu page, truncate any URL to a parent path and append `.md` (e.g. `https://dev.wix.com/docs/sdk.md`, `https://dev.wix.com/docs/sdk/core-modules.md`). > - Top-level index of all portals: https://dev.wix.com/docs/llms.txt > - Full concatenated docs: https://dev.wix.com/docs/llms-full.txt ## Resource: About AI Tools ## Article: About AI Tools for Wix Developers ## Article Link: https://dev.wix.com/docs/api-reference/articles/ai-tools/about-ai-tools.md ## Article Content: # About AI Tools Wix provides AI tools to help you build and manage Wix sites and apps. Use these tools from your AI client or IDE to access Wix documentation, APIs, and development workflows without leaving your environment. ## Available tools - [Wix MCP server](https://dev.wix.com/docs/api-reference/articles/ai-tools/wix-mcp/about-the-wix-mcp.md): Search Wix documentation, call Wix APIs, and create and manage sites, apps, and headless projects from your AI client. - [Wix plugin](https://dev.wix.com/docs/api-reference/articles/ai-tools/about-the-wix-plugin.md): Adds Wix Skills and the Wix MCP to your AI client, giving it the context it needs to help you build and manage Wix sites and apps. - [Wix Skills](https://dev.wix.com/docs/api-reference/articles/ai-tools/about-wix-skills.md): Self-contained instructions that help AI tools work with Wix. - [Wix AI APIs](https://dev.wix.com/docs/api-reference/articles/ai-tools/ai-apis/about-the-wix-ai-apis.md): Add AI-powered features to a site or app, such as text generation, image generation, and embeddings. ## Machine-readable documentation Wix developer documentation is available in AI-friendly formats, so you can feed it directly to AI coding assistants and LLMs: - **llms.txt index:** Browse a structured index of all documentation at [dev.wix.com/docs/llms.txt](https://dev.wix.com/docs/llms.txt.md). - **Markdown format:** Append `.md` to any documentation page URL to retrieve a Markdown version of that page. - **Page menu:** Use the "Ask Assistant" dropdown on any documentation page to copy the page as Markdown or get a direct link to the Markdown version. --- > Portal Navigation: > > - Append `.md` to any URL under `https://dev.wix.com/docs/` to get its markdown version. > - Pages are either content pages (article or reference text) or menu pages (a list of links to child pages). > - To get a menu page, truncate any URL to a parent path and append `.md` (e.g. `https://dev.wix.com/docs/sdk.md`, `https://dev.wix.com/docs/sdk/core-modules.md`). > - Top-level index of all portals: https://dev.wix.com/docs/llms.txt > - Full concatenated docs: https://dev.wix.com/docs/llms-full.txt ## Resource: About the Wix Plugin ## Article: About the Wix Plugin ## Article Link: https://dev.wix.com/docs/api-reference/articles/ai-tools/about-the-wix-plugin.md ## Article Content: # About the Wix Plugin The Wix plugin adds [Wix Skills](https://dev.wix.com/docs/api-reference/articles/ai-tools/about-wix-skills.md) and the [Wix MCP](https://dev.wix.com/docs/api-reference/articles/ai-tools/wix-mcp/about-the-wix-mcp.md) to your AI client, giving it the context it needs to help you build and manage with Wix. Once installed, your AI client understands Wix-specific workflows and development patterns, so you can get more accurate, relevant assistance without having to explain the platform yourself. ## How it works The plugin works by loading Wix Skills and the Wix MCP into your AI client. Skills are self-contained instruction sets that guide your AI client through Wix development tasks. The MCP lets your AI client search Wix documentation, call Wix APIs, and create and manage sites, apps, and headless projects. For a full list of available skills, see the [Wix Skills repository](https://github.com/wix/skills). ## Install the Wix plugin The plugin is available for Claude Code, Cursor, and VS Code. ### Claude Code In Claude Code run: ``` /plugin marketplace add wix/skills /plugin install wix@wix ``` ### Cursor Use one of the following methods to install the plugin: - Install it from the [Cursor marketplace](https://cursor.com/marketplace/wix). - Run the following command in the AI chat: ``` /add-plugin wix ``` ### Codex In a terminal, register the marketplace: ``` codex plugin marketplace add wix/skills ``` Then in Codex CLI, run `/plugins`, select **Wix**, and choose **Install Plugin**. ### VS Code 1. Open the Command Palette with Command+Shift+P on Mac or Ctrl+Shift+P on Windows. 2. Select **Chat: Install Plugin From Source**. 3. Enter `https://github.com/wix/skills`. ### Gemini CLI Install using [Gemini CLI](https://geminicli.com/). ``` gemini extensions install https://github.com/wix/skills ``` --- > Portal Navigation: > > - Append `.md` to any URL under `https://dev.wix.com/docs/` to get its markdown version. > - Pages are either content pages (article or reference text) or menu pages (a list of links to child pages). > - To get a menu page, truncate any URL to a parent path and append `.md` (e.g. `https://dev.wix.com/docs/sdk.md`, `https://dev.wix.com/docs/sdk/core-modules.md`). > - Top-level index of all portals: https://dev.wix.com/docs/llms.txt > - Full concatenated docs: https://dev.wix.com/docs/llms-full.txt ## Resource: About Wix Skills ## Article: About Wix Skills ## Article Link: https://dev.wix.com/docs/api-reference/articles/ai-tools/about-wix-skills.md ## Article Content: # About Wix Skills Wix Skills are self-contained instructions that help AI tools work with Wix development workflows. They follow the open [Agent Skills specification](https://agentskills.io/specification) and consist of a `SKILL.md` file containing metadata, instructions, and background information. Each skill includes: - **Name and description:** Help agents identify what a skill does and when to use it. - **Instructions:** Step-by-step guidance for performing the task. - **Optional resources:** Scripts, documentation, and assets that agents can use. ## Available skills The [Wix Skills repository](https://github.com/wix/skills) includes skills for different development workflows, such as building Wix app extensions with the CLI and managing Wix business solutions using the REST API. ## Install Wix Skills To install Wix Skills, run: ```bash npx skills add wix/skills ``` > **Note:** Add `-g` to install globally and make Wix Skills available across all your projects. ## See also - [Wix plugin](https://dev.wix.com/docs/api-reference/articles/ai-tools/about-the-wix-plugin.md) - [Wix Skills repository](https://github.com/wix/skills) - [CLI sample prompts](https://dev.wix.com/docs/wix-cli/guides/development/about-wix-skills.md#sample-prompts) --- > Portal Navigation: > > - Append `.md` to any URL under `https://dev.wix.com/docs/` to get its markdown version. > - Pages are either content pages (article or reference text) or menu pages (a list of links to child pages). > - To get a menu page, truncate any URL to a parent path and append `.md` (e.g. `https://dev.wix.com/docs/sdk.md`, `https://dev.wix.com/docs/sdk/core-modules.md`). > - Top-level index of all portals: https://dev.wix.com/docs/llms.txt > - Full concatenated docs: https://dev.wix.com/docs/llms-full.txt ## Resource: About the Wix AI APIs ## Article: About the Wix AI APIs ## Article Link: https://dev.wix.com/docs/api-reference/articles/ai-tools/ai-apis/about-the-wix-ai-apis.md ## Article Content: # About the Wix AI APIs
        Developer Preview This API is subject to change. Bug fixes and new features will be released based on developer feedback throughout the preview period.
        > **Authentication and Permissions** > > To use the AI APIs, you must be authenticated as a Wix app or Wix user [identity](https://dev.wix.com/docs/api-reference/articles/authentication/about-identities.md). When [developing a site](https://dev.wix.com/docs/api-reference/articles/platform-overview/about-wix-site-development.md), you can also authenticate with an [API key](https://dev.wix.com/docs/api-reference/articles/authentication/api-keys/about-api-keys.md). > > For [app development](https://dev.wix.com/docs/build-apps/develop-your-app/about-developing-apps.md), you must also include the [`INVOKE AI MODELS`](https://manage.wix.com/app-selector?title=Select+an+App&subtitle=After+Selection+you+will+be+redirected+to+App+Permissions+Page&primaryButtonText=Go+to+permissions+page&actionUrl=https%3A%2F%2Fdev.wix.com%2Fapps%2F%7BappId%7D%2Fdev-center-permissions%2Fadd%3FselectedPermission%3DSCOPE.DATA_SCIENCE.INVOKE_AI_MODELS%26filterByPermissionName%3DSCOPE.DATA_SCIENCE.INVOKE_AI_MODELS) permission scope. Learn more about [app permissions](https://dev.wix.com/docs/build-apps/develop-your-app/access/authorization/about-permissions.md). ::::tabs :::REST_TAB The Wix AI APIs provide a streamlined way to interact with multiple AI providers in your code while Wix handles authentication and billing: ::: :::SDK_TAB Built on the [Vercel AI SDK](https://ai-sdk.dev/), the Wix AI APIs provide a streamlined way to interact with multiple AI providers in your code while Wix handles authentication and billing: ::: :::: - When [developing a site](https://dev.wix.com/docs/api-reference/articles/platform-overview/about-wix-site-development.md), Wix bills based on AI model usage by you, your collaborators, members, and visitors. - When [building a Wix app](https://dev.wix.com/docs/build-apps/get-started/overview/about-wix-apps.md), Wix bills the Wix users who install your app, so you don't need to set up billing integration. ::::tabs :::REST_TAB ::: :::SDK_TAB Learn how to [set up the Wix AI SDK](https://dev.wix.com/docs/api-reference/articles/ai-tools/ai-apis/set-up-the-wix-ai-sdk.md). ::: ::::
        **Important:** Each method call uses approximately 1 AI credit. Learn more about [AI credits on Wix](https://support.wix.com/en/article/about-ai-credits).
        ## Providers and models Wix provides access to models from the following providers. To call any supported provider method, use this base URL pattern: ```curl https://www.wixapis.com/{provider}/v1/{method-path} ``` To view the full list of models, call each provider's method at the specified URL. See each provider's documentation for request parameters and response details: | Provider | Method | URL to call | | --------- | ------------------------------------------------------------------------- | --------------------------------------------- | | OpenAI | [List Models](https://platform.openai.com/docs/api-reference/models/list) | `https://www.wixapis.com/openai/v1/models` | | Anthropic | [List Models](https://platform.claude.com/docs/en/api/models/list) | `https://www.wixapis.com/anthropic/v1/models` | > **Note:** When a provider releases a new model, it might take a few days before Wix supports it. ## Generating text ::::tabs :::REST_TAB Generate text from prompts using models by the following providers: ### OpenAI OpenAI methods are available on the following base URL: ```curl https://www.wixapis.com/openai/v1/{method-path} ``` Generate text by calling any supported OpenAI method on its path: | Name | Description | Path | | ------------------------------------------------------------------------------------------ | ---------------------------------------------------------- | ------------------- | | [Create a model response](https://platform.openai.com/docs/api-reference/responses/create) | Create a response from text or image prompts. | `/responses` | | [Create chat completion](https://platform.openai.com/docs/api-reference/chat/create) | Create a model response for a specified chat conversation. | `/chat/completions` | > **Note:** To stream the response, set the `stream` parameter to `true`. For example, this request uses the GPT-5 model to generate a response to the prompt "Tell me a bedtime story about a unicorn": ```curl curl -X POST 'https://www.wixapis.com/openai/v1/responses' \ -H 'Content-Type: application/json' \ -H 'Authorization: ' \ -d '{ "model": "gpt-5", "input": "Tell me a bedtime story about a unicorn." }' ``` ### Anthropic Anthropic methods are available on the following base URL: ```curl https://www.wixapis.com/anthropic/v1/{method-path} ``` Generate text by calling any supported Anthropic method on its path: | Name | Description | Path | | --------------------------------------------------------------------------- | ----------------------------------------------- | ----------- | | [Create a message](https://platform.claude.com/docs/en/api/messages/create) | Create a message from a list of input messages. | `/messages` | > **Note:** To stream the response, set the `stream` parameter to `true`. For example, this request uses the Claude Opus 4.6 model to stream a response to the prompt "Hello, world": ```curl curl -X POST 'https://www.wixapis.com/anthropic/v1/messages' \ -H 'Content-Type: application/json' \ -H 'Authorization: ' \ -d '{ "messages": [ { "content": "Hello, world", "role": "user" } ], "model": "claude-opus-4-6", "stream": true }' ``` ::: :::SDK_TAB Generate text from prompts with the following methods: - [`generateText()`](https://ai-sdk.dev/docs/reference/ai-sdk-core/generate-text): Generates text for a specified prompt and model. - [`streamText()`](https://ai-sdk.dev/docs/reference/ai-sdk-core/stream-text): Streams text from a specified prompt and model. For example, this code snippet generates text using OpenAI's GPT-5 model via the Responses API: ```js import { generateText } from "ai"; import { openai } from "@wix/ai"; const { text } = await generateText({ model: openai.responses("gpt-5"), prompt: "Invent a new holiday and describe its traditions.", }); console.log(text); ``` This code snippet generates text using Anthropic's Claude Opus 4.6 model: ```js import { generateText } from "ai"; import { anthropic } from "@wix/ai"; const { text } = await generateText({ model: anthropic("claude-opus-4-6"), prompt: "Tell me a bedtime story about a unicorn.", }); console.log(text); ``` ::: :::: ### Suggested models You can generate text using these suggested models from the following providers: | Provider | Model | | --------- | ------------------- | | OpenAI | `gpt-5.2-pro` | | OpenAI | `gpt-5.2` | | OpenAI | `gpt-5.1` | | OpenAI | `gpt-5-nano` | | OpenAI | `gpt-5-mini` | | OpenAI | `gpt-5` | | OpenAI | `gpt-4.1-nano` | | OpenAI | `gpt-4.1-mini` | | OpenAI | `gpt-4.1` | | Anthropic | `claude-opus-4-7` | | Anthropic | `claude-sonnet-4-6` | | Anthropic | `claude-haiku-4-5` | Learn more about [providers and models](#providers-and-models). ## Generating embeddings ::::tabs :::REST_TAB Create vector representations for semantic comparisons and search using models by the following providers: ### OpenAI OpenAI methods are available on the following base URL: ```curl https://www.wixapis.com/openai/v1/{method-path} ``` Generate embeddings by calling the supported OpenAI method on its path: | Name | Description | Path | | ------------------------------------------------------------------------------------- | -------------------------------------------------------- | ------------- | | [Create embeddings](https://platform.openai.com/docs/api-reference/embeddings/create) | Create an embeddings vector representing the input text. | `/embeddings` | For example, this request uses the text-embedding-ada-002 model to create an embedding vector: ```curl curl -X POST 'https://www.wixapis.com/openai/v1/embeddings' \ -H 'Content-Type: application/json' \ -H 'Authorization: ' \ -d '{ "input": "The food was delicious but the waiter was rude.", "model": "text-embedding-ada-002", "encoding_format": "float" }' ``` ::: :::SDK_TAB Create vector representations for semantic comparisons and search by calling the following methods: - [`embed()`](https://ai-sdk.dev/docs/reference/ai-sdk-core/embed): Embed a single value. - [`embedMany()`](https://ai-sdk.dev/docs/reference/ai-sdk-core/embed-many): Embed multiple values at once. For example, this code snippet uses OpenAI's text-embedding-3-small model via the [Embeddings API](https://ai-sdk.dev/docs/ai-sdk-core/embeddings) to create multiple embedding vectors: ```js import { embedMany } from "ai"; import { openai } from "@wix/ai"; const { embeddings } = await embedMany({ model: openai.embeddingModel("text-embedding-3-small"), values: [ "sunny day at the beach", "rainy afternoon in the city", "snowy night in the mountains", ], }); ``` ::: :::: ### Suggested models You can create embeddings using these suggested models from the following providers: | Provider | Model | | -------- | ------------------------ | | OpenAI | `text-embedding-3-small` | | OpenAI | `text-embedding-3-large` | | OpenAI | `text-embedding-ada-002` | Learn more about [providers and models](#providers-and-models). ## Generating images ::::tabs :::REST_TAB Generate images from text prompts using models by the following providers: ### Runware Access [Runware](https://runware.ai/docs/image-inference/introduction) image generation functionality using the following URL: ```curl https://www.wixapis.com/runwareschemaless/v1/request ``` To interact with Runware models, send a [request with an array of tasks](https://runware.ai/docs/image-inference/api-reference#request), each containing the required configuration details. For example, this request generates an image using Google's Nano Banana Pro 2 model: ```curl curl -X POST 'https://www.wixapis.com/runwareschemaless/v1/request' \ -H 'Content-Type: application/json' \ -H 'Authorization: ' \ -d '[{ "taskType": "imageInference", "taskUUID": "a770f077-f413-47de-9dac-be0b26a35da6", "outputType": "URL", "outputFormat": "jpg", "positivePrompt": "a serene mountain landscape with a crystal-clear lake reflecting the sky", "height": 1024, "width": 1024, "model": "google:4@2", "steps": 30, "CFGScale": 7.5, "numberResults": 4 }]' ``` ::: :::SDK_TAB Generate images from text prompts by calling the following method: - [`generateImage()`](https://ai-sdk.dev/docs/reference/ai-sdk-core/generate-image) For example, this code snippet uses Google's Nano Banana Pro 2 model to generate an image: ```js import { generateImage } from "ai"; import { runware } from "@wix/ai"; const result = await generateImage({ model: runware.image("google:4@2"), prompt: "A futuristic cityscape at night with neon lights", }); ``` ::: :::: ### Suggested models You can generate images using these suggested [Runware models](https://runware.ai/models). Specify the [model's AIR ID](https://runware.ai/docs/image-inference/models#air-system) in the image generation method: | Model name | Model AIR ID | | ------------------ | ------------------------ | | FLUX.2 Dev | `runware:400@1` | | FLUX.2 Pro | `bfl:5@1` | | Ideogram 3.0 | `ideogram:4@1` | | ImagineArt 1.5 Pro | `imagineart:1.5-pro@0` | | Nano Banana Pro 2 | `google:4@2` | | Seedream 4.5 | `bytedance:seedream@4.5` | | Z-Image-Turbo | `runware:z-image@turbo` | > **Note:** You can use any model supported by Runware. [Sign up to Runware](https://my.runware.ai/signup) to explore the full model list. ## See also - [Set up the Wix AI SDK](https://dev.wix.com/docs/api-reference/articles/ai-tools/ai-apis/set-up-the-wix-ai-sdk.md) - [About AI credits on Wix](https://support.wix.com/en/article/about-ai-credits) - [Vercel AI SDK Core](https://ai-sdk.dev/docs/ai-sdk-core/overview) --- > Portal Navigation: > > - Append `.md` to any URL under `https://dev.wix.com/docs/` to get its markdown version. > - Pages are either content pages (article or reference text) or menu pages (a list of links to child pages). > - To get a menu page, truncate any URL to a parent path and append `.md` (e.g. `https://dev.wix.com/docs/sdk.md`, `https://dev.wix.com/docs/sdk/core-modules.md`). > - Top-level index of all portals: https://dev.wix.com/docs/llms.txt > - Full concatenated docs: https://dev.wix.com/docs/llms-full.txt ## Resource: Set up the Wix AI SDK ## Article: Set up the Wix AI SDK ## Article Link: https://dev.wix.com/docs/api-reference/articles/ai-tools/ai-apis/set-up-the-wix-ai-sdk.md ## Article Content: # Set up the Wix AI SDK The Wix AI SDK lets you access AI models from [supported providers](https://dev.wix.com/docs/api-reference/articles/ai-apis/about-the-wix-ai-apis?apiView=SDK.md#supported-providers) via the [Vercel AI SDK](https://ai-sdk.dev/). Follow these steps to set it up: ## Step 1 | Install the packages Install the Vercel `ai`, Wix `@wix/ai` and `zod` packages: ```bash npm install @wix/ai npm install ai@>=6.0.26 npm install zod@>=4.1.8 ``` ## Step 2 | Import an AI method Import one or more [supported methods](https://dev.wix.com/docs/api-reference/articles/ai-apis/about-the-wix-ai-apis?apiView=SDK.md#supported-methods) from the Vercel AI package: ```js import { } from "ai"; ``` Where `` is the method you want to call. For example, this line imports `generateText()` from Vercel: ```js import { generateText } from "ai"; ``` ## Step 3 | Set up a provider module Import an AI provider from the Wix AI package. The import method depends on your [hosting environment](https://dev.wix.com/docs/sdk/articles/get-started/about-the-wix-java-script-sdk.md#uses): ::::tabs :::Wix-managed In a [Wix-managed environment](https://dev.wix.com/docs/sdk/articles/get-started/about-the-wix-java-script-sdk.md#uses), directly import the [provider module](https://dev.wix.com/docs/api-reference/articles/ai-apis/about-the-wix-ai-apis.md#supported-providers): ```js import { } from "@wix/ai"; ``` Where `` is the provider whose API and models you want to access. For example, this line imports `openai` from Wix: ```js import { openai } from "@wix/ai"; ``` You can directly import the following provider modules: | Provider | Module name | | -------- | ----------- | | OpenAI | `openai` | | Runware | `runware` | ::: :::Self-managed In a [self-managed environment](https://dev.wix.com/docs/sdk/articles/get-started/about-the-wix-java-script-sdk.md#uses): 1. Initialize a [Wix client](https://dev.wix.com/docs/sdk/core-modules/sdk/wix-client.md) with an [authorization strategy](https://dev.wix.com/docs/sdk/articles/set-up-a-client/about-the-wix-client.md#authorization-strategy-auth): ```js import { createClient, } from "@wix/sdk"; const wixClient = createClient({}); ``` 2. Import a Wix utility method and call it to create an authenticated [provider module](https://dev.wix.com/docs/api-reference/articles/ai-apis/about-the-wix-ai-apis.md#supported-providers): ```js import { } from "@wix/ai"; const = ({ client: wixClient }); ``` Where: - `` creates a provider module authenticated by the Wix client. - `` is the provider whose API and models you want to access. For example, this code snippet sets up and authenticates the `openai` provider module: ```js import { generateText } from "ai"; import { createOpenAI } from "@wix/ai"; import { createClient, AppStrategy } from "@wix/sdk"; // Create a Wix client with a Wix app context: const wixClient = createClient({ auth: AppStrategy({ appId: "YOUR_APP_ID", appSecret: "YOUR_APP_SECRET", instanceId: "YOUR_INSTANCE_ID", }), }); // Create an openai module with the authenticated client const openai = createOpenAI({ client: wixClient }); ``` You can create the following provider modules: | Provider | Module name | Create by calling | | -------- | ----------- | ----------------- | | OpenAI | `openai` | `createOpenAI()` | | Runware | `runware` | `createRunware()` | ::: :::: ## Step 4 | Specify the provider API and model Call the AI method and specify the [provider API and model](https://dev.wix.com/docs/api-reference/articles/ai-apis/about-the-wix-ai-apis?apiView=SDK.md#supported-providers): ```js const result = await ({ model: .(""), // Additional method parameters }); ``` Where: - `` is the Vercel AI method you want to call. - `` is the provider whose API you want to access. - `` is the API that has the functionality you need. - `` is the specific model you want to interact with. For example, this code snippet calls the `generateText()` method imported from Vercel, and configures it using the `openai` module imported from Wix: ```js const { text } = await generateText({ model: openai("gpt-5.2"), prompt: "Write a vegetarian lasagna recipe for 4 people.", }); ``` ## Complete code example This code uses [`generateText()`](https://ai-sdk.dev/docs/reference/ai-sdk-core/generate-text) to call [OpenAI's Responses API](https://ai-sdk.dev/providers/ai-sdk-providers/openai#responses-models) to generate text: ::::tabs :::Wix-managed ```js // Import AI functionality from the Vercel SDK import { generateText } from "ai"; // Import the provider module import { openai } from "@wix/ai"; // Generate text by specifying the model name const { text } = await generateText({ model: openai("gpt-5.2"), // or openai.responses('gpt-5.2') prompt: "Write a vegetarian lasagna recipe for 4 people.", }); ``` ::: :::Self-managed ```js // Import AI functionality from the Vercel SDK import { generateText } from "ai"; // Import the method to create an authenticated provider module import { createOpenAI } from "@wix/ai"; // Import Wix client methods import { createClient, AppStrategy } from "@wix/sdk"; // Create a Wix client authenticated with an AppStrategy const wixClient = createClient({ auth: AppStrategy({ appId: "YOUR_APP_ID", appSecret: "YOUR_APP_SECRET", instanceId: "YOUR_INSTANCE_ID", }), }); // Create the openai provider module via the authenticated Wix client const openai = createOpenAI({ client: wixClient }); // Generate text by specifying the model name const { text } = await generateText({ model: openai("gpt-5.2"), // or openai.responses('gpt-5.2') prompt: "Write a vegetarian lasagna recipe for 4 people.", }); ``` ::: :::: ## See also - [About the Wix AI APIs](https://dev.wix.com/docs/api-reference/articles/ai-apis/about-the-wix-ai-apis.md) - [About AI credits on Wix](https://support.wix.com/en/article/about-ai-credits) - [Vercel AI SDK Core](https://ai-sdk.dev/docs/ai-sdk-core/overview) --- > Portal Navigation: > > - Append `.md` to any URL under `https://dev.wix.com/docs/` to get its markdown version. > - Pages are either content pages (article or reference text) or menu pages (a list of links to child pages). > - To get a menu page, truncate any URL to a parent path and append `.md` (e.g. `https://dev.wix.com/docs/sdk.md`, `https://dev.wix.com/docs/sdk/core-modules.md`). > - Top-level index of all portals: https://dev.wix.com/docs/llms.txt > - Full concatenated docs: https://dev.wix.com/docs/llms-full.txt ## Resource: About the Wix MCP ## Article: About the Wix MCP ## Article Link: https://dev.wix.com/docs/api-reference/articles/ai-tools/wix-mcp/about-the-wix-mcp.md ## Article Content: # About the Wix MCP Wix now provides a [Model Context Protocol](https://modelcontextprotocol.io/introduction) (MCP) server that allows you to work with Wix tools and services in your chosen AI client. By configuring the Wix MCP server, you enable your client to search the Wix documentation, write code for the Wix platform, and make API calls on Wix sites. This saves you the time and effort of finding and applying the information in the documentation yourself. > **Note:** The Wix MCP is available as a [built-in connector](https://claude.com/connectors/wix) in Claude, allowing you to access all MCP tools without additional configuration. With the connector, Claude can help you search Wix API and SDK documentation, manage site data, and work with app data like products, bookings services, and blog posts. For examples on how to use the Wix MCP server, see our [sample prompts](https://dev.wix.com/docs/api-reference/articles/ai-tools/wix-mcp/mcp-sample-prompts.md). ## Configure the Wix MCP This section shows you the basic configuration you need to add to your AI tool to use the Wix MCP server. Watch our video to see a demo of how to set up the MCP: `youtube:https://www.youtube.com/watch?v=n6PxVIiaJw4` ### Before you begin - Make sure you have [Node.js](https://nodejs.org/en) version 19.9.0 or higher installed. ### Required configuration Wix provides multiple ways to configure the Wix MCP server. In most cases, you need to manually add one of the following JSON objects to your MCP server configuration file: **For tools that support remote MCP:** ```json { "mcpServers": { "wix-mcp-remote": { "type": "http", "url": "https://mcp.wix.com/mcp" } } } ``` The supported values for the `type` field are `"sse"` and `"http"`. The type you select depends on your agent. Agents that support remote MCP include Claude, [Cursor](#cursor), Copilot, and Windsurf. **For tools that don't support remote MCP:** ```json { "mcpServers": { "wix-mcp-remote": { "command": "npx", "args": ["-y", "@wix/mcp-remote@latest", "https://mcp.wix.com/mcp"] } } } ``` You can also authenticate to the MCP using an [API key](https://dev.wix.com/docs/api-reference/articles/authentication/api-keys/about-api-keys.md) and your Wix account ID. This is useful for tools like [n8n](https://n8n.io/) or [A2A](https://developers.googleblog.com/en/a2a-a-new-era-of-agent-interoperability/). To authenticate with an API key, use one of the following configurations: **For tools that support remote MCP:** ```json { "mcpServers": { "wix-mcp": { "type": "http", "url": "https://mcp.wix.com/mcp", "headers": { "Authorization": "", "wix-account-id": "" } } } } ``` The supported values for the `type` field are `"sse"` and `"http"`. The type you select depends on your agent. Use this configuration to set up the MCP in n8n, or in Cursor if you want to authenticate with an API key. **For tools that don't support remote MCP:** ```json { "mcpServers": { "wix-mcp": { "command": "npx", "args": [ "@wix/mcp-remote@latest", "https://mcp.wix.com/mcp", "--header", "Authorization:${WIX_API_KEY}", "--header", "wix-account-id:" ], "env": { "WIX_API_KEY": "" } } } } ``` Depending on your client, you may be able to configure the MCP server through the client settings, or even ask the client itself to add the configuration. See the instructions for adding MCP servers to common AI tools: - [Instructions for Claude Desktop](https://modelcontextprotocol.io/quickstart/user#2-add-the-filesystem-mcp-server) - [Instructions for Claude Web](https://support.anthropic.com/en/articles/11175166-about-custom-integrations-using-remote-mcp) - [Instructions for Windsurf](https://docs.windsurf.com/windsurf/cascade/mcp) - [Instructions for VS Code](https://code.visualstudio.com/docs/copilot/chat/mcp-servers#_add-an-mcp-server-to-your-workspace) - [Instructions for n8n](https://docs.n8n.io/integrations/builtin/cluster-nodes/sub-nodes/n8n-nodes-langchain.toolmcp/) #### Cursor If you're working with Cursor and not using an API key to authenticate, you no longer need to configure the MCP manually. Click below to install the Wix MCP. Install MCP Server You can also add the Wix MCP from the [Cursor MCP library](https://docs.cursor.com/en/tools/mcp#wix). ## Available tools The Wix MCP server provides the following tools in the table below. All of these tools are enabled by default. | | | | ------------------------------ | ------------------------------------------------------------------------------------ | | Tool | Description | | SearchWixWDSDocumentation | Search the [Wix Design System](https://www.wix-pages.com/wix-design-system/) documentation. | | SearchWixRESTDocumentation | Search the [Wix REST](https://dev.wix.com/docs/rest.md) documentation. | | SearchWixSDKDocumentation | Search the [Wix SDK](https://dev.wix.com/docs/sdk.md) documentation. | | SearchBuildAppsDocumentation | Search the [Wix Build Apps](https://dev.wix.com/docs/build-apps.md) documentation. | | SearchWixHeadlessDocumentation | Search the [Wix Headless](https://dev.wix.com/docs/go-headless.md) documentation. | | WixBusinessFlowsDocumentation | Include complete step-by-step instructions for multi-step sample flows. | | ReadFullDocsArticle | Fetch the full content of an article by article URL. | | ReadFullDocsMethodSchema | Get the full request and response schema of an API method. | | ListWixSites | Query the sites for a Wix account. | | CallWixSiteAPI | Perform an action or query for a given account and selected site. | | ManageWixSite | Perform a site-level action, such as creating a site. | | SupportAndFeedback | Prompt the user for feedback and send it to Wix. | ## Troubleshooting > **Share your feedback**
        > Want to share feedback about your MCP experience? Tell your AI client to submit feedback to Wix. The client will prompt you for your message and send it directly to us. We review all feedback as part of our ongoing effort to improve. If you’re getting errors when running the MCP server, try the following: 1. Check the IDE logs. 1. Check if the error is related to your package manager. Make sure you have the latest node version as the default on the path. 1. Check that you entered the npx arguments correctly in the configuration. Make sure you included `-y` and the correct npm registry. 1. Include the full path to Node. 1. Restart the IDE. 1. Locate the MCP server in your IDE settings and log out, then log back in to reconnect to the server. 1. Run the MCP server directly on the command line: ```bash npx -y @wix/mcp-remote@latest https://mcp.wix.com/mcp ``` 1. The connection to the server may be lost after a long period of inactivity, or if you switch the Wix account you’re authenticating with. In that case, it may help to delete `~/.mcp-auth` (on Mac) or `C:\Users\\.mcp-auth` (on Windows). 1. If the server still isn’t working, check the [MCP debugging guide](https://modelcontextprotocol.io/docs/tools/debugging#debugging-in-claude-desktop) for more help. ## See also - [Wix MCP Sample Prompts for App Developers](https://dev.wix.com/docs/build-apps/develop-your-app/wix-mcp/wix-mcp-sample-prompts-for-app-developers.md) - [Wix MCP Sample Prompts for Headless](https://dev.wix.com/docs/go-headless/get-started/about-headless/wix-mcp-sample-prompts-for-headless.md) - [Wix MCP Sample Prompts (SDK)](https://dev.wix.com/docs/sdk/articles/use-the-wix-mcp/mcp-sample-prompts.md) --- > Portal Navigation: > > - Append `.md` to any URL under `https://dev.wix.com/docs/` to get its markdown version. > - Pages are either content pages (article or reference text) or menu pages (a list of links to child pages). > - To get a menu page, truncate any URL to a parent path and append `.md` (e.g. `https://dev.wix.com/docs/sdk.md`, `https://dev.wix.com/docs/sdk/core-modules.md`). > - Top-level index of all portals: https://dev.wix.com/docs/llms.txt > - Full concatenated docs: https://dev.wix.com/docs/llms-full.txt ## Resource: MCP Sample Prompts ## Article: MCP Sample Prompts ## Article Link: https://dev.wix.com/docs/api-reference/articles/ai-tools/wix-mcp/mcp-sample-prompts.md ## Article Content: # MCP Sample Prompts Ready to build with AI? This article showcases some sample prompts and flows an AI client can run using the [Wix MCP](https://dev.wix.com/docs/sdk/articles/use-the-wix-mcp/about-the-wix-mcp.md)—giving you a strong starting point to explore what's possible and accelerate your development. ## Perform site actions Let's say you want to take actions like updating store products, creating a new bookings service, or approving a member on a site. Instead of searching the documentation and implementing the APIs yourself, the Wix MCP can train your AI client to take these actions for you. ### Apply a discount to your store's products **Prompt:** Apply a 15% discount to all products on the site Party Costume Store for 1 week starting from today. **Expected AI response**: The AI client creates a coupon giving customers a discount for 15% off all products. ### Create a new data collection on a site **Prompt:** Create a data collection called Contact Labels on my site with 3 columns: name (string), email (string), label (string). Encrypt the name and email fields as PII. **Expected AI response**: The AI client creates a data collection with the requested fields on the site. The name and email fields are marked as PII. ### Add a staff member to your business **Prompt:** On site Joann's Salon, add a new staff member with Wix Bookings. **Expected AI response**: The AI client adds a new staff member. ### Discover and book business services **Prompt:** What are the services on site Tax Consultation Business? **Expected AI response**: The AI client queries the available services on the site and lists them for you. You can extend the prompt by requesting to book one of the services, and the client creates a new booking for you at the requested time. ### Send emails to store customers **Prompt:** Send an inbox email message to Joe White in the site Just Bags. The message should say "This is a test message" and also attach an image. **Expected AI response**: The AI client searches for the contact and creates a new contact if it doesn't find one. It then sends the inbox email message with the attached image. ### Create and publish posts in your blog **Prompt:** Could you create 5 new blog posts for me? Use the site DIY Activities and make the posts about various topics–fishing, video-making, and yoga. Then publish these posts for me. **Expected AI response**: The AI client creates 5 new blog posts about the given topics and publishes them on the site. ## Build Headless sites The Wix MCP makes it easy to develop your [Wix Headless](https://dev.wix.com/docs/go-headless.md) site directly in your AI client. The MCP helps your client set up a headless project and update the project code to take actions on your site. ### Create a headless site in your client **Prompt:** Create a new Wix Headless site **Expected AI response**: The AI client creates a new Wix Headless site in your [sites list](https://manage.wix.com/studio/sites?referralInfo=sidebar&viewId=all-items-view). ### Create a login page and authenticate with Wix **Prompt:** I want to create a login page, and authenticate it using Wix Headless authentication. Add a new page in this project for the login code and write the code I need to authenticate with Wix. **Expected AI response**: The AI client creates a new file in your local repository and adds the code needed to authenticate with Wix. ### Write code that allows customers to register for events **Prompt:** Write code for my current headless client that lets site visitors register for events. Add this code to a new local file. **Expected AI response**: The AI client creates a new file in your local repository and adds code that uses the Events APIs to let visitors register for an event on the site. ### Display collection data on the frontend **Prompt:** Retrieve data from my Wix CMS collection named "Real estate properties" and filter items where the title includes the word "beach". Display these items on a page called **Available Properties**. **Expected AI response**: The AI client finds and retrieves all properties with the word "beach" in the title from your headless site collection **Real estate properties**, and writes code to display them on the **Available Properties** page. ## Get code for your app If you're confused about how to create code using a specific API, or don't want to code parts of your app yourself, you can ask the AI client to generate REST or SDK code for you. The Wix MCP trains the client to generate correct examples and flows for working with Wix APIs. ### Get JS code examples for the Wix Members APIs **Prompt:** Give me example SDK code in Node.js to use the Block Member method of Wix Members. **Expected AI response**: The AI client generates some JS code showing how to block a member using the Members API. You can copy this code or use further prompts to build more extensive code. ### Generate Python code to create a booking **Prompt:** Show me Python code that uses Create Booking from Wix Bookings API. **Expected AI response**: The AI client returns the steps required to create a booking and gives a minimal code example that you can copy and expand on. ### Update dashboard page code to display a collection **Prompt:** Show my `todos` collection in my app's dashboard page. **Expected AI response**: The AI client edits the app code in your local files to display the collection as a table on the dashboard page. ### Write code to create a form in a dashboard page **Prompt:** Create a form in my dashboard page with first name, last name and email. **Expected AI response**: The AI client adds Wix design system elements to the dashboard page code in your local editor to build a form with the requested fields. You can continue prompting it to add elements, required fields, and field validation to further develop your dashboard page form. ## Manage sites The Wix MCP lets you perform site-level actions through the AI client, such as creating and publishing sites. ### Create a new Wix site from the client **Prompt:** Can you create a new Wix site for me? **Expected AI response**: The client prompts you for some extra information, like the type of site and a site name, and then creates the site for you. ### Install apps on your Wix site **Prompt:** Install Wix Blog for me on the site The Travel Writer. **Expected AI response**: The client installs Wix Blog on the requested site. ### Publish a Wix site from the client **Prompt:** Publish the site The Travel Writer. **Expected AI response**: Publishes the site The Travel Writer. ## Tips for working with the MCP Here are some tips to try if your AI client isn't returning the results you want: ### Be specific When you write prompts for an AI client using the Wix MCP, the more specific the request is, the more likely it is that the result will be helpful and correct. Try the following to improve your client's response: - Especially when starting a new chat, use the word "Wix" to cue the client to use the Wix MCP. For example: "On the Wix site...", "...using the Wix APIs". - Tell the client clearly which Wix business solution you're referring to. For example, Wix Restaurants, Stores, and Events all have Orders APIs. To indicate which Orders API you want to use, include the name of the business solution you want to work with. For example, "List the orders on a site using the Events APIs". - Give the client specific instructions on what you want it to do. This improves the response and prevents the client from changing files unexpectedly. For example, if you want example code you can copy, use a prompt like "Write sample code that uses the Wix Members API to block a member". If you want the client to create code for you, use a prompt like "Write code that blocks a member on a Wix site and add it to a file members.tsx". ### Switch your model Sometimes even if the prompt is good, the request fails or doesn't return the result you expect. The issue may be the LLM you're working with. Common tools like Cursor and Windsurf use GPT-4.1 by default. Try changing to a different model such as Sonnet 3.7 or Gemini 2.5. ### Disable auto-run mode Depending on the prompt you give it, your AI client may make changes to your local code files or live site. To prevent the client from making unwanted changes, consider disabling auto-run mode in the client settings. This forces the client to request your permission to run MCP tools, which gives you a chance to review any actions before it continues. ### Use templates In particular if you're building an app or a headless site, we recommend starting your project from one of our [app](https://dev.wix.com/apps-templates) or [headless](https://dev.wix.com/docs/go-headless/self-managed-headless/self-managed-templates/next-js-templates.md) templates. Then, you can return to your IDE and use the MCP to develop your project from the template. This gives the AI client more context about what you're trying to create, and may achieve better results. --- > Portal Navigation: > > - Append `.md` to any URL under `https://dev.wix.com/docs/` to get its markdown version. > - Pages are either content pages (article or reference text) or menu pages (a list of links to child pages). > - To get a menu page, truncate any URL to a parent path and append `.md` (e.g. `https://dev.wix.com/docs/sdk.md`, `https://dev.wix.com/docs/sdk/core-modules.md`). > - Top-level index of all portals: https://dev.wix.com/docs/llms.txt > - Full concatenated docs: https://dev.wix.com/docs/llms-full.txt ## Resource: Install Wix Apps ## Article: Install Wix Apps ## Article Link: https://dev.wix.com/docs/api-reference/business-management/app-installation/skills/install-wix-apps.md ## Article Content: # Install Wix Apps on a Site This recipe guides you through installing Wix apps on a site using the Apps Installer REST API. ## Prerequisites - Site ID where apps will be installed - Knowledge of which app to install (see [Apps Created by Wix](https://dev.wix.com/docs/api-reference/articles/work-with-wix-apis/platform/about-apps-created-by-wix.md)) ## Required APIs - **Apps Installer API**: [REST](https://dev.wix.com/docs/api-reference/business-management/app-installation/app-installation/install-app.md) --- ## Step 0: Find the App ID (skip if you already have it) If you already know the `appDefId` (e.g. from the table of Wix-built apps below), skip to Step 1. For any third-party app, or any app you only know by name, resolve the ID first using the Search Market Listings API. **Endpoint**: `POST https://www.wixapis.com/devcenter/app-market-listing/v1/market-listings/search` **Request**: ```bash curl -X POST \ 'https://www.wixapis.com/devcenter/app-market-listing/v1/market-listings/search' \ -H 'Authorization: ' \ -H 'Content-Type: application/json' \ -d '{ "searchTerm": "Usercentrics" }' ``` **Response** (truncated): ```json { "marketListings": [ { "appId": "b8cfbda5-91e8-45ad-8c8d-4d4700534ab5", "basicInfo": { "name": "Usercentrics for Wix", ... } } ] } ``` Use the returned `appId` as the `appDefId` in Step 2. ### IMPORTANT NOTES - The `appDefId` field in the install request and the `appId` field returned here are the same value - If multiple results come back, match on `basicInfo.name` to confirm you have the right app before installing - Only listings with `status: "PUBLISHED"` can be installed ## Install the Wix App Use the Apps Installer API to install any Wix app on a site. **Endpoint**: `POST https://www.wixapis.com/apps-installer-service/v1/app-instance/install` **Request Body**: ```json { "tenant": { "tenantType": "SITE", "id": "" }, "appInstance": { "appDefId": "" } } ``` **Request**: ```bash curl -X POST \ 'https://www.wixapis.com/apps-installer-service/v1/app-instance/install' \ -H 'Authorization: ' \ -H 'Content-Type: application/json' \ -d '{ "tenant": { "tenantType": "SITE", "id": "" }, "appInstance": { "appDefId": "" } }' ``` ### Common App Definition IDs Before installing, refer to the [Apps Created by Wix](https://dev.wix.com/docs/api-reference/articles/work-with-wix-apis/platform/about-apps-created-by-wix.md) documentation to find the correct `appDefId` for the app you want to install. Some common apps: | App | appDefId | |-----|----------| | Wix Stores | `215238eb-22a5-4c36-9e7b-e7c08025e04e` | | Wix Bookings | `13d21c63-b5ec-5912-8397-c3a5ddb27a97` | | Wix Blog | `14bcded7-0066-7c35-14d7-466cb3f09103` | | Wix Events | `140603ad-af8d-84a5-2c80-a0f60cb47351` | | Wix Pricing Plans | `1522827f-c56c-a5c9-2ac9-00f9e6ae12d3` | | Wix CMS | `e593b0bd-b783-45b8-97c2-873d42aacaf4` | ### IMPORTANT NOTES: - NEVER guess the `appDefId`. For Wix-built apps, use the table above. For any other app, resolve the ID using Step 0 (Search Market Listings). - The `tenantType` MUST be `SITE` - The `id` in tenant is the site's metaSiteId --- ## Error Handling ### App Not Installed Error If you receive an error indicating a required app is not installed, use this recipe to install it before proceeding. --- ## Next Steps After installing an app: - Configure the app's settings using its specific APIs - Set up any required app-specific data (products for Stores, services for Bookings, etc.) --- ## Common Pitfalls - **"I don't have the appDefId"** → Run Step 0. The table in Step 2 only covers Wix-built apps; the App Market has thousands of others. - **Don't try to scrape the App Market website to find IDs** — pages are client-rendered and the appId is not in the HTML. Use Search Market Listings instead. - **Don't try `InstallAppFromShareUrl` as a workaround for unknown IDs** — `shareUrlId` is an internal identifier you generally don't have either. --- > Portal Navigation: > > - Append `.md` to any URL under `https://dev.wix.com/docs/` to get its markdown version. > - Pages are either content pages (article or reference text) or menu pages (a list of links to child pages). > - To get a menu page, truncate any URL to a parent path and append `.md` (e.g. `https://dev.wix.com/docs/sdk.md`, `https://dev.wix.com/docs/sdk/core-modules.md`). > - Top-level index of all portals: https://dev.wix.com/docs/llms.txt > - Full concatenated docs: https://dev.wix.com/docs/llms-full.txt ## Resource: List Installed Apps ## Article: List Installed Apps ## Article Link: https://dev.wix.com/docs/api-reference/business-management/app-installation/skills/list-installed-apps.md ## Article Content: # List Installed Apps on a Site This recipe guides you through listing all installed apps on a Wix site using the Apps Installer REST API. This is useful for verifying app installations before making API calls that require specific apps. ## Prerequisites - Site ID for the site you want to check ## Required APIs - **Apps Installer API**: [Get Installed Apps](https://dev.wix.com/docs/api-reference/business-management/app-installation/app-installation/get-installed-apps.md) --- ## Step 1: Query Installed Apps Use the Get Installed Apps endpoint to retrieve all apps installed on a site. **Endpoint**: `GET https://www.wixapis.com/apps-installer-service/v1/app-instances` **Request**: ```bash curl -X GET \ 'https://www.wixapis.com/apps-installer-service/v1/app-instances' \ -H 'Authorization: ' \ -H 'Content-Type: application/json' ``` **Response**: ```json { "appInstances": [ { "id": "instance-id-1", "appDefId": "1380b703-ce81-ff05-f115-39571d94dfcd", "version": "^0.0.0", "enabled": true, "status": "UNKNOWN" }, { "id": "instance-id-2", "appDefId": "13d21c63-b5ec-5912-8397-c3a5ddb27a97", "enabled": true, "status": "UNKNOWN" } ] } ``` --- ## Step 2: Identify Apps by Definition ID Match the `appDefId` values from the response against known Wix app IDs. ### Common Wix App Definition IDs | App | appDefId | |-----|----------| | Wix Stores | `1380b703-ce81-ff05-f115-39571d94dfcd` | | Wix Bookings | `13d21c63-b5ec-5912-8397-c3a5ddb27a97` | | Wix Blog | `14bcded7-0066-7c35-14d7-466cb3f09103` | | Wix Events | `140603ad-af8d-84a5-2c80-a0f60cb47351` | | Wix Pricing Plans | `1522827f-c56c-a5c9-2ac9-00f9e6ae12d3` | | Wix Restaurants | `13e8d036-5516-6f75-e025-2aca3b5d7930` | For a complete list, see [Apps Created by Wix](https://dev.wix.com/docs/api-reference/articles/work-with-wix-apis/platform/about-apps-created-by-wix.md). --- ## Use Cases ### Verify App Before API Calls Before calling APIs that require specific apps (e.g., Bookings, Stores), check if the app is installed: ```javascript // Pseudocode example const installedApps = await getInstalledApps(siteId); const bookingsAppId = "13d21c63-b5ec-5912-8397-c3a5ddb27a97"; const hasBookings = installedApps.appInstances.some( app => app.appDefId === bookingsAppId ); if (!hasBookings) { // Install Bookings app first // See: Install Wix Apps recipe } ``` ### Diagnose Authorization Errors If you receive `401 Unauthorized` or `403 Forbidden` errors from Wix APIs: 1. **List installed apps** using this recipe 2. **Check if the required app** is in the response 3. **If missing**: Install the app using the [Install Wix Apps](https://dev.wix.com/docs/api-reference/business-management/app-installation/skills/install-wix-apps.md) recipe 4. **Retry the original API call** --- ## Error Handling ### 401 Unauthorized - Verify your authentication token is valid - Check that the token has `APP-MARKET.VIEW-INSTALLED-APP` permission ### Empty Response - The site may have no additional apps installed beyond core Wix functionality - This is normal for new or minimal sites --- ## Next Steps After checking installed apps: - **If app is missing**: Use the [Install Wix Apps](https://dev.wix.com/docs/api-reference/business-management/app-installation/skills/install-wix-apps.md) recipe to install required apps - **If app is installed but API fails**: Check API permissions and authentication - **For Bookings APIs**: See [Bookings recipes](https://dev.wix.com/docs/api-reference/articles/ai-tools/wix-mcp/skills/wix-management-recipes-index.md) for service setup --- > Portal Navigation: > > - Append `.md` to any URL under `https://dev.wix.com/docs/` to get its markdown version. > - Pages are either content pages (article or reference text) or menu pages (a list of links to child pages). > - To get a menu page, truncate any URL to a parent path and append `.md` (e.g. `https://dev.wix.com/docs/sdk.md`, `https://dev.wix.com/docs/sdk/core-modules.md`). > - Top-level index of all portals: https://dev.wix.com/docs/llms.txt > - Full concatenated docs: https://dev.wix.com/docs/llms-full.txt ## Resource: How to Create Blog Posts ## Article: How to Create Blog Posts ## Article Link: https://dev.wix.com/docs/api-reference/business-solutions/blog/skills/how-to-create-blog-posts.md ## Article Content: **Article: Create and Publish Blog Posts with Rich Content and Images** > **Standard call shape (every curl below).** The `` placeholder is shorthand for `Authorization: Bearer ` only. Body-bearing requests also need `Content-Type: application/json`. --- ## Description This article demonstrates how to create and immediately publish blog posts using Wix Blog REST API, including handling external images, rich content formatting, and proper media management workflow. ### Part 0: Get an Author/Member ID (Required for 3rd-Party Apps) **IMPORTANT**: When calling the Blog API as a 3rd-party app (not as the site owner), `draftPost.memberId` is **required**. The API will reject requests with "Missing post owner information" if omitted. 1. Query site members to get a valid member ID using [List Members](https://dev.wix.com/docs/api-reference/crm/members-contacts/members/member-management/members/list-members.md): ```bash curl -X GET "https://www.wixapis.com/members/v1/members?fieldsets=PUBLIC&paging.limit=1" \ -H "Authorization: " ``` 2. Use the `id` field from the response as `draftPost.memberId` when creating the blog post. This member will be the post author. > **Note**: The member ID must belong to an existing site member or collaborator. If the members query returns no results, you may need to create a member first or use the site owner's member ID. ### Part 1: Import External Images to Wix Media Manager 1. Identify external image URLs from user input for cover images and embedded content images. 2. Import each external image using [Import File](https://dev.wix.com/docs/api-reference/assets/media/media-manager/files/import-file.md). This converts external URLs to Wix Media IDs required for blog posts. ```bash curl -X POST "https://www.wixapis.com/site-media/v1/files/import" \ -H "Authorization: " \ -H "Content-Type: application/json" \ -d '{ "url": "https://example.com/image.jpg", "mediaType": "IMAGE", "displayName": "Cover Image.jpg" }' ``` The response will include a `file.id` field. Use this ID in blog post creation. Images with `operationStatus: "PENDING"` can be used immediately. 3. Store the returned file IDs for use in blog post creation. ### Part 2: Create Blog Post with Rich Content You have two endpoints: - **Single post:** [Create Draft Post](https://dev.wix.com/docs/api-reference/business-solutions/blog/draft-posts/create-draft-post.md) — `POST https://www.wixapis.com/blog/v3/draft-posts` - **Multiple posts (preferred for any N ≥ 2):** [Bulk Create Draft Posts](https://dev.wix.com/docs/api-reference/business-solutions/blog/draft-posts/bulk-create-draft-posts.md) — `POST https://www.wixapis.com/blog/v3/bulk/draft-posts/create` **Use the bulk endpoint when seeding multiple posts** — one call replaces N single-post calls and avoids the per-call latency of ~25–30 s each. #### Single-post endpoint ```bash curl -X POST "https://www.wixapis.com/blog/v3/draft-posts" \ -H "Authorization: " \ -H "Content-Type: application/json" \ -d '{ "draftPost": { "title": "My Blog Post", "memberId": "author-member-id", "richContent": { "nodes": [ { "type": "PARAGRAPH", "nodes": [{ "type": "TEXT", "textData": { "text": "This is a paragraph with some content.", "decorations": [] } }], "paragraphData": {} } ] }, "media": { "wixMedia": { "image": { "id": "mediaId" } }, "displayed": true, "custom": true } }, "publish": true }' ``` #### Bulk-create endpoint (preferred for multiple posts) > **⚠️ Body shape — read this carefully. Each item in `draftPosts` is a FLAT post object: `{title, memberId, richContent, media?, ...}`. Do NOT wrap each item in a `draftPost` field.** Unlike the single-post endpoint (which uses `{draftPost: {...}}` because the request is one post), the bulk endpoint puts each post DIRECTLY inside the `draftPosts` array. ✅ **CORRECT body shape (verified against the live API — returns 200 with `results[].itemMetadata.success: true`):** ```json { "draftPosts": [ { "title": "First Post", "memberId": "...", "richContent": { /* … */ } }, { "title": "Second Post", "memberId": "...", "richContent": { /* … */ } } ], "publish": true } ``` ❌ **WRONG body shape (returns `400 Bad Request` with `draftPosts[i].title must not be empty` because the API is looking for `draftPosts[i].title` directly and finds it nested under a `draftPost` field):** ```json { "draftPosts": [ { "draftPost": { "title": "First Post", "memberId": "...", "richContent": { /* … */ } } }, { "draftPost": { "title": "Second Post", "memberId": "...", "richContent": { /* … */ } } } ], "publish": true } ``` The natural intuition is "the bulk endpoint reuses the single-post `{draftPost: {...}}` envelope, just inside an array" — that's wrong. The bulk endpoint flattens the envelope away because the array IS the envelope. **Use the FLAT shape: `draftPosts[i]` IS the post.** #### Full bulk-create curl example ```bash curl -X POST "https://www.wixapis.com/blog/v3/bulk/draft-posts/create" \ -H "Authorization: " \ -H "Content-Type: application/json" \ -d '{ "draftPosts": [ { "title": "First Post", "memberId": "author-member-id", "richContent": { /* Ricos JSON — see below */ }, "media": { "wixMedia": { "image": { "id": "mediaId" } }, "displayed": true, "custom": true } }, { "title": "Second Post", "memberId": "author-member-id", "richContent": { /* Ricos JSON */ } } ], "publish": true }' ``` The response body is `{results: [{itemMetadata: {id, originalIndex, success}}, ...]}`. Each result's `itemMetadata` carries the created post id and a `success: boolean` flag — the bulk call returns 200 even if some posts fail; check each `results[i].itemMetadata.success` individually. **Common URL-shape mistakes (do not use these — both return 404):** - `/blog/v3/draft-posts/bulk` ✗ - `/blog/v3/draft-posts/bulk-create` ✗ - The correct path is `/blog/v3/bulk/draft-posts/create` (note: `bulk` is a path segment between `v3` and `draft-posts`, not a suffix on `draft-posts`). 2. Structure rich content using Ricos JSON format. Reference [Ricos documentation](https://dev.wix.com/docs/api-reference/assets/rich-content/ricos-documents/introduction.md) for complete node structure. Common node types: - `PARAGRAPH` for text content - `HEADING` for section headers - `IMAGE` for embedded images (requires Wix Media ID) - `ORDERED_LIST` and `BULLETED_LIST` for lists - `BLOCKQUOTE` for quoted text - `LIST_ITEM` for individual list items **CRITICAL**: All TEXT nodes MUST be wrapped in PARAGRAPH nodes within their parent containers. **Correct Ricos structure example:** ```json { "nodes": [ { "type": "PARAGRAPH", "nodes": [ { "type": "TEXT", "textData": { "text": "This is a paragraph with some content.", "decorations": [] } } ], "paragraphData": {} } ] } ``` **Correct BLOCKQUOTE structure:** ```json { "type": "BLOCKQUOTE", "nodes": [ { "type": "PARAGRAPH", "nodes": [ { "type": "TEXT", "textData": { "text": "Quote text here", "decorations": [] } } ], "paragraphData": {} } ], "blockquoteData": { "indentation": 1 } } ``` **Correct LIST_ITEM structure:** ```json { "type": "LIST_ITEM", "nodes": [ { "type": "PARAGRAPH", "nodes": [ { "type": "TEXT", "textData": { "text": "List item text", "decorations": [] } } ], "paragraphData": {} } ] } ``` 3. For embedded images in rich content, use IMAGE nodes with Wix Media IDs: ```json { "type": "IMAGE", "nodes": [], "imageData": { "containerData": { "width": { "size": "CONTENT" }, "alignment": "CENTER" }, "image": { "src": { "id": "mediaId" }, "width": 900, "height": 600 }, "altText": "Descriptive alt text" } } ``` 4. Set `publish: true` to immediately publish the post rather than saving as draft. ### Part 3: Handle Categories and Tags (Optional) 1. Resolve category IDs using [List Categories](https://dev.wix.com/docs/api-reference/business-solutions/blog/category/list-categories.md) if user provides category names. 2. Resolve tag IDs using [Query Tags](https://dev.wix.com/docs/api-reference/business-solutions/blog/tags/query-tags.md) if user provides tag labels. 3. Include resolved IDs in `categoryIds` and `tagIds` arrays in the draft post object. ### IMPORTANT NOTES: - Never mock blog posts or media IDs - always use the APIs to import images and create posts - Always read the full documentation of methods before implementation - External images MUST be imported via Import File API before use in blog posts - direct external URLs will not work - For 3rd-party app integrations, `memberId` is mandatory - use the [List Members](https://dev.wix.com/docs/api-reference/crm/members-contacts/members/member-management/members/list-members.md) API if needed to get member ID - Use ONLY the file ID (without `wix:image://v1/` prefix) for both cover images and embedded images - Rich content IMAGE nodes require both `width` and `height` properties in the `image` object - Images with `"operationStatus": "PENDING"` from import can be used immediately in blog posts - Set `publish: true` in the request to publish immediately rather than save as draft - For multiple posts, use Bulk Create Draft Posts API with `draftPosts` array - Include `fieldsets: ['URL']` to get post URLs in the response - Handle image import failures gracefully - continue without images if import fails - Provide meaningful `displayName` values during image import for better organization - Use appropriate Ricos node types (PARAGRAPH, HEADING, LIST, etc.) for semantic content structure - Consider batching image imports when creating multiple posts with many images ### CRITICAL RICOS JSON STRUCTURE RULES: - **NEVER place TEXT nodes directly in BLOCKQUOTE, LIST_ITEM, or other container nodes** - **ALL TEXT nodes MUST be wrapped in PARAGRAPH nodes within their parent containers** - **BLOCKQUOTE nodes must contain PARAGRAPH nodes, which contain TEXT nodes** - **LIST_ITEM nodes must contain PARAGRAPH nodes, which contain TEXT nodes** - **Failure to follow proper nesting will result in parsing errors: "Expected a paragraph node but found TEXT"** - **Always validate Ricos structure before sending to ensure TEXT nodes are properly nested** ### Troubleshooting | Error | Cause | Solution | | ------------------------------------------ | --------------------------- | ------------------------------------------------------------------- | | "Missing post owner information" | `memberId` not provided | Add `draftPost.memberId` - see Part 0 for how to get one | | "memberIds ... do not exist" | Invalid member ID | Query members first using List Members API to get valid IDs | | "Expected a paragraph node but found TEXT" | Invalid Ricos structure | Wrap TEXT nodes in PARAGRAPH nodes (see structure rules above) | | Image not displaying | Using external URL directly | Import image via Media Manager first, then use the returned file ID | --- > Portal Navigation: > > - Append `.md` to any URL under `https://dev.wix.com/docs/` to get its markdown version. > - Pages are either content pages (article or reference text) or menu pages (a list of links to child pages). > - To get a menu page, truncate any URL to a parent path and append `.md` (e.g. `https://dev.wix.com/docs/sdk.md`, `https://dev.wix.com/docs/sdk/core-modules.md`). > - Top-level index of all portals: https://dev.wix.com/docs/llms.txt > - Full concatenated docs: https://dev.wix.com/docs/llms-full.txt ## Resource: Booking Service Policy Setup ## Article: Booking Service Policy Setup ## Article Link: https://dev.wix.com/docs/api-reference/business-solutions/bookings/skills/booking-service-policy-setup.md ## Article Content: # Technical Step-by-Step Instructions: Configuring Wix Bookings Service Policies (Real-World, API-First) ## Description Below are the recommended steps to successfully configure booking, cancellation, and waitlist policies for Wix Bookings services. This recipe covers policy inheritance, service-specific overrides, and common policy configurations for different business models. --- ## Overview Wix Bookings policy configuration allows businesses to set rules for: - **Booking policies**: When customers can book, how far in advance, booking deadlines - **Cancellation policies**: Cancellation deadlines, refund rules, fees - **Waitlist policies**: When waitlists are enabled, capacity handling - **Group booking policies**: Maximum participants per booking Policies can be configured at two levels: - **Site-wide (business) policies**: Default rules that apply to all services - **Service-specific policies**: Override rules for individual services ### IMPORTANT NOTES - Services inherit from site-wide booking policies by default - Service policies only override fields you explicitly specify - unspecified fields keep site defaults - Policy options available may vary based on service type (APPOINTMENT, CLASS, COURSE) - All policy configurations support the same core features across service types --- ## Steps ### 1. Configure Site-Wide Business Policy (Optional) Set default policies that will apply to all services unless overridden. Use the Business Policy API to configure booking deadlines, cancellation rules, waitlist settings, and group booking limits. ### 2. Create or Update Service with Policy Overrides When creating or updating a service, specify policy fields that should differ from business defaults. Only include the policy fields you want to override - unspecified fields will inherit from business defaults. ### 3. Configure Course-Specific Policies Courses may have additional policy options such as `bookUntilXMinutesAfterStart` which allows customers to join courses even after they've started. ### 4. Verify Policy Application Query the service to confirm policies are applied correctly. The service should show explicitly set policy fields with your specified values and unspecified fields inheriting from business defaults. ### IMPORTANT NOTES - **Policy inheritance**: Only specify fields you want to override - leave others undefined to inherit business defaults - **Partial updates**: When updating service policies, only include fields you want to change - **Capacity requirements**: Waitlist policies require service capacity settings to be configured - **Group booking considerations**: `maxParticipantsPerBooking` works with all service types - **Time calculations**: Policy deadlines are calculated from booking start time in business timezone - **Course flexibility**: Course services support additional policy options like `bookUntilXMinutesAfterStart` ### Troubleshooting Common Issues **Policies not applying:** - Verify you're setting policies on the service object, not as separate policy entities - Check that policy fields are properly nested under `service.policy` - Ensure you're updating the correct service ID **Waitlist not working:** - Confirm service has `maxParticipants` capacity set - Verify `waitingListPolicy.enabled` is `true` - Check that `waitingListPolicy.capacity` is set if you want limited waitlist size **Cancellation policies not enforced:** - Ensure `cancelRescheduleUpToInMinutes` is set to appropriate value - Verify `cancelationAllowed` is `true` if cancellations should be permitted - Check that payment and booking flow supports the configured policy **Group booking limits not working:** - Confirm `maxParticipantsPerBooking` is set to desired limit - Verify service type supports group bookings (all types do) - Check that booking UI respects the participant limit ## API Documentation References - [Booking Policies API](https://dev.wix.com/docs/api-reference/business-solutions/bookings/policies/introduction.md) - [Bulk Create Services](https://dev.wix.com/docs/api-reference/business-solutions/bookings/services/services-v2/bulk-create-services.md) — `POST https://www.wixapis.com/bookings/v2/bulk/services/create` - [Update Service](https://dev.wix.com/docs/api-reference/business-solutions/bookings/services/services-v2/update-service.md) — `PATCH https://www.wixapis.com/bookings/v2/services/` - [Query Services](https://dev.wix.com/docs/api-reference/business-solutions/bookings/services/services-v2/query-services.md) — `POST https://www.wixapis.com/bookings/v2/services/query` --- > Portal Navigation: > > - Append `.md` to any URL under `https://dev.wix.com/docs/` to get its markdown version. > - Pages are either content pages (article or reference text) or menu pages (a list of links to child pages). > - To get a menu page, truncate any URL to a parent path and append `.md` (e.g. `https://dev.wix.com/docs/sdk.md`, `https://dev.wix.com/docs/sdk/core-modules.md`). > - Top-level index of all portals: https://dev.wix.com/docs/llms.txt > - Full concatenated docs: https://dev.wix.com/docs/llms-full.txt ## Resource: Booking System Integration Gaps ## Article: Booking System Integration Gaps ## Article Link: https://dev.wix.com/docs/api-reference/business-solutions/bookings/skills/booking-system-integration-gaps.md ## Article Content: # Technical Step-by-Step Instructions: Wix Bookings System Integration Gaps - Complete API Documentation Analysis ## Description This recipe addresses **critical undocumented API patterns and business integration gaps** across the entire Wix Bookings ecosystem. While Wix extensively documents individual booking creation APIs, there exist fundamental undocumented integration patterns that are essential for any payment-enabled booking business but completely absent from all official documentation sources. --- ## Prerequisites ### Required App Installations Before implementing any booking integration, ensure the following requirements are met: 1. **Wix Bookings** - Core app must be installed and configured 2. **Wix Ecommerce** - Required for payment processing (undocumented dependency) 3. **Services Created** - At least one bookable service must exist on the site 4. **Staff Resources** - Staff members must be available for service delivery 5. **Business Schedule** - Operating hours must be configured ### App Installation Process If you encounter service-related errors, install the required apps using the Apps Installer API. **For detailed app installation procedures, refer to:** - [Apps Installer API Documentation](https://dev.wix.com/docs/api-reference/business-management/app-installation/app-installation/install-app.md) - Business setup recipes for comprehensive app installation workflows ## Overview The Wix Bookings system contains **fundamental undocumented integration patterns** that affect every booking scenario requiring payment processing. These gaps create confusion and implementation barriers across all booking types: - **Single Appointment Bookings**: How booking payments actually work - **Class Bookings**: Payment processing for group services - **Course Bookings**: Complex dual-API requirements for scheduling - **Multi-Service Packages**: Completely undocumented unified booking endpoint ### CRITICAL API DOCUMENTATION GAPS **The Universal Undocumented Pattern**: **Bookings→Ecommerce Integration Architecture** **Documentation Status Across ALL Booking Types**: - ❌ **NOT** documented how booking IDs become catalog items - ❌ **NOT** documented that ecom system handles all pricing/tax calculations - ❌ **NOT** documented async payment confirmation patterns - ❌ **NOT** documented booking status vs order status separation - ❌ **NOT** documented service properties preservation in checkout - ❌ **NO** mention of `BACKOFFICE_MERCHANT` channel requirement - ❌ **NO** explanation of why checkout/order APIs are needed for bookings **Additional Service-Specific Gaps**: - ❌ **Courses**: Dual API requirement (booking + calendar events) completely undocumented - ❌ **Multi-Service**: Entire endpoint missing from all documentation - ❌ **Payment Flow**: Universal integration pattern affects all booking types ### Key Discovery: Universal Architecture Gap **What Developers Expect** (Based on Documentation): - Create booking → Booking system handles payment → Done - Payment status managed within booking system - Booking APIs contain all necessary functionality **Actual Undocumented Architecture**: - Create booking → Booking system creates reservation only - Use booking ID as catalog item in ecom system - Ecom system handles all pricing, tax, discount calculations - Create checkout and order for actual payment processing - Async messaging system handles payment confirmation - Booking status (CONFIRMED) independent of payment status **Reality Check**: ``` Standard Documentation Shows: Booking API → Payment ✓ Actual Required Flow: Booking API → Ecom Integration → Payment ✓ ``` ### Business Impact of These Gaps **Without Understanding Universal Integration Patterns:** - Developers assume booking creation includes payment processing - No knowledge that ecom system handles all financial calculations - Missing understanding of async payment confirmation architecture - Confusion about booking status vs payment status separation - Unknown relationship between booking system and ecommerce system **Without Service-Specific Knowledge:** - Course businesses cannot create functioning course delivery schedules - Package-based businesses cannot create unified booking experiences - Payment implementation becomes trial-and-error process - Integration projects fail due to missing critical steps **Current Developer Confusion Patterns:** - "Why do I need ecommerce APIs for booking payments?" - "How do booking payments actually work?" - "Why are my course bookings invisible on the calendar?" - "How do I create spa day packages?" - "What's the difference between booking status and payment status?" ### IMPORTANT NOTES * **Universal Integration Gap**: Every booking requiring payment uses undocumented ecom integration * **Service Type Complexity**: Different booking structures but same payment patterns * **Async Architecture**: Payment confirmation decoupled from booking creation * **Status Separation**: Booking confirmation independent of payment processing * **Hidden Dependencies**: Ecommerce system required for all booking payments * **Business Model Impact**: Documentation gaps prevent entire business models --- ## Steps ### 1. Understand Universal Booking→Payment Architecture **CRITICAL DISCOVERY**: All Wix booking payments flow through undocumented ecommerce integration. **The Hidden Architecture**: - **Booking System**: Handles time slot reservations, service coordination, scheduling - **Ecommerce System**: Handles pricing, tax calculations, discount processing, payment collection - **Integration Bridge**: Booking IDs automatically become catalog item IDs **Universal Pattern** (Works for ALL Service Types): ``` Create Booking → Extract Booking ID → Use as Catalog Item ID → Create Checkout → Create Order → Process Payment ``` ### 2. Identify Service Type-Specific Booking Patterns Different service types use different booking structures but same payment integration: **Appointments**: Use `bookedEntity.slot` with all required fields ```json { "booking": { "bookedEntity": { "slot": { "serviceId": "", "scheduleId": "", "startDate": "2024-06-14T14:00:00", "endDate": "2024-06-14T15:15:00", "timezone": "America/New_York", "resource": { "id": "" }, "location": { "locationType": "OWNER_BUSINESS" } } }, "contactDetails": { "firstName": "John", "email": "john@example.com" }, "totalParticipants": 1 } } ``` > **Critical**: All slot fields (`scheduleId`, `resource.id`, `location.locationType`, `timezone`) are **required** for appointments. Omitting any of them returns a 400 error. The `locationType` must be `OWNER_BUSINESS` (not `BUSINESS` which is what Time Slots V2 returns). **Classes**: Use `bookedEntity.slot` with `eventId` (auto-derives other fields) ```json { "booking": { "bookedEntity": { "slot": { "serviceId": "", "eventId": "" } }, "contactDetails": { "firstName": "Jane", "email": "jane@example.com" }, "totalParticipants": 1 } } ``` **Courses**: Use `bookedEntity.schedule` structure + require separate calendar events ```json { "booking": { "bookedEntity": { "schedule": { "scheduleId": "", "serviceId": "", "timezone": "America/New_York", "location": { "locationType": "OWNER_BUSINESS" } } }, "contactDetails": { "firstName": "Bob", "email": "bob@example.com" }, "totalParticipants": 1 } } ``` ### 3. Create Booking Using Appropriate Service Pattern Use standard booking creation APIs with service-specific structures: **Standard Booking Endpoint**: `POST https://www.wixapis.com/_api/bookings-service/v2/bookings` ([REST](https://dev.wix.com/docs/api-reference/business-solutions/bookings/bookings/bookings-writer-v2/create-booking.md)) **Critical Parameters for All Types**: - `booking.contactDetails` — at minimum `firstName` and `email` - `booking.totalParticipants` — number of participants - `selectedPaymentOption: "OFFLINE"` — for ecom integration flows - `flowControlSettings.skipBusinessConfirmation: true` — for administrative bookings - Service-appropriate `bookedEntity` structure (see Step 2 above) ### 4. Handle Course-Specific Calendar Requirements **MAJOR DISCOVERY**: Courses require dual API implementation - booking alone is insufficient. **Course Booking Problem**: Creating course booking without calendar sessions results in: - Participant enrollment and payment processing works - No visible sessions on business calendar - Staff unaware of when/where to conduct sessions - Course delivery schedule missing **Required Additional Step for Courses**: Create calendar events using `POST https://www.wixapis.com/calendar/v3/bulk/events/create` ([REST](https://dev.wix.com/docs/api-reference/business-management/calendar/events-v3/bulk-create-event.md)): ```json { "events": [{ "event": { "type": "COURSE", "scheduleId": "", "externalScheduleId": "", "start": { "localDate": "2025-06-16T09:00:00" }, "end": { "localDate": "2025-06-16T10:00:00" }, "resources": [{ "id": "" }], "recurrenceRule": { "frequency": "WEEKLY", "interval": 1, "days": ["MONDAY"], "until": { "localDate": "2025-08-11T23:59:59" } } } }] } ``` > **Critical**: Each element in the `events` array must be wrapped in `{ "event": {...} }`. The `resources` array with at least one resource ID is **required** for CLASS/COURSE events — without it the API returns 400. `start`/`end` fields and `externalScheduleId` are also required. ### 5. Implement Multi-Service Package Bookings (Advanced) **CRITICAL UNDOCUMENTED ENDPOINT**: For businesses requiring unified package experiences. **Endpoint**: `POST https://manage.wix.com/_api/bookings-service/v2/multi_service_bookings` **Business Use Cases**: - Spa packages (massage + facial + manicure as single booking) - Beauty services (cut + color + styling as unified experience) - Wellness programs (consultation + treatment + follow-up coordination) **Undocumented Requirements**: - Identical contact information across all services in package - Sequential service timing coordination (second service start = first service end) - `skipAvailabilityValidation: true` for back-to-back scheduling ### 6. Process Payment Through Universal Ecom Integration **MAJOR DISCOVERY**: ALL booking payments use identical ecommerce integration pattern. **Step 6A: Create Checkout with Booking ID as Catalog Item** **Endpoint**: `POST https://www.wixapis.com/ecom/v1/checkouts` ([REST](https://dev.wix.com/docs/api-reference/business-solutions/e-commerce/purchase-flow/checkout/checkout/create-checkout.md)) ```json { "lineItems": [{ "catalogReference": { "catalogItemId": "", "appId": "13d21c63-b5ec-5912-8397-c3a5ddb27a97" }, "quantity": 1 }], "channelType": "WEB" } ``` **Step 6B: Create Order for Payment Processing** **Endpoint**: `POST https://www.wixapis.com/ecom/v1/checkouts/{checkoutId}/createOrder` **Critical Architecture Discoveries**: - **Automatic ID Transformation**: Booking IDs automatically valid as catalog item IDs - **Service Properties Preserved**: Booking context (scheduledDate, numberOfParticipants) maintained - **Pricing Calculation**: Ecom system handles all financial calculations (not booking system) - **Item Type Assignment**: `"preset": "SERVICE"` automatically applied ### 7. Understand Async Payment Confirmation Architecture **Payment Processing Architecture**: ``` Booking (CONFIRMED) → Checkout → Order → Payment Processing (async) ↓ Messaging System ↓ Final Status Updates ``` **Status Management Patterns**: - **Booking Status**: CONFIRMED (reserves time slot regardless of payment) - **Order Status**: PAID/NOT_PAID (reflects payment processing outcome) - **Business Logic**: Time slot reservation independent of payment success **Operational Benefits**: - Payment failures don't lose reserved time slots - Supports multiple payment models (prepaid, deposits, invoicing) - Retry payment without recreating complex booking coordination ### 8. Implement Business-Specific Integration Patterns **Single Appointments**: Basic booking + ecom integration **Group Classes**: Booking with participant count + ecom integration **Course Programs**: Booking + calendar events + ecom integration **Service Packages**: Multi-service booking + ecom integration **Universal Integration Considerations**: - All service types use same checkout/order creation pattern - Pricing calculations always handled by ecom system - Async payment confirmation applies to all booking types - Service properties preserved across all integration points ### IMPORTANT NOTES * **Universal Integration Required**: Every booking payment flows through ecommerce system * **Service-Specific Booking Creation**: Different booking structures for different service types * **Courses Require Dual APIs**: Booking system + calendar events system * **Multi-Service Endpoint Undocumented**: Complete gap for package-based businesses * **Async Payment Architecture**: Payment confirmation decoupled from booking creation * **Status Independence**: Booking confirmation separate from payment processing * **Hidden Ecommerce Dependency**: Not mentioned in any booking documentation ### Troubleshooting Universal Integration Issues **Booking ID Not Working as Catalog Item**: - Verify booking was created successfully and has valid ID - Ensure using correct Wix Bookings app ID in catalog reference - Check that booking status is CONFIRMED before attempting checkout **Course Bookings Not Visible on Calendar**: - Course bookings handle enrollment only, not session scheduling - Must create calendar events separately using calendar API - Session scheduling independent of participant enrollment **Payment Status Confusion**: - Booking status (CONFIRMED) indicates time slot reservation - Order status (PAID/NOT_PAID) indicates payment processing outcome - These statuses operate independently through async messaging **Multi-Service Booking Failures**: - Contact details must be identical across all services in package - Service timing must be precisely coordinated (end time = next start time) - Resource allocation requires manual verification with `skipAvailabilityValidation` **Ecommerce Integration Errors**: - Verify ecommerce app is installed and enabled - Ensure using `"BACKOFFICE_MERCHANT"` channel type for owner flows - Check that service pricing is properly configured in booking system ### Cross-Platform Implementation Challenges **Headless Implementation**: - No documented SDK methods for booking→ecom integration - Manual API orchestration required for payment processing - Frontend developers must understand backend integration patterns **Mobile Integration**: - Booking creation patterns differ across service types - Payment flow design requires understanding async confirmation - Course management requires dual API coordination **Third-Party Integration**: - Booking export may not include payment status information - External calendar systems may not receive course session details - CRM integration requires understanding booking vs payment status separation ### Business Architecture Considerations **Payment Model Planning**: - Booking system reserves capacity, ecom system processes payments - Multiple payment models supported (full prepaid, deposits, invoicing) - Refund processing requires coordination between both systems **Service Type Planning**: - Appointments: Immediate booking and payment - Classes: Group bookings with participant management - Courses: Long-term enrollment with session scheduling - Packages: Unified experience across multiple services **Scaling Considerations**: - Integration complexity increases with service variety - Payment processing load handled by ecommerce system - Booking coordination managed by booking system - Analytics require data from both systems ## API Documentation References **Documented APIs** (That Don't Explain Integration Requirements): * [Standard Booking Flow](https://dev.wix.com/docs/api-reference/business-solutions/bookings/flow-single-service-booking.md) - Missing payment integration * [Create Booking](https://dev.wix.com/docs/api-reference/business-solutions/bookings/bookings/bookings-writer-v2/create-booking.md) - No payment processing guidance * [Service Types](https://dev.wix.com/docs/api-reference/business-solutions/bookings/services/services-v2/about-service-types.md) - Missing integration patterns * [Ecommerce Checkout](https://dev.wix.com/docs/api-reference/business-solutions/e-commerce/purchase-flow/checkout/checkout/introduction.md) - No booking integration mention **Completely Undocumented**: * **Booking→Ecom Integration**: Universal pattern affecting all booking payments * **Multi-Service Bookings**: `https://manage.wix.com/_api/bookings-service/v2/multi_service_bookings` * **Course Calendar Requirements**: Dual API necessity for course functionality * **Async Payment Confirmation**: Messaging system architecture * **Status Separation Patterns**: Booking vs payment status independence --- > Portal Navigation: > > - Append `.md` to any URL under `https://dev.wix.com/docs/` to get its markdown version. > - Pages are either content pages (article or reference text) or menu pages (a list of links to child pages). > - To get a menu page, truncate any URL to a parent path and append `.md` (e.g. `https://dev.wix.com/docs/sdk.md`, `https://dev.wix.com/docs/sdk/core-modules.md`). > - Top-level index of all portals: https://dev.wix.com/docs/llms.txt > - Full concatenated docs: https://dev.wix.com/docs/llms-full.txt ## Resource: Bookings Staff Setup ## Article: Bookings Staff Setup ## Article Link: https://dev.wix.com/docs/api-reference/business-solutions/bookings/skills/bookings-staff-setup.md ## Article Content: # Technical Step-by-Step Instructions: Setting Up Wix Bookings Staff Members with Custom Working Hours (Real-World, API-First) ## Description Below are the recommended steps to successfully set up Wix Bookings staff members and configure their custom working schedules on Wix, with real-world troubleshooting and fixes for common API issues. --- ## Prerequisites - **Wix Bookings app installed** (App ID: `13d21c63-b5ec-5912-8397-c3a5ddb27a97`) > **Note:** If you receive errors from Bookings APIs, the Wix Bookings app may not be installed on the site. Use [List Installed Apps](https://dev.wix.com/docs/api-reference/business-management/app-installation/skills/list-installed-apps.md) to verify, and [Install Wix Apps](https://dev.wix.com/docs/api-reference/business-management/app-installation/skills/install-wix-apps.md) to install it if missing. --- ## Overview A Wix Bookings staff member setup involves multiple interconnected steps that must be executed in the correct sequence. This recipe covers the complete workflow from foundation setup to custom working hours configuration. ### 🚨 CRITICAL: Staff Inheritance Timing **STAFF INHERIT BUSINESS HOURS AT CREATION TIME**: When you create a new staff member, they immediately inherit whatever business hours exist at that moment. This inheritance is NOT dynamic - it's a one-time copy during creation. **Order of Operations Matters**: 1. **Option A (Recommended)**: Fix business hours FIRST, then create staff (staff inherit correct hours) 2. **Option B**: Create staff first, then detach them from default hours and configure custom schedules **Understanding the Impact**: - If you create staff when business hours are 9 AM - 5 PM, staff inherit 9 AM - 5 PM - If you later change business hours to 8 AM - 6 PM, existing staff STILL have 9 AM - 5 PM - New staff created after the change would inherit 8 AM - 6 PM Staff schedule configuration includes: - **Default behavior**: Staff inherit business hours and are available at all business locations - **Custom schedules**: Staff can have individual working hours different from business defaults - **Working hours creation**: Custom hours are created as events with `"type": "WORKING_HOURS"` and recurrence rules ### Key Concepts * **Staff Member**: An individual providing services within Wix Bookings. Each staff member has an associated resource with schedules for working hours and events. * **Working Hours Schedule**: Defines when a staff member is available to provide services. Can be either business default hours or custom hours. * **Event Schedule**: The actual calendar events that define specific working time blocks (WORKING_HOURS events). * **Resource ID**: Each staff member has a `resourceId` that links them to their schedules and availability. * **Inheritance Timestamp**: The exact moment when a staff member is created determines which business hours they inherit. ### Critical Workflow Requirements The complete custom working hours setup requires understanding three distinct ID types and their relationships: - **Staff Member ID**: Used for staff updates and schedule assignment - **Resource ID**: Used for linking to services and events (`externalScheduleId` and `resources` array) - **Events Schedule ID**: Used for creating working hours events (`scheduleId`) The most common mistake is confusing which ID to use in which API call, leading to "Resource not found" or "Invalid scheduleId" errors. ### 🚨 INHERITANCE WARNINGS * **One-Time Inheritance**: Business hours are copied (not linked) to staff at creation time * **Creation Order Impact**: The state of business hours when you create staff determines their initial schedule * **Retroactive Changes**: Changing business hours does NOT affect existing staff schedules * **Multiple Staff Issue**: If you create multiple staff at different times, they may inherit different business hours ### IMPORTANT NOTES * **Two-Step Requirement**: Custom working hours requires both `assignWorkingHoursSchedule` AND creating `WORKING_HOURS` events. Only doing the first step results in staff with no actual working hours. * **Foundation Dependencies**: Staff operations require Wix Bookings app installation and proper business schedule configuration. "Business schedule not found" errors indicate missing foundation setup. * **Event Field Requirements**: When creating `WORKING_HOURS` events, several fields that appear optional in documentation are actually required: `externalScheduleId`, `adjustedStart`, `adjustedEnd`, `resources` array, and `appId`. * **Revision Numbers**: Event updates ALWAYS require the current revision number. Fetch current event details before any update operation. * **Time Format Precision**: All date/time fields must use precise ISO 8601 format (`YYYY-MM-DDTHH:mm:ss`) without timezone indicators. * **Separate Events for Each Day**: Each working day requires a separate event with single-day recurrence rules. You cannot specify multiple days in one event's `recurrenceRule.days` array. --- ## Steps ### Step 0: Choose Your Strategy (CRITICAL DECISION) Before proceeding, decide your approach based on business hour requirements: #### Strategy A: Fix Business Hours First (Recommended) **When to use**: All staff will have the same working hours or similar schedules 1. Configure correct business hours (see business hours recipe) 2. Create staff members (they inherit correct hours automatically) 3. Only customize specific staff if needed **Advantages**: - Staff inherit correct hours immediately - Minimal post-creation configuration - Consistent scheduling across staff #### Strategy B: Create Staff First, Configure Later **When to use**: Each staff member needs completely different schedules 1. Create staff with whatever business hours exist 2. Detach each staff from business hours 3. Configure individual custom schedules for each **Disadvantages**: - Requires more API calls per staff member - Risk of forgetting to configure some staff - Temporary period with incorrect availability ### 1. Verify Foundation Setup (Prerequisites - Optional if Already Configured) **Note**: If your site already has Wix Bookings properly configured with business schedules, you can skip this step and go directly to Step 2. Before creating staff members, ensure the foundation is properly configured: **Check Wix Bookings Installation**: Query staff members (`POST https://www.wixapis.com/bookings/v1/staff-members/query`) to test if Bookings is installed. If you receive "Business schedule not found" errors, the foundation needs setup. **Install Wix Bookings App** (if needed): Use the App Installer API with Wix Bookings app ID: `13d21c63-b5ec-5912-8397-c3a5ddb27a97`. **Configure Business Schedule**: Set up site properties with business operating hours using the Site Properties API. **Create Calendar Schedule and Working Hours**: Create a calendar schedule for Wix Bookings integration and populate it with business `WORKING_HOURS` events. ### 2. Verify Current Business Hours (CRITICAL) Before creating any staff, query the current business hours (`POST https://www.wixapis.com/calendar/v3/events/query`) to understand what staff will inherit: ```json { "recurrenceType": ["MASTER"], "query": { "filter": { "scheduleId": "business-schedule-id", "type": "WORKING_HOURS" } } } ``` **Document the current hours** - this is what your staff will inherit! ### 3A. Strategy A: Configure Business Hours First If following Strategy A, ensure business hours are set correctly BEFORE creating staff: 1. Update or replace existing business hours (follow business hours recipe) 2. Verify the final business hours configuration 3. Proceed to create staff (they'll inherit these correct hours) ### 3B. Strategy B: Create Staff with Current Hours If following Strategy B, accept that staff will inherit current (possibly incorrect) hours and plan to configure them individually later. ### 4. Create Staff Members Create staff members using the Staff API (`POST https://www.wixapis.com/bookings/v1/staff-members`) with required information: - Name (required) - Email (optional but recommended) - Phone (optional) - Description/Professional bio (optional) **⚠️ INHERITANCE MOMENT**: The moment this API call completes, the staff member inherits the current business hours. There's no "undo" for this inheritance. **Save Critical IDs from Response**: - `staffMember.id` for updates and schedule assignment - `staffMember.resourceId` for services and event resources - `staffMember.resource.eventsSchedule.id` for working hours events - `staffMember.resource.usesDefaultWorkingHours` (should be `true` initially) ### 5. Set Up Custom Working Hours (Two-Step Process) **Only needed if**: You want staff to have different hours than what they inherited, OR you followed Strategy B. **Step 5A: Assign Custom Working Hours Schedule** Get staff member details (`GET https://www.wixapis.com/bookings/v1/staff-members/?fields=RESOURCE_DETAILS`) to extract the events schedule ID. Call `assignWorkingHoursSchedule` (`POST https://www.wixapis.com/bookings/v1/staff-members//assign-working-hours-schedule`) using the staff member ID and their events schedule ID. This detaches the staff member from business default hours. Verify the response shows `"usesDefaultWorkingHours": false`. **Step 5B: Create WORKING_HOURS Events** Use the Events API (`POST https://www.wixapis.com/calendar/v3/bulk/events/create`) to create working hours events for each working day. Each event must include: - `scheduleId`: Staff member's events schedule ID - `externalScheduleId`: Staff member's resource ID - `type`: `"WORKING_HOURS"` - `resources` array: Staff member's resource ID - `appId`: Wix Bookings app ID - Proper recurrence rules with single-day specification Create separate events for each day of the week the staff member works. ### 6. Verify Setup Query the staff member to confirm: - `"usesDefaultWorkingHours": false` (if you set custom hours) - Query working hours events to verify proper creation with correct `type` and resource associations - Test booking availability to ensure hours are applied correctly ### IMPORTANT NOTES * **ID Relationship Critical**: Use staff member ID for assignment, events schedule ID for event `scheduleId`, and resource ID for `externalScheduleId` and `resources` array * **Foundation First**: Complete foundation setup before staff operations to avoid "Business schedule not found" errors * **Complete Two-Step Process**: Both schedule assignment AND event creation are mandatory for custom working hours * **Event Field Requirements**: Include all required fields even if they appear optional in basic documentation * **Revision Management**: Always fetch current revision numbers before updating events * **Date Format Strict**: Use precise ISO 8601 format without timezone indicators * **Inheritance is Permanent**: Once inherited, business hours changes don't affect existing staff ### Troubleshooting Common Issues **"Business schedule not found" Error**: Execute systematic diagnosis: check app installation, site properties, calendar schedule, and working hours events in sequence. Fix the first failed component before proceeding. **Staff Member Still Shows Default Hours**: Completed assignment but missing event creation. Create `WORKING_HOURS` events using the Bulk Create Events API. **Staff Inherited Wrong Hours**: - **Root Cause**: Business hours were incorrect when staff was created - **Solution**: Either update business hours first (affects future staff) or configure each existing staff member individually **Multiple Staff Have Different Inherited Hours**: - **Root Cause**: Business hours changed between staff creation times - **Solution**: Standardize by configuring custom hours for all staff, or recreate staff after fixing business hours **"Invalid scheduleId" or "Resource not found" Errors**: Using wrong ID type in API calls. Verify you're using events schedule ID for `scheduleId`, resource ID for `externalScheduleId` and `resources` array, and staff member ID for updates. **Event Update Fails with Revision Error**: Get current event details first and include the revision number in update requests. **Cannot Create Events for Past Dates**: Use current or future dates for recurring event start dates. **Events Not Linked to Staff Member**: Ensure `resources` array contains staff member's resource ID and `externalScheduleId` is properly set. ### Working with Existing Staff If working with existing staff members, first retrieve their details using `queryStaffMembers` with `RESOURCE_DETAILS` fieldmask to get the necessary IDs for schedule configuration. This allows you to configure custom working hours for staff members that were created previously. **Check Their Current Inheritance**: - Look at `usesDefaultWorkingHours` field - If `true`: They're still using business hours they inherited at creation - If `false`: They have custom hours (may have been configured previously) ### Common Gotchas 1. **Wrong Order**: Creating staff before fixing business hours leads to incorrect inheritance 2. **Inheritance Assumption**: Thinking business hour changes affect existing staff 3. **Incomplete Custom Setup**: Only doing schedule assignment without creating events 4. **Mixed Timing**: Creating staff at different times when business hours are changing 5. **ID Confusion**: Using wrong ID types in API calls ## API Documentation References * [Create Staff Member](https://dev.wix.com/docs/api-reference/business-solutions/bookings/staff-members/staff-members/create-staff-member.md) * [Query Staff Members](https://dev.wix.com/docs/api-reference/business-solutions/bookings/staff-members/staff-members/query-staff-members.md) * [Assign Working Hours Schedule](https://dev.wix.com/docs/api-reference/business-solutions/bookings/staff-members/staff-members/assign-working-hours-schedule.md) * [Schedules and Sessions API](https://dev.wix.com/docs/api-reference/business-solutions/bookings/calendar/schedules-and-sessions/schedule-and-sessions/introduction.md) * [Apps Created by Wix](https://dev.wix.com/docs/api-reference/articles/work-with-wix-apis/platform/about-apps-created-by-wix.md) --- > Portal Navigation: > > - Append `.md` to any URL under `https://dev.wix.com/docs/` to get its markdown version. > - Pages are either content pages (article or reference text) or menu pages (a list of links to child pages). > - To get a menu page, truncate any URL to a parent path and append `.md` (e.g. `https://dev.wix.com/docs/sdk.md`, `https://dev.wix.com/docs/sdk/core-modules.md`). > - Top-level index of all portals: https://dev.wix.com/docs/llms.txt > - Full concatenated docs: https://dev.wix.com/docs/llms-full.txt ## Resource: Create and Update Booking Services ## Article: Create and Update Booking Services ## Article Link: https://dev.wix.com/docs/api-reference/business-solutions/bookings/skills/create-and-update-booking-services.md ## Article Content: # Technical Step-by-Step Instructions: Creating or Updating a Wix Bookings Service (Real-World, API-First) ## Description Below are the recommended steps to successfully create or update a Wix Bookings service (or several at once) on Wix, with real-world troubleshooting and fixes for common API issues. --- ## Prerequisites - **Wix Bookings app installed** (App ID: `13d21c63-b5ec-5912-8397-c3a5ddb27a97`) > **Note:** If you receive errors from Bookings APIs, the Wix Bookings app may not be installed on the site. Use [List Installed Apps](https://dev.wix.com/docs/api-reference/business-management/app-installation/skills/list-installed-apps.md) to verify, and [Install Wix Apps](https://dev.wix.com/docs/api-reference/business-management/app-installation/skills/install-wix-apps.md) to install it if missing. ## Overview A Bookings service defines a time based offering and includes the following considerations: - type - for detailed information about service type - refer to the [article](https://dev.wix.com/docs/api-reference/business-solutions/bookings/services/services-v2/about-service-types.md) - `APPOINTMENT` - Appointments allow customers to book services at their preferred time during the business hours. For example, a hair salon might offer different appointment-based hair cutting and styling services. Appointments appear in the booking calendar once they're booked by a customer. Not-yet-booked times during the business hours are displayed as available slots to potential customers while booking. The availability of the service is based on the availability of the staff member providing it - `CLASS` - A class is a single event or a series of recurring events that multiple customers can book. For example, a yoga studio might offer a twice-weekly vinyasa flow class. Classes may have a set end date or continue indefinitely. If a class includes more than a single event, customers can sign up for 1, several, or all of the events. Upon creation, classes are listed immediately in the booking calendar. - `COURSE` - A course starts and ends on pre-defined dates with a limited number of events that multiple customers can book. For example, a yoga studio might offer a teacher training course with 5 events. In contrast to classes, customers must book the entire course. Upon creation, courses are displayed immediately in the booking calendar. - Staff Member - a resource required in order to provide a service. [REST](https://dev.wix.com/docs/api-reference/business-solutions/bookings/staff-members/staff-members/create-staff-member.md) A staff member availability is defined by the schedule associated with the staff member, by default it is the main business schedule and cannot be modified by schedule APIs, but a staff member can have its own schedule by calling `assignWorkingHoursSchedule` which allows the staff member to have its own availability. The property `staffMember.usesDefaultWorkingHours` defines whether the default hours (business hours) are used. - Schedule (availability) - availability is defined by `Events` ([REST](https://dev.wix.com/docs/api-reference/business-management/calendar/events-v3/introduction.md)) defined on a schedule. - The schedule which defines the service availability is based on the service type. - For appointment service, it is based on the schedule of staff members which provides it (`service.staffMemberIds` which is mapped to `staffMember.resourceId`). In order to fetch the staff schedule you should retrieve the staff member with `RESOURCE_DETAILS` fieldmask and read the schedule id from the `staffMember.resource.eventsSchedule.id` - This is needed if you wish to define the staff member's availability as part of the process - For classes and courses it is based on the schedule of the service itself (`service.schedule`) - When creating an APPOINTMENT service and specifying `staffMemberIds`, ensure you are using the staff member's resourceId, not their primary staff member id. - Service Images - the service may have several images - `service.media.mainMedia` - presented in the services list, `service.media.coverMedia` - presented in the service page and `service.media.items` - array of images presented as a gallery in the service page for site visitors. - In order to add a media (image) to a service, it should first be defined in Wix Media Manager - search existing ([REST](https://dev.wix.com/docs/api-reference/assets/media/media-manager/files/search-files.md)) or new ([REST](https://dev.wix.com/docs/api-reference/assets/media/media-manager/files/bulk-import-file.md)) - You should only set the image id (for example `item.id` -> `service.media.mainMedia.id`) there is no need to set the entire object. ### Service Type Selection Guide Choose based on these documented behaviors: - **APPOINTMENT**: Customer picks available time slot. Availability based on staff schedules. One customer (or dedicated group) per booking. - **CLASS**: Business sets recurring times. Multiple customers book same session. Customers can book 1, some, or all sessions in series. - **COURSE**: Business sets fixed series. Multiple customers book. Customers must book entire course (all sessions). When unsure, refer to [About Service Types](https://dev.wix.com/docs/api-reference/business-solutions/bookings/services/services-v2/about-service-types.md). ### CRITICAL: Staff Assignment Behavior by Service Type **APPOINTMENT Services:** - **Staff assignment WORKS**: Can specify `staffMemberIds` array with staff member `resourceId` values - **Behavior**: Service availability based on assigned staff schedules - **Example**: Personal training session assigned to specific trainer **CLASS and COURSE Services:** - **Staff assignment IGNORED**: Setting `staffMemberIds` has no effect on service creation - **Behavior**: Service uses its own schedule (`service.schedule`), not staff schedules - **Workaround**: Staff association must be handled separately through calendar events or other mechanisms - **Example**: Yoga class where any qualified instructor can teach This is a critical API limitation that affects service planning and staff resource management. ### IMPORTANT NOTES - I MUST read the full articles about [service types](https://dev.wix.com/docs/api-reference/business-solutions/bookings/services/services-v2/about-service-types.md), [service payments](https://dev.wix.com/docs/api-reference/business-solutions/bookings/services/services-v2/about-service-payments.md), [service location](https://dev.wix.com/docs/api-reference/business-solutions/bookings/services/services-v2/about-service-locations.md) in order to fully understand how to set the service properties - If the service type is `CLASS` or `COURSE` I MUST read the full articles service's _schedule_ and _events_ mentioned before - If the service type is `APPOINTMENT` I MUST read the relevant full article about staff members ([REST](https://dev.wix.com/docs/api-reference/business-solutions/bookings/staff-members/staff-members/introduction.md)) in order to determine whether I should create a new staff member (or members) - For free service I MUST set `service.payment.rateType` as `"NO_FEE"` and `service.payment.options.inPerson` as `true` (at least one payment option must be true) - For paid service I MUST set the `service.payment.fixed.price.value` (must be above 0) as well as `service.payment.fixed.price.currency` - When changing a free service to a paid service, I MUST update `service.payment.rateType` from `"NO_FEE"` to `"FIXED"` in the same request where I set `service.payment.fixed.price`; patching only `fixed.price` on a `NO_FEE` service fails validation. ### Payment Options Validation Rules | rateType | `options.online` | `options.inPerson` | Valid? | | -------- | ---------------- | ------------------ | --------------------------------- | | FIXED | true | false | ✓ | | FIXED | false | true | ✓ | | FIXED | true | true | ✓ | | VARIED | true | false | ✓ | | VARIED | false | true | ✓ | | NO_FEE | false | true | ✓ | | NO_FEE | true | false | ✗ (online not allowed for NO_FEE) | | Any | false | false | ✗ (at least one must be true) | - Always Prioritize Reading Full API Method Documentation: this overview article provides a general workflow. However, it repeatedly stresses the importance of reading the full documentation for each specific REST method you intend to use. This is critical for understanding detailed requirements. - I should pay close attention to all required fields, data types, enum values, and specific ID types (e.g., resourceId vs. id) as defined in the detailed schema of each API endpoint. The overview article serves as a guide but doesn't replace the need to consult these specifics. ### Service Categories - CRITICAL for UI Visibility **IMPORTANT**: Services without categories may not appear in category-based UI filters, which are commonly used in booking interfaces. **Service Category Considerations:** - **Default Behavior**: Services created without explicit category assignment may not be visible in filtered views - **UI Impact**: Many booking interfaces filter services by `category.id`, hiding uncategorized services - **Best Practice**: Always assign services to appropriate categories during creation **Category Management Steps:** 1. **Query existing categories** using [Query Categories](https://dev.wix.com/docs/api-reference/business-solutions/bookings/services/categories-v2/query-categories.md) to see available options 2. **Create new category if needed** using [Create Category](https://dev.wix.com/docs/api-reference/business-solutions/bookings/services/categories-v2/create-category.md) 3. **Assign category during service creation** by including `category.id` in the service object 4. **Update existing services** using [Update Service](https://dev.wix.com/docs/api-reference/business-solutions/bookings/services/services-v2/update-service.md) to add missing categories **Common Category Filter Patterns:** ```json { "filter": { "category.id": { "$exists": true } } } ``` This filter will only show services with assigned categories, making uncategorized services invisible to users. ### Querying Existing Services You can retrieve a list of existing booking services using the [Query Services](https://dev.wix.com/docs/api-reference/business-solutions/bookings/services/services-v2/query-services.md) endpoint. This allows you to filter, sort, and page through up to 100 services at a time, making it easy to find and manage your current offerings. --- ## Steps ### 0. Query and Setup Categories (CRITICAL FIRST STEP) 1. **Query existing categories** using `queryCategories` API ([REST](https://dev.wix.com/docs/api-reference/business-solutions/bookings/services/categories-v2/query-categories.md)) to identify available categories 2. **Create category if needed** using `createCategory` API ([REST](https://dev.wix.com/docs/api-reference/business-solutions/bookings/services/categories-v2/create-category.md)) if no suitable category exists 3. **Record category ID** for use in service creation - this prevents services from being hidden in UI filters **Query Categories:** ```bash curl -X POST 'https://www.wixapis.com/bookings/v2/categories/query' \ -H 'Authorization: ' \ -H 'Content-Type: application/json' \ -d '{ "query": {} }' ``` **Create Category (if none exist):** ```bash curl -X POST 'https://www.wixapis.com/bookings/v2/categories' \ -H 'Authorization: ' \ -H 'Content-Type: application/json' \ -d '{ "category": { "name": "General" } }' ``` ### 1. Define staff member to use (REQUIRED for APPOINTMENT) > **IMPORTANT:** For APPOINTMENT services, `staffMemberIds` is **required**. The API will return a 400 error without it. You must query staff members first to obtain a valid `resourceId`. 1. **Query existing staff members** to get their `resourceId` values 2. For new staff, create using `createStaffMember` API ([REST](https://dev.wix.com/docs/api-reference/business-solutions/bookings/staff-members/staff-members/create-staff-member.md)) and keep the response `staffMember.id` and `resourceId` 3. If you wish to update working hours, call `getStaffMember` API ([REST](https://dev.wix.com/docs/api-reference/business-solutions/bookings/staff-members/staff-members/get-staff-member.md)) to get `resource.eventsSchedule.id` **Query Staff Members (to get resourceId):** ```bash curl -X POST 'https://www.wixapis.com/bookings/v1/staff-members/query' \ -H 'Authorization: ' \ -H 'Content-Type: application/json' \ -d '{ "query": {}, "fields": ["RESOURCE_DETAILS"] }' ``` Use the `resourceId` from the response (not `id`) in `staffMemberIds` when creating APPOINTMENT services. **Staff Selection Strategy:** - If a staff member has `default: true` → use it - If only one staff member exists → use it - If multiple exist → pick the first or most appropriate - If none exist → create one using the [Staff Setup recipe](https://dev.wix.com/docs/api-reference/business-solutions/bookings/skills/bookings-staff-setup.md) **Service Type Requirements:** - **APPOINTMENT**: `staffMemberIds` is **required** - API will fail without it - **CLASS/COURSE**: `staffMemberIds` is ignored; use `service.schedule` instead ### 2. Creating or Updating a service Based on the information gathered above, use the relevant API based on the desired outcome. - **Create services**: `bulkCreateServices` endpoint ([REST](https://dev.wix.com/docs/api-reference/business-solutions/bookings/services/services-v2/bulk-create-services.md)) - **Update single service**: `updateService` endpoint ([REST](https://dev.wix.com/docs/api-reference/business-solutions/bookings/services/services-v2/update-service.md)) - **Update services (bulk)**: `bulkUpdateServices` ([REST](https://dev.wix.com/docs/api-reference/business-solutions/bookings/services/services-v2/bulk-update-services.md)) - **Update by filter**: `bulkUpdateServicesByFilter` ([REST](https://dev.wix.com/docs/api-reference/business-solutions/bookings/services/services-v2/bulk-update-services-by-filter.md)) - **Get single service**: `getService` endpoint ([REST](https://dev.wix.com/docs/api-reference/business-solutions/bookings/services/services-v2/get-service.md)) **Create Service Example (paid APPOINTMENT, 60 minutes):** ```bash curl -X POST 'https://www.wixapis.com/bookings/v2/bulk/services/create' \ -H 'Authorization: ' \ -H 'Content-Type: application/json' \ -d '{ "services": [{ "name": "Consultation", "type": "APPOINTMENT", "onlineBooking": { "enabled": true }, "staffMemberIds": [""], "schedule": { "availabilityConstraints": { "sessionDurations": [60] } }, "payment": { "rateType": "FIXED", "options": { "online": true, "inPerson": false }, "fixed": { "price": { "value": "50", "currency": "USD" } } }, "category": { "id": "" } }] }' ``` > **Note:** Currency may default to the site's business currency regardless of what you specify. Verify the response if currency is critical. **Create Service Example (free APPOINTMENT, 60 minutes):** ```bash curl -X POST 'https://www.wixapis.com/bookings/v2/bulk/services/create' \ -H 'Authorization: ' \ -H 'Content-Type: application/json' \ -d '{ "services": [{ "name": "Free Consultation", "type": "APPOINTMENT", "onlineBooking": { "enabled": true }, "staffMemberIds": [""], "schedule": { "availabilityConstraints": { "sessionDurations": [60] } }, "payment": { "rateType": "NO_FEE", "options": { "online": false, "inPerson": true } }, "category": { "id": "" } }] }' ``` **Create Service Example (CLASS with capacity):** > **Note:** CLASS services do not use `staffMemberIds` or `sessionDurations`. After creation, you must create events via `bulkCreateEvents` using the returned `service.schedule.id` to define when the class occurs. ```bash curl -X POST 'https://www.wixapis.com/bookings/v2/bulk/services/create' \ -H 'Authorization: ' \ -H 'Content-Type: application/json' \ -d '{ "services": [{ "name": "Yoga Class", "type": "CLASS", "onlineBooking": { "enabled": true }, "defaultCapacity": 20, "payment": { "rateType": "FIXED", "options": { "online": true, "inPerson": false }, "fixed": { "price": { "value": "25", "currency": "USD" } } }, "category": { "id": "" } }] }' ``` After creation, use the `service.schedule.id` from the response to create class events with `bulkCreateEvents` (see Step 3). **Required Fields:** - `name` - Service name - `type` - `APPOINTMENT`, `CLASS`, or `COURSE` - `onlineBooking: { enabled: true }` - Required for all services - `staffMemberIds` - **Required for APPOINTMENT only** (use `resourceId` values); ignored for CLASS/COURSE - `schedule.availabilityConstraints.sessionDurations` - Duration in minutes (APPOINTMENT only) - `defaultCapacity` - **Required for CLASS/COURSE** (max participants per session) - `payment.options` - At least one of `online` or `inPerson` must be `true` (required for all services, including free; see validation table above) **Service Type Specific Considerations:** - **APPOINTMENT**: Must include `staffMemberIds` with staff `resourceId` values - **CLASS/COURSE**: Omit `staffMemberIds`; configure `service.schedule` instead **Update Service Example (PATCH):** > **Note:** Updates require the current `revision` value (from a GET response) placed **inside** the `service` object, not at the top level. ```bash # First, get current service to obtain revision curl -X GET 'https://www.wixapis.com/bookings/v2/services/' \ -H 'Authorization: ' # Then update with revision inside service object curl -X PATCH 'https://www.wixapis.com/bookings/v2/services/' \ -H 'Authorization: ' \ -H 'Content-Type: application/json' \ -d '{ "service": { "revision": "", "category": { "id": "" } } }' ``` **Update free service to fixed price:** When an existing service has `payment.rateType: "NO_FEE"` and the user asks to set a price, convert it to `FIXED` and set the price in the same update. ```bash # First, get current service to obtain revision and current payment settings curl -X GET 'https://www.wixapis.com/bookings/v2/services/' \ -H 'Authorization: ' curl -X PATCH 'https://www.wixapis.com/bookings/v2/services/' \ -H 'Authorization: ' \ -H 'Content-Type: application/json' \ -d '{ "service": { "revision": "", "payment": { "rateType": "FIXED", "options": { "online": false, "inPerson": true }, "fixed": { "price": { "value": "200", "currency": "" } } } } }' ``` ### 3. Set the availability of the service Once the service and staff member are available, you can define when the service is available: **3a. Determine the schedule to use** based on the service type: - **APPOINTMENT**: The staff member working hours determine the service availability. If the staff member needs different hours from the business defaults, call `assignWorkingHoursSchedule` (`POST https://www.wixapis.com/bookings/v1/staff-members//assign-working-hours-schedule`) ([REST](https://dev.wix.com/docs/api-reference/business-solutions/bookings/staff-members/staff-members/assign-working-hours-schedule.md)). Use the `resource.eventsSchedule.id` as the `scheduleId`. - **CLASS or COURSE**: Use the `service.schedule.id` from the service created/updated in Step 2. **3b. Create events** using `bulkCreateEvents` (`POST https://www.wixapis.com/calendar/v3/bulk/events/create`) ([REST](https://dev.wix.com/docs/api-reference/business-management/calendar/events-v3/bulk-create-event.md)) or update existing ones with `bulkUpdateEvents` (`POST https://www.wixapis.com/calendar/v3/bulk/events/update`) ([REST](https://dev.wix.com/docs/api-reference/business-management/calendar/events-v3/bulk-update-event.md)). **Event requirements**: - `event.resources` array **must include at least one resource** (a staff member/room/etc.) using the `resourceId`. CLASS and COURSE events will fail with a 400 error if no resources are provided. - `event.scheduleId` — use the staff member's events schedule ID for APPOINTMENT availability, or `service.schedule.id` for CLASS/COURSE. - `event.type` — set to `WORKING_HOURS` for staff availability, `CLASS` for class sessions, or `COURSE` for course sessions. ### Troubleshooting Common Issues **APPOINTMENT Service Creation Fails (staffMemberIds required):** - **Error**: `"service of type appointment requires at least one staff member id"` - **Cause**: APPOINTMENT services cannot be created without at least one staff member assigned - **Solution**: Query staff members first (Step 1) to get a valid `resourceId`, then include it in `staffMemberIds` **Service Creation Fails (payment.options required):** - **Error**: `INVALID_PAYMENT_OPTIONS - "It is mandatory to specify either payment.options.online or payment.options.inPerson as true"` - **Cause**: All services (including free) require at least one payment option to be `true` - **Solution**: Add `"options": { "online": true, "inPerson": false }` (or `inPerson: true` for free services) to the `payment` object **Free Service Fails with online=true:** - **Error**: `INVALID_PAYMENT_OPTIONS - "Specifying payment.paymentOptions.online as true is applicable only to payments of types FIXED or VARIED"` - **Cause**: `payment.options.online: true` is only valid for paid services (FIXED or VARIED) - **Solution**: For free services (NO_FEE), use `"options": { "online": false, "inPerson": true }` **Changing a free service price fails:** - **Error**: `"Payment of type FREE cannot be used with payment.rate"` - **Cause**: The service is still `NO_FEE` while the update tries to set `fixed.price` - **Solution**: Change `payment.rateType` to `"FIXED"` and include `payment.fixed.price` in the same update request **Services Not Appearing in UI Filters:** - **Problem**: Services created without category assignment are invisible in category-based filters - **Root Cause**: Many UI implementations filter by `category.id` existence or specific category values - **Solution**: Query all services, identify those missing categories, and update them using bulk update operations - **Prevention**: Always assign categories during service creation (Step 0) **Staff Assignment Not Working for CLASS/COURSE Services:** - **Problem**: Setting `staffMemberIds` in CLASS or COURSE services appears to be ignored - **Solution**: This is expected behavior; use service schedules instead of staff assignments - **Alternative**: Manage staff-to-class relationships through calendar events or custom data structures **App Not Installed Errors:** - **Problem**: 428 "App not installed" errors when creating services - **Solution**: Install Wix Bookings app using Apps Installer API before creating services - **Verification**: Query existing services to confirm app installation **Resource ID vs Staff ID Confusion:** - **Problem**: Using wrong ID type for `staffMemberIds` array - **Solution**: Always use `staffMember.resourceId`, not `staffMember.id` - **Verification**: Query staff with `RESOURCE_DETAILS` fieldMask to get correct IDs **Service Schedule vs Staff Schedule Confusion:** - **Problem**: Mixing up schedule IDs between service and staff schedules - **Solution**: - APPOINTMENT: Use staff schedule ID (`staffMember.resource.eventsSchedule.id`) - CLASS/COURSE: Use service schedule ID (`service.schedule.id`) **Update Service Fails with revision error:** - **Error**: `revision must not be empty` or `service.revision is required` - **Cause**: `revision` placed at top level of request body instead of inside `service` object - **Solution**: Structure as `{ "service": { "revision": "...", ...fields } }` - get revision value from GET response first ### IMPORTANT NOTES - I MUST read the full article about the REST method I wish to use - `onlineBooking` Field: The onlineBooking object (e.g., {"enabled": true}) is a required field when creating services, even if not explicitly highlighted as mandatory in the high-level overview. This is a schema-level requirement. - Event Creation (BulkCreateEvents): When specifying recurrenceRule.days, I MUST use full day names (e.g., "TUESDAY", "FRIDAY") - The recurrenceRule.days field within an event object can only accept a single day of the week (e.g., ["TUESDAY"]). - If I need to set up recurring events for multiple days of the week (e.g., a staff member working every Tuesday and Friday), I MUST define a separate event for each day and send them as separate items for BulkCreateEvents. - Start Dates for Recurring Events: Recurring events must have a start.localDate that is today or in the future, relative to the server's current time. If I am not sure what the current date and time are I MUST check it. - When setting `event.type` as `WORKING_HOURS` (APPOINTMENT) I MUST call `assignWorkingHoursSchedule` BEFORE CREATING THE EVENTS so that the staff member is no longer linked to the business working hours - When setting `event.type` as `CLASS` or `COURSE` I MUST use the service schedule id, so the service has to exist (created/updated) before setting the availability of it ## Booking REST API Documentation Reference - [Query Categories](https://dev.wix.com/docs/api-reference/business-solutions/bookings/services/categories-v2/query-categories.md) - [Create Category](https://dev.wix.com/docs/api-reference/business-solutions/bookings/services/categories-v2/create-category.md) - [Get Service](https://dev.wix.com/docs/api-reference/business-solutions/bookings/services/services-v2/get-service.md) - [Update Service](https://dev.wix.com/docs/api-reference/business-solutions/bookings/services/services-v2/update-service.md) - [Create Staff Member](https://dev.wix.com/docs/api-reference/business-solutions/bookings/staff-members/staff-members/create-staff-member.md) - [Get Staff Member](https://dev.wix.com/docs/api-reference/business-solutions/bookings/staff-members/staff-members/get-staff-member.md) - [Query Staff Members](https://dev.wix.com/docs/api-reference/business-solutions/bookings/staff-members/staff-members/query-staff-members.md) - [Bulk Create Services](https://dev.wix.com/docs/api-reference/business-solutions/bookings/services/services-v2/bulk-create-services.md) - [Bulk Update Services](https://dev.wix.com/docs/api-reference/business-solutions/bookings/services/services-v2/bulk-update-services.md) - [Bulk Update Services By Filter](https://dev.wix.com/docs/api-reference/business-solutions/bookings/services/services-v2/bulk-update-services-by-filter.md) - [Assign Working Hours Schedule](https://dev.wix.com/docs/api-reference/business-solutions/bookings/staff-members/staff-members/assign-working-hours-schedule.md) - [Bulk Create Events](https://dev.wix.com/docs/api-reference/business-management/calendar/events-v3/bulk-create-event.md) - [Bulk Update Events](https://dev.wix.com/docs/api-reference/business-management/calendar/events-v3/bulk-update-event.md) - [Media Manager: Search Files](https://dev.wix.com/docs/api-reference/assets/media/media-manager/files/search-files.md) - [Media Manager: Bulk Import File](https://dev.wix.com/docs/api-reference/assets/media/media-manager/files/bulk-import-file.md) - [Query Services](https://dev.wix.com/docs/api-reference/business-solutions/bookings/services/services-v2/query-services.md) - [Apps Installer API](https://dev.wix.com/docs/api-reference/business-management/app-installation/app-installation/install-app.md) --- > Portal Navigation: > > - Append `.md` to any URL under `https://dev.wix.com/docs/` to get its markdown version. > - Pages are either content pages (article or reference text) or menu pages (a list of links to child pages). > - To get a menu page, truncate any URL to a parent path and append `.md` (e.g. `https://dev.wix.com/docs/sdk.md`, `https://dev.wix.com/docs/sdk/core-modules.md`). > - Top-level index of all portals: https://dev.wix.com/docs/llms.txt > - Full concatenated docs: https://dev.wix.com/docs/llms-full.txt ## Resource: Create Booking Service from Prompt ## Article: Create Booking Service from Prompt ## Article Link: https://dev.wix.com/docs/api-reference/business-solutions/bookings/skills/create-booking-service-from-prompt.md ## Article Content: # Create Booking Service from Natural Language Prompt ## When to Use - User describes a service they want to create using natural language (e.g., "create a yoga class for $50", "set up consultation sessions", "add a personal training appointment") - The intent is autonomous creation — fill in reasonable defaults rather than asking the user for every field ## Step 1: Determine Service Type | User mentions | Type | Recipe | |---|---|---| | consultation, appointment, meeting, 1-on-1, one-on-one, session | `APPOINTMENT` | [Create Appointment Service](https://dev.wix.com/docs/api-reference/business-solutions/bookings/skills/create-appointment-service.md) | | class, yoga, pilates, group session, group workout, bootcamp class | `CLASS` | [Create Class Service](https://dev.wix.com/docs/api-reference/business-solutions/bookings/skills/create-class-service.md) | | workshop, program, course, training program, multi-session | `COURSE` | [Create Course Service](https://dev.wix.com/docs/api-reference/business-solutions/bookings/skills/create-course-service.md) | | (unclear or unspecified) | `APPOINTMENT` | [Create Appointment Service](https://dev.wix.com/docs/api-reference/business-solutions/bookings/skills/create-appointment-service.md) | ## Step 2: Follow the Type-Specific Recipe Once the service type is determined, follow the corresponding recipe linked above. Each recipe covers: 1. Gathering business context (staff where required, categories, duplicate check) 2. Applying type-specific defaults (pricing, capacity, duration, staff assignment) 3. Creating the service via `bulkCreateServices` 4. Navigating to the service form for user review 5. Providing a summary of what was created and assumptions made --- > Portal Navigation: > > - Append `.md` to any URL under `https://dev.wix.com/docs/` to get its markdown version. > - Pages are either content pages (article or reference text) or menu pages (a list of links to child pages). > - To get a menu page, truncate any URL to a parent path and append `.md` (e.g. `https://dev.wix.com/docs/sdk.md`, `https://dev.wix.com/docs/sdk/core-modules.md`). > - Top-level index of all portals: https://dev.wix.com/docs/llms.txt > - Full concatenated docs: https://dev.wix.com/docs/llms-full.txt ## Resource: Create Appointment Service ## Article: Create Appointment Service ## Article Link: https://dev.wix.com/docs/api-reference/business-solutions/bookings/skills/create-appointment-service.md ## Article Content: # Create Appointment Service from Prompt ## When to Use - User wants to create an appointment-based service: "set up consultations", "create a 1-on-1 session", "add a personal training appointment", "create a meeting service" - The service type is APPOINTMENT — customer picks an available time slot during staff working hours - For general service creation where the type is ambiguous, see [Create Booking Service from Prompt](https://dev.wix.com/docs/api-reference/business-solutions/bookings/skills/create-booking-service-from-prompt.md) ## Prerequisites - For full API field definitions, validation rules, and troubleshooting, see [Create and Update Booking Services](https://dev.wix.com/docs/api-reference/business-solutions/bookings/skills/create-and-update-booking-services.md) --- ## Step 1: Gather Business Context Run these queries to collect site data for informed defaults. ### 1a. Query Staff Members (CRITICAL for Appointments) ```bash curl -X POST 'https://www.wixapis.com/bookings/v1/staff-members/query' \ -H 'Authorization: ' \ -H 'Content-Type: application/json' \ -d '{ "query": {}, "fields": ["RESOURCE_DETAILS"] }' ``` Save each staff member's `resourceId` (not `id`). Note which one has `default: true`. **APPOINTMENT services REQUIRE at least one staff member.** If no staff members exist, create one first using [Bookings Staff Setup](https://dev.wix.com/docs/api-reference/business-solutions/bookings/skills/bookings-staff-setup.md). ### 1b. Query Service Categories ```bash curl -X POST 'https://www.wixapis.com/bookings/v2/categories/query' \ -H 'Authorization: ' \ -H 'Content-Type: application/json' \ -d '{ "query": {} }' ``` ### 1c. Query Existing Services (Duplicate Check) ```bash curl -X POST 'https://www.wixapis.com/bookings/v2/services/query' \ -H 'Authorization: ' \ -H 'Content-Type: application/json' \ -d '{ "query": { "paging": { "limit": 100 } } }' ``` Warn the user if a service with a similar name already exists. --- ## Step 2: Apply Appointment Defaults For any fields the user did not explicitly specify: | Field | Default | Notes | |---|---|---| | Duration | 60 minutes | Set via `schedule.availabilityConstraints.sessionDurations` | | Capacity | 1 | Appointments are typically 1-on-1 | | Staff | Auto-assign | Use `default: true` staff, or first available | | Online booking | Enabled | `onlineBooking.enabled: true` | ### Pricing (if not specified) - If user specifies a price → `rateType: "FIXED"` - If user says "free" → `rateType: "NO_FEE"`, `options.inPerson: true`, `options.online: false` - If no price mentioned → infer from context (consultations ~$50-100, sessions ~$30-60) or default to free ### Staff Assignment - **1 staff member** → auto-assign using their `resourceId` - **Multiple staff members** → use the one with `default: true`, or the first one - **No staff members** → create one first using [Bookings Staff Setup](https://dev.wix.com/docs/api-reference/business-solutions/bookings/skills/bookings-staff-setup.md), then proceed ### Category - If categories exist → assign the most relevant one - If no categories exist → create a "General" category: ```bash curl -X POST 'https://www.wixapis.com/bookings/v2/categories' \ -H 'Authorization: ' \ -H 'Content-Type: application/json' \ -d '{ "category": { "name": "General" } }' ``` ### Service Name & Description - Use the user's wording for the service name - Generate a brief, professional description (1-2 sentences) --- ## Step 3: Create the Appointment Service **Paid appointment:** ```bash curl -X POST 'https://www.wixapis.com/bookings/v2/bulk/services/create' \ -H 'Authorization: ' \ -H 'Content-Type: application/json' \ -d '{ "services": [{ "name": "", "description": "", "type": "APPOINTMENT", "onlineBooking": { "enabled": true }, "staffMemberIds": [""], "schedule": { "availabilityConstraints": { "sessionDurations": [] } }, "payment": { "rateType": "FIXED", "options": { "online": true, "inPerson": false }, "fixed": { "price": { "value": "" } } }, "category": { "id": "" } }] }' ``` **Free appointment:** ```bash curl -X POST 'https://www.wixapis.com/bookings/v2/bulk/services/create' \ -H 'Authorization: ' \ -H 'Content-Type: application/json' \ -d '{ "services": [{ "name": "", "description": "", "type": "APPOINTMENT", "onlineBooking": { "enabled": true }, "staffMemberIds": [""], "schedule": { "availabilityConstraints": { "sessionDurations": [] } }, "payment": { "rateType": "NO_FEE", "options": { "online": false, "inPerson": true } }, "category": { "id": "" } }] }' ``` ### APPOINTMENT-Specific Reminders - `staffMemberIds` is **required** — uses `resourceId` values, not staff member `id` - `schedule.availabilityConstraints.sessionDurations` sets the appointment length - Availability is based on the assigned staff member's working hours schedule Save the `serviceId` from the response: `results[0].item.service.id` --- ## Step 4: Summary Message Provide a summary including: 1. **What was created** — service name, price, duration, assigned staff member 2. **Assumptions made** — list defaults used (e.g., "I set the duration to 60 minutes since you didn't specify") 3. **Next steps** — "Click Save to finalize, then set up your availability" 4. **Offer to adjust** — "Want me to change the price, duration, or staff assignment?" **Example:** > I created **"Strategy Consultation"**: > > - **Type**: Appointment (1-on-1) > - **Price**: $75 per session > - **Duration**: 60 minutes > - **Staff**: Assigned to Sarah Johnson > - **Category**: Consulting > > I assumed a 60-minute duration since you didn't specify. You can review and adjust the details in the service form. --- ## Error Handling | Error | Cause | Action | |---|---|---| | 400 "staffMemberIds required" | No staff assigned | Query staff; if none exist, create one via [Bookings Staff Setup](https://dev.wix.com/docs/api-reference/business-solutions/bookings/skills/bookings-staff-setup.md) | | 400 "INVALID_PAYMENT_OPTIONS" | Payment misconfigured | Free: `inPerson: true`, `online: false`. Paid: price > 0 | | 403 | Permission denied | Inform user they lack permission | --- ## Payment Validation Quick Reference | rateType | `options.online` | `options.inPerson` | Valid? | |----------|------------------|-------------------|--------| | FIXED | true | false | ✓ | | FIXED | false | true | ✓ | | FIXED | true | true | ✓ | | NO_FEE | false | true | ✓ | | NO_FEE | true | false | ✗ | | Any | false | false | ✗ | --- ## What This Skill Does NOT Cover - **Schedule/availability setup** — staff working hours need separate configuration. See [Bookings Staff Setup](https://dev.wix.com/docs/api-reference/business-solutions/bookings/skills/bookings-staff-setup.md) - **Pricing plans** — memberships and session packs are separate. See [Create and Update Pricing Plans](https://dev.wix.com/docs/api-reference/business-solutions/pricing-plans/skills/create-and-update-pricing-plans.md) - **Service images** — requires Media Manager API (see [create-and-update-booking-services.md](https://dev.wix.com/docs/api-reference/business-solutions/bookings/skills/create-and-update-booking-services.md)) --- ## API Documentation Reference - [Bulk Create Services](https://dev.wix.com/docs/api-reference/business-solutions/bookings/services/services-v2/bulk-create-services.md) - [Query Services](https://dev.wix.com/docs/api-reference/business-solutions/bookings/services/services-v2/query-services.md) - [Query Categories](https://dev.wix.com/docs/api-reference/business-solutions/bookings/services/categories-v2/query-categories.md) - [Create Category](https://dev.wix.com/docs/api-reference/business-solutions/bookings/services/categories-v2/create-category.md) - [Query Staff Members](https://dev.wix.com/docs/api-reference/business-solutions/bookings/staff-members/staff-members/query-staff-members.md) - [Create Staff Member](https://dev.wix.com/docs/api-reference/business-solutions/bookings/staff-members/staff-members/create-staff-member.md) - [About Service Types](https://dev.wix.com/docs/api-reference/business-solutions/bookings/services/services-v2/about-service-types.md) - [About Service Payments](https://dev.wix.com/docs/api-reference/business-solutions/bookings/services/services-v2/about-service-payments.md) --- > Portal Navigation: > > - Append `.md` to any URL under `https://dev.wix.com/docs/` to get its markdown version. > - Pages are either content pages (article or reference text) or menu pages (a list of links to child pages). > - To get a menu page, truncate any URL to a parent path and append `.md` (e.g. `https://dev.wix.com/docs/sdk.md`, `https://dev.wix.com/docs/sdk/core-modules.md`). > - Top-level index of all portals: https://dev.wix.com/docs/llms.txt > - Full concatenated docs: https://dev.wix.com/docs/llms-full.txt ## Resource: Create Class Service ## Article: Create Class Service ## Article Link: https://dev.wix.com/docs/api-reference/business-solutions/bookings/skills/create-class-service.md ## Article Content: # Create Class Service from Prompt ## When to Use - User wants to create a group class: "create a yoga class", "set up a pilates class", "add a group fitness session", "create a weekly meditation class" - The service type is CLASS — a single event or recurring series that multiple customers can book - Customers can sign up for one, several, or all sessions in a class series - For general service creation where the type is ambiguous, see [Create Booking Service from Prompt](https://dev.wix.com/docs/api-reference/business-solutions/bookings/skills/create-booking-service-from-prompt.md) ## Prerequisites - For full API field definitions, validation rules, and troubleshooting, see [Create and Update Booking Services](https://dev.wix.com/docs/api-reference/business-solutions/bookings/skills/create-and-update-booking-services.md) --- ## Step 1: Gather Business Context Run these queries to collect site data for informed defaults. ### 1a. Query Service Categories ```bash curl -X POST 'https://www.wixapis.com/bookings/v2/categories/query' \ -H 'Authorization: ' \ -H 'Content-Type: application/json' \ -d '{ "query": {} }' ``` ### 1b. Query Existing Services (Duplicate Check) ```bash curl -X POST 'https://www.wixapis.com/bookings/v2/services/query' \ -H 'Authorization: ' \ -H 'Content-Type: application/json' \ -d '{ "query": { "paging": { "limit": 100 } } }' ``` Warn the user if a service with a similar name already exists. > **Note:** Staff queries are optional for CLASS services since `staffMemberIds` is ignored by the API. However, querying staff can still be useful for context (e.g., mentioning instructors in the description). --- ## Step 2: Apply Class Defaults For any fields the user did not explicitly specify: | Field | Default | Notes | |---|---|---| | Capacity | 10 | `defaultCapacity` — required for CLASS | | Online booking | Enabled | `onlineBooking.enabled: true` | ### Pricing (if not specified) - If user specifies a price → `rateType: "FIXED"` (per session) - If user says "free" → `rateType: "NO_FEE"`, `options.inPerson: true`, `options.online: false` - If no price mentioned → infer from context (yoga/fitness classes ~$15-30, art/music ~$20-40) or default to free ### Capacity (if not specified) - Default: 10 participants - If user mentions capacity (e.g., "small group of 6", "up to 20") → use their number - Typical ranges: small group 4-8, standard 10-20, large 20-50 ### Category - If categories exist → assign the most relevant one (e.g., "Fitness", "Wellness") - If no categories exist → create one: ```bash curl -X POST 'https://www.wixapis.com/bookings/v2/categories' \ -H 'Authorization: ' \ -H 'Content-Type: application/json' \ -d '{ "category": { "name": "General" } }' ``` ### Service Name & Description - Use the user's wording for the service name - Generate a brief, professional description (1-2 sentences) mentioning it's a group class --- ## Step 3: Create the Class Service **CRITICAL: CLASS services do NOT use `staffMemberIds` or `sessionDurations`.** These fields are ignored. Use `defaultCapacity` instead. **Paid class:** ```bash curl -X POST 'https://www.wixapis.com/bookings/v2/bulk/services/create' \ -H 'Authorization: ' \ -H 'Content-Type: application/json' \ -d '{ "services": [{ "name": "", "description": "", "type": "CLASS", "onlineBooking": { "enabled": true }, "defaultCapacity": , "payment": { "rateType": "FIXED", "options": { "online": true, "inPerson": false }, "fixed": { "price": { "value": "" } } }, "category": { "id": "" } }] }' ``` **Free class:** ```bash curl -X POST 'https://www.wixapis.com/bookings/v2/bulk/services/create' \ -H 'Authorization: ' \ -H 'Content-Type: application/json' \ -d '{ "services": [{ "name": "", "description": "", "type": "CLASS", "onlineBooking": { "enabled": true }, "defaultCapacity": , "payment": { "rateType": "NO_FEE", "options": { "online": false, "inPerson": true } }, "category": { "id": "" } }] }' ``` ### CLASS-Specific Reminders - Do **NOT** include `staffMemberIds` — it is ignored for CLASS services - Do **NOT** include `schedule.availabilityConstraints.sessionDurations` — not used for CLASS - `defaultCapacity` is **required** — sets max participants per session - After creation, class sessions must be scheduled separately via `bulkCreateEvents` using the returned `service.schedule.id` (see [Create and Update Booking Services](https://dev.wix.com/docs/api-reference/business-solutions/bookings/skills/create-and-update-booking-services.md)) Save the `serviceId` from the response: `results[0].item.service.id` --- ## Step 4: Summary Message Provide a summary including: 1. **What was created** — service name, price per session, capacity 2. **Assumptions made** — list defaults used (e.g., "I set the capacity to 10 participants since you didn't specify") 3. **Schedule note** — remind the user that class sessions still need to be scheduled 4. **Next steps** — "Click Save to finalize, then set up the class schedule" 5. **Offer to adjust** — "Want me to change the price, capacity, or description?" **Example:** > I created **"Vinyasa Yoga Class"**: > > - **Type**: Class (group session) > - **Price**: $25 per session > - **Capacity**: 10 participants > - **Category**: Fitness > > I assumed a capacity of 10 since you didn't specify. You can review and adjust the details in the service form. > > **Next step:** You'll need to set up the class schedule (days and times) in the service form. --- ## Error Handling | Error | Cause | Action | |---|---|---| | 400 "INVALID_PAYMENT_OPTIONS" | Payment misconfigured | Free: `inPerson: true`, `online: false`. Paid: price > 0 | | 403 | Permission denied | Inform user they lack permission | --- ## Payment Validation Quick Reference | rateType | `options.online` | `options.inPerson` | Valid? | |----------|------------------|-------------------|--------| | FIXED | true | false | ✓ | | FIXED | false | true | ✓ | | FIXED | true | true | ✓ | | NO_FEE | false | true | ✓ | | NO_FEE | true | false | ✗ | | Any | false | false | ✗ | --- ## What This Skill Does NOT Cover - **Class schedule setup** — recurring events (days/times) must be configured separately via Calendar Events API. See [Create and Update Booking Services](https://dev.wix.com/docs/api-reference/business-solutions/bookings/skills/create-and-update-booking-services.md) Step 3. - **Pricing plans** — memberships and class packs are separate. See [Create and Update Pricing Plans](https://dev.wix.com/docs/api-reference/business-solutions/pricing-plans/skills/create-and-update-pricing-plans.md) - **Instructor assignment** — `staffMemberIds` is ignored for CLASS. Staff association is managed through calendar events. - **Service images** — requires Media Manager API (see [create-and-update-booking-services.md](https://dev.wix.com/docs/api-reference/business-solutions/bookings/skills/create-and-update-booking-services.md)) --- ## API Documentation Reference - [Bulk Create Services](https://dev.wix.com/docs/api-reference/business-solutions/bookings/services/services-v2/bulk-create-services.md) - [Query Services](https://dev.wix.com/docs/api-reference/business-solutions/bookings/services/services-v2/query-services.md) - [Query Categories](https://dev.wix.com/docs/api-reference/business-solutions/bookings/services/categories-v2/query-categories.md) - [Create Category](https://dev.wix.com/docs/api-reference/business-solutions/bookings/services/categories-v2/create-category.md) - [Bulk Create Events](https://dev.wix.com/docs/api-reference/business-management/calendar/events-v3/bulk-create-event.md) - [About Service Types](https://dev.wix.com/docs/api-reference/business-solutions/bookings/services/services-v2/about-service-types.md) - [About Service Payments](https://dev.wix.com/docs/api-reference/business-solutions/bookings/services/services-v2/about-service-payments.md) --- > Portal Navigation: > > - Append `.md` to any URL under `https://dev.wix.com/docs/` to get its markdown version. > - Pages are either content pages (article or reference text) or menu pages (a list of links to child pages). > - To get a menu page, truncate any URL to a parent path and append `.md` (e.g. `https://dev.wix.com/docs/sdk.md`, `https://dev.wix.com/docs/sdk/core-modules.md`). > - Top-level index of all portals: https://dev.wix.com/docs/llms.txt > - Full concatenated docs: https://dev.wix.com/docs/llms-full.txt ## Resource: Create Course Service ## Article: Create Course Service ## Article Link: https://dev.wix.com/docs/api-reference/business-solutions/bookings/skills/create-course-service.md ## Article Content: # Create Course Service from Prompt ## When to Use - User wants to create a multi-session course: "create a training program", "set up a 6-week workshop", "add a bootcamp course", "create a teacher training course" - The service type is COURSE — a fixed series with pre-defined start and end dates - Customers must book the entire course (all sessions), unlike CLASS where they can pick individual sessions - For general service creation where the type is ambiguous, see [Create Booking Service from Prompt](https://dev.wix.com/docs/api-reference/business-solutions/bookings/skills/create-booking-service-from-prompt.md) ## Prerequisites - For full API field definitions, validation rules, and troubleshooting, see [Create and Update Booking Services](https://dev.wix.com/docs/api-reference/business-solutions/bookings/skills/create-and-update-booking-services.md) --- ## Step 1: Gather Business Context Run these queries to collect site data for informed defaults. ### 1a. Query Service Categories ```bash curl -X POST 'https://www.wixapis.com/bookings/v2/categories/query' \ -H 'Authorization: ' \ -H 'Content-Type: application/json' \ -d '{ "query": {} }' ``` ### 1b. Query Existing Services (Duplicate Check) ```bash curl -X POST 'https://www.wixapis.com/bookings/v2/services/query' \ -H 'Authorization: ' \ -H 'Content-Type: application/json' \ -d '{ "query": { "paging": { "limit": 100 } } }' ``` Warn the user if a service with a similar name already exists. > **Note:** Staff queries are optional for COURSE services since `staffMemberIds` is ignored by the API. However, querying staff can still be useful for context (e.g., mentioning the instructor in the description). --- ## Step 2: Apply Course Defaults For any fields the user did not explicitly specify: | Field | Default | Notes | |---|---|---| | Capacity | 10 | `defaultCapacity` — required for COURSE | | Online booking | Enabled | `onlineBooking.enabled: true` | ### Pricing (if not specified) - If user specifies a price → `rateType: "FIXED"` (for the entire course) - If user says "free" → `rateType: "NO_FEE"`, `options.inPerson: true`, `options.online: false` - If no price mentioned → infer from context (workshops ~$100-300, training programs ~$200-500, bootcamps ~$150-400) or default to free - **Course pricing is for the full course**, not per session — remind the user of this in the summary ### Capacity (if not specified) - Default: 10 participants - If user mentions group size → use their number - Typical ranges: intensive 5-10, standard 10-20, lecture-style 20-50 ### Category - If categories exist → assign the most relevant one (e.g., "Training", "Workshops") - If no categories exist → create one: ```bash curl -X POST 'https://www.wixapis.com/bookings/v2/categories' \ -H 'Authorization: ' \ -H 'Content-Type: application/json' \ -d '{ "category": { "name": "General" } }' ``` ### Service Name & Description - Use the user's wording for the service name - Generate a brief, professional description (1-2 sentences) mentioning it's a multi-session course - If the user specified the number of sessions or duration, include that in the description --- ## Step 3: Create the Course Service **CRITICAL: COURSE services do NOT use `staffMemberIds` or `sessionDurations`.** These fields are ignored. Use `defaultCapacity` instead. **Paid course:** ```bash curl -X POST 'https://www.wixapis.com/bookings/v2/bulk/services/create' \ -H 'Authorization: ' \ -H 'Content-Type: application/json' \ -d '{ "services": [{ "name": "", "description": "", "type": "COURSE", "onlineBooking": { "enabled": true }, "defaultCapacity": , "payment": { "rateType": "FIXED", "options": { "online": true, "inPerson": false }, "fixed": { "price": { "value": "" } } }, "category": { "id": "" } }] }' ``` **Free course:** ```bash curl -X POST 'https://www.wixapis.com/bookings/v2/bulk/services/create' \ -H 'Authorization: ' \ -H 'Content-Type: application/json' \ -d '{ "services": [{ "name": "", "description": "", "type": "COURSE", "onlineBooking": { "enabled": true }, "defaultCapacity": , "payment": { "rateType": "NO_FEE", "options": { "online": false, "inPerson": true } }, "category": { "id": "" } }] }' ``` ### COURSE-Specific Reminders - Do **NOT** include `staffMemberIds` — it is ignored for COURSE services - Do **NOT** include `schedule.availabilityConstraints.sessionDurations` — not used for COURSE - `defaultCapacity` is **required** — sets max participants for the entire course - Customers must book the **entire course** (all sessions), not individual sessions - After creation, course sessions must be scheduled separately via `bulkCreateEvents` using the returned `service.schedule.id` (see [Create and Update Booking Services](https://dev.wix.com/docs/api-reference/business-solutions/bookings/skills/create-and-update-booking-services.md)) Save the `serviceId` from the response: `results[0].item.service.id` --- ## Step 4: Summary Message Provide a summary including: 1. **What was created** — service name, total course price, capacity 2. **Assumptions made** — list defaults used (e.g., "I set the capacity to 10 participants since you didn't specify") 3. **Pricing clarification** — note that the price is for the entire course, not per session 4. **Schedule note** — remind the user that course sessions (dates and times) still need to be set up 5. **Next steps** — "Click Save to finalize, then set up the course schedule" 6. **Offer to adjust** — "Want me to change the price, capacity, or description?" **Example:** > I created **"Yoga Teacher Training"**: > > - **Type**: Course (customers book the full program) > - **Price**: $300 for the full course > - **Capacity**: 10 participants > - **Category**: Training > > I assumed a capacity of 10 since you didn't specify. The price of $300 covers the entire course — customers pay once for all sessions. You can review and adjust the details in the service form. > > **Next step:** You'll need to set up the course schedule (specific session dates and times) in the service form. --- ## Error Handling | Error | Cause | Action | |---|---|---| | 400 "INVALID_PAYMENT_OPTIONS" | Payment misconfigured | Free: `inPerson: true`, `online: false`. Paid: price > 0 | | 403 | Permission denied | Inform user they lack permission | --- ## Payment Validation Quick Reference | rateType | `options.online` | `options.inPerson` | Valid? | |----------|------------------|-------------------|--------| | FIXED | true | false | ✓ | | FIXED | false | true | ✓ | | FIXED | true | true | ✓ | | NO_FEE | false | true | ✓ | | NO_FEE | true | false | ✗ | | Any | false | false | ✗ | --- ## What This Skill Does NOT Cover - **Course schedule setup** — individual session events (dates/times) must be configured separately via Calendar Events API. See [Create and Update Booking Services](https://dev.wix.com/docs/api-reference/business-solutions/bookings/skills/create-and-update-booking-services.md) Step 3. - **Pricing plans** — memberships or installment payments are separate. See [Create and Update Pricing Plans](https://dev.wix.com/docs/api-reference/business-solutions/pricing-plans/skills/create-and-update-pricing-plans.md) - **Instructor assignment** — `staffMemberIds` is ignored for COURSE. Staff association is managed through calendar events. - **Service images** — requires Media Manager API (see [create-and-update-booking-services.md](https://dev.wix.com/docs/api-reference/business-solutions/bookings/skills/create-and-update-booking-services.md)) --- ## API Documentation Reference - [Bulk Create Services](https://dev.wix.com/docs/api-reference/business-solutions/bookings/services/services-v2/bulk-create-services.md) - [Query Services](https://dev.wix.com/docs/api-reference/business-solutions/bookings/services/services-v2/query-services.md) - [Query Categories](https://dev.wix.com/docs/api-reference/business-solutions/bookings/services/categories-v2/query-categories.md) - [Create Category](https://dev.wix.com/docs/api-reference/business-solutions/bookings/services/categories-v2/create-category.md) - [Bulk Create Events](https://dev.wix.com/docs/api-reference/business-management/calendar/events-v3/bulk-create-event.md) - [About Service Types](https://dev.wix.com/docs/api-reference/business-solutions/bookings/services/services-v2/about-service-types.md) - [About Service Payments](https://dev.wix.com/docs/api-reference/business-solutions/bookings/services/services-v2/about-service-payments.md) --- > Portal Navigation: > > - Append `.md` to any URL under `https://dev.wix.com/docs/` to get its markdown version. > - Pages are either content pages (article or reference text) or menu pages (a list of links to child pages). > - To get a menu page, truncate any URL to a parent path and append `.md` (e.g. `https://dev.wix.com/docs/sdk.md`, `https://dev.wix.com/docs/sdk/core-modules.md`). > - Top-level index of all portals: https://dev.wix.com/docs/llms.txt > - Full concatenated docs: https://dev.wix.com/docs/llms-full.txt ## Resource: Diagnose Bookings Availability Issues ## Article: Diagnose Bookings Availability Issues ## Article Link: https://dev.wix.com/docs/api-reference/business-solutions/bookings/skills/diagnose-bookings-availability-issues.md ## Article Content: # Diagnose Bookings Availability Issues > ## ⚠️ Output rule (read first) > You are talking to a **site owner**, not a developer. Use everything below — the endpoint, JSON, reason codes, `suggestedAction` values, field names — **only to run the diagnosis**. Your **reply to the user must be plain language**: the cause in everyday words plus the fix, and an offer to help. > > **Never put any of these in your reply:** endpoint paths or curl, JSON, reason-code names (e.g. `RESOURCE_NOT_AVAILABLE_AT_SERVICE_LOCATION`), `suggestedAction` enums, or field names. Translate them. See [Presenting the diagnosis](#presenting-the-diagnosis-to-the-user). > > ✅ "Your staff don't have working hours at the location this service is offered at, so there's nothing to book. Want me to add hours there?" > ❌ "`DiagnoseAvailability` returned `RESOURCE_NOT_AVAILABLE_AT_SERVICE_LOCATION` / `CHECK_WORK_LOCATIONS`." ## When to use A site owner reports that an **appointment-based** service has **no bookable time slots** — the calendar shows nothing available, or customers can't book. This recipe finds the cause. Diagnosis is **endpoint-first**: 1. **Call `DiagnoseAvailability`.** It returns ordered, machine-readable reason codes — each with a suggested owner action — for setup/configuration problems. Fix what it reports and re-check. 2. **Fall back to `ListAvailabilityTimeSlots`** only when the endpoint is inconclusive. The endpoint detects setup/configuration problems; it does **not** evaluate booking policy or remaining capacity, so those are checked here. > **Scope:** appointment-based services. --- ## Prerequisites - **Wix Bookings app installed** (App ID: `13d21c63-b5ec-5912-8397-c3a5ddb27a97`). > **Note:** If Bookings APIs return errors, the app may not be installed. Use [List Installed Apps](https://dev.wix.com/docs/api-reference/business-management/app-installation/skills/list-installed-apps.md) to verify and [Install Wix Apps](https://dev.wix.com/docs/api-reference/business-management/app-installation/skills/install-wix-apps.md) to install it. - Typically the `serviceId` (optionally with a staff member's `resourceId` to scope to one provider). A `resourceId` on its own is also supported for the staff editor, where no service is in context — see [Which inputs to pass](#which-inputs-to-pass-prefer-a-service). - **Authorization:** the caller needs the `bookings:availability:v2:time_slot:diagnose_availability` permission. A plain site/owner token can come back **403 (empty body)** if that permission isn't granted to the caller — that's an auth problem, not "no cause found." Ensure the calling context carries the permission before treating a 403 as inconclusive. --- ## Step 1 — Run the diagnosis `DiagnoseAvailability` is a read-only custom action that explains **why availability is empty** rather than returning slots. - **Endpoint:** `POST https://www.wixapis.com/_api/service-availability/v2/time-slots/diagnose` - **Maturity:** ALPHA, behind the `diagnoseAvailabilityEndpoint` feature toggle (deployed and available in production). If it returns **no reasons** for a service you'd expect to be broken, treat the result as inconclusive and go to Step 2. - **`hasAvailability`** is set `true` only on the **service paths**, when the availability-window check confirms real availability — and for `serviceId`-only, only when the service needs a single staff resource type. It is **never** asserted `true` for `serviceId`+`resourceId` (one resource can't confirm the whole service) or for resource-only. So `hasAvailability: false` with an empty `reasons` array means **inconclusive** ("no blocking cause found"), not necessarily "no availability." ### Which inputs to pass (prefer a service) **Prefer passing `serviceId`** — on its own, or together with a `resourceId` to scope to one provider. `resourceId` alone is a valid mode (it serves the staff editor, where there is no service context) but is shallower; use it when a service genuinely isn't available. The service is what makes the diagnosis deep. Only the service paths run the L2 availability-window check — it needs the service configuration (duration, buffer, offered locations, resource types) to actually verify the resource has real windows in the range and at the right locations. That L2 check is what produces `NO_RESOURCE_AVAILABILITY_WINDOWS`, `RESOURCE_NOT_AVAILABLE_AT_SERVICE_LOCATION`, and `REQUESTED_LOCATION_NOT_OFFERED_BY_SERVICE`. | Inputs | Diagnoses | Depth | `hasAvailability` | |--------|-----------|-------|-------------------| | `serviceId` + `resourceId` *(preferred)* | Why a specific provider has no slots for the service | L1 setup + L2 window/location | never asserted `true` | | `serviceId` only | Whole-service availability across assigned staff/locations | L1 setup + L2 window/location | `true` only if the service needs a single staff resource type | | `resourceId` only | Staff-editor check, no service context | L1 setup + missing/empty working-hours check (no window/location; `deep` not allowed) | never asserted `true` | **Resource-only is a valid mode, but lighter.** It exists for contexts where there is no service — e.g. the **staff editor**, diagnosing a staff member on their own. It catches a **missing or empty** working-hours schedule (`RESOURCE_HAS_NO_WORKING_HOURS`), but with no service configuration it can't run the availability-window or location checks, can't resolve locations, and can't use `deep`. So problems that only surface against a service — no windows despite having hours, a location mismatch, duration/buffer — are caught only when a `serviceId` is supplied. - Owner reports a **service** has no availability → pass `serviceId`. - Concern is a **specific provider**, and you have (or can find) a service → pass `serviceId` + `resourceId` (use a service they're assigned to) for the fullest diagnosis. - **Only a `resourceId` is available** (e.g. from the staff editor, with no service in context) → use resource-only; it flags missing/empty working hours, but treat an inconclusive result with care — it can't check windows, locations, or run `deep`. When you can, re-run with a service the resource is assigned to. ### Request ```bash curl -X POST 'https://www.wixapis.com/_api/service-availability/v2/time-slots/diagnose' \ -H 'Authorization: ' \ -H 'Content-Type: application/json' \ -d '{ "serviceId": "", "fromLocalDate": "2026-07-01T00:00:00", "toLocalDate": "2026-09-29T00:00:00", "timeZone": "America/New_York" }' ``` | Field | Notes | |-------|-------| | `serviceId` | Service to diagnose. Provide this or `resourceId`. | | `resourceId` | Staff member / resource to diagnose. Pair it with `serviceId` (see [Which inputs to pass](#which-inputs-to-pass-prefer-a-service)). Resource-only (no `serviceId`) runs a lighter check — missing/empty working hours only, no window/location/`deep` — and can miss service-dependent problems. | | `fromLocalDate` | `YYYY-MM-DDThh:mm:ss` (ISO-8601). Optional; defaults to now. | | `toLocalDate` | Optional; defaults to `fromLocalDate` + 90 days. | | `timeZone` | IANA tz (e.g. `America/New_York`). Defaults to the site's time zone. | | `locations` | Locations to diagnose. Empty ⇒ all locations the service offers. | | `deep` | Optional (default `false`). Set `true` **with a `serviceId`** to refine a "no availability windows" result into *why* — outside working hours vs. blocked/busy time. Extra sampling call; only acts when no windows exist; rejected on the resource-only path (`MISSING_ARGUMENTS`). See [Deep mode](#deep-mode). | ### Response ```json { "hasAvailability": false, "reasons": [ { "code": "RESOURCE_NOT_AVAILABLE_AT_SERVICE_LOCATION", "suggestedAction": "CHECK_WORK_LOCATIONS" } ], "resolvedContext": { "serviceId": "", "resolvedLocations": [ { "id": "...", "name": "...", "locationType": "BUSINESS" } ], "durationInMinutes": 60, "bufferTimeInMinutes": 0, "fromLocalDate": "2026-07-01T00:00:00", "toLocalDate": "2026-09-29T00:00:00", "timeZone": "..." } } ``` - `reasons` are ordered **most-specific first**. Fix the first, then re-run. - `resolvedContext` echoes the inputs actually used (resolved locations, duration, buffer, window, time zone) — use it to confirm you diagnosed what you meant to. - Empty `reasons` ⇒ **inconclusive** → go to **Step 2**. ### Reason codes → owner fix (agent-internal — never shown to the user) > This table is for **your** interpretation only. Map the returned code to the plain-language cause and fix, then write the reply in everyday words — the code names and `suggestedAction` values must not appear in your response. See [Presenting the diagnosis](#presenting-the-diagnosis-to-the-user). | `code` | `suggestedAction` | Meaning & fix | |--------|-------------------|---------------| | `NO_ASSIGNED_STAFF_OR_RESOURCES` | `ASSIGN_STAFF_OR_RESOURCES` | No staff/resources assigned to the service. Assign at least one. | | `RESOURCE_NOT_ASSIGNED_TO_SERVICE` | `ASSIGN_RESOURCE_TO_SERVICE` | The given resource isn't assigned to the service. Assign it, or diagnose a resource that is. | | `RESOURCE_HAS_NO_WORKING_HOURS` | `CHECK_STAFF_WORKING_HOURS` | The staff member has no working-hours schedule. Configure working hours — see [Bookings Staff Setup](https://dev.wix.com/docs/api-reference/business-solutions/bookings/skills/bookings-staff-setup.md). | | `RESOURCE_NOT_AVAILABLE_AT_SERVICE_LOCATION` | `CHECK_WORK_LOCATIONS` | Assigned resources have availability windows, but none at a location the service offers. Add working hours at an offered location, offer the service where the staff works, or assign a provider who works at the offered location. | | `NO_RESOURCE_AVAILABILITY_WINDOWS` | `CHECK_STAFF_WORKING_HOURS` | No availability windows exist anywhere in the diagnosed range. Add working hours, or widen the range. | | `REQUESTED_LOCATION_NOT_OFFERED_BY_SERVICE` | `CHECK_SERVICE_LOCATIONS` | A requested `locations` filter isn't offered by the service. Drop the filter or fix the service's locations. | | `DURATION_TOO_LONG_FOR_AVAILABLE_WINDOWS` | `REDUCE_DURATION_OR_BUFFER` | The service is longer than every free window. Shorten it or lengthen working hours. | | `BUFFER_TIME_ELIMINATES_WINDOWS` | `REDUCE_DURATION_OR_BUFFER` | Buffer time consumes all otherwise-free windows. Reduce the buffer or lengthen working hours. | | `SERVICE_AVAILABILITY_CONFIGURATION_MISSING` | — | The service's availability configuration is missing. | | `RESOURCE_TYPE_RESOLUTION_FAILED` | — | The service's resource types couldn't be resolved. | | `RESOURCE_NOT_IN_WORKING_HOURS` | `CHECK_STAFF_WORKING_HOURS` | The resource works, but not during the empty range — it's outside their working hours. **Reported only with `deep: true`.** Fix: adjust/extend working hours. | | `RESOURCE_BLOCKED` | `CHECK_BLOCKED_TIME` | The resource is within working hours but blocked by existing bookings, calendar events, or an external calendar. **Reported only with `deep: true`.** Fix: free up the blocked time. | ### Endpoint errors | HTTP | `application_code` | Cause | |------|-------------------|-------| | 400 | `MISSING_ARGUMENTS` | Neither `serviceId` nor `resourceId` provided; or `deep: true` sent without a `serviceId`. | | 400 | `INVALID_TIME_ZONE` | `timeZone` isn't a valid IANA zone. | | 400 | `INVALID_SERVICE_IDS_PROVIDED` | The `serviceId` doesn't resolve to a service on the site. In practice a well-formed-but-nonexistent `serviceId` (not only a malformed one) currently surfaces here rather than as a 404 — re-check the ID. | | 404 | `SERVICE_NOT_FOUND` / `RESOURCE_NOT_FOUND` | Service / staff record missing. (A missing `serviceId` may instead surface as the 400 `INVALID_SERVICE_IDS_PROVIDED` above.) | | 404 | `NO_IMPLEMENTERS_FOUND` / `MULTIPLE_IMPLEMENTERS_FOUND` | No / multiple availability providers configured. | | 403 | `UNAUTHORIZED_OPERATION` | Caller lacks `bookings:availability:v2:time_slot:diagnose_availability`. | ### Deep mode `deep: true` (with a `serviceId`) refines a **no-availability-windows** result — it tells you *why* there are no windows: the staff are **outside their working hours** for that range (`RESOURCE_NOT_IN_WORKING_HOURS`) vs. within hours but **blocked/busy** (`RESOURCE_BLOCKED`, e.g. existing bookings or an external calendar). - **When to use:** the standard call returns `NO_RESOURCE_AVAILABILITY_WINDOWS` and you want to tell the owner whether to *add hours* or *free up blocked time*. - **How it works:** it samples a handful of slots across the range and makes one availability check, then attributes the cause. It runs **only when no windows exist** — it does nothing when availability is already present. - **Constraints:** requires a `serviceId` (resource-only + `deep` → `MISSING_ARGUMENTS`); it's a best-effort refinement and silently falls back to the generic `NO_RESOURCE_AVAILABILITY_WINDOWS` cause if the sampling is inconclusive. --- ## Step 2 — Fallback when the endpoint is inconclusive Empty `reasons` + still no bookable slots usually means the cause is one the endpoint **doesn't evaluate**: booking policy or remaining capacity. Call `ListAvailabilityTimeSlots` for the same service and window, and inspect the returned slots: - **`nonBookableReasons`** — `noRemainingCapacity`, `violatesBookingPolicy`, `reservedForWaitingList`, `eventCancelled`. - **`bookingPolicyViolations`** — `tooEarlyToBook`, `tooLateToBook`, `bookOnlineDisabled`. If **no slots come back at all**, re-check the inputs: the diagnosed window isn't entirely in the past, and any `locations` filter is actually offered by the service. See [End-to-End Booking Flow](https://dev.wix.com/docs/api-reference/business-solutions/bookings/skills/end-to-end-booking-flow.md) for the `ListAvailabilityTimeSlots` request shape. --- ## Presenting the diagnosis to the user The diagnosis is part of a conversation with a site owner. Reply in plain, friendly language: - **Don't expose the internals** — no reason codes, `suggestedAction` enums, raw JSON, endpoint names, or field paths. - **Lead with the cause in plain English**, then give the concrete fix as the next step. One or two short sentences is usually enough. - **Use the owner's own terms** — "your service", "your staff", "the dates you're looking at", real location names from `resolvedLocations`. - **Offer to help with the fix** rather than only stating it. - If the result is inconclusive (empty `reasons`), say only that you **couldn't find a blocking problem**, and describe what you'll check next (policy/capacity, or re-run against a service for a resource-only check). **Do not state or imply that anything is set up correctly** — an empty `reasons` array means "no blocker detected," *not* "working hours / locations / setup are present." In particular, on the resource-only path never say the staff "have working hours set"; the check doesn't verify that. Don't imply the service is fine. **Plain-language phrasing per cause:** | Cause | Say something like | |-------|--------------------| | No staff/resources on the service | "This service doesn't have any staff assigned yet, so there's nothing to book. Want me to help you add someone?" | | Provider isn't on the service | "That staff member isn't assigned to this service, so their times don't show. I can add them to it." | | Provider has no working hours | "The staff for this service don't have any working hours set, so there are no times to offer. Let's set their hours." | | Provider works only at other locations | "Your staff have working hours, but not at the location(s) this service is offered at. We can either add hours at one of the service's locations, or offer the service where they already work." | | No working-hours windows in range | "None of the staff for this service have working hours in the dates you're checking. Let's add or extend their hours — or try a different date range." | | Outside working hours (deep) | "For those dates, your staff simply aren't scheduled to work, so there's nothing to offer. Let's add working hours in that period." | | Within hours but blocked/busy (deep) | "Your staff are scheduled to work then, but that time is already taken up — by existing bookings or events on their calendar. Freeing some of it up will open slots." | | Service too long / buffer too large | "The service is longer than any open gap in your staff's schedule (the duration plus buffer doesn't fit). Shortening it a bit, or widening working hours, would open up slots." | | Requested location not offered | "This service isn't offered at the location you picked. Want me to add that location to the service, or check a different one?" | | Slots exist but aren't bookable (Step 2) | "There are times available, but customers can't book them right now — [e.g. they're fully booked / it's too early or late to book per your policy]. Here's how to adjust that." | **Example conversational reply** (for a location-mismatch result): > I looked into why no times are showing for **[service name]**. Your staff do have working hours, but none of them are at the locations this service is offered at (**Jerusalem2** and **Holon**) — so there's nothing available to book. > > To fix it you can either add working hours for a staff member at Jerusalem2 or Holon, or offer the service at the location where your staff already work. Want me to set that up? --- ## Common causes (quick reference) Popular reasons a service shows no availability, and where each surfaces: | Situation | Where it surfaces | Fix | |-----------|-------------------|-----| | No staff/resources on the service | `NO_ASSIGNED_STAFF_OR_RESOURCES` | Assign staff/resources. | | Provider isn't on the service | `RESOURCE_NOT_ASSIGNED_TO_SERVICE` | Assign the provider. | | Provider has no working hours | `RESOURCE_HAS_NO_WORKING_HOURS` | Configure working hours. | | Provider works only at other locations | `RESOURCE_NOT_AVAILABLE_AT_SERVICE_LOCATION` | Align staff work locations with the service's offered locations. | | No working-hours windows in range | `NO_RESOURCE_AVAILABILITY_WINDOWS` | Add working hours / widen the range. | | No windows — outside working hours (deep) | `RESOURCE_NOT_IN_WORKING_HOURS` (`deep: true`) | Add or extend working hours in the range. | | No windows — within hours but blocked/busy (deep) | `RESOURCE_BLOCKED` (`deep: true`) | Free up blocked time / check the external calendar. | | Service too long / buffer too large for the windows | `DURATION_TOO_LONG_FOR_AVAILABLE_WINDOWS`, `BUFFER_TIME_ELIMINATES_WINDOWS` | Shorten duration/buffer or lengthen hours. | | Requested location not offered | `REQUESTED_LOCATION_NOT_OFFERED_BY_SERVICE` | Fix the location filter or the service's locations. | | Slots exist but aren't bookable (fully booked, too early/late, online booking off) | Step 2 — `ListAvailabilityTimeSlots` `nonBookableReasons` / `bookingPolicyViolations` | Adjust capacity or booking policy. | --- ## Gotchas - **`hasAvailability: false` + empty `reasons` ≠ a confirmed problem.** It means "no blocking cause detected." Always confirm with `ListAvailabilityTimeSlots`. - **The endpoint is ALPHA and feature-toggled.** If it returns nothing for an obviously broken service, the `diagnoseAvailabilityEndpoint` toggle may be off — fall back to Step 2. - **A 403 is an auth problem, not a diagnosis.** The action needs the `bookings:availability:v2:time_slot:diagnose_availability` permission; a caller without it gets a 403 with an empty body. Don't read that as "no cause found" — confirm the caller has the permission (see [Prerequisites](#prerequisites)). - **`deep: true` needs a `serviceId`** (resource-only + `deep` → `MISSING_ARGUMENTS`) and only refines a "no windows" result — it does nothing when windows already exist. - **The endpoint ignores booking policy and capacity** — those are Step 2. - **Resource-only diagnosis is lighter.** Passing `resourceId` without `serviceId` catches missing/empty working hours but skips the window, location, and deep checks, so it can return "inconclusive" for service-dependent problems. Valid when there's no service context (e.g. the staff editor); otherwise pair the resource with a service. - **Appointment-based services only.** ## API Documentation References - [Time Slots V2 — List Availability Time Slots](https://dev.wix.com/docs/api-reference/business-solutions/bookings/time-slots/time-slots-v2/list-availability-time-slots.md) - [Services V2](https://dev.wix.com/docs/api-reference/business-solutions/bookings/services/services-v2/introduction.md) - [Staff Members](https://dev.wix.com/docs/api-reference/business-solutions/bookings/staff-members/staff-members/introduction.md) - [Booking Policies](https://dev.wix.com/docs/api-reference/business-solutions/bookings/policies/booking-policies/introduction.md) - Related recipes: [Bookings Staff Setup](https://dev.wix.com/docs/api-reference/business-solutions/bookings/skills/bookings-staff-setup.md) · [Create and Update Booking Services](https://dev.wix.com/docs/api-reference/business-solutions/bookings/skills/create-and-update-booking-services.md) · [End-to-End Booking Flow](https://dev.wix.com/docs/api-reference/business-solutions/bookings/skills/end-to-end-booking-flow.md) --- > Portal Navigation: > > - Append `.md` to any URL under `https://dev.wix.com/docs/` to get its markdown version. > - Pages are either content pages (article or reference text) or menu pages (a list of links to child pages). > - To get a menu page, truncate any URL to a parent path and append `.md` (e.g. `https://dev.wix.com/docs/sdk.md`, `https://dev.wix.com/docs/sdk/core-modules.md`). > - Top-level index of all portals: https://dev.wix.com/docs/llms.txt > - Full concatenated docs: https://dev.wix.com/docs/llms-full.txt ## Resource: End-to-End Booking Flow ## Article: End-to-End Booking Flow ## Article Link: https://dev.wix.com/docs/api-reference/business-solutions/bookings/skills/end-to-end-booking-flow.md ## Article Content: # End-to-End Booking Flow (REST) Step-by-step flow for implementing a complete booking experience using REST APIs. ## Prerequisites - **Wix Bookings app installed** (App ID: `13d21c63-b5ec-5912-8397-c3a5ddb27a97`) - For paid services: Wix Payments or eCommerce configured > **Note:** If you receive errors from Bookings APIs, the Wix Bookings app may not be installed on the site. Use [List Installed Apps](https://dev.wix.com/docs/api-reference/business-management/app-installation/skills/list-installed-apps.md) to verify, and [Install Wix Apps](https://dev.wix.com/docs/api-reference/business-management/app-installation/skills/install-wix-apps.md) to install it if missing. ## Required APIs - **Services API**: [Query Services](https://dev.wix.com/docs/api-reference/business-solutions/bookings/services/services-v2/query-services.md) - **Time Slots V2 API**: [List Availability Time Slots](https://dev.wix.com/docs/api-reference/business-solutions/bookings/time-slots/time-slots-v2/list-availability-time-slots.md) - **Bookings API**: [Create Booking](https://dev.wix.com/docs/api-reference/business-solutions/bookings/bookings/bookings-writer-v2/create-booking.md), [Confirm Booking](https://dev.wix.com/docs/api-reference/business-solutions/bookings/bookings/bookings-writer-v2/confirm-booking.md) - **eCommerce API**: [Create Checkout](https://dev.wix.com/docs/api-reference/business-solutions/e-commerce/purchase-flow/checkout/checkout/create-checkout.md) --- ## Step 1: Query Available Services **Endpoint**: `POST https://www.wixapis.com/bookings/v2/services/query` ```json { "query": { "filter": { "type": "APPOINTMENT" }, "paging": { "limit": 20 } } } ``` **Service Types**: - `APPOINTMENT` — One-on-one sessions with a staff member - `CLASS` — Group sessions at scheduled times - `COURSE` — Multi-session series (customers book the entire course) **Save from the response**: - `id` — service ID - `schedule.id` — schedule ID (needed for appointment bookings and course bookings) - `type` — determines the booking flow (slot vs schedule) - `staffMemberIds` — resource IDs of assigned staff (for appointments) --- ## Step 2: Check Availability **Endpoint**: `POST https://www.wixapis.com/_api/service-availability/v2/time-slots` > **Important**: The old Availability Calendar API (`/bookings/v2/availability/query`) is deprecated. Always use Time Slots V2. ```json { "serviceId": "", "fromLocalDate": "2024-06-15T08:00:00", "toLocalDate": "2024-06-16T18:00:00", "timeZone": "America/New_York", "bookable": true, "includeResourceTypeIds": [""] } ``` ### Date format Dates **must** be in `YYYY-MM-DDThh:mm:ss` format (local datetime). Plain dates like `2024-06-15` will be rejected with a 400 error. ### Parameters | Parameter | Required | Description | | ------------------------ | -------- | ----------------------------------------------------------------------- | | `serviceId` | Yes | From Step 1 | | `fromLocalDate` | Yes | Start of range in `YYYY-MM-DDThh:mm:ss` format | | `toLocalDate` | Yes | End of range in `YYYY-MM-DDThh:mm:ss` format | | `timeZone` | Yes | IANA timezone (e.g. `America/New_York`) | | `bookable` | No | Set `true` to only get bookable slots | | `includeResourceTypeIds` | No | Array of resource type IDs — populates `availableResources` in response | ### Save from each time slot - `serviceId`, `scheduleId` — needed for Create Booking - `localStartDate`, `localEndDate` — slot times - `availableResources[].resources[].id` — resource ID (only populated if `includeResourceTypeIds` was provided) - `location.locationType` — **warning**: returns `BUSINESS` but Create Booking requires `OWNER_BUSINESS` (see Step 3) ### For Classes Use [List Event Time Slots](https://dev.wix.com/docs/api-reference/business-solutions/bookings/time-slots/time-slots-v2/list-event-time-slots.md) instead. Each class session has an `eventId` — save it for the booking. --- ## Step 3: Create the Booking **Endpoint**: `POST https://www.wixapis.com/_api/bookings-service/v2/bookings` ### For Appointments (use `slot`) ```json { "booking": { "bookedEntity": { "slot": { "serviceId": "", "scheduleId": "", "startDate": "2024-06-15T14:00:00", "endDate": "2024-06-15T15:00:00", "timezone": "America/New_York", "resource": { "id": "" }, "location": { "locationType": "OWNER_BUSINESS" } } }, "contactDetails": { "firstName": "John", "lastName": "Doe", "email": "john@example.com" }, "totalParticipants": 1 } } ``` All slot fields are **required** for appointments when no `eventId` is provided: | Field | Source | Notes | | ----------------------- | ------ | ---------------------------------------------------------------------------------------------------------------------------- | | `serviceId` | Step 1 | Service GUID | | `scheduleId` | Step 2 | From the time slot response | | `startDate` / `endDate` | Step 2 | `YYYY-MM-DDThh:mm:ss` format | | `timezone` | Step 2 | IANA tz format | | `resource.id` | Step 2 | From `availableResources` in time slot response | | `location.locationType` | — | Must be `OWNER_BUSINESS`, `OWNER_CUSTOM`, or `CUSTOM`. Time Slots returns `BUSINESS` but that value is **not accepted** here | ### For Classes (use `slot` with `eventId`) ```json { "booking": { "bookedEntity": { "slot": { "serviceId": "", "eventId": "" } }, "contactDetails": { "firstName": "Jane", "lastName": "Doe", "email": "jane@example.com" }, "totalParticipants": 1 } } ``` When you provide `eventId`, all other slot fields (`startDate`, `endDate`, `timezone`, `resource`, `location`) are **auto-derived** from the event. You only need `serviceId` + `eventId`. ### For Courses (use `schedule`) ```json { "booking": { "bookedEntity": { "schedule": { "scheduleId": "", "serviceId": "", "timezone": "America/New_York", "location": { "locationType": "OWNER_BUSINESS" } } }, "contactDetails": { "firstName": "Bob", "lastName": "Test", "email": "bob@example.com" }, "totalParticipants": 1 } } ``` ### Participants Specify exactly one of: - `totalParticipants` — for services with fixed pricing and no variants - `participantsChoices` — for services with [variants and options](https://dev.wix.com/docs/api-reference/business-solutions/bookings/services/service-options-and-variants/introduction.md) ### Result Booking is created with `status: CREATED`. This is **not yet visible** in the booking calendar. You must either: - **Confirm it** (Step 4, for offline/free payments), or - **Process payment** (Step 4, for online payments) — confirmation happens automatically after checkout --- ## Step 4: Confirm or Process Payment ### For free or offline-payment bookings: Confirm directly **Endpoint**: `POST https://www.wixapis.com/_api/bookings-service/v2/bookings//confirm` ```json { "revision": "", "paymentStatus": "EXEMPT" } ``` Use the `id` and `revision` from the Create Booking response. Set `paymentStatus` to `EXEMPT` for free services or `NOT_PAID` for pay-at-location. **Result**: Booking status changes to `CONFIRMED` and is visible in the booking calendar. ### For online payments: Create checkout **4a. Create Checkout** **Endpoint**: `POST https://www.wixapis.com/ecom/v1/checkouts` ```json { "lineItems": [ { "catalogReference": { "catalogItemId": "", "appId": "13d21c63-b5ec-5912-8397-c3a5ddb27a97" }, "quantity": 1 } ], "channelType": "WEB" } ``` Use the booking ID as `catalogItemId` with the Wix Bookings app ID. **4b. Get Checkout URL** **Endpoint**: `POST https://www.wixapis.com/ecom/v1/checkouts/{checkoutId}/getCheckoutUrl` Redirect the user to the returned `checkoutUrl`. After payment, the booking is automatically confirmed. **4c. Create Order (alternative, server-to-server)** **Endpoint**: `POST https://www.wixapis.com/ecom/v1/checkouts/{checkoutId}/createOrder` Creates an order directly without redirect. --- ## Service Type Summary | Service Type | `bookedEntity` | Availability API | Key Difference | | ------------ | ------------------------------------- | ------------------------------------------ | ---------------------------------------------------------- | | APPOINTMENT | `slot` (all fields required) | Time Slots V2 | Single session, specific time, needs resource + scheduleId | | CLASS | `slot` (only `serviceId` + `eventId`) | Event Time Slots | Group session, auto-derives fields from event | | COURSE | `schedule` | Check capacity via Query Extended Bookings | Multi-session, books entire schedule | ## See Also - [Flow: Single-Service Booking](https://dev.wix.com/docs/api-reference/business-solutions/bookings/flow-single-service-booking.md) - [Create Booking Sample Flows](https://dev.wix.com/docs/api-reference/business-solutions/bookings/bookings/bookings-writer-v2/sample-flows.md) - [Time Slots V2 Sample Flows](https://dev.wix.com/docs/api-reference/business-solutions/bookings/time-slots/time-slots-v2/sample-flows.md) --- > Portal Navigation: > > - Append `.md` to any URL under `https://dev.wix.com/docs/` to get its markdown version. > - Pages are either content pages (article or reference text) or menu pages (a list of links to child pages). > - To get a menu page, truncate any URL to a parent path and append `.md` (e.g. `https://dev.wix.com/docs/sdk.md`, `https://dev.wix.com/docs/sdk/core-modules.md`). > - Top-level index of all portals: https://dev.wix.com/docs/llms.txt > - Full concatenated docs: https://dev.wix.com/docs/llms-full.txt ## Resource: External Calendar Integration ## Article: External Calendar Integration ## Article Link: https://dev.wix.com/docs/api-reference/business-solutions/bookings/skills/external-calendar-integration.md ## Article Content: # Technical Step-by-Step Instructions: Connecting External Calendars (Google, Microsoft, Apple) to Wix Bookings (Real-World, API-First) ## Description Below are the recommended steps to successfully connect and sync external calendars (Google Calendar, Microsoft Outlook, Apple Calendar) with Wix Bookings, with real-world troubleshooting and fixes for common API issues. This recipe covers the complete OAuth flow, sync configuration, and verification procedures. --- ## Prerequisites ### Required Features and Apps Before connecting external calendars, ensure the following requirements are met: 1. **Wix Bookings** - Core app must be installed and configured 2. **Premium Plan** - External calendar integration requires premium features enabled 3. **Active Staff or Business Schedule** - Target schedule must exist for connection ### Premium Feature Validation **CRITICAL**: External calendar integration is a **premium feature**. If not enabled, you'll receive a 403 error with `"PREMIUM_FEATURE_NOT_ENABLED"` code. **Verification Steps:** 1. Attempt to list providers - should return Google, Microsoft, Apple 2. If 403 error occurs, upgrade plan or enable premium features 3. Contact Wix support if premium features aren't accessible after upgrade ### App Installation Process If you encounter app-related errors, install the required apps using the Apps Installer API. **For detailed app installation procedures, refer to:** - [Apps Installer API Documentation](https://dev.wix.com/docs/api-reference/business-management/app-installation/app-installation/install-app.md) - Business setup recipes for comprehensive app installation workflows ## Overview Wix External Calendar integration allows bidirectional sync between Wix schedules and external calendar providers. The system supports: - **Google Calendar** - OAuth authentication, primary calendar sync - **Microsoft Outlook/365** - OAuth authentication, specific calendar selection - **Apple Calendar** - Credential authentication, dedicated calendar creation ### CRITICAL API DISCOVERY **❌ COMMON ENDPOINT MISTAKES**: - `/bookings/v2/external-calendar/providers` (missing 's' in calendars) - `/calendar/v3/external-calendars/` (wrong namespace) **✅ CORRECT ENDPOINTS**: - List Providers: `/bookings/v2/external-calendars/providers` - Connect OAuth: `/bookings/v2/external-calendars/connections:connectByOAuth` - List Connections: `/bookings/v2/external-calendars/connections` ### Key Discovery: Schedule Selection Strategy **Schedule Types Available:** - **Business Schedule**: Universal external ID `4e0579a5-491e-4e70-a872-d097eed6e520` - **Staff Schedules**: Individual staff member schedules with unique IDs **Recommendation:** - Use **Staff Schedules** for personal calendar sync (individual staff members) - Use **Business Schedule** for company-wide calendar integration - **Never connect the same external calendar to multiple schedules** - causes conflicts ### IMPORTANT NOTES * **Premium Feature Gate**: Always verify premium features are enabled before attempting connections * **OAuth Flow Complexity**: The OAuth process requires user interaction - cannot be fully automated * **Sync Configuration**: Default settings may not match your needs - always review `syncConfig` after connection * **Provider-Specific Behaviors**: Google only syncs primary calendar, Microsoft allows specific calendar selection * **Connection Ownership**: If schedule ownership changes, external calendar connection is automatically disconnected * **Real-Time Limitations**: External Calendar API doesn't provide webhooks or real-time event notifications * **Revision Numbers**: External calendar connections don't use revision numbers like other calendar entities --- ## Steps ### 1. Verify Premium Features and List Providers First, confirm external calendar features are available and identify supported providers. Use `listProviders` API ([REST](https://dev.wix.com/docs/api-reference/business-solutions/bookings/calendar/external-calendar-v2/list-providers.md)): **Expected Response Structure:** - **Google Provider**: `name: "Google"`, `features.connectMethods: ["OAUTH"]` - **Microsoft Provider**: `name: "Outlook or Office 365"`, `features.connectMethods: ["OAUTH"]` - **Apple Provider**: `name: "Apple"`, `features.connectMethods: ["CREDENTIALS"]` Save the `providerId` for your desired provider and note the required `connectMethods`. ### 2. Query Available Schedules Identify which schedule to connect the external calendar to using `querySchedules` API ([REST](https://dev.wix.com/docs/api-reference/business-management/calendar/schedules-v3/query-schedules.md)): **Schedule Selection Guide:** - **Staff Schedule**: Use for individual staff member calendar sync - **Business Schedule**: Use for company-wide availability sync - **Multiple Schedules**: Create separate connections for each schedule if needed Save the `scheduleId` for your chosen schedule. ### 3. Initiate OAuth Connection (Google/Microsoft) For OAuth providers (Google, Microsoft), create a connection using `connectByOAuth` API ([REST](https://dev.wix.com/docs/api-reference/business-solutions/bookings/calendar/external-calendar-v2/connect-by-o-auth.md)): **Required Parameters:** - `providerId`: From step 1 - `scheduleId`: From step 2 - `redirectUrl`: Where user returns after authorization (can be placeholder) **Response Contains:** - `oauthUrl`: URL to redirect user for authorization **User Authorization Flow:** 1. Direct user to the `oauthUrl` 2. User completes Google/Microsoft authorization 3. User is redirected to `redirectUrl` with `connectionId` parameter 4. Extract `connectionId` from redirect URL query parameters ### 4. Alternative: Connect by Credentials (Apple) For credential-based providers (Apple), use `connectByCredentials` API ([REST](https://dev.wix.com/docs/api-reference/business-solutions/bookings/calendar/external-calendar-v2/connect-by-credentials.md)): **Required Parameters:** - `providerId`: Apple provider ID - `scheduleId`: Target schedule ID - `email`: Apple ID email - `password`: Apple ID password **Important**: This method requires collecting sensitive credentials from users. ### 5. Verify Connection and Configure Sync After successful connection, verify the connection status and configure sync settings: **Check Connection:** Use `getConnection` API ([REST](https://dev.wix.com/docs/api-reference/business-solutions/bookings/calendar/external-calendar-v2/get-connection.md)) with the `connectionId`. **Review Sync Configuration:** - **Connection Status**: Should show `"CONNECTED"` when successful - **Import Settings**: `syncConfig.listEventFromCalendars.enabled` controls importing external events to Wix - **Export Settings**: `syncConfig.syncToCalendar.enabled` controls exporting Wix events to external calendar **Update Sync Settings (if needed):** Use `updateSyncConfig` API ([REST](https://dev.wix.com/docs/api-reference/business-solutions/bookings/calendar/external-calendar-v2/update-sync-config.md)) to modify import/export behavior. ### 6. Test Connection and List Events Verify the integration is working by listing external calendar events: Use `listEvents` API ([REST](https://dev.wix.com/docs/api-reference/business-solutions/bookings/calendar/external-calendar-v2/list-events.md)) with date range filters: **Required Parameters:** - `from`: Start date (required) - `to`: End date (required) - `scheduleIds`: Optional filter by specific schedules This should return events from the connected external calendar. ### IMPORTANT NOTES * **OAuth Completion**: OAuth flow requires actual user interaction - cannot be automated * **Connection Persistence**: Connections remain active until manually disconnected or ownership changes * **Sync Timing**: Event synchronization is not real-time - may take several minutes * **Calendar Permissions**: External calendar must grant appropriate read/write permissions * **Multiple Connections**: Each schedule can connect to multiple external calendar providers * **Error Recovery**: Failed OAuth attempts can be retried with new `connectByOAuth` calls ### Troubleshooting Common Issues **"PREMIUM_FEATURE_NOT_ENABLED" Error (403):** - Verify site has premium plan enabled - Contact Wix support to enable external calendar features - Cannot proceed without premium feature access **"Not Found" Error (404) on Providers:** - Check endpoint URL has 's' in 'calendars': `/external-calendars/providers` - Verify Wix Bookings app is installed - Ensure using correct API version (v2) **OAuth Authorization Fails:** - Check `redirectUrl` is accessible and properly formatted - Verify user has appropriate permissions for external calendar - Try incognito/private browsing to avoid cached authorization issues - Check external calendar provider status (Google/Microsoft outages) **OAuth Internal Server Errors:** - **"Internal Server Error" during Google OAuth**: Common issue that can occur after account selection - **Immediate retry strategy**: Try the same OAuth flow again - temporary server issues often resolve - **Alternative schedule approach**: If business schedule fails, try connecting to a staff schedule instead (or vice versa) - **Browser troubleshooting**: Clear cookies/cache for the calendar provider's domain, or use incognito/private mode - **Different redirect URL**: Try using a different `redirectUrl` parameter (e.g., `https://www.wix.com` instead of custom URLs) - **Account-specific issues**: Try a different Google/Microsoft account if available for testing - **Timing-based retry**: Wait 5-10 minutes between failed attempts - OAuth rate limiting may be involved **OAuth Flow Recovery Steps:** 1. **First attempt fails** → Retry immediately with same parameters 2. **Second attempt fails** → Try alternative schedule type (business ↔ staff) 3. **Third attempt fails** → Clear browser data and use incognito mode 4. **Fourth attempt fails** → Try different redirect URL parameter 5. **All attempts fail** → Switch to different calendar provider (Google → Microsoft → Apple) **Connection Shows "DISCONNECTED" Status:** - Schedule ownership may have changed - External calendar permissions may have been revoked - User may have disconnected from external calendar provider side - Recreate connection with fresh OAuth flow **Events Not Syncing:** - Check `syncConfig` settings match intended behavior - Verify date range filters in `listEvents` calls - Allow 5-10 minutes for sync to complete - Check external calendar permissions and sharing settings **Multiple Calendar Connections Conflict:** - Avoid connecting same external calendar to multiple Wix schedules - Use specific calendar selection for Microsoft Outlook connections - Document which staff schedules connect to which external calendars **Apple Calendar Credential Issues:** - Verify Apple ID supports third-party app access - Check if two-factor authentication requires app-specific passwords - Test credentials in Apple Calendar app before API calls ### Provider-Specific Notes **Google Calendar:** - Only syncs with primary calendar - Requires Google account with calendar access - OAuth scope: `https://www.googleapis.com/auth/calendar` **Microsoft Outlook/365:** - Allows specific calendar selection - Supports both personal and business accounts - May require additional organizational permissions **Apple Calendar:** - Uses credential authentication (email/password) - Creates dedicated calendar for Wix events - May require app-specific password if 2FA enabled ## API Documentation References * [List Providers](https://dev.wix.com/docs/api-reference/business-solutions/bookings/calendar/external-calendar-v2/list-providers.md) * [Connect By OAuth](https://dev.wix.com/docs/api-reference/business-solutions/bookings/calendar/external-calendar-v2/connect-by-o-auth.md) * [Connect By Credentials](https://dev.wix.com/docs/api-reference/business-solutions/bookings/calendar/external-calendar-v2/connect-by-credentials.md) * [Get Connection](https://dev.wix.com/docs/api-reference/business-solutions/bookings/calendar/external-calendar-v2/get-connection.md) * [Update Sync Config](https://dev.wix.com/docs/api-reference/business-solutions/bookings/calendar/external-calendar-v2/update-sync-config.md) * [List Events](https://dev.wix.com/docs/api-reference/business-solutions/bookings/calendar/external-calendar-v2/list-events.md) * [Query Schedules](https://dev.wix.com/docs/api-reference/business-management/calendar/schedules-v3/query-schedules.md) * [Apps Installer API](https://dev.wix.com/docs/api-reference/business-management/app-installation/app-installation/install-app.md) --- > Portal Navigation: > > - Append `.md` to any URL under `https://dev.wix.com/docs/` to get its markdown version. > - Pages are either content pages (article or reference text) or menu pages (a list of links to child pages). > - To get a menu page, truncate any URL to a parent path and append `.md` (e.g. `https://dev.wix.com/docs/sdk.md`, `https://dev.wix.com/docs/sdk/core-modules.md`). > - Top-level index of all portals: https://dev.wix.com/docs/llms.txt > - Full concatenated docs: https://dev.wix.com/docs/llms-full.txt ## Resource: Multi-Resource Service Creation ## Article: Multi-Resource Service Creation ## Article Link: https://dev.wix.com/docs/api-reference/business-solutions/bookings/skills/multi-resource-service-creation.md ## Article Content: # Technical Step-by-Step Instructions: Creating Multi-Resource Bookings Services (Rooms, Equipment, Staff) - Real-World, API-First ## Description Below are the recommended steps to successfully create Wix Bookings services that require multiple resource types (e.g., Room + Equipment + Instructor). This recipe covers the **gaps** in individual API documentation: resource architecture planning, entity relationship patterns, availability dependencies, and real-world coordination challenges that aren't clear from reading individual API references. --- ## Prerequisites ### Required App Installations Before creating multi-resource services, ensure the following requirements are met: 1. **Wix Bookings** - Core app must be installed and configured 2. **Premium Plan** - Advanced resource management typically requires premium features 3. **Business Location** - At least one business location must be configured ### App Installation Process If you encounter resource-related errors, install the required apps using the Apps Installer API. **For detailed app installation procedures, refer to:** - [Apps Installer API Documentation](https://dev.wix.com/docs/api-reference/business-management/app-installation/app-installation/install-app.md) - Business setup recipes for comprehensive app installation workflows ## Overview Multi-resource services allow businesses to create bookings that require multiple types of resources simultaneously. Common examples: - **Fitness Classes**: Room + Equipment + Instructor - **Meeting Services**: Conference Room + AV Equipment + Catering Staff - **Spa Treatments**: Treatment Room + Specialized Equipment + Therapist The system involves three independent entity types that can be connected: 1. **Resource Types** - Category definitions (Room, Equipment, Staff) - independent entities 2. **Resources** - Individual resource instances with their own schedules and availability - independent entities 3. **Services** - Booking services that can optionally reference resource types - independent entities **Key Architecture Principle**: Resources and Services are **separate, independent entities**. Resources exist independently but their availability depends on business location hours (for non-staff resources) or working hour schedules (for staff resources). Services can optionally connect to resource types (not individual resources) to require resource allocation during booking, but this connection is loose and flexible. ### CRITICAL API DISCOVERY **❌ COMMON ARCHITECTURE MISTAKES** (Not Clear in Individual Docs): - Creating resources without resource types first (creation sequence matters) - Assuming resources automatically inherit business hours (availability dependency isn't clear) - Thinking you can connect same resource to conflicting schedules **✅ CORRECT RESOURCE ARCHITECTURE**: - **Independent Creation**: Resource Types → Resources (both exist independently) - **Optional Service Connection**: Services can reference resource types when resource allocation is needed - **Loose Coupling**: Resources maintain their own schedules and availability regardless of service connections - **Type-Based References**: Services connect to `resourceType.id`, not individual resource IDs - **Resource Autonomy**: Resources function independently - services simply request allocation from available resources of specified types ### Key Discovery: Resource Schedule Behavior **Resource Availability Behavior:** - Each resource automatically gets a dedicated `eventsSchedule` for tracking bookings - **Non-staff resources**: Availability depends on business location hours (not 24/7) - **Staff resources**: Have working hour schedules in addition to event schedules - **Working hours override**: When `workingHoursSchedules` is configured, it takes precedence over location hours **Schedule Sharing Patterns:** - `shared: false` = Dedicated schedule per resource (recommended for most cases) - `shared: true` = Multiple resources use same working hours schedule - Business schedule is always `shared: true` among staff ### Key Discovery: Service-Resource Connection Pattern **Service Configuration Pattern:** ```json "serviceResources": [ {"resourceType": {"id": "room-type-id"}}, {"resourceType": {"id": "equipment-type-id"}}, {"resourceType": {"id": "staff-type-id"}} ] ``` **Critical**: Services specify resource **types**, not individual resources. This creates a **loose coupling** where: - Resources exist independently but availability follows business location hours (non-staff) or working hours (staff) - Services request allocation from available resources of specified types during booking - No direct binding between individual resources and services - Resource management (updates, working hours) is independent of service configuration ### IMPORTANT NOTES * **Entity Independence**: Resources and Services are separate entities - you can create and manage resources without any services, and vice versa * **Optional Connection**: Services only need to reference resource types if they require resource allocation for bookings * **Location Complexity**: `availableInAllLocations: true` is simplest; specific location configuration is complex and often unnecessary * **Service Pricing**: Multi-resource services often justify higher pricing due to resource coordination complexity --- ## Steps ### 1. Plan Resource Type Architecture Before creating anything, plan your resource type structure. Each type should represent a category of resources that can be substituted for each other in bookings. **Common Resource Type Patterns:** - **Physical Spaces**: Room, Studio, Meeting Room, Treatment Room - **Equipment Categories**: AV Equipment, Medical Equipment, Sports Equipment - **Human Resources**: Instructor, Therapist, Consultant, Technician **Design Principle**: If resources are interchangeable for a service, they belong to the same type. ### 2. Create Resource Types Create resource types using `createResourceType` API (`POST https://www.wixapis.com/bookings/v2/resources/resource-types`) ([REST](https://dev.wix.com/docs/api-reference/business-solutions/bookings/resources/resource-types-v2/create-resource-type.md)): **Key Requirements:** - `name` must be unique across the site - Keep `name` descriptive but concise (appears in booking interface) - Save the returned `resourceType.id` for resource creation **Important**: Cannot change `name` after creation if conflicts occur - plan carefully. ### 3. Create Individual Resources For each resource type, create the individual resource instances using `createResource` API (`POST https://www.wixapis.com/bookings/v2/resources`) ([REST](https://dev.wix.com/docs/api-reference/business-solutions/bookings/resources/resources-v2/create-resource.md)): **Gap Not in Docs**: The docs don't clearly explain that `availableInAllLocations: true` is the simplest approach and that specific location configuration is complex and often unnecessary. **Advanced Configuration (Gap):** - Custom working hours override business location hours (this behavior isn't clearly documented) - Specific locations: Use `specificLocationOptions` (complex - avoid unless required) **Critical**: Each resource automatically gets its own `eventsSchedule` for booking management (this is documented but the implications for multi-resource coordination aren't clear). ### 4. Create Multi-Resource Service (Optional Connection) Create the service that optionally connects to multiple resource types using `bulkCreateServices` API ([REST](https://dev.wix.com/docs/api-reference/business-solutions/bookings/services/services-v2/bulk-create-services.md)): **Service Resource Configuration:** ```json "serviceResources": [ {"resourceType": {"id": "room-type-id"}}, {"resourceType": {"id": "equipment-type-id"}}, {"resourceType": {"id": "instructor-type-id"}} ] ``` **Key Principle**: This creates a **loose connection** where the service requests resource allocation during booking, but resources remain independent entities with their own lifecycle and management. **Pricing Strategy**: Multi-resource services typically command premium pricing due to coordination complexity. ### 5. Understand Resource Allocation Behavior (Gap in Docs) The docs don't explain how multi-resource allocation actually works during booking. Key behaviors to understand: - **Peak time conflicts**: When Room 1 is booked, Wix automatically tries Room 2 for the same resource type - **Equipment maintenance**: Blocking specific resources affects all services requiring that resource type - **Cross-resource dependencies**: If ANY required resource type has no availability, the entire booking fails **Architecture Implication**: Plan resource quantities based on expected concurrent demand across all services. ### IMPORTANT NOTES * **Resource Allocation Logic**: Wix automatically handles resource selection during booking - you specify types, not individual resources * **Conflict Resolution**: If any required resource type has no available resources, the entire booking fails * **Service Modification**: Adding/removing resource type requirements from existing services may affect existing bookings * **Performance Consideration**: Complex multi-resource services may have slower booking availability calculation ### Troubleshooting Common Issues **"Resource type not found" Error:** - Verify resource type was created successfully before creating resources - Check that `typeId` exactly matches the resource type `id` - Ensure you're not using resource type `name` when `id` is required **"Resource type name already exists" Error (409):** - Resource type names must be unique across the site - Query existing resource types to avoid duplicates - Consider using more specific names (e.g., "Meeting Room" vs "Room") **Service doesn't show resource requirements:** - Verify `serviceResources` array includes all required resource types - Check that resource type IDs are correct - Confirm service creation was successful with proper resource configuration **Resources showing as unavailable:** - Check if `workingHoursSchedules` is too restrictive - Verify `locationOptions` matches your business location setup - Test with `availableInAllLocations: true` to eliminate location issues **Resource updates failing:** - Handle revision conflicts with retry logic (revision requirement is documented but conflict handling strategies aren't) **Complex location availability issues:** - Start with `availableInAllLocations: true` for all resources - Only add location restrictions if absolutely necessary - Location configuration is complex and often causes more problems than it solves **Resource deletion concerns:** - Deleting resources with active bookings may cause issues (deletion cleanup is documented but impact on existing bookings isn't clear) - Consider disabling/hiding resources instead of deletion ### Resource Architecture Best Practices **Resource Type Design:** - Keep types broad enough to allow flexibility but specific enough to be meaningful - Plan for growth - easier to split types later than merge them - Use clear, customer-facing names (they appear in booking interfaces) **Resource Naming:** - Include location/identifier in resource names for easy management - Be consistent with naming patterns across resource types - Consider how names appear in booking confirmations and staff interfaces **Availability Strategy:** - Default to 24/7 availability unless business rules require restrictions - Use working hours sparingly - they add complexity without always adding value - Test availability scenarios thoroughly before going live **Service Design:** - Start with simpler single-resource services before attempting multi-resource - Consider premium pricing for multi-resource services due to coordination complexity - Plan for resource substitution scenarios (what if preferred room is unavailable?) ## API Documentation References * [Create Resource Type](https://dev.wix.com/docs/api-reference/business-solutions/bookings/resources/resource-types-v2/create-resource-type.md) * [Create Resource](https://dev.wix.com/docs/api-reference/business-solutions/bookings/resources/resources-v2/create-resource.md) * [Update Resource](https://dev.wix.com/docs/api-reference/business-solutions/bookings/resources/resources-v2/update-resource.md) * [Bulk Create Services](https://dev.wix.com/docs/api-reference/business-solutions/bookings/services/services-v2/bulk-create-services.md) * [Query Resources](https://dev.wix.com/docs/api-reference/business-solutions/bookings/resources/resources-v2/query-resources.md) * [Calendar Schedules API](https://dev.wix.com/docs/api-reference/business-management/calendar/schedules-v3/introduction.md) * [Apps Installer API](https://dev.wix.com/docs/api-reference/business-management/app-installation/app-installation/install-app.md) --- > Portal Navigation: > > - Append `.md` to any URL under `https://dev.wix.com/docs/` to get its markdown version. > - Pages are either content pages (article or reference text) or menu pages (a list of links to child pages). > - To get a menu page, truncate any URL to a parent path and append `.md` (e.g. `https://dev.wix.com/docs/sdk.md`, `https://dev.wix.com/docs/sdk/core-modules.md`). > - Top-level index of all portals: https://dev.wix.com/docs/llms.txt > - Full concatenated docs: https://dev.wix.com/docs/llms-full.txt ## Resource: Configure Default Business Hours ## Article: Configure Default Business Hours ## Article Link: https://dev.wix.com/docs/api-reference/business-management/calendar/skills/configure-default-business-hours.md ## Article Content: # Technical Step-by-Step Instructions: Setting Up Wix Bookings Default Business Hours (Real-World, API-First) ## Description Below are the recommended steps to successfully configure default business hours for Wix Bookings, which control the base availability shown in the "Set default hours" dashboard. This recipe covers the correct API usage, common pitfalls, and cleanup procedures for managing business schedule events. --- ## Prerequisites - **Wix Bookings app installed** (App ID: `13d21c63-b5ec-5912-8397-c3a5ddb27a97`) > **Note:** If you receive errors from Bookings APIs, the Wix Bookings app may not be installed on the site. Use [List Installed Apps](https://dev.wix.com/docs/api-reference/business-management/app-installation/skills/list-installed-apps.md) to verify, and [Install Wix Apps](https://dev.wix.com/docs/api-reference/business-management/app-installation/skills/install-wix-apps.md) to install it if missing. ## Overview Wix Bookings default business hours define the base availability for your booking system and appear in the Bookings dashboard under "Set default hours". These hours: - **Control base availability**: Set when your business is generally available for bookings - **Apply to new staff**: Default working hours that new staff members inherit - **Display in dashboard**: Show as time slots in the "Set default hours" interface ### 🚨 CRITICAL: Default Hours Upon Installation **IMPORTANT**: When Wix Bookings is first installed on a site, it automatically creates DEFAULT business hours (typically 9 AM - 5 PM, Monday through Friday). You CANNOT simply create new hours without handling these existing default hours first. **You MUST either:** 1. **Update the existing default hours** to your desired schedule, OR 2. **Delete the existing default hours** and create new ones **Failure to handle existing hours will result in:** - Duplicate time slots in the dashboard - Conflicting availability schedules - Unexpected booking behavior ### CRITICAL API DISCOVERY **❌ WRONG API**: Site Properties API (`/site-properties/v4/properties/business-schedule`) - This sets general site business schedule, NOT Bookings default hours **✅ CORRECT API**: Calendar Events V3 API (`/calendar/v3/events`) - Creates `WORKING_HOURS` events on the business schedule - Each `MASTER` event creates one time slot in the dashboard - Uses fixed business resource ID: `4e0579a5-491e-4e70-a872-d097eed6e520` ### Key Discovery: Universal Business Schedule External ID **VERIFIED**: The business schedule external ID `"4e0579a5-491e-4e70-a872-d097eed6e520"` is **universal across all Wix sites**. This has been tested and confirmed on multiple different Wix sites: - All sites have a business schedule with this exact external ID - The schedule name is consistently `"business"` - While the internal schedule `id` varies per site, the `externalId` is constant - This makes the recipe reliable without requiring site-specific discovery ### IMPORTANT NOTES * **Universal External ID**: The business schedule external ID `"4e0579a5-491e-4e70-a872-d097eed6e520"` is verified to work across all Wix sites * **Default Hours Always Exist**: Every Wix Bookings installation creates default hours automatically * **Event Scheduling Flexibility**: Businesses can create multiple time slots per day or complex schedules as needed - there are no restrictions on number of events per day * **MASTER vs INSTANCE Events**: Based on observed behavior, MASTER events appear to generate INSTANCE events automatically, but always verify current event state when working with recurring events * **Query Patterns**: Use `"recurrenceType": ["MASTER"]` to focus on the primary recurring event definitions * **Revision Numbers**: Calendar events require current revision numbers for updates - always get fresh revision before bulk operations --- ## Steps ### 1. Find Business Schedule Query the business schedule that controls default hours using the fixed external ID. **Endpoint**: `POST https://www.wixapis.com/calendar/v3/schedules/query` Use `querySchedules` API ([REST](https://dev.wix.com/docs/api-reference/business-management/calendar/schedules-v3/query-schedules.md)) with filter: - `externalId`: `"4e0579a5-491e-4e70-a872-d097eed6e520"` Keep the returned `schedule.id` for creating events. ### 2. Query Existing Working Hours (MANDATORY) **🚨 CRITICAL STEP**: You MUST query for existing `WORKING_HOURS` events because Wix Bookings automatically creates default hours upon installation. **Endpoint**: `POST https://www.wixapis.com/calendar/v3/events/query` Use `queryEvents` API ([REST](https://dev.wix.com/docs/api-reference/business-management/calendar/events-v3/query-events.md)): Query pattern: ```json { "recurrenceType": ["MASTER"], "query": { "filter": { "scheduleId": "business-schedule-id", "type": "WORKING_HOURS" } } } ``` **Important**: Always query for MASTER events specifically to see actual recurring schedules. **Expected Result**: You will typically find 5 existing MASTER events (Monday through Friday, 9 AM - 5 PM) from the default Bookings installation. ### 3. Choose Your Strategy: Update OR Replace Based on the existing hours found in Step 2, choose one approach: #### Strategy A: Update Existing Hours (Recommended) If you want to modify the times but keep the same days, update the existing events. #### Strategy B: Replace All Hours If you want completely different days/times, delete existing events and create new ones. ### 4A. Update Existing Business Hours (Strategy A) **Endpoint**: `POST https://www.wixapis.com/calendar/v3/bulk/events/update` Use `bulkUpdateEvents` API ([REST](https://dev.wix.com/docs/api-reference/business-management/calendar/events-v3/bulk-update-event.md)) with `fieldmask` pattern: Update fields: - `start`/`end`: New times - `revision`: Current revision number (from Step 2 query) - `fieldmask`: `"start,end"` **Example**: Change Monday hours from 9 AM-5 PM to 12 AM-4 PM: ```json { "events": [{ "event": { "id": "existing-monday-event-id", "start": {"localDate": "2025-06-16T00:00:00"}, "end": {"localDate": "2025-06-16T16:00:00"}, "revision": "current-revision-number" } }], "fieldmask": "start,end" } ``` ### 4B. Replace All Business Hours (Strategy B) #### Step 4B.1: Delete Existing Hours Cancel existing MASTER events using `bulkCancelEvents` API (`POST https://www.wixapis.com/calendar/v3/bulk/events/cancel`) ([REST](https://dev.wix.com/docs/api-reference/business-management/calendar/events-v3/bulk-cancel-event.md)): ```json { "eventIds": ["event-id-1", "event-id-2", "event-id-3", "event-id-4", "event-id-5"] } ``` #### Step 4B.2: Create New Business Hours Create `WORKING_HOURS` events for each day using `bulkCreateEvents` API (`POST https://www.wixapis.com/calendar/v3/bulk/events/create`) ([REST](https://dev.wix.com/docs/api-reference/business-management/calendar/events-v3/bulk-create-event.md)). **Each event pattern**: - `type`: `"WORKING_HOURS"` - `scheduleId`: Business schedule ID from step 1 - `scheduleOwnerId`: `"4e0579a5-491e-4e70-a872-d097eed6e520"` - `externalScheduleId`: `"4e0579a5-491e-4e70-a872-d097eed6e520"` - `recurrenceRule`: Weekly recurring with single day - `start`/`end`: Business hours times **Note**: Create separate events for each day of the week (Monday, Tuesday, etc.). ### 5. Verify Final Configuration Query the business schedule events again to confirm: 1. No duplicate time slots exist 2. Each desired day has exactly one MASTER event 3. Times match your requirements ### IMPORTANT NOTES * **Future dates required**: Recurring events must start today or in the future * **Revision management**: Always use current revision numbers when updating events * **MASTER vs INSTANCE**: Based on observed behavior, MASTER events appear to control recurring patterns while INSTANCE events are auto-generated, but always verify current event state * **Default Hours Impact**: Remember that these hours will be inherited by any new staff members created after this configuration ### Troubleshooting Common Issues **"App not installed" Error (428):** - Install Wix Bookings app using Apps Installer API - Verify installation by querying existing services **Duplicate time slots in dashboard:** - **Root Cause**: You created new events without handling existing default hours - **Solution**: Query MASTER events to find duplicates and cancel unwanted ones - Each day should have only one MASTER event unless split hours are needed **Updates not reflecting in dashboard:** - Verify you're updating MASTER events, not INSTANCE events - Check that revision numbers are current - Confirm `fieldmask` includes the fields you're changing **Cannot create events in the past:** - Set `start.localDate` to current date or future - Recurring events automatically generate past INSTANCE events **Business schedule not found:** - Query schedules using the fixed external ID: `4e0579a5-491e-4e70-a872-d097eed6e520` - Ensure Wix Bookings is installed (schedule is created when Bookings is installed) **Working hours not affecting staff/services:** - Default hours only apply to staff using `usesDefaultWorkingHours: true` - Services with custom schedules ignore default business hours - Staff with assigned custom schedules override default hours ### Common Gotchas 1. **Skipping the Query Step**: Never assume no hours exist - always query first 2. **Creating Without Cleaning**: Adding new hours without removing defaults creates duplicates 3. **Wrong Event Type**: Using INSTANCE instead of MASTER events for queries/updates 4. **Missing Revision Numbers**: Updates require current revision numbers from the query response ## API Documentation References * [Query Schedules](https://dev.wix.com/docs/api-reference/business-management/calendar/schedules-v3/query-schedules.md) * [Query Events](https://dev.wix.com/docs/api-reference/business-management/calendar/events-v3/query-events.md) * [Bulk Create Events](https://dev.wix.com/docs/api-reference/business-management/calendar/events-v3/bulk-create-event.md) * [Bulk Update Events](https://dev.wix.com/docs/api-reference/business-management/calendar/events-v3/bulk-update-event.md) * [Bulk Cancel Events](https://dev.wix.com/docs/api-reference/business-management/calendar/events-v3/bulk-cancel-event.md) * [Apps Installer API](https://dev.wix.com/docs/api-reference/business-management/app-installation/app-installation/install-app.md) --- > Portal Navigation: > > - Append `.md` to any URL under `https://dev.wix.com/docs/` to get its markdown version. > - Pages are either content pages (article or reference text) or menu pages (a list of links to child pages). > - To get a menu page, truncate any URL to a parent path and append `.md` (e.g. `https://dev.wix.com/docs/sdk.md`, `https://dev.wix.com/docs/sdk/core-modules.md`). > - Top-level index of all portals: https://dev.wix.com/docs/llms.txt > - Full concatenated docs: https://dev.wix.com/docs/llms-full.txt ## Resource: CMS Data Items CRUD ## Article: CMS Data Items CRUD ## Article Link: https://dev.wix.com/docs/api-reference/business-solutions/cms/skills/cms-data-items-crud.md ## Article Content: # CMS Data Items CRUD > **Standard call shape (every curl below).** The `` placeholder is shorthand for `Authorization: Bearer ` only. Body-bearing requests also need `Content-Type: application/json`. This recipe covers basic Create, Read, Update, Delete (CRUD) operations for Wix CMS data items. ## Prerequisites 1. Wix CMS enabled on the site (appDefId: `e593b0bd-b783-45b8-97c2-873d42aacaf4`) 2. Collections already created (see [CMS Schema Management](https://dev.wix.com/docs/api-reference/business-solutions/cms/skills/cms-schema-management.md)) 3. API access with CMS permissions ## Required APIs - **Data Items API**: [REST](https://dev.wix.com/docs/api-reference/business-solutions/cms/data-items/introduction.md) --- ## Know the Schema First Before inserting or updating items, you need to know the collection's field names and types. If you don't already know the schema: 1. **Query existing items** - Fetch a few items to infer field names from the data 2. **Get collection schema** - Use `GET /collections/{dataCollectionId}` for full field definitions 3. **List collections** - Use `GET /collections?fields=displayName` to see what collections exist (see [Schema Management](https://dev.wix.com/docs/api-reference/business-solutions/cms/skills/cms-schema-management.md)) It may be, that user refers to schema by its `displayName` rather than `id`, if collection is not found list all collections to find the right `id` (`dataCollectionId`) to use. --- ## Insert Data Item **Endpoint**: `POST /wix-data/v2/items` **Request Body**: ```json { "dataCollectionId": "Products", "dataItem": { "data": { "title": "Wireless Headphones", "price": 149.99, "description": "Premium wireless headphones with noise cancellation", "inStock": true, "tags": ["wireless", "audio", "premium"] } } } ``` **Response**: ```json { "dataItem": { "id": "generated-item-id", "dataCollectionId": "Products", "data": { "_id": "generated-item-id", "title": "Wireless Headphones", "price": 149.99, "_createdDate": { "$date": "2024-01-15T10:00:00.000Z" }, "_updatedDate": { "$date": "2024-01-15T10:00:00.000Z" } } } } ``` ## Bulk Insert Items **Endpoint**: `POST /wix-data/v2/bulk/items/insert` **Request Body**: ```json { "dataCollectionId": "Products", "dataItems": [ { "data": { "title": "Bluetooth Speaker", "price": 79.99, "inStock": true } }, { "data": { "title": "USB-C Cable", "price": 12.99, "inStock": true } }, { "data": { "title": "Laptop Stand", "price": 49.99, "inStock": false } } ], "returnEntity": true } ``` ## Query Data Items **Endpoint**: `POST /wix-data/v2/items/query` **Basic Query**: ```json { "dataCollectionId": "Products", "query": { "filter": { "inStock": true }, "sort": [ { "fieldName": "price", "order": "ASC" } ], "paging": { "limit": 50, "offset": 0 } } } ``` **Advanced Query with Multiple Conditions**: ```json { "dataCollectionId": "Products", "query": { "filter": { "$and": [ { "inStock": true }, { "price": { "$gte": 50, "$lte": 200 } } ] } } } ``` **Text Search**: ```json { "dataCollectionId": "Products", "query": { "filter": { "title": { "$contains": "wireless" } } } } ``` ## Get Single Item **Endpoint**: `GET /wix-data/v2/items/{itemId}?dataCollectionId={collectionId}` ```bash curl -X GET \ 'https://www.wixapis.com/wix-data/v2/items/abc123?dataCollectionId=Products' \ -H 'Authorization: ' ``` ## Update Data Item **Endpoint**: `PUT /wix-data/v2/items/{itemId}` **Request Body**: ```json { "dataCollectionId": "Products", "dataItem": { "data": { "title": "Wireless Headphones Pro", "price": 199.99, "description": "Updated premium wireless headphones", "inStock": true } } } ``` ## Patch Data Item (Partial Update - Single Item) **Endpoint**: `PATCH /wix-data/v2/items/{dataItemId}` Unlike Update, this only modifies the specified fields — all other fields remain unchanged. > **Note**: Only works on user-created collections. Wix app collections (e.g. Wix Stores Products) cannot be patched. ```json { "dataCollectionId": "Products", "patch": { "dataItemId": "item-guid", "fieldModifications": [ { "fieldPath": "price", "action": "SET_FIELD", "setFieldOptions": { "value": 159.99 } }, { "fieldPath": "description", "action": "REMOVE_FIELD" }, { "fieldPath": "viewCount", "action": "INCREMENT_FIELD", "incrementFieldOptions": { "value": 1 } } ] } } ``` ## Bulk Update Items **Endpoint**: `POST /wix-data/v2/bulk/items/update` > **Important**: Use `id` (not `_id`) at the element level. The `data` object should NOT contain `_id`. ```json { "dataCollectionId": "Products", "dataItems": [ { "id": "item-guid-1", "data": { "price": 159.99, "inStock": true } }, { "id": "item-guid-2", "data": { "price": 89.99, "inStock": false } } ] } ``` > **Note**: This replaces the entire item. Include all fields you want to keep, not just the ones you're changing. ## Bulk Patch Items (Partial Update) **Endpoint**: `POST /wix-data/v2/bulk/items/patch` Unlike bulk update, this only modifies the specified fields - other fields remain unchanged. **Use this for partial updates.** > **Important**: This endpoint uses `patches` array with `fieldModifications`, NOT `dataItems`. Do not confuse with bulk update. ```json { "dataCollectionId": "Products", "patches": [ { "dataItemId": "item-guid-1", "fieldModifications": [ { "fieldPath": "price", "action": "SET_FIELD", "setFieldOptions": { "value": 159.99 } } ] }, { "dataItemId": "item-guid-2", "fieldModifications": [ { "fieldPath": "price", "action": "SET_FIELD", "setFieldOptions": { "value": 89.99 } } ] } ] } ``` **Setting a reference field** (single REFERENCE only): ```json { "dataCollectionId": "events", "patches": [ { "dataItemId": "event-id", "fieldModifications": [ { "fieldPath": "venue", "action": "SET_FIELD", "setFieldOptions": { "value": "venue-item-id" } } ] } ] } ``` **Available actions**: `SET_FIELD`, `REMOVE_FIELD`, `INCREMENT_FIELD`, `APPEND_TO_ARRAY`, `REMOVE_FROM_ARRAY` > **Common error**: If you get `WDE0080: patches must not be empty`, you sent `dataItems` instead of `patches`. Use the format above. > **Recommended**: Use bulk patch instead of bulk update when you only need to change specific fields. > **Reference Fields**: > - **Single REFERENCE**: CAN be set during insert/update by providing the referenced item's ID as the field value (e.g., `"venue": "venue-item-id"`) > - **MULTI_REFERENCE**: **STOP** - You cannot use this recipe for multi-reference fields. They cannot be set via insert/update/patch. > > **For MULTI_REFERENCE operations (add speakers, assign tags, link categories, etc.):** > **READ [CMS References & Relationships](https://dev.wix.com/docs/api-reference/business-solutions/cms/skills/cms-references-and-relationships.md)** for the exact endpoints and request bodies: > - `POST /wix-data/v2/bulk/items/insert-references` - add references > - `POST /wix-data/v2/items/replace-references` - replace all references > - `POST /wix-data/v2/bulk/items/remove-references` - remove references > > Error `WDE0303` occurs when attempting to set multi-reference fields via data operations. ## Delete Data Item **Endpoint**: `DELETE /wix-data/v2/items/{itemId}?dataCollectionId={collectionId}` ```bash curl -X DELETE \ 'https://www.wixapis.com/wix-data/v2/items/abc123?dataCollectionId=Products' \ -H 'Authorization: ' ``` ## Bulk Delete Items **Endpoint**: `POST /wix-data/v2/bulk/items/remove` ```json { "dataCollectionId": "Products", "dataItemIds": ["item-id-1", "item-id-2", "item-id-3"] } ``` ## Field Types Reference | Type | Description | Example Value | |------|-------------|---------------| | `TEXT` | String | `"Hello World"` | | `NUMBER` | Numeric | `99.99` | | `BOOLEAN` | True/false | `true` | | `DATE` | Date only | `"2024-01-15"` | | `DATETIME` | Date and time | `{ "$date": "2024-01-15T10:00:00.000Z" }` | | `IMAGE` | Image reference (HTTP url or wix:image://v1/{mediaId}/{friendlyName}) | `"wix:image://v1/3f72369f2219e2ee853e9e3df0217ce1.jpg/Colorful%20Business%20Cards.jpg"` | | `VIDEO` | Video reference (HTTP url or wix:video://v1/{mediaId}/{friendlyName}) | `"wix:video://v1/11062b_484182533ede4b9a81329daf20238867/Sketching%20Design%20Concepts#posterUri=11062b_484182533ede4b9a81329daf20238867f000.jpg&posterWidth=1920&posterHeight=1080"` | | `DOCUMENT` | Document reference (HTTP url or wix:document://v1/{mediaId}) | `"wix:document://v1/..."` | | `MEDIA_IMAGE` | Wix Media Image | `{ "url": "http://...", "height": 640, "width": 480, "alt": "Picture" }` | | `MEDIA_VECTOR_ART` | Wix Media Vector Art | `{ "uri": "wix:vector://v1/...", "viewBox": "0 0 100 100", "contentType": "shape", "svgContent": "..." }` | | `URL` | Web URL | `"https://example.com"` | | `RICH_TEXT` | HTML content | `"

        Rich text

        "` | | `EMAIL` | Email | `"example@wix.com"` | | `RICH_CONTENT` | Structured content | Complex object | | `ADDRESS` | Address object | Address fields | | `ARRAY_STRING` | Array of strings | `["tag1", "tag2"]` | | `OBJECT` | JSON object | `{"key": "value"}` | | `REFERENCE` | Single reference | Item ID string | | `MULTI_REFERENCE` | Multiple references, use separate *reference* endpoints to manipulate, `include` to include in queries | Array of IDs | --- ## Query Operators | Operator | Description | Example | |----------|-------------|---------| | `$eq` | Equal | `{ "status": { "$eq": "active" } }` | | `$ne` | Not equal | `{ "status": { "$ne": "archived" } }` | | `$gt` | Greater than | `{ "price": { "$gt": 100 } }` | | `$gte` | Greater or equal | `{ "price": { "$gte": 100 } }` | | `$lt` | Less than | `{ "price": { "$lt": 50 } }` | | `$lte` | Less or equal | `{ "price": { "$lte": 50 } }` | | `$in` | In array | `{ "status": { "$in": ["active", "pending"] } }` | | `$contains` | Contains string | `{ "title": { "$contains": "pro" } }` | | `$startsWith` | Starts with | `{ "title": { "$startsWith": "Wireless" } }` | | `$and` | All conditions | `{ "$and": [{...}, {...}] }` | | `$or` | Any condition | `{ "$or": [{...}, {...}] }` | --- ## Pagination ### Offset-Based (Simple) ```json { "query": { "paging": { "limit": 50, "offset": 100 } } } ``` ### Cursor-Based (Large Datasets) ```json { "query": { "cursorPaging": { "limit": 50, "cursor": "cursor-from-previous-response" } } } ``` --- ## Error Handling | Error | Cause | Solution | |-------|-------|----------| | `COLLECTION_NOT_FOUND` | Invalid collection ID | Check collection exists | | `ITEM_NOT_FOUND` | Invalid item ID | Verify item exists | | `VALIDATION_ERROR` | Invalid field value | Check field types | | `DUPLICATE_KEY` | Duplicate unique field | Use unique values | | `PERMISSION_DENIED` | Insufficient access | Check API permissions | | `WDE0007` | Bulk update: wrong ID field name | Use `id` not `_id` at element level | | `WDE0080` | Validation failed (multiple causes) | Bulk update: don't include `_id` in `data`; Bulk patch: use `patches` array not `dataItems` | | `WDE0303` | Can't set multi-reference field via data operations | Use reference endpoints: `insert-references`, `replace-references` | | `WDE0110` | Wix CMS (Wix Data) application is not installed | Install application with appDefId: `e593b0bd-b783-45b8-97c2-873d42aacaf4` | --- ## Related Documentation - [Data Items API Reference](https://dev.wix.com/docs/api-reference/business-solutions/cms/data-items/introduction.md) - [CMS Schema Management](https://dev.wix.com/docs/api-reference/business-solutions/cms/skills/cms-schema-management.md) - Creating and modifying collections - [CMS References & Relationships](https://dev.wix.com/docs/api-reference/business-solutions/cms/skills/cms-references-and-relationships.md) - Linking collections - [CMS Data Operations Extended](https://dev.wix.com/docs/api-reference/business-solutions/cms/skills/cms-data-operations-extended.md) - Count, upsert, aggregate --- > Portal Navigation: > > - Append `.md` to any URL under `https://dev.wix.com/docs/` to get its markdown version. > - Pages are either content pages (article or reference text) or menu pages (a list of links to child pages). > - To get a menu page, truncate any URL to a parent path and append `.md` (e.g. `https://dev.wix.com/docs/sdk.md`, `https://dev.wix.com/docs/sdk/core-modules.md`). > - Top-level index of all portals: https://dev.wix.com/docs/llms.txt > - Full concatenated docs: https://dev.wix.com/docs/llms-full.txt ## Resource: CMS Data Operations Extended ## Article: CMS Data Operations Extended ## Article Link: https://dev.wix.com/docs/api-reference/business-solutions/cms/skills/cms-data-operations-extended.md ## Article Content: # CMS Data Operations Extended This recipe covers additional CMS data operations not included in the basic CRUD recipe. ## Prerequisites 1. Wix CMS enabled on the site 2. Collections created with data 3. API access with CMS permissions ## Required APIs - **Data Items API**: [REST](https://dev.wix.com/docs/api-reference/business-solutions/cms/data-items/introduction.md) ## Count Data Items Count items in a collection, optionally with filters. **Endpoint**: `POST /wix-data/v2/items/count` **Count All Items**: ```bash curl -X POST \ 'https://www.wixapis.com/wix-data/v2/items/count' \ -H 'Content-Type: application/json' \ -H 'Authorization: ' \ -d '{ "dataCollectionId": "Products" }' ``` **Response**: ```json { "totalCount": 42 } ``` **Count with Filter**: ```bash curl -X POST \ 'https://www.wixapis.com/wix-data/v2/items/count' \ -H 'Content-Type: application/json' \ -H 'Authorization: ' \ -d '{ "dataCollectionId": "Products", "filter": { "inStock": true } }' ``` **Count with Complex Filter**: ```json { "dataCollectionId": "Products", "filter": { "$and": [ { "inStock": true }, { "price": { "$gte": 50 } } ] } } ``` ## Bulk Save (Upsert) Insert new items or update existing items in a single operation. This is useful for syncing data. **Endpoint**: `POST /wix-data/v2/bulk/items/save` **Request Body**: ```json { "dataCollectionId": "Products", "dataItems": [ { "id": "existing-item-id", "data": { "title": "Updated Product", "price": 199.99, "inStock": true } }, { "data": { "title": "New Product", "price": 79.99, "inStock": true } } ], "returnEntity": true } ``` ### Bulk Save Behavior | Scenario | Action | |----------|--------| | No `id` provided | INSERT - Creates new item with generated ID | | `id` provided, doesn't exist | INSERT - Creates new item with provided ID | | `id` provided, exists | UPDATE - Replaces existing item | > **Warning**: When updating, the entire item is replaced. Include all fields you want to keep. ## Update by Filter Pattern Wix CMS doesn't have a direct "update by filter" API. Use this two-step pattern: ### 3.1: Query Items to Update ```bash curl -X POST \ 'https://www.wixapis.com/wix-data/v2/items/query' \ -H 'Content-Type: application/json' \ -H 'Authorization: ' \ -d '{ "dataCollectionId": "Products", "query": { "filter": { "category": "electronics" } } }' ``` ### 3.2: Bulk Update Those Items > **Important**: Use `id` (not `_id`) at the element level. The `data` object should NOT contain `_id`. ```bash curl -X POST \ 'https://www.wixapis.com/wix-data/v2/bulk/items/update' \ -H 'Content-Type: application/json' \ -H 'Authorization: ' \ -d '{ "dataCollectionId": "Products", "dataItems": [ { "id": "item-1-from-query", "data": { "title": "Updated Title 1", "price": 99.99, "onSale": true } }, { "id": "item-2-from-query", "data": { "title": "Updated Title 2", "price": 149.99, "onSale": true } } ] }' ``` ### Alternative: Bulk Patch (Partial Update) If you only want to update specific fields without replacing the entire item, use Bulk Patch: **Endpoint**: `POST /wix-data/v2/bulk/items/patch` > **Important**: This endpoint uses `patches` array with `fieldModifications`, NOT `dataItems`. Do not confuse with bulk update. ```bash curl -X POST \ 'https://www.wixapis.com/wix-data/v2/bulk/items/patch' \ -H 'Content-Type: application/json' \ -H 'Authorization: ' \ -d '{ "dataCollectionId": "Products", "patches": [ { "dataItemId": "item-1", "fieldModifications": [ { "fieldPath": "onSale", "action": "SET_FIELD", "setFieldOptions": { "value": true } } ] } ] }' ``` > **Common error**: If you get `WDE0080: patches must not be empty`, you sent `dataItems` instead of `patches`. Use the format above. ## Truncate Collection Remove all items from a collection (dangerous operation). **Endpoint**: `POST /wix-data/v2/items/truncate` ```bash curl -X POST \ 'https://www.wixapis.com/wix-data/v2/items/truncate' \ -H 'Content-Type: application/json' \ -H 'Authorization: ' \ -d '{ "dataCollectionId": "TestCollection" }' ``` > **Warning**: This permanently deletes ALL items in the collection. Use with extreme caution. ## Aggregate Data Perform calculations on collection data using a pipeline of sequential stages. **Endpoint**: `POST /wix-data/v2/items/aggregate-pipeline` **Count by Category**: ```bash curl -X POST \ 'https://www.wixapis.com/wix-data/v2/items/aggregate-pipeline' \ -H 'Content-Type: application/json' \ -H 'Authorization: ' \ -d '{ "dataCollectionId": "Products", "pipeline": { "stages": [ { "group": { "groupIds": [ {"key": "category", "expression": {"fieldPath": "category"}} ], "accumulators": [ { "resultFieldName": "count", "sum": {"expression": {"numeric": 1}} } ] } } ] } }' ``` ## Operation Comparison | Operation | Use Case | Behavior | |-----------|----------|----------| | **Bulk Insert** | Add new items only | Fails if ID exists | | **Bulk Update** | Update existing items | Fails if ID doesn't exist, replaces entire item | | **Bulk Save** | Upsert (insert or update) | Creates or updates based on ID | | **Bulk Patch** | Partial update | Only modifies specified fields | ## Related Documentation - [Data Items API Reference](https://dev.wix.com/docs/api-reference/business-solutions/cms/data-items/introduction.md) - [CMS Operations Best Practices](https://dev.wix.com/docs/api-reference/business-solutions/cms/skills/cms-data-items-crud.md) - [CMS Schema Management](https://dev.wix.com/docs/api-reference/business-solutions/cms/skills/cms-schema-management.md) --- > Portal Navigation: > > - Append `.md` to any URL under `https://dev.wix.com/docs/` to get its markdown version. > - Pages are either content pages (article or reference text) or menu pages (a list of links to child pages). > - To get a menu page, truncate any URL to a parent path and append `.md` (e.g. `https://dev.wix.com/docs/sdk.md`, `https://dev.wix.com/docs/sdk/core-modules.md`). > - Top-level index of all portals: https://dev.wix.com/docs/llms.txt > - Full concatenated docs: https://dev.wix.com/docs/llms-full.txt ## Resource: CMS eCommerce Catalog Integration ## Article: CMS eCommerce Catalog Integration ## Article Link: https://dev.wix.com/docs/api-reference/business-solutions/cms/skills/cms-e-commerce-catalog-integration.md ## Article Content: # CMS eCommerce Catalog Integration This recipe documents how to convert CMS collections into sellable product catalogs that integrate with Wix eCommerce (cart, checkout, orders). ## Overview Converting a CMS collection to a catalog enables: - Items in the collection become purchasable products - Integration with Wix Cart and Checkout APIs - Real-time price and availability from your CMS data ## Prerequisites Your collection needs these fields (or mappable equivalents): - **Name field** (TEXT) - Product display name - **Price field** (NUMBER) - Product price Optional catalog fields: - **Description** (TEXT) - Product description - **Image** (IMAGE) - Product image - **URL** (URL) - Product link - **Quantity** (NUMBER) - Inventory quantity ## Step 1: Add CATALOG Plugin to Collection ### API Endpoint ``` POST https://www.wixapis.com/wix-data/v2/collections/add-plugin ``` ### Example: Convert Collection with Custom Field Names ```json { "dataCollectionId": "Products", "plugin": { "type": "CATALOG", "catalogOptions": { "name": "title", "price": "price", "description": "description" } } } ``` ### Example: Full Catalog with All Optional Fields ```json { "dataCollectionId": "Products", "plugin": { "type": "CATALOG", "catalogOptions": { "name": "itemName", "price": "itemPrice", "description": "itemDescription", "image": "itemImage", "url": "itemUrl", "quantity": "itemQuantity" } } } ``` ## Step 2: Verify eCommerce App is Installed Most Wix sites with Stores, Bookings, or similar apps already have eCommerce installed. Check by querying the Cart API: ``` POST https://www.wixapis.com/ecom/v1/carts ``` ## Step 3: Use Catalog Items in Cart ### CMS App ID (for catalogReference) ``` e593b0bd-b783-45b8-97c2-873d42aacaf4 ``` ### Add CMS Catalog Item to Cart ``` POST https://www.wixapis.com/ecom/v1/carts/{cartId}/add-to-cart ``` ```json { "lineItems": [ { "catalogReference": { "appId": "e593b0bd-b783-45b8-97c2-873d42aacaf4", "catalogItemId": "" }, "quantity": 1 } ] } ``` ## Removing CATALOG Plugin ``` POST https://www.wixapis.com/wix-data/v2/collections/delete-plugin ``` ```json { "dataCollectionId": "Products", "pluginType": "CATALOG" } ``` ## Differences from Wix Stores | Feature | CMS Catalog | Wix Stores | |---------|-------------|------------| | Product management | CMS collections | Stores dashboard | | Variants | Manual (separate items) | Built-in variant system | | Inventory tracking | Manual via quantity field | Automatic | | Product options | Not supported | Full support | | Discounts | Manual price changes | Built-in discount system | CMS Catalogs are best for simple product catalogs. For complex eCommerce needs, consider Wix Stores. ## See Also - [CMS Schema Management](https://dev.wix.com/docs/api-reference/business-solutions/cms/skills/cms-schema-management.md) - [CMS Data Operations](https://dev.wix.com/docs/api-reference/business-solutions/cms/skills/cms-data-items-crud.md) - [Wix Cart API](https://dev.wix.com/docs/api-reference/business-solutions/e-commerce/purchase-flow/cart/cart/introduction.md) --- > Portal Navigation: > > - Append `.md` to any URL under `https://dev.wix.com/docs/` to get its markdown version. > - Pages are either content pages (article or reference text) or menu pages (a list of links to child pages). > - To get a menu page, truncate any URL to a parent path and append `.md` (e.g. `https://dev.wix.com/docs/sdk.md`, `https://dev.wix.com/docs/sdk/core-modules.md`). > - Top-level index of all portals: https://dev.wix.com/docs/llms.txt > - Full concatenated docs: https://dev.wix.com/docs/llms-full.txt ## Resource: CMS References And Relationships ## Article: CMS References And Relationships ## Article Link: https://dev.wix.com/docs/api-reference/business-solutions/cms/skills/cms-references-and-relationships.md ## Article Content: # CMS References & Relationships > **Standard call shape (every curl below).** The `` placeholder is shorthand for `Authorization: Bearer ` only. Body-bearing requests also need `Content-Type: application/json`. This recipe covers linking CMS collections together using reference fields. ## Prerequisites 1. Wix CMS enabled on the site 2. At least two collections to link together 3. API access with CMS permissions ## Required APIs - **Collections API**: [REST](https://dev.wix.com/docs/api-reference/business-solutions/cms/collection-management/data-collections/introduction.md) - **Data Items API**: [REST](https://dev.wix.com/docs/api-reference/business-solutions/cms/data-items/introduction.md) ## Reference Types | Type | Field Type | Relationship | Example | |------|------------|--------------|---------| | Single Reference | `REFERENCE` | One-to-one, Many-to-one | Product → Category | | Multi-Reference | `MULTI_REFERENCE` | One-to-many, Many-to-many | Product → Tags | ## Add a Single Reference Field **Endpoint**: `POST /wix-data/v2/collections/create-field` ```bash curl -X POST \ 'https://www.wixapis.com/wix-data/v2/collections/create-field' \ -H 'Content-Type: application/json' \ -H 'Authorization: ' \ -d '{ "dataCollectionId": "Products", "field": { "key": "category", "displayName": "Category", "type": "REFERENCE", "typeMetadata": { "reference": { "referencedCollectionId": "Categories" } } } }' ``` ## Add a Multi-Reference Field **Endpoint**: `POST /wix-data/v2/collections/create-field` ```bash curl -X POST \ 'https://www.wixapis.com/wix-data/v2/collections/create-field' \ -H 'Content-Type: application/json' \ -H 'Authorization: ' \ -d '{ "dataCollectionId": "Products", "field": { "key": "tags", "displayName": "Tags", "type": "MULTI_REFERENCE", "typeMetadata": { "multiReference": { "referencedCollectionId": "Tags", "referencingFieldKey": "products", "referencingDisplayName": "Products" } } } }' ``` ## Insert Multi-Reference Links **Endpoint**: `POST /wix-data/v2/bulk/items/insert-references` ```json { "dataCollectionId": "Products", "dataItemReferences": [ { "referringItemId": "product-item-id", "referringItemFieldName": "tags", "referencedItemId": "tag-1-item-id" }, { "referringItemId": "product-item-id", "referringItemFieldName": "tags", "referencedItemId": "tag-2-item-id" } ], "returnEntity": true } ``` ## Replace All References **Endpoint**: `POST /wix-data/v2/items/replace-references` ```json { "dataCollectionId": "Products", "referringItemId": "product-item-id", "referringItemFieldName": "tags", "newReferencedItemIds": ["new-tag-1-id", "new-tag-2-id", "new-tag-3-id"] } ``` > **Note**: To remove all references, pass an empty array for `newReferencedItemIds`. ## Remove References (Bulk) **Endpoint**: `POST /wix-data/v2/bulk/items/remove-references` ```json { "dataCollectionId": "Products", "dataItemReferences": [ { "referringItemId": "product-id-1", "referringItemFieldName": "tags", "referencedItemId": "tag-to-remove-id" } ] } ``` ## Query with Referenced Items Expanded **Endpoint**: `POST /wix-data/v2/items/query` ```json { "dataCollectionId": "Products", "query": { "filter": { "inStock": true } }, "includeReferencedItems": ["category", "tags"] } ``` ## Reference Query Operators | Operator | Description | Example | |----------|-------------|---------| | `$eq` | Exact match (single reference) | `{ "category": "id" }` | | `$hasSome` | Has at least one of | `{ "tags": { "$hasSome": ["id1", "id2"] } }` | | `$hasAll` | Has all of | `{ "tags": { "$hasAll": ["id1", "id2"] } }` | ## Related Documentation - [Data Items API Reference](https://dev.wix.com/docs/api-reference/business-solutions/cms/data-items/introduction.md) - [Collections API Reference](https://dev.wix.com/docs/api-reference/business-solutions/cms/collection-management/data-collections/introduction.md) - [CMS Schema Management Recipe](https://dev.wix.com/docs/api-reference/business-solutions/cms/skills/cms-schema-management.md) --- > Portal Navigation: > > - Append `.md` to any URL under `https://dev.wix.com/docs/` to get its markdown version. > - Pages are either content pages (article or reference text) or menu pages (a list of links to child pages). > - To get a menu page, truncate any URL to a parent path and append `.md` (e.g. `https://dev.wix.com/docs/sdk.md`, `https://dev.wix.com/docs/sdk/core-modules.md`). > - Top-level index of all portals: https://dev.wix.com/docs/llms.txt > - Full concatenated docs: https://dev.wix.com/docs/llms-full.txt ## Resource: CMS Schema Management ## Article: CMS Schema Management ## Article Link: https://dev.wix.com/docs/api-reference/business-solutions/cms/skills/cms-schema-management.md ## Article Content: # CMS Schema Management > **Standard call shape (every curl below).** The `` placeholder is shorthand for `Authorization: Bearer ` only. Body-bearing requests also need `Content-Type: application/json`. This recipe covers managing the structure (schema) of Wix CMS collections using the REST API. ## Prerequisites 1. Wix CMS application installed on the site (appDefId: `e593b0bd-b783-45b8-97c2-873d42aacaf4`) 2. API access with CMS permissions (Manage Data Collections scope) ## Required APIs - **Collections API**: [REST](https://dev.wix.com/docs/api-reference/business-solutions/cms/collection-management/data-collections/introduction.md) ## List All Collections **Lightweight listing (recommended for existence checks)**: ```bash curl -X GET \ 'https://www.wixapis.com/wix-data/v2/collections?fields=displayName' \ -H 'Authorization: ' ``` **Full listing (includes all field schemas)**: ```bash curl -X GET \ 'https://www.wixapis.com/wix-data/v2/collections' \ -H 'Authorization: ' ``` **Collection Types**: `NATIVE` (user-created), `WIX_APP` (Wix app collections), `BLOCKS_APP`, `EXTERNAL` ## Get Collection Schema **Endpoint**: `GET /wix-data/v2/collections/{collectionId}` ```bash curl -X GET \ 'https://www.wixapis.com/wix-data/v2/collections/Products' \ -H 'Authorization: ' ``` ## Create a New Collection **Endpoint**: `POST /wix-data/v2/collections` ```json { "collection": { "id": "Products", "displayName": "Products", "fields": [ {"key": "title", "displayName": "Title", "type": "TEXT", "required": true}, {"key": "price", "displayName": "Price", "type": "NUMBER"}, {"key": "description", "displayName": "Description", "type": "TEXT"}, {"key": "inStock", "displayName": "In Stock", "type": "BOOLEAN"} ], "permissions": { "insert": "ADMIN", "update": "ADMIN", "remove": "ADMIN", "read": "ANYONE" } } } ``` ## Add a Field to Existing Collection **Endpoint**: `POST /wix-data/v2/collections/create-field` ```json { "dataCollectionId": "Products", "field": { "key": "sku", "displayName": "SKU", "type": "TEXT", "description": "Product SKU code" } } ``` ## Delete a Field from Collection > **Warning**: This permanently deletes all data stored in this field across all items. **Endpoint**: `POST /wix-data/v2/collections/delete-field` ```json { "dataCollectionId": "Products", "fieldKey": "sku" } ``` ## Update Collection Settings **Endpoint**: `PATCH /wix-data/v2/collections/{collectionId}` ```json { "dataCollection": { "id": "Products", "displayName": "Product Catalog" } } ``` ## Field Types Reference | Type | Description | Example Value | |------|-------------|---------------| | `TEXT` | String | `"Hello World"` | | `NUMBER` | Numeric | `99.99` | | `BOOLEAN` | True/false | `true` | | `DATE` | Date only | `"2024-01-15"` | | `DATETIME` | Date and time | `{ "$date": "2024-01-15T10:00:00.000Z" }` | | `IMAGE` | Image reference | `"wix:image://v1/..."` | | `MEDIA_IMAGE` | Wix Media Image | `{ "url": "http://...", "height": 640, "width": 480, "alt": "Picture" }` | | `MEDIA_VECTOR_ART` | Wix Media Vector Art | `{ "uri": "wix:vector://v1/...", "viewBox": "0 0 100 100", "contentType": "shape", "svgContent": "..." }` | | `URL` | Web URL | `"https://example.com"` | | `RICH_TEXT` | HTML content | `"

        Rich text

        "` | | `ARRAY_STRING` | Array of strings | `["tag1", "tag2"]` | | `OBJECT` | JSON object | `{"key": "value"}` | | `REFERENCE` | Single reference | Item ID string | | `MULTI_REFERENCE` | Multiple references | Array of IDs | ## Permission Levels | Role | Description | |------|-------------| | `ANYONE` | All visitors (including anonymous) | | `SITE_MEMBER` | Logged-in site members | | `SITE_MEMBER_AUTHOR` | Members who created the item | | `ADMIN` | Site admins only | ## Related Documentation - [Data Collections API Reference](https://dev.wix.com/docs/api-reference/business-solutions/cms/collection-management/data-collections/introduction.md) - [Data Types in Wix Data](https://dev.wix.com/docs/api-reference/business-solutions/cms/data-types-in-wix-data.md) - [CMS Data Items CRUD Recipe](https://dev.wix.com/docs/api-reference/business-solutions/cms/skills/cms-data-items-crud.md) --- > Portal Navigation: > > - Append `.md` to any URL under `https://dev.wix.com/docs/` to get its markdown version. > - Pages are either content pages (article or reference text) or menu pages (a list of links to child pages). > - To get a menu page, truncate any URL to a parent path and append `.md` (e.g. `https://dev.wix.com/docs/sdk.md`, `https://dev.wix.com/docs/sdk/core-modules.md`). > - Top-level index of all portals: https://dev.wix.com/docs/llms.txt > - Full concatenated docs: https://dev.wix.com/docs/llms-full.txt ## Resource: Bulk Delete Contacts ## Article: Bulk Delete Contacts ## Article Link: https://dev.wix.com/docs/api-reference/crm/members-contacts/contacts/skills/bulk-delete-contacts.md ## Article Content: # Bulk Delete Contacts ## Description Deletes multiple contacts using the Wix Contacts REST API. All contacts that meet the specified `filter` and `search` criteria are deleted. The request should contain a `filter` value or a `search` value, or both. To perform a dry run, call [Query Contacts](https://dev.wix.com/docs/api-reference/crm/members-contacts/contacts/contacts/contact-v4/query-contacts.md) with the intended filter options. When this method is called, a bulk job is started and the job ID is returned. The job might not complete right away, depending on its size. The job's status can be retrieved with [Get Bulk Job](https://dev.wix.com/docs/api-reference/crm/members-contacts/contacts/contacts/bulk-job/get-bulk-job.md). **IMPORTANT NOTE:** When specific contacts are to be deleted, they should be filtered by id. ## API Endpoint `POST https://www.wixapis.com/contacts/v4/bulk/contacts/delete` ## Request Example ```bash curl -X POST \ 'https://www.wixapis.com/contacts/v4/bulk/contacts/delete' \ -H 'Authorization: ' \ -H 'Content-Type: application/json' \ -d '{ "filter": { "info.name.last": "Smith" } }' ``` ## Request Parameters - `filter` (object, optional): Filter criteria to identify contacts. When specific contacts are to be deleted, filter by `id`. - `search` (string, optional): Search query to identify contacts. **Note:** The request should contain a `filter` value or a `search` value, or both. ## Response The response includes a `jobId` which can be used to track the bulk job status: ```json { "jobId": "00000000-0000-0000-0000-000000000001" } ``` Use the [Get Bulk Job](https://dev.wix.com/docs/api-reference/crm/members-contacts/contacts/contacts/bulk-job/get-bulk-job.md) endpoint to check the job status. ## Common Errors The following errors might occur during the bulk processing and will appear in the bulk job: - `CANNOT_DELETE_SITE_MEMBERS` - Contact is a site member and can't be deleted. Member must be deleted first. - `CANNOT_DELETE_CONTACT_WITH_BILLING_SUBSCRIPTION` - Contact has a valid billing subscription and can't be deleted. - `CANNOT_DELETE_MEMBER_OWNER_OR_CONTRIBUTOR` - Member is a Wix user and can't be deleted. This can happen only if the request indicated to delete the member. - `FAILED_DELETE_CONTACT_AFTER_MEMBER_DELETION` - Member was deleted, but contact was not. This can happen only if the request indicated to delete the member. - `FAILED_DELETE_CONTACT` - Contact could not be deleted. ## Permissions Required - `CONTACTS.MODIFY` - `MEMBERS.MEMBER_DELETE` (if deleting members) ## Related Documentation - [Bulk Delete Contacts API Reference](https://dev.wix.com/docs/api-reference/crm/members-contacts/contacts/contacts/contact-v4/bulk-delete-contacts.md) - [Query Contacts](https://dev.wix.com/docs/api-reference/crm/members-contacts/contacts/contacts/contact-v4/query-contacts.md) - [Get Bulk Job](https://dev.wix.com/docs/api-reference/crm/members-contacts/contacts/contacts/bulk-job/get-bulk-job.md) --- > Portal Navigation: > > - Append `.md` to any URL under `https://dev.wix.com/docs/` to get its markdown version. > - Pages are either content pages (article or reference text) or menu pages (a list of links to child pages). > - To get a menu page, truncate any URL to a parent path and append `.md` (e.g. `https://dev.wix.com/docs/sdk.md`, `https://dev.wix.com/docs/sdk/core-modules.md`). > - Top-level index of all portals: https://dev.wix.com/docs/llms.txt > - Full concatenated docs: https://dev.wix.com/docs/llms-full.txt ## Resource: Bulk Label and Unlabel Contacts ## Article: Bulk Label and Unlabel Contacts ## Article Link: https://dev.wix.com/docs/api-reference/crm/members-contacts/contacts/skills/bulk-label-and-unlabel-contacts.md ## Article Content: # Bulk Label And Unlabel Contacts ## Description Adds and removes labels from multiple contacts using the Wix Contacts REST API. Labels are added to and removed from all contacts that meet the specified `filter` and `search` criteria. The request should specify a `filter` value, a `search` value, or both. To perform a dry run, call [Query Contacts](https://dev.wix.com/docs/api-reference/crm/members-contacts/contacts/contacts/contact-v4/query-contacts.md) with the intended filter options. When this method is used, a bulk job is started and the job ID is returned. The job might not complete right away, depending on its size. The job's status can be retrieved with [Get Bulk Job](https://dev.wix.com/docs/api-reference/crm/members-contacts/contacts/contacts/bulk-job/get-bulk-job.md). **IMPORTANT NOTE:** When specific contacts are to be labeled, they should be filtered by id. ## API Endpoint `POST https://www.wixapis.com/contacts/v4/bulk/contacts/add-remove-labels` ## Request Example ```bash curl -X POST \ 'https://www.wixapis.com/contacts/v4/bulk/contacts/add-remove-labels' \ -H 'Authorization: ' \ -H 'Content-Type: application/json' \ -d '{ "filter": { "info.name.first": "John" }, "labelKeysToAdd": ["custom.name-john", "custom.name-starts-with-J"], "labelKeysToRemove": ["custom.last-name-smith"] }' ``` ## Request Parameters - `filter` (object, optional): Filter criteria to identify contacts. When specific contacts are to be labeled, filter by `id`. - `search` (string, optional): Search query to identify contacts. - `labelKeysToAdd` (array of strings): Array of label keys to add to matching contacts. - `labelKeysToRemove` (array of strings): Array of label keys to remove from matching contacts. **Note:** The request should specify a `filter` value, a `search` value, or both. ## Response The response includes a `jobId` which can be used to track the bulk job status: ```json { "jobId": "00000000-0000-0000-0000-000000000001" } ``` Use the [Get Bulk Job](https://dev.wix.com/docs/api-reference/crm/members-contacts/contacts/contacts/bulk-job/get-bulk-job.md) endpoint to check the job status. ## Permissions Required - `CONTACTS.MODIFY` ## Related Documentation - [Bulk Label And Unlabel Contacts API Reference](https://dev.wix.com/docs/api-reference/crm/members-contacts/contacts/contacts/contact-v4/bulk-label-and-unlabel-contacts.md) - [Query Contacts](https://dev.wix.com/docs/api-reference/crm/members-contacts/contacts/contacts/contact-v4/query-contacts.md) - [Get Bulk Job](https://dev.wix.com/docs/api-reference/crm/members-contacts/contacts/contacts/bulk-job/get-bulk-job.md) - [Labels API Reference](https://dev.wix.com/docs/api-reference/crm/members-contacts/contacts/labels/introduction.md) --- > Portal Navigation: > > - Append `.md` to any URL under `https://dev.wix.com/docs/` to get its markdown version. > - Pages are either content pages (article or reference text) or menu pages (a list of links to child pages). > - To get a menu page, truncate any URL to a parent path and append `.md` (e.g. `https://dev.wix.com/docs/sdk.md`, `https://dev.wix.com/docs/sdk/core-modules.md`). > - Top-level index of all portals: https://dev.wix.com/docs/llms.txt > - Full concatenated docs: https://dev.wix.com/docs/llms-full.txt ## Resource: Domain Search and Purchase ## Article: Domain Search and Purchase ## Article Link: https://dev.wix.com/docs/api-reference/account-level/domains/skills/domain-search-and-purchase.md ## Article Content: # Domain Search and Purchase Use this recipe when a user wants to: - Buy / purchase a domain - Register a domain through Wix - Get a custom domain for their Wix site - Check if a domain is available and then buy it - Says something like "buy me a domain", "I want to purchase a domain", "get me mybusiness.com" ## How Purchase Works You help the user find an available domain, then collect registration details (cycle, privacy protection, contact info) directly in the chat. Once collected, you save the contact info, create a cart with the domain + addons, and provide a checkout link where the user only needs to complete payment. **UX guidelines**: Keep the conversation natural. Do NOT expose internal implementation details to the user (e.g. don't say "I'm canceling the old cart", "saving to intent API", "adding line items"). Just tell them what matters: "Setting up your order..." then show the summary and checkout link. ## Site Context (Optional) Domain purchase does NOT require a site. Do NOT call `ListWixSites` unless the user specifically mentions a site or asks to connect the domain to one. However, after finding an available domain (Step 1), you should ask the user if they want to connect it to a Wix site. This unlocks two benefits: - If the user has a **premium site**, the domain can be connected to it after purchase - If the user has **no premium site**, they can get the domain **free for the first year** by upgrading to a premium plan (bundle deal) See **Step 1b** for the site check flow. ## Required APIs - **Check Domain Availability**: `GET https://www.wixapis.com/domain-search/v2/check-domain-availability` - **Suggest Domains**: `GET https://www.wixapis.com/domain-search/v2/suggest-domains` These are **public APIs that require no special authentication or scopes**. Just make a plain GET request to the URL with query parameters. No extra headers, no account-level auth, no site-level auth. No tokens needed. **Important**: Do NOT use `GetSuggestedDomains` tool for domain suggestions in this recipe. Use the `SuggestDomains` v2 endpoint above instead -- it accepts free-text queries and does not need a site ID. --- ## Step 1: Find an Available Domain ### If the user has a specific domain in mind Check if it's available using: `GET https://www.wixapis.com/domain-search/v2/check-domain-availability?domain={domain}` The `domain` parameter **must** include the TLD (e.g., `mybusiness.com`, not just `mybusiness`). If the user gives a name without a TLD, default to `.com` first. **Response when available**: ```json { "availability": { "domain": "mybusiness.com", "available": true, "premium": false } } ``` **Response when taken**: ```json { "availability": { "domain": "mybusiness.com", "available": false } } ``` - **available: true** -> Proceed to Step 2 - **available: false** -> Do NOT just say "it's taken" and stop. Immediately suggest alternatives (see below). - **DOMAINS_UNSUPPORTED_TLD error** -> Tell the user that TLD isn't supported by Wix, then suggest alternatives with supported TLDs (see below). ### If the domain is taken, unsupported, or the user wants ideas Use the **Suggest Domains v2** API to find available alternatives: `GET https://www.wixapis.com/domain-search/v2/suggest-domains` **IMPORTANT**: Do NOT use the `GetSuggestedDomains` tool for this. Always use the v2 endpoint above. This API accepts **free-text queries** -- it works with business descriptions, keywords, and brand concepts, not just domain names. For example: "pancakes business", "modern yoga studio", "photography portfolio". **Query Parameters**: | Parameter | Description | Example | |-----------|-------------|---------| | `query` | Keywords, business idea, or brand concept | `pancakes business` | | `paging.limit` | Number of suggestions (default: 10) | `10` | | `tlds` | Filter by specific TLDs (repeatable, no dots) | `com`, `net` | **Example -- alternatives for a taken domain**: ``` GET https://www.wixapis.com/domain-search/v2/suggest-domains?query=mybusiness&paging.limit=10 ``` **Example -- brainstorming from a business idea**: ``` GET https://www.wixapis.com/domain-search/v2/suggest-domains?query=pancakes+business&paging.limit=10 ``` **Example -- filtered by TLDs**: ``` GET https://www.wixapis.com/domain-search/v2/suggest-domains?query=mybusiness&paging.limit=5&tlds=com&tlds=net ``` **Example Response**: ```json { "suggestions": [ { "domain": "mybusiness.com", "premium": false }, { "domain": "mybusiness.net", "premium": false }, { "domain": "mybusiness.org", "premium": false }, { "domain": "mybusiness.co", "premium": false }, { "domain": "mybusiness.online", "premium": false } ], "pagingMetadata": { "count": 5, "cursors": { "next": "..." }, "hasNext": true } } ``` When presenting suggestions: - List the domain names clearly - All returned suggestions are already available for purchase -- no need to re-check availability - Do NOT show a "Premium" column or flag premium domains -- it confuses users - If the user has a TLD preference, highlight relevant ones (`.com` for general business, `.shop`/`.store` for e-commerce, `.me` for personal branding) - If no suggestions come back, ask the user to try different keywords or broader terms - If `pagingMetadata.hasNext` is true, more suggestions exist -- offer to show more Once the user picks a domain (or the original was available), proceed to Step 1b. --- ## Step 1b: Check for Wix Sites (Optional but Recommended) After the user has chosen a domain, ask: "Would you like to connect this domain to one of your Wix sites?" If the user says yes (or if they mentioned a site earlier), call `ListWixSites` to get their sites. The response includes each site's `id` and `name`. If the user has multiple sites, list them and ask which one they want to use. Once a site is selected, remember the `siteId` (also called `msid`) -- you'll use it in the checkout link (Step 4d). **Based on the site's plan status**, you can offer different guidance: - **Site has a premium plan**: "Great, after purchasing the domain you can connect it to your site." - **Site has no premium plan**: "I notice your site doesn't have a premium plan yet. If you upgrade to a premium plan, you can get this domain free for the first year! Want me to generate a link for the bundle deal instead?" If yes, generate: `[Get domain free with a site plan](https://manage.wix.com/premium-domains/split-page?domainName={DOMAIN_NAME})` -- this page shows the bundle option. - **No sites at all**: "No problem, we'll proceed with a standalone domain purchase." If the user says no or wants to skip, proceed without a site context. --- ## Step 2: Collect Registration Details Once the user picks a domain, collect the details needed for purchase. ### 2a: Show pricing and ask for registration period Get available cycles and pricing for the chosen TLD: **Request** (via `ManageWixSite`): ``` POST https://manage.wix.com/_api/premium-purchase-platform-serverless/v1/offering/72af0602-1321-4897-8299-f507480b2bb8 ``` Body: ```json { "purchaseContext": { "params": { "tld": ".com" } } } ``` Replace `.com` with the actual TLD (include the leading dot). **Response** contains `products[0]` with: - `productId` -- save this, you'll need it for the cart - `pricingDetails[]` -- array of pricing per cycle Present the pricing to the user as a table, for example: | Period | Price | |--------|-------| | 1 year | $14.95 | | 2 years | $27.90 | | 3 years | $40.85 | Ask the user which period they prefer. Default to 1 year if they don't have a preference. If the API returns no products for this TLD, tell the user: "Wix doesn't support purchasing this TLD. Try a different extension like .com, .net, or .org." ### 2b: Ask about privacy protection Present the user with three options: 1. **Privacy + DNSSEC** (recommended, most protecting) -- Hides your personal contact info from public WHOIS lookups AND adds DNSSEC protection against DNS spoofing/hijacking attacks. Product ID: `f8211619-d9f6-4312-9d03-f2958bbd08aa` 2. **Privacy only** -- Hides your personal contact info from public WHOIS lookups. Product ID: `22a84545-4ac0-4490-a434-45a1ebc479fb` 3. **No protection** -- Your contact info will be publicly visible in WHOIS. Product ID: `b9d89ff0-f29b-4bfd-a3f0-6e34ae65120d` All three options use the addon product type ID `b3d86a1d-9db3-4f69-bd54-c132808856b1`. ### 2c: Collect or confirm contact info First, check if the user already has contact info on file: **Request** (via `ManageWixSite`): ``` GET https://manage.wix.com/v1/domain-registration-intents/preview/{domain} ``` Replace `{domain}` with the chosen domain (e.g. `mybakery.com`). **Response** contains `domainRegistrationIntent` with existing contacts: ```json { "domainRegistrationIntent": { "registrantContact": { "firstName": "...", "lastName": "...", "email": "...", "phone": "...", "streetAddress": "...", "city": "...", "country": "...", "postalCode": "..." }, "adminContact": { ... }, "techContact": { ... } } } ``` > Address fields are **flat** on each contact (`streetAddress`, `city`, `country`, `postalCode`) — there is no nested `address` sub-object. - **If contacts exist**: Show the info and explicitly ask "Should I use these details, or would you like to register with different info?" Wait for the user to confirm before proceeding to Step 3. Do NOT skip this confirmation. - **If contacts are empty**: Ask the user for: first name, last name, email, phone number, street address, city, country, and postal code. The user can provide country as a full name (e.g. "Israel", "United States") -- convert it to the 2-letter ISO country code (e.g. "IL", "US") before sending to the API. Wait for them to provide all fields before proceeding. --- ## Step 3: Save Contact Info Generate a random UUID to use as a session ID (`wsess`). This links the contact info to the cart. **Request** (via `ManageWixSite`): ``` POST https://manage.wix.com/v1/domain-registration-intents/upsert ``` Body: ```json { "domainRegistrationIntent": { "domain": "mybakery.com", "sessionId": "", "registrantContact": { "firstName": "John", "lastName": "Smith", "email": "john@email.com", "phone": "+1.5551234567", "streetAddress": "123 Main St", "city": "New York", "country": "US", "postalCode": "10001" }, "adminContact": { ... same as registrant ... }, "techContact": { ... same as registrant ... } } } ``` Use the same contact info for registrant, admin, and tech contacts (standard practice for individual registrations). Phone format: `+{countryCode}.{number}` (e.g. `+1.5551234567`, `+972.544738293`). If the API returns a validation error: - Show the user exactly which fields have issues (missing, invalid format, etc.) - Ask them to provide corrected values for those specific fields - Retry the upsert with the corrected data - Some TLDs require extra fields (e.g. .com.br needs an identification number, .it needs entity type). If the error mentions TLD-specific requirements, explain what's needed and ask the user to provide it. --- ## Step 4: Create Cart and Checkout Link **Important**: If the user selected a site in Step 1b, use `CallWixSiteAPI` (with the site's `siteId`) for ALL cart operations below. This creates the cart in the site's context so the checkout link with `?msid=` works correctly. If no site was selected, use `ManageWixSite` (account-level). ### 4a: Cancel any existing cart ``` POST https://manage.wix.com/_api/premium-cart/v1/carts/active/cancel ``` Body: `{}` This clears any leftover cart. If there's no active cart, this returns successfully anyway. ### 4b: Get a fresh cart ``` GET https://manage.wix.com/_api/premium-cart/v1/carts/active ``` This creates a new cart if none exists and returns it. ### 4c: Add domain and addon to cart ``` PATCH https://manage.wix.com/_api/premium-cart/v1/carts/active/add-items ``` Body: ```json { "lineItems": [ { "productInfo": { "productId": "", "productTypeId": "72af0602-1321-4897-8299-f507480b2bb8" }, "cycle": { "cycleDuration": { "count": 1, "unit": "YEAR" }, "cycleType": "RECURRING" }, "metadata": { "domainName": "mybakery.com", "wsess": "", "core": "true" } } ] } ``` Set `cycle.cycleDuration.count` to the number of years the user chose. Add a second line item for the addon (based on the user's choice from Step 2b): ```json { "productInfo": { "productId": "", "productTypeId": "b3d86a1d-9db3-4f69-bd54-c132808856b1" }, "cycle": { "cycleDuration": { "count": 1, "unit": "YEAR" }, "cycleType": "RECURRING" }, "metadata": { "domainName": "mybakery.com", "wsess": "" } } ``` Use the same cycle duration for the addon as for the domain. ### 4d: Provide checkout link Once the cart is populated, give the user a checkout link: - **If a site was selected** (Step 1b): `[Click here to complete your purchase](https://manage.wix.com/cart/checkout?msid={siteId})` - **No site / standalone purchase**: `[Click here to complete your purchase](https://manage.wix.com/cart/checkout)` This opens the checkout page with the pre-filled cart. The user only needs to complete payment. --- ## Error Handling | Error Code | Description | Action | |------------|-------------|--------| | `DOMAINS_UNSUPPORTED_TLD` | TLD not supported by Wix | Suggest alternatives using Suggest Domains API | | `access_denied` or `403` on domain search APIs | Auth issue | These are public APIs -- do not add extra auth headers | | Offering API returns no products | TLD not supported by Wix | Tell user to try a different TLD (.com, .net, .org) | | Intent API validation error | Missing/invalid contact fields | Show the error, ask user to correct, retry | | Cart add-items fails | Product ID or format issue | Verify product ID came from offering API response | --- ## Example Flows ### Flow 1: Full purchase (happy path) 1. User: "Buy me mybakery.com" 2. Check availability -> available: true 3. Get pricing for .com -> show cycles table 4. User picks 1 year 5. Ask about privacy -> user says yes 6. Preview contact info -> shows existing info -> user confirms 7. Save contact via intent API (generate wsess UUID) 8. Cancel old cart -> get fresh cart -> add domain + privacy addon 9. Share checkout link: [Complete your purchase](https://manage.wix.com/cart/checkout) ### Flow 2: Domain taken, suggest alternatives, then full purchase 1. User: "I want to buy coolstartup.com" 2. Check availability -> available: false 3. Suggest alternatives with query "coolstartup" -> show 10 options 4. User picks "coolstartup.online" 5. Get pricing for .online -> show cycles table 6. User picks 2 years 7. Ask about privacy -> user says no 8. Preview contact info -> empty -> ask user for details 9. User provides: name, email, phone, address 10. Save contact via intent API 11. Create cart with domain only (no addon), 2-year cycle 12. Share checkout link ### Flow 3: Brainstorming from scratch 1. User: "I need a domain for my pancakes restaurant" 2. Suggest domains with query "pancakes restaurant" -> show 10 options 3. User picks "stackedpancakes.com" 4. Get pricing for .com -> show cycles 5. User picks 1 year, wants privacy 6. Confirm contact info -> user confirms existing info 7. Save contact, create cart, share checkout link ### Flow 4: Purchase with site connection 1. User: "Buy mybakery.com and connect it to my site" 2. Check availability -> available: true 3. Ask which site -> call ListWixSites -> user picks "My Bakery Site" (msid: abc-123) 4. Site has premium plan -> "Great, we'll connect it after purchase" 5. Get pricing, user picks 1 year, wants privacy, confirms contact info 6. Save contact, create cart, share checkout link with msid: `https://manage.wix.com/cart/checkout?msid=abc-123` ### Flow 5: No premium site, suggest bundle 1. User: "I want mybakery.com for my website" 2. Check availability -> available: true 3. Call ListWixSites -> user picks "My Bakery Site" -> site has no premium plan 4. "Your site doesn't have a premium plan. You can get this domain free for the first year by upgrading! Want the bundle deal?" 5. User says yes -> share: [Get domain free with a site plan](https://manage.wix.com/premium-domains/split-page?domainName=mybakery.com) ### Flow 6: Unsupported TLD 1. User: "Buy mysite.io" 2. Check availability -> DOMAINS_UNSUPPORTED_TLD 3. Tell user .io is not supported, suggest alternatives with query "mysite" 4. User picks "mysite.online" 5. Continue with full purchase flow (pricing, privacy, contact, cart, checkout) --- > Portal Navigation: > > - Append `.md` to any URL under `https://dev.wix.com/docs/` to get its markdown version. > - Pages are either content pages (article or reference text) or menu pages (a list of links to child pages). > - To get a menu page, truncate any URL to a parent path and append `.md` (e.g. `https://dev.wix.com/docs/sdk.md`, `https://dev.wix.com/docs/sdk/core-modules.md`). > - Top-level index of all portals: https://dev.wix.com/docs/llms.txt > - Full concatenated docs: https://dev.wix.com/docs/llms-full.txt ## Resource: Recommend: eCommerce Strategy ## Article: Recommend: eCommerce Strategy ## Article Link: https://dev.wix.com/docs/api-reference/business-solutions/e-commerce/skills/recommend-e-commerce-strategy.md ## Article Content: # Recommend: eCommerce Strategy > ⛔ **MANDATORY PRE-STEP — do this BEFORE Step 1 (before any API call).** > > Classify the merchant's request and immediately call `ReadFullDocsArticle` on the matching goal skill. Do NOT gather data first — the goal skill tells you which metrics to pull and what guardrails to apply. > > | Merchant intent | Goal to load | > |---|---| > | Holiday / event / date mentioned | `ReadFullDocsArticle` → [Goal: Seasonal Revenue](https://dev.wix.com/docs/api-reference/business-solutions/e-commerce/skills/goal-seasonal-revenue.md) | > | "increase AOV", "spend more", "upsell", "boost sales", generic sales improvement | `ReadFullDocsArticle` → [Goal: Increase AOV](https://dev.wix.com/docs/api-reference/business-solutions/e-commerce/skills/goal-increase-aov.md) | > | "clear inventory", "overstock", "clearance", "slow-moving" | `ReadFullDocsArticle` → [Goal: Clear Inventory](https://dev.wix.com/docs/api-reference/business-solutions/e-commerce/skills/goal-clear-inventory.md) | > | "bundle", "cross-sell", "buy together", "more items per order" | `ReadFullDocsArticle` → [Goal: Drive Cross-Sells](https://dev.wix.com/docs/api-reference/business-solutions/e-commerce/skills/goal-drive-cross-sells.md) | > > After loading the goal skill, continue from Step 1 below. The goal skill will instruct you to load the matching flow skill — follow those instructions too. > > **If COUPON mechanism in Step 4c**, also load: > - [Pricing: Create Coupon](https://dev.wix.com/docs/api-reference/business-solutions/e-commerce/skills/pricing-create-coupon.md) ## EXECUTION RULES — READ BEFORE ANYTHING ELSE **You are an operator, not a consultant.** When this recipe is activated: 1. **Do NOT ask clarifying questions — start executing immediately from Step 1.** The merchant's request contains enough information. The analysis steps will determine which domains and strategies apply. 2. **Do NOT produce recommendations before calling the mandatory APIs.** If you skip the API calls and generate advice from assumptions, your output is wrong — even if it sounds reasonable. 3. **Execute every step in order.** Do not skip steps. Do not merge steps. Do not answer "in the meantime." 4. **Use ONLY data returned by API calls.** Never substitute reasoning, general knowledge, or doc summaries for live data. Every number you cite in `reasoning` MUST come directly from an API response — do NOT assume, infer, or fabricate data. 5. **If a call fails or is blocked, report the exact blocker.** Do not work around it with assumptions. 6. **All API calls use `CallWixSiteAPI`.** The internal tool names (getSiteData, getCatalogAnalytics, etc.) are NOT directly callable. 7. **Generate recommendations across ALL relevant domains** — not just discounts. Consider shipping, discounts, and any other domain that the data supports. --- ## Step 1: Resolve the target site **MANDATORY — do this first.** If you don't already have a `siteId`, call `ListWixSites` to find it. If the merchant mentioned a site name, match it. If only one site exists, auto-select it. Store the `siteId` — every subsequent API call requires it. **Do not proceed without a siteId.** --- ## Step 2: Load recommendation history (Tracking) **MANDATORY — do NOT skip unless the user said `SKIP_TRACKING` or "don't track".** Query the tracking database for existing recommendations on this site: ``` CallWixSiteAPI( url: "https://manage.wix.com/_api/agentic-recommendations/v1/agentic-recommendations/query", method: "POST", body: { "query": { "filter": {}, "cursorPaging": { "limit": 50 } } } ) ``` **Use the returned history to inform your analysis:** | State | How to use it | |---|---| | `PROPOSED` | Don't re-propose — ask about the pending one | | `DONE` | Don't re-propose — consider complementary recommendations | | `REJECTED` | Do NOT re-propose. If `rejectionPermanent` is true, never suggest this action type again | | `FAILED` | Offer to retry or suggest alternative | | `EXPIRED` | Can re-propose if still relevant with fresh data | If the query returns empty results or fails, continue — this is a fresh session. --- ## Step 3: Gather site data **MANDATORY API CALL — do not skip.** ``` CallWixSiteAPI( url: "https://www.wix.com/wix-profile-client/v4/profile/metasite", method: "POST", body: { "fields": [ "language", "merchant_business_country", "suggested_main_industry", "suggested_sub_industry", "last_30_days_distinct_visitors", "last_30_days_orders_count", "online_gpv_last_30_days", "payment_currency" ] } ) ``` **Available fields:** | Field ID | Type | Description | Used for | |---|---|---|---| | `language` | STRING | Wix site language code | Locale-aware recommendations | | `merchant_business_country` | STRING | Merchant's business country (ISO alpha-2) | Holiday detection, region analysis, shipping | | `suggested_main_industry` | STRING | Dominant industry in last 30 days (user growth model) | Domain classification, goal selection | | `suggested_sub_industry` | STRING | Dominant sub-industry in last 30 days | Domain classification | | `last_30_days_distinct_visitors` | LONG | Distinct visitors in last 30 days (incl. app sessions) | Traffic-based thresholds | | `last_30_days_orders_count` | LONG | Order count in last 30 days | AOV calculation, goal selection | | `online_gpv_last_30_days` | LONG | Online Gross Payment Volume in last 30 days (site currency units) | Revenue analysis, AOV calculation | | `payment_currency` | STRING | Store payment currency code (ISO-4217) | Discount/shipping amount formatting | **Response shape** — each field is a nested object; missing fields = no data for this site: ```json { "metaSiteId": "", "fields": { "language": { "aSingleValue": { "aString": "en-US" } }, "merchant_business_country": { "aSingleValue": { "aString": "US" } }, "payment_currency": { "aSingleValue": { "aString": "USD" } }, "last_30_days_orders_count": { "aSingleValue": { "aLong": "2141" } }, "online_gpv_last_30_days": { "aSingleValue": { "aLong": "526550" } } } } ``` Extracting values: - String: `fields..aSingleValue.aString` - Number: `fields..aSingleValue.aLong` — **returned as a JSON string, parse to int before arithmetic** **Derived value:** `aov = parseInt(online_gpv_last_30_days) / parseInt(last_30_days_orders_count)` — in `payment_currency` units **Currency rule:** All monetary values (`online_gpv_last_30_days`, `aov`, discount thresholds, shipping amounts) are in the site's `payment_currency`. Never assume USD. Always display and compute amounts using `payment_currency`. **STOP if `merchant_business_country`, `suggested_main_industry`, or `online_gpv_last_30_days` are missing or null.** Report: "Cannot generate recommendations — missing required site data: {fields}." --- ## Step 3b: Validate the request Check if the merchant's request includes anything unsupported. **Reject** these: | Unsupported request | Response | |---|---| | Buy one get one (BOGO) | Explain: not supported by Discount Rules API | | Fixed-price bundles ("3 for $100") | Explain: requires custom pricing logic | | Unrelated to eCommerce | Decline politely | If valid, continue. --- ## Step 4: Identify applicable domains Based on the merchant's request AND the site data, determine which domains to analyze. **Multiple domains can be active simultaneously.** | Domain | When to activate | Data signals | |---|---|---| | **DISCOUNTS** | Merchant mentions sales, promotions, revenue, AOV, clearance, holidays, coupons. **Also activate if no specific domain is mentioned** (default). | Always — site data contains discount metrics | | **SHIPPING** | Merchant mentions shipping, delivery, checkout conversion, cart abandonment. **Also activate proactively** if site data suggests shipping issues. | High visitors + low orders may indicate shipping friction | **Priority rule**: If the merchant mentions a specific holiday/event/date, the DISCOUNTS domain MUST use the **SEASONAL** strategy — even if other signals like "boost sales" or "increase revenue" could match other goals. Holidays are time-sensitive and take priority over general intent. **If the request is generic** (e.g., "boost my sales", "help my business"), **activate ALL domains**. The best recommendations will come from analyzing every angle. **If the request targets a specific domain** (e.g., "give me a coupon", "fix my shipping rates", "set up a gift card"), **activate ONLY that domain**. Do not generate cross-domain recommendations — focus all 5 recommendation slots on the requested domain. The merchant asked for something specific; respect that focus. --- ## Step 4b: Load domain-specific goal skills **MANDATORY — load the matching goal skill(s) now using `ReadFullDocsArticle`.** These contain detailed strategy logic, KPIs, margin tiers, campaign window calculations, and guardrails that you MUST follow. **For DISCOUNTS domain — classify the discount goal and load it:** | Discount goal | Trigger | Load this skill | |---|---|---| | SEASONAL | Holiday/event/date mentioned | [Goal: Seasonal Revenue](https://dev.wix.com/docs/api-reference/business-solutions/e-commerce/skills/goal-seasonal-revenue.md) | | UPSELL_BOOST | "increase AOV", "spend more", "upsell" | [Goal: Increase AOV](https://dev.wix.com/docs/api-reference/business-solutions/e-commerce/skills/goal-increase-aov.md) | | STOCK_MOVER | "clear inventory", "overstock", "clearance" | [Goal: Clear Inventory](https://dev.wix.com/docs/api-reference/business-solutions/e-commerce/skills/goal-clear-inventory.md) | | BUNDLE_AND_SAVE | "bundle", "cross-sell", "buy together" | [Goal: Drive Cross-Sells](https://dev.wix.com/docs/api-reference/business-solutions/e-commerce/skills/goal-drive-cross-sells.md) | | Generic (no clear goal) | "boost sales", ambiguous | Default to SEASONAL if holiday nearby, else UPSELL_BOOST | **For SHIPPING domain — load the same goal as discounts.** Shipping flows (free shipping threshold, rate optimization) serve the same business goals as discount flows. Load the matching discount goal above — it now includes shipping flow references. **The goal skill will instruct you to load flow and guardrail skills** — follow those instructions. This chain provides the detailed execution logic you need for high-quality recommendations. **Do NOT skip this step.** The goal/flow/guardrail skills contain critical constraints (margin tiers, campaign windows, conflict checks) that prevent bad recommendations. --- ## Step 4c: Determine mechanism — Automatic Discount or Coupon **Only for DISCOUNTS domain. Skip if DISCOUNTS is not active.** | Merchant says | Mechanism | |---|---| | "sale", "promotion", "discount for everyone" | **AUTOMATIC** | | "coupon", "code", "promo code", "voucher" | **COUPON** | | "discount for subscribers", "influencer code" | **COUPON** | | Unclear | **Ask the merchant** | **If unclear, ask:** "Would you like this to apply automatically to everyone, or as a coupon code?" **If COUPON is selected**, load the coupon setup reference with `ReadFullDocsArticle`: [Setup: Coupons](https://dev.wix.com/docs/api-reference/business-solutions/coupons.md) --- ## Step 5: Analyze catalog **Permission**: `ecom:discounts_recommendations:v1:recommendation:build_recommendation` Call both APIs concurrently: ### Call 1: GetCatalogAnalytics ``` CallWixSiteAPI( url: "https://manage.wix.com/recommendations/v1/recommendations/get-catalog-analytics-tool", method: "POST", body: { "aggregates": , "minMarginPct": 0.15 } ) ``` Valid `aggregates` values: `op` ∈ `count|sum|avg|min|max|stddev|quantiles` · `field` ∈ `quantity|price|cost|profit|profitMargin|ordersCount` · `q` required only for `quantiles` (array of 0.0–1.0, max 20) **Aggregates by goal:** | Goal | `aggregates` array | |---|---| | UPSELL_BOOST | `[{"op":"count","field":"price"}, {"op":"quantiles","field":"price","q":[0.5,0.75,0.9]}, {"op":"avg","field":"profitMargin"}]` | | BUNDLE_AND_SAVE | `[{"op":"min","field":"price"}, {"op":"max","field":"price"}, {"op":"avg","field":"profitMargin"}, {"op":"count","field":"price"}]` | | STOCK_MOVER | `[{"op":"sum","field":"quantity"}, {"op":"sum","field":"ordersCount"}, {"op":"avg","field":"profitMargin"}]` | | SEASONAL | `[{"op":"sum","field":"ordersCount"}, {"op":"quantiles","field":"price","q":[0.5,0.9]}, {"op":"avg","field":"profitMargin"}]` | | SHIPPING | `[{"op":"count","field":"price"}, {"op":"quantiles","field":"price","q":[0.5,0.75]}, {"op":"avg","field":"profitMargin"}]` | **Response shape:** ```json { "categoryGroups": [ { "categoryName": "Electronics", "fields": { "count()": 45, "quantiles([0.5,0.75,0.9],price)": [ { "quantile": 0.5, "value": 89.99 }, { "quantile": 0.75, "value": 149.99 } ], "avg(profitMargin)": 0.42 } }, { "categoryName": "All Products", "fields": { "count()": 120, "avg(profitMargin)": 0.35 } } ] } ``` **Important**: Use "All Products" only for overall catalog stats. Exclude it from category-level analysis. ### Call 2: GetProductCatalogData ``` CallWixSiteAPI( url: "https://manage.wix.com/recommendations/v1/recommendations/get-product-catalog-data-tool", method: "POST", body: { "businessGoal": "", "minMarginPct": 0.15, "catalogLimit": 30, "query": "", "categoryNames": } ) ``` **Sort order applied server-side by `businessGoal`:** | Goal | Sort order | |---|---| | UPSELL_BOOST | price DESC, ordersCount DESC | | BUNDLE_AND_SAVE | price DESC, ordersCount DESC | | STOCK_MOVER | quantity DESC, ordersCount ASC | | SEASONAL / SHIPPING | ordersCount DESC | **Response shape:** ```json { "items": [ { "id": "product-uuid", "name": "Premium Headphones", "quantity": 85, "price": 149.99, "profit": 67.50, "profitMargin": 0.45, "ordersCount": 23 } ] } ``` `price` and `profit` are in `payment_currency` units. `id` is the product UUID — use for `productIds` in rules. ### Step 5b: Convert category names to GUIDs (if using CATEGORY scope) **MANDATORY before outputting any categoryIds.** Never output category names as IDs. **Send only categories you plan to target — max 10 per call.** ``` CallWixSiteAPI( url: "https://manage.wix.com/recommendations/v1/recommendations/get-category-ids-tool", method: "POST", body: { "categoryNames": ["", ""] } ) ``` **Response:** `{ "categoryIds": ["a1b2c3d4-...", "b2c3d4e5-..."] }` If `categoryIds` is empty: category doesn't exist — fall back to SITE scope and tell the merchant: "Could not resolve category '{name}', using site-wide scope instead." ### Failure handling - Both calls fail: Fall back to SITE scope using only site profile data. - One fails: Use whichever succeeded. --- ## Step 6: Generate recommendations across ALL active domains **Only now — after data gathering — generate recommendations.** Maximum **5 recommendations total** across all domains. Each recommendation includes its `domain` field. ### Discount recommendations (if DISCOUNTS domain active) Use site data + catalog data to generate discount recommendations. Each should use a **different strategy**: | Strategy | When to use | Key parameters | |---|---|---| | SEASONAL | Holiday/event within 30 days | Time-bounded, site-wide or category scope | | UPSELL_BOOST | AOV data available | minSubTotal above current AOV | | STOCK_MOVER | Products with high stock + low orders | Deeper discounts on slow movers | | BUNDLE_AND_SAVE | Many low-priced items | minItemQuantity conditions | **Scope selection** (in order of preference): 1. **CATEGORY** (preferred): High-opportunity category from analytics. Must have GUID from GetCategoryIds. 2. **ITEMS** (specific): Individual products from catalog data. Max 5 product IDs. 3. **SITE** (fallback): When no clear category/product opportunity. **Performance signals:** | What you observe in the data | What to recommend | |---|---| | High visitors, low ordersCount | Site-wide discount to convert traffic | | High AOV, few items per order | BUNDLE_AND_SAVE | | Products with high stock + low orders | STOCK_MOVER | | Holiday within 30 days | SEASONAL | **Discount constraints:** - Discount must not exceed `discountMargin` from site data (unless merchant overrides) - Round percentages to 5/10/15/20/25% unless merchant specified exact value - All categoryIds must be GUIDs from GetCategoryIds - All productIds must be from GetProductCatalogData - Mechanism must be AUTOMATIC or COUPON per Step 4c ### Shipping recommendations (if SHIPPING domain active) Analyze the site's shipping configuration using the rules below. All shipping recommendations use `domain: "shipping"`. **Externally managed regions:** Regions where `deliveryCarriers[].appId` matches an external carrier (e.g., Shippo) — exclude from ALL analysis. Do not recommend changes to these. **Shipping analysis rules — evaluate each and recommend where data supports:** | Rule | Finding | Recommendation | |---|---|---| | **Coverage** | Active region with zero shipping options | CRITICAL — `create_shipping_option` for that region | | **Coverage** | Domestic country not covered by any region | CRITICAL — `activate_region` or create domestic region | | **Coverage** | Inactive regions with shipping options | `activate_region` or clean up orphaned options | | **Free Shipping** | No free shipping option anywhere | `create_shipping_option` with AOV-calibrated threshold (1.2-1.5x AOV) | | **Free Shipping** | Free shipping threshold > 2x AOV | Lower threshold — too high for most customers | | **Rates** | Flat rate > 15% of AOV | Reduce rate or add conditional tiering — sticker shock risk | | **Rates** | All flat rates, no conditional pricing | Add threshold-based tiers for better conversion | | **Rates** | Per-item pricing enabled | Review — usually causes unexpectedly high totals | | **Carrier** | No backup rate on carrier regions | `enable_backup_rate` as fallback | | **Options** | Too many options per region (> 5) | Consolidate — choice paralysis reduces conversion | | **Options** | Only 1 option per region | Add at least one alternative (e.g., express tier) | **Shipping action types:** `create_shipping_option`, `update_shipping_option`, `enable_backup_rate`, `activate_region`. **Priority order:** CRITICAL blockers (no options, no coverage) → Conversion-linked (no free shipping, high rates) → Revenue opportunities (international, tiered pricing) → Configuration improvements (consolidate, add estimates). ### Cross-domain balance - If request is generic, aim for recommendations from **multiple domains** (e.g., 2-3 discount + 1-2 shipping) - If request targets a specific domain, focus all slots on that domain - Rank by business impact: CRITICAL blockers first, then conversion-linked, then revenue opportunities --- ## Step 7: Validate before returning 1. **Conflict check**: Do existing active discounts/coupons overlap with your recommendation scope? Warn about stacking. 2. **Margin check**: Discounts within `discountMargin` cap. 3. **No duplicates**: Each recommendation targets a different scope/action combination. 4. **No contradictions**: Don't recommend opposite actions in the same domain. 5. **Strategy diversity**: Discount recommendations use different strategies where possible. 6. **Mechanism match**: Discount mechanism matches Step 4c determination. 7. **ID validity**: All categoryIds are GUIDs from GetCategoryIds. All productIds are from GetProductCatalogData. 8. **Rounding**: Discount percentages round to 5/10/15/20/25% unless merchant specified exact value. 9. **Data-backed**: Every recommendation must reference specific data from API responses. 10. **Domain labeled**: Every recommendation has the correct `domain` field. --- ## Step 8: Persist recommendations to database (Tracking) **MANDATORY — do NOT skip unless the user said `SKIP_TRACKING`.** Before calling BatchCreate, load the tracking recipe to get the exact request body shape: ``` ReadFullDocsArticle("https://dev.wix.com/docs/api-reference/business-solutions/e-commerce/skills/api-recommendation-tracking".md) ``` Then call `BatchCreate` to persist ALL recommendations as PROPOSED: ``` CallWixSiteAPI( url: "https://manage.wix.com/_api/agentic-recommendations/v1/agentic-recommendations/batch-create", method: "POST", body: { "agenticRecommendations": [ { "title": "", "reasoning": "", "domain": "", "urgency": "", "advice": { "action": "", "params": , "successCriteria": "" } } ], "conversationId": "" } ) ``` **Save the `id` and `revision` from each result.** Include them in the output. If BatchCreate fails, report the error and include recommendations without tracking IDs. --- ## Output format ```json { "recommendations": [ { "id": "", "revision": "", "title": "Memorial Weekend Flash Sale — 15% Off Orders Over $250", "reasoning": "AOV is $242 (online_gpv_last_30_days / last_30_days_orders_count). merchant_business_country is US, Memorial Day is within 7 days. Setting $250 threshold nudges carts above AOV while staying within 25% discount cap.", "domain": "discounts", "urgency": "HIGH", "advice": { "action": "apply_discount", "params": { "mechanism": "AUTOMATIC", "scope": "SITE", "categoryIds": [], "productIds": [], "name": "Memorial Weekend Sale", "why": "Your AOV is $242. A 15% discount on orders over $250 encourages adding one more item.", "discountType": "PERCENTAGE", "discount": 15, "code": "", "usageLimit": 0, "limitPerCustomer": 0, "conditions": { "minItemQuantity": 0, "minSubTotal": 250, "startDate": "2026-05-23", "endDate": "2026-05-26" } }, "success_criteria": "15% discount applied site-wide for orders above $250 during Memorial Weekend" } } ] } ``` ### Field rules | Field | Rule | |---|---| | `id` | GUID from tracking BatchCreate response (omit if tracking skipped/failed) | | `title` | Short, actionable. Max 200 chars. Always English. | | `reasoning` | **Must reference which API call returned the data.** Always English. | | `domain` | `"discounts"` or `"shipping"` (future: `"gift_cards"`, `"taxes"`) | | `urgency` | `CRITICAL`, `HIGH`, `MEDIUM`, or `LOW` | | `mechanism` | `AUTOMATIC` or `COUPON`. From Step 4c. Only for discounts domain. | | `name` | Marketing headline, 2-5 words. Translate to site `language` if not English. | | `why` | 1-2 sentences with specific data points from API responses. Translate to site `language`. | | `code` | Only for COUPON mechanism. Memorable code, max 20 chars (e.g., "SAVE15"). | | `scope` + IDs | For discounts: SITE = both empty, CATEGORY = categoryIds only (max 3), ITEMS = productIds only (max 5). | | `success_criteria` | How to verify the recommendation was applied correctly | ### Valid action types by domain | Domain | Action types | |---|---| | discounts | `apply_discount` | | shipping | `create_shipping_option`, `update_shipping_option`, `enable_backup_rate`, `activate_region` | --- ## Constraints - Maximum 5 recommendations total across all domains - Each discount recommendation must use a different strategy - All data must come from API responses — no assumptions - Respect discountMargin cap unless merchant overrides - All IDs must be GUIDs from API responses - Catalog queries limited to 30 items - Every recommendation MUST be persisted via tracking before presenting (unless SKIP_TRACKING) - Recommendations should span multiple domains when the request is generic - Never recommend changes to externally managed (Shippo) shipping regions --- > Portal Navigation: > > - Append `.md` to any URL under `https://dev.wix.com/docs/` to get its markdown version. > - Pages are either content pages (article or reference text) or menu pages (a list of links to child pages). > - To get a menu page, truncate any URL to a parent path and append `.md` (e.g. `https://dev.wix.com/docs/sdk.md`, `https://dev.wix.com/docs/sdk/core-modules.md`). > - Top-level index of all portals: https://dev.wix.com/docs/llms.txt > - Full concatenated docs: https://dev.wix.com/docs/llms-full.txt ## Resource: Pricing & Promotions ## Article: Pricing & Promotions ## Article Link: https://dev.wix.com/docs/api-reference/business-solutions/e-commerce/skills/pricing-promotions.md ## Article Content: # Pricing & Promotions Discount rules, coupon codes, sales, ribbons, bundles, tiered pricing, and the strategic side of "run a promotion to grow revenue". > **Routing rule (READ FIRST).** Any merchant query that mentions BOTH a Pricing-side topic (discount, coupon, sale, ribbon, bundle, promotion strategy) AND a NON-pricing-side topic (refunding a past order, processing a payment, editing the product's base price, shipping rates) MUST be answered by loading this dispatcher first AND the relevant other category (refunds → Get Paid / Dashboard; price → Catalog; shipping rates → Shipping). Do NOT route mixed queries from the WixREADME index alone; the binding decision lives here. **Pricing & promotions is NOT:** - The product price itself or its description/image → see **Catalog** (those are product fields). - A standing $0 shipping option/region rate → see **Shipping & fulfillment**. - Refunding a previous discounted order → route to verified Get Paid/payment docs or Dashboard guidance. > **Before dispatching** — confirm MerchantContext is loaded. If `siteData.country` is not in your conversation context, load it via [Load Merchant Context](https://dev.wix.com/docs/api-reference/business-solutions/e-commerce/skills/e-commerce-load-context.md). Skip if already loaded. > > **Promotion dispatch.** Score each entry below by (a) the merchant's query → `intent:*` tags, (b) MerchantContext → context tags. Load the **highest-scoring** entry. Ties → highest `priority`. No match → follow the base recipe at the bottom. > > **Do not fall back to legacy `setup-*` or `flow-*` pricing slugs.** The skills below replaced earlier `…/skills/setup-coupons` and `…/skills/flow-` articles during the routing-tree migration. If a slug below returns a transient 404 (rawdocs ingestion delay), **retry the same URL after a brief pause** — do NOT load any `setup-coupons` or `flow-*` legacy version even if it appears in the WixREADME index; that content is stale pre-migration material that contradicts this dispatcher. ### Actions — concrete operations > - [Create coupon](https://dev.wix.com/docs/api-reference/business-solutions/e-commerce/skills/pricing-create-coupon.md) — tags: `[intent:create-coupon]` · priority 0 > - [Create discount rule (auto-apply)](https://dev.wix.com/docs/api-reference/business-solutions/e-commerce/skills/pricing-create-discount-rule.md) — tags: `[intent:create-discount-rule]` · priority 0 > - [Add sale ribbon / new ribbon](https://dev.wix.com/docs/api-reference/business-solutions/e-commerce/skills/pricing-create-discount-rule.md) — tags: `[intent:add-ribbon]` · priority 0 · *ribbons are configured via Discount Rules; same recipe* > - [Schedule a future sale](https://dev.wix.com/docs/api-reference/business-solutions/e-commerce/skills/pricing-create-discount-rule.md) — tags: `[intent:schedule-sale]` · priority 0 · *uses Discount Rules with `startTime` in the future* ### Business flows — the orchestrator The single business-flow orchestrator (`recommend-ecommerce-strategy`) handles all strategic discount intents. It classifies internally (SEASONAL / UPSELL_BOOST / STOCK_MOVER / BUNDLE_AND_SAVE / ABANDONED_CART) and loads its `goal-*` / `flow-*` support files from the kept ecommerce-root siblings. > - [Run a sale / promotion strategy](https://dev.wix.com/docs/api-reference/business-solutions/e-commerce/skills/recommend-e-commerce-strategy.md) — tags: `[intent:run-a-sale]` · priority 0 > - [Boost my business / increase sales](https://dev.wix.com/docs/api-reference/business-solutions/e-commerce/skills/recommend-e-commerce-strategy.md) — tags: `[intent:boost-business]` · priority 0 > - [Seasonal / holiday promotion](https://dev.wix.com/docs/api-reference/business-solutions/e-commerce/skills/recommend-e-commerce-strategy.md) — tags: `[intent:seasonal-promo]` · priority 0 > - [Clearance / move slow stock](https://dev.wix.com/docs/api-reference/business-solutions/e-commerce/skills/recommend-e-commerce-strategy.md) — tags: `[intent:clearance]` · priority 0 > - [Increase AOV (bundle / upsell)](https://dev.wix.com/docs/api-reference/business-solutions/e-commerce/skills/recommend-e-commerce-strategy.md) — tags: `[intent:increase-aov]` · priority 0 > > **If the orchestrator above returns a 404** — do not stop. Classify the merchant intent directly and load the matching goal skill via `ReadFullDocsArticle`, then follow its routing chain into the flow skill: > - Holiday / event / date mentioned (SEASONAL — takes priority over all other signals) → [Goal: Seasonal Revenue](https://dev.wix.com/docs/api-reference/business-solutions/e-commerce/skills/goal-seasonal-revenue.md) > - "Boost sales", "increase AOV", "upsell", "spend more" (UPSELL_BOOST) → [Goal: Increase AOV](https://dev.wix.com/docs/api-reference/business-solutions/e-commerce/skills/goal-increase-aov.md) > - "Clearance", "slow stock", "overstock", "move inventory" (STOCK_MOVER) → [Goal: Clear Inventory](https://dev.wix.com/docs/api-reference/business-solutions/e-commerce/skills/goal-clear-inventory.md) > - "Bundle", "cross-sell", "buy together", "more items per order" (BUNDLE_AND_SAVE) → [Goal: Drive Cross-Sells](https://dev.wix.com/docs/api-reference/business-solutions/e-commerce/skills/goal-drive-cross-sells.md) ### Info / troubleshoot / recommendation > - [Discount not applying — diagnose](https://dev.wix.com/docs/api-reference/business-solutions/e-commerce/skills/pricing-discount-not-applying.md) — tags: `[intent:troubleshoot]` · priority 0 > - [View active discounts (Coupons API)](https://dev.wix.com/docs/api-reference/business-solutions/coupons/coupons/query-coupons.md) — tags: `[intent:view-active-discounts]` · priority 0 · **API doc, no skill** (per §7.5) > - [View active discounts (Discount Rules API)](https://dev.wix.com/docs/api-reference/business-solutions/e-commerce/extensions/discounts/discount-rules/query-discount-rules.md) — tags: `[intent:view-active-rules]` · priority 0 · **API doc, no skill** > - [Coupon usage stats](https://dev.wix.com/docs/api-reference/business-solutions/coupons/coupons/get-coupon-usage.md) — tags: `[intent:coupon-usage-stats]` · priority 0 · **API doc, no skill** > - Competitive pricing check (how do my prices compare?) — tags: `[intent:competitive-pricing]` · *no Wix API for competitor data — advise the merchant to benchmark externally (Google Shopping / market research); Wix only exposes their own catalog prices via Catalog API* ### Cross-category routes (handled in another category) > - [Change product price](https://dev.wix.com/docs/api-reference/business-solutions/stores/products-v3/update-product.md) — tags: `[intent:change-price]` · *price is a product field — Catalog API* > - [Set compare-at price](https://dev.wix.com/docs/api-reference/business-solutions/stores/products-v3/update-product.md) — tags: `[intent:set-compare-at]` · *Catalog* > - [Free shipping over $X (promo rule)](https://dev.wix.com/docs/api-reference/business-solutions/e-commerce/skills/pricing-create-discount-rule.md) — tags: `[intent:free-shipping-promo]` · *belongs here as a promo rule; a $0 shipping rate is Shipping* ## Tag matching The agent matches the merchant's natural-language query to an `intent:*` tag (cues are in each promotion file's `description`), AND matches MerchantContext to any context tags. A promotion's tags must ALL be satisfied for it to be eligible. Among eligible promotions, the one with the highest tag-count wins; ties broken by `priority`. ### Worked examples | Merchant query | MerchantContext | Match | |---|---|---| | "Create a 20% off coupon" | any | `ecom-pricing-create-coupon` via `[intent:create-coupon]` | | "Run a Black Friday sale" | any | `recommend-ecommerce-strategy` via `[intent:run-a-sale]` (orchestrator classifies as SEASONAL internally) | | "Help me boost my sales" | any | `recommend-ecommerce-strategy` via `[intent:boost-business]` | | "My coupon code XMAS isn't working" | any | `ecom-pricing-troubleshoot-not-applying` | | "Show me my active discounts" | any | `query-coupons` API doc (no skill — per §7.5) | | "Change the price of product Y" | any | Catalog cross-route (re-dispatch to Catalog when that category exists) | ## Base recipe (fallback) If nothing matches, the merchant query is too vague. Ask **one** clarifying question: > "Do you want to (a) **create** a specific discount/coupon now, (b) **strategize** a sale or promotion campaign, or (c) **fix** a discount that isn't applying?" Map the answer → re-dispatch: - (a) → `ecom-pricing-create-coupon` (default for "create a discount") - (b) → `recommend-ecommerce-strategy` - (c) → `ecom-pricing-troubleshoot-not-applying` --- > Portal Navigation: > > - Append `.md` to any URL under `https://dev.wix.com/docs/` to get its markdown version. > - Pages are either content pages (article or reference text) or menu pages (a list of links to child pages). > - To get a menu page, truncate any URL to a parent path and append `.md` (e.g. `https://dev.wix.com/docs/sdk.md`, `https://dev.wix.com/docs/sdk/core-modules.md`). > - Top-level index of all portals: https://dev.wix.com/docs/llms.txt > - Full concatenated docs: https://dev.wix.com/docs/llms-full.txt ## Resource: Shipping ## Article: Shipping ## Article Link: https://dev.wix.com/docs/api-reference/business-solutions/e-commerce/skills/shipping.md ## Article Content: # Shipping Set up and tune how a store ships — what rates to charge, which regions are covered, pickup/local-delivery options, free-shipping thresholds, and diagnosing wrong or missing shipping at checkout. > **Routing rule (READ FIRST).** This dispatcher owns shipping *setup* — rates, regions, pickup, free-shipping thresholds, and diagnosing wrong/missing shipping at checkout. Post-purchase / order-execution work (mark shipped, update tracking, partial/bulk fulfill, shipping labels, packing slips, invoices, "find unshipped orders") is not yet in the routing tree — fall back to the relevant API docs or Dashboard guidance for those. **Shipping is NOT:** - Tax on shipping or destination tax → tax APIs / Dashboard. - The checkout/delivery step conversion itself → see **Checkout & cart**. - Marking orders fulfilled, updating tracking, bulk fulfillment, invoices, or shipping labels → not covered here; use the Order Fulfillments API directly or the Wix Dashboard. - Order lifecycle (approve/cancel/search an order), refunds/payments → existing Get Paid/payment docs or Dashboard guidance. > **Before dispatching** — confirm MerchantContext is loaded. If `siteData.country` is not in your conversation context, load it via [Load Merchant Context](https://dev.wix.com/docs/api-reference/business-solutions/e-commerce/skills/e-commerce-load-context.md). Skip if already loaded. > > **Promotion dispatch.** Score each entry below by (a) the merchant's query → `intent:*` tags, (b) MerchantContext → context tags. Load the **highest-scoring** entry with `ReadFullDocsArticle`. Ties → highest `priority`. No match → follow the base recipe at the bottom. > > **Do not fall back to legacy `flow-*` slugs.** The skills below replaced earlier `…/skills/flow-` articles (e.g. `flow-add-free-shipping`) during the routing-tree migration. If a slug below returns a transient 404 from the docs backend (rawdocs ingestion delay on a freshly-renamed slug), **retry the same URL after a brief pause** — do NOT load the legacy `flow-*` version, which carries stale pre-migration content that contradicts this dispatcher. > > **API reference.** All shipping endpoints (Shipping Options + Delivery Profiles) are documented inline in [Shipping API Reference](https://dev.wix.com/docs/api-reference/business-solutions/e-commerce/skills/shipping-api-reference.md) — there is no public `dev.wix.com` docs page for them, so that file is the authoritative spec. The recipes below link to it where needed. > > **Routing rule:** After identifying the matching skill above, call `ReadFullDocsArticle` on it BEFORE making any API calls or offering a configuration. The exact endpoint shapes, field names, and guardrails live in the recipe — do not configure shipping from training knowledge alone. If the URL returns a 404, retry once; then try the next-best match from the list above. ### Actions — set up shipping > - [Set up shipping rates / rules](https://dev.wix.com/docs/api-reference/business-solutions/e-commerce/skills/shipping-set-up-rates.md) — tags: `[intent:setup-rates]` · priority 0 > - [Set up delivery regions / coverage](https://dev.wix.com/docs/api-reference/business-solutions/e-commerce/skills/shipping-set-up-regions.md) — tags: `[intent:setup-regions]` · priority 0 > - [Set up store pickup / local delivery](https://dev.wix.com/docs/api-reference/business-solutions/e-commerce/skills/shipping-set-up-pickup-local-delivery.md) — tags: `[intent:setup-pickup]` · priority 0 > - [Add free shipping over $X](https://dev.wix.com/docs/api-reference/business-solutions/e-commerce/skills/shipping-add-free-shipping.md) — tags: `[intent:free-shipping]` · priority 0 ### Optimize & fix > - [Optimize shipping rates (flat ↔ tiered, gaps)](https://dev.wix.com/docs/api-reference/business-solutions/e-commerce/skills/shipping-optimize-rates.md) — tags: `[intent:optimize-rates]` · priority 0 > - [Fix coverage gaps (regions with no shipping option)](https://dev.wix.com/docs/api-reference/business-solutions/e-commerce/skills/shipping-fix-coverage-gaps.md) — tags: `[intent:fix-coverage]` · priority 0 ### Troubleshoot > - [Shipping rate incorrect (customer charged wrong shipping)](https://dev.wix.com/docs/api-reference/business-solutions/e-commerce/skills/shipping-optimize-rates.md) — tags: `[intent:rate-incorrect]` · priority 0 · *audit rates via the Rate Pricing Sanity guardrail, then correct the rate structure* ## Tag matching The agent matches the merchant's natural-language query to an `intent:*` tag (cues are in each file's `description`), AND matches MerchantContext to any context tags (e.g. `country`, `region`). All of an entry's tags must be satisfied for it to be eligible; highest tag-count wins; ties → `priority`. ### Worked examples | Merchant query | MerchantContext | Match | |---|---|---| | "Set up free shipping over $50" | any | `ecom-shipping-free-shipping` via `[intent:free-shipping]` | | "How much should I charge for shipping?" | any | `ecom-shipping-setup-rates` via `[intent:setup-rates]` | | "I want customers to pick up from my shop" | any | `ecom-shipping-setup-pickup` via `[intent:setup-pickup]` | | "Some regions have no shipping option" | any | `ecom-shipping-fix-coverage` via `[intent:fix-coverage]` | | "A customer was charged the wrong shipping" | any | `ecom-shipping-optimize-rates` via `[intent:rate-incorrect]` (runs rate-sanity guardrail first) | ## Base recipe (fallback) If nothing matches, the merchant's intent is unclear. Ask **one** clarifying question: > "Do you want to **set up** shipping (rates, regions, or pickup), **add free shipping**, **optimize** your existing rates, or **fix** a region with no shipping option?" Map the answer to one of the `intent:*` tags above and re-dispatch. Order-fulfillment requests fall outside this dispatcher — use the Order Fulfillments API or Wix Dashboard. --- > Portal Navigation: > > - Append `.md` to any URL under `https://dev.wix.com/docs/` to get its markdown version. > - Pages are either content pages (article or reference text) or menu pages (a list of links to child pages). > - To get a menu page, truncate any URL to a parent path and append `.md` (e.g. `https://dev.wix.com/docs/sdk.md`, `https://dev.wix.com/docs/sdk/core-modules.md`). > - Top-level index of all portals: https://dev.wix.com/docs/llms.txt > - Full concatenated docs: https://dev.wix.com/docs/llms-full.txt ## Resource: eCommerce: Load Context ## Article: eCommerce: Load Context ## Article Link: https://dev.wix.com/docs/api-reference/business-solutions/e-commerce/skills/e-commerce-load-context.md ## Article Content: # eCommerce: Load Context > **L1 loader pattern.** Each L1 domain (eCommerce, Stores, Get-paid, Contacts, …) owns its own context loader. This file is the **eCommerce** L1 loader. Other L1s have their own (e.g. `stores-load-context.md` will detect Catalog V1/V3 for Stores categories). The boilerplate (Step 1 + 2) is small; the **field list and runtime detections differ by L1**. > **When to run.** Called from the dispatch block of any eCommerce category's `default.md` (Tax, Pricing & promotions, …) before tag-matching. Run **once per session**. If `siteData.country` is already in your conversation context, skip the API calls below and return immediately — every subsequent eCommerce category entry reuses the loaded data. This is the canonical extract of Steps 1 + 3 from today's `recommend-ecommerce-strategy.md`, scoped to the fields eCommerce categories actually need. ## Step 1 — Resolve siteId If a `siteId` is not already known, call `ListWixSites`: ``` ListWixSites() ``` - If the merchant referenced a site by name, match it. - If exactly one site exists, auto-select it. - Otherwise, ask the merchant which site to use. **Do not proceed without a `siteId`.** ## Step 2 — Load business profile (the canonical endpoint) Same call today's `recommend-ecommerce-strategy.md` Step 3 makes. The field list below is the **eCommerce** subset — orchestrator-needed metrics (visitors / orders / GPV → AOV) plus locale/currency/industry used for dispatch tags and recommendations. ``` CallWixSiteAPI( url: "https://www.wix.com/wix-profile-client/v4/profile/metasite", method: "POST", body: { "fields": [ "language", "merchant_business_country", "suggested_main_industry", "suggested_sub_industry", "last_30_days_distinct_visitors", "last_30_days_orders_count", "online_gpv_last_30_days", "payment_currency" ] } ) ``` Extract each field into conversation context as `siteData`: | Field in response | Maps to | Notes | |---|---|---| | `fields.language.aSingleValue.aString` | `siteData.language` | Locale code (e.g. `en-US`) | | `fields.merchant_business_country.aSingleValue.aString` | `siteData.country` | ISO-3166-1 alpha-2 | | `fields.suggested_main_industry.aSingleValue.aString` | `siteData.industry` | Used by Pricing orchestrator's goal classification | | `fields.suggested_sub_industry.aSingleValue.aString` | `siteData.subIndustry` | Optional | | `fields.last_30_days_distinct_visitors.aSingleValue.aLong` | `siteData.visitors30d` | **Returned as JSON string** — `parseInt` before arithmetic | | `fields.last_30_days_orders_count.aSingleValue.aLong` | `siteData.orders30d` | parseInt | | `fields.online_gpv_last_30_days.aSingleValue.aLong` | `siteData.gpv30d` | parseInt | | `fields.payment_currency.aSingleValue.aString` | `siteData.currency` | ISO-4217 | Missing fields ⇒ no data for that field (don't fabricate). If `merchant_business_country`, `suggested_main_industry`, or `online_gpv_last_30_days` are missing or null, surface to the merchant: "Cannot resolve required site data: ." and stop. **Derived value:** `siteData.aov = parseInt(gpv30d) / parseInt(orders30d)` — in `siteData.currency` units. ## Step 2b — Detect catalog presence and load analytics Call `GetCatalogAnalytics` once here so all downstream pricing/promotions flows can reference `siteData.catalogAnalytics` without re-fetching. ``` CallWixSiteAPI( url: "https://manage.wix.com/recommendations/v1/recommendations/get-catalog-analytics-tool", method: "POST", body: { "aggregates": [ {"op":"count","field":"price"}, {"op":"min","field":"price"}, {"op":"max","field":"price"}, {"op":"avg","field":"profitMargin"}, {"op":"quantiles","field":"price","q":[0.5,0.75,0.9]}, {"op":"sum","field":"quantity"}, {"op":"sum","field":"ordersCount"} ], "minMarginPct": 0.15 } ) ``` Save the full `categoryGroups` array as `siteData.catalogAnalytics`. From the "All Products" group extract: - `siteData.catalogProductCount` = `count()` value (0 if missing or call fails) - `siteData.hasCatalog` = `siteData.catalogProductCount > 0` If the call fails, set `siteData.hasCatalog = true` (assume catalog exists; let downstream fail naturally). **This data is used by all pricing & promotions discount flows.** Flows that require a product catalog (Bundle & Save, Upsell Boost, Stock Mover, Seasonal) MUST check `siteData.hasCatalog` before proceeding — if `false`, stop with: "This site has no products. Set up your product catalog first before running promotions." ## Step 3 — Derive region (used by dispatch context tags) From `siteData.country`, set `siteData.region`: - `BR | AR | MX | CL | CO | PE` → `LATAM` - EU member states (`DE | FR | IT | ES | NL | BE | PL | SE | IE | AT | PT | FI | DK | CZ | HU | GR | RO | BG | HR | SK | SI | LT | LV | EE | CY | MT | LU`) → `EU` - `JP | CN | KR | SG | AU | NZ | IN | TH | ID | MY | PH | VN | HK | TW` → `APAC` - otherwise → `null` (UK is **not** in `region:EU`. AU/NZ are in `region:APAC` but Tax inclusive-pricing rules differ — handled inside Tax promotions.) ## Step 4 — Return Return immediately. Subsequent eCommerce category dispatches read `siteData.*` from conversation context without re-fetching. If the agent crosses into a different L1 (e.g. Stores) within the same session, that L1's loader will see `siteData.country` already loaded, skip its Steps 1-3, and only fire its own general derivations. ## Architectural rule — general site data only **This file must contain only general / cross-cutting site data** — fields that **every** category in this L1 needs. It must **not** include L3-category-specific runtime detection (e.g. Tax calculator, Catalog V1/V3, payment-provider state, shipping-coverage state). Reasoning: - Per-category detect calls accumulate cost on every session entry, even when the agent never visits that category. - L3-specific state can use APIs that aren't TPA-public (e.g. the Wix Tax FQDNs are `exposure: INTERNAL`); if the L1 loader depends on them, the entire L1 fails to load. Keeping the loader general-only contains the blast radius. - Per-category state can change independently of the merchant; loading it eagerly invites stale-data bugs. **Where category-specific runtime data is detected instead:** inside the category's `default.md` (Step before dispatch) or inside the specific promotion that needs it. The L1 loader does **not** prime per-category fields; the category does its own detection lazily, only when its own intent dispatch fires. Concretely for the categories we know about: - **Tax** — calculator detection (Manual vs Avalara) belongs in `ecom-tax.md` (the merged category-doc + dispatcher) or in each Tax promotion when it runs. Not here. - **Catalog V1/V3 version detection** — belongs in the Stores category loader when Stores migrates. `getCatalogAnalytics` (product count/margin/price) is already loaded here as a cross-cutting concern; V1/V3 detection is a separate, Stores-specific signal. - **Payments & finance** (when Get-paid migrates) — payment-provider state belongs in `finance-and-payments/get-paid-finance-default.md`. ## What this file does NOT do - **Does not detect per-category runtime state** (see architectural rule above). - **Does not load tracking history.** But: if any recipe in this session generates a recommendation to present to the merchant — regardless of which eCommerce category — it MUST load [API: Recommendation Tracking](https://dev.wix.com/docs/api-reference/business-solutions/e-commerce/skills/api-recommendation-tracking.md) and follow the lifecycle: load history before generating (Query), persist as PROPOSED via BatchCreate before presenting, and track execution via MarkExecuting / MarkDone / MarkFailed. This obligation applies to ALL eCommerce domains. - **Does not load non-eCommerce L1 fields** (catalog V1/V3 version detection, payment provider, …). Those belong inside the owning L1's category-level files (per the architectural rule). Note: `getCatalogAnalytics` (product count, margin, price distribution) IS loaded here as a cross-cutting concern; Catalog V1/V3 version detection is separate and belongs in the Stores category's own loader. - **Does not enforce dispatch.** The category's `default.md` is what scores tags and picks a promotion — this file only fills general site context. ## Pattern for future L1 loaders When a new L1 domain is migrated to the routing tree, author a `-load-context.md` at its root: - `references/stores/stores-load-context.md` — Stores L1 loader. Steps 1-3 same boilerplate, Step 4 runtime-detects Catalog version (V1/V3) and any other Stores-specific fields. - `references/get-paid/get-paid-load-context.md` — Get-paid L1 loader. Step 4 inspects payment provider state, enabled methods. - `references/contacts/contacts-load-context.md` — Contacts L1 loader. Possibly minimal — most CRM ops don't need runtime detection. Each lives sibling to its L1's category-docs. Each is referenced from every category's `default.md` within its L1. Skip-if-loaded check across L1s makes cross-L1 sessions cost-free. --- > Portal Navigation: > > - Append `.md` to any URL under `https://dev.wix.com/docs/` to get its markdown version. > - Pages are either content pages (article or reference text) or menu pages (a list of links to child pages). > - To get a menu page, truncate any URL to a parent path and append `.md` (e.g. `https://dev.wix.com/docs/sdk.md`, `https://dev.wix.com/docs/sdk/core-modules.md`). > - Top-level index of all portals: https://dev.wix.com/docs/llms.txt > - Full concatenated docs: https://dev.wix.com/docs/llms-full.txt ## Resource: Pricing: Create Coupon ## Article: Pricing: Create Coupon ## Article Link: https://dev.wix.com/docs/api-reference/business-solutions/e-commerce/skills/pricing-create-coupon.md ## Article Content: # Pricing: Create Coupon > **This skill is the single source for coupon creation.** Do NOT load `…/skills/setup-coupons` — that legacy slug pre-dates the routing tree migration and its content has been merged into this file. If the WixREADME index surfaces it, ignore it. ## Prerequisites - Wix Stores (or another eCommerce business solution) installed on the site ## Required APIs - [Create Coupon](https://dev.wix.com/docs/api-reference/business-solutions/coupons/coupons/create-a-coupon.md) — `POST /v2/coupons` - [Update Coupon](https://dev.wix.com/docs/api-reference/business-solutions/coupons/coupons/update-a-coupon.md) — `PATCH /v2/coupons/{id}` - [Query Coupons](https://dev.wix.com/docs/api-reference/business-solutions/coupons/coupons/query-coupons.md) — `POST /v2/coupons/query` - [Delete Coupon](https://dev.wix.com/docs/api-reference/business-solutions/coupons/coupons/delete-a-coupon.md) — `DELETE /v2/coupons/{id}` --- ## Step 1: Query existing coupons Before creating a coupon, check for code conflicts and existing promotions on the same scope. **Endpoint**: `POST https://www.wixapis.com/stores/v2/coupons/query` **Request**: ```json { "query": { "paging": { "limit": 100 } } } ``` **Response**: ```json { "coupons": [ { "id": "a1b2c3d4-e5f6-7890-abcd-ef1234567890", "specification": { "name": "Summer Sale", "code": "SUMMER20", "percentOffRate": 20, "scope": { "namespace": "stores", "group": { "name": "product" } }, "startTime": 1717200000000, "expirationTime": 1719792000000, "usageLimit": 100, "limitPerCustomer": 1, "active": true }, "numberOfUsages": 12, "expired": false } ] } ``` Check for: duplicate codes, overlapping scopes with active coupons, and cross-mechanism stacking with active automatic discount rules. ### Guardrails — run before creating the coupon - **Duplicate / conflicting code** — reject a code already in use. - **Cross-mechanism stacking** — coupons stack with automatic discount rules at checkout. Query active discount rules on overlapping scope; if found, warn with the combined effective discount ("a 20% coupon during a 20% automatic sale = ~36% off"). Only one coupon applies per checkout, but automatic rules are unlimited. - **% sanity** — > 50% warn (show a $100 → $(100−pct) example); = 100% block unless confirmed; > 100% always block. - **Margin** — if cost data is available, ensure the discount doesn't push price below cost; otherwise warn for > 40%. - **User override** — explicit merchant values override these caps; document the override in your reasoning. (The automatic-rule side of these checks lives in [Create Discount Rule](https://dev.wix.com/docs/api-reference/business-solutions/e-commerce/skills/pricing-create-discount-rule.md) → "Guardrails".) --- ## Step 2: Create a percentage-off coupon **Endpoint**: `POST https://www.wixapis.com/stores/v2/coupons` **Request** — 15% off all store products: ```json { "specification": { "name": "Spring Sale 15%", "code": "SPRING15", "percentOffRate": 15, "scope": { "namespace": "stores", "group": { "name": "product" } }, "startTime": 1714521600000, "usageLimit": 200, "limitPerCustomer": 1, "active": true } } ``` **Response**: ```json { "id": "b2c3d4e5-f6a7-8901-bcde-f12345678901" } ``` **Request** — 20% off a specific collection: ```json { "specification": { "name": "Electronics Deal", "code": "ELEC20", "percentOffRate": 20, "scope": { "namespace": "stores", "group": { "name": "collection", "entityId": "collection-uuid-here" } }, "startTime": 1714521600000, "expirationTime": 1717200000000, "usageLimit": 50, "limitPerCustomer": 1, "active": true } } ``` **Request** — 10% off a specific product: ```json { "specification": { "name": "VIP Product Discount", "code": "VIP10", "percentOffRate": 10, "scope": { "namespace": "stores", "group": { "name": "product", "entityId": "product-uuid-here" } }, "startTime": 1714521600000, "limitPerCustomer": 1, "active": true } } ``` --- ## Step 3: Create a fixed-amount coupon **Request** — $10 off all products: ```json { "specification": { "name": "Save $10", "code": "SAVE10", "moneyOffAmount": 10, "scope": { "namespace": "stores", "group": { "name": "product" } }, "startTime": 1714521600000, "active": true } } ``` --- ## Step 4: Create a minimum subtotal coupon Instead of targeting a scope, you can require a minimum cart subtotal. This is a **oneOf** with scope — you set EITHER `scope` OR `minimumSubtotal`, not both. **Request** — 15% off orders over $100: ```json { "specification": { "name": "Spend $100, Save 15%", "code": "SPEND100", "percentOffRate": 15, "minimumSubtotal": 100, "startTime": 1714521600000, "usageLimit": 500, "limitPerCustomer": 1, "active": true } } ``` --- ## Key field rules | Field | Required | Notes | |---|---|---| | `name` | Yes | Display name shown to customers | | `code` | Yes | Unique coupon code. Max 20 characters. Case-insensitive at checkout. | | `startTime` | Yes | UNIX epoch in **milliseconds** (not seconds). E.g., `1714521600000` for 2024-05-01T00:00:00Z | | `expirationTime` | No | UNIX epoch in milliseconds. Omit for no expiration. | | `scope` OR `minimumSubtotal` | One required | **OneOf** — set scope to target items, OR minimumSubtotal for cart threshold. Cannot set both. Exception: freeShipping type ignores scope. | | `usageLimit` | No | Total uses across all customers. Omit for unlimited. | | `limitPerCustomer` | No | Max uses per customer. Omit for unlimited. | | `limitedToOneItem` | No | If true, discount applies only to lowest-priced item when customer buys multiple. | | `active` | No | Default `true`. Set `false` to create as draft. | ## Coupon types (oneOf — set exactly one) | Type | Field | Value | Example | |---|---|---|---| | Percentage off | `percentOffRate` | Double (e.g., `15` for 15%) | `"percentOffRate": 15` | | Fixed amount off | `moneyOffAmount` | Double (e.g., `10` for $10 off) | `"moneyOffAmount": 10` | | Fixed price | `fixedPriceAmount` | Double (e.g., `29.99`) | `"fixedPriceAmount": 29.99` | | Free shipping | `freeShipping` | Boolean `true` | `"freeShipping": true` | | Buy X Get Y | `buyXGetY` | Object with `x` and `y` fields | `"buyXGetY": {"x": 2, "y": 1}` | > **Note**: Free shipping as an **automatic discount rule** is NOT supported — use the `freeShipping` coupon type here, or configure a free-shipping rate via the Shipping Options API. ## Scope values for Wix Stores | Scope target | `namespace` | `group.name` | `group.entityId` | |---|---|---|---| | All store products | `"stores"` | `"product"` | Omit (applies to all) | | Specific product | `"stores"` | `"product"` | Product UUID | | Specific collection | `"stores"` | `"collection"` | Collection UUID | --- ## Recommendation → Coupon API Mapping When the recommendation output has `mechanism: "COUPON"`, use this mapping to convert it into a Coupons API payload. ### Scope mapping | Recommendation `scope` | Coupon `scope` | |---|---| | `SITE` | `{ "namespace": "stores", "group": { "name": "product" } }` (all products, no entityId) | | `CATEGORY` | `{ "namespace": "stores", "group": { "name": "collection", "entityId": "" } }` | | `ITEMS` | `{ "namespace": "stores", "group": { "name": "product", "entityId": "" } }` | **Important limitation**: The Coupons API scope supports only **one entityId** (one product or one collection). If the recommendation targets multiple products or categories: - For CATEGORY with multiple categoryIds: Create one coupon per collection, or pick the primary collection. - For ITEMS with multiple productIds: Create one coupon per product, or use `minimumSubtotal` instead of `scope` if the intent is cart-level. ### Discount type mapping | Recommendation `discountType` | Coupon field | |---|---| | `PERCENTAGE` | `"percentOffRate": ` | | `FIXED_AMOUNT` | `"moneyOffAmount": ` | | `FIXED_PRICE` | `"fixedPriceAmount": ` | ### Condition mapping | Recommendation condition | Coupon approach | |---|---| | `minSubTotal > 0` | Use `minimumSubtotal` instead of `scope` (they are oneOf — cannot use both) | | `minItemQuantity > 0` | **Not natively supported by Coupons API**. Mention in the coupon name (e.g., "Buy 3+, use code BUNDLE15") but the API cannot enforce item quantity. | | `startDate` | Convert to UNIX epoch milliseconds: `Date.parse("2026-06-01") → 1748736000000`. Set as `startTime`. | | `endDate` | Convert to UNIX epoch milliseconds. Set as `expirationTime`. | ### Code generation | Recommendation field | Coupon field | Rules | |---|---|---| | `code` from recommendation | `specification.code` | Max 20 characters. Must be unique on the site. Suggest memorable, brand-relevant codes (e.g., `SUMMER25`, `SAVE15`, `VIP20`). | | `usageLimit` from recommendation | `specification.usageLimit` | Total times the coupon can be used. `0` in recommendation → omit (unlimited). | | `limitPerCustomer` from recommendation | `specification.limitPerCustomer` | Max per customer. `0` → omit (unlimited). Recommend setting to `1` for most campaigns. | ### Full mapping example **Recommendation output**: ```json { "mechanism": "COUPON", "scope": "CATEGORY", "categoryIds": ["electronics-collection-uuid"], "name": "Tech Insider Deal", "discountType": "PERCENTAGE", "discount": 20, "code": "TECH20", "usageLimit": 100, "limitPerCustomer": 1, "conditions": { "startDate": "2026-06-01", "endDate": "2026-06-30" } } ``` **Coupon API request**: ```json { "specification": { "name": "Tech Insider Deal", "code": "TECH20", "percentOffRate": 20, "scope": { "namespace": "stores", "group": { "name": "collection", "entityId": "electronics-collection-uuid" } }, "startTime": 1748736000000, "expirationTime": 1751328000000, "usageLimit": 100, "limitPerCustomer": 1, "active": true } } ``` ### Key differences from Automatic Discounts | Aspect | Automatic Discount (Discount Rules API) | Coupon (Coupons API) | |---|---|---| | Scope supports multiple items | Yes (multiple IDs in arrays) | No (one entityId per scope) | | minSubTotal + scope together | Yes (scope + trigger) | No (oneOf — choose one) | | minItemQuantity enforcement | Yes (ITEM_QUANTITY_RANGE trigger) | Not supported by API | | Date format | ISO 8601 timestamps | UNIX epoch milliseconds | | Created state | `active: false`, `status: PENDING` | `active: true` by default | | Triggers/conditions | Separate trigger object with typed ranges | Only minimumSubtotal (simple threshold) | --- ## Error Handling | Error | Cause | Fix | |---|---|---| | `"When scope or minimumSubtotal is not used - only FreeShipping coupon is allowed"` | Coupon sent without `scope` or `minimumSubtotal` | Add `scope: { "namespace": "stores", "group": { "name": "product" } }` for site-wide, or set `minimumSubtotal` | | Duplicate code | Another coupon uses the same code | Generate a different code | | Invalid startTime | Value too low (must be epoch ms, not seconds) | Multiply by 1000 if in seconds | | Both scope and minimumSubtotal set | These are oneOf — cannot use both | Choose scope OR minimumSubtotal | | Code exceeds 20 characters | Code is too long | Shorten the code | ## References - [Coupons API](https://dev.wix.com/docs/api-reference/business-solutions/coupons/coupons/create-a-coupon.md) - [Valid Scope Values](https://dev.wix.com/docs/api-reference/business-solutions/coupons/coupons/valid-scope-values.md) --- > Portal Navigation: > > - Append `.md` to any URL under `https://dev.wix.com/docs/` to get its markdown version. > - Pages are either content pages (article or reference text) or menu pages (a list of links to child pages). > - To get a menu page, truncate any URL to a parent path and append `.md` (e.g. `https://dev.wix.com/docs/sdk.md`, `https://dev.wix.com/docs/sdk/core-modules.md`). > - Top-level index of all portals: https://dev.wix.com/docs/llms.txt > - Full concatenated docs: https://dev.wix.com/docs/llms-full.txt ## Resource: Pricing: Create Discount Rule ## Article: Pricing: Create Discount Rule ## Article Link: https://dev.wix.com/docs/api-reference/business-solutions/e-commerce/skills/pricing-create-discount-rule.md ## Article Content: # Setup Discount Rules ## Prerequisites - Wix Stores (or another eCommerce business solution) installed on the site - At least one product in the catalog ## Required APIs - [Create Discount Rule](https://dev.wix.com/docs/api-reference/business-solutions/e-commerce/extensions/discounts/discount-rules/create-discount-rule.md) - [Get Discount Rule](https://dev.wix.com/docs/api-reference/business-solutions/e-commerce/extensions/discounts/discount-rules/get-discount-rule.md) - [Query Discount Rules](https://dev.wix.com/docs/api-reference/business-solutions/e-commerce/extensions/discounts/discount-rules/query-discount-rules.md) - [Update Discount Rule](https://dev.wix.com/docs/api-reference/business-solutions/e-commerce/extensions/discounts/discount-rules/update-discount-rule.md) - [Delete Discount Rule](https://dev.wix.com/docs/api-reference/business-solutions/e-commerce/extensions/discounts/discount-rules/delete-discount-rule.md) --- ## Critical: `discounts` structure **The API always returns the full normalized structure.** Never assume a simplified form. Each discount entry looks like: ```json { "targetType": "SPECIFIC_ITEMS", "specificItemsInfo": { "scopes": [ { "id": "all_215238eb-22a5-4c36-9e7b-e7c08025e04e", "type": "CATALOG_ITEM", "catalogItemFilter": { "catalogAppId": "215238eb-22a5-4c36-9e7b-e7c08025e04e" } } ] }, "discount": { "discountType": "PERCENTAGE", "percentage": 20 } } ``` When updating a rule, always use the `discounts` array as returned from the query/get, modifying only the specific fields you need. **Do not reconstruct from scratch unless creating a new rule.** --- ## Step 1: Query existing discount rules **Endpoint**: `POST https://www.wixapis.com/ecom/v1/discount-rules/query` > **Paging**: This API uses **cursor paging** (`cursorPaging`), not offset paging. Using `paging` instead of `cursorPaging` will fail. **Request** — list all rules: ```json { "query": { "cursorPaging": { "limit": 100 } } } ``` **Request** — find by name (exact match): ```json { "query": { "filter": { "name": { "$eq": "Summer Sale" } }, "cursorPaging": { "limit": 10 } } } ``` Filterable fields: `id`, `name`, `active`, `revision`, `created_date`, `updated_date`, `active_time_info.start`, `active_time_info.end` **Response**: ```json { "discountRules": [ { "id": "a1b2c3d4-e5f6-7890-abcd-ef1234567890", "revision": "1", "name": "Summer Sale 10%", "active": true, "activeTimeInfo": { "start": "2026-06-01T00:00:00.000Z", "end": "2026-08-31T23:59:59.000Z" }, "discounts": [ { "targetType": "SPECIFIC_ITEMS", "specificItemsInfo": { "scopes": [ { "id": "all_215238eb-22a5-4c36-9e7b-e7c08025e04e", "type": "CATALOG_ITEM", "catalogItemFilter": { "catalogAppId": "215238eb-22a5-4c36-9e7b-e7c08025e04e" } } ] }, "discount": { "discountType": "PERCENTAGE", "percentage": 10 } } ] } ], "pagingMetadata": { "cursors": {}, "hasNext": false } } ``` Note existing rules and their scopes to avoid stacking conflicts. --- ## Guardrails — run before creating or updating any discount These checks guard every discount creation (rule **or** coupon). Run them before the create/update calls below. **User input overrides all caps** — if the merchant explicitly asks for a value beyond a threshold, honor it and document the override in your reasoning. **Conflict / stacking** (uses the Step 1 query of active rules; for coupons, also query active coupons): - **Same-scope overlap** — a new rule conflicts with an existing active rule when scopes overlap (both `CATALOG`; `CATALOG` vs `COLLECTION`; same `COLLECTION`/`SPECIFIC_PRODUCTS` id). Wix stacks automatic rules → warn and offer to deactivate the existing one. - **Time overlap** — overlapping `activeTimeInfo` on the same scope (`existingStart < newEnd AND existingEnd > newStart`) → warn about the overlap window. - **Cross-mechanism (automatic + coupon)** — automatic discounts and coupons both apply at checkout. If creating a rule, query active coupons on overlapping scope (and vice-versa); warn with the combined effective discount. (Only one coupon per checkout, but automatic rules are unlimited.) **Margin / sanity:** - **Global cap** — default max discount **25%**; flag anything higher (proceed only on explicit request). - **Minimum margin** — default floor **15%**; if cost data is available, `effective_margin = (price − cost − discount_amount) / price × 100` must stay ≥ 15% (block + explain otherwise). - **% sanity** — > 50% warn (show a $100 → $(100−pct) example); = 100% block unless confirmed ("makes the product free"); > 100% always block. - **Stacking margin** — when a new discount overlaps existing active ones, evaluate the *combined* discount against the cap and margin floor, not just the new one in isolation. | Scenario | Action | |---|---| | Discount ≤ 25% and margin ≥ 15%, no scope overlap | Proceed | | Scope/time/cross-mechanism overlap | Warn; offer to deactivate existing or confirm stacking | | Discount 26–50% (no override) | Warn, ask to confirm | | Discount > 50% | Warn with $ example, confirm | | Discount = 100% | Block unless confirmed | | Discount > 100% | Block always | | Combined/stacked discount exceeds cap or margin floor | Warn about cumulative effect | | Any threshold, explicit user override | Proceed, document the override in reasoning | When a discount *isn't* applying as expected, see [Troubleshoot: Discount Not Applying](https://dev.wix.com/docs/api-reference/business-solutions/e-commerce/skills/pricing-discount-not-applying.md). --- ## Step 2: Create a percentage discount rule **Endpoint**: `POST https://www.wixapis.com/ecom/v1/discount-rules` **Request** — 20% off all products: ```json { "discountRule": { "name": "Flash Sale 20% Off", "active": true, "activeTimeInfo": { "start": "2026-05-01T00:00:00.000Z", "end": "2026-05-03T23:59:59.000Z" }, "discounts": [ { "targetType": "SPECIFIC_ITEMS", "specificItemsInfo": { "scopes": [ { "id": "all_215238eb-22a5-4c36-9e7b-e7c08025e04e", "type": "CATALOG_ITEM", "catalogItemFilter": { "catalogAppId": "215238eb-22a5-4c36-9e7b-e7c08025e04e" } } ] }, "discount": { "discountType": "PERCENTAGE", "percentage": 20 } } ], "settings": { "appliesTo": "ALL_ITEMS" } } } ``` **Request** — 15% off a specific collection: ```json { "discountRule": { "name": "Summer Collection Sale", "active": true, "discounts": [ { "targetType": "SPECIFIC_ITEMS", "specificItemsInfo": { "scopes": [ { "id": "collections_215238eb-22a5-4c36-9e7b-e7c08025e04e", "type": "CUSTOM_FILTER", "customFilter": { "appId": "215238eb-22a5-4c36-9e7b-e7c08025e04e", "params": { "collectionIds": ["collection-uuid-here"] } } } ] }, "discount": { "discountType": "PERCENTAGE", "percentage": 15 } } ], "settings": { "appliesTo": "ALL_ITEMS" } } } ``` --- ## Step 3: Create a fixed-amount discount rule **Request** — $5 off specific products: ```json { "discountRule": { "name": "$5 Off Selected Items", "active": true, "discounts": [ { "targetType": "SPECIFIC_ITEMS", "specificItemsInfo": { "scopes": [ { "id": "specific_215238eb-22a5-4c36-9e7b-e7c08025e04e", "type": "CATALOG_ITEM", "catalogItemFilter": { "catalogAppId": "215238eb-22a5-4c36-9e7b-e7c08025e04e", "catalogItemIds": ["product-uuid-here"] } } ] }, "discount": { "discountType": "FIXED_AMOUNT", "fixedAmount": "5.00" } } ], "settings": { "appliesTo": "ALL_ITEMS" } } } ``` --- ## Step 4: Update a discount rule Always fetch the rule first (via Get or Query), then modify only the fields you need. The `mask` field tells the API which fields to update — omit it to replace all writable fields. **Endpoint**: `PATCH https://www.wixapis.com/ecom/v1/discount-rules/{discountRule.id}` **Required**: `discountRule.id`, `discountRule.revision` (must match current revision) **Request** — change percentage on an existing rule (full discounts replacement): ```json { "discountRule": { "id": "a1b2c3d4-e5f6-7890-abcd-ef1234567890", "revision": "1", "discounts": [ { "targetType": "SPECIFIC_ITEMS", "specificItemsInfo": { "scopes": [ { "id": "all_215238eb-22a5-4c36-9e7b-e7c08025e04e", "type": "CATALOG_ITEM", "catalogItemFilter": { "catalogAppId": "215238eb-22a5-4c36-9e7b-e7c08025e04e" } } ] }, "discount": { "discountType": "PERCENTAGE", "percentage": 25 } } ] }, "mask": { "paths": ["discounts"] } } ``` **Request** — change only `active` status (field mask for partial update): ```json { "discountRule": { "id": "a1b2c3d4-e5f6-7890-abcd-ef1234567890", "revision": "2", "active": false }, "mask": { "paths": ["active"] } } ``` --- ## Step 5: Find by name and update (complete pattern) The safe pattern for "find a rule by name and update its percentage": 1. Query with name filter → get the rule's `id`, `revision`, and `discounts` array 2. Modify only the `discount.percentage` inside each discount entry, keeping all other fields intact 3. PATCH with the modified `discounts` and `mask: { paths: ["discounts"] }` **Step 5a — Query by name**: ```json POST https://www.wixapis.com/ecom/v1/discount-rules/query { "query": { "filter": { "name": { "$eq": "My Rule Name" } }, "cursorPaging": { "limit": 1 } } } ``` Extract from response: `discountRules[0].id`, `discountRules[0].revision`, `discountRules[0].discounts` **Step 5b — Update percentage** (modify the returned discounts in-place): Take the `discounts` array from the query response and update only `discount.percentage` on each entry: ```json PATCH https://www.wixapis.com/ecom/v1/discount-rules/{id} { "discountRule": { "id": "", "revision": "", "discounts": [ { "targetType": "SPECIFIC_ITEMS", "specificItemsInfo": { "" }, "discount": { "discountType": "PERCENTAGE", "percentage": 10 } } ] }, "mask": { "paths": ["discounts"] } } ``` > **Important**: Copy `targetType`, `specificItemsInfo.scopes` verbatim from the query response — do not reconstruct them. Only change `discount.discountType` and `discount.percentage`/`discount.fixedAmount`. --- ## Step 6: Deactivate or delete a discount rule To deactivate without deleting: ```json { "discountRule": { "id": "b2c3d4e5-f6a7-8901-bcde-f12345678901", "revision": "2", "active": false }, "mask": { "paths": ["active"] } } ``` To delete permanently: **Endpoint**: `DELETE https://www.wixapis.com/ecom/v1/discount-rules/{discountRuleId}` --- ## Key field rules | Field | Required | Notes | |---|---|---| | `name` | Yes | Internal name for the rule. Filterable in query. | | `active` | Yes | Whether the rule is currently applied | | `activeTimeInfo.start` | No | ISO 8601 start time. Omit for immediate activation | | `activeTimeInfo.end` | No | ISO 8601 end time. Omit for no expiration | | `discounts[].targetType` | Yes | Always `"SPECIFIC_ITEMS"` for standard rules | | `discounts[].specificItemsInfo.scopes[]` | Yes | Array of scope objects — see Scope types below | | `discounts[].discount.discountType` | Yes | `"PERCENTAGE"` or `"FIXED_AMOUNT"` or `"FIXED_PRICE"` | | `discounts[].discount.percentage` | If PERCENTAGE | Integer 1-100 | | `discounts[].discount.fixedAmount` | If FIXED_AMOUNT | Decimal string (e.g., `"5.00"`) | | `settings.appliesTo` | Yes on create | Always `"ALL_ITEMS"` | | `revision` | On update/delete | Must match current value — fetch first | | `mask.paths[]` | On update | Recommended — list fields being changed (e.g., `["discounts"]`, `["active"]`) | ## Scope types | Scope | `type` | `id` prefix | When to use | |---|---|---|---| | All products | `"CATALOG_ITEM"` | `all_` | `catalogItemFilter.catalogAppId` only, no `catalogItemIds` | | Specific products | `"CATALOG_ITEM"` | `specific_` | `catalogItemFilter.catalogAppId` + `catalogItemFilter.catalogItemIds` | | Collection | `"CUSTOM_FILTER"` | `collections_` | `customFilter.appId` + `customFilter.params.collectionIds` | **Store catalog app ID** (required in all scopes): `215238eb-22a5-4c36-9e7b-e7c08025e04e` ## Recommendation → API Mapping When creating a discount rule from a recommendation output, use this mapping to convert the recommendation's simplified JSON into the actual Discount Rules API payload. ### Constants - **Store catalog app ID**: `215238eb-22a5-4c36-9e7b-e7c08025e04e` — used in all scope constructions below. - **Initial state**: Recommendations create rules as `active: false` with `status: "PENDING"`. The merchant must approve before the rule goes live. ### Scope mapping The recommendation's `scope` field maps to the API's internal scope structure. The scope ID uses a prefix convention: | Recommendation scope | API scope type | Scope ID prefix | How to build | |---|---|---|---| | `SITE` | `CATALOG_ITEM` | `all_` | Set `catalogItemFilter.catalogAppId` to the store catalog app ID. No item IDs. | | `ITEMS` | `CATALOG_ITEM` | `specific_` | Set `catalogItemFilter.catalogAppId` + `catalogItemFilter.catalogItemIds` to the product UUIDs from `productIds`. | | `CATEGORY` | `CUSTOM_FILTER` | `collections_` | Set `customFilter.appId` to the store catalog app ID + `customFilter.params.collectionIds` to the category UUIDs from `categoryIds`. | **Example — SITE scope**: ```json { "scope": { "id": "all_215238eb-22a5-4c36-9e7b-e7c08025e04e", "type": "CATALOG_ITEM", "catalogItemFilter": { "catalogAppId": "215238eb-22a5-4c36-9e7b-e7c08025e04e" } } } ``` **Example — ITEMS scope** (with product IDs): ```json { "scope": { "id": "specific_215238eb-22a5-4c36-9e7b-e7c08025e04e", "type": "CATALOG_ITEM", "catalogItemFilter": { "catalogAppId": "215238eb-22a5-4c36-9e7b-e7c08025e04e", "catalogItemIds": ["product-uuid-1", "product-uuid-2"] } } } ``` **Example — CATEGORY scope** (with collection IDs): ```json { "scope": { "id": "collections_215238eb-22a5-4c36-9e7b-e7c08025e04e", "type": "CUSTOM_FILTER", "customFilter": { "appId": "215238eb-22a5-4c36-9e7b-e7c08025e04e", "params": { "collectionIds": ["collection-uuid-1"] } } } } ``` ### Discount type mapping | Recommendation `discountType` | API field to set | Value format | |---|---|---| | `PERCENTAGE` | `discount.percentage` | Integer (e.g., `15`) | | `FIXED_AMOUNT` | `discount.fixedAmount` | String (e.g., `"5.00"`) | | `FIXED_PRICE` | `discount.fixedPrice` | String (e.g., `"29.99"`) | All discount entries use `targetType: "SPECIFIC_ITEMS"` with the scope wrapped in `specificItemsInfo.scopes[]`. ### Trigger mapping (conditions) Triggers determine WHEN the discount activates. They are built from the recommendation's `conditions` fields. **If no conditions exist (both minSubTotal and minItemQuantity are 0), do NOT set a trigger — the discount applies unconditionally.** | Condition | Trigger type | How to build | |---|---|---| | `minItemQuantity > 0` only | `ITEM_QUANTITY_RANGE` | Set `itemQuantityRange.from` to the value. No upper bound. Include the same scope as the discount target. | | `minSubTotal > 0` only | `SUBTOTAL_RANGE` | Set `subtotalRange.from` to the value as a string. No upper bound. Include the same scope. | | Both conditions > 0 | `AND` | Combine both triggers in `and.triggers[]` array. | | Neither condition | No trigger | Leave trigger field unset entirely. | **Example — minSubTotal trigger** (upsell boost: spend $200+): ```json { "trigger": { "triggerType": "SUBTOTAL_RANGE", "subtotalRange": { "from": "200", "scopes": [ { "id": "all_215238eb-22a5-4c36-9e7b-e7c08025e04e", "type": "CATALOG_ITEM", "catalogItemFilter": { "catalogAppId": "215238eb-22a5-4c36-9e7b-e7c08025e04e" } } ] } } } ``` **Example — minItemQuantity trigger** (bundle: buy 3+): ```json { "trigger": { "triggerType": "ITEM_QUANTITY_RANGE", "itemQuantityRange": { "from": 3, "scopes": [ { "id": "collections_215238eb-22a5-4c36-9e7b-e7c08025e04e", "type": "CUSTOM_FILTER", "customFilter": { "appId": "215238eb-22a5-4c36-9e7b-e7c08025e04e", "params": { "collectionIds": ["category-uuid"] } } } ] } } } ``` **Example — AND trigger** (both conditions): ```json { "trigger": { "triggerType": "AND", "and": { "triggers": [ { "triggerType": "ITEM_QUANTITY_RANGE", "itemQuantityRange": { "from": 2, "scopes": [/* same scope */] } }, { "triggerType": "SUBTOTAL_RANGE", "subtotalRange": { "from": "100", "scopes": [/* same scope */] } } ] } } } ``` ### Date handling | Recommendation field | API mapping | |---|---| | `startDate` is a date string (e.g., `"2026-06-01"`) | Convert to ISO 8601 timestamp: `activeTimeInfo.start` | | `startDate` is empty `""` | Default to current time (now) | | `endDate` is a date string | Convert to ISO 8601 timestamp: `activeTimeInfo.end` | | `endDate` is empty `""` | Omit `activeTimeInfo.end` — rule has no expiration | ### Settings All recommendation-created rules use these fixed settings: ```json { "settings": { "appliesTo": "ALL_ITEMS", "indexOptIn": true } } ``` --- ## Error Handling | Error | Cause | Fix | |---|---|---| | `DISCOUNT_RULE_NOT_FOUND` | The discount rule ID doesn't exist | Re-query discount rules to get current IDs | | `REVISION_MISMATCH` | The `revision` doesn't match the current version | Re-fetch the rule to get the latest revision, then retry | | `INVALID_DISCOUNT_TYPE` | Unsupported discount type | Use `PERCENTAGE` or `FIXED_AMOUNT` | | Both `productIds` and `categoryIds` set | Scope mutual exclusivity violation | Use only one: ITEMS with productIds OR CATEGORY with categoryIds | | `productIds` empty when scope is ITEMS | Missing required IDs | Query products and provide at least 1 product UUID | | `categoryIds` empty when scope is CATEGORY | Missing required IDs | Call getCategoryIds to convert category names to GUIDs | ## References - [Discount Rules API](https://dev.wix.com/docs/api-reference/business-solutions/e-commerce/extensions/discounts/discount-rules/introduction.md) - [Coupons API](https://dev.wix.com/docs/api-reference/business-solutions/coupons/coupons/introduction.md) --- > Portal Navigation: > > - Append `.md` to any URL under `https://dev.wix.com/docs/` to get its markdown version. > - Pages are either content pages (article or reference text) or menu pages (a list of links to child pages). > - To get a menu page, truncate any URL to a parent path and append `.md` (e.g. `https://dev.wix.com/docs/sdk.md`, `https://dev.wix.com/docs/sdk/core-modules.md`). > - Top-level index of all portals: https://dev.wix.com/docs/llms.txt > - Full concatenated docs: https://dev.wix.com/docs/llms-full.txt ## Resource: Pricing: Discount Not Applying ## Article: Pricing: Discount Not Applying ## Article Link: https://dev.wix.com/docs/api-reference/business-solutions/e-commerce/skills/pricing-discount-not-applying.md ## Article Content: # Troubleshoot: Discount Not Applying ## When to use Use this diagnostic tree when a merchant reports that a discount rule exists but products are not showing the discounted price at checkout or in the storefront. --- ## Step 1: Check rule active status Query the discount rule by ID and verify the `active` field. - If `active: false` → **Resolution**: "The rule is deactivated. Set `active: true` to enable it." - If `active: true` → proceed to Step 2. --- ## Step 2: Check time window Examine the `activeTimeInfo` field on the discount rule. - If `activeTimeInfo` does not exist → the rule has no time constraints, proceed to Step 3. - If `activeTimeInfo` exists: - Is the current date/time within the `start` and `end` range? - If the current date is before `start` → **Resolution**: "The campaign hasn't started yet. It begins on {startDate}." - If the current date is after `end` → **Resolution**: "The campaign ended on {endDate}. Update or remove the time window to re-enable." - If within range → proceed to Step 3. --- ## Step 3: Check scope targeting Examine the discount rule's scope configuration: ### CATALOG scope - Should apply to all products. If it's not applying, skip to Step 5 (app installation check). ### COLLECTION scope - Verify that `categoryIds` contain valid GUIDs, not collection names. - Common mistake: using the collection name string instead of its GUID. - Call `getCategoryIds` or query collections to validate that each ID resolves to an existing collection. - If any ID is invalid → **Resolution**: "The collection ID '{id}' does not match any existing collection. Use the collection GUID, not the display name." ### SPECIFIC_PRODUCTS scope - Verify that each `productId` in the rule exists in the store catalog. - Query products to confirm each ID resolves. - If any product was deleted → **Resolution**: "Product '{id}' no longer exists in the catalog. Remove it from the discount rule or replace it with a valid product ID." --- ## Step 4: Check revision Was the rule recently updated? A revision mismatch indicates the update failed silently. - Query the current rule and compare the `revision` field against the expected value. - If the revision does not match what was expected after an update → **Resolution**: "The last update to this rule may have failed. The current revision is {currentRevision}. Try updating the rule again with the correct revision number." --- ## Step 5: Check app installation Is the Wix Stores or eCommerce app installed on the site? - Error code `WDE0110: Wix Code not enabled` → **Resolution**: "The Wix Stores app is not installed. Install Wix Stores first, then the discount rule will take effect." - If the eCommerce platform is not fully set up, discount rules cannot be evaluated at checkout. --- ## Step 6: Check stacking interference Are other active discount rules conflicting with or overriding this one? 1. Query all active discount rules. 2. Check for scope overlap with the problematic rule. 3. Some discount combinations may cause unexpected behavior where one rule appears to "not apply" because another rule takes precedence. **Resolution**: "There are {count} other active discount rules that overlap with this rule's scope. Review them to check if another rule is taking priority or if stacking behavior is masking this rule's effect." --- ## Summary: Diagnostic checklist | Step | Check | Common resolution | |---|---|---| | 1 | `active` field | Set `active: true` | | 2 | Time window | Update or remove expired `activeTimeInfo` | | 3 | Scope targeting | Fix invalid collection/product GUIDs | | 4 | Revision mismatch | Retry the update with correct revision | | 5 | App installation | Install Wix Stores app | | 6 | Stacking interference | Review and resolve overlapping rules | --- > Portal Navigation: > > - Append `.md` to any URL under `https://dev.wix.com/docs/` to get its markdown version. > - Pages are either content pages (article or reference text) or menu pages (a list of links to child pages). > - To get a menu page, truncate any URL to a parent path and append `.md` (e.g. `https://dev.wix.com/docs/sdk.md`, `https://dev.wix.com/docs/sdk/core-modules.md`). > - Top-level index of all portals: https://dev.wix.com/docs/llms.txt > - Full concatenated docs: https://dev.wix.com/docs/llms-full.txt ## Resource: Flow: Upsell Boost ## Article: Flow: Upsell Boost ## Article Link: https://dev.wix.com/docs/api-reference/business-solutions/e-commerce/skills/flow-upsell-boost.md ## Article Content: # Flow: Upsell Boost Campaign > **Before executing this skill**, read [Create Discount Rule](https://dev.wix.com/docs/api-reference/business-solutions/e-commerce/skills/pricing-create-discount-rule.md) with `ReadFullDocsArticle` — it contains the discount-rule mechanics **and** the pre-create guardrails (conflict/stacking, margin floor, %-sanity). Creates a discount that incentivizes customers to spend more per order by setting a minimum subtotal threshold above the store's current AOV. The discount percentage is scaled to the store's average profit margin, and the scope targets high-margin categories or products. ## Prerequisites - Products exist in the catalog with price data (`siteData.hasCatalog === true`, checked at context load) - AOV data available from site metrics (`siteData.aov`, loaded by eCommerce Load Context) ## Required APIs - [Create Discount Rule](https://dev.wix.com/docs/api-reference/business-solutions/e-commerce/extensions/discounts/discount-rules/create-discount-rule.md) - [Query Discount Rules](https://dev.wix.com/docs/api-reference/business-solutions/e-commerce/extensions/discounts/discount-rules/query-discount-rules.md) --- ## Step 1: Use pre-loaded catalog data Catalog analytics and product data are already in conversation context — do NOT re-fetch: - `siteData.catalogAnalytics` — category groups with `count()`, `quantiles([0.5,0.75,0.9], price)`, `avg(profitMargin)`. Loaded by the eCommerce Load Context. - `siteData.productCatalogData` — per-product list sorted `price DESC, ordersCount DESC` for UPSELL_BOOST goal. Loaded by the run-a-sale orchestrator Step 5. - `siteData.aov` — site-level AOV (revenue / ordersCount). Loaded by eCommerce Load Context. Extract from context: - `effective_aov` — use `siteData.aov`; run AOV sanity check: if AOV < price_p25, override with price_p50 as effective AOV - `avg_profit_margin` — from the "All Products" group in `siteData.catalogAnalytics` - `price_p50`, `price_p75`, `price_p90` — from quantiles in `siteData.catalogAnalytics` - Top products by price and order volume — from `siteData.productCatalogData` --- ## Step 2: Determine margin tier and calculate discount + minSubTotal Use the average profit margin to select the appropriate discount and threshold tier. | Margin Tier | Condition | Max Discount | minSubTotal Formula | |---|---|---|---| | Low margin | `avg_profit_margin < 25%` | 10% | `1.15 x effective_aov` | | Medium margin | `25% <= avg_profit_margin <= 50%` | 15% | `1.3 x effective_aov` | | High margin | `avg_profit_margin > 50%` | 20% | `1.5 x effective_aov` | | No data | Margin data unavailable | 10% | `1.15 x effective_aov` | Example: If `effective_aov` = $150 and `avg_profit_margin` = 35% (medium), then max discount = 15% and raw minSubTotal = $195. --- ## Step 3: Round minSubTotal (CRITICAL) **minSubTotal MUST be rounded UP to the nearest $5 increment** (the result mod 5 must equal 0). Always round UP, never down. | Raw Value | Rounded Value | |---|---| | $195 | $195 (already divisible by 5) | | $217 | $220 | | $223 | $225 | | $199 | $200 | | $172.50 | $175 | | $201 | $205 | Formula: `minSubTotal = ceil(raw_value / 5) * 5` --- ## Step 4: Determine discount scope Select the scope based on analytics data: - **CATEGORY** (preferred): When analytics show a clear high-margin category opportunity. Target the category with the highest profit margin that also has sufficient product count. - **ITEMS**: When specific high-margin products stand out as upsell candidates (max 5 productIds). - **SITE** (fallback): When no single category or product group dominates, apply catalog-wide. --- ## Step 5: Convert category names to GUIDs (if CATEGORY scope) If scope is CATEGORY, call `getCategoryIds` to convert human-readable category names into GUIDs. **Never output category names directly as scope IDs.** Exclude the "All Products" system category — it contains every product and would effectively make the discount site-wide. Max 3 categoryIds per discount rule. --- ## Step 6: Run guardrail checks **Run the pre-create guardrails in [Create Discount Rule](https://dev.wix.com/docs/api-reference/business-solutions/e-commerce/skills/pricing-create-discount-rule.md) → "Guardrails" before creating the rule** — conflict/stacking (scope, time, coupon cross-stacking), the 25% cap, the 15% margin floor, and %-sanity. Present any warnings to the merchant and get confirmation before proceeding. --- ## Step 7: Create the discount rule **Endpoint**: `POST https://www.wixapis.com/ecom/v1/discount-rules` **Request** — 15% off orders over $195, scoped to a category: ```json { "discountRule": { "name": "Spend $195+, Get 15% Off", "active": true, "discounts": [ { "discount": { "discountType": "PERCENTAGE", "percentage": 15 }, "scope": { "id": "category-guid-here", "type": "COLLECTION" } } ], "conditions": { "subtotalRange": { "from": "195.00" } } } } ``` **Response**: ```json { "discountRule": { "id": "c3d4e5f6-a7b8-9012-cdef-123456789012", "revision": "1", "name": "Spend $195+, Get 15% Off", "active": true, "discounts": [ { "discount": { "discountType": "PERCENTAGE", "percentage": 15 }, "scope": { "id": "category-guid-here", "type": "COLLECTION" } } ], "conditions": { "subtotalRange": { "from": "195.00" } } } } ``` **Request** — site-wide fallback example: ```json { "discountRule": { "name": "Spend $175+, Get 10% Off Everything", "active": true, "discounts": [ { "discount": { "discountType": "PERCENTAGE", "percentage": 10 }, "scope": { "id": "catalog", "type": "CATALOG" } } ], "conditions": { "subtotalRange": { "from": "175.00" } } } } ``` Save the returned `id` and `revision` for later management. --- ## Step 8: Verify the rule is active 1. Query discount rules to confirm the new rule exists and is `active: true` 2. Verify the minSubTotal condition is correctly set 3. Report to the merchant: > "Upsell discount is live: {discount}% off on orders over ${minSubTotal} for {scope description}. This threshold is {percentage}% above your current average order value of ${effective_aov}, designed to incentivize higher spending." --- ## Branching logic | Merchant intent | Scope | Discount | minSubTotal | |---|---|---|---| | "Increase average order value" | Determined by analytics (CATEGORY preferred) | Margin-tiered | Calculated from AOV | | "Get people to spend more on electronics" | COLLECTION with electronics category GUID | Margin-tiered | Calculated from AOV | | "20% off orders over $200" (explicit) | As specified by merchant | 20% (user override) | $200 (user override) | | "Reward big spenders" | CATALOG (site-wide) | Margin-tiered | Calculated from AOV | ## Error Handling | Error | Cause | Fix | |---|---|---| | `DISCOUNT_RULE_NOT_FOUND` | Rule ID doesn't exist | Re-query discount rules for current IDs | | `REVISION_MISMATCH` | Revision doesn't match | Re-fetch rule for latest revision, then retry | | AOV unavailable | No revenue or order data | Use price_p50 from catalog analytics as AOV proxy | | Margin data unavailable | No profit margin data in catalog | Default to low-margin tier (10% discount, 1.15x AOV) | | Category GUID not found | Category name doesn't match any collection | Re-query categories or fall back to SITE scope | ## References - [Discount Rules API](https://dev.wix.com/docs/api-reference/business-solutions/e-commerce/extensions/discounts/discount-rules/introduction.md) --- > Portal Navigation: > > - Append `.md` to any URL under `https://dev.wix.com/docs/` to get its markdown version. > - Pages are either content pages (article or reference text) or menu pages (a list of links to child pages). > - To get a menu page, truncate any URL to a parent path and append `.md` (e.g. `https://dev.wix.com/docs/sdk.md`, `https://dev.wix.com/docs/sdk/core-modules.md`). > - Top-level index of all portals: https://dev.wix.com/docs/llms.txt > - Full concatenated docs: https://dev.wix.com/docs/llms-full.txt ## Resource: Flow: Bundle and Save ## Article: Flow: Bundle and Save ## Article Link: https://dev.wix.com/docs/api-reference/business-solutions/e-commerce/skills/flow-bundle-and-save.md ## Article Content: # Flow: Bundle & Save Campaign > **Before executing this skill**, read [Create Discount Rule](https://dev.wix.com/docs/api-reference/business-solutions/e-commerce/skills/pricing-create-discount-rule.md) with `ReadFullDocsArticle` — it contains the discount-rule mechanics **and** the pre-create guardrails (conflict/stacking, margin floor, %-sanity). Creates a discount that rewards customers for purchasing multiple items, encouraging product discovery and cross-selling. The discount activates when the cart contains a minimum number of items, and targets categories or products where bundling makes strategic sense. ## Prerequisites - Products exist in the catalog across multiple categories (`siteData.hasCatalog === true`, checked at context load) - Categories with 2+ products suitable for bundling ## Required APIs - [Create Discount Rule](https://dev.wix.com/docs/api-reference/business-solutions/e-commerce/extensions/discounts/discount-rules/create-discount-rule.md) - [Query Discount Rules](https://dev.wix.com/docs/api-reference/business-solutions/e-commerce/extensions/discounts/discount-rules/query-discount-rules.md) --- ## Step 1: Use pre-loaded catalog data Catalog analytics and product data are already in conversation context — do NOT re-fetch: - `siteData.catalogAnalytics` — category groups with `min(price)`, `max(price)`, `avg(profitMargin)`, `count()`. Loaded by the eCommerce Load Context. - `siteData.productCatalogData` — per-product list sorted `price DESC, ordersCount DESC` for BUNDLE_AND_SAVE goal. Loaded by the run-a-sale orchestrator Step 5. Extract the following from context: - `min_price`, `max_price` — from the "All Products" group in `siteData.catalogAnalytics` - `avg_profit_margin` — sets the discount ceiling - `count` — catalog breadth; more products = more bundling options - Top products by price and order count — from `siteData.productCatalogData` --- ## Step 2: Analyze cross-sell patterns Evaluate the catalog for bundling opportunities: 1. **Category diversity**: Look for categories with multiple products at complementary price points (e.g., a $50 main item + $15 accessories). 2. **Price range suitability**: Wide price ranges (large gap between min_price and max_price) suggest tiered bundles. Narrow ranges suggest quantity-based bundles. 3. **High-margin categories**: Categories with above-average profit margin are better candidates because the discount erodes less absolute profit. 4. **Popular + discoverable**: Pair best-selling products (high ordersCount) with lower-visibility products to drive discovery. --- ## Step 3: Set minimum item quantity Determine the `minItemQuantity` based on catalog characteristics: | Catalog Profile | Recommended minItemQuantity | Rationale | |---|---|---| | High-price items (avg price > price_p75) | 2 | Customers are less likely to buy 3+ expensive items | | Medium-price items | 2-3 | Standard bundle size | | Low-price items (avg price < price_p25) | 3-4 | Lower price per item makes larger bundles feasible | | Many items in category (count > 10) | 3 | More products to choose from | | Few items in category (count <= 5) | 2 | Limited selection constrains bundle size | Default to `minItemQuantity: 2` if data is ambiguous. --- ## Step 4: Select discount percentage Scale the discount to the average margin, rewarding multi-item purchases without eroding profitability: | Margin Tier | Condition | Recommended Discount | |---|---|---| | Low margin | `avg_profit_margin < 25%` | 10% | | Medium margin | `25% <= avg_profit_margin <= 50%` | 15% | | High margin | `avg_profit_margin > 50%` | 20% | | No data | Margin unavailable | 10% | Verify that the discount respects the global cap of 25% and the minimum margin threshold of 15% (`discount <= avg_profit_margin - 15%`). --- ## Step 5: Determine discount scope Select the scope based on bundling analysis: - **CATEGORY** (preferred): When analytics show a clear category with cross-sell potential — multiple products, high margin, complementary items. Target that category. - **ITEMS**: When specific complementary products are identified for bundling (max 5 productIds). Use when cross-sell pairs are specific rather than category-wide. - **SITE**: When the goal is store-wide multi-buy incentive. Less targeted but simpler. --- ## Step 6: Convert category names to GUIDs (if CATEGORY scope) If scope is CATEGORY, call `getCategoryIds` to convert category names to GUIDs. - Never use category names as scope IDs — always use the GUID. - Exclude the "All Products" system category. - Max 3 categoryIds per discount rule. --- ## Step 7: Run guardrail checks **Run the pre-create guardrails in [Create Discount Rule](https://dev.wix.com/docs/api-reference/business-solutions/e-commerce/skills/pricing-create-discount-rule.md) → "Guardrails" before creating the rule.** Bundle discounts are especially prone to **scope-overlap stacking** (a customer buying 3 items in a category with both a bundle discount and a catalog-wide sale gets both) and **coupon stacking** — present any conflicts to the merchant and confirm. --- ## Step 8: Create the discount rule with minItemQuantity condition **Endpoint**: `POST https://www.wixapis.com/ecom/v1/discount-rules` **Request** — Buy 2+ items from a category, get 15% off: ```json { "discountRule": { "name": "Buy 2+, Save 15% on Accessories", "active": true, "discounts": [ { "discount": { "discountType": "PERCENTAGE", "percentage": 15 }, "scope": { "id": "accessories-category-guid", "type": "COLLECTION" } } ], "conditions": { "itemQuantityRange": { "from": 2 } } } } ``` **Response**: ```json { "discountRule": { "id": "d4e5f6a7-b8c9-0123-def0-234567890123", "revision": "1", "name": "Buy 2+, Save 15% on Accessories", "active": true, "discounts": [ { "discount": { "discountType": "PERCENTAGE", "percentage": 15 }, "scope": { "id": "accessories-category-guid", "type": "COLLECTION" } } ], "conditions": { "itemQuantityRange": { "from": 2 } } } } ``` **Request** — Buy 3+ specific items, get 10% off: ```json { "discountRule": { "name": "Bundle 3 Best Sellers, Save 10%", "active": true, "discounts": [ { "discount": { "discountType": "PERCENTAGE", "percentage": 10 }, "scope": { "id": "product-uuid-1", "type": "SPECIFIC_PRODUCTS" } }, { "discount": { "discountType": "PERCENTAGE", "percentage": 10 }, "scope": { "id": "product-uuid-2", "type": "SPECIFIC_PRODUCTS" } }, { "discount": { "discountType": "PERCENTAGE", "percentage": 10 }, "scope": { "id": "product-uuid-3", "type": "SPECIFIC_PRODUCTS" } } ], "conditions": { "itemQuantityRange": { "from": 3 } } } } ``` Save the returned `id` and `revision` for later management. --- ## Step 9: Verify the rule is active 1. Query discount rules to confirm the new rule exists and is `active: true` 2. Verify the minItemQuantity condition is correctly set 3. Report to the merchant: > "Bundle discount is live: {discount}% off when buying {minItemQuantity}+ items from {scope description}. This encourages customers to explore more products and increases items per order." --- ## Branching logic | Merchant intent | Scope | minItemQuantity | Discount | |---|---|---|---| | "Encourage people to buy more" | Determined by analytics | 2-3 | Margin-tiered | | "Bundle accessories together" | COLLECTION with category GUID | 2 | Margin-tiered | | "Buy 3 get 20% off these products" (explicit) | SPECIFIC_PRODUCTS with product GUIDs | 3 (user override) | 20% (user override) | | "Multi-buy deal on everything" | CATALOG (site-wide) | 2 | Margin-tiered | | "Promote these 4 items as a set" | SPECIFIC_PRODUCTS (max 5) | 2-4 | Margin-tiered | ## Error Handling | Error | Cause | Fix | |---|---|---| | `DISCOUNT_RULE_NOT_FOUND` | Rule ID doesn't exist | Re-query discount rules for current IDs | | `REVISION_MISMATCH` | Revision doesn't match | Re-fetch rule for latest revision, then retry | | Too few products in category | Category has only 1 product — bundling not viable | Switch to SITE scope or suggest a different category | | Margin data unavailable | No profit margin data in catalog | Default to 10% discount | | Category GUID not found | Category name doesn't match any collection | Re-query categories or fall back to SITE scope | | Max items exceeded | More than 5 productIds specified | Reduce to top 5 by ordersCount or switch to CATEGORY scope | ## References - [Discount Rules API](https://dev.wix.com/docs/api-reference/business-solutions/e-commerce/extensions/discounts/discount-rules/introduction.md) --- > Portal Navigation: > > - Append `.md` to any URL under `https://dev.wix.com/docs/` to get its markdown version. > - Pages are either content pages (article or reference text) or menu pages (a list of links to child pages). > - To get a menu page, truncate any URL to a parent path and append `.md` (e.g. `https://dev.wix.com/docs/sdk.md`, `https://dev.wix.com/docs/sdk/core-modules.md`). > - Top-level index of all portals: https://dev.wix.com/docs/llms.txt > - Full concatenated docs: https://dev.wix.com/docs/llms-full.txt ## Resource: Flow: Stock Mover ## Article: Flow: Stock Mover ## Article Link: https://dev.wix.com/docs/api-reference/business-solutions/e-commerce/skills/flow-stock-mover.md ## Article Content: # Flow: Stock Mover Clearance > **Routing rule (READ FIRST).** This recipe is a sub-step of [Goal: Clear Inventory](https://dev.wix.com/docs/api-reference/business-solutions/e-commerce/skills/goal-clear-inventory.md). If you arrived here directly from the WixREADME index, load the goal recipe NOW before executing — it owns the velocity scoring, classification cues, and the per-recommendation presentation rules (including the **margin-floor guardrail** surfacing requirement). > > **Then** read [Create Discount Rule](https://dev.wix.com/docs/api-reference/business-solutions/e-commerce/skills/pricing-create-discount-rule.md) with `ReadFullDocsArticle` — it contains the discount-rule mechanics **and** the pre-create guardrails (conflict/stacking, margin floor, %-sanity). Creates a discount targeting slow-moving inventory — products with high stock levels and low sales velocity. The discount depth is proportional to how overstocked the product is, with deeper discounts for the most stagnant items. Margin protection guardrails are especially important here since clearance discounts tend to push closer to cost. ## Prerequisites - Products exist in the catalog with inventory (quantity) data (`siteData.hasCatalog === true`, checked at context load) - Inventory tracking enabled for target products ## Required APIs - [Create Discount Rule](https://dev.wix.com/docs/api-reference/business-solutions/e-commerce/extensions/discounts/discount-rules/create-discount-rule.md) - [Query Discount Rules](https://dev.wix.com/docs/api-reference/business-solutions/e-commerce/extensions/discounts/discount-rules/query-discount-rules.md) --- ## Step 1: Use pre-loaded catalog data Catalog analytics and product data are already in conversation context — do NOT re-fetch: - `siteData.catalogAnalytics` — category groups with `sum(quantity)`, `sum(ordersCount)`, `avg(profitMargin)`. Loaded by the eCommerce Load Context. - `siteData.productCatalogData` — per-product list sorted `quantity DESC, ordersCount ASC` for STOCK_MOVER goal. Loaded by the run-a-sale orchestrator Step 5. Extract from context: - `total_quantity` — `sum(quantity)` from the "All Products" group in `siteData.catalogAnalytics` - `total_orders` — `sum(ordersCount)` from the "All Products" group - `avg_profit_margin` — sets the discount ceiling - Per-product: `quantity`, `ordersCount`, `price`, `name`, `id`, `categoryId` — from `siteData.productCatalogData` --- ## Step 2: Identify slow-moving products Calculate the velocity ratio for each product to identify overstocked items: ``` velocity_ratio = ordersCount / quantity ``` | Velocity Ratio | Classification | Action | |---|---|---| | < 0.1 | **Severely overstocked** — fewer than 1 sale per 10 units in stock | High priority for clearance discount | | 0.1 - 0.3 | **Moderately overstocked** — slow but not stagnant | Medium priority | | 0.3 - 0.7 | **Balanced** — reasonable sell-through rate | Not a clearance candidate | | > 0.7 | **Fast-moving** — selling well relative to stock | Do NOT discount — unnecessary margin erosion | Select products with velocity_ratio < 0.3 as clearance candidates. If `quantity = 0` for a product, skip it (nothing to clear). If `ordersCount = 0`, the velocity ratio is 0 — this is the most urgent clearance case. --- ## Step 3: Calculate discount depth Scale the discount based on inventory urgency. Deeper discounts for more overstocked items, constrained by margin: | Velocity Ratio | Recommended Discount | Rationale | |---|---|---| | 0 (zero sales) | 20-25% | Maximum urgency — product is not moving at all | | < 0.1 | 15-20% | Severely slow — needs aggressive pricing | | 0.1 - 0.2 | 10-15% | Moderately slow — moderate discount | | 0.2 - 0.3 | 5-10% | Slightly slow — gentle nudge | **Margin constraint**: Always verify `discount <= avg_profit_margin - 15%` (minMarginPct). Clearance discounts are more likely to violate margin thresholds because they are deliberately deeper. **Global cap**: Do not exceed 25% unless the merchant explicitly overrides. For clearance, merchants may accept deeper discounts to free up capital and shelf space. --- ## Step 4: Determine discount scope Select the scope based on the distribution of slow movers: - **ITEMS** (preferred for clearance): Target specific slow-moving products by ID (max 5 productIds). This is the most precise approach and avoids discounting fast sellers. - **CATEGORY**: When multiple slow movers cluster in the same category, target the whole category. This is simpler but may discount some healthy-velocity products in the same category. - **SITE**: Rarely appropriate for clearance — avoid discounting the entire catalog to clear a few items. When selecting ITEMS scope, prioritize the products with the worst velocity ratios (lowest first), up to the max of 5 productIds. --- ## Step 5: Convert category names to GUIDs (if CATEGORY scope) If scope is CATEGORY, call `getCategoryIds` to convert category names to GUIDs. - Never use category names as scope IDs — always use the GUID. - Exclude the "All Products" system category. - Max 3 categoryIds per discount rule. --- ## Step 6: Run guardrail checks **Run the pre-create guardrails in [Create Discount Rule](https://dev.wix.com/docs/api-reference/business-solutions/e-commerce/skills/pricing-create-discount-rule.md) → "Guardrails" before creating the rule** (conflict/stacking, %-sanity, margin floor). Clearance is the **most margin-sensitive** case: discounts push closest to cost, so the margin-floor check (effective margin ≥ 15% unless the merchant overrides) is the one most likely to fire here — verify it per candidate product. --- ## Step 7: Create the discount rule **Endpoint**: `POST https://www.wixapis.com/ecom/v1/discount-rules` **Request** — 20% off specific slow-moving products: ```json { "discountRule": { "name": "Clearance - Overstock Items 20% Off", "active": true, "discounts": [ { "discount": { "discountType": "PERCENTAGE", "percentage": 20 }, "scope": { "id": "slow-mover-product-uuid-1", "type": "SPECIFIC_PRODUCTS" } }, { "discount": { "discountType": "PERCENTAGE", "percentage": 20 }, "scope": { "id": "slow-mover-product-uuid-2", "type": "SPECIFIC_PRODUCTS" } }, { "discount": { "discountType": "PERCENTAGE", "percentage": 20 }, "scope": { "id": "slow-mover-product-uuid-3", "type": "SPECIFIC_PRODUCTS" } } ] } } ``` **Response**: ```json { "discountRule": { "id": "e5f6a7b8-c9d0-1234-ef01-345678901234", "revision": "1", "name": "Clearance - Overstock Items 20% Off", "active": true, "discounts": [ { "discount": { "discountType": "PERCENTAGE", "percentage": 20 }, "scope": { "id": "slow-mover-product-uuid-1", "type": "SPECIFIC_PRODUCTS" } }, { "discount": { "discountType": "PERCENTAGE", "percentage": 20 }, "scope": { "id": "slow-mover-product-uuid-2", "type": "SPECIFIC_PRODUCTS" } }, { "discount": { "discountType": "PERCENTAGE", "percentage": 20 }, "scope": { "id": "slow-mover-product-uuid-3", "type": "SPECIFIC_PRODUCTS" } } ] } } ``` **Request** — clearance on an entire category: ```json { "discountRule": { "name": "Clearance - Winter Collection 15% Off", "active": true, "discounts": [ { "discount": { "discountType": "PERCENTAGE", "percentage": 15 }, "scope": { "id": "winter-collection-category-guid", "type": "COLLECTION" } } ] } } ``` Save the returned `id` and `revision` for later management. --- ## Step 8: Verify the rule is active 1. Query discount rules to confirm the new rule exists and is `active: true` 2. Verify the correct products or category are targeted 3. Report to the merchant: > "Clearance discount is live: {discount}% off {number_of_products} slow-moving items. These products had a velocity ratio of {avg_velocity}, indicating high stock relative to sales. **Margin floor enforced — effective margin stays ≥ 15% on every targeted SKU.** Monitor inventory levels — once stock clears, consider deactivating the rule." --- ## Presentation requirement — margin guardrail line is mandatory When generating recommendations for the merchant (whether persisted as PROPOSED via the tracking API or returned inline), **every clearance recommendation MUST include explicit margin-floor language in its `reasoning` / `why` field.** Examples: - "Discount keeps effective margin ≥ 15% (minMarginPct floor)." - "Pre-discount margin {X}%, post-discount {Y}% — above 15% breakeven floor." - "Margin protected: 20% off does NOT push `{product}` below the 15% floor." Urgency labels, stock level, capital tied up, and the "Why {N}%" velocity rationale are NOT substitutes — the merchant must see a per-item margin protection statement on every clearance line. If you cannot meet the floor at the velocity-tier discount, either reduce the discount or drop the item; never silently breach the floor. --- ## Branching logic | Merchant intent | Scope | Discount depth | Notes | |---|---|---|---| | "Clear out old inventory" | ITEMS — top 5 slowest movers | Velocity-based (15-25%) | Target worst performers | | "Clearance sale on winter items" | COLLECTION with category GUID | 15-20% | Category-wide clearance | | "Get rid of product X" (specific) | SPECIFIC_PRODUCTS with product UUID | 20-25% (user may override) | Single product clearance | | "Move stale stock across the store" | ITEMS — 5 worst velocity products | Velocity-based | Avoid SITE scope for clearance | | "25% off these 3 items" (explicit) | SPECIFIC_PRODUCTS | 25% (user override) | Honor explicit request | ## Error Handling | Error | Cause | Fix | |---|---|---| | `DISCOUNT_RULE_NOT_FOUND` | Rule ID doesn't exist | Re-query discount rules for current IDs | | `REVISION_MISMATCH` | Revision doesn't match | Re-fetch rule for latest revision, then retry | | No slow movers found | All products have healthy velocity ratios (> 0.3) | Inform merchant that inventory is balanced; no clearance needed | | Margin violation | Discount would push margin below 15% | Reduce discount percentage or get explicit merchant override | | Quantity data missing | Products lack inventory tracking | Cannot identify slow movers; ask merchant to enable inventory tracking or specify products manually | | Max items exceeded | More than 5 slow-moving products identified | Select the 5 with worst velocity ratios; consider CATEGORY scope if they share a category | ## References - [Discount Rules API](https://dev.wix.com/docs/api-reference/business-solutions/e-commerce/extensions/discounts/discount-rules/introduction.md) --- > Portal Navigation: > > - Append `.md` to any URL under `https://dev.wix.com/docs/` to get its markdown version. > - Pages are either content pages (article or reference text) or menu pages (a list of links to child pages). > - To get a menu page, truncate any URL to a parent path and append `.md` (e.g. `https://dev.wix.com/docs/sdk.md`, `https://dev.wix.com/docs/sdk/core-modules.md`). > - Top-level index of all portals: https://dev.wix.com/docs/llms.txt > - Full concatenated docs: https://dev.wix.com/docs/llms-full.txt ## Resource: Flow: Seasonal Promotion ## Article: Flow: Seasonal Promotion ## Article Link: https://dev.wix.com/docs/api-reference/business-solutions/e-commerce/skills/flow-seasonal-promotion.md ## Article Content: # Flow: Seasonal Promotion > ⛔ **Routing gate — [Goal: Seasonal Revenue](https://dev.wix.com/docs/api-reference/business-solutions/e-commerce/skills/goal-seasonal-revenue.md) must be loaded before this flow.** > > This flow is a sub-step, not a direct entry point. If you have not yet called `ReadFullDocsArticle` on [Goal: Seasonal Revenue](https://dev.wix.com/docs/api-reference/business-solutions/e-commerce/skills/goal-seasonal-revenue.md) in this conversation, **stop and load it now**. The goal skill owns the SEASONAL classification rule, the time-window presentation requirement, and the priority rule that gates access to this flow. > > **Before executing this flow**, also read [Create Discount Rule](https://dev.wix.com/docs/api-reference/business-solutions/e-commerce/skills/pricing-create-discount-rule.md) with `ReadFullDocsArticle` — it contains the discount-rule mechanics **and** the pre-create guardrails (conflict/stacking, margin floor, %-sanity). Creates event-driven promotional discounts tied to holidays, shopping events, or seasonal milestones. The flow identifies upcoming events based on the site's country and current date, calculates optimal campaign start/end windows, and targets event-relevant product categories with appropriately sized discounts. ## Prerequisites - Products exist in the catalog (`siteData.hasCatalog === true`, checked at context load) - `current_date` available for event scheduling - Site `country` known for region-specific event mapping (`siteData.country`, loaded by eCommerce Load Context) ## Required APIs - [Create Discount Rule](https://dev.wix.com/docs/api-reference/business-solutions/e-commerce/extensions/discounts/discount-rules/create-discount-rule.md) - [Query Discount Rules](https://dev.wix.com/docs/api-reference/business-solutions/e-commerce/extensions/discounts/discount-rules/query-discount-rules.md) --- ## Step 1: Identify upcoming event Use `current_date` and the site's `country` (from `getSiteData`) to identify major holidays or shopping events within the next 30 days. ### Common event calendar | Event | Typical Date | Regions | Event-relevant categories | |---|---|---|---| | Valentine's Day | February 14 | Global | Gifts, Jewelry, Flowers, Fashion | | Mother's Day | 2nd Sunday in May (US), March (UK) | Varies by country | Gifts, Home & Garden, Jewelry | | Father's Day | 3rd Sunday in June (US) | Varies by country | Electronics, Tools, Fashion | | Back to School | August-September | US, Global | School supplies, Kids, Fashion | | Black Friday | 4th Friday in November | US, spreading globally | Electronics, Fashion, All categories | | Cyber Monday | Monday after Black Friday | US, spreading globally | Electronics, Tech, All categories | | Christmas | December 25 | Global (Christian-majority) | Gifts, Toys, Fashion, Home | | Boxing Day | December 26 | UK, Canada, Australia | All categories (clearance) | | New Year Sale | January 1-7 | Global | All categories (clearance) | | Singles' Day | November 11 | China, spreading globally | Fashion, Electronics, Beauty | If no event is within 30 days, inform the merchant and suggest either a general seasonal promotion or waiting for the next event. --- ## Step 2: Calculate campaign window Determine the optimal start and end dates for the campaign based on the event date. ### Window calculation rules - **Start date**: 3-5 days before the event date. - **End date**: 1-3 days after the event (or through the following Tuesday for weekend events). - **IMPORTANT**: If the calculated start date is before `current_date`, set start to `current_date`. Never schedule a campaign to start in the past. ### Examples | Event | Event Date | Start | End | Notes | |---|---|---|---|---| | Valentine's Day | Feb 14 (Saturday) | Feb 10 (Tuesday) | Feb 16 (Monday) | Through the weekend after | | Black Friday | Nov 27 (Friday) | Nov 23 (Monday) | Dec 1 (Tuesday) | Start Monday, end following Tuesday (covers Cyber Monday) | | Cyber Monday | Nov 30 (Monday) | Nov 28 (Saturday) | Dec 1 (Tuesday) | Often combined with Black Friday window | | Christmas | Dec 25 (Thursday) | Dec 20 (Saturday) | Dec 27 (Saturday) | Start ~5 days before, include Boxing Day | | Mother's Day | May 10 (Sunday) | May 6 (Wednesday) | May 11 (Monday) | Through the day after | ### Combined events For Black Friday + Cyber Monday, use a single extended window: start the preceding Monday/Tuesday, end the following Tuesday. Do not create two separate discount rules. --- ## Step 3: Use pre-loaded catalog data Catalog analytics and product data are already in conversation context — do NOT re-fetch: - `siteData.catalogAnalytics` — category groups with `sum(ordersCount)`, `quantiles([0.5,0.9], price)`, `avg(profitMargin)`. Loaded by the eCommerce Load Context. - `siteData.productCatalogData` — per-product list sorted `ordersCount DESC` for SEASONAL goal. Loaded by the run-a-sale orchestrator Step 5. Extract from context: - `total_orders` — `sum(ordersCount)` from the "All Products" group in `siteData.catalogAnalytics` - `price_p50`, `price_p90` — from quantiles in `siteData.catalogAnalytics` - `avg_profit_margin` — sets discount ceiling - Top products by sales volume — from `siteData.productCatalogData` --- ## Step 4: Focus on event-relevant categories Map the identified event to relevant product categories: | Event | Priority Categories | Fallback | |---|---|---| | Valentine's Day | Gifts, Jewelry, Flowers, Fashion | Site-wide | | Black Friday / Cyber Monday | Electronics, Fashion, Home | Site-wide (broad event) | | Christmas | Gifts, Toys, Home Decor, Fashion | Site-wide | | Back to School | School Supplies, Kids, Fashion | Site-wide | | Mother's Day / Father's Day | Gifts, relevant verticals | Site-wide | If the merchant's catalog matches an event-relevant category, target that category specifically. If no clear match exists, use site-wide scope. --- ## Step 5: Create campaign name Build a compelling campaign name using the event/period name: | Event | Example Campaign Names | |---|---| | Black Friday | "Black Friday Flash Deal", "Black Friday Blowout" | | Cyber Monday | "Cyber Monday Special", "Cyber Monday Deals" | | Christmas | "Holiday Season Sale", "Christmas Gift Sale" | | Valentine's Day | "Valentine's Day Special", "Love Day Sale" | | New Year | "New Year Clearance", "Fresh Start Sale" | | Generic seasonal | "Spring Sale", "Summer Savings", "Fall Collection Sale" | Keep names concise and recognizable. The name is internal (not shown to customers in checkout) but helps merchants manage their promotions. --- ## Step 6: Determine discount scope - **CATEGORY** (preferred for event-relevant promotions): Target the event-relevant category with the highest margin and product count. - **SITE** (for broad events): Use for events like Black Friday where the expectation is store-wide deals. Avoid ITEMS scope for seasonal campaigns — seasonal promotions are typically broad rather than targeting individual products. --- ## Step 7: Convert category names to GUIDs (if CATEGORY scope) If scope is CATEGORY, call `getCategoryIds` to convert category names to GUIDs. - Never use category names as scope IDs — always use the GUID. - Exclude the "All Products" system category. - Max 3 categoryIds per discount rule. --- ## Step 8: Run guardrail checks **Run the pre-create guardrails in [Create Discount Rule](https://dev.wix.com/docs/api-reference/business-solutions/e-commerce/skills/pricing-create-discount-rule.md) → "Guardrails" before creating the rule.** For seasonal campaigns the most relevant are **time overlap** (defined windows — ensure no existing rule covers the same period/scope), **scope overlap** (a category discount stacking with a catalog-wide one), and **coupon stacking** (seasonal events drive high coupon usage). Present any conflicts to the merchant and get confirmation. --- ## Step 9: Create the discount rule with campaign window **Endpoint**: `POST https://www.wixapis.com/ecom/v1/discount-rules` **Request** — Black Friday 20% off electronics category, Monday-Tuesday window: ```json { "discountRule": { "name": "Black Friday Flash Deal", "active": true, "activeTimeInfo": { "start": "2026-11-23T00:00:00.000Z", "end": "2026-12-01T23:59:59.000Z" }, "discounts": [ { "discount": { "discountType": "PERCENTAGE", "percentage": 20 }, "scope": { "id": "electronics-category-guid", "type": "COLLECTION" } } ] } } ``` **Response**: ```json { "discountRule": { "id": "f6a7b8c9-d0e1-2345-f012-456789012345", "revision": "1", "name": "Black Friday Flash Deal", "active": true, "activeTimeInfo": { "start": "2026-11-23T00:00:00.000Z", "end": "2026-12-01T23:59:59.000Z" }, "discounts": [ { "discount": { "discountType": "PERCENTAGE", "percentage": 20 }, "scope": { "id": "electronics-category-guid", "type": "COLLECTION" } } ] } } ``` **Request** — Valentine's Day site-wide 15% off: ```json { "discountRule": { "name": "Valentine's Day Special", "active": true, "activeTimeInfo": { "start": "2026-02-10T00:00:00.000Z", "end": "2026-02-16T23:59:59.000Z" }, "discounts": [ { "discount": { "discountType": "PERCENTAGE", "percentage": 15 }, "scope": { "id": "catalog", "type": "CATALOG" } } ] } } ``` Save the returned `id` and `revision` for later management. --- ## Step 10: Verify and remind about deactivation 1. Query discount rules to confirm the new rule exists and is `active: true` 2. Verify the `activeTimeInfo` window is correctly set 3. Report to the merchant: > "{Campaign name} is live: {discount}% off {scope description} from {start_date} to {end_date}. The discount will apply automatically at checkout during this window." 4. **IMPORTANT — Deactivation reminder**: There is no native auto-deactivation in Wix discount rules. Even though `activeTimeInfo.end` is set, the rule remains in the system after expiration. Remind the merchant: > "Note: After {end_date}, the discount will no longer apply at checkout, but the rule will remain active in your dashboard. You may want to deactivate or delete it after the promotion ends to keep your discount rules tidy." --- ## Branching logic | Merchant intent | Event | Scope | Window | |---|---|---|---| | "Run a Black Friday sale" | Black Friday | Electronics/Fashion CATEGORY or SITE | Mon before through following Tue | | "Valentine's promotion on gifts" | Valentine's Day | Gifts CATEGORY | 3-5 days before through day after | | "Christmas sale on everything" | Christmas | CATALOG (site-wide) | ~5 days before through Dec 26 | | "Seasonal promotion" (generic) | Next upcoming event for site's country | Determined by analytics | Standard 3-5 day lead, 1-3 day tail | | "30% off for Cyber Monday" (explicit) | Cyber Monday | As specified | User-defined or standard window | | No event within 30 days | None | N/A | Inform merchant; suggest general promotion instead | ## Error Handling | Error | Cause | Fix | |---|---|---| | `DISCOUNT_RULE_NOT_FOUND` | Rule ID doesn't exist | Re-query discount rules for current IDs | | `REVISION_MISMATCH` | Revision doesn't match | Re-fetch rule for latest revision, then retry | | No upcoming event | No major holiday within 30 days of current_date | Inform merchant; suggest a general promotion or ask for a specific event | | Start date in the past | Calculated start < current_date | Set start to current_date | | Country not available | Site country unknown from getSiteData | Use global events (Black Friday, Christmas) as fallback | | Category GUID not found | Event-relevant category doesn't exist in merchant's catalog | Fall back to SITE scope | | Time conflict with existing rule | Another seasonal promotion overlaps the same window | Present conflict; suggest adjusting window or deactivating the existing rule | ## References - [Discount Rules API](https://dev.wix.com/docs/api-reference/business-solutions/e-commerce/extensions/discounts/discount-rules/introduction.md) --- > Portal Navigation: > > - Append `.md` to any URL under `https://dev.wix.com/docs/` to get its markdown version. > - Pages are either content pages (article or reference text) or menu pages (a list of links to child pages). > - To get a menu page, truncate any URL to a parent path and append `.md` (e.g. `https://dev.wix.com/docs/sdk.md`, `https://dev.wix.com/docs/sdk/core-modules.md`). > - Top-level index of all portals: https://dev.wix.com/docs/llms.txt > - Full concatenated docs: https://dev.wix.com/docs/llms-full.txt ## Resource: Shipping: Set Up Rates ## Article: Shipping: Set Up Rates ## Article Link: https://dev.wix.com/docs/api-reference/business-solutions/e-commerce/skills/shipping-set-up-rates.md ## Article Content: # Shipping Rates ## AOV Sanity Check **MANDATORY before any threshold calculation that references AOV.** Raw AOV can be misleading due to data issues or bulk purchases. 1. Extract `price_p25` and `price_p50` from `catalog_stats` (use the "All Products" category group). 2. Evaluate AOV against catalog price distribution: | Condition | Interpretation | Action | |---|---|---| | AOV < price_p25 | Anomalous — likely a data or unit issue | Override: use `price_p50` as base. Note in reasoning. | | AOV > price_p90 | Possible bulk/combo orders | Still use AOV but note discrepancy. | | price_p25 <= AOV <= price_p90 | Reasonable | Use AOV as-is. | 3. Store the result as `effective_aov`. Use `effective_aov` everywhere AOV would be referenced — backup rate calibration, shipping thresholds, free shipping thresholds. --- ## Rate Types Rate types are determined by the conditions array, not by an explicit field. | Rate Type | Configuration | |---|---| | Flat rate | `conditions[]` empty, just `amount` | | Free shipping | `amount = "0"` with optional `BY_TOTAL_PRICE GTE [threshold]` | | Weight-based tiers | `BY_TOTAL_WEIGHT` conditions | | Price-based tiers | `BY_TOTAL_PRICE` conditions | | Quantity-based | `BY_TOTAL_QUANTITY` conditions | ## Condition Operators Supported operators: `EQ`, `GT`, `GTE`, `LT`, `LTE`. When multiple conditions appear in the same rate entry, they combine with AND logic. ## Free Shipping Threshold Calibration Optimal range: `effective_aov x 1.0` to `effective_aov x 1.5` | Scenario | Impact | |---|---| | `threshold > AOV x 2` | Too high -- customers rarely qualify | | `threshold < AOV x 0.8` | Too low -- potential margin erosion | Enhanced calibration using catalog stats: - If `price_p75 > aov x 1.5` then use `price_p50 x 1.5` - If `price_p75 < aov` then use `aov x 1.2` - Default: `max(aov x 1.2, price_p75)` ## Per-Item Penalty Avoidance `multiplyByQuantity = true` charges `amount x cart quantity`. Always flag this configuration and recommend switching to flat rate or tiered pricing instead. ## Price-Based Tiers Recommendation Recommend switching from flat to tiered rates when ALL of the following are true: - `price_spread_ratio > 10` - `price_stddev > price_avg x 0.5` - Only flat rates currently exist Recommended tier structure: - **Tier 1**: Below p50 -- lower rate - **Tier 2**: p50 to p75 -- standard rate - **Tier 3**: Above p75 -- higher rate or free ## Flat Rate Confirmation When ALL of the following are true, flat rate is optimal and no change is needed: - `price_spread_ratio <= 3` - `price_stddev < price_avg x 0.3` ## Tier Gap Detection Sort all conditions by value and look for gaps between ranges. Gaps mean some cart totals have no matching rate, which can cause checkout failures. ## Shipping Cost Sanity Check Any rate `amount > AOV x 0.15` (15% of average order value) should be flagged as a cart abandonment risk. --- > Portal Navigation: > > - Append `.md` to any URL under `https://dev.wix.com/docs/` to get its markdown version. > - Pages are either content pages (article or reference text) or menu pages (a list of links to child pages). > - To get a menu page, truncate any URL to a parent path and append `.md` (e.g. `https://dev.wix.com/docs/sdk.md`, `https://dev.wix.com/docs/sdk/core-modules.md`). > - Top-level index of all portals: https://dev.wix.com/docs/llms.txt > - Full concatenated docs: https://dev.wix.com/docs/llms-full.txt ## Resource: Shipping: Set Up Regions ## Article: Shipping: Set Up Regions ## Article Link: https://dev.wix.com/docs/api-reference/business-solutions/e-commerce/skills/shipping-set-up-regions.md ## Article Content: # Shipping Regions ## Creating Delivery Profiles - The first profile is auto-created when Stores is installed. - Up to **99 profiles** per site. ## Adding Regions - Up to **100 regions** per profile. - Each region requires: `name`, `destinations` (array of country codes), `active` flag. ### Domestic Region Set `countryCode` to match `site_context.country`. ### International Region Use multiple country codes, or leave `destinations` empty to represent "Rest of World." ## Assigning Carriers - Up to **25 carriers** per region. - Use `appId` to identify the carrier. ## Enabling Backup Rates CRITICAL -- set `backupRate.active = true` on each carrier. The backup rate amount should be **5-10% of effective AOV**. Without a backup rate, if the carrier service fails the shipping option silently disappears from checkout. ## External Carrier Detection - Shippo `appId`: `2b1943e2-3fc2-47bc-be56-3d402e5966d7` - If **ALL** carriers in a region are external, skip that region -- it is externally managed. - If the region has a mix of external and Wix-native carriers, treat it as hybrid and only configure the Wix-native carriers. ## Business Context Filter for International (MANDATORY) Check the site's industry. If it matches any of the following categories, DO NOT recommend international shipping: food, restaurant, grocery, bakery, catering, perishable, fresh, meat, produce, dairy, drink, beverage Perishable goods require cold chain logistics that standard international shipping does not support. ## Identifying International Regions A region is considered "international" if any of the following are true: - Region name contains "international" or "internacional" (case-insensitive) - `destinations[]` is empty (Rest of World) - `destinations` include countries OTHER than the site country --- > Portal Navigation: > > - Append `.md` to any URL under `https://dev.wix.com/docs/` to get its markdown version. > - Pages are either content pages (article or reference text) or menu pages (a list of links to child pages). > - To get a menu page, truncate any URL to a parent path and append `.md` (e.g. `https://dev.wix.com/docs/sdk.md`, `https://dev.wix.com/docs/sdk/core-modules.md`). > - Top-level index of all portals: https://dev.wix.com/docs/llms.txt > - Full concatenated docs: https://dev.wix.com/docs/llms-full.txt ## Resource: Local Delivery ## Article: Local Delivery ## Article Link: https://dev.wix.com/docs/api-reference/business-solutions/e-commerce/skills/local-delivery.md ## Article Content: # Set Up Store Pickup Location > **Routing rule:** BEFORE taking any action, call `ReadFullDocsArticle` on [Shipping API Reference](https://dev.wix.com/docs/api-reference/business-solutions/e-commerce/skills/shipping-api-reference.md). The endpoint shapes for List Installed Delivery Carriers, Query Delivery Profiles, Add Delivery Region, and Add Delivery Carrier all live there. Do NOT call any of these APIs without loading it first. ## Prerequisites - Wix Stores (or another eCommerce business solution) installed on the site - The **Pickup** carrier must be installed on the site (it is a built-in carrier, not a third-party app) ## Required APIs - [List Installed Delivery Carriers](https://dev.wix.com/docs/api-reference/business-solutions/e-commerce/skills/shipping-api-reference.md#list-installed-delivery-carriers) - [Query Delivery Profiles](https://dev.wix.com/docs/api-reference/business-solutions/e-commerce/skills/shipping-api-reference.md#query-delivery-profiles) - [Add Delivery Region](https://dev.wix.com/docs/api-reference/business-solutions/e-commerce/skills/shipping-api-reference.md#add-delivery-region) - [Add Delivery Carrier](https://dev.wix.com/docs/api-reference/business-solutions/e-commerce/skills/shipping-api-reference.md#add-delivery-carrier) --- ## Step 1: Discover the Pickup carrier Call [List Installed Delivery Carriers](https://dev.wix.com/docs/api-reference/business-solutions/e-commerce/skills/shipping-api-reference.md#list-installed-delivery-carriers) to find the Pickup carrier's `id`. **Endpoint**: `GET https://www.wixapis.com/ecom/v1/delivery-profiles/installed-carriers` **Response**: ```json { "installedDeliveryCarriers": [ { "id": "50d8c12f-715e-41ad-be25-d0f61375dbee", "displayName": "Pickup", "fallbackDefinitionMandatory": false, "toggleGetCarrierSettingsEnabled": true }, { "id": "45c44b27-ca7b-4891-8c0d-1747d588b835", "displayName": "Basic Shipping", "description": "Manage shipping rates and options for this region", "fallbackDefinitionMandatory": false, "toggleGetCarrierSettingsEnabled": true } ] } ``` Look for the carrier with `"displayName": "Pickup"` and save its `id`. This is the `appId` you will use in Step 4. If no Pickup carrier appears in the list, the Pickup app is not installed on the site and must be installed before proceeding. --- ## Step 2: Find the default delivery profile Call [Query Delivery Profiles](https://dev.wix.com/docs/api-reference/business-solutions/e-commerce/skills/shipping-api-reference.md#query-delivery-profiles) to retrieve the site's default delivery profile. **Endpoint**: `POST https://www.wixapis.com/ecom/v1/delivery-profiles/query` **Request**: ```json {} ``` The response contains an array of `deliveryProfiles`. Find the one where `"default": true`. Save its `id` and `revision`. Inspect its `deliveryRegions` array. **Decision point:** - **Region exists for the user's country** (match on `destinations[].countryCode`): save that region's `id` → skip to Step 4. - **No matching region**: proceed to Step 3. --- ## Step 3: Add a delivery region for the pickup country If no region exists for the user's country in the default profile, call [Add Delivery Region](https://dev.wix.com/docs/api-reference/business-solutions/e-commerce/skills/shipping-api-reference.md#add-delivery-region) to create one. **Endpoint**: `POST https://www.wixapis.com/ecom/v1/delivery-profiles/{deliveryProfileId}/delivery-region` Replace `{deliveryProfileId}` with the default profile's `id` from Step 2. **Request**: ```json { "deliveryRegion": { "name": "US Pickup", "active": true, "destinations": [ { "countryCode": "US" } ] }, "revision": "3" } ``` - `name`: descriptive, e.g. `"{Country} Pickup"`. - `countryCode`: [ISO-3166 alpha-2](https://www.iso.org/obp/ui/#search/code/) code (e.g. `"US"`, `"IL"`, `"DE"`, `"GB"`). - `revision`: from the profile returned in Step 2. **Response**: ```json { "deliveryProfile": { "id": "02625bf4-70b4-49b7-93f0-5c9d72608937", "name": "General profile", "default": true, "deliveryRegions": [ { "id": "23823d4a-0ad2-4f92-a48a-467497a9470a", "name": "US Pickup", "active": true, "deliveryCarriers": [], "destinations": [ { "countryCode": "US", "subdivisions": [] } ] } ], "revision": "4" } } ``` Save the new region's `id` from the response. --- ## Step 4: Add the Pickup carrier to the region Call [Add Delivery Carrier](https://dev.wix.com/docs/api-reference/business-solutions/e-commerce/skills/shipping-api-reference.md#add-delivery-carrier) to attach the Pickup carrier to the delivery region. **Endpoint**: `POST https://www.wixapis.com/ecom/v1/delivery-profiles/add-delivery-carrier` **Request**: ```json { "deliveryRegionId": "", "deliveryCarrier": { "appId": "50d8c12f-715e-41ad-be25-d0f61375dbee", "backupRate": { "title": "Pickup at 123 Main St, New York", "amount": "0", "active": true } } } ``` - `deliveryRegionId`: from Step 2 (existing region) or Step 3 (new region). - `appId`: the Pickup carrier `id` from Step 1. - `backupRate.title`: the pickup address customers see at checkout. - `backupRate.amount`: `"0"` for free pickup, or a price string like `"5.00"`. - `backupRate.active`: must be `true` for the option to appear at checkout. **Response**: ```json { "deliveryProfile": { "id": "02625bf4-70b4-49b7-93f0-5c9d72608937", "name": "General profile", "default": true, "deliveryRegions": [ { "id": "23823d4a-0ad2-4f92-a48a-467497a9470a", "name": "US Pickup", "active": true, "deliveryCarriers": [ { "appId": "50d8c12f-715e-41ad-be25-d0f61375dbee", "backupRate": { "title": "Pickup at 123 Main St, New York", "amount": "0", "active": true }, "additionalCharges": [] } ], "destinations": [ { "countryCode": "US", "subdivisions": [] } ] } ], "revision": "5" } } ``` --- ## Error Handling | Error | Cause | Fix | |-------|-------|-----| | `DESTINATIONS_COLLISION` | The country is already assigned to another region in the same profile. | Skip Step 3 — use the existing region's `id` and add the carrier to it in Step 4. | | `CARRIER_ALREADY_EXISTS_IN_REGION` | The Pickup carrier is already configured in this region. | The pickup option is already set up. No action needed. | | `DELIVERY_CARRIER_MISSING_BACKUP_RATE` | The `backupRate` or `backupRate.amount` field is missing. | Ensure `backupRate` includes `title`, `amount`, and `active`. | --- ## Related Documentation - [API: Shipping Delivery](https://dev.wix.com/docs/api-reference/business-solutions/e-commerce/skills/shipping-api-reference.md) --- > Portal Navigation: > > - Append `.md` to any URL under `https://dev.wix.com/docs/` to get its markdown version. > - Pages are either content pages (article or reference text) or menu pages (a list of links to child pages). > - To get a menu page, truncate any URL to a parent path and append `.md` (e.g. `https://dev.wix.com/docs/sdk.md`, `https://dev.wix.com/docs/sdk/core-modules.md`). > - Top-level index of all portals: https://dev.wix.com/docs/llms.txt > - Full concatenated docs: https://dev.wix.com/docs/llms-full.txt ## Resource: Shipping: Add Free Shipping ## Article: Shipping: Add Free Shipping ## Article Link: https://dev.wix.com/docs/api-reference/business-solutions/e-commerce/skills/shipping-add-free-shipping.md ## Article Content: # Shipping: Add Free Shipping > **This skill is the single source for adding free shipping.** Do NOT load `…/skills/flow-add-free-shipping` — that legacy slug pre-dates the routing tree migration and its content has been merged into this file. If the WixREADME index surfaces it, or this slug returns a transient 404 from the docs backend (rawdocs ingestion delay), retry this same URL — do NOT fall back to the legacy slug. > **Before executing this skill**, read [Setup: Shipping Rates](https://dev.wix.com/docs/api-reference/business-solutions/e-commerce/skills/shipping-set-up-rates.md) with `ReadFullDocsArticle` for the rate-object mechanics. ## Rate pricing sanity (inline guardrail) Validate every rate you create or update against the store's AOV; flag any that fail: | Check | Threshold | Why / fix | |---|---|---| | Excessive rate | amount > AOV × 0.15 | top cart-abandonment driver | | Per-item penalty | `multiplyByQuantity: true` | penalizes larger orders → use flat/tiered | | Free threshold too high | threshold > AOV × 2 | unreachable; lower to ~AOV × 1.2 | | Free threshold too low | threshold < AOV × 0.8 | no upsell incentive; raise to ~AOV × 1.2 | | Backup rate shock | `backupRate.amount` > AOV × 0.15 | set to 5–10% of AOV | | Hidden surcharges | total `additionalCharges` > AOV × 0.10 | review necessity | Adds a free shipping option with an optimal threshold calibrated against the site's average order value and catalog price distribution. Free shipping is the single most effective lever for reducing cart abandonment at the delivery step. ## Prerequisites - Wix Stores (or another eCommerce business solution) installed on the site - Site metrics available (revenue, ordersCount) for AOV calculation - Catalog stats available (price quantiles) for threshold calibration - At least one active delivery region configured ## Required APIs - [Query Shipping Options](https://dev.wix.com/docs/api-reference/business-solutions/e-commerce/skills/shipping-api-reference.md#query-shipping-options) - [Create Shipping Option](https://dev.wix.com/docs/api-reference/business-solutions/e-commerce/skills/shipping-api-reference.md#create-shipping-option) - [Update Shipping Option](https://dev.wix.com/docs/api-reference/business-solutions/e-commerce/skills/shipping-api-reference.md#update-shipping-option) - [Query Delivery Profiles](https://dev.wix.com/docs/api-reference/business-solutions/e-commerce/skills/shipping-api-reference.md#query-delivery-profiles) --- ## Step 1: Check for existing free shipping Query all shipping options and check if free shipping already exists. **Endpoint**: `POST https://www.wixapis.com/ecom/v1/shipping-options/query` **Request**: ```json { "query": { "cursorPaging": { "limit": 100 } } } ``` Scan the response for any option matching either condition: - `rates[].amount` equals `"0"` - `title` contains "free" (case-insensitive match) If free shipping already exists, proceed to Step 2 (threshold calibration check). If no free shipping exists, skip to Step 3. --- ## Step 2: Validate existing free shipping threshold If a free shipping option already exists, extract its threshold and validate it. ### 2a: Extract the threshold Find the `BY_TOTAL_PRICE` `GTE` condition value from the free rate's `conditions[]` array. Example rate with threshold: ```json { "amount": "0", "multiplyByQuantity": false, "conditions": [ { "type": "BY_TOTAL_PRICE", "operator": "GTE", "value": "75" } ] } ``` If there is no condition (unconditional free shipping), note this but do not flag it as an error -- the merchant may intentionally offer free shipping on all orders. ### 2b: Evaluate threshold against AOV | Condition | Diagnosis | Recommendation | |---|---|---| | `threshold > AOV x 2` | Too high -- customers rarely qualify for free shipping | Lower the threshold to `AOV x 1.2` | | `threshold < AOV x 0.8` | Too low -- margin erosion risk, most orders qualify automatically | Raise the threshold to `AOV x 1.2` | | `AOV x 0.8 <= threshold <= AOV x 2` | Acceptable range | No change needed | If the threshold needs adjustment, update the shipping option via PATCH (see Step 5 for the update pattern). --- ## Step 3: Run AOV sanity check Before calculating a threshold, validate that AOV is reliable by comparing it against catalog price distribution. ### 3a: Get catalog price statistics Use the catalog stats to retrieve price quantiles for the "All Products" category group: - `price_p25` -- 25th percentile product price - `price_p50` -- 50th percentile (median) product price - `price_p75` -- 75th percentile product price - `price_p90` -- 90th percentile product price ### 3b: Determine effective_aov | Condition | Interpretation | Action | |---|---|---| | `AOV < price_p25` | Anomalous -- AOV is below 75% of product prices | Override: use `price_p50` as `effective_aov` | | `AOV > price_p90` | Possible bulk/combo orders | Use AOV but note the discrepancy | | `price_p25 <= AOV <= price_p90` | Reasonable | Use AOV as `effective_aov` | --- ## Step 4: Calculate optimal free shipping threshold Apply enhanced calibration using both `effective_aov` and catalog stats: | Condition | Threshold Formula | Rationale | |---|---|---| | `price_p75 > effective_aov x 1.5` | `price_p50 x 1.5` | High-price items skew the catalog; threshold encourages 2-item orders of mid-range products | | `price_p75 < effective_aov` | `effective_aov x 1.2` | Most products are lower-priced; threshold encourages adding items to cart | | Default (neither condition) | `max(effective_aov x 1.2, price_p75)` | Standard calibration balancing reach and margin | **Example calculation**: - `effective_aov` = $60 - `price_p50` = $35, `price_p75` = $55 - `price_p75 ($55) < effective_aov ($60)` --> use `effective_aov x 1.2` = $72 - Threshold = $72 --- ## Step 5: Identify the target delivery region Query delivery profiles to find the primary/domestic active region. **Endpoint**: `POST https://www.wixapis.com/ecom/v1/delivery-profiles/query` **Request**: ```json { "query": { "cursorPaging": { "limit": 100 } } } ``` Select the region where: 1. `active=true` 2. `destinations[].countryCode` matches the site's primary country 3. Falls within the default delivery profile Save the region's `id` as the `deliveryRegionId` for the new option. --- ## Step 6: Create the free shipping option **Endpoint**: `POST https://www.wixapis.com/ecom/v1/shipping-options` **Request**: ```json { "shippingOption": { "title": "Free Shipping", "estimatedDeliveryTime": "5-7 business days", "deliveryRegionId": "42b0ed3b-fc54-4ac0-89cf-5d2d17ec441c", "rates": [ { "amount": "0", "multiplyByQuantity": false, "conditions": [ { "type": "BY_TOTAL_PRICE", "operator": "GTE", "value": "72" } ] } ] } } ``` **Response**: ```json { "shippingOption": { "id": "dece6160-4e72-4fcc-adcc-7607215edab0", "revision": "1", "createdDate": "2026-04-15T13:14:01.214Z", "updatedDate": "2026-04-15T13:14:01.214Z", "deliveryRegionId": "42b0ed3b-fc54-4ac0-89cf-5d2d17ec441c", "deliveryRegionIds": [], "title": "Free Shipping", "estimatedDeliveryTime": "5-7 business days", "rates": [ { "amount": "0", "conditions": [ { "type": "BY_TOTAL_PRICE", "operator": "GTE", "value": "72" } ], "multiplyByQuantity": false } ] } } ``` **Key field rules**: | Field | Value | Notes | |---|---|---| | `title` | `"Free Shipping"` | Display name at checkout | | `estimatedDeliveryTime` | `"5-7 business days"` | Always populate -- never leave empty | | `deliveryRegionId` | Region UUID | Use singular field, not `deliveryRegionIds` | | `rates[].amount` | `"0"` | Decimal string for free | | `rates[].multiplyByQuantity` | `false` | Always false for free shipping | | `rates[].conditions[].type` | `"BY_TOTAL_PRICE"` | Cart total threshold | | `rates[].conditions[].operator` | `"GTE"` | Greater than or equal to | | `rates[].conditions[].value` | Threshold as string | Calculated in Step 4 | --- ## Step 7: Verify the option appears in checkout Re-query shipping options to confirm the new free shipping option is live. **Endpoint**: `POST https://www.wixapis.com/ecom/v1/shipping-options/query` Verify: 1. The new option appears with `title: "Free Shipping"` and `amount: "0"` 2. The condition shows the correct threshold value 3. The option is linked to the correct `deliveryRegionId` 4. The linked region has `active=true` in its delivery profile Report to the merchant: > "Free shipping created with a $[threshold] minimum order. Customers spending $[threshold] or more will see free shipping at checkout. This threshold is calibrated to your average order value to encourage larger carts while protecting margins." --- ## Error Handling | Error | Cause | Fix | |---|---|---| | `deliveryRegionId is not a valid GUID` | Used `deliveryRegionIds` (plural) instead of `deliveryRegionId` (singular) | Use the singular `deliveryRegionId` field | | `SHIPPING_OPTION_NOT_FOUND` | Option ID doesn't exist when trying to update | Re-query shipping options to get current IDs | | `REVISION_MISMATCH` | Revision doesn't match the current version when updating | Re-fetch the option for the latest revision, then retry | | Threshold seems unreasonable | AOV data is unreliable (too few orders, data anomaly) | Run the AOV sanity check (Step 3) and use `effective_aov` instead of raw AOV | | Free shipping not visible at checkout | Region linked to the option has `active=false` | Check region active status and activate if intended | ## References - [API: Shipping Delivery](https://dev.wix.com/docs/api-reference/business-solutions/e-commerce/skills/shipping-api-reference.md) --- > Portal Navigation: > > - Append `.md` to any URL under `https://dev.wix.com/docs/` to get its markdown version. > - Pages are either content pages (article or reference text) or menu pages (a list of links to child pages). > - To get a menu page, truncate any URL to a parent path and append `.md` (e.g. `https://dev.wix.com/docs/sdk.md`, `https://dev.wix.com/docs/sdk/core-modules.md`). > - Top-level index of all portals: https://dev.wix.com/docs/llms.txt > - Full concatenated docs: https://dev.wix.com/docs/llms-full.txt ## Resource: Shipping: Optimize Rates ## Article: Shipping: Optimize Rates ## Article Link: https://dev.wix.com/docs/api-reference/business-solutions/e-commerce/skills/shipping-optimize-rates.md ## Article Content: # Flow: Optimize Shipping Rates > **Routing rule:** BEFORE taking any action, call `ReadFullDocsArticle` on [Shipping API Reference](https://dev.wix.com/docs/api-reference/business-solutions/e-commerce/skills/shipping-api-reference.md). The Query Shipping Options and Update/Create Shipping Option endpoints used in Steps 2–4 live there. Do NOT query or modify any shipping options without loading it first. ## Rate pricing sanity (inline guardrail) Validate every rate you create or update against the store's AOV; flag any that fail: | Check | Threshold | Why / fix | |---|---|---| | Excessive rate | amount > AOV × 0.15 | top cart-abandonment driver | | Per-item penalty | `multiplyByQuantity: true` | penalizes larger orders → use flat/tiered | | Free threshold too high | threshold > AOV × 2 | unreachable; lower to ~AOV × 1.2 | | Free threshold too low | threshold < AOV × 0.8 | no upsell incentive; raise to ~AOV × 1.2 | | Backup rate shock | `backupRate.amount` > AOV × 0.15 | set to 5–10% of AOV | | Hidden surcharges | total `additionalCharges` > AOV × 0.10 | review necessity | Analyzes the site's catalog price distribution and current shipping rate structure to determine if the rate strategy is optimal. Recommends and applies changes when flat rates should become tiered, when tier gaps exist, or when per-item penalties are harming conversion. ## Prerequisites - Wix Stores (or another eCommerce business solution) installed on the site - Catalog stats available (product_count, price quantiles, price_stddev) - Site metrics available for AOV calculation - At least one shipping option configured ## Required APIs - [Query Shipping Options](https://dev.wix.com/docs/api-reference/business-solutions/e-commerce/skills/shipping-api-reference.md#query-shipping-options) - [Update Shipping Option](https://dev.wix.com/docs/api-reference/business-solutions/e-commerce/skills/shipping-api-reference.md#update-shipping-option) - [Create Shipping Option](https://dev.wix.com/docs/api-reference/business-solutions/e-commerce/skills/shipping-api-reference.md#create-shipping-option) --- ## Step 1: Gather catalog price distribution Retrieve catalog statistics for the "All Products" category group. Required fields: | Metric | Description | |---|---| | `product_count` | Total number of products | | `price_min` | Lowest product price | | `price_max` | Highest product price | | `price_avg` | Average product price | | `price_stddev` | Standard deviation of prices | | `price_p25` | 25th percentile price | | `price_p50` | 50th percentile (median) price | | `price_p75` | 75th percentile price | | `price_p90` | 90th percentile price | ### 1a: Calculate price spread ratio ``` price_spread_ratio = price_max / price_min ``` This ratio indicates how diverse the catalog pricing is. A ratio of 3 means the most expensive product is 3x the cheapest; a ratio of 50 means extreme price diversity. --- ## Step 2: Query current shipping options Retrieve all shipping options to analyze the existing rate structure. **Endpoint**: `POST https://www.wixapis.com/ecom/v1/shipping-options/query` **Request**: ```json { "query": { "cursorPaging": { "limit": 100 } } } ``` **Response**: ```json { "shippingOptions": [ { "id": "c0e5be8f-5266-4720-a732-5f571e4750db", "revision": "1", "deliveryRegionId": "42b0ed3b-fc54-4ac0-89cf-5d2d17ec441c", "deliveryRegionIds": [], "title": "Standard Shipping", "estimatedDeliveryTime": "5-7 business days", "rates": [ { "amount": "15.00", "conditions": [], "multiplyByQuantity": false } ] } ], "pagingMetadata": { "count": 1, "cursors": {}, "hasNext": false } } ``` For each option, classify its rate structure: - **Flat rate**: `conditions[]` is empty - **Tiered**: Multiple rates with `BY_TOTAL_PRICE`, `BY_TOTAL_WEIGHT`, or `BY_TOTAL_QUANTITY` conditions - **Free shipping**: `amount="0"` - **Per-item**: `multiplyByQuantity=true` --- ## Step 3: Apply the rate strategy decision tree ### 3a: Check for per-item penalty (highest priority) If any shipping option has `multiplyByQuantity=true`, flag it immediately. **Problem**: Per-item charging means shipping cost = `amount x cart quantity`. A $5 rate on a 5-item order charges $25 for shipping. This discourages larger carts and directly conflicts with AOV growth goals. **Recommendation**: Switch to flat rate or tiered pricing. Update the option to set `multiplyByQuantity=false`. ### 3b: Evaluate flat-to-tiered conversion Check ALL three conditions. If all are true, recommend converting flat rates to price-based tiers: | Condition | Threshold | |---|---| | `price_spread_ratio > 10` | Catalog has extreme price diversity | | `price_stddev > price_avg x 0.5` | High variance in pricing | | Only flat rates currently exist | No tiered structure in place | **If all three conditions are met**, recommend price-based tiers: | Tier | Price Range | Rate Strategy | |---|---|---| | Tier 1 | Orders below `price_p50` | Lower flat rate | | Tier 2 | Orders `price_p50` to `price_p75` | Standard rate | | Tier 3 | Orders above `price_p75` | Higher rate or free shipping | ### 3c: Confirm flat rate is optimal If ALL of the following are true, flat rate is the correct strategy -- no changes needed: | Condition | Threshold | |---|---| | `price_spread_ratio <= 3` | Narrow price range | | `price_stddev < price_avg x 0.3` | Low variance | Report: "Your catalog has a narrow price range. Flat rate shipping is the optimal strategy. No changes recommended." ### 3d: Check for tier gaps in existing tiered options For options that already use tiered pricing (weight-based or price-based conditions): 1. Sort all rates by their condition `value` 2. Look for gaps between tier boundaries **Example gap**: Tier 1 has `LTE 5` (kg or $), Tier 2 has `GT 10`. A cart at 7 matches neither tier and gets no shipping rate for this option. **Fix**: Adjust condition boundaries to ensure complete, contiguous coverage. --- ## Step 4: Apply recommended changes ### 4a: Fix per-item penalty Update the shipping option to disable per-item multiplication. **Endpoint**: `PATCH https://www.wixapis.com/ecom/v1/shipping-options/{shippingOptionId}` **Request**: ```json { "shippingOption": { "id": "c0e5be8f-5266-4720-a732-5f571e4750db", "revision": "1", "title": "Standard Shipping", "estimatedDeliveryTime": "5-7 business days", "rates": [ { "amount": "9.99", "multiplyByQuantity": false, "conditions": [] } ] } } ``` **Response**: ```json { "shippingOption": { "id": "c0e5be8f-5266-4720-a732-5f571e4750db", "revision": "2", "createdDate": "2026-04-14T14:43:24.804Z", "updatedDate": "2026-04-15T13:14:13.716Z", "deliveryRegionId": "42b0ed3b-fc54-4ac0-89cf-5d2d17ec441c", "deliveryRegionIds": [], "title": "Standard Shipping", "estimatedDeliveryTime": "5-7 business days", "rates": [ { "amount": "9.99", "conditions": [], "multiplyByQuantity": false } ] } } ``` ### 4b: Create tiered shipping option When converting from flat to tiered, create a new option with price-based tiers. Use catalog quantiles to set tier boundaries. **Example** with `price_p50=$35`, `price_p75=$80`: **Endpoint**: `POST https://www.wixapis.com/ecom/v1/shipping-options` **Request**: ```json { "shippingOption": { "title": "Standard Shipping", "estimatedDeliveryTime": "5-7 business days", "deliveryRegionId": "42b0ed3b-fc54-4ac0-89cf-5d2d17ec441c", "rates": [ { "amount": "9.99", "multiplyByQuantity": false, "conditions": [ { "type": "BY_TOTAL_PRICE", "operator": "LTE", "value": "35" } ] }, { "amount": "7.99", "multiplyByQuantity": false, "conditions": [ { "type": "BY_TOTAL_PRICE", "operator": "GT", "value": "35" }, { "type": "BY_TOTAL_PRICE", "operator": "LTE", "value": "80" } ] }, { "amount": "0", "multiplyByQuantity": false, "conditions": [ { "type": "BY_TOTAL_PRICE", "operator": "GT", "value": "80" } ] } ] } } ``` **Response**: ```json { "shippingOption": { "id": "f3a4b5c6-d7e8-9012-fghi-345678901def", "revision": "1", "createdDate": "2026-04-15T14:00:00.000Z", "updatedDate": "2026-04-15T14:00:00.000Z", "deliveryRegionId": "42b0ed3b-fc54-4ac0-89cf-5d2d17ec441c", "deliveryRegionIds": [], "title": "Standard Shipping", "estimatedDeliveryTime": "5-7 business days", "rates": [ { "amount": "9.99", "conditions": [ { "type": "BY_TOTAL_PRICE", "operator": "LTE", "value": "35" } ], "multiplyByQuantity": false }, { "amount": "7.99", "conditions": [ { "type": "BY_TOTAL_PRICE", "operator": "GT", "value": "35" }, { "type": "BY_TOTAL_PRICE", "operator": "LTE", "value": "80" } ], "multiplyByQuantity": false }, { "amount": "0", "conditions": [ { "type": "BY_TOTAL_PRICE", "operator": "GT", "value": "80" } ], "multiplyByQuantity": false } ] } } ``` **Tier logic**: Multiple conditions within the same rate use AND logic. The middle tier (`GT 35 AND LTE 80`) matches cart totals between $35 and $80. --- ## Step 5: Verify updated rates Re-query shipping options to confirm changes took effect. **Endpoint**: `POST https://www.wixapis.com/ecom/v1/shipping-options/query` Verify: 1. Per-item options now have `multiplyByQuantity=false` 2. Tiered options have contiguous tier boundaries with no gaps 3. All options have `estimatedDeliveryTime` populated 4. Rate amounts are reasonable (no single rate exceeds 15% of effective_aov) 5. Updated options show incremented `revision` values --- ## Error Handling | Error | Cause | Fix | |---|---|---| | `SHIPPING_OPTION_NOT_FOUND` | Option ID doesn't exist | Re-query shipping options to get current IDs | | `REVISION_MISMATCH` | Revision doesn't match the current version | Re-fetch the option for the latest revision, then retry | | `deliveryRegionId is not a valid GUID` | Used `deliveryRegionIds` (plural) instead of `deliveryRegionId` (singular) | Use the singular `deliveryRegionId` field | | Tier gap detected after update | Condition boundaries don't cover all ranges | Verify tier boundaries are contiguous: use LTE for upper bounds and GT for lower bounds of adjacent tiers | | Rate exceeds 15% of AOV | Shipping cost is a cart abandonment risk | Lower the rate amount or add a free shipping tier for larger orders | ## References - [API: Shipping Delivery](https://dev.wix.com/docs/api-reference/business-solutions/e-commerce/skills/shipping-api-reference.md) --- > Portal Navigation: > > - Append `.md` to any URL under `https://dev.wix.com/docs/` to get its markdown version. > - Pages are either content pages (article or reference text) or menu pages (a list of links to child pages). > - To get a menu page, truncate any URL to a parent path and append `.md` (e.g. `https://dev.wix.com/docs/sdk.md`, `https://dev.wix.com/docs/sdk/core-modules.md`). > - Top-level index of all portals: https://dev.wix.com/docs/llms.txt > - Full concatenated docs: https://dev.wix.com/docs/llms-full.txt ## Resource: Shipping: Fix Coverage Gaps ## Article: Shipping: Fix Coverage Gaps ## Article Link: https://dev.wix.com/docs/api-reference/business-solutions/e-commerce/skills/shipping-fix-coverage-gaps.md ## Article Content: # Flow: Fix Shipping Coverage Gaps > **Before executing this skill**, read [Setup: Shipping Regions](https://dev.wix.com/docs/api-reference/business-solutions/e-commerce/skills/shipping-set-up-regions.md) with `ReadFullDocsArticle` for region/carrier mechanics. ## Shipping health score (inline) Use to gauge urgency before fixing gaps: | Score | Key indicator | Action | |---|---|---| | CRITICAL | no profiles/options, or all regions inactive | immediate setup | | POOR | minimal config, low CVR, or no backup rates | fix fundamentals | | FAIR | basic setup, no free shipping, moderate CVR | add free shipping, expand regions | | GOOD | domestic + international, free shipping, good CVR | optimize rates/carriers | | EXCELLENT | full coverage, tiered rates, high CVR | maintain | ## Business-context filter for international (MANDATORY) Before creating or recommending ANY international shipping, check the store's `industry`/`businessType` (case-insensitive) for: food, restaurant, grocery, bakery, catering, perishable, fresh, meat, produce, dairy, drink, beverage. **If matched → do NOT create/recommend international shipping** (cold-chain & regulatory barriers). A region is "international" if its `name` contains "international"/"internacional", its `destinations[]` is empty (Rest of World), or it includes countries outside the store's home country. Detects delivery regions where customers cannot see any shipping options at checkout and creates standard shipping to fill the gaps. A coverage gap is a HIGH priority blocking issue -- customers in affected destinations literally cannot complete a purchase. ## Prerequisites - Wix Stores (or another eCommerce business solution) installed on the site - Site metrics available for AOV-based rate calculation (effective_aov) - Delivery profiles configured with at least one region ## Required APIs - [Query Delivery Profiles](https://dev.wix.com/docs/api-reference/business-solutions/e-commerce/skills/shipping-api-reference.md#query-delivery-profiles) - [Query Shipping Options](https://dev.wix.com/docs/api-reference/business-solutions/e-commerce/skills/shipping-api-reference.md#query-shipping-options) - [Create Shipping Option](https://dev.wix.com/docs/api-reference/business-solutions/e-commerce/skills/shipping-api-reference.md#create-shipping-option) --- ## Step 1: Query all delivery profiles Retrieve all delivery profiles to build a complete map of regions and their carriers. **Endpoint**: `POST https://www.wixapis.com/ecom/v1/delivery-profiles/query` **Request**: ```json { "query": { "cursorPaging": { "limit": 100 } } } ``` **Response**: ```json { "deliveryProfiles": [ { "id": "6a9b2f9b-533a-4d0d-ac8d-64ec3f32fcbd", "name": "General profile", "default": true, "deliveryRegions": [ { "id": "42b0ed3b-fc54-4ac0-89cf-5d2d17ec441c", "name": "Domestic", "active": true, "deliveryCarriers": [ { "appId": "45c44b27-ca7b-4891-8c0d-1747d588b835", "additionalCharges": [] } ], "destinations": [ { "countryCode": "GB", "subdivisions": [] } ] }, { "id": "a1c2d3e4-f5a6-7890-bcde-f12345678901", "name": "International", "active": true, "deliveryCarriers": [ { "appId": "45c44b27-ca7b-4891-8c0d-1747d588b835", "additionalCharges": [] } ], "destinations": [] } ], "revision": "43", "createdDate": "2025-10-26T11:05:10.774Z", "updatedDate": "2026-04-14T14:43:25.397Z" } ], "pagingMetadata": { "count": 1, "cursors": {}, "hasNext": false } } ``` Save every region `id`, `name`, `active` status, and carrier `appId` values. --- ## Step 2: Query all shipping options Retrieve all shipping options to determine which regions already have coverage. **Endpoint**: `POST https://www.wixapis.com/ecom/v1/shipping-options/query` **Request**: ```json { "query": { "cursorPaging": { "limit": 100 } } } ``` **Response**: ```json { "shippingOptions": [ { "id": "c0e5be8f-5266-4720-a732-5f571e4750db", "revision": "1", "createdDate": "2026-04-14T14:43:24.804Z", "updatedDate": "2026-04-14T14:43:24.804Z", "deliveryRegionId": "42b0ed3b-fc54-4ac0-89cf-5d2d17ec441c", "deliveryRegionIds": [], "title": "Standard Shipping", "estimatedDeliveryTime": "5-7 business days", "rates": [ { "amount": "15.00", "conditions": [], "multiplyByQuantity": false } ] } ], "pagingMetadata": { "count": 1, "cursors": {}, "hasNext": false } } ``` Build a map of `deliveryRegionId` to the count of shipping options linked to it. --- ## Step 3: Cross-reference regions and options to find gaps For each `deliveryRegion` across all profiles, apply these checks in order: ### 3a: Skip externally managed regions If ALL carriers in the region have an external appId (e.g., Shippo `appId: "2b1943e2-3fc2-47bc-be56-3d402e5966d7"`), skip the region entirely. External carriers manage their own rates. ### 3b: Skip inactive regions If `active=false`, skip. Inactive regions are not shown at checkout regardless of shipping options. ### 3c: Count linked shipping options Count how many shipping options have this region's `id` in their `deliveryRegionId` field. If the count is **zero**, this is a **coverage gap**. **Severity**: HIGH -- blocking. Customers shipping to this region's destinations cannot see any shipping options and cannot complete checkout. ### 3d: Check for options linked only to inactive regions For each shipping option, check if ALL of its linked regions have `active=false`. If so, the option exists but is invisible at checkout. This is a configuration issue worth flagging. ### 3e: Check for orphaned options For each shipping option, verify that its `deliveryRegionId` actually exists in one of the delivery profiles. If the region no longer exists, the option is orphaned -- it exists in the system but is never shown to customers. --- ## Step 4: Create shipping options for each gap For each region identified as having zero coverage, create a standard shipping option and a free shipping tier. ### 4a: Calculate rates - **Standard rate**: 5-10% of `effective_aov` (e.g., if effective_aov is $60, rate is $3.00-$6.00) - **Free shipping threshold**: `effective_aov x 1.2` (e.g., if effective_aov is $60, threshold is $72) - **Always set `estimatedDeliveryTime`** -- never leave it empty. Use "5-7 business days" for domestic, "7-14 business days" for international. ### 4b: Create standard shipping option **Endpoint**: `POST https://www.wixapis.com/ecom/v1/shipping-options` **Request**: ```json { "shippingOption": { "title": "Standard Shipping", "estimatedDeliveryTime": "5-7 business days", "deliveryRegionId": "a1c2d3e4-f5a6-7890-bcde-f12345678901", "rates": [ { "amount": "4.99", "multiplyByQuantity": false, "conditions": [] } ] } } ``` **Response**: ```json { "shippingOption": { "id": "b2c3d4e5-f6a7-8901-cdef-234567890abc", "revision": "1", "createdDate": "2026-04-15T13:14:01.214Z", "updatedDate": "2026-04-15T13:14:01.214Z", "deliveryRegionId": "a1c2d3e4-f5a6-7890-bcde-f12345678901", "deliveryRegionIds": [], "title": "Standard Shipping", "estimatedDeliveryTime": "5-7 business days", "rates": [ { "amount": "4.99", "conditions": [], "multiplyByQuantity": false } ] } } ``` ### 4c: Create free shipping option with threshold **Endpoint**: `POST https://www.wixapis.com/ecom/v1/shipping-options` **Request**: ```json { "shippingOption": { "title": "Free Shipping", "estimatedDeliveryTime": "5-7 business days", "deliveryRegionId": "a1c2d3e4-f5a6-7890-bcde-f12345678901", "rates": [ { "amount": "0", "multiplyByQuantity": false, "conditions": [ { "type": "BY_TOTAL_PRICE", "operator": "GTE", "value": "72" } ] } ] } } ``` --- ## Step 5: Verify the fix After creating options for all gaps, re-query shipping options to confirm: 1. New options appear in the list with correct titles and rates 2. Each new option is linked to the correct `deliveryRegionId` 3. The `estimatedDeliveryTime` is populated (not empty) 4. No regions remain uncovered **Endpoint**: `POST https://www.wixapis.com/ecom/v1/shipping-options/query` Use the same request from Step 2 and verify the count now covers all active, non-external regions. --- ## Error Handling | Error | Cause | Fix | |---|---|---| | `deliveryRegionId is not a valid GUID` | Used `deliveryRegionIds` (plural) instead of `deliveryRegionId` (singular) in create request | Use the singular `deliveryRegionId` field | | `SHIPPING_OPTION_NOT_FOUND` | The shipping option ID doesn't exist | Re-query shipping options to get current IDs | | `REVISION_MISMATCH` | The `revision` doesn't match the current version | Re-fetch the option to get the latest revision, then retry | | Region appears covered but customers still can't check out | Region has `active=false` | Check region active status in the delivery profile; activate the region if intended | | Option exists but not visible at checkout | Option linked to an inactive or deleted region | Verify region exists and `active=true` in the delivery profile | ## References - [API: Shipping Delivery](https://dev.wix.com/docs/api-reference/business-solutions/e-commerce/skills/shipping-api-reference.md) --- > Portal Navigation: > > - Append `.md` to any URL under `https://dev.wix.com/docs/` to get its markdown version. > - Pages are either content pages (article or reference text) or menu pages (a list of links to child pages). > - To get a menu page, truncate any URL to a parent path and append `.md` (e.g. `https://dev.wix.com/docs/sdk.md`, `https://dev.wix.com/docs/sdk/core-modules.md`). > - Top-level index of all portals: https://dev.wix.com/docs/llms.txt > - Full concatenated docs: https://dev.wix.com/docs/llms-full.txt ## Resource: Shipping: API Reference ## Article: Shipping: API Reference ## Article Link: https://dev.wix.com/docs/api-reference/business-solutions/e-commerce/skills/shipping-api-reference.md ## Article Content: # API: Shipping Delivery Two services govern the shipping configuration of a Wix eCommerce store: - **Delivery Profiles** — define geographic regions and which carriers serve each region. Each site has a default profile. Regions contain destinations (countries/subdivisions) and carriers. - **Shipping Options** — define the rate entries customers see at checkout (flat, tiered, free). Each option is scoped to one or more delivery regions. **Base URL**: `https://www.wixapis.com/ecom` **How to call these APIs**: Use `CallWixSiteAPI`. --- ## Shipping Options ### Query Shipping Options Retrieves all shipping options for the site. Up to 1,000 per request (cursor paging). **Endpoint**: `POST https://www.wixapis.com/ecom/v1/shipping-options/query` **Request**: ```json { "query": { "cursorPaging": { "limit": 100 } } } ``` **Filterable fields**: `id`, `delivery_region_id`, `delivery_region_ids`, `estimated_delivery_time`, `created_date`, `updated_date` **Response**: ```json { "shippingOptions": [ { "id": "abc123", "revision": "1", "deliveryRegionId": "region-guid", "deliveryRegionIds": ["region-guid"], "title": "Standard Shipping", "category": "STANDARD", "estimatedDeliveryTime": "3-5 business days", "rates": [ { "id": "rate-guid", "title": "Standard Shipping", "amount": "5.99", "multiplyByQuantity": false, "active": true, "conditions": [] } ] } ], "pagingMetadata": { "count": 1, "hasNext": false } } ``` --- ### Create Shipping Option Creates a new shipping option and associates it with one or more delivery regions. **Endpoint**: `POST https://www.wixapis.com/ecom/v1/shipping-options` **Required fields**: `shippingOption.deliveryRegionId` (or `deliveryRegionIds`), `shippingOption.title`, `shippingOption.rates[]` > **Gotcha:** use the **singular** `deliveryRegionId` when linking an option to one region. Passing a single region in the plural `deliveryRegionIds` field returns `deliveryRegionId is not a valid GUID`. **Request**: ```json { "shippingOption": { "deliveryRegionId": "region-guid", "title": "Free Shipping Over $75", "category": "FREE", "estimatedDeliveryTime": "5-7 business days", "rates": [ { "title": "Free Shipping", "amount": "0", "multiplyByQuantity": false, "active": true, "conditions": [ { "type": "BY_TOTAL_PRICE", "operator": "GTE", "value": "75" } ] } ] } } ``` **Response**: `{ "shippingOption": { ... } }` — the created option with `id` and `revision`. **Error**: `INVALID_QUANTITY_VALUE` (400) — condition value cannot be fractional. --- ### Get Shipping Option Retrieves a single shipping option by ID. **Endpoint**: `GET https://www.wixapis.com/ecom/v1/shipping-options/{shippingOptionId}` **Response**: `{ "shippingOption": { ... } }` --- ### Update Shipping Option Updates a shipping option. Requires `id` and the current `revision`. Each update increments `revision`. **Endpoint**: `PATCH https://www.wixapis.com/ecom/v1/shipping-options/{shippingOption.id}` **Required fields**: `shippingOption.id`, `shippingOption.revision` **Request**: ```json { "shippingOption": { "id": "abc123", "revision": "1", "rates": [ { "id": "rate-guid", "title": "Free Shipping", "amount": "0", "multiplyByQuantity": false, "active": true, "conditions": [ { "type": "BY_TOTAL_PRICE", "operator": "GTE", "value": "85" } ] } ] } } ``` **Response**: `{ "shippingOption": { ... } }` with updated `revision`. --- ### Delete Shipping Option Permanently deletes a shipping option. **Endpoint**: `DELETE https://www.wixapis.com/ecom/v1/shipping-options/{shippingOptionId}` --- ### Add Delivery Region (to Shipping Option) Associates an additional delivery region with an existing shipping option. **Endpoint**: `POST https://www.wixapis.com/ecom/v1/shipping-options/{shippingOptionId}/add-delivery-region` **Required fields**: `deliveryRegionId`, `revision` **Request**: ```json { "deliveryRegionId": "region-guid", "revision": "2" } ``` --- ### Remove Delivery Region (from Shipping Option) Removes a delivery region association from a shipping option. **Endpoint**: `POST https://www.wixapis.com/ecom/v1/shipping-options/{shippingOptionId}/remove-delivery-region` **Required fields**: `deliveryRegionId`, `revision` --- ## Rate Configuration Rate types are determined by the `conditions` array, not an explicit field: | Rate Type | `amount` | `conditions` | |-----------|---------|-------------| | Flat rate | any | empty `[]` | | Free shipping | `"0"` | optional `BY_TOTAL_PRICE GTE ` | | Price-based tiers | any | one or more `BY_TOTAL_PRICE` conditions | | Weight-based tiers | any | `BY_TOTAL_WEIGHT` conditions | | Quantity-based | any | `BY_TOTAL_QUANTITY` conditions | **Condition operators**: `EQ`, `GT`, `GTE`, `LT`, `LTE` Multiple conditions in one rate combine with AND logic. **`multiplyByQuantity: true`** charges `amount × cart quantity`. Flag this configuration — it penalizes large orders and should be replaced with flat or tiered pricing. --- ## Delivery Profiles ### Query Delivery Profiles Retrieves all delivery profiles for the site. Typically one default profile exists. **Endpoint**: `POST https://www.wixapis.com/ecom/v1/delivery-profiles/query` **Request**: `{}` **Response**: ```json { "deliveryProfiles": [ { "id": "profile-guid", "revision": "3", "name": "General profile", "default": true, "deliveryRegions": [ { "id": "region-guid", "name": "United States", "active": true, "destinations": [ { "countryCode": "US", "subdivisions": [] } ], "deliveryCarriers": [ { "appId": "45c44b27-ca7b-4891-8c0d-1747d588b835", "backupRate": { "title": "Standard Shipping", "amount": "5.99", "active": true }, "additionalCharges": [] } ] } ] } ] } ``` --- ### Get Delivery Profile Retrieves a single delivery profile by ID. **Endpoint**: `GET https://www.wixapis.com/ecom/v1/delivery-profiles/{deliveryProfileId}` **Response**: `{ "deliveryProfile": { ... } }` --- ### Get Delivery Profile by Region Retrieves the profile that contains a given delivery region. **Endpoint**: `GET https://www.wixapis.com/ecom/v1/delivery-profiles/delivery-regions/{deliveryRegionId}` --- ### Create Delivery Profile Creates a new delivery profile (rarely needed — most sites use the default profile). **Endpoint**: `POST https://www.wixapis.com/ecom/v1/delivery-profiles` --- ### Update Delivery Profile Updates profile-level fields (name, etc.). Requires current `revision`. **Endpoint**: `PATCH https://www.wixapis.com/ecom/v1/delivery-profiles/{deliveryProfile.id}` --- ### Add Delivery Region Adds a geographic region to a delivery profile. Returns the updated profile with the new region's `id`. **Endpoint**: `POST https://www.wixapis.com/ecom/v1/delivery-profiles/{deliveryProfileId}/delivery-region` **Required fields**: `deliveryRegion.name`, `deliveryRegion.destinations[]`, `revision` **Request**: ```json { "deliveryRegion": { "name": "United States", "active": true, "destinations": [ { "countryCode": "US" } ] }, "revision": "3" } ``` **Response**: `{ "deliveryProfile": { ... } }` — full updated profile with new region `id`. **Error**: `DESTINATIONS_COLLISION` — country already assigned to another region in this profile. Use the existing region instead. --- ### Update Delivery Region Updates name, active status, or destinations of an existing region. **Endpoint**: `PATCH https://www.wixapis.com/ecom/v1/delivery-profiles/{deliveryProfileId}/delivery-region/{deliveryRegion.id}` --- ### Remove Delivery Region Removes a delivery region from a profile. **Endpoint**: `DELETE https://www.wixapis.com/ecom/v1/delivery-profiles/{deliveryProfileId}/delivery-region/{deliveryRegionId}` --- ### List Installed Delivery Carriers Returns all carriers installed on the site (both built-in and third-party apps). Use this to find the `id` of a specific carrier (e.g., Pickup, Basic Shipping) before calling Add Delivery Carrier. **Endpoint**: `GET https://www.wixapis.com/ecom/v1/delivery-profiles/installed-carriers` **Response**: ```json { "installedDeliveryCarriers": [ { "id": "50d8c12f-715e-41ad-be25-d0f61375dbee", "displayName": "Pickup", "fallbackDefinitionMandatory": false, "toggleGetCarrierSettingsEnabled": true }, { "id": "45c44b27-ca7b-4891-8c0d-1747d588b835", "displayName": "Basic Shipping", "description": "Manage shipping rates and options for this region", "fallbackDefinitionMandatory": false, "toggleGetCarrierSettingsEnabled": true } ] } ``` --- ### List Delivery Carriers (in a Profile) Lists the carriers configured within a specific delivery profile. **Endpoint**: `POST https://www.wixapis.com/ecom/v1/delivery-profiles/{deliveryProfileId}/delivery-carriers` --- ### Add Delivery Carrier Adds a carrier to a delivery region within a profile. The carrier appears as a shipping option to customers in that region. **Endpoint**: `POST https://www.wixapis.com/ecom/v1/delivery-profiles/add-delivery-carrier` **Request**: ```json { "deliveryRegionId": "region-guid", "deliveryCarrier": { "appId": "50d8c12f-715e-41ad-be25-d0f61375dbee", "backupRate": { "title": "Pickup at 123 Main St", "amount": "0", "active": true } } } ``` **Response**: `{ "deliveryProfile": { ... } }` — full updated profile. **Errors**: | Error | Cause | |-------|-------| | `CARRIER_ALREADY_EXISTS_IN_REGION` | Carrier already in this region | | `DELIVERY_CARRIER_MISSING_BACKUP_RATE` | `backupRate` or `backupRate.amount` missing | --- ### Remove Delivery Carrier Removes a carrier from a delivery region. **Endpoint**: `POST https://www.wixapis.com/ecom/v1/delivery-profiles/remove-delivery-carrier` **Request**: ```json { "deliveryRegionId": "region-guid", "appId": "carrier-app-id" } ``` --- ### Update Delivery Carrier Updates `backupRate` or `additionalCharges` for a carrier in a region. **Endpoint**: `PATCH https://www.wixapis.com/ecom/v1/delivery-profiles/update-delivery-carrier` --- ### Set Delivery Carrier Active Status Activates or deactivates a carrier in a delivery region. **Endpoint**: `POST https://www.wixapis.com/ecom/v1/delivery-profiles/delivery-carriers/set-active-status` --- ## Known Carrier IDs | Carrier | App ID | |---------|--------| | Basic Shipping | `45c44b27-ca7b-4891-8c0d-1747d588b835` | | Pickup | `50d8c12f-715e-41ad-be25-d0f61375dbee` | --- > Portal Navigation: > > - Append `.md` to any URL under `https://dev.wix.com/docs/` to get its markdown version. > - Pages are either content pages (article or reference text) or menu pages (a list of links to child pages). > - To get a menu page, truncate any URL to a parent path and append `.md` (e.g. `https://dev.wix.com/docs/sdk.md`, `https://dev.wix.com/docs/sdk/core-modules.md`). > - Top-level index of all portals: https://dev.wix.com/docs/llms.txt > - Full concatenated docs: https://dev.wix.com/docs/llms-full.txt ## Resource: Create Form ## Article: Create Form ## Article Link: https://dev.wix.com/docs/api-reference/crm/forms/skills/create-form.md ## Article Content: # RECIPE: Create a Wix Form > **Standard call shape (every curl below).** The `` placeholder is shorthand for `Authorization: Bearer ` only. Body-bearing requests also need `Content-Type: application/json`. Create a form on a Wix site that appears in the Forms & Submissions dashboard. The form collects visitor information (e.g., name, email) and can automatically upsert contacts on submission. --- ## Create the form Call the Create Form endpoint with the `wix.form_app.form` namespace. The Wix Forms app (appDefId: `14ce1214-b278-a7e4-1373-00cebd1bef7c`) is usually already installed on sites. ```bash curl -X POST \ 'https://www.wixapis.com/form-schema-service/v4/forms' \ -H 'Content-Type: application/json' \ -H 'Authorization: ' \ -d '{ "form": { "name": "Contact Form", "namespace": "wix.form_app.form", "enabled": true, "spamFilterProtectionLevel": "ADVANCED", "formFields": [ { "id": "c1a2b3d4-0001-4a00-b000-000000000001", "hidden": false, "identifier": "CONTACTS_FIRST_NAME", "fieldType": "INPUT", "inputOptions": { "target": "first_name_0001", "pii": true, "required": false, "inputType": "STRING", "readOnly": false, "stringOptions": { "validation": { "format": "UNKNOWN_FORMAT", "enum": [] }, "componentType": "TEXT_INPUT", "textInputOptions": { "label": "First name", "showLabel": true } } } }, { "id": "c1a2b3d4-0002-4a00-b000-000000000002", "hidden": false, "identifier": "CONTACTS_LAST_NAME", "fieldType": "INPUT", "inputOptions": { "target": "last_name_0002", "pii": true, "required": false, "inputType": "STRING", "readOnly": false, "stringOptions": { "validation": { "format": "UNKNOWN_FORMAT", "enum": [] }, "componentType": "TEXT_INPUT", "textInputOptions": { "label": "Last name", "showLabel": true } } } }, { "id": "c1a2b3d4-0003-4a00-b000-000000000003", "hidden": false, "identifier": "CONTACTS_EMAIL", "fieldType": "INPUT", "inputOptions": { "target": "email_0003", "pii": true, "required": true, "inputType": "STRING", "readOnly": false, "stringOptions": { "validation": { "format": "EMAIL", "enum": [] }, "componentType": "TEXT_INPUT", "textInputOptions": { "label": "Email", "showLabel": true } } } }, { "id": "c1a2b3d4-0004-4a00-b000-000000000004", "hidden": false, "identifier": "TEXT_INPUT", "fieldType": "INPUT", "inputOptions": { "target": "message_0004", "pii": false, "required": false, "inputType": "STRING", "readOnly": false, "stringOptions": { "validation": { "format": "UNKNOWN_FORMAT", "enum": [] }, "componentType": "TEXT_INPUT", "textInputOptions": { "label": "Message", "showLabel": true } } } }, { "id": "c1a2b3d4-0005-4a00-b000-000000000005", "hidden": false, "identifier": "SUBMIT_BUTTON", "fieldType": "DISPLAY", "displayOptions": { "displayFieldType": "PAGE_NAVIGATION", "pageNavigationOptions": { "nextPageText": "Next", "previousPageText": "Back", "submitText": "Submit" } } } ], "steps": [ { "id": "d1e2f3a4-0001-4b00-c000-000000000001", "name": "Page 1", "hidden": false, "layout": { "large": { "items": [ { "fieldId": "c1a2b3d4-0001-4a00-b000-000000000001", "row": 0, "column": 0, "width": 6, "height": 1 }, { "fieldId": "c1a2b3d4-0002-4a00-b000-000000000002", "row": 0, "column": 6, "width": 6, "height": 1 }, { "fieldId": "c1a2b3d4-0003-4a00-b000-000000000003", "row": 1, "column": 0, "width": 12, "height": 1 }, { "fieldId": "c1a2b3d4-0004-4a00-b000-000000000004", "row": 2, "column": 0, "width": 12, "height": 1 }, { "fieldId": "c1a2b3d4-0005-4a00-b000-000000000005", "row": 3, "column": 6, "width": 6, "height": 1 } ], "sections": [] } } } ], "postSubmissionTriggers": { "upsertContact": { "fieldsMapping": { "first_name_0001": { "contactField": "FIRST_NAME" }, "last_name_0002": { "contactField": "LAST_NAME" }, "email_0003": { "contactField": "EMAIL", "emailInfo": { "tag": "UNTAGGED" } } }, "labels": [] } }, "submitSettings": { "submitSuccessAction": "THANK_YOU_MESSAGE", "thankYouMessageOptions": { "durationInSeconds": 8, "richContent": { "nodes": [ { "type": "PARAGRAPH", "id": "ty1", "nodes": [ { "type": "TEXT", "id": "", "nodes": [], "textData": { "text": "Thanks, we received your submission.", "decorations": [] } } ], "paragraphData": { "textStyle": { "textAlignment": "CENTER" } } } ], "metadata": { "version": 1, "createdTimestamp": "2025-01-01T00:00:00.000Z", "updatedTimestamp": "2025-01-01T00:00:00.000Z", "id": "thank-you-msg-001" } } } } } }' ``` The response includes the created form with its `id`. Store this ID to manage the form later. Verify the form in the dashboard: `https://manage.wix.com/dashboard/{siteId}/forms` ## Key Details ### Field Configuration - All `id` fields (for `formFields`, `steps`) and all `fieldId` references in the layout **must be valid UUIDs**. Generate fresh UUIDs for each form you create — do not reuse the example UUIDs above. - Each field needs a unique `id` and a unique `target` value. The `target` is used to map submissions to contact fields. - **CRITICAL: The `identifier` must be a recognized Wix value.** Custom identifiers like `"product_name"` or `"color_preference"` will cause the field to be silently dropped from the form — no error is thrown. For any generic/custom text field, use `"TEXT_INPUT"` as the identifier and set the display name via the `label` property in `textInputOptions`. - For plain text fields, use `"format": "UNKNOWN_FORMAT"`. For email fields, use `"format": "EMAIL"`. For phone fields, use `"format": "PHONE"`. Valid format values: `UNKNOWN_FORMAT`, `DATE`, `TIME`, `DATE_TIME`, `EMAIL`, `URL`, `UUID`, `PHONE`, `URI`, `HOSTNAME`, `COLOR_HEX`, `CURRENCY`, `LANGUAGE`, `DATE_OPTIONAL_TIME`. - The submit button is a `DISPLAY` field with `identifier: "SUBMIT_BUTTON"`. - **Build the complete form in one call — do not create throwaway "test" forms to probe field shapes.** A site has a **low form cap (~4 forms)**; iterative probing hits the cap (`maximum number of forms reached`), forcing you to `GET` the form list and `DELETE` the test forms before the real create can succeed. Assemble all fields (including any RADIO_GROUP/DROPDOWN per § "Choice fields") and POST once. ### Field Types Reference | Identifier | componentType | format | Use case | |---|---|---|---| | `TEXT_INPUT` | `TEXT_INPUT` | `UNKNOWN_FORMAT` | Generic single-line text (use `label` for display name) | | `CONTACTS_FIRST_NAME` | `TEXT_INPUT` | `UNKNOWN_FORMAT` | Contact first name | | `CONTACTS_LAST_NAME` | `TEXT_INPUT` | `UNKNOWN_FORMAT` | Contact last name | | `CONTACTS_EMAIL` | `TEXT_INPUT` | `EMAIL` | Contact email | | `CONTACTS_PHONE` | `TEXT_INPUT` | `PHONE` | Contact phone | | `SUBMIT_BUTTON` | N/A (`DISPLAY` field) | N/A | Submit button | | `TEXT_INPUT` | `RADIO_GROUP` | `UNKNOWN_FORMAT` | Single-choice from a fixed list (radio buttons) — see § "Choice fields" | | `TEXT_INPUT` | `DROPDOWN` | `UNKNOWN_FORMAT` | Single-choice from a fixed list (dropdown) — same shape as RADIO_GROUP | > **Note:** `LONG_TEXT_INPUT` is not supported as a `componentType` via REST — it throws `INVALID_ARGUMENT`. Use `TEXT_INPUT` for all text fields. ### Choice fields (RADIO_GROUP / DROPDOWN) A single-choice field (radio buttons or a dropdown — e.g. an RSVP "Will you attend?") is a **`STRING` input field**, not a separate field type. It uses `identifier: "TEXT_INPUT"`, `inputType: "STRING"`, and sets `componentType` to `RADIO_GROUP` (or `DROPDOWN`) **inside `stringOptions`**. Two things must agree or the field breaks: 1. **`stringOptions.validation.enum`** must list every option `value` (an empty `enum` is for free-text only). 2. **`stringOptions.radioGroupOptions.options[]`** carries the rendered choices — each option needs its own **UUID `id`**, a `value`, and a `label`. (For `DROPDOWN`, use `dropdownOptions` with the same `{id, value, label}` shape.) > **CRITICAL — silent fallback to TEXT_INPUT.** If `radioGroupOptions` is missing/malformed (wrong key like `choices` instead of `options`, an option missing its `id`, or an empty `validation.enum`), the API does **not** error — it silently creates the field as a plain `TEXT_INPUT`. If a choice field renders as a text box, this is why. Build it correctly on the first call; do not probe. ```json { "id": "a1b2c3d4-1002-4e00-8001-000000000002", "hidden": false, "identifier": "TEXT_INPUT", "fieldType": "INPUT", "inputOptions": { "target": "attending_0002", "pii": false, "required": true, "inputType": "STRING", "readOnly": false, "stringOptions": { "validation": { "format": "UNKNOWN_FORMAT", "enum": ["Joyfully accepts", "Regretfully declines"] }, "componentType": "RADIO_GROUP", "radioGroupOptions": { "label": "Will you attend?", "showLabel": true, "numberOfColumns": "ONE", "options": [ { "id": "c3d4e5f6-3001-4a00-8001-000000000001", "value": "Joyfully accepts", "label": "Joyfully accepts" }, { "id": "c3d4e5f6-3001-4a00-8001-000000000002", "value": "Regretfully declines", "label": "Regretfully declines" } ] } } } } ``` `numberOfColumns` is a string enum (`"ONE"`, `"TWO"`, `"THREE"`) controlling the radio layout — omit it and the field still works (defaults to one column). ### Layout The `steps[].layout.large.items` array controls how fields are positioned: - `row` and `column` set the position (0-based grid) - `width` sets the column span (max 12 for full width, 6 for half) - `height` is typically 1 ### Post-Submission Triggers The `postSubmissionTriggers.upsertContact` object maps form field targets to contact fields, so each submission automatically creates or updates a contact. The `fieldsMapping` keys must match the `target` values from the form fields. ### Prerequisites The Wix Forms app (appDefId: `14ce1214-b278-a7e4-1373-00cebd1bef7c`) must be installed on the site. It is usually pre-installed, but if the API returns a "missing installed app" error, install it first using the [Install Wix Apps](https://dev.wix.com/docs/api-reference/business-management/app-installation/skills/install-wix-apps.md) recipe. ## Troubleshooting | Error | Cause | Fix | |---|---|---| | `Unrecognized value passed for enum` | Invalid `componentType` value (e.g., `LONG_TEXT_INPUT`) | Use only `componentType` values from the schema: `TEXT_INPUT`, `RADIO_GROUP`, `DROPDOWN`, `DATE_TIME`, `PHONE_INPUT`, `DATE_INPUT`, `TIME_INPUT`, `DATE_PICKER`, `PASSWORD` | | Field silently missing from created form | Custom `identifier` value (e.g., `"product_name"`) | Use a recognized identifier like `TEXT_INPUT` and set display name via `label` | | Choice field rendered as a plain text box | `radioGroupOptions`/`dropdownOptions` malformed (wrong key, option missing `id`, empty `validation.enum`) — API silently falls back to `TEXT_INPUT` | Match the § "Choice fields" shape exactly: `componentType` in `stringOptions`, `options[]` each with a UUID `id`, and `validation.enum` listing all option values | | `maximum number of forms reached` / form-cap error | Sites cap at ~4 forms; reached by creating throwaway test forms | `GET form-schema-service/v4/forms` then `DELETE` the unwanted forms; build the real form in one call (don't probe) | | `Permissions for given namespace not found` | `wix.form_app.form` namespace not active | Ensure the Wix Forms app is installed; try creating a form through the UI first to activate the namespace | | `missing installed app` | Wix Forms app not installed | Install app `14ce1214-b278-a7e4-1373-00cebd1bef7c` via the [Install Wix Apps](https://dev.wix.com/docs/api-reference/business-management/app-installation/skills/install-wix-apps.md) recipe | ## Related Documentation - [Form Schemas API Introduction](https://dev.wix.com/docs/api-reference/crm/forms/form-schemas/introduction.md) - [Create Form API Reference](https://dev.wix.com/docs/api-reference/crm/forms/form-schemas/create-form.md) - [Form Submissions API](https://dev.wix.com/docs/api-reference/crm/forms/form-submissions/introduction.md) --- > Portal Navigation: > > - Append `.md` to any URL under `https://dev.wix.com/docs/` to get its markdown version. > - Pages are either content pages (article or reference text) or menu pages (a list of links to child pages). > - To get a menu page, truncate any URL to a parent path and append `.md` (e.g. `https://dev.wix.com/docs/sdk.md`, `https://dev.wix.com/docs/sdk/core-modules.md`). > - Top-level index of all portals: https://dev.wix.com/docs/llms.txt > - Full concatenated docs: https://dev.wix.com/docs/llms-full.txt ## Resource: Create Payment Links ## Article: Create Payment Links ## Article Link: https://dev.wix.com/docs/api-reference/business-management/get-paid/skills/create-payment-links.md ## Article Content: # Create Payment Links This recipe shows how to create and manage payment links using the current Payment Links REST API. ## Prerequisites 1. Site is premium. 2. Site is published. 3. Site is set up to accept payments (Wix Payments onboarding completed). 4. App has payment-link permissions. 5. Wix Stores is installed if you plan to charge for catalog products. ## Required APIs - **Payment Links API**: [REST](https://dev.wix.com/docs/api-reference/business-management/get-paid/payment-links/payment-links/create-payment-link.md) - **Products API**: [REST](https://dev.wix.com/docs/api-reference/business-solutions/stores/catalog-v1/catalog/query-products.md) ## Overview Payment links are created at: - `POST https://www.wixapis.com/payment-links/v1/payment-links` Use one of these payment-link types: - `ECOM`: charge for custom or catalog line items. - `ECOM_ORDER`: collect payment for an existing unpaid eCommerce order. ## Step 1: Retrieve product details (optional) If you plan to use catalog items, fetch the product first. **Examples**: - Catalog V1: `GET https://www.wixapis.com/stores/v1/products/{productId}` - Catalog V1 query: `POST https://www.wixapis.com/stores/v1/products/query` ```json { "query": { "paging": { "limit": 50, "offset": 0 } } } ``` ## Step 2: Create an `ECOM` payment link with custom line items ```json { "paymentLink": { "title": "Business Listing Fee", "description": "One-time listing fee", "currency": "USD", "type": "ECOM", "ecomPaymentLink": { "lineItems": [ { "type": "CUSTOM", "customItem": { "name": "Listing Fee", "quantity": 1, "price": "200.00" } } ] } } } ``` ## Step 3: Create an `ECOM` payment link with catalog items ```json { "paymentLink": { "title": "Product Payment", "currency": "USD", "type": "ECOM", "ecomPaymentLink": { "lineItems": [ { "type": "CATALOG", "catalogItem": { "quantity": 1, "catalogReference": { "appId": "215238eb-22a5-4c36-9e7b-e7c08025e04e", "catalogItemId": "PRODUCT_ID", "options": { "variantId": "VARIANT_ID" } } } } ] } } } ``` ## Step 4: Create an `ECOM_ORDER` payment link for an existing order ```json { "paymentLink": { "title": "Order Balance", "currency": "USD", "type": "ECOM_ORDER", "paymentsLimit": 1, "ecomOrderPaymentLink": { "orderId": "ORDER_ID", "amount": "50" } } } ``` ## Step 5: Send payment link to recipients Use: - `POST https://www.wixapis.com/payment-links/v1/payment-links/{paymentLinkId}/send` Request body: ```json { "paymentLinkId": "PAYMENT_LINK_ID", "recipients": [ { "contactId": "CONTACT_ID", "sendMethods": ["EMAIL_METHOD"] } ] } ``` ## Step 6: Query and manage payment links Query: - `POST https://www.wixapis.com/payment-links/v1/payment-links/query` ```json { "query": { "filter": { "status": "ACTIVE" }, "cursorPaging": { "limit": 50 } } } ``` Get one: - `GET https://www.wixapis.com/payment-links/v1/payment-links/{paymentLinkId}` Deactivate: - `POST https://www.wixapis.com/payment-links/v1/payment-links/{paymentLinkId}/deactivate` Activate: - `POST https://www.wixapis.com/payment-links/v1/payment-links/{paymentLinkId}/activate` Delete (only when no payments were received): - `DELETE https://www.wixapis.com/payment-links/v1/payment-links/{paymentLinkId}` ## Payment Link Statuses | Status | Description | |--------|-------------| | `ACTIVE` | Link is active and can receive payments | | `INACTIVE` | Link is inactive and cannot receive payments | | `PAID` | Payment has been completed | | `EXPIRED` | Link has passed its expiration date | ## Common Errors | Error Code | Meaning | |------------|---------| | `UNPUBLISHED_SITE` | Site must be published before creating payment links | | `MISSING_ACCEPT_PAYMENTS` | Site is not set up to accept payments | | `FAILED_TO_INSTALL_ECOM` | Required eCommerce capability is missing | | `RECIPIENT_NOT_FOUND` | Provided recipient contact does not exist | | `ORDER_NOT_FOUND` | Provided order ID does not exist | | `INVALID_PAYMENTS_LIMIT_FOR_ECOM_ORDER_PAYMENT_LINK` | `ECOM_ORDER` links require `paymentsLimit: 1` | ## Best Practices 1. Validate prerequisites first (premium, published, payments enabled). 2. Use `ECOM` for line-item collection and `ECOM_ORDER` for existing unpaid orders. 3. Use IDs from real entities (products, variants, contacts, orders). 4. Keep currency aligned with your business/order currency rules. 5. Persist payment-link IDs and monitor status via query/get methods. ## Related Documentation - [Payment Links API Reference](https://dev.wix.com/docs/api-reference/business-management/get-paid/payment-links/payment-links/introduction.md) - [Payments Overview](https://dev.wix.com/docs/api-reference/business-management/get-paid/payment-links/introduction.md) - [Products API Reference](https://dev.wix.com/docs/api-reference/business-solutions/stores/catalog-v1/catalog/introduction.md) - [Send Payment Link](https://dev.wix.com/docs/api-reference/business-management/get-paid/payment-links/payment-links/send-payment-link.md) --- > Portal Navigation: > > - Append `.md` to any URL under `https://dev.wix.com/docs/` to get its markdown version. > - Pages are either content pages (article or reference text) or menu pages (a list of links to child pages). > - To get a menu page, truncate any URL to a parent path and append `.md` (e.g. `https://dev.wix.com/docs/sdk.md`, `https://dev.wix.com/docs/sdk/core-modules.md`). > - Top-level index of all portals: https://dev.wix.com/docs/llms.txt > - Full concatenated docs: https://dev.wix.com/docs/llms-full.txt ## Resource: How to Setup Wix Payments ## Article: How to Setup Wix Payments ## Article Link: https://dev.wix.com/docs/api-reference/business-management/get-paid/skills/how-to-setup-wix-payments.md ## Article Content: # How to Set Up Wix Payments This recipe covers the setup flow needed before creating payment links or collecting payments. ## Step 1: Collect required user inputs Before connecting Wix Payments, collect and confirm: 1. Terms acceptance: https://www.wix.com/about/terms-of-payments 2. First name 3. Last name 4. Product/service description (minimum meaningful business description) ## Step 2: Connect Wix Payments account Call: - `POST https://www.wixapis.com/payments/v1/wix-payments-account/connect` ```json { "account": { "firstName": "", "lastName": "", "tosAccepted": true, "productDescription": "" } } ``` ## Step 3: Handle common setup blockers ### Location-related failure If setup fails due to location details, update the business location and retry: - `PUT https://www.wixapis.com/locations/v1/locations/{locationId}` - Reference: [Update Location](https://dev.wix.com/docs/api-reference/business-management/locations/update-location.md) ### Already connected If the API returns an "already connected" style response, skip reconnect and continue with onboarding checks. ## Step 4: Complete dashboard onboarding Connecting the account is not always the final step. To receive payments, the site owner may still need to complete Wix Payments onboarding in the site dashboard. ## Important Notes 1. Never invent or assume user identity/business details. 2. Always obtain explicit user consent before calling connect. 3. Use the exact accepted values provided by the user. 4. Verify readiness by testing a real payment flow (for example, create payment link) after setup. --- > Portal Navigation: > > - Append `.md` to any URL under `https://dev.wix.com/docs/` to get its markdown version. > - Pages are either content pages (article or reference text) or menu pages (a list of links to child pages). > - To get a menu page, truncate any URL to a parent path and append `.md` (e.g. `https://dev.wix.com/docs/sdk.md`, `https://dev.wix.com/docs/sdk/core-modules.md`). > - Top-level index of all portals: https://dev.wix.com/docs/llms.txt > - Full concatenated docs: https://dev.wix.com/docs/llms-full.txt ## Resource: Payment Links for Bookings ## Article: Payment Links for Bookings ## Article Link: https://dev.wix.com/docs/api-reference/business-management/get-paid/skills/payment-links-for-bookings.md ## Article Content: # Payment Links for Bookings Use this recipe to collect payment for booking-related flows by generating payment links with the Payment Links API. ## When to Use Which Type ### Use `ECOM_ORDER` for existing unpaid orders If a booking already has an associated unpaid eCommerce order, create an `ECOM_ORDER` payment link. ```json { "paymentLink": { "title": "Booking Balance", "currency": "USD", "type": "ECOM_ORDER", "paymentsLimit": 1, "ecomOrderPaymentLink": { "orderId": "ORDER_ID", "amount": "50" } } } ``` Notes: - `orderId` must exist and be unpaid. - `ECOM_ORDER` links require `paymentsLimit: 1`. ### Use `ECOM` for ad-hoc booking charges If there is no existing order, create an `ECOM` payment link with custom line items. ```json { "paymentLink": { "title": "Booking Fee", "currency": "USD", "type": "ECOM", "ecomPaymentLink": { "lineItems": [ { "type": "CUSTOM", "customItem": { "name": "Booking Fee", "quantity": 1, "price": "50.00" } } ] } } } ``` ## Send Flow Creating a payment link does not deliver it. Send it explicitly: - `POST https://www.wixapis.com/payment-links/v1/payment-links/{paymentLinkId}/send` ```json { "paymentLinkId": "PAYMENT_LINK_ID", "recipients": [ { "contactId": "CONTACT_ID", "sendMethods": ["EMAIL_METHOD"] } ] } ``` ## Prerequisites Before creating booking payment links, ensure: 1. Site is premium. 2. Site is published. 3. Site is set up to accept payments. 4. Required payment-link permissions are granted to the app. 5. Recipient contacts exist if you plan to send links. ## Common Errors | Error Code | Meaning | |------------|---------| | `UNPUBLISHED_SITE` | Site must be published before creating payment links | | `MISSING_ACCEPT_PAYMENTS` | Site is not set up to accept payments | | `ORDER_NOT_FOUND` | The provided order ID does not exist | | `INVALID_PAYMENTS_LIMIT_FOR_ECOM_ORDER_PAYMENT_LINK` | `ECOM_ORDER` links require `paymentsLimit: 1` | | `RECIPIENT_NOT_FOUND` | Recipient contact ID does not exist | ## API Documentation References - [Create Payment Link](https://dev.wix.com/docs/api-reference/business-management/get-paid/payment-links/payment-links/create-payment-link.md) - [Send Payment Link](https://dev.wix.com/docs/api-reference/business-management/get-paid/payment-links/payment-links/send-payment-link.md) --- > Portal Navigation: > > - Append `.md` to any URL under `https://dev.wix.com/docs/` to get its markdown version. > - Pages are either content pages (article or reference text) or menu pages (a list of links to child pages). > - To get a menu page, truncate any URL to a parent path and append `.md` (e.g. `https://dev.wix.com/docs/sdk.md`, `https://dev.wix.com/docs/sdk/core-modules.md`). > - Top-level index of all portals: https://dev.wix.com/docs/llms.txt > - Full concatenated docs: https://dev.wix.com/docs/llms-full.txt ## Resource: Upload Media to Wix ## Article: Upload Media to Wix ## Article Link: https://dev.wix.com/docs/api-reference/assets/media/skills/upload-media-to-wix.md ## Article Content: # RECIPE: Upload Media to Wix Media Manager Learn how to upload images and files to a Wix site's Media Manager using the REST API. --- ## Overview The Wix Media Manager stores all media files for a site. When you need to use images or files in other Wix APIs, you should first upload them to the Media Manager to get a reliable wixstatic.com URL. **Key Points:** - Uploaded files are permanently stored on Wix servers - You get back a `url` (wixstatic.com) that works reliably in other APIs - External URLs can fail if the source server blocks requests - Media Manager URLs never fail --- ## Method: Import File from External URL The simplest way to add media is to import it from an external URL. Wix will download and store the file. ### API Endpoint ``` POST https://www.wixapis.com/site-media/v1/files/import ``` ### Request Example ```bash curl -X POST 'https://www.wixapis.com/site-media/v1/files/import' \ -H 'Content-Type: application/json' \ -H 'Authorization: ' \ -d '{ "url": "https://images.unsplash.com/photo-1563729784474-d77dbb933a9e?w=400", "mimeType": "image/jpeg", "displayName": "My Image" }' ``` ### Request Parameters | Parameter | Required | Description | |-----------|----------|-------------| | `url` | Yes | The external URL of the file to import | | `mimeType` | Recommended | MIME type (e.g., `image/jpeg`, `image/png`). If omitted, Wix tries to detect it | | `displayName` | No | Display name in Media Manager. Include extension (e.g., `My Image.jpg`) | | `parentFolderId` | No | Folder ID to store the file. Defaults to `media-root` | ### Response Example ```json { "file": { "id": "e6a89e_19dae9fef9bb48a6b5e392d0d2e5b95d~mv2.jpg", "displayName": "My Image.jpg", "url": "https://static.wixstatic.com/media/e6a89e_19dae9fef9bb48a6b5e392d0d2e5b95d~mv2.jpg", "parentFolderId": "media-root", "mediaType": "IMAGE", "operationStatus": "PENDING", "sizeInBytes": "31911" } } ``` ### Key Response Fields | Field | Description | |-------|-------------| | `id` | Media ID | | `url` | **The wixstatic.com URL - use this in other APIs** | | `operationStatus` | `PENDING` → `READY` when processed, or `FAILED` if import failed | > **Can I Use the URL Immediately?** > > **In most cases, yes.** The returned `wixstatic.com` URL typically works immediately for basic use cases like adding to products or blog posts. > > **Wait for READY when:** > - You need image dimensions or metadata > - You're using image transformations (resize, crop) > - You want guaranteed consistency for critical operations > > **Practical approach:** Try using the URL immediately. If it fails, poll until `operationStatus: "READY"`. --- ## Checking File Status After importing, the file goes through async processing. For guaranteed consistency, verify `operationStatus: "READY"` before using the file. ### Get File by ID (Recommended) Use this endpoint to check the status of a specific file: ```bash curl -X GET 'https://www.wixapis.com/site-media/v1/files/get-file-by-id?fileId={fileId}' \ -H 'Authorization: ' ``` **Example:** ```bash curl -X GET 'https://www.wixapis.com/site-media/v1/files/get-file-by-id?fileId=e6a89e_9d32c0dbae954582bce7b2bf35981ca6~mv2.jpg' \ -H 'Authorization: ' ``` ### List Recent Files (Alternative) If you need to find files without knowing the ID: ```bash curl -X GET 'https://www.wixapis.com/site-media/v1/files?parentFolderId=media-root&mediaTypes=IMAGE&sort.fieldName=updatedDate&sort.order=DESC&paging.limit=5' \ -H 'Authorization: ' ``` ### Status Values | Status | Meaning | |--------|---------| | `PENDING` | Still processing - wait before using | | `READY` | File is ready to use | | `FAILED` | Import failed | ### Response When Ready ```json { "files": [{ "id": "e6a89e_19dae9fef9bb48a6b5e392d0d2e5b95d~mv2.jpg", "url": "https://static.wixstatic.com/media/e6a89e_19dae9fef9bb48a6b5e392d0d2e5b95d~mv2.jpg", "operationStatus": "READY", "media": { "image": { "image": { "height": 600, "width": 400 } } }, "labels": ["cupcakes", "pastry", "dessert"] }] } ``` > **Note:** Wix automatically generates labels (tags) for images using AI. --- ## Alternative: Upload from Local Device If you need to upload files from a local device (not from a URL), use the two-step upload process: ### Step 1: Generate Upload URL ```bash curl -X POST 'https://www.wixapis.com/site-media/v1/files/generate-upload-url' \ -H 'Content-Type: application/json' \ -H 'Authorization: ' \ -d '{ "mimeType": "image/jpeg", "fileName": "my-photo.jpg" }' ``` ### Step 2: Upload to the Generated URL ```bash curl -X PUT '' \ -H 'Content-Type: image/jpeg' \ --data-binary @my-photo.jpg ``` > **Note:** For files larger than 10MB, use the Resumable Upload URL API instead. --- ## Common Issues ### Issue 1: Import Fails (operationStatus: FAILED) **Problem:** The file shows `operationStatus: "FAILED"` after import. **Causes:** - Source server blocks external requests (e.g., Wikipedia, some CDNs) - Source server requires authentication - Invalid URL or file not found - File type not supported **Solution:** Use image sources that allow hotlinking: - Unsplash (`images.unsplash.com`) - Pexels (`images.pexels.com`) - Your own hosted images - Public cloud storage (S3, GCS with public access) ### Issue 2: File Stuck in PENDING **Problem:** File stays in `PENDING` status for a long time. **Solution:** - Large files take longer to process - Check back after a few seconds - If still pending after 30+ seconds, the import may have silently failed --- ## Summary | Step | Action | Result | |------|--------|--------| | 1 | Call Import File API with external URL | Get file `id` and `url` with status `PENDING` | | 2 | Poll List Files API | Wait for `operationStatus: "READY"` | | 3 | Use in other APIs | Use the `url` field (wixstatic.com URL) | --- > Portal Navigation: > > - Append `.md` to any URL under `https://dev.wix.com/docs/` to get its markdown version. > - Pages are either content pages (article or reference text) or menu pages (a list of links to child pages). > - To get a menu page, truncate any URL to a parent path and append `.md` (e.g. `https://dev.wix.com/docs/sdk.md`, `https://dev.wix.com/docs/sdk/core-modules.md`). > - Top-level index of all portals: https://dev.wix.com/docs/llms.txt > - Full concatenated docs: https://dev.wix.com/docs/llms-full.txt ## Resource: Create and Update Pricing Plans ## Article: Create and Update Pricing Plans ## Article Link: https://dev.wix.com/docs/api-reference/business-solutions/pricing-plans/skills/create-and-update-pricing-plans.md ## Article Content: # Technical Step-by-Step Instructions: Creating or Updating a Wix Pricing Plans (Real-World, API-First) ## Description Below are the recommended steps to successfully create or update a Wix Pricing Plans (or several at once) on Wix and attach a booking session to a pricing plan, with real-world troubleshooting and fixes for common API issues. --- ## Overview Wix Pricing Plans includes Plans that allows Wix users to build a customized membership plan experiences and sell them to their customers. Pricing plans can also have bundled booking session as benefits. - With Plans, a site owner can create different types of plans, such as, free, one-time or recurring subscriptions and memberships. - With Benefits, a site owner can connect other wix apps like booking service to a pricing plan subscription or membership. Read the full list of pricing plan integration [here](https://dev.wix.com/docs/api-reference/business-solutions/pricing-plans/introduction.md). ### IMPORTANT NOTES - Always Prioritize Reading Full API Method Documentation: this overview article provides a general workflow. However, it repeatedly stresses the importance of reading the full documentation for each specific REST method you intend to use. This is critical for understanding detailed requirements. - Pay close attention to all required fields, data types, enum values, and specific ID types (e.g., resourceId vs. id) as defined in the detailed schema of each API endpoint. The overview article serves as a guide but doesn't replace the need to consult these specifics. --- ## Steps ### 0. Read pricing plans API docs Before proceeding to further steps I must read the following [documentation](https://dev.wix.com/docs/api-reference/business-solutions/pricing-plans/introduction.md) on how to form request to pricing plans API. ### 1. Create a pricing plan Creating a pricing plan can be done by using [create plan](https://dev.wix.com/docs/api-reference/business-solutions/pricing-plans/plans-v3/create-plan.md) endpoint. ### 2. Attach integrating app entity to pricing plans To attach integrating app entity, like bookings or blog to pricing plans read the [Benefit Programs](https://dev.wix.com/docs/api-reference/business-solutions/benefit-programs/introduction.md) documentation and proceed to further steps. #### 2.1. Find program definition Use [Get Program Definition By External Id And Namespace](https://dev.wix.com/docs/api-reference/business-solutions/benefit-programs/program-definitions/get-program-definition-by-external-id-and-namespace.md) endpoint to find the corresponding program definition of the plan. The call must have these query params: - `externalId` must be equal to pricing plan id. - `namespace` must be `@wix/pricing-plans` Example the request in curl: ```bash curl --request GET \ "https://www.wixapis.com/benefit-programs/v1/program-definitions/by-namespace-and-external-id?externalId=00000000-0000-0000-0000-000000000001&namespace=@wix/pricing-plans" \ -H 'Authorization: ' \ -H "Content-Type: application/json" ``` #### 2.2. Create a pool definition Only one pool definition per integrating app must be created. The pool definition should be created using [create pool definition](https://dev.wix.com/docs/api-reference/business-solutions/benefit-programs/pool-definitions/create-pool-definition.md) endpoint. The request for this endpoint must adhere to these rules: - `namespace` must be `@wix/pricing-plans` - only one benefit can be defined in the pool definition - benefit benefitKey must be a random generated UUID - benefit provider app id must be the integrating app def id. For the full list of wix app def ids read [this](https://dev.wix.com/docs/api-reference/articles/work-with-wix-apis/platform/about-apps-created-by-wix.md) article. - benefit price must be only 1 or 0. 0 - if you want the benefit to have unlimited credits and 1 - for the benefit to be limited. - `creditConfiguration` must be empty if the benefit is unlimited #### 2.3. Create benefit items This step is needed to attach the integrating app entity to benefit program. This is done by using [bulk create items](https://dev.wix.com/docs/api-reference/business-solutions/benefit-programs/items/bulk-create-items.md) endpoint. Each item in the request for this endpoint must adhere to these rules: - `namespace` must be `@wix/pricing-plans` - `category` must be empty string - provider app id must be the integrating app def id. For the full list of wix app def ids read [this](https://dev.wix.com/docs/api-reference/articles/work-with-wix-apis/platform/about-apps-created-by-wix.md) article. - `itemSetId` must set to the created pool definition benefit item set id. - `externalId` must be set to the integrating app entity id, example: booking service id or blog post id. ## Pricing plans REST API Documentation Reference - [Create plan](https://dev.wix.com/docs/api-reference/business-solutions/pricing-plans/plans-v3/create-plan.md) - [Get plan](https://dev.wix.com/docs/api-reference/business-solutions/pricing-plans/plans-v3/get-plan.md) - [Update plan](https://dev.wix.com/docs/api-reference/business-solutions/pricing-plans/plans-v3/update-plan.md) - [Query Plans](https://dev.wix.com/docs/api-reference/business-solutions/pricing-plans/plans-v3/query-plans.md) - [Pricing Plans Introduction](https://dev.wix.com/docs/api-reference/business-solutions/pricing-plans/introduction.md) --- > Portal Navigation: > > - Append `.md` to any URL under `https://dev.wix.com/docs/` to get its markdown version. > - Pages are either content pages (article or reference text) or menu pages (a list of links to child pages). > - To get a menu page, truncate any URL to a parent path and append `.md` (e.g. `https://dev.wix.com/docs/sdk.md`, `https://dev.wix.com/docs/sdk/core-modules.md`). > - Top-level index of all portals: https://dev.wix.com/docs/llms.txt > - Full concatenated docs: https://dev.wix.com/docs/llms-full.txt ## Resource: Pricing Plans Bookings Integration ## Article: Pricing Plans Bookings Integration ## Article Link: https://dev.wix.com/docs/api-reference/business-solutions/pricing-plans/skills/pricing-plans-bookings-integration.md ## Article Content: # Technical Step-by-Step Instructions: Integrating Wix Pricing Plans with Bookings Services (Real-World, API-First) ## Description Below are the recommended steps to successfully integrate Wix Pricing Plans with Wix Bookings services, enabling customers to purchase packages and memberships for booking sessions. This recipe covers the complete workflow including the required Benefit Programs integration. --- ## Prerequisites ### Required App Installations Before starting the integration, ensure the following apps are installed on the site: 1. **Wix Bookings** - Usually pre-installed, but verify using site queries 2. **Pricing Plans** - Must be installed if not present - Install if you encounter 428 "App not installed" errors ### App Installation Process If you receive app-related errors, install the missing app using the Apps Installer API. **Steps:** 1. Identify the required app through error messages or API documentation 2. Use the Apps Installer API to install the missing app 3. Verify installation before proceeding **For detailed app installation procedures, refer to:** - [Apps Installer API Documentation](https://dev.wix.com/docs/api-reference/business-management/app-installation/app-installation/install-app.md) - Business setup recipes for app installation workflows - API error messages which typically indicate the required app and installation steps ## Overview Integrating Pricing Plans with Bookings allows businesses to offer: - **Packages**: Fixed session count (e.g., "10 sessions") that can be used within validity period - **Memberships with session limits**: Sessions per billing cycle (e.g., "10 sessions a month") - **Unlimited memberships**: Unlimited access during subscription period (shows as "Unlimited Sessions") The integration requires coordination between three APIs: 1. **Pricing Plans API** - Creates the plan structure and pricing 2. **Benefit Programs API** - Creates the bridge between plans and services 3. **Bookings API** - Services automatically support pricing plan payments ### IMPORTANT NOTES - The integration requires using all three APIs in sequence - there's no direct connection between Pricing Plans and Bookings - This is a complex integration that requires careful error handling and state management - Service `payment.options.pricingPlan` automatically becomes `true` when benefit programs are properly connected - The benefit program `externalId` must exactly match the pricing plan `id` for the connection to work - **Minimum Duration Requirements**: Plans must have minimum 7-day validity periods - cannot create 1-day plans - **Revision Number Management**: The Benefit Programs API uses revision numbers that can conflict with concurrent operations --- ## Steps ### 1. Create the Pricing Plan Create the pricing plan first using the Pricing Plans API. You can create either: - **Package plans** using `singlePaymentForDuration` pricing model with `"type": "bookings-package"` in `clientData` - **Membership plans** using `subscription` pricing model with `"type": "bookings-membership"` in `clientData` **Important Validation Requirements:** - `validity.duration` must be minimum 7 days (`P7D` format) - Cannot use `P1D` or shorter periods due to API validation - For subscription plans, billing cycles have similar minimum requirements Keep the returned `plan.id` for the next step. ### 2. Create Benefit Program Definition Use the Benefit Programs API to create the program definition that links to your pricing plan. The `externalId` must exactly match the pricing plan `id` from step 1, and use `"@wix/pricing-plans"` as the namespace. **Error Handling Note**: If you receive "Entity already exists" errors, the program definition may already exist from a previous attempt. Query existing programs first or handle the error gracefully. ### 3. Create Benefit Definition for Bookings Service Create the benefit definition that connects the program to your specific booking service: - For **packages with session limits**: Include `creditAmount` set to the desired session count - For **unlimited memberships**: Omit the `creditAmount` field entirely - Always use the correct `serviceId` from your bookings service and `"@wix/pricing-plans"` namespace **Revision Number Handling**: The Benefit Programs API requires revision numbers. If operations fail due to revision conflicts, retrieve the current revision number and retry. ### 4. Verify Service Integration Query the service to confirm integration is working. The service should now show `payment.options.pricingPlan: true` and the plan should appear in the booking UI as a payment option. ### IMPORTANT NOTES - **Sequence matters**: Create pricing plan → benefit program definition → benefit definition. Wrong order will cause "Plan not found" errors - **Complex State Management**: This integration involves multiple APIs with different revision systems and error handling patterns - **ID relationships**: - Pricing Plan `id` → Benefit Program Definition `externalId` - Service `id` → Benefit Definition `serviceId` - Program Definition `id` → Benefit Definition `programDefinitionId` - **Session behavior**: - With `creditAmount`: Users consume credits per session - Without `creditAmount`: Users get unlimited access during subscription - **Namespace requirement**: Always use `"@wix/pricing-plans"` as namespace for pricing plan integrations - **Service updates**: Services automatically update when benefit programs are connected - no manual service modification needed ### Troubleshooting Common Issues **"App not installed" Error (428):** - Install Pricing Plans app using Apps Installer API - Verify installation before proceeding with plan creation **"Plan not found" Error:** - Verify `externalId` exactly matches pricing plan `id` - Ensure pricing plan was created successfully before creating benefit program - Check that the plan hasn't been deleted or modified **"Entity already exists" Error:** - Query existing benefit program definitions to check for duplicates - Consider updating existing programs instead of creating new ones - Implement proper error handling for idempotent operations **Service doesn't show pricing plan option:** - Check that benefit definition has correct `serviceId` - Verify all three entities (plan, program definition, benefit definition) were created successfully - Confirm service query shows `payment.options.pricingPlan: true` **Credits not working correctly:** - For packages: Ensure `creditAmount` is set to desired session count - For unlimited: Ensure `creditAmount` is omitted entirely - Verify the benefit definition is properly linked to the correct program definition **Minimum Duration Validation Errors:** - Ensure `validity.duration` is at least `P7D` (7 days) - Adjust single-session plans to weekly validity instead of daily - For subscription plans, use appropriate billing cycle minimums **Revision Number Conflicts:** - Implement retry logic with fresh revision number retrieval - Handle concurrent operations gracefully - Consider queuing operations if dealing with high-frequency updates ## API Documentation References - [Create Plan](https://dev.wix.com/docs/api-reference/business-solutions/pricing-plans/plans-v3/create-plan.md) — `POST https://www.wixapis.com/pricing-plans/v3/plans` - [Create Program Definition](https://dev.wix.com/docs/api-reference/business-solutions/benefit-programs/program-definitions/create-program-definition.md) — `POST https://www.wixapis.com/_api/benefit-programs/v1/program-definitions` - [Pricing Plans API](https://dev.wix.com/docs/api-reference/business-solutions/pricing-plans/introduction.md) - [Benefit Programs API](https://dev.wix.com/docs/api-reference/business-solutions/benefit-programs/introduction.md) - [Bookings Services API](https://dev.wix.com/docs/api-reference/business-solutions/bookings/services/introduction.md) - [Apps Installer API](https://dev.wix.com/docs/api-reference/business-management/app-installation/app-installation/install-app.md) --- > Portal Navigation: > > - Append `.md` to any URL under `https://dev.wix.com/docs/` to get its markdown version. > - Pages are either content pages (article or reference text) or menu pages (a list of links to child pages). > - To get a menu page, truncate any URL to a parent path and append `.md` (e.g. `https://dev.wix.com/docs/sdk.md`, `https://dev.wix.com/docs/sdk/core-modules.md`). > - Top-level index of all portals: https://dev.wix.com/docs/llms.txt > - Full concatenated docs: https://dev.wix.com/docs/llms-full.txt ## Resource: Wix Restaurants Setup ## Article: Wix Restaurants Setup ## Article Link: https://dev.wix.com/docs/api-reference/business-solutions/restaurants/skills/wix-restaurants-setup.md ## Article Content: # Wix Restaurants Setup API Reference This recipe covers setting up and configuring Wix Restaurants using the REST API, including menus, items, and ordering configuration. ## Prerequisites 1. Wix Restaurants app installed on the site 2. API access with restaurant management permissions ## Required APIs - **Menus API**: [REST](https://dev.wix.com/docs/api-reference/business-solutions/restaurants/menus/menus/create-menu.md) - **Menu Items API**: [REST](https://dev.wix.com/docs/api-reference/business-solutions/restaurants/menus/items/items/create-item.md) - **Menu Sections API**: [REST](https://dev.wix.com/docs/api-reference/business-solutions/restaurants/menus/sections/create-section.md) - **Item Modifier Groups API**: [REST](https://dev.wix.com/docs/api-reference/business-solutions/restaurants/menus/items/item-modifier-groups/create-modifier-group.md) - **Item Variants API**: [REST](https://dev.wix.com/docs/api-reference/business-solutions/restaurants/menus/items/item-variants/bulk-create-variants.md) ## Overview Wix Restaurants uses a hierarchical structure: - **Menus** (e.g., Breakfast, Lunch, Dinner) - **Sections** (e.g., Appetizers, Main Courses, Desserts) - **Items** (e.g., Caesar Salad, Grilled Salmon) ## Step 1: Create a Menu **Endpoint**: `POST https://www.wixapis.com/restaurants/menus-menu/v1/menus` **Request Body**: ```json { "menu": { "name": "Dinner Menu", "description": "Our evening dining selections", "visible": true } } ``` **Response**: ```json { "menu": { "id": "menu-id-123", "name": "Dinner Menu", "description": "Our evening dining selections", "visible": true, "createdDate": "2024-01-15T10:00:00.000Z" } } ``` ## Step 2: Create Menu Sections **Endpoint**: `POST https://www.wixapis.com/restaurants/menus-section/v1/sections` **Request Body**: ```json { "section": { "name": "Appetizers", "description": "Start your meal with our delicious starters", "visible": true, "sortOrder": 1 } } ``` Create multiple sections: ```json // Section 1: Appetizers { "section": { "name": "Appetizers", "sortOrder": 1 } } // Section 2: Main Courses { "section": { "name": "Main Courses", "sortOrder": 2 } } // Section 3: Desserts { "section": { "name": "Desserts", "sortOrder": 3 } } ``` ## Step 3: Create Menu Items **Endpoint**: `POST https://www.wixapis.com/restaurants/menus-item/v1/items` **Request Body**: ```json { "item": { "name": "Caesar Salad", "description": "Fresh romaine lettuce with house-made Caesar dressing, croutons, and parmesan", "priceInfo": { "price": "14.99" }, "visible": true, "labels": [], "modifierGroups": [] } } ``` ## Step 4: Add Items to Sections **Endpoint**: `PATCH https://www.wixapis.com/restaurants/menus-section/v1/sections/{sectionId}` Each section update requires the latest section `revision`. ```json { "section": { "id": "", "revision": "", "itemIds": ["item-id-1", "item-id-2", "item-id-3"] } } ``` ## Step 5: Configure Item Options and Modifiers Create modifiers for customization (e.g., cooking temperature, add-ons): **Endpoint**: `POST https://www.wixapis.com/restaurants/item-modifier-group/v1/modifier-groups` ```json { "modifier": { "name": "Cooking Temperature", "required": true, "minSelections": 1, "maxSelections": 1, "options": [ { "name": "Rare", "price": { "amount": "0", "currency": "USD" } }, { "name": "Medium Rare", "price": { "amount": "0", "currency": "USD" } }, { "name": "Medium", "price": { "amount": "0", "currency": "USD" } }, { "name": "Well Done", "price": { "amount": "0", "currency": "USD" } } ] } } ``` Add-on modifier with pricing: ```json { "modifier": { "name": "Add-ons", "required": false, "minSelections": 0, "maxSelections": 5, "options": [ { "name": "Extra Cheese", "price": { "amount": "2.00", "currency": "USD" } }, { "name": "Bacon", "price": { "amount": "3.00", "currency": "USD" } }, { "name": "Avocado", "price": { "amount": "2.50", "currency": "USD" } } ] } } ``` ## Step 6: Set Menu Structure (Attach Sections to Menu) Attach section IDs to a menu. This call requires the latest menu `revision`. **Endpoint**: `PATCH https://www.wixapis.com/restaurants/menus-menu/v1/menus/{menuId}` ```json { "menu": { "id": "", "revision": "", "sectionIds": ["", ""] } } ``` ## Step 7: Bulk Operations for Large Menus For restaurant setup flows with many sections/items, use bulk endpoints: - **Bulk Create Sections**: `POST https://www.wixapis.com/restaurants/menus-section/v1/bulk/sections/create` - **Bulk Create Items**: `POST https://www.wixapis.com/restaurants/menus-item/v1/bulk/items/create` - **Bulk Create Variants**: `POST https://www.wixapis.com/restaurants/item-variants/v1/bulk/variants/create` ```json { "sections": [ { "name": "Appetizers", "visible": true }, { "name": "Main Courses", "visible": true } ], "returnEntity": true } ``` ## Step 8: Query Menus / Sections / Items Use query APIs for retrieval and UI display flows. - **Query Menus**: `POST https://www.wixapis.com/restaurants/menus-menu/v1/menus/query` - **Query Sections**: `POST https://www.wixapis.com/restaurants/menus-section/v1/sections/query` - **Query Items**: `POST https://www.wixapis.com/restaurants/menus-item/v1/items/query` ```json { "query": { "cursorPaging": { "limit": 50 } } } ``` ## Query Menus **Endpoint**: `GET https://www.wixapis.com/restaurants/menus-menu/v1/menus` **Response**: ```json { "menus": [ { "id": "menu-1", "name": "Breakfast Menu", "visible": true, "sections": [...] }, { "id": "menu-2", "name": "Lunch Menu", "visible": true, "sections": [...] } ] } ``` ## Recommended Setup Order For complex restaurant menus, use this order to avoid dependency issues: 1. Create variants (sizes/options) if needed. 2. Create items (single or bulk). 3. Create sections (single or bulk). 4. Update each section with `itemIds`. 5. Update menu with `sectionIds`. ## Item Labels Common dietary labels: - `vegetarian` - `vegan` - `gluten-free` - `gluten-free-option` - `dairy-free` - `nut-free` - `spicy` - `chef-recommendation` ## Best Practices 1. **High-Quality Images**: Use appetizing food photography 2. **Clear Descriptions**: Include ingredients and preparation methods 3. **Accurate Pricing**: Keep prices up-to-date 4. **Stock Management**: Update availability in real-time 5. **Modifier Organization**: Group related customizations logically 6. **Menu Structure**: Organize sections in logical dining order ## Error Handling | Error | Cause | Solution | |-------|-------|----------| | `MENU_NOT_FOUND` | Invalid menu ID | Verify menu exists | | `ITEM_NOT_FOUND` | Invalid item ID | Verify item exists | | `INVALID_PRICE` | Negative price | Use positive amounts | ## Related Documentation - [Menus API Reference](https://dev.wix.com/docs/api-reference/business-solutions/restaurants/menus/menus/introduction.md) - [Menu Items API Reference](https://dev.wix.com/docs/api-reference/business-solutions/restaurants/menus/items/items/introduction.md) - [Menu Sections API Reference](https://dev.wix.com/docs/api-reference/business-solutions/restaurants/menus/sections/introduction.md) - [Restaurant Orders API](https://dev.wix.com/docs/api-reference/business-solutions/e-commerce/orders/orders/introduction.md) --- > Portal Navigation: > > - Append `.md` to any URL under `https://dev.wix.com/docs/` to get its markdown version. > - Pages are either content pages (article or reference text) or menu pages (a list of links to child pages). > - To get a menu page, truncate any URL to a parent path and append `.md` (e.g. `https://dev.wix.com/docs/sdk.md`, `https://dev.wix.com/docs/sdk/core-modules.md`). > - Top-level index of all portals: https://dev.wix.com/docs/llms.txt > - Full concatenated docs: https://dev.wix.com/docs/llms-full.txt ## Resource: Ricos Converter Service ## Article: Ricos Converter Service ## Article Link: https://dev.wix.com/docs/api-reference/assets/rich-content/skills/ricos-converter-service.md ## Article Content: # Rich Content (Ricos) Converter Service This recipe covers how to validate and convert content between Ricos documents (Wix's rich content format) and other formats like HTML, Markdown, and plain text. ## Overview Ricos is Wix's rich content format used across various Wix applications (Blog, Stores, etc.). The [Ricos Documents API](https://dev.wix.com/docs/api-reference/assets/rich-content/ricos-documents/introduction.md) provides: - **Validation**: Check if a document conforms to the Ricos format - **Convert to Ricos**: Transform HTML, Markdown, or plain text into a Ricos document - **Convert from Ricos**: Transform a Ricos document back to HTML, Markdown, or plain text Learn more about [Rich Content](https://dev.wix.com/docs/api-reference/articles/work-with-wix-apis/platform/about-rich-content.md) and [Ricos document structure](https://dev.wix.com/docs/ricos/getting-started/introduction.md). ## Required API Endpoints | Method | Endpoint | Docs | |--------|----------|------| | Validate Document | `POST https://www.wixapis.com/ricos/v1/ricos-document/validate` | | Convert To Ricos | `POST https://www.wixapis.com/ricos/v1/ricos-document/convert/to-ricos` | | Convert From Ricos | `POST https://www.wixapis.com/ricos/v1/ricos-document/convert/from-ricos` | --- ## Available Plugins Plugins determine which content types are recognized when validating or converting. Specify them as uppercase enum values: | Plugin Enum | Description | |-------------|-------------| | `ACTION_BUTTON` | Call-to-action buttons | | `AUDIO` | Audio content | | `CODE_BLOCK` | Code snippets | | `COLLAPSIBLE_LIST` | Expandable/collapsible lists | | `DIVIDER` | Section dividers | | `EMOJI` | Emoji support | | `FILE` | File attachments | | `FONT_FAMILY` | Font family selection | | `GALLERY` | Image galleries | | `GIPHY` | GIF integration | | `HASHTAG` | Hashtag support | | `HEADING` | Headings (h1-h6) | | `HTML` | Raw HTML blocks | | `IMAGE` | Images | | `INDENT` | Text indentation | | `LAYOUT` | Layout containers | | `LINE_SPACING` | Line spacing control | | `LINK` | Hyperlinks | | `LINK_BUTTON` | Link buttons | | `LINK_PREVIEW` | Link previews | | `MENTIONS` | @mentions | | `POLL` | Polls | | `SPOILER` | Spoiler/hidden content | | `TABLE` | Tables | | `TEXT_COLOR` | Text color | | `TEXT_HIGHLIGHT` | Text highlighting | | `VERTICAL_EMBED` | Vertical embeds | | `VIDEO` | Video content | ### IMPORTANT NOTES: - Plugin values must be **UPPERCASE** enum strings (e.g., `"HEADING"`, not `"heading"`) - Content using unsupported plugins will result in validation violations - When converting HTML, only elements matching your plugins are converted --- ## Step 1: Validate a Ricos Document Check if a document conforms to the Ricos format and optionally fix issues. **Endpoint**: `POST https://www.wixapis.com/ricos/v1/ricos-document/validate` ([docs](https://dev.wix.com/docs/api-reference/assets/rich-content/ricos-documents/validate-document.md)) **Request Body**: ```json { "document": { "nodes": [ { "type": "PARAGRAPH", "id": "p1", "nodes": [ { "type": "TEXT", "id": "t1", "textData": { "text": "Hello World", "decorations": [] } } ], "paragraphData": {} } ] }, "plugins": ["HEADING", "LINK", "IMAGE", "TEXT_COLOR"], "fixDocument": true } ``` **Response**: ```json { "valid": true, "violations": [], "validDocument": { "nodes": [ { "type": "PARAGRAPH", "id": "p1", "nodes": [ { "type": "TEXT", "id": "t1", "textData": { "text": "Hello World", "decorations": [] } } ], "paragraphData": {} } ] } } ``` --- ## Step 2: Convert HTML to Ricos Transform HTML content into Ricos document format. **Endpoint**: `POST https://www.wixapis.com/ricos/v1/ricos-document/convert/to-ricos` ([docs](https://dev.wix.com/docs/api-reference/assets/rich-content/ricos-documents/convert-to-ricos-document.md)) **Request Body**: ```json { "html": "

        Welcome

        This is a bold paragraph with a link.

        ", "options": { "plugins": ["HEADING", "LINK", "TEXT_COLOR", "TEXT_HIGHLIGHT"] } } ``` **Response**: ```json { "document": { "nodes": [ { "type": "HEADING", "id": "", "headingData": { "level": 1 }, "nodes": [ { "type": "TEXT", "textData": { "text": "Welcome", "decorations": [] } } ] }, { "type": "PARAGRAPH", "id": "", "nodes": [ { "type": "TEXT", "textData": { "text": "This is a ", "decorations": [] } }, { "type": "TEXT", "textData": { "text": "bold", "decorations": [{ "type": "BOLD", "fontWeightValue": 700 }] } }, { "type": "TEXT", "textData": { "text": " paragraph with a ", "decorations": [] } }, { "type": "TEXT", "textData": { "text": "link", "decorations": [{ "type": "LINK", "linkData": { "link": { "url": "https://example.com", "target": "SELF" } } }] } }, { "type": "TEXT", "textData": { "text": ".", "decorations": [] } } ] } ], "metadata": { "version": 1 } } } ``` --- ## Step 3: Convert Markdown to Ricos Uses the same endpoint as HTML conversion, with `markdown` instead of `html`. **Request Body**: ```json { "markdown": "# Welcome\n\nThis is a **bold** paragraph with a [link](https://example.com).", "options": { "plugins": ["HEADING", "LINK", "CODE_BLOCK"] } } ``` --- ## Step 4: Convert Plain Text to Ricos **Request Body**: ```json { "plainText": "This is plain text content.\n\nIt will be converted to paragraphs.", "options": { "plugins": [] } } ``` --- ## Step 5: Convert Ricos to HTML / Markdown / Plain Text Convert a Ricos document back to another format. **Endpoint**: `POST https://www.wixapis.com/ricos/v1/ricos-document/convert/from-ricos` ([docs](https://dev.wix.com/docs/api-reference/assets/rich-content/ricos-documents/convert-from-ricos-document.md)) **Request Body (to HTML)**: ```json { "document": { "nodes": [ { "type": "HEADING", "id": "h1", "headingData": { "level": 1 }, "nodes": [ { "type": "TEXT", "id": "t1", "textData": { "text": "Welcome", "decorations": [] } } ] }, { "type": "PARAGRAPH", "id": "p1", "nodes": [ { "type": "TEXT", "id": "t2", "textData": { "text": "Hello world with ", "decorations": [] } }, { "type": "TEXT", "id": "t3", "textData": { "text": "bold", "decorations": [{ "type": "BOLD", "fontWeightValue": 700 }] } } ], "paragraphData": {} } ] }, "targetFormat": "HTML" } ``` **Response**: ```json { "html": "

        Welcome

        Hello world with bold

        " } ``` **Target format options**: `"HTML"`, `"MARKDOWN"`, `"PLAIN_TEXT"` For plain text, you can include optional settings: ```json { "document": { "nodes": [...] }, "targetFormat": "PLAIN_TEXT", "plainTextOptions": { "includeLinks": true, "includeMediaLinks": true } } ``` --- ## Common Use Cases ### Blog Post Content Import When importing blog content from external sources: 1. Convert HTML/Markdown to Ricos format using Convert To Ricos 2. Validate the converted document with `fixDocument: true` 3. Use the validated document in the Blog Posts API ### Rich Content Validation Before Saving Before saving rich content: 1. Validate with `fixDocument: true` 2. Use the returned `validDocument` for saving 3. Check `violations` array for any issues ### Round-Trip Conversion Convert between formats for editing workflows: 1. Convert Ricos to Markdown for a Markdown editor 2. Convert edited Markdown back to Ricos for storage 3. See [Sample Flows](https://dev.wix.com/docs/api-reference/assets/rich-content/ricos-documents/sample-flows.md) for a detailed example --- ## Gotchas & Troubleshooting - Maximum content length: 10,000 characters for HTML, Markdown, or plain text - Plugin limits: Maximum 100 plugins per request - Plugin name max length: 30 characters - If converting HTML with images but `IMAGE` plugin not specified, images are silently dropped - Always validate converted content before using in production - The plain text `convert/from-ricos` response concatenates text without separators between nodes — use `includeLinks: true` in `plainTextOptions` if you need link URLs preserved --- > Portal Navigation: > > - Append `.md` to any URL under `https://dev.wix.com/docs/` to get its markdown version. > - Pages are either content pages (article or reference text) or menu pages (a list of links to child pages). > - To get a menu page, truncate any URL to a parent path and append `.md` (e.g. `https://dev.wix.com/docs/sdk.md`, `https://dev.wix.com/docs/sdk/core-modules.md`). > - Top-level index of all portals: https://dev.wix.com/docs/llms.txt > - Full concatenated docs: https://dev.wix.com/docs/llms-full.txt ## Resource: Author Ricos Rich Content ## Article: Author Ricos Rich Content ## Article Link: https://dev.wix.com/docs/api-reference/assets/rich-content/skills/author-ricos-rich-content.md ## Article Content: # Author Ricos Rich Content Ricos is Wix's rich-content format — a tree of typed nodes serialized as JSON. The same structure is embedded by many products: a Blog post's `draftPost.richContent`, a Store product's rich description, an Events description, and CMS rich-text fields all expect a Ricos document. This recipe is the **authoring reference for that node tree**: the valid shape of each node, how nodes nest, and how to format text. It is intentionally product-agnostic — the consuming API decides *where* the document goes; this recipe governs *what a valid document looks like*. > A Ricos document is an object with a `nodes` array: `{ "nodes": [ /* block nodes */ ] }`. Whatever field the consuming API exposes (e.g. `richContent`), it holds this object. For validating or converting an existing document to/from HTML/Markdown, see [Ricos Converter Service](https://dev.wix.com/docs/api-reference/assets/rich-content/skills/ricos-converter-service.md). ## Universal rules for every node - **`type` is always a bare string** — `"type": "PARAGRAPH"`, never an object like `"type": { "type": "PARAGRAPH" }`. An object-valued `type` may pass a shallow validation but renders as a broken/uneditable block. - Every node carries a `type`, an optional `id`, and (for container nodes) a `nodes` array of children. Node `id`s are optional when authoring for a create request — the API generates them; the examples below omit `id` for brevity. - **TEXT is a leaf.** A TEXT node only ever lives inside a `PARAGRAPH`, `HEADING`, or `CODE_BLOCK`. It must **never** sit directly in the root `nodes` array or inside a `LIST_ITEM`, `BLOCKQUOTE`, or `TABLE_CELL` — those must contain a `PARAGRAPH` (or `HEADING`) that then contains the TEXT. See [Nesting rules](#nesting-rules). - Failing to wrap TEXT correctly produces the parse error **"Expected a paragraph node but found TEXT"**. ## Block node shapes **PARAGRAPH** — the base text container. An empty paragraph — `{ "type": "PARAGRAPH" }` — acts as a vertical spacer. `paragraphData.textStyle.textAlignment` accepts `AUTO`·`LEFT`·`CENTER`·`RIGHT`·`JUSTIFY`: ```json { "type": "PARAGRAPH", "nodes": [ { "type": "TEXT", "textData": { "text": "Body copy.", "decorations": [] } } ], "paragraphData": { "textStyle": { "textAlignment": "AUTO" } } } ``` **HEADING** — same TEXT-in-container shape as PARAGRAPH, with the level (1–6) in `headingData`: ```json { "type": "HEADING", "nodes": [ { "type": "TEXT", "textData": { "text": "Section Title", "decorations": [] } } ], "headingData": { "level": 2, "textStyle": { "textAlignment": "AUTO" } } } ``` **BULLETED_LIST / ORDERED_LIST** — nesting is `LIST → LIST_ITEM → PARAGRAPH → TEXT`. Ordered lists use `orderedListData` in place of `bulletedListData`: ```json { "type": "BULLETED_LIST", "nodes": [ { "type": "LIST_ITEM", "nodes": [ { "type": "PARAGRAPH", "nodes": [ { "type": "TEXT", "textData": { "text": "First item", "decorations": [] } } ] } ] } ], "bulletedListData": { "indentation": 0 } } ``` **BLOCKQUOTE** — wraps a PARAGRAPH (never a bare TEXT): ```json { "type": "BLOCKQUOTE", "nodes": [ { "type": "PARAGRAPH", "nodes": [ { "type": "TEXT", "textData": { "text": "A quoted line.", "decorations": [] } } ] } ], "blockquoteData": { "indentation": 1 } } ``` **DIVIDER** — a standalone horizontal rule (no children). `lineStyle`: `SINGLE`·`DOUBLE`·`DASHED`·`DOTTED`; `width`: `LARGE`·`MEDIUM`·`SMALL`: ```json { "type": "DIVIDER", "dividerData": { "lineStyle": "SINGLE", "width": "LARGE", "alignment": "CENTER" } } ``` **TABLE** — nesting is `TABLE → TABLE_ROW → TABLE_CELL → PARAGRAPH → TEXT`. `tableData.dimensions.colsWidthRatio` sets relative column widths. Fill a header row or zebra-stripe body rows with `tableCellData.cellStyle.backgroundColor` (a hex string): ```json { "type": "TABLE", "nodes": [ { "type": "TABLE_ROW", "nodes": [ { "type": "TABLE_CELL", "tableCellData": { "cellStyle": { "verticalAlignment": "MIDDLE", "backgroundColor": "#116DFF" }, "borderColors": {} }, "nodes": [ { "type": "PARAGRAPH", "nodes": [ { "type": "TEXT", "textData": { "text": "Header A", "decorations": [] } } ] } ] }, { "type": "TABLE_CELL", "tableCellData": { "cellStyle": { "verticalAlignment": "MIDDLE", "backgroundColor": "#116DFF" }, "borderColors": {} }, "nodes": [ { "type": "PARAGRAPH", "nodes": [ { "type": "TEXT", "textData": { "text": "Header B", "decorations": [] } } ] } ] } ] } ], "tableData": { "dimensions": { "colsWidthRatio": [50, 50], "colsMinWidth": [120, 120], "rowsHeight": [47] } } } ``` **CODE_BLOCK** — children are TEXT nodes (one per line, or `\n`-joined): ```json { "type": "CODE_BLOCK", "nodes": [ { "type": "TEXT", "textData": { "text": "const x = 1;", "decorations": [] } } ], "codeBlockData": { "textStyle": { "textAlignment": "AUTO" } } } ``` **IMAGE** — references a Wix Media `id` (upload/import the image first via Media Manager; a raw external URL will not render). Requires `width` and `height`. An optional `CAPTION` child holds a TEXT node: ```json { "type": "IMAGE", "nodes": [ { "type": "CAPTION", "nodes": [ { "type": "TEXT", "textData": { "text": "Figure 1", "decorations": [] } } ] } ], "imageData": { "containerData": { "width": { "size": "CONTENT" }, "alignment": "CENTER" }, "image": { "src": { "id": "mediaId" }, "width": 900, "height": 600 }, "altText": "Descriptive alt text" } } ``` ## Inline text formatting (decorations) Apply formatting with the `decorations` array on a TEXT node. Each decoration is an object with a `type` and (for some types) a data field: ```json { "type": "TEXT", "textData": { "text": "Bold, colored, and linked", "decorations": [ { "type": "BOLD", "fontWeightValue": 700 }, { "type": "COLOR", "colorData": { "foreground": "#116DFF" } }, { "type": "LINK", "linkData": { "link": { "url": "https://example.com", "target": "BLANK" } } } ] } } ``` | Decoration | Data field | | ------------------------------------------ | ---------------------------------------------------------- | | `BOLD` | `fontWeightValue: 700` | | `ITALIC` | `italicData: true` | | `UNDERLINE` | _(none)_ | | `STRIKETHROUGH` | `strikethroughData: true` | | `COLOR` | `colorData: { foreground: "#hex" }` (add `background` for highlight) | | `LINK` | `linkData: { link: { url, target: "BLANK" } }` | | `FONT_SIZE` | `fontSizeData: { unit: "PX", value: 24 }` | - **Mixed formatting in one paragraph → split into multiple TEXT nodes** (one per style run) inside the same PARAGRAPH. A single TEXT node carries one consistent set of decorations. - Use a plain hex string in `foreground` for colors. - **No `\n` inside `textData.text`** — one visual line is one node. Emit separate sibling PARAGRAPH/HEADING nodes for separate lines. ## A complete worked example Assemble the shapes above into one valid `richContent` document. This example exercises **every** common node type — heading, bulleted list, ordered list, blockquote, filled-header table, divider, code block, and a paragraph with mixed bold + link runs — all correctly nested. Copy its **structure**; replace the placeholder text with real content. ```json { "nodes": [ { "type": "HEADING", "nodes": [ { "type": "TEXT", "textData": { "text": "What's New in v2.1", "decorations": [] } } ], "headingData": { "level": 2, "textStyle": { "textAlignment": "AUTO" } } }, { "type": "PARAGRAPH", "nodes": [ { "type": "TEXT", "textData": { "text": "This release focuses on speed and clarity.", "decorations": [] } } ], "paragraphData": { "textStyle": { "textAlignment": "AUTO" } } }, { "type": "HEADING", "nodes": [ { "type": "TEXT", "textData": { "text": "Highlights", "decorations": [] } } ], "headingData": { "level": 3 } }, { "type": "BULLETED_LIST", "nodes": [ { "type": "LIST_ITEM", "nodes": [ { "type": "PARAGRAPH", "nodes": [ { "type": "TEXT", "textData": { "text": "Faster page loads", "decorations": [] } } ] } ] }, { "type": "LIST_ITEM", "nodes": [ { "type": "PARAGRAPH", "nodes": [ { "type": "TEXT", "textData": { "text": "Redesigned dashboard", "decorations": [] } } ] } ] } ], "bulletedListData": { "indentation": 0 } }, { "type": "HEADING", "nodes": [ { "type": "TEXT", "textData": { "text": "How to upgrade", "decorations": [] } } ], "headingData": { "level": 3 } }, { "type": "ORDERED_LIST", "nodes": [ { "type": "LIST_ITEM", "nodes": [ { "type": "PARAGRAPH", "nodes": [ { "type": "TEXT", "textData": { "text": "Back up your data", "decorations": [] } } ] } ] }, { "type": "LIST_ITEM", "nodes": [ { "type": "PARAGRAPH", "nodes": [ { "type": "TEXT", "textData": { "text": "Run the migration", "decorations": [] } } ] } ] } ], "orderedListData": { "indentation": 0 } }, { "type": "BLOCKQUOTE", "nodes": [ { "type": "PARAGRAPH", "nodes": [ { "type": "TEXT", "textData": { "text": "The new dashboard cut our reporting time in half.", "decorations": [] } } ] } ], "blockquoteData": { "indentation": 1 } }, { "type": "DIVIDER", "dividerData": { "lineStyle": "SINGLE", "width": "LARGE", "alignment": "CENTER" } }, { "type": "HEADING", "nodes": [ { "type": "TEXT", "textData": { "text": "Plan comparison", "decorations": [] } } ], "headingData": { "level": 3 } }, { "type": "TABLE", "nodes": [ { "type": "TABLE_ROW", "nodes": [ { "type": "TABLE_CELL", "tableCellData": { "cellStyle": { "verticalAlignment": "MIDDLE", "backgroundColor": "#116DFF" }, "borderColors": {} }, "nodes": [ { "type": "PARAGRAPH", "nodes": [ { "type": "TEXT", "textData": { "text": "Plan", "decorations": [ { "type": "BOLD", "fontWeightValue": 700 }, { "type": "COLOR", "colorData": { "foreground": "#FFFFFF" } } ] } } ] } ] }, { "type": "TABLE_CELL", "tableCellData": { "cellStyle": { "verticalAlignment": "MIDDLE", "backgroundColor": "#116DFF" }, "borderColors": {} }, "nodes": [ { "type": "PARAGRAPH", "nodes": [ { "type": "TEXT", "textData": { "text": "Price", "decorations": [ { "type": "BOLD", "fontWeightValue": 700 }, { "type": "COLOR", "colorData": { "foreground": "#FFFFFF" } } ] } } ] } ] } ] }, { "type": "TABLE_ROW", "nodes": [ { "type": "TABLE_CELL", "tableCellData": { "cellStyle": { "verticalAlignment": "MIDDLE" }, "borderColors": {} }, "nodes": [ { "type": "PARAGRAPH", "nodes": [ { "type": "TEXT", "textData": { "text": "Starter", "decorations": [] } } ] } ] }, { "type": "TABLE_CELL", "tableCellData": { "cellStyle": { "verticalAlignment": "MIDDLE" }, "borderColors": {} }, "nodes": [ { "type": "PARAGRAPH", "nodes": [ { "type": "TEXT", "textData": { "text": "$0", "decorations": [] } } ] } ] } ] } ], "tableData": { "dimensions": { "colsWidthRatio": [50, 50], "colsMinWidth": [120, 120], "rowsHeight": [47, 47] } } }, { "type": "CODE_BLOCK", "nodes": [ { "type": "TEXT", "textData": { "text": "npm install @wix/sdk@latest", "decorations": [] } } ], "codeBlockData": { "textStyle": { "textAlignment": "AUTO" } } }, { "type": "PARAGRAPH", "nodes": [ { "type": "TEXT", "textData": { "text": "Read the ", "decorations": [] } }, { "type": "TEXT", "textData": { "text": "full release notes", "decorations": [ { "type": "BOLD", "fontWeightValue": 700 }, { "type": "LINK", "linkData": { "link": { "url": "https://example.com/release-notes", "target": "BLANK" } } } ] } }, { "type": "TEXT", "textData": { "text": " for details.", "decorations": [] } } ], "paragraphData": { "textStyle": { "textAlignment": "AUTO" } } } ] } ``` Note the mixed-run paragraph at the end: the linked words are their own TEXT node carrying `BOLD` + `LINK`, while the surrounding words are separate plain TEXT runs — that is how you apply formatting to *part* of a sentence. ## Nesting rules | Parent | Valid children | | ------------------------------------ | ----------------------------------------------------------------------------------------------------- | | Root `nodes` | PARAGRAPH, HEADING, BULLETED_LIST, ORDERED_LIST, BLOCKQUOTE, DIVIDER, IMAGE, TABLE, CODE_BLOCK | | PARAGRAPH / HEADING / CODE_BLOCK | TEXT | | BULLETED_LIST / ORDERED_LIST | LIST_ITEM | | LIST_ITEM / BLOCKQUOTE | PARAGRAPH (which then contains TEXT) | | TABLE → TABLE_ROW → TABLE_CELL | cell contains PARAGRAPH / HEADING / IMAGE | | IMAGE | CAPTION (optional) | ## Self-audit before returning the document All decidable from the JSON itself — check before handing the document to a consuming API: 1. **Every `type` is a bare string** — search for `"type": {`; there should be zero hits. 2. **TEXT wrapping** — no TEXT node sits directly in the root array, a `LIST_ITEM`, a `BLOCKQUOTE`, or a `TABLE_CELL`. 3. **Container nesting is complete** — `LIST → LIST_ITEM → PARAGRAPH → TEXT` and `TABLE → TABLE_ROW → TABLE_CELL → PARAGRAPH → TEXT`, no level skipped. 4. **Headings carry a `level`** (1–6) and nest logically (don't jump H2 → H4). 5. **No `\n` inside `textData.text`** — split into sibling nodes; mixed inline formatting → split into multiple TEXT runs. 6. **Images** use a Wix Media `id` (not a raw URL), with `width`, `height`, and meaningful `altText`. 7. **Links** — every `LINK` decoration has a valid `url` and `target`. --- > Portal Navigation: > > - Append `.md` to any URL under `https://dev.wix.com/docs/` to get its markdown version. > - Pages are either content pages (article or reference text) or menu pages (a list of links to child pages). > - To get a menu page, truncate any URL to a parent path and append `.md` (e.g. `https://dev.wix.com/docs/sdk.md`, `https://dev.wix.com/docs/sdk/core-modules.md`). > - Top-level index of all portals: https://dev.wix.com/docs/llms.txt > - Full concatenated docs: https://dev.wix.com/docs/llms-full.txt ## Resource: Change Payment Currency (Site Properties) ## Article: Change Payment Currency (Site Properties) ## Article Link: https://dev.wix.com/docs/api-reference/business-management/site-properties/skills/change-payment-currency-site-properties.md ## Article Content: # RECIPE: Change a Site's Payment (Store) Currency via Site Properties API ## Goal Update a Wix site's **payment currency** (the ISO-4217 currency code used to bill customers) programmatically. ## When to use - You need to switch a site's store/payment currency (for example, from `USD` to `EUR`). - You want to automate regional/business setup for sites. ## Important notes before you start - The `paymentCurrency` field is part of **Site Properties** (often shown in the dashboard under regional/business info). - A successful update increments the Site Properties `version`. - Use a **field mask** (`fields.paths`) to indicate which fields you're updating. ## Step 1 — (Optional) Read current site properties version This is useful to understand the current snapshot version and other regional fields. ```bash curl -X GET 'https://www.wixapis.com/site-properties/v4/properties' \ -H 'Authorization: ' ``` ## Step 2 — Update the payment currency Use the `PATCH /site-properties/v4/properties` endpoint: put the new currency under `properties.paymentCurrency` and include a `fields.paths` mask. ```bash curl -X PATCH 'https://www.wixapis.com/site-properties/v4/properties' \ -H 'Content-Type: application/json' \ -H 'Authorization: ' \ --data-binary '{ "properties": { "paymentCurrency": "EUR" }, "fields": { "paths": ["paymentCurrency"] } }' ``` ### Expected response A successful call returns an updated Site Properties snapshot version, for example: ```json { "version": "123" } ``` ## Gotchas & troubleshooting - **Always send a field mask**: omitting `fields.paths` will fail with `400` and `"Illegal request - No updates on request body"`. - Currency must be a **3-letter ISO-4217** code (for example, `USD`, `CAD`, `EUR`, `GBP`). ## Related APIs - **Site Properties API**: [REST](https://dev.wix.com/docs/api-reference/business-management/site-properties/properties/introduction.md) - Stores Currency Converter (conversion utilities, not for setting the site currency): - `POST https://www.wixapis.com/currency_converter/v1/currencies/amounts/{from}/convert/{to}` --- > Portal Navigation: > > - Append `.md` to any URL under `https://dev.wix.com/docs/` to get its markdown version. > - Pages are either content pages (article or reference text) or menu pages (a list of links to child pages). > - To get a menu page, truncate any URL to a parent path and append `.md` (e.g. `https://dev.wix.com/docs/sdk.md`, `https://dev.wix.com/docs/sdk/core-modules.md`). > - Top-level index of all portals: https://dev.wix.com/docs/llms.txt > - Full concatenated docs: https://dev.wix.com/docs/llms-full.txt ## Resource: Create Site from Template ## Article: Create Site from Template ## Article Link: https://dev.wix.com/docs/api-reference/account-level/sites/skills/create-site-from-template.md ## Article Content: # Create Site from Template This recipe guides you through creating a new Wix site from a template, including template selection and optional publishing. ## Prerequisites - Wix account with site creation permissions - Account-level API access ## Required APIs - **Templates Search API**: `GET https://www.wix.com/_api/template-cms-view-service/view/v2/templates/search` - **Create Site API**: `POST https://www.wixapis.com/msm/v1/meta-site/create-from-template` - **Publish Site API**: `POST https://www.wixapis.com/site-publisher/v1/site/publish` --- ## Step 1: Understand User Requirements Before searching templates, gather information: 1. **Ask the user** to describe the site they want in a few sentences 2. **Ask if they want** Wix Editor or Wix Studio 3. **Identify main apps** needed (Stores, Bookings, Blog, etc.) ### Quick Start (Skip Template Search) If user wants an empty/blank site: - **Wix Studio blank**: `fe86a14e-ef67-49b4-a409-d086f3abaa1a` - **Wix Editor blank**: `b55bdf43-95e0-4cef-b9bb-92dcc7af2742` Skip to Step 3 with these template IDs. --- ## Step 2: Search for Templates **Endpoint**: `GET https://www.wix.com/_api/template-cms-view-service/view/v2/templates/search` **Query Parameters**: | Parameter | Description | Values | |-----------|-------------|--------| | `language` | Always use | `en` | | `limit` | Results per page | `24` | | `offset` | Pagination offset | Start at `0`, increment by 24 | | `bookType` | Editor type | `studio` or `main-v2` | | `query` | Search keywords | `yoga+studio`, `ecommerce`, etc. | **Example Request**: ```bash curl -X GET \ 'https://www.wix.com/_api/template-cms-view-service/view/v2/templates/search?language=en&limit=24&offset=0&bookType=studio&query=yoga+studio' \ -H 'Authorization: ' ``` **Response** includes for each template: - `metaSiteId` - Template ID for creation - `templateSlug` - For preview URL - Template name and description - Color scheme ### Present Templates to User For each relevant template, show: - Template name - Description (without "Click Edit" text) - "Good for" description - Color scheme - Preview link: `https://www.wix.com/website-template/view/html/{templateSlug}` --- ## Step 3: Create the Site **Endpoint**: `POST https://www.wixapis.com/msm/v1/meta-site/create-from-template` **Request Body**: ```json { "originTemplateId": "", "siteName": "my-new-site" } ``` **Request**: ```bash curl -X POST \ 'https://www.wixapis.com/msm/v1/meta-site/create-from-template' \ -H 'Authorization: ' \ -H 'Content-Type: application/json' \ -d '{ "originTemplateId": "", "siteName": "my-new-site" }' ``` ### Site Name Requirements The `siteName` must follow these rules: - 4-20 characters - Only lowercase letters, numbers, hyphens, underscores - Pattern: `[a-z0-9_-]{4,20}` - Must be unique If `siteName` is not provided, one is generated automatically. ### For Headless Sites Add `"namespace": "HEADLESS"` to the request body: ```json { "originTemplateId": "", "siteName": "my-headless-site", "namespace": "HEADLESS" } ``` **Response** includes the new site's `metaSiteId`. ### IMPORTANT NOTES: - Only mention headless if user specifically requests it - If user doesn't ask for headless, do NOT include the `namespace` field --- ## Step 4: Publish the Site (Optional) **Ask the user** if they want to publish their site before proceeding. **Endpoint**: `POST https://www.wixapis.com/site-publisher/v1/site/publish` This is a **site-level API** - use the site ID from the creation response. **Request**: ```bash curl -X POST \ 'https://www.wixapis.com/site-publisher/v1/site/publish' \ -H 'Authorization: ' \ -H 'Content-Type: application/json' \ -d '{}' ``` ### IMPORTANT NOTES: - NEVER publish without asking the user first - This makes the site publicly accessible --- ## Step 5: For Headless Sites - Create OAuth App If the site was created as headless, you MUST create an OAuth app for authentication. See [Create OAuth App](https://dev.wix.com/docs/api-reference/business-management/headless/oauth-apps/create-oauth-app.md) documentation. This is a site-level call in the context of the newly created site. --- ## Common Template IDs For quick access without searching: | Type | Template ID | |------|-------------| | Blank (Studio) | `fe86a14e-ef67-49b4-a409-d086f3abaa1a` | | Blank (Editor) | `b55bdf43-95e0-4cef-b9bb-92dcc7af2742` | | Store | `b783f9f9-4f4d-4139-9659-cc95a51b9ee5` | | Bookings/Services | `17b2bf9e-8661-4c92-973c-67502b415e58` | | Beauty | `0281d415-0682-42ac-b35e-49b349f19332` | --- ## Next Steps After creating the site: - Install required apps using [Install Wix Apps](https://dev.wix.com/docs/api-reference/business-management/app-installation/skills/install-wix-apps.md) - Configure site settings - Add content (products, services, blog posts, etc.) --- > Portal Navigation: > > - Append `.md` to any URL under `https://dev.wix.com/docs/` to get its markdown version. > - Pages are either content pages (article or reference text) or menu pages (a list of links to child pages). > - To get a menu page, truncate any URL to a parent path and append `.md` (e.g. `https://dev.wix.com/docs/sdk.md`, `https://dev.wix.com/docs/sdk/core-modules.md`). > - Top-level index of all portals: https://dev.wix.com/docs/llms.txt > - Full concatenated docs: https://dev.wix.com/docs/llms-full.txt ## Resource: Query Sites ## Article: Query Sites ## Article Link: https://dev.wix.com/docs/api-reference/account-level/sites/skills/query-sites.md ## Article Content: # Query Sites This recipe demonstrates how to list and query the sites associated with a Wix account. ## Prerequisites - Account-level API access (authenticated as a Wix user or using an account-level API key) - Permission `SITE_LIST.READ` (scope `SCOPE.ACC-DC-OS.READ-SITE`) ## Required APIs - **Query Sites API**: [REST](https://dev.wix.com/docs/api-reference/account-level/sites/sites/query-sites.md) > Returns up to **100** sites per request. Use cursor paging (below) to retrieve more. --- ## Query Sites **Endpoint**: `POST https://www.wixapis.com/site-list/v2/sites/query` The request takes a `query` object that supports `filter`, `sort`, and `cursorPaging`. **Request Body**: ```json { "query": { "filter": { "editorType": "EDITOR" }, "sort": [{ "fieldName": "createdDate", "order": "ASC" }], "cursorPaging": { "limit": 50 } } } ``` All three fields are optional — `{ "query": { "cursorPaging": { "limit": 50 } } }` lists every site. **Request**: ```bash curl -X POST \ 'https://www.wixapis.com/site-list/v2/sites/query' \ -H 'Authorization: ' \ -H 'Content-Type: application/json' \ -d '{ "query": { "filter": { "editorType": "EDITOR" }, "sort": [{ "fieldName": "createdDate", "order": "ASC" }], "cursorPaging": { "limit": 50 } } }' ``` --- ## Response Structure The response has the sites array plus **two** paging objects: a top-level `cursorPaging` (echoes the applied limit and the next cursor) and `metadata` (count, `cursors.next`, `hasNext`). > ⚠️ There is **no** `pagingMetadata` field. Read paging info from `metadata`. ```json { "sites": [ { "id": "f6061c5f-6aa3-42f8-8822-36a4981dabb2", "htmlAppId": "70df538d-906c-44ca-9f27-c186b62f2b2b", "name": "my-site-47", "displayName": "My Site 47", "createdDate": "2023-02-01T14:56:09.831Z", "updatedDate": "2026-06-22T03:55:49.031Z", "published": true, "premium": false, "viewUrl": "https://username.wixsite.com/my-site-47", "editUrl": "/editor/f6061c5f-6aa3-42f8-8822-36a4981dabb2?editorSessionId=...", "thumbnail": "/site-thumbnail/f6061c5f-6aa3-42f8-8822-36a4981dabb2", "ownerAccountId": "e6a89eda-d100-4b2d-8a47-3040e2134497", "contributorAccountIds": [], "editorType": "EDITOR", "blocked": false, "namespace": "WIX", "domainConnected": false, "parentChildRole": "NONE" } ], "cursorPaging": { "limit": 50, "cursor": "" }, "metadata": { "count": 50, "cursors": { "next": "" }, "hasNext": true } } ``` ### Site object fields Each entry in `sites` has these fields (from the `Site` schema): | Field | Type | Notes | |---|---|---| | `id` | string | Site ID — use for site-level API calls | | `htmlAppId` | string | Internal HTML app ID | | `name` | string | URL slug / internal name | | `displayName` | string | Human-readable site name | | `createdDate` / `updatedDate` | datetime | | | `trashedDate` | datetime | Present only if the site is in the trash | | `published` | boolean | Whether the site is published | | `premium` | boolean | Whether the site has a Wix Premium (paid) plan | | `viewUrl` | string | Public site address; empty string when unpublished. **There is no `siteUrl` field.** | | `editUrl` | string | Relative editor path; prefix with `https://manage.wix.com` to open | | `thumbnail` | string | Relative thumbnail path | | `ownerAccountId` | string | | | `contributorAccountIds` | string[] | | | `editorType` | string | e.g. `EDITOR`, `ODEDITOR` — also a valid `filter` field | | `blocked` | boolean | | | `folderId` / `parentId` | string | Set for sites organized in folders / parent-child setups | | `namespace` | string | e.g. `WIX` | | `domainConnected` | boolean | | | `parentChildRole` | string | e.g. `NONE` | --- ## Pagination Cursor-based. Read the next cursor from `metadata.cursors.next` and stop when `metadata.hasNext` is `false`. > The cursor does **not** carry the page limit, and it already encodes the filter/sort > from the first request. On follow-up pages send **only** the cursor (plus `limit` if you > want a non-default page size) — do **not** repeat `filter` or `sort`. **First request**: ```json { "query": { "filter": { "editorType": "EDITOR" }, "sort": [{ "fieldName": "createdDate", "order": "ASC" }], "cursorPaging": { "limit": 50 } } } ``` **Next page** (cursor from `metadata.cursors.next`): ```json { "query": { "cursorPaging": { "limit": 50, "cursor": "" } } } ``` **Loop**: ```javascript async function listAllSites() { const sites = []; let cursor = null; do { const cursorPaging = cursor ? { limit: 100, cursor } : { limit: 100 }; const res = await wixRequest({ query: { cursorPaging } }); // POST .../site-list/v2/sites/query sites.push(...res.sites); cursor = res.metadata.hasNext ? res.metadata.cursors.next : null; } while (cursor); return sites; } ``` --- ## Common Use Cases ### List all sites Omit `filter` and page through with `cursorPaging` until `metadata.hasNext` is `false`. ### Find a specific site Prefer server-side `filter` (e.g. `{ "editorType": "EDITOR" }`) and `sort` over fetching everything and filtering client-side. Filterable fields match the site object (e.g. `name`, `displayName`, `editorType`, `published`). --- ## Next Steps After finding a site: - Use the site `id` for site-level API calls - Create new sites using [Create Site from Template](https://dev.wix.com/docs/api-reference/account-level/sites/skills/create-site-from-template.md) - Manage site settings and content --- > Portal Navigation: > > - Append `.md` to any URL under `https://dev.wix.com/docs/` to get its markdown version. > - Pages are either content pages (article or reference text) or menu pages (a list of links to child pages). > - To get a menu page, truncate any URL to a parent path and append `.md` (e.g. `https://dev.wix.com/docs/sdk.md`, `https://dev.wix.com/docs/sdk/core-modules.md`). > - Top-level index of all portals: https://dev.wix.com/docs/llms.txt > - Full concatenated docs: https://dev.wix.com/docs/llms-full.txt ## Resource: Add Store Pages to Site ## Article: Add Store Pages to Site ## Article Link: https://dev.wix.com/docs/api-reference/business-solutions/stores/skills/add-store-pages-to-site.md ## Article Content: # Add Store Pages to Site This recipe demonstrates how to add checkout and cart pages to a Wix site when the Stores app is installed but pages are missing. ## Overview When Wix Stores is installed on a site, it should automatically create cart and checkout pages. However, in some cases these pages may be missing. This recipe provides a way to add them programmatically. ## Prerequisites - Wix Stores app installed on the site - API access with site management permissions --- ## Step 1: Add Pages to Site **Endpoint**: `POST https://www.wix.com/_api/add-pages-to-site/install` **Request**: ```bash curl -X POST \ 'https://www.wix.com/_api/add-pages-to-site/install' \ -H 'Authorization: ' \ -H 'Content-Type: application/json' \ -d '{}' ``` **Response**: Empty body on success. ### IMPORTANT NOTES: - This endpoint adds missing store pages (cart, checkout) if they don't exist - The request body is empty - no parameters needed - Only required Authorization header --- ## When to Use This Recipe Use this recipe when: - Checkout flow fails because checkout page is missing - Cart functionality doesn't work - Store was migrated or had page issues - You receive errors about missing store pages --- ## Next Steps After adding pages: - Verify checkout flow works by creating a test order - Customize page designs if needed via the Editor - Set up payment methods if not already configured --- > Portal Navigation: > > - Append `.md` to any URL under `https://dev.wix.com/docs/` to get its markdown version. > - Pages are either content pages (article or reference text) or menu pages (a list of links to child pages). > - To get a menu page, truncate any URL to a parent path and append `.md` (e.g. `https://dev.wix.com/docs/sdk.md`, `https://dev.wix.com/docs/sdk/core-modules.md`). > - Top-level index of all portals: https://dev.wix.com/docs/llms.txt > - Full concatenated docs: https://dev.wix.com/docs/llms-full.txt ## Resource: Bulk Create Products with Options (Catalog V3) ## Article: Bulk Create Products with Options (Catalog V3) ## Article Link: https://dev.wix.com/docs/api-reference/business-solutions/stores/skills/bulk-create-products-with-options-catalog-v3.md ## Article Content: # RECIPE: Business Recipe - Bulk Creating Wix Store Products with inventory and options > **Standard call shape (every curl below).** The `` placeholder is shorthand for `Authorization: Bearer ` only. Body-bearing requests also need `Content-Type: application/json`. Learn how to create multiple Wix store products with customizable options like colors, sizes, or other variants in a single bulk operation, allowing efficient creation of product catalogs. --- ## ⚠️ CRITICAL REQUIREMENTS - READ FIRST **API ENDPOINT:** `https://www.wixapis.com/stores/v3/bulk/products-with-inventory/create` **MEDIA FORMAT - MUST INCLUDE BOTH SECTIONS:** ```json "media": { "main": { "url": "https://images.unsplash.com/photo-example?w=400&h=400&fit=crop&crop=center", "altText": "Product Name - Main Product Image" }, "itemsInfo": { "items": [ { "url": "https://images.unsplash.com/photo-example?w=400&h=400&fit=crop&crop=center", "altText": "Product Name - Product View" } ] } } ``` **VARIANTS:** The recipe shows ALL possible variant combinations (Cartesian product) with 3 visible variants per product. Each product has 6 total variants: 3 visible + 3 hidden for future use. **❌ COMMON FAILURES:** * Missing `itemsInfo` section in media (media won't work) * Missing URL parameters `?w=400&h=400&fit=crop&crop=center` ## Article: Steps for Bulk Creating Wix Store Products with Options ## STEP 1: bulk create products with options and variants 1. bulk create products with options and create variants for them - Wix REST API: [Bulk Create Products With Inventory](https://dev.wix.com/docs/api-reference/business-solutions/stores/catalog-v3/products-v3/bulk-create-products-with-inventory.md) **CRITICAL: USE THIS WORKING EXAMPLE - if more products are required copy the same format exactly to create more** ```bash curl -X POST "https://www.wixapis.com/stores/v3/bulk/products-with-inventory/create" \ -H "Content-Type: application/json" \ -H "Authorization: " \ -d '{ "products": [ { "name": "Pro Basketball Sneaker", "description": { "nodes": [ { "type": "PARAGRAPH", "id": "desc1", "nodes": [ { "type": "TEXT", "textData": { "text": "High-performance basketball sneaker with superior ankle support and responsive court feel." } } ], "paragraphData": { "textStyle": { "textAlignment": "AUTO" } } } ], "metadata": { "version": 1, "id": "basketball-desc-001" } }, "visible": true, "visibleInPos": true, "productType": "PHYSICAL", "physicalProperties": {}, "media": { "main": { "url": "https://images.unsplash.com/photo-1542291026-7eec264c27ff?w=400&h=400&fit=crop&crop=center", "altText": "Pro Basketball Sneaker - Main Product Image" }, "itemsInfo": { "items": [ { "url": "https://images.unsplash.com/photo-1542291026-7eec264c27ff?w=400&h=400&fit=crop&crop=center", "altText": "Pro Basketball Sneaker - Product View" } ] } }, "options": [ { "name": "Size", "optionRenderType": "TEXT_CHOICES", "choicesSettings": { "choices": [ { "choiceType": "CHOICE_TEXT", "name": "8" }, { "choiceType": "CHOICE_TEXT", "name": "9" }, { "choiceType": "CHOICE_TEXT", "name": "10" } ] } }, { "name": "Color", "optionRenderType": "SWATCH_CHOICES", "choicesSettings": { "choices": [ { "choiceType": "ONE_COLOR", "name": "Red", "colorCode": "#FF0000" }, { "choiceType": "ONE_COLOR", "name": "Blue", "colorCode": "#0000FF" } ] } } ], "variantsInfo": { "variants": [ { "choices": [ { "optionChoiceNames": { "optionName": "Size", "choiceName": "8", "renderType": "TEXT_CHOICES" } }, { "optionChoiceNames": { "optionName": "Color", "choiceName": "Red", "renderType": "SWATCH_CHOICES" } } ], "price": { "actualPrice": { "amount": "159.99" }, "compareAtPrice": { "amount": "200.00" } }, "visible": true, "inventoryItem": { "quantity": 25, "preorderInfo": { "enabled": false } }, "physicalProperties": {} }, { "choices": [ { "optionChoiceNames": { "optionName": "Size", "choiceName": "8", "renderType": "TEXT_CHOICES" } }, { "optionChoiceNames": { "optionName": "Color", "choiceName": "Blue", "renderType": "SWATCH_CHOICES" } } ], "price": { "actualPrice": { "amount": "159.99" }, "compareAtPrice": { "amount": "200.00" } }, "visible": false, "inventoryItem": { "quantity": 25, "preorderInfo": { "enabled": false } }, "physicalProperties": {} }, { "choices": [ { "optionChoiceNames": { "optionName": "Size", "choiceName": "9", "renderType": "TEXT_CHOICES" } }, { "optionChoiceNames": { "optionName": "Color", "choiceName": "Red", "renderType": "SWATCH_CHOICES" } } ], "price": { "actualPrice": { "amount": "159.99" }, "compareAtPrice": { "amount": "200.00" } }, "visible": false, "inventoryItem": { "quantity": 30, "preorderInfo": { "enabled": false } }, "physicalProperties": {} }, { "choices": [ { "optionChoiceNames": { "optionName": "Size", "choiceName": "9", "renderType": "TEXT_CHOICES" } }, { "optionChoiceNames": { "optionName": "Color", "choiceName": "Blue", "renderType": "SWATCH_CHOICES" } } ], "price": { "actualPrice": { "amount": "159.99" }, "compareAtPrice": { "amount": "200.00" } }, "visible": true, "inventoryItem": { "quantity": 30, "preorderInfo": { "enabled": false } }, "physicalProperties": {} }, { "choices": [ { "optionChoiceNames": { "optionName": "Size", "choiceName": "10", "renderType": "TEXT_CHOICES" } }, { "optionChoiceNames": { "optionName": "Color", "choiceName": "Red", "renderType": "SWATCH_CHOICES" } } ], "price": { "actualPrice": { "amount": "159.99" }, "compareAtPrice": { "amount": "200.00" } }, "visible": true, "inventoryItem": { "quantity": 20, "preorderInfo": { "enabled": false } }, "physicalProperties": {} }, { "choices": [ { "optionChoiceNames": { "optionName": "Size", "choiceName": "10", "renderType": "TEXT_CHOICES" } }, { "optionChoiceNames": { "optionName": "Color", "choiceName": "Blue", "renderType": "SWATCH_CHOICES" } } ], "price": { "actualPrice": { "amount": "159.99" }, "compareAtPrice": { "amount": "200.00" } }, "visible": false, "inventoryItem": { "quantity": 20, "preorderInfo": { "enabled": false } }, "physicalProperties": {} } ] } }, { "name": "Classic Canvas Shoes", "description": { "nodes": [ { "type": "PARAGRAPH", "id": "desc2", "nodes": [ { "type": "TEXT", "textData": { "text": "Timeless canvas shoes with durable construction and comfortable fit for everyday wear." } } ], "paragraphData": { "textStyle": { "textAlignment": "AUTO" } } } ], "metadata": { "version": 1, "id": "canvas-desc-002" } }, "visible": true, "visibleInPos": true, "productType": "PHYSICAL", "physicalProperties": {}, "media": { "main": { "url": "https://images.unsplash.com/photo-1560769629-975ec94e6a86?w=400&h=400&fit=crop&crop=center", "altText": "Classic Canvas Shoes - Main Product Image" }, "itemsInfo": { "items": [ { "url": "https://images.unsplash.com/photo-1560769629-975ec94e6a86?w=400&h=400&fit=crop&crop=center", "altText": "Classic Canvas Shoes - Product View" } ] } }, "options": [ { "name": "Size", "optionRenderType": "TEXT_CHOICES", "choicesSettings": { "choices": [ { "choiceType": "CHOICE_TEXT", "name": "7" }, { "choiceType": "CHOICE_TEXT", "name": "8" }, { "choiceType": "CHOICE_TEXT", "name": "9" } ] } }, { "name": "Color", "optionRenderType": "SWATCH_CHOICES", "choicesSettings": { "choices": [ { "choiceType": "ONE_COLOR", "name": "White", "colorCode": "#FFFFFF" }, { "choiceType": "ONE_COLOR", "name": "Navy", "colorCode": "#000080" } ] } } ], "variantsInfo": { "variants": [ { "choices": [ { "optionChoiceNames": { "optionName": "Size", "choiceName": "7", "renderType": "TEXT_CHOICES" } }, { "optionChoiceNames": { "optionName": "Color", "choiceName": "White", "renderType": "SWATCH_CHOICES" } } ], "price": { "actualPrice": { "amount": "89.99" }, "compareAtPrice": { "amount": "100.00" } }, "visible": true, "inventoryItem": { "quantity": 15, "preorderInfo": { "enabled": false } }, "physicalProperties": {} }, { "choices": [ { "optionChoiceNames": { "optionName": "Size", "choiceName": "7", "renderType": "TEXT_CHOICES" } }, { "optionChoiceNames": { "optionName": "Color", "choiceName": "Navy", "renderType": "SWATCH_CHOICES" } } ], "price": { "actualPrice": { "amount": "89.99" }, "compareAtPrice": { "amount": "100.00" } }, "visible": false, "inventoryItem": { "quantity": 15, "preorderInfo": { "enabled": false } }, "physicalProperties": {} }, { "choices": [ { "optionChoiceNames": { "optionName": "Size", "choiceName": "8", "renderType": "TEXT_CHOICES" } }, { "optionChoiceNames": { "optionName": "Color", "choiceName": "White", "renderType": "SWATCH_CHOICES" } } ], "price": { "actualPrice": { "amount": "89.99" }, "compareAtPrice": { "amount": "100.00" } }, "visible": false, "inventoryItem": { "quantity": 18, "preorderInfo": { "enabled": false } }, "physicalProperties": {} }, { "choices": [ { "optionChoiceNames": { "optionName": "Size", "choiceName": "8", "renderType": "TEXT_CHOICES" } }, { "optionChoiceNames": { "optionName": "Color", "choiceName": "Navy", "renderType": "SWATCH_CHOICES" } } ], "price": { "actualPrice": { "amount": "89.99" }, "compareAtPrice": { "amount": "100.00" } }, "visible": true, "inventoryItem": { "quantity": 18, "preorderInfo": { "enabled": false } }, "physicalProperties": {} }, { "choices": [ { "optionChoiceNames": { "optionName": "Size", "choiceName": "9", "renderType": "TEXT_CHOICES" } }, { "optionChoiceNames": { "optionName": "Color", "choiceName": "White", "renderType": "SWATCH_CHOICES" } } ], "price": { "actualPrice": { "amount": "89.99" }, "compareAtPrice": { "amount": "100.00" } }, "visible": false, "inventoryItem": { "quantity": 12, "preorderInfo": { "enabled": false } }, "physicalProperties": {} }, { "choices": [ { "optionChoiceNames": { "optionName": "Size", "choiceName": "9", "renderType": "TEXT_CHOICES" } }, { "optionChoiceNames": { "optionName": "Color", "choiceName": "Navy", "renderType": "SWATCH_CHOICES" } } ], "price": { "actualPrice": { "amount": "89.99" }, "compareAtPrice": { "amount": "100.00" } }, "visible": true, "inventoryItem": { "quantity": 12, "preorderInfo": { "enabled": false } }, "physicalProperties": {} } ] } }, { "name": "Running Track Shoes", "description": { "nodes": [ { "type": "PARAGRAPH", "id": "desc3", "nodes": [ { "type": "TEXT", "textData": { "text": "Lightweight running shoes with responsive cushioning and breathable mesh construction for optimal performance." } } ], "paragraphData": { "textStyle": { "textAlignment": "AUTO" } } } ], "metadata": { "version": 1, "id": "running-desc-003" } }, "visible": true, "visibleInPos": true, "productType": "PHYSICAL", "physicalProperties": {}, "media": { "main": { "url": "https://images.unsplash.com/photo-1551107696-a4b0c5a0d9a2?w=400&h=400&fit=crop&crop=center", "altText": "Running Track Shoes - Main Product Image" }, "itemsInfo": { "items": [ { "url": "https://images.unsplash.com/photo-1551107696-a4b0c5a0d9a2?w=400&h=400&fit=crop&crop=center", "altText": "Running Track Shoes - Product View" } ] } }, "options": [ { "name": "Size", "optionRenderType": "TEXT_CHOICES", "choicesSettings": { "choices": [ { "choiceType": "CHOICE_TEXT", "name": "8" }, { "choiceType": "CHOICE_TEXT", "name": "9" }, { "choiceType": "CHOICE_TEXT", "name": "10" } ] } }, { "name": "Color", "optionRenderType": "SWATCH_CHOICES", "choicesSettings": { "choices": [ { "choiceType": "ONE_COLOR", "name": "Black", "colorCode": "#000000" }, { "choiceType": "ONE_COLOR", "name": "Gray", "colorCode": "#808080" } ] } } ], "variantsInfo": { "variants": [ { "choices": [ { "optionChoiceNames": { "optionName": "Size", "choiceName": "8", "renderType": "TEXT_CHOICES" } }, { "optionChoiceNames": { "optionName": "Color", "choiceName": "Black", "renderType": "SWATCH_CHOICES" } } ], "price": { "actualPrice": { "amount": "119.99" }, "compareAtPrice": { "amount": "180.00" } }, "visible": true, "inventoryItem": { "quantity": 0, "preorderInfo": { "enabled": false } }, "physicalProperties": {} }, { "choices": [ { "optionChoiceNames": { "optionName": "Size", "choiceName": "8", "renderType": "TEXT_CHOICES" } }, { "optionChoiceNames": { "optionName": "Color", "choiceName": "Gray", "renderType": "SWATCH_CHOICES" } } ], "price": { "actualPrice": { "amount": "119.99" }, "compareAtPrice": { "amount": "180.00" } }, "visible": false, "inventoryItem": { "quantity": 0, "preorderInfo": { "enabled": false } }, "physicalProperties": {} }, { "choices": [ { "optionChoiceNames": { "optionName": "Size", "choiceName": "9", "renderType": "TEXT_CHOICES" } }, { "optionChoiceNames": { "optionName": "Color", "choiceName": "Black", "renderType": "SWATCH_CHOICES" } } ], "price": { "actualPrice": { "amount": "119.99" }, "compareAtPrice": { "amount": "180.00" } }, "visible": false, "inventoryItem": { "quantity": 0, "preorderInfo": { "enabled": false } }, "physicalProperties": {} }, { "choices": [ { "optionChoiceNames": { "optionName": "Size", "choiceName": "9", "renderType": "TEXT_CHOICES" } }, { "optionChoiceNames": { "optionName": "Color", "choiceName": "Gray", "renderType": "SWATCH_CHOICES" } } ], "price": { "actualPrice": { "amount": "119.99" }, "compareAtPrice": { "amount": "180.00" } }, "visible": true, "inventoryItem": { "quantity": 0, "preorderInfo": { "enabled": false } }, "physicalProperties": {} }, { "choices": [ { "optionChoiceNames": { "optionName": "Size", "choiceName": "10", "renderType": "TEXT_CHOICES" } }, { "optionChoiceNames": { "optionName": "Color", "choiceName": "Black", "renderType": "SWATCH_CHOICES" } } ], "price": { "actualPrice": { "amount": "119.99" }, "compareAtPrice": { "amount": "180.00" } }, "visible": true, "inventoryItem": { "quantity": 0, "preorderInfo": { "enabled": false } }, "physicalProperties": {} }, { "choices": [ { "optionChoiceNames": { "optionName": "Size", "choiceName": "10", "renderType": "TEXT_CHOICES" } }, { "optionChoiceNames": { "optionName": "Color", "choiceName": "Gray", "renderType": "SWATCH_CHOICES" } } ], "price": { "actualPrice": { "amount": "119.99" }, "compareAtPrice": { "amount": "180.00" } }, "visible": false, "inventoryItem": { "quantity": 0, "preorderInfo": { "enabled": false } }, "physicalProperties": {} } ] } } ], "returnEntity": true }' ``` ### IMPORTANT NOTES: * When bulk creating products with inventory YOU MUST follow the same format as single product creation but wrap all products in a "products" array. Each product MUST leave the physicalProperties and all other non required fields empty. for example: "physicalProperties": {}. In most cases the products will be physical products, and therefore MUST have the empty physicalProperties object ("physicalProperties": {}) and a corresponding "productType": "PHYSICAL". * In case part of the request fails, retry bulk creating the failed products, by copying the exact format from the previous working example. * When creating a Color option **YOU MUST** use the `"optionRenderType": "SWATCH_CHOICES"` and the appropriate choice type: `"choiceType": "ONE_COLOR"`, while also providing the relevant `colorCode`. This must be done similar to the example above. **CRITICAL: Bulk Request Structure**The bulk create API requires a different endpoint and request structure: * **URL**: `https://www.wixapis.com/stores/v3/bulk/products-with-inventory/create` * **Body**: `{"products": [array of product objects]}` * Each product in the array follows the exact same format as single product creation **CRITICAL: Description Format**If you include a description, it MUST use Wix's rich text nodes structure, NOT a plain string. Plain strings will cause "Expected an object" API errors. **WRONG:** `"description": "Your text here"` **CORRECT:** ```json "description": { "nodes": [ { "type": "PARAGRAPH", "id": "desc1", "nodes": [ { "type": "TEXT", "textData": { "text": "Your product description here" } } ], "paragraphData": { "textStyle": { "textAlignment": "AUTO" } } } ], "metadata": { "version": 1, "id": "unique-desc-id" } } ``` **CRITICAL: Media Format**To add product images, use the media object with main image and optional additional items.**YOU MUST** add an image to each product, with a url from the web which should be relevant to the product. ```json "media": { "main": { "url": "https://images.unsplash.com/photo-example?w=400&h=400&fit=crop&crop=center", "altText": "Product Name - Main Product Image" }, "itemsInfo": { "items": [ { "url": "https://images.unsplash.com/photo-example?w=400&h=400&fit=crop&crop=center", "altText": "Product Name - Product View" } ] } } ``` **CRITICAL: Options Structure**Each option MUST include: * `optionRenderType`: "TEXT_CHOICES" for text-based choices * `choicesSettings`: Object containing the choices array * `choicesSettings.choices`: Array with at least one choice * Each choice MUST have `choiceType`: "CHOICE_TEXT" and `name` **CRITICAL: Variants Structure** * Create one variant for EVERY combination of option choices (Cartesian product of all options) * In these examples: Each product creates ALL possible combinations: Size options x Color options = 6 total variants each * Each variant must reference ALL options defined on the product * Use `optionChoiceNames` structure with `optionName`, `choiceName`, and `renderType` * Price must use `price.actualPrice.amount` with string values * Include inventory information with `inventoryItem.quantity` * Use `visible: true` for variants you want customers to see, `visible: false` for variants you want to keep hidden but available for future use * **Pro Basketball Sneaker**: 6 variants total (3 visible: Size 8+Red, Size 9+Blue, Size 10+Red) * **Classic Canvas Shoes**: 6 variants total (3 visible: Size 7+White, Size 8+Navy, Size 9+Navy) * **Running Track Shoes**: 6 variants total (3 visible: Size 8+Black, Size 9+Gray, Size 10+Black) ## Common Issues and Troubleshooting ### 1. "Expected an object" Error in Description This occurs when using a plain string instead of the rich text nodes structure. Always use the nodes format shown above. ### 2. Media Not Displaying Ensure both `main` and `itemsInfo` sections are included in the media object, and URLs include the required parameters. ### 3. Options Not Working Verify that each option has the correct `optionRenderType` and `choicesSettings` structure. ### 4. Variants Missing Choices Each variant must include choices for ALL options defined on the product. ### 5. Invalid Color Options Color options must use `optionRenderType: "SWATCH_CHOICES"` and `choiceType: "ONE_COLOR"` with a valid `colorCode`. ### 6. Bulk Request Failures If part of the bulk request fails, extract the failed products and retry them separately using the same format. --- > Portal Navigation: > > - Append `.md` to any URL under `https://dev.wix.com/docs/` to get its markdown version. > - Pages are either content pages (article or reference text) or menu pages (a list of links to child pages). > - To get a menu page, truncate any URL to a parent path and append `.md` (e.g. `https://dev.wix.com/docs/sdk.md`, `https://dev.wix.com/docs/sdk/core-modules.md`). > - Top-level index of all portals: https://dev.wix.com/docs/llms.txt > - Full concatenated docs: https://dev.wix.com/docs/llms-full.txt ## Resource: Create Product from Image ## Article: Create Product from Image ## Article Link: https://dev.wix.com/docs/api-reference/business-solutions/stores/skills/create-product-from-image.md ## Article Content: # RECIPE: Create Product from Image > **ALWAYS use this recipe as the entry point** when the user wants to create a product from one or more images. Do NOT skip STEP 1 (version detection) — even if you believe you know the catalog version from dynamic context. > > **CRITICAL — IMAGE DESCRIPTION FIRST:** In your VERY FIRST response after seeing a product image, you MUST write a detailed text description of what you see in the image (product type, colors, materials, shape, branding). Output this description as text alongside your first tool call. This description will persist in conversation context and is the ONLY source of truth for product details in later steps. Do NOT attempt to re-analyze the image later — use the description you wrote here. This recipe creates a Wix Store product from an image. It first detects the site's catalog version, then runs the appropriate flow: - **V3 flow:** 6 interactive steps. Up to 3 images, multi-image variant detection, info sections (materials, care, specs), SEO meta, options/variants, atomic single-call create. - **V1 flow:** 3 sequential steps. Single image, product details inferred from the image, separate media-attach call after create. **Prerequisites:** - The user MUST provide at least one product image — uploaded directly to the chat or as a publicly accessible URL. - Up to 3 images are supported (V3 only — V1 supports only 1 image). --- ## STEP 1: Detect Catalog Version (no user interaction) **API Endpoint:** `GET https://www.wixapis.com/stores/v3/provision/version` No request body — this is a GET request. **Expected response:** ```json { "catalogVersion": "V3_CATALOG" } ``` Possible values for `catalogVersion`: | Value | Action | |-------|--------| | `V3_CATALOG` | Run the **V3 Flow** below (V3 STEP 2 through V3 STEP 6) | | `V1_CATALOG` | Run the **V1 Flow** below (V1 STEP 2 through V1 STEP 4) | | `STORES_NOT_INSTALLED` | Stop. Inform the user: "The Wix Stores app is not installed on this site. Please install Wix Stores first before creating products. You can install it using the [Install Wix Apps](https://dev.wix.com/docs/api-reference/business-management/app-installation/skills/install-wix-apps.md) recipe." | --- # V3 Flow (catalogVersion = `V3_CATALOG`) > Run this section ONLY if STEP 1 returned `V3_CATALOG`. Otherwise jump to the V1 Flow further below. This is an interactive 5-step flow (STEP 2 through STEP 6). V3 STEP 4 and V3 STEP 5 require user interaction — do NOT skip them. --- ## V3 STEP 2: Collect Images and Upload to Wix Media Manager Ask the user to provide **1 to 3 images** of their product: > Upload 1-3 images of your product. If your product comes in different colors or sizes, feel free to upload images of those variants — I'll use them to set up product options automatically. > > You can upload images directly or provide public URLs. **Rules:** - Accept uploaded files (any image the user sends in the chat) OR publicly accessible URLs (`https://`). - Minimum: 1 image. Maximum: 3 images. - Supported formats: JPG, PNG, WEBP. - All images must be of the **same product**. If the images appear to show completely different products, respond: "It looks like these images show different products. For now, I can create one product at a time. Please upload images of a single product." - If an image is blurry or unrecognizable, respond: "I wasn't able to identify a product in this image. Try a clearer photo or add a description." **Optional free-text:** The user may include a text note with context (e.g., "handmade ceramic mug, usually around $25, available in blue and green"). Use this to supplement the image analysis. **Immediately upload each image** to the Wix Media Manager to get permanent public URLs: **API Endpoint:** `POST https://www.wixapis.com/site-media/v1/files/import` **For each image, send:** ```json { "url": "", "mimeType": "image/jpeg", "displayName": "product-image-1.jpg" } ``` **Expected response:** ```json { "file": { "id": "e6a89e_19dae9fef9bb48a6b5e392d0d2e5b95d~mv2.jpg", "displayName": "product-image-1.jpg", "url": "https://static.wixstatic.com/media/e6a89e_19dae9fef9bb48a6b5e392d0d2e5b95d~mv2.jpg", "parentFolderId": "media-root", "mediaType": "IMAGE", "operationStatus": "PENDING" } } ``` **After uploading, save the `file.url` (wixstatic.com URL) for each image.** You need these in V3 STEP 3 and V3 STEP 6. **Fallback:** If the upload fails (e.g., the source URL is not publicly accessible, or `operationStatus: "FAILED"`), ask the user: "I couldn't upload that image. Could you provide a publicly accessible URL for it (e.g., from Unsplash, Imgur, or any https:// link)?" **Media assignment:** - The **first** successfully uploaded image becomes `media.main`. - **All** images go into `media.itemsInfo.items[]`. --- ## V3 STEP 3: Analyze Images and Generate Product Details **Use the image description you wrote at the start of this conversation** (in your first response, per the CRITICAL instruction at the top of this recipe). That description is the source of truth for all product fields. Do NOT attempt to re-analyze the image — use the text description already in context. **Use ONLY details from your earlier image description to generate the fields below.** Do NOT use generic names like "Product" or hallucinate new details. If you did not write an image description earlier, ask the user for clarification instead of guessing. **Generate the following fields based on what you see in the image(s)** (and any free-text note from the user): ### 4a. Product Name A concise, appealing product name optimized for e-commerce discoverability. Maximum 80 characters. Follow the naming convention: `[Brand/Style] [Material] [Product Type]`. Example: `"Artisan Stoneware Ceramic Mug"` — not generic names like `"Mug"` or `"Product"`. ### 4b. Sample Existing Product Tone (silent — no user interaction) Before writing the description, check whether the site already has products to match their tone: **API Endpoint:** `POST https://www.wixapis.com/stores/v3/products/query` ```json { "query": { "paging": { "limit": 2 } } } ``` - If the response contains products with non-empty `description` fields, analyze their writing style (casual, professional, playful, luxury, technical, etc.) and note it as the **site tone**. - If no products exist or descriptions are empty, use a neutral e-commerce tone. - This query is best-effort — if it fails, proceed with neutral tone. Do NOT block the flow. ### 4c. Product Description A marketing description of 2-4 sentences. Highlight key features, materials, and use case. **Match the site tone detected in 4b** — if the existing products use casual language, write casually; if they use formal/luxury language, match that style. If no site tone was detected, adapt tone to the product type (artisanal for handmade, technical for electronics, warm for home goods). This will be formatted as rich text nodes in V3 STEP 7. ### 4d. Price with Market Range - Suggest a retail price based on the product type and industry averages. - Also determine an approximate **market range** for annotation (e.g., "avg. market: $28-$42"). This range is shown to the user in V3 STEP 5 but is NOT sent to the API. ### 4e. Info Sections (only if relevant) Based on the product type and what's visible in the image, generate category-specific info sections. **Only include sections that are relevant — omit entirely if not applicable.** | Product Category | Possible Info Sections | |-----------------|----------------------| | Clothing/Textiles | "Materials & Composition" (e.g., "100% Organic Cotton"), "Care Instructions" (e.g., "Machine wash cold, tumble dry low") | | Candles/Fragrance | "Burn Time & Care" (e.g., "Approx. 45 hours burn time. Trim wick to 1/4 inch before each use.") | | Furniture/Home | "Dimensions & Specs" (e.g., "Height: 30cm, Width: 15cm"), "Assembly" if applicable | | Electronics | "Technical Specifications", "What's Included" | | Food/Beverages | "Ingredients", "Nutritional Info", "Storage Instructions" | | Jewelry | "Materials" (e.g., "Sterling Silver 925"), "Sizing Guide" | | Skincare/Beauty | "Ingredients", "How to Use" | Each info section needs: a `uniqueName` (lowercase-hyphenated, e.g., `"care-instructions"`), a `title` (display name, e.g., `"Care Instructions"`), and a description (2-3 sentences). ### 4f. SEO Meta Description A short meta description (120-160 characters) optimized for search. Include the product type, key materials, and primary use case. Example: `"Handcrafted stoneware ceramic mug with a matte glaze finish. Perfect for coffee and tea lovers. Microwave and dishwasher safe."` ### 4g. Suggested Options (from images) Examine the images for visible product attributes that should become variant options. **CRITICAL: Do NOT invent or infer attributes.** Only suggest options that meet **one** of these evidence thresholds: - **Visually confirmed** in the image(s) — you can see distinct values (e.g., two different colors across two images, a size label printed on packaging) - **Explicitly stated** by the user in their text note (e.g., "available in blue and green", "comes in S, M, L") **Do NOT suggest standard industry options based on product category.** For example, do NOT suggest Size: S, M, L, XL, XXL for apparel just because it is a clothing item. If no size information is visible in the image and the user did not mention sizes, report no size options detected. **Negative example:** Image shows a single t-shirt with no size labels visible and the user did not mention sizes → do NOT suggest a Size option. Report: "No variant options detected from the image." **Multi-image variant detection:** - If multiple images show the **same product in different colors** (e.g., one red shirt, one blue shirt), suggest a Color option with **only those visible colors** as choices. - If multiple images show the **same product from different angles**, treat them as additional product media — NOT as separate variants. - If only one image is provided and a distinctive color is visible, suggest that single color as a choice and ask the user if the product comes in other colors. ### 4h. Subscription Eligibility Detection (silent — no user interaction) Based on the product name, description, and image analysis, determine whether this product is **subscription-eligible**. A product qualifies if it is a consumable that gets depleted at a predictable rate — something customers buy repeatedly on a regular schedule. **Eligible categories (examples):** - Food & beverage: coffee beans/pods, tea, protein powder, meal kits - Supplements & health: vitamins, probiotics, protein supplements - Pet: pet food, flea/tick treatments, cat litter - Personal care: skincare routine products, razor blades/cartridges, deodorant, shampoo/conditioner - Household: cleaning supplies, paper towels, toilet paper, laundry detergent - Baby: diapers, formula, wipes - Media: print/digital newspapers, magazines - Candles (daily-use scented candles with high burn frequency) **NOT eligible (do not suggest):** - Furniture, art, décor (one-time purchase) - Electronics, tools, appliances - Standard clothing, apparel, shoes (not subscription-typical) - Jewelry, watches - Books (single title), games, toys - Any unique or collectible item Store the result internally as `subscription_eligible: true/false`. If `true`, also note a brief reason (e.g., `"coffee beans — daily consumable"`). No user interaction at this step. --- ## V3 STEP 4: Present Review Card to User (INTERACTIVE) **You MUST present ALL generated fields to the user and ask for confirmation before proceeding.** Present a structured review card using the markdown format below. This provides a visual product-card-style layout: ``` --- ### [Product Name] **$[price]** · _avg. market: $[low]-$[high]_ > [Generated description text — the full 2-4 sentence description] --- | Detail | Value | |--------|-------| | Images | [count] uploaded | | SEO | [first 60 chars of meta description]… | | Tone | [Matched from existing site products / Neutral e-commerce] | | Subscription | [e.g. Monthly · 10% off] or [Not applicable] | **Info Sections** - **[Title 1]:** [one-line summary] - **[Title 2]:** [one-line summary] **Detected Options:** [option summary, e.g. "Color: Slate Blue, Terracotta" or "None detected"] --- ``` After the card, present the action options: > 1. **Refine** — tell me what to change (e.g., "make the description shorter", "the price should be lower") > 2. **Regenerate** — I'll start the analysis over, optionally with additional context from you > 3. **Approve** — lock in these details and continue to the next steps If the user provided a text note that **contradicts** what's visible in the image (e.g., image shows blue but note says "available in red"), ask the user to clarify before proceeding. **Wait for user confirmation.** Apply any corrections they request. Do NOT proceed until approved. --- ## V3 STEP 4.5: Suggest Subscription (INTERACTIVE, conditional) > **Run this step ONLY if `subscription_eligible: true` was set in V3 STEP 3 section 4h.** Otherwise skip directly to V3 STEP 5. Present a short, non-pushy suggestion card: --- **This product looks like a great candidate for a subscription plan.** Customers who subscribe to *[product name]* get auto-refills on a schedule they choose — boosting repeat revenue for you. Would you like to add a subscription option? - **Yes** — set it up now (takes ~30 seconds) - **No** — create as a one-time purchase only --- If the user says **No**, proceed directly to V3 STEP 5. If the user says **Yes**, ask the following 4 questions (can be presented together as a single form): **Q1 — Billing frequency** > "How often should subscribers be charged and receive this product?" | Choice | `frequency` | `interval` | |--------|------------|-----------| | Every week | `WEEK` | `1` | | Every 2 weeks | `WEEK` | `2` | | Every month *(Recommended)* | `MONTH` | `1` | | Every 2 months | `MONTH` | `2` | | Every 3 months | `MONTH` | `3` | | Every 6 months | `MONTH` | `6` | | Every year | `YEAR` | `1` | **Q2 — Duration** > "How long should the subscription run?" - **Ongoing** — renews automatically until the customer cancels (omit `billingCycles`) - **Fixed** — ends after N cycles (ask: "How many cycles?") → set `billingCycles: N` **Q3 — Subscriber discount (optional incentive)** > "Would you like to offer a discount to customers who subscribe?" - No discount (omit `discount` block) - **10% off** *(Recommended)* → `type: "PERCENTAGE", amount: 10` - Custom percentage → ask for value → `type: "PERCENTAGE", amount: [value]` - Fixed amount off → ask for value → `type: "AMOUNT", amount: [value]` **Q4 — Allow one-time purchase alongside subscription** > "Can customers also buy this product as a one-time purchase (without subscribing)?" - **Yes — sell both ways** *(Recommended)* → `allowOneTimePurchases: true` - No — subscription only → `allowOneTimePurchases: false` After collecting the user's answers, show a brief confirmation line before moving on: > Subscription plan configured: [e.g. Monthly · Ongoing · 10% off · One-time purchases also allowed] Store the collected subscription data for use in V3 STEP 6. --- ## V3 STEP 5: Suggest Options and Ask User (INTERACTIVE) **Present the detected options from V3 STEP 4g and ask the user if they want to add product options.** If options were detected: > **Based on your image(s), I suggest the following product options:** > > - **[Option Name]:** [Choice 1], [Choice 2], ... > > Would you like to: > 1. Use these options as suggested > 2. Add more choices (e.g., additional colors or sizes) > 3. Add entirely new options > 4. Skip options and create a simple product (no variants) If no options were detected: > I didn't detect any variant attributes from the image(s). Would you like to add product options, or should I create a simple product without variants? **Wait for user response.** Collect the final list of options and choices based on their answer. --- ## V3 STEP 6: Create the Product Before making the API call, ask the user one final time: > Everything is ready. Shall I create the product now? > - **Yes, create it** — I'll submit the product to your store now. > - **No, go back** — return to a previous step to make changes. **Wait for confirmation.** Only proceed with the API call if the user says Yes. --- **API Endpoint:** `POST https://www.wixapis.com/stores/v3/products` Build the request body with all confirmed fields. The write must be **atomic** — either all fields save or none do. **If a subscription was configured in V3 STEP 4.5**, include a `subscriptionDetails` block in the product body (see rules below). Otherwise omit it entirely. **`subscriptionDetails` rules:** - `title`: auto-generate from frequency (e.g. `"Monthly Subscription"`, `"Weekly Subscription"`, `"Quarterly Subscription"`) - `description`: if a discount was set, write a short sentence referencing it (e.g. `"Subscribe and save 10% on every order."`). Omit if no discount. - `visible`: always `true` - `frequency` + `interval`: from user's Q1 answer - `billingCycles`: include only for fixed-duration subscriptions (from Q2). Omit for ongoing. - `discount`: include only if a discount was chosen (from Q3). Omit the entire block if no discount. - `allowOneTimePurchases`: from user's Q4 answer **Example `subscriptionDetails` block (monthly, ongoing, 10% off, one-time also allowed):** ```json "subscriptionDetails": { "subscriptions": [ { "title": "Monthly Subscription", "description": "Subscribe and save 10% on every order.", "visible": true, "frequency": "MONTH", "interval": 1, "discount": { "type": "PERCENTAGE", "amount": 10 } } ], "allowOneTimePurchases": true } ``` **Example with fixed duration and flat amount discount (every 2 months, 6 cycles, $5 off, subscription only):** ```json "subscriptionDetails": { "subscriptions": [ { "title": "Bi-Monthly Subscription", "description": "Subscribe and save $5 on every order.", "visible": true, "frequency": "MONTH", "interval": 2, "billingCycles": 6, "discount": { "type": "AMOUNT", "amount": 5 } } ], "allowOneTimePurchases": false } ``` --- ### Path A: Simple Product (No Options) Use this if the user chose to skip options in V3 STEP 6. **Exact request example:** ```json { "product": { "name": "Artisan Stoneware Ceramic Mug", "description": { "nodes": [ { "type": "PARAGRAPH", "id": "desc1", "nodes": [ { "type": "TEXT", "textData": { "text": "A beautifully handcrafted stoneware mug with a smooth matte glaze. Its generous 12oz capacity and comfortable handle make it perfect for your morning coffee or evening tea. Microwave and dishwasher safe." } } ], "paragraphData": { "textStyle": { "textAlignment": "AUTO" } } } ], "metadata": { "version": 1, "id": "product-desc-001" } }, "productType": "PHYSICAL", "physicalProperties": {}, "media": { "main": { "url": "https://static.wixstatic.com/media/e6a89e_abc123~mv2.jpg", "altText": "Artisan Stoneware Ceramic Mug - Front View" }, "itemsInfo": { "items": [ { "url": "https://static.wixstatic.com/media/e6a89e_abc123~mv2.jpg", "altText": "Artisan Stoneware Ceramic Mug - Front View" }, { "url": "https://static.wixstatic.com/media/e6a89e_def456~mv2.jpg", "altText": "Artisan Stoneware Ceramic Mug - Side View" } ] } }, "infoSections": [ { "uniqueName": "materials-composition", "title": "Materials & Composition", "description": { "nodes": [ { "type": "PARAGRAPH", "id": "info-materials-1", "nodes": [ { "type": "TEXT", "textData": { "text": "Made from high-fired stoneware clay with a food-safe matte glaze finish. Lead-free and cadmium-free." } } ], "paragraphData": { "textStyle": { "textAlignment": "AUTO" } } } ], "metadata": { "version": 1, "id": "info-materials" } } }, { "uniqueName": "care-instructions", "title": "Care Instructions", "description": { "nodes": [ { "type": "PARAGRAPH", "id": "info-care-1", "nodes": [ { "type": "TEXT", "textData": { "text": "Microwave and dishwasher safe. Hand washing recommended to preserve the glaze finish. Avoid sudden temperature changes." } } ], "paragraphData": { "textStyle": { "textAlignment": "AUTO" } } } ], "metadata": { "version": 1, "id": "info-care" } } } ], "seoData": { "tags": [ { "type": "meta", "props": { "name": "description", "content": "Handcrafted stoneware ceramic mug with matte glaze finish. 12oz capacity, microwave and dishwasher safe. Perfect for coffee and tea lovers." } } ] }, "price": { "actualPrice": { "amount": "34.99" } } } } ``` --- ### Path B: Product with Options Use this if the user confirmed or provided options in V3 STEP 6. You MUST define both `options` and `variantsInfo.variants`. **Rules for variants:** - Generate ALL combinations of option choices as variants. - Each variant uses the same price unless the user specified different prices. - Set `visible: true` for all variants. **Exact request example (product with Color option detected from two images):** ```json { "product": { "name": "Artisan Stoneware Ceramic Mug", "description": { "nodes": [ { "type": "PARAGRAPH", "id": "desc1", "nodes": [ { "type": "TEXT", "textData": { "text": "A beautifully handcrafted stoneware mug with a smooth matte glaze. Its generous 12oz capacity and comfortable handle make it perfect for your morning coffee or evening tea. Microwave and dishwasher safe." } } ], "paragraphData": { "textStyle": { "textAlignment": "AUTO" } } } ], "metadata": { "version": 1, "id": "product-desc-001" } }, "productType": "PHYSICAL", "physicalProperties": {}, "media": { "main": { "url": "https://static.wixstatic.com/media/e6a89e_abc123~mv2.jpg", "altText": "Artisan Stoneware Ceramic Mug - Slate Blue" }, "itemsInfo": { "items": [ { "url": "https://static.wixstatic.com/media/e6a89e_abc123~mv2.jpg", "altText": "Artisan Stoneware Ceramic Mug - Slate Blue" }, { "url": "https://static.wixstatic.com/media/e6a89e_def456~mv2.jpg", "altText": "Artisan Stoneware Ceramic Mug - Terracotta" } ] } }, "options": [ { "name": "Color", "optionRenderType": "TEXT_CHOICES", "choicesSettings": { "choices": [ { "choiceType": "CHOICE_TEXT", "name": "Slate Blue" }, { "choiceType": "CHOICE_TEXT", "name": "Terracotta" } ] } } ], "variantsInfo": { "variants": [ { "choices": [ { "optionChoiceNames": { "optionName": "Color", "choiceName": "Slate Blue", "renderType": "TEXT_CHOICES" } } ], "price": { "actualPrice": { "amount": "34.99" } }, "physicalProperties": {}, "visible": true }, { "choices": [ { "optionChoiceNames": { "optionName": "Color", "choiceName": "Terracotta", "renderType": "TEXT_CHOICES" } } ], "price": { "actualPrice": { "amount": "34.99" } }, "physicalProperties": {}, "visible": true } ] }, "infoSections": [ { "uniqueName": "materials-composition", "title": "Materials & Composition", "description": { "nodes": [ { "type": "PARAGRAPH", "id": "info-materials-1", "nodes": [ { "type": "TEXT", "textData": { "text": "Made from high-fired stoneware clay with a food-safe matte glaze finish. Lead-free and cadmium-free." } } ], "paragraphData": { "textStyle": { "textAlignment": "AUTO" } } } ], "metadata": { "version": 1, "id": "info-materials" } } }, { "uniqueName": "care-instructions", "title": "Care Instructions", "description": { "nodes": [ { "type": "PARAGRAPH", "id": "info-care-1", "nodes": [ { "type": "TEXT", "textData": { "text": "Microwave and dishwasher safe. Hand washing recommended to preserve the glaze finish. Avoid sudden temperature changes." } } ], "paragraphData": { "textStyle": { "textAlignment": "AUTO" } } } ], "metadata": { "version": 1, "id": "info-care" } } } ], "seoData": { "tags": [ { "type": "meta", "props": { "name": "description", "content": "Handcrafted stoneware ceramic mug with matte glaze finish. 12oz capacity, microwave and dishwasher safe. Perfect for coffee and tea lovers." } } ] }, "price": { "actualPrice": { "amount": "34.99" } } } } ``` --- **Expected response (partial):** ```json { "product": { "id": "a1b2c3d4-e5f6-7890-abcd-ef1234567890", "name": "Artisan Stoneware Ceramic Mug", "visible": true, "productType": "PHYSICAL", "price": { "actualPrice": { "amount": "34.99" } } } } ``` **On success:** Present a completion card summarizing what was created: ``` --- ### Product Created **[Product Name]** · **$[price]** | | | |---|---| | Options | [option summary or "None"] | | Info Sections | [list of section titles] | | Images | [count] attached | **View in dashboard:** `https://manage.wix.com/dashboard/[siteId]/store/products/[productId]` --- ``` Replace `[siteId]` with the site ID from the MCP context and `[productId]` with the `product.id` from the API response. This link lets the user immediately view and edit the product in the Wix dashboard. **On failure:** Show an error message and offer to retry. Do NOT leave a partially created product. --- ## V3 Completion Checklist Before reporting success to the user, verify ALL of the following: - [ ] STEP 1 completed: Catalog version detected as `V3_CATALOG`. - [ ] V3 STEP 2 completed: User provided 1-3 images, all uploaded to Media Manager with wixstatic.com URLs. - [ ] V3 STEP 3 completed: Images analyzed from user's message, all product fields generated based on what's visible in the image(s). - [ ] V3 STEP 4 completed: User reviewed and approved the generated details. - [ ] V3 STEP 4.5 completed (if applicable): Subscription eligibility was evaluated. If eligible, user was asked and their choice (Yes/No) was applied before proceeding to STEP 5. - [ ] V3 STEP 5 completed: User confirmed, modified, or skipped product options. - [ ] V3 STEP 6 completed: User confirmed "create now", product was created via API and you received a product ID. --- # V1 Flow (catalogVersion = `V1_CATALOG`) > Run this section ONLY if STEP 1 returned `V1_CATALOG`. Otherwise use the V3 Flow above. This is a 3-step sequential flow (STEP 2 through STEP 4). ALL steps MUST be completed in order. Do NOT report success until ALL steps have executed successfully. **V1 prerequisites:** - The user MUST provide at least one product image — uploaded directly to the chat or as a publicly accessible URL. - Both chat uploads and public URLs are accepted. Chat-uploaded images have a wixmp URL that works for Media Manager import. --- ## V1 STEP 2: Upload the Image to Wix Media Manager (MANDATORY) **API Endpoint:** `POST https://www.wixapis.com/site-media/v1/files/import` **Request body fields:** | Field | Type | Required | Description | |-------|------|----------|-------------| | `url` | string | Yes | The image URL. Can be a publicly accessible HTTP/HTTPS URL OR a wixmp URL from a chat-uploaded image. Both work with the Media Manager import API. | | `mimeType` | string | Recommended | The MIME type of the image. Use `image/jpeg` for .jpg/.jpeg files, `image/png` for .png files, `image/webp` for .webp files. | | `displayName` | string | No | A display name for the file in Media Manager. Include the file extension (e.g., `product-image.jpg`). | **Exact request example:** ```json { "url": "https://images.unsplash.com/photo-1563729784474-d77dbb933a9e?w=400", "mimeType": "image/jpeg", "displayName": "product-image.jpg" } ``` **Expected response:** ```json { "file": { "id": "e6a89e_19dae9fef9bb48a6b5e392d0d2e5b95d~mv2.jpg", "displayName": "product-image.jpg", "url": "https://static.wixstatic.com/media/e6a89e_19dae9fef9bb48a6b5e392d0d2e5b95d~mv2.jpg", "parentFolderId": "media-root", "mediaType": "IMAGE", "operationStatus": "PENDING" } } ``` **After this step, save these values — you need them later:** - `file.url` — the wixstatic.com URL (use in V1 STEP 4) - `file.id` — the media file ID **If the response contains `operationStatus: "FAILED"`:** The source URL is not accessible. Ask the user for a different image URL. --- ## V1 STEP 3: Create the Product (with image-based details) **API Endpoint:** `POST https://www.wixapis.com/stores/v1/products` **Use the image description you wrote at the start of this conversation** (in your first response, per the CRITICAL instruction at the top of this recipe). That description is the source of truth for the product name, description, and price. Do NOT attempt to re-analyze the image — use the text description already in context. **Use ONLY details from your earlier image description to set the product name, description, and price below.** Do NOT use generic text like "Product from image" or hallucinate new details. If you did not write an image description earlier, ask the user for clarification instead of guessing. **Request body fields:** | Field | Type | Required | Value | |-------|------|----------|-------| | `product.name` | string | Yes | A concise, appealing name describing the ACTUAL product in the image (max 80 chars). Example: `"Premium Spinning Fishing Reel"` — NOT `"Product from image"`. | | `product.description` | string | Yes | A 2-3 sentence marketing description of what you SEE in the image. MUST be wrapped in `

        ` tags. | | `product.visible` | boolean | Yes | `true` | | `product.productType` | string | Yes | `"physical"` | | `product.priceData.price` | number | Yes | A reasonable retail price based on the product type visible in the image | **Exact request example (using values from V1 STEP 3):** ```json { "product": { "name": "Premium Spinning Fishing Reel", "description": "

        A sleek black-and-gold spinning fishing reel designed for smooth retrieves and dependable performance. Ideal for anglers targeting freshwater or light saltwater species.

        ", "visible": true, "productType": "physical", "priceData": { "price": 79.99 } } } ``` **Expected response (partial):** ```json { "product": { "id": "a1b2c3d4-e5f6-7890-abcd-ef1234567890", "name": "Premium Spinning Fishing Reel", "visible": true, "productType": "physical", "priceData": { "price": 79.99 } } } ``` **After this step, save this value — you need it in V1 STEP 4:** - `product.id` — the product ID (a UUID string like `"a1b2c3d4-e5f6-7890-abcd-ef1234567890"`) --- ## V1 STEP 4: Attach the Image to the Product (MANDATORY — DO NOT SKIP) **API Endpoint:** `POST https://www.wixapis.com/stores/v1/products/{id}/media` Replace `{id}` in the URL with the `product.id` from V1 STEP 4. **Request body fields:** | Field | Type | Required | Description | |-------|------|----------|-------------| | `media` | array | Yes | Array of media objects to attach | | `media[].url` | string | Yes | The `file.url` (wixstatic.com URL) from V1 STEP 2. Do NOT use the original image URL — use the wixstatic.com URL returned by the Media Manager. | **Exact request example:** URL: `POST https://www.wixapis.com/stores/v1/products/a1b2c3d4-e5f6-7890-abcd-ef1234567890/media` ```json { "media": [ { "url": "https://static.wixstatic.com/media/e6a89e_19dae9fef9bb48a6b5e392d0d2e5b95d~mv2.jpg" } ] } ``` **Expected response:** Empty object `{}` — this means success. **This step is MANDATORY.** The product is not complete without its image. Do NOT report success to the user before this step returns successfully. --- ## V1 Completion Checklist Before reporting success to the user, verify ALL of the following: - [ ] STEP 1 completed: Catalog version detected as `V1_CATALOG`. - [ ] V1 STEP 2 completed: Image was uploaded to Wix Media Manager and you received a wixstatic.com URL. - [ ] V1 STEP 3 completed: You looked at the image, identified the product, and created it with accurate name/description/price. - [ ] V1 STEP 4 completed: Image was attached to the product using the Add Product Media endpoint. Only after ALL 4 steps succeed (STEP 1 + V1 STEP 2-4), report to the user: the product name, price, and that it was created with the image attached. --- # Troubleshooting and Error Handling ## Catalog version detection issues ### Get Catalog Version returns 404 or authorization error The API key may not have permission to access Stores APIs, or Stores may not be installed. Verify Stores is installed and the auth token has the correct scopes. ### Unsure which flow to run The response field is `catalogVersion`. Map it as follows: - `V3_CATALOG` -> run V3 Flow (V3 STEP 2 onward) - `V1_CATALOG` -> run V1 Flow (V1 STEP 2 onward) - `STORES_NOT_INSTALLED` -> stop and ask user to install Wix Stores ## V3 issues ### Image is blurry or unrecognizable Respond: "I wasn't able to identify a product in this image. Try a clearer photo or add a description." ### Images show different products Respond: "It looks like these images show different products. For now, I can create one product at a time. Please upload images of a single product." ### User text contradicts images If the user's free-text note conflicts with what's visible (e.g., image shows blue but note says "available in red"), ask the user to clarify before showing the review card. ### Description format error (V3) V3 requires rich text nodes, NOT HTML strings. Ensure the description is an object with `nodes` array. ### Variant count mismatch You must generate ALL combinations of option choices. For example, 2 colors x 2 sizes = 4 variants. ### V3 API write fails Show an error and offer to retry. Do NOT leave a partially created product. ## V1 issues ### "The url field must be a publicly accessible URL" The URL may be a local file path or invalid reference. Both public HTTPS URLs and wixmp URLs from chat uploads work. If the error persists, ask the user for a different image source. ### Product created but no image visible (V1) You used the original external URL instead of the wixstatic.com URL in V1 STEP 4. Always use the `file.url` from V1 STEP 2's response. ## Cross-version errors ### Image import fails (operationStatus: FAILED) The source server blocks external requests. Ask the user for a different image URL. Reliable sources: Unsplash (`images.unsplash.com`), Pexels (`images.pexels.com`), Imgur, public S3/GCS buckets. ### 428 Precondition Required on product creation You called the wrong endpoint for the site's catalog version. Re-run STEP 1 to detect the version and use the matching flow: - V3 sites must use `POST /stores/v3/products` (V3 STEP 6) - V1 sites must use `POST /stores/v1/products` (V1 STEP 4) # References - [Get Catalog Version](https://dev.wix.com/docs/rest/business-solutions/stores/catalog-versioning/get-catalog-version.md) - [Catalog Versioning Overview](https://dev.wix.com/docs/rest/business-solutions/stores/catalog-versioning/introduction.md) - [Create Product (Catalog V3)](https://dev.wix.com/docs/rest/business-solutions/stores/catalog-v3/products-v3/create-product.md) - [Create Product with Options (Catalog V3)](https://dev.wix.com/docs/api-reference/business-solutions/stores/skills/create-product-with-options-catalog-v3.md) - [Info Sections API (Catalog V3)](https://dev.wix.com/docs/rest/business-solutions/stores/catalog-v3/info-sections-v3/introduction.md) - [Create Product (Catalog V1)](https://dev.wix.com/docs/api-reference/business-solutions/stores/skills/create-product-catalog-v1.md) - [Add Product Media (Catalog V1)](https://dev.wix.com/docs/api-reference/business-solutions/stores/catalog-v1/catalog/add-product-media.md) - [Upload Media to Wix](https://dev.wix.com/docs/api-reference/assets/media/skills/upload-media-to-wix.md) - [Install Wix Apps](https://dev.wix.com/docs/api-reference/business-management/app-installation/skills/install-wix-apps.md) --- > Portal Navigation: > > - Append `.md` to any URL under `https://dev.wix.com/docs/` to get its markdown version. > - Pages are either content pages (article or reference text) or menu pages (a list of links to child pages). > - To get a menu page, truncate any URL to a parent path and append `.md` (e.g. `https://dev.wix.com/docs/sdk.md`, `https://dev.wix.com/docs/sdk/core-modules.md`). > - Top-level index of all portals: https://dev.wix.com/docs/llms.txt > - Full concatenated docs: https://dev.wix.com/docs/llms-full.txt ## Resource: Create Product (Catalog V1) ## Article: Create Product (Catalog V1) ## Article Link: https://dev.wix.com/docs/api-reference/business-solutions/stores/skills/create-product-catalog-v1.md ## Article Content: # RECIPE: Business Recipe - Create Product (Catalog V1) ## STEP 1: Create a Simple Product Use `POST https://www.wixapis.com/stores/v1/products` to create a product. **CRITICAL: Description accepts an HTML string in V1** (unlike V3 which requires rich text nodes). ```bash curl -X POST 'https://www.wixapis.com/stores/v1/products' \ -H 'Content-Type: application/json' \ -H 'Authorization: ' \ -d '{ "product": { "name": "Air Max Runner", "description": "

        Premium running sneaker with advanced cushioning technology.

        ", "visible": true, "productType": "physical", "priceData": { "price": 129.99 } } }' ``` **Key V1 fields:** | Field | Type | Notes | |---|---|---| | `name` | string | Required. Max 80 characters | | `description` | string | HTML string — NOT rich text nodes (e.g. `"

        text

        "`) | | `productType` | string | `"physical"` only (digital not supported via API) | | `priceData.price` | number | Product base price | | `visible` | boolean | Whether the product is visible to customers | --- ## STEP 2: Create a Product with Options In V1, options are defined via `productOptions`. Variants are **auto-generated** from the choices — you do not need to define them manually. ```bash curl -X POST 'https://www.wixapis.com/stores/v1/products' \ -H 'Content-Type: application/json' \ -H 'Authorization: ' \ -d '{ "product": { "name": "Colombian Arabica", "description": "

        The best organic coffee that Colombia has to offer.

        ", "visible": true, "productType": "physical", "priceData": { "price": 35 }, "productOptions": [ { "name": "Weight", "optionType": "drop_down", "choices": [ { "value": "250g", "description": "250g", "inStock": true, "visible": true }, { "value": "500g", "description": "500g", "inStock": true, "visible": true } ] }, { "name": "Ground for", "optionType": "drop_down", "choices": [ { "value": "Stovetop", "description": "Stovetop", "inStock": true, "visible": true }, { "value": "Filter", "description": "Filter", "inStock": true, "visible": true } ] } ] } }' ``` **V1 Options structure:** - `optionType`: `"drop_down"` for text choices, `"color"` for color swatches - `choices[].description`: Display name shown to customers - `choices[].value`: Internal value (use hex color code for `color` type, e.g. `"#000000"`) - `choices[].inStock`: Whether this choice is in stock - `choices[].visible`: Whether this choice is visible to customers **Variants in V1 responses** are returned as an object with option name keys: ```json "choices": { "Weight": "250g", "Ground for": "Stovetop" } ``` This is different from V3 which uses an array structure. --- ## Key Differences from V3 | Feature | Catalog V1 | Catalog V3 | |---|---|---| | Create endpoint | `POST /stores/v1/products` | `POST /stores/v3/products` | | Description | HTML string (`"

        text

        "`) | Rich text nodes object | | Options field | `productOptions` | `options` | | Option type field | `optionType` (`drop_down`, `color`) | `optionRenderType` (`TEXT_CHOICES`, `SWATCH_CHOICES`) | | Choice visibility | `choices[].visible` | `choices[].isVisible` | | Variants | Auto-generated from choices | Must be explicitly defined in `variantsInfo.variants` | | Variant choices | Object: `{"Weight": "250g"}` | Array of `optionChoiceNames` | | Price field | `priceData.price` (number) | `price.actualPrice.amount` (string) | --- ## Important Notes - **Never use `/stores/v3/` endpoints on a CATALOG_V1 site** — they return `428 Precondition Required`. - Check the site's catalog version in dynamic context before choosing endpoints. - `productType` only supports `"physical"` via the API. - To add media to a product, use the separate **Add Product Media** endpoint after creation. - To query products on a V1 site, see [Query Products (Catalog V1)](https://dev.wix.com/docs/api-reference/business-solutions/stores/skills/query-products-catalog-v1.md). ## References - [V1 Create Product](https://dev.wix.com/docs/api-reference/business-solutions/stores/catalog-v1/catalog/create-product.md) - [Catalog Versioning Overview](https://dev.wix.com/docs/api-reference/business-solutions/stores/catalog-versioning/introduction.md) --- > Portal Navigation: > > - Append `.md` to any URL under `https://dev.wix.com/docs/` to get its markdown version. > - Pages are either content pages (article or reference text) or menu pages (a list of links to child pages). > - To get a menu page, truncate any URL to a parent path and append `.md` (e.g. `https://dev.wix.com/docs/sdk.md`, `https://dev.wix.com/docs/sdk/core-modules.md`). > - Top-level index of all portals: https://dev.wix.com/docs/llms.txt > - Full concatenated docs: https://dev.wix.com/docs/llms-full.txt ## Resource: Create Product with Options (Catalog V3) ## Article: Create Product with Options (Catalog V3) ## Article Link: https://dev.wix.com/docs/api-reference/business-solutions/stores/skills/create-product-with-options-catalog-v3.md ## Article Content: # RECIPE: Business Recipe - Creating a Wix Store Product with options (Catalog V3) Learn how to create a Wix store product with customizable options like colors, sizes, or other variants, allowing customers to select their preferences when purchasing. --- ## Article: Steps for creating a Wix Store Product with Options ## STEP 1: create the product with options and variants 1. create the product with options and create variants for them - Wix REST API: [Create Product](https://dev.wix.com/docs/api-reference/business-solutions/stores/catalog-v3/products-v3/create-product.md) **CRITICAL: USE THIS WORKING EXAMPLE** ```bash curl -X POST 'https://www.wixapis.com/stores/v3/products' \ -H 'Content-Type: application/json' \ -H 'Authorization: ' \ -d '{ "product": { "name": "Air Max Runner", "description": { "nodes": [ { "type": "PARAGRAPH", "id": "desc1", "nodes": [ { "type": "TEXT", "textData": { "text": "Premium running sneaker with advanced cushioning technology and breathable mesh design for ultimate comfort." } } ], "paragraphData": { "textStyle": { "textAlignment": "AUTO" } } } ], "metadata": { "version": 1, "id": "sneaker-desc-001" } }, "productType": "PHYSICAL", "physicalProperties": {}, "media": { "main": { "url": "https://images.unsplash.com/photo-1549298916-b41d501d3772?w=400&h=400&fit=crop&crop=center", "altText": "Air Max Runner - Main Product Image" }, "itemsInfo": { "items": [ { "url": "https://images.unsplash.com/photo-1549298916-b41d501d3772?w=400&h=400&fit=crop&crop=center", "altText": "Air Max Runner - Product View" } ] } }, "options": [ { "name": "Size", "optionRenderType": "TEXT_CHOICES", "choicesSettings": { "choices": [ { "choiceType": "CHOICE_TEXT", "name": "8" }, { "choiceType": "CHOICE_TEXT", "name": "9" }, { "choiceType": "CHOICE_TEXT", "name": "10" } ] } }, { "name": "Color", "optionRenderType": "TEXT_CHOICES", "choicesSettings": { "choices": [ { "choiceType": "CHOICE_TEXT", "name": "Black" }, { "choiceType": "CHOICE_TEXT", "name": "White" } ] } } ], "variantsInfo": { "variants": [ { "choices": [ { "optionChoiceNames": { "optionName": "Size", "choiceName": "8", "renderType": "TEXT_CHOICES" } }, { "optionChoiceNames": { "optionName": "Color", "choiceName": "Black", "renderType": "TEXT_CHOICES" } } ], "price": { "actualPrice": { "amount": "129.99" } }, "physicalProperties": {}, "visible": true }, { "choices": [ { "optionChoiceNames": { "optionName": "Size", "choiceName": "8", "renderType": "TEXT_CHOICES" } }, { "optionChoiceNames": { "optionName": "Color", "choiceName": "White", "renderType": "TEXT_CHOICES" } } ], "price": { "actualPrice": { "amount": "129.99" } }, "physicalProperties": {}, "visible": false }, { "choices": [ { "optionChoiceNames": { "optionName": "Size", "choiceName": "9", "renderType": "TEXT_CHOICES" } }, { "optionChoiceNames": { "optionName": "Color", "choiceName": "Black", "renderType": "TEXT_CHOICES" } } ], "price": { "actualPrice": { "amount": "129.99" } }, "physicalProperties": {}, "visible": false }, { "choices": [ { "optionChoiceNames": { "optionName": "Size", "choiceName": "9", "renderType": "TEXT_CHOICES" } }, { "optionChoiceNames": { "optionName": "Color", "choiceName": "White", "renderType": "TEXT_CHOICES" } } ], "price": { "actualPrice": { "amount": "129.99" } }, "physicalProperties": {}, "visible": true }, { "choices": [ { "optionChoiceNames": { "optionName": "Size", "choiceName": "10", "renderType": "TEXT_CHOICES" } }, { "optionChoiceNames": { "optionName": "Color", "choiceName": "Black", "renderType": "TEXT_CHOICES" } } ], "price": { "actualPrice": { "amount": "129.99" } }, "physicalProperties": {}, "visible": true }, { "choices": [ { "optionChoiceNames": { "optionName": "Size", "choiceName": "10", "renderType": "TEXT_CHOICES" } }, { "optionChoiceNames": { "optionName": "Color", "choiceName": "White", "renderType": "TEXT_CHOICES" } } ], "price": { "actualPrice": { "amount": "129.99" } }, "physicalProperties": {}, "visible": false } ] } } }' ``` ### IMPORTANT NOTES: When Creating a product YOU MUST leave the physicalProperties and all other non required fields empty. for example: "physicalProperties": {}. In most cases the product will be a physical product, and therefore MUST have the empty physicalProperties object ("physicalProperties": {}) and a corresponding "productType": "PHYSICAL". **CRITICAL: variantsInfo is Always Required** `variantsInfo.variants` must contain at least one variant, even for simple products without options. Omitting it causes: `"variantsInfo must not be empty"`. **CRITICAL: Description Format**If you include a description, it MUST use Wix's rich text nodes structure, NOT a plain string. Plain strings will cause "Expected an object" API errors. **WRONG:** `"description": "Your text here"` **CORRECT:** ```json "description": { "nodes": [ { "type": "PARAGRAPH", "id": "desc1", "nodes": [ { "type": "TEXT", "textData": { "text": "Your product description here" } } ], "paragraphData": { "textStyle": { "textAlignment": "AUTO" } } } ], "metadata": { "version": 1, "id": "unique-desc-id" } } ``` **CRITICAL: Media Format** To add product images, use the `media` object with `main` for the primary image and `itemsInfo.items` for additional gallery images. **YOU MUST** add an image to each product. > **Important:** The V3 Products API requires **URLs** for media, not media IDs. Even when using files from the Media Manager, you must use the full wixstatic.com URL. **Option 1: Using External URLs Directly** You can reference images directly from external URLs that allow hotlinking (e.g., Unsplash, Pexels): ```json "media": { "main": { "url": "https://images.unsplash.com/photo-1549298916-b41d501d3772?w=400", "altText": "Product Main Image" }, "itemsInfo": { "items": [ { "url": "https://images.unsplash.com/photo-1549298916-b41d501d3772?w=400", "altText": "Product View" } ] } } ``` > **Warning:** Some external URLs may fail if the source server blocks requests or has hotlink protection. For reliable media, use Option 2. **Option 2: Using Media Manager (Recommended)** For reliable, permanent media storage, first upload the image to the site's Media Manager, then use the returned wixstatic.com URL. **Step 1:** Upload the image to Media Manager using the Import File API: ```bash curl -X POST 'https://www.wixapis.com/site-media/v1/files/import' \ -H 'Content-Type: application/json' \ -H 'Authorization: ' \ -d '{ "url": "https://images.unsplash.com/photo-1563729784474-d77dbb933a9e?w=400", "mimeType": "image/jpeg", "displayName": "Product Image" }' ``` Response includes the wixstatic.com URL: ```json { "file": { "id": "e6a89e_19dae9fef9bb48a6b5e392d0d2e5b95d~mv2.jpg", "url": "https://static.wixstatic.com/media/e6a89e_19dae9fef9bb48a6b5e392d0d2e5b95d~mv2.jpg", "operationStatus": "PENDING" } } ``` > **Note:** Wait for `operationStatus` to become `READY` before using the media. You can verify by calling the List Files API (`GET /site-media/v1/files`). **Step 2:** Use the wixstatic.com **URL** (not the ID) when creating the product: ```json "media": { "main": { "url": "https://static.wixstatic.com/media/e6a89e_19dae9fef9bb48a6b5e392d0d2e5b95d~mv2.jpg", "altText": "Product Image" }, "itemsInfo": { "items": [ { "url": "https://static.wixstatic.com/media/e6a89e_19dae9fef9bb48a6b5e392d0d2e5b95d~mv2.jpg", "altText": "Product Image" } ] } } ``` > **Why use Media Manager?** External URLs can fail if the source server blocks requests. Once uploaded to Media Manager, the file is permanently stored on Wix servers and the wixstatic.com URL is always reliable. **CRITICAL: Options Structure**Each option MUST include: * `optionRenderType`: "TEXT_CHOICES" for text-based choices * `choicesSettings`: Object containing the choices array * `choicesSettings.choices`: Array with at least one choice * Each choice MUST have `choiceType`: "CHOICE_TEXT" and `name` properties **CRITICAL: Variants Structure** * Create one variant for EVERY combination of option choices (Cartesian product of all options) * In this example: 2 colors and 3 sizes creates 6 variants (2 x 3) - all combinations must be included * Each variant must reference ALL options defined on the product * Use `optionChoiceNames` structure with `optionName`, `choiceName`, and `renderType` * Price must use `price.actualPrice.amount` with string values * Use `visible: true` for variants you want customers to see and purchase * Use `visible: false` for variants that exist but should be hidden from customers The Create Product API can handle creating customizations and choices in a single call. There's no need to separately check for existing customizations, create new ones, or add choices to them—the API handles all of this automatically: 1. If you provide an option with a name that doesn't exist as a customization, a new customization will be created 2. If a customization with that name already exists, it will be associated with the product 3. New choices will be added to the customization if they don't exist 4. When creating variants, use optionChoiceNames rather than optionChoiceIds to reference the options and choices 5. Always include the choicesSettings object with the complete list of choices 6. You must create one variant for each combination of option choices ### Next Steps: After Creating the product, verify that the options appear correctly in the store and that customers can select different variants. > **Need to Update This Product Later?** > > See [Update Product with Options](https://dev.wix.com/docs/api-reference/business-solutions/stores/skills/update-product-with-options-catalog-v3.md) for updating existing products. > > **Important:** All update operations (PATCH) require the current `product.revision` value. Always GET the product first to obtain the revision before updating. ## Troubleshooting Common Issues ### Issue 1: "ChoicesSettings must not be empty" error * **Problem**: When creating a product with options, you get an error saying `choicesSettings must not be empty`. This can appear in several forms: * `"product is invalid: options [at index 0] is invalid: value choicesSettings must not be empty"` * `"product is invalid: options [at index 0] is invalid: value choicesSettings must not be empty"` with `"violatedRule":"REQUIRED_ONE_OF_FIELD"` * `"choicesSettings must not be empty"` with field violations showing `"supported":["choicesSettings"]` * **Solution**: Always include the `choicesSettings` object with the full array of `choices` when creating a product with options. Every option MUST have a complete choicesSettings structure with at least one choice, even when using an existing customization. **Common Causes:** 1. **Missing choicesSettings entirely** - The option object doesn't include any choicesSettings 2. **Empty choicesSettings object** - The choicesSettings exists but has no choices array or empty choices array 3. **Null or undefined choicesSettings** - The choicesSettings field is present but set to null/undefined **Example of correct choicesSettings structure:** ```json "options": [ { "name": "Size", "optionRenderType": "TEXT_CHOICES", "choicesSettings": { "choices": [ { "choiceType": "CHOICE_TEXT", "name": "Small" } ] } } ] ``` **What NOT to do:** ```json // WRONG - Missing choicesSettings entirely "options": [ { "name": "Size", "optionRenderType": "TEXT_CHOICES" } ] // WRONG - Empty choicesSettings "options": [ { "name": "Size", "optionRenderType": "TEXT_CHOICES", "choicesSettings": {} } ] // WRONG - Empty choices array "options": [ { "name": "Size", "optionRenderType": "TEXT_CHOICES", "choicesSettings": { "choices": [] } } ] ``` ### Issue 2: "optionSettings.choicesSettings.choices must not be empty" error * **Problem**: You get an error like `"product is invalid: options [at index 0] is invalid: optionSettings.choicesSettings is invalid: choices has size 0, expected 1 or more"` or `"choices must not be empty"`. * **Solution**: This error occurs when using the incorrect nested structure `optionSettings.choicesSettings` instead of the correct `choicesSettings` directly under the option. **WRONG Structure (causes the error):** ```json "options": [ { "name": "Size", "optionRenderType": "TEXT_CHOICES", "optionSettings": { "choicesSettings": { "choices": [] } } } ] ``` **CORRECT Structure (use this instead):** ```json "options": [ { "name": "Size", "optionRenderType": "TEXT_CHOICES", "choicesSettings": { "choices": [ { "choiceType": "CHOICE_TEXT", "name": "Small" } ] } } ] ``` **Key Points:** * Use `choicesSettings` directly under the option object, NOT nested under `optionSettings` * The `choicesSettings.choices` array MUST contain at least one choice * Each choice MUST have `choiceType` and `name` properties * Always include the complete choices array even when referencing existing customizations ### Issue 3: Variants not matching options * **Problem**: The API returns errors about variants not matching the product's options. * **Solution**: * Create one variant for each possible combination of option choices * Ensure each variant references all options defined on the product * If the product has only one option with three choices, you need three variants * Make sure each variant's option choice name exactly matches the corresponding option choice ### Issue 4: Conflicts when using existing customizations * **Problem**: When attempting to use existing customizations, you encounter name conflicts or choice conflicts. * **Solution**: * If you need to use a specific existing customization ID, first query customizations to get the correct ID * When working with existing customizations, ensure all choices you reference actually exist in that customization * If you're creating a new customization with the same name as an existing one, the API will use the existing one * Be aware that customizations are shared across all products in your store ### Issue 5: "Expected an object" error for description * **Problem**: Using a plain string for the description field causes API failure. * **Solution**: Always use the rich text nodes structure for descriptions as shown in the CRITICAL section above. ### Issue 6: Inconsistencies in documentation vs. actual API behavior * **Problem**: Several API requirements are not well-documented or are documented differently from how the API actually behaves. * **Solution**: * Always include choicesSettings with all choices when creating a product * Use optionChoiceNames rather than optionChoiceIds in variants for more reliable results * Include the renderType in optionChoiceNames * Use the exact same choice names as defined in the customization ## Conclusion Creating a Wix store product with options involves understanding the relationship between store-wide customizations and product-specific options and variants. The key is to ensure consistency between customization definitions, product options, and product variants. By following this recipe and being aware of the common pitfalls, you can successfully create a Wix store product with options. --- > Portal Navigation: > > - Append `.md` to any URL under `https://dev.wix.com/docs/` to get its markdown version. > - Pages are either content pages (article or reference text) or menu pages (a list of links to child pages). > - To get a menu page, truncate any URL to a parent path and append `.md` (e.g. `https://dev.wix.com/docs/sdk.md`, `https://dev.wix.com/docs/sdk/core-modules.md`). > - Top-level index of all portals: https://dev.wix.com/docs/llms.txt > - Full concatenated docs: https://dev.wix.com/docs/llms-full.txt ## Resource: Find Products (Query and Search, Catalog V3) ## Article: Find Products (Query and Search, Catalog V3) ## Article Link: https://dev.wix.com/docs/api-reference/business-solutions/stores/skills/find-products-query-and-search-catalog-v3.md ## Article Content: # RECIPE: Business Recipe – Find Products in a Wix Store (Query and Search, Catalog V3) Find products in a Wix store using the Catalog V3 Search Products and Query Products APIs. ## Article: How to Find Products ### STEP 0: Choose the right product lookup method Use **Search Products** for text search and name-based lookup. Use **Query Products** for structured filtering, sorting, paging, and listing products. | Need | Endpoint | Notes | | ---- | -------- | ----- | | Find products by name or free text | [Search Products](https://dev.wix.com/docs/api-reference/business-solutions/stores/catalog-v3/products-v3/search-products.md) | Best for user-provided names, keywords, and broad product lookup. | | List all products or page through the catalog | [Query Products](https://dev.wix.com/docs/api-reference/business-solutions/stores/catalog-v3/products-v3/query-products.md) | Supports paging and structured filters on the fields listed below. | | Filter by `id`, `slug`, `handle`, dates, or `visible` | [Query Products](https://dev.wix.com/docs/api-reference/business-solutions/stores/catalog-v3/products-v3/query-products.md) | Best for exact structured criteria. | | Need exact name matching after text lookup | [Search Products](https://dev.wix.com/docs/api-reference/business-solutions/stores/catalog-v3/products-v3/search-products.md) + client-side match | Search by the name text, then match the returned `product.name` in your own code. | ### STEP 1: Search products by name or free text Use Search Products when the user gives a product name, keyword, or other text expression: ```bash curl -X POST 'https://www.wixapis.com/stores/v3/products/search' \ -H 'Content-Type: application/json' \ -H 'Authorization: ' \ -d '{ "search": { "expression": "Blue Shirt" } }' ``` For exact name matching, search with the user-provided text and then compare the returned `product.name` values in your own code. ### STEP 2: Query products with structured filters, sorting, or paging Use the **POST** [Query Products](https://dev.wix.com/docs/api-reference/business-solutions/stores/catalog-v3/products-v3/query-products.md) endpoint to query products. The endpoint returns up to 100 products per request. **Endpoint:** `POST https://www.wixapis.com/stores/v3/products/query` **Basic query (all products, default fields):** ```bash curl -X POST 'https://www.wixapis.com/stores/v3/products/query' \ -H 'Content-Type: application/json' \ -H 'Authorization: ' \ -d '{ "query": {} }' ``` This returns all products with their default fields (id, name, slug, visible, productType, priceData, stock, media, etc.). ### STEP 3: Understanding the `fields` parameter The `fields` array requests **additional** fields beyond the defaults. It does **NOT** accept property names like `"name"` or `"id"`. **⚠️ CRITICAL: Valid `fields` enum values:** | Enum Value | Description | | ---------------------------------- | ---------------------------- | | `URL` | Product page URL | | `CURRENCY` | Currency information | | `INFO_SECTION` | Info sections (rich content) | | `MERCHANT_DATA` | Merchant-specific data | | `PLAIN_DESCRIPTION` | Plain text description | | `INFO_SECTION_PLAIN_DESCRIPTION` | Info section plain text | | `SUBSCRIPTION_PRICES_INFO` | Subscription pricing | | `BREADCRUMBS_INFO` | Category breadcrumbs | | `WEIGHT_MEASUREMENT_UNIT_INFO` | Weight unit info | | `VARIANT_OPTION_CHOICE_NAMES` | Variant option choice names | | `MEDIA_ITEMS_INFO` | Additional media items | | `DESCRIPTION` | Rich text description | | `DIRECT_CATEGORIES_INFO` | Direct category info | | `ALL_CATEGORIES_INFO` | All category info | | `MIN_VARIANT_PRICE_INFO` | Minimum variant price | | `INFO_SECTION_DESCRIPTION` | Info section rich content | | `THUMBNAIL` | Thumbnail image | | `DIRECT_CATEGORY_IDS` | Direct category IDs | | `PRODUCT_CHOICES_MEDIA_REFERENCES` | Choice-specific media | **WRONG – these are NOT valid field values:** ```json "fields": ["id", "name", "slug", "visible", "priceData"] ``` **CORRECT – use enum constants or leave empty for defaults:** ```json "fields": [] ``` **CORRECT – requesting additional fields:** ```json "fields": ["DESCRIPTION", "URL", "ALL_CATEGORIES_INFO"] ``` ### STEP 4: Filtering and sorting with Query Products `QueryProducts` supports filters only on these fields: | Field | Supported Filters | Sortable | | ----- | ----------------- | -------- | | `id` | `$eq`, `$ne`, `$exists`, `$in`, `$startsWith` | No | | `handle` | `$eq`, `$ne`, `$exists`, `$in`, `$startsWith` | No | | `options.id` | `$isEmpty`, `$hasAll`, `$hasSome` | No | | `slug` | `$eq`, `$ne`, `$exists`, `$in`, `$startsWith` | Yes | | `createdDate` | `$eq`, `$ne`, `$exists`, `$in`, `$lt`, `$lte`, `$gt`, `$gte` | Yes | | `updatedDate` | `$eq`, `$ne`, `$exists`, `$in`, `$lt`, `$lte`, `$gt`, `$gte` | Yes | | `visible` | `$eq`, `$ne`, `$exists`, `$in` | Yes | **Query with filter and sort:** ```bash curl -X POST 'https://www.wixapis.com/stores/v3/products/query' \ -H 'Content-Type: application/json' \ -H 'Authorization: ' \ -d '{ "fields": [], "query": { "filter": { "visible": true }, "sort": [ { "field_name": "createdDate", "order": "ASC" } ], "paging": { "limit": 50, "offset": 0 } } }' ``` **Filter by product IDs:** ```bash curl -X POST 'https://www.wixapis.com/stores/v3/products/query' \ -H 'Content-Type: application/json' \ -H 'Authorization: ' \ -d '{ "fields": [], "query": { "filter": { "id": { "$in": [ "product-id-1", "product-id-2" ] } } } }' ``` ### STEP 5: Handling pagination When there are more products than the page limit, use cursor-based or offset-based paging: ```json { "query": { "paging": { "limit": 100, "offset": 0 } } } ``` Check the response `pagingMetadata` to determine if more pages exist. --- ## Important Notes - **Variant data is NOT returned** by Query Products. To get variant details, use [Get Product](https://dev.wix.com/docs/api-reference/business-solutions/stores/catalog-v3/products-v3/get-product.md) for individual products. - **Non-visible products** require the `SCOPE.STORES.PRODUCT_READ_ADMIN` permission. - Default fields include: `id`, `name`, `slug`, `visible`, `productType`, `priceData`, `stock`, `media`, `createdDate`, `updatedDate`. - The `fields` parameter adds fields **on top of** the defaults — you never need to request `id` or `name` explicitly. ## Conclusion To find products by name or free text, use `POST https://www.wixapis.com/stores/v3/products/search`. To list, page, sort, or structurally filter products, use `POST https://www.wixapis.com/stores/v3/products/query`. Use `fields: []` for defaults, or pass valid enum values like `DESCRIPTION`, `URL`, `ALL_CATEGORIES_INFO` for additional data. Never pass property names as field values. --- > Portal Navigation: > > - Append `.md` to any URL under `https://dev.wix.com/docs/` to get its markdown version. > - Pages are either content pages (article or reference text) or menu pages (a list of links to child pages). > - To get a menu page, truncate any URL to a parent path and append `.md` (e.g. `https://dev.wix.com/docs/sdk.md`, `https://dev.wix.com/docs/sdk/core-modules.md`). > - Top-level index of all portals: https://dev.wix.com/docs/llms.txt > - Full concatenated docs: https://dev.wix.com/docs/llms-full.txt ## Resource: Query Products (Catalog V1) ## Article: Query Products (Catalog V1) ## Article Link: https://dev.wix.com/docs/api-reference/business-solutions/stores/skills/query-products-catalog-v1.md ## Article Content: # RECIPE: Business Recipe - Query Products (Catalog V1) ## STEP 1: Query Products Use `POST https://www.wixapis.com/stores-reader/v1/products/query` to query products from a V1 store. **Basic query (all products):** ```bash curl -X POST 'https://www.wixapis.com/stores-reader/v1/products/query' \ -H 'Content-Type: application/json' \ -H 'Authorization: ' \ -d '{ "query": {} }' ``` --- ## STEP 2: Filtering and Sorting > **CRITICAL:** In V1, `filter` and `sort` are **JSON-encoded strings**, not objects — unlike V3 where they are plain objects. **Query with filter and sort:** ```bash curl -X POST 'https://www.wixapis.com/stores-reader/v1/products/query' \ -H 'Content-Type: application/json' \ -H 'Authorization: ' \ -d '{ "query": { "filter": "{\"visible\": true}", "sort": "[{\"fieldName\": \"name\", \"order\": \"ASC\"}]", "paging": { "limit": 50, "offset": 0 } } }' ``` **Query by product IDs:** ```bash curl -X POST 'https://www.wixapis.com/stores-reader/v1/products/query' \ -H 'Content-Type: application/json' \ -H 'Authorization: ' \ -d '{ "query": { "filter": "{\"id\": {\"$in\": [\"product-id-1\", \"product-id-2\"]}}" } }' ``` --- ## Key Differences from V3 | Feature | Catalog V1 | Catalog V3 | |---|---|---| | Query endpoint | `POST /stores-reader/v1/products/query` | `POST /stores/v3/products/query` | | Filter/sort | JSON-encoded strings | Plain objects | | Additional fields | Not applicable | Enum values like `DESCRIPTION`, `URL` | --- ## Important Notes - **Never use `/stores/v3/` endpoints on a CATALOG_V1 site** — they return `428 Precondition Required`. - Check the site's catalog version in dynamic context before choosing endpoints. - To create products on a V1 site, see [Create Product (Catalog V1)](https://dev.wix.com/docs/api-reference/business-solutions/stores/skills/create-product-catalog-v1.md). ## References - [V1 Query Products](https://dev.wix.com/docs/api-reference/business-solutions/stores/catalog-v1/catalog/query-products.md) - [Catalog Versioning Overview](https://dev.wix.com/docs/api-reference/business-solutions/stores/catalog-versioning/introduction.md) --- > Portal Navigation: > > - Append `.md` to any URL under `https://dev.wix.com/docs/` to get its markdown version. > - Pages are either content pages (article or reference text) or menu pages (a list of links to child pages). > - To get a menu page, truncate any URL to a parent path and append `.md` (e.g. `https://dev.wix.com/docs/sdk.md`, `https://dev.wix.com/docs/sdk/core-modules.md`). > - Top-level index of all portals: https://dev.wix.com/docs/llms.txt > - Full concatenated docs: https://dev.wix.com/docs/llms-full.txt ## Resource: Setup Online Store (Catalog V3) ## Article: Setup Online Store (Catalog V3) ## Article Link: https://dev.wix.com/docs/api-reference/business-solutions/stores/skills/setup-online-store-catalog-v3.md ## Article Content: **RECIPE**: Business Recipe – Initial Setup for a Wix Online Store (Catalog V3) > **Standard call shape (every curl below).** The `` placeholder is shorthand for `Authorization: Bearer ` only. Body-bearing requests also need `Content-Type: application/json`. A concise checklist for preparing any new Wix site that uses the Online Stores app with Catalog V3. **Notice** that this recipe is **NOT** meant for coding purposes and is **ONLY** meant for initial catalog setup. --- ## Article: Steps for Setting Up a Wix Online Store **YOU MUST** Complete all the following steps **in the given order** (1 -5) without skipping any and **without requiring additional user input**. **YOU MUST** remind yourself as many times as needed throughout the process that you most complete all the steps and not stop at all in the middle. **⚠️ CRITICAL ORDER REQUIREMENT: You MUST start with creating products FIRST (Steps 1-2), then categories (Steps 3-5). Categories API might take some time to be fully available after Stores installation, so always create products before attempting category operations.** ### STEP 1: Confirm Catalog V3 & Stick to V3 APIs - **Check if the site uses Catalog V3.** This can be done using the [Get Catalog Version](https://dev.wix.com/docs/api-reference/business-solutions/stores/catalog-versioning/get-catalog-version.md) endpoint. path: `https://www.wixapis.com/stores/v3/provision/version` - From this point forward, as long as the result is V3, use only Catalog V3 REST endpoints. All API calls should be directed to endpoints starting with `/stores/v3/....` Do not mix V3 calls with earlier versions. - Exception for Categories: The Categories API is an exception. It uses a v1 endpoint, as it replaces the older Collections API. For example, to create a category in V3, use the following endpoint: `https://www.wixapis.com/categories/v1/categories` ### STEP 2: Create 5 new products based on the format specified in the Bulk Create Products with Options recipe (4 in stock, 1 out of stock) 1. First *YOU MUST* pull up the [Bulk Create Wix Store Products with Options](https://dev.wix.com/docs/api-reference/business-solutions/stores/skills/bulk-create-products-with-options-catalog-v3.md) recipe to understand the exact format required for creating products. 2. Create 5 products according to this format using bulk creation (use a single bulk request). 4 of the created products **MUST** have ALL there variants in-stock, and the last (5th) product **MUST** have all its variants be out-of-stock. 3. **Make sure** to add in image (using media) using a url from the web that matches each product. 4. **YOU MUST** use the price formatting as seen in the example, meaning using actualPrice and compareAtPrice. 5. **ALL** products **MUST** be created **EXACTLY** from the same format as the full example in the Bulk Create Wix Store Products with Options recipe. **ONLY** information within the strings of the given fields may differ based on the products. **⚠️ CRITICAL: EXACT FORMAT REQUIREMENTS** **YOU MUST** use the following recipe to create ALL products with the EXACT same format: - **Bulk Create Wix Store Products with Options** [Recipe: Bulk Create Products with Options](https://dev.wix.com/docs/api-reference/business-solutions/stores/skills/bulk-create-products-with-options-catalog-v3.md) ### STEP 3: Prepare Three Store Categories 1. Determine how many categories the user requested. 2. If fewer than **3** are provided, create additional categories until the total equals **3** which are relevant for the type of store. 3. Examples for different types of stores: - **Book store** → Drama, Kids, Sci-Fi - **Fashion** → Men, Women, Kids - **Other industries** → any logical grouping that fits the catalog. 4. Use the Categories API to create each category. **YOU MUST USE** the endpoint: [Create Category](https://dev.wix.com/docs/api-reference/business-solutions/stores/catalog-v3/categories/create-category.md) based on the example below. Endpoint path: `POST https://www.wixapis.com/categories/v1/categories`. **There is no bulk-create endpoint for `/categories/v1/`** (the `events/v1/bulk/categories/create` URL is for the Events product, not Stores). 5. **Fire all N category-create calls as a single concurrent batch.** Each call is independent (creates a different category), so issue them as siblings in one assistant message — do not serialize. For 3 categories this saves ~6–8 s of wall vs. sequential calls. When calling the endpoint, make sure the request body includes a top-level `treeReference` field. It must **not** be nested inside the `category` object. Use the following example format: ```json { "category": { "name": "Drinkware", "description": "The Drinkware category includes a wide range of containers designed for holding beverages", "visible": true }, "treeReference": { "appNamespace": "@wix/stores", "treeKey": null } } ``` ### STEP 4: Add Each Product to a Category 1. **YOU MUST** add each existing product to at least one category that most makes sense. 2. First acquire the product's ids to use for this action. 3. Then adding a product to a category **MUST** be done using the Category API, specifically [Bulk Add Items To Category](https://dev.wix.com/docs/api-reference/business-solutions/stores/catalog-v3/categories/bulk-add-items-to-category.md), where products are referred to as items. This endpoint enables adding multiple products at once to a category. 4. **Fire all N add-items calls as a single concurrent batch.** Each call targets a different `categoryId` (the path parameter is single, so one call per category is unavoidable), but the calls are independent and run as siblings in one assistant message. For 3 categories this saves another ~6–8 s of wall. **⚠️ CRITICAL: Use correct endpoint `/categories/v1/bulk/categories/{categoryId}/add-items` with `catalogItemId`, `appId: "215238eb-22a5-4c36-9e7b-e7c08025e04e"`, and `treeReference` object.** **Make Sure** you pass the treeReference correctly at the same level as "items". ### STEP 5: (Optional) Verify Each Product was Added to a Category **Skip this step in trusting flows.** Step 4's bulk add-items endpoint returns an `itemMetadata` array per call — check each result there for failures (`itemMetadata[i].success === false`). The `list-items` round-trip is a defense-in-depth that adds ~10 s of wall and rarely surfaces a failure that the metadata didn't already report. If you keep the verification (e.g., for high-stakes catalogs): 1. Use [List Items In Category](https://dev.wix.com/docs/api-reference/business-solutions/stores/catalog-v3/categories/list-items-in-category.md) for each category. Path: `https://www.wixapis.com/categories/v1/categories/{categoryId}/list-items`. 2. **Fire all N list-items calls as a single concurrent batch** — they're independent. 3. Body must include a top-level `treeReference` field (not nested inside `category`). 4. If a list is empty for a category that should have items, repeat STEP 4 for that category only. --- ## Conclusion Following these steps **in order** guarantees the creation flow for new V3 Wix Online Store sites: - Contains exactly **3** categories - Contains exactly **5** products (unless the user explicitly requests fewer) - Each product is connected to at least one category. - All products follow the correct Catalog V3 API format as specified in the referenced recipe. --- > Portal Navigation: > > - Append `.md` to any URL under `https://dev.wix.com/docs/` to get its markdown version. > - Pages are either content pages (article or reference text) or menu pages (a list of links to child pages). > - To get a menu page, truncate any URL to a parent path and append `.md` (e.g. `https://dev.wix.com/docs/sdk.md`, `https://dev.wix.com/docs/sdk/core-modules.md`). > - Top-level index of all portals: https://dev.wix.com/docs/llms.txt > - Full concatenated docs: https://dev.wix.com/docs/llms-full.txt ## Resource: Update Product Pre-Order (Catalog V3) ## Article: Update Product Pre-Order (Catalog V3) ## Article Link: https://dev.wix.com/docs/api-reference/business-solutions/stores/skills/update-product-pre-order-catalog-v3.md ## Article Content: # Update Product Pre-Order Information (Catalog V3) This recipe outlines the steps to manage pre-orders for product variants, including enabling/disabling pre-orders, setting messages, and configuring limits. ## Prerequisites - Wix Stores app installed - Product with variants already created - API access with stores permissions ## Required APIs - **Products Search API**: [REST](https://dev.wix.com/docs/api-reference/business-solutions/stores/catalog-v3/products-v3/search-products.md) - **Query Inventory Items API**: [REST](https://dev.wix.com/docs/api-reference/business-solutions/stores/catalog-v3/inventory-items-v3/query-inventory-items.md) - **Bulk Update Inventory Items API**: [REST](https://dev.wix.com/docs/api-reference/business-solutions/stores/catalog-v3/inventory-items-v3/bulk-update-inventory-items.md) - **Update Inventory Item API**: [REST](https://dev.wix.com/docs/api-reference/business-solutions/stores/catalog-v3/inventory-items-v3/update-inventory-item.md) --- ## Step 1: Find the Product and Get Variant Information ### 1.1 Search for the Product **Endpoint**: `POST https://www.wixapis.com/stores/v3/products/search` ```json { "search": { "expression": "Product Name" } } ``` ### 1.2 Query Inventory Items for Variant Details Use the `productId` from the search to get variant information: **Endpoint**: `POST https://www.wixapis.com/stores/v3/inventory-items/query` ```json { "query": { "filter": { "productId": { "$in": [""] } } } } ``` The response includes: - `product.variantName` - identifies each variant - `inventoryItemId` - needed for updates - `revision` - required for update operations - `locationId` - inventory location - Current `preorderInfo` settings ### IMPORTANT NOTES: - I MUST get user input on which specific variant(s) to update - I MUST NEVER update all variants without explicit user selection - I MUST ask the user whether to enable or disable pre-orders for each variant - If enabling, I MUST get the pre-order message from the user - If setting a pre-order limit, I MUST ensure `trackQuantity: true` is set --- ## Step 2: Update Pre-Order Information ### Method A: Bulk Update (PREFERRED for multiple variants) Use when applying the same pre-order settings to multiple variants: **Endpoint**: `POST https://www.wixapis.com/stores/v3/bulk/inventory-items/update` **Request Body (Enable Pre-Order)**: ```json { "inventoryItems": [ { "inventoryItem": { "id": "", "revision": "", "preorderInfo": { "enabled": true, "message": "Available for pre-order! Ships in 2 weeks." } } }, { "inventoryItem": { "id": "", "revision": "", "preorderInfo": { "enabled": true, "message": "Available for pre-order! Ships in 2 weeks." } } } ], "returnEntity": true, "reason": "MANUAL" } ``` **Request Body (With Pre-Order Limit)**: ```json { "inventoryItems": [ { "inventoryItem": { "id": "", "revision": "", "trackQuantity": true, "quantity": 100, "preorderInfo": { "enabled": true, "message": "Pre-order now!", "limit": 50 } } } ], "returnEntity": true, "reason": "MANUAL" } ``` ### IMPORTANT NOTES: - Pre-order limits ONLY work when `trackQuantity: true` - If variant wasn't tracking quantity, I MUST ask user for initial quantity - The `revision` field is required and must be an integer --- ### Method B: Individual Update (Single variant or unique settings) **Endpoint**: `PATCH https://www.wixapis.com/stores/v3/inventory-items/{inventoryItemId}` **Request Body (Enable Pre-Order)**: ```json { "inventoryItem": { "id": "", "revision": "", "preorderInfo": { "enabled": true, "message": "Coming soon! Pre-order today." } }, "reason": "MANUAL" } ``` **Request Body (Disable Pre-Order)**: ```json { "inventoryItem": { "id": "", "revision": "", "preorderInfo": { "enabled": false, "limit": null } }, "reason": "MANUAL" } ``` --- ## Pre-Order Limit Behavior When you set a `preorderInfo.limit`: - It specifies how many units can be pre-ordered **after stock reaches zero** - Example: 10 in stock + limit of 50 = customers can order up to 60 total (10 regular + 50 pre-order) ### CRITICAL: Enabling Quantity Tracking If setting a limit on a variant that wasn't tracking quantity: 1. **Inform the user**: "`trackQuantity` will be enabled for this variant" 2. **Ask for initial quantity**: "What initial stock quantity should I set?" 3. **Include both in update**: ```json { "inventoryItem": { "id": "", "revision": "", "trackQuantity": true, "quantity": "", "preorderInfo": { "enabled": true, "message": "Pre-order message", "limit": 50 } }, "reason": "MANUAL" } ``` --- ## Next Steps After updating pre-order settings: - Confirm the changes with the user - Offer to update other products or variants - Consider updating product descriptions to mention pre-order availability --- > Portal Navigation: > > - Append `.md` to any URL under `https://dev.wix.com/docs/` to get its markdown version. > - Pages are either content pages (article or reference text) or menu pages (a list of links to child pages). > - To get a menu page, truncate any URL to a parent path and append `.md` (e.g. `https://dev.wix.com/docs/sdk.md`, `https://dev.wix.com/docs/sdk/core-modules.md`). > - Top-level index of all portals: https://dev.wix.com/docs/llms.txt > - Full concatenated docs: https://dev.wix.com/docs/llms-full.txt ## Resource: Update Product with Options (Catalog V3) ## Article: Update Product with Options (Catalog V3) ## Article Link: https://dev.wix.com/docs/api-reference/business-solutions/stores/skills/update-product-with-options-catalog-v3.md ## Article Content: **RECIPE**: Business Recipe - Updating a Wix Store Product (Catalog V3) Use this recipe to update an existing Catalog V3 product: description, media, options, variants, prices, or stock-related inventory records. ## Before Any Product Update Every Catalog V3 product update is revision-based: - If the user gives a product name instead of a product ID, use [Search Products](https://dev.wix.com/docs/api-reference/business-solutions/stores/catalog-v3/products-v3/search-products.md) and choose the exact product name match. - Use [Get Product](https://dev.wix.com/docs/api-reference/business-solutions/stores/catalog-v3/products-v3/get-product.md) to retrieve the current product and `product.revision`. - Include `product.id` and the current `product.revision` in every [Update Product](https://dev.wix.com/docs/api-reference/business-solutions/stores/catalog-v3/products-v3/update-product.md) PATCH body. - For simple text/HTML description updates, prefer `plainDescription`. Use `description` only when sending a Rich Content object. ### Find the product by name ```bash curl -X POST "https://www.wixapis.com/stores/v3/products/search" \ -H "Content-Type: application/json" \ -H "Authorization: " \ -d '{ "search": { "expression": "Product name" } }' ``` For product-name lookup, prefer Search Products before retrieving the product by ID. ### Get the current revision ```bash curl -X GET "https://www.wixapis.com/stores/v3/products/{productId}" \ -H "Authorization: " ``` ## Common Update Patterns ### Update Description Only For a normal user request like "set the product description to X", use `plainDescription` with valid HTML. The API converts it to rich content. Do not send a plain string in `description`. `description` is a Rich Content object. ```bash curl -X PATCH "https://www.wixapis.com/stores/v3/products/{productId}" \ -H "Content-Type: application/json" \ -H "Authorization: " \ -d '{ "product": { "id": "{productId}", "revision": "{currentRevision}", "plainDescription": "

        A great product for everyone.

        " } }' ``` Use `description` only when you intentionally need to send Rich Content: ```bash curl -X PATCH "https://www.wixapis.com/stores/v3/products/{productId}" \ -H "Content-Type: application/json" \ -H "Authorization: " \ -d '{ "product": { "id": "{productId}", "revision": "{currentRevision}", "description": { "nodes": [ { "type": "PARAGRAPH", "id": "description", "nodes": [ { "type": "TEXT", "textData": { "text": "Updated product description." } } ], "paragraphData": { "textStyle": { "textAlignment": "AUTO" } } } ], "metadata": { "version": 1 } } } }' ``` ### Update Options and Variants When adding or changing options and variants, send the full option definitions and one variant for each option-choice combination. Use `optionChoiceNames` to reference choices. ```bash curl -X PATCH "https://www.wixapis.com/stores/v3/products/{productId}" \ -H "Content-Type: application/json" \ -H "Authorization: " \ -d '{ "product": { "id": "{productId}", "revision": "{currentRevision}", "options": [ { "name": "Color", "optionRenderType": "SWATCH_CHOICES", "choicesSettings": { "choices": [ { "name": "White", "choiceType": "ONE_COLOR", "colorCode": "#FFFFFF" }, { "name": "Red", "choiceType": "ONE_COLOR", "colorCode": "#FF0000" }, { "name": "Black", "choiceType": "ONE_COLOR", "colorCode": "#000000" } ] } } ], "variantsInfo": { "variants": [ { "choices": [ { "optionChoiceNames": { "optionName": "Color", "choiceName": "White", "renderType": "SWATCH_CHOICES" } } ], "price": { "actualPrice": { "amount": "270.00" } } }, { "choices": [ { "optionChoiceNames": { "optionName": "Color", "choiceName": "Red", "renderType": "SWATCH_CHOICES" } } ], "price": { "actualPrice": { "amount": "270.00" } } }, { "choices": [ { "optionChoiceNames": { "optionName": "Color", "choiceName": "Black", "renderType": "SWATCH_CHOICES" } } ], "price": { "actualPrice": { "amount": "270.00" } } } ] } } }' ``` When updating existing variants, include each existing variant `id`. If no GUID is passed, a variant is created with a new GUID. ### Convert a Simple Product to Color Variants When adding the first option to a simple product, do not preserve a choice-less default variant unchanged. A simple product often has one existing variant with price or stock but no `choices`. After you add a `Color` option, every variant in `variantsInfo.variants` must include choices that match the product options. Use the existing default variant as source data only. For example, copy its price if the user did not ask to change price, then send a complete optioned variants list where each variant has: ```json { "choices": [ { "optionChoiceNames": { "optionName": "Color", "choiceName": "Red", "renderType": "SWATCH_CHOICES" } } ], "price": { "actualPrice": { "amount": "{existingOrRequestedPrice}" } } } ``` After the product update returns the new variant IDs, use those IDs to set inventory. ### Set Stock for New Variants Inventory is handled separately from product updates. After the product update returns variant IDs, use [Bulk Create Inventory Items](https://dev.wix.com/docs/api-reference/business-solutions/stores/catalog-v3/inventory-items-v3/bulk-create-inventory-items.md) with `productId`, `variantId`, and `quantity`. If the store has multiple inventory locations, include `locationId`; otherwise the store's default location is used. After bulk inventory create, check `bulkActionMetadata.totalSuccesses` and `results[].itemMetadata.success`. Returned inventory entities are under `results[].item`, not a top-level `inventoryItems` field; confirm stock from `results[].item.quantity`. ```bash curl -X POST "https://www.wixapis.com/stores/v3/bulk/inventory-items/create" \ -H "Content-Type: application/json" \ -H "Authorization: " \ -d '{ "inventoryItems": [ { "productId": "{productId}", "variantId": "{redVariantId}", "quantity": 10 }, { "productId": "{productId}", "variantId": "{blueVariantId}", "quantity": 10 } ], "returnEntity": true }' ``` ### Update Media Only ```bash curl -X PATCH "https://www.wixapis.com/stores/v3/products/{productId}" \ -H "Content-Type: application/json" \ -H "Authorization: " \ -d '{ "product": { "id": "{productId}", "revision": "{currentRevision}", "media": { "itemsInfo": { "items": [ { "url": "https://static.wixstatic.com/media/your-image.jpg", "altText": "Product image" } ] } } } }' ``` ### Update Variant Price Only ```bash curl -X PATCH "https://www.wixapis.com/stores/v3/products/{productId}" \ -H "Content-Type: application/json" \ -H "Authorization: " \ -d '{ "product": { "id": "{productId}", "revision": "{currentRevision}", "variantsInfo": { "variants": [ { "id": "{existingVariantId}", "price": { "actualPrice": { "amount": "29.99" } } } ] } } }' ``` ## Important Notes - To update array fields like `options`, `modifiers`, `variantsInfo.variants`, and any others, pass the entire existing array. Passing only the changed item overwrites the whole array. - To update `variantsInfo.variants`, also pass `options`, and vice versa. Variants and options are mutually dependent and must stay aligned. - When converting a simple product to an optioned product, rebuild the variants list so every variant has `choices`; do not keep an existing choice-less default variant unchanged. - Always include `choicesSettings` with the complete list of choices when updating a product with options. - Use `optionChoiceNames` rather than `optionChoiceIds` in variants for more reliable updates. - Include the `renderType` in `optionChoiceNames`. ## Error Message Reference | Error Message | Meaning | Fix | |---------------|---------|-----| | `revision must not be empty` | Missing optimistic lock | GET product first and include `product.revision` in PATCH | | `revision mismatch` | Stale revision | Re-GET product and retry with the new revision | | `Expected an object` for `description` | Sent `description` as a string | Use `plainDescription` for HTML strings, or send `description` as Rich Content | | `choicesSettings must not be empty` | Missing choices array | Include full `choicesSettings.choices` array | | `Missing product option choices` | Variant references non-existent option | Use `optionChoiceNames` with exact option and choice names | | `price must not be empty` | A variant was created or replaced without a price | Include `price.actualPrice.amount` on every new variant | | `Missing option choices` or `INVALID_DEFAULT_VARIANT` | Product has options but at least one variant has no matching choices | Rebuild `variantsInfo.variants` so every variant includes choices for all product options | --- > Portal Navigation: > > - Append `.md` to any URL under `https://dev.wix.com/docs/` to get its markdown version. > - Pages are either content pages (article or reference text) or menu pages (a list of links to child pages). > - To get a menu page, truncate any URL to a parent path and append `.md` (e.g. `https://dev.wix.com/docs/sdk.md`, `https://dev.wix.com/docs/sdk/core-modules.md`). > - Top-level index of all portals: https://dev.wix.com/docs/llms.txt > - Full concatenated docs: https://dev.wix.com/docs/llms-full.txt # some-operation # Package: oauth-2 # Method link: https://dev.wix.com/docs/api-reference/app-management/oauth-2/create-access-token.md ## Permission Scopes: undefined ## Introduction Creates an access token.
        __Important:__ Authentication methods differ depending on whether you're building a [Wix app](https://dev.wix.com/docs/build-apps/get-started/overview/about-wix-apps.md) or a [Wix Headless](https://dev.wix.com/docs/go-headless/get-started/about-headless/about-wix-headless.md) project. * For apps using [OAuth](https://dev.wix.com/docs/build-apps/develop-your-app/access/authentication/about-oauth.md), this is the correct method. * For apps using [custom authentication (legacy)](https://dev.wix.com/docs/build-apps/develop-your-app/access/authentication/custom-authentication-legacy.md), call [Request an Access Token](https://dev.wix.com/docs/rest/app-management/oauth-2/request-an-access-token.md) or [Refresh an Access Token](https://dev.wix.com/docs/rest/app-management/oauth-2/refresh-an-access-token.md). * For headless projects, use one of the [authentication strategies for Wix Headless](https://dev.wix.com/docs/go-headless/get-started/setup/authentication/authentication-strategies.md).
        The endpoint accepts raw HTTP requests. You must pass the request's body parameters formatted as bytes in the raw HTTP request's `body` field, following this template: `{"grant_type": "client_credentials", "client_id": "", "client_secret": "", "instance_id": ""}`. When the call succeeds, Wix returns `{"statusCode": 200}` and the created access token in the `body` field of the raw HTTP response. In case the call fails, Wix returns the relevant `4XX` error code in the raw HTTP response's `statusCode` field and details about the error in `body`. Error details follow the [conventions of the Internet Engineering Task Force (IETF)](https://datatracker.ietf.org/doc/html/rfc6749#appendix-A.7). --- ## REST API ### Examples ### Create a custom authentication refresh and access token. ```curl curl -X POST \ 'https://www.wixapis.com/oauth/access' \ -H 'Content-Type: application/json' \ -d '{ "grant_type": "authorization_code", "client_id": "", "client_secret": "", "code": "" }' ``` --- --- > Portal Navigation: > > - Append `.md` to any URL under `https://dev.wix.com/docs/` to get its markdown version. > - Pages are either content pages (article or reference text) or menu pages (a list of links to child pages). > - To get a menu page, truncate any URL to a parent path and append `.md` (e.g. `https://dev.wix.com/docs/sdk.md`, `https://dev.wix.com/docs/sdk/core-modules.md`). > - Top-level index of all portals: https://dev.wix.com/docs/llms.txt > - Full concatenated docs: https://dev.wix.com/docs/llms-full.txt # some-operation # Package: oauth-2 # Method link: https://dev.wix.com/docs/api-reference/app-management/oauth-2/refresh-an-access-token.md ## Permission Scopes: undefined ## Introduction Creates a new access token.
        Deprecated: This method is deprecated and is no longer available for new apps. Existing apps that already use [custom authentication (deprecated)](https://dev.wix.com/docs/build-apps/develop-your-app/access/authentication/custom-authentication-legacy.md) can continue using it. To migrate to the new authentication, see [Authenticate Using OAuth](https://dev.wix.com/docs/build-apps/develop-your-app/access/authentication/authenticate-using-oauth.md#migrate-from-custom-authentication-legacy).
        __Important:__ Authentication methods differ depending on whether you're building a [Wix app](https://dev.wix.com/docs/build-apps/get-started/overview/about-wix-apps.md) or a [Wix Headless](https://dev.wix.com/docs/go-headless/get-started/about-headless/about-wix-headless.md) project. * For apps using [custom authentication (legacy)](https://dev.wix.com/docs/build-apps/develop-your-app/access/authentication/custom-authentication-legacy.md), this is the correct method. * For apps using [OAuth](https://dev.wix.com/docs/build-apps/develop-your-app/access/authentication/about-oauth.md), call [Create an Access Token](https://dev.wix.com/docs/rest/app-management/oauth-2/create-access-token.md). * For headless projects, use one of the [authentication strategies for Wix Headless](https://dev.wix.com/docs/go-headless/get-started/setup/authentication/authentication-strategies.md).
        You must pass your app ID, your app’s secret key, the refresh token, and `{"grant_type": "refresh_token"}` to create a new access token. --- ## REST API ### Examples ### Create a custom authentication refresh and access token. ```curl curl -X POST \ 'https://www.wixapis.com/oauth/access' \ -H 'Content-Type: application/json' \ -d '{ "grant_type": "authorization_code", "client_id": "", "client_secret": "", "code": "" }' ``` --- --- > Portal Navigation: > > - Append `.md` to any URL under `https://dev.wix.com/docs/` to get its markdown version. > - Pages are either content pages (article or reference text) or menu pages (a list of links to child pages). > - To get a menu page, truncate any URL to a parent path and append `.md` (e.g. `https://dev.wix.com/docs/sdk.md`, `https://dev.wix.com/docs/sdk/core-modules.md`). > - Top-level index of all portals: https://dev.wix.com/docs/llms.txt > - Full concatenated docs: https://dev.wix.com/docs/llms-full.txt # some-operation # Package: oauth-2 # Method link: https://dev.wix.com/docs/api-reference/app-management/oauth-2/request-an-access-token.md ## Permission Scopes: undefined ## Introduction Creates your app’s refresh token and an initial access token.
        Deprecated: This method is deprecated and is no longer available for new apps. Existing apps that already use [custom authentication (deprecated)](https://dev.wix.com/docs/build-apps/develop-your-app/access/authentication/custom-authentication-legacy.md) can continue using it. To migrate to the new authentication, see [Authenticate Using OAuth](https://dev.wix.com/docs/build-apps/develop-your-app/access/authentication/authenticate-using-oauth.md#migrate-from-custom-authentication-legacy).
        __Important:__ Authentication methods differ depending on whether you're building a [Wix app](https://dev.wix.com/docs/build-apps/get-started/overview/about-wix-apps.md) or a [Wix Headless](https://dev.wix.com/docs/go-headless/get-started/about-headless/about-wix-headless.md) project. * For apps using [custom authentication (legacy)](https://dev.wix.com/docs/build-apps/develop-your-app/access/authentication/custom-authentication-legacy.md), this is the correct method. * For apps using [OAuth](https://dev.wix.com/docs/build-apps/develop-your-app/access/authentication/about-oauth.md), call [Create an Access Token](https://dev.wix.com/docs/rest/app-management/oauth-2/create-access-token.md). * For headless projects, use one of the [authentication strategies for Wix Headless](https://dev.wix.com/docs/go-headless/get-started/setup/authentication/authentication-strategies.md).
        Wix sends your app the authorization code after a new user has completed the installation process and given your app permission to access their data. You must pass the authorization code, your app ID, your app’s secret key, and `{"grant_type": "authorization_code"}` to create the refresh token and an initial access token. --- ## REST API ### Examples ### Create a custom authentication refresh and access token. ```curl curl -X POST \ 'https://www.wixapis.com/oauth/access' \ -H 'Content-Type: application/json' \ -d '{ "grant_type": "authorization_code", "client_id": "", "client_secret": "", "code": "" }' ``` --- --- > Portal Navigation: > > - Append `.md` to any URL under `https://dev.wix.com/docs/` to get its markdown version. > - Pages are either content pages (article or reference text) or menu pages (a list of links to child pages). > - To get a menu page, truncate any URL to a parent path and append `.md` (e.g. `https://dev.wix.com/docs/sdk.md`, `https://dev.wix.com/docs/sdk/core-modules.md`). > - Top-level index of all portals: https://dev.wix.com/docs/llms.txt > - Full concatenated docs: https://dev.wix.com/docs/llms-full.txt # some-operation # Package: oauth-2 # Method link: https://dev.wix.com/docs/api-reference/app-management/oauth-2/token-info.md ## Permission Scopes: undefined ## Introduction Retrieves information about a specific access token. Access tokens are specific to a subject and a client. A client (app) creates and issues an access token to a subject. The client may request a valid token from a subject to perform a certain action, such as an API call. This endpoint works with both OAuth and custom authentication tokens. --- ## REST API ### Examples ### Create a custom authentication refresh and access token. ```curl curl -X POST \ 'https://www.wixapis.com/oauth/access' \ -H 'Content-Type: application/json' \ -d '{ "grant_type": "authorization_code", "client_id": "", "client_secret": "", "code": "" }' ``` --- --- > Portal Navigation: > > - Append `.md` to any URL under `https://dev.wix.com/docs/` to get its markdown version. > - Pages are either content pages (article or reference text) or menu pages (a list of links to child pages). > - To get a menu page, truncate any URL to a parent path and append `.md` (e.g. `https://dev.wix.com/docs/sdk.md`, `https://dev.wix.com/docs/sdk/core-modules.md`). > - Top-level index of all portals: https://dev.wix.com/docs/llms.txt > - Full concatenated docs: https://dev.wix.com/docs/llms-full.txt ## Resource: Introduction ## Article: Introduction ## Article Link: https://dev.wix.com/docs/api-reference/app-management/oauth-2/introduction.md ## Article Content: # About the OAuth 2 API The OAuth 2 API allows your app to manage tokens that you can use to authenticate Wix API calls. By default, OAuth authentication follows the [OAuth Client Credentials protocol](https://oauth.net/2/grant-types/client-credentials/). With the OAuth 2 API, you can: + Create access tokens for OAuth. + Request an access token for custom authentication (legacy). + Refresh an access token for custom authentication (legacy). + Get information about a specific access token. Learn more: + [About OAuth](https://dev.wix.com/docs/build-apps/develop-your-app/access/authentication/about-oauth.md) + [How to authenticate using OAuth](https://dev.wix.com/docs/build-apps/develop-your-app/access/authentication/authenticate-using-oauth.md) ## Before you begin It's important to note the following points before starting to code: + If your app uses OAuth to authenticate Wix API calls, you must create access tokens by calling [Create Access Token](https://dev.wix.com/docs/api-reference/app-management/oauth-2/create-access-token.md). + If your app uses custom authentication, Wix sends you an authorization code while redirecting new users to your app URL. You must use this authorization code within 10 minutes to create a refresh token by calling [Request an Access Token](https://dev.wix.com/docs/api-reference/app-management/oauth-2/request-an-access-token.md). If the process fails, you're unable to retrieve access tokens with [Refresh an Access Token](https://dev.wix.com/docs/api-reference/app-management/oauth-2/refresh-an-access-token.md). From the site owner's point-of-view, it seems that the app installation has succeeded. You have 2 options in this situation: Ask the site owners to re-install your app, or fall back to retrieving access tokens with the OAuth strategy by calling [Create Access Token](https://dev.wix.com/docs/api-reference/app-management/oauth-2/create-access-token.md).
        **Caution:** Custom authentication (legacy) is no longer available for new apps. Existing apps that already use custom authentication can continue to do so. For details, see [Custom Authentication (Legacy)](https://dev.wix.com/docs/build-apps/develop-your-app/access/authentication/custom-authentication-legacy.md).
        ## Terminology + __OAuth__: Authorization protocol used by Wix to allow third-party apps to securely obtain access to Wix APIs. + __Access token__: A string used in the `"authorization"` header to make authenticated calls to Wix APIs. All Wix access tokens are of type `"Bearer"`. Learn more about [access token types](https://oauth.net/2/access-tokens/). + __Custom authentication (legacy)__: A legacy version of the OAuth protocol used by Wix. This method is only applicable if your app needs to redirect users to a URL outside the Wix ecosystem during the app installation process. **Note:** Custom authentication is no longer available for new apps. + __Authorization code__: A temporary string sent by Wix to your app during the custom authentication process, after a user completes the installation and grants your app the necessary permissions. The authorization code expires in 10 minutes. Use it to generate a refresh token before it expires. + __Refresh token__: A persistent string used by your app to generate access tokens in the custom authentication process. The refresh token does not expire. Store it securely and never share or expose it publicly. @sdk_package_setup --- > Portal Navigation: > > - Append `.md` to any URL under `https://dev.wix.com/docs/` to get its markdown version. > - Pages are either content pages (article or reference text) or menu pages (a list of links to child pages). > - To get a menu page, truncate any URL to a parent path and append `.md` (e.g. `https://dev.wix.com/docs/sdk.md`, `https://dev.wix.com/docs/sdk/core-modules.md`). > - Top-level index of all portals: https://dev.wix.com/docs/llms.txt > - Full concatenated docs: https://dev.wix.com/docs/llms-full.txt ## Resource: Introduction ## Article: Introduction ## Article Link: https://dev.wix.com/docs/api-reference/app-management/app-billing/introduction.md ## Article Content: # About the App Billing APIs The App Billing APIs include various aspects, such as [billing](https://dev.wix.com/docs/rest/app-management/app-billing/billing/introduction.md), [pricing plans](https://dev.wix.com/docs/rest/app-management/app-billing/app-plans/introduction.md), and [custom charges](https://dev.wix.com/docs/rest/app-management/app-billing/custom-charges-service-plugin/introduction.md). These features allow you to charge site owners for using your app, get information about the pricing plans an app offers, and manage what customers must pay to use your app. With the App Billing APIs you can: + Retrieve data about a site's [previous paid plans for your app](https://dev.wix.com/docs/rest/app-management/app-billing/billing/get-purchase-history.md). + [Redirect site owners to the standard Wix checkout page](https://dev.wix.com/docs/rest/app-management/app-billing/billing/get-url.md) in case you manage your app's pricing page outside of Wix. + Retrieve [pricing information for a list of apps](https://dev.wix.com/docs/rest/app-management/app-billing/app-plans/list-app-plans-by-app-id.md). + [Add your app's charges](https://dev.wix.com/docs/rest/app-management/app-billing/custom-charges-service-plugin/introduction.md) to the invoice that Wix sends to site owners. + [Receive notifications about charges](https://dev.wix.com/docs/rest/app-management/app-billing/custom-charges-service-plugin/charges-rejected-event.md) that Wix doesn't accept, created invoices, or when customers increase their charge limit. + Keep your customers informed about [how much your app would charge them if Wix were to send an invoice at this moment](https://dev.wix.com/docs/rest/app-management/app-billing/custom-charges-service-plugin/list-charges.md). ## Terminology - **App instance**: Specific occurrence of your app on a particular Wix site. - **Charge**: Price for using your app that you can add to an invoice. You can add up to 5 charges per invoice. - **Charge limit**: Maximum amount that you're allowed to charge customers for using your app per billing cycle. It helps ensure that customers are aware of their potential costs upfront. - **Paid plan**: A version of your app that isn't free. This version could require a single one-time payment or a subscription based payment. - **App plan**: Pricing plan that describes how your app charges users. You can set up multiple plans for your app, with different plans offering different tiers of functionality. For example, you can offer a free plan and 3 paid plans with an increasing number of benefits. - **Wix pricing page**: Wix offers your app an out-of-the-box pricing page that displays up to 4 app plans for your app to users. - **Wix checkout**: Wix allows you to charge site owners either through the Wix Billing ecosystem or to manage your app's billing externally. In case you manage your app's pricing page on your own servers, you can still redirect site owners to the standard Wix checkout page by using `getUrl()`. --- > Portal Navigation: > > - Append `.md` to any URL under `https://dev.wix.com/docs/` to get its markdown version. > - Pages are either content pages (article or reference text) or menu pages (a list of links to child pages). > - To get a menu page, truncate any URL to a parent path and append `.md` (e.g. `https://dev.wix.com/docs/sdk.md`, `https://dev.wix.com/docs/sdk/core-modules.md`). > - Top-level index of all portals: https://dev.wix.com/docs/llms.txt > - Full concatenated docs: https://dev.wix.com/docs/llms-full.txt # GetMeteredBillingCharges # Package: appBilling # Namespace: Checkout # Method link: https://dev.wix.com/docs/api-reference/app-management/app-billing/billing/get-metered-billing-charges.md ## Permission Scopes: Manage Your App: SCOPE.DC.MANAGE-YOUR-APP ## Introduction Retrieves a preview of charges for a site's [usage-based billing](https://dev.wix.com/docs/build-apps/launch-your-app/pricing-and-billing/set-up-a-usage-based-business-model.md#set-up-a-usage-based-business-model). When you call this method, Wix triggers your app's [List Custom Charges service plugin](https://dev.wix.com/docs/api-reference/app-management/app-billing/custom-charges-service-plugin/list-charges.md) and returns the charges you provide. Use this method to verify that your service plugin is working correctly and returning the expected charges. > **Important:** > This method only retrieves charge information for testing purposes. It doesn't create an invoice or charge the customer. Wix creates actual invoices by calling your List Custom Charges service plugin directly. > **Note:** > This feature isn't yet available to all users. Your app can have only 1 usage-based plan and no other plans. To add a usage-based plan to your app, [submit a request to add a usage-based plan](https://www.wix.com/support-chatbot?nodeId=25a57397-ccf7-4376-8b74-48d51edf7159&referral=devRels). --- ## REST API ### Examples ### GetMeteredBillingCharges ```curl ~~~cURL curl -X GET \ https://www.wixapis.com/apps/v1/metered-billing-charges \ -H 'Authorization: ' \ -d '{ "currency": "EUR", "startDate": "2023-01-01T00:00:00.000Z", "endDate": "2023-01-31T23:59:59.999Z" }' ~~~ ``` --- ## JavaScript SDK ### Examples ### getMeteredBillingCharges ```javascript import { billing } from '@wix/app-management'; async function getMeteredBillingCharges(options) { const response = await billing.getMeteredBillingCharges(options); }; ``` ### getMeteredBillingCharges (with elevated permissions) ```javascript import { billing } from '@wix/app-management'; import { auth } from '@wix/essentials'; async function myGetMeteredBillingChargesMethod(options) { const elevatedGetMeteredBillingCharges = auth.elevate(billing.getMeteredBillingCharges); const response = await elevatedGetMeteredBillingCharges(options); } ``` ### getMeteredBillingCharges (self-hosted) Self-hosted SDK calls require you to [create a client](https://dev.wix.com/docs/sdk/articles/work-with-the-sdk/about-the-wix-client.md). ```javascript import { createClient } from '@wix/sdk'; import { billing } from '@wix/app-management'; // Import the auth strategy for the relevant access type // Import the relevant host module if needed const myWixClient = createClient ({ modules: { billing }, // Include the auth strategy and host as relevant }); async function getMeteredBillingCharges(options) { const response = await myWixClient.billing.getMeteredBillingCharges(options); }; ``` --- --- > Portal Navigation: > > - Append `.md` to any URL under `https://dev.wix.com/docs/` to get its markdown version. > - Pages are either content pages (article or reference text) or menu pages (a list of links to child pages). > - To get a menu page, truncate any URL to a parent path and append `.md` (e.g. `https://dev.wix.com/docs/sdk.md`, `https://dev.wix.com/docs/sdk/core-modules.md`). > - Top-level index of all portals: https://dev.wix.com/docs/llms.txt > - Full concatenated docs: https://dev.wix.com/docs/llms-full.txt # GetPurchaseHistory # Package: appBilling # Namespace: Checkout # Method link: https://dev.wix.com/docs/api-reference/app-management/app-billing/billing/get-purchase-history.md ## Permission Scopes: Manage Your App: SCOPE.DC.MANAGE-YOUR-APP ## Introduction Retrieves a list of past purchases for your app on this site. You don't have to explicitly pass an identifier for the Wix site as part of the request, since this information is taken automatically from the context. The response doesn't include any details about cancellations. --- ## REST API ### Examples ### GetPurchaseHistory ```curl ~~~cURL curl -X GET \ https://www.wixapis.com/apps/v1/checkout/history\ -H 'Authorization: ' \ ~~~ ``` --- ## JavaScript SDK ### Examples ### getPurchaseHistory ```javascript import { billing } from '@wix/app-management'; async function getPurchaseHistory() { const response = await billing.getPurchaseHistory(); }; ``` ### getPurchaseHistory (with elevated permissions) ```javascript import { billing } from '@wix/app-management'; import { auth } from '@wix/essentials'; async function myGetPurchaseHistoryMethod() { const elevatedGetPurchaseHistory = auth.elevate(billing.getPurchaseHistory); const response = await elevatedGetPurchaseHistory(); } ``` ### getPurchaseHistory (self-hosted) Self-hosted SDK calls require you to [create a client](https://dev.wix.com/docs/sdk/articles/work-with-the-sdk/about-the-wix-client.md). ```javascript import { createClient } from '@wix/sdk'; import { billing } from '@wix/app-management'; // Import the auth strategy for the relevant access type // Import the relevant host module if needed const myWixClient = createClient ({ modules: { billing }, // Include the auth strategy and host as relevant }); async function getPurchaseHistory() { const response = await myWixClient.billing.getPurchaseHistory(); }; ``` --- --- > Portal Navigation: > > - Append `.md` to any URL under `https://dev.wix.com/docs/` to get its markdown version. > - Pages are either content pages (article or reference text) or menu pages (a list of links to child pages). > - To get a menu page, truncate any URL to a parent path and append `.md` (e.g. `https://dev.wix.com/docs/sdk.md`, `https://dev.wix.com/docs/sdk/core-modules.md`). > - Top-level index of all portals: https://dev.wix.com/docs/llms.txt > - Full concatenated docs: https://dev.wix.com/docs/llms-full.txt # GetUrl # Package: appBilling # Namespace: Checkout # Method link: https://dev.wix.com/docs/api-reference/app-management/app-billing/billing/get-url.md ## Permission Scopes: Manage Your App: SCOPE.DC.MANAGE-YOUR-APP ## Introduction Retrieves the URL for a Wix checkout page for the specified paid plan of your app. Call this method when initiating the purchase flow from your pricing page. The returned checkout URL redirects to Wix to complete payment. This call succeeds only if you have previously [set up an external pricing page in your app's dashboard](https://dev.wix.com/docs/build-apps/build-your-app/pricing-plans/set-up-an-external-pricing-page.md). The returned checkout URL is valid for 48 hours. This API allows your app to manage your pricing page outside of Wix while still using the standard Wix checkout flow. --- ## REST API ### Examples ### GetUrl ```curl ~~~cURL curl -X POST \ https://www.wixapis.com/apps/v1/checkout \ -H 'Authorization: ' \ -H 'Content-Type: application/json' \ -d '{ "productId": "e8f429d4-0a6a-468f-8044-87f519a53202", "billingCycle": "MONTHLY" }' ~~~ ``` --- ## JavaScript SDK ### Examples ### getUrl ```javascript import { billing } from '@wix/app-management'; async function getUrl(productId,options) { const response = await billing.getUrl(productId,options); }; ``` ### getUrl (with elevated permissions) ```javascript import { billing } from '@wix/app-management'; import { auth } from '@wix/essentials'; async function myGetUrlMethod(productId,options) { const elevatedGetUrl = auth.elevate(billing.getUrl); const response = await elevatedGetUrl(productId,options); } ``` ### getUrl (self-hosted) Self-hosted SDK calls require you to [create a client](https://dev.wix.com/docs/sdk/articles/work-with-the-sdk/about-the-wix-client.md). ```javascript import { createClient } from '@wix/sdk'; import { billing } from '@wix/app-management'; // Import the auth strategy for the relevant access type // Import the relevant host module if needed const myWixClient = createClient ({ modules: { billing }, // Include the auth strategy and host as relevant }); async function getUrl(productId,options) { const response = await myWixClient.billing.getUrl(productId,options); }; ``` --- --- > Portal Navigation: > > - Append `.md` to any URL under `https://dev.wix.com/docs/` to get its markdown version. > - Pages are either content pages (article or reference text) or menu pages (a list of links to child pages). > - To get a menu page, truncate any URL to a parent path and append `.md` (e.g. `https://dev.wix.com/docs/sdk.md`, `https://dev.wix.com/docs/sdk/core-modules.md`). > - Top-level index of all portals: https://dev.wix.com/docs/llms.txt > - Full concatenated docs: https://dev.wix.com/docs/llms-full.txt # Package: appBilling # Namespace: billing # Webhook link: https://dev.wix.com/docs/api-reference/app-management/app-billing/billing/purchased-item-invoice-status-updated.md ## Introduction Triggered when there is an update to the payment status of an invoice. Charges made using the [Custom Charges service plugin](https://dev.wix.com/docs/rest/app-management/app-billing/custom-charges-service-plugin/introduction.md) may be based on usage. Learn more about [usage-based charges](https://dev.wix.com/docs/build-apps/launch-your-app/pricing-and-billing/set-up-a-usage-based-business-model.md). --- ## REST API ### Examples ```curl { "status":"PAID", "invoiceId":"1111111111", "instanceId":"12345678-a70c-45c8-b276-a3a8a665a8bd", "recurring":true } ``` --- ## JavaScript SDK ### Examples ```javascript import { billing } from '@wix/app-management'; billing.onPurchasedItemInvoiceStatusUpdated((event) => { // handle your event here }); ``` ```javascript import { createClient, AppStrategy } from '@wix/sdk'; import { billing } from '@wix/app-management'; const wixClient = createClient({ auth: AppStrategy({ appId: 'MY-APP-ID', publicKey: 'YOUR_APP_PUBLIC_KEY', }), modules: { billing, }, }); wixClient.billing.onPurchasedItemInvoiceStatusUpdated((event) => { // handle your event here }); ``` --- --- > Portal Navigation: > > - Append `.md` to any URL under `https://dev.wix.com/docs/` to get its markdown version. > - Pages are either content pages (article or reference text) or menu pages (a list of links to child pages). > - To get a menu page, truncate any URL to a parent path and append `.md` (e.g. `https://dev.wix.com/docs/sdk.md`, `https://dev.wix.com/docs/sdk/core-modules.md`). > - Top-level index of all portals: https://dev.wix.com/docs/llms.txt > - Full concatenated docs: https://dev.wix.com/docs/llms-full.txt ## Resource: Introduction ## Article: Introduction ## Article Link: https://dev.wix.com/docs/api-reference/app-management/app-billing/billing/introduction.md ## Article Content: # About the Billing API The Billing API allows you to charge Wix users for using your app when Wix processes the payments. > **Note:** If you process payments yourself for a [Partner Billed App](https://dev.wix.com/docs/build-apps/launch-your-app/pricing-and-billing/partner-billed-apps-reporting.md), use the [External Billing Events API](https://dev.wix.com/docs/rest/app-management/app-billing/external-billing-events/introduction.md) instead. With the Billing API, you can: - Retrieve the Wix checkout URL for a specific plan. Use it to redirect Wix users from your custom pricing page to Wix checkout. - Retrieve data about a site's previous purchases for your app. - Test your app's integration and charge Wix users varying amounts each billing cycle with the [Custom Charges service plugin](https://dev.wix.com/docs/rest/app-management/app-billing/custom-charges-service-plugin/introduction.md). For more information on how to track data associated with individual app instances, see the [App Instance API](https://dev.wix.com/docs/api-reference/app-management/app-instance/introduction.md). ## Before you begin It's important to note the following points before starting to code: - Wix allows you to manage your app's pricing page either through Wix or externally. You can display up to 4 different plans for your app on the Wix pricing page. - If you manage your app's pricing page on your own servers with an external pricing page, you can still redirect Wix users to the Wix checkout page by using [Get URL](https://dev.wix.com/docs/api-reference/app-management/app-billing/billing/get-url.md). ## Use cases - [Set up an external pricing page](https://dev.wix.com/docs/api-reference/app-management/app-billing/billing/sample-flows.md#set-up-an-external-pricing-page) ## Terminology - **App instance**: Specific occurrence of your app on a particular Wix site. - **Paid plan**: Wix users have installed a version of your app that isn't free of charge. Your app can charge them a one-time payment or on a subscription basis. - **Wix pricing page**: Wix offers your app an out-of-the-box pricing page that displays up to 4 plans for your app to Wix users. - **External pricing page**: A custom pricing page that you host on your own servers. You can use an external pricing page with either Wix-processed payments using this Billing API, or partner-processed payments using the [External Billing Events API](https://dev.wix.com/docs/rest/app-management/app-billing/external-billing-events/introduction.md). - **Partner Billed App**: An app where you process payments through your own payment provider, such as Stripe or PayPal, instead of using Wix checkout. Partner Billed Apps must report billing events using the [External Billing Events API](https://dev.wix.com/docs/rest/app-management/app-billing/external-billing-events/introduction.md). - **Wix checkout**: The standard Wix checkout page where Wix processes payments. @sdk_package_setup --- > Portal Navigation: > > - Append `.md` to any URL under `https://dev.wix.com/docs/` to get its markdown version. > - Pages are either content pages (article or reference text) or menu pages (a list of links to child pages). > - To get a menu page, truncate any URL to a parent path and append `.md` (e.g. `https://dev.wix.com/docs/sdk.md`, `https://dev.wix.com/docs/sdk/core-modules.md`). > - Top-level index of all portals: https://dev.wix.com/docs/llms.txt > - Full concatenated docs: https://dev.wix.com/docs/llms-full.txt ## Resource: Sample Flows ## Article: Sample Flows ## Article Link: https://dev.wix.com/docs/api-reference/app-management/app-billing/billing/sample-flows.md ## Article Content: # Billing API: Sample Flows This article presents possible use cases and corresponding sample flows that you can support. This article can be a helpful jumping-off point as you plan your implementation. These flows apply to apps that use an external pricing page with Wix-processed payments. If you process payments yourself, you must report all billing events to Wix using the [External Billing Events API](https://dev.wix.com/docs/rest/app-management/app-billing/external-billing-events/introduction.md) and submit quarterly reports. For complete requirements, see [Reporting For Partner Billed Apps](https://dev.wix.com/docs/build-apps/launch-your-app/pricing-and-billing/partner-billed-apps-reporting.md). > **Note:** The Billing API supports subscription-based plans by default. For 1-time payments or usage-based billing, use the [Custom Charges service plugin](https://dev.wix.com/docs/rest/app-management/app-billing/custom-charges-service-plugin/introduction.md). ## Set up an external pricing page When a visitor browses an app you build on the App Market, you can offer an external pricing page to show plans and pricing. This option lets you customize the pricing experience and guide potential customers through purchase or upgrade flows. Your pricing page needs to handle different scenarios for both existing app users and new visitors: - **Installed app site visitors:** When site visitors click **Upgrade App** on the **Manage Apps** page, Wix attaches an `instance` query parameter to the pricing page URL. Use the instance query parameter to recognize visitors and display their current billing information. - **App Market visitors:** Visitors who click the pricing link from an **App Market** listing usually want to see pricing but probably haven't installed the app yet. Your pricing page should detect when there's no `instance` query parameter and display public pricing information. To set up an external pricing page and handle the complete purchase journey: 1. In the code of your external pricing page, use each Wix user's unique app instance ID to recognize them and display the right information. Call [Get App Instance](https://dev.wix.com/docs/rest/app-management/app-instance/get-app-instance.md) with the instance token to retrieve their current billing information. 2. In the code of your external pricing page, after a Wix user chooses their preferred plan, redirect them to the Wix checkout. Call [Get URL](https://dev.wix.com/docs/api-reference/app-management/app-billing/billing/get-url.md) to retrieve the checkout URL. The URL is valid for 48 hours, so generate it on demand when the Wix user clicks to purchase. 3. Once the Wix user completes their purchase, Wix redirects them to the `successUrl` that you specify when you call `Get URL`. If you don't specify a `successUrl`, Wix redirects them to the default Wix success page. For apps with an internal dashboard, set the `successUrl` to `"https://www.wix.com/account/app//"` to redirect Wix users directly to their app dashboard. 4. The purchase triggers the [Paid Plan Purchased](https://dev.wix.com/docs/api-reference/app-management/app-instance/paid-plan-purchased.md) event. Handle this event in your backend. The event response includes the Plan ID. To validate that the Wix user has signed up for a premium plan, call [Get App Instance](https://dev.wix.com/docs/api-reference/app-management/app-instance/get-app-instance.md) to confirm the Wix user's plan. 5. In the app's **Pricing & Plans** settings on the **app dashboard**, select **External pricing page** and enter the pricing page URL. 6. Test your pricing page flow. During development, Wix automatically sets all plans to a price of $0.00, so you can test the flow. Once Wix approves the app, Wix activates the plans' real prices. You can then [generate coupons for testing](https://dev.wix.com/docs/build-apps/launch-your-app/app-promotion/create-a-coupon.md).
        Prevent Wix users from downgrading using the external pricing page. This restriction includes switching from annual to monthly pricing. To downgrade or switch to monthly pricing, Wix users must cancel their subscription first, then purchase a new plan.
        --- > Portal Navigation: > > - Append `.md` to any URL under `https://dev.wix.com/docs/` to get its markdown version. > - Pages are either content pages (article or reference text) or menu pages (a list of links to child pages). > - To get a menu page, truncate any URL to a parent path and append `.md` (e.g. `https://dev.wix.com/docs/sdk.md`, `https://dev.wix.com/docs/sdk/core-modules.md`). > - Top-level index of all portals: https://dev.wix.com/docs/llms.txt > - Full concatenated docs: https://dev.wix.com/docs/llms-full.txt # Resource: App Plans # Type: App Plans Object # Link: https://dev.wix.com/docs/api-reference/app-management/app-billing/app-plans/app-plans-object.md ## Schema: ```json Type: App Plans Object | type: AppPlans - name: id | type: string | description: App ID, as defined in the [app dashboard](https://dev.wix.com/apps/my-apps?viewId=active-apps-view). - name: plans | type: Array | description: List of the app's pricing plans. Min: `0` plans Max: `50` plans - name: id | type: string | description: ID of the app plan. - name: vendorId | type: string | description: ID of your app's pricing plan, as displayed in the [app dashboard](https://dev.wix.com/apps/my-apps?viewId=active-apps-view). Identical to `vendorProductId` in the [Paid Plan Purchased webhook](https://dev.wix.com/docs/rest/api-reference/app-management/apps/app-instance/paid-plan-purchased.md). - name: name | type: string | description: Name of your app's pricing plan, as defined by you in the [app dashboard](https://dev.wix.com/apps/my-apps?viewId=active-apps-view). - name: benefits | type: Array | description: List of your plan's benefits, as defined by you in the [app dashboard](https://dev.wix.com/apps/my-apps?viewId=active-apps-view). Currently, the benefits are available only in English. Min: `0` benefits Max: `4` benefits Max per benefit: 1024 characters - name: prices | type: Array | description: List of the plan's prices. Available only when the plan's prices are managed by Wix and not externally. Min: `0` prices Max: `10` prices - name: priceBeforeTax | type: string | description: Price without taxes. For yearly plans, Wix calculates and returns the average price per month. You can get the full price by multiplying the returned price by 12. Min: `0.00` Max: 1024 characters - name: totalPrice | type: string | description: Total price including taxes. Min: `0.00` Max: 1024 characters - name: billingCycle | type: Cycle | description: Information about the plan's recurring billing cycle or single payment. - name: usageBaseOptions | type: UsageBasedDetails | description: Details about the plan's usage-based pricing. Available only for plans with [usage-based pricing](https://dev.wix.com/docs/build-apps/build-your-app/pricing-plans/usage-based-pricing.md). - name: discount | type: Discount | description: - name: billingSource | type: string | description: - name: customPaymentTitle | type: string | description: Can be shown instead of plan price - used for dynamic plans ``` --- > Portal Navigation: > > - Append `.md` to any URL under `https://dev.wix.com/docs/` to get its markdown version. > - Pages are either content pages (article or reference text) or menu pages (a list of links to child pages). > - To get a menu page, truncate any URL to a parent path and append `.md` (e.g. `https://dev.wix.com/docs/sdk.md`, `https://dev.wix.com/docs/sdk/core-modules.md`). > - Top-level index of all portals: https://dev.wix.com/docs/llms.txt > - Full concatenated docs: https://dev.wix.com/docs/llms-full.txt # ListAppPlansByAppId # Package: appBilling # Namespace: AppsPlans # Method link: https://dev.wix.com/docs/api-reference/app-management/app-billing/app-plans/list-app-plans-by-app-id.md ## Introduction Retrieves plans for the given apps. Also returns tax settings and currency details. Wix calculates this information based on the 2-letter country code in [ISO-3166 alpha-2](https://en.wikipedia.org/wiki/ISO_3166-1_alpha-2#Officially_assigned_code_elements) format that you pass in the call's header. If you don't pass a country code in the header, Wix calculates the tax settings and currency details based on the call's IP address. Note that the tax settings and currency details may not resolve properly if you call through a VPN. Prices for plans that are managed outside of Wix aren't returned. Consumers must pay for yearly and multi-yearly plans of your app every month. For these plans this method returns the price that the consumer must pay every month and not the total price for the entire year. > **Notes:** > - The App Plans API doesn't follow any tenancy model. You don't need any permissions to call `List App Plans by App ID`. > - This method only returns app plans that have been activated. --- ## REST API ### Examples ### Retrieve app plans. ```curl curl -X GET \ 'https://manage.wix.com/api/apps-plans/v1/apps-plans/{appIds}' \ -H 'X-Wix-Country-Code: ' ``` --- ## JavaScript SDK ### Examples ### listAppPlansByAppId ```javascript import { appPlans } from '@wix/app-management'; async function listAppPlansByAppId(appIds) { const response = await appPlans.listAppPlansByAppId(appIds); }; ``` ### listAppPlansByAppId (with elevated permissions) ```javascript import { appPlans } from '@wix/app-management'; import { auth } from '@wix/essentials'; async function myListAppPlansByAppIdMethod(appIds) { const elevatedListAppPlansByAppId = auth.elevate(appPlans.listAppPlansByAppId); const response = await elevatedListAppPlansByAppId(appIds); } ``` ### listAppPlansByAppId (self-hosted) Self-hosted SDK calls require you to [create a client](https://dev.wix.com/docs/sdk/articles/work-with-the-sdk/about-the-wix-client.md). ```javascript import { createClient } from '@wix/sdk'; import { appPlans } from '@wix/app-management'; // Import the auth strategy for the relevant access type // Import the relevant host module if needed const myWixClient = createClient ({ modules: { appPlans }, // Include the auth strategy and host as relevant }); async function listAppPlansByAppId(appIds) { const response = await myWixClient.appPlans.listAppPlansByAppId(appIds); }; ``` --- --- > Portal Navigation: > > - Append `.md` to any URL under `https://dev.wix.com/docs/` to get its markdown version. > - Pages are either content pages (article or reference text) or menu pages (a list of links to child pages). > - To get a menu page, truncate any URL to a parent path and append `.md` (e.g. `https://dev.wix.com/docs/sdk.md`, `https://dev.wix.com/docs/sdk/core-modules.md`). > - Top-level index of all portals: https://dev.wix.com/docs/llms.txt > - Full concatenated docs: https://dev.wix.com/docs/llms-full.txt ## Resource: Introduction ## Article: Introduction ## Article Link: https://dev.wix.com/docs/api-reference/app-management/app-billing/app-plans/introduction.md ## Article Content: # About the App Plans API The App Plans API allows you to get information about all pricing plans that a list of apps offer to users. With the App Plans API, you can retrieve pricing information for a list of apps. Learn more about [setting up your app pricing](https://dev.wix.com/docs/build-apps/launch-your-app/pricing-and-billing/about-monetizing-your-app.md). ## Before you begin It’s important to note the following points before starting to code: + App plans are only returned once they have been reviewed and activated. This typically occurs just before a new app version is released. If any plans aren't returned, it's likely because they haven't been activated yet. + You can retrieve pricing information for any app, not just your own. This means your competitors can also retrieve pricing information about your plans, if they have access to your app ID. + Prices for plans that are managed outside of Wix aren't returned in [List App Plans By App Id](https://dev.wix.com/docs/rest/app-management/app-billing/app-plans/list-app-plans-by-app-id.md). + [List App Plans By App Id](https://dev.wix.com/docs/rest/app-management/app-billing/app-plans/list-app-plans-by-app-id.md), always returns monthly prices. If your app offers yearly plans, Wix calculates and returns the average price per month. For yearly plans, you can get the full price by multiplying the returned price with 12. + If you want to offer more than 4 plans for your app, you need to create an external pricing page, and you can't use Wix's out-of-the-box pricing page. ## Terminology + __App Plan__: Pricing plan that describes how your app charges users. You can set up multiple plans for your app, with different plans offering different tiers of functionality. For example, you can offer a free plan and 3 paid plans with an increasing number of benefits. Learn more about [setting up your app pricing](https://dev.wix.com/docs/build-apps/launch-your-app/pricing-and-billing/about-monetizing-your-app.md). + __Wix pricing page__: Wix offers your app an out-of-the-box pricing page that displays up to 4 app plans for your app to users. Learn more about [setting up a pricing page](https://dev.wix.com/docs/build-apps/launch-your-app/pricing-and-billing/about-pricing-plans-and-business-models.md). @sdk_package_setup --- > Portal Navigation: > > - Append `.md` to any URL under `https://dev.wix.com/docs/` to get its markdown version. > - Pages are either content pages (article or reference text) or menu pages (a list of links to child pages). > - To get a menu page, truncate any URL to a parent path and append `.md` (e.g. `https://dev.wix.com/docs/sdk.md`, `https://dev.wix.com/docs/sdk/core-modules.md`). > - Top-level index of all portals: https://dev.wix.com/docs/llms.txt > - Full concatenated docs: https://dev.wix.com/docs/llms-full.txt # Resource: Custom Charges Service Plugin # Type: Extension Config # Link: https://dev.wix.com/docs/api-reference/app-management/app-billing/custom-charges-service-plugin/extension-config.md ## Description: The JSON object below defines the configuration for this service plugin extension. How you supply values depends on the framework you’re using: + **Self-hosted apps:** After adding a service plugin extension to your app in the app dashboard, provide configuration details in your extension's page. Learn more about how to add and configure a self-hosted service plugin extension with [REST](https://dev.wix.com/docs/build-apps/develop-your-app/frameworks/self-hosting/supported-extensions/backend-extensions/add-self-hosted-service-plugin-extensions-with-rest.md) or the [SDK](https://dev.wix.com/docs/build-apps/develop-your-app/frameworks/self-hosting/supported-extensions/backend-extensions/add-self-hosted-service-plugin-extensions-with-the-sdk.md). + **CLI apps:** Customize the configuration in your extension's [`.extension.ts`](https://dev.wix.com/docs/build-apps/develop-your-app/frameworks/wix-cli/supported-extensions/backend/service-plugins/service-plugin-extension-files-and-code.md#service-plugin-builder) file. ## Schema: ```json Type: Extension Config | type: CustomChargesConfig Description: The JSON object below defines the configuration for this service plugin extension. How you supply values depends on the framework you’re using: + **Self-hosted apps:** After adding a service plugin extension to your app in the app dashboard, provide configuration details in your extension's page. Learn more about how to add and configure a self-hosted service plugin extension with [REST](https://dev.wix.com/docs/build-apps/develop-your-app/frameworks/self-hosting/supported-extensions/backend-extensions/add-self-hosted-service-plugin-extensions-with-rest.md) or the [SDK](https://dev.wix.com/docs/build-apps/develop-your-app/frameworks/self-hosting/supported-extensions/backend-extensions/add-self-hosted-service-plugin-extensions-with-the-sdk.md). + **CLI apps:** Customize the configuration in your extension's [`.extension.ts`](https://dev.wix.com/docs/build-apps/develop-your-app/frameworks/wix-cli/supported-extensions/backend/service-plugins/service-plugin-extension-files-and-code.md#service-plugin-builder) file. - name: baseUri | type: SpiBaseUri | description: Base part of your integration's deployment URI for the Custom Charges SPI. For example `"https://provider.example.com"`, if Wix should call your integration at `https://provider.example.com/v1/charge-limit` for the Get Charge Limit method. - name: baseUri | type: string | description: Base URI for your service plugin. Wix appends each method's path to this URI. For example, to receive requests at `https://my-app.com/v1/my-method`, set this field to `https://my-app.com/`. - name: alternativeUris | type: Array | description: Alternative URIs for specific methods. Use these to override the default URI for individual methods. - name: methodName | type: string | description: Name of the method to call at the absolute URI, in PascalCase. For example, to call [Get Shipping Rates](https://dev.wix.com/docs/api-reference/business-solutions/e-commerce/extensions/shipping-rates/shipping-rates-integration-service-plugin/get-shipping-rates.md) on an alternative URI, specify `GetShippingRates`. - name: absoluteUri | type: string | description: Absolute URI that Wix calls for this method. Wix doesn't append any path to this URI. The URI must begin with `https://`, such as `https://my-app.com/v1/my-custom-method`. - name: listUsagesEnabled | type: boolean | description: Flag that indicates if charges by usages are enabled ``` --- > Portal Navigation: > > - Append `.md` to any URL under `https://dev.wix.com/docs/` to get its markdown version. > - Pages are either content pages (article or reference text) or menu pages (a list of links to child pages). > - To get a menu page, truncate any URL to a parent path and append `.md` (e.g. `https://dev.wix.com/docs/sdk.md`, `https://dev.wix.com/docs/sdk/core-modules.md`). > - Top-level index of all portals: https://dev.wix.com/docs/llms.txt > - Full concatenated docs: https://dev.wix.com/docs/llms-full.txt # ChargeLimitUpdatedEvent # Package: appBilling # Namespace: CustomChargesProvider # Method link: https://dev.wix.com/docs/api-reference/app-management/app-billing/custom-charges-service-plugin/charge-limit-updated-event.md ## Introduction Triggered in case the charge limit for an instance of your app is updated. You can't update the charge limit after you've set an initial value. Site owners can increase the limit in their site's dashboard, currently they aren't allowed to decrease it. --- ## REST API ### Examples ### Get notified when a customer updates the charge limit. The data payload includes the following object as an encoded JWT. Here, we show the request and response objects decoded. ```curl curl -X POST \ 'https://provider.example.com/v1/limit-updated' \ -H 'Authorization: ' \ -d '{ "data": { "request": { "subscriptionId": "efa6b37d-74c6-44bb-b639-28c4af3957dd", "currency": "USD", "chargeLimit": "1000.00" }, "metadata": { "requestId": "1680014776.67327419774788218037", "identity": { "identityType": "APP", "appId": "365288ae-38f4-4932-92d5-d45c596c7260" }, "instanceId": "3aa496c3-aa49-4369-84e6-3fa1876f191d" } }, "aud": "6675724b-bf3e-482a-9a00-65616953b570", "iss": "wix.com", "iat": 1680014777, "exp": 1683614777 }' ``` --- ## JavaScript SDK ### Examples ### Example of a charge limit updated event ```javascript import { customCharges } from '@wix/app-management/service-plugins'; customCharges.provideHandlers({ chargeLimitUpdatedEvent: async ( payload ) => { const {request, metadata} = payload; // Use the `request` and `metadata` received from Wix and // apply custom logic. return {} } }); ``` ### chargeLimitUpdatedEvent (self-hosted) Self-hosted SDK calls require you to [create a client](https://dev.wix.com/docs/sdk/articles/work-with-the-sdk/about-the-wix-client.md). ```javascript import { createClient } from '@wix/sdk'; import { customCharges } from '@wix/app-management/service-plugins'; // Import the auth strategy for the relevant access type // Import the relevant host module if needed const myWixClient = createClient ({ modules: { customCharges }, // Include the auth strategy and host as relevant }); async function chargeLimitUpdatedEvent(request,metadata) { const response = await myWixClient.customCharges.chargeLimitUpdatedEvent(request,metadata); }; ``` --- --- > Portal Navigation: > > - Append `.md` to any URL under `https://dev.wix.com/docs/` to get its markdown version. > - Pages are either content pages (article or reference text) or menu pages (a list of links to child pages). > - To get a menu page, truncate any URL to a parent path and append `.md` (e.g. `https://dev.wix.com/docs/sdk.md`, `https://dev.wix.com/docs/sdk/core-modules.md`). > - Top-level index of all portals: https://dev.wix.com/docs/llms.txt > - Full concatenated docs: https://dev.wix.com/docs/llms-full.txt # ChargesRejectedEvent # Package: appBilling # Namespace: CustomChargesProvider # Method link: https://dev.wix.com/docs/api-reference/app-management/app-billing/custom-charges-service-plugin/charges-rejected-event.md ## Introduction Triggered in case Wix doesn't accept the charges you've returned in the List Charges method. You aren't allowed to charge a site owner more than the charge limit. Wix call List Charges in regular intervals until the sum of all charges is lower than the charge limit. Wix doesn't create an invoice in case the charges aren't accepted. --- ## REST API ### Examples ### Get notified when Wix doesn't accept your custom charges. The data payload includes the following object as an encoded JWT. Here, we show the request and response objects decoded. ```curl curl -X POST \ 'https://provider.example.com/v1/charges-rejected' \ -H 'Authorization: ' \ -d '{ "data": { "request": { "subscriptionId": "efa6b37d-74c6-44bb-b639-28c4af3957dd", "currency": "USD", "chargeIds": [ "Some Charge Id 1", "Some Charge Id 2" ], "chargeLimit": "1000.00", "reasons": [ "CHARGE_LIMIT_EXCEEDED" ] }, "metadata": { "requestId": "1680014776.67327419774788218037", "identity": { "identityType": "APP", "appId": "365288ae-38f4-4932-92d5-d45c596c7260" }, "instanceId": "3aa496c3-aa49-4369-84e6-3fa1876f191d" } }, "aud": "6675724b-bf3e-482a-9a00-65616953b570", "iss": "wix.com", "iat": 1680014777, "exp": 1683614777 }' ``` --- ## JavaScript SDK ### Examples ### Example of a charges rejected event ```javascript import { customCharges } from '@wix/app-management/service-plugins'; customCharges.provideHandlers({ chargesRejectedEvent: async ( payload ) => { const {request, metadata} = payload; // Use the `request` and `metadata` received from Wix and // apply custom logic. return {} } }); ``` ### chargesRejectedEvent (self-hosted) Self-hosted SDK calls require you to [create a client](https://dev.wix.com/docs/sdk/articles/work-with-the-sdk/about-the-wix-client.md). ```javascript import { createClient } from '@wix/sdk'; import { customCharges } from '@wix/app-management/service-plugins'; // Import the auth strategy for the relevant access type // Import the relevant host module if needed const myWixClient = createClient ({ modules: { customCharges }, // Include the auth strategy and host as relevant }); async function chargesRejectedEvent(request,metadata) { const response = await myWixClient.customCharges.chargesRejectedEvent(request,metadata); }; ``` --- --- > Portal Navigation: > > - Append `.md` to any URL under `https://dev.wix.com/docs/` to get its markdown version. > - Pages are either content pages (article or reference text) or menu pages (a list of links to child pages). > - To get a menu page, truncate any URL to a parent path and append `.md` (e.g. `https://dev.wix.com/docs/sdk.md`, `https://dev.wix.com/docs/sdk/core-modules.md`). > - Top-level index of all portals: https://dev.wix.com/docs/llms.txt > - Full concatenated docs: https://dev.wix.com/docs/llms-full.txt # GetChargeLimit # Package: appBilling # Namespace: CustomChargesProvider # Method link: https://dev.wix.com/docs/api-reference/app-management/app-billing/custom-charges-service-plugin/get-charge-limit.md ## Introduction Wix calls this method to retrieve the initial charge limit for a paid instance of your app. This happens every time a customer is upgrading to a paid version of your app. You can't update the charge limit after you've set an initial value. Customers can increase the limit in their site's dashboard, currently they aren't allowed to decrease it. > **Note:** > This feature isn't yet available to all users. Your app can have only 1 usage-based plan and no other plans. To add a usage-based plan to your app, [submit a request to add a usage-based plan](https://www.wix.com/support-chatbot?nodeId=25a57397-ccf7-4376-8b74-48d51edf7159&referral=devRels). --- ## REST API ### Examples ### Return an app instance's initial charge limit. The data payload includes the following object as an encoded JWT. Here, we show the request and response objects decoded. ```curl curl -X POST \ 'https://provider.example.com/v1/charge-limit' \ -H 'Authorization: ' \ -d '{ "data": { "request": { "subscriptionId": "efa6b37d-74c6-44bb-b639-28c4af3957dd", "currency": "USD" }, "metadata": { "requestId": "1680014776.67327419774788218037", "identity": { "identityType": "APP", "appId": "365288ae-38f4-4932-92d5-d45c596c7260" }, "instanceId": "3aa496c3-aa49-4369-84e6-3fa1876f191d" } }, "aud": "6675724b-bf3e-482a-9a00-65616953b570", "iss": "wix.com", "iat": 1680014777, "exp": 1683614777 }' ``` --- ## JavaScript SDK ### Examples ### Example of a `chargeLimit` return value ```javascript import { customCharges } from '@wix/app-management/service-plugins'; customCharges.provideHandlers({ getChargeLimit: async ( payload ) => { const {request, metadata} = payload; // Use the `request` and `metadata` received from Wix and // apply custom logic. return { // Return your response exactly as documented to integrate with Wix. // Return value example: chargeLimit: "1000.00" } } }); ``` ### getChargeLimit (self-hosted) Self-hosted SDK calls require you to [create a client](https://dev.wix.com/docs/sdk/articles/work-with-the-sdk/about-the-wix-client.md). ```javascript import { createClient } from '@wix/sdk'; import { customCharges } from '@wix/app-management/service-plugins'; // Import the auth strategy for the relevant access type // Import the relevant host module if needed const myWixClient = createClient ({ modules: { customCharges }, // Include the auth strategy and host as relevant }); async function getChargeLimit(request,metadata) { const response = await myWixClient.customCharges.getChargeLimit(request,metadata); }; ``` --- --- > Portal Navigation: > > - Append `.md` to any URL under `https://dev.wix.com/docs/` to get its markdown version. > - Pages are either content pages (article or reference text) or menu pages (a list of links to child pages). > - To get a menu page, truncate any URL to a parent path and append `.md` (e.g. `https://dev.wix.com/docs/sdk.md`, `https://dev.wix.com/docs/sdk/core-modules.md`). > - Top-level index of all portals: https://dev.wix.com/docs/llms.txt > - Full concatenated docs: https://dev.wix.com/docs/llms-full.txt # InvoiceCreatedEvent # Package: appBilling # Namespace: CustomChargesProvider # Method link: https://dev.wix.com/docs/api-reference/app-management/app-billing/custom-charges-service-plugin/invoice-created-event.md ## Introduction Triggered in case Wix creates an invoice that includes charges for an instance of your app. --- ## REST API ### Examples ### Get notified when Wix creates an invoice with your custom charges. The data payload includes the following object as an encoded JWT. Here, we show the request and response objects decoded. ```curl curl -X POST \ 'https://provider.example.com/v1/invoice-created' \ -H 'Authorization: ' \ -d '{ "data": { "request": { "subscriptionId": "efa6b37d-74c6-44bb-b639-28c4af3957dd", "currency": "USD", "invoiceId": 43434213, "lineItems": [ { "chargeId": "Some Charge Id 1", "amount": "200.00", "id": "f322c4bf-7edb-42f8-b0c2-162b51d4ad75" }, { "chargeId": "Some Charge Id 2", "amount": "300.00", "id": "4faa44b4-654c-411d-803d-be816e03726e" } ] }, "metadata": { "requestId": "1680014776.67327419774788218037", "identity": { "identityType": "APP", "appId": "365288ae-38f4-4932-92d5-d45c596c7260" }, "instanceId": "3aa496c3-aa49-4369-84e6-3fa1876f191d" } }, "aud": "6675724b-bf3e-482a-9a00-65616953b570", "iss": "wix.com", "iat": 1680014777, "exp": 1683614777 }' ``` --- ## JavaScript SDK ### Examples ### Example of an invoice created event ```javascript import { customCharges } from '@wix/app-management/service-plugins'; customCharges.provideHandlers({ invoiceCreatedEvent: async ( payload ) => { const {request, metadata} = payload; // Use the `request` and `metadata` received from Wix and // apply custom logic. return {} } }); ``` ### invoiceCreatedEvent (self-hosted) Self-hosted SDK calls require you to [create a client](https://dev.wix.com/docs/sdk/articles/work-with-the-sdk/about-the-wix-client.md). ```javascript import { createClient } from '@wix/sdk'; import { customCharges } from '@wix/app-management/service-plugins'; // Import the auth strategy for the relevant access type // Import the relevant host module if needed const myWixClient = createClient ({ modules: { customCharges }, // Include the auth strategy and host as relevant }); async function invoiceCreatedEvent(request,metadata) { const response = await myWixClient.customCharges.invoiceCreatedEvent(request,metadata); }; ``` --- --- > Portal Navigation: > > - Append `.md` to any URL under `https://dev.wix.com/docs/` to get its markdown version. > - Pages are either content pages (article or reference text) or menu pages (a list of links to child pages). > - To get a menu page, truncate any URL to a parent path and append `.md` (e.g. `https://dev.wix.com/docs/sdk.md`, `https://dev.wix.com/docs/sdk/core-modules.md`). > - Top-level index of all portals: https://dev.wix.com/docs/llms.txt > - Full concatenated docs: https://dev.wix.com/docs/llms-full.txt # ListCharges # Package: appBilling # Namespace: CustomChargesProvider # Method link: https://dev.wix.com/docs/api-reference/app-management/app-billing/custom-charges-service-plugin/list-charges.md ## Introduction Wix calls this method to retrieve a list of charges for a paid instance of your app. This happens when Wix creates an invoice or in case the customer wants to preview how much your app would charge them at the moment. You must return the charges in the currency that's specified in the request, you aren't allowed to return more than 5 charges, and their sum must be lower than the charge limit. You may not bill customers for any usage that didn’t occur during the period Wix specifies when retrieving the charges. If Wix discovers that your app has charged customers for usage outside of an invoice's specified period, we may take action such as blocking your app from charging the customer, removing your app from the Wix App Market, revoking your access to the Wix developer program, or pursuing legal action to recover damages caused by overcharging. We understand that mistakes can happen and encourage you to contact [the Wix App Market team](https://devforum.wix.com/kb/en/contact) immediately if you become aware of any overcharging issues so that we can work together to resolve the situation. > **Note:** > This feature isn't yet available to all users. Your app can have only 1 usage-based plan and no other plans. To add a usage-based plan to your app, [submit a request to add a usage-based plan](https://www.wix.com/support-chatbot?nodeId=25a57397-ccf7-4376-8b74-48d51edf7159&referral=devRels). --- ## REST API ### Examples ### Return your app's custom charges. The data payload includes the following object as an encoded JWT. Here, we show the request and response objects decoded. ```curl curl -X POST \ 'https://provider.example.com/v1/charges' \ -H 'Authorization: ' \ -d '{ "data": { "request": { "subscriptionId": "efa6b37d-74c6-44bb-b639-28c4af3957dd", "currency": "USD", "periodStart": 1677674012000, "periodEnd": 1680179612000, "intent": "CREATE_INVOICE" }, "metadata": { "requestId": "1680014776.67327419774788218037", "identity": { "identityType": "APP", "appId": "365288ae-38f4-4932-92d5-d45c596c7260" }, "instanceId": "3aa496c3-aa49-4369-84e6-3fa1876f191d" } }, "aud": "6675724b-bf3e-482a-9a00-65616953b570", "iss": "wix.com", "iat": 1680014777, "exp": 1683614777 }' ``` --- ## JavaScript SDK ### Examples ### Example of a `charges` return value ```javascript import { customCharges } from '@wix/app-management/service-plugins'; customCharges.provideHandlers({ listCharges: async ( payload ) => { const {request, metadata} = payload; // Use the `request` and `metadata` received from Wix and // apply custom logic. return { // Return your response exactly as documented to integrate with Wix. // Return value example: charges: [ { _id: "Some Charge Id 1", description: "Setup fee", amount: "200.00" }, { _id: "Some Charge Id 2", description: "Usage charges", amount: "300.00" } ] } } }); ``` ### listCharges (self-hosted) Self-hosted SDK calls require you to [create a client](https://dev.wix.com/docs/sdk/articles/work-with-the-sdk/about-the-wix-client.md). ```javascript import { createClient } from '@wix/sdk'; import { customCharges } from '@wix/app-management/service-plugins'; // Import the auth strategy for the relevant access type // Import the relevant host module if needed const myWixClient = createClient ({ modules: { customCharges }, // Include the auth strategy and host as relevant }); async function listCharges(request,metadata) { const response = await myWixClient.customCharges.listCharges(request,metadata); }; ``` --- --- > Portal Navigation: > > - Append `.md` to any URL under `https://dev.wix.com/docs/` to get its markdown version. > - Pages are either content pages (article or reference text) or menu pages (a list of links to child pages). > - To get a menu page, truncate any URL to a parent path and append `.md` (e.g. `https://dev.wix.com/docs/sdk.md`, `https://dev.wix.com/docs/sdk/core-modules.md`). > - Top-level index of all portals: https://dev.wix.com/docs/llms.txt > - Full concatenated docs: https://dev.wix.com/docs/llms-full.txt ## Resource: Introduction ## Article: Introduction ## Article Link: https://dev.wix.com/docs/api-reference/app-management/app-billing/custom-charges-service-plugin/introduction.md ## Article Content: # About the Custom Charges Service Plugin The Custom Charges service plugin (formerly SPI) allows you to manage what customers must pay to use your app. This includes regularly recurring base prices, installation and usage fees, and any other custom charges. With the Custom Charges service plugin, you can: + Add your app's charges to the invoice that Wix sends to site owners. + Receive notifications about charges that Wix doesn't accept, created invoices, or when customers increase their charge limit. + Keep your customers informed about how much your app would charge them if Wix were to send an invoice at this moment. See the [App Instance API](https://dev.wix.com/docs/api-reference/app-management/app-instance/introduction.md) for more details about the notifications you receive when a customer installs an instance of your app on their site. ## How to become a provider When configuring your app in the app dashboard: + Set up [Usage-Based Pricing](https://dev.wix.com/docs/build-apps/launch-your-app/pricing-and-billing/set-up-a-usage-based-business-model.md) for your app. Note that Usage-Based Pricing is in Alpha and may change in the future. + Add a __Premium Custom Charges__ integration component. + Use the JSON editor to update the `baseUri`. Make sure to include only the base part of your integration's URI. For example, if Wix should call your integration at `https://provider.example.com/v1/charge-limit` for the [Get Charge Limit](https://dev.wix.com/docs/rest/app-management/app-billing/custom-charges-service-plugin/get-charge-limit.md) endpoint set `{"baseUri": "https://provider.example.com/"}`. ## Before you begin It’s important to note the following points before starting to code: + This service plugin isn't yet supported by the [CLI](https://dev.wix.com/docs/build-apps/develop-your-app/frameworks/wix-cli/about-the-wix-cli-for-apps.md). + Before you can implement the Custom Charges service plugin, it's essential to set up [Usage-Based Pricing](https://dev.wix.com/docs/build-apps/launch-your-app/pricing-and-billing/set-up-a-usage-based-business-model.md) for your app in the [app dashboard](https://dev.wix.com/). Note that you have to [submit a request](https://devforum.wix.com/en/contact) to enable Usage-Based Pricing. Keep in mind that Usage-Based Pricing is currently in Alpha, this means it's still in development and may change in the future. + You can't bill your customers before they [upgrade](https://support.wix.com/en/article/upgrading-an-app-from-the-wix-app-market) to a paid version of your app. + You're able to include up to 5 custom charges per invoice. + You must set an initial charge limit and can't bill customers more than this limit per billing cycle. You can't change the limit later, but customers are able to increase it themselves. + You receive notifications in case Wix doesn't accept the charges you return via the service plugin. Currently, there is no notification if the customer agrees to your proposed charge limit or pays an invoice. + Currently, Wix supports the following currencies: `AUD`, `BRL`, `CAD`, `EUR`, `GBP`, `ILS`, `INR`, `JPY`, `MXN`, `PLN`, `RUB`, `TRY`, `USD`. Wix may add more currencies in the future. + We recommend to use the `instanceId` instead of the `subscriptionId` to track usage and billing for apps, because this field is also used in the [App Instance API](https://dev.wix.com/docs/rest/app-management/app-instance/introduction.md). + If we discover that your app has charged customers for usage outside of an invoice's specified period, we may take action such as blocking your app from charging the customer, removing your app from the Wix App Market, revoking your access to the Wix developer program, or pursuing legal action to recover damages caused by overcharging. We understand that mistakes can happen and encourage you to contact [the Wix App Market team](https://devforum.wix.com/kb/en/contact) immediately if you become aware of any overcharging issues so that we can work together to resolve the situation. ## Use cases + [Support app upgrades](https://dev.wix.com/docs/api-reference/app-management/app-billing/custom-charges-service-plugin/sample-flows.md#support-app-upgrades) + [Bill a customer](https://dev.wix.com/docs/api-reference/app-management/app-billing/custom-charges-service-plugin/sample-flows.md#bill-a-customer) + [Get Notified when an app instance is canceled](https://dev.wix.com/docs/api-reference/app-management/app-billing/custom-charges-service-plugin/sample-flows.md#get-notified-when-an-app-instance-is-canceled) ## Terminology + __App instance__: Particular installation of an app that let's you identify your customer. Learn more about how to retrieve the instance ID from a [service plugin request envelope](https://dev.wix.com/docs/build-apps/develop-your-app/frameworks/self-hosting/supported-extensions/backend-extensions/add-self-hosted-service-plugin-extensions-with-rest.md#request-envelope). + __Customer__: Site owner who installs your app on their Wix site. + __Invoice__: Document that Wix sends to customers specifying the price they have to pay for using the Wix platform. Includes charges for 3rd-party apps associated with the site. + __Charge__: Price for using your app that you can add to an invoice. You can add up to 5 charges per invoice. + __Charge limit__: Maximum amount that you're allowed to charge customers for using your app per billing cycle. It helps ensure that customers are aware of their potential costs upfront. + __Subscription ID__: Unique identifier for the agreement that specifies the product or service to which the customer has access to and how they are billed. Currently, Wix doesn't provide an API to retrieve information about subscriptions. In case the product is an app, we recommend to use the app instance ID instead of the subscription ID to track usage and billing, because this field is also used in the [App Instance API](https://dev.wix.com/docs/rest/app-management/app-instance/introduction.md). --- > Portal Navigation: > > - Append `.md` to any URL under `https://dev.wix.com/docs/` to get its markdown version. > - Pages are either content pages (article or reference text) or menu pages (a list of links to child pages). > - To get a menu page, truncate any URL to a parent path and append `.md` (e.g. `https://dev.wix.com/docs/sdk.md`, `https://dev.wix.com/docs/sdk/core-modules.md`). > - Top-level index of all portals: https://dev.wix.com/docs/llms.txt > - Full concatenated docs: https://dev.wix.com/docs/llms-full.txt ## Resource: Sample Flows ## Article: Sample Flows ## Article Link: https://dev.wix.com/docs/api-reference/app-management/app-billing/custom-charges-service-plugin/sample-flows.md ## Article Content: # Custom Charges Service Plugin: Sample Use Cases & Flows This article shares some possible use cases your app could support, as well as a sample flow that could support each use case. This can be a helpful jumping off point as you plan your app's implementation. ## Support app upgrades Every time a customer upgrades an instance of your app, Wix retrieves an initial charge limit from your app. Wix displays this limit to the customer in the checkout page of the upgrade process. This helps customers understand how much they may have to pay maximally for using your app per billing cycle. To support app upgrades: 1. Wix calls [Get Charge Limit](https://dev.wix.com/docs/api-reference/app-management/app-billing/custom-charges-service-plugin/get-charge-limit.md). 2. Return the initial charge limit that your app is allowed to charge the customer per billing cycle. 3. Wix displays the limit to the customer for approval. Note that your app can't change this limit later, but customers are able to increase it themselves. ## Bill a customer Your app can add custom charges to an invoice that Wix sends to a customer at the end of the billing cycle. To bill a customer: 1. Wix calls [List charges](https://dev.wix.com/docs/api-reference/app-management/app-billing/custom-charges-service-plugin/list-charges.md). Note that Wix sends `{"intent": "CREATE_INVOICE"}` to actually create an invoice with the charges you return. For other purposes, Wix sends `{"intent": "DISPLAY_ONLY"}`. 2. Return up to 5 charges that Wix adds to the invoice. 3. In case Wix accepts your charges, Wix calls [Invoice Created Event](https://dev.wix.com/docs/api-reference/app-management/app-billing/custom-charges-service-plugin/invoice-created-event.md) and sends the invoice to the customer. ## Get notified when an app instance is canceled Currently, you can't receive notifications when a payment for an invoice has failed. If that happens, Wix sends an email to the customer and retries to collect the payment several times. In case all retries fail, Wix cancels the app instance. Your app could get notified in this situation, and you could reach out to the customer. To receive notifications when an app instance is canceled: 1. Sign up for the [Paid Plan Auto Renewal Cancelled Webhook](https://dev.wix.com/docs/api-reference/app-management/app-instance/paid-plan-auto-renewal-cancelled.md) of the App Instance API. 2. Listen to the webhook. Wix sends `{"cancelReason": "FAILED_PAYMENT"}` in case an app instance is canceled due to a failed payment. 3. Reach out to the relevant customer. --- > Portal Navigation: > > - Append `.md` to any URL under `https://dev.wix.com/docs/` to get its markdown version. > - Pages are either content pages (article or reference text) or menu pages (a list of links to child pages). > - To get a menu page, truncate any URL to a parent path and append `.md` (e.g. `https://dev.wix.com/docs/sdk.md`, `https://dev.wix.com/docs/sdk/core-modules.md`). > - Top-level index of all portals: https://dev.wix.com/docs/llms.txt > - Full concatenated docs: https://dev.wix.com/docs/llms-full.txt # Resource: External Billing Events # Type: External Billing Event Object # Link: https://dev.wix.com/docs/api-reference/app-management/app-billing/external-billing-events/external-billing-event-object.md ## Schema: ```json Type: External Billing Event Object | type: ExternalBillingEvent - name: appId | type: string | description: The app ID linked to this transaction. This field is only relevant if using an API key for authorization, in which case you're required to pass the app ID. - name: value | type: string | description: - name: instanceId | type: string | description: The app instance ID linked to this transaction. This field is only relevant if using an API key for authorization, in which case you can optionally pass the instance ID. This connects the transaction to a specific instance of your app installed on a Wix site. Learn more [about app instances](https://dev.wix.com/docs/build-apps/develop-your-app/access/app-instances/about-app-instances.md). - name: grossRevenue | type: string | description: The total amount of the transaction in USD, not including tax. This value can be negative for refunds or adjustments. Example: "120.50" for a $120.50 charge, or "-120.50" for a $120.50 refund. - name: netRevenue | type: string | description: The amount charged in USD minus agreed-upon expenses, such as shipping fees or payment processing fees. Wix subtracts its share from this amount. The value can be negative for refunds. Example calculation: - Gross revenue: $120.50 - Minus expenses: $20.00 (shipping) - Net revenue: $100.50 - name: wixShare | type: string | description: Wix's share of the transaction in USD, taken from the net revenue. This value can be negative, such as for adjustments or refunds. Calculate based on your Partner Agreement terms. For example, if Wix's share is 20%: - Net revenue: $100.50 - Wix share (20%): $20.10 Important: Update this value if your revenue share percentage changes. - name: createdDate | type: string | description: The date and time of the transaction. - name: seconds | type: string | description: - name: nanos | type: number | description: - name: billingType | type: string | description: The type of billing event, either charge or refund. enum: UNKNOWN, CHARGE, REFUND ``` --- > Portal Navigation: > > - Append `.md` to any URL under `https://dev.wix.com/docs/` to get its markdown version. > - Pages are either content pages (article or reference text) or menu pages (a list of links to child pages). > - To get a menu page, truncate any URL to a parent path and append `.md` (e.g. `https://dev.wix.com/docs/sdk.md`, `https://dev.wix.com/docs/sdk/core-modules.md`). > - Top-level index of all portals: https://dev.wix.com/docs/llms.txt > - Full concatenated docs: https://dev.wix.com/docs/llms-full.txt # ReportExternalBillingEvent # Package: appBilling # Namespace: ExternalBillingBIService # Method link: https://dev.wix.com/docs/api-reference/app-management/app-billing/external-billing-events/report-external-billing-event.md ## Permission Scopes: Manage Your App: SCOPE.DC.MANAGE-YOUR-APP ## Introduction Sends an external billing event to Wix. Use this to report charges or refunds for your [Partner Billed App](https://dev.wix.com/docs/build-apps/launch-your-app/pricing-and-billing/partner-billed-apps-reporting.md). The reported event enables Wix to track revenue, deductions, and Wix's share related to Partner Billed App charges. --- ## REST API ### Examples ### Report a billing event with an access token ```curl curl -X POST \ 'https://www.wixapis.com/apps/v1/billing-event' \ -H 'Authorization: ' \ -H 'Content-Type: application/json' \ -d '{ "event": { "created_date": "2025-05-04T00:00:00Z", "billing_type": "CHARGE", "wix_share": "10", "net_revenue": "100", "gross_revenue": "110" } }' ``` ### Report a billing event with an API key ```curl curl -X POST \ 'https://www.wixapis.com/apps/v1/billing-event' \ -H 'Authorization: ' \ -H 'Content-Type: application/json' \ -H 'wix-account-id: ' \ -d '{ "event": { "app_id": "157f033e-c1ae-4418-adb0-79d2bcd9d4a8", "created_date": "2025-05-04T00:00:00Z", "billing_type": "CHARGE", "wix_share": "10", "net_revenue": "100", "gross_revenue": "110" } }' ``` --- ## JavaScript SDK ### Examples ### Report a billing event with an API key ```javascript import { createClient, ApiKeyStrategy } from "@wix/sdk"; import { externalBilling } from "@wix/app-management"; const myWixClient = createClient({ auth: ApiKeyStrategy({ apiKey: "", accountId: "", }), modules: { externalBilling }, }); const options = { event: { // Required when authenticating with an API key. appId: "", _createdDate: "2025-05-04T00:00:00Z", billingType: "CHARGE", grossRevenue: "110", netRevenue: "100", wixShare: "10", }, }; async function reportExternalBillingEvent() { await myWixClient.externalBilling.reportExternalBillingEvent(options); } ``` ### Report a billing event with an app access token ```javascript import { externalBilling } from "@wix/app-management"; const options = { event: { _createdDate: "2025-05-04T00:00:00Z", billingType: "CHARGE", grossRevenue: "110", netRevenue: "100", wixShare: "10", }, }; async function reportExternalBillingEvent() { await externalBilling.reportExternalBillingEvent(options); } ``` ### reportExternalBillingEvent (self-hosted) Self-hosted SDK calls require you to [create a client](https://dev.wix.com/docs/sdk/articles/work-with-the-sdk/about-the-wix-client.md). ```javascript import { createClient } from '@wix/sdk'; import { externalBilling } from '@wix/app-management'; // Import the auth strategy for the relevant access type // Import the relevant host module if needed const myWixClient = createClient ({ modules: { externalBilling }, // Include the auth strategy and host as relevant }); async function reportExternalBillingEvent(options) { const response = await myWixClient.externalBilling.reportExternalBillingEvent(options); }; ``` --- --- > Portal Navigation: > > - Append `.md` to any URL under `https://dev.wix.com/docs/` to get its markdown version. > - Pages are either content pages (article or reference text) or menu pages (a list of links to child pages). > - To get a menu page, truncate any URL to a parent path and append `.md` (e.g. `https://dev.wix.com/docs/sdk.md`, `https://dev.wix.com/docs/sdk/core-modules.md`). > - Top-level index of all portals: https://dev.wix.com/docs/llms.txt > - Full concatenated docs: https://dev.wix.com/docs/llms-full.txt ## Resource: Introduction ## Article: Introduction ## Article Link: https://dev.wix.com/docs/api-reference/app-management/app-billing/external-billing-events/introduction.md ## Article Content: # About the External Billing Events API > **Note:** This API is only for [Partner Billed Apps](https://dev.wix.com/docs/build-apps/launch-your-app/pricing-and-billing/partner-billed-apps-reporting.md), which charge users using their own payment provider. The External Billing Events API allows you to report charges and refunds to Wix for revenue tracking when you handle payment processing yourself, such as through Stripe or PayPal. To get your Partner Billed App approved, you need to: 1. Get approval from Wix. 2. Implement this API. 3. [Submit Partner Billed App reports](https://dev.wix.com/docs/build-apps/launch-your-app/pricing-and-billing/partner-billed-apps-reporting.md#submit-a-partner-billed-app-report). > **Note:** Hosting your own [external pricing page](https://dev.wix.com/docs/build-apps/launch-your-app/pricing-and-billing/set-up-an-external-pricing-page.md) doesn't automatically make you a Partner Billed App. External pricing pages that process payments through Wix should use the [Billing API](https://dev.wix.com/docs/rest/app-management/app-billing/billing/introduction.md), whereas external pricing pages that process payments independently should use this External Billing Events API. The API has 1 method, [Report External Billing Event](https://dev.wix.com/docs/rest/app-management/app-billing/external-billing-events/report-external-billing-event.md), that lets you send the details of a billing event. In each method call, you report 1 external billing event associated with a single instance of your app. ## Before you begin It’s important to note the following point before starting to code: Since you report a billing event for a specific app instance, you need at least 1 of the following: - An [access token](https://dev.wix.com/docs/rest/app-management/oauth-2/introduction.md) set up for the app instance. This is the recommended option. - The [app instance ID](https://dev.wix.com/docs/rest/app-management/app-instance/introduction.md). - An [API key](https://dev.wix.com/docs/api-reference/articles/authentication/api-keys/about-api-keys.md) with the account-level `Manage Custom Apps` permission, from the account that owns your app. ## Use cases - [Report external billing events with an access token](https://dev.wix.com/docs/rest/app-management/app-billing/external-billing-events/sample-flows.md#report-external-billing-events-with-an-access-token) - [Report external billing events with an API key](https://dev.wix.com/docs/rest/app-management/app-billing/external-billing-events/sample-flows.md#report-external-billing-events-with-an-api-key) ## Terminology - **Partner Billed App**: An app that processes payments yourself using your own payment provider such as Stripe or PayPal instead of using Wix checkout. Requires Wix approval and regular reporting of billing events using this API. - **External billing event**: A charge or refund that occurs outside the Wix Billing system. - **External pricing page**: A custom pricing page that you host on your own servers. - **App instance**: Specific occurrence of your app on a particular Wix site. @sdk_package_setup --- > Portal Navigation: > > - Append `.md` to any URL under `https://dev.wix.com/docs/` to get its markdown version. > - Pages are either content pages (article or reference text) or menu pages (a list of links to child pages). > - To get a menu page, truncate any URL to a parent path and append `.md` (e.g. `https://dev.wix.com/docs/sdk.md`, `https://dev.wix.com/docs/sdk/core-modules.md`). > - Top-level index of all portals: https://dev.wix.com/docs/llms.txt > - Full concatenated docs: https://dev.wix.com/docs/llms-full.txt ## Resource: Sample Flows ## Article: Sample Flows ## Article Link: https://dev.wix.com/docs/api-reference/app-management/app-billing/external-billing-events/sample-flows.md ## Article Content: # External Billing Events API: Sample Flows This article presents possible use cases and sample flows that you may encounter when working with external billing events. This can be a helpful jumping off point as you plan your app's implementation. > **Important:** These examples are only for Partner Billed Apps that process payments outside the Wix Billing system, using their own payment provider. If you use an external pricing page but Wix processes your payments, use the [Billing API](https://dev.wix.com/docs/api-reference/app-management/app-billing/billing/introduction.md) instead. ## Report external billing events with an access token Use this flow when you have an app instance ID and can generate an access token for authentication. To report external billing events using an access token: 1. If you don't have an access token, call [Create Access Token](https://dev.wix.com/docs/rest/app-management/oauth-2/create-access-token.md) and pass your [app instance ID](https://dev.wix.com/docs/build-apps/develop-your-app/access/app-instances/about-app-instances.md#get-the-app-instance-id) in the request. 2. Call [Report External Billing Event](https://dev.wix.com/docs/rest/app-management/app-billing/external-billing-events/report-external-billing-event.md) and pass the access token as the `Authorization` header. 3. Specify the billing event details in the method parameters: ```json "event": { "created_date": "2025-04-07T08:01:31Z", "gross_revenue": "120", "net_revenue": "100", "wix_share": "20", "billing_type": "CHARGE" } ``` 1. The response contains the app and instance IDs extracted from the access token. It also echoes any parameters that you passed in the method call: ```json "event": { "app_id": "cc59f2e7-7a40-4cbf-a78a-ac6e83d17e96", "instance_id": "7dd21ebc-a097-43ac-8763-2806daee84a1", "gross_revenue": "120", "net_revenue": "100", "wix_share": "20", "created_date": "2025-04-07T08:02:31Z", "billing_type": "CHARGE" } ``` ## Report external billing events with an API key Use this flow when an access token cannot be generated but you still need to report a billing event. For example, if a Wix user uninstalls your app, you won't be able to generate access tokens for that app instance afterward. To report external billing events using an [API key](https://dev.wix.com/docs/api-reference/articles/authentication/api-keys/about-api-keys.md): 1. Create a new API key in the [API key manager](https://manage.wix.com/account/api-keys) of the Wix account that owns your app. This key must have the account-level `Manage Custom Apps` permission. 2. When you call Report External Billing Event, pass the API key as the `Authorization` header. In addition, pass your account ID in the `wix-account-ID` header. Your account ID will be listed within the [API key manager](https://manage.wix.com/account/api-keys). 3. Specify your app ID and the billing event details in the method parameters. --- > Portal Navigation: > > - Append `.md` to any URL under `https://dev.wix.com/docs/` to get its markdown version. > - Pages are either content pages (article or reference text) or menu pages (a list of links to child pages). > - To get a menu page, truncate any URL to a parent path and append `.md` (e.g. `https://dev.wix.com/docs/sdk.md`, `https://dev.wix.com/docs/sdk/core-modules.md`). > - Top-level index of all portals: https://dev.wix.com/docs/llms.txt > - Full concatenated docs: https://dev.wix.com/docs/llms-full.txt # Resource: App Instance # Type: App Instance Object # Link: https://dev.wix.com/docs/api-reference/app-management/app-instance/app-instance-object.md ## Description: An app instance is a specific occurrence of an app on a Wix site. When a Wix user installs an app, a unique instance is generated for that specific site. Use the `instanceId` to keep track of the individual data associated with each app instance. ## Schema: ```json Type: App Instance Object | type: AppInstance Description: An app instance is a specific occurrence of an app on a Wix site. When a Wix user installs an app, a unique instance is generated for that specific site. Use the `instanceId` to keep track of the individual data associated with each app instance. - name: instanceId | type: string | description: App instance ID. Useful to keep track of the data that's associated with the specific instance of your app installed on a Wix site. - name: appName | type: string | description: App name, as you entered it in the App Dashboard. - name: appVersion | type: string | description: Version of your app that's installed on the Wix site. - name: value | type: string | description: - name: isFree | type: boolean | description: Whether the Wix user has installed a free or paid version of your app on their site. - name: billing | type: BillingInfo | description: Billing information for the app instance. Available only in case `{"isFree": false}`. - name: packageName | type: string | description: Name of the package that the site owner has paid for. - name: billingCycle | type: string | description: Interval of the billing cycle. `ONE_TIME` indicates that the Wix user has made a single upfront payment without any automatic subscription renewal. This is primarily for usage credits (for example, 5 SMS) but may occasionally apply to a one-time setup for the app. enum: NO_CYCLE, MONTHLY, YEARLY, ONE_TIME, TWO_YEARS, THREE_YEARS, FOUR_YEARS, FIVE_YEARS - name: timeStamp | type: string | description: Date and time the Wix user purchased the app's paid plan or began their free trial. In `YYYY-MM-DDThh:mm:ss.sssZ` format. - name: expirationDate | type: string | description: Date and time the app's current billing cycle ends in `YYYY-MM-DDThh:mm:ss.sssZ` format. Available only for yearly and multi-yearly plans. - name: autoRenewing | type: boolean | description: Whether the app's subscription automatically renews at the end of the current billing cycle. - name: value | type: boolean | description: - name: invoiceId | type: string | description: ID of the invoice for the current billing cycle. - name: value | type: number | description: - name: source | type: string | description: Information about any discounts applied to the app instance's current billing cycle. If the site owners applied a developer coupon or Wix Voucher when installing the paid version of your app, this field holds the coupon's name or `“Wix discount coupon”`. Site owners may receive a Wix Voucher when upgrading their Wix subscription. If there is no discount for the current billing cycle, the field is an empty string. - name: freeTrialInfo | type: FreeTrialInfo | description: Information about the free trial applied, if relevant. - name: status | type: string | description: Current free trial status. - name: endDate | type: string | description: When the free trial has ended. Populated only once the free trial is over. - name: permissions | type: Array | description: List of [permissions](https://dev.wix.com/docs/build-apps/developer-tools/developers-center/example-app-walkthrough/build-an-app.md#4-add-permissions) that the Wix user has granted your app. You set the list of permissions that your app requires from the Wix user in your app's Permissions page. - name: availablePlans | type: Array | description: Plans available to this app instance. - name: packageName | type: string | description: Package name of the available plan. - name: source | type: string | description: Source of the available plan. Can be a bundle or 3rd-party app. - name: originInstanceId | type: string | description: ID of the Wix site from which the instance of your app has been cloned. All visual settings of the Wix site and app data are duplicated during the cloning process. Wix also notifies you in case there is any additional external functionality for the original site. - name: isOriginSiteTemplate | type: boolean | description: __Deprecated__. This parameter will be removed on March 30, 2023. Use `copiedFromTemplate` instead. - name: copiedFromTemplate | type: boolean | description: Whether this app instance was created when another Wix site was cloned. - name: freeTrialAvailable | type: boolean | description: Whether this app instance includes a free trial that hasn't started yet. ``` --- > Portal Navigation: > > - Append `.md` to any URL under `https://dev.wix.com/docs/` to get its markdown version. > - Pages are either content pages (article or reference text) or menu pages (a list of links to child pages). > - To get a menu page, truncate any URL to a parent path and append `.md` (e.g. `https://dev.wix.com/docs/sdk.md`, `https://dev.wix.com/docs/sdk/core-modules.md`). > - Top-level index of all portals: https://dev.wix.com/docs/llms.txt > - Full concatenated docs: https://dev.wix.com/docs/llms-full.txt # GetAppInstance # Package: appInstance # Namespace: AppInstanceService # Method link: https://dev.wix.com/docs/api-reference/app-management/app-instance/get-app-instance.md ## Permission Scopes: Manage Your App: SCOPE.DC.MANAGE-YOUR-APP ## Introduction Retrieves data about the instance of your app that's installed on a Wix site and data about the site itself. For example, to check whether the Wix user has installed a free or paid version of your app, or to check which apps made by Wix are installed on the site. You must authenticate this method [as a Wix app](https://dev.wix.com/docs/build-apps/develop-your-app/access/authentication/authenticate-using-oauth.md#step-2--make-an-authenticated-api-request). To retrieve `site.ownerInfo` in the response, you must have the __READ SITE OWNER EMAIL__ permission scope in addition to __MANAGE YOUR APP__. --- ## REST API ### Examples ### GetAppInstance ```curl ~~~cURL curl -X GET \ https://www.wixapis.com/apps/v1/instance \ -H 'Authorization: ' ~~~ ``` --- ## JavaScript SDK ### Examples ### getAppInstance ```javascript import { appInstances } from '@wix/app-management'; async function getAppInstance() { const response = await appInstances.getAppInstance(); }; ``` ### getAppInstance (with elevated permissions) ```javascript import { appInstances } from '@wix/app-management'; import { auth } from '@wix/essentials'; async function myGetAppInstanceMethod() { const elevatedGetAppInstance = auth.elevate(appInstances.getAppInstance); const response = await elevatedGetAppInstance(); } ``` ### getAppInstance (self-hosted) Self-hosted SDK calls require you to [create a client](https://dev.wix.com/docs/sdk/articles/work-with-the-sdk/about-the-wix-client.md). ```javascript import { createClient } from '@wix/sdk'; import { appInstances } from '@wix/app-management'; // Import the auth strategy for the relevant access type // Import the relevant host module if needed const myWixClient = createClient ({ modules: { appInstances }, // Include the auth strategy and host as relevant }); async function getAppInstance() { const response = await myWixClient.appInstances.getAppInstance(); }; ``` --- --- > Portal Navigation: > > - Append `.md` to any URL under `https://dev.wix.com/docs/` to get its markdown version. > - Pages are either content pages (article or reference text) or menu pages (a list of links to child pages). > - To get a menu page, truncate any URL to a parent path and append `.md` (e.g. `https://dev.wix.com/docs/sdk.md`, `https://dev.wix.com/docs/sdk/core-modules.md`). > - Top-level index of all portals: https://dev.wix.com/docs/llms.txt > - Full concatenated docs: https://dev.wix.com/docs/llms-full.txt # Package: appInstance # Webhook link: https://dev.wix.com/docs/api-reference/app-management/app-instance/app-instance-installed.md ## Introduction Triggered when an instance of your app is installed on a Wix site. Both App Instance Installed and [App Installation Created](https://dev.wix.com/docs/api-reference/app-management/app-installations/app-installation-created.md) trigger on the first install of your app. The two events carry different data. Subscribe to App Installation Created to receive the full [App Installation object](https://dev.wix.com/docs/api-reference/app-management/app-installations/app-installation-object.md) directly. --- ## REST API ### Examples ```javascript import { appInstances } from '@wix/app-management'; appInstances.onAppInstanceInstalled((event) => { // handle your event here }); ``` ```javascript import { createClient, AppStrategy } from '@wix/sdk'; import { appInstances } from '@wix/app-management'; const wixClient = createClient({ auth: AppStrategy({ appId: 'MY-APP-ID', publicKey: 'YOUR_APP_PUBLIC_KEY', }), modules: { appInstances, }, }); wixClient.appInstances.onAppInstanceInstalled((event) => { // handle your event here }); ``` --- --- > Portal Navigation: > > - Append `.md` to any URL under `https://dev.wix.com/docs/` to get its markdown version. > - Pages are either content pages (article or reference text) or menu pages (a list of links to child pages). > - To get a menu page, truncate any URL to a parent path and append `.md` (e.g. `https://dev.wix.com/docs/sdk.md`, `https://dev.wix.com/docs/sdk/core-modules.md`). > - Top-level index of all portals: https://dev.wix.com/docs/llms.txt > - Full concatenated docs: https://dev.wix.com/docs/llms-full.txt # Package: appInstance # Webhook link: https://dev.wix.com/docs/api-reference/app-management/app-instance/app-instance-removed.md ## Introduction Triggered when an instance of your app is uninstalled from a Wix site. --- ## REST API ### Examples ```javascript import { appInstances } from '@wix/app-management'; appInstances.onAppInstanceRemoved((event) => { // handle your event here }); ``` ```javascript import { createClient, AppStrategy } from '@wix/sdk'; import { appInstances } from '@wix/app-management'; const wixClient = createClient({ auth: AppStrategy({ appId: 'MY-APP-ID', publicKey: 'YOUR_APP_PUBLIC_KEY', }), modules: { appInstances, }, }); wixClient.appInstances.onAppInstanceRemoved((event) => { // handle your event here }); ``` --- --- > Portal Navigation: > > - Append `.md` to any URL under `https://dev.wix.com/docs/` to get its markdown version. > - Pages are either content pages (article or reference text) or menu pages (a list of links to child pages). > - To get a menu page, truncate any URL to a parent path and append `.md` (e.g. `https://dev.wix.com/docs/sdk.md`, `https://dev.wix.com/docs/sdk/core-modules.md`). > - Top-level index of all portals: https://dev.wix.com/docs/llms.txt > - Full concatenated docs: https://dev.wix.com/docs/llms-full.txt # Package: appInstance # Webhook link: https://dev.wix.com/docs/api-reference/app-management/app-instance/paid-plan-auto-renewal-cancelled.md ## Introduction Triggered when a Wix user either cancels a paid plan for your app, or cancels the plan's auto-renewal. The Wix user can continue to use your app until the end of the current billing cycle. --- ## REST API ### Examples ```curl { "operationTimeStamp": "2019-12-09T07:55:18.356Z", "vendorProductId": "e8f429d4-0a6a-468f-8044-87f519a53202", "cycle": "MONTHLY", "cancelReason": "USER_CANCEL", "userReason": "Cancel reason: No reason chosen", "subscriptionCancellationType": "AT_END_OF_PERIOD" } ``` --- ## JavaScript SDK ### Examples ```javascript import { appInstances } from '@wix/app-management'; appInstances.onAppInstancePaidPlanAutoRenewalCancelled((event) => { // handle your event here }); ``` ```javascript import { createClient, AppStrategy } from '@wix/sdk'; import { appInstances } from '@wix/app-management'; const wixClient = createClient({ auth: AppStrategy({ appId: 'MY-APP-ID', publicKey: 'YOUR_APP_PUBLIC_KEY', }), modules: { appInstances, }, }); wixClient.appInstances.onAppInstancePaidPlanAutoRenewalCancelled((event) => { // handle your event here }); ``` --- --- > Portal Navigation: > > - Append `.md` to any URL under `https://dev.wix.com/docs/` to get its markdown version. > - Pages are either content pages (article or reference text) or menu pages (a list of links to child pages). > - To get a menu page, truncate any URL to a parent path and append `.md` (e.g. `https://dev.wix.com/docs/sdk.md`, `https://dev.wix.com/docs/sdk/core-modules.md`). > - Top-level index of all portals: https://dev.wix.com/docs/llms.txt > - Full concatenated docs: https://dev.wix.com/docs/llms-full.txt # Package: appInstance # Webhook link: https://dev.wix.com/docs/api-reference/app-management/app-instance/paid-plan-changed.md ## Introduction Triggered when a Wix user upgrades or downgrades their plan for your app. --- ## REST API ### Examples ```curl { "operationTimeStamp": "2019-12-08T07:42:04.535Z", "vendorProductId": "e61158e5-e327-4694-ac50-2a3a0db87c84", "cycle": "YEARLY", "previousVendorProductId": "e61158e5-e327-4694-ac50-2a3a0db87c84", "previousCycle": "MONTHLY" } ``` --- ## JavaScript SDK ### Examples ```javascript import { appInstances } from '@wix/app-management'; appInstances.onAppInstancePaidPlanChanged((event) => { // handle your event here }); ``` ```javascript import { createClient, AppStrategy } from '@wix/sdk'; import { appInstances } from '@wix/app-management'; const wixClient = createClient({ auth: AppStrategy({ appId: 'MY-APP-ID', publicKey: 'YOUR_APP_PUBLIC_KEY', }), modules: { appInstances, }, }); wixClient.appInstances.onAppInstancePaidPlanChanged((event) => { // handle your event here }); ``` --- --- > Portal Navigation: > > - Append `.md` to any URL under `https://dev.wix.com/docs/` to get its markdown version. > - Pages are either content pages (article or reference text) or menu pages (a list of links to child pages). > - To get a menu page, truncate any URL to a parent path and append `.md` (e.g. `https://dev.wix.com/docs/sdk.md`, `https://dev.wix.com/docs/sdk/core-modules.md`). > - Top-level index of all portals: https://dev.wix.com/docs/llms.txt > - Full concatenated docs: https://dev.wix.com/docs/llms-full.txt # Package: appInstance # Webhook link: https://dev.wix.com/docs/api-reference/app-management/app-instance/paid-plan-purchased.md ## Introduction Triggered when a Wix user purchases a paid plan for your app. --- ## REST API ### Examples ```curl { "operationTimeStamp": "2019-12-09T07:44:53.659Z", "vendorProductId": "e8f429d5-0a6a-468f-8044-87f519a53202", "cycle": "MONTHLY", "expiresOn": "2020-01-09T07:44:53Z" } ``` --- ## JavaScript SDK ### Examples ```javascript import { appInstances } from '@wix/app-management'; appInstances.onAppInstancePaidPlanPurchased((event) => { // handle your event here }); ``` ```javascript import { createClient, AppStrategy } from '@wix/sdk'; import { appInstances } from '@wix/app-management'; const wixClient = createClient({ auth: AppStrategy({ appId: 'MY-APP-ID', publicKey: 'YOUR_APP_PUBLIC_KEY', }), modules: { appInstances, }, }); wixClient.appInstances.onAppInstancePaidPlanPurchased((event) => { // handle your event here }); ``` --- --- > Portal Navigation: > > - Append `.md` to any URL under `https://dev.wix.com/docs/` to get its markdown version. > - Pages are either content pages (article or reference text) or menu pages (a list of links to child pages). > - To get a menu page, truncate any URL to a parent path and append `.md` (e.g. `https://dev.wix.com/docs/sdk.md`, `https://dev.wix.com/docs/sdk/core-modules.md`). > - Top-level index of all portals: https://dev.wix.com/docs/llms.txt > - Full concatenated docs: https://dev.wix.com/docs/llms-full.txt # Package: appInstance # Webhook link: https://dev.wix.com/docs/api-reference/app-management/app-instance/plan-converted-to-paid.md ## Introduction Triggered when a Wix user reaches the end of a free-trial period and is charged successfully. --- ## REST API ### Examples ```javascript import { appInstances } from '@wix/app-management'; appInstances.onAppInstancePlanConvertedToPaid((event) => { // handle your event here }); ``` ```javascript import { createClient, AppStrategy } from '@wix/sdk'; import { appInstances } from '@wix/app-management'; const wixClient = createClient({ auth: AppStrategy({ appId: 'MY-APP-ID', publicKey: 'YOUR_APP_PUBLIC_KEY', }), modules: { appInstances, }, }); wixClient.appInstances.onAppInstancePlanConvertedToPaid((event) => { // handle your event here }); ``` --- --- > Portal Navigation: > > - Append `.md` to any URL under `https://dev.wix.com/docs/` to get its markdown version. > - Pages are either content pages (article or reference text) or menu pages (a list of links to child pages). > - To get a menu page, truncate any URL to a parent path and append `.md` (e.g. `https://dev.wix.com/docs/sdk.md`, `https://dev.wix.com/docs/sdk/core-modules.md`). > - Top-level index of all portals: https://dev.wix.com/docs/llms.txt > - Full concatenated docs: https://dev.wix.com/docs/llms-full.txt # Package: appInstance # Webhook link: https://dev.wix.com/docs/api-reference/app-management/app-instance/plan-reactivated.md ## Introduction Triggered when auto-renewal is turned on for a paid plan. --- ## REST API ### Examples ```javascript import { appInstances } from '@wix/app-management'; appInstances.onAppInstancePlanReactivated((event) => { // handle your event here }); ``` ```javascript import { createClient, AppStrategy } from '@wix/sdk'; import { appInstances } from '@wix/app-management'; const wixClient = createClient({ auth: AppStrategy({ appId: 'MY-APP-ID', publicKey: 'YOUR_APP_PUBLIC_KEY', }), modules: { appInstances, }, }); wixClient.appInstances.onAppInstancePlanReactivated((event) => { // handle your event here }); ``` --- --- > Portal Navigation: > > - Append `.md` to any URL under `https://dev.wix.com/docs/` to get its markdown version. > - Pages are either content pages (article or reference text) or menu pages (a list of links to child pages). > - To get a menu page, truncate any URL to a parent path and append `.md` (e.g. `https://dev.wix.com/docs/sdk.md`, `https://dev.wix.com/docs/sdk/core-modules.md`). > - Top-level index of all portals: https://dev.wix.com/docs/llms.txt > - Full concatenated docs: https://dev.wix.com/docs/llms-full.txt # Package: appInstance # Webhook link: https://dev.wix.com/docs/api-reference/app-management/app-instance/plan-transferred.md ## Introduction Triggered when a paid plan for your app is transferred to a different Wix account. --- ## REST API ### Examples ```javascript import { appInstances } from '@wix/app-management'; appInstances.onAppInstancePlanTransferred((event) => { // handle your event here }); ``` ```javascript import { createClient, AppStrategy } from '@wix/sdk'; import { appInstances } from '@wix/app-management'; const wixClient = createClient({ auth: AppStrategy({ appId: 'MY-APP-ID', publicKey: 'YOUR_APP_PUBLIC_KEY', }), modules: { appInstances, }, }); wixClient.appInstances.onAppInstancePlanTransferred((event) => { // handle your event here }); ``` --- --- > Portal Navigation: > > - Append `.md` to any URL under `https://dev.wix.com/docs/` to get its markdown version. > - Pages are either content pages (article or reference text) or menu pages (a list of links to child pages). > - To get a menu page, truncate any URL to a parent path and append `.md` (e.g. `https://dev.wix.com/docs/sdk.md`, `https://dev.wix.com/docs/sdk/core-modules.md`). > - Top-level index of all portals: https://dev.wix.com/docs/llms.txt > - Full concatenated docs: https://dev.wix.com/docs/llms-full.txt ## Resource: Introduction ## Article: Introduction ## Article Link: https://dev.wix.com/docs/api-reference/app-management/app-instance/introduction.md ## Article Content: # About the App Instances API The App Instances API allows you to collect data about the Wix sites that have installed your app and when a subscription for your app is modified. With the App Instances API, you can: + Get notified by Wix when a Wix user installs your app on their site. + Track data that's associated with individual app instances. For example, to check whether the Wix user has installed a free or paid version of your app, or to check what apps made by Wix are installed on the site. + Receive notifications from Wix when Wix users modify or cancel their subscription for your app. See the [Billing API](https://dev.wix.com/docs/rest/app-management/app-billing/billing/introduction.md) for more information how to charge Wix users for using your app. ## Before you begin It’s important to note the following points before starting to code: + You must [authenticate as a Wix App](https://dev.wix.com/docs/rest/articles/getting-started/about-identities.md#wix-app). + Wix users can install only a single version of your app on their site. For example, they can't install a free and paid version of your app at the same time. ## Use cases + [Reach out to new users](https://dev.wix.com/docs/api-reference/app-management/app-instance/sample-flows.md#reach-out-to-new-users) + [Identify a site's installed apps made by Wix](https://dev.wix.com/docs/api-reference/app-management/app-instance/sample-flows.md#identify-a-sites-installed-apps-made-by-wix) ## Terminology + __App instance__: Specific occurrence of your app on a particular Wix site. + __Paid plan__: A version of your app that isn't free. This version could require a single one-time payment or a subscription based payment. @sdk_package_setup --- > Portal Navigation: > > - Append `.md` to any URL under `https://dev.wix.com/docs/` to get its markdown version. > - Pages are either content pages (article or reference text) or menu pages (a list of links to child pages). > - To get a menu page, truncate any URL to a parent path and append `.md` (e.g. `https://dev.wix.com/docs/sdk.md`, `https://dev.wix.com/docs/sdk/core-modules.md`). > - Top-level index of all portals: https://dev.wix.com/docs/llms.txt > - Full concatenated docs: https://dev.wix.com/docs/llms-full.txt ## Resource: Sample Flows ## Article: Sample Flows ## Article Link: https://dev.wix.com/docs/api-reference/app-management/app-instance/sample-flows.md ## Article Content: # App Management: Sample Use Cases and Flows This article shares some possible use cases you could support, as well as a sample flow that could support each use case. This can be a helpful jumping off point as you plan your implementation. ## Reach out to new users When a Wix user installs your app, you can collect their email address and send them a welcome email. To retrieve new users' email: 1. Ensure your app requests the __Read Site Owner Email__ permission scope. 1. Listen to [App Instance Installed](https://dev.wix.com/docs/api-reference/app-management/app-instance/app-instance-installed.md) to be notified when a new user installs your app. Save the `data.instanceId` value from the webhook payload. 1. Call [Get App Instance](https://dev.wix.com/docs/api-reference/app-management/app-instance/get-app-instance.md) with the `instanceId` collected above. This returns an object containing data about a specific app instance. Inside the object, you'll find the site owner's email in `site.ownerInfo.email`. Note that you'll need to [create an access token](https://dev.wix.com/docs/rest/app-management/oauth-2/create-access-token.md) using the OAuth 2 API with your `APP_ID` and `APP_SECRET_KEY` from your app's **OAuth** page, as well as the instance ID you collected above. This will generate an access token you can use to communicate with the user's site. 1. Send your email. > **Notes:** > + If the `ownerInfo` object returns empty, check to make sure you've added the correct permission scope to your app. > + You'll need to check on your end whether the user has opted in to communications from your app. ## Identify a site's installed apps made by Wix Your app may be dependant on a specific [app made by Wix](https://dev.wix.com/docs/rest/articles/getting-started/wix-business-solutions.md). In this case, you can use the App Management API to verify that the relevant app is installed on a site. If so, Wix recommends marking one or more apps made by Wix as [requirements](https://dev.wix.com/docs/build-apps/launch-your-app/market-listing/add-your-app-audience-info.md). This will block the installation of your app and prompt the Wix user to install the required app. However, if your app supports different use cases depending on which app is installed, we recommend following the steps below. For example, your app may offer one flow for a site that includes Wix Stores, and a different flow for a site that includes Wix Bookings. To identify a site's installed apps made by Wix: 1. Listen to [App Instance Installed](https://dev.wix.com/docs/api-reference/app-management/app-instance/app-instance-installed.md) to be notified when a Wix user installs your app. Save the `data.instanceId` value from the webhook payload. 1. Call [Get App Instance](https://dev.wix.com/docs/api-reference/app-management/app-instance/get-app-instance.md) with the `instanceId` collected above to retrieve a list of the site's installed apps made by Wix. You can find this list in the `site.installedWixApps` array. Note that you'll need to [create an access token](https://dev.wix.com/docs/rest/app-management/oauth-2/create-access-token.md) using the OAuth 2 API with your `APP_ID` and `APP_SECRET_KEY` from your app's **OAuth** page, as well as the instance ID you collected above. This will generate an access token you can use to communicate with the user's site. With this data, your app can now perform any logic on your end to adjust your app's flows to the installed Wix apps. If the user has installed multiple apps made by Wix for which you support different flows, you can present them with a modal that lets them choose their preference. You can call Get App Instance regularly to stay up to date on a site's installed apps. If a Wix user no longer has a required Wix app installed, you may want to adjust your flow, or ask them to reinstall it. This is important to prevent getting errors when calling APIs that rely on an app made by Wix being installed. --- > Portal Navigation: > > - Append `.md` to any URL under `https://dev.wix.com/docs/` to get its markdown version. > - Pages are either content pages (article or reference text) or menu pages (a list of links to child pages). > - To get a menu page, truncate any URL to a parent path and append `.md` (e.g. `https://dev.wix.com/docs/sdk.md`, `https://dev.wix.com/docs/sdk/core-modules.md`). > - Top-level index of all portals: https://dev.wix.com/docs/llms.txt > - Full concatenated docs: https://dev.wix.com/docs/llms-full.txt # Resource: App Permissions # Type: App Permission Object # Link: https://dev.wix.com/docs/api-reference/app-management/app-permissions/app-permission-object.md ## Schema: ```json Type: App Permission Object | type: AppPermission - name: appId | type: string | description: App ID. You can find the app ID in the app's dashboard's [Home page](https://manage.wix.com/app-selector?title=Select+an+App&primaryButtonText=Select+Site&actionUrl=https%3A%2F%2Fdev.wix.com%2Fapps%2F%7BappId%7D%home). - name: permission | type: Permission | description: Permission the app requests when installed on a site. Learn more [about permissions for Wix apps](https://dev.wix.com/docs/build-apps/develop-your-app/access/authorization/about-permissions.md). - name: permissionId | type: string | description: Permission ID. To find the permission ID, navigate to the [Permissions page](https://dev.wix.com/app-selector?title=Select+an+App&primaryButtonText=Select+Site&actionUrl=https%3A%2F%2Fdev.wix.com%2Fapps%2F%7BappId%7D%2Fdev-center-permissions/add) in the app's dashboard and search for the [permission you want to configure](https://dev.wix.com/docs/build-apps/develop-your-app/access/authorization/configure-permissions-for-your-app.md#step-1--identify-required-permissions). - name: createdDate | type: string | description: When the permission was created. - name: seconds | type: string | description: - name: nanos | type: number | description: - name: updatedDate | type: string | description: When the permission was last updated. ``` --- > Portal Navigation: > > - Append `.md` to any URL under `https://dev.wix.com/docs/` to get its markdown version. > - Pages are either content pages (article or reference text) or menu pages (a list of links to child pages). > - To get a menu page, truncate any URL to a parent path and append `.md` (e.g. `https://dev.wix.com/docs/sdk.md`, `https://dev.wix.com/docs/sdk/core-modules.md`). > - Top-level index of all portals: https://dev.wix.com/docs/llms.txt > - Full concatenated docs: https://dev.wix.com/docs/llms-full.txt # CreateAppPermission # Package: appPermissions # Namespace: AppPermissionsService # Method link: https://dev.wix.com/docs/api-reference/app-management/app-permissions/create-app-permission.md ## Permission Scopes: Write Dev Center App Permissions: SCOPE.DEV_CENTER.WRITE_PERMISSIONS ## Introduction Adds a permission to the specified app. When users install your app on a site, it requests this permission. > **Important**: Disregard the **Authentication** note below. You can only call this method by authenticating with an account-level [API key](https://dev.wix.com/docs/rest/articles/get-started/api-keys.md). --- ## REST API ### Examples ### Add a permission to an app ```curl curl -X POST \ 'https://www.wixapis.com/apps/v1/app-permissions/v1/app-permissions' \ -H 'Content-Type: application/json' \ -H 'Authorization: ' \ -H 'wix-account-id: ' \ -d '{ "appPermission": { "appId": "73k98f4e-a8f3-4b7c-9d87-23fc55g793ec", "permission": { "permissionId": "SCOPE.DC-EVENTS.MANAGE-EVENTS" } } }' ``` --- ## JavaScript SDK ### Examples ### createAppPermission ```javascript import { appPermissions } from '@wix/app-management'; async function createAppPermission(appPermission) { const response = await appPermissions.createAppPermission(appPermission); }; ``` ### createAppPermission (with elevated permissions) ```javascript import { appPermissions } from '@wix/app-management'; import { auth } from '@wix/essentials'; async function myCreateAppPermissionMethod(appPermission) { const elevatedCreateAppPermission = auth.elevate(appPermissions.createAppPermission); const response = await elevatedCreateAppPermission(appPermission); } ``` ### createAppPermission (self-hosted) Self-hosted SDK calls require you to [create a client](https://dev.wix.com/docs/sdk/articles/work-with-the-sdk/about-the-wix-client.md). ```javascript import { createClient } from '@wix/sdk'; import { appPermissions } from '@wix/app-management'; // Import the auth strategy for the relevant access type // Import the relevant host module if needed const myWixClient = createClient ({ modules: { appPermissions }, // Include the auth strategy and host as relevant }); async function createAppPermission(appPermission) { const response = await myWixClient.appPermissions.createAppPermission(appPermission); }; ``` --- --- > Portal Navigation: > > - Append `.md` to any URL under `https://dev.wix.com/docs/` to get its markdown version. > - Pages are either content pages (article or reference text) or menu pages (a list of links to child pages). > - To get a menu page, truncate any URL to a parent path and append `.md` (e.g. `https://dev.wix.com/docs/sdk.md`, `https://dev.wix.com/docs/sdk/core-modules.md`). > - Top-level index of all portals: https://dev.wix.com/docs/llms.txt > - Full concatenated docs: https://dev.wix.com/docs/llms-full.txt # DeleteAppPermission # Package: appPermissions # Namespace: AppPermissionsService # Method link: https://dev.wix.com/docs/api-reference/app-management/app-permissions/delete-app-permission.md ## Permission Scopes: Write Dev Center App Permissions: SCOPE.DEV_CENTER.WRITE_PERMISSIONS ## Introduction Deletes a permission from the specified app. After deleting a permission, your app no longer requests it when users install it on a site. As a result, the app can no longer make calls to APIs that require this permission. > **Important**: Disregard the **Authentication** note below. You can only call this method by authenticating with an account-level [API key](https://dev.wix.com/docs/rest/articles/get-started/api-keys.md). --- ## REST API ### Examples ### Add a permission to an app ```curl curl -X DELETE \ 'https://www.wixapis.com/apps/v1/app-permissions/v1/app-permissions?appId=73k98f4e-a8f3-4b7c-9d87-23fc55g793ec&permissionId=SCOPE.DC-EVENTS.MANAGE-EVENTS' \ -H 'Content-Type: application/json' \ -H 'Authorization: ' \ -H 'wix-account-id: ' ``` --- ## JavaScript SDK ### Examples ### deleteAppPermission ```javascript import { appPermissions } from '@wix/app-management'; async function deleteAppPermission(appId,permissionId) { const response = await appPermissions.deleteAppPermission(appId,permissionId); }; ``` ### deleteAppPermission (with elevated permissions) ```javascript import { appPermissions } from '@wix/app-management'; import { auth } from '@wix/essentials'; async function myDeleteAppPermissionMethod(appId,permissionId) { const elevatedDeleteAppPermission = auth.elevate(appPermissions.deleteAppPermission); const response = await elevatedDeleteAppPermission(appId,permissionId); } ``` ### deleteAppPermission (self-hosted) Self-hosted SDK calls require you to [create a client](https://dev.wix.com/docs/sdk/articles/work-with-the-sdk/about-the-wix-client.md). ```javascript import { createClient } from '@wix/sdk'; import { appPermissions } from '@wix/app-management'; // Import the auth strategy for the relevant access type // Import the relevant host module if needed const myWixClient = createClient ({ modules: { appPermissions }, // Include the auth strategy and host as relevant }); async function deleteAppPermission(appId,permissionId) { const response = await myWixClient.appPermissions.deleteAppPermission(appId,permissionId); }; ``` --- --- > Portal Navigation: > > - Append `.md` to any URL under `https://dev.wix.com/docs/` to get its markdown version. > - Pages are either content pages (article or reference text) or menu pages (a list of links to child pages). > - To get a menu page, truncate any URL to a parent path and append `.md` (e.g. `https://dev.wix.com/docs/sdk.md`, `https://dev.wix.com/docs/sdk/core-modules.md`). > - Top-level index of all portals: https://dev.wix.com/docs/llms.txt > - Full concatenated docs: https://dev.wix.com/docs/llms-full.txt # ListAppPermissions # Package: appPermissions # Namespace: AppPermissionsService # Method link: https://dev.wix.com/docs/api-reference/app-management/app-permissions/list-app-permissions.md ## Introduction Lists all permissions for the specified app. These are the permissions your app requests when users install it on a site. --- ## REST API ### Examples ### List an app's permissions ```curl curl -X GET \ 'https://www.wixapis.com/apps/v1/app-permissions/v1/app-permissions?appId=73k98f4e-a8f3-4b7c-9d87-23fc55g793ec&consistent' \ -H 'Content-Type: application/json' \ -H 'Authorization: ' ``` --- ## JavaScript SDK ### Examples ### listAppPermissions ```javascript import { appPermissions } from '@wix/app-management'; async function listAppPermissions(appId,options) { const response = await appPermissions.listAppPermissions(appId,options); }; ``` ### listAppPermissions (with elevated permissions) ```javascript import { appPermissions } from '@wix/app-management'; import { auth } from '@wix/essentials'; async function myListAppPermissionsMethod(appId,options) { const elevatedListAppPermissions = auth.elevate(appPermissions.listAppPermissions); const response = await elevatedListAppPermissions(appId,options); } ``` ### listAppPermissions (self-hosted) Self-hosted SDK calls require you to [create a client](https://dev.wix.com/docs/sdk/articles/work-with-the-sdk/about-the-wix-client.md). ```javascript import { createClient } from '@wix/sdk'; import { appPermissions } from '@wix/app-management'; // Import the auth strategy for the relevant access type // Import the relevant host module if needed const myWixClient = createClient ({ modules: { appPermissions }, // Include the auth strategy and host as relevant }); async function listAppPermissions(appId,options) { const response = await myWixClient.appPermissions.listAppPermissions(appId,options); }; ``` --- --- > Portal Navigation: > > - Append `.md` to any URL under `https://dev.wix.com/docs/` to get its markdown version. > - Pages are either content pages (article or reference text) or menu pages (a list of links to child pages). > - To get a menu page, truncate any URL to a parent path and append `.md` (e.g. `https://dev.wix.com/docs/sdk.md`, `https://dev.wix.com/docs/sdk/core-modules.md`). > - Top-level index of all portals: https://dev.wix.com/docs/llms.txt > - Full concatenated docs: https://dev.wix.com/docs/llms-full.txt ## Resource: Introduction ## Article: Introduction ## Article Link: https://dev.wix.com/docs/api-reference/app-management/app-permissions/introduction.md ## Article Content: # About the App Permissions API The App Permissions API allows you to manage the permissions your app needs for its functionality. When users install your app, they need to grant your app the permissions it needs to allow it to access their site data and make API calls on their behalf. Permissions are granular and can be tailored to your app's specific needs, such as creating a [business location](https://dev.wix.com/docs/rest/business-management/locations/create-location.md) or [setting a member's privacy settings](https://dev.wix.com/docs/rest/crm/members-contacts/members/member-privacy-settings/set-member-privacy-settings.md). Learn more [about permissions for Wix apps](https://dev.wix.com/docs/build-apps/develop-your-app/access/authorization/about-permissions.md). With the Wix App Permissions API, you can: - [List permissions](https://dev.wix.com/docs/rest/app-management/app-permissions/list-app-permissions.md) associated with a specific app. - [Create new permissions](https://dev.wix.com/docs/rest/app-management/app-permissions/create-app-permission.md) for an app. - [Delete existing permissions](https://dev.wix.com/docs/rest/app-management/app-permissions/delete-app-permission.md) from an app. > **Note**: After adding or removing a permission, it might take up to 5 minutes for the update to appear across the [Wix ecosystem](https://dev.wix.com/docs/build-apps/get-started/overview/the-wix-ecosystem.md). ## Before you begin It's important to note the following points before starting to code: - You must have a [Wix app](https://dev.wix.com/docs/build-apps/get-started/overview/about-wix-apps.md). Learn more [about developing apps](https://dev.wix.com/docs/build-apps/develop-your-app/about-developing-apps.md). - You must have an [API key](https://dev.wix.com/docs/rest/articles/get-started/api-keys.md) with the account-level **Manage Custom Apps** permission from the account that owns the app. - [Identify the permissions your app needs](https://dev.wix.com/docs/build-apps/develop-your-app/access/authorization/configure-permissions-for-your-app.md#step-1--identify-required-permissions) by checking which Wix APIs it uses. ## Use case - [Add a permission for your app](https://dev.wix.com/docs/rest/app-management/app-permissions/sample-flows.md) @sdk_package_setup --- > Portal Navigation: > > - Append `.md` to any URL under `https://dev.wix.com/docs/` to get its markdown version. > - Pages are either content pages (article or reference text) or menu pages (a list of links to child pages). > - To get a menu page, truncate any URL to a parent path and append `.md` (e.g. `https://dev.wix.com/docs/sdk.md`, `https://dev.wix.com/docs/sdk/core-modules.md`). > - Top-level index of all portals: https://dev.wix.com/docs/llms.txt > - Full concatenated docs: https://dev.wix.com/docs/llms-full.txt ## Resource: Sample Flows ## Article: Sample Flows ## Article Link: https://dev.wix.com/docs/api-reference/app-management/app-permissions/sample-flows.md ## Article Content: # Sample Flow This article presents a possible use case and corresponding sample flow that you can support. This can be a helpful jumping off point as you plan your implementation. ## Add a permission to your app To add a permission to your app, such as the **Manage Events** permission: 1. Find your app's ID on the [Home page](https://manage.wix.com/app-selector?title=Select+an+App&primaryButtonText=Select+Site&actionUrl=https%3A%2F%2Fdev.wix.com%2Fapps%2F%7BappId%7D%home) in the app's dashboard. 2. In the API reference, locate the method your app needs and [identify the required permission](https://dev.wix.com/docs/build-apps/develop-your-app/access/authorization/configure-permissions-for-your-app.md#step-1--identify-required-permissions). 3. Find the ID of the required permission by searching for it on the [Permissions page](https://dev.wix.com/app-selector?title=Select+an+App&primaryButtonText=Select+Site&actionUrl=https%3A%2F%2Fdev.wix.com%2Fapps%2F%7BappId%7D%2Fdev-center-permissions/add) in the app's dashboard. 4. Call the [Create App Permission](https://dev.wix.com/docs/rest/app-management/app-permissions/create-app-permission.md) method with the app ID and permission ID: ```json { "appPermission": { "appId": "73c38f4e-a8f3-4b7c-9d87-23fc578793ec", "permission": { "permissionId": "SCOPE.DC-EVENTS.MANAGE-EVENTS" } } } ``` The method returns a response such as: ```json { "appPermission": { "appId": "73c38f4e-a8f3-4b7c-9d87-23fc578793ec", "permission": { "permissionId": "SCOPE.DC-EVENTS.MANAGE-EVENTS" }, "createdDate": "2025-05-05T08:53:20.154Z", "updatedDate": "2025-05-05T08:53:20.154Z" } } ``` Now, when users install your app on a site, they are asked to grant it the **Manage Events** permission. > **Note**: It might take up to 5 minutes for the permission to update across the [Wix ecosystem](https://dev.wix.com/docs/build-apps/get-started/overview/the-wix-ecosystem.md). --- > Portal Navigation: > > - Append `.md` to any URL under `https://dev.wix.com/docs/` to get its markdown version. > - Pages are either content pages (article or reference text) or menu pages (a list of links to child pages). > - To get a menu page, truncate any URL to a parent path and append `.md` (e.g. `https://dev.wix.com/docs/sdk.md`, `https://dev.wix.com/docs/sdk/core-modules.md`). > - Top-level index of all portals: https://dev.wix.com/docs/llms.txt > - Full concatenated docs: https://dev.wix.com/docs/llms-full.txt # Resource: Embedded Scripts # Type: Script Properties Object # Link: https://dev.wix.com/docs/api-reference/app-management/embedded-scripts/script-properties-object.md ## Schema: ```json Type: Script Properties Object | type: ScriptProperties - name: parameters | type: object | description: Dynamic parameters available to the script when it runs on the site. Learn more about [using dynamic parameters](https://dev.wix.com/docs/wix-cli/guides/extensions/site-extensions/embedded-scripts/embedded-script-extension-files-and-code.md#using-dynamic-parameters-in-your-html-code). - name: disabled | type: boolean | description: Whether to disable the script. Default: `false`. ``` --- > Portal Navigation: > > - Append `.md` to any URL under `https://dev.wix.com/docs/` to get its markdown version. > - Pages are either content pages (article or reference text) or menu pages (a list of links to child pages). > - To get a menu page, truncate any URL to a parent path and append `.md` (e.g. `https://dev.wix.com/docs/sdk.md`, `https://dev.wix.com/docs/sdk/core-modules.md`). > - Top-level index of all portals: https://dev.wix.com/docs/llms.txt > - Full concatenated docs: https://dev.wix.com/docs/llms-full.txt # GetEmbeddedScript # Package: embeddedScripts # Namespace: EmbeddedScriptsService # Method link: https://dev.wix.com/docs/api-reference/app-management/embedded-scripts/get-embedded-script.md ## Permission Scopes: Manage Embedded Scripts: SCOPE.DC-APPS.MANAGE-EMBEDDED-SCRIPTS ## Introduction Retrieves information about your app's existing embedded script. If your app doesn't have an embedded script on the relevant site, a `404` error is returned. --- ## REST API ### Examples ### GetEmbeddedScript ```curl ~~~cURL curl -X GET \ https://www.wixapis.com/apps/v1/scripts \ -H 'Authorization: ' ~~~ ``` --- ## JavaScript SDK ### Examples ### getEmbeddedScript ```javascript import { embeddedScripts } from '@wix/app-management'; async function getEmbeddedScript(options) { const response = await embeddedScripts.getEmbeddedScript(options); }; ``` ### getEmbeddedScript (with elevated permissions) ```javascript import { embeddedScripts } from '@wix/app-management'; import { auth } from '@wix/essentials'; async function myGetEmbeddedScriptMethod(options) { const elevatedGetEmbeddedScript = auth.elevate(embeddedScripts.getEmbeddedScript); const response = await elevatedGetEmbeddedScript(options); } ``` ### getEmbeddedScript (self-hosted) Self-hosted SDK calls require you to [create a client](https://dev.wix.com/docs/sdk/articles/work-with-the-sdk/about-the-wix-client.md). ```javascript import { createClient } from '@wix/sdk'; import { embeddedScripts } from '@wix/app-management'; // Import the auth strategy for the relevant access type // Import the relevant host module if needed const myWixClient = createClient ({ modules: { embeddedScripts }, // Include the auth strategy and host as relevant }); async function getEmbeddedScript(options) { const response = await myWixClient.embeddedScripts.getEmbeddedScript(options); }; ``` --- --- > Portal Navigation: > > - Append `.md` to any URL under `https://dev.wix.com/docs/` to get its markdown version. > - Pages are either content pages (article or reference text) or menu pages (a list of links to child pages). > - To get a menu page, truncate any URL to a parent path and append `.md` (e.g. `https://dev.wix.com/docs/sdk.md`, `https://dev.wix.com/docs/sdk/core-modules.md`). > - Top-level index of all portals: https://dev.wix.com/docs/llms.txt > - Full concatenated docs: https://dev.wix.com/docs/llms-full.txt # EmbedScript # Package: embeddedScripts # Namespace: EmbeddedScriptsService # Method link: https://dev.wix.com/docs/api-reference/app-management/embedded-scripts/embed-script.md ## Permission Scopes: Manage Embedded Scripts: SCOPE.DC-APPS.MANAGE-EMBEDDED-SCRIPTS ## Introduction Inserts custom script tags into a site, with the specified values for any dynamic parameters. Call this method when your app is installed on a site. Your app must have an existing [embedded script component](https://dev.wix.com/docs/build-apps/develop-your-app/extensions/site-extensions/embedded-scripts/about-embedded-scripts.md), with exactly matching parameter names. --- ## REST API ### Examples ### EmbedScript ```curl ~~~cURL curl -X POST \ https://www.wixapis.com/apps/v1/scripts \ -H 'Authorization: ' \ -d '{ "properties": { "parameters": { "KeyName123": "Value123" } } }' ~~~ ``` --- ## JavaScript SDK ### Examples ### embedScript ```javascript import { embeddedScripts } from '@wix/app-management'; async function embedScript(properties,options) { const response = await embeddedScripts.embedScript(properties,options); }; ``` ### embedScript (with elevated permissions) ```javascript import { embeddedScripts } from '@wix/app-management'; import { auth } from '@wix/essentials'; async function myEmbedScriptMethod(properties,options) { const elevatedEmbedScript = auth.elevate(embeddedScripts.embedScript); const response = await elevatedEmbedScript(properties,options); } ``` ### embedScript (self-hosted) Self-hosted SDK calls require you to [create a client](https://dev.wix.com/docs/sdk/articles/work-with-the-sdk/about-the-wix-client.md). ```javascript import { createClient } from '@wix/sdk'; import { embeddedScripts } from '@wix/app-management'; // Import the auth strategy for the relevant access type // Import the relevant host module if needed const myWixClient = createClient ({ modules: { embeddedScripts }, // Include the auth strategy and host as relevant }); async function embedScript(properties,options) { const response = await myWixClient.embeddedScripts.embedScript(properties,options); }; ``` --- --- > Portal Navigation: > > - Append `.md` to any URL under `https://dev.wix.com/docs/` to get its markdown version. > - Pages are either content pages (article or reference text) or menu pages (a list of links to child pages). > - To get a menu page, truncate any URL to a parent path and append `.md` (e.g. `https://dev.wix.com/docs/sdk.md`, `https://dev.wix.com/docs/sdk/core-modules.md`). > - Top-level index of all portals: https://dev.wix.com/docs/llms.txt > - Full concatenated docs: https://dev.wix.com/docs/llms-full.txt ## Resource: Introduction ## Article: Introduction ## Article Link: https://dev.wix.com/docs/api-reference/app-management/embedded-scripts/introduction.md ## Article Content: # About the Embedded Script API You can use the Embedded Script API to inject custom script tags to the head tag of a site. If you have custom keys or data, you can use dynamic parameters in your embedded script. You can also [listen to predefined Wix events](https://dev.wix.com/docs/build-apps/develop-your-app/extensions/site-extensions/embedded-scripts/analyze-user-behavior-using-embedded-scripts.md#listen-to-predefined-wix-events), and [report and listen to custom events](https://dev.wix.com/docs/build-apps/develop-your-app/extensions/site-extensions/embedded-scripts/analyze-user-behavior-using-embedded-scripts.md#report-and-listen-to-custom-events). ## Using dynamic parameters The embedded script can include dynamic parameters. For example: `` ## Before you begin - You must [authenticate as a Wix App](https://dev.wix.com/docs/rest/articles/getting-started/about-identities.md#wix-app). - If an app has more than one embedded script component, the relevant component ID must be passed for all calls. The component ID for each embedded script component is available as a query parameter in the embedded script's extension page in the app dashboard. - If an app only has one embedded script component, don't pass the component ID. - The keys in the custom parameters passed in this API must be identical to the keys defined in the app's embedded script component. Using any other keys results in a 400 error. - Dynamic parameters must: - Be strings. - Contain only alphanumeric characters (no special characters or spaces). - Be wrapped in double curly braces (`{{`). - Be enclosed in quotes (") to prevent code evaluation. - Be provided upon installation when calling [Embed Script](https://dev.wix.com/docs/rest/app-management/embedded-scripts/embed-script.md). ## Use cases - [Listen when a visitor adds an item to a cart](https://dev.wix.com/docs/rest/app-management/embedded-scripts/sample-flows.md). ## Troubleshooting The `MISMATCHED ANONYMOUS DEFINE() MODULES...` error is a common issue when working with AMD/UMD bundled scripts. The error occurs when an embedded script defines an anonymous module, either because it's bundled with AMD or it adds a script tag to the head containing an anonymous module. To resolve the issue, try the following: * **For the embedded script itself:** If the script is bundled with AMD/UMD, make sure that you declare only [named modules](https://requirejs.org/docs/api.html#modulename). * **For scripts loaded by the embed**: * **If you own the code:** If the scripts are bundled with AMD/UMD, make sure that you declare only [named modules](https://requirejs.org/docs/api.html#modulename). * **If you don't own the code:** Check if `requirejs` exists on the window. If it does, load the script via `requirejs` instead of adding the script to the ``. This approach is suboptimal and might still lead to race conditions and errors. For more information on this issue, see [RequireJS: Common Errors](https://requirejs.org/docs/errors.html#mismatch). @sdk_package_setup --- > Portal Navigation: > > - Append `.md` to any URL under `https://dev.wix.com/docs/` to get its markdown version. > - Pages are either content pages (article or reference text) or menu pages (a list of links to child pages). > - To get a menu page, truncate any URL to a parent path and append `.md` (e.g. `https://dev.wix.com/docs/sdk.md`, `https://dev.wix.com/docs/sdk/core-modules.md`). > - Top-level index of all portals: https://dev.wix.com/docs/llms.txt > - Full concatenated docs: https://dev.wix.com/docs/llms-full.txt ## Resource: Sample Flows ## Article: Sample Flows ## Article Link: https://dev.wix.com/docs/api-reference/app-management/embedded-scripts/sample-flows.md ## Article Content: # Sample Flows This article shares some possible use cases you can support, as well as an example flow that supports each use case. You're certainly not limited to these use cases, but they can be a helpful jumping off point as you plan your implementation. For detailed instructions, see [Add an Embedded Script Extension to a Self-Hosted App](https://dev.wix.com/docs/build-apps/develop-your-app/frameworks/self-hosting/supported-extensions/site-extensions/embedded-scripts/add-an-embedded-script-extension-to-a-self-hosted-app.md). ## Listen when a visitor clicks a product To listen to the [predefined Wix event](https://dev.wix.com/docs/build-apps/develop-your-app/extensions/site-extensions/embedded-scripts/analyze-user-behavior-using-embedded-scripts.md) `clickProduct`, add it to your embedded script code. 1. Create an [Embedded Script extension](https://dev.wix.com/docs/build-apps/develop-your-app/extensions/site-extensions/embedded-scripts/about-embedded-scripts.md) in your app and select a script type. For example: ``` ``` Replace with your own unique app ID, as found in the OAuth page of your [app's dashboard](https://dev.wix.com/apps/my-apps). 2. Listen to the to [App Instance Installed](https://dev.wix.com/docs/rest/app-management/app-instance/app-instance-installed.md). 3. When a Wix user installs your app, call [Embed Script](https://dev.wix.com/docs/rest/app-management/embedded-scripts/embed-script.md) to embed the script in their site, with the relevant values for your dynamic parameters. For example: ``` { "properties": { "parameters": { "": "<1234567890>" } } } ``` 3. When a site visitor clicks a product, your function will run. --- > Portal Navigation: > > - Append `.md` to any URL under `https://dev.wix.com/docs/` to get its markdown version. > - Pages are either content pages (article or reference text) or menu pages (a list of links to child pages). > - To get a menu page, truncate any URL to a parent path and append `.md` (e.g. `https://dev.wix.com/docs/sdk.md`, `https://dev.wix.com/docs/sdk/core-modules.md`). > - Top-level index of all portals: https://dev.wix.com/docs/llms.txt > - Full concatenated docs: https://dev.wix.com/docs/llms-full.txt # sendBIEvent # Package: biEvent # Namespace: BIEventsService # Method link: https://dev.wix.com/docs/api-reference/app-management/bi-event/send-bi-event.md ## Permission Scopes: Manage Your App: SCOPE.DC.MANAGE-YOUR-APP ## Introduction Submit a BI event to Wix. --- ## REST API ### Examples ### First Success ```curl curl -X POST \ 2 https://www.wixapis.com/apps/v1/bi-event \ 3 -H 'Authorization: ' \ 4 -d '{ 5 "eventName": "PRIMARY_ACTION_PERFORMED", 6 }' ``` ### Complete Setup ```curl curl -X POST \ https://www.wixapis.com/apps/v1/bi-event \ -H 'Authorization: ' \ -d '{ "eventName": "APP_FINISHED_CONFIGURATION", }' ``` ### Log-in Completed ```curl curl -X POST \ https://www.wixapis.com/apps/v1/bi-event \ -H 'Authorization: ' \ -d '{ "eventName": "CUSTOM", "customEventName': "Log_in_completed", }' ``` ### App Dashboard Loaded ```curl curl -X POST \ 2 https://www.wixapis.com/apps/v1/bi-event \ 3 -H 'Authorization: ' \ 4 -d '{ 5 "eventName": "APP_DASHBOARD_LOADED", 6 }' ``` ### App Upgraded ```curl curl -X POST \ https://www.wixapis.com/apps/v1/bi-event \ -H 'Authorization: ' \ -d '{ "eventName": "APP_UPGRADED", "eventData": { "cycle_name": "yearly", "currency": "usd", "sum": "10", "reason": "upgrade", "app_plan_id" : "pro", }' ``` ### sendBIEvent ```curl ~~~cURL curl -X POST \ https://www.wixapis.com/apps/v1/bi-event \ -H 'Authorization: ' \ -d '{ "eventName": "CUSTOM", "customEventName": "Contact form submitted", "eventData": { "User name": "John Doe", "Title": "Need help with the app", "Description": "I have run into a little bit of an issue with my app" }' ~~~ ``` --- ## JavaScript SDK ### Examples ### sendBiEvent ```javascript import { biEvents } from '@wix/app-management'; async function sendBiEvent(options) { const response = await biEvents.sendBiEvent(options); }; ``` ### sendBiEvent (with elevated permissions) ```javascript import { biEvents } from '@wix/app-management'; import { auth } from '@wix/essentials'; async function mySendBiEventMethod(options) { const elevatedSendBiEvent = auth.elevate(biEvents.sendBiEvent); const response = await elevatedSendBiEvent(options); } ``` ### sendBiEvent (self-hosted) Self-hosted SDK calls require you to [create a client](https://dev.wix.com/docs/sdk/articles/work-with-the-sdk/about-the-wix-client.md). ```javascript import { createClient } from '@wix/sdk'; import { biEvents } from '@wix/app-management'; // Import the auth strategy for the relevant access type // Import the relevant host module if needed const myWixClient = createClient ({ modules: { biEvents }, // Include the auth strategy and host as relevant }); async function sendBiEvent(options) { const response = await myWixClient.biEvents.sendBiEvent(options); }; ``` --- --- > Portal Navigation: > > - Append `.md` to any URL under `https://dev.wix.com/docs/` to get its markdown version. > - Pages are either content pages (article or reference text) or menu pages (a list of links to child pages). > - To get a menu page, truncate any URL to a parent path and append `.md` (e.g. `https://dev.wix.com/docs/sdk.md`, `https://dev.wix.com/docs/sdk/core-modules.md`). > - Top-level index of all portals: https://dev.wix.com/docs/llms.txt > - Full concatenated docs: https://dev.wix.com/docs/llms-full.txt ## Resource: Introduction ## Article: Introduction ## Article Link: https://dev.wix.com/docs/api-reference/app-management/bi-event/introduction.md ## Article Content: # About the BI Events API
        New API available BI events related to charges have been replaced by the [External Billing Events API](https://dev.wix.com/docs/rest/app-management/app-billing/external-billing-events/introduction.md). Use this new API to report your app's external billing events to Wix.
        This API allows 3rd party apps connected to Wix, to send BI events to the Wix system. It includes several out-of-the-box events, like when the app dashboard is loaded, or when a primary action is taken (the most valuable action in an app product flow). If the list of built-in event does not suit your needs, you can also send a custom event. @sdk_package_setup --- > Portal Navigation: > > - Append `.md` to any URL under `https://dev.wix.com/docs/` to get its markdown version. > - Pages are either content pages (article or reference text) or menu pages (a list of links to child pages). > - To get a menu page, truncate any URL to a parent path and append `.md` (e.g. `https://dev.wix.com/docs/sdk.md`, `https://dev.wix.com/docs/sdk/core-modules.md`). > - Top-level index of all portals: https://dev.wix.com/docs/llms.txt > - Full concatenated docs: https://dev.wix.com/docs/llms-full.txt ## Resource: Sample Flows ## Article: Sample Flows ## Article Link: https://dev.wix.com/docs/api-reference/app-management/bi-event/sample-flows.md ## Article Content: # BI Events: Sample flows This article outlines key flows for sending BI events and explains their implications. ## Alert users when app setup is incomplete To alert users that your app requires additional configuration, such as setting preferences or creating an account, Wix can display a "Setup incomplete" status badge next to your app in the site dashboard. To enable the badge, your app has to send the `APP_FINISHED_CONFIGURATION` event at least once. Wix will then recognize your app as requiring additional setup and show the badge for future installations. Once you determine that the [app instance](https://dev.wix.com/docs/build-apps/develop-your-app/access/app-instances/about-app-instances.md) has completed the setup of the app, send the event for that instance to remove the badge and mark it as configuration finished. The process looks like this: 1. A user installs your app. At this point: * If you’ve sent the `APP_FINISHED_CONFIGURATION` event at least once, the user sees the "Status incomplete" badge next to your app in the site dashboard. * If you haven’t sent the event, no setup status is shown to the user. 1. Upon opening the app, your app prompts the user to complete the setup. 1. After setup is complete, your app sends the `APP_FINISHED_CONFIGURATION` event, including an [OAuth](https://dev.wix.com/docs/build-apps/develop-your-app/access/authentication/about-oauth.md) access token for the relevant app instance in the `Authorization` header. 1. Wix removes the "Setup incomplete" status badge next to your app in the site dashboard.
        **Warning**: After sending the `APP_FINISHED_CONFIGURATION` event, your app will always show a "Setup incomplete" status for new installations. This behavior can't be disabled.
        --- > Portal Navigation: > > - Append `.md` to any URL under `https://dev.wix.com/docs/` to get its markdown version. > - Pages are either content pages (article or reference text) or menu pages (a list of links to child pages). > - To get a menu page, truncate any URL to a parent path and append `.md` (e.g. `https://dev.wix.com/docs/sdk.md`, `https://dev.wix.com/docs/sdk/core-modules.md`). > - Top-level index of all portals: https://dev.wix.com/docs/llms.txt > - Full concatenated docs: https://dev.wix.com/docs/llms-full.txt ## Resource: About the Editor Deep Link API ## Article: About the Editor Deep Link API ## Article Link: https://dev.wix.com/docs/api-reference/app-management/editor-deep-link/about-the-editor-deep-link-api.md ## Article Content: # About the Editor Deep Link API This API generates a URL that will open the editor and add an app's [Custom Element](https://support.wix.com/en/article/wix-editor-adding-a-custom-element-to-your-site) component to the user's page. If the app doesn't have a Custom Element component, the URL just opens the editor. > **Note:** This API works only with the [legacy custom element](https://dev.wix.com/docs/build-apps/develop-your-app/develop-a-self-managed-app/supported-extensions/deprecated/legacy-custom-elements/legacy-custom-element-deprecated.md). ## Terminology - **Custom Element** - A website component that contains a custom script as well as custom parameters with UI control elements in a settings panel. - **Editor Deep Link** - A link that sends a user to the editor, adding a Custom Element components directly to the page. ## Use Cases The Editor Deep Link API generates a URL that opens the editor and adds Custom Element components to a page. It can be used in the following ways. ### Use Case 1: Open the Editor Calling the API for an app that doesn't have a Custom Element component generates a URL that just opens the editor. It isn't necessary to include any parameters in the body of the request. #### Request ```CURL Curl -X POST \ https://www.wixapis.com/apps/v1/post-installation/editor-deep-link \ -H 'Authorization: ' ``` #### Response ``` { "url": } ``` ### Use Case 2: Use the Deep Link to Add a Custom Element Add a Custom Element component to your app. Edit the component, and enter the URL for your script in the **Basic Info** section. Click the **Settings Panel** tab and add custom parameters to the settings panel, adding keys and values for each parameter. Values depend on the type of parameter - default text, toggle on/off, slider value and so on. ![Settings Panel](images/rest-docs_media_custom-element-settings-panel.png) Use the API to create a URL that will open the user's editor and then add the Custom Element component to a page. You can further customize each generated URL by adjusting the values of the custom parameters. This is done passing new values in the body of the request. #### Request ```CURL Curl -X POST \ https://wixapis.com/apps/v1/post-installation/editor-deep-link \ -H 'Authorization: ' -data-raw '{ "customParams": [ { "key1": "value1", "key2": "value2" } ] }' ``` #### Response ```JSON { "url": } ``` > **Note:** > Parameters passed in the body of the API request will only populate the settings panel if their keys match the keys already present in the settings panel. When users install your app they have access to the same settings panel. The values you set, either in the settings panel or in the body of the API request, are presented to users as default or initial settings that can be changed by the user. ![Custom Element](images/rest-docs_media_custom-plus-settings.png) ## An Example of Using the Custom Element Consider an app that adds a lead generation form. Site owners create forms via the app's dashboard, and each form has a unique id. Next to each form in the dashboard the developer adds an “Add to Site" button. It uses the Editor Deep Link API together with the unique form id as a custom key-value pair into a settings panel field with the same key. When site owners click the button, they are taken to the editor and the form is added to the page. --- > Portal Navigation: > > - Append `.md` to any URL under `https://dev.wix.com/docs/` to get its markdown version. > - Pages are either content pages (article or reference text) or menu pages (a list of links to child pages). > - To get a menu page, truncate any URL to a parent path and append `.md` (e.g. `https://dev.wix.com/docs/sdk.md`, `https://dev.wix.com/docs/sdk/core-modules.md`). > - Top-level index of all portals: https://dev.wix.com/docs/llms.txt > - Full concatenated docs: https://dev.wix.com/docs/llms-full.txt ## Resource: Create an Editor Deep Link ## Article: Create an Editor Deep Link ## Article Link: https://dev.wix.com/docs/api-reference/app-management/editor-deep-link/create-an-editor-deep-link.md ## Article Content: # Create an Editor Deep Link

        Permissions
        This endpoint requires the Manage Your App permission.md scope.

          POST   https://www.wixapis.com/apps/v1/post-installation/editor-deep-link ### Body Params Name | Type | Description ---------|----------|---------   **customParams** | object |Array of key-value pairs | **key** | string | | **value** | string | ### Response Object Name | Type | Description ---------|----------|--------- **url** | URL | Deep Link URL ### Example #### Request ```CURL Curl -X POST \ https://www.wixapis.com/apps/v1/post-installation/editor-deep-link \ -H 'Authorization: ' -data-raw '{ "customParams": [ { "key1": "value1", "key2": "value2" } ] }' ``` #### Response ``` { "url": "https://www.wix.com/editor/8d157c7a-2cb8-4ea9-bf6f-3039e30099a3?appMarketParams=eyJraWQiOiJ5R0xVRVlVTiIsImFsZy.." } ``` ### Status/Error Codes The response will include an [HTTP status code](https://dev.wix.com/docs/api-reference/articles/work-with-wix-apis/troubleshooting/about-errors.md). --- > Portal Navigation: > > - Append `.md` to any URL under `https://dev.wix.com/docs/` to get its markdown version. > - Pages are either content pages (article or reference text) or menu pages (a list of links to child pages). > - To get a menu page, truncate any URL to a parent path and append `.md` (e.g. `https://dev.wix.com/docs/sdk.md`, `https://dev.wix.com/docs/sdk/core-modules.md`). > - Top-level index of all portals: https://dev.wix.com/docs/llms.txt > - Full concatenated docs: https://dev.wix.com/docs/llms-full.txt # Resource: App Installations # Type: App Installation Object # Link: https://dev.wix.com/docs/api-reference/app-management/app-installations/app-installation-object.md ## Description: An app installation represents a single installation of one of your apps on a Wix site. It includes details about the site, the app instance, the installed app version, the purchased plan, the installation status, and any review the site owner left for the app. ## Schema: ```json Type: App Installation Object | type: AppInstallation Description: An app installation represents a single installation of one of your apps on a Wix site. It includes details about the site, the app instance, the installed app version, the purchased plan, the installation status, and any review the site owner left for the app. - name: id | type: string | description: App installation ID. - name: value | type: string | description: - name: instanceId | type: string | description: Unique identifier of the app instance on the site. Stable across uninstalls and reinstalls of the same app on the same site. - name: createdDate | type: string | description: Date and time the app installation was created. - name: seconds | type: string | description: - name: nanos | type: number | description: - name: updatedDate | type: string | description: Date and time the app installation was last updated. - name: revision | type: string | description: Revision number, which increments by 1 each time the app installation is updated. - name: value | type: string | description: - name: firstInstallationDate | type: string | description: Date and time the app was first installed on the site. Preserved across uninstalls and reinstalls. - name: siteInfo | type: SiteInfo | description: Information about the site the app is installed on. - name: siteId | type: string | description: Site ID. - name: businessName | type: string | description: Business name displayed on the site. - name: siteUrl | type: string | description: Public URL of the site. - name: businessEmail | type: string | description: Business email address configured on the site. - name: countryCode | type: string | description: 2-letter country code in [ISO-3166 alpha-2](https://en.wikipedia.org/wiki/ISO_3166-1_alpha-2) format. - name: businessCategory | type: Categories | description: Business category the site belongs to. - name: primary | type: string | description: Primary site category. - name: secondary | type: Array | description: Secondary site category. - name: premium | type: boolean | description: Whether the site has an active Premium subscription. - name: editorType | type: string | description: Editor the site was created with. enum: EDITOR, ADI, EDITORX, STUDIO, HARMONY, VIBE, WIXEL - name: ownerEmail | type: string | description: Email address of the site owner. Returned only when `OWNER_EMAIL` is requested in the `fields` parameter and the app has the **Get Site Owner** permission. - name: accountId | type: string | description: ID of the site owner's account. - name: planInfo | type: PlanInfo | description: Information about the plan the site owner purchased for the app. - name: planName | type: string | description: Name of the plan the site owner purchased for the app. - name: billingCycle | type: Cycle | description: Billing cycle of the purchased plan. - name: cycleType | type: string | description: Type of the billing cycle. + `"UNKNOWN_UNIT"`: There is no information about the billing cycle. + `"ONE_TIME"`: The customer pays for unlimited usage of the app with a single payment. + `"RECURRING"`: The customer pays for a subscription to the app on a recurring schedule. - name: cycleDuration | type: Duration | description: Duration of the billing cycle. Available only for `{"cycleType": "RECURRING"}`. - name: planStatus | type: string | description: Current status of the purchased plan. enum: UPGRADED, CANCELED, AUTO_RENEW_OFF - name: freeTrialInfo | type: FreeTrialInfo | description: Free trial details for the purchased plan, if a free trial is or was active. - name: status | type: string | description: Current free trial status. - name: endDate | type: string | description: Date and time the free trial ended. Returned only after the free trial has ended. - name: endDate | type: string | description: Date and time the plan expires. Returned only when auto-renewal is turned off. - name: appId | type: string | description: ID of the installed app. - name: appVersion | type: string | description: Major version of the installed app. - name: status | type: string | description: Current installation status of the app on the site. enum: INSTALLED, UNINSTALLED - name: review | type: ReviewInfo | description: Information about the review the site owner left for the app, if any. - name: id | type: string | description: Review ID. - name: date | type: string | description: Date and time the review was published. - name: rating | type: number | description: Rating the site owner left for the app, from 1 to 5. - name: value | type: number | description: - name: title | type: string | description: Review title. - name: description | type: string | description: Review body text. ``` --- > Portal Navigation: > > - Append `.md` to any URL under `https://dev.wix.com/docs/` to get its markdown version. > - Pages are either content pages (article or reference text) or menu pages (a list of links to child pages). > - To get a menu page, truncate any URL to a parent path and append `.md` (e.g. `https://dev.wix.com/docs/sdk.md`, `https://dev.wix.com/docs/sdk/core-modules.md`). > - Top-level index of all portals: https://dev.wix.com/docs/llms.txt > - Full concatenated docs: https://dev.wix.com/docs/llms-full.txt # QueryAppInstallations # Package: appInstallations # Namespace: AppInstallations # Method link: https://dev.wix.com/docs/api-reference/app-management/app-installations/query-app-installations.md ## Permission Scopes: Read App Installations: SCOPE.APP_MARKET.READ_APP_INSTALLATIONS ## Introduction Retrieves a list of up to 100 app installations, with the specified paging, filtering, and sorting. Query App Installations runs with these defaults, which you can override: - `createdDate` is sorted in `DESC` order - `paging.limit` is `50` The results include installations across all the apps in your developer account. Pass supported values to `fields` in the request to include those fields in the response. To learn about working with Query methods, see [API Query Language](https://dev.wix.com/docs/api-reference/articles/work-with-wix-apis/data-retrieval/about-the-wix-api-query-language.md), [Sorting and Paging](https://dev.wix.com/docs/api-reference/articles/work-with-wix-apis/data-retrieval/about-sorting-and-paging.md), and [Field Projection](https://dev.wix.com/docs/api-reference/articles/work-with-wix-apis/data-retrieval/about-field-projection.md). For a free-text search across a number of fields, use [Search App Installation](https://dev.wix.com/docs/api-reference/app-management/app-installations/search-app-installation.md). --- ## REST API ### Examples ### Query App Installations Retrieves currently installed instances of a specific app, sorted by most recent first. ```curl curl -X POST \ 'https://www.wixapis.com/app/installations/v1/app-installation/query' \ -H 'Authorization: ' \ -H 'Content-Type: application/json' \ --data-binary '{ "query": { "filter": { "appId": { "$eq": "2b4d6452-e1a7-4f28-9747-13d77225e6b6" }, "status": { "$eq": "INSTALLED" } }, "sort": [ { "fieldName": "createdDate", "order": "DESC" } ], "cursorPaging": { "limit": 50 } } }' ``` --- ## JavaScript SDK ### Examples ### queryAppInstallations ```javascript import { appInstallations } from '@wix/app-installations'; async function queryAppInstallations(query,options) { const response = await appInstallations.queryAppInstallations(query,options); }; ``` ### queryAppInstallations (with elevated permissions) ```javascript import { appInstallations } from '@wix/app-installations'; import { auth } from '@wix/essentials'; async function myQueryAppInstallationsMethod(query,options) { const elevatedQueryAppInstallations = auth.elevate(appInstallations.queryAppInstallations); const response = await elevatedQueryAppInstallations(query,options); } ``` ### queryAppInstallations (self-hosted) Self-hosted SDK calls require you to [create a client](https://dev.wix.com/docs/sdk/articles/work-with-the-sdk/about-the-wix-client.md). ```javascript import { createClient } from '@wix/sdk'; import { appInstallations } from '@wix/app-installations'; // Import the auth strategy for the relevant access type // Import the relevant host module if needed const myWixClient = createClient ({ modules: { appInstallations }, // Include the auth strategy and host as relevant }); async function queryAppInstallations(query,options) { const response = await myWixClient.appInstallations.queryAppInstallations(query,options); }; ``` --- --- > Portal Navigation: > > - Append `.md` to any URL under `https://dev.wix.com/docs/` to get its markdown version. > - Pages are either content pages (article or reference text) or menu pages (a list of links to child pages). > - To get a menu page, truncate any URL to a parent path and append `.md` (e.g. `https://dev.wix.com/docs/sdk.md`, `https://dev.wix.com/docs/sdk/core-modules.md`). > - Top-level index of all portals: https://dev.wix.com/docs/llms.txt > - Full concatenated docs: https://dev.wix.com/docs/llms-full.txt # SearchAppInstallation # Package: appInstallations # Namespace: AppInstallations # Method link: https://dev.wix.com/docs/api-reference/app-management/app-installations/search-app-installation.md ## Permission Scopes: Read App Installations: SCOPE.APP_MARKET.READ_APP_INSTALLATIONS ## Introduction Retrieves a list of up to 100 app installations that match a free-text search expression. Search matches against the site URL, business name, business email, site owner email, instance ID, review title, and review description. Pass supported values to `fields` in the request to include those fields in the response. Search App Installation runs with these defaults, which you can override: - `paging.limit` is `50` The results include installations across all the apps in your developer account. To search a single field only, use [Query App Installations](https://dev.wix.com/docs/api-reference/app-management/app-installations/query-app-installations.md) with the appropriate filter. --- ## REST API ### Examples ### Search App Installation Searches app installations by free-text expression across site URL, business name, business email, site owner email, instance ID, and review title and description. ```curl curl -X POST \ 'https://www.wixapis.com/app/installations/v1/app-installation/search' \ -H 'Authorization: ' \ -H 'Content-Type: application/json' \ --data-binary '{ "search": { "search": { "expression": "example.wixsite.com" }, "cursorPaging": { "limit": 50 } } }' ``` --- ## JavaScript SDK ### Examples ### searchAppInstallation ```javascript import { appInstallations } from '@wix/app-installations'; async function searchAppInstallation(search,options) { const response = await appInstallations.searchAppInstallation(search,options); }; ``` ### searchAppInstallation (with elevated permissions) ```javascript import { appInstallations } from '@wix/app-installations'; import { auth } from '@wix/essentials'; async function mySearchAppInstallationMethod(search,options) { const elevatedSearchAppInstallation = auth.elevate(appInstallations.searchAppInstallation); const response = await elevatedSearchAppInstallation(search,options); } ``` ### searchAppInstallation (self-hosted) Self-hosted SDK calls require you to [create a client](https://dev.wix.com/docs/sdk/articles/work-with-the-sdk/about-the-wix-client.md). ```javascript import { createClient } from '@wix/sdk'; import { appInstallations } from '@wix/app-installations'; // Import the auth strategy for the relevant access type // Import the relevant host module if needed const myWixClient = createClient ({ modules: { appInstallations }, // Include the auth strategy and host as relevant }); async function searchAppInstallation(search,options) { const response = await myWixClient.appInstallations.searchAppInstallation(search,options); }; ``` --- --- > Portal Navigation: > > - Append `.md` to any URL under `https://dev.wix.com/docs/` to get its markdown version. > - Pages are either content pages (article or reference text) or menu pages (a list of links to child pages). > - To get a menu page, truncate any URL to a parent path and append `.md` (e.g. `https://dev.wix.com/docs/sdk.md`, `https://dev.wix.com/docs/sdk/core-modules.md`). > - Top-level index of all portals: https://dev.wix.com/docs/llms.txt > - Full concatenated docs: https://dev.wix.com/docs/llms-full.txt # Package: appInstallations # Webhook link: https://dev.wix.com/docs/api-reference/app-management/app-installations/app-installation-created.md ## Introduction Triggered when an app installation is created. Triggers the first time one of your apps is installed on a site. Subsequent uninstalls and reinstalls of the same app on the same site update the existing app installation and trigger [App Installation Updated](https://dev.wix.com/docs/api-reference/app-management/app-installations/app-installation-updated.md) instead. Both App Installation Created and [App Instance Installed](https://dev.wix.com/docs/api-reference/app-management/app-instance/app-instance-installed.md) trigger on the first install of your app. The two events carry different data. Subscribe to this event to receive the full [App Installation object](https://dev.wix.com/docs/api-reference/app-management/app-installations/app-installation-object.md) directly. --- ## REST API ### Examples ```curl { "id": "52269077-05f2-4b59-ba4f-36ef8c4c1e11", "entityFqdn": "wix.app.installations.v1.app_installation", "slug": "created", "entityId": "8046df3c-7575-4098-a5ab-c91ad8f33c47", "createdEvent": { "entityAsJson": "{\"appInstallation\":{\"id\":\"8046df3c-7575-4098-a5ab-c91ad8f33c47\",\"instanceId\":\"a1b2c3d4-e5f6-7890-abcd-ef1234567890\",\"appId\":\"2b4d6452-e1a7-4f28-9747-13d77225e6b6\",\"appVersion\":\"1.234\",\"status\":\"INSTALLED\",\"siteInfo\":{\"siteUrl\":\"https://example.wixsite.com\",\"businessName\":\"My Business\",\"countryCode\":\"US\"},\"firstInstallationDate\":\"2025-06-15T09:00:00.000Z\",\"createdDate\":\"2025-06-15T09:00:00.000Z\",\"updatedDate\":\"2025-06-15T09:00:00.000Z\",\"revision\":1}}" }, "eventTime": "2025-06-15T09:00:00.123456Z", "triggeredByAnonymizeRequest": false } ``` --- ## JavaScript SDK ### Examples ```javascript import { appInstallations } from '@wix/app-installations'; appInstallations.onAppInstallationCreated((event) => { // handle your event here }); ``` ```javascript import { createClient, AppStrategy } from '@wix/sdk'; import { appInstallations } from '@wix/app-installations'; const wixClient = createClient({ auth: AppStrategy({ appId: 'MY-APP-ID', publicKey: 'YOUR_APP_PUBLIC_KEY', }), modules: { appInstallations, }, }); wixClient.appInstallations.onAppInstallationCreated((event) => { // handle your event here }); ``` --- --- > Portal Navigation: > > - Append `.md` to any URL under `https://dev.wix.com/docs/` to get its markdown version. > - Pages are either content pages (article or reference text) or menu pages (a list of links to child pages). > - To get a menu page, truncate any URL to a parent path and append `.md` (e.g. `https://dev.wix.com/docs/sdk.md`, `https://dev.wix.com/docs/sdk/core-modules.md`). > - Top-level index of all portals: https://dev.wix.com/docs/llms.txt > - Full concatenated docs: https://dev.wix.com/docs/llms-full.txt # Package: appInstallations # Webhook link: https://dev.wix.com/docs/api-reference/app-management/app-installations/app-installation-deleted.md ## Introduction Triggered when an app installation record is permanently removed. This happens when the site the app is installed on is deleted, or when the app transitions to an [Apps Created by Wix](https://dev.wix.com/docs/api-reference/articles/work-with-wix-apis/platform/about-apps-created-by-wix.md) app. It doesn't trigger when a site owner uninstalls the app. In that case, `status` changes to `UNINSTALLED` and [App Installation Updated](https://dev.wix.com/docs/api-reference/app-management/app-installations/app-installation-updated.md) triggers. --- ## REST API ### Examples ```curl { "id": "b7d2c5e1-4a8f-49b3-9e6c-1d4f2a7b8e95", "entityFqdn": "wix.app.installations.v1.app_installation", "slug": "deleted", "entityId": "8046df3c-7575-4098-a5ab-c91ad8f33c47", "deletedEvent": { "deletedEntityAsJson": "{\"appInstallation\":{\"id\":\"8046df3c-7575-4098-a5ab-c91ad8f33c47\",\"instanceId\":\"a1b2c3d4-e5f6-7890-abcd-ef1234567890\",\"appId\":\"2b4d6452-e1a7-4f28-9747-13d77225e6b6\",\"appVersion\":\"1.234\",\"status\":\"INSTALLED\",\"siteInfo\":{\"siteUrl\":\"https://example.wixsite.com\",\"businessName\":\"My Business\",\"countryCode\":\"US\"},\"planInfo\":{\"planName\":\"Premium\",\"planStatus\":\"UPGRADED\"},\"firstInstallationDate\":\"2025-06-15T09:00:00.000Z\",\"createdDate\":\"2025-06-15T09:00:00.000Z\",\"updatedDate\":\"2026-03-05T11:42:00.000Z\",\"revision\":5}}" }, "eventTime": "2026-03-05T11:42:00.789012Z", "triggeredByAnonymizeRequest": false } ``` --- ## JavaScript SDK ### Examples ```javascript import { appInstallations } from '@wix/app-installations'; appInstallations.onAppInstallationDeleted((event) => { // handle your event here }); ``` ```javascript import { createClient, AppStrategy } from '@wix/sdk'; import { appInstallations } from '@wix/app-installations'; const wixClient = createClient({ auth: AppStrategy({ appId: 'MY-APP-ID', publicKey: 'YOUR_APP_PUBLIC_KEY', }), modules: { appInstallations, }, }); wixClient.appInstallations.onAppInstallationDeleted((event) => { // handle your event here }); ``` --- --- > Portal Navigation: > > - Append `.md` to any URL under `https://dev.wix.com/docs/` to get its markdown version. > - Pages are either content pages (article or reference text) or menu pages (a list of links to child pages). > - To get a menu page, truncate any URL to a parent path and append `.md` (e.g. `https://dev.wix.com/docs/sdk.md`, `https://dev.wix.com/docs/sdk/core-modules.md`). > - Top-level index of all portals: https://dev.wix.com/docs/llms.txt > - Full concatenated docs: https://dev.wix.com/docs/llms-full.txt # Package: appInstallations # Webhook link: https://dev.wix.com/docs/api-reference/app-management/app-installations/app-installation-updated.md ## Introduction Triggered when any field on the [App Installation object](https://dev.wix.com/docs/api-reference/app-management/app-installations/app-installation-object.md) updates, not only on app version updates. This includes plan changes, site information changes, and new or updated reviews. To detect an uninstall, subscribe to this event and filter for `status` set to `UNINSTALLED` in the response. --- ## REST API ### Examples ```curl { "id": "a3f1e8c4-9b2d-4e7a-b1f6-2c5d8e9a4b73", "entityFqdn": "wix.app.installations.v1.app_installation", "slug": "updated", "entityId": "8046df3c-7575-4098-a5ab-c91ad8f33c47", "updatedEvent": { "currentEntityAsJson": "{\"appInstallation\":{\"id\":\"8046df3c-7575-4098-a5ab-c91ad8f33c47\",\"instanceId\":\"a1b2c3d4-e5f6-7890-abcd-ef1234567890\",\"appId\":\"2b4d6452-e1a7-4f28-9747-13d77225e6b6\",\"appVersion\":\"1.234\",\"status\":\"UNINSTALLED\",\"siteInfo\":{\"siteUrl\":\"https://example.wixsite.com\",\"businessName\":\"My Business\",\"countryCode\":\"US\"},\"planInfo\":{\"planName\":\"Premium\",\"planStatus\":\"UPGRADED\"},\"firstInstallationDate\":\"2025-06-15T09:00:00.000Z\",\"createdDate\":\"2025-06-15T09:00:00.000Z\",\"updatedDate\":\"2026-02-20T08:15:00.000Z\",\"revision\":4}}", "modifiedFields": { "status": "UNINSTALLED", "revision": "4", "updatedDate": "2026-02-20T08:15:00.000Z" } }, "eventTime": "2026-02-20T08:15:00.123456Z", "triggeredByAnonymizeRequest": false } ``` --- ## JavaScript SDK ### Examples ```javascript import { appInstallations } from '@wix/app-installations'; appInstallations.onAppInstallationUpdated((event) => { // handle your event here }); ``` ```javascript import { createClient, AppStrategy } from '@wix/sdk'; import { appInstallations } from '@wix/app-installations'; const wixClient = createClient({ auth: AppStrategy({ appId: 'MY-APP-ID', publicKey: 'YOUR_APP_PUBLIC_KEY', }), modules: { appInstallations, }, }); wixClient.appInstallations.onAppInstallationUpdated((event) => { // handle your event here }); ``` --- --- > Portal Navigation: > > - Append `.md` to any URL under `https://dev.wix.com/docs/` to get its markdown version. > - Pages are either content pages (article or reference text) or menu pages (a list of links to child pages). > - To get a menu page, truncate any URL to a parent path and append `.md` (e.g. `https://dev.wix.com/docs/sdk.md`, `https://dev.wix.com/docs/sdk/core-modules.md`). > - Top-level index of all portals: https://dev.wix.com/docs/llms.txt > - Full concatenated docs: https://dev.wix.com/docs/llms-full.txt ## Resource: Introduction ## Article: Introduction ## Article Link: https://dev.wix.com/docs/api-reference/app-management/app-installations/introduction.md ## Article Content: # About the App Installations API The App Installations API lets you list, filter, and search installations of your own apps across the Wix sites where they're installed. An app installation represents a single installation of one of your apps on a Wix site. It includes details about the site, the installed app version, the purchased plan, the installation status, and any review the site owner left for the app. With the App Installations API, you can: - [Query](https://dev.wix.com/docs/api-reference/app-management/app-installations/query-app-installations.md) app installations of your apps by status, plan, billing cycle, installation date, country, editor type, and more. - [Search](https://dev.wix.com/docs/api-reference/app-management/app-installations/search-app-installation.md) app installations using free-text matching across site URL, business name, business email, owner email, instance ID, and review text. - Subscribe to events to track installs, updates, and uninstalls in real time. ## Before you begin It's important to note the following before starting to code: - Uninstalling and reinstalling the same app on a site doesn't create a new app installation. The existing app installation's `status` flips between `INSTALLED` and `UNINSTALLED`, and `instanceId` stays the same. ## Use cases - [Search app installations](https://dev.wix.com/docs/api-reference/app-management/app-installations/sample-flows.md) - [Query app installations](https://dev.wix.com/docs/api-reference/app-management/app-installations/sample-flows.md) ## Terminology - **App installation**: A record describing one installation of one of your apps on a Wix site, including site details, plan information, installation status, and review data. An app can be installed on a site only once. The same app installation persists across uninstalls and reinstalls. The `instanceId` stays the same and only `status` changes. - **Instance**: A specific install of an app on a site, identified by `instanceId`. The `instanceId` is stable across uninstalls and reinstalls of the same app on the same site. - **Status**: Whether the app is currently `INSTALLED` or `UNINSTALLED` on the site. - **Plan**: The Premium plan, if any, that the site owner purchased for the installed app. @sdk_package_setup --- > Portal Navigation: > > - Append `.md` to any URL under `https://dev.wix.com/docs/` to get its markdown version. > - Pages are either content pages (article or reference text) or menu pages (a list of links to child pages). > - To get a menu page, truncate any URL to a parent path and append `.md` (e.g. `https://dev.wix.com/docs/sdk.md`, `https://dev.wix.com/docs/sdk/core-modules.md`). > - Top-level index of all portals: https://dev.wix.com/docs/llms.txt > - Full concatenated docs: https://dev.wix.com/docs/llms-full.txt ## Resource: Sample Flows ## Article: Sample Flows ## Article Link: https://dev.wix.com/docs/api-reference/app-management/app-installations/sample-flows.md ## Article Content: # App Installations: Sample Use Cases and Flows This article presents possible use cases and corresponding sample flows that you can support. It provides a useful starting point as you plan your implementation. ## Search app installations You want to find the app installation for a specific Wix site without knowing which of your apps is installed there or which field uniquely identifies it. To find an app installation by free-text search: 1. Call [Search App Installation](https://dev.wix.com/docs/api-reference/app-management/app-installations/search-app-installation.md) with `search.search.expression` set to the value you want to match. The search runs against site URL, business name, business email, site owner email, instance ID, and review title and description. 1. Read `appInstallations` in the response. If there are more results than fit on a single page, use the cursor in `pagingMetadata.cursors.next` to retrieve the next page by calling [Search App Installation](https://dev.wix.com/docs/api-reference/app-management/app-installations/search-app-installation.md) again with the cursor in the request. ## Query app installations You want to list installations of one of your apps that match specific criteria. For example, all active installations in a country, all installations of a specific app version, or all installations whose plan ended in the last week. To retrieve a filtered list of app installations: 1. Call [Query App Installations](https://dev.wix.com/docs/api-reference/app-management/app-installations/query-app-installations.md) with a `query.filter` describing the criteria. For example, to retrieve installations of a specific app that are currently installed in the US: ```json { "query": { "filter": { "appId": { "$eq": "" }, "status":{ "$eq": "INSTALLED" }, "siteInfo.countryCode": { "$eq": "US" } }, "sort": [{ "fieldName": "createdDate", "order": "DESC" }] } } ``` 1. Read `appInstallations` in the response. If there are more results than fit on a single page, use the cursor in `pagingMetadata.cursors.next` to retrieve the next page by calling [Query App Installations](https://dev.wix.com/docs/api-reference/app-management/app-installations/query-app-installations.md) again with the cursor in the request. ## React to install and uninstall events You want to keep your own backend in sync with the state of your apps' installations. For example, to provision tenant data on install, update on plan changes, and clean up on uninstall. Uninstalls aren't delivered as a separate event. An uninstall is a `status` change on the existing app installation from `INSTALLED` to `UNINSTALLED`, which triggers the App Installation Updated event. To react to an uninstall, subscribe to the Updated event and filter the response for `status` set to `UNINSTALLED`. To track app installations in real time: 1. Subscribe your app to [App Installation Created](https://dev.wix.com/docs/api-reference/app-management/app-installations/app-installation-created.md). On each event, provision the tenant in your system using `appId`, `instanceId`, and `siteInfo` from the event response. 1. Subscribe to [App Installation Updated](https://dev.wix.com/docs/api-reference/app-management/app-installations/app-installation-updated.md). On each event: - If the entity's `status` is now `UNINSTALLED`, treat it as an uninstall. Clean up the tenant or mark it as uninstalled in your system. - If the entity's `status` is `INSTALLED` and was previously `UNINSTALLED`, use `updatedEvent.modifiedFields` to detect the transition. Treat it as a reinstall. Restore or re-activate the tenant. - Otherwise, update your stored state based on the modified fields in the event response. 1. Optionally, call [Query App Installations](https://dev.wix.com/docs/api-reference/app-management/app-installations/query-app-installations.md) periodically to reconcile your state against the source of truth. --- > Portal Navigation: > > - Append `.md` to any URL under `https://dev.wix.com/docs/` to get its markdown version. > - Pages are either content pages (article or reference text) or menu pages (a list of links to child pages). > - To get a menu page, truncate any URL to a parent path and append `.md` (e.g. `https://dev.wix.com/docs/sdk.md`, `https://dev.wix.com/docs/sdk/core-modules.md`). > - Top-level index of all portals: https://dev.wix.com/docs/llms.txt > - Full concatenated docs: https://dev.wix.com/docs/llms-full.txt ## Resource: Introduction ## Article: Introduction ## Article Link: https://dev.wix.com/docs/api-reference/app-management/site-plugins/introduction.md ## Article Content: # About the Site Plugins APIs The Site Plugins APIs enable you to [get the placement status](https://dev.wix.com/docs/rest/app-management/site-plugins/placement-status-v1/get-placement-status.md) of your app's [site plugins](https://dev.wix.com/docs/build-apps/develop-your-app/extensions/site-extensions/site-plugins/about-site-plugin-extensions.md) on a user's site. --- > Portal Navigation: > > - Append `.md` to any URL under `https://dev.wix.com/docs/` to get its markdown version. > - Pages are either content pages (article or reference text) or menu pages (a list of links to child pages). > - To get a menu page, truncate any URL to a parent path and append `.md` (e.g. `https://dev.wix.com/docs/sdk.md`, `https://dev.wix.com/docs/sdk/core-modules.md`). > - Top-level index of all portals: https://dev.wix.com/docs/llms.txt > - Full concatenated docs: https://dev.wix.com/docs/llms-full.txt # Resource: Placement Status V1 # Type: Placement Status Object # Link: https://dev.wix.com/docs/api-reference/app-management/site-plugins/placement-status-v1/placement-status-object.md ## Description: The `PlacementStatus` object represents the status of your app's site plugins, indicating whether they are currently placed in a slot on the user's site. ## Schema: ```json Type: Placement Status Object | type: PlacementStatus Description: The `PlacementStatus` object represents the status of your app's site plugins, indicating whether they are currently placed in a slot on the user's site. - name: pluginId | type: string | description: Plugin ID. This is a unique ID that is assigned to each plugin. You can view your plugin IDs in [extensions](https://dev.wix.com/app-selector?title=Select+an+App&primaryButtonText=Select+Site&actionUrl=https%3A%2F%2Fdev.wix.com%2Fapps%2F%7BappId%7D%2Fextensions) in your app's dashboard. - name: value | type: string | description: - name: placedInSlot | type: boolean | description: Whether the plugin placed in a slot on the user's site. - name: value | type: boolean | description: ``` --- > Portal Navigation: > > - Append `.md` to any URL under `https://dev.wix.com/docs/` to get its markdown version. > - Pages are either content pages (article or reference text) or menu pages (a list of links to child pages). > - To get a menu page, truncate any URL to a parent path and append `.md` (e.g. `https://dev.wix.com/docs/sdk.md`, `https://dev.wix.com/docs/sdk/core-modules.md`). > - Top-level index of all portals: https://dev.wix.com/docs/llms.txt > - Full concatenated docs: https://dev.wix.com/docs/llms-full.txt # GetPlacementStatus # Package: sitePlugins # Namespace: PluginsPlacementStatusImpl # Method link: https://dev.wix.com/docs/api-reference/app-management/site-plugins/placement-status-v1/get-placement-status.md ## Permission Scopes: Read Site Plugin Status: SCOPE.SITE-PLUGIN.READ-PLACEMENT-STATUS ## Introduction Get the placement statuses of your app's site plugins on the user's site. --- ## REST API ### Examples ### Get Placement Status ```curl curl GET \ 'https://www.wixapis.com/app-plugins/v1/site-plugins/placement-status' \ -H 'Authorization: ' ``` --- ## JavaScript SDK ### Examples ### getPlacementStatus ```javascript import { plugins } from '@wix/site-plugins'; async function getPlacementStatus() { const response = await plugins.getPlacementStatus(); }; ``` ### getPlacementStatus (with elevated permissions) ```javascript import { plugins } from '@wix/site-plugins'; import { auth } from '@wix/essentials'; async function myGetPlacementStatusMethod() { const elevatedGetPlacementStatus = auth.elevate(plugins.getPlacementStatus); const response = await elevatedGetPlacementStatus(); } ``` ### getPlacementStatus (self-hosted) Self-hosted SDK calls require you to [create a client](https://dev.wix.com/docs/sdk/articles/work-with-the-sdk/about-the-wix-client.md). ```javascript import { createClient } from '@wix/sdk'; import { plugins } from '@wix/site-plugins'; // Import the auth strategy for the relevant access type // Import the relevant host module if needed const myWixClient = createClient ({ modules: { plugins }, // Include the auth strategy and host as relevant }); async function getPlacementStatus() { const response = await myWixClient.plugins.getPlacementStatus(); }; ``` --- --- > Portal Navigation: > > - Append `.md` to any URL under `https://dev.wix.com/docs/` to get its markdown version. > - Pages are either content pages (article or reference text) or menu pages (a list of links to child pages). > - To get a menu page, truncate any URL to a parent path and append `.md` (e.g. `https://dev.wix.com/docs/sdk.md`, `https://dev.wix.com/docs/sdk/core-modules.md`). > - Top-level index of all portals: https://dev.wix.com/docs/llms.txt > - Full concatenated docs: https://dev.wix.com/docs/llms-full.txt ## Resource: Introduction ## Article: Introduction ## Article Link: https://dev.wix.com/docs/api-reference/app-management/site-plugins/placement-status-v1/introduction.md ## Article Content: # Introduction This API enables you to get the placement status of your app's [site plugins](https://dev.wix.com/docs/build-apps/develop-your-app/extensions/site-extensions/site-plugins/about-site-plugin-extensions.md) on a user's site. @sdk_package_setup --- > Portal Navigation: > > - Append `.md` to any URL under `https://dev.wix.com/docs/` to get its markdown version. > - Pages are either content pages (article or reference text) or menu pages (a list of links to child pages). > - To get a menu page, truncate any URL to a parent path and append `.md` (e.g. `https://dev.wix.com/docs/sdk.md`, `https://dev.wix.com/docs/sdk/core-modules.md`). > - Top-level index of all portals: https://dev.wix.com/docs/llms.txt > - Full concatenated docs: https://dev.wix.com/docs/llms-full.txt # Resource: Market Listing # Type: Market Listing Object # Link: https://dev.wix.com/docs/api-reference/app-management/market-listing/market-listing-object.md ## Description: A market listing is the localized marketing page for an app in the Wix App Market. A listing is uniquely identified by the combination of `appId`, `languageCode`, and `status`. An app therefore has one listing record per language per lifecycle status. ## Schema: ```json Type: Market Listing Object | type: MarketListing Description: A market listing is the localized marketing page for an app in the Wix App Market. A listing is uniquely identified by the combination of `appId`, `languageCode`, and `status`. An app therefore has one listing record per language per lifecycle status. - name: id | type: string | description: Market listing ID. - name: value | type: string | description: - name: appId | type: string | description: ID of the app the listing belongs to. - name: languageCode | type: string | description: 2-letter language code in ISO 639-1 alpha-2 format. For example, `en` for English. - name: basicInfo | type: BasicInfo | description: Basic marketing information about the app, including its name, description, and categories. - name: name | type: string | description: Display name of the app shown in the Wix App Market. - name: teaser | type: string | description: Short description of the app shown in listing previews. - name: longDescription | type: string | description: Full description of the app shown on the listing detail page. - name: benefits | type: Array | description: Key benefits of the app displayed on its listing page. - name: title | type: string | description: Benefit title. - name: searchKeywords | type: Array | description: Keywords used to improve the app's discoverability in search. - name: demoUrl | type: string | description: URL of a demo page or video for the app. - name: categories | type: Array | description: App Market categories the app belongs to. - name: assetsMap | type: object | description: Map of marketing assets keyed by asset type. JSON field name is `assetsMap`. Common keys include `appIcon`, `screenshots`, and `banners`. The platform may add other keys over time. - name: contactInfo | type: ContactInfo | description: Developer contact and legal information for the app. - name: website | type: string | description: URL of the developer's website. - name: developerMetaSiteId | type: string | description: ID of the developer's Wix development site associated with the app. - name: supportEmail | type: string | description: Support email address for the app. - name: privacyPolicyUrl | type: string | description: URL of the app's privacy policy. - name: termsOfUseUrl | type: string | description: URL of the app's terms of use. - name: installationRequirement | type: InstallationRequirement | description: Conditions that control where and how the app can be installed. - name: requiredApps | type: Array | description: Apps created by Wix that must already be installed for this app to function. For example, Wix Stores. - name: id | type: string | description: Required app ID. - name: slug | type: string | description: URL-friendly identifier for the required app, as it appears in the Wix App Market URL. For example, in `https://www.wix.com/app-market/wix-stores`, the slug is `wix-stores`. Optional — use `id` alone if you have the app's GUID. - name: includeCountries | type: Array | description: 2-letter country codes in ISO-3166 alpha-2 format for countries where this app is available for installation. Empty means available in all countries not listed in `excludeCountries`. - name: excludeCountries | type: Array | description: 2-letter country codes in ISO-3166 alpha-2 format for countries where this app is not available for installation. - name: includeLanguages | type: Array | description: 2-letter language codes in ISO 639-1 alpha-2 format for languages supported by this app. Empty means all languages are supported, except those in `excludeLanguages`. - name: excludeLanguages | type: Array | description: 2-letter language codes in ISO 639-1 alpha-2 format for languages not supported by this app. - name: allowLanguageCustomization | type: boolean | description: Whether the user can choose their preferred language when installing the app. - name: requiredWixPremium | type: boolean | description: Whether a Wix Premium plan is required to install this app. - name: revision | type: string | description: Revision number, which increments by 1 each time the market listing is updated. To prevent conflicting changes, the current revision must be passed when updating the market listing. - name: value | type: number | description: - name: createdDate | type: string | description: Date and time the market listing was created. - name: seconds | type: string | description: - name: nanos | type: number | description: - name: updatedDate | type: string | description: Date and time the market listing was updated. - name: status | type: string | description: Lifecycle status of the listing. enum: DRAFT, PUBLISHED, APPROVED - name: classification | type: string | description: How the app integrates with Wix and who can install it. Each app has exactly one classification. enum: SITE_APP, API_KEY, VELO_APP, PRIVATE_APP, HEADLESS, FUNCTION_ACTIVATION_APP - name: pricingData | type: PricingData | description: Pricing and free trial information for the app. - name: externalPricingPageUrl | type: string | description: URL of the app's external pricing page, when hosted outside Wix. - name: externalCheckout | type: boolean | description: Whether checkout for this app happens on an external site instead of in Wix. - name: freeTrialDays | type: number | description: Number of free trial days offered by the app developer. - name: value | type: number | description: - name: internalFreeTrialDays | type: number | description: Number of free trial days provided and managed by Wix. - name: llmContext | type: LLMContext | description: Custom description used by LLM-based tools for AI-generated content and recommendations. Available only with the `APP_MARKET.LLM_CONTEXT` permission. - name: instructions | type: string | description: Custom description of the app used by LLM-based tools for AI-generated content and recommendations. - name: llmMetadata | type: LlmMetadata | description: Structured metadata for AI-powered app discovery and recommendations. Available only with the `APP_MARKET.LLM_CONTEXT` permission. - name: primaryUseCases | type: Array | description: Primary use cases for the app, used by AI tools for app discovery and recommendations. - name: capabilities | type: Capabilities | description: Functional capabilities of the app. - name: coreFeatures | type: Array | description: Core features of the app. - name: advancedFeatures | type: Array | description: Advanced features of the app. - name: apiCapabilities | type: Array | description: API capabilities exposed by the app. - name: platformFeatures | type: PlatformFeatures | description: Platform and technical constraints of the app. - name: headlessCapable | type: boolean | description: Whether the app supports headless deployments. - name: requiresWixPremium | type: boolean | description: Whether the app requires Wix Premium to function. ``` --- > Portal Navigation: > > - Append `.md` to any URL under `https://dev.wix.com/docs/` to get its markdown version. > - Pages are either content pages (article or reference text) or menu pages (a list of links to child pages). > - To get a menu page, truncate any URL to a parent path and append `.md` (e.g. `https://dev.wix.com/docs/sdk.md`, `https://dev.wix.com/docs/sdk/core-modules.md`). > - Top-level index of all portals: https://dev.wix.com/docs/llms.txt > - Full concatenated docs: https://dev.wix.com/docs/llms-full.txt # SearchMarketListings # Package: marketListing # Namespace: MarketListingService # Method link: https://dev.wix.com/docs/api-reference/app-management/market-listing/search-market-listings.md ## Introduction Searches published market listings by keyword or app name. Intended for AI agents and automation tools that need to find published app listings before taking action, such as installing an app. Defaults to listings in English (`en`). --- ## REST API ### Examples ### Search Market Listings Searches published market listings by keyword or app name. Intended for finding apps before taking actions such as installing them. ```curl curl -X POST \ 'https://www.wixapis.com/app-market-listing/v1/market-listings/search' \ -H 'Authorization: ' \ -H 'Content-Type: application/json' \ --data-binary '{ "searchTerm": "analytics", "languageCode": "en" }' ``` --- ## JavaScript SDK ### Examples ### searchMarketListings ```javascript import { appMarketListing } from '@wix/app-market-listing'; async function searchMarketListings(options) { const response = await appMarketListing.searchMarketListings(options); }; ``` ### searchMarketListings (with elevated permissions) ```javascript import { appMarketListing } from '@wix/app-market-listing'; import { auth } from '@wix/essentials'; async function mySearchMarketListingsMethod(options) { const elevatedSearchMarketListings = auth.elevate(appMarketListing.searchMarketListings); const response = await elevatedSearchMarketListings(options); } ``` ### searchMarketListings (self-hosted) Self-hosted SDK calls require you to [create a client](https://dev.wix.com/docs/sdk/articles/work-with-the-sdk/about-the-wix-client.md). ```javascript import { createClient } from '@wix/sdk'; import { appMarketListing } from '@wix/app-market-listing'; // Import the auth strategy for the relevant access type // Import the relevant host module if needed const myWixClient = createClient ({ modules: { appMarketListing }, // Include the auth strategy and host as relevant }); async function searchMarketListings(options) { const response = await myWixClient.appMarketListing.searchMarketListings(options); }; ``` --- --- > Portal Navigation: > > - Append `.md` to any URL under `https://dev.wix.com/docs/` to get its markdown version. > - Pages are either content pages (article or reference text) or menu pages (a list of links to child pages). > - To get a menu page, truncate any URL to a parent path and append `.md` (e.g. `https://dev.wix.com/docs/sdk.md`, `https://dev.wix.com/docs/sdk/core-modules.md`). > - Top-level index of all portals: https://dev.wix.com/docs/llms.txt > - Full concatenated docs: https://dev.wix.com/docs/llms-full.txt ## Resource: Introduction ## Article: Introduction ## Article Link: https://dev.wix.com/docs/api-reference/app-management/market-listing/introduction.md ## Article Content: # About the App Market Listing API The App Market Listing API lets you retrieve and search for app listings in the Wix App Market. Each listing is the localized marketing page for an app, containing its name, description, categories, assets, and other marketing content. With the App Market Listing API, you can: - Search published listings by keyword or app name for a given language. ## Before you begin It's important to note the following points before starting to code: - A market listing is uniquely identified by the combination of `appId`, `languageCode`, and `status`. An app has one `DRAFT` and one `PUBLISHED` listing for each supported language. - Search Market Listings is keyword-based and returns only `PUBLISHED` listings. Call it when searching by app name or keyword. It returns up to 50 results per page and defaults to English (`en`). ## Market listing lifecycle Before your app can go live in the Wix App Market, your listing goes through a submission and review process: 1. **Prepare your listing**: Add your app's name, description, categories, and marketing assets in the app dashboard. Your listing is in `DRAFT` status while you work on it. 2. **Submit for review**: When your listing is ready, submit it from the app dashboard. See [Submit Your First App Version](https://dev.wix.com/docs/build-apps/launch-your-app/app-distribution/submit-your-first-app-version.md) for what's required. If the submission passes Wix review, your listing moves to `APPROVED` status. 3. **Go live**: The next time you publish an app version, Wix automatically promotes the `APPROVED` listing to `PUBLISHED`, making it visible in the Wix App Market. ## Use cases - [Search for a published app by name](https://dev.wix.com/docs/api-reference/app-management/market-listing/sample-flows.md#search-for-a-published-app-by-name) - [Find a listing for a specific app](https://dev.wix.com/docs/api-reference/app-management/market-listing/sample-flows.md#find-a-listing-for-a-specific-app) ## Terminology - **Market listing:** A localized marketing page for an app in the Wix App Market. Uniquely identified by the combination of `appId`, `languageCode`, and `status`. - **Status:** Lifecycle stage of a listing. - `DRAFT`: Editable working copy of the listing in the app dashboard. - `PUBLISHED`: Live listing visible to users in the Wix App Market. - `APPROVED`: Post-review, pre-publication state. The listing has passed review but hasn't been promoted to `PUBLISHED` yet. - **Classification:** How the app integrates with Wix or who can install it. Each app has exactly one classification: - `SITE_APP`: A publicly listed app that users install on their Wix sites. - `PRIVATE_APP`: An app restricted to the owner account and its sub-accounts. Not available in the public App Market. - `VELO_APP`: An app built for the Velo development environment. - `API_KEY`: An app that authenticates using an API key to access Wix services, without installing on a site. - `HEADLESS`: A headless app that accesses Wix public services without installing on a site. - `FUNCTION_ACTIVATION_APP`: An app scoped to a specific site that tracks activated functions on that site. - **Installation requirement:** Conditions that control where and how an app can be installed, including geographic restrictions, language restrictions, app dependencies, and Wix Premium requirements. @sdk_package_setup --- > Portal Navigation: > > - Append `.md` to any URL under `https://dev.wix.com/docs/` to get its markdown version. > - Pages are either content pages (article or reference text) or menu pages (a list of links to child pages). > - To get a menu page, truncate any URL to a parent path and append `.md` (e.g. `https://dev.wix.com/docs/sdk.md`, `https://dev.wix.com/docs/sdk/core-modules.md`). > - Top-level index of all portals: https://dev.wix.com/docs/llms.txt > - Full concatenated docs: https://dev.wix.com/docs/llms-full.txt ## Resource: Sample Flows ## Article: Sample Flows ## Article Link: https://dev.wix.com/docs/api-reference/app-management/market-listing/sample-flows.md ## Article Content: # App Market Listing API: Sample Flows This article presents possible use cases and corresponding sample flows that you can support. This can be a helpful jumping off point as you plan your implementation. ## Search for a published app by name Call [Search Market Listings](https://dev.wix.com/docs/api-reference/app-management/market-listing/search-market-listings.md) to find published apps by keyword or name — for example, before installing an app or recommending it to a user. The search returns only `PUBLISHED` listings and defaults to English. To search for a published app by name: 1. Call [Search Market Listings](https://dev.wix.com/docs/api-reference/app-management/market-listing/search-market-listings.md) with: - `searchTerm` set to the app name or keyword. - `languageCode` set to the desired language. Omit to default to `en`. - Optional `paging` to control the result size (up to 50 per page). 2. Iterate through the returned `marketListings` to identify the relevant app. 3. Use the `appId` from the result in downstream operations, such as app installation. ## Find a listing for a specific app Call [Search Market Listings](https://dev.wix.com/docs/api-reference/app-management/market-listing/search-market-listings.md) to retrieve the published listing for an app when you know its name. This is useful when you want to display listing details such as the app description, categories, or marketing assets. To find a listing for a specific app: 1. Call [Search Market Listings](https://dev.wix.com/docs/api-reference/app-management/market-listing/search-market-listings.md) with: - `searchTerm` set to the app name. - `languageCode` set to the desired language. Omit to default to `en`. 2. Iterate through the returned `marketListings` to find the exact match by app name. 3. Use the listing data as needed — for example, to display the app description or marketing assets. --- > Portal Navigation: > > - Append `.md` to any URL under `https://dev.wix.com/docs/` to get its markdown version. > - Pages are either content pages (article or reference text) or menu pages (a list of links to child pages). > - To get a menu page, truncate any URL to a parent path and append `.md` (e.g. `https://dev.wix.com/docs/sdk.md`, `https://dev.wix.com/docs/sdk/core-modules.md`). > - Top-level index of all portals: https://dev.wix.com/docs/llms.txt > - Full concatenated docs: https://dev.wix.com/docs/llms-full.txt ## Resource: Introduction ## Article: Introduction ## Article Link: https://dev.wix.com/docs/api-reference/business-solutions/e-commerce/introduction.md ## Article Content: # About the Wix eCommerce API The [Wix eCommerce platform](https://dev.wix.com/docs/api-reference/business-solutions/e-commerce/what-is-the-wix-e-commerce-platform.md) is a comprehensive suite of services that addresses standard and specialized needs in online selling. The platform serves as a foundational layer for Wix's own business solutions, such as [Stores](https://support.wix.com/en/article/wix-stores-about-wix-stores), [Bookings](https://support.wix.com/en/article/wix-bookings-about-wix-bookings), [Restaurants Orders](https://www.wix.com/app-market/wix-restaurants-orders-new), and [Table Reservations](https://support.wix.com/en/article/wix-restaurants-adding-and-setting-up-wix-table-reservations). It can also be [integrated with external business solutions](https://dev.wix.com/docs/api-reference/business-solutions/e-commerce/get-started/apps/build-a-business-solution.md), enabling customization and flexibility. To learn more about the Wix eCommerce platform, explore these resources: - [Platform overview & capabilities](https://dev.wix.com/docs/api-reference/business-solutions/e-commerce/what-is-the-wix-e-commerce-platform.md) - [Who can use the eCom platform?](https://dev.wix.com/docs/api-reference/business-solutions/e-commerce/who-can-use-the-e-com-platform.md) - [Architecture & data flow](https://dev.wix.com/docs/api-reference/business-solutions/e-commerce/architecture-data-flow.md) - [Installation](https://dev.wix.com/docs/api-reference/business-solutions/e-commerce/get-started/installation.md) - [Extending the platform](https://dev.wix.com/docs/api-reference/business-solutions/e-commerce/guides/extend-the-wix-e-commerce-platform.md) ## APIs The Wix eCommerce API provides developers with a comprehensive set of services for customizing eCommerce functionality on Wix sites. The API empowers you to extend functionality, create features, and build robust eCommerce solutions that meet the specific needs of your users. With the Wix eCommerce API, you can do the following and more: + Access, manage, and create a site visitor's [cart](https://dev.wix.com/docs/api-reference/business-solutions/e-commerce/purchase-flow/cart/introduction.md). + Access, manage, and create a site visitor's [checkout](https://dev.wix.com/docs/api-reference/business-solutions/e-commerce/purchase-flow/checkout/checkout/introduction.md), and handle recovery of an [abandoned checkout](https://dev.wix.com/docs/api-reference/business-solutions/e-commerce/purchase-flow/checkout/abandoned-checkout/introduction.md). + Create and manage [discount rules](https://dev.wix.com/docs/api-reference/business-solutions/e-commerce/extensions/discounts/discount-rules/introduction.md). + [Promote and recommend](https://dev.wix.com/docs/api-reference/business-solutions/e-commerce/other-services/recommendations/recommendations/introduction.md) items to customers. + Create, access, and manage [orders](https://dev.wix.com/docs/api-reference/business-solutions/e-commerce/orders/orders/introduction.md), and retrieve information about order-related [transactions](https://dev.wix.com/docs/api-reference/business-solutions/e-commerce/orders/order-transactions/introduction.md). + Manage [fulfillment](https://dev.wix.com/docs/api-reference/business-solutions/e-commerce/orders/order-fulfillments/introduction.md) (preparation and delivery) of orders. ## Service plugins The Wix eCommerce platform also incorporates service plugins for greater customization. Use the service plugins to: + Incorporate custom [additional fees](https://dev.wix.com/docs/rest/business-solutions/e-commerce/extensions/additional-fees/additional-fees-service-plugin/introduction.md). + Integrate [shipping rates](https://dev.wix.com/docs/rest/business-solutions/e-commerce/extensions/shipping-rates/shipping-rates-integration-service-plugin/introduction.md). + [Validate](https://dev.wix.com/docs/rest/business-solutions/e-commerce/extensions/validations/validations-integration-service-plugin/introduction.md) a site visitor's checkout and cart. + Integrate external [payment](https://dev.wix.com/docs/rest/business-solutions/e-commerce/payments/payment-settings/payment-settings-integration-service-plugin/introduction.md) services. + Integrate a custom [catalog](https://dev.wix.com/docs/rest/business-solutions/e-commerce/catalogs/catalog-service-plugin/introduction.md). ## Terminology + **Catalog:** A repository containing items for sale. A catalog can contain anything sellable, including physical products, services, gift cards, pricing plans, and custom items created for individual transactions like specialized project work. Wix business solutions, such as Wix Bookings and Wix Stores, provide built-in catalogs. External business solutions can provide the Wix eCommerce platform with access to their catalogs via the [Catalog service plugin](https://dev.wix.com/docs/rest/business-solutions/e-commerce/catalogs/catalog-service-plugin/introduction.md). This enables robust integration of the platform's cart and checkout functionalities with diverse business types. + **Cart:** Once customers have found catalog items they want to purchase, they can add these items to their cart. A cart holds information about a potential transaction, including details about selected items, prices, and discounts, as well as the potential buyer. Site visitors can see their cart on the cart page. Developers can access and manage a customer's cart with the [Cart API](https://dev.wix.com/docs/api-reference/business-solutions/e-commerce/purchase-flow/cart/introduction.md). Some purchasing flows bypass the cart entirely and proceed directly to checkout. + **Checkout:** Checkout is the page where a buyer finalizes a purchase. Each checkout holds information about the items to be purchased, price and tax summaries, shipping and billing information, any applied discounts, and more. Developers can access and manage checkout details and trigger checkout-related events with the [Checkout API](https://dev.wix.com/docs/api-reference/business-solutions/e-commerce/purchase-flow/checkout/checkout/introduction.md). + **Order:** Once a customer has committed to a purchase, an order is created. An order holds information about purchased items, price and tax summaries, shipping and billing information, any applied discounts, and the status of payment and fulfillment. In the dashboard, business staff can create new orders, view and edit existing orders, track fulfillment, and manage the payments cycle. The [Orders API](https://dev.wix.com/docs/api-reference/business-solutions/e-commerce/orders/orders/introduction.md) enables apps or site owners to customize management of the order lifecycle, including viewing, editing, approving, canceling, and charging. --- > Portal Navigation: > > - Append `.md` to any URL under `https://dev.wix.com/docs/` to get its markdown version. > - Pages are either content pages (article or reference text) or menu pages (a list of links to child pages). > - To get a menu page, truncate any URL to a parent path and append `.md` (e.g. `https://dev.wix.com/docs/sdk.md`, `https://dev.wix.com/docs/sdk/core-modules.md`). > - Top-level index of all portals: https://dev.wix.com/docs/llms.txt > - Full concatenated docs: https://dev.wix.com/docs/llms-full.txt ## Resource: What is the Wix eCommerce platform? ## Article: What is the Wix eCommerce platform? ## Article Link: https://dev.wix.com/docs/api-reference/business-solutions/e-commerce/what-is-the-wix-e-commerce-platform.md ## Article Content: # What Is the Wix eCommerce Platform? The Wix eCommerce platform is a comprehensive suite of services that addresses standard and specialized needs in online selling. The platform serves as a foundational layer for Wix's own business solutions, such as [Stores](https://support.wix.com/en/article/wix-stores-about-wix-stores), [Bookings](https://support.wix.com/en/article/wix-bookings-about-wix-bookings), and [Restaurants Orders](https://www.wix.com/app-market/wix-restaurants-orders-new). It can also be [integrated with external business solutions](https://dev.wix.com/docs/api-reference/business-solutions/e-commerce/get-started/apps/build-a-business-solution.md), enabling customization and flexibility. ![Wix eCommerce Platform & Business Solution Apps](https://wixmp-833713b177cebf373f611808.wixmp.com/images/20d7e7d23435a34e93769a812c35ea75.png) At the platform’s core lies a robust set of interconnected [components](https://dev.wix.com/docs/api-reference/business-solutions/e-commerce/architecture-data-flow.md), which together enable a seamless and efficient online shopping experience for end-users and a streamlined management process for businesses. The Wix eCommerce platform's power lies in its modularity. The platform’s composable architecture provides you with the autonomy to customize, extend, or replace the platform’s functionalities to meet your requirements. This is made possible through various extension points such as APIs, service plugins, data extensions, and custom extensions to a site’s checkout UI and its dashboard. --- > Portal Navigation: > > - Append `.md` to any URL under `https://dev.wix.com/docs/` to get its markdown version. > - Pages are either content pages (article or reference text) or menu pages (a list of links to child pages). > - To get a menu page, truncate any URL to a parent path and append `.md` (e.g. `https://dev.wix.com/docs/sdk.md`, `https://dev.wix.com/docs/sdk/core-modules.md`). > - Top-level index of all portals: https://dev.wix.com/docs/llms.txt > - Full concatenated docs: https://dev.wix.com/docs/llms-full.txt ## Resource: Architecture & Data Flow ## Article: Architecture & Data Flow ## Article Link: https://dev.wix.com/docs/api-reference/business-solutions/e-commerce/architecture-data-flow.md ## Article Content: # Architecture & Data Flow The Wix eCommerce platform comprises multiple interconnected components. Together, these components enable sophisticated purchase flows for customers, as well as powerful sales and order management capabilities for business owners. This architecture provides flexibility and adaptability, allowing you to extend, customize, or replace elements of the purchase flow in accordance with your specific needs. ![Wix eCommerce Platform Architecture: A Map](https://wixmp-833713b177cebf373f611808.wixmp.com/images/2324608b2193a9b7f15618aa35b4e349.png) These are the platform’s main components: ### Catalog (service plugin) Different businesses sell different types of products and services, so Wix provides a flexible interface for connecting externally managed catalogs with the Wix eCommerce platform through the Catalog service plugin ([REST](https://dev.wix.com/docs/api-reference/business-solutions/e-commerce/catalogs/catalog-service-plugin/introduction.md) | [Velo](https://dev.wix.com/docs/velo/api-reference/wix-ecom-v2/service-plugins-spis/ecom-catalog/introduction.md)). A catalog can contain anything sellable, including physical products, services, gift cards, pricing plans, and singular, custom items created for individual transactions like specialized project work. Business solutions with varied offerings, such as Wix Bookings, Wix Stores, and Wix Restaurants, provide the Wix eCommerce platform with access to their catalogs via the Catalog service plugin. This enables robust integration of the platform’s Cart and Checkout functionalities with diverse business types. ### Cart Once customers have found catalog items they want to purchase, they can add these items to their cart. A cart holds information about a potential transaction, including details about selected items, prices, and discounts, as well as the potential buyer. Site visitors can see their cart on the cart page. Developers can access and manage customer carts with the Cart API ([REST](https://dev.wix.com/docs/api-reference/business-solutions/e-commerce/purchase-flow/cart/introduction.md) | [SDK](https://dev.wix.com/docs/sdk/api-reference/ecom/cart/setup.md) | [Velo](https://www.wix.com/velo/reference/wix-ecom-backend/cart/introduction)) and the Current Cart API ([REST](https://dev.wix.com/docs/rest/business-solutions/e-commerce/cart/add-to-current-cart.md) | [SDK](https://dev.wix.com/docs/sdk/api-reference/ecom/current-cart/setup.md) | [Velo](https://www.wix.com/velo/reference/wix-ecom-backend/currentcart/introduction)). Some purchasing flows bypass the cart entirely and proceed directly to checkout. ### Checkout Checkout is the page where a buyer finalizes a purchase. A buyer can reach the checkout page from their cart, or directly – for example, by clicking a button on a catalog or product page. Each checkout holds information about the items to be purchased, price and tax summaries, shipping and billing information, any applied discounts, and more. The checkout experience can be customized, extended, and replaced to suit the needs of the business. Out of the box, the checkout page is tailored to the geographical location of the customer. Developers can access and manage checkout details and trigger checkout-related events with the Checkout API ([REST](https://dev.wix.com/docs/api-reference/business-solutions/e-commerce/purchase-flow/checkout/checkout/introduction.md) | [SDK](https://dev.wix.com/docs/sdk/api-reference/ecom/checkout/setup.md) | [Velo](https://www.wix.com/velo/reference/wix-ecom-backend/checkout/introduction)). ### Customization service plugins You might need to integrate additional logic into your cart or checkout functionality. The eCommerce platform provides service plugins that enable you to integrate custom additional fees ([REST](https://dev.wix.com/docs/api-reference/business-solutions/e-commerce/extensions/additional-fees/additional-fees-service-plugin/introduction.md) | [SDK](https://dev.wix.com/docs/sdk/backend-modules/ecom/service-plugins/additional-fees/introduction.md) | [Velo](https://dev.wix.com/docs/velo/api-reference/wix-ecom-v2/service-plugins-spis/ecom-additional-fees/introduction.md)), external shipping rates ([REST](https://dev.wix.com/docs/api-reference/business-solutions/e-commerce/extensions/shipping-rates/shipping-rates-integration-service-plugin/introduction.md) | [SDK](https://dev.wix.com/docs/sdk/backend-modules/ecom/service-plugins/shipping-rates/introduction.md) | [Velo](https://dev.wix.com/docs/velo/api-reference/wix-ecom-v2/service-plugins-spis/ecom-shipping-rates/introduction.md)), custom cart or checkout validations ([REST](https://dev.wix.com/docs/api-reference/business-solutions/e-commerce/extensions/validations/validations-integration-service-plugin/introduction.md) | [SDK](https://dev.wix.com/docs/sdk/backend-modules/ecom/service-plugins/validations/introduction.md) | [Velo](https://dev.wix.com/docs/velo/api-reference/wix-ecom-v2/service-plugins-spis/ecom-validations/introduction.md)), and custom discount triggers ([REST](https://dev.wix.com/docs/rest/business-solutions/e-commerce/service-plugins/custom-discount-triggers-integration-service-plugin/introduction.md) | [SDK](https://dev.wix.com/docs/sdk/backend-modules/ecom/service-plugins/custom-triggers/introduction.md) | [Velo](https://dev.wix.com/docs/velo/api-reference/wix-ecom-v2/service-plugins-spis/ecom-custom-discount-triggers/introduction.md)). Cart and Checkout determine the total cost of a purchase based on these customizations. ![Customization Service Plugins](https://wixmp-833713b177cebf373f611808.wixmp.com/images/3b727e6c2f872fade2d8fd61986c4d53.png) ### Discounts The Discounts component offers flexibility in pricing strategies. With the Discount Rules API ([REST](https://dev.wix.com/docs/api-reference/business-solutions/e-commerce/extensions/discounts/discount-rules/introduction.md) | [SDK](https://dev.wix.com/docs/sdk/api-reference/ecom/discount-rules/setup.md) | [Velo](https://www.wix.com/velo/reference/wix-ecom-backend/discountrules/introduction)), or directly in a site’s [dashboard](https://support.wix.com/en/article/wix-stores-creating-automatic-discounts), you can create and manage complex discount rules that are applied to cart or checkout items automatically. These rules are informed by custom triggers ([REST](https://dev.wix.com/docs/rest/business-solutions/e-commerce/service-plugins/custom-discount-triggers-integration-service-plugin/introduction.md) | [SDK](https://dev.wix.com/docs/sdk/backend-modules/ecom/service-plugins/custom-triggers/introduction.md) | [Velo](https://dev.wix.com/docs/velo/api-reference/wix-ecom-v2/service-plugins-spis/ecom-custom-discount-triggers/introduction.md)). ### Tax The Wix eCommerce platform integrates a comprehensive tax calculation system, facilitating accurate tax calculations based on varying geographical regions and product categories. The component includes APIs for categorizing items into tax groups ([REST](https://dev.wix.com/docs/rest/business-management/payments/tax/tax-groups/introduction.md) | [SDK](https://dev.wix.com/docs/sdk/backend-modules/billing/tax-groups/introduction.md) | [Velo](https://dev.wix.com/docs/velo/api-reference/wix-billing-v2/tax-groups/introduction.md)) and mapping regions ([REST](https://dev.wix.com/docs/rest/business-management/payments/tax/tax-regions/introduction.md) | [SDK](https://dev.wix.com/docs/sdk/backend-modules/billing/tax-regions/introduction.md) | [Velo](https://dev.wix.com/docs/velo/api-reference/wix-billing-v2/tax-regions/introduction.md)) to specific tax calculators ([REST](https://dev.wix.com/docs/rest/business-management/payments/tax/tax-calculation/introduction.md) | [SDK](https://dev.wix.com/docs/sdk/backend-modules/billing/tax-calculation/introduction.md) | [Velo](https://dev.wix.com/docs/velo/api-reference/wix-billing-v2/tax-calculation/introduction.md)). With the Tax Calculation service plugin ([REST](https://dev.wix.com/docs/api-reference/business-solutions/e-commerce/extensions/tax/tax-calculation-integration-service-plugin/introduction.md)) you can customize transactional tax calculations to provide precise tax assessments in a variety of cases. ### Payments The Payments component facilitates payment processing for buyers. It’s integrated into the site’s checkout page for customer-initiated payments, and the dashboard, where business staff can process customer payments. Payments can also be triggered after an order has been made for unpaid, changed, or partially paid orders. Wix offers several options for handling payments, including [Wix Payments](https://www.wix.com/payments) for credit cards and other popular payment methods, [Wix Pricing Plans](https://support.wix.com/en/article/pricing-plans-an-overview) for memberships, and [Rise.ai](https://rise.ai/) for gift cards. Additional payment integration options can be found in the [Wix App Market](https://www.wix.com/app-market/), and developers can create custom payment platform integrations using the Order Transactions API ([REST](https://dev.wix.com/docs/api-reference/business-solutions/e-commerce/orders/order-transactions/introduction.md) | [SDK](https://dev.wix.com/docs/sdk/backend-modules/ecom/order-transactions/setup.md) | [Velo](https://dev.wix.com/docs/velo/api-reference/wix-ecom-backend/order-transactions/introduction.md)). ### Thank you page Once a transaction is completed, the customer is redirected to a thank you page. This page acknowledges the successful payment and thanks the customer for their purchase. ### Orders Once a customer has committed to a purchase, an order is created. An order holds information about purchased items, price and tax summaries, shipping and billing information, any applied discounts, and the status of payment and fulfillment. In the dashboard, business staff can create new orders, view and edit existing orders, track fulfillment, and manage the payments cycle. The Orders API ([REST](https://dev.wix.com/docs/api-reference/business-solutions/e-commerce/orders/orders/introduction.md) | [SDK](https://dev.wix.com/docs/sdk/api-reference/ecom/orders/setup.md) | [Velo](https://www.wix.com/velo/reference/wix-ecom-backend/orders/introduction)) enables apps or site owners to customize management of the order lifecycle, including viewing, editing, approving, canceling, and charging. ### Fulfillment The Fulfillment component is the process's concluding step, ensuring customers receive their purchases. It accommodates all types of goods or services, from physical and digital products to service provisions, ensuring a comprehensive fulfillment solution. A fulfillment object contains information about an order’s shipping provider, tracking details, and line items. Fulfillment details can be accessed and managed using the Order Fulfillments API ([REST](https://dev.wix.com/docs/api-reference/business-solutions/e-commerce/orders/order-fulfillments/introduction.md) | [SDK](https://dev.wix.com/docs/sdk/api-reference/ecom/order-fulfillments/setup.md) | [Velo](https://www.wix.com/velo/reference/wix-ecom-backend/orderfulfillments/introduction)), allowing a high degree of customization. ### Notifications The Notifications component plays a vital role in keeping site owners up-to-date with critical events throughout the buying process. This service sends alerts to site owners when specific events take place, such as a successful or failed payment, the creation of an order, or fulfillment events. Notifications keep site owners informed and help them stay on top of orders, ensuring a smooth buying experience for their customers. --- > Portal Navigation: > > - Append `.md` to any URL under `https://dev.wix.com/docs/` to get its markdown version. > - Pages are either content pages (article or reference text) or menu pages (a list of links to child pages). > - To get a menu page, truncate any URL to a parent path and append `.md` (e.g. `https://dev.wix.com/docs/sdk.md`, `https://dev.wix.com/docs/sdk/core-modules.md`). > - Top-level index of all portals: https://dev.wix.com/docs/llms.txt > - Full concatenated docs: https://dev.wix.com/docs/llms-full.txt ## Resource: Who can use the eCom platform? ## Article: Who can use the eCom platform? ## Article Link: https://dev.wix.com/docs/api-reference/business-solutions/e-commerce/who-can-use-the-e-com-platform.md ## Article Content: # Who Can Use the Wix eCommerce Platform? The Wix eCommerce platform is versatile and adaptable, serving a wide range of use cases, from simple to complex. Let's look at how different kinds of developers and creators can unlock its potential: + [**Wix site creators**](#wix-site-creators-add-ecommerce-capabilities-without-code): Launch a robust eCommerce site easily without code. + [**Velo developers**](#website-developers-customize-your-sites-ecommerce-functionality): Use code to go beyond standard eCommerce functionality. + [**Wix Headless**](#wix-headless-use-wix-ecommerce-from-any-platform): Leverage Wix eCommerce with any tech stack. + [**Wix App developers**](#wix-app-developers): Create specialized eCommerce business features or comprehensive business solutions. ## Wix site creators: Add eCommerce capabilities without code For many standard use cases, you can leverage the power of the Wix eCommerce platform without need for any coding skills. Simply install a Wix business solution, such as [Wix Bookings](https://support.wix.com/en/article/wix-bookings-about-wix-bookings) or [Wix Stores](https://support.wix.com/en/article/wix-stores-about-wix-stores), on your Wix site. This process automatically equips your site with the [eCommerce platform's features](https://www.wix.com/ecommerce/features), such as cart and checkout site pages, as well as dashboard pages for managing orders and payments. The eCommerce platform’s functionalities integrate seamlessly into your site, providing a complete eCommerce experience with minimal effort. If your requirements are straightforward, this setup is all you need to start selling online. And you can further extend the capabilities of your eCommerce site by installing Wix Apps from the [Wix App Market](https://www.wix.com/app-market). For example: + If you run a yoga studio and wish to offer online bookings for your classes, install [Wix Bookings](https://www.wix.com/app-market/web-solution/bookings) to gain immediate access to the eCommerce platform's capabilities. + For a restaurant owner, install [Wix Restaurants Orders](https://www.wix.com/app-market/wix-restaurants-orders-new) to create a site that takes online orders. Learn how to [get started integrating eCommerce functionality into a Wix site](https://dev.wix.com/docs/api-reference/business-solutions/e-commerce/get-started/sites/add-e-com-to-a-site.md). ## Website developers: Customize your site's eCommerce functionality If you have a Wix site and need more customization than the pre-existing business solutions provide out of the box, use [code](https://www.wix.com/velo/reference/api-overview) to extend your site’s functionalities and meet your business’s requirements. With the Wix eCommerce [APIs](https://www.wix.com/velo/reference/wix-ecom-backend/introduction), you can use code to access and manage carts, checkouts, orders, and more. With the Wix eCommerce [service plugins](https://www.wix.com/velo/reference/spis/wix-ecom), you can integrate custom logic and dynamic external information, such as shipping rates, additional fees, custom validations, and automatically triggered discounts. The possibilities for customization of your site’s eCommerce functionalities are endless. For example: * Customize the user experience for customers who have items in their cart exceeding a certain value, by using the [Current Cart](https://www.wix.com/velo/reference/wix-ecom-backend/currentcart) API to determine when a customer’s cart meets the criteria. * Synchronize with an external inventory management system after a successful order or checkout, by creating event handlers that react to [eCommerce events](https://www.wix.com/velo/reference/wix-ecom-backend/events) on your site and automatically execute custom code. * Provide real-time shipping rates for a provider not natively supported by Wix, by using the [Shipping Rates](https://dev.wix.com/docs/velo/events-service-plugins/e-commerce/service-plugins/ecom-shipping-rates/introduction.md) service plugin. * Develop a feature to display customer testimonials for products. Use the [Orders](https://www.wix.com/velo/reference/wix-ecom-backend/orders/introduction) API to verify that an order was fulfilled, then allow the customer to submit a review. Learn how to [get started customizing a Wix site's eCommerce functionality using code](https://dev.wix.com/docs/api-reference/business-solutions/e-commerce/get-started/sites/add-e-com-to-a-site.md). ## Wix Headless: Use Wix eCommerce from any platform [Wix Headless](https://dev.wix.com/docs/go-headless.md) empowers you to build and innovate sites and apps on any platform, while leveraging the robust backend functionalities of Wix business solutions, including the eCommerce platform. Develop your front-end user experience on any platform, and use the eCommerce platform’s APIs (either via [REST](https://dev.wix.com/docs/api-reference/business-solutions/e-commerce/introduction.md) or the Wix [JavaScript SDK](https://dev.wix.com/docs/sdk/api-reference/ecom/introduction.md)) to implement and customize your eCommerce functionalities. Wix provides the backend – you retain full control over the frontend on your chosen platform. For example: + [Create an online store](https://dev.wix.com/docs/go-headless/tutorials-templates/java-script-sdk-tutorials/e-commerce-quick-start.md) on a platform of your choice, leveraging the functionality of the Wix eCommerce platform for business management. + Develop an [event ticketing site](https://dev.wix.com/docs/go-headless/self-managed-headless/self-managed-templates/next-js-templates.md) on an external platform, utilizing the Wix eCommerce APIs for ticket sales and order management. Learn how to [get started using the Wix eCommerce platform with any tech stack](https://dev.wix.com/docs/api-reference/business-solutions/e-commerce/get-started/headless/use-wix-e-com-from-any-platform.md). ## Wix App developers Wix apps extend the features and management capabilities of Wix sites in a variety of ways, from adding an individual site or dashboard feature to implementing a comprehensive set of functionalities for a new business type. Wix users can find Wix apps in the [Wix App Market](https://www.wix.com/app-market) and install them on their sites to take advantage of the additional capabilities they offer. If you’re a developer looking to [create new eCommerce functionalities](https://dev.wix.com/docs/build-apps.md) that can be integrated across many Wix sites, the Wix eCommerce platform provides fertile ground for innovation. To integrate your app with the Wix eCommerce platform, use Wix’s [REST API](https://dev.wix.com/docs/api-reference/business-solutions/e-commerce/introduction.md) or the Wix [JavaScript SDK](https://dev.wix.com/docs/sdk/api-reference/ecom/introduction.md). ### Develop a new feature Create specific eCommerce features that supplement and integrate with existing business solutions. For example: + Craft an up-sell or cross-sell widget offering recommendations based on the contents of a customer’s cart. + Create a "meal planner" app for food stores, letting customers choose recipes and automatically adding the necessary ingredients to their cart. + Develop an app for automated product recommendations, based on customer browsing and purchase history. Learn how to [get started building an eCommerce feature app](https://dev.wix.com/docs/api-reference/business-solutions/e-commerce/get-started/apps/build-a-feature-app.md). ### Develop a new business solution Build a Wix App that offers a comprehensive business solution, comparable to Wix’s own [Bookings](https://support.wix.com/en/article/wix-bookings-about-wix-bookings), [Stores](https://support.wix.com/en/article/wix-stores-about-wix-stores), and [Restaurants Orders](https://www.wix.com/app-market/wix-restaurants-orders-new). For example: + Develop a business solution enabling site functionality for property rentals, integrating with the eCommerce platform for handling checkouts, payments, and more. + Create an auction solution that enables site owners to sell their goods or services in auction-style sales, where customers can submit live bids, secure winning items, and complete their purchases via the eCommerce platform. + Design an app that empowers businesses to offer customized or tailor-made products, where users can select specifications, preview their choices, and make purchases, all while smoothly integrating with the eCommerce infrastructure for payment processing and order handling. Learn how to [get started building an eCommerce business solution](https://dev.wix.com/docs/api-reference/business-solutions/e-commerce/get-started/apps/build-a-business-solution.md). --- > Portal Navigation: > > - Append `.md` to any URL under `https://dev.wix.com/docs/` to get its markdown version. > - Pages are either content pages (article or reference text) or menu pages (a list of links to child pages). > - To get a menu page, truncate any URL to a parent path and append `.md` (e.g. `https://dev.wix.com/docs/sdk.md`, `https://dev.wix.com/docs/sdk/core-modules.md`). > - Top-level index of all portals: https://dev.wix.com/docs/llms.txt > - Full concatenated docs: https://dev.wix.com/docs/llms-full.txt ## Resource: Installation ## Article: Installation ## Article Link: https://dev.wix.com/docs/api-reference/business-solutions/e-commerce/get-started/installation.md ## Article Content: # Getting Started: Installation To add the Wix eCommerce platform’s functionality to a site, a Wix user needs to install it as an app. However, unlike other Wix apps, the eCommerce platform can't be installed by itself. Instead, the Wix eCommerce app is added automatically as a dependency when installing a business solution app that relies on its functionalities, such as [Wix Bookings](https://support.wix.com/en/article/wix-bookings-about-wix-bookings), [Wix Stores](https://support.wix.com/en/article/wix-stores-about-wix-stores), [Wix Restaurants Orders](https://www.wix.com/app-market/wix-restaurants-orders-new), or a business solution app you develop. The following articles explain how developers building different types of products should handle installation of the eCommerce app: + [Wix site creators & developers: Add eCommerce functionality to your site.](https://dev.wix.com/docs/api-reference/business-solutions/e-commerce/get-started/sites/add-e-com-to-a-site.md) + [Wix Headless developers: Use Wix eCommerce from any platform.](https://dev.wix.com/docs/api-reference/business-solutions/e-commerce/get-started/headless/use-wix-e-com-from-any-platform.md) + [Wix App developers: Build a feature app that extends eCommerce functionality.](https://dev.wix.com/docs/api-reference/business-solutions/e-commerce/get-started/apps/build-a-feature-app.md) + [Wix App developers: Build a new eCommerce business solution.](https://dev.wix.com/docs/api-reference/business-solutions/e-commerce/get-started/apps/build-a-business-solution.md) --- > Portal Navigation: > > - Append `.md` to any URL under `https://dev.wix.com/docs/` to get its markdown version. > - Pages are either content pages (article or reference text) or menu pages (a list of links to child pages). > - To get a menu page, truncate any URL to a parent path and append `.md` (e.g. `https://dev.wix.com/docs/sdk.md`, `https://dev.wix.com/docs/sdk/core-modules.md`). > - Top-level index of all portals: https://dev.wix.com/docs/llms.txt > - Full concatenated docs: https://dev.wix.com/docs/llms-full.txt ## Resource: Add eCom to a site ## Article: Wix Site Creators & Velo Developers: Add eCommerce functionality to a site ## Article Link: https://dev.wix.com/docs/api-reference/business-solutions/e-commerce/get-started/sites/add-e-com-to-a-site.md ## Article Content: # Wix Site Creators & Velo Developers: Add eCommerce Functionality to Your Site If you are creating a Wix site and want to ensure it has eCommerce functionality, follow these steps: 1. Install a business solution app that integrates the platform. You can do this in one of the following ways: * When creating your site, choose a template that already has an eCommerce business solution app installed. For example, choose an [online store template](https://www.wix.com/website/templates/html/online-store). * Install a Wix business solution that integrates Wix eCommerce, such as Wix Bookings or Wix Stores. To do this, find the app you want in the [Wix App Market](https://www.wix.com/app-market/collection/wix-business-solutions) and click **Add to site**. 1. Optionally, add features to your site by installing other apps from the [Wix App Market](https://www.wix.com/app-market) that extend eCommerce functionality. Once a site has the Wix eCommerce platform installed, site developers can customize and extend the site’s functionalities by: * Importing the [Velo eCommerce modules](https://www.wix.com/velo/reference/wix-ecom-backend/introduction) and using its APIs in your code. * Leveraging the [Velo eCommerce service plugins](https://www.wix.com/velo/reference/spis/wix-ecom) for deeper customization. --- > Portal Navigation: > > - Append `.md` to any URL under `https://dev.wix.com/docs/` to get its markdown version. > - Pages are either content pages (article or reference text) or menu pages (a list of links to child pages). > - To get a menu page, truncate any URL to a parent path and append `.md` (e.g. `https://dev.wix.com/docs/sdk.md`, `https://dev.wix.com/docs/sdk/core-modules.md`). > - Top-level index of all portals: https://dev.wix.com/docs/llms.txt > - Full concatenated docs: https://dev.wix.com/docs/llms-full.txt ## Resource: Build a feature app ## Article: Wix App Developers: Build a Wix eCom feature app ## Article Link: https://dev.wix.com/docs/api-reference/business-solutions/e-commerce/get-started/apps/build-a-feature-app.md ## Article Content: # Wix App Developers: Build a Feature App That Extends eCommerce Functionality Many apps in the Wix App market enhance the eCommerce functionality of sites that already integrate with the Wix eCommerce platform. If you are creating such an app, your app should require that Wix users first install a business solution app that integrates the Wix eCommerce platform, such as Wix Bookings or Wix Stores. To prevent your app from being installed on sites that don't have an eCommerce business solution app already installed, follow these steps: 1. Go to your [app's dashboard](https://dev.wix.com/apps/). 2. In the left sidebar, click **App Profile**. 3. In the sidebar submenu, click **App Audience**. 4. Under **Required Wix Products**, select **Yes, additional products are required**. 5. In the **Choose products** list, select the required business solutions, such as **Wix Stores**, **Wix Bookings**, and **Wix Restaurants Orders**. If you select more than 1 app, your app will require at least 1 of the selected apps. 6. Click **Save**. To check whether a business solution is installed on a site, you can also use the [Get App Instance](https://dev.wix.com/docs/api-reference/app-management/app-instance/get-app-instance.md) method. The response object contains a list of installed Wix apps in `site.installedWixApps`. To learn more about developing a Wix app that extends eCommerce functionality, read about [integrating with Wix business solutions](https://dev.wix.com/docs/build-apps/get-started/overview/integrating-with-wix-s-business-solutions.md). If you are new to developing apps for installation on Wix sites, learn more about the [app-building journey](https://dev.wix.com/docs/build-apps/get-started/overview/about-wix-apps.md), or get started from one of our growing selection of [app templates](https://dev.wix.com/docs/build-apps/get-started/templates/get-started-from-an-app-template.md). --- > Portal Navigation: > > - Append `.md` to any URL under `https://dev.wix.com/docs/` to get its markdown version. > - Pages are either content pages (article or reference text) or menu pages (a list of links to child pages). > - To get a menu page, truncate any URL to a parent path and append `.md` (e.g. `https://dev.wix.com/docs/sdk.md`, `https://dev.wix.com/docs/sdk/core-modules.md`). > - Top-level index of all portals: https://dev.wix.com/docs/llms.txt > - Full concatenated docs: https://dev.wix.com/docs/llms-full.txt ## Resource: Build a business solution ## Article: Wix App Developers: Build a Wix eCom business solution ## Article Link: https://dev.wix.com/docs/api-reference/business-solutions/e-commerce/get-started/apps/build-a-business-solution.md ## Article Content: # Wix App Developers: Build a New eCommerce Business Solution If you are developing a full-scale business solution that requires eCommerce capabilities (similar to Wix Stores, Wix Bookings, or Wix Restaurants Orders), you can integrate your app with the Wix eCommerce platform and take advantage of its features. To enable this integration, you need to: 1. [Set up automatic installation of the eCommerce app.](#step-1--set-up-automatic-installation-of-the-ecommerce-app) 1. [Integrate an external catalog with your app.](#step-2--integrate-an-external-catalog-with-your-app) 1. [Integrate with the Inventory service plugin.](#step-3--integrate-with-the-inventory-service-plugin) 1. [Integrate with additional eCommerce services.](#step-4-optional--integrate-with-additional-ecommerce-services) (Optional) For a comprehensive guide, see our [tutorial on building a business solution integrated with the Wix eCommerce platform](https://dev.wix.com/docs/build-apps/get-started/tutorials/tutorial-build-an-e-commerce-business-solution/overview.md). ## Step 1 | Set up automatic installation of the eCommerce app The eCommerce platform’s functionality can be added to a Wix site by installing the Wix Checkout & Orders app. However, the Wix Checkout & Orders app isn’t a standalone app that a site owner can install independently. To integrate eCommerce capabilities into your own business solution app, you need to make sure that your app automatically installs the Wix Checkout & Orders app as a dependency. Follow these steps to make your app install Wix eCommerce capabilities every time it's installed on a site: 1. Go to your [app's dashboard](https://dev.wix.com/apps/). 2. In the left sidebar, click **App Profile**. 3. In the sidebar submenu, click **App Audience**. 4. Under **Required Wix Products**, select **Yes, additional products are required**. 5. In the **Choose products** list, select **Wix Checkout & Orders**. ![Wix Checkout & Orders](https://wixmp-833713b177cebf373f611808.wixmp.com/images/444cfe17d5680683847c9ffc3870665c.png) 6. Click **Save**. You have now configured your app to frontload the Wix eCommerce platform. Whenever your app is installed on a site, it now automatically installs the Wix Checkout & Orders app which adds standard Wix eCommerce pages and components to the site it’s installed on. After installing your app, a Wix site will have these features: **Site pages:** + Cart Page + Checkout Page (not visible in the editor) + Thank You Page **Dashboard pages:** + Orders + Gift Cards ## Step 2 | Integrate an external catalog with your app Any business solution app that integrates with the Wix eCommerce platform needs to connect with an external [catalog](https://dev.wix.com/docs/api-reference/business-solutions/e-commerce/architecture-data-flow.md) containing available products or services. To get your app set up with an external catalog, follow these steps: 1. Implement the Catalog service plugin to make your external catalog's data available to Wix in the required format and structure. Refer to the [Catalog service plugin documentation](https://dev.wix.com/docs/rest/business-solutions/e-commerce/introduction.md) for detailed instructions. 1. Create an [item page](https://dev.wix.com/docs/api-reference/business-solutions/e-commerce/get-started/apps/develop-a-business-solution-item-page-with-blocks.md) (a product page, a service page, or equivalent) and/or a gallery page for your app that displays information about individual items for sale. This page should include functionality for adding items to the site visitor's cart, using the [Cart API](https://dev.wix.com/docs/api-reference/business-solutions/e-commerce/purchase-flow/cart.md). For guidance on creating a page for your app, consult [About Site Page Extensions](https://dev.wix.com/docs/build-apps/develop-your-app/extensions/site-extensions/site-pages/about-site-page-extensions.md). 1. (Optional) To enable Wix users to manage catalog items from their site dashboard, develop a [dashboard page](https://dev.wix.com/docs/build-apps/develop-your-app/extensions/dashboard-extensions/dashboard-pages/about-dashboard-page-extensions.md) for your app. For detailed instructions on developing Wix apps, consult our comprehensive documentation on [building Wix apps](https://dev.wix.com/docs/build-apps.md). ## Step 3 | Integrate with the Inventory service plugin Any business solution app that integrates with the Wix eCommerce platform and manages inventory needs to prevent orders for unavailable items and keep stock levels in sync with order flows. To get your app set up with inventory management, follow these steps: 1. Implement the Inventory service plugin to integrate with Wix's unified inventory system. This enables your app to automatically decrement availability when items are ordered or paid for, and increment it when orders are canceled or refunded. Refer to the [Inventory service plugin documentation](https://dev.wix.com/docs/api-reference/business-solutions/e-commerce/catalogs/inventory-service-plugin/introduction.md) for detailed instructions. 1. (Optional) Configure multi-location inventory management if your business solution involves tracking stock across multiple physical or virtual locations. The Inventory service plugin is especially useful for business solutions involving physical products, digital goods with limited availability, or time-based services like appointments or event tickets. ## Step 4 (Optional) | Integrate with additional eCommerce services You can further customize your app's functionality by integrating with additional services available on the eCommerce platform. The [Tax Groups service plugin](https://dev.wix.com/docs/api-reference/business-solutions/e-commerce/extensions/tax/tax-groups-integration-service-plugin/introduction.md) enables you to create and manage custom tax groups to categorize items from your app's catalog based on distinct tax treatments. This integration is required to charge tax on your external catalog items. ## See also + [Tutorial | Build an eCommerce Business Solution](https://dev.wix.com/docs/build-apps/get-started/tutorials/tutorial-build-an-e-commerce-business-solution/overview.md) --- > Portal Navigation: > > - Append `.md` to any URL under `https://dev.wix.com/docs/` to get its markdown version. > - Pages are either content pages (article or reference text) or menu pages (a list of links to child pages). > - To get a menu page, truncate any URL to a parent path and append `.md` (e.g. `https://dev.wix.com/docs/sdk.md`, `https://dev.wix.com/docs/sdk/core-modules.md`). > - Top-level index of all portals: https://dev.wix.com/docs/llms.txt > - Full concatenated docs: https://dev.wix.com/docs/llms-full.txt ## Resource: Develop a business solution item page with Blocks ## Article: Develop a Business Solution Item Page with Blocks ## Article Link: https://dev.wix.com/docs/api-reference/business-solutions/e-commerce/get-started/apps/develop-a-business-solution-item-page-with-blocks.md ## Article Content: # Develop a Business Solution Item Page with Blocks When you [build a business solution on top of the Wix eCommerce platform](https://dev.wix.com/docs/api-reference/business-solutions/e-commerce/get-started/apps/build-a-business-solution.md), you need at least one page in your app that exposes eCommerce functionality and allows site visitors to make purchases. This is known as an item page. When a site owner installs your app on their site, any item pages you create are included in the installation and displayed to site visitors on the site. An item page displays information about your item, including images. It uses the [Wix eCommerce frontend API](https://dev.wix.com/docs/sdk/frontend-modules/ecom/introduction.md) to allow site visitors to view their cart and navigate to checkout from the item page. An example of an item page is the Wix Stores product page. This page lets a customer on a site view details about a product, and updates the customer’s cart or navigates to checkout when the customer clicks certain buttons. The product page is installed automatically whenever a user adds Wix Stores to their site. ![Stores item page example](https://wixmp-833713b177cebf373f611808.wixmp.com/images/f7f2702328a8f63bd4fc6d4879923297.png) This article explains how to create an item page in [Blocks](https://dev.wix.com/docs/build-apps/develop-your-app/develop-an-app-with-blocks/about-wix-blocks.md) as part of your business solution. ## Before you begin Before getting started, make sure that you: - Create an app on the [Custom Apps page](https://manage.wix.com/account/custom-apps). - Configure your app to [install Wix eCom](https://dev.wix.com/docs/rest/business-solutions/e-commerce/wix-e-commerce-platform-handbook/get-started/apps/build-a-business-solution.md#step-1--set-up-automatic-installation-of-the-ecommerce-app). - Create an item catalog and implement the [Catalog service plugin](https://dev.wix.com/docs/rest/business-solutions/e-commerce/service-plugins/catalog-service-plugin/introduction.md). ## Step 1 | Design a site widget in Blocks 1. In the [Custom Apps page](https://dev.wix.com/apps), select the app you want to add the item page to and go to [Extensions](https://dev.wix.com/app-selector?title=Select+an+App\&primaryButtonText=Select+Site\&actionUrl=https%3A%2F%2Fdev.wix.com%2Fapps%2F%7BappId%7D%2Fextensions). 2. Click **+ Create Extension** and in the modal that appears, search for the **Widget** extension labeled Wix Blocks. ![Create a widget extension on Blocks](https://wixmp-833713b177cebf373f611808.wixmp.com/images/b1ea9d19905c987a31cb373732585b6d.png) 3. Click **+ Create on Blocks**. This opens the widget extension in a new page on Wix Blocks. 4. Use the Blocks Editor to design your widget to match your app’s needs. For example, if you want to create an item page that displays all available items on a site, you can add a repeater element. Or, you can combine basic elements like buttons and images to create a product page similar to Wix Stores’. 5. Connect your item catalog to the widget. If you’re hosting the catalog externally, fetch the data from the external service to populate the widget. This completes the design of your site widget. ## Step 2 | Add code to the widget to support eCommerce functionality At a minimum, your item page code should do the following: - Add items to the cart using the [`catalogReference` object](https://dev.wix.com/docs/rest/business-solutions/e-commerce/service-plugins/catalog-service-plugin/handle-item-variants.md#the-catalogreference-object). - Navigate the visitor to a cart view or checkout page. We’ll show you an example of some basic code that does this below. To add code to your item page in Blocks: 1. At the bottom of the Blocks Editor, open the [code section](https://dev.wix.com/docs/build-apps/develop-your-app/develop-an-app-with-blocks/get-started/a-blocks-app-workflow.md#add-widget-code) for your widget. 2. At the top of the code section, add the following import statements: ```javascript import {currentCart} from 'wix-ecom-backend'; import wixEcomFrontend from "wix-ecom-frontend"; ``` These lines import 2 modules that are necessary for your item page: - The [`currentCart`](https://dev.wix.com/docs/sdk/backend-modules/ecom/current-cart/setup.md) module from the Wix eCom backend API. This module lets you update the current cart on a site and create the checkout. - The [Wix eCom frontend API](https://dev.wix.com/docs/velo/api-reference/wix-ecom-frontend/introduction.md): This API lets you update the cart UI and navigate to the cart or checkout page. 3. Call `addToCurrentCart()` to add an item to the current site visitor’s cart. As part of the method arguments, pass it an object containing a reference to your item catalog. Here’s an example of what that looks like: ```javascript const catalogReferenceObject = { lineItems: [{ catalogReference: { appId: "10e5b2b7-f4cf-4063-ad08-01f38a114b48", catalogItemId: "abc123" }, quantity: 1 }] }; // Call addToCurrentCart() with the reference currentCart.addToCurrentCart(catalogReferenceObject); ``` The important part of this function is the `catalogReferenceObject` that is passed to `addToCurrentCart()`. Whenever your code uses the Wix eCommerce flow, you need to pass the eCommerce platform a catalog reference so it can retrieve the item information. The code above uses hard-coded values as an example, but normally you collect these values dynamically. For example, you might retrieve values from a repeater item. The object contains 3 required parameters: - The `appId` is the ID of your custom app. You can find this in your app’s [dashboard page](https://dev.wix.com/app-selector?title=Select+an+App\&primaryButtonText=Select+Site\&actionUrl=https%3A%2F%2Fdev.wix.com%2Fapps%2F%7BappId%7D%2F). The app ID tells the eCommerce platform which app it’s working with, so it can look up the URI of your catalog implementation. - The `catalogItemId` tells Wix eCom which item in the catalog to request information for. The ID can take any format you choose, as long as it matches an ID in your item catalog. - `quantity` indicates the requested number of items. Include an optional `options` parameter to request information for different [variants](https://dev.wix.com/docs/rest/business-solutions/e-commerce/service-plugins/catalog-service-plugin/handle-item-variants.md) of an item. For example, if an item can come in different sizes and colors, your catalog reference might look something like this: ```javascript const catalogReferenceObject = { lineItems: [{ catalogReference: { appId: "10e5b2b7-f4cf-4063-ad08-01f38a114b48", catalogItemId: "cdf456", options: { color: "Blue", size: "L" } }, quantity: 1 }] }; currentCart.addToCurrentCart(catalogReferenceObject); ``` 4. Add a clickable element such as an **Add to cart** button, and call `addToCurrentCart()` in the element’s `onClick()` handler. Inside the provided `onReady()` function, add logic that navigates customers to the checkout or cart pages using the eCom frontend API. For example, if your widget contains a **View Cart** button, call [`navigateToCartPage()`](https://dev.wix.com/docs/velo/api-reference/wix-ecom-frontend/navigate-to-cart-page.md) when it’s clicked. Before navigating to the cart view, make sure to call the [`refreshCart()`](https://dev.wix.com/docs/velo/api-reference/wix-ecom-frontend/refresh-cart.md) function. This function updates the cart UI with the latest data, and ensures that all items selected by the customer appear in the cart view. Here’s an example of logic that adds an item to the cart and then navigates to the cart page: ```javascript $w.onReady(function () {     $w('#addToCartButton').onClick(async () => {         await addToCurrentCart();         await wixEcomFrontend.refreshCart();         wixEcomFrontend.navigateToCartPage();     }) }); ``` Here’s a complete example: ```js import {currentCart} from 'wix-ecom-backend'; import wixEcomFrontend from "wix-ecom-frontend"; $w.onReady(function () {   $w('#addToCartButton').onClick(async () => { const catalogRef = {         lineItems: [{             catalogReference: {                 appId: "538b878c-03c3-477f-b5bd-74f493aa86b5",                 catalogItemId: "abc123"             },             quantity: 1         }]     };     await addToCurrentCart(catalogRef);     await wixEcomFrontend.refreshCart();   wixEcomFrontend.navigateToCartPage();    }) }); ``` Use this code as a starting point for your own logic. Here are a few suggestions for building upon the example code: - Listen to [onCartChange()](https://dev.wix.com/docs/sdk/frontend-modules/ecom/on-cart-change.md) to dynamically update the value of `quantity`, based on site visitor input. - Add support for [removing line items from the cart](https://dev.wix.com/docs/sdk/backend-modules/ecom/current-cart/remove-line-items-from-current-cart.md). * Add a **Buy Now** button to your widget and implement a flow to take the customer directly to the checkout page. A "Buy now" flow skips the cart view, so you don’t need to call `refreshCart()`. When a customer clicks the **Buy Now** button, [create a checkout directly](https://dev.wix.com/docs/sdk/backend-modules/ecom/checkout/create-checkout.md) to get a checkout ID, then pass that ID to [`navigateToCheckoutPage()`](https://dev.wix.com/docs/sdk/frontend-modules/ecom/navigate-to-checkout-page.md). You now have a fully functional site widget. ## Step 3 | Add your widget to a site page extension You want your item page to be added automatically to a site whenever a user installs your app. To make sure this happens, do the following steps: 1. In the Wix Blocks editor, go to the **Wix Blocks** menu in the top left corner and select **Dashboard**. This opens your app dashboard. ![View Blocks dashboard](https://wixmp-833713b177cebf373f611808.wixmp.com/images/fe6a36f1e97bfa74667364b275503dc7.png) 2. In your app dashboard, go to the [Extensions](https://dev.wix.com/app-selector?title=Select+an+App\&primaryButtonText=Select+Site\&actionUrl=https%3A%2F%2Fdev.wix.com%2Fapps%2F%7BappId%7D%2Fextensions) page. 3. Click **+ Create Extension**. In the modal that opens, select the **Site Page** extension. 4. Give your page a name and ID. The name is visible to users on a site. The ID is not visible to users and is used to refer to the page in code. Configure the other settings as necessary. 5. Under **Add widgets to this page**, click **+ Add Widgets** and select the site widget you created in the previous steps. Click **Save** to save the site page extension. 6. Return to the home page of your app dashboard. Under **Building your app**, click **Installation settings** > **Manage Settings**. ![Installation settings](https://wixmp-833713b177cebf373f611808.wixmp.com/images/8d5b5f8cd896e8fd467f48e591abdc7c.png) 7. Under **Installation**, select **Added to a site page** and make sure your widget is added to a page. Select the site page extension you created. ![Site page config](https://wixmp-833713b177cebf373f611808.wixmp.com/images/063526bbc5e72385b02c86b91e9d1a8b.png) Finish configuring the remaining settings and click **Save**. Now, when a user installs your app, the site page extension with the widget you created will be added automatically to the site. ## Step 4 | Test your item page on a site Now that you have a complete item page with code, you can test it on a site to make sure it works. We recommend installing and testing on a [premium test site](https://dev.wix.com/docs/build-apps/launch-your-app/app-submission/test-your-app-on-a-premium-site.md). 1. Return to your app in the app dashboard. 2. Click **Test App** > **Editor**. 3. Select a site to install and test the app on. Wix takes you to the selected test site. Click **Add to Site** to add your app and agree to the terms of use. This adds the app, along with the item page, to your site. 4. Publish your site and go to your item page. Test your widget by clicking on various buttons. Make sure that it navigates to the correct pages, and that the cart updates appropriately. ## See also - [Wix App Developers: Build a New eCommerce Business Solution](https://dev.wix.com/docs/api-reference/business-solutions/e-commerce/get-started/apps/build-a-business-solution.md) - [About the eCommerce Catalog Service Plugin](https://dev.wix.com/docs/rest/business-solutions/e-commerce/service-plugins/catalog-service-plugin/introduction.md#about-the-ecommerce-catalog-service-plugin) - [Tutorial | Build an eCommerce Business Solution](https://dev.wix.com/docs/build-apps/get-started/tutorials/tutorial-build-an-e-commerce-business-solution/overview.md) --- > Portal Navigation: > > - Append `.md` to any URL under `https://dev.wix.com/docs/` to get its markdown version. > - Pages are either content pages (article or reference text) or menu pages (a list of links to child pages). > - To get a menu page, truncate any URL to a parent path and append `.md` (e.g. `https://dev.wix.com/docs/sdk.md`, `https://dev.wix.com/docs/sdk/core-modules.md`). > - Top-level index of all portals: https://dev.wix.com/docs/llms.txt > - Full concatenated docs: https://dev.wix.com/docs/llms-full.txt ## Resource: Use Wix eCom from any platform ## Article: Wix Headless Developers: Use Wix eCom from any platform ## Article Link: https://dev.wix.com/docs/api-reference/business-solutions/e-commerce/get-started/headless/use-wix-e-com-from-any-platform.md ## Article Content: # Wix Headless Developers: Use Wix eCommerce From Any Platform If you are developing a site or app on a different platform, [Wix Headless](https://dev.wix.com/docs/go-headless.md) lets you take advantage of Wix business solutions via Wix APIs. To use the Wix eCommerce platform with any tech stack: 1. Follow the instructions to [create and set up a Wix Headless project](https://dev.wix.com/docs/go-headless/getting-started/setup/general-setup/overview.md). 2. Install the eCommerce business solution, or an app that integrates the Wix eCommerce platform, such as Wix Bookings. You can do this when [creating your project](https://dev.wix.com/docs/go-headless/getting-started/setup/general-setup/create-a-project.md) or later from the [project dashboard](https://dev.wix.com/docs/go-headless/getting-started/setup/general-setup/add-apps-to-a-project.md). 3. Use Wix APIs to communicate with the Wix eCommerce platform. You can do this in two ways: * If you’re coding in JavaScript or TypeScript, use the [Wix JavaScript SDK](https://dev.wix.com/docs/sdk/api-reference/ecom/introduction.md) to call Wix APIs. * Otherwise, use the [Wix REST API](https://dev.wix.com/docs/api-reference/business-solutions/e-commerce/introduction.md). For further guidance, see: * [Tutorial for creating a simple React component](https://dev.wix.com/docs/go-headless/tutorials-templates/java-script-sdk-tutorials/e-commerce-quick-start.md) with a complete eCommerce flow using Wix Headless. * [Next.js template](https://dev.wix.com/docs/go-headless/self-managed-headless/self-managed-templates/next-js-templates.md) for a site that takes advantage of the Wix eCommerce platform using Wix Headless. * [React Native template](https://dev.wix.com/docs/go-headless/tutorials-templates/templates/mobile/react-native-template.md) for a mobile application that integrates with Wix eCommerce using Wix Headless. * [Tutorial for creating a WordPress plugin](https://dev.wix.com/docs/go-headless/tutorials-templates/other-tutorials/create-a-word-press-plugin.md) that integrates with a Wix Headless project using Wix eCommerce APIs. --- > Portal Navigation: > > - Append `.md` to any URL under `https://dev.wix.com/docs/` to get its markdown version. > - Pages are either content pages (article or reference text) or menu pages (a list of links to child pages). > - To get a menu page, truncate any URL to a parent path and append `.md` (e.g. `https://dev.wix.com/docs/sdk.md`, `https://dev.wix.com/docs/sdk/core-modules.md`). > - Top-level index of all portals: https://dev.wix.com/docs/llms.txt > - Full concatenated docs: https://dev.wix.com/docs/llms-full.txt ## Resource: Extend the Wix eCommerce Platform ## Article: Extend the Wix eCommerce Platform ## Article Link: https://dev.wix.com/docs/api-reference/business-solutions/e-commerce/guides/extend-the-wix-e-commerce-platform.md ## Article Content: # Extend the Wix eCommerce Platform The [Wix eCommerce platform](https://dev.wix.com/docs/build-apps/develop-your-app/wix-business-solutions/wix-e-commerce/what-is-the-wix-e-commerce-platform.md) provides you with a variety of extension points that enable you to customize, extend, or replace the platform's standard functionalities in [site code](https://dev.wix.com/docs/api-reference/business-solutions/e-commerce/get-started/sites/add-e-com-to-a-site.md) or in a [Wix app](https://dev.wix.com/docs/api-reference/business-solutions/e-commerce/get-started/apps/build-a-feature-app.md) that you build. To get started, check out some of our materials on extending the eCommerce platform: + [Extend eCommerce Site Pages](https://dev.wix.com/docs/api-reference/business-solutions/e-commerce/guides/extend-e-commerce-site-pages.md): Build a Wix app that adds custom features to site visitors' experience. + [Extend eCommerce Dashboard Pages](https://dev.wix.com/docs/api-reference/business-solutions/e-commerce/guides/extend-e-commerce-dashboard-pages.md): Provide site owners with custom functionality and a custom UI in the site dashboard. + [Extend the eCommerce Platform with Service Plugins](https://dev.wix.com/docs/api-reference/business-solutions/e-commerce/guides/extend-the-e-commerce-platform-with-service-plugins.md): Inject custom logic or integrate external services with the eCommerce platform. + [Extend the eCommerce Platform with Schema Plugins](https://dev.wix.com/docs/api-reference/business-solutions/e-commerce/guides/extend-the-e-commerce-platform-with-schema-plugins.md): Extend standard eCommerce data schemas to provide unique functionality. --- > Portal Navigation: > > - Append `.md` to any URL under `https://dev.wix.com/docs/` to get its markdown version. > - Pages are either content pages (article or reference text) or menu pages (a list of links to child pages). > - To get a menu page, truncate any URL to a parent path and append `.md` (e.g. `https://dev.wix.com/docs/sdk.md`, `https://dev.wix.com/docs/sdk/core-modules.md`). > - Top-level index of all portals: https://dev.wix.com/docs/llms.txt > - Full concatenated docs: https://dev.wix.com/docs/llms-full.txt ## Resource: Extend eCommerce Site Pages ## Article: Extend eCommerce Site Pages ## Article Link: https://dev.wix.com/docs/api-reference/business-solutions/e-commerce/guides/extend-e-commerce-site-pages.md ## Article Content: # Extend eCommerce Site Pages Wix eCommerce adds [pages](https://dev.wix.com/docs/build-apps/develop-your-app/extensions/site-extensions/site-pages/about-site-page-extensions.md) to the user's site. The functionality of these pages can be extended by [adding plugins](https://dev.wix.com/docs/build-apps/develop-your-app/extensions/site-extensions/site-plugins/about-site-plugin-extensions.md) to predefined slots. For example, you can extend the functionality of the [Checkout Page](https://dev.wix.com/docs/build-apps/develop-your-app/extensions/site-extensions/site-plugins/supported-wix-app-pages/wix-e-commerce/wix-e-commerce-checkout-page.md) by adding plugins that apply custom logic to various stages in the checkout process. Learn how to extend the following eCommerce site pages: | Site Page | Description | |-----|----| | **Checkout Page** | Add plugins to extend functionality on the page where site visitors finalize their transaction. [Learn how to extend the Checkout Page](https://dev.wix.com/docs/build-apps/develop-your-app/extensions/site-extensions/site-plugins/supported-wix-app-pages/wix-e-commerce/wix-e-commerce-checkout-page.md). | | **Side Cart** | Add plugins to extend functionality in the side cart where visitors can view the items in their cart and continue to checkout. [Learn how to extend the Side Cart](https://dev.wix.com/docs/build-apps/develop-your-app/extensions/site-extensions/site-plugins/supported-wix-app-pages/wix-e-commerce/wix-e-commerce-side-cart.md). | --- > Portal Navigation: > > - Append `.md` to any URL under `https://dev.wix.com/docs/` to get its markdown version. > - Pages are either content pages (article or reference text) or menu pages (a list of links to child pages). > - To get a menu page, truncate any URL to a parent path and append `.md` (e.g. `https://dev.wix.com/docs/sdk.md`, `https://dev.wix.com/docs/sdk/core-modules.md`). > - Top-level index of all portals: https://dev.wix.com/docs/llms.txt > - Full concatenated docs: https://dev.wix.com/docs/llms-full.txt ## Resource: Extend eCommerce Dashboard Pages ## Article: Extend eCommerce Dashboard Pages ## Article Link: https://dev.wix.com/docs/api-reference/business-solutions/e-commerce/guides/extend-e-commerce-dashboard-pages.md ## Article Content: # Extend eCommerce Dashboard Pages Wix eCommerce adds [dashboard pages](https://dev.wix.com/docs/build-apps/develop-your-app/extensions/dashboard-extensions/dashboard-pages/about-dashboard-page-extensions.md) to the site dashboard. These can also be extended by [adding plugins](https://dev.wix.com/docs/build-apps/develop-your-app/extensions/dashboard-extensions/dashboard-plugins/about-dashboard-plugin-extensions.md) to predefined slots. For example, you can extend the functionality of the [Order Page](https://dev.wix.com/docs/build-apps/develop-your-app/extensions/dashboard-extensions/dashboard-plugins/supported-wix-app-dashboard-pages/wix-e-commerce/wix-e-commerce-order-page.md#slot-3-collect-payment-menu) by adding a plugin that enables site owners to accept a custom payment method. Learn how to extend the following eCommerce dashboard pages: | Dashboard Page | Description | |-----|----| | **Order Page** | The Order Page has two dashboard slots and two dashboard menu slots. [Learn how to extend the Order Page](https://dev.wix.com/docs/build-apps/develop-your-app/extensions/dashboard-extensions/dashboard-plugins/supported-wix-app-dashboard-pages/wix-e-commerce/wix-e-commerce-order-page.md). | | **Edit Order Page** | The Edit Order Page has a dashboard menu slot. [Learn how to extend the Edit Order Page](https://dev.wix.com/docs/build-apps/develop-your-app/extensions/dashboard-extensions/dashboard-plugins/supported-wix-app-dashboard-pages/wix-e-commerce/wix-e-commerce-edit-order-page.md). | | **Orders List Page** | The Orders Page has a dashboard menu slot. Learn how to extend the Order Page. [Learn how to extend the Orders List Page](https://dev.wix.com/docs/build-apps/develop-your-app/extensions/dashboard-extensions/dashboard-plugins/supported-wix-app-dashboard-pages/wix-e-commerce/wix-e-commerce-orders-page.md). | --- > Portal Navigation: > > - Append `.md` to any URL under `https://dev.wix.com/docs/` to get its markdown version. > - Pages are either content pages (article or reference text) or menu pages (a list of links to child pages). > - To get a menu page, truncate any URL to a parent path and append `.md` (e.g. `https://dev.wix.com/docs/sdk.md`, `https://dev.wix.com/docs/sdk/core-modules.md`). > - Top-level index of all portals: https://dev.wix.com/docs/llms.txt > - Full concatenated docs: https://dev.wix.com/docs/llms-full.txt ## Resource: Extend the eCommerce Platform with Service Plugins ## Article: Extend the eCommerce Platform with Service Plugins ## Article Link: https://dev.wix.com/docs/api-reference/business-solutions/e-commerce/guides/extend-the-e-commerce-platform-with-service-plugins.md ## Article Content: # Extend the eCommerce Platform with Service Plugins Inject custom logic or integrate external services with the eCommerce platform using [service plugins](https://dev.wix.com/docs/build-apps/develop-your-app/extensions/backend-extensions/service-plugins/about-service-plugin-extensions.md). For example, you can create a service that calculates custom shipping rates and seamlessly integrates them in a site's eCommerce flow. Learn how to implement the following eCommerce service plugins: | Extension | What you create | How you build it | |-----|----|---| | Catalog service plugin | Business logic for becoming a Wix catalog provider and integrating any external repository of sellable items with the Wix eCommerce platform. | [REST: Self-hosted app service plugin](https://dev.wix.com/docs/rest/business-solutions/e-commerce/service-plugins/catalog-service-plugin/introduction.md) / [Velo: Site service plugin](https://dev.wix.com/docs/velo/api-reference/wix-ecom-v2/service-plugins-spis/ecom-catalog/introduction.md) | | Additional Fees service plugin | Business logic for calculating additional fees for a site visitor’s cart and checkout. | [SDK: Wix CLI or self-hosted app service plugin](https://dev.wix.com/docs/sdk/backend-modules/ecom/service-plugins/additional-fees/introduction.md) / [REST: Self-hosted app service plugin](https://dev.wix.com/docs/api-reference/business-solutions/e-commerce/extensions/additional-fees/additional-fees-service-plugin/introduction.md) / [Velo: Site service plugin](https://dev.wix.com/docs/velo/api-reference/wix-ecom-v2/service-plugins-spis/ecom-additional-fees/introduction.md) | | Shipping Rates service plugin | Business logic for calculating shipping rates for a site visitor’s cart and checkout. | [SDK: Wix CLI or self-hosted app service plugin](https://dev.wix.com/docs/sdk/backend-modules/ecom/service-plugins/shipping-rates/introduction.md) / [REST: Self-hosted app service plugin](https://dev.wix.com/docs/api-reference/business-solutions/e-commerce/extensions/shipping-rates/shipping-rates-integration-service-plugin/introduction.md) / [Velo: Site service plugin](https://dev.wix.com/docs/velo/api-reference/wix-ecom-v2/service-plugins-spis/ecom-shipping-rates/introduction.md) | | Discount Trigger service plugin | Business logic for applying discount rules to a site visitor’s cart and checkout. | [SDK: Wix CLI or self-hosted app service plugin](https://dev.wix.com/docs/sdk/backend-modules/ecom/service-plugins/custom-triggers/introduction.md) / [REST: Self-hosted app service plugin](https://dev.wix.com/docs/api-reference/business-solutions/e-commerce/extensions/discounts/custom-discount-triggers-integration-service-plugin/introduction.md) / [Velo: Site service plugin](https://dev.wix.com/docs/velo/api-reference/wix-ecom-v2/service-plugins-spis/ecom-custom-discount-triggers/introduction.md) | | Payment Settings service plugin | Business logic to determine whether to apply 3D Secure validation during a merchant's payment process. | [SDK: Wix CLI or self-hosted app service plugin](https://dev.wix.com/docs/sdk/backend-modules/ecom/service-plugins/payment-settings/introduction.md) / [REST: Self-hosted app service plugin](https://dev.wix.com/docs/api-reference/business-solutions/e-commerce/payments/payment-settings/payment-settings-integration-service-plugin/introduction.md) / [Velo: Site service plugin](https://dev.wix.com/docs/velo/api-reference/wix-ecom-v2/service-plugins-spis/ecom-payment-settings/introduction.md) | | Validations service plugin | Business logic for validating a site visitor’s cart and checkout. | [SDK: Wix CLI or self-hosted app service plugin](https://dev.wix.com/docs/sdk/backend-modules/ecom/service-plugins/validations/introduction.md) / [REST: Self-hosted app service plugin](https://dev.wix.com/docs/api-reference/business-solutions/e-commerce/extensions/validations/validations-integration-service-plugin/introduction.md) / [Velo: Site service plugin](https://dev.wix.com/docs/velo/api-reference/wix-ecom-v2/service-plugins-spis/ecom-validations/introduction.md) | | Payment Provider service plugin | Business logic for integrating payments with Wix. | [REST: Self-hosted app service plugin](https://dev.wix.com/docs/api-reference/business-management/payments/payment-service-provider-service-plugin/introduction.md) | | Tax Calculation service plugin | Business logic for calculating taxes. | [REST: Self-hosted app service plugin](https://dev.wix.com/docs/api-reference/business-solutions/e-commerce/extensions/tax/tax-calculation-integration-service-plugin/introduction.md) | | Tax Groups service plugin | Business logic for managing default tax groups to categorize products from your app's catalog based on distinct tax treatments. | [REST: Self-hosted app service plugin](https://dev.wix.com/docs/api-reference/business-solutions/e-commerce/extensions/tax/tax-groups-integration-service-plugin/introduction.md) | ## Tutorials for site developers If you are developing a site, check out these tutorials to learn how to implement a service plugin and expand your site's capabilities: + [Additional Fees Service Plugin Tutorial](https://dev.wix.com/docs/develop-websites/articles/code-tutorials/wix-e-commerce-stores/e-commerce-additional-fees-service-plugin.md) + [Catalog Service Plugin Tutorial](https://dev.wix.com/docs/develop-websites/articles/code-tutorials/wix-e-commerce-stores/e-commerce-catalog-service-plugin.md) + [Custom Discount Trigger Service Plugin Tutorial](https://dev.wix.com/docs/develop-websites/articles/code-tutorials/wix-e-commerce-stores/tutorial-custom-discount-trigger-service-plugin.md) + [Shipping Rates Service Plugin Tutorial](https://dev.wix.com/docs/develop-websites/articles/code-tutorials/wix-e-commerce-stores/e-commerce-shipping-rates-service-plugin.md) + [Validations Service Plugin Tutorial](https://dev.wix.com/docs/develop-websites/articles/code-tutorials/wix-e-commerce-stores/tutorial-validations-service-plugin.md) ## See also + Get started quickly with the [Custom Shipping Rates self-hosted app template](https://dev.wix.com/apps-templates/template?id=0580022b-625e-4467-9f78-28cc3e618483), which implements the Shipping Rates service plugin. + Follow this tutorial to [create a self-hosted custom shipping rates app](https://dev.wix.com/docs/build-apps/get-started/tutorials/tutorial-create-a-self-hosted-custom-shipping-rates-app.md) that implements the Shipping Rates service plugin. --- > Portal Navigation: > > - Append `.md` to any URL under `https://dev.wix.com/docs/` to get its markdown version. > - Pages are either content pages (article or reference text) or menu pages (a list of links to child pages). > - To get a menu page, truncate any URL to a parent path and append `.md` (e.g. `https://dev.wix.com/docs/sdk.md`, `https://dev.wix.com/docs/sdk/core-modules.md`). > - Top-level index of all portals: https://dev.wix.com/docs/llms.txt > - Full concatenated docs: https://dev.wix.com/docs/llms-full.txt ## Resource: Extend the eCommerce Platform with Schema Plugins ## Article: Extend the eCommerce Platform with Schema Plugins ## Article Link: https://dev.wix.com/docs/api-reference/business-solutions/e-commerce/guides/extend-the-e-commerce-platform-with-schema-plugins.md ## Article Content: # Extend the eCommerce Platform with Schema Plugins Every Wix API has a service object with predefined fields, which can’t be removed or changed. But sometimes, the fields that the object provides aren’t enough. For example, if your app uses the Order object for handling visitors' orders, you may want to include custom warranty information as part of the order. Out of the box, the Order object doesn't have a field for this. [Schema plugins](https://dev.wix.com/docs/build-apps/develop-your-app/extensions/backend-extensions/schema-plugins/about-schema-plugin-extensions.md) solve this problem. You can use schema plugins to extend an object with additional fields. This allows you to store data that the object doesn’t otherwise support. Once added, these fields can be read and written using the object's regular endpoints, just like any other field in the object. Currently, you can extend the following Wix eCommerce objects with schema plugins: - [Checkout object](https://dev.wix.com/docs/rest/business-solutions/e-commerce/checkout/checkout-object.md) - [Order object](https://dev.wix.com/docs/rest/business-solutions/e-commerce/orders/order-object.md) Learn more [about schema plugins](https://dev.wix.com/docs/build-apps/develop-your-app/extensions/backend-extensions/schema-plugins/about-schema-plugin-extensions.md) and [how to implement them](https://dev.wix.com/docs/build-apps/develop-your-app/extensions/backend-extensions/schema-plugins/extend-an-existing-object.md). --- > Portal Navigation: > > - Append `.md` to any URL under `https://dev.wix.com/docs/` to get its markdown version. > - Pages are either content pages (article or reference text) or menu pages (a list of links to child pages). > - To get a menu page, truncate any URL to a parent path and append `.md` (e.g. `https://dev.wix.com/docs/sdk.md`, `https://dev.wix.com/docs/sdk/core-modules.md`). > - Top-level index of all portals: https://dev.wix.com/docs/llms.txt > - Full concatenated docs: https://dev.wix.com/docs/llms-full.txt ## Resource: Introduction ## Article: About Catalog ## Article Link: https://dev.wix.com/docs/api-reference/business-solutions/e-commerce/catalogs/introduction.md ## Article Content: # About Catalogs Catalogs organize and manage sellable items within the Wix eCommerce platform. These catalog items move through the [purchase flow](https://dev.wix.com/docs/rest/business-solutions/e-commerce/purchase-flow/introduction.md) when customers add them to carts and proceed to checkout. The platform supports multiple approaches to catalog management, from built-in solutions to external integrations, each suited to different business requirements and technical constraints. This section covers: - **[Catalog and custom items](https://dev.wix.com/docs/rest/business-solutions/e-commerce/catalogs/catalog-and-custom-items.md)**: Compare item types, understand when to use catalog items versus custom items, and learn about implementation patterns. - **[Catalog service plugin](https://dev.wix.com/docs/rest/business-solutions/e-commerce/catalogs/catalog-service-plugin/introduction.md)**: Integrate external catalog systems with the Wix eCommerce platform for dynamic item management and real-time updates. - **[Inventory service plugin](https://dev.wix.com/docs/rest/business-solutions/e-commerce/catalogs/inventory-service-plugin/introduction.md)**: Implement unified inventory management across different business verticals and catalog providers. ## Catalog approaches Choose the approach that best fits your technical requirements and business model: + **Built-in catalogs**: Wix business solutions like [Stores](https://support.wix.com/en/article/wix-stores-about-wix-stores), [Bookings](https://support.wix.com/en/article/wix-bookings-about-wix-bookings), and [Restaurants](https://support.wix.com/en/article/wix-restaurants-an-overview) provide preconfigured catalog functionality. Use those when existing solutions meet your needs. + **External catalog integration**: Connect external item repositories through the Catalog and Inventory service plugins for real-time synchronization, custom business logic, and [item variant handling](https://dev.wix.com/docs/rest/business-solutions/e-commerce/catalogs/catalog-service-plugin/handle-item-variants.md). Implement if you are [developing a business solution](https://dev.wix.com/docs/rest/business-solutions/e-commerce/get-started/apps/build-a-business-solution.md) that relies on real-time updates for item details, availability, and pricing. + **Direct item processing**: Handle items directly in eCommerce flows without maintaining a persistent catalog. Use for 1-off, non-physical, or unlimited items for which you don't need inventory tracking, real-time dynamic item updates, or catalog-based management. ## See also - [About Purchase Flow](https://dev.wix.com/docs/rest/business-solutions/e-commerce/purchase-flow/introduction.md) (processing catalog items) - [Architecture and Data Flow](https://dev.wix.com/docs/rest/business-solutions/e-commerce/architecture-data-flow.md) - [Build a Business Solution](https://dev.wix.com/docs/rest/business-solutions/e-commerce/get-started/apps/build-a-business-solution.md) - [Tutorial | Build an eCommerce Business Solution](https://dev.wix.com/docs/build-apps/get-started/tutorials/tutorial-build-an-e-commerce-business-solution/overview.md) --- > Portal Navigation: > > - Append `.md` to any URL under `https://dev.wix.com/docs/` to get its markdown version. > - Pages are either content pages (article or reference text) or menu pages (a list of links to child pages). > - To get a menu page, truncate any URL to a parent path and append `.md` (e.g. `https://dev.wix.com/docs/sdk.md`, `https://dev.wix.com/docs/sdk/core-modules.md`). > - Top-level index of all portals: https://dev.wix.com/docs/llms.txt > - Full concatenated docs: https://dev.wix.com/docs/llms-full.txt ## Resource: Catalog and Custom Items ## Article: About Catalog and Custom Items ## Article Link: https://dev.wix.com/docs/api-reference/business-solutions/e-commerce/catalogs/catalog-and-custom-items.md ## Article Content: # About Catalog and Custom Items In the Wix eCommerce platform, flexibility in handling different item types is essential for meeting various business needs. Whether items are managed in a catalog or processed on the fly, there are several ways to handle them in the ecosystem, each with unique strengths suited to different use cases. ## Item types The following table summarizes the capabilities and advantages of each main item type: | Option | Description | Example use case | Catalog dependency | |--------------------------------------------------------------------------------|-------------------------------------------------|----------------------------------------------------------------|------------------------| | [**Catalog item**](#catalog-item) | Full integration with catalog provider. Ensures real-time updating of item details. | Equipment rental business solution app | Catalog service plugin | | [**Catalog item with overrides**](#catalog-item-with-overrides) | A flexible solution for catalog-based items needing occasional customization. | Staff discount | Catalog service plugin | | [**Custom item without catalog reference**](#custom-item-without-catalog-reference) | Fully customizable. For items that don’t require real-time updates, inventory tracking, or catalog-based management. | Donations app | None | | [**Custom item with catalog reference**](#custom-item-with-catalog-reference) | Gives custom items a lightweight reference system, enabling external apps to personalize and track them effectively. | Greeting card app with custom text | External only | Each option is designed for different levels of integration with an external service and control over item details. Let's dive into the details of each type. ## Catalog item The [Catalog service plugin](https://dev.wix.com/docs/api-reference/business-solutions/e-commerce/catalogs/catalog-service-plugin/introduction.md) lets you become a Wix catalog provider. This means you can integrate any external repository of sellable items with the Wix eCommerce platform. Wix calls the Catalog service plugin to get up-to-date information about items whenever a cart or checkout is updated, and when an item is added to an order. The Catalog service plugin enables you to maintain a complex and dynamic external catalog while being confident Wix can retrieve the latest information for every action. For example, after a customer adds a particular item to their cart, one of the following details might change in your dynamic catalog: + The name of the item might be changed. + The price might be adjusted. + The item might go out of stock. With the Catalog service plugin, you can be sure that when the customer moves the item from their cart to their checkout, Wix retrieves up-to-date details from your catalog automatically. > **Note:** You can manually override specific fields in a catalog item. Learn more about [catalog items with overrides](#catalog-item-with-overrides). ### When to use it Implement the [Catalog service plugin](https://dev.wix.com/docs/api-reference/business-solutions/e-commerce/catalogs/catalog-service-plugin/introduction.md) if you are developing a [business solution](https://dev.wix.com/docs/api-reference/business-solutions/e-commerce/get-started/apps/build-a-business-solution.md) like Wix Stores or Wix Bookings that relies on real-time updates for item details, availability, and pricing. Implementing the Catalog service plugin involves configuring an API endpoint and maintaining catalog synchronization. When you add a catalog item to a Wix eCommerce flow, you provide the [catalog reference](https://dev.wix.com/docs/api-reference/business-solutions/e-commerce/catalogs/catalog-service-plugin/handle-item-variants.md#the-catalogreference-object), which Wix uses when calling the Catalog service plugin to retrieve the item's full details. ### Example use cases You might implement a catalog integration for: + An equipment rental app. + An app for selling online courses. These are fully-fledged eCommerce apps that Wix users can install on their site to run their business. ### Get started To implement a catalog integration, you’ll first need to set up a Catalog service plugin and connect it to your external repository. To learn how to do this, see the [Catalog service plugin documentation](https://dev.wix.com/docs/api-reference/business-solutions/e-commerce/catalogs/catalog-service-plugin/introduction.md). Then, process an item from the catalog. Follow this example flow to understand how processing a catalog item works, noting that not all steps may be necessary in your implementation: 1. Make sure you know the [catalog reference](https://dev.wix.com/docs/api-reference/business-solutions/e-commerce/catalogs/catalog-service-plugin/handle-item-variants.md#the-catalogreference-object) details for the item you want to process. 2. Call a method that introduces a new item into the eCommerce flow. For example, this might be [Add to Cart](https://dev.wix.com/docs/api-reference/business-solutions/e-commerce/purchase-flow/cart/add-to-cart.md), [Add to Current Cart](https://dev.wix.com/docs/api-reference/business-solutions/e-commerce/purchase-flow/cart/add-to-current-cart.md), or [Add to Checkout](https://dev.wix.com/docs/api-reference/business-solutions/e-commerce/purchase-flow/checkout/checkout/add-to-checkout.md), depending on your needs. Include the catalog reference and desired quantity for the item you want to process in the `lineItems` array in the request. 3. Call a method that returns items in the eCommerce flow, such as [Get Cart](https://dev.wix.com/docs/api-reference/business-solutions/e-commerce/purchase-flow/cart/get-cart.md), [Get Current Cart](https://dev.wix.com/docs/api-reference/business-solutions/e-commerce/purchase-flow/cart/get-current-cart.md), or [Get Checkout](https://dev.wix.com/docs/api-reference/business-solutions/e-commerce/purchase-flow/checkout/checkout/get-checkout.md). The `lineItems` array in the response includes the item you added, with all of its up-to-date details. The `lineItems` array can contain both catalog items and custom items. For a catalog item, the `customLineItem` property is `false`. ## Catalog item with overrides This option is useful primarily for working with items from a catalog associated with a different Wix app. Sometimes you need to modify certain fields for a [catalog item](#catalog-item) without breaking its connection to the catalog. This option allows you to override specific fields, such as price, while retaining catalog-based item tracking and updates for other fields. To override catalog item fields, your app must have the permission scope named "Manage eCommerce - Admin Permissions". Learn more about [permission scopes](https://dev.wix.com/docs/build-apps/develop-your-app/access/authorization/about-permissions.md). ### When to use it Use a catalog item with overrides to enable your app to override specific items in a catalog managed by another app, like Wix Stores or Wix Bookings. ### Example use cases You might use catalog items with overrides in: + A B2B app offering customized pricing for different groups of customers. + An app that allows staff to offer discounts. + A product customization app that overrides an item's title, image, or price based on preferences selected by the customer. In these cases, the app fetches up-to-date data for the item from its catalog but overrides the price for eligible customers. ### Get started Follow this example flow to understand how processing a catalog item with overrides works, noting that not all steps may be necessary in your implementation: 1. Make sure you know the [`catalogReference`](https://dev.wix.com/docs/api-reference/business-solutions/e-commerce/catalogs/catalog-service-plugin/handle-item-variants.md#the-catalogreference-object) details for the item you want to process. 2. Call a method that introduces a new item into the eCommerce flow. For example, this might be [Add to Cart](https://dev.wix.com/docs/api-reference/business-solutions/e-commerce/purchase-flow/cart/add-to-cart.md), [Add to Current Cart](https://dev.wix.com/docs/api-reference/business-solutions/e-commerce/purchase-flow/cart/add-to-current-cart.md), or [Add to Checkout](https://dev.wix.com/docs/api-reference/business-solutions/e-commerce/purchase-flow/checkout/checkout/add-to-checkout.md), depending on your needs. Include the catalog reference and desired quantity for the item you want to process in the `lineItems` array in the request. In addition, pass a `catalogOverrideFields` object containing a specified value for each field you want to override. For syntax and a list of fields that can be overridden, see the method documentation. For example, this API call adds a catalog item to the current site visitor's cart while manually overriding the price: ```bash curl -X POST \ 'https://www.wixapis.com/ecom/v1/carts/current/add-to-cart' \ -H 'Authorization: ' -H 'Content-Type: application/json' \ --data-binary '{ "lineItems": [{ "catalogReference": { "appId": "215238eb-22a5-4c36-9e7b-e7c08025e04e", "catalogItemId": "a667539v45-9v22-b343-bbf4-eee54be85634f" }, "quantity": 2, "catalogOverrideFields": { "price": "10.00" } }] }' ``` After this, the overridden value persists for the rest of the eCommerce flow. 3. Call a method that returns items, such as [Get Cart](https://dev.wix.com/docs/api-reference/business-solutions/e-commerce/purchase-flow/cart/get-cart.md), [Get Current Cart](https://dev.wix.com/docs/api-reference/business-solutions/e-commerce/purchase-flow/cart/get-current-cart.md), or [Get Checkout](https://dev.wix.com/docs/api-reference/business-solutions/e-commerce/purchase-flow/checkout/checkout/get-checkout.md). The `lineItems` array in the response includes the item you added with all of its up-to-date details, with values overridden for the fields you specified. In addition, the item object contains the same `catalogOverrideFields` field passed originally, which you can use to check which fields' values have been overridden. The `lineItems` array can contain both catalog items and custom items. For a catalog item with overrides, the `customLineItem` property is `false`. ## Custom item without catalog reference A custom item works similarly to a catalog item, except that for a custom item, Wix doesn't make calls to an external Catalog service plugin to update item details after the item is introduced to the flow. This means that when you add a custom item to an eCommerce flow, for example by adding it to a cart or checkout, the details you provide for the item persist throughout the flow exactly as you provided them. To access and manage custom line items, your app must have the permission scope named "Manage eCommerce - Admin Permissions". Learn more about [permission scopes](https://dev.wix.com/docs/build-apps/develop-your-app/access/authorization/about-permissions.md). > **Note:** You can optionally add a catalog reference to a custom item, as a lightweight reference for use by your external app. Learn more about [custom items with a catalog reference](#custom-item-with-catalog-reference). ### When to use it Custom items save you the effort of implementing a catalog, but they don't provide functionality for dynamic updating of item information as the eCommerce flow proceeds. So you should use custom items for one-off, purpose-specific, non-physical, or unlimited items for which you don't need inventory tracking or real-time dynamic item updates. ### Example use cases You might use custom items for: + A donations app that allows site visitors to contribute custom amounts to a cause. + An app for adding gift wrapping services to purchases. ### Get started Follow this example flow to understand how processing a custom item works, noting that not all steps may be necessary in your implementation: 1. Call a method that introduces a new item into the eCommerce flow. For example, this might be [Add to Cart](https://dev.wix.com/docs/api-reference/business-solutions/e-commerce/purchase-flow/cart/add-to-cart.md), [Add to Current Cart](https://dev.wix.com/docs/api-reference/business-solutions/e-commerce/purchase-flow/cart/add-to-current-cart.md), or [Add to Checkout](https://dev.wix.com/docs/api-reference/business-solutions/e-commerce/purchase-flow/checkout/checkout/add-to-checkout.md), depending on your needs. When you add a custom item to an eCommerce flow, you need to provide all of the item details, rather than just a catalog reference. Provide these details in the `customLineItems` array in the request. 2. Call a method that returns items, such as [Get Cart](https://dev.wix.com/docs/api-reference/business-solutions/e-commerce/purchase-flow/cart/get-cart.md), [Get Current Cart](https://dev.wix.com/docs/api-reference/business-solutions/e-commerce/purchase-flow/cart/get-current-cart.md), or [Get Checkout](https://dev.wix.com/docs/api-reference/business-solutions/e-commerce/purchase-flow/checkout/checkout/get-checkout.md). The `lineItems` array in the response includes the item you added with the details you provided. The `lineItems` array can contain both catalog items and custom items. For a custom item, the `customLineItem` property is `true`. ## Custom item with catalog reference [Custom items](#custom-item-with-catalog-reference) can optionally include a `catalogReference` object like the one used in catalog items. For custom items, Wix doesn’t call an external catalog to update item details, but the catalog reference object persists throughout the eCommerce flow. This means your app can use it to store information that remains associated with the item. This catalog reference can serve as a lightweight reference for custom items, for example when you need to record tailored item details, store a personalized message, or retain attribution details. You can also use it to associate fulfillment-related details with an item or to easily enable order queries for specific items belonging to your app. You can either store these custom item details in the catalog reference itself, or store an ID in the catalog reference which you associate with the specific item in an external service. To access and manage custom line items, your app must have the permission scope named "Manage eCommerce - Admin Permissions". Learn more about [permission scopes](https://dev.wix.com/docs/build-apps/develop-your-app/access/authorization/about-permissions.md). > **Note:** Since custom items aren't connected to an external catalog through Wix, items with identical `catalogReference` properties are treated as distinct items. This means that if 2 or more are added to a cart or checkout, they appear as separate items each with a quantity of 1. ### When to use it Use custom items with a catalog reference when you: + Want to take advantage of the flexibility of custom items. + Don't need dynamic updating of item details. + Need some kind of information to be associated with an individual item as it proceeds through the Wix eCommerce flow. ### Example use cases You might use custom items with a catalog reference for: + A greeting card app that allows customers to provide custom greeting text. + An app for custom-made jewelry that lets customers choose various features of the jewelry item before it's made. ### Get started Follow this example flow to understand how processing a custom item with a catalog reference works, noting that not all steps may be necessary in your implementation: 1. Call a method that introduces a new item into the eCommerce flow. For example, this might be [Add to Cart](https://dev.wix.com/docs/api-reference/business-solutions/e-commerce/purchase-flow/cart/add-to-cart.md), [Add to Current Cart](https://dev.wix.com/docs/api-reference/business-solutions/e-commerce/purchase-flow/cart/add-to-current-cart.md), or [Add to Checkout](https://dev.wix.com/docs/api-reference/business-solutions/e-commerce/purchase-flow/checkout/checkout/add-to-checkout.md), depending on your needs. When you add a custom item to an eCommerce flow, you need to provide all of the item details, rather than just a catalog reference. Provide these details in the `customLineItems` array in the request. To include a catalog reference for a custom item, provide the optional `catalogReference` object. Include your item variant details in `catalogReference.options`, which you can structure however you like. For example: ```json "catalogReference": { "appId": "my-gift-card-app", "catalogItemId": "gift-card-12", "options": { "messageText": "Happy birthday, Billy!!", "age": 14, "colorScheme": "light" } } ``` Alternatively, include an ID for the item variant in `catalogReference.options` and associate that ID with the item details in an external service. For example: ```json "catalogReference": { "appId": "my-jewelry-app", "catalogItemId": "necklace-3", "options": { "variantId": "c52a3c2a-542e-4454-b4c9-7eae5c7e4a5b" } } ``` Whichever approach you take, this information persists with the item and can be retrieved with other item details during later stages of the eCommerce flow. 2. Call a method that returns items, such as [Get Cart](https://dev.wix.com/docs/api-reference/business-solutions/e-commerce/purchase-flow/cart/get-cart.md), [Get Current Cart](https://dev.wix.com/docs/api-reference/business-solutions/e-commerce/purchase-flow/cart/get-current-cart.md), or [Get Checkout](https://dev.wix.com/docs/api-reference/business-solutions/e-commerce/purchase-flow/checkout/checkout/get-checkout.md). The `lineItems` array in the response includes the item you added with the details you provided, including the details you included in the `catalogReference` property. The `lineItems` array can contain both catalog items and custom items. For a custom item with a catalog reference, the `customLineItem` property is `true`. ## See also + [Catalog service plugin](https://dev.wix.com/docs/api-reference/business-solutions/e-commerce/catalogs/catalog-service-plugin/introduction.md) + [Wix app developers: Build a feature app that extends eCommerce functionality](https://dev.wix.com/docs/api-reference/business-solutions/e-commerce/get-started/apps/build-a-feature-app.md) + [Wix app developers: Build a new eCommerce business solution](https://dev.wix.com/docs/api-reference/business-solutions/e-commerce/get-started/apps/build-a-business-solution.md) --- > Portal Navigation: > > - Append `.md` to any URL under `https://dev.wix.com/docs/` to get its markdown version. > - Pages are either content pages (article or reference text) or menu pages (a list of links to child pages). > - To get a menu page, truncate any URL to a parent path and append `.md` (e.g. `https://dev.wix.com/docs/sdk.md`, `https://dev.wix.com/docs/sdk/core-modules.md`). > - Top-level index of all portals: https://dev.wix.com/docs/llms.txt > - Full concatenated docs: https://dev.wix.com/docs/llms-full.txt # Resource: Catalog Service Plugin # Type: Extension Config # Link: https://dev.wix.com/docs/api-reference/business-solutions/e-commerce/catalogs/catalog-service-plugin/extension-config.md ## Description: The JSON object below defines the configuration for this service plugin extension. How you supply values depends on the framework you’re using: + **Self-hosted apps:** After adding a service plugin extension to your app in the app dashboard, provide configuration details in your extension's page. Learn more about how to add and configure a self-hosted service plugin extension with [REST](https://dev.wix.com/docs/build-apps/develop-your-app/frameworks/self-hosting/supported-extensions/backend-extensions/add-self-hosted-service-plugin-extensions-with-rest.md) or the [SDK](https://dev.wix.com/docs/build-apps/develop-your-app/frameworks/self-hosting/supported-extensions/backend-extensions/add-self-hosted-service-plugin-extensions-with-the-sdk.md). + **CLI apps:** When you [add a service plugin extension to your app with the Wix CLI](https://dev.wix.com/docs/build-apps/develop-your-app/frameworks/wix-cli/supported-extensions/backend-extensions/service-plugins/add-service-plugin-extensions-with-the-cli.md), the required configuration details are populated automatically. You can then customize them in your extension's [`plugin.json`](https://dev.wix.com/docs/build-apps/develop-your-app/frameworks/wix-cli/supported-extensions/backend-extensions/service-plugins/service-plugin-extension-files-and-code.md) file. ## Schema: ```json Type: Extension Config | type: CatalogSPIConfig Description: The JSON object below defines the configuration for this service plugin extension. How you supply values depends on the framework you’re using: + **Self-hosted apps:** After adding a service plugin extension to your app in the app dashboard, provide configuration details in your extension's page. Learn more about how to add and configure a self-hosted service plugin extension with [REST](https://dev.wix.com/docs/build-apps/develop-your-app/frameworks/self-hosting/supported-extensions/backend-extensions/add-self-hosted-service-plugin-extensions-with-rest.md) or the [SDK](https://dev.wix.com/docs/build-apps/develop-your-app/frameworks/self-hosting/supported-extensions/backend-extensions/add-self-hosted-service-plugin-extensions-with-the-sdk.md). + **CLI apps:** When you [add a service plugin extension to your app with the Wix CLI](https://dev.wix.com/docs/build-apps/develop-your-app/frameworks/wix-cli/supported-extensions/backend-extensions/service-plugins/add-service-plugin-extensions-with-the-cli.md), the required configuration details are populated automatically. You can then customize them in your extension's [`plugin.json`](https://dev.wix.com/docs/build-apps/develop-your-app/frameworks/wix-cli/supported-extensions/backend-extensions/service-plugins/service-plugin-extension-files-and-code.md) file. - name: deploymentUri | type: string | description: Base URI which Wix eCommerce will call to access Catalog service plugin endpoints. For example, to call the Get Catalog Items endpoint at `https://my-external-catalog.com/get-catalog-items`, the base URI you provide here is `https://my-external-catalog.com`. - name: allItemsDiscount | type: AllItemsDiscountConfig | description: Configuration details for discounts applied to all items in the catalog. - name: enabled | type: boolean | description: Whether the discount is enabled. Default: `false`. - name: name | type: string | description: Translatable name for "all items discount" in the catalog. For example, for restaurant menus, this could be "All dishes". - name: value | type: string | description: - name: specificItemsDiscount | type: SpecificItemsDiscountConfig | description: Configuration details for discounts applied to specific items in the catalog. - name: enabled | type: boolean | description: Whether the discount is enabled. Default: `false`. - name: name | type: string | description: Translatable name for "all items discount" in the catalog. ``` --- > Portal Navigation: > > - Append `.md` to any URL under `https://dev.wix.com/docs/` to get its markdown version. > - Pages are either content pages (article or reference text) or menu pages (a list of links to child pages). > - To get a menu page, truncate any URL to a parent path and append `.md` (e.g. `https://dev.wix.com/docs/sdk.md`, `https://dev.wix.com/docs/sdk/core-modules.md`). > - Top-level index of all portals: https://dev.wix.com/docs/llms.txt > - Full concatenated docs: https://dev.wix.com/docs/llms-full.txt # GetCatalogItems # Package: catalogs # Namespace: PlatformCatalogSPI # Method link: https://dev.wix.com/docs/api-reference/business-solutions/e-commerce/catalogs/catalog-service-plugin/get-catalog-items.md ## Introduction Retrieves data for specified items in a specified catalog. Wix calls this method whenever a cart or checkout is updated, and when an item is added to an order. The method receives a `catalogReferences` array. Each catalog reference in the array contains: + The ID of the item whose latest information Wix needs to retrieve. + The ID of the app providing the catalog containing the item. + Optional details about preferences or customization of the item. The method also receives preferences for the currency and weight unit to be used in the response. Your external catalog can store and organize item details in any way you prefer. When implementing the Catalog service plugin, learn how to [handle item variants](https://dev.wix.com/docs/rest/business-solutions/e-commerce/catalog-service-plugin/handle-item-variants.md) in a way that meets your needs. The method's response must contain a `catalogItems` array. Each item in the array must contain: + A `catalogReference` object. This must be identical to the `catalogReference` object received in the request. + A `data` object with full details about the item. > **Notes:** > + If an item doesn't exist in the catalog, the response must exclude it from the `catalogItems` array in the response. > + When none of the items requested exist in the catalog, `catalogItems` must contain an empty array. > + Wix calls the method every time a cart or checkout is updated. If the response doesn't include an item that was already in the cart or checkout, Wix removes the item from the cart or checkout. --- ## REST API ### Examples ### Get Catalog Items - decoded JWT The data payload will include the following object as an encoded JWT. For the purposes of this example, we show the request and response objects decoded. ```curl curl -X POST https://provider.example.com/get-catalog-items \ -H 'user-agent: Wix' \ -H 'accept-encoding: gzip, deflate' \ -H 'content-type: text/plain; charset=utf-8' \ -d '{ "catalogReferences": [ { "catalogReference": { "appId": "3b8658a6-3282-4b5e-ae0e-439113e20aef", "catalogItemId": "205c539b-fd89-4b0c-8d7e-55630f66e5f9" }, "quantity": 1 }, { "catalogReference": { "appId": "3b8658a6-3282-4b5e-ae0e-439113e20aef", "catalogItemId": "f95bd723-ea83-40f2-8cb8-accff2d54866", "options": { "color": "Green", "size": "M" } }, "quantity": 1 } ], "weightUnit": "KG", "currency": "USD" }' ``` --- ## JavaScript SDK ### Examples ### Example of a `catalogItems` return value ```javascript import { catalog } from '@wix/ecom/service-plugins'; catalog.provideHandlers({ getCatalogItems: async ( payload ) => { const {request, metadata} = payload; // Use the `request` and `metadata` received from Wix and // apply custom logic. return { // Return your response exactly as documented to integrate with Wix. // Return value example: catalogItems: [ { catalogReference: { appId: "3b8658a6-3282-4b5e-ae0e-439113e20aef", catalogItemId: "205c539b-fd89-4b0c-8d7e-55630f66e5f9" }, data: { productName: { original: "Simple Black Sun Hat" }, url: { relativePath: "/product-page/sun-hat", url: "https://www..com/" }, itemType: { preset: "PHYSICAL" }, price: "20.00", physicalProperties: { sku: "227220141836", shippable: true }, media: { id: "e3bc27_6edeb786f2aa44b19d9abcb4d1f6bfd6~mv2.png", height: 720, width: 720 } } }, { catalogReference: { appId: "3b8658a6-3282-4b5e-ae0e-439113e20aef", catalogItemId: "f95bd723-ea83-40f2-8cb8-accff2d54866", options: { color: "Green", size: "M" } }, data: { productName: { original: "Cotton T-shirt" }, url: { relativePath: "/product-page/t-shirt", url: "https://www..com/" }, itemType: { preset: "PHYSICAL" }, price: { amount: "80.00" }, descriptionLines: [ { name: { original: "Size", translated: "Size" }, plainText: { original: "Medium", translated: "Medium" } }, { name: { original: "Color", translated: "Color" }, plainText: { original: "Green", translated: "Green" } } ], physicalProperties: { sku: "889809004958", shippable: true }, media: { id: "3258d9_77f175cc4d234714825fbf316803ca9a~mv2.png", height: 720, width: 720 } } } ] } } }); ``` ### getCatalogItems (self-hosted) Self-hosted SDK calls require you to [create a client](https://dev.wix.com/docs/sdk/articles/work-with-the-sdk/about-the-wix-client.md). ```javascript import { createClient } from '@wix/sdk'; import { catalog } from '@wix/ecom/service-plugins'; // Import the auth strategy for the relevant access type // Import the relevant host module if needed const myWixClient = createClient ({ modules: { catalog }, // Include the auth strategy and host as relevant }); async function getCatalogItems(request,metadata) { const response = await myWixClient.catalog.getCatalogItems(request,metadata); }; ``` --- --- > Portal Navigation: > > - Append `.md` to any URL under `https://dev.wix.com/docs/` to get its markdown version. > - Pages are either content pages (article or reference text) or menu pages (a list of links to child pages). > - To get a menu page, truncate any URL to a parent path and append `.md` (e.g. `https://dev.wix.com/docs/sdk.md`, `https://dev.wix.com/docs/sdk/core-modules.md`). > - Top-level index of all portals: https://dev.wix.com/docs/llms.txt > - Full concatenated docs: https://dev.wix.com/docs/llms-full.txt ## Resource: Introduction ## Article: Introduction ## Article Link: https://dev.wix.com/docs/api-reference/business-solutions/e-commerce/catalogs/catalog-service-plugin/introduction.md ## Article Content: # About the Wix eCommerce Catalog Service Plugin
        __Important:__ When developing websites or building apps with Blocks, use [Velo service plugins](https://dev.wix.com/docs/velo/events-service-plugins/about-events-service-plugins-and-the-sdk.md).
        The Catalog service plugin lets you become a Wix catalog provider. This means you can integrate any external repository of sellable items with the Wix eCommerce platform. Wix calls the Catalog service plugin to get up-to-date information about items whenever a cart or checkout is updated, and when an item is added to an order. With the Catalog service plugin, you can: + [Build a comprehensive business solution](https://dev.wix.com/docs/build-apps/get-started/tutorials/tutorial-build-an-e-commerce-business-solution/overview.md) offering functionality that differs from Wix's in-house solutions like [Wix Stores](https://support.wix.com/en/article/wix-stores-about-wix-stores) or [Wix Bookings](https://support.wix.com/en/article/wix-bookings-about-wix-bookings), and integrate your solution with the Wix eCommerce platform to handle transactional capabilities. For example, develop an app to manage equipment rentals, online courses, subscriptions, or vouchers. + Integrate an externally managed repository of sellable items with the Wix eCommerce platform to meet specific business needs. For example, if your business handles pricing or availability in a unique way, or if you sell items that aren't easily categorized as physical or digital products or services. + Create a Wix app to integrate an existing eCommerce repository on a different platform with Wix's eCommerce platform. ## Why an external catalog? The Catalog service plugin enables you to maintain a complex and dynamic external catalog while being confident Wix can retrieve the latest information for every action. For example, after a customer adds a particular item to their cart, one of the following details might change in your dynamic catalog: + The name of the item might be changed. + The price might be adjusted. + The item might go out of stock. With the Catalog service plugin, you can be sure that when the customer moves the item from their cart to their checkout, Wix will retrieve the updated details from your catalog automatically. ## Before you begin It's important to note the following points before starting to code: + Create a database of items on the platform of your choice. + Learn how to [handle item variants](https://dev.wix.com/docs/rest/business-solutions/e-commerce/catalogs/catalog-service-plugin/handle-item-variants.md) with the Catalog service plugin. + Existing solutions may already provide the catalog functionality that you need. Check out [Wix Stores](https://support.wix.com/en/article/wix-stores-about-wix-stores) and [Wix Bookings](https://support.wix.com/en/article/wix-bookings-about-wix-bookings), which provide built-in catalogs. If they cater to your needs, you probably don't need to implement the Catalog service plugin. + For some items, you might not need an external catalog. Learn more about [catalog and custom items](https://dev.wix.com/docs/api-reference/business-solutions/e-commerce/catalogs/catalog-and-custom-items.md). + For an overview of the Wix eCommerce platform and its capabilities, take a look at the [Wix eCommerce Platform Handbook](https://dev.wix.com/docs/api-reference/business-solutions/e-commerce/introduction.md). + We are constantly updating functionality. Check the documentation regularly to see the latest capabilities. Currently, external catalog integration has a few limitations: + Coupons aren't yet supported. + Preview mode in the Wix editor doesn't reflect full functionality. + Integration with external sales channels isn't yet available. ::::tabs :::REST_TAB ## Get started To integrate an external catalog with the Wix eCommerce platform: 1. Implement the [Get Catalog Items](https://dev.wix.com/docs/api-reference/business-solutions/e-commerce/catalogs/catalog-service-plugin/get-catalog-items.md) method so Wix can retrieve the information it needs about specific items. >**Note:** When Wix calls your app's implementation of the Get Catalog Items method, your app receives a request containing a payload as an [encoded JWT](https://dev.wix.com/docs/build-apps/develop-your-app/access/authentication/verify-requests-received-from-wix.md). 1. Create an app in your Wix Studio workspace and [add a catalog integration extension](#configuration). ## App Configuration To enable your Wix app to communicate with your external catalog: 1. Select an app from the [**Custom Apps** page](https://manage.wix.com/studio/custom-apps) in your Wix Studio workspace. 1. Go to **Extensions** in your app's dashboard. 1. Click **Create Extension**. 1. Scroll down to **Ecom Catalog** and click **Create**. 1. In the JSON editor, assign the URI where the Catalog service plugin is implemented to `deploymentUri`. For example: ```json { "deploymentUri": "https://my-external-catalog.com/" } ``` **Note:** Other fields in the JSON editor are reserved for future functionality. 1. Click **Save**. ::: :::SDK_TAB ## Get started Follow these steps to begin implementing your service plugin: ### Step 1 | Choose a framework You can implement this service plugin with the following [frameworks](https://dev.wix.com/docs/build-apps/get-started/overview/wix-s-development-frameworks.md): + **Wix CLI:** Learn how to [implement a service plugin with the CLI and the SDK](https://dev.wix.com/docs/build-apps/develop-your-app/frameworks/wix-cli/supported-extensions/backend-extensions/service-plugins/add-service-plugin-extensions-with-the-cli.md). + **Self-hosted:** Learn how to [implement a self-hosted service plugin with the SDK and the app dashboard](https://dev.wix.com/docs/build-apps/develop-your-app/frameworks/self-hosting/supported-extensions/backend-extensions/add-self-hosted-service-plugin-extensions-with-the-sdk.md). ### Step 2 | Configure your service plugin To configure and customize your plugin, you need to provide important information in the service plugin configuration file. You can [configure your plugin in the app dashboard](https://dev.wix.com/docs/build-apps/develop-your-app/frameworks/self-hosting/supported-extensions/backend-extensions/add-self-hosted-service-plugin-extensions-with-the-sdk.md#step-1--add-a-service-plugin-extension-to-your-app). For details, see [Catalog Extension Configuration](https://dev.wix.com/docs/rest/business-solutions/e-commerce/catalogs/catalog-service-plugin/extension-config.md). ### Step 3 | Define handler functions Use [`catalog.provideHandlers()`](https://dev.wix.com/docs/build-apps/develop-your-app/frameworks/self-hosting/supported-extensions/backend-extensions/add-self-hosted-service-plugin-extensions-with-the-sdk.md#step-4--define-handler-functions) to define the following handler function that implement your custom business logic. | Function | Required | |--------------------------------------------------------------------------------------------------------------------|----------| | [`getCatalogItems()`](https://dev.wix.com/docs/rest/business-solutions/e-commerce/catalogs/catalog-service-plugin/get-catalog-items.md) | Yes | ## Code examples Below is an example for implementing the Catalog service plugin in your code. ### CLI: Basic code structure This is the basic code structure for implementing the Catalog service plugin with the Wix CLI: ```js import { catalog } from '@wix/ecom/service-plugins' catalog.provideHandlers({ getCatalogItems: async (payload) => { const {request, metadata} = payload; // Add your logic here } }); ``` ### Self-hosted: Basic code structure This is the basic code structure for implementing a self-hosted Catalog service plugin: ```js import { createClient } from '@wix/sdk'; import { catalog } from '@wix/ecom/service-plugins' const wixClient = createClient({ auth: { appId: , publicKey: }, modules: { catalog } }); wixClient.catalog.provideHandlers({ getCatalogItems: async (payload) => { const { request, metadata } = payload; // Add your logic here } }); // Implement a router to process all requests express.post('/plugins-and-webhooks/*', (req, res) => { wixClient.process(req); }); ``` ::: :::: ## Terminology + **Catalog:** A repository containing items for sale. Wix business solutions, such as Wix Bookings and Wix Stores, provide built-in catalogs. External business solutions can provide the Wix eCommerce platform with access to their catalogs via the Catalog service plugin. This enables robust integration of the platform’s cart and checkout functionalities with diverse business types. + **Item:** An item in a catalog can be anything sellable, including physical products, services, gift cards, pricing plans, and custom items created for individual transactions like specialized project work. + **Cart:** A customer's cart holds information about a potential transaction, including details about selected items, prices, and discounts, as well as the potential buyer. Site visitors can see their cart on the cart page. Developers can access and manage a customer's cart with the [Cart API](https://dev.wix.com/docs/api-reference/business-solutions/e-commerce/purchase-flow/cart/introduction.md). When an item is added to a cart, Wix calls the Catalog service plugin to retrieve current details for the item. + **Checkout:** Checkout is the page where a buyer finalizes a purchase. Each checkout holds information about the items to be purchased, price and tax summaries, shipping and billing information, any applied discounts, and more. Developers can access and manage checkout details and trigger checkout-related events with the [Checkout API](https://dev.wix.com/docs/api-reference/business-solutions/e-commerce/purchase-flow/checkout/checkout/introduction.md). When an item is added to a checkout, Wix calls the Catalog service plugin to retrieve current details for the item. + **Order:** Once a customer has committed to a purchase, an order is created. An order holds information about purchased items, price and tax summaries, shipping and billing information, any applied discounts, and the status of payment and fulfillment. In the dashboard, business staff can create new orders, view and edit existing orders, track fulfillment, and manage the payments cycle. The [Orders API](https://dev.wix.com/docs/api-reference/business-solutions/e-commerce/orders/orders/introduction.md) enables apps or site owners to customize management of the order lifecycle, including viewing, editing, approving, canceling, and charging. When an item is added to an order, Wix calls the Catalog service plugin to retrieve current details for the item. ## See also + [About Service Plugin Extensions](https://dev.wix.com/docs/build-apps/develop-your-app/extensions/backend-extensions/service-plugins/about-service-plugin-extensions.md) + [Add a Service Plugin Extension With the CLI](https://dev.wix.com/docs/build-apps/develop-your-app/frameworks/wix-cli/supported-extensions/backend-extensions/service-plugins/add-service-plugin-extensions-with-the-cli.md) + [Add a Self-hosted Service Plugin With the SDK](https://dev.wix.com/docs/build-apps/develop-your-app/frameworks/self-hosting/supported-extensions/backend-extensions/add-self-hosted-service-plugin-extensions-with-the-sdk.md) + [Add Self-hosted Service Plugin Extensions with REST](https://dev.wix.com/docs/build-apps/develop-your-app/frameworks/self-hosting/supported-extensions/backend-extensions/add-self-hosted-service-plugin-extensions-with-rest.md) --- > Portal Navigation: > > - Append `.md` to any URL under `https://dev.wix.com/docs/` to get its markdown version. > - Pages are either content pages (article or reference text) or menu pages (a list of links to child pages). > - To get a menu page, truncate any URL to a parent path and append `.md` (e.g. `https://dev.wix.com/docs/sdk.md`, `https://dev.wix.com/docs/sdk/core-modules.md`). > - Top-level index of all portals: https://dev.wix.com/docs/llms.txt > - Full concatenated docs: https://dev.wix.com/docs/llms-full.txt ## Resource: Sample Flows ## Article: Sample Flows ## Article Link: https://dev.wix.com/docs/api-reference/business-solutions/e-commerce/catalogs/catalog-service-plugin/sample-flows.md ## Article Content: # Catalog Service Provider: Sample Use Cases & Flows This article presents sample flows you can support. You aren't limited to this exact flow, but it can be a helpful jumping off point as you plan your catalog integration. ## Add a catalog item to a cart > **Note:** In this example, item variant details are passed in the request. Learn more about this approach to [handling item variants](https://dev.wix.com/docs/api-reference/business-solutions/e-commerce/catalogs/catalog-service-plugin/handle-item-variants.md#approach-1--pass-variant-details-in-options). In this flow, a site visitor adds an item to their cart, and then Wix calls the Catalog service plugin to retrieve the item's full details. 1. A site visitor selects a color and size for a customizable T-shirt on a Wix site's item page. Then they add it to their cart. 1. The app code calls [Add To Current Cart](https://dev.wix.com/docs/api-reference/business-solutions/e-commerce/purchase-flow/cart/add-to-current-cart.md) with the following `lineItems` array in the payload to create a new cart that includes the item: ```json { "lineItems": [ { "quantity": 1, "catalogReference": { "appId": "3b8658a6-3282-4b5e-ae0e-439113e20aef", "catalogItemId": "f95bd723-ea83-40f2-8cb8-accff2d54866", "options": { "color": "Green", "size": "M" } } } ] } ``` The `catalogReference` object for the item includes: + `appId`: The ID of the app the catalog belongs to. This tells Wix which app's implementation of the Catalog service plugin to call. + `catalogItemId`: The ID of the item in the catalog it belongs to. + `options`: Item variant information. In this case, the app handles item variants by passing the variant details in the `catalogReference` object's `options` field. 1. Wix automatically calls your app's implementation of [Get Catalog Items](https://dev.wix.com/docs/api-reference/business-solutions/e-commerce/catalogs/catalog-service-plugin/get-catalog-items.md) with the following payload to retrieve the item's full and current details: ```json { "catalogReferences": [ { "catalogReference": { "appId": "3b8658a6-3282-4b5e-ae0e-439113e20aef", "catalogItemId": "f95bd723-ea83-40f2-8cb8-accff2d54866", "options": { "color": "Green", "size": "M" } }, "quantity": 1 } ], "currency": "USD", "weightUnit": "KG" } ``` 1. Your implementation of Get Catalog Items returns a response like this one: ```json { "catalogItems": [ { "catalogReference": { "appId": "3b8658a6-3282-4b5e-ae0e-439113e20aef", "catalogItemId": "f95bd723-ea83-40f2-8cb8-accff2d54866", "options": { "color": "Green", "size": "M" } }, "data": { "productName": { "original": "Cotton T-shirt" }, "url": { "relativePath": "/product-page/t-shirt", "url": "https://www..com/" }, "itemType": { "preset": "PHYSICAL" }, "price": { "amount": "80.00" }, "descriptionLines": [ { "name": { "original": "Size", "translated": "Size" }, "plainText": { "original": "Medium", "translated": "Medium" } }, { "name": { "original": "Color", "translated": "Color" }, "plainText": { "original": "Green", "translated": "Green" } } ], "physicalProperties": { "sku": "889809004958", "shippable": true }, "media": { "id": "3258d9_77f175cc4d234714825fbf316803ca9a~mv2.png", "height": 720, "width": 720 } } } ] } ``` It's important to note the following about the response: + The `catalogReference` object in the response must be identical to the one received in the request. + The response must include the variant details associated with the preferences specified in `options`. + The response must include all fields marked as required in the [response description](https://dev.wix.com/docs/api-reference/business-solutions/e-commerce/catalogs/catalog-service-plugin/get-catalog-items.md). 1. Wix adds the item to the visitor's cart, including the name, price, image, and variant details. ## Add a catalog item to a checkout > **Note:** In this example, item variant details are processed externally via a custom API that returns a unique ID. Learn more about this approach to [handling item variants](https://dev.wix.com/docs/api-reference/business-solutions/e-commerce/catalogs/catalog-service-plugin/handle-item-variants.md#approach-2--pass-a-variant-id-in-options). In this flow, a site visitor adds an item to their checkout. Wix calls the Catalog service plugin to retrieve the item's full details. 1. A site visitor selects a color and size for a customizable T-shirt on a Wix site's item page. Then they click **Buy Now** to add it directly to their checkout. 1. The app code calls a custom API with the variant details. The custom API validates and stores these details, then returns a unique `variantId`. 1. The app code calls [Create Checkout](https://dev.wix.com/docs/api-reference/business-solutions/e-commerce/purchase-flow/checkout/checkout/create-checkout.md) with the following `lineItems` array in the payload to create a new checkout that includes the item: ```json { "lineItems": [ { "quantity": 1, "catalogReference": { "appId": "3b8658a6-3282-4b5e-ae0e-439113e20aef", "catalogItemId": "f95bd723-ea83-40f2-8cb8-accff2d54866", "options": { "variantId": "c1988f6b-00a6-4e24-bd60-ce3054a54fbd" } } } ] } ``` The `catalogReference` object for the item includes: + `appId`: The ID of the app the catalog belongs to. This tells Wix which app's implementation of the Catalog SPI to call. + `catalogItemId`: The ID of the item in the catalog it belongs to. + `options`: Item variant information. In this case, the app handles item variants by using a custom API to generate and store the variant details. It then passes only the variant ID details in the `catalogReference` object's `options` field. 1. Wix automatically calls your app's implementation of [Get Catalog Items](https://dev.wix.com/docs/api-reference/business-solutions/e-commerce/catalogs/catalog-service-plugin/get-catalog-items.md) with the following request object to retrieve the item's full and current details: ```json { "catalogReferences": [ { "catalogReference": { "appId": "3b8658a6-3282-4b5e-ae0e-439113e20aef", "catalogItemId": "f95bd723-ea83-40f2-8cb8-accff2d54866", "options": { "variantId": "c1988f6b-00a6-4e24-bd60-ce3054a54fbd" } }, "quantity": 1 } ], "currency": "USD", "weightUnit": "KG" } ``` 1. Your implementation of Get Catalog Items returns a response like this one: ```json { "catalogItems": [ { "catalogReference": { "appId": "3b8658a6-3282-4b5e-ae0e-439113e20aef", "catalogItemId": "f95bd723-ea83-40f2-8cb8-accff2d54866", "options": { "color": "Green", "size": "M" } }, "data": { "productName": { "original": "Cotton T-shirt" }, "url": { "relativePath": "/product-page/t-shirt", "url": "https://www..com/" }, "itemType": { "preset": "PHYSICAL" }, "price": { "amount": "80.00" }, "descriptionLines": [ { "name": { "original": "Size", "translated": "Size" }, "plainText": { "original": "Medium", "translated": "Medium" } }, { "name": { "original": "Color", "translated": "Color" }, "plainText": { "original": "Green", "translated": "Green" } } ], "physicalProperties": { "sku": "889809004958", "shippable": true }, "media": { "id": "3258d9_77f175cc4d234714825fbf316803ca9a~mv2.png", "height": 720, "width": 720 } } } ] } ``` It's important to note the following about the response: + The `catalogReference` object in the response must be identical to the one received in the request. + The response should include the variant details associated with the `variantID` provided in `options`. + The response must include all fields marked as required in the [response description](https://dev.wix.com/docs/api-reference/business-solutions/e-commerce/catalogs/catalog-service-plugin/get-catalog-items.md). 1. Wix adds the item to the visitor's checkout, including the name, price, image, and variant details. --- > Portal Navigation: > > - Append `.md` to any URL under `https://dev.wix.com/docs/` to get its markdown version. > - Pages are either content pages (article or reference text) or menu pages (a list of links to child pages). > - To get a menu page, truncate any URL to a parent path and append `.md` (e.g. `https://dev.wix.com/docs/sdk.md`, `https://dev.wix.com/docs/sdk/core-modules.md`). > - Top-level index of all portals: https://dev.wix.com/docs/llms.txt > - Full concatenated docs: https://dev.wix.com/docs/llms-full.txt ## Resource: Handle Item Variants ## Article: Handle Item Variants ## Article Link: https://dev.wix.com/docs/api-reference/business-solutions/e-commerce/catalogs/catalog-service-plugin/handle-item-variants.md ## Article Content: # Handle Item Variants This article explains how to handle item customization and variants when implementing the Catalog service plugin. ## The `catalogReference` object When Wix calls the Get Catalog Items method, it includes a `catalogReference` object containing the reference details for each item to retrieve from your catalog. This object includes the following properties: + `catalogItemId`: The ID of the item in the catalog it belongs to. You can use any system you like for generating and storing unique item IDs. You may wish to expose an API so your app can query and retrieve item IDs. + `appId`: ID of the app providing the catalog. You can get your app's ID from your [app's dashboard](https://dev.wix.com/apps). + `options`: Additional item details in key:value pairs. Use this optional field to specify a variant of the item or add custom details. See below for more information. ## The `options` field In some cases, your catalog might need more than just the item ID and app ID in order to return all of the correct item details. On a site's item page, visitors can often choose variants of the item or add custom details. For example: + T-shirt size + Recipient information for a gift + Time and date of an appointment + Donation or gift card amount + Custom text for a necklace There are several ways you can use the `options` object for handling item variants. Here are two different approaches to implementing it. Decide which approach to take based on your technical requirements, existing system architecture, and business needs. ### Approach 1 | Pass variant details in `options` You can pass specific information about the item in the `options` object as key:value pairs. You can choose how to structure the information and what keys and values to support. For example, you can specify item variant details in any of the following ways: + T-shirt size and color: `"options": {"Size": "M", "Color": "Red"}` + Custom text for a necklace: `"options": {"customText": "Natalie"}` + Recipient information: `"options": {"recipientName": "Omar", "message": "Happy anniversary!"}` If you take this approach, make sure that: + Your Catalog service plugin implementation handles the expected `options` properties, processes them, and returns the correct item details. + When your app adds an item to a cart, checkout, or order, the `options` property of the item's `catalogReference` only includes key:value pairs that your catalog supports. Use this approach if: + You prefer not to store details for every variant a client selects, unless they result in a purchase. + You don't mind handling validation of the `options` object's properties in your implementation of Get Catalog Items. ### Approach 2 | Pass a variant ID in `options` You can create a separate API that processes item variants and returns a unique variant ID. Then your app can pass an `options` object containing only the item variant ID. When Wix calls Get Catalog Items, your Catalog service plugin retrieves the correct details for the item variant on the basis of this ID and returns them. For example, suppose you are creating an app for processing donations that can be added to a customer's transaction. You could implement this as follows: 1. Create an API called Create Donation for generating the specific details for a given donation. The request body might include properties that vary between donations, such as `organizationId`, `campaignId` and `amount`. It returns a unique `donationId`. 1. Create an API called Get Donation for retrieving the details of a donation based on its unique `donationId`. 1. When a site visitor makes a donation, they specify their preferred organization, campaign, and donation amount. The app then sends these details to the Create Donation API, which creates a donation entry and stores the details in your catalog's database. It then returns a unique `donationId`. 1. When your app adds a donation to a [cart](https://dev.wix.com/docs/api-reference/business-solutions/e-commerce/purchase-flow/cart/introduction.md), [checkout](https://dev.wix.com/docs/api-reference/business-solutions/e-commerce/purchase-flow/checkout/checkout/introduction.md), or [order](https://dev.wix.com/docs/api-reference/business-solutions/e-commerce/orders/orders/introduction.md), include the unique donation ID in the `catalogReference` object's `options` property. For example: `"options": { "donationId": "bf3b953d-d0b7-4755-a54e-13c167fc4484"}`. 1. When Wix calls your Get Catalog Items method to retrieve current information on the donation, it provides the `catalogReference` for the item, including the unique `donationId`. On the basis of this ID, the method returns the full details for the specific donation, which can then be added to the cart, checkout, or order. If you take this approach, make sure that: + You implement an API for creating item variants. Your API must receive the required variant details, store them, and generate a unique ID for each item variant. + When your app adds an item to a cart, checkout, or order, the `options` property of the item's `catalogReference` contains a field with the item variant ID your API generated. + Your Catalog service plugin implementation expects and handles the unique item variant IDs it receives in the `options` object, and returns the correct item details. Use this approach if: + You don't mind storing details for every variant a client selects, including those that don't result in a purchase. + You prefer to implement a formal API that enforces structure and validates all variants before they are included in a request to the catalog. --- > Portal Navigation: > > - Append `.md` to any URL under `https://dev.wix.com/docs/` to get its markdown version. > - Pages are either content pages (article or reference text) or menu pages (a list of links to child pages). > - To get a menu page, truncate any URL to a parent path and append `.md` (e.g. `https://dev.wix.com/docs/sdk.md`, `https://dev.wix.com/docs/sdk/core-modules.md`). > - Top-level index of all portals: https://dev.wix.com/docs/llms.txt > - Full concatenated docs: https://dev.wix.com/docs/llms-full.txt # DecrementAvailability # Package: catalogs # Namespace: InventorySpi # Method link: https://dev.wix.com/docs/api-reference/business-solutions/e-commerce/catalogs/inventory-service-plugin/decrement-availability.md ## Introduction Reduces the available stock quantity for specified items. Use this method when inventory needs to be decremented due to order events such as order placement or payment. The method supports validation to prevent negative inventory levels when `restrictInventoryValue` is set to true. --- ## REST API ### Examples ### Decrement inventory by 4 units ```curl curl -X POST https://provider.example.com/v1/decrement \ -H 'user-agent: Wix' \ -H 'accept-encoding: gzip, deflate' \ -H 'content-type: text/plain; charset=utf-8' \ -d '{ "items": [ { "catalogReference": { "appId": "215238eb-22a5-4c36-9e7b-e7c08025e04e", "catalogItemId": "e35409da-d374-4c4b-b08b-6c703c5b6960" }, "locationId": "2163c198-6c85-4d30-b317-48714f627e4b", "quantity": 4, "subscriptionItem": false } ], "orderId": "a22ebad0-11ef-4a4d-a567-691fa7cb264c", "reason": "ORDER_PAID", "restrictInventoryValue": true }' ``` --- ## JavaScript SDK ### Examples ### Basic inventory decrement for order placement Decrements inventory when an order is placed, with stock validation enabled ```javascript import { inventory } from "@wix/ecom/service-plugins"; inventory.provideHandlers({ decrementAvailability: async (payload) => { const { request, metadata } = payload; // Use the `request` and `metadata` received from Wix and // apply custom logic. // Example: Log the decrement operation console.log(`Decrementing inventory for order: ${request.orderId}`); // Example: Add custom validation logic const hasSubscriptionItems = request.items.some(item => item.subscriptionItem); if (hasSubscriptionItems) { console.log('Processing subscription items with special handling'); } // Return your response exactly as documented to integrate with Wix. return { // Empty response indicates successful decrement }; } }); ``` ### decrementAvailability (self-hosted) Self-hosted SDK calls require you to [create a client](https://dev.wix.com/docs/sdk/articles/work-with-the-sdk/about-the-wix-client.md). ```javascript import { createClient } from '@wix/sdk'; import { inventory } from '@wix/ecom/service-plugins'; // Import the auth strategy for the relevant access type // Import the relevant host module if needed const myWixClient = createClient ({ modules: { inventory }, // Include the auth strategy and host as relevant }); async function decrementAvailability(request,metadata) { const response = await myWixClient.inventory.decrementAvailability(request,metadata); }; ``` --- --- > Portal Navigation: > > - Append `.md` to any URL under `https://dev.wix.com/docs/` to get its markdown version. > - Pages are either content pages (article or reference text) or menu pages (a list of links to child pages). > - To get a menu page, truncate any URL to a parent path and append `.md` (e.g. `https://dev.wix.com/docs/sdk.md`, `https://dev.wix.com/docs/sdk/core-modules.md`). > - Top-level index of all portals: https://dev.wix.com/docs/llms.txt > - Full concatenated docs: https://dev.wix.com/docs/llms-full.txt # IncrementAvailability # Package: catalogs # Namespace: InventorySpi # Method link: https://dev.wix.com/docs/api-reference/business-solutions/e-commerce/catalogs/inventory-service-plugin/increment-availability.md ## Introduction Increases the available stock quantity for specified items. Use this method when inventory needs to be incremented due to order events such as order cancellation, refund, or order editing. This method does not validate stock levels and allows negative inventory to be corrected. --- ## REST API ### Examples ### Increment inventory by 4 units ```curl curl -X POST https://provider.example.com/v1/increment \ -H 'user-agent: Wix' \ -H 'accept-encoding: gzip, deflate' \ -H 'content-type: text/plain; charset=utf-8' \ -d '{ "items": [ { "catalogReference": { "appId": "215238eb-22a5-4c36-9e7b-e7c08025e04e", "catalogItemId": "e35409da-d374-4c4b-b08b-6c703c5b6960" }, "locationId": "2163c198-6c85-4d30-b317-48714f627e4b", "quantity": 4, "subscriptionItem": false } ], "orderId": "a22ebad0-11ef-4a4d-a567-691fa7cb264c", "reason": "ORDER_EDITED" }' ``` --- ## JavaScript SDK ### Examples ### Basic inventory increment for order cancellation or refund Increments inventory when an order is canceled or refunded, restoring stock levels ```javascript import { inventory } from "@wix/ecom/service-plugins"; inventory.provideHandlers({ incrementAvailability: async (payload) => { const { request, metadata } = payload; // Use the `request` and `metadata` received from Wix and // apply custom logic. // Example: Log the increment operation console.log(`Incrementing inventory for order: ${request.orderId}`); // Example: Add custom logic based on reason switch (request.reason) { case "ORDER_CANCELED": console.log('Restoring inventory due to order cancellation'); break; case "ORDER_REFUNDED": console.log('Restoring inventory due to order refund'); break; case "ORDER_EDITED": console.log('Adjusting inventory due to order modification'); break; default: console.log(`Processing increment for reason: ${request.reason}`); } // Example: Handle subscription items differently const hasSubscriptionItems = request.items.some(item => item.subscriptionItem); if (hasSubscriptionItems) { console.log('Processing subscription items with special handling'); } // Return your response exactly as documented to integrate with Wix. return { // Empty response indicates successful increment }; } }); ``` ### incrementAvailability (self-hosted) Self-hosted SDK calls require you to [create a client](https://dev.wix.com/docs/sdk/articles/work-with-the-sdk/about-the-wix-client.md). ```javascript import { createClient } from '@wix/sdk'; import { inventory } from '@wix/ecom/service-plugins'; // Import the auth strategy for the relevant access type // Import the relevant host module if needed const myWixClient = createClient ({ modules: { inventory }, // Include the auth strategy and host as relevant }); async function incrementAvailability(request,metadata) { const response = await myWixClient.inventory.incrementAvailability(request,metadata); }; ``` --- --- > Portal Navigation: > > - Append `.md` to any URL under `https://dev.wix.com/docs/` to get its markdown version. > - Pages are either content pages (article or reference text) or menu pages (a list of links to child pages). > - To get a menu page, truncate any URL to a parent path and append `.md` (e.g. `https://dev.wix.com/docs/sdk.md`, `https://dev.wix.com/docs/sdk/core-modules.md`). > - Top-level index of all portals: https://dev.wix.com/docs/llms.txt > - Full concatenated docs: https://dev.wix.com/docs/llms-full.txt ## Resource: Introduction ## Article: Introduction ## Article Link: https://dev.wix.com/docs/api-reference/business-solutions/e-commerce/catalogs/inventory-service-plugin/introduction.md ## Article Content: # About the Inventory Service Plugin The Inventory Service Plugin enables any business vertical or catalog implementor to integrate with a unified inventory system. It supports inventory business logic without requiring implementors to acquire deep knowledge of purchase or post-purchase events. It keeps inventory in sync with order flows and prevents orders for unavailable items—whether physical, digital, or time-based. The integration is done via an app in the Wix App Market (created in the Wix Studio workspace), and the Wix Inventory service plugin. Learn more about [implementing a service plugin with Wix](https://dev.wix.com/docs/build-apps/develop-your-app/extensions/backend-extensions/service-plugins/about-service-plugin-extensions.md). With the Inventory Service Plugin, you can: + Decrement availability when items are ordered, paid for, or allocated. + Increment availability when orders are canceled, refunded, or edited. + Manage inventory across multiple locations. + Handle both regular and subscription items. + Control inventory validation behavior for different order flows. ## Use cases + [Decrement inventory as part of order placed flow](https://dev.wix.com/docs/rest/business-solutions/e-commerce/catalogs/inventory-service-plugin/sample-flows.md) + [Update inventory as part of order edit flow](https://dev.wix.com/docs/rest/business-solutions/e-commerce/catalogs/inventory-service-plugin/sample-flows.md) Both operations work with the same `item` object, which includes catalog references, quantities, location information, and subscription details. ## Key service plugin behavior ### Inventory validation control The `restrictInventoryValue` parameter in decrement requests controls critical validation behavior: + **When `true`**: The operation validates available stock and fails if decrementing would result in negative inventory. + **When `false`**: The operation proceeds regardless of current stock levels, allowing negative inventory. This distinction is crucial for different order flows - strict validation for customer-initiated orders versus flexible handling for merchant-initiated changes. ### Location-based inventory Inventory can be managed per location using the optional `locationId` field: + **When provided**: Inventory changes apply to the specific location. + **When omitted**: Changes apply to the default location. ### Quantity limits The service plugin has different quantity limits for operations: + **Decrement operations**: Support up to 300 items per request. + **Increment operations**: Support up to 300 items per request. ## Before you begin It's important to note the following points before starting to code: + You can configure your inventory update preference with the [Orders Settings API](https://dev.wix.com/docs/rest/business-solutions/e-commerce/orders/orders-settings/introduction.md): + **Order placed (default)**: This will fail the order creation if items aren't available. + **Order paid**: An order will always be created and inventory will update upon successful payment. If items are no longer available at that moment, the merchant will be responsible for resolving the issue. + Your service must handle both increment and decrement operations. ## Terminology + **Inventory integration**: A 3rd-party app that implements custom logic to manage inventory. + **Inventory item**: Identify an item with quantity in the inventory system that needs to be updated. + **Catalog reference**: The unique identifier of an item in the platform managed by the catalog owner. + **Subscription item**: Describes if the current item is part of a recurring subscription. Inventory systems can decide to handle those items differently. + **Restrict inventory**: A flag passed on the decrement API. When set to true, the implementer should fail the request if inventory is not available. --- > Portal Navigation: > > - Append `.md` to any URL under `https://dev.wix.com/docs/` to get its markdown version. > - Pages are either content pages (article or reference text) or menu pages (a list of links to child pages). > - To get a menu page, truncate any URL to a parent path and append `.md` (e.g. `https://dev.wix.com/docs/sdk.md`, `https://dev.wix.com/docs/sdk/core-modules.md`). > - Top-level index of all portals: https://dev.wix.com/docs/llms.txt > - Full concatenated docs: https://dev.wix.com/docs/llms-full.txt ## Resource: Sample Flows ## Article: Sample Flows ## Article Link: https://dev.wix.com/docs/api-reference/business-solutions/e-commerce/catalogs/inventory-service-plugin/sample-flows.md ## Article Content: # Sample Flows This article presents sample flows you can support. You aren't limited to these exact flows, but they can be helpful jumping off points as you plan your inventory integration. ## Decrement inventory as part of order placed flow You can reduce inventory levels when customers place orders to ensure accurate stock tracking and prevent overselling. To decrement inventory when an order is placed: 1. A site visitor completes the checkout process. 2. Wix sends a [Decrement Availability](https://dev.wix.com/docs/rest/business-solutions/e-commerce/catalogs/inventory-service-plugin/decrement-availability.md) request to your integration with `restrictInventoryValue` set to `true`. 3. Your service validates that the requested items are in stock: + If sufficient inventory is available, deduct the items from stock and return an empty response object. + If any items have insufficient stock, return an error without modifying inventory levels. 4. When an error is returned, the site visitor cannot complete the checkout and is notified about the unavailable items. ## Update inventory as part of order edit flow You can adjust inventory levels when merchants edit existing orders, handling both items being added and removed from orders. To update inventory when an order is edited: 1. A merchant edits an order in the Wix dashboard. 2. The merchant replaces a line item with a different item from the same catalog. 3. When the merchant commits the changes, Wix sends 2 requests to your service: + A [Decrement Availability](https://dev.wix.com/docs/rest/business-solutions/e-commerce/catalogs/inventory-service-plugin/decrement-availability.md) request for the newly added item with `restrictInventoryValue` set to `false`. + An [Increment Availability](https://dev.wix.com/docs/rest/business-solutions/e-commerce/catalogs/inventory-service-plugin/increment-availability.md) request for the removed item to restore its stock. 4. Since these requests are initiated by the merchant and should not fail the order edit, the decrement request uses `restrictInventoryValue: false`, allowing your service to proceed even if it would result in negative inventory. --- > Portal Navigation: > > - Append `.md` to any URL under `https://dev.wix.com/docs/` to get its markdown version. > - Pages are either content pages (article or reference text) or menu pages (a list of links to child pages). > - To get a menu page, truncate any URL to a parent path and append `.md` (e.g. `https://dev.wix.com/docs/sdk.md`, `https://dev.wix.com/docs/sdk/core-modules.md`). > - Top-level index of all portals: https://dev.wix.com/docs/llms.txt > - Full concatenated docs: https://dev.wix.com/docs/llms-full.txt ## Resource: Introduction ## Article: About Purchase Flow ## Article Link: https://dev.wix.com/docs/api-reference/business-solutions/e-commerce/purchase-flow/introduction.md ## Article Content: # About Purchase Flow The purchase flow represents the customer journey from item selection to payment completion within the Wix eCommerce platform. This process transforms browsing customers into buyers by processing [catalog items](https://dev.wix.com/docs/rest/business-solutions/e-commerce/catalogs/introduction.md) through a structured 2-stage sequence: cart management and checkout processing. Successful completion of the purchase flow creates an [order](https://dev.wix.com/docs/api-reference/business-solutions/e-commerce/orders/orders/introduction.md) for post-purchase processing and fulfillment. This section covers: - **[Cart](https://dev.wix.com/docs/api-reference/business-solutions/e-commerce/purchase-flow/cart/introduction.md)**: Manage customer item selections, quantities, pricing calculations, and cart modifications before proceeding to checkout. - **[Checkout](https://dev.wix.com/docs/api-reference/business-solutions/e-commerce/purchase-flow/checkout/checkout/introduction.md)**: Handle the payment collection phase, including transaction processing, checkout configuration, template management, and abandoned checkout recovery. ## Purchase flow patterns The platform supports 2 fundamental approaches to moving customers through the purchase flow: + **Cart-to-checkout flow**: Customers add items to a persistent cart, review and modify selections, then continue to checkout for payment processing. This familiar eCommerce pattern allows customers to browse, compare, and refine their selections before committing to purchase. The cart maintains state across sessions for logged-in users. + **Direct checkout flow**: Skip cart management and proceed directly from item selection to checkout. This "buy now" approach reduces friction for single-item purchases, appointment bookings, or scenarios where immediate purchase intent is clear. ## Purchase flow customization The purchase flow provides extensive customization options through service plugins and configuration APIs: + **Purchase flow extensions**: Integrate custom logic for additional fees, discounts, shipping rates, tax calculations, and validations through [extensions](https://dev.wix.com/docs/rest/business-solutions/e-commerce/extensions/introduction.md) that enhance cart and checkout processing. + **Checkout behavior**: Configure policies, terms of service agreements, and user interface elements through the [Checkout Settings API](https://dev.wix.com/docs/rest/business-solutions/e-commerce/purchase-flow/checkout/checkout-settings/introduction.md) to align with business requirements and legal compliance. + **Pre-configured checkouts**: Create standardized checkout experiences using [Checkout Templates](https://dev.wix.com/docs/rest/business-solutions/e-commerce/purchase-flow/checkout/checkout-templates/introduction.md) with predefined items, pricing, or promotional offers. Templates enable consistent experiences for flash sales, product bundles, or recurring purchase scenarios while working with either flow pattern. + **Abandoned checkout recovery**: Implement customer re-engagement strategies using the [Abandoned Checkout API](https://dev.wix.com/docs/rest/business-solutions/e-commerce/purchase-flow/checkout/abandoned-checkout/introduction.md) to recover lost sales from incomplete checkout sessions. ## See also - [About Catalogs](https://dev.wix.com/docs/rest/business-solutions/e-commerce/catalogs/introduction.md) - [About Orders](https://dev.wix.com/docs/api-reference/business-solutions/e-commerce/orders/orders/introduction.md) - [Architecture and Data Flow](https://dev.wix.com/docs/rest/business-solutions/e-commerce/architecture-data-flow.md) --- > Portal Navigation: > > - Append `.md` to any URL under `https://dev.wix.com/docs/` to get its markdown version. > - Pages are either content pages (article or reference text) or menu pages (a list of links to child pages). > - To get a menu page, truncate any URL to a parent path and append `.md` (e.g. `https://dev.wix.com/docs/sdk.md`, `https://dev.wix.com/docs/sdk/core-modules.md`). > - Top-level index of all portals: https://dev.wix.com/docs/llms.txt > - Full concatenated docs: https://dev.wix.com/docs/llms-full.txt # Resource: Cart # Type: Cart Object # Link: https://dev.wix.com/docs/api-reference/business-solutions/e-commerce/purchase-flow/cart/cart-object.md ## Description: A shopping cart that holds items a buyer intends to purchase. Carts are converted to checkouts when the buyer proceeds to payment. ## Schema: ```json Type: Cart Object | type: Cart Description: A shopping cart that holds items a buyer intends to purchase. Carts are converted to checkouts when the buyer proceeds to payment. - name: id | type: string | description: Cart ID. - name: value | type: string | description: - name: lineItems | type: Array | description: Line items. - name: id | type: string | description: Line item ID. - name: quantity | type: number | description: Item quantity. - name: catalogReference | type: CatalogReference | description: Catalog and item reference. Holds IDs for the item and the catalog it came from, as well as further optional info. Optional for custom line items, which don't trigger the Catalog service plugin. - name: catalogItemId | type: string | description: ID of the item within the catalog it belongs to. - name: appId | type: string | description: ID of the app providing the catalog. You can get your app's ID from its page in the [app dashboard](https://dev.wix.com/dc3/my-apps/). For items from Wix catalogs, the following values always apply: + Wix Stores: `"215238eb-22a5-4c36-9e7b-e7c08025e04e"` + Wix Bookings: `"13d21c63-b5ec-5912-8397-c3a5ddb27a97"` + Wix Restaurants: `"9a5d83fd-8570-482e-81ab-cfa88942ee60"` - name: options | type: Struct | description: Additional item details in `key:value` pairs. Use this optional field for more specificity with item selection. The values of the `options` field differ depending on which catalog is providing the items. For Wix Stores products, learn more about integrating with [Catalog V3](https://dev.wix.com/docs/api-reference/business-solutions/stores/catalog-v3/e-commerce-integration.md) or [Catalog V1](https://dev.wix.com/docs/api-reference/business-solutions/stores/catalog-v1/catalog/e-commerce-integration.md), depending on [the version the site uses](https://dev.wix.com/docs/api-reference/business-solutions/stores/catalog-versioning/introduction.md). - name: productName | type: ProductName | description: Item name. + Stores - `product.name` + Bookings - `service.info.name` + Events - `ticket.name` - name: original | type: string | description: __Required.__ Item name in the site's default language as defined in the [request envelope](https://dev.wix.com/docs/build-apps/develop-your-app/frameworks/self-hosting/supported-extensions/backend-extensions/add-self-hosted-service-plugin-extensions.md#request-envelope). Min: 1 character. Max: 200 characters. - name: translated | type: string | description: Item name translated into the buyer's language. Min: 1 character. Max: 400 characters. Default: Same as `original`. - name: url | type: PageUrlV2 | description: URL to the item's page on the site. - name: relativePath | type: string | description: The relative path for the page within the site. For example, `/product-page/a-product`. - name: url | type: string | description: The page's full URL. For example, `https://mysite.com/product-page/a-product`. - name: price | type: MultiCurrencyPrice | description: Item price **after** catalog-defined discount and line item discounts. - name: amount | type: string | description: Amount. - name: convertedAmount | type: string | description: Converted amount. - name: formattedAmount | type: string | description: Amount formatted with currency symbol. - name: formattedConvertedAmount | type: string | description: Converted amount formatted with currency symbol. - name: fullPrice | type: MultiCurrencyPrice | description: Item price **before** catalog-defined discount. Defaults to `price` when not provided. - name: priceBeforeDiscounts | type: MultiCurrencyPrice | description: Item price **before** line item discounts and **after** catalog-defined discount. Defaults to `price` when not provided. - name: lineItemPrice | type: MultiCurrencyPrice | description: Total price **after** catalog-defined discount and line item discounts. - name: descriptionLines | type: Array | description: Line item description lines. Used for displaying the cart, checkout and order. - name: name | type: DescriptionLineName | description: Description line name. - name: image | type: Image | description: Line item image details. - name: id | type: string | description: WixMedia image ID. - name: url | type: string | description: Image URL. - name: height | type: number | description: Original image height. - name: width | type: number | description: Original image width. - name: altText | type: string | description: Image alt text. - name: filename | type: string | description: Image filename. - name: availability | type: ItemAvailabilityInfo | description: Item availability details. - name: status | type: string | description: Item availability status. - name: quantityAvailable | type: number | description: Quantity available. - name: physicalProperties | type: PhysicalProperties | description: Physical properties of the item. When relevant, contains information such as SKU, item weight, and shippability. - name: weight | type: number | description: Line item weight. Measurement unit matches the weight unit specified in `weightUnit` in the request. - name: sku | type: string | description: Stock-keeping unit. Learn more about [SKUs](https://www.wix.com/encyclopedia/definition/stock-keeping-unit-sku). - name: shippable | type: boolean | description: Whether this line item is shippable. - name: itemType | type: ItemType | description: Item type. Either a preset type or custom. - name: subscriptionOptionInfo | type: SubscriptionOptionInfo | description: Subscription option information. - name: subscriptionSettings | type: SubscriptionSettings | description: Subscription option settings. - name: title | type: Title | description: Subscription option title. - name: description | type: Description | description: Subscription option description. - name: paymentOption | type: string | description: Type of selected payment option for current item. Default: `FULL_PAYMENT_ONLINE` enum: FULL_PAYMENT_ONLINE, FULL_PAYMENT_OFFLINE, MEMBERSHIP, DEPOSIT_ONLINE, MEMBERSHIP_OFFLINE, MEMBERSHIP_ONLINE_WITH_OFFLINE_REMAINDER - name: serviceProperties | type: ServiceProperties | description: Service properties. When relevant, this contains information such as date and number of participants. - name: scheduledDate | type: string | description: Date and time the service is to be provided, in [ISO-8601](https://en.wikipedia.org/wiki/ISO_8601#Combined_date_and_time_representations) format. For example, the start time of a class. - name: numberOfParticipants | type: number | description: The number of people participating in the service. For example, the number of people attending a class or the number of people per hotel room. - name: rootCatalogItemId | type: string | description: In cases where `catalogReference.catalogItemId` is NOT the actual catalog item ID, this field will return the true item's ID. + For example, for Wix Bookings, `catalogReference.catalogItemId` is the booking ID. Therefore this value is set to the service ID. + in most cases, this field is the same as `catalogReference.catalogItemId`. + Used in membership validation. - name: priceDescription | type: PriceDescription | description: Additional description for the price. For example, when price is 0 but additional details about the actual price are needed - "Starts at $67". - name: original | type: string | description: __Required.__ Price description in the site's default language as defined in the [request envelope](https://dev.wix.com/docs/build-apps/develop-your-app/frameworks/self-hosting/supported-extensions/backend-extensions/add-self-hosted-service-plugin-extensions.md#request-envelope). - name: translated | type: string | description: Price description translated into the buyer's language. Default: Same as `original`. - name: depositAmount | type: MultiCurrencyPrice | description: Partial payment to be paid upfront during the checkout. Eligible for catalog items with `lineItem.paymentOption` type `DEPOSIT_ONLINE` only. - name: selectedMembership | type: SelectedMembership | description: Selected membership to be used as payment for this item. Must be used with `lineItem.paymentOption` set to `MEMBERSHIP` or `MEMBERSHIP_OFFLINE`. This field can be empty when `lineItem.paymentOption` is set to `MEMBERSHIP_OFFLINE`. - name: id | type: string | description: Membership ID. - name: appId | type: string | description: ID of the app providing this payment option. - name: deliveryProfileId | type: string | description: Delivery profile ID. - name: taxGroupId | type: string | description: Tax group ID for this line item. - name: customLineItem | type: boolean | description: Whether the line item is a custom line item. Custom line items don't trigger the Catalog service plugin. - name: consentRequiredPaymentPolicy | type: string | description: Item payment policy that requires customer consent to complete purchase. The payment policy will be displayed on the checkout page. - name: priceUndetermined | type: boolean | description: Whether the price is not yet defined, and will be updated after the order is created. - name: fixedQuantity | type: boolean | description: Whether the line item quantity is fixed and cannot be changed. - name: catalogOverrideFields | type: CatalogOverrideFields | description: Overriding values for catalog item properties. To override catalog fields, your app must have the permission scope named "Manage eCommerce - Admin Permissions". Learn more about [permission scopes](https://dev.wix.com/docs/build-apps/develop-your-app/access/authorization/about-permissions.md). - name: productName | type: ProductName | description: Item name. - name: price | type: string | description: Item price **after** discounts. - name: fullPrice | type: string | description: Item price **before** discounts. - name: descriptionLines | type: Array | description: Item description lines. Used when displaying the line item to customers. - name: physicalProperties | type: PhysicalProperties | description: Physical properties of the item. - name: image | type: Image | description: Item image. - name: paymentOption | type: PaymentOption | description: Payment method selected for the item. - name: depositAmount | type: string | description: Only eligible for catalog items with `lineItem.paymentOption.value` type of `DEPOSIT_ONLINE`. - name: savePaymentMethod | type: boolean | description: Whether to save the payment method on the order. Default: `false` - name: inventoryAppId | type: string | description: ID of the app managing the inventory. - name: savePaymentMethod | type: boolean | description: Whether to save the payment method on the order. Default: `false` - name: taxableAddress | type: TaxableAddress | description: Address to use for tax calculation purposes. - name: extendedFields | type: ExtendedFields | description: Custom extended fields for the line item object. [Extended fields](https://dev.wix.com/docs/rest/articles/getting-started/extended-fields.md) must be configured using the 'Checkout & Orders - Line Items Schema Plugin' in the app dashboard before they can be accessed with API calls. - name: namespaces | type: object | description: Extended field data. Each key corresponds to the namespace of the app that created the extended fields. The value of each key is structured according to the schema defined when the extended fields were configured. You can only access fields for which you have the appropriate permissions. Learn more about [extended fields](https://dev.wix.com/docs/rest/articles/getting-started/extended-fields.md). - name: policies | type: Array | description: Policies to be displayed to the customer on the checkout page. - name: title | type: string | description: Policy title - should be translated - name: content | type: string | description: Policy content - should be translated - name: membersOnly | type: boolean | description: Whether the item can only be purchased by site members. Default: `false` - name: modifierGroups | type: Array | description: Modifier groups that were added to the item. - name: id | type: string | description: Modifier group ID. - name: name | type: TranslatableString | description: Modifier group name. - name: modifiers | type: Array | description: List of modifiers in this group. - name: modifiersTotalPrice | type: MultiCurrencyPrice | description: Total price of all item modifiers. Included in the item price. - name: buyerNote | type: string | description: [Buyer note](https://support.wix.com/en/article/collecting-and-viewing-buyer-notes) left by the customer. - name: buyerInfo | type: BuyerInfo | description: Buyer information. - name: contactId | type: string | description: Contact ID. For more information, see the Contacts API. - name: email | type: string | description: Buyer email address. - name: currency | type: string | description: The site’s default currency, in three-letter [ISO-4217 alphabetic](https://en.wikipedia.org/wiki/ISO_4217#Active_codes) format. This represents the base currency configured for the site and remains constant regardless of the customer’s currency selection. - name: conversionCurrency | type: string | description: The currency [selected by the customer](https://support.wix.com/en/article/multicurrency-an-overview) during the purchase flow, in three-letter [ISO-4217 alphabetic](https://en.wikipedia.org/wiki/ISO_4217#Active_codes) format. This reflects the customer’s preferred display currency and may differ from the site’s default currency. When no specific currency is selected by the customer, this matches the `currency` property. - name: buyerLanguage | type: string | description: Language for communication with the buyer. Defaults to the site language. For a site that supports multiple languages, this is the language the buyer selected. - name: siteLanguage | type: string | description: Site language in which original values are displayed. - name: taxIncludedInPrices | type: boolean | description: Whether tax is included in line item prices. - name: value | type: boolean | description: - name: weightUnit | type: string | description: Weight measurement unit - defaults to site's weight unit. enum: UNSPECIFIED_WEIGHT_UNIT, KG, LB - name: checkoutId | type: string | description: ID of the checkout that originated from this cart. - name: appliedDiscounts | type: Array | description: Cart discounts. - name: createdDate | type: string | description: Date and time the cart was created. - name: seconds | type: string | description: - name: nanos | type: number | description: - name: updatedDate | type: string | description: Date and time the cart was updated. - name: contactInfo | type: AddressWithContact | description: Contact info. - name: address | type: Address | description: Address. - name: country | type: string | description: Two-letter country code in [ISO-3166 alpha-2](https://www.iso.org/obp/ui/#search/code/) format. - name: subdivision | type: string | description: Code for a subdivision (such as state, prefecture, or province) in [ISO 3166-2](https://www.iso.org/standard/72483.html) format. - name: city | type: string | description: City name. - name: postalCode | type: string | description: Postal or zip code. - name: streetAddress | type: StreetAddress | description: Street address. - name: addressLine | type: string | description: Main address line (usually street name and number). - name: addressLine2 | type: string | description: Free text providing more detailed address info. Usually contains apt, suite, floor. - name: geocode | type: AddressLocation | description: Geocode object containing latitude and longitude coordinates. - name: countryFullname | type: string | description: Country's full name. - name: subdivisionFullname | type: string | description: Subdivision full-name. - name: contactDetails | type: FullAddressContactDetails | description: Contact details. - name: firstName | type: string | description: First name. - name: lastName | type: string | description: Last name. - name: phone | type: string | description: Phone number. - name: company | type: string | description: Company name. - name: vatId | type: VatId | description: Tax information (for Brazil only). If ID is provided, `vatId.type` must also be set, `UNSPECIFIED` is not allowed. - name: overrideCheckoutUrl | type: string | description: `overrideCheckoutUrl` allows the flexibility to redirect customers to a customized checkout page. This field overrides the `checkoutUrl` in a cart or checkout. `checkoutUrl` is used in the Abandoned Checkout API to send customers back to their checkouts. By default, a `checkoutUrl` generates for a checkout and directs to a standard Wix checkout page. When `overrideCheckoutUrl` has a value, it will replace and set the value of `checkoutUrl`. - name: purchaseFlowId | type: string | description: Persistent ID that correlates between the various eCommerce elements: cart, checkout, and order. - name: selectedShippingOption | type: SelectedShippingOption | description: Selected shipping option. - name: carrierId | type: string | description: Carrier ID. - name: code | type: string | description: Selected shipping option code. For example, "usps_std_overnight". - name: extendedFields | type: ExtendedFields | description: Fields extended by data extensions - name: businessLocationId | type: string | description: The business location ID associated with the cart. To learn more, see the Locations API. - name: paymentCurrency | type: string | description: The currency used for payment, in three-letter [ISO-4217 alphabetic](https://en.wikipedia.org/wiki/ISO_4217#Active_codes) format. This is determined by the [customer's selected currency](https://support.wix.com/en/article/multicurrency-an-overview) and the site’s supported payment currencies. If the customer’s selected currency is supported for payment, this matches the `conversionCurrency` property. If not supported, this falls back to the `currency` property. - name: revision | type: string | description: Revision number, which increments by 1 each time the Cart is updated. - name: value | type: string | description: ``` --- > Portal Navigation: > > - Append `.md` to any URL under `https://dev.wix.com/docs/` to get its markdown version. > - Pages are either content pages (article or reference text) or menu pages (a list of links to child pages). > - To get a menu page, truncate any URL to a parent path and append `.md` (e.g. `https://dev.wix.com/docs/sdk.md`, `https://dev.wix.com/docs/sdk/core-modules.md`). > - Top-level index of all portals: https://dev.wix.com/docs/llms.txt > - Full concatenated docs: https://dev.wix.com/docs/llms-full.txt # CreateCart # Package: purchaseFlow # Namespace: CartService # Method link: https://dev.wix.com/docs/api-reference/business-solutions/e-commerce/purchase-flow/cart/create-cart.md ## Permission Scopes: Manage eCommerce - all permissions: SCOPE.DC-ECOM-MEGA.MANAGE-ECOM Manage eCommerce - Admin Permissions: SCOPE.ECOM.MANAGE-ADMIN ## Introduction Creates a cart. > **Notes:** > + When adding catalog line items, the `lineItems.catalogReference.appId` and `lineItems.catalogReference.catalogItemId` fields are required. > + This method requires [visitor or member authentication](https://dev.wix.com/docs/rest/articles/getting-started/access-types-and-permissions.md). --- ## REST API ### Examples ### Create a cart with custom line items ```curl curl -X POST \ 'https://www.wixapis.com/ecom/v1/carts' \ -H 'Authorization: ' \ -H 'Content-Type: application/json' \ -d '{ "customLineItems": [{ "quantity": 1, "price": "1", "productName": { "original": "Accessory Surprise" }, "itemType": { "preset": "PHYSICAL" } }] }' ``` ### Create a cart with minimum required information ```curl curl -X POST \ 'https://www.wixapis.com/ecom/v1/carts' \ -H 'Content-Type: application/json' \ -H 'Authorization: ' \ -d '{ "lineItems": [{ "catalogReference": { "appId": "215238eb-22a5-4c36-9e7b-e7c08025e04e", "catalogItemId": "c8539b66-7a44-fe18-affc-afec4be8562a" }, "quantity": 3 }] }' ``` --- ## JavaScript SDK ### Examples ### Create a cart with minimum required fields ```javascript /************************************** * Backend code - my-backend-file.web.js/ts * *************************************/ import { Permissions, webMethod } from '@wix/web-methods'; import { cart } from '@wix/ecom'; export const myCreateCartFunction = webMethod(Permissions.Anyone, async (options) => { try { const newCart = await cart.createCart(options); console.log('Success! Created newCart:', newCart); return newCart; } catch (error) { console.error(error); // Handle the error } }); /************* * Page code * ************/ import { myCreateCartFunction } from 'backend/my-backend-file.web'; // Sample options object: const options = { lineItems: [{ catalogReference: { // appId for Wix Stores Catalog appId: "215238eb-22a5-4c36-9e7b-e7c08025e04e", // example of Wix Stores productId catalogItemId: "c8539b66-7a44-fe18-affc-afec4be8562a" }, quantity: 3 }] } myCreateCartFunction(options) .then((newCart) => { const cartId = newCart._id; const cartCheckoutId = newCart.checkoutId; console.log('Success! Created newCart:', newCart); return newCart; }) .catch((error) => { console.error(error); // Handle the error }); /* Promise resolves to: * * { * "_id": "96a61a4b-6b61-47d1-a039-0213a8230ccd", * "lineItems": [ * { * "_id": "00000000-0000-0000-0000-000000000001", * "quantity": 3, * "catalogReference": { * "catalogItemId": "c8539b66-7a44-fe18-affc-afec4be8562a", * "appId": "215238eb-22a5-4c36-9e7b-e7c08025e04e" * }, * "productName": { * "original": "Shirt", * "translated": "Shirt" * }, * "url": "https://example.wixsite.com", * "price": { * "amount": "10", * "convertedAmount": "10", * "formattedAmount": "€10.00", * "formattedConvertedAmount": "€10.00" * }, * "fullPrice": { * "amount": "10", * "convertedAmount": "10", * "formattedAmount": "€10.00", * "formattedConvertedAmount": "€10.00" * }, * "priceBeforeDiscounts": { * "amount": "10", * "convertedAmount": "10", * "formattedAmount": "€10.00", * "formattedConvertedAmount": "€10.00" * }, * "descriptionLines": [], * "image": "wix:image://v1/3c76e2_c5331f937348492a97df87b0a3b34ea4~mv2.jpg#originWidth=1000&originHeight=1000", * "availability": { * "status": "AVAILABLE" * }, * "physicalProperties": { * "sku": "364115376135191", * "shippable": true * }, * "itemType": { * "preset": "PHYSICAL" * }, * "paymentOption": "FULL_PAYMENT_ONLINE" * } * ], * "buyerInfo": { * "memberId": "c43190d2-eea3-493e-b6e8-f146850c6873" * }, * "currency": "EUR", * "conversionCurrency": "EUR", * "buyerLanguage": "en", * "siteLanguage": "en", * "taxIncludedInPrices": false, * "weightUnit": "KG", * "appliedDiscounts": [], * "_createdDate": "2022-05-16T12:04:01.244Z", * "_updatedDate": "2022-05-16T12:04:01.244Z" * } * */ ``` ### createCart (self-hosted) Self-hosted SDK calls require you to [create a client](https://dev.wix.com/docs/sdk/articles/work-with-the-sdk/about-the-wix-client.md). ```javascript import { createClient } from '@wix/sdk'; import { cart } from '@wix/ecom'; // Import the auth strategy for the relevant access type // Import the relevant host module if needed const myWixClient = createClient ({ modules: { cart }, // Include the auth strategy and host as relevant }); async function createCart(options) { const response = await myWixClient.cart.createCart(options); }; ``` --- --- > Portal Navigation: > > - Append `.md` to any URL under `https://dev.wix.com/docs/` to get its markdown version. > - Pages are either content pages (article or reference text) or menu pages (a list of links to child pages). > - To get a menu page, truncate any URL to a parent path and append `.md` (e.g. `https://dev.wix.com/docs/sdk.md`, `https://dev.wix.com/docs/sdk/core-modules.md`). > - Top-level index of all portals: https://dev.wix.com/docs/llms.txt > - Full concatenated docs: https://dev.wix.com/docs/llms-full.txt # GetCart # Package: purchaseFlow # Namespace: CartService # Method link: https://dev.wix.com/docs/api-reference/business-solutions/e-commerce/purchase-flow/cart/get-cart.md ## Permission Scopes: Read Orders: SCOPE.DC-STORES.READ-ORDERS ## Introduction Retrieves a cart. --- ## REST API ### Examples ### Get Cart ```curl curl -X GET \ 'https://www.wixapis.com/ecom/v1/carts/b7b79cdb-5ff5-4ce8-8b64-0e28b1ea7a95' \ -H 'Authorization: ' ``` --- ## JavaScript SDK ### Examples ### Get a cart ```javascript /************************************** * Backend code - my-backend-file.web.js/ts * *************************************/ import { Permissions, webMethod } from '@wix/web-methods'; import { cart } from '@wix/ecom'; export const myGetCartFunction = webMethod(Permissions.Anyone, async (cartId) => { try { const retrievedCart = await cart.getCart(cartId); console.log('Success! Retrieved cart:', retrievedCart); return retrievedCart; } catch (error) { console.error(error); // Handle the error } }); /************* * Page code * ************/ import { myGetCartFunction } from 'backend/my-backend-file.web'; // Sample cartId: const cartId = '96a61a4b-6b61-47d1-a039-0213a8230ccd'; myGetCartFunction(cartId) .then((cart) => { const cartCheckoutId = cart.checkoutId; const numOfCartLineItems = cart.lineItems.length; console.log('Success! Retrieved cart:', cart); return cart; }) .catch((error) => { console.error(error); // Handle the error }); /* Promise resolves to: * * { * "_id": "96a61a4b-6b61-47d1-a039-0213a8230ccd", * "lineItems": [ * { * "_id": "00000000-0000-0000-0000-000000000001", * "quantity": 3, * "catalogReference": { * "catalogItemId": "c8539b66-7a44-fe18-affc-afec4be8562a", * "appId": "215238eb-22a5-4c36-9e7b-e7c08025e04e" * }, * "productName": { * "original": "Shirt", * "translated": "Shirt" * }, * "url": "https://example.wixsite.com", * "price": { * "amount": "10", * "convertedAmount": "10", * "formattedAmount": "€10.00", * "formattedConvertedAmount": "€10.00" * }, * "fullPrice": { * "amount": "10", * "convertedAmount": "10", * "formattedAmount": "€10.00", * "formattedConvertedAmount": "€10.00" * }, * "priceBeforeDiscounts": { * "amount": "10", * "convertedAmount": "10", * "formattedAmount": "€10.00", * "formattedConvertedAmount": "€10.00" * }, * "descriptionLines": [], * "image": "wix:image://v1/3c76e2_c5331f937348492a97df87b0a3b34ea4~mv2.jpg#originWidth=1000&originHeight=1000", * "availability": { * "status": "AVAILABLE" * }, * "physicalProperties": { * "sku": "364115376135191", * "shippable": true * }, * "itemType": { * "preset": "PHYSICAL" * }, * "paymentOption": "FULL_PAYMENT_ONLINE" * } * ], * "buyerInfo": { * "contactId": "f7dc17a6-825a-466e-a78e-c4abea0217db", * "memberId": "c43190d2-eea3-493e-b6e8-f146850c6873" * }, * "currency": "EUR", * "conversionCurrency": "EUR", * "buyerLanguage": "en", * "siteLanguage": "en", * "taxIncludedInPrices": false, * "weightUnit": "KG", * "appliedDiscounts": [], * "_createdDate": "2022-05-16T12:04:01.244Z", * "_updatedDate": "2022-05-16T12:04:01.244Z" * } * */ ``` ### getCart (self-hosted) Self-hosted SDK calls require you to [create a client](https://dev.wix.com/docs/sdk/articles/work-with-the-sdk/about-the-wix-client.md). ```javascript import { createClient } from '@wix/sdk'; import { cart } from '@wix/ecom'; // Import the auth strategy for the relevant access type // Import the relevant host module if needed const myWixClient = createClient ({ modules: { cart }, // Include the auth strategy and host as relevant }); async function getCart(_id) { const response = await myWixClient.cart.getCart(_id); }; ``` --- --- > Portal Navigation: > > - Append `.md` to any URL under `https://dev.wix.com/docs/` to get its markdown version. > - Pages are either content pages (article or reference text) or menu pages (a list of links to child pages). > - To get a menu page, truncate any URL to a parent path and append `.md` (e.g. `https://dev.wix.com/docs/sdk.md`, `https://dev.wix.com/docs/sdk/core-modules.md`). > - Top-level index of all portals: https://dev.wix.com/docs/llms.txt > - Full concatenated docs: https://dev.wix.com/docs/llms-full.txt # UpdateCart # Package: purchaseFlow # Namespace: CartService # Method link: https://dev.wix.com/docs/api-reference/business-solutions/e-commerce/purchase-flow/cart/update-cart.md ## Permission Scopes: Manage eCommerce - all permissions: SCOPE.DC-ECOM-MEGA.MANAGE-ECOM Manage eCommerce - Admin Permissions: SCOPE.ECOM.MANAGE-ADMIN ## Introduction Updates a cart's properties. > **Notes:** > + When updating line items, the `lineItems.catalogReference.appId` and `lineItems.catalogReference.catalogItemId` fields are required. > + After a cart is updated, call [Refresh Cart](https://dev.wix.com/docs/sdk/frontend-modules/ecom/refresh-cart.md) to update the cart's UI elements and trigger the Cart Updated event. --- ## REST API ### Examples ### Update a cart with line items and custom line items ```curl curl -X PATCH \ 'https://www.wixapis.com/ecom/v1/carts/5ff1e9b9-60c3-4698-95c5-67b2fe427a52' \ -H 'Authorization: ' \ -H 'Content-Type: application/json' \ -d '{ "cartInfo": { "id": "5ff1e9b9-60c3-4698-95c5-67b2fe427a52" }, "customLineItems": [{ "quantity": 1, "price": "2", "productName": { "original": "Accessory Surprise" }, "itemType": { "preset": "PHYSICAL" } }] }' ``` ### Update a cart with a coupon code ```curl curl -X PATCH \ 'https://www.wixapis.com/ecom/v1/carts/f97a2939-b1f3-41f2-9fc5-7ecea2060991' \ -H 'Authorization: ' \ -H 'Content-Type: application/json' \ -d '{ "cartInfo": { "id": "f97a2939-b1f3-41f2-9fc5-7ecea2060991" }, "couponCode": "SUMMERSALE10" }' ``` --- ## JavaScript SDK ### Examples ### Update a cart Apply a coupon to a cart ```javascript /************************************** * Backend code - my-backend-file.web.js/ts * *************************************/ import { Permissions, webMethod } from '@wix/web-methods'; import { cart } from '@wix/ecom'; export const myUpdateCartFunction = webMethod(Permissions.Anyone, async (_id, options) => { try { const updatedCart = await cart.updateCart(_id, options); console.log('Success! Updated cart:', updatedCart); return updatedCart; } catch (error) { console.error(error); // Handle the error } }); /************* * Page code * ************/ import { ecom } from "@wix/site-ecom"; import { myUpdateCartFunction } from 'backend/my-backend-file.web'; // Sample cartId: const _id = 'ba47a627-7bb8-4918-89b2-6a72af464765'; // Coupon code to be applied to the cart const updateOptions = { "couponCode": "SUMMERSALE10" } const updatedCart = await myUpdateCartFunction(_id, updateOptions); // Refresh the cart after adding item. await ecom.refreshCart(); // Navigate to the cart page. await ecom.navigateToCartPage(); /* Promise resolves to: * * { * "_id": "ba47a627-7bb8-4918-89b2-6a72af464765", * "appliedDiscounts": [ * { * "coupon": { * "_id": "fbb94b06-7447-4161-9c48-59bfcdc39e77", * "code": "SUMMERSALE10" * } * } * ], * "lineItems": [ * { * "_id": "00000000-0000-0000-0000-000000000001", * "quantity": 1, * "catalogReference": { * "catalogItemId": "c8539b66-7a44-fe18-affc-afec4be8562a", * "appId": "215238eb-22a5-4c36-9e7b-e7c08025e04e" * }, * "productName": { * "original": "Shirt", * "translated": "Shirt" * }, * "url": "https://example.wixsite.com", * "price": { * "amount": "10", * "convertedAmount": "10", * "formattedAmount": "€10.00", * "formattedConvertedAmount": "€10.00" * }, * "fullPrice": { * "amount": "10", * "convertedAmount": "10", * "formattedAmount": "€10.00", * "formattedConvertedAmount": "€10.00" * }, * "priceBeforeDiscounts": { * "amount": "10", * "convertedAmount": "10", * "formattedAmount": "€10.00", * "formattedConvertedAmount": "€10.00" * }, * "descriptionLines": [], * "image": "wix:image://v1/3c76e2_c5331f937348492a97df87b0a3b34ea4~mv2.jpg#originWidth=1000&originHeight=1000", * "availability": { * "status": "AVAILABLE" * }, * "physicalProperties": { * "sku": "364115376135191", * "shippable": true * }, * "itemType": { * "preset": "PHYSICAL" * }, * "paymentOption": "FULL_PAYMENT_ONLINE" * } * ], * "buyerInfo": { * "visitorId": "4c7ce95c-9fb3-417d-9f02-b41e82b841f7" * }, * "currency": "EUR", * "conversionCurrency": "EUR", * "buyerLanguage": "en", * "siteLanguage": "en", * "taxIncludedInPrices": false, * "weightUnit": "KG", * "_createdDate": "2022-05-15T11:31:30.484Z", * "_updatedDate": "2022-06-16T09:20:23.388Z" * } * */ ``` ### updateCart (self-hosted) Self-hosted SDK calls require you to [create a client](https://dev.wix.com/docs/sdk/articles/work-with-the-sdk/about-the-wix-client.md). ```javascript import { createClient } from '@wix/sdk'; import { cart } from '@wix/ecom'; // Import the auth strategy for the relevant access type // Import the relevant host module if needed const myWixClient = createClient ({ modules: { cart }, // Include the auth strategy and host as relevant }); async function updateCart(_id,options) { const response = await myWixClient.cart.updateCart(_id,options); }; ``` --- --- > Portal Navigation: > > - Append `.md` to any URL under `https://dev.wix.com/docs/` to get its markdown version. > - Pages are either content pages (article or reference text) or menu pages (a list of links to child pages). > - To get a menu page, truncate any URL to a parent path and append `.md` (e.g. `https://dev.wix.com/docs/sdk.md`, `https://dev.wix.com/docs/sdk/core-modules.md`). > - Top-level index of all portals: https://dev.wix.com/docs/llms.txt > - Full concatenated docs: https://dev.wix.com/docs/llms-full.txt # DeleteCart # Package: purchaseFlow # Namespace: CartService # Method link: https://dev.wix.com/docs/api-reference/business-solutions/e-commerce/purchase-flow/cart/delete-cart.md ## Permission Scopes: Manage eCommerce - all permissions: SCOPE.DC-ECOM-MEGA.MANAGE-ECOM ## Introduction Deletes a cart. --- ## REST API ### Examples ### Delete a Cart ```curl curl -X DELETE \ 'https://www.wixapis.com/ecom/v1/carts/f97a2939-b1f3-41f2-9fc5-7ecea2060991' \ -H 'Authorization: ' ``` --- ## JavaScript SDK ### Examples ### Delete a cart ```javascript /************************************** * Backend code - my-backend-file.web.js/ts * *************************************/ import { Permissions, webMethod } from '@wix/web-methods'; import { cart } from '@wix/ecom'; export const myDeleteCartFunction = webMethod(Permissions.Anyone, async (cartId) => { try { await cart.deleteCart(cartId); console.log('Success! Deleted cart'); return; } catch (error) { console.error(error); // Handle the error } }); /************* * Page code * ************/ import { myDeleteCartFunction } from 'backend/my-backend-file.web'; // Sample cartId: const cartId = '96a61a4b-6b61-47d1-a039-0213a8230ccd'; myDeleteCartFunction(cartId) .then(() => { console.log('Success! Deleted cart'); return; }) .catch((error) => { console.error(error); // Handle the error }); ``` ### deleteCart (self-hosted) Self-hosted SDK calls require you to [create a client](https://dev.wix.com/docs/sdk/articles/work-with-the-sdk/about-the-wix-client.md). ```javascript import { createClient } from '@wix/sdk'; import { cart } from '@wix/ecom'; // Import the auth strategy for the relevant access type // Import the relevant host module if needed const myWixClient = createClient ({ modules: { cart }, // Include the auth strategy and host as relevant }); async function deleteCart(_id) { const response = await myWixClient.cart.deleteCart(_id); }; ``` --- --- > Portal Navigation: > > - Append `.md` to any URL under `https://dev.wix.com/docs/` to get its markdown version. > - Pages are either content pages (article or reference text) or menu pages (a list of links to child pages). > - To get a menu page, truncate any URL to a parent path and append `.md` (e.g. `https://dev.wix.com/docs/sdk.md`, `https://dev.wix.com/docs/sdk/core-modules.md`). > - Top-level index of all portals: https://dev.wix.com/docs/llms.txt > - Full concatenated docs: https://dev.wix.com/docs/llms-full.txt # AddToCart # Package: purchaseFlow # Namespace: CartService # Method link: https://dev.wix.com/docs/api-reference/business-solutions/e-commerce/purchase-flow/cart/add-to-cart.md ## Permission Scopes: Manage eCommerce - all permissions: SCOPE.DC-ECOM-MEGA.MANAGE-ECOM Manage eCommerce - Admin Permissions: SCOPE.ECOM.MANAGE-ADMIN ## Introduction Adds [catalog](https://dev.wix.com/docs/rest/business-solutions/stores/catalog/e-commerce-integration.md) line items to a cart. >**Notes:** > + When adding catalog line items to a cart, the `lineItems.catalogReference.appId` and `lineItems.catalogReference.catalogItemId` fields are required. > + After a cart is updated, call [Refresh Cart](https://dev.wix.com/docs/sdk/frontend-modules/ecom/refresh-cart.md) to update the cart's UI elements and trigger the Cart Updated event. --- ## REST API ### Examples ### Add a custom line item to a cart ```curl curl -X POST \ 'https://www.wixapis.com/ecom/v1/carts/5ff1e9b9-60c3-4698-95c5-67b2fe427a52/add-to-cart' \ -H 'Authorization: ' \ -H 'Content-Type: application/json' \ -d '{ "customLineItems": [{ "quantity": 1, "price": "1", "productName": { "original": "Accessory Surprise" }, "itemType": { "preset": "PHYSICAL" } }] }' ``` ### Add a catalog line item to a cart ```curl curl -X POST \ 'https://www.wixapis.com/ecom/v1/carts/f97a2939-b1f3-41f2-9fc5-7ecea2060991/add-to-cart' \ -H 'Authorization: ' \ -H 'Content-Type: application/json' \ -d '{ "lineItems": [{ "catalogReference": { "appId": "215238eb-22a5-4c36-9e7b-e7c08025e04e", "catalogItemId": "a667539v45-9v22-b343-bbf4-eee54be85634f" }, "quantity": 7 }] }' ``` --- ## JavaScript SDK ### Examples ### Add a catalog item to a cart ```javascript /************************************** * Backend code - my-backend-file.web.js/ts * *************************************/ import { Permissions, webMethod } from '@wix/web-methods'; import { cart } from '@wix/ecom'; export const myAddToCartFunction = webMethod(Permissions.Anyone, async (_id, options) => { try { const updatedCart = await cart.addToCart(_id, options); console.log('Success! Updated cart:', updatedCart); return updatedCart; } catch (error) { console.error(error); // Handle the error } }); /************* * Page code * ************/ import { ecom } from "@wix/site-ecom"; import { myAddToCartFunction } from 'backend/my-backend-file.web'; // Sample addToCart function parameters: const cartId = '96a61a4b-6b61-47d1-a039-0213a8230ccd'; const options = { "lineItems": [{ "catalogReference": { // Wix Stores appId "appId": "215238eb-22a5-4c36-9e7b-e7c08025e04e", // Wix Stores productId "catalogItemId": "c8539b66-7a44-fe18-affc-afec4be8562a" }, "quantity": 1 }] }; const updatedCart = await myAddToCartFunction(cartId, options); // Refresh the cart after adding item. await ecom.refreshCart(); // Navigate to the cart page. await ecom.navigateToCartPage(); /* Promise resolves to: * * { * "_id": "ba47a627-7bb8-4918-89b2-6a72af464765", * "lineItems": [ * { * "_id": "00000000-0000-0000-0000-000000000001", * "quantity": 1, * "catalogReference": { * "catalogItemId": "c8539b66-7a44-fe18-affc-afec4be8562a", * "appId": "215238eb-22a5-4c36-9e7b-e7c08025e04e" * }, * "productName": { * "original": "Shirt", * "translated": "Shirt" * }, * "url": "https://example.wixsite.com", * "price": { * "amount": "10", * "convertedAmount": "10", * "formattedAmount": "€10.00", * "formattedConvertedAmount": "€10.00" * }, * "fullPrice": { * "amount": "10", * "convertedAmount": "10", * "formattedAmount": "€10.00", * "formattedConvertedAmount": "€10.00" * }, * "priceBeforeDiscounts": { * "amount": "10", * "convertedAmount": "10", * "formattedAmount": "€10.00", * "formattedConvertedAmount": "€10.00" * }, * "descriptionLines": [], * "image": "wix:image://v1/3c76e2_c5331f937348492a97df87b0a3b34ea4~mv2.jpg#originWidth=1000&originHeight=1000", * "availability": { * "status": "AVAILABLE" * }, * "physicalProperties": { * "sku": "364115376135191", * "shippable": true * }, * "itemType": { * "preset": "PHYSICAL" * }, * "paymentOption": "FULL_PAYMENT_ONLINE" * } * ], * "buyerInfo": { * "visitorId": "4c7ce95c-9fb3-417d-9f02-b41e82b841f7" * }, * "currency": "EUR", * "conversionCurrency": "EUR", * "buyerLanguage": "en", * "siteLanguage": "en", * "taxIncludedInPrices": false, * "weightUnit": "KG", * "appliedDiscounts": [], * "_createdDate": "2022-05-15T11:31:30.484Z", * "_updatedDate": "2022-05-23T12:11:55.095Z" * } * */ ``` ### addToCart (self-hosted) Self-hosted SDK calls require you to [create a client](https://dev.wix.com/docs/sdk/articles/work-with-the-sdk/about-the-wix-client.md). ```javascript import { createClient } from '@wix/sdk'; import { cart } from '@wix/ecom'; // Import the auth strategy for the relevant access type // Import the relevant host module if needed const myWixClient = createClient ({ modules: { cart }, // Include the auth strategy and host as relevant }); async function addToCart(_id,options) { const response = await myWixClient.cart.addToCart(_id,options); }; ``` --- --- > Portal Navigation: > > - Append `.md` to any URL under `https://dev.wix.com/docs/` to get its markdown version. > - Pages are either content pages (article or reference text) or menu pages (a list of links to child pages). > - To get a menu page, truncate any URL to a parent path and append `.md` (e.g. `https://dev.wix.com/docs/sdk.md`, `https://dev.wix.com/docs/sdk/core-modules.md`). > - Top-level index of all portals: https://dev.wix.com/docs/llms.txt > - Full concatenated docs: https://dev.wix.com/docs/llms-full.txt # AddToCurrentCart # Package: purchaseFlow # Namespace: CurrentCartService # Method link: https://dev.wix.com/docs/api-reference/business-solutions/e-commerce/purchase-flow/cart/add-to-current-cart.md ## Permission Scopes: Manage eCommerce - all permissions: SCOPE.DC-ECOM-MEGA.MANAGE-ECOM ## Introduction Adds catalog line items to the current site visitor's cart. >**Notes:** >+ When adding catalog line items, the `lineItems.catalogReference.appId` and `lineItems.catalogReference.catalogItemId` fields are required. >+ This method requires [visitor or member authentication](https://dev.wix.com/docs/api-reference/articles/authentication/about-identities.md). >+ After a cart is updated, call [Refresh Cart](https://dev.wix.com/docs/sdk/frontend-modules/ecom/refresh-cart.md) to update the cart's UI elements and trigger the Cart Updated event. --- ## REST API ### Examples ### Add a catalog line item to the current site visitor's cart ```curl curl -X POST \ 'https://www.wixapis.com/ecom/v1/carts/current/add-to-cart' \ -H 'Authorization: ' \ -H 'Content-Type: application/json' \ -d '{ "lineItems": [{ "catalogReference": { "appId": "215238eb-22a5-4c36-9e7b-e7c08025e04e", "catalogItemId": "a667539v45-9v22-b343-bbf4-eee54be85634f" }, "quantity": 7 }] }' ``` --- ## JavaScript SDK ### Examples ### Add a Wix Stores product to the current cart ```javascript /***************************************** * Backend code - my-backend-file.web.js/ts * ****************************************/ import { Permissions, webMethod } from '@wix/web-methods'; import { currentCart } from '@wix/ecom'; export const myAddToCurrentCartFunction = webMethod(Permissions.Anyone, async (options) => { try { const updatedCurrentCart = await currentCart.addToCurrentCart(options); console.log('Success! Updated current cart:', updatedCurrentCart); return updatedCurrentCart; } catch (error) { console.error(error); // Handle the error } }); /************* * Page code * ************/ import { ecom } from "@wix/site-ecom"; import { myAddToCurrentCartFunction } from 'backend/my-backend-file.web'; // Sample options object: const options = { "lineItems": [{ "catalogReference": { // Wix Stores appId "appId": "215238eb-22a5-4c36-9e7b-e7c08025e04e", // Wix Stores productId "catalogItemId": "1a2d7e83-4bef-31d5-09e1-3326ee271c09", "options": { // Wix Stores variantId "variantId": "132b84e8-aab8-47a1-a1f6-2c47557b64a4" } }, "quantity": 1 }] }; const updatedCurrentCart = await myAddToCurrentCartFunction(options); // Refresh the cart after adding item. await ecom.refreshCart(); // Navigate to the cart page. await ecom.navigateToCartPage(); /* Promise resolves to: * * { * "_id": "e4156539-32b8-48dd-97f8-164b5a5b8740", * "lineItems": [ * { * "_id": "00000000-0000-0000-0000-000000000001", * "quantity": 1, * "catalogReference": { * "catalogItemId": "1a2d7e83-4bef-31d5-09e1-3326ee271c09", * "appId": "215238eb-22a5-4c36-9e7b-e7c08025e04e", * "options": { * "variantId": "132b84e8-aab8-47a1-a1f6-2c47557b64a4" * } * }, * "productName": { * "original": "Watch", * "translated": "Watch" * }, * "url": "https://example.wixsite.com", * "price": { * "amount": "30", * "convertedAmount": "30", * "formattedAmount": "€30.00", * "formattedConvertedAmount": "€30.00" * }, * "fullPrice": { * "amount": "30", * "convertedAmount": "30", * "formattedAmount": "€30.00", * "formattedConvertedAmount": "€30.00" * }, * "priceBeforeDiscounts": { * "amount": "30", * "convertedAmount": "30", * "formattedAmount": "€30.00", * "formattedConvertedAmount": "€30.00" * }, * "descriptionLines": [ * { * "name": { * "original": "Size", * "translated": "Size" * }, * "plainText": { * "original": "Medium", * "translated": "Medium" * }, * }, * { * "name": { * "original": "Color", * "translated": "Color" * }, * "colorInfo": { * "original": "Grey", * "translated": "Grey", * "code": "rgb(128, 128, 128)" * }, * } * ], * "image": "wix:image://v1/3c76e2_8891bbe3372a428aac976ac59aa0ac74~mv2.jpg#originWidth=1000&originHeight=1000", * "availability": { * "status": "AVAILABLE" * }, * "physicalProperties": { * "sku": "217537123517253", * "shippable": true * }, * "itemType": { * "preset": "PHYSICAL" * }, * "paymentOption": "FULL_PAYMENT_ONLINE" * } * ], * "buyerInfo": { * "memberId": "c43190d2-eea3-493e-b6e8-f146850c6873" * }, * "currency": "EUR", * "conversionCurrency": "EUR", * "buyerLanguage": "en", * "siteLanguage": "en", * "taxIncludedInPrices": false, * "weightUnit": "KG", * "appliedDiscounts": [], * "_createdDate": "2022-05-23T13:17:46.801Z", * "_updatedDate": "2022-05-23T13:17:46.801Z" * } * */ ``` ### addToCurrentCart (self-hosted) Self-hosted SDK calls require you to [create a client](https://dev.wix.com/docs/sdk/articles/work-with-the-sdk/about-the-wix-client.md). ```javascript import { createClient } from '@wix/sdk'; import { currentCart } from '@wix/ecom'; // Import the auth strategy for the relevant access type // Import the relevant host module if needed const myWixClient = createClient ({ modules: { currentCart }, // Include the auth strategy and host as relevant }); async function addToCurrentCart(options) { const response = await myWixClient.currentCart.addToCurrentCart(options); }; ``` --- --- > Portal Navigation: > > - Append `.md` to any URL under `https://dev.wix.com/docs/` to get its markdown version. > - Pages are either content pages (article or reference text) or menu pages (a list of links to child pages). > - To get a menu page, truncate any URL to a parent path and append `.md` (e.g. `https://dev.wix.com/docs/sdk.md`, `https://dev.wix.com/docs/sdk/core-modules.md`). > - Top-level index of all portals: https://dev.wix.com/docs/llms.txt > - Full concatenated docs: https://dev.wix.com/docs/llms-full.txt # CreateCheckout # Package: purchaseFlow # Namespace: CartService # Method link: https://dev.wix.com/docs/api-reference/business-solutions/e-commerce/purchase-flow/cart/create-checkout-from-cart.md ## Permission Scopes: Manage Orders: SCOPE.DC-STORES.MANAGE-ORDERS ## Introduction Creates a checkout from a cart. If a checkout for the specified cart already exists, that checkout is updated with any new information from the cart. > **Note:** `channelType` is a required field. --- ## REST API ### Examples ### Create a checkout from a cart ```curl curl -X POST \ 'https://www.wixapis.com/ecom/v1/carts/f97a2939-b1f3-41f2-9fc5-7ecea2060991/create-checkout' \ -H 'Authorization: ' \ -H 'Content-Type: application/json' \ -d '{ "channelType": "EBAY" }' ``` --- ## JavaScript SDK ### Examples ### Create a checkout from a cart ```javascript /************************************** * Backend code - my-backend-file.web.js/ts * *************************************/ import { Permissions, webMethod } from '@wix/web-methods'; import { cart } from '@wix/ecom'; export const myCreateCheckoutFunction = webMethod(Permissions.Anyone, async (cartId, options) => { try { const checkoutId = await cart.createCheckout(cartId, options); console.log('Success! Checkout created, checkoutId:', checkoutId); return checkoutId; } catch (error) { console.error(error); // Handle the error } }); /************* * Page code * ************/ import { myCreateCheckoutFunction } from 'backend/my-backend-file.web'; // Sample cartId: const cartId = '96a61a4b-6b61-47d1-a039-0213a8230ccd'; // Sample options object: const options = { // channelType is a required field "channelType": "WEB", "email": "janedoe@example.com", "shippingAddress": { "addressLine1": "235 West 23rd Street", "addressLine2": "3rd floor", "city": "New York", "country": "US", "postalCode": "10011", "streetAddress": { "name": "West 23rd Street", "number": "235" }, "subdivision": "US-NY" } }; myCreateCheckoutFunction(cartId, options) .then((checkoutId) => { console.log('Success! Checkout created, checkoutId:', checkoutId); return checkoutId; }) .catch((error) => { console.error(error); // Handle the error }); /* Promise resolves to: * * {"checkoutId": "a43420aa-986b-456a-a2f7-7ea5c80e9007"} * */ ``` ### createCheckout (self-hosted) Self-hosted SDK calls require you to [create a client](https://dev.wix.com/docs/sdk/articles/work-with-the-sdk/about-the-wix-client.md). ```javascript import { createClient } from '@wix/sdk'; import { cart } from '@wix/ecom'; // Import the auth strategy for the relevant access type // Import the relevant host module if needed const myWixClient = createClient ({ modules: { cart }, // Include the auth strategy and host as relevant }); async function createCheckout(_id,options) { const response = await myWixClient.cart.createCheckout(_id,options); }; ``` --- --- > Portal Navigation: > > - Append `.md` to any URL under `https://dev.wix.com/docs/` to get its markdown version. > - Pages are either content pages (article or reference text) or menu pages (a list of links to child pages). > - To get a menu page, truncate any URL to a parent path and append `.md` (e.g. `https://dev.wix.com/docs/sdk.md`, `https://dev.wix.com/docs/sdk/core-modules.md`). > - Top-level index of all portals: https://dev.wix.com/docs/llms.txt > - Full concatenated docs: https://dev.wix.com/docs/llms-full.txt # CreateCheckoutFromCurrentCart # Package: purchaseFlow # Namespace: CurrentCartService # Method link: https://dev.wix.com/docs/api-reference/business-solutions/e-commerce/purchase-flow/cart/create-checkout-from-current-cart.md ## Permission Scopes: Manage Orders: SCOPE.DC-STORES.MANAGE-ORDERS ## Introduction Creates a checkout from the current site visitor's cart. If a checkout was already created from the current cart, that checkout will be updated with any new information from the cart. >**Notes:** >+ `channelType` is a required field. >+ This method requires [visitor or member authentication](https://dev.wix.com/docs/rest/articles/getting-started/access-types-and-permissions.md). --- ## REST API ### Examples ### Create a checkout from the current site visitor's cart ```curl curl -X POST \ 'https://www.wixapis.com/ecom/v1/carts/current/create-checkout' \ -H 'Authorization: ' \ -H 'Content-Type: application/json' \ -d '{ "channelType": "EBAY" }' ``` --- ## JavaScript SDK ### Examples ### Create a checkout from the current cart ```javascript /************************************** * Backend code - my-backend-file.web.js/ts * *************************************/ import { Permissions, webMethod } from '@wix/web-methods'; import { currentCart } from '@wix/ecom'; export const myCreateCheckoutFromCurrentCartFunction = webMethod(Permissions.Anyone, async (options) => { try { const checkoutId = await currentCart.createCheckoutFromCurrentCart(options); console.log('Success! Checkout created, checkoutId:', checkoutId); return checkoutId; } catch (error) { console.error(error); // Handle the error } }); /************* * Page code * ************/ import { myCreateCheckoutFromCurrentCartFunction } from 'backend/my-backend-file.web'; // Sample options object: const options = { // channelType is a required field "channelType": "WEB", "email": "janedoe@example.com", "shippingAddress": { "addressLine1": "235 West 23rd Street", "addressLine2": "3rd floor", "city": "New York", "country": "US", "postalCode": "10011", "streetAddress": { "name": "West 23rd Street", "number": "235" }, "subdivision": "US-NY" } }; myCreateCheckoutFromCurrentCartFunction(options) .then((checkoutId) => { console.log('Success! Checkout created, checkoutId:', checkoutId); return checkoutId; }) .catch((error) => { console.error(error); // Handle the error }); /* Promise resolves to: * * {"checkoutId": "a43420aa-986b-456a-a2f7-7ea5c80e9007"} * */ ``` ### createCheckoutFromCurrentCart (self-hosted) Self-hosted SDK calls require you to [create a client](https://dev.wix.com/docs/sdk/articles/work-with-the-sdk/about-the-wix-client.md). ```javascript import { createClient } from '@wix/sdk'; import { currentCart } from '@wix/ecom'; // Import the auth strategy for the relevant access type // Import the relevant host module if needed const myWixClient = createClient ({ modules: { currentCart }, // Include the auth strategy and host as relevant }); async function createCheckoutFromCurrentCart(options) { const response = await myWixClient.currentCart.createCheckoutFromCurrentCart(options); }; ``` --- --- > Portal Navigation: > > - Append `.md` to any URL under `https://dev.wix.com/docs/` to get its markdown version. > - Pages are either content pages (article or reference text) or menu pages (a list of links to child pages). > - To get a menu page, truncate any URL to a parent path and append `.md` (e.g. `https://dev.wix.com/docs/sdk.md`, `https://dev.wix.com/docs/sdk/core-modules.md`). > - Top-level index of all portals: https://dev.wix.com/docs/llms.txt > - Full concatenated docs: https://dev.wix.com/docs/llms-full.txt # DeleteCurrentCart # Package: purchaseFlow # Namespace: CurrentCartService # Method link: https://dev.wix.com/docs/api-reference/business-solutions/e-commerce/purchase-flow/cart/delete-current-cart.md ## Permission Scopes: Manage eCommerce - all permissions: SCOPE.DC-ECOM-MEGA.MANAGE-ECOM ## Introduction Deletes the current site visitor's cart. >**Note:** >This method requires [visitor or member authentication](https://dev.wix.com/docs/rest/articles/getting-started/access-types-and-permissions.md). --- ## REST API ### Examples ### Deletes the current site visitor's cart ```curl curl -X DELETE \ 'https://www.wixapis.com/ecom/v1/carts/current' \ -H 'Authorization: ' ``` --- ## JavaScript SDK ### Examples ### Delete the current site visitor's cart ```javascript /************************************** * Backend code - my-backend-file.web.js/ts * *************************************/ import { Permissions, webMethod } from '@wix/web-methods'; import { currentCart } from '@wix/ecom'; export const myDeleteCurrentCartFunction = webMethod(Permissions.Anyone, async () => { try { await currentCart.deleteCurrentCart(); console.log('Success! Deleted cart'); return; } catch (error) { console.error(error); // Handle the error } }); /************* * Page code * ************/ import { myDeleteCurrentCartFunction } from 'backend/my-backend-file.web'; myDeleteCurrentCartFunction() .then(() => { console.log('Success! Deleted current cart'); return; }) .catch((error) => { console.error(error); // Handle the error }); ``` ### deleteCurrentCart (self-hosted) Self-hosted SDK calls require you to [create a client](https://dev.wix.com/docs/sdk/articles/work-with-the-sdk/about-the-wix-client.md). ```javascript import { createClient } from '@wix/sdk'; import { currentCart } from '@wix/ecom'; // Import the auth strategy for the relevant access type // Import the relevant host module if needed const myWixClient = createClient ({ modules: { currentCart }, // Include the auth strategy and host as relevant }); async function deleteCurrentCart() { const response = await myWixClient.currentCart.deleteCurrentCart(); }; ``` --- --- > Portal Navigation: > > - Append `.md` to any URL under `https://dev.wix.com/docs/` to get its markdown version. > - Pages are either content pages (article or reference text) or menu pages (a list of links to child pages). > - To get a menu page, truncate any URL to a parent path and append `.md` (e.g. `https://dev.wix.com/docs/sdk.md`, `https://dev.wix.com/docs/sdk/core-modules.md`). > - Top-level index of all portals: https://dev.wix.com/docs/llms.txt > - Full concatenated docs: https://dev.wix.com/docs/llms-full.txt # EstimateCurrentCartTotals # Package: purchaseFlow # Namespace: CurrentCartService # Method link: https://dev.wix.com/docs/api-reference/business-solutions/e-commerce/purchase-flow/cart/estimate-current-cart-totals.md ## Permission Scopes: Read Orders: SCOPE.DC-STORES.READ-ORDERS ## Introduction Estimates the current cart's price totals (including tax), based on a selected carrier service, shipping address, and billing information. Use this method for preview purposes, such as displaying estimated totals before checkout. This provides a partial estimation, not a full cart calculation. >**Notes:** >+ Use boolean flags to control which components to include in the estimation: delivery costs, additional fees, taxes, and gift cards. Components that aren't explicitly enabled are excluded. >+ Line item discounts are already calculated and applied to the cart. >+ Not passing any properties only estimates the cart items price totals, without considering shipping and billing information. >+ Calling this method before adding an item to the cart returns a 404 error, as the cart doesn't exist yet. >+ This method requires [visitor or member authentication](https://dev.wix.com/docs/rest/articles/getting-started/access-types-and-permissions.md). --- ## REST API ### Examples ### Estimate price totals of the current site visitor's cart This example estimates price totals with a specific billing address. ```curl curl -X POST \ 'https://www.wixapis.com/ecom/v1/carts/current/estimate-totals' \ -H 'Authorization: ' \ -H 'Content-Type: application/json' \ -d '{ "billingAddress": { "city": "Provence-Alpes-Côte d'Azur", "subdivision": "FR-PAC", "postalCode": "13127", "streetAddress": {}, "country": "FR", "addressLine": "43 Rue Bonnet", "addressLine2": "23rd floor" } }' ``` --- ## JavaScript SDK ### Examples ### Estimate the current cart's totals ```javascript /***************************************** * Backend code - my-backend-file.web.js/ts * ****************************************/ import { Permissions, webMethod } from '@wix/web-methods'; import { currentCart } from '@wix/ecom'; export const myEstimateCurrentCartTotalsFunction = webMethod(Permissions.Anyone, async (estimateOptions) => { try { const estimatedCartTotals = await currentCart.estimateCurrentCartTotals(estimateOptions); console.log('Success! Cart totals estimated:', estimatedCartTotals); return estimatedCartTotals; } catch (error) { console.error(error); // Handle the error } }); /************* * Page code * ************/ import { myEstimateCurrentCartTotalsFunction } from 'backend/my-backend-file.web'; // Sample options object: const estimateOptions = { "selectedShippingOption": { "code": "standard_us_shipping" }, "shippingAddress": { "addressLine1": "235 West 23rd Street", "addressLine2": "3rd floor", "city": "New York", "country": "US", "postalCode": "10011", "streetAddress": { "name": "West 23rd Street", "number": "235" }, "subdivision": "US-NY" }, "billingAddress": { "addressLine1": "235 West 23rd Street", "addressLine2": "3rd floor", "city": "New York", "country": "US", "postalCode": "10011", "streetAddress": { "name": "West 23rd Street", "number": "235" }, "subdivision": "US-NY" } }; myEstimateCurrentCartTotalsFunction(estimateOptions) .then((estimatedCartTotals) => { const formattedShippingPrice = estimatedCartTotals.priceSummary.shipping.formattedAmount; const estimatedCartTotal = estimatedCartTotals.priceSummary.total.formattedAmount; console.log('Success! Cart totals estimated:', estimatedCartTotals); return estimatedCartTotals; }) .catch((error) => { console.error(error); // Handle the error }); /* Promise resolves to: * * { * "cart": { * "_id": "96a61a4b-6b61-47d1-a039-0213a8230ccd", * "lineItems": [ * { * "_id": "00000000-0000-0000-0000-000000000001", * "quantity": 5, * "catalogReference": { * "catalogItemId": "c8539b66-7a44-fe18-affc-afec4be8562a", * "appId": "215238eb-22a5-4c36-9e7b-e7c08025e04e" * }, * "productName": { * "original": "Shirt", * "translated": "Shirt" * }, * "url": "https://example.wixsite.com", * "price": { * "amount": "10", * "convertedAmount": "10", * "formattedAmount": "€10.00", * "formattedConvertedAmount": "€10.00" * }, * "fullPrice": { * "amount": "10", * "convertedAmount": "10", * "formattedAmount": "€10.00", * "formattedConvertedAmount": "€10.00" * }, * "priceBeforeDiscounts": { * "amount": "10", * "convertedAmount": "10", * "formattedAmount": "€10.00", * "formattedConvertedAmount": "€10.00" * }, * "descriptionLines": [], * "image": "wix:image://v1/3c76e2_c5331f937348492a97df87b0a3b34ea4~mv2.jpg#originWidth=1000&originHeight=1000", * "availability": { * "status": "AVAILABLE" * }, * "physicalProperties": { * "sku": "364115376135191", * "shippable": true * }, * "itemType": { * "preset": "PHYSICAL" * }, * "paymentOption": "FULL_PAYMENT_ONLINE" * } * ], * "buyerInfo": { * "contactId": "f7dc17a6-825a-466e-a78e-c4abea0217db", * "memberId": "c43190d2-eea3-493e-b6e8-f146850c6873" * }, * "currency": "EUR", * "conversionCurrency": "EUR", * "buyerLanguage": "en", * "siteLanguage": "en", * "taxIncludedInPrices": false, * "weightUnit": "KG", * "subtotal": { * "amount": "50", * "convertedAmount": "50", * "formattedAmount": "€50.00", * "formattedConvertedAmount": "€50.00" * }, * "appliedDiscounts": [], * "_createdDate": "2022-05-16T12:04:01.244Z", * "_updatedDate": "2022-05-23T11:55:30.023Z" * }, * "calculatedLineItems": [ * { * "lineItemId": "00000000-0000-0000-0000-000000000001", * "pricesBreakdown": { * "totalPriceAfterTax": { * "amount": "50.00", * "convertedAmount": "50.00", * "formattedAmount": "€50.00", * "formattedConvertedAmount": "€50.00" * }, * "totalPriceBeforeTax": { * "amount": "50.00", * "convertedAmount": "50.00", * "formattedAmount": "€50.00", * "formattedConvertedAmount": "€50.00" * }, * "taxDetails": { * "taxableAmount": { * "amount": "50.00", * "convertedAmount": "50.00", * "formattedAmount": "€50.00", * "formattedConvertedAmount": "€50.00" * }, * "taxRate": "0.0", * "totalTax": { * "amount": "0.0", * "convertedAmount": "0.0", * "formattedAmount": "€0.00", * "formattedConvertedAmount": "€0.00" * }, * "rateBreakdown": [] * }, * "totalDiscount": { * "amount": "0", * "convertedAmount": "0", * "formattedAmount": "€0.00", * "formattedConvertedAmount": "€0.00" * }, * "price": { * "amount": "10.00", * "convertedAmount": "10.00", * "formattedAmount": "€10.00", * "formattedConvertedAmount": "€10.00" * }, * "priceBeforeDiscounts": { * "amount": "10.00", * "convertedAmount": "", * "formattedAmount": "", * "formattedConvertedAmount": "" * } * }, * "paymentOption": "FULL_PAYMENT_ONLINE" * } * ], * "priceSummary": { * "subtotal": { * "amount": "50.00", * "convertedAmount": "50.00", * "formattedAmount": "€50.00", * "formattedConvertedAmount": "€50.00" * }, * "shipping": { * "amount": "10.0", * "convertedAmount": "10.0", * "formattedAmount": "€10.00", * "formattedConvertedAmount": "€10.00" * }, * "tax": { * "amount": "0.0", * "convertedAmount": "0.0", * "formattedAmount": "€0.00", * "formattedConvertedAmount": "€0.00" * }, * "discount": { * "amount": "0", * "convertedAmount": "0", * "formattedAmount": "€0.00", * "formattedConvertedAmount": "€0.00" * }, * "total": { * "amount": "60.00", * "convertedAmount": "60.00", * "formattedAmount": "€60.00", * "formattedConvertedAmount": "€60.00" * } * }, * "shippingInfo": { * "region": { * "_id": "009fbe5d-89d3-7825-cbbf-1aab4d908b73", * "name": "USA shipping" * }, * "selectedCarrierServiceOption": { * "code": "ed5bbce2-9533-dff4-7db0-13702fd139c5", * "title": "Standard US Shipping", * "logistics": { * "deliveryTime": "" * }, * "cost": { * "totalPriceAfterTax": { * "amount": "10.0", * "convertedAmount": "10.0", * "formattedAmount": "€10.00", * "formattedConvertedAmount": "€10.00" * }, * "totalPriceBeforeTax": { * "amount": "10", * "convertedAmount": "10", * "formattedAmount": "€10.00", * "formattedConvertedAmount": "€10.00" * }, * "taxDetails": { * "taxRate": "0.0", * "totalTax": { * "amount": "0.0", * "convertedAmount": "0.0", * "formattedAmount": "€0.00", * "formattedConvertedAmount": "€0.00" * }, * "rateBreakdown": [] * }, * "price": { * "amount": "10", * "convertedAmount": "10", * "formattedAmount": "€10.00", * "formattedConvertedAmount": "€10.00" * } * }, * "requestedShippingOption": false, * "otherCharges": [], * "carrierId": "c8a08776-c095-4dec-8553-8f9698d86adc" * }, * "carrierServiceOptions": [ * { * "carrierId": "c8a08776-c095-4dec-8553-8f9698d86adc", * "shippingOptions": [ * { * "code": "ed5bbce2-9533-dff4-7db0-13702fd139c5", * "title": "Standard US Shipping", * "logistics": { * "deliveryTime": "" * }, * "cost": { * "price": { * "amount": "10", * "convertedAmount": "10", * "formattedAmount": "€10.00", * "formattedConvertedAmount": "€10.00" * }, * "otherCharges": [] * } * } * ] * } * ] * }, * "appliedDiscounts": [], * "calculationErrors": { * "orderValidationErrors": [] * }, * "weightUnit": "KG", * "currency": "EUR", * "payNow": { * "subtotal": { * "amount": "50.00", * "convertedAmount": "50.00", * "formattedAmount": "€50.00", * "formattedConvertedAmount": "€50.00" * }, * "shipping": { * "amount": "10.0", * "convertedAmount": "10.0", * "formattedAmount": "€10.00", * "formattedConvertedAmount": "€10.00" * }, * "tax": { * "amount": "0.0", * "convertedAmount": "0.0", * "formattedAmount": "€0.00", * "formattedConvertedAmount": "€0.00" * }, * "discount": { * "amount": "0", * "convertedAmount": "0", * "formattedAmount": "€0.00", * "formattedConvertedAmount": "€0.00" * }, * "total": { * "amount": "60.00", * "convertedAmount": "60.00", * "formattedAmount": "€60.00", * "formattedConvertedAmount": "€60.00" * } * }, * "payLater": { * "subtotal": { * "amount": "0", * "convertedAmount": "0", * "formattedAmount": "€0.00", * "formattedConvertedAmount": "€0.00" * }, * "shipping": { * "amount": "0", * "convertedAmount": "0", * "formattedAmount": "€0.00", * "formattedConvertedAmount": "€0.00" * }, * "tax": { * "amount": "0", * "convertedAmount": "0", * "formattedAmount": "€0.00", * "formattedConvertedAmount": "€0.00" * }, * "discount": { * "amount": "0", * "convertedAmount": "0", * "formattedAmount": "€0.00", * "formattedConvertedAmount": "€0.00" * }, * "total": { * "amount": "0", * "convertedAmount": "0", * "formattedAmount": "€0.00", * "formattedConvertedAmount": "€0.00" * } * }, * "membershipOptions": { * "eligibleMemberships": [], * "invalidMemberships": [], * "selectedMemberships": [] * } * } * */ ``` ### estimateCurrentCartTotals (self-hosted) Self-hosted SDK calls require you to [create a client](https://dev.wix.com/docs/sdk/articles/work-with-the-sdk/about-the-wix-client.md). ```javascript import { createClient } from '@wix/sdk'; import { currentCart } from '@wix/ecom'; // Import the auth strategy for the relevant access type // Import the relevant host module if needed const myWixClient = createClient ({ modules: { currentCart }, // Include the auth strategy and host as relevant }); async function estimateCurrentCartTotals(options) { const response = await myWixClient.currentCart.estimateCurrentCartTotals(options); }; ``` --- --- > Portal Navigation: > > - Append `.md` to any URL under `https://dev.wix.com/docs/` to get its markdown version. > - Pages are either content pages (article or reference text) or menu pages (a list of links to child pages). > - To get a menu page, truncate any URL to a parent path and append `.md` (e.g. `https://dev.wix.com/docs/sdk.md`, `https://dev.wix.com/docs/sdk/core-modules.md`). > - Top-level index of all portals: https://dev.wix.com/docs/llms.txt > - Full concatenated docs: https://dev.wix.com/docs/llms-full.txt # EstimateTotals # Package: purchaseFlow # Namespace: CartService # Method link: https://dev.wix.com/docs/api-reference/business-solutions/e-commerce/purchase-flow/cart/estimate-totals.md ## Permission Scopes: Read Orders: SCOPE.DC-STORES.READ-ORDERS ## Introduction Estimates the subtotal and total for current site visitor’s cart. Totals include tax and are based on the selected carrier service, shipping address, and billing information. > **Note:** Not passing any optional parameters will only estimate the cart items price totals. --- ## REST API ### Examples ### Estimate price totals of a cart This example estimates price totals with a specific billing address. ```curl curl -X POST \ 'https://www.wixapis.com/ecom/v1/carts/f97a2939-b1f3-41f2-9fc5-7ecea2060991/estimate-totals' \ -H 'Authorization: ' \ -H 'Content-Type: application/json' \ -d '{ "billingAddress": { "city": "Provence-Alpes-Côte d'Azur", "subdivision": "FR-PAC", "postalCode": "13127", "streetAddress": {}, "country": "FR", "addressLine": "43 Rue Bonnet", "addressLine2": "23rd floor" } }' ``` --- ## JavaScript SDK ### Examples ### Estimate a cart's totals ```javascript /***************************************** * Backend code - my-backend-file.web.js/ts * ****************************************/ import { Permissions, webMethod } from '@wix/web-methods'; import { cart } from '@wix/ecom'; export const myEstimateTotalsFunction = webMethod(Permissions.Anyone, async (cartId, estimateOptions) => { try { const estimatedCartTotals = await cart.estimateTotals(cartId, estimateOptions); console.log('Success! Cart totals estimated:', estimatedCartTotals); return estimatedCartTotals; } catch (error) { console.error(error); // Handle the error } }); /************* * Page code * ************/ import { myEstimateTotalsFunction } from 'backend/my-backend-file.web'; // Sample cartId: const cartId = '96a61a4b-6b61-47d1-a039-0213a8230ccd'; // Sample options object: const estimateOptions = { "selectedShippingOption": { "code": "standard_us_shipping" }, "shippingAddress": { "addressLine1": "235 West 23rd Street", "addressLine2": "3rd floor", "city": "New York", "country": "US", "postalCode": "10011", "streetAddress": { "name": "West 23rd Street", "number": "235" }, "subdivision": "US-NY" }, "billingAddress": { "addressLine1": "235 West 23rd Street", "addressLine2": "3rd floor", "city": "New York", "country": "US", "postalCode": "10011", "streetAddress": { "name": "West 23rd Street", "number": "235" }, "subdivision": "US-NY" } }; myEstimateTotalsFunction(cartId, estimateOptions) .then((estimatedCartTotals) => { const formattedShippingPrice = estimatedCartTotals.priceSummary.shipping.formattedAmount; const estimatedCartTotal = estimatedCartTotals.priceSummary.total.formattedAmount; console.log('Success! Cart totals estimated:', estimatedCartTotals); return estimatedCartTotals; }) .catch((error) => { console.error(error); // Handle the error }); /* Promise resolves to: * * { * "cart": { * "_id": "96a61a4b-6b61-47d1-a039-0213a8230ccd", * "lineItems": [ * { * "_id": "00000000-0000-0000-0000-000000000001", * "quantity": 5, * "catalogReference": { * "catalogItemId": "c8539b66-7a44-fe18-affc-afec4be8562a", * "appId": "215238eb-22a5-4c36-9e7b-e7c08025e04e" * }, * "productName": { * "original": "Shirt", * "translated": "Shirt" * }, * "url": "https://example.wixsite.com", * "price": { * "amount": "10", * "convertedAmount": "10", * "formattedAmount": "€10.00", * "formattedConvertedAmount": "€10.00" * }, * "fullPrice": { * "amount": "10", * "convertedAmount": "10", * "formattedAmount": "€10.00", * "formattedConvertedAmount": "€10.00" * }, * "priceBeforeDiscounts": { * "amount": "10", * "convertedAmount": "10", * "formattedAmount": "€10.00", * "formattedConvertedAmount": "€10.00" * }, * "descriptionLines": [], * "image": "wix:image://v1/3c76e2_c5331f937348492a97df87b0a3b34ea4~mv2.jpg#originWidth=1000&originHeight=1000", * "availability": { * "status": "AVAILABLE" * }, * "physicalProperties": { * "sku": "364115376135191", * "shippable": true * }, * "itemType": { * "preset": "PHYSICAL" * }, * "paymentOption": "FULL_PAYMENT_ONLINE" * } * ], * "buyerInfo": { * "contactId": "f7dc17a6-825a-466e-a78e-c4abea0217db", * "memberId": "c43190d2-eea3-493e-b6e8-f146850c6873" * }, * "currency": "EUR", * "conversionCurrency": "EUR", * "buyerLanguage": "en", * "siteLanguage": "en", * "taxIncludedInPrices": false, * "weightUnit": "KG", * "subtotal": { * "amount": "50", * "convertedAmount": "50", * "formattedAmount": "€50.00", * "formattedConvertedAmount": "€50.00" * }, * "appliedDiscounts": [], * "_createdDate": "2022-05-16T12:04:01.244Z", * "_updatedDate": "2022-05-23T11:55:30.023Z" * }, * "calculatedLineItems": [ * { * "lineItemId": "00000000-0000-0000-0000-000000000001", * "pricesBreakdown": { * "totalPriceAfterTax": { * "amount": "50.00", * "convertedAmount": "50.00", * "formattedAmount": "€50.00", * "formattedConvertedAmount": "€50.00" * }, * "totalPriceBeforeTax": { * "amount": "50.00", * "convertedAmount": "50.00", * "formattedAmount": "€50.00", * "formattedConvertedAmount": "€50.00" * }, * "taxDetails": { * "taxableAmount": { * "amount": "50.00", * "convertedAmount": "50.00", * "formattedAmount": "€50.00", * "formattedConvertedAmount": "€50.00" * }, * "taxRate": "0.0", * "totalTax": { * "amount": "0.0", * "convertedAmount": "0.0", * "formattedAmount": "€0.00", * "formattedConvertedAmount": "€0.00" * }, * "rateBreakdown": [] * }, * "totalDiscount": { * "amount": "0", * "convertedAmount": "0", * "formattedAmount": "€0.00", * "formattedConvertedAmount": "€0.00" * }, * "price": { * "amount": "10.00", * "convertedAmount": "10.00", * "formattedAmount": "€10.00", * "formattedConvertedAmount": "€10.00" * }, * "priceBeforeDiscounts": { * "amount": "10.00", * "convertedAmount": "", * "formattedAmount": "", * "formattedConvertedAmount": "" * } * }, * "paymentOption": "FULL_PAYMENT_ONLINE" * } * ], * "priceSummary": { * "subtotal": { * "amount": "50.00", * "convertedAmount": "50.00", * "formattedAmount": "€50.00", * "formattedConvertedAmount": "€50.00" * }, * "shipping": { * "amount": "10.0", * "convertedAmount": "10.0", * "formattedAmount": "€10.00", * "formattedConvertedAmount": "€10.00" * }, * "tax": { * "amount": "0.0", * "convertedAmount": "0.0", * "formattedAmount": "€0.00", * "formattedConvertedAmount": "€0.00" * }, * "discount": { * "amount": "0", * "convertedAmount": "0", * "formattedAmount": "€0.00", * "formattedConvertedAmount": "€0.00" * }, * "total": { * "amount": "60.00", * "convertedAmount": "60.00", * "formattedAmount": "€60.00", * "formattedConvertedAmount": "€60.00" * } * }, * "shippingInfo": { * "region": { * "_id": "009fbe5d-89d3-7825-cbbf-1aab4d908b73", * "name": "USA shipping" * }, * "selectedCarrierServiceOption": { * "code": "ed5bbce2-9533-dff4-7db0-13702fd139c5", * "title": "Standard US Shipping", * "logistics": { * "deliveryTime": "" * }, * "cost": { * "totalPriceAfterTax": { * "amount": "10.0", * "convertedAmount": "10.0", * "formattedAmount": "€10.00", * "formattedConvertedAmount": "€10.00" * }, * "totalPriceBeforeTax": { * "amount": "10", * "convertedAmount": "10", * "formattedAmount": "€10.00", * "formattedConvertedAmount": "€10.00" * }, * "taxDetails": { * "taxRate": "0.0", * "totalTax": { * "amount": "0.0", * "convertedAmount": "0.0", * "formattedAmount": "€0.00", * "formattedConvertedAmount": "€0.00" * }, * "rateBreakdown": [] * }, * "price": { * "amount": "10", * "convertedAmount": "10", * "formattedAmount": "€10.00", * "formattedConvertedAmount": "€10.00" * } * }, * "requestedShippingOption": false, * "otherCharges": [], * "carrierId": "c8a08776-c095-4dec-8553-8f9698d86adc" * }, * "carrierServiceOptions": [ * { * "carrierId": "c8a08776-c095-4dec-8553-8f9698d86adc", * "shippingOptions": [ * { * "code": "ed5bbce2-9533-dff4-7db0-13702fd139c5", * "title": "Standard US Shipping", * "logistics": { * "deliveryTime": "" * }, * "cost": { * "price": { * "amount": "10", * "convertedAmount": "10", * "formattedAmount": "€10.00", * "formattedConvertedAmount": "€10.00" * }, * "otherCharges": [] * } * } * ] * } * ] * }, * "appliedDiscounts": [], * "calculationErrors": { * "orderValidationErrors": [] * }, * "weightUnit": "KG", * "currency": "EUR", * "payNow": { * "subtotal": { * "amount": "50.00", * "convertedAmount": "50.00", * "formattedAmount": "€50.00", * "formattedConvertedAmount": "€50.00" * }, * "shipping": { * "amount": "10.0", * "convertedAmount": "10.0", * "formattedAmount": "€10.00", * "formattedConvertedAmount": "€10.00" * }, * "tax": { * "amount": "0.0", * "convertedAmount": "0.0", * "formattedAmount": "€0.00", * "formattedConvertedAmount": "€0.00" * }, * "discount": { * "amount": "0", * "convertedAmount": "0", * "formattedAmount": "€0.00", * "formattedConvertedAmount": "€0.00" * }, * "total": { * "amount": "60.00", * "convertedAmount": "60.00", * "formattedAmount": "€60.00", * "formattedConvertedAmount": "€60.00" * } * }, * "payLater": { * "subtotal": { * "amount": "0", * "convertedAmount": "0", * "formattedAmount": "€0.00", * "formattedConvertedAmount": "€0.00" * }, * "shipping": { * "amount": "0", * "convertedAmount": "0", * "formattedAmount": "€0.00", * "formattedConvertedAmount": "€0.00" * }, * "tax": { * "amount": "0", * "convertedAmount": "0", * "formattedAmount": "€0.00", * "formattedConvertedAmount": "€0.00" * }, * "discount": { * "amount": "0", * "convertedAmount": "0", * "formattedAmount": "€0.00", * "formattedConvertedAmount": "€0.00" * }, * "total": { * "amount": "0", * "convertedAmount": "0", * "formattedAmount": "€0.00", * "formattedConvertedAmount": "€0.00" * } * }, * "membershipOptions": { * "eligibleMemberships": [], * "invalidMemberships": [], * "selectedMemberships": [] * } * } * */ ``` ### estimateTotals (self-hosted) Self-hosted SDK calls require you to [create a client](https://dev.wix.com/docs/sdk/articles/work-with-the-sdk/about-the-wix-client.md). ```javascript import { createClient } from '@wix/sdk'; import { cart } from '@wix/ecom'; // Import the auth strategy for the relevant access type // Import the relevant host module if needed const myWixClient = createClient ({ modules: { cart }, // Include the auth strategy and host as relevant }); async function estimateTotals(_id,options) { const response = await myWixClient.cart.estimateTotals(_id,options); }; ``` --- --- > Portal Navigation: > > - Append `.md` to any URL under `https://dev.wix.com/docs/` to get its markdown version. > - Pages are either content pages (article or reference text) or menu pages (a list of links to child pages). > - To get a menu page, truncate any URL to a parent path and append `.md` (e.g. `https://dev.wix.com/docs/sdk.md`, `https://dev.wix.com/docs/sdk/core-modules.md`). > - Top-level index of all portals: https://dev.wix.com/docs/llms.txt > - Full concatenated docs: https://dev.wix.com/docs/llms-full.txt # GetCurrentCart # Package: purchaseFlow # Namespace: CurrentCartService # Method link: https://dev.wix.com/docs/api-reference/business-solutions/e-commerce/purchase-flow/cart/get-current-cart.md ## Permission Scopes: Read Orders: SCOPE.DC-STORES.READ-ORDERS ## Introduction Retrieves the current site visitor/member's cart. >**Notes:** > + A 'current cart' is automatically created when the site visitor/member adds an item to their cart, or when calling [Add To Current Cart](https://dev.wix.com/docs/api-reference/business-solutions/e-commerce/purchase-flow/cart/cart/add-to-current-cart.md). > + Calling this method before adding an item to the cart returns a 404 error. > + This method doesn't calculate or return price totals. To get estimated totals including tax, shipping, and discounts, use [Estimate Current Cart Totals](https://dev.wix.com/docs/api-reference/business-solutions/e-commerce/purchase-flow/cart/cart/estimate-current-cart-totals.md). > + This method requires [visitor or member authentication](https://dev.wix.com/docs/api-reference/articles/authentication/about-identities.md). --- ## REST API ### Examples ### Get the current site visitor's cart ```curl curl -X GET \ 'https://www.wixapis.com/ecom/v1/carts/current' \ -H 'Authorization: ' ``` --- ## JavaScript SDK ### Examples ### Get the current site visitor's cart ```javascript import { currentCart } from '@wix/ecom'; currentCart.getCurrentCart() .then((myCurrentCart) => { const cartId = myCurrentCart._id; const cartLineItems = myCurrentCart.lineItems; console.log('Success! Retrieved myCurrentCart:', myCurrentCart); return myCurrentCart; }) .catch((error) => { console.error(error); // Handle the error }); /* Promise resolves to: * { * "_id": "295f60d4-6b04-4d53-a48c-24f51953cdc0", * "_createdDate": "2024-03-07T12:23:18.083Z", * "_updatedDate": "2024-03-07T12:23:18.083Z", * "lineItems": [ * { * "quantity": 1, * "catalogReference": { * "catalogItemId": "df19c1f7-07d8-a265-42f8-e8dfa824cc6e", * "appId": "215238eb-22a5-4c36-9e7b-e7c08025e04e", * "options": { * "options": { * "Size": "Medium", * "Color": "Pink" * }, * "variantId": "00000000-0000-0000-0000-000000000000" * } * }, * "productName": { * "original": "SWEATSHIRT", * "translated": "SWEATSHIRT" * }, * "url": "https://example.wixstudio.io/product-page/sweatshirt", * "price": { * "amount": "85", * "convertedAmount": "85", * "formattedAmount": "€85.00", * "formattedConvertedAmount": "€85.00" * }, * "fullPrice": { * "amount": "85", * "convertedAmount": "85", * "formattedAmount": "€85.00", * "formattedConvertedAmount": "€85.00" * }, * "priceBeforeDiscounts": { * "amount": "85", * "convertedAmount": "85", * "formattedAmount": "€85.00", * "formattedConvertedAmount": "€85.00" * }, * "descriptionLines": [ * { * "name": { * "original": "Color", * "translated": "Color" * }, * "colorInfo": { * "original": "Pink", * "translated": "Pink", * "code": "#D50075" * }, * }, * { * "name": { * "original": "Size", * "translated": "Size" * }, * "plainText": { * "original": "Medium", * "translated": "Medium" * }, * } * ], * "image": "wix:image://v1/c837a6_92b21b13a9534ad9a3874f5d980c0448~mv2.jpg/c837a6_92b21b13a9534ad9a3874f5d980c0448~mv2.jpg#originWidth=2763&originHeight=2772", * "availability": { * "status": "AVAILABLE" * }, * "physicalProperties": { * "sku": "0001", * "shippable": true * }, * "itemType": { * "preset": "PHYSICAL" * }, * "paymentOption": "FULL_PAYMENT_ONLINE", * "customLineItem": false, * "_id": "00000000-0000-0000-0000-000000000001" * } * ], * "buyerInfo": { * "visitorId": "66886a50-cdec-4774-8568-45d4a3c1f60c" * }, * "currency": "EUR", * "conversionCurrency": "EUR", * "buyerLanguage": "en", * "siteLanguage": "en", * "taxIncludedInPrices": false, * "weightUnit": "KG", * "appliedDiscounts": [], * "contactInfo": { * "address": { * "subdivision": "IE-L", * "country": "IE", * "postalCode": "D02" * } * }, * "purchaseFlowId": "ff848d1d-bc92-4de6-9acc-ad098d866f28" * } */ ``` ### getCurrentCart (self-hosted) Self-hosted SDK calls require you to [create a client](https://dev.wix.com/docs/sdk/articles/work-with-the-sdk/about-the-wix-client.md). ```javascript import { createClient } from '@wix/sdk'; import { currentCart } from '@wix/ecom'; // Import the auth strategy for the relevant access type // Import the relevant host module if needed const myWixClient = createClient ({ modules: { currentCart }, // Include the auth strategy and host as relevant }); async function getCurrentCart() { const response = await myWixClient.currentCart.getCurrentCart(); }; ``` --- --- > Portal Navigation: > > - Append `.md` to any URL under `https://dev.wix.com/docs/` to get its markdown version. > - Pages are either content pages (article or reference text) or menu pages (a list of links to child pages). > - To get a menu page, truncate any URL to a parent path and append `.md` (e.g. `https://dev.wix.com/docs/sdk.md`, `https://dev.wix.com/docs/sdk/core-modules.md`). > - Top-level index of all portals: https://dev.wix.com/docs/llms.txt > - Full concatenated docs: https://dev.wix.com/docs/llms-full.txt # RemoveBusinessLocation # Package: purchaseFlow # Namespace: CartService # Method link: https://dev.wix.com/docs/api-reference/business-solutions/e-commerce/purchase-flow/cart/remove-business-location.md ## Permission Scopes: Manage eCommerce - all permissions: SCOPE.DC-ECOM-MEGA.MANAGE-ECOM ## Introduction Removes the location associated with a cart. --- ## REST API ### Examples ### Removes the location associated with a cart ```curl curl -X POST \ 'https://www.wixapis.com/ecom/v1/carts/7cb39a9e-f5f0-46ed-9d3a-dfdaf4b787d4/remove-business-location' \ -H 'Authorization: ' \ -H 'Content-Type: application/json' \ ``` --- ## JavaScript SDK ### Examples ### removeBusinessLocation ```javascript import { cart } from '@wix/ecom'; async function removeBusinessLocation(_id) { const response = await cart.removeBusinessLocation(_id); }; ``` ### removeBusinessLocation (with elevated permissions) ```javascript import { cart } from '@wix/ecom'; import { auth } from '@wix/essentials'; async function myRemoveBusinessLocationMethod(_id) { const elevatedRemoveBusinessLocation = auth.elevate(cart.removeBusinessLocation); const response = await elevatedRemoveBusinessLocation(_id); } ``` ### removeBusinessLocation (self-hosted) Self-hosted SDK calls require you to [create a client](https://dev.wix.com/docs/sdk/articles/work-with-the-sdk/about-the-wix-client.md). ```javascript import { createClient } from '@wix/sdk'; import { cart } from '@wix/ecom'; // Import the auth strategy for the relevant access type // Import the relevant host module if needed const myWixClient = createClient ({ modules: { cart }, // Include the auth strategy and host as relevant }); async function removeBusinessLocation(_id) { const response = await myWixClient.cart.removeBusinessLocation(_id); }; ``` --- --- > Portal Navigation: > > - Append `.md` to any URL under `https://dev.wix.com/docs/` to get its markdown version. > - Pages are either content pages (article or reference text) or menu pages (a list of links to child pages). > - To get a menu page, truncate any URL to a parent path and append `.md` (e.g. `https://dev.wix.com/docs/sdk.md`, `https://dev.wix.com/docs/sdk/core-modules.md`). > - Top-level index of all portals: https://dev.wix.com/docs/llms.txt > - Full concatenated docs: https://dev.wix.com/docs/llms-full.txt # RemoveCoupon # Package: purchaseFlow # Namespace: CartService # Method link: https://dev.wix.com/docs/api-reference/business-solutions/e-commerce/purchase-flow/cart/remove-coupon.md ## Permission Scopes: Manage eCommerce - all permissions: SCOPE.DC-ECOM-MEGA.MANAGE-ECOM ## Introduction Removes the coupon from a cart. > **Note:** After a cart is updated, call [Refresh Cart](https://dev.wix.com/docs/sdk/frontend-modules/ecom/refresh-cart.md) to update the cart's UI elements and trigger the Cart Updated event. --- ## REST API ### Examples ### Remove a coupon from a cart ```curl curl -X POST \ 'https://www.wixapis.com/ecom/v1/carts/f97a2939-b1f3-41f2-9fc5-7ecea2060991/remove-coupon' \ -H 'Authorization: ' \ -H 'Content-Type: application/json' \ ``` --- ## JavaScript SDK ### Examples ### Remove coupon from a cart ```javascript /************************************** * Backend code - my-backend-file.web.js/ts * **************************************/ import { Permissions, webMethod } from '@wix/web-methods'; import { cart } from '@wix/ecom'; export const myRemoveCouponFunction = webMethod(Permissions.Anyone, async (cartId) => { try { const updatedCart = await cart.removeCoupon(cartId); console.log('Success! Updated cart:', updatedCart); return updatedCart; } catch (error) { console.error(error); // Handle the error } }); /************* * Page code * ************/ import { ecom } from "@wix/site-ecom"; import { myRemoveCouponFunction } from 'backend/my-backend-file.web'; // Sample cartId: const cartId = 'ba47a627-7bb8-4918-89b2-6a72af464765'; const updatedCart = await myRemoveCouponFunction(cartId); // Refresh the cart after adding item. await ecom.refreshCart(); // Navigate to the cart page. await ecom.navigateToCartPage(); /* Promise resolves to: * * { * "_id": "ba47a627-7bb8-4918-89b2-6a72af464765", * "appliedDiscounts": [], * "lineItems": [ * { * "_id": "00000000-0000-0000-0000-000000000001", * "quantity": 1, * "catalogReference": { * "catalogItemId": "c8539b66-7a44-fe18-affc-afec4be8562a", * "appId": "215238eb-22a5-4c36-9e7b-e7c08025e04e" * }, * "productName": { * "original": "Shirt", * "translated": "Shirt" * }, * "url": "https://example.wixsite.com", * "price": { * "amount": "10", * "convertedAmount": "10", * "formattedAmount": "€10.00", * "formattedConvertedAmount": "€10.00" * }, * "fullPrice": { * "amount": "10", * "convertedAmount": "10", * "formattedAmount": "€10.00", * "formattedConvertedAmount": "€10.00" * }, * "priceBeforeDiscounts": { * "amount": "10", * "convertedAmount": "10", * "formattedAmount": "€10.00", * "formattedConvertedAmount": "€10.00" * }, * "descriptionLines": [], * "image": "wix:image://v1/3c76e2_c5331f937348492a97df87b0a3b34ea4~mv2.jpg#originWidth=1000&originHeight=1000", * "availability": { * "status": "AVAILABLE" * }, * "physicalProperties": { * "sku": "364115376135191", * "shippable": true * }, * "itemType": { * "preset": "PHYSICAL" * }, * "paymentOption": "FULL_PAYMENT_ONLINE" * } * ], * "buyerInfo": { * "visitorId": "4c7ce95c-9fb3-417d-9f02-b41e82b841f7" * }, * "currency": "EUR", * "conversionCurrency": "EUR", * "buyerLanguage": "en", * "siteLanguage": "en", * "taxIncludedInPrices": false, * "weightUnit": "KG", * "_createdDate": "2022-05-15T11:31:30.484Z", * "_updatedDate": "2022-06-16T09:20:23.388Z" * } * */ ``` ### removeCoupon (self-hosted) Self-hosted SDK calls require you to [create a client](https://dev.wix.com/docs/sdk/articles/work-with-the-sdk/about-the-wix-client.md). ```javascript import { createClient } from '@wix/sdk'; import { cart } from '@wix/ecom'; // Import the auth strategy for the relevant access type // Import the relevant host module if needed const myWixClient = createClient ({ modules: { cart }, // Include the auth strategy and host as relevant }); async function removeCoupon(_id) { const response = await myWixClient.cart.removeCoupon(_id); }; ``` --- --- > Portal Navigation: > > - Append `.md` to any URL under `https://dev.wix.com/docs/` to get its markdown version. > - Pages are either content pages (article or reference text) or menu pages (a list of links to child pages). > - To get a menu page, truncate any URL to a parent path and append `.md` (e.g. `https://dev.wix.com/docs/sdk.md`, `https://dev.wix.com/docs/sdk/core-modules.md`). > - Top-level index of all portals: https://dev.wix.com/docs/llms.txt > - Full concatenated docs: https://dev.wix.com/docs/llms-full.txt # RemoveCouponFromCurrentCart # Package: purchaseFlow # Namespace: CurrentCartService # Method link: https://dev.wix.com/docs/api-reference/business-solutions/e-commerce/purchase-flow/cart/remove-coupon-from-current-cart.md ## Permission Scopes: Manage eCommerce - all permissions: SCOPE.DC-ECOM-MEGA.MANAGE-ECOM ## Introduction Removes the coupon from the current site visitor's cart. >**Notes:** >+ This method requires [visitor or member authentication](https://dev.wix.com/docs/rest/articles/getting-started/access-types-and-permissions.md). >+ After a cart is updated, call [Refresh Cart](https://dev.wix.com/docs/sdk/frontend-modules/ecom/refresh-cart.md) to update the cart's UI elements and trigger the Cart Updated event. --- ## REST API ### Examples ### Remove a coupon from the current site visitor's cart ```curl curl -X POST \ 'https://www.wixapis.com/ecom/v1/carts/current/remove-coupon' \ -H 'Authorization: ' \ -H 'Content-Type: application/json' \ ``` --- ## JavaScript SDK ### Examples ### Remove the coupon applied to the current cart ```javascript /***************************************** * Backend code - my-backend-file.web.js/ts * ****************************************/ import { Permissions, webMethod } from '@wix/web-methods'; import { currentCart } from '@wix/ecom'; export const myRemoveCouponFromCurrentCartFunction = webMethod(Permissions.Anyone, async () => { try { const updatedCurrentCart = await currentCart.removeCouponFromCurrentCart(); console.log('Success! Updated current cart:', updatedCurrentCart); return updatedCurrentCart; } catch (error) { console.error(error); // Handle the error } }); /************* * Page code * ************/ import { ecom } from "@wix/site-ecom"; import { myRemoveCouponFromCurrentCartFunction } from 'backend/my-backend-file.web'; const updatedCurrentCart = await myRemoveCouponFromCurrentCartFunction(); // Refresh the cart after adding item. await ecom.refreshCart(); // Navigate to the cart page. await ecom.navigateToCartPage(); /* Promise resolves to: * * { * "_id": "ba47a627-7bb8-4918-89b2-6a72af464765", * "appliedDiscounts": [], * "lineItems": [ * { * "_id": "00000000-0000-0000-0000-000000000001", * "quantity": 1, * "catalogReference": { * "catalogItemId": "c8539b66-7a44-fe18-affc-afec4be8562a", * "appId": "215238eb-22a5-4c36-9e7b-e7c08025e04e" * }, * "productName": { * "original": "Shirt", * "translated": "Shirt" * }, * "url": "https://example.wixsite.com", * "price": { * "amount": "10", * "convertedAmount": "10", * "formattedAmount": "€10.00", * "formattedConvertedAmount": "€10.00" * }, * "fullPrice": { * "amount": "10", * "convertedAmount": "10", * "formattedAmount": "€10.00", * "formattedConvertedAmount": "€10.00" * }, * "priceBeforeDiscounts": { * "amount": "10", * "convertedAmount": "10", * "formattedAmount": "€10.00", * "formattedConvertedAmount": "€10.00" * }, * "descriptionLines": [], * "image": "wix:image://v1/3c76e2_c5331f937348492a97df87b0a3b34ea4~mv2.jpg#originWidth=1000&originHeight=1000", * "availability": { * "status": "AVAILABLE" * }, * "physicalProperties": { * "sku": "364115376135191", * "shippable": true * }, * "itemType": { * "preset": "PHYSICAL" * }, * "paymentOption": "FULL_PAYMENT_ONLINE" * } * ], * "buyerInfo": { * "visitorId": "4c7ce95c-9fb3-417d-9f02-b41e82b841f7" * }, * "currency": "EUR", * "conversionCurrency": "EUR", * "buyerLanguage": "en", * "siteLanguage": "en", * "taxIncludedInPrices": false, * "weightUnit": "KG", * "_createdDate": "2022-05-15T11:31:30.484Z", * "_updatedDate": "2022-06-16T09:20:23.388Z" * } * */ ``` ### removeCouponFromCurrentCart (self-hosted) Self-hosted SDK calls require you to [create a client](https://dev.wix.com/docs/sdk/articles/work-with-the-sdk/about-the-wix-client.md). ```javascript import { createClient } from '@wix/sdk'; import { currentCart } from '@wix/ecom'; // Import the auth strategy for the relevant access type // Import the relevant host module if needed const myWixClient = createClient ({ modules: { currentCart }, // Include the auth strategy and host as relevant }); async function removeCouponFromCurrentCart() { const response = await myWixClient.currentCart.removeCouponFromCurrentCart(); }; ``` --- --- > Portal Navigation: > > - Append `.md` to any URL under `https://dev.wix.com/docs/` to get its markdown version. > - Pages are either content pages (article or reference text) or menu pages (a list of links to child pages). > - To get a menu page, truncate any URL to a parent path and append `.md` (e.g. `https://dev.wix.com/docs/sdk.md`, `https://dev.wix.com/docs/sdk/core-modules.md`). > - Top-level index of all portals: https://dev.wix.com/docs/llms.txt > - Full concatenated docs: https://dev.wix.com/docs/llms-full.txt # RemoveLineItems # Package: purchaseFlow # Namespace: CartService # Method link: https://dev.wix.com/docs/api-reference/business-solutions/e-commerce/purchase-flow/cart/remove-line-items.md ## Permission Scopes: Manage eCommerce - all permissions: SCOPE.DC-ECOM-MEGA.MANAGE-ECOM ## Introduction Removes line items from a cart. > **Note:** After a cart is updated, call [Refresh Cart](https://dev.wix.com/docs/sdk/frontend-modules/ecom/refresh-cart.md) to update the cart's UI elements and trigger the Cart Updated event. --- ## REST API ### Examples ### Remove line items from a cart ```curl curl -X POST \ 'https://www.wixapis.com/ecom/v1/carts/f97a2939-b1f3-41f2-9fc5-7ecea2060991/remove-line-items' \ -H 'Authorization: ' \ -H 'Content-Type: application/json' \ -d '{ "lineItemIds": ["00000000-0000-0000-0000-000000000002", "00000000-0000-0000-0000-000000000003"] }' ``` --- ## JavaScript SDK ### Examples ### Remove 3 line items from a cart ```javascript /***************************************** * Backend code - my-backend-file.web.js/ts * ****************************************/ import { Permissions, webMethod } from '@wix/web-methods'; import { cart } from '@wix/ecom'; export const myRemoveLineItemsFunction = webMethod(Permissions.Anyone, async (cartId, lineItemIds) => { try { const updatedCart = await cart.removeLineItems(cartId, lineItemIds); console.log('Success! Line items removed from cart:', updatedCart); return updatedCart; } catch (error) { console.error(error); // Handle the error } }); /************* * Page code * ************/ import { ecom } from "@wix/site-ecom"; import { myRemoveLineItemsFunction } from 'backend/my-backend-file.web'; // Sample cartId: const cartId = 'ba47a627-7bb8-4918-89b2-6a72af464765'; // Sample lineItemIds array: const lineItemIds = [ '00000000-0000-0000-0000-000000000001', '00000000-0000-0000-0000-000000000002', '00000000-0000-0000-0000-000000000003' ] const updatedCart = await myRemoveLineItemsFunction(cartId, lineItemIds); // Refresh the cart after adding item. await ecom.refreshCart(); // Navigate to the cart page. await ecom.navigateToCartPage(); /* Promise resolves to: * * { * "_id": "ba47a627-7bb8-4918-89b2-6a72af464765", * "lineItems": [], * "buyerInfo": { * "visitorId": "4c7ce95c-9fb3-417d-9f02-b41e82b841f7" * }, * "currency": "EUR", * "conversionCurrency": "EUR", * "buyerLanguage": "en", * "siteLanguage": "en", * "taxIncludedInPrices": false, * "weightUnit": "KG", * "appliedDiscounts": [], * "_createdDate": "2022-05-15T11:31:30.484Z", * "_updatedDate": "2022-06-16T09:18:32.388Z" * } * */ ``` ### removeLineItems (self-hosted) Self-hosted SDK calls require you to [create a client](https://dev.wix.com/docs/sdk/articles/work-with-the-sdk/about-the-wix-client.md). ```javascript import { createClient } from '@wix/sdk'; import { cart } from '@wix/ecom'; // Import the auth strategy for the relevant access type // Import the relevant host module if needed const myWixClient = createClient ({ modules: { cart }, // Include the auth strategy and host as relevant }); async function removeLineItems(_id,lineItemIds) { const response = await myWixClient.cart.removeLineItems(_id,lineItemIds); }; ``` --- --- > Portal Navigation: > > - Append `.md` to any URL under `https://dev.wix.com/docs/` to get its markdown version. > - Pages are either content pages (article or reference text) or menu pages (a list of links to child pages). > - To get a menu page, truncate any URL to a parent path and append `.md` (e.g. `https://dev.wix.com/docs/sdk.md`, `https://dev.wix.com/docs/sdk/core-modules.md`). > - Top-level index of all portals: https://dev.wix.com/docs/llms.txt > - Full concatenated docs: https://dev.wix.com/docs/llms-full.txt # RemoveLineItemsFromCurrentCart # Package: purchaseFlow # Namespace: CurrentCartService # Method link: https://dev.wix.com/docs/api-reference/business-solutions/e-commerce/purchase-flow/cart/remove-line-items-from-current-cart.md ## Permission Scopes: Manage eCommerce - all permissions: SCOPE.DC-ECOM-MEGA.MANAGE-ECOM ## Introduction Removes line items from the current site visitor's cart. >**Notes:** >+ This method requires [visitor or member authentication](https://dev.wix.com/docs/rest/articles/getting-started/access-types-and-permissions.md). >+ After a cart is updated, call [Refresh Cart](https://dev.wix.com/docs/sdk/frontend-modules/ecom/refresh-cart.md) to update the cart's UI elements and trigger the Cart Updated event. --- ## REST API ### Examples ### Remove line items from the current site visitor's cart ```curl curl -X POST \ 'https://www.wixapis.com/ecom/v1/carts/current/remove-line-items' \ -H 'Authorization: ' \ -H 'Content-Type: application/json' \ -d '{ "lineItemIds": ["00000000-0000-0000-0000-000000000002", "00000000-0000-0000-0000-000000000003"] }' ``` --- ## JavaScript SDK ### Examples ### Remove 3 line items from the current cart ```javascript /************************************** * Backend code - my-backend-file.web.js/ts * *************************************/ import { Permissions, webMethod } from '@wix/web-methods'; import { currentCart } from '@wix/ecom'; export const myRemoveLineItemsFromCurrentCartFunction = webMethod(Permissions.Anyone, async (lineItemIds) => { try { const updatedCurrentCart = await currentCart.removeLineItemsFromCurrentCart(lineItemIds); console.log('Success! Line items removed from cart:', updatedCurrentCart); return updatedCurrentCart; } catch (error) { console.error(error); // Handle the error } }); /************* * Page code * ************/ import { ecom } from "@wix/site-ecom"; import { myRemoveLineItemsFromCurrentCartFunction } from 'backend/my-backend-file.web'; // Sample lineItemIds array: const lineItemIds = [ '00000000-0000-0000-0000-000000000001', '00000000-0000-0000-0000-000000000002', '00000000-0000-0000-0000-000000000003' ] const updatedCurrentCart = await myRemoveLineItemsFromCurrentCartFunction(lineItemIds); // Refresh the cart after adding item. await ecom.refreshCart(); // Navigate to the cart page. await ecom.navigateToCartPage(); /* Promise resolves to: * * { * "_id": "ba47a627-7bb8-4918-89b2-6a72af464765", * "lineItems": [], * "buyerInfo": { * "visitorId": "4c7ce95c-9fb3-417d-9f02-b41e82b841f7" * }, * "currency": "EUR", * "conversionCurrency": "EUR", * "buyerLanguage": "en", * "siteLanguage": "en", * "taxIncludedInPrices": false, * "weightUnit": "KG", * "appliedDiscounts": [], * "_createdDate": "2022-05-15T11:31:30.484Z", * "_updatedDate": "2022-06-16T09:18:32.388Z" * } * */ ``` ### removeLineItemsFromCurrentCart (self-hosted) Self-hosted SDK calls require you to [create a client](https://dev.wix.com/docs/sdk/articles/work-with-the-sdk/about-the-wix-client.md). ```javascript import { createClient } from '@wix/sdk'; import { currentCart } from '@wix/ecom'; // Import the auth strategy for the relevant access type // Import the relevant host module if needed const myWixClient = createClient ({ modules: { currentCart }, // Include the auth strategy and host as relevant }); async function removeLineItemsFromCurrentCart(lineItemIds) { const response = await myWixClient.currentCart.removeLineItemsFromCurrentCart(lineItemIds); }; ``` --- --- > Portal Navigation: > > - Append `.md` to any URL under `https://dev.wix.com/docs/` to get its markdown version. > - Pages are either content pages (article or reference text) or menu pages (a list of links to child pages). > - To get a menu page, truncate any URL to a parent path and append `.md` (e.g. `https://dev.wix.com/docs/sdk.md`, `https://dev.wix.com/docs/sdk/core-modules.md`). > - Top-level index of all portals: https://dev.wix.com/docs/llms.txt > - Full concatenated docs: https://dev.wix.com/docs/llms-full.txt # UpdateCurrentCart # Package: purchaseFlow # Namespace: CurrentCartService # Method link: https://dev.wix.com/docs/api-reference/business-solutions/e-commerce/purchase-flow/cart/update-current-cart.md ## Permission Scopes: Manage eCommerce - all permissions: SCOPE.DC-ECOM-MEGA.MANAGE-ECOM ## Introduction Updates the current site visitor's cart. >**Notes:** >+ When adding catalog line items, the `lineItems.catalogReference.appId` and `lineItems.catalogReference.catalogItemId` fields are required. >+ This method requires [visitor or member authentication](https://dev.wix.com/docs/api-reference/articles/authentication/about-identities.md). >+ After a cart is updated, call [Refresh Cart](https://dev.wix.com/docs/sdk/frontend-modules/ecom/refresh-cart.md) to update the cart's UI elements and trigger the Cart Updated event. --- ## REST API ### Examples ### Update the current site visitor's cart Apply a coupon to the current cart. ```curl curl -X PATCH \ 'https://www.wixapis.com/ecom/v1/carts/current' \ -H 'Authorization: ' \ -H 'Content-Type: application/json' \ -d '{ "couponCode": "SUMMERSALE10" }' ``` --- ## JavaScript SDK ### Examples ### Update the current site visitor's cart Apply a coupon to the current cart ```javascript /************************************** * Backend code - my-backend-file.web.js/ts * *************************************/ import { Permissions, webMethod } from '@wix/web-methods'; import { currentCart } from '@wix/ecom'; export const myUpdateCurrentCartFunction = webMethod(Permissions.Anyone, async (options) => { try { const updatedCurrentCart = await currentCart.updateCurrentCart(options); console.log('Success! Updated current cart:', updatedCurrentCart); return updatedCurrentCart; } catch (error) { console.error(error); // Handle the error } }); /************* * Page code * ************/ import { ecom } from "@wix/site-ecom"; import { myUpdateCurrentCartFunction } from 'backend/my-backend-file.web'; // Coupon code to be applied to the current cart const updateOptions = { "couponCode": "SUMMERSALE10" } const updatedCurrentCart = await myUpdateCurrentCartFunction(updateOptions); // Refresh the cart after adding item. await ecom.refreshCart(); // Navigate to the cart page. await ecom.navigateToCartPage(); /* Promise resolves to: * * { * "_id": "ba47a627-7bb8-4918-89b2-6a72af464765", * "appliedDiscounts": [ * { * "coupon": { * "_id": "fbb94b06-7447-4161-9c48-59bfcdc39e77", * "code": "SUMMERSALE10" * } * } * ], * "lineItems": [ * { * "_id": "00000000-0000-0000-0000-000000000001", * "quantity": 1, * "catalogReference": { * "catalogItemId": "c8539b66-7a44-fe18-affc-afec4be8562a", * "appId": "215238eb-22a5-4c36-9e7b-e7c08025e04e" * }, * "productName": { * "original": "Shirt", * "translated": "Shirt" * }, * "url": "https://example.wixsite.com", * "price": { * "amount": "10", * "convertedAmount": "10", * "formattedAmount": "€10.00", * "formattedConvertedAmount": "€10.00" * }, * "fullPrice": { * "amount": "10", * "convertedAmount": "10", * "formattedAmount": "€10.00", * "formattedConvertedAmount": "€10.00" * }, * "priceBeforeDiscounts": { * "amount": "10", * "convertedAmount": "10", * "formattedAmount": "€10.00", * "formattedConvertedAmount": "€10.00" * }, * "descriptionLines": [], * "image": "wix:image://v1/3c76e2_c5331f937348492a97df87b0a3b34ea4~mv2.jpg#originWidth=1000&originHeight=1000", * "availability": { * "status": "AVAILABLE" * }, * "physicalProperties": { * "sku": "364115376135191", * "shippable": true * }, * "itemType": { * "preset": "PHYSICAL" * }, * "paymentOption": "FULL_PAYMENT_ONLINE" * } * ], * "buyerInfo": { * "visitorId": "4c7ce95c-9fb3-417d-9f02-b41e82b841f7" * }, * "currency": "EUR", * "conversionCurrency": "EUR", * "buyerLanguage": "en", * "siteLanguage": "en", * "taxIncludedInPrices": false, * "weightUnit": "KG", * "_createdDate": "2022-05-15T11:31:30.484Z", * "_updatedDate": "2022-06-16T09:20:23.388Z" * } * */ ``` ### updateCurrentCart (self-hosted) Self-hosted SDK calls require you to [create a client](https://dev.wix.com/docs/sdk/articles/work-with-the-sdk/about-the-wix-client.md). ```javascript import { createClient } from '@wix/sdk'; import { currentCart } from '@wix/ecom'; // Import the auth strategy for the relevant access type // Import the relevant host module if needed const myWixClient = createClient ({ modules: { currentCart }, // Include the auth strategy and host as relevant }); async function updateCurrentCart(options) { const response = await myWixClient.currentCart.updateCurrentCart(options); }; ``` --- --- > Portal Navigation: > > - Append `.md` to any URL under `https://dev.wix.com/docs/` to get its markdown version. > - Pages are either content pages (article or reference text) or menu pages (a list of links to child pages). > - To get a menu page, truncate any URL to a parent path and append `.md` (e.g. `https://dev.wix.com/docs/sdk.md`, `https://dev.wix.com/docs/sdk/core-modules.md`). > - Top-level index of all portals: https://dev.wix.com/docs/llms.txt > - Full concatenated docs: https://dev.wix.com/docs/llms-full.txt # UpdateCurrentCartLineItemQuantity # Package: purchaseFlow # Namespace: CurrentCartService # Method link: https://dev.wix.com/docs/api-reference/business-solutions/e-commerce/purchase-flow/cart/update-current-cart-line-item-quantity.md ## Permission Scopes: Manage eCommerce - all permissions: SCOPE.DC-ECOM-MEGA.MANAGE-ECOM ## Introduction Updates the quantity of 1 or more line items in the current site visitor's cart. This method is only for updating the quantity of line items. To entirely remove a line item from the current cart, use the Remove Line Items From Current Cart method. To add a new line item to the current cart, use the Add To Current Cart method. This method checks the amount of stock remaining for this line item. If the specified `quantity` is greater than the remaining stock, then the `quantity` returned in the response is the total amount of remaining stock. >**Notes:** >+ This method requires [visitor or member authentication](https://dev.wix.com/docs/rest/articles/getting-started/access-types-and-permissions.md). >+ After a cart is updated, call [Refresh Cart](https://dev.wix.com/docs/sdk/frontend-modules/ecom/refresh-cart.md) to update the cart's UI elements and trigger the Cart Updated event. --- ## REST API ### Examples ### Update the quantity of line items in the current site visitor's cart This example updates the quantity of a line item from 3 to 2. ```curl curl -X POST \ 'https://www.wixapis.com/ecom/v1/carts/current/update-line-items-quantity' \ -H 'Authorization: ' \ -H 'Content-Type: application/json' \ -d '{ "lineItems": [{ "id": "00000000-0000-0000-0000-000000000001", "quantity": 2 }] }' ``` --- ## JavaScript SDK ### Examples ### Update the quantity of the current cart's line items The first line item is updated to a quantity of 2, while the second is updated to a quantity of 3 ```javascript /************************************** * Backend code - my-backend-file.web.js/ts * *************************************/ import { Permissions, webMethod } from '@wix/web-methods'; import { currentCart } from '@wix/ecom'; export const myUpdateCurrentCartLineItemQuantityFunction = webMethod(Permissions.Anyone, async (lineItems) => { try { const updatedCurrentCart = await currentCart.updateCurrentCartLineItemQuantity(lineItems); console.log('Success! Line item quantities updated:', updatedCurrentCart); return updatedCurrentCart; } catch (error) { console.error(error); // Handle the error } }); /************* * Page code * ************/ import { ecom } from "@wix/site-ecom"; import { myUpdateCurrentCartLineItemQuantityFunction } from 'backend/my-backend-file.web'; // Sample lineItems array: const lineItems = [ { "_id": '00000000-0000-0000-0000-000000000001', "quantity": 2 }, { "_id": '00000000-0000-0000-0000-000000000002', "quantity": 3 } ] const updatedCurrentCart = await myUpdateCurrentCartLineItemQuantityFunction(lineItems); // Refresh the cart after adding item. await ecom.refreshCart(); // Navigate to the cart page. await ecom.navigateToCartPage(); /* Promise resolves to: * * { * "_id": "b79fd177-ec98-4245-b9f6-f09e7afa9d04", * "lineItems": [ * { * "_id": "00000000-0000-0000-0000-000000000001", * "quantity": 2, * "catalogReference": { * "catalogItemId": "df19c1f7-07d8-a265-42f8-e8dfa824cc6e", * "appId": "215238eb-22a5-4c36-9e7b-e7c08025e04e", * "options": { * "variantId": "e62fee23-7878-437a-bf0e-292f17d11cb5" * } * }, * "productName": { * "original": "Shoe", * "translated": "Shoe" * }, * "url": "https://example.wixsite.com", * "price": { * "amount": "85", * "convertedAmount": "85", * "formattedAmount": "€85.00", * "formattedConvertedAmount": "€85.00" * }, * "fullPrice": { * "amount": "85", * "convertedAmount": "85", * "formattedAmount": "€85.00", * "formattedConvertedAmount": "€85.00" * }, * "priceBeforeDiscounts": { * "amount": "85", * "convertedAmount": "85", * "formattedAmount": "€85.00", * "formattedConvertedAmount": "€85.00" * }, * "descriptionLines": [ * { * "name": { * "original": "Color", * "translated": "Color" * }, * "colorInfo": { * "original": "Black", * "translated": "Black", * "code": "#000" * }, * } * ], * "image": "wix:image://v1/3c76e2_bf235c38610f4d2a905db71095b351cf~mv2.jpg#originWidth=1000&originHeight=1000", * "availability": { * "status": "AVAILABLE", * "quantityAvailable": 30 * }, * "physicalProperties": { * "sku": "364215376135191", * "shippable": true * }, * "itemType": { * "preset": "PHYSICAL" * }, * "paymentOption": "FULL_PAYMENT_ONLINE" * }, * { * "_id": "00000000-0000-0000-0000-000000000002", * "quantity": 3, * "catalogReference": { * "catalogItemId": "1a2d7e83-4bef-31d5-09e1-3326ee271c09", * "appId": "215238eb-22a5-4c36-9e7b-e7c08025e04e", * "options": { * "variantId": "132b84e8-aab8-47a1-a1f6-2c47557b64a4" * } * }, * "productName": { * "original": "Watch", * "translated": "Watch" * }, * "url": "https://example.wixsite.com", * "price": { * "amount": "30", * "convertedAmount": "30", * "formattedAmount": "€30.00", * "formattedConvertedAmount": "€30.00" * }, * "fullPrice": { * "amount": "30", * "convertedAmount": "30", * "formattedAmount": "€30.00", * "formattedConvertedAmount": "€30.00" * }, * "priceBeforeDiscounts": { * "amount": "30", * "convertedAmount": "30", * "formattedAmount": "€30.00", * "formattedConvertedAmount": "€30.00" * }, * "descriptionLines": [ * { * "name": { * "original": "Size", * "translated": "Size" * }, * "plainText": { * "original": "Medium", * "translated": "Medium" * }, * }, * { * "name": { * "original": "Color", * "translated": "Color" * }, * "colorInfo": { * "original": "Grey", * "translated": "Grey", * "code": "rgb(128, 128, 128)" * }, * } * ], * "image": "wix:image://v1/3c76e2_8891bbe3372a428aac976ac59aa0ac74~mv2.jpg#originWidth=1000&originHeight=1000", * "availability": { * "status": "AVAILABLE" * }, * "physicalProperties": { * "sku": "217537123517253", * "shippable": true * }, * "itemType": { * "preset": "PHYSICAL" * }, * "paymentOption": "FULL_PAYMENT_ONLINE" * } * ], * "buyerInfo": { * "visitorId": "4c7ce95c-9fb3-417d-9f02-b41e82b841f7" * }, * "currency": "EUR", * "conversionCurrency": "EUR", * "buyerLanguage": "en", * "siteLanguage": "en", * "taxIncludedInPrices": false, * "weightUnit": "KG", * "appliedDiscounts": [], * "_createdDate": "2022-06-22T11:32:29.601Z", * "_updatedDate": "2022-06-22T11:36:48.831Z" * } * */ ``` ### updateCurrentCartLineItemQuantity (self-hosted) Self-hosted SDK calls require you to [create a client](https://dev.wix.com/docs/sdk/articles/work-with-the-sdk/about-the-wix-client.md). ```javascript import { createClient } from '@wix/sdk'; import { currentCart } from '@wix/ecom'; // Import the auth strategy for the relevant access type // Import the relevant host module if needed const myWixClient = createClient ({ modules: { currentCart }, // Include the auth strategy and host as relevant }); async function updateCurrentCartLineItemQuantity(lineItems) { const response = await myWixClient.currentCart.updateCurrentCartLineItemQuantity(lineItems); }; ``` --- --- > Portal Navigation: > > - Append `.md` to any URL under `https://dev.wix.com/docs/` to get its markdown version. > - Pages are either content pages (article or reference text) or menu pages (a list of links to child pages). > - To get a menu page, truncate any URL to a parent path and append `.md` (e.g. `https://dev.wix.com/docs/sdk.md`, `https://dev.wix.com/docs/sdk/core-modules.md`). > - Top-level index of all portals: https://dev.wix.com/docs/llms.txt > - Full concatenated docs: https://dev.wix.com/docs/llms-full.txt # UpdateLineItemsQuantity # Package: purchaseFlow # Namespace: CartService # Method link: https://dev.wix.com/docs/api-reference/business-solutions/e-commerce/purchase-flow/cart/update-line-items-quantity.md ## Permission Scopes: Manage eCommerce - all permissions: SCOPE.DC-ECOM-MEGA.MANAGE-ECOM ## Introduction Updates the quantity of 1 or more line items in a cart. This method is only for updating the quantity of line items. To entirely remove a line item from the cart, use Remove Line Items. To add a new line item to the cart, use Add To Cart. This method checks the amount of stock remaining for this line item. If the specified quantity is greater than the remaining stock, then the quantity returned in the response is the total amount of remaining stock. > **Note:** After a cart is updated, call [Refresh Cart](https://dev.wix.com/docs/sdk/frontend-modules/ecom/refresh-cart.md) to update the cart's UI elements and trigger the Cart Updated event. --- ## REST API ### Examples ### Update the quantity of a line item in a cart This example updates the quantity of a line item from 3 to 2. ```curl curl -X POST \ 'https://www.wixapis.com/ecom/v1/carts/f97a2939-b1f3-41f2-9fc5-7ecea2060991/update-line-items-quantity' \ -H 'Authorization: ' \ -H 'Content-Type: application/json' \ -d '{ "lineItems": [{ "id": "00000000-0000-0000-0000-000000000001", "quantity": 2 }] }' ``` --- ## JavaScript SDK ### Examples ### Update the quantity of a cart's line items The first line item is updated to a quantity of 2, while the second is updated to a quantity of 3 ```javascript /************************************** * Backend code - my-backend-file.web.js/ts * *************************************/ import { Permissions, webMethod } from '@wix/web-methods'; import { cart } from '@wix/ecom'; export const myUpdateLineItemsQuantityFunction = webMethod(Permissions.Anyone, async (cartId, lineItems) => { try { const updatedCart = await cart.updateLineItemsQuantity(cartId, lineItems); console.log('Success! Line item quantities updated:', updatedCart); return updatedCart; } catch (error) { console.error(error); // Handle the error } }); /************* * Page code * ************/ import { ecom } from "@wix/site-ecom"; import { myUpdateLineItemsQuantityFunction } from 'backend/my-backend-file.web'; // Sample cartId: const cartId = 'b79fd177-ec98-4245-b9f6-f09e7afa9d04'; // Sample lineItems array: const lineItems = [ { "_id": '00000000-0000-0000-0000-000000000001', "quantity": 2 }, { "_id": '00000000-0000-0000-0000-000000000002', "quantity": 3 } ] const updatedCart = await myUpdateLineItemsQuantityFunction(cartId, lineItems); // Refresh the cart after adding item. await ecom.refreshCart(); // Navigate to the cart page. await ecom.navigateToCartPage(); /* Promise resolves to: * * { * "_id": "b79fd177-ec98-4245-b9f6-f09e7afa9d04", * "lineItems": [ * { * "_id": "00000000-0000-0000-0000-000000000001", * "quantity": 2, * "catalogReference": { * "catalogItemId": "df19c1f7-07d8-a265-42f8-e8dfa824cc6e", * "appId": "215238eb-22a5-4c36-9e7b-e7c08025e04e", * "options": { * "variantId": "e62fee23-7878-437a-bf0e-292f17d11cb5" * } * }, * "productName": { * "original": "Shoe", * "translated": "Shoe" * }, * "url": "https://example.wixsite.com", * "price": { * "amount": "85", * "convertedAmount": "85", * "formattedAmount": "€85.00", * "formattedConvertedAmount": "€85.00" * }, * "fullPrice": { * "amount": "85", * "convertedAmount": "85", * "formattedAmount": "€85.00", * "formattedConvertedAmount": "€85.00" * }, * "priceBeforeDiscounts": { * "amount": "85", * "convertedAmount": "85", * "formattedAmount": "€85.00", * "formattedConvertedAmount": "€85.00" * }, * "descriptionLines": [ * { * "name": { * "original": "Color", * "translated": "Color" * }, * "colorInfo": { * "original": "Black", * "translated": "Black", * "code": "#000" * }, * } * ], * "image": "wix:image://v1/3c76e2_bf235c38610f4d2a905db71095b351cf~mv2.jpg#originWidth=1000&originHeight=1000", * "availability": { * "status": "AVAILABLE", * "quantityAvailable": 30 * }, * "physicalProperties": { * "sku": "364215376135191", * "shippable": true * }, * "itemType": { * "preset": "PHYSICAL" * }, * "paymentOption": "FULL_PAYMENT_ONLINE" * }, * { * "_id": "00000000-0000-0000-0000-000000000002", * "quantity": 3, * "catalogReference": { * "catalogItemId": "1a2d7e83-4bef-31d5-09e1-3326ee271c09", * "appId": "215238eb-22a5-4c36-9e7b-e7c08025e04e", * "options": { * "variantId": "132b84e8-aab8-47a1-a1f6-2c47557b64a4" * } * }, * "productName": { * "original": "Watch", * "translated": "Watch" * }, * "url": "https://example.wixsite.com", * "price": { * "amount": "30", * "convertedAmount": "30", * "formattedAmount": "€30.00", * "formattedConvertedAmount": "€30.00" * }, * "fullPrice": { * "amount": "30", * "convertedAmount": "30", * "formattedAmount": "€30.00", * "formattedConvertedAmount": "€30.00" * }, * "priceBeforeDiscounts": { * "amount": "30", * "convertedAmount": "30", * "formattedAmount": "€30.00", * "formattedConvertedAmount": "€30.00" * }, * "descriptionLines": [ * { * "name": { * "original": "Size", * "translated": "Size" * }, * "plainText": { * "original": "Medium", * "translated": "Medium" * }, * }, * { * "name": { * "original": "Color", * "translated": "Color" * }, * "colorInfo": { * "original": "Grey", * "translated": "Grey", * "code": "rgb(128, 128, 128)" * }, * } * ], * "image": "wix:image://v1/3c76e2_8891bbe3372a428aac976ac59aa0ac74~mv2.jpg#originWidth=1000&originHeight=1000", * "availability": { * "status": "AVAILABLE" * }, * "physicalProperties": { * "sku": "217537123517253", * "shippable": true * }, * "itemType": { * "preset": "PHYSICAL" * }, * "paymentOption": "FULL_PAYMENT_ONLINE" * } * ], * "buyerInfo": { * "visitorId": "4c7ce95c-9fb3-417d-9f02-b41e82b841f7" * }, * "currency": "EUR", * "conversionCurrency": "EUR", * "buyerLanguage": "en", * "siteLanguage": "en", * "taxIncludedInPrices": false, * "weightUnit": "KG", * "appliedDiscounts": [], * "_createdDate": "2022-06-22T11:32:29.601Z", * "_updatedDate": "2022-06-22T11:36:48.831Z" * } * */ ``` ### updateLineItemsQuantity (self-hosted) Self-hosted SDK calls require you to [create a client](https://dev.wix.com/docs/sdk/articles/work-with-the-sdk/about-the-wix-client.md). ```javascript import { createClient } from '@wix/sdk'; import { cart } from '@wix/ecom'; // Import the auth strategy for the relevant access type // Import the relevant host module if needed const myWixClient = createClient ({ modules: { cart }, // Include the auth strategy and host as relevant }); async function updateLineItemsQuantity(_id,lineItems) { const response = await myWixClient.cart.updateLineItemsQuantity(_id,lineItems); }; ``` --- --- > Portal Navigation: > > - Append `.md` to any URL under `https://dev.wix.com/docs/` to get its markdown version. > - Pages are either content pages (article or reference text) or menu pages (a list of links to child pages). > - To get a menu page, truncate any URL to a parent path and append `.md` (e.g. `https://dev.wix.com/docs/sdk.md`, `https://dev.wix.com/docs/sdk/core-modules.md`). > - Top-level index of all portals: https://dev.wix.com/docs/llms.txt > - Full concatenated docs: https://dev.wix.com/docs/llms-full.txt # Package: purchaseFlow # Namespace: cart # Webhook link: https://dev.wix.com/docs/api-reference/business-solutions/e-commerce/purchase-flow/cart/cart-deleted.md ## Introduction Triggered when a cart is deleted. --- ## REST API ### Examples ```curl { "entityId": "55d42452-8e08-45ed-a72a-9df4da368f9f", "slug": "deleted", "id": "f7d530db-f81a-43fa-b026-e053ffebba5b", "entityFqdn": "wix.ecom.v1.cart", "deletedEvent": { "movedToTrash": true }, "eventTime": "2022-12-12T13:27:58.914939Z", "triggeredByAnonymizeRequest": false } ``` --- ## JavaScript SDK ### Examples ```javascript import { currentCart } from '@wix/ecom'; currentCart.onCartDeleted((event) => { // handle your event here }); ``` ```javascript import { createClient, AppStrategy } from '@wix/sdk'; import { currentCart } from '@wix/ecom'; const wixClient = createClient({ auth: AppStrategy({ appId: 'MY-APP-ID', publicKey: 'YOUR_APP_PUBLIC_KEY', }), modules: { currentCart, }, }); wixClient.currentCart.onCartDeleted((event) => { // handle your event here }); ``` --- --- > Portal Navigation: > > - Append `.md` to any URL under `https://dev.wix.com/docs/` to get its markdown version. > - Pages are either content pages (article or reference text) or menu pages (a list of links to child pages). > - To get a menu page, truncate any URL to a parent path and append `.md` (e.g. `https://dev.wix.com/docs/sdk.md`, `https://dev.wix.com/docs/sdk/core-modules.md`). > - Top-level index of all portals: https://dev.wix.com/docs/llms.txt > - Full concatenated docs: https://dev.wix.com/docs/llms-full.txt # Package: purchaseFlow # Namespace: cart # Webhook link: https://dev.wix.com/docs/api-reference/business-solutions/e-commerce/purchase-flow/cart/cart-updated.md ## Introduction # Webhook Permissions Scopes IDs: Read Orders: SCOPE.DC-STORES.READ-ORDERS --- ## REST API ### Examples ```curl { "entityId": "55d42452-8e08-45ed-a72a-9df4da368f9f", "entityEventSequence": "7", "slug": "updated", "id": "417f6111-d0c6-439e-8972-1f3dab3009f9", "entityFqdn": "wix.ecom.v1.cart", "updatedEvent": { "currentEntity": { "lineItems": [ { "physicalProperties": { "sku": "364115376135191", "shippable": true }, "quantity": 1, "paymentOption": "FULL_PAYMENT_ONLINE", "url": { "relativePath": "/product-page/shirt", "url": "https://example.wixsite.com/ep-tester" }, "image": { "id": "3c76e2_c5331f937348492a97df87b0a3b34ea4~mv2.jpg", "url": "https://static.wixstatic.com/media/3c76e2_c5331f937348492a97df87b0a3b34ea4~mv2.jpg", "height": 1000, "width": 1000 }, "price": { "amount": "10", "convertedAmount": "10", "formattedAmount": "$10.00", "formattedConvertedAmount": "$10.00" }, "availability": { "status": "AVAILABLE" }, "priceBeforeDiscounts": { "amount": "10", "convertedAmount": "10", "formattedAmount": "$10.00", "formattedConvertedAmount": "$10.00" }, "id": "00000000-0000-0000-0000-000000000002", "fullPrice": { "amount": "10", "convertedAmount": "10", "formattedAmount": "$10.00", "formattedConvertedAmount": "$10.00" }, "itemType": { "preset": "PHYSICAL" }, "productName": { "original": "Shirt", "translated": "Shirt" }, "descriptionLines": [], "catalogReference": { "catalogItemId": "c8539b66-7a44-fe18-affc-afec4be8562a", "appId": "215238eb-22a5-4c36-9e7b-e7c08025e04e", "options": { "options": {}, "variantId": "00000000-0000-0000-0000-000000000000" } } }, { "physicalProperties": { "sku": "217537123517253", "shippable": true }, "quantity": 1, "paymentOption": "FULL_PAYMENT_ONLINE", "url": { "relativePath": "/product-page/watch", "url": "https://example.wixsite.com/ep-tester" }, "image": { "id": "3c76e2_8891bbe3372a428aac976ac59aa0ac74~mv2.jpg", "url": "https://static.wixstatic.com/media/3c76e2_8891bbe3372a428aac976ac59aa0ac74~mv2.jpg", "height": 1000, "width": 1000 }, "price": { "amount": "30", "convertedAmount": "30", "formattedAmount": "$30.00", "formattedConvertedAmount": "$30.00" }, "availability": { "status": "AVAILABLE", "quantityAvailable": 10 }, "priceBeforeDiscounts": { "amount": "30", "convertedAmount": "30", "formattedAmount": "$30.00", "formattedConvertedAmount": "$30.00" }, "id": "00000000-0000-0000-0000-000000000003", "fullPrice": { "amount": "30", "convertedAmount": "30", "formattedAmount": "$30.00", "formattedConvertedAmount": "$30.00" }, "itemType": { "preset": "PHYSICAL" }, "productName": { "original": "Watch", "translated": "Watch" }, "descriptionLines": [ { "name": { "original": "Size", "translated": "Size" }, "plainText": { "original": "Medium", "translated": "Medium" } }, { "name": { "original": "Color", "translated": "Color" }, "colorInfo": { "original": "Grey", "translated": "Grey", "code": "rgb(128, 128, 128)" } } ], "catalogReference": { "catalogItemId": "1a2d7e83-4bef-31d5-09e1-3326ee271c09", "appId": "215238eb-22a5-4c36-9e7b-e7c08025e04e", "options": { "options": { "Size": "Medium", "Color": "Grey" }, "variantId": "132b84e8-aab8-47a1-a1f6-2c47557b64a4" } } } ], "siteLanguage": "en", "appliedDiscounts": [ { "coupon": { "id": "fbb94b06-7447-4161-9c48-59bfcdc39e77", "code": "SUMMERSALE10" } } ], "taxIncludedInPrices": false, "weightUnit": "KG", "id": "55d42452-8e08-45ed-a72a-9df4da368f9f", "buyerInfo": { "visitorId": "4c7ce95c-9fb3-417d-9f02-b41e82b841f7" }, "currency": "USD", "updatedDate": "2022-12-12T13:22:36.861Z", "conversionCurrency": "USD", "buyerLanguage": "en", "createdDate": "2022-12-12T08:50:15.814Z" } }, "eventTime": "2022-12-12T13:22:36.876934Z", "triggeredByAnonymizeRequest": false } ``` --- ## JavaScript SDK ### Examples ```javascript import { cart } from '@wix/ecom'; cart.onCartUpdated((event) => { // handle your event here }); ``` ```javascript import { createClient, AppStrategy } from '@wix/sdk'; import { cart } from '@wix/ecom'; const wixClient = createClient({ auth: AppStrategy({ appId: 'MY-APP-ID', publicKey: 'YOUR_APP_PUBLIC_KEY', }), modules: { cart, }, }); wixClient.cart.onCartUpdated((event) => { // handle your event here }); ``` --- --- > Portal Navigation: > > - Append `.md` to any URL under `https://dev.wix.com/docs/` to get its markdown version. > - Pages are either content pages (article or reference text) or menu pages (a list of links to child pages). > - To get a menu page, truncate any URL to a parent path and append `.md` (e.g. `https://dev.wix.com/docs/sdk.md`, `https://dev.wix.com/docs/sdk/core-modules.md`). > - Top-level index of all portals: https://dev.wix.com/docs/llms.txt > - Full concatenated docs: https://dev.wix.com/docs/llms-full.txt # Package: purchaseFlow # Namespace: cart # Webhook link: https://dev.wix.com/docs/api-reference/business-solutions/e-commerce/purchase-flow/cart/cart-created.md ## Introduction Triggered when a cart is created. --- ## REST API ### Examples ```curl { "entityId": "33d99986-63b0-4f0e-a549-33bda4bef756", "entityEventSequence": "1", "slug": "created", "id": "09f3dfbf-f0c2-4276-9527-cc4af371125a", "createdEvent": { "entity": { "lineItems": [ { "physicalProperties": { "sku": "364215376135191", "shippable": true }, "quantity": 3, "paymentOption": "FULL_PAYMENT_ONLINE", "url": { "relativePath": "/product-page/shoe", "url": "https://example.wixsite.com/ep-tester" }, "image": { "id": "3c76e2_bf235c38610f4d2a905db71095b351cf~mv2.jpg", "url": "https://static.wixstatic.com/media/3c76e2_bf235c38610f4d2a905db71095b351cf~mv2.jpg", "height": 1000, "width": 1000 }, "price": { "amount": "85", "convertedAmount": "85", "formattedAmount": "$85.00", "formattedConvertedAmount": "$85.00" }, "availability": { "status": "AVAILABLE", "quantityAvailable": 30 }, "priceBeforeDiscounts": { "amount": "85", "convertedAmount": "85", "formattedAmount": "$85.00", "formattedConvertedAmount": "$85.00" }, "id": "00000000-0000-0000-0000-000000000001", "fullPrice": { "amount": "85", "convertedAmount": "85", "formattedAmount": "$85.00", "formattedConvertedAmount": "$85.00" }, "itemType": { "preset": "PHYSICAL" }, "productName": { "original": "Shoe", "translated": "Shoe" }, "descriptionLines": [ { "name": { "original": "Color", "translated": "Color" }, "colorInfo": { "original": "Black", "translated": "Black", "code": "#000" } } ], "catalogReference": { "catalogItemId": "df19c1f7-07d8-a265-42f8-e8dfa824cc6e", "appId": "215238eb-22a5-4c36-9e7b-e7c08025e04e", "options": { "variantId": "e62fee23-7878-437a-bf0e-292f17d11cb5" } } } ], "siteLanguage": "en", "appliedDiscounts": [], "taxIncludedInPrices": false, "weightUnit": "KG", "id": "33d99986-63b0-4f0e-a549-33bda4bef756", "buyerInfo": { "visitorId": "4c7ce95c-9fb3-417d-9f02-b41e82b841f7" }, "currency": "USD", "updatedDate": "2022-12-12T13:29:22.950Z", "conversionCurrency": "USD", "buyerLanguage": "en", "createdDate": "2022-12-12T13:29:22.950Z" } }, "entityFqdn": "wix.ecom.v1.cart", "eventTime": "2022-12-12T13:29:22.953616Z", "triggeredByAnonymizeRequest": false } ``` --- ## JavaScript SDK ### Examples ```javascript import { cart } from '@wix/ecom'; cart.onCartCreated((event) => { // handle your event here }); ``` ```javascript import { createClient, AppStrategy } from '@wix/sdk'; import { cart } from '@wix/ecom'; const wixClient = createClient({ auth: AppStrategy({ appId: 'MY-APP-ID', publicKey: 'YOUR_APP_PUBLIC_KEY', }), modules: { cart, }, }); wixClient.cart.onCartCreated((event) => { // handle your event here }); ``` --- --- > Portal Navigation: > > - Append `.md` to any URL under `https://dev.wix.com/docs/` to get its markdown version. > - Pages are either content pages (article or reference text) or menu pages (a list of links to child pages). > - To get a menu page, truncate any URL to a parent path and append `.md` (e.g. `https://dev.wix.com/docs/sdk.md`, `https://dev.wix.com/docs/sdk/core-modules.md`). > - Top-level index of all portals: https://dev.wix.com/docs/llms.txt > - Full concatenated docs: https://dev.wix.com/docs/llms-full.txt ## Resource: Introduction ## Article: Introduction ## Article Link: https://dev.wix.com/docs/api-reference/business-solutions/e-commerce/purchase-flow/cart/introduction.md ## Article Content: # About the eCommerce Cart API The cart is the first phase of a purchase, followed by checkout, then order. A cart holds information about purchased items, prices, discounts, site details, buyer IDs (contact and member/visitor) and more. Additionally, some methods in the Cart API can directly manage the current cart of the site visitor or logged-in member. With the eCommerce Cart API you can: + Get [a cart](https://dev.wix.com/docs/api-reference/business-solutions/e-commerce/purchase-flow/cart/get-cart.md) or [the current cart](https://dev.wix.com/docs/api-reference/business-solutions/e-commerce/purchase-flow/cart/get-current-cart.md). + Add catalog items to [a cart](https://dev.wix.com/docs/api-reference/business-solutions/e-commerce/purchase-flow/cart/add-to-cart.md) or to [the current cart](https://dev.wix.com/docs/api-reference/business-solutions/e-commerce/purchase-flow/cart/add-to-current-cart.md). + Create a checkout from [a cart](https://dev.wix.com/docs/api-reference/business-solutions/e-commerce/purchase-flow/cart/create-checkout-from-cart.md) or from [the current cart](https://dev.wix.com/docs/api-reference/business-solutions/e-commerce/purchase-flow/cart/create-checkout-from-current-cart.md). + Estimate the price totals for [a cart](https://dev.wix.com/docs/api-reference/business-solutions/e-commerce/purchase-flow/cart/estimate-totals.md) or [the current cart](https://dev.wix.com/docs/api-reference/business-solutions/e-commerce/purchase-flow/cart/estimate-current-cart-totals.md). + Update the properties of [a cart](https://dev.wix.com/docs/api-reference/business-solutions/e-commerce/purchase-flow/cart/update-cart.md) or [the current cart](https://dev.wix.com/docs/api-reference/business-solutions/e-commerce/purchase-flow/cart/update-current-cart.md). + Update the quantity of line items in [a cart](https://dev.wix.com/docs/api-reference/business-solutions/e-commerce/purchase-flow/cart/update-line-items-quantity.md) or [the current cart](https://dev.wix.com/docs/api-reference/business-solutions/e-commerce/purchase-flow/cart/update-current-cart-line-item-quantity.md). + Remove a coupon from [a cart](https://dev.wix.com/docs/api-reference/business-solutions/e-commerce/purchase-flow/cart/remove-coupon.md) or [the current cart](https://dev.wix.com/docs/api-reference/business-solutions/e-commerce/purchase-flow/cart/remove-coupon-from-current-cart.md). + Remove line items from [a cart](https://dev.wix.com/docs/api-reference/business-solutions/e-commerce/purchase-flow/cart/remove-line-items.md) or [the current cart](https://dev.wix.com/docs/api-reference/business-solutions/e-commerce/purchase-flow/cart/remove-line-items-from-current-cart.md). + Delete [a cart](https://dev.wix.com/docs/api-reference/business-solutions/e-commerce/purchase-flow/cart/delete-cart.md) or [the current cart](https://dev.wix.com/docs/api-reference/business-solutions/e-commerce/purchase-flow/cart/delete-current-cart.md). You can also listen for events when a cart is [created](https://dev.wix.com/docs/api-reference/business-solutions/e-commerce/purchase-flow/cart/cart-created.md), [updated](https://dev.wix.com/docs/api-reference/business-solutions/e-commerce/purchase-flow/cart/cart-updated.md), and [deleted](https://dev.wix.com/docs/api-reference/business-solutions/e-commerce/purchase-flow/cart/cart-deleted.md). > **Note:** Some methods in this API require [visitor or member authentication](https://dev.wix.com/docs/api-reference/articles/authentication/about-identities.md). @sdk_package_setup --- > Portal Navigation: > > - Append `.md` to any URL under `https://dev.wix.com/docs/` to get its markdown version. > - Pages are either content pages (article or reference text) or menu pages (a list of links to child pages). > - To get a menu page, truncate any URL to a parent path and append `.md` (e.g. `https://dev.wix.com/docs/sdk.md`, `https://dev.wix.com/docs/sdk/core-modules.md`). > - Top-level index of all portals: https://dev.wix.com/docs/llms.txt > - Full concatenated docs: https://dev.wix.com/docs/llms-full.txt ## Resource: Sample Flows ## Article: Sample Flows ## Article Link: https://dev.wix.com/docs/api-reference/business-solutions/e-commerce/purchase-flow/cart/sample-flows.md ## Article Content: # Sample Flows This article shares some possible use cases your app could support, as well as an example flow that could support each use case. You're certainly not limited to these use cases, but they can be a helpful jumping off point as you plan your app's implementation. ## Listen for a cart created by a site visitor 1. A site visitor adds an item to the cart. 2. Using [Cart Created](https://dev.wix.com/docs/api-reference/business-solutions/e-commerce/purchase-flow/cart/cart-created.md), listen for an event when a cart is created. ```js { "entityId" : "33d99986-63b0-4f0e-a549-33bda4bef756", "entityEventSequence" : "1", "slug" : "created", "id" : "09f3dfbf-f0c2-4276-9527-cc4af371125a", "createdEvent" : { "entity" : { "lineItems" : [ { "physicalProperties" : { "sku" : "364215376135191", "shippable" : true }, "quantity" : 3, "paymentOption" : "FULL_PAYMENT_ONLINE", "couponScopes" : [ { "namespace" : "stores", "group" : { "name" : "collection", "entityId" : "00000000-000000-000000-000000000001" } }, { "namespace" : "stores", "group" : { "name" : "product", "entityId" : "df19c1f7-07d8-a265-42f8-e8dfa824cc6e" } } ], "url" : { "relativePath" : "/product-page/shoe", "url" : "https://example.wixsite.com/ep-tester" }, "image" : { "id" : "3c76e2_bf235c38610f4d2a905db71095b351cf~mv2.jpg", "url" : "https://static.wixstatic.com/media/3c76e2_bf235c38610f4d2a905db71095b351cf~mv2.jpg", "height" : 1000, "width" : 1000 }, "price" : { "amount" : "85", "convertedAmount" : "85", "formattedAmount" : "$85.00", "formattedConvertedAmount" : "$85.00" }, "availability" : { "status" : "AVAILABLE", "quantityAvailable" : 30 }, "priceBeforeDiscounts" : { "amount" : "85", "convertedAmount" : "85", "formattedAmount" : "$85.00", "formattedConvertedAmount" : "$85.00" }, "id" : "00000000-0000-0000-0000-000000000001", "fullPrice" : { "amount" : "85", "convertedAmount" : "85", "formattedAmount" : "$85.00", "formattedConvertedAmount" : "$85.00" }, "itemType" : { "preset" : "PHYSICAL" }, "productName" : { "original" : "Shoe", "translated" : "Shoe" }, "descriptionLines" : [ { "name" : { "original" : "Color", "translated" : "Color" }, "colorInfo" : { "original" : "Black", "translated" : "Black", "code" : "#000" }, "lineType" : "UNRECOGNISED" } ], "catalogReference" : { "catalogItemId" : "df19c1f7-07d8-a265-42f8-e8dfa824cc6e", "appId" : "1380b703-ce81-ff05-f115-39571d94dfcd", "options" : { "variantId" : "e62fee23-7878-437a-bf0e-292f17d11cb5" } } } ], "siteLanguage" : "en", "appliedDiscounts": [{ "coupon": { "id": "e463550b-220a-428f-82d9-8d11c3c1acd7", "code": "SUMMERSALE10" } }], "taxIncludedInPrices" : false, "weightUnit" : "KG", "id" : "33d99986-63b0-4f0e-a549-33bda4bef756", "buyerInfo" : { "visitorId" : "4c7ce95c-9fb3-417d-9f02-b41e82b841f7" }, "currency" : "USD", "subtotal" : { "amount" : "255", "convertedAmount" : "255", "formattedAmount" : "$255.00", "formattedConvertedAmount" : "$255.00" }, "updatedDate" : "2022-12-12T13\:29\:22.950Z", "conversionCurrency" : "USD", "buyerLanguage" : "en", "createdDate" : "2022-12-12T13\:29\:22.950Z" } }, "entityFqdn" : "wix.ecom.v1.cart", "eventTime" : "2022-12-12T13\:29\:22.953616Z", "triggeredByAnonymizeRequest" : false } ``` Save the newly created cart's ID (`entityId` field in the above webhook's payload) for use in the flow below. ## Update a cart If a store owner wants to update a specific cart with a buyer note and remove a coupon, they can follow this basic flow. 1. Pass the cart's ID (`entityId` field in the above webhook's payload) to the [Update Cart](https://dev.wix.com/docs/api-reference/business-solutions/e-commerce/purchase-flow/cart/update-cart.md) method to add a buyer note to the cart: ::::tabs :::REST_TAB ```js curl -X PATCH \ 'https://www.wixapis.com/ecom/v1/carts/33d99986-63b0-4f0e-a549-33bda4bef756' \ -H 'Authorization: ' \ -H 'Content-Type: application/json' \ -d '{ "cartInfo": { "id": "33d99986-63b0-4f0e-a549-33bda4bef756", "buyerNote": "Please ship ASAP." } }' ``` ::: :::SDK_TAB ```js /************************************** * Backend code - my-backend-file.web.js/ts * *************************************/ import { Permissions, webMethod } from "@wix/web-methods"; import { cart } from "@wix/ecom"; export const myUpdateCartFunction = webMethod( Permissions.Anyone, async (_id, options) => { try { const updatedCart = await cart.updateCart(_id, options); console.log("Success! Updated cart:", updatedCart); return updatedCart; } catch (error) { console.error(error); // Handle the error } }, ); /************* * Page code * ************/ import { ecom } from "@wix/site-ecom"; import { myUpdateCartFunction } from "backend/my-backend-file.web"; // Sample cartId: const _id = "33d99986-63b0-4f0e-a549-33bda4bef756"; // Buyer note to add: const updateOptions = { cartInfo: { _id: "33d99986-63b0-4f0e-a549-33bda4bef756", buyerNote: "Please ship this ASAP." }, }; const updatedCart = await myUpdateCartFunction(_id, updateOptions); ``` ::: :::: The response is the cart object containing the newly added buyer note. 2. Use [Remove Coupon](https://dev.wix.com/docs/api-reference/business-solutions/e-commerce/purchase-flow/cart/remove-coupon.md) to remove a coupon from a cart. ::::tabs :::REST_TAB ```js curl -X POST \ 'https://www.wixapis.com/ecom/v1/carts/33d99986-63b0-4f0e-a549-33bda4bef756/remove-coupon' \ -H 'Authorization: ' -H 'Content-Type: application/json' \ ``` ::: :::SDK_TAB ```js /************************************** * Backend code - my-backend-file.web.js/ts * **************************************/ import { Permissions, webMethod } from "@wix/web-methods"; import { cart } from "@wix/ecom"; export const myRemoveCouponFunction = webMethod( Permissions.Anyone, async (cartId) => { try { const updatedCart = await cart.removeCoupon(cartId); console.log("Success! Updated cart:", updatedCart); return updatedCart; } catch (error) { console.error(error); // Handle the error } }, ); /************* * Page code * ************/ import { ecom } from "@wix/site-ecom"; import { myRemoveCouponFunction } from "backend/my-backend-file.web"; // Sample cartId: const cartId = "33d99986-63b0-4f0e-a549-33bda4bef756"; const updatedCart = await myRemoveCouponFunction(cartId); ``` ::: :::: --- > Portal Navigation: > > - Append `.md` to any URL under `https://dev.wix.com/docs/` to get its markdown version. > - Pages are either content pages (article or reference text) or menu pages (a list of links to child pages). > - To get a menu page, truncate any URL to a parent path and append `.md` (e.g. `https://dev.wix.com/docs/sdk.md`, `https://dev.wix.com/docs/sdk/core-modules.md`). > - Top-level index of all portals: https://dev.wix.com/docs/llms.txt > - Full concatenated docs: https://dev.wix.com/docs/llms-full.txt ## Resource: Cart Object Conversion ## Article: Cart Object Conversion ## Article Link: https://dev.wix.com/docs/api-reference/business-solutions/e-commerce/purchase-flow/cart/cart-object-conversion.md ## Article Content: # Stores to eCommerce Cart Conversion Table To help with migration from the [Stores Cart API](https://dev.wix.com/api/rest/wix-stores/carts/cart-object) to the eCommerce [Cart](https://dev.wix.com/docs/api-reference/business-solutions/e-commerce/purchase-flow/cart/cart-object.md) and [Checkout](https://dev.wix.com/docs/api-reference/business-solutions/e-commerce/purchase-flow/checkout/checkout/introduction.md) APIs, refer to the table below for field changes in name and/or location. Certain information that used to be held in the Cart, is now kept in the Checkout object. These fields are marked in the table below, with more information available in the [Stores Cart to eCommerce Checkout Conversion Table](https://dev.wix.com/docs/api-reference/business-solutions/e-commerce/purchase-flow/checkout/checkout/stores-cart-to-e-commerce-checkout-object-conversion.md). The address object used in the eCommerce APIs is slightly different to the one used in the Stores APIs. For more details, refer to the [address object conversion table](invalid-url). Fields marked with an asterisk (*) signify little to no change in semantics or service location. | Stores Cart | eCommerce Cart | | ---------------------------------------------------|-------------------------------------------------------------| | `id`* | `id` | | `status` | All carts in the eCommerce Cart API have a status value of `INCOMPLETE`. After a purchase, the cart is deleted and the [Cart Deleted Webhook](https://dev.wix.com/docs/api-reference/business-solutions/e-commerce/purchase-flow/cart/cart-deleted.md) is triggered. Any attempt to retrieve it via the [Get Cart](https://dev.wix.com/docs/api-reference/business-solutions/e-commerce/purchase-flow/cart/get-cart.md) endpoint will yield a 404 error code. In the Stores Cart API, the cart's status would change to `COMPLETE` after a purchase. | | `weightUnit`* | `weightUnit` | | `buyerNote`* | `buyerNote` | | `currency.code` | `currency` | | `currency.symbol` | No longer returned. Instead, for every price returned, we also provide the formatted price. | | `convertedCurrency.code` | `conversionCurrency` | | `convertedCurrency.symbol` | No longer returned. Instead, for every converted price returned, we also provide the formatted converted price. | | `billingAddress` | Billing address is no longer kept in the Cart. This information is only kept in [Checkout](https://dev.wix.com/docs/api-reference/business-solutions/e-commerce/purchase-flow/checkout/checkout/checkout-object.md). | | `appliedCoupon.couponId` | `appliedDiscounts[i].coupon.id` - The coupon is now an item in the `appliedDiscounts` array. To get it, search the `appliedDiscounts` array for the only populated `coupon` field. | | `appliedCoupon.code` | `appliedDiscounts[i].coupon.code` - The coupon is now an item in the `appliedDiscounts` array. To get it, search the `appliedDiscounts` array for the only populated `coupon` field. | | `appliedCoupon.name` | This field is held only in the [Checkout object](https://dev.wix.com/docs/api-reference/business-solutions/e-commerce/purchase-flow/checkout/checkout/checkout-object.md) under `appliedDiscounts[i].coupon.name`. | | `appliedCoupon.discountValue` | This field is held only in the [Checkout object](https://dev.wix.com/docs/api-reference/business-solutions/e-commerce/purchase-flow/checkout/checkout/checkout-object.md) under `appliedDiscounts[i].coupon.amount.amount`. | | `appliedCoupon.convertedDiscountValue` | This field is held only in the [Checkout object](https://dev.wix.com/docs/api-reference/business-solutions/e-commerce/purchase-flow/checkout/checkout/checkout-object.md) under `appliedDiscounts[i].coupon.amount.convertedAmount`. | | `appliedCoupon.couponType` | No longer returned. | | | `totals` | Future functionality will see this information made available in the eCommerce Cart API. | | | `convertedTotals` | Future functionality will see this information made available in the eCommerce Cart API. | | `shippingInfo` | Shipping information is now only kept in [Checkout](https://dev.wix.com/docs/api-reference/business-solutions/e-commerce/purchase-flow/checkout/checkout/checkout-object.md). | | `buyerInfo.id` and `buyerInfo.identityType: CONTACT`| `buyerInfo.contactId` only. | | `buyerInfo.id` and `buyerInfo.identityType: VISITOR`| `buyerInfo.visitorId` only. | | `buyerInfo.id` and `buyerInfo.identityType: MEMBER` | `buyerInfo.memberId` only. | | `buyerInfo.email` | Buyer email is now only kept in [Checkout](https://dev.wix.com/docs/api-reference/business-solutions/e-commerce/purchase-flow/checkout/checkout/checkout-object.md). | | `buyerInfo.phone` | Buyer phone is now only kept in [Checkout](https://dev.wix.com/docs/api-reference/business-solutions/e-commerce/purchase-flow/checkout/checkout/checkout-object.md). | | `buyerInfo.firstName` | Buyer first name is now only kept in [Checkout](https://dev.wix.com/docs/api-reference/business-solutions/e-commerce/purchase-flow/checkout/checkout/checkout-object.md). | | `buyerInfo.lastName` | Buyer last name is now only kept in [Checkout](https://dev.wix.com/docs/api-reference/business-solutions/e-commerce/purchase-flow/checkout/checkout/checkout-object.md). | | `lineItems[i].id` | `lineItems[i].id` - **Note:** this `id` is of type GUID. In the Stores Cart API, the `lineItem.id` is of type Int32. | | `lineItems[i].productId` | `lineItems[i].catalogReference.catalogItemId` - See [Stores Catalog eCommerce Integration](https://dev.wix.com/docs/api-reference/business-solutions/stores/catalog-v1/catalog/e-commerce-integration.md) for more information. | | `lineItems[i].name` | `lineItems[i].productName.original` | | `lineItems[i].quantity` | `lineItems[i].quantity` | | `lineItems[i].weight` | `lineItems[i].physicalProperties.weight` | | `lineItems[i].sku` | `lineItems[i].physicalProperties.sku` | | `lineItems[i].lineItemType: "PHYSICAL"` | `lineItems[i].itemType.preset: "PHYSICAL"` | | `lineItems[i].lineItemType: "DIGITAL"` | `lineItems[i].itemType.preset: "DIGITAL"` | | `lineItems[i].lineItemType: "CUSTOM_AMOUNT_ITEM"`| `lineItems[i].itemType.custom` and `lineItems[i].catalogReference` is empty. | | `lineItems[i].notes` | `lineItems[i].descriptionLines[i].plainText.original` | | `lineItems[i].customTextFields` | `lineItems[i].descriptionLines` | | `lineItems[i].mediaItem.mediaType` | All line item media in the Cart API are images. | | `lineItems[i].mediaItem.url` | `lineItems[i].media.url` | | `lineItems[i].mediaItem.width` | `lineItems[i].media.width` | | `lineItems[i].mediaItem.height` | `lineItems[i].media.height` | | `lineItems[i].options` | `lineItems[i].descriptionLines` - See [Stores Catalog eCommerce Integration](https://dev.wix.com/docs/api-reference/business-solutions/stores/catalog-v1/catalog/e-commerce-integration.md) for more information. | `lineItems[i].priceData.price` | `lineItems[i].price.amount` | | `lineItems[i].priceData.totalPrice` | `lineItems[i].price.amount` X `lineItems[i].quantity` | | `lineItems[i].convertedPriceData.price` | `lineItems[i].price.convertedAmount` | | `lineItems[i].convertedPriceData.totalPrice` | `lineItems[i].price.convertedAmount` X `lineItems[i].quantity` | --- > Portal Navigation: > > - Append `.md` to any URL under `https://dev.wix.com/docs/` to get its markdown version. > - Pages are either content pages (article or reference text) or menu pages (a list of links to child pages). > - To get a menu page, truncate any URL to a parent path and append `.md` (e.g. `https://dev.wix.com/docs/sdk.md`, `https://dev.wix.com/docs/sdk/core-modules.md`). > - Top-level index of all portals: https://dev.wix.com/docs/llms.txt > - Full concatenated docs: https://dev.wix.com/docs/llms-full.txt ## Resource: Address Object Conversion ## Article: Address Object Conversion ## Article Link: https://dev.wix.com/docs/api-reference/business-solutions/e-commerce/purchase-flow/cart/address-object-conversion.md ## Article Content: # Address Object Conversion Table The eCommerce APIs use a different `address` object. Notably, fields related to contact information have been moved to an adjacent `contactDetails` object (for example, in `order.shippingInfo`). To help with conversion and migration, refer to the table below to check which fields have changed and how. > Note: in the eCommerce API, the buyer's email is only held in the `buyerInfo` field in the [eCommerce Order object](https://dev.wix.com/docs/api-reference/business-solutions/e-commerce/orders/orders/order-object.md). | Previous Address Object | eCommerce Address Field Location | Change | | ------------------------------------------------|--------------------------------------------------------------|-------------------| | `address.city` | `address.city` | | `address.email` | `buyerInfo.email` | | `address.zipCode` | `address.postalCode` | Field name | `address.country` | `address.country` | | `address.addressLine1` | `address.addressLine` | Field name | `address.addressLine2` | `address.addressLine2` | | `address.street` | `address.streetAddress` | Field name | `address.subdivision` | `address.subdivision` | | `address.fullName.firstName` | `contactDetails.firstName` | Moved to `contactDetails` object | `address.fullName.lastName` | `contactDetails.lastName` | Moved to `contactDetails` object | `address.phone` | `contactDetails.phone` | Moved to `contactDetails` object | `address.company` | `contactDetails.company` | Moved to `contactDetails` object | `address.vatId` | `contactDetails.vatId` | Moved to `contactDetails` object --- > Portal Navigation: > > - Append `.md` to any URL under `https://dev.wix.com/docs/` to get its markdown version. > - Pages are either content pages (article or reference text) or menu pages (a list of links to child pages). > - To get a menu page, truncate any URL to a parent path and append `.md` (e.g. `https://dev.wix.com/docs/sdk.md`, `https://dev.wix.com/docs/sdk/core-modules.md`). > - Top-level index of all portals: https://dev.wix.com/docs/llms.txt > - Full concatenated docs: https://dev.wix.com/docs/llms-full.txt ## Resource: Introduction ## Article: About Checkout ## Article Link: https://dev.wix.com/docs/api-reference/business-solutions/e-commerce/purchase-flow/checkout/introduction.md ## Article Content: # About Checkout Checkout functionality manages the second stage of the [purchase flow](https://dev.wix.com/docs/rest/business-solutions/e-commerce/purchase-flow/introduction.md), where customers finalize purchases by providing payment details, billing information, and shipping preferences. The checkout process handles transaction processing, applies discounts and taxes, and creates orders upon successful completion. The Checkout section includes these APIs: - **[Checkout API](https://dev.wix.com/docs/rest/business-solutions/e-commerce/purchase-flow/checkout/checkout/introduction.md)**: Core functionality for processing transactions and managing checkout data. - **[Checkout Templates API](https://dev.wix.com/docs/rest/business-solutions/e-commerce/purchase-flow/checkout/checkout-templates/introduction.md)**: Create and manage pre-populated checkouts with predefined items and configurations. - **[Abandoned Checkout API](https://dev.wix.com/docs/rest/business-solutions/e-commerce/purchase-flow/checkout/abandoned-checkout/introduction.md)**: Recover incomplete checkout sessions and re-engage customers. - **[Checkout Settings API](https://dev.wix.com/docs/rest/business-solutions/e-commerce/purchase-flow/checkout/checkout-settings/introduction.md)**: Configure checkout behavior, policies, and user interface elements. ## See also - [About Purchase Flow](https://dev.wix.com/docs/rest/business-solutions/e-commerce/purchase-flow/introduction.md) - [About Cart](https://dev.wix.com/docs/api-reference/business-solutions/e-commerce/purchase-flow/cart/introduction.md) - [Architecture & Data Flow](https://dev.wix.com/docs/rest/business-solutions/e-commerce/architecture-data-flow.md) --- > Portal Navigation: > > - Append `.md` to any URL under `https://dev.wix.com/docs/` to get its markdown version. > - Pages are either content pages (article or reference text) or menu pages (a list of links to child pages). > - To get a menu page, truncate any URL to a parent path and append `.md` (e.g. `https://dev.wix.com/docs/sdk.md`, `https://dev.wix.com/docs/sdk/core-modules.md`). > - Top-level index of all portals: https://dev.wix.com/docs/llms.txt > - Full concatenated docs: https://dev.wix.com/docs/llms-full.txt # Resource: Checkout # Type: Checkout Object # Link: https://dev.wix.com/docs/api-reference/business-solutions/e-commerce/purchase-flow/checkout/checkout/checkout-object.md ## Description: A checkout represents a cart that is in the process of being purchased. It holds calculated prices, tax, shipping, and buyer information needed to complete the purchase. ## Schema: ```json Type: Checkout Object | type: Checkout Description: A checkout represents a cart that is in the process of being purchased. It holds calculated prices, tax, shipping, and buyer information needed to complete the purchase. - name: id | type: string | description: Checkout ID. - name: value | type: string | description: - name: lineItems | type: Array | description: Line items. Max: 300 items - name: id | type: string | description: Line item ID. - name: quantity | type: number | description: Item quantity. Min: `"1"` Max: `"100000"` - name: catalogReference | type: CatalogReference | description: Catalog and item reference. Includes IDs for the item and the catalog it came from, as well as further optional info. Optional for custom line items, which don't trigger the Catalog service plugin. - name: catalogItemId | type: string | description: ID of the item within the catalog it belongs to. - name: appId | type: string | description: ID of the app providing the catalog. You can get your app's ID from its page in the [app dashboard](https://dev.wix.com/dc3/my-apps/). For items from Wix catalogs, the following values always apply: + Wix Stores: `"215238eb-22a5-4c36-9e7b-e7c08025e04e"` + Wix Bookings: `"13d21c63-b5ec-5912-8397-c3a5ddb27a97"` + Wix Restaurants: `"9a5d83fd-8570-482e-81ab-cfa88942ee60"` - name: options | type: Struct | description: Additional item details in `key:value` pairs. Use this optional field for more specificity with item selection. The values of the `options` field differ depending on which catalog is providing the items. For Wix Stores products, learn more about integrating with [Catalog V3](https://dev.wix.com/docs/api-reference/business-solutions/stores/catalog-v3/e-commerce-integration.md) or [Catalog V1](https://dev.wix.com/docs/api-reference/business-solutions/stores/catalog-v1/catalog/e-commerce-integration.md), depending on [the version the site uses](https://dev.wix.com/docs/api-reference/business-solutions/stores/catalog-versioning/introduction.md). - name: productName | type: ProductName | description: Item name. + Stores - `product.name` + Bookings - `service.info.name` + Events - `ticket.name` - name: original | type: string | description: __Required.__ Item name in the site's default language as defined in the [request envelope](https://dev.wix.com/docs/build-apps/develop-your-app/frameworks/self-hosting/supported-extensions/backend-extensions/add-self-hosted-service-plugin-extensions.md#request-envelope). Min: 1 character. Max: 200 characters. - name: translated | type: string | description: Item name translated into the buyer's language. Min: 1 character. Max: 400 characters. Default: Same as `original`. - name: url | type: PageUrlV2 | description: URL to the item's page on the site. - name: relativePath | type: string | description: The relative path for the page within the site. For example, `/product-page/a-product`. - name: url | type: string | description: The page's full URL. For example, `https://mysite.com/product-page/a-product`. - name: price | type: MultiCurrencyPrice | description: Item price **after** catalog-defined discount and line item discounts. - name: amount | type: string | description: Amount. - name: convertedAmount | type: string | description: Converted amount. - name: formattedAmount | type: string | description: Amount formatted with currency symbol. - name: formattedConvertedAmount | type: string | description: Converted amount formatted with currency symbol. - name: lineItemPrice | type: MultiCurrencyPrice | description: Total line item price **after** catalog-defined discount and line item discounts. - name: fullPrice | type: MultiCurrencyPrice | description: Item price **before** catalog-defined discount. Defaults to `price` when not provided. - name: priceBeforeDiscounts | type: MultiCurrencyPrice | description: Item price **before** line item discounts and **after** catalog-defined discount. Defaults to `price` when not provided. - name: totalPriceAfterTax | type: MultiCurrencyPrice | description: Total price after all discounts and tax. - name: totalPriceBeforeTax | type: MultiCurrencyPrice | description: Total price after discounts, and before tax. - name: taxDetails | type: ItemTaxFullDetails | description: Tax details for this line item. - name: taxableAmount | type: MultiCurrencyPrice | description: Amount for which tax is calculated. - name: taxRate | type: string | description: Tax rate %, as a decimal point between 0 and 1. - name: totalTax | type: MultiCurrencyPrice | description: Calculated tax, based on `taxable_amount` and `tax_rate`. - name: rateBreakdown | type: Array | description: If breakdown exists, the sum of rates in the breakdown must equal `tax_rate`. Deprecated - use 'tax_breakdown' instead. - name: taxBreakdown | type: Array | description: tax information for a line item. - name: discount | type: MultiCurrencyPrice | description: Discount for this line item's entire quantity. - name: descriptionLines | type: Array | description: Line item description lines. Used for display purposes for the cart, checkout and order. - name: name | type: DescriptionLineName | description: Description line name. - name: media | type: Image | description: Line item image details. - name: id | type: string | description: WixMedia image ID. - name: url | type: string | description: Image URL. - name: height | type: number | description: Original image height. - name: width | type: number | description: Original image width. - name: altText | type: string | description: Image alt text. - name: filename | type: string | description: Image filename. - name: availability | type: ItemAvailabilityInfo | description: Item availability details. - name: status | type: string | description: Item availability status. - name: quantityAvailable | type: number | description: Quantity available. - name: physicalProperties | type: PhysicalProperties | description: Physical properties of the item. When relevant, contains information such as SKU, item weight, and shippability. - name: weight | type: number | description: Line item weight. Measurement unit matches the weight unit specified in `weightUnit` in the request. - name: sku | type: string | description: Stock-keeping unit. Learn more about [SKUs](https://www.wix.com/encyclopedia/definition/stock-keeping-unit-sku). - name: shippable | type: boolean | description: Whether this line item is shippable. - name: itemType | type: ItemType | description: Item type. Either a preset type or custom. - name: subscriptionOptionInfo | type: SubscriptionOptionInfo | description: Subscription option information. - name: subscriptionSettings | type: SubscriptionSettings | description: Subscription option settings. - name: title | type: Title | description: Subscription option title. - name: description | type: Description | description: Subscription option description. - name: paymentOption | type: string | description: Type of selected payment option for current item. Default: `FULL_PAYMENT_ONLINE` enum: FULL_PAYMENT_ONLINE, FULL_PAYMENT_OFFLINE, MEMBERSHIP, DEPOSIT_ONLINE, MEMBERSHIP_OFFLINE, MEMBERSHIP_ONLINE_WITH_OFFLINE_REMAINDER - name: serviceProperties | type: ServiceProperties | description: Service properties. When relevant, this contains information such as date and number of participants. - name: scheduledDate | type: string | description: Date and time the service is to be provided, in [ISO-8601](https://en.wikipedia.org/wiki/ISO_8601#Combined_date_and_time_representations) format. For example, the start time of a class. - name: numberOfParticipants | type: number | description: The number of people participating in the service. For example, the number of people attending a class or the number of people per hotel room. - name: rootCatalogItemId | type: string | description: In cases where `catalogReference.catalogItemId` is NOT the actual catalog item ID, this field will return the true item's ID. + For example, for Wix Bookings, `catalogReference.catalogItemId` is the booking ID. Therefore this value is set to the service ID. + In most cases, this field has the same value as `catalogReference.catalogItemId`. + Used in membership validation. - name: priceDescription | type: PriceDescription | description: Additional description for the price. For example, when price is 0 but additional details about the actual price are needed - "Starts at $67". - name: original | type: string | description: __Required.__ Price description in the site's default language as defined in the [request envelope](https://dev.wix.com/docs/build-apps/develop-your-app/frameworks/self-hosting/supported-extensions/backend-extensions/add-self-hosted-service-plugin-extensions.md#request-envelope). - name: translated | type: string | description: Price description translated into the buyer's language. Default: Same as `original`. - name: depositAmount | type: MultiCurrencyPrice | description: Partial payment to be paid upfront during the checkout. Eligible for catalog items with `lineItem.paymentOption` type `DEPOSIT_ONLINE` only. - name: deliveryProfileId | type: string | description: Delivery profile ID. - name: customLineItem | type: boolean | description: Whether the line item is a custom line item. Custom line items don't trigger the Catalog service plugin. - name: consentRequiredPaymentPolicy | type: string | description: Item payment policy that requires customer consent to complete purchase. The payment policy will be displayed on the checkout page. - name: catalogOverrideFields | type: CatalogOverrideFields | description: Overriding values for catalog item properties. To override catalog fields, your app must have the permission scope named "Manage eCommerce - Admin Permissions". Learn more about [permission scopes](https://dev.wix.com/docs/build-apps/develop-your-app/access/authorization/about-permissions.md). - name: productName | type: ProductName | description: Item name. - name: price | type: string | description: Item price **after** discounts. - name: fullPrice | type: string | description: Item price **before** discounts. - name: descriptionLines | type: Array | description: Item description lines. Used when displaying the line item to customers. - name: physicalProperties | type: PhysicalProperties | description: Physical properties of the item. - name: image | type: Image | description: Item image. - name: paymentOption | type: PaymentOption | description: Payment method selected for the item. - name: depositAmount | type: string | description: Only eligible for catalog items with `lineItem.paymentOption.value` type of `DEPOSIT_ONLINE`. - name: savePaymentMethod | type: boolean | description: Whether to save the payment method on the order. Default: `false` - name: inventoryAppId | type: string | description: ID of the app managing the inventory. - name: priceUndetermined | type: boolean | description: Whether the price is not yet defined, and will be updated after the order is created. - name: fixedQuantity | type: boolean | description: Whether the line item quantity is fixed and cannot be changed. - name: savePaymentMethod | type: boolean | description: Whether to save the payment method on the order. Default: `false` - name: taxableAddress | type: TaxableAddress | description: Address to use for tax calculation purposes. - name: extendedFields | type: ExtendedFields | description: Custom extended fields for the line item object. [Extended fields](https://dev.wix.com/docs/rest/articles/getting-started/extended-fields.md) must be configured using the 'Checkout & Orders - Line Items Schema Plugin' in the app dashboard before they can be accessed with API calls. - name: namespaces | type: object | description: Extended field data. Each key corresponds to the namespace of the app that created the extended fields. The value of each key is structured according to the schema defined when the extended fields were configured. You can only access fields for which you have the appropriate permissions. Learn more about [extended fields](https://dev.wix.com/docs/rest/articles/getting-started/extended-fields.md). - name: policies | type: Array | description: Policies to be displayed to the customer on the checkout page. - name: title | type: string | description: Policy title - should be translated - name: content | type: string | description: Policy content - should be translated - name: membersOnly | type: boolean | description: Whether the item can only be purchased by site members. Default: `false` - name: modifierGroups | type: Array | description: Modifier groups that were added to the item. - name: id | type: string | description: Modifier group ID. - name: name | type: TranslatableString | description: Modifier group name. - name: modifiers | type: Array | description: List of modifiers in this group. - name: modifiersTotalPrice | type: MultiCurrencyPrice | description: Total price of all item modifiers. Included in the item price. - name: billingInfo | type: AddressWithContact | description: Billing information. - name: address | type: Address | description: Address. - name: country | type: string | description: Two-letter country code in [ISO-3166 alpha-2](https://www.iso.org/obp/ui/#search/code/) format. - name: subdivision | type: string | description: Code for a subdivision (such as state, prefecture, or province) in [ISO 3166-2](https://www.iso.org/standard/72483.html) format. - name: city | type: string | description: City name. - name: postalCode | type: string | description: Postal or zip code. - name: streetAddress | type: StreetAddress | description: Street address. - name: addressLine | type: string | description: Main address line (usually street name and number). - name: addressLine2 | type: string | description: Free text providing more detailed address info. Usually contains apt, suite, floor. - name: geocode | type: AddressLocation | description: Geocode object containing latitude and longitude coordinates. - name: countryFullname | type: string | description: Country's full name. - name: subdivisionFullname | type: string | description: Subdivision full-name. - name: contactDetails | type: FullAddressContactDetails | description: Contact details. - name: firstName | type: string | description: First name. - name: lastName | type: string | description: Last name. - name: phone | type: string | description: Phone number. - name: company | type: string | description: Company name. - name: vatId | type: VatId | description: Tax information (for Brazil only). If ID is provided, `vatId.type` must also be set, `UNSPECIFIED` is not allowed. - name: shippingInfo | type: ShippingInfo | description: Shipping information. - name: shippingDestination | type: AddressWithContact | description: Shipping address and contact details. - name: selectedCarrierServiceOption | type: SelectedCarrierServiceOption | description: Selected option out of the options allowed for the `region`. - name: code | type: string | description: Unique identifier of selected option. For example, "usps_std_overnight". - name: title | type: string | description: Title of the option, such as USPS Standard Overnight Delivery (in the requested locale). For example, "Standard" or "First-Class Package International". - name: logistics | type: DeliveryLogistics | description: Delivery logistics. - name: cost | type: SelectedCarrierServiceOptionPrices | description: Shipping costs. - name: requestedShippingOption | type: boolean | description: Were we able to find the requested shipping option, or otherwise we fallback to the default one (the first) - name: otherCharges | type: Array | description: Other charges - name: carrierId | type: string | description: This carrier's unique ID - name: deliveryAllocations | type: Array | description: Delivery solution allocations to different delivery carriers and delivery regions - name: partial | type: boolean | description: If the delivery solution is a partial and doesn't apply to all items. - name: region | type: ShippingRegion | description: Shipping region. Based on the address provided. - name: id | type: string | description: Shipping region ID. - name: name | type: string | description: Shipping region name. - name: carrierServiceOptions | type: Array | description: All carrier options for this shipping rule. - name: carrierId | type: string | description: Carrier ID. - name: shippingOptions | type: Array | description: Shipping options offered by this carrier for this request. - name: buyerNote | type: string | description: [Buyer note](https://support.wix.com/en/article/collecting-and-viewing-buyer-notes) left by the customer. - name: buyerInfo | type: BuyerInfo | description: Buyer information. - name: contactId | type: string | description: Contact ID. Auto-created if one does not yet exist. For more information, see the Contacts API. - name: email | type: string | description: Buyer email address. - name: conversionCurrency | type: string | description: The currency [selected by the customer](https://support.wix.com/en/article/multicurrency-an-overview) during the purchase flow, in three-letter [ISO-4217 alphabetic](https://en.wikipedia.org/wiki/ISO_4217#Active_codes) format. This reflects the customer’s preferred display currency and may differ from the site’s default currency. When no specific currency is selected by the customer, this matches the `currency` property. - name: priceSummary | type: PriceSummary | description: Calculated price summary for the checkout. - name: subtotal | type: MultiCurrencyPrice | description: Subtotal of all line items, before discounts and before tax. - name: shipping | type: MultiCurrencyPrice | description: Total shipping price, before discounts and before tax. - name: tax | type: MultiCurrencyPrice | description: Total tax. - name: discount | type: MultiCurrencyPrice | description: Total calculated discount value. - name: total | type: MultiCurrencyPrice | description: Total price after discounts, gift cards, and tax. - name: additionalFees | type: MultiCurrencyPrice | description: Total additional fees price before tax. - name: calculationErrors | type: CalculationErrors | description: Errors when calculating totals. - name: taxCalculationError | type: Details | description: Tax calculation error. - name: tracing | type: object | description: deprecated in API's - to enable migration from rendering arbitrary tracing to rest response - name: couponCalculationError | type: Details | description: Coupon calculation error. - name: giftCardCalculationError | type: Details | description: DEPRECATED: Use gift_card_calculation_errors instead. - name: orderValidationErrors | type: Array | description: Order validation errors. - name: code | type: string | description: Error code. - name: description | type: string | description: Description of the error. - name: data | type: Struct | description: Data related to the error. - name: membershipError | type: Details | description: Membership payment methods calculation errors For example, will indicate that a line item that must be paid with membership payment doesn't have one or selected memberships are invalid - name: discountsCalculationError | type: Details | description: Discount Rule calculation error. - name: giftCard | type: GiftCard | description: Applied gift card details. >**Note:** Gift cards are supported through the Wix UI, though the service plugin is not currently available. Learn more about [Wix Gift Cards](https://support.wix.com/en/article/setting-up-wix-gift-cards-9451439). - name: id | type: string | description: Gift Card ID. - name: obfuscatedCode | type: string | description: Gift card obfuscated code. - name: amount | type: MultiCurrencyPrice | description: Actual amount to be redeemed from the gift card. - name: appId | type: string | description: App ID of the gift card provider. - name: externalId | type: string | description: External ID in the gift card provider's system. Used for integration and tracking across different platforms. - name: requestedAmount | type: MultiCurrencyPrice | description: Requested amount to redeem from the gift card. - name: appliedDiscounts | type: Array | description: Applied discounts. - name: discountType | type: string | description: Discount type. enum: GLOBAL, SPECIFIC_ITEMS, SHIPPING - name: lineItemIds | type: Array | description: IDs of line items the discount applies to. - name: customFields | type: Array | description: Custom fields. - name: value | type: Value | description: Custom field value. - name: title | type: string | description: Custom field title. - name: translatedTitle | type: string | description: Translated custom field title. - name: weightUnit | type: string | description: Weight measurement unit. Defaults to a site's weight unit. enum: UNSPECIFIED_WEIGHT_UNIT, KG, LB - name: taxSummary | type: TaxSummary | description: Tax summary. - name: taxableAmount | type: MultiCurrencyPrice | description: Amount for which tax is calculated, added from line items. - name: totalTax | type: MultiCurrencyPrice | description: Calculated tax, added from line items. - name: calculationDetails | type: TaxCalculationDetails | description: Tax calculator that was active when the order was created. - name: rateType | type: string | description: Rate calculation type. - name: currency | type: string | description: The site’s default currency, in three-letter [ISO-4217 alphabetic](https://en.wikipedia.org/wiki/ISO_4217#Active_codes) format. This represents the base currency configured for the site and remains constant regardless of the customer’s currency selection. - name: channelType | type: string | description: Sales channel that submitted the order. enum: UNSPECIFIED, WEB, POS, EBAY, AMAZON, OTHER_PLATFORM, WIX_APP_STORE, WIX_INVOICES, BACKOFFICE_MERCHANT, WISH, CLASS_PASS, GLOBAL_E, FACEBOOK, ETSY, TIKTOK, FAIRE_COM, PAYPAL_AGENTIC_CHECKOUT, STRIPE_AGENTIC_CHECKOUT - name: siteLanguage | type: string | description: Site language in which original values are shown. - name: buyerLanguage | type: string | description: Language for communication with the buyer. Defaults to the site language. For a site that supports multiple languages, this is the language the buyer selected. - name: completed | type: boolean | description: Whether an order was successfully created from this checkout. For an order to be successful, it must be successfully paid for (unless the total is 0). - name: taxIncludedInPrice | type: boolean | description: Whether tax is included in line item prices. - name: createdBy | type: CreatedBy | description: ID of the checkout's initiator. - name: createdDate | type: string | description: Date and time the checkout was created. - name: seconds | type: string | description: - name: nanos | type: number | description: - name: updatedDate | type: string | description: Date and time the checkout was updated. - name: payNow | type: PriceSummary | description: Minimal amount to pay in order to place the order. - name: payLater | type: PriceSummary | description: Remaining amount for the order to be fully paid. - name: membershipOptions | type: MembershipOptions | description: Memberships to apply when creating the order. - name: eligibleMemberships | type: Array | description: Reserved for internal use. - name: id | type: string | description: Membership ID. - name: appId | type: string | description: ID of the application providing this payment option. - name: name | type: MembershipName | description: The name of this membership. - name: lineItemIds | type: Array | description: Deprecated. Use `ExistingMembership.covered_line_items` to see which line items this membership covers. - name: credits | type: MembershipPaymentCredits | description: Membership's payment credits (balance information). - name: expirationDate | type: string | description: Deprecated. Use `offering_description`. - name: additionalData | type: Struct | description: Deprecated. Use `offering_description`. - name: invalidMemberships | type: Array | description: Reserved for internal use. - name: membership | type: Membership | description: Membership details. - name: reason | type: string | description: Reason why this membership is invalid and cannot be used. - name: selectedMemberships | type: SelectedMemberships | description: Selected membership to apply to this checkout. - name: memberships | type: Array | description: Selected memberships. - name: additionalFees | type: Array | description: Additional Fees. - name: code | type: string | description: Additional fee's unique code (or ID) for future processing. - name: name | type: string | description: Additional fee's name. - name: price | type: MultiCurrencyPrice | description: Additional fee's price. - name: taxDetails | type: ItemTaxFullDetails | description: Tax details. - name: providerAppId | type: string | description: Provider's app id. - name: priceBeforeTax | type: MultiCurrencyPrice | description: Additional fee's price before tax. - name: priceAfterTax | type: MultiCurrencyPrice | description: Additional fee's price after tax. - name: lineItemIds | type: Array | description: Optional - Line items associated with this additional fee. If no `lineItemIds` are provided, the fee will be associated with the whole cart/checkout/order. - name: source | type: string | description: the source the additional fee was added from enum: UNKNOWN_ADDITIONAL_FEE_SOURCE, SERVICE_PLUGIN, ITEM, MANUAL, SHIPPING, PLATFORM - name: translatedName | type: string | description: The translated name of the additional fee. The translation language is determined by the `languages` field in the [request envelope](https://dev.wix.com/docs/build-apps/develop-your-app/frameworks/self-hosting/supported-extensions/backend-extensions/add-self-hosted-service-plugin-extensions.md#request-envelope). - name: cartId | type: string | description: Cart ID that this checkout was created from. Empty if this checkout wasn't created from a cart. - name: violations | type: Array | description: List of validation violations raised by the [Validations service plugin](https://dev.wix.com/docs/rest/business-solutions/e-commerce/service-plugins/validations-integration-service-plugin/introduction.md). - name: severity | type: string | description: Severity of the violation. The violations are shown on the cart and checkout pages. A warning is displayed as yellow, and allows a site visitor to proceed with caution. An error is displayed as red, and doesn't allow a site visitor to proceed with the eCommerce flow. enum: WARNING, ERROR - name: target | type: Target | description: Target location on a checkout or cart page where the violation will be displayed. - name: description | type: string | description: Violation description. Can include rich text. Only HTTP or HTTPS links in the following format are allowed: `Click me`. - name: extendedFields | type: ExtendedFields | description: Custom field data for the checkout object. [Extended fields](https://dev.wix.com/docs/rest/articles/getting-started/extended-fields.md) must be configured in the app dashboard before they can be accessed with API calls. - name: purchaseFlowId | type: string | description: Persistent ID that correlates between the various eCommerce elements: cart, checkout, and order. - name: customSettings | type: CustomSettings | description: Additional settings for customization of the checkout process. > **Notes:** > * Custom settings can only be set when creating a checkout. > * To access and manage custom checkout page content, your app must have the permission scope named "Manage eCommerce - Admin Permissions". Learn more about [permission scopes](https://dev.wix.com/docs/build-apps/develop-your-app/access/authorization/about-permissions.md). - name: lockGiftCard | type: boolean | description: Whether to restrict the option to add or remove a gift card on the checkout page. Default: `false` - name: lockCouponCode | type: boolean | description: Whether to restrict the option to add or remove a coupon code on the checkout page. Default: `false` - name: disabledPolicyAgreementCheckbox | type: boolean | description: Whether to disable policy agreement checkout in the checkout page Default: `false` - name: disabledManualPayment | type: boolean | description: Whether to disable manual payment option for this checkout. Default: `false` - name: customContentReference | type: CustomContentReference | description: Reference IDs for the app and component providing custom checkout page content. To access and manage custom checkout page content, your app must have the permission scope named "Manage eCommerce - Admin Permissions". Learn more about [permission scopes](https://dev.wix.com/docs/build-apps/develop-your-app/access/authorization/about-permissions.md). - name: appId | type: string | description: ID of the app providing the content. You can get your app's ID from its page in the [app dashboard](https://dev.wix.com/dc3/my-apps/). - name: componentId | type: string | description: ID of the component within the app it belongs to. You can get your component's ID from its page in the [app dashboard](https://dev.wix.com/dc3/my-apps/). - name: externalReference | type: ExternalReference | description: References to an external app and resource associated with this checkout. Used for integration and tracking across different platforms. - name: appId | type: string | description: ID of the app associated with the purchase flow. For example, the Wix Pay Links app ID. - name: resourceId | type: string | description: Reference to an external resource ID. Used to link the purchase flow to a specific entity in an external system. For example, a Wix Pay Link ID. - name: payAfterFreeTrial | type: PriceSummary | description: Payment for subscriptions after free trial period. - name: businessLocationId | type: string | description: The business location ID associated with the checkout. To learn more, see the Locations API. - name: paymentCurrency | type: string | description: The currency used for payment, in three-letter [ISO-4217 alphabetic](https://en.wikipedia.org/wiki/ISO_4217#Active_codes) format. This is determined by the [customer's selected currency](https://support.wix.com/en/article/multicurrency-an-overview) and the site’s supported payment currencies. If the customer’s selected currency is supported for payment, this matches the `conversionCurrency` property. If not supported, this falls back to the `currency` property. - name: taxExemptGroupId | type: string | description: Tax exempt group ID to use for tax exemptions. ``` --- > Portal Navigation: > > - Append `.md` to any URL under `https://dev.wix.com/docs/` to get its markdown version. > - Pages are either content pages (article or reference text) or menu pages (a list of links to child pages). > - To get a menu page, truncate any URL to a parent path and append `.md` (e.g. `https://dev.wix.com/docs/sdk.md`, `https://dev.wix.com/docs/sdk/core-modules.md`). > - Top-level index of all portals: https://dev.wix.com/docs/llms.txt > - Full concatenated docs: https://dev.wix.com/docs/llms-full.txt # CreateCheckout # Package: checkout # Namespace: CheckoutService # Method link: https://dev.wix.com/docs/api-reference/business-solutions/e-commerce/purchase-flow/checkout/checkout/create-checkout.md ## Permission Scopes: Manage Orders: SCOPE.DC-STORES.MANAGE-ORDERS Manage eCommerce - Admin Permissions: SCOPE.ECOM.MANAGE-ADMIN ## Introduction Creates a checkout. A checkout must include at least 1 item in `lineItems` or `customLineItems`. If passing `checkoutInfo.customFields`, then `checkoutInfo.customFields.value` is a required field. --- ## REST API ### Examples ### Create checkout - custom content reference and custom settings ```curl curl -X POST \ 'https://www.wixapis.com/ecom/v1/checkouts' \ -H 'Content-Type: application/json' \ -H 'Authorization: ' \ -d '{ "checkoutInfo": { "settings": { "lockGiftCard": true, "lockCouponCode": false, "disabledPolicyAgreementCheckbox": true, "disabledManualPayment": true }, "customContentReference": { "appId": "0ad60ba7-712d-4b51-8c05-dc8f3181b890", "componentId": "fefdc677-eeea-4c52-8e0c-8367ca194183" } }, "lineItems": [ { "quantity": 10, "catalogReference": { "catalogItemId": "c8539b66-7a44-fe18-affc-afec4be8562a", "appId": "215238eb-22a5-4c36-9e7b-e7c08025e04e", "options": { "options": { "Color": "White" } } } } ], "channelType": "WEB" }' ``` ### Create checkout - custom line items ```curl curl -X POST \ 'https://www.wixapis.com/ecom/v1/checkouts' \ -H 'Content-Type: application/json' \ -H 'Authorization: ' \ -d '{ "customLineItems": [{ "price": "1", "quantity": 1, "productName": { "original": "Accessory Surprise" }, "itemType": { "preset": "PHYSICAL" } }], "channelType": "WEB" }' ``` ### Create checkout example - full checkout ```curl curl -X POST 'https://www.wixapis.com/ecom/v1/checkouts' \ -H 'Content-Type: application/json' \ -H 'Authorization: ' \ -d '{ "lineItems": [ { "quantity": 2, "catalogReference": { "appId": "215238eb-22a5-4c36-9e7b-e7c08025e04e", "catalogItemId": "0614129c-8777-9f3b-4dfe-b80a54df10d5" } }, { "quantity": 1, "catalogReference": { "appId": "215238eb-22a5-4c36-9e7b-e7c08025e04e", "catalogItemId": "2d28c854-8ee9-4ca9-8321-20df7bf1729c", "options": { "variantId": "7b9421d6-823d-4bb7-8ded-22c51cd31169", "customTextFields": { "Any text you want to add": "Happy Birthday!" } } } } ], "couponCode": "5-off-coffee", "checkoutInfo": { "shippingInfo": { "shippingDestination": { "address": { "country": "US", "subdivision": "US-ME", "city": "Richmond", "postalCode": "04357", "addressLine": "1773 Fantages Way" }, "contactDetails": { "firstName": "Johnny", "lastName": "Doe", "phone": "2075555217" } }, "selectedCarrierServiceOption": { "code": "c0feaab1-60d1-8eed-4283-b3bc10765af9", "carrierId": "c8a08776-c095-4dec-8553-8f9698d86adc" } }, "billingInfo": { "address": { "country": "US", "subdivision": "US-ME", "city": "Richmond", "postalCode": "04357", "addressLine": "1772 Fantages Way" }, "contactDetails": { "firstName": "John", "lastName": "Doe", "phone": "2075555217" } }, "buyerInfo": { "email": "Janedoe@gmail.com" }, "buyerNote": "Please wrap the order as a present" }, "channelType": "WEB" }' ``` ### Create checkout - minimum required fields ```curl curl -X POST \ 'https://www.wixapis.com/ecom/v1/checkouts' \ -H 'Content-Type: application/json' \ -H 'Authorization: ' \ -d '{ "lineItems": [ { "quantity": 10, "catalogReference": { "catalogItemId": "36d373dc-d992-2fe0-42be-887754c730b9", "appId": "215238eb-22a5-4c36-9e7b-e7c08025e04e" } } ], "channelType": "WEB" }' ``` --- ## JavaScript SDK ### Examples ### Create a checkout, full object ```javascript /************************************** * Backend code - my-backend-file.web.js/ts * **************************************/ import { Permissions, webMethod } from '@wix/web-methods'; import { checkout } from '@wix/ecom'; export const myCreateCheckoutFunction = webMethod(Permissions.Anyone, async (options) => { try { const newCheckout = await checkout.createCheckout(options); console.log('Success! Checkout created, checkout:', newCheckout); return newCheckout; } catch (error) { console.error(error); // Handle the error } }); /************* * Page code * ************/ import { myCreateCheckoutFunction } from 'backend/my-backend-file.web'; // Sample options object: const options = { "lineItems": [{ "quantity": 3, "catalogReference": { // Wix Stores appId "appId": "215238eb-22a5-4c36-9e7b-e7c08025e04e", // Wix Stores productId "catalogItemId": "c8539b66-7a44-fe18-affc-afec4be8562a" } }, { "quantity": 1, "catalogReference": { "appId": "215238eb-22a5-4c36-9e7b-e7c08025e04e", "catalogItemId": "df19c1f7-07d8-a265-42f8-e8dfa824cc6e", "options": { "variantId": "2f430d69-9b75-4874-bfbd-c5f6fa5aff3d", "customTextFields": { "birthday card": "Happy Birthday!" } } } }, { "quantity": 1, "catalogReference": { "appId": "215238eb-22a5-4c36-9e7b-e7c08025e04e", "catalogItemId": "9fe8c5b2-9c94-7153-ebb9-8533695e2b6f", "options": { "Size": "Large", "Color": "White" } } } ], "channelType": "WEB", "couponCode": "SUMMERSALE10", "checkoutInfo": { "shippingInfo": { "shippingDestination": { "address": { "country": "US", "subdivision": "US-NY", "city": "New York", "postalCode": "10011", "addressLine1": "235 West 23rd Street", "addressLine2": "3rd floor" }, "contactDetails": { "firstName": "Jane", "lastName": "Doe", "phone": "+1234567890" } }, "selectedCarrierServiceOption": { "carrierId": "c8a08776-c095-4dec-8553-8f9698d86adc", "code": "ed5bbce2-9533-dff4-7db0-13702fd139c5" } }, "billingInfo": { "address": { "country": "US", "subdivision": "US-NY", "city": "New York", "postalCode": "10011", "addressLine1": "235 West 23rd Street", "addressLine2": "3rd floor" }, "contactDetails": { "firstName": "Jane", "lastName": "Doe", "phone": "+1234567890" } }, "buyerInfo": { "email": "Janedoe@example.com" }, "buyerNote": "Please wrap it up as a present", "customFields": [{ "title": "Tax ID", "translatedTitle": "Tax ID", "value": "12345" }] } } myCreateCheckoutFunction(options) .then((newCheckout) => { console.log('Success! Checkout created:', newCheckout); return newCheckout; }) .catch((error) => { console.error(error); // Handle the error }); /* Promise resolves to: * * { * "_id": "74cc6825-82a1-4f1f-9fbb-7d73f6be152a", * "lineItems": [ * { * "_id": "00000000-0000-0000-0000-000000000001", * "quantity": 3, * "catalogReference": { * "catalogItemId": "c8539b66-7a44-fe18-affc-afec4be8562a", * "appId": "215238eb-22a5-4c36-9e7b-e7c08025e04e" * }, * "productName": { * "original": "Shirt", * "translated": "Shirt" * }, * "url": "https://example.wixsite.com", * "price": { * "amount": "10", * "convertedAmount": "10", * "formattedAmount": "$10.00", * "formattedConvertedAmount": "$10.00" * }, * "lineItemPrice": { * "amount": "30", * "convertedAmount": "30", * "formattedAmount": "$30.00", * "formattedConvertedAmount": "$30.00" * }, * "fullPrice": { * "amount": "10", * "convertedAmount": "10", * "formattedAmount": "$10.00", * "formattedConvertedAmount": "$10.00" * }, * "priceBeforeDiscounts": { * "amount": "10", * "convertedAmount": "10", * "formattedAmount": "$10.00", * "formattedConvertedAmount": "$10.00" * }, * "totalPriceAfterTax": { * "amount": "20", * "convertedAmount": "20", * "formattedAmount": "$20.00", * "formattedConvertedAmount": "$20.00" * }, * "totalPriceBeforeTax": { * "amount": "20", * "convertedAmount": "20", * "formattedAmount": "$20.00", * "formattedConvertedAmount": "$20.00" * }, * "taxDetails": { * "taxableAmount": { * "amount": "20", * "convertedAmount": "20", * "formattedAmount": "$20.00", * "formattedConvertedAmount": "$20.00" * }, * "taxRate": "0", * "totalTax": { * "amount": "0", * "convertedAmount": "0", * "formattedAmount": "$0.00", * "formattedConvertedAmount": "$0.00" * }, * "rateBreakdown": [] * }, * "discount": { * "amount": "10", * "convertedAmount": "10", * "formattedAmount": "$10.00", * "formattedConvertedAmount": "$10.00" * }, * "descriptionLines": [], * "media": "wix:image://v1/3c76e2_c5331f937348492a97df87b0a3b34ea4~mv2.jpg#originWidth=1000&originHeight=1000", * "availability": { * "status": "AVAILABLE" * }, * "physicalProperties": { * "sku": "364115376135191", * "shippable": true * }, * "itemType": { * "preset": "PHYSICAL" * }, * "paymentOption": "FULL_PAYMENT_ONLINE", * "rootCatalogItemId": "c8539b66-7a44-fe18-affc-afec4be8562a" * }, * { * "_id": "00000000-0000-0000-0000-000000000002", * "quantity": 1, * "catalogReference": { * "catalogItemId": "df19c1f7-07d8-a265-42f8-e8dfa824cc6e", * "appId": "215238eb-22a5-4c36-9e7b-e7c08025e04e", * "options": { * "variantId": "2f430d69-9b75-4874-bfbd-c5f6fa5aff3d", * "customTextFields": { * "birthday card": "Happy Birthday!" * } * } * }, * "productName": { * "original": "Shoe", * "translated": "Shoe" * }, * "url": "https://example.wixsite.com", * "price": { * "amount": "85", * "convertedAmount": "85", * "formattedAmount": "$85.00", * "formattedConvertedAmount": "$85.00" * }, * "lineItemPrice": { * "amount": "85", * "convertedAmount": "85", * "formattedAmount": "$85.00", * "formattedConvertedAmount": "$85.00" * }, * "fullPrice": { * "amount": "85", * "convertedAmount": "85", * "formattedAmount": "$85.00", * "formattedConvertedAmount": "$85.00" * }, * "priceBeforeDiscounts": { * "amount": "85", * "convertedAmount": "85", * "formattedAmount": "$85.00", * "formattedConvertedAmount": "$85.00" * }, * "totalPriceAfterTax": { * "amount": "85", * "convertedAmount": "85", * "formattedAmount": "$85.00", * "formattedConvertedAmount": "$85.00" * }, * "totalPriceBeforeTax": { * "amount": "85", * "convertedAmount": "85", * "formattedAmount": "$85.00", * "formattedConvertedAmount": "$85.00" * }, * "taxDetails": { * "taxableAmount": { * "amount": "85", * "convertedAmount": "85", * "formattedAmount": "$85.00", * "formattedConvertedAmount": "$85.00" * }, * "taxRate": "0", * "totalTax": { * "amount": "0", * "convertedAmount": "0", * "formattedAmount": "$0.00", * "formattedConvertedAmount": "$0.00" * }, * "rateBreakdown": [] * }, * "discount": { * "amount": "0", * "convertedAmount": "0", * "formattedAmount": "$0.00", * "formattedConvertedAmount": "$0.00" * }, * "descriptionLines": [ * { * "name": { * "original": "Color", * "translated": "Color" * }, * "colorInfo": { * "original": "Brown", * "translated": "Brown", * "code": "#783f04" * } * }, * { * "name": { * "original": "birthday card", * "translated": "birthday card" * }, * "plainText": { * "original": "Happy Birthday!", * "translated": "Happy Birthday!" * } * } * ], * "media": "wix:image://v1/3c76e2_bf235c38610f4d2a905db71095b351cf~mv2.jpg#originWidth=1000&originHeight=1000", * "availability": { * "status": "AVAILABLE", * "quantityAvailable": 30 * }, * "physicalProperties": { * "sku": "364215376135191", * "shippable": true * }, * "itemType": { * "preset": "PHYSICAL" * }, * "paymentOption": "FULL_PAYMENT_ONLINE", * "rootCatalogItemId": "df19c1f7-07d8-a265-42f8-e8dfa824cc6e" * }, * { * "_id": "00000000-0000-0000-0000-000000000003", * "quantity": 1, * "catalogReference": { * "catalogItemId": "9fe8c5b2-9c94-7153-ebb9-8533695e2b6f", * "appId": "215238eb-22a5-4c36-9e7b-e7c08025e04e", * "options": { * "Size": "Large", * "Color": "White" * } * }, * "price": { * "amount": "0", * "convertedAmount": "0", * "formattedAmount": "", * "formattedConvertedAmount": "" * }, * "fullPrice": { * "amount": "0", * "convertedAmount": "0", * "formattedAmount": "", * "formattedConvertedAmount": "" * }, * "priceBeforeDiscounts": { * "amount": "0", * "convertedAmount": "0", * "formattedAmount": "", * "formattedConvertedAmount": "" * }, * "descriptionLines": [], * "availability": { * "status": "NOT_FOUND" * }, * "paymentOption": "FULL_PAYMENT_ONLINE" * } * ], * "billingInfo": { * "address": { * "addressLine1": "235 West 23rd Street", * "addressLine2": "3rd floor", * "city": "New York", * "subdivision": "US-NY", * "country": "US", * "postalCode": "10011" * }, * "contactDetails": { * "firstName": "Jane", * "lastName": "Doe", * "phone": "+1234567890" * } * }, * "shippingInfo": { * "shippingDestination": { * "address": { * "addressLine1": "235 West 23rd Street", * "addressLine2": "3rd floor", * "city": "New York", * "subdivision": "US-NY", * "country": "US", * "postalCode": "10011" * }, * "contactDetails": { * "firstName": "Jane", * "lastName": "Doe", * "phone": "+1234567890" * } * }, * "selectedCarrierServiceOption": { * "code": "ed5bbce2-9533-dff4-7db0-13702fd139c5", * "title": "Standard US Shipping", * "logistics": { * "deliveryTime": "" * }, * "cost": { * "totalPriceAfterTax": { * "amount": "10", * "convertedAmount": "10", * "formattedAmount": "$10.00", * "formattedConvertedAmount": "$10.00" * }, * "totalPriceBeforeTax": { * "amount": "10", * "convertedAmount": "10", * "formattedAmount": "$10.00", * "formattedConvertedAmount": "$10.00" * }, * "taxDetails": { * "taxRate": "0", * "totalTax": { * "amount": "0", * "convertedAmount": "0", * "formattedAmount": "$0.00", * "formattedConvertedAmount": "$0.00" * }, * "rateBreakdown": [] * }, * "price": { * "amount": "10", * "convertedAmount": "10", * "formattedAmount": "$10.00", * "formattedConvertedAmount": "$10.00" * } * }, * "requestedShippingOption": true, * "otherCharges": [], * "carrierId": "c8a08776-c095-4dec-8553-8f9698d86adc" * }, * "region": { * "_id": "009fbe5d-89d3-7825-cbbf-1aab4d908b73", * "name": "USA shipping" * }, * "carrierServiceOptions": [ * { * "carrierId": "c8a08776-c095-4dec-8553-8f9698d86adc", * "shippingOptions": [ * { * "code": "ed5bbce2-9533-dff4-7db0-13702fd139c5", * "title": "Standard US Shipping", * "logistics": { * "deliveryTime": "" * }, * "cost": { * "price": { * "amount": "10", * "convertedAmount": "10", * "formattedAmount": "$10.00", * "formattedConvertedAmount": "$10.00" * }, * "otherCharges": [] * } * } * ] * } * ] * }, * "buyerNote": "Please wrap it up as a present", * "buyerInfo": { * "email": "Janedoe@example.com", * "memberId": "c43190d2-eea3-493e-b6e8-f146850c6873" * }, * "conversionCurrency": "USD", * "priceSummary": { * "subtotal": { * "amount": "115", * "convertedAmount": "115", * "formattedAmount": "$115.00", * "formattedConvertedAmount": "$115.00" * }, * "shipping": { * "amount": "10", * "convertedAmount": "10", * "formattedAmount": "$10.00", * "formattedConvertedAmount": "$10.00" * }, * "tax": { * "amount": "0", * "convertedAmount": "0", * "formattedAmount": "$0.00", * "formattedConvertedAmount": "$0.00" * }, * "discount": { * "amount": "10", * "convertedAmount": "10", * "formattedAmount": "$10.00", * "formattedConvertedAmount": "$10.00" * }, * "total": { * "amount": "115", * "convertedAmount": "115", * "formattedAmount": "$115.00", * "formattedConvertedAmount": "$115.00" * } * }, * "calculationErrors": { * "orderValidationErrors": [] * }, * "appliedDiscounts": [ * { * "discountType": "GLOBAL", * "lineItemIds": [], * "coupon": { * "_id": "fbb94b06-7447-4161-9c48-59bfcdc39e77", * "code": "SUMMERSALE10", * "amount": { * "amount": "10", * "convertedAmount": "10", * "formattedAmount": "$10.00", * "formattedConvertedAmount": "$10.00" * }, * "name": "SUMMERSALE10", * "couponType": "MoneyOff" * } * } * ], * "customFields": [ * { * "value": "12345", * "title": "Tax ID", * "translatedTitle": "Tax ID" * } * ], * "weightUnit": "KG", * "currency": "USD", * "channelType": "WEB", * "siteLanguage": "en", * "buyerLanguage": "en", * "completed": false, * "taxIncludedInPrice": false, * "createdBy": { * "memberId": "c43190d2-eea3-493e-b6e8-f146850c6873" * }, * "_createdDate": "2022-07-18T13:25:22.141Z", * "_updatedDate": "2022-07-18T13:25:22.141Z", * "payNow": { * "subtotal": { * "amount": "115", * "convertedAmount": "115", * "formattedAmount": "$115.00", * "formattedConvertedAmount": "$115.00" * }, * "shipping": { * "amount": "10", * "convertedAmount": "10", * "formattedAmount": "$10.00", * "formattedConvertedAmount": "$10.00" * }, * "tax": { * "amount": "0", * "convertedAmount": "0", * "formattedAmount": "$0.00", * "formattedConvertedAmount": "$0.00" * }, * "discount": { * "amount": "10", * "convertedAmount": "10", * "formattedAmount": "$10.00", * "formattedConvertedAmount": "$10.00" * }, * "total": { * "amount": "115", * "convertedAmount": "115", * "formattedAmount": "$115.00", * "formattedConvertedAmount": "$115.00" * } * }, * "payLater": { * "subtotal": { * "amount": "0", * "convertedAmount": "0", * "formattedAmount": "$0.00", * "formattedConvertedAmount": "$0.00" * }, * "shipping": { * "amount": "0", * "convertedAmount": "0", * "formattedAmount": "$0.00", * "formattedConvertedAmount": "$0.00" * }, * "tax": { * "amount": "0", * "convertedAmount": "0", * "formattedAmount": "$0.00", * "formattedConvertedAmount": "$0.00" * }, * "discount": { * "amount": "0", * "convertedAmount": "0", * "formattedAmount": "$0.00", * "formattedConvertedAmount": "$0.00" * }, * "total": { * "amount": "0", * "convertedAmount": "0", * "formattedAmount": "$0.00", * "formattedConvertedAmount": "$0.00" * } * }, * "membershipOptions": { * "eligibleMemberships": [], * "invalidMemberships": [], * "selectedMemberships": { * "memberships": [] * } * } * } * */ ``` ### Create a checkout with minimum required properties ```javascript /***************************************** * Backend code - my-backend-file.web.js/ts * ****************************************/ import { Permissions, webMethod } from '@wix/web-methods'; import { checkout } from '@wix/ecom'; export const myCreateCheckoutFunction = webMethod(Permissions.Anyone, async (options) => { try { const newCheckout = await checkout.createCheckout(options); console.log('Success! Checkout created, checkout:', newCheckout); return newCheckout; } catch (error) { console.error(error); // Handle the error } }); /************* * Page code * ************/ import { myCreateCheckoutFunction } from 'backend/my-backend-file.web'; // Sample options object: const options = { "lineItems": [{ "quantity": 3, "catalogReference": { // Wix Stores appId "appId": "215238eb-22a5-4c36-9e7b-e7c08025e04e", // Wix Stores productId "catalogItemId": "c8539b66-7a44-fe18-affc-afec4be8562a" } }], "channelType": "WEB" } myCreateCheckoutFunction(options) .then((newCheckout) => { console.log('Success! Checkout created:', newCheckout); return newCheckout; }) .catch((error) => { console.error(error); // Handle the error }); /* Promise resolves to: * * { * "_id": "8a27ba84-0814-4b0e-8db3-b6057a421bd9", * "lineItems": [ * { * "_id": "00000000-0000-0000-0000-000000000001", * "quantity": 3, * "catalogReference": { * "catalogItemId": "c8539b66-7a44-fe18-affc-afec4be8562a", * "appId": "215238eb-22a5-4c36-9e7b-e7c08025e04e" * }, * "productName": { * "original": "Shirt", * "translated": "Shirt" * }, * "url": "https://example.wixsite.com", * "price": { * "amount": "10", * "convertedAmount": "10", * "formattedAmount": "$10.00", * "formattedConvertedAmount": "$10.00" * }, * "lineItemPrice": { * "amount": "30", * "convertedAmount": "30", * "formattedAmount": "$30.00", * "formattedConvertedAmount": "$30.00" * }, * "fullPrice": { * "amount": "10", * "convertedAmount": "10", * "formattedAmount": "$10.00", * "formattedConvertedAmount": "$10.00" * }, * "priceBeforeDiscounts": { * "amount": "10", * "convertedAmount": "10", * "formattedAmount": "$10.00", * "formattedConvertedAmount": "$10.00" * }, * "totalPriceAfterTax": { * "amount": "30", * "convertedAmount": "30", * "formattedAmount": "$30.00", * "formattedConvertedAmount": "$30.00" * }, * "totalPriceBeforeTax": { * "amount": "30", * "convertedAmount": "30", * "formattedAmount": "$30.00", * "formattedConvertedAmount": "$30.00" * }, * "taxDetails": { * "taxableAmount": { * "amount": "30", * "convertedAmount": "30", * "formattedAmount": "$30.00", * "formattedConvertedAmount": "$30.00" * }, * "taxRate": "0", * "totalTax": { * "amount": "0", * "convertedAmount": "0", * "formattedAmount": "$0.00", * "formattedConvertedAmount": "$0.00" * }, * "rateBreakdown": [] * }, * "discount": { * "amount": "0", * "convertedAmount": "0", * "formattedAmount": "$0.00", * "formattedConvertedAmount": "$0.00" * }, * "descriptionLines": [], * "media": "wix:image://v1/3c76e2_c5331f937348492a97df87b0a3b34ea4~mv2.jpg#originWidth=1000&originHeight=1000", * "availability": { * "status": "AVAILABLE" * }, * "physicalProperties": { * "sku": "364115376135191", * "shippable": true * }, * "itemType": { * "preset": "PHYSICAL" * }, * "paymentOption": "FULL_PAYMENT_ONLINE", * "rootCatalogItemId": "c8539b66-7a44-fe18-affc-afec4be8562a" * } * ], * "shippingInfo": { * "carrierServiceOptions": [] * }, * "buyerInfo": { * "memberId": "c43190d2-eea3-493e-b6e8-f146850c6873" * }, * "conversionCurrency": "USD", * "priceSummary": { * "subtotal": { * "amount": "30", * "convertedAmount": "30", * "formattedAmount": "$30.00", * "formattedConvertedAmount": "$30.00" * }, * "shipping": { * "amount": "0", * "convertedAmount": "0", * "formattedAmount": "$0.00", * "formattedConvertedAmount": "$0.00" * }, * "tax": { * "amount": "0", * "convertedAmount": "0", * "formattedAmount": "$0.00", * "formattedConvertedAmount": "$0.00" * }, * "discount": { * "amount": "0", * "convertedAmount": "0", * "formattedAmount": "$0.00", * "formattedConvertedAmount": "$0.00" * }, * "total": { * "amount": "30", * "convertedAmount": "30", * "formattedAmount": "$30.00", * "formattedConvertedAmount": "$30.00" * } * }, * "calculationErrors": { * "orderValidationErrors": [] * }, * "appliedDiscounts": [], * "customFields": [], * "weightUnit": "KG", * "currency": "USD", * "channelType": "WEB", * "siteLanguage": "en", * "buyerLanguage": "en", * "completed": false, * "taxIncludedInPrice": false, * "createdBy": { * "memberId": "c43190d2-eea3-493e-b6e8-f146850c6873" * }, * "_createdDate": "2022-07-18T13:39:03.023Z", * "_updatedDate": "2022-07-18T13:39:03.023Z", * "payNow": { * "subtotal": { * "amount": "30", * "convertedAmount": "30", * "formattedAmount": "$30.00", * "formattedConvertedAmount": "$30.00" * }, * "shipping": { * "amount": "0", * "convertedAmount": "0", * "formattedAmount": "$0.00", * "formattedConvertedAmount": "$0.00" * }, * "tax": { * "amount": "0", * "convertedAmount": "0", * "formattedAmount": "$0.00", * "formattedConvertedAmount": "$0.00" * }, * "discount": { * "amount": "0", * "convertedAmount": "0", * "formattedAmount": "$0.00", * "formattedConvertedAmount": "$0.00" * }, * "total": { * "amount": "30", * "convertedAmount": "30", * "formattedAmount": "$30.00", * "formattedConvertedAmount": "$30.00" * } * }, * "payLater": { * "subtotal": { * "amount": "0", * "convertedAmount": "0", * "formattedAmount": "$0.00", * "formattedConvertedAmount": "$0.00" * }, * "shipping": { * "amount": "0", * "convertedAmount": "0", * "formattedAmount": "$0.00", * "formattedConvertedAmount": "$0.00" * }, * "tax": { * "amount": "0", * "convertedAmount": "0", * "formattedAmount": "$0.00", * "formattedConvertedAmount": "$0.00" * }, * "discount": { * "amount": "0", * "convertedAmount": "0", * "formattedAmount": "$0.00", * "formattedConvertedAmount": "$0.00" * }, * "total": { * "amount": "0", * "convertedAmount": "0", * "formattedAmount": "$0.00", * "formattedConvertedAmount": "$0.00" * } * }, * "membershipOptions": { * "eligibleMemberships": [], * "invalidMemberships": [], * "selectedMemberships": { * "memberships": [] * } * } * } * */ ``` ### createCheckout (self-hosted) Self-hosted SDK calls require you to [create a client](https://dev.wix.com/docs/sdk/articles/work-with-the-sdk/about-the-wix-client.md). ```javascript import { createClient } from '@wix/sdk'; import { checkout } from '@wix/ecom'; // Import the auth strategy for the relevant access type // Import the relevant host module if needed const myWixClient = createClient ({ modules: { checkout }, // Include the auth strategy and host as relevant }); async function createCheckout(options) { const response = await myWixClient.checkout.createCheckout(options); }; ``` --- --- > Portal Navigation: > > - Append `.md` to any URL under `https://dev.wix.com/docs/` to get its markdown version. > - Pages are either content pages (article or reference text) or menu pages (a list of links to child pages). > - To get a menu page, truncate any URL to a parent path and append `.md` (e.g. `https://dev.wix.com/docs/sdk.md`, `https://dev.wix.com/docs/sdk/core-modules.md`). > - Top-level index of all portals: https://dev.wix.com/docs/llms.txt > - Full concatenated docs: https://dev.wix.com/docs/llms-full.txt # GetCheckout # Package: checkout # Namespace: CheckoutService # Method link: https://dev.wix.com/docs/api-reference/business-solutions/e-commerce/purchase-flow/checkout/checkout/get-checkout.md ## Permission Scopes: Read Orders: SCOPE.DC-STORES.READ-ORDERS ## Introduction Retrieves a checkout. --- ## REST API ### Examples ### Get Checkout ```curl curl -X GET \ 'https://www.wixapis.com/ecom/v1/checkouts/d0d530f0-45d9-4c2c-bd71-8ab07a058472' \ -H 'Content-Type: application/json' \ -H 'Authorization: ' ``` --- ## JavaScript SDK ### Examples ### Get a checkout ```javascript /************************************** * Backend code - my-backend-file.web.js/ts * *************************************/ import { Permissions, webMethod } from '@wix/web-methods'; import { checkout } from '@wix/ecom'; export const myGetCheckoutFunction = webMethod(Permissions.Anyone, async (checkoutId) => { try { const retrievedCheckout = await checkout.getCheckout(checkoutId); console.log('Success! Retrieved checkout:', retrievedCheckout); return retrievedCheckout; } catch (error) { console.error(error); // Handle the error } }); /************* * Page code * ************/ import { myGetCheckoutFunction } from 'backend/my-backend-file.web'; // Sample checkoutId: const checkoutId = '74cc6825-82a1-4f1f-9fbb-7d73f6be152a'; myGetCheckoutFunction(checkoutId) .then((checkout) => { const formattedCheckoutTotal = checkout.priceSummary.subtotal.formattedAmount; const numOfCheckoutLineItems = checkout.lineItems.length; console.log('Success! Retrieved checkout:', checkout); return checkout; }) .catch((error) => { console.error(error); // Handle the error }); /* Promise resolves to: * * { * "_id": "74cc6825-82a1-4f1f-9fbb-7d73f6be152a", * "lineItems": [ * { * "_id": "00000000-0000-0000-0000-000000000001", * "quantity": 3, * "catalogReference": { * "catalogItemId": "c8539b66-7a44-fe18-affc-afec4be8562a", * "appId": "215238eb-22a5-4c36-9e7b-e7c08025e04e" * }, * "productName": { * "original": "Shirt", * "translated": "Shirt" * }, * "url": "https://example.wixsite.com", * "price": { * "amount": "10.00", * "convertedAmount": "10.00", * "formattedAmount": "$10.00", * "formattedConvertedAmount": "$10.00" * }, * "lineItemPrice": { * "amount": "30.00", * "convertedAmount": "30.00", * "formattedAmount": "$30.00", * "formattedConvertedAmount": "$30.00" * }, * "fullPrice": { * "amount": "10.00", * "convertedAmount": "10.00", * "formattedAmount": "$10.00", * "formattedConvertedAmount": "$10.00" * }, * "priceBeforeDiscounts": { * "amount": "10.00", * "convertedAmount": "10.00", * "formattedAmount": "$10.00", * "formattedConvertedAmount": "$10.00" * }, * "totalPriceAfterTax": { * "amount": "20.0", * "convertedAmount": "20.0", * "formattedAmount": "$20.00", * "formattedConvertedAmount": "$20.00" * }, * "totalPriceBeforeTax": { * "amount": "20.0", * "convertedAmount": "20.0", * "formattedAmount": "$20.00", * "formattedConvertedAmount": "$20.00" * }, * "taxDetails": { * "taxableAmount": { * "amount": "20.0", * "convertedAmount": "20.0", * "formattedAmount": "$20.00", * "formattedConvertedAmount": "$20.00" * }, * "taxRate": "0.0", * "totalTax": { * "amount": "0.0", * "convertedAmount": "0.0", * "formattedAmount": "$0.00", * "formattedConvertedAmount": "$0.00" * }, * "rateBreakdown": [] * }, * "discount": { * "amount": "10.0", * "convertedAmount": "10.0", * "formattedAmount": "$10.00", * "formattedConvertedAmount": "$10.00" * }, * "descriptionLines": [], * "media": "wix:image://v1/3c76e2_c5331f937348492a97df87b0a3b34ea4~mv2.jpg#originWidth=1000&originHeight=1000", * "availability": { * "status": "AVAILABLE" * }, * "physicalProperties": { * "sku": "364115376135191", * "shippable": true * }, * "itemType": { * "preset": "PHYSICAL" * }, * "paymentOption": "FULL_PAYMENT_ONLINE", * "rootCatalogItemId": "c8539b66-7a44-fe18-affc-afec4be8562a" * }, * { * "_id": "00000000-0000-0000-0000-000000000002", * "quantity": 1, * "catalogReference": { * "catalogItemId": "df19c1f7-07d8-a265-42f8-e8dfa824cc6e", * "appId": "215238eb-22a5-4c36-9e7b-e7c08025e04e", * "options": { * "variantId": "2f430d69-9b75-4874-bfbd-c5f6fa5aff3d", * "customTextFields": { * "birthday card": "Happy Birthday!" * } * } * }, * "productName": { * "original": "Shoe", * "translated": "Shoe" * }, * "url": "https://example.wixsite.com", * "price": { * "amount": "85.00", * "convertedAmount": "85.00", * "formattedAmount": "$85.00", * "formattedConvertedAmount": "$85.00" * }, * "lineItemPrice": { * "amount": "85.00", * "convertedAmount": "85.00", * "formattedAmount": "$85.00", * "formattedConvertedAmount": "$85.00" * }, * "fullPrice": { * "amount": "85.00", * "convertedAmount": "85.00", * "formattedAmount": "$85.00", * "formattedConvertedAmount": "$85.00" * }, * "priceBeforeDiscounts": { * "amount": "85.00", * "convertedAmount": "85.00", * "formattedAmount": "$85.00", * "formattedConvertedAmount": "$85.00" * }, * "totalPriceAfterTax": { * "amount": "85.00", * "convertedAmount": "85.00", * "formattedAmount": "$85.00", * "formattedConvertedAmount": "$85.00" * }, * "totalPriceBeforeTax": { * "amount": "85.00", * "convertedAmount": "85.00", * "formattedAmount": "$85.00", * "formattedConvertedAmount": "$85.00" * }, * "taxDetails": { * "taxableAmount": { * "amount": "85.00", * "convertedAmount": "85.00", * "formattedAmount": "$85.00", * "formattedConvertedAmount": "$85.00" * }, * "taxRate": "0.0", * "totalTax": { * "amount": "0.0", * "convertedAmount": "0.0", * "formattedAmount": "$0.00", * "formattedConvertedAmount": "$0.00" * }, * "rateBreakdown": [] * }, * "discount": { * "amount": "0", * "convertedAmount": "0", * "formattedAmount": "$0.00", * "formattedConvertedAmount": "$0.00" * }, * "descriptionLines": [ * { * "name": { * "original": "Color", * "translated": "Color" * }, * "colorInfo": { * "original": "Brown", * "translated": "Brown", * "code": "#783f04" * } * }, * { * "name": { * "original": "birthday card", * "translated": "birthday card" * }, * "plainText": { * "original": "Happy Birthday!", * "translated": "Happy Birthday!" * } * } * ], * "media": "wix:image://v1/3c76e2_bf235c38610f4d2a905db71095b351cf~mv2.jpg#originWidth=1000&originHeight=1000", * "availability": { * "status": "AVAILABLE", * "quantityAvailable": 30 * }, * "physicalProperties": { * "sku": "364215376135191", * "shippable": true * }, * "itemType": { * "preset": "PHYSICAL" * }, * "paymentOption": "FULL_PAYMENT_ONLINE", * "rootCatalogItemId": "df19c1f7-07d8-a265-42f8-e8dfa824cc6e" * }, * { * "_id": "00000000-0000-0000-0000-000000000003", * "quantity": 1, * "catalogReference": { * "catalogItemId": "9fe8c5b2-9c94-7153-ebb9-8533695e2b6f", * "appId": "215238eb-22a5-4c36-9e7b-e7c08025e04e", * "options": { * "Size": "Large", * "Color": "White" * } * }, * "price": { * "amount": "", * "convertedAmount": "", * "formattedAmount": "", * "formattedConvertedAmount": "" * }, * "fullPrice": { * "amount": "", * "convertedAmount": "", * "formattedAmount": "", * "formattedConvertedAmount": "" * }, * "priceBeforeDiscounts": { * "amount": "", * "convertedAmount": "", * "formattedAmount": "", * "formattedConvertedAmount": "" * }, * "descriptionLines": [], * "availability": { * "status": "NOT_FOUND" * }, * "paymentOption": "FULL_PAYMENT_ONLINE" * } * ], * "billingInfo": { * "address": { * "addressLine1": "235 West 23rd Street", * "addressLine2": "3rd floor", * "city": "New York", * "subdivision": "US-NY", * "country": "US", * "postalCode": "10011" * }, * "contactDetails": { * "firstName": "Jane", * "lastName": "Doe", * "phone": "+1234567890" * } * }, * "shippingInfo": { * "shippingDestination": { * "address": { * "addressLine1": "235 West 23rd Street", * "addressLine2": "3rd floor", * "city": "New York", * "subdivision": "US-NY", * "country": "US", * "postalCode": "10011" * }, * "contactDetails": { * "firstName": "Jane", * "lastName": "Doe", * "phone": "+1234567890" * } * }, * "selectedCarrierServiceOption": { * "code": "ed5bbce2-9533-dff4-7db0-13702fd139c5", * "title": "Standard US Shipping", * "logistics": { * "deliveryTime": "" * }, * "cost": { * "totalPriceAfterTax": { * "amount": "10.0", * "convertedAmount": "10.0", * "formattedAmount": "$10.00", * "formattedConvertedAmount": "$10.00" * }, * "totalPriceBeforeTax": { * "amount": "10", * "convertedAmount": "10", * "formattedAmount": "$10.00", * "formattedConvertedAmount": "$10.00" * }, * "taxDetails": { * "taxRate": "0.0", * "totalTax": { * "amount": "0.0", * "convertedAmount": "0.0", * "formattedAmount": "$0.00", * "formattedConvertedAmount": "$0.00" * }, * "rateBreakdown": [] * }, * "price": { * "amount": "10", * "convertedAmount": "10", * "formattedAmount": "$10.00", * "formattedConvertedAmount": "$10.00" * } * }, * "requestedShippingOption": true, * "otherCharges": [], * "carrierId": "c8a08776-c095-4dec-8553-8f9698d86adc" * }, * "region": { * "_id": "009fbe5d-89d3-7825-cbbf-1aab4d908b73", * "name": "USA shipping" * }, * "carrierServiceOptions": [ * { * "carrierId": "c8a08776-c095-4dec-8553-8f9698d86adc", * "shippingOptions": [ * { * "code": "ed5bbce2-9533-dff4-7db0-13702fd139c5", * "title": "Standard US Shipping", * "logistics": { * "deliveryTime": "" * }, * "cost": { * "price": { * "amount": "10", * "convertedAmount": "10", * "formattedAmount": "$10.00", * "formattedConvertedAmount": "$10.00" * }, * "otherCharges": [] * } * } * ] * } * ] * }, * "buyerNote": "Please wrap it up as a present", * "buyerInfo": { * "contactId": "f7dc17a6-825a-466e-a78e-c4abea0217db", * "email": "Janedoe@example.com", * "memberId": "c43190d2-eea3-493e-b6e8-f146850c6873" * }, * "conversionCurrency": "USD", * "priceSummary": { * "subtotal": { * "amount": "115.00", * "convertedAmount": "115.00", * "formattedAmount": "$115.00", * "formattedConvertedAmount": "$115.00" * }, * "shipping": { * "amount": "10.0", * "convertedAmount": "10.0", * "formattedAmount": "$10.00", * "formattedConvertedAmount": "$10.00" * }, * "tax": { * "amount": "0.0", * "convertedAmount": "0.0", * "formattedAmount": "$0.00", * "formattedConvertedAmount": "$0.00" * }, * "discount": { * "amount": "10.0", * "convertedAmount": "10.0", * "formattedAmount": "$10.00", * "formattedConvertedAmount": "$10.00" * }, * "total": { * "amount": "115.00", * "convertedAmount": "115.00", * "formattedAmount": "$115.00", * "formattedConvertedAmount": "$115.00" * } * }, * "calculationErrors": { * "orderValidationErrors": [] * }, * "appliedDiscounts": [ * { * "discountType": "GLOBAL", * "lineItemIds": [], * "coupon": { * "_id": "fbb94b06-7447-4161-9c48-59bfcdc39e77", * "code": "SUMMERSALE10", * "amount": { * "amount": "10.0", * "convertedAmount": "10.0", * "formattedAmount": "$10.00", * "formattedConvertedAmount": "$10.00" * }, * "name": "SUMMERSALE10", * "couponType": "MoneyOff" * } * } * ], * "customFields": [ * { * "value": "12345", * "title": "Tax ID", * "translatedTitle": "Tax ID" * } * ], * "weightUnit": "KG", * "currency": "USD", * "channelType": "WEB", * "siteLanguage": "en", * "buyerLanguage": "en", * "completed": false, * "taxIncludedInPrice": false, * "createdBy": { * "memberId": "c43190d2-eea3-493e-b6e8-f146850c6873" * }, * "_createdDate": "2022-07-18T13:25:22.141Z", * "_updatedDate": "2022-07-18T13:25:22.216Z", * "payNow": { * "subtotal": { * "amount": "115.00", * "convertedAmount": "115.00", * "formattedAmount": "$115.00", * "formattedConvertedAmount": "$115.00" * }, * "shipping": { * "amount": "10.0", * "convertedAmount": "10.0", * "formattedAmount": "$10.00", * "formattedConvertedAmount": "$10.00" * }, * "tax": { * "amount": "0.0", * "convertedAmount": "0.0", * "formattedAmount": "$0.00", * "formattedConvertedAmount": "$0.00" * }, * "discount": { * "amount": "10.0", * "convertedAmount": "10.0", * "formattedAmount": "$10.00", * "formattedConvertedAmount": "$10.00" * }, * "total": { * "amount": "115.00", * "convertedAmount": "115.00", * "formattedAmount": "$115.00", * "formattedConvertedAmount": "$115.00" * } * }, * "payLater": { * "subtotal": { * "amount": "0.00", * "convertedAmount": "0.00", * "formattedAmount": "$0.00", * "formattedConvertedAmount": "$0.00" * }, * "shipping": { * "amount": "0.0", * "convertedAmount": "0.0", * "formattedAmount": "$0.00", * "formattedConvertedAmount": "$0.00" * }, * "tax": { * "amount": "0.0", * "convertedAmount": "0.0", * "formattedAmount": "$0.00", * "formattedConvertedAmount": "$0.00" * }, * "discount": { * "amount": "0.0", * "convertedAmount": "0.0", * "formattedAmount": "$0.00", * "formattedConvertedAmount": "$0.00" * }, * "total": { * "amount": "0.00", * "convertedAmount": "0.00", * "formattedAmount": "$0.00", * "formattedConvertedAmount": "$0.00" * } * }, * "membershipOptions": { * "eligibleMemberships": [], * "invalidMemberships": [], * "selectedMemberships": { * "memberships": [] * } * } * } * */ ``` ### getCheckout (self-hosted) Self-hosted SDK calls require you to [create a client](https://dev.wix.com/docs/sdk/articles/work-with-the-sdk/about-the-wix-client.md). ```javascript import { createClient } from '@wix/sdk'; import { checkout } from '@wix/ecom'; // Import the auth strategy for the relevant access type // Import the relevant host module if needed const myWixClient = createClient ({ modules: { checkout }, // Include the auth strategy and host as relevant }); async function getCheckout(_id) { const response = await myWixClient.checkout.getCheckout(_id); }; ``` --- --- > Portal Navigation: > > - Append `.md` to any URL under `https://dev.wix.com/docs/` to get its markdown version. > - Pages are either content pages (article or reference text) or menu pages (a list of links to child pages). > - To get a menu page, truncate any URL to a parent path and append `.md` (e.g. `https://dev.wix.com/docs/sdk.md`, `https://dev.wix.com/docs/sdk/core-modules.md`). > - Top-level index of all portals: https://dev.wix.com/docs/llms.txt > - Full concatenated docs: https://dev.wix.com/docs/llms-full.txt # UpdateCheckout # Package: checkout # Namespace: CheckoutService # Method link: https://dev.wix.com/docs/api-reference/business-solutions/e-commerce/purchase-flow/checkout/checkout/update-checkout.md ## Permission Scopes: Manage Orders: SCOPE.DC-STORES.MANAGE-ORDERS Manage eCommerce - Admin Permissions: SCOPE.ECOM.MANAGE-ADMIN ## Introduction Updates a checkout. Use this method to update checkout fields such as billing and shipping info, or to add a coupon code or gift card. To update a checkout's `lineItems`, `completed` status, or to remove coupons and gift cards, see these methods: + Add to Checkout: Add line items to the checkout. + Update Line Items Quantity: Update the quantity of 1 or more line items in the checkout. + Remove Line Items: Remove a line item from the checkout. + Mark Checkout As Completed: To update `completed` to `true` if the checkout was completed through a non-Wix orders or payments system. + Remove Coupon: To remove an applied coupon from the checkout. + Remove Gift Card: To remove an applied gift card from the checkout. >**Notes:** > + If nothing is passed in the request, the call will fail. > + The `checkout.buyerInfo.email` may not be removed once it is set. --- ## REST API ### Examples ### Update checkout - custom content reference ```curl curl -X PATCH 'https://www.wixapis.com/ecom/v1/checkouts/656c5386-a982-439d-b3b1-155543a71e0d' \ -H 'Content-Type: application/json' \ -H 'Authorization: ' \ -d '{ "checkout": { "customContentReference": { "appId": "0ad60ba7-712d-4b51-8c05-dc8f3181b890", "componentId": "fefdc677-eeea-4c52-8e0c-8367ca194183" } } } ``` ### Update checkout example - update custom line items ```curl curl -X PATCH 'https://www.wixapis.com/ecom/v1/checkouts/cad3f0c4-d088-4ee6-ac8b-2ae926fb3580' \ -H 'Content-Type: application/json' \ -H 'Authorization: ' \ -d '{ "customLineItems": [{ "price": "2", "quantity": 1, "itemType": { "preset": "PHYSICAL" }, "productName": { "original": "Accessory Surprise" } }] }' ``` ### Update checkout example - partial update with field masks ```curl curl -X PATCH 'https://www.wixapis.com/ecom/v1/checkouts/98efbd87-8097-44e9-9005-72093d7a21d5' \ -H 'Content-Type: application/json' \ -H 'Authorization: ' \ -d '{ "checkout": { "shippingInfo": { "shippingDestination": { "contactDetails": { "firstName": "John", "lastName": "Doe", "phone": "2075555218" } } }, "buyerInfo": { "email": "Ivanushka1@example.com" } } }' ``` ### Update checkout example - apply gift card ```curl curl -X PATCH 'https://www.wixapis.com/ecom/v1/checkouts/98efbd87-8097-44e9-9005-72093d7a21d5' \ -H 'Content-Type: application/json' \ -H 'Authorization: ' \ -d '{ "giftCardCode": "100dollars" }' ``` ### Update checkout example - apply coupon ```curl curl -X PATCH 'https://www.wixapis.com/ecom/v1/checkouts/98efbd87-8097-44e9-9005-72093d7a21d5' \ -H 'Content-Type: application/json' \ -H 'Authorization: ' \ -d '{ "couponCode": "summer sale" }' ``` ### Update checkout example - update all fields in one request ```curl curl -X PATCH 'https://www.wixapis.com/ecom/v1/checkouts/98efbd87-8097-44e9-9005-72093d7a21d5' \ -H 'Content-Type: application/json' \ -H 'Authorization: ' \ -d '{ "couponCode": "summer sale", "giftCardCode": "100dollars", "checkout": { "shippingInfo": { "shippingDestination": { "address": { "country": "US", "subdivision": "US-ME", "city": "Richmond", "postalCode": "04357", "addressLine": "1773 Fantages Way" }, "contactDetails": { "firstName": "John1", "lastName": "Doe", "phone": "2075555217" } }, "selectedCarrierServiceOption": { "code": "c0feaab1-60d1-8eed-4283-b3bc10765af9", "carrierId": "c8a08776-c095-4dec-8553-8f9698d86adc" } }, "billingInfo": { "address": { "country": "US", "subdivision": "US-ME", "city": "Richmond", "postalCode": "04357", "addressLine": "1772 Fantages Way" }, "contactDetails": { "firstName": "John", "lastName": "Doe", "phone": "2075555217" } }, "buyerInfo": { "email": "janedoe1@gmail.com" }, "buyerNote": "wrap it as present", "customFields": [ { "title": "Tax id", "translatedTitle": "Tax id", "value": "12345" } ] } }' ``` --- ## JavaScript SDK ### Examples ### Update a checkout Updates the `buyerNote` and adds a coupon to the checkout ```javascript /************************************** * Backend code - my-backend-file.web.js/ts * *************************************/ import { Permissions, webMethod } from '@wix/web-methods'; import { checkout } from '@wix/ecom'; export const myUpdateCheckoutFunction = webMethod(Permissions.Anyone, async (_id, checkoutInfo, options) => { try { const updatedCheckout = await checkout.updateCheckout(_id, checkoutInfo, options); console.log('Success! Updated checkout: ', updatedCheckout); return updatedCheckout; } catch (error) { console.error(error); // Handle the error } }); /************* * Page code * ************/ import { myUpdateCheckoutFunction } from 'backend/my-backend-file.web'; // Sample checkoutId: const _id = "21fe558e-21a0-4cff-a49b-a4ccb0f7414f"; const checkoutInfo = { // New value for buyerNote "buyerNote": "Please gift wrap this order. Thanks!" } const options = { // Coupon code to be applied to the checkout "couponCode": "SUMMERSALE10" } myUpdateCheckoutFunction(_id, checkoutInfo, options) .then((updatedCheckout) => { const updatedBuyerNote = updatedCheckout.buyerNote; // appliedCoupon boolean resolves to true if coupon object exists const appliedCoupon = !!updatedCheckout.appliedDiscounts[0].coupon console.log('Success! Updated checkout:', updatedCheckout); return updatedCheckout; }) .catch((error) => { console.error(error); // Handle the error }); /* Promise resolves to: * { * "_id": "21fe558e-21a0-4cff-a49b-a4ccb0f7414f", * "lineItems": [ * { * "_id": "00000000-0000-0000-0000-000000000001", * "quantity": 3, * "catalogReference": { * "catalogItemId": "c8539b66-7a44-fe18-affc-afec4be8562a", * "appId": "215238eb-22a5-4c36-9e7b-e7c08025e04e" * }, * "productName": { * "original": "Shirt", * "translated": "Shirt" * }, * "url": "https://giftsstore.wixsite.com/greatest-gifts/product-page/shirt", * "price": { * "amount": "10", * "convertedAmount": "10", * "formattedAmount": "€10.00", * "formattedConvertedAmount": "€10.00" * }, * "lineItemPrice": { * "amount": "30", * "convertedAmount": "30", * "formattedAmount": "€30.00", * "formattedConvertedAmount": "€30.00" * }, * "fullPrice": { * "amount": "10", * "convertedAmount": "10", * "formattedAmount": "€10.00", * "formattedConvertedAmount": "€10.00" * }, * "priceBeforeDiscounts": { * "amount": "10", * "convertedAmount": "10", * "formattedAmount": "€10.00", * "formattedConvertedAmount": "€10.00" * }, * "totalPriceAfterTax": { * "amount": "30", * "convertedAmount": "30", * "formattedAmount": "€30.00", * "formattedConvertedAmount": "€30.00" * }, * "totalPriceBeforeTax": { * "amount": "30", * "convertedAmount": "30", * "formattedAmount": "€30.00", * "formattedConvertedAmount": "€30.00" * }, * "taxDetails": { * "taxableAmount": { * "amount": "30", * "convertedAmount": "30", * "formattedAmount": "€30.00", * "formattedConvertedAmount": "€30.00" * }, * "taxRate": "0", * "totalTax": { * "amount": "0", * "convertedAmount": "0", * "formattedAmount": "€0.00", * "formattedConvertedAmount": "€0.00" * }, * "rateBreakdown": [] * }, * "discount": { * "amount": "0", * "convertedAmount": "0", * "formattedAmount": "€0.00", * "formattedConvertedAmount": "€0.00" * }, * "descriptionLines": [], * "media": "wix:image://v1/3c76e2_c5331f937348492a97df87b0a3b34ea4~mv2.jpg#originWidth=1000&originHeight=1000", * "availability": { * "status": "AVAILABLE" * }, * "physicalProperties": { * "sku": "364115376135191", * "shippable": true * }, * "itemType": { * "preset": "PHYSICAL" * }, * "paymentOption": "FULL_PAYMENT_ONLINE", * "rootCatalogItemId": "c8539b66-7a44-fe18-affc-afec4be8562a" * } * ], * "shippingInfo": { * "carrierServiceOptions": [] * }, * "buyerNote": "Please gift wrap this order. Thanks!", * "buyerInfo": { * "contactId": "a4bc8d90-a91b-467f-a775-77d65dd0442e", * "email": "johnnydoe@example.com", * "memberId": "ea3d74df-b7dc-4ca1-a7c9-c416b9017a86" * }, * "conversionCurrency": "EUR", * "priceSummary": { * "subtotal": { * "amount": "30", * "convertedAmount": "30", * "formattedAmount": "€30.00", * "formattedConvertedAmount": "€30.00" * }, * "shipping": { * "amount": "0", * "convertedAmount": "0", * "formattedAmount": "€0.00", * "formattedConvertedAmount": "€0.00" * }, * "tax": { * "amount": "0", * "convertedAmount": "0", * "formattedAmount": "€0.00", * "formattedConvertedAmount": "€0.00" * }, * "discount": { * "amount": "0", * "convertedAmount": "0", * "formattedAmount": "€0.00", * "formattedConvertedAmount": "€0.00" * }, * "total": { * "amount": "30", * "convertedAmount": "30", * "formattedAmount": "€30.00", * "formattedConvertedAmount": "€30.00" * }, * "additionalFees": { * "amount": "0", * "convertedAmount": "0", * "formattedAmount": "€0.00", * "formattedConvertedAmount": "€0.00" * } * }, * "calculationErrors": { * "orderValidationErrors": [] * }, * "appliedDiscounts": [ * { * "discountType": "GLOBAL", * "lineItemIds": [], * "coupon": { * "_id": "fbb94b06-7447-4161-9c48-59bfcdc39e77", * "code": "SUMMERSALE10", * "amount": { * "amount": "10.0", * "convertedAmount": "10.0", * "formattedAmount": "€10.00", * "formattedConvertedAmount": "€10.00" * }, * "name": "SUMMERSALE10", * "couponType": "MoneyOff" * } * } * ], * "customFields": [], * "weightUnit": "KG", * "currency": "EUR", * "channelType": "WEB", * "siteLanguage": "en", * "buyerLanguage": "en", * "completed": false, * "taxIncludedInPrice": false, * "createdBy": { * "memberId": "ea3d74df-b7dc-4ca1-a7c9-c416b9017a86" * }, * "_createdDate": "2023-02-22T15:49:04.627Z", * "_updatedDate": "2023-02-22T16:30:58.947Z", * "payNow": { * "subtotal": { * "amount": "30", * "convertedAmount": "30", * "formattedAmount": "€30.00", * "formattedConvertedAmount": "€30.00" * }, * "shipping": { * "amount": "0", * "convertedAmount": "0", * "formattedAmount": "€0.00", * "formattedConvertedAmount": "€0.00" * }, * "tax": { * "amount": "0", * "convertedAmount": "0", * "formattedAmount": "€0.00", * "formattedConvertedAmount": "€0.00" * }, * "discount": { * "amount": "0", * "convertedAmount": "0", * "formattedAmount": "€0.00", * "formattedConvertedAmount": "€0.00" * }, * "total": { * "amount": "30", * "convertedAmount": "30", * "formattedAmount": "€30.00", * "formattedConvertedAmount": "€30.00" * }, * "additionalFees": { * "amount": "0", * "convertedAmount": "0", * "formattedAmount": "€0.00", * "formattedConvertedAmount": "€0.00" * } * }, * "payLater": { * "subtotal": { * "amount": "0", * "convertedAmount": "0", * "formattedAmount": "€0.00", * "formattedConvertedAmount": "€0.00" * }, * "shipping": { * "amount": "0", * "convertedAmount": "0", * "formattedAmount": "€0.00", * "formattedConvertedAmount": "€0.00" * }, * "tax": { * "amount": "0", * "convertedAmount": "0", * "formattedAmount": "€0.00", * "formattedConvertedAmount": "€0.00" * }, * "discount": { * "amount": "0", * "convertedAmount": "0", * "formattedAmount": "€0.00", * "formattedConvertedAmount": "€0.00" * }, * "total": { * "amount": "0", * "convertedAmount": "0", * "formattedAmount": "€0.00", * "formattedConvertedAmount": "€0.00" * }, * "additionalFees": { * "amount": "0", * "convertedAmount": "0", * "formattedAmount": "€0.00", * "formattedConvertedAmount": "€0.00" * } * }, * "membershipOptions": { * "eligibleMemberships": [], * "invalidMemberships": [], * "selectedMemberships": { * "memberships": [] * } * }, * "additionalFees": [], * } */ ``` ### updateCheckout (self-hosted) Self-hosted SDK calls require you to [create a client](https://dev.wix.com/docs/sdk/articles/work-with-the-sdk/about-the-wix-client.md). ```javascript import { createClient } from '@wix/sdk'; import { checkout } from '@wix/ecom'; // Import the auth strategy for the relevant access type // Import the relevant host module if needed const myWixClient = createClient ({ modules: { checkout }, // Include the auth strategy and host as relevant }); async function updateCheckout(_id,checkout,options) { const response = await myWixClient.checkout.updateCheckout(_id,checkout,options); }; ``` --- --- > Portal Navigation: > > - Append `.md` to any URL under `https://dev.wix.com/docs/` to get its markdown version. > - Pages are either content pages (article or reference text) or menu pages (a list of links to child pages). > - To get a menu page, truncate any URL to a parent path and append `.md` (e.g. `https://dev.wix.com/docs/sdk.md`, `https://dev.wix.com/docs/sdk/core-modules.md`). > - Top-level index of all portals: https://dev.wix.com/docs/llms.txt > - Full concatenated docs: https://dev.wix.com/docs/llms-full.txt # AddToCheckout # Package: checkout # Namespace: CheckoutService # Method link: https://dev.wix.com/docs/api-reference/business-solutions/e-commerce/purchase-flow/checkout/checkout/add-to-checkout.md ## Permission Scopes: Manage Orders: SCOPE.DC-STORES.MANAGE-ORDERS Manage eCommerce - Admin Permissions: SCOPE.ECOM.MANAGE-ADMIN ## Introduction Adds catalog line items and/or custom line items to a checkout. When adding [catalog](https://dev.wix.com/docs/rest/business-solutions/stores/catalog/e-commerce-integration.md) items to a checkout, the `lineItems.catalogReference.appId` and `lineItems.catalogReference.catalogItemId` fields are required. --- ## REST API ### Examples ### Add a custom line item to a checkout ```curl curl -X POST \ 'https://www.wixapis.com/ecom/v1/checkouts/cad3f0c4-d088-4ee6-ac8b-2ae926fb3580/add-to-checkout' \ -H 'Content-Type: application/json' \ -H 'Authorization: ' \ -d '{ "customLineItems": [{ "price": "1", "quantity": 1, "itemType": { "preset": "PHYSICAL" }, "productName": { "original": "Accessory Surprise" } }] }' ``` ### Add additional quantity to a line item in a checkout ```curl curl -X POST \ 'https://www.wixapis.com/ecom/v1/checkouts/050c8248-6c07-45e7-841c-4dcdf6ce8949/add-to-checkout' \ -H 'Content-Type: application/json' \ -H 'Authorization: ' \ -d '{ "lineItems": [ { "quantity": 10, "catalogReference": { "catalogItemId": "c8539b66-7a44-fe18-affc-afec4be8562a", "appId": "215238eb-22a5-4c36-9e7b-e7c08025e04e" } } ] }' ``` --- ## JavaScript SDK ### Examples ### Add a catalog item to a checkout ```javascript /***************************************** * Backend code - my-backend-file.web.js/ts * ****************************************/ import { Permissions, webMethod } from '@wix/web-methods'; import { checkout } from '@wix/ecom'; export const myAddToCheckoutFunction = webMethod(Permissions.Anyone, async (_id, options) => { try { const updatedCheckout = await checkout.addToCheckout(_id, options); console.log('Success! Updated checkout:', updatedCheckout); return updatedCheckout; } catch (error) { console.error(error); // Handle the error } }); /************* * Page code * ************/ import { myAddToCheckoutFunction } from 'backend/my-backend-file.web'; // Sample checkout ID: const _id = "63879d9f-0d1c-49aa-a0c5-5fc612a24ec7"; // Sample addToCheckout options: const options = { "lineItems": [{ "catalogReference": { // Wix Stores appId "appId": "215238eb-22a5-4c36-9e7b-e7c08025e04e", // Wix Stores productId "catalogItemId": "df19c1f7-07d8-a265-42f8-e8dfa824cc6e", // Wix Stores variantId "options": { "variantId": "e62fee23-7878-437a-bf0e-292f17d11cb5" } }, "quantity": 1 }] }; myAddToCheckoutFunction(_id, options) .then((updatedCheckout) => { const checkoutSubtotal = updatedCheckout.checkout.priceSummary.subtotal.amount; const numberOfCheckoutLineItems = updatedCheckout.checkout.lineItems.length; console.log('Success! Updated checkout:', updatedCheckout); return updatedCheckout; }) .catch((error) => { console.error(error); // Handle the error }); /* Promise resolves to: * * { * "_id": "63879d9f-0d1c-49aa-a0c5-5fc612a24ec7", * "lineItems": [ * { * "_id": "00000000-0000-0000-0000-000000000001", * "quantity": 1, * "catalogReference": { * "catalogItemId": "c8539b66-7a44-fe18-affc-afec4be8562a", * "appId": "215238eb-22a5-4c36-9e7b-e7c08025e04e" * }, * "productName": { * "original": "Shirt", * "translated": "Shirt" * }, * "url": "https://example.wixsite.com/ep-tester/product-page/shirt", * "price": { * "amount": "10", * "convertedAmount": "10", * "formattedAmount": "$10.00", * "formattedConvertedAmount": "$10.00" * }, * "lineItemPrice": { * "amount": "10", * "convertedAmount": "10", * "formattedAmount": "$10.00", * "formattedConvertedAmount": "$10.00" * }, * "fullPrice": { * "amount": "10", * "convertedAmount": "10", * "formattedAmount": "$10.00", * "formattedConvertedAmount": "$10.00" * }, * "priceBeforeDiscounts": { * "amount": "10", * "convertedAmount": "10", * "formattedAmount": "$10.00", * "formattedConvertedAmount": "$10.00" * }, * "totalPriceAfterTax": { * "amount": "10", * "convertedAmount": "10", * "formattedAmount": "$10.00", * "formattedConvertedAmount": "$10.00" * }, * "totalPriceBeforeTax": { * "amount": "10", * "convertedAmount": "10", * "formattedAmount": "$10.00", * "formattedConvertedAmount": "$10.00" * }, * "taxDetails": { * "taxableAmount": { * "amount": "10", * "convertedAmount": "10", * "formattedAmount": "$10.00", * "formattedConvertedAmount": "$10.00" * }, * "taxRate": "0", * "totalTax": { * "amount": "0", * "convertedAmount": "0", * "formattedAmount": "$0.00", * "formattedConvertedAmount": "$0.00" * }, * "rateBreakdown": [] * }, * "discount": { * "amount": "0", * "convertedAmount": "0", * "formattedAmount": "$0.00", * "formattedConvertedAmount": "$0.00" * }, * "descriptionLines": [], * "media": "wix:image://v1/3c76e2_c5331f937348492a97df87b0a3b34ea4~mv2.jpg#originWidth=1000&originHeight=1000", * "availability": { * "status": "AVAILABLE" * }, * "physicalProperties": { * "sku": "364115376135191", * "shippable": true * }, * "itemType": { * "preset": "PHYSICAL" * }, * "paymentOption": "FULL_PAYMENT_ONLINE", * "rootCatalogItemId": "c8539b66-7a44-fe18-affc-afec4be8562a" * }, * { * "_id": "00000000-0000-0000-0000-000000000002", * "quantity": 1, * "catalogReference": { * "catalogItemId": "df19c1f7-07d8-a265-42f8-e8dfa824cc6e", * "appId": "215238eb-22a5-4c36-9e7b-e7c08025e04e", * "options": { * "variantId": "e62fee23-7878-437a-bf0e-292f17d11cb5" * } * }, * "productName": { * "original": "Shoe", * "translated": "Shoe" * }, * "url": "https://example.wixsite.com/ep-tester/product-page/shoe", * "price": { * "amount": "85", * "convertedAmount": "85", * "formattedAmount": "$85.00", * "formattedConvertedAmount": "$85.00" * }, * "lineItemPrice": { * "amount": "85", * "convertedAmount": "85", * "formattedAmount": "$85.00", * "formattedConvertedAmount": "$85.00" * }, * "fullPrice": { * "amount": "85", * "convertedAmount": "85", * "formattedAmount": "$85.00", * "formattedConvertedAmount": "$85.00" * }, * "priceBeforeDiscounts": { * "amount": "85", * "convertedAmount": "85", * "formattedAmount": "$85.00", * "formattedConvertedAmount": "$85.00" * }, * "totalPriceAfterTax": { * "amount": "85", * "convertedAmount": "85", * "formattedAmount": "$85.00", * "formattedConvertedAmount": "$85.00" * }, * "totalPriceBeforeTax": { * "amount": "85", * "convertedAmount": "85", * "formattedAmount": "$85.00", * "formattedConvertedAmount": "$85.00" * }, * "taxDetails": { * "taxableAmount": { * "amount": "85", * "convertedAmount": "85", * "formattedAmount": "$85.00", * "formattedConvertedAmount": "$85.00" * }, * "taxRate": "0", * "totalTax": { * "amount": "0", * "convertedAmount": "0", * "formattedAmount": "$0.00", * "formattedConvertedAmount": "$0.00" * }, * "rateBreakdown": [] * }, * "discount": { * "amount": "0", * "convertedAmount": "0", * "formattedAmount": "$0.00", * "formattedConvertedAmount": "$0.00" * }, * "descriptionLines": [ * { * "name": { * "original": "Color", * "translated": "Color" * }, * "colorInfo": { * "original": "Black", * "translated": "Black", * "code": "#000" * } * } * ], * "media": "wix:image://v1/3c76e2_bf235c38610f4d2a905db71095b351cf~mv2.jpg#originWidth=1000&originHeight=1000", * "availability": { * "status": "AVAILABLE", * "quantityAvailable": 30 * }, * "physicalProperties": { * "sku": "364215376135191", * "shippable": true * }, * "itemType": { * "preset": "PHYSICAL" * }, * "paymentOption": "FULL_PAYMENT_ONLINE", * "rootCatalogItemId": "df19c1f7-07d8-a265-42f8-e8dfa824cc6e" * } * ], * "shippingInfo": { * "carrierServiceOptions": [] * }, * "buyerInfo": { * "contactId": "f7dc17a6-825a-466e-a78e-c4abea0217db", * "memberId": "c43190d2-eea3-493e-b6e8-f146850c6873" * }, * "conversionCurrency": "USD", * "priceSummary": { * "subtotal": { * "amount": "95", * "convertedAmount": "95", * "formattedAmount": "$95.00", * "formattedConvertedAmount": "$95.00" * }, * "shipping": { * "amount": "0", * "convertedAmount": "0", * "formattedAmount": "$0.00", * "formattedConvertedAmount": "$0.00" * }, * "tax": { * "amount": "0", * "convertedAmount": "0", * "formattedAmount": "$0.00", * "formattedConvertedAmount": "$0.00" * }, * "discount": { * "amount": "0", * "convertedAmount": "0", * "formattedAmount": "$0.00", * "formattedConvertedAmount": "$0.00" * }, * "total": { * "amount": "95", * "convertedAmount": "95", * "formattedAmount": "$95.00", * "formattedConvertedAmount": "$95.00" * }, * "additionalFees": { * "amount": "0", * "convertedAmount": "0", * "formattedAmount": "$0.00", * "formattedConvertedAmount": "$0.00" * } * }, * "calculationErrors": { * "orderValidationErrors": [] * }, * "appliedDiscounts": [], * "customFields": [], * "weightUnit": "KG", * "currency": "USD", * "channelType": "WEB", * "siteLanguage": "en", * "buyerLanguage": "en", * "completed": false, * "taxIncludedInPrice": false, * "createdBy": { * "memberId": "c43190d2-eea3-493e-b6e8-f146850c6873" * }, * "_createdDate": "2023-01-04T15:11:20.762Z", * "_updatedDate": "2023-01-04T15:15:24.035Z", * "payNow": { * "subtotal": { * "amount": "95", * "convertedAmount": "95", * "formattedAmount": "$95.00", * "formattedConvertedAmount": "$95.00" * }, * "shipping": { * "amount": "0", * "convertedAmount": "0", * "formattedAmount": "$0.00", * "formattedConvertedAmount": "$0.00" * }, * "tax": { * "amount": "0", * "convertedAmount": "0", * "formattedAmount": "$0.00", * "formattedConvertedAmount": "$0.00" * }, * "discount": { * "amount": "0", * "convertedAmount": "0", * "formattedAmount": "$0.00", * "formattedConvertedAmount": "$0.00" * }, * "total": { * "amount": "95", * "convertedAmount": "95", * "formattedAmount": "$95.00", * "formattedConvertedAmount": "$95.00" * }, * "additionalFees": { * "amount": "0", * "convertedAmount": "0", * "formattedAmount": "$0.00", * "formattedConvertedAmount": "$0.00" * } * }, * "payLater": { * "subtotal": { * "amount": "0", * "convertedAmount": "0", * "formattedAmount": "$0.00", * "formattedConvertedAmount": "$0.00" * }, * "shipping": { * "amount": "0", * "convertedAmount": "0", * "formattedAmount": "$0.00", * "formattedConvertedAmount": "$0.00" * }, * "tax": { * "amount": "0", * "convertedAmount": "0", * "formattedAmount": "$0.00", * "formattedConvertedAmount": "$0.00" * }, * "discount": { * "amount": "0", * "convertedAmount": "0", * "formattedAmount": "$0.00", * "formattedConvertedAmount": "$0.00" * }, * "total": { * "amount": "0", * "convertedAmount": "0", * "formattedAmount": "$0.00", * "formattedConvertedAmount": "$0.00" * }, * "additionalFees": { * "amount": "0", * "convertedAmount": "0", * "formattedAmount": "$0.00", * "formattedConvertedAmount": "$0.00" * } * }, * "membershipOptions": { * "eligibleMemberships": [], * "invalidMemberships": [], * "selectedMemberships": { * "memberships": [] * } * }, * "additionalFees": [], * } * */ ``` ### addToCheckout (self-hosted) Self-hosted SDK calls require you to [create a client](https://dev.wix.com/docs/sdk/articles/work-with-the-sdk/about-the-wix-client.md). ```javascript import { createClient } from '@wix/sdk'; import { checkout } from '@wix/ecom'; // Import the auth strategy for the relevant access type // Import the relevant host module if needed const myWixClient = createClient ({ modules: { checkout }, // Include the auth strategy and host as relevant }); async function addToCheckout(_id,options) { const response = await myWixClient.checkout.addToCheckout(_id,options); }; ``` --- --- > Portal Navigation: > > - Append `.md` to any URL under `https://dev.wix.com/docs/` to get its markdown version. > - Pages are either content pages (article or reference text) or menu pages (a list of links to child pages). > - To get a menu page, truncate any URL to a parent path and append `.md` (e.g. `https://dev.wix.com/docs/sdk.md`, `https://dev.wix.com/docs/sdk/core-modules.md`). > - Top-level index of all portals: https://dev.wix.com/docs/llms.txt > - Full concatenated docs: https://dev.wix.com/docs/llms-full.txt # CreateOrder # Package: checkout # Namespace: CheckoutService # Method link: https://dev.wix.com/docs/api-reference/business-solutions/e-commerce/purchase-flow/checkout/checkout/create-order.md ## Permission Scopes: Manage Orders: SCOPE.DC-STORES.MANAGE-ORDERS ## Introduction Creates an order from a specified checkout. For an order to be created from a checkout, the following requirements must be met: + A checkout cannot have calculation errors. Pass the checkout ID to Get Checkout and review the `calculationErrors` field. + A checkout must have at least 1 line item or custom line item. + All of the line Items have an `availability.status` of `"AVAILABLE"` or `"PARTIALLY_AVAILABLE"`. + If there is a payment to be made, meaning that `priceSummary.total` is greater than `0`, the `billingInfo.address` field are required. + When a checkout has line items to be shipped, the `shippingInfo.shippingDestination.address` and `shippingInfo.selectedCarrierServiceOption` fields are required. + When a checkout has line items for pickup, the `shippingInfo.selectedCarrierServiceOption.logistics.pickupDetails` field are required. --- ## REST API ### Examples ### Create subscription from checkout ```curl curl -X POST 'https://www.wixapis.com/ecom/v1/checkouts/01e8665c-2ce7-458e-a6b4-65befaefa382/create-order' \ -H 'Content-Type: application/json' \ -H 'Authorization: ' \ ``` ### Create order from checkout ```curl curl -X POST 'https://www.wixapis.com/ecom/v1/checkouts/98efbd87-8097-44e9-9005-72093d7a21d5/create-order' \ -H 'Content-Type: application/json' \ -H 'Authorization: ' \ ``` --- ## JavaScript SDK ### Examples ### Create an order from a checkout ```javascript /************************************** * Backend code - my-backend-file.web.js/ts * *************************************/ import { Permissions, webMethod } from '@wix/web-methods'; import { checkout } from '@wix/ecom'; export const myCreateOrderFromCheckoutFunction = webMethod(Permissions.Anyone, async (checkoutId) => { try { const createOrderResponse = await checkout.createOrder(checkoutId); console.log('Success! Created an order from the checkout'); return createOrderResponse; } catch (error) { console.error(error); // Handle the error } }); /************* * Page code * ************/ import { myCreateOrderFromCheckoutFunction } from 'backend/my-backend-file.web'; // Sample checkoutId: const checkoutId = '23a7b29a-3c14-4ef1-9353-f4b714b13217'; myCreateOrderFromCheckoutFunction(checkoutId) .then((createOrderResponse) => { const orderId = createOrderResponse.orderId; const paymentGatewayOrderId = createOrderResponse.paymentGatewayOrderId; console.log('Success! Created an order from the checkout'); return createOrderResponse; }) .catch((error) => { console.error(error); // Handle the error }); /* Promise resolves to: * * { * "orderId": "02843248-495f-45c0-a5d6-e913f647c9f2", * "paymentGatewayOrderId": "f30440f4-413a-4382-bc38-7280b155a5ed" * } * */ ``` ### createOrder (self-hosted) Self-hosted SDK calls require you to [create a client](https://dev.wix.com/docs/sdk/articles/work-with-the-sdk/about-the-wix-client.md). ```javascript import { createClient } from '@wix/sdk'; import { checkout } from '@wix/ecom'; // Import the auth strategy for the relevant access type // Import the relevant host module if needed const myWixClient = createClient ({ modules: { checkout }, // Include the auth strategy and host as relevant }); async function createOrder(_id,options) { const response = await myWixClient.checkout.createOrder(_id,options); }; ``` --- --- > Portal Navigation: > > - Append `.md` to any URL under `https://dev.wix.com/docs/` to get its markdown version. > - Pages are either content pages (article or reference text) or menu pages (a list of links to child pages). > - To get a menu page, truncate any URL to a parent path and append `.md` (e.g. `https://dev.wix.com/docs/sdk.md`, `https://dev.wix.com/docs/sdk/core-modules.md`). > - Top-level index of all portals: https://dev.wix.com/docs/llms.txt > - Full concatenated docs: https://dev.wix.com/docs/llms-full.txt # GetCheckoutByCartId # Package: checkout # Namespace: CheckoutService # Method link: https://dev.wix.com/docs/api-reference/business-solutions/e-commerce/purchase-flow/checkout/checkout/get-checkout-by-cart-id.md ## Permission Scopes: Read Orders: SCOPE.DC-STORES.READ-ORDERS ## Introduction Retrieves the checkout associated with a specified cart. --- ## REST API ### Examples ### Get Checkout By Cart ID ```curl curl -X GET \ 'https://www.wixapis.com/ecom/v1/checkouts/by-cart-id/17019e72-f590-447e-b62e-d9b67969bfac' \ -H 'Content-Type: application/json' \ -H 'Authorization: ' ``` --- ## JavaScript SDK ### Examples ### getCheckoutByCartId ```javascript import { checkout } from '@wix/ecom'; async function getCheckoutByCartId(_id) { const response = await checkout.getCheckoutByCartId(_id); }; ``` ### getCheckoutByCartId (with elevated permissions) ```javascript import { checkout } from '@wix/ecom'; import { auth } from '@wix/essentials'; async function myGetCheckoutByCartIdMethod(_id) { const elevatedGetCheckoutByCartId = auth.elevate(checkout.getCheckoutByCartId); const response = await elevatedGetCheckoutByCartId(_id); } ``` ### getCheckoutByCartId (self-hosted) Self-hosted SDK calls require you to [create a client](https://dev.wix.com/docs/sdk/articles/work-with-the-sdk/about-the-wix-client.md). ```javascript import { createClient } from '@wix/sdk'; import { checkout } from '@wix/ecom'; // Import the auth strategy for the relevant access type // Import the relevant host module if needed const myWixClient = createClient ({ modules: { checkout }, // Include the auth strategy and host as relevant }); async function getCheckoutByCartId(_id) { const response = await myWixClient.checkout.getCheckoutByCartId(_id); }; ``` --- --- > Portal Navigation: > > - Append `.md` to any URL under `https://dev.wix.com/docs/` to get its markdown version. > - Pages are either content pages (article or reference text) or menu pages (a list of links to child pages). > - To get a menu page, truncate any URL to a parent path and append `.md` (e.g. `https://dev.wix.com/docs/sdk.md`, `https://dev.wix.com/docs/sdk/core-modules.md`). > - Top-level index of all portals: https://dev.wix.com/docs/llms.txt > - Full concatenated docs: https://dev.wix.com/docs/llms-full.txt # GetCheckoutURL # Package: checkout # Namespace: CheckoutService # Method link: https://dev.wix.com/docs/api-reference/business-solutions/e-commerce/purchase-flow/checkout/checkout/get-checkout-url.md ## Permission Scopes: Read Orders: SCOPE.DC-STORES.READ-ORDERS ## Introduction Retrieves the checkout page URL of a specified checkout. By default, a `checkoutUrl` generates for a checkout and directs to a standard Wix checkout page. However, if `overrideCheckoutUrl` has a value, it will replace and set the value of `checkoutUrl`. --- ## REST API ### Examples ### Get Checkout Url ```curl curl -X GET \ 'https://www.wixapis.com/ecom/v1/checkouts/d0d530f0-45d9-4c2c-bd71-8ab07a058472/checkout-url' \ -H 'Content-Type: application/json' \ -H 'Authorization: ' ``` --- ## JavaScript SDK ### Examples ### getCheckoutUrl ```javascript import { checkout } from '@wix/ecom'; async function getCheckoutUrl(_id) { const response = await checkout.getCheckoutUrl(_id); }; ``` ### getCheckoutUrl (with elevated permissions) ```javascript import { checkout } from '@wix/ecom'; import { auth } from '@wix/essentials'; async function myGetCheckoutUrlMethod(_id) { const elevatedGetCheckoutUrl = auth.elevate(checkout.getCheckoutUrl); const response = await elevatedGetCheckoutUrl(_id); } ``` ### getCheckoutUrl (self-hosted) Self-hosted SDK calls require you to [create a client](https://dev.wix.com/docs/sdk/articles/work-with-the-sdk/about-the-wix-client.md). ```javascript import { createClient } from '@wix/sdk'; import { checkout } from '@wix/ecom'; // Import the auth strategy for the relevant access type // Import the relevant host module if needed const myWixClient = createClient ({ modules: { checkout }, // Include the auth strategy and host as relevant }); async function getCheckoutUrl(_id) { const response = await myWixClient.checkout.getCheckoutUrl(_id); }; ``` --- --- > Portal Navigation: > > - Append `.md` to any URL under `https://dev.wix.com/docs/` to get its markdown version. > - Pages are either content pages (article or reference text) or menu pages (a list of links to child pages). > - To get a menu page, truncate any URL to a parent path and append `.md` (e.g. `https://dev.wix.com/docs/sdk.md`, `https://dev.wix.com/docs/sdk/core-modules.md`). > - Top-level index of all portals: https://dev.wix.com/docs/llms.txt > - Full concatenated docs: https://dev.wix.com/docs/llms-full.txt # MarkCheckoutAsCompleted # Package: checkout # Namespace: CheckoutService # Method link: https://dev.wix.com/docs/api-reference/business-solutions/e-commerce/purchase-flow/checkout/checkout/mark-checkout-as-completed.md ## Permission Scopes: Manage Orders: SCOPE.DC-STORES.MANAGE-ORDERS ## Introduction Sets `completed` to `true` to mark a checkout as completed. When an order is completed through Wix, the `completed` field in the associated checkout object will automatically be updated to `true`. If an order is completed through a separate system, use this method to manually mark the checkout as completed. --- ## REST API ### Examples ### MarkCheckoutAsCompleted ```curl ~~~cURL curl -X POST 'https://www.wixapis.com/ecom/v1/checkouts/98efbd87-8097-44e9-9005-72093d7a21d5/mark-as-completed' \ -H 'Content-Type: application/json' \ -H 'Authorization: ' ~~~ ``` --- ## JavaScript SDK ### Examples ### Mark a checkout as completed ```javascript /************************************** * Backend code - my-backend-file.web.js/ts * *************************************/ import { Permissions, webMethod } from '@wix/web-methods'; import { checkout } from '@wix/ecom'; export const myMarkCheckoutAsCompletedFunction = webMethod(Permissions.Anyone, async (checkoutId) => { try { await checkout.markCheckoutAsCompleted(checkoutId); console.log('Success! Checkout marked as completed'); return; } catch (error) { console.error(error); // Handle the error } }); /************* * Page code * ************/ import { myMarkCheckoutAsCompletedFunction } from 'backend/my-backend-file.web'; // Sample checkoutId: const checkoutId = '96a61a4b-6b61-47d1-a039-0213a8230ccd'; myMarkCheckoutAsCompletedFunction(checkoutId) .then(() => { console.log('Success! Checkout marked as completed'); return; }) .catch((error) => { console.error(error); // Handle the error }); ``` ### markCheckoutAsCompleted (self-hosted) Self-hosted SDK calls require you to [create a client](https://dev.wix.com/docs/sdk/articles/work-with-the-sdk/about-the-wix-client.md). ```javascript import { createClient } from '@wix/sdk'; import { checkout } from '@wix/ecom'; // Import the auth strategy for the relevant access type // Import the relevant host module if needed const myWixClient = createClient ({ modules: { checkout }, // Include the auth strategy and host as relevant }); async function markCheckoutAsCompleted(_id) { const response = await myWixClient.checkout.markCheckoutAsCompleted(_id); }; ``` --- --- > Portal Navigation: > > - Append `.md` to any URL under `https://dev.wix.com/docs/` to get its markdown version. > - Pages are either content pages (article or reference text) or menu pages (a list of links to child pages). > - To get a menu page, truncate any URL to a parent path and append `.md` (e.g. `https://dev.wix.com/docs/sdk.md`, `https://dev.wix.com/docs/sdk/core-modules.md`). > - Top-level index of all portals: https://dev.wix.com/docs/llms.txt > - Full concatenated docs: https://dev.wix.com/docs/llms-full.txt # RemoveCoupon # Package: checkout # Namespace: CheckoutService # Method link: https://dev.wix.com/docs/api-reference/business-solutions/e-commerce/purchase-flow/checkout/checkout/remove-coupon.md ## Permission Scopes: Manage Orders: SCOPE.DC-STORES.MANAGE-ORDERS ## Introduction Removes the coupon from a specified checkout. --- ## REST API ### Examples ### RemoveCoupon ```curl ~~~cURL curl -X POST 'https://www.wixapis.com/ecom/v1/checkouts/98efbd87-8097-44e9-9005-72093d7a21d5/remove-coupon' \ -H 'Content-Type: application/json' \ -H 'Authorization: ' ~~~ ``` --- ## JavaScript SDK ### Examples ### Remove coupon from a checkout ```javascript /************************************** * Backend code - my-backend-file.web.js/ts * **************************************/ import { Permissions, webMethod } from '@wix/web-methods'; import { checkout } from '@wix/ecom'; export const myRemoveCouponFunction = webMethod(Permissions.Anyone, async (checkoutId) => { try { const updatedCheckout = await checkout.removeCoupon(checkoutId); console.log('Success! Updated checkout:', updatedCheckout); return updatedCheckout; } catch (error) { console.error(error); // Handle the error } }); /************* * Page code * ************/ import { myRemoveCouponFunction } from 'backend/my-backend-file.web'; // Sample checkoutId: const checkoutId = '75b0d071-8ca0-4227-962f-91d0605c8c3a'; myRemoveCouponFunction(checkoutId) .then((updatedCheckout) => { const checkoutId = updatedCheckout.checkout._id; const appliedDiscounts = updatedCheckout.checkout.appliedDiscounts; // appliedCoupon boolean value is false if no coupon exists on checkout const appliedCoupon = appliedDiscounts.some(({ coupon }) => coupon); console.log('Success! Updated checkout:', updatedCheckout); return updatedCheckout; }) .catch((error) => { console.error(error); // Handle the error }); /* Promise resolves to: * * { * "_id": "75b0d071-8ca0-4227-962f-91d0605c8c3a", * "lineItems": [ * { * "_id": "00000000-0000-0000-0000-000000000001", * "quantity": 3, * "catalogReference": { * "catalogItemId": "c8539b66-7a44-fe18-affc-afec4be8562a", * "appId": "215238eb-22a5-4c36-9e7b-e7c08025e04e" * }, * "productName": { * "original": "Shirt", * "translated": "Shirt" * }, * "url": "https://example.wixsite.com", * "price": { * "amount": "10", * "convertedAmount": "10", * "formattedAmount": "$10.00", * "formattedConvertedAmount": "$10.00" * }, * "lineItemPrice": { * "amount": "30", * "convertedAmount": "30", * "formattedAmount": "$30.00", * "formattedConvertedAmount": "$30.00" * }, * "fullPrice": { * "amount": "10", * "convertedAmount": "10", * "formattedAmount": "$10.00", * "formattedConvertedAmount": "$10.00" * }, * "priceBeforeDiscounts": { * "amount": "10", * "convertedAmount": "10", * "formattedAmount": "$10.00", * "formattedConvertedAmount": "$10.00" * }, * "totalPriceAfterTax": { * "amount": "30", * "convertedAmount": "30", * "formattedAmount": "$30.00", * "formattedConvertedAmount": "$30.00" * }, * "totalPriceBeforeTax": { * "amount": "30", * "convertedAmount": "30", * "formattedAmount": "$30.00", * "formattedConvertedAmount": "$30.00" * }, * "taxDetails": { * "taxableAmount": { * "amount": "30", * "convertedAmount": "30", * "formattedAmount": "$30.00", * "formattedConvertedAmount": "$30.00" * }, * "taxRate": "0", * "totalTax": { * "amount": "0", * "convertedAmount": "0", * "formattedAmount": "$0.00", * "formattedConvertedAmount": "$0.00" * }, * "rateBreakdown": [] * }, * "discount": { * "amount": "0", * "convertedAmount": "0", * "formattedAmount": "$0.00", * "formattedConvertedAmount": "$0.00" * }, * "descriptionLines": [], * "media": "wix:image://v1/3c76e2_c5331f937348492a97df87b0a3b34ea4~mv2.jpg#originWidth=1000&originHeight=1000", * "availability": { * "status": "AVAILABLE" * }, * "physicalProperties": { * "sku": "364115376135191", * "shippable": true * }, * "itemType": { * "preset": "PHYSICAL" * }, * "paymentOption": "FULL_PAYMENT_ONLINE", * "rootCatalogItemId": "c8539b66-7a44-fe18-affc-afec4be8562a" * }, * { * "_id": "00000000-0000-0000-0000-000000000002", * "quantity": 1, * "catalogReference": { * "catalogItemId": "df19c1f7-07d8-a265-42f8-e8dfa824cc6e", * "appId": "215238eb-22a5-4c36-9e7b-e7c08025e04e", * "options": { * "variantId": "2f430d69-9b75-4874-bfbd-c5f6fa5aff3d", * "customTextFields": { * "birthday card": "Happy Birthday!" * } * } * }, * "productName": { * "original": "Shoe", * "translated": "Shoe" * }, * "url": "https://example.wixsite.com", * "price": { * "amount": "85", * "convertedAmount": "85", * "formattedAmount": "$85.00", * "formattedConvertedAmount": "$85.00" * }, * "lineItemPrice": { * "amount": "85", * "convertedAmount": "85", * "formattedAmount": "$85.00", * "formattedConvertedAmount": "$85.00" * }, * "fullPrice": { * "amount": "85", * "convertedAmount": "85", * "formattedAmount": "$85.00", * "formattedConvertedAmount": "$85.00" * }, * "priceBeforeDiscounts": { * "amount": "85", * "convertedAmount": "85", * "formattedAmount": "$85.00", * "formattedConvertedAmount": "$85.00" * }, * "totalPriceAfterTax": { * "amount": "85", * "convertedAmount": "85", * "formattedAmount": "$85.00", * "formattedConvertedAmount": "$85.00" * }, * "totalPriceBeforeTax": { * "amount": "85", * "convertedAmount": "85", * "formattedAmount": "$85.00", * "formattedConvertedAmount": "$85.00" * }, * "taxDetails": { * "taxableAmount": { * "amount": "85", * "convertedAmount": "85", * "formattedAmount": "$85.00", * "formattedConvertedAmount": "$85.00" * }, * "taxRate": "0", * "totalTax": { * "amount": "0", * "convertedAmount": "0", * "formattedAmount": "$0.00", * "formattedConvertedAmount": "$0.00" * }, * "rateBreakdown": [] * }, * "discount": { * "amount": "0", * "convertedAmount": "0", * "formattedAmount": "$0.00", * "formattedConvertedAmount": "$0.00" * }, * "descriptionLines": [ * { * "name": { * "original": "Color", * "translated": "Color" * }, * "colorInfo": { * "original": "Brown", * "translated": "Brown", * "code": "#783f04" * } * }, * { * "name": { * "original": "birthday card", * "translated": "birthday card" * }, * "plainText": { * "original": "Happy Birthday!", * "translated": "Happy Birthday!" * } * } * ], * "media": "wix:image://v1/3c76e2_bf235c38610f4d2a905db71095b351cf~mv2.jpg#originWidth=1000&originHeight=1000", * "availability": { * "status": "AVAILABLE", * "quantityAvailable": 30 * }, * "physicalProperties": { * "sku": "364215376135191", * "shippable": true * }, * "itemType": { * "preset": "PHYSICAL" * }, * "paymentOption": "FULL_PAYMENT_ONLINE", * "rootCatalogItemId": "df19c1f7-07d8-a265-42f8-e8dfa824cc6e" * }, * { * "_id": "00000000-0000-0000-0000-000000000003", * "quantity": 1, * "catalogReference": { * "catalogItemId": "9fe8c5b2-9c94-7153-ebb9-8533695e2b6f", * "appId": "215238eb-22a5-4c36-9e7b-e7c08025e04e", * "options": { * "Size": "Large", * "Color": "White" * } * }, * "price": { * "amount": "0", * "convertedAmount": "0", * "formattedAmount": "$0.00", * "formattedConvertedAmount": "$0.00" * }, * "fullPrice": { * "amount": "0", * "convertedAmount": "0", * "formattedAmount": "$0.00", * "formattedConvertedAmount": "$0.00" * }, * "priceBeforeDiscounts": { * "amount": "0", * "convertedAmount": "0", * "formattedAmount": "$0.00", * "formattedConvertedAmount": "$0.00" * }, * "descriptionLines": [], * "availability": { * "status": "NOT_FOUND" * }, * "paymentOption": "FULL_PAYMENT_ONLINE" * } * ], * "billingInfo": { * "address": { * "addressLine1": "235 West 23rd Street", * "addressLine2": "3rd floor", * "city": "New York", * "subdivision": "US-NY", * "country": "US", * "postalCode": "10011" * }, * "contactDetails": { * "firstName": "Jane", * "lastName": "Doe", * "phone": "+1234567890" * } * }, * "shippingInfo": { * "shippingDestination": { * "address": { * "addressLine1": "235 West 23rd Street", * "addressLine2": "3rd floor", * "city": "New York", * "subdivision": "US-NY", * "country": "US", * "postalCode": "10011" * }, * "contactDetails": { * "firstName": "Jane", * "lastName": "Doe", * "phone": "+1234567890" * } * }, * "selectedCarrierServiceOption": { * "code": "ed5bbce2-9533-dff4-7db0-13702fd139c5", * "title": "Standard US Shipping", * "logistics": { * "deliveryTime": "" * }, * "cost": { * "totalPriceAfterTax": { * "amount": "10", * "convertedAmount": "10", * "formattedAmount": "$10.00", * "formattedConvertedAmount": "$10.00" * }, * "totalPriceBeforeTax": { * "amount": "10", * "convertedAmount": "10", * "formattedAmount": "$10.00", * "formattedConvertedAmount": "$10.00" * }, * "taxDetails": { * "taxRate": "0", * "totalTax": { * "amount": "0", * "convertedAmount": "0", * "formattedAmount": "$0.00", * "formattedConvertedAmount": "$0.00" * }, * "rateBreakdown": [] * }, * "price": { * "amount": "10", * "convertedAmount": "10", * "formattedAmount": "$10.00", * "formattedConvertedAmount": "$10.00" * } * }, * "requestedShippingOption": true, * "otherCharges": [], * "carrierId": "c8a08776-c095-4dec-8553-8f9698d86adc" * }, * "region": { * "_id": "009fbe5d-89d3-7825-cbbf-1aab4d908b73", * "name": "USA shipping" * }, * "carrierServiceOptions": [ * { * "carrierId": "c8a08776-c095-4dec-8553-8f9698d86adc", * "shippingOptions": [ * { * "code": "ed5bbce2-9533-dff4-7db0-13702fd139c5", * "title": "Standard US Shipping", * "logistics": { * "deliveryTime": "" * }, * "cost": { * "price": { * "amount": "10", * "convertedAmount": "10", * "formattedAmount": "$10.00", * "formattedConvertedAmount": "$10.00" * }, * "otherCharges": [] * } * } * ] * } * ] * }, * "buyerNote": "Please wrap it up as a present", * "buyerInfo": { * "contactId": "f7dc17a6-825a-466e-a78e-c4abea0217db", * "email": "Janedoe@example.com", * "memberId": "c43190d2-eea3-493e-b6e8-f146850c6873" * }, * "conversionCurrency": "USD", * "priceSummary": { * "subtotal": { * "amount": "115", * "convertedAmount": "115", * "formattedAmount": "$115.00", * "formattedConvertedAmount": "$115.00" * }, * "shipping": { * "amount": "10", * "convertedAmount": "10", * "formattedAmount": "$10.00", * "formattedConvertedAmount": "$10.00" * }, * "tax": { * "amount": "0", * "convertedAmount": "0", * "formattedAmount": "$0.00", * "formattedConvertedAmount": "$0.00" * }, * "discount": { * "amount": "0", * "convertedAmount": "0", * "formattedAmount": "$0.00", * "formattedConvertedAmount": "$0.00" * }, * "total": { * "amount": "125", * "convertedAmount": "125", * "formattedAmount": "$125.00", * "formattedConvertedAmount": "$125.00" * }, * "additionalFees": { * "amount": "0", * "convertedAmount": "0", * "formattedAmount": "$0.00", * "formattedConvertedAmount": "$0.00" * } * }, * "calculationErrors": { * "orderValidationErrors": [] * }, * "appliedDiscounts": [], * "customFields": [ * { * "value": "12345", * "title": "Tax ID", * "translatedTitle": "Tax ID" * } * ], * "weightUnit": "KG", * "currency": "USD", * "channelType": "WEB", * "siteLanguage": "en", * "buyerLanguage": "en", * "completed": false, * "taxIncludedInPrice": false, * "createdBy": { * "memberId": "c43190d2-eea3-493e-b6e8-f146850c6873" * }, * "_createdDate": "2022-10-19T14:22:03.847Z", * "_updatedDate": "2022-10-19T14:22:30.842Z", * "payNow": { * "subtotal": { * "amount": "115", * "convertedAmount": "115", * "formattedAmount": "$115.00", * "formattedConvertedAmount": "$115.00" * }, * "shipping": { * "amount": "10", * "convertedAmount": "10", * "formattedAmount": "$10.00", * "formattedConvertedAmount": "$10.00" * }, * "tax": { * "amount": "0", * "convertedAmount": "0", * "formattedAmount": "$0.00", * "formattedConvertedAmount": "$0.00" * }, * "discount": { * "amount": "0", * "convertedAmount": "0", * "formattedAmount": "$0.00", * "formattedConvertedAmount": "$0.00" * }, * "total": { * "amount": "125", * "convertedAmount": "125", * "formattedAmount": "$125.00", * "formattedConvertedAmount": "$125.00" * }, * "additionalFees": { * "amount": "0", * "convertedAmount": "0", * "formattedAmount": "$0.00", * "formattedConvertedAmount": "$0.00" * } * }, * "payLater": { * "subtotal": { * "amount": "0", * "convertedAmount": "0", * "formattedAmount": "$0.00", * "formattedConvertedAmount": "$0.00" * }, * "shipping": { * "amount": "0", * "convertedAmount": "0", * "formattedAmount": "$0.00", * "formattedConvertedAmount": "$0.00" * }, * "tax": { * "amount": "0", * "convertedAmount": "0", * "formattedAmount": "$0.00", * "formattedConvertedAmount": "$0.00" * }, * "discount": { * "amount": "0", * "convertedAmount": "0", * "formattedAmount": "$0.00", * "formattedConvertedAmount": "$0.00" * }, * "total": { * "amount": "0", * "convertedAmount": "0", * "formattedAmount": "$0.00", * "formattedConvertedAmount": "$0.00" * }, * "additionalFees": { * "amount": "0", * "convertedAmount": "0", * "formattedAmount": "$0.00", * "formattedConvertedAmount": "$0.00" * } * }, * "membershipOptions": { * "eligibleMemberships": [], * "invalidMemberships": [], * "selectedMemberships": { * "memberships": [] * } * }, * "additionalFees": [] * } * */ ``` ### removeCoupon (self-hosted) Self-hosted SDK calls require you to [create a client](https://dev.wix.com/docs/sdk/articles/work-with-the-sdk/about-the-wix-client.md). ```javascript import { createClient } from '@wix/sdk'; import { checkout } from '@wix/ecom'; // Import the auth strategy for the relevant access type // Import the relevant host module if needed const myWixClient = createClient ({ modules: { checkout }, // Include the auth strategy and host as relevant }); async function removeCoupon(_id) { const response = await myWixClient.checkout.removeCoupon(_id); }; ``` --- --- > Portal Navigation: > > - Append `.md` to any URL under `https://dev.wix.com/docs/` to get its markdown version. > - Pages are either content pages (article or reference text) or menu pages (a list of links to child pages). > - To get a menu page, truncate any URL to a parent path and append `.md` (e.g. `https://dev.wix.com/docs/sdk.md`, `https://dev.wix.com/docs/sdk/core-modules.md`). > - Top-level index of all portals: https://dev.wix.com/docs/llms.txt > - Full concatenated docs: https://dev.wix.com/docs/llms-full.txt # RemoveGiftCard # Package: checkout # Namespace: CheckoutService # Method link: https://dev.wix.com/docs/api-reference/business-solutions/e-commerce/purchase-flow/checkout/checkout/remove-gift-card.md ## Permission Scopes: Manage Orders: SCOPE.DC-STORES.MANAGE-ORDERS ## Introduction Removes the gift card from a specified checkout. A checkout can only hold 1 gift card. --- ## REST API ### Examples ### RemoveGiftCard ```curl ~~~cURL curl -X POST 'https://www.wixapis.com/ecom/v1/checkouts/98efbd87-8097-44e9-9005-72093d7a21d5/remove-gift-card' \ -H 'Content-Type: application/json' \ -H 'Authorization: ' ~~~ ``` --- ## JavaScript SDK ### Examples ### Remove the gift card from a checkout ```javascript /************************************** * Backend code - my-backend-file.web.js/ts * **************************************/ import { Permissions, webMethod } from '@wix/web-methods'; import { checkout } from '@wix/ecom'; export const myRemoveGiftCardFunction = webMethod(Permissions.Anyone, async (checkoutId) => { try { const updatedCheckout = await checkout.removeGiftCard(checkoutId); console.log('Success! Removed gift card from checkout:', updatedCheckout); return updatedCheckout; } catch (error) { console.error(error); // Handle the error } }); /************* * Page code * ************/ import { myRemoveGiftCardFunction } from 'backend/my-backend-file.web'; // Sample checkoutId: const checkoutId = '84d74a0e-5c3c-4113-8bd2-d264cc60d82a'; myRemoveGiftCardFunction(checkoutId) .then((updatedCheckout) => { const checkoutId = updatedCheckout.checkout._id; const totalPrice = updatedCheckout.checkout.priceSummary.total; console.log('Success! Removed gift card from checkout:', updatedCheckout); return updatedCheckout; }) .catch((error) => { console.error(error); // Handle the error }); /* Promise resolves to: * * { * "_id": "84d74a0e-5c3c-4113-8bd2-d264cc60d82a", * "lineItems": [ * { * "_id": "00000000-0000-0000-0000-000000000001", * "quantity": 1, * "catalogReference": { * "catalogItemId": "1a2d7e83-4bef-31d5-09e1-3326ee271c09", * "appId": "215238eb-22a5-4c36-9e7b-e7c08025e04e", * "options": { * "variantId": "132b84e8-aab8-47a1-a1f6-2c47557b64a4" * } * }, * "productName": { * "original": "Watch", * "translated": "Watch" * }, * "url": "https://example.wixsite.com", * "price": { * "amount": "30", * "convertedAmount": "30", * "formattedAmount": "$30.00", * "formattedConvertedAmount": "$30.00" * }, * "lineItemPrice": { * "amount": "30", * "convertedAmount": "30", * "formattedAmount": "$30.00", * "formattedConvertedAmount": "$30.00" * }, * "fullPrice": { * "amount": "30", * "convertedAmount": "30", * "formattedAmount": "$30.00", * "formattedConvertedAmount": "$30.00" * }, * "priceBeforeDiscounts": { * "amount": "30", * "convertedAmount": "30", * "formattedAmount": "$30.00", * "formattedConvertedAmount": "$30.00" * }, * "totalPriceAfterTax": { * "amount": "30", * "convertedAmount": "30", * "formattedAmount": "$30.00", * "formattedConvertedAmount": "$30.00" * }, * "totalPriceBeforeTax": { * "amount": "30", * "convertedAmount": "30", * "formattedAmount": "$30.00", * "formattedConvertedAmount": "$30.00" * }, * "taxDetails": { * "taxableAmount": { * "amount": "30", * "convertedAmount": "30", * "formattedAmount": "$30.00", * "formattedConvertedAmount": "$30.00" * }, * "taxRate": "0", * "totalTax": { * "amount": "0", * "convertedAmount": "0", * "formattedAmount": "$0.00", * "formattedConvertedAmount": "$0.00" * }, * "rateBreakdown": [] * }, * "discount": { * "amount": "0", * "convertedAmount": "0", * "formattedAmount": "$0.00", * "formattedConvertedAmount": "$0.00" * }, * "descriptionLines": [ * { * "name": { * "original": "Size", * "translated": "Size" * }, * "plainText": { * "original": "Medium", * "translated": "Medium" * } * }, * { * "name": { * "original": "Color", * "translated": "Color" * }, * "colorInfo": { * "original": "Grey", * "translated": "Grey", * "code": "rgb(128, 128, 128)" * } * } * ], * "media": "wix:image://v1/3c76e2_8891bbe3372a428aac976ac59aa0ac74~mv2.jpg#originWidth=1000&originHeight=1000", * "availability": { * "status": "AVAILABLE" * }, * "physicalProperties": { * "sku": "217537123517253", * "shippable": true * }, * "itemType": { * "preset": "PHYSICAL" * }, * "paymentOption": "FULL_PAYMENT_ONLINE", * "rootCatalogItemId": "1a2d7e83-4bef-31d5-09e1-3326ee271c09" * } * ], * "billingInfo": { * "address": { * "addressLine1": "525 5th Avenue", * "city": "New York", * "subdivision": "US-NY", * "country": "US", * "postalCode": "10173" * }, * "contactDetails": { * "firstName": "Jane", * "lastName": "Doe", * "phone": "0555555555" * } * }, * "shippingInfo": { * "shippingDestination": { * "address": { * "addressLine1": "525 5th Avenue", * "city": "New York", * "subdivision": "US-NY", * "country": "US", * "postalCode": "10173" * }, * "contactDetails": { * "firstName": "Jane", * "lastName": "Doe", * "phone": "0555555555" * } * }, * "selectedCarrierServiceOption": { * "code": "ed5bbce2-9533-dff4-7db0-13702fd139c5", * "title": "Standard US Shipping", * "logistics": { * "deliveryTime": "" * }, * "cost": { * "totalPriceAfterTax": { * "amount": "10", * "convertedAmount": "10", * "formattedAmount": "$10.00", * "formattedConvertedAmount": "$10.00" * }, * "totalPriceBeforeTax": { * "amount": "10", * "convertedAmount": "10", * "formattedAmount": "$10.00", * "formattedConvertedAmount": "$10.00" * }, * "taxDetails": { * "taxRate": "0", * "totalTax": { * "amount": "0", * "convertedAmount": "0", * "formattedAmount": "$0.00", * "formattedConvertedAmount": "$0.00" * }, * "rateBreakdown": [] * }, * "price": { * "amount": "10", * "convertedAmount": "10", * "formattedAmount": "$10.00", * "formattedConvertedAmount": "$10.00" * } * }, * "requestedShippingOption": true, * "otherCharges": [], * "carrierId": "c8a08776-c095-4dec-8553-8f9698d86adc" * }, * "region": { * "_id": "009fbe5d-89d3-7825-cbbf-1aab4d908b73", * "name": "USA shipping" * }, * "carrierServiceOptions": [ * { * "carrierId": "c8a08776-c095-4dec-8553-8f9698d86adc", * "shippingOptions": [ * { * "code": "ed5bbce2-9533-dff4-7db0-13702fd139c5", * "title": "Standard US Shipping", * "logistics": { * "deliveryTime": "" * }, * "cost": { * "price": { * "amount": "10", * "convertedAmount": "10", * "formattedAmount": "$10.00", * "formattedConvertedAmount": "$10.00" * }, * "otherCharges": [] * } * } * ] * } * ] * }, * "buyerInfo": { * "contactId": "24de6f0b-60ce-4faa-9138-2e39f1415615", * "email": "janedoe@gmail.com", * "memberId": "c43190d2-eea3-493e-b6e8-f146850c6873" * }, * "conversionCurrency": "USD", * "priceSummary": { * "subtotal": { * "amount": "30", * "convertedAmount": "30", * "formattedAmount": "$30.00", * "formattedConvertedAmount": "$30.00" * }, * "shipping": { * "amount": "10", * "convertedAmount": "10", * "formattedAmount": "$10.00", * "formattedConvertedAmount": "$10.00" * }, * "tax": { * "amount": "0", * "convertedAmount": "0", * "formattedAmount": "$0.00", * "formattedConvertedAmount": "$0.00" * }, * "discount": { * "amount": "0", * "convertedAmount": "0", * "formattedAmount": "$0.00", * "formattedConvertedAmount": "$0.00" * }, * "total": { * "amount": "40", * "convertedAmount": "40", * "formattedAmount": "$40.00", * "formattedConvertedAmount": "$40.00" * }, * "additionalFees": { * "amount": "0", * "convertedAmount": "0", * "formattedAmount": "$0.00", * "formattedConvertedAmount": "$0.00" * } * }, * "calculationErrors": { * "orderValidationErrors": [] * }, * "appliedDiscounts": [], * "customFields": [], * "weightUnit": "KG", * "currency": "USD", * "channelType": "WEB", * "siteLanguage": "en", * "buyerLanguage": "en", * "completed": false, * "taxIncludedInPrice": false, * "createdBy": { * "visitorId": "4c7ce95c-9fb3-417d-9f02-b41e82b841f7" * }, * "_createdDate": "2022-10-27T08:51:44.099Z", * "_updatedDate": "2022-10-27T08:54:53.785Z", * "payNow": { * "subtotal": { * "amount": "30", * "convertedAmount": "30", * "formattedAmount": "$30.00", * "formattedConvertedAmount": "$30.00" * }, * "shipping": { * "amount": "10", * "convertedAmount": "10", * "formattedAmount": "$10.00", * "formattedConvertedAmount": "$10.00" * }, * "tax": { * "amount": "0", * "convertedAmount": "0", * "formattedAmount": "$0.00", * "formattedConvertedAmount": "$0.00" * }, * "discount": { * "amount": "0", * "convertedAmount": "0", * "formattedAmount": "$0.00", * "formattedConvertedAmount": "$0.00" * }, * "total": { * "amount": "40", * "convertedAmount": "40", * "formattedAmount": "$40.00", * "formattedConvertedAmount": "$40.00" * }, * "additionalFees": { * "amount": "0", * "convertedAmount": "0", * "formattedAmount": "$0.00", * "formattedConvertedAmount": "$0.00" * } * }, * "payLater": { * "subtotal": { * "amount": "0", * "convertedAmount": "0", * "formattedAmount": "$0.00", * "formattedConvertedAmount": "$0.00" * }, * "shipping": { * "amount": "0", * "convertedAmount": "0", * "formattedAmount": "$0.00", * "formattedConvertedAmount": "$0.00" * }, * "tax": { * "amount": "0", * "convertedAmount": "0", * "formattedAmount": "$0.00", * "formattedConvertedAmount": "$0.00" * }, * "discount": { * "amount": "0", * "convertedAmount": "0", * "formattedAmount": "$0.00", * "formattedConvertedAmount": "$0.00" * }, * "total": { * "amount": "0", * "convertedAmount": "0", * "formattedAmount": "$0.00", * "formattedConvertedAmount": "$0.00" * }, * "additionalFees": { * "amount": "0", * "convertedAmount": "0", * "formattedAmount": "$0.00", * "formattedConvertedAmount": "$0.00" * } * }, * "membershipOptions": { * "eligibleMemberships": [], * "invalidMemberships": [], * "selectedMemberships": { * "memberships": [] * } * }, * "additionalFees": [], * "cartId": "d7aca608-cbbd-4a22-9813-0459992abd1f" * } * */ ``` ### removeGiftCard (self-hosted) Self-hosted SDK calls require you to [create a client](https://dev.wix.com/docs/sdk/articles/work-with-the-sdk/about-the-wix-client.md). ```javascript import { createClient } from '@wix/sdk'; import { checkout } from '@wix/ecom'; // Import the auth strategy for the relevant access type // Import the relevant host module if needed const myWixClient = createClient ({ modules: { checkout }, // Include the auth strategy and host as relevant }); async function removeGiftCard(_id) { const response = await myWixClient.checkout.removeGiftCard(_id); }; ``` --- --- > Portal Navigation: > > - Append `.md` to any URL under `https://dev.wix.com/docs/` to get its markdown version. > - Pages are either content pages (article or reference text) or menu pages (a list of links to child pages). > - To get a menu page, truncate any URL to a parent path and append `.md` (e.g. `https://dev.wix.com/docs/sdk.md`, `https://dev.wix.com/docs/sdk/core-modules.md`). > - Top-level index of all portals: https://dev.wix.com/docs/llms.txt > - Full concatenated docs: https://dev.wix.com/docs/llms-full.txt # RemoveLineItems # Package: checkout # Namespace: CheckoutService # Method link: https://dev.wix.com/docs/api-reference/business-solutions/e-commerce/purchase-flow/checkout/checkout/remove-line-items.md ## Permission Scopes: Manage Orders: SCOPE.DC-STORES.MANAGE-ORDERS ## Introduction Removes line items from the specified checkout. --- ## REST API ### Examples ### RemoveLineItems ```curl ~~~cURL curl -X POST 'https://www.wixapis.com/ecom/v1/checkouts/01e8665c-2ce7-458e-a6b4-65befaefa382/remove-line-items' \ -H 'Content-Type: application/json' \ -H 'Authorization: ' \ -d '{ "lineItemIds": [ "00000000-0000-0000-0000-000000000001", "00000000-0000-0000-0000-000000000002" ] }' ~~~ ``` --- ## JavaScript SDK ### Examples ### Remove 2 line items from a checkout ```javascript /************************************** * Backend code - my-backend-file.web.js/ts * **************************************/ import { Permissions, webMethod } from '@wix/web-methods'; import { checkout } from '@wix/ecom'; export const myRemoveLineItemsFunction = webMethod(Permissions.Anyone, async (checkoutId, lineItemIds) => { try { const updatedCheckout = await checkout.removeLineItems(checkoutId, lineItemIds); console.log('Success! Line items removed from checkout:', updatedCheckout); return updatedCheckout; } catch (error) { console.error(error); // Handle the error } }); /************* * Page code * ************/ import { myRemoveLineItemsFunction } from 'backend/my-backend-file.web'; // Sample checkoutId: const checkoutId = '23a7b29a-3c14-4ef1-9353-f4b714b13217'; // Sample line item IDs const lineItemIds = ["00000000-0000-0000-0000-000000000002", "00000000-0000-0000-0000-000000000003"] myRemoveLineItemsFunction(checkoutId, lineItemIds) .then((updatedCheckout) => { const checkoutId = updatedCheckout.checkout._id; const numOfLineItems = updatedCheckout.checkout.lineItems.length; console.log('Success! Line items removed from checkout:', updatedCheckout); return updatedCheckout; }) .catch((error) => { console.error(error); // Handle the error }); /* Promise resolves to: * * * { * "_id": "23a7b29a-3c14-4ef1-9353-f4b714b13217", * "lineItems": [ * { * "_id": "00000000-0000-0000-0000-000000000001", * "quantity": 3, * "catalogReference": { * "catalogItemId": "c8539b66-7a44-fe18-affc-afec4be8562a", * "appId": "215238eb-22a5-4c36-9e7b-e7c08025e04e" * }, * "productName": { * "original": "Shirt", * "translated": "Shirt" * }, * "url": "https://example.wixsite.com", * "price": { * "amount": "10", * "convertedAmount": "10", * "formattedAmount": "$10.00", * "formattedConvertedAmount": "$10.00" * }, * "lineItemPrice": { * "amount": "30", * "convertedAmount": "30", * "formattedAmount": "$30.00", * "formattedConvertedAmount": "$30.00" * }, * "fullPrice": { * "amount": "10", * "convertedAmount": "10", * "formattedAmount": "$10.00", * "formattedConvertedAmount": "$10.00" * }, * "priceBeforeDiscounts": { * "amount": "10", * "convertedAmount": "10", * "formattedAmount": "$10.00", * "formattedConvertedAmount": "$10.00" * }, * "totalPriceAfterTax": { * "amount": "20", * "convertedAmount": "20", * "formattedAmount": "$20.00", * "formattedConvertedAmount": "$20.00" * }, * "totalPriceBeforeTax": { * "amount": "20", * "convertedAmount": "20", * "formattedAmount": "$20.00", * "formattedConvertedAmount": "$20.00" * }, * "taxDetails": { * "taxableAmount": { * "amount": "20", * "convertedAmount": "20", * "formattedAmount": "$20.00", * "formattedConvertedAmount": "$20.00" * }, * "taxRate": "0", * "totalTax": { * "amount": "0", * "convertedAmount": "0", * "formattedAmount": "$0.00", * "formattedConvertedAmount": "$0.00" * }, * "rateBreakdown": [] * }, * "discount": { * "amount": "10", * "convertedAmount": "10", * "formattedAmount": "$10.00", * "formattedConvertedAmount": "$10.00" * }, * "descriptionLines": [], * "media": "wix:image://v1/3c76e2_c5331f937348492a97df87b0a3b34ea4~mv2.jpg#originWidth=1000&originHeight=1000", * "availability": { * "status": "AVAILABLE" * }, * "physicalProperties": { * "sku": "364115376135191", * "shippable": true * }, * "itemType": { * "preset": "PHYSICAL" * }, * "paymentOption": "FULL_PAYMENT_ONLINE", * "rootCatalogItemId": "c8539b66-7a44-fe18-affc-afec4be8562a" * } * ], * "billingInfo": { * "address": { * "addressLine1": "235 West 23rd Street", * "addressLine2": "3rd floor", * "city": "New York", * "subdivision": "US-NY", * "country": "US", * "postalCode": "10011" * }, * "contactDetails": { * "firstName": "Jane", * "lastName": "Doe", * "phone": "+1234567890" * } * }, * "shippingInfo": { * "shippingDestination": { * "address": { * "addressLine1": "235 West 23rd Street", * "addressLine2": "3rd floor", * "city": "New York", * "subdivision": "US-NY", * "country": "US", * "postalCode": "10011" * }, * "contactDetails": { * "firstName": "Jane", * "lastName": "Doe", * "phone": "+1234567890" * } * }, * "selectedCarrierServiceOption": { * "code": "ed5bbce2-9533-dff4-7db0-13702fd139c5", * "title": "Standard US Shipping", * "logistics": { * "deliveryTime": "" * }, * "cost": { * "totalPriceAfterTax": { * "amount": "10", * "convertedAmount": "10", * "formattedAmount": "$10.00", * "formattedConvertedAmount": "$10.00" * }, * "totalPriceBeforeTax": { * "amount": "10", * "convertedAmount": "10", * "formattedAmount": "$10.00", * "formattedConvertedAmount": "$10.00" * }, * "taxDetails": { * "taxRate": "0", * "totalTax": { * "amount": "0", * "convertedAmount": "0", * "formattedAmount": "$0.00", * "formattedConvertedAmount": "$0.00" * }, * "rateBreakdown": [] * }, * "price": { * "amount": "10", * "convertedAmount": "10", * "formattedAmount": "$10.00", * "formattedConvertedAmount": "$10.00" * } * }, * "requestedShippingOption": true, * "otherCharges": [], * "carrierId": "c8a08776-c095-4dec-8553-8f9698d86adc" * }, * "region": { * "_id": "009fbe5d-89d3-7825-cbbf-1aab4d908b73", * "name": "USA shipping" * }, * "carrierServiceOptions": [ * { * "carrierId": "c8a08776-c095-4dec-8553-8f9698d86adc", * "shippingOptions": [ * { * "code": "ed5bbce2-9533-dff4-7db0-13702fd139c5", * "title": "Standard US Shipping", * "logistics": { * "deliveryTime": "" * }, * "cost": { * "price": { * "amount": "10", * "convertedAmount": "10", * "formattedAmount": "$10.00", * "formattedConvertedAmount": "$10.00" * }, * "otherCharges": [] * } * } * ] * } * ] * }, * "buyerNote": "Please wrap it up as a present", * "buyerInfo": { * "contactId": "f7dc17a6-825a-466e-a78e-c4abea0217db", * "email": "Janedoe@example.com", * "memberId": "c43190d2-eea3-493e-b6e8-f146850c6873" * }, * "conversionCurrency": "USD", * "priceSummary": { * "subtotal": { * "amount": "30", * "convertedAmount": "30", * "formattedAmount": "$30.00", * "formattedConvertedAmount": "$30.00" * }, * "shipping": { * "amount": "10", * "convertedAmount": "10", * "formattedAmount": "$10.00", * "formattedConvertedAmount": "$10.00" * }, * "tax": { * "amount": "0", * "convertedAmount": "0", * "formattedAmount": "$0.00", * "formattedConvertedAmount": "$0.00" * }, * "discount": { * "amount": "10", * "convertedAmount": "10", * "formattedAmount": "$10.00", * "formattedConvertedAmount": "$10.00" * }, * "total": { * "amount": "30", * "convertedAmount": "30", * "formattedAmount": "$30.00", * "formattedConvertedAmount": "$30.00" * }, * "additionalFees": { * "amount": "0", * "convertedAmount": "0", * "formattedAmount": "$0.00", * "formattedConvertedAmount": "$0.00" * } * }, * "calculationErrors": { * "orderValidationErrors": [] * }, * "appliedDiscounts": [ * { * "discountType": "GLOBAL", * "lineItemIds": [], * "coupon": { * "_id": "fbb94b06-7447-4161-9c48-59bfcdc39e77", * "code": "SUMMERSALE10", * "amount": { * "amount": "10", * "convertedAmount": "10", * "formattedAmount": "$10.00", * "formattedConvertedAmount": "$10.00" * }, * "name": "SUMMERSALE10", * "couponType": "MoneyOff" * } * } * ], * "customFields": [ * { * "value": "12345", * "title": "Tax ID", * "translatedTitle": "Tax ID" * } * ], * "weightUnit": "KG", * "currency": "USD", * "channelType": "WEB", * "siteLanguage": "en", * "buyerLanguage": "en", * "completed": false, * "taxIncludedInPrice": false, * "createdBy": { * "memberId": "c43190d2-eea3-493e-b6e8-f146850c6873" * }, * "_createdDate": "2022-10-26T10:55:56.759Z", * "_updatedDate": "2022-10-26T10:56:59.653Z", * "payNow": { * "subtotal": { * "amount": "30", * "convertedAmount": "30", * "formattedAmount": "$30.00", * "formattedConvertedAmount": "$30.00" * }, * "shipping": { * "amount": "10", * "convertedAmount": "10", * "formattedAmount": "$10.00", * "formattedConvertedAmount": "$10.00" * }, * "tax": { * "amount": "0", * "convertedAmount": "0", * "formattedAmount": "$0.00", * "formattedConvertedAmount": "$0.00" * }, * "discount": { * "amount": "10", * "convertedAmount": "10", * "formattedAmount": "$10.00", * "formattedConvertedAmount": "$10.00" * }, * "total": { * "amount": "30", * "convertedAmount": "30", * "formattedAmount": "$30.00", * "formattedConvertedAmount": "$30.00" * }, * "additionalFees": { * "amount": "0", * "convertedAmount": "0", * "formattedAmount": "$0.00", * "formattedConvertedAmount": "$0.00" * } * }, * "payLater": { * "subtotal": { * "amount": "0", * "convertedAmount": "0", * "formattedAmount": "$0.00", * "formattedConvertedAmount": "$0.00" * }, * "shipping": { * "amount": "0", * "convertedAmount": "0", * "formattedAmount": "$0.00", * "formattedConvertedAmount": "$0.00" * }, * "tax": { * "amount": "0", * "convertedAmount": "0", * "formattedAmount": "$0.00", * "formattedConvertedAmount": "$0.00" * }, * "discount": { * "amount": "0", * "convertedAmount": "0", * "formattedAmount": "$0.00", * "formattedConvertedAmount": "$0.00" * }, * "total": { * "amount": "0", * "convertedAmount": "0", * "formattedAmount": "$0.00", * "formattedConvertedAmount": "$0.00" * }, * "additionalFees": { * "amount": "0", * "convertedAmount": "0", * "formattedAmount": "$0.00", * "formattedConvertedAmount": "$0.00" * } * }, * "membershipOptions": { * "eligibleMemberships": [], * "invalidMemberships": [], * "selectedMemberships": { * "memberships": [] * } * }, * "additionalFees": [] * } * */ ``` ### removeLineItems (self-hosted) Self-hosted SDK calls require you to [create a client](https://dev.wix.com/docs/sdk/articles/work-with-the-sdk/about-the-wix-client.md). ```javascript import { createClient } from '@wix/sdk'; import { checkout } from '@wix/ecom'; // Import the auth strategy for the relevant access type // Import the relevant host module if needed const myWixClient = createClient ({ modules: { checkout }, // Include the auth strategy and host as relevant }); async function removeLineItems(_id,lineItemIds) { const response = await myWixClient.checkout.removeLineItems(_id,lineItemIds); }; ``` --- --- > Portal Navigation: > > - Append `.md` to any URL under `https://dev.wix.com/docs/` to get its markdown version. > - Pages are either content pages (article or reference text) or menu pages (a list of links to child pages). > - To get a menu page, truncate any URL to a parent path and append `.md` (e.g. `https://dev.wix.com/docs/sdk.md`, `https://dev.wix.com/docs/sdk/core-modules.md`). > - Top-level index of all portals: https://dev.wix.com/docs/llms.txt > - Full concatenated docs: https://dev.wix.com/docs/llms-full.txt # RemoveOverrideCheckoutUrl # Package: checkout # Namespace: CheckoutService # Method link: https://dev.wix.com/docs/api-reference/business-solutions/e-commerce/purchase-flow/checkout/checkout/remove-override-checkout-url.md ## Permission Scopes: Manage Orders: SCOPE.DC-STORES.MANAGE-ORDERS ## Introduction Removes the `overrideCheckoutUrl` from a specified checkout. When `overrideCheckoutUrl` is removed, the `checkoutUrl` will be set to the default, standard Wix checkout page URL. --- ## REST API ### Examples ### RemoveOverrideCheckoutUrl ```curl ~~~cURL curl -X POST 'https://www.wixapis.com/ecom/v1/checkouts/98efbd87-8097-44e9-9005-72093d7a21d5/remove-override-checkout-url' \ -H 'Content-Type: application/json' \ -H 'Authorization: ' ~~~ ``` --- ## JavaScript SDK ### Examples ### removeOverrideCheckoutUrl ```javascript import { checkout } from '@wix/ecom'; async function removeOverrideCheckoutUrl(_id) { const response = await checkout.removeOverrideCheckoutUrl(_id); }; ``` ### removeOverrideCheckoutUrl (with elevated permissions) ```javascript import { checkout } from '@wix/ecom'; import { auth } from '@wix/essentials'; async function myRemoveOverrideCheckoutUrlMethod(_id) { const elevatedRemoveOverrideCheckoutUrl = auth.elevate(checkout.removeOverrideCheckoutUrl); const response = await elevatedRemoveOverrideCheckoutUrl(_id); } ``` ### removeOverrideCheckoutUrl (self-hosted) Self-hosted SDK calls require you to [create a client](https://dev.wix.com/docs/sdk/articles/work-with-the-sdk/about-the-wix-client.md). ```javascript import { createClient } from '@wix/sdk'; import { checkout } from '@wix/ecom'; // Import the auth strategy for the relevant access type // Import the relevant host module if needed const myWixClient = createClient ({ modules: { checkout }, // Include the auth strategy and host as relevant }); async function removeOverrideCheckoutUrl(_id) { const response = await myWixClient.checkout.removeOverrideCheckoutUrl(_id); }; ``` --- --- > Portal Navigation: > > - Append `.md` to any URL under `https://dev.wix.com/docs/` to get its markdown version. > - Pages are either content pages (article or reference text) or menu pages (a list of links to child pages). > - To get a menu page, truncate any URL to a parent path and append `.md` (e.g. `https://dev.wix.com/docs/sdk.md`, `https://dev.wix.com/docs/sdk/core-modules.md`). > - Top-level index of all portals: https://dev.wix.com/docs/llms.txt > - Full concatenated docs: https://dev.wix.com/docs/llms-full.txt # UpdateLineItemsQuantity # Package: checkout # Namespace: CheckoutService # Method link: https://dev.wix.com/docs/api-reference/business-solutions/e-commerce/purchase-flow/checkout/checkout/update-line-items-quantity.md ## Permission Scopes: Manage Orders: SCOPE.DC-STORES.MANAGE-ORDERS ## Introduction Updates the quantity of one or more line items in a checkout. This method is only for updating the quantity of line items. To entirely remove a line item from the checkout, use the Remove Line Items method. To add a new line item to the checkout, use the Add to Checkout method. This method checks the amount of stock remaining for this line item. If the specified `quantity` is greater than the remaining stock, then the `quantity` returned in the response is the total amount of remaining stock. --- ## REST API ### Examples ### Update the quantity of line items in a checkout ```javascript import { checkout } from '@wix/ecom'; /* Sample checkoutId value: '21fe558e-21a0-4cff-a49b-a4ccb0f7414d' * * Sample listItems value: * { * _id: '00000000-0000-0000-0000-000000000001', * quantity: 10 * } */ export async function myUpdateQuantityFunction(checkoutId, lineItems) { try { const updatedCheckout = await checkout.updateLineItemsQuantity(checkoutId, lineItems); const firstUpdatedLineItem = updatedCheckout.checkout.lineItems[0]; const updatedQuantity = firstUpdatedLineItem.quantity; console.log('Success! The updated quantity for the first line item is:', updatedQuantity); return updatedCheckout; } catch (error) { console.error(error); } } /* Promise resolves to: * { * "checkout": { * "_id": "21fe558e-21a0-4cff-a49b-a4ccb0f7414d", * "lineItems": [ * { * "_id": "00000000-0000-0000-0000-000000000001", * "quantity": 10, * "catalogReference": { * "catalogItemId": "c8539b66-7a44-fe18-affc-afec4be8562a", * "appId": "215238eb-22a5-4c36-9e7b-e7c08025e04e" * }, * "productName": { * "original": "Shirt", * "translated": "Shirt" * }, * "url": "https://example.wixsite.com/product-page/shirt", * "price": { * "amount": "10", * "convertedAmount": "10", * "formattedAmount": "$10.00", * "formattedConvertedAmount": "$10.00" * }, * "lineItemPrice": { * "amount": "100", * "convertedAmount": "100", * "formattedAmount": "$100.00", * "formattedConvertedAmount": "$100.00" * }, * "fullPrice": { * "amount": "10", * "convertedAmount": "10", * "formattedAmount": "$10.00", * "formattedConvertedAmount": "$10.00" * }, * "priceBeforeDiscounts": { * "amount": "10", * "convertedAmount": "10", * "formattedAmount": "$10.00", * "formattedConvertedAmount": "$10.00" * }, * "totalPriceAfterTax": { * "amount": "100", * "convertedAmount": "100", * "formattedAmount": "$100.00", * "formattedConvertedAmount": "$100.00" * }, * "totalPriceBeforeTax": { * "amount": "100", * "convertedAmount": "100", * "formattedAmount": "$100.00", * "formattedConvertedAmount": "$100.00" * }, * "taxDetails": { * "taxableAmount": { * "amount": "100", * "convertedAmount": "100", * "formattedAmount": "$100.00", * "formattedConvertedAmount": "$100.00" * }, * "taxRate": "0", * "totalTax": { * "amount": "0", * "convertedAmount": "0", * "formattedAmount": "$0.00", * "formattedConvertedAmount": "$0.00" * }, * "rateBreakdown": [] * }, * "discount": { * "amount": "0", * "convertedAmount": "0", * "formattedAmount": "$0.00", * "formattedConvertedAmount": "$0.00" * }, * "descriptionLines": [], * "media": "wix:image://v1/3c76e2_c5331f937348492a97df87b0a3b34ea4~mv2.jpg/3c76e2_c5331f937348492a97df87b0a3b34ea4~mv2.jpg#originWidth=1000&originHeight=1000", * "availability": { * "status": "AVAILABLE" * }, * "physicalProperties": { * "sku": "364115376135191", * "shippable": true * }, * "itemType": { * "preset": "PHYSICAL" * }, * "paymentOption": "FULL_PAYMENT_ONLINE", * "rootCatalogItemId": "c8539b66-7a44-fe18-affc-afec4be8562a" * } * ], * "shippingInfo": { * "carrierServiceOptions": [] * }, * "buyerNote": "Updated note.", * "buyerInfo": { * "contactId": "a4bc8d90-a91b-467f-a775-77d65dd0442e", * "email": "testing3@example.com", * "memberId": "ea3d74df-b7dc-4ca1-a7c9-c416b9017a86" * }, * "conversionCurrency": "USD", * "priceSummary": { * "subtotal": { * "amount": "100", * "convertedAmount": "100", * "formattedAmount": "$100.00", * "formattedConvertedAmount": "$100.00" * }, * "shipping": { * "amount": "0", * "convertedAmount": "0", * "formattedAmount": "$0.00", * "formattedConvertedAmount": "$0.00" * }, * "tax": { * "amount": "0", * "convertedAmount": "0", * "formattedAmount": "$0.00", * "formattedConvertedAmount": "$0.00" * }, * "discount": { * "amount": "0", * "convertedAmount": "0", * "formattedAmount": "$0.00", * "formattedConvertedAmount": "$0.00" * }, * "total": { * "amount": "100", * "convertedAmount": "100", * "formattedAmount": "$100.00", * "formattedConvertedAmount": "$100.00" * }, * "additionalFees": { * "amount": "0", * "convertedAmount": "0", * "formattedAmount": "$0.00", * "formattedConvertedAmount": "$0.00" * } * }, * "calculationErrors": { * "orderValidationErrors": [] * }, * "appliedDiscounts": [], * "customFields": [], * "weightUnit": "LB", * "currency": "USD", * "channelType": "WEB", * "siteLanguage": "en", * "buyerLanguage": "en", * "completed": false, * "taxIncludedInPrice": false, * "createdBy": { * "memberId": "ea3d74df-b7dc-4ca1-a7c9-c416b9017a86" * }, * "_createdDate": "2023-02-22T15:49:04.627Z", * "_updatedDate": "2023-04-30T05:51:13.309Z", * "payNow": { * "subtotal": { * "amount": "100", * "convertedAmount": "100", * "formattedAmount": "$100.00", * "formattedConvertedAmount": "$100.00" * }, * "shipping": { * "amount": "0", * "convertedAmount": "0", * "formattedAmount": "$0.00", * "formattedConvertedAmount": "$0.00" * }, * "tax": { * "amount": "0", * "convertedAmount": "0", * "formattedAmount": "$0.00", * "formattedConvertedAmount": "$0.00" * }, * "discount": { * "amount": "0", * "convertedAmount": "0", * "formattedAmount": "$0.00", * "formattedConvertedAmount": "$0.00" * }, * "total": { * "amount": "100", * "convertedAmount": "100", * "formattedAmount": "$100.00", * "formattedConvertedAmount": "$100.00" * }, * "additionalFees": { * "amount": "0", * "convertedAmount": "0", * "formattedAmount": "$0.00", * "formattedConvertedAmount": "$0.00" * } * }, * "payLater": { * "subtotal": { * "amount": "0", * "convertedAmount": "0", * "formattedAmount": "$0.00", * "formattedConvertedAmount": "$0.00" * }, * "shipping": { * "amount": "0", * "convertedAmount": "0", * "formattedAmount": "$0.00", * "formattedConvertedAmount": "$0.00" * }, * "tax": { * "amount": "0", * "convertedAmount": "0", * "formattedAmount": "$0.00", * "formattedConvertedAmount": "$0.00" * }, * "discount": { * "amount": "0", * "convertedAmount": "0", * "formattedAmount": "$0.00", * "formattedConvertedAmount": "$0.00" * }, * "total": { * "amount": "0", * "convertedAmount": "0", * "formattedAmount": "$0.00", * "formattedConvertedAmount": "$0.00" * }, * "additionalFees": { * "amount": "0", * "convertedAmount": "0", * "formattedAmount": "$0.00", * "formattedConvertedAmount": "$0.00" * } * }, * "membershipOptions": { * "eligibleMemberships": [], * "invalidMemberships": [], * "selectedMemberships": { * "memberships": [] * } * }, * "additionalFees": [], * } * } */ ``` ### updateLineItemsQuantity (self-hosted) Self-hosted SDK calls require you to [create a client](https://dev.wix.com/docs/sdk/articles/work-with-the-sdk/about-the-wix-client.md). ```javascript import { createClient } from '@wix/sdk'; import { checkout } from '@wix/ecom'; // Import the auth strategy for the relevant access type // Import the relevant host module if needed const myWixClient = createClient ({ modules: { checkout }, // Include the auth strategy and host as relevant }); async function updateLineItemsQuantity(_id,lineItems) { const response = await myWixClient.checkout.updateLineItemsQuantity(_id,lineItems); }; ``` --- --- > Portal Navigation: > > - Append `.md` to any URL under `https://dev.wix.com/docs/` to get its markdown version. > - Pages are either content pages (article or reference text) or menu pages (a list of links to child pages). > - To get a menu page, truncate any URL to a parent path and append `.md` (e.g. `https://dev.wix.com/docs/sdk.md`, `https://dev.wix.com/docs/sdk/core-modules.md`). > - Top-level index of all portals: https://dev.wix.com/docs/llms.txt > - Full concatenated docs: https://dev.wix.com/docs/llms-full.txt # Package: checkout # Namespace: checkout # Webhook link: https://dev.wix.com/docs/api-reference/business-solutions/e-commerce/purchase-flow/checkout/checkout/checkout-marked-as-completed.md ## Introduction Triggered when an order created from this checkout is successfully paid for or when a checkout is marked as completed. --- ## REST API ### Examples ```curl { "id": "1ca9c89a-7d88-4613-808a-6d7878e06450", "slug": "completed", "entityFqdn": "wix.ecom.v1.checkout", "entityId": "ddbeb7fc-fab7-4ab8-9ce2-f87a8f5f4327", "actionEvent": { "body": { "checkout": { "additionalFees": [], "cartId": "5f000867-100a-445c-968d-88368d263da5", "lineItems": [ { "physicalProperties": { "sku": "217537123517253", "shippable": true }, "quantity": 1, "paymentOption": "FULL_PAYMENT_ONLINE", "lineItemPrice": { "amount": "30", "convertedAmount": "30", "formattedAmount": "$30.00", "formattedConvertedAmount": "$30.00" }, "url": { "relativePath": "/product-page/watch", "url": "https://roysha.wixsite.com/ep-tester" }, "price": { "amount": "30", "convertedAmount": "30", "formattedAmount": "$30.00", "formattedConvertedAmount": "$30.00" }, "totalPriceBeforeTax": { "amount": "30", "convertedAmount": "30", "formattedAmount": "$30.00", "formattedConvertedAmount": "$30.00" }, "availability": { "status": "AVAILABLE", "quantityAvailable": 10 }, "totalPriceAfterTax": { "amount": "30", "convertedAmount": "30", "formattedAmount": "$30.00", "formattedConvertedAmount": "$30.00" }, "priceBeforeDiscounts": { "amount": "30", "convertedAmount": "30", "formattedAmount": "$30.00", "formattedConvertedAmount": "$30.00" }, "id": "00000000-0000-0000-0000-000000000001", "fullPrice": { "amount": "30", "convertedAmount": "30", "formattedAmount": "$30.00", "formattedConvertedAmount": "$30.00" }, "itemType": { "preset": "PHYSICAL" }, "rootCatalogItemId": "1a2d7e83-4bef-31d5-09e1-3326ee271c09", "taxDetails": { "taxableAmount": { "amount": "30", "convertedAmount": "30", "formattedAmount": "$30.00", "formattedConvertedAmount": "$30.00" }, "taxRate": "0", "totalTax": { "amount": "0", "convertedAmount": "0", "formattedAmount": "$0.00", "formattedConvertedAmount": "$0.00" }, "rateBreakdown": [] }, "media": { "id": "3c76e2_8891bbe3372a428aac976ac59aa0ac74~mv2.jpg", "url": "https://static.wixstatic.com/media/3c76e2_8891bbe3372a428aac976ac59aa0ac74~mv2.jpg", "height": 1000, "width": 1000 }, "productName": { "original": "Watch", "translated": "Watch" }, "descriptionLines": [ { "name": { "original": "Size", "translated": "Size" }, "plainText": { "original": "Medium", "translated": "Medium" } }, { "name": { "original": "Color", "translated": "Color" }, "colorInfo": { "original": "Grey", "translated": "Grey", "code": "rgb(128, 128, 128)" } } ], "catalogReference": { "catalogItemId": "1a2d7e83-4bef-31d5-09e1-3326ee271c09", "appId": "215238eb-22a5-4c36-9e7b-e7c08025e04e", "options": { "options": { "Size": "Medium", "Color": "Grey" }, "variantId": "132b84e8-aab8-47a1-a1f6-2c47557b64a4" } }, "discount": { "amount": "0", "convertedAmount": "0", "formattedAmount": "$0.00", "formattedConvertedAmount": "$0.00" } }, { "physicalProperties": { "sku": "364115376135191", "shippable": true }, "quantity": 2, "paymentOption": "FULL_PAYMENT_ONLINE", "lineItemPrice": { "amount": "20", "convertedAmount": "20", "formattedAmount": "$20.00", "formattedConvertedAmount": "$20.00" }, "url": { "relativePath": "/product-page/shirt", "url": "https://roysha.wixsite.com/ep-tester" }, "price": { "amount": "10", "convertedAmount": "10", "formattedAmount": "$10.00", "formattedConvertedAmount": "$10.00" }, "totalPriceBeforeTax": { "amount": "10", "convertedAmount": "10", "formattedAmount": "$10.00", "formattedConvertedAmount": "$10.00" }, "availability": { "status": "AVAILABLE" }, "totalPriceAfterTax": { "amount": "10", "convertedAmount": "10", "formattedAmount": "$10.00", "formattedConvertedAmount": "$10.00" }, "priceBeforeDiscounts": { "amount": "10", "convertedAmount": "10", "formattedAmount": "$10.00", "formattedConvertedAmount": "$10.00" }, "id": "00000000-0000-0000-0000-000000000002", "fullPrice": { "amount": "10", "convertedAmount": "10", "formattedAmount": "$10.00", "formattedConvertedAmount": "$10.00" }, "itemType": { "preset": "PHYSICAL" }, "rootCatalogItemId": "c8539b66-7a44-fe18-affc-afec4be8562a", "taxDetails": { "taxableAmount": { "amount": "10", "convertedAmount": "10", "formattedAmount": "$10.00", "formattedConvertedAmount": "$10.00" }, "taxRate": "0", "totalTax": { "amount": "0", "convertedAmount": "0", "formattedAmount": "$0.00", "formattedConvertedAmount": "$0.00" }, "rateBreakdown": [] }, "media": { "id": "3c76e2_c5331f937348492a97df87b0a3b34ea4~mv2.jpg", "url": "https://static.wixstatic.com/media/3c76e2_c5331f937348492a97df87b0a3b34ea4~mv2.jpg", "height": 1000, "width": 1000 }, "productName": { "original": "Shirt", "translated": "Shirt" }, "descriptionLines": [], "catalogReference": { "catalogItemId": "c8539b66-7a44-fe18-affc-afec4be8562a", "appId": "215238eb-22a5-4c36-9e7b-e7c08025e04e", "options": { "options": {}, "variantId": "00000000-0000-0000-0000-000000000000" } }, "discount": { "amount": "10", "convertedAmount": "10", "formattedAmount": "$10.00", "formattedConvertedAmount": "$10.00" } } ], "siteLanguage": "en", "calculationErrors": { "orderValidationErrors": [] }, "shippingInfo": { "shippingDestination": { "address": { "city": "New York", "countryFullname": "United States", "subdivisionFullname": "New York", "addressLine": "525 5th Avenue", "country": "US", "postalCode": "10173", "subdivision": "US-NY" }, "contactDetails": { "firstName": "Jane", "lastName": "Doe", "phone": "0555555555" } }, "selectedCarrierServiceOption": { "requestedShippingOption": true, "code": "ed5bbce2-9533-dff4-7db0-13702fd139c5", "cost": { "totalPriceAfterTax": { "amount": "10", "convertedAmount": "10", "formattedAmount": "$10.00", "formattedConvertedAmount": "$10.00" }, "totalPriceBeforeTax": { "amount": "10", "convertedAmount": "10", "formattedAmount": "$10.00", "formattedConvertedAmount": "$10.00" }, "taxDetails": { "taxRate": "0", "totalTax": { "amount": "0", "convertedAmount": "0", "formattedAmount": "$0.00", "formattedConvertedAmount": "$0.00" }, "rateBreakdown": [] }, "price": { "amount": "10", "convertedAmount": "10", "formattedAmount": "$10.00", "formattedConvertedAmount": "$10.00" } }, "logistics": { "deliveryTime": "" }, "carrierId": "c8a08776-c095-4dec-8553-8f9698d86adc", "otherCharges": [], "title": "Standard US Shipping" }, "region": { "id": "009fbe5d-89d3-7825-cbbf-1aab4d908b73", "name": "USA shipping" }, "carrierServiceOptions": [ { "carrierId": "c8a08776-c095-4dec-8553-8f9698d86adc", "shippingOptions": [ { "code": "ed5bbce2-9533-dff4-7db0-13702fd139c5", "title": "Standard US Shipping", "logistics": { "deliveryTime": "" }, "cost": { "price": { "amount": "10", "convertedAmount": "10", "formattedAmount": "$10.00", "formattedConvertedAmount": "$10.00" }, "otherCharges": [] } } ] } ] }, "channelType": "WEB", "appliedDiscounts": [ { "discountType": "GLOBAL", "lineItemIds": [], "coupon": { "name": "SUMMERSALE10", "amount": { "amount": "10", "convertedAmount": "10", "formattedAmount": "$10.00", "formattedConvertedAmount": "$10.00" }, "code": "SUMMERSALE10", "id": "fbb94b06-7447-4161-9c48-59bfcdc39e77", "couponType": "MoneyOff" } } ], "customFields": [], "weightUnit": "KG", "priceSummary": { "additionalFees": { "amount": "0", "convertedAmount": "0", "formattedAmount": "$0.00", "formattedConvertedAmount": "$0.00" }, "tax": { "amount": "0", "convertedAmount": "0", "formattedAmount": "$0.00", "formattedConvertedAmount": "$0.00" }, "total": { "amount": "50", "convertedAmount": "50", "formattedAmount": "$50.00", "formattedConvertedAmount": "$50.00" }, "subtotal": { "amount": "50", "convertedAmount": "50", "formattedAmount": "$50.00", "formattedConvertedAmount": "$50.00" }, "discount": { "amount": "10", "convertedAmount": "10", "formattedAmount": "$10.00", "formattedConvertedAmount": "$10.00" }, "shipping": { "amount": "10", "convertedAmount": "10", "formattedAmount": "$10.00", "formattedConvertedAmount": "$10.00" } }, "id": "ddbeb7fc-fab7-4ab8-9ce2-f87a8f5f4327", "completed": true, "billingInfo": { "address": { "city": "New York", "countryFullname": "United States", "subdivisionFullname": "New York", "addressLine": "525 5th Avenue", "country": "US", "postalCode": "10173", "subdivision": "US-NY" }, "contactDetails": { "firstName": "Jane", "lastName": "Doe", "phone": "0555555555" } }, "buyerInfo": { "contactId": "24de6f0b-60ce-4faa-9138-2e39f1415615", "email": "janedoe@gmail.com", "visitorId": "4c7ce95c-9fb3-417d-9f02-b41e82b841f7" }, "payNow": { "additionalFees": { "amount": "0", "convertedAmount": "0", "formattedAmount": "$0.00", "formattedConvertedAmount": "$0.00" }, "tax": { "amount": "0", "convertedAmount": "0", "formattedAmount": "$0.00", "formattedConvertedAmount": "$0.00" }, "total": { "amount": "50", "convertedAmount": "50", "formattedAmount": "$50.00", "formattedConvertedAmount": "$50.00" }, "subtotal": { "amount": "50", "convertedAmount": "50", "formattedAmount": "$50.00", "formattedConvertedAmount": "$50.00" }, "discount": { "amount": "10", "convertedAmount": "10", "formattedAmount": "$10.00", "formattedConvertedAmount": "$10.00" }, "shipping": { "amount": "10", "convertedAmount": "10", "formattedAmount": "$10.00", "formattedConvertedAmount": "$10.00" } }, "createdBy": { "visitorId": "4c7ce95c-9fb3-417d-9f02-b41e82b841f7" }, "taxIncludedInPrice": false, "currency": "USD", "payLater": { "additionalFees": { "amount": "0", "convertedAmount": "0", "formattedAmount": "$0.00", "formattedConvertedAmount": "$0.00" }, "tax": { "amount": "0", "convertedAmount": "0", "formattedAmount": "$0.00", "formattedConvertedAmount": "$0.00" }, "total": { "amount": "0", "convertedAmount": "0", "formattedAmount": "$0.00", "formattedConvertedAmount": "$0.00" }, "subtotal": { "amount": "0", "convertedAmount": "0", "formattedAmount": "$0.00", "formattedConvertedAmount": "$0.00" }, "discount": { "amount": "0", "convertedAmount": "0", "formattedAmount": "$0.00", "formattedConvertedAmount": "$0.00" }, "shipping": { "amount": "0", "convertedAmount": "0", "formattedAmount": "$0.00", "formattedConvertedAmount": "$0.00" } }, "updatedDate": "2022-12-12T13:43:15.132Z", "conversionCurrency": "USD", "buyerLanguage": "en", "createdDate": "2022-12-12T13:36:40.690Z" } } }, "eventTime": "2022-12-12T13:43:15.139746Z", "triggeredByAnonymizeRequest": false } ``` --- ## JavaScript SDK ### Examples ```javascript import { checkout } from '@wix/ecom'; checkout.onCheckoutCompleted((event) => { // handle your event here }); ``` ```javascript import { createClient, AppStrategy } from '@wix/sdk'; import { checkout } from '@wix/ecom'; const wixClient = createClient({ auth: AppStrategy({ appId: 'MY-APP-ID', publicKey: 'YOUR_APP_PUBLIC_KEY', }), modules: { checkout, }, }); wixClient.checkout.onCheckoutCompleted((event) => { // handle your event here }); ``` --- --- > Portal Navigation: > > - Append `.md` to any URL under `https://dev.wix.com/docs/` to get its markdown version. > - Pages are either content pages (article or reference text) or menu pages (a list of links to child pages). > - To get a menu page, truncate any URL to a parent path and append `.md` (e.g. `https://dev.wix.com/docs/sdk.md`, `https://dev.wix.com/docs/sdk/core-modules.md`). > - Top-level index of all portals: https://dev.wix.com/docs/llms.txt > - Full concatenated docs: https://dev.wix.com/docs/llms-full.txt # Package: checkout # Namespace: checkout # Webhook link: https://dev.wix.com/docs/api-reference/business-solutions/e-commerce/purchase-flow/checkout/checkout/checkout-created.md ## Introduction Triggered when a checkout is created. --- ## REST API ### Examples ```curl { "entityId": "ddbeb7fc-fab7-4ab8-9ce2-f87a8f5f4327", "slug": "created", "id": "51569a05-8a0a-4cba-bed3-d733b6044d32", "entityEventSequence": "1", "createdEvent": { "entity": { "additionalFees": [], "cartId": "5f000867-100a-445c-968d-88368d263da5", "lineItems": [ { "physicalProperties": { "sku": "217537123517253", "shippable": true }, "quantity": 1, "paymentOption": "FULL_PAYMENT_ONLINE", "lineItemPrice": { "amount": "30", "convertedAmount": "30", "formattedAmount": "$30.00", "formattedConvertedAmount": "$30.00" }, "url": { "relativePath": "/product-page/watch", "url": "https://example.wixsite.com/ep-tester" }, "price": { "amount": "30", "convertedAmount": "30", "formattedAmount": "$30.00", "formattedConvertedAmount": "$30.00" }, "totalPriceBeforeTax": { "amount": "30", "convertedAmount": "30", "formattedAmount": "$30.00", "formattedConvertedAmount": "$30.00" }, "availability": { "status": "AVAILABLE", "quantityAvailable": 10 }, "totalPriceAfterTax": { "amount": "30", "convertedAmount": "30", "formattedAmount": "$30.00", "formattedConvertedAmount": "$30.00" }, "priceBeforeDiscounts": { "amount": "30", "convertedAmount": "30", "formattedAmount": "$30.00", "formattedConvertedAmount": "$30.00" }, "id": "00000000-0000-0000-0000-000000000001", "fullPrice": { "amount": "30", "convertedAmount": "30", "formattedAmount": "$30.00", "formattedConvertedAmount": "$30.00" }, "itemType": { "preset": "PHYSICAL" }, "rootCatalogItemId": "1a2d7e83-4bef-31d5-09e1-3326ee271c09", "taxDetails": { "taxableAmount": { "amount": "30", "convertedAmount": "30", "formattedAmount": "$30.00", "formattedConvertedAmount": "$30.00" }, "taxRate": "0", "totalTax": { "amount": "0", "convertedAmount": "0", "formattedAmount": "$0.00", "formattedConvertedAmount": "$0.00" }, "rateBreakdown": [] }, "media": { "id": "3c76e2_8891bbe3372a428aac976ac59aa0ac74~mv2.jpg", "url": "https://static.wixstatic.com/media/3c76e2_8891bbe3372a428aac976ac59aa0ac74~mv2.jpg", "height": 1000, "width": 1000 }, "productName": { "original": "Watch", "translated": "Watch" }, "descriptionLines": [ { "name": { "original": "Size", "translated": "Size" }, "plainText": { "original": "Medium", "translated": "Medium" } }, { "name": { "original": "Color", "translated": "Color" }, "colorInfo": { "original": "Grey", "translated": "Grey", "code": "rgb(128, 128, 128)" } } ], "catalogReference": { "catalogItemId": "1a2d7e83-4bef-31d5-09e1-3326ee271c09", "appId": "215238eb-22a5-4c36-9e7b-e7c08025e04e", "options": { "options": { "Size": "Medium", "Color": "Grey" }, "variantId": "132b84e8-aab8-47a1-a1f6-2c47557b64a4" } }, "discount": { "amount": "0", "convertedAmount": "0", "formattedAmount": "$0.00", "formattedConvertedAmount": "$0.00" } }, { "physicalProperties": { "sku": "364115376135191", "shippable": true }, "quantity": 2, "paymentOption": "FULL_PAYMENT_ONLINE", "lineItemPrice": { "amount": "20", "convertedAmount": "20", "formattedAmount": "$20.00", "formattedConvertedAmount": "$20.00" }, "url": { "relativePath": "/product-page/shirt", "url": "https://example.wixsite.com/ep-tester" }, "price": { "amount": "10", "convertedAmount": "10", "formattedAmount": "$10.00", "formattedConvertedAmount": "$10.00" }, "totalPriceBeforeTax": { "amount": "10", "convertedAmount": "10", "formattedAmount": "$10.00", "formattedConvertedAmount": "$10.00" }, "availability": { "status": "AVAILABLE" }, "totalPriceAfterTax": { "amount": "10", "convertedAmount": "10", "formattedAmount": "$10.00", "formattedConvertedAmount": "$10.00" }, "priceBeforeDiscounts": { "amount": "10", "convertedAmount": "10", "formattedAmount": "$10.00", "formattedConvertedAmount": "$10.00" }, "id": "00000000-0000-0000-0000-000000000002", "fullPrice": { "amount": "10", "convertedAmount": "10", "formattedAmount": "$10.00", "formattedConvertedAmount": "$10.00" }, "itemType": { "preset": "PHYSICAL" }, "rootCatalogItemId": "c8539b66-7a44-fe18-affc-afec4be8562a", "taxDetails": { "taxableAmount": { "amount": "10", "convertedAmount": "10", "formattedAmount": "$10.00", "formattedConvertedAmount": "$10.00" }, "taxRate": "0", "totalTax": { "amount": "0", "convertedAmount": "0", "formattedAmount": "$0.00", "formattedConvertedAmount": "$0.00" }, "rateBreakdown": [] }, "media": { "id": "3c76e2_c5331f937348492a97df87b0a3b34ea4~mv2.jpg", "url": "https://static.wixstatic.com/media/3c76e2_c5331f937348492a97df87b0a3b34ea4~mv2.jpg", "height": 1000, "width": 1000 }, "productName": { "original": "Shirt", "translated": "Shirt" }, "descriptionLines": [], "catalogReference": { "catalogItemId": "c8539b66-7a44-fe18-affc-afec4be8562a", "appId": "215238eb-22a5-4c36-9e7b-e7c08025e04e", "options": { "options": {}, "variantId": "00000000-0000-0000-0000-000000000000" } }, "discount": { "amount": "10", "convertedAmount": "10", "formattedAmount": "$10.00", "formattedConvertedAmount": "$10.00" } } ], "siteLanguage": "en", "calculationErrors": { "orderValidationErrors": [] }, "shippingInfo": { "shippingDestination": { "address": { "country": "US", "subdivision": "US-NY", "countryFullname": "United States", "subdivisionFullname": "New York" } }, "selectedCarrierServiceOption": { "requestedShippingOption": false, "code": "ed5bbce2-9533-dff4-7db0-13702fd139c5", "cost": { "totalPriceAfterTax": { "amount": "10", "convertedAmount": "10", "formattedAmount": "$10.00", "formattedConvertedAmount": "$10.00" }, "totalPriceBeforeTax": { "amount": "10", "convertedAmount": "10", "formattedAmount": "$10.00", "formattedConvertedAmount": "$10.00" }, "taxDetails": { "taxRate": "0", "totalTax": { "amount": "0", "convertedAmount": "0", "formattedAmount": "$0.00", "formattedConvertedAmount": "$0.00" }, "rateBreakdown": [] }, "price": { "amount": "10", "convertedAmount": "10", "formattedAmount": "$10.00", "formattedConvertedAmount": "$10.00" } }, "logistics": { "deliveryTime": "" }, "carrierId": "c8a08776-c095-4dec-8553-8f9698d86adc", "otherCharges": [], "title": "Standard US Shipping" }, "region": { "id": "009fbe5d-89d3-7825-cbbf-1aab4d908b73", "name": "USA shipping" }, "carrierServiceOptions": [ { "carrierId": "c8a08776-c095-4dec-8553-8f9698d86adc", "shippingOptions": [ { "code": "ed5bbce2-9533-dff4-7db0-13702fd139c5", "title": "Standard US Shipping", "logistics": { "deliveryTime": "" }, "cost": { "price": { "amount": "10", "convertedAmount": "10", "formattedAmount": "$10.00", "formattedConvertedAmount": "$10.00" }, "otherCharges": [] } } ] } ] }, "channelType": "WEB", "appliedDiscounts": [ { "discountType": "GLOBAL", "lineItemIds": [], "coupon": { "name": "SUMMERSALE10", "amount": { "amount": "10", "convertedAmount": "10", "formattedAmount": "$10.00", "formattedConvertedAmount": "$10.00" }, "code": "SUMMERSALE10", "id": "fbb94b06-7447-4161-9c48-59bfcdc39e77", "couponType": "MoneyOff" } } ], "customFields": [], "weightUnit": "KG", "priceSummary": { "additionalFees": { "amount": "0", "convertedAmount": "0", "formattedAmount": "$0.00", "formattedConvertedAmount": "$0.00" }, "tax": { "amount": "0", "convertedAmount": "0", "formattedAmount": "$0.00", "formattedConvertedAmount": "$0.00" }, "total": { "amount": "50", "convertedAmount": "50", "formattedAmount": "$50.00", "formattedConvertedAmount": "$50.00" }, "subtotal": { "amount": "50", "convertedAmount": "50", "formattedAmount": "$50.00", "formattedConvertedAmount": "$50.00" }, "discount": { "amount": "10", "convertedAmount": "10", "formattedAmount": "$10.00", "formattedConvertedAmount": "$10.00" }, "shipping": { "amount": "10", "convertedAmount": "10", "formattedAmount": "$10.00", "formattedConvertedAmount": "$10.00" } }, "id": "ddbeb7fc-fab7-4ab8-9ce2-f87a8f5f4327", "completed": false, "buyerInfo": { "visitorId": "4c7ce95c-9fb3-417d-9f02-b41e82b841f7" }, "payNow": { "additionalFees": { "amount": "0", "convertedAmount": "0", "formattedAmount": "$0.00", "formattedConvertedAmount": "$0.00" }, "tax": { "amount": "0", "convertedAmount": "0", "formattedAmount": "$0.00", "formattedConvertedAmount": "$0.00" }, "total": { "amount": "50", "convertedAmount": "50", "formattedAmount": "$50.00", "formattedConvertedAmount": "$50.00" }, "subtotal": { "amount": "50", "convertedAmount": "50", "formattedAmount": "$50.00", "formattedConvertedAmount": "$50.00" }, "discount": { "amount": "10", "convertedAmount": "10", "formattedAmount": "$10.00", "formattedConvertedAmount": "$10.00" }, "shipping": { "amount": "10", "convertedAmount": "10", "formattedAmount": "$10.00", "formattedConvertedAmount": "$10.00" } }, "createdBy": { "visitorId": "4c7ce95c-9fb3-417d-9f02-b41e82b841f7" }, "taxIncludedInPrice": false, "currency": "USD", "payLater": { "additionalFees": { "amount": "0", "convertedAmount": "0", "formattedAmount": "$0.00", "formattedConvertedAmount": "$0.00" }, "tax": { "amount": "0", "convertedAmount": "0", "formattedAmount": "$0.00", "formattedConvertedAmount": "$0.00" }, "total": { "amount": "0", "convertedAmount": "0", "formattedAmount": "$0.00", "formattedConvertedAmount": "$0.00" }, "subtotal": { "amount": "0", "convertedAmount": "0", "formattedAmount": "$0.00", "formattedConvertedAmount": "$0.00" }, "discount": { "amount": "0", "convertedAmount": "0", "formattedAmount": "$0.00", "formattedConvertedAmount": "$0.00" }, "shipping": { "amount": "0", "convertedAmount": "0", "formattedAmount": "$0.00", "formattedConvertedAmount": "$0.00" } }, "updatedDate": "2022-12-12T13:36:40.690Z", "conversionCurrency": "USD", "buyerLanguage": "en", "createdDate": "2022-12-12T13:36:40.690Z" } }, "entityFqdn": "wix.ecom.v1.checkout", "eventTime": "2022-12-12T13:36:40.699582Z", "triggeredByAnonymizeRequest": false } ``` --- ## JavaScript SDK ### Examples ```javascript import { checkout } from '@wix/ecom'; checkout.onCheckoutCreated((event) => { // handle your event here }); ``` ```javascript import { createClient, AppStrategy } from '@wix/sdk'; import { checkout } from '@wix/ecom'; const wixClient = createClient({ auth: AppStrategy({ appId: 'MY-APP-ID', publicKey: 'YOUR_APP_PUBLIC_KEY', }), modules: { checkout, }, }); wixClient.checkout.onCheckoutCreated((event) => { // handle your event here }); ``` --- --- > Portal Navigation: > > - Append `.md` to any URL under `https://dev.wix.com/docs/` to get its markdown version. > - Pages are either content pages (article or reference text) or menu pages (a list of links to child pages). > - To get a menu page, truncate any URL to a parent path and append `.md` (e.g. `https://dev.wix.com/docs/sdk.md`, `https://dev.wix.com/docs/sdk/core-modules.md`). > - Top-level index of all portals: https://dev.wix.com/docs/llms.txt > - Full concatenated docs: https://dev.wix.com/docs/llms-full.txt # Package: checkout # Namespace: checkout # Webhook link: https://dev.wix.com/docs/api-reference/business-solutions/e-commerce/purchase-flow/checkout/checkout/checkout-updated.md ## Introduction Triggered when a checkout is updated. --- ## REST API ### Examples ```curl { "entityId": "ddbeb7fc-fab7-4ab8-9ce2-f87a8f5f4327", "slug": "updated", "id": "69c3c6f4-9ed3-413b-b161-209029cc1a7a", "entityFqdn": "wix.ecom.v1.checkout", "entityEventSequence": "4", "updatedEvent": { "currentEntity": { "additionalFees": [], "cartId": "5f000867-100a-445c-968d-88368d263da5", "lineItems": [ { "physicalProperties": { "sku": "217537123517253", "shippable": true }, "quantity": 1, "paymentOption": "FULL_PAYMENT_ONLINE", "lineItemPrice": { "amount": "30", "convertedAmount": "30", "formattedAmount": "$30.00", "formattedConvertedAmount": "$30.00" }, "url": { "relativePath": "/product-page/watch", "url": "https://example.wixsite.com/ep-tester" }, "price": { "amount": "30", "convertedAmount": "30", "formattedAmount": "$30.00", "formattedConvertedAmount": "$30.00" }, "totalPriceBeforeTax": { "amount": "30", "convertedAmount": "30", "formattedAmount": "$30.00", "formattedConvertedAmount": "$30.00" }, "availability": { "status": "AVAILABLE", "quantityAvailable": 10 }, "totalPriceAfterTax": { "amount": "30", "convertedAmount": "30", "formattedAmount": "$30.00", "formattedConvertedAmount": "$30.00" }, "priceBeforeDiscounts": { "amount": "30", "convertedAmount": "30", "formattedAmount": "$30.00", "formattedConvertedAmount": "$30.00" }, "id": "00000000-0000-0000-0000-000000000001", "fullPrice": { "amount": "30", "convertedAmount": "30", "formattedAmount": "$30.00", "formattedConvertedAmount": "$30.00" }, "itemType": { "preset": "PHYSICAL" }, "rootCatalogItemId": "1a2d7e83-4bef-31d5-09e1-3326ee271c09", "taxDetails": { "taxableAmount": { "amount": "30", "convertedAmount": "30", "formattedAmount": "$30.00", "formattedConvertedAmount": "$30.00" }, "taxRate": "0", "totalTax": { "amount": "0", "convertedAmount": "0", "formattedAmount": "$0.00", "formattedConvertedAmount": "$0.00" }, "rateBreakdown": [] }, "media": { "id": "3c76e2_8891bbe3372a428aac976ac59aa0ac74~mv2.jpg", "url": "https://static.wixstatic.com/media/3c76e2_8891bbe3372a428aac976ac59aa0ac74~mv2.jpg", "height": 1000, "width": 1000 }, "productName": { "original": "Watch", "translated": "Watch" }, "descriptionLines": [ { "name": { "original": "Size", "translated": "Size" }, "plainText": { "original": "Medium", "translated": "Medium" } }, { "name": { "original": "Color", "translated": "Color" }, "colorInfo": { "original": "Grey", "translated": "Grey", "code": "rgb(128, 128, 128)" } } ], "catalogReference": { "catalogItemId": "1a2d7e83-4bef-31d5-09e1-3326ee271c09", "appId": "215238eb-22a5-4c36-9e7b-e7c08025e04e", "options": { "options": { "Size": "Medium", "Color": "Grey" }, "variantId": "132b84e8-aab8-47a1-a1f6-2c47557b64a4" } }, "discount": { "amount": "0", "convertedAmount": "0", "formattedAmount": "$0.00", "formattedConvertedAmount": "$0.00" } }, { "physicalProperties": { "sku": "364115376135191", "shippable": true }, "quantity": 2, "paymentOption": "FULL_PAYMENT_ONLINE", "lineItemPrice": { "amount": "20", "convertedAmount": "20", "formattedAmount": "$20.00", "formattedConvertedAmount": "$20.00" }, "url": { "relativePath": "/product-page/shirt", "url": "https://example.wixsite.com/ep-tester" }, "price": { "amount": "10", "convertedAmount": "10", "formattedAmount": "$10.00", "formattedConvertedAmount": "$10.00" }, "totalPriceBeforeTax": { "amount": "10", "convertedAmount": "10", "formattedAmount": "$10.00", "formattedConvertedAmount": "$10.00" }, "availability": { "status": "AVAILABLE" }, "totalPriceAfterTax": { "amount": "10", "convertedAmount": "10", "formattedAmount": "$10.00", "formattedConvertedAmount": "$10.00" }, "priceBeforeDiscounts": { "amount": "10", "convertedAmount": "10", "formattedAmount": "$10.00", "formattedConvertedAmount": "$10.00" }, "id": "00000000-0000-0000-0000-000000000002", "fullPrice": { "amount": "10", "convertedAmount": "10", "formattedAmount": "$10.00", "formattedConvertedAmount": "$10.00" }, "itemType": { "preset": "PHYSICAL" }, "rootCatalogItemId": "c8539b66-7a44-fe18-affc-afec4be8562a", "taxDetails": { "taxableAmount": { "amount": "10", "convertedAmount": "10", "formattedAmount": "$10.00", "formattedConvertedAmount": "$10.00" }, "taxRate": "0", "totalTax": { "amount": "0", "convertedAmount": "0", "formattedAmount": "$0.00", "formattedConvertedAmount": "$0.00" }, "rateBreakdown": [] }, "media": { "id": "3c76e2_c5331f937348492a97df87b0a3b34ea4~mv2.jpg", "url": "https://static.wixstatic.com/media/3c76e2_c5331f937348492a97df87b0a3b34ea4~mv2.jpg", "height": 1000, "width": 1000 }, "productName": { "original": "Shirt", "translated": "Shirt" }, "descriptionLines": [], "catalogReference": { "catalogItemId": "c8539b66-7a44-fe18-affc-afec4be8562a", "appId": "215238eb-22a5-4c36-9e7b-e7c08025e04e", "options": { "options": {}, "variantId": "00000000-0000-0000-0000-000000000000" } }, "discount": { "amount": "10", "convertedAmount": "10", "formattedAmount": "$10.00", "formattedConvertedAmount": "$10.00" } } ], "siteLanguage": "en", "calculationErrors": { "orderValidationErrors": [] }, "shippingInfo": { "shippingDestination": { "address": { "city": "New York", "countryFullname": "United States", "subdivisionFullname": "New York", "addressLine": "525 5th Avenue", "country": "US", "postalCode": "10173", "subdivision": "US-NY" }, "contactDetails": { "firstName": "Jane", "lastName": "Doe", "phone": "0555555555" } }, "selectedCarrierServiceOption": { "requestedShippingOption": true, "code": "ed5bbce2-9533-dff4-7db0-13702fd139c5", "cost": { "totalPriceAfterTax": { "amount": "10", "convertedAmount": "10", "formattedAmount": "$10.00", "formattedConvertedAmount": "$10.00" }, "totalPriceBeforeTax": { "amount": "10", "convertedAmount": "10", "formattedAmount": "$10.00", "formattedConvertedAmount": "$10.00" }, "taxDetails": { "taxRate": "0", "totalTax": { "amount": "0", "convertedAmount": "0", "formattedAmount": "$0.00", "formattedConvertedAmount": "$0.00" }, "rateBreakdown": [] }, "price": { "amount": "10", "convertedAmount": "10", "formattedAmount": "$10.00", "formattedConvertedAmount": "$10.00" } }, "logistics": { "deliveryTime": "" }, "carrierId": "c8a08776-c095-4dec-8553-8f9698d86adc", "otherCharges": [], "title": "Standard US Shipping" }, "region": { "id": "009fbe5d-89d3-7825-cbbf-1aab4d908b73", "name": "USA shipping" }, "carrierServiceOptions": [ { "carrierId": "c8a08776-c095-4dec-8553-8f9698d86adc", "shippingOptions": [ { "code": "ed5bbce2-9533-dff4-7db0-13702fd139c5", "title": "Standard US Shipping", "logistics": { "deliveryTime": "" }, "cost": { "price": { "amount": "10", "convertedAmount": "10", "formattedAmount": "$10.00", "formattedConvertedAmount": "$10.00" }, "otherCharges": [] } } ] } ] }, "channelType": "WEB", "appliedDiscounts": [ { "discountType": "GLOBAL", "lineItemIds": [], "coupon": { "name": "SUMMERSALE10", "amount": { "amount": "10", "convertedAmount": "10", "formattedAmount": "$10.00", "formattedConvertedAmount": "$10.00" }, "code": "SUMMERSALE10", "id": "fbb94b06-7447-4161-9c48-59bfcdc39e77", "couponType": "MoneyOff" } } ], "customFields": [], "weightUnit": "KG", "priceSummary": { "additionalFees": { "amount": "0", "convertedAmount": "0", "formattedAmount": "$0.00", "formattedConvertedAmount": "$0.00" }, "tax": { "amount": "0", "convertedAmount": "0", "formattedAmount": "$0.00", "formattedConvertedAmount": "$0.00" }, "total": { "amount": "50", "convertedAmount": "50", "formattedAmount": "$50.00", "formattedConvertedAmount": "$50.00" }, "subtotal": { "amount": "50", "convertedAmount": "50", "formattedAmount": "$50.00", "formattedConvertedAmount": "$50.00" }, "discount": { "amount": "10", "convertedAmount": "10", "formattedAmount": "$10.00", "formattedConvertedAmount": "$10.00" }, "shipping": { "amount": "10", "convertedAmount": "10", "formattedAmount": "$10.00", "formattedConvertedAmount": "$10.00" } }, "id": "ddbeb7fc-fab7-4ab8-9ce2-f87a8f5f4327", "completed": false, "billingInfo": { "address": { "city": "New York", "countryFullname": "United States", "subdivisionFullname": "New York", "addressLine": "525 5th Avenue", "country": "US", "postalCode": "10173", "subdivision": "US-NY" }, "contactDetails": { "firstName": "Jane", "lastName": "Doe", "phone": "0555555555" } }, "buyerInfo": { "contactId": "24de6f0b-60ce-4faa-9138-2e39f1415615", "email": "janedoe@gmail.com", "visitorId": "4c7ce95c-9fb3-417d-9f02-b41e82b841f7" }, "payNow": { "additionalFees": { "amount": "0", "convertedAmount": "0", "formattedAmount": "$0.00", "formattedConvertedAmount": "$0.00" }, "tax": { "amount": "0", "convertedAmount": "0", "formattedAmount": "$0.00", "formattedConvertedAmount": "$0.00" }, "total": { "amount": "50", "convertedAmount": "50", "formattedAmount": "$50.00", "formattedConvertedAmount": "$50.00" }, "subtotal": { "amount": "50", "convertedAmount": "50", "formattedAmount": "$50.00", "formattedConvertedAmount": "$50.00" }, "discount": { "amount": "10", "convertedAmount": "10", "formattedAmount": "$10.00", "formattedConvertedAmount": "$10.00" }, "shipping": { "amount": "10", "convertedAmount": "10", "formattedAmount": "$10.00", "formattedConvertedAmount": "$10.00" } }, "createdBy": { "visitorId": "4c7ce95c-9fb3-417d-9f02-b41e82b841f7" }, "taxIncludedInPrice": false, "currency": "USD", "payLater": { "additionalFees": { "amount": "0", "convertedAmount": "0", "formattedAmount": "$0.00", "formattedConvertedAmount": "$0.00" }, "tax": { "amount": "0", "convertedAmount": "0", "formattedAmount": "$0.00", "formattedConvertedAmount": "$0.00" }, "total": { "amount": "0", "convertedAmount": "0", "formattedAmount": "$0.00", "formattedConvertedAmount": "$0.00" }, "subtotal": { "amount": "0", "convertedAmount": "0", "formattedAmount": "$0.00", "formattedConvertedAmount": "$0.00" }, "discount": { "amount": "0", "convertedAmount": "0", "formattedAmount": "$0.00", "formattedConvertedAmount": "$0.00" }, "shipping": { "amount": "0", "convertedAmount": "0", "formattedAmount": "$0.00", "formattedConvertedAmount": "$0.00" } }, "updatedDate": "2022-12-12T13:41:51.061Z", "conversionCurrency": "USD", "buyerLanguage": "en", "createdDate": "2022-12-12T13:36:40.690Z" } }, "eventTime": "2022-12-12T13:41:51.071921Z", "triggeredByAnonymizeRequest": false } ``` --- ## JavaScript SDK ### Examples ```javascript import { checkout } from '@wix/ecom'; checkout.onCheckoutUpdated((event) => { // handle your event here }); ``` ```javascript import { createClient, AppStrategy } from '@wix/sdk'; import { checkout } from '@wix/ecom'; const wixClient = createClient({ auth: AppStrategy({ appId: 'MY-APP-ID', publicKey: 'YOUR_APP_PUBLIC_KEY', }), modules: { checkout, }, }); wixClient.checkout.onCheckoutUpdated((event) => { // handle your event here }); ``` --- --- > Portal Navigation: > > - Append `.md` to any URL under `https://dev.wix.com/docs/` to get its markdown version. > - Pages are either content pages (article or reference text) or menu pages (a list of links to child pages). > - To get a menu page, truncate any URL to a parent path and append `.md` (e.g. `https://dev.wix.com/docs/sdk.md`, `https://dev.wix.com/docs/sdk/core-modules.md`). > - Top-level index of all portals: https://dev.wix.com/docs/llms.txt > - Full concatenated docs: https://dev.wix.com/docs/llms-full.txt ## Resource: Introduction ## Article: Introduction ## Article Link: https://dev.wix.com/docs/api-reference/business-solutions/e-commerce/purchase-flow/checkout/checkout/introduction.md ## Article Content: # About the eCommerce Checkout API The checkout is the second stage of the eCommerce purchase flow: cart; checkout; order. A checkout holds information about items to be purchased, price and tax summaries, shipping and billing info, any applied discounts, and more. The eCommerce Checkout API currently provides functionality for [retrieving](invalid-url) checkouts and listening to events when a checkout is [created](invalid-url), [updated](invalid-url), and [marked as completed](invalid-url). @sdk_package_setup --- > Portal Navigation: > > - Append `.md` to any URL under `https://dev.wix.com/docs/` to get its markdown version. > - Pages are either content pages (article or reference text) or menu pages (a list of links to child pages). > - To get a menu page, truncate any URL to a parent path and append `.md` (e.g. `https://dev.wix.com/docs/sdk.md`, `https://dev.wix.com/docs/sdk/core-modules.md`). > - Top-level index of all portals: https://dev.wix.com/docs/llms.txt > - Full concatenated docs: https://dev.wix.com/docs/llms-full.txt ## Resource: Stores Cart to eCommerce Checkout Object Conversion ## Article: Stores Cart to eCommerce Checkout Object Conversion ## Article Link: https://dev.wix.com/docs/api-reference/business-solutions/e-commerce/purchase-flow/checkout/checkout/stores-cart-to-e-commerce-checkout-object-conversion.md ## Article Content: # Stores Cart to eCommerce Checkout Conversion Table To help with migration to the eCommerce API, refer to the table below for differences between the Stores Cart and eCommerce Checkout objects. The address object used in the eCommerce APIs is slightly different to the one used in the Stores APIs. For more details, refer to the [address object conversion table](https://dev.wix.com/docs/api-reference/business-solutions/e-commerce/purchase-flow/checkout/checkout/address-object-conversion.md). | Stores Cart Object | eCommerce Checkout Object | | ------------------------------------------------|-----------------------------------------------------------| | `id` | - | | `status` | - | | `weightUnit` | `weightUnit` | | `buyerNote` | `buyerNote` | | `currency.code` | `currency` | | `currency.symbol` | For every price returned, we also provide the formatted price under `checkout.priceSummary`. | | `convertedCurrency.code` | `conversionCurrency` | | `convertedCurrency.symbol` | For every converted price returned, we also provide the formatted converted price under `checkout.priceSummary`. | | `billingAddress.address`| `billingInfo.address` - See [address object conversion table](https://dev.wix.com/docs/api-reference/business-solutions/e-commerce/purchase-flow/checkout/checkout/address-object-conversion.md) for more details. | `billingAddress.contactDetails.firstName` | `billingInfo.contactDetails.firstName` | | `billingAddress.contactDetails.lastName` | `billingInfo.contactDetails.lastName` | | `billingAddress.contactDetails.phone` | `billingInfo.contactDetails.phone` | | `billingAddress.contactDetails.company` | `billingInfo.contactDetails.company` | | `billingAddress.contactDetails.vatId` | `billingInfo.contactDetails.vatId` | | `billingAddress.contactDetails.email` | `billingInfo.buyerInfo.email` | | `appliedCoupon.couponId` | `appliedDiscounts[i].coupon.id` | | `appliedCoupon.name` | `appliedDiscounts[i].coupon.name` | | `appliedCoupon.code` | `appliedDiscounts[i].coupon.code` | | `appliedCoupon.discountValue` | `appliedDiscounts[i].coupon.amount.amount` | | `appliedCoupon.convertedDiscountValue` | `appliedDiscounts[i].coupon.convertedAmount` | | `appliedCoupon.couponType` | No longer returned. | | `totals.subtotal` | `priceSummary.subtotal.amount` | | `totals.shipping` | `priceSummary.shipping.amount` | | `totals.tax` | `priceSummary.tax.amount` | | `totals.discount` | `priceSummary.discount.amount` | | `totals.total` | `priceSummary.total.amount` | | `totals.weight` | `lineItems[i].physicalProperties.weight` X `lineItems[i].quantity` and so on. | | `totals.quantity` | `lineItems[0].quantity` + `lineItems[1].quantity` + `lineItems[2].quantity` and so on. | | `convertedTotals.subtotal` | `priceSummary.subtotal.convertedAmount` | | `convertedTotals.shipping` | `priceSummary.shipping.convertedAmount` | | `convertedTotals.tax` | `priceSummary.tax.convertedAmount` | | `convertedTotals.discount` | `priceSummary.discount.convertedAmount` | | `convertedTotals.total` | `priceSummary.total.convertedAmount` | | `convertedTotals.weight` | No weight conversion in checkout. Same value as `cart.totals.weight`.| | `convertedTotals.quantity` | Same value as `cart.totals.quantity`. | | `shippingInfo.shippingRuleDetails.ruleId` | `ֿֿֿֿֿֿֿֿshippingInfo.region.id` | | `shippingInfo.shippingRuleDetails.optionId` | `ֿֿֿֿֿֿֿֿshippingInfo.selectedCarrierServiceOption.title` | | `shippingInfo.shippingRuleDetails.deliveryOption` | `ֿֿֿֿֿֿֿֿshippingInfo.selectedCarrierServiceOption.title` | | `shippingInfo.shippingRuleDetails.estimatedDeliveryTime` | `ֿֿֿֿֿֿֿֿshippingInfo.logistics.deliveryTime` | | `shippingInfo.pickupDetails.pickupAddress` | `shippingInfo.selectedCarrierServiceOption.logistics.pickupDetails.address` - See [address object conversion table](https://dev.wix.com/docs/api-reference/business-solutions/e-commerce/purchase-flow/checkout/checkout/address-object-conversion.md) for more details. | | `shippingInfo.pickupDetails.buyerDetails.firstName` | `shippingInfo.shippingDestination.contactDetails.firstName` | | `shippingInfo.pickupDetails.buyerDetails.lastName` | `shippingInfo.shippingDestination.contactDetails.lastName` | | `shippingInfo.pickupDetails.buyerDetails.email` | `buyerInfo.email` | | `shippingInfo.pickupDetails.buyerDetails.phone` | `shippingInfo.shippingDestination.contactDetails.phone` | | `shippingInfo.pickupDetails.pickupInstructions` | `shippingInfo.logistics.instructions` | | `shippingInfo.shippingAddress.address` | `shippingInfo.shippingDestination.address` - See [address object conversion table](https://dev.wix.com/docs/api-reference/business-solutions/e-commerce/purchase-flow/checkout/checkout/address-object-conversion.md) for more details. | | `shippingInfo.shippingAddress.contactDetails` | `shippingInfo.shippingDestination.contactDetails` | | | `buyerInfo.id` and `buyerInfo.identityType: CONTACT`| `buyerInfo.contactId` only. | | `buyerInfo.id` and `buyerInfo.identityType: VISITOR`| `buyerInfo.visitorId` only. | | `buyerInfo.id` and `buyerInfo.identityType: MEMBER` | `buyerInfo.memberId` only. | | `buyerInfo.email` | `buyerInfo.email` | | `buyerInfo.phone` | `billingInfo.contactDetails.phone` | | `buyerInfo.firstName` | `billingInfo.contactDetails.firstName` | | `buyerInfo.lastName` | `billingInfo.contactDetails.lastName` | | `lineItems[i].id` | `lineItems[i].id` - **Note:** this `id` is of type GUID. In the Stores Cart API, this `id` was of type Int32. | | `lineItems[i].productId` | `lineItems[i].catalogReference.catalogItemId` - See [Stores Catalog eCommerce Integration](https://dev.wix.com/docs/api-reference/business-solutions/stores/catalog-v1/catalog/e-commerce-integration.md) for more information. | `lineItems[i].name` | `lineItems[i].productName.original` | | `lineItems[i].quantity` | `lineItems[i].quantity` | | `lineItems[i].weight` | `lineItems[i].physicalProperties.weight` | | `lineItems[i].sku` | `lineItems[i].physicalProperties.sku` | | `lineItems[i].lineItemType: "PHYSICAL"` | `lineItems[i].itemType.preset: "PHYSICAL"` | | `lineItems[i].lineItemType: "DIGITAL"` | `lineItems[i].itemType.preset: "DIGITAL"` | | `lineItems[i].lineItemType: "CUSTOM_AMOUNT_ITEM` | `lineItems[i].itemType.custom` and `lineItems[i].catalogReference` is empty. | | `lineItems[i].notes` | `lineItems[i].descriptionLines[i].plainText.original` | | `lineItems[i].customTextFields` | `lineItems[i].descriptionLines` | | `lineItems[i].mediaItem.mediaType` | All line item media in the eCommerce Cart, Checkout, and Order APIs are image types. | `lineItems[i].mediaItem.url` | `lineItems[i].media.url` | | `lineItems[i].mediaItem.width` | `lineItems[i].media.width` | | `lineItems[i].mediaItem.height` | `lineItems[i].media.height` | | `lineItems[i].options` | `lineItems[i].catalogReference.options` - See [Stores Catalog eCommerce Integration](https://dev.wix.com/docs/api-reference/business-solutions/stores/catalog-v1/catalog/e-commerce-integration.md) for more information. | `lineItems[i].priceData.price` | `lineItems[i].price.amount` | | `lineItems[i].priceData.totalPrice` | `lineItems[i].price.amount` X `lineItems[i].quantity` | | `lineItems[i].convertedPriceData.price` | `lineItems[i].price.convertedAmount` | | `lineItems[i].convertedPriceData.totalPrice` | `lineItems[i].price.convertedAmount` X `lineItems[i].quantity` | --- > Portal Navigation: > > - Append `.md` to any URL under `https://dev.wix.com/docs/` to get its markdown version. > - Pages are either content pages (article or reference text) or menu pages (a list of links to child pages). > - To get a menu page, truncate any URL to a parent path and append `.md` (e.g. `https://dev.wix.com/docs/sdk.md`, `https://dev.wix.com/docs/sdk/core-modules.md`). > - Top-level index of all portals: https://dev.wix.com/docs/llms.txt > - Full concatenated docs: https://dev.wix.com/docs/llms-full.txt ## Resource: Address Object Conversion ## Article: Address Object Conversion ## Article Link: https://dev.wix.com/docs/api-reference/business-solutions/e-commerce/purchase-flow/checkout/checkout/address-object-conversion.md ## Article Content: # Address Object Conversion Table The eCommerce APIs use a different `address` object. Notably, fields related to contact information have been moved to an adjacent `contactDetails` object (for example, in `order.shippingInfo`). To help with conversion and migration, refer to the table below to check which fields have changed and how. > Note: in the eCommerce API, the buyer's email is only held in the `buyerInfo` field in the [eCommerce Order object](https://dev.wix.com/docs/api-reference/business-solutions/e-commerce/orders/orders/order-object.md). | Previous Address Object | eCommerce Address Field Location | Change | | ------------------------------------------------|--------------------------------------------------------------|-------------------| | `address.city` | `address.city` | | `address.email` | `buyerInfo.email` | | `address.zipCode` | `address.postalCode` | Field name | `address.country` | `address.country` | | `address.addressLine1` | `address.addressLine` | Field name | `address.addressLine2` | `address.addressLine2` | | `address.street` | `address.streetAddress` | Field name | `address.subdivision` | `address.subdivision` | | `address.fullName.firstName` | `contactDetails.firstName` | Moved to `contactDetails` object | `address.fullName.lastName` | `contactDetails.lastName` | Moved to `contactDetails` object | `address.phone` | `contactDetails.phone` | Moved to `contactDetails` object | `address.company` | `contactDetails.company` | Moved to `contactDetails` object | `address.vatId` | `contactDetails.vatId` | Moved to `contactDetails` object --- > Portal Navigation: > > - Append `.md` to any URL under `https://dev.wix.com/docs/` to get its markdown version. > - Pages are either content pages (article or reference text) or menu pages (a list of links to child pages). > - To get a menu page, truncate any URL to a parent path and append `.md` (e.g. `https://dev.wix.com/docs/sdk.md`, `https://dev.wix.com/docs/sdk/core-modules.md`). > - Top-level index of all portals: https://dev.wix.com/docs/llms.txt > - Full concatenated docs: https://dev.wix.com/docs/llms-full.txt # Resource: Checkout Templates # Type: Checkout Template Object # Link: https://dev.wix.com/docs/api-reference/business-solutions/e-commerce/purchase-flow/checkout/checkout-templates/checkout-template-object.md ## Description: A reusable template for creating checkouts with predefined line items, coupons, and customization settings. ## Schema: ```json Type: Checkout Template Object | type: CheckoutTemplate Description: A reusable template for creating checkouts with predefined line items, coupons, and customization settings. - name: id | type: string | description: Checkout template ID. - name: value | type: string | description: - name: status | type: string | description: Status of the checkout template. When `status` is `INACTIVE` checkouts will not be created with this template `id`. Instead, the endpoint will redirect to the domain site. Default: `ACTIVE` enum: ACTIVE, INACTIVE - name: customization | type: CheckoutCustomization | description: Custom settings to apply to the checkout page created from this template. - name: webClient | type: WebClientCustomization | description: Web client customizations. These customizations only apply to the standard Wix checkout page. - name: disabledContinueShoppingButton | type: boolean | description: Whether to disable the "Continue shopping" button. Default: `false` - name: disabledPolicyAgreementCheckbox | type: boolean | description: Whether to disable policy agreement checkout in the checkout page Default: `false` - name: lockedGiftCard | type: boolean | description: Whether to lock the ability to add or remove a gift card. Default: `false` - name: lockedCoupon | type: boolean | description: Whether to lock the ability to apply or remove a coupon code. Default: `false` - name: disabledManualPayment | type: boolean | description: Whether to disable manual payment option for this checkout. Default: `false` - name: lineItems | type: Array | description: Catalog line items. Max: 300 items - name: quantity | type: number | description: Item quantity. Min: `1`
        Max: `100000` - name: catalogReference | type: CatalogReference | description: Catalog and item reference. Holds IDs for the item and the catalog it came from, as well as further optional info. Optional for custom line items, which don't trigger the Catalog service plugin. - name: catalogItemId | type: string | description: ID of the item within the catalog it belongs to. - name: appId | type: string | description: ID of the app providing the catalog. You can get your app's ID from its page in the [app dashboard](https://dev.wix.com/dc3/my-apps/). For items from Wix catalogs, the following values always apply: + Wix Stores: `"215238eb-22a5-4c36-9e7b-e7c08025e04e"` + Wix Bookings: `"13d21c63-b5ec-5912-8397-c3a5ddb27a97"` + Wix Restaurants: `"9a5d83fd-8570-482e-81ab-cfa88942ee60"` - name: options | type: Struct | description: Additional item details in `key:value` pairs. Use this optional field for more specificity with item selection. The values of the `options` field differ depending on which catalog is providing the items. For Wix Stores products, learn more about integrating with [Catalog V3](https://dev.wix.com/docs/api-reference/business-solutions/stores/catalog-v3/e-commerce-integration.md) or [Catalog V1](https://dev.wix.com/docs/api-reference/business-solutions/stores/catalog-v1/catalog/e-commerce-integration.md), depending on [the version the site uses](https://dev.wix.com/docs/api-reference/business-solutions/stores/catalog-versioning/introduction.md). - name: catalogOverrideFields | type: CatalogOverrideFields | description: Overriding values for catalog item properties. - name: productName | type: ProductName | description: Item name. - name: price | type: string | description: Item price **after** discounts. - name: fullPrice | type: string | description: Item price **before** discounts. - name: descriptionLines | type: Array | description: Item description lines. Used when displaying the line item to customers. - name: physicalProperties | type: PhysicalProperties | description: Physical properties of the item. - name: image | type: Image | description: Item image. - name: paymentOption | type: PaymentOption | description: Payment method selected for the item. - name: depositAmount | type: string | description: Only eligible for catalog items with `lineItem.paymentOption.value` type of `DEPOSIT_ONLINE`. - name: savePaymentMethod | type: boolean | description: Whether to save the payment method on the order. Default: `false` - name: inventoryAppId | type: string | description: ID of the app managing the inventory. - name: customLineItems | type: Array | description: Custom line items. Custom line items don't trigger the Catalog service plugin. Max: 300 items - name: quantity | type: number | description: Custom line item quantity. Min: `1` Max: `100000` - name: price | type: string | description: Custom line item price. Must be a number or a decimal without symbols. - name: priceDescription | type: PriceDescription | description: Additional description for the price. For example, when price is 0 but additional details about the actual price are needed - "Starts at $67". - name: original | type: string | description: __Required.__ Price description in the site's default language as defined in the [request envelope](https://dev.wix.com/docs/build-apps/develop-your-app/frameworks/self-hosting/supported-extensions/backend-extensions/add-self-hosted-service-plugin-extensions.md#request-envelope). - name: translated | type: string | description: Price description translated into the buyer's language. Default: Same as `original`. - name: descriptionLines | type: Array | description: Custom line item description lines. Used for display purposes for the cart, checkout and order. - name: name | type: DescriptionLineName | description: Description line name. - name: media | type: Image | description: Custom line item's media. - name: id | type: string | description: WixMedia image ID. - name: height | type: number | description: Original image height. - name: width | type: number | description: Original image width. - name: altText | type: string | description: Image alt text. Optional. - name: filename | type: string | description: Image filename. Optional. - name: id | type: string | description: Deprecated. Custom line item ID. To maintain a unique value for a custom line item across multiple carts and orders, pass `catalogReference` instead. Learn more about [custom items with catalog reference](https://dev.wix.com/docs/api-reference/business-solutions/e-commerce/catalogs/catalog-and-custom-items.md#custom-item-with-catalog-reference). - name: taxGroupId | type: string | description: Tax group ID for this custom line item. - name: productName | type: ProductName | description: Name of the item or product. - name: original | type: string | description: __Required.__ Item name in the site's default language as defined in the [request envelope](https://dev.wix.com/docs/build-apps/develop-your-app/frameworks/self-hosting/supported-extensions/backend-extensions/add-self-hosted-service-plugin-extensions.md#request-envelope). Min: 1 character. Max: 200 characters. - name: translated | type: string | description: Item name translated into the buyer's language. Min: 1 character. Max: 400 characters. Default: Same as `original`. - name: url | type: PageUrlV2 | description: URL to the item's page on the site. When not provided, the link back from the cart page to the relevant product page will not work. - name: relativePath | type: string | description: The relative path for the page within the site. For example, `/product-page/a-product`. - name: url | type: string | description: The page's full URL. For example, `https://mysite.com/product-page/a-product`. - name: itemType | type: ItemType | description: Item type. Either a preset type or custom. - name: fullPrice | type: string | description: Item price **before** catalog-defined discount. Defaults to `price` when not provided. - name: quantityAvailable | type: number | description: Item quantity available for purchase. Only return this if inventory is managed. Not returning this field means that the buyer can "infinitely" tick up the number of items in the cart. - name: value | type: number | description: - name: physicalProperties | type: PhysicalProperties | description: Physical properties of the item. - name: weight | type: number | description: Line item weight. Measurement unit matches the weight unit specified in `weightUnit` in the request. - name: sku | type: string | description: Stock-keeping unit. Learn more about [SKUs](https://www.wix.com/encyclopedia/definition/stock-keeping-unit-sku). - name: shippable | type: boolean | description: Whether this line item is shippable. - name: paymentOption | type: string | description: Type of selected payment option for current item. Defaults to `FULL_PAYMENT_ONLINE`. + `FULL_PAYMENT_ONLINE` - Entire payment for this item happens as part of the checkout. + `FULL_PAYMENT_OFFLINE` - Entire payment for this item happens after the checkout. For example, when using cash, check, or other offline payment methods. + `MEMBERSHIP` - Payment for this item is done by charging a membership. When this option is used, `lineItem.price.amount` is 0. + `DEPOSIT_ONLINE` - Partial payment for the given item to be paid upfront during the checkout. Amount to be paid is defined by deposit_amount field. enum: FULL_PAYMENT_ONLINE, FULL_PAYMENT_OFFLINE, MEMBERSHIP, DEPOSIT_ONLINE, MEMBERSHIP_OFFLINE, MEMBERSHIP_ONLINE_WITH_OFFLINE_REMAINDER - name: serviceProperties | type: ServiceProperties | description: Service properties. When relevant, this contains information such as date and number of participants. Used, among other things, when checking for valid memberships. - name: scheduledDate | type: string | description: Date and time the service is to be provided, in [ISO-8601](https://en.wikipedia.org/wiki/ISO_8601#Combined_date_and_time_representations) format. For example, the start time of a class. - name: numberOfParticipants | type: number | description: The number of people participating in the service. For example, the number of people attending a class or the number of people per hotel room. - name: rootCatalogItemId | type: string | description: In cases where `catalogReference.catalogItemId` is NOT the actual catalog item ID, this field will return the true item's ID. + For example, for Wix Bookings, `catalogReference.catalogItemId` is the booking ID. Therefore this value is set to the service ID. + In most cases, this field is the same as `catalogReference.catalogItemId`. + Used in membership validation. - name: depositAmount | type: string | description: Partial payment for the given item to be paid upfront during the checkout. Eligible for catalog items with type `DEPOSIT_ONLINE`. When omitted, the item's price will not be split and is expected to be paid in a single installment. - name: deliveryProfileId | type: string | description: Delivery profile ID. - name: catalogReference | type: CatalogReference | description: Catalog and item reference. Includes IDs for the item and the catalog it came from, as well as further optional info. Optional for custom line items, which don't trigger the Catalog service plugin. - name: priceUndetermined | type: boolean | description: Whether the price is not yet defined, and will be updated after the order is created. Default: `false` - name: fixedQuantity | type: boolean | description: Whether the line item quantity is fixed and cannot be changed. Default: `false` - name: consentRequiredPaymentPolicy | type: string | description: Item payment policy that requires customer consent to complete purchase. The payment policy will be displayed on the checkout page. - name: savePaymentMethod | type: boolean | description: Whether to save the payment method on the order. Default: `false` - name: policies | type: Array | description: Policies to be displayed to the customer on the checkout page. - name: title | type: string | description: Policy title - should be translated - name: content | type: string | description: Policy content - should be translated - name: membersOnly | type: boolean | description: Whether the item can only be purchased by site members. Default: `false` - name: taxableAddress | type: TaxableAddress | description: Address to use for tax calculation purposes. - name: modifierGroups | type: Array | description: Modifier groups that were added to the item. - name: id | type: string | description: Modifier group ID. - name: name | type: TranslatableString | description: Modifier group name. - name: modifiers | type: Array | description: List of modifiers in this group. - name: couponCode | type: string | description: Coupon code. Note that a checkout can only hold one `couponCode` at a time. If an additional `couponCode` is added, it will override the existing `couponCode`. For additional information, see the Coupons API. - name: customContentReference | type: CustomContentReference | description: Reference IDs for the app and component providing custom checkout page content. To access and manage custom checkout page content, your app must have the permission scope named "Manage eCommerce - Admin Permissions". Learn more about [permission scopes](https://dev.wix.com/docs/build-apps/develop-your-app/access/authorization/about-permissions.md). - name: appId | type: string | description: ID of the app providing the content. You can get your app's ID from its page in the [app dashboard](https://dev.wix.com/dc3/my-apps/). - name: componentId | type: string | description: ID of the component within the app it belongs to. You can get your component's ID from its page in the [app dashboard](https://dev.wix.com/dc3/my-apps/). - name: externalReference | type: ExternalReference | description: References to an external app and resource associated with the checkout. Used for integration and tracking across different platforms. - name: appId | type: string | description: ID of the app associated with the purchase flow. For example, the Wix Pay Links app ID. - name: resourceId | type: string | description: Reference to an external resource ID. Used to link the purchase flow to a specific entity in an external system. For example, a Wix Pay Link ID. ``` --- > Portal Navigation: > > - Append `.md` to any URL under `https://dev.wix.com/docs/` to get its markdown version. > - Pages are either content pages (article or reference text) or menu pages (a list of links to child pages). > - To get a menu page, truncate any URL to a parent path and append `.md` (e.g. `https://dev.wix.com/docs/sdk.md`, `https://dev.wix.com/docs/sdk/core-modules.md`). > - Top-level index of all portals: https://dev.wix.com/docs/llms.txt > - Full concatenated docs: https://dev.wix.com/docs/llms-full.txt # CreateCheckoutTemplate # Package: checkout # Namespace: CheckoutTemplateService # Method link: https://dev.wix.com/docs/api-reference/business-solutions/e-commerce/purchase-flow/checkout/checkout-templates/create-checkout-template.md ## Permission Scopes: Manage eCommerce - all permissions: SCOPE.DC-ECOM-MEGA.MANAGE-ECOM ## Introduction Creates a checkout template. A checkout template is used to create a new checkout that will include predefined information. For example, a single link with a `checkoutTemplateId` can be shared with customers and each time the link is clicked, a new checkout page will be created for that customer with certain checkout information already populated. The customizable features include the option to allow or to lock coupon codes or gift cards. For example, if a store owner is using the checkout template to offer a flash sale to their social media followers, they may want to lock the option to apply an additional coupon on top of the sale being offered. If so, they can set `customization.lockedCoupon` to `true`. A checkout can be created with a checkout template by calling Create Checkout From Template. The site may add further customizations to the new checkout and then redirect the customer using the new checkout's `checkoutUrl`. --- ## REST API ### Examples ### Create Checkout Template with custom content reference ```curl curl -X POST \ 'https://www.wixapis.com/ecom/v1/checkout-templates' \ -H 'Authorization: ' \ -H 'Content-Type: application/json' \ -d '{ "checkoutTemplate": { "lineItems": [ { "quantity": 10, "catalogReference": { "catalogItemId": "c8539b66-7a44-fe18-affc-afec4be8562a", "appId": "215238eb-22a5-4c36-9e7b-e7c08025e04e", "options": { "options": { "Color": "White" } } } } ], "customContentReference": { "appId": "0ad60ba7-712d-4b51-8c05-dc8f3181b890", "componentId": "fefdc677-eeea-4c52-8e0c-8367ca194183" } } }' ``` ### Create Checkout Template Creating a checkout template with custom line items ```curl curl -X POST \ 'https://www.wixapis.com/ecom/v1/checkout-templates' \ -H 'Authorization: ' \ -H 'Content-Type: application/json' \ -d '{ "checkoutTemplate": { "status": "ACTIVE", "customization": { "webClient": { "disabledContinueShoppingButton": true, "disabledPolicyAgreementCheckbox": true }, "lockedGiftCard": true, "lockedCoupon": true, "disabledManualPayment": true }, "customLineItems": [ { "quantity": 1, "price": "5", "productName": { "original": "My Custom Item" }, "itemType": { "preset": "PHYSICAL" }, "paymentOption": "FULL_PAYMENT_ONLINE" } ], "couponCode": "SUMMER_FLASH_SALE" } }' ``` ### Create Checkout Template ```curl curl -X POST \ 'https://www.wixapis.com/ecom/v1/checkout-templates' \ -H 'Authorization: ' \ -H 'Content-Type: application/json' \ -d '{ "checkoutTemplate": { "lineItems": [ { "quantity": 2, "catalogReference": { "catalogItemId": "8df1afe4-90d1-162d-2d42-b8308125c193", "appId": "215238eb-22a5-4c36-9e7b-e7c08025e04e", "options": { "options": { "Size": "Medium" }, "variantId": "00000000-0000-0000-0000-000000000000" } } } ], "status": "ACTIVE", "customization": { "lockedGiftCard": false, "webClient": { "disabledContinueShoppingButton": true }, "lockedCoupon": true }, "couponCode": "SUMMER_FLASH_SALE" } }' ``` --- ## JavaScript SDK ### Examples ### createCheckoutTemplate ```javascript import { checkoutTemplates } from '@wix/ecom'; async function createCheckoutTemplate(checkoutTemplate) { const response = await checkoutTemplates.createCheckoutTemplate(checkoutTemplate); }; ``` ### createCheckoutTemplate (with elevated permissions) ```javascript import { checkoutTemplates } from '@wix/ecom'; import { auth } from '@wix/essentials'; async function myCreateCheckoutTemplateMethod(checkoutTemplate) { const elevatedCreateCheckoutTemplate = auth.elevate(checkoutTemplates.createCheckoutTemplate); const response = await elevatedCreateCheckoutTemplate(checkoutTemplate); } ``` ### createCheckoutTemplate (self-hosted) Self-hosted SDK calls require you to [create a client](https://dev.wix.com/docs/sdk/articles/work-with-the-sdk/about-the-wix-client.md). ```javascript import { createClient } from '@wix/sdk'; import { checkoutTemplates } from '@wix/ecom'; // Import the auth strategy for the relevant access type // Import the relevant host module if needed const myWixClient = createClient ({ modules: { checkoutTemplates }, // Include the auth strategy and host as relevant }); async function createCheckoutTemplate(checkoutTemplate) { const response = await myWixClient.checkoutTemplates.createCheckoutTemplate(checkoutTemplate); }; ``` --- --- > Portal Navigation: > > - Append `.md` to any URL under `https://dev.wix.com/docs/` to get its markdown version. > - Pages are either content pages (article or reference text) or menu pages (a list of links to child pages). > - To get a menu page, truncate any URL to a parent path and append `.md` (e.g. `https://dev.wix.com/docs/sdk.md`, `https://dev.wix.com/docs/sdk/core-modules.md`). > - Top-level index of all portals: https://dev.wix.com/docs/llms.txt > - Full concatenated docs: https://dev.wix.com/docs/llms-full.txt # GetCheckoutTemplate # Package: checkout # Namespace: CheckoutTemplateService # Method link: https://dev.wix.com/docs/api-reference/business-solutions/e-commerce/purchase-flow/checkout/checkout-templates/get-checkout-template.md ## Permission Scopes: Manage eCommerce - all permissions: SCOPE.DC-ECOM-MEGA.MANAGE-ECOM ## Introduction Retrieves a checkout template. --- ## REST API ### Examples ### Get Checkout Template ```curl curl -X GET \ 'https://www.wixapis.com/ecom/v1/checkout-templates/d447475f-34ed-4be5-b199-b120c6938c39' \ -H 'Content-Type: application/json' \ -H 'Authorization: ' \ ``` --- ## JavaScript SDK ### Examples ### getCheckoutTemplate ```javascript import { checkoutTemplates } from '@wix/ecom'; async function getCheckoutTemplate(checkoutTemplateId) { const response = await checkoutTemplates.getCheckoutTemplate(checkoutTemplateId); }; ``` ### getCheckoutTemplate (with elevated permissions) ```javascript import { checkoutTemplates } from '@wix/ecom'; import { auth } from '@wix/essentials'; async function myGetCheckoutTemplateMethod(checkoutTemplateId) { const elevatedGetCheckoutTemplate = auth.elevate(checkoutTemplates.getCheckoutTemplate); const response = await elevatedGetCheckoutTemplate(checkoutTemplateId); } ``` ### getCheckoutTemplate (self-hosted) Self-hosted SDK calls require you to [create a client](https://dev.wix.com/docs/sdk/articles/work-with-the-sdk/about-the-wix-client.md). ```javascript import { createClient } from '@wix/sdk'; import { checkoutTemplates } from '@wix/ecom'; // Import the auth strategy for the relevant access type // Import the relevant host module if needed const myWixClient = createClient ({ modules: { checkoutTemplates }, // Include the auth strategy and host as relevant }); async function getCheckoutTemplate(checkoutTemplateId) { const response = await myWixClient.checkoutTemplates.getCheckoutTemplate(checkoutTemplateId); }; ``` --- --- > Portal Navigation: > > - Append `.md` to any URL under `https://dev.wix.com/docs/` to get its markdown version. > - Pages are either content pages (article or reference text) or menu pages (a list of links to child pages). > - To get a menu page, truncate any URL to a parent path and append `.md` (e.g. `https://dev.wix.com/docs/sdk.md`, `https://dev.wix.com/docs/sdk/core-modules.md`). > - Top-level index of all portals: https://dev.wix.com/docs/llms.txt > - Full concatenated docs: https://dev.wix.com/docs/llms-full.txt # UpdateCheckoutTemplate # Package: checkout # Namespace: CheckoutTemplateService # Method link: https://dev.wix.com/docs/api-reference/business-solutions/e-commerce/purchase-flow/checkout/checkout-templates/update-checkout-template.md ## Permission Scopes: Manage eCommerce - all permissions: SCOPE.DC-ECOM-MEGA.MANAGE-ECOM ## Introduction Updates a checkout template. If the info in a checkout template is updated, only new checkouts created from this template will include the updated items. Checkouts previously created from this template before the update will not be affected. --- ## REST API ### Examples ### Update Checkout Template Updating a checkout template with custom line items ```curl curl -X PATCH \ 'https://www.wixapis.com/ecom/v1/checkout-templates/0df708f7-1371-41d1-8964-01c5dc2f8fdc' \ -H 'Authorization: ' \ -H 'Content-Type: application/json' \ -d '{ "checkoutTemplate": { "status": "INACTIVE", "customLineItems": [ { "quantity": 5, "price": "50", "productName": { "original": "My Digital Custom Item" }, "itemType": { "preset": "DIGITAL" } } ] } }' ``` ### Update Checkout Template ```curl curl -X PATCH \ 'https://www.wixapis.com/ecom/v1/checkout-templates/825315ef-1b62-40f7-ab62-97b751ebf285' \ -H 'Authorization: ' \ -H 'Content-Type: application/json' \ -d '{ "checkoutTemplate": { "id": "825315ef-1b62-40f7-ab62-97b751ebf285", "status": "INACTIVE", "lineItems": [ { "quantity": 4, "catalogReference": { "catalogItemId": "8df1afe4-90d1-162d-2d42-b8308125c193", "appId": "215238eb-22a5-4c36-9e7b-e7c08025e04e", "options": { "options": { "Size": "Small" }, "variantId": "00000000-0000-0000-0000-000000000000" } } } ] } }' ``` --- ## JavaScript SDK ### Examples ### updateCheckoutTemplate ```javascript import { checkoutTemplates } from '@wix/ecom'; async function updateCheckoutTemplate(_id,checkoutTemplate) { const response = await checkoutTemplates.updateCheckoutTemplate(_id,checkoutTemplate); }; ``` ### updateCheckoutTemplate (with elevated permissions) ```javascript import { checkoutTemplates } from '@wix/ecom'; import { auth } from '@wix/essentials'; async function myUpdateCheckoutTemplateMethod(_id,checkoutTemplate) { const elevatedUpdateCheckoutTemplate = auth.elevate(checkoutTemplates.updateCheckoutTemplate); const response = await elevatedUpdateCheckoutTemplate(_id,checkoutTemplate); } ``` ### updateCheckoutTemplate (self-hosted) Self-hosted SDK calls require you to [create a client](https://dev.wix.com/docs/sdk/articles/work-with-the-sdk/about-the-wix-client.md). ```javascript import { createClient } from '@wix/sdk'; import { checkoutTemplates } from '@wix/ecom'; // Import the auth strategy for the relevant access type // Import the relevant host module if needed const myWixClient = createClient ({ modules: { checkoutTemplates }, // Include the auth strategy and host as relevant }); async function updateCheckoutTemplate(_id,checkoutTemplate) { const response = await myWixClient.checkoutTemplates.updateCheckoutTemplate(_id,checkoutTemplate); }; ``` --- --- > Portal Navigation: > > - Append `.md` to any URL under `https://dev.wix.com/docs/` to get its markdown version. > - Pages are either content pages (article or reference text) or menu pages (a list of links to child pages). > - To get a menu page, truncate any URL to a parent path and append `.md` (e.g. `https://dev.wix.com/docs/sdk.md`, `https://dev.wix.com/docs/sdk/core-modules.md`). > - Top-level index of all portals: https://dev.wix.com/docs/llms.txt > - Full concatenated docs: https://dev.wix.com/docs/llms-full.txt # DeleteCheckoutTemplate # Package: checkout # Namespace: CheckoutTemplateService # Method link: https://dev.wix.com/docs/api-reference/business-solutions/e-commerce/purchase-flow/checkout/checkout-templates/delete-checkout-template.md ## Permission Scopes: Manage eCommerce - all permissions: SCOPE.DC-ECOM-MEGA.MANAGE-ECOM ## Introduction Deletes a checkout template. If a checkout template is deleted and a customer attempts to create a checkout with that `checkoutTemplateId` then the customer will be redirected to the domain site. --- ## REST API ### Examples ### Delete Checkout Template ```curl curl -X DELETE \ 'https://www.wixapis.com/ecom/v1/checkout-templates/825315ef-1b62-40f7-ab62-97b751ebf285' \ -H 'Authorization: ' \ -H 'Content-Type: application/json' ``` --- ## JavaScript SDK ### Examples ### deleteCheckoutTemplate ```javascript import { checkoutTemplates } from '@wix/ecom'; async function deleteCheckoutTemplate(checkoutTemplateId) { const response = await checkoutTemplates.deleteCheckoutTemplate(checkoutTemplateId); }; ``` ### deleteCheckoutTemplate (with elevated permissions) ```javascript import { checkoutTemplates } from '@wix/ecom'; import { auth } from '@wix/essentials'; async function myDeleteCheckoutTemplateMethod(checkoutTemplateId) { const elevatedDeleteCheckoutTemplate = auth.elevate(checkoutTemplates.deleteCheckoutTemplate); const response = await elevatedDeleteCheckoutTemplate(checkoutTemplateId); } ``` ### deleteCheckoutTemplate (self-hosted) Self-hosted SDK calls require you to [create a client](https://dev.wix.com/docs/sdk/articles/work-with-the-sdk/about-the-wix-client.md). ```javascript import { createClient } from '@wix/sdk'; import { checkoutTemplates } from '@wix/ecom'; // Import the auth strategy for the relevant access type // Import the relevant host module if needed const myWixClient = createClient ({ modules: { checkoutTemplates }, // Include the auth strategy and host as relevant }); async function deleteCheckoutTemplate(checkoutTemplateId) { const response = await myWixClient.checkoutTemplates.deleteCheckoutTemplate(checkoutTemplateId); }; ``` --- --- > Portal Navigation: > > - Append `.md` to any URL under `https://dev.wix.com/docs/` to get its markdown version. > - Pages are either content pages (article or reference text) or menu pages (a list of links to child pages). > - To get a menu page, truncate any URL to a parent path and append `.md` (e.g. `https://dev.wix.com/docs/sdk.md`, `https://dev.wix.com/docs/sdk/core-modules.md`). > - Top-level index of all portals: https://dev.wix.com/docs/llms.txt > - Full concatenated docs: https://dev.wix.com/docs/llms-full.txt # QueryCheckoutTemplates # Package: checkout # Namespace: CheckoutTemplateService # Method link: https://dev.wix.com/docs/api-reference/business-solutions/e-commerce/purchase-flow/checkout/checkout-templates/query-checkout-templates.md ## Permission Scopes: Manage eCommerce - all permissions: SCOPE.DC-ECOM-MEGA.MANAGE-ECOM ## Introduction Retrieves a list of checkout templates, given the provided paging, filtering, and sorting. Query Checkout Templates runs with these defaults, which you can override: - `id` sorted in `ASC` order The following table shows field support for filters and sorting for the checkout template object: | Field | Supported Filters | Sortable | | ------------------ | --------------------------------------------------------- | -------- | | `id` | `$eq`, `$ne`, `$in`, `$startsWith`, `$exists`, `$hasSome` | Sortable | | `status` | `$eq`, `$ne`, `$in`, `$exists`, `$hasSome` | Sortable | To learn about working with _Query_ endpoints, see [API Query Language](https://dev.wix.com/api/rest/getting-started/api-query-language), [Sorting and Paging](https://dev.wix.com/api/rest/getting-started/sorting-and-paging), and [Field Projection](https://dev.wix.com/api/rest/getting-started/field-projection). --- ## REST API ### Examples ### Query Checkout Templates using Cursor Paging ```curl curl -X POST \ 'https://www.wixapis.com/ecom/v1/checkout-templates/query' \ -H 'Authorization: ' \ -H 'Content-Type: application/json' \ -d '{ "query": { "sort": [], "filter": { "status": "ACTIVE" }, "cursorPaging": { "limit": 3 } } }' ``` --- ## JavaScript SDK ### Examples ### queryCheckoutTemplates ```javascript import { checkoutTemplates } from '@wix/ecom'; async function queryCheckoutTemplates(query) { const response = await checkoutTemplates.queryCheckoutTemplates(query); }; ``` ### queryCheckoutTemplates (with elevated permissions) ```javascript import { checkoutTemplates } from '@wix/ecom'; import { auth } from '@wix/essentials'; async function myQueryCheckoutTemplatesMethod(query) { const elevatedQueryCheckoutTemplates = auth.elevate(checkoutTemplates.queryCheckoutTemplates); const response = await elevatedQueryCheckoutTemplates(query); } ``` ### queryCheckoutTemplates (self-hosted) Self-hosted SDK calls require you to [create a client](https://dev.wix.com/docs/sdk/articles/work-with-the-sdk/about-the-wix-client.md). ```javascript import { createClient } from '@wix/sdk'; import { checkoutTemplates } from '@wix/ecom'; // Import the auth strategy for the relevant access type // Import the relevant host module if needed const myWixClient = createClient ({ modules: { checkoutTemplates }, // Include the auth strategy and host as relevant }); async function queryCheckoutTemplates(query) { const response = await myWixClient.checkoutTemplates.queryCheckoutTemplates(query); }; ``` --- --- > Portal Navigation: > > - Append `.md` to any URL under `https://dev.wix.com/docs/` to get its markdown version. > - Pages are either content pages (article or reference text) or menu pages (a list of links to child pages). > - To get a menu page, truncate any URL to a parent path and append `.md` (e.g. `https://dev.wix.com/docs/sdk.md`, `https://dev.wix.com/docs/sdk/core-modules.md`). > - Top-level index of all portals: https://dev.wix.com/docs/llms.txt > - Full concatenated docs: https://dev.wix.com/docs/llms-full.txt # CreateAndRedirectToCheckout # Package: checkout # Namespace: CheckoutTemplateService # Method link: https://dev.wix.com/docs/api-reference/business-solutions/e-commerce/purchase-flow/checkout/checkout-templates/create-and-redirect-to-checkout.md ## Introduction Creates a new checkout based on the checkout template and redirects to the new checkout page. Before using this method, you must have a checkout template available. Create a checkout template with Create Checkout Template. To build a URL that uses this method, follow this format: `https://www.wixapis.com/ecom/v1/checkout-templates/{checkoutTemplateId}/create-and-redirect-to-checkout?siteId={siteId}` To create a checkout but not automatically redirect to the checkout page, use Create Checkout From Template. --- ## REST API ### Examples ### Create And Redirect To Checkout From Template ```curl curl -X GET \ 'https://www.wixapis.com/ecom/v1/checkout-templates/d447475f-34ed-4be5-b199-b120c6938c39/create-and-redirect-to-checkout' \ -H 'Authorization: ' \ -H 'Content-Type: application/json' \ -d '{ "siteId": "811d8a67-3bd7-46a5-8cd9-843bb77b2a7d" }' ``` --- ## JavaScript SDK ### Examples ### createAndRedirectToCheckout ```javascript import { checkoutTemplates } from '@wix/ecom'; async function createAndRedirectToCheckout(checkoutTemplateId,siteId) { const response = await checkoutTemplates.createAndRedirectToCheckout(checkoutTemplateId,siteId); }; ``` ### createAndRedirectToCheckout (with elevated permissions) ```javascript import { checkoutTemplates } from '@wix/ecom'; import { auth } from '@wix/essentials'; async function myCreateAndRedirectToCheckoutMethod(checkoutTemplateId,siteId) { const elevatedCreateAndRedirectToCheckout = auth.elevate(checkoutTemplates.createAndRedirectToCheckout); const response = await elevatedCreateAndRedirectToCheckout(checkoutTemplateId,siteId); } ``` ### createAndRedirectToCheckout (self-hosted) Self-hosted SDK calls require you to [create a client](https://dev.wix.com/docs/sdk/articles/work-with-the-sdk/about-the-wix-client.md). ```javascript import { createClient } from '@wix/sdk'; import { checkoutTemplates } from '@wix/ecom'; // Import the auth strategy for the relevant access type // Import the relevant host module if needed const myWixClient = createClient ({ modules: { checkoutTemplates }, // Include the auth strategy and host as relevant }); async function createAndRedirectToCheckout(checkoutTemplateId,siteId) { const response = await myWixClient.checkoutTemplates.createAndRedirectToCheckout(checkoutTemplateId,siteId); }; ``` --- --- > Portal Navigation: > > - Append `.md` to any URL under `https://dev.wix.com/docs/` to get its markdown version. > - Pages are either content pages (article or reference text) or menu pages (a list of links to child pages). > - To get a menu page, truncate any URL to a parent path and append `.md` (e.g. `https://dev.wix.com/docs/sdk.md`, `https://dev.wix.com/docs/sdk/core-modules.md`). > - Top-level index of all portals: https://dev.wix.com/docs/llms.txt > - Full concatenated docs: https://dev.wix.com/docs/llms-full.txt # CreateCheckoutFromTemplate # Package: checkout # Namespace: CheckoutTemplateService # Method link: https://dev.wix.com/docs/api-reference/business-solutions/e-commerce/purchase-flow/checkout/checkout-templates/create-checkout-from-template.md ## Permission Scopes: Manage eCommerce - all permissions: SCOPE.DC-ECOM-MEGA.MANAGE-ECOM ## Introduction Creates a new checkout based on the checkout template. Before using this method, you must have a checkout template available. Create a checkout template with Create Checkout Template. The customer can be directed to the new checkout using the checkout's `checkoutUrl`. --- ## REST API ### Examples ### Create Checkout From Template ```curl curl -X POST \ 'https://www.wixapis.com/ecom/v1/checkout-templates/d447475f-34ed-4be5-b199-b120c6938c39/create-checkout-from-template' \ -H 'Authorization: ' \ -H 'Content-Type: application/json' \ -d '{ "siteId": "811d8a67-3bd7-46a5-8cd9-843bb77b2a7d" }' ``` --- ## JavaScript SDK ### Examples ### createCheckoutFromTemplate ```javascript import { checkoutTemplates } from '@wix/ecom'; async function createCheckoutFromTemplate(checkoutTemplateId,siteId) { const response = await checkoutTemplates.createCheckoutFromTemplate(checkoutTemplateId,siteId); }; ``` ### createCheckoutFromTemplate (with elevated permissions) ```javascript import { checkoutTemplates } from '@wix/ecom'; import { auth } from '@wix/essentials'; async function myCreateCheckoutFromTemplateMethod(checkoutTemplateId,siteId) { const elevatedCreateCheckoutFromTemplate = auth.elevate(checkoutTemplates.createCheckoutFromTemplate); const response = await elevatedCreateCheckoutFromTemplate(checkoutTemplateId,siteId); } ``` ### createCheckoutFromTemplate (self-hosted) Self-hosted SDK calls require you to [create a client](https://dev.wix.com/docs/sdk/articles/work-with-the-sdk/about-the-wix-client.md). ```javascript import { createClient } from '@wix/sdk'; import { checkoutTemplates } from '@wix/ecom'; // Import the auth strategy for the relevant access type // Import the relevant host module if needed const myWixClient = createClient ({ modules: { checkoutTemplates }, // Include the auth strategy and host as relevant }); async function createCheckoutFromTemplate(checkoutTemplateId,siteId) { const response = await myWixClient.checkoutTemplates.createCheckoutFromTemplate(checkoutTemplateId,siteId); }; ``` --- --- > Portal Navigation: > > - Append `.md` to any URL under `https://dev.wix.com/docs/` to get its markdown version. > - Pages are either content pages (article or reference text) or menu pages (a list of links to child pages). > - To get a menu page, truncate any URL to a parent path and append `.md` (e.g. `https://dev.wix.com/docs/sdk.md`, `https://dev.wix.com/docs/sdk/core-modules.md`). > - Top-level index of all portals: https://dev.wix.com/docs/llms.txt > - Full concatenated docs: https://dev.wix.com/docs/llms-full.txt # Package: checkout # Namespace: checkoutTemplates # Webhook link: https://dev.wix.com/docs/api-reference/business-solutions/e-commerce/purchase-flow/checkout/checkout-templates/checkout-template-created.md ## Introduction Triggered when a checkout template is created. --- ## REST API ### Examples ```curl { "id": "79e70c2a-f3fe-4a3b-a62f-1089857bab84", "entityFqdn": "wix.ecom.v1.checkout_template", "slug": "created", "entityId": "5bf5cb44-13fa-4933-9655-1d8423636a74", "createdEvent": { "entity": { "id": "5bf5cb44-13fa-4933-9655-1d8423636a74", "status": "ACTIVE", "lineItems": [{ "quantity": 2, "catalogReference": { "catalogItemId": "8df1afe4-90d1-162d-2d42-b8308125c193", "appId": "215238eb-22a5-4c36-9e7b-e7c08025e04e", "options": { "options": { "Size": "Medium" }, "variantId": "00000000-0000-0000-0000-000000000000" } } }], "couponCode": "SUMMER_FLASH_SALE" } }, "eventTime": "2023-09-11T14:58:22.481838Z", "triggeredByAnonymizeRequest": false, "entityEventSequence": "1" } ``` --- ## JavaScript SDK ### Examples ```javascript import { checkoutTemplates } from '@wix/ecom'; checkoutTemplates.onCheckoutTemplateCreated((event) => { // handle your event here }); ``` ```javascript import { createClient, AppStrategy } from '@wix/sdk'; import { checkoutTemplates } from '@wix/ecom'; const wixClient = createClient({ auth: AppStrategy({ appId: 'MY-APP-ID', publicKey: 'YOUR_APP_PUBLIC_KEY', }), modules: { checkoutTemplates, }, }); wixClient.checkoutTemplates.onCheckoutTemplateCreated((event) => { // handle your event here }); ``` --- --- > Portal Navigation: > > - Append `.md` to any URL under `https://dev.wix.com/docs/` to get its markdown version. > - Pages are either content pages (article or reference text) or menu pages (a list of links to child pages). > - To get a menu page, truncate any URL to a parent path and append `.md` (e.g. `https://dev.wix.com/docs/sdk.md`, `https://dev.wix.com/docs/sdk/core-modules.md`). > - Top-level index of all portals: https://dev.wix.com/docs/llms.txt > - Full concatenated docs: https://dev.wix.com/docs/llms-full.txt # Package: checkout # Namespace: checkoutTemplates # Webhook link: https://dev.wix.com/docs/api-reference/business-solutions/e-commerce/purchase-flow/checkout/checkout-templates/checkout-template-deleted.md ## Introduction Triggered when a checkout template is deleted. --- ## REST API ### Examples ```curl { "id": "5c55d2dd-8919-438d-b9c0-19ec2b3f913f", "entityFqdn": "wix.ecom.v1.checkout_template", "slug": "deleted", "entityId": "825315ef-1b62-40f7-ab62-97b751ebf285", "deletedEvent": { "movedToTrash": true }, "eventTime": "2023-09-11T09:40:28.303263Z", "triggeredByAnonymizeRequest": false, "entityEventSequence": "7" } ``` --- ## JavaScript SDK ### Examples ```javascript import { checkoutTemplates } from '@wix/ecom'; checkoutTemplates.onCheckoutTemplateDeleted((event) => { // handle your event here }); ``` ```javascript import { createClient, AppStrategy } from '@wix/sdk'; import { checkoutTemplates } from '@wix/ecom'; const wixClient = createClient({ auth: AppStrategy({ appId: 'MY-APP-ID', publicKey: 'YOUR_APP_PUBLIC_KEY', }), modules: { checkoutTemplates, }, }); wixClient.checkoutTemplates.onCheckoutTemplateDeleted((event) => { // handle your event here }); ``` --- --- > Portal Navigation: > > - Append `.md` to any URL under `https://dev.wix.com/docs/` to get its markdown version. > - Pages are either content pages (article or reference text) or menu pages (a list of links to child pages). > - To get a menu page, truncate any URL to a parent path and append `.md` (e.g. `https://dev.wix.com/docs/sdk.md`, `https://dev.wix.com/docs/sdk/core-modules.md`). > - Top-level index of all portals: https://dev.wix.com/docs/llms.txt > - Full concatenated docs: https://dev.wix.com/docs/llms-full.txt # Package: checkout # Namespace: checkoutTemplates # Webhook link: https://dev.wix.com/docs/api-reference/business-solutions/e-commerce/purchase-flow/checkout/checkout-templates/checkout-template-updated.md ## Introduction Triggered when a checkout template is updated. --- ## REST API ### Examples ```curl { "id": "295e8d31-92e3-4868-9b2f-c6da5cb0abff", "entityFqdn": "wix.ecom.v1.checkout_template", "slug": "updated", "entityId": "825315ef-1b62-40f7-ab62-97b751ebf285", "updatedEvent": { "currentEntity": { "id": "825315ef-1b62-40f7-ab62-97b751ebf285", "status": "ACTIVE", "customization": { "webClient": { "disabledContinueShoppingButton": true }, "lockedGiftCard": false, "lockedCoupon": true }, "lineItems": [{ "quantity": 4, "catalogReference": { "catalogItemId": "8df1afe4-90d1-162d-2d42-b8308125c193", "appId": "215238eb-22a5-4c36-9e7b-e7c08025e04e", "options": { "options": { "Size": "Small" }, "variantId": "00000000-0000-0000-0000-000000000000" } } }], "couponCode": "SUMMER_FLASH_SALE" } }, "eventTime": "2023-09-11T09:32:02.365080Z", "triggeredByAnonymizeRequest": false, "entityEventSequence": "3" } ``` --- ## JavaScript SDK ### Examples ```javascript import { checkoutTemplates } from '@wix/ecom'; checkoutTemplates.onCheckoutTemplateUpdated((event) => { // handle your event here }); ``` ```javascript import { createClient, AppStrategy } from '@wix/sdk'; import { checkoutTemplates } from '@wix/ecom'; const wixClient = createClient({ auth: AppStrategy({ appId: 'MY-APP-ID', publicKey: 'YOUR_APP_PUBLIC_KEY', }), modules: { checkoutTemplates, }, }); wixClient.checkoutTemplates.onCheckoutTemplateUpdated((event) => { // handle your event here }); ``` --- --- > Portal Navigation: > > - Append `.md` to any URL under `https://dev.wix.com/docs/` to get its markdown version. > - Pages are either content pages (article or reference text) or menu pages (a list of links to child pages). > - To get a menu page, truncate any URL to a parent path and append `.md` (e.g. `https://dev.wix.com/docs/sdk.md`, `https://dev.wix.com/docs/sdk/core-modules.md`). > - Top-level index of all portals: https://dev.wix.com/docs/llms.txt > - Full concatenated docs: https://dev.wix.com/docs/llms-full.txt # Package: checkout # Namespace: checkoutTemplates # Webhook link: https://dev.wix.com/docs/api-reference/business-solutions/e-commerce/purchase-flow/checkout/checkout-templates/checkout-template-used.md ## Introduction Triggered when a checkout is created from a checkout template. --- ## REST API ### Examples ```curl { "id": "148a3b54-bb9a-450b-996c-5101d8889fb4", "entityFqdn": "wix.ecom.v1.checkout_template", "slug": "used", "entityId": "b3210445-9252-4094-8df2-48adec157322", "actionEvent": { "body": { "checkoutTemplate": { "id": "44efbcf4-481d-454c-b3d0-57b7a1cae99c", "status": "ACTIVE", "customization": { "webClient": { "disabledContinueShoppingButton": false }, "lockedGiftCard": true, "lockedCoupon": true }, "lineItems": [ { "quantity": 2, "catalogReference": { "catalogItemId": "8df1afe4-90d1-162d-2d42-b8308125c193", "appId": "215238eb-22a5-4c36-9e7b-e7c08025e04e", "options": { "options": { "Size": "Medium" }, "variantId": "00000000-0000-0000-0000-000000000000" } } } ], "customLineItems": [], "couponCode": "SUMMERSALE20" }, "checkout": { "id": "b3210445-9252-4094-8df2-48adec157322", "lineItems": [ { "id": "00000000-0000-0000-0000-000000000001", "quantity": 2, "catalogReference": { "catalogItemId": "8df1afe4-90d1-162d-2d42-b8308125c193", "appId": "215238eb-22a5-4c36-9e7b-e7c08025e04e", "options": { "options": { "Size": "Medium" }, "variantId": "00000000-0000-0000-0000-000000000000" } }, "productName": { "original": "Hat 1", "translated": "Hat 1" }, "url": { "relativePath": "/product-page/hat-1", "url": "https://example.wixsite.com/example-store/product-page/hat-1" }, "price": { "amount": "25", "convertedAmount": "25", "formattedAmount": "$25.00", "formattedConvertedAmount": "$25.00" }, "lineItemPrice": { "amount": "50", "convertedAmount": "50", "formattedAmount": "$50.00", "formattedConvertedAmount": "$50.00" }, "fullPrice": { "amount": "25", "convertedAmount": "25", "formattedAmount": "$25.00", "formattedConvertedAmount": "$25.00" }, "priceBeforeDiscounts": { "amount": "25", "convertedAmount": "25", "formattedAmount": "$25.00", "formattedConvertedAmount": "$25.00" }, "totalPriceAfterTax": { "amount": "45", "convertedAmount": "45", "formattedAmount": "$45.00", "formattedConvertedAmount": "$45.00" }, "totalPriceBeforeTax": { "amount": "45", "convertedAmount": "45", "formattedAmount": "$45.00", "formattedConvertedAmount": "$45.00" }, "taxDetails": { "taxableAmount": { "amount": "45", "convertedAmount": "45", "formattedAmount": "$45.00", "formattedConvertedAmount": "$45.00" }, "taxRate": "0", "totalTax": { "amount": "0", "convertedAmount": "0", "formattedAmount": "$0.00", "formattedConvertedAmount": "$0.00" }, "rateBreakdown": [] }, "discount": { "amount": "5", "convertedAmount": "5", "formattedAmount": "$5.00", "formattedConvertedAmount": "$5.00" }, "descriptionLines": [ { "name": { "original": "Size", "translated": "Size" }, "plainText": { "original": "Medium", "translated": "Medium" } } ], "media": { "id": "baac51_444fa6e3add545a6b3757f46a11ee9de~mv2_d_2000_1500_s_2.jpg", "url": "https://static.wixstatic.com/media/baac51_444fa6e3add545a6b3757f46a11ee9de~mv2_d_2000_1500_s_2.jpg", "height": 1500, "width": 2000, "filename": "baac51_444fa6e3add545a6b3757f46a11ee9de~mv2_d_2000_1500_s_2.jpg" }, "availability": { "status": "AVAILABLE" }, "physicalProperties": { "sku": "0002", "shippable": true }, "couponScopes": [ { "namespace": "stores", "group": { "name": "collection", "entityId": "d704acf4-11af-f65e-b9a5-fc49ab782122" } }, { "namespace": "stores", "group": { "name": "collection", "entityId": "00000000-000000-000000-000000000001" } }, { "namespace": "stores", "group": { "name": "product", "entityId": "8df1afe4-90d1-162d-2d42-b8308125c193" } } ], "itemType": { "preset": "PHYSICAL" }, "paymentOption": "FULL_PAYMENT_ONLINE", "rootCatalogItemId": "8df1afe4-90d1-162d-2d42-b8308125c193", "customLineItem": false } ], "shippingInfo": { "carrierServiceOptions": [] }, "buyerInfo": { "openAccess": true }, "conversionCurrency": "USD", "priceSummary": { "subtotal": { "amount": "50", "convertedAmount": "50", "formattedAmount": "$50.00", "formattedConvertedAmount": "$50.00" }, "shipping": { "amount": "0", "convertedAmount": "0", "formattedAmount": "$0.00", "formattedConvertedAmount": "$0.00" }, "tax": { "amount": "0", "convertedAmount": "0", "formattedAmount": "$0.00", "formattedConvertedAmount": "$0.00" }, "discount": { "amount": "5", "convertedAmount": "5", "formattedAmount": "$5.00", "formattedConvertedAmount": "$5.00" }, "total": { "amount": "45", "convertedAmount": "45", "formattedAmount": "$45.00", "formattedConvertedAmount": "$45.00" }, "additionalFees": { "amount": "0", "convertedAmount": "0", "formattedAmount": "$0.00", "formattedConvertedAmount": "$0.00" } }, "calculationErrors": { "orderValidationErrors": [] }, "appliedDiscounts": [ { "discountType": "SPECIFIC_ITEMS", "lineItemIds": [ "00000000-0000-0000-0000-000000000001" ], "coupon": { "id": "14d074d8-15f3-4d71-bfa9-dc5b4ac47e61", "code": "SUMMERSALE20", "amount": { "amount": "5", "convertedAmount": "5", "formattedAmount": "$5.00", "formattedConvertedAmount": "$5.00" }, "name": "summer sale", "couponType": "MoneyOff" }, "lineItemDiscounts": [] } ], "customFields": [], "weightUnit": "LB", "taxSummary": { "taxableAmount": { "amount": "45", "convertedAmount": "45", "formattedAmount": "$45.00", "formattedConvertedAmount": "$45.00" }, "totalTax": { "amount": "0", "convertedAmount": "0", "formattedAmount": "$0.00", "formattedConvertedAmount": "$0.00" }, "manualTaxRate": "0", "aggregatedTaxBreakdown": [] }, "currency": "USD", "channelType": "WEB", "siteLanguage": "en", "buyerLanguage": "en", "completed": false, "taxIncludedInPrice": false, "createdBy": { "appId": "1380b703-ce81-ff05-f115-39571d94dfcd" }, "createdDate": "2024-01-07T14:42:19.240Z", "updatedDate": "2024-01-07T14:42:19.240Z", "payNow": { "subtotal": { "amount": "50", "convertedAmount": "50", "formattedAmount": "$50.00", "formattedConvertedAmount": "$50.00" }, "shipping": { "amount": "0", "convertedAmount": "0", "formattedAmount": "$0.00", "formattedConvertedAmount": "$0.00" }, "tax": { "amount": "0", "convertedAmount": "0", "formattedAmount": "$0.00", "formattedConvertedAmount": "$0.00" }, "discount": { "amount": "5", "convertedAmount": "5", "formattedAmount": "$5.00", "formattedConvertedAmount": "$5.00" }, "total": { "amount": "45", "convertedAmount": "45", "formattedAmount": "$45.00", "formattedConvertedAmount": "$45.00" }, "additionalFees": { "amount": "0", "convertedAmount": "0", "formattedAmount": "$0.00", "formattedConvertedAmount": "$0.00" } }, "payLater": { "subtotal": { "amount": "0", "convertedAmount": "0", "formattedAmount": "$0.00", "formattedConvertedAmount": "$0.00" }, "shipping": { "amount": "0", "convertedAmount": "0", "formattedAmount": "$0.00", "formattedConvertedAmount": "$0.00" }, "tax": { "amount": "0", "convertedAmount": "0", "formattedAmount": "$0.00", "formattedConvertedAmount": "$0.00" }, "discount": { "amount": "0", "convertedAmount": "0", "formattedAmount": "$0.00", "formattedConvertedAmount": "$0.00" }, "total": { "amount": "0", "convertedAmount": "0", "formattedAmount": "$0.00", "formattedConvertedAmount": "$0.00" }, "additionalFees": { "amount": "0", "convertedAmount": "0", "formattedAmount": "$0.00", "formattedConvertedAmount": "$0.00" } }, "additionalFees": [], "payNowTotalAfterGiftCard": { "amount": "45", "convertedAmount": "45", "formattedAmount": "$45.00", "formattedConvertedAmount": "$45.00" }, "violations": [], "totalAfterGiftCard": { "amount": "45", "convertedAmount": "45", "formattedAmount": "$45.00", "formattedConvertedAmount": "$45.00" }, "purchaseFlowId": "4595d2bd-6e73-4f12-a876-ac7b3bce901f", "customSettings": { "lockGiftCard": true, "lockCouponCode": true } } } }, "eventTime": "2024-01-07T14:42:19.340889012Z", "triggeredByAnonymizeRequest": false } ``` --- ## JavaScript SDK ### Examples ```javascript import { checkoutTemplates } from '@wix/ecom'; checkoutTemplates.onCheckoutTemplateUsed((event) => { // handle your event here }); ``` ```javascript import { createClient, AppStrategy } from '@wix/sdk'; import { checkoutTemplates } from '@wix/ecom'; const wixClient = createClient({ auth: AppStrategy({ appId: 'MY-APP-ID', publicKey: 'YOUR_APP_PUBLIC_KEY', }), modules: { checkoutTemplates, }, }); wixClient.checkoutTemplates.onCheckoutTemplateUsed((event) => { // handle your event here }); ``` --- --- > Portal Navigation: > > - Append `.md` to any URL under `https://dev.wix.com/docs/` to get its markdown version. > - Pages are either content pages (article or reference text) or menu pages (a list of links to child pages). > - To get a menu page, truncate any URL to a parent path and append `.md` (e.g. `https://dev.wix.com/docs/sdk.md`, `https://dev.wix.com/docs/sdk/core-modules.md`). > - Top-level index of all portals: https://dev.wix.com/docs/llms.txt > - Full concatenated docs: https://dev.wix.com/docs/llms-full.txt ## Resource: Introduction ## Article: Introduction ## Article Link: https://dev.wix.com/docs/api-reference/business-solutions/e-commerce/purchase-flow/checkout/checkout-templates/introduction.md ## Article Content: # About the eCommerce Checkout Templates API The Checkout Templates API allows you to create and manage pre-populated checkouts to share with customers. When customers then create checkouts from these templates, the new checkouts already include information such as predefined line items, coupons, or other customizations. With the Checkout Templates API, you can: + [Create](https://dev.wix.com/docs/api-reference/business-solutions/e-commerce/purchase-flow/checkout/checkout-templates/create-checkout-template.md), [update](https://dev.wix.com/docs/api-reference/business-solutions/e-commerce/purchase-flow/checkout/checkout-templates/update-checkout-template.md), and [delete](https://dev.wix.com/docs/api-reference/business-solutions/e-commerce/purchase-flow/checkout/checkout-templates/delete-checkout-template.md) checkout templates. + [Get](https://dev.wix.com/docs/api-reference/business-solutions/e-commerce/purchase-flow/checkout/checkout-templates/get-checkout-template.md) and [query](https://dev.wix.com/docs/api-reference/business-solutions/e-commerce/purchase-flow/checkout/checkout-templates/query-checkout-templates.md) checkout templates. + Customize the checkout experience to [create a checkout from a template](https://dev.wix.com/docs/api-reference/business-solutions/e-commerce/purchase-flow/checkout/checkout-templates/create-checkout-from-template.md) or to [create and redirect to a checkout from a template](https://dev.wix.com/docs/api-reference/business-solutions/e-commerce/purchase-flow/checkout/checkout-templates/create-and-redirect-to-checkout.md). ## Before you begin It’s important to note that the checkout template functionality is not currently available in the Wix Dashboard. If a site creates checkout templates with an app, they must also be able to manage and update their checkout templates through an app. For example, a site offering a sale through a checkout template must be able to change the template’s `status` to `"INACTIVE"` or they will not be able to turn off the sale when they want it to end. ## Use cases + [Run a flash sale through social media](https://dev.wix.com/docs/api-reference/business-solutions/e-commerce/purchase-flow/checkout/checkout-templates/sample-flows.md) + [Limit the number of checkouts for a specific coupon](https://dev.wix.com/docs/api-reference/business-solutions/e-commerce/purchase-flow/checkout/checkout-templates/sample-flows.md) @sdk_package_setup --- > Portal Navigation: > > - Append `.md` to any URL under `https://dev.wix.com/docs/` to get its markdown version. > - Pages are either content pages (article or reference text) or menu pages (a list of links to child pages). > - To get a menu page, truncate any URL to a parent path and append `.md` (e.g. `https://dev.wix.com/docs/sdk.md`, `https://dev.wix.com/docs/sdk/core-modules.md`). > - Top-level index of all portals: https://dev.wix.com/docs/llms.txt > - Full concatenated docs: https://dev.wix.com/docs/llms-full.txt ## Resource: Sample Flows ## Article: Sample Flows ## Article Link: https://dev.wix.com/docs/api-reference/business-solutions/e-commerce/purchase-flow/checkout/checkout-templates/sample-flows.md ## Article Content: # Checkout Templates: Sample Use Case & Flow This article shares some possible use cases your app could support, as well as an sample flow that could support each use case. This can be a helpful jumping off point as you plan your app's implementation. ## Run a flash sale through social media Offer a sale to customers through social media channels that runs for a limited time only. Create the checkout template and pull the URL to automatically redirect anyone that clicks on the link to a checkout page with the offer. When the period for the sale is complete, update the checkout template's `status` to `INACTIVE` to turn it off. To create and share the offer: 1. Use [Create Checkout Template](https://dev.wix.com/docs/api-reference/business-solutions/e-commerce/purchase-flow/checkout/checkout-templates/create-checkout-template.md) with the product and coupon information for offer. 2. Use the `checkoutTemplateId` to build the URL to share with customers. Build the URL in this format: `https://www.wixapis.com/ecom/v1/checkout-templates/{checkoutTemplateId}/create-and-redirect-to-checkout?siteId={siteId}`. 3. Post and share the URL to customers. To turn off the offer at the end of the sale: 1. Use [Update Checkout Template](https://dev.wix.com/docs/api-reference/business-solutions/e-commerce/purchase-flow/checkout/checkout-templates/update-checkout-template.md) to update `checkoutTemplate.status` to `INACTIVE`. ## Limit the number of checkouts for a specific coupon Offer a sale to the first 100 customers that click on an offer. Create a checkout template, then share your own custom link that will run custom logic before creating a new checkout for the customer. Create a checkout template and add your own custom logic: 1. Use [Create Checkout Template](https://dev.wix.com/docs/api-reference/business-solutions/e-commerce/purchase-flow/checkout/checkout-templates/create-checkout-template.md) with the product and coupon information for offer. 2. Create a bank of all new checkouts for this sale by collecting the `checkoutId`s of checkouts created from this `checkoutTemplateId`. 3. Before a new checkout is created with the `checkoutTemplateId`, check the bank and count the number of `checkoutId`s being stored. 4. Once the count hits `100` checkouts, use [Update Checkout Template](https://dev.wix.com/docs/api-reference/business-solutions/e-commerce/purchase-flow/checkout/checkout-templates/update-checkout-template.md) to update `checkoutTemplate.status` to `INACTIVE`. --- > Portal Navigation: > > - Append `.md` to any URL under `https://dev.wix.com/docs/` to get its markdown version. > - Pages are either content pages (article or reference text) or menu pages (a list of links to child pages). > - To get a menu page, truncate any URL to a parent path and append `.md` (e.g. `https://dev.wix.com/docs/sdk.md`, `https://dev.wix.com/docs/sdk/core-modules.md`). > - Top-level index of all portals: https://dev.wix.com/docs/llms.txt > - Full concatenated docs: https://dev.wix.com/docs/llms-full.txt # Resource: Abandoned Checkout # Type: Abandoned Checkout Object # Link: https://dev.wix.com/docs/api-reference/business-solutions/e-commerce/purchase-flow/checkout/abandoned-checkout/abandoned-checkout-object.md ## Description: A checkout that was started but not completed. Use abandoned checkouts to track and recover potential sales through automated follow-ups. ## Schema: ```json Type: Abandoned Checkout Object | type: AbandonedCheckout Description: A checkout that was started but not completed. Use abandoned checkouts to track and recover potential sales through automated follow-ups. - name: id | type: string | description: Abandoned checkout ID. - name: createdDate | type: string | description: Date and time the abandoned checkout was created. - name: seconds | type: string | description: - name: nanos | type: number | description: - name: updatedDate | type: string | description: Date and time the abandoned checkout was updated. - name: checkoutId | type: string | description: The associated checkout ID. - name: value | type: string | description: - name: cartId | type: string | description: The associated cart ID. - name: status | type: string | description: Status of the abandoned checkout. enum: ABANDONED, RECOVERED - name: buyerLanguage | type: string | description: Language for communication with the buyer. Defaults to the site language. For a site that supports multiple languages, this is the language the buyer selected. - name: buyerInfo | type: BuyerInfo | description: Buyer information. - name: contactId | type: string | description: Contact ID. For more information, see the Contacts API. - name: email | type: string | description: Buyer email address. - name: contactDetails | type: FullAddressContactDetails | description: Contact details. - name: firstName | type: string | description: First name. - name: lastName | type: string | description: Last name. - name: phone | type: string | description: Phone number. - name: company | type: string | description: Company name. - name: vatId | type: VatId | description: Tax information (for Brazil only). If ID is provided, `vatId.type` must also be set, `UNSPECIFIED` is not allowed. - name: id | type: string | description: Customer's tax ID. - name: type | type: string | description: Tax type. Supported values: + `CPF`: for individual tax payers + `CNPJ`: for corporations - name: currency | type: string | description: The store's currency. - name: conversionCurrency | type: string | description: Currency the buyer used in checkout. - name: totalPrice | type: MultiCurrencyPrice | description: Total price after discounts, gift cards, and tax. - name: amount | type: string | description: Amount. - name: convertedAmount | type: string | description: Converted amount. - name: formattedAmount | type: string | description: Amount formatted with currency symbol. - name: formattedConvertedAmount | type: string | description: Converted amount formatted with currency symbol. - name: activities | type: Array | description: List of all automation activities performed by [Wix Automations](https://dev.wix.com/docs/rest/business-management/automations/introduction.md) regarding the abandoned checkout. Wix Automations updates the `activities` field for each activity in the automation flow. Only relevant if the site owner set up [automations in the Dashboard](https://support.wix.com/en/article/wix-automations-creating-an-automation-with-the-new-builder#step-1-create-a-new-automation). Read more about `activities` in the Abandoned Checkouts introduction. - name: createdDate | type: string | description: Date and time the automation activity was created. - name: type | type: string | description: Automation activity type. enum: SCHEDULED, EMAIL_SENT, EMAIL_NOT_SENT, NOTIFICATION_SENT, TASK_CREATED, AUTOMATION_SKIPPED - name: checkoutRecoveredDate | type: string | description: Date and time the abandoned checkout was recovered. - name: checkoutUrl | type: string | description: Checkout URL. - name: subtotalPrice | type: MultiCurrencyPrice | description: Subtotal price of all line items, before discounts and before tax. - name: lineItems | type: Array | description: Line items. - name: id | type: string | description: Line item ID. - name: quantity | type: number | description: Item quantity. - name: catalogReference | type: CatalogReference | description: Catalog and item reference. Holds IDs for the item and the catalog it came from, as well as further optional info. Optional for custom line items, which don't trigger the Catalog service plugin. - name: catalogItemId | type: string | description: ID of the item within the catalog it belongs to. - name: appId | type: string | description: ID of the app providing the catalog. You can get your app's ID from its page in the [app dashboard](https://dev.wix.com/dc3/my-apps/). For items from Wix catalogs, the following values always apply: + Wix Stores: `"215238eb-22a5-4c36-9e7b-e7c08025e04e"` + Wix Bookings: `"13d21c63-b5ec-5912-8397-c3a5ddb27a97"` + Wix Restaurants: `"9a5d83fd-8570-482e-81ab-cfa88942ee60"` - name: options | type: Struct | description: Additional item details in `key:value` pairs. Use this optional field for more specificity with item selection. The values of the `options` field differ depending on which catalog is providing the items. For Wix Stores products, learn more about integrating with [Catalog V3](https://dev.wix.com/docs/api-reference/business-solutions/stores/catalog-v3/e-commerce-integration.md) or [Catalog V1](https://dev.wix.com/docs/api-reference/business-solutions/stores/catalog-v1/catalog/e-commerce-integration.md), depending on [the version the site uses](https://dev.wix.com/docs/api-reference/business-solutions/stores/catalog-versioning/introduction.md). - name: productName | type: ProductName | description: Item name. + Stores - `product.name` + Bookings - `service.info.name` + Events - `ticket.name` - name: original | type: string | description: __Required.__ Item name in the site's default language as defined in the [request envelope](https://dev.wix.com/docs/build-apps/develop-your-app/frameworks/self-hosting/supported-extensions/backend-extensions/add-self-hosted-service-plugin-extensions.md#request-envelope). Min: 1 character. Max: 200 characters. - name: translated | type: string | description: Item name translated into the buyer's language. Min: 1 character. Max: 400 characters. Default: Same as `original`. - name: price | type: MultiCurrencyPrice | description: Item price **after** catalog-defined discount and line item discounts. - name: priceBeforeDiscounts | type: MultiCurrencyPrice | description: Item price **before** line item discounts and **after** catalog-defined discount. Defaults to `price` when not provided. - name: descriptionLines | type: Array | description: Line item description lines. Used for displaying the cart, checkout and order. - name: name | type: DescriptionLineName | description: Description line name. - name: image | type: Image | description: Line item image details. - name: id | type: string | description: WixMedia image ID. - name: url | type: string | description: Image URL. - name: height | type: number | description: Original image height. - name: width | type: number | description: Original image width. - name: altText | type: string | description: Image alt text. - name: physicalProperties | type: PhysicalProperties | description: Physical properties of the item. When relevant, contains information such as SKU, item weight, and shippability. - name: weight | type: number | description: Line item weight. Measurement unit matches the weight unit specified in `weightUnit` in the request. - name: sku | type: string | description: Stock-keeping unit. Learn more about [SKUs](https://www.wix.com/encyclopedia/definition/stock-keeping-unit-sku). - name: shippable | type: boolean | description: Whether this line item is shippable. - name: appliedDiscounts | type: Array | description: Applied discounts. - name: discountType | type: string | description: Discount type. enum: GLOBAL, SPECIFIC_ITEMS, SHIPPING - name: lineItemIds | type: Array | description: IDs of line items the discount applies to. ``` --- > Portal Navigation: > > - Append `.md` to any URL under `https://dev.wix.com/docs/` to get its markdown version. > - Pages are either content pages (article or reference text) or menu pages (a list of links to child pages). > - To get a menu page, truncate any URL to a parent path and append `.md` (e.g. `https://dev.wix.com/docs/sdk.md`, `https://dev.wix.com/docs/sdk/core-modules.md`). > - Top-level index of all portals: https://dev.wix.com/docs/llms.txt > - Full concatenated docs: https://dev.wix.com/docs/llms-full.txt # GetAbandonedCheckout # Package: checkout # Namespace: AbandonedCheckoutService # Method link: https://dev.wix.com/docs/api-reference/business-solutions/e-commerce/purchase-flow/checkout/abandoned-checkout/get-abandoned-checkout.md ## Permission Scopes: Read Orders: SCOPE.DC-STORES.READ-ORDERS ## Introduction Retrieves an abandoned checkout. --- ## REST API ### Examples ### Get Abandoned Checkout ```curl curl -X GET https://www.wixapis.com/ecom/v1/abandoned-checkout/b4ebb0b8-4482-4693-ae09-7b47e977484c \ -H 'Content-Type: application/json;charset=UTF-8' \ -H 'Authorization: ' ``` --- ## JavaScript SDK ### Examples ### getAbandonedCheckout ```javascript import { abandonedCheckouts } from '@wix/ecom'; async function getAbandonedCheckout(abandonedCheckoutId) { const response = await abandonedCheckouts.getAbandonedCheckout(abandonedCheckoutId); }; ``` ### getAbandonedCheckout (with elevated permissions) ```javascript import { abandonedCheckouts } from '@wix/ecom'; import { auth } from '@wix/essentials'; async function myGetAbandonedCheckoutMethod(abandonedCheckoutId) { const elevatedGetAbandonedCheckout = auth.elevate(abandonedCheckouts.getAbandonedCheckout); const response = await elevatedGetAbandonedCheckout(abandonedCheckoutId); } ``` ### getAbandonedCheckout (self-hosted) Self-hosted SDK calls require you to [create a client](https://dev.wix.com/docs/sdk/articles/work-with-the-sdk/about-the-wix-client.md). ```javascript import { createClient } from '@wix/sdk'; import { abandonedCheckouts } from '@wix/ecom'; // Import the auth strategy for the relevant access type // Import the relevant host module if needed const myWixClient = createClient ({ modules: { abandonedCheckouts }, // Include the auth strategy and host as relevant }); async function getAbandonedCheckout(abandonedCheckoutId) { const response = await myWixClient.abandonedCheckouts.getAbandonedCheckout(abandonedCheckoutId); }; ``` --- --- > Portal Navigation: > > - Append `.md` to any URL under `https://dev.wix.com/docs/` to get its markdown version. > - Pages are either content pages (article or reference text) or menu pages (a list of links to child pages). > - To get a menu page, truncate any URL to a parent path and append `.md` (e.g. `https://dev.wix.com/docs/sdk.md`, `https://dev.wix.com/docs/sdk/core-modules.md`). > - Top-level index of all portals: https://dev.wix.com/docs/llms.txt > - Full concatenated docs: https://dev.wix.com/docs/llms-full.txt # DeleteAbandonedCheckout # Package: checkout # Namespace: AbandonedCheckoutService # Method link: https://dev.wix.com/docs/api-reference/business-solutions/e-commerce/purchase-flow/checkout/abandoned-checkout/delete-abandoned-checkout.md ## Permission Scopes: Manage Orders: SCOPE.DC-STORES.MANAGE-ORDERS ## Introduction Deletes an abandoned checkout. --- ## REST API ### Examples ### Delete Abandoned Checkout ```curl curl -X DELETE \ 'https://www.wixapis.com/ecom/v1/abandoned-checkout/330c3e52-73d4-4cc7-8eb2-61f6c5a07478' \ -H 'Authorization: ' \ -H "Content-Type:application/json" ``` --- ## JavaScript SDK ### Examples ### deleteAbandonedCheckout ```javascript import { abandonedCheckouts } from '@wix/ecom'; async function deleteAbandonedCheckout(abandonedCheckoutId) { const response = await abandonedCheckouts.deleteAbandonedCheckout(abandonedCheckoutId); }; ``` ### deleteAbandonedCheckout (with elevated permissions) ```javascript import { abandonedCheckouts } from '@wix/ecom'; import { auth } from '@wix/essentials'; async function myDeleteAbandonedCheckoutMethod(abandonedCheckoutId) { const elevatedDeleteAbandonedCheckout = auth.elevate(abandonedCheckouts.deleteAbandonedCheckout); const response = await elevatedDeleteAbandonedCheckout(abandonedCheckoutId); } ``` ### deleteAbandonedCheckout (self-hosted) Self-hosted SDK calls require you to [create a client](https://dev.wix.com/docs/sdk/articles/work-with-the-sdk/about-the-wix-client.md). ```javascript import { createClient } from '@wix/sdk'; import { abandonedCheckouts } from '@wix/ecom'; // Import the auth strategy for the relevant access type // Import the relevant host module if needed const myWixClient = createClient ({ modules: { abandonedCheckouts }, // Include the auth strategy and host as relevant }); async function deleteAbandonedCheckout(abandonedCheckoutId) { const response = await myWixClient.abandonedCheckouts.deleteAbandonedCheckout(abandonedCheckoutId); }; ``` --- --- > Portal Navigation: > > - Append `.md` to any URL under `https://dev.wix.com/docs/` to get its markdown version. > - Pages are either content pages (article or reference text) or menu pages (a list of links to child pages). > - To get a menu page, truncate any URL to a parent path and append `.md` (e.g. `https://dev.wix.com/docs/sdk.md`, `https://dev.wix.com/docs/sdk/core-modules.md`). > - Top-level index of all portals: https://dev.wix.com/docs/llms.txt > - Full concatenated docs: https://dev.wix.com/docs/llms-full.txt # QueryAbandonedCheckouts # Package: checkout # Namespace: AbandonedCheckoutService # Method link: https://dev.wix.com/docs/api-reference/business-solutions/e-commerce/purchase-flow/checkout/abandoned-checkout/query-abandoned-checkouts.md ## Permission Scopes: Read Orders: SCOPE.DC-STORES.READ-ORDERS ## Introduction Retrieves a list of abandoned checkouts, given the provided paging, filtering, and sorting. Up to 100 abandoned checkouts can be returned per request. To learn how to query abandoned checkouts, see [API Query Language](https://dev.wix.com/api/rest/getting-started/api-query-language). --- ## REST API ### Examples ### Query Abandoned Checkouts ```curl curl -X POST https://www.wixapis.com/ecom/v1/abandoned-checkout/query \ -H 'Content-Type: application/json;charset=UTF-8' \ -H 'Authorization: ' \ -d '{ "query": { "sort": [ { "fieldName": "createdDate", "order": "DESC" } ], "filter": { "contactDetails.firstName": "John" }, "paging": { "limit": 20, "offset": 0 } } }' ``` --- ## JavaScript SDK ### Examples ### queryAbandonedCheckouts ```javascript import { abandonedCheckouts } from '@wix/ecom'; async function queryAbandonedCheckouts(query) { const response = await abandonedCheckouts.queryAbandonedCheckouts(query); }; ``` ### queryAbandonedCheckouts (with elevated permissions) ```javascript import { abandonedCheckouts } from '@wix/ecom'; import { auth } from '@wix/essentials'; async function myQueryAbandonedCheckoutsMethod(query) { const elevatedQueryAbandonedCheckouts = auth.elevate(abandonedCheckouts.queryAbandonedCheckouts); const response = await elevatedQueryAbandonedCheckouts(query); } ``` ### queryAbandonedCheckouts (self-hosted) Self-hosted SDK calls require you to [create a client](https://dev.wix.com/docs/sdk/articles/work-with-the-sdk/about-the-wix-client.md). ```javascript import { createClient } from '@wix/sdk'; import { abandonedCheckouts } from '@wix/ecom'; // Import the auth strategy for the relevant access type // Import the relevant host module if needed const myWixClient = createClient ({ modules: { abandonedCheckouts }, // Include the auth strategy and host as relevant }); async function queryAbandonedCheckouts(query) { const response = await myWixClient.abandonedCheckouts.queryAbandonedCheckouts(query); }; ``` --- --- > Portal Navigation: > > - Append `.md` to any URL under `https://dev.wix.com/docs/` to get its markdown version. > - Pages are either content pages (article or reference text) or menu pages (a list of links to child pages). > - To get a menu page, truncate any URL to a parent path and append `.md` (e.g. `https://dev.wix.com/docs/sdk.md`, `https://dev.wix.com/docs/sdk/core-modules.md`). > - Top-level index of all portals: https://dev.wix.com/docs/llms.txt > - Full concatenated docs: https://dev.wix.com/docs/llms-full.txt # SearchAbandonedCheckouts # Package: checkout # Namespace: AbandonedCheckoutService # Method link: https://dev.wix.com/docs/api-reference/business-solutions/e-commerce/purchase-flow/checkout/abandoned-checkout/search-abandoned-checkouts.md ## Permission Scopes: Read Orders: SCOPE.DC-STORES.READ-ORDERS ## Introduction Retrieves a list of abandoned checkouts, given the provided paging, filtering, search details and sorting. Up to 100 abandoned checkouts can be returned per request. --- ## REST API ### Examples ### Search Abandoned Checkouts ```curl curl -X POST \ 'https://www.wixapis.com/ecom/v1/abandoned-checkout/search' \ -H 'Content-Type: application/json' \ -H 'Authorization: ' \ -d '{ "search": { "sort": [ { "fieldName": "createdDate", "order": "DESC" } ], "search": { "fields": [ "contactDetails.firstName", "contactDetails.lastName", "buyerInfo.email" ], "expression": "John" }, "paging": { "limit": 1, "offset": 0 } } }' ``` --- ## JavaScript SDK ### Examples ### searchAbandonedCheckouts ```javascript import { abandonedCheckouts } from '@wix/ecom'; async function searchAbandonedCheckouts(search) { const response = await abandonedCheckouts.searchAbandonedCheckouts(search); }; ``` ### searchAbandonedCheckouts (with elevated permissions) ```javascript import { abandonedCheckouts } from '@wix/ecom'; import { auth } from '@wix/essentials'; async function mySearchAbandonedCheckoutsMethod(search) { const elevatedSearchAbandonedCheckouts = auth.elevate(abandonedCheckouts.searchAbandonedCheckouts); const response = await elevatedSearchAbandonedCheckouts(search); } ``` ### searchAbandonedCheckouts (self-hosted) Self-hosted SDK calls require you to [create a client](https://dev.wix.com/docs/sdk/articles/work-with-the-sdk/about-the-wix-client.md). ```javascript import { createClient } from '@wix/sdk'; import { abandonedCheckouts } from '@wix/ecom'; // Import the auth strategy for the relevant access type // Import the relevant host module if needed const myWixClient = createClient ({ modules: { abandonedCheckouts }, // Include the auth strategy and host as relevant }); async function searchAbandonedCheckouts(search) { const response = await myWixClient.abandonedCheckouts.searchAbandonedCheckouts(search); }; ``` --- --- > Portal Navigation: > > - Append `.md` to any URL under `https://dev.wix.com/docs/` to get its markdown version. > - Pages are either content pages (article or reference text) or menu pages (a list of links to child pages). > - To get a menu page, truncate any URL to a parent path and append `.md` (e.g. `https://dev.wix.com/docs/sdk.md`, `https://dev.wix.com/docs/sdk/core-modules.md`). > - Top-level index of all portals: https://dev.wix.com/docs/llms.txt > - Full concatenated docs: https://dev.wix.com/docs/llms-full.txt # BulkDeleteAbandonedCheckouts # Package: checkout # Namespace: AbandonedCheckoutService # Method link: https://dev.wix.com/docs/api-reference/business-solutions/e-commerce/purchase-flow/checkout/abandoned-checkout/bulk-delete-abandoned-checkouts.md ## Permission Scopes: Manage Orders: SCOPE.DC-STORES.MANAGE-ORDERS ## Introduction Deletes multiple abandoned checkouts. --- ## REST API ### Examples ### Bulk Delete Abandoned Checkouts ```curl curl -X POST \ 'https://www.wixapis.com/ecom/v1/bulk/abandoned-checkouts/delete' \ -H 'Content-Type: application/json' \ -H 'Authorization: ' \ -d '{ "abandonedCheckoutIds": [ "b4ebb0b8-4482-4693-ae09-7b47e977484c", "f126d944-c0ae-4474-b416-3285e19ada7e", "e2bb2326-5cb0-47f8-a0c5-88cd8896a96b" ] }' ``` --- ## JavaScript SDK ### Examples ### bulkDeleteAbandonedCheckouts ```javascript import { abandonedCheckouts } from '@wix/ecom'; async function bulkDeleteAbandonedCheckouts(abandonedCheckoutIds) { const response = await abandonedCheckouts.bulkDeleteAbandonedCheckouts(abandonedCheckoutIds); }; ``` ### bulkDeleteAbandonedCheckouts (with elevated permissions) ```javascript import { abandonedCheckouts } from '@wix/ecom'; import { auth } from '@wix/essentials'; async function myBulkDeleteAbandonedCheckoutsMethod(abandonedCheckoutIds) { const elevatedBulkDeleteAbandonedCheckouts = auth.elevate(abandonedCheckouts.bulkDeleteAbandonedCheckouts); const response = await elevatedBulkDeleteAbandonedCheckouts(abandonedCheckoutIds); } ``` ### bulkDeleteAbandonedCheckouts (self-hosted) Self-hosted SDK calls require you to [create a client](https://dev.wix.com/docs/sdk/articles/work-with-the-sdk/about-the-wix-client.md). ```javascript import { createClient } from '@wix/sdk'; import { abandonedCheckouts } from '@wix/ecom'; // Import the auth strategy for the relevant access type // Import the relevant host module if needed const myWixClient = createClient ({ modules: { abandonedCheckouts }, // Include the auth strategy and host as relevant }); async function bulkDeleteAbandonedCheckouts(abandonedCheckoutIds) { const response = await myWixClient.abandonedCheckouts.bulkDeleteAbandonedCheckouts(abandonedCheckoutIds); }; ``` --- --- > Portal Navigation: > > - Append `.md` to any URL under `https://dev.wix.com/docs/` to get its markdown version. > - Pages are either content pages (article or reference text) or menu pages (a list of links to child pages). > - To get a menu page, truncate any URL to a parent path and append `.md` (e.g. `https://dev.wix.com/docs/sdk.md`, `https://dev.wix.com/docs/sdk/core-modules.md`). > - Top-level index of all portals: https://dev.wix.com/docs/llms.txt > - Full concatenated docs: https://dev.wix.com/docs/llms-full.txt # RedirectToCheckout # Package: checkout # Namespace: AbandonedCheckoutService # Method link: https://dev.wix.com/docs/api-reference/business-solutions/e-commerce/purchase-flow/checkout/abandoned-checkout/redirect-to-checkout.md ## Introduction Redirects an abandoned checkout to its checkout page. --- ## REST API ### Examples ### Redirect To Checkout Redirects the API caller to the checkout page. ```curl curl -X GET https://www.wixapis.com/ecom/v1/abandoned-checkout/330c3e52-73d4-4cc7-8eb2-61f6c5a07478/redirect-to-checkout?metasiteId=f245094e-5aef-43c5-8d93-765c99e35a39 \ -H "Authorization: " \ -H "Content-Type:application/json" ``` --- ## JavaScript SDK ### Examples ### redirectToCheckout ```javascript import { abandonedCheckouts } from '@wix/ecom'; async function redirectToCheckout(abandonedCheckoutId,metasiteId) { const response = await abandonedCheckouts.redirectToCheckout(abandonedCheckoutId,metasiteId); }; ``` ### redirectToCheckout (with elevated permissions) ```javascript import { abandonedCheckouts } from '@wix/ecom'; import { auth } from '@wix/essentials'; async function myRedirectToCheckoutMethod(abandonedCheckoutId,metasiteId) { const elevatedRedirectToCheckout = auth.elevate(abandonedCheckouts.redirectToCheckout); const response = await elevatedRedirectToCheckout(abandonedCheckoutId,metasiteId); } ``` ### redirectToCheckout (self-hosted) Self-hosted SDK calls require you to [create a client](https://dev.wix.com/docs/sdk/articles/work-with-the-sdk/about-the-wix-client.md). ```javascript import { createClient } from '@wix/sdk'; import { abandonedCheckouts } from '@wix/ecom'; // Import the auth strategy for the relevant access type // Import the relevant host module if needed const myWixClient = createClient ({ modules: { abandonedCheckouts }, // Include the auth strategy and host as relevant }); async function redirectToCheckout(abandonedCheckoutId,metasiteId) { const response = await myWixClient.abandonedCheckouts.redirectToCheckout(abandonedCheckoutId,metasiteId); }; ``` --- --- > Portal Navigation: > > - Append `.md` to any URL under `https://dev.wix.com/docs/` to get its markdown version. > - Pages are either content pages (article or reference text) or menu pages (a list of links to child pages). > - To get a menu page, truncate any URL to a parent path and append `.md` (e.g. `https://dev.wix.com/docs/sdk.md`, `https://dev.wix.com/docs/sdk/core-modules.md`). > - Top-level index of all portals: https://dev.wix.com/docs/llms.txt > - Full concatenated docs: https://dev.wix.com/docs/llms-full.txt # Package: checkout # Namespace: abandonedCheckout # Webhook link: https://dev.wix.com/docs/api-reference/business-solutions/e-commerce/purchase-flow/checkout/abandoned-checkout/abandoned-checkout-created.md ## Introduction Triggered when an abandoned checkout is created. --- ## REST API ### Examples ```curl { "id": "fd2c1880-4092-4321-9ce4-973076b4e440", "entityFqdn": "wix.ecom.v1.abandoned_checkout", "slug": "created", "entityId": "b4ebb0b8-4482-4693-ae09-7b47e977484c", "createdEvent": { "entity": { "id": "b4ebb0b8-4482-4693-ae09-7b47e977484c", "createdDate": "2023-05-03T08:26:07.512Z", "updatedDate": "2023-05-03T08:26:07.512Z", "checkoutId": "a9524a00-4b00-4edb-abbc-538a09e59f43", "cartId": "b1460e65-bf14-42e3-9279-d96705a69347", "status": "ABANDONED", "buyerLanguage": "en", "buyerInfo": { "contactId": "251f2a54-3bde-4c34-8647-89111ef83358", "email": "John.Doe@example.com", "visitorId": "2f8d09d0-d067-44d9-9bd8-495d63fa5b4a" }, "contactDetails": { "firstName": "John", "lastName": "Doe" }, "currency": "USD", "conversionCurrency": "USD", "checkoutUrl": "http://www.wixapis.com/ecom/v1/abandoned-checkout/b4ebb0b8-4482-4693-ae09-7b47e977484c?metasiteId=07b12318-c5d9-419f-9c2c-9507db543901", "totalPrice": { "amount": "255", "convertedAmount": "255", "formattedAmount": "$255.00", "formattedConvertedAmount": "$255.00" }, "activities": [] } }, "eventTime": "2023-05-14T04:45:08.759905Z", "triggeredByAnonymizeRequest": false, "entityEventSequence": "1" } ``` --- ## JavaScript SDK ### Examples ```javascript import { abandonedCheckouts } from '@wix/ecom'; abandonedCheckouts.onAbandonedCheckoutCreated((event) => { // handle your event here }); ``` ```javascript import { createClient, AppStrategy } from '@wix/sdk'; import { abandonedCheckouts } from '@wix/ecom'; const wixClient = createClient({ auth: AppStrategy({ appId: 'MY-APP-ID', publicKey: 'YOUR_APP_PUBLIC_KEY', }), modules: { abandonedCheckouts, }, }); wixClient.abandonedCheckouts.onAbandonedCheckoutCreated((event) => { // handle your event here }); ``` --- --- > Portal Navigation: > > - Append `.md` to any URL under `https://dev.wix.com/docs/` to get its markdown version. > - Pages are either content pages (article or reference text) or menu pages (a list of links to child pages). > - To get a menu page, truncate any URL to a parent path and append `.md` (e.g. `https://dev.wix.com/docs/sdk.md`, `https://dev.wix.com/docs/sdk/core-modules.md`). > - Top-level index of all portals: https://dev.wix.com/docs/llms.txt > - Full concatenated docs: https://dev.wix.com/docs/llms-full.txt # Package: checkout # Namespace: abandonedCheckout # Webhook link: https://dev.wix.com/docs/api-reference/business-solutions/e-commerce/purchase-flow/checkout/abandoned-checkout/abandoned-checkout-deleted.md ## Introduction Triggerred when an abandoned checkout is deleted. --- ## REST API ### Examples ```javascript import { abandonedCheckouts } from '@wix/ecom'; abandonedCheckouts.onAbandonedCheckoutDeleted((event) => { // handle your event here }); ``` ```javascript import { createClient, AppStrategy } from '@wix/sdk'; import { abandonedCheckouts } from '@wix/ecom'; const wixClient = createClient({ auth: AppStrategy({ appId: 'MY-APP-ID', publicKey: 'YOUR_APP_PUBLIC_KEY', }), modules: { abandonedCheckouts, }, }); wixClient.abandonedCheckouts.onAbandonedCheckoutDeleted((event) => { // handle your event here }); ``` --- --- > Portal Navigation: > > - Append `.md` to any URL under `https://dev.wix.com/docs/` to get its markdown version. > - Pages are either content pages (article or reference text) or menu pages (a list of links to child pages). > - To get a menu page, truncate any URL to a parent path and append `.md` (e.g. `https://dev.wix.com/docs/sdk.md`, `https://dev.wix.com/docs/sdk/core-modules.md`). > - Top-level index of all portals: https://dev.wix.com/docs/llms.txt > - Full concatenated docs: https://dev.wix.com/docs/llms-full.txt # Package: checkout # Namespace: abandonedCheckout # Webhook link: https://dev.wix.com/docs/api-reference/business-solutions/e-commerce/purchase-flow/checkout/abandoned-checkout/abandoned-checkout-recovered.md ## Introduction Triggered when an abandoned checkout is recovered. --- ## REST API ### Examples ```curl { "id": "d916dcfc-0e37-49e3-be32-965d7877b844", "entityFqdn": "wix.ecom.v1.abandoned_checkout", "slug": "recovered", "entityId": "b4ebb0b8-4482-4693-ae09-7b47e977484c", "actionEvent": { "body": { "id": "b4ebb0b8-4482-4693-ae09-7b47e977484c", "createdDate": "2023-05-03T08:26:07.512Z", "updatedDate": "2023-05-03T08:33:33.809Z", "checkoutId": "a9524a00-4b00-4edb-abbc-538a09e59f43", "cartId": "b1460e65-bf14-42e3-9279-d96705a69347", "status": "RECOVERED", "buyerLanguage": "en", "buyerInfo": { "contactId": "251f2a54-3bde-4c34-8647-89111ef83358", "email": "John.Doe@example.com", "visitorId": "2f8d09d0-d067-44d9-9bd8-495d63fa5b4a" }, "contactDetails": { "firstName": "John", "lastName": "Doe" }, "currency": "USD", "conversionCurrency": "USD", "checkoutUrl": "http://www.wixapis.com/ecom/v1/abandoned-checkout/b4ebb0b8-4482-4693-ae09-7b47e977484c?metasiteId=07b12318-c5d9-419f-9c2c-9507db543901", "totalPrice": { "amount": "255", "convertedAmount": "255", "formattedAmount": "$255.00", "formattedConvertedAmount": "$255.00" }, "activities": [ { "createdDate": "2023-05-03T08:26:07.747Z", "type": "SCHEDULED" }, { "createdDate": "2023-05-03T08:32:01.991Z", "type": "EMAIL_SENT" } ] } }, "eventTime": "2023-05-14T04:45:12.786205Z", "triggeredByAnonymizeRequest": false } ``` --- ## JavaScript SDK ### Examples ```javascript import { abandonedCheckouts } from '@wix/ecom'; abandonedCheckouts.onAbandonedCheckoutRecovered((event) => { // handle your event here }); ``` ```javascript import { createClient, AppStrategy } from '@wix/sdk'; import { abandonedCheckouts } from '@wix/ecom'; const wixClient = createClient({ auth: AppStrategy({ appId: 'MY-APP-ID', publicKey: 'YOUR_APP_PUBLIC_KEY', }), modules: { abandonedCheckouts, }, }); wixClient.abandonedCheckouts.onAbandonedCheckoutRecovered((event) => { // handle your event here }); ``` --- --- > Portal Navigation: > > - Append `.md` to any URL under `https://dev.wix.com/docs/` to get its markdown version. > - Pages are either content pages (article or reference text) or menu pages (a list of links to child pages). > - To get a menu page, truncate any URL to a parent path and append `.md` (e.g. `https://dev.wix.com/docs/sdk.md`, `https://dev.wix.com/docs/sdk/core-modules.md`). > - Top-level index of all portals: https://dev.wix.com/docs/llms.txt > - Full concatenated docs: https://dev.wix.com/docs/llms-full.txt # Package: checkout # Namespace: abandonedCheckout # Webhook link: https://dev.wix.com/docs/api-reference/business-solutions/e-commerce/purchase-flow/checkout/abandoned-checkout/abandoned-checkout-updated.md ## Introduction Triggered when an abandoned checkout is updated. --- ## REST API ### Examples ```javascript import { abandonedCheckouts } from '@wix/ecom'; abandonedCheckouts.onAbandonedCheckoutUpdated((event) => { // handle your event here }); ``` ```javascript import { createClient, AppStrategy } from '@wix/sdk'; import { abandonedCheckouts } from '@wix/ecom'; const wixClient = createClient({ auth: AppStrategy({ appId: 'MY-APP-ID', publicKey: 'YOUR_APP_PUBLIC_KEY', }), modules: { abandonedCheckouts, }, }); wixClient.abandonedCheckouts.onAbandonedCheckoutUpdated((event) => { // handle your event here }); ``` --- --- > Portal Navigation: > > - Append `.md` to any URL under `https://dev.wix.com/docs/` to get its markdown version. > - Pages are either content pages (article or reference text) or menu pages (a list of links to child pages). > - To get a menu page, truncate any URL to a parent path and append `.md` (e.g. `https://dev.wix.com/docs/sdk.md`, `https://dev.wix.com/docs/sdk/core-modules.md`). > - Top-level index of all portals: https://dev.wix.com/docs/llms.txt > - Full concatenated docs: https://dev.wix.com/docs/llms-full.txt ## Resource: Introduction ## Article: Introduction ## Article Link: https://dev.wix.com/docs/api-reference/business-solutions/e-commerce/purchase-flow/checkout/abandoned-checkout/introduction.md ## Article Content: # About the eCommerce Abandoned Checkouts API An abandoned checkout is created when: + A customer begins an eCommerce checkout process but doesn't complete it (for example, after closing their browser tab before putting in their payment details and making a payment). + A customer who is also a site member creates a cart and closes their browser tab before proceeding to the checkout page. (Wix eCommerce creates an abandoned checkout entity with the cart details). The Abandoned Checkouts API allows you to help a customer recover their abandoned checkout. When a customer completes their checkout and makes a purchase, the checkout becomes an [order](https://dev.wix.com/docs/api-reference/business-solutions/e-commerce/orders/orders/introduction.md). An abandoned checkout contains buyer details, prices, reference to the initial cart or checkout, a URL for accessing the abandoned checkout, and more. The Abandoned Checkouts API provides functionality for [retrieving information about an abandoned checkout](https://dev.wix.com/docs/api-reference/business-solutions/e-commerce/purchase-flow/checkout/abandoned-checkout/get-abandoned-checkout.md). You can also listen for events when an abandoned checkout is [created](https://dev.wix.com/docs/api-reference/business-solutions/e-commerce/purchase-flow/checkout/abandoned-checkout/abandoned-checkout-created.md) and [recovered](https://dev.wix.com/docs/api-reference/business-solutions/e-commerce/purchase-flow/checkout/abandoned-checkout/abandoned-checkout-recovered.md). ## Use cases + [Redirect a site visitor with an abandoned checkout back to their checkout page](https://dev.wix.com/docs/api-reference/business-solutions/e-commerce/purchase-flow/checkout/abandoned-checkout/sample-flows.md#redirect-a-site-visitor-with-an-abandoned-checkout-back-to-their-checkout-page) ## Terminology + **Recovered:** When a customer returns to their abandoned checkout and completes the checkout. + **Activities:** This property is only relevant if the Wix user set up [automations in the Dashboard](https://support.wix.com/en/article/wix-automations-creating-an-automation-with-the-new-builder#step-1-create-a-new-automation). The `activities` property is a list of all automation activities performed by [Wix Automations](https://dev.wix.com/docs/rest/business-management/automations/introduction.md) regarding the abandoned checkout. Wix Automations updates the `activities` field for each activity in the automation flow. For example, if a Wix user set up an automation to send a notification to a site visitor an hour after their abandoned checkout is created, Wix automations does the following: + Updates the `activities` field to `"SCHEDULED"` when the abandoned checkout is created. + Updates the `activities` field to `"NOTIFICATION_SENT"` after an hour, when the notification is sent to the site visitor. Other `actvities` include: + `"EMAIL_SENT"` + `"EMAIL_NOT_SENT"` + `"TASK_CREATED"` @sdk_package_setup --- > Portal Navigation: > > - Append `.md` to any URL under `https://dev.wix.com/docs/` to get its markdown version. > - Pages are either content pages (article or reference text) or menu pages (a list of links to child pages). > - To get a menu page, truncate any URL to a parent path and append `.md` (e.g. `https://dev.wix.com/docs/sdk.md`, `https://dev.wix.com/docs/sdk/core-modules.md`). > - Top-level index of all portals: https://dev.wix.com/docs/llms.txt > - Full concatenated docs: https://dev.wix.com/docs/llms-full.txt ## Resource: Sample Flows ## Article: Sample Flows ## Article Link: https://dev.wix.com/docs/api-reference/business-solutions/e-commerce/purchase-flow/checkout/abandoned-checkout/sample-flows.md ## Article Content: # Abandoned Checkouts: Sample Use Case & Flow This article presents a possible use case and corresponding sample flow that you can support. This can be a helpful jumping off point as you plan your implementation. ## Redirect a site visitor with an abandoned checkout back to their checkout page If a site visitor starts a checkout but doesn't complete it, you can redirect them to their checkout page. You can also check whether the site visitor has recovered their abandoned checkout and completed the purchase. To redirect the site visitor to their checkout page: 1. Call [Abandoned Checkout Created](https://dev.wix.com/docs/rest/business-solutions/e-commerce/abandoned-checkout/abandoned-checkout-created.md) to listen for when an abandoned checkout is created (a checkout was not completed). 2. Save the newly created abandoned checkout's ID (`entityId` field) and `checkoutUrl` from the above webhook's payload. Then send a marketing campaign with the `checkoutURL` to the site visitor, redirecting them to their checkout page. 3. After the marketing campaign, call [Get Abandoned Checkout](https://dev.wix.com/docs/rest/business-solutions/e-commerce/abandoned-checkout/get-abandoned-checkout.md) with the abandoned checkout's ID. Then check the `status` field in the response to see if the abandoned checkout has been recovered. --- > Portal Navigation: > > - Append `.md` to any URL under `https://dev.wix.com/docs/` to get its markdown version. > - Pages are either content pages (article or reference text) or menu pages (a list of links to child pages). > - To get a menu page, truncate any URL to a parent path and append `.md` (e.g. `https://dev.wix.com/docs/sdk.md`, `https://dev.wix.com/docs/sdk/core-modules.md`). > - Top-level index of all portals: https://dev.wix.com/docs/llms.txt > - Full concatenated docs: https://dev.wix.com/docs/llms-full.txt ## Resource: Sort and Filter ## Article: Sort and Filter ## Article Link: https://dev.wix.com/docs/api-reference/business-solutions/e-commerce/purchase-flow/checkout/abandoned-checkout/sort-and-filter.md ## Article Content: # Abandoned Checkouts: Supported Filters and Sorting The table below shows field support for filters and sorting for the base set of abandoned checkout properties. | Field | Supported Filters | Sortable | | ---------------------------- | --------------------------------------------- | -------- | | `id` | `$eq`, `$ne`, `$in`, `$exists` | | | `createdDate` | `$eq`, `$ne`, `$gt`, `$lt`, `$gte`, `$lte` | Sortable | | `updatedDate` | `$eq`, `$ne`, `$gt`, `$lt`, `$gte`, `$lte` | Sortable | | `status` | `$eq` | Sortable | | `buyerInfo.email` | `$eq` | | | `totalPrice.amount` | `$eq`, `$gt`, `$lt`, `$gte`, `$lte` | Sortable | | `totalPrice.convertedAmount` | `$eq`, `$gt`, `$lt`, `$gte`, `$lte` | Sortable | --- > Portal Navigation: > > - Append `.md` to any URL under `https://dev.wix.com/docs/` to get its markdown version. > - Pages are either content pages (article or reference text) or menu pages (a list of links to child pages). > - To get a menu page, truncate any URL to a parent path and append `.md` (e.g. `https://dev.wix.com/docs/sdk.md`, `https://dev.wix.com/docs/sdk/core-modules.md`). > - Top-level index of all portals: https://dev.wix.com/docs/llms.txt > - Full concatenated docs: https://dev.wix.com/docs/llms-full.txt # Resource: Checkout Settings # Type: Checkout Settings Object # Link: https://dev.wix.com/docs/api-reference/business-solutions/e-commerce/purchase-flow/checkout/checkout-settings/checkout-settings-object.md ## Description: Site-level settings that control the checkout experience, including policies, field visibility, and branding. ## Schema: ```json Type: Checkout Settings Object | type: CheckoutSettings Description: Site-level settings that control the checkout experience, including policies, field visibility, and branding. - name: checkoutPolicies | type: CheckoutPolicies | description: Checkout policies. - name: termsAndConditions | type: TermsAndConditionsPolicy | description: Terms and conditions. - name: visible | type: boolean | description: Whether the terms and conditions policy is visible to the customer in the checkout page.

        Default: `false` - name: content | type: string | description: Terms and conditions policy content. - name: privacyPolicy | type: PrivacyPolicy | description: Privacy policy. - name: visible | type: boolean | description: Whether the privacy policy is visible to the customer in the checkout page.

        Default: `false` - name: content | type: string | description: Privacy policy content. - name: returnPolicy | type: ReturnPolicy | description: Return policy. - name: visible | type: boolean | description: Whether the return policy is visible to the customer in the checkout page.

        Default: `false` - name: content | type: string | description: Return policy content. - name: digitalItemPolicy | type: DigitalItemPolicy | description: Digital item policy. - name: visible | type: boolean | description: Whether the digital item policy is visible to the customer in the checkout page.

        Default: `false` - name: content | type: string | description: Digital item policy content. - name: contactUs | type: ContactUsPolicy | description: "Contact us" information. - name: visible | type: boolean | description: Whether the contact us policy is visible to the customer in the checkout page.

        Default: `false` - name: content | type: string | description: Contact us policy content. - name: customPolicy | type: CustomCheckoutPolicy | description: Custom policy. - name: visible | type: boolean | description: Whether the custom policy is visible to the customer in the checkout page.

        Default: `false` - name: content | type: string | description: Custom policy content. - name: title | type: string | description: Custom policy title. - name: checkoutFields | type: CheckoutFields | description: Settings that apply to checkout fields and the checkout process. - name: subscriptionCheckbox | type: CheckboxField | description: Subscription checkbox.

        Defaults: + `visible`: `false` + `checkedByDefault`: `false` - name: visible | type: boolean | description: Whether the checkbox is visible to the customer. - name: checkedByDefault | type: boolean | description: Whether the checkbox is checked by default. - name: policyAgreementCheckbox | type: CheckboxField | description: Policy agreement checkbox.

        Defaults: + `visible`: `false` + `checkedByDefault`: `false` - name: giftCardRedeemEnabled | type: boolean | description: Whether the ability to redeem a gift card is enabled.

        Default: `false` - name: value | type: boolean | description: - name: mitEnabled | type: boolean | description: Whether to allow for MIT transactions.

        Default: `false` - name: delayCaptureEnabled | type: boolean | description: Whether to allow for Auth & Capture transactions.

        Default: `false` - name: captureBeforeExpiryEnabled | type: boolean | description: Whether to automatically capture the transaction before the authorization expires. Default: `true` >**Note:** this setting is only relevant when `delay_capture_enabled: true`. - name: checkoutBrand | type: CheckoutBrand | description: Checkout brand settings. - name: header | type: CheckoutHeader | description: Checkout header. - name: text | type: string | description: Textual content to be included in the header (e.g. Business Name) - name: textColor | type: string | description: Text color hex code. - name: logo | type: Logo | description: Specifications for when a logo is included in the header. - name: alignment | type: string | description: Alignment within the header. >**Note:** `SIDE` alignment is decided depending on the locale's language. For example, scripts like Hebrew and Arabic will automatically align right-to-left. - name: displayCheckoutLabel | type: boolean | description: Whether to display the 'Checkout' label within the header. Depending on the locale, the label may be translated. - name: continueShopping | type: ContinueShopping | description: Continue shopping specifications. - name: backgroundFill | type: BackgroundFill | description: Background fill specifications. - name: createdDate | type: string | description: Date and time the checkout settings were created. - name: seconds | type: string | description: - name: nanos | type: number | description: - name: updatedDate | type: string | description: Date and time the checkout settings were updated. - name: checkoutBillingFields | type: string | description: Billing information required to complete the checkout. enum: All_FIELDS, MINIMUM_REQUIRED_FIELDS ``` --- > Portal Navigation: > > - Append `.md` to any URL under `https://dev.wix.com/docs/` to get its markdown version. > - Pages are either content pages (article or reference text) or menu pages (a list of links to child pages). > - To get a menu page, truncate any URL to a parent path and append `.md` (e.g. `https://dev.wix.com/docs/sdk.md`, `https://dev.wix.com/docs/sdk/core-modules.md`). > - Top-level index of all portals: https://dev.wix.com/docs/llms.txt > - Full concatenated docs: https://dev.wix.com/docs/llms-full.txt # GetCheckoutSettings # Package: checkout # Namespace: CheckoutSettingsService # Method link: https://dev.wix.com/docs/api-reference/business-solutions/e-commerce/purchase-flow/checkout/checkout-settings/get-checkout-settings.md ## Permission Scopes: Read Orders: SCOPE.DC-STORES.READ-ORDERS ## Introduction Retrieves the site's checkout settings. --- ## REST API ### Examples ### Get checkout settings ```curl curl -X GET \ 'https://www.wixapis.com/ecom/v1/checkout-settings' \ -H 'Authorization: ' ``` --- ## JavaScript SDK ### Examples ### Get checkout settings with elevated permissions ```javascript import { checkoutSettings } from '@wix/ecom'; import { auth } from '@wix/essentials'; const elevatedGetCheckoutSettings = auth.elevate(checkoutSettings.getCheckoutSettings); export async function myGetCheckoutSettingsFunction() { try { const getCheckoutSettings = await elevatedGetCheckoutSettings(); console.log('Success! Checkout settings:', getCheckoutSettings); return getCheckoutSettings; } catch (error) { console.error(error); // Handle the error } } /* Promise resolves to: { "checkoutSettings": { "checkoutPolicies": { "termsAndConditions": { "visible": true, "content": "All product listings, prices, and specifications are subject to change without notice. ACCS reserves the right to modify or discontinue products at any time." }, "privacyPolicy": { "visible": true, "content": "Your privacy is important to us. Please review our Privacy Policy to understand how we collect, use, and disclose information." }, "returnPolicy": { "visible": true, "content": "Please refer to our Return Policy page for information on returns and refunds. ACCS reserves the right to refuse returns that do not meet our policy criteria." }, "digitalItemPolicy": { "visible": false, "content": "" }, "contactUs": { "visible": true, "content": "Email: accs@mail.com" }, "customPolicy": { "visible": true, "content": "Placing an order on our website constitutes an offer to purchase the products. We reserve the right to refuse or cancel any order for any reason. Payment must be received before order processing.", "title": "Orders and Payments" } }, "checkoutFields": { "subscriptionCheckbox": { "visible": true, "checkedByDefault": false }, "policyAgreementCheckbox": { "visible": true, "checkedByDefault": false }, "giftCardRedeemEnabled": true, "mitEnabled": false } } } */ ``` ### Get checkout settings ```javascript import { checkoutSettings } from '@wix/ecom'; export async function myGetCheckoutSettingsFunction() { try { const settings = await checkoutSettings.getCheckoutSettings(); console.log('Success! CheckoutSettings:', settings); return settings; } catch (error) { console.error(error); // Handle the error } } /* Promise resolves to: { "checkoutSettings": { "checkoutPolicies": { "termsAndConditions": { "visible": true, "content": "All product listings, prices, and specifications are subject to change without notice. ACCS reserves the right to modify or discontinue products at any time." }, "privacyPolicy": { "visible": true, "content": "Your privacy is important to us. Please review our Privacy Policy to understand how we collect, use, and disclose information." }, "returnPolicy": { "visible": true, "content": "Please refer to our Return Policy page for information on returns and refunds. ACCS reserves the right to refuse returns that do not meet our policy criteria." }, "digitalItemPolicy": { "visible": false, "content": "" }, "contactUs": { "visible": true, "content": "Email: accs@mail.com" }, "customPolicy": { "visible": true, "content": "Placing an order on our website constitutes an offer to purchase the products. We reserve the right to refuse or cancel any order for any reason. Payment must be received before order processing.", "title": "Orders and Payments" } }, "checkoutFields": { "subscriptionCheckbox": { "visible": true, "checkedByDefault": false }, "policyAgreementCheckbox": { "visible": true, "checkedByDefault": false }, "giftCardRedeemEnabled": true, "mitEnabled": false } } } */ ``` ### getCheckoutSettings (self-hosted) Self-hosted SDK calls require you to [create a client](https://dev.wix.com/docs/sdk/articles/work-with-the-sdk/about-the-wix-client.md). ```javascript import { createClient } from '@wix/sdk'; import { checkoutSettings } from '@wix/ecom'; // Import the auth strategy for the relevant access type // Import the relevant host module if needed const myWixClient = createClient ({ modules: { checkoutSettings }, // Include the auth strategy and host as relevant }); async function getCheckoutSettings() { const response = await myWixClient.checkoutSettings.getCheckoutSettings(); }; ``` --- --- > Portal Navigation: > > - Append `.md` to any URL under `https://dev.wix.com/docs/` to get its markdown version. > - Pages are either content pages (article or reference text) or menu pages (a list of links to child pages). > - To get a menu page, truncate any URL to a parent path and append `.md` (e.g. `https://dev.wix.com/docs/sdk.md`, `https://dev.wix.com/docs/sdk/core-modules.md`). > - Top-level index of all portals: https://dev.wix.com/docs/llms.txt > - Full concatenated docs: https://dev.wix.com/docs/llms-full.txt # UpdateCheckoutSettings # Package: checkout # Namespace: CheckoutSettingsService # Method link: https://dev.wix.com/docs/api-reference/business-solutions/e-commerce/purchase-flow/checkout/checkout-settings/update-checkout-settings.md ## Permission Scopes: Manage Orders: SCOPE.DC-STORES.MANAGE-ORDERS ## Introduction Updates the site's checkout settings. --- ## REST API ### Examples ### Update checkout settings ```curl curl -X PATCH \ 'https://www.wixapis.com/ecom/v1/checkout-settings' \ -H 'Content-Type: application/json' \ -H 'Authorization: ' \ -d '{ "checkoutSettings": { "checkoutFields": { "giftCardRedeemEnabled": true, "mitEnabled": false } } }' ``` --- ## JavaScript SDK ### Examples ### Update checkout settings (with elevated permissions) ```javascript import { checkoutSettings } from '@wix/ecom'; import { auth } from '@wix/essentials'; /* Sample update value: { "checkoutSettingsInfo": { "checkoutFields": { "mitEnabled": false } } } */ const elevatedUpdateCheckoutSettings = auth.elevate(checkoutSettings.updateCheckoutSettings); export async function myUpdateCheckoutSettingsFunction(checkoutSettingsInfo) { try { const settings = await elevatedUpdateCheckoutSettings(checkoutSettingsInfo); console.log('Success! Updated checkout settings:', settings); return settings; } catch (error) { console.error(error); // Handle the error } } /* Promise resolves to: { "checkoutSettings": { "checkoutPolicies": { "termsAndConditions": { "visible": true, "content": "All product listings, prices, and specifications are subject to change without notice. ACCS reserves the right to modify or discontinue products at any time." }, "privacyPolicy": { "visible": true, "content": "Your privacy is important to us. Please review our Privacy Policy to understand how we collect, use, and disclose information." }, "returnPolicy": { "visible": true, "content": "Please refer to our Return Policy page for information on returns and refunds. ACCS reserves the right to refuse returns that do not meet our policy criteria." }, "digitalItemPolicy": { "visible": false, "content": "" }, "contactUs": { "visible": true, "content": "Email: accs@mail.com" }, "customPolicy": { "visible": true, "content": "Placing an order on our website constitutes an offer to purchase the products. We reserve the right to refuse or cancel any order for any reason. Payment must be received before order processing.", "title": "Orders and Payments" } }, "checkoutFields": { "subscriptionCheckbox": { "visible": true, "checkedByDefault": false }, "policyAgreementCheckbox": { "visible": true, "checkedByDefault": false }, "giftCardRedeemEnabled": true, "mitEnabled": false } } } */ ``` ### Update checkout settings ```javascript import { checkoutSettings } from '@wix/ecom'; /* Sample update value: { "checkoutSettingsInfo": { "checkoutFields": { "mitEnabled": false } } } */ export async function myUpdateCheckoutSettingsFunction(checkoutSettingsInfo) { try { const settings = await checkoutSettings.updateCheckoutSettings(checkoutSettingsInfo); console.log('Success! Updated checkout settings:', settings); return settings; } catch (error) { console.error(error); // Handle the error } } /* Promise resolves to: { "checkoutSettings": { "checkoutPolicies": { "termsAndConditions": { "visible": true, "content": "All product listings, prices, and specifications are subject to change without notice. ACCS reserves the right to modify or discontinue products at any time." }, "privacyPolicy": { "visible": true, "content": "Your privacy is important to us. Please review our Privacy Policy to understand how we collect, use, and disclose information." }, "returnPolicy": { "visible": true, "content": "Please refer to our Return Policy page for information on returns and refunds. ACCS reserves the right to refuse returns that do not meet our policy criteria." }, "digitalItemPolicy": { "visible": false, "content": "" }, "contactUs": { "visible": true, "content": "Email: accs@mail.com" }, "customPolicy": { "visible": true, "content": "Placing an order on our website constitutes an offer to purchase the products. We reserve the right to refuse or cancel any order for any reason. Payment must be received before order processing.", "title": "Orders and Payments" } }, "checkoutFields": { "subscriptionCheckbox": { "visible": true, "checkedByDefault": false }, "policyAgreementCheckbox": { "visible": true, "checkedByDefault": false }, "giftCardRedeemEnabled": true, "mitEnabled": false } } } */ ``` ### updateCheckoutSettings (self-hosted) Self-hosted SDK calls require you to [create a client](https://dev.wix.com/docs/sdk/articles/work-with-the-sdk/about-the-wix-client.md). ```javascript import { createClient } from '@wix/sdk'; import { checkoutSettings } from '@wix/ecom'; // Import the auth strategy for the relevant access type // Import the relevant host module if needed const myWixClient = createClient ({ modules: { checkoutSettings }, // Include the auth strategy and host as relevant }); async function updateCheckoutSettings(checkoutSettings) { const response = await myWixClient.checkoutSettings.updateCheckoutSettings(checkoutSettings); }; ``` --- --- > Portal Navigation: > > - Append `.md` to any URL under `https://dev.wix.com/docs/` to get its markdown version. > - Pages are either content pages (article or reference text) or menu pages (a list of links to child pages). > - To get a menu page, truncate any URL to a parent path and append `.md` (e.g. `https://dev.wix.com/docs/sdk.md`, `https://dev.wix.com/docs/sdk/core-modules.md`). > - Top-level index of all portals: https://dev.wix.com/docs/llms.txt > - Full concatenated docs: https://dev.wix.com/docs/llms-full.txt # Package: checkout # Namespace: checkoutSettings # Webhook link: https://dev.wix.com/docs/api-reference/business-solutions/e-commerce/purchase-flow/checkout/checkout-settings/checkout-settings-updated.md ## Introduction Triggered when checkout settings are updated. --- ## REST API ### Examples ```curl { "id": "7b05fbd6-c3e2-42c2-ace6-06272bd3fdfa", "entityFqdn": "wix.ecom.v1.checkout_settings", "slug": "updated", "entityId": "74a91ddc-8540-11ee-b9d1-0242ac120002", "updatedEvent": { "currentEntity": { "checkoutPolicies": { "termsAndConditions": { "visible": true, "content": "All product listings, prices, and specifications are subject to change without notice. ACCS reserves the right to modify or discontinue products at any time." }, "privacyPolicy": { "visible": true, "content": "Your privacy is important to us. Please review our Privacy Policy to understand how we collect, use, and disclose information." }, "returnPolicy": { "visible": true, "content": "Please refer to our Return Policy page for information on returns and refunds. ACCS reserves the right to refuse returns that do not meet our policy criteria." }, "digitalItemPolicy": { "visible": false, "content": "" }, "contactUs": { "visible": true, "content": "email: accs@mail.com" }, "customPolicy": { "visible": true, "content": "Placing an order on our website constitutes an offer to purchase the products. We reserve the right to refuse or cancel any order for any reason. Payment must be received before order processing.", "title": "Orders and Payments" } }, "checkoutFields": { "subscriptionCheckbox": { "visible": true, "checkedByDefault": true }, "policyAgreementCheckbox": { "visible": true, "checkedByDefault": false }, "giftCardRedeemEnabled": false, "mitEnabled": true } } }, "eventTime": "2023-11-16T13:28:59.036159Z", "triggeredByAnonymizeRequest": false, "entityEventSequence": "133" } ``` --- ## JavaScript SDK ### Examples ```javascript import { checkoutSettings } from '@wix/ecom'; checkoutSettings.onCheckoutSettingsUpdated((event) => { // handle your event here }); ``` ```javascript import { createClient, AppStrategy } from '@wix/sdk'; import { checkoutSettings } from '@wix/ecom'; const wixClient = createClient({ auth: AppStrategy({ appId: 'MY-APP-ID', publicKey: 'YOUR_APP_PUBLIC_KEY', }), modules: { checkoutSettings, }, }); wixClient.checkoutSettings.onCheckoutSettingsUpdated((event) => { // handle your event here }); ``` --- --- > Portal Navigation: > > - Append `.md` to any URL under `https://dev.wix.com/docs/` to get its markdown version. > - Pages are either content pages (article or reference text) or menu pages (a list of links to child pages). > - To get a menu page, truncate any URL to a parent path and append `.md` (e.g. `https://dev.wix.com/docs/sdk.md`, `https://dev.wix.com/docs/sdk/core-modules.md`). > - Top-level index of all portals: https://dev.wix.com/docs/llms.txt > - Full concatenated docs: https://dev.wix.com/docs/llms-full.txt ## Resource: Introduction ## Article: Introduction ## Article Link: https://dev.wix.com/docs/api-reference/business-solutions/e-commerce/purchase-flow/checkout/checkout-settings/introduction.md ## Article Content: # About Checkout Settings With the Checkout Settings API, you can retrieve and update the checkout settings for a site. These settings include adding or removing eCommerce policies, and setting checkbox behavior for a checkout. Policies will appear as clickable links in the footer of a checkout. Checkboxes can be found when selecting the payment method. Clicking on the policy name opens a pop-up window with the policy text. Default checkout settings are provided when Wix eCommerce, Bookings, or Events & Tickets apps are installed on a site. ## Before you begin It’s important to note the following before starting to code: - Install the [Wix Stores](https://www.wix.com/app-market/wix-stores?referral=category&appIndex=1&referralTag=ecommerce), [Wix Bookings](https://www.wix.com/app-market/web-solution/bookings?appIndex=0&referral=search-result&referralSectionName=bookings), or [Wix Events & Tickets](https://www.wix.com/app-market/web-solution/events?appIndex=1&referral=search-result&referralSectionName=events) app from the App Market. ## Use cases - [Update checkout settings across multiple sites](invalid-url) ## Terminology - **Checkout**: The second stage of the eCommerce purchase flow: cart; checkout; order. A checkout holds information about items to be purchased, price and tax summaries, shipping and billing info, any applied discounts, and more. - **Policy**: Set of guidelines, rules, or principles established by an organization or authority to govern behavior, decision-making, and specific actions. @sdk_package_setup --- > Portal Navigation: > > - Append `.md` to any URL under `https://dev.wix.com/docs/` to get its markdown version. > - Pages are either content pages (article or reference text) or menu pages (a list of links to child pages). > - To get a menu page, truncate any URL to a parent path and append `.md` (e.g. `https://dev.wix.com/docs/sdk.md`, `https://dev.wix.com/docs/sdk/core-modules.md`). > - Top-level index of all portals: https://dev.wix.com/docs/llms.txt > - Full concatenated docs: https://dev.wix.com/docs/llms-full.txt ## Resource: Sample Use Cases and Flows ## Article: Sample Use Cases and Flows ## Article Link: https://dev.wix.com/docs/api-reference/business-solutions/e-commerce/purchase-flow/checkout/checkout-settings/sample-use-cases-and-flows.md ## Article Content: # Checkout Settings: Sample Use Cases & Flows This article presents a possible use case and a corresponding sample flow that you can support. It provides a useful starting point as you plan your implementation. ## Update checkout settings across all sites You can synchronize checkout settings across multiple sites. For example, if the return policies change on 1 site, and now the policies guarantee a 100-day item return, this change can also be reflected on other sites. To update the checkout policy settings across multiple sites: 1. Call [Get Checkout Settings](https://dev.wix.com/docs/rest/business-solutions/e-commerce/checkout-settings/get-checkout-settings.md) on the site where you updated the policy. 1. Extract the `checkoutPolicies.returnPolicy.content` field value. 1. Call [Update Checkout Settings](https://dev.wix.com/docs/rest/business-solutions/e-commerce/checkout-settings/update-checkout-settings.md) for other sites and pass the new policy to each. --- > Portal Navigation: > > - Append `.md` to any URL under `https://dev.wix.com/docs/` to get its markdown version. > - Pages are either content pages (article or reference text) or menu pages (a list of links to child pages). > - To get a menu page, truncate any URL to a parent path and append `.md` (e.g. `https://dev.wix.com/docs/sdk.md`, `https://dev.wix.com/docs/sdk/core-modules.md`). > - Top-level index of all portals: https://dev.wix.com/docs/llms.txt > - Full concatenated docs: https://dev.wix.com/docs/llms-full.txt ## Resource: Add to Cart ## Article: Add to Cart ## Article Link: https://dev.wix.com/docs/api-reference/business-solutions/e-commerce/purchase-flow/skills/add-to-cart.md ## Article Content: # RECIPE: Add Product to Cart ## When to use this recipe Any visitor request that boils down to "put product X (optionally size/color Y) into the cart". Examples: - "Add the red candle to my cart" - "Buy 2 of the cheapest sweater in size M" - "Add product `` to my cart" ## Inputs you need before STEP 4 | Input | How to get it | |---|---| | Visitor token | STEP 1 (`GenerateVisitorToken`, or reuse one already in the conversation) | | Product GUID (`catalogItemId`) | STEP 2 (`POST /stores/v3/products/query`) — skip if the user gave it | | Variant GUID (`options.variantId`) | STEP 3 (`GET /stores/v3/products/{id}` → pick from inlined `variantsInfo.variants[]`) — **only** if the user picked a size/color/etc. | | Quantity | from the user (default 1) | ## Decision tree — pick the shortest path - **User gave product GUID + variant GUID** → STEP 1 + STEP 4. - **User gave product GUID + picked options (size/color/etc.)** → STEP 1 + STEP 3 (`GET /products/{id}`) + STEP 4. - **User gave product name / "the X one"** → STEP 1 + STEP 2 + (STEP 3 if options) + STEP 4. - **User said "cheapest" / "any X"** → STEP 1 + STEP 2 (paginate all, sort client-side — see warning below) + (STEP 3 if options) + STEP 4. STEP 3 default = **`GET /stores/v3/products/{id}`** (variants inlined at `variantsInfo.variants[]`). Avoid `/query-variants` unless you're listing variants across multiple products. --- ## STEP 1: Get a visitor token If you do not already have a visitor token in the conversation context, call the `GenerateVisitorToken` tool to mint one. **Reuse the same token for every step** of this flow — re-running add-to-cart with the same token merges items into the same cart, it does not create a new cart. --- ## STEP 2: Find the product `POST https://www.wixapis.com/stores/v3/products/query` > **WARNING — price is not server-side sortable in V3.** No path under `actualPriceRange` is sortable. Do **not** send `"sort": [{"fieldName": "actualPriceRange.minValue.amount", ...}]` and do **not** send `"sort": [{"fieldName": "actualPriceRange.minValue", ...}]` — both return: > ``` > 400 { "message": "value Field 'actualPriceRange.minValue[.amount]' is not declared as sortable" } > ``` > For "cheapest" / price-sorted requests: fetch up to `paging.limit: 100` products and sort client-side on `product.actualPriceRange.minValue.amount` (the value is a **string** — parse to number before comparing). **List up to 100 products (use this for "cheapest" / "any" requests):** ```bash curl -X POST 'https://www.wixapis.com/stores/v3/products/query' \ -H 'Authorization: ' \ -H 'Content-Type: application/json' \ -d '{ "query": { "paging": { "limit": 100 } } }' ``` **Filter by name (use this when the user named a product):** ```bash curl -X POST 'https://www.wixapis.com/stores/v3/products/query' \ -H 'Authorization: ' \ -H 'Content-Type: application/json' \ -d '{ "query": { "filter": { "name": { "$startsWith": "Sculpted" } }, "paging": { "limit": 20 } } }' ``` ### What you need from the response ```jsonc { "products": [{ "id": "", // ← catalogItemId for STEP 4 "name": "Sculpted Candle", "actualPriceRange": { "minValue": { "amount": "12" }, // ← parse as number for client-side sort "maxValue": { "amount": "16" } }, "options": [{ // ← which option choices exist for this product "id": "", "name": "Size", "choicesSettings": { "choices": [ { "choiceId": "", "name": "Small", "key": "Small", "inStock": true }, { "choiceId": "", "name": "Large", "key": "Large", "inStock": true } ] } }], "variantSummary": { "variantCount": 2 } // ← if 0 or 1, you can usually skip STEP 3 }] } ``` - **`product.id`** is the product GUID. Pass it as `catalogItemId` in STEP 4. - **`options[].choicesSettings.choices[].choiceId`** is a *choice* ID (the "Large" choice itself). It is **not** the variant ID — do **not** put it in `options.variantId` in STEP 4. - **`variantSummary.variantCount`** tells you whether STEP 3 is needed: - `0` or `1` → the product has no variants; skip STEP 3 and add by `catalogItemId` only. - `>1` and the user picked a size/color/etc. → continue to STEP 3. --- ## STEP 3: Resolve the variant GUID Only needed when the product has variants (`variantCount > 1`) **and** the user specified an option (size, color, model…). ### Primary path: GET the single product with variants inlined `GET https://www.wixapis.com/stores/v3/products/` ```bash curl -X GET 'https://www.wixapis.com/stores/v3/products/' \ -H 'Authorization: ' ``` This is one call scoped to one product — strictly better than the alternative below for single-product resolution. The response inlines all variants at **`product.variantsInfo.variants[]`** with their IDs and option-choice mappings. #### What you need from the response ```jsonc { "product": { "id": "", "options": [{ // option definitions (Size, Color, …) "id": "", "name": "Size", "choicesSettings": { "choices": [ { "choiceId": "", "key": "Small", "name": "Small" }, { "choiceId": "", "key": "Large", "name": "Large" } ] } }], "variantsInfo": { "variants": [{ "id": "", // ← options.variantId for STEP 4 "choices": [{ "optionChoiceIds": { "optionId": "", "choiceId": "" // ← matches a choice from `options` above } }], "price": { "actualPrice": { "amount": "16" } }, "inventoryStatus": { "inStock": true } }] } } } ``` #### How to pick the right variant For each option the user picked (e.g. `Size = "Large"`): 1. In `product.options[]`, find the option with `name === "