Wix Studio: Working with the Code Panel
Note: The features and workflows listed below are only available in Wix Studio.
The Code panel is where you can write code to add custom functionality and interactions to your site. Use the Code panel to add frontend code and CSS styling directly with the built-in code editor, manage your collections, add code packages, and add custom apps or extensions. You can also use the panel to access the platforms, such as the Wix IDE or GitHub integration, for advanced coding features like backend web modules, data hooks, and http functions.
To begin coding, select the code icon  and click Start Coding.

Code Editor
The code editor is where you write and edit the code for your site. You can toggle between different code files in the Page Code and Public & Backend sections of the Code sidebar.
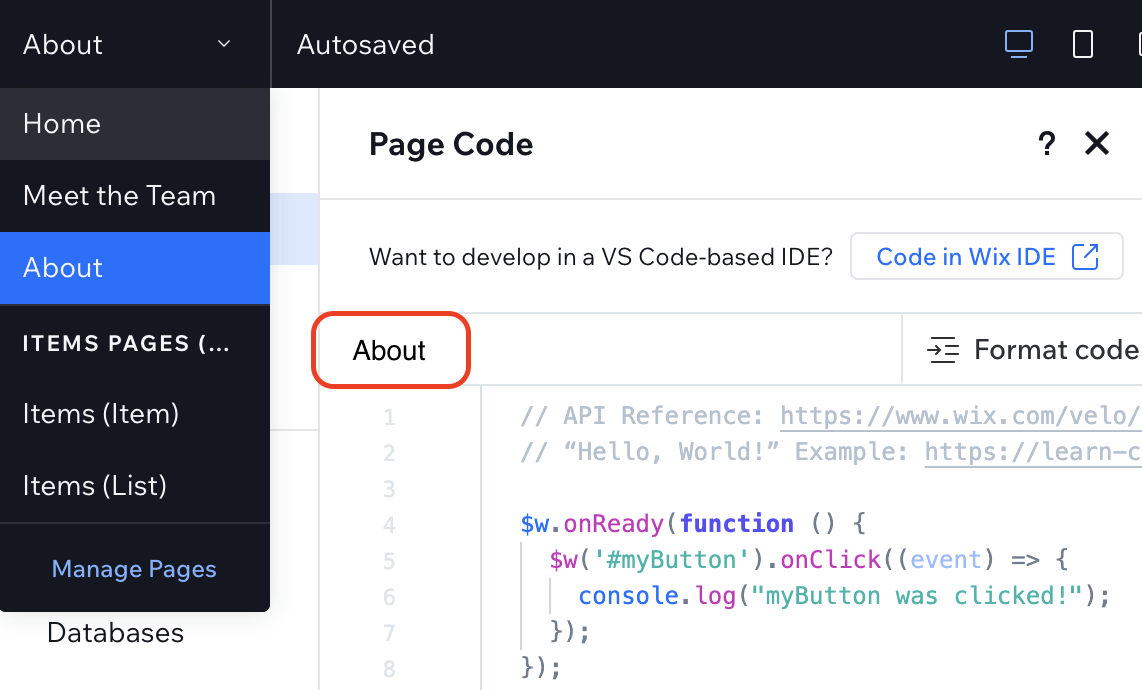
Page Code
The Page Code section opens the frontend code editor for every page on your site.

Toggle between your site pages in the Page Code section of the Code sidebar, in the Pages panel, or in the top bar to edit each page's frontend code (shown below). You can see which page you are currently editing at the top left of the code editor.
Public Code
The Public section is where you put JavaScript files that contain the code you want to use on any page in your site. For example, you may have a function that you need to use in multiple pages and you don't want to repeat it on each page. You can write that function once in a public file and then call it from any page, or from any backend or public file as needed. You can add public code in the Public & Backend section of the Code sidebar.
Backend Code
The Backend code section of the Code sidebar includes files that are not publicly accessible from your site. Since the backend code isn't visible, you can place sensitive information in your backend code that might otherwise be a security risk.
You can add backend code in the Public & Backend section of the Code sidebar, or with one of these options:
-
Wix IDE: Click Code in Wix IDE at the top of the code editor to get started.
-
GitHub integration: Navigate to the GitHub section to get started.
Note: Currently, you can't write code using both Wix IDE and GitHub integration.
Global Code
Run your global code in the masterPage.js file, located in the Page Code section of the Code sidebar. Use this file to add frontend code that runs on every page. If you want to add processing for your header or footer, this is the place to do it. This is also the place to handle elements that you want to put on every page, like a search bar or shopping cart icon for a store.
Note: Don't import functions from masterPage.js into the code files of individual pages. Doing this will cause the masterPage onReady function to run twice on that page. If there's a function that you want to use in the code for multiple pages but not every page, store it in a public.js file and import it from there. Learn more about the public files section in About the Wix IDE.
CSS
The CSS section, located under the Page Code section of the Code sidebar, allows you to add CSS styling that applies globally to every page of your site. Learn more about CSS editing.

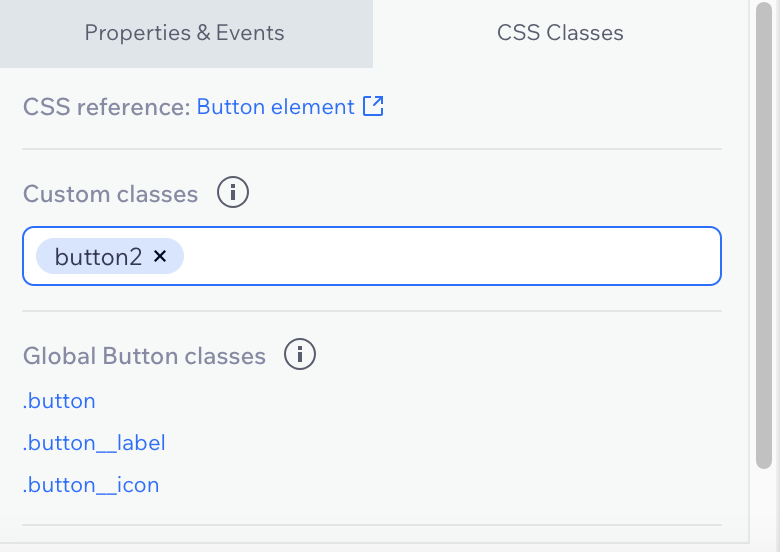
CSS Classes Panel
In addition to global CSS styling, you can add CSS styles to specific elements on your site with the CSS Classes panel. Select a specific element on your site and the CSS Classes panel displays the available Global classes for that element. You can also create your own custom class with this panel. See custom CSS classes to learn more.
Properties & Events Panel
Use the Properties & Events panel to work with selected elements, such as the header and footer, and datasets. With the Properties & Events panel you can change an element's ID and default values, or add an event handler that triggers when an action is taken on this element. Note that not all actions are available for every element.
Select an element on your site and click the Properties & Events tab in the Code panel:
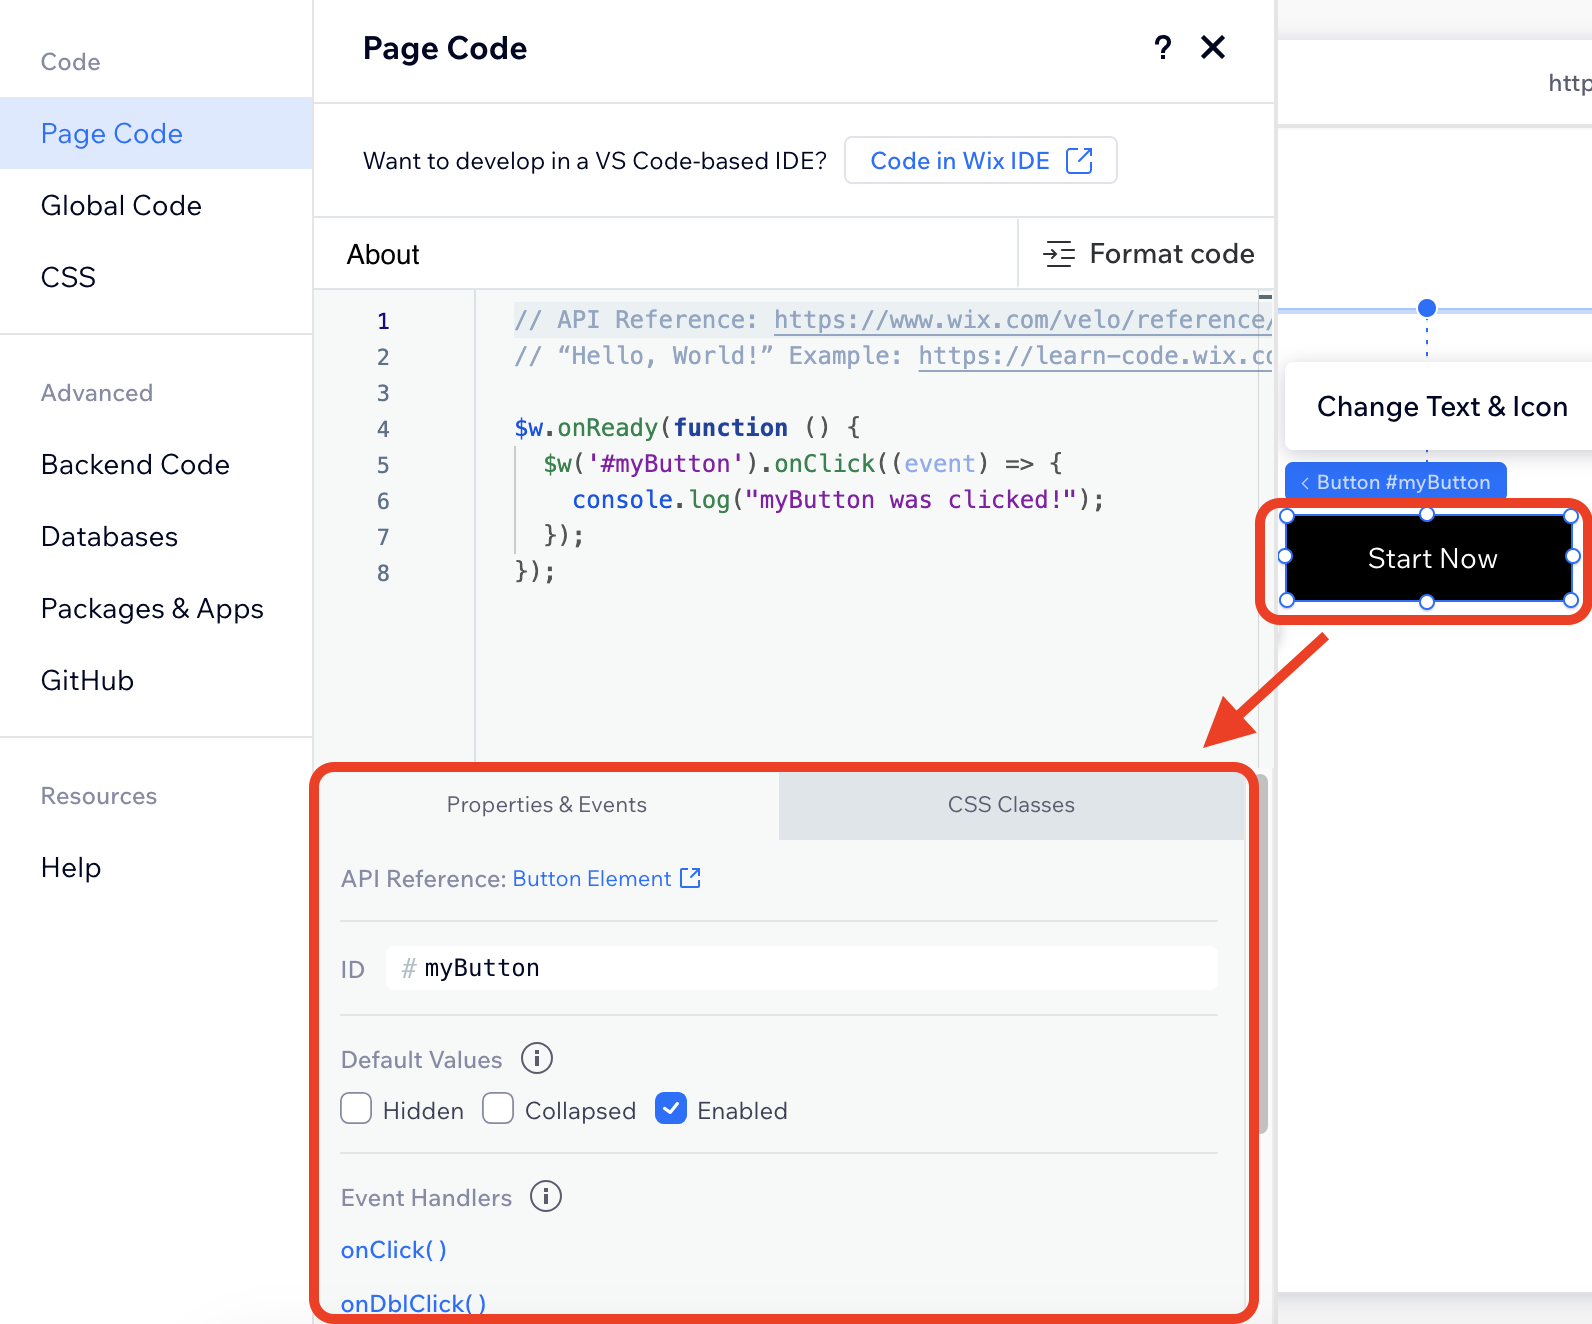
Available actions in the properties & events panel:
-
Change an element's ID: The ID field holds the name of the element you selected. Initially a default name is assigned to your element, but you can rename the element to something meaningful.

-
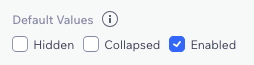
Change an element's default values: By default, an element on your page will have certain initial states. For example, a form might be hidden when your page is loaded, or a button might be disabled. You can change these default values.
-
Add an event handler: Click the event that you want as a trigger and the function for the event handler is added to your page code. Then add the code to run with this event.

Right-Click Menu
You can right-click anywhere in the code editor to open the right-click menu and display more options.

Format Code
You can easily format your code by clicking on the Format code button in the code editor toolbar. You can also format your code using the "Format code" keyboard shortcut(Alt + Shift + F) or by clicking Format in the right-click-menu.

Notes:
- See the full list of keyboard shortcuts you can use while editing your code.
- The "Search in all files" keyboard shortcut is not yet supported in Wix Studio.
Velo Syntax and Autocomplete
Selecting a Specific Element
Velo lets you code using standard JavaScript. It also has a specific syntax, or set of rules, for selecting an element on your page, which is:
If you know jQuery, this should look familiar. If you don't, here's what you need to know.
To select an element:
- Type $w.
- Enclose the ID of the element in parentheses and quotes.
- Add a hashtag before the element ID.
Note: You can use either single quotes or double quotes.
To make things even easier, Velo includes code completion. When you type the $, a pop-up window opens listing the elements on your page and the relevant Wix APIs.

Select the element you want. The reference to the element is added to your code with all the necessary syntax.
Tips:
- You can press Ctrl+space at any time to view the code completion pop-up.
- Element IDs are case sensitive. '#Button1' is not the same as '#button1'.
- If you add a new .js file in your page code, code completion lists the elements from the last page you were on.
You can find the ID of any element by hovering over it or selecting it. You can change the ID of any element in the Properties & Events panel.
Selecting Multiple Elements
If you want to select multiple elements by ID, use the same syntax as above to refer to your elements and separate each element with a comma, like this:
Selecting all Elements of a Specific Type
To select all the elements of a specific type, use the ID of the element type without the hashtag, like this:
The ID of the element type is the name of the element as it appears in the Velo API.
JavaScript Templates
In addition to autocomplete that relates directly to Velo, the Code panel also includes autocomplete for standard JavaScript templates and keywords. For example, if you type the word "for," the autocomplete list includes templates for "for statements" as well as the keyword "for." Each template includes a link to a standard JavaScript API where you can read more information.

When you select a JavaScript template, the full syntax for the template is added to the Code panel. For example, if you select the "for statement," the following template gets added to your code:
Working with Elements in the Code Editor
When a page loads in a browser, it's possible for the code on the page to run before the page finishes loading. This can cause an error if your code tries to reference an element in the page before it's loaded.
All the elements on your page should load before you try to access them using code. Make sure to include all code that uses the $w selector in the following function:
This is only required if you add code on your own using the $w selector. Any code you add to a function using the Properties & Events panel runs only after the page loads. Learn more about $w.onReady here.
All of the elements in the code editor have properties, methods, and event handlers that you can use to work with your elements and add functionality to your site.
Add a period after the $w selector to see the full list of these items.

Once you select and item, the necessary syntax is added to the end of your selector. You can move through the options using the up and down arrow keys to see a brief description of the functionality. Click the "Read more" link for more information.
Properties
Properties contain information about your elements. Some of these are read-only, while others have values you can also set.
For example, the text element has an isVisible property that returns whether the element is actually visible on-screen. This property is read-only. The text element also has the text property that contains the current text in the text element. This is a property you can both read and set.
Methods
Methods perform actions on your elements.
For example, the button element has a hide method that causes the button not to appear on your site.
Some methods have additional options that affect how the action occurs. For example, you can add animation to the hide method by specifying it in the parenthesis, like this:
Learn more about methods in the Velo API reference.
Event Handlers
Event handlers let your elements respond to user actions (events). When you add an event handler to an element, you need to specify an action when the event occurs. Do this in the callback function for your event.
For example, let's say you have a button that says "Take the Tour" on it. You want to add functionality so that when a visitor hovers over the button the text changes to "Let's Go!". You would add code to your site that looks like this:
Warnings and Errors
As you write your code in the Code panel, you may see warning and error indications in the form of a red or yellow wavy line beneath the relevant code. To view a warning or error message, hover over the underlined the code.
-
Warnings: A warning in your code is an informational message that brings your attention to some code that you might want to change. Warnings do not stop your code from running and can often be safely ignored. Warnings are indicated by a yellow wavy underline.

A common warning message occurs when you have an unnecessary 'else' after 'return'. This most often occurs when you use the following coding pattern:
CopyIf
someConditionis true, the function will return. That means that we don't need theelseto stop the code from executing whensomeConditionistrue.You can safely ignore this warning or change your code to the following pattern:
Copy -
Errors: An error in your code means that your code will not function properly. Depending on the type of error, your code will either not work as expected or not run at all. Make sure to fix all errors in your code before publishing your site for your site visitors to use. Errors are indicated by a red wavy underline.

Here are some common situations where you might find errors in your code:
-
Error message: "#text1" is not a valid selector (see image above)
If you change the ID of an element that you are using in some of your page code, the
$w()selections in your code will cause errors. For example, if you have a text element with the ID text1 and you change the ID to statusMessage, all instances where you selected the element using$w('#text1')will now be errors.
Note: you can use the Search and Replace functionality to fix this error throughout your code. -
Error message: 'import' and 'export' may only appear at the top level
When you import an API module, the
importstatement must appear at the top level of your code before the module is used. That means you cannot import the module inside a function as shown below. In general, it is recommended that you place allimportstatements on the first lines of your code, before any variable declarations and function definitions.
-
In certain cases, the error indication does not appear at the point of your actual mistake, but occurs on the first line on which your mistake causes an error. For example, if you leave out the closing curly brace (
}) in one of the functions of your page code, an error will most probably occur on whatever the next line of code happens to be. In the code shown below, a closing curly brace is missing from line 6, but the error does not occur until line 8.
-
Databases
The Databases section of the sidebar contains your database collections. These collections store your site's content and are managed in the Content Management System (CMS).
- Add a new collection by clicking the plus
 icon that appears when you hover over My Collections, and then clicking Create collection.
 - Manage an existing collection by clicking the More Actions
 icon that appears when you hover over a collection name. You can update a collection's permissions and privacy, add a new dynamic page based on a collection, remove a collection, or add and remove data hooks to a collection.
 - Connect external databases in External Databases. You can manage their content here like any other collection.
- When certain Wix Apps are added to your site, database collections are automatically added to your site and appear under Wix App Collections. Collections for each app are grouped together and are read-only. You can edit the collections in the relevant app manager in your Dashboard.
Note: You may need to save or publish the site and refresh your browser to view the Apps collections in the Database.
Packages & Apps
This section allows you to add complex functionality to your site with packages and apps.
Packages
You can use a code library that suits your needs and incorporate it into your own code. Each reusable library of code is known as a package. There are 2 types of pre-built packages that you can install in the Packages section of the sidebar - npm Packages and Velo Packages.
- Install a package by clicking the plus
 icon that appears when you hover over npm or Velo Packages, or click Install packages from npm and Install Velo Package.
 - Uninstall a package by hovering over the package you want to uninstall, click the More Actions
 icon, and select Uninstall.
Apps
You can create a custom app with Wix Blocks. Click the plus icon, and then Create New App to get started.
Custom Extensions
Custom extensions, also known as service plugins, allow you to add your own custom logic to out-of-the-box apps and to integrate services from 3rd party providers. Learn more about custom app extensions using service plugins.
GitHub Integration
In the GitHub section of the sidebar, you can connect your site to GitHub to write, test, and publish code locally on your computer for your Wix site. To get started, select Connect to GitHub. Learn more about GitHub integration.
Developer Tools
Your code will run in your published site or test site, but you may want to test your code before you publish to make sure it works as expected.
The Developer Tools section of the Code sidebar contains tools for:
- Monitoring your code's performance.
- Viewing logs.
- Connecting your site to Google Cloud Logs.
- Securing your code's secrets.
- Sending a triggered email.
You can test your code before you publish by previewing your site or creating a test site. The code runs the same in Preview Mode and Test Site Mode as it does in the published version. You may also want to debug your code before publishing to identify any potential issues.
Saving Versions of Your Code
When you save your site or your site is autosaved, the corresponding code is saved with that version of your site. If you go to the Site History and revert to a saved version of your site, the code that was saved with that version is restored as well.
Help
The Help section offers links to additional resources:
- Check out the API Reference to explore how to use APIs with your site and to learn basic concepts.
- Find examples of the functionality you need with video tutorials and code examples.
- Connect with Wix developers in Discord or the Velo Forum.
Last updated: 8 February 2026