Velo Tutorial: Using the Pricing Plans API for Pricing Plan Ordering and Payment
This article describes how you can use the Velo Pricing Plans API to customize how you offer pricing plans to your site's visitors. We're going to explain how we set up a sample site and the code we added to make it work.
Note: The terms popup and lightbox refer to the same element. While the editor and dashboard now refer to it as a popup, the API methods continue to use the term lightbox for backward compatibility. The documentation uses both terms accordingly.
The customization in this sample includes:
-
Working with dynamic pages and multiple collections.
-
Customizing the order and payment flow by adding popups.
-
Responding to the event of a plan being purchased.

Overview
In our site we added the following:
- The Pricing Plans app.
- When adding the Pricing Plans app, a Plans collection with a list of membership plans for sale was automatically added.
- A collection for adding more details to each plan, such as testimonials and images.
- A collection for tracking purchases.
- A Collection & Repeater page. The repeater displays plans from the Testimonials collection, which references the Plans collection. Visitors can click a See More button for more details about a plan.
- A Dynamic page. This page displays information from both the Plans collection and the Testimonials collection. Visitors can click a Buy Now button to purchase a plan.
- A popup that displays before processing with the purchase, and a different popup that displays after ordering a free plan.
- An event for logging successful purchases in a collection.
Then we added code to do the following:
- When a visitor clicks the See More button, the button's click event handler calls the
to()function to open the dynamic page. - When a visitor clicks the Buy Now button for a free plan, the button's click event handler calls the
createOnlineOrder()function to order the plan and opens a congratulations popup. - When a visitor clicks the Buy Now button for a plan that costs money, the button's click event handler opens a confirmation popup.
- When a visitor clicks Yes, the button's event handler calls the
createOnlineOrder()function to order the plan. - The function checks if the visitor is logged in, and if not, prompts for login.
- When the visitor is logged in, the function creates, and returns, a promise that resolves to an
orderobject. - A payment procedure is initiated using the ID from the
orderobject, causing a payment window to appear. - The visitor enters payment information and completes the transaction. This triggers the
onPlanPurchased()event, which receives aPlanPurchasedEventobject. - The function logs an event in a collection using data from the
PlanPurchasedEventobject.
Here are the resources we created for this example:

Note: This example demonstrates how, with Velo, we can customize the membership plan flow. We intentionally did not use the standard Plans & Pricing page that is automatically created when adding the Pricing Plans app.
Before You Start
Before you start working with Wix pricing plans in code, make sure you do the following:
- Set up Wix Payments on your site. We also recommend that you understand the typical payment process before proceeding.
- Add the Pricing Plans app to your site.
Step 1: Set up Collections
For this example, we added the Pricing Plans app to set up this collection:
- A PaidPlans/Plans collection, for membership plans.
We manually created these collections:
- A Testimonials collection, for each plan's testimonials and images.
- A PlanEvents collection, for logging each successful purchase.
Note: You may need to save/publish the site and refresh your browser to view collections.
The PaidPlans/Plans Collection
Adding the Wix Pricing Plans app to your site automatically creates the PaidPlans/Plans collection. This collection contains the basic fields necessary to work with pricing plans, such as the plan title, its price, its duration, its benefits, and so on. The Plans collection is read-only — plans can be created or modified on the Pricing Plans page in the site dashboard.
This is what some of the data in our Plans collection looks like.

The plan title is saved in the Name field. Then, a field called Slug is created with similar but unique values. We used the Slug field to link to other collections.
Additional Collections
You can create additional collections for additional plan details, such as testimonials and an image for each plan.
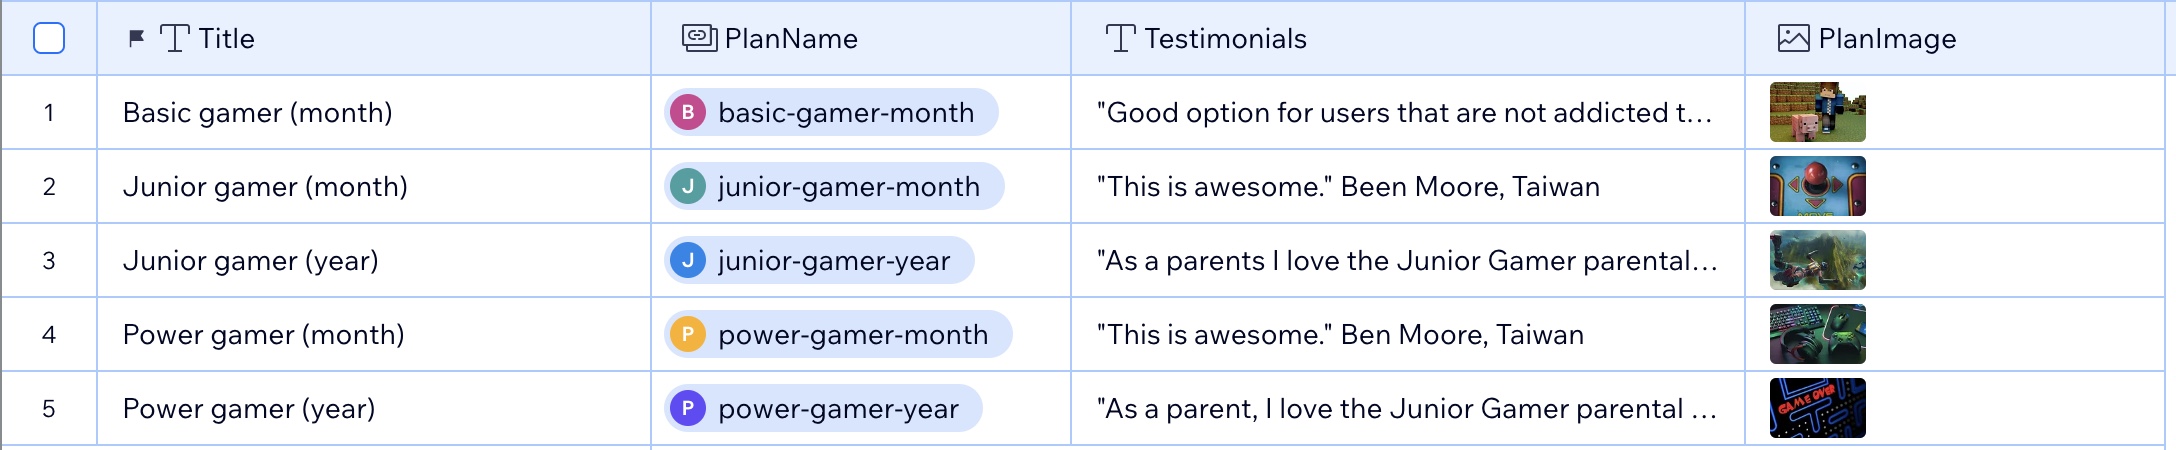
In our new Testimonials collection, we added a PlanName reference field that references the Slug field in our Plans collection. The reference field links the testimonials and plan images to the corresponding plan in the Plans collection.
This is what some of the data in our Testimonials collection looks like:
PlanEvents Collection
We created a collection to track successful purchases. We added a text field called Data to the collection.
We created code in an events.js page to insert the live data from the PlanPurchasedResult object into the Title and Data fields. This code is explained in detail in Step 4.
This is what some of the live data in our PlanEvents collection looks like, after we have made a few purchases.

Step 2: Set up the Collection & Repeater Page
We created a blank new page for displaying all the plans in our collection with a repeater and named it Collection & Repeater.
Design the Page
On the Collection & Repeater page, we added:
- A repeater to display the plans.
- Text and image elements in the repeater to display the name, price, and picture of each plan.
- A See More button in the repeater to display the selected plan using a dynamic page. (Instructions for creating the dynamic page are provided in Step 5.)
- A dataset connected to our Testimonials collection for connecting data in the collection to the repeater.
Because the Testimonials collection has a reference field to our PaidPlans/Plans collection, all the data we need is accessible with this one dataset.

Note: When you display data from a collection in a repeater, you must first connect the repeater to the dataset, and then connect each element in the repeater to the dataset.
Add Event Handlers
- In our page's onReady( ) function, we added an onClick event handler that will run when a See More button is clicked.
Code the Page
We added the following code to let the visitor select and view a specific plan.
Alternatively, we could have connected the click action for our See More button to PlanName: Plans (Slug) in our dataset.

Step 3: Customize the Purchase of a Plan
To demonstrate that we can customize the flow of a paid plan purchase, we will use the createOnlineOrder() function instead of the startOnlinePurchase() function.
- With
createOnlineOrder(), we can control and customize aspects of the order process. - With
startOnlinePurchase(), we use the standard paid plan functionality as provided with the Wix Paid Plans app. ThestartOnlinePurchase()function provides a standard payment flow that starts with ordering and automatically continues to payment. This gives you less opportunity to customize, but requires less coding and design.
As part of our customization, we added two popups to our site (to be used in Step 5).
- The Confirm popup displays information about the currently-selected plan, and provides buttons for continuing or canceling the purchase.
- The Congrats popup lets you know that you purchased a free plan.
In this step, we kept it simple. However, this is the opportunity for you to really customize the process as you like.

Step 4: Set up an Event Handler in the Backend to Log Purchases
When a plan is successfully purchased or ordered, an onPlanPurchased event is triggered.
In our example, when this event is fired, we log the details about the purchase by inserting the information in our PlanEvents collection.
Here is sample backend code that we put in an events.js file.
Step 5: Customize your Dynamic Page
Next, we created a new dynamic page for displaying each selected plan. We did this by going to our Plans collection in the Databases section of the Code sidebar and clicking Add Blank Dynamic Page. (If you use another method you will need to manually add the dataset for the PaidPlans/Plans collection.)

After we created the dynamic page, we customized its URL to end in "gameplans/{Slug}".
Design the Page
On this page, we added:
-
Text and image elements to display the details of each plan from the PaidPlans/Plans collection and the Testimonials collection.
-
A dataset for the Testimonials collection.
The Testimonials collection is filtered by planName so that any data displayed from the Testimonials collection matches the currently-displayed plan from the Plans collection.
-
A Buy Now button to order the plan.

Add Event Handlers
- In the Properties & Events panel of the repeater, we added an
onItemReadyevent handler that will run when the repeater is ready to be loaded. - In the Properties & Events panel of the
buyNowbutton, we added anonClickevent handler that will run when the Buy Now button is clicked.

Code the Page
The code on our dynamic page consists of five parts:
-
Imports for the APIs used in the rest of the code.
-
An
onReady()event handler for making sure all page elements are available. -
Retrieval of the current plan's data from the Plans collection in a
currentPlanObjectobject. -
Check if the visitor is logged in. If necessary, the site prompts the visitor to log in.
-
A function for processing the order of free plans and the purchase of plans that cost money.
Let's take a look at the code one piece at a time. At the end of this article, you can see the code in its entirety.
The Imports
We used the following APIs:
wix-members-frontend- For getting information about the current member and for logging members in and out.wix-window-frontend- For popups.wix-pricing-plans-frontend- For ordering and purchasing pricing plans.wix-pay-frontend- For processing payments.
So our importing code looks like this:
onReady() Event Handler
In this example, there is no special setup we need to do for our elements. So we used the standard onReady() event handler.
getCurrentItem() Function
Next, we retrieved the current plan's data from the PaidPlans\Plans collection using the Wix Dataset getCurrentItem() function with the dynamic dataset on the page. We stored the information in a currentPlanObject object variable. Now we have access to the information we need about the plan to continue processing the order or purchase.
If you copy the code snippet below, make sure to change the dataset name to match your own.
onClick() Event Handler
Most of the logic in our page is contained in the onClick() event handler of the buyNow button.
If you copy the code snippet below, make sure to change the button name to match your own.
Check if Logged In
We don't want to sell plans to visitors that are not logged in. So we used authentication.loggedIn() to see if the visitor is logged in.
- If the visitor is not logged in, we used
authentication.promptLogin()function to ask the visitor to log in. Then we can call a function that we namedprocessPlan()to continue. - If the visitor is already logged in, we can immediately call the
processPlan()function.
Process the Order
Now let's look at the function we created, processPlan(), to get payment for the plan.
We chose to use the createOnlineOrder() function for processing because we wanted to control and customize the entire order/purchase flow. When orderPlan() is called, and a plan is successfully purchased or ordered, an onPlanPurchased event is triggered.
This is where you can enter your own code to customize your own order/purchase flow.
In our example, we customized the flow by:
- If the plan costs money, asking for member confirmation using the
Confirmpopup. If the member confirms, we callcreateOnlineOrder()and then process payment with the Wix Pay FrontendstartPaymentfunction. - If the plan is free, using the
Congratspopup to let the member know the plan order is successful.
The order details are contained in the orderObject object.
When copying this snippet, make sure to change the names of your popups to match your own.
All the Code
The code in its entirety looks like this:
Tip: Want to use the standard, "out of the box" Wix flow for letting visitors purchase a plan?
- Use the
startOnlinePurchase()function in the code instead of thecreateOnlineOrder()function. - No need to call
wixPayFrontend. ThestartOnlinePurchase( )function does that for you.
API List
The following APIs are used in the code in this article. To learn more, see the API Reference.
- wix-pricing-plans-frontend - For ordering and purchasing pricing plans.
- wix-pay-frontend - For payments.
- wix-members-frontend - Gets information about the current member and for logging members in and out.
- wix-data - For inserting into collections.
- wix-location-frontend - For navigation.
Last updated: 30 December 2025