Set Up a Triggered Email
Set up a triggered email to automatically send customized emails for specific events on your site.
Step 1 | Navigate to the Triggered Emails dashboard page
To access the Triggered Emails dashboard page, you can either:
- Select Developer Tools from the code sidebar and click Triggered Emails.
- Select Developer Tools from your site’s dashboard and select Triggered Emails.
Step 2 | Create an email
Use the editor to create and design a new email:
- On your Triggered Emails dashboard page, click + New Campaign to create a new email, or click the More Actions
 icon and select Duplicate to duplicate an existing triggered email.
 - Design your email in the editor.
Step 3 (Optional) | Add variables to personalize text
Add variables to personalize the text of your email. The variable is a placeholder that will be replaced by a value you define in the code.
- With a text element selected in the editor, click + Add Variable:
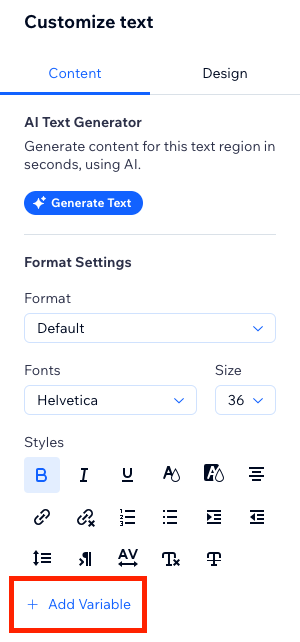
- Fill out the fields in the popup:
- Variable name: Name the variable something meaningful so it’s easy to identify later. For example,
newSubscriberName. - Fallback value: A replacement text that displays here in case you’re missing that specific piece of data. You can apply fallback values in the body of an email, but not in the subject line. For example, with the fallback value
there, in a case where you don't have the new subscriber's name the email will fallback to "Hey there,".
- Click Add.
Step 4 | Test, save, or publish the email
Once your email is designed you have the option at the top of the editor to preview, save, or publish the triggered email.

- Click Preview & Test to send yourself the email to see how it will appear in an inbox and to test any links you included in the email.
- Click Save as Draft to save your email as a work-in-progress and returns you to the Triggered Emails dashboard page. Draft emails are not sent when the triggering event occurs.
- Click Save & Continue. If this is the first time ever you're creating a campaign, you'll be asked to fill out sender details. That must be completed before publishing.
Step 5 | Add sender details
Sender details are required to send triggered emails. These details contain the information that appears as the sender’s name and email address when an email from your site is received:
- Sender’s name: This is the name that displays in the recipient's inbox.
- Reply-to email: This is the email address that will populate as the send-to address in your reader's email when they click Reply.
- Emails sent with a reply-to email with a public domain, such as
@gmail.comor@yahoo.com, tend to land in the spam or promotions category. It's better to use an email address with an authenticated domain, such asyou@yourbusiness.com. - If you use a public domain address, Wix redirects your email through our own authenticated address
@wixemails.comor, for free users,@wixsitemail.com. When someone replies to your email, their new email will automatically populate the send field with the reply-to email. - You may be asked to confirm your reply-to email. You'll receive an email in your inbox with those instructions.
Click Save to continue.
Step 6 | Get the code snippet
Before redirecting back to the Triggered Emails dashboard page you have the opportunity to make changes to the email ID and the audience who will receive the email:
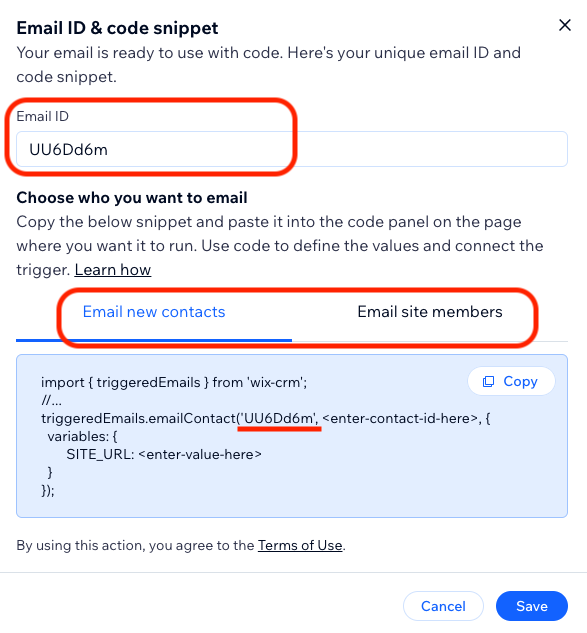
- Update the unique Email ID to one that’s more friendly to work with. For example,
newsletter_signup. This email ID is used in the code snippet. - Click Email new contacts or Email site members to display the appropriate snippet.
- Copy the code snippet now or access it later from the Triggered Emails dashboard page.
- Click Save.
Step 7 | Add the code snippet to an event on your site
Take the code snippet you copied from the previous window or hover over a triggered email in the Triggered Emails dashboard page and click the View code snippet  icon and add the snippet to your code.
See also
Last updated: 1 September 2025