Velo: Integrate Your AWS Databases with Your Wix Site

Note: This feature is only available for sites with certain premium plans. If you need to use this feature, you can upgrade your site. Learn more about premium plans.

Wix Data gives you powerful data storage and retrieval capabilities and the ability to create and maintain your own data collections. But what if you have your own database already, or want to host your data on a relational database?

With the external database connections adaptor, you can use your AWS databases and fully integrate it into your Wix site. You can use any of the wix-data and wix-dataset APIs with External Database Collections, as well as connect repeaters, tables, and other page elements to your data.

If you want to do this with Google Cloud Platform, see Integrate your Google Cloud Platform Databases with your Wix Site. For Microsoft Azure, see Integrate your Azure Database with your Wix Site.

Overview

This tutorial walks you through setting up a database on Amazon Web Services (AWS) and connecting it to your Wix site.

Supported Databases

We currently support the following AWS databases:

If you don't already have your own database on AWS, we'll help you create one.

Here's what's involved:

  1. Set up a new project on Amazon Web Services.
  2. Create one of the supported databases, if you don't already have one.
  3. Create a new collection (table) in your database.
  4. Create secrets to securely store your database credentials and your Wix Secret Key.
  5. Create and deploy a new App Runner service to host the Wix database adaptor.
  6. Connect your Wix site to your database.

This tutorial uses a container image with all the functionality needed to interface between your database and your Wix site. If you want to learn more, adapt or expand the adaptor to your needs, see the SPI specifications and the corresponding implementation for creating external database connection adaptors of your own.

Amazon Web Services

This tutorial assumes a bit of knowledge about Amazon Web Services. If you've never worked with AWS, see this guide and click the Create a Free Account button.

Create a Database Instance

This part of the tutorial walks you through setting up a supported AWS database instance and adding a table. If you already have your own database on AWS, you can skip this section.

Important
If you want read-write access to your database tables, they must contain the 4 columns described in the Create a New Database Table section.

Set Up a MySql Database Instance

Show me how
  1. Open the RDS Management Console, then click Create database.

  2. Select Easy create.

  3. Select MySQL as the Engine type.

  4. Select Free tier.

  5. Enter a DB instance identifier, Master username, and a Master password.

  6. Scroll to the bottom of the page and click Create database. The database creation may take a few minutes. Wait until the status is available.

    Now we'll make your database publicly accessible.

  7. Click the DB identifier.

  8. Click Modify, then scroll to the Connectivity section.

  9. Click Additional configuration.

  10. Select Publicly Accessible and click Continue at the bottom of the page.

  11. Select Apply immediately. Then click Modify DB instance.

    Now we'll set your "VPC security group" to allow incoming requests from any source on port 3306.

  12. Click the DB identifier, then click on the name of yourVPC security groups.

  13. Click Actions, and then select Edit inbound rules.

  14. Click Add rule. Select MYSQL/Aurora as the Type, Custom as the Source, then enter and select 0.0.0.0/0 in the search bar.

  15. Click Add rule again, select MYSQL/Aurora as the Type , Custom as the Source, then enter and select ::/0 in the search bar.

  16. Click Save rules.

  17. Return to the RDS Databases console, click on your DB identifier, then copy and save the Endpoint URL for later use.

You now have a database instance called mysql-db-1.

Set Up a Postgres Database Instance

Show me how
  1. Open the RDS Management Console, then click Create database.

  2. Select Easy create.

  3. Select PostgreSQL as your engine type. Under Engine Version, select version 14.12-R2 or lower. Wix doesn't support Postgres versions higher than 14.

  4. Select the Free tier template.

  5. Enter a DB instance identifier, Master username, and a Master password.

  6. Scroll to the bottom of the page and click Create database.The database creation may take a few minutes. Wait until the status is available.

    Now we'll make your database publicly accessible.

  7. Click on your DB identifier.

  8. Click Modify, then scroll down to the Connectivity section.

  9. Open the Additional configurationdrop down.

  10. Select Publicly Accessible, then click Continue at the bottom of the page.

  11. Select Apply immediately, then click Modify DB instance.

    Now we'll set your "VPC security group" to allow incoming requests from any source on port 5432.

  12. Click your DB identifier, then click on the name of your VPC security groups.

  13. Click Actions, and select Edit inbound rules.

    Add the following rules if they don't already exist.

  14. Click Add rule, select PostgreSQL as the Type, Custom as the Source, then enter and select 0.0.0.0/0 in the search bar.

  15. Click Add rule again, select PostgreSQL as the Type, Custom as the Source, then enter and select ::/0 in the search bar.

  16. Click Save rules.

  17. Return to the RDS Databases page and click on your DB identifier. Copy the Endpoint URL and save it for later use.

You now have a database instance called rds-postgres-tutorial.

Set Up an Aurora MySQL Database Instance

Show me how
  1. Open the RDS Management Console, then click Create database.

  2. Select Easy create.

  3. Select Aurora (MySQL Compatible) as your engine type.

  4. Under Templates, select the Dev/Test template.

  5. Enter a DB instance identifier, Master username, and a Master password.

  6. Click Create Database.

    The database creation might take a few minutes.

  7. From the Databases console, click on your DB identifier instance.

  8. Click Modify.

  9. Under Instance configuration, select Burstable classes.

    Choose db.t3.small from the drop down.

  10. Scroll to the Connectivity section. Click Additional configuration.

  11. Select Publicly Accessible, then click Continue at the bottom of the page.

  12. Select Apply immediately, then click Modify DB instance.

    Now we'll set your "VPC security group" to allow incoming requests from any source on port 3306.

  13. Click on your DB identifier instance.Then click on your VPC security groups.

  14. Click Actions, and select Edit inbound rules.

    Add the following rules if they don't already exist:

  15. Click Add rule. Select MYSQL/Aurora as the Type , Custom as the Source, then enter and select 0.0.0.0/0 in the search bar.

  16. Click Add rule again, select MYSQL/Aurora as the Type , Custom as the Source, then enter and select ::/0 in the search bar.

  17. Click Save rules.

  18. Return to the RDS Databases page and click on your DB identifier instance. Copy the Endpoint URL of the Writer instance and save it for later use.

You now have a database instance called rds-aurora-sql-adaptor-tutorial.

Set Up an Aurora Postgres Database Instance

Show me how
  1. Open the RDS Management Console, then click Create database.

  2. Select Easy create.

  3. Select Aurora (PostgreSQL Compatible) as your engine type.

  4. Under Templates, select the Dev/Test template.

  5. Enter a DB instance identifier, Master username, and a Master password.

  6. Click Create Database.

    The database creation might take a few minutes.

  7. From the Databases console, click on your DB identifier instance.

  8. Click Modify.

  9. Under Instance configuration, select Burstable classes.

  10. Choose db.t3.small from the drop down.

  11. Scroll to the Connectivity section. Click Additional configuration.

  12. Select Publicly Accessible, then click Continue at the bottom of the page.

  13. Select Apply immediately, then click Modify DB instance.

    Now we'll set your "VPC security group" to allow incoming requests from any source on port 5432.

  14. After creation, click the DB identifier instance.

  15. Click the name of your VPC security groups.

  16. Click Actions, and select Edit inbound rules.

    Add the following rules if they don't already exist.

  17. Click Add rule, select PostgreSQL as the Type, Custom as the Source, then enter and select 0.0.0.0/0 in the search bar.

  18. Click Add rule again, select PostgreSQL as the Type, Custom as the Source, then enter and select ::/0 in the search bar.

  19. Click Save rules.

  20. Return to the RDS Databases page and click on your DB identifier's Writer instance. Copy the Endpoint URL of the Writer instance and save it for later use.

You now have a database instance called rds-aurora-postgresql-adaptor-tutorial.

Create a New Database Table

This section walks you through creating a new database and table for MySQL, Postgres, and Aurora databases. If you know what you're doing, or you already have tables and don't want write access you can skip this section.

Prerequisites for Read-Write Access to Your Database Table:
If you want your table to be read-write on your Wix site, it must contain the following columns:

  • _id
  • _createdDate
  • _updatedDate
  • _owner

Tables without these columns will be read-only in your Wix site.

Create a New MySQL Table

Show me how
  1. Open an AWS CloudShell.

  2. At the command prompt, type the following command and enter your password when prompted.

    Copy
    1

    Replace the endpoint mysql-tutorial.tutorialjwp.us-west-2.rds.amazonaws.com with the endpoint from your database we copied earlier. Make sure the username matches the one used to create your database.

  3. Create a new database called mysqlTutorial using the following command:

    Copy
    1
  4. Create a new table called contacts as follows:

    Copy
    1

You now have a new database called mysqlTutorial with a table called contacts.

Create a New PostgreSQL Table

Show me how
  1. Open an AWS CloudShell.

  2. Install pqsl client using the following command:

    Copy
    1
  3. Enter the following command at the prompt and enter your password when prompted.

    Use your database endpoint, username, and name in the designated places in the prompt.

    Copy
    1

    To find your database name, navigate to your databases summary and click Configuration.

    If you do not have a database name, use the default database name postgres.

  4. Create a new database called postgresTutorial.

    Copy
    1
  5. Create a new table called contacts as follows:

    Copy
    1

Create a New Aurora MySQL Table

Show me how
  1. Open an AWS CloudShell.

  2. At the command prompt, type the following command and enter your password when prompted.

    Copy
    1

    Replace the endpoint mysql-tutorial.tutorialjwp.us-west-2.rds.amazonaws.com with the instance cluster endpoint that we copied earlier. Make sure the username matches the one you used to create your database.

  3. Create a new database using the following command. We'll use auroraMysqlTutorial as the database name.

    Copy
    1
  4. Create a new table called contacts as follows:

    Copy
    1

You now have a new database called auroraMysqlTutorial with a table called contacts.

Create a New Aurora Postgres Table

Show me how
  1. Open an AWS CloudShell.

  2. Install pqsl client using the following command:

    Copy
    1
  3. Enter the following command at the prompt and enter your password when prompted.

    Use your database endpoint, username, and name in the designated places in the prompt.

    Copy
    1

    To find your database name, navigate to your databases summary and click Configuration.

    If you do not have a database name, use the default database name postgres.

  4. Create a new database called auroraPostgresTutorial.

    Copy
    1
  5. Create a new table called contacts as follows:

    Copy
    1

Configure Secrets and Deploy the Service

An App Runner service is required to run the adaptor and make it accessible to your Wix site.

To deploy the adaptor as service, we need to do the following:

  1. Use the AWS Secrets Manager to securely store your database credentials.

  2. Create an App Runner Service to run the container.

The external database adaptor requires you to set some environment variables. Some of these variables, like the DB credentials, are sensitive and should not be visible. Use the AWS Secrets Manager to store and access these variables securely.

Create a New Secret for RDS Databases

For RDS databases, you need to store 5 secret values:

  • USERNAME The username used to connect to your database instance.

  • PASSWORD The password used to connect to your database instance.

  • DB The name of the database to connect to. For example, we previously created a database for the mysql-db-1 instance called mysqlTutorial.

  • SECRET_KEY A secret key used to connect your Wix site to the adaptor. To create a level of authentication between your site and the adaptor, each request your site sends to the adaptor contains this value in the payload.

  • PERMISSIONS (optional) A stringified JSON object that defines the read and write permissions for the tables in your database. It's important to note the following about setting permissions:

    • If you don't set permissions, they default to admin. With admin permissions, only site admins can read or write to the external database from a Wix site. API calls or CMS connections to the database don't work for anyone who isn't a site admin. This means site code that communicates with the external database might not work for site visitors.
    • When setting up permissions, make sure you use the ID of the table you want to read and write to, and not the database ID.

    Note: Customizing permissions for external databases is currently a developer preview feature, and may change. Changes to permissions settings are not reflected in the Wix Editor.

Learn more about configuring database permissions

You can use the PERMISSIONS secret to customize the permission settings for each table in a database. The JSON object contains one key, collectionPermissions, whose value is an array of objects. Each object in this array contains the permissions settings for one of the collections in the database, using the following parameters:

  • id: The collection ID.
  • read: An array of strings representing which roles can read from the collection. Options: 'Admin', 'Member', 'Visitor'
  • write: An array of strings representing which roles can write to the collection. Options: 'Admin', 'Member', 'Visitor'

Example PERMISSIONS value:

Copy
1

Note that you need to store the PERMISSIONS JSON object as a string. To do this, first write the object as usual and use a tool such as your browser's developer tools console to stringify it.

Note When you store a new secret and select Credentials for Amazon RDS database, the Secrets Manager automatically stores the USERNAME, PASSWORD, and other connection information for you. You will need to manually add the SECRET_KEY, DB, and PERMISSIONS (optional) values as shown in the steps below.

Show me how
  1. Go to the AWS Secrets Manager and click Store a new secret.

  2. Select Credentials for RDS database and enter the User name and Password for your database instance.

  3. Select your DB instance from the list and click Next.

  4. Enter a secret name Secret name field. We'll use secret_tutorial.

    Click Next.

    The secret name is used in the following section when configuring the environment variables for the App Runner service.

  5. Check that Automatic rotation toggle is off and click Next.

  6. On the following page, click Store.

  7. Click the secret that you created on the Secrets page.

  8. Click Retrieve secret value.

  9. Click Edit.

  10. Click Add row to add additional key/value pairs as follows:

    • SECRET_KEY / myBigSecret or your own SECRET_KEY value.
    • DB / mysqlTutorial or the name of your database.
    • PERMISSIONS (optional) / the stringified JSON representing the permissions settings for the tables in your database.
  11. Click Save.

Grant Roles & Permissions to the Instance Role

In the section below we create a new role for the AppRunner instance so that it can read the secrets we created.

Create a New Role for an RDS Instance

Show me how
  1. Open the IAM Manger Console and click Roles in the left panel.

  2. Click Create role.

  3. For Select trusted entity, choose Custom trust policy and paste the following custom trust policy. Click Next.

    Copy
    1
  4. In the Add permissions panel, search for SecretsManagerReadWrite and AmazonRDSDataFullAccess,then select the checkbox for each.

  5. After you select both permissions, click Next.

  6. In the Name, review, and create section, set the Role name. We recommend that you set the role name to match the AppRunner instance name so that you can easily identify which account is used by which instance. We named ours velo-db-adaptor.Here you can also verify the trusted entities and permissions we added in the previous steps. They should look something like this:

  7. Click Create role.

Create an App Runner Service

Now we'll create the service that will run the adaptor and make it available to your Wix site.

  1. From the AWS Management Console, under Compute, click AWS App Runner.

  2. Click Create Service.

  3. Select Container registry, Amazon ECR Public, and Manual.

  4. Enter public.ecr.aws/p2z5s3h8/wix-velo/velo-external-db:latest in the Container image URI field and click Next.

  5. Enter a Service name.We'll use velo-external-db-adaptor.

  6. Click Add environment variable to add the following additional key/value pairs:

    SourceEnvironment variable nameEnvironment variable value
    Plain textCLOUD_VENDORAll databases: aws
    Plain textTYPEMySQL database: mysql
    PostgreSQL database: postgres
    Aurora_mysql:mysql
    Aurora_postgresql:postgres
    Plain textSECRET_NAMEAll databases:
    The secret you created for your database. Ours is tutorial_secret

    Here is an example of how your environment variables should look for MySQL:

  7. Scroll down to the Security section. In the dropdown, select the role you created in Grant Roles & Permissions to the Instance Role section. Then click Next.

  1. Scroll down and click Create and deploy. Creating the service will take a few minutes.

  2. When the status changes to Running, click the Default domain URL to test the service.

    The following page displays DB Config Status and Connection Status in green. If you added a PERMISSIONS secret, the Permissions Config Status is also green. If you didn't, it's yellow.

    If one of the statuses is red, check the configuration, secret values, and environment variables. Make any necessary changes and redeploy the service.

Test Your Service

You can test that your service is working by making a quick request using Curl.

Use the Curl command below, replacing the URL with your URL from Step 10 above, and replacing thesecretKey value with your secret.

Copy
1

The output provides a list of tables and their columns from your database. If you have python installed, you can pipe the output to python -m json.tool and it will give you nicely formatted JSON.

The formatted output containing a list of tables and their columns:

Copy
1

Connect to Your Wix Site

Now that we have a database and an adaptor service, we are ready to add the database as an external collection on our Wix site.

Note: You can only add external collections to your site if you have a premium plan.

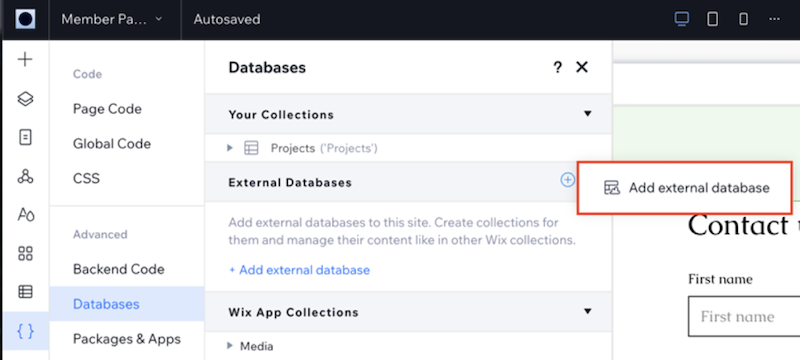
  1. Go to the Databases section of the Code sidebar (Wix Editor) or the Code sidebar (Wix Studio).

  2. Click the icon next to External Databases and select Add external database.
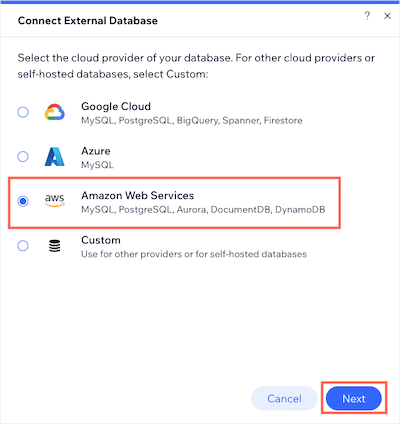
  3. Choose Amazon Web Services as the provider of the external collection being added, then click Next.
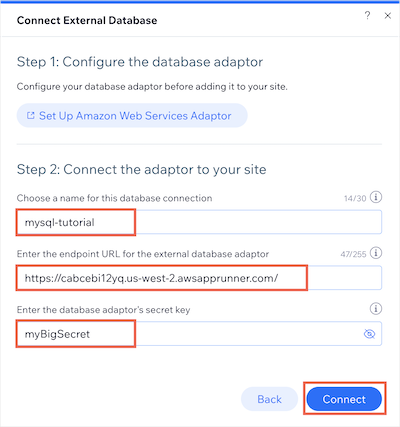
  4. Enter a name for your external collection's namespace.

  5. Copy and paste your adaptor service's URL into the endpoint URL field.

  6. Enter your database adaptor's secret key.

  7. Click Connect.

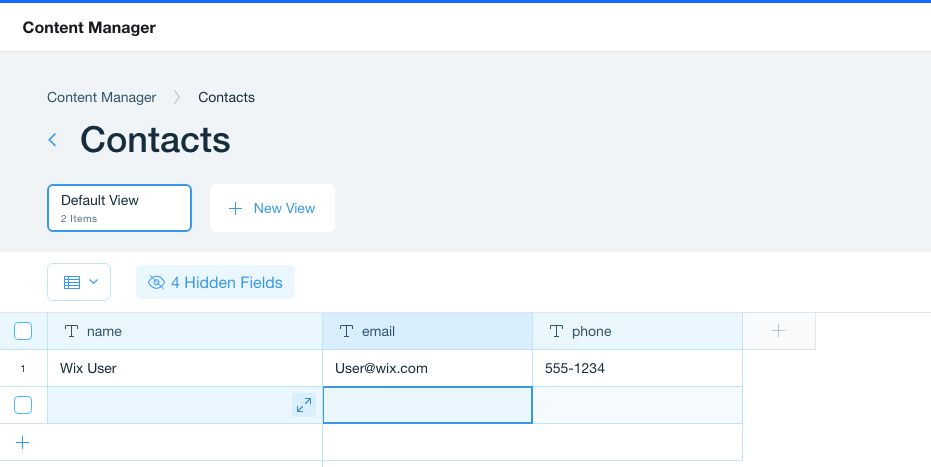
The Content Management System (CMS) displays the tables. If your table contains the _id, _createdDate, _updatedDate, and _owner fields, you can add data to the table directly from the CMS.
Was this helpful?
Yes
No