Add a Custom Trigger
Custom triggers give you the ability to run an automation from anywhere in your site code. This article explains how to create a custom trigger and use the Custom Trigger API to run your automation.
Step 1 | Install the Automations SDK package
If you're working in the editor or Wix IDE:
-
Wix Studio: In the code panel on the left of the site editor, go to Code
> Packages & Apps.
Wix Editor: Make sure Dev Mode is enabled. Then, in the code sidebar on the left, go to Packages & Apps
.
-
Under npm, click + Install packages from npm.
-
Search for and install the
@wix/automationspackage.
-
Repeat these steps to install the
@wix/essentialspackage.
If you're working in your local IDE:
-
Install the necessary packages on your command line:
Copy
Now that you’ve installed the @wix/automations package, you’re able to use the Custom Trigger API in your site code. Before you write any code, however, you need to create an automation that uses the Velo code trigger.
Step 2 | Create an automation with the Velo code trigger
To create a new automation:
-
Go to the Automations page in your site dashboard.
-
Click + New Automation > + Start from Scratch to open the builder. Give your new automation a title.
-
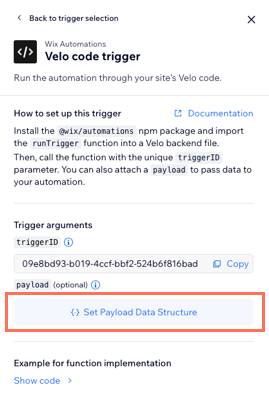
In the left menu, from the list of available triggers, select Velo code trigger.
Once you select the trigger, the left panel displays instructions on how to work with the trigger, as well as the trigger ID and the payload. The bottom part of the panel also displays sample code that you can copy.
Define the payload structure (optional)
You have the option to define the trigger payload schema by inputting sample data. Wix provides you with default sample data, which you can choose to keep or replace with your own data.
To define a payload schema for the trigger:
-
In the Velo code trigger panel, click {..} Set Payload Data Structure.
-
Edit the displayed JSON data as necessary, then click Preview Structure >. A preview of your payload schema opens.

-
Optionally, click Mark Contact ID to mark one of the UUIDs as a contact ID.

Only fields in proper UUID format appear on the list. You may only select one field to be a contact ID. Click Save to exit the Mark Contact ID modal.
-
When you’re satisfied with your payload schema structure, click Save Structure. You can return to edit the structure in the builder at any time.
Copy code and complete automation setup
Whether you define a payload or not, Wix provides you with the trigger ID, which you need to run your automation, as well as some example code.
-
Copy the trigger ID to use for later in your site code. At the bottom of the trigger configuration panel, click Show code >.

The trigger setup provides you with some sample code. Copy this code for use as a starting point in your own code.
-
Click Apply to save your trigger setup.
-
Select and configure at least one action as part of your automation, then activate the automation.
Now that you’ve configured your automation, you can write the code to run it for any event.
Step 3 | Implement Run Trigger in site code
In order to implement Run Trigger, you need to define a web method in the backend that calls the method. Then you can export that web method to other code files for use.
-
If you’re working in the editor, create a new web module in the Backend & Public > Backend section of the code panel. If you’re working in the Wix IDE or locally, add the file under
src/backend. -
In the web module, paste the code you copied from the automation setup, so that your file looks like this:
CopyLet’s break down the important lines in this code:
Lines 1-3. Import necessary packages, including the
@wix/automationspackage that contains the Run Trigger functionality, and the@wix/essentialspackage that provides auth functionality.Line 5. Create the web method to export to the frontend.
Line 8. Elevate Run Trigger so it runs with the correct permissions.
Lines 11-14. Call the elevated method. In place of
triggerId, enter the trigger ID you copied from your automation. If you defined a payload schema for your trigger, pass thepayloadargument as well. -
Export your web method to another file, such as the frontend code for a site page. Add this line to the top of the file you want to import the method into:
Copy -
Call the method in the file code where necessary. To give a simple example, let’s say you add a button element to your site page, and you want to run the automation every time a visitor clicks that button. You can then simply call Run Trigger in that button’s
onClick()handler:CopyIf you defined a payload schema for your trigger, you can pass a payload object to Run Trigger. All payload fields are optional, but any fields you include in the payload should match the keys and types defined in the schema.
-
To test your code, either publish your site or create a test site. Your backend code may not work in Preview mode.
See also
Last updated: 23 March 2025