Integrate your Microsoft Azure Database with your Wix Site
Note: This feature is only available for sites with certain premium plans. If you need to use this feature, you can upgrade your site. Learn more about premium plans.
Wix allows users to connect an external database to Wix sites using an external database adaptor. Once the connection is set up, users can interact with these databases and use them to populate site elements as though they were Wix CMS collections.
With an external database adaptor, you can use your MySQL database hosted on Azure and fully integrate it into your Wix site. This means your Azure data can be managed via the Wix Data APIs, and used (with or without datasets) to populate Wix UI elements like repeaters and tables.
Overview
This article walks you through the following:
- Creating a web app.
- Setting up a key vault and secrets.
- Testing your adaptor.
- Connecting your Wix site.
This tutorial assumes you already have your own Azure database server for MySQL with a table containing some data. If you don't have this set up, refer to the Azure Database for MySQL documentation for instructions.
This tutorial uses a container image with all the functionality needed to interface between your database and your Wix site. If you want to look under the hood, you can have a look at the service plugin specifications for external database collections, and an overview of what's involved in building your own adaptor.
Prerequisites for Read-Write Access to Your Database Tables:
If you want your table to be read-write on your Wix site, it must contain the following columns:
_id_createdDate_updatedDate_owner
Tables without these columns will be read-only in your Wix site.
Note: We don't provide specific instructions for any configuration in Azure, as Azure's UI and flows may change. For further details on any of the instructions below, see the Azure Database for MySQL documentation.
Step 1 | Create a Web App
A web app service is needed to run the adaptor and make it accessible to your Wix site.
To deploy the adaptor as a web app:
-
Create a web app service to run the container.
-
Use the following Container Image URL:
Copy -
Add the virtual network to the web app.
Step 2 | Set up a Key Vault and secrets
The external database adaptor uses environment variables to configure database credentials and connection details. Some of these variables are sensitive and shouldn't be visible. Use the Key Vault to store and access these variables securely.
-
Create a new Key Vault.
-
Define and then create the following 5 secrets:
-
HOST: The host name of your database instance. It can be found on your instance's overview page as the Server name.
-
USER: The username used to connect to your database instance. It can be found on your instance's overview page as the Server admin login name as shown below.
-
PASSWORD: The server admin login password used to connect to your SQL instance.
-
DB: The database name. When you created your database in the previous steps, you called the database mysqlTutorial. You can find this in the MySQL database server overview - under Available Resources at the bottom of the page.
-
SECRETKEY: A secret key that's used when connecting your Wix site to the adaptor. To create a level of authentication between your site and the adaptor, each request your site sends to the adaptor contains this value in the payload. For the tutorial, use myBigSecret as the SECRETKEY value.
-
PERMISSIONS (optional) A stringified JSON object that defines the read and write permissions for the tables in your database. When setting up permissions, note a couple of important things:
-
If you don't set permissions, they default to admin. With admin permissions, only site admins can read or write to the external database from a Wix site. API calls or CMS connections to the database don't work for anyone who isn't a site admin. This means site code that communicates with the external database might not work for site visitors.
-
When setting up permissions, make sure you use the ID of the table you want to read and write to, and not the database ID.
-
Note: Customizing permissions for external databases is currently a developer preview feature, and may change. Changes to permission settings are not reflected in the editor.
Learn more about configuring database permissions
You can use the PERMISSIONS secret to customize the permission settings for each table in a database. The JSON object contains one key, collectionPermissions, whose value is an array of objects. Each object in this array contains the permissions settings for one of the collections in the database, using the following parameters:
- id: The collection ID.
- read: An array of strings representing which roles can read from the collection.
Options: 'Admin', 'Member', 'Visitor' - write: An array of strings representing which roles can write to the collection.
Options: 'Admin', 'Member', 'Visitor'
Example PERMISSIONS value:
CopyNote that you need to store the PERMISSIONS JSON object as a string. To do this, first write the object as usual and use a tool such as your browser’s developer tools console to stringify it.
-
-
Create an identity for the web app.
-
Add the web app's Identity to the Key Vault's access policies.
-
Configure Web App Environment Variables
For each of the secrets you created in the previous section, add an application setting as per the table below:
Substitute the value for "VaultName" with your own key vault name.
Name Value USER @Microsoft.KeyVault(VaultName=my-velo-DB-key-vault;SecretName=USER) HOST @Microsoft.KeyVault(VaultName=my-velo-DB-key-vault;SecretName=HOST) DB @Microsoft.KeyVault(VaultName=my-velo-DB-key-vault;SecretName=DB) PASSWORD @Microsoft.KeyVault(VaultName=my-velo-DB-key-vault;SecretName=PASSWORD) SECRET_KEY @Microsoft.KeyVault(VaultName=my-velo-DB-key-vault;SecretName=SECRETKEY) PERMISSIONS @Microsoft.KeyVault(VaultName=my-velo-DB-key-vault;SecretName=PERMISSIONS) Note: When configuring the SECRETKEY, the application setting is SECRET_KEY but the secret name is SECRETKEY. This is because you cant use an "_" in a secret name in Azure.
-
Add 2 more application settings as per the table below:
Name Value TYPE mysql CLOUD_VENDOR azure
Step 3 | Test your adaptor
You can test that your service is working by making a quick request using Curl.
Use the curl command below, replacing the URL with your URL from the web app overview page, and replacing the secretKey value with your secret key.
The output provides a list of tables and their columns from your database. If you have python installed, you can pipe the output to python -m json.tool and it will give you nicely formatted JSON.
The formatted output containing a list of tables and their columns:
Step 4 | Connect to your Wix site
Now that you have a database and an adaptor service, you're ready to add the database as an external collection on your site.
Note: You can only add external collections to your site if you have a premium plan.
-
In the editor, select Databases from the Code sidebar (Wix Editor) or Code sidebar (Wix Studio).
-
Click the
 icon next to External Databases and select Add external database.
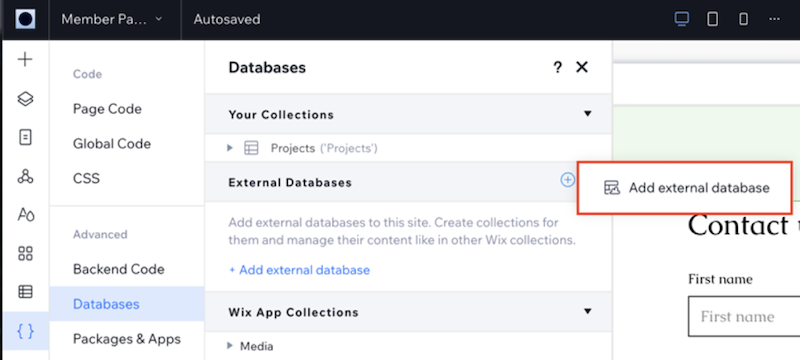
-
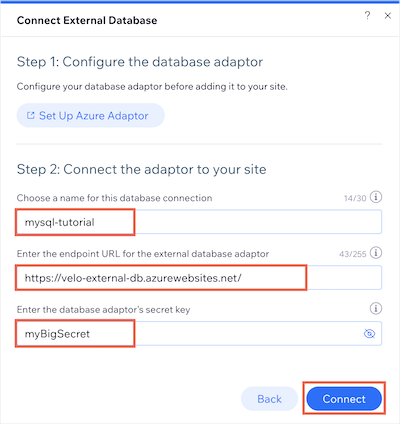
Choose Azure as the provider of the external collection being added, then click Next.

-
Enter a name for your external collection's namespace.
-
Copy and paste your adaptor service's URL into the endpoint URL field.
-
Enter your database adaptor's secret key.
-
Click Connect.
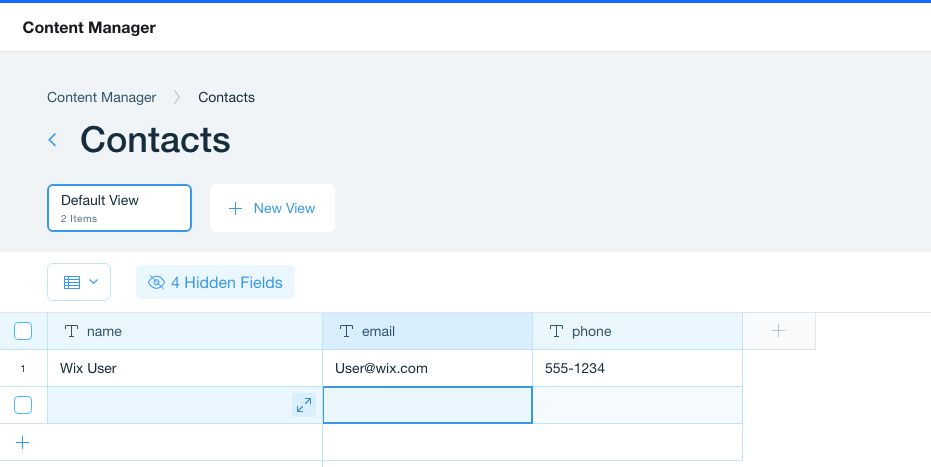
The Content Management System (CMS) displays the tables. If your table contains _id, _createdDate, _updatedDate, and _owner fields, you can add data to the table directly from the CMS.
Last updated: 4 December 2025