Tutorial: Using the Fetch API to Add a Currency Converter
In this tutorial, you'll learn how to create a simple currency converter site that uses the wix-fetch API to connect to a 3rd-party service. Site visitors choose source and target currencies from dropdowns and enter an amount to convert. The results are displayed in a text box.

Follow the steps below to create a currency converter with the wix-fetch API.
Step 1: Create a New Wix Site
- Sign into your Wix account or sign up for a Wix account if you don’t already have one.
- Open a blank template in Wix Studio or the Wix Editor.
Step 2: Enable Velo Dev Mode
-
Wix Studio: In the Code panel, click Start Coding.

-
Wix Editor: In the top bar of the Wix Editor, click Dev Mode > Turn on Dev Mode.

Step 3: Add Elements to the Page
Add page elements in the editor:
- On the left side of the editor, click Add Elements.
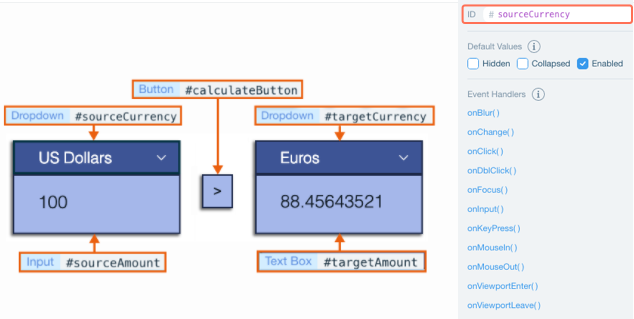
- Add the page elements illustrated below to your site.
-
When you add each element, set its ID in the Properties & Events panel. In Wix Studio it appears at the bottom of the code editor, and in Wix Editor, the Properties & Events panel appears on the right side of the code editor.
-

| Element | Location in Add Menu | Description | ID |
|---|---|---|---|
| Dropdown | User Input | For selecting the source currency | sourceCurrency |
| Dropdown | User Input | For selecting the target currency | targetCurrency |
| Input | User Input | For entering the amount to convert | sourceAmount |
| Text Box | User Input | To display the converted amount | targetAmount |
| Button | Button | To trigger the currency conversion when clicked | calculateButton |
Step 4: Add Code
Notes
- All the code for this example is added to a single page on the site. In this section we divided the code into short blocks followed by explanations. To see the complete code for this example without comments, scroll down to the end of the tutorial.
- See our API Reference to learn more about the Velo-based code in this example.
To add the code:
-
- Wix Studio: On the left, click
> Page Code.
- Wix Editor: In the Code sidebar, click Page Code. Under Main Pages double-click the page labeled HOME.
- Wix Studio: On the left, click
-
Add the following code to the top of the code in the tab before the onReady function:
Copy -
Add the code below to the onReady function. Code inside the onReady function runs when the page loads.
CopyThe
$wfunction can select elements on a page by ID or by type, allowing us to run functions and define the properties of the elements. Use this syntax to select an element by ID,$w("#myElementId"), and this syntax to select by type,$w("ElementType").Here we select the button and define an
onClickevent handler to calculate the target amount. -
Add code to define the functions:
populateDropdowns( )
CopyHere we select all the dropdowns by type. By calling
$wwith the element type "Dropdown", we select all dropdowns on the pagecalculateCurrency( )
CopyWe use template literals to define the full URL, which includes the source and target currencies.
The wix-fetch API
getJSONfunction retrieves the JSON resource using the full URL.getJSONreturns a promise, which resolves to a JSON object.We multiply the retrieved rate by the initial amount and assign it to the
targetAmounttext box.
Step 5: See It in Action
Now it's time to test your site:
- In the top right corner of the editor, click
(Wix Studio) or Preview (Wix Editor).
- Enter an amount in the source currency input.
- Click the calculate button and see the converted currency result in the target amount text box.
- Publish your site to make it live and production ready.
That's it! In just a few minutes, you created a web application in Velo! No setup, no managing server infrastructure, just integrating Velo APIs with the Wix visual builder.
Next Steps
Now that you've had a taste of Velo, check out what else you can do:
- Easily call backend code from the frontend using web modules.
- Work with Wix's visual builder.
- Add features and customize your site using Velo APIs. Here are some examples of what you can do:
- Visit the Velo by Wix website to onboard and continue learning. Check out Velo documentation and the API Reference.
Example Code
Here is the complete code for this example, without comments: