Add a Custom Action
Custom actions allow you to write custom code that executes when an automation is triggered. The Automations Actions service plugin lets you develop these custom actions directly in your site's dashboard.
To add a custom action, you first need to create an automation and add a trigger:
-
Go to the Automations page in your site's dashboard.
-
Click + Create Automation, then Start from Scratch to open the automation builder.
-
Select and configure a trigger.
-
Click the + beneath the trigger to add a step and then click Action. In the menu on the left, select Run Velo code.

-
Click Start Coding to add your code. You'll be prompted to create a new code file.

-
Give the file a name and click Create & Start Coding. Note that you can't rename the file once it's created.

You should now see something like this:
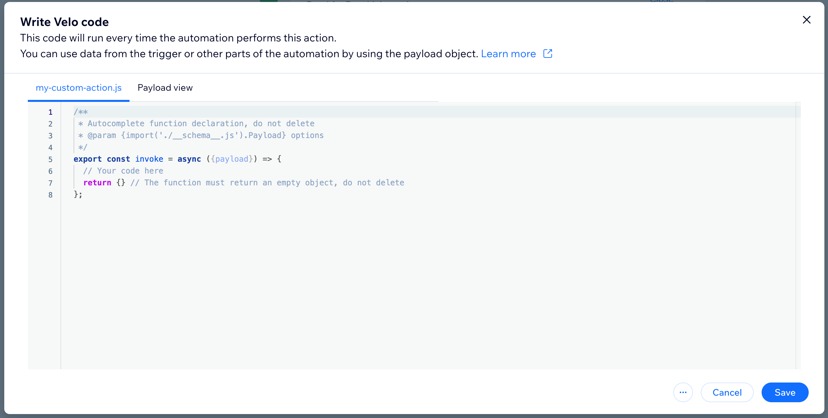
The Write Velo code modal contains 2 tabs. The first is the
.jsfile where you write your code. The second tab appears under Payload view and lets you view the expected structure of the trigger payload.Write your code in the inside the
invoke()method. Make sure the return statement remains empty. -
When you finish writing your code, click Save.
After you set up and code your custom action, you can activate the automation immediately. However, we recommend testing the action code first.
-
To test your code, follow the instructions under Run your code to test this action. Then click Run Code.

Wix provides sample data that matches the structure of your trigger response. You can edit any of the fields in the sample response to test your action.
Note: When you test the action, the code runs on your live site and may cause changes on your site or dashaboard. Testing runs your code live on a site and may change a site or dashboard.
-
Once you test your code and are sure your action works. Click Apply, then click Activate.
Edit your custom action
To edit your action code, edit your automation and select the Run Velo code action. Then click Edit Code and make your changes.
Make sure to save a re-test your code. Click Apply, then click Publish Changes.
See also
Last updated: 11 December 2025