Tutorial: Build a Custom Booking Calendar Page
This tutorial shows you how to replace a site's default Wix Booking Calendar page with your own customized version. This allows you to modify or extend the page's functionality to suit your precise business needs and create a unique booking experience for your customers.
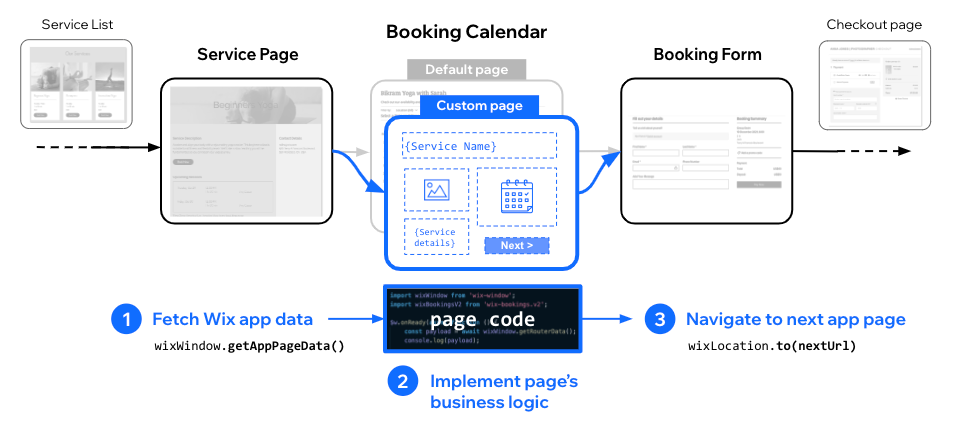
By the end of this tutorial, you'll have a custom booking calendar page that displays service information, shows available time slots, and seamlessly integrates with your site's booking flow.
Follow these steps to build a custom booking calendar page:
- Add a custom calendar page to your site
- Design your custom calendar page
- Add code to your custom page
Note: The code in this tutorial uses the following module versions:
- @wix/site-window (v1.0.0)
- @wix/bookings (v1.0.0)
- @wix/site-location (v1.0.0)
Learn how to install npm packages in the editor or using the CLI.
Before you begin
It's important to note the following points before doing this tutorial:
- You need to have Wix Bookings installed on your site with at least 1 service created.
- This feature is currently not supported with Multi-service bookings appointments.
Step 1 | Add a custom calendar page to your site
In this step, you'll replace the default Wix Bookings calendar page with a custom page that you can fully control and customize.
At the end of this step, you'll have a blank custom page ready for design and coding.
To create a custom calendar page:
Step 2 | Design your custom page
In this step, you'll design the layout and add the necessary elements to your custom booking calendar page.
At the end of this step, you'll have a page with the elements needed to display service information, show available time slots, and allow site visitors to make selections.
To design your custom page:
-
Add elements to the page to create your business's customized design and functionality. Make sure to include these essential elements:
- Text element to display information about the selected service.
- Dropdown or selection element to provide site visitors with a way to view availability and select a slot.
- Button element to navigate to the next step in the bookings flow.
-
Give your elements meaningful IDs that you'll use in your code:
#serviceNamefor the service name text.#dateDropdownfor the time slot selection dropdown.#nextButtonfor the navigation button.
Step 3 | Add code to your custom page
In this step, you'll add code that connects your custom page to your booking service's data. We'll use the JavaScript SDK to retrieve information about the selected service, display service availability, and navigate to the next step in the booking flow.
At the end of this step, you'll have access to the service information that was passed to your custom page.
To retrieve and display service data with code:
-
Add the following import statements at the top of your page code:
Copy -
Call the Get App Page Data method to get the service object associated with the page:
Copy
Note: To receive a populated page data object using getAppPageData() when testing your code, do the following:
- Create at least 1 Bookings service.
- Preview the Bookings Calendar page and then return to the editor.
- Query the service availability. The following example queries the availability for the upcoming week in the site visitor's time zone.
- Populate your custom page's elements with the service information and availability. The code below displays the service name, and creates dropdown options for the service availability.
Tip: You can customize how the time slots are displayed by modifying the label format. For example, you might want to show just the time or format the date differently.
- Add an event handler to the page's action button so that it navigates to the next page in the flow, which is typically the Booking Form. You can [create a link to a preloaded Booking Form](fallback::https://dev.wix.com/docs/sdk/ frontend-modules/bookings/shareable-booking-form-links), specifying the appropriate query params based on the visitor's selections.
Complete example code
Here's the complete code for your custom booking calendar page:
You've now successfully created a custom booking calendar page that integrates seamlessly with your site's booking flow. Your custom page can now display service data, provide site visitors with an interface for selecting available time slots, and direct them to the next page in the booking process.
Last updated: 11 December 2025