Blocks Widget Properties
Editor compatibility
Wix Blocks apps aren't supported in the Wix Harmony editor. Existing Blocks apps remain available for purchase on the Wix App Market for Wix Editor and Wix Studio sites. To learn more, see About Wix Harmony and Blocks.
Properties allow site builders to pass information to the widget and get information from it. For example, in a shopping widget, you can add properties that represent information about the product.
Wix users can set property values through the default Settings panel, or by a custom panel that you create. Learn more about using your widget API when editing a site.
To add a new property to your widget:
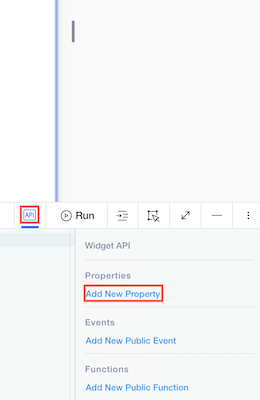
- Open your app in Wix Blocks.
- Click the Widget API
 icon on the bottom right.
 - Click Add New Property or hover over Properties and click the
 icon.
icon.
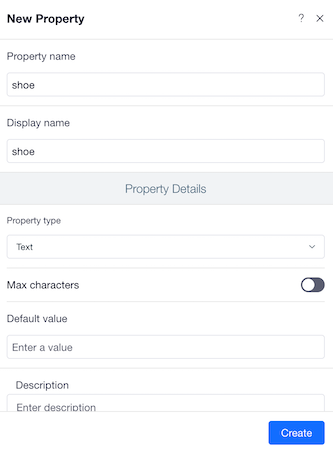
4. Name your property, select its type and default values, add a description and click Create. Make sure to fill in these fields with care. The Display Name will be visible to users.
Property types
These are the types of properties you can add to your Widget API:
- Text: String values.
- Number: Number values, without spaces or special characters except for a minus sign "-", to indicate a negative value.
- Boolean: Either true or false.
- Image: The URL for the source of the image. The format for the URL is described here.
- Date and Time: See Date and Time Conventions.
- URL: In the format
http(s)://www.<domainname>.<topleveldomain>, such as www.wix.com - Custom: A highly-flexible property type that you design around the needs of your app. Learn more about creating custom type properties.
- List: An array of any single type listed above. Learn more about creating list type properties.
To change the property type, hover over the property in the Widget API  panel and click the Edit
  icon.
icon.
Interact with properties in your widget code
Interact with properties in your widget code through the $widget module, using the following syntax. Internal properties are optional - they're needed only if you're using a custom type property:
For example, let's say that you want to present the size of a shoe in a text element in your widget. The property is "shoe". Shoe is a custom type that has an internal property named "size". So the statement will look like this:
Interact with properties in panels
You can get or set properties in custom panels through your panel code, or through connecting properties to panel elements with no code.
Note that Blocks also creates a default Settings panel for any widget that has properties.
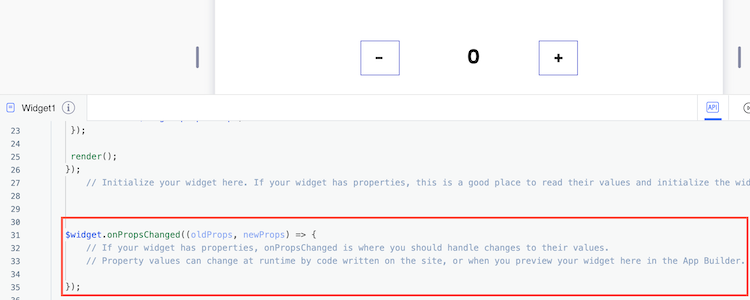
Define onPropsChanged()
The onPropsChanged() event is fired when there is a change in your widget's properties.
It receives oldProps and newProps as its parameters. Here is the syntax to use in the widget code:
The initial code for onPropsChanged() is created automatically in every new Blocks widget. You can define what happens in this event through adding code.
For example, in a shopping widget, if the product id is changed - load the data for the new product and customer:
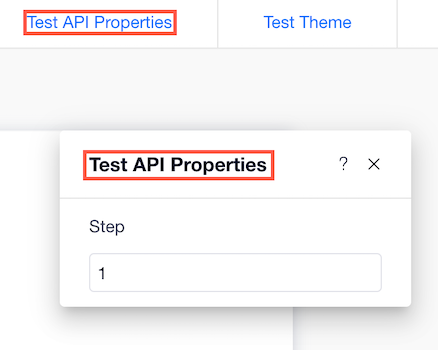
Testing your widget's API properties
When your widget is installed on a site, it comes with a default Settings panel, which includes any properties that you defined in your API (Learn more about using your Widget API when editing a site). You can also use a custom Settings panel by using the panel builder in Blocks. Use Blocks's Test API Properties to see how these properties look on a site:
To test your widget's API properties:
- Click Preview.
- Click Test API Properties when you are in preview mode.
Make sure to document your widget API by describing any property, event or function you add to it. These descriptions are available to site creators who install your widget.