Tutorial | Create a Self-Managed Custom Shipping Rates App
In this tutorial, we’ll show you how to create an app similar to our Custom Shipping Rates app template from scratch. When a user installs the app on their site, it adds a dashboard page that allows them to create custom shipping rates. These rates are added to customers’ transactions in the cart and checkout pages.
You’ll gain experience with the following Wix tools:
At the end of the tutorial, you’ll have a basic app that calculates custom shipping rates and adds them at checkout. You can then extend the app however you like, either by adding your own logic or following the code in the Github repo.
We’ll use the following steps to build the shipping rates app:
- Set up the app in the Custom Apps page of your Wix Studio workspace.
- Bootstrap a Next.js app with
create-next-app. - Set up the Wix SDK.
- Write the code for the main app logic.
- Deploy your app.
- Test your app out on a dev site.
Before you begin
Before getting started, make sure that:
- You are signed into your Wix account.
- You have Node.js 18.17 or higher installed.
Step 1 | Set up your app in the Custom Apps page
In the Custom Apps page, click Create New App > Build from scratch to create a new app. Wix generates a Wix app ID, secret, and JWT key that you will need later when configuring your app to work with the Wix SDK packages. Give your app a name, but you don’t need to configure anything else for now.
Step 2 | Create the project with create-next-app
This step configures a full Next.js project in your local directory. We’ll set up our project in two steps:
- Create the Next.js app with create-next-app.
- Set up the folder structure and add the files necessary to build the basic app.
Create the app
We’ll create our project using the interactive option in create-next-app.
To create the project:
-
On the command line, navigate to the directory where you want to save your project.
-
Run the following command:
Copy -
Give your project a name when prompted. For example:
custom-shipping-rates. -
The tool will present a list of dependencies. Choose
yesfor the following:- TypeScript
- ESLint
src/directory- App Router
Once you select your dependencies,
create-next-appwill create your new application.
Now you have a new project in your selected directory. The project has a basic folder structure that we are going to build on next.
Set up the project structure
In these next few steps, we’ll walk through the folder set up. We’ll also add several necessary files.
-
In this tutorial, we develop our app using the Next.js App Router. We start by creating a folder in
src/app/to work with the App router. -
We need to define the
getShippingRates()handler function from the Shipping Rates service plugin, which is called when the service plugin endpoint receives a request. This requires us to set up an API route handler in our app.Create a new directory
src/app/api/shipping-rates/v1/getRates/. Next.js uses this folder path to determine the endpoint path for your Get Shipping Rates implementation. -
In addition to handling service plugin requests, our app will also provide a dashboard page where a user can customize their shipping rates. Therefore, we also need to set up a route for the dashboard.
Create a folder
src/app/dashboard/. Inside this folder, add two items:- A file called
page.tsx. This file provides the Next.js route for the app’s dashboard page. - A subfolder called
parts. This folder will contain the different dashboard components that we create later. For now, you can leave it empty.
- A file called
-
In
src/app, create these folders:actionsclient-hookstypesutils
You can leave these folders empty for now. We will add the files and code we need later.
-
In the root directory of your project, add a file called
.env.local. In this file, we’ll add the environment variables we need for local development.Note: Add the
.env.localfile to.gitignoreso it is not pushed to the origin.
Once you’ve added everything, your directory structure should look something like this:
Note:
Files that were automatically generated by create-next-app are not included here.
Now that our project has the correct folder structure, we can set up the environment to work with the Wix SDK.
Step 3 | Set up the Wix SDK
We need to do a few things to make sure our app can work with the Wix platform:
- Install the Wix SDK package.
- Set environment variables that will be used locally for Wix Client authorization.
- Create the Wix Client.
Install Wix SDK
Navigate to the root folder of your project on the command line, and run the following command:
This installs the Wix SDK package, which provides methods to let your app authenticate and communicate with the Wix platform.
Set local environment variables
Connect the local environment to the app you created in the Custom Apps page as follows:
-
Paste the following code into the
.env.localfile:Copy -
Go to your app and click on OAuth. Copy the App ID at the top of the page. Paste the App ID as the value for
WIX_APP_IDin.env.local. -
Next to the App Secret Key field, click the eye icon to show the secret key. Copy and paste it in
.env.localas the value forWIX_APP_SECRET. -
To get the value for the public key, go to Webhooks and scroll to the bottom of the page to the Public Key section. Click Open to show your public key. Copy the public key.
Note: In order to view your public key, you first have to add a webhook.
You have two options to paste the value of the public key for the value of
WIX_APP_JWT_KEY:- Paste the value exactly as it appears in the app dashboard, and surround it with quotation marks.
- Base64 encode the public key, and paste the value without quotation marks. We strongly recommend this method, as some deployment platforms don’t support multi-line environment variables. You can use an online encoder to base64 encode your public key.
Your .env.local file should look similar to this when you are done (we used base64 encoding):
Now that we’ve set our local environment variables, we can use them to create a Wix Client.
Note: You can also use the local environment to run your code locally.
Create a Wix Client with AppStrategy
The Wix Client allows your app to authenticate and communicate with the Wix platform. In this tutorial, we’ll set up two separate clients for our app:
- A client that authenticates as an app instance. This will be used to handle app-level logic such as receiving service plugin requests and handling webhooks.
- A client that authenticates on behalf of a Wix user. This client works with the dashboard. We will create this client later in the tutorial.
In this step, we’ll add the code to set up the first client that authenticates as an app instance.
In the src/app/utils directory, add a file called wix-sdk.app.ts. In this file, paste the following code:
Understanding the code
Lines 1-2: Imports AppStrategy and createClient() from the Wix SDK. Both are necessary to set up our app’s Wix Client.
Lines 4-10: Creates a Wix Client by passing AppStrategy as the auth parameter. Inside AppStrategy we set the Wix app ID, secret key, and public key from the environment variables in .env.local.
Now we can import the Wix Client to our code, which we’ll add next.
Step 4 | Add the code
Now we get to the fun part–the code! Note that we won’t cover every file in the full code repo, but you can look at this table that summarizes what each file does.
Our goal is to walk you through the app's core logic, so you can expand on it later yourself. There are two major actions that the app performs:
- Returns shipping rates data when the Get Shipping Rates endpoint receives a request from a Wix site.
- Displays shipping rates data on a dashboard page where a site admin can edit them, and saves any changes.
We’ll add the code in three steps:
- Add the supporting code that needs to be imported to the rest of the app.
- Add the logic for receiving and responding to requests.
- Add the dashboard code.
Once you’ve completed these steps, you’ll be able to install your app on a site, view the dashboard, and handle shipping rates requests from Wix.
Add supporting code
We’ll start by adding code that will be used widely across the app, such as getter and setter methods and type interfaces to define our shipping data.
Create shipping rates data types
We’re going to create several types to make our code more flexible, especially for the dashboard code.
-
Navigate to the
typesdirectory that we created earlier, and in this folder add a file calledapp-data.model.ts. -
In this file, add the following two enums:
CopyThe first enum gives options on how to determine shipping rates, either by the number of items in the customer’s cart, or by weight in kilograms or pounds. The second enum gives two options for shipping, standard or express.
-
Because our app uses Typescript, which is strongly typed, we need to create interfaces that define the structure of the types for our shipping costs and data. Below the two enums, add the following two interface definitions:
CopyThe first interface defines three number fields. This lets users set the price on each item that a customer orders. This field is an important part of our dashboard.
The second interface uses the previously defined enums and interface to define shipping rate data type. Notice that the interface contains an array of shipping methods. This lets you define multiple shipping methods in your app.
The types we define here are specific to this application. You can edit them as necessary for your app later.
Write setter and getter methods
For the purposes of this tutorial, we define a default ShippingAppData object, and create basic getter and setter methods that retrieve and set values for that default object.
-
Navigate to the
actionsdirectory and create a file calledapp-data.ts. -
At the top of the file, import the types we created in
src/app/types/app-data.model.ts:Copy -
Now create the default shipping app data object by adding this code:
CopyOur default object contains two different methods in its shipping methods array: one for standard and one for express delivery. As you’ll see later, this will be reflected in the dashboard page. Notice that for each element, we use the shipping method type and shipping unit of measure enums that we defined in
types/app-data.model.tsto set the shipping type and rate. For both shipping methods, we apply the rates per item. -
Below the default object code, add the getter and setter methods:
CopyFor this tutorial, we store our shipping data within this object in the app itself. This allows us to write very basic getter and setter methods. This is done for simplicity.
When you create your own app, create getter and setter methods that implement logic to fetch shipping rate data from your database. The code here can help you get started.
We can now export the methods and types we’ve created to other parts of our app.
Handle shipping rates requests
Next, we’ll add the code to implement a Get Shipping Rates endpoint with the required URL path. In the src/app/api/shipping-rates/v1/getRates/ directory that we created earlier, add a file called route.ts. We’ll put all the logic for receiving and responding to requests in this file. Copy and paste the code below into route.ts:
Let’s walk through this code and understand what it does:
Lines 1-2: We import two objects:
- The Wix Client that we set up in the
src/app/utils/wix-sdk.appfolder. This enables our app to communicate with the Wix platform. - The getter method we defined in
src/app/actions/app-data.ts, which returns our default shipping data object when requested.
Line 4: We call the provideHandlers() function to define handler functions that are called whenever a service plugin request is received.
Line 5: We define the getShippingRates() handler function that is triggered whenever a request is received by the endpoint. All our logic goes in this function.
Line 6: We call our getter method to return our default shipping data object.
Line 7: We get the currency from the metadata sent with the site’s and set our currency type to match it. This ensures that the price we return is in the site's currency.
Lines 9-18: The getShippingRates() handler function returns a valid response with our shipping rate data. In the function, we map our data to the fields in the return object that Wix expects our function to return.
Note that in line 15, we pass the site’s currency type to our object to ensure this shipping rate is returned in the correct currency.
Line 22: We create a POST function that is called whenever a POST request is received by the endpoint.
Line 23: This function does a lot of work! It parses the request our app receives from the site, validates its JWT signature, calls the handler function we defined above and passes it the request and associated metadata. Then, it returns the response as a JSON to the user's site, so the site will display the shipping rates to the customer. To learn more about what’s going on in the background, read about verifying requests received from Wix and see this sample flow.
This code takes care of the service plugin handling part of our app, and now we can move on to creating the dashboard.
Develop the dashboard page
The dashboard page lets a site admin interact with your app. The page we build in this app will allow users to customize their shipping rates directly from their site dashboard.
The code for the dashboard is spread over a number of files. We won’t review every line of code in detail, but we will show you what files you need to add and what code they should contain.
We’ll start by adding several supporting files that we need to import into the main UI code. Then we’ll write the dashboard code itself.
Before you begin
Install the following packages if you don’t have them already:
@tanstack/react-query@wix/dashboard@wix/design-system
Create a Wix Client with Dashboard SDK Auth
Previously we created a Wix Client in wix-sdk.app.ts that uses WixAppOAuth to authenticate as an app instance. However, to perform actions on the dashboard, our app also needs to authenticate on behalf of the user. Therefore, we use the Dashboard SDK to create an additional client.
-
Navigate to the
src/app/utilsfolder, and add a file calledwix-sdk.client-only.ts. In this file, add the following code:CopyThis code contains two functions:
- A utility function
inIframe()that checks if the current window is displayed in an iFrame. This is necessary because the dashboard SDK won’t be initialized outside of an iFrame. This would make the SDK methods unusable. - A
useSDK()function that creates a dashboard SDK client if it determines the window is embedded in an iFrame. Like the first client we created,useSDK()calls the Wix SDK’screateClient()function. Now, however, we pass indashboard.host()anddashboard.auth()to set up the authentication on behalf of the user.
Our app now has the proper authorizations to work with the dashboard through the new Wix Client.
- A utility function
Supporting files
In addition to the Wix Client, we also need to add a few more supporting files. The code in these files provides necessary wrappers and enums to render our dashboard UI.
-
In
src/app/utilsadd the following files:client-providers.tsxnavigation.const.ts
-
In
client-providers.tsx, add the following code:CopyThe purpose of this code is to create a wrapper for the dashboard React component and define global variables.
-
In
navigation.const.ts, add:CopyThis enum provides the page IDs that components of your app can navigate to. For example, on our dashboard page we will include breadcrumbs that allow the user to navigate back to the Manage Apps page of their site dashboard.
For the breadcrumbs to work, you have to pass the relevant page IDs, as you will see in the dashboard code. We store the page IDs here so we can easily access them from anywhere in the code.
-
Now navigate to
src/app/client-hooks. In theclient-hooksfolder, add a file calledapp-data.ts. Add the following code to the file:CopyThe purpose of the code in this file is to wrap the setter and getter methods we created earlier in React Query, so that we can use them with the UI. Let’s go through this file in more detail to understand what the code is doing:
Line 1: We indicate that this file is intended for client-side code with the
'use client'directive.Line 2-3: We import necessary functions from the
@tanstack/react-querylibrary. We also import the setter and getter methods that we created earlier.Line 5: We define a unique query key for fetching and validating the data.
Line 7-14: We wrap our getter method,
getShippingAppData(), in React Query. Remember that in this tutorial,getShippingAppData()just returns our default object. In a fully functioning app, it should fetch the data from an external database.Line 16-27: This function wraps our setter method in React Query, so that any changes to the data from the UI are stored in the database.
Now that we’ve added the supporting files, we can export them to the dashboard code.
The dashboard code
The dashboard is broken up into a few different components, as shown below.
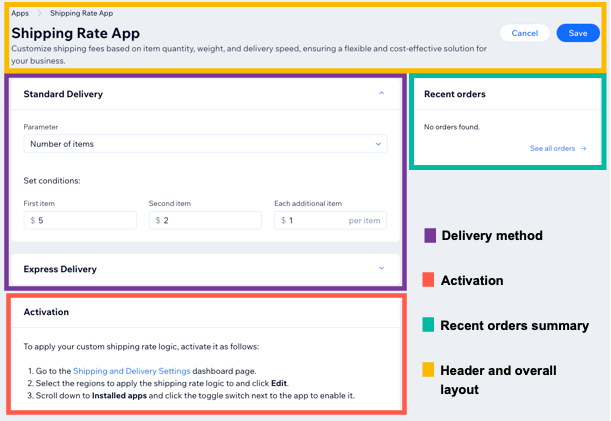
For this tutorial, we’ll only add the delivery method and header sections. We’ll explain how to add the activation and order summary sections so you can do it on your own. You can find the original template code for all these sections here.
-
Navigate to
src/app/dashboard/partsand add the following three files:ShippingDeliveryMethodForm.tsxShippingRatesPage.tsxShippingRatesPageContent.tsx
-
Let’s start by adding the code to
ShippingDeliveryMethodForm.tsx. This sets up the two delivery method sections (one is collapsed) shown in the image above. Start by adding the import statements to the file:CopyAs you can see, we import the types we created for handling shipping data in line 4. These types will make it easier to set up our dashboard page.
In addition, in line 2, we import a number of elements from the Wix Design System. We use these to construct the delivery method UI.
The rest of the file exports a React functional component called
ShippingDeliveryMethodFormthat controls the UI of the delivery method sections. Add the function to your file:CopyLet’s review the important parts of the code:
Lines 6-21: We pass destructured
title,ShippingUnitOfMeasureandShippingCostsprops toShippingDeliveryMethodForm. We annotate each prop with Typescript to define its expected type. We also pass two callback functions,onUnitOfMeasureSelectedandonShippingCostsChangedwhich perform actions in the UI when the measurement unit or costs are changed. We’ll define these callbacks inShippingRatesPageContent.tsx.Line 30: The function returns a Card component containing header and content, as shown here:
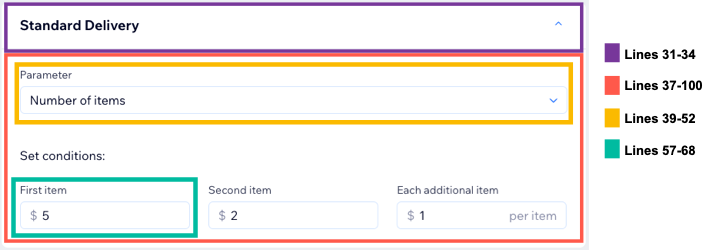
Lines 38-54: The function sets up a Box component that contains a dropdown. This lets users select the unit of measurement they wish to use.
Lines 54-98: The function sets up another box that contains three cells. Each cell corresponds to the per-unit cost fields. For example, lines 57-69 set up the first cost field.
-
Now we’ll add the code to
ShippingRatesPageContent.tsx. The code in this file drives the main logic of the UI, so we will go through it in more detail.Let’s start, once again, by adding the import statements:
CopyLine 1: We mark the file as containing client-only code.
Line 2: We import the elements we need from the Wix Design System.
Line 3: We import the
useSDK()we created insrc/app/utils/wix-sdk.client. This function allows our code to communicate with the dashboard SDK client.Line 4: We import several necessary React methods. We will use these shortly to define the logic of our code.
Line 5: We import the
ShippingDeliveryMethodFormfunction that we created in the previous step. We will integrate this into the overall dashboard page UI.Line 6: We import the
WixPageIdenum. Recall that we need the codes in this enum to navigate from our page to other pages in the dashboard.Line 7: We import the wrapped setter and getter methods. We’ll use these to respond to user actions in the UI.
Line 8: We import our shipping data types.
-
Next, we export a React functional component called ShippingRatesPageContent.
CopyCurrently, this function doesn’t accept props, but you can add them later if required for your app.
-
Inside the
ShippingRatesPageContent()function, first add this code:CopyWe destructure the
sdkobject returned fromuseSDK()and extract two functions we need, showToast() and navigate(). -
Next, define a variable to contain our setter wrapper function:
Copy -
In the next line, add this code:
CopyAt some point, we’ll need to fetch the shipping data we’ve stored to display on the dashboard. We’ll store the fetched data in
persistedShippingAppData.In this tutorial, we are simply returning the default object that’s hard-coded into our app, so
isLoadingAppDatais not that relevant. But you’ll need it later when you implement logic to fetch the data from a database. -
Next, add the following code:
CopyWe manage the state of the data displayed on the dashboard with the
useState()React hook. We also manage the loading state. We use the loading state later in the UI to display a loader element.We keep the displayed shipping data up-to-date with the React hook
useEffect(). If a user makes changes to the shipping data stored in the database, the new data is displayed on the dashboard when the component reloads. -
Now add the callback function for saving updated shipping data:
CopyThe
onSave()function passes the input shipping data to the setter method, which updates the data (in our case, in the default object; normally, in a database).While updating, it displays the loader, which is controlled by
setLoading(). When the update completes, it uses the showToast() SDK method to indicate success or failure before clearing the loader. -
Beneath the first callback, add another two that look like this:
CopyThese two callbacks fire when a user updates the unit of measurement or the shipping costs. They update the displayed shipping data to match the user’s selection.
In
ShippingDeliveryMethodForm(), we defined two props to receive callback functions. We’ll pass the two callback functions we define here as those arguments, as you’ll see shortly. -
Define the UI and behavior for the button bar, using the Box and Button components from the Wix Design System:
Copy -
Last, return the UI component. We’ll walk through the code so you can see how everything comes together.
Start by adding the return statement, and inside add a Page component with a
Page.Headerand aPage.Contentelement. Inside thePage.Content, add a cell and wrap it in a Layout element. Set the Cell component’sspanprop to 8. It should look like this:Copy -
Add code to the header element:
CopyThe page header contains the buttons bar that we set up previously, the page title and subtitle, and breadcrumbs. Notice in the Breadcrumbs element, we pass the page ID for the Manage Apps dashboard page. This lets users navigate to Manage Apps from your app’s dashboard page.
-
Now add the page content. We’re going to add a ternary operator that determines the page content based on the value of
isLoadingAppData:CopyIf the app is still loading the shipping data from the backend, we display a Loader. Once the shipping data is loaded, we update
isLoadingAppDatatofalseto display the data.The second part of the ternary expression iterates over an array of shipping method elements fetched from the database. For each element, it populates the props of a
ShippingDeliveryMethodFormcomponent. The component then uses these props to create the UI of each delivery method.
The dashboard page of your app now closely resembles that of the template. Here is the full code for ShippingRatesPageContent.tsx:
Notice in the complete code, two sections have been commented out. These sections define two more components that we've excluded for this tutorial:
- The activation details card.
- The order summary.
These components aren’t necessary for the app to work, but the full app template includes them. If you want to add them to your app, you can use the code in the app template repo as follows:
Add activation details
The activation details card provides instructions to the site admin on how to activate your app on their site. You can find the code in the app template repo.
Notice that you need to use the Wix page ID to direct the user to the correct page.
Add order summary
The order summary section provides the site admin with a list of recent orders made on their site. For this section to work, you’ll need to create a third Wix client that initializes the Wix eCommerce Orders API, and implement code to fetch the site’s last orders. There are several steps to do this:
-
Install the Wix JavaScript SDK’s
ordersmodule and import it into your client code file as shown here. -
In the same file, add the code for the client:
CopyPass the Orders module into
createClient(), so that the client will initialize the module for use. -
Now you can export the client to other files and call functions belonging to the
ordersmodule. For example, you can use thesearchOrders()function to get a list of orders that have been made on your site:CopySee the full code.
Once you implement code to retrieve recent orders, you need to wrap it in React Query. Then you can use the wrapped code to populate the UI with the order data. In the app template code, we use a sticky area to display the order summary.
Render the dashboard page
At this point, we’ve completed the bulk of the code needed to define our dashboard. We need to add code to two more files so our dashboard page will render on a site.
-
In
ShippingRatesPage.tsx, add the following code:CopyWe wrap
ShippingRatesPageContentin theAppProviderscomponent we created in our supporting code. This allows the UI code we wrote to be accessed by the entire app. -
In
page.tsx, copy and paste this code:CopyThis will render the dashboard UI on the site.
You now have a custom shipping rates Wix app with basic functionality and a dashboard page. You can continue expanding on it from here, or you can deploy and test it in the next steps.
Step 5 | Deploy your app
To deploy our app, we have to do the following:
Set up your app on a deployment platform
- Connect the Git repository containing your app code to the deployment platform you choose.
- Add the three variables from your
.env.localfile to your site’s environment variables on the deployment platform. - Deploy your app and copy its deployment domain so you have it for the next steps.
Finish configuring the app in your app's dashboard
Now we’ll return to your app's dashboard to connect our deployed app. We need to add and configure the following extensions to our app so it will work on a site:
- Shipping Rates extension: Enables our app to communicate with the Get Shipping Rates endpoint we implemented.
- Dashboard Page extension: Integrate the dashboard UI we created in our code.
Add a Shipping Rates Extension
-
From the app's dashboard, click Extensions > Create Extension.
-
In the modal that pops up, search for “shipping rates” in the search bar. You should see an extension called Ecom Shipping Rates.
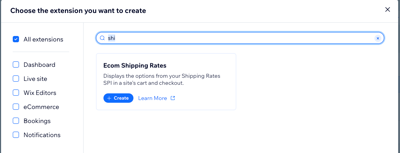
-
Click on the Create button to add a new Ecom Shipping Rates extension. This will bring up a JSON editor that looks like this:

-
You’re required to define
deploymentUriandnamein your JSON. You can give your app any name. The deployment URI should consist of your app’s deployment domain with the path/api/shipping-ratesappended to it:CopyBelow is an example of a JSON with the
nameanddeploymentUrikeys defined.CopyWhen your JSON is complete, save it and exit the JSON editor to return to the main Extensions page.
Add a Dashboard Page extension
-
Click Create Extension and create a new Dashboard Page.
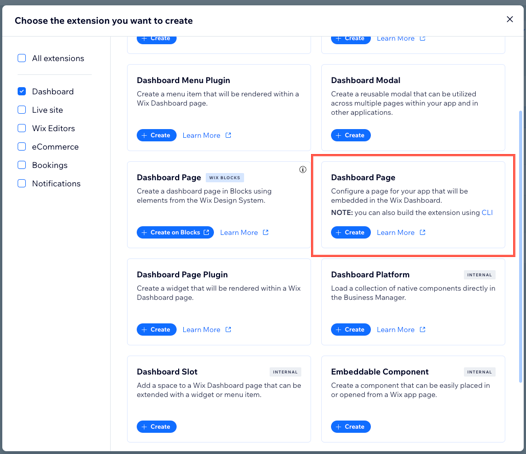
Note: Select the dashboard page option that is not built on Wix Blocks.
You should now see something like this:
-
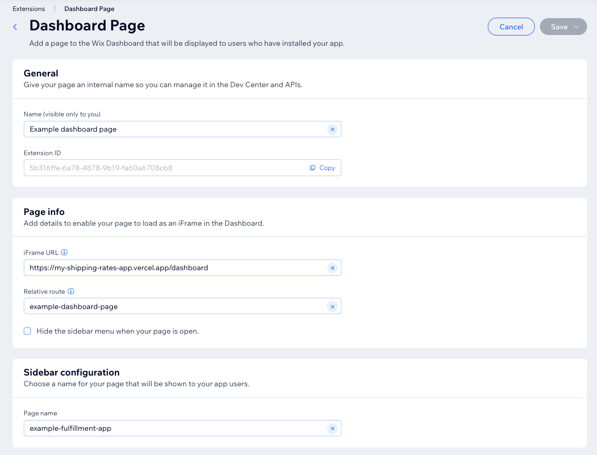
Fill out the following fields:
-
Name: This is the name of the page that you’ll see in your app's dashboard.
-
iFrame URL: This is the domain from your deployment platform. Our dashboard code is in the
dashboarddirectory of our app, so we append/dashboardto the domain. For example, if you deployed on Vercel and your domain ismy-tutorial-app.vercel.app, your iFrame URL should be:Copy -
Relative route: This will appear as your relative page URL on the user’s dashboard. For example:
shipping-rates-dashboard. -
Page name: This is the name of your page that will appear on the side menu on the user’s dashboard. For example:
Custom Shipping Rates.
-
-
Click Save to exit. Your app is now set up and ready to be installed on a site.
Step 6 | Test your app on a site
Now that your app has basic functionality, you can install it on a free development site to test it. We’ll walk through how to set up a test site so we can use our app with it, then show you how to test the installed app itself.
Install the app on a development site
- In the top right corner of your app's dashboard, click Test App and select Test on dev site.
- Select an existing development site or click + Create Dev Site to create a new site. Select the editor and the Wix Business Solution you want to use and click Create Dev Site.
- Click Test App. Wix installs your app and opens the site in a new tab. You can set which site page opens in your app settings. If you don't set a page, the site editor opens by default.
Try out the app
Let’s start by looking at the dashboard we created:
-
Go to your development site’s dashboard.
-
In the left sidebar, click Apps. In the submenu that opens, click the name you chose for your app, such as Custom Shipping Rates.
-
You can test out the functionality of the dashboard by changing the parameter and the costs in each cell.
Now let’s see the app’s logic in action:
-
Once the app is installed, go to your site dashboard and navigate to Settings > Shipping, Delivery & Fulfillment.
-
Click on the Create Region button. A new page will open.
In the Create Region section, choose a region name, click Add Destination and select at least one country from the list.
-
Select delivery method and rate.
On the next page, select the delivery method that you want to offer customers and choose the rate for that method.
Click Add.
-
Enable the custom app.
A new destination item is added to the page. On this destination, select Manage your Apps and you'll see your app. Click the toggle to turn it on.
Click Save.
-
Go back to the editor and publish your site. View your published site and navigate to the product page.
-
Select any product and add it to the cart, then view the cart. Under Delivery, select the country you chose to add shipping rates to.
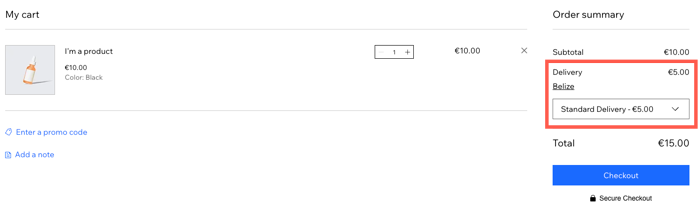
You should see the delivery price change to 5 units of your site’s currency (for example, €5). This comes directly from the default shipping data object we created in
src/app/actions/app-data.ts. We return the price of the first item as the shipping cost.
Run the app locally
Since you have already set up your local environment variables in the .env.local file, you can also run your app locally. To do so, do the following:
-
In the root folder of your project repo, install dependencies:
Copy -
You need to manually change your app URL in your app's dashboard. Replace your current base URL with
https://localhost:3000/in the following places:- OAuth page: App URL and Redirect URL for the app OAuth flow.
- Webhooks page: App Removed and App Installed webhooks.
-
Reinstall the app on your test site.
-
To start the development server, run the command:
Copy
You can now install the app on a Wix site with server code running locally.
Note: Remember to revert to the deployment URLs in your app's dashboard when you are ready to switch your app to production server deployment. You'll need to reinstall the app again for the change to take effect.
What’s next
Now that your app is working and has some basic functionality, you can continue building on it. Here are some places to help you get going:
- Check out the full custom shipping rates app template code for ideas.
- View our Build Wix Apps documentation to answer any questions.
Table of Files
This table describes the purpose of each file in the original code.
Note:
The table does not include config files such as .gitignore or package.json, or other files generated automatically by create-next-app.
| File path | Description |
|---|---|
src/app/actions/app-data.ts | Contains several functions for fetching and updating shipping rates data in an external database. |
src/app/actions/app-instance.ts | Parses a Wix decoded instance to extract the instance id. |
src/app/actions/orders.ts | Retrieves recent orders made on the site to provide the order summary on the dashboard page. |
src/app/api/oauth/v1/authorize/route.ts | Sets up the request handler for the app url Oauth implementation. The user is required to add their own logic, as described in Custom Authentication (Legacy). |
src/app/api/oauth/v1/signup/route.ts | Sets up the request handler for the app url Oauth implementation. The user is required to add their own logic, as described in Custom Authentication (Legacy). |
src/app/api/shipping-rates/v1/getRates/route.ts | Provides the main logic for receiving and responding to service plugin requests from the user’s site. |
src/app/api/webhooks/v1/install/route.ts | An empty webhook implementation for app installation. The user can add their own logic. |
src/app/api/webhooks/v1/uninstall/route.ts | An empty webhook implementation for uninstalling the app. The user can add their own logic. |
src/app/client-hooks/access-token.ts | A React hook which uses the Wix Dashboard SDK to fetch the current user’s access token. |
src/app/client-hooks/app-data.ts | React hooks to define the shipping data getter and setter methods. |
src/app/client-hooks/orders.ts | Wraps the code to fetch the latest orders in React Query so it can be used in the UI. |
src/app/dashboard/parts/ActivationDetailsCard.tsx | Builds the UI for the activation instructions in the dashboard. |
src/app/dashboard/parts/ShippingDeliveryMethodForm.tsx | Builds the UI for the main part of the dashboard where the user can adjust shipping rates. |
src/app/dashboard/parts/ShippingMethodSummary.tsx | Builds the UI for the order summary in the dashboard. |
src/app/dashboard/parts/ShippingRatesPage.tsx | Wraps the dashboard page content in the AppProviders wrapper for React. |
src/app/dashboard/parts/ShippingRatesPageContent.tsx | Builds the overarching UI for the dashboard page and pulls in the main components: the activation details, order summary, and shipping rates forms. |
src/app/dashboard/page.tsx | Renders the dashboard components on the site. |
src/app/types/app-data.model.ts | Creates several types for handling the shipping rates data. |
src/app/types/order.ts | Creates an order summary type used when fetching previous orders for display on the dashboard page. |
src/app/utils/client-providers.tsx | Creates the AppProviders wrapper to wrap the dashboard page component. |
src/app/utils/jwt-verify.ts | Parses the Wix instance in order to pull the app instance ID. |
src/app/utils/navigation.const.ts | Adds page ID information to the app so it can interact with the dashboard page. |
src/app/utils/shipping-calculator.ts | Implements a function to calculate shipping rates prices from the ShippingAppData object. |
src/app/utils/wix-sdk.app.ts | Creates the Wix Client that authenticates as the app. |
src/app/utils/wix-sdk.client-only.ts | Creates the Wix client that authenticates with user permissions and identity. Later used in the dashboard. |
src/app/utils/wix-sdk.ts | Creates a Wix SDK client that can be used in both server and client components. |
Last updated: 13 July 2026