Tutorial | Create an Editor Add-on that Imports Icons from a Library
In this tutorial, we’ll show you how to create an editor add-on from scratch. This add-on lets users import icons from a predefined library directly into their site by uploading them to the site's media files and applying them to a selected element in the Wix Editor.
We'll follow these steps to build the app:
- Create a React project using Vite.
- Run the project locally.
- Set up your app in the Wix Custom Apps page.
- Test the app on a site.
While we’re using Vite as the build tool, you can choose any local development server that suits your needs.
Before you begin
Before getting started, make sure that:
- You are signed into your Wix account.
- You have Node.js 20 or higher installed.
- You have a Wix site that you can use for testing purposes. If you don’t have one yet, create a new site.
Step 1 | Set up a React project
Start by setting up a new React project with Vite. We’ll follow these steps:
- Bootstrap the React project.
- Install dependencies.
- Configure Vite.
- Create React application files.
Bootstrap a React project with Vite
-
Run the following command in your terminal:
Copy -
Navigate to your new project folder:
Copy
Add dependencies in the package.json file and install them
Next, we'll install the required dependencies for the app. These include:
@wix/design-system– Ensures the UI follows Wix’s design guidelines, providing components likeBox,Text, andButton.@wix/editor– Enables interaction with the Wix Editor, including selecting and modifying site elements.@wix/media– Handles uploading the selected icon to Wix Media storage for use on the site.@wix/sdk– Provides API access to Wix services likefilesandelements, allowing the add-on to modify editor elements.vite-plugin-mkcert– Enables HTTPS support for local development, which is required for secure communication with Wix.vite-plugin-node-polyfills– Ensures compatibility with Node.js APIs within a Vite-based front-end environment.@emotion/react&@emotion/styled– Required by Material UI for styling components dynamically.@mui/icons-material&@mui/material– Provides the Material UI components and icons used for the icon selection interface.
-
Open
package.jsonand add the following dependencies under"dependencies":Copy -
Under
"devDependencies", add:Copy -
Install the dependencies:
Copy
Configure Vite
Update the vite.config.ts file in your project root with the following code to enable HTTPS for local development and add Node.js polyfills:
Create application files
We'll now create the core application files needed for the project:
main.tsx: This is the entry point of your application. Update it to import Wix Design System's style sheet.App.tsx: This file contains the main structure of the app, showing a button for adding icons, a loader for upload states, and a message for the user.Icons.tsx: Displays the available icons in the library using Material UI'sIconButton. Icons can be selected, and a state is updated for the chosen icon.useIconsManager.tsx: Manages icon selection, uploading, and handling interactions with the Wix media service. This includes logic for converting the selected icon into an SVG and uploading it to site's media files, and applying it to the selected element in the Wix editor.
Ensure your src directory includes App.tsx and main.tsx files and update their content as follows:
src/main.tsx
src/App.tsx
In your src directory create the following files:
src/Icons.tsx
src/useIconsManager.tsx
Step 2 | Run your project
Start the development server by running the following command in your terminal:
Once the server starts, Vite will provide a local development URL (typically https://localhost:5173). Open your browser and navigate to this URL to preview your app.
You can view and interact with the UI in your browser. However, the add-on functionality will not work outside the Wix Editor. In the next step, we'll set it up as a Wix app extension so we can test it properly within the Wix Editor.
Step 3 | Set up your app in the Custom Apps page
To make the add-on available for installation on sites, we'll create a Wix app and set up an add-on extension.
-
In the Custom Apps page, go to My Apps, and then click Create New App.
-
Select Build from scratch.
-
In the left sidebar, select Extensions, and then click Create Extension.
A panel opens, showing the available extension types. -
Find the Editor Add-on extension and click Create.
-
Configure the add-on’s basic data:
- Add-on name: Enter a name for your add-on, for example,
Get Icons. - Panel URL: Enter the localhost URL provided by Vite in the previous step.
- Panel width: Choose
Smallto match the size of most native editor panels. - Panel height: Set the height to
400 px.
- Add-on name: Enter a name for your add-on, for example,
-
Under Market listing, fill in the Teaser field with a short description, such as
Import icons from the Material UI library. -
Click Save.
-
Add the required permissions to the app so it can access a site's media files:
-
In the left sidebar, select Permissions, and then click Add Permissions.
-
Find the Manage Media Manager permission scope, select it, and then click Save.
-
Your add-on extension is now available for installation on a site.
Step 4 | Test your add-on in the editor
To test the add-on, we'll install it on a site:
-
In the top right corner of your app's dashboard, click Test App and select Test on dev site.
-
Select an existing development site or click + Create Dev Site to create a new site. Select the editor and the Wix Business Solution you want to use and click Create Dev Site.
-
Click Test App. Wix installs your app and opens the site in a new tab. You can set which site page opens in your app settings. If you don't set a page, the site editor opens by default.
-
In the editor's Tools menu, select Editor Add-ons, and then select your add-on.
Your add-on’s panel is displayed. -
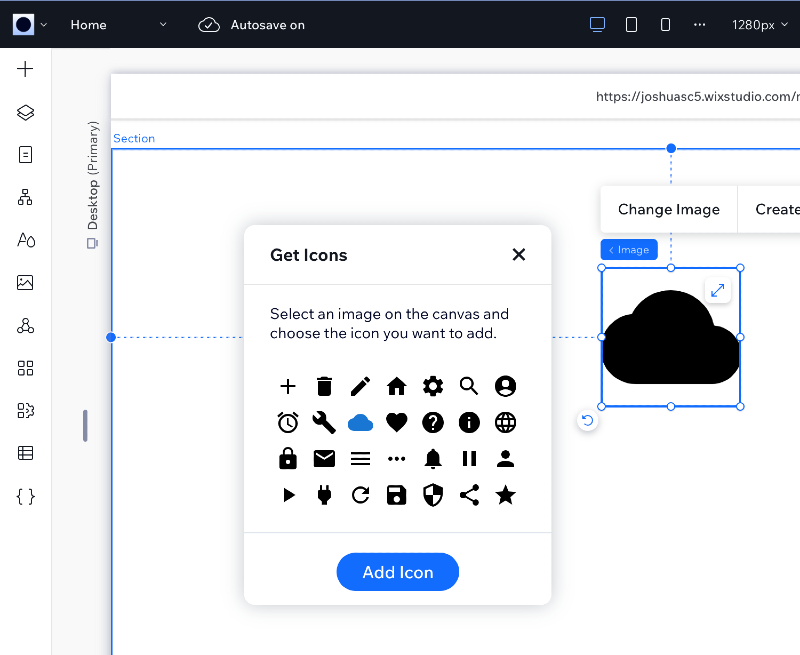
Add an image element to the page and select it.
-
Select one of the icons in the add-on panel and click Add Icon.
The add-on should successfully upload the icon to the site's media files and apply it to the selected image element.
What’s next
Now that you've learned how to set up a self-managed editor add-on, you can start thinking about building your own app. Here are a few resources to get you started:
- Learn more about editor add-ons.
- Learn more about self-managed apps.
- Explore our JavaScript SDK.
- Discover opportunities for your next app by exploring our list of top user-requested features.
Last updated: 17 June 2026