Add Self-hosted Dashboard Page Extensions
The dashboard page extension adds an iframe page to a site dashboard. Add a self-hosted dashboard page in your app's dashboard.
Note: For a more streamlined approach to developing your dashboard page, try out the Wix CLI or Blocks instead of self-hosting.
Add a dashboard page
- Build your extension using the technologies of your choice. Make sure your iframe extension:
- Is hosted on a publicly accessible server.
- Is served on an
httpsURL, not anhttpone. For security reasons, the app dashboard does not support making requests to non-httpsservers.
- Select an app from the Custom Apps page in your Wix Studio workspace.
- Go to Extensions and click + Create Extension.
- In the Choose the extension you want to create modal, select Dashboard Page and click Create.
- On the Dashboard Page extension configuration page, fill in the following fields:
| Field | Description |
|---|---|
| General > Name | Required. An internal name used in the app dashboard to manage this page. |
| General > Extension ID | A unique Wix-generated ID used to identify this extension. Use this identifier with the Dashboard SDK to trigger navigation between your app’s pages. |
| Page Info > iFrame URL | Required. Your app server’s address. Content hosted there is rendered in the iFrame on the dashboard. The app instance data is appended to the iFrame URL as an app instance query parameter, instance, so that you can identify the site owner when they view your page. Note: For security reasons, your app must be hosted on an https address. |
| Page info > Relative route | Required. A path suffix to append to the URL when users visit your page in the dashboard. For example, https://manage.wix.com/dashboard/<site_identifier_guid>/app/<app_identifier_guid>/<relative_route_used>. |
| Page info > Hide the sidebar menu when your page is open | Whether to hide the sidebar menu when your dashboard page is viewed. |
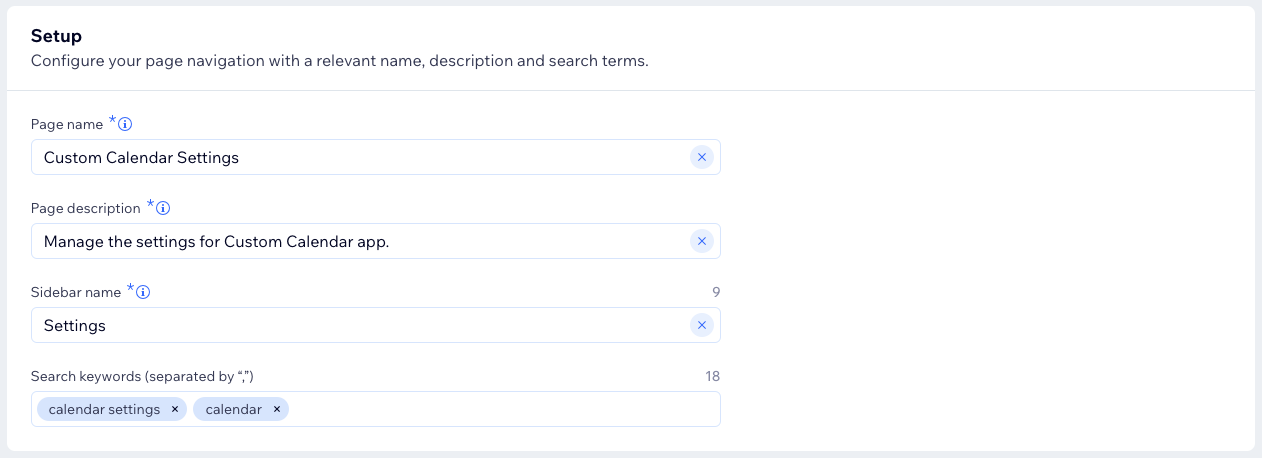
| Setup > Page name | Required. A full name for the dashboard page. This name appears in search results and in the Favorites and Recently Used sections of your dashboard. You should add your top-level menu name to give it full context when it appears, for example "Custom Calendar Settings". |
| Setup > Page description | Required. A description for the dashboard page. Appears in the dashboard search results. |
| Setup > Sidebar name | Required. A name for the dashboard page. Appears in the sidebar menu under your app's name. |
| Setup > Search keywords | Keywords that when searched for in the dashboard will return this dashboard page in the search results. |
| Search anchors > Search title | Title of the section of the dashboard page. Appears in the dashboard search. |
| Search anchors > Search description | A description of the section of the dashboard page. Appears in the dashboard search. |
| Search anchors > Search keywords | Keywords that when searched for will return this section of the dashboard page in the search results. |
| Search anchors > Anchor query param | Specific section on the dashboard page to send user to when search title is selected in a dashboard search. |
- Click Save to save your changes.
Manage and customize your dashboard page
Now that your dashboard page is set up you can manage and customize your dashboard page.
-
Manage your dashboard page with the dashboard SDK.
Access data from the dashboard page using the
observeState()SDK function in your dashboard page extension:CopyNote: If you use a menu plugin extension to navigate to your dashboard page, data from the page hosting the menu plugin, such as an ID, is passed through the menu plugin slot to your dashboard page extension.
-
Design your dashboard page's UI. Consider using the Wix Design System, a collection of reusable React components that you can use to make your app appear and feel like a native Wix app.
Link directly into your app
If you want to notify a user about something that happened in your app or an action they must take, you can direct them to your app instance installed on a specific Wix site. Use the following URL: https://www.wix.com/my-account/app/<appID>/<appInstanceID>.
You can get the app instance ID by parsing it from the app instance query parameter in the iFrame URL, or by calling the Get App Instance endpoint.
Organize multiple dashboard pages
Your app can include multiple dashboard pages, for example, an overview page and a settings page. Multiple dashboard pages are bundled in the sidebar menu under your app’s name. When a user clicks or hovers over it, a submenu appears with all your dashboard pages.
To manage multiple dashboard pages:
-
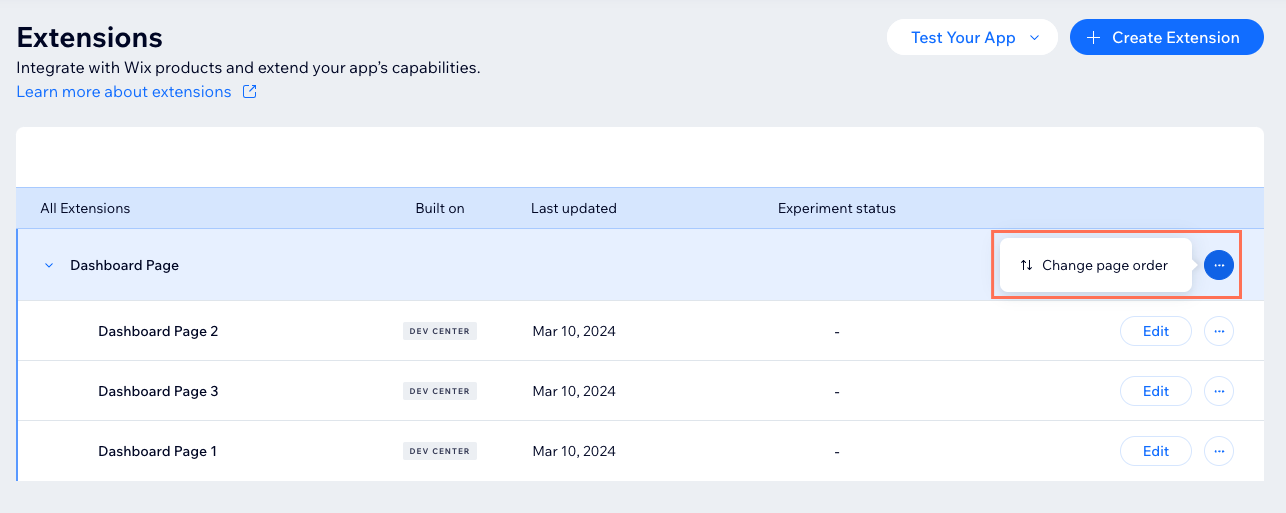
Go to Extensions in your app's dashboard.
-
In the top-level menu item, click the ellipsis icon and click Change page order.

-
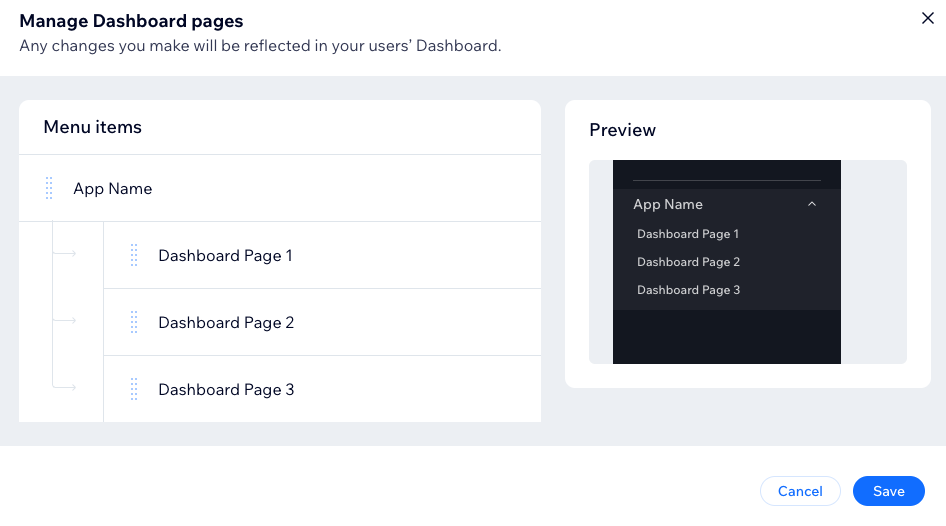
In the Manage Dashboard pages modal, rearrange the pages as you’d like them to appear in the side menu of the user’s dashboard.

The top-level menu item displays your app’s name, with dashboard page extensions listed as sub-items. Each extension is named based on the value specified in the Sidebar name field on its configuration page.
-
You can rename any of these menu items by hovering over them and clicking the pencil icon.
-
Click Save.
Page name and sidebar name
The page name appears in multiple places on the user's dashboard without any additional context, such as in search results or in a user's Favorites section. If you don't provide the context it can be confusing. For example, if your app has a dashboard page "Settings", then when it stands alone it isn't clear what this page accesses the settings for. Therefore, we recommend using something like "App Name Settings" for the page name.
The sidebar name appears in the side menu of the user's dashboard below your app's name, so no additional context is necessary.

Search anchors
The information in the Search anchors section enables users to search for specific sections within the dashboard pages of your app. When users select one of these anchors from their search results, they navigate directly to that section of the dashboard page.