Set Up a Freemium Business Model
A freemium business model lets you offer a basic version of your app for free and encourages users to upgrade for additional, premium features. Your app is free by default, and you add at least 1 single and/or recurring (monthly or yearly) paid plan.
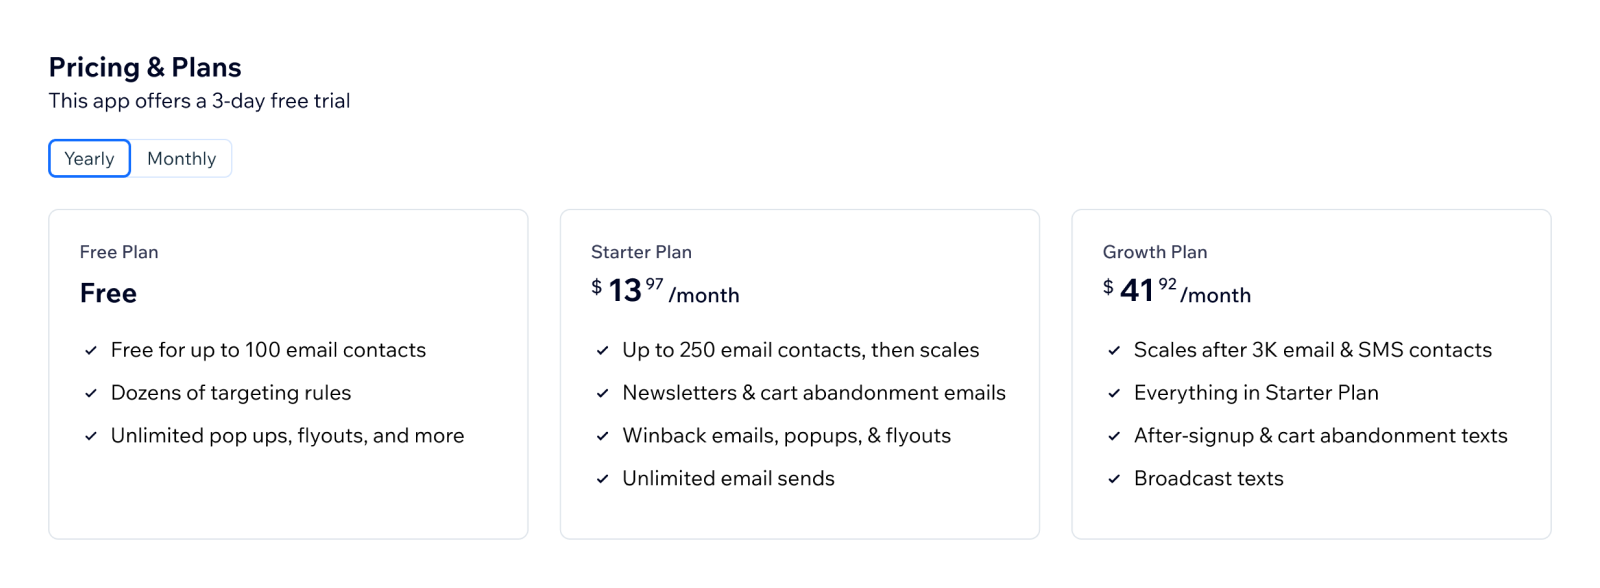
This is what it looks like on your App Market listing:
In this article you will:
- Decide whether to offer a free trial.
- Set up pricing plans for you freemium business model.
- Set up a pricing page for users to select their preferred plan.
- Learn how to identify and manage paid users.
- Learn how to test your app.
Don’t want to offer a free plan? Set up a premium, pay as you go, or usage-based business model instead.
Step 1 | Choose whether to offer a free trial
A free trial is optional – it can be a great way to show off your app's best paid features for a limited time. After the trial, users decide if they want to pay.
Note: A free trial isn’t the same as the free plan in a freemium model.
To do this, enable Free Trial and input the amount of days you want to offer it for. You manage both the UI and code for the trial on your side.
Learn how to manage free trials.
Step 2 | Add Pricing Plans
A freemium model always includes a free installation option. You can add multiple paid plans each offering their own set of features and benefits.
Note: Free apps are installed directly without going through a pricing page. The pricing page only appears when users are purchasing or upgrading to a paid plan.
- Go to the Pricing page in your app's dashboard.
- Select Freemium under Business model.
- Go to Pricing Plans and click Add Plan.
- Choose the specific Billing model associated with this plan:
- Recurring (Monthly and / or Yearly): A stable, recurring fee that is billed monthly or yearly. You can offer a discount to encourage users to sign up for a Yearly plan.
- Single: A non-recurring upfront fee each time users use a service within the app. For example, credits for sending SMSs.
Note: If these billing models don't meet your needs, Wix also supports flexible custom and usage-based models that handle variable fees. For example, when shipping fees are taken within your app or you charge per emails sent in the last month. Please open a ticket to request access.
- Set a price: Add the price you want to charge for each of your app's paid plans.
- Add plan details:
- Plan Name: Add a name for each plan (max. 23 characters). Aim to structure the names so they have some sort of progression, such as 'Beginner', 'Intermediate', and 'Pro'.
- Benefits: Add up to four benefits for each plan with a clear distinction and progression for each plan, with stronger benefits reserved for plans with a higher price. You can also write out the plan’s benefits in paragraph form.
- Click Add Plan.
- Use the Visible toggle next to each plan to control whether it is displayed in the Wix App Market. The Wix pricing page displays up to 4 recurring plans. If you add more than 4 recurring plans, mark only 4 as visible, and display the others on an external pricing page.
- Click Save.
- To check how it looks, click Preview Listing.
Change a pricing plan: You can adjust or delete your plans or add new ones for a number of reasons. For example, changes to your product, to stay competitive, or just to increase prices. Learn how to change pricing plans.
Step 3 | Set up a pricing page
Set up a Wix pricing page to showcase your paid plans with a benefits table. The pricing page displays up to 4 recurring plans. Learn how to set up a Wix pricing page.
Alternatively, if you prefer to host your own pricing page, you can set up an external pricing page.
Step 4 | Identify and manage paid app users
Your app needs to present the correct user experience for each customer, depending on the plan they selected. There are 2 key elements involved in this:
- Being able to detect those users and identify when changes occur to their plan. We offer several different methods for this.
- Delivering the right user experience within your app. For example, activating and deactivating specific features.
Learn how to identify your users.
Step 5 | Test your pricing flow
You should test the app’s upgrade flow as a user. Make sure that:
- Premium features that were disabled in the free plan are now enabled in the paid plan.
- If you have multiple plans, check that the correct features are enabled / disabled between them.
- Test your free trial flow (if offered).
See also
Last updated: 27 November 2025