Step 4 | Create a Dashboard Page to Manage the Catalog
Instead of requiring the Wix user to enter the CMS and directly edit the Poems collection, we’ll create dashboard pages where they can add and remove poems. This is a more comfortable interface, especially for a user who doesn’t work frequently with databases.
In Wix Blocks you can create dashboard pages that are added to the dashboard of a Wix site upon installation. These pages appear under the Apps page in a Wix user’s dashboard.
To add a dashboard page in the Blocks editor:
-
In the menu on the left, click on the Dashboard Interface
 icon and click + Create Extension. Select the Dashboard page option.
 -
Blocks opens a new dashboard page for you in the editor. Next to the title of the dashboard page, click More Actions
 > Rename and change the name of the page to Poems Manager.
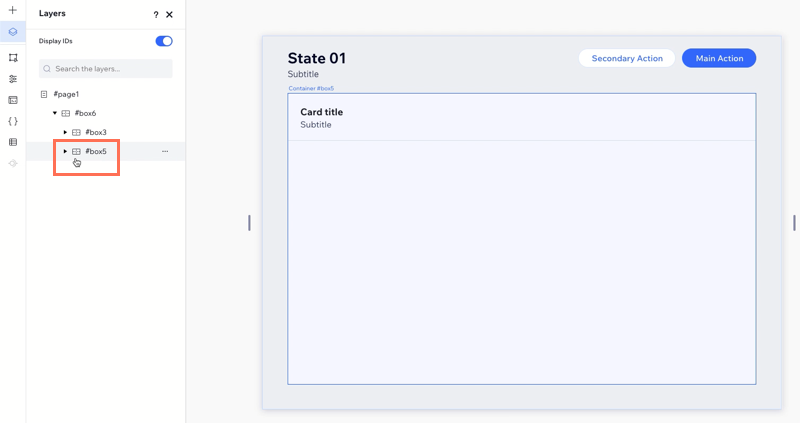
The Poems Manager page already has some basic layout elements. You can see these elements more clearly by clicking the Layers
 icon in the left menu.
 -
Hover over each of the elements in the page to understand which label corresponds to what. First, locate the label that corresponds to the title. Click More Actions
> Rename and rename the box to pageTitleso that we can distinguish it later.This first dashboard page will display the poems in the catalog database, and allow the Wix user to delete poems. So let’s give it a fitting title and subtitle:
- Title: Poems Manager
- Subtitle: Add and remove the poems your site offers
-
Delete the Secondary Action button, and edit the Main Action button settings to change the button text to Add a poem. Change the element ID of the Add a poem button to
#mainAddPoemButton.
The upper box on the dashboard page should now look like this:

-
Now locate the label that corresponds to the card on the dashboard page.
In general, we want the Poems Manager dashboard page to display the poems listed in the product catalog. However, if the catalog is empty, it should instead display a message prompting users to add a poem. Since our dashboard page will look different depending on the state of the collection, we need to incorporate that state into the card by using a multi-state box.
Next to the box that corresponds to the card, click More Actions
, and select Place in Multi-State Box.
In the box itself, first delete the subtitle and edit the title to say Your Poems. This can remain the same in both states.
Now rename the box
emptyStateto distinguish it from the opposite state.In the lefthand menu, click Add Elements
 > Design Patterns > Empty States and select the Add your first product option.
Edit the text and the button so that the empty state element looks like this:

Then, select the button and change its ID to
#addFirstPoemButtonto distinguish it from the Add a poem button at the top of the page.This completes the dashboard UI for the empty state. We’ll add code shortly. Let’s create the second state next.
-
Add a second box to the multi-state box and rename it
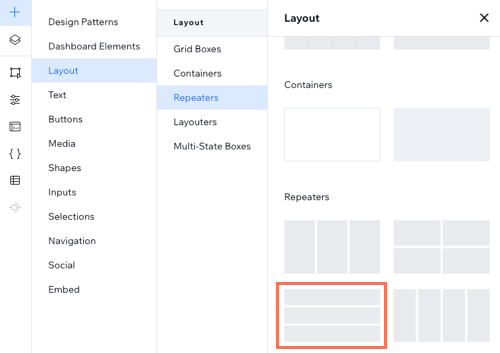
poemsList. Again, delete the subtitle and edit the title of the box to Your Poems.For this state, we’ll use a repeater to display poems in the collection. Go to Add Elements
> Layout > Repeaters and select the 4-square repeater.
Adjust the repeater’s position on the page.
In the Properties & Events panel, change the repeater ID to
listOfPoemsand the ID of each card topoemCard. Then add the following elements inside the cards:- A Heading 2 text element
- A Heading 4 text element
- An icon button like this:

-
We can add functionality to the
poemsListstate simply by connecting it to the CMS. Select the repeater, and in the action bar click Connect to CMS .
.Though we already created a dataset for the item page, that dataset doesn’t apply to the dashboard interface. Therefore, we need to create a new one. In the menu on the right, click + Add a Dataset to create a new dataset. Select the Poems collection as the one we want to connect to, and name the dataset Poems Dashboard so we can distinguish it from the item page dataset:

Click Create. The righthand menu displays the new dataset.
We first need to edit the dataset settings to allow the dashboard to write to the collection. From the righthand menu click Dataset Settings.

Set the dataset mode to Read & Write.

Now connect the elements in the repeater card as follows:
- Heading 2 text: Title
- Heading 4 text: Description
- Icon button: Under Connections > Click action connects to, select Delete.
Our nonempty state now can display poems from the collection and delete them. Next we’ll create the capability to add poems from the dashboard.
-
In order to add poems to the collection, we’ll create an entirely new dashboard page. Return to the Dashboard Interface
section and at the bottom of the menu click + Create Extension. -
Rename the new dashboard page to Add poem. We actually don’t want this dashboard page to be visible in the menu–we only want a Wix user to access it from the Poems Manager page. To set this behavior, click More Actions
> Hide from dashboard menu. -
To set up the UI for the Add poem page, first edit the existing elements as follows:
- State 01: Add a poem
- Page subtitle: delete
- Card title: Poem Details
- Card subtitle: delete
- Main Action button: Change text to Save and change the ID to
#savePoemButton. - Secondary Action button: Change text to Cancel and change the ID to
#cancelButton.
When you complete these changes, the top of your dashboard page should look like this:

-
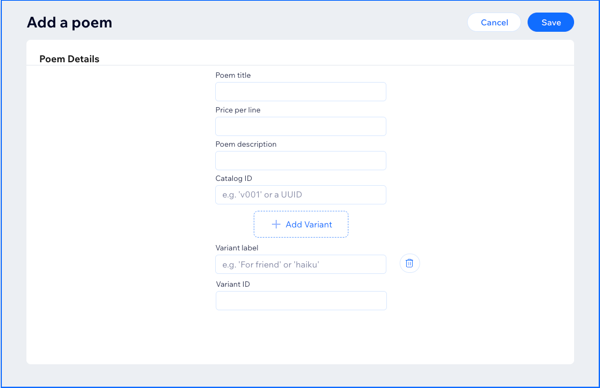
Now we’ll create a form that will allow the user to add a poem’s details. To do so, add the following elements in the order shown and set their IDs in the Properties & Events panel:
Element type ID Text Text Input #poemTitle Poem title Text Input #poemPrice Price per line Text Input #poemDescription Poem description Text Input #poemId Catalog ID Upload + Add Product Button 
#addVariantButton Add Variant Beneath these elements, add a repeater:
We’ll use this repeater to give the Wix user control over how many variants they want to add.
Adjust the size of the repeater to align with the other elements, and change the repeater’s ID to
variantsList. With the repeater still selected, in the right menu edit the number of elements: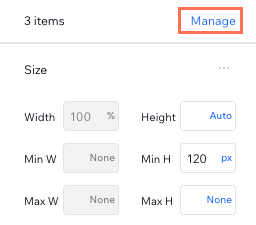
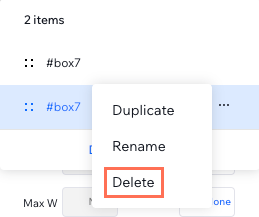
We want to start with just one element in the repeater, so delete 2 of the boxes:
Add the following elements to the remaining box in the repeater:
Element type ID Text Text Input #variantLabel Variant label Text Input #variantId Variant ID Trash can icon button #deleteVariantButton The complete UI should look like this:
Now that we’ve designed the dashboard UI, in the next section we’ll add the code that will enable the user to actually add a new poem to the collection.
Dashboard code
Before we dive into the code, let’s consider exactly what we need the code to do:
- Insert the user inputs into the collection when the user clicks Save.
- Return to the Poems Manager page after the user clicks either Save or Cancel.
- Add new fields for variant information each time the user clicks + Add Variant.
- Delete a set of variant fields when the user clicks
#deleteVariantButton.
As it turns out, the trickiest part of the code will be controlling the UI to add and remove variants, so we’ll start with that.
-
Open the code panel for the Add poem page. Delete the existing code and add the following:
CopyLines 1-2. We import 2 packages for handling data and moving between dashboard pages. These packages aren’t necessary for the repeater code but will become important later.
Line 5. Inside the
onReady()handler, we first create a blank array calledvariantsarray. We’ll use this array to set the#variantsListrepeater data, which will control the number of variants that appear in UI.Line 6. Hide the variants list when the Add poem page first loads.
-
Next, we add the logic to add a variant:
CopyLet’s start by breaking down the
onClick()handler code first:Lines 14-16. Unhide the repeater in case it was still hidden.
Lines 18-21. Perform a calculation to track the correct index. This helps later if we need to delete a variant.
Lines 23-28. Create a new item to insert into the array. The
valueandlabelfields, which correspond to the 2 input fields in the repeater item, are blank. The result is that a new set of blank fields is added to#variantsList.Lines 29-30. Push the new item to
variantsArrayand set the repeater data equal to the updated array. This triggers theonItemReady()handler above.This brings us back up to the top of the code:
Lines 2-3. Create the 2 new input fields with blank values.
Lines 4-10. Handle the behavior for when the
#deleteVariantButtonis clicked. Remove the selected item fromvariantsArrayand set the repeater data equal to the reduced array.The end result of all this logic is behavior like this:

-
Let’s move on now to the part of the code that controls the save and cancel actions. When both of these actions complete, we want to navigate the user back to the Poems Manager dashboard page.
Previously, we imported the
wix-dashboardpackage. In Blocks, we can use thenavigate()function from this package to open a different dashboard page from our current one.Let’s start with the code for the Cancel button as it is simpler. When the user clicks the Cancel button, we don’t need to store anything. We can simply navigate back to Poems Manager:
CopyThe only piece of information we need here is the ID of the page we want to go to, in this case Poems Manager. To find this ID, open the Dashboard Interface
and click More Actions > Page settings next to Poems Manager. Next to Page ID click Copy and close out of the modal.Paste the copied ID as the value for the
pageIdparameter.We can start the Save logic in a similar manner:
CopyHowever, when we save we also need to store the details that the user input. To do so, add the following code before
navigate():CopyLines 1-10. Get the values from each item in the
#variantsListrepeater.Lines 11-17. Create a new object containing the values of all the input fields, including all the variants.
Line 18. Using the
wix-datapackage we imported at the top of code, insert the new poem data into the Poems collection.This completes the code for the Add poem page. Here’s the full code:
CopyNext, we'll write the code for Poems Manager.
-
Return to the Poems Manager page in the dashboard interface and open the code panel. We’ll start with the import statements we added on the other page:
Copy -
Recall that our Poems Manager page has 2 states: empty and nonempty. Whenever the page loads, it needs to determine which state to display. To determine the state, we simply query the Poems collection to check if there are items to display.
Below the import statements, add the following function:
CopydetermineManagerState()queries the collection to see if there are poems, and based on the length of the results sets the current state of the multi-state box.Beneath
determineManagerState(), we add anonReady()handler:CopyLine 2. Determine the correct state when the page first loads.
Line 4-6. Determine the correct state after an item has been removed from the repeater that lists the poems. This handles the edge case of a user deleting the last poem in the list.
Lines 8-18. When a user clicks any button to add a new poem–whether in the empty state or not–navigate to the Add poem page. The page ID can be located in the dashboard interface section under More Actions.
Here’s the full code for the Poems Manager page:
Copy
Our app now has 2 functioning dashboard pages, along with a working item page. You can preview some of the features in Blocks. We’ll test everything in the last step of this tutorial, but first, we need to complete the final part of our app and implement the Get Catalog service plugin.
Last updated: 29 June 2026