Wix eCommerce (Checkout & Orders): Checkout Page
The following slots and APIs are available when building a site plugin for the Checkout Page.
Important: Some plugins may not support automatic addition upon installation, even with autoAddToSite enabled. In that case, you must:
- Create a dashboard page to manage your site plugin that calls
addSitePlugin()to let users add the plugin to the checkout slot. - Release at least 1 version of your app so the site plugin extension is registered with Wix for
addSitePlugin()to work properly.
Slots
The following image shows slots in the checkout page, into which users can add plugins.
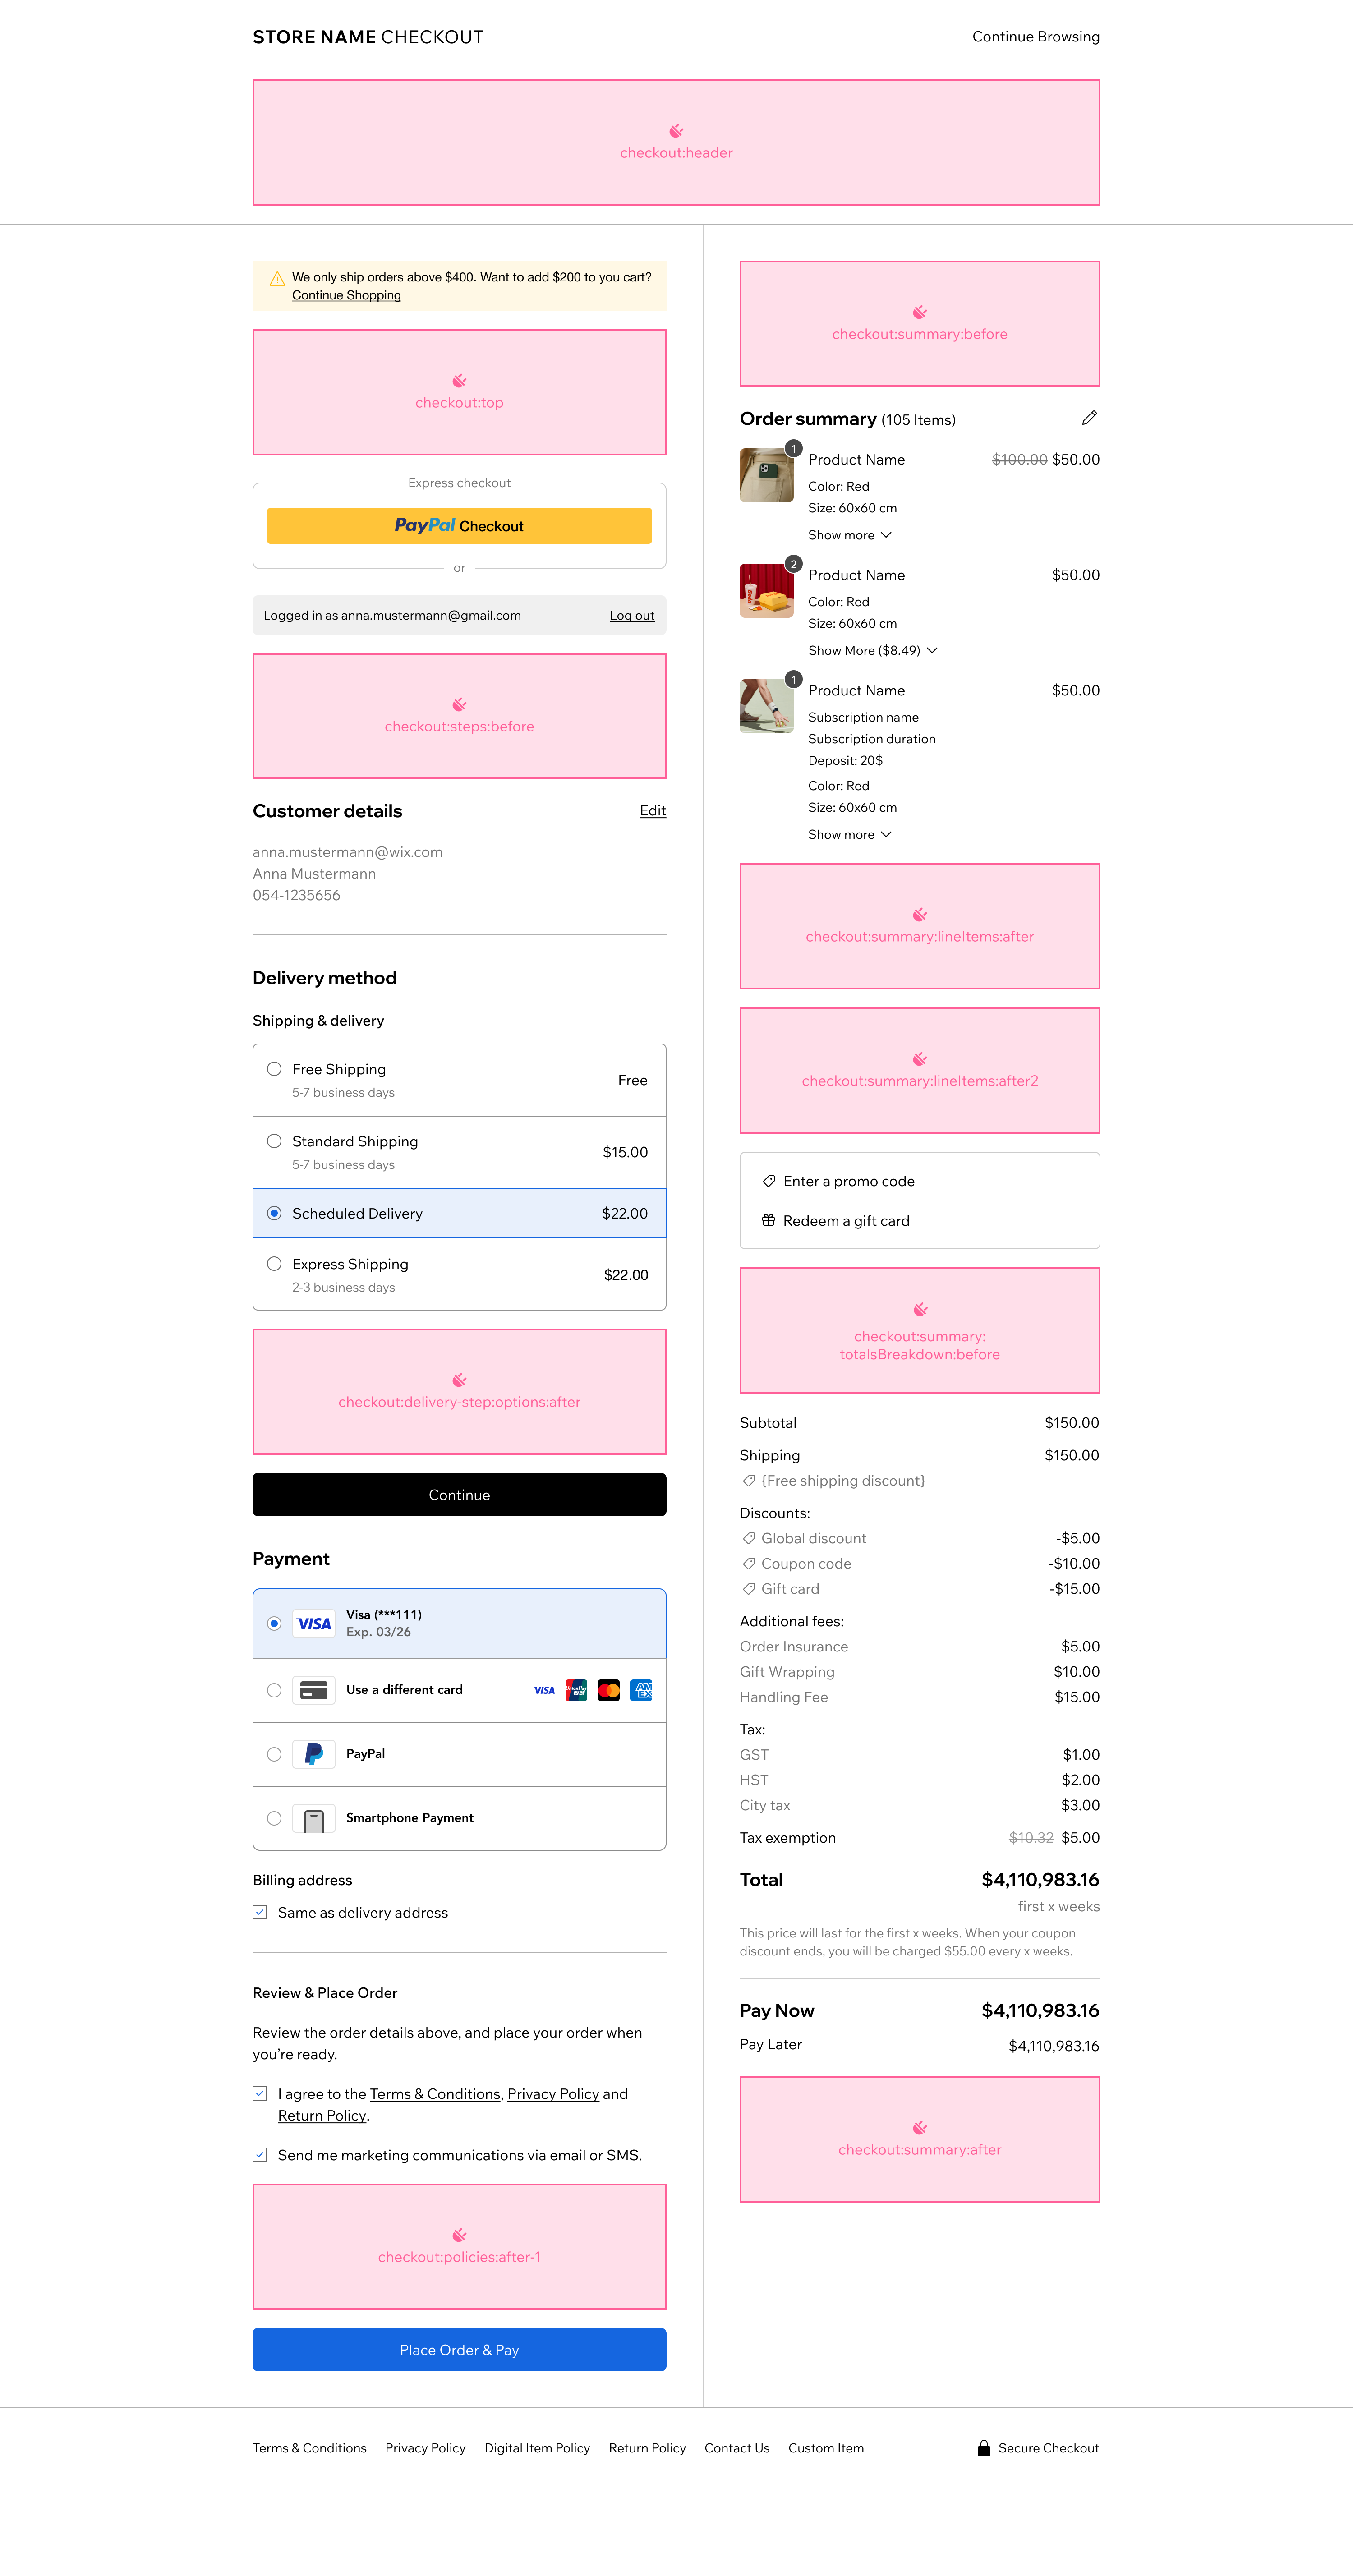
The slots are represented by the following placement object:
Provide the following values for each property:
| Key | Value |
|---|---|
appDefinitionId | "1380b703-ce81-ff05-f115-39571d94dfcd" |
widgetId | "14fd5970-8072-c276-1246-058b79e70c1a" |
slotId | ID of the slot you want as displayed in the image above. Supported values:
|
For example, for your widget to appear before the totals breakdown in a checkout page use the following object in your configuration:
Checkout plugin API
Use the Checkout plugin API to integrate with the plugin's host.
The API provides data about the current checkout process and lets you define a callback function that's invoked whenever changes are made in the checkout.
Note: The checkout:delivery-step:options:after slot uses a different API.
Properties
| Name | Type | Description |
|---|---|---|
checkoutId | String | The ID of the current checkout process. |
stepId | String | The ID of the step currently rendered in the checkout page, which can be one of the following:
|
checkoutUpdatedDate | String | Date and time the checkout was updated. |
slotBrand | Object | The resolved brand styling for the section where your slot is rendered, so your plugin can match the merchant's checkout theme. Always defined, with sensible defaults when the merchant hasn't customized their checkout. See Brand styling. |
Functions
| Name | Type | Description |
|---|---|---|
onRefreshCheckout() | (refreshCheckoutCallback: () => void) => void | An event handler that accepts a callback function that's invoked by a widget. The widget should call the function whenever the checkout needs to be refreshed. |
Code example CLI custom element
When building a checkout plugin with the CLI, the checkout API properties are passed as custom element attributes in kebab-case (for example, checkoutId becomes checkout-id).
Code example: Velo
Brand styling
Merchants can theme their checkout (colors and corner radius). Checkout can't style your slot for you, so it passes the resolved design to your plugin as data in the slotBrand property, for you to apply in your own markup.
The values are:
- Per-slot: your slot receives the colors of the section it renders in — a form slot gets the form section's background, a summary slot gets the summary section's background, and a header slot gets the header's. In the single-column layout used on narrow screens, summary slots receive the form section's colors.
- Always defined: checkout supplies sensible defaults when the merchant hasn't customized their checkout.
- Contrast-safe:
textColorandbuttonTextColorare pre-resolved for contrast against their section's background.
Note: Checkout re-pushes slotBrand on every change, including live edits in the checkout composer. Read it reactively and reapply it each time. Don't cache a value read once at startup.
The slotBrand object has the following properties:
| Name | Type | Description |
|---|---|---|
backgroundColor | String | Background color of the section behind your slot, as a hex value. |
textColor | String | Text color for the section where the slot sits, as a hex value. Pre-resolved for contrast against backgroundColor. |
buttonColor | String | Color of the checkout's primary button, as a hex value. |
buttonTextColor | String | Text color of the primary button, as a hex value. Pre-resolved for contrast against buttonColor. |
selectionColor | String | Color of radio buttons and checkboxes, as a hex value. |
cornerRadius | Number | Default corner radius, in pixels, for the section where the slot sits. |
The only difference between the CLI and Velo is how slotBrand reaches you — a JSON-encoded string attribute (CLI) or a ready-to-use object (Velo). Read it, apply the values, and reapply on every change; how you apply them is framework-specific.
When building with the CLI, checkout passes slotBrand as the slot-brand custom element attribute, JSON-encoded. Parse it in attributeChangedCallback() and reapply it on each change:
In Velo, slotBrand is a ready-to-use object on $widget.props, so you don't need to parse it. Apply the same values to your elements through their style APIs when the widget loads, and again on every change with $widget.onPropsChanged():
Important: Checkout paints a white background behind your slot, so anything your slot doesn't cover renders as white. To avoid white gaps:
- Paint
backgroundColoron your outermost element, and usepaddingrather thanmarginfor spacing. - Don't apply
cornerRadiusto the outermost element, because the rounded corners expose white notches. Keep the outermost element square and full-bleed, and apply the corner radius (and any border) to a nested element.
If you don't use slotBrand, your slot renders on a white background, which can look broken on a dark-themed checkout.
Dashboard page example
Checkout plugins require a dashboard page so users can add the plugin to their checkout page. Use addSitePlugin() to trigger the addition flow. The pluginId is the ID of your site plugin extension, which you can find in your app's dashboard under Extensions.
Important: Some plugins may not support automatic addition upon installation, even with autoAddToSite enabled. In that case, you must:
- Create a dashboard page to manage your site plugin that calls
addSitePlugin()to let users add the plugin to the checkout slot. - Release at least 1 version of your app so the site plugin extension is registered with Wix for
addSitePlugin()to work properly.
Delivery step options slot API
The checkout:delivery-step:options:after slot uses a different API than the other checkout slots.
Properties
| Name | Type | Description |
|---|---|---|
checkoutId | String | The ID of the current checkout process. |
checkoutUpdatedDate | String | Date and time the checkout was updated. |
selectedDeliveryOptionCarrierId | String | The ID of the carrier for the selected delivery option. |
selectedDeliveryOptionId | String | The ID of the selected delivery option. |
deliveryStepState | String | The current state of the delivery step. Possible values: 'open' or 'summary'. |
slotBrand | Object | The resolved brand styling for the checkout's form section, where this slot renders, so your plugin can match the merchant's checkout theme. Always defined, with sensible defaults when the merchant hasn't customized their checkout. See Brand styling. |
Functions
| Name | Type | Description |
|---|---|---|
onRefreshCheckout() | (callback: () => Promise<void>) => void | An event handler that accepts a callback function that's invoked by a widget. The widget should call the function whenever the checkout needs to be refreshed. |
disableContinueButton() | (callback: (isDisabled: boolean) => void) => void | An event handler that accepts a callback function to control the checkout's continue button. Call the callback with true to disable the button, or false to enable it. |
Permissions and webhooks
The following permissions are relevant for most checkout plugins:
- Wix Developers > Manage Your App: Added automatically.
- Stores > Read Stores: Required for accessing product and store data.
The following webhooks are relevant to most checkout plugins:
Design guidelines
The Checkout page is the final step in the customer's purchase process. Its layout is closed and can't be changed by users or third parties, and all Wix eCommerce sites share the same checkout structure. Merchants can customize the checkout's colors and corner radius, and your plugin can match those choices — see Brand styling.
Testing checkout plugins
To test a checkout plugin:
- Create a Premium development site. Select Wix Stores as the business solution.
- Install your app on the development site.
- If your plugin requires dashboard-based installation, go to your dashboard page and add the plugin to the checkout page.
- Initiate a checkout flow on the live site to verify your plugin appears and functions correctly.
Related Wix backend APIs
Checkout plugins usually need to integrate with Wix eCommerce's Checkout APIs, as well as other backend APIs.
In your site plugin or in your app's server code, you may want to perform actions or implement logic that's dependent on the state of the current checkout or related data.
The following Wix APIs may be useful:
- eCommerce APIs (JavaScript SDK, REST, Velo)
- Stores APIs (JavaScript SDK, REST, Velo)
Last updated: 14 September 2026