Tutorial | Create a Top Blog Posts App Using the Wix CLI
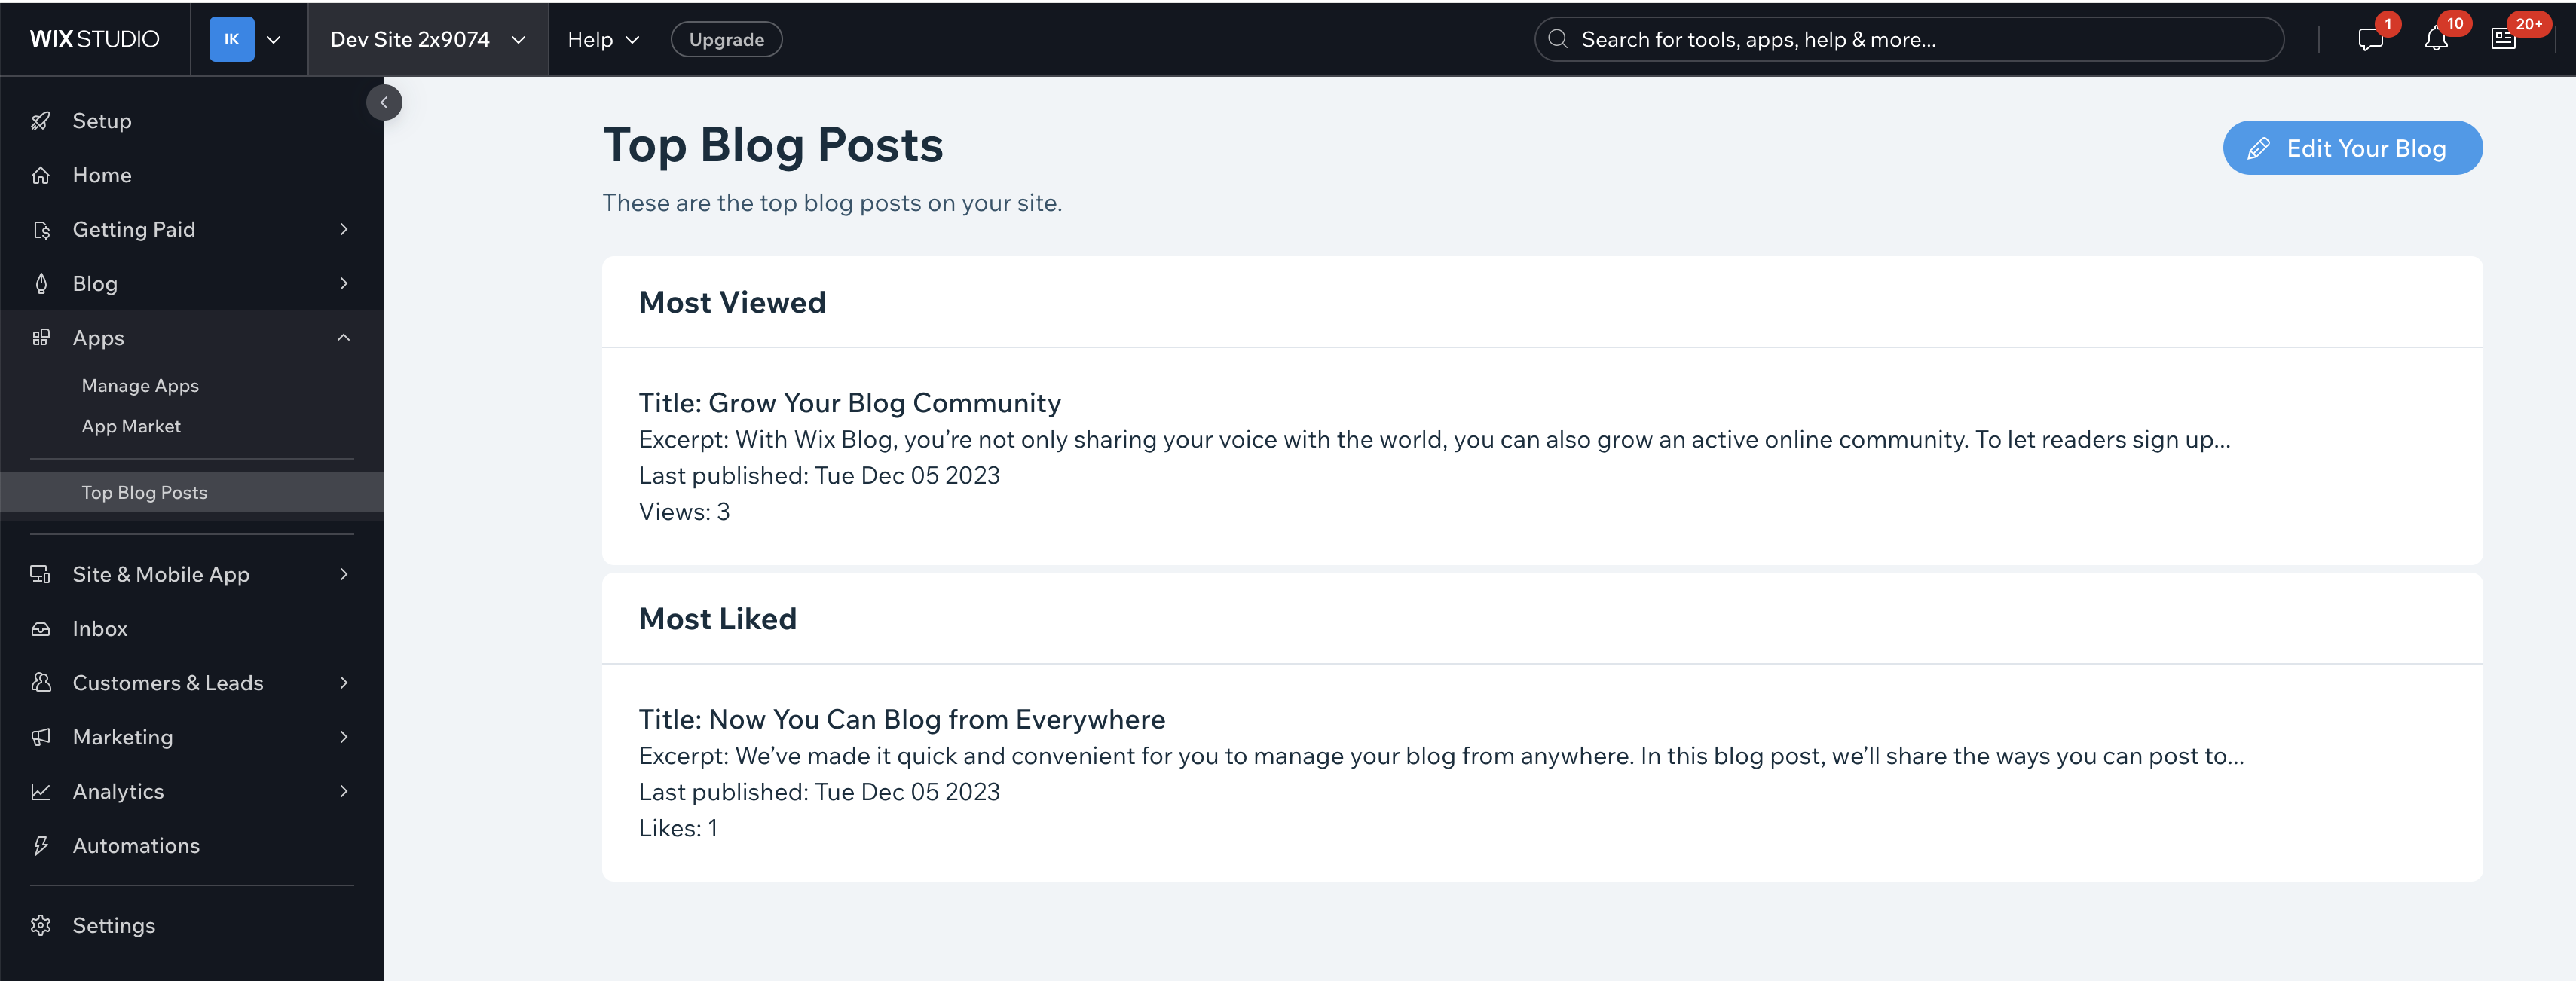
This tutorial demonstrates how to use the Wix CLI to build a Top Blog Posts app on the Wix Platform. The app contains a dashboard page that shows the most-viewed and most-liked posts of a Wix site's blog in two cards.
By following this tutorial, you'll learn how to:
- Build a dashboard page using the Wix Design System.
- Query blog posts and retrieve per-post metrics using the Wix Blog SDK.
- Navigate to a built-in Wix dashboard page from within your app, using the Wix Dashboard SDK.
The end result will look like this:
We'll use the following steps to build the Top Blog Posts app:
- Initialize the app.
- Create the dashboard page.
- Run a local development server.
- Add permissions.
- Set up Wix Blog.
- Develop the app.
- Display the top posts in the dashboard.
- Test the app.
- Build and deploy the app.
Before you begin
Before getting started, make sure that:
- You install Node.js (v20.11.0 or higher).
- You install npm or yarn.
- You're logged into your Wix Studio account. If you don't already have one, sign up for a Wix Studio account.
Step 1 | Initialize the app
We use the Wix CLI to initialize our Top Blog Posts app. In the process of initializing our app, the Wix CLI automatically:
- Creates a new app in the Custom Apps page of your Wix Studio workspace.
- Sets up a new folder for your app in your local file system. The folder includes:
- A
srcfolder containing initial boilerplate code for an app with a dashboard page. - A
package.jsonfile containing your app dependencies.
- A
- Creates a local Git repository for your app.
To initialize the app:
-
Open a terminal and navigate to the folder where you want to create your app.
-
Run the following command:
CopyIf prompted to install the
@wix/create-newpackage, pressy. -
Select Create a new Wix App.
-
Select Create a basic app.
-
Enter a name for your app. Let’s name our app
Top Blog Posts. -
Press
Enterto accept the default folder name (top-blog-posts). -
When asked to configure Wix MCP for your IDE, select your preferred MCP.
A green Success message confirms that your app has been registered in the Custom Apps page.
-
Press
Enterto accept the default namespace (top-blog-posts). -
Press
Enterto accept the default code identifier (top_blog_posts).
You now have a new app in the Custom Apps page, a new folder in your local file system, and a local Git repository for developing and testing your app.
Step 2 | Create the dashboard page
We use the CLI's generate command to create a dashboard page for our app.
To create the dashboard page:
-
Navigate to your newly created folder for your app.
Copy -
Run the following command and follow the prompts:
Copy -
When prompted for the kind of extension, select Dashboard Page.
-
When prompted for a page title, enter Top Blog Posts.
-
When prompted for the page route, press
Enterto accept the default (top-blog-posts).
Upon completion, the extension files are created at src/extensions/dashboard/pages/top-blog-posts/:
For more information about these files, see Dashboard Page Extension Files and Code.
Tip: The CLI's default scaffold also created a my-page extension at src/extensions/dashboard/pages/my-page/. You can leave it (it won't interfere with this tutorial) or delete the my-page/ folder to keep the dashboard sidebar showing only the Top Blog Posts page.
Step 3 | Run a local development server
Now that you’ve initialized your app, you can run a local development server to see the app in action, and view local changes as you develop your app.
To run a local development server for your app:
-
In the terminal, from your app's folder, run the following command:
Copy -
The CLI prompts you to choose a development site (test site), which you’ll use throughout this tutorial to run and test your app. You can choose an existing Wix site as your development site, or create a new one. Let’s Create a new Development Site. The newly created development site is automatically named Dev Sitex followed by a number (for example, Dev Sitex 12345), and can be found in your Wix account’s list of sites.
-
Follow the prompt to open the app installation page in your default browser. If the browser doesn’t open, install your app on your test site manually and skip the next step.
-
Click Agree & Add to install your app on your development site.
-
In the terminal menu, select Dashboard to open your development site’s dashboard.
-
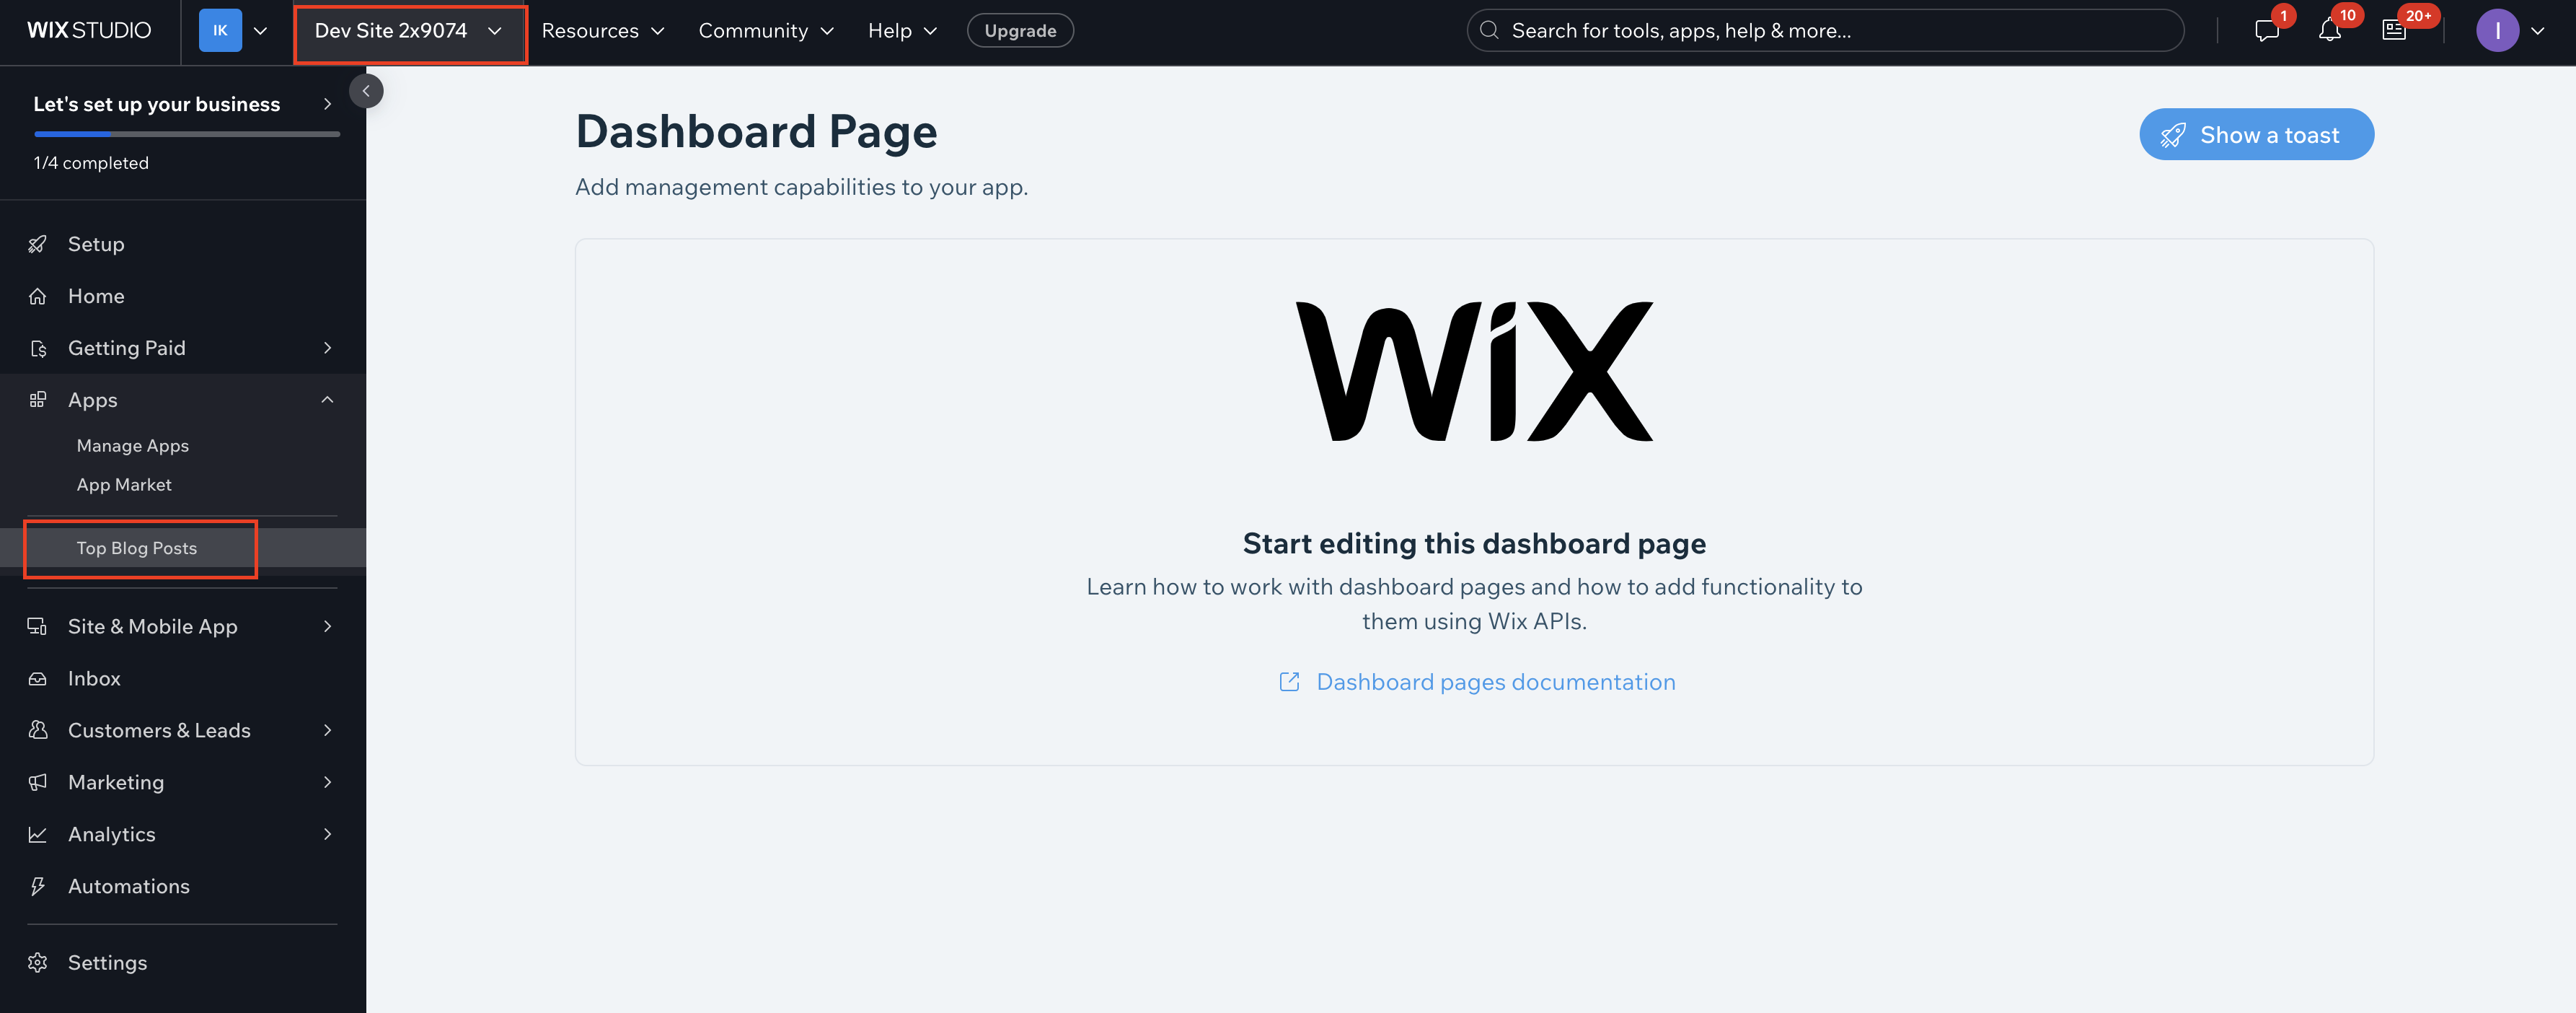
In the dashboard sidebar, click Apps > Top Blog Posts to see your newly created app’s dashboard page. We add the content of our app’s dashboard page in the next step.
Your app is now running on your development site. As you develop your app, any changes made to your app’s code are reflected in real time on your development site.
If your changes don’t show up, try refreshing the page, or closing and reopening the development site.
Step 4 | Add permissions
In this step, we'll add permissions for the app. Every SDK API requires specific permissions to use. In this app, we will use the queryPosts() and getPostMetrics() functions in the Wix Blog API to get a list of posts and retrieve their metrics.
To use these functions, we need to give our app permission requirements in the app dashboard. Once we do this, anyone installing the app will be prompted to grant the specified permissions.
Both queryPosts() and getPostMetrics() require the same scope: a read blog scope. Each method's reference page (linked above) lists the exact scope it requires in its Permission Scopes section, including the scope's ID (SCOPE.DC-BLOG.READ-BLOGS).
To add the scope:
- Go to the Permissions tab in your app's dashboard.
- Click Add Permissions.
- Search for the scope. Several scopes can have similar names, so match the one whose ID matches the scope ID shown on the method's reference page.
- Check its checkbox under Choose Permission Scopes and click Save.
For more information on configuring permissions, see Configure permissions for your app.
Step 5 | Set up Wix Blog
Before you can start coding, you need to set up Wix Blog on your site and app:
- Install the Wix Blog app on your test site. You can create some new blog posts, or use the sample ones provided by Wix.
- Publish the site and “like” one of the posts. You can find the blog at
https://{your-site-url}/blog. - Open your app’s dashboard in the Custom Apps page.
- Click Test App, then select Test on dev site. In the Select a development site dialog, choose your dev site and click Test App. The app is reinstalled on your dev site with the latest permissions.
Step 6 | Develop the app
Next, we will use the JavaScript SDK to retrieve blog data from the test site.
Create a code file for your SDK code
Before starting to write code for the SDK, set up a file for your code. The code for this project uses the SDK's blog and dashboard modules. The dashboard module is preinstalled by the CLI, but you'll need to install the blog module manually.
-
Create a file named
blog-utils.jsatsrc/extensions/dashboard/pages/top-blog-posts/, alongside thetop-blog-posts.tsxfile you generated in Step 2. -
In your IDE terminal, run the following command:
Copy
Retrieve blog data
Next, use the blog module in the SDK to retrieve the data you need.
- Import the
postssubmodule from the@wix/blogpackage into your file. - Create an
asyncfunction calledgetTopBlogPosts. - Use the
queryPosts()function to find the posts with the most likes and views. The query allows you to sort the posts in descending order based on likes and views. Call this function twice, once for likes and once for views. - Extract the first item IDs from the result and save them as
mostLikedandmostViewedvariables. - Use the
getPostMetrics()function to retrieve the post metrics by passing the ID of the post. These metrics include likes and views. Save these metrics asmostLikedMetricsandmostViewedMetricsvariables. - Your function should return an object with two keys,
mostViewedandmostLiked. The value for each key should be an object containing the post data and the likes and views respectively of the highest-ranking posts.
Your final blog-utils.js file should look like this:
Step 7 | Display the top posts in the dashboard
Now that we have the blog data, we can use the Wix Design System to display it on a dashboard page. The app framework created by the CLI includes the code for a sample dashboard page. We can use that code as the basis for a dashboard page.
Set up the dashboard code files
-
Open the
top-blog-posts.tsxfile atsrc/extensions/dashboard/pages/top-blog-posts/. -
Delete all the import statements and paste in the following ones:
Copy -
In the return statement for the
Index()component, delete everything in between the<WixDesignSystemProvider>tags.
When you’re done, your file should look like this:
Prepare blog data for display
Next, get your blog data ready to display on your dashboard page. This code goes below the import statements on your my-page.tsx file:
-
Define the interfaces for viewed and liked blog posts.
Copy -
In the
Index()component use React hooks to access the data.Copy -
Add a loader that displays while data are loading.
Copy
Create the page structure
Next, add React components from the Wix Design System to create the page structure.
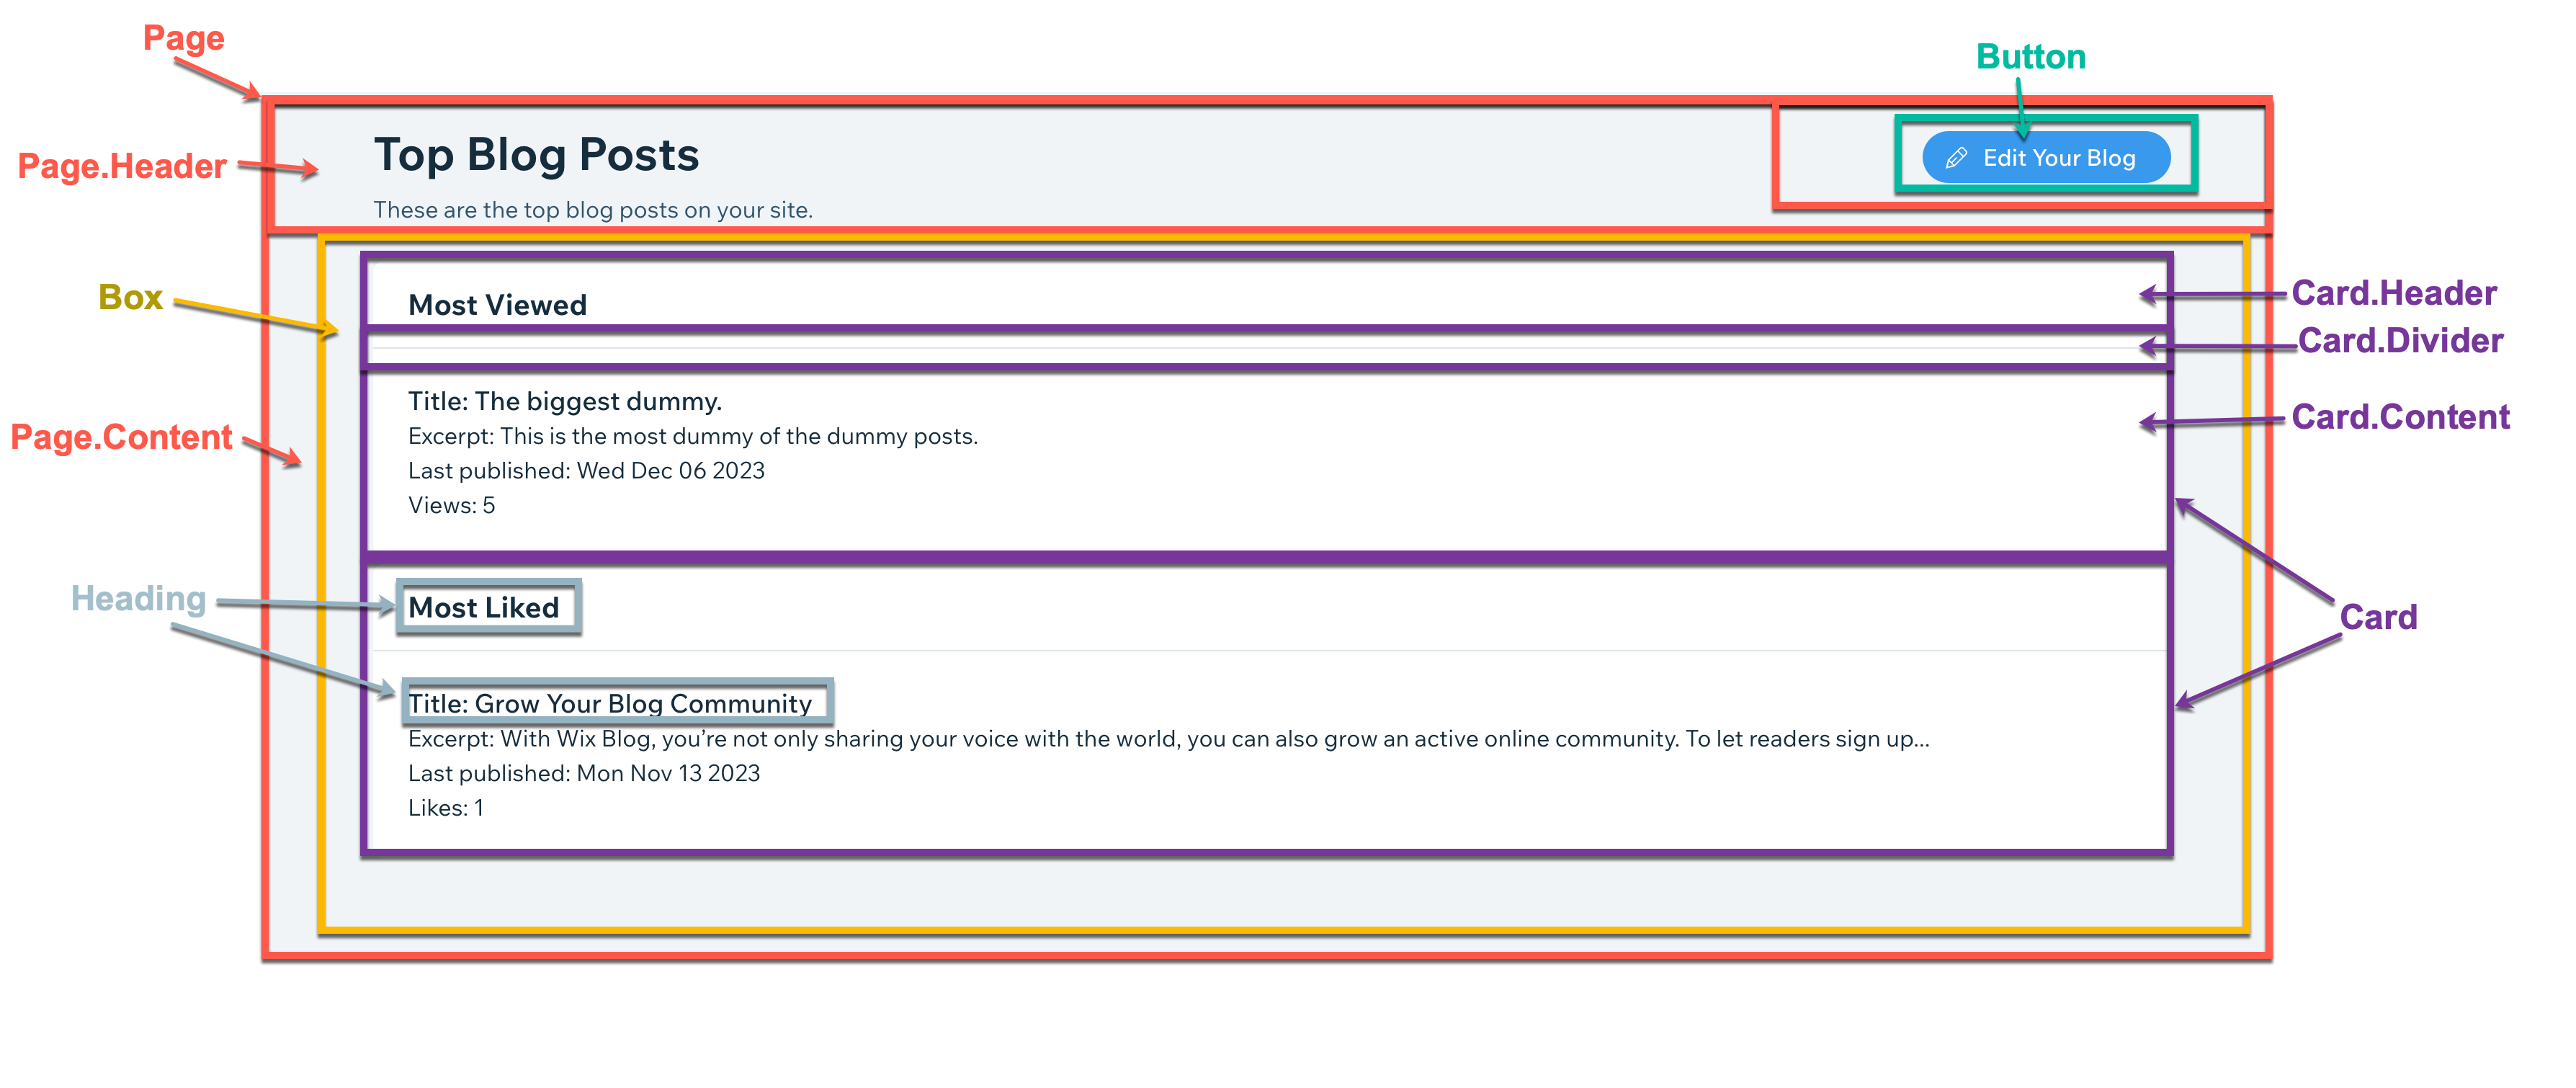
- Add nested components between the
<WixDesignSystemProvider>tags in the return statement for theIndex()component. Structure your components to match the following diagram. Wrap<Text>components in<div>tags so that they each display on a different line.
- Add the following variables to the opening tag of the
Boxcomponent to ensure the cards inside it display correctly:
When you’re done, your Index() component should look like this:
Add content to the page
Add static text, dynamic text, and other content to your Design System components. In some cases, text is added between the component’s opening and closing tags. In other cases, the text is passed into the component as a variable.
-
Pass these variables to the
Headingcomponents inside theCard.Headercomponents:Copy -
Pass these variables to the
Headingcomponents inside theCar.Contentcomponents:Copy -
Add an
onClickevent handler to theButtoncomponent in the page header actions bar. Set the variable to this function:Copy
When you’re done, your Index() function should look like this:
Step 8 | Test the app
Now that the app’s code is ready, you can test it locally using the Wix CLI.
The finished code sample should look like this:
To test your app, do the following:
- Run a local development server for your app. Your app’s dashboard page will now look like this:
- Click the button to show top blog posts.
- If things don’t look right, open your browser’s developer tools and check for errors in the console.
Step 9 | Build and deploy the app
After testing your app and seeing that it works as expected, you can:
Last updated: 13 July 2026