Add Self-Managed Site Widget Extensions with Custom Elements
Tip: The self-managed framework requires you to manage deployment, authentication, and ongoing maintenance. To reduce complexity, build your widget with the Wix CLI.
You can create a site widget extension using custom element technology, with your code deployed on your own server. The custom element is essentially a new HTML tag that you define, which is made available in the Wix editors as a widget.
To create this extension, you need to do the following:
- Code and deploy the custom element.
- Code and deploy your widget's settings panel.
- Configure the widget in your app dashboard.
Step 1 | Code your custom element
Code your custom element and its functionality in a JavaScript file. Use a class to define the element.
Note: For further guidance and examples on using web components, which are the foundation of custom elements, see the MDN documentation.
In your code, create a class for the custom element and register the custom element.
Here is a sample code snippet:
- Keep track of the name you used when registering the element with
customElements.define(). You will need it when defining the tag name while configuring the widget extension in your app's dashboard. In our example, the name ismy-custom-element. - To call APIs using the Wix SDK, you need to authenticate using the Wix Client.
Custom elements react to DOM-related events. When you create your custom element, use MDN lifecycle callback functions such as connectedCallback() and attributeChangedCallback().
When your code is ready, deploy your custom element’s JavaScript file on a remote or local server.
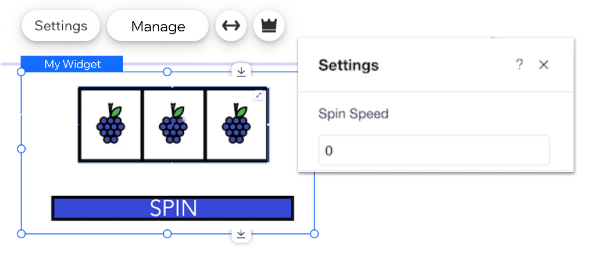
Step 2 | Code your widget’s settings panel
Your widget must have a settings panel in the editor, which is displayed when a user clicks the Settings button in the widget’s action bar. The panel is rendered as an iframe, which you can build using any tools you choose.
Learn more about building a settings panel for a self-managed site widget.
When your code is ready, deploy your settings panel’s HTML file on a remote or local server.
Step 3 | Configure the widget in your app dashboard
Configure your widget in your app dashboard so that it can be added to sites.
- In your Wix Studio workspace, select Custom Apps, and then create a new app or select an existing app.
- In the left menu, select Extensions.
- Click Create Extension and select Site Widget (Custom Element).
- Configure your widget’s basic data:
- Widget name: The element name displayed in the editor.
- Tag name: The custom element’s tag name that is used when registering the element. The tag name should be identical to the name you use in the
customElements.define()function in your JavaScript file. - Script URL: The URL where your custom element’s JavaScript code is deployed.
- Define how your widget is sized when added to a site:
- Widget width: Whether users can stretch the widget to full width or modify the widget’s width, and how it is sized on installation.
- Widget height: Whether the widget’s height is adjusted automatically according to the custom element’s content or can be manually adjusted.
- Define where your widget is added to a site and how instances of the widget are handled in the editor:
- Define whether your widget is added automatically to the site and on which page. You can add your widget to the site’s homepage or to one of your app’s pages.
- If you're adding your widget to one of your app's pages, define whether your widget is set as essential, meaning that it’s crucial to your app’s functionality. If set as essential, deleting the widget will also delete the entire app.
- If your widget isn't set as essential, you can display it in the Add Elements panel in the editor and the Manage Apps page in the site dashboard. To ensure that your widget appears in both locations, it must include a thumbnail. This allows Wix users to easily find and add it to a site. Learn more about displaying a site widget in the add panel and site dashboard.
- Configure your widget’s action bar in the editor:
- Settings action button: Provide the URL where your settings panel’s HTML code is deployed.
- Manage action button (optional): If your app has a dashboard page, select the page you want to open when a user clicks the Manage button in the widget’s action bar.
- Click Save.
You can now install your widget on a site.
Step 4 | Test and preview
To test your widget in the editors:
- In the top right corner of your app's dashboard, click Test App and select Test on dev site.
- Select an existing development site or click + Create Dev Site to create a new site. Select the editor and the Wix Business Solution you want to use and click Create Dev Site.
- Click Test App. Wix installs your app and opens the site in a new tab. You can set which site page opens in your app settings. If you don't set a page, the site editor opens by default.
Once your widget is added to the site, you can preview or publish the site to test the widget’s functionality.
Important:
Site widgets are sandboxed when rendered in the editor to enhance security. This means they're treated as if they come from a different domain, which impacts access to browser storage APIs and other same-origin resources. You may encounter various errors when testing.
Learn more about handling sandboxing in the editor.
See also
Last updated: 29 June 2026