About Panels in Blocks
Editor compatibility
Wix Blocks apps aren't supported in the Wix Harmony editor. Existing Blocks apps remain available for purchase on the Wix App Market for Wix Editor and Wix Studio sites. To learn more, see About Wix Harmony and Blocks.
Blocks allows site builders to customize your widget when they install it. A large part of this customization takes place through the widget's action bars. The site builder adapts the widget to their site through using the action buttons. Learn more about action bars.
Panels are a key part of the customization process. When your widget is installed on a site, the site builder clicks on the widget, or its elements, and an action bar appears. When you click on an action button, for example, the Design  button, a panel appears. You use the options available in this panel to customize your widget.
Note: Panels are available for site builders in the Wix Editors, not on the live site.
Learn more about
Default Panels
Blocks uses default panels which give site builders a range of customization options. The default panels are generated automatically by the Blocks product.
Available default panels:
Design presets panel (see more)
The Design button  opens a presets panels so that you can switch between design presets.

Add Elements panel (see more)
If the site builder has hidden one of the elements of your widget the Elements  button opens a panel with all the hidden elements so that they can be restored. In the following example a widget button has been hidden but can be restored using the default panel.

Settings panel (see more)
Site builders can access your widget's API through the default settings panel.

Editor elements default panels (see more)
Site builders have access to all the regular editor default panels such as design, layout and settings for every element in your widget's UI.
The following screenshot shows the default design panel in the Change Design button.

Custom Panels
API reference for panel elements See all available panel elements and their API reference.
The user interface of the default panels cannot be changed. By using custom panels, you can change the user interface and create panels that are unique to your widget, which direct the flow and how it's used.
You can create unique designs for your panel by using sliders, section dividers, toggles and multiple choice elements. Adding these elements makes your widget easier to customize and more functional.
After designing your panel, you need to write code to make it work.
Custom Panel Design Examples
Pay Button Settings Panel
If you have a shopping widget, with a pay button, for example, you can create a custom panel which allows the site builder to choose which information is displayed. The site builder can customize the widget so that on different sites it can display different information. On one site it might be important to display the price in another currency, or to show the terms and conditions.
This Pay Button Settings panel includes rich text (text with links), text input fields, dividers and a toggle, which enables the site create to decide whether or not to show the Terms & Conditions.
This is how it looks when the toggle is on:

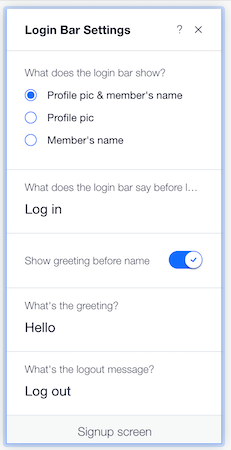
Login Bar Settings Panel
If your widget is a login button, you can design a panel which gives the site builder the option to decide whether to display a greeting or not, or if they want to display a profile pic or name. By using a custom panel the site builder can change this on different sites. They can use the same widget on one site which displays a profile pic, and on another site the same widget displays a name only.
This panel for the Login Bar Settings button has a radio button, text inputs, a divider and a toggle, which determines whether or not to show a greeting before the user's name.