Adjust a CLI App to Different Pricing Plans
When you publish your CLI app to the Wix App Market, you can provide Wix users with different pricing plans. For example, you can provide a free version of your app and enable users to purchase a premium version with additional features.
If you provide different plans for your app, it’s your responsibility as the developer to code behavior that limits features for certain plans. Your app should also provide calls-to-action to upgrade to paid plans where applicable.
This article explains the steps you need to take to provide users with free versus paid plans that have varying levels of access to features.
Example application
As an example, think of an app that provides Wix users with a site widget that they can place in their online store. When site visitors click on the widget, it randomly generates a discount that the visitor can use when purchasing products.
The app also provides a dashboard page where the Wix user can adjust the range of discount amounts that can be generated. By default, the app sets a range of 1-5%. A Wix user who purchases a paid plan can alter this range.
In this article, we’ll focus on the dashboard code, which provides restrictive logic that prevents free users from changing the range, while allowing paid users to do so.
Before you begin
-
Create an app in the app dashboard.
-
Select a business model for your app that involves multiple plans, for example a freemium model with free and paid plans.
Step 1 | Use getAppInstance() to determine the plan
In order to know which app features to restrict, you need to know the user’s current plan. You can determine the user’s plan from the app instance.
Fetch the app instance using the getAppInstance() method. The method returns an object containing information about the instance and the site it’s installed on.
You can call getAppInstance() directly in your dashboard page code. From the returned object, you can extract several pieces of information:
-
The app instance ID.
-
The
isFreeparameter, which indicates if the user is on a free plan or not. -
The
packageNameparameter, which tells you the plan the user selected.
Here’s some sample code that extracts the instance ID and isFree:
Once you know which plan an app instance is using, you can decide where to apply restrictive logic in your app.
Step 2 | Restrict features based on user plan
If you offer a free plan and a single paid plan with your app, you can apply the isFree parameter to limit access to certain app features.
The discount generator example sets a default range of percent discounts that can be randomly generated. We only want to allow paid plan users to alter the discount range.
One way to achieve this behavior is to disable the fields that define discount ranges for free plan users, and enable them for paid plans. If you’re building a React component, you can use Wix design system elements to do this easily. Input elements such as NumberInput let you enable or disable a field using the disabled boolean.
In the code below, we directly use the isFree state to disable the input fields and save button. If a user is using a paid plan, isFree is false and the elements are enabled, allowing the user to alter the discount range. In this way, we restrict the ability to change the range to paid users.
If you offer multiple paid plans, use the packageName parameter to create behavior specific to each plan.
Step 3 | Include CTAs to upgrade
When you limit certain features by plan, notify the Wix user and include an option for them to upgrade. The call-to-action to upgrade can take any form that suits your app’s UI. In our discount generator example, we include a text button that links to the pricing plan page.
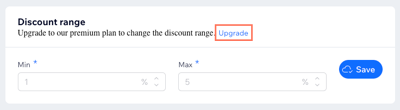
The CTA appears conditionally, if the isFree is true:
Complete code
Below is the complete dashboard page code used in this example: