Add Self-Managed Dashboard Modal Extensions
The dashboard modal extension lets you import a modal that you built and are hosting externally into your app. You can manage the modal in your app using the openModal() and closeModal() functions from the dashboard SDK.
Note: For a more streamlined approach to developing your dashboard modal, try out the Wix CLI instead of self-managing.
Follow these steps and you'll be ready to add a dashboard modal to your self-managed apps.
Before you begin
Before implementing a dashboard modal extension you need to:
- Build and host your modal externally.
- Make sure there are no restrictions on how you build your modal.
- Have the URL that hosts your modal ready.
Add a dashboard modal to your app
-
Select an app from the Custom Apps page in your Wix Studio workspace.
-
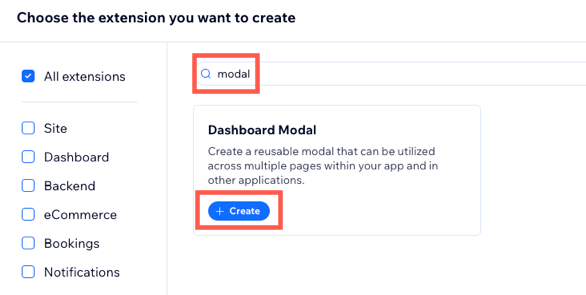
Go to the Extensions page, and click + Create Extension.
-
Search for the dashboard modal. Then click + Create.
-
Add your modal's details in the JSON editor. This is where you provide the extension with the details it needs to render your modal in your app. This includes the URL that hosts your modal, size, and names. Use the Documentation tab on the right hand side of the JSON editor to help you.
Important: The hosting platform must be "BUSINESS_MANAGER".
For example:
Copy
Manage and customize your dashboard modal
Now that your dashboard modal extension is set up, you can manage and customize your modal.
-
Manage your modal with the dashboard SDK.
-
To find your modal's extension ID:
- On the Extensions page of your app's dashboard, click the extension’s More Actions
 button and select Copy extension ID.
 - Open the extension in your app's dashboard and check the URL at the top of your browser. For example:

- On the Extensions page of your app's dashboard, click the extension’s More Actions
-
Use the
openModal()andcloseModal()functions from the dashboard SDK in your app's dashboard page to control how your modal opens and closes.CopyCopy -
You can optionally pass custom data into the dashboard modal extension with the
openModal()function.CopyIf you use a menu plugin extension to navigate to your modal, data from the host page of the menu plugin, such as an ID, is passed through the menu plugin slot and can be accessed by your dashboard modal extension.
-
Access your custom data or the data passed through the menu plugin slot using the
observeState()SDK function in your modal extension.Copy
-
-
Design your modal's UI. Consider using the Wix Design System, a collection of reusable React components that you can use to make your app appear and feel like a native Wix app.