Flow: Ticketed Event Setup
This article outlines the end-to-end flow for ticketed events using the Events V3, Ticket Definitions V3, Ticket Resevations, Orders and Tickets APIs, from initial event configuration through buying tickets to checking-in a physical ticket.
Ticketed events require payment and involve purchasing tickets for attendance. For free events where guests simply confirm their attendance without purchasing tickets, see the RSVP Event Setup flow.
Note: On Wix sites, ticketing can be managed by the Wix Events & Tickets app.
Before you begin
It's important to note the following before starting to code:
- To sell tickets for which you collect payment, you must set up a payment method and upgrade a site.
Ticketed event setup flow
The following diagram shows the full ticketed event setup flow.
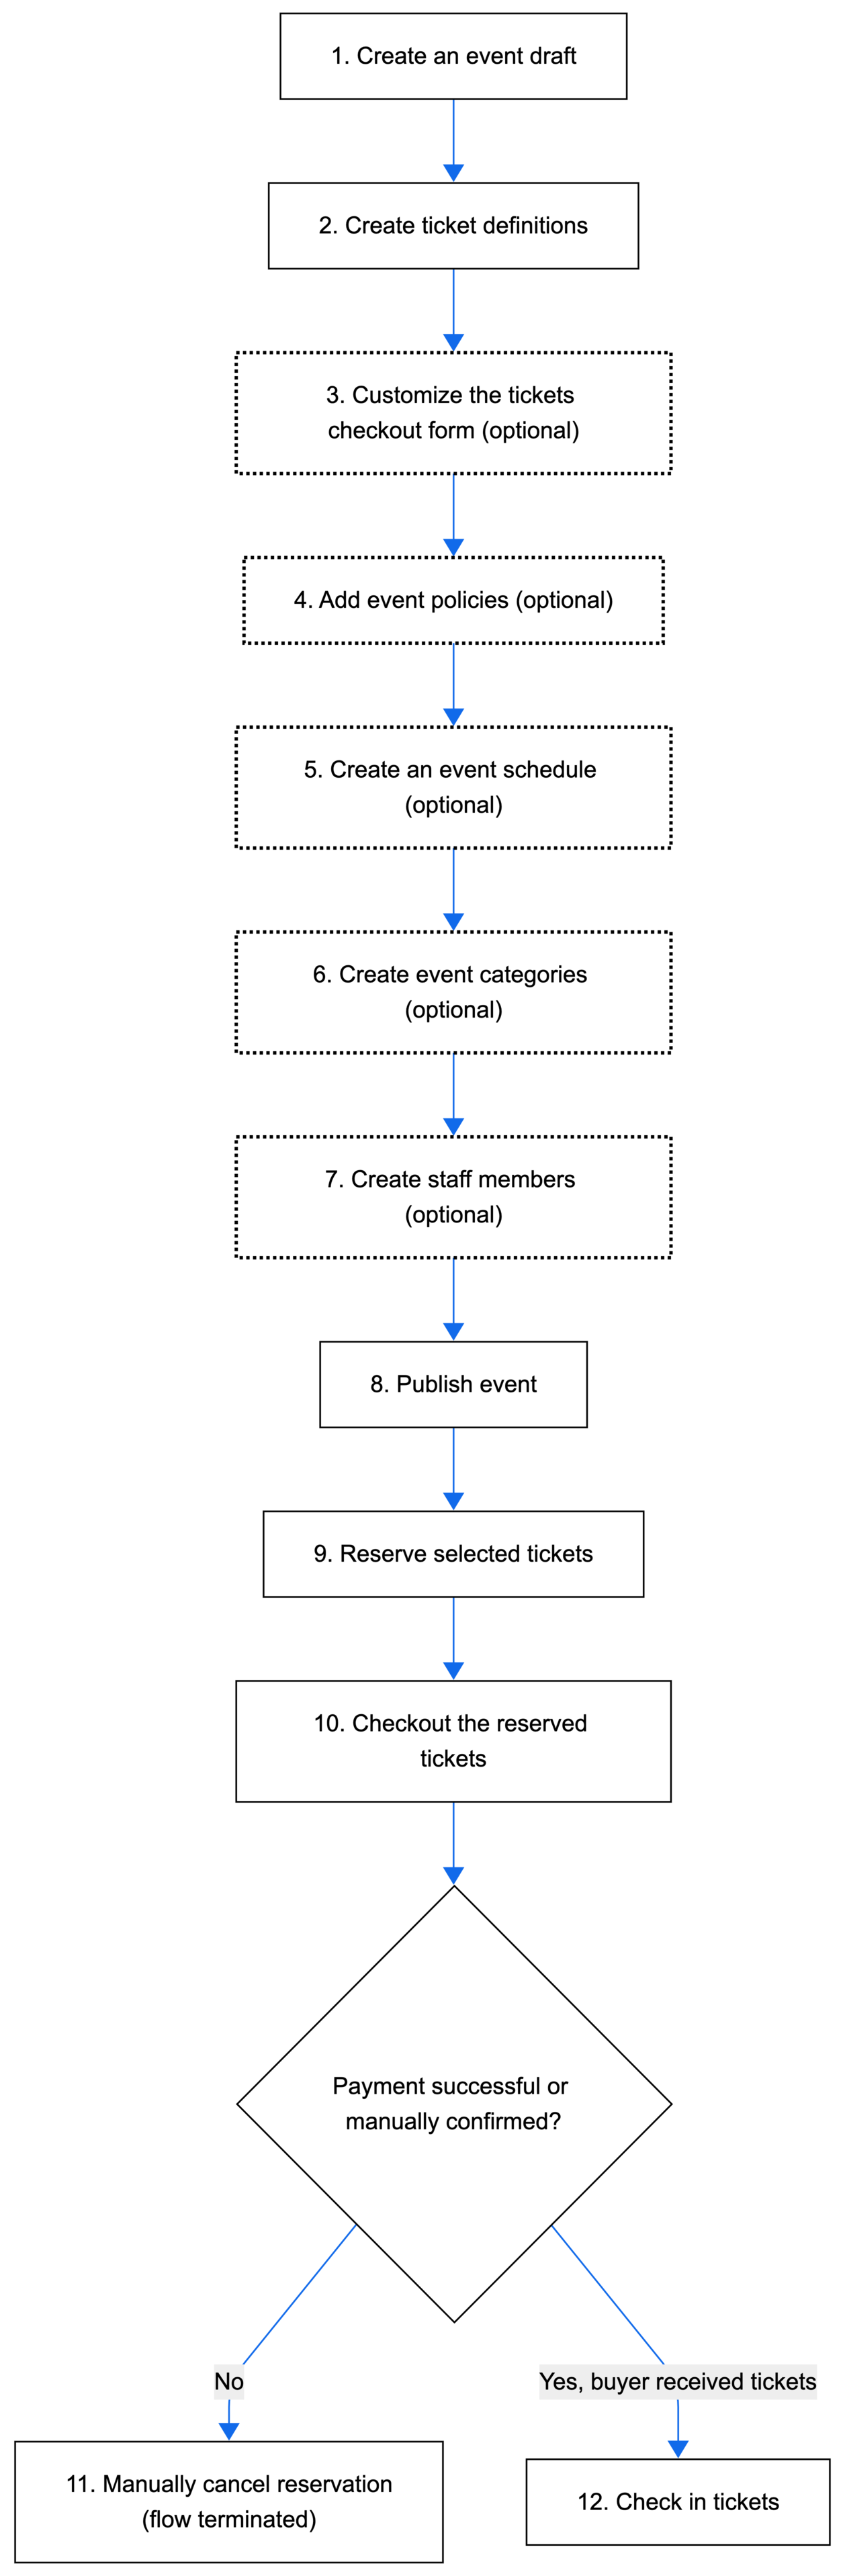
The following steps describe the complete setup flow for configuring a ticketed event from creating a draft event through checking in a physical ticket.
Step 1 | Create an event draft
Begin by adding the essential event details, defining it as a ticketed event, and saving the event as a draft.
Action: Call Create Event and set initialType to TICKETING. Enter ticketing-specific event details into the registration.tickets object.
Tip:
- To save time when holding the same type of event repeatedly, create a recurring event.
- If you want to duplicate an existing draft, call Clone Event to create a new event with the same settings and details.
Result: Creates an event with unique ID in a form of a draft.
Step 2 | Create ticket definitions
You can create 1 or more ticket definitions for your event (for example, VIP or General) and set a ticket price for each one. After setup, site visitors registering for an event can select the tickets they want to purchase. Guests receive a confirmation email which includes their ticket in PDF form.
Action: Call Create Ticket Definition for each type of ticket, and for each event.
Result: Creates a ticket definition for each type of ticket.
Step 3 | Customize the tickets checkout form (optional)
When guests purchase event tickets, they fill out a checkout form. You can customize this form to gather the exact information you need from each guest. First name, last name, and email are required fields on the checkout form. It's not possible to remove them.
Action: Use the Form API to update the checkout form.
Result: Customizes a checkout form.
Step 4 | Add event policies (optional)
You can add a policy checkbox that guests see when they complete their checkout form. Guests must agree to the policies to register for an event.
Action: Call Create Policy.
Result: Creates a policy linked to a specific event.
Step 5 | Create an event schedule (optional)
Let guests know what's happening at an event by creating an event schedule.
Action: Call Update Event and set event.agendaSettings.enabled to true. Call Add Schedule Item.
Result: Adds a schedule for the event.
Step 6 | Create event categories (optional)
Create categories for your events to keep them organized. This also allows you to display different types of events on different site pages.
Action: Call Create Category, or create multiple categories with Bulk Create Category. Call Assign Events to assign the event to a category.
Result: Creates a category for events.
Step 7 | Create staff members (optional)
You can add staff members to assist with guest check-ins, track ticket sales and ticket scanning at the door. You have complete control over your event, enabling you to accommodate last-minute guests, sell tickets instantly, and monitor event statistics.
Action: Call Create Staff Member to create staff members for an event.
Result: Creates staff members for an event.
Step 8 | Publish event
When ready, publish the event.
Action: Call Publish Draft Event.
Result: Publishes an event. It's now available to be displayed on a site.
Step 9 | Reserve selected tickets
Reserve selected tickets after the site visitor clicks the checkout button.
Action: Call Create Ticket Reservation with the site visitor's ticket selections.
Result: The tickets are reserved with a PENDING status for a limited time, preventing other customers from purchasing them while this guest completes their purchase.
Step 10 | Checkout the reserved tickets
Checkout the reserved tickets. This automatically creates order and tickets as well.
Action: Call Checkout to checkout the reserved tickets. This method redirects the site visitor to the Wix checkout. The site visitor completes payment through Wix Payments.
Possible results:
- The reservation status automatically updates to
CONFIRMEDupon successful payment, and sends out tickets to the buyer. You can verify this by calling Get Ticket Reservation. Continue to Step 12. - If you have the
OFFLINE_PENDINGorder (you set to receive payment for tickets in cash), then you need to manually confirm the order. Call Confirm Order. Continue to Step 12. - If a site visitor decides not to complete their purchase, you can manually cancel their reservation to immediately release the tickets. Continue to Step 11.
- If payment isn't completed before the expiration time, the reservation automatically changes to
EXPIREDstatus and tickets are released back to inventory. The flow is terminated.
Step 11 | Manually cancel reservation
To manually cancel the ticket reservation:
Action: Ensure the reservation is in PENDING or CONFIRMED status. Call Cancel Ticket Reservation.
Result: The reservation status changes to CANCELED_MANUALLY and tickets are immediately available for other customers to purchase. The flow is terminated.
Step 12 | Check in tickets
During the event, staff members can check in the tickets:
Action: Call Check In Ticket to check in the physical tickets of an event.
Result: The tickets are checked-in. The flow is complete.
Results
After implementing this flow, guests can buy and check-in tickets to an event.
See also
Last updated: 12 January 2026