Flow: Email Domain Setup
This flow explains how to set up email sending from a custom domain on a Wix site, covering the complete process from email verification through domain authentication.
Before you begin
Make sure you have:
- An email address that can receive verification codes. If you don't have access to verify the email yourself, you have the following options:
- Ask the Wix user to verify their email in the dashboard, and then start at Step 4.
- Get the verification code from the Wix user and complete the email verification process programmatically by following Steps 1-3.
- Access to the domain's DNS configuration (for example, GoDaddy, Cloudflare, or Namecheap). If you don't have direct access to the DNS provider, you have the following options:
- Use the DNS provider's API to add records programmatically.
- Provide the DNS records from the Sending Domains API to the Wix user to add to their DNS provider.
Email domain setup flow
The following diagram shows the full email domain setup flow.
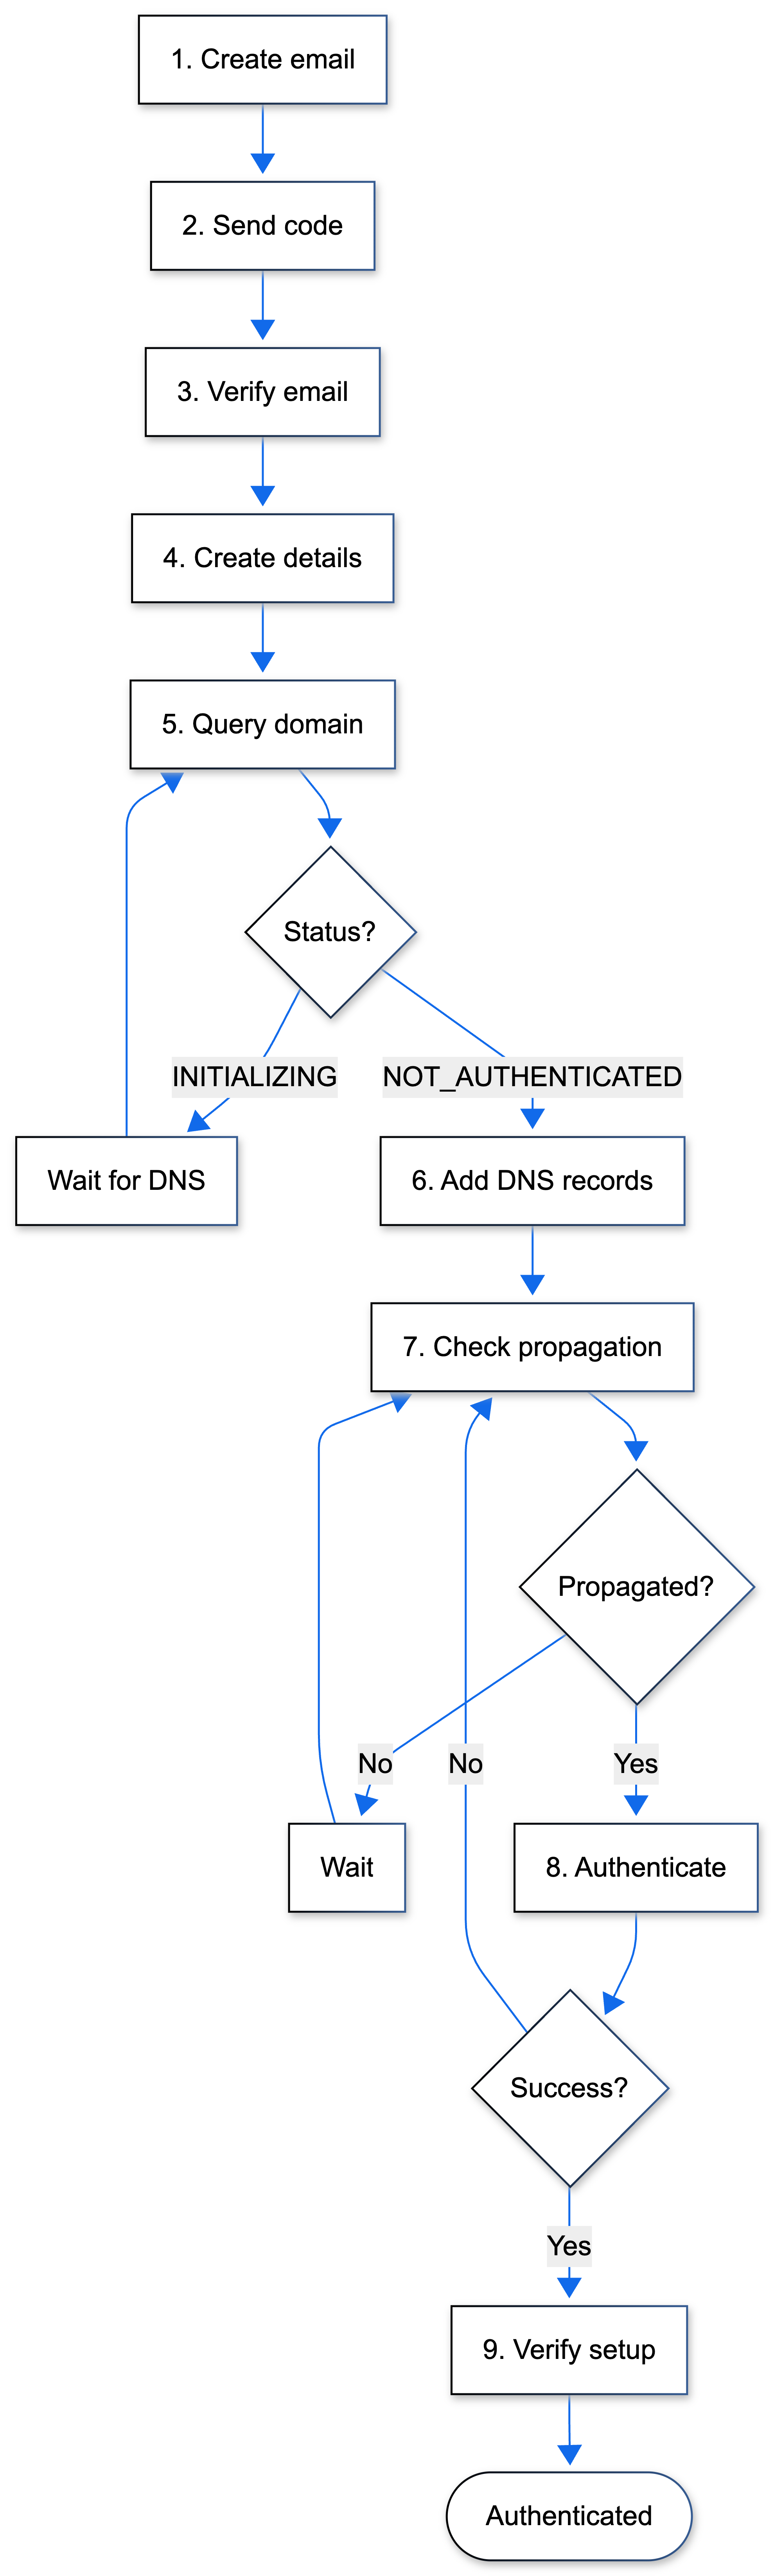
The following steps describe the complete email domain setup process from sender email creation through domain authentication.
Step 1 | Create sender email
Create a sender email address for sending emails from the site.
Note: If the Wix user has already verified their email in the dashboard, skip to Step 4 and get the verified sender email data by calling List Sender Emails. Filter in page code for emails where verified: true.
Action: Call Create Sender Email with the email address.
Result: Sender email is created with verified: false. Save the sender email ID for verification.
Step 2 | Send verification code
Send a verification code to the sender email address.
Note: Steps 2-3 are not necessary if the email address matches the Wix user's verified login email or if the email was purchased from Wix as a business email. In these cases, the email is already verified.
Action: Call Send Verification Code with the sender email ID.
Result: Verification code is sent to the email address. The code typically arrives in a few minutes.
Step 3 | Verify sender email
Use the verification code to verify the sender email address.
Action: Call Verify Sender Email with the sender email ID and the code received via email.
Result: Sender email is verified (verified: true). The verified email can now be used to create sender details.
Step 4 | Create sender details
Create sender details that define the display name and from address for email campaigns.
Skip to here if the Wix user has already verified their email in the dashboard: Use the verified email for the List Sender Emails fromEmailAddress property.
Action: Call Create Sender Details with fromName and fromEmailAddress (must be a verified sender email).
Result: Sender details are created. The Sending Domains API is now accessible.
Step 5 | Query the sending domain
Retrieve the sending domain that matches the sender email's domain.
Action: Call Query Sending Domains. You must filter by domain or by id. Without a filter, the method returns a SENDER_DETAILS_DO_NOT_EXIST error.
Possible results:
- Status property is
NOT_AUTHENTICATED: DNS records are available in thednsRecordsproperty. Continue to Step 6. - Status property is
INITIALIZING: DNS records are being generated. Implement polling logic to query the domain status every few minutes until status changes toNOT_AUTHENTICATED, and then continue to Step 6.
Step 6 | Add DNS records
Add the CNAME records from the dnsRecords property to the domain's DNS configuration at the DNS provider.
Note: If Wix manages DNS for the domain (domain purchased from Wix or connected via nameservers), Wix adds DNS records automatically. Manual DNS configuration is only needed for externally managed domains.
Action:
- Extract the
hostNameandvaluefrom each record in thednsRecordsarray. - Add the CNAME records to the domain's DNS configuration. You can add them manually or programmatically if you have access to the DNS provider's API (for example, GoDaddy, Cloudflare, or Namecheap).
- Manual approach: Log in to the DNS provider, navigate to the DNS management page for the domain, add each CNAME record with the exact
hostNameandvalue, and save the DNS changes. - Programmatic approach: Use the DNS provider's API to add the records programmatically.
- If you don't have access to the DNS provider: Provide the DNS records to the Wix user so they can add them to their DNS provider. You may want to display the records with clear instructions for the Wix user.
- Manual approach: Log in to the DNS provider, navigate to the DNS management page for the domain, add each CNAME record with the exact
Result: DNS records are added to the domain. DNS changes take time to propagate across the internet (typically a few hours, up to 48 hours).
Step 7 | Verify DNS propagation
Confirm DNS records have propagated globally before attempting authentication.
Action: Use DNS lookup tools to verify the CNAME records are visible:
- Command line:
dig {hostName} CNAME - Online tool: DNS Checker
Possible results:
- Records visible globally: Continue to Step 8.
- Records not visible: Wait longer for propagation. Check again after 1-4 hours. Continue to Step 8 once records are visible.
Step 8 | Authenticate the sending domain
Authenticate the domain to verify ownership after DNS propagation.
Note: If Wix manages DNS for the domain (domain purchased from Wix or connected via nameservers), you don't need to call this method.
Action: Call Authenticate Sending Domain with the sending domain ID.
Possible results:
- Status changes to
AUTHENTICATED: Domain is verified. Flow ends (setup complete). - Authentication fails: DNS records haven't propagated yet. Return to Step 7 to verify propagation status and then retry authentication. For detailed retry strategies, see Troubleshooting.
Step 9 | Verify complete setup
Confirm the sending domain is authenticated and ready for sending emails.
Action: Call Get Sending Domain with the sending domain ID.
Result: Response shows the status property as AUTHENTICATED. The custom domain is ready for sending emails with improved deliverability.
Results
After implementing this flow, the custom domain is authenticated and ready for sending emails. Emails sent from addresses using this domain have improved deliverability and domain reputation. Wix users and apps can now send email campaigns and transactional emails using the authenticated domain.
See also
Last updated: 4 February 2026